# Table of Contents
- [Overview – Exoscale Documentation](#overview-exoscale-documentation)
- [Allow HTTP/HTTPS – Exoscale Documentation](#allow-http-https-exoscale-documentation)
- [Protocols and Ports – Exoscale Documentation](#protocols-and-ports-exoscale-documentation)
- [Kubernetes Audit – Exoscale Documentation](#kubernetes-audit-exoscale-documentation)
- [Overview – Exoscale Documentation](#overview-exoscale-documentation)
- [Overview – Exoscale Documentation](#overview-exoscale-documentation)
- [Architecture – Exoscale Documentation](#architecture-exoscale-documentation)
- [Overview – Exoscale Documentation](#overview-exoscale-documentation)
- [Kafka – Exoscale Documentation](#kafka-exoscale-documentation)
- [DNS Configuration – Exoscale Documentation](#dns-configuration-exoscale-documentation)
- [Storage – Exoscale Documentation](#storage-exoscale-documentation)
- [DNS Configuration Examples – Exoscale Documentation](#dns-configuration-examples-exoscale-documentation)
- [Anti-Affinity Groups – Exoscale Documentation](#anti-affinity-groups-exoscale-documentation)
- [Allow Outbound Reply – Exoscale Documentation](#allow-outbound-reply-exoscale-documentation)
- [Naming Convention – Exoscale Documentation](#naming-convention-exoscale-documentation)
- [Operation – Exoscale Documentation](#operation-exoscale-documentation)
- [Operation – Exoscale Documentation](#operation-exoscale-documentation)
- [Overview – Exoscale Documentation](#overview-exoscale-documentation)
- [Overview – Exoscale Documentation](#overview-exoscale-documentation)
- [Overview – Exoscale Documentation](#overview-exoscale-documentation)
- [Creating an Elastic IPv6 prefix – Exoscale Documentation](#creating-an-elastic-ipv6-prefix-exoscale-documentation)
- [Overview – Exoscale Documentation](#overview-exoscale-documentation)
- [Attach an Elastic IPv6 Prefix – Exoscale Documentation](#attach-an-elastic-ipv6-prefix-exoscale-documentation)
- [SKS Certificates and API Keys – Exoscale Documentation](#sks-certificates-and-api-keys-exoscale-documentation)
- [How-To – Exoscale Documentation](#how-to-exoscale-documentation)
- [Operation – Exoscale Documentation](#operation-exoscale-documentation)
- [Operation – Exoscale Documentation](#operation-exoscale-documentation)
- [Operation – Exoscale Documentation](#operation-exoscale-documentation)
- [Operation – Exoscale Documentation](#operation-exoscale-documentation)
- [Operation – Exoscale Documentation](#operation-exoscale-documentation)
- [Service Level Agreement – Exoscale Documentation](#service-level-agreement-exoscale-documentation)
- [Reference – Exoscale Documentation](#reference-exoscale-documentation)
- [SSH Keypairs – Exoscale Documentation](#ssh-keypairs-exoscale-documentation)
- [Rescue Mode – Exoscale Documentation](#rescue-mode-exoscale-documentation)
- [Maintenance Windows – Exoscale Documentation](#maintenance-windows-exoscale-documentation)
- [Reference – Exoscale Documentation](#reference-exoscale-documentation)
- [Labels – Exoscale Documentation](#labels-exoscale-documentation)
- [Service Plan Scaling – Exoscale Documentation](#service-plan-scaling-exoscale-documentation)
- [OpenSearch – Exoscale Documentation](#opensearch-exoscale-documentation)
- [Roles and Policies – Exoscale Documentation](#roles-and-policies-exoscale-documentation)
- [Backups and Restore – Exoscale Documentation](#backups-and-restore-exoscale-documentation)
- [Operation – Exoscale Documentation](#operation-exoscale-documentation)
- [Operation – Exoscale Documentation](#operation-exoscale-documentation)
- [Operation – Exoscale Documentation](#operation-exoscale-documentation)
- [Operation – Exoscale Documentation](#operation-exoscale-documentation)
- [Operation – Exoscale Documentation](#operation-exoscale-documentation)
- [Users and Keys – Exoscale Documentation](#users-and-keys-exoscale-documentation)
- [Overview – Exoscale Documentation](#overview-exoscale-documentation)
- [Overview – Exoscale Documentation](#overview-exoscale-documentation)
- [Overview – Exoscale Documentation](#overview-exoscale-documentation)
- [Overview – Exoscale Documentation](#overview-exoscale-documentation)
- [Encryption – Exoscale Documentation](#encryption-exoscale-documentation)
- [Overview – Exoscale Documentation](#overview-exoscale-documentation)
- [Windows Bitlocker, vTPM & Secureboot – Exoscale Documentation](#windows-bitlocker-vtpm-secureboot-exoscale-documentation)
- [How-To – Exoscale Documentation](#how-to-exoscale-documentation)
- [Operation – Exoscale Documentation](#operation-exoscale-documentation)
- [How-To – Exoscale Documentation](#how-to-exoscale-documentation)
- [How-To – Exoscale Documentation](#how-to-exoscale-documentation)
- [Reference – Exoscale Documentation](#reference-exoscale-documentation)
- [Operation – Exoscale Documentation](#operation-exoscale-documentation)
- [Operation – Exoscale Documentation](#operation-exoscale-documentation)
- [Operation – Exoscale Documentation](#operation-exoscale-documentation)
- [Reference – Exoscale Documentation](#reference-exoscale-documentation)
- [Operation – Exoscale Documentation](#operation-exoscale-documentation)
- [How-To – Exoscale Documentation](#how-to-exoscale-documentation)
- [Operation – Exoscale Documentation](#operation-exoscale-documentation)
- [Operation – Exoscale Documentation](#operation-exoscale-documentation)
- [Product – Exoscale Documentation](#product-exoscale-documentation)
- [Operation – Exoscale Documentation](#operation-exoscale-documentation)
- [NLB – Exoscale Documentation](#nlb-exoscale-documentation)
- [How-To – Exoscale Documentation](#how-to-exoscale-documentation)
- [CDN – Exoscale Documentation](#cdn-exoscale-documentation)
- [IAM – Exoscale Documentation](#iam-exoscale-documentation)
- [Networking – Exoscale Documentation](#networking-exoscale-documentation)
- [How-To – Exoscale Documentation](#how-to-exoscale-documentation)
- [DBaaS – Exoscale Documentation](#dbaas-exoscale-documentation)
---
# Overview – Exoscale Documentation
[Product](https://community.exoscale.com/product/)
[Networking](https://community.exoscale.com/product/networking/)
[DNS](https://community.exoscale.com/product/networking/dns/)
Overview
Overview
========
The DNS service supports the following record types with standard and extra types.
Standard DNS record types[](https://community.exoscale.com/product/networking/dns/overview/#standard-dns-record-types)
-----------------------------------------------------------------------------------------------------------------------
| Type | Portal | API or CLI | Description |
| --- | --- | --- | --- |
| A | X | X | Add an “A” record that points your domain or a subdomain to an IP address. |
| AAAA | X | X | Add an “AAAA” record that points your domain to an IPv6 address. These records are the same as A records except they use IPv6 addresses. |
| CAA | | X | Add a “CAA” record to your domain. Certification Authority Authorization (CAA) record is used to specify which certificate authorities (CAs) are allowed to issue certificates for a domain. Transferring CAA records to secondary name servers is not supported. |
| CNAME | X | X | Add a “CNAME” record that aliases a subdomain to another host. These types of records are used when a server is reached by several names. Only use CNAME records on subdomains. |
| HINFO | X | X | Add an “HINFO” record is used to describe the CPU and OS of a host. |
| MX | X | X | Add a mail exchange record that points to a mail server or relay. These types of records are used to describe which servers handle incoming email. |
| NAPTR | X | X | Add an “NAPTR” record to provide a means to map a resource that is not in the domain name syntax to a label that is. More information can be found in [RFC 2915](https://www.ietf.org/rfc/rfc2915.txt)
. |
| NS | X | X | Add an “NS” record the delegates a domain to another name server. You may only delegate subdomains (for example subdomain.yourdomain.com). |
| SPF | X | X | Add an “SPF” record to indicate what hosts and addresses are allowed to send mail from your domain. When creating an SPF record we will automatically create a corresponding TXT record for you as some older mail exchanges require a TXT version of the SPF record. |
| SRV | X | X | Add an “SRV” record to specify the location of servers for a specific service. |
| SSHFP | X | X | Edit an “SSHFP” record to share your SSH fingerprint with others. |
| TXT | X | X | Add a “TXT” record. This is useful for domain records that are not covered by the standard record types. For example, Google uses this type of record for domain verification. |
Extra DNS record types[](https://community.exoscale.com/product/networking/dns/overview/#extra-dns-record-types)
-----------------------------------------------------------------------------------------------------------------
| Type | Portal | API or CLI | Description |
| --- | --- | --- | --- |
| URL | X | X | Add an URL redirection record that points your domain to a URL. This type of record uses an HTTP redirect to redirect visitors from a domain to a web site. |
| POOL | X | X | Add a “POOL” record that aliases a subdomain to another host as part of a pool of available CNAME records. This is a DNSimple custom record type. |
| ALIAS | X | X | Add an “ALIAS” record. An ALIAS record is a special record that will map a domain to another domain transparently. It can be used like a CNAME but for a name with other records, like the root. When the record is resolved it will look up the A records for the aliased domain and return those as the records for the record name. Note: If you want to redirect to a URL, use a URL record instead. |
---
# Allow HTTP/HTTPS – Exoscale Documentation
[Product](https://community.exoscale.com/product/)
[Networking](https://community.exoscale.com/product/networking/)
[Security Group](https://community.exoscale.com/product/networking/security-group/)
[How-To](https://community.exoscale.com/product/networking/security-group/how-to/)
Allow HTTP/HTTPS
Allow HTTP/HTTPS
================
When you deploy an application on your server, you might want it accessible via a browser, either via `HTTP` or `HTTPS`. To do that, you need **ingress** rules in a security group to allow communication on **port 80** (`HTTP`) and **port 443** (`HTTPS`).
* Create a new security group called **frontend**
* Add a first rule: `INGRESS, TCP, CIDR 0.0.0.0/0, port 80-80`
* Add another rule: `INGRESS, TCP, CIDR 0.0.0.0/0, port 443-443`
Now the instances using this security group will allow traffic from any IP (CIDR 0.0.0.0/0) on port 80 and 443.
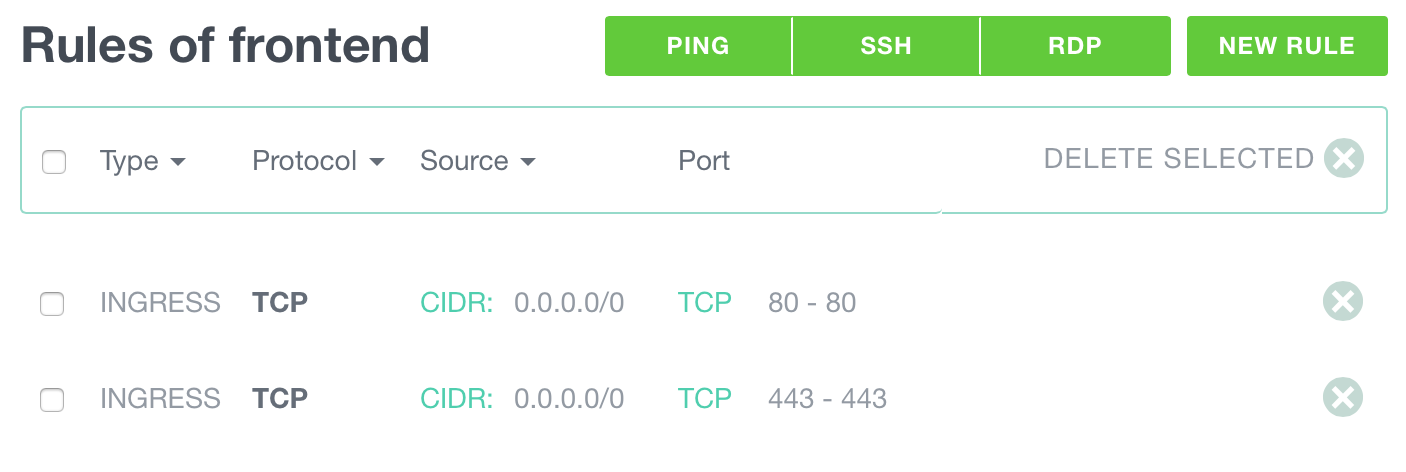
Frontend Security Group
Add this Security Group to the instance that will be accessed via `HTTP` and `HTTPS`.
> **NOTE**
> If your instance only has this Security Group, you will not be able to access it via `SSH`.
---
# Protocols and Ports – Exoscale Documentation
[Product](https://community.exoscale.com/product/)
[Networking](https://community.exoscale.com/product/networking/)
[NLB](https://community.exoscale.com/product/networking/nlb/)
[Operation](https://community.exoscale.com/product/networking/nlb/operation/)
Protocols and Ports
Protocols and Ports
===================
For each service you will provide the protocol of the traffic to be balanced (either `TCP` or `UDP`) and a pair of ports:
* **Service port**, the port on which the NLB Service has to listen for the incoming traffic.
* **Target port**, the port on which the NLB Service has to forward the traffic. This is the port on which the members of the Instance Pool will actually receive the forwarded traffic.
> **WARNING**
> Your Instance Pool [security groups](https://community.exoscale.com/product/networking/security-group/)
> need to have an open ingress rule on the designated target port to work.
---
# Kubernetes Audit – Exoscale Documentation
[Product](https://community.exoscale.com/product/)
[Compute](https://community.exoscale.com/product/compute/)
[Containers (SKS)](https://community.exoscale.com/product/compute/containers/)
[Operation](https://community.exoscale.com/product/compute/containers/operation/)
Kubernetes Audit
Kubernetes Audit
================
[Kubernetes Audit](https://kubernetes.io/docs/tasks/debug/debug-cluster/audit/)
is a feature in K8s’ APIserver to audit requests inbound to the apiserver. By choosing the _webhook_ mode, an operator can listen for audit data on a dedicated HTTP webserver as a source for analytics, monitoring, etc.
Exoscale packages Kubernetes Audit in SKS. It can be enabled, disabled and configured at no operational cost other than setting up and managing the receiving Webserver.
Prerequisites[](https://community.exoscale.com/product/compute/containers/operation/kubernetes-audit/#prerequisites)
---------------------------------------------------------------------------------------------------------------------
* Knowledge of SKS - how to create and/or update an SKS Cluster
* An SKS Cluster (new or existing) with the following conditions: **PRO** offering, and Kubernetes version **\>= 1.31.0**
* A webserver, ideally supporting **Bearer-token authentication** and **HTTPS**
Configuration[](https://community.exoscale.com/product/compute/containers/operation/kubernetes-audit/#configuration)
---------------------------------------------------------------------------------------------------------------------
At the moment we support the following parameters:
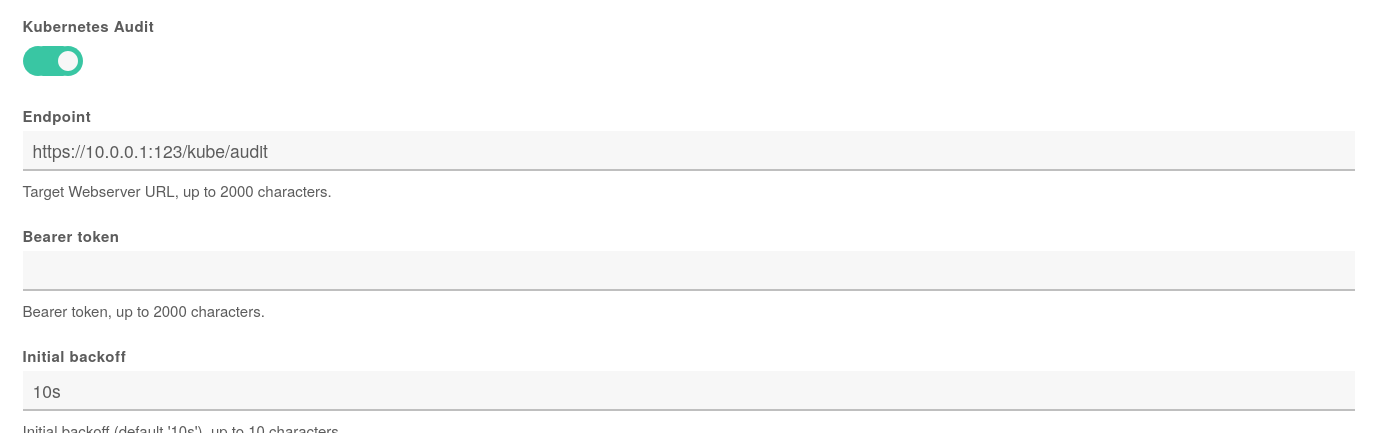
* Endpoint: the URL to send the audit data to
* Bearer token: the authentication token for the receiving webserver
* Initial Backoff: how long to wait before sending the first batch of data (by default 10 seconds)
We deploy a static Audit Policy which integrates with [Falco](https://falco.org/)
but can be used with bespoke solutions and offers sane defaults. You can check the contents [here](https://github.com/falcosecurity/plugins/blob/main/plugins/k8saudit/rules/k8s_audit_rules.yaml)
The first version of the feature supports bearer token authentication exclusively.
Other parameters are set to their default value.
How-to[](https://community.exoscale.com/product/compute/containers/operation/kubernetes-audit/#how-to)
-------------------------------------------------------------------------------------------------------
### Portal[](https://community.exoscale.com/product/compute/containers/operation/kubernetes-audit/#portal)
In order to **activate and configure** the feature:
* For **existing** SKS clusters: navigate to `SKS > your_cluster > Update Cluster`. Enable the _Kubernetes Audit_ toggle and fill-in the form.
* For **new** SKS clusters: navigate to `SKS > Add`. Similarly, enable the toggle and fill in the details.
In order to **disable** the feature:
* Navigate to `SKS > your_cluster > Update Cluster` and disable the toggle.
> **NOTE** We do not expose the bearer token. Leaving the _Bearer token_ field blank will preserve it.
> **NOTE** You won’t see the toggle unless the prerequisites are met - PRO offering, Kubernetes >= 1.31
### API[](https://community.exoscale.com/product/compute/containers/operation/kubernetes-audit/#api)
Our [OpenAPI Spec](https://openapi-v2.exoscale.com/operation/operation-update-sks-cluster#operation-update-sks-cluster-body-application-json-audit)
describes how to parametrize Kubernetes audit.
Tooling integration (Exoscale Terraform Provider and the CLI) is coming soon
---
# Overview – Exoscale Documentation
[Product](https://community.exoscale.com/product/)
[Networking](https://community.exoscale.com/product/networking/)
[EIP](https://community.exoscale.com/product/networking/eip/)
Overview
Overview
========
Exoscale Elastic IPs (EIPs) provide static IP addresses that can be persistently attached to multiple Compute instances within the same zone, allowing seamless transition and consistent IP configurations across different instances.
Terminology[](https://community.exoscale.com/product/networking/eip/overview/#terminology)
-------------------------------------------------------------------------------------------
* **Native IP Address**
The primary IP address automatically assigned to a Compute instance. It is distinct from any Elastic or additional IPv6 addresses that might be assigned.
* **Elastic IP**
A static public IP address that an organization can attach to one or multiple Compute instances in addition to their native IP addresses. Elastic IP addresses are created for the organization and remain available until they are explicitly deleted.
* **Manual Elastic IP**
A type of Elastic IP that requires manual configuration on Compute instances. It provides more flexibility, allowing traffic to originate from the manual Elastic IP address if configured correctly.
* **Managed Elastic IP**
A type of Elastic IP that does not require manual configuration. When attached, it automatically routes traffic to Compute instances.
* **Elastic IPv6 Prefix**
A Compute resource providing an entire IPv6 prefix (with a prefix length of /96) that can be assigned to one or several instances. It offers multiple IPv6 addresses for use within an organization.
* **Traffic Distribution**
The process by which incoming traffic is distributed among multiple instances attached to a single Elastic IP. There is no guarantee of even load distribution across instances.
* **Zone**
A specific geographical location where Exoscale infrastructure is available. Compute instances and Elastic IPs are bound to a certain zone, meaning resources must be within the same zone to be attached to each other.
Features[](https://community.exoscale.com/product/networking/eip/overview/#features)
-------------------------------------------------------------------------------------
All Exoscale instances are provisioned with a native IPv4 address, leased from a global pool and intrinsically tied to the Compute instance. However, upon instance termination, the IP address is released back to the pool with no guarantee of reacquisition.
* **Elastic IPs**
Ensure continuity with Elastic IPs, designed for persistent address allocation across instances. Elastic IPs supplement native addresses and can attach to multiple instances simultaneously.
* **Persistent Usage**
Achieve IP persistence through Elastic IPs, mitigating address changes upon instance destruction. Seamlessly reroute traffic with an Elastic IP when transitioning between underlying instances.
* **Multi-IP Scenarios**
Elastic IPs address complex requirements like multi-TLS certificate usage or running numerous service instances on a single machine.
> **NOTE**
> Leverage Elastic IPs for operational continuity and flexibility across your network architecture.
### Elastic IP Types[](https://community.exoscale.com/product/networking/eip/overview/#elastic-ip-types)
* **Manual Elastic IPs**
* **Managed Elastic IPs**
**Basic Behavior of Elastic IPs (EIPs)**
* **Creation and Availability**
Elastic IPs are created for your organization. They remain available until you decide to delete them.
* **Attachment and Zone Binding**
Elastic IPs can be attached to one or multiple instances at any time, but can only be attached to Compute instances within the same zone.
* **Traffic Characteristics**
All incoming traffic towards an Elastic IP is redirected to the attached instances. All outgoing traffic is sent by the internal IP address attached to the instance. It **will not** appear as coming from the Elastic IP. When multiple instances are attached to an Elastic IP, traffic is distributed among them with **no guarantee of even load distribution**.
**Customizable Behavior**
Both manual and managed Elastic IPs have distinct characteristics, their behavior can be customized further based on requirements. Distinct Characteristics of Manual and Managed Elastic IPs are:
### Manual Elastic IPs[](https://community.exoscale.com/product/networking/eip/overview/#manual-elastic-ips)
* **Configuration**
Manual Elastic IPs need to be manually enabled on the instance, this type offers more flexibility but requires more manual configuration.
* **Traffic Perception**
Internally, instances attached to a manual Elastic IP see traffic as coming directly to the Elastic IP address, this is different from managed Elastic IPs, where incoming traffic is seen as coming to the native IP address of the attached instance.
* **Outgoing Traffic**
Outgoing traffic can originate from the manual Elastic IP, allowing the instance to use it as a traffic source, albeit with some limitations.
### Managed Elastic IPs[](https://community.exoscale.com/product/networking/eip/overview/#managed-elastic-ips)
* **Configuration**
Managed Elastic IPs do not require manual action on your part for the instance itself. Once attached, a managed Elastic IP transparently routes traffic to the instance.
* **Traffic Routing**
Includes basic health check capabilities, ensuring traffic is routed only to healthy instances.
* **Traffic Perception**
Instances see incoming traffic as if it’s from the native IP address, making it impossible to differentiate traffic based on the target IP.
* **Outgoing Traffic**
Outgoing traffic will always appear from the native IP address, unlike manual Elastic IPs.
### Elastic IPv6 Prefix[](https://community.exoscale.com/product/networking/eip/overview/#elastic-ipv6-prefix)
Exoscale Compute instances can optionally be assigned a public IPv6 address either during creation or afterward. This IPv6 address is partially derived from the instance’s unique MAC address, making it intrinsically tied to the instance. Therefore, when an instance is destroyed, its public IPv6 address is permanently released.
In scenarios where a persistent IPv6 address is desirable, such as employing multiple IPv6 addresses for a single use case, an Elastic IPv6 prefix can be used. The Elastic IPv6 prefix is a Compute resource that provides your organization with an entire IPv6 prefix (with prefix length /96), which can be attached to one or several instances in addition to their primary IPv6 address.
To utilize these prefixes, instances must have [IPv6 enabled](https://community.exoscale.com/product/networking/ip/overview/#adding-ipv6-to-new-instance)
. Your organization can attach multiple Elastic IPv6 prefixes as needed. Unlike its IPv4 counterpart, an Elastic IPv6 prefix contains over 4 billion addresses, providing ample resources to cater to your instances’ networking requirements.
Availability[](https://community.exoscale.com/product/networking/eip/overview/#availability)
---------------------------------------------------------------------------------------------
| Zone | Country | City | Availability |
| --- | --- | --- | --- |
| **`at-vie-1`** | Austria | Vienna | |
| **`at-vie-2`** | Austria | Vienna | |
| **`ch-gva-2`** | Switzerland | Geneva | |
| **`ch-dk-2`** | Switzerland | Zurich | |
| **`de-fra-1`** | Germany | Frankfurt | |
| **`de-muc-1`** | Germany | Munich | |
| **`bg-sof-1`** | Bulgaria | Sofia | |
| **`hr-zag-1`** | Croatia | Zagreb | |
Limitations[](https://community.exoscale.com/product/networking/eip/overview/#limitations)
-------------------------------------------------------------------------------------------
* Elastic IPs are initially limited to 5 per organization. You can ask for a quota iIP addresses are not managed by Exoscale APIs, but are parameters in operations with platform products like instances (LIST, CREATE) increase in the [quotas section](https://portal.exoscale.com/organization/quotas/)
of the Portal.
* Instances sharing a common Elastic IP cannot communicate with each other by using the Elastic IP address.
* Elastic IP will natively work only for incoming traffic. Outgoing traffic will still use the native instance’s IP address as a source. This behavior can be partially circumvented manually with manual Elastic IPs.
* Instances associated with a managed Elastic IP will see incoming Elastic IP traffic destined to their primary interface IP address.
* With managed Elastic IPs, it is currently not possible to retrieve the health status of an instance: while the system will not direct traffic to a unhealthy instance, there is no information about which instance is in an unhealthy state.
* HTTP health checks do not follow redirects.
* Elastic IPv6 prefixes have the same limitations as Elastic IPs.
* For managed Elastic IPv6 prefixes, only the first-plus-one IPv6 address of that prefix is transparently forwarded to the associated instances.
---
# Overview – Exoscale Documentation
[Product](https://community.exoscale.com/product/)
[DBaaS](https://community.exoscale.com/product/dbaas/)
[Service-Specific](https://community.exoscale.com/product/dbaas/service-specific/)
[PostgreSQL](https://community.exoscale.com/product/dbaas/service-specific/postgresql/)
Overview
Overview
========
Exoscale **Managed PostgreSQL** delivers a fully managed, high-availability deployment of the popular open-source database engine. The service is aimed at teams that need rock-solid ACID compliance, automated operations, and predictable performance without managing infrastructure themselves.
Terminology[](https://community.exoscale.com/product/dbaas/service-specific/postgresql/overview/#terminology)
--------------------------------------------------------------------------------------------------------------
* **Service**
A running PostgreSQL cluster managed by Exoscale DBaaS
* **Plan**
A size / redundancy tier (`hobbyist-1`, `startup-4`, `business-32`, `premium-9x-16`, …)
* **Fork**
A point-in-time clone of an existing service (used for upgrades, DR tests, etc.)
* **Read Replica**
A replica created through the DBaaS “read replica” integration
* **pgBouncer**
Built-in connection pooler that fronts every service for higher connection density
Features[](https://community.exoscale.com/product/dbaas/service-specific/postgresql/overview/#features)
--------------------------------------------------------------------------------------------------------
* **Managed Cluster Lifecycle**
automated provisioning, patching and minor-version upgrades.
* **Automatic Daily Backups**
with user-defined retention and point-in-time recovery (PITR) on Business & Premium plans.
* **Vertical & Horizontal Scaling**
change plan size or add read replicas without downtime.
* **Connection Pooling**
pgBouncer is pre-configured for each service, reducing idle connection load.
* **High SLA**
99.95 % on Hobbyist / Startup, 99.99 % on Business / Premium plans.
* **CLI & API First**
every feature exposed via `exo dbaas …`; the Portal currently covers common workflows.
Availability[](https://community.exoscale.com/product/dbaas/service-specific/postgresql/overview/#availability)
----------------------------------------------------------------------------------------------------------------
PostgreSQL is available in all current [Exoscale zones](https://www.exoscale.com/datacenters/)
.
| Zone | Country | City | Availability |
| --- | --- | --- | --- |
| **`at-vie-1`** | Austria | Vienna | |
| **`at-vie-2`** | Austria | Vienna | |
| **`ch-gva-2`** | Switzerland | Geneva | |
| **`ch-dk-2`** | Switzerland | Zurich | |
| **`de-fra-1`** | Germany | Frankfurt | |
| **`de-muc-1`** | Germany | Munich | |
| **`bg-sof-1`** | Bulgaria | Sofia | |
| **`hr-zag-1`** | Croatia | Zagreb | |
Limitations[](https://community.exoscale.com/product/dbaas/service-specific/postgresql/overview/#limitations)
--------------------------------------------------------------------------------------------------------------
* **Portal Feature Gap**
some advanced settings (e.g. custom `pg-` parameters, PITR window edits) are currently available only through the CLI or API.
* **No Cross-Engine Integrations**
direct replication between PostgreSQL and other DBaaS engines is not supported.
* **Single-Zone Clusters**
geo-replication is available via read-replica integration, but primary clusters live in one zone.
* **Super-User Access**
is restricted; extensions that require super-user rights must be requested via support.
> **NOTE**
> For operational procedures (backups, upgrades, maintenance windows, …) see the section **[Operation](https://community.exoscale.com/product/dbaas/service-specific/postgresql/operation/)
> **.
> Hands-on guides (migrations, client libraries, Terraform modules, …) you can find under **[How-To](https://community.exoscale.com/product/dbaas/service-specific/postgresql/how-to/)
> **.
---
# Architecture – Exoscale Documentation
[Product](https://community.exoscale.com/product/)
[DBaaS](https://community.exoscale.com/product/dbaas/)
[Operation](https://community.exoscale.com/product/dbaas/operation/)
Architecture
Architecture
============
Exoscale DBaaS provisions **dedicated virtual machines** per service; no compute resources are shared across organizations, and the servers never appear in your public instance list — they live behind a managed endpoint that Exoscale operates for you. Each plan changes _how many_ of those isolated nodes are launched (single-node for Hobbyist/Startup, multi-node clusters for Business/Premium).
Under the hood, a European control plane (powered by our partner **Aiven**) orchestrates day-to-day operations: creation, daily backups, automated fail-over, rolling upgrades, and health checks. Traffic between nodes and to the object storage is encrypted, and all data remains inside the zone-country you selected.
Because every service has dedicated VMs, you can resize, fork, or terminate it without affecting any other customer. After internal fail-over, the endpoint’s DNS name stays the same, so clients only need basic reconnect logic.
> **NOTE**
> Use the plan naming scheme (`-x?-`) to know instantly how many dedicated nodes and RAM each deployment receives.
---
# Overview – Exoscale Documentation
[Product](https://community.exoscale.com/product/)
[IAM](https://community.exoscale.com/product/iam/)
Overview
Overview
========
Identity and Access Management (IAM) will define the permissions and actions that individuals and services can perform on your platform, regardless of whether you access Exoscale programmatically through the command line, via your preferred coding language, through integrations with third-party tools, or using the user-friendly web portal.
Terminology[](https://community.exoscale.com/product/iam/overview/#terminology)
--------------------------------------------------------------------------------
* **Identity**
Represents users or services that have access to the Exoscale platform. These can be individuals, applications, or any entity that interacts with Exoscale resources.
* **Access Management**
The process and policies used to control who is authenticated and authorized to use resources.
* **Policies**
Sets of permissions attached to identities that define what actions they can perform on which resources.
* **Roles**
Collections of policies that can be assigned to identities to streamline permission assignments that meet specific needs or job functions.
* **Permissions**
Specific rights that define what actions an identity can perform, such as read, write, or delete resources.
* **Authentication**
The process of verifying an identity when it tries to access resources.
* **Authorization**
The process of determining whether an authenticated identity has permission to perform a requested action on a resource.
Features[](https://community.exoscale.com/product/iam/overview/#features)
--------------------------------------------------------------------------
* **Fine-Grained Access Controls**
Allows administrators to define precise access controls at various levels, ensuring that users and services have only the permissions they need.
* **Policy-Based Permissions**
Provides the ability to write policies that specify who can access which resources and what actions they can perform.
* **Role-Based Access Control (RBAC)**
Supports assigning roles to users and groups, simplifying the management of permissions by associating roles with specific job functions.
* **Multi-Factor Authentication (MFA)**
Enhances security by requiring multiple forms of verification before granting access to the platform.
* **Audit Logging**
Keeps detailed logs of user activities and changes made within the IAM system, aiding in compliance and monitoring.
* **API Access**
Provides programmatic access to manage IAM resources, allowing developers to integrate IAM functionality into their workflows.
* **Customizable Policies**: Allows for the creation of customized policies tailored to specific organizational needs, accommodating diverse security requirements.
Availability[](https://community.exoscale.com/product/iam/overview/#availability)
----------------------------------------------------------------------------------
| Zone | Country | City | Availability |
| --- | --- | --- | --- |
| **`at-vie-1`** | Austria | Vienna | |
| **`at-vie-2`** | Austria | Vienna | |
| **`ch-gva-2`** | Switzerland | Geneva | |
| **`ch-dk-2`** | Switzerland | Zurich | |
| **`de-fra-1`** | Germany | Frankfurt | |
| **`de-muc-1`** | Germany | Munich | |
| **`bg-sof-1`** | Bulgaria | Sofia | |
| **`hr-zag-1`** | Croatia | Zagreb | |
Limitations[](https://community.exoscale.com/product/iam/overview/#limitations)
--------------------------------------------------------------------------------
---
# Kafka – Exoscale Documentation
[Product](https://community.exoscale.com/product/)
[DBaaS](https://community.exoscale.com/product/dbaas/)
[Service-Specific](https://community.exoscale.com/product/dbaas/service-specific/)
Kafka
Kafka
=====
[Quick Start\
\
Comprehensive guide for getting started quickly.](https://community.exoscale.com/product/dbaas/service-specific/kafka/quick-start/)
[Overview\
\
Product descriptions, architectures and details.](https://community.exoscale.com/product/dbaas/service-specific/kafka/overview/)
[Operation\
\
Life cycle management, maintenance and upgrades.](https://community.exoscale.com/product/dbaas/service-specific/kafka/operation/)
[How-To\
\
Step-by-step guide to accomplish specific tasks.](https://community.exoscale.com/product/dbaas/service-specific/kafka/how-to/)
[Reference\
\
Overview of internal and external references.](https://community.exoscale.com/product/dbaas/service-specific/kafka/reference/)
---
# DNS Configuration – Exoscale Documentation
[Product](https://community.exoscale.com/product/)
[Networking](https://community.exoscale.com/product/networking/)
[DNS](https://community.exoscale.com/product/networking/dns/)
[Operation](https://community.exoscale.com/product/networking/dns/operation/)
DNS Configuration
DNS Configuration
=================
The Portal for our DNS service lets you manage all aspects of your DNS zone.
We assume for this guide that you have already chosen a zone bundle. If you have not chosen a zone bundle yet, refer to the [quickstart](https://community.exoscale.com/product/networking/dns/quick-start/)
to select one.
Configuring a Zone via the Portal[](https://community.exoscale.com/product/networking/dns/operation/config-dns/#configuring-a-zone-via-the-portal)
---------------------------------------------------------------------------------------------------------------------------------------------------
Enter your domain name in the `Add a Domain` form and click on `Add` to add a name to the domains list.
If the status bar turns red, you cannot manage more domains. To add more domains you need to upgrade your subscription to a [larger plan](https://community.exoscale.com/product/networking/dns/quick-start/)
.
Your domain name appears in the list of managed domains. Click on the domain name to display its records.
Configuring a Domain with a Registrar[](https://community.exoscale.com/product/networking/dns/operation/config-dns/#configuring-a-domain-with-a-registrar)
-----------------------------------------------------------------------------------------------------------------------------------------------------------
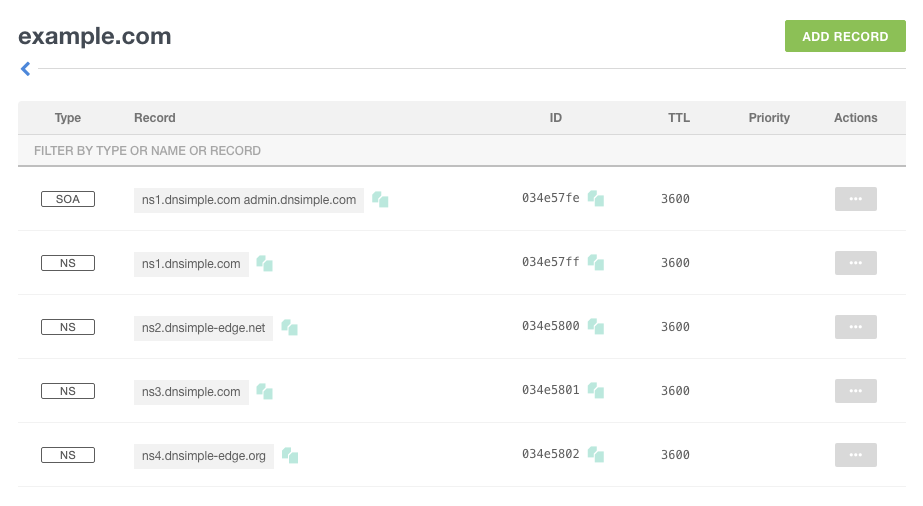
Before going any further with the zone configuration, check the domain name configuration with your registrar. The name servers should be set to the NS records showing on the Exoscale Portal. If the NS record is not set, any records you set up in the Portal will not be used.
---
# Storage – Exoscale Documentation
[Product](https://community.exoscale.com/product/)
Storage
Storage
=======
[Block Storage\
\
A network attachable, scalable, block storage service.](https://community.exoscale.com/product/storage/block-storage/)
[Object Storage\
\
An S3 compatible, cloud native object storage service.](https://community.exoscale.com/product/storage/object-storage/)
---
# DNS Configuration Examples – Exoscale Documentation
[Product](https://community.exoscale.com/product/)
[Networking](https://community.exoscale.com/product/networking/)
[DNS](https://community.exoscale.com/product/networking/dns/)
[How-To](https://community.exoscale.com/product/networking/dns/how-to/)
DNS Configuration Examples
DNS Configuration Examples
==========================
Configuring a machine record[](https://community.exoscale.com/product/networking/dns/how-to/config-examples/#configuring-a-machine-record)
-------------------------------------------------------------------------------------------------------------------------------------------
* click on the `Add Record` button at the top right of the header
* Select the record type `A`
* Enter a name
* Enter the IP address of the server
* Change the TTL value if necessary
* Click on `Add`
A toaster/pop-up will indicate that the record has been added successfully. You can continue adding records to the zone.
Configuring an alias record[](https://community.exoscale.com/product/networking/dns/how-to/config-examples/#configuring-an-alias-record)
-----------------------------------------------------------------------------------------------------------------------------------------
* Select the record type `CNAME`
* Enter a name
* Enter the targeted subdomain
* Change the TTL value if necessary
* Click on `Add`
Configuring a Mail Exchange record[](https://community.exoscale.com/product/networking/dns/how-to/config-examples/#configuring-a-mail-exchange-record)
-------------------------------------------------------------------------------------------------------------------------------------------------------
* Select the record type `MX`
* Enter a name
* Enter the mail server host
* Enter the priority
* Change the TTL value if necessary
* Click on `Add`
Configure my domain to point to an IP[](https://community.exoscale.com/product/networking/dns/how-to/config-examples/#configure-my-domain-to-point-to-an-ip)
-------------------------------------------------------------------------------------------------------------------------------------------------------------
In some cases, you need a domain to point to an IP. For instance, you want the domain `example.com` to point to 10.0.13.37 with an A record.
* Click on the `Add Record` button at the top right of the header
* Select the record type `A`
* Leave the name **blank**
* Enter the IP address of the server
* Change the TTL value if necessary
* click on `Add`
---
# Anti-Affinity Groups – Exoscale Documentation
[Product](https://community.exoscale.com/product/)
[Compute](https://community.exoscale.com/product/compute/)
[Instances](https://community.exoscale.com/product/compute/instances/)
[How-To](https://community.exoscale.com/product/compute/instances/how-to/)
Anti-Affinity Groups
Anti-Affinity Groups
====================
Anti-Affinity Groups let you specify which instances should run on separate hosts. In an HA cluster, for example, you could keep your instances on separate hypervisors to ensure more reliable fault tolerance. Two instances in the same anti-affinity group will spawn on **different hypervisors**. After creation, your instance will stay on its hypervisor for its entire life. It is best practice to define your groups in advance for a proper distribution strategy.
An example of how Anti-Affinity Groups may prove helpful would be associating your instances with different groups based on their role. You could define one Anti-Affinity Group for the database servers and another Anti-Affinity Group for the front servers. In this way, any issue on one hypervisor will not affect your entire infrastructure.
If you need more than eight instances per Anti-Affinity Group, you could split the group in two to grant the best spread. Anti-Affinity Groups let you specify which instances should run on separate hosts. In an HA cluster, for example, you could keep your instances on separate hypervisors to ensure more reliable fault tolerance.
From **COMPUTE** in the Portal, select the **ANTI-AFFINITY** section. You can then create, delete, or view the details of your groups, and in the detail of a group, you can see the instances attributed to that group.
Associating Anti-Affinity Groups[](https://community.exoscale.com/product/compute/instances/how-to/anti-affinity/#associating-anti-affinity-groups)
----------------------------------------------------------------------------------------------------------------------------------------------------
When you create an instance, you will see a list of your Anti-Affinity Groups. You can choose to associate your instance with any number of groups. Please note that you will have this option **only during the instance creation**. Although there is no limit to the number of groups you may have, an Anti-Affinity Group cannot contain more than 8 instances. If a group is full, it will not be presented in the available options.
How to Use Anti-Affinity Groups[](https://community.exoscale.com/product/compute/instances/how-to/anti-affinity/#how-to-use-anti-affinity-groups)
--------------------------------------------------------------------------------------------------------------------------------------------------
Two instances on the same group will be spawned on different hypervisors.
After creation, your instance will stay on its hypervisor for its entire life. To define a proper distribution strategy, it is best practice to define your groups in advance.
An example of how Anti-Affinity Groups may prove useful would be to associate your instances to different groups based on their role. You could define one Anti-Affinity Group for the database servers and another Anti-Affinity Group for the front servers. In this way, any issue on one hypervisor will not affect your entire infrastructure.
If you find yourself needing more than 8 instances per Anti-Affinity Group, a possible strategy would be to split a group in two to grant the best spread possible.
---
# Allow Outbound Reply – Exoscale Documentation
[Product](https://community.exoscale.com/product/)
[Networking](https://community.exoscale.com/product/networking/)
[Security Group](https://community.exoscale.com/product/networking/security-group/)
[How-To](https://community.exoscale.com/product/networking/security-group/how-to/)
Allow Outbound Reply
Allow Outbound Reply
====================
If your outbound traffic is restricted and you need to allow outbound `ICMP ECHO REPLY` traffic, you can achieve this by adding a specific outbound rule to your Exoscale Security Group. This guide will help you configure the rule to permit `ICMP Type ECHO REPLY (type 0)` with no code, ensuring proper ping functionality.
Steps to Allow Outbound Reply[](https://community.exoscale.com/product/networking/security-group/how-to/allow-outbound-reply/#steps-to-allow-outbound-reply)
-------------------------------------------------------------------------------------------------------------------------------------------------------------
* **Access the Exoscale Portal**
* Log in to your Exoscale account.
* Navigate to the **Compute** section and access your instance.
* **Select Security Group**
* From your instance details, locate the **Security Group** settings.
* Choose the relevant security group to which your instance is attached. This is the group where you’ll add the outbound rule.
* **Configure Outbound Rule**
* Within the selected Security Group, go to the **Outbound Rules** section.
* Click on the **Add Rule** button to begin creating a new outbound rule.
* **Specify ICMP Protocol**
* In the protocol selection, choose `ICMP`.
* Set the Type to `ECHO REPLY (type 0)`.
* Leave the code field as `NO CODE` since no specific code is required for this ICMP type.
* **Restrict Destination (Optional)**
* If desired, specify a destination IP address or network range to restrict which IPs can receive outbound ECHO REPLY messages. By default, this will be open to all.
* **Save the Rule**
* After configuring the rule parameters, click on **ADD** to save the changes.
* Allow some time for the changes to take effect and propagate through your instance setup.
* **Verification**
* Test your configuration by performing a ping operation from an internal service or monitoring tool. The outbound ICMP ECHO REPLY responses should now be successful.
---
# Naming Convention – Exoscale Documentation
[Product](https://community.exoscale.com/product/)
[DBaaS](https://community.exoscale.com/product/dbaas/)
[Operation](https://community.exoscale.com/product/dbaas/operation/)
Naming Convention
Naming Convention
=================
A DBaaS plan name tells you **three key facts** about the service without opening a table:
| Segment | Example | Meaning |
| --- | --- | --- |
| **Tier** | `premium` | Redundancy & backup profile (Hobbyist —> Premium) |
| **Node Count** | `9x` | Number of nodes in the cluster (omitted on single-node plans) |
| **RAM per Node** | `16` | Memory in GB for _each_ node; aligns with Exoscale Compute flavors |
### Reading a Plan[](https://community.exoscale.com/product/dbaas/operation/naming-convention/#reading-a-plan)
_`premium-9x-16`_ —> Premium-tier cluster, **9** nodes, **16 GB** RAM each.
### Tier Quick Reference[](https://community.exoscale.com/product/dbaas/operation/naming-convention/#tier-quick-reference)
* **Hobbyist**
single node, basic SLA, hourly backup (1 copy)
* **Startup**
single node, hourly + rolling 3-day daily backups
* **Business**
2 nodes, hourly + 14-day retention, 99.99 % SLA
* **Premium**
3 nodes, hourly + 30-day retention, 99.99 % SLA
Details (CPU, storage, price) live in the [DBaaS plan tables](https://www.exoscale.com/dbaas/)
.
### Why the Pattern?[](https://community.exoscale.com/product/dbaas/operation/naming-convention/#why-the-pattern)
The scheme is shared by all engines (`pg`, `mysql`, `kafka`, `opensearch`, `valkey`, `grafana`) so teams can:
* **Spot Capacity**
larger last number = more RAM
* **Spot Resilience**
higher tier = more replicas/backups
* **Compare Costs**
same tier & size behave similarly across zones
> **NOTE**
> when creating or updating a service via CLI/API, the `plan-string` is the only argument you need to switch hardware, redundancy or price class.
---
# Operation – Exoscale Documentation
[Product](https://community.exoscale.com/product/)
[DBaaS](https://community.exoscale.com/product/dbaas/)
[Service-Specific](https://community.exoscale.com/product/dbaas/service-specific/)
[Grafana](https://community.exoscale.com/product/dbaas/service-specific/grafana/)
Operation
Operation
=========
[Plugins\
\
Overview of Panel, Data Source and Other plugins for Grafana.](https://community.exoscale.com/product/dbaas/service-specific/grafana/operation/plugins/)
[Restricting Connections\
\
Updating the service with an IP filter using SSL encrypted CIDRs.](https://community.exoscale.com/product/dbaas/service-specific/grafana/operation/restricting-connections/)
---
# Operation – Exoscale Documentation
[Product](https://community.exoscale.com/product/)
[DBaaS](https://community.exoscale.com/product/dbaas/)
[Service-Specific](https://community.exoscale.com/product/dbaas/service-specific/)
[OpenSearch](https://community.exoscale.com/product/dbaas/service-specific/opensearch/)
Operation
Operation
=========
[Replication Factors\
\
Explaining OpenSearch’s different replication factors.](https://community.exoscale.com/product/dbaas/service-specific/opensearch/operation/replication-factors/)
[Restricting Connections\
\
With an IP filter using SSL encrypted CIDRs.](https://community.exoscale.com/product/dbaas/service-specific/opensearch/operation/restricting-connections/)
---
# Overview – Exoscale Documentation
[Product](https://community.exoscale.com/product/)
[Networking](https://community.exoscale.com/product/networking/)
[NLB](https://community.exoscale.com/product/networking/nlb/)
Overview
Overview
========
A **Network Load Balancer (or NLB)** is a Layer 4 (TCP/UDP) load balancer that distributes incoming traffic to Compute instances managed by an [Instance Pool](https://community.exoscale.com/product/compute/instances/how-to/instance-pools/)
.

Terminology[](https://community.exoscale.com/product/networking/nlb/overview/#terminology)
-------------------------------------------------------------------------------------------
Several types of load balancing strategies are available during service configuration:
* **Round Robin**
incoming traffic will be forwarded to each member of the Instance Pool in equal proportions and in circular order.
* **Source-Hash**
incoming traffic will be balanced on different members of the target Instance Pool depending on the source IP address. A given source IP address will always forward to the same Instance.
* **Maglev-Hash**
consistent hashing with minimal disruption. Each destination will receive an almost equal number of connections.
There is no difference in terms of raw performance between the strategies. The choice depends on your specific application and needs.
Features[](https://community.exoscale.com/product/networking/nlb/overview/#features)
-------------------------------------------------------------------------------------
A NLB is composed of several services, each bound to an Instance Pool that resides in the same zone as the NLB. Services will efficiently forward connections reaching the NLB’s IP address to the member instances of the Instance Pool.
While the instances remain individually accessible through their public IP, the NLB will expose a single IP address for all services and distribute the incoming traffic across the members of the Instance Pool following the service’s rules.
NLB services will update automatically when the Instance Pool scales up or down, distributing traffic across all reachable member instances of the pool and excluding unreachable ones by using an integrated health check functionality.
NLB acts only on incoming traffic, so all return traffic from the backend to the client that originated the request goes out directly from the pool member instance.
Each NLB is composed of up to 10 services - each service with its own configuration. Each NLB service can target a different Instance Pool residing in the same zone as the NLB, and is independent from other services.
Each NLB Service is composed of the following parts:
* A target Instance Pool
* A load balancing strategy
* A triplet indicating the Protocol, Service Port and Target Port for the traffic to be balanced.
* A Health Check probe
> **NOTE**
> While it’s possible to edit and modify most of the parameters of a service, it is not possible to modify the targeted Instance Pool. Moreover, an Instance Pool cannot be deleted if it is targeted by a service.
Network Load Balancer supports [labels](https://community.exoscale.com/product/compute/instances/how-to/labels/)
.
Availability[](https://community.exoscale.com/product/networking/nlb/overview/#availability)
---------------------------------------------------------------------------------------------
| Zone | Country | City | Availability |
| --- | --- | --- | --- |
| **`at-vie-1`** | Austria | Vienna | |
| **`at-vie-2`** | Austria | Vienna | |
| **`ch-gva-2`** | Switzerland | Geneva | |
| **`ch-dk-2`** | Switzerland | Zurich | |
| **`de-fra-1`** | Germany | Frankfurt | |
| **`de-muc-1`** | Germany | Munich | |
| **`bg-sof-1`** | Bulgaria | Sofia | |
| **`hr-zag-1`** | Croatia | Zagreb | |
Limitations[](https://community.exoscale.com/product/networking/nlb/overview/#limitations)
-------------------------------------------------------------------------------------------
* Network Load Balancers are limited by default to 5 per account. Please note that **each NLB will count** towards your [Elastic IP](https://community.exoscale.com/product/networking/eip/)
quota as well. Please contact our support if you need to increase your quota.
* Network Load Balancers only work with [Instance Pools](https://community.exoscale.com/product/compute/instances/how-to/instance-pools/)
. It is not possible to provide an arbitrary list of instances as a target.
* Each NLB can have up to 10 Services at most.
* NLB only forwards connections to Instance Pool members. It is not possible to terminate TCP or SSL/TLS connections with NLB.
* Once a service is created, it is not possible to modify its target Instance Pool.
* Names of NLBs need to be unique in the context of an organization.
* Names of NLB Services need to be unique in the context of the NLB itself.
---
# Overview – Exoscale Documentation
[Product](https://community.exoscale.com/product/)
[Networking](https://community.exoscale.com/product/networking/)
[CDN](https://community.exoscale.com/product/networking/cdn/)
Overview
Overview
========
Enhance user experience with a fast and cost-effective CDN that accelerates asset delivery, caches content across multiple locations, and ensures nearby servers handle user requests. This CDN offers high availability to meet growing demands, employing modern protocols and a robust global infrastructure for optimal performance and security. Leveraging the Akamai Intelligent Platform’s extensive reach, content is delivered quickly and securely worldwide. Ducksify’s partnership with Akamai streamlines deployment, offering an efficient and consolidated solution for edge delivery.
Terminology[](https://community.exoscale.com/product/networking/cdn/overview/#terminology)
-------------------------------------------------------------------------------------------
* **CDN (Content Delivery Network)**
A geographically distributed network of servers designed to deliver content efficiently to users based on their location.
* **Edge Server**
A server positioned close to end users that caches and delivers content, significantly reducing latency.
* **Origin Server**
The primary server where the original version of your content is stored and managed.
* **Cache**
Content temporarily stored on edge servers to accelerate delivery and reduce the load on the origin server.
* **Caching**
The process of storing content closer to the user to enhance performance and speed up access times.
* **Hit / Miss**
A _Cache Hit_ occurs when content is found in the CDN cache, allowing for faster delivery. A _Cache Miss_ occurs when content is not found in the CDN cache and must be retrieved from the origin server.
* **TTL (Time To Live)**
The duration for which cached content remains valid before it needs to be refreshed or revalidated.
* **PoP (Point of Presence)**
A physical data center location where CDN servers are deployed to improve content distribution.
* **Purge**
The act of removing content from the CDN cache, typically to force an update to the cached copy.
* **Latency**
The delay between a user’s content request and the actual delivery of that content.
* **Throughput**
The volume of data transmitted over a network within a specified time frame, often used as a measure of network performance.
* **Request Routing**
The process of directing a user’s request to the nearest or most optimal edge server to ensure efficient content delivery.
Features[](https://community.exoscale.com/product/networking/cdn/overview/#features)
-------------------------------------------------------------------------------------
This CDN solution ensures 100% content delivery, boosts download completion rates and supports modern protocols like HTTP/2 and IPv6 for enhanced performance. QUIC support overcomes delivery challenges and enriches user experiences. The Akamai Intelligent Platform delivers rapid assets from a vast global server network. At the same time, Ducksify integration offers a seamless, efficient edge delivery service.
* **Get Started Quickly**
Deploy CDN in front of your S3 compatible Object Storage buckets from the same interface you are already using.
* **Volume Based Pricing**
Zero fixed fees, no commitment - just a simple, three-tier pricing model. Flat rates across regions worldwide.
* **Leveraging Akamai Network**
Highly distributed CDN with more than 4,170 locations in 134 countries around the world
* **World-class Delivery Availability**
Align your brand with service predictability amidst increasing consumer expectations. Our CDN will serve your content 100% of the time.
* **Improve Download Completion Rates**
Through better, reliable, and secure performance.
* **Modern Protocol Support**
Ability to leverage HTTP/2 to provide better efficiency, performance and security, as well as IPv6 for traffic routing across the internet.
* **QUIC Support**
Address the fundamental challenges of delivery over the internet to create a more engaging experience for all end users.
* **Leveraging the Akamai Intelligent Platform**
Instantly serve your assets from the most pervasive, highly-distributed CDN with approximately 300,000 servers in 134 countries and nearly 1,400 networks around the world.
* **Powered by Ducksify**
We have partnered with the CDN experts from Ducksify, member of the Akamai NetAlliance Partner network, to provide you with a simple, integrated service to the Akamai Edge Delivery Network.
Availability[](https://community.exoscale.com/product/networking/cdn/overview/#availability)
---------------------------------------------------------------------------------------------
| Zone | Country | City | Availability |
| --- | --- | --- | --- |
| **`at-vie-1`** | Austria | Vienna | |
| **`at-vie-2`** | Austria | Vienna | |
| **`ch-gva-2`** | Switzerland | Geneva | |
| **`ch-dk-2`** | Switzerland | Zurich | |
| **`de-fra-1`** | Germany | Frankfurt | |
| **`de-muc-1`** | Germany | Munich | |
| **`bg-sof-1`** | Bulgaria | Sofia | |
| **`hr-zag-1`** | Croatia | Zagreb | |
Limitations[](https://community.exoscale.com/product/networking/cdn/overview/#limitations)
-------------------------------------------------------------------------------------------
The current service iteration has the following limitations:
* The source content must be hosted on the Exoscale SOS service.
* Using a vanity domain for the CDN endpoint is not supported.
* The CDN cache cannot be explicitly purged - other strategies must be used to manage the cache lifecycle.
* Buckets with dots in their names cannot be served through the CDN.
---
# Overview – Exoscale Documentation
[Product](https://community.exoscale.com/product/)
[DBaaS](https://community.exoscale.com/product/dbaas/)
[Service-Specific](https://community.exoscale.com/product/dbaas/service-specific/)
[Valkey](https://community.exoscale.com/product/dbaas/service-specific/valkey/)
Overview
Overview
========
Exoscale’s Managed Valkey is an open-source, in-memory key-value data store designed as a drop-in replacement for Redis®. It offers high performance for databases, caching, or message brokers, ensuring data stays within Europe and complies with GDPR regulations.
Terminology[](https://community.exoscale.com/product/dbaas/service-specific/valkey/overview/#terminology)
----------------------------------------------------------------------------------------------------------
* **Valkey Service**
a managed deployment of the Valkey engine on Exoscale
* **Plan**
pre-sized bundle of CPU, RAM & storage (Hobbyist, Startup, Business, Premium)
* **Replica**
follower node receiving asynchronous replication from the primary
* **Fork**
on-demand clone of an existing service, useful for tests or disaster recovery
* **Eviction Policy**
strategy Valkey uses when memory is exhausted (e.g. `allkeys-lru`)
Features[](https://community.exoscale.com/product/dbaas/service-specific/valkey/overview/#features)
----------------------------------------------------------------------------------------------------
* **Managed Lifecycle**
automated provisioning, rolling upgrades and in-place re-sizing
* **High Availability**
configurable replica count (Business & Premium plans) with automatic fail-over
* **Backups**
daily encrypted snapshots retained 7 days (Hobbyist/Startup) or 14 days (Business/Premium)
* **Metrics & Logging**
Prometheus endpoint and streaming logs to your preferred target
* **TLS Everywhere**
client connections encrypted by default; IP filtering for extra control
* **Full Redis Command Set**
because Valkey 7.2.4 is binary-compatible with Redis 7
> **NOTE**
> _Open-Source Continuity in a Nutshell_ (Redis —> _Valkey_)
> Same API, new governance under the Linux Foundation; no licence fees, no code gatekeeping.
> Exoscale switched its “Redis®” DBaaS offering to Valkey to guarantee long-term open-source freedom for customers.
Availability[](https://community.exoscale.com/product/dbaas/service-specific/valkey/overview/#availability)
------------------------------------------------------------------------------------------------------------
Valkey services can be created in every current Exoscale zone:
| Zone | Country | City | Availability |
| --- | --- | --- | --- |
| **`at-vie-1`** | Austria | Vienna | |
| **`at-vie-2`** | Austria | Vienna | |
| **`ch-gva-2`** | Switzerland | Geneva | |
| **`ch-dk-2`** | Switzerland | Zurich | |
| **`de-fra-1`** | Germany | Frankfurt | |
| **`de-muc-1`** | Germany | Munich | |
| **`bg-sof-1`** | Bulgaria | Sofia | |
| **`hr-zag-1`** | Croatia | Zagreb | |
Limitations[](https://community.exoscale.com/product/dbaas/service-specific/valkey/overview/#limitations)
----------------------------------------------------------------------------------------------------------
* Migration wizard is **not yet available**; use `redis-cli --rdb` or `replication` to move data
* Multi-primary (Redis Cluster-style sharding) is **not supported**; scale is vertical + read replicas
* Functionality is limited to core Valkey; no Redis Stack or proprietary modules
* Portal currently exposes basic operations only; use **CLI/API** for advanced settings
---
# Creating an Elastic IPv6 prefix – Exoscale Documentation
[Product](https://community.exoscale.com/product/)
[Networking](https://community.exoscale.com/product/networking/)
[EIP](https://community.exoscale.com/product/networking/eip/)
[Operation](https://community.exoscale.com/product/networking/eip/operation/)
Creating an Elastic IPv6 prefix
Creating an Elastic IPv6 prefix
===============================
To use an Elastic IPv6 prefix, the first step is to allocate it. This can be achieved via the \[Portal\]\[portal\], the \[CLI\]\[cli\] or the \[API\]\[api\].
Create a Manual Elastic IPv6 prefix[](https://community.exoscale.com/product/networking/eip/operation/creating-eipv6-prefix/#create-a-manual-elastic-ipv6-prefix)
------------------------------------------------------------------------------------------------------------------------------------------------------------------
To create an Elastic IPv6 prefix via the CLI, you need to specify IPv6 `create --ipv6` and your chosen zone. This is what it looks like in the CLI:
# Mind the --ipv6 flag
exo compute elastic-ip create --ipv6 --zone at-vie-1
✔ Creating Elastic IP... 4s
┼────────────────┼──────────────────────────────────────┼
│ ELASTIC IP │ │
┼────────────────┼──────────────────────────────────────┼
│ ID │ 1eabae57-50c9-4368-a591-8695cbfe37ce │
│ IP Address │ 2a04:c45:c00:3a46:500:2:0:1 │
│ Address Family │ inet6 │
│ CIDR │ 2a04:c45:c00:3a46:500:2::/96 │
│ Description │ │
│ Zone │ at-vie-1 │
│ Type │ manual │
┼────────────────┼──────────────────────────────────────┼
The Elastic IPv6 prefix is visible in the `CIDR` field, while a reference IPv6 address within that prefix is displayed in the `IP Address` field. Note that the whole prefix is usable.
Create a Managed Elastic IPv6 prefix[](https://community.exoscale.com/product/networking/eip/operation/creating-eipv6-prefix/#create-a-managed-elastic-ipv6-prefix)
--------------------------------------------------------------------------------------------------------------------------------------------------------------------
Backed by a health check.
exo compute elastic-ip create \
--ipv6 \
--zone at-vie-1 \
--healthcheck-mode tcp \
--healthcheck-port 80
✔ Creating Elastic IP... 3s
┼──────────────────────────┼──────────────────────────────────────┼
│ ELASTIC IP │ │
┼──────────────────────────┼──────────────────────────────────────┼
│ ID │ 19f2cc9a-e7a7-4e03-b32c-525c123f4eb2 │
│ IP Address │ 2a04:c45:c00:3a46:500:3:0:1 │
│ Address Family │ inet6 │
│ CIDR │ 2a04:c45:c00:3a46:500:3::/96 │
│ Description │ │
│ Zone │ at-vie-1 │
│ Type │ managed │
│ Healthcheck Mode │ tcp │
│ Healthcheck Port │ 80 │
│ Healthcheck Interval │ 10s │
│ Healthcheck Timeout │ 3s │
│ Healthcheck Strikes OK │ 3 │
│ Healthcheck Strikes Fail │ 2 │
┼──────────────────────────┼──────────────────────────────────────┼
As seen above, in order to create a managed Elastic IPv6 prefix, you also have to provide the required health check parameters. Without those parameters, an Elastic IPv6 manual type will be created.
---
# Overview – Exoscale Documentation
[Product](https://community.exoscale.com/product/)
[Networking](https://community.exoscale.com/product/networking/)
[IP](https://community.exoscale.com/product/networking/ip/)
Overview
Overview
========
IP addresses allow machines to address each other across a network. IPv4 is still the most widely used version of the protocol, but the IPv4 address space is being consumed rapidly. IPv6 is the most recent version of the protocol, designed to solve the address space problem.
Terminology[](https://community.exoscale.com/product/networking/ip/overview/#terminology)
------------------------------------------------------------------------------------------
* **IP Address**
A unique identifier for a device on a network (e.g., 192.168.1.10 or 2001:db8::1)
* **IPv4**
32-bit addressing (e.g., 192.0.2.1), widely used but running out of addresses
* **IPv6**
128-bit addressing (e.g., 2001:db8::1), created to solve IPv4 exhaustion
* **Subnet**
A segment of an IP network defined by a subnet mask or prefix (e.g., /24 for IPv4, /64 for IPv6)
* **Default Gateway**
The router that forwards traffic to destinations outside the local network
* **Private IP**
IPs used only inside local networks (e.g., 192.168.0.0/16 or fd00::/8)
* **Public IP**
Globally routable addresses used on the Internet
* **NAT**
Network Address Translation, allows many devices to share one public IPv4 address
* **Loopback Address**
Refers to the local machine (127.0.0.1 for IPv4, ::1 for IPv6)
* **Broadcast**
(IPv4 only) Sends traffic to all devices in a subnet (e.g., 192.168.1.255)
Features[](https://community.exoscale.com/product/networking/ip/overview/#features)
------------------------------------------------------------------------------------
You can selectively enable IPv6 on new or existing instances. Once enabled, an IPv6 will be automatically configured on the first interface of your instance, along with its public IPv4 address.
Availability[](https://community.exoscale.com/product/networking/ip/overview/#availability)
--------------------------------------------------------------------------------------------
| Zone | Country | City | Availability |
| --- | --- | --- | --- |
| **`at-vie-1`** | Austria | Vienna | |
| **`at-vie-2`** | Austria | Vienna | |
| **`ch-gva-2`** | Switzerland | Geneva | |
| **`ch-dk-2`** | Switzerland | Zurich | |
| **`de-fra-1`** | Germany | Frankfurt | |
| **`de-muc-1`** | Germany | Munich | |
| **`bg-sof-1`** | Bulgaria | Sofia | |
| **`hr-zag-1`** | Croatia | Zagreb | |
Limitations[](https://community.exoscale.com/product/networking/ip/overview/#limitations)
------------------------------------------------------------------------------------------
All IPv6 addresses for your organization are taken from the same `/64` subnet (the beginning of the IPv6 address will always be the same). Currently, only one IPv6 address can be assigned for each instance. In the future, we will allow you to assign more IPv6 addresses. An instance that is transferred to a different organization will keep the primary IPv6 address of the source organization.
---
# Attach an Elastic IPv6 Prefix – Exoscale Documentation
[Product](https://community.exoscale.com/product/)
[Networking](https://community.exoscale.com/product/networking/)
[EIP](https://community.exoscale.com/product/networking/eip/)
[Operation](https://community.exoscale.com/product/networking/eip/operation/)
Attach an Elastic IPv6 Prefix
Attach an Elastic IPv6 Prefix
=============================
After the Elastic IPv6 prefix has been created, you can then attach it to one or more Compute instances.
To refer to a Elastic IPv6 prefix, use either its unique ID or the reference IPv6 address, as you can see here in the CLI:
exo compute elastic-ip show 4ef39790-3409-4b2b-aa44-672db338edd5 -z at-vie-1
Output:
┼────────────────┼──────────────────────────────────────┼
│ ELASTIC IP │ │
┼────────────────┼──────────────────────────────────────┼
│ ID │ 4ef39790-3409-4b2b-aa44-672db338edd5 │
│ IP Address │ 2a04:c45:c00:3a46:500:2:0:1 │
│ Address Family │ inet6 │
│ CIDR │ 2a04:c45:c00:3a46:500:2::/96 │
│ Description │ │
│ Zone │ at-vie-1 │
│ Type │ manual │
┼────────────────┼──────────────────────────────────────┼
Attach the Elastic IPv6 prefix like this:
exo compute instance elastic-ip attach my-instance 4ef39790-3409-4b2b-aa44-672db338edd5 -z at-vie-1
Output:
✔ Attaching Elastic IP "4ef39790-3409-4b2b-aa44-672db338edd5" to instance "my-instance"... 3s
┼──────────────────────┼──────────────────────────────────────┼
│ COMPUTE INSTANCE │ │
┼──────────────────────┼──────────────────────────────────────┼
│ ID │ 8a7dd501-ccc4-4582-867a-347e14bf43ff │
│ Name │ my-instance │
│ Creation Date │ 2022-08-25 14:23:04 +0000 UTC │
│ Instance Type │ standard.medium │
│ Template │ Linux Ubuntu 20.04 LTS 64-bit │
│ Zone │ at-vie-1 │
│ Anti-Affinity Groups │ n/a │
│ Security Groups │ default │
│ Private Networks │ n/a │
│ Elastic IPs │ 2a04:c45:c00:3a46:500:2:0:1 │
│ IP Address │ 185.150.8.7 │
│ IPv6 Address │ 2a04:c45:c00:3a46:4fa:70ff:fe00:4a │
│ SSH Key │ my-instance-1661437382 │
│ Disk Size │ 50 GiB │
│ State │ running │
│ Labels │ n/a │
┼──────────────────────┼──────────────────────────────────────┼
Traffic for any address within the Elastic IPv6 prefix is now routed to `my-instance`.
> **NOTE**
> in the case of the manual Elastic IPv6, the user has to configure the address within the attached instances.
For the managed Elastic IPv6, traffic towards the reference IPv6 address is transparently forwarded, with no need for additional configuration. The whole Elastic IPv6 prefix is still routed to the attached instances. However, any other IPv6 addresses need to be configured within the instances.
---
# SKS Certificates and API Keys – Exoscale Documentation
[Product](https://community.exoscale.com/product/)
[Compute](https://community.exoscale.com/product/compute/)
[Containers (SKS)](https://community.exoscale.com/product/compute/containers/)
[Operation](https://community.exoscale.com/product/compute/containers/operation/)
SKS Certificates and API Keys
SKS Certificates and API Keys
=============================
Certificates Authorities[](https://community.exoscale.com/product/compute/containers/operation/certificates-and-keys/#certificates-authorities)
------------------------------------------------------------------------------------------------------------------------------------------------
Several certificates authorities are generated when you create a cluster. You can retrieve the public certificate for some of these authorities by using the `exo compute sks authority-cert ` command in the CLI.
The authorities are:
* `kubelet`: the authority generating certificates for the Kubelet daemon running on the workers.
* `aggregation`: the authority used by the aggregation layer.
Addon credentials[](https://community.exoscale.com/product/compute/containers/operation/certificates-and-keys/#addon-credentials)
----------------------------------------------------------------------------------------------------------------------------------
Both the Exoscale Cloud Controller Manager CCM and Exoscale Container Storage Interface CSI addons need a set of credentials to communicate with the platform. An IAM role and api key are created automatically per-addon and per-cluster on your account when you create or update a cluster with addons selected. The lifecycle of these credentials is managed by Exoscale. They are deleted automatically once the cluster is deleted.
Credentials managed by Exoscale SKS all have following naming scheme: `sks--` eg. `sks-ccm-859ece7e-f4ec-4eab-a77f-d06a1cfc08fd`
In case of unintended deletion of the credentials one can _rotate_ specific credentials
* from the CLI `exo compute sks rotate-ccm-credentials ` or soon `exo compute sks rotate-csi-credentials `
* from the Portal under cluster details
---
# How-To – Exoscale Documentation
[Product](https://community.exoscale.com/product/)
[DBaaS](https://community.exoscale.com/product/dbaas/)
[Service-Specific](https://community.exoscale.com/product/dbaas/service-specific/)
[MySQL](https://community.exoscale.com/product/dbaas/service-specific/mysql/)
How-To
How-To
======
[Migrating to MySQL\
\
Migrating to Managed MySQL.](https://community.exoscale.com/product/dbaas/service-specific/mysql/how-to/mysql-migration/)
[Read Replicas\
\
PostgreSQL Read Replicas](https://community.exoscale.com/product/dbaas/service-specific/mysql/how-to/read-replicas/)
---
# Operation – Exoscale Documentation
[Product](https://community.exoscale.com/product/)
[DBaaS](https://community.exoscale.com/product/dbaas/)
[Service-Specific](https://community.exoscale.com/product/dbaas/service-specific/)
[Valkey](https://community.exoscale.com/product/dbaas/service-specific/valkey/)
Operation
Operation
=========
[Connect with valkey-cli\
\
The Valkey CLI is primarily used for administration and troubleshooting.](https://community.exoscale.com/product/dbaas/service-specific/valkey/operation/connect-valkey-cli/)
[Restricting Connections\
\
Updating the service with an IP filter using SSL encrypted CIDRs.](https://community.exoscale.com/product/dbaas/service-specific/valkey/operation/restricting-connections/)
---
# Operation – Exoscale Documentation
[Product](https://community.exoscale.com/product/)
[DBaaS](https://community.exoscale.com/product/dbaas/)
[Service-Specific](https://community.exoscale.com/product/dbaas/service-specific/)
[MySQL](https://community.exoscale.com/product/dbaas/service-specific/mysql/)
Operation
Operation
=========
[JSON Configuration\
\
Managing JSON Configuration Settings.](https://community.exoscale.com/product/dbaas/service-specific/mysql/operation/json-configuration/)
[Restricting Connections\
\
Restricting connections from the Internet.](https://community.exoscale.com/product/dbaas/service-specific/mysql/operation/restricting-connections/)
---
# Operation – Exoscale Documentation
[Product](https://community.exoscale.com/product/)
[DBaaS](https://community.exoscale.com/product/dbaas/)
[Service-Specific](https://community.exoscale.com/product/dbaas/service-specific/)
[Kafka](https://community.exoscale.com/product/dbaas/service-specific/kafka/)
Operation
Operation
=========
[Authentication and CA\
\
Securing producer and consumer connections with SSL/TLS validated through a trusted Certificate Authority.](https://community.exoscale.com/product/dbaas/service-specific/kafka/operation/auth-ca/)
[Connecting to a Instance\
\
Connecting via SSL certificate authentication for secure communication plus option for SASL authentication.](https://community.exoscale.com/product/dbaas/service-specific/kafka/operation/connect-instance/)
---
# Operation – Exoscale Documentation
[Product](https://community.exoscale.com/product/)
[DBaaS](https://community.exoscale.com/product/dbaas/)
[Service-Specific](https://community.exoscale.com/product/dbaas/service-specific/)
[PostgreSQL](https://community.exoscale.com/product/dbaas/service-specific/postgresql/)
Operation
Operation
=========
[Connect with psql\
\
Connect with psql to your PostgreSQL database.](https://community.exoscale.com/product/dbaas/service-specific/postgresql/operation/connect-with-psql/)
[JSON Configuration\
\
Managing JSON Configuration Settings.](https://community.exoscale.com/product/dbaas/service-specific/postgresql/operation/json-configuration/)
[Restricting Connections\
\
Restricting connections from the Internet.](https://community.exoscale.com/product/dbaas/service-specific/postgresql/operation/restricting-connections/)
---
# Operation – Exoscale Documentation
[Product](https://community.exoscale.com/product/)
[DBaaS](https://community.exoscale.com/product/dbaas/)
Operation
Operation
=========
[Architecture\
\
Isolated VMs per service, managed by a European control-plane; not shown in your instance list.](https://community.exoscale.com/product/dbaas/operation/architecture/)
[Service Level Agreement\
\
Discover for each DBaaS plan tier the defined Service Level Agreements (SLAs).](https://community.exoscale.com/product/dbaas/operation/service-level-agreement/)
[Naming Convention\
\
Decode tier + node count + RAM from any DBaaS plan name at a glance.](https://community.exoscale.com/product/dbaas/operation/naming-convention/)
---
# Service Level Agreement – Exoscale Documentation
[Product](https://community.exoscale.com/product/)
[DBaaS](https://community.exoscale.com/product/dbaas/)
[Operation](https://community.exoscale.com/product/dbaas/operation/)
Service Level Agreement
Service Level Agreement
=======================
Each DBaaS plan has a guaranteed **Service Level Agreement (SLA)** for high availability and reliability.
* **Hobbyist** and **Startup** plans provide **99.95%** availability
* **Business** and **Premium** plans provide **99.99%** availability
The SLA applies to the uptime and responsiveness of the managed database services. It ensures that services remain accessible and functional according to enterprise-grade standards. Failures beyond this threshold are eligible for compensation as defined in the [Exoscale’s SLAs](https://www.exoscale.com/terms/#:~:text=4.%20Service%20Level%20Agreement%20%28SLA%29)
.
> **NOTE**
> The SLA applies only to the service infrastructure and not to user data, applications, or queries running on the databases.
---
# Reference – Exoscale Documentation
[Product](https://community.exoscale.com/product/)
[DBaaS](https://community.exoscale.com/product/dbaas/)
[Service-Specific](https://community.exoscale.com/product/dbaas/service-specific/)
[Valkey](https://community.exoscale.com/product/dbaas/service-specific/valkey/)
Reference
Reference
=========
[API DBaaS\
\
All operations on DBaaS.](https://community.exoscale.com/product/dbaas/service-specific/valkey/reference/api-dbaas/)
[CLI DBaaS\
\
All commands on DBaaS.](https://community.exoscale.com/product/dbaas/service-specific/valkey/reference/cli-dbaas/)
---
# SSH Keypairs – Exoscale Documentation
[Product](https://community.exoscale.com/product/)
[Compute](https://community.exoscale.com/product/compute/)
[Instances](https://community.exoscale.com/product/compute/instances/)
[How-To](https://community.exoscale.com/product/compute/instances/how-to/)
SSH Keypairs
SSH Keypairs
============
SSH keypairs are a way to authenticate to your Linux instance (virtual machine) without using a password using the added security of [SSH Public-Key authentication](https://en.wikipedia.org/wiki/Public-key_cryptography)
.
Public-Key authentication is both:
* **Secure**: Breaking an SSH key requires so much time and computational power that these sorts of attacks are not practical in the real world. SSH keys are much more secure than even very strong passwords.
* **Convenient**: Instead of managing per-instance passwords or sharing them across your organization, every person who needs access to your servers gives you their public key. You can then set up granular access control by adding those keys only to the relevant instances. If you need to revoke someone’s access, simply revoking their key prevents them from logging in without affecting other people’s workflow.
Exoscale allows you to automatically provision Linux instances with SSH public keys to use for Public-Key authentication with SSHv2.
Note that while you can have multiple keypairs in your account, the instance creation dialog only allows you to select one keypair. After the instance is created, you can allow additional public keys and set up more detailed access control using traditional means.
Keypairs can be imported both by using the CLI or through the [Portal](https://portal.exoscale.com/compute/keypairs)
.
> **NOTE**
> The supported SSH key formats are ssh-rsa and ssh-ed25519.
Create a New SSH Keypair[](https://community.exoscale.com/product/compute/instances/how-to/ssh-keypairs/#create-a-new-ssh-keypair)
-----------------------------------------------------------------------------------------------------------------------------------
If you do not have an SSH keypair, you can create a new SSH keypair on your local machine with the following command in your terminal:
`ssh-keygen -t rsa -b 4096 -C 'a-comment-to-identify-your-key'`
You will be asked for a name and location to save your new keypair and for a password to protect it. Keypairs are usually stored in the `~/.ssh` folder, and the main keypair for a user is usually called `id_rsa`.
You can then import the content of your new **public key** to Exoscale.
Provision an Instance with a Keypair[](https://community.exoscale.com/product/compute/instances/how-to/ssh-keypairs/#provision-an-instance-with-a-keypair)
-----------------------------------------------------------------------------------------------------------------------------------------------------------
When creating a new instance, select the keypair you want to associate to that instance. The person holding the corresponding private key can log in via SSH.
Please note that deleting a public key in the Portal does not automatically remove the authorized public key from a previously created instance. If you want to completely revoke a key, you need to do so manually by **deleting the key on every instance** holding it.
Connecting to Your New Instance[](https://community.exoscale.com/product/compute/instances/how-to/ssh-keypairs/#connecting-to-your-new-instance)
-------------------------------------------------------------------------------------------------------------------------------------------------
When your new instance has started and is running, you can connect to it via SSH. How to use SSH is out of the scope of this documentation, but assuming you have the following conditions:
* You have SSH installed on your local machine
* Your private key is stored in `~/.ssh/id_rsa`
* Permissions of the `~/.ssh` folder (700) and of your private key (600) are correct
* You opened TCP port 22 in your instance’s [security groups](https://community.exoscale.com/product/networking/security-group/)
you should then be able to connect to your instance with:
`ssh root@ip-address-of-your-instance`
You may be asked for the password of your **private key** (not the instance password) if it has been set.
You may also see a warning about the remote host identification: this is expected **on a first connection**, and you can trust the remote.
---
# Rescue Mode – Exoscale Documentation
[Product](https://community.exoscale.com/product/)
[Compute](https://community.exoscale.com/product/compute/)
[Instances](https://community.exoscale.com/product/compute/instances/)
[Operation](https://community.exoscale.com/product/compute/instances/operation/)
Rescue Mode
Rescue Mode
===========
Just like a physical machine, some user operations (such as a major upgrade of the operating system or a modification of the partition layout) could cause a Compute instance to be unable to boot normally. When an instance cannot boot normally, a rescue mode exists to access the root disk by booting from a different source. In this case, we use an open-source program called [netboot.xyz](https://netboot.xyz/)
that can utilize a variety of Linux, BSD, ISO images, specialized installers, or utilities.
Rescue Mode Prerequisites[](https://community.exoscale.com/product/compute/instances/operation/rescue-mode/#rescue-mode-prerequisites)
---------------------------------------------------------------------------------------------------------------------------------------
Rescue mode is not a default operation and can be operated only via the CLI or the API. Rescue mode requires:
* a working [`exo` CLI](https://community.exoscale.com/tools/command-line-interface/)
environment
* access to an [IAM API key](https://community.exoscale.com/product/iam/quick-start/)
* access to the Portal
If you wish to use a custom ISO, it must be loaded in a publicly accessible URL. You can always use [Simple Object Storage](https://community.exoscale.com/product/storage/object-storage/quick-start/)
.
> **WARNING**
> Rescue Mode relies on netboot.xyz, which does not support Secure Boot. Instances with Secure Boot enabled will therefore be unable to boot into Rescue Mode.
> **WARNING**
> Exoscale is solely responsible for the instance’s booting in rescue mode with the `netboot.xyz` loader. Any operation performed in `netboot.xyz` and the repair of the instance itself are outside of Exoscale’s standard support scope. The examples in this guide are intended to point the user in the right direction without guaranteeing their outcome. Knowledge of tooling and operations is required.
Booting Into Rescue Mode[](https://community.exoscale.com/product/compute/instances/operation/rescue-mode/#booting-into-rescue-mode)
-------------------------------------------------------------------------------------------------------------------------------------
To reboot in rescue mode, first start by shutting down your instance via the CLI or the Portal in the instance details:
exo compute instance stop broken-vm
Then start your instance in either BIOS or UEFI rescue mode, depending on the template you are using.
To start an instance in BIOS rescue mode:
exo compute instance start --rescue-profile=netboot broken-vm
To start an instance in UEFI rescue mode:
exo compute instance start --rescue-profile=netboot-efi broken-vm

Start Instance in Rescue Mode
The instance will now boot the `netboot.xyz` image.
Accessing the Rescue Mode[](https://community.exoscale.com/product/compute/instances/operation/rescue-mode/#accessing-the-rescue-mode)
---------------------------------------------------------------------------------------------------------------------------------------
To access the rescue mode, log into the Portal and navigate to the instance detail view. Select `Console` in the `...` menu at the top right header.
A new window will open and display the instance console and the `netboot.xyz` menu:
netboot.xyz Rescue Menu from Console
> **NOTE**
> When booting a [Private Instance](https://community.exoscale.com/product/compute/instances/how-to/private-instances/)
> , you need to enter the Failsafe Menu from `netboot.xyz` to perform a manual network configuration.
You can now perform any operations needed to repair the instance and then reboot it normally after you have finished. After the instance has rebooted, it will exit rescue mode and try to boot from its root disk.
Booting from a Custom ISO Image[](https://community.exoscale.com/product/compute/instances/operation/rescue-mode/#booting-from-a-custom-iso-image)
---------------------------------------------------------------------------------------------------------------------------------------------------
Through rescue mode, it is possible to boot an instance from an external ISO as long as the ISO supports VirtIO storage and network drivers. This method allows for bare metal recovery, for example.
> **NOTE**
> The custom ISO must be located in a publicly accessible URL. You can always use our [Simple Object Storage](https://community.exoscale.com/product/storage/object-storage/quick-start/)
> .
To boot from an external ISO:
* Start your instance in rescue mode as described above
* From the main netboot.xyz menu, select `Tools -> Utilities`
* Then select `netboot.xyz tools -> Test Distribution ISO`
* Enter the public URL of the target ISO
* e.g., [https://releases.ubuntu.com/24.04/ubuntu-24.04.2-live-server-amd64.iso](https://releases.ubuntu.com/24.04/ubuntu-24.04.2-live-server-amd64.iso)
boots an Ubuntu Live CD
Netboot Rescue Menu from Console \`iso-image\`
Booting from a Windows Recovery Image[](https://community.exoscale.com/product/compute/instances/operation/rescue-mode/#booting-from-a-windows-recovery-image)
---------------------------------------------------------------------------------------------------------------------------------------------------------------
If you need to recover a Windows instance from a Windows Recovery Image, you can use two ISOs we have provided, where all the needed [virtIO drivers](https://docs.fedoraproject.org/en-US/quick-docs/creating-windows-virtual-machines-using-virtio-drivers/)
have already been integrated:
* `http://sos-de-muc-1.exo.io/windows-recovery-image/w2k16` a Windows 2016 recovery image
* `http://sos-de-muc-1.exo.io/windows-recovery-image/w2k19` a Windows 2019 recovery image
* `http://sos-de-muc-1.exo.io/windows-recovery-image/w2k22` a Windows 2022 recovery image
> **WARNING** Although provided for public use, the above Windows Recovery Images are provided as is, without warranties. As for any other rescue mode operation, the user is solely responsible for the outcome of their actions, and rescue operations beyond the booting of the `netboot.xyz` loader are out of the Exoscale standard support scope.

Netboot rescue menu from console iso-image
To proceed:
* Start your instance in rescue mode as described above
* From the main `netboot.xyz` menu, select `Distributions -> Windows`
* Select `Options -> Base URL`
* Enter the URL corresponding to your instance’s Windows version from the abovementioned options. Then enter any key to return to the `Windows` menu
* After returning to the `Windows` menu, select `Load Microsoft Windows Installer...`
* The Windows Recovery Image will load, and you will be prompted to enter some basic options. Click on **Next** when ready
* On the next screen, click on **Repair Your Computer**
You can now recover your Windows instance.
Linux Password Reset via Rescue Environment[](https://community.exoscale.com/product/compute/instances/operation/rescue-mode/#linux-password-reset-via-rescue-environment)
---------------------------------------------------------------------------------------------------------------------------------------------------------------------------
Suppose you need to reset a Linux password, such as the root password, and cannot access the system normally. In that case, you can boot into a rescue environment and manually reset the password. Here’s a step-by-step guide to doing this using a rescue environment like **`netboot.xyz`**.
**Step 1: Access a Linux Rescue Environment via `netboot.xyz`**
* _Boot from `netboot.xyz`_: Use the \`\`netboot.xyz\` tool to boot into a live or rescue environment for Linux: Stop the VM and boot it in rescue mode. Make sure your VM type is at least LARGE.
exo compute instance start --rescue-profile=netboot instance_name
* _Select a Distribution_: In the `netboot.xyz` menu, choose an option to boot into Rescue Mode or a minimal environment. In this example, we will use the **Ubuntu** rescue environment, but you can use any distribution available in the menu.
**Step 2: Mount the Root Filesystem**
Once you’re in the live environment, you’ll need to identify and mount the root partition of your system. Follow these steps:
* _Identify the Root Partition_:
Use the following command to list available partitions and find your root partition:
fdisk -l
Look for a partition named `/dev/sda1` or `/dev/vda1`. This is likely your root partition, where the Linux system is installed.
* _Mount the Root Filesystem_:
Mount the root filesystem to a directory like `/mnt` replace `/dev/vdX` with the root partition (e.g., `/dev/vda1`)
mount /dev/vdX /mnt
* _Mount Additional Filesystems_:
Mount the necessary system filesystems required for `chroot`:
mount -t proc /proc /mnt/proc
mount --rbind /sys /mnt/sys
mount --rbind /dev /mnt/dev
**Step 3: Chroot into the Mounted Filesystem**
* _Enter the chroot environment_:
Use `chroot` to change your root directory to the mounted filesystem:
chroot /mnt
* _Reset the Password_:
To reset the root password, run the following command:
passwd root
If you need to reset the password for a specific user, replace `root` with the username:
passwd
* _Exit the Chroot Environment_:
After resetting the password, exit the chroot environment by typing:
exit
**Step 4: Unmount Filesystems and Reboot**
* _Unmount the filesystems_:
Unmount the filesystems you mounted earlier:
umount --recursive --lazy /mnt
* _Reboot the system_:
Reboot the system with the following command:
exo compute instance reboot "instance-name"
After the reboot, you should be able to log into the system with the new password via the console or SSH.
---
# Maintenance Windows – Exoscale Documentation
[Product](https://community.exoscale.com/product/)
[DBaaS](https://community.exoscale.com/product/dbaas/)
[How-To](https://community.exoscale.com/product/dbaas/how-to/)
Maintenance Windows
Maintenance Windows
===================
Maintenance windows are used to perform necessary updates and upgrades regarding security and management layers of your Exoscale DBaaS services. They are not used to perform major service version upgrades, refer to the section [upgrades](https://community.exoscale.com/product/dbaas/how-to/maintenance-windows/#upgrades)
on how to upgrade versions.
> **NOTE**
> Urgent upgrades including vulnerability updates will happen before the maintenance window in order to keep the services safe.
By default, an arbitrary slot will be assigned when creating your service. You can control the weekly maintenance window of each service to ensure maintenance occurs during a window with lower traffic levels.
### Changing the Maintenance Window of a Service[](https://community.exoscale.com/product/dbaas/how-to/maintenance-windows/#changing-the-maintenance-window-of-a-service)
To adapt the maintenance window of a service, you need to pass a new day of week and associated time with the `update` command
exo dbaas update -z de-fra-1 test-pg --maintenance-dow=tuesday --maintenance-time=10:10:10
Updating Database Service "test-pg"...
┼───────────────────────┼────────────────────────────────────────────────────────────────────────────────────────────────────────────────────────────────┼
│ DATABASE SERVICE │ │
┼───────────────────────┼────────────────────────────────────────────────────────────────────────────────────────────────────────────────────────────────┼
│ Zone │ de-fra-1 │
│ Name │ test-pg │
│ Type │ pg │
│ Plan │ hobbyist-1 │
│ Disk Size │ 8.0 GiB │
│ State │ running │
│ Creation Date │ 2021-10-21 08:42:40 +0000 UTC │
│ Update Date │ 2021-11-01 09:25:27 +0000 UTC │
│ Nodes │ 1 │
│ Node CPUs │ 2 │
│ Node Memory │ 2.0 GiB │
│ Termination Protected │ true │
│ Maintenance │ tuesday (10:10:10) │
│ Backup Schedule │ 20:28 │
│ URI │ postgres://avnadmin:xxxxx@test-pg-exoscale-08b0165e-ef03-47ec-926f-f01163d557ed.aivencloud.com:21699/defaultdb?sslmode=require │
│ IP Filter │ 0.0.0.0/0 │
│ Components │ │
│ │ pg test-pg-exoscale-08b0165e-ef03-47ec-926f-f01163d557ed.aivencloud.com:21699 route:dynamic usage:primary │
│ │ pgbouncer test-pg-exoscale-08b0165e-ef03-47ec-926f-f01163d557ed.aivencloud.com:21700 route:dynamic usage:primary │
│ │ │
│ Users │ avnadmin (primary) │
┼───────────────────────┼────────────────────────────────────────────────────────────────────────────────────────────────────────────────────────────────┼
The maintenance window can also be specified at creation time with the same parameters.
This parameter can also be checked and adjusted within the Portal under the `maintenance` tab of a service. The same tab also lists the upcoming updates to be applied at the next scheduled maintenance or manually within the page.
### How Maintenance and Upgrades Work[](https://community.exoscale.com/product/dbaas/how-to/maintenance-windows/#how-maintenance-and-upgrades-work)
Upgrades are performed as rolling upgrades where completely new instances are built alongside the old ones. After the new instances are running and synced with the old instances, a controlled automatic failover is performed to switch the service to use the new upgraded instances. The old servers are retired automatically after the new instances have taken over for providing the service.
The controlled failover is very quick and safe - it takes less than a minute to get clients connected again. Typically, we see a 5-10 second period during which the clients are unable to re-establish the connection. Single node plans will however see a longer downtime.
Best practices for client configuration:
* Do not cache IP addresses of services.
* Make sure your client can automatically reconnect to a service.
* Make sure the DNS name of a service stays the same after the upgrade.
---
# Reference – Exoscale Documentation
[Product](https://community.exoscale.com/product/)
[DBaaS](https://community.exoscale.com/product/dbaas/)
[Service-Specific](https://community.exoscale.com/product/dbaas/service-specific/)
[MySQL](https://community.exoscale.com/product/dbaas/service-specific/mysql/)
Reference
Reference
=========
[API dbaas\
\
All operations on DBaaS.](https://community.exoscale.com/product/dbaas/service-specific/mysql/reference/api-dbaas/)
[CLI dbaas\
\
All commands on DBaaS.](https://community.exoscale.com/product/dbaas/service-specific/mysql/reference/cli-dbaas/)
---
# Labels – Exoscale Documentation
[Product](https://community.exoscale.com/product/)
[Compute](https://community.exoscale.com/product/compute/)
[Containers (SKS)](https://community.exoscale.com/product/compute/containers/)
[How-To](https://community.exoscale.com/product/compute/containers/how-to/)
Labels
Labels
======
Using Labels to Organize SKS Clusters and Nodepools[](https://community.exoscale.com/product/compute/containers/how-to/labels/#using-labels-to-organize-sks-clusters-and-nodepools)
------------------------------------------------------------------------------------------------------------------------------------------------------------------------------------
SKS clusters and nodepools support [labels](https://community.exoscale.com/product/compute/instances/how-to/labels/)
similarly to Compute instance labels. Labels can be associated with clusters and nodepools to help classify and organize them.
The `--label key=value` and `--nodepool-label` options can be passed to the `exo compute sks create` command to add labels to your clusters or nodepools. The `sks nodepool add` command also supports `--label`.
The labels options can be repeated to add multiple labels to an entity.
Labeling Rules for the `kubernetes.io` Namespace[](https://community.exoscale.com/product/compute/containers/how-to/labels/#labeling-rules-for-the-kubernetesio-namespace)
---------------------------------------------------------------------------------------------------------------------------------------------------------------------------
When using labels in the `kubernetes.io` namespace, you must follow strict naming rules. Labels must either:
1. Start with an allowed prefix:
* `kubelet.kubernetes.io`
* `node.kubernetes.io`
**OR**
2. Be part of the explicitly allowed set:
* `beta.kubernetes.io/arch`
* `beta.kubernetes.io/instance-type`
* `beta.kubernetes.io/os`
* `failure-domain.beta.kubernetes.io/region`
* `failure-domain.beta.kubernetes.io/zone`
* `kubernetes.io/arch`
* `kubernetes.io/hostname`
* `kubernetes.io/os`
* `node.kubernetes.io/instance-type`
* `topology.kubernetes.io/region`
* `topology.kubernetes.io/zone`
If you need another label in the `kubernetes.io` namespace, you will need to set it after the nodes are registered with:
kubectl label node NODE-NAME unallowed.kubernetes.io/prefix=true
---
# Service Plan Scaling – Exoscale Documentation
[Product](https://community.exoscale.com/product/)
[DBaaS](https://community.exoscale.com/product/dbaas/)
[How-To](https://community.exoscale.com/product/dbaas/how-to/)
Service Plan Scaling
Service Plan Scaling
====================
You can scale a service from one supported plan to another.
### Scaling Up[](https://community.exoscale.com/product/dbaas/how-to/scaling/#scaling-up)
Scaling to a larger plan is always supported:
* within the same plan category: for example, from business-8 to business-16
* from one plan category to another: for example, from startup-8 to business-16
* from one family to another: for example, from startup-32 to cpu-startup32
You can trigger the scale operation with the `update` command:
exo dbaas update -z de-fra-1 test-pg --plan startup-4
Output:
Updating Database Service "test-pg"...
### Scaling Down[](https://community.exoscale.com/product/dbaas/how-to/scaling/#scaling-down)
Scaling down a service is generally supported on all service types, provided the storage requirements of the lower plan will fit the space currently used within your service.
From one plan category to another, scaling down is generally supported for non-distributed services like `pg` or `mysql`, as it will remove one replica from the replica set. For example, scaling down from premium-32 to business-32 will remove one replica only.
---
# OpenSearch – Exoscale Documentation
[Product](https://community.exoscale.com/product/)
[DBaaS](https://community.exoscale.com/product/dbaas/)
[Service-Specific](https://community.exoscale.com/product/dbaas/service-specific/)
OpenSearch
OpenSearch
==========
[Quick Start\
\
Comprehensive guide for getting started quickly.](https://community.exoscale.com/product/dbaas/service-specific/opensearch/quick-start/)
[Overview\
\
Product descriptions, architectures and details.](https://community.exoscale.com/product/dbaas/service-specific/opensearch/overview/)
[Operation\
\
Life cycle management, maintenance and upgrades.](https://community.exoscale.com/product/dbaas/service-specific/opensearch/operation/)
[How-To\
\
Step-by-step guide to accomplish specific tasks.](https://community.exoscale.com/product/dbaas/service-specific/opensearch/how-to/)
[Reference\
\
Overview of internal and external references.](https://community.exoscale.com/product/dbaas/service-specific/opensearch/reference/)
---
# Roles and Policies – Exoscale Documentation
[Product](https://community.exoscale.com/product/)
[IAM](https://community.exoscale.com/product/iam/)
[Operation](https://community.exoscale.com/product/iam/operation/)
Roles and Policies
Roles and Policies
==================
Exoscale provides multiple interaction methods with its platform, including programmatic access through the command line, various programming languages, and integrations with third-party tools, as well as a simple user interface via the web portal; in all instances, users will encounter Identity and Access Management (IAM), which determines permissions and roles for both individuals and services.
IAM is composed by 2 main building blocks:
* **Roles**
which act as a container for a single Policy and add some options on top of it.
* **Policies**
which are a set of rules describing what can and what cannot be done.
Authorization Flow[](https://community.exoscale.com/product/iam/operation/roles-policies/#authorization-flow)
--------------------------------------------------------------------------------------------------------------
IAM decouples authorization from authentication. Therefore, we can split authorization through several levels or “gateways” for a single request.
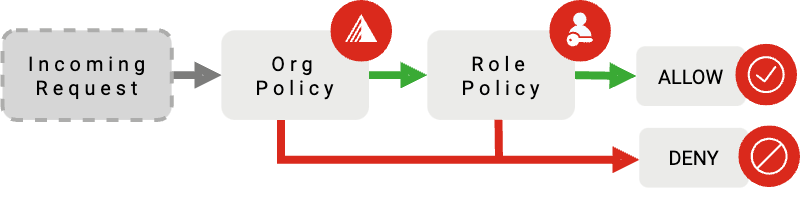
Authorization Layers
* **Organization Policy**
the ORG Policy applies to any User or API Key within an organization.
* **Role Policy**
the ROLE Policy is assigned to one or more API Keys or Users.
A request must be authorized at both levels to be processed by the platform. The Organization Policy defaults to an empty set of rules, allowing all operations to be performed.
> **WARNING**
> Beware to not lock yourself out. A wrong Organization Policy might end up denying you access to the entire platform. At any time, an Owner of an Organization can reset the Organization Policy via the web portal.
Roles[](https://community.exoscale.com/product/iam/operation/roles-policies/#roles)
------------------------------------------------------------------------------------
A Role is a way to store a Policy:
{
"name": "my-new-role",
"policy": {
"default-service-strategy": "deny",
"services": {
"iam": {
"type": "allow"
}
}
}
}
In the example above, the role called `"my-new-role"` contains a Policy stating that all operations are denied except for IAM services, which are explicitly allowed.
A Role can have one and only one Policy. Roles can then be assigned to one or more API Keys or Users, applying the permissions stated in its Policy.
Policies[](https://community.exoscale.com/product/iam/operation/roles-policies/#policies)
------------------------------------------------------------------------------------------
A Policy is composed of
* The **Services** map - a separation of the authorization logic according to which service class the request belongs to.
* The **Default Service Strategy** - a default top-level `allow` or `deny` decision that applies when there is no entry in the services map for the service of the incoming API operation. For example: `list-zones` is an operation that belongs to the `compute` service - if `compute` is not present in the services map, the default service strategy will be applied.
{
"default-service-strategy": "allow",
"services": {
"compute": {...},
"dbaas": {...}
}
}
Requests are evaluated in the context of the service class they belong to - Compute, SOS, DBaaS, etc - a Policy can define one of the following authorization bodies for each service:
* **Nothing**
in the absence of a specification, use the default service strategy
* **Allow**
overrides the default service strategy - allow all requests.
* **Deny**
overrides the default service strategy - deny all requests.
* **Rule-based**
a more fine-grained approach to authorization
> **NOTE**
> Policy updates may **not** take effect immediately due to some background synchronization. Generally, you should design your usage patterns with re-use of Roles in mind, and if you require frequent rotation, favor rotating API Keys rather than Roles.
---
# Backups and Restore – Exoscale Documentation
[Product](https://community.exoscale.com/product/)
[DBaaS](https://community.exoscale.com/product/dbaas/)
[How-To](https://community.exoscale.com/product/dbaas/how-to/)
Backups and Restore
Backups and Restore
===================
Exoscale DBaaS are automatically backed up, encrypted and stored securely in Object Storage.
The frequency and retention of backups is defined in the plan. Refer to the [plan tables](https://www.exoscale.com/dbaas/)
to review the specifications of each plan. You can also check the specific plan backup strategy with the command:
exo dbaas type show pg --backup-config startup-8
Output:
┼────────────────────────────┼──────┼
│ Backup interval (hours) │ 24 │
│ Max backups │ 3 │
│ Recovery mode │ pitr │
│ Frequent backup interval │ n/a │
│ Frequent backup max age │ n/a │
│ Infrequent backup interval │ n/a │
│ Infrequent backup max age │ n/a │
┼────────────────────────────┼──────┼
Some services like `pg` include PITR (point in time recovery) which enables you to restore data at any time between 2 backup intervals.
Exoscale DBaaS does not allow you to restore data over an existing running service. Instead, you can create a new service from an existing service specifying the time of recovery you need in order to restore data. This operation is called a **fork**.
### Forks[](https://community.exoscale.com/product/dbaas/how-to/backups-restore/#forks)
Here is an example for `pg` that demonstrates how to create a fork of a service from a previous backup, and how to perform a point-in-time recovery.
* Identify the available backups and periods of time available for a fork:
exo dbaas show test-pg -z de-fra-1 --backups
Output:
┼─────────────────────────────────────┼───────────────────────────────┼──────────┼
│ NAME │ DATE │ SIZE │
┼─────────────────────────────────────┼───────────────────────────────┼──────────┼
│ 2021-10-30_20-28_0.00000000.pghoard │ 2021-10-30 20:28:01 +0000 UTC │ 36341760 │
│ 2021-10-31_20-28_0.00000000.pghoard │ 2021-10-31 20:28:04 +0000 UTC │ 36382720 │
┼─────────────────────────────────────┼───────────────────────────────┼──────────┼
* Create a fork with a point-in-time recovery:
exo dbaas create pg startup-4 fork-test-pg --pg-recovery-backup-time 2021-10-30 23:35 --pg-fork-ftest-pg -z de-fra-1
The rest of the create options behave like the normal create command. You can specify options and service-specific options at launch time. Refer to the service specific documentation for additional details.
> **NOTE**
> If you need to fork a service specifying another plan size than the original, note that the storage should be sufficient if you launch the new service with a smaller plan than the original service or fork.
### Backup Schedule[](https://community.exoscale.com/product/dbaas/how-to/backups-restore/#backup-schedule)
In the example above, we can see that the service is backed up each day at 20:28.
This slot can be adjusted for most services, but the process is service specific. Refer to the service specific documentation to change the backup schedule of a service.
Upgrades[](https://community.exoscale.com/product/dbaas/how-to/backups-restore/#upgrades)
------------------------------------------------------------------------------------------
Running upgrades will follow the same process as restoring a service from a fork, except that we will only create the service specifying the fork but not the recovery backup time. The service will be created using the latest major and minor supported release of a service type.
Termination Protection[](https://community.exoscale.com/product/dbaas/how-to/backups-restore/#termination-protection)
----------------------------------------------------------------------------------------------------------------------
Termination protection will ensure your service is not deleted accidentally by running the `delete` command or any other destructive operation.
exo dbaas update test-pg -z de-fra-1 --termination-protection=true
Output:
Updating Database Service "test-pg"...
┼───────────────────────┼────────────────────────────────────────────────────────────────────────────────────────────────────────────────────────────────┼
│ DATABASE SERVICE │ │
┼───────────────────────┼────────────────────────────────────────────────────────────────────────────────────────────────────────────────────────────────┼
│ Zone │ de-fra-1 │
│ Name │ test-pg │
│ Type │ pg │
│ Plan │ hobbyist-1 │
│ Disk Size │ 8.0 GiB │
│ State │ running │
│ Creation Date │ 2021-07-05 08:38:39 +0000 UTC │
│ Update Date │ 2021-10-21 08:30:54 +0000 UTC │
│ Nodes │ 1 │
│ Node CPUs │ 2 │
│ Node Memory │ 2.0 GiB │
│ Termination Protected │ true │
│ Maintenance │ sunday (10:40:38) │
│ Backup Schedule │ 12:52 │
│ URI │ postgres://avnadmin:xxxxx@test-pg-exoscale-08b0165e-ef03-47ec-926f-f01163d557ed.aivencloud.com:21699/defaultdb?sslmode=require │
│ IP Filter │ 0.0.0.0/0 │
│ Components │ │
│ │ pg test-pg-exoscale-08b0165e-ef03-47ec-926f-f01163d557ed.aivencloud.com:21699 route:dynamic usage:primary │
│ │ pgbouncer test-pg-exoscale-08b0165e-ef03-47ec-926f-f01163d557ed.aivencloud.com:21700 route:dynamic usage:primary │
│ │ │
│ Users │ avnadmin (primary) │
┼───────────────────────┼────────────────────────────────────────────────────────────────────────────────────────────────────────────────────────────────┼
It is therefore not possible to delete the service. If you decide to delete the service once termination protection is enabled:
exo dbaas -z de-fra-1 delete test-pg
Output:
[+] Are you sure you want to delete Database Service "test-pg"? [yN]: y
✔ Deleting Database Service "test-pg"... 0s
error: Delete "https://api-de-fra-1.exoscale.com/v2/dbaas-service/test-pg": invalid request: The service is protected against termination and shutdown. Remove termination protectio
n first.
Revert the flag and then delete the DB instance.
---
# Operation – Exoscale Documentation
[Product](https://community.exoscale.com/product/)
[Storage](https://community.exoscale.com/product/storage/)
[Block Storage](https://community.exoscale.com/product/storage/block-storage/)
Operation
Operation
=========
[Snapshot\
\
Creating snapshots from volumes and using snapshots to creat volumes.](https://community.exoscale.com/product/storage/block-storage/operation/snapshot)
---
# Operation – Exoscale Documentation
[Product](https://community.exoscale.com/product/)
[Networking](https://community.exoscale.com/product/networking/)
[Security Group](https://community.exoscale.com/product/networking/security-group/)
Operation
Operation
=========
[Organizing Security Groups\
\
Structure your rules for better visibility](https://community.exoscale.com/product/networking/security-group/operation/organizing-security-groups)
---
# Operation – Exoscale Documentation
[Product](https://community.exoscale.com/product/)
[Networking](https://community.exoscale.com/product/networking/)
[DNS](https://community.exoscale.com/product/networking/dns/)
Operation
Operation
=========
[DNS Configuration\
\
Manage your DNS zones using the Exoscale portal.](https://community.exoscale.com/product/networking/dns/operation/config-dns)
---
# Operation – Exoscale Documentation
[Product](https://community.exoscale.com/product/)
[Storage](https://community.exoscale.com/product/storage/)
[Object Storage](https://community.exoscale.com/product/storage/object-storage/)
Operation
Operation
=========
[Access Control List (ACL)\
\
ACLs let you manage access to buckets and objects.](https://community.exoscale.com/product/storage/object-storage/operation/acl)
---
# Operation – Exoscale Documentation
[Product](https://community.exoscale.com/product/)
[Networking](https://community.exoscale.com/product/networking/)
[IP](https://community.exoscale.com/product/networking/ip/)
Operation
Operation
=========
[IPv6 Security Group\
\
To authorize IPv6 ingress and egress traffic, you need to add specific rules.](https://community.exoscale.com/product/networking/ip/operation/ipv6-security-group)
---
# Users and Keys – Exoscale Documentation
[Product](https://community.exoscale.com/product/)
[IAM](https://community.exoscale.com/product/iam/)
[Operation](https://community.exoscale.com/product/iam/operation/)
Users and Keys
Users and Keys
==============
Identity and Access Management (IAM) regulates which actions can be performed and by whom, whether it’s a person accessing the web portal or an API key used by a client like the CLI or Terraform. Once a Role and a Policy are established, you can either create an API key or invite a new user to your Organization.
Users management[](https://community.exoscale.com/product/iam/operation/users-keys/#users-management)
------------------------------------------------------------------------------------------------------
Users of an Organization are people that have access to the UI and can control or verify your cloud infrastructure and platform from the web portal.
[See here for differences between Users and Organizations](https://community.exoscale.com/platform/organization/)
.
### Owner Role[](https://community.exoscale.com/product/iam/operation/users-keys/#owner-role)
When creating a new Organization, would that be during registration or at a later point in time, the new Organization will be provisioned with a special default “Owner” IAM Role.
This Role cannot be modified or deleted, and is available to all Organizations. It contains an empty policy, meaning it allows all kind of operations on the platform.
The user that creates a new Organization becomes automatically its Owner: that is, it will be associated to the Owner Role.
Owner roles can also perform special actions, that might be shared with other special default roles, as e.g managing payments and billing.
An Organization can have more than one Owner, but always at least one Owner must be present. You can hence use the Owner role when you invite other people to your Organization, giving them the same privileges you have.
### Billing Role[](https://community.exoscale.com/product/iam/operation/users-keys/#billing-role)
On top of the default “Owner” Role, any new Organization also gets a special “Billing”.
As for the “Owner” Role, the “Billing” role cannot be modified or deleted. With its “deny-all” policy, it’s only allowed to manage administrative and billing information. “Billing” role cannot manage any resources deployed on Exoscale, or perform organizational management.
### Inviting new Users[](https://community.exoscale.com/product/iam/operation/users-keys/#inviting-new-users)
If you want other people to have access to your Organization via the web portal, you can invite them to join it.
If the person you have invited, identified by their email, has already an Exoscale account, they will be simply added to your Organization. Otherwise they will receive an email with instructions on how to create an account on Exoscale, and once the process completed, they will have access to your Organization. No payment is required during this process, and there is no added cost for adding a user.
Generally, all users are subject to the IAM authorization flow. You need to define a proper IAM Role and its related IAM Policy in order to invite a new user in a role that is not Owner.
When inviting users, you will be able to select the target IAM Role for them, including the two default roles “Owner” and “Billing”.
It is of course possible to declare a more complex Policy, restricting e.g. IAM management, allowing some users to operate on only specific parts of the UI, or have only read access, and so on. Please refer to the [IAM Policy Guide](https://community.exoscale.com/product/iam/how-to/policy-guide/#user-management-and-portal-access)
for more information.
> **NOTE**
> If you are familiar with user management at Exoscale prior of IAM, you can refer to that guide in order to see how a generic `Tech` role could be translated.
You can control the status of an invitation at any time, and while the invitation is pending, you can change the Role if you have changed your mind.
Owners, and users with IAM rights, can edit a Policy if the Role has been created as `editable` at any time.
As an Owner, it is possible to change the Role of a user, and to remove the user from your Organization at any time.
> **NOTE**
> Given the power and granularity of IAM Roles, the web portal does not adapt to what is allowed or not. A Role with a restricted Policy will still be shown a complete navigation menu, but will potentially receive a number of API errors denying requests for resources that have been denied in the Policy.
Actions performed by Users will be clearly identifiable in Audit Trail by the user UUID.
API Keys[](https://community.exoscale.com/product/iam/operation/users-keys/#api-keys)
--------------------------------------------------------------------------------------
As for users, API Keys can be created associating them a Role with its related Policy.
While the basic principles are the same as for Users, an API Key is intended to be used programmatically, does not give access to the web portal, and cannot be directly associated to a user.
When creating a new API Key, you can define the associated Role.
Contrary to Users, it is not possible to modify the IAM Role of a key. The key’s secret is shown only once at creation time, and cannot be recovered afterwards.
Actions performed by an API Key will be clearly identifiable in Audit Trail by the key itself.
---
# Overview – Exoscale Documentation
[Product](https://community.exoscale.com/product/)
[Networking](https://community.exoscale.com/product/networking/)
[Private Network](https://community.exoscale.com/product/networking/private-network/)
Overview
Overview
========
Each instance may provision one or more additional unmanaged and managed network interfaces. This interface is bound to a private network segment shared only with your other instances.
Terminology[](https://community.exoscale.com/product/networking/private-network/overview/#terminology)
-------------------------------------------------------------------------------------------------------
* **Managed Private Network**
Managed Private Networks allow you to create Private Networks with a DHCP server managed by Exoscale.\\
* **Manual Private Network**
A Manual Private Networks allow you to create your Private Network with a static IP configuration on each instance.
Features[](https://community.exoscale.com/product/networking/private-network/overview/#features)
-------------------------------------------------------------------------------------------------
The Private Network is a classic layer 2 segment: it is as if your instances were attached to a dedicated switch. This means:
* You can use any ethernet-compatible protocol (IPv4, IPv6, NetBIOS).
* Security group rules do not apply to traffic inside private networks.
* Multicast and broadcast are authorized.
* Only your instances are attached to the segment.
* No encryption is performed, but your packets do not leave our datacenter.
* Private Networks can be managed.
* Private Networks do not span across several zones.
However, there is a small difference: unknown MAC addresses cannot be used. Do not create a bridge including the private interface.
By default, there is no DHCP listening on your Private Network. If you want a DHCP server attached to your Private Network, you should create a [managed Private Network](https://community.exoscale.com/product/networking/private-network/how-to/managed-private-network/)
. Managed Private Networks allow you to create Private Networks with a DHCP server managed by Exoscale in order to automatically configure the IP addresses of your Private Network interfaces. You can also assign specific IP addresses to Private Network interfaces.
> **NOTE**
> In order to use managed Private Networks, install `Cloud Init` version `19.3` or later on your instance to use the `Exoscale` datasource. You can learn more about Cloud Init on the [Cloud Init documentation page](https://community.exoscale.com/product/compute/instances/how-to/cloud-init-user-data/)
> .
Availability[](https://community.exoscale.com/product/networking/private-network/overview/#availability)
---------------------------------------------------------------------------------------------------------
| Zone | Country | City | Availability |
| --- | --- | --- | --- |
| **`at-vie-1`** | Austria | Vienna | |
| **`at-vie-2`** | Austria | Vienna | |
| **`ch-gva-2`** | Switzerland | Geneva | |
| **`ch-dk-2`** | Switzerland | Zurich | |
| **`de-fra-1`** | Germany | Frankfurt | |
| **`de-muc-1`** | Germany | Munich | |
| **`bg-sof-1`** | Bulgaria | Sofia | |
| **`hr-zag-1`** | Croatia | Zagreb | |
Limitations[](https://community.exoscale.com/product/networking/private-network/overview/#limitations)
-------------------------------------------------------------------------------------------------------
* Private Networks are local to a zone.
* Private Networks are unlimited per organization.
* A maximum of 8 Private Networks can be attached to each single instance.
* Jumbo Frames are not supported - the largest supported MTU size is 1500.
---
# Overview – Exoscale Documentation
[Product](https://community.exoscale.com/product/)
[Storage](https://community.exoscale.com/product/storage/)
[Block Storage](https://community.exoscale.com/product/storage/block-storage/)
Overview
Overview
========
Block Storage is a redundant and distributed block device implementation for Exoscale Compute instances which provides rapid data access and retrieval to support your most demanding workloads with exceptional performance for latency-sensitive applications. Effortlessly meeting growing storage demands, and easily store containerized applications.
* **High Data Durability**
Multiple data copies are maintained at all times on separate servers. Snapshots are retained indefinitely.
* **Ultra-Low Latency for High-Performance Workloads**
Experience outstanding performance fueled by the latest generation NVMe SSDs—ideal for latency-sensitive applications such as databases.
* **Flexible Storage Capabilities**
Add volumes to your instances anytime, enabling you to scale capacity as your needs evolve seamlessly.
Terminology[](https://community.exoscale.com/product/storage/block-storage/overview/#terminology)
--------------------------------------------------------------------------------------------------
* **Volume**
A single storage device that is partitioned and formatted to store directories and files.
* **Snapshot**
A storage snapshot is the state of a volume at a particular point in time. It provides the ability to create new volumes with the state of the current volume at that specific point in time.
Features[](https://community.exoscale.com/product/storage/block-storage/overview/#features)
--------------------------------------------------------------------------------------------
Block Storage volumes feature a fixed 4KiB block size and replicate data at least twice within the same Zone for durability. They support snapshots—enabling the creation of new volumes (“forking”)—though exporting or downloading snapshots is impossible. Access is _ReadWriteOnce_, allowing only a single instance to attach a volume at any given time; however, volumes can be detached from one instance and reattached to another within the same Zone.
* **IOPS**
Enjoy 5,000 IOPS per volume for read and write operations—no sharing involved.
* **Built-In Feature**
Use Block Storage alongside Compute Instances or Managed Kubernetes.
* **Easy Snapshots**
Take a snapshot of any volume via an API call. Create new volumes from snapshots whenever needed.
* **Five Volumes Per Instance**
You can attach up to five Block Storage volumes to each instance, with a maximum capacity of 10 TiB per volume.
* **Easy Scaling**
Create a Block Storage volume in seconds using the Exoscale Portal, CLI, API, or Terraform provider. Detach and reattach volumes to move them between Instances.
* **Exoscale CSI Driver**
Interact seamlessly with Block Storage from Kubernetes using our Exoscale CSI Driver. (Read more)
* **Two-Times Replication**
Data is replicated twice across multiple nodes, ensuring availability even if a disk fails.
* **Secure Data Storage in Europe**
As a fully European cloud provider, all data remains in your chosen zone and is fully GDPR-compliant.
With its unique features, Block Storage suits mission-critical, I/O-intensive applications. Use it for relational and transactional databases, time series, container volumes, or hypervisor file systems. Because volumes are directly connected to an instance, their I/O speeds are often significantly faster than alternative storage solutions like Object Storage.
* **Flexibility for Containerized Applications**
As containers are flexible, scalable, and efficient, so is our Block Storage. Containers benefit from Block Storage’s speed and the native ability to mount multiple volumes on a single host. Migrate seamlessly between servers, locations, and operating systems.
* **Discover the Best Cost-to-Performance Ratio**
Our Block Storage offers a fair and transparent cost-to-performance ratio. With a simple pricing structure, you’ll have predictable monthly expenses—no cumbersome IOPS provisioning or pay-per-use variability.
* **Persistent Volumes**
Create persistent volumes for critical information, databases, or other essential data to retain it over extended periods. These volumes can be accessed across multiple instances or sessions.
Availability[](https://community.exoscale.com/product/storage/block-storage/overview/#availability)
----------------------------------------------------------------------------------------------------
| Zone | Country | City | Availability |
| --- | --- | --- | --- |
| **`at-vie-1`** | Austria | Vienna | |
| **`at-vie-2`** | Austria | Vienna | |
| **`ch-gva-2`** | Switzerland | Geneva | |
| **`ch-dk-2`** | Switzerland | Zurich | |
| **`de-fra-1`** | Germany | Frankfurt | |
| **`de-muc-1`** | Germany | Munich | |
| **`bg-sof-1`** | Bulgaria | Sofia | |
| **`hr-zag-1`** | Croatia | Zagreb | |
Limitations[](https://community.exoscale.com/product/storage/block-storage/overview/#limitations)
--------------------------------------------------------------------------------------------------
The following table shows which limits are enforced on Block Storage usage. It also highlights some of the characteristics of the product:
| Usage | Limit |
| --- | --- |
| Maximum number of volumes attached to an instance | 5 |
| Maximum number of snapshot per volume | 20 |
| Maximum volume size | 10 TiB |
| Minimum volume size | 1 GiB |
| Maximum read IOPS per volume | 5K |
| Maximum write IOPS per volume | 5K |
| Maximum bandwidth per volume | 200 MiB/s |
| Minimum instance size to attach a volume | Small |
| Supported service offerings | All |
| Block storage durability on snapshot guarantee | Full durability of data only when the volume is snapshotted |
In addition the default Organization Quotas are set and can be expanded upon request:
| Usage | Quota |
| --- | --- |
| Volumes per Organization | 1000 |
| Overall Provisioned Volume Size | 20 TiB |
As block storage volumes expose a block size of 4KiB, some software that incorrectly assume a smaller block size might not work. This issue can be circumvented by using a compatibility layer in your instance like [dm-ebs](https://docs.kernel.org/admin-guide/device-mapper/dm-ebs.html)
on linux.
---
# Overview – Exoscale Documentation
[Product](https://community.exoscale.com/product/)
[Networking](https://community.exoscale.com/product/networking/)
[Security Group](https://community.exoscale.com/product/networking/security-group/)
Overview
Overview
========
Exoscale **Security Groups** provide a modular way to define and compose firewall rules. The rules are managed at the hypervisor level in order to restrict incoming and outgoing network traffic. Security Groups give you the power of VLANs while keeping a single public IP.
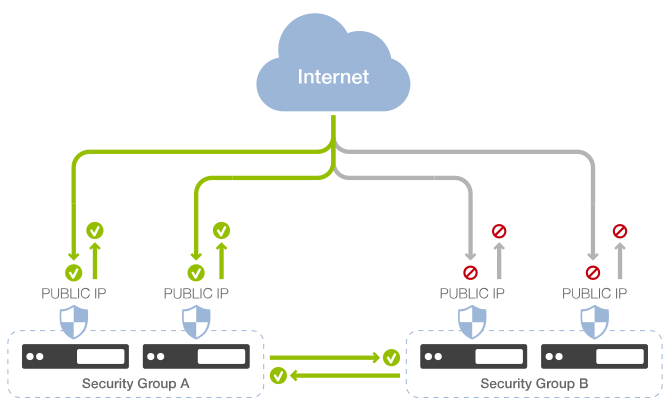
An example of what you may easily achieve with Security Groups
Terminology[](https://community.exoscale.com/product/networking/security-group/overview/#terminology)
------------------------------------------------------------------------------------------------------
* **Security Groups**
A modular set of firewall rules managed at the hypervisor level to control incoming and outgoing network traffic.
* **Firewall Rules**
Rules defined within security groups that take precedence over default network traffic rules.
* **Member Instances**
Instances that are part of a security group, allowing the group to be used as traffic sources or destinations in rules.
* **Layer 2 Filtering**
Network layer filtering providing protection against spoofing and man-in-the-middle attacks. Ensures Ethernet isolation and prevents unauthorized ARP, DHCP, and traffic visibility.
* **Layer 3 and Layer 4 Filtering**
Network layer filtering that allows ingress and egress IP traffic to be managed by protocol, destination, and port settings.
* **Egress & Ingress Filtering**
Egress filtering relates to outgoing traffic that is fully allowed until a rule is applied, while ingress filtering by default denies all incoming traffic until rules are specified.
* **Broadcast, Unknown-unicast and Multicast (BUM) Traffic**
A type of network traffic that is generally dropped by egress rules to prevent traffic leakage and security breaches.
Features[](https://community.exoscale.com/product/networking/security-group/overview/#features)
------------------------------------------------------------------------------------------------
Security Groups encapsulate two primary types of information:
* **Traffic Rules**
A comprehensive list of rules dedicated to managing and directing network traffic efficiently.
* **Member Instances**
This list includes member instances within the security group, enabling the utilization of groups as traffic sources or destinations in governing rules.
When you create an instance, you can attribute one or more security groups to it. Firewall rules defined in your security groups take precedence over the default rules, which are:
* All **outgoing traffic** is **allowed**
* All **incoming traffic** is **forbidden**
> **NOTE**
> By default, once you define an outbound rule, outbound traffic is restricted to only what is allowed by those specified rules. For further details, consult the guide on [restricting outbound traffic](https://community.exoscale.com/product/networking/security-group/how-to/restrict-outbound-traffic/)
> .
A new instance with the `default` unmodified security group will be completely inaccessible from outside If you wish to ping your instance or access it via SSH, you will have to define incoming rules for the instance.
By default, an unmodified security group without any rule specified allows any kind of outbound traffic However, as soon as you **define an outbound rule**, outbound traffic is only allowed for the defined outbound rules. Any outgoing traffic not allowed by a rule will be then blocked. See [managing outbound security rules](https://community.exoscale.com/product/networking/security-group/overview/#outbound-security-rules)
for more information.
Access to outbound SMTP is restricted by default to prevent common spam abuse. SMTP access can be requested within the security groups section in the Portal.
Usually, you attribute one or more security groups during the instance creation process. Note that an instance must belong to at **least one** security group.
During the creation process, you will find your primary group already selected. You can change your primary group from the security groups list.
If you need to change an instance’s groups, you can use the instance detail. You can add and remove groups as needed, so long as the instance is stopped.
### Layer-2 Filtering[](https://community.exoscale.com/product/networking/security-group/overview/#layer-2-filtering)
Security groups provide Layer 2 filtering to keep your instance safe from different types of spoofing and man-in-the-middle attacks. This filtering is managed automatically for you.
For example, the following traffic will be dropped:
* ARP is allowed only when the source MAC matches the instance’s assigned MAC address, so it is not possible to spoof an instance MAC address.
* An instance cannot send ARP responses for an IP address it does not own.
* An instance cannot spoof a DHCP server response.
* If you run Wireshark/tcpdump within your instance, you will not see your neighbor’s traffic, even though your NIC is set to promiscuous mode.
With security groups on Exoscale, Layer 2 Ethernet isolation is enforced. This is commonly achieved using VLANs on a standard architecture.
### Layer-3 and Layer-4 Filtering[](https://community.exoscale.com/product/networking/security-group/overview/#layer-3-and-layer-4-filtering)
Security groups provide Layer 3 filtering, which can be managed through the Portal or API:
* Ingress and egress IP traffic can filtered by Protocol / destination / destination port.
* By default, all ingress is denied and egress is fully allowed until you create a first rule. As soon as you create an egress rule, only the matching traffic will be allowed.
* Egress filtering is preventing any broadcast / multicast traffic to leave your instance.
Layer 3 and 4 filtering typically take an IP address or security group for source parameters:
* The IP address should be in the form of a single IP or network. For example, 8.8.8.8/32 or 0.0.0.0/0 are valid entries.
* The security group can be a self declaration for allowing traffic from instances belonging to the same group or another security group.
### BUM Traffic[](https://community.exoscale.com/product/networking/security-group/overview/#bum-traffic)
[BUM](https://en.wikipedia.org/wiki/Broadcast,_unknown-unicast_and_multicast_traffic)
is dropped by egress rule. This is an expected behavior, as we don’t want anyone to receive this type of traffic, which could also leak sensitive information. Therefore, any application relying on Broadcast, Unknown unicast and Multicast traffic type will not work.
Availability[](https://community.exoscale.com/product/networking/security-group/overview/#availability)
--------------------------------------------------------------------------------------------------------
| Zone | Country | City | Availability |
| --- | --- | --- | --- |
| **`at-vie-1`** | Austria | Vienna | |
| **`at-vie-2`** | Austria | Vienna | |
| **`ch-gva-2`** | Switzerland | Geneva | |
| **`ch-dk-2`** | Switzerland | Zurich | |
| **`de-fra-1`** | Germany | Frankfurt | |
| **`de-muc-1`** | Germany | Munich | |
| **`bg-sof-1`** | Bulgaria | Sofia | |
| **`hr-zag-1`** | Croatia | Zagreb | |
Limitations[](https://community.exoscale.com/product/networking/security-group/overview/#limitations)
------------------------------------------------------------------------------------------------------
Exoscale Security Groups have a limitation of 60 rules per group. Contact support if this is an issue.
---
# Overview – Exoscale Documentation
[Product](https://community.exoscale.com/product/)
[Networking](https://community.exoscale.com/product/networking/)
[Private Connect](https://community.exoscale.com/product/networking/private-connect/)
Overview
Overview
========
Private Connect lets you connect your on-premises or hosted infrastructure with one or more private networks from a single Exoscale organization. This guide will show you how to set up Private Connect.
Terminology[](https://community.exoscale.com/product/networking/private-connect/overview/#terminology)
-------------------------------------------------------------------------------------------------------
* **MAC** (Media Access Control)
A unique hardware address assigned to a network interface for communication on a local network
* **WAN** (Wide Area Network)
A network that spans a large geographic area, connecting multiple LANs
* **MAN** (Metropolitan Area Network)
A network that covers a city or campus, larger than a LAN but smaller than a WAN
* **HSRP** (Hot Standby Router Protocol)
A Cisco protocol that provides gateway redundancy by designating active and standby routers
* **VRRP** (Virtual Router Redundancy Protocol)
An open standard for assigning a virtual IP to multiple routers for gateway failover
* **LCAP** (Local Cloud Access Point)
A physical interconnect location enabling private, low-latency cloud access
Features[](https://community.exoscale.com/product/networking/private-connect/overview/#features)
-------------------------------------------------------------------------------------------------
Your situation to start with Private Connect can differ depending on where you store your infrastructure. If your infrastructure is collocated in the **same datacenter or datacenter campus** as the Exoscale zone:
* The connection to Private Connect can be established via cross connections between Exoscale and your racks/cage within the datacenter. You are responsible for the cross connections setup and costs. Exoscale will provide a location, circuit-ID and letter of agreement (LOA) upon subscribing to Private Connect which let you order the cross connections to the datacenter operator.
* The connection in Equinix-based zones can be established using Equinix Cloud Exchange to reduce cross-connection costs and Private Connect costs. After you subscribe to Private Connect, Exoscale will provide the ECX information for interconnection.
If your infrastructure is located **in a separate datacenter** from the Exoscale zone a WAN or MAN connection is required.
Availability[](https://community.exoscale.com/product/networking/private-connect/overview/#availability)
---------------------------------------------------------------------------------------------------------
| Zone | Country | City | Availability |
| --- | --- | --- | --- |
| **`at-vie-1`** | Austria | Vienna | |
| **`at-vie-2`** | Austria | Vienna | |
| **`ch-gva-2`** | Switzerland | Geneva | |
| **`ch-dk-2`** | Switzerland | Zurich | |
| **`de-fra-1`** | Germany | Frankfurt | |
| **`de-muc-1`** | Germany | Munich | |
| **`bg-sof-1`** | Bulgaria | Sofia | |
| **`hr-zag-1`** | Croatia | Zagreb | |
Limitations[](https://community.exoscale.com/product/networking/private-connect/overview/#limitations)
-------------------------------------------------------------------------------------------------------
The limitations for Private Connect are:
* 3 MAC Addresses maximum per link
* Routing element on your side
* Optical connections only
---
# Encryption – Exoscale Documentation
[Product](https://community.exoscale.com/product/)
[Storage](https://community.exoscale.com/product/storage/)
[Object Storage](https://community.exoscale.com/product/storage/object-storage/)
[How-To](https://community.exoscale.com/product/storage/object-storage/how-to/)
Encryption
Encryption
==========
Encryption with SOS is realized at various levels:
* Data in transit
* Data at rest
### Encryption in transit[](https://community.exoscale.com/product/storage/object-storage/how-to/encryption/#encryption-in-transit)
By default all data and metadata sent to or retrieved from buckets using SOS endpoints over HTTPs is encrypted in transit using TLS.
### Encryption at rest[](https://community.exoscale.com/product/storage/object-storage/how-to/encryption/#encryption-at-rest)
To protect data at rest, multiple options are available when using SOS:
* Client side encryption: data is encrypted before being sent to SOS by the client library, tool or code. With this mode, the encryption process, encryption key and libraries are fully managed by you.
* Server side encryption: data is transparently encrypted by SOS upon reception and transparently deciphered at egress, without any extra costs.
Exoscale supports two types of server-side encryption at rest:
* Server-side encryption with Exoscale managed keys `SSE-SOS` (recommended): [Reference: Encryption with SSE-SOS](https://community.exoscale.com/product/storage/object-storage/how-to/encryption/sse-sos/)
* Server-side encryption with Customer provided keys `SSE-C`: [Reference: Encryption with SSE-C](https://community.exoscale.com/product/storage/object-storage/how-to/encryption/sse-c/)
Once encryption at rest is configured on a bucket, all new objects uploaded to this bucket will automatically be transparently encrypted at rest when `SSE-SOS` is used. When `SSE-SOS` is enabled, it cannot be disabled, it acks as a default for new uploads, still allowing `SSE-C` to be used on the bucket.
> **NOTE** SSE-KMS, while similar to SSE-SOS, is currently not supported on Exoscale. A KMS implementation is planned for future release and this page will be updated accordingly when available.
---
# Overview – Exoscale Documentation
[Product](https://community.exoscale.com/product/)
[Storage](https://community.exoscale.com/product/storage/)
[Object Storage](https://community.exoscale.com/product/storage/object-storage/)
Overview
Overview
========
Exoscale’s Simple Object Storage (SOS) is a highly durable, S3-compatible service that offers seamless data accessibility across various locations over the HTTP(s) protocol, supporting a diverse range of tools, libraries, and programming languages.
Terminlogy[](https://community.exoscale.com/product/storage/object-storage/overview/#terminlogy)
-------------------------------------------------------------------------------------------------
In the realm of object storage, particularly when discussing S3-compatible storage, there are several key terms to understand:
* **Bucket**
A container for storing objects. Each bucket can store unlimited objects.
* **Object**
The fundamental entities stored . Objects consist of data, metadata, and a unique identifier within a bucket.
* **Key**
The unique identifier for an object within a bucket. It’s essentially the object’s name, and each object in a bucket can be uniquel addressed using the combination of the bucket name and the key.
* **Metadata**
A set of name-value pairs that describe or configure the object. It can include standard HTTP headers like Content-Type an Content-Length and custom metadata defined by the user.
* **Access Control**
Mechanisms to manage permissions for buckets and objects. This includes policies at both the bucket and object level, which defin who can access the data and what they can do with it.
* **Storage Class**
Different classes define how the data is stored and charged, each offering different levels of availability, durability, and cost.
Features[](https://community.exoscale.com/product/storage/object-storage/overview/#features)
---------------------------------------------------------------------------------------------
The Simple Object Storage service, compatible with S3, offers high data durability, is accessible in multiple locations, and is supported across a variety of tools, libraries, and languages.
* **Use your own S3 compatible tool**
Easily integrate our S3 compatible Object Storage into any existing app or workflow, using your existing clients and libraries with no lock-in.
* **A Cloud native Object Storage solution**
Object Storage is important when designing architecture for cloud applications for scale. Get better scalability, reliability, and speed than just storing files on the filesystem.
* **For any kind of data, pay only what you use**
Use Object Storage for static assets, user uploads or backups. We offer a performant solution with a fair pay-per-use pricing and no hidden costs.
Object Storage features for Cloud Native implementations are:
* **S3 compatible API**
Easily integrate our Object Storage solution in your applications using S3 compatible libraries. You can also connect with a GUI or CLI tool. Simply set a new endpoint and credentials.
* **H/A Object Storage replication**
We replicate data stored in our Object Storage on three different high-available nodes, in order to keep your important data safe. Our Object Storage SLA is covered by our 99.95% availability SLA.
* **Bucket Replication**
Automatically replicate objects to one or multiple buckets across zones for disaster recovery, backup, or multi-region synchronization.
* **Direct HTTP/s access**
Serve files directly from low latency, high bandwidth object storage via HTTP or HTTPS. Keep your own servers free to do more important things.
* **ACL and CORS support**
Set per bucket policies to manage permissions and control access. Or configure cross origin headers to use object storage from browser based applications and websites.
* **Metadata support**
Store additional information about your objects in key-value pairs and easily access this metadata through HTTP headers in every Object Storage response.
* **Keep your data in your country**
All data and replicas of our Object Storage service are stored in the country of your chosen zone. Object Storage is also available in every zone across Europe.
* **Supported Backup Solutions**
Various backup solutions are supported to let you do backups as you need - whether it’s services with a simple, fast setup, to solutions with enterprise-grade features. Read more
* **Object lock and versioning**
Store multiple versions of your object and configure locks for long term retention and archiving of data. Meet the most stringent data compliance policies with the Legal Hold feature. Read more
### Advanced Features[](https://community.exoscale.com/product/storage/object-storage/overview/#advanced-features)
* [ACL for Buckets and Objects](https://community.exoscale.com/product/storage/object-storage/operation/acl/)
* [CDN Caching for Buckets](https://community.exoscale.com/product/networking/cdn/quick-start/)
* [CORS for Buckets](https://community.exoscale.com/product/storage/object-storage/how-to/cors/)
* [Metadata for Objects](https://community.exoscale.com/product/storage/object-storage/how-to/metadata/)
* [Bucket Versioning and Object Lock](https://community.exoscale.com/product/storage/object-storage/how-to/versioning/)
* [Server Side Encryption with Customer Key](https://community.exoscale.com/product/storage/object-storage/how-to/replication/)
* [Bucket Replication](https://community.exoscale.com/product/storage/object-storage/how-to/replication/)
These advanced features are accessible via the API, with ACL, CORS, and Metadata configurations also manageable through the Portal:
* **Identity and Access Management (IAM)**
Control programmatic access by creating specific [IAM API Keys](https://community.exoscale.com/product/iam/quick-start/#generating-api-access-keys)
. These keys can be restricted to a single bucket, ensuring precise access management.
* **Access Control Lists (ACLs)**
Define precise permissions for buckets and individual objects with ACLs, allowing for granular access policies. Manage access rights such as read, write, and full control without inheritance from parent entities. For detailed information, refer to the [SOS ACL Documentation](https://community.exoscale.com/product/storage/object-storage/operation/acl/)
.
* **Cross-Origin Resource Sharing (CORS)**
Enable browser-based applications to interact seamlessly with objects in a bucket via CORS, implemented at the bucket level for uniform configuration. More details are available in the [SOS CORS Documentation](https://community.exoscale.com/product/storage/object-storage/how-to/cors/)
.
* **Metadata**
Tag each object in a bucket with key-value pairs, presented through HTTP headers in SOS requests and responses. Comprehensive information and examples can be found in the [SOS Metadata Documentation](https://community.exoscale.com/product/storage/object-storage/how-to/metadata/)
.
* **Encryption**
Leverage both client-side encryption and Server-Side Encryption with Customer Keys (SSE-C) to secure data. For client-side encryption details, consult your library documentation, while SSE-C specifics can be explored in the [SSE-C Documentation](https://community.exoscale.com/product/storage/object-storage/how-to/replication/)
.
### Limits[](https://community.exoscale.com/product/storage/object-storage/overview/#limits)
The following table shows which limits are applied to SOS compared to AWS.
| Usage | Limit | AWS S3 equivalent |
| --- | --- | --- |
| Maximum number of buckets | 20 \* | 100 |
| Maximum object size | 4TiB | 5TiB |
| Maximum number of parts in a multipart upload | 10000 | 10000 |
| Minimum part size | 5MiB \*\* | 5MiB \*\* |
| Maximum part size | 5GiB | 5GiB |
| Maximum number of objects in a bucket | unlimited | unlimited |
| Maximum number of versions per object | 1000 | unlimited |
| Minimum billed size | 128kb | 128kb |
| Maximum metadata size | 2kb | 2kb |
| Maximum tags per object | 10 | 10 |
| Maximum tag key size | 128 char | 128 char |
| Maximum tag value size | 256 char | 256 char |
| Maximum bucket name size | 64 char \*\*\* | 64 char \*\*\* |
| Maximum key name size | 1024 byte (UTF-8) | 1024 byte (UTF-8) |
| Maximum number of objects per delete-objects operation | 1000 | 1000 |
> `*) service limit upgradeable` `**) does not apply to last part` `***) DNS compatible`
Availability[](https://community.exoscale.com/product/storage/object-storage/overview/#availability)
-----------------------------------------------------------------------------------------------------
| Zone | Country | City | Availability |
| --- | --- | --- | --- |
| **`at-vie-1`** | Austria | Vienna | |
| **`at-vie-2`** | Austria | Vienna | |
| **`ch-gva-2`** | Switzerland | Geneva | |
| **`ch-dk-2`** | Switzerland | Zurich | |
| **`de-fra-1`** | Germany | Frankfurt | |
| **`de-muc-1`** | Germany | Munich | |
| **`bg-sof-1`** | Bulgaria | Sofia | |
| **`hr-zag-1`** | Croatia | Zagreb | |
Limitations[](https://community.exoscale.com/product/storage/object-storage/overview/#limitations)
---------------------------------------------------------------------------------------------------
**Unsupported S3 Features**
While we strive to maintain full compatibility with the S3 API, we do not support all S3 features.
Currently, the following functionality cannot be used on Exoscale:
* Encryption should be performed client-side
* [Object Tagging](https://docs.aws.amazon.com/AmazonS3/latest/userguide/object-tagging.html)
* [Object Lifecycle Management](https://docs.aws.amazon.com/AmazonS3/latest/userguide/object-lifecycle-mgmt.html)
* [Bucket Access Logging](https://docs.aws.amazon.com/AmazonS3/latest/userguide/ServerLogs.html)
* [Bucket Event Notification](https://docs.aws.amazon.com/AmazonS3/latest/userguide/NotificationHowTo.html)
* [Static Website Hosting](https://docs.aws.amazon.com/AmazonS3/latest/userguide/WebsiteHosting.html)
---
# Windows Bitlocker, vTPM & Secureboot – Exoscale Documentation
[Product](https://community.exoscale.com/product/)
[Compute](https://community.exoscale.com/product/compute/)
[Instances](https://community.exoscale.com/product/compute/instances/)
[How-To](https://community.exoscale.com/product/compute/instances/how-to/)
Windows Bitlocker, vTPM & Secureboot
Windows Bitlocker, vTPM & Secureboot
====================================
Exoscale supports vTPM and Secureboot technology to allow usage of Windows security features like Bitlocker drive encryption. The required key to unlock the drive is safely stored in the vTPM and no interaction is required when rebooting the server. A recovery key is stored to allow recovery if the VM is migrated off Exoscale or the vTPM is lost. Tested on Windows Server 2022 and Windows Server 2025 using Exoscale Templates Tested on 20th of March 2025
Prerequisites[](https://community.exoscale.com/product/compute/instances/how-to/bitlocker-windows/#prerequisites)
------------------------------------------------------------------------------------------------------------------
As prerequisites you’ll have to:
* access to Exoscale environment UI
* Sufficient rights to create a compute instance
Create a Windows compute instance with vTPM and Secureboot enabled[](https://community.exoscale.com/product/compute/instances/how-to/bitlocker-windows/#create-a-windows-compute-instance-with-vtpm-and-secureboot-enabled)
----------------------------------------------------------------------------------------------------------------------------------------------------------------------------------------------------------------------------
### Via the Portal UI[](https://community.exoscale.com/product/compute/instances/how-to/bitlocker-windows/#via-the-portal-ui)
* Configure a Microsoft Windows Server instance as you need
* Add one Block Storage Volume with 1GiB size - this will be used to store the Bitlocker Recovery Key during configuration
* In the bottom of the configuration page select “TPM enabled” and “Secureboot” enabled
* Create the instance
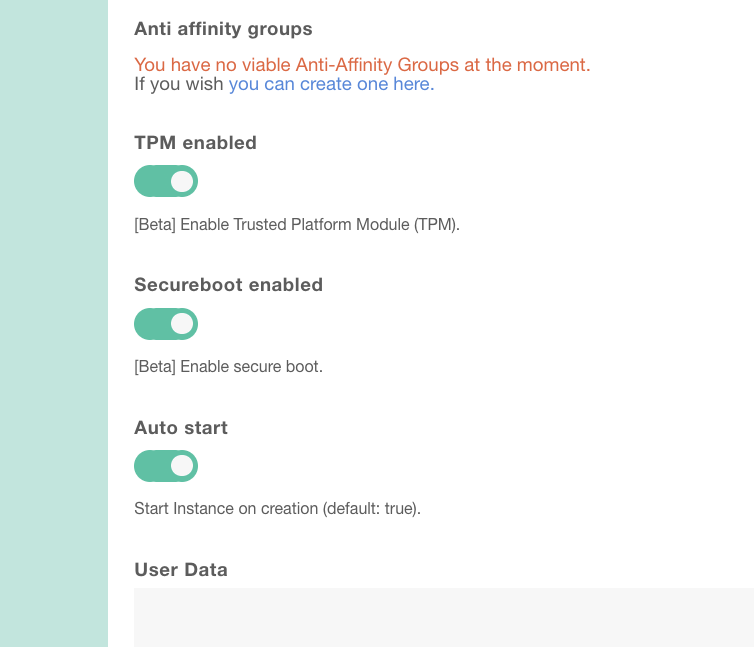
Windows Bitlocker Drive Encryption
### Via the API[](https://community.exoscale.com/product/compute/instances/how-to/bitlocker-windows/#via-the-api)
* Add the following extensions to the create-instance API call:
"tpm-enabled": true,
"secureboot-enabled": true
Install and enable Bitlocker[](https://community.exoscale.com/product/compute/instances/how-to/bitlocker-windows/#install-and-enable-bitlocker)
------------------------------------------------------------------------------------------------------------------------------------------------
### Via the Portal UI[](https://community.exoscale.com/product/compute/instances/how-to/bitlocker-windows/#via-the-portal-ui-1)
* Configure the additional Block Storage Volume and format it.
* Open the Server Manager and click on “Manage” -> “Add Roles and Features”
* On the “Features” tab of the Wizard select “Bitlocker Drive Encryption” and add all required Features
* Finish the Wizard and reboot once the installation of the Feature is done
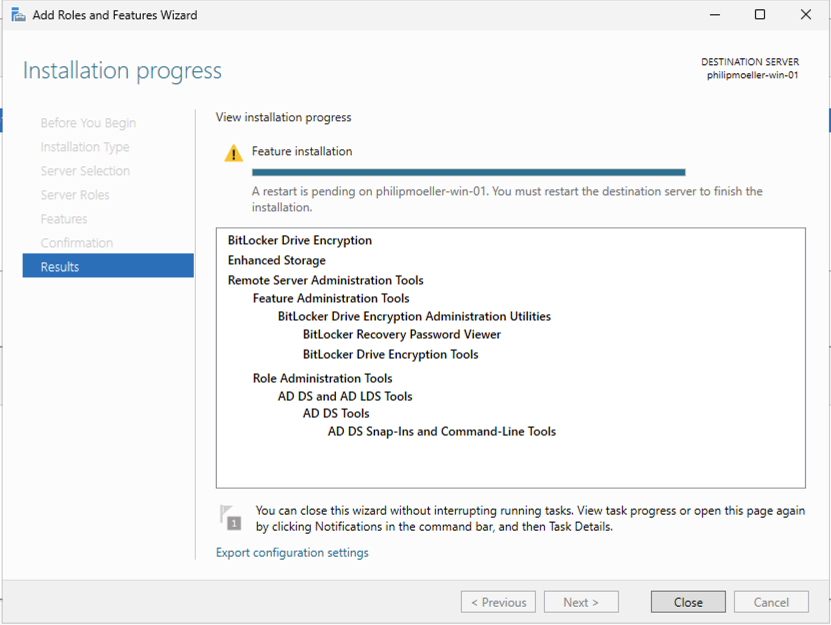
Windows Bitlocker Drive Encryption
* After the reboot access the Windows Server and open the Explorer
* Navigate to “This PC” and right click on the drive selected for encryption, click on “Turn on Bitlocker”
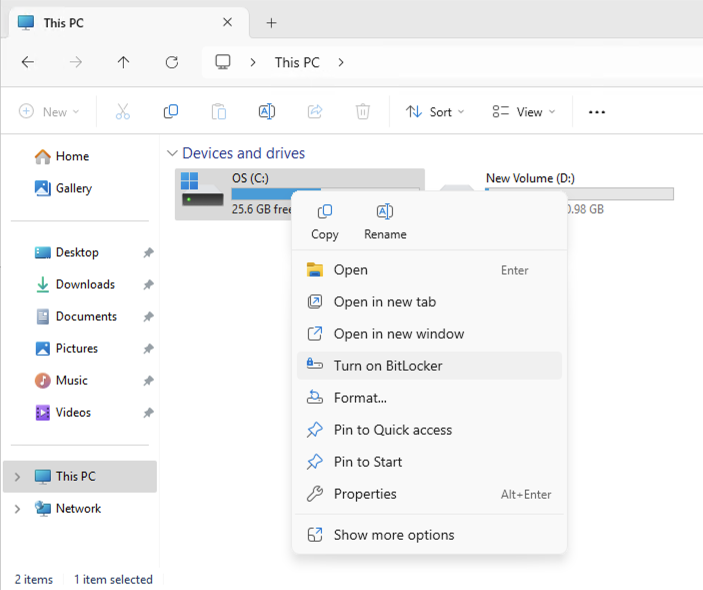
Windows Bitlocker Drive Encryption
* Follow the Wizard until asked how to backup the Recovery Key. Select “Save to a file” and select the 1GiB block volume, create a folder and store the file into that folder
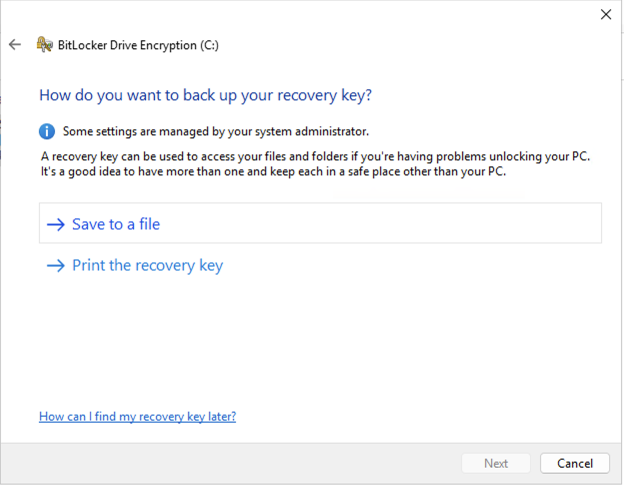
Windows Bitlocker Drive Encryption
* Finish the Wizard to start encryption. You can let Windows Run the Bitlocker check before by selecting “Run Bitlocker system check”, a reboot is required.
* Click on “Start encrypting”
* Open the explorer and navigate to the Block Storage Volume and copy the Recovery Key off to an safe destination outside of the compute instance.
* Check the encryption is ongoing by openeing the Explorer, navigate to “This PC”. Select “Manage Bitlocker” in the menu when right clicking on the disk. It should show “Bitlocker Encrypting” until the disk is encrypted, the status shows “Bitlocker on” once the disk is fully encrypted
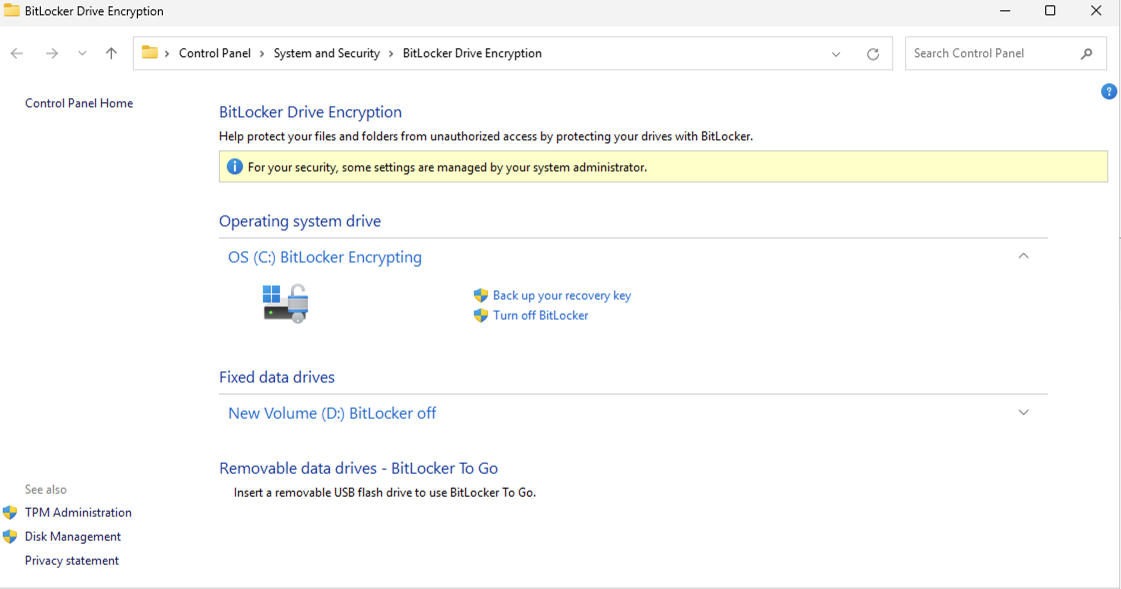
Windows Bitlocker Drive Encryption
* Remove the Block Storage Volume in the instance configuration once the Recovery Key is secured outside of the instance
### Via Powershell[](https://community.exoscale.com/product/compute/instances/how-to/bitlocker-windows/#via-powershell)
* Configure the additional Block Storage Volume and format it.
* Open a Powershell terminal with elevated rights
* Install Bitlocker and required features:
Install-WindowsFeature BitLocker -IncludeAllSubFeature -IncludeManagementTools
* A reboot is required to finish the installation
* After the reboot access the Windows Server and open a Powershell terminal with elevated rights
* Enabled Bitlocker drive encryption on the selected drive:
Enable-BitLocker -MountPoint "C:" -EncryptionMethod "XtsAes256" -TpmProtector -UsedSpaceOnly -SkipHardwareTest
* Bitlocker will start to encrypt your drive. To check the status use:
Get-BitLockerVolume
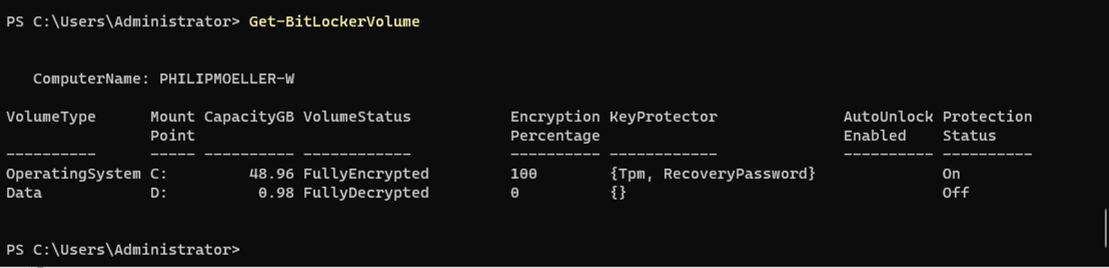
Windows Bitlocker Drive Encryption
* Create the recovery key:
Add-BitLockerKeyProtector -MountPoint "C:" -RecoveryPasswordProtector
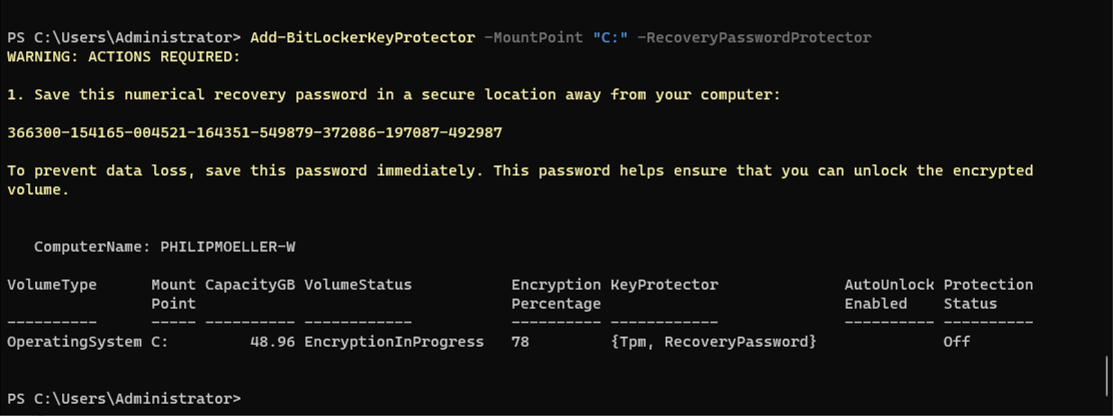
Windows Bitlocker Drive Encryption
* Copy the Recovery Key to a safe location outside of the compute instance.
* Remove the Block Storage Volume in the instance configuration once the Recovery Key is secured outside of the compute instance.
---
# How-To – Exoscale Documentation
[Product](https://community.exoscale.com/product/)
[Networking](https://community.exoscale.com/product/networking/)
[CDN](https://community.exoscale.com/product/networking/cdn/)
How-To
How-To
======
[Cache Control\
\
Set custom TTL using Cache-Control and Expires headers on SOS objects.](https://community.exoscale.com/product/networking/cdn/how-to/cache-control)
---
# Operation – Exoscale Documentation
[Product](https://community.exoscale.com/product/)
[Networking](https://community.exoscale.com/product/networking/)
[CDN](https://community.exoscale.com/product/networking/cdn/)
Operation
Operation
=========
[Cache Management\
\
Learn about the versioning and TTL of your assets.](https://community.exoscale.com/product/networking/cdn/operation/cache-mgmt)
---
# How-To – Exoscale Documentation
[Product](https://community.exoscale.com/product/)
[Networking](https://community.exoscale.com/product/networking/)
[NLB](https://community.exoscale.com/product/networking/nlb/)
How-To
How-To
======
[Configure Health Check\
\
Learn to configure Health Check parameters](https://community.exoscale.com/product/networking/nlb/how-to/config-healthcheck)
---
# How-To – Exoscale Documentation
[Product](https://community.exoscale.com/product/)
[Networking](https://community.exoscale.com/product/networking/)
[IP](https://community.exoscale.com/product/networking/ip/)
How-To
How-To
======
[Testing Connections\
\
Testing IPv6 connectivity to ensure successful connectivity across various operating systems.](https://community.exoscale.com/product/networking/ip/how-to/testing-connections)
---
# Reference – Exoscale Documentation
[Product](https://community.exoscale.com/product/)
[IAM](https://community.exoscale.com/product/iam/)
Reference
Reference
=========
[API IAM\
\
All operations controlable by IAM.](https://community.exoscale.com/product/iam/reference/api-iam/)
[CLI IAM\
\
All commands for IAM.](https://community.exoscale.com/product/iam/reference/cli-iam/)
[Resources IAM\
\
All resources list for IAM.](https://community.exoscale.com/reference/iam/)
---
# Operation – Exoscale Documentation
[Product](https://community.exoscale.com/product/)
[Compute](https://community.exoscale.com/product/compute/)
[Instances](https://community.exoscale.com/product/compute/instances/)
Operation
Operation
=========
[Snapshot\
\
Create point-in-time backups of instances to restore a previous state.](https://community.exoscale.com/product/compute/instances/operation/snapshot)
[Rescue Mode\
\
Boot into a recovery environment to fix boot issues, reset passwords, or recover using custom or Windows ISOs.](https://community.exoscale.com/product/compute/instances/operation/rescue-mode)
---
# Operation – Exoscale Documentation
[Product](https://community.exoscale.com/product/)
[Networking](https://community.exoscale.com/product/networking/)
[Private Network](https://community.exoscale.com/product/networking/private-network/)
Operation
Operation
=========
[Change a Private Network\
\
Change a private network from Manual to Managed or opposite.](https://community.exoscale.com/product/networking/private-network/operation/change-private-network)
[DHCP options\
\
Adjust DHCP options on Managed Private Networks.](https://community.exoscale.com/product/networking/private-network/operation/dhcp-options)
---
# Operation – Exoscale Documentation
[Product](https://community.exoscale.com/product/)
[Networking](https://community.exoscale.com/product/networking/)
[NLB](https://community.exoscale.com/product/networking/nlb/)
Operation
Operation
=========
[Load Balancer Strategies\
\
Learn the details of the load balancer strategies.](https://community.exoscale.com/product/networking/nlb/operation/loadbalancer-strategies)
[Protocols and Ports\
\
Learn about protocol, service port and target port.](https://community.exoscale.com/product/networking/nlb/operation/protocols-and-ports)
---
# Reference – Exoscale Documentation
[Product](https://community.exoscale.com/product/)
[Networking](https://community.exoscale.com/product/networking/)
[NLB](https://community.exoscale.com/product/networking/nlb/)
Reference
Reference
=========
[API Network Load Balancer\
\
All operations on network load balancer.](https://community.exoscale.com/product/networking/nlb/reference/api-nlb)
[CLI Network Load Balancer\
\
All commands on network load balancer.](https://community.exoscale.com/product/networking/nlb/reference/cli-nlb)
---
# Operation – Exoscale Documentation
[Product](https://community.exoscale.com/product/)
[Networking](https://community.exoscale.com/product/networking/)
[Private Connect](https://community.exoscale.com/product/networking/private-connect/)
Operation
Operation
=========
[Network Setup\
\
Various ways to configure your network.](https://community.exoscale.com/product/networking/private-connect/operation/network-setup)
[Routing Configuration\
\
Configure how traffic is sent over the network.](https://community.exoscale.com/product/networking/private-connect/operation/routing-configuration)
---
# How-To – Exoscale Documentation
[Product](https://community.exoscale.com/product/)
[IAM](https://community.exoscale.com/product/iam/)
How-To
How-To
======
[Key Management\
\
Instructions for managing API keys, creation of restricted keys and creating roles.](https://community.exoscale.com/product/iam/how-to/key-mgmt)
[Policy Guide\
\
Colllection of best practices and examples for creating effective policies .](https://community.exoscale.com/product/iam/how-to/policy-guide)
---
# Operation – Exoscale Documentation
[Product](https://community.exoscale.com/product/)
[IAM](https://community.exoscale.com/product/iam/)
Operation
Operation
=========
[Role Management\
\
Describes commands to manage roles using the `exo` CLI and step-by-step instructions for the portal.](https://community.exoscale.com/product/iam/operation/role-mgmt)
[Roles and Policies\
\
Features to securely manage access and permissions across the platform, ensuring precise authorization control.](https://community.exoscale.com/product/iam/operation/roles-policies)
[User and Keys\
\
Manage access for users and API keys in an organization, including the creation of special roles.](https://community.exoscale.com/product/iam/operation/users-keys)
---
# Operation – Exoscale Documentation
[Product](https://community.exoscale.com/product/)
[Compute](https://community.exoscale.com/product/compute/)
[Containers (SKS)](https://community.exoscale.com/product/compute/containers/)
Operation
Operation
=========
[SKS Lifecycle Management\
\
Upgrade SKS clusters, update nodepools, and back up to keep Kubernetes stable and secure.](https://community.exoscale.com/product/compute/containers/operation/lifecycle-management)
[Autoscaling an SKS Node Pool\
\
Auto-scale SKS node pools based on workload with the Kubernetes Cluster Autoscaler.](https://community.exoscale.com/product/compute/containers/operation/autoscaling)
[SKS Certificates and API Keys\
\
Manage certificates and API keys to secure SKS cluster communication.](https://community.exoscale.com/product/compute/containers/operation/certificates-and-keys)
[Kubernetes Audit\
\
Setup Kubernetes Audit for your cluster](https://community.exoscale.com/product/compute/containers/operation/kubernetes-audit)
---
# Product – Exoscale Documentation
Product
Product
=======
Exoscale is a privacy-minded IaaS platform offering on-demand resources to build your application. In seconds, you can start virtual machines or Kubernetes clusters, store petabytes of data, and easily integrate your on-premises or multi-cloud deployment, taking advantage of the most common DevOps tools.
[Compute\
\
provides virtual machines and containers to focus on your application instead of managing data center.](https://community.exoscale.com/product/compute)
[Storage\
\
provides fast, scalable, and cost-effective storage solutions for latency-sensitive and containerized applications.](https://community.exoscale.com/product/storage)
[Networking\
\
delivers robust and high-performance network solutions, enabling seamless connectivity and performance across all environments.](https://community.exoscale.com/product/networking)
[DBaaS\
\
provides scalable and fully managed database solutions with high availability and performance without the complexities of management.](https://community.exoscale.com/product/dbaas)
[IAM\
\
delivers secure and flexible identity and access management, simplifying user permissions and enhancing security.](https://community.exoscale.com/product/iam)
---
# Operation – Exoscale Documentation
[Product](https://community.exoscale.com/product/)
[Networking](https://community.exoscale.com/product/networking/)
[EIP](https://community.exoscale.com/product/networking/eip/)
Operation
Operation
=========
[Configure IPv6\
\
Instructions on configuring additional IPv6 addresses for compute instances when using an Elastic IPv6 prefix.](https://community.exoscale.com/product/networking/eip/operation/configure-ipv6)
[Configure a Manual Elastic IP\
\
Configurations to ensure the instance can receive traffic while maintaining its original IP for outgoing connections.](https://community.exoscale.com/product/networking/eip/operation/configure-manual-eip)
[Creating an Elastic IPv6 prefix\
\
Steps for creating manual and managed types, including required health check parameters for managed types.](https://community.exoscale.com/product/networking/eip/operation/creating-eipv6-prefix)
[Attach an Elastic IPv6 prefix\
\
Create and attach an Elastic IPv6 prefix to compute instances and configuration details for Elastic IPv6 setups.](https://community.exoscale.com/product/networking/eip/operation/attach-eipv6-prefix)
---
# NLB – Exoscale Documentation
[Product](https://community.exoscale.com/product/)
[Networking](https://community.exoscale.com/product/networking/)
NLB
NLB
===
[Quick Start\
\
Comprehensive guide for getting started quickly.](https://community.exoscale.com/product/networking/nlb/quick-start)
[Overview\
\
Product descriptions, architectures and details.](https://community.exoscale.com/product/networking/nlb/overview)
[Operation\
\
Life cycle management, maintenance and upgrades.](https://community.exoscale.com/product/networking/nlb/operation)
[How-To\
\
Step-by-step guide to accomplish specific tasks.](https://community.exoscale.com/product/networking/nlb/how-to)
[Reference\
\
Overview of internal and external references.](https://community.exoscale.com/product/networking/nlb/reference)
---
# How-To – Exoscale Documentation
[Product](https://community.exoscale.com/product/)
[Networking](https://community.exoscale.com/product/networking/)
[Security Group](https://community.exoscale.com/product/networking/security-group/)
How-To
How-To
======
[Allow SSH\
\
Permit secure shell access on port 22.](https://community.exoscale.com/product/networking/security-group/how-to/allow-ssh)
[Allow PING\
\
Let your instance respond to ICMP echo requests.](https://community.exoscale.com/product/networking/security-group/how-to/allow-ping)
[Allow HTTP/HTTPS\
\
Enable web traffic access on ports 80 and 443.](https://community.exoscale.com/product/networking/security-group/how-to/allow-http-https)
[Allow Outbound Reply\
\
Permit response traffic from your instance.](https://community.exoscale.com/product/networking/security-group/how-to/allow-outbound-reply)
[Restrict Outbound Traffic\
\
Block outgoing connections to control egress.](https://community.exoscale.com/product/networking/security-group/how-to/restrict-outbound-traffic)
---
# CDN – Exoscale Documentation
[Product](https://community.exoscale.com/product/)
[Networking](https://community.exoscale.com/product/networking/)
CDN
CDN
===
[Quick Start\
\
Comprehensive guide for getting started quickly.](https://community.exoscale.com/product/networking/cdn/quick-start)
[Overview\
\
Product descriptions, architectures and details.](https://community.exoscale.com/product/networking/cdn/overview)
[Operation\
\
Life cycle management, maintenance and upgrades.](https://community.exoscale.com/product/networking/cdn/operation)
[How-To\
\
Step-by-step guide to accomplish specific tasks.](https://community.exoscale.com/product/networking/cdn/how-to)
[Reference\
\
Overview of internal and external references.](https://community.exoscale.com/product/networking/cdn/reference)
---
# IAM – Exoscale Documentation
[Product](https://community.exoscale.com/product/)
IAM
IAM
===
[Quick Start\
\
Comprehensive guide for getting started quickly.](https://community.exoscale.com/product/iam/quick-start)
[Overview\
\
Product descriptions, architectures and details.](https://community.exoscale.com/product/iam/overview)
[Operation\
\
Life cycle management, maintenance and upgrades.](https://community.exoscale.com/product/iam/operation)
[How-To\
\
Step-by-step guide to accomplish specific tasks.](https://community.exoscale.com/product/iam/how-to)
[Reference\
\
Overview of internal and external references.](https://community.exoscale.com/product/iam/reference)
---
# Networking – Exoscale Documentation
[Product](https://community.exoscale.com/product/)
Networking
Networking
==========
[IP\
\
Every instance comes with an included and free of charge public IPv4 and IPv6 address.](https://community.exoscale.com/product/networking/ip)
[EIP\
\
Elastic IP are additional IPs for your instances, with optional health check support.](https://community.exoscale.com/product/networking/eip)
[NLB\
\
A fast and reliable Layer-4 Network Load Balancer.](https://community.exoscale.com/product/networking/nlb)
[DNS\
\
Manage your DNS zones with a straightforward web interface.](https://community.exoscale.com/product/networking/dns)
[CDN\
\
Push your Object Storage assets close to your users with the fast-performing CDN.](https://community.exoscale.com/product/networking/cdn)
[Security Group\
\
An easy way to configure Layer-2 and Layer-3 fire walling for your instances.](https://community.exoscale.com/product/networking/security-group)
[Private Network\
\
Secure Private Networks for your instances with an optional DHCP server.](https://community.exoscale.com/product/networking/private-network)
[Private Connect\
\
Directly connect to Exoscale zones using your own 10G connectivity in supported locations.](https://community.exoscale.com/product/networking/private-connect)
---
# How-To – Exoscale Documentation
[Product](https://community.exoscale.com/product/)
[Compute](https://community.exoscale.com/product/compute/)
[Containers (SKS)](https://community.exoscale.com/product/compute/containers/)
How-To
How-To
======
[SKS Load Balancer and Ingress Controller\
\
Easily expose your SKS services with Exoscale Load Balancers or use Ingress Controllers for advanced routing.](https://community.exoscale.com/product/compute/containers/how-to/loadbalancer-ingress)
[Karpenter\
\
Just-in-time Nodes for SKS clusters.](https://community.exoscale.com/product/compute/containers/how-to/karpenter)
[Enabling GPU Support in SKS Nodes\
\
Add GPU capabilities to your SKS cluster for ML, analytics, and more by deploying the NVIDIA Device Plugin.](https://community.exoscale.com/product/compute/containers/how-to/gpu-sks-nodes)
[OpedID Connect\
\
Secure your SKS cluster with external identity providers using OpenID Connect.](https://community.exoscale.com/product/compute/containers/how-to/openid-connect)
[Labels\
\
Organize SKS clusters and nodepools with custom labels for easier management and automation.](https://community.exoscale.com/product/compute/containers/how-to/labels)
[Managed Compute Instances Prefixes\
\
Customize SKS-managed instance names with prefixes for easier management across clusters and nodepools.](https://community.exoscale.com/product/compute/containers/how-to/managed-instance-prefixes)
[Kubernetes Taints\
\
Kubernetes taints restrict pods from running on specific nodes unless they have matching tolerations.](https://community.exoscale.com/product/compute/containers/how-to/kubernetes-taints)
[Custom CNI Setup\
\
Use a custom CNI in SKS by installing it on all nodes, ensuring no IP conflicts and correct DNS/API settings.](https://community.exoscale.com/product/compute/containers/how-to/custom-cni-setup)
[Removing kube-proxy\
\
Remove the default kube-proxy before installing a custom CNI for optimized, proxy-less networking.](https://community.exoscale.com/product/compute/containers/how-to/kube-proxy-removal)
[SKS Egress Security Groups filtering notice\
\
Control outbound traffic from your SKS cluster with fine-grained egress security groups.](https://community.exoscale.com/product/compute/containers/how-to/sks-egress-security-groups)
[Rancher Integration\
\
Provision and manage your SKS clusters directly with SUSE Rancher.](https://community.exoscale.com/product/compute/containers/how-to/rancher-integration)
---
# DBaaS – Exoscale Documentation
[Product](https://community.exoscale.com/product/)
DBaaS
DBaaS
=====
[Quick Start\
\
Comprehensive guide for getting started quickly.](https://community.exoscale.com/product/dbaas/quick-start)
[Overview\
\
Product descriptions, architectures and details.](https://community.exoscale.com/product/dbaas/overview)
[Operation\
\
Life cycle management, maintenance and upgrades.](https://community.exoscale.com/product/dbaas/operation)
[How-To\
\
Step-by-step guide to accomplish specific tasks.](https://community.exoscale.com/product/dbaas/how-to)
[Reference\
\
Overview of internal and external references.](https://community.exoscale.com/product/dbaas/reference)
Supported Services[](https://community.exoscale.com/product/dbaas/#supported-services)
---------------------------------------------------------------------------------------
[PostgreSQL\
\
The popular open-source relational database is known for its variety of features.](https://community.exoscale.com/product/dbaas/service-specific/postgresql)
[MySQL\
\
The most widely used open-source, object-relational database on Exoscale.](https://community.exoscale.com/product/dbaas/service-specific/mysql)
[Kafka\
\
The distributed, open-source data source for optimized real-time processing of streaming data.](https://community.exoscale.com/product/dbaas/service-specific/kafka)
[OpenSearch\
\
The popular open-source search and analytics database on Exoscale.](https://community.exoscale.com/product/dbaas/service-specific/opensearch)
[Valkey\
\
The open-source key-value data store with a Redis® compatible interface.](https://community.exoscale.com/product/dbaas/service-specific/valkey)
[Grafana\
\
The open-source software enables you to query, visualize, and alert your metrics, logs, and traces from any storage.](https://community.exoscale.com/product/dbaas/service-specific/grafana)
---