# Table of Contents
- [PrestaShop 8 Documentation :: PrestaShop Developer Documentation](#prestashop-8-documentation-prestashop-developer-documentation)
- [Introduction :: PrestaShop Developer Documentation](#introduction-prestashop-developer-documentation)
- [Interacting with APIs :: PrestaShop Developer Documentation](#interacting-with-apis-prestashop-developer-documentation)
- [Getting Started :: PrestaShop Developer Documentation](#getting-started-prestashop-developer-documentation)
- [Extension concepts :: PrestaShop Developer Documentation](#extension-concepts-prestashop-developer-documentation)
- [Shops configuration :: PrestaShop Developer Documentation](#shops-configuration-prestashop-developer-documentation)
- [Configuration forms :: PrestaShop Developer Documentation](#configuration-forms-prestashop-developer-documentation)
- [Shops context :: PrestaShop Developer Documentation](#shops-context-prestashop-developer-documentation)
- [Adding a configuration page (Legacy architecture) :: PrestaShop Developer Documentation](#adding-a-configuration-page-legacy-architecture-prestashop-developer-documentation)
- [Testing :: PrestaShop Developer Documentation](#testing-prestashop-developer-documentation)
- [Modern configuration page :: PrestaShop Developer Documentation](#modern-configuration-page-prestashop-developer-documentation)
- [Asset management :: PrestaShop Developer Documentation](#asset-management-prestashop-developer-documentation)
- [How to add a layout in a theme from a module :: PrestaShop Developer Documentation](#how-to-add-a-layout-in-a-theme-from-a-module-prestashop-developer-documentation)
- [Webpack :: PrestaShop Developer Documentation](#webpack-prestashop-developer-documentation)
- [Changes in PrestaShop 8.1 :: PrestaShop Developer Documentation](#changes-in-prestashop-8-1-prestashop-developer-documentation)
- [Theme development reference :: PrestaShop Developer Documentation](#theme-development-reference-prestashop-developer-documentation)
- [New password policy based on zxcvbn :: PrestaShop Developer Documentation](#new-password-policy-based-on-zxcvbn-prestashop-developer-documentation)
- [How to add an email theme from a module :: PrestaShop Developer Documentation](#how-to-add-an-email-theme-from-a-module-prestashop-developer-documentation)
- [How to add layout variables from a module :: PrestaShop Developer Documentation](#how-to-add-layout-variables-from-a-module-prestashop-developer-documentation)
- [Email Protection | Cloudflare](#email-protection-cloudflare)
- [Optimize your Apache httpd configuration :: PrestaShop Developer Documentation](#optimize-your-apache-httpd-configuration-prestashop-developer-documentation)
- [The Hook component :: PrestaShop Developer Documentation](#the-hook-component-prestashop-developer-documentation)
- [Frequently Asked Questions :: PrestaShop Developer Documentation](#frequently-asked-questions-prestashop-developer-documentation)
- [Tutorials :: PrestaShop Developer Documentation](#tutorials-prestashop-developer-documentation)
- [Internationalization :: PrestaShop Developer Documentation](#internationalization-prestashop-developer-documentation)
- [Writing a good commit message :: PrestaShop Developer Documentation](#writing-a-good-commit-message-prestashop-developer-documentation)
---
# PrestaShop 8 Documentation :: PrestaShop Developer Documentation
[Improve this page](https://github.com/PrestaShop/docs/edit/8.x/_index.md "Improve this page")
[How](https://devdocs.prestashop-project.org/9/contribute/documentation/how)
**Warning:** You are browsing the documentation for PrestaShop 8, which is outdated.
You might want to read an updated version of this page for the current version, PrestaShop 9. [Read the updated version of this page](https://devdocs.prestashop-project.org/9/)
[Learn how to update to the latest version.](https://devdocs.prestashop-project.org/9/basics/keeping-up-to-date/update)
PrestaShop 8 Documentation[](https://devdocs.prestashop-project.org/8/#prestashop-8-documentation)
===================================================================================================
* [Basics](https://devdocs.prestashop-project.org/8/basics/)
* [Core Development Reference](https://devdocs.prestashop-project.org/8/development/)
* [Testing](https://devdocs.prestashop-project.org/8/testing/)
* [PrestaShop modules](https://devdocs.prestashop-project.org/8/modules/)
* [Themes](https://devdocs.prestashop-project.org/8/themes/)
* [The PrestaShop Webservice API](https://devdocs.prestashop-project.org/8/webservice/)
* [Contribute](https://devdocs.prestashop-project.org/8/contribute/)
* [Scale](https://devdocs.prestashop-project.org/8/scale/)
* [The PrestaShop Project](https://devdocs.prestashop-project.org/8/project/)
* [Frequently Asked Questions](https://devdocs.prestashop-project.org/8/faq/)
[Next: Basics ›](https://devdocs.prestashop-project.org/8/basics/ "Basics")
---
# Introduction :: PrestaShop Developer Documentation
[Improve this page](https://github.com/PrestaShop/docs/edit/9.x/basics/introduction.md "Improve this page")
[How](https://devdocs.prestashop-project.org/9/contribute/documentation/how)
Table of Contents
[Next article](https://devdocs.prestashop-project.org/9/basics/installation/ "Installation")
Fundamentals of PrestaShop Development[](https://devdocs.prestashop-project.org/9/basics/introduction/#fundamentals-of-prestashop-development)
===============================================================================================================================================
PrestaShop was conceived so that third-party modules could easily build upon its foundations, making it an extremely customizable e-commerce software.
PrestaShop’s customization is based on four possibilities:
* Themes,
* Modules,
* Hooks,
* Overriding.
Themes are explored in full in the [Themes](https://devdocs.prestashop-project.org/9/themes/)
section.
Modules, hooks and the override system are explored in this page and in the [Modules](https://devdocs.prestashop-project.org/9/modules/)
section.
By default, PrestaShop is provided with more than 50 modules, enabling you to launch your online business quickly and for free.
Concepts[](https://devdocs.prestashop-project.org/9/basics/introduction/#concepts)
-----------------------------------------------------------------------------------
You should be familiar with PHP and Object-Oriented Programming before attempting to write your own module.
You can learn PHP here:
* [Getting started on PHP documentation](https://www.php.net/manual/en/getting-started.php)
* [Learning PHP on CodeCademy](https://www.codecademy.com/catalog/language/php)
You can learn Object-Oriented programming here:
* [Object-oriented programming on Wikipedia](https://en.wikipedia.org/wiki/Object-oriented_programming)
* [Object oriented php for beginners on Tuts+](https://net.tutsplus.com/tutorials/php/object-oriented-php-for-beginners/)
A module is an extension to PrestaShop that enables any developer to add the following:
* Provide additional functionality to PrestaShop.
* View additional items on the site (product selection, etc.).
* Communicate with other e-commerce services (buying guides, payment platforms, logistics, etc.).
Overriding is a system in itself. PrestaShop uses completely object-oriented code. One of the advantages of this is that, with the right code architecture, you can easily replace or extend parts of the core code with your own custom code, without having to touch the core code.
Your code thus overrides the core code, making PrestaShop behave as you prefer it to.
It is however not recommended to use an override in a module that you intend to distribute (for instance through the PrestaShop Addons marketplace), and they are forbidden in partner modules. Keep them for your own shop.
PrestaShop’s technical architecture[](https://devdocs.prestashop-project.org/9/basics/introduction/#prestashops-technical-architecture)
----------------------------------------------------------------------------------------------------------------------------------------
MVC as the root[](https://devdocs.prestashop-project.org/9/basics/introduction/#mvc-as-the-root)
-------------------------------------------------------------------------------------------------
Until PrestaShop 1.6, PrestaShop was based on a 3-tier architecture:
* Object/data. Database access is controlled through files in the “classes” folder.
* Data control. User-provided content is controlled by files in the root folder.
* Design. All of the theme’s files are in the “themes” folder.
This is the same principle as the [Model>View>Controller (MVC) architecture](https://en.wikipedia.org/wiki/Model%E2%80%93view%E2%80%93controller)
, only in a simpler and more accessible way.
A 3-tier architecture has many advantages:
* It’s easier to read the software’s code.
* Developers can add and edit code faster.
* Graphic designer and HTML integrators can work with the confines of the `/themes` folder without having to understand or even read a single line of PHP code.
* Developers can work on additional data and modules that the HTML integrators can make use of.
#### Model[](https://devdocs.prestashop-project.org/9/basics/introduction/#model)
A model represents the application’s behavior: data processing, database interaction, etc.
It describes or contains the data that have been processed by the application. It manages this data and guarantees its integrity.
#### View[](https://devdocs.prestashop-project.org/9/basics/introduction/#view)
A view is the interface with which the user interacts.
Its first role is to display the data that has been provided by the model. Its second role is to handle all the actions from the user (mouse click, element selection, buttons, etc.), and send these events to the controller.
The view does not do any processing; it only displays the result of the processing performed by the model, and interacts with the user.
#### Controller[](https://devdocs.prestashop-project.org/9/basics/introduction/#controller)
The Controller manages synchronization events between the Model and the View, and updates both as needed. It receives all the user events and triggers the actions to perform.
If an action requires the modification of data, the Controller “asks” the Model to modify the data and, in return, the Model informs the View that the data has been changed, so that the View can update itself.
Moving forward with Symfony[](https://devdocs.prestashop-project.org/9/basics/introduction/#moving-forward-with-symfony)
-------------------------------------------------------------------------------------------------------------------------
While all versions of PrestaShop up to 1.6 took pride in only using a custom architecture, it was decided to incorporate the [Symfony PHP framework](https://symfony.com/)
starting with PrestaShop 1.7.
The driving idea is that we want our code to be more robust, more modular, and fully testable. The 1.6 architecture, inherited from version 1.5 and years of PrestaShop development, is not getting any younger, and its age is really starting to show.
Using a proven and popular open-source framework will allow us to focus on our core business code (managing a cart, handling orders, calculating prices and taxes, generating invoices, etc.) with greater efficiency, while enjoying the stability of a globally recognized framework.
In the documentation, we will refer to the 1.6 framework as the “legacy” framework, as this is a popular [designation](https://en.wikipedia.org/wiki/Legacy_system)
used in the software world.
How it is built inside[](https://devdocs.prestashop-project.org/9/basics/introduction/#how-it-is-built-inside)
---------------------------------------------------------------------------------------------------------------
Here is a small guide to help you navigate the software.
### Front office MVC[](https://devdocs.prestashop-project.org/9/basics/introduction/#front-office-mvc)
The Front Office is an application being powered by PHP and Smarty.
The frontend relies on controllers you can find in the directory `controllers/front` and PrestaShop classes that contain the business logic, mainly from the `classes` folder.
The views and the Javascript come from the installed theme that you will find in `themes/`. You can have multiple themes available on a shop but only one is enabled and in use.
If the Multistore feature is enabled, each shop can use a different theme.
### Visit a Front controller[](https://devdocs.prestashop-project.org/9/basics/introduction/#visit-a-front-controller)
When you visit `/` on your shop, you are being returned to the Homepage.
The HTTP request you sent was received by the _Dispatcher_ which found the right Front controller (the `IndexController` for Homepage).
This `IndexController` returned an HTTP response containing an HTML document rendered by Smarty.
Back office MVC[](https://devdocs.prestashop-project.org/9/basics/introduction/#back-office-mvc)
-------------------------------------------------------------------------------------------------
The Back Office is a large application powered by PHP and Smarty for the legacy part and by PHP, Symfony, and Twig for the migrated part.
The legacy backend relies on controllers which you can find in the directory `controllers/admin`. It also relies on PrestaShop classes that contain the business logic, mainly from the `classes` folder.
For legacy pages, the views and the Javascript can be found in `admin-dev/themes/default`.
The Symfony backend relies on the controllers you can find in `src/PrestaShopBundle/Controller/Admin` and PrestaShop logic that mostly comes from the `src` folder, and also some `classes` files.
For migrated pages, you can find the views in `src/PrestaShopBundle/Resources/views/Admin`. The Javascript can be found in `admin-dev/themes/new-theme/js`.
### Visit a legacy Back Office controller[](https://devdocs.prestashop-project.org/9/basics/introduction/#visit-a-legacy-back-office-controller)
When you visit `/admin{x}/index.php?controller=AdminCarriers&token={y}` on your shop, you are being returned to the Carriers Back Office page.
The HTTP request you sent was received by the Back Office _Dispatcher_ which found the right Admin controller (the `AdminCarriersController`).
This `AdminCarriersController` returned an HTTP response containing an HTML document rendered by Smarty.
The Admin controllers use a generic system to choose what Smarty template to use. Generic templates to display forms and listings are available and the controller provides the structure configuration (for example it controls what columns and rows are displayed).
### Visit a Symfony Back Office controller[](https://devdocs.prestashop-project.org/9/basics/introduction/#visit-a-symfony-back-office-controller)
When you visit `/admin-{xxx}/index.php/configure/shop/preferences/preferences?_token={yyy}` on your shop, you are being returned to the Preferences Back Office page.
The HTTP request you sent was received by Symfony and the kernel that handled your request.
Symfony found the right Back Office controller, matching your URL, the `PreferencesController`.
The `PreferencesController` returned an HTTP response containing an HTML document rendered by Twig.
---
# Interacting with APIs :: PrestaShop Developer Documentation
[Improve this page](https://github.com/PrestaShop/docs/edit/1.7.x/modules/creation/external-services.md "Improve this page")
[How](https://devdocs.prestashop-project.org/9/contribute/documentation/how)
Table of Contents
[Next article](https://devdocs.prestashop-project.org/1.7/modules/concepts/ "Extension concepts")
**Warning:** You are browsing the documentation for PrestaShop 1.7, which is outdated.
You might want to read an updated version of this page for the current version, PrestaShop 9. [Read the updated version of this page](https://devdocs.prestashop-project.org/9/modules/creation/external-services/)
[Learn how to update to the latest version.](https://devdocs.prestashop-project.org/9/basics/keeping-up-to-date/update)
Interacting with APIs[](https://devdocs.prestashop-project.org/1.7/modules/creation/external-services/#interacting-with-apis)
==============================================================================================================================
There are different options to transfer data between your shop and any external service. The method you choose will depend on the usecase:
* if data must be pulled or pushed to the shop,
* if one specific application (the shop or an external service) must initiate the calls,
* if there are constraints on the implementation (i.e a cron job scheduler is required).
Requests to a shop[](https://devdocs.prestashop-project.org/1.7/modules/creation/external-services/#requests-to-a-shop)
------------------------------------------------------------------------------------------------------------------------
You may retrieve and update data from a shop using different methods:
### The native webservice[](https://devdocs.prestashop-project.org/1.7/modules/creation/external-services/#the-native-webservice)
The webservice is a REST API allowing you to interact with most of the database tables used by the core. It uses Basic access authentication to allow requests.
**Resources:**
* [About the webservice](https://devdocs.prestashop-project.org/1.7/webservice/)
* [Enable & add users to the webservice](https://devdocs.prestashop-project.org/1.7/webservice/tutorials/creating-access/)
**Adding a module ObjectModel to the list of resources available**
The hook `addWebserviceResources` must be registered by your module.
Then an array containing all the ressources (= Object Model subclasses) you want to add should be returned. For instance, in the module blockreassurance we have an ObjectModel class, called `reassuranceClass`. If we wanted to make it available in the webservice, it would look like this:
array(
'description' => 'Module Reassurance example',
'class' => 'reassuranceClass',
'forbidden_method' => array('PUT', 'POST', 'DELETE')),
);
}
This will add the resource `reassurance` available into the permissions list, based on the key.
### Module controllers[](https://devdocs.prestashop-project.org/1.7/modules/creation/external-services/#module-controllers)
As the webservice is only an interface to get and update objects on the database, it does not allow to run complex actions. Module controller may be implemented to allow any external service to reach your shop, then trigger specific actions or retrieve content.
You should implement a method that filters non-authenticated calls. This prevents guests accessing private content, or trigger actions on your behalf. This can be done by generating your own token and checking it everytime the controller is called. `Tools::encrypt($token)` may be useful.
**Resources:**
* [About the controllers](https://devdocs.prestashop-project.org/1.7/modules/concepts/controllers/front-controllers/)
* [Example with Faceted Search module (Outside a controller)](https://github.com/PrestaShop/ps_facetedsearch/blob/6f7b97e77b0fca30c0acf74316996cfc82a263a9/ps_facetedsearch-clear-cache.php#L6-L8)
Requests from a shop[](https://devdocs.prestashop-project.org/1.7/modules/creation/external-services/#requests-from-a-shop)
----------------------------------------------------------------------------------------------------------------------------
HTTP requests can be triggered from a shop to an external service.
Several methods allows requests to be sent (in order of preference):
* [Guzzle](https://github.com/guzzle/guzzle)
. The version 5 is included from PrestaShop 1.7.0 , but can be included in your module as well for older PS versions.
* Loading in memory another version of guzzle in the same namespace will trigger errors on the shop.
* Example with PS Checkout module: [Inclusion in composer.json](https://github.com/PrestaShopCorp/ps_checkout/blob/578135d8bef2d99b8056ebc0bd709e9a87d661e6/composer.json#L28)
& [implementation](https://github.com/PrestaShopCorp/ps_checkout/blob/ef48da09735e6e64b42364a703b5a74d41cd24d9/classes/Api/Payment/Dispute.php)
* [\\Tools::file\_get\_contents(…)](https://github.com/PrestaShop/PrestaShop/blob/a07a569b45ab6afc777f25aba505997004e5f70a/classes/Tools.php#L2212-L2223)
* Will rely on `cURL` or `fopen()`, depending on what is available on the shop.
* Exists from PrestaShop 1.4
* [cURL](https://www.php.net/manual/en/book.curl.php)
* cURL is mandatory for PrestaShop 1.7 . For older versions, the extension must be checked first to avoid fatal errors.
---
# Getting Started :: PrestaShop Developer Documentation
[Improve this page](https://github.com/PrestaShop/docs/edit/8.x/modules/creation/_index.md "Improve this page")
[How](https://devdocs.prestashop-project.org/9/contribute/documentation/how)
Table of Contents
[Next article](https://devdocs.prestashop-project.org/8/modules/creation/tutorial/ "Tutorial: Creating your first module")
**Warning:** You are browsing the documentation for PrestaShop 8, which is outdated.
You might want to read an updated version of this page for the current version, PrestaShop 9. [Read the updated version of this page](https://devdocs.prestashop-project.org/9/modules/creation/)
[Learn how to update to the latest version.](https://devdocs.prestashop-project.org/9/basics/keeping-up-to-date/update)
Getting Started[](https://devdocs.prestashop-project.org/8/modules/creation/#getting-started)
==============================================================================================
If you want to get started quickly with a ready-to-use module template, you can use [PrestaShop Validator’s Module Generator](https://validator.prestashop.com/generator)
. It provides an easy way to generate a module, including the basic structure, customized default properties, and most common use cases covered (hook, upgrade…).
Other skeletons have been created to help you create specific modules:
* [Skeleton of a Payment module for PrestaShop 1.7](https://github.com/PrestaShop/paymentexample)
* [Skeleton of a module using CQRS feature](https://github.com/friends-of-presta/demo-cqrs-hooks-usage-module)
([More details about CQRS](https://devdocs.prestashop-project.org/8/development/architecture/domain/)
)
In this section[](https://devdocs.prestashop-project.org/8/modules/creation/#in-this-section)
----------------------------------------------------------------------------------------------
* [Tutorial: Creating your first module](https://devdocs.prestashop-project.org/8/modules/creation/tutorial/)
* [Folder structure](https://devdocs.prestashop-project.org/8/modules/creation/module-file-structure/)
* [Adding a configuration page (Legacy architecture)](https://devdocs.prestashop-project.org/8/modules/creation/adding-configuration-page/)
* [Modern configuration page](https://devdocs.prestashop-project.org/8/modules/creation/adding-configuration-page-modern/)
* [Displaying content on the front office](https://devdocs.prestashop-project.org/8/modules/creation/displaying-content-in-front-office/)
* [Enabling the Auto-Update](https://devdocs.prestashop-project.org/8/modules/creation/enabling-auto-update/)
* [Module translation](https://devdocs.prestashop-project.org/8/modules/creation/module-translation/)
* [Good practices for developing modules](https://devdocs.prestashop-project.org/8/modules/creation/good-practices/)
* [Interacting with APIs](https://devdocs.prestashop-project.org/8/modules/creation/external-services/)
---
# Extension concepts :: PrestaShop Developer Documentation
[Improve this page](https://github.com/PrestaShop/docs/edit/1.7.x/modules/concepts/_index.md "Improve this page")
[How](https://devdocs.prestashop-project.org/9/contribute/documentation/how)
**Warning:** You are browsing the documentation for PrestaShop 1.7, which is outdated.
You might want to read an updated version of this page for the current version, PrestaShop 9. [Read the updated version of this page](https://devdocs.prestashop-project.org/9/modules/concepts/)
[Learn how to update to the latest version.](https://devdocs.prestashop-project.org/9/basics/keeping-up-to-date/update)
Extension concepts[](https://devdocs.prestashop-project.org/1.7/modules/concepts/#extension-concepts)
======================================================================================================
* [Hooks](https://devdocs.prestashop-project.org/1.7/modules/concepts/hooks/)
* [Widgets](https://devdocs.prestashop-project.org/1.7/modules/concepts/widgets/)
* [Controllers](https://devdocs.prestashop-project.org/1.7/modules/concepts/controllers/)
* [Forms](https://devdocs.prestashop-project.org/1.7/modules/concepts/forms/)
* [Templating](https://devdocs.prestashop-project.org/1.7/modules/concepts/templating/)
* [Doctrine](https://devdocs.prestashop-project.org/1.7/modules/concepts/doctrine/)
* [Overrides](https://devdocs.prestashop-project.org/1.7/modules/concepts/overrides/)
* [External dependencies & autoload with Composer](https://devdocs.prestashop-project.org/1.7/modules/concepts/composer/)
* [Services](https://devdocs.prestashop-project.org/1.7/modules/concepts/services/)
* [Symfony extension concepts](https://devdocs.prestashop-project.org/1.7/modules/concepts/symfony/)
* [Commands](https://devdocs.prestashop-project.org/1.7/modules/concepts/commands/)
* [Pdf Files](https://devdocs.prestashop-project.org/1.7/modules/concepts/pdf/)
* [Mail Templates](https://devdocs.prestashop-project.org/1.7/modules/concepts/mail-templates/)
* [Module class reference](https://devdocs.prestashop-project.org/1.7/modules/concepts/module-class/)
* [Multistore](https://devdocs.prestashop-project.org/1.7/modules/concepts/multistore/)
* [Webservice](https://devdocs.prestashop-project.org/1.7/modules/concepts/webservice/)
[Next: Hooks ›](https://devdocs.prestashop-project.org/1.7/modules/concepts/hooks/ "Hooks")
---
# Shops configuration :: PrestaShop Developer Documentation
[Improve this page](https://github.com/PrestaShop/docs/edit/9.x/development/multistore/shops-configuration/_index.md "Improve this page")
[How](https://devdocs.prestashop-project.org/9/contribute/documentation/how)
Table of Contents
[Next article](https://devdocs.prestashop-project.org/9/development/multistore/configuration-forms/ "Configuration forms")
Fetching shop configuration values in multistore context[](https://devdocs.prestashop-project.org/9/development/multistore/shops-configuration/#fetching-shop-configuration-values-in-multistore-context)
==========================================================================================================================================================================================================
When multistore is disabled and you fetch a configuration value, you are in a **single store context**, so you are fetching configuration values of your only store. All you have to do is use the **legacy configuration adapter** (more on that later).
But what if you want to fetch a configuration value with more than one activated shop? This is where the **ShopConstraint** value object (VO) comes in handy, this is what you will use in order to specify which store(s) configuration value you are targeting.
If you don’t know what is a value object, you will find out about it and its use in the [value objects](https://devdocs.prestashop-project.org/9/development/architecture/domain/value_objects/)
documentation.
Usage[](https://devdocs.prestashop-project.org/9/development/multistore/shops-configuration/#usage)
----------------------------------------------------------------------------------------------------
In order to fetch a configuration value in multistore context, you will need the legacy configuration adapter service `prestashop.adapter.legacy.configuration` and a ShopConstraint instance `PrestaShop\PrestaShop\Core\Domain\Shop\ValueObject\ShopConstraint`.
Example:
get('prestashop.adapter.legacy.configuration');
// Instantiate a ShopConstraint value object
$shopConstraint = new ShopConstraint(
(int) $order->id_shop,
(int) $order->id_shop_group
);
// Get the needed configuration value, passing your ShopConstraint object as a third parameter
$roundType = (int) $configuration->get('PS_ROUND_TYPE', null, $shopConstraint);
// ...
}
}
Note that the ShopConstraint VO is not solely dedicated to being used with the configuration service. If you write a method/function that should have different behaviors depending on a given shop / shop group, then using the ShopConstraint VO is a good idea.
Fetched configuration values depending on context[](https://devdocs.prestashop-project.org/9/development/multistore/shops-configuration/#fetched-configuration-values-depending-on-context)
--------------------------------------------------------------------------------------------------------------------------------------------------------------------------------------------
This is how configuration values are stored in database, depending on the current shop context (in the table `ps_configuration`):
| Current context | configuration name | id\_shop | id\_shop\_group | value |
| --- | --- | --- | --- | --- |
| All shops context | PS\_SHOP\_ENABLE | NULL | NULL | ‘all shops value’ |
| Group shop context (ex: shop group’s id is 2) | PS\_SHOP\_ENABLE | NULL | 2 | ‘group shop value’ |
| Single shop context (ex: shop’s id is 3 and its group id is 2 ) | PS\_SHOP\_ENABLE | 3 | 2 | ‘single shop value’ |
Note that setting the value of a parent context does not override the values for children contexts that were set before. For example, if a configuration value is set for a **single shop**, setting a configuration value in **all shops context** will not override it.
When fetching a configuration value, the configuration service will look for the corresponding value for the current context, if there is none, you will get the configuration value for the next parent context having a configuration value, it goes from the most precise to the most generic context:
**Single shop => Group shop => All shops**
For example, if you are in single shop context but no configuration value is set for this shop, then if there is a configuration value for the shop group, you will get it, otherwise you will get the “all shops” value as a default.
---
# Configuration forms :: PrestaShop Developer Documentation
[Improve this page](https://github.com/PrestaShop/docs/edit/9.x/development/multistore/configuration-forms/_index.md "Improve this page")
[How](https://devdocs.prestashop-project.org/9/contribute/documentation/how)
Table of Contents
[Next article](https://devdocs.prestashop-project.org/9/testing/ "Testing")
Configuration forms in multistore context[](https://devdocs.prestashop-project.org/9/development/multistore/configuration-forms/#configuration-forms-in-multistore-context)
============================================================================================================================================================================
The Back Office contains multiple configuration forms that control settings of the shop. When multistore is enabled, Back Office user must be able to modify these settings either for all shops, for a group of shop or for a single shop.
Migrated configuration forms can display a checkbox before fields in order to specify if the configuration value is set for the current context shop/group, or if it is a value inherited from all contexts, or from a shop group. It will also display a dropdown at the right of the field, telling you whether this field is customized or inherits its value from its parent context. Here is how it looks like:
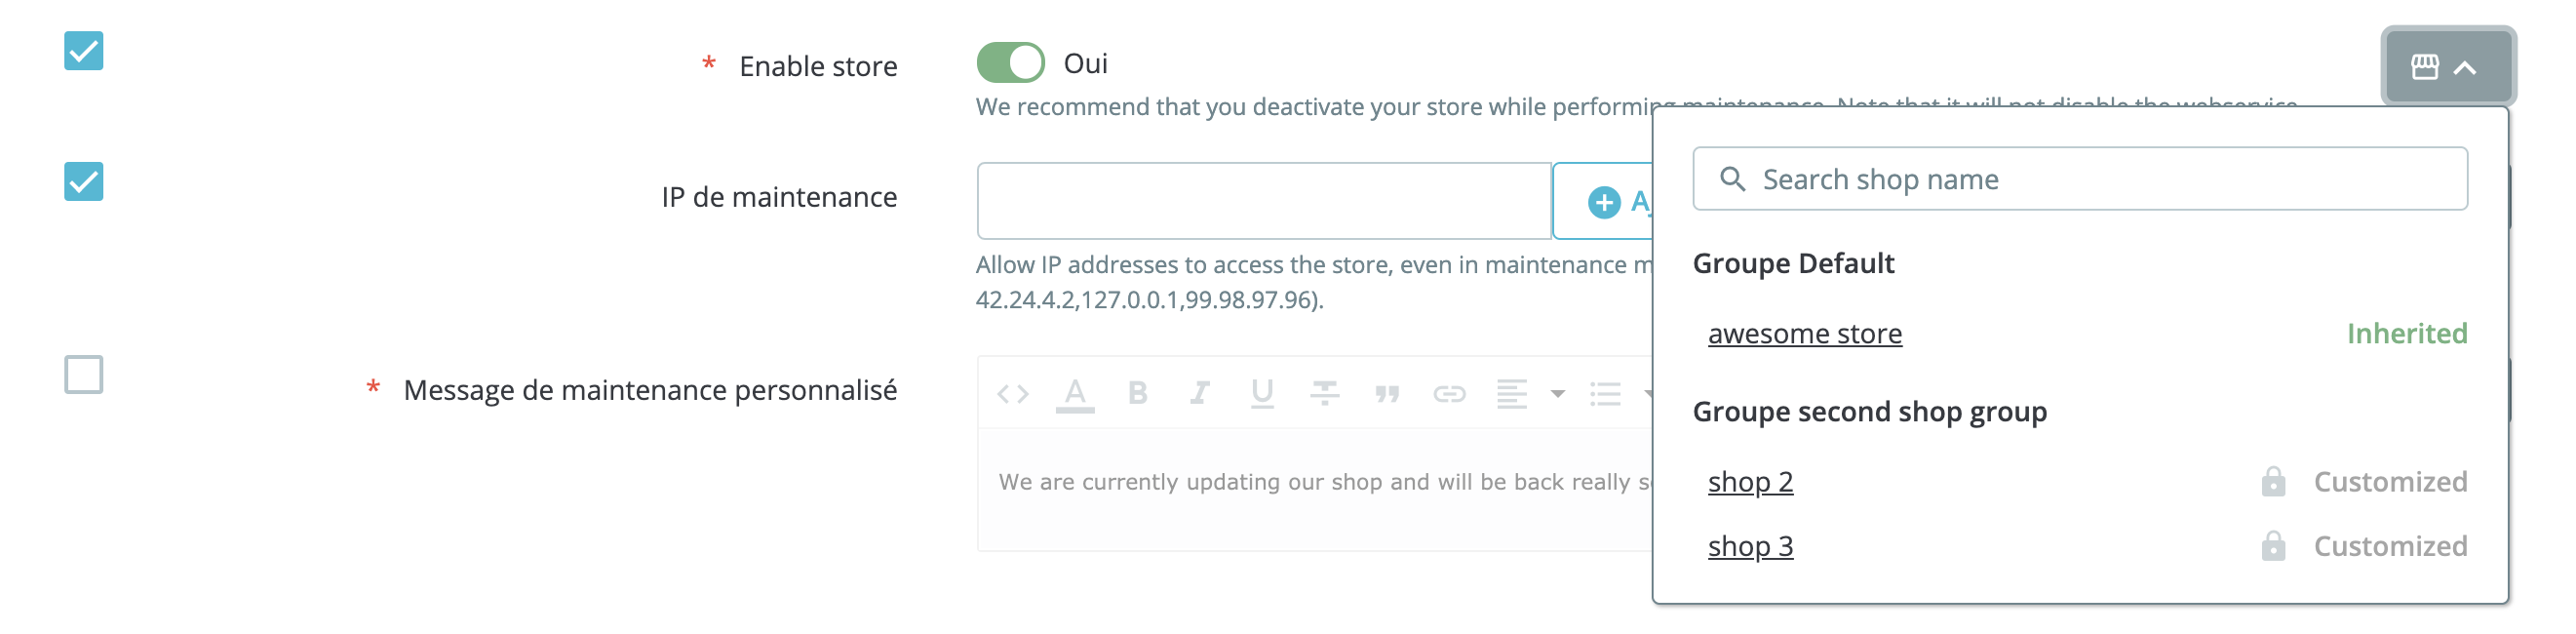
#### Multistore configuration form dropdown
If you are building a configuration form and you want the form to be aware of the current multistore context, then you must make your form compatible with multistore checkboxes. This is made possible thanks to [Symfony’s form extensions mechanism](https://symfony.com/doc/4.4/form/create_form_type_extension.html)
.
Creating a multistore compatible configuration form[](https://devdocs.prestashop-project.org/9/development/multistore/configuration-forms/#creating-a-multistore-compatible-configuration-form)
------------------------------------------------------------------------------------------------------------------------------------------------------------------------------------------------
You will find a concrete example of how a configuration form is made multistore-compatible [on this github pull-request](https://github.com/PrestaShop/PrestaShop/pull/24393)
.
A Symfony form extension called `MultistoreConfigurationTypeExtension` has been created in order to make it easy to add multistore checkboxes to a configuration form.
In order to extend this form extension, your Symfony form type must implement a `getParent()` method returning `MultistoreConfigurationType::class`.
add(
'my_field',
SwitchType::class,
[\
'required' => true,\
// Here we add the multistore_configuration_key option with the configuration key it is linked to.\
'multistore_configuration_key' => 'THE_CONFIGURATION_KEY',\
// ...\
]
)
// ...
Last but not least, you must make the frontend aware of these state modifications, you need to add the `MultistoreConfigField` in your javascript:
window.prestashop.component.initComponents(
[\
'MultistoreConfigField',\
],
);
Doing this will have several effects:
* Each field having the `multistore_configuration_key` option will have a multistore checkbox on its left and a multistore dropdown on its right;
* Checkboxes will automatically be checked or not depending on the configuration for the current shop context;
* When the configuration value is inherited, the checkbox will be unchecked, and the field will be disabled and greyed out;
* Thanks to the javascript component, checking or unchecking a checkbox will enable/disable the field for the current shop context.
Saving data from a multistore configuration form[](https://devdocs.prestashop-project.org/9/development/multistore/configuration-forms/#saving-data-from-a-multistore-configuration-form)
------------------------------------------------------------------------------------------------------------------------------------------------------------------------------------------
When receiving the data from the form, you will also receive values from the multistore checkboxes that were added to your form:
* When a multistore checkbox is pushed unchecked, we want to delete the configuration value for the current context (so that it inherits its value from parent contexts).
* When a multistore checkbox is pushed checked, we want to save the configuration value for the current context.
When your configuration form is multistore compatible, your configuration class should extend the `AbstractMultistoreConfiguration` abstract class instead of directly implementing the `DataConfigurationInterface` interface. This will give you access to helper methods that will make it easy to store the right configuration values at the right place and for the right context.
The two helper methods are
* **`getShopConstraint()`:** this will give you a ShopConstraint object reflecting the current context or null
public function getShopConstraint(): ?ShopConstraint
* **`updateConfigurationValue()`:** this will save or delete the configuration value for the given configuration key, and is aware of the multistore checkbox and the current shop context. Note that this helper method is fully compatible with not-multistore fields.
public function updateConfigurationValue(string $configurationKey, string $fieldName, array $input, ?ShopConstraint $shopConstraint, array $options = []): void
As an example, see how it is used in the `MaintenanceConfiguration` class
getShopConstraint();
// note that $configurationInputValues is an associative array where keys are field names and values are field values, it's the data coming from the form
$this->updateConfigurationValue('PS_SHOP_ENABLE', 'enable_shop', $configurationInputValues, $shopConstraint);
$this->updateConfigurationValue('PS_MAINTENANCE_IP', 'maintenance_ip', $configurationInputValues, $shopConstraint);
$this->updateConfigurationValue('PS_MAINTENANCE_TEXT', 'maintenance_text', $configurationInputValues, $shopConstraint, ['html' => true]);
return [];
}
}
As you can see, by using these two helper methods you can easily store your configuration values in a multistore context.
---
# Shops context :: PrestaShop Developer Documentation
[Improve this page](https://github.com/PrestaShop/docs/edit/9.x/development/multistore/shop-context/_index.md "Improve this page")
[How](https://devdocs.prestashop-project.org/9/contribute/documentation/how)
Table of Contents
[Next article](https://devdocs.prestashop-project.org/9/development/multistore/shops-configuration/ "Shops configuration")
Shop context[](https://devdocs.prestashop-project.org/9/development/multistore/shop-context/#shop-context)
===========================================================================================================
In many cases, your code will need to know if the multistore mode is enabled, if there are more than one shop activated, and if yes, what is the current shop context. This is where the shop context and multistore feature adapters will come in handy.
The multistore feature adapter[](https://devdocs.prestashop-project.org/9/development/multistore/shop-context/#the-multistore-feature-adapter)
-----------------------------------------------------------------------------------------------------------------------------------------------
**Service identifier:** `prestashop.adapter.feature.multistore` (it takes the legacy configuration adapter as a parameter)
**Class:** `PrestaShop\PrestaShop\Adapter\Feature\MultistoreFeature`
The multistore feature adapter can be used to:
* detect if multistore was enabled in the configuration,
* detect if multistore is active (if it is enabled, and if there are more than one active shop),
* enable/disable the multistore feature.
Example:
get('prestashop.adapter.feature.multistore');
// Is the multistore feature enabled?
$isMultistoreEnabled = $multistoreFeature->isActive();
// This will check that multistore is enabled AND that there are at least two active shops
$isMultistoreUsed = $multistoreFeature->isUsed();
// Disable / enable multistore feature
$multistoreFeature->disable();
$multistoreFeature->enable();
The shop context adapter[](https://devdocs.prestashop-project.org/9/development/multistore/shop-context/#the-shop-context-adapter)
-----------------------------------------------------------------------------------------------------------------------------------
**Service identifier:** `prestashop.adapter.shop.context`
**Class:** `PrestaShop\PrestaShop\Adapter\Shop\Context`
When the multistore feature is enabled, at the top of all Back Office pages, a dropdown is displayed. It allows selecting the shop context we want (all shops, a group shop, a single shop). The shop context adapter will tell you in what context your code is operating.
Here are some examples of commonly used functions in the shop context adapter:
get('prestashop.adapter.shop.context');
// Get a list of all active shops
$shopList = $shopContext->getShops(false, true);
// Is the current context a group of shops?
$isShopGroupContext = $shopContext->isShopGroupContext();
// Is the current context a single shop?
$isSingleShopContext = $shopContext->isSingleShopContext();
// Is "all shops" context
$isAllShopContext = $shopContext->isAllContext();
// Get a list of IDs for all shops belonging to the current context (useful is the current context is a group)
$shopList = $shopContext->getContextListShopID();
// Get the id of the shop in the current context (useful if the current context is a single shop)
$currentIdShop = $shopContext->getContextShopID();
The shop context adapter class has many functions with self-explanatory naming and helpful comments, feel free to [explore it by yourself](https://github.com/PrestaShop/PrestaShop/blob/8.0.x/src/Adapter/Shop/Context.php)
.
---
# Adding a configuration page (Legacy architecture) :: PrestaShop Developer Documentation
[Improve this page](https://github.com/PrestaShop/docs/edit/8.x/modules/creation/adding-configuration-page.md "Improve this page")
[How](https://devdocs.prestashop-project.org/9/contribute/documentation/how)
Table of Contents
[Next article](https://devdocs.prestashop-project.org/8/modules/creation/adding-configuration-page-modern/ "Modern configuration page")
**Warning:** You are browsing the documentation for PrestaShop 8, which is outdated.
You might want to read an updated version of this page for the current version, PrestaShop 9. [Read the updated version of this page](https://devdocs.prestashop-project.org/9/modules/creation/adding-configuration-page/)
[Learn how to update to the latest version.](https://devdocs.prestashop-project.org/9/basics/keeping-up-to-date/update)
Adding a configuration page[](https://devdocs.prestashop-project.org/8/modules/creation/adding-configuration-page/#adding-a-configuration-page)
================================================================================================================================================
Learn [how to create a configuration page with Symfony forms](https://devdocs.prestashop-project.org/8/modules/creation/adding-configuration-page-modern/)
.
This guide is about the legacy way of creating configuration pages for modules using `HelperForm`.
Modules usually provide a dedicated configuration page, accessible through a “Configure” button in the Module Manager list, that allows the shop’s administrator to set up any options provided by the module.
In difference with other [controllers](https://devdocs.prestashop-project.org/8/modules/concepts/controllers/)
, the content of configuration page is handled directly in the module’s main class by the `getContent()` public method. PrestaShop will check if this method exists and will only display the “Configure” button if this method is declared.
In the following example we will implement a minimalistic configuration page that displays a form allowing the user to edit the content of the `MYMODULE_CONFIG` [Configuration](https://devdocs.prestashop-project.org/8/development/components/configuration/)
variable.
The `getContent()` method[](https://devdocs.prestashop-project.org/8/modules/creation/adding-configuration-page/#the-getcontent-method)
----------------------------------------------------------------------------------------------------------------------------------------
First, let’s have a look at our `getContent()` method:
/**
* This method handles the module's configuration page
* @return string The page's HTML content
*/
public function getContent()
{
$output = '';
// this part is executed only when the form is submitted
if (Tools::isSubmit('submit' . $this->name)) {
// retrieve the value set by the user
$configValue = (string) Tools::getValue('MYMODULE_CONFIG');
// check that the value is valid
if (empty($configValue) || !Validate::isGenericName($configValue)) {
// invalid value, show an error
$output = $this->displayError($this->l('Invalid Configuration value'));
} else {
// value is ok, update it and display a confirmation message
Configuration::updateValue('MYMODULE_CONFIG', $configValue);
$output = $this->displayConfirmation($this->l('Settings updated'));
}
}
// display any message, then the form
return $output . $this->displayForm();
}
The `getContent()` method is called when the configuration page is loaded. Therefore, we use it to both display a form and handle the action behind that form.
Here is a step by step explanation:
* `Tools::isSubmit()` is a PrestaShop-specific method that checks if a given form has been submitted. In this case, if the configuration form has not yet been sent, the whole `if()` block is skipped and PrestaShop will only use the last line, which displays the configuration form using current values, as generated by the `displayForm()` method.
* `Tools::getValue()` is another PrestaShop-specific method that retrieves the specified parameter from either POST or GET. In this case, we retrieve the value of the `MYMODULE_CONFIG` form field, turn its value into a text string using `(string)`, then store it in the `$configValue` variable.
* We then check that `$configValue` is not empty and valid. In this case, we decided that the configuration should not accept special characters, so we use `Validate::isGenericName()`. The `Validate` object contains many data validation methods, among which is `isGenericName()`, a method that helps you keep only strings that are valid PrestaShop names – meaning, a string that does not contain special characters.
* If any of these checks fail, the configuration will display an error message, indicating that the form validation failed. The `$output` variable, which contains the final rendition of the HTML code that makes the configuration page, will begin with an error message, that we create using PrestaShop’s `displayError()` method. This method returns the correct HTML code for our need, and since that code is first in `$output`, this means the configuration will be displayed before any other content.
* If the checks are successful, this means we can store the value in our database. The `Configuration::updateValue()` method will store the new value for `MYMODULE_CONFIG` in the configuration database. After that, we want to add a friendly message to the user, indicating that the value has indeed been saved. To that end, we use PrestaShop’s `displayConfirmation()` method to add that message as the first data in the `$output` variable – and therefore, at the top of the page.
* Finally, we use the custom `displayForm()` method (explained in the next section) in order to build the form, that we want to render whether if it is submitted or not. Then we will send the resulting HTML code into `$output` so that we can render the page. Note that we could have included the code for `displayForm()` right within `getContent()`, but chose to separate the two for readability and separation of concerns.
This form-validation code is nothing new for PHP developers, but uses some of the PrestaShop methods that you will regularly use.
Displaying the form[](https://devdocs.prestashop-project.org/8/modules/creation/adding-configuration-page/#displaying-the-form)
--------------------------------------------------------------------------------------------------------------------------------
The configuration form itself is displayed with the `displayForm()` method. Here is its code, which we are going to explain after the jump:
/**
* Builds the configuration form
* @return string HTML code
*/
public function displayForm()
{
// Init Fields form array
$form = [\
'form' => [\
'legend' => [\
'title' => $this->l('Settings'),\
],\
'input' => [\
[\
'type' => 'text',\
'label' => $this->l('Configuration value'),\
'name' => 'MYMODULE_CONFIG',\
'size' => 20,\
'required' => true,\
],\
],\
'submit' => [\
'title' => $this->l('Save'),\
'class' => 'btn btn-default pull-right',\
],\
],\
];
$helper = new HelperForm();
// Module, token and currentIndex
$helper->table = $this->table;
$helper->name_controller = $this->name;
$helper->token = Tools::getAdminTokenLite('AdminModules');
$helper->currentIndex = AdminController::$currentIndex . '&' . http_build_query(['configure' => $this->name]);
$helper->submit_action = 'submit' . $this->name;
// Default language
$helper->default_form_language = (int) Configuration::get('PS_LANG_DEFAULT');
// Load current value into the form
$helper->fields_value['MYMODULE_CONFIG'] = Tools::getValue('MYMODULE_CONFIG', Configuration::get('MYMODULE_CONFIG'));
return $helper->generateForm([$form]);
}
While this might look like a huge block of code for a single form field, this block actually uses some of PrestaShop’s methods that make it easier to build forms, most notably the `HelperForm` object.
Let’s run down this method:
* In preparation for the generation of the form, we create the `$form` variable, which contains the definition of the various elements (fields, labels, etc) the form will contain. From this variable, PrestaShop will render the HTML form as it is described.
In this example, we define three sections (`legend`, `input` and `submit`) and their properties using arrays. The format is quite straightforward: the `legend` and `submit` arrays simply contain the attributes to each tag, while the `input` array contains as many input elements as needed, each being in turn an array containing the necessary attributes.
For instance:
'input' => [\
[\
'type' => 'text',\
'label' => $this->l('Configuration value'),\
'name' => 'MYMODULE_CONFIG',\
'size' => 20,\
'required' => true,\
]\
]
…generates the following HTML:
As you can see, PrestaShop is quite clever, and will generate all the code that is needed to obtain a useful form.
* We then create an instance of the `HelperForm` class.
* Once all `HelperForm` settings have been configured, we generate the form based on the content of the `$form` variable using `generateForm()`.
### Understanding HelperForm[](https://devdocs.prestashop-project.org/8/modules/creation/adding-configuration-page/#understanding-helperform)
The [HelperForm component](https://devdocs.prestashop-project.org/8/development/components/helpers/helperform/)
enables you to generate standard HTML elements for the back office as well as for module configuration pages.
Our example uses several of `HelperForm`’s attributes; they need to be set before we can generate the form using the `$form` variable:
* `$helper->table` takes the module’s table. `$this->table` set to “modules” by default for all modules.
* `$helper->name_controller` requires the name of the module.
* `$helper->token` is the Back office CSRF token that will be appended to the form’s action. `getAdminTokenLite()` helps us generate one.
* `$helper->currentIndex` expects the URL where the form will be sent to. We use the same URL as the form.
* `$helper->submit_action` is the name of the hidden input sent with the form, which we will later use to tell if the form has been submitted.
* `$helper->default_form_language` requires the shop’s default language id, in case we used multi language features.
* `$helper->fields_value[]` is used to fill out the form fields.
The `generateForm()` method takes care of putting it all together and, as its name says, generates the form that the user will use to configure the module’s settings.
Here is the rendition of the form as it is presently written – which you can see by yourself by clicking on the “Configure” link for the module in the back office:
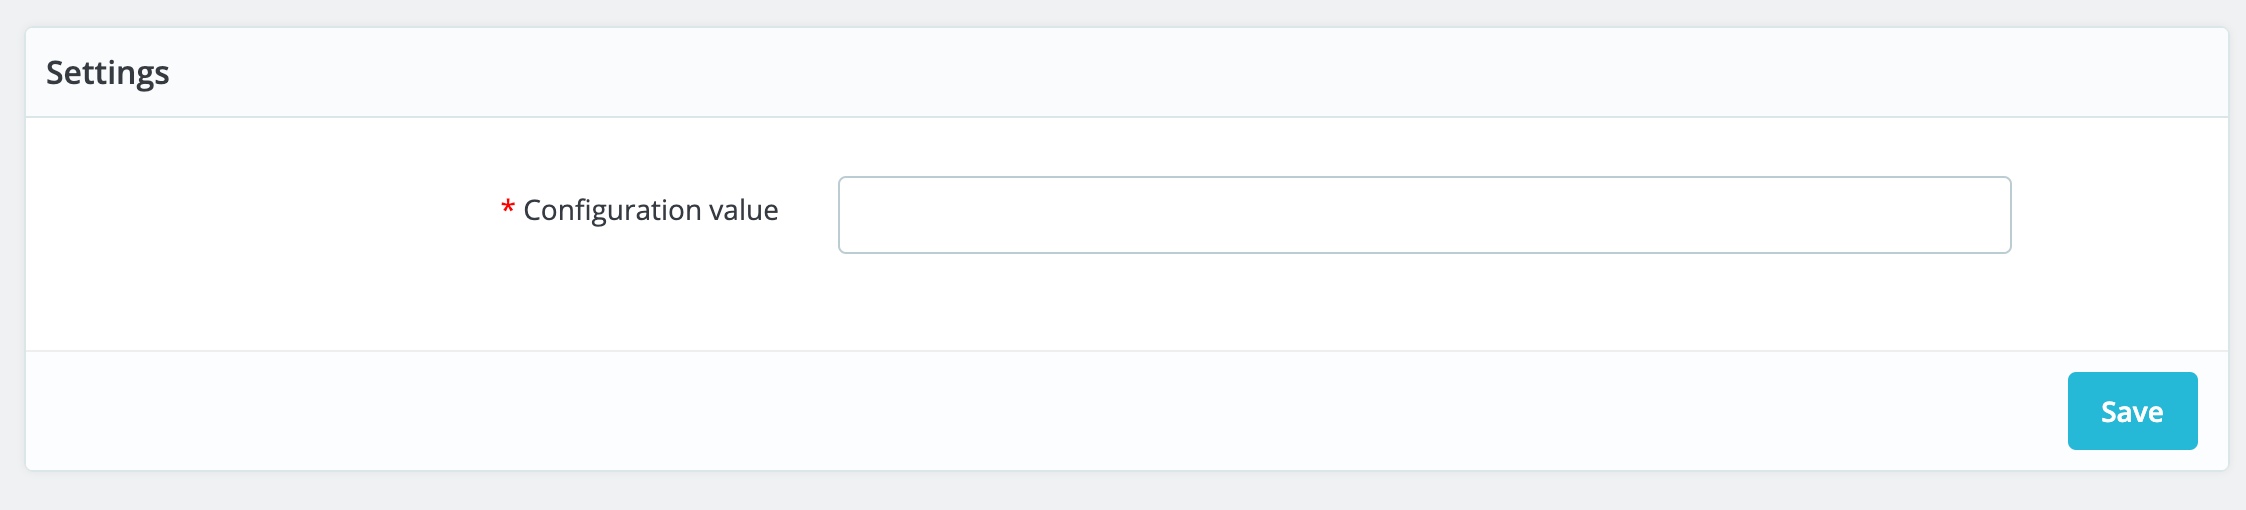
Change the value to whichever you like, click on the “Save” button, then go reload the homepage: the form is indeed updated with the new string!
---
# Testing :: PrestaShop Developer Documentation
[Improve this page](https://github.com/PrestaShop/docs/edit/9.x/testing/_index.md "Improve this page")
[How](https://devdocs.prestashop-project.org/9/contribute/documentation/how)
### Chapter 3[](https://devdocs.prestashop-project.org/9/testing/#chapter-3)
Testing[](https://devdocs.prestashop-project.org/9/testing/#testing)
=====================================================================
How testing works in PrestaShop[](https://devdocs.prestashop-project.org/9/testing/#how-testing-works-in-prestashop)
=====================================================================================================================
PrestaShop is a complex software and uses automated testing to ensure that the new additions to the codebase do not break existing behaviors.
Automated tests are located in `tests` folders
What kind of tests does PrestaShop use?[](https://devdocs.prestashop-project.org/9/testing/#what-kind-of-tests-does-prestashop-use)
------------------------------------------------------------------------------------------------------------------------------------
In the `tests` folder, you will find:
* [Integration tests](https://devdocs.prestashop-project.org/9/testing/integration-tests/)
* [Unit tests](https://devdocs.prestashop-project.org/9/testing/unit-tests/)
* [User interface tests](https://devdocs.prestashop-project.org/9/testing/ui-tests/)
[Next: Integration tests ›](https://devdocs.prestashop-project.org/9/testing/integration-tests/ "Integration tests")
---
# Modern configuration page :: PrestaShop Developer Documentation
[Improve this page](https://github.com/PrestaShop/docs/edit/8.x/modules/creation/adding-configuration-page-modern.md "Improve this page")
[How](https://devdocs.prestashop-project.org/9/contribute/documentation/how)
Table of Contents
[Next article](https://devdocs.prestashop-project.org/8/modules/creation/displaying-content-in-front-office/ "Displaying content on the front office")
**Warning:** You are browsing the documentation for PrestaShop 8, which is outdated.
You might want to read an updated version of this page for the current version, PrestaShop 9. [Read the updated version of this page](https://devdocs.prestashop-project.org/9/modules/creation/adding-configuration-page-modern/)
[Learn how to update to the latest version.](https://devdocs.prestashop-project.org/9/basics/keeping-up-to-date/update)
Adding a configuration page with Symfony forms[](https://devdocs.prestashop-project.org/8/modules/creation/adding-configuration-page-modern/#adding-a-configuration-page-with-symfony-forms)
=============================================================================================================================================================================================
With the new Symfony architecture, [there is a much modern way of integrating settings forms](https://devdocs.prestashop-project.org/8/development/architecture/migration-guide/forms/settings-forms/)
(`Configure` action) for your modules.
In the first part of this guide, we will explain how to implement such a mechanism in a module. We will create a module with a dedicated configuration page consisting of a simple configuration field.
**Summary:**
Create the base module[](https://devdocs.prestashop-project.org/8/modules/creation/adding-configuration-page-modern/#create-the-base-module)
---------------------------------------------------------------------------------------------------------------------------------------------
[Following this guide](https://devdocs.prestashop-project.org/8/modules/creation/tutorial/)
, create a base module. For our example, the base module is:
name = 'demosymfonyformsimple';
$this->author = 'PrestaShop';
$this->version = '1.0.0';
$this->need_instance = 0;
$this->bootstrap = true;
parent::__construct();
$this->displayName = $this->trans('Demo of the Symfony-based configuration form', [], 'Modules.Demosymfonyformsimple.Admin');
$this->description = $this->trans(
'Module demonstrates a simple module\'s configuration page made with Symfony.',
[],
'Modules.Demosymfonyformsimple.Admin'
);
$this->ps_versions_compliancy = ['min' => '8.0.0', 'max' => '8.99.99'];
}
}
Then, create a `composer.json` file in your module, and register your namespace:
{
"name": "prestashop/demosymfonyformsimple",
"description": "PrestaShop - Settings Form Examples",
"license": "AFL-3.0",
"authors": [\
{\
"name": "PrestaShop Core Team"\
}\
],
"autoload": {
"psr-4": {
"PrestaShop\\Module\\DemoSymfonyFormSimple\\": "src/"
}
},
"require": {
"php": ">=7.1.0"
},
"config": {
"preferred-install": "dist",
"prepend-autoloader": false
},
"type": "prestashop-module"
}
Then, run `composer dump-autoload` from the module’s directory to generate the `autoload.php` file. See [Setup composer in a module](https://devdocs.prestashop-project.org/8/modules/concepts/composer/#autoloading)
for more informations.
Create the configuration form type[](https://devdocs.prestashop-project.org/8/modules/creation/adding-configuration-page-modern/#create-the-configuration-form-type)
---------------------------------------------------------------------------------------------------------------------------------------------------------------------
First thing to create is the form type for our configuration form.
Create a `DemoConfigurationFormType.php` file in `src/Form`.
add('config_text', TextType::class, [\
'label' => $this->trans('Configuration text', 'Modules.Demosymfonyformsimple.Admin'),\
'help' => $this->trans('Maximum 32 characters', 'Modules.Demosymfonyformsimple.Admin'),\
]);
}
}
This form has only one setting : `config_text`, of type `Symfony\Component\Form\Extension\Core\Type\TextType`.
### Register your newly created form type[](https://devdocs.prestashop-project.org/8/modules/creation/adding-configuration-page-modern/#register-your-newly-created-form-type)
Create a `services.yml` file in `config/`.
services:
_defaults:
public: true
# Demo configuration text form
prestashop.module.demosymfonyformsimple.form.type.demo_configuration_text:
class: 'PrestaShop\Module\DemoSymfonyFormSimple\Form\DemoConfigurationFormType'
parent: 'form.type.translatable.aware'
public: true
tags:
- { name: form.type }
This `services.yml` file is registering your `PrestaShop\Module\DemoSymfonyFormSimple\Form\DemoConfigurationFormType` class as `prestashop.module.demosymfonyformsimple.form.type.demo_configuration_text`. It also add a tag `name: form.type`, and declares it as `public`.
You can read more about services in the [official Symfony official documentation](https://symfony.com/doc/4.4/service_container.html)
Create the Data configuration[](https://devdocs.prestashop-project.org/8/modules/creation/adding-configuration-page-modern/#create-the-data-configuration)
-----------------------------------------------------------------------------------------------------------------------------------------------------------
Create a `DemoConfigurationTextDataConfiguration.php` file in `src/Form`.
configuration = $configuration;
}
public function getConfiguration(): array
{
$return = [];
$return['config_text'] = $this->configuration->get(static::DEMO_SYMFONY_FORM_SIMPLE_TEXT_TYPE);
return $return;
}
public function updateConfiguration(array $configuration): array
{
$errors = [];
if ($this->validateConfiguration($configuration)) {
if (strlen($configuration['config_text']) <= static::CONFIG_MAXLENGTH) {
$this->configuration->set(static::DEMO_SYMFONY_FORM_SIMPLE_TEXT_TYPE, $configuration['config_text']);
} else {
$errors[] = 'DEMO_SYMFONY_FORM_SIMPLE_TEXT_TYPE value is too long';
}
}
/* Errors are returned here. */
return $errors;
}
/**
* Ensure the parameters passed are valid.
*
* @return bool Returns true if no exception are thrown
*/
public function validateConfiguration(array $configuration): bool
{
return isset($configuration['config_text']);
}
}
`DemoConfigurationTextDataConfiguration` maps the `config_text` from the Form Type to the `DEMO_SYMFONY_FORM_SIMPLE_TEXT_TYPE` configuration data key.
### Register the Data configuration[](https://devdocs.prestashop-project.org/8/modules/creation/adding-configuration-page-modern/#register-the-data-configuration)
In `config/services.yml`, register your newly created `DemoConfigurationTextDataConfiguration`:
prestashop.module.demosymfonyformsimple.form.demo_configuration_text_data_configuration:
class: PrestaShop\Module\DemoSymfonyFormSimple\Form\DemoConfigurationTextDataConfiguration
arguments: ['@prestashop.adapter.legacy.configuration']
Create the form data provider[](https://devdocs.prestashop-project.org/8/modules/creation/adding-configuration-page-modern/#create-the-form-data-provider)
-----------------------------------------------------------------------------------------------------------------------------------------------------------
Create a `DemoConfigurationTextFormDataProvider.php` file in `src/Form`.
demoConfigurationTextDataConfiguration = $demoConfigurationTextDataConfiguration;
}
public function getData(): array
{
return $this->demoConfigurationTextDataConfiguration->getConfiguration();
}
public function setData(array $data): array
{
return $this->demoConfigurationTextDataConfiguration->updateConfiguration($data);
}
}
### Register the form data provider[](https://devdocs.prestashop-project.org/8/modules/creation/adding-configuration-page-modern/#register-the-form-data-provider)
In `config/services.yml`, register your newly created `DemoConfigurationTextFormDataProvider`:
prestashop.module.demosymfonyformsimple.form.demo_configuration_text_form_data_provider:
class: 'PrestaShop\Module\DemoSymfonyFormSimple\Form\DemoConfigurationTextFormDataProvider'
arguments:
- '@prestashop.module.demosymfonyformsimple.form.demo_configuration_text_data_configuration'
Create and register the form handler[](https://devdocs.prestashop-project.org/8/modules/creation/adding-configuration-page-modern/#create-and-register-the-form-handler)
-------------------------------------------------------------------------------------------------------------------------------------------------------------------------
For this form handler, we don’t need to create a new class, we can use PrestaShop native’s one.
By receiving an instance of `DemoConfigurationTextFormDataProvider` and `DemoConfigurationFormType`, the PrestaShop native Form Handler is able to process the data it receives.
Simply register it in `config/services.yml`:
prestashop.module.demosymfonyformsimple.form.demo_configuration_text_form_data_handler:
class: 'PrestaShop\PrestaShop\Core\Form\Handler'
arguments:
- '@form.factory'
- '@prestashop.core.hook.dispatcher'
- '@prestashop.module.demosymfonyformsimple.form.demo_configuration_text_form_data_provider'
- 'PrestaShop\Module\DemoSymfonyFormSimple\Form\DemoConfigurationFormType'
- 'DemoConfiguration'
Create the form templates[](https://devdocs.prestashop-project.org/8/modules/creation/adding-configuration-page-modern/#create-the-form-templates)
---------------------------------------------------------------------------------------------------------------------------------------------------
Create a `form.html.twig` file in `views/templates/admin`.
{% extends '@PrestaShop/Admin/layout.html.twig' %}
{% block content %}
{{ form_start(demoConfigurationForm) }}
settings {{ 'Text form types'|trans({}, 'Modules.Demosymfonyformsimple.Admin') }}
{{ form_widget(demoConfigurationForm) }}
{{ form_end(demoConfigurationForm) }}
{% endblock %}
Create the configuration controller[](https://devdocs.prestashop-project.org/8/modules/creation/adding-configuration-page-modern/#create-the-configuration-controller)
-----------------------------------------------------------------------------------------------------------------------------------------------------------------------
You will create a Controller to handle your requests on the configuration form.
Create a `DemoConfigurationController.php` file in `src/Controller`.
get('prestashop.module.demosymfonyformsimple.form.demo_configuration_text_form_data_handler');
$textForm = $textFormDataHandler->getForm();
$textForm->handleRequest($request);
if ($textForm->isSubmitted() && $textForm->isValid()) {
/** You can return array of errors in form handler and they can be displayed to user with flashErrors */
$errors = $textFormDataHandler->save($textForm->getData());
if (empty($errors)) {
$this->addFlash('success', $this->trans('Successful update.', 'Admin.Notifications.Success'));
return $this->redirectToRoute('demo_configuration_form_simple');
}
$this->flashErrors($errors);
}
return $this->render('@Modules/demosymfonyformsimple/views/templates/admin/form.html.twig', [\
'demoConfigurationForm' => $textForm->createView()\
]);
}
}
You can read more about controllers in [controller & routing section](https://devdocs.prestashop-project.org/8/development/architecture/modern/controller-routing/)
and [in the official Symfony documentation](https://symfony.com/doc/4.4/controller.html)
### Create a route for the configuration controller[](https://devdocs.prestashop-project.org/8/modules/creation/adding-configuration-page-modern/#create-a-route-for-the-configuration-controller)
Create a `routes.yml` file in `config/`.
demo_configuration_form_simple:
path: /demosymfonyformsimple/configuration
methods: [GET, POST]
defaults:
_controller: 'PrestaShop\Module\DemoSymfonyFormSimple\Controller\DemoConfigurationController::index'
# Needed to work with tab system
_legacy_controller: AdminDemoSymfonyFormSimple
_legacy_link: AdminDemoSymfonyFormSimple
Add this route to the getContent() method of the module[](https://devdocs.prestashop-project.org/8/modules/creation/adding-configuration-page-modern/#add-this-route-to-the-getcontent-method-of-the-module)
-------------------------------------------------------------------------------------------------------------------------------------------------------------------------------------------------------------
The `getContent()` method of a module is the method called when accessing the configuration page of the module.
Add this method to your module, with a redirection to the route previously registered.
public function getContent()
{
$route = $this->get('router')->generate('demo_configuration_form_simple');
Tools::redirectAdmin($route);
}
Install and enable your module[](https://devdocs.prestashop-project.org/8/modules/creation/adding-configuration-page-modern/#install-and-enable-your-module)
-------------------------------------------------------------------------------------------------------------------------------------------------------------
Go to the Back Office, and in Modules Manager, find your module and install it.
You can also install it via CLI:
php bin/console prestashop:module install demosymfonyformsimple
php bin/console prestashop:module enable demosymfonyformsimple
Navigate / test your configuration form[](https://devdocs.prestashop-project.org/8/modules/creation/adding-configuration-page-modern/#navigate--test-your-configuration-form)
------------------------------------------------------------------------------------------------------------------------------------------------------------------------------
Open your browser, and navigate to `Back Office > Modules`.
Then, find your module (`Demo symfony form configuration`), and click on the `Configure` button.
Complete example module[](https://devdocs.prestashop-project.org/8/modules/creation/adding-configuration-page-modern/#complete-example-module)
-----------------------------------------------------------------------------------------------------------------------------------------------
The module created in this guide is available [here](https://github.com/PrestaShop/example-modules/tree/8.x/demosymfonyformsimple)
.
Other form types[](https://devdocs.prestashop-project.org/8/modules/creation/adding-configuration-page-modern/#other-form-types)
---------------------------------------------------------------------------------------------------------------------------------
You can use all [native Symfony Form Types](https://symfony.com/doc/4.4/reference/forms/types.html)
, and the PrestaShop specific ones: [see Form Types reference](https://devdocs.prestashop-project.org/8/development/components/form/types-reference/)
.
Please refer to this example module for a complete implementation of those fields: [DemoSymfonyForm](https://github.com/PrestaShop/example-modules/tree/8.x/demosymfonyform)
### Required Javascript for some types[](https://devdocs.prestashop-project.org/8/modules/creation/adding-configuration-page-modern/#required-javascript-for-some-types)
Some types require JavaScript component initialization to work correctly.
Add a JS file to your form’s twig template:
{% block javascripts %}
{{ parent() }}
{% endblock %}
And add the following JavaScript code to this file:
$(document).ready(function () {
// Learn more about components in documentation
// https://devdocs.prestashop.com/8/development/components/global-components/
window.prestashop.component.initComponents(
[\
'TranslatableField',\
'TinyMCEEditor',\
'TranslatableInput',\
'GeneratableInput',\
'TextWithLengthCounter',\
],
);
window.prestashop.instance.generatableInput.attachOn('.js-generator-btn');
new window.prestashop.component.ChoiceTree('#form_category_choice_tree_type');
});
The JavaScript dependencies of specific types are [described in the form types reference](https://devdocs.prestashop-project.org/8/development/components/form/types-reference/)
You can check this module to see an example of using JavaScript components: [DemoSymfonyForm](https://github.com/PrestaShop/example-modules/tree/8.x/demosymfonyform)
---
# Asset management :: PrestaShop Developer Documentation
[Improve this page](https://github.com/PrestaShop/docs/edit/1.7.x/themes/getting-started/asset-management/_index.md "Improve this page")
[How](https://devdocs.prestashop-project.org/9/contribute/documentation/how)
Table of Contents
[Next article](https://devdocs.prestashop-project.org/1.7/themes/getting-started/asset-management/webpack/ "Webpack")
**Warning:** You are browsing the documentation for PrestaShop 1.7, which is outdated.
You might want to read an updated version of this page for the current version, PrestaShop 9. [Read the updated version of this page](https://devdocs.prestashop-project.org/9/themes/getting-started/asset-management/)
[Learn how to update to the latest version.](https://devdocs.prestashop-project.org/9/basics/keeping-up-to-date/update)
Asset Management[](https://devdocs.prestashop-project.org/1.7/themes/getting-started/asset-management/#asset-management)
=========================================================================================================================
PrestaShop 1.7 has significantly improved the way assets (CSS, JavaScript and image files) are managed.
We advise theme developers to compile most of their style and JavaScript code into a single concatenated/minified file (see the Webpack section below).
If you need to add special assets, for example an extra JavaScript library on the home page or the product page, there are a few ways to do so.
Your theme have to print assets correctly in the smarty template, and it’s explained in the [template section](https://devdocs.prestashop-project.org/1.7/themes/reference/templates/head/)
.
Registering assets[](https://devdocs.prestashop-project.org/1.7/themes/getting-started/asset-management/#registering-assets)
-----------------------------------------------------------------------------------------------------------------------------
In PrestaShop 1.7+, it’s easy to register custom assets on each pages. The major improvement is that you can easily manage them from your theme, without any modules.
We introduced new methods to register assets, and especially new cool options.
For instance, you can register your asset specifically in the head or bottom of your HTML code; you can load it with attributes like `async` or `defer`; and you can even inline it easily.
One favorite option is the priority one, which makes it very easy to ensure everything is loaded in the order you need.
Backward compatibility is kept for the `addJS()`, `addCSS()`, `addJqueryUI()` and `addJqueryPlugin()` methods. Incidentally, now is the best time to update your libraries and use the new method.
Here is a list of options, and what they do.
### Options[](https://devdocs.prestashop-project.org/1.7/themes/getting-started/asset-management/#options)
PrestaShop’s FrontController class provides 2 new methods to easily register new assets: `registerStylesheet()` and `registerJavascript()`.
In order to have the most extensible signatures, these 2 methods take 3 arguments. The first one is the unique ID of the asset, the second one is the relative path, and the third one is an array of all other optional parameters, as described below.
**ID**
This unique identifier needed for each asset. Reusing the same ID is useful to either override or unregister something already loaded by the Core or a native module.
However, avoid generic names when adding new JS and CSS files to avoid collision with other extensions. Prefixing with your module or theme name is a good start.
**Relative path**
This is the path of your asset. In order to make your assets fully overridable and compatible with the parent/child feature, you need to provide the path from the theme’s root directory, or PrestaShop’s root directory if it’s a module.
For example:
* ‘assets/css/example.css’ for something in your theme.
* ‘modules/modulename/css/example.css’ for something in your module.
**Extra parameters for stylesheet**
| | | |
| --- | --- | --- |
| Name | Values | Comment |
| media | all \| braille \| embossed \| handheld \| print \| projection \| screen \| speech \| tty \| tv (default: all) | \- |
| priority | 0-999 (default: 50) | 0 is the highest priority |
| inline | true \| false (default: false) | If true, your style will be printed inside the `