# Table of Contents
- [WHOOP Developer Platform | WHOOP for Developers](#whoop-developer-platform-whoop-for-developers)
- [WHOOP 101 | WHOOP for Developers](#whoop-101-whoop-for-developers)
- [Overview | WHOOP for Developers](#overview-whoop-for-developers)
- [Getting Started | WHOOP for Developers](#getting-started-whoop-for-developers)
- [API Rate Limiting | WHOOP for Developers](#api-rate-limiting-whoop-for-developers)
- [Webhooks | WHOOP for Developers](#webhooks-whoop-for-developers)
- [OAuth 2.0 | WHOOP for Developers](#oauth-2-0-whoop-for-developers)
- [Design Guidelines | WHOOP for Developers](#design-guidelines-whoop-for-developers)
- [Tutorials | WHOOP for Developers](#tutorials-whoop-for-developers)
- [Authenticating with WHOOP (with Passport) | WHOOP for Developers](#authenticating-with-whoop-with-passport-whoop-for-developers)
- [Support | WHOOP for Developers](#support-whoop-for-developers)
- [Pagination | WHOOP for Developers](#pagination-whoop-for-developers)
- [Authenticating with WHOOP | WHOOP for Developers](#authenticating-with-whoop-whoop-for-developers)
- [v1 to v2 Migration Guide | WHOOP for Developers](#v1-to-v2-migration-guide-whoop-for-developers)
- [App Approval | WHOOP for Developers](#app-approval-whoop-for-developers)
- [Cycle | WHOOP for Developers](#cycle-whoop-for-developers)
- [API Changelog | WHOOP for Developers](#api-changelog-whoop-for-developers)
- [Get Current Recovery Score | WHOOP for Developers](#get-current-recovery-score-whoop-for-developers)
- [Sleep | WHOOP for Developers](#sleep-whoop-for-developers)
- [Recovery | WHOOP for Developers](#recovery-whoop-for-developers)
- [Refreshing Access Tokens | WHOOP for Developers](#refreshing-access-tokens-whoop-for-developers)
- [Refreshing Access Tokens | WHOOP for Developers](#refreshing-access-tokens-whoop-for-developers)
- [Workout | WHOOP for Developers](#workout-whoop-for-developers)
- [User | WHOOP for Developers](#user-whoop-for-developers)
---
# WHOOP Developer Platform | WHOOP for Developers
[Skip to main content](https://developer.whoop.com/docs/introduction/#docusaurus_skipToContent_fallback)
**IMPORTANT: v1 webhooks have been be removed. [Learn how](https://developer.whoop.com/docs/developing/v1-v2-migration#2-lookup-v2-ids-from-v1-ids)
to look up mappings from v1 to v2 ids.**
On this page
WHOOP Developer Platform
========================
WHOOP is on a mission to unlock human performance. We want companies and developers that share our mission to join us on the journey.
The goal of the WHOOP Developer Platform is to empower developers and companies to create robust apps and integrations with WHOOP. We believe empowering WHOOP members to share their insights and data with other apps can help them achieve their personal goals - whether that is sleeping better, reaching a new fitness goal, or living a healthier lifestyle.
The WHOOP Developer Platform documentation includes the information you need to design, develop, launch, and support your app.
WHOOP 101[](https://developer.whoop.com/docs/introduction/#whoop-101 "Direct link to WHOOP 101")
--------------------------------------------------------------------------------------------------
[WHOOP 101](https://developer.whoop.com/docs/whoop-101)
is where you learn about the core concepts and science behind WHOOP, including Recovery, Sleep, Strain, and Workouts.
Are you new to WHOOP?
Start with [WHOOP 101](https://developer.whoop.com/docs/whoop-101)
. We believe developing a successful app requires understanding the core concepts and science behind WHOOP.
Developing Your App[](https://developer.whoop.com/docs/introduction/#developing-your-app "Direct link to Developing Your App")
--------------------------------------------------------------------------------------------------------------------------------
Check out our guide to help you [get started](https://developer.whoop.com/docs/developing/getting-started)
with developing and launching your first app. You will learn how to register your app, make requests to WHOOP on behalf of a member, what data is available, and considerations before launching to your users.
* Learn about what [data is available to you](https://developer.whoop.com/docs/developing/user-data/cycle)
are available.
* Learn how to [create an app](https://developer.whoop.com/docs/developing/getting-started)
and [authenticate with WHOOP](https://developer.whoop.com/docs/developing/oauth)
.
* Review [design and brand guidelines](https://developer.whoop.com/docs/developing/design-guidelines)
.
Tutorials[](https://developer.whoop.com/docs/introduction/#tutorials "Direct link to Tutorials")
--------------------------------------------------------------------------------------------------
[Tutorials](https://developer.whoop.com/docs/tutorials/)
provide sample code and guides for common patterns such as authenticating with WHOOP or requesting a member's current Recovery Score.
API Reference Docs[](https://developer.whoop.com/docs/introduction/#api-reference-docs "Direct link to API Reference Docs")
-----------------------------------------------------------------------------------------------------------------------------
[API Reference Docs](https://developer.whoop.com/api)
include what API endpoints are available and how to make requests to them including the URL, required parameters, and response body.
* [WHOOP 101](https://developer.whoop.com/docs/introduction/#whoop-101)
* [Developing Your App](https://developer.whoop.com/docs/introduction/#developing-your-app)
* [Tutorials](https://developer.whoop.com/docs/introduction/#tutorials)
* [API Reference Docs](https://developer.whoop.com/docs/introduction/#api-reference-docs)
---
# WHOOP 101 | WHOOP for Developers
[Skip to main content](https://developer.whoop.com/docs/whoop-101/#docusaurus_skipToContent_fallback)
**IMPORTANT: v1 webhooks have been be removed. [Learn how](https://developer.whoop.com/docs/developing/v1-v2-migration#2-lookup-v2-ids-from-v1-ids)
to look up mappings from v1 to v2 ids.**
On this page
WHOOP 101
=========
WHOOP is a 24/7 wearable that helps members understand how well their bodies function and how they change over time. Through continuous monitoring of physiological signals, WHOOP helps members understand how well their body performs and recovers. As a developer, you have the opportunity to build integrations that leverage WHOOP insights across three pillars - **Strain, Recovery, and Sleep**.
This guide will provide you with an overview of the core concepts powering WHOOP to get you ready to build your app.
Strain[](https://developer.whoop.com/docs/whoop-101/#strain "Direct link to Strain")
--------------------------------------------------------------------------------------
WHOOP Strain is a measurement of the amount of stress on your body. The Strain score is a number on a 0 to 21 scale, based on the [Borg Scale of Perceived Exertion](https://www.whoop.com/thelocker/borg-scale-perceived-exertion-rpe/)
. WHOOP scores Strain continuously for members throughout the day and every workout.
**Note:** _Strain is not on a linear scale. It takes more stress to move from a score of **16 to 17** than **4 to 5**._
Your body is constantly changing, and each day is different. If you do the same workout two days in a row, you will likely report different Strain scores based on fluctuations in how your body recovered and changed. Strain is also specific to your baseline. Two people making the same motions will likely generate different Strain scores.
WHOOP categorizes Strain score values into Light, Moderate, High, and All Out.

* **Light Strain (0-9)** - This strain category indicates room for active recovery with minimal stress on the body.
* **Moderate Strain (10-13)** - This category indicates moderate stress on the body, which helps maintain fitness.
* **High Strain (14-17)** - This category indicates increased stress which helps build fitness gains in your training.
* **All Out (18-21)** - This category indicates all-out training or a packed activity day that puts significant stress on the body and may be difficult to recover from the day after.
Want to learn more?
* [WHOOP Strain](https://support.whoop.com/s/article/WHOOP-Strain)
* [How Does WHOOP Strain Work?](https://www.whoop.com/thelocker/how-does-whoop-strain-work-101/)
* [Why Doesn't WHOOP Count Steps?](https://www.whoop.com/thelocker/dont-count-steps-strain/)
* [Podcast No. 26: Understanding Strain](https://www.whoop.com/thelocker/podcast-26-understanding-strain/)
### Workout Activity[](https://developer.whoop.com/docs/whoop-101/#workout-activity "Direct link to Workout Activity")
WHOOP tracks workouts for you and how much Strain accumulated over the workout. You can create workout activities manually, import them from other sources like [Apple Health](https://support.whoop.com/s/article/Apple-Health-Integration)
, or [WHOOP may automatically detect and classify workouts](https://www.whoop.com/thelocker/activity-auto-detection-knows-you-work-out/)
.
WHOOP keeps track of what type of activity you performed (e.g., Running, Cycle), Strain score, and other physiological measurements such as duration in [Heart Rate Zones](https://www.whoop.com/thelocker/max-heart-rate-training-zones/)
.
Recovery[](https://developer.whoop.com/docs/whoop-101/#recovery "Direct link to Recovery")
--------------------------------------------------------------------------------------------
WHOOP Recovery is a daily measure of how prepared your body is to perform. When you wake up in the morning, WHOOP calculates a Recovery score as a percentage between 0 - 100%. The higher the score, the more primed your body is to take on Strain that day.
WHOOP calculates Recovery scores using measurements from the previous day and your sleep, such as resting heart rate (RHR), heart rate variability (HRV), respiratory rate, sleep duration/quality, skin temperature, and blood oxygen. Unlike Strain, a Recovery score does not change over the day (unless you edit your sleep which triggers a Recovery score re-calculation).
WHOOP categorizes Recovery scores into one of three colors: 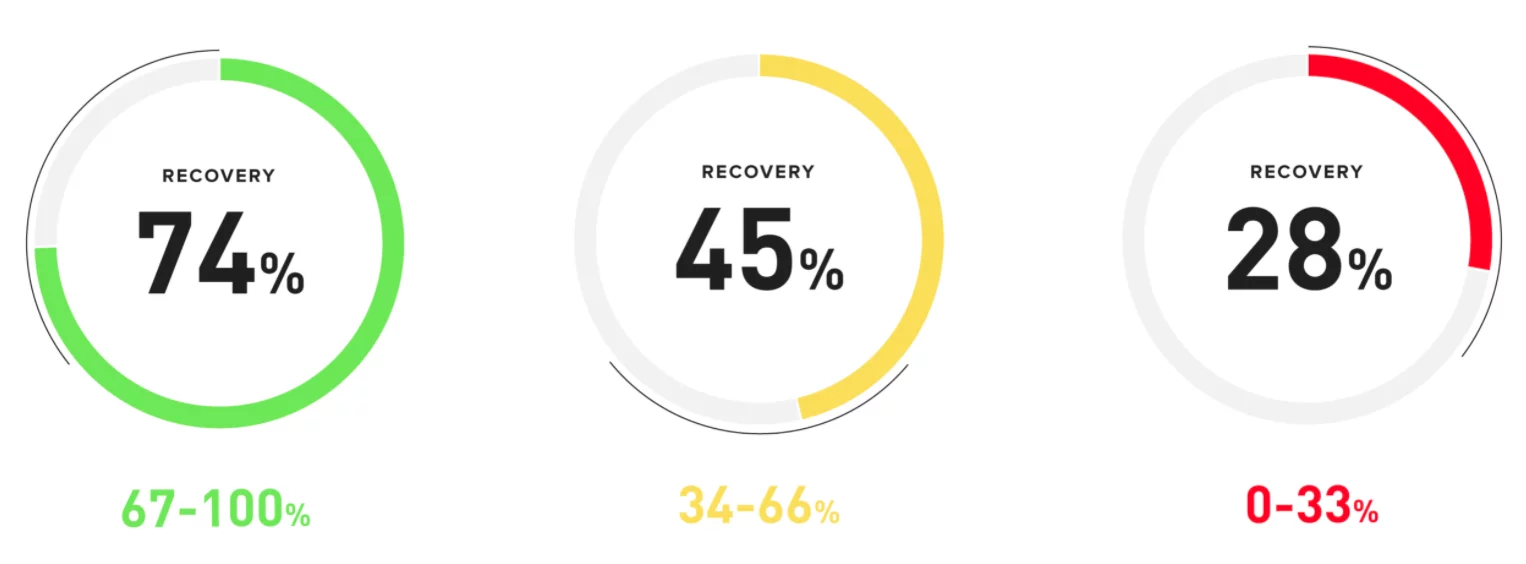
* **GREEN (67-100%)**: You are well recovered and primed to perform. Whether at home, at work, or in the gym, your body is signaling that it can handle a strenuous day.
* **YELLOW (34-66%)**: Your body is maintaining and ready to take on moderate amounts of strain.
* **RED (0-33%)**: Rest is likely what your body needs. Your body is working hard to recover. Some reasons could include overtraining, sickness, stress, lack of sleep, or other lifestyle factors.
Want to learn more?
* [WHOOP Recovery](https://support.whoop.com/s/article/WHOOP-Recovery)
* [How Does WHOOP Recovery Work?](https://www.whoop.com/thelocker/how-does-whoop-recovery-work-101/)
* [Everything You Need to Know About Heart Rate Variability (HRV)](https://www.whoop.com/thelocker/heart-rate-variability-hrv/)
* [Podcast No. 29: Heart Rate Variability (HRV)](https://www.whoop.com/thelocker/podcast-29-heart-rate-variability-hrv/)
Sleep[](https://developer.whoop.com/docs/whoop-101/#sleep "Direct link to Sleep")
-----------------------------------------------------------------------------------
WHOOP tracks your sleep, including how long you slept and the stages of your sleep - Light, REM, and Slow Wave Sleep (Deep). WHOOP also calculates how much sleep you need based on your [Sleep Debt](https://www.whoop.com/thelocker/what-is-sleep-debt-catch-up/)
and your previous day's activity.
Want to learn more?
* [WHOOP Sleep](https://support.whoop.com/s/article/WHOOP-Sleep)
* [How Does WHOOP Measure Sleep, and How Accurate is it?](https://www.whoop.com/thelocker/how-well-whoop-measures-sleep/)
* [What is Light Sleep?](https://www.whoop.com/thelocker/what-is-light-sleep-why-its-important/)
| [Deep Sleep?](https://www.whoop.com/thelocker/what-is-deep-sleep/)
| [REM Sleep?](https://www.whoop.com/thelocker/what-is-rem-sleep/)
* [What are the differences between Deep and REM Sleep?](https://www.whoop.com/thelocker/deep-sleep-vs-rem-sleep-what-are-the-differences/)
* [Strain](https://developer.whoop.com/docs/whoop-101/#strain)
* [Workout Activity](https://developer.whoop.com/docs/whoop-101/#workout-activity)
* [Recovery](https://developer.whoop.com/docs/whoop-101/#recovery)
* [Sleep](https://developer.whoop.com/docs/whoop-101/#sleep)
---
# Overview | WHOOP for Developers
[Skip to main content](https://developer.whoop.com/docs/developing/overview/#docusaurus_skipToContent_fallback)
**IMPORTANT: v1 webhooks have been be removed. [Learn how](https://developer.whoop.com/docs/developing/v1-v2-migration#2-lookup-v2-ids-from-v1-ids)
to look up mappings from v1 to v2 ids.**
On this page
Overview
========
Before diving into specifics, let's review the process for launching an app on the WHOOP Developer Platform.
1\. Sign up for WHOOP[](https://developer.whoop.com/docs/developing/overview/#1-sign-up-for-whoop "Direct link to 1. Sign up for WHOOP")
------------------------------------------------------------------------------------------------------------------------------------------
You must have a WHOOP membership to develop an app on the Developer Platform. Your WHOOP account is also your WHOOP developer login. You can join WHOOP [here](https://join.whoop.com/?utm_source=whoop&utm_medium=developer)
.
2\. Create an App in the WHOOP Developer Dashboard[](https://developer.whoop.com/docs/developing/overview/#2-create-an-app-in-the-whoop-developer-dashboard "Direct link to 2. Create an App in the WHOOP Developer Dashboard")
---------------------------------------------------------------------------------------------------------------------------------------------------------------------------------------------------------------------------------
The [WHOOP Developer Dashboard](https://developer-dashboard.whoop.com/)
is where you register your app with WHOOP. You can create a new app, access your Client Secret, and invite other developers to view and maintain the app. [Getting started with the Developer Dashboard](https://developer.whoop.com/docs/developing/getting-started)
will walk you through registering your first app.
You can create up to 5 apps. If you need more, please submit a request for more apps via [this link](https://whoopinc.typeform.com/to/XmzituEp)
.
3\. Authenticate with WHOOP using the OAuth 2.0 protocol[](https://developer.whoop.com/docs/developing/overview/#3-authenticate-with-whoop-using-the-oauth-20-protocol "Direct link to 3. Authenticate with WHOOP using the OAuth 2.0 protocol")
--------------------------------------------------------------------------------------------------------------------------------------------------------------------------------------------------------------------------------------------------
Once you have a `Client ID` and `Client Secret` in the Developer Dashboard, you can use the [OAuth standard](https://developer.whoop.com/docs/developing/oauth)
to request consent from WHOOP members to access data on their behalf. Once a WHOOP member grants your app permission, you will receive a per-user Access and Refresh Token that your app uses on requests to the WHOOP API.
4\. Make requests to the WHOOP API[](https://developer.whoop.com/docs/developing/overview/#4-make-requests-to-the-whoop-api "Direct link to 4. Make requests to the WHOOP API")
---------------------------------------------------------------------------------------------------------------------------------------------------------------------------------
WHOOP exposes RESTful endpoints that you can access using the Access and Refresh Token from **Step #3: Authenticate with WHOOP**. You can view the documentation on the API endpoints [here](https://developer.whoop.com/api)
.
5\. Launch your app[](https://developer.whoop.com/docs/developing/overview/#5-launch-your-app "Direct link to 5. Launch your app")
------------------------------------------------------------------------------------------------------------------------------------
When you are ready to launch your app, [submit it for approval](https://developer.whoop.com/docs/developing/app-approval)
.
Also, consider how [request limits](https://developer.whoop.com/docs/developing/rate-limiting)
may impact your app.
* [1\. Sign up for WHOOP](https://developer.whoop.com/docs/developing/overview/#1-sign-up-for-whoop)
* [2\. Create an App in the WHOOP Developer Dashboard](https://developer.whoop.com/docs/developing/overview/#2-create-an-app-in-the-whoop-developer-dashboard)
* [3\. Authenticate with WHOOP using the OAuth 2.0 protocol](https://developer.whoop.com/docs/developing/overview/#3-authenticate-with-whoop-using-the-oauth-20-protocol)
* [4\. Make requests to the WHOOP API](https://developer.whoop.com/docs/developing/overview/#4-make-requests-to-the-whoop-api)
* [5\. Launch your app](https://developer.whoop.com/docs/developing/overview/#5-launch-your-app)
---
# Getting Started | WHOOP for Developers
[Skip to main content](https://developer.whoop.com/docs/developing/getting-started/#docusaurus_skipToContent_fallback)
**IMPORTANT: v1 webhooks have been be removed. [Learn how](https://developer.whoop.com/docs/developing/v1-v2-migration#2-lookup-v2-ids-from-v1-ids)
to look up mappings from v1 to v2 ids.**
On this page
Getting Started
===============
To start developing with WHOOP, you first need to create an `App` in the WHOOP [Developer Dashboard](https://developer-dashboard.whoop.com/)
. If you're already registered in the Developer Dashboard, you can skip this section and learn [how to authenticate with WHOOP](https://developer.whoop.com/docs/developing/oauth)
using your app's `Client ID` and `Client Secret`.
The [Developer Dashboard](https://developer-dashboard.whoop.com/)
site manages Client Secrets and access to WHOOP OAuth API endpoints. When you sign in to the Developer Dashboard, you'll be redirected to id.whoop.com to authenticate using your WHOOP account credentials.
Creating your first App[](https://developer.whoop.com/docs/developing/getting-started/#creating-your-first-app "Direct link to Creating your first App")
----------------------------------------------------------------------------------------------------------------------------------------------------------
To create your first App, head to the [App creation flow](https://developer-dashboard.whoop.com/apps/create)
in the Developer Dashboard. You will be prompted to [create a Team](https://developer.whoop.com/docs/developing/getting-started#creating-your-team)
if you have not yet done so.
You can create up to 5 Apps. If you need more, please submit a request for more apps via [this link](https://whoopinc.typeform.com/to/XmzituEp)
.
### Scopes[](https://developer.whoop.com/docs/developing/getting-started/#scopes "Direct link to Scopes")
Scopes define the limits of access your App will have to an individual's account data. At least one scope _must_ be specified to create an App. When performing the OAuth flow, you can request one or more of these scopes from a WHOOP member.
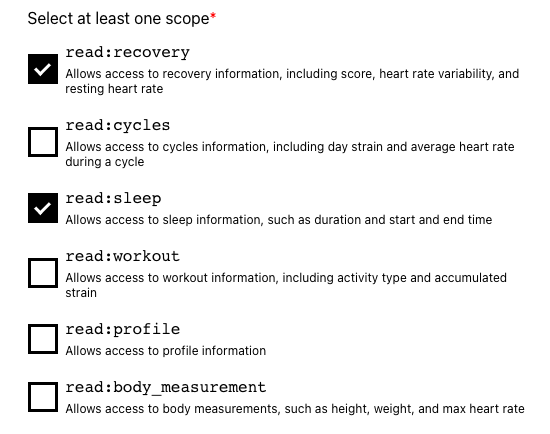
Please note that you should limit the scopes requested to _only_ the ones your application will use.
You can learn more about the available scopes and what they represent from the [API Docs](https://developer.whoop.com/api#section/Authentication)
.
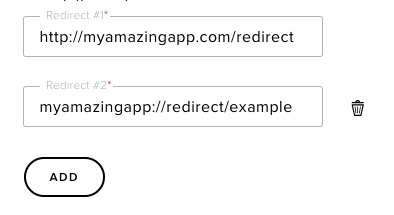
### Redirect URIs[](https://developer.whoop.com/docs/developing/getting-started/#redirect-uris "Direct link to Redirect URIs")
You must specify at least one redirect URL for each App. The redirect URI on your OAuth authorization request must match the value in the Developer Dashboard. You may provide multiple Redirect URIs that your client needs.
### Completing Client Creation[](https://developer.whoop.com/docs/developing/getting-started/#completing-client-creation "Direct link to Completing Client Creation")
After filling in all the fields, click the **Create** button at the bottom to complete the process.
Accessing Client Credentials[](https://developer.whoop.com/docs/developing/getting-started/#accessing-client-credentials "Direct link to Accessing Client Credentials")
-------------------------------------------------------------------------------------------------------------------------------------------------------------------------
After you have created your App, you will be provided with your `Client ID` and `Client Secret`. These values are required to complete the OAuth flow.
Note: your `Client Secret` should _never_ be logged or shared with anyone. It should only be used server side and should never be exposed in a client, web, or mobile application.
After creating the App, you will be able to see these values later by clicking into the app from the [Apps](https://developer-dashboard.whoop.com/)
section, where all your current Apps are listed.
Editing or Deleting an App[](https://developer.whoop.com/docs/developing/getting-started/#editing-or-deleting-an-app "Direct link to Editing or Deleting an App")
-------------------------------------------------------------------------------------------------------------------------------------------------------------------
To change any details about your app, navigate to the [App](https://developer-dashboard.whoop.com/)
, click the pencil icon, edit any values, and save your app.
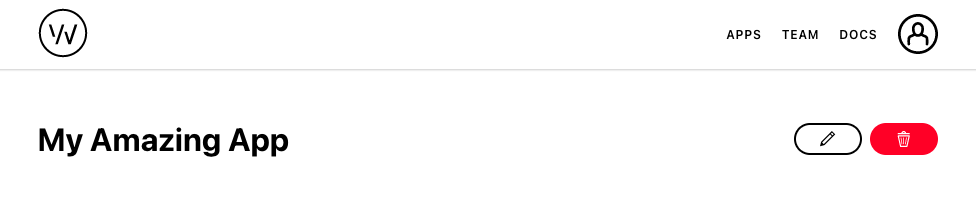
Caution!
Clicking the red trash can button will delete the app. Exercise caution when deleting apps, as this action cannot be undone.
* * *
Creating your team[](https://developer.whoop.com/docs/developing/getting-started/#creating-your-team "Direct link to Creating your team")
-------------------------------------------------------------------------------------------------------------------------------------------
Before creating your first app, you'll be prompted to create a Team.
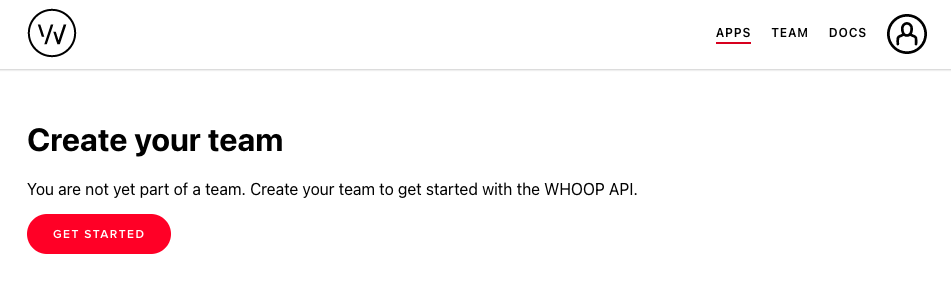
After clicking **Get Started**, you'll be taken to the team creation form.
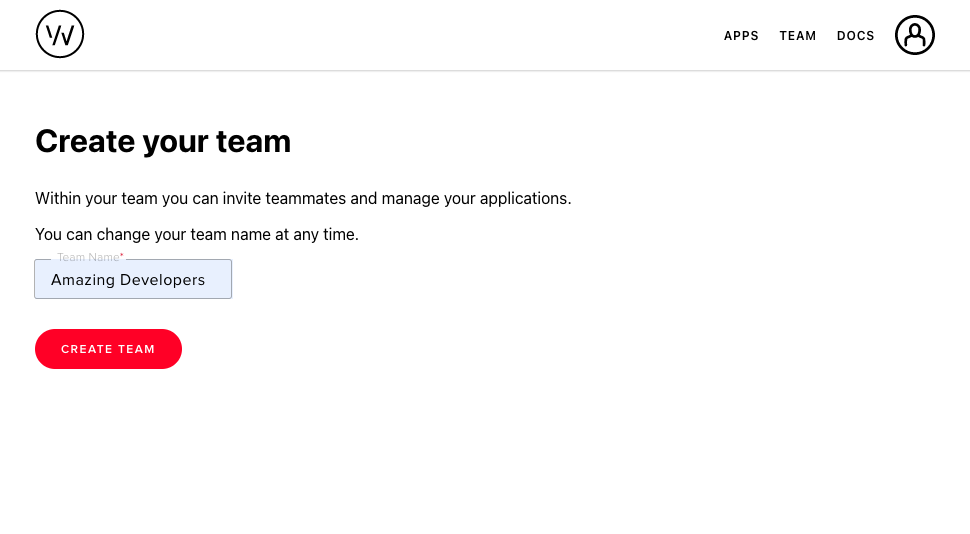
Choose a name for your team and click **Create Team**.
Adding Users To A Team[](https://developer.whoop.com/docs/developing/getting-started/#adding-users-to-a-team "Direct link to Adding Users To A Team")
-------------------------------------------------------------------------------------------------------------------------------------------------------
You can add other developers to your team to share access to app information and management.
To invite someone to your team, you can head to the [Team](https://developer-dashboard.whoop.com/team)
section of the Developer Dashboard and click the **Invite** button in the top right corner.

From there, you can add another developer to your team. To add the developer to your team, you need the email address associated with their WHOOP account.
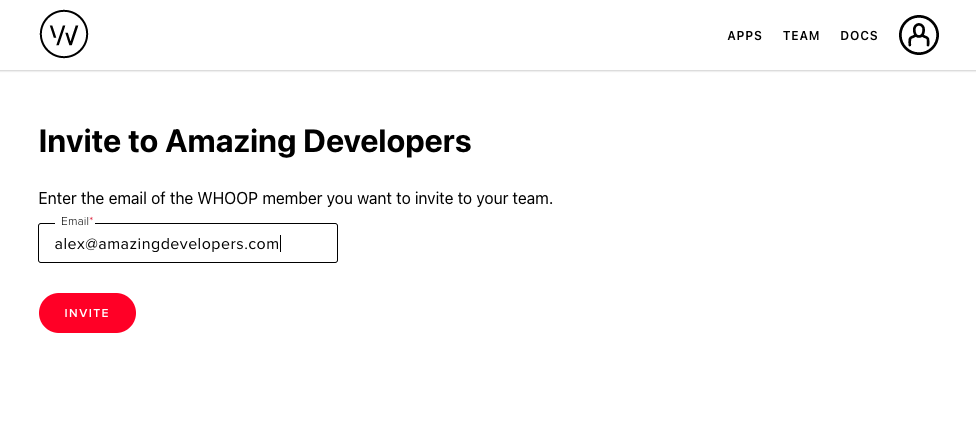
Fill in the WHOOP email of the other developer, and click **Invite**.
* [Creating your first App](https://developer.whoop.com/docs/developing/getting-started/#creating-your-first-app)
* [Scopes](https://developer.whoop.com/docs/developing/getting-started/#scopes)
* [Redirect URIs](https://developer.whoop.com/docs/developing/getting-started/#redirect-uris)
* [Completing Client Creation](https://developer.whoop.com/docs/developing/getting-started/#completing-client-creation)
* [Accessing Client Credentials](https://developer.whoop.com/docs/developing/getting-started/#accessing-client-credentials)
* [Editing or Deleting an App](https://developer.whoop.com/docs/developing/getting-started/#editing-or-deleting-an-app)
* [Creating your team](https://developer.whoop.com/docs/developing/getting-started/#creating-your-team)
* [Adding Users To A Team](https://developer.whoop.com/docs/developing/getting-started/#adding-users-to-a-team)
---
# API Rate Limiting | WHOOP for Developers
[Skip to main content](https://developer.whoop.com/docs/developing/rate-limiting/#docusaurus_skipToContent_fallback)
**IMPORTANT: v1 webhooks have been be removed. [Learn how](https://developer.whoop.com/docs/developing/v1-v2-migration#2-lookup-v2-ids-from-v1-ids)
to look up mappings from v1 to v2 ids.**
On this page
API Rate Limiting
=================
All clients are subject to two sets of rate limiting for requests. By default, clients may only send:
* 100 requests per minute.
* 10,000 requests per day.
Rate Limit Increases
Upon request, WHOOP can increase your rate limits. Please submit a request for increased rate limits via [this link](https://whoopinc.typeform.com/to/XmzituEp)
and be sure to include details surrounding your request.
Rate Limit Information[](https://developer.whoop.com/docs/developing/rate-limiting/#rate-limit-information "Direct link to Rate Limit Information")
-----------------------------------------------------------------------------------------------------------------------------------------------------
Information about current rate limits is provided in response headers, following this [specification](https://datatracker.ietf.org/doc/id/draft-polli-ratelimit-headers-05.html#name-header-specifications)
.
You may see response headers that look like the following:
X-RateLimit-Limit = "100, 100;window=60, 10000;window=86400"X-RateLimit-Remaining = "98"X-RateLimit-Reset = "3"
### X-RateLimit-Limit[](https://developer.whoop.com/docs/developing/rate-limiting/#x-ratelimit-limit "Direct link to X-RateLimit-Limit")
This value expresses the current values for the rate-limiting and over what [time window](https://datatracker.ietf.org/doc/id/draft-polli-ratelimit-headers-05.html#name-time-window)
.
The example here is using the default rate limits. The client has not reached any limit yet and is
closest to hitting the `minute` window (versus the `day` window). The first number (`100`) states the limit the client is closest to hitting. The time window is in seconds. `100;window=60` describes the first rate limit of 100 requests per minute (60 seconds). `10000;window=86400` represents a rate limit of 10,000 requests over a 24-hour (86,400 seconds) period.
### X-RateLimit-Remaining[](https://developer.whoop.com/docs/developing/rate-limiting/#x-ratelimit-remaining "Direct link to X-RateLimit-Remaining")
`X-RateLimit-Remaining` is the number of requests that your app may execute within the [time window](https://datatracker.ietf.org/doc/id/draft-polli-ratelimit-headers-05.html#name-time-window)
before WHOOP will reject subsequent requests. In this case, the client is closest to hitting the minute limit of 100, so `X-RateLimit-Remaining: 98` means the client can make 98 more requests in that minute. In other words, the client only made two requests in the current minute.
### X-RateLimit-Reset[](https://developer.whoop.com/docs/developing/rate-limiting/#x-ratelimit-reset "Direct link to X-RateLimit-Reset")
`X-RateLimit-Reset` is the number of seconds that need to elapse before the `X-RateLimit-Remaining` header resets. In this case, the client is closest to hitting the minute limit of 100 so the `X-RateLimit-Reset` header corresponds to that limit precisely.
Rate Limited Response[](https://developer.whoop.com/docs/developing/rate-limiting/#rate-limited-response "Direct link to Rate Limited Response")
--------------------------------------------------------------------------------------------------------------------------------------------------
After an API key's rate limit has been reached or exceeded, WHOOP's servers will respond with a `429 - Too Many Requests` HTTP status code.
* [Rate Limit Information](https://developer.whoop.com/docs/developing/rate-limiting/#rate-limit-information)
* [X-RateLimit-Limit](https://developer.whoop.com/docs/developing/rate-limiting/#x-ratelimit-limit)
* [X-RateLimit-Remaining](https://developer.whoop.com/docs/developing/rate-limiting/#x-ratelimit-remaining)
* [X-RateLimit-Reset](https://developer.whoop.com/docs/developing/rate-limiting/#x-ratelimit-reset)
* [Rate Limited Response](https://developer.whoop.com/docs/developing/rate-limiting/#rate-limited-response)
---
# Webhooks | WHOOP for Developers
[Skip to main content](https://developer.whoop.com/docs/developing/webhooks/#docusaurus_skipToContent_fallback)
**IMPORTANT: v1 webhooks have been be removed. [Learn how](https://developer.whoop.com/docs/developing/v1-v2-migration#2-lookup-v2-ids-from-v1-ids)
to look up mappings from v1 to v2 ids.**
On this page
Webhooks
========
WHOOP webhooks allow you to get notified when an event takes place for users that have authenticated with your app. By subscribing to webhooks, you will be alerted when a user's data was updated rather than needing to constantly make API requests to check for updates.
Setting Up Webhooks[](https://developer.whoop.com/docs/developing/webhooks/#setting-up-webhooks "Direct link to Setting Up Webhooks")
---------------------------------------------------------------------------------------------------------------------------------------
You will first need to create an HTTPS URL endpoint to receive webhooks. This endpoint should be capable of accepting POST requests with a body consisting of the [webhook data format](https://developer.whoop.com/docs/developing/webhooks/#webhook-specifications)
and be able to perform [webhook signature validation](https://developer.whoop.com/docs/developing/webhooks/#webhooks-security)
.
note
If you are using multiple apps in the WHOOP dashboard, you will need a unique Webhook endpoint per app.
With your webhook endpoint set up, you can [create or update](https://developer.whoop.com/docs/developing/getting-started)
an app to start accepting webhooks at that URL. Simply add your HTTPS URL to the **Webhook URL** section at the bottom of the page and save the app.
That's it! The next time a WHOOP user that has authenticated with your app triggers one of the supported webhook events, you will receive a webhook alerting you of the change.
Webhook Model Versions[](https://developer.whoop.com/docs/developing/webhooks/#webhook-model-versions "Direct link to Webhook Model Versions")
------------------------------------------------------------------------------------------------------------------------------------------------
WHOOP supports two webhook model versions that you can configure for each webhook URL:
### v2 Webhooks (default)[](https://developer.whoop.com/docs/developing/webhooks/#v2-webhooks-default "Direct link to v2 Webhooks (default)")
v2 webhooks use UUID identifiers instead of integer IDs, providing better alignment with the v2 API endpoints. When you configure a webhook URL to use the v2 model version:
### v1 Webhooks (legacy)[](https://developer.whoop.com/docs/developing/webhooks/#v1-webhooks-legacy "Direct link to v1 Webhooks (legacy)")
v1 webhooks used traditional integer IDs for identifying resources and maintain backward compatibility with existing integrations. v1 webhooks are no longer published.
* **Activity webhooks** (workout and sleep events) will include UUID identifiers that correspond to the v2 API endpoints
* **Recovery webhooks** will include the UUID identifier of the sleep that the recovery is associated with, rather than the cycle ID
### Configuring Webhook Model Versions[](https://developer.whoop.com/docs/developing/webhooks/#configuring-webhook-model-versions "Direct link to Configuring Webhook Model Versions")
In the WHOOP Developer Dashboard, you can configure the model version for each webhook URL individually:
1. Navigate to your app settings in the [WHOOP Developer Dashboard](https://developer-dashboard.whoop.com/)
2. In the **Webhooks** section, you can add multiple webhook URLs
3. For each URL, select either **v1** or **v2** from the **Model Version** dropdown
4. Save your app configuration
This flexibility allows you to:
* Migrate to v2 webhooks gradually by configuring different URLs for different versions
* Test v2 webhook format on a separate endpoint before switching your production webhook
* Support both v1 and v2 integrations simultaneously if needed
Migration Strategy
If you're migrating from v1 to v2 webhooks, consider setting up a separate webhook URL with v2 model version for testing before switching your production webhook configuration.
Webhook Specifications[](https://developer.whoop.com/docs/developing/webhooks/#webhook-specifications "Direct link to Webhook Specifications")
------------------------------------------------------------------------------------------------------------------------------------------------
Webhooks are sent over HTTPS as a POST request to your configured URL. The body of the webhook request includes the following fields:
| | |
| --- | --- |
| user\_id | int64
The WHOOP User for the event |
| id | int64 or string
Identifier of the object that triggered this webhook. For v1 webhooks: integer ID. For v2 webhooks: UUID. For recovery events in v2, this is the id (UUID) of the sleep that the recovery is associated with. |
| type | string
Enum: "workout.updated" "workout.deleted" "sleep.updated" "sleep.deleted" "recovery.updated" "recovery.deleted"
The type of event that triggered this webhook |
| trace\_id | string
Trace ID for the event that triggered this webhook |
Copy
`{ * "user_id": 10129, * "id": 10235, * "type": "workout.updated", * "trace_id": "d3709ee7-104e-4f70-a928-2932964b017b" }`
### Webhook Event Types[](https://developer.whoop.com/docs/developing/webhooks/#webhook-event-types "Direct link to Webhook Event Types")
There are several events that are published as webhooks:
| Event Type | v1 ID Type (long) | v2 ID Type (UUID) | Explanation |
| --- | --- | --- | --- |
| `recovery.updated` | The id of the cycle for the recovery (long) | The id of the associated sleep (UUID) | Occurs when a recovery is created or updated. In v1, the ID refers to the cycle. In v2, the ID is the UUID of the sleep that the recovery is associated with. |
| `recovery.deleted` | The id of the cycle for the recovery (long) | The id of the associated sleep (UUID) | Occurs when a recovery is deleted. In v1, the ID refers to the cycle. In v2, the ID is the UUID of the sleep that the recovery is associated with. Note: a recovery is deleted when its associated sleep is deleted. |
| `workout.updated` | The id of the workout (long) | The id of the workout (UUID) | Occurs when a workout is created or updated. |
| `workout.deleted` | The id of the workout (long) | The id of the workout (UUID) | Occurs when a workout is deleted. |
| `sleep.updated` | The id of the sleep (long) | The id of the sleep (UUID) | Occurs when a sleep is created or updated. |
| `sleep.deleted` | The id of the sleep (long) | The id of the sleep (UUID) | Occurs when a sleep is deleted. |
note
All webhook event types are sent to each configured webhook URL. If you don't need to process a specific event type, simply respond with a `2XX` status code.
Webhooks Security[](https://developer.whoop.com/docs/developing/webhooks/#webhooks-security "Direct link to Webhooks Security")
---------------------------------------------------------------------------------------------------------------------------------
In order to validate that the webhooks you are receiving are originating from WHOOP, you will want to implement signature validation. This can be done by making use of two of the headers sent with each webhook request:
* `X-WHOOP-Signature` - the actual signature
* `X-WHOOP-Signature-Timestamp` - the milliseconds since epoch timestamp used to verify the signature
To verify the signature, first prepend the timestamp header value to the raw http request body. Then, generate a SHA256 HMAC signature of that string using the secret key for your app, which can be found in the [WHOOP Developer Dashboard](https://developer-dashboard.whoop.com/)
. Finally, base64 encode the result, and compare it to the signature header. If they do not match then the request is invalid and should be dropped.
See below for example signature validation pseudocode:
calculated_signature_string = base64Encode(HMACSHA256(timestamp_header + raw_http_request_body, client_secret))
Example Request Flow[](https://developer.whoop.com/docs/developing/webhooks/#example-request-flow "Direct link to Example Request Flow")
------------------------------------------------------------------------------------------------------------------------------------------
To illustrate a webhook use case, check out the below example request flows that utilize webhooks.
### v2 Webhook Example[](https://developer.whoop.com/docs/developing/webhooks/#v2-webhook-example "Direct link to v2 Webhook Example")
1. WHOOP user `456` goes through the OAuth consent flow with your app, allowing you to read their sleep data.
2. WHOOP user `456` records a sleep. WHOOP assigns UUID `550e8400-e29b-41d4-a716-446655440000` to this sleep.
3. WHOOP makes a post request to your V2 webhook endpoint with the body of:
{ "user_id": 456, "id": "550e8400-e29b-41d4-a716-446655440000", "type": "sleep.updated", "trace_id": "e369c784-5100-49e8-8098-75d35c47b31b"}
4. Based on seeing `sleep.updated` in the `type` field, your app makes a GET request to the `v2/activity/sleep/550e8400-e29b-41d4-a716-446655440000` endpoint using the access token for WHOOP user `456` in order to retrieve the sleep data.
### v1 Webhook Example[](https://developer.whoop.com/docs/developing/webhooks/#v1-webhook-example "Direct link to v1 Webhook Example")
1. WHOOP user `456` goes through the OAuth consent flow with your app, allowing you to read their sleep data.
2. WHOOP user `456` records a sleep. WHOOP assigns id `1234` to this sleep.
3. WHOOP makes a post request to your v1 webhook endpoint with the body of:
{ "user_id": 456, "id": 1234, "type": "sleep.updated", "trace_id": "e369c784-5100-49e8-8098-75d35c47b31b"}
4. Based on seeing `sleep.updated` in the `type` field, your app makes a GET request to the `v1/activity/sleep/1234` endpoint using the access token for WHOOP user `456` in order to retrieve the sleep data.
As you begin implementing webhooks, you should have logic for interpreting each of these webhook event types. The webhook model version you choose should align with the API version you're using to retrieve the data:
* **v2 webhooks** → Use with `v2` API endpoints (UUID IDs)
* **v1 webhooks** → Use with `v1` API endpoints (long IDs)
Webhooks Testing[](https://developer.whoop.com/docs/developing/webhooks/#webhooks-testing "Direct link to Webhooks Testing")
------------------------------------------------------------------------------------------------------------------------------
To generate a webhook, first authenticate with your app to ensure your data is retrievable via the API. Then, open the WHOOP app and do one of the following:
1. [Log an activity](https://support.whoop.com/s/article/Logging-Activities-Sleep)
in the past (e.g. navigate to yesterday and create a 5 minute cycling activity) – once this activity is processed, your webhook endpoint will receive a `workout.updated` webhook.
2. Edit a previous sleep by changing the start or end time by 1 minute – once the sleep is processed, your webhook will receive both a `sleep.updated` webhook and a `recovery.updated` webhook.
You can then edit or delete the workout you created, and you can revert the sleep duration change. Each of these actions will also result in webhooks being sent – `workout.updated`, `workout.deleted`, and `sleep.updated`, respectively.
Delivery & Retries[](https://developer.whoop.com/docs/developing/webhooks/#delivery--retries "Direct link to Delivery & Retries")
-----------------------------------------------------------------------------------------------------------------------------------
WHOOP will retry webhook delivery for failed webhook requests **five times over the course of about one hour**. A webhook delivery is considered failed if it receives any response other than a successful `2XX`, or if it receives no response before timing out.
In order to reduce the amount of delivery failures you encounter, you should consider processing the requests asynchronously after returning a successful response, e.g. with a queue worker.
Best Practices[](https://developer.whoop.com/docs/developing/webhooks/#best-practices "Direct link to Best Practices")
------------------------------------------------------------------------------------------------------------------------
While working with webhooks, it is important to follow these best practices in order to ensure that you can get the most out of the webhook system.
### Respond quickly[](https://developer.whoop.com/docs/developing/webhooks/#respond-quickly "Direct link to Respond quickly")
As laid out in the [Delivery & Retries](https://developer.whoop.com/docs/developing/webhooks/#delivery--retries)
section, WHOOP will not indefinitely retry if your webhook endpoint is determined to be unavailable. We recommend designing your webhook API to return a successful `2XX` status code within a second and for high availability. If your webhook implementation has other dependencies or needs to do expensive work, one strategy is to have your API enqueue the event on a queue for asynchronous processing.
### Validate signatures[](https://developer.whoop.com/docs/developing/webhooks/#validate-signatures "Direct link to Validate signatures")
Be sure to validate the message signature to ensure webhooks you receive were actually sent by WHOOP. Check out the [Webhooks Security](https://developer.whoop.com/docs/developing/webhooks/#webhooks-security)
section to see more details on how to implement this.
### Implement a reconciliation job[](https://developer.whoop.com/docs/developing/webhooks/#implement-a-reconciliation-job "Direct link to Implement a reconciliation job")
Since webhook delivery can fail webhooks should not be the sole source of truth for your application. Therefore, we recommend implementing a reconciliation job to occasionally fetch data from WHOOP.
Limitations[](https://developer.whoop.com/docs/developing/webhooks/#limitations "Direct link to Limitations")
---------------------------------------------------------------------------------------------------------------
There are a few limitations to be aware of when implementing webhooks:
1. It is possible you will receive multiple webhook invocations for the same triggering event. You can make use of the `trace_id` field in the webhook to detect duplicate webhooks.
2. These are event based webhooks, meaning they are notifications of changes and not actually the changes themselves. You will need to call the API in order to retrieve the most up-to-date data around this event. There is an example of what this flow would look like in the [Example Request Flow](https://developer.whoop.com/docs/developing/webhooks/#example-request-flow)
section.
3. It is possible that a webhook may be missed. You should implement a reconciliation job that can occasionally reach out to the WHOOP API for the data types you care about to fetch data that may have been missed.
Webhooks FAQs[](https://developer.whoop.com/docs/developing/webhooks/#webhooks-faqs "Direct link to Webhooks FAQs")
---------------------------------------------------------------------------------------------------------------------
#### Why are there only update and delete events? Do we get notified of create events?[](https://developer.whoop.com/docs/developing/webhooks/#why-are-there-only-update-and-delete-events-do-we-get-notified-of-create-events "Direct link to Why are there only update and delete events? Do we get notified of create events?")
Yes! When workouts, sleeps, or recoveries are created those events are published as an "update" event.
#### Are there webhooks for Day Strain, cycles, or body measurements?[](https://developer.whoop.com/docs/developing/webhooks/#are-there-webhooks-for-day-strain-cycles-or-body-measurements "Direct link to Are there webhooks for Day Strain, cycles, or body measurements?")
Not at the moment; these data points should be retrieved by calling their respective APIs. All of the current webhook types are listed in the [Event Types](https://developer.whoop.com/docs/developing/webhooks/#webhook-event-types)
section.
#### How can I stop receiving webhooks for users who have disabled my integration?[](https://developer.whoop.com/docs/developing/webhooks/#how-can-i-stop-receiving-webhooks-for-users-who-have-disabled-my-integration "Direct link to How can I stop receiving webhooks for users who have disabled my integration?")
It is best practice to [revoke access tokens](https://developer.whoop.com/docs/developing/oauth#revoking-an-access-token)
for users who have disabled your integration. Once you do revoke their access token, no webhooks will be sent for the user.
* [Setting Up Webhooks](https://developer.whoop.com/docs/developing/webhooks/#setting-up-webhooks)
* [Webhook Model Versions](https://developer.whoop.com/docs/developing/webhooks/#webhook-model-versions)
* [v2 Webhooks (default)](https://developer.whoop.com/docs/developing/webhooks/#v2-webhooks-default)
* [v1 Webhooks (legacy)](https://developer.whoop.com/docs/developing/webhooks/#v1-webhooks-legacy)
* [Configuring Webhook Model Versions](https://developer.whoop.com/docs/developing/webhooks/#configuring-webhook-model-versions)
* [Webhook Specifications](https://developer.whoop.com/docs/developing/webhooks/#webhook-specifications)
* [Webhook Event Types](https://developer.whoop.com/docs/developing/webhooks/#webhook-event-types)
* [Webhooks Security](https://developer.whoop.com/docs/developing/webhooks/#webhooks-security)
* [Example Request Flow](https://developer.whoop.com/docs/developing/webhooks/#example-request-flow)
* [v2 Webhook Example](https://developer.whoop.com/docs/developing/webhooks/#v2-webhook-example)
* [v1 Webhook Example](https://developer.whoop.com/docs/developing/webhooks/#v1-webhook-example)
* [Webhooks Testing](https://developer.whoop.com/docs/developing/webhooks/#webhooks-testing)
* [Delivery & Retries](https://developer.whoop.com/docs/developing/webhooks/#delivery--retries)
* [Best Practices](https://developer.whoop.com/docs/developing/webhooks/#best-practices)
* [Respond quickly](https://developer.whoop.com/docs/developing/webhooks/#respond-quickly)
* [Validate signatures](https://developer.whoop.com/docs/developing/webhooks/#validate-signatures)
* [Implement a reconciliation job](https://developer.whoop.com/docs/developing/webhooks/#implement-a-reconciliation-job)
* [Limitations](https://developer.whoop.com/docs/developing/webhooks/#limitations)
* [Webhooks FAQs](https://developer.whoop.com/docs/developing/webhooks/#webhooks-faqs)
---
# OAuth 2.0 | WHOOP for Developers
[Skip to main content](https://developer.whoop.com/docs/developing/oauth/#docusaurus_skipToContent_fallback)
**IMPORTANT: v1 webhooks have been be removed. [Learn how](https://developer.whoop.com/docs/developing/v1-v2-migration#2-lookup-v2-ids-from-v1-ids)
to look up mappings from v1 to v2 ids.**
On this page
OAuth 2.0
=========
All endpoints for retrieving a WHOOP user's data require successful authorization via the [OAuth 2.0](https://oauth.net/2/)
protocol. [IETF RFC-6749](https://tools.ietf.org/html/rfc6749)
documents the full standard. While we will not explain OAuth 2.0 generally in this section, we will demonstrate how to use it to authorize an app's access to a WHOOP user's data after the user grants consent.
Any subsequent references to _OAuth_ in this documentation will be referring to _OAuth 2.0_.
We recommend you use a library to manage the details of the OAuth flow. You can find recommended libraries in a variety of programming languages [here](https://oauth.net/code/)
.
Pre-requisite[](https://developer.whoop.com/docs/developing/oauth/#pre-requisite "Direct link to Pre-requisite")
------------------------------------------------------------------------------------------------------------------
Before starting, you must create an App in the WHOOP Developer Dashboard. You can follow the [getting started](https://developer.whoop.com/docs/developing/getting-started)
to learn how if you have not already.
Required Information for OAuth[](https://developer.whoop.com/docs/developing/oauth/#required-information-for-oauth "Direct link to Required Information for OAuth")
---------------------------------------------------------------------------------------------------------------------------------------------------------------------
### Client ID[](https://developer.whoop.com/docs/developing/oauth/#client-id "Direct link to Client ID")
The `Client ID` can be found after creating a client in the WHOOP Developer Dashboard.
### Client Secret[](https://developer.whoop.com/docs/developing/oauth/#client-secret "Direct link to Client Secret")
You can find the `Client Secret` after creating a Client in the WHOOP Developer Dashboard.
### Authorization URL[](https://developer.whoop.com/docs/developing/oauth/#authorization-url "Direct link to Authorization URL")
This WHOOP URL prompts a user to authorize your app to access the WHOOP user's data. After the user grants authorization, WHOOP will respond with an authorization code.
https://api.prod.whoop.com/oauth/oauth2/auth
### Token URL[](https://developer.whoop.com/docs/developing/oauth/#token-url "Direct link to Token URL")
This WHOOP URL provides your app with the authorization code from the [authorization URL](https://developer.whoop.com/docs/developing/oauth/#authorization-url)
after the WHOOP user authorizes your app to access their WHOOP data. This endpoint provides an access token in exchange for the authorization code.
https://api.prod.whoop.com/oauth/oauth2/token
### Redirect URL[](https://developer.whoop.com/docs/developing/oauth/#redirect-url "Direct link to Redirect URL")
WHOOP will redirect the user to the [Redirect URL](https://www.oauth.com/oauth2-servers/redirect-uris/)
after they authorize your App to access the request scopes. You must register the Redirect URL in the WHOOP Developer Dashboard.
A valid URL will take the form of `https://whoop.com/example/redirect` or `whoop://example/redirect`.
**Note:** Your OAuth library may reference `Redirect URL` as a `Callback URL`.
### State[](https://developer.whoop.com/docs/developing/oauth/#state "Direct link to State")
The [state parameter](https://auth0.com/docs/protocols/state-parameters)
is a security measure to prevent against [CSRF attacks](https://owasp.org/www-community/attacks/csrf)
. It's a generated random string that you provide to WHOOP's server. Upon successful authorization by the user, WHOOP will respond with this same state value.
Your OAuth 2.0 library may handle this functionality for you; however, you may be responsible for explicitly using it by setting the option to true.
The state parameter must be eight characters long if you need to generate it yourself.
### Scope[](https://developer.whoop.com/docs/developing/oauth/#scope "Direct link to Scope")
The [scope parameter](https://oauth.net/2/scope/)
is how your application declares which data and what level of access is being requested.
When the OAuth flow prompts a WHOOP user to authorize access to your app, the user will see the list of scopes your app requested. The user must authorize access to them before WHOOP grants your app a token.
You can learn more about what scopes are available in [the API Docs](https://developer.whoop.com/api#section/Authentication)
.
Request An Access Token[](https://developer.whoop.com/docs/developing/oauth/#request-an-access-token "Direct link to Request An Access Token")
------------------------------------------------------------------------------------------------------------------------------------------------
We highly recommend using a library to manage the flow. There are available libraries in many [programming languages](https://oauth.net/code/)
.
The steps that the library will follow are:
1. Your application will send a request to the Authorization URL for an [authorization code](https://www.oauth.com/oauth2-servers/access-tokens/authorization-code-request/)
.
2. WHOOP prompts the user to log in with their WHOOP credentials.
3. The user will confirm they authorize access to your app.
4. WHOOP will respond to the Redirect URL with an authorization code.
5. Your application will send a request to the Token URL, exchanging the authorization code for an access token (and optionally a refresh token if your app requested the `offline` scope).
### Access Token Request Examples[](https://developer.whoop.com/docs/developing/oauth/#access-token-request-examples "Direct link to Access Token Request Examples")
* [Javascript and Passport](https://developer.whoop.com/docs/tutorials/access-token-passport)
Using An Access Token[](https://developer.whoop.com/docs/developing/oauth/#using-an-access-token "Direct link to Using An Access Token")
------------------------------------------------------------------------------------------------------------------------------------------
After receiving an access token, all requests must include the access token. Your app should pass the access token as a `Bearer` token in the `Authorization` header.
WHOOP will return the requested data if the access token is successfully verified. However, if the token is invalid, WHOOP returns a `401 - Unauthorized` response.
Access Token Expiration[](https://developer.whoop.com/docs/developing/oauth/#access-token-expiration "Direct link to Access Token Expiration")
------------------------------------------------------------------------------------------------------------------------------------------------
Access tokens are only valid for a short time. WHOOP provides the token expiry in the `expires_in` parameter (in seconds). After the token expires, your app must [refresh the token](https://developer.whoop.com/docs/developing/oauth/#refreshing-an-access-token)
.
### Refreshing an Access Token[](https://developer.whoop.com/docs/developing/oauth/#refreshing-an-access-token "Direct link to Refreshing an Access Token")
Access tokens are short-lived, depending on the `expires_in` value. WHOOP will respond with a (401 - Unauthorized) [HTTP status code](https://developer.mozilla.org/en-US/docs/Web/HTTP/Status/401)
if your app sends a request with an expired access token.
When the access token is expired, you can no longer use it and must refresh the token. If you do not want to wait for the token to expire before refreshing, you can refresh the complete set of access tokens regularly. One strategy is to execute refreshing access tokens using a background cron job.
Existing access tokens are invalidated once your app uses the refresh token to generate a new access token. The access token from the refresh response is now the valid access token, and your app can use the new access token for future requests. Similarly, the refresh token from the refresh response is now the valid refresh token, and your app must use the new refresh token on the subsequent refresh request.
Another advantage to refreshing tokens in a recurring job is that it limits the likelihood of issues occurring with multiple concurrent requests attempting to refresh an expired token. When your app makes simultaneous refresh token requests, the first refresh request that reaches WHOOP will succeed. The second request would fail because the first request invalidates the refresh token.
### Receiving a Refresh Token[](https://developer.whoop.com/docs/developing/oauth/#receiving-a-refresh-token "Direct link to Receiving a Refresh Token")
WHOOP provides your app with a refresh token after completing the OAuth 2.0 flow _if_ the `offline` scope is included in the authorization request. You _must_ request the `offline` scope to receive a refresh token.
### Required Information To Refresh[](https://developer.whoop.com/docs/developing/oauth/#required-information-to-refresh "Direct link to Required Information To Refresh")
#### Refresh Token Endpoint[](https://developer.whoop.com/docs/developing/oauth/#refresh-token-endpoint "Direct link to Refresh Token Endpoint")
The WHOOP URL where your app sends a POST request including the refresh token in exchange for a new access token.
https://api.prod.whoop.com/oauth/oauth2/token
#### Refresh Token[](https://developer.whoop.com/docs/developing/oauth/#refresh-token "Direct link to Refresh Token")
If your app requests the `offline` scope during the OAuth authorization flow, WHOOP returns a refresh token that your app uses to refresh expired access tokens.
#### Client ID[](https://developer.whoop.com/docs/developing/oauth/#client-id-1 "Direct link to Client ID")
The Client ID is a unique identifier for your Client app. Your app uses this ID to authenticate with WHOOP. You can create and manage this ID in the WHOOP Developer Dashboard.
#### Client Secret[](https://developer.whoop.com/docs/developing/oauth/#client-secret-1 "Direct link to Client Secret")
The Client Secret is a secret value that accompanies a Client ID. You can view the Client Secret in the WHOOP Developer Dashboard.
### Sample POST Request Payload[](https://developer.whoop.com/docs/developing/oauth/#sample-post-request-payload "Direct link to Sample POST Request Payload")
{ "grant_type": "refresh_token", "refresh_token": "{{RefreshToken}}", "client_id": "{{ClientID}}", "client_secret": "{{ClientSecret}}", "scope": "offline"}
The payload above uses [Postman variables](https://learning.postman.com/docs/sending-requests/variables/)
, rather than actual data. The variables represent:
* RefreshToken - the value of the refresh token you receive along with an access token.
* ClientID - the client identifier created in the WHOOP Developer Dashboard.
* ClientSecret - the secret that accompanies the Client ID in the WHOOP Developer Dashboard.
### Sample POST Response Payload[](https://developer.whoop.com/docs/developing/oauth/#sample-post-response-payload "Direct link to Sample POST Response Payload")
{ "access_token": "the-value-of-the-new-access-token", "expires_in": 3600, "refresh_token": "the-value-of-the-new-refresh-token", "scope": "offline other-scopes-requested", "token_type": "bearer"}
### Token Refresh Examples[](https://developer.whoop.com/docs/developing/oauth/#token-refresh-examples "Direct link to Token Refresh Examples")
* [Postman](https://developer.whoop.com/docs/tutorials/refresh-token-postman)
* [Javascript](https://developer.whoop.com/docs/tutorials/refresh-token-javascript)
Revoking an Access Token[](https://developer.whoop.com/docs/developing/oauth/#revoking-an-access-token "Direct link to Revoking an Access Token")
---------------------------------------------------------------------------------------------------------------------------------------------------
When a user disables your integration, you should revoke their access token from your application to respect their privacy. If you have adopted [webhooks](https://developer.whoop.com/docs/developing/webhooks)
, revoking an access token will ensure that you no longer receive webhooks for this user.
To revoke an access token, you can use the [revokeUserOauthAccess](https://developer.whoop.com/api/#tag/User/operation/revokeUserOAuthAccess)
API endpoint.
* [Pre-requisite](https://developer.whoop.com/docs/developing/oauth/#pre-requisite)
* [Required Information for OAuth](https://developer.whoop.com/docs/developing/oauth/#required-information-for-oauth)
* [Client ID](https://developer.whoop.com/docs/developing/oauth/#client-id)
* [Client Secret](https://developer.whoop.com/docs/developing/oauth/#client-secret)
* [Authorization URL](https://developer.whoop.com/docs/developing/oauth/#authorization-url)
* [Token URL](https://developer.whoop.com/docs/developing/oauth/#token-url)
* [Redirect URL](https://developer.whoop.com/docs/developing/oauth/#redirect-url)
* [State](https://developer.whoop.com/docs/developing/oauth/#state)
* [Scope](https://developer.whoop.com/docs/developing/oauth/#scope)
* [Request An Access Token](https://developer.whoop.com/docs/developing/oauth/#request-an-access-token)
* [Access Token Request Examples](https://developer.whoop.com/docs/developing/oauth/#access-token-request-examples)
* [Using An Access Token](https://developer.whoop.com/docs/developing/oauth/#using-an-access-token)
* [Access Token Expiration](https://developer.whoop.com/docs/developing/oauth/#access-token-expiration)
* [Refreshing an Access Token](https://developer.whoop.com/docs/developing/oauth/#refreshing-an-access-token)
* [Receiving a Refresh Token](https://developer.whoop.com/docs/developing/oauth/#receiving-a-refresh-token)
* [Required Information To Refresh](https://developer.whoop.com/docs/developing/oauth/#required-information-to-refresh)
* [Sample POST Request Payload](https://developer.whoop.com/docs/developing/oauth/#sample-post-request-payload)
* [Sample POST Response Payload](https://developer.whoop.com/docs/developing/oauth/#sample-post-response-payload)
* [Token Refresh Examples](https://developer.whoop.com/docs/developing/oauth/#token-refresh-examples)
* [Revoking an Access Token](https://developer.whoop.com/docs/developing/oauth/#revoking-an-access-token)
---
# Design Guidelines | WHOOP for Developers
[Skip to main content](https://developer.whoop.com/docs/developing/design-guidelines/#docusaurus_skipToContent_fallback)
**IMPORTANT: v1 webhooks have been be removed. [Learn how](https://developer.whoop.com/docs/developing/v1-v2-migration#2-lookup-v2-ids-from-v1-ids)
to look up mappings from v1 to v2 ids.**
On this page
Design Guidelines
=================
By integrating with the WHOOP API, you are helping our members accelerate their journey towards unlocking their performance by bringing their WHOOP data into your contextually relevant experience. We've established the following design and brand guidelines to ensure that the WHOOP brand and accompanying data is consistent for our members.
Design Guidelines[](https://developer.whoop.com/docs/developing/design-guidelines/#design-guidelines-1 "Direct link to Design Guidelines")
--------------------------------------------------------------------------------------------------------------------------------------------
The WHOOP Design Guidelines is a valuable resource for designers and developers who wish to integrate WHOOP into their products. You’ll find guidance for logo use, typefaces, colors, recommendations, and more in this comprehensive guide.
[View Design Guidelines](https://developer.whoop.com/assets/files/WHOOP%20-%20Brand%20&%20Design%20Guidelines-bdea3554e94b4ea09e68695b1e8dc8e7.pdf)
Digital Assets[](https://developer.whoop.com/docs/developing/design-guidelines/#digital-assets "Direct link to Digital Assets")
---------------------------------------------------------------------------------------------------------------------------------
Below you can easily download acceptable versions of the WHOOP logo. Files are provided in SVG, PNG, and PDF formats.
[Download Logo & Icon](https://developer.whoop.com/assets/files/WHOOP%20-%20Logos-771dd7bce35d93f93653f2ae3225916a.zip)
By downloading any files from this page, you agree to the [WHOOP Privacy Principles](https://www.whoop.com/privacy/whoop-privacy-principles/)
& [Terms of Use](https://www.whoop.com/termsofuse/)
.
* [Design Guidelines](https://developer.whoop.com/docs/developing/design-guidelines/#design-guidelines-1)
* [Digital Assets](https://developer.whoop.com/docs/developing/design-guidelines/#digital-assets)
---
# Tutorials | WHOOP for Developers
[Skip to main content](https://developer.whoop.com/docs/tutorials/#docusaurus_skipToContent_fallback)
**IMPORTANT: v1 webhooks have been be removed. [Learn how](https://developer.whoop.com/docs/developing/v1-v2-migration#2-lookup-v2-ids-from-v1-ids)
to look up mappings from v1 to v2 ids.**
Tutorials
=========
This section walks you through common scenarios you might face while developing with the WHOOP API.
* Authentication (Javascript)
* [Authenticating with WHOOP (with Passport)](https://developer.whoop.com/docs/tutorials/access-token-passport)
* [Refreshing Access Tokens](https://developer.whoop.com/docs/tutorials/refresh-token-javascript)
* Authentication (Postman)
* [Authenticating with WHOOP](https://developer.whoop.com/docs/tutorials/access-token-postman)
* [Refreshing Access Tokens](https://developer.whoop.com/docs/tutorials/refresh-token-postman)
* Request Patterns
* [Get Current Recovery Score for User](https://developer.whoop.com/docs/tutorials/get-current-recovery-score)
---
# Authenticating with WHOOP (with Passport) | WHOOP for Developers
[Skip to main content](https://developer.whoop.com/docs/tutorials/access-token-passport/#docusaurus_skipToContent_fallback)
**IMPORTANT: v1 webhooks have been be removed. [Learn how](https://developer.whoop.com/docs/developing/v1-v2-migration#2-lookup-v2-ids-from-v1-ids)
to look up mappings from v1 to v2 ids.**
On this page
Authenticating with WHOOP (with Passport)
=========================================
Though Javascript is a primary language for client-side application development, all requests to WHOOP must be made server-side. This tutorial does not propose or require a given framework for building Javascript server-side applications. Some examples of Javascript server-side frameworks are [express.js](https://expressjs.com/)
and [next.js](https://nextjs.org/)
.
You can choose from one of the many OAuth 2.0 libraries. In this tutorial, we will use [Passport](http://www.passportjs.org/)
for authentication. Specifically, this will use the [passport-oauth2](http://www.passportjs.org/packages/passport-oauth2/)
package.
Install Dependencies[](https://developer.whoop.com/docs/tutorials/access-token-passport/#install-dependencies "Direct link to Install Dependencies")
------------------------------------------------------------------------------------------------------------------------------------------------------
npm install passport passport-oauth2
Additionally, if you're using Typescript, you'll want to include the type definitions as well:
npm install @types/passport @types/passport-oauth2
Configure The Strategy[](https://developer.whoop.com/docs/tutorials/access-token-passport/#configure-the-strategy "Direct link to Configure The Strategy")
------------------------------------------------------------------------------------------------------------------------------------------------------------
We first need to define the data `Passport` will need to complete the OAuth 2.0 authorization flow, stored in a configuration.
const whoopOAuthConfig = { authorizationURL: `${process.env.WHOOP_API_HOSTNAME}/oauth/oauth2/auth`, tokenURL: `${process.env.WHOOP_API_HOSTNAME}/oauth/oauth2/token`, clientID: process.env.CLIENT_ID, clientSecret: process.env.CLIENT_SECRET, callbackURL: process.env.CALLBACK_URL, state: true, scope: [ 'offline', 'read:profile' ],}
The data elements are:
* `authorizationURL`: The WHOOP URL prompts a user to sign in to WHOOP and authorize your application. [Learn more](https://developer.whoop.com/docs/developing/oauth#authorization-url)
* `tokenURL`: The WHOOP URL to exchange an authorization code for an access token. [Learn more](https://developer.whoop.com/docs/developing/oauth#token-url)
* `clientID`: A unique identifier for your client. [Learn more](https://developer.whoop.com/docs/developing/oauth#client-id)
* `clientSecret`: A secret value that accompanies your client identifier. [Learn more](https://developer.whoop.com/docs/developing/oauth#client-secret)
* `callbackURL`: WHOOP will redirect the user to this location after the user authorizes your application. [Learn more](https://developer.whoop.com/docs/developing/oauth#redirect-url)
* `state`: Set this to `true` to have the strategy define the state value that WHOOP will pass back to your app. [Learn more](https://developer.whoop.com/docs/developing/oauth#state)
* `scope`: A list of the data types and operations your app can access. We are requesting the `offline` scope to retrieve a refresh token and `read:profile` to access User Profile information from the WHOOP API in this example. You need to add the relevant scopes your app needs access. [Learn more](https://developer.whoop.com/docs/developing/oauth#scope)
Determine What To Do After Authentication Succeeds[](https://developer.whoop.com/docs/tutorials/access-token-passport/#determine-what-to-do-after-authentication-succeeds "Direct link to Determine What To Do After Authentication Succeeds")
------------------------------------------------------------------------------------------------------------------------------------------------------------------------------------------------------------------------------------------------
`Passport` needs a function to execute once the OAuth flow is complete. What occurs in that function is specific to your application.
In this example, we will use the received information from the OAuth flow to save the user to our database using [Prisma](https://www.prisma.io/)
. But, of course, what your application does with this may differ.
const getUser = async ( accessToken, refreshToken, {expires_in}, profile, done,) => { const {first_name, last_name, user_id} = profile const createUserParams = { accessToken, expiresAt: Date.now() + expires_in * 1000, firstName: first_name, lastName: last_name, refreshToken, userId: user_id, } const user = await prisma.user.upsert({ where: {userId: user_id}, create: createUserParams, update: createUserParams, }) done(null, user)}
Passport will pass in several parameters that we can use in our application-specific logic:
* `accessToken`: the access token to retrieve user information from the WHOOP API. For future requests, your app must pass the Access Token as a Bearer token in the Authorization header. We will use this as an example below to retrieve [profile data](https://developer.whoop.com/docs/tutorials/access-token-passport/#get-user-profile-information)
.
* `refreshToken`: Your app can use the Refresh Token to retrieve a new access token after expiration. [Learn more](https://developer.whoop.com/docs/developing/oauth#refresh-the-token)
* `results`: this is an object that contains fields for `access_token`, `expires_in`, `scope`, and `token_type`.
* `profile`: the normalized representation of a user's profile data. The Passport library will populate the `profile` because we later tell Passport how to [get user profile information](https://developer.whoop.com/docs/tutorials/access-token-passport/#get-user-profile-information)
.
* `done`: a callback function accepting errors and the user as the parameters.
Given all that information, we are extracting the user's first name, last name, and WHOOP user id from their profile and storing that in our database, along with their active tokens.
Note that Passport's documentation shows a function that takes [four parameters](https://github.com/jaredhanson/passport-oauth2#configure-strategy)
. Using this won't have the information about when the token expires, so we're instead, we're relying on a [less-common variant](https://github.com/jaredhanson/passport-google-oauth/issues/23#issuecomment-27128329)
for this data.
Get User Profile Information[](https://developer.whoop.com/docs/tutorials/access-token-passport/#get-user-profile-information "Direct link to Get User Profile Information")
------------------------------------------------------------------------------------------------------------------------------------------------------------------------------
WHOOP includes an API endpoint to access user profile details, which your app will have access to if the app requests (and the user authorizes) the `read:profile` scope.
const fetchProfile = async ( accessToken, done,) => { const profileResponse = await fetch( `${process.env.WHOOP_API_HOSTNAME}/developer/v1/user/profile/basic`, { headers: { Authorization: `Bearer ${accessToken}`, }, }, ) const profile = await profileResponse.json() done(null, profile)}
This [async function](https://developer.mozilla.org/en-US/docs/Web/JavaScript/Reference/Statements/async_function)
uses Javascript's [Fetch API](https://developer.mozilla.org/en-US/docs/Web/API/Fetch_API/Using_Fetch)
to make a request to the WHOOP profile endpoint, passing in the access token we receive from a successful OAuth 2.0 flow as a bearer token in the Authorization header.
The function returns the user's profile information. Passport [normalizes](http://www.passportjs.org/docs/profile/)
received profile information.
Use The WHOOP Strategy[](https://developer.whoop.com/docs/tutorials/access-token-passport/#use-the-whoop-strategy "Direct link to Use The WHOOP Strategy")
------------------------------------------------------------------------------------------------------------------------------------------------------------
Now that we have all of the individual pieces built, it's time to put them together.
const whoopAuthorizationStrategy = new OAuth2Strategy(whoopOAuthConfig, getUser)whoopAuthorizationStrategy.userProfile = fetchProfilepassport.use('withWhoop', whoopAuthorizationStrategy)
Here we are building a strategy, passing it our WHOOP configuration and telling it what to do when a user is authenticated - which is to save or get the user from our database.
We're also telling the strategy to use our ability to fetch profile information.
Lastly, we're telling Passport itself to use our newly-created strategy.
Authenticate With WHOOP[](https://developer.whoop.com/docs/tutorials/access-token-passport/#authenticate-with-whoop "Direct link to Authenticate With WHOOP")
---------------------------------------------------------------------------------------------------------------------------------------------------------------
We need to authenticate requests using `passport.authenticate()`. Where this gets invoked will depend on your framework of choice. Let's assume an [Express](https://expressjs.com/)
application.
app.get('/auth/example', passport.authenticate('withWhoop'));app.get('/auth/example/callback', passport.authenticate('withWhoop', {failureRedirect: '/login'}), function (req, res) { res.redirect('/welcome'); });
How this gets invoked in your middleware stack or routing layer will depend on the framework you're using.
Congratulations[](https://developer.whoop.com/docs/tutorials/access-token-passport/#congratulations "Direct link to Congratulations")
---------------------------------------------------------------------------------------------------------------------------------------
After going through this tutorial, you have learned:
* How to build a custom Passport OAuth 2.0 strategy to complete the OAuth flow with WHOOP.
* Where to add your custom logic to handle user management and persistence.
* How to access a user's profile information and tell Passport about it to automatically retrieve user information from WHOOP.
* How to connect those individual pieces with Passports OAuth 2.0 package.
The next step for you is to plug this into whatever framework or middleware you're using to trigger Passport to authenticate.
* [Install Dependencies](https://developer.whoop.com/docs/tutorials/access-token-passport/#install-dependencies)
* [Configure The Strategy](https://developer.whoop.com/docs/tutorials/access-token-passport/#configure-the-strategy)
* [Determine What To Do After Authentication Succeeds](https://developer.whoop.com/docs/tutorials/access-token-passport/#determine-what-to-do-after-authentication-succeeds)
* [Get User Profile Information](https://developer.whoop.com/docs/tutorials/access-token-passport/#get-user-profile-information)
* [Use The WHOOP Strategy](https://developer.whoop.com/docs/tutorials/access-token-passport/#use-the-whoop-strategy)
* [Authenticate With WHOOP](https://developer.whoop.com/docs/tutorials/access-token-passport/#authenticate-with-whoop)
* [Congratulations](https://developer.whoop.com/docs/tutorials/access-token-passport/#congratulations)
---
# Support | WHOOP for Developers
[Skip to main content](https://developer.whoop.com/docs/developing/support/#docusaurus_skipToContent_fallback)
**IMPORTANT: v1 webhooks have been be removed. [Learn how](https://developer.whoop.com/docs/developing/v1-v2-migration#2-lookup-v2-ids-from-v1-ids)
to look up mappings from v1 to v2 ids.**
On this page
Support
=======
FAQ[](https://developer.whoop.com/docs/developing/support/#faq "Direct link to FAQ")
--------------------------------------------------------------------------------------
#### How do I get started with the WHOOP Developer Platform?[](https://developer.whoop.com/docs/developing/support/#how-do-i-get-started-with-the-whoop-developer-platform "Direct link to How do I get started with the WHOOP Developer Platform?")
To get started, you need to sign up for an account on whoop.com and obtain a WHOOP device. Once you have an account, you can create an application by navigating to Dashboard on developer.whoop.com and logging in with your account credentials. You can reference our [getting started](https://developer.whoop.com/docs/developing/getting-started)
guide to learn how to integrate WHOOP data into your application.
#### What data is available through the WHOOP API?[](https://developer.whoop.com/docs/developing/support/#what-data-is-available-through-the-whoop-api "Direct link to What data is available through the WHOOP API?")
The WHOOP API provides access to various types of data, including [activity](https://developer.whoop.com/docs/developing/user-data/workout)
data, [sleep](https://developer.whoop.com/docs/developing/user-data/sleep)
data, [recovery](https://developer.whoop.com/docs/developing/user-data/recovery)
data, and more. For a detailed list of available endpoints and the data they return, please refer to our [API documentation](https://developer.whoop.com/api)
.
#### Are there any costs associated with using the WHOOP API?[](https://developer.whoop.com/docs/developing/support/#are-there-any-costs-associated-with-using-the-whoop-api "Direct link to Are there any costs associated with using the WHOOP API?")
Access to the WHOOP Developer Platform and API is currently free. However, you must have a WHOOP device, which requires a membership. Check [join.whoop.com](https://www.join.whoop.com/?utm_source=whoop&utm_medium=developer)
for more details.
#### Do you offer a sandbox environment for developers who do not have a WHOOP?[](https://developer.whoop.com/docs/developing/support/#do-you-offer-a-sandbox-environment-for-developers-who-do-not-have-a-whoop "Direct link to Do you offer a sandbox environment for developers who do not have a WHOOP?")
We require all developers on the Developer Platform to have a WHOOP device. Using WHOOP and understanding the user flow dramatically helps with understanding and integrating with our API.
#### What are the future improvement plans for the WHOOP API?[](https://developer.whoop.com/docs/developing/support/#what-are-the-future-improvement-plans-for-the-whoop-api "Direct link to What are the future improvement plans for the WHOOP API?")
We strive to continuously improve our API offering and make it straightforward to work with. We will regularly update the API as new functionality and features are released, and note the update in our [changelog](https://developer.whoop.com/docs/api-changelog/)
. For ideas on enhancing the API, please [share](https://whoopinc.typeform.com/to/XmzituEp)
them with us.
#### What is your rate limiting policy?[](https://developer.whoop.com/docs/developing/support/#what-is-your-rate-limiting-policy "Direct link to What is your rate limiting policy?")
Check out our rate limiting policy [here](https://developer.whoop.com/docs/developing/rate-limiting)
.
#### What is a rough estimate of how much a day’s worth of data for an individual would be in terms of KB?[](https://developer.whoop.com/docs/developing/support/#what-is-a-rough-estimate-of-how-much-a-days-worth-of-data-for-an-individual-would-be-in-terms-of-kb "Direct link to What is a rough estimate of how much a day’s worth of data for an individual would be in terms of KB?")
A day’s worth of member data (with one workout, one sleep, and one recovery) would be about 4 KB. For each additional workout or nap, add 1 KB.
#### How often should we refresh tokens in the OAuth flow?[](https://developer.whoop.com/docs/developing/support/#how-often-should-we-refresh-tokens-in-the-oauth-flow "Direct link to How often should we refresh tokens in the OAuth flow?")
You should refresh tokens every hour. See an example flow [here](https://www.oauth.com/oauth2-servers/server-side-apps/example-flow/)
and documentation for refreshing an access token [here](https://www.oauth.com/oauth2-servers/making-authenticated-requests/refreshing-an-access-token/)
.
#### Do I need to include the `offline` scope?[](https://developer.whoop.com/docs/developing/support/#do-i-need-to-include-the-offline-scope "Direct link to do-i-need-to-include-the-offline-scope")
We recommend requesting the `offline` scope _both_ when requesting an access token, as this will give you a refresh token, as well as when refreshing an access token. With a refresh token, your app can get a new access token after the original one expires, which is crucial for accessing WHOOP data over time.
#### Do I need to show that my app has collected a member’s authorization in my UI?[](https://developer.whoop.com/docs/developing/support/#do-i-need-to-show-that-my-app-has-collected-a-members-authorization-in-my-ui "Direct link to Do I need to show that my app has collected a member’s authorization in my UI?")
The WHOOP member should always be able to see that they've granted you access to their data. You should offer an easy and intuitive way for the member to [disable](https://developer.whoop.com/api/#tag/User/operation/revokeUserOAuthAccess)
the integration as well. The member can also revoke access to an integration via the WHOOP app.
#### Generally, what is the lift to use the API?[](https://developer.whoop.com/docs/developing/support/#generally-what-is-the-lift-to-use-the-api "Direct link to Generally, what is the lift to use the API?")
The WHOOP API utilizes [OAuth 2.0](https://developer.whoop.com/docs/developing/oauth)
authentication, which is well-documented and industry standard, and [webhooks](https://developer.whoop.com/docs/developing/webhooks/)
to notify when new data is available. Integrating with the WHOOP API is very straightforward. Typically, the hardest part of integrating with the WHOOP API is understanding the data model (_e.g., what is a [physiological cycle](https://developer.whoop.com/docs/developing/user-data/cycle)
, and how does that differ from a calendar day?_). We’ve heard from countless developers that wearing a WHOOP makes understanding the API and data model significantly easier.
#### Does the API offer access to continuous heart rate data?[](https://developer.whoop.com/docs/developing/support/#does-the-api-offer-access-to-continuous-heart-rate-data "Direct link to Does the API offer access to continuous heart rate data?")
Each WHOOP device can broadcast heart rate over Bluetooth Low Energy (BLE) to other devices. Many applications have implemented a Bluetooth listener to let members connect their WHOOP as a heart rate monitor. Continuous heart rate data is not available via the WHOOP API.
Submitting feedback[](https://developer.whoop.com/docs/developing/support/#submitting-feedback "Direct link to Submitting feedback")
--------------------------------------------------------------------------------------------------------------------------------------
If you are encountering issues with or have feedback about the WHOOP API, you can submit a [request](https://whoopinc.typeform.com/to/XmzituEp)
. Please note that responses to this form may take some time.
Still have questions? [Share](https://whoopinc.typeform.com/to/XmzituEp)
your questions with us.
* [FAQ](https://developer.whoop.com/docs/developing/support/#faq)
* [Submitting feedback](https://developer.whoop.com/docs/developing/support/#submitting-feedback)
---
# Pagination | WHOOP for Developers
[Skip to main content](https://developer.whoop.com/docs/developing/pagination/#docusaurus_skipToContent_fallback)
**IMPORTANT: v1 webhooks have been be removed. [Learn how](https://developer.whoop.com/docs/developing/v1-v2-migration#2-lookup-v2-ids-from-v1-ids)
to look up mappings from v1 to v2 ids.**
On this page
Pagination
==========
Collections such as the [Cycle](https://developer.whoop.com/api#operation/getCycleCollection)
, [Recovery](https://developer.whoop.com/api#operation/getRecoveryCollection)
, [Sleep](https://developer.whoop.com/api#operation/getSleepCollection)
, and [Workout](https://developer.whoop.com/api#operation/getWorkoutCollection)
Collections can include a large number of records. Responses to queries on the collection may be truncated, but you can paginate through the results to read the full collection.
The Collection APIs return a token to represent the current page on each response. You send that token on the subsequent request to retrieve the next page. You iterated through all pages if the `next_token` field is empty on the response.
Using the' limit' header, you can also control how many records the API endpoint returns per page. However, the API endpoint will not return more than the max allowed value ([API Docs](https://developer.whoop.com/api#operation/getCycleCollection)
specify the max value on each endpoint).
Example[](https://developer.whoop.com/docs/developing/pagination/#example "Direct link to Example")
-----------------------------------------------------------------------------------------------------
Let's query a user's sleep for the first three months of 2022. We make the first request specifying the query parameters for `start` and `end`.
GET https://api.prod.whoop.com/developer/v1/activity/sleep?start=2022-01-01T00:00:00.000Z&end=2022-04-01T00:00:00.000Z
The request returns each sleep in the `records` field and a `next_token`, which we can use on the request to get the next page.
{ "records": [ { ... } ], "next_token": "eyIkIjoib0AxIiwibyI6MTB9"}
The `next_token` can be placed on the subsequent request to fetch the next page of Sleeps using the same query parameters.
GET https://api.prod.whoop.com/developer/v1/activity/sleep?nextToken=eyIkIjoib0AxIiwibyI6MTB9&start=2022-01-01T00:00:00.000Z&end=2022-04-01T00:00:00.000Z
You can continue paginating in this manner to retrieve all pages until the `next_token` is empty.
* [Example](https://developer.whoop.com/docs/developing/pagination/#example)
---
# Authenticating with WHOOP | WHOOP for Developers
[Skip to main content](https://developer.whoop.com/docs/tutorials/access-token-postman/#docusaurus_skipToContent_fallback)
**IMPORTANT: v1 webhooks have been be removed. [Learn how](https://developer.whoop.com/docs/developing/v1-v2-migration#2-lookup-v2-ids-from-v1-ids)
to look up mappings from v1 to v2 ids.**
On this page
Authenticating with WHOOP
=========================
[Postman](https://www.postman.com/)
is an application you can use to make, save, and share API requests. It includes the functionality to complete an OAuth 2.0 flow for user data. Being programming language-agnostic, it may be a great starting point to validate your [credentials](https://developer.whoop.com/docs/developing/oauth#client-id)
are functioning.
Environment Setup[](https://developer.whoop.com/docs/tutorials/access-token-postman/#environment-setup "Direct link to Environment Setup")
--------------------------------------------------------------------------------------------------------------------------------------------
The Postman collection used here requires that you set up the Client Secret information from the WHOOP [Developer Dashboard](https://developer.whoop.com/docs/developing/getting-started)
, and you saved the data as Postman variables.
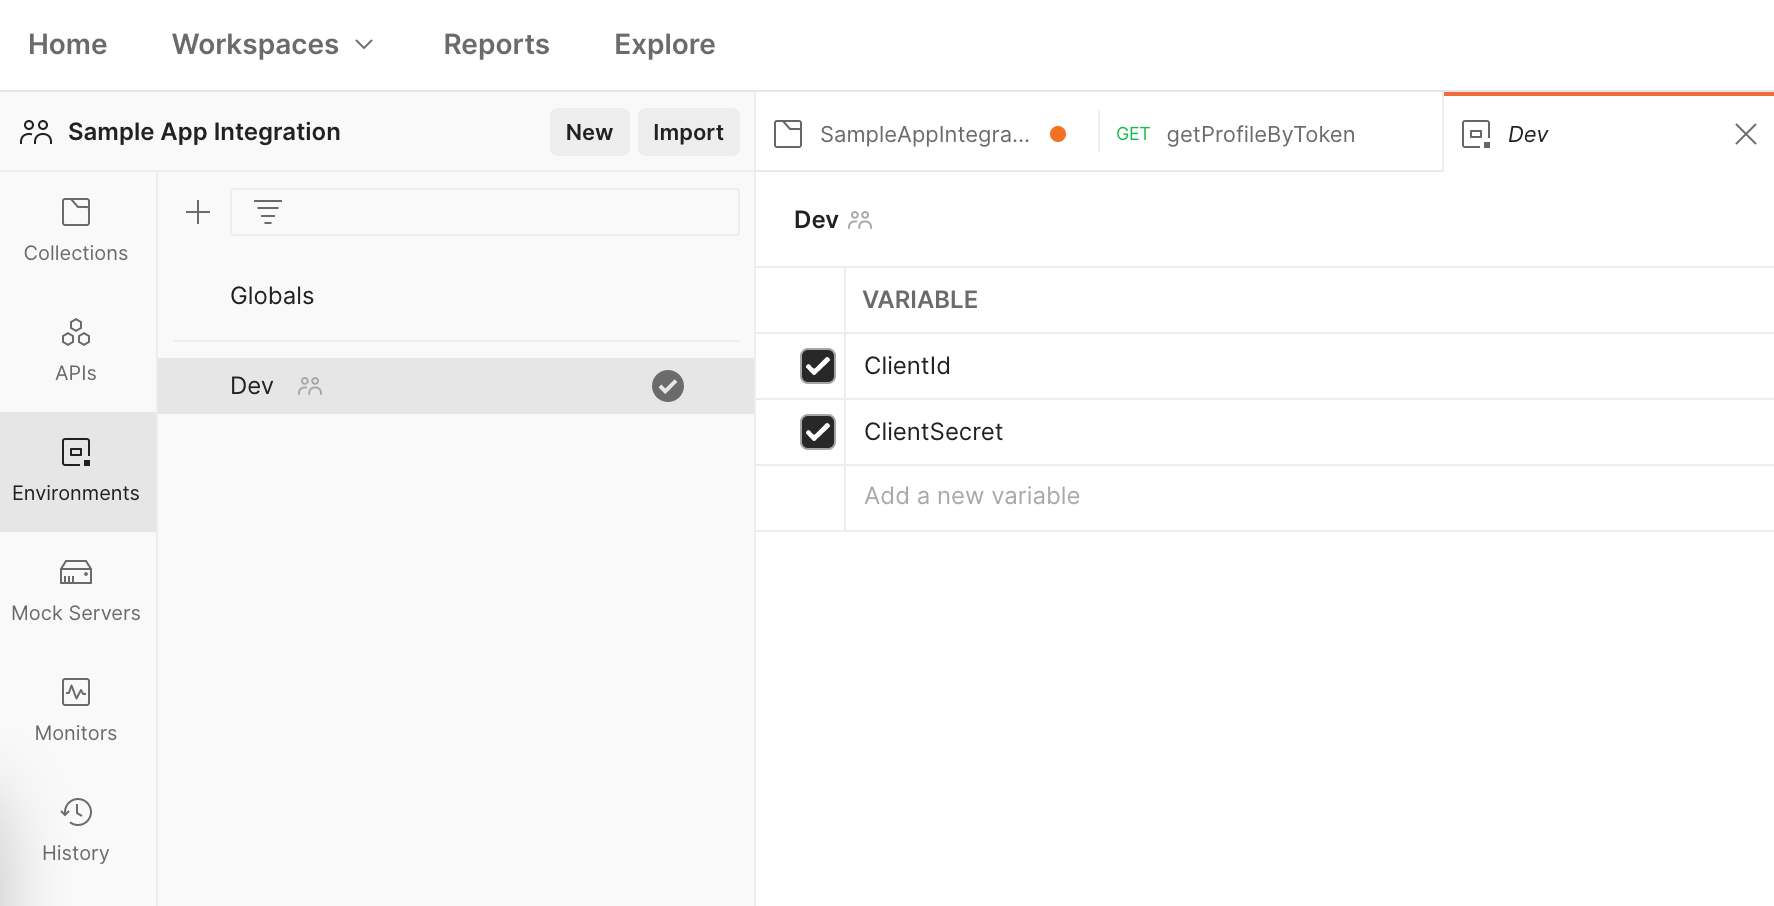
In the Postman app, navigate to the "Environments" section on the far left. Then, add or modify two [variables](https://learning.postman.com/docs/sending-requests/variables/)
in the main content window:
1. `ClientId` - this is the unique client Id from the WHOOP [Developer Dashboard](https://developer.whoop.com/docs/developing/oauth#client-id)
.
2. `ClientSecret` - this is the secret for the client Id from the WHOOP [Developer Dashboard](https://developer.whoop.com/docs/developing/oauth#client-secret)
.
In addition to naming these variables, fill in the values with the credentials from the Developer Dashboard.
**Note**: _The screenshot does not show that information to avoid sharing credentials._
Now you're ready to use those values as variables for the rest of the flow, and don't need to share the actual secrets in the saved requests.
Starting the Authorization Flow[](https://developer.whoop.com/docs/tutorials/access-token-postman/#starting-the-authorization-flow "Direct link to Starting the Authorization Flow")
--------------------------------------------------------------------------------------------------------------------------------------------------------------------------------------
Postman includes support for completing the OAuth 2.0 [flow](https://learning.postman.com/docs/sending-requests/authorization/#oauth-20)
. This section will show you how to give Postman access to your WHOOP credentials for future requests.
Navigate to the "Collections" section on the far left, and select the collection name for the WHOOP API in the pane to the right of that.
Next, select the "Authorization" heading in the main content window. It should be underlined in orange.
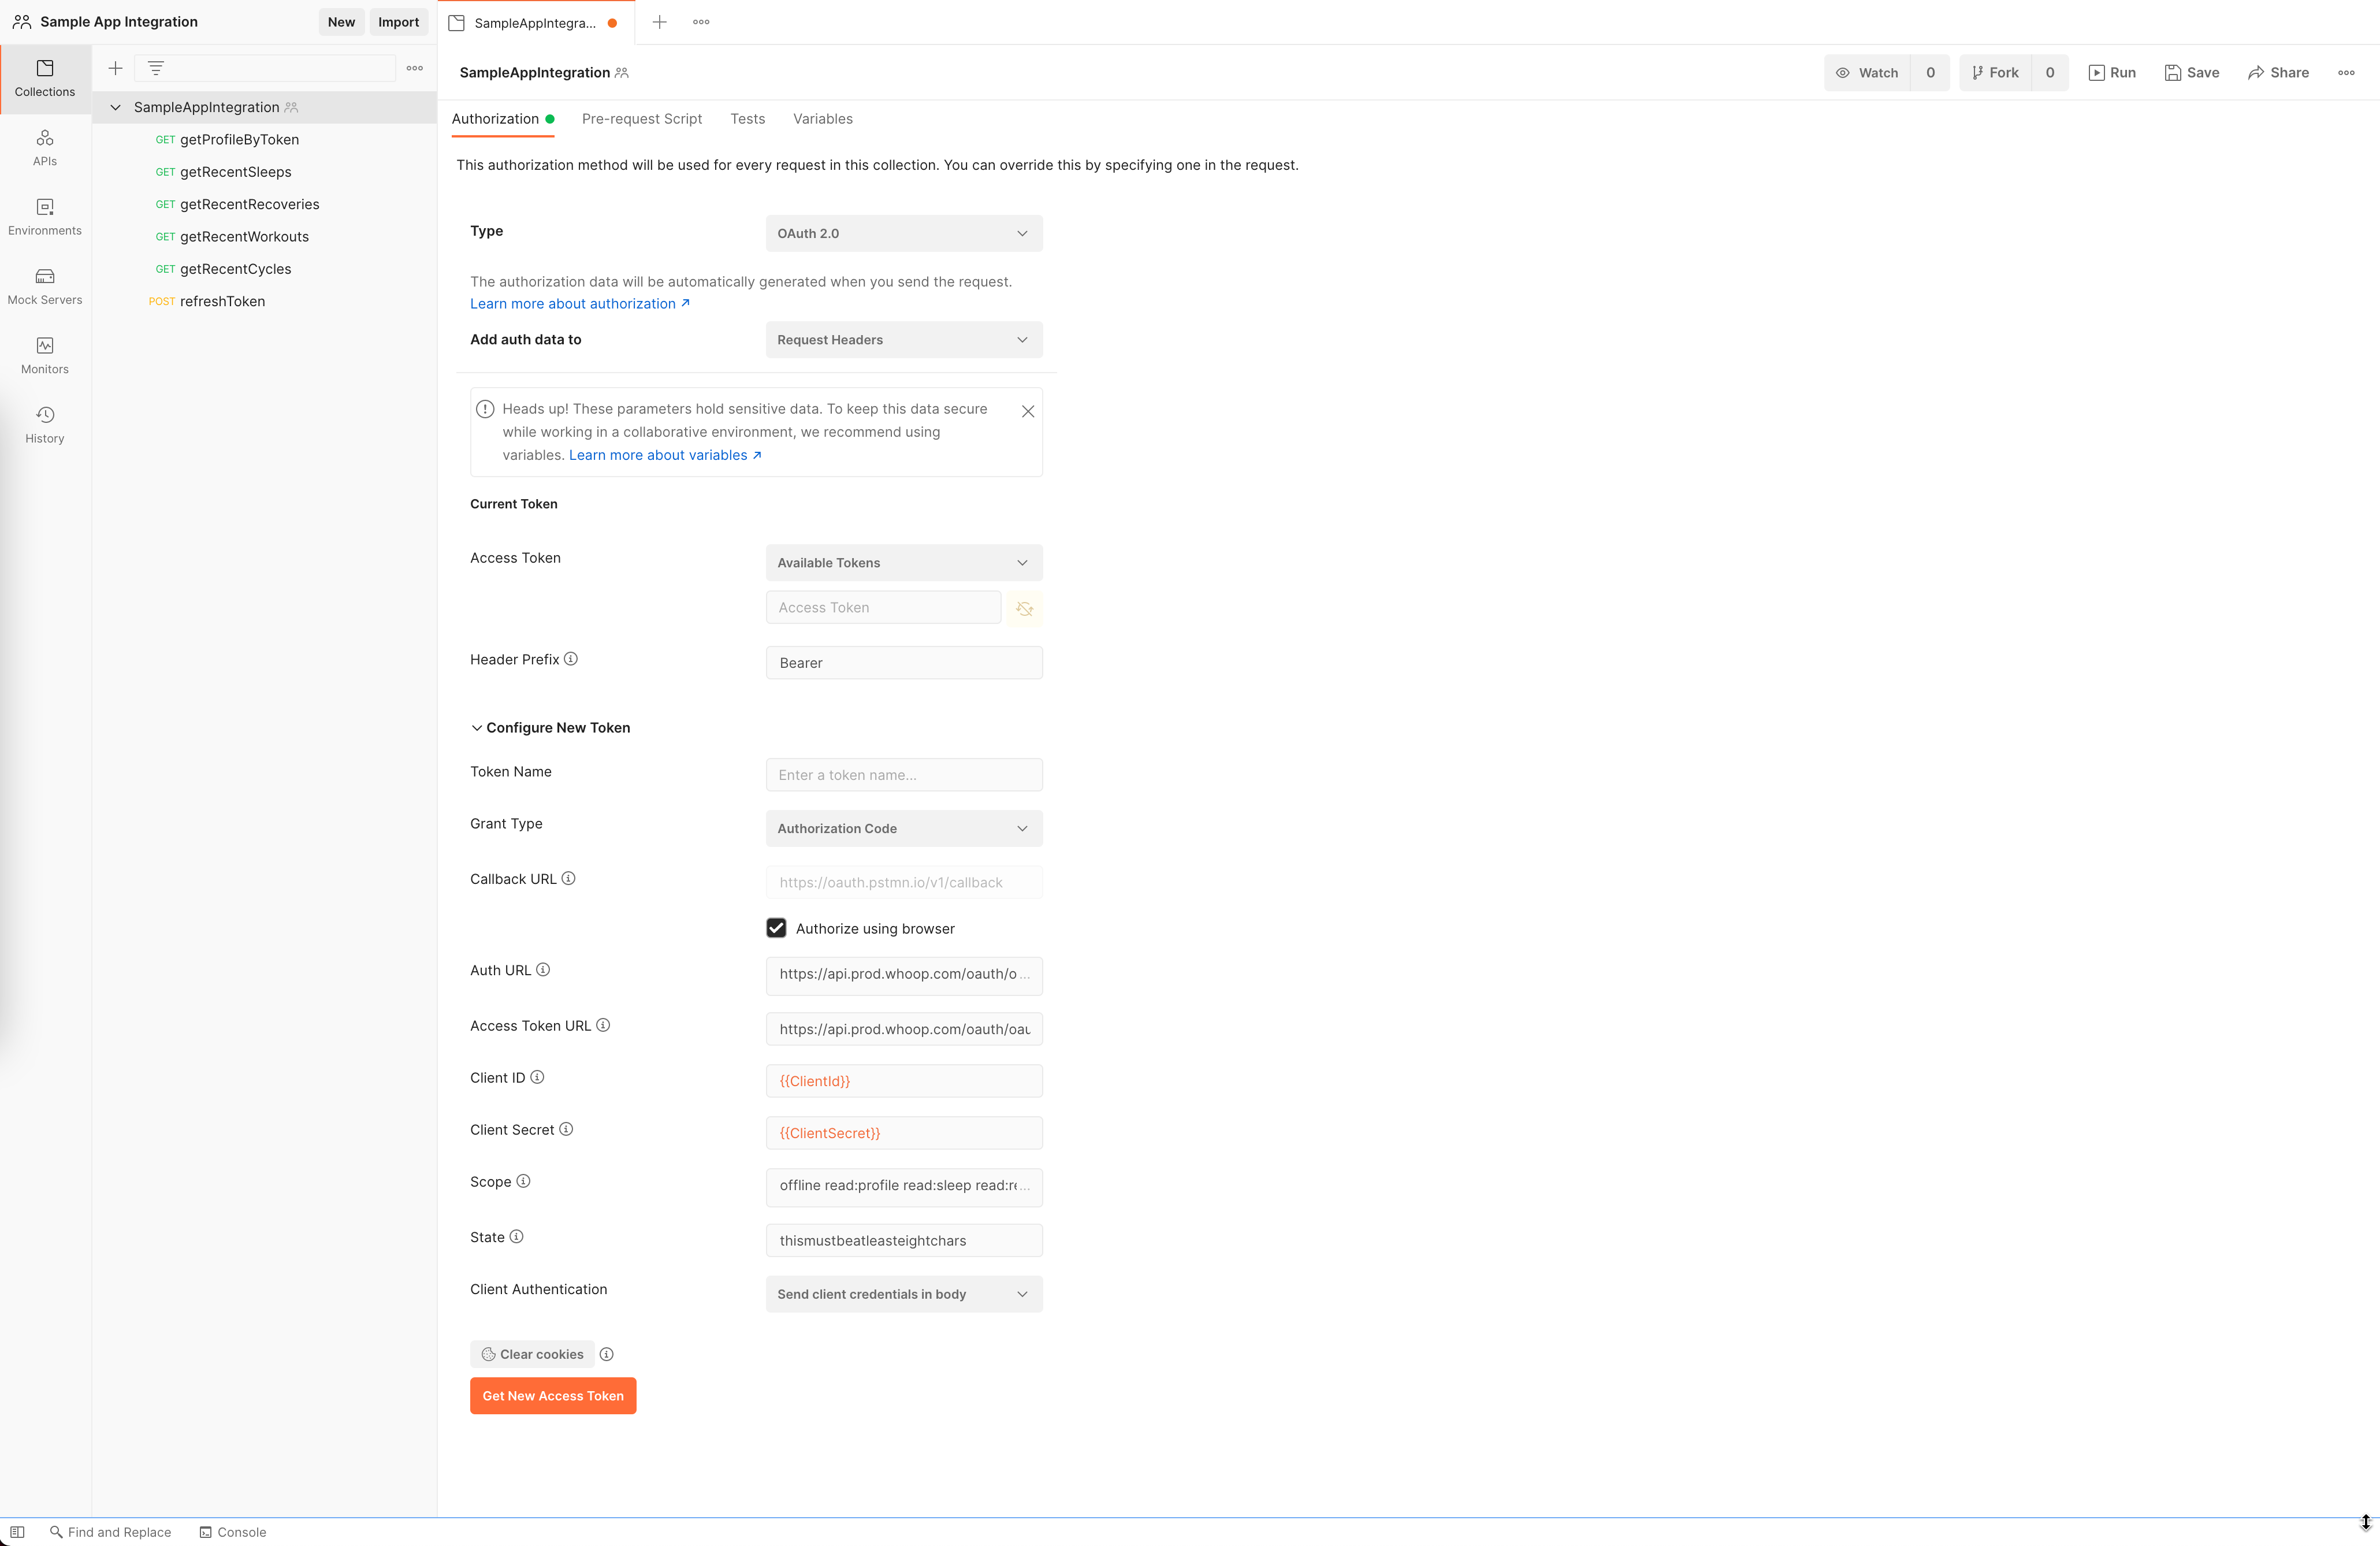
Fill in the fields as follows:
* **Type**: OAuth 2.0
* **Add auth data to**: Request Headers
* **Access Token**: Available tokens
* **Header Prefix**: Bearer
* **Grant Type**: Authorization Code
* **Callback URL**: check "Authorize using browser"
* **Auth URL**: `https://api.prod.whoop.com/oauth/oauth2/auth` - [Learn more](https://developer.whoop.com/docs/developing/oauth#authorization-url)
.
* **Access Token URL**: `https://api.prod.whoop.com/oauth/oauth2/token` - [Learn more](https://developer.whoop.com/docs/developing/oauth#token-url)
.
* **Client Id**: `{{ClientId}}` - this is using the [variable](https://developer.whoop.com/docs/tutorials/access-token-postman/#environments-setup)
updated earlier. [Learn more](https://developer.whoop.com/docs/developing/oauth#client-id)
.
* **Client Secret**: `{{ClientSecret}}` - this is using the [variable](https://developer.whoop.com/docs/tutorials/access-token-postman/#environments-setup)
updated earlier. [Learn more](https://developer.whoop.com/docs/developing/oauth#client-secret)
.
* **Scope**: A space-delimited list of scopes to request data access to. [Learn more](https://developer.whoop.com/docs/developing/oauth#scope)
.
* **State**: A string that must be at least eight characters long to be sent to the WHOOP server and used for verification. [Learn more](https://developer.whoop.com/docs/developing/oauth#state)
.
* **Client Authentication**: Send client credentials in body
Lastly, click the "Get New Access Token" button, and Postman will make the request to WHOOP's Auth URL specified above.
Sign in to WHOOP[](https://developer.whoop.com/docs/tutorials/access-token-postman/#sign-in-to-whoop "Direct link to Sign in to WHOOP")
-----------------------------------------------------------------------------------------------------------------------------------------
Postman should then redirect to a browser window and present WHOOP's sign-in form.
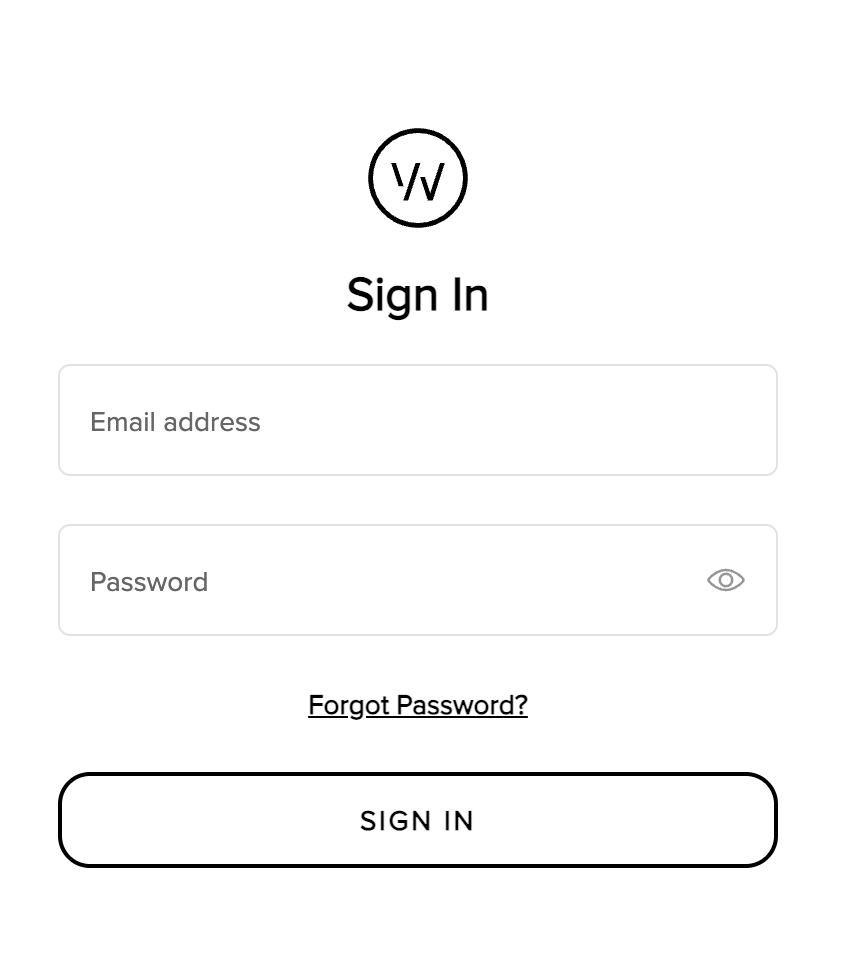
Fill in this information with the account information that Postman will use in future requests to access data.
Click the "SIGN IN" button after providing the account information.
Authorize Access to WHOOP Data[](https://developer.whoop.com/docs/tutorials/access-token-postman/#authorize-access-to-whoop-data "Direct link to Authorize Access to WHOOP Data")
-----------------------------------------------------------------------------------------------------------------------------------------------------------------------------------
After providing valid WHOOP user account credentials, Postman will redirect you to a WHOOP log-in asking you to authorize your app and displays the requested scopes as part of the OAuth flow. These are all the [scopes](https://developer.whoop.com/docs/developing/oauth#scope)
that were requested in Postman [earlier](https://developer.whoop.com/docs/tutorials/access-token-postman/#starting-the-authorization-flow)
.
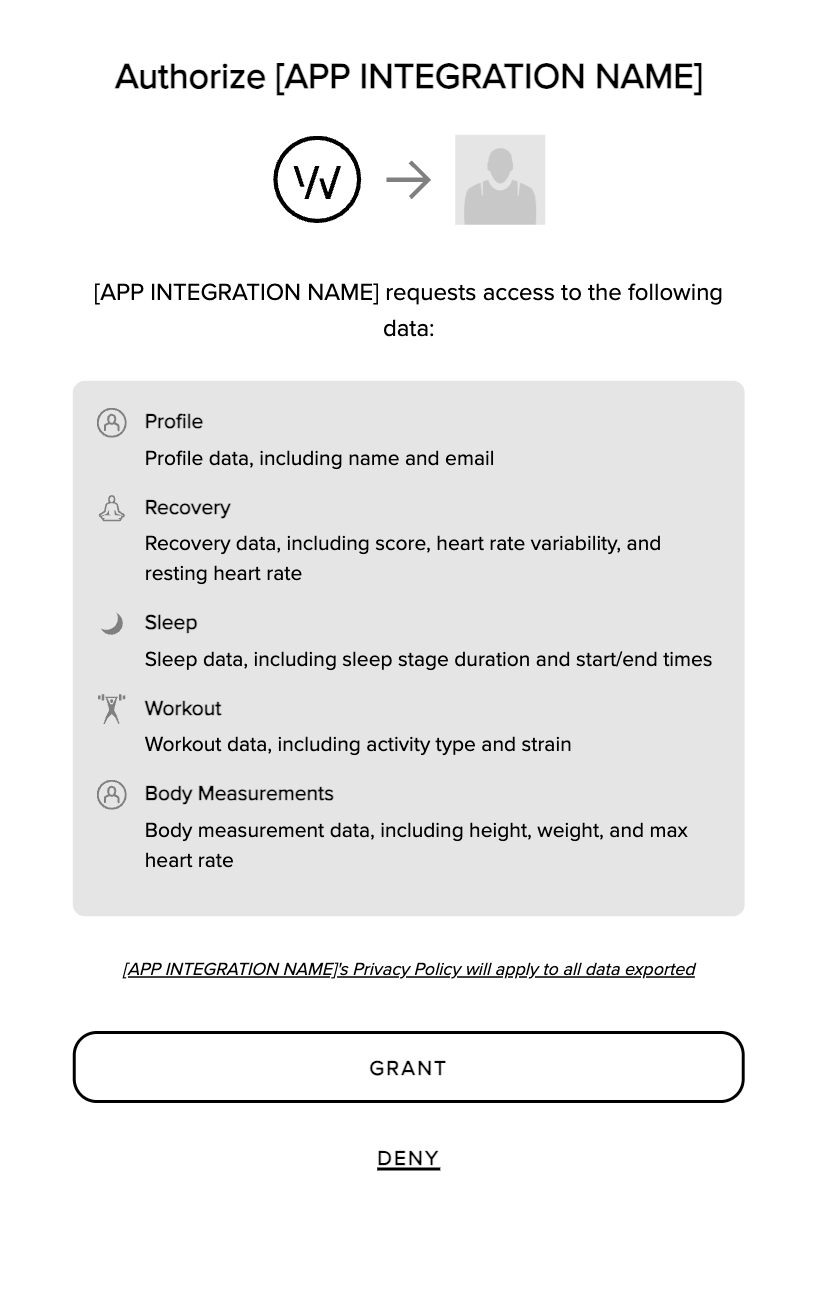
To complete the flow, you must grant the application access by clicking the "GRANT" button.
Depending on your browser, you may receive an alert to redirect you back to the Postman app. Please do so to complete the round-trip.
Manage Access Tokens[](https://developer.whoop.com/docs/tutorials/access-token-postman/#manage-access-tokens "Direct link to Manage Access Tokens")
-----------------------------------------------------------------------------------------------------------------------------------------------------
After completing the redirect, Postman will next show a modal that displays all of the token information returned from WHOOP.
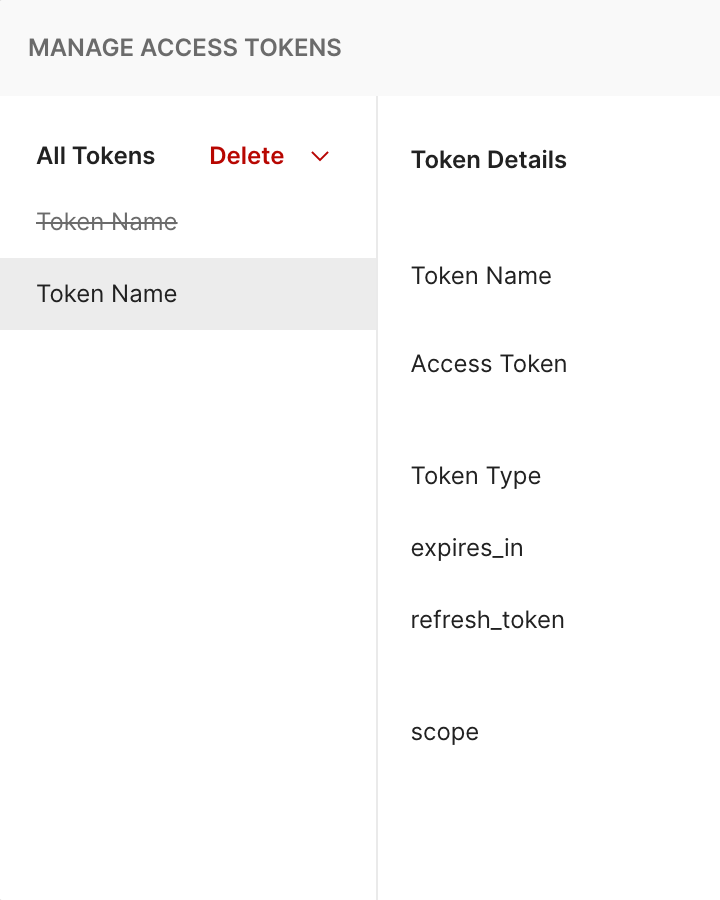
Once again, this screenshot purposely censors the actual _values_ of these tokens to not share personal information.
If you want to use the `refresh_token` in Postman to request a refreshed token, you will need to copy this value at this point and save it somewhere safe. Postman does not retain access to this data.
You will use the Access Token in future requests, and you can save those credentials in Postman.
Use Access Token[](https://developer.whoop.com/docs/tutorials/access-token-postman/#use-access-token "Direct link to Use Access Token")
-----------------------------------------------------------------------------------------------------------------------------------------
Click the "Use Token" button on the right in the Manage Access Tokens modal.

For this to persist on future requests, that change must be saved by clicking the "Save" button on the far right of the collection after leaving the modal.

Congratulations[](https://developer.whoop.com/docs/tutorials/access-token-postman/#congratulations "Direct link to Congratulations")
--------------------------------------------------------------------------------------------------------------------------------------
You have completed the OAuth 2.0 flow using Postman, and you can make additional requests for WHOOP data using this token in Postman.
* [Environment Setup](https://developer.whoop.com/docs/tutorials/access-token-postman/#environment-setup)
* [Starting the Authorization Flow](https://developer.whoop.com/docs/tutorials/access-token-postman/#starting-the-authorization-flow)
* [Sign in to WHOOP](https://developer.whoop.com/docs/tutorials/access-token-postman/#sign-in-to-whoop)
* [Authorize Access to WHOOP Data](https://developer.whoop.com/docs/tutorials/access-token-postman/#authorize-access-to-whoop-data)
* [Manage Access Tokens](https://developer.whoop.com/docs/tutorials/access-token-postman/#manage-access-tokens)
* [Use Access Token](https://developer.whoop.com/docs/tutorials/access-token-postman/#use-access-token)
* [Congratulations](https://developer.whoop.com/docs/tutorials/access-token-postman/#congratulations)
---
# v1 to v2 Migration Guide | WHOOP for Developers
[Skip to main content](https://developer.whoop.com/docs/developing/v1-v2-migration/#docusaurus_skipToContent_fallback)
**IMPORTANT: v1 webhooks have been be removed. [Learn how](https://developer.whoop.com/docs/developing/v1-v2-migration#2-lookup-v2-ids-from-v1-ids)
to look up mappings from v1 to v2 ids.**
On this page
v1 to v2 Migration Guide
========================
This guide provides information for developers migrating from v1 to v2 of the WHOOP Developer API. The v2 API offers several improvements while maintaining compatibility with core functionality.
Overview of Changes[](https://developer.whoop.com/docs/developing/v1-v2-migration/#overview-of-changes "Direct link to Overview of Changes")
----------------------------------------------------------------------------------------------------------------------------------------------
The v2 API provides several improvements over the v1 API:
* More consistent resource paths and naming
* Enhanced data modeling with more precise types
* UUID-based identification for certain resources
* Better client/server error handling
* More consistent pagination behavior
* Improved OpenAPI specifications and documentation
* Recovery activities are included in the Workouts endpoint
Endpoint Changes[](https://developer.whoop.com/docs/developing/v1-v2-migration/#endpoint-changes "Direct link to Endpoint Changes")
-------------------------------------------------------------------------------------------------------------------------------------
| v1 Endpoint | v2 Endpoint | Notes |
| --- | --- | --- |
| `v1/activity/sleep` | `v2/activity/sleep` | Same structure, but UUID instead of long for `sleepId` |
| `v1/activity/workout` | `v2/activity/workout` | Same structure, but UUID instead of long for `workoutId` |
| `v1/cycle` | `v2/cycle` | Enhanced with `v2/cycle/{cycleId}/sleep` relationship |
| `v1/recovery` | `v2/recovery` | Improved scoring model |
Data Model Changes[](https://developer.whoop.com/docs/developing/v1-v2-migration/#data-model-changes "Direct link to Data Model Changes")
-------------------------------------------------------------------------------------------------------------------------------------------
### Common Changes[](https://developer.whoop.com/docs/developing/v1-v2-migration/#common-changes "Direct link to Common Changes")
* IDs changed from `long` to `UUID` for some resources (e.g., Sleep, Workout)
* More consistent Optional handling
* Added `activityV1Id` fields to maintain backwards compatibility
* Timezone handling standardized to UTC when not specified
### Sleep Model[](https://developer.whoop.com/docs/developing/v1-v2-migration/#sleep-model "Direct link to Sleep Model")
* `v1: long getId()` → `v2: UUID getId()` for uniquely identifying sleep
* Added `Optional getActivityV1Id()` to maintain backwards compatibility
* Enhanced sleep stage information
* More detailed sleep quality metrics
* Improved scoring model with additional fields
### Workout Model[](https://developer.whoop.com/docs/developing/v1-v2-migration/#workout-model "Direct link to Workout Model")
* `v1: long getId()` → `v2: UUID getId()` for uniquely identifying workouts
* Added `Optional getActivityV1Id()` to maintain backwards compatibility with v1 IDs
* More consistent handling of Optional fields
* Improved workout scoring model with properly typed Optional values
### Cycle Model[](https://developer.whoop.com/docs/developing/v1-v2-migration/#cycle-model "Direct link to Cycle Model")
* Consistent score state handling between v1 and v2
* Score is only created when all required data is present (avg heart rate, max heart rate, kilojoules, and strain)
* No fallback values for missing data (maintains backwards compatibility)
* Added relationship to Sleep data through `v2/cycle/{cycleId}/sleep`
### Authentication and Security[](https://developer.whoop.com/docs/developing/v1-v2-migration/#authentication-and-security "Direct link to Authentication and Security")
* Consistent scope naming and usage
* Same OAuth 2.0 flow with improved token validation
* Security scopes defined as constants in `DeveloperApiConstants` (e.g., `READ_SLEEP`, `READ_CYCLES`, `READ_WORKOUT`)
Webhook Model Versions[](https://developer.whoop.com/docs/developing/v1-v2-migration/#webhook-model-versions "Direct link to Webhook Model Versions")
-------------------------------------------------------------------------------------------------------------------------------------------------------
WHOOP supports two webhook model versions that align with the API versions. For detailed webhook documentation, see [Webhooks](https://developer.whoop.com/docs/developing/webhooks/)
.
### v2 Webhooks (default)[](https://developer.whoop.com/docs/developing/v1-v2-migration/#v2-webhooks-default "Direct link to v2 Webhooks (default)")
* Use UUID identifiers instead of integer IDs for activity webhooks (workout and sleep events)
* Recovery webhooks use the UUID identifier of the sleep associated with the recovery in v2 model versions
* Align with v2 API endpoints and data models
### v1 Webhooks (legacy)[](https://developer.whoop.com/docs/developing/v1-v2-migration/#v1-webhooks-legacy "Direct link to v1 Webhooks (legacy)")
* Use integer IDs for identifying resources
* Compatible with existing v1 integrations
* Align with v1 API endpoints
### Key Differences[](https://developer.whoop.com/docs/developing/v1-v2-migration/#key-differences "Direct link to Key Differences")
| Event Type | v1 Webhook ID | v2 Webhook ID | Notes |
| --- | --- | --- | --- |
| `workout.updated/deleted` | Integer workout ID | UUID workout ID | Corresponds to v2 workout endpoints |
| `sleep.updated/deleted` | Integer sleep ID | UUID sleep ID | Corresponds to v2 sleep endpoints |
| `recovery.updated/deleted` | Integer cycle ID | UUID sleep ID | Recovery webhooks use UUID sleep IDs in v2 versions |
### Configuring Webhook Versions[](https://developer.whoop.com/docs/developing/v1-v2-migration/#configuring-webhook-versions "Direct link to Configuring Webhook Versions")
In the WHOOP Developer Dashboard, you can configure the model version for each webhook URL:
1. Navigate to your app settings in the [WHOOP Developer Dashboard](https://developer-dashboard.whoop.com/)
2. In the **Webhooks** section, add or edit webhook URLs
3. Select **v1** or **v2** from the **Model Version** dropdown for each URL
4. Save your app configuration
### Migration Strategy for Webhooks[](https://developer.whoop.com/docs/developing/v1-v2-migration/#migration-strategy-for-webhooks "Direct link to Migration Strategy for Webhooks")
When migrating from v1 to v2:
1. **Set up a test webhook URL** with v2 model version to test the new UUID format
2. **Update your webhook handler** to process UUID identifiers for activity events
3. **Align with your API version**: Use v2 webhooks if you're calling v2 API endpoints
4. **Gradual migration**: You can run both v1 and v2 webhooks simultaneously during testing
**Example v1 vs v2 Webhook Payloads:**
v1 Webhook (sleep.updated):
{ "user_id": 456, "id": 1234, "type": "sleep.updated", "trace_id": "e369c784-5100-49e8-8098-75d35c47b31b"}
v2 Webhook (sleep.updated):
{ "user_id": 456, "id": "550e8400-e29b-41d4-a716-446655440000", "type": "sleep.updated", "trace_id": "e369c784-5100-49e8-8098-75d35c47b31b"}
Webhook and API Alignment
The webhook model version you choose should align with the API version you're using:
* **v1 webhooks** → Use with `v1` API endpoints (integer IDs)
* **v2 webhooks** → Use with `v2` API endpoints (UUID IDs)
Migration Steps[](https://developer.whoop.com/docs/developing/v1-v2-migration/#migration-steps "Direct link to Migration Steps")
----------------------------------------------------------------------------------------------------------------------------------
### 1\. Update Endpoints[](https://developer.whoop.com/docs/developing/v1-v2-migration/#1-update-endpoints "Direct link to 1. Update Endpoints")
Update your API client to use v2 endpoints instead of v1:
- GET /v1/activity/sleep+ GET /v2/activity/sleep- GET /v1/activity/sleep/{sleepId}+ GET /v2/activity/sleep/{sleepId}- GET /v1/activity/workout+ GET /v2/activity/workout- GET /v1/activity/workout/{workoutId}+ GET /v2/activity/workout/{workoutId}
### 2\. Lookup V2 IDs from V1 IDs[](https://developer.whoop.com/docs/developing/v1-v2-migration/#2-lookup-v2-ids-from-v1-ids "Direct link to 2. Lookup V2 IDs from V1 IDs")
If you have existing V1 activity IDs and need to find their corresponding V2 UUIDs, you can use the Activity ID Mapping endpoint:
GET /v1/activity-mapping/{activityV1Id}
**Response Codes:**
* `200`: Successfully retrieved V2 UUID
* `404`: No mapping found for the provided V1 ID
**Use Case:** This endpoint is designed for **one-time migration** scenarios when:
* You have stored V1 activity IDs in your database and need to migrate them to V2 UUIDs
* You need to lookup the V2 UUID for a historical V1 activity ID
* You're transitioning your application from v1 to v2
Migration Only
This endpoint is intended for migration purposes only. Once you migrate to v2, you should **store and use V2 UUIDs** exclusively. Do not rely on V1 IDs or repeatedly call this mapping endpoint in production workflows.
### 3\. Update ID Handling[](https://developer.whoop.com/docs/developing/v1-v2-migration/#3-update-id-handling "Direct link to 3. Update ID Handling")
Resource IDs are now UUIDs instead of longs for certain resources:
- long sleepId = 12345;+ UUID sleepId = UUID.fromString("ecfc6a15-4661-442f-a9a4-f160dd7afae8");- long workoutId = 56789;+ UUID workoutId = UUID.fromString("7bfc6a15-5521-612f-b9a4-e274dd7afae9");
**For existing V1 IDs:** Use the Activity ID Mapping endpoint (see section 2) to perform a one-time lookup of the corresponding V2 UUID, then store and use the V2 UUID going forward.
### 4\. Update Webhook Configuration (If Using Webhooks)[](https://developer.whoop.com/docs/developing/v1-v2-migration/#4-update-webhook-configuration-if-using-webhooks "Direct link to 4. Update Webhook Configuration (If Using Webhooks)")
If you're using webhooks, you will need to update to the v2 webhook model version:
1. **Test first**: Set up a separate webhook URL with v2 model version
2. **Update webhook processing**: Modify your webhook handler to process UUID identifiers
3. **Switch webhook version**: Update your production webhook URL to use v2 model version
4. **Verify alignment**: Ensure webhook version matches the API version you're calling
See the [Webhooks documentation](https://developer.whoop.com/docs/developing/webhooks/)
for detailed configuration instructions.
### 5\. Update Response Handling[](https://developer.whoop.com/docs/developing/v1-v2-migration/#5-update-response-handling "Direct link to 5. Update Response Handling")
Adjust your code to handle the updated data models:
* Check for presence of fields with Optional.isPresent() rather than null checks
* Use Optional.map(), Optional.orElse(), etc. for proper Optional handling
* Use the new field names and structures
* Take advantage of additional fields and relationships available in v2
### 6\. Testing[](https://developer.whoop.com/docs/developing/v1-v2-migration/#6-testing "Direct link to 6. Testing")
* Test your integration thoroughly with both v1 and v2 endpoints
* Compare responses for consistency before fully migrating
* If using webhooks, test both v1 and v2 webhook formats
* Test the Activity ID Mapping endpoint with your existing V1 IDs to verify mappings exist
* Use the v2 API documentation for field details and required parameters
Benefits of Migrating[](https://developer.whoop.com/docs/developing/v1-v2-migration/#benefits-of-migrating "Direct link to Benefits of Migrating")
----------------------------------------------------------------------------------------------------------------------------------------------------
* More consistent API behavior
* Better data models and relationships
* Improved error handling
* Webhook model versions that align with API versions
* Future features will be added to v2 first
* Long-term support and improvement path
Deprecation Timeline[](https://developer.whoop.com/docs/developing/v1-v2-migration/#deprecation-timeline "Direct link to Deprecation Timeline")
-------------------------------------------------------------------------------------------------------------------------------------------------
The v1 API is no longer supported and any new features or functionality will be added to v2 only. As such, developers must migrate to v2 to take continue getting webhook events and take advantage of future improvements and functionality.
* [Overview of Changes](https://developer.whoop.com/docs/developing/v1-v2-migration/#overview-of-changes)
* [Endpoint Changes](https://developer.whoop.com/docs/developing/v1-v2-migration/#endpoint-changes)
* [Data Model Changes](https://developer.whoop.com/docs/developing/v1-v2-migration/#data-model-changes)
* [Common Changes](https://developer.whoop.com/docs/developing/v1-v2-migration/#common-changes)
* [Sleep Model](https://developer.whoop.com/docs/developing/v1-v2-migration/#sleep-model)
* [Workout Model](https://developer.whoop.com/docs/developing/v1-v2-migration/#workout-model)
* [Cycle Model](https://developer.whoop.com/docs/developing/v1-v2-migration/#cycle-model)
* [Authentication and Security](https://developer.whoop.com/docs/developing/v1-v2-migration/#authentication-and-security)
* [Webhook Model Versions](https://developer.whoop.com/docs/developing/v1-v2-migration/#webhook-model-versions)
* [v2 Webhooks (default)](https://developer.whoop.com/docs/developing/v1-v2-migration/#v2-webhooks-default)
* [v1 Webhooks (legacy)](https://developer.whoop.com/docs/developing/v1-v2-migration/#v1-webhooks-legacy)
* [Key Differences](https://developer.whoop.com/docs/developing/v1-v2-migration/#key-differences)
* [Configuring Webhook Versions](https://developer.whoop.com/docs/developing/v1-v2-migration/#configuring-webhook-versions)
* [Migration Strategy for Webhooks](https://developer.whoop.com/docs/developing/v1-v2-migration/#migration-strategy-for-webhooks)
* [Migration Steps](https://developer.whoop.com/docs/developing/v1-v2-migration/#migration-steps)
* [1\. Update Endpoints](https://developer.whoop.com/docs/developing/v1-v2-migration/#1-update-endpoints)
* [2\. Lookup V2 IDs from V1 IDs](https://developer.whoop.com/docs/developing/v1-v2-migration/#2-lookup-v2-ids-from-v1-ids)
* [3\. Update ID Handling](https://developer.whoop.com/docs/developing/v1-v2-migration/#3-update-id-handling)
* [4\. Update Webhook Configuration (If Using Webhooks)](https://developer.whoop.com/docs/developing/v1-v2-migration/#4-update-webhook-configuration-if-using-webhooks)
* [5\. Update Response Handling](https://developer.whoop.com/docs/developing/v1-v2-migration/#5-update-response-handling)
* [6\. Testing](https://developer.whoop.com/docs/developing/v1-v2-migration/#6-testing)
* [Benefits of Migrating](https://developer.whoop.com/docs/developing/v1-v2-migration/#benefits-of-migrating)
* [Deprecation Timeline](https://developer.whoop.com/docs/developing/v1-v2-migration/#deprecation-timeline)
---
# App Approval | WHOOP for Developers
[Skip to main content](https://developer.whoop.com/docs/developing/app-approval/#docusaurus_skipToContent_fallback)
**IMPORTANT: v1 webhooks have been be removed. [Learn how](https://developer.whoop.com/docs/developing/v1-v2-migration#2-lookup-v2-ids-from-v1-ids)
to look up mappings from v1 to v2 ids.**
On this page
App Approval
============
Apps can be used for development immediately with a limit of 10 WHOOP members. To launch your app to all WHOOP members, you must first submit your app for approval.
Approval Process[](https://developer.whoop.com/docs/developing/app-approval/#approval-process "Direct link to Approval Process")
----------------------------------------------------------------------------------------------------------------------------------
1. Ensure that you have read, are familiar with, and are abiding by the [WHOOP API Terms of Use](https://developer.whoop.com/api-terms-of-use/)
. As a reminder, in order to use the WHOOP API you must adhere to these terms.
2. Ensure that you have tested your app with at least one WHOOP member.
3. Verify your app information is correct in the [Developer Dashboard](https://developer-dashboard.whoop.com/)
. In particular, make sure your **App Name**, **Contact Email(s)**, and **Privacy Policy URL** are filled in and accurate to accelerate the approval process.
4. Verify your app adheres to the [WHOOP Design and Brand Guidelines](https://developer.whoop.com/docs/developing/design-guidelines)
.
5. Once ready, fill out an App Submission request that includes designs and other helpful context via [this link](https://whoopinc.typeform.com/to/XmzituEp)
. Once approved, your app will be able to have more than 10 WHOOP members.
* [Approval Process](https://developer.whoop.com/docs/developing/app-approval/#approval-process)
---
# Cycle | WHOOP for Developers
[Skip to main content](https://developer.whoop.com/docs/developing/user-data/cycle/#docusaurus_skipToContent_fallback)
**IMPORTANT: v1 webhooks have been be removed. [Learn how](https://developer.whoop.com/docs/developing/v1-v2-migration#2-lookup-v2-ids-from-v1-ids)
to look up mappings from v1 to v2 ids.**
Cycle
=====
The human body undergoes a biological rhythm of asleep, awake, asleep, awake. We often think of one repetition within a calendar day, such as Tuesday, April 19, 2022. However, calendar days and sleep patterns don't always align. Some people work when other people are sleeping. Some people don't go to sleep for at least 24 hours.
We always reference a member's activity in the context of a Physiological Cycle (known as Cycle for short) rather than calendar days. When you request a member's latest Cycle, the member's current Cycle will only have a `Start Time`. Cycles in the past have both a start and end time.
Data Model[](https://developer.whoop.com/docs/developing/user-data/cycle/#data-model "Direct link to Data Model")
-------------------------------------------------------------------------------------------------------------------
| | |
| --- | --- |
| id
required | integer
Unique identifier for the physiological cycle |
| user\_id
required | integer
The WHOOP User for the physiological cycle |
| created\_at
required | string
The time the cycle was recorded in WHOOP |
| updated\_at
required | string
The time the cycle was last updated in WHOOP |
| start
required | string
Start time bound of the cycle |
| end | string
End time bound of the cycle. If not present, the user is currently in this cycle |
| timezone\_offset
required | string
The user's timezone offset at the time the cycle was recorded. Follows format for Time Zone Designator (TZD) - '+hh:mm', '-hh:mm', or 'Z'.
[Learn more about the Time Zone Designator from the W3C Standard](https://www.w3.org/TR/NOTE-datetime) |
| score\_state
required | string
Enum: "SCORED" "PENDING\_SCORE" "UNSCORABLE"
`SCORED` means the cycle was scored and the measurement values will be present. `PENDING_SCORE` means WHOOP is currently evaluating the cycle. `UNSCORABLE` means this activity could not be scored for some reason - commonly because there is not enough user metric data for the time range. |
| score | object (CycleScore)
WHOOP's measurements and evaluation of the cycle. Only present if the score state is `SCORED` |
Copy
Expand all Collapse all
`{ * "id": 93845, * "user_id": 10129, * "created_at": "2022-04-24T11:25:44.774Z", * "updated_at": "2022-04-24T14:25:44.774Z", * "start": "2022-04-24T02:25:44.774Z", * "end": "2022-04-24T10:25:44.774Z", * "timezone_offset": "-05:00", * "score_state": "SCORED", * "score": { * "strain": 5.2951527, * "kilojoule": 8288.297, * "average_heart_rate": 68, * "max_heart_rate": 141 } }`
---
# API Changelog | WHOOP for Developers
[Skip to main content](https://developer.whoop.com/docs/api-changelog/#docusaurus_skipToContent_fallback)
**IMPORTANT: v1 webhooks have been be removed. [Learn how](https://developer.whoop.com/docs/developing/v1-v2-migration#2-lookup-v2-ids-from-v1-ids)
to look up mappings from v1 to v2 ids.**
On this page
API Changelog
=============
This changelog highlights notable changes to the WHOOP Developer Platform, such as new API endpoints or webhook event types.
2025-11-01[](https://developer.whoop.com/docs/api-changelog/#2025-11-01 "Direct link to 2025-11-01")
------------------------------------------------------------------------------------------------------
### Webhook Updates, New V1 Migration API[](https://developer.whoop.com/docs/api-changelog/#webhook-updates-new-v1-migration-api "Direct link to Webhook Updates, New V1 Migration API")
Updated webhook documentation to clarify that v1 webhooks are no longer being published. Provided documentation for new activity mapping endpoint to look up historical v1 activity ids.
* **Documentation**: ✨New✨ [v1 -> v2 activity id mapping documentation](https://developer.whoop.com/docs/developing/v1-v2-migration#2-lookup-v2-ids-from-v1-ids)
for activity v1 id lookups.
2025-08-01[](https://developer.whoop.com/docs/api-changelog/#2025-08-01 "Direct link to 2025-08-01")
------------------------------------------------------------------------------------------------------
### Webhook Documentation Clarification[](https://developer.whoop.com/docs/api-changelog/#webhook-documentation-clarification "Direct link to Webhook Documentation Clarification")
Updated webhook documentation to clarify that v2 recovery webhooks use the UUID of the associated sleep, not the cycle ID.
* **v1 Recovery Webhooks**: Continue to use cycle ID as the identifier
* **v2 Recovery Webhooks**: Use the UUID of the sleep that the recovery is associated with
* **Documentation**: Updated [webhook documentation](https://developer.whoop.com/docs/developing/webhooks/)
to reflect the correct identifier usage
2025-07-01[](https://developer.whoop.com/docs/api-changelog/#2025-07-01 "Direct link to 2025-07-01")
------------------------------------------------------------------------------------------------------
### v2 API Launch[](https://developer.whoop.com/docs/api-changelog/#v2-api-launch "Direct link to v2 API Launch")
The v2 API is now available, featuring improved data models and new capabilities. All developers are encouraged to migrate from v1.
* **Migration Guide**: A comprehensive [v1 to v2 migration guide](https://developer.whoop.com/docs/developing/v1-v2-migration)
is available to assist with the transition.
2024-05-01[](https://developer.whoop.com/docs/api-changelog/#2024-05-01 "Direct link to 2024-05-01")
------------------------------------------------------------------------------------------------------
### Strength Trainer activities[](https://developer.whoop.com/docs/api-changelog/#strength-trainer-activities "Direct link to Strength Trainer activities")
Strength Trainer activities are available via the [`/workout`](https://developer.whoop.com/api#tag/Workout)
endpoint.
2023-02-01[](https://developer.whoop.com/docs/api-changelog/#2023-02-01 "Direct link to 2023-02-01")
------------------------------------------------------------------------------------------------------
### De-authorization endpoint[](https://developer.whoop.com/docs/api-changelog/#de-authorization-endpoint "Direct link to De-authorization endpoint")
[revokeUserOauthAccess](https://developer.whoop.com/api/#tag/User/operation/revokeUserOAuthAccess)
– if a user wants to disable your integration, you can revoke their access token from your application in order to respect their privacy. This will ensure you no longer receive webhooks for this user.
2022-09-01[](https://developer.whoop.com/docs/api-changelog/#2022-09-01 "Direct link to 2022-09-01")
------------------------------------------------------------------------------------------------------
### Developer Platform Launch 🚀[](https://developer.whoop.com/docs/api-changelog/#developer-platform-launch- "Direct link to Developer Platform Launch 🚀")
WHOOP releases their Developer Platform! Read more about the launch [here](https://www.whoop.com/thelocker/access-your-whoop-data-with-new-integrations-data-export-options)
.
* [2025-11-01](https://developer.whoop.com/docs/api-changelog/#2025-11-01)
* [Webhook Updates, New V1 Migration API](https://developer.whoop.com/docs/api-changelog/#webhook-updates-new-v1-migration-api)
* [2025-08-01](https://developer.whoop.com/docs/api-changelog/#2025-08-01)
* [Webhook Documentation Clarification](https://developer.whoop.com/docs/api-changelog/#webhook-documentation-clarification)
* [2025-07-01](https://developer.whoop.com/docs/api-changelog/#2025-07-01)
* [v2 API Launch](https://developer.whoop.com/docs/api-changelog/#v2-api-launch)
* [2024-05-01](https://developer.whoop.com/docs/api-changelog/#2024-05-01)
* [Strength Trainer activities](https://developer.whoop.com/docs/api-changelog/#strength-trainer-activities)
* [2023-02-01](https://developer.whoop.com/docs/api-changelog/#2023-02-01)
* [De-authorization endpoint](https://developer.whoop.com/docs/api-changelog/#de-authorization-endpoint)
* [2022-09-01](https://developer.whoop.com/docs/api-changelog/#2022-09-01)
* [Developer Platform Launch 🚀](https://developer.whoop.com/docs/api-changelog/#developer-platform-launch-)
---
# Get Current Recovery Score | WHOOP for Developers
[Skip to main content](https://developer.whoop.com/docs/tutorials/get-current-recovery-score/#docusaurus_skipToContent_fallback)
**IMPORTANT: v1 webhooks have been be removed. [Learn how](https://developer.whoop.com/docs/developing/v1-v2-migration#2-lookup-v2-ids-from-v1-ids)
to look up mappings from v1 to v2 ids.**
Get Current Recovery Score
==========================
This example will use the [Fetch API](https://developer.mozilla.org/en-US/docs/Web/API/Fetch_API/Using_Fetch)
to make an HTTP request to WHOOP's server.
Prerequisites[](https://developer.whoop.com/docs/tutorials/get-current-recovery-score/#prerequisites "Direct link to Prerequisites")
--------------------------------------------------------------------------------------------------------------------------------------
* Access Token: The token received after completing the OAuth 2.0 flow. Your app must pass the Access Token as a Bearer token in the `Authorization` header.
* The Access Token is granted permission to `read:cycles` and `read:recovery` OAuth scopes.
Overview[](https://developer.whoop.com/docs/tutorials/get-current-recovery-score/#overview "Direct link to Overview")
-----------------------------------------------------------------------------------------------------------------------
The process of getting a user's current recovery score requires two steps:
* Get the user's current Cycle. ([API Docs](https://developer.whoop.com/api#operation/getCycleCollection)
)
* Get the user's Recovery for the current Cycle if one exists. ([API Docs](https://developer.whoop.com/api#operation/getRecoveryForCycle)
)
These two steps are required because every Cycle is not guaranteed to have a Recovery score. For example, the user may not have worn their WHOOP the previous day. In this scenario, the Recovery score will be missing for the Cycle.
Get the User's Current Cycle[](https://developer.whoop.com/docs/tutorials/get-current-recovery-score/#get-the-users-current-cycle "Direct link to Get the User's Current Cycle")
----------------------------------------------------------------------------------------------------------------------------------------------------------------------------------
Let's start by getting the current Cycle. The Cycle Collection is sorted by time in descending order, so making a request with `limit=1` will give us the latest Cycle.
const accessToken = "__ACCESS_TOKEN_FOR_USER__";query = new URLSearchParams({ limit: "1",});
We will append those parameters as query param values to our GET request.
const getCurrentCycle = async (accessToken, query) => { const uri = `https://api.prod.whoop.com/developer/v1/cycle?${query}`; const cycleResponse = await fetch(uri, { headers: { Authorization: `Bearer ${accessToken}`, }, }); if (cycleResponse.status === 200) { return cycleResponse.json(); } else { throw new Error(`Received ${cycleResponse.status} status from Whoop`); }};
### Response[](https://developer.whoop.com/docs/tutorials/get-current-recovery-score/#response "Direct link to Response")
The response will include an array of Cycles, which should have precisely one if the user has at least one Cycle (new users may not have a Cycle yet, so check there is at least one in the array). You will need the `cycle_id` from the latest cycle for the next step.
| | |
| --- | --- |
| records | Array of objects (Cycle) \[ items \]
The collection of records in this page. |
| next\_token | string
A token that can be used on the next request to access the next page of records. If the token is not present, there are no more records in the collection. |
Copy
Expand all Collapse all
`{ * "records": [ * { * "id": 93845, * "user_id": 10129, * "created_at": "2022-04-24T11:25:44.774Z", * "updated_at": "2022-04-24T14:25:44.774Z", * "start": "2022-04-24T02:25:44.774Z", * "end": "2022-04-24T10:25:44.774Z", * "timezone_offset": "-05:00", * "score_state": "SCORED", * "score": { * "strain": 5.2951527, * "kilojoule": 8288.297, * "average_heart_rate": 68, * "max_heart_rate": 141 } } ], * "next_token": "MTIzOjEyMzEyMw" }`
Get Recovery for Cycle[](https://developer.whoop.com/docs/tutorials/get-current-recovery-score/#get-recovery-for-cycle "Direct link to Get Recovery for Cycle")
-----------------------------------------------------------------------------------------------------------------------------------------------------------------
With the latest Cycle, we can now get the Recovery score for the Cycle if one exists. Before using the Recovery score, there are a few things you should consider:
* Not every Cycle has a Recovery - the user may not have worn their strap the previous day.
* New users may be calibrating. New users require calibration before the Recovery score is relevant to them. The calibration period lasts a few days for new users. You can use the field `user_calibrating` to check if the user is still in the calibration phase.
* WHOOP may not be able to score every Recovery - you should check if the `score_state` is `SCORED`. If the `score_state` is `PENDING_SCORE`, you will need to check back later. If the `score_state` is `UNSCORABLE`, a Recovery Score cannot be calculated by WHOOP for this user's Cycle.
const getRecoveryForCycle: = async (accessToken, cycleId) => { const uri = `https://api.prod.whoop.com/developer/v1/cycle/${cycleId}/recovery` const recoveryResponse = await fetch(uri, { headers: { Authorization: `Bearer ${accessToken}`, }, }) if (recoveryResponse.status === 200) { return recoveryResponse.json() } else if (recoveryResponse.status === 404) { return null } else { throw new Error(`Received ${recoveryResponse.status} status from Whoop`) }}
### Response[](https://developer.whoop.com/docs/tutorials/get-current-recovery-score/#response-1 "Direct link to Response")
Upon success, the API should return a 200 HTTP status or 404 if a Recovery does not exist for the current cycle. Remember not all Cycles will have a Recovery.
Recovery data is included in the Cycle response. See the [Cycle schema](https://developer.whoop.com/api#operation/getCycleById)
for the complete data structure.
Congratulations[](https://developer.whoop.com/docs/tutorials/get-current-recovery-score/#congratulations "Direct link to Congratulations")
--------------------------------------------------------------------------------------------------------------------------------------------
You have now received Recovery data for the current Cycle.
---
# Sleep | WHOOP for Developers
[Skip to main content](https://developer.whoop.com/docs/developing/user-data/sleep/#docusaurus_skipToContent_fallback)
**IMPORTANT: v1 webhooks have been be removed. [Learn how](https://developer.whoop.com/docs/developing/v1-v2-migration#2-lookup-v2-ids-from-v1-ids)
to look up mappings from v1 to v2 ids.**
Sleep
=====
WHOOP tracks a member's [sleep performance](https://support.whoop.com/s/article/WHOOP-Sleep)
. You can view details and measurements about sleep.
**Note:** In addition to the sleep activity that starts a [Cycle](https://developer.whoop.com/docs/developing/user-data/cycle)
, a member can also take _naps_ throughout the Cycle. WHOOP sets the field `nap` to true on a Sleep that is a Nap. Naps reduce the amount of sleep needed by a member for the next Cycle.
Data Model[](https://developer.whoop.com/docs/developing/user-data/sleep/#data-model "Direct link to Data Model")
-------------------------------------------------------------------------------------------------------------------
| | |
| --- | --- |
| id
required | string
Unique identifier for the sleep activity |
| cycle\_id
required | integer
Unique identifier for the cycle this sleep belongs to |
| v1\_id | integer
Previous generation identifier for the activity. Will not exist past 09/01/2025 |
| user\_id
required | integer
The WHOOP User who performed the sleep activity |
| created\_at
required | string
The time the sleep activity was recorded in WHOOP |
| updated\_at
required | string
The time the sleep activity was last updated in WHOOP |
| start
required | string
Start time bound of the sleep |
| end
required | string
End time bound of the sleep |
| timezone\_offset
required | string
The user's timezone offset at the time the sleep was recorded. Follows format for Time Zone Designator (TZD) - '+hh:mm', '-hh:mm', or 'Z'.
[Learn more about the Time Zone Designator from the W3C Standard](https://www.w3.org/TR/NOTE-datetime) |
| nap
required | boolean
If true, this sleep activity was a nap for the user |
| score\_state
required | string
Enum: "SCORED" "PENDING\_SCORE" "UNSCORABLE"
`SCORED` means the sleep activity was scored and the measurement values will be present. `PENDING_SCORE` means WHOOP is currently evaluating the sleep activity. `UNSCORABLE` means this activity could not be scored for some reason - commonly because there is not enough user metric data for the time range. |
| score | object (SleepScore)
WHOOP's measurements and evaluation of the sleep activity. Only present if the Sleep State is `SCORED` |
Copy
Expand all Collapse all
`{ * "id": "ecfc6a15-4661-442f-a9a4-f160dd7afae8", * "cycle_id": 93845, * "v1_id": 93845, * "user_id": 10129, * "created_at": "2022-04-24T11:25:44.774Z", * "updated_at": "2022-04-24T14:25:44.774Z", * "start": "2022-04-24T02:25:44.774Z", * "end": "2022-04-24T10:25:44.774Z", * "timezone_offset": "-05:00", * "nap": false, * "score_state": "SCORED", * "score": { * "stage_summary": { * "total_in_bed_time_milli": 30272735, * "total_awake_time_milli": 1403507, * "total_no_data_time_milli": 0, * "total_light_sleep_time_milli": 14905851, * "total_slow_wave_sleep_time_milli": 6630370, * "total_rem_sleep_time_milli": 5879573, * "sleep_cycle_count": 3, * "disturbance_count": 12 }, * "sleep_needed": { * "baseline_milli": 27395716, * "need_from_sleep_debt_milli": 352230, * "need_from_recent_strain_milli": 208595, * "need_from_recent_nap_milli": -12312 }, * "respiratory_rate": 16.11328125, * "sleep_performance_percentage": 98, * "sleep_consistency_percentage": 90, * "sleep_efficiency_percentage": 91.69533848 } }`
---
# Recovery | WHOOP for Developers
[Skip to main content](https://developer.whoop.com/docs/developing/user-data/recovery/#docusaurus_skipToContent_fallback)
**IMPORTANT: v1 webhooks have been be removed. [Learn how](https://developer.whoop.com/docs/developing/v1-v2-migration#2-lookup-v2-ids-from-v1-ids)
to look up mappings from v1 to v2 ids.**
Recovery
========
WHOOP Recovery is a daily measure of how prepared your body is to perform. When you wake up in the morning, WHOOP calculates a Recovery score as a percentage between 0 - 100%. The higher the score, the more primed your body is to take on Strain that day.
In addition to the WHOOP Recovery score, the Recovery object has objective measurements that factored into the score such as the resting heart rate (RHR), heart rate variability (HRV), and for 4.0 members, blood oxygen (SpO2) and skin temperature.
Data Model[](https://developer.whoop.com/docs/developing/user-data/recovery/#data-model "Direct link to Data Model")
----------------------------------------------------------------------------------------------------------------------
| | |
| --- | --- |
| cycle\_id
required | integer
The Recovery represents how recovered the user is for this physiological cycle |
| sleep\_id
required | string
ID of the Sleep associated with the Recovery |
| user\_id
required | integer
The WHOOP User for the recovery |
| created\_at
required | string
The time the recovery was recorded in WHOOP |
| updated\_at
required | string
The time the recovery was last updated in WHOOP |
| score\_state
required | string
Enum: "SCORED" "PENDING\_SCORE" "UNSCORABLE"
`SCORED` means the recovery was scored and the measurement values will be present. `PENDING_SCORE` means WHOOP is currently evaluating the cycle. `UNSCORABLE` means this activity could not be scored for some reason - commonly because there is not enough user metric data for the time range. |
| score | object (RecoveryScore)
WHOOP's measurements and evaluation of the recovery. Only present if the Recovery State is `SCORED` |
Copy
Expand all Collapse all
`{ * "cycle_id": 93845, * "sleep_id": "123e4567-e89b-12d3-a456-426614174000", * "user_id": 10129, * "created_at": "2022-04-24T11:25:44.774Z", * "updated_at": "2022-04-24T14:25:44.774Z", * "score_state": "SCORED", * "score": { * "user_calibrating": false, * "recovery_score": 44, * "resting_heart_rate": 64, * "hrv_rmssd_milli": 31.813562, * "spo2_percentage": 95.6875, * "skin_temp_celsius": 33.7 } }`
Recovery data is available through the Cycle endpoints in the V2 API. See the [API documentation](https://developer.whoop.com/api#operation/getCycleById)
for details on accessing recovery information through cycles.
---
# Refreshing Access Tokens | WHOOP for Developers
[Skip to main content](https://developer.whoop.com/docs/tutorials/refresh-token-postman/#docusaurus_skipToContent_fallback)
**IMPORTANT: v1 webhooks have been be removed. [Learn how](https://developer.whoop.com/docs/developing/v1-v2-migration#2-lookup-v2-ids-from-v1-ids)
to look up mappings from v1 to v2 ids.**
On this page
Refreshing Access Tokens
========================
[Postman](https://www.postman.com/)
is an application you can use to make, save, and share API requests. We're going to use it to demonstrate using a refresh token to receive a new access token from WHOOP.
Prerequisites[](https://developer.whoop.com/docs/tutorials/refresh-token-postman/#prerequisites "Direct link to Prerequisites")
---------------------------------------------------------------------------------------------------------------------------------
* Refresh Token: A refresh token is received along with an access token when completing the initial [OAuth 2.0 flow](https://developer.whoop.com/docs/developing/oauth#request-an-access-token)
, when the auth request includes the `offline` [scope](https://developer.whoop.com/docs/developing/oauth#scope)
. [Learn more](https://developer.whoop.com/docs/developing/oauth#refresh-the-token)
* Client Id: A unique identifier for your client. [Learn more](https://developer.whoop.com/docs/developing/oauth#client-id)
* Client Secret: A secret value that accompanies your client identifier. [Learn more](https://developer.whoop.com/docs/developing/oauth#client-secret)
* Refresh Token Endpoint: `https://api.prod.whoop.com/oauth/oauth2/token` . [Learn more](https://developer.whoop.com/docs/developing/oauth#refresh-token-endpoint)
Making the Request[](https://developer.whoop.com/docs/tutorials/refresh-token-postman/#making-the-request "Direct link to Making the Request")
------------------------------------------------------------------------------------------------------------------------------------------------
We're going to issue a POST request to the refresh token endpoint to receive a new access token.
Fill in the fields as follows:
* **HTTP Request Type/Verb**: POST
* **URL**: `https://api.prod.whoop.com/oauth/oauth2/token`
In the Body section, select the "x-www-form-urlencoded" radio button. Fill in the following keys and values:
* **grant\_type**: `refresh_token`. This [grant type](https://oauth.net/2/grant-types/refresh-token/)
explicitly tells an OAuth provider you're asking for a refresh token.
* **refresh\_token**: The value of the refresh token received along with an access token.
* **client\_id**: A unique identifier for your client.
* **client\_secret**: A secret value that accompanies your client identifier.
* **scope**: The `offline` scope allows you to get a new refresh token and an access token.
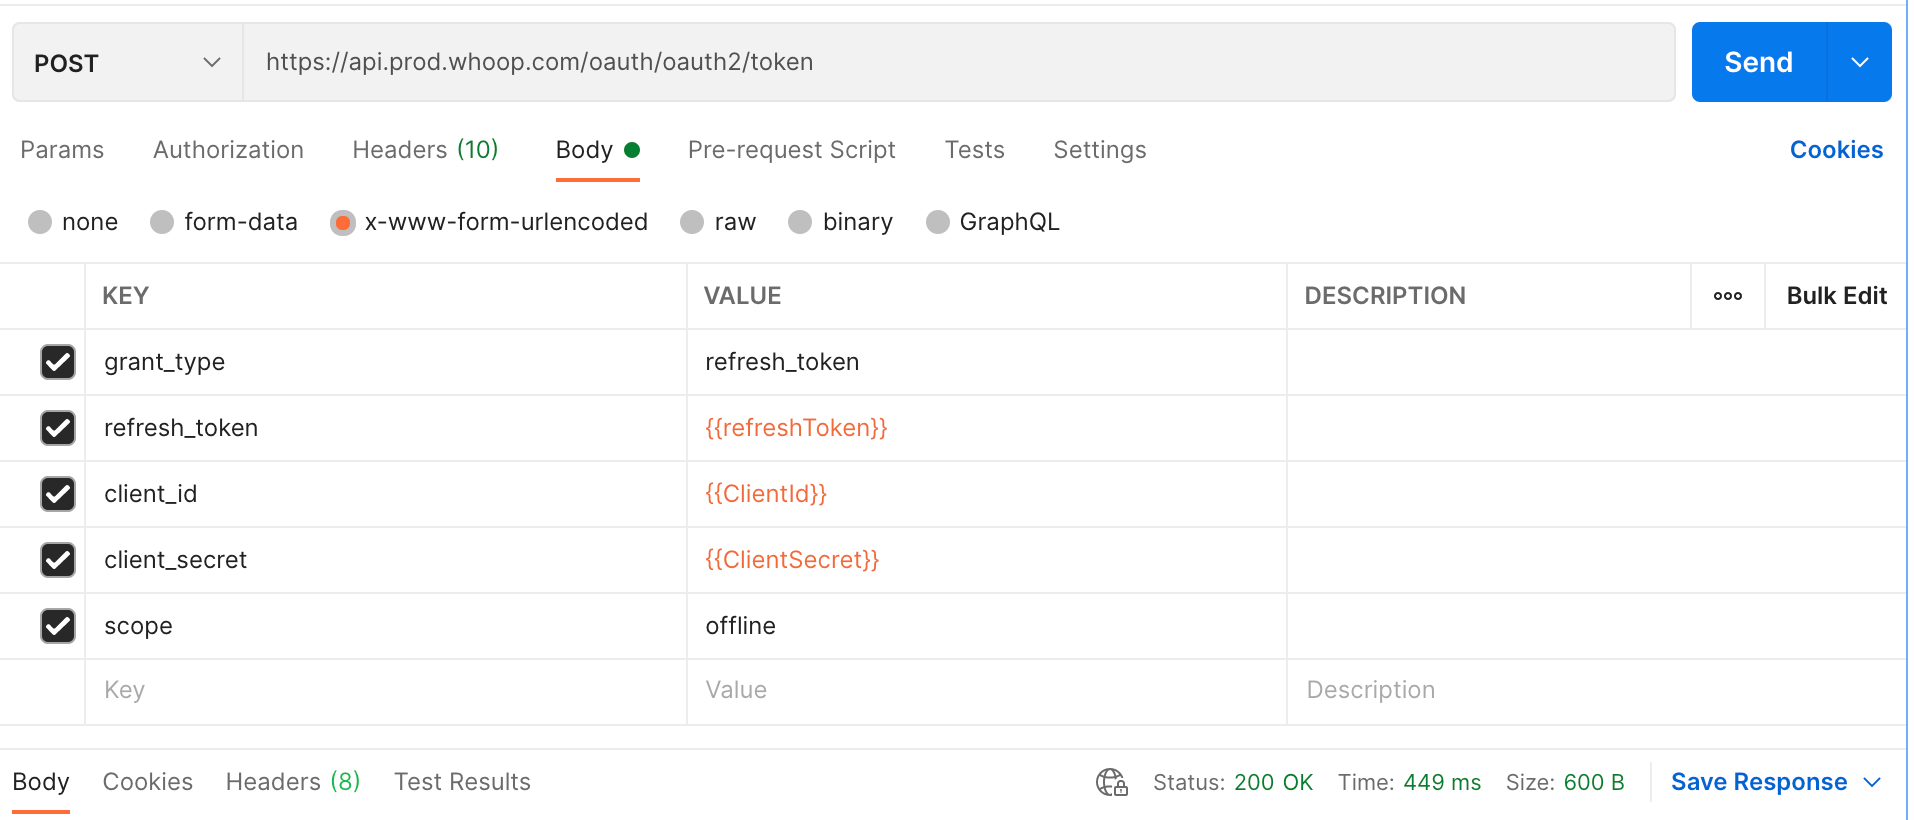
In this image, Postman [variables](https://learning.postman.com/docs/sending-requests/variables/)
take the place of the refresh token, client id, and client secret. Postman should prepopulate those variables with the configured values. Alternatively, place the values directly in the value of the POST data rather than using variables at all.
Click "Send" to make your request.
Receiving the Response[](https://developer.whoop.com/docs/tutorials/refresh-token-postman/#receiving-the-response "Direct link to Receiving the Response")
------------------------------------------------------------------------------------------------------------------------------------------------------------
Under the Request Body section, a Response Body should be visible as a JSON payload. It will have the following form:
{ "access_token": "the-value-of-the-new-access-token", "expires_in": 3600, "refresh_token": "the-value-of-the-new-refresh-token", "scope": "offline other-scopes-requested", "token_type": "bearer"}
Congratulations[](https://developer.whoop.com/docs/tutorials/refresh-token-postman/#congratulations "Direct link to Congratulations")
---------------------------------------------------------------------------------------------------------------------------------------
You can use the new access token to make additional API requests for this user's data. You can also use the new refresh token to complete this flow once the access token expires.
* [Prerequisites](https://developer.whoop.com/docs/tutorials/refresh-token-postman/#prerequisites)
* [Making the Request](https://developer.whoop.com/docs/tutorials/refresh-token-postman/#making-the-request)
* [Receiving the Response](https://developer.whoop.com/docs/tutorials/refresh-token-postman/#receiving-the-response)
* [Congratulations](https://developer.whoop.com/docs/tutorials/refresh-token-postman/#congratulations)
---
# Refreshing Access Tokens | WHOOP for Developers
[Skip to main content](https://developer.whoop.com/docs/tutorials/refresh-token-javascript/#docusaurus_skipToContent_fallback)
**IMPORTANT: v1 webhooks have been be removed. [Learn how](https://developer.whoop.com/docs/developing/v1-v2-migration#2-lookup-v2-ids-from-v1-ids)
to look up mappings from v1 to v2 ids.**
On this page
Refreshing Access Tokens
========================
This example will use the [Fetch API](https://developer.mozilla.org/en-US/docs/Web/API/Fetch_API/Using_Fetch)
to make an HTTP request to WHOOP's server.
Prerequisites[](https://developer.whoop.com/docs/tutorials/refresh-token-javascript/#prerequisites "Direct link to Prerequisites")
------------------------------------------------------------------------------------------------------------------------------------
* Refresh Token: A refresh token is received along with an access token when completing the initial [OAuth 2.0 flow](https://developer.whoop.com/docs/developing/oauth#request-an-access-token)
, when the auth request includes the `offline` [scope](https://developer.whoop.com/docs/developing/oauth#scope)
. [Learn more](https://developer.whoop.com/docs/developing/oauth#refresh-the-token)
* Client Id: A unique identifier for your client. [Learn more](https://developer.whoop.com/docs/developing/oauth#client-id)
* Client Secret: A secret value that accompanies your client identifier. [Learn more](https://developer.whoop.com/docs/developing/oauth#client-secret)
* Refresh Token Endpoint: `https://api.prod.whoop.com/oauth/oauth2/token` . [Learn more](https://developer.whoop.com/docs/developing/oauth#refresh-token-endpoint)
Making the Request[](https://developer.whoop.com/docs/tutorials/refresh-token-javascript/#making-the-request "Direct link to Making the Request")
---------------------------------------------------------------------------------------------------------------------------------------------------
We first need to assemble the parameters to provide to WHOOP's server in order to retrieve new access and refresh tokens.
const refreshParams = { grant_type: 'refresh_token', client_id: process.env.CLIENT_ID, client_secret: process.env.CLIENT_SECRET, scope: 'offline', refresh_token: refresh_token,}
These fields represent:
* **grant\_type**: `refresh_token`. This [grant type](https://oauth.net/2/grant-types/refresh-token/)
explicitly tells an OAuth provider you're asking for a refresh token.
* **client\_id**: A unique identifier for your client.
* **client\_secret**: A secret value that accompanies your client identifier.
* **scope**: The `offline` scope allows your app the receive a refresh token, along with the new access token.
* **refresh\_token**: The value of the refresh token received along with an access token.
Now that we have the parameters to send to the API endpoint, we can construct the entire API call:
const getFreshTokens = async (refreshParams) => { const body = new URLSearchParams(refreshParams) const headers = { 'Content-Type': 'application/x-www-form-urlencoded', } const refreshTokenResponse = await fetch( `https://api.prod.whoop.com/oauth/oauth2/token`, { body, headers, method: 'POST', }, ) return refreshTokenResponse.json()}
Response Type[](https://developer.whoop.com/docs/tutorials/refresh-token-javascript/#response-type "Direct link to Response Type")
------------------------------------------------------------------------------------------------------------------------------------
The response object received from making the API request will look as follows:
interface AuthResult { access_token: string refresh_token: string expires_in: number scope: string token_type: 'bearer'}
Congratulations[](https://developer.whoop.com/docs/tutorials/refresh-token-javascript/#congratulations "Direct link to Congratulations")
------------------------------------------------------------------------------------------------------------------------------------------
Your app can now use the new access token for subsequent API requests for this user's data. Your app can also use the refresh token to complete this flow once the access token expires.
* [Prerequisites](https://developer.whoop.com/docs/tutorials/refresh-token-javascript/#prerequisites)
* [Making the Request](https://developer.whoop.com/docs/tutorials/refresh-token-javascript/#making-the-request)
* [Response Type](https://developer.whoop.com/docs/tutorials/refresh-token-javascript/#response-type)
* [Congratulations](https://developer.whoop.com/docs/tutorials/refresh-token-javascript/#congratulations)
---
# Workout | WHOOP for Developers
[Skip to main content](https://developer.whoop.com/docs/developing/user-data/workout/#docusaurus_skipToContent_fallback)
**IMPORTANT: v1 webhooks have been be removed. [Learn how](https://developer.whoop.com/docs/developing/v1-v2-migration#2-lookup-v2-ids-from-v1-ids)
to look up mappings from v1 to v2 ids.**
WHOOP keeps track of what type of activity you performed (e.g., Running, Cycling), Strain score, and other physiological measurements such as duration in [Heart Rate Zones](https://www.whoop.com/thelocker/max-heart-rate-training-zones/)
.
Data Model[](https://developer.whoop.com/docs/developing/user-data/workout/#data-model "Direct link to Data Model")
---------------------------------------------------------------------------------------------------------------------
| | |
| --- | --- |
| id
required | string
Unique identifier for the workout activity |
| v1\_id | integer
Previous generation identifier for the activity. Will not exist past 09/01/2025 |
| user\_id
required | integer
The WHOOP User who performed the workout |
| created\_at
required | string
The time the workout activity was recorded in WHOOP |
| updated\_at
required | string
The time the workout activity was last updated in WHOOP |
| start
required | string
Start time bound of the workout |
| end
required | string
End time bound of the workout |
| timezone\_offset
required | string
The user's timezone offset at the time the workout was recorded. Follows format for Time Zone Designator (TZD) - '+hh:mm', '-hh:mm', or 'Z'.
[Learn more about the Time Zone Designator from the W3C Standard](https://www.w3.org/TR/NOTE-datetime) |
| sport\_name
required | string
Name of the WHOOP Sport performed during the workout |
| score\_state
required | string
Enum: "SCORED" "PENDING\_SCORE" "UNSCORABLE"
`SCORED` means the workout activity was scored and the measurement values will be present. `PENDING_SCORE` means WHOOP is currently evaluating the workout activity. `UNSCORABLE` means this activity could not be scored for some reason - commonly because there is not enough user metric data for the time range. |
| score | object (WorkoutScore)
WHOOP's measurements and evaluation of the workout activity. Only present if the Workout State is `SCORED` |
| sport\_id | integer
ID of the WHOOP Sport performed during the workout. Will not exist past 09/01/2025 |
Copy
Expand all Collapse all
`{ * "id": "ecfc6a15-4661-442f-a9a4-f160dd7afae8", * "v1_id": 1043, * "user_id": 9012, * "created_at": "2022-04-24T11:25:44.774Z", * "updated_at": "2022-04-24T14:25:44.774Z", * "start": "2022-04-24T02:25:44.774Z", * "end": "2022-04-24T10:25:44.774Z", * "timezone_offset": "-05:00", * "sport_name": "running", * "score_state": "SCORED", * "score": { * "strain": 8.2463, * "average_heart_rate": 123, * "max_heart_rate": 146, * "kilojoule": 1569.34033203125, * "percent_recorded": 100, * "distance_meter": 1772.77035916, * "altitude_gain_meter": 46.64384460449, * "altitude_change_meter": -0.781372010707855, * "zone_durations": { * "zone_zero_milli": 300000, * "zone_one_milli": 600000, * "zone_two_milli": 900000, * "zone_three_milli": 900000, * "zone_four_milli": 600000, * "zone_five_milli": 300000 } }, * "sport_id": 1 }`
WHOOP Sports[](https://developer.whoop.com/docs/developing/user-data/workout/#whoop-sports "Direct link to WHOOP Sports")
---------------------------------------------------------------------------------------------------------------------------
| Sport ID | Sport |
| --- | --- |
| \-1 | Activity |
| 0 | Running |
| 1 | Cycling |
| 16 | Baseball |
| 17 | Basketball |
| 18 | Rowing |
| 19 | Fencing |
| 20 | Field Hockey |
| 21 | Football |
| 22 | Golf |
| 24 | Ice Hockey |
| 25 | Lacrosse |
| 27 | Rugby |
| 28 | Sailing |
| 29 | Skiing |
| 30 | Soccer |
| 31 | Softball |
| 32 | Squash |
| 33 | Swimming |
| 34 | Tennis |
| 35 | Track & Field |
| 36 | Volleyball |
| 37 | Water Polo |
| 38 | Wrestling |
| 39 | Boxing |
| 42 | Dance |
| 43 | Pilates |
| 44 | Yoga |
| 45 | Weightlifting |
| 47 | Cross Country Skiing |
| 48 | Functional Fitness |
| 49 | Duathlon |
| 51 | Gymnastics |
| 52 | Hiking/Rucking |
| 53 | Horseback Riding |
| 55 | Kayaking |
| 56 | Martial Arts |
| 57 | Mountain Biking |
| 59 | Powerlifting |
| 60 | Rock Climbing |
| 61 | Paddleboarding |
| 62 | Triathlon |
| 63 | Walking |
| 64 | Surfing |
| 65 | Elliptical |
| 66 | Stairmaster |
| 70 | Meditation |
| 71 | Other |
| 73 | Diving |
| 74 | Operations - Tactical |
| 75 | Operations - Medical |
| 76 | Operations - Flying |
| 77 | Operations - Water |
| 82 | Ultimate |
| 83 | Climber |
| 84 | Jumping Rope |
| 85 | Australian Football |
| 86 | Skateboarding |
| 87 | Coaching |
| 88 | Ice Bath |
| 89 | Commuting |
| 90 | Gaming |
| 91 | Snowboarding |
| 92 | Motocross |
| 93 | Caddying |
| 94 | Obstacle Course Racing |
| 95 | Motor Racing |
| 96 | HIIT |
| 97 | Spin |
| 98 | Jiu Jitsu |
| 99 | Manual Labor |
| 100 | Cricket |
| 101 | Pickleball |
| 102 | Inline Skating |
| 103 | Box Fitness |
| 104 | Spikeball |
| 105 | Wheelchair Pushing |
| 106 | Paddle Tennis |
| 107 | Barre |
| 108 | Stage Performance |
| 109 | High Stress Work |
| 110 | Parkour |
| 111 | Gaelic Football |
| 112 | Hurling/Camogie |
| 113 | Circus Arts |
| 121 | Massage Therapy |
| 123 | Strength Trainer |
| 125 | Watching Sports |
| 126 | Assault Bike |
| 127 | Kickboxing |
| 128 | Stretching |
| 230 | Table Tennis |
| 231 | Badminton |
| 232 | Netball |
| 233 | Sauna |
| 234 | Disc Golf |
| 235 | Yard Work |
| 236 | Air Compression |
| 237 | Percussive Massage |
| 238 | Paintball |
| 239 | Ice Skating |
| 240 | Handball |
| 248 | F45 Training |
| 249 | Padel |
| 250 | Barry's |
| 251 | Dedicated Parenting |
| 252 | Stroller Walking |
| 253 | Stroller Jogging |
| 254 | Toddlerwearing |
| 255 | Babywearing |
| 258 | Barre3 |
| 259 | Hot Yoga |
| 261 | Stadium Steps |
| 262 | Polo |
| 263 | Musical Performance |
| 264 | Kite Boarding |
| 266 | Dog Walking |
| 267 | Water Skiing |
| 268 | Wakeboarding |
| 269 | Cooking |
| 270 | Cleaning |
| 272 | Public Speaking |
---
# User | WHOOP for Developers
[Skip to main content](https://developer.whoop.com/docs/developing/user-data/user/#docusaurus_skipToContent_fallback)
**IMPORTANT: v1 webhooks have been be removed. [Learn how](https://developer.whoop.com/docs/developing/v1-v2-migration#2-lookup-v2-ids-from-v1-ids)
to look up mappings from v1 to v2 ids.**
User
====
Basic Profile[](https://developer.whoop.com/docs/developing/user-data/user/#basic-profile "Direct link to Basic Profile")
---------------------------------------------------------------------------------------------------------------------------
Profile information about the user, such as their email and name.
### Data Model[](https://developer.whoop.com/docs/developing/user-data/user/#data-model "Direct link to Data Model")
| | |
| --- | --- |
| user\_id
required | integer
The WHOOP User |
| email
required | string
User's Email |
| first\_name
required | string
User's First Name |
| last\_name
required | string
User's Last Name |
Copy
`{ * "user_id": 10129, * "email": "jsmith123@whoop.com", * "first_name": "John", * "last_name": "Smith" }`
Body Measurements[](https://developer.whoop.com/docs/developing/user-data/user/#body-measurements "Direct link to Body Measurements")
---------------------------------------------------------------------------------------------------------------------------------------
Body measurements about the user, such as their weight and height.
### Data Model[](https://developer.whoop.com/docs/developing/user-data/user/#data-model-1 "Direct link to Data Model")
| | |
| --- | --- |
| height\_meter
required | number
User's height in meters |
| weight\_kilogram
required | number
User's weight in kilograms |
| max\_heart\_rate
required | integer
The max heart rate WHOOP calculated for the user
[WHOOP Locker: Understanding Max Heart Rate and Why It Matters for Training](https://www.whoop.com/thelocker/calculating-max-heart-rate/) |
Copy
`{ * "height_meter": 1.8288, * "weight_kilogram": 90.7185, * "max_heart_rate": 200 }`
---