# Table of Contents - [Introduction (Preface) | AdonisJS Documentation](#introduction-preface-adonisjs-documentation) - [Introduction (Views & Templates) | AdonisJS Documentation](#introduction-views-templates-adonisjs-documentation) - [Encryption (Security) | AdonisJS Documentation](#encryption-security-adonisjs-documentation) - [Basic auth guard (Authentication) | AdonisJS Documentation](#basic-auth-guard-authentication-adonisjs-documentation) - [CORS (Security) | AdonisJS Documentation](#cors-security-adonisjs-documentation) - [EdgeJS (Views & Templates) | AdonisJS Documentation](#edgejs-views-templates-adonisjs-documentation) - [Database (Testing) | AdonisJS Documentation](#database-testing-adonisjs-documentation) - [Mocks & Fakes (Testing) | AdonisJS Documentation](#mocks-fakes-testing-adonisjs-documentation) - [Repl (Digging deeper) | AdonisJS Documentation](#repl-digging-deeper-adonisjs-documentation) - [Hashing (Security) | AdonisJS Documentation](#hashing-security-adonisjs-documentation) - [Command arguments (Ace commands) | AdonisJS Documentation](#command-arguments-ace-commands-adonisjs-documentation) - [Introduction (Testing) | AdonisJS Documentation](#introduction-testing-adonisjs-documentation) - [Console tests (Testing) | AdonisJS Documentation](#console-tests-testing-adonisjs-documentation) - [Custom auth guard (Authentication) | AdonisJS Documentation](#custom-auth-guard-authentication-adonisjs-documentation) - [Prompts (Ace commands) | AdonisJS Documentation](#prompts-ace-commands-adonisjs-documentation) - [Introduction (Ace commands) | AdonisJS Documentation](#introduction-ace-commands-adonisjs-documentation) - [Command flags (Ace commands) | AdonisJS Documentation](#command-flags-ace-commands-adonisjs-documentation) - [Browser tests (Testing) | AdonisJS Documentation](#browser-tests-testing-adonisjs-documentation) - [Securing SSR apps (Security) | AdonisJS Documentation](#securing-ssr-apps-security-adonisjs-documentation) - [HTTP tests (Testing) | AdonisJS Documentation](#http-tests-testing-adonisjs-documentation) - [Social authentication (Authentication) | AdonisJS Documentation](#social-authentication-authentication-adonisjs-documentation) - [Transmit (Digging deeper) | AdonisJS Documentation](#transmit-digging-deeper-adonisjs-documentation) - [Terminal UI (Ace commands) | AdonisJS Documentation](#terminal-ui-ace-commands-adonisjs-documentation) - [Creating commands (Ace commands) | AdonisJS Documentation](#creating-commands-ace-commands-adonisjs-documentation) - [Drive (Digging deeper) | AdonisJS Documentation](#drive-digging-deeper-adonisjs-documentation) - [Locks (Digging deeper) | AdonisJS Documentation](#locks-digging-deeper-adonisjs-documentation) - [Cache (Digging deeper) | AdonisJS Documentation](#cache-digging-deeper-adonisjs-documentation) - [Events (References) | AdonisJS Documentation](#events-references-adonisjs-documentation) - [Exceptions (References) | AdonisJS Documentation](#exceptions-references-adonisjs-documentation) - [Edge helpers and tags (References) | AdonisJS Documentation](#edge-helpers-and-tags-references-adonisjs-documentation) - [Commands (References) | AdonisJS Documentation](#commands-references-adonisjs-documentation) - [Logger (Digging deeper) | AdonisJS Documentation](#logger-digging-deeper-adonisjs-documentation) - [Emitter (Digging deeper) | AdonisJS Documentation](#emitter-digging-deeper-adonisjs-documentation) - [Health checks (Digging deeper) | AdonisJS Documentation](#health-checks-digging-deeper-adonisjs-documentation) - [Rate limiting (Security) | AdonisJS Documentation](#rate-limiting-security-adonisjs-documentation) - [Helpers (References) | AdonisJS Documentation](#helpers-references-adonisjs-documentation) - [I18n (Digging deeper) | AdonisJS Documentation](#i18n-digging-deeper-adonisjs-documentation) - [Mail (Digging deeper) | AdonisJS Documentation](#mail-digging-deeper-adonisjs-documentation) - [Inertia (Views & Templates) | AdonisJS Documentation](#inertia-views-templates-adonisjs-documentation) --- # Introduction (Preface) | AdonisJS Documentation Toggle docs menu Introduction [](https://docs.adonisjs.com/guides/preface/introduction#introduction) Introduction =================================================================================== ### Getting started * [Screencasts](https://adocasts.com/?utm_source=docs.adonisjs.com) * [AdonisJS VSCode extension](https://marketplace.visualstudio.com/items?itemName=jripouteau.adonis-vscode-extension) * [Edge VSCode extension](https://marketplace.visualstudio.com/items?itemName=AdonisJS.vscode-edge) * [Japa VSCode extension](https://marketplace.visualstudio.com/items?itemName=jripouteau.japa-vscode) ### Community and Help * [Discord server](https://discord.gg/vDcEjq6) * [X (Formerly Twitter)](https://twitter.com/adonisframework) * [GitHub discussions](https://github.com/orgs/adonisjs/discussions) * [Packages ecosystem](https://packages.adonisjs.com/) * [Priority Support](https://adonisjs.com/contact) ### Translations The following translations are not official and managed by the community * [Japanese](https://adonisjs-docs-ja.vercel.app/) [](https://docs.adonisjs.com/guides/preface/introduction#what-is-adonisjs) What is AdonisJS? -------------------------------------------------------------------------------------------- AdonisJS is a TypeScript-first web framework for Node.js. You can use it to create a full-stack web application or a JSON API server. At the fundamental level, AdonisJS [provides structure to your applications](https://docs.adonisjs.com/guides/getting-started/folder-structure) , configures a [seamless TypeScript development environment](https://docs.adonisjs.com/guides/concepts/typescript-build-process) , configures [HMR](https://docs.adonisjs.com/guides/concepts/hot-module-replacement) for your backend code, and offers a vast collection of well-maintained and extensively documented packages. We envision teams using AdonisJS **spending less time** on trivial decisions like cherry-picking npm packages for every minor feature, writing glue code, debating for the perfect folder structure, and **spending more time** delivering real-world features critical for the business needs. ### [](https://docs.adonisjs.com/guides/preface/introduction#frontend-agnostic) Frontend agnostic AdonisJS focuses on the backend and lets you choose the frontend stack of your choice. If you like to keep things simple, pair AdonisJS with a [traditional template engine](https://docs.adonisjs.com/guides/views-and-templates/introduction) to generate static HTML on the server, create a JSON API for your frontend Vue/React application or use [Inertia](https://docs.adonisjs.com/guides/views-and-templates/inertia) to make your favorite frontend framework work together in perfect harmony. AdonisJS aims to provide you with batteries to create a robust backend application from scratch. Be it sending emails, validating user input, performing CRUD operations, or authenticating users. We take care of it all. ### [](https://docs.adonisjs.com/guides/preface/introduction#modern-and-type-safe) Modern and Type-safe AdonisJS is built on top of modern JavaScript primitives. We use ES modules, Node.js sub-path import aliases, SWC for executing TypeScript source, and Vite for assets bundling. Also, TypeScript plays a considerable role when designing the framework's APIs. For example, AdonisJS has: * [Type-safe event emitter](https://docs.adonisjs.com/guides/digging-deeper/emitter#making-events-type-safe) * [Type-safe environment variables](https://docs.adonisjs.com/guides/getting-started/environment-variables) * [Type-safe validation library](https://docs.adonisjs.com/guides/basics/validation) ### [](https://docs.adonisjs.com/guides/preface/introduction#embracing-mvc) Embracing MVC AdonisJS embraces the classic MVC design pattern. You start by defining the routes using the functional JavaScript API, bind controllers to them and write logic to handle the HTTP requests within the controllers. start/routes.ts Copy code to clipboard import router from '@adonisjs/core/services/router' const PostsController = () => import('#controllers/posts_controller') router.get('posts', [PostsController, 'index']) Controllers can use models to fetch data from the database and render a view (aka template) as a response. app/controllers/posts\_controller.ts Copy code to clipboard import Post from '#models/post' import type { HttpContext } from '@adonisjs/core/http' export default class PostsController { async index({ view }: HttpContext) { const posts = await Post.all() return view.render('pages/posts/list', { posts }) } } If you are building an API server, you can replace the view layer with a JSON response. But, the flow of handling and responding to the HTTP requests remains the same. app/controllers/posts\_controller.ts Copy code to clipboard import Post from '#models/post' import type { HttpContext } from '@adonisjs/core/http' export default class PostsController { async index({ view }: HttpContext) { const posts = await Post.all() return view.render('pages/posts/list', { posts }) /** * Posts array will be serialized to JSON * automatically. */ return posts } } [](https://docs.adonisjs.com/guides/preface/introduction#guides-assumptions) Guides assumptions ----------------------------------------------------------------------------------------------- The AdonisJS documentation is written as a reference guide, covering the usage and the API of several packages and modules maintained by the core team. **The guide does not teach you how to build an application from scratch**. If you are looking for a tutorial, we recommend starting your journey with [Adocasts](https://adocasts.com/) . Tom (the creator of Adocasts) has created some high quality screencasts, helping you to take the first steps with AdonisJS. With that said, the documentation extensively covers the usage of available modules and the inner workings of the framework. [](https://docs.adonisjs.com/guides/preface/introduction#recent-releases) Recent releases ----------------------------------------------------------------------------------------- Following is the list of recent releases. [Click here](https://docs.adonisjs.com/guides/preface/releases) to view all the releases. | Package | Change | Released on | | --- | --- | --- | | [`@adonisjs/repl`](https://github.com/adonisjs/repl/releases/tag/v4.1.1) | Update dependencies. | Aug 15, 2025 | | [`@adonisjs/eslint-config`](https://github.com/adonisjs/eslint-config/releases/tag/v2.1.2) | Remove @stylistic/eslint-plugin-ts in favor of @stylistic/eslint-plugin. | Aug 8, 2025 | | [`@adonisjs/lucid`](https://github.com/adonisjs/lucid/releases/tag/v21.8.0) | Use natural sort when executing seeders and display migration filename during error in compact mode. | Jul 22, 2025 | | [`@adonisjs/cache`](https://github.com/adonisjs/cache/releases/tag/v1.3.0) | \`cache:prune\` and database migration. | Jul 20, 2025 | | [`@adonisjs/i18n`](https://github.com/adonisjs/i18n/releases/tag/v2.2.2) | Resolve otherField from translations. | Jul 16, 2025 | [](https://docs.adonisjs.com/guides/preface/introduction#sponsors) Sponsors --------------------------------------------------------------------------- List of individuals and companies publicly sponsoring [Harminder Virk on GitHub](https://github.com/sponsors/thetutlage) . If you are sponsoring and cannot see your name, ensure your [sponsorship is not private](https://docs.github.com/en/sponsors/sponsoring-open-source-contributors/managing-your-sponsorship#managing-the-privacy-setting-for-your-sponsorship) . ### Featured sponsors [](https://route4me.com/?utm_source=adonisjs.com) [](https://ezycourse.com/?utm_source=adonisjs.com) [](https://meteor.software/g6h?utm_source=adonisjs.com) [](https://www.lambdatest.com/?utm_source=adonisjs.com) [](https://relancer.com/?utm_source=adonisjs.com) [Your logo](https://github.com/sponsors/thetutlage/sponsorships?tier_id=379745&preview=false&pay_prorated=false) ### Gold sponsors [![Jalil Wahdatehagh](https://avatars.githubusercontent.com/u/2725836?u=a09742a92b1b8ef794cf684c4defda971291fa44&v=4)](https://github.com/jwahdatehagh "Jalil Wahdatehagh") [![Route4Me Route Planner](https://avatars.githubusercontent.com/u/7936820?v=4)](https://github.com/route4me "Route4Me Route Planner") [![Zakodium](https://avatars.githubusercontent.com/u/24538973?v=4)](https://github.com/zakodium "Zakodium") [![Sadek Hossain](https://avatars.githubusercontent.com/u/26408759?u=ebcc35f122d4f87beecad9dd417bda73390da1ba&v=4)](https://github.com/hkmsadek "Sadek Hossain") [![LambdaTest](https://avatars.githubusercontent.com/u/171592363?u=96606606a45fa170427206199014f2a5a2a4920b&v=4)](https://github.com/LambdaTest-Inc "LambdaTest") [![Galaxy Cloud](https://avatars.githubusercontent.com/u/216723882?v=4)](https://github.com/CloudByGalaxy "Galaxy Cloud") ### Silver sponsors [![Carl Mathisen](https://avatars.githubusercontent.com/u/380661?u=ac512498497a88727613ce122da2e2a8c1bc5672&v=4)](https://github.com/carlmathisen "Carl Mathisen") [![Connor Ford](https://avatars.githubusercontent.com/u/5564278?u=9d75331ac2dfceda8071da92f8b5247ed7837682&v=4)](https://github.com/connorford2 "Connor Ford") [![Tom Gobich](https://avatars.githubusercontent.com/u/19398726?u=ecb4e8211c88e6d2798f39bb7f5c89b499d802db&v=4)](https://github.com/tomgobich "Tom Gobich") [![Martin Paucot](https://avatars.githubusercontent.com/u/36955373?u=be8ef6b671fecf24c5f6b81c981d1dc3a87cf43f&v=4)](https://github.com/kerwanp "Martin Paucot") [![Outloud](https://avatars.githubusercontent.com/u/80029227?v=4)](https://github.com/madebyoutloud "Outloud") ### Sponsors [![Marco Leong](https://avatars.githubusercontent.com/u/119320?v=4)](https://github.com/marcoleong "Marco Leong") [![Tim Griesser](https://avatars.githubusercontent.com/u/154748?u=aa019a14901035d69022b198558b10f36a9d5ed2&v=4)](https://github.com/tgriesser "Tim Griesser") [![Pedro Solá](https://avatars.githubusercontent.com/u/520550?u=bae92befde2b0dbb6d84e23189ef947cebcbb1e7&v=4)](https://github.com/p3drosola "Pedro Solá") [![Edu Wass](https://avatars.githubusercontent.com/u/1070495?u=d1659f587ea62d59a59c51cece4ec09a68bc5f64&v=4)](https://github.com/eduwass "Edu Wass") [![Eric Pugh](https://avatars.githubusercontent.com/u/1176767?u=82305338baa4508719355560aa9a73b9167a65e3&v=4)](https://github.com/ericpugh "Eric Pugh") [![Jeremy Chaufourier](https://avatars.githubusercontent.com/u/1385093?v=4)](https://github.com/batosai "Jeremy Chaufourier") [![Filipe Braida](https://avatars.githubusercontent.com/u/2746730?u=f0ca8cc6338716aec08345e9f76b29cc591cbb1d&v=4)](https://github.com/filipebraida "Filipe Braida") [![Jarle Mathiesen](https://avatars.githubusercontent.com/u/5922571?u=9095f0d3f9f9511401ae91e580846ab1ee7f29c1&v=4)](https://github.com/jarle "Jarle Mathiesen") [![Benjamin Noufel](https://avatars.githubusercontent.com/u/6586577?u=c64dad9994b590343f08f3ab1bdc0ea9326ee327&v=4)](https://github.com/bnoufel "Benjamin Noufel") [![McSneaky](https://avatars.githubusercontent.com/u/6796697?u=69ad3f1f9496437729da9d62236cd84beea2aca1&v=4)](https://github.com/McSneaky "McSneaky") [![Andrew Connell](https://avatars.githubusercontent.com/u/8943827?u=b45247dc62abcb67aa3ca451423270d3e5046e54&v=4)](https://github.com/andrew-connell "Andrew Connell") [![gunhanselas](https://avatars.githubusercontent.com/u/10177775?u=b05151fe3d3f6bb6d512205ed49b09461811d116&v=4)](https://github.com/gunhanselas "gunhanselas") [![Ian Chen](https://avatars.githubusercontent.com/u/11452327?u=d56b0e78b9c99275c09c42303a4bc5b4f3bb8b4b&v=4)](https://github.com/CoSNaYe "Ian Chen") [![nativadesenvolvimento](https://avatars.githubusercontent.com/u/13489398?v=4)](https://github.com/nativadesenvolvimento "nativadesenvolvimento") [![Davi de Carvalho](https://avatars.githubusercontent.com/u/15630886?u=3f603ac623a984b4d9ce18841cacee43b4d47f1e&v=4)](https://github.com/DavideCarvalho "Davi de Carvalho") [![Neighbourhoodie Software](https://avatars.githubusercontent.com/u/16577321?v=4)](https://github.com/neighbourhoodie "Neighbourhoodie Software") [![Philippe DESPLATS](https://avatars.githubusercontent.com/u/21154061?u=a3a3c6872f837f576f7d3626b1dc38a65ff7d067&v=4)](https://github.com/philippe-desplats "Philippe DESPLATS") [![capoia](https://avatars.githubusercontent.com/u/21159928?u=1c3ddb88553e3266f3c78ef428792081bb0e4f2f&v=4)](https://github.com/capoia "capoia") [![Emirhan Engin](https://avatars.githubusercontent.com/u/21215832?u=368f5013518d25d52f9368e228ea16901063eb3c&v=4)](https://github.com/itsemirhanengin "Emirhan Engin") [![Fernando Isidro Luna](https://avatars.githubusercontent.com/u/22108070?u=f33e6c069ae4a8fe6d53214e0828d4aa24d9596f&v=4)](https://github.com/luffynando "Fernando Isidro Luna") [![Jonas Thiesen](https://avatars.githubusercontent.com/u/23408018?u=9d6b9856dbe80a3d432c5abd7d0d2a155cfffea6&v=4)](https://github.com/jonasthiesen "Jonas Thiesen") [![Quentin Roggy](https://avatars.githubusercontent.com/u/34277270?u=a952003a6953c62a20bdf389e4781ff6c14c40d6&v=4)](https://github.com/QuentinRoggy "Quentin Roggy") [![Boris Abramov](https://avatars.githubusercontent.com/u/35063063?u=87ea28a3f52736e0073d338ef06d3bd5062c8790&v=4)](https://github.com/manomintis "Boris Abramov") [![Ben Smith](https://avatars.githubusercontent.com/u/37027883?u=eda62f61ccdcba2f53210fb5fa01405dd73190d2&v=4)](https://github.com/smithbm2316 "Ben Smith") [![Trésor Muco](https://avatars.githubusercontent.com/u/43722815?u=c4860a6fce415febfe459b5385908039a7a59c9f&v=4)](https://github.com/muco-rolle "Trésor Muco") [![Diego Sepulveda](https://avatars.githubusercontent.com/u/48002357?u=4d85250ffa7677d975d5d32ce2c55a3ea5d52108&v=4)](https://github.com/diego-sepulveda-lavin "Diego Sepulveda") [![Julien Nantet](https://avatars.githubusercontent.com/u/48794117?u=58ae940008e30b40d6a24921eeb202e09ca595f6&v=4)](https://github.com/JNantet "Julien Nantet") [![Clément Mistral](https://avatars.githubusercontent.com/u/55872681?u=3a57179f10b19dd9834c180b6efd3900a27317f7&v=4)](https://github.com/clement-mistral "Clément Mistral") [![Mohamed M'rabet](https://avatars.githubusercontent.com/u/58339336?u=1133a92170ef40fd472b7a791981aa6a3f4ef7da&v=4)](https://github.com/mhmdmrabet "Mohamed M'rabet") [![Thibault Pointurier](https://avatars.githubusercontent.com/u/61085504?u=b976a62c7d128d814a91360ef9475daa837e9199&v=4)](https://github.com/ThibaultPointurier "Thibault Pointurier") [![coddess-development](https://avatars.githubusercontent.com/u/84347978?v=4)](https://github.com/coddess-development "coddess-development") [![Ugo ROSERAT](https://avatars.githubusercontent.com/u/97634774?u=54ae5fd18f958913f57c2e40932becd580774af0&v=4)](https://github.com/roseratugo "Ugo ROSERAT") [![BretRen](https://avatars.githubusercontent.com/u/135674689?u=088b3680d27bd4be23b28a39f1b778fc04333bcf&v=4)](https://github.com/BretRen "BretRen") [![Let's Dial](https://avatars.githubusercontent.com/u/145757616?v=4)](https://github.com/letsdial "Let's Dial") ### Backers [![Luiz Alves](https://avatars.githubusercontent.com/u/777635?u=b946420bf6d4813b50dc1b4e20f78ee9d23780e7&v=4)](https://github.com/Zizaco "Luiz Alves") [![José Silva Jr.](https://avatars.githubusercontent.com/u/1750415?u=fe8c21a2d825ddf2ccd95f5fa1c24171333e53cb&v=4)](https://github.com/jsilva74 "José Silva Jr.") [![Jared Dunham](https://avatars.githubusercontent.com/u/8052095?u=92a926fffc2828e8ec8c586669c350282c5b7548&v=4)](https://github.com/dunhamjared "Jared Dunham") [![moistpope](https://avatars.githubusercontent.com/u/9668293?v=4)](https://github.com/moistpope "moistpope") [![Maciej Ładoś](https://avatars.githubusercontent.com/u/11617741?u=b4f907334246af5916f2778adc7db1aefd3c7623&v=4)](https://github.com/macieklad "Maciej Ładoś") [![Julian Dawson](https://avatars.githubusercontent.com/u/13298355?u=695d8fb32c6d8782ed2839a8ee447b87e5bf0ebd&v=4)](https://github.com/juael "Julian Dawson") [![Igor Trindade](https://avatars.githubusercontent.com/u/13478652?u=8818b3963dc43b90f46daf35c362203bc1f2076c&v=4)](https://github.com/igortrinidad "Igor Trindade") [![Tavares](https://avatars.githubusercontent.com/u/22455192?u=829d9b40ac8e610cfa232ac3e813e9a4ba41001e&v=4)](https://github.com/tavaresgerson "Tavares") [![vartiainen](https://avatars.githubusercontent.com/u/36074900?u=1c3cecb1baf7a6af3b2adea52198195b573a43cd&v=4)](https://github.com/vartiainen "vartiainen") [![Lucas Finoti](https://avatars.githubusercontent.com/u/42899930?u=b4dda6902ab8717d4b3721c6cb1be933210bdf1e&v=4)](https://github.com/FinotiLucas "Lucas Finoti") [![ChristopherFritz](https://avatars.githubusercontent.com/u/96966738?v=4)](https://github.com/ChristopherFritz "ChristopherFritz") [![Syntax](https://avatars.githubusercontent.com/u/130389858?v=4)](https://github.com/syntaxfm "Syntax") ### Past sponsors [![Yura](https://avatars.githubusercontent.com/u/42239243?u=b0d288f724926f1239aa33c735656977a3c2b9f1&v=4)](https://github.com/furatamasensei "Yura") [![Professor MAD](https://avatars.githubusercontent.com/u/162829721?u=5503245ebe0b3c3d828e3012a806c5d01323605c&v=4)](https://github.com/Professor-MAD "Professor MAD") [![bitkidd](https://avatars.githubusercontent.com/u/2136460?s=60&v=4)](https://github.com/bitkidd "bitkidd") [![DominusKelvin](https://avatars.githubusercontent.com/u/24433274?s=60&v=4)](https://github.com/DominusKelvin "DominusKelvin") [![adegbengaagoro](https://avatars.githubusercontent.com/u/5008453?s=60&v=4)](https://github.com/adegbengaagoro "adegbengaagoro") [![DanielCoulbourne](https://avatars.githubusercontent.com/u/429010?s=60&v=4)](https://github.com/DanielCoulbourne "DanielCoulbourne") [![microeinhundert](https://avatars.githubusercontent.com/u/23029146?s=60&v=4)](https://github.com/microeinhundert "microeinhundert") [![hecht-a](https://avatars.githubusercontent.com/u/50453254?s=60&v=4)](https://github.com/hecht-a "hecht-a") [![frangambin1](https://avatars.githubusercontent.com/u/3390025?s=60&v=4)](https://github.com/frangambin1 "frangambin1") [![baekilda](https://avatars.githubusercontent.com/u/67785358?s=60&v=4)](https://github.com/baekilda "baekilda") [![roonie007](https://avatars.githubusercontent.com/u/7860859?s=60&v=4)](https://github.com/roonie007 "roonie007") [![GabrielNBDS](https://avatars.githubusercontent.com/u/48018647?s=60&v=4)](https://github.com/GabrielNBDS "GabrielNBDS") [![MatusMockor](https://avatars.githubusercontent.com/u/33400567?s=60&v=4)](https://github.com/MatusMockor "MatusMockor") [![AlexandreGerault](https://avatars.githubusercontent.com/u/3494871?s=60&v=4)](https://github.com/AlexandreGerault "AlexandreGerault") [![wavedeck](https://avatars.githubusercontent.com/u/62691352?s=60&v=4)](https://github.com/wavedeck "wavedeck") [![ungerpeter](https://avatars.githubusercontent.com/u/4763039?s=60&v=4)](https://github.com/ungerpeter "ungerpeter") [![ammezie](https://avatars.githubusercontent.com/u/6279134?s=60&v=4)](https://github.com/ammezie "ammezie") [![ArthurFranckPat](https://avatars.githubusercontent.com/u/50202146?s=60&v=4)](https://github.com/ArthurFranckPat "ArthurFranckPat") [![hsoumi-technology](https://avatars.githubusercontent.com/u/53514479?s=60&v=4)](https://github.com/hsoumi-technology "hsoumi-technology") [![xqsit94](https://avatars.githubusercontent.com/u/20275754?s=60&v=4)](https://github.com/xqsit94 "xqsit94") [![natapolc](https://avatars.githubusercontent.com/u/47173482?s=60&v=4)](https://github.com/natapolc "natapolc") [![brunoziie](https://avatars.githubusercontent.com/u/764339?s=60&v=4)](https://github.com/brunoziie "brunoziie") [![devKnaryo](https://avatars.githubusercontent.com/u/140100690?s=60&v=4)](https://github.com/devKnaryo "devKnaryo") [![Dolu89](https://avatars.githubusercontent.com/u/4184590?s=60&v=4)](https://github.com/Dolu89 "Dolu89") [![augustosamame](https://avatars.githubusercontent.com/u/16038063?s=60&v=4)](https://github.com/augustosamame "augustosamame") [![PandaGuerrier](https://avatars.githubusercontent.com/u/76222146?s=60&v=4)](https://github.com/PandaGuerrier "PandaGuerrier") [![flozdra](https://avatars.githubusercontent.com/u/56303005?s=60&v=4)](https://github.com/flozdra "flozdra") [![webNeat](https://avatars.githubusercontent.com/u/2133333?s=60&v=4)](https://github.com/webNeat "webNeat") [![watzon](https://avatars.githubusercontent.com/u/4535422?s=60&v=4)](https://github.com/watzon "watzon") [![xinha-sh](https://avatars.githubusercontent.com/u/107257599?s=60&v=4)](https://github.com/xinha-sh "xinha-sh") [![cyanicr](https://avatars.githubusercontent.com/u/39081704?s=60&v=4)](https://github.com/cyanicr "cyanicr") [![Forsties08](https://avatars.githubusercontent.com/u/4083699?s=60&v=4)](https://github.com/Forsties08 "Forsties08") [![urloki](https://avatars.githubusercontent.com/u/38019492?s=60&v=4)](https://github.com/urloki "urloki") [![itsabdessalam](https://avatars.githubusercontent.com/u/23357835?s=60&v=4)](https://github.com/itsabdessalam "itsabdessalam") [![alexandrecoin](https://avatars.githubusercontent.com/u/36371437?s=60&v=4)](https://github.com/alexandrecoin "alexandrecoin") [![hariesnurikhwan](https://avatars.githubusercontent.com/u/10152692?s=60&v=4)](https://github.com/hariesnurikhwan "hariesnurikhwan") [![Morganjackson](https://avatars.githubusercontent.com/u/833805?s=60&v=4)](https://github.com/Morganjackson "Morganjackson") [![gabrielmaialva33](https://avatars.githubusercontent.com/u/26732067?s=60&v=4)](https://github.com/gabrielmaialva33 "gabrielmaialva33") [![karakunai](https://avatars.githubusercontent.com/u/28718177?s=60&v=4)](https://github.com/karakunai "karakunai") [![anthonykoch](https://avatars.githubusercontent.com/u/11045374?s=60&v=4)](https://github.com/anthonykoch "anthonykoch") [![tom-brulin](https://avatars.githubusercontent.com/u/18754253?s=60&v=4)](https://github.com/tom-brulin "tom-brulin") [![flowdev777](https://avatars.githubusercontent.com/u/13289036?s=60&v=4)](https://github.com/flowdev777 "flowdev777") [![franciskouaho](https://avatars.githubusercontent.com/u/44967681?s=60&v=4)](https://github.com/franciskouaho "franciskouaho") [![vnay92](https://avatars.githubusercontent.com/u/8510776?s=60&v=4)](https://github.com/vnay92 "vnay92") [![aniftyco](https://avatars.githubusercontent.com/u/18599486?s=60&v=4)](https://github.com/aniftyco "aniftyco") [![BSN4](https://avatars.githubusercontent.com/u/199647?s=60&v=4)](https://github.com/BSN4 "BSN4") [![gabrielbuzziv](https://avatars.githubusercontent.com/u/9993834?s=60&v=4)](https://github.com/gabrielbuzziv "gabrielbuzziv") [![Secular12](https://avatars.githubusercontent.com/u/19291050?s=60&v=4)](https://github.com/Secular12 "Secular12") [![petchpool](https://avatars.githubusercontent.com/u/32625530?s=60&v=4)](https://github.com/petchpool "petchpool") [![lmd-dev](https://avatars.githubusercontent.com/u/63463185?s=60&v=4)](https://github.com/lmd-dev "lmd-dev") [![KeqinHQ](https://avatars.githubusercontent.com/u/89907720?s=60&v=4)](https://github.com/KeqinHQ "KeqinHQ") [![prisca-c](https://avatars.githubusercontent.com/u/91020684?s=60&v=4)](https://github.com/prisca-c "prisca-c") [![Sonny93](https://avatars.githubusercontent.com/u/24420064?s=60&v=4)](https://github.com/Sonny93 "Sonny93") [![maamri95](https://avatars.githubusercontent.com/u/30296078?s=60&v=4)](https://github.com/maamri95 "maamri95") [![ninjaparade](https://avatars.githubusercontent.com/u/228899?s=60&v=4)](https://github.com/ninjaparade "ninjaparade") [![sefidary](https://avatars.githubusercontent.com/u/5389819?s=60&v=4)](https://github.com/sefidary "sefidary") [![bartonhammond](https://avatars.githubusercontent.com/u/1282364?s=60&v=4)](https://github.com/bartonhammond "bartonhammond") [![CloudGakkai](https://avatars.githubusercontent.com/u/66408661?s=60&v=4)](https://github.com/CloudGakkai "CloudGakkai") [![akatora28](https://avatars.githubusercontent.com/u/22596574?s=60&v=4)](https://github.com/akatora28 "akatora28") [![good-tape](https://avatars.githubusercontent.com/u/135593451?s=60&v=4)](https://github.com/good-tape "good-tape") [![PietroDSK](https://avatars.githubusercontent.com/u/36972545?s=60&v=4)](https://github.com/PietroDSK "PietroDSK") [![FernandoEncina](https://avatars.githubusercontent.com/u/28442812?s=60&v=4)](https://github.com/FernandoEncina "FernandoEncina") [![iDroid-dev](https://avatars.githubusercontent.com/u/82721482?s=60&v=4)](https://github.com/iDroid-dev "iDroid-dev") [![whayes75](https://avatars.githubusercontent.com/u/609642?s=60&v=4)](https://github.com/whayes75 "whayes75") [![itsjustanks](https://avatars.githubusercontent.com/u/11022280?s=60&v=4)](https://github.com/itsjustanks "itsjustanks") [![Untel](https://avatars.githubusercontent.com/u/15136981?s=60&v=4)](https://github.com/Untel "Untel") [![fadeaway](https://avatars.githubusercontent.com/u/4672329?s=60&v=4)](https://github.com/fadeaway "fadeaway") [![FragRappy](https://avatars.githubusercontent.com/u/136443369?s=60&v=4)](https://github.com/FragRappy "FragRappy") [![ClementLaval](https://avatars.githubusercontent.com/u/82887830?s=60&v=4)](https://github.com/ClementLaval "ClementLaval") [![Raesta](https://avatars.githubusercontent.com/u/4834347?s=60&v=4)](https://github.com/Raesta "Raesta") [![yungsilva](https://avatars.githubusercontent.com/u/145920901?s=60&v=4)](https://github.com/yungsilva "yungsilva") [![maximedeoliveira](https://avatars.githubusercontent.com/u/11207671?s=60&v=4)](https://github.com/maximedeoliveira "maximedeoliveira") [![Segfaultd](https://avatars.githubusercontent.com/u/5221072?s=60&v=4)](https://github.com/Segfaultd "Segfaultd") [![leereichardt](https://avatars.githubusercontent.com/u/1117892?s=60&v=4)](https://github.com/leereichardt "leereichardt") [![devanandb](https://avatars.githubusercontent.com/u/1044609?s=60&v=4)](https://github.com/devanandb "devanandb") [![meyer0x](https://avatars.githubusercontent.com/u/71312955?s=60&v=4)](https://github.com/meyer0x "meyer0x") [![Yofou](https://avatars.githubusercontent.com/u/39814328?s=60&v=4)](https://github.com/Yofou "Yofou") [![ademoverflow](https://avatars.githubusercontent.com/u/6079944?s=60&v=4)](https://github.com/ademoverflow "ademoverflow") [![olivier-lucas](https://avatars.githubusercontent.com/u/51017753?s=60&v=4)](https://github.com/olivier-lucas "olivier-lucas") [![romainrhd](https://avatars.githubusercontent.com/u/2768253?s=60&v=4)](https://github.com/romainrhd "romainrhd") [![tomgscs](https://avatars.githubusercontent.com/u/11200868?s=60&v=4)](https://github.com/tomgscs "tomgscs") [![adokce](https://avatars.githubusercontent.com/u/20118440?s=60&v=4)](https://github.com/adokce "adokce") [![JasonVerk](https://avatars.githubusercontent.com/u/74001083?s=60&v=4)](https://github.com/JasonVerk "JasonVerk") [![denisdenes](https://avatars.githubusercontent.com/u/6594741?s=60&v=4)](https://github.com/denisdenes "denisdenes") [![Geek2tech](https://avatars.githubusercontent.com/u/99734728?s=60&v=4)](https://github.com/Geek2tech "Geek2tech") [![luzzbe](https://avatars.githubusercontent.com/u/19195247?s=60&v=4)](https://github.com/luzzbe "luzzbe") [![eliemoriceau](https://avatars.githubusercontent.com/u/62339484?s=60&v=4)](https://github.com/eliemoriceau "eliemoriceau") [![flupine](https://avatars.githubusercontent.com/u/32355020?s=60&v=4)](https://github.com/flupine "flupine") [![chaptiste](https://avatars.githubusercontent.com/u/7189050?s=60&v=4)](https://github.com/chaptiste "chaptiste") [![s1nyx](https://avatars.githubusercontent.com/u/23642036?s=60&v=4)](https://github.com/s1nyx "s1nyx") [![mkevison](https://avatars.githubusercontent.com/u/66646473?s=60&v=4)](https://github.com/mkevison "mkevison") [![qkab78](https://avatars.githubusercontent.com/u/15227469?s=60&v=4)](https://github.com/qkab78 "qkab78") [![lncitador](https://avatars.githubusercontent.com/u/55416536?s=60&v=4)](https://github.com/lncitador "lncitador") [![dmdboi](https://avatars.githubusercontent.com/u/23747483?s=60&v=4)](https://github.com/dmdboi "dmdboi") [![arkerone](https://avatars.githubusercontent.com/u/9639876?s=60&v=4)](https://github.com/arkerone "arkerone") [![MeLoBeats](https://avatars.githubusercontent.com/u/109726979?s=60&v=4)](https://github.com/MeLoBeats "MeLoBeats") [![brngrs](https://avatars.githubusercontent.com/u/46816769?s=60&v=4)](https://github.com/brngrs "brngrs") [![GermainMichaud](https://avatars.githubusercontent.com/u/78552546?s=60&v=4)](https://github.com/GermainMichaud "GermainMichaud") [![FrenchMajesty](https://avatars.githubusercontent.com/u/24761660?s=60&v=4)](https://github.com/FrenchMajesty "FrenchMajesty") [![Flamystal](https://avatars.githubusercontent.com/u/100171836?s=60&v=4)](https://github.com/Flamystal "Flamystal") [![Renaud-HUSSON](https://avatars.githubusercontent.com/u/74457553?s=60&v=4)](https://github.com/Renaud-HUSSON "Renaud-HUSSON") [![muniter](https://avatars.githubusercontent.com/u/9699804?s=60&v=4)](https://github.com/muniter "muniter") [![kubilaysalih](https://avatars.githubusercontent.com/u/17550955?s=60&v=4)](https://github.com/kubilaysalih "kubilaysalih") [![ivan-prats](https://avatars.githubusercontent.com/u/63517766?s=60&v=4)](https://github.com/ivan-prats "ivan-prats") [![WebShapedBiz](https://avatars.githubusercontent.com/u/6765137?s=60&v=4)](https://github.com/WebShapedBiz "WebShapedBiz") [![DennisKraaijeveld](https://avatars.githubusercontent.com/u/50783193?s=60&v=4)](https://github.com/DennisKraaijeveld "DennisKraaijeveld") [![Obapelumi](https://avatars.githubusercontent.com/u/31254017?s=60&v=4)](https://github.com/Obapelumi "Obapelumi") [![usagar80](https://avatars.githubusercontent.com/u/4917613?s=60&v=4)](https://github.com/usagar80 "usagar80") [![enkot](https://avatars.githubusercontent.com/u/10506522?s=60&v=4)](https://github.com/enkot "enkot") [![juni0r](https://avatars.githubusercontent.com/u/11867?s=60&v=4)](https://github.com/juni0r "juni0r") [![roggerJt](https://avatars.githubusercontent.com/u/2109081?s=60&v=4)](https://github.com/roggerJt "roggerJt") [![lucas-jacques](https://avatars.githubusercontent.com/u/79991728?s=60&v=4)](https://github.com/lucas-jacques "lucas-jacques") [![dimas-cyriaco](https://avatars.githubusercontent.com/u/65256?s=60&v=4)](https://github.com/dimas-cyriaco "dimas-cyriaco") [![keef3ar](https://avatars.githubusercontent.com/u/35760257?s=60&v=4)](https://github.com/keef3ar "keef3ar") [![mr-feek](https://avatars.githubusercontent.com/u/5747667?s=60&v=4)](https://github.com/mr-feek "mr-feek") [![pranab-martiniapp](https://avatars.githubusercontent.com/u/117786520?s=60&v=4)](https://github.com/pranab-martiniapp "pranab-martiniapp") [![forgiv](https://avatars.githubusercontent.com/u/49741676?s=60&v=4)](https://github.com/forgiv "forgiv") [![BrodyMacfarlane](https://avatars.githubusercontent.com/u/11724352?s=60&v=4)](https://github.com/BrodyMacfarlane "BrodyMacfarlane") [![bakaburg24](https://avatars.githubusercontent.com/u/122837276?s=60&v=4)](https://github.com/bakaburg24 "bakaburg24") [![jikkai](https://avatars.githubusercontent.com/u/14025786?s=60&v=4)](https://github.com/jikkai "jikkai") [![OmnizTwink](https://avatars.githubusercontent.com/u/142337388?s=60&v=4)](https://github.com/OmnizTwink "OmnizTwink") [![jamesbuch](https://avatars.githubusercontent.com/u/140830722?s=60&v=4)](https://github.com/jamesbuch "jamesbuch") [![mrfelipemartins](https://avatars.githubusercontent.com/u/24225909?s=60&v=4)](https://github.com/mrfelipemartins "mrfelipemartins") [![AlexGalhardo](https://avatars.githubusercontent.com/u/19540357?s=60&v=4)](https://github.com/AlexGalhardo "AlexGalhardo") [![mayavadeesoft](https://avatars.githubusercontent.com/u/199403?s=60&v=4)](https://github.com/mayavadeesoft "mayavadeesoft") [![8mist](https://avatars.githubusercontent.com/u/94165729?s=60&v=4)](https://github.com/8mist "8mist") [![HamzaDams](https://avatars.githubusercontent.com/u/15633553?s=60&v=4)](https://github.com/HamzaDams "HamzaDams") [![JusCezari](https://avatars.githubusercontent.com/u/2501179?s=60&v=4)](https://github.com/JusCezari "JusCezari") [![branrgx](https://avatars.githubusercontent.com/u/131713617?s=60&v=4)](https://github.com/branrgx "branrgx") [![brandon-beacher](https://avatars.githubusercontent.com/u/469?s=60&v=4)](https://github.com/brandon-beacher "brandon-beacher") [![MrGlox](https://avatars.githubusercontent.com/u/8365856?s=60&v=4)](https://github.com/MrGlox "MrGlox") [![c4n4r](https://avatars.githubusercontent.com/u/9746558?s=60&v=4)](https://github.com/c4n4r "c4n4r") [![MateoSRQ](https://avatars.githubusercontent.com/u/2517753?s=60&v=4)](https://github.com/MateoSRQ "MateoSRQ") [![capibawa](https://avatars.githubusercontent.com/u/12531452?s=60&v=4)](https://github.com/capibawa "capibawa") [![wmmariano](https://avatars.githubusercontent.com/u/3382706?s=60&v=4)](https://github.com/wmmariano "wmmariano") [![autumn-witch](https://avatars.githubusercontent.com/u/55837878?s=60&v=4)](https://github.com/autumn-witch "autumn-witch") [![jtanudjaja](https://avatars.githubusercontent.com/u/48204814?s=60&v=4)](https://github.com/jtanudjaja "jtanudjaja") [![studio-intellisoft](https://avatars.githubusercontent.com/u/92744395?s=60&v=4)](https://github.com/studio-intellisoft "studio-intellisoft") [![cloleb](https://avatars.githubusercontent.com/u/48698699?s=60&v=4)](https://github.com/cloleb "cloleb") [![davidharting](https://avatars.githubusercontent.com/u/6146772?s=60&v=4)](https://github.com/davidharting "davidharting") [![danygiguere](https://avatars.githubusercontent.com/u/5892397?s=60&v=4)](https://github.com/danygiguere "danygiguere") [![adocasts](https://avatars.githubusercontent.com/u/60223087?s=60&v=4)](https://github.com/adocasts "adocasts") [![redeemefy](https://avatars.githubusercontent.com/u/9165819?s=60&v=4)](https://github.com/redeemefy "redeemefy") [![WilliamTraoreee](https://avatars.githubusercontent.com/u/33811490?s=60&v=4)](https://github.com/WilliamTraoreee "WilliamTraoreee") [![tecrovalsdevelop](https://avatars.githubusercontent.com/u/64419874?s=60&v=4)](https://github.com/tecrovalsdevelop "tecrovalsdevelop") [![jstoone](https://avatars.githubusercontent.com/u/1711456?s=60&v=4)](https://github.com/jstoone "jstoone") [![ymir95](https://avatars.githubusercontent.com/u/4718326?s=60&v=4)](https://github.com/ymir95 "ymir95") [![shiny](https://avatars.githubusercontent.com/u/117487?s=60&v=4)](https://github.com/shiny "shiny") [![SX-3](https://avatars.githubusercontent.com/u/34186963?s=60&v=4)](https://github.com/SX-3 "SX-3") [![AlexTorrenti](https://avatars.githubusercontent.com/u/23656163?s=60&v=4)](https://github.com/AlexTorrenti "AlexTorrenti") [![ScribeSavant](https://avatars.githubusercontent.com/u/34011883?s=60&v=4)](https://github.com/ScribeSavant "ScribeSavant") [![Fabio-web](https://avatars.githubusercontent.com/u/33074345?s=60&v=4)](https://github.com/Fabio-web "Fabio-web") [![jerome-dm](https://avatars.githubusercontent.com/u/114067535?s=60&v=4)](https://github.com/jerome-dm "jerome-dm") [![tleneveu](https://avatars.githubusercontent.com/u/24315977?s=60&v=4)](https://github.com/tleneveu "tleneveu") [![TranspaClean](https://avatars.githubusercontent.com/u/125120232?s=60&v=4)](https://github.com/TranspaClean "TranspaClean") [![marcelodelta](https://avatars.githubusercontent.com/u/2933264?s=60&v=4)](https://github.com/marcelodelta "marcelodelta") [![damienguezou](https://avatars.githubusercontent.com/u/9945898?s=60&v=4)](https://github.com/damienguezou "damienguezou") [![CodingDive](https://avatars.githubusercontent.com/u/28842311?s=60&v=4)](https://github.com/CodingDive "CodingDive") [![LeadcodeDev](https://avatars.githubusercontent.com/u/8946317?s=60&v=4)](https://github.com/LeadcodeDev "LeadcodeDev") [![aarhusgregersen](https://avatars.githubusercontent.com/u/9022499?s=60&v=4)](https://github.com/aarhusgregersen "aarhusgregersen") [![langovoi](https://avatars.githubusercontent.com/u/5055595?s=60&v=4)](https://github.com/langovoi "langovoi") [![nfadili](https://avatars.githubusercontent.com/u/12177975?s=60&v=4)](https://github.com/nfadili "nfadili") [![Arania](https://avatars.githubusercontent.com/u/102757?s=60&v=4)](https://github.com/Arania "Arania") [![CoreyVincent](https://avatars.githubusercontent.com/u/11997743?s=60&v=4)](https://github.com/CoreyVincent "CoreyVincent") [![rchrdkvcs](https://avatars.githubusercontent.com/u/54708737?s=60&v=4)](https://github.com/rchrdkvcs "rchrdkvcs") [![mytraiteur](https://avatars.githubusercontent.com/u/49456694?s=60&v=4)](https://github.com/mytraiteur "mytraiteur") [![crbast](https://avatars.githubusercontent.com/u/31575093?s=60&v=4)](https://github.com/crbast "crbast") [![mathieuh](https://avatars.githubusercontent.com/u/832364?s=60&v=4)](https://github.com/mathieuh "mathieuh") [![ivanlobster](https://avatars.githubusercontent.com/u/45121415?s=60&v=4)](https://github.com/ivanlobster "ivanlobster") [![nickgravel](https://avatars.githubusercontent.com/u/918742?s=60&v=4)](https://github.com/nickgravel "nickgravel") [![fareeda0](https://avatars.githubusercontent.com/u/48023586?s=60&v=4)](https://github.com/fareeda0 "fareeda0") [![ndianabasi](https://avatars.githubusercontent.com/u/13512173?s=60&v=4)](https://github.com/ndianabasi "ndianabasi") [![lolabyleaf](https://avatars.githubusercontent.com/u/139067613?s=60&v=4)](https://github.com/lolabyleaf "lolabyleaf") [![gatarelib](https://avatars.githubusercontent.com/u/29035759?s=60&v=4)](https://github.com/gatarelib "gatarelib") [![laxadev](https://avatars.githubusercontent.com/u/13567271?s=60&v=4)](https://github.com/laxadev "laxadev") [![rbartholomay](https://avatars.githubusercontent.com/u/1138142?s=60&v=4)](https://github.com/rbartholomay "rbartholomay") [![armgitaar](https://avatars.githubusercontent.com/u/30202878?s=60&v=4)](https://github.com/armgitaar "armgitaar") [![pb03](https://avatars.githubusercontent.com/u/21006120?s=60&v=4)](https://github.com/pb03 "pb03") [![victormolla14](https://avatars.githubusercontent.com/u/5132951?s=60&v=4)](https://github.com/victormolla14 "victormolla14") [![richardk80](https://avatars.githubusercontent.com/u/56086535?s=60&v=4)](https://github.com/richardk80 "richardk80") [![hymns](https://avatars.githubusercontent.com/u/232046?s=60&v=4)](https://github.com/hymns "hymns") [![satrio-pamungkas](https://avatars.githubusercontent.com/u/62191088?s=60&v=4)](https://github.com/satrio-pamungkas "satrio-pamungkas") [![andipyk](https://avatars.githubusercontent.com/u/11852352?s=60&v=4)](https://github.com/andipyk "andipyk") [![agusm](https://avatars.githubusercontent.com/u/20964938?s=60&v=4)](https://github.com/agusm "agusm") [![Porrapat](https://avatars.githubusercontent.com/u/3755764?s=60&v=4)](https://github.com/Porrapat "Porrapat") [![LeCoupa](https://avatars.githubusercontent.com/u/1658644?s=60&v=4)](https://github.com/LeCoupa "LeCoupa") [![stanosmith](https://avatars.githubusercontent.com/u/79282?s=60&v=4)](https://github.com/stanosmith "stanosmith") [![saiganov](https://avatars.githubusercontent.com/u/8457838?s=60&v=4)](https://github.com/saiganov "saiganov") [![hdouanla](https://avatars.githubusercontent.com/u/844501?s=60&v=4)](https://github.com/hdouanla "hdouanla") [![Joan1590](https://avatars.githubusercontent.com/u/10948409?s=60&v=4)](https://github.com/Joan1590 "Joan1590") [![EdwinRomelta](https://avatars.githubusercontent.com/u/5573164?s=60&v=4)](https://github.com/EdwinRomelta "EdwinRomelta") [![ramsesmoreno](https://avatars.githubusercontent.com/u/30059695?s=60&v=4)](https://github.com/ramsesmoreno "ramsesmoreno") [![fredrickreuben](https://avatars.githubusercontent.com/u/9050049?s=60&v=4)](https://github.com/fredrickreuben "fredrickreuben") [![tonimoreiraa](https://avatars.githubusercontent.com/u/59844592?s=60&v=4)](https://github.com/tonimoreiraa "tonimoreiraa") [![phongpanotdang2000](https://avatars.githubusercontent.com/u/129178054?s=60&v=4)](https://github.com/phongpanotdang2000 "phongpanotdang2000") [![armandojes](https://avatars.githubusercontent.com/u/46112188?s=60&v=4)](https://github.com/armandojes "armandojes") [![timganter](https://avatars.githubusercontent.com/u/1911000?s=60&v=4)](https://github.com/timganter "timganter") [![dogpaw-io](https://avatars.githubusercontent.com/u/63131449?s=60&v=4)](https://github.com/dogpaw-io "dogpaw-io") [![peguimasid](https://avatars.githubusercontent.com/u/54289589?s=60&v=4)](https://github.com/peguimasid "peguimasid") [![AugustinLegrand](https://avatars.githubusercontent.com/u/64466360?s=60&v=4)](https://github.com/AugustinLegrand "AugustinLegrand") [![jpamittan](https://avatars.githubusercontent.com/u/7790698?s=60&v=4)](https://github.com/jpamittan "jpamittan") [![wukong0111](https://avatars.githubusercontent.com/u/89298649?s=60&v=4)](https://github.com/wukong0111 "wukong0111") [![thehypergraph](https://avatars.githubusercontent.com/u/616532?s=60&v=4)](https://github.com/thehypergraph "thehypergraph") [![FreelancePayrollSystems](https://avatars.githubusercontent.com/u/69112538?s=60&v=4)](https://github.com/FreelancePayrollSystems "FreelancePayrollSystems") [![maukoese](https://avatars.githubusercontent.com/u/14233942?s=60&v=4)](https://github.com/maukoese "maukoese") [![antoineLZCH](https://avatars.githubusercontent.com/u/37066803?s=60&v=4)](https://github.com/antoineLZCH "antoineLZCH") [![Christopher2K](https://avatars.githubusercontent.com/u/16650656?s=60&v=4)](https://github.com/Christopher2K "Christopher2K") [![josejames](https://avatars.githubusercontent.com/u/8967329?s=60&v=4)](https://github.com/josejames "josejames") [![Kokoskun](https://avatars.githubusercontent.com/u/8565563?s=60&v=4)](https://github.com/Kokoskun "Kokoskun") [![krthr](https://avatars.githubusercontent.com/u/18665740?s=60&v=4)](https://github.com/krthr "krthr") [![glprog](https://avatars.githubusercontent.com/u/11445879?s=60&v=4)](https://github.com/glprog "glprog") [![darshithedpara](https://avatars.githubusercontent.com/u/22654104?s=60&v=4)](https://github.com/darshithedpara "darshithedpara") [![HappyLDE](https://avatars.githubusercontent.com/u/1710331?s=60&v=4)](https://github.com/HappyLDE "HappyLDE") [![nahumrosillo](https://avatars.githubusercontent.com/u/5967792?s=60&v=4)](https://github.com/nahumrosillo "nahumrosillo") [![Xstoudi](https://avatars.githubusercontent.com/u/2575182?s=60&v=4)](https://github.com/Xstoudi "Xstoudi") [![SpatzlHD](https://avatars.githubusercontent.com/u/79466158?s=60&v=4)](https://github.com/SpatzlHD "SpatzlHD") [![theoludwig](https://avatars.githubusercontent.com/u/25207499?s=60&v=4)](https://github.com/theoludwig "theoludwig") [![aditya-wiguna](https://avatars.githubusercontent.com/u/21081180?s=60&v=4)](https://github.com/aditya-wiguna "aditya-wiguna") [![mbagalwa](https://avatars.githubusercontent.com/u/57249405?s=60&v=4)](https://github.com/mbagalwa "mbagalwa") [![avenikolay](https://avatars.githubusercontent.com/u/5336802?s=60&v=4)](https://github.com/avenikolay "avenikolay") [![sooluh](https://avatars.githubusercontent.com/u/20874779?s=60&v=4)](https://github.com/sooluh "sooluh") [![tokalink](https://avatars.githubusercontent.com/u/124254162?s=60&v=4)](https://github.com/tokalink "tokalink") [![Luis-Sejer](https://avatars.githubusercontent.com/u/75311144?s=60&v=4)](https://github.com/Luis-Sejer "Luis-Sejer") [![radiumrasheed](https://avatars.githubusercontent.com/u/11582800?s=60&v=4)](https://github.com/radiumrasheed "radiumrasheed") [![kennymark](https://avatars.githubusercontent.com/u/11825592?s=60&v=4)](https://github.com/kennymark "kennymark") [![herquiloidehele](https://avatars.githubusercontent.com/u/23740775?s=60&v=4)](https://github.com/herquiloidehele "herquiloidehele") [![arnaudfribault](https://avatars.githubusercontent.com/u/134615713?s=60&v=4)](https://github.com/arnaudfribault "arnaudfribault") [![phatmann](https://avatars.githubusercontent.com/u/36146?s=60&v=4)](https://github.com/phatmann "phatmann") [![rafael-neri](https://avatars.githubusercontent.com/u/460273?s=60&v=4)](https://github.com/rafael-neri "rafael-neri") [![ldivrala](https://avatars.githubusercontent.com/u/62551586?s=60&v=4)](https://github.com/ldivrala "ldivrala") [![johngerome](https://avatars.githubusercontent.com/u/2002000?s=60&v=4)](https://github.com/johngerome "johngerome") [![monojson](https://avatars.githubusercontent.com/u/8258429?s=60&v=4)](https://github.com/monojson "monojson") [![CheatCodeSam](https://avatars.githubusercontent.com/u/35058096?s=60&v=4)](https://github.com/CheatCodeSam "CheatCodeSam") [![senthilpk](https://avatars.githubusercontent.com/u/869260?s=60&v=4)](https://github.com/senthilpk "senthilpk") [![afrijaldz](https://avatars.githubusercontent.com/u/11768743?s=60&v=4)](https://github.com/afrijaldz "afrijaldz") [![sinanusluer](https://avatars.githubusercontent.com/u/22320223?s=60&v=4)](https://github.com/sinanusluer "sinanusluer") [![PangFive](https://avatars.githubusercontent.com/u/85504739?s=60&v=4)](https://github.com/PangFive "PangFive") [![darkmoon-dev](https://avatars.githubusercontent.com/u/46304872?s=60&v=4)](https://github.com/darkmoon-dev "darkmoon-dev") [![sorenzo](https://avatars.githubusercontent.com/u/47154025?s=60&v=4)](https://github.com/sorenzo "sorenzo") [![diogops](https://avatars.githubusercontent.com/u/6543878?s=60&v=4)](https://github.com/diogops "diogops") [![Ziut3k-dev](https://avatars.githubusercontent.com/u/67505802?s=60&v=4)](https://github.com/Ziut3k-dev "Ziut3k-dev") [![sizovs](https://avatars.githubusercontent.com/u/2264968?s=60&v=4)](https://github.com/sizovs "sizovs") [![mcordoba](https://avatars.githubusercontent.com/u/1489586?s=60&v=4)](https://github.com/mcordoba "mcordoba") [![LucasCavalheri](https://avatars.githubusercontent.com/u/104279631?s=60&v=4)](https://github.com/LucasCavalheri "LucasCavalheri") [![ahmerds](https://avatars.githubusercontent.com/u/32063477?s=60&v=4)](https://github.com/ahmerds "ahmerds") [![adufr](https://avatars.githubusercontent.com/u/26418696?s=60&v=4)](https://github.com/adufr "adufr") [![leofmarciano](https://avatars.githubusercontent.com/u/131293652?s=60&v=4)](https://github.com/leofmarciano "leofmarciano") [![etmartinkazoo](https://avatars.githubusercontent.com/u/13721164?s=60&v=4)](https://github.com/etmartinkazoo "etmartinkazoo") [![RomainLanz](https://avatars.githubusercontent.com/u/2793951?s=60&v=4)](https://github.com/RomainLanz "RomainLanz") [![Intraweb-Org](https://avatars.githubusercontent.com/u/130863254?s=60&v=4)](https://github.com/Intraweb-Org "Intraweb-Org") [![glomepe](https://avatars.githubusercontent.com/u/46260837?s=60&v=4)](https://github.com/glomepe "glomepe") [![ApixPlay](https://avatars.githubusercontent.com/u/7550868?s=60&v=4)](https://github.com/ApixPlay "ApixPlay") [![KevinRouchut](https://avatars.githubusercontent.com/u/8747883?s=60&v=4)](https://github.com/KevinRouchut "KevinRouchut") [![stephenhuh](https://avatars.githubusercontent.com/u/6165538?s=60&v=4)](https://github.com/stephenhuh "stephenhuh") [![cfu288](https://avatars.githubusercontent.com/u/2985976?s=60&v=4)](https://github.com/cfu288 "cfu288") [![0xtlt](https://avatars.githubusercontent.com/u/31560900?s=60&v=4)](https://github.com/0xtlt "0xtlt") [![tky0065](https://avatars.githubusercontent.com/u/90393229?s=60&v=4)](https://github.com/tky0065 "tky0065") [![loichauseux](https://avatars.githubusercontent.com/u/44899382?s=60&v=4)](https://github.com/loichauseux "loichauseux") [![codec4](https://avatars.githubusercontent.com/u/3988282?s=60&v=4)](https://github.com/codec4 "codec4") * * * [Preface\ \ FAQs](https://docs.adonisjs.com/guides/preface/faqs) © 2025 AdonisJS [Edit this page](https://github.com/adonisjs/v6-docs/blob/main/content/docs/preface/introduction.md) --- # Introduction (Views & Templates) | AdonisJS Documentation Toggle docs menu Introduction [](https://docs.adonisjs.com/guides/views-and-templates/introduction#views-and-templates) Views and Templates ============================================================================================================= AdonisJS is an excellent fit for creating traditional server-rendered applications in Node.js. If you enjoy the simplicity of using a backend template engine that outputs HTML without any overhead of Virtual DOM and build tools, then this guide is for you. The typical workflow of a server-rendered application in AdonisJS looks as follows. * Choose a template engine to render HTML dynamically. * Use [Vite](https://docs.adonisjs.com/guides/basics/vite) for bundling CSS and frontend JavaScript. * Optionally, you can opt for libraries like [HTMX](https://htmx.org/) or [Unpoly](https://unpoly.com/) to progressively enhance your application and navigate like a SPA. The AdonisJS core team has created a framework-agnostic template engine called [Edge.js](https://edgejs.dev/) but does not force you to use it. You can use any other template engine you would like inside an AdonisJS application. [](https://docs.adonisjs.com/guides/views-and-templates/introduction#popular-options) Popular options ----------------------------------------------------------------------------------------------------- Following is the list of popular template engines you can use inside an AdonisJS application (just like any other Node.js application). * [**EdgeJS**](https://edgejs.dev/) is a simple, modern, and batteries included template engine created and maintained by the AdonisJS core team for Node.js. * [**Pug**](https://pugjs.org/) is a template engine heavily influenced by Haml. * [**Nunjucks**](https://mozilla.github.io/nunjucks) is a rich feature template engine inspired by Jinja2. [](https://docs.adonisjs.com/guides/views-and-templates/introduction#hybrid-applications) Hybrid applications ------------------------------------------------------------------------------------------------------------- AdonisJS is also a great fit for creating hybrid applications that render HTML on the server and then hydrate your JavaScript on the client. This approach is popular among developers who want to use `Vue`, `React`, `Svelte`, `Solid`, or others for building interactive user interfaces but still want a full backend stack to handle server-side concerns. In this case, AdonisJS provide a first-class support for using [InertiaJS](https://docs.adonisjs.com/guides/views-and-templates/inertia) to bridge the gap between your frontend and backend. * * * [Security\ \ Rate limiting](https://docs.adonisjs.com/guides/security/rate-limiting) [Views & Templates\ \ EdgeJS](https://docs.adonisjs.com/guides/views-and-templates/edgejs) © 2025 AdonisJS [Edit this page](https://github.com/adonisjs/v6-docs/blob/main/content/docs/views-and-templates/introduction.md) --- # Encryption (Security) | AdonisJS Documentation Toggle docs menu Encryption [](https://docs.adonisjs.com/guides/security/encryption#encryption) Encryption ============================================================================== Using the encryption service, you may encrypt and decrypt values in your application. The encryption is based on the [aes-256-cbc algorithm](https://www.n-able.com/blog/aes-256-encryption-algorithm) , and we append an integrity hash (HMAC) to the final output to prevent value tampering. The `encryption` service uses the `appKey` stored inside the `config/app.ts` file as the secret to encrypt the values. * It is recommended to keep the `appKey` secure and inject it into your application using [environment variables](https://docs.adonisjs.com/guides/getting-started/environment-variables) . Anyone with access to this key can decrypt values. * The key should be at least 16 characters long and have a cryptographically secure random value. You may generate the key using the `node ace generate:key` command. * If you decide to change the key later, you will not be able to decrypt existing values. This will result in invalidating existing cookies and user sessions. [](https://docs.adonisjs.com/guides/security/encryption#encrypting-values) Encrypting values -------------------------------------------------------------------------------------------- You may encrypt values using the `encryption.encrypt` method. The method accepts the value to encrypt and an optional time duration after which to consider the value expired. Copy code to clipboard import encryption from '@adonisjs/core/services/encryption' const encrypted = encryption.encrypt('hello world') Define a time duration after which the value will be considered expired and cannot be decrypted. Copy code to clipboard const encrypted = encryption.encrypt('hello world', '2 hours') [](https://docs.adonisjs.com/guides/security/encryption#decrypting-values) Decrypting values -------------------------------------------------------------------------------------------- Encrypted values can be decrypted using the `encryption.decrypt` method. The method accepts the encrypted value as the first argument. Copy code to clipboard import encryption from '@adonisjs/core/services/encryption' encryption.decrypt(encryptedValue) [](https://docs.adonisjs.com/guides/security/encryption#supported-data-types) Supported data types -------------------------------------------------------------------------------------------------- The value given to the `encrypt` method is serialized to a string using `JSON.stringify`. Therefore, you can use the following JavaScript data types. * string * number * bigInt * boolean * null * object * array Copy code to clipboard import encryption from '@adonisjs/core/services/encryption' // Object encryption.encrypt({ id: 1, fullName: 'virk', }) // Array encryption.encrypt([1, 2, 3, 4]) // Boolean encryption.encrypt(true) // Number encryption.encrypt(10) // BigInt encryption.encrypt(BigInt(10)) // Data objects are converted to ISO string encryption.encrypt(new Date()) [](https://docs.adonisjs.com/guides/security/encryption#using-custom-secret-keys) Using custom secret keys ---------------------------------------------------------------------------------------------------------- You can create an [instance of the Encryption class](https://github.com/adonisjs/encryption/blob/main/src/encryption.ts) directly to use custom secret keys. Copy code to clipboard import { Encryption } from '@adonisjs/core/encryption' const encryption = new Encryption({ secret: 'alongrandomsecretkey', }) * * * [Security\ \ Authorization](https://docs.adonisjs.com/guides/security/authorization) [Security\ \ Hashing](https://docs.adonisjs.com/guides/security/hashing) © 2025 AdonisJS [Edit this page](https://github.com/adonisjs/v6-docs/blob/main/content/docs/security/encryption.md) --- # Basic auth guard (Authentication) | AdonisJS Documentation Toggle docs menu Basic auth guard [](https://docs.adonisjs.com/guides/authentication/basic-auth-guard#basic-authentication-guard) Basic authentication guard ========================================================================================================================== The basic auth guard is an implementation of the [HTTP authentication framework](https://developer.mozilla.org/en-US/docs/Web/HTTP/Authentication) , in which the client must pass the user credentials as a base64 encoded string via the `Authorization` header. The server allows the request if the credentials are valid. Otherwise, a web-native prompt is displayed to re-enter the credentials. [](https://docs.adonisjs.com/guides/authentication/basic-auth-guard#configuring-the-guard) Configuring the guard ---------------------------------------------------------------------------------------------------------------- The authentication guards are defined inside the `config/auth.ts` file. You can configure multiple guards inside this file under the `guards` object. Copy code to clipboard import { defineConfig } from '@adonisjs/auth' import { basicAuthGuard, basicAuthUserProvider } from '@adonisjs/auth/basic_auth' const authConfig = defineConfig({ default: 'basicAuth', guards: { basicAuth: basicAuthGuard({ provider: basicAuthUserProvider({ model: () => import('#models/user'), }), }) }, }) export default authConfig The `basicAuthGuard` method creates an instance of the [BasicAuthGuard](https://github.com/adonisjs/auth/blob/main/modules/basic_auth_guard/guard.ts) class. It accepts a user provider that can be used to find users during authentication. The `basicAuthUserProvider` method creates an instance of the [BasicAuthLucidUserProvider](https://github.com/adonisjs/auth/blob/main/modules/basic_auth_guard/user_providers/lucid.ts) class. It accepts a reference to the model to use for verifying user credentials. [](https://docs.adonisjs.com/guides/authentication/basic-auth-guard#preparing-the-user-model) Preparing the User model ---------------------------------------------------------------------------------------------------------------------- The model (`User` model in this example) configured with the `basicAuthUserProvider` must use the [AuthFinder](https://docs.adonisjs.com/guides/authentication/verifying-user-credentials#using-the-auth-finder-mixin) mixin to verify the user credentials during authentication. Copy code to clipboard import { DateTime } from 'luxon' import { compose } from '@adonisjs/core/helpers' import { BaseModel, column } from '@adonisjs/lucid/orm' import hash from '@adonisjs/core/services/hash' import { withAuthFinder } from '@adonisjs/auth/mixins/lucid' const AuthFinder = withAuthFinder(() => hash.use('scrypt'), { uids: ['email'], passwordColumnName: 'password', }) export default class User extends compose(BaseModel, AuthFinder) { @column({ isPrimary: true }) declare id: number @column() declare fullName: string | null @column() declare email: string @column() declare password: string @column.dateTime({ autoCreate: true }) declare createdAt: DateTime @column.dateTime({ autoCreate: true, autoUpdate: true }) declare updatedAt: DateTime } [](https://docs.adonisjs.com/guides/authentication/basic-auth-guard#protecting-routes) Protecting routes -------------------------------------------------------------------------------------------------------- Once you have configured the guard, you can use the `auth` middleware to protect routes from unauthenticated requests. The middleware is registered inside the `start/kernel.ts` file under the named middleware collection. Copy code to clipboard import router from '@adonisjs/core/services/router' export const middleware = router.named({ auth: () => import('#middleware/auth_middleware') }) Copy code to clipboard import { middleware } from '#start/kernel' import router from '@adonisjs/core/services/router' router .get('dashboard', ({ auth }) => { return auth.user }) .use(middleware.auth({ guards: ['basicAuth'] })) ### [](https://docs.adonisjs.com/guides/authentication/basic-auth-guard#handling-authentication-exception) Handling authentication exception The auth middleware throws the [E\_UNAUTHORIZED\_ACCESS](https://github.com/adonisjs/auth/blob/main/src/errors.ts#L21) if the user is not authenticated. The exception is automatically converted to an HTTP response with the [WWW-Authenticate](https://developer.mozilla.org/en-US/docs/Web/HTTP/Headers/WWW-Authenticate) header in the response. The `WWW-Authenticate` challenges the authentication and triggers a web-native prompt to re-enter the credentials. [](https://docs.adonisjs.com/guides/authentication/basic-auth-guard#getting-access-to-the-authenticated-user) Getting access to the authenticated user ------------------------------------------------------------------------------------------------------------------------------------------------------ You may access the logged-in user instance using the `auth.user` property. Since, you are using the `auth` middleware, the `auth.user` property will always be available. Copy code to clipboard import { middleware } from '#start/kernel' import router from '@adonisjs/core/services/router' router .get('dashboard', ({ auth }) => { return `You are authenticated as ${auth.user!.email}` }) .use(middleware.auth({ guards: ['basicAuth'] })) ### [](https://docs.adonisjs.com/guides/authentication/basic-auth-guard#get-authenticated-user-or-fail) Get authenticated user or fail If you do not like using the [non-null assertion operator](https://www.typescriptlang.org/docs/handbook/2/everyday-types.html#non-null-assertion-operator-postfix-) on the `auth.user` property, you may use the `auth.getUserOrFail` method. This method will return the user object or throw [E\_UNAUTHORIZED\_ACCESS](https://docs.adonisjs.com/guides/references/exceptions#e_unauthorized_access) exception. Copy code to clipboard import { middleware } from '#start/kernel' import router from '@adonisjs/core/services/router' router .get('dashboard', ({ auth }) => { const user = auth.getUserOrFail() return `You are authenticated as ${user.email}` }) .use(middleware.auth({ guards: ['basicAuth'] })) * * * [Authentication\ \ Access tokens guard](https://docs.adonisjs.com/guides/authentication/access-tokens-guard) [Authentication\ \ Custom auth guard](https://docs.adonisjs.com/guides/authentication/custom-auth-guard) © 2025 AdonisJS [Edit this page](https://github.com/adonisjs/v6-docs/blob/main/content/docs/authentication/basic_auth_guard.md) --- # CORS (Security) | AdonisJS Documentation Toggle docs menu CORS [](https://docs.adonisjs.com/guides/security/cors#cors) CORS ============================================================ [CORS](https://developer.mozilla.org/en-US/docs/Web/HTTP/CORS) helps you protect your application from malicious requests triggered using scripts in a browser environment. For example, if an AJAX or a fetch request is sent to your server from a different domain, the browser will block that request with a CORS error and expect you to implement a CORS policy if you think the request should be allowed. In AdonisJS, you can implement the CORS policy using the `@adonisjs/cors` package. The package ships with an HTTP middleware that intercepts incoming requests and responds with correct CORS headers. [](https://docs.adonisjs.com/guides/security/cors#installation) Installation ---------------------------------------------------------------------------- Install and configure the package using the following command : Copy code to clipboard node ace add @adonisjs/cors See steps performed by the add command 1. Installs the `@adonisjs/cors` package using the detected package manager. 2. Registers the following service provider inside the `adonisrc.ts` file. Copy code to clipboard { providers: [\ // ...other providers\ () => import('@adonisjs/cors/cors_provider')\ ] } 3. Creates the `config/cors.ts` file. This file contains the configuration settings for CORS. 4. Registers the following middleware inside the `start/kernel.ts` file. Copy code to clipboard server.use([\ () => import('@adonisjs/cors/cors_middleware')\ ]) [](https://docs.adonisjs.com/guides/security/cors#configuration) Configuration ------------------------------------------------------------------------------ The configuration for the CORS middleware is stored inside the `config/cors.ts` file. Copy code to clipboard import { defineConfig } from '@adonisjs/cors' const corsConfig = defineConfig({ enabled: true, origin: true, methods: ['GET', 'HEAD', 'POST', 'PUT', 'DELETE'], headers: true, exposeHeaders: [], credentials: true, maxAge: 90, }) export default corsConfig enabled Turn the middleware on or off temporarily without removing it from the middleware stack. origin The `origin` property controls the value for the [Access-Control-Allow-Origin](https://developer.mozilla.org/en-US/docs/Web/HTTP/Headers/Access-Control-Allow-Origin) header. You can allow the request's current origin by setting the value to `true` or disallow the request's current origin by setting it to `false`. Copy code to clipboard { origin: true } You may specify a list of hardcoded origins to allow an array of domain names. Copy code to clipboard { origin: ['adonisjs.com'] } Use the wildcard expression `*` to allow all the origins. Read the [MDN documentation](https://developer.mozilla.org/en-US/docs/Web/HTTP/Headers/Access-Control-Allow-Origin#directives) to understand how the wildcard expression works. When the `credentials` property is set to `true`, we will automatically make the wildcard expression behave like a `boolean (true)`. Copy code to clipboard { origin: '*' } You can compute the `origin` value during the HTTP request using a function. For example: Copy code to clipboard { origin: (requestOrigin, ctx) => { return true } } methods The `methods` property controls the method to allow during the preflight request. The [Access-Control-Request-Method](https://developer.mozilla.org/en-US/docs/Web/HTTP/Headers/Access-Control-Request-Method) header value is checked against the allowed methods. Copy code to clipboard { methods: ['GET', 'HEAD', 'POST', 'PUT', 'DELETE'] } headers The `headers` property controls the request headers to allow during the preflight request. The [Access-Control-Request-Headers](https://developer.mozilla.org/en-US/docs/Web/HTTP/Headers/Access-Control-Request-Headers) header value is checked against the headers property. Setting the value to `true` will allow all the headers. Whereas setting the value to `false` will disallow all the headers. Copy code to clipboard { headers: true } You can specify a list of headers to allow by defining them as an array of strings. Copy code to clipboard { headers: [\ 'Content-Type',\ 'Accept',\ 'Cookie'\ ] } You can compute the `headers` config value using a function during the HTTP request. For example: Copy code to clipboard { headers: (requestHeaders, ctx) => { return true } } exposeHeaders The `exposeHeaders` property controls the headers to expose via [Access-Control-Expose-Headers](https://developer.mozilla.org/en-US/docs/Web/HTTP/Headers/Access-Control-Expose-Headers) header during the preflight request. Copy code to clipboard { exposeHeaders: [\ 'cache-control',\ 'content-language',\ 'content-type',\ 'expires',\ 'last-modified',\ 'pragma',\ ] } credentials The `credentials` property controls whether to set the [Access-Control-Allow-Credentials](https://developer.mozilla.org/en-US/docs/Web/HTTP/Headers/Access-Control-Allow-Credentials) header during the preflight request. Copy code to clipboard { credentials: true } maxAge The `maxAge` property controls the [Access-Control-Max-Age](https://developer.mozilla.org/en-US/docs/Web/HTTP/Headers/Access-Control-Max-Age) response header. The value is in seconds. * Setting the value to `null` will not set the header. * Whereas setting it to `-1` does set the header but disables the cache. Copy code to clipboard { maxAge: 90 } [](https://docs.adonisjs.com/guides/security/cors#debugging-cors-errors) Debugging CORS errors ---------------------------------------------------------------------------------------------- Debugging CORS issues is a challenging experience. However, there are no shortcuts other than understanding the rules of CORS and debugging the response headers to ensure everything is in place. Following are some links to the articles you may read to understand better how CORS works. * [How to Debug Any CORS Error](https://httptoolkit.com/blog/how-to-debug-cors-errors/) * [Will it CORS?](https://httptoolkit.com/will-it-cors/) * [MDN in-depth explanation of CORS](https://developer.mozilla.org/en-US/docs/Web/HTTP/CORS) * * * [Security\ \ Hashing](https://docs.adonisjs.com/guides/security/hashing) [Security\ \ Securing SSR apps](https://docs.adonisjs.com/guides/security/securing-ssr-applications) © 2025 AdonisJS [Edit this page](https://github.com/adonisjs/v6-docs/blob/main/content/docs/security/cors.md) --- # EdgeJS (Views & Templates) | AdonisJS Documentation Toggle docs menu EdgeJS [](https://docs.adonisjs.com/guides/views-and-templates/edgejs#edgejs) EdgeJS ============================================================================= Edge is a **simple**, **Modern**, and **batteries included** template engine created and maintained by the AdonisJS core team for Node.js. Edge is similar to writing JavaScript. If you know JavaScript, you know Edge. The documentation for Edge is available on [https://edgejs.dev](https://edgejs.dev/) [](https://docs.adonisjs.com/guides/views-and-templates/edgejs#installation) Installation ----------------------------------------------------------------------------------------- Install and configure Edge using the following command. Copy code to clipboard node ace add edge See steps performed by the add command 1. Installs the `edge.js` package using the detected package manager. 2. Registers the following service provider inside the `adonisrc.ts` file. Copy code to clipboard { providers: [\ // ...other providers\ () => import('@adonisjs/core/providers/edge_provider')\ ] } [](https://docs.adonisjs.com/guides/views-and-templates/edgejs#rendering-your-first-template) Rendering your first template --------------------------------------------------------------------------------------------------------------------------- Once the configuration is completed, you can use Edge to render templates. Let's create a `welcome.edge` file inside the `resources/views` directory. Copy code to clipboard node ace make:view welcome Open the newly created file and write the following markup inside it. Copy code to clipboard

Hello world from {{ request.url() }} endpoint

Finally, let's register a route to render the template. Copy code to clipboard import router from '@adonisjs/core/services/router' router.get('/', async ({ view }) => { return view.render('welcome') }) You can also use the `router.on().render` method to render a template without assigning a callback to the route. Copy code to clipboard router.on('/').render('welcome') ### [](https://docs.adonisjs.com/guides/views-and-templates/edgejs#passing-data-to-the-template) Passing data to the template You can pass data to the template by passing an object as the second argument to the `view.render` method. Copy code to clipboard router.get('/', async ({ view }) => { return view.render('welcome', { username: 'romainlanz' }) }) [](https://docs.adonisjs.com/guides/views-and-templates/edgejs#configuring-edge) Configuring Edge ------------------------------------------------------------------------------------------------- You can use Edge plugins or add global helpers to Edge by creating a [preload file](https://docs.adonisjs.com/guides/concepts/adonisrc-file#preloads) inside the `start` directory. Copy code to clipboard node ace make:preload view start/view.ts Copy code to clipboard import edge from 'edge.js' import env from '#start/env' import { edgeIconify } from 'edge-iconify' /** * Register a plugin */ edge.use(edgeIconify) /** * Define a global property */ edge.global('appUrl', env.get('APP_URL')) [](https://docs.adonisjs.com/guides/views-and-templates/edgejs#global-helpers) Global helpers --------------------------------------------------------------------------------------------- Please check the [Edge helpers reference guide](https://docs.adonisjs.com/guides/references/edge) to view the list of helpers contributed by AdonisJS. [](https://docs.adonisjs.com/guides/views-and-templates/edgejs#learn-more) Learn more ------------------------------------------------------------------------------------- * [Edge.js documentation](https://edgejs.dev/) * [Components](https://edgejs.dev/docs/components/introduction) * [SVG icons](https://edgejs.dev/docs/edge-iconify) * [Adocasts Edge Series](https://adocasts.com/topics/edge) * * * [Views & Templates\ \ Introduction](https://docs.adonisjs.com/guides/views-and-templates/introduction) [Views & Templates\ \ Inertia](https://docs.adonisjs.com/guides/views-and-templates/inertia) © 2025 AdonisJS [Edit this page](https://github.com/adonisjs/v6-docs/blob/main/content/docs/views-and-templates/edgejs.md) --- # Database (Testing) | AdonisJS Documentation Toggle docs menu Database [](https://docs.adonisjs.com/guides/testing/database#database-tests) Database tests =================================================================================== Database tests refer to testing how your application interacts with the database. This includes testing what is written to the database, how to run migrations before the tests, and how to keep the database clean between tests. [](https://docs.adonisjs.com/guides/testing/database#migrating-the-database) Migrating the database --------------------------------------------------------------------------------------------------- Before executing your tests that interact with the database, you would want to run your migrations first. We have two hooks available in the `testUtils` service for that, which you can configure inside the `tests/bootstrap.ts` file. ### [](https://docs.adonisjs.com/guides/testing/database#reset-database-after-each-run-cycle) Reset database after each run cycle The first option we have is `testUtils.db().migrate()`. This hook will first run all your migrations, and then rollback everything. tests/bootstrap.ts Copy code to clipboard import testUtils from '@adonisjs/core/services/test_utils' export const runnerHooks: Required> = { setup: [\ () => testUtils.db().migrate(),\ ], teardown: [], } By configuring the hook here, what will happen is: * Before running our tests, the migrations will be executed. * At the end of our tests, the database will be rolled back. So, each time we run our tests, we will have a fresh and empty database. ### [](https://docs.adonisjs.com/guides/testing/database#truncate-tables-after-each-run-cycle) Truncate tables after each run cycle Resetting the database after each run cycle is a good option, but it can be slow if you have a lot of migrations. Another option is to truncate the tables after each run cycle. This option will be faster, as the migrations will only be executed once : the very first time you run your tests on a fresh database. At the end of each run cycle, the tables will just be truncated, but our schema will be kept. So, the next time we run our tests, we will have an empty database, but the schema will already be in place, so there's no need to run every migration again. tests/bootstrap.ts Copy code to clipboard import testUtils from '@adonisjs/core/services/test_utils' export const runnerHooks: Required> = { setup: [\ () => testUtils.db().truncate(),\ ], } [](https://docs.adonisjs.com/guides/testing/database#seeding-the-database) Seeding the database ----------------------------------------------------------------------------------------------- If you need to seed your database, you can use the `testUtils.db().seed()` hook. This hook will run all your seeds before running your tests. tests/bootstrap.ts Copy code to clipboard import testUtils from '@adonisjs/core/services/test_utils' export const runnerHooks: Required> = { setup: [\ () => testUtils.db().seed(),\ ], } [](https://docs.adonisjs.com/guides/testing/database#keeping-the-database-clean-between-tests) Keeping the database clean between tests --------------------------------------------------------------------------------------------------------------------------------------- ### [](https://docs.adonisjs.com/guides/testing/database#global-transaction) Global transaction When running tests, you may want to keep your database clean between each test. For that, you can use the `testUtils.db().withGlobalTransaction()` hook. This hook will start a transaction before each test and roll it back at the end of the test. tests/unit/user.spec.ts Copy code to clipboard import { test } from '@japa/runner' import testUtils from '@adonisjs/core/services/test_utils' test.group('User', (group) => { group.each.setup(() => testUtils.db().withGlobalTransaction()) }) Note that if you are using any transactions in your tested code, this will not work as transactions cannot be nested. In this case, you can use the `testUtils.db().migrate()` or `testUtils.db().truncate()` hook instead. ### [](https://docs.adonisjs.com/guides/testing/database#truncate-tables) Truncate tables As mentioned above, the global transaction will not work if you are using transactions in your tested code. In this case, you can use the `testUtils.db().truncate()` hook. This hook will truncate all your tables after each test. tests/unit/user.spec.ts Copy code to clipboard import { test } from '@japa/runner' test.group('User', (group) => { group.each.setup(() => testUtils.db().truncate()) }) * * * [Testing\ \ Console tests](https://docs.adonisjs.com/guides/testing/console-tests) [Testing\ \ Mocks & Fakes](https://docs.adonisjs.com/guides/testing/mocks-and-fakes) © 2025 AdonisJS [Edit this page](https://github.com/adonisjs/v6-docs/blob/main/content/docs/testing/database.md) --- # Mocks & Fakes (Testing) | AdonisJS Documentation Toggle docs menu Mocks & Fakes [](https://docs.adonisjs.com/guides/testing/mocks-and-fakes#mocks-and-fakes) Mocks and Fakes ============================================================================================ When testing your applications, you might want to mock or fake specific dependencies to prevent actual implementations from running. For example, you wish to refrain from emailing your customers when running tests and neither call third-party services like a payment gateway. AdonisJS offers a few different APIs and recommendations using which you can fake, mock, or stub a dependency. [](https://docs.adonisjs.com/guides/testing/mocks-and-fakes#using-the-fakes-api) Using the fakes API ---------------------------------------------------------------------------------------------------- Fakes are objects with working implementations explicitly created for testing. For example, The mailer module of AdonisJS has a fake implementation that you can use during testing to collect outgoing emails in memory and write assertions for them. We provide fake implementations for the following container services. The fakes API is documented alongside the module documentation. * [Emitter fake](https://docs.adonisjs.com/guides/digging-deeper/emitter#faking-events-during-tests) * [Hash fake](https://docs.adonisjs.com/guides/security/hashing#faking-hash-service-during-tests) * [Fake mailer](https://docs.adonisjs.com/guides/digging-deeper/mail#fake-mailer) * [Drive fake](https://docs.adonisjs.com/guides/digging-deeper/drive#faking-disks) [](https://docs.adonisjs.com/guides/testing/mocks-and-fakes#dependency-injection-and-fakes) Dependency injection and fakes -------------------------------------------------------------------------------------------------------------------------- If you use dependency injection in your application or use the [container to create class instances](https://docs.adonisjs.com/guides/concepts/dependency-injection) , you can provide a fake implementation for a class using the `container.swap` method. In the following example, we inject `UserService` to the `UsersController`. Copy code to clipboard import UserService from '#services/user_service' import { inject } from '@adonisjs/core' export default class UsersController { @inject() index(service: UserService) {} } During testing, we can provide an alternate/fake implementation of the `UserService` class as follows. Copy code to clipboard import UserService from '#services/user_service' import app from '@adonisjs/core/services/app' test('get all users', async () => { class FakeService extends UserService { all() { return [{ id: 1, username: 'virk' }] } } /** * Swap `UserService` with an instance of * `FakeService` */ app.container.swap(UserService, () => { return new FakeService() }) /** * Test logic goes here */ }) Once the test has been completed, you must restore the fake using the `container.restore` method. Copy code to clipboard app.container.restore(UserService) // Restore UserService and PostService app.container.restoreAll([UserService, PostService]) // Restore all app.container.restoreAll() [](https://docs.adonisjs.com/guides/testing/mocks-and-fakes#mocks-and-stubs-using-sinonjs) Mocks and stubs using Sinon.js ------------------------------------------------------------------------------------------------------------------------- [Sinon](https://sinonjs.org/#get-started) is a mature, time-tested mocking library in the Node.js ecosystem. If you use mocks and stubs regularly, we recommend using Sinon, as it works great with TypeScript. [](https://docs.adonisjs.com/guides/testing/mocks-and-fakes#mocking-network-requests) Mocking network requests -------------------------------------------------------------------------------------------------------------- If your application makes outgoing HTTP requests to third-party services, you can use [nock](https://github.com/nock/nock) during testing to mock the network requests. Since nock intercepts all outgoing requests from the [Node.js HTTP module](https://nodejs.org/dist/latest-v20.x/docs/api/http.html#class-httpclientrequest) , it works with almost every third-party library like `got`, `axios` and so on. [](https://docs.adonisjs.com/guides/testing/mocks-and-fakes#freezing-time) Freezing time ---------------------------------------------------------------------------------------- You may use the [timekeeper](https://www.npmjs.com/package/timekeeper) package to freeze or travel time when writing tests. The timekeeper packages works by mocking the `Date` class. In the following example, we encapsulate the API of `timekeeper` inside a [Japa Test resource](https://japa.dev/docs/test-resources) . Copy code to clipboard import { getActiveTest } from '@japa/runner' import timekeeper from 'timekeeper' export function timeTravel(secondsToTravel: number) { const test = getActiveTest() if (!test) { throw new Error('Cannot use "timeTravel" outside of a Japa test') } timekeeper.reset() const date = new Date() date.setSeconds(date.getSeconds() + secondsToTravel) timekeeper.travel(date) test.cleanup(() => { timekeeper.reset() }) } You may use the `timeTravel` method inside your tests as follows. Copy code to clipboard import { timeTravel } from '#test_helpers' test('expire token after 2 hours', async ({ assert }) => { /** * Travel 3 hours into the future */ timeTravel(60 * 60 * 3) }) * * * [Testing\ \ Database](https://docs.adonisjs.com/guides/testing/database) [Digging deeper\ \ Cache](https://docs.adonisjs.com/guides/digging-deeper/cache) © 2025 AdonisJS [Edit this page](https://github.com/adonisjs/v6-docs/blob/main/content/docs/testing/mocks_and_fakes.md) --- # Repl (Digging deeper) | AdonisJS Documentation Toggle docs menu Repl [](https://docs.adonisjs.com/guides/digging-deeper/repl#repl) REPL ================================================================== Like the [Node.js REPL](https://nodejs.org/api/repl.html) , AdonisJS offers an application-aware REPL to interact with your application from the command line. You can start the REPL session using the `node ace repl` command. Copy code to clipboard node ace repl ![](https://docs.adonisjs.com/assets/ace_repl-15-ICn_7.png) On top of a standard Node.js REPL, AdonisJS provides the following features. * Import and execute TypeScript files. * Shorthand methods to import container services like the `router`, `helpers`, `hash` service, and so on. * Shorthand method to make class instances using the [IoC container](https://docs.adonisjs.com/guides/concepts/dependency-injection#constructing-a-tree-of-dependencies) . * Extensible API to add custom methods and REPL commands. [](https://docs.adonisjs.com/guides/digging-deeper/repl#interacting-with-repl) Interacting with REPL ---------------------------------------------------------------------------------------------------- Once you start the REPL session, you will see an interactive prompt in which you can write valid JavaScript code and press enter to execute it. The output of the code will be printed on the following line. If you want to type multiple lines of code, you can enter into the editor mode by typing the `.editor` command. Press `Ctrl+D` to execute a multiline statement or `Ctrl+C` to cancel and exit the editor mode. Copy code to clipboard > (js) .editor # // Entering editor mode (Ctrl+D to finish, Ctrl+C to cancel) ### [](https://docs.adonisjs.com/guides/digging-deeper/repl#accessing-the-result-of-the-last-executed-command) Accessing the result of the last executed command If you forget to assign the value of a statement to a variable, you can access it using the `_` variable. For example: Copy code to clipboard > (js) helpers.string.generateRandom(32) # 'Z3y8QQ4HFpYSc39O2UiazwPeKYdydZ6M' > (js) _ # 'Z3y8QQ4HFpYSc39O2UiazwPeKYdydZ6M' > (js) _.length # 32 > (js) ### [](https://docs.adonisjs.com/guides/digging-deeper/repl#accessing-error-raised-by-last-executed-command) Accessing error raised by last executed command You can access the exception raised by the previous command using the `_error` variable. For example: Copy code to clipboard > (js) helpers.string.generateRandom() > (js) _error.message # 'The value of "size" is out of range. It must be >= 0 && <= 2147483647. Received NaN' ### [](https://docs.adonisjs.com/guides/digging-deeper/repl#searching-through-history) Searching through history The REPL history is saved in the `.adonisjs_v6_repl_history` file in the user's home directory. You can loop through the commands from the history by pressing the up arrow `↑` key or pressing `Ctrl+R` to search within the history. ### [](https://docs.adonisjs.com/guides/digging-deeper/repl#exiting-from-repl-session) Exiting from REPL session You can exit the REPL session by typing `.exit` or press the `Ctrl+C` twice. AdonisJS will perform a graceful shutdown before closing the REPL session. Also, if you modify your codebase, you must exit and restart the REPL session for new changes to pick up. [](https://docs.adonisjs.com/guides/digging-deeper/repl#importing-modules) Importing modules -------------------------------------------------------------------------------------------- Node.js does not allow using the `import` statements inside the REPL session. Therefore, you must use the dynamic `import` function and assign the output to a variable. For example: Copy code to clipboard const { default: User } = await import('#models/user') You can use the `importDefault` method to access default export without destructuring the exports. Copy code to clipboard const User = await importDefault('#models/user') [](https://docs.adonisjs.com/guides/digging-deeper/repl#helpers-methods) Helpers methods ---------------------------------------------------------------------------------------- Helper methods are shortcut functions you can execute to perform specific actions. You can view the list of available methods using the `.ls` command. Copy code to clipboard > (js) .ls # GLOBAL METHODS: importDefault Returns the default export for a module make Make class instance using "container.make" method loadApp Load "app" service in the REPL context loadEncryption Load "encryption" service in the REPL context loadHash Load "hash" service in the REPL context loadRouter Load "router" service in the REPL context loadConfig Load "config" service in the REPL context loadTestUtils Load "testUtils" service in the REPL context loadHelpers Load "helpers" module in the REPL context clear Clear a property from the REPL context p Promisify a function. Similar to Node.js "util.promisify" [](https://docs.adonisjs.com/guides/digging-deeper/repl#adding-custom-methods-to-repl) Adding custom methods to REPL -------------------------------------------------------------------------------------------------------------------- You can add custom methods to the REPL using `repl.addMethod`. The method accepts the name as the first argument and the implementation callback as the second argument. For demonstration, let's create a [preload file](https://docs.adonisjs.com/guides/concepts/adonisrc-file#preloads) file and define a method to import all models from the `./app/models` directory. Copy code to clipboard node ace make:preload repl -e=repl start/repl.ts Copy code to clipboard import app from '@adonisjs/core/services/app' import repl from '@adonisjs/core/services/repl' import { fsImportAll } from '@adonisjs/core/helpers' repl.addMethod('loadModels', async () => { const models = await fsImportAll(app.makePath('app/models')) repl.server!.context.models = models repl.notify('Imported models. You can access them using the "models" property') repl.server!.displayPrompt() }) You can pass the following options to the `repl.addMethod` method as the third argument. * `description`: Human-readable description to display in the help output. * `usage`: Define the method usage code snippet. If not set, the method name will be used. Once done, you can restart the REPL session and execute the `loadModels` method to import all the models. Copy code to clipboard node ace repl # Type ".ls" to a view list of available context methods/properties > (js) await loadModels() * * * [Digging deeper\ \ Mail](https://docs.adonisjs.com/guides/digging-deeper/mail) [Digging deeper\ \ Transmit](https://docs.adonisjs.com/guides/digging-deeper/transmit) © 2025 AdonisJS [Edit this page](https://github.com/adonisjs/v6-docs/blob/main/content/docs/digging_deeper/repl.md) --- # Hashing (Security) | AdonisJS Documentation Toggle docs menu Hashing [](https://docs.adonisjs.com/guides/security/hashing#hashing) Hashing ===================================================================== You may hash user passwords in your application using the `hash` service. AdonisJS has first-class support for `bcrypt`, `scrypt`, and `argon2` hashing algorithms and the ability to [add custom drivers](https://docs.adonisjs.com/guides/security/hashing#creating-a-custom-hash-driver) . The hashed values are stored in [PHC string format](https://github.com/P-H-C/phc-string-format/blob/master/phc-sf-spec.md) . PHC is a deterministic encoding specification for formatting hashes. [](https://docs.adonisjs.com/guides/security/hashing#usage) Usage ----------------------------------------------------------------- The `hash.make` method accepts a plain string value (the user password input) and returns a hash output. Copy code to clipboard import hash from '@adonisjs/core/services/hash' const hash = await hash.make('user_password') // $scrypt$n=16384,r=8,p=1$iILKD1gVSx6bqualYqyLBQ$DNzIISdmTQS6sFdQ1tJ3UCZ7Uun4uGHNjj0x8FHOqB0pf2LYsu9Xaj5MFhHg21qBz8l5q/oxpeV+ZkgTAj+OzQ You [cannot convert a hash value to plain text](https://cheatsheetseries.owasp.org/cheatsheets/Password_Storage_Cheat_Sheet.html#hashing-vs-encryption) , hashing is a one-way process, and there is no way to retrieve the original value after a hash has been generated. However, hashing provides a way to verify if a given plain text value matches against an existing hash, and you can perform this check using the `hash.verify` method. Copy code to clipboard import hash from '@adonisjs/core/services/hash' if (await hash.verify(existingHash, plainTextValue)) { // password is correct } [](https://docs.adonisjs.com/guides/security/hashing#configuration) Configuration --------------------------------------------------------------------------------- The configuration for hashing is stored inside the `config/hash.ts` file. The default driver is set to `scrypt` because scrypt uses the Node.js native crypto module and does not require any third-party packages. config/hash.ts Copy code to clipboard import { defineConfig, drivers } from '@adonisjs/core/hash' export default defineConfig({ default: 'scrypt', list: { scrypt: drivers.scrypt(), /** * Uncomment when using argon2 argon: drivers.argon2(), */ /** * Uncomment when using bcrypt bcrypt: drivers.bcrypt(), */ } }) ### [](https://docs.adonisjs.com/guides/security/hashing#argon) Argon Argon is the recommended hashing algorithm to hash user passwords. To use argon with the AdonisJS hash service, you must install the [argon2](https://npmjs.com/argon2) npm package. Copy code to clipboard npm i argon2 We configure the argon driver with secure defaults but feel free to tweak the configuration options per your application requirements. Following is the list of available options. Copy code to clipboard export default defineConfig({ // Make sure to update the default driver to argon default: 'argon', list: { argon: drivers.argon2({ version: 0x13, // hex code for 19 variant: 'id', iterations: 3, memory: 65536, parallelism: 4, saltSize: 16, hashLength: 32, }) } }) variant The argon hash variant to use. * `d` is faster and highly resistant against GPU attacks, which is useful for cryptocurrency * `i` is slower and resistant against tradeoff attacks, which is preferred for password hashing and key derivation. * `id` _(default)_ is a hybrid combination of the above, resistant against GPU and tradeoff attacks. version The argon version to use. The available options are `0x10 (1.0)` and `0x13 (1.3)`. The latest version should be used by default. iterations The `iterations` count increases the hash strength but takes more time to compute. The default value is `3`. memory The amount of memory to be used for hashing the value. Each parallel thread will have a memory pool of this size. The default value is `65536 (KiB)`. parallelism The number of threads to use for computing the hash. The default value is `4`. saltSize The length of salt (in bytes). Argon generates a cryptographically secure random salt of this size when computing the hash. The default and recommended value for password hashing is `16`. hashLength Maximum length for the raw hash (in bytes). The output value will be longer than the mentioned hash length because the raw hash output is further encoded to PHC format. The default value is `32` ### [](https://docs.adonisjs.com/guides/security/hashing#bcrypt) Bcrypt To use Bcrypt with the AdonisJS hash service, you must install the [bcrypt](http://npmjs.com/bcrypt) npm package. Copy code to clipboard npm i bcrypt Following is the list of available configuration options. Copy code to clipboard export default defineConfig({ // Make sure to update the default driver to bcrypt default: 'bcrypt', list: { bcrypt: drivers.bcrypt({ rounds: 10, saltSize: 16, version: 98 }) } }) rounds The cost for computing the hash. We recommend reading the [A Note on Rounds](https://github.com/kelektiv/node.bcrypt.js#a-note-on-rounds) section from Bcrypt docs to learn how the `rounds` value has an impact on the time it takes to compute the hash. The default value is `10`. saltSize The length of salt (in bytes). When computing the hash, we generate a cryptographically secure random salt of this size. The default value is `16`. version The version for the hashing algorithm. The supported values are `97` and `98`. Using the latest version, i.e., `98` is recommended. ### [](https://docs.adonisjs.com/guides/security/hashing#scrypt) Scrypt The scrypt driver uses the Node.js crypto module for computing the password hash. The configuration options are the same as those accepted by the [Node.js `scrypt` method](https://nodejs.org/dist/latest-v19.x/docs/api/crypto.html#cryptoscryptpassword-salt-keylen-options-callback) . Copy code to clipboard export default defineConfig({ // Make sure to update the default driver to scrypt default: 'scrypt', list: { scrypt: drivers.scrypt({ cost: 16384, blockSize: 8, parallelization: 1, saltSize: 16, maxMemory: 33554432, keyLength: 64 }) } }) [](https://docs.adonisjs.com/guides/security/hashing#using-model-hooks-to-hash-password) Using model hooks to hash password --------------------------------------------------------------------------------------------------------------------------- Since you will be using the `hash` service to hash user passwords, you may find placing the logic inside the `beforeSave` model hook helpful. If you are using the `@adonisjs/auth` module, hashing passwords within your model is unnecessary. The `AuthFinder` automatically handles password hashing, ensuring your user credentials are securely processed. Learn more about this process [here](https://docs.adonisjs.com/guides/authentication/verifying-user-credentials#hashing-user-password) . Copy code to clipboard import { BaseModel, beforeSave } from '@adonisjs/lucid' import hash from '@adonisjs/core/services/hash' export default class User extends BaseModel { @beforeSave() static async hashPassword(user: User) { if (user.$dirty.password) { user.password = await hash.make(user.password) } } } [](https://docs.adonisjs.com/guides/security/hashing#switching-between-drivers) Switching between drivers --------------------------------------------------------------------------------------------------------- If your application uses multiple hashing drivers, you can switch between them using the `hash.use` method. The `hash.use` method accepts the mapping name from the config file and returns an instance of the matching driver. Copy code to clipboard import hash from '@adonisjs/core/services/hash' // uses "list.scrypt" mapping from the config file await hash.use('scrypt').make('secret') // uses "list.bcrypt" mapping from the config file await hash.use('bcrypt').make('secret') // uses "list.argon" mapping from the config file await hash.use('argon').make('secret') [](https://docs.adonisjs.com/guides/security/hashing#checking-if-a-password-needs-to-be-rehashed) Checking if a password needs to be rehashed --------------------------------------------------------------------------------------------------------------------------------------------- The latest configuration options are recommended to keep passwords secure, especially when a vulnerability is reported with an older version of the hashing algorithm. After you update the config with the latest options, you can use the `hash.needsReHash` method to check if a password hash uses old options and perform a re-hash. The check must be performed during user login because that is the only time you can access the plain text password. Copy code to clipboard import hash from '@adonisjs/core/services/hash' if (await hash.needsReHash(user.password)) { user.password = await hash.make(plainTextPassword) await user.save() } You can assign a plain text value to `user.password` if you use model hooks to compute the hash. Copy code to clipboard if (await hash.needsReHash(user.password)) { // Let the model hook rehash the password user.password = plainTextPassword await user.save() } [](https://docs.adonisjs.com/guides/security/hashing#faking-hash-service-during-tests) Faking hash service during tests ----------------------------------------------------------------------------------------------------------------------- Hashing a value is usually a slow process, and it will make your tests slow. Therefore, you might consider faking the hash service using the `hash.fake` method to disable password hashing. We create 20 users using the `UserFactory` in the following example. Since you are using a model hook to hash passwords, it might take 5-7 seconds (depending on the configuration). Copy code to clipboard import hash from '@adonisjs/core/services/hash' test('get users list', async ({ client }) => { await UserFactory().createMany(20) const response = await client.get('users') }) However, once you fake the hash service, the same test will run in order of magnitude faster. Copy code to clipboard import hash from '@adonisjs/core/services/hash' test('get users list', async ({ client }) => { hash.fake() await UserFactory().createMany(20) const response = await client.get('users') hash.restore() }) [](https://docs.adonisjs.com/guides/security/hashing#creating-a-custom-hash-driver) Creating a custom hash driver ----------------------------------------------------------------------------------------------------------------- A hash driver must implement the [HashDriverContract](https://github.com/adonisjs/hash/blob/main/src/types.ts#L13) interface. Also, the official Hash drivers use [PHC format](https://github.com/P-H-C/phc-string-format/blob/master/phc-sf-spec.md) to serialize the hash output for storage. You can check the existing driver's implementation to see how they use the [PHC formatter](https://github.com/adonisjs/hash/blob/main/src/drivers/bcrypt.ts) to make and verify hashes. Copy code to clipboard import { HashDriverContract, ManagerDriverFactory } from '@adonisjs/core/types/hash' /** * Config accepted by the hash driver */ export type PbkdfConfig = { } /** * Driver implementation */ export class Pbkdf2Driver implements HashDriverContract { constructor(public config: PbkdfConfig) { } /** * Check if the hash value is formatted as per * the hashing algorithm. */ isValidHash(value: string): boolean { } /** * Convert raw value to Hash */ async make(value: string): Promise { } /** * Verify if the plain value matches the provided * hash */ async verify( hashedValue: string, plainValue: string ): Promise { } /** * Check if the hash needs to be re-hashed because * the config parameters have changed */ needsReHash(value: string): boolean { } } /** * Factory function to reference the driver * inside the config file. */ export function pbkdf2Driver (config: PbkdfConfig): ManagerDriverFactory { return () => { return new Pbkdf2Driver(config) } } In the above code example, we export the following values. * `PbkdfConfig`: TypeScript type for the configuration you want to accept. * `Pbkdf2Driver`: Driver's implementation. It must adhere to the `HashDriverContract` interface. * `pbkdf2Driver`: Finally, a factory function to lazily create an instance of the driver. ### [](https://docs.adonisjs.com/guides/security/hashing#using-the-driver) Using the driver Once the implementation is completed, you can reference the driver inside the config file using the `pbkdf2Driver` factory function. config/hash.ts Copy code to clipboard import { defineConfig } from '@adonisjs/core/hash' import { pbkdf2Driver } from 'my-custom-package' export default defineConfig({ list: { pbkdf2: pbkdf2Driver({ // config goes here }), } }) * * * [Security\ \ Encryption](https://docs.adonisjs.com/guides/security/encryption) [Security\ \ CORS](https://docs.adonisjs.com/guides/security/cors) © 2025 AdonisJS [Edit this page](https://github.com/adonisjs/v6-docs/blob/main/content/docs/security/hashing.md) --- # Command arguments (Ace commands) | AdonisJS Documentation Toggle docs menu Command arguments [](https://docs.adonisjs.com/guides/ace/arguments#command-arguments) Command arguments ====================================================================================== Arguments refer to the positional arguments mentioned after the command name. Since arguments are positional, passing them in the correct order is necessary. You must define command arguments as class properties and decorate them using the `args` decorator. The arguments will be accepted in the same order as they are defined in the class. In the following example, we use the `@args.string` decorator to define an argument that accepts a string value. Copy code to clipboard import { BaseCommand, args, flags } from '@adonisjs/core/ace' export default class GreetCommand extends BaseCommand { static commandName = 'greet' static description = 'Greet a user by name' @args.string() declare name: string run() { console.log(this.name) } } To accept multiple values under the same argument name, you may use the `@args.spread` decorator. Do note, the spread argument must be the last. Copy code to clipboard import { BaseCommand, args, flags } from '@adonisjs/core/ace' export default class GreetCommand extends BaseCommand { static commandName = 'greet' static description = 'Greet a user by name' @args.spread() declare names: string[] run() { console.log(this.names) } } [](https://docs.adonisjs.com/guides/ace/arguments#argument-name-and-description) Argument name and description -------------------------------------------------------------------------------------------------------------- The argument name is displayed on the help screen. By default, the argument name is a dashed case representation of the class property name. However, you can define a custom value as well. Copy code to clipboard @args.string({ argumentName: 'user-name' }) declare name: string The argument description is shown on the help screen and can be set using the `description` option. Copy code to clipboard @args.string({ argumentName: 'user-name', description: 'Name of the user' }) declare name: string [](https://docs.adonisjs.com/guides/ace/arguments#optional-arguments-with-a-default-value) Optional arguments with a default value ---------------------------------------------------------------------------------------------------------------------------------- By default, all arguments are required. However, you can make them optional by setting the `required` option to `false`. The optional arguments must be at the end. Copy code to clipboard @args.string({ description: 'Name of the user', required: false, }) declare name?: string You may set the default value of an optional argument using the `default` property. Copy code to clipboard @args.string({ description: 'Name of the user', required: false, default: 'guest' }) declare name: string [](https://docs.adonisjs.com/guides/ace/arguments#processing-argument-value) Processing argument value ------------------------------------------------------------------------------------------------------ Using the `parse` method, you can process the argument value before it is defined as the class property. Copy code to clipboard @args.string({ argumentName: 'user-name', description: 'Name of the user', parse (value) { return value ? value.toUpperCase() : value } }) declare name: string [](https://docs.adonisjs.com/guides/ace/arguments#accessing-all-arguments) Accessing all arguments -------------------------------------------------------------------------------------------------- You can access all the arguments mentioned while running the command using the `this.parsed.args` property. Copy code to clipboard import { BaseCommand, args, flags } from '@adonisjs/core/ace' export default class GreetCommand extends BaseCommand { static commandName = 'greet' static description = 'Greet a user by name' @args.string() declare name: string run() { console.log(this.parsed.args) } } * * * [Ace commands\ \ Creating commands](https://docs.adonisjs.com/guides/ace/creating-commands) [Ace commands\ \ Command flags](https://docs.adonisjs.com/guides/ace/flags) © 2025 AdonisJS [Edit this page](https://github.com/adonisjs/v6-docs/blob/main/content/docs/ace/args.md) --- # Introduction (Testing) | AdonisJS Documentation Toggle docs menu Introduction [](https://docs.adonisjs.com/guides/testing/introduction#testing) Testing ========================================================================= AdonisJS has in-built support for writing tests. You do not have to install additional packages or wire up your application to be ready for testing - All the hard work has already been done. You can run the application tests using the following ace command. Copy code to clipboard node ace test The tests are stored inside the `tests` directory and we further organize tests by their type. For example, the functional tests are stored inside the `tests/functional` directory, and the unit tests are stored inside the `tests/unit` directory. Functional tests refer to outside-in testing in which you will make real HTTP requests to your application to test the functionality of a given flow or an endpoint. For example, you may have a collection of functional tests for creating a user. Some communities might refer to functional tests as feature tests or end-to-end tests. AdonisJS is flexible about what you call them. We decided to settle on the term **functional tests**. [](https://docs.adonisjs.com/guides/testing/introduction#configuring-the-tests-runner) Configuring the tests runner ------------------------------------------------------------------------------------------------------------------- AdonisJS uses [Japa](https://japa.dev/docs) for writing and running tests. Therefore, we recommend reading the Japa documentation to understand its APIs and configuration options better. ### [](https://docs.adonisjs.com/guides/testing/introduction#suites) Suites The test suites are defined inside the `adonisrc.ts` file. By default, we register the `functional` and the `unit` test suites. If needed, you can remove the existing suites and start from scratch. Copy code to clipboard { tests: { suites: [\ {\ name: 'functional',\ files: ['tests/functional/**/*.spec.(js|ts)']\ },\ {\ name: 'unit',\ files: ['tests/unit/**/*.spec.(js|ts)']\ }\ ] } } * A suite combines the suite's unique name and the file's glob pattern. * When you run tests for a specific suite, files only related to that suite are imported. You can configure a suite at runtime using the `configureSuite` hook defined inside the `tests/bootstrap.ts` file. For example, when running functional tests, you can register suite-level hooks to start the HTTP server. Copy code to clipboard export const configureSuite: Config['configureSuite'] = (suite) => { if (['browser', 'functional', 'e2e'].includes(suite.name)) { return suite.setup(() => testUtils.httpServer().start()) } } ### [](https://docs.adonisjs.com/guides/testing/introduction#runner-hooks) Runner hooks Runner hooks are global actions you can run before and after all the tests. The hooks are defined using the `runnerHooks` property inside the `tests/boostrap.ts` file. Copy code to clipboard export const runnerHooks: Required> = { setup: [\ () => {\ console.log('running before all the tests')\ }\ ], teardown: [\ () => {\ console.log('running after all the tests')\ }\ ], } ### [](https://docs.adonisjs.com/guides/testing/introduction#plugins) Plugins Japa has a plugin system you can use to extend its functionality. Plugins are registered inside the `tests/bootstrap.ts` file. See also: [Creating Japa plugins](https://japa.dev/docs/creating-plugins) Copy code to clipboard export const plugins: Config['plugins'] = [\ assert(),\ pluginAdonisJS(app)\ ] ### [](https://docs.adonisjs.com/guides/testing/introduction#reporters) Reporters Reporters are used for reporting/displaying the progress of tests as they run. The reporters are registered inside the `tests/bootstrap.ts` file. See also: [Creating Japa reporters](https://japa.dev/docs/creating-reporters) Copy code to clipboard export const reporters: Config['reporters'] = { activated: ['spec'] } [](https://docs.adonisjs.com/guides/testing/introduction#creating-tests) Creating tests --------------------------------------------------------------------------------------- You may create a new test using the `make:test` command. The command needs the suite's name to create the test file. See also: [Make test command](https://docs.adonisjs.com/guides/references/commands#maketest) Copy code to clipboard node ace make:test posts/create --suite=functional The file will be created inside the directory configured using the `files` glob property. [](https://docs.adonisjs.com/guides/testing/introduction#writing-tests) Writing tests ------------------------------------------------------------------------------------- The tests are defined using the `test` method imported from the `@japa/runner` package. A test accepts a title as the first parameter and the implementation callback as the second parameter. In the following example, we create a new user account and use the [`assert`](https://japa.dev/docs/plugins/assert) object to ensure the password hashed correctly. Copy code to clipboard import { test } from '@japa/runner' import User from '#models/User' import hash from '@adonisjs/core/services/hash' test('hashes user password when creating a new user', async ({ assert }) => { const user = new User() user.password = 'secret' await user.save() assert.isTrue(hash.isValidHash(user.password)) assert.isTrue(await hash.verify(user.password, 'secret')) }) ### [](https://docs.adonisjs.com/guides/testing/introduction#using-test-groups) Using test groups Test groups are created using the `test.group` method. Groups add structure to your tests and allow you to run [lifecycle hooks](https://japa.dev/docs/lifecycle-hooks) around your tests. Continuing the previous example, let's move the password hashing test inside a group. Copy code to clipboard import { test } from '@japa/runner' import User from '#models/User' import hash from '@adonisjs/core/services/hash' test.group('creating user', () => { test('hashes user password', async ({ assert }) => { const user = new User() user.password = 'secret' await user.save() assert.isTrue(hash.isValidHash(user.password)) assert.isTrue(await hash.verify(user.password, 'secret')) }) }) If you have noticed, we remove the **"when creating a new user"** fragment from our test title. This is because the group title clarifies that all tests under this group are scoped to **creating a new user**. ### [](https://docs.adonisjs.com/guides/testing/introduction#lifecycle-hooks) Lifecycle hooks Lifecycle hooks are used to perform actions around tests. You can define hooks using the `group` object. See also - [Japa docs for Lifecycle hooks](https://japa.dev/docs/lifecycle-hooks) Copy code to clipboard test.group('creating user', (group) => { group.each.setup(async () => { console.log('runs before every test') }) group.each.teardown(async () => { console.log('runs after every test') }) group.setup(async () => { console.log('runs once before all the tests') }) group.teardown(async () => { console.log('runs once after all the tests') }) test('hashes user password', async ({ assert }) => { const user = new User() user.password = 'secret' await user.save() assert.isTrue(hash.isValidHash(user.password)) assert.isTrue(await hash.verify(user.password, 'secret')) }) }) ### [](https://docs.adonisjs.com/guides/testing/introduction#next-steps) Next steps Now that you know the basics of creating and writing tests. We recommend you explore the following topics in the Japa documentation. * [Explore the `test` function API](https://japa.dev/docs/underlying-test-class) * [Learn how to test asynchronous code effectively](https://japa.dev/docs/testing-async-code) * [Using datasets to avoid repetitive tests](https://japa.dev/docs/datasets) [](https://docs.adonisjs.com/guides/testing/introduction#running-tests) Running tests ------------------------------------------------------------------------------------- You may run tests using the `test` command. By default, the tests for all the suites are executed. However, you can run tests for a specific suite by passing the name. Copy code to clipboard node ace test Copy code to clipboard node ace test functional node ace test unit ### [](https://docs.adonisjs.com/guides/testing/introduction#watching-for-file-changes-and-re-running-tests) Watching for file changes and re-running tests You may use the `--watch` command to watch the file system and re-run tests. If a test file is changed, then tests inside the changed file will run. Otherwise, all tests will be re-run. Copy code to clipboard node ace test --watch ### [](https://docs.adonisjs.com/guides/testing/introduction#filtering-tests) Filtering tests You can apply filters using the command-line flags when running the tests. Following is the list of available options. See also: [Japa filtering tests guide](https://japa.dev/docs/filtering-tests) **Using VSCode?** Use the [Japa extension](https://marketplace.visualstudio.com/items?itemName=jripouteau.japa-vscode) to run selected tests within your code editor using keyboard shortcuts or the activity sidebar. | Flag | Description | | --- | --- | | `--tests` | Filter test by the test title. This filter matches against the exact test title. | | `--files` | Filter tests by subset of test file name. The match is performed against the end of the filename without `.spec.ts`. You can run tests for a complete folder using the wildcard expression. `folder/*` | | `--groups` | Filter test by group name. This filter matches against the exact group name. | | `--tags` | Filter tests by tags. You can prefix the tag name with tilde `~` to ignore tests with the given tag | | `--matchAll` | By default, Japa will run tests that matches any of the mentioned tags. If you want all tags to match, then use the `--matchAll` flag | ### [](https://docs.adonisjs.com/guides/testing/introduction#force-exiting-tests) Force exiting tests Japa waits for the process to gracefully shut down after completing all the tests. The graceful shutdown process means exiting all long-lived connections and emptying the Node.js event loop. If needed, you can force Japa to exit the process and not wait for a graceful shutdown using the `--force-exit` flag. Copy code to clipboard node ace test --force-exit ### [](https://docs.adonisjs.com/guides/testing/introduction#retrying-tests) Retrying tests You can retry failing tests for multiple times using the `--retries` flag. The flag will be applied to all the tests without an explicit retries count defined at the test level. Copy code to clipboard # Retry failing tests 2 times node ace test --retries=2 ### [](https://docs.adonisjs.com/guides/testing/introduction#running-failed-tests-from-the-last-run) Running failed tests from the last run You can re-run tests failed from the last run using the `--failed` commandline flag. Copy code to clipboard node ace test --failed ### [](https://docs.adonisjs.com/guides/testing/introduction#switching-between-reporters) Switching between reporters Japa allows you register multiple test reporters inside the config file, but does not activate them by default. You can activate reporters either inside the config file, or using the `--reporter` commandline flag. Copy code to clipboard # Activate spec reporter node ace test --reporter=spec # Activate spec and json reporters node ace test --reporter=spec,json You may also activate reporters inside the config file. Copy code to clipboard export const reporters: Config['reporters'] = { activated: ['spec', 'json'] } ### [](https://docs.adonisjs.com/guides/testing/introduction#passing-options-to-the-nodejs-commandline) Passing options to the Node.js commandline The `test` command runs tests `(bin/test.ts file)` as a child process. If you want to pass [node arguments](https://nodejs.org/api/cli.html#options) to the child process, you can define them before the command name. Copy code to clipboard node ace --no-warnings --trace-exit test [](https://docs.adonisjs.com/guides/testing/introduction#environment-variables) Environment variables ----------------------------------------------------------------------------------------------------- You may use the `.env.test` file to define the environment variables required during testing. The values inside the `.env.test` takes precedence over those inside the `.env` file. The `SESSION_DRIVER` during testing must be set to `memory`. .env.test Copy code to clipboard SESSION_DRIVER=memory * * * [Views & Templates\ \ Inertia](https://docs.adonisjs.com/guides/views-and-templates/inertia) [Testing\ \ HTTP tests](https://docs.adonisjs.com/guides/testing/http-tests) © 2025 AdonisJS [Edit this page](https://github.com/adonisjs/v6-docs/blob/main/content/docs/testing/introduction.md) --- # Console tests (Testing) | AdonisJS Documentation Toggle docs menu Console tests [](https://docs.adonisjs.com/guides/testing/console-tests#console-tests) Console tests ====================================================================================== Command-line tests refer to testing custom Ace commands that are part of your application or the package codebase. In this guide, we will learn how to write tests for a command, mock the logger output, and trap CLI prompts. [](https://docs.adonisjs.com/guides/testing/console-tests#basic-example) Basic example -------------------------------------------------------------------------------------- Let's start by creating a new command named `greet`. Copy code to clipboard node ace make:command greet Copy code to clipboard import { BaseCommand } from '@adonisjs/core/ace' import { CommandOptions } from '@adonisjs/core/types/ace' export default class Greet extends BaseCommand { static commandName = 'greet' static description = 'Greet a username by name' static options: CommandOptions = {} async run() { this.logger.info('Hello world from "Greet"') } } Let's create a **unit** test inside the `tests/unit` directory. Feel free to [define the unit test suite](https://docs.adonisjs.com/guides/testing/introduction#suites) if it is not already defined. Copy code to clipboard node ace make:test commands/greet --suite=unit # DONE: create tests/unit/commands/greet.spec.ts Let's open the newly created file and write the following test. We will use the `ace` service to create an instance of the `Greet` command and assert that it exits successfully. Copy code to clipboard import { test } from '@japa/runner' import Greet from '#commands/greet' import ace from '@adonisjs/core/services/ace' test.group('Commands greet', () => { test('should greet the user and finish with exit code 0', async () => { /** * Create an instance of the Greet command class */ const command = await ace.create(Greet, []) /** * Execute command */ await command.exec() /** * Assert command exited with status code 0 */ command.assertSucceeded() }) }) Let's run the test using the following ace command. Copy code to clipboard node ace test --files=commands/greet [](https://docs.adonisjs.com/guides/testing/console-tests#testing-logger-output) Testing logger output ------------------------------------------------------------------------------------------------------ The `Greet` command currently writes the log message to the terminal. To capture this message and write an assertion for it, we will have to switch the UI library of ace into `raw` mode. In `raw` mode, the ace will not write any logs to the terminal. Instead, keep them within memory for writing assertions. We will use the Japa `each.setup` hook to switch into and out of the `raw` mode. Copy code to clipboard test.group('Commands greet', (group) => { group.each.setup(() => { ace.ui.switchMode('raw') return () => ace.ui.switchMode('normal') }) // test goes here }) Once the hook has been defined, you can update your test as follows. Copy code to clipboard test('should greet the user and finish with exit code 1', async () => { /** * Create an instance of the Greet command class */ const command = await ace.create(Greet, []) /** * Execute command */ await command.exec() /** * Assert command exited with status code 0 */ command.assertSucceeded() /** * Assert the command printed the following log message */ command.assertLog('[ blue(info) ] Hello world from "Greet"') }) [](https://docs.adonisjs.com/guides/testing/console-tests#testing-tables-output) Testing tables output ------------------------------------------------------------------------------------------------------ Similar to testing the log messages, you can write assertions for the table output by switching the UI library into `raw` mode. Copy code to clipboard async run() { const table = this.ui.table() table.head(['Name', 'Email']) table.row(['Harminder Virk', 'virk@adonisjs.com']) table.row(['Romain Lanz', 'romain@adonisjs.com']) table.row(['Julien-R44', 'julien@adonisjs.com']) table.row(['Michaël Zasso', 'targos@adonisjs.com']) table.render() } Given the above table, you can write an assertion for it as follows. Copy code to clipboard const command = await ace.create(Greet, []) await command.exec() command.assertTableRows([\ ['Harminder Virk', 'virk@adonisjs.com'],\ ['Romain Lanz', 'romain@adonisjs.com'],\ ['Julien-R44', 'julien@adonisjs.com'],\ ['Michaël Zasso', 'targos@adonisjs.com'],\ ]) [](https://docs.adonisjs.com/guides/testing/console-tests#trapping-prompts) Trapping prompts -------------------------------------------------------------------------------------------- Since [prompts](https://docs.adonisjs.com/guides/ace/prompts) block the terminal waiting for manual input, you must trap and respond to them programmatically when writing tests. Prompts are trapped using the `prompt.trap` method. The method accepts the prompt title (case-sensitive) and offers a chainable API for configuring additional behavior. The traps are removed automatically after the prompt gets triggered. An error will be thrown if the test finishes without triggering the prompt with a trap. In the following example, we place a trap on a prompt titled `"What is your name?"` and answer it using the `replyWith` method. Copy code to clipboard const command = await ace.create(Greet, []) command.prompt .trap('What is your name?') .replyWith('Virk') await command.exec() command.assertSucceeded() ### [](https://docs.adonisjs.com/guides/testing/console-tests#choosing-options) Choosing options You can choose options with a select or a multi-select prompt using the `chooseOption` and `chooseOptions` methods. Copy code to clipboard command.prompt .trap('Select package manager') .chooseOption(0) Copy code to clipboard command.prompt .trap('Select database manager') .chooseOptions([1, 2]) ### [](https://docs.adonisjs.com/guides/testing/console-tests#accepting-or-rejecting-confirmation-prompts) Accepting or rejecting confirmation prompts You can accept or reject prompts displayed using the `toggle` and the `confirm` methods. Copy code to clipboard command.prompt .trap('Want to delete all files?') .accept() Copy code to clipboard command.prompt .trap('Want to delete all files?') .reject() ### [](https://docs.adonisjs.com/guides/testing/console-tests#asserting-against-validations) Asserting against validations To test the validation behavior of a prompt, you can use the `assertPasses` and `assertFails` methods. These methods accept the value of the prompt and test it against the [prompt's validate](https://docs.adonisjs.com/guides/ace/prompts#prompt-options) method. Copy code to clipboard command.prompt .trap('What is your name?') // assert the prompt fails when an empty value is provided .assertFails('', 'Please enter your name') command.prompt .trap('What is your name?') .assertPasses('Virk') Following is an example of using assertions and replying to a prompt together. Copy code to clipboard command.prompt .trap('What is your name?') .assertFails('', 'Please enter your name') .assertPasses('Virk') .replyWith('Romain') [](https://docs.adonisjs.com/guides/testing/console-tests#available-assertions) Available assertions ---------------------------------------------------------------------------------------------------- Following is the list of assertion methods available on a command instance. ### [](https://docs.adonisjs.com/guides/testing/console-tests#assertsucceeded) assertSucceeded Assert the command exited with `exitCode=0`. Copy code to clipboard await command.exec() command.assertSucceeded() ### [](https://docs.adonisjs.com/guides/testing/console-tests#assertfailed) assertFailed Assert the command exited with non-zero `exitCode`. Copy code to clipboard await command.exec() command.assertFailed() ### [](https://docs.adonisjs.com/guides/testing/console-tests#assertexitcode) assertExitCode Assert the command exited with a specific `exitCode`. Copy code to clipboard await command.exec() command.assertExitCode(2) ### [](https://docs.adonisjs.com/guides/testing/console-tests#assertnotexitcode) assertNotExitCode Assert the command exited with any `exitCode`, but not the given exit code. Copy code to clipboard await command.exec() command.assertNotExitCode(0) ### [](https://docs.adonisjs.com/guides/testing/console-tests#assertlog) assertLog Assert the command writes a log message using the `this.logger` property. You can optionally assert the output stream as `stdout` or `stderr`. Copy code to clipboard await command.exec() command.assertLog('Hello world from "Greet"') command.assertLog('Hello world from "Greet"', 'stdout') ### [](https://docs.adonisjs.com/guides/testing/console-tests#assertlogmatches) assertLogMatches Assert the command writes a log message that matches the given regular expression. Copy code to clipboard await command.exec() command.assertLogMatches(/Hello world/) ### [](https://docs.adonisjs.com/guides/testing/console-tests#asserttablerows) assertTableRows Assert the command prints a table to the `stdout`. You can provide the table rows as an array of columns. The columns are represented as an array of cells. Copy code to clipboard await command.exec() command.assertTableRows([\ ['Harminder Virk', 'virk@adonisjs.com'],\ ['Romain Lanz', 'romain@adonisjs.com'],\ ['Julien-R44', 'julien@adonisjs.com'],\ ]) * * * [Testing\ \ Browser tests](https://docs.adonisjs.com/guides/testing/browser-tests) [Testing\ \ Database](https://docs.adonisjs.com/guides/testing/database) © 2025 AdonisJS [Edit this page](https://github.com/adonisjs/v6-docs/blob/main/content/docs/testing/console_tests.md) --- # Custom auth guard (Authentication) | AdonisJS Documentation Toggle docs menu Custom auth guard [](https://docs.adonisjs.com/guides/authentication/custom-auth-guard#creating-a-custom-auth-guard) Creating a custom auth guard =============================================================================================================================== The auth package enables you to create custom authentication guards for use cases not served by the built-in guards. In this guide, we will create a guard for using JWT tokens for authentication. The authentication guard revolves around the following concepts. * **User Provider**: Guards must be user agnostic. They should not hardcode the functions to query and find users from the database. Instead, a guard should rely on a User Provider and accept its implementation as a constructor dependency. * **Guard implementation**: The guard implementation must adhere to the `GuardContract` interface. This interface describes the APIs needed to integrate the guard with the rest of the Auth layer. [](https://docs.adonisjs.com/guides/authentication/custom-auth-guard#creating-the-userprovider-interface) Creating the `UserProvider` interface ----------------------------------------------------------------------------------------------------------------------------------------------- A guard is responsible for defining the `UserProvider` interface and the methods/properties it should contain. For example, the UserProvider accepted by the [Session guard](https://github.com/adonisjs/auth/blob/develop/modules/session_guard/types.ts#L153-L166) is far simpler than the UserProvider accepted by the [Access tokens guard](https://github.com/adonisjs/auth/blob/develop/modules/access_tokens_guard/types.ts#L192-L222) . So, there is no need to create User Providers that satisfy every guard implementation. Each guard can dictate the requirements for the User provider they accept. For this example, we need a provider to look up users inside the database using the `user ID`. We do not care which database is used or how the query is performed. That's the responsibility of the developer implementing the User provider. All the code we will write in this guide can initially live inside a single file stored within the `app/auth/guards` directory. app/auth/guards/jwt.ts Copy code to clipboard import { symbols } from '@adonisjs/auth' /** * The bridge between the User provider and the * Guard */ export type JwtGuardUser = { /** * Returns the unique ID of the user */ getId(): string | number | BigInt /** * Returns the original user object */ getOriginal(): RealUser } /** * The interface for the UserProvider accepted by the * JWT guard. */ export interface JwtUserProviderContract { /** * A property the guard implementation can use to infer * the data type of the actual user (aka RealUser) */ [symbols.PROVIDER_REAL_USER]: RealUser /** * Create a user object that acts as an adapter between * the guard and real user value. */ createUserForGuard(user: RealUser): Promise> /** * Find a user by their id. */ findById(identifier: string | number | BigInt): Promise | null> } In the above example, the `JwtUserProviderContract` interface accepts a generic user property named `RealUser`. Since this interface does not know what the actual user (the one we fetch from the database) looks like, it accepts it as a generic. For example: * An implementation using Lucid models will return an instance of the Model. Hence, the value of `RealUser` will be that instance. * An implementation using Prisma will return a user object with specific properties; therefore, the value of `RealUser` will be that object. To summarize, the `JwtUserProviderContract` leaves it to the User Provider implementation to decide the User's data type. ### [](https://docs.adonisjs.com/guides/authentication/custom-auth-guard#understanding-the-jwtguarduser-type) Understanding the `JwtGuardUser` type The `JwtGuardUser` type acts as a bridge between the User provider and the guard. The guard uses the `getId` method to get the user's unique ID and the `getOriginal` method to get the user's object after authenticating the request. [](https://docs.adonisjs.com/guides/authentication/custom-auth-guard#implementing-the-guard) Implementing the guard ------------------------------------------------------------------------------------------------------------------- Let's create the `JwtGuard` class and define the methods/properties needed by the [`GuardContract`](https://github.com/adonisjs/auth/blob/main/src/types.ts#L30) interface. Initially, we will have many errors in this file, but that's okay; as we progress, all the errors will disappear. Please take some time and read the comments next to every property/method in the following example. Copy code to clipboard import { symbols } from '@adonisjs/auth' import { AuthClientResponse, GuardContract } from '@adonisjs/auth/types' export class JwtGuard> implements GuardContract { /** * A list of events and their types emitted by * the guard. */ declare [symbols.GUARD_KNOWN_EVENTS]: {} /** * A unique name for the guard driver */ driverName: 'jwt' = 'jwt' /** * A flag to know if the authentication was an attempt * during the current HTTP request */ authenticationAttempted: boolean = false /** * A boolean to know if the current request has * been authenticated */ isAuthenticated: boolean = false /** * Reference to the currently authenticated user */ user?: UserProvider[typeof symbols.PROVIDER_REAL_USER] /** * Generate a JWT token for a given user. */ async generate(user: UserProvider[typeof symbols.PROVIDER_REAL_USER]) { } /** * Authenticate the current HTTP request and return * the user instance if there is a valid JWT token * or throw an exception */ async authenticate(): Promise { } /** * Same as authenticate, but does not throw an exception */ async check(): Promise { } /** * Returns the authenticated user or throws an error */ getUserOrFail(): UserProvider[typeof symbols.PROVIDER_REAL_USER] { } /** * This method is called by Japa during testing when "loginAs" * method is used to login the user. */ async authenticateAsClient( user: UserProvider[typeof symbols.PROVIDER_REAL_USER] ): Promise { } } [](https://docs.adonisjs.com/guides/authentication/custom-auth-guard#accepting-a-user-provider) Accepting a user provider ------------------------------------------------------------------------------------------------------------------------- A guard must accept a user provider to look up users during authentication. You can accept it as a constructor parameter and store a private reference. Copy code to clipboard export class JwtGuard> implements GuardContract { #userProvider: UserProvider constructor( userProvider: UserProvider ) { this.#userProvider = userProvider } } [](https://docs.adonisjs.com/guides/authentication/custom-auth-guard#generating-a-token) Generating a token ----------------------------------------------------------------------------------------------------------- Let's implement the `generate` method and create a token for a given user. We will install and use the `jsonwebtoken` package from npm to generate a token. Copy code to clipboard npm i jsonwebtoken @types/jsonwebtoken Also, we will have to use a **secret key** to sign a token, so let's update the `constructor` method and accept the secret key as an option via the options object. Copy code to clipboard import jwt from 'jsonwebtoken' export type JwtGuardOptions = { secret: string } export class JwtGuard> implements GuardContract { #userProvider: UserProvider #options: JwtGuardOptions constructor( userProvider: UserProvider options: JwtGuardOptions ) { this.#userProvider = userProvider this.#options = options } /** * Generate a JWT token for a given user. */ async generate( user: UserProvider[typeof symbols.PROVIDER_REAL_USER] ) { const providerUser = await this.#userProvider.createUserForGuard(user) const token = jwt.sign({ userId: providerUser.getId() }, this.#options.secret) return { type: 'bearer', token: token } } } * First, we use the `userProvider.createUserForGuard` method to create an instance of the provider user (aka the bridge between the real user and the guard). * Next, we use the `jwt.sign` method to create a signed token with the `userId` in the payload and return it. [](https://docs.adonisjs.com/guides/authentication/custom-auth-guard#authenticating-a-request) Authenticating a request ----------------------------------------------------------------------------------------------------------------------- Authenticating a request includes: * Reading the JWT token from the request header or cookie. * Verifying its authenticity. * Fetching the user for whom the token was generated. Our guard will need access to the [HttpContext](https://docs.adonisjs.com/guides/concepts/http-context) to read request headers and cookies, so let's update the class `constructor` and accept it as an argument. Copy code to clipboard import type { HttpContext } from '@adonisjs/core/http' export class JwtGuard> implements GuardContract { #ctx: HttpContext #userProvider: UserProvider #options: JwtGuardOptions constructor( ctx: HttpContext, userProvider: UserProvider, options: JwtGuardOptions ) { this.#ctx = ctx this.#userProvider = userProvider this.#options = options } } We will read the token from the `authorization` header for this example. However, you can adjust the implementation to support cookies as well. Copy code to clipboard import { symbols, errors } from '@adonisjs/auth' export class JwtGuard> implements GuardContract { /** * Authenticate the current HTTP request and return * the user instance if there is a valid JWT token * or throw an exception */ async authenticate(): Promise { /** * Avoid re-authentication when it has been done already * for the given request */ if (this.authenticationAttempted) { return this.getUserOrFail() } this.authenticationAttempted = true /** * Ensure the auth header exists */ const authHeader = this.#ctx.request.header('authorization') if (!authHeader) { throw new errors.E_UNAUTHORIZED_ACCESS('Unauthorized access', { guardDriverName: this.driverName, }) } /** * Split the header value and read the token from it */ const [, token] = authHeader.split('Bearer ') if (!token) { throw new errors.E_UNAUTHORIZED_ACCESS('Unauthorized access', { guardDriverName: this.driverName, }) } /** * Verify token */ const payload = jwt.verify(token, this.#options.secret) if (typeof payload !== 'object' || !('userId' in payload)) { throw new errors.E_UNAUTHORIZED_ACCESS('Unauthorized access', { guardDriverName: this.driverName, }) } /** * Fetch the user by user ID and save a reference to it */ const providerUser = await this.#userProvider.findById(payload.userId) if (!providerUser) { throw new errors.E_UNAUTHORIZED_ACCESS('Unauthorized access', { guardDriverName: this.driverName, }) } this.user = providerUser.getOriginal() return this.getUserOrFail() } } [](https://docs.adonisjs.com/guides/authentication/custom-auth-guard#implementing-the-check-method) Implementing the `check` method ----------------------------------------------------------------------------------------------------------------------------------- The `check` method is a silent version of the `authenticate` method, and you can implement it as follows. Copy code to clipboard export class JwtGuard> implements GuardContract { /** * Same as authenticate, but does not throw an exception */ async check(): Promise { try { await this.authenticate() return true } catch { return false } } } [](https://docs.adonisjs.com/guides/authentication/custom-auth-guard#implementing-the-getuserorfail-method) Implementing the `getUserOrFail` method --------------------------------------------------------------------------------------------------------------------------------------------------- Finally, let's implement the `getUserOrFail` method. It should return the user instance or throw an error (if the user does not exist). Copy code to clipboard export class JwtGuard> implements GuardContract { /** * Returns the authenticated user or throws an error */ getUserOrFail(): UserProvider[typeof symbols.PROVIDER_REAL_USER] { if (!this.user) { throw new errors.E_UNAUTHORIZED_ACCESS('Unauthorized access', { guardDriverName: this.driverName, }) } return this.user } } [](https://docs.adonisjs.com/guides/authentication/custom-auth-guard#implementing-the-authenticateasclient-method) Implementing the `authenticateAsClient` method ----------------------------------------------------------------------------------------------------------------------------------------------------------------- The `authenticateAsClient` method is used during tests when you want to login a user during tests via the [`loginAs` method](https://docs.adonisjs.com/guides/testing/http-tests#authenticating-users) . For the JWT implementation, this method should return the `authorization` header containing the JWT token. Copy code to clipboard export class JwtGuard> implements GuardContract { /** * This method is called by Japa during testing when "loginAs" * method is used to login the user. */ async authenticateAsClient( user: UserProvider[typeof symbols.PROVIDER_REAL_USER] ): Promise { const token = await this.generate(user) return { headers: { authorization: `Bearer ${token.token}`, }, } } } [](https://docs.adonisjs.com/guides/authentication/custom-auth-guard#using-the-guard) Using the guard ----------------------------------------------------------------------------------------------------- Let's head over to the `config/auth.ts` and register the guard within the `guards` list. Copy code to clipboard import { defineConfig } from '@adonisjs/auth' import { sessionUserProvider } from '@adonisjs/auth/session' import env from '#start/env' import { JwtGuard } from '../app/auth/jwt/guard.js' const jwtConfig = { secret: env.get('APP_KEY'), } const userProvider = sessionUserProvider({ model: () => import('#models/user'), }) const authConfig = defineConfig({ default: 'jwt', guards: { jwt: (ctx) => { return new JwtGuard(ctx, userProvider, jwtConfig) }, }, }) export default authConfig As you can notice, we are using the `sessionUserProvider` with our `JwtGuard` implementation. This is because the `JwtUserProviderContract` interface is compatible with the User Provider created by the Session guard. So, instead of creating our own implementation of a User Provider, we re-use one from the Session guard. [](https://docs.adonisjs.com/guides/authentication/custom-auth-guard#final-example) Final example ------------------------------------------------------------------------------------------------- Once the implementation is completed, you can use the `jwt` guard like other inbuilt guards. The following is an example of how to generate and verify JWT tokens. Copy code to clipboard import User from '#models/user' import router from '@adonisjs/core/services/router' import { middleware } from './kernel.js' router.post('login', async ({ request, auth }) => { const { email, password } = request.all() const user = await User.verifyCredentials(email, password) return await auth.use('jwt').generate(user) }) router .get('/', async ({ auth }) => { return auth.getUserOrFail() }) .use(middleware.auth()) * * * [Authentication\ \ Basic auth guard](https://docs.adonisjs.com/guides/authentication/basic-auth-guard) [Authentication\ \ Social authentication](https://docs.adonisjs.com/guides/authentication/social-authentication) © 2025 AdonisJS [Edit this page](https://github.com/adonisjs/v6-docs/blob/main/content/docs/authentication/custom_auth_guard.md) --- # Prompts (Ace commands) | AdonisJS Documentation Toggle docs menu Prompts [](https://docs.adonisjs.com/guides/ace/prompts#prompts) Prompts ================================================================ Prompts are interactive terminal widgets you can use to accept user input. Ace prompts are powered by the [@poppinss/prompts](https://github.com/poppinss/prompts) package, which supports the following prompt types. * input * list * password * confirm * toggle * select * multi-select * autocomplete Ace prompts are built with testing in mind. When writing tests, you may trap prompts and respond to them programmatically. See also: [Testing ace commands](https://docs.adonisjs.com/guides/testing/console-tests) [](https://docs.adonisjs.com/guides/ace/prompts#displaying-a-prompt) Displaying a prompt ---------------------------------------------------------------------------------------- You may display prompts using the `this.prompt` property available on all Ace commands. Copy code to clipboard import { BaseCommand } from '@adonisjs/core/ace' export default class GreetCommand extends BaseCommand { async run() { const modelName = await this.prompt.ask('Enter the model name') console.log(modelName) } } [](https://docs.adonisjs.com/guides/ace/prompts#prompt-options) Prompt options ------------------------------------------------------------------------------ Following is the list of options accepted by prompts. You may reference this table as the single source of truth. | | | | | --- | --- | --- | | Option | Accepted by | Description | | `default` (String) | All prompts | The default value to use when no value is entered. In the case of `select`, `multiselect`, and `autocomplete` prompts, the value must be the choices array index. | | `name` (String) | All prompts | The unique name for the prompt | | `hint` (String) | All prompts | The hint text to display next to the prompt | | `result` (Function) | All prompts | Transform the prompt return value. The input value of the `result` method depends on the prompt. For example, the `multiselect` prompt value will be an array of selected choices.

Copy code to clipboard

{
result(value) {
return value.toUpperCase()
}
} | | `format` (Function) | All prompts | Live format the input value as the user types. The formatting is only applied to the CLI output, not the return value.

Copy code to clipboard

{
format(value) {
return value.toUpperCase()
}
} | | `validate` (Function) | All prompts | Validate the user input. Returning `true` from the method will pass the validation. Returning `false` or an error message string will be considered a failure.

Copy code to clipboard

{
validate(value) {
return value.length > 6
? true
: 'Model name must be 6 characters long'
}
} | | `limit` (Number) | `autocomplete` | Limit the number of options to display. You will have to scroll to see the rest of the options. | [](https://docs.adonisjs.com/guides/ace/prompts#text-input) Text input ---------------------------------------------------------------------- You may render the prompt to accept text input using the `prompt.ask` method. The method accepts the prompt message as the first parameter and the [options object](https://docs.adonisjs.com/guides/ace/prompts#prompt-options) as the second parameter. Copy code to clipboard await this.prompt.ask('Enter the model name') Copy code to clipboard // Validate input await this.prompt.ask('Enter the model name', { validate(value) { return value.length > 0 } }) Copy code to clipboard // Default value await this.prompt.ask('Enter the model name', { default: 'User' }) [](https://docs.adonisjs.com/guides/ace/prompts#masked-input) Masked input -------------------------------------------------------------------------- As the name suggests, the masked input prompt masks the user input in the terminal. You may display the masked prompt using the `prompt.secure` method. The method accepts the prompt message as the first parameter and the [options object](https://docs.adonisjs.com/guides/ace/prompts#prompt-options) as the second parameter. Copy code to clipboard await this.prompt.secure('Enter account password') Copy code to clipboard await this.prompt.secure('Enter account password', { validate(value) { return value.length < 6 ? 'Password must be 6 characters long' : true } }) [](https://docs.adonisjs.com/guides/ace/prompts#list-of-choices) List of choices -------------------------------------------------------------------------------- You may display a list of choices for a single selection using the `prompt.choice` method. The method accepts the following parameters. 1. Prompt message. 2. An array of choices. 3. Optional [options object](https://docs.adonisjs.com/guides/ace/prompts#prompt-options) . Copy code to clipboard await this.prompt.choice('Select package manager', [\ 'npm',\ 'yarn',\ 'pnpm'\ ]) To mention a different display value, you can define options as objects. The `name` property is returned as the prompt result, and the `message` property is displayed in the terminal. Copy code to clipboard await this.prompt.choice('Select database driver', [\ {\ name: 'sqlite',\ message: 'SQLite'\ },\ {\ name: 'mysql',\ message: 'MySQL'\ },\ {\ name: 'pg',\ message: 'PostgreSQL'\ }\ ]) [](https://docs.adonisjs.com/guides/ace/prompts#multi-select-choices) Multi-select choices ------------------------------------------------------------------------------------------ You may use the `prompt.multiple` method to allow multiple selections in the choices list. The accepted parameters are the same as the `choice` prompt. Copy code to clipboard await this.prompt.multiple('Select database drivers', [\ {\ name: 'sqlite',\ message: 'SQLite'\ },\ {\ name: 'mysql',\ message: 'MySQL'\ },\ {\ name: 'pg',\ message: 'PostgreSQL'\ }\ ]) [](https://docs.adonisjs.com/guides/ace/prompts#confirm-action) Confirm action ------------------------------------------------------------------------------ You can display a confirmation prompt with `Yes/No` options using the `prompt.confirm` method. The method accepts the prompt message as the first parameter and the [options object](https://docs.adonisjs.com/guides/ace/prompts#prompt-options) as the second parameter. The `confirm` prompt returns a boolean value. Copy code to clipboard const deleteFiles = await this.prompt.confirm( 'Want to delete all files?' ) if (deleteFiles) { } To customize the `Yes/No` options display value, you may use the `prompt.toggle` method. Copy code to clipboard const deleteFiles = await this.prompt.toggle( 'Want to delete all files?', ['Yup', 'Nope'] ) if (deleteFiles) { } [](https://docs.adonisjs.com/guides/ace/prompts#autocomplete) Autocomplete -------------------------------------------------------------------------- The `autocomplete` prompt is a combination of the select and the multi-select prompt, but with the ability to fuzzy search the choices. Copy code to clipboard const selectedCity = await this.prompt.autocomplete( 'Select your city', await getCitiesList() ) * * * [Ace commands\ \ Command flags](https://docs.adonisjs.com/guides/ace/flags) [Ace commands\ \ Terminal UI](https://docs.adonisjs.com/guides/ace/terminal-ui) © 2025 AdonisJS [Edit this page](https://github.com/adonisjs/v6-docs/blob/main/content/docs/ace/prompts.md) --- # Introduction (Ace commands) | AdonisJS Documentation Toggle docs menu Introduction [](https://docs.adonisjs.com/guides/ace/introduction#introduction) Introduction =============================================================================== Ace is a command line framework used by AdonisJS to create and run console commands. The entry point file for Ace is stored in the root of your project, and you can execute it as follows. Copy code to clipboard node ace Since the `node` binary cannot run the TypeScript source code directly, we have to keep the ace file in pure JavaScript and use the `.js` extension. Under the hood, the `ace.js` file registers TS Node as an [ESM module loader hook](https://nodejs.org/api/module.html#customization-hooks) to execute the TypeScript code and imports the `bin/console.ts` file. [](https://docs.adonisjs.com/guides/ace/introduction#help-and-list-commands) Help and list commands --------------------------------------------------------------------------------------------------- You can view the list of available commands by running the ace entry point file without any arguments or using the `list` command. Copy code to clipboard node ace # Same as above node ace list ![](https://docs.adonisjs.com/assets/ace_help_screen-jLRZM9Lm.jpeg) You can view help for a single command by typing the command name with the `--help` flag. Copy code to clipboard node ace make:controller --help The output of the help screen is formatted as per the [docopt](http://docopt.org/) standard. [](https://docs.adonisjs.com/guides/ace/introduction#enablingdisabling-colors) Enabling/disabling colors -------------------------------------------------------------------------------------------------------- Ace detects the CLI environment in which it is running and disables the colorful output if the terminal does not support colors. However, you can manually enable or disable colors using the `--ansi` flag. Copy code to clipboard # Disable colors node ace list --no-ansi # Force enable colors node ace list --ansi [](https://docs.adonisjs.com/guides/ace/introduction#creating-command-aliases) Creating command aliases ------------------------------------------------------------------------------------------------------- Command aliases provide a convenience layer to define aliases for commonly used commands. For example, if you often create singular resourceful controllers, you may create an alias for it inside the `adonisrc.ts` file. Copy code to clipboard { commandsAliases: { resource: 'make:controller --resource --singular' } } Once the alias is defined, you can use the alias to run the command. Copy code to clipboard node ace resource admin ### [](https://docs.adonisjs.com/guides/ace/introduction#how-alias-expansion-works) How alias expansion works? * Every time you run a command, Ace will check for aliases inside the `commandsAliases` object. * If an alias exists, the first segment (before the space) will be used to look up the command. * If a command exists, the rest of the alias value segments will be appended to the command name. For example, if you run the following command Copy code to clipboard node ace resource admin --help It will be expanded to Copy code to clipboard make:controller --resource --singular admin --help [](https://docs.adonisjs.com/guides/ace/introduction#running-commands-programmatically) Running commands programmatically ------------------------------------------------------------------------------------------------------------------------- You can use the `ace` service to execute commands programmatically. The ace service is available after the application has been booted. The `ace.exec` method accepts the command name as the first parameter and an array of command line arguments as the second parameter. For example: Copy code to clipboard import ace from '@adonisjs/core/services/ace' const command = await ace.exec('make:controller', [\ 'user',\ '--resource',\ ]) console.log(command.exitCode) console.log(command.result) console.log(command.error) You may use the `ace.hasCommand` method to check if a command exists before executing it. Copy code to clipboard import ace from '@adonisjs/core/services/ace' /** * Boot method will load commands (if not already loaded) */ await ace.boot() if (ace.hasCommand('make:controller')) { await ace.exec('make:controller', [\ 'user',\ '--resource',\ ]) } * * * [Digging deeper\ \ Transmit](https://docs.adonisjs.com/guides/digging-deeper/transmit) [Ace commands\ \ Creating commands](https://docs.adonisjs.com/guides/ace/creating-commands) © 2025 AdonisJS [Edit this page](https://github.com/adonisjs/v6-docs/blob/main/content/docs/ace/introduction.md) --- # Command flags (Ace commands) | AdonisJS Documentation Toggle docs menu Command flags [](https://docs.adonisjs.com/guides/ace/flags#command-flags) Command flags ========================================================================== Flags are named parameters mentioned with either two hyphens (`--`) or a single hyphen (`-`) (known as the flag alias). The flags can be mentioned in any order. You must define flags as class properties and decorate them using the `@flags` decorator. In the following example, we define `resource` and `singular` flags, and both represent a boolean value. Copy code to clipboard import { BaseCommand, flags } from '@adonisjs/core/ace' export default class MakeControllerCommand extends BaseCommands { @flags.boolean() declare resource: boolean @flags.boolean() declare singular: boolean } [](https://docs.adonisjs.com/guides/ace/flags#flag-types) Flag types -------------------------------------------------------------------- Ace allows defining flags for one of the following types. ### [](https://docs.adonisjs.com/guides/ace/flags#boolean-flag) Boolean flag A boolean flag is defined using the `@flags.boolean` decorator. Mentioning the flag will set its value to `true`. Otherwise, the flag value is `undefined`. Copy code to clipboard make:controller --resource # this.resource === true Copy code to clipboard make:controller # this.resource === undefined Copy code to clipboard make:controller --no-resource # this.resource === false The last example shows that the boolean flags can be negated with the `--no-` prefix. By default, the negated option is not shown in the help output. However, you may enable it using the `showNegatedVariantInHelp` option. Copy code to clipboard export default class MakeControllerCommand extends BaseCommands { @flags.boolean({ showNegatedVariantInHelp: true, }) declare resource: boolean } ### [](https://docs.adonisjs.com/guides/ace/flags#string-flag) String flag A string flag accepts a value after the flag name. You may define a string flag using the `@flags.string` method. Copy code to clipboard import { BaseCommand, flags } from '@adonisjs/core/ace' export default class MakeControllerCommand extends BaseCommands { @flags.string() declare model: string } Copy code to clipboard make:controller --model user # this.model = 'user' If the flag value has spaces or special characters, it must be wrapped inside the quotes `""`. Copy code to clipboard make:controller --model blog user # this.model = 'blog' make:controller --model "blog user" # this.model = 'blog user' An error is displayed if the flag is mentioned but no value is provided (even when the flag is optional). Copy code to clipboard make:controller # Works! The optional flag is not mentioned make:controller --model # Error! Missing value ### [](https://docs.adonisjs.com/guides/ace/flags#number-flag) Number flag The parsing of a number flag is similar to the string flag. However, the value is validated to ensure it is a valid number. You can create a number flag using the `@flags.number` decorator. Copy code to clipboard import { BaseCommand, flags } from '@adonisjs/core/ace' export default class MakeUserCommand extends BaseCommands { @flags.number() declare score: number } ### [](https://docs.adonisjs.com/guides/ace/flags#array-flag) Array flag The array flag allows the usage of the flag multiple times when running a command. You can define an array flag using the `@flags.array` method. Copy code to clipboard import { BaseCommand, flags } from '@adonisjs/core/ace' export default class MakeUserCommand extends BaseCommands { @flags.array() declare groups: string[] } Copy code to clipboard make:user --groups=admin --groups=moderators --groups=creators # this.groups = ['admin', 'moderators', 'creators'] [](https://docs.adonisjs.com/guides/ace/flags#flag-name-and-description) Flag name and description -------------------------------------------------------------------------------------------------- By default, the flag name is a dashed case representation of the class property name. However, you can define a custom name via the `flagName` option. Copy code to clipboard @flags.boolean({ flagName: 'server' }) declare startServer: boolean The flag description is displayed on the help screen. You can define it using the `description` option. Copy code to clipboard @flags.boolean({ flagName: 'server', description: 'Starts the application server' }) declare startServer: boolean [](https://docs.adonisjs.com/guides/ace/flags#flag-aliases) Flag aliases ------------------------------------------------------------------------ Aliases the shorthand names for a flag mentioned using a single hyphen (`-`). An alias must be a single character. Copy code to clipboard @flags.boolean({ alias: ['r'] }) declare resource: boolean @flags.boolean({ alias: ['s'] }) declare singular: boolean Flag aliases can be combined when running the command. Copy code to clipboard make:controller -rs # Same as make:controller --resource --singular [](https://docs.adonisjs.com/guides/ace/flags#default-value) Default value -------------------------------------------------------------------------- You can define the default value for a flag using the `default` option. The default value is used when the flag is not mentioned or mentioned without a value. Copy code to clipboard @flags.boolean({ default: true, }) declare startServer: boolean @flags.string({ default: 'sqlite', }) declare connection: string [](https://docs.adonisjs.com/guides/ace/flags#processing-flag-value) Processing flag value ------------------------------------------------------------------------------------------ Using the `parse` method, you can process the flag value before it is defined as the class property. Copy code to clipboard @flags.string({ parse (value) { return value ? connections[value] : value } }) declare connection: string [](https://docs.adonisjs.com/guides/ace/flags#accessing-all-flags) Accessing all flags -------------------------------------------------------------------------------------- You can access all flags mentioned while running the command using the `this.parsed.flags` property. The flags property is an object of key-value pair. Copy code to clipboard import { BaseCommand, flags } from '@adonisjs/core/ace' export default class MakeControllerCommand extends BaseCommands { @flags.boolean() declare resource: boolean @flags.boolean() declare singular: boolean async run() { console.log(this.parsed.flags) /** * Names of flags mentioned but not * accepted by the command */ console.log(this.parsed.unknownFlags) } } * * * [Ace commands\ \ Command arguments](https://docs.adonisjs.com/guides/ace/arguments) [Ace commands\ \ Prompts](https://docs.adonisjs.com/guides/ace/prompts) © 2025 AdonisJS [Edit this page](https://github.com/adonisjs/v6-docs/blob/main/content/docs/ace/flags.md) --- # Browser tests (Testing) | AdonisJS Documentation Toggle docs menu Browser tests [](https://docs.adonisjs.com/guides/testing/browser-tests#browser-tests) Browser tests ====================================================================================== Browser tests are executed inside real browsers like Chrome, Firefox, or Safari. We make use of [Playwright](https://playwright.dev/) (a browser automation tool) for interacting with webpages programmatically. Playwright is both a testing framework and a library that exposes JavaScript APIs to interact with the browser. We **do not use the Playwright testing framework** because we are already using Japa, and using multiple testing frameworks inside a single project will only lead to confusion and config bloat. Instead, we will use the [Browser Client](https://japa.dev/docs/plugins/browser-client) plugin from Japa, which integrates nicely with Playwright and offers a great testing experience. [](https://docs.adonisjs.com/guides/testing/browser-tests#setup) Setup ---------------------------------------------------------------------- The first step is to install the following packages from the npm packages registry. npm Copy code to clipboard npm i -D playwright @japa/browser-client ### [](https://docs.adonisjs.com/guides/testing/browser-tests#registering-browser-suite) Registering browser suite Let's start by creating a new test suite for browser tests inside the `adonisrc.ts` file. The test files for the browser suite will be stored inside the `tests/browser` directory. Copy code to clipboard { tests: { suites: [\ {\ files: [\ 'tests/browser/**/*.spec(.ts|.js)'\ ],\ name: 'browser',\ timeout: 300000\ }\ ] } } ### [](https://docs.adonisjs.com/guides/testing/browser-tests#configuring-the-plugin) Configuring the plugin Before you can start writing tests, you must register the `browserClient` plugin within the `tests/bootstrap.ts` file. Copy code to clipboard import { browserClient } from '@japa/browser-client' export const plugins: Config['plugins'] = [\ assert(),\ apiClient(),\ browserClient({\ runInSuites: ['browser']\ }),\ pluginAdonisJS(app)\ ] [](https://docs.adonisjs.com/guides/testing/browser-tests#basic-example) Basic example -------------------------------------------------------------------------------------- Let's create an example test that will open the home page of your AdonisJS application and verify the contents of the page. The [`visit`](https://japa.dev/docs/plugins/browser-client#browser-api) helper opens a new page and visits a URL. The return value is the [page object](https://playwright.dev/docs/api/class-page) . See also: [List of assertions methods](https://japa.dev/docs/plugins/browser-client#assertions) Copy code to clipboard node ace make:test pages/home --suite=browser # DONE: create tests/browser/pages/home.spec.ts tests/browser/pages/home.spec.ts Copy code to clipboard import { test } from '@japa/runner' test.group('Home page', () => { test('see welcome message', async ({ visit }) => { const page = await visit('/') await page.assertTextContains('body', 'It works!') }) }) Finally, let's run the above test using the `test` command. You may use the `--watch` flag to create a file watcher and re-run tests on every file change. Copy code to clipboard node ace test browser ![](https://docs.adonisjs.com/assets/browser_tests_output-C-wlD2Uu.jpeg) [](https://docs.adonisjs.com/guides/testing/browser-tests#readingwriting-cookies) Reading/writing cookies --------------------------------------------------------------------------------------------------------- When testing inside a real browser, the cookies are persisted throughout the lifecycle of a [browser context](https://playwright.dev/docs/api/class-browsercontext) . Japa creates a fresh browser context for each test. Therefore, the cookies from one test will not leak onto other tests. However, multiple page visits inside a single test will share the cookies because they use the same `browserContext`. Copy code to clipboard test.group('Home page', () => { test('see welcome message', async ({ visit, browserContext }) => { await browserContext.setCookie('username', 'virk') // The "username" cookie will be sent during the request const homePage = await visit('/') // The "username" cookie will also be sent during this request const aboutPage = await visit('/about') }) }) Similarly, the cookies set by the server can be accessed using the `browserContext.getCookie` method. Copy code to clipboard import router from '@adonisjs/core/services/router' router.get('/', async ({ response }) => { response.cookie('cartTotal', '100') return 'It works!' }) Copy code to clipboard test.group('Home page', () => { test('see welcome message', async ({ visit, browserContext }) => { const page = await visit('/') console.log(await browserContext.getCookie('cartTotal')) }) }) You may use the following methods to read/write encrypted and plain cookies. Copy code to clipboard // Write await browserContext.setEncryptedCookie('username', 'virk') await browserContext.setPlainCookie('username', 'virk') // Read await browserContext.getEncryptedCookie('cartTotal') await browserContext.getPlainCookie('cartTotal') [](https://docs.adonisjs.com/guides/testing/browser-tests#populating-session-store) Populating session store ------------------------------------------------------------------------------------------------------------ If you are using the [`@adonisjs/session`](https://docs.adonisjs.com/guides/basics/session) package to read/write session data in your application, you may also want to use the `sessionBrowserClient` plugin to populate the session store when writing tests. ### [](https://docs.adonisjs.com/guides/testing/browser-tests#setup-1) Setup The first step is registering the plugin inside the `tests/bootstrap.ts` file. Copy code to clipboard import { sessionBrowserClient } from '@adonisjs/session/plugins/browser_client' export const plugins: Config['plugins'] = [\ assert(),\ pluginAdonisJS(app),\ sessionBrowserClient(app)\ ] And then, update the `.env.test` file (create one if it is missing) and set the `SESSON_DRIVER` to `memory`. .env.test Copy code to clipboard SESSION_DRIVER=memory ### [](https://docs.adonisjs.com/guides/testing/browser-tests#writing-session-data) Writing session data You may use the `browserContext.setSession` method to define the session data for the current browser context. All page visits using the same browser context will have access to the same session data. However, the session data will be removed when the browser or the context is closed. Copy code to clipboard test('checkout with cart items', async ({ browserContext, visit }) => { await browserContext.setSession({ cartItems: [\ {\ id: 1,\ name: 'South Indian Filter Press Coffee'\ },\ {\ id: 2,\ name: 'Cold Brew Bags',\ }\ ] }) const page = await visit('/checkout') }) Like the `setSession` method, you may use the `browser.setFlashMessages` method to define flash messages. Copy code to clipboard /** * Define flash messages */ await browserContext.setFlashMessages({ success: 'Post created successfully', }) const page = await visit('/posts/1') /** * Assert the post page shows the flash message * inside ".alert-success" div. */ await page.assertExists(page.locator( 'div.alert-success', { hasText: 'Post created successfully' } )) ### [](https://docs.adonisjs.com/guides/testing/browser-tests#reading-session-data) Reading session data You may read the data inside a session store using the `browserContext.getSession` and `browser.getFlashMessages` methods. These methods will return all the data for the session ID associated with a specific browser context instance. Copy code to clipboard const session = await browserContext.getSession() const flashMessages = await browserContext.getFlashMessages() [](https://docs.adonisjs.com/guides/testing/browser-tests#authenticating-users) Authenticating users ---------------------------------------------------------------------------------------------------- If you are using the `@adonisjs/auth` package to authenticate users in your application, you may use the `authBrowserClient` Japa plugin to authenticate users when making HTTP requests to your application. The first step is registering the plugin inside the `tests/bootstrap.ts` file. tests/bootstrap.ts Copy code to clipboard import { authBrowserClient } from '@adonisjs/auth/plugins/browser_client' export const plugins: Config['plugins'] = [\ assert(),\ pluginAdonisJS(app),\ authBrowserClient(app)\ ] If you are using session-based authentication, make sure to also set up the session plugin. See [Populating session store - Setup](https://docs.adonisjs.com/guides/testing/browser-tests#setup-1) . That's all. Now, you may login users using the `loginAs` method. The method accepts the user object as the only argument and marks the user as logged in the current browser context. All page visits using the same browser context will have access to the logged-in user. However, the user session will be destroyed when the browser or the context is closed. Copy code to clipboard import User from '#models/user' test('get payments list', async ({ browserContext, visit }) => { const user = await User.create(payload) await browserContext.loginAs(user) const page = await visit('/dashboard') }) The `loginAs` method uses the default guard configured inside the `config/auth.ts` file for authentication. However, you may specify a custom guard using the `withGuard` method. For example: Copy code to clipboard const user = await User.create(payload) await browserContext .withGuard('admin') .loginAs(user) [](https://docs.adonisjs.com/guides/testing/browser-tests#the-route-helper) The route helper -------------------------------------------------------------------------------------------- You may use the `route` helper from the TestContext to create a URL for a route. Using the route helper ensures that whenever you update your routes, you do not have to come back and fix all the URLs inside your tests. The `route` helper accepts the same set of arguments accepted by the global template method [route](https://docs.adonisjs.com/guides/basics/routing#url-builder) . Copy code to clipboard test('see list of users', async ({ visit, route }) => { const page = await visit( route('users.list') ) }) * * * [Testing\ \ HTTP tests](https://docs.adonisjs.com/guides/testing/http-tests) [Testing\ \ Console tests](https://docs.adonisjs.com/guides/testing/console-tests) © 2025 AdonisJS [Edit this page](https://github.com/adonisjs/v6-docs/blob/main/content/docs/testing/browser_tests.md) --- # Securing SSR apps (Security) | AdonisJS Documentation Toggle docs menu Securing SSR apps [](https://docs.adonisjs.com/guides/security/securing-ssr-applications#securing-server-rendered-applications) Securing server-rendered applications =================================================================================================================================================== If you are creating a server-rendered application using AdonisJS, then you must use the `@adonisjs/shield` package to protect your applications from common web attacks like **CSRF**, **XSS**, **Content sniffing**, and so on. The package comes pre-configured with the **web starter kit**. However, you can manually install and configure the package as follows. The `@adonisjs/shield` package has a peer dependency on the `@adonisjs/session` package, so make sure to [configure the session package](https://docs.adonisjs.com/guides/basics/session) first. Copy code to clipboard node ace add @adonisjs/shield See steps performed by the add command 1. Installs the `@adonisjs/shield` package using the detected package manager. 2. Registers the following service provider inside the `adonisrc.ts` file. Copy code to clipboard { providers: [\ // ...other providers\ () => import('@adonisjs/shield/shield_provider'),\ ] } 3. Creates the `config/shield.ts` file. 4. Registers the following middleware inside the `start/kernel.ts` file. Copy code to clipboard router.use([() => import('@adonisjs/shield/shield_middleware')]) [](https://docs.adonisjs.com/guides/security/securing-ssr-applications#csrf-protection) CSRF protection ------------------------------------------------------------------------------------------------------- [CSRF (Cross-Site Request Forgery)](https://owasp.org/www-community/attacks/csrf) is an attack in which a malicious website tricks the users of your web app to perform form submissions without their explicit consent. To protect against CSRF attacks, you should define a hidden input field holding the CSRF token value that only your website can generate and verify. Hence, the form submissions triggered by the malicious website will fail. ### [](https://docs.adonisjs.com/guides/security/securing-ssr-applications#protecting-forms) Protecting forms Once you configure the `@adonisjs/shield` package, all form submissions without a CSRF token will automatically fail. Therefore, you must use the `csrfField` edge helper to define a hidden input field with the CSRF token. **Edge helper** Copy code to clipboard
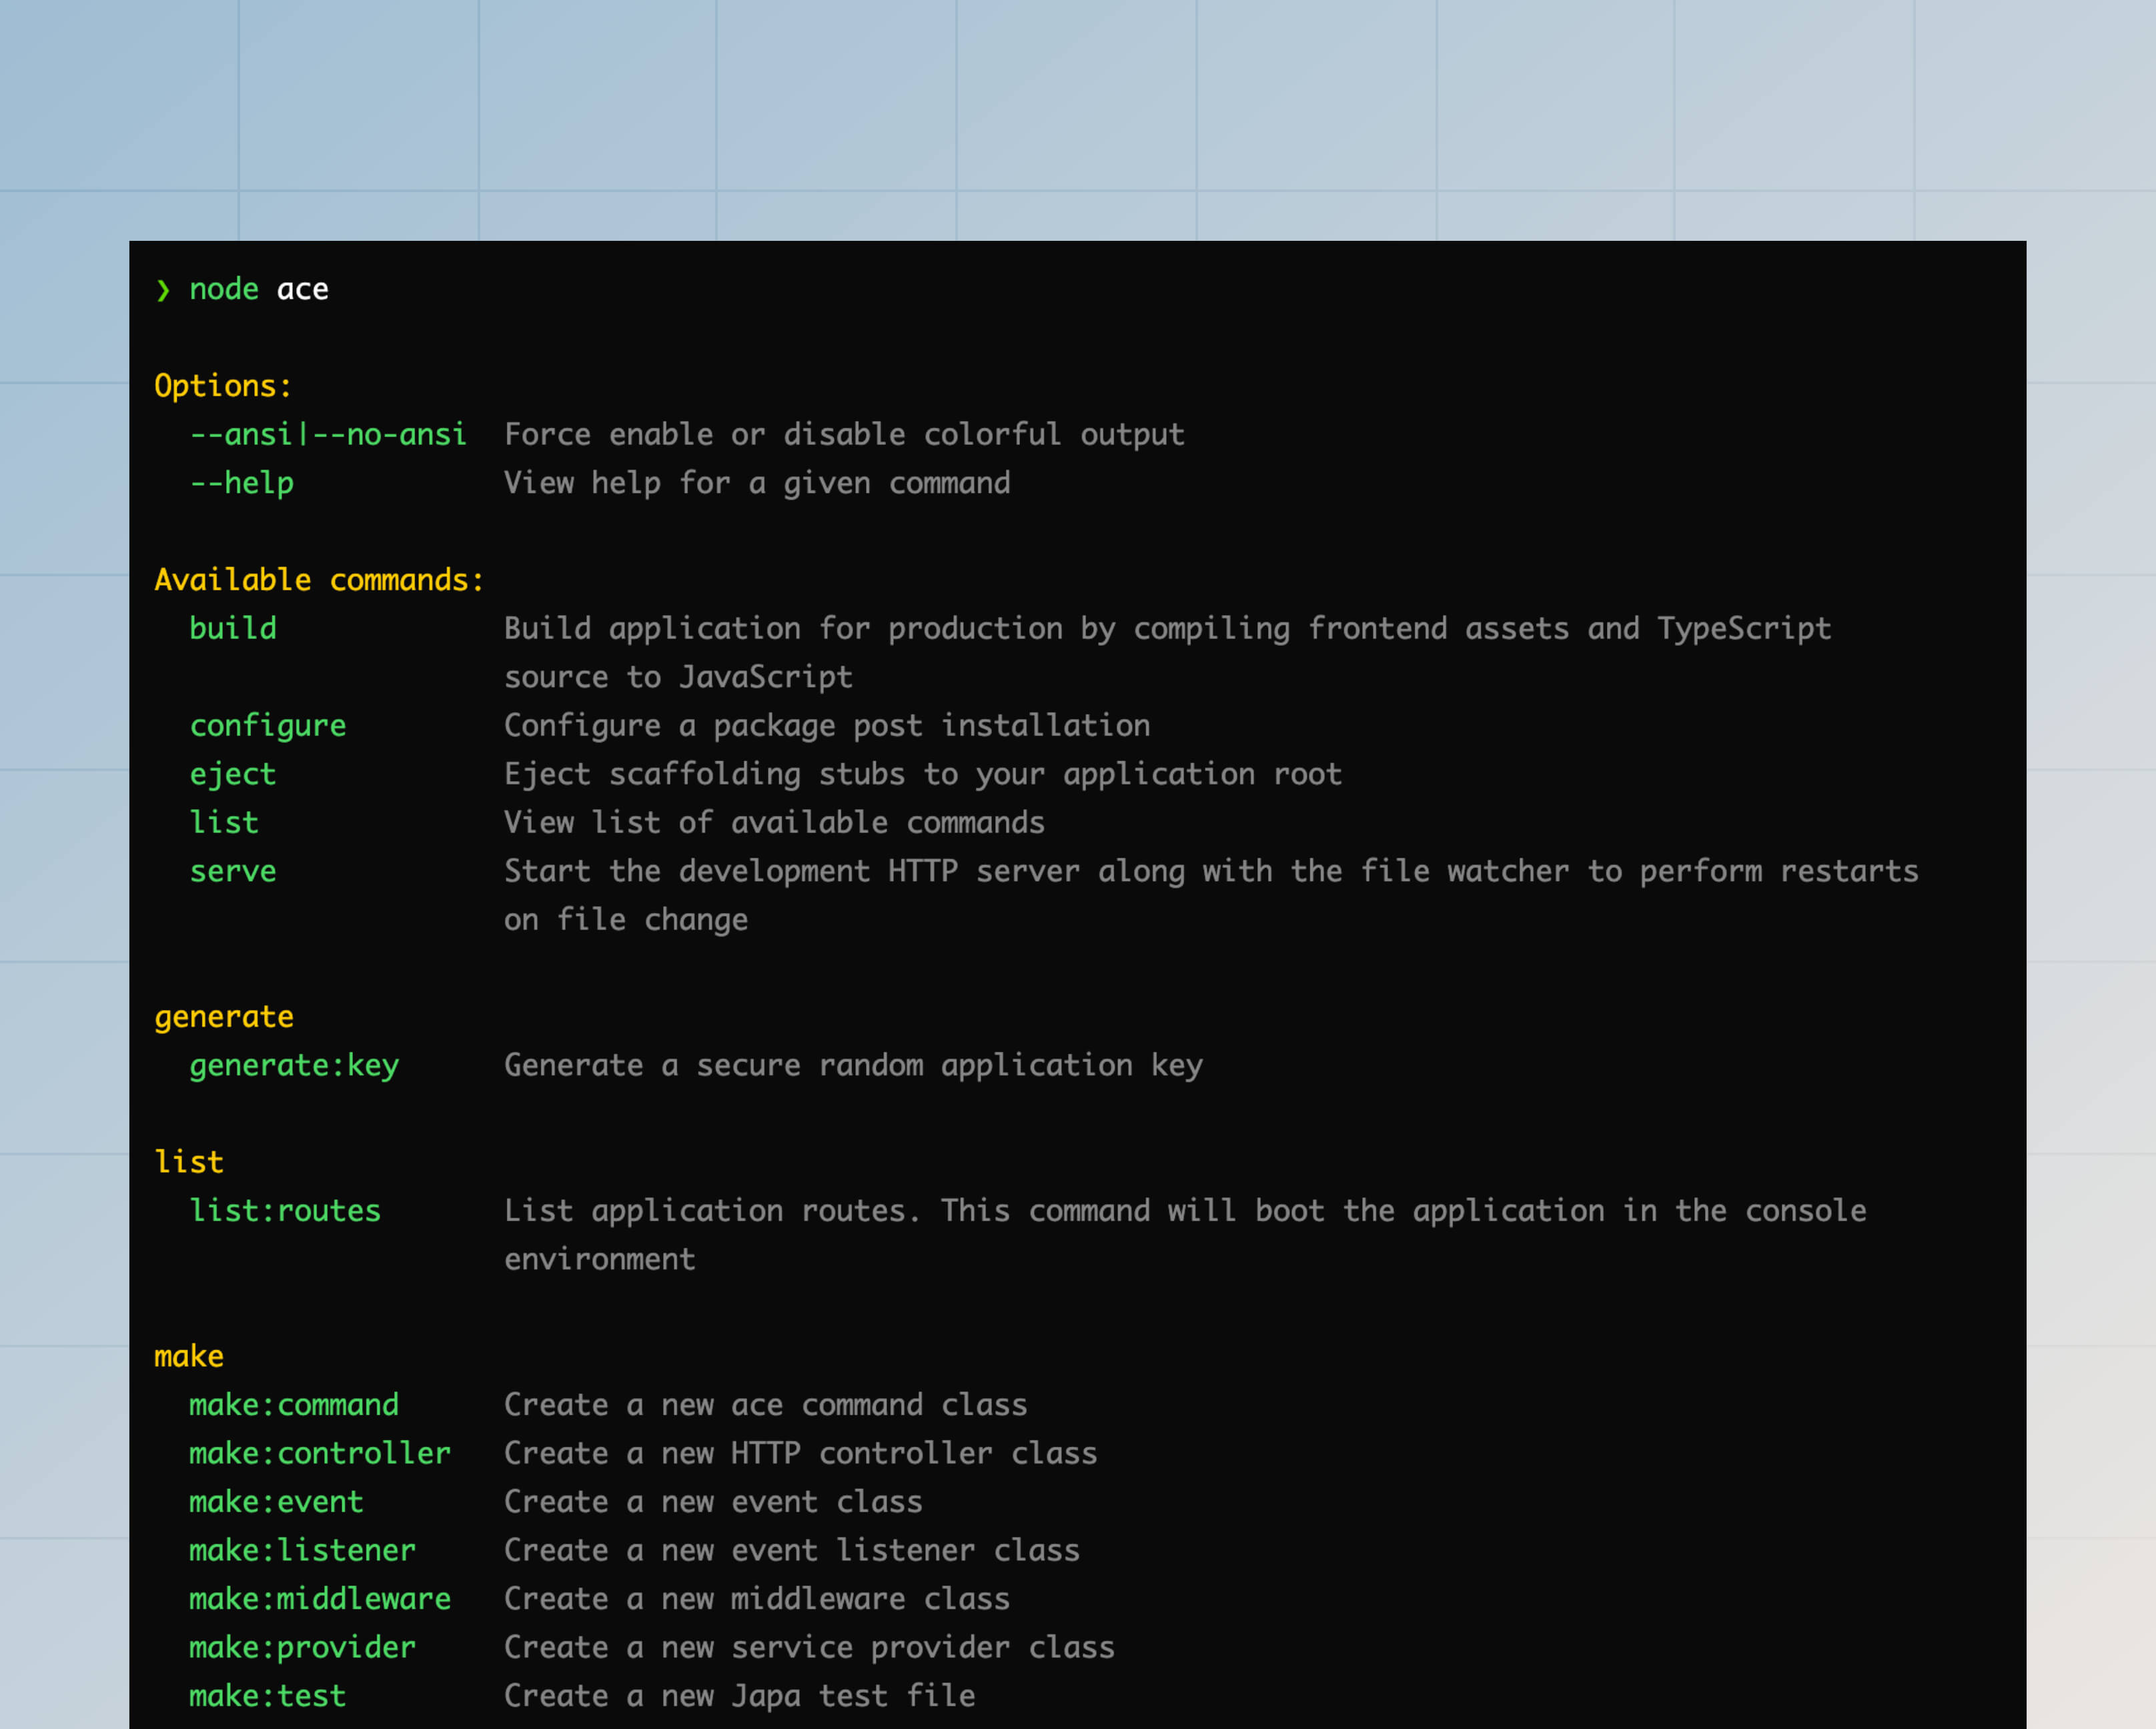
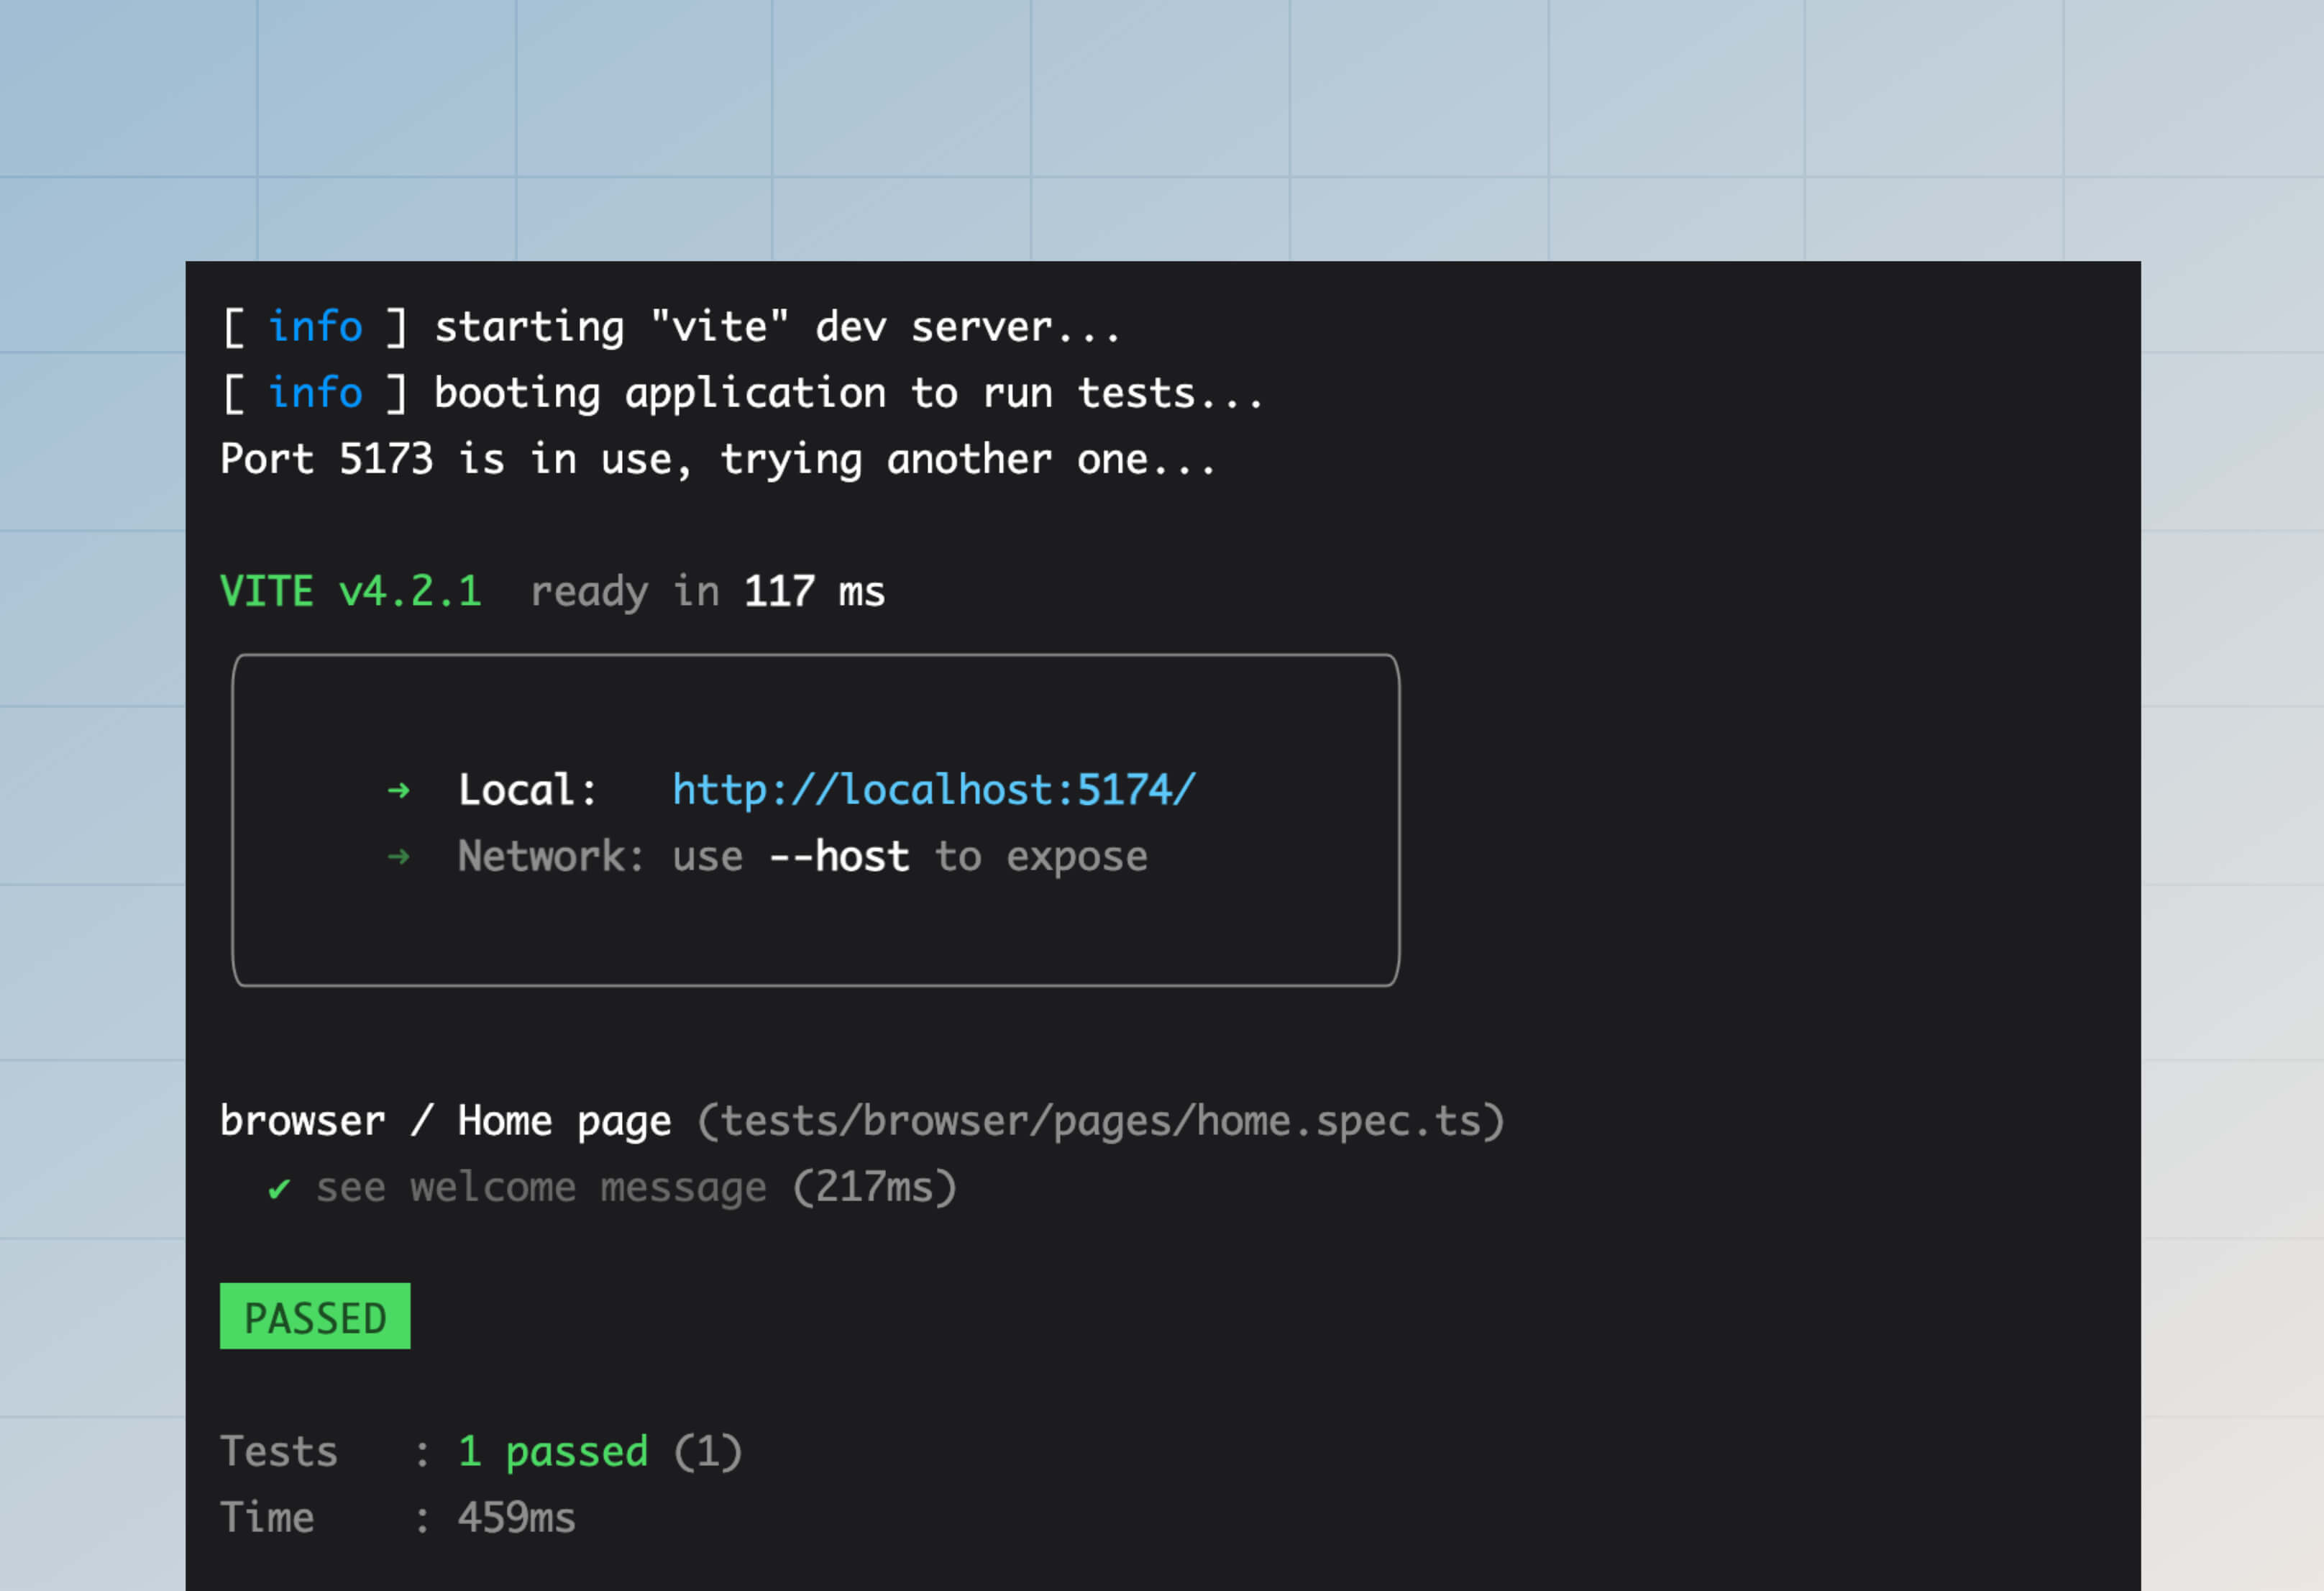
{{ csrfField() }}
**Output HTML** Copy code to clipboard
During the form submission, the `shield_middleware` will automatically verify the `_csrf` token, only allowing the form submissions with a valid CSRF token. ### [](https://docs.adonisjs.com/guides/security/securing-ssr-applications#handling-exceptions) Handling exceptions Shield raises an `E_BAD_CSRF_TOKEN` exception when the CSRF token is missing or invalid. By default, AdonisJS will capture the exception and redirect the user back to the form with an error flash message. You can access the flash message as follows inside an edge template. Copy code to clipboard @error('E_BAD_CSRF_TOKEN')

{{ $message }}

@end
{{ csrfField() }}
You can also self-handle the `E_BAD_CSRF_TOKEN` exception inside the [global exception handler](https://docs.adonisjs.com/guides/basics/exception-handling#handling-exceptions) as follows. Copy code to clipboard import app from '@adonisjs/core/services/app' import { errors } from '@adonisjs/shield' import { HttpContext, ExceptionHandler } from '@adonisjs/core/http' export default class HttpExceptionHandler extends ExceptionHandler { async handle(error: unknown, ctx: HttpContext) { if (error instanceof errors.E_BAD_CSRF_TOKEN) { return ctx.response .status(error.status) .send('Page has expired') } return super.handle(error, ctx) } } ### [](https://docs.adonisjs.com/guides/security/securing-ssr-applications#config-reference) Config reference The configuration for the CSRF guard is stored inside the `config/shield.ts` file. Copy code to clipboard import { defineConfig } from '@adonisjs/shield' const shieldConfig = defineConfig({ csrf: { enabled: true, exceptRoutes: [], enableXsrfCookie: true, methods: ['POST', 'PUT', 'PATCH', 'DELETE'], }, }) export default shieldConfig enabled Turn the CSRF guard on or off. exceptRoutes An array of route patterns to exempt from the CSRF protection. If your application has routes that accept form submissions via an API, you might want to exempt them. For more advanced use cases, you may register a function to exempt specific routes dynamically. Copy code to clipboard { exceptRoutes: (ctx) => { // exempt all routes starting with /api/ return ctx.request.url().includes('/api/') } } enableXsrfCookie When enabled, Shield will store the CSRF token inside an encrypted cookie named `XSRF-TOKEN`, which can be read by the frontend JavaScript code. This allows frontend request libraries like Axios to read the `XSRF-TOKEN` automatically and set it as a `X-XSRF-TOKEN` header when making Ajax requests without server-rendered forms. You must keep the `enableXsrfCookie` disabled if you are not triggering Ajax requests programmatically. methods An array of HTTP methods to protect. All incoming requests for the mentioned methods must present a valid CSRF token. cookieOptions Configuration for the `XSRF-TOKEN` cookie. [See cookies configuration](https://docs.adonisjs.com/guides/basics/cookies#configuration) for available options. [](https://docs.adonisjs.com/guides/security/securing-ssr-applications#defining-csp-policy) Defining CSP policy --------------------------------------------------------------------------------------------------------------- [CSP (Content security policy)](https://web.dev/csp/) protects your applications from XSS attacks by defining trusted sources for loading JavaScript, CSS, fonts, images, and so on. The CSP guard is disabled by default. However, we recommend you enable it and configure the policy directives inside the `config/shield.ts` file. Copy code to clipboard import { defineConfig } from '@adonisjs/shield' const shieldConfig = defineConfig({ csp: { enabled: true, directives: { // policy directives go here }, reportOnly: false, }, }) export default shieldConfig enabled Turn the CSP guard on or off. directives Configure the CSP directives. You can view the list of available directives on [https://content-security-policy.com/](https://content-security-policy.com/#directive) Copy code to clipboard const shieldConfig = defineConfig({ csp: { enabled: true, directives: { defaultSrc: [`'self'`], scriptSrc: [`'self'`, 'https://cdnjs.cloudflare.com'], fontSrc: [`'self'`, 'https://fonts.googleapis.com'] }, reportOnly: false, }, }) export default shieldConfig reportOnly The CSP policy will not block the resources when the `reportOnly` flag is enabled. Instead, it will report the violations on an endpoint configured using the `reportUri` directive. Copy code to clipboard const shieldConfig = defineConfig({ csp: { enabled: true, directives: { defaultSrc: [`'self'`], reportUri: ['/csp-report'] }, reportOnly: true, }, }) Also, register the `csp-report` endpoint to collect the violation reports. Copy code to clipboard router.post('/csp-report', async ({ request }) => { const report = request.input('csp-report') }) ### [](https://docs.adonisjs.com/guides/security/securing-ssr-applications#using-nonce) Using Nonce You may allow inline `script` and `style` tags by defining the [nonce attribute](https://content-security-policy.com/nonce/) on them. The value of the nonce attribute can be accessed inside Edge templates using the `cspNonce` property. Copy code to clipboard Also, use the `@nonce` keyword inside the directives config to allow nonce-based inline scripts and styles. Copy code to clipboard const shieldConfig = defineConfig({ csp: { directives: { defaultSrc: [`'self'`, '@nonce'], }, }, }) ### [](https://docs.adonisjs.com/guides/security/securing-ssr-applications#loading-assets-from-the-vite-dev-server) Loading assets from the Vite Dev server If you are using the [Vite integration](https://docs.adonisjs.com/guides/basics/vite) , you can use the following CSP keywords to allow assets served by the Vite Dev server. * The `@viteDevUrl` adds the Vite dev server URL to the allowed list. * The `@viteHmrUrl` adds the Vite HMR websocket server URL to the allowed list. Copy code to clipboard const shieldConfig = defineConfig({ csp: { directives: { defaultSrc: [`'self'`, '@viteDevUrl'], connectSrc: ['@viteHmrUrl'] }, }, }) If you are deploying the Vite bundled output to a CDN server, you must replace `@viteDevUrl` with the `@viteUrl` keyword to allow assets from both the development server and the CDN server. Copy code to clipboard directives: { defaultSrc: [`'self'`, '@viteDevUrl'], defaultSrc: [`'self'`, '@viteUrl'], connectSrc: ['@viteHmrUrl'] }, ### [](https://docs.adonisjs.com/guides/security/securing-ssr-applications#adding-nonce-to-styles-injected-by-vite) Adding Nonce to styles injected by Vite Currently, Vite does not allow defining a `nonce` attribute to the `style` tags injected by it inside the DOM. There is an [open PR](https://github.com/vitejs/vite/pull/11864) for the same, and we are hoping it will be resolved soon. [](https://docs.adonisjs.com/guides/security/securing-ssr-applications#configuring-hsts) Configuring HSTS --------------------------------------------------------------------------------------------------------- The [**Strict-Transport-Security (HSTS)**](https://developer.mozilla.org/en-US/docs/Web/HTTP/Headers/Strict-Transport-Security) response header informs the browsers to always load the website using HTTPS. You can configure the header directives using the `config/shield.ts` file. Copy code to clipboard import { defineConfig } from '@adonisjs/shield' const shieldConfig = defineConfig({ hsts: { enabled: true, maxAge: '180 days', includeSubDomains: true, }, }) enabled Turn the hsts guard on or off. maxAge Defines the `max-age` attribute. The value should either be a number in seconds or a string-based time expression. Copy code to clipboard { // Remember for 10 seconds maxAge: 10, } Copy code to clipboard { // Remember for 2 days maxAge: '2 days', } includeSubDomains Defines the `includeSubDomains` directive to apply the setting on subdomains. [](https://docs.adonisjs.com/guides/security/securing-ssr-applications#configuring-x-frame-protection) Configuring X-Frame protection ------------------------------------------------------------------------------------------------------------------------------------- The [**X-Frame-Options**](https://developer.mozilla.org/en-US/docs/Web/HTTP/Headers/X-Frame-Options) header is used to indicate if a browser is allowed to render a website embedded inside an `iframe`, `frame`, `embed`, or `object` tags. If you have configured CSP, you may instead use the [frame-ancestors](https://developer.mozilla.org/en-US/docs/Web/HTTP/Headers/Content-Security-Policy/frame-ancestors) directive and disable the `xFrame` guard. You can configure the header directives using the `config/shield.ts` file. Copy code to clipboard import { defineConfig } from '@adonisjs/shield' const shieldConfig = defineConfig({ xFrame: { enabled: true, action: 'DENY' }, }) enabled Turn the xFrame guard on or off. action The `action` property defines the header value. It could be `DENY`, `SAMEORIGIN`, or `ALLOW-FROM`. Copy code to clipboard { action: 'DENY' } In the case of `ALLOW-FROM`, you must also define the `domain` property. Copy code to clipboard { action: 'ALLOW-FROM', domain: 'https://foo.com', } [](https://docs.adonisjs.com/guides/security/securing-ssr-applications#disabling-mime-sniffing) Disabling MIME sniffing ----------------------------------------------------------------------------------------------------------------------- The [**X-Content-Type-Options**](https://developer.mozilla.org/en-US/docs/Web/HTTP/Headers/X-Content-Type-Options) header instructs browsers to follow the `content-type` header and not perform MIME sniffing by inspecting the content of an HTTP response. Once you enable this guard, Shield will define the `X-Content-Type-Options: nosniff` header for all HTTP responses. Copy code to clipboard import { defineConfig } from '@adonisjs/shield' const shieldConfig = defineConfig({ contentTypeSniffing: { enabled: true, }, }) * * * [Security\ \ CORS](https://docs.adonisjs.com/guides/security/cors) [Security\ \ Rate limiting](https://docs.adonisjs.com/guides/security/rate-limiting) © 2025 AdonisJS [Edit this page](https://github.com/adonisjs/v6-docs/blob/main/content/docs/security/securing_ssr_applications.md) --- # HTTP tests (Testing) | AdonisJS Documentation Toggle docs menu HTTP tests [](https://docs.adonisjs.com/guides/testing/http-tests#http-tests) HTTP tests ============================================================================= HTTP tests refer to testing your application endpoints by making an actual HTTP request against them and asserting the response body, headers, cookies, session, etc. HTTP tests are performed using the [API client plugin](https://japa.dev/docs/plugins/api-client) of Japa. The API client plugin is a stateless request library similar to `Axios` or `fetch` but more suited for testing. If you want to test your web apps inside a real browser and interact with them programmatically, we recommend using the [Browser client](https://docs.adonisjs.com/guides/testing/browser-tests) that uses Playwright for testing. [](https://docs.adonisjs.com/guides/testing/http-tests#setup) Setup ------------------------------------------------------------------- The first step is to install the following packages from the npm packages registry. npm Copy code to clipboard npm i -D @japa/api-client ### [](https://docs.adonisjs.com/guides/testing/http-tests#registering-the-plugin) Registering the plugin Before moving forward, register the plugin inside the `tests/bootstrap.ts` file. tests/bootstrap.ts Copy code to clipboard import { apiClient } from '@japa/api-client' export const plugins: Config['plugins'] = [\ assert(),\ apiClient(),\ pluginAdonisJS(app),\ ] The `apiClient` method optionally accepts the `baseURL` for the server. If not provided, it will use the `HOST` and the `PORT` environment variables. Copy code to clipboard import env from '#start/env' export const plugins: Config['plugins'] = [\ apiClient({\ baseURL: `http://${env.get('HOST')}:${env.get('PORT')}`\ })\ ] [](https://docs.adonisjs.com/guides/testing/http-tests#basic-example) Basic example ----------------------------------------------------------------------------------- Once the `apiClient` plugin is registered, you may access the `client` object from [TestContext](https://japa.dev/docs/test-context) to make an HTTP request. The HTTP tests must be written inside the folder configured for the `functional` tests suite. You may use the following command to create a new test file. Copy code to clipboard node ace make:test users/list --suite=functional Copy code to clipboard import { test } from '@japa/runner' test.group('Users list', () => { test('get a list of users', async ({ client }) => { const response = await client.get('/users') response.assertStatus(200) response.assertBody({ data: [\ {\ id: 1,\ email: 'foo@bar.com',\ }\ ] }) }) }) To view all the available request and assertion methods, make sure to [go through the Japa documentation](https://japa.dev/docs/plugins/api-client) . [](https://docs.adonisjs.com/guides/testing/http-tests#open-api-testing) Open API testing ----------------------------------------------------------------------------------------- The assertion and API client plugins allow you to use Open API spec files for writing assertions. Instead of manually testing the response against a fixed payload, you may use a spec file to test the shape of the HTTP response. It is a great way to keep your Open API spec and server responses in sync. Because if you remove a certain endpoint from the spec file or change the response data shape, your tests will fail. ### [](https://docs.adonisjs.com/guides/testing/http-tests#registering-schema) Registering schema AdonisJS does not offer tooling for generating Open API schema files from code. You may write it by hand or use graphical tools to create it. Once you have a spec file, save it inside the `resources` directory (create the directory if missing) and register it with the `openapi-assertions` plugin within the `tests/bootstrap.ts` file. Copy code to clipboard npm i -D @japa/openapi-assertions tests/bootstrap.ts Copy code to clipboard import app from '@adonisjs/core/services/app' import { openapi } from '@japa/openapi-assertions' export const plugins: Config['plugins'] = [\ assert(),\ openapi({\ schemas: [app.makePath('resources/open_api_schema.yaml')]\ })\ apiClient(),\ pluginAdonisJS(app)\ ] ### [](https://docs.adonisjs.com/guides/testing/http-tests#writing-assertions) Writing assertions Once the schema is registered, you can use the `response.assertAgainstApiSpec` method to assert against the API spec. Copy code to clipboard test('paginate posts', async ({ client }) => { const response = await client.get('/posts') response.assertAgainstApiSpec() }) * The `response.assertAgainstApiSpec` method will use the **request method**, the **endpoint**, and the **response status code** to find the expected response schema. * An exception will be raised when the response schema cannot be found. Otherwise, the response body will be validated against the schema. Only the response's shape is tested, not the actual values. Therefore, you may have to write additional assertions. For example: Copy code to clipboard // Assert that the response is as per the schema response.assertAgainstApiSpec() // Assert for expected values response.assertBodyContains({ data: [{ title: 'Adonis 101' }, { title: 'Lucid 101' }] }) [](https://docs.adonisjs.com/guides/testing/http-tests#readingwriting-cookies) Reading/writing cookies ------------------------------------------------------------------------------------------------------ You may send cookies during the HTTP request using the `withCookie` method. The method accepts the cookie name as the first argument and the value as the second. Copy code to clipboard await client .get('/users') .withCookie('user_preferences', { limit: 10 }) The `withCookie` method defines a [signed cookie](https://docs.adonisjs.com/guides/basics/cookies#signed-cookies) . In addition, you may use the `withEncryptedCookie` or `withPlainCookie` methods to send other types of cookies to the server. Copy code to clipboard await client .get('/users') .withEncryptedCookie('user_preferences', { limit: 10 }) Copy code to clipboard await client .get('/users') .withPlainCookie('user_preferences', { limit: 10 }) ### [](https://docs.adonisjs.com/guides/testing/http-tests#reading-cookies-from-the-response) Reading cookies from the response You may access the cookies set by your AdonisJS server using the `response.cookies` method. The method returns an object of cookies as a key-value pair. Copy code to clipboard const response = await client.get('/users') console.log(response.cookies()) You may use the `response.cookie` method to access a single cookie value by its name. Or use the `assertCookie` method to assert the cookie value. Copy code to clipboard const response = await client.get('/users') console.log(response.cookie('user_preferences')) response.assertCookie('user_preferences') [](https://docs.adonisjs.com/guides/testing/http-tests#populating-session-store) Populating session store --------------------------------------------------------------------------------------------------------- If you are using the [`@adonisjs/session`](https://docs.adonisjs.com/guides/basics/session) package to read/write session data in your application, you may also want to use the `sessionApiClient` plugin to populate the session store when writing tests. ### [](https://docs.adonisjs.com/guides/testing/http-tests#setup-1) Setup The first step is registering the plugin inside the `tests/bootstrap.ts` file. tests/bootstrap.ts Copy code to clipboard import { sessionApiClient } from '@adonisjs/session/plugins/api_client' export const plugins: Config['plugins'] = [\ assert(),\ pluginAdonisJS(app),\ sessionApiClient(app)\ ] And then, update the `.env.test` file (create one if it is missing) and set the `SESSON_DRIVER` to `memory`. .env.test Copy code to clipboard SESSION_DRIVER=memory ### [](https://docs.adonisjs.com/guides/testing/http-tests#making-requests-with-session-data) Making requests with session data You may use the `withSession` method on the Japa API client to make an HTTP request with some pre-defined session data. The `withSession` method will create a new session ID and populate the memory store with the data, and your AdonisJS application code can read the session data as usual. After the request finishes, the session ID and its data will be destroyed. Copy code to clipboard test('checkout with cart items', async ({ client }) => { await client .post('/checkout') .withSession({ cartItems: [\ {\ id: 1,\ name: 'South Indian Filter Press Coffee'\ },\ {\ id: 2,\ name: 'Cold Brew Bags',\ }\ ] }) }) Like the `withSession` method, you may use the `withFlashMessages` method to set flash messages when making an HTTP request. Copy code to clipboard const response = await client .get('posts/1') .withFlashMessages({ success: 'Post created successfully' }) response.assertTextIncludes(`Post created successfully`) ### [](https://docs.adonisjs.com/guides/testing/http-tests#reading-session-data-from-the-response) Reading session data from the response You may access the session data set by your AdonisJS server using the `response.session()` method. The method returns the session data as an object of a key-value pair. Copy code to clipboard const response = await client .post('/posts') .json({ title: 'some title', body: 'some description', }) console.log(response.session()) // all session data console.log(response.session('post_id')) // value of post_id You may read flash messages from the response using the `response.flashMessage` or `response.flashMessages` method. Copy code to clipboard const response = await client.post('/posts') response.flashMessages() response.flashMessage('errors') response.flashMessage('success') Finally, you may write assertions for the session data using one of the following methods. Copy code to clipboard const response = await client.post('/posts') /** * Assert a specific key (with optional value) exists * in the session store */ response.assertSession('cart_items') response.assertSession('cart_items', [{\ id: 1,\ }, {\ id: 2,\ }]) /** * Assert a specific key is not in the session store */ response.assertSessionMissing('cart_items') /** * Assert a flash message exists (with optional value) * in the flash messages store */ response.assertFlashMessage('success') response.assertFlashMessage('success', 'Post created successfully') /** * Assert a specific key is not in the flash messages store */ response.assertFlashMissing('errors') /** * Assert for validation errors in the flash messages * store */ response.assertHasValidationError('title') response.assertValidationError('title', 'Enter post title') response.assertValidationErrors('title', [\ 'Enter post title',\ 'Post title must be 10 characters long.'\ ]) response.assertDoesNotHaveValidationError('title') [](https://docs.adonisjs.com/guides/testing/http-tests#authenticating-users) Authenticating users ------------------------------------------------------------------------------------------------- If you use the `@adonisjs/auth` package to authenticate users in your application, you may use the `authApiClient` Japa plugin to authenticate users when making HTTP requests to your application. The first step is registering the plugin inside the `tests/bootstrap.ts` file. tests/bootstrap.ts Copy code to clipboard import { authApiClient } from '@adonisjs/auth/plugins/api_client' export const plugins: Config['plugins'] = [\ assert(),\ pluginAdonisJS(app),\ authApiClient(app)\ ] If you are using session-based authentication, make sure to also set up the session plugin. See [Populating session store - Setup](https://docs.adonisjs.com/guides/testing/http-tests#setup-1) . That's all. Now, you may login users using the `loginAs` method. The method accepts the user object as the only argument and marks the user as logged in for the current HTTP request. Copy code to clipboard import User from '#models/user' test('get payments list', async ({ client }) => { const user = await User.create(payload) await client .get('/me/payments') .loginAs(user) }) The `loginAs` method uses the default guard configured inside the `config/auth.ts` file for authentication. However, you may specify a custom guard using the `withGuard` method. For example: Copy code to clipboard await client .get('/me/payments') .withGuard('api_tokens') .loginAs(user) [](https://docs.adonisjs.com/guides/testing/http-tests#making-a-request-with-a-csrf-token) Making a request with a CSRF token ----------------------------------------------------------------------------------------------------------------------------- If forms in your application use [CSRF protection](https://docs.adonisjs.com/guides/security/securing-ssr-applications) , you may use the `withCsrfToken` method to generate a CSRF token and pass it as a header during the request. Before using the `withCsrfToken` method, register the following Japa plugins inside the `tests/bootstrap.ts` file and also make sure to [switch the `SESSION_DRIVER` env variable](https://docs.adonisjs.com/guides/testing/http-tests#setup-1) to `memory`. tests/bootstrap.ts Copy code to clipboard import { shieldApiClient } from '@adonisjs/shield/plugins/api_client' import { sessionApiClient } from '@adonisjs/session/plugins/api_client' export const plugins: Config['plugins'] = [\ assert(),\ pluginAdonisJS(app),\ sessionApiClient(app),\ shieldApiClient()\ ] Copy code to clipboard test('create a post', async ({ client }) => { await client .post('/posts') .form(dataGoesHere) .withCsrfToken() }) [](https://docs.adonisjs.com/guides/testing/http-tests#the-route-helper) The route helper ----------------------------------------------------------------------------------------- You may use the `route` helper from the TestContext to create a URL for a route. Using the route helper ensures that whenever you update your routes, you do not have to come back and fix all the URLs inside your tests. The `route` helper accepts the same set of arguments accepted by the global template method [route](https://docs.adonisjs.com/guides/basics/routing#url-builder) . Copy code to clipboard test('get a list of users', async ({ client, route }) => { const response = await client.get( route('users.list') ) response.assertStatus(200) response.assertBody({ data: [\ {\ id: 1,\ email: 'foo@bar.com',\ }\ ] }) }) * * * [Testing\ \ Introduction](https://docs.adonisjs.com/guides/testing/introduction) [Testing\ \ Browser tests](https://docs.adonisjs.com/guides/testing/browser-tests) © 2025 AdonisJS [Edit this page](https://github.com/adonisjs/v6-docs/blob/main/content/docs/testing/http_tests.md) --- # Social authentication (Authentication) | AdonisJS Documentation Toggle docs menu Social authentication [](https://docs.adonisjs.com/guides/authentication/social-authentication#social-authentication) Social authentication ===================================================================================================================== You can implement social authentication in your AdonisJS applications using the `@adonisjs/ally` package. Ally comes with the following inbuilt drivers, alongside an extensible API to [register custom drivers](https://docs.adonisjs.com/guides/authentication/social-authentication#creating-a-custom-social-driver) . * Twitter * Facebook * Spotify * Google * GitHub * Discord * LinkedIn Ally does not store any users or access tokens on your behalf. It implements the OAuth2 and OAuth1 protocols, authenticates a user with social service, and provides user details. You can store that information inside a database and use the [auth](https://docs.adonisjs.com/guides/authentication/introduction) package to login the user within your application. [](https://docs.adonisjs.com/guides/authentication/social-authentication#installation) Installation --------------------------------------------------------------------------------------------------- Install and configure the package using the following command : Copy code to clipboard node ace add @adonisjs/ally # Define providers as CLI flags node ace add @adonisjs/ally --providers=github --providers=google See steps performed by the add command 1. Installs the `@adonisjs/ally` package using the detected package manager. 2. Registers the following service provider inside the `adonisrc.ts` file. Copy code to clipboard { providers: [\ // ...other providers\ () => import('@adonisjs/ally/ally_provider')\ ] } 3. Create the `config/ally.ts` file. This file contains the configuration settings for selected OAuth providers. 4. Defines the environment variables to store `CLIENT_ID` and `CLIENT_SECRET` for selected OAuth providers. [](https://docs.adonisjs.com/guides/authentication/social-authentication#configuration) Configuration ----------------------------------------------------------------------------------------------------- The `@adonisjs/ally` package configuration is stored inside the `config/ally.ts` file. You can define config for multiple services within a single config file. See also: [Config stub](https://github.com/adonisjs/ally/blob/main/stubs/config/ally.stub) Copy code to clipboard import { defineConfig, services } from '@adonisjs/ally' defineConfig({ github: services.github({ clientId: env.get('GITHUB_CLIENT_ID')!, clientSecret: env.get('GITHUB_CLIENT_SECRET')!, callbackUrl: '', }), twitter: services.twitter({ clientId: env.get('TWITTER_CLIENT_ID')!, clientSecret: env.get('TWITTER_CLIENT_SECRET')!, callbackUrl: '', }), }) ### [](https://docs.adonisjs.com/guides/authentication/social-authentication#configuring-the-callback-url) Configuring the callback URL OAuth providers require you to register a callback URL to handle the redirect response after the user authorizes the login request. The callback URL must be registered with the OAuth service provider. For example: If you are using GitHub, you must log in to your GitHub account, [create a new app](https://docs.github.com/en/apps/oauth-apps/building-oauth-apps/creating-an-oauth-app) and define the callback URL using the GitHub interface. Also, you must register the same callback URL within the `config/ally.ts` file using the `callbackUrl` property. [](https://docs.adonisjs.com/guides/authentication/social-authentication#usage) Usage ------------------------------------------------------------------------------------- Once the package has been configured, you can interact with Ally APIs using the `ctx.ally` property. You can switch between the configured auth providers using the `ally.use()` method. For example: Copy code to clipboard router.get('/github/redirect', ({ ally }) => { // GitHub driver instance const gh = ally.use('github') }) router.get('/twitter/redirect', ({ ally }) => { // Twitter driver instance const twitter = ally.use('twitter') }) // You could also dynamically retrieve the driver router.get('/:provider/redirect', ({ ally, params }) => { const driverInstance = ally.use(params.provider) }).where('provider', /github|twitter/) ### [](https://docs.adonisjs.com/guides/authentication/social-authentication#redirecting-the-user-for-authentication) Redirecting the user for authentication The first step in social authentication is to redirect the user to an OAuth service and wait for them to either approve or deny the authentication request. You can perform the redirect using the `.redirect()` method. Copy code to clipboard router.get('/github/redirect', ({ ally }) => { return ally.use('github').redirect() }) You can pass a callback function to define custom scopes or query string values during the redirect. Copy code to clipboard router.get('/github/redirect', ({ ally }) => { return ally .use('github') .redirect((request) => { request.scopes(['user:email', 'repo:invite']) request.param('allow_signup', false) }) }) ### [](https://docs.adonisjs.com/guides/authentication/social-authentication#handling-callback-response) Handling callback response The user will be redirected back to your application's `callbackUrl` after they approve or deny the authentication request. Within this route, you can call the `.user()` method to get the logged-in user details and the access token. However, you must also check the response for possible error states. Copy code to clipboard router.get('/github/callback', async ({ ally }) => { const gh = ally.use('github') /** * User has denied access by canceling * the login flow */ if (gh.accessDenied()) { return 'You have cancelled the login process' } /** * OAuth state verification failed. This happens when the * CSRF cookie gets expired. */ if (gh.stateMisMatch()) { return 'We are unable to verify the request. Please try again' } /** * GitHub responded with some error */ if (gh.hasError()) { return gh.getError() } /** * Access user info */ const user = await gh.user() return user }) [](https://docs.adonisjs.com/guides/authentication/social-authentication#user-properties) User properties --------------------------------------------------------------------------------------------------------- Following is the list of properties you can access from the return value of the `.user()` method call. The properties are consistent among all the underlying drivers. Copy code to clipboard const user = await gh.user() user.id user.email user.emailVerificationState user.name user.nickName user.avatarUrl user.token user.original ### [](https://docs.adonisjs.com/guides/authentication/social-authentication#id) id A unique ID returned by the OAuth provider. ### [](https://docs.adonisjs.com/guides/authentication/social-authentication#email) email The email address returned by the OAuth provider. The value will be `null` if the OAuth request does not ask for the user's email address. ### [](https://docs.adonisjs.com/guides/authentication/social-authentication#emailverificationstate) emailVerificationState Many OAuth providers allow users with unverified emails to log in and authenticate OAuth requests. You should use this flag to ensure only users with verified emails can log in. Following is the list of possible values. * `verified`: The user's email address is verified with the OAuth provider. * `unverified`: The user's email address is not verified. * `unsupported`: The OAuth provider does not share the email verification state. ### [](https://docs.adonisjs.com/guides/authentication/social-authentication#name) name The name of the user returned by the OAuth provider. ### [](https://docs.adonisjs.com/guides/authentication/social-authentication#nickname) nickName A publicly visible nick name of the user. The value of `nickName` and `name` will be the same if the OAuth provider has no concept of nicknames. ### [](https://docs.adonisjs.com/guides/authentication/social-authentication#avatarurl) avatarUrl The HTTP(s) URL to the user's public profile picture. ### [](https://docs.adonisjs.com/guides/authentication/social-authentication#token) token The token property is the reference to the underlying access token object. The token object has the following sub-properties. Copy code to clipboard user.token.token user.token.type user.token.refreshToken user.token.expiresAt user.token.expiresIn | Property | Protocol | Description | | --- | --- | --- | | `token` | OAuth2 / OAuth1 | The value of the access token. The value is available for the `OAuth2` and the `OAuth1` protocols. | | `secret` | OAuth1 | The token secret applicable only for `OAuth1` protocol. Currently, Twitter is the only official driver using OAuth1. | | `type` | OAuth2 | The token type. Usually, it will be a [bearer token](https://oauth.net/2/bearer-tokens/)
. | | `refreshToken` | OAuth2 | You can use the refresh token to create a new access token. The value will be `undefined` if the OAuth provider does not support refresh tokens | | `expiresAt` | OAuth2 | An instance of the luxon DateTime class representing the absolute time when the access token will expire. | | `expiresIn` | OAuth2 | Value in seconds, after which the token will expire. It is a static value and does not change as time passes by. | ### [](https://docs.adonisjs.com/guides/authentication/social-authentication#original) original Reference to the original response from the OAuth provider. You might want to reference the original response if the normalized set of user properties does not have all the information you need. Copy code to clipboard const user = await github.user() console.log(user.original) [](https://docs.adonisjs.com/guides/authentication/social-authentication#defining-scopes) Defining scopes --------------------------------------------------------------------------------------------------------- Scopes refers to the data you want to access after the user approves the authentication request. The name of scopes and the data you can access varies between the OAuth providers; therefore, you must read their documentation. The scopes can be defined within the `config/ally.ts` file, or you can define them when redirecting the user. Thanks to TypeScript, you will get autocomplete suggestions for all the available scopes. ![](https://docs.adonisjs.com/assets/ally_autocomplete-C4bJMD9J.png) config/ally.ts Copy code to clipboard github: { driver: 'github', clientId: env.get('GITHUB_CLIENT_ID')!, clientSecret: env.get('GITHUB_CLIENT_SECRET')!, callbackUrl: '', scopes: ['read:user', 'repo:invite'], } During redirect Copy code to clipboard ally .use('github') .redirect((request) => { request.scopes(['read:user', 'repo:invite']) }) [](https://docs.adonisjs.com/guides/authentication/social-authentication#defining-redirect-query-params) Defining redirect query params --------------------------------------------------------------------------------------------------------------------------------------- You can customize the query parameters for the redirect request alongside the scopes. In the following example, we define the `prompt` and the `access_type` params applicable with the [Google provider](https://developers.google.com/identity/protocols/oauth2/web-server#httprest) . Copy code to clipboard router.get('/google/redirect', async ({ ally }) => { return ally .use('google') .redirect((request) => { request .param('access_type', 'offline') .param('prompt', 'select_account') }) }) You can clear any existing parameters using the `.clearParam()` method on the request. This can be helpful if parameter defaults are defined in the config and you need to redefine them for a separate custom auth flow. Copy code to clipboard router.get('/google/redirect', async ({ ally }) => { return ally .use('google') .redirect((request) => { request .clearParam('redirect_uri') .param('redirect_uri', '') }) }) [](https://docs.adonisjs.com/guides/authentication/social-authentication#fetching-user-details-from-an-access-token) Fetching user details from an access token --------------------------------------------------------------------------------------------------------------------------------------------------------------- Sometimes, you might want to fetch user details from an access token stored in the database or provided via another OAuth flow. For example, you used the Native OAuth flow via a mobile app and received an access token back. You can fetch the user details using the `.userFromToken()` method. Copy code to clipboard const user = await ally .use('github') .userFromToken(accessToken) You can fetch the user details for an OAuth1 driver using the `.userFromTokenAndSecret` method. Copy code to clipboard const user = await ally .use('github') .userFromTokenAndSecret(token, secret) [](https://docs.adonisjs.com/guides/authentication/social-authentication#stateless-authentication) Stateless authentication --------------------------------------------------------------------------------------------------------------------------- Many OAuth providers [recommend using a CSRF state token](https://developers.google.com/identity/openid-connect/openid-connect?hl=en#createxsrftoken) to prevent your application from cross-site request forgery attacks. Ally creates a CSRF token and saves it inside an encrypted cookie, which is later verified after the user approves the authentication request. However, if you cannot use cookies for some reason, you can enable the stateless mode in which no state verification will take place, and hence, no CSRF cookie will be generated. Redirecting Copy code to clipboard ally.use('github').stateless().redirect() Handling callback response Copy code to clipboard const gh = ally.use('github').stateless() await gh.user() [](https://docs.adonisjs.com/guides/authentication/social-authentication#complete-config-reference) Complete config reference ----------------------------------------------------------------------------------------------------------------------------- The following is the complete configuration reference for all the drivers. You can copy-paste the following objects directly to `config/ally.ts` file. GitHub config Copy code to clipboard { github: services.github({ clientId: '', clientSecret: '', callbackUrl: '', // GitHub specific login: 'adonisjs', scopes: ['user', 'gist'], allowSignup: true, }) } Google config Copy code to clipboard { google: services.google({ clientId: '', clientSecret: '', callbackUrl: '', // Google specific prompt: 'select_account', accessType: 'offline', hostedDomain: 'adonisjs.com', display: 'page', scopes: ['userinfo.email', 'calendar.events'], }) } Twitter config Copy code to clipboard { twitter: services.twitter({ clientId: '', clientSecret: '', callbackUrl: '', }) } Discord config Copy code to clipboard { discord: services.discord({ clientId: '', clientSecret: '', callbackUrl: '', // Discord specific prompt: 'consent' | 'none', guildId: '', disableGuildSelect: false, permissions: 10, scopes: ['identify', 'email'], }) } LinkedIn config (deprecated) This configuration is deprecated in compliance with the updated [LinkedIn OAuth requirements](https://learn.microsoft.com/en-us/linkedin/consumer/integrations/self-serve/sign-in-with-linkedin) . Copy code to clipboard { linkedin: services.linkedin({ clientId: '', clientSecret: '', callbackUrl: '', // LinkedIn specific scopes: ['r_emailaddress', 'r_liteprofile'], }) } LinkedIn Openid Connect config Copy code to clipboard { linkedin: services.linkedinOpenidConnect({ clientId: '', clientSecret: '', callbackUrl: '', // LinkedIn specific scopes: ['openid', 'profile', 'email'], }) } Facebook config Copy code to clipboard { facebook: services.facebook({ clientId: '', clientSecret: '', callbackUrl: '', // Facebook specific scopes: ['email', 'user_photos'], userFields: ['first_name', 'picture', 'email'], display: '', authType: '', }) } Spotify config Copy code to clipboard { spotify: services.spotify({ clientId: '', clientSecret: '', callbackUrl: '', // Spotify specific scopes: ['user-read-email', 'streaming'], showDialog: false }) } [](https://docs.adonisjs.com/guides/authentication/social-authentication#creating-a-custom-social-driver) Creating a custom social driver ----------------------------------------------------------------------------------------------------------------------------------------- We have created a [starter kit](https://github.com/adonisjs-community/ally-driver-boilerplate) to implement and publish a custom social driver on npm. Please go through the README of the starter kit for further instructions. * * * [Authentication\ \ Custom auth guard](https://docs.adonisjs.com/guides/authentication/custom-auth-guard) [Security\ \ Authorization](https://docs.adonisjs.com/guides/security/authorization) © 2025 AdonisJS [Edit this page](https://github.com/adonisjs/v6-docs/blob/main/content/docs/authentication/social_authentication.md) --- # Transmit (Digging deeper) | AdonisJS Documentation Toggle docs menu Transmit [](https://docs.adonisjs.com/guides/digging-deeper/transmit#transmit) Transmit ============================================================================== Transmit is a native opinionated Server-Sent-Event (SSE) module built for AdonisJS. It is a simple and efficient way to send real-time updates to the client, such as notifications, live chat messages, or any other type of real-time data. The data transmission occurs only from server to client, not the other way around. You have to use a form or a fetch request to achieve client to server communication. [](https://docs.adonisjs.com/guides/digging-deeper/transmit#installation) Installation -------------------------------------------------------------------------------------- Install and configure the package using the following command : Copy code to clipboard node ace add @adonisjs/transmit See steps performed by the add command 1. Installs the `@adonisjs/transmit` package using the detected package manager. 2. Registers the `@adonisjs/transmit/transmit_provider` service provider inside the `adonisrc.ts` file. 3. Creates a new `transmit.ts` file inside the `config` directory. You will also have to install the Transmit client package to listen for events on the client-side. Copy code to clipboard npm install @adonisjs/transmit-client [](https://docs.adonisjs.com/guides/digging-deeper/transmit#configuration) Configuration ---------------------------------------------------------------------------------------- The configuration for the transmit package is stored within the `config/transmit.ts` file. See also: [Config stub](https://github.com/adonisjs/transmit/blob/main/stubs/config/transmit.stub) Copy code to clipboard import { defineConfig } from '@adonisjs/transmit' export default defineConfig({ pingInterval: false, transport: null, }) pingInterval The interval used to send ping messages to the client. The value is in milliseconds or using a string `Duration` format (i.e: `10s`). Set to `false` to disable ping messages. transport Transmit supports syncing events across multiple servers or instances. You can enable the feature by referencing the wanted transport layer (only `redis` is supported for now). Set to `null` to disable syncing. Copy code to clipboard import env from '#start/env' import { defineConfig } from '@adonisjs/transmit' import { redis } from '@adonisjs/transmit/transports' export default defineConfig({ transport: { driver: redis({ host: env.get('REDIS_HOST'), port: env.get('REDIS_PORT'), password: env.get('REDIS_PASSWORD'), keyPrefix: 'transmit', }) } }) Ensure you have `ioredis` installed when using the `redis` transport. [](https://docs.adonisjs.com/guides/digging-deeper/transmit#register-routes) Register Routes -------------------------------------------------------------------------------------------- You have to register the transmit routes to allow the client to connect to the server. The routes are registered manually. start/routes.ts Copy code to clipboard import transmit from '@adonisjs/transmit/services/main' transmit.registerRoutes() You can also register each route manually by binding the controller by hand. start/routes.ts Copy code to clipboard const EventStreamController = () => import('@adonisjs/transmit/controllers/event_stream_controller') const SubscribeController = () => import('@adonisjs/transmit/controllers/subscribe_controller') const UnsubscribeController = () => import('@adonisjs/transmit/controllers/unsubscribe_controller') router.get('/__transmit/events', [EventStreamController]) router.post('/__transmit/subscribe', [SubscribeController]) router.post('/__transmit/unsubscribe', [UnsubscribeController]) If you want to modify the route definition, for example, to use the [`Rate Limiter`](https://docs.adonisjs.com/guides/security/rate-limiting) and auth middleware to avoid abuse of some transmit routes, you can either change the route definition or pass a callback to the `transmit.registerRoutes` method. start/routes.ts Copy code to clipboard import transmit from '@adonisjs/transmit/services/main' transmit.registerRoutes((route) => { // Ensure you are authenticated to register your client if (route.getPattern() === '__transmit/events') { route.middleware(middleware.auth()) return } // Add a throttle middleware to other transmit routes route.use(throttle) }) [](https://docs.adonisjs.com/guides/digging-deeper/transmit#channels) Channels ------------------------------------------------------------------------------ Channels are used to group events. For example, you can have a channel for notifications, another for chat messages, and so on. They are created on the fly when the client subscribes to them. ### [](https://docs.adonisjs.com/guides/digging-deeper/transmit#channel-names) Channel Names Channel names are used to identify the channel. They are case-sensitive and must be a string. You cannot use any special characters or spaces in the channel name except `/`. The following are some examples of valid channel names: Copy code to clipboard import transmit from '@adonisjs/transmit/services/main' transmit.broadcast('global', { message: 'Hello' }) transmit.broadcast('chats/1/messages', { message: 'Hello' }) transmit.broadcast('users/1', { message: 'Hello' }) Channel names use the same syntax as route in AdonisJS but are not related to them. You can freely define a http route and a channel with the same key. ### [](https://docs.adonisjs.com/guides/digging-deeper/transmit#channel-authorization) Channel Authorization You can authorize or reject a connection to a channel using the `authorize` method. The method receives the channel name and the `HttpContext`. It must return a boolean value. start/transmit.ts Copy code to clipboard import transmit from '@adonisjs/transmit/services/main' import Chat from '#models/chat' import type { HttpContext } from '@adonisjs/core/http' transmit.authorize<{ id: string }>('users/:id', (ctx: HttpContext, { id }) => { return ctx.auth.user?.id === +id }) transmit.authorize<{ id: string }>('chats/:id/messages', async (ctx: HttpContext, { id }) => { const chat = await Chat.findOrFail(+id) return ctx.bouncer.allows('accessChat', chat) }) [](https://docs.adonisjs.com/guides/digging-deeper/transmit#broadcasting-events) Broadcasting Events ---------------------------------------------------------------------------------------------------- You can broadcast events to a channel using the `broadcast` method. The method receives the channel name and the data to send. Copy code to clipboard import transmit from '@adonisjs/transmit/services/main' transmit.broadcast('global', { message: 'Hello' }) You can also broadcast events to any channel except one using the `broadcastExcept` method. The method receives the channel name, the data to send, and the UID you want to ignore. Copy code to clipboard transmit.broadcastExcept('global', { message: 'Hello' }, 'uid-of-sender') ### [](https://docs.adonisjs.com/guides/digging-deeper/transmit#syncing-across-multiple-servers-or-instances) Syncing across multiple servers or instances By default, broadcasting events works only within the context of an HTTP request. However, you can broadcast events from the background using the `transmit` service if you register a `transport` in your configuration. The transport layer is responsible for syncing events across multiple servers or instances. It works by broadcasting any events (like broadcasted events, subscriptions, and un-subscriptions) to all connected servers or instances using a `Message Bus`. The server or instance responsible for your client connection will receive the event and broadcast it to the client. [](https://docs.adonisjs.com/guides/digging-deeper/transmit#transmit-client) Transmit Client -------------------------------------------------------------------------------------------- You can listen for events on the client-side using the `@adonisjs/transmit-client` package. The package provides a `Transmit` class. The client use the [`EventSource`](https://developer.mozilla.org/en-US/docs/Web/API/EventSource) API by default to connect to the server. Copy code to clipboard import { Transmit } from '@adonisjs/transmit-client' export const transmit = new Transmit({ baseUrl: window.location.origin }) You should create only one instance of the `Transmit` class and reuse it throughout your application. ### [](https://docs.adonisjs.com/guides/digging-deeper/transmit#configuring-the-transmit-instance) Configuring the Transmit Instance The `Transmit` class accepts an object with the following properties: baseUrl The base URL of the server. The URL must include the protocol (http or https) and the domain name. uidGenerator A function that generates a unique identifier for the client. The function must return a string. It defaults to `crypto.randomUUID`. eventSourceFactory A function that creates a new `EventSource` instance. It defaults to the WebAPI [`EventSource`](https://developer.mozilla.org/en-US/docs/Web/API/EventSource) . You need to provide a custom implementation if you want to use the client on `Node.js`, `React Native` or any other environment that does not support the `EventSource` API. eventTargetFactory A function that creates a new `EventTarget` instance. It defaults to the WebAPI [`EventTarget`](https://developer.mozilla.org/en-US/docs/Web/API/EventTarget) . You need to provide a custom implementation if you want to use the client on `Node.js`, `React Native` or any other environment that does not support the `EventTarget` API. Return `null` to disable the `EventTarget` API. httpClientFactory A function that creates a new `HttpClient` instance. It is mainly used for testing purposes. beforeSubscribe A function that is called before subscribing to a channel. It receives the channel name and the `Request` object sent to the server. Use this function to add custom headers or modify the request object. beforeUnsubscribe A function that is called before unsubscribing from a channel. It receives the channel name and the `Request` object sent to the server. Use this function to add custom headers or modify the request object. maxReconnectAttempts The maximum number of reconnection attempts. It defaults to `5`. onReconnectAttempt A function that is called before each reconnection attempt and receives the number of attempts made so far. Use this function to add custom logic. onReconnectFailed A function that is called when the reconnection attempts fail. Use this function to add custom logic. onSubscribeFailed A function that is called when the subscription fails. It receives the `Response` object. Use this function to add custom logic. onSubscription A function that is called when the subscription is successful. It receives the channel name. Use this function to add custom logic. onUnsubscription A function that is called when the unsubscription is successful. It receives the channel name. Use this function to add custom logic. ### [](https://docs.adonisjs.com/guides/digging-deeper/transmit#creating-a-subscription) Creating a Subscription You can create a subscription to a channel using the `subscription` method. The method receives the channel name. Copy code to clipboard const subscription = transmit.subscription('chats/1/messages') await subscription.create() The `create` method registers the subscription on the server. It returns a promise that you can `await` or `void`. If you don't call the `create` method, the subscription will not be registered on the server, and you will not receive any events. ### [](https://docs.adonisjs.com/guides/digging-deeper/transmit#listening-for-events) Listening for Events You can listen for events on the subscription using the `onMessage` method that receives a callback function. You can call the `onMessage` method multiple times to add different callbacks. Copy code to clipboard subscription.onMessage((data) => { console.log(data) }) You can also listen to a channel only once using the `onMessageOnce` method which receives a callback function. Copy code to clipboard subscription.onMessageOnce(() => { console.log('I will be called only once') }) ### [](https://docs.adonisjs.com/guides/digging-deeper/transmit#stop-listening-for-events) Stop Listening for Events The `onMessage` and `onMessageOnce` methods return a function that you can call to stop listening for a specific callback. Copy code to clipboard const stopListening = subscription.onMessage((data) => { console.log(data) }) // Stop listening stopListening() ### [](https://docs.adonisjs.com/guides/digging-deeper/transmit#deleting-a-subscription) Deleting a Subscription You can delete a subscription using the `delete` method. The method returns a promise that you can `await` or `void`. This method will unregister the subscription on the server. Copy code to clipboard await subscription.delete() [](https://docs.adonisjs.com/guides/digging-deeper/transmit#avoiding-gzip-interference) Avoiding GZip Interference ------------------------------------------------------------------------------------------------------------------ When deploying applications that use `@adonisjs/transmit`, it’s important to ensure that GZip compression does not interfere with the `text/event-stream` content type used by Server-Sent Events (SSE). Compression applied to `text/event-stream` can cause connection issues, leading to frequent disconnects or SSE failures. If your deployment uses a reverse proxy (such as Traefik or Nginx) or other middleware that applies GZip, ensure that compression is disabled for the `text/event-stream` content type. ### [](https://docs.adonisjs.com/guides/digging-deeper/transmit#example-configuration-for-traefik) Example Configuration for Traefik Copy code to clipboard traefik.http.middlewares.gzip.compress=true traefik.http.middlewares.gzip.compress.excludedcontenttypes=text/event-stream traefik.http.routers.my-router.middlewares=gzip * * * [Digging deeper\ \ Repl](https://docs.adonisjs.com/guides/digging-deeper/repl) [Ace commands\ \ Introduction](https://docs.adonisjs.com/guides/ace/introduction) © 2025 AdonisJS [Edit this page](https://github.com/adonisjs/v6-docs/blob/main/content/docs/digging_deeper/transmit.md) --- # Terminal UI (Ace commands) | AdonisJS Documentation Toggle docs menu Terminal UI [](https://docs.adonisjs.com/guides/ace/terminal-ui#terminal-ui) Terminal UI ============================================================================ Ace terminal UI is powered by the [@poppinss/cliui](https://github.com/poppinss/cliui) package. The package exports helpers to display logs, render tables, render animated tasks UI, and much more. The terminal UI primitives are built with testing in mind. When writing tests, you may turn on the `raw` mode to disable colors and formatting and collect all logs in memory to write assertions against them. See also: [Testing Ace commands](https://docs.adonisjs.com/guides/testing/console-tests) [](https://docs.adonisjs.com/guides/ace/terminal-ui#displaying-log-messages) Displaying log messages ---------------------------------------------------------------------------------------------------- You may display log messages using the CLI logger. Following is the list of available log methods. Copy code to clipboard import { BaseCommand } from '@adonisjs/core/ace' export default class GreetCommand extends BaseCommand { async run() { this.logger.debug('Something just happened') this.logger.info('This is an info message') this.logger.success('Account created') this.logger.warning('Running out of disk space') // Writes to stderr this.logger.error(new Error('Unable to write. Disk full')) this.logger.fatal(new Error('Unable to write. Disk full')) } } ### [](https://docs.adonisjs.com/guides/ace/terminal-ui#adding-prefix-and-suffix) Adding prefix and suffix Using the options object, you may define the `prefix` and `suffix` for the log message. The prefix and suffix are displayed with lower opacity. Copy code to clipboard this.logger.info('installing packages', { suffix: 'npm i --production' }) this.logger.info('installing packages', { prefix: process.pid }) ### [](https://docs.adonisjs.com/guides/ace/terminal-ui#loading-animation) Loading animation A log message with loading animation appends animated three dots (...) to the message. You may update the log message using the `animation.update` method and stop the animation using the `animation.stop` method. Copy code to clipboard const animation = this.logger.await('installing packages', { suffix: 'npm i' }) animation.start() // Update the message animation.update('unpacking packages', { suffix: undefined }) // Stop animation animation.stop() ### [](https://docs.adonisjs.com/guides/ace/terminal-ui#logger-actions) Logger actions Logger actions can display the state of action with consistent styling and colors. You may create an action using the `logger.action` method. The method accepts the action title as the first parameter. Copy code to clipboard const createFile = this.logger.action('creating config/auth.ts') try { await performTasks() createFile.displayDuration().succeeded() } catch (error) { createFile.failed(error) } You can mark an action as either `succeeded`, `failed`, or `skipped`. Copy code to clipboard action.succeeded() action.skipped('Skip reason') action.failed(new Error()) [](https://docs.adonisjs.com/guides/ace/terminal-ui#formatting-text-with-ansi-colors) Formatting text with ANSI colors ---------------------------------------------------------------------------------------------------------------------- Ace uses [kleur](https://www.npmjs.com/package/kleur) for formatting text with ANSI colors. Using the `this.colors` property, you can access kleur's chained API. Copy code to clipboard this.colors.red('[ERROR]') this.colors.bgGreen().white(' CREATED ') [](https://docs.adonisjs.com/guides/ace/terminal-ui#rendering-tables) Rendering tables -------------------------------------------------------------------------------------- A table can be created using the `this.ui.table` method. The method returns an instance of the `Table` class that you can use to define the table head and rows. Copy code to clipboard import { BaseCommand } from '@adonisjs/core/ace' export default class GreetCommand extends BaseCommand { async run() { const table = this.ui.table() table .head([\ 'Migration',\ 'Duration',\ 'Status',\ ]) .row([\ '1590591892626_tenants.ts',\ '2ms',\ 'DONE'\ ]) .row([\ '1590595949171_entities.ts',\ '2ms',\ 'DONE'\ ]) .render() } } You may apply color transforms to any value when rendering the table. For example: Copy code to clipboard table.row([\ '1590595949171_entities.ts',\ '2',\ this.colors.green('DONE')\ ]) ### [](https://docs.adonisjs.com/guides/ace/terminal-ui#right-align-columns) Right-align columns You may right-align the columns by defining them as objects and using the hAlign property. Make sure to also right-align the header column. Copy code to clipboard table .head([\ 'Migration',\ 'Batch'\ {\ content: 'Status',\ hAlign: 'right'\ },\ ]) table.row([\ '1590595949171_entities.ts',\ '2',\ {\ content: this.colors.green('DONE'),\ hAlign: 'right'\ }\ ]) ### [](https://docs.adonisjs.com/guides/ace/terminal-ui#full-width-rendering) Full-width rendering By default, tables are rendered with width `auto`, taking only the space required by the contents of each column. However, you may render tables at full-width (taking all the terminal space) using the `fullWidth` method. In full-width mode: * We will render all columns as per the size of the content. * Except for the first column, which takes all the available space. Copy code to clipboard table.fullWidth().render() You may change the column index for the fluid column (the one that takes all the space) by calling the `table.fluidColumnIndex` method. Copy code to clipboard table .fullWidth() .fluidColumnIndex(1) [](https://docs.adonisjs.com/guides/ace/terminal-ui#printing-stickers) Printing stickers ---------------------------------------------------------------------------------------- Stickers allow you to render content inside a box with a border. They are helpful when you want to draw the user's attention to an essential piece of information. You can create an instance of a sticker using the `this.ui.sticker` method. Copy code to clipboard import { BaseCommand } from '@adonisjs/core/ace' export default class GreetCommand extends BaseCommand { async run() { const sticker = this.ui.sticker() sticker .add('Started HTTP server') .add('') .add(`Local address: ${this.colors.cyan('http://localhost:3333')}`) .add(`Network address: ${this.colors.cyan('http://192.168.1.2:3333')}`) .render() } } If you want to display a set of instructions inside a box, you can use the `this.ui.instructions` method. Each line in the instructions output will be prefixed with an arrow sign `>`. [](https://docs.adonisjs.com/guides/ace/terminal-ui#rendering-tasks) Rendering tasks ------------------------------------------------------------------------------------ The tasks widget provides an excellent UI for sharing the progress of multiple time-taking tasks. The widget has the following two rendering modes: * In `minimal` mode, the UI for the currently running task is expanded to show one log line at a time. * In `verbose` mode, each log statement is rendered in its line. The verbose renderer must be used for debugging tasks. You can create an instance of the tasks widget using the `this.ui.tasks` method. Copy code to clipboard import { BaseCommand } from '@adonisjs/core/ace' export default class GreetCommand extends BaseCommand { async run() { const tasks = this.ui.tasks() // ... rest of the code to follow } } Individual tasks are added using the `tasks.add` method. The method accepts the task title as the first parameter and the implementation callback as the second parameter. You must return the status of the task from the callback. All return values are considered success messages until you wrap them inside the `task.error` method or throw an exception inside the callback. Copy code to clipboard import { BaseCommand } from '@adonisjs/core/ace' export default class GreetCommand extends BaseCommand { async run() { const tasks = this.ui.tasks() await tasks .add('clone repo', async (task) => { return 'Completed' }) .add('update package file', async (task) => { return task.error('Unable to update package file') }) .add('install dependencies', async (task) => { return 'Installed' }) .run() } } ### [](https://docs.adonisjs.com/guides/ace/terminal-ui#reporting-task-progress) Reporting task progress Instead of writing the task progress messages to the console, it is recommended to call the `task.update` method. The `update` method displays the latest log message using the `minimal` renderer and logs all messages using the `verbose` renderer. Copy code to clipboard const sleep = () => new Promise((resolve) => setTimeout(resolve, 50)) const tasks = this.ui.tasks() await tasks .add('clone repo', async (task) => { for (let i = 0; i <= 100; i = i + 2) { await sleep() task.update(`Downloaded ${i}%`) } return 'Completed' }) .run() ### [](https://docs.adonisjs.com/guides/ace/terminal-ui#switching-to-the-verbose-renderer) Switching to the verbose renderer You may switch to a verbose renderer when creating the tasks widget. You might consider allowing the command's user to pass a flag to turn on the `verbose` mode. Copy code to clipboard import { BaseCommand, flags } from '@adonisjs/core/ace' export default class GreetCommand extends BaseCommand { @flags.boolean() declare verbose: boolean async run() { const tasks = this.ui.tasks({ verbose: this.verbose }) } } * * * [Ace commands\ \ Prompts](https://docs.adonisjs.com/guides/ace/prompts) [References\ \ Commands](https://docs.adonisjs.com/guides/references/commands) © 2025 AdonisJS [Edit this page](https://github.com/adonisjs/v6-docs/blob/main/content/docs/ace/tui.md) --- # Creating commands (Ace commands) | AdonisJS Documentation Toggle docs menu Creating commands [](https://docs.adonisjs.com/guides/ace/creating-commands#creating-commands) Creating commands ============================================================================================== Alongside using Ace commands, you may also create custom commands as part of your application codebase. The commands are stored inside the `commands` directory (at the root level). You may create a command by running the following command. See also: [Make command](https://docs.adonisjs.com/guides/references/commands#makecommand) Copy code to clipboard node ace make:command greet The above command will create a `greet.ts` file inside the `commands` directory. Ace commands are represented by a class and must implement the `run` method to execute the command instructions. [](https://docs.adonisjs.com/guides/ace/creating-commands#command-metadata) Command metadata -------------------------------------------------------------------------------------------- The command metadata consists of the **command name**, **description**, **help text**, and the **options** to configure the command behavior. Copy code to clipboard import { BaseCommand } from '@adonisjs/core/ace' import { CommandOptions } from '@adonisjs/core/types/ace' export default class GreetCommand extends BaseCommand { static commandName = 'greet' static description = 'Greet a user by name' static options: CommandOptions = { startApp: false, allowUnknownFlags: false, staysAlive: false, } } commandName The `commandName` property is used to define the command name. A command name should not contain spaces. Also, it is recommended to avoid using unfamiliar special characters like `*`, `&`, or slashes in the command name. The command names can be under a namespace. For example, to define a command under the `make` namespace, you may prefix it with `make:`. description The command description is shown inside the commands list and on the command help screen. You must keep the description short and use the **help text** for longer descriptions. help The help text is used to write a longer description or show usage examples. Copy code to clipboard export default class GreetCommand extends BaseCommand { static help = [\ 'The greet command is used to greet a user by name',\ '',\ 'You can also send flowers to a user, if they have an updated address',\ '{{ binaryName }} greet --send-flowers',\ ] } > The `{{ binaryName }}` variable substitution is a reference to the binary used to execute ace commands. aliases You may define one or more aliases for the command name using the `aliases` property. Copy code to clipboard export default class GreetCommand extends BaseCommand { static commandName = 'greet' static aliases = ['welcome', 'sayhi'] } options.startApp By default, AdonisJS does not boot the application when running an Ace command. This ensures that the commands are quick to run and do not go through the application boot phase to perform simple tasks. However, if your command relies on the application state, you can tell Ace to start the app before executing the command. Copy code to clipboard import { BaseCommand } from '@adonisjs/core/ace' import { CommandOptions } from '@adonisjs/core/types/ace' export default class GreetCommand extends BaseCommand { static options: CommandOptions = { startApp: true } } options.allowUnknownFlags By default, Ace prints an error if you pass an unknown flag to the command. However, you can disable strict flags parsing at the command level using the `options.allowUnknownFlags` property. Copy code to clipboard import { BaseCommand } from '@adonisjs/core/ace' import { CommandOptions } from '@adonisjs/core/types/ace' export default class GreetCommand extends BaseCommand { static options: CommandOptions = { allowUnknownFlags: true } } options.staysAlive AdonisJS implicitly terminates the app after executing the command's `run` command. However, if you want to start a long-running process in a command, you must tell Ace not to kill the process. See also: [Terminating app](https://docs.adonisjs.com/guides/ace/creating-commands#terminating-application) and [cleaning up before the app terminates](https://docs.adonisjs.com/guides/ace/creating-commands#cleaning-up-before-the-app-terminates) sections. Copy code to clipboard import { BaseCommand } from '@adonisjs/core/ace' import { CommandOptions } from '@adonisjs/core/types/ace' export default class GreetCommand extends BaseCommand { static options: CommandOptions = { staysAlive: true } } [](https://docs.adonisjs.com/guides/ace/creating-commands#command-lifecycle-methods) Command lifecycle methods -------------------------------------------------------------------------------------------------------------- You may define the following lifecycle methods on a command class, and Ace will execute them in a pre-defined order. Copy code to clipboard import { BaseCommand, args, flags } from '@adonisjs/core/ace' export default class GreetCommand extends BaseCommand { async prepare() { console.log('preparing') } async interact() { console.log('interacting') } async run() { console.log('running') } async completed() { console.log('completed') } } | Method | Description | | --- | --- | | `prepare` | This is the first method Ace executes on a command. This method can set up the state or data needed to run the command. | | `interact` | The interact method is executed after the `prepare` method. It can be used to display prompts to the user. | | `run` | The command main logic goes inside the `run` method. This method is called after the `interact` method. | | `completed` | The completed method is called after running all other lifecycle methods. This method can be used to perform cleanup or handle/display thrown raised by other methods. | [](https://docs.adonisjs.com/guides/ace/creating-commands#dependency-injection) Dependency injection ---------------------------------------------------------------------------------------------------- Ace commands are constructed and executed using the [IoC container](https://docs.adonisjs.com/guides/concepts/dependency-injection) . Therefore, you can type-hint dependencies on command lifecycle methods and use the `@inject` decorator to resolve them. For demonstration, let's inject the `UserService` class in all the lifecycle methods. Copy code to clipboard import { inject } from '@adonisjs/core' import { BaseCommand } from '@adonisjs/core/ace' import UserService from '#services/user_service' export default class GreetCommand extends BaseCommand { @inject() async prepare(userService: UserService) { } @inject() async interact(userService: UserService) { } @inject() async run(userService: UserService) { } @inject() async completed(userService: UserService) { } } [](https://docs.adonisjs.com/guides/ace/creating-commands#handling-errors-and-exit-code) Handling errors and exit code ---------------------------------------------------------------------------------------------------------------------- Exceptions raised by commands are displayed using the CLI logger, and the command `exitCode` is set to `1` (a non-zero error code means the command failed). However, you may also capture errors by wrapping your code inside a `try/catch` block or using the `completed` lifecycle method to handle errors. In either situation, remember to update the command `exitCode` and `error` properties. ### [](https://docs.adonisjs.com/guides/ace/creating-commands#handling-errors-with-trycatch) Handling errors with try/catch Copy code to clipboard import { BaseCommand } from '@adonisjs/core/ace' export default class GreetCommand extends BaseCommand { async run() { try { await runSomeOperation() } catch (error) { this.logger.error(error.message) this.error = error this.exitCode = 1 } } } ### [](https://docs.adonisjs.com/guides/ace/creating-commands#handling-errors-inside-the-completed-method) Handling errors inside the completed method Copy code to clipboard import { BaseCommand } from '@adonisjs/core/ace' export default class GreetCommand extends BaseCommand { async run() { await runSomeOperation() } async completed() { if (this.error) { this.logger.error(this.error.message) /** * Notify Ace that error has been handled */ return true } } } [](https://docs.adonisjs.com/guides/ace/creating-commands#terminating-application) Terminating application ---------------------------------------------------------------------------------------------------------- By default, Ace will terminate the application after executing the command. However, if you have enabled the `staysAlive` option, you will have to explicitly terminate the application using the `this.terminate` method. Let's assume we make a redis connection to monitor the server memory. We listen for the `error` event on the redis connection and terminate the app when the connection fails. Copy code to clipboard import { BaseCommand } from '@adonisjs/core/ace' import { CommandOptions } from '@adonisjs/core/types/ace' export default class GreetCommand extends BaseCommand { static options: CommandOptions = { staysAlive: true } async run() { const redis = createRedisConnection() redis.on('error', (error) => { this.logger.error(error) this.terminate() }) } } [](https://docs.adonisjs.com/guides/ace/creating-commands#cleaning-up-before-the-app-terminates) Cleaning up before the app terminates -------------------------------------------------------------------------------------------------------------------------------------- Multiple events can trigger an application to terminate, including the [`SIGTERM` signal](https://www.howtogeek.com/devops/linux-signals-hacks-definition-and-more/) . Therefore, you must listen for the `terminating` hook in your commands to perform the cleanup. You can listen for the terminating hook inside the `prepare` lifecycle method. Copy code to clipboard import { BaseCommand } from '@adonisjs/core/ace' import { CommandOptions } from '@adonisjs/core/types/ace' export default class GreetCommand extends BaseCommand { static options: CommandOptions = { staysAlive: true } prepare() { this.app.terminating(() => { // perform the cleanup }) } async run() { } } * * * [Ace commands\ \ Introduction](https://docs.adonisjs.com/guides/ace/introduction) [Ace commands\ \ Command arguments](https://docs.adonisjs.com/guides/ace/arguments) © 2025 AdonisJS [Edit this page](https://github.com/adonisjs/v6-docs/blob/main/content/docs/ace/creating_commands.md) --- # Drive (Digging deeper) | AdonisJS Documentation Toggle docs menu Drive [](https://docs.adonisjs.com/guides/digging-deeper/drive#drive) Drive ===================================================================== AdonisJS Drive (`@adonisjs/drive`) is a lightweight wrapper on top of [flydrive.dev](https://flydrive.dev/) . FlyDrive is a file storage library for Node.js. It provides a unified API to interact with the local file system and cloud storage solutions like S3, R2, and GCS. Using FlyDrive, you can manage user-uploaded files on various cloud storage services (including the local filesystem) without changing a single line of code. [](https://docs.adonisjs.com/guides/digging-deeper/drive#installation) Installation ----------------------------------------------------------------------------------- Install and configure the `@adonisjs/drive` package using the following command: Copy code to clipboard node ace add @adonisjs/drive See steps performed by the add command 1. Installs the `@adonisjs/drive` package using the detected package manager. 2. Registers the following service provider inside the `adonisrc.ts` file. Copy code to clipboard { providers: [\ // ...other providers\ () => import('@adonisjs/drive/drive_provider'),\ ] } 3. Creates the `config/drive.ts` file. 4. Defines the environment variables for the selected storage services. 5. Installs the required peer dependencies for the selected storage services. [](https://docs.adonisjs.com/guides/digging-deeper/drive#configuration) Configuration ------------------------------------------------------------------------------------- The `@adonisjs/drive` package configuration is stored inside the `config/drive.ts` file. You can define config for multiple services within a single config file. See also: [Config stub](https://github.com/adonisjs/drive/blob/3.x/stubs/config/drive.stub) Copy code to clipboard import env from '#start/env' import app from '@adonisjs/core/services/app' import { defineConfig, services } from '@adonisjs/drive' const driveConfig = defineConfig({ default: env.get('DRIVE_DISK'), services: { /** * Persist files on the local filesystem */ fs: services.fs({ location: app.makePath('storage'), serveFiles: true, routeBasePath: '/uploads', visibility: 'public', }), /** * Persist files on Digital Ocean spaces */ spaces: services.s3({ credentials: { accessKeyId: env.get('SPACES_KEY'), secretAccessKey: env.get('SPACES_SECRET'), }, region: env.get('SPACES_REGION'), bucket: env.get('SPACES_BUCKET'), endpoint: env.get('SPACES_ENDPOINT'), visibility: 'public', }), }, }) export default driveConfig ### [](https://docs.adonisjs.com/guides/digging-deeper/drive#environment-variables) Environment variables The credentials/settings for the storage services are stored as environment variables within the `.env` file. Make sure to update the values before you can use Drive. Also, the `DRIVE_DISK` environment variable defines the default disk/service for managing files. For example, you may want to use the `fs` disk in development and the `spaces` disk in production. [](https://docs.adonisjs.com/guides/digging-deeper/drive#usage) Usage --------------------------------------------------------------------- Once you have configured Drive, you can import the `drive` service to interact with its APIs. In the following example, we handle a file upload operation using Drive. Since the AdonisJS integration is a thin wrapper on top of FlyDrive, you should read the [FlyDrive docs](https://flydrive.dev/) to better understand its APIs. Copy code to clipboard import { cuid } from '@adonisjs/core/helpers' import drive from '@adonisjs/drive/services/main' import router from '@adonisjs/core/services/router' router.put('/me', async ({ request, response }) => { /** * Step 1: Grab the image from the request and perform basic * validations */ const image = request.file('avatar', { size: '2mb', extnames: ['jpeg', 'jpg', 'png'], }) if (!image) { return response.badRequest({ error: 'Image missing' }) } /** * Step 2: Move the image with a unique name using Drive */ const key = `uploads/${cuid()}.${image.extname}` await image.moveToDisk(key) /** * Respond with the file's public URL */ return { message: 'Image uploaded', url: image.meta.url, } }) * The Drive package adds the `moveToDisk` method to the [MultipartFile](https://github.com/adonisjs/drive/blob/develop/providers/drive_provider.ts#L110) . This method moves the file from its `tmpPath` to the configured storage provider. * After moving the file, the `meta.url` property will be set on the file object. This property contains the public URL of the file. If your files are private, then you must use the `drive.use().getSignedUrl()` method. [](https://docs.adonisjs.com/guides/digging-deeper/drive#drive-service) Drive service ------------------------------------------------------------------------------------- Drive service exported by the `@adonisjs/drive/services/main` path is a singleton instance of the [DriveManager](https://flydrive.dev/docs/drive_manager) class created using the config exported from the `config/drive.ts` file. You can import this service to interact with the DriveManager and the configured file storage services. For example: Copy code to clipboard import drive from '@adonisjs/drive/services/main' drive instanceof DriveManager // true /** * Returns instance of the default disk */ const disk = drive.use() /** * Returns instance of a disk named r2 */ const disk = drive.use('r2') /** * Returns instance of a disk named spaces */ const disk = drive.use('spaces') Once you have access to an instance of a Disk, you can use it to manage files. See also: [Disk API](https://flydrive.dev/docs/disk_api) Copy code to clipboard await disk.put(key, value) await disk.putStream(key, readableStream) await disk.get(key) await disk.getStream(key) await disk.getArrayBuffer(key) await disk.delete(key) await disk.deleteAll(prefix) await disk.copy(source, destination) await disk.move(source, destination) await disk.copyFromFs(source, destination) await disk.moveFromFs(source, destination) [](https://docs.adonisjs.com/guides/digging-deeper/drive#local-filesystem-driver) Local filesystem driver --------------------------------------------------------------------------------------------------------- AdonisJS integration enhances the FlyDrive's local filesystem driver and adds support for URL generation and the ability to serve files using the AdonisJS HTTP server. Following is the list of options you may use to configure the filesystem driver. Copy code to clipboard { services: { fs: services.fs({ location: app.makePath('storage'), visibility: 'public', appUrl: env.get('APP_URL'), serveFiles: true, routeBasePath: '/uploads', }), } } location The `location` property defines the store inside which the files should be stored. This directory should be added to `.gitignore` so that you do not push files uploaded during development to the production server. visibility The `visibility` property is used to mark files public or private. Private files can only be accessed using signed URLs. [Learn more](https://flydrive.dev/docs/disk_api#getsignedurl) serveFiles The `serveFiles` option auto registers a route to serve the files from the local filesystem. You can view this route using the [list:routes](https://docs.adonisjs.com/guides/references/commands#listroutes) ace command. routeBasePath The `routeBasePath` option defines the base prefix for the route to serve files. Make sure the base prefix is unique. appUrl You may optionally define the `appUrl` property to create URLs with the complete domain name of your application. Otherwise relative URLs will be created. [](https://docs.adonisjs.com/guides/digging-deeper/drive#edge-helpers) Edge helpers ----------------------------------------------------------------------------------- Within the Edge templates, you may use one of the following helper methods to generate URLs. Both the methods are async, so make sure to `await` them. Copy code to clipboard Copy code to clipboard Download Invoice Download Invoice Download Invoice [](https://docs.adonisjs.com/guides/digging-deeper/drive#multipartfile-helper) MultipartFile helper --------------------------------------------------------------------------------------------------- Drive extends the Bodyparser [MultipartFile](https://github.com/adonisjs/drive/blob/develop/providers/drive_provider.ts#L110) class and adds the `moveToDisk` method. This method copies the file from its `tmpPath` to the configured storage provider. Copy code to clipboard const image = request.file('image')! const key = 'user-1-avatar.png' /** * Move file to the default disk */ await image.moveToDisk(key) /** * Move file to a named disk */ await image.moveToDisk(key, 's3') /** * Define additional properties during the * move operation */ await image.moveToDisk(key, 's3', { contentType: 'image/png', }) /** * Write file by first reading it as a buffer. You may use this * option when your cloud storage provider results in broken * files with the "stream" option */ await image.moveToDisk(key, 's3', { moveAs: 'buffer' }) [](https://docs.adonisjs.com/guides/digging-deeper/drive#faking-disks-during-tests) Faking disks during tests ------------------------------------------------------------------------------------------------------------- The fakes API of Drive can be used during testing to prevent interacting with a remote storage. In the fakes mode, the `drive.use()` method will return a fake disk (backed by local filesystem) and all files will be written inside the `./tmp/drive-fakes` directory of your application root. These files are deleted automatically after you restore a fake using the `drive.restore` method. See also: [FlyDrive fakes documentation](https://flydrive.dev/docs/drive_manager#using-fakes) tests/functional/users/update.spec.ts Copy code to clipboard import { test } from '@japa/runner' import drive from '@adonisjs/drive/services/main' import fileGenerator from '@poppinss/file-generator' test.group('Users | update', () => { test('should be able to update my avatar', async ({ client, cleanup }) => { /** * Fake the "spaces" disk and restore the fake * after the test finishes */ const fakeDisk = drive.fake('spaces') cleanup(() => drive.restore('spaces')) /** * Create user to perform the login and update */ const user = await UserFactory.create() /** * Generate a fake in-memory png file with size of * 1mb */ const { contents, mime, name } = await fileGenerator.generatePng('1mb') /** * Make put request and send the file */ await client .put('me') .file('avatar', contents, { filename: name, contentType: mime, }) .loginAs(user) /** * Assert the file exists */ fakeDisk.assertExists(user.avatar) }) }) * * * [Digging deeper\ \ Cache](https://docs.adonisjs.com/guides/digging-deeper/cache) [Digging deeper\ \ Emitter](https://docs.adonisjs.com/guides/digging-deeper/emitter) © 2025 AdonisJS [Edit this page](https://github.com/adonisjs/v6-docs/blob/main/content/docs/digging_deeper/drive.md) --- # Locks (Digging deeper) | AdonisJS Documentation Toggle docs menu Locks [](https://docs.adonisjs.com/guides/digging-deeper/locks#atomic-locks) Atomic Locks =================================================================================== An atomic lock, otherwise known as a `mutex`, is used for synchronizing access to a shared resource. In other words, it prevents several processes, or concurrent code, from executing a section of code at the same time. The AdonisJS team has created a framework-agnostic package called [Verrou](https://github.com/Julien-R44/verrou) . The `@adonisjs/lock` package is based on this package, **so make sure to also read [the Verrou documentation](https://verrou.dev/docs/introduction) which is more detailed.** [](https://docs.adonisjs.com/guides/digging-deeper/locks#installation) Installation ----------------------------------------------------------------------------------- Install and configure the package using the following command: Copy code to clipboard node ace add @adonisjs/lock See steps performed by the add command 1. Install the `@adonisjs/lock` package using the detected package manager. 2. Registers the following service provider inside the `adonisrc.ts` file. Copy code to clipboard { providers: [\ // ...other providers\ () => import('@adonisjs/lock/lock_provider')\ ] } 3. Create the `config/lock.ts` file. 4. Define the following environment variable alongside its validation inside the `start/env.ts` file. Copy code to clipboard LOCK_STORE=redis 5. Optionally, create the database migration for the `locks` table if using the `database` store. [](https://docs.adonisjs.com/guides/digging-deeper/locks#configuration) Configuration ------------------------------------------------------------------------------------- The configuration for the locks is stored inside the `config/lock.ts` file. Copy code to clipboard import env from '#start/env' import { defineConfig, stores } from '@adonisjs/lock' const lockConfig = defineConfig({ default: env.get('LOCK_STORE'), stores: { redis: stores.redis({}), database: stores.database({ tableName: 'locks', }), memory: stores.memory() }, }) export default lockConfig declare module '@adonisjs/lock/types' { export interface LockStoresList extends InferLockStores {} } default The `default` store to use for managing locks. The store is defined within the same config file under the `stores` object. stores A collection of stores you plan to use within your application. We recommend always configuring the `memory` store that could be used during testing. * * * ### [](https://docs.adonisjs.com/guides/digging-deeper/locks#environment-variables) Environment variables The default lock store is defined using the `LOCK_STORE` environment variable, and therefore, you can switch between different stores in different environments. For example, use the `memory` store during testing and the `redis` store for development and production. Also, the environment variable must be validated to allow one of the pre-configured stores. The validation is defined inside the `start/env.ts` file using the `Env.schema.enum` rule. Copy code to clipboard { LOCK_STORE: Env.schema.enum(['redis', 'database', 'memory'] as const), } ### [](https://docs.adonisjs.com/guides/digging-deeper/locks#redis-store) Redis store The `redis` store has a peer dependency on the `@adonisjs/redis` package; therefore, you must configure this package before using the Redis store. Following is the list of options the Redis store accepts: Copy code to clipboard { redis: stores.redis({ connectionName: 'main', }), } connectionName The `connectionName` property refers to a connection defined within the `config/redis.ts` file. ### [](https://docs.adonisjs.com/guides/digging-deeper/locks#database-store) Database store The `database` store has a peer dependency on the `@adonisjs/lucid` package, and therefore, you must configure this package before using the database store. Following is the list of options the database store accepts: Copy code to clipboard { database: stores.database({ connectionName: 'postgres', tableName: 'my_locks', }), } connectionName Reference to the database connection defined within the `config/database.ts` file. If not defined, we will use the default database connection. tableName The database table to use to store rate limits. ### [](https://docs.adonisjs.com/guides/digging-deeper/locks#memory-store) Memory store The `memory` store is a simple in-memory store that can be useful for testing purposes but not only. Sometimes, for some use cases, you might want to have a lock that is only valid for the current process and not shared across multiple ones. The memory store is built on top of the [`async-mutex`](https://www.npmjs.com/package/async-mutex) package. Copy code to clipboard { memory: stores.memory(), } [](https://docs.adonisjs.com/guides/digging-deeper/locks#locking-a-resource) Locking a resource ----------------------------------------------------------------------------------------------- Once you have configured your lock store, you can start using locks to protect your resources anywhere within your application. Here is a simple example of how to use locks to protect a resource. Manual locking Automatic locking Copy code to clipboard import { errors } from '@adonisjs/lock' import locks from '@adonisjs/lock/services/main' import { HttpContext } from '@adonisjs/core/http' export default class OrderController { async process({ response, request }: HttpContext) { const orderId = request.input('order_id') /** * Try to acquire the lock immediately ( without retrying ) */ const lock = locks.createLock(`order.processing.${orderId}`) const acquired = await lock.acquireImmediately() if (!acquired) { return 'Order is already being processed' } /** * Lock has been acquired. We can process the order */ try { await processOrder() return 'Order processed successfully' } finally { /** * Always release the lock using the `finally` block, so that * we are sure that the lock is released even when an exception * is thrown during the processing. */ await lock.release() } } } Copy code to clipboard import { errors } from '@adonisjs/lock' import locks from '@adonisjs/lock/services/main' import { HttpContext } from '@adonisjs/core/http' export default class OrderController { async process({ response, request }: HttpContext) { const orderId = request.input('order_id') /** * Will run the function only if lock is available * Lock will also be automatically released once the function * has been executed */ const [executed, result] = await locks .createLock(`order.processing.${orderId}`) .runImmediately(async (lock) => { /** * Lock has been acquired. We can process the order */ await processOrder() return 'Order processed successfully' }) /** * Lock could not be acquired and function was not executed */ if (!executed) return 'Order is already being processed' return result } } This is a quick example of how to use locks within your application. They are many other methods available to manage locks, such as `extend` for extending the lock duration, `getRemainingTime` to get the remaining time before the lock expires, options to configure the lock, and more. **For that, make sure to read the [Verrou documentation](https://verrou.dev/docs/introduction) for more details**. As a reminder, the `@adonisjs/lock` package is based on the `Verrou` package, so everything you read in the Verrou documentation is also applicable to the `@adonisjs/lock` package. [](https://docs.adonisjs.com/guides/digging-deeper/locks#using-another-store) Using another store ------------------------------------------------------------------------------------------------- If you defined multiple stores inside the `config/lock.ts` file, you can use a different store for a specific lock by using the `use` method. Copy code to clipboard import locks from '@adonisjs/lock/services/main' const lock = locks.use('redis').createLock('order.processing.1') Otherwise, if using only the `default` store, you can omit the `use` method. Copy code to clipboard import locks from '@adonisjs/lock/services/main' const lock = locks.createLock('order.processing.1') [](https://docs.adonisjs.com/guides/digging-deeper/locks#managing-locks-across-multiple-processes) Managing locks across multiple processes ------------------------------------------------------------------------------------------------------------------------------------------- Sometimes, you might want to have one process creating and acquiring a lock, and another process releasing it. For example, you might want to acquire a lock inside a web request and release it inside a background job. This is possible using the `restoreLock` method. Your main server Copy code to clipboard import locks from '@adonisjs/lock/services/main' export class OrderController { async process({ response, request }: HttpContext) { const orderId = request.input('order_id') const lock = locks.createLock(`order.processing.${orderId}`) await lock.acquire() /** * Dispatch a background job to process the order. * * We also pass the serialized lock to the job, so that the job * can release the lock once the order has been processed. */ queue.dispatch('app/jobs/process_order', { lock: lock.serialize() }) } } Your background job Copy code to clipboard import locks from '@adonisjs/lock/services/main' export class ProcessOrder { async handle({ lock }) { /** * We are restoring the lock from the serialized version */ const handle = locks.restoreLock(lock) /** * Process the order */ await processOrder() /** * Release the lock */ await handle.release() } } [](https://docs.adonisjs.com/guides/digging-deeper/locks#testing) Testing ------------------------------------------------------------------------- During testing, you can use the `memory` store to avoid making real network requests to acquire locks. You can do this by setting the `LOCK_STORE` environment variable to `memory` inside the `.env.testing` file. .env.test Copy code to clipboard LOCK_STORE=memory [](https://docs.adonisjs.com/guides/digging-deeper/locks#create-a-custom-lock-store) Create a custom lock store --------------------------------------------------------------------------------------------------------------- First, make sure to consult the [Verrou documentation](https://verrou.dev/docs/custom-lock-store) that goes deeper into the creation of a custom lock store. In AdonisJS, it will be pretty much the same. Let's create a simple Noop store that does not do anything. First, we must create a class that will implement the `LockStore` interface. Copy code to clipboard import type { LockStore } from '@adonisjs/lock/types' class NoopStore implements LockStore { /** * Save the lock in the store. * This method should return false if the given key is already locked * * @param key The key to lock * @param owner The owner of the lock * @param ttl The time to live of the lock in milliseconds. Null means no expiration * * @returns True if the lock was acquired, false otherwise */ async save(key: string, owner: string, ttl: number | null): Promise { return false } /** * Delete the lock from the store if it is owned by the given owner * Otherwise should throws a E_LOCK_NOT_OWNED error * * @param key The key to delete * @param owner The owner */ async delete(key: string, owner: string): Promise { return false } /** * Force delete the lock from the store without checking the owner */ async forceDelete(key: string): Promise { return false } /** * Check if the lock exists. Returns true if so, false otherwise */ async exists(key: string): Promise { return false } /** * Extend the lock expiration. Throws an error if the lock is not owned by * the given owner * Duration is in milliseconds */ async extend(key: string, owner: string, duration: number): Promise { return false } } ### [](https://docs.adonisjs.com/guides/digging-deeper/locks#defining-the-store-factory) Defining the store factory Once you have created your store, you must define a simple factory function that will be used by `@adonisjs/lock` to create an instance of you store. Copy code to clipboard function noopStore(options: MyNoopStoreConfig) { return { driver: { factory: () => new NoopStore(options) } } } ### [](https://docs.adonisjs.com/guides/digging-deeper/locks#using-the-custom-store) Using the custom store Once done, you may use the `noopStore` function as follows: Copy code to clipboard import { defineConfig } from '@adonisjs/lock' const lockConfig = defineConfig({ default: 'noop', stores: { noop: noopStore({}), }, }) * * * [Digging deeper\ \ I18n](https://docs.adonisjs.com/guides/digging-deeper/i18n) [Digging deeper\ \ Logger](https://docs.adonisjs.com/guides/digging-deeper/logger) © 2025 AdonisJS [Edit this page](https://github.com/adonisjs/v6-docs/blob/main/content/docs/digging_deeper/locks.md) --- # Cache (Digging deeper) | AdonisJS Documentation Toggle docs menu Cache [](https://docs.adonisjs.com/guides/digging-deeper/cache#cache) Cache ===================================================================== AdonisJS Cache (`@adonisjs/cache`) is a simple, lightweight wrapper built on top of [bentocache.dev](https://bentocache.dev/) to cache data and enhance the performance of your application. It provides a straightforward and unified API to interact with various cache drivers, such as Redis, DynamoDB, PostgreSQL, in-memory caching, and more. We highly encourage you to read the Bentocache documentation. Bentocache offers some advanced, optional concepts that can be very useful in certain situations, such as [multi-tiering](https://bentocache.dev/docs/multi-tier) , [grace periods](https://bentocache.dev/docs/grace-periods) , [tagging](https://bentocache.dev/docs/tagging) , [timeouts](https://bentocache.dev/docs/timeouts) , [Stampede Protection](https://bentocache.dev/docs/stampede-protection) and more. [](https://docs.adonisjs.com/guides/digging-deeper/cache#installation) Installation ----------------------------------------------------------------------------------- Install and configure the `@adonisjs/cache` package by running the following command: Copy code to clipboard node ace add @adonisjs/cache See the steps performed by the add command 1. Installs the `@adonisjs/cache` package using the detected package manager. 2. Registers the following service provider inside the `adonisrc.ts` file: Copy code to clipboard { providers: [\ // ...other providers\ () => import('@adonisjs/cache/cache_provider'),\ ] } 3. Creates the `config/cache.ts` file. 4. Defines the environment variables for the selected cache drivers inside the `.env` file. [](https://docs.adonisjs.com/guides/digging-deeper/cache#configuration) Configuration ------------------------------------------------------------------------------------- The configuration file for the cache package is located at `config/cache.ts`. You can configure the default cache driver, the list of drivers, and their specific configurations. See also: [Config stub](https://github.com/adonisjs/cache/blob/1.x/stubs/config.stub) Copy code to clipboard import { defineConfig, store, drivers } from '@adonisjs/cache' const cacheConfig = defineConfig({ default: 'redis', stores: { /** * Cache data only on DynamoDB */ dynamodb: store().useL2Layer(drivers.dynamodb({})), /** * Cache data using your Lucid-configured database */ database: store().useL2Layer(drivers.database({ connectionName: 'default' })), /** * Cache data in-memory as the primary store and Redis as the secondary store. * If your application is running on multiple servers, then in-memory caches * need to be synchronized using a bus. */ redis: store() .useL1Layer(drivers.memory({ maxSize: '100mb' })) .useL2Layer(drivers.redis({ connectionName: 'main' })) .useBus(drivers.redisBus({ connectionName: 'main' })), }, }) export default cacheConfig In the code example above, we are setting up multiple layers for each cache store. This is called a [multi-tier caching system](https://bentocache.dev/docs/multi-tier) . It lets us first check a fast in-memory cache (the first layer). If we do not find the data there, we will then use the distributed cache (the second layer). ### [](https://docs.adonisjs.com/guides/digging-deeper/cache#redis) Redis To use Redis as your cache system, you must install the `@adonisjs/redis` package and configure it. Refer to the documentation here: [Redis](https://docs.adonisjs.com/guides/database/redis) . In `config/cache.ts`, you must specify a `connectionName`. This property should match the Redis configuration key in the `config/redis.ts` file. ### [](https://docs.adonisjs.com/guides/digging-deeper/cache#database) Database The `database` driver has a peer dependency on `@adonisjs/lucid`. Therefore, you must install and configure this package to use the `database` driver. In `config/cache.ts`, you must specify a `connectionName`. This property should correspond to the database configuration key in the `config/database.ts` file. Additionally, when configuring the `database` driver, a [migration](https://github.com/adonisjs/cache/blob/1.x/stubs/migration.stub) will be published to your `database/migrations` directory, which you must run to create the necessary table for storing cache entries. ### [](https://docs.adonisjs.com/guides/digging-deeper/cache#other-drivers) Other drivers You can use other drivers such as `memory`, `dynamodb`, `kysely` and `orchid`. See [Cache Drivers](https://bentocache.dev/docs/cache-drivers) for more information. [](https://docs.adonisjs.com/guides/digging-deeper/cache#usage) Usage --------------------------------------------------------------------- Once your cache is configured, you can import the `cache` service to interact with it. In the following example, we cache the user details for 5 minutes: Copy code to clipboard import cache from '@adonisjs/cache/services/main' import router from '@adonisjs/core/services/router' import User from '#models/user' router.get('/user/:id', async ({ params }) => { return cache.getOrSet({ key: `user:${params.id}`, factory: async () => { const user = await User.find(params.id) return user.toJSON() }, ttl: '5m', }) }) As you can see, we serialize the user's data using `user.toJSON()`. This is necessary because your data must be serialized to be stored in the cache. Classes such as Lucid models or instances of `Date` cannot be stored directly in caches like Redis or a database. The `ttl` defines the time-to-live for the cache key. After the TTL expires, the cache key is considered stale, and the next request will re-fetch the data from the factory method. ### [](https://docs.adonisjs.com/guides/digging-deeper/cache#tagging) Tagging You can associate a cache entry with one or more tags to simplify invalidation. Instead of managing individual keys, entries can be grouped under multiple tags and invalidated in a single operation. Copy code to clipboard await cache.getOrSet({ key: 'foo', factory: getFromDb(), tags: ['tag-1', 'tag-2'] }); await cache.deleteByTag({ tags: ['tag-1'] }); ### [](https://docs.adonisjs.com/guides/digging-deeper/cache#namespaces) Namespaces Another way to group your keys is to use namespaces. This allows you to invalidate everything at once later: Copy code to clipboard const users = cache.namespace('users') users.set({ key: '32', value: { name: 'foo' } }) users.set({ key: '33', value: { name: 'bar' } }) users.clear() ### [](https://docs.adonisjs.com/guides/digging-deeper/cache#grace-period) Grace period You can allow Bentocache to return stale data if the cache key is expired but still within a grace period using the `grace` option. This makes Bentocache work in the same way libraries like SWR or TanStack Query do. Copy code to clipboard import cache from '@adonisjs/cache/services/main' cache.getOrSet({ key: 'slow-api', factory: async () => { await sleep(5000) return 'slow-api-response' }, ttl: '1h', grace: '6h', }) In the example above, the data will be considered stale after 1 hour. However, the next request within the grace period of 6 hours will return the stale data while re-fetching the data from the factory method and updating the cache. ### [](https://docs.adonisjs.com/guides/digging-deeper/cache#timeouts) Timeouts You can configure how long you allow your factory method to run before returning stale data using the `timeout` option. By default, Bentocache sets a soft timeout of 0ms, which means we always return stale data while re-fetching the data in the background. Copy code to clipboard import cache from '@adonisjs/cache/services/main' cache.getOrSet({ key: 'slow-api', factory: async () => { await sleep(5000) return 'slow-api-response' }, ttl: '1h', grace: '6h', timeout: '200ms', }) In the example above, the factory method will be allowed to run for a maximum of 200ms. If the factory method takes longer than 200ms, the stale data will be returned to the user but the factory method will continue to run in the background. If you have not defined a `grace` period, you can still use a hard timeout to stop the factory method from running after a certain time. Copy code to clipboard import cache from '@adonisjs/cache/services/main' cache.getOrSet({ key: 'slow-api', factory: async () => { await sleep(5000) return 'slow-api-response' }, ttl: '1h', hardTimeout: '200ms', }) In this example, the factory method will be stopped after 200ms and an error will be thrown. You can define the `timeout` and `hardTimeout` together. The `timeout` is the maximum time the factory method is allowed to run before returning stale data, while the `hardTimeout` is the maximum time the factory method is allowed to run before being stopped. [](https://docs.adonisjs.com/guides/digging-deeper/cache#cache-service) Cache Service ------------------------------------------------------------------------------------- The cache service exported from `@adonisjs/cache/services/main` is a singleton instance of the [BentoCache](https://bentocache.dev/docs/named-caches) class created using the configuration defined in `config/cache.ts`. You can import the cache service into your application and use it to interact with the cache: Copy code to clipboard import cache from '@adonisjs/cache/services/main' /** * Without calling the `use` method, the methods you call on the cache service * will use the default store defined in `config/cache.ts`. */ cache.put({ key: 'username', value: 'jul', ttl: '1h' }) /** * Using the `use` method, you can switch to a different store defined in * `config/cache.ts`. */ cache.use('dynamodb').put({ key: 'username', value: 'jul', ttl: '1h' }) You can find all available methods here: [BentoCache API](https://bentocache.dev/docs/methods) . Copy code to clipboard await cache.namespace('users').set({ key: 'username', value: 'jul' }) await cache.namespace('users').get({ key: 'username' }) await cache.get({ key: 'username' }) await cache.set({ key: 'username', value: 'jul' }) await cache.setForever({ key: 'username', value:'jul' }) await cache.getOrSet({ key: 'username', factory: async () => fetchUserName(), ttl: '1h', }) await cache.has({ key: 'username' }) await cache.missing({ key: 'username' }) await cache.pull({ key: 'username' }) await cache.delete({ key: 'username' }) await cache.deleteMany({ keys: ['products', 'users'] }) await cache.deleteByTag({ tags: ['products', 'users'] }) await cache.clear() [](https://docs.adonisjs.com/guides/digging-deeper/cache#edge-helper) Edge Helper --------------------------------------------------------------------------------- The `cache` service is available as an Edge helper within your views. You can use it to retrieve cached values directly in your templates. Copy code to clipboard
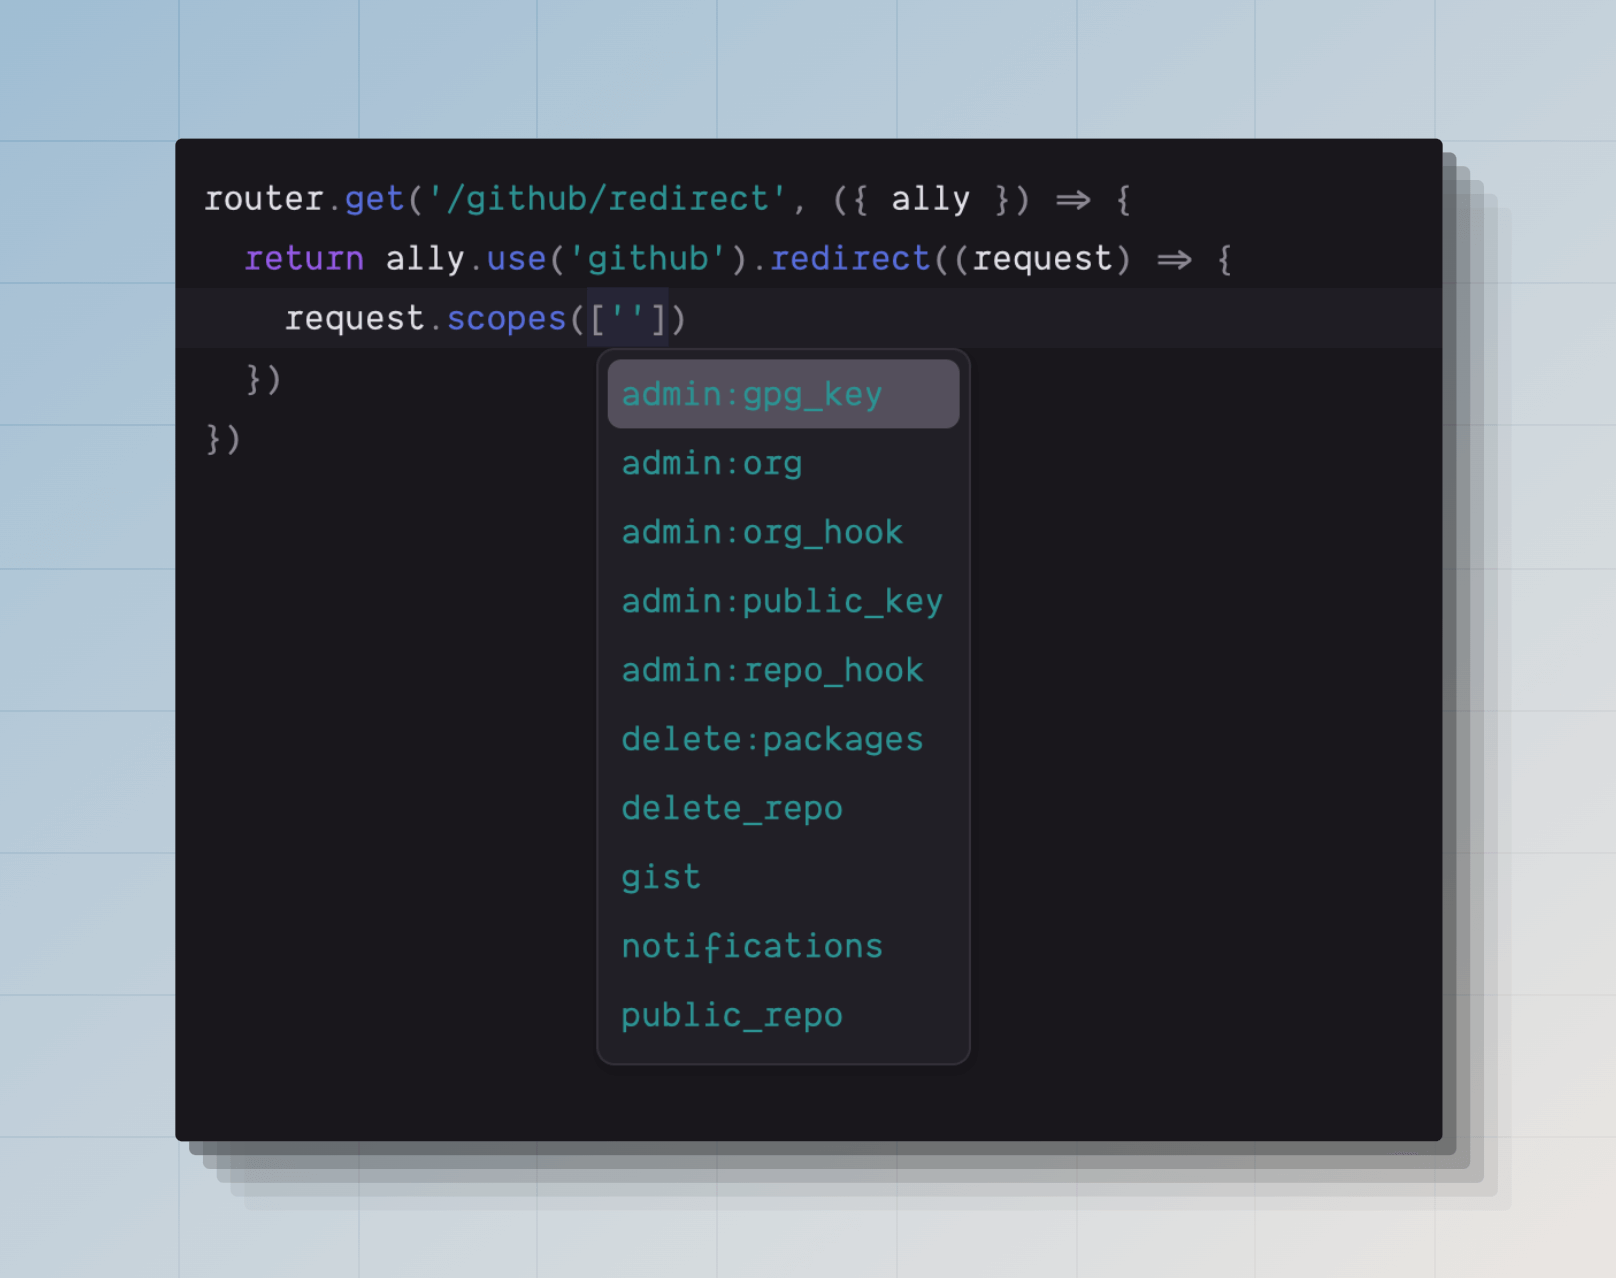
Hello {{ await cache.get('username') }}

[](https://docs.adonisjs.com/guides/digging-deeper/cache#ace-commands) Ace Commands ----------------------------------------------------------------------------------- The `@adonisjs/cache` package also provides a set of Ace commands to interact with the cache from the terminal. ### [](https://docs.adonisjs.com/guides/digging-deeper/cache#cacheclear) `cache:clear` Clears the cache for the specified store. If not specified, it will clear the default one. Copy code to clipboard # Clear the default cache store node ace cache:clear # Clear a specific cache store node ace cache:clear redis # Clear a specific namespace node ace cache:clear store --namespace users # Clear multiple specific tags node ace cache:clear store --tags products --tags users ### [](https://docs.adonisjs.com/guides/digging-deeper/cache#cachedelete) `cache:delete` Deletes a specific cache key from the specified store. If not specified, it will delete from the default one. Copy code to clipboard # Delete a specific cache key node ace cache:delete cache-key # Delete a specific cache key from a specific store node ace cache:delete cache-key store ### [](https://docs.adonisjs.com/guides/digging-deeper/cache#cacheprune) `cache:prune` Some cache drivers, like the database driver, do not automatically remove expired keys because they lack native TTL support. You can use the `cache:prune` command to manually remove expired keys. On stores that support TTL, this command will result in a no-op. Copy code to clipboard # Prune expired keys from the default cache store node ace cache:prune # Prune expired keys from a specific cache store node ace cache:prune store * * * [Testing\ \ Mocks & Fakes](https://docs.adonisjs.com/guides/testing/mocks-and-fakes) [Digging deeper\ \ Drive](https://docs.adonisjs.com/guides/digging-deeper/drive) © 2025 AdonisJS [Edit this page](https://github.com/adonisjs/v6-docs/blob/main/content/docs/digging_deeper/cache.md) --- # Events (References) | AdonisJS Documentation Toggle docs menu Events [](https://docs.adonisjs.com/guides/references/events#events-reference) Events reference ======================================================================================== In this guide, we look at the list of events dispatched by the framework core and the official packages. Check out the [emitter](https://docs.adonisjs.com/guides/digging-deeper/emitter) documentation to learn more about its usage. [](https://docs.adonisjs.com/guides/references/events#httprequest_completed) http:request\_completed ---------------------------------------------------------------------------------------------------- The [`http:request_completed`](https://github.com/adonisjs/http-server/blob/main/src/types/server.ts#L65) event is dispatched after an HTTP request is completed. The event contains an instance of the [HttpContext](https://docs.adonisjs.com/guides/concepts/http-context) and the request duration. The `duration` value is the output of the `process.hrtime` method. Copy code to clipboard import emitter from '@adonisjs/core/services/emitter' import string from '@adonisjs/core/helpers/string' emitter.on('http:request_completed', (event) => { const method = event.ctx.request.method() const url = event.ctx.request.url(true) const duration = event.duration console.log(`${method} ${url}: ${string.prettyHrTime(duration)}`) }) [](https://docs.adonisjs.com/guides/references/events#httpserver_ready) http:server\_ready ------------------------------------------------------------------------------------------ The event is dispatched once the AdonisJS HTTP server is ready to accept incoming requests. Copy code to clipboard import emitter from '@adonisjs/core/services/emitter' emitter.on('http:server_ready', (event) => { console.log(event.host) console.log(event.port) /** * Time it took to boot the app and start * the HTTP server. */ console.log(event.duration) }) [](https://docs.adonisjs.com/guides/references/events#container_bindingresolved) container\_binding:resolved ------------------------------------------------------------------------------------------------------------ The event is dispatched after the IoC container resolves a binding or constructs a class instance. The `event.binding` property will be a string (binding name) or a class constructor, and the `event.value` property is the resolved value. Copy code to clipboard import emitter from '@adonisjs/core/services/emitter' emitter.on('container_binding:resolved', (event) => { console.log(event.binding) console.log(event.value) }) [](https://docs.adonisjs.com/guides/references/events#sessioninitiated) session:initiated ----------------------------------------------------------------------------------------- The `@adonisjs/session` package emits the event when the session store is initiated during an HTTP request. The `event.session` property is an instance of the [Session class](https://github.com/adonisjs/session/blob/main/src/session.ts) . Copy code to clipboard import emitter from '@adonisjs/core/services/emitter' emitter.on('session:initiated', (event) => { console.log(`Initiated store for ${event.session.sessionId}`) }) [](https://docs.adonisjs.com/guides/references/events#sessioncommitted) session:committed ----------------------------------------------------------------------------------------- The `@adonisjs/session` package emits the event when the session data is written to the session store during an HTTP request. Copy code to clipboard import emitter from '@adonisjs/core/services/emitter' emitter.on('session:committed', (event) => { console.log(`Persisted data for ${event.session.sessionId}`) }) [](https://docs.adonisjs.com/guides/references/events#sessionmigrated) session:migrated --------------------------------------------------------------------------------------- The `@adonisjs/session` package emits the event when a new session ID is generated using the `session.regenerate()` method. Copy code to clipboard import emitter from '@adonisjs/core/services/emitter' emitter.on('session:migrated', (event) => { console.log(`Migrating data to ${event.toSessionId}`) console.log(`Destroying session ${event.fromSessionId}`) }) [](https://docs.adonisjs.com/guides/references/events#i18nmissingtranslation) i18n:missing:translation ------------------------------------------------------------------------------------------------------ The event is dispatched by the `@adonisjs/i18n` package when a translation for a specific key and locale is missing. You may listen to this event to find the missing translations for a given locale. Copy code to clipboard import emitter from '@adonisjs/core/services/emitter' emitter.on('i18n:missing:translation', function (event) { console.log(event.identifier) console.log(event.hasFallback) console.log(event.locale) }) [](https://docs.adonisjs.com/guides/references/events#mailsending) mail:sending ------------------------------------------------------------------------------- The `@adonisjs/mail` package emits the event before sending an email. In the case of the `mail.sendLater` method call, the event will be emitted when the mail queue processes the job. Copy code to clipboard import emitter from '@adonisjs/core/services/emitter' emitter.on('mail:sending', (event) => { console.log(event.mailerName) console.log(event.message) console.log(event.views) }) [](https://docs.adonisjs.com/guides/references/events#mailsent) mail:sent ------------------------------------------------------------------------- After sending the email, the event is dispatched by the `@adonisjs/mail` package. Copy code to clipboard import emitter from '@adonisjs/core/services/emitter' emitter.on('mail:sent', (event) => { console.log(event.response) console.log(event.mailerName) console.log(event.message) console.log(event.views) }) [](https://docs.adonisjs.com/guides/references/events#mailqueueing) mail:queueing --------------------------------------------------------------------------------- The `@adonisjs/mail` package emits the event before queueing the job to send the email. Copy code to clipboard import emitter from '@adonisjs/core/services/emitter' emitter.on('mail:queueing', (event) => { console.log(event.mailerName) console.log(event.message) console.log(event.views) }) [](https://docs.adonisjs.com/guides/references/events#mailqueued) mail:queued ----------------------------------------------------------------------------- After the email has been queued, the event is dispatched by the `@adonisjs/mail` package. Copy code to clipboard import emitter from '@adonisjs/core/services/emitter' emitter.on('mail:queued', (event) => { console.log(event.mailerName) console.log(event.message) console.log(event.views) }) [](https://docs.adonisjs.com/guides/references/events#queuedmailerror) queued:mail:error ---------------------------------------------------------------------------------------- The event is dispatched when the [MemoryQueue](https://github.com/adonisjs/mail/blob/main/src/messengers/memory_queue.ts) implementation of the `@adonisjs/mail` package is unable to send the email queued using the `mail.sendLater` method. If you are using a custom queue implementation, you must capture the job errors and emit this event. Copy code to clipboard import emitter from '@adonisjs/core/services/emitter' emitter.on('queued:mail:error', (event) => { console.log(event.error) console.log(event.mailerName) }) [](https://docs.adonisjs.com/guides/references/events#session_authlogin_attempted) session\_auth:login\_attempted ----------------------------------------------------------------------------------------------------------------- The event is dispatched by the [SessionGuard](https://github.com/adonisjs/auth/blob/main/src/guards/session/guard.ts) implementation of the `@adonisjs/auth` package when the `auth.login` method is called either directly or internally by the session guard. Copy code to clipboard import emitter from '@adonisjs/core/services/emitter' emitter.on('session_auth:login_attempted', (event) => { console.log(event.guardName) console.log(event.user) }) [](https://docs.adonisjs.com/guides/references/events#session_authlogin_succeeded) session\_auth:login\_succeeded ----------------------------------------------------------------------------------------------------------------- The event is dispatched by the [SessionGuard](https://github.com/adonisjs/auth/blob/main/src/guards/session/guard.ts) implementation of the `@adonisjs/auth` package after a user has been logged in successfully. You may use this event to track sessions associated with a given user. Copy code to clipboard import emitter from '@adonisjs/core/services/emitter' emitter.on('session_auth:login_succeeded', (event) => { console.log(event.guardName) console.log(event.sessionId) console.log(event.user) console.log(event.rememberMeToken) // (if created one) }) [](https://docs.adonisjs.com/guides/references/events#session_authauthentication_attempted) session\_auth:authentication\_attempted ----------------------------------------------------------------------------------------------------------------------------------- The event is dispatched by the `@adonisjs/auth` package when an attempt is made to validate the request session and check for a logged-in user. Copy code to clipboard import emitter from '@adonisjs/core/services/emitter' emitter.on('session_auth:authentication_attempted', (event) => { console.log(event.guardName) console.log(event.sessionId) }) [](https://docs.adonisjs.com/guides/references/events#session_authauthentication_succeeded) session\_auth:authentication\_succeeded ----------------------------------------------------------------------------------------------------------------------------------- The event is dispatched by the `@adonisjs/auth` package after the request session has been validated and the user is logged in. You may access the logged-in user using the `event.user` property. Copy code to clipboard import emitter from '@adonisjs/core/services/emitter' emitter.on('session_auth:authentication_succeeded', (event) => { console.log(event.guardName) console.log(event.sessionId) console.log(event.user) console.log(event.rememberMeToken) // if authenticated using token }) [](https://docs.adonisjs.com/guides/references/events#session_authauthentication_failed) session\_auth:authentication\_failed ----------------------------------------------------------------------------------------------------------------------------- The event is dispatched by the `@adonisjs/auth` package when the authentication check fails, and the user is not logged in during the current HTTP request. Copy code to clipboard import emitter from '@adonisjs/core/services/emitter' emitter.on('session_auth:authentication_failed', (event) => { console.log(event.guardName) console.log(event.sessionId) console.log(event.error) }) [](https://docs.adonisjs.com/guides/references/events#session_authlogged_out) session\_auth:logged\_out ------------------------------------------------------------------------------------------------------- The event is dispatched by the `@adonisjs/auth` package after the user has been logged out. Copy code to clipboard import emitter from '@adonisjs/core/services/emitter' emitter.on('session_auth:logged_out', (event) => { console.log(event.guardName) console.log(event.sessionId) /** * The value of the user will be null when logout is called * during a request where no user was logged in in the first place. */ console.log(event.user) }) [](https://docs.adonisjs.com/guides/references/events#access_tokens_authauthentication_attempted) access\_tokens\_auth:authentication\_attempted ------------------------------------------------------------------------------------------------------------------------------------------------ The event is dispatched by the `@adonisjs/auth` package when an attempt is made to validate the access token during an HTTP request. Copy code to clipboard import emitter from '@adonisjs/core/services/emitter' emitter.on('access_tokens_auth:authentication_attempted', (event) => { console.log(event.guardName) }) [](https://docs.adonisjs.com/guides/references/events#access_tokens_authauthentication_succeeded) access\_tokens\_auth:authentication\_succeeded ------------------------------------------------------------------------------------------------------------------------------------------------ The event is dispatched by the `@adonisjs/auth` package after the access token has been verified. You may access the authenticated user using the `event.user` property. Copy code to clipboard import emitter from '@adonisjs/core/services/emitter' emitter.on('access_tokens_auth:authentication_succeeded', (event) => { console.log(event.guardName) console.log(event.user) console.log(event.token) }) [](https://docs.adonisjs.com/guides/references/events#access_tokens_authauthentication_failed) access\_tokens\_auth:authentication\_failed ------------------------------------------------------------------------------------------------------------------------------------------ The event is dispatched by the `@adonisjs/auth` package when the authentication check fails. Copy code to clipboard import emitter from '@adonisjs/core/services/emitter' emitter.on('access_tokens_auth:authentication_failed', (event) => { console.log(event.guardName) console.log(event.error) }) [](https://docs.adonisjs.com/guides/references/events#authorizationfinished) authorization:finished --------------------------------------------------------------------------------------------------- The event is dispatched by the `@adonisjs/bouncer` package after the authorization check has been performed. The event payload includes the final response you may inspect to know the status of the check. Copy code to clipboard import emitter from '@adonisjs/core/services/emitter' emitter.on('authorization:finished', (event) => { console.log(event.user) console.log(event.response) console.log(event.parameters) console.log(event.action) }) [](https://docs.adonisjs.com/guides/references/events#cachecleared) cache:cleared --------------------------------------------------------------------------------- The event is dispatched by the `@adonisjs/cache` package after the cache has been cleared using the `cache.clear` method. Copy code to clipboard import emitter from '@adonisjs/core/services/emitter' emitter.on('cache:cleared', (event) => { console.log(event.store) }) [](https://docs.adonisjs.com/guides/references/events#cachedeleted) cache:deleted --------------------------------------------------------------------------------- The event is dispatched by the `@adonisjs/cache` package after a cache key has been deleted using the `cache.delete` method. Copy code to clipboard import emitter from '@adonisjs/core/services/emitter' emitter.on('cache:deleted', (event) => { console.log(event.key) }) [](https://docs.adonisjs.com/guides/references/events#cachehit) cache:hit ------------------------------------------------------------------------- The event is dispatched by the `@adonisjs/cache` package when a cache key is found in the cache store. Copy code to clipboard import emitter from '@adonisjs/core/services/emitter' emitter.on('cache:hit', (event) => { console.log(event.key) console.log(event.value) }) [](https://docs.adonisjs.com/guides/references/events#cachemiss) cache:miss --------------------------------------------------------------------------- The event is dispatched by the `@adonisjs/cache` package when a cache key is not found in the cache store. Copy code to clipboard import emitter from '@adonisjs/core/services/emitter' emitter.on('cache:miss', (event) => { console.log(event.key) }) [](https://docs.adonisjs.com/guides/references/events#cachewritten) cache:written --------------------------------------------------------------------------------- The event is dispatched by the `@adonisjs/cache` package after a cache key has been written to the cache store. Copy code to clipboard import emitter from '@adonisjs/core/services/emitter' emitter.on('cache:written', (event) => { console.log(event.key) console.log(event.value) }) * * * [References\ \ Edge helpers and tags](https://docs.adonisjs.com/guides/references/edge) [References\ \ Exceptions](https://docs.adonisjs.com/guides/references/exceptions) © 2025 AdonisJS [Edit this page](https://github.com/adonisjs/v6-docs/blob/main/content/docs/references/events.md) --- # Exceptions (References) | AdonisJS Documentation Toggle docs menu Exceptions [](https://docs.adonisjs.com/guides/references/exceptions#exceptions-reference) Exceptions reference ==================================================================================================== In this guide we will go through the list of known exceptions raised by the framework core and the official packages. Some of the exceptions are marked as **self-handled**. [Self-handled exceptions](https://docs.adonisjs.com/guides/basics/exception-handling#defining-the-handle-method) can convert themselves to an HTTP response. [](https://docs.adonisjs.com/guides/references/exceptions#e_route_not_found) E\_ROUTE\_NOT\_FOUND ------------------------------------------------------------------------------------------------- The exception is raised when the HTTP server receives a request for a non-existing route. By default, the client will get a 404 response, and optionally, you may render an HTML page using [status pages](https://docs.adonisjs.com/guides/basics/exception-handling#status-pages) . * **Status code**: 404 * **Self handled**: No Copy code to clipboard import { errors } from '@adonisjs/core' if (error instanceof errors.E_ROUTE_NOT_FOUND) { // handle error } [](https://docs.adonisjs.com/guides/references/exceptions#e_row_not_found) E\_ROW\_NOT\_FOUND --------------------------------------------------------------------------------------------- The exception is raised when the database query for finding one item fails \[e.g when using `Model.findOrFail()`\]. By default, the client will get a 404 response, and optionally, you may render an HTML page using [status pages](https://docs.adonisjs.com/guides/basics/exception-handling#status-pages) . * **Status code**: 404 * **Self handled**: No Copy code to clipboard import { errors as lucidErrors } from '@adonisjs/lucid' if (error instanceof lucidErrors.E_ROW_NOT_FOUND) { // handle error console.log(`${error.model?.name || 'Row'} not found`) } [](https://docs.adonisjs.com/guides/references/exceptions#e_authorization_failure) E\_AUTHORIZATION\_FAILURE ------------------------------------------------------------------------------------------------------------ The exception is raised when a bouncer authorization check fails. The exception is self-handled and [uses content-negotiation](https://docs.adonisjs.com/guides/security/authorization#throwing-authorizationexception) to return an appropriate error response to the client. * **Status code**: 403 * **Self handled**: Yes * **Translation identifier**: `errors.E_AUTHORIZATION_FAILURE` Copy code to clipboard import { errors as bouncerErrors } from '@adonisjs/bouncer' if (error instanceof bouncerErrors.E_AUTHORIZATION_FAILURE) { } [](https://docs.adonisjs.com/guides/references/exceptions#e_too_many_requests) E\_TOO\_MANY\_REQUESTS ----------------------------------------------------------------------------------------------------- The exception is raised by the [@adonisjs/rate-limiter](https://docs.adonisjs.com/guides/security/rate-limiting) package when a request exhausts all the requests allowed during a given duration. The exception is self-handled and [uses content-negotiation](https://docs.adonisjs.com/guides/security/rate-limiting#handling-throttleexception) to return an appropriate error response to the client. * **Status code**: 429 * **Self handled**: Yes * **Translation identifier**: `errors.E_TOO_MANY_REQUESTS` Copy code to clipboard import { errors as limiterErrors } from '@adonisjs/limiter' if (error instanceof limiterErrors.E_TOO_MANY_REQUESTS) { } [](https://docs.adonisjs.com/guides/references/exceptions#e_bad_csrf_token) E\_BAD\_CSRF\_TOKEN ----------------------------------------------------------------------------------------------- The exception is raised when a form using [CSRF protection](https://docs.adonisjs.com/guides/security/securing-ssr-applications#csrf-protection) is submitted without the CSRF token, or the CSRF token is invalid. * **Status code**: 403 * **Self handled**: Yes * **Translation identifier**: `errors.E_BAD_CSRF_TOKEN` Copy code to clipboard import { errors as shieldErrors } from '@adonisjs/shield' if (error instanceof shieldErrors.E_BAD_CSRF_TOKEN) { } The `E_BAD_CSRF_TOKEN` exception is [self-handled](https://github.com/adonisjs/shield/blob/main/src/errors.ts#L20) , and the user will be redirected back to the form, and you can access the error using the flash messages. Copy code to clipboard @error('E_BAD_CSRF_TOKEN')

{{ message }}

@end [](https://docs.adonisjs.com/guides/references/exceptions#e_oauth_missing_code) E\_OAUTH\_MISSING\_CODE ------------------------------------------------------------------------------------------------------- The `@adonisjs/ally` package raises the exception when the OAuth service does not provide the OAuth code during the redirect. You can avoid this exception if you [handle the errors](https://docs.adonisjs.com/guides/authentication/social-authentication#handling-callback-response) before calling the `.accessToken` or `.user` methods. * **Status code**: 500 * **Self handled**: No Copy code to clipboard import { errors as allyErrors } from '@adonisjs/bouncer' if (error instanceof allyErrors.E_OAUTH_MISSING_CODE) { } [](https://docs.adonisjs.com/guides/references/exceptions#e_oauth_state_mismatch) E\_OAUTH\_STATE\_MISMATCH ----------------------------------------------------------------------------------------------------------- The `@adonisjs/ally` package raises the exception when the CSRF state defined during the redirect is missing. You can avoid this exception if you [handle the errors](https://docs.adonisjs.com/guides/authentication/social-authentication#handling-callback-response) before calling the `.accessToken` or `.user` methods. * **Status code**: 400 * **Self handled**: No Copy code to clipboard import { errors as allyErrors } from '@adonisjs/bouncer' if (error instanceof allyErrors.E_OAUTH_STATE_MISMATCH) { } [](https://docs.adonisjs.com/guides/references/exceptions#e_unauthorized_access) E\_UNAUTHORIZED\_ACCESS -------------------------------------------------------------------------------------------------------- The exception is raised when one of the authentication guards is not able to authenticate the request. The exception is self-handled and uses [content-negotiation](https://docs.adonisjs.com/guides/authentication/session-guard#handling-authentication-exception) to return an appropriate error response to the client. * **Status code**: 401 * **Self handled**: Yes * **Translation identifier**: `errors.E_UNAUTHORIZED_ACCESS` Copy code to clipboard import { errors as authErrors } from '@adonisjs/auth' if (error instanceof authErrors.E_UNAUTHORIZED_ACCESS) { } [](https://docs.adonisjs.com/guides/references/exceptions#e_invalid_credentials) E\_INVALID\_CREDENTIALS -------------------------------------------------------------------------------------------------------- The exception is raised when the auth finder is not able to verify the user credentials. The exception is handled and use [content-negotiation](https://docs.adonisjs.com/guides/authentication/verifying-user-credentials#handling-exceptions) to return an appropriate error response to the client. * **Status code**: 400 * **Self handled**: Yes * **Translation identifier**: `errors.E_INVALID_CREDENTIALS` Copy code to clipboard import { errors as authErrors } from '@adonisjs/auth' if (error instanceof authErrors.E_INVALID_CREDENTIALS) { } [](https://docs.adonisjs.com/guides/references/exceptions#e_cannot_lookup_route) E\_CANNOT\_LOOKUP\_ROUTE --------------------------------------------------------------------------------------------------------- The exception is raised when you attempt to create a URL for a route using the [URL builder](https://docs.adonisjs.com/guides/basics/routing#url-builder) . * **Status code**: 500 * **Self handled**: No Copy code to clipboard import { errors } from '@adonisjs/core' if (error instanceof errors.E_CANNOT_LOOKUP_ROUTE) { // handle error } [](https://docs.adonisjs.com/guides/references/exceptions#e_http_exception) E\_HTTP\_EXCEPTION ---------------------------------------------------------------------------------------------- The `E_HTTP_EXCEPTION` is a generic exception for throwing errors during an HTTP request. You can use this exception directly or create a custom exception extending it. * **Status code**: Defined at the time of raising the exception * **Self handled**: Yes Throw exception Copy code to clipboard import { errors } from '@adonisjs/core' throw errors.E_HTTP_EXCEPTION.invoke( { errors: ['Cannot process request'] }, 422 ) Handle exception Copy code to clipboard import { errors } from '@adonisjs/core' if (error instanceof errors.E_HTTP_EXCEPTION) { // handle error } [](https://docs.adonisjs.com/guides/references/exceptions#e_http_request_aborted) E\_HTTP\_REQUEST\_ABORTED ----------------------------------------------------------------------------------------------------------- The `E_HTTP_REQUEST_ABORTED` is a sub-class of the `E_HTTP_EXCEPTION` exception. This exception is raised by the [response.abort](https://docs.adonisjs.com/guides/basics/response#aborting-request-with-an-error) method. Copy code to clipboard import { errors } from '@adonisjs/core' if (error instanceof errors.E_HTTP_REQUEST_ABORTED) { // handle error } [](https://docs.adonisjs.com/guides/references/exceptions#e_insecure_app_key) E\_INSECURE\_APP\_KEY --------------------------------------------------------------------------------------------------- The exception is raised when the length of `appKey` is smaller than 16 characters. You can use the [generate](https://docs.adonisjs.com/guides/references/commands#generatekey) ace command to generate a secure app key. * **Status code**: 500 * **Self handled**: No Copy code to clipboard import { errors } from '@adonisjs/core' if (error instanceof errors.E_INSECURE_APP_KEY) { // handle error } [](https://docs.adonisjs.com/guides/references/exceptions#e_missing_app_key) E\_MISSING\_APP\_KEY ------------------------------------------------------------------------------------------------- The exception is raised when the `appKey` property is not defined inside the `config/app.ts` file. By default, the value of the `appKey` is set using the `APP_KEY` environment variable. * **Status code**: 500 * **Self handled**: No Copy code to clipboard import { errors } from '@adonisjs/core' if (error instanceof errors.E_MISSING_APP_KEY) { // handle error } [](https://docs.adonisjs.com/guides/references/exceptions#e_invalid_env_variables) E\_INVALID\_ENV\_VARIABLES ------------------------------------------------------------------------------------------------------------- The exception is raised when one or more environment variables fail the validation. The detailed validation errors can be accessed using the `error.help` property. * **Status code**: 500 * **Self handled**: No Copy code to clipboard import { errors } from '@adonisjs/core' if (error instanceof errors.E_INVALID_ENV_VARIABLES) { console.log(error.help) } [](https://docs.adonisjs.com/guides/references/exceptions#e_missing_command_name) E\_MISSING\_COMMAND\_NAME ----------------------------------------------------------------------------------------------------------- The exception is raised when a command does not define the `commandName` property or its value is an empty string. * **Status code**: 500 * **Self handled**: No Copy code to clipboard import { errors } from '@adonisjs/core' if (error instanceof errors.E_MISSING_COMMAND_NAME) { console.log(error.commandName) } [](https://docs.adonisjs.com/guides/references/exceptions#e_command_not_found) E\_COMMAND\_NOT\_FOUND ----------------------------------------------------------------------------------------------------- The exception is raised by Ace when unable to find a command. * **Status code**: 404 * **Self handled**: No Copy code to clipboard import { errors } from '@adonisjs/core' if (error instanceof errors.E_COMMAND_NOT_FOUND) { console.log(error.commandName) } [](https://docs.adonisjs.com/guides/references/exceptions#e_missing_flag) E\_MISSING\_FLAG ------------------------------------------------------------------------------------------ The exception is raised when executing a command without passing a required CLI flag. * **Status code**: 500 * **Self handled**: No Copy code to clipboard import { errors } from '@adonisjs/core' if (error instanceof errors.E_MISSING_FLAG) { console.log(error.commandName) } [](https://docs.adonisjs.com/guides/references/exceptions#e_missing_flag_value) E\_MISSING\_FLAG\_VALUE ------------------------------------------------------------------------------------------------------- The exception is raised when trying to execute a command without providing any value to a non-boolean CLI flag. * **Status code**: 500 * **Self handled**: No Copy code to clipboard import { errors } from '@adonisjs/core' if (error instanceof errors.E_MISSING_FLAG_VALUE) { console.log(error.commandName) } [](https://docs.adonisjs.com/guides/references/exceptions#e_missing_arg) E\_MISSING\_ARG ---------------------------------------------------------------------------------------- The exception is raised when executing a command without defining the required arguments. * **Status code**: 500 * **Self handled**: No Copy code to clipboard import { errors } from '@adonisjs/core' if (error instanceof errors.E_MISSING_ARG) { console.log(error.commandName) } [](https://docs.adonisjs.com/guides/references/exceptions#e_missing_arg_value) E\_MISSING\_ARG\_VALUE ----------------------------------------------------------------------------------------------------- The exception is raised when executing a command without defining the value for a required argument. * **Status code**: 500 * **Self handled**: No Copy code to clipboard import { errors } from '@adonisjs/core' if (error instanceof errors.E_MISSING_ARG_VALUE) { console.log(error.commandName) } [](https://docs.adonisjs.com/guides/references/exceptions#e_unknown_flag) E\_UNKNOWN\_FLAG ------------------------------------------------------------------------------------------ The exception is raised when executing a command with an unknown CLI flag. * **Status code**: 500 * **Self handled**: No Copy code to clipboard import { errors } from '@adonisjs/core' if (error instanceof errors.E_UNKNOWN_FLAG) { console.log(error.commandName) } [](https://docs.adonisjs.com/guides/references/exceptions#e_invalid_flag) E\_INVALID\_FLAG ------------------------------------------------------------------------------------------ The exception is raised when the value provided for a CLI flag is invalid—for example, passing a string value to a flag that accepts numeric values. * **Status code**: 500 * **Self handled**: No Copy code to clipboard import { errors } from '@adonisjs/core' if (error instanceof errors.E_INVALID_FLAG) { console.log(error.commandName) } [](https://docs.adonisjs.com/guides/references/exceptions#e_multiple_redis_subscriptions) E\_MULTIPLE\_REDIS\_SUBSCRIPTIONS --------------------------------------------------------------------------------------------------------------------------- The `@adonisjs/redis` package raises the exception when you attempt to [subscribe to a given pub/sub channel](https://docs.adonisjs.com/guides/database/redis#pubsub) multiple times. * **Status code**: 500 * **Self handled**: No Copy code to clipboard import { errors as redisErrors } from '@adonisjs/redis' if (error instanceof redisErrors.E_MULTIPLE_REDIS_SUBSCRIPTIONS) { } [](https://docs.adonisjs.com/guides/references/exceptions#e_multiple_redis_psubscriptions) E\_MULTIPLE\_REDIS\_PSUBSCRIPTIONS ----------------------------------------------------------------------------------------------------------------------------- The `@adonisjs/redis` package raises the exception when you attempt to [subscribe to a given pub/sub pattern](https://docs.adonisjs.com/guides/database/redis#pubsub) multiple times. * **Status code**: 500 * **Self handled**: No Copy code to clipboard import { errors as redisErrors } from '@adonisjs/redis' if (error instanceof redisErrors.E_MULTIPLE_REDIS_PSUBSCRIPTIONS) { } [](https://docs.adonisjs.com/guides/references/exceptions#e_mail_transport_error) E\_MAIL\_TRANSPORT\_ERROR ----------------------------------------------------------------------------------------------------------- The exception is raised by the `@adonisjs/mail` package when unable to send the email using a given transport. Usually, this will happen when the HTTP API of the email service returns a non-200 HTTP response. You may access the network request error using the `error.cause` property. The `cause` property is the [error object](https://github.com/sindresorhus/got/blob/main/documentation/8-errors.md) returned by `got` (npm package). * **Status code**: 400 * **Self handled**: No Copy code to clipboard import { errors as mailErrors } from '@adonisjs/mail' if (error instanceof mailErrors.E_MAIL_TRANSPORT_ERROR) { console.log(error.cause) } [](https://docs.adonisjs.com/guides/references/exceptions#e_session_not_mutable) E\_SESSION\_NOT\_MUTABLE --------------------------------------------------------------------------------------------------------- The exception is raised by the `@adonisjs/session` package when the session store is initiated in the read-only mode. * **Status code**: 500 * **Self handled**: No Copy code to clipboard import { errors as sessionErrors } from '@adonisjs/session' if (error instanceof sessionErrors.E_SESSION_NOT_MUTABLE) { console.log(error.message) } [](https://docs.adonisjs.com/guides/references/exceptions#e_session_not_ready) E\_SESSION\_NOT\_READY ----------------------------------------------------------------------------------------------------- The exception is raised by the `@adonisjs/session` package when the session store has not been initiated yet. This will be the case when you are not using the session middleware. * **Status code**: 500 * **Self handled**: No Copy code to clipboard import { errors as sessionErrors } from '@adonisjs/session' if (error instanceof sessionErrors.E_SESSION_NOT_READY) { console.log(error.message) } * * * [References\ \ Events](https://docs.adonisjs.com/guides/references/events) [References\ \ Helpers](https://docs.adonisjs.com/guides/references/helpers) © 2025 AdonisJS [Edit this page](https://github.com/adonisjs/v6-docs/blob/main/content/docs/references/exceptions.md) --- # Edge helpers and tags (References) | AdonisJS Documentation Toggle docs menu Edge helpers and tags [](https://docs.adonisjs.com/guides/references/edge#edge-helpers-and-tags) Edge helpers and tags ================================================================================================ In this guide, we will learn about the **helpers and the tags** contributed to Edge by the AdonisJS official packages. The helpers shipped with Edge are not covered in this guide and must reference [Edge](https://edgejs.dev/docs/helpers) documentation for the same. [](https://docs.adonisjs.com/guides/references/edge#request) request -------------------------------------------------------------------- Reference to the instance of ongoing [HTTP request](https://docs.adonisjs.com/guides/basics/request) . The property is only available when a template is rendered using the `ctx.view.render` method. Copy code to clipboard {{ request.url() }} {{ request.input('signature') }} [](https://docs.adonisjs.com/guides/references/edge#routesignedroute) route/signedRoute --------------------------------------------------------------------------------------- Helper functions to create URL for a route using the [URL builder](https://docs.adonisjs.com/guides/basics/routing#url-builder) . Unlike the URL builder, the view helpers do not have a fluent API and accept the following parameters. | | | | --- | --- | | Position | Description | | 1st | The route identifier or the route pattern | | 2nd | Route params are defined as an array or an object. | | 3rd | The options object with the following properties.

* `qs`: Define query string parameters as an object.
* `domain`: Search for routes under a specific domain.
* `prefixUrl`: Prefix a URL to the output.
* `disableRouteLookup`: Enable/disable routes lookup. | Copy code to clipboard View post Copy code to clipboard Unsubscribe [](https://docs.adonisjs.com/guides/references/edge#app) app ------------------------------------------------------------ Reference to the [Application instance](https://docs.adonisjs.com/guides/concepts/application) . Copy code to clipboard {{ app.getEnvironment() }} [](https://docs.adonisjs.com/guides/references/edge#config) config ------------------------------------------------------------------ A [helper function](https://docs.adonisjs.com/guides/getting-started/configuration#reading-config-inside-edge-templates) to reference configuration values inside Edge templates. You may use the `config.has` method to check if the value for a key exists. Copy code to clipboard @if(config.has('app.appUrl')) Home @else Home @end [](https://docs.adonisjs.com/guides/references/edge#session) session -------------------------------------------------------------------- A read-only copy of the [session object](https://docs.adonisjs.com/guides/basics/session#reading-and-writing-data) . You cannot mutate session data within Edge templates. The `session` property is only available when the template is rendered using the `ctx.view.render` method. Copy code to clipboard Post views: {{ session.get(`post.${post.id}.visits`) }} [](https://docs.adonisjs.com/guides/references/edge#flashmessages) flashMessages -------------------------------------------------------------------------------- A read-only copy of [session flash messages](https://docs.adonisjs.com/guides/basics/session#flash-messages) . The `flashMessages` property is only available when the template is rendered using the `ctx.view.render` method. Copy code to clipboard @if(flashMessages.has('inputErrorsBag.title'))

{{ flashMessages.get('inputErrorsBag.title') }}

@end @if(flashMessages.has('notification'))
{{ flashMessages.get('notification').message }}
@end [](https://docs.adonisjs.com/guides/references/edge#old) old ------------------------------------------------------------ The `old` method is a shorthand for the `flashMessages.get` method. Copy code to clipboard [](https://docs.adonisjs.com/guides/references/edge#t) t -------------------------------------------------------- The `t` method is contributed by the `@adonisjs/i18n` package to display translations using the [i18n class](https://docs.adonisjs.com/guides/digging-deeper/i18n#resolving-translations) . The method accepts the translation key identifier, message data and a fallback message as the parameters. Copy code to clipboard

{{ t('messages.greeting') }}

[](https://docs.adonisjs.com/guides/references/edge#i18n) i18n -------------------------------------------------------------- Reference to an instance of the I18n class configured using the application's default locale. However, the [`DetectUserLocaleMiddleware`](https://docs.adonisjs.com/guides/digging-deeper/i18n#detecting-user-locale-during-an-http-request) overrides this property with an instance created for the current HTTP request locale. Copy code to clipboard {{ i18n.formatCurrency(200, { currency: 'USD' }) }} [](https://docs.adonisjs.com/guides/references/edge#auth) auth -------------------------------------------------------------- Reference to the [ctx.auth](https://docs.adonisjs.com/guides/concepts/http-context#http-context-properties) property shared by the [InitializeAuthMiddleware](https://github.com/adonisjs/auth/blob/main/src/auth/middleware/initialize_auth_middleware.ts#L14) . You may use this property to access information about the logged-in user. Copy code to clipboard @if(auth.isAuthenticated)

{{ auth.user.email }}

@end If you are displaying the logged-in user info on a public page (not protected by the auth middleware), then you may want to first silently check if the user is logged-in or not. Copy code to clipboard {{-- Check if user is logged-in --}} @eval(await auth.use('web').check()) @if(auth.use('web').isAuthenticated)

{{ auth.use('web').user.email }}

@end [](https://docs.adonisjs.com/guides/references/edge#asset) asset ---------------------------------------------------------------- Resolve the URL of an asset processed by Vite. Learn more about [referencing assets inside Edge templates](https://docs.adonisjs.com/guides/basics/vite#referencing-assets-inside-edge-templates) . Copy code to clipboard [](https://docs.adonisjs.com/guides/references/edge#embedimage--embedimagedata) embedImage / embedImageData ----------------------------------------------------------------------------------------------------------- The `embedImage` and the `embedImageData` helpers are added by the [mail](https://docs.adonisjs.com/guides/digging-deeper/mail#embedding-images) package and are only available when rendering a template to send an email. Copy code to clipboard [](https://docs.adonisjs.com/guides/references/edge#flashmessage) @flashMessage ------------------------------------------------------------------------------- The `@flashMessage` tag provides a better DX for reading flash messages for a given key conditionally. **Instead of writing conditionals** Copy code to clipboard @if(flashMessages.has('notification'))
{{ flashMessages.get('notification').message }}
@end **You may prefer using the tag** Copy code to clipboard @flashMessage('notification')
{{ $message.message }}
@end [](https://docs.adonisjs.com/guides/references/edge#error) @error ----------------------------------------------------------------- The `@error` tag provides a better DX for reading error messages stored inside the `errorsBag` key in `flashMessages`. **Instead of writing conditionals** Copy code to clipboard @if(flashMessages.has('errorsBag.E_BAD_CSRF_TOKEN'))

{{ flashMessages.get('errorsBag.E_BAD_CSRF_TOKEN') }}

@end **You may prefer using the tag** Copy code to clipboard @error('E_BAD_CSRF_TOKEN')

{{ $message }}

@end [](https://docs.adonisjs.com/guides/references/edge#inputerror) @inputError --------------------------------------------------------------------------- The `@inputError` tag provides a better DX for reading validation error messages stored inside the `inputErrorsBag` key in `flashMessages`. **Instead of writing conditionals** Copy code to clipboard @if(flashMessages.has('inputErrorsBag.title')) @each(message in flashMessages.get('inputErrorsBag.title'))

{{ message }}

@end @end **You may prefer using the tag** Copy code to clipboard @inputError('title') @each(message in $messages)

{{ message }}

@end @end [](https://docs.adonisjs.com/guides/references/edge#vite) @vite --------------------------------------------------------------- The `@vite` tag accepts an array of entry point paths and returns the `script` and the `link` tags for the same. The path you provide to the `@vite` tag should match exactly the path registered inside the `vite.config.js` file. Copy code to clipboard export default defineConfig({ plugins: [\ adonisjs({\ entrypoints: ['resources/js/app.js'],\ }),\ ] }) Copy code to clipboard @vite(['resources/js/app.js']) You can define the script tag attributes as the 2nd argument. For example: Copy code to clipboard @vite(['resources/js/app.js'], { defer: true, }) [](https://docs.adonisjs.com/guides/references/edge#vitereactrefresh) @viteReactRefresh --------------------------------------------------------------------------------------- The `@viteReactRefresh` tag returns a [script tag to enable React HMR](https://vitejs.dev/guide/backend-integration.html#:~:text=you%27ll%20also%20need%20to%20add%20this%20before%20the%20above%20scripts) for project using the [@vitejs/plugin-react](https://www.npmjs.com/package/@vitejs/plugin-react) package. Copy code to clipboard @viteReactRefresh() Output HTML Copy code to clipboard [](https://docs.adonisjs.com/guides/references/edge#cancannot) @can/@cannot --------------------------------------------------------------------------- The `@can` and `@cannot` tags allows you write authorization checks in Edge templates by referencing the ability name or the policy name as a string. The first argument is the ability or the policy reference followed by the arguments accepted by the check. See also: [Pre-registering abilities and policies](https://docs.adonisjs.com/guides/security/authorization#pre-registering-abilities-and-policies) Copy code to clipboard @can('editPost', post) {{-- Can edit post --}} @end @can('PostPolicy.edit', post) {{-- Can edit post --}} @end Copy code to clipboard @cannot('editPost', post) {{-- Cannot edit post --}} @end @cannot('editPost', post) {{-- Cannot edit post --}} @end * * * [References\ \ Commands](https://docs.adonisjs.com/guides/references/commands) [References\ \ Events](https://docs.adonisjs.com/guides/references/events) © 2025 AdonisJS [Edit this page](https://github.com/adonisjs/v6-docs/blob/main/content/docs/references/edge.md) --- # Commands (References) | AdonisJS Documentation Toggle docs menu Commands [](https://docs.adonisjs.com/guides/references/commands#commands-reference) Commands reference ============================================================================================== In this guide, we cover the usage of all the commands shipped with the framework core and the official packages. You may also view the commands help using the `node ace list` command or the `node ace --help` command. Copy code to clipboard node ace list ![](https://docs.adonisjs.com/assets/ace_help_screen-jLRZM9Lm.jpeg) The output of the help screen is formatted as per the [docopt](http://docopt.org/) standard. [](https://docs.adonisjs.com/guides/references/commands#serve) serve -------------------------------------------------------------------- The `serve` uses the [@adonisjs/assembler](https://github.com/adonisjs/assembler?tab=readme-ov-file#dev-server) package to start the AdonisJS application in development environment. You can optionally watch for file changes and restart the HTTP server on every file change. Copy code to clipboard node ace serve --hmr The `serve` command starts the development server (via the `bin/server.ts` file) as a child process. If you want to pass [node arguments](https://nodejs.org/api/cli.html#options) to the child process, you can define them before the command name. Copy code to clipboard node ace --no-warnings --inspect serve --hmr Following is the list of available options you can pass to the `serve` command. Alternatively, use the `--help` flag to view the command's help. \--hmr Watch the filesystem and reload the server in HMR mode. \--watch Watch the filesystem and always restart the process on file change. \--poll Use polling to detect filesystem changes. You might want to use polling when using a Docker container for development. \--clear | --no-clear Clear the terminal after every file change and before displaying the new logs. Use the `--no-clear` flag to retain old logs. \--assets | --no-assets Start the assets bundle development server alongside the AdonisJS HTTP server. Use the `--no-assets` flag to turn off the assets bundler dev server. \--assets-args Pass commandline arguments to the asset manager child process. For example, if you use vite, you can define its options as follows. Copy code to clipboard node ace serve --hmr --assets-args="--cors --open" [](https://docs.adonisjs.com/guides/references/commands#build) build -------------------------------------------------------------------- The `build` command uses the [@adonisjs/assembler](https://github.com/adonisjs/assembler?tab=readme-ov-file#bundler) package to create the production build of your AdonisJS application. The following steps are performed to generate the build. See also: [TypeScript build process](https://docs.adonisjs.com/guides/concepts/typescript-build-process) . Copy code to clipboard node ace build Following is the list of available options you can pass to the `build` command. Alternatively, use the `--help` flag to view the command's help. \--ignore-ts-errors The build command terminates the build process when your project has TypeScript errors. However, you can ignore those errors and finish the build using the `--ignore-ts-errors` flag. \--package-manager The build command copies the `package.json` file alongside the lock file of the package manager your application is using. We detect the package manager using the [@antfu/install-pkg](https://github.com/antfu/install-pkg) package. However, you can turn off detection by explicitly providing the package manager's name. \--assets | --no-assets Bundle frontend assets alongside your backend application. Use the `--no-assets` flag to turn off the assets bundler dev server. \--assets-args Pass commandline arguments to the asset manager child process. For example, if you use vite, you can define its options as follows. Copy code to clipboard node ace build --assets-args="--sourcemap --debug" [](https://docs.adonisjs.com/guides/references/commands#add) add ---------------------------------------------------------------- The `add` command combines the `npm install ` and `node ace configure` commands. So, instead of running two separate commands, you can install and configure the package in one go using the `add` command. The `add` command will automatically detect the package manager used by your application and use that to install the package. However, you can always opt for a specific package manager using the `--package-manager` CLI flag. Copy code to clipboard # Install and configure the @adonisjs/lucid package node ace add @adonisjs/lucid # Install the package as a development dependency and configure it node ace add my-dev-package --dev If the package can be configured using flags, you can pass them directly to the `add` command. Every unknown flag will be passed down to the `configure` command. Copy code to clipboard node ace add @adonisjs/lucid --db=sqlite \--verbose Enable verbose mode to display the package installation and configuration logs. \--force Passed down to the `configure` command. Force overwrite files when configuring the package. See the `configure` command for more information. \--package-manager Define the package manager to use for installing the package. The value must be `npm`, `pnpm`, `bun` or `yarn`. \--dev Install the package as a development dependency. [](https://docs.adonisjs.com/guides/references/commands#configure) configure ---------------------------------------------------------------------------- Configure a package after it has been installed. The command accepts the package name as the first argument. Copy code to clipboard node ace configure @adonisjs/lucid \--verbose Enable verbose mode to display the package installation logs. \--force The stubs system of AdonisJS does not overwrite existing files. For example, if you configure the `@adonisjs/lucid` package and your application already has a `config/database.ts` file, the configure process will not overwrite the existing config file. However, you can force overwrite files using the `--force` flag. [](https://docs.adonisjs.com/guides/references/commands#eject) eject -------------------------------------------------------------------- Eject stubs from a given package to your application `stubs` directory. In the following example, we copy the `make/controller` stubs to our application for modification. See also: [Customizing stubs](https://docs.adonisjs.com/guides/concepts/scaffolding#ejecting-stubs) Copy code to clipboard # Copy stub from @adonisjs/core package node ace eject make/controller # Copy stub from @adonisjs/bouncer package node ace eject make/policy --pkg=@adonisjs/bouncer [](https://docs.adonisjs.com/guides/references/commands#generatekey) generate:key --------------------------------------------------------------------------------- Generate a cryptographically secure random key and write to the `.env` file as the `APP_KEY` environment variable. See also: [App key](https://docs.adonisjs.com/guides/security/encryption) Copy code to clipboard node ace generate:key \--show Display the key on the terminal instead of writing it to the `.env` file. By default, the key is written to the env file. \--force The `generate:key` command does not write the key to the `.env` file when running your application in production. However, you can use the `--force` flag to override this behavior. [](https://docs.adonisjs.com/guides/references/commands#makecontroller) make:controller --------------------------------------------------------------------------------------- Create a new HTTP controller class. Controllers are created inside the `app/controllers` directory and use the following naming conventions. * Form: `plural` * Suffix: `controller` * Class name example: `UsersController` * File name example: `users_controller.ts` Copy code to clipboard node ace make:controller users You also generate a controller with custom action names, as shown in the following example. Copy code to clipboard # Generates controller with "index", "show", and "store" methods node ace make:controller users index show store \--singular Force the controller name to be in singular form. \--resource Generate a controller with methods to perform CRUD operations on a resource. \--api The `--api` flag is similar to the `--resource` flag. However, it does not define the `create` and the `edit` methods since they are used to display forms. [](https://docs.adonisjs.com/guides/references/commands#makemiddleware) make:middleware --------------------------------------------------------------------------------------- Create a new middleware for HTTP requests. Middleware are stored inside the `app/middleware` directory and uses the following naming conventions. * Form: `singular` * Suffix: `middleware` * Class name example: `BodyParserMiddleware` * File name example: `body_parser_middleware.ts` Copy code to clipboard node ace make:middleware bodyparser \--stack Skip the [middleware stack](https://docs.adonisjs.com/guides/basics/middleware#middleware-stacks) selection prompt by defining the stack explicitly. The value must be `server`, `named`, or `router`. Copy code to clipboard node ace make:middleware bodyparser --stack=router [](https://docs.adonisjs.com/guides/references/commands#makeevent) make:event ----------------------------------------------------------------------------- Create a new event class. Events are stored inside the `app/events` directory and use the following naming conventions. * Form: `NA` * Suffix: `NA` * Class name example: `OrderShipped` * File name example: `order_shipped.ts` * Recommendation: You must name your events around the lifecycle of an action. For example: `MailSending`, `MailSent`, `RequestCompleted`, and so on. Copy code to clipboard node ace make:event orderShipped [](https://docs.adonisjs.com/guides/references/commands#makevalidator) make:validator ------------------------------------------------------------------------------------- Create a new VineJS validator file. The validators are stored inside the `app/validators` directory, and each file may export multiple validators. * Form: `singular` * Suffix: `NA` * File name example: `user.ts` * Recommendation: You must create validator files around the resources of your application. Copy code to clipboard # A validator for managing a user node ace make:validator user # A validator for managing a post node ace make:validator post \--resource Create a validator file with pre-defined validators for `create` and `update` actions. Copy code to clipboard node ace make:validator post --resource [](https://docs.adonisjs.com/guides/references/commands#makelistener) make:listener ----------------------------------------------------------------------------------- Create a new event listener class. The listener classes are stored inside the `app/listeners` directory and use the following naming conventions. * Form: `NA` * Suffix: `NA` * Class name example: `SendShipmentNotification` * File name example: `send_shipment_notification.ts` * Recommendation: The event listeners must be named after the action they perform. For example, a listener that sends the shipment notification email should be called `SendShipmentNotification`. Copy code to clipboard node ace make:listener sendShipmentNotification \--event Generate an event class alongside the event listener. Copy code to clipboard node ace make:listener sendShipmentNotification --event=shipment_received [](https://docs.adonisjs.com/guides/references/commands#makeservice) make:service --------------------------------------------------------------------------------- Create a new service class. Service classes are stored inside the `app/services` directory and use the following naming conventions. A service has no pre-defined meaning, and you can use it to extract the business logic inside your application. For example, if your application generates a lot of PDFs, you may create a service called `PdfGeneratorService` and reuse it in multiple places. * Form: `singular` * Suffix: `service` * Class name example: `InvoiceService` * File name example: `invoice_service.ts` Copy code to clipboard node ace make:service invoice [](https://docs.adonisjs.com/guides/references/commands#makeexception) make:exception ------------------------------------------------------------------------------------- Create a new [custom exception class](https://docs.adonisjs.com/guides/basics/exception-handling#custom-exceptions) . Exceptions are stored inside the `app/exceptions` directory. * Form: `NA` * Suffix: `exception` * Class name example: `CommandValidationException` * File name example: `command_validation_exception.ts` Copy code to clipboard node ace make:exception commandValidation [](https://docs.adonisjs.com/guides/references/commands#makecommand) make:command --------------------------------------------------------------------------------- Create a new Ace command. By default, the commands are stored inside the `commands` directory at the root of your application. Commands from this directory are imported automatically by AdonisJS when you try to execute any Ace command. You may prefix the filename with an `_` to store additional files that are not Ace commands in this directory. * Form: `NA` * Suffix: `NA` * Class name example: `ListRoutes` * File name example: `list_routes.ts` * Recommendation: Commands must be named after the action they perform. For example, `ListRoutes`, `MakeController`, and `Build`. Copy code to clipboard node ace make:command listRoutes [](https://docs.adonisjs.com/guides/references/commands#makeview) make:view --------------------------------------------------------------------------- Create a new Edge.js template file. The templates are created inside the `resources/views` directory. * Form: `NA` * Suffix: `NA` * File name example: `posts/view.edge` * Recommendation: You must group templates for a resource inside a subdirectory. For example: `posts/list.edge`, `posts/create.edge`, and so on. Copy code to clipboard node ace make:view posts/create node ace make:view posts/list [](https://docs.adonisjs.com/guides/references/commands#makeprovider) make:provider ----------------------------------------------------------------------------------- Create a [service provider file](https://docs.adonisjs.com/guides/concepts/service-providers) . Providers are stored inside the `providers` directory at the root of your application and use the following naming conventions. * Form: `singular` * Suffix: `provider` * Class name example: `AppProvider` * File name example: `app_provider.ts` Copy code to clipboard node ace make:provider app \--environments Define environments in which the provider should get imported. [Learn more about app environments](https://docs.adonisjs.com/guides/concepts/application#environment) Copy code to clipboard node ace make:provider app -e=web -e=console [](https://docs.adonisjs.com/guides/references/commands#makepreload) make:preload --------------------------------------------------------------------------------- Create a new [preload file](https://docs.adonisjs.com/guides/concepts/adonisrc-file#preloads) . Preload files are stored inside the `start` directory. Copy code to clipboard node ace make:preload view \--environments Define environments in which the preload file should get imported. [Learn more about app environments](https://docs.adonisjs.com/guides/concepts/application#environment) Copy code to clipboard node ace make:preload view app -e=web -e=console [](https://docs.adonisjs.com/guides/references/commands#maketest) make:test --------------------------------------------------------------------------- Create a new test file inside the `tests/` directory. * Form: NA * Suffix: `.spec` * File name example: `posts/list.spec.ts`, `posts/update.spec.ts` Copy code to clipboard node ace make:test --suite=unit \--suite Define the suite for which you want to create the test file. Otherwise, the command will display a prompt for suite selection. [](https://docs.adonisjs.com/guides/references/commands#makemail) make:mail --------------------------------------------------------------------------- Create a new mail class inside the `app/mails` directory. The mail classes are suffixed with the `Notification` keyword. However, you may define a custom suffix using the `--intent` CLI flag. * Form: NA * Suffix: `Intent` * Class name example: ShipmentNotification * File name example: shipment\_notification.ts Copy code to clipboard node ace make:mail shipment # ./app/mails/shipment_notification.ts \--intent Define a custom intent for the mail. Copy code to clipboard node ace make:mail shipment --intent=confirmation # ./app/mails/shipment_confirmation.ts node ace make:mail storage --intent=warning # ./app/mails/storage_warning.ts [](https://docs.adonisjs.com/guides/references/commands#makepolicy) make:policy ------------------------------------------------------------------------------- Create a new Bouncer policy class. The policies are stored inside the `app/policies` folder and use the following naming conventions. * Form: `singular` * Suffix: `policy` * Class name example: `PostPolicy` * File name example: `post_policy.ts` Copy code to clipboard node ace make:policy post [](https://docs.adonisjs.com/guides/references/commands#inspectrcfile) inspect:rcfile ------------------------------------------------------------------------------------- View the contents of the `adonisrc.ts` file after merging the defaults. You may use this command to inspect the available configuration options and override them per your application requirements. See also: [AdonisRC file](https://docs.adonisjs.com/guides/concepts/adonisrc-file) Copy code to clipboard node ace inspect:rcfile [](https://docs.adonisjs.com/guides/references/commands#listroutes) list:routes ------------------------------------------------------------------------------- View list of routes registered by your application. This command will boot your AdonisJS application in the `console` environment. Copy code to clipboard node ace list:routes Also, you can see the routes list from the VSCode activity bar if you are using our [official VSCode extension](https://marketplace.visualstudio.com/items?itemName=jripouteau.adonis-vscode-extension) . ![](https://docs.adonisjs.com/assets/vscode_routes_list-DbxKQOJv.png) \--json View routes as a JSON string. The output will be an array of object. \--table View routes inside a CLI table. By default, we display routes inside a compact, pretty list. \--middleware Filter routes list and include the ones using the mentioned middleware. You may use the `*` keyword to include routes using one or more middleware. \--ignore-middleware Filter routes list and include the ones NOT using the mentioned middleware. You may use the `*` keyword to include routes that do not use any middleware. [](https://docs.adonisjs.com/guides/references/commands#envadd) env:add ----------------------------------------------------------------------- The `env:add` command allows you to add a new environment variables to the `.env`, `.env.example` files and will also define the validation rules in the `start/env.ts` file. You can just run the command and it will prompt you for the variable name, value, and validation rules. Or you can pass them as arguments. Copy code to clipboard # Will prompt for the variable name, value, and validation rules node ace env:add # Define the variable name, value, and validation rule node ace env:add MY_VARIABLE value --type=string \--type Define the type of the environment variable. The value must be one of the following: `string`, `boolean`, `number`, `enum`. \--enum-values Define the allowed values for the environment variable when the type is `enum`. Copy code to clipboard node ace env:add MY_VARIABLE foo --type=enum --enum-values=foo --enum-values=bar * * * [Ace commands\ \ Terminal UI](https://docs.adonisjs.com/guides/ace/terminal-ui) [References\ \ Edge helpers and tags](https://docs.adonisjs.com/guides/references/edge) © 2025 AdonisJS [Edit this page](https://github.com/adonisjs/v6-docs/blob/main/content/docs/references/commands.md) --- # Logger (Digging deeper) | AdonisJS Documentation Toggle docs menu Logger [](https://docs.adonisjs.com/guides/digging-deeper/logger#logger) Logger ======================================================================== AdonisJS has an inbuilt logger that supports writing logs to a **file**, **standard output**, and **external logging services**. Under the hood, we use [pino](https://getpino.io/#/) . Pino is one of the fastest logging libraries in the Node.js ecosystem that generates logs in the [NDJSON format](https://github.com/ndjson/ndjson-spec) . [](https://docs.adonisjs.com/guides/digging-deeper/logger#usage) Usage ---------------------------------------------------------------------- To begin, you may import the Logger service to write logs from anywhere inside your application. The logs are written to `stdout` and will appear on the terminal. Copy code to clipboard import logger from '@adonisjs/core/services/logger' logger.info('this is an info message') logger.error({ err: error }, 'Something went wrong') It is recommended to use the `ctx.logger` property during HTTP requests. The HTTP context holds an instance of a request-aware logger that adds the current request ID to every log statement. Copy code to clipboard import router from '@adonisjs/core/services/router' import User from '#models/user' router.get('/users/:id', async ({ logger, params }) => { logger.info('Fetching user by id %s', params.id) const user = await User.find(params.id) }) [](https://docs.adonisjs.com/guides/digging-deeper/logger#configuration) Configuration -------------------------------------------------------------------------------------- The config for the logger is stored within the `config/logger.ts` file. By default, only one logger is configured. However, you can define config for multiple loggers if you want to use more than one in your application. config/logger.ts Copy code to clipboard import env from '#start/env' import { defineConfig } from '@adonisjs/core/logger' export default defineConfig({ default: 'app', loggers: { app: { enabled: true, name: env.get('APP_NAME'), level: env.get('LOG_LEVEL', 'info') }, } }) default The `default` property is a reference to one of the configured loggers within the same file under the `loggers` object. The default logger is used to write logs unless you select a specific logger when using the logger API. loggers The `loggers` object is a key-value pair to configure multiple loggers. The key is the name of the logger, and the value is the config object accepted by [pino](https://getpino.io/#/docs/api?id=options) [](https://docs.adonisjs.com/guides/digging-deeper/logger#transport-targets) Transport targets ---------------------------------------------------------------------------------------------- Transports in pino play an essential role as they write logs to a destination. You can configure [multiple targets](https://getpino.io/#/docs/api?id=transport-object) within your config file, and pino will deliver logs to all of them. Each target can also specify a level from which it wants to receive the logs. If you have not defined the `level` within the target configuration, the configured targets will inherit it from the parent logger. This behavior is different from pino. In Pino, targets do not inherit levels from the parent logger. Copy code to clipboard { loggers: { app: { enabled: true, name: env.get('APP_NAME'), level: env.get('LOG_LEVEL', 'info'), transport: { targets: [\ {\ target: 'pino/file',\ level: 'info',\ options: {\ destination: 1\ }\ },\ {\ target: 'pino-pretty',\ level: 'info',\ options: {}\ },\ ] } } } } File target The `pino/file` target writes logs to a file descriptor. The `destination = 1` means write logs to `stdout` (this is a standard [unix convention for file descriptors](https://en.wikipedia.org/wiki/File_descriptor) ). Pretty target The `pino-pretty` target uses the [pino-pretty npm module](http://npmjs.com/package/pino-pretty) to pretty-print logs to a file descriptor. [](https://docs.adonisjs.com/guides/digging-deeper/logger#defining-targets-conditionally) Defining targets conditionally ------------------------------------------------------------------------------------------------------------------------ It is common to register targets based on the environment in which the code is running. For example, using the `pino-pretty` target in development and the `pino/file` target in production. As shown below, constructing the `targets` array with conditionals makes the config file look untidy. Copy code to clipboard import app from '@adonisjs/core/services/app' loggers: { app: { transport: { targets: [\ ...(!app.inProduction\ ? [{ target: 'pino-pretty', level: 'info' }]\ : []\ ),\ ...(app.inProduction\ ? [{ target: 'pino/file', level: 'info' }]\ : []\ ),\ ] } } } Therefore, you can use the `targets` helper to define conditional array items using a fluent API. We express the same conditionals in the following example using the `targets.pushIf` method. Copy code to clipboard import { targets, defineConfig } from '@adonisjs/core/logger' loggers: { app: { transport: { targets: targets() .pushIf( !app.inProduction, { target: 'pino-pretty', level: 'info' } ) .pushIf( app.inProduction, { target: 'pino/file', level: 'info' } ) .toArray() } } } To further simplify the code, you can define the config object for the `pino/file` and `pino-pretty` targets using the `targets.pretty` and `targets.file` methods. Copy code to clipboard import { targets, defineConfig } from '@adonisjs/core/logger' loggers: { app: { transport: { targets: targets() .pushIf(app.inDev, targets.pretty()) .pushIf(app.inProduction, targets.file()) .toArray() } } } [](https://docs.adonisjs.com/guides/digging-deeper/logger#using-multiple-loggers) Using multiple loggers -------------------------------------------------------------------------------------------------------- AdonisJS has first-class support for configuring multiple loggers. The logger's unique name and config are defined within the `config/logger.ts` file. Copy code to clipboard export default defineConfig({ default: 'app', loggers: { app: { enabled: true, name: env.get('APP_NAME'), level: env.get('LOG_LEVEL', 'info') }, payments: { enabled: true, name: 'payments', level: env.get('LOG_LEVEL', 'info') }, } }) Once configured, you can access a named logger using the `logger.use` method. Copy code to clipboard import logger from '@adonisjs/core/services/logger' logger.use('payments') logger.use('app') // Get an instance of the default logger logger.use() [](https://docs.adonisjs.com/guides/digging-deeper/logger#dependency-injection) Dependency injection ---------------------------------------------------------------------------------------------------- When using Dependency injection, you can type-hint the `Logger` class as a dependency, and the IoC container will resolve an instance of the default logger defined inside the config file. If the class is constructed during an HTTP request, then the container will inject the request-aware instance of the Logger. Copy code to clipboard import { inject } from '@adonisjs/core' import { Logger } from '@adonisjs/core/logger' @inject() class UserService { constructor(protected logger: Logger) {} async find(userId: string | number) { this.logger.info('Fetching user by id %s', userId) const user = await User.find(userId) } } [](https://docs.adonisjs.com/guides/digging-deeper/logger#logging-methods) Logging methods ------------------------------------------------------------------------------------------ The Logger API is nearly identical to Pino, except the AdonisJS logger is not an instance of an Event emitter (whereas Pino is). Apart from that, the logging methods have the same API as pino. Copy code to clipboard import logger from '@adonisjs/core/services/logger' logger.trace(config, 'using config') logger.debug('user details: %o', { username: 'virk' }) logger.info('hello %s', 'world') logger.warn('Unable to connect to database') logger.error({ err: Error }, 'Something went wrong') logger.fatal({ err: Error }, 'Something went wrong') An additional merging object can be passed as the first argument. Then, the object properties are added to the output JSON. Copy code to clipboard logger.info({ user: user }, 'Fetched user by id %s', user.id) To display errors, you can [use the `err` key](https://getpino.io/#/docs/api?id=serializers-object) to specify the error value. Copy code to clipboard logger.error({ err: error }, 'Unable to lookup user') [](https://docs.adonisjs.com/guides/digging-deeper/logger#logging-conditionally) Logging conditionally ------------------------------------------------------------------------------------------------------ The logger produces logs for and above the level configured in the config file. For example, if the level is set to `warn`, the logs for the `info`, `debug`, and the `trace` levels will be ignored. If computing data for a log message is expensive, you should check if a given log level is enabled before computing the data. Copy code to clipboard import logger from '@adonisjs/core/services/logger' if (logger.isLevelEnabled('debug')) { const data = await getLogData() logger.debug(data, 'Debug message') } You may express the same conditional using the `ifLevelEnabled` method. The method accepts a callback as the 2nd argument, which gets executed when the specified logging level is enabled. Copy code to clipboard logger.ifLevelEnabled('debug', async () => { const data = await getLogData() logger.debug(data, 'Debug message') }) [](https://docs.adonisjs.com/guides/digging-deeper/logger#child-logger) Child logger ------------------------------------------------------------------------------------ A child logger is an isolated instance that inherits the config and bindings from the parent logger. An instance of the child logger can be created using the `logger.child` method. The method accepts bindings as the first argument and an optional config object as the second argument. Copy code to clipboard import logger from '@adonisjs/core/services/logger' const requestLogger = logger.child({ requestId: ctx.request.id() }) The child logger can also log under a different logging level. Copy code to clipboard logger.child({}, { level: 'warn' }) [](https://docs.adonisjs.com/guides/digging-deeper/logger#pino-statics) Pino statics ------------------------------------------------------------------------------------ [Pino static](https://getpino.io/#/docs/api?id=statics) methods and properties are exported by the `@adonisjs/core/logger` module. Copy code to clipboard import { multistream, destination, transport, stdSerializers, stdTimeFunctions, symbols, pinoVersion } from '@adonisjs/core/logger' [](https://docs.adonisjs.com/guides/digging-deeper/logger#writing-logs-to-a-file) Writing logs to a file -------------------------------------------------------------------------------------------------------- Pino ships with a `pino/file` target, which you can use to write logs to a file. Within the target options, you can specify the log file destination path. Copy code to clipboard app: { enabled: true, name: env.get('APP_NAME'), level: env.get('LOG_LEVEL', 'info') transport: { targets: targets() .push({ transport: 'pino/file', level: 'info', options: { destination: '/var/log/apps/adonisjs.log' } }) .toArray() } } ### [](https://docs.adonisjs.com/guides/digging-deeper/logger#file-rotation) File rotation Pino does not have inbuilt support for file rotation, and therefore, you either have to use a system-level tool like [logrotate](https://getpino.io/#/docs/help?id=rotate) or make use of a third-party package like [pino-roll](https://github.com/feugy/pino-roll) . Copy code to clipboard npm i pino-roll Copy code to clipboard app: { enabled: true, name: env.get('APP_NAME'), level: env.get('LOG_LEVEL', 'info') transport: { targets: targets() .push({ target: 'pino-roll', level: 'info', options: { file: '/var/log/apps/adonisjs.log', frequency: 'daily', mkdir: true } }) .toArray() } } [](https://docs.adonisjs.com/guides/digging-deeper/logger#hiding-sensitive-values) Hiding sensitive values ---------------------------------------------------------------------------------------------------------- Logs can become the source for leaking sensitive data. Therefore, it is recommended to observe your logs and remove/hide sensitive values from the output. In Pino, you can use the `redact` option to hide/remove sensitive key-value pairs from the logs. Under the hood, the [fast-redact](https://github.com/davidmarkclements/fast-redact) package is used, and you can consult its documentation to view available expressions. config/logger.ts Copy code to clipboard app: { enabled: true, name: env.get('APP_NAME'), level: env.get('LOG_LEVEL', 'info') redact: { paths: ['password', '*.password'] } } Copy code to clipboard import logger from '@adonisjs/core/services/logger' const username = request.input('username') const password = request.input('password') logger.info({ username, password }, 'user signup') // output: {"username":"virk","password":"[Redacted]","msg":"user signup"} By default, the value is replaced with the `[Redacted]` placeholder. You can define a custom placeholder or remove the key-value pair. Copy code to clipboard redact: { paths: ['password', '*.password'], censor: '[PRIVATE]' } // Remove property redact: { paths: ['password', '*.password'], remove: true } ### [](https://docs.adonisjs.com/guides/digging-deeper/logger#using-the-secret-data-type) Using the Secret data type An alternative to redaction is to wrap sensitive values inside the Secret class. For example: See also: [Secret class usage docs](https://docs.adonisjs.com/guides/references/helpers#secret) Copy code to clipboard import { Secret } from '@adonisjs/core/helpers' const username = request.input('username') const password = request.input('password') const password = new Secret(request.input('password')) logger.info({ username, password }, 'user signup') // output: {"username":"virk","password":"[redacted]","msg":"user signup"} * * * [Digging deeper\ \ Locks](https://docs.adonisjs.com/guides/digging-deeper/locks) [Digging deeper\ \ Mail](https://docs.adonisjs.com/guides/digging-deeper/mail) © 2025 AdonisJS [Edit this page](https://github.com/adonisjs/v6-docs/blob/main/content/docs/digging_deeper/logger.md) --- # Emitter (Digging deeper) | AdonisJS Documentation Toggle docs menu Emitter [](https://docs.adonisjs.com/guides/digging-deeper/emitter#event-emitter) Event Emitter ======================================================================================= AdonisJS has an inbuilt event emitter created on top of [emittery](https://github.com/sindresorhus/emittery) . Emittery dispatches events asynchronously and [fixes many common issues](https://github.com/sindresorhus/emittery#how-is-this-different-than-the-built-in-eventemitter-in-nodejs) with the Node.js default Event emitter. AdonisJS further enhances emittery with additional features. * Provide static type safety by defining a list of events and their associated data types. * Support for class-based events and listeners. Moving listeners to dedicated files keep your codebase tidy and easy to test. * Ability to fake events during tests. [](https://docs.adonisjs.com/guides/digging-deeper/emitter#basic-usage) Basic usage ----------------------------------------------------------------------------------- The event listeners are defined inside the `start/events.ts` file. You may create this file using the `make:preload` ace command. Copy code to clipboard node ace make:preload events You must use the `emitter.on` to listen to an event. The method accepts the event's name as the first argument and the listener as the second argument. start/events.ts Copy code to clipboard import emitter from '@adonisjs/core/services/emitter' emitter.on('user:registered', function (user) { console.log(user) }) Once you have defined the event listener, you can emit the `user:registered` event using the `emitter.emit` method. It takes the event name as the first argument and the event data as the second argument. Copy code to clipboard import emitter from '@adonisjs/core/services/emitter' export default class UsersController { async store() { const user = await User.create(data) emitter.emit('user:registered', user) } } You may use the `emitter.once` to listen to an event once. Copy code to clipboard emitter.once('user:registered', function (user) { console.log(user) }) [](https://docs.adonisjs.com/guides/digging-deeper/emitter#making-events-type-safe) Making events type-safe ----------------------------------------------------------------------------------------------------------- AdonisJS makes it mandatory to define static types for every event you want to emit within your application. The types are registered within the `types/events.ts` file. In the following example, we register the `User` model as the data type for the `user:registered` event. If you find defining types for every event cumbersome, you may switch to [class-based events](https://docs.adonisjs.com/guides/digging-deeper/emitter#class-based-events) . Copy code to clipboard import User from '#models/User' declare module '@adonisjs/core/types' { interface EventsList { 'user:registered': User } } [](https://docs.adonisjs.com/guides/digging-deeper/emitter#class-based-listeners) Class-based listeners ------------------------------------------------------------------------------------------------------- Like HTTP controllers, listener classes offer an abstraction layer to move inline event listeners inside dedicated files. Listener classes are stored inside the `app/listeners` directory and you may create a new listener using the `make:listener` command. See also: [Make listener command](https://docs.adonisjs.com/guides/references/commands#makelistener) Copy code to clipboard node ace make:listener sendVerificationEmail The listener file is scaffolded with the `class` declaration and `handle` method. In this class, you can define additional methods to listen to multiple events (if needed). Copy code to clipboard import User from '#models/user' export default class SendVerificationEmail { handle(user: User) { // Send email } } As the final step, you must bind the listener class to an event within the `start/events.ts` file. You may import the listener using the `#listeners` alias. The aliases are defined using the [subpath imports feature of Node.js](https://docs.adonisjs.com/guides/getting-started/folder-structure#the-sub-path-imports) . start/events.ts Copy code to clipboard import emitter from '@adonisjs/core/services/emitter' import SendVerificationEmail from '#listeners/send_verification_email' emitter.on('user:registered', [SendVerificationEmail, 'handle']) ### [](https://docs.adonisjs.com/guides/digging-deeper/emitter#lazy-loading-listeners) Lazy-loading listeners It is recommended to lazy load listeners to speed up the application boot phase. Lazy loading is as simple as moving the import statement behind a function and using dynamic imports. Copy code to clipboard import emitter from '@adonisjs/core/services/emitter' import SendVerificationEmail from '#listeners/send_verification_email' const SendVerificationEmail = () => import('#listeners/send_verification_email') emitter.on('user:registered', [SendVerificationEmail, 'handle']) ### [](https://docs.adonisjs.com/guides/digging-deeper/emitter#dependency-injection) Dependency injection You cannot inject the `HttpContext` inside a listener class. Because events are processed asynchronously, the listener might run after the HTTP request is finished. The listener classes are instantiated using the [IoC container](https://docs.adonisjs.com/guides/concepts/dependency-injection) ; therefore, you can type-hint dependencies inside the class constructor or the method which handles the event. In the following example, we type-hint the `TokensService` as a constructor argument. When invoking this listener, the IoC container will inject an instance of the `TokensService` class. Constructor injection Copy code to clipboard import { inject } from '@adonisjs/core' import TokensService from '#services/tokens_service' @inject() export default class SendVerificationEmail { constructor(protected tokensService: TokensService) {} handle(user: User) { const token = this.tokensService.generate(user.email) } } In the following example, we inject the `TokensService` inside the handle method. However, do remember, the first argument will always be the event payload. Method injection Copy code to clipboard import { inject } from '@adonisjs/core' import TokensService from '#services/tokens_service' import UserRegistered from '#events/user_registered' export default class SendVerificationEmail { @inject() handle(event: UserRegistered, tokensService: TokensService) { const token = tokensService.generate(event.user.email) } } [](https://docs.adonisjs.com/guides/digging-deeper/emitter#class-based-events) Class-based events ------------------------------------------------------------------------------------------------- An event is a combination of the event identifier (usually a string-based event name) and the associated data. For example: * `user:registered` is the event identifier (aka the event name). * An instance of the User model is the event data. Class-based events encapsulate the event identifier and the event data within the same class. The class constructor serves as the identifier, and an instance of the class holds the event data. You may create an event class using the `make:event` command. See also: [Make event command](https://docs.adonisjs.com/guides/references/commands#makeevent) Copy code to clipboard node ace make:event UserRegistered The event class has no behavior. Instead, it is a data container for the event. You may accept event data via the class constructor and make it available as an instance property. app/events/user\_registered.ts Copy code to clipboard import { BaseEvent } from '@adonisjs/core/events' import User from '#models/user' export default class UserRegistered extends BaseEvent { constructor(public user: User) { super() } } ### [](https://docs.adonisjs.com/guides/digging-deeper/emitter#listening-to-class-based-events) Listening to class-based events You may attach listeners for class-based events using the `emitter.on` method. The first argument is the event class reference, followed by the listener. Copy code to clipboard import emitter from '@adonisjs/core/services/emitter' import UserRegistered from '#events/user_registered' emitter.on(UserRegistered, function (event) { console.log(event.user) }) In the following example, we use both class-based events and listeners. Copy code to clipboard import emitter from '@adonisjs/core/services/emitter' import UserRegistered from '#events/user_registered' const SendVerificationEmail = () => import('#listeners/send_verification_email') emitter.on(UserRegistered, [SendVerificationEmail]) ### [](https://docs.adonisjs.com/guides/digging-deeper/emitter#emitting-class-based-events) Emitting class-based events You may emit a class-based event using the `static dispatch` method. The `dispatch` method takes arguments accepted by the event class constructor. Copy code to clipboard import User from '#models/user' import UserRegistered from '#events/user_registered' export default class UsersController { async store() { const user = await User.create(data) /** * Dispatch/emit the event */ UserRegistered.dispatch(user) } } [](https://docs.adonisjs.com/guides/digging-deeper/emitter#simplifying-events-listening-experience) Simplifying events listening experience ------------------------------------------------------------------------------------------------------------------------------------------- If you decide to use class-based events and listeners, you may use the `emitter.listen` method to simplify the process of binding listeners. The `emitter.listen` method accepts the event class as the first argument and an array of class-based listeners as the second argument. In addition, the registered listener must have a `handle` method to handle the event. Copy code to clipboard import emitter from '@adonisjs/core/services/emitter' import UserRegistered from '#events/user_registered' emitter.listen(UserRegistered, [\ () => import('#listeners/send_verification_email'),\ () => import('#listeners/register_with_payment_provider'),\ () => import('#listeners/provision_account')\ ]) [](https://docs.adonisjs.com/guides/digging-deeper/emitter#handling-errors) Handling errors ------------------------------------------------------------------------------------------- By default, the exceptions raised by the listeners will result in [unhandledRejection](https://nodejs.org/api/process.html#event-unhandledrejection) . Therefore, it is recommended to self capture and handle the error using the `emitter.onError` method. The `emitter.onError` method accepts a callback which receives the event name, error, and event data. Copy code to clipboard import emitter from '@adonisjs/core/services/emitter' emitter.onError((event, error, eventData) => { }) [](https://docs.adonisjs.com/guides/digging-deeper/emitter#listening-to-all-events) Listening to all events ----------------------------------------------------------------------------------------------------------- You can listen to all the events using the `emitter.onAny` method. The method accepts the listener callback as the only parameter. Copy code to clipboard import emitter from '@adonisjs/core/services/emitter' emitter.onAny((name, event) => { console.log(name) console.log(event) }) [](https://docs.adonisjs.com/guides/digging-deeper/emitter#unsubscribing-from-events) Unsubscribing from events --------------------------------------------------------------------------------------------------------------- The `emitter.on` method returns an unsubscribe function you may call to remove the event listener subscription. Copy code to clipboard import emitter from '@adonisjs/core/services/emitter' const unsubscribe = emitter.on('user:registered', () => {}) // Remove the listener unsubscribe() You may also use the `emitter.off` method to remove the event listener subscription. The method accepts the event name/class as the first argument and a reference to the listener as the second argument. Copy code to clipboard import emitter from '@adonisjs/core/services/emitter' function sendEmail () {} // Listen for event emitter.on('user:registered', sendEmail) // Remove listener emitter.off('user:registered', sendEmail) ### [](https://docs.adonisjs.com/guides/digging-deeper/emitter#emitteroffany) emitter.offAny The `emitter.offAny` removes a wildcard listener, listening for all the events. Copy code to clipboard emitter.offAny(callback) ### [](https://docs.adonisjs.com/guides/digging-deeper/emitter#emitterclearlisteners) emitter.clearListeners The `emitter.clearListeners` method removes all the listeners for a given event. Copy code to clipboard //String-based event emitter.clearListeners('user:registered') //Class-based event emitter.clearListeners(UserRegistered) ### [](https://docs.adonisjs.com/guides/digging-deeper/emitter#emitterclearalllisteners) emitter.clearAllListeners The `emitter.clearAllListeners` method removes all the listeners for all the events. Copy code to clipboard emitter.clearAllListeners() [](https://docs.adonisjs.com/guides/digging-deeper/emitter#list-of-available-events) List of available events ------------------------------------------------------------------------------------------------------------- Please check the [events reference guide](https://docs.adonisjs.com/guides/references/events) to view the list of available events. [](https://docs.adonisjs.com/guides/digging-deeper/emitter#faking-events-during-tests) Faking events during tests ----------------------------------------------------------------------------------------------------------------- Event listeners are often used for performing side effects after a given action. For example: Send an email to a newly registered user, or send a notification after an order status update. When writing tests, you might want to avoid sending emails to the user created during the test. You may disable event listeners by faking the event emitter. In the following example, we call `emitter.fake` before making an HTTP request to signup a user. After the request, we use the `events.assertEmitted` method to ensure that the `SignupController` emits a specific event. Copy code to clipboard import emitter from '@adonisjs/core/services/emitter' import UserRegistered from '#events/user_registered' test.group('User signup', () => { test('create a user account', async ({ client, cleanup }) => { const events = emitter.fake() cleanup(() => { emitter.restore() }) await client .post('signup') .form({ email: 'foo@bar.com', password: 'secret', }) }) // Assert the event was emitted events.assertEmitted(UserRegistered) }) * The `event.fake` method returns an instance of the [EventBuffer](https://github.com/adonisjs/events/blob/main/src/events_buffer.ts) class, and you may use it for assertions and finding emitted events. * The `emitter.restore` method restores the fake. After restoring the fake, the events will be emitted normally. ### [](https://docs.adonisjs.com/guides/digging-deeper/emitter#faking-specific-events) Faking specific events The `emitter.fake` method fakes all the events if you invoke the method without any arguments. If you want to fake a specific event, pass the event name or the class as the first argument. Copy code to clipboard // Fakes only the user:registered event emitter.fake('user:registered') // Fake multiple events emitter.fake([UserRegistered, OrderUpdated]) Calling the `emitter.fake` method multiple times will remove the old fakes. ### [](https://docs.adonisjs.com/guides/digging-deeper/emitter#events-assertions) Events assertions You may use `assertEmitted`, `assertNotEmitted`, `assertNoneEmitted` and the `assertEmittedCount` methods to write assertions for faked events. The `assertEmitted` and `assertNotEmitted` methods accepts either the event name or the class constructor as the first argument and an optional finder function that must return a boolean to mark the event as emitted. Copy code to clipboard const events = emitter.fake() events.assertEmitted('user:registered') events.assertNotEmitted(OrderUpdated) With a callback Copy code to clipboard events.assertEmitted(OrderUpdated, ({ data }) => { /** * Only consider the event as emitted, if * the orderId matches */ return data.order.id === orderId }) Asserting events count Copy code to clipboard // Assert count of a specific event events.assertEmittedCount(OrderUpdated, 1) // Assert no events were emitted events.assertNoneEmitted() * * * [Digging deeper\ \ Drive](https://docs.adonisjs.com/guides/digging-deeper/drive) [Digging deeper\ \ Health checks](https://docs.adonisjs.com/guides/digging-deeper/health-checks) © 2025 AdonisJS [Edit this page](https://github.com/adonisjs/v6-docs/blob/main/content/docs/digging_deeper/emitter.md) --- # Health checks (Digging deeper) | AdonisJS Documentation Toggle docs menu Health checks [](https://docs.adonisjs.com/guides/digging-deeper/health-checks#health-checks) Health checks ============================================================================================= Health checks are performed to ensure that your application is in a healthy state while running in production. This may include monitoring the **available disk space** on the server, the **memory consumed by your application**, or **testing the database connection**. AdonisJS provides a handful of built-in [health checks](https://docs.adonisjs.com/guides/digging-deeper/health-checks#available-health-checks) and the ability to create and register [custom health checks](https://docs.adonisjs.com/guides/digging-deeper/health-checks#creating-a-custom-health-check) . [](https://docs.adonisjs.com/guides/digging-deeper/health-checks#configuring-health-checks) Configuring health checks --------------------------------------------------------------------------------------------------------------------- You may configure health checks in your application by executing the following command. The command will create a `start/health.ts` file and configures health checks for **memory usage** and **used disk space**. Feel free to modify this file and remove/add additional health checks. Make sure you have installed `@adonisjs/core@6.12.1` before using the following command. Copy code to clipboard node ace configure health_checks start/health.ts Copy code to clipboard import { HealthChecks, DiskSpaceCheck, MemoryHeapCheck } from '@adonisjs/core/health' export const healthChecks = new HealthChecks().register([\ new DiskSpaceCheck(),\ new MemoryHeapCheck(),\ ]) [](https://docs.adonisjs.com/guides/digging-deeper/health-checks#exposing-an-endpoint) Exposing an endpoint ----------------------------------------------------------------------------------------------------------- A common approach for performing health checks is to expose an HTTP endpoint that an external monitoring service can ping to collect the health check results. So, let's define a route within the `start/routes.ts` file and bind the `HealthChecksController` to it. The `health_checks_controller.ts` file is created during the initial setup and lives inside the `app/controllers` directory. start/routes.ts Copy code to clipboard import router from '@adonisjs/core/services/router' const HealthChecksController = () => import('#controllers/health_checks_controller') router.get('/health', [HealthChecksController]) ### [](https://docs.adonisjs.com/guides/digging-deeper/health-checks#sample-report) Sample report The `healthChecks.run` method will execute all the checks and return a detailed [report as a JSON object](https://github.com/adonisjs/health/blob/develop/src/types.ts#L36) . The report has the following properties: Copy code to clipboard { "isHealthy": true, "status": "warning", "finishedAt": "2024-06-20T07:09:35.275Z", "debugInfo": { "pid": 16250, "ppid": 16051, "platform": "darwin", "uptime": 16.271809083, "version": "v21.7.3" }, "checks": [\ {\ "name": "Disk space check",\ "isCached": false,\ "message": "Disk usage is 76%, which is above the threshold of 75%",\ "status": "warning",\ "finishedAt": "2024-06-20T07:09:35.275Z",\ "meta": {\ "sizeInPercentage": {\ "used": 76,\ "failureThreshold": 80,\ "warningThreshold": 75\ }\ }\ },\ {\ "name": "Memory heap check",\ "isCached": false,\ "message": "Heap usage is under defined thresholds",\ "status": "ok",\ "finishedAt": "2024-06-20T07:09:35.265Z",\ "meta": {\ "memoryInBytes": {\ "used": 41821592,\ "failureThreshold": 314572800,\ "warningThreshold": 262144000\ }\ }\ }\ ] } isHealthy A boolean to know if all the checks have passed. The value will be set to `false` if one or more checks fail. status Report status after performing all the checks. It will be one of the following. * `ok`: All checks have passed successfully. * `warning`: One or more checks have reported a warning. * `error`: One or more checks have failed. finishedAt The DateTime at which the tests were completed. checks An array of objects containing the detailed report of all the performed checks. debugInfo Debug info can be used to identify the process and the duration for which it has been running. It includes the following properties. * `pid`: The process ID. * `ppid`: The process ID of the parent process managing your AdonisJS app process. * `platform`: The platform on which the application is running. * `uptime`: The duration (in seconds) for which the application is running. * `version`: Node.js version. ### [](https://docs.adonisjs.com/guides/digging-deeper/health-checks#protecting-the-endpoint) Protecting the endpoint You may protect the `/health` endpoint from public access using either the auth middleware or creating a custom middleware that checks for a particular API secret inside the request header. For example: Copy code to clipboard import router from '@adonisjs/core/services/router' const HealthChecksController = () => import('#controllers/health_checks_controller') router .get('/health', [HealthChecksController]) .use(({ request, response }, next) => { if (request.header('x-monitoring-secret') === 'some_secret_value') { return next() } response.unauthorized({ message: 'Unauthorized access' }) }) [](https://docs.adonisjs.com/guides/digging-deeper/health-checks#available-health-checks) Available health checks ----------------------------------------------------------------------------------------------------------------- Following is the list of available health checks you can configure within the `start/health.ts` file. ### [](https://docs.adonisjs.com/guides/digging-deeper/health-checks#diskspacecheck) DiskSpaceCheck The `DiskSpaceCheck` calculates the used disk space on your server and reports a warning/error when a certain threshold has been exceeded. Copy code to clipboard import { HealthChecks, DiskSpaceCheck } from '@adonisjs/core/health' export const healthChecks = new HealthChecks().register([\ new DiskSpaceCheck()\ ]) By default, the warning threshold is set to 75%, and the failure threshold is set to 80%. However, you may also define custom thresholds. Copy code to clipboard export const healthChecks = new HealthChecks().register([\ new DiskSpaceCheck()\ .warnWhenExceeds(80) // warn when used over 80%\ .failWhenExceeds(90), // fail when used over 90%\ ]) ### [](https://docs.adonisjs.com/guides/digging-deeper/health-checks#memoryheapcheck) MemoryHeapCheck The `MemoryHeapCheck` monitors the heap size reported by the [process.memoryUsage()](https://nodejs.org/api/process.html#processmemoryusage) method and reports a warning/error when a certain threshold has been exceeded. Copy code to clipboard import { HealthChecks, MemoryHeapCheck } from '@adonisjs/core/health' export const healthChecks = new HealthChecks().register([\ new MemoryHeapCheck()\ ]) By default, the warning threshold is set to **250MB** and the failure threshold is set to **300MB**. However, you may define custom thresholds as well. Copy code to clipboard export const healthChecks = new HealthChecks().register([\ new MemoryHeapCheck()\ .warnWhenExceeds('300 mb')\ .failWhenExceeds('700 mb'),\ ]) ### [](https://docs.adonisjs.com/guides/digging-deeper/health-checks#memoryrsscheck) MemoryRSSCheck The `MemoryRSSCheck` monitors the Resident Set Size reported by the [process.memoryUsage()](https://nodejs.org/api/process.html#processmemoryusage) method and reports a warning/error when a certain threshold has been exceeded. Copy code to clipboard import { HealthChecks, MemoryRSSCheck } from '@adonisjs/core/health' export const healthChecks = new HealthChecks().register([\ new MemoryRSSCheck()\ ]) By default, the warning threshold is set to **320MB**, and the failure threshold is set to **350MB**. However, you may also define custom thresholds. Copy code to clipboard export const healthChecks = new HealthChecks().register([\ new MemoryRSSCheck()\ .warnWhenExceeds('600 mb')\ .failWhenExceeds('800 mb'),\ ]) ### [](https://docs.adonisjs.com/guides/digging-deeper/health-checks#dbcheck) DbCheck The `DbCheck` is provided by the `@adonisjs/lucid` package to monitor the connection with a SQL database. You can import and use it as follows. Copy code to clipboard import db from '@adonisjs/lucid/services/db' import { DbCheck } from '@adonisjs/lucid/database' import { HealthChecks, DiskSpaceCheck, MemoryHeapCheck } from '@adonisjs/core/health' export const healthChecks = new HealthChecks().register([\ new DiskSpaceCheck(),\ new MemoryHeapCheck(),\ new DbCheck(db.connection()),\ ]) Following is an example report from the database health check. Report sample Copy code to clipboard { "name": "Database health check (postgres)", "isCached": false, "message": "Successfully connected to the database server", "status": "ok", "finishedAt": "2024-06-20T07:18:23.830Z", "meta": { "connection": { "name": "postgres", "dialect": "postgres" } } } The `DbCheck` class accepts a database connection for monitoring. Register this check multiple times for each connection if you want to monitor multiple connections. For example: Monitoring multiple connections Copy code to clipboard export const healthChecks = new HealthChecks().register([\ new DiskSpaceCheck(),\ new MemoryHeapCheck(),\ new DbCheck(db.connection()),\ new DbCheck(db.connection('mysql')),\ new DbCheck(db.connection('pg')),\ ]) ### [](https://docs.adonisjs.com/guides/digging-deeper/health-checks#dbconnectioncountcheck) DbConnectionCountCheck The `DbConnectionCountCheck` monitors the active connections on the database server and reports a warning/error when a certain threshold has been exceeded. This check is only supported for **PostgreSQL** and **MySQL** databases. Copy code to clipboard import db from '@adonisjs/lucid/services/db' import { DbCheck, DbConnectionCountCheck } from '@adonisjs/lucid/database' import { HealthChecks, DiskSpaceCheck, MemoryHeapCheck } from '@adonisjs/core/health' export const healthChecks = new HealthChecks().register([\ new DiskSpaceCheck(),\ new MemoryHeapCheck(),\ new DbCheck(db.connection()),\ new DbConnectionCountCheck(db.connection())\ ]) Following is an example report from the database connection count health check. Report sample Copy code to clipboard { "name": "Connection count health check (postgres)", "isCached": false, "message": "There are 6 active connections, which is under the defined thresholds", "status": "ok", "finishedAt": "2024-06-20T07:30:15.840Z", "meta": { "connection": { "name": "postgres", "dialect": "postgres" }, "connectionsCount": { "active": 6, "warningThreshold": 10, "failureThreshold": 15 } } } By default, the warning threshold is set to **10 connections**, and the failure threshold is set to **15 connections**. However, you may also define custom thresholds. Copy code to clipboard new DbConnectionCountCheck(db.connection()) .warnWhenExceeds(4) .failWhenExceeds(10) ### [](https://docs.adonisjs.com/guides/digging-deeper/health-checks#redischeck) RedisCheck The `RedisCheck` is provided by the `@adonisjs/redis` package to monitor the connection with a Redis database (including Cluster). You can import and use it as follows. Copy code to clipboard import redis from '@adonisjs/redis/services/main' import { RedisCheck } from '@adonisjs/redis' import { HealthChecks, DiskSpaceCheck, MemoryHeapCheck } from '@adonisjs/core/health' export const healthChecks = new HealthChecks().register([\ new DiskSpaceCheck(),\ new MemoryHeapCheck(),\ new RedisCheck(redis.connection()),\ ]) Following is an example report from the database health check. Report sample Copy code to clipboard { "name": "Redis health check (main)", "isCached": false, "message": "Successfully connected to the redis server", "status": "ok", "finishedAt": "2024-06-22T05:37:11.718Z", "meta": { "connection": { "name": "main", "status": "ready" } } } The `RedisCheck` class accepts a redis connection to monitor. Register this check multiple times for each connection if you want to monitor multiple connections. For example: Monitoring multiple connections Copy code to clipboard export const healthChecks = new HealthChecks().register([\ new DiskSpaceCheck(),\ new MemoryHeapCheck(),\ new RedisCheck(redis.connection()),\ new RedisCheck(redis.connection('cache')),\ new RedisCheck(redis.connection('locks')),\ ]) ### [](https://docs.adonisjs.com/guides/digging-deeper/health-checks#redismemoryusagecheck) RedisMemoryUsageCheck The `RedisMemoryUsageCheck` monitors the memory consumption of the redis server and reports a warning/error when a certain threshold has been exceeded. Copy code to clipboard import redis from '@adonisjs/redis/services/main' import { RedisCheck, RedisMemoryUsageCheck } from '@adonisjs/redis' import { HealthChecks, DiskSpaceCheck, MemoryHeapCheck } from '@adonisjs/core/health' export const healthChecks = new HealthChecks().register([\ new DiskSpaceCheck(),\ new MemoryHeapCheck(),\ new RedisCheck(redis.connection()),\ new RedisMemoryUsageCheck(redis.connection())\ ]) Following is an example report from the redis memory usage health check. Report sample Copy code to clipboard { "name": "Redis memory consumption health check (main)", "isCached": false, "message": "Redis memory usage is 1.06MB, which is under the defined thresholds", "status": "ok", "finishedAt": "2024-06-22T05:36:32.524Z", "meta": { "connection": { "name": "main", "status": "ready" }, "memoryInBytes": { "used": 1109616, "warningThreshold": 104857600, "failureThreshold": 125829120 } } } By default, the warning threshold is set to **100MB**, and the failure threshold is set to **120MB**. However, you may also define custom thresholds. Copy code to clipboard new RedisMemoryUsageCheck(db.connection()) .warnWhenExceeds('200MB') .failWhenExceeds('240MB') [](https://docs.adonisjs.com/guides/digging-deeper/health-checks#caching-results) Caching results ------------------------------------------------------------------------------------------------- Health checks are performed every time you call the `healthChecks.run` method (aka visit the `/health` endpoint). You might want to ping the `/health` endpoint frequently, but avoid performing certain checks on every visit. For example, monitoring disk space every minute is not very useful, but tracking memory every minute can be helpful. Therefore, we allow you to cache the results of individual health checks when you register them. For example: Copy code to clipboard import { HealthChecks, MemoryRSSCheck, DiskSpaceCheck, MemoryHeapCheck, } from '@adonisjs/core/health' export const healthChecks = new HealthChecks().register([\ new DiskSpaceCheck().cacheFor('1 hour'),\ new MemoryHeapCheck(), // do not cache\ new MemoryRSSCheck(), // do not cache\ ]) [](https://docs.adonisjs.com/guides/digging-deeper/health-checks#creating-a-custom-health-check) Creating a custom health check ------------------------------------------------------------------------------------------------------------------------------- You may create a custom health check as a JavaScript class that adheres to the [HealthCheckContract](https://github.com/adonisjs/health/blob/develop/src/types.ts#L98) interface. You can define a health check anywhere inside your project or package and import it within the `start/health.ts` file to register it. Copy code to clipboard import { Result, BaseCheck } from '@adonisjs/core/health' import type { HealthCheckResult } from '@adonisjs/core/types/health' export class ExampleCheck extends BaseCheck { async run(): Promise { /** * The following checks are for reference purposes only */ if (checkPassed) { return Result.ok('Success message to display') } if (checkFailed) { return Result.failed('Error message', errorIfAny) } if (hasWarning) { return Result.warning('Warning message') } } } As shown in the above example, you may use the [Result](https://github.com/adonisjs/health/blob/develop/src/result.ts) class to create Health check results. Optionally, you may merge meta-data for the result as follows. Copy code to clipboard Result.ok('Database connection is healthy').mergeMetaData({ connection: { dialect: 'pg', activeCount: connections, }, }) ### [](https://docs.adonisjs.com/guides/digging-deeper/health-checks#registering-custom-health-check) Registering custom health check You may import your custom health check class within the `start/health.ts` file and register it by creating a new class instance. Copy code to clipboard import { ExampleCheck } from '../app/health_checks/example.js' export const healthChecks = new HealthChecks().register([\ new DiskSpaceCheck().cacheFor('1 hour'),\ new MemoryHeapCheck(),\ new MemoryRSSCheck(),\ new ExampleCheck()\ ]) * * * [Digging deeper\ \ Emitter](https://docs.adonisjs.com/guides/digging-deeper/emitter) [Digging deeper\ \ I18n](https://docs.adonisjs.com/guides/digging-deeper/i18n) © 2025 AdonisJS [Edit this page](https://github.com/adonisjs/v6-docs/blob/main/content/docs/digging_deeper/health_checks.md) --- # Rate limiting (Security) | AdonisJS Documentation Toggle docs menu Rate limiting [](https://docs.adonisjs.com/guides/security/rate-limiting#rate-limiting) Rate limiting ======================================================================================= AdonisJS provides a first-party package for implementing rate limits in your web application or the API server. The rate limiter provides `redis`, `mysql`, `postgresql`, `sqlite` and `memory` as the storage options, with the ability to [create custom storage providers](https://docs.adonisjs.com/guides/security/rate-limiting#creating-a-custom-storage-provider) . The `@adonisjs/limiter` package is built on top of the [node-rate-limiter-flexible](https://github.com/animir/node-rate-limiter-flexible) package, which provides one of the fastest rate-limiting API and uses atomic increments to avoid race conditions. [](https://docs.adonisjs.com/guides/security/rate-limiting#installation) Installation ------------------------------------------------------------------------------------- Install and configure the package using the following command : Copy code to clipboard node ace add @adonisjs/limiter See steps performed by the add command 1. Installs the `@adonisjs/limiter` package using the detected package manager. 2. Registers the following service provider inside the `adonisrc.ts` file. Copy code to clipboard { providers: [\ // ...other providers\ () => import('@adonisjs/limiter/limiter_provider')\ ] } 3. Create the `config/limiter.ts` file. 4. Create the `start/limiter.ts` file. This file is used to define HTTP throttle middleware. 5. Define the following environment variable alongside its validation inside the `start/env.ts` file. Copy code to clipboard LIMITER_STORE=redis 6. Optionally, create the database migration for the `rate_limits` table if using the `database` store. [](https://docs.adonisjs.com/guides/security/rate-limiting#configuration) Configuration --------------------------------------------------------------------------------------- The configuration for the rate limiter is stored within the `config/limiter.ts` file. See also: [Rate limiter config stub](https://github.com/adonisjs/limiter/blob/2.x/stubs/config/limiter.stub) Copy code to clipboard import env from '#start/env' import { defineConfig, stores } from '@adonisjs/limiter' const limiterConfig = defineConfig({ default: env.get('LIMITER_STORE'), stores: { redis: stores.redis({}), database: stores.database({ tableName: 'rate_limits' }), memory: stores.memory({}), }, }) export default limiterConfig declare module '@adonisjs/limiter/types' { export interface LimitersList extends InferLimiters {} } default The `default` store to use for applying rate limits. The store is defined within the same config file under the `stores` object. stores A collection of stores you plan to use within your application. We recommend always configuring the `memory` store that could be used during testing. * * * ### [](https://docs.adonisjs.com/guides/security/rate-limiting#environment-variables) Environment variables The default limiter is defined using the `LIMITER_STORE` environment variable, and therefore, you can switch between different stores in different environments. For example, use the `memory` store during testing and the `redis` store for development and production. Also, the environment variable must be validated to allow one of the pre-configured stores. The validation is defined inside the `start/env.ts` file using the `Env.schema.enum` rule. Copy code to clipboard { LIMITER_STORE: Env.schema.enum(['redis', 'database', 'memory'] as const), } ### [](https://docs.adonisjs.com/guides/security/rate-limiting#shared-options) Shared options Following is the list of options shared by all the bundled stores. keyPrefix Define the prefix for the keys stored inside the database store. The database store ignores the `keyPrefix` since different database tables can be used to isolate data. execEvenly The `execEvenly` option adds a delay when throttling the requests so that all requests are exhausted at the end of the provided duration. For example, if you allow a user to make **10 requests/min**, all requests will have an artificial delay, so the tenth request finishes at the end of the 1 minute. Read the [smooth out traffic peaks](https://github.com/animir/node-rate-limiter-flexible/wiki/Smooth-out-traffic-peaks) article on `rate-limiter-flexible` repo to learn more about the `execEvenly` option. inMemoryBlockOnConsumed Define the number of requests after which the key should be blocked within memory. For example, you allow a user to make **10 requests/min**, and they have consumed all the requests within the first 10 seconds. However, they continue to make requests to the server, and therefore, the rate limiter has to check with the database before denying the request. To reduce the load on the database, you can define the number of requests, after which we should stop querying the database and block the key within the memory. Copy code to clipboard { duration: '1 minute', requests: 10, /** * After 12 requests, block the key within the * memory and stop consulting the database. */ inMemoryBlockOnConsumed: 12, } inMemoryBlockDuration The duration for which to block the key within memory. This option will reduce the load on the database since the backend stores will first check within memory to see if a key is blocked. Copy code to clipboard { inMemoryBlockDuration: '1 min' } * * * ### [](https://docs.adonisjs.com/guides/security/rate-limiting#redis-store) Redis store The `redis` store has a peer dependency on the `@adonisjs/redis` package; therefore, you must configure this package before using the redis store. Following is the list of options the redis store accepts (alongside the shared options). Copy code to clipboard { redis: stores.redis({ connectionName: 'main', rejectIfRedisNotReady: false, }), } connectionName The `connectionName` property refers to a connection defined within the `config/redis.ts` file. We recommend using a separate redis database for the limiter. rejectIfRedisNotReady Reject the rate-limiting requests when the status of the Redis connection is not `ready.` * * * ### [](https://docs.adonisjs.com/guides/security/rate-limiting#database-store) Database store The `database` store has a peer dependency on the `@adonisjs/lucid` package, and therefore, you must configure this package before using the Database store. Following is the list of options the database store accepts (alongside the shared options). Only MySQL, PostgreSQL, and SQLite databases can be used with the database store. Copy code to clipboard { database: stores.database({ connectionName: 'mysql', dbName: 'my_app', tableName: 'rate_limits', schemaName: 'public', clearExpiredByTimeout: false, }), } connectionName Reference to the database connection defined within the `config/database.ts` file. If not defined, we will use the default database connection. dbName The database to use for making SQL queries. We try to infer the value of `dbName` from the connection config defined within the `config/database.ts` file. However, if using a connection string, you must supply the database name via this property. tableName The database table to use to store rate limits. schemaName The schema to use for making SQL queries (PostgreSQL only). clearExpiredByTimeout When enabled, the database store will clear expired keys every 5 minutes. Do note that only keys that have been expired for more than 1 hour will be cleared. [](https://docs.adonisjs.com/guides/security/rate-limiting#throttling-http-requests) Throttling HTTP requests ------------------------------------------------------------------------------------------------------------- Once the limiter has been configured, you may create HTTP throttle middleware using the `limiter.define` method. The `limiter` service is a singleton instance of the [LimiterManager](https://github.com/adonisjs/limiter/blob/2.x/src/limiter_manager.ts) class created using the config defined within the `config/limiter.ts` file. If you open the `start/limiter.ts` file, you will find a pre-defined global throttle middleware you can apply on a route or a group of routes. Similarly, you can create as many throttle middleware as you need in your application. In the following example, the global throttle middleware allows users to make **10 requests/min** based on their IP address. start/limiter.ts Copy code to clipboard import limiter from '@adonisjs/limiter/services/main' export const throttle = limiter.define('global', () => { return limiter.allowRequests(10).every('1 minute') }) You can apply the `throttle` middleware to a route as follows. start/routes.ts Copy code to clipboard import router from '@adonisjs/core/services/router' import { throttle } from '#start/limiter' router .get('/', () => {}) .use(throttle) ### [](https://docs.adonisjs.com/guides/security/rate-limiting#dynamic-rate-limiting) Dynamic rate limiting Let's create another middleware to protect an API endpoint. This time, we will apply dynamic rate limits based on the authentication status of a request. start/limiter.ts Copy code to clipboard export const apiThrottle = limiter.define('api', (ctx) => { /** * Allow logged-in users to make 100 requests by * their user ID */ if (ctx.auth.user) { return limiter .allowRequests(100) .every('1 minute') .usingKey(`user_${ctx.auth.user.id}`) } /** * Allow guest users to make 10 requests by ip address */ return limiter .allowRequests(10) .every('1 minute') .usingKey(`ip_${ctx.request.ip()}`) }) start/routes.ts Copy code to clipboard import { apiThrottle } from '#start/limiter' router .get('/api/repos/:id/stats', [RepoStatusController]) .use(apiThrottle) ### [](https://docs.adonisjs.com/guides/security/rate-limiting#switching-the-backend-store) Switching the backend store You can use a specific backend store with throttle middleware using the `store` method. For example: Copy code to clipboard limiter .allowRequests(10) .every('1 minute') .store('redis') ### [](https://docs.adonisjs.com/guides/security/rate-limiting#using-a-custom-key) Using a custom key By default, the requests are rate-limited by the user's IP Address. However, you can specify a custom key using the `usingKey` method. Copy code to clipboard limiter .allowRequests(10) .every('1 minute') .usingKey(`user_${ctx.auth.user.id}`) ### [](https://docs.adonisjs.com/guides/security/rate-limiting#blocking-user) Blocking user You may block a user for a specified duration if they continue to make requests even after exhausting their quota using the `blockFor` method. The method accepts the duration in seconds or the time expression. Copy code to clipboard limiter .allowRequests(10) .every('1 minute') /** * Will be blocked for 30mins, if they send more than * 10 requests under one minute */ .blockFor('30 mins') [](https://docs.adonisjs.com/guides/security/rate-limiting#handling-throttleexception) Handling ThrottleException ----------------------------------------------------------------------------------------------------------------- The throttle middleware throws the [E\_TOO\_MANY\_REQUESTS](https://docs.adonisjs.com/guides/references/exceptions#e_too_many_requests) exception when the user has exhausted all the requests within the specified timeframe. The exception will be automatically converted to an HTTP response using the following content negotiation rules. * HTTP requests with the `Accept=application/json` header will receive an array of error messages. Each array element will be an object with the message property. * HTTP requests with the `Accept=application/vnd.api+json` header will receive an array of error messages formatted per the JSON API spec. * All other requests will receive a plain text response message. However, you may use [status pages](https://docs.adonisjs.com/guides/basics/exception-handling#status-pages) to show a custom error page for limiter errors. You may also self-handle the error within the [global exception handler](https://docs.adonisjs.com/guides/basics/exception-handling#handling-exceptions) . Copy code to clipboard import { errors } from '@adonisjs/limiter' import { HttpContext, ExceptionHandler } from '@adonisjs/core/http' export default class HttpExceptionHandler extends ExceptionHandler { protected debug = !app.inProduction protected renderStatusPages = app.inProduction async handle(error: unknown, ctx: HttpContext) { if (error instanceof errors.E_TOO_MANY_REQUESTS) { const message = error.getResponseMessage(ctx) const headers = error.getDefaultHeaders() Object.keys(headers).forEach((header) => { ctx.response.header(header, headers[header]) }) return ctx.response.status(error.status).send(message) } return super.handle(error, ctx) } } ### [](https://docs.adonisjs.com/guides/security/rate-limiting#customizing-the-error-message) Customizing the error message Instead of handling the exception globally, you may customize the error message, status, and response headers using the `limitExceeded` hook. Copy code to clipboard import limiter from '@adonisjs/limiter/services/main' export const throttle = limiter.define('global', () => { return limiter .allowRequests(10) .every('1 minute') .limitExceeded((error) => { error .setStatus(400) .setMessage('Cannot process request. Try again later') }) }) ### [](https://docs.adonisjs.com/guides/security/rate-limiting#using-translations-for-the-error-message) Using translations for the error message If you have configured the [@adonisjs/i18n](https://docs.adonisjs.com/guides/digging-deeper/i18n) package, you may define the translation for the error message using the `errors.E_TOO_MANY_REQUESTS` key. For example: resources/lang/fr/errors.json Copy code to clipboard { "E_TOO_MANY_REQUESTS": "Trop de demandes" } Finally, you can define a custom translation key using the `error.t` method. Copy code to clipboard limitExceeded((error) => { error.t('errors.rate_limited', { limit: error.response.limit, remaining: error.response.remaining, }) }) [](https://docs.adonisjs.com/guides/security/rate-limiting#direct-usage) Direct usage ------------------------------------------------------------------------------------- Alongside throttling HTTP requests, you may also use the limiter to apply rate limits in other parts of your application. For example, block a user during login if they provide invalid credentials multiple times. Or limit the number of concurrent jobs a user can run. ### [](https://docs.adonisjs.com/guides/security/rate-limiting#creating-limiter) Creating limiter Before you can apply rate limiting on an action, you must get an instance of the [Limiter](https://github.com/adonisjs/limiter/blob/2.x/src/limiter.ts) class using the `limiter.use` method. The `use` method accepts the name of the backend store and the following rate-limiting options. * `requests`: The number of requests to allow for a given duration. * `duration`: The duration in seconds or a [time expression](https://docs.adonisjs.com/guides/references/helpers#seconds) string. * `block (optional)`: The duration for which to block the key after all the requests have been exhausted. * `inMemoryBlockOnConsumed (optional)`: See [shared options](https://docs.adonisjs.com/guides/security/rate-limiting#shared-options) * `inMemoryBlockDuration (optional)`: See [shared options](https://docs.adonisjs.com/guides/security/rate-limiting#shared-options) Copy code to clipboard import limiter from '@adonisjs/limiter/services/main' const reportsLimiter = limiter.use('redis', { requests: 1, duration: '1 hour' }) Omit the first parameter if you want to use the default store. For example: Copy code to clipboard const reportsLimiter = limiter.use({ requests: 1, duration: '1 hour' }) ### [](https://docs.adonisjs.com/guides/security/rate-limiting#applying-rate-limit-on-an-action) Applying rate limit on an action Once you have created a limiter instance, you can use the `attempt` method to apply rate limiting on an action. The method accepts the following parameters. * A unique key to use for rate limiting. * The callback function to be executed until all the attempts have been exhausted. The `attempt` method returns the result of the callback function (if it is executed). Otherwise, it returns `undefined`. Copy code to clipboard const key = 'user_1_reports' /** * Attempt to run an action for the given key. * The result will be the callback function return * value or undefined if no callback was executed. */ const executed = reportsLimiter.attempt(key, async () => { await generateReport() return true }) /** * Notify users that they have exceeded the limit */ if (!executed) { const availableIn = await reportsLimiter.availableIn(key) return `Too many requests. Try after ${availableIn} seconds` } return 'Report generated' ### [](https://docs.adonisjs.com/guides/security/rate-limiting#preventing-too-many-login-failures) Preventing too many login failures Another example of direct usage could be to disallow an IP Address from making multiple invalid attempts on a login form. In the following example, we use the `limiter.penalize` method to consume one request whenever the user provides invalid credentials and block them for 20 minutes after all the attempts have been exhausted. The `limiter.penalize` method accepts the following arguments. * A unique key to use for rate limiting. * The callback function to be executed. One request will be consumed if the function throws an error. The `penalize` method returns the result of the callback function or an instance of the `ThrottleException`. You can use the exception to find the duration remaining till the next attempt. Copy code to clipboard import User from '#models/user' import { HttpContext } from '@adonisjs/core/http' import limiter from '@adonisjs/limiter/services/main' export default class SessionController { async store({ request, response, session }: HttpContext) { const { email, password } = request.only(['email', 'passwords']) /** * Create a limiter */ const loginLimiter = limiter.use({ requests: 5, duration: '1 min', blockDuration: '20 mins' }) /** * Use IP address + email combination. This ensures if an * attacker is misusing emails; we do not block actual * users from logging in and only penalize the attacker * IP address. */ const key = `login_${request.ip()}_${email}` /** * Wrap User.verifyCredentials inside the "penalize" method, so * that we consume one request for every invalid credentials * error */ const [error, user] = await loginLimiter.penalize(key, () => { return User.verifyCredentials(email, password) }) /** * On ThrottleException, redirect the user back with a * custom error message */ if (error) { session.flashAll() session.flashErrors({ E_TOO_MANY_REQUESTS: `Too many login requests. Try again after ${error.response.availableIn} seconds` }) return response.redirect().back() } /** * Otherwise, login the user */ } } [](https://docs.adonisjs.com/guides/security/rate-limiting#manually-consuming-requests) Manually consuming requests ------------------------------------------------------------------------------------------------------------------- Alongside the `attempt` and the `penalize` methods, you may interact with the limiter directly to check the remaining requests and manually consume them. In the following example, we use the `remaining` method to check if a given key has consumed all the requests. Otherwise, use the `increment` method to consume one request. Copy code to clipboard import limiter from '@adonisjs/limiter/services/main' const requestsLimiter = limiter.use({ requests: 10, duration: '1 minute' }) if (await requestsLimiter.remaining('unique_key') > 0) { await requestsLimiter.increment('unique_key') await performAction() } else { return 'Too many requests' } You might run into a race condition in the above example between calling the `remaining` and the `increment` methods. Therefore, you may want to use the `consume` method instead. The `consume` method will increment the requests count and throw an exception if all the requests have been consumed. Copy code to clipboard import { errors } from '@adonisjs/limiter' try { await requestsLimiter.consume('unique_key') await performAction() } catch (error) { if (error instanceof errors.E_TOO_MANY_REQUESTS) { return 'Too many requests' } } [](https://docs.adonisjs.com/guides/security/rate-limiting#blocking-keys) Blocking keys --------------------------------------------------------------------------------------- Alongside consuming requests, you may block a key for longer if a user continues to make requests after exhausting all the attempts. The blocking is performed by the `consume`, `attempt`, and the `penalize` methods automatically when you create a limiter instance with `blockDuration` option. For example: Copy code to clipboard import limiter from '@adonisjs/limiter/services/main' const requestsLimiter = limiter.use({ requests: 10, duration: '1 minute', blockDuration: '30 mins' }) /** * A user can make 10 requests in a minute. However, if * they send the 11th request, we will block the key * for 30 mins. */ await requestLimiter.consume('a_unique_key') /** * Same behavior as consume */ await requestLimiter.attempt('a_unique_key', () => { }) /** * Allow 10 failures and then block the key for 30 mins. */ await requestLimiter.penalize('a_unique_key', () => { }) Finally, you may use the `block` method to block a key for a given duration. Copy code to clipboard const requestsLimiter = limiter.use({ requests: 10, duration: '1 minute', }) await requestsLimiter.block('a_unique_key', '30 mins') [](https://docs.adonisjs.com/guides/security/rate-limiting#resetting-attempts) Resetting attempts ------------------------------------------------------------------------------------------------- You may use one of the following methods to decrease the number of requests or delete the entire key from the storage. The `decrement` method reduces the request count by 1, and the `delete` method deletes the key. Note that the `decrement` method is not atomic and might set the requests count to `-1` when concurrency is too high. Decrement requests count Copy code to clipboard import limiter from '@adonisjs/limiter/services/main' const jobsLimiter = limiter.use({ requests: 2, duration: '5 mins', }) await jobsLimiter.attempt('unique_key', async () => { await processJob() /** * Decrement the consumed requests after we are done * processing the job. This will allow other workers * to use the slot. */ await jobsLimiter.decrement('unique_key') }) Delete key Copy code to clipboard import limiter from '@adonisjs/limiter/services/main' const requestsLimiter = limiter.use({ requests: 2, duration: '5 mins', }) await requestsLimiter.delete('unique_key') [](https://docs.adonisjs.com/guides/security/rate-limiting#testing) Testing --------------------------------------------------------------------------- If you use a single (i.e., default) store for rate limiting, you may want to switch to the `memory` store during testing by defining the `LIMITER_STORE` environment variable inside the `.env.test` file. .env.test Copy code to clipboard LIMITER_STORE=memory You may clear the rate-limiting storage between tests using the `limiter.clear` method. The `clear` method accepts an array of store names and flushes the database. When using Redis, it is recommended to use a separate database for the rate limiter. Otherwise, the `clear` method will flush the entire DB, and this might impact other parts of the applications. Copy code to clipboard import limiter from '@adonisjs/limiter/services/main' test.group('Reports', (group) => { group.each.setup(() => { return () => limiter.clear(['redis', 'memory']) }) }) Alternatively, you can call the `clear` method without any arguments, and all configured stores will be cleared. Copy code to clipboard test.group('Reports', (group) => { group.each.setup(() => { return () => limiter.clear() }) }) [](https://docs.adonisjs.com/guides/security/rate-limiting#creating-a-custom-storage-provider) Creating a custom storage provider --------------------------------------------------------------------------------------------------------------------------------- A custom storage provider must implement the [LimiterStoreContract](https://github.com/adonisjs/limiter/blob/2.x/src/types.ts#L163) interface and define the following properties/methods. You may write the implementation inside any file/folder. A service provider is not needed to create a custom store. Copy code to clipboard import string from '@adonisjs/core/helpers/string' import { LimiterResponse } from '@adonisjs/limiter' import { LimiterStoreContract, LimiterConsumptionOptions } from '@adonisjs/limiter/types' /** * A custom set of options you want to accept. */ export type MongoDbLimiterConfig = { client: MongoDBConnection } export class MongoDbLimiterStore implements LimiterStoreContract { readonly name = 'mongodb' declare readonly requests: number declare readonly duration: number declare readonly blockDuration: number constructor(public config: MongoDbLimiterConfig & LimiterConsumptionOptions) { this.request = this.config.requests this.duration = string.seconds.parse(this.config.duration) this.blockDuration = string.seconds.parse(this.config.blockDuration) } /** * Consume one request for the given key. This method * should throw an error when all requests have been * already consumed. */ async consume(key: string | number): Promise { } /** * Consume one request for the given key, but do not throw an * error when all requests have been consumed. */ async increment(key: string | number): Promise {} /** * Reward one request to the given key. If possible, do not set * the requests count to a negative value. */ async decrement(key: string | number): Promise {} /** * Block a key for the specified duration. */ async block( key: string | number, duration: string | number ): Promise {} /** * Set the number of consumed requests for a given key. The duration * should be inferred from the config if no explicit duration * is provided. */ async set( key: string | number, requests: number, duration?: string | number ): Promise {} /** * Delete the key from the storage */ async delete(key: string | number): Promise {} /** * Flush all keys from the database */ async clear(): Promise {} /** * Get a limiter response for a given key. Return `null` if the * key does not exist. */ async get(key: string | number): Promise {} } ### [](https://docs.adonisjs.com/guides/security/rate-limiting#defining-the-config-helper) Defining the config helper Once you have written the implementation, you must create a config helper to use the provider inside the `config/limiter.ts` file. The config helper should return a `LimiterManagerStoreFactory` function. You may write the following function within the same file as the `MongoDbLimiterStore` implementation. Copy code to clipboard import { LimiterManagerStoreFactory } from '@adonisjs/limiter/types' /** * Config helper to use the mongoDb store * inside the config file */ export function mongoDbStore(config: MongoDbLimiterConfig) { const storeFactory: LimiterManagerStoreFactory = (runtimeOptions) => { return new MongoDbLimiterStore({ ...config, ...runtimeOptions }) } } ### [](https://docs.adonisjs.com/guides/security/rate-limiting#using-the-config-helper) Using the config helper Once done, you may use the `mongoDbStore` helper as follows. config/limiter.ts Copy code to clipboard import env from '#start/env' import { mongoDbStore } from 'my-custom-package' import { defineConfig } from '@adonisjs/limiter' const limiterConfig = defineConfig({ default: env.get('LIMITER_STORE'), stores: { mongodb: mongoDbStore({ client: mongoDb // create mongoDb client }) }, }) ### [](https://docs.adonisjs.com/guides/security/rate-limiting#wrapping-rate-limiter-flexible-drivers) Wrapping rate-limiter-flexible drivers If you are planning to wrap an existing driver from the [node-rate-limiter-flexible](https://github.com/animir/node-rate-limiter-flexible?tab=readme-ov-file#docs-and-examples) package, then you may use the [RateLimiterBridge](https://github.com/adonisjs/limiter/blob/2.x/src/stores/bridge.ts) for the implementation. Let's re-implement the same `MongoDbLimiterStore` using the bridge this time. Copy code to clipboard import { RateLimiterBridge } from '@adonisjs/limiter' import { RateLimiterMongo } from 'rate-limiter-flexible' export class MongoDbLimiterStore extends RateLimiterBridge { readonly name = 'mongodb' constructor(public config: MongoDbLimiterConfig & LimiterConsumptionOptions) { super( new RateLimiterMongo({ storeClient: config.client, points: config.requests, duration: string.seconds.parse(config.duration), blockDuration: string.seconds.parse(this.config.blockDuration) // ... provide other options as well }) ) } /** * Self-implement the clear method. Ideally, use the * config.client to issue a delete query */ async clear() {} } * * * [Security\ \ Securing SSR apps](https://docs.adonisjs.com/guides/security/securing-ssr-applications) [Views & Templates\ \ Introduction](https://docs.adonisjs.com/guides/views-and-templates/introduction) © 2025 AdonisJS [Edit this page](https://github.com/adonisjs/v6-docs/blob/main/content/docs/security/rate_limiting.md) --- # Helpers (References) | AdonisJS Documentation Toggle docs menu Helpers [](https://docs.adonisjs.com/guides/references/helpers#helpers-reference) Helpers reference =========================================================================================== AdonisJS bundles its utilities into the `helpers` module and makes them available to your application code. Since these utilities are already installed and used by the framework, the `helpers` module does not add any additional bloat to your `node_modules`. The helper methods are exported from the following modules. Copy code to clipboard import is from '@adonisjs/core/helpers/is' import * as helpers from '@adonisjs/core/helpers' import string from '@adonisjs/core/helpers/string' [](https://docs.adonisjs.com/guides/references/helpers#escapehtml) escapeHTML ----------------------------------------------------------------------------- Escape HTML entities in a string value. Under the hood, we use the [he](https://www.npmjs.com/package/he#heescapetext) package. Copy code to clipboard import string from '@adonisjs/core/helpers/string' string.escapeHTML('

foo © bar

') // <p> foo © bar </p> Optionally, you can encode non-ASCII symbols using the `encodeSymbols` option. Copy code to clipboard import string from '@adonisjs/core/helpers/string' string.escapeHTML('

foo © bar

', { encodeSymbols: true, }) // <p> foo © bar </p> [](https://docs.adonisjs.com/guides/references/helpers#encodesymbols) encodeSymbols ----------------------------------------------------------------------------------- You may encode non-ASCII symbols in a string value using the `encodeSymbols` helper. Under the hood, we use [he.encode](https://www.npmjs.com/package/he#heencodetext-options) method. Copy code to clipboard import string from '@adonisjs/core/helpers/string' string.encodeSymbols('foo © bar ≠ baz 𝌆 qux') // 'foo © bar ≠ baz 𝌆 qux' [](https://docs.adonisjs.com/guides/references/helpers#prettyhrtime) prettyHrTime --------------------------------------------------------------------------------- Pretty print the diff of [process.hrtime](https://nodejs.org/api/process.html#processhrtimetime) method. Copy code to clipboard import { hrtime } from 'node:process' import string from '@adonisjs/core/helpers/string' const startTime = hrtime() await someOperation() const endTime = hrtime(startTime) console.log(string.prettyHrTime(endTime)) [](https://docs.adonisjs.com/guides/references/helpers#isempty) isEmpty ----------------------------------------------------------------------- Check if a string value is empty. Copy code to clipboard import string from '@adonisjs/core/helpers/string' string.isEmpty('') // true string.isEmpty(' ') // true [](https://docs.adonisjs.com/guides/references/helpers#truncate) truncate ------------------------------------------------------------------------- Truncate a string at a given number of characters. Copy code to clipboard import string from '@adonisjs/core/helpers/string' string.truncate('This is a very long, maybe not that long title', 12) // Output: This is a ve... By default, the string is truncated exactly at the given index. However, you can instruct the method to wait for the words to complete. Copy code to clipboard string.truncate('This is a very long, maybe not that long title', 12, { completeWords: true, }) // Output: This is a very... You can customize the suffix using the `suffix` option. Copy code to clipboard string.truncate('This is a very long, maybe not that long title', 12, { completeWords: true, suffix: '... Read more ', }) // Output: This is a very... Read more [](https://docs.adonisjs.com/guides/references/helpers#excerpt) excerpt ----------------------------------------------------------------------- The `excerpt` method is identical to the `truncate` method. However, it strips the HTML tags from the string. Copy code to clipboard import string from '@adonisjs/core/helpers/string' string.excerpt('

This is a very long, maybe not that long title

', 12, { completeWords: true, }) // Output: This is a very... [](https://docs.adonisjs.com/guides/references/helpers#slug) slug ----------------------------------------------------------------- Generate slug for a string value. The method is exported from the [slugify package](https://www.npmjs.com/package/slugify) ; therefore, consult its documentation for available options. Copy code to clipboard import string from '@adonisjs/core/helpers/string' console.log(string.slug('hello ♥ world')) // hello-love-world You can add custom replacements for Unicode values as follows. Copy code to clipboard string.slug.extend({ '☢': 'radioactive' }) console.log(string.slug('unicode ♥ is ☢')) // unicode-love-is-radioactive [](https://docs.adonisjs.com/guides/references/helpers#interpolate) interpolate ------------------------------------------------------------------------------- Interpolate variables inside a string. The variables must be inside double curly braces. Copy code to clipboard import string from '@adonisjs/core/helpers/string' string.interpolate('hello {{ user.username }}', { user: { username: 'virk' } }) // hello virk Curly braces can be escaped using the `\\` prefix. Copy code to clipboard string.interpolate('hello \\{{ users.0 }}', {}) // hello {{ users.0 }} [](https://docs.adonisjs.com/guides/references/helpers#plural) plural --------------------------------------------------------------------- Convert a word to its plural form. The method is exported from the [pluralize package](https://www.npmjs.com/package/pluralize) . Copy code to clipboard import string from '@adonisjs/core/helpers/string' string.plural('test') // tests [](https://docs.adonisjs.com/guides/references/helpers#isplural) isPlural ------------------------------------------------------------------------- Find if a word already is in plural form. Copy code to clipboard import string from '@adonisjs/core/helpers/string' string.isPlural('tests') // true [](https://docs.adonisjs.com/guides/references/helpers#pluralize) pluralize --------------------------------------------------------------------------- This method combines the `singular` and the `plural` methods and uses one or the other based on the count. For example: Copy code to clipboard import string from '@adonisjs/core/helpers/string' string.pluralize('box', 1) // box string.pluralize('box', 2) // boxes string.pluralize('box', 0) // boxes string.pluralize('boxes', 1) // box string.pluralize('boxes', 2) // boxes string.pluralize('boxes', 0) // boxes The `pluralize` property exports [additional methods](https://www.npmjs.com/package/pluralize) to register custom uncountable, irregular, plural, and singular rules. Copy code to clipboard import string from '@adonisjs/core/helpers/string' string.pluralize.addUncountableRule('paper') string.pluralize.addSingularRule(/singles$/i, 'singular') [](https://docs.adonisjs.com/guides/references/helpers#singular) singular ------------------------------------------------------------------------- Convert a word to its singular form. The method is exported from the [pluralize package](https://www.npmjs.com/package/pluralize) . Copy code to clipboard import string from '@adonisjs/core/helpers/string' string.singular('tests') // test [](https://docs.adonisjs.com/guides/references/helpers#issingular) isSingular ----------------------------------------------------------------------------- Find if a word is already in a singular form. Copy code to clipboard import string from '@adonisjs/core/helpers/string' string.isSingular('test') // true [](https://docs.adonisjs.com/guides/references/helpers#camelcase) camelCase --------------------------------------------------------------------------- Convert a string value to camelcase. Copy code to clipboard import string from '@adonisjs/core/helpers/string' string.camelCase('user_name') // userName Following are some of the conversion examples. | Input | Output | | --- | --- | | 'test' | 'test' | | 'test string' | 'testString' | | 'Test String' | 'testString' | | 'TestV2' | 'testV2' | | '_foo\_bar_' | 'fooBar' | | 'version 1.2.10' | 'version1210' | | 'version 1.21.0' | 'version1210' | [](https://docs.adonisjs.com/guides/references/helpers#capitalcase) capitalCase ------------------------------------------------------------------------------- Convert a string value to a capital case. Copy code to clipboard import string from '@adonisjs/core/helpers/string' string.capitalCase('helloWorld') // Hello World Following are some of the conversion examples. | Input | Output | | --- | --- | | 'test' | 'Test' | | 'test string' | 'Test String' | | 'Test String' | 'Test String' | | 'TestV2' | 'Test V 2' | | 'version 1.2.10' | 'Version 1.2.10' | | 'version 1.21.0' | 'Version 1.21.0' | [](https://docs.adonisjs.com/guides/references/helpers#dashcase) dashCase ------------------------------------------------------------------------- Convert a string value to a dash case. Copy code to clipboard import string from '@adonisjs/core/helpers/string' string.dashCase('helloWorld') // hello-world Optionally, you can capitalize the first letter of each word. Copy code to clipboard string.dashCase('helloWorld', { capitalize: true }) // Hello-World Following are some of the conversion examples. | Input | Output | | --- | --- | | 'test' | 'test' | | 'test string' | 'test-string' | | 'Test String' | 'test-string' | | 'Test V2' | 'test-v2' | | 'TestV2' | 'test-v-2' | | 'version 1.2.10' | 'version-1210' | | 'version 1.21.0' | 'version-1210' | [](https://docs.adonisjs.com/guides/references/helpers#dotcase) dotCase ----------------------------------------------------------------------- Convert a string value to a dot case. Copy code to clipboard import string from '@adonisjs/core/helpers/string' string.dotCase('helloWorld') // hello.World Optionally, you can convert the first letter of all the words to lowercase. Copy code to clipboard string.dotCase('helloWorld', { lowerCase: true }) // hello.world Following are some of the conversion examples. | Input | Output | | --- | --- | | 'test' | 'test' | | 'test string' | 'test.string' | | 'Test String' | 'Test.String' | | 'dot.case' | 'dot.case' | | 'path/case' | 'path.case' | | 'TestV2' | 'Test.V.2' | | 'version 1.2.10' | 'version.1210' | | 'version 1.21.0' | 'version.1210' | [](https://docs.adonisjs.com/guides/references/helpers#nocase) noCase --------------------------------------------------------------------- Remove all sorts of casing from a string value. Copy code to clipboard import string from '@adonisjs/core/helpers/string' string.noCase('helloWorld') // hello world Following are some of the conversion examples. | Input | Output | | --- | --- | | 'test' | 'test' | | 'TEST' | 'test' | | 'testString' | 'test string' | | 'testString123' | 'test string123' | | 'testString\_1\_2\_3' | 'test string 1 2 3' | | 'ID123String' | 'id123 string' | | 'foo bar123' | 'foo bar123' | | 'a1bStar' | 'a1b star' | | 'CONSTANT\_CASE ' | 'constant case' | | 'CONST123\_FOO' | 'const123 foo' | | 'FOO\_bar' | 'foo bar' | | 'XMLHttpRequest' | 'xml http request' | | 'IQueryAArgs' | 'i query a args' | | 'dot.case' | 'dot case' | | 'path/case' | 'path case' | | 'snake\_case' | 'snake case' | | 'snake\_case123' | 'snake case123' | | 'snake\_case\_123' | 'snake case 123' | | '"quotes"' | 'quotes' | | 'version 0.45.0' | 'version 0 45 0' | | 'version 0..78..9' | 'version 0 78 9' | | 'version 4\_99/4' | 'version 4 99 4' | | ' test ' | 'test' | | 'something\_2014\_other' | 'something 2014 other' | | 'amazon s3 data' | 'amazon s3 data' | | 'foo\_13\_bar' | 'foo 13 bar' | [](https://docs.adonisjs.com/guides/references/helpers#pascalcase) pascalCase ----------------------------------------------------------------------------- Convert a string value to a Pascal case. Great for generating JavaScript class names. Copy code to clipboard import string from '@adonisjs/core/helpers/string' string.pascalCase('user team') // UserTeam Following are some of the conversion examples. | Input | Output | | --- | --- | | 'test' | 'Test' | | 'test string' | 'TestString' | | 'Test String' | 'TestString' | | 'TestV2' | 'TestV2' | | 'version 1.2.10' | 'Version1210' | | 'version 1.21.0' | 'Version1210' | [](https://docs.adonisjs.com/guides/references/helpers#sentencecase) sentenceCase --------------------------------------------------------------------------------- Convert a value to a sentence. Copy code to clipboard import string from '@adonisjs/core/helpers/string' string.sentenceCase('getting_started-with-adonisjs') // Getting started with adonisjs Following are some of the conversion examples. | Input | Output | | --- | --- | | 'test' | 'Test' | | 'test string' | 'Test string' | | 'Test String' | 'Test string' | | 'TestV2' | 'Test v2' | | 'version 1.2.10' | 'Version 1 2 10' | | 'version 1.21.0' | 'Version 1 21 0' | [](https://docs.adonisjs.com/guides/references/helpers#snakecase) snakeCase --------------------------------------------------------------------------- Convert value to snake case. Copy code to clipboard import string from '@adonisjs/core/helpers/string' string.snakeCase('user team') // user_team Following are some of the conversion examples. | Input | Output | | --- | --- | | '\_id' | 'id' | | 'test' | 'test' | | 'test string' | 'test\_string' | | 'Test String' | 'test\_string' | | 'Test V2' | 'test\_v2' | | 'TestV2' | 'test\_v\_2' | | 'version 1.2.10' | 'version\_1210' | | 'version 1.21.0' | 'version\_1210' | [](https://docs.adonisjs.com/guides/references/helpers#titlecase) titleCase --------------------------------------------------------------------------- Convert a string value to the title case. Copy code to clipboard import string from '@adonisjs/core/helpers/string' string.titleCase('small word ends on') // Small Word Ends On Following are some of the conversion examples. | Input | Output | | --- | --- | | 'one. two.' | 'One. Two.' | | 'a small word starts' | 'A Small Word Starts' | | 'small word ends on' | 'Small Word Ends On' | | 'we keep NASA capitalized' | 'We Keep NASA Capitalized' | | 'pass camelCase through' | 'Pass camelCase Through' | | 'follow step-by-step instructions' | 'Follow Step-by-Step Instructions' | | 'this vs. that' | 'This vs. That' | | 'this vs that' | 'This vs That' | | 'newcastle upon tyne' | 'Newcastle upon Tyne' | | 'newcastle \*upon\* tyne' | 'Newcastle \*upon\* Tyne' | [](https://docs.adonisjs.com/guides/references/helpers#random) random --------------------------------------------------------------------- Generate a cryptographically secure random string of a given length. The output value is a URL-safe base64 encoded string. Copy code to clipboard import string from '@adonisjs/core/helpers/string' string.random(32) // 8mejfWWbXbry8Rh7u8MW3o-6dxd80Thk [](https://docs.adonisjs.com/guides/references/helpers#sentence) sentence ------------------------------------------------------------------------- Convert an array of words to a comma-separated sentence. Copy code to clipboard import string from '@adonisjs/core/helpers/string' string.sentence(['routes', 'controllers', 'middleware']) // routes, controllers, and middleware You can replace the `and` with an `or` by specifying the `options.lastSeparator` property. Copy code to clipboard string.sentence(['routes', 'controllers', 'middleware'], { lastSeparator: ', or ', }) In the following example, the two words are combined using the `and` separator, not the comma (usually advocated in English). However, you can use a custom separator for a pair of words. Copy code to clipboard string.sentence(['routes', 'controllers']) // routes and controllers string.sentence(['routes', 'controllers'], { pairSeparator: ', and ', }) // routes, and controllers [](https://docs.adonisjs.com/guides/references/helpers#condensewhitespace) condenseWhitespace --------------------------------------------------------------------------------------------- Remove multiple whitespaces from a string to a single whitespace. Copy code to clipboard import string from '@adonisjs/core/helpers/string' string.condenseWhitespace('hello world') // hello world string.condenseWhitespace(' hello world ') // hello world [](https://docs.adonisjs.com/guides/references/helpers#seconds) seconds ----------------------------------------------------------------------- Parse a string-based time expression to seconds. Copy code to clipboard import string from '@adonisjs/core/helpers/string' string.seconds.parse('10h') // 36000 string.seconds.parse('1 day') // 86400 Passing a numeric value to the `parse` method is returned as it is, assuming the value is already in seconds. Copy code to clipboard string.seconds.parse(180) // 180 You can format seconds to a pretty string using the `format` method. Copy code to clipboard string.seconds.format(36000) // 10h string.seconds.format(36000, true) // 10 hours [](https://docs.adonisjs.com/guides/references/helpers#milliseconds) milliseconds --------------------------------------------------------------------------------- Parse a string-based time expression to milliseconds. Copy code to clipboard import string from '@adonisjs/core/helpers/string' string.milliseconds.parse('1 h') // 3.6e6 string.milliseconds.parse('1 day') // 8.64e7 Passing a numeric value to the `parse` method is returned as it is, assuming the value is already in milliseconds. Copy code to clipboard string.milliseconds.parse(180) // 180 Using the `format` method, you can format milliseconds to a pretty string. Copy code to clipboard string.milliseconds.format(3.6e6) // 1h string.milliseconds.format(3.6e6, true) // 1 hour [](https://docs.adonisjs.com/guides/references/helpers#bytes) bytes ------------------------------------------------------------------- Parse a string-based unit expression to bytes. Copy code to clipboard import string from '@adonisjs/core/helpers/string' string.bytes.parse('1KB') // 1024 string.bytes.parse('1MB') // 1048576 Passing a numeric value to the `parse` method is returned as it is, assuming the value is already in bytes. Copy code to clipboard string.bytes.parse(1024) // 1024 Using the `format` method, you can format bytes to a pretty string. The method is exported directly from the [bytes](https://www.npmjs.com/package/bytes) package. Please reference the package README for available options. Copy code to clipboard string.bytes.format(1048576) // 1MB string.bytes.format(1024 * 1024 * 1000) // 1000MB string.bytes.format(1024 * 1024 * 1000, { thousandsSeparator: ',' }) // 1,000MB [](https://docs.adonisjs.com/guides/references/helpers#ordinal) ordinal ----------------------------------------------------------------------- Get the ordinal letter for a given number. Copy code to clipboard import string from '@adonisjs/core/helpers/string' string.ordinal(1) // 1st string.ordinal(2) // '2nd' string.ordinal(3) // '3rd' string.ordinal(4) // '4th' string.ordinal(23) // '23rd' string.ordinal(24) // '24th' [](https://docs.adonisjs.com/guides/references/helpers#safeequal) safeEqual --------------------------------------------------------------------------- Check if two buffer or string values are the same. This method does not leak any timing information and prevents [timing attack](https://javascript.plainenglish.io/what-are-timing-attacks-and-how-to-prevent-them-using-nodejs-158cc7e2d70c) . Under the hood, this method uses Node.js [crypto.timeSafeEqual](https://nodejs.org/api/crypto.html#cryptotimingsafeequala-b) method, with support for comparing string values. _(crypto.timeSafeEqual does not support string comparison)_ Copy code to clipboard import { safeEqual } from '@adonisjs/core/helpers' /** * The trusted value, it might be saved inside the db */ const trustedValue = 'hello world' /** * Untrusted user input */ const userInput = 'hello' if (safeEqual(trustedValue, userInput)) { // both are the same } else { // value mismatch } [](https://docs.adonisjs.com/guides/references/helpers#cuid) cuid ----------------------------------------------------------------- Create a secure, collision-resistant ID optimized for horizontal scaling and performance. This method uses the [@paralleldrive/cuid2](https://github.com/paralleldrive/cuid2) package under the hood. Copy code to clipboard import { cuid } from '@adonisjs/core/helpers' const id = cuid() // tz4a98xxat96iws9zmbrgj3a You can use the `isCuid` method to check if a value is a valid CUID. Copy code to clipboard import { cuid, isCuid } from '@adonisjs/core/helpers' const id = cuid() isCuid(id) // true [](https://docs.adonisjs.com/guides/references/helpers#compose) compose ----------------------------------------------------------------------- The `compose` helper allows you to use TypeScript class mixins with a cleaner API. Following is an example of mixin usage without the `compose` helper. Copy code to clipboard class User extends UserWithAttributes(UserWithAge(UserWithPassword(UserWithEmail(BaseModel)))) {} Following is an example with the `compose` helper. * There is no nesting. * The order of mixins is from (left to right/top to bottom). Whereas earlier, it was inside out. Copy code to clipboard import { compose } from '@adonisjs/core/helpers' class User extends compose( BaseModel, UserWithEmail, UserWithPassword, UserWithAge, UserWithAttributes ) {} [](https://docs.adonisjs.com/guides/references/helpers#base64) base64 --------------------------------------------------------------------- Utility methods to base64 encode and decode values. Copy code to clipboard import { base64 } from '@adonisjs/core/helpers' base64.encode('hello world') // aGVsbG8gd29ybGQ= Like the `encode` method, you can use the `urlEncode` to generate a base64 string safe to pass in a URL. The `urlEncode` method performs the following replacements. * Replace `+` with `-`. * Replace `/` with `_`. * And remove the `=` sign from the end of the string. Copy code to clipboard base64.urlEncode('hello world') // aGVsbG8gd29ybGQ You can use the `decode` and the `urlDecode` methods to decode a previously encoded base64 string. Copy code to clipboard base64.decode(base64.encode('hello world')) // hello world base64.urlDecode(base64.urlEncode('hello world')) // hello world The `decode` and the `urlDecode` methods return `null` when the input value is an invalid base64 string. You can turn on the `strict` mode to raise an exception instead. Copy code to clipboard base64.decode('hello world') // null base64.decode('hello world', 'utf-8', true) // raises exception [](https://docs.adonisjs.com/guides/references/helpers#fsreadall) fsReadAll --------------------------------------------------------------------------- Get a list of all the files from a directory. The method recursively fetches files from the main and the sub-folders. The dotfiles are ignored implicitly. Copy code to clipboard import { fsReadAll } from '@adonisjs/core/helpers' const files = await fsReadAll(new URL('./config', import.meta.url), { pathType: 'url' }) await Promise.all(files.map((file) => import(file))) You can also pass the options along with the directory path as the second argument. Copy code to clipboard type Options = { ignoreMissingRoot?: boolean filter?: (filePath: string, index: number) => boolean sort?: (current: string, next: string) => number pathType?: 'relative' | 'unixRelative' | 'absolute' | 'unixAbsolute' | 'url' } const options: Partial = {} await fsReadAll(location, options) | Argument | Description | | --- | --- | | `ignoreMissingRoot` | By default, an exception is raised when the root directory is missing. Setting `ignoreMissingRoot` to true will not result in an error, and an empty array is returned. | | `filter` | Define a filter to ignore certain paths. The method is called on the final list of files. | | `sort` | Define a custom method to sort file paths. By default, the files are sorted using natural sort. | | `pathType` | Define how to return the collected paths. By default, OS-specific relative paths are returned. If you want to import the collected files, you must set the`pathType = 'url'` | [](https://docs.adonisjs.com/guides/references/helpers#fsimportall) fsImportAll ------------------------------------------------------------------------------- The `fsImportAll` method imports all the files recursively from a given directory and sets the exported value from each module on an object. Copy code to clipboard import { fsImportAll } from '@adonisjs/core/helpers' const collection = await fsImportAll(new URL('./config', import.meta.url)) console.log(collection) * Collection is an object with a tree of key-value pairs. * The key is the nested object created from the file path. * Value is the exported values from the module. Only the default export is used if a module has both `default` and `named` exports. The second param is the option to customize the import behavior. Copy code to clipboard type Options = { ignoreMissingRoot?: boolean filter?: (filePath: string, index: number) => boolean sort?: (current: string, next: string) => number transformKeys? (keys: string[]) => string[] } const options: Partial = {} await fsImportAll(location, options) | Argument | Description | | --- | --- | | `ignoreMissingRoot` | By default, an exception is raised when the root directory is missing. Setting `ignoreMissingRoot` to true will not result in an error, and an empty object will be returned. | | `filter` | Define a filter to ignore certain paths. By default, only files ending with `.js`, `.ts`, `.json`, `.cjs`, and `.mjs` are imported. | | `sort` | Define a custom method to sort file paths. By default, the files are sorted using natural sort. | | `transformKeys` | Define a callback method to transform the keys for the final object. The method receives an array of nested keys and must return an array. | [](https://docs.adonisjs.com/guides/references/helpers#string-builder) String builder ------------------------------------------------------------------------------------- The `StringBuilder` class offers a fluent API to perform transformations on a string value. You may get an instance of string builder using the `string.create` method. Copy code to clipboard import string from '@adonisjs/core/helpers/string' const value = string .create('userController') .removeSuffix('controller') // user .plural() // users .snakeCase() // users .suffix('_controller') // users_controller .ext('ts') // users_controller.ts .toString() [](https://docs.adonisjs.com/guides/references/helpers#message-builder) Message builder --------------------------------------------------------------------------------------- The `MessageBuilder` class offers an API to serialize JavaScript data types with an expiry and purpose. You can either store the serialized output in safe storage like your application database or encrypt it (to avoid tampering) and share it publicly. In the following example, we serialize an object with the `token` property and set its expiry to be `1 hour`. Copy code to clipboard import { MessageBuilder } from '@adonisjs/core/helpers' const builder = new MessageBuilder() const encoded = builder.build( { token: string.random(32), }, '1 hour', 'email_verification' ) /** * { * "message": { * "token":"GZhbeG5TvgA-7JCg5y4wOBB1qHIRtX6q" * }, * "purpose":"email_verification", * "expiryDate":"2022-10-03T04:07:13.860Z" * } */ Once you have the JSON string with the expiry and the purpose, you can encrypt it (to prevent tampering) and share it with the client. During the token verification, you can decrypt the previously encrypted value and use the `MessageBuilder` to verify the payload and convert it to a JavaScript object. Copy code to clipboard import { MessageBuilder } from '@adonisjs/core/helpers' const builder = new MessageBuilder() const decoded = builder.verify(value, 'email_verification') if (!decoded) { return 'Invalid payload' } console.log(decoded.token) [](https://docs.adonisjs.com/guides/references/helpers#secret) Secret --------------------------------------------------------------------- The `Secret` class lets you hold sensitive values within your application without accidentally leaking them inside logs and console statements. For example, the `appKey` value defined inside the `config/app.ts` file is an instance of the `Secret` class. If you try to log this value to the console, you will see `[redacted]` and not the original value. For demonstration, let's fire up a REPL session and try it. Copy code to clipboard node ace repl Copy code to clipboard > (js) config = await import('./config/app.js') # [Module: null prototype] { # appKey: [redacted], # http: { # } # } Copy code to clipboard > (js) console.log(config.appKey) # [redacted] You can call the `config.appKey.release` method to read the original value. The purpose of the Secret class is not to prevent your code from accessing the original value. Instead, it provides a safety net from exposing sensitive data inside logs. ### [](https://docs.adonisjs.com/guides/references/helpers#using-the-secret-class) Using the Secret class You can wrap custom values inside the Secret class as follows. Copy code to clipboard import { Secret } from '@adonisjs/core/helpers' const value = new Secret('some-secret-value') console.log(value) // [redacted] console.log(value.release()) // some-secret-value [](https://docs.adonisjs.com/guides/references/helpers#types-detection) Types detection --------------------------------------------------------------------------------------- We export the [@sindresorhus/is](https://github.com/sindresorhus/is) module from the `helpers/is` import path, and you may use it to perform the type detection in your apps. Copy code to clipboard import is from '@adonisjs/core/helpers/is' is.object({}) // true is.object(null) // false * * * [References\ \ Exceptions](https://docs.adonisjs.com/guides/references/exceptions) © 2025 AdonisJS [Edit this page](https://github.com/adonisjs/v6-docs/blob/main/content/docs/references/helpers.md) --- # I18n (Digging deeper) | AdonisJS Documentation Toggle docs menu I18n [](https://docs.adonisjs.com/guides/digging-deeper/i18n#internationalization-and-localization) Internationalization and Localization ==================================================================================================================================== Internationalization and Localization aims to help you create web apps for multiple regions and languages. The support for i18n (shorthand for Internationalization) is provided by the `@adonisjs/i18n` package. * **Localization** is the process of translating the text of your application to multiple languages. You must write a copy for each language and reference them within Edge templates, validation error messages, or using `i18n` API directly. * **Internationalization** is the process of formatting values such as **date**, **time**, **numbers** as per a specific region or country. [](https://docs.adonisjs.com/guides/digging-deeper/i18n#installation) Installation ---------------------------------------------------------------------------------- Install and configure the package using the following command : Copy code to clipboard node ace add @adonisjs/i18n See steps performed by the add command 1. Installs the `@adonisjs/i18n` package using the detected package manager. 2. Registers the following service provider inside the `adonisrc.ts` file. Copy code to clipboard { providers: [\ // ...other providers\ () => import('@adonisjs/i18n/i18n_provider')\ ] } 3. Creates the `config/i18n.ts` file. 4. Creates `detect_user_locale_middleware` inside the `middleware` directory. 5. register the following middleware inside the `start/kernel.ts` file. Copy code to clipboard router.use([\ () => import('#middleware/detect_user_locale_middleware')\ ]) [](https://docs.adonisjs.com/guides/digging-deeper/i18n#configuration) Configuration ------------------------------------------------------------------------------------ The configuration for the i18n package is stored within the `config/i18n.ts` file. See also: [Config stub](https://github.com/adonisjs/i18n/blob/main/stubs/config/i18n.stub) Copy code to clipboard import app from '@adonisjs/core/services/app' import { defineConfig, formatters, loaders } from '@adonisjs/i18n' const i18nConfig = defineConfig({ defaultLocale: 'en', formatter: formatters.icu(), loaders: [\ loaders.fs({\ location: app.languageFilesPath()\ })\ ], }) export default i18nConfig formatter Defines the format to use for storing translations. AdonisJS supports the [ICU message format](https://format-message.github.io/icu-message-format-for-translators/index.html) . The ICU message format is a widely accepted standard supported by many translation services like Crowdin and Lokalise. Also, you can [add custom message formatters](https://docs.adonisjs.com/guides/digging-deeper/i18n#creating-a-custom-translation-formatter) . defaultLocale The default locale for the application. Translations and values formatting will fall back to this locale when your application does not support the user language. fallbackLocales A key-value pair that defines a collection of locales and their fallback locales. For example, if your application supports Spanish, you may define it as a fallback for the Catalin language. Copy code to clipboard export default defineConfig({ formatter: formatters.icu(), defaultLocale: 'en', fallbackLocales: { ca: 'es' // show Spanish content when a user speaks Catalan } }) supportedLocales An array of locales supported by your application. Copy code to clipboard export default defineConfig({ formatter: formatters.icu(), defaultLocale: 'en', supportedLocales: ['en', 'fr', 'it'] }) If you do not define this value, we will infer the `supportedLocales` from translations. For example, if you have defined translations for English, French, and Spanish, the value of `supportedLocales` will be `['en', 'es', 'fr']` loaders A collection of loaders to use for loading translations. By default, we only support the File system loader. However, you can [add custom loaders](https://docs.adonisjs.com/guides/digging-deeper/i18n#creating-a-custom-translation-loader) . [](https://docs.adonisjs.com/guides/digging-deeper/i18n#storing-translations) Storing translations -------------------------------------------------------------------------------------------------- The translations are stored inside the `resources/lang` directory, and you must create a sub-directory for every language as per [IETF language tag](https://en.wikipedia.org/wiki/IETF_language_tag) format. For example: Copy code to clipboard resources ├── lang │ ├── en │ └── fr You can define translations for a specific region by creating sub-directories with the region code. In the following example, we define different translations for **English (Global)**, **English (United States)**, and **English (United Kingdom)**. AdonisJS will automatically fall back to **English (Global)** when you have a missing translation in a region-specific translations set. See also: [ISO Language code](https://www.andiamo.co.uk/resources/iso-language-codes/) Copy code to clipboard resources ├── lang │ ├── en │ ├── en-us │ ├── en-uk ### [](https://docs.adonisjs.com/guides/digging-deeper/i18n#files-format) Files format Translations must be stored inside `.json` or `.yaml` files. Feel free to create a nested directory structure for better organization. Copy code to clipboard resources ├── lang │ ├── en │ │ └── messages.json │ └── fr │ └── messages.json Translations must be formatted per the [ICU message syntax](https://format-message.github.io/icu-message-format-for-translators/index.html) . resources/lang/en/messages.json Copy code to clipboard { "greeting": "Hello world" } resources/lang/fr/messages.json Copy code to clipboard { "greeting": "Bonjour le monde" } [](https://docs.adonisjs.com/guides/digging-deeper/i18n#resolving-translations) Resolving translations ------------------------------------------------------------------------------------------------------ Before you can look up and format translations, you will have to create a locale-specific instance of the [I18n class](https://github.com/adonisjs/i18n/blob/main/src/i18n.ts) using the `i18nManager.locale` method. Copy code to clipboard import i18nManager from '@adonisjs/i18n/services/main' // I18n instance for English const en = i18nManager.locale('en') // I18n instance for French const fr = i18nManager.locale('fr') Once you have an instance of the `I18n` class, you may use the `.t` method to format a translation. Copy code to clipboard const i18n = i18nManager.locale('en') i18n.t('messages.greeting') // Hello world Copy code to clipboard const i18n = i18nManager.locale('fr') i18n.t('messages.greeting') // Bonjour le monde ### [](https://docs.adonisjs.com/guides/digging-deeper/i18n#fallback-locale) Fallback locale Each instance has a pre-configured fallback language based upon the [config.fallbackLocales](https://docs.adonisjs.com/guides/digging-deeper/i18n#config-fallback-locales) collection. The fallback language is used when a translation is missing for the main language. Copy code to clipboard export default defineConfig({ fallbackLocales: { 'de-CH': 'de', 'fr-CH': 'fr' } }) Copy code to clipboard const i18n = i18nManager.locale('de-CH') i18n.fallbackLocale // de (using fallback collection) Copy code to clipboard const i18n = i18nManager.locale('fr-CH') i18n.fallbackLocale // fr (using fallback collection) Copy code to clipboard const i18n = i18nManager.locale('en') i18n.fallbackLocale // en (using default locale) ### [](https://docs.adonisjs.com/guides/digging-deeper/i18n#missing-translations) Missing translations If a translation is missing in the main and the fallback locales, the `.t` method will return an error string formatted as follows. Copy code to clipboard const i18n = i18nManager.locale('en') i18n.t('messages.hero_title') // translation missing: en, messages.hero_title You can replace this message with a different message or an empty string by defining a fallback value as the second parameter. Copy code to clipboard const fallbackValue = '' i18n.t('messages.hero_title', fallbackValue) // output: '' You may also compute a fallback value globally via the config file. The `fallback` method receives the translation path as the first parameter and the locale code as the second parameter. Make sure always to return a string value. Copy code to clipboard import { defineConfig } from '@adonisjs/i18n' export default defineConfig({ fallback: (identifier, locale) => { return '' }, }) [](https://docs.adonisjs.com/guides/digging-deeper/i18n#detecting-user-locale-during-an-http-request) Detecting user locale during an HTTP request -------------------------------------------------------------------------------------------------------------------------------------------------- During the initial setup, we create a `detect_user_locale_middleware.ts` file inside the `./app/middleware` directory. The middleware performs the following actions. * Detect the locale of the request using the [`Accept-language` header](https://developer.mozilla.org/en-US/docs/Web/HTTP/Headers/Accept-Language) . * Create an instance of the `I18n` class for the request locale and share it with the rest of the request pipeline using the [HTTP Context](https://docs.adonisjs.com/guides/concepts/http-context) . * Share the same instance with Edge templates as a global `i18n` property. * Finally, hook into the [Request validator](https://docs.adonisjs.com/guides/basics/validation#the-requestvalidateusing-method) and provide validation messages using translation files. If this middleware is active, you can translate messages inside your controllers and Edge templates as follows. Copy code to clipboard import { HttpContext } from '@adonisjs/core/http' export default class PostsController { async store({ i18n, session }: HttpContext) { session.flash('success', { message: i18n.t('post.created') }) } } Copy code to clipboard

{{ t('messages.heroTitle') }}

### [](https://docs.adonisjs.com/guides/digging-deeper/i18n#changing-the-user-language-detection-code) Changing the user language detection code Since the `detect_user_locale_middleware` is part of your application codebase, you may modify the `getRequestLocale` method and use custom logic to find the user language. [](https://docs.adonisjs.com/guides/digging-deeper/i18n#translating-validation-messages) Translating validation messages ------------------------------------------------------------------------------------------------------------------------ The `detect_user_locale_middleware` hooks into the [Request validator](https://docs.adonisjs.com/guides/basics/validation#the-requestvalidateusing-method) and provides validation messages using the translation files. Copy code to clipboard export default class DetectUserLocaleMiddleware { static { RequestValidator.messagesProvider = (ctx) => { return ctx.i18n.createMessagesProvider() } } } The translations must be stored inside the `validator.json` file under the `shared` key. The validation messages can be defined for the validation rule or the `field + rule` combination. resources/lang/en/validator.json Copy code to clipboard { "shared": { "fields": { "first_name": "first name" }, "messages": { "required": "Enter {field}", "username.required": "Choose a username for your account", "email": "The email must be valid" } } } resources/lang/fr/validator.json Copy code to clipboard { "shared": { "fields": { "first_name": "Prénom" }, "messages": { "required": "Remplisser le champ {field}", "username.required": "Choissisez un nom d'utilisateur pour votre compte", "email": "L'email doit être valide" } } } ### [](https://docs.adonisjs.com/guides/digging-deeper/i18n#using-translations-with-vinejs-directly) Using translations with VineJS directly During an HTTP request, the `detect_user_locale_middleware` hooks into the Request validator and registers a [custom messages provider](https://vinejs.dev/docs/custom_error_messages#registering-messages-provider) to lookup validation errors from translation files. However, if you use VineJS outside of an HTTP request, in Ace commands or queue jobs, you must explicitly register a custom messages provider when calling the `validator.validate` method. Copy code to clipboard import { createJobValidator } from '#validators/jobs' import i18nManager from '@adonisjs/i18n/services/main' /** * Get an i18n instance for a specific locale */ const i18n = i18nManager.locale('fr') await createJobValidator.validate(data, { /** * Register a messages provider for using * translations */ messagesProvider: i18n.createMessagesProvider() }) [](https://docs.adonisjs.com/guides/digging-deeper/i18n#icu-message-format) ICU message format ---------------------------------------------------------------------------------------------- ### [](https://docs.adonisjs.com/guides/digging-deeper/i18n#interpolation) Interpolation The ICU messages syntax uses a single curly brace for referencing dynamic values. For example: The ICU messages syntax [does not support nested data sets](https://github.com/formatjs/formatjs/pull/2039#issuecomment-951550150) , and hence, you can only access properties from a flat object during interpolation. Copy code to clipboard { "greeting": "Hello { username }" } Copy code to clipboard {{ t('messages.greeting', { username: 'Virk' }) }} You can also write HTML within the messages. However, use three [curly braces](https://edgejs.dev/docs/interpolation#escaped-html-output) within the Edge templates to render HTML without escaping it. Copy code to clipboard { "greeting": "

Hello { username }

" } Copy code to clipboard {{{ t('messages.greeting', { username: 'Virk' }) }}} ### [](https://docs.adonisjs.com/guides/digging-deeper/i18n#number-format) Number format You can format numeric values within the translation messages using the `{key, type, format}` syntax. In the following example: * The `amount` is the runtime value. * The `number` is the formatting type. * And the `::currency/USD` is the currency format with a [number skeleton](https://unicode-org.github.io/icu/userguide/format_parse/numbers/skeletons.html#overview) Copy code to clipboard { "bagel_price": "The price of this bagel is {amount, number, ::currency/USD}" } Copy code to clipboard {{ t('bagel_price', { amount: 2.49 }) }} Copy code to clipboard The price of this bagel is $2.49 The following are examples of using the `number` format with different formatting styles and number skeletons. Copy code to clipboard Length of the pole: {price, number, ::measure-unit/length-meter} Copy code to clipboard Account balance: {price, number, ::currency/USD compact-long} ### [](https://docs.adonisjs.com/guides/digging-deeper/i18n#datetime-format) Date/time format You may format the [Date](https://developer.mozilla.org/en-US/docs/Web/JavaScript/Reference/Global_Objects/Date) instances or the [luxon DateTime](https://moment.github.io/luxon/api-docs/index.html) instances using the `{key, type, format}` syntax. In the following example: * The `expectedDate` is the runtime value. * The `date` is the formatting type. * And the `medium` is the date format. Copy code to clipboard { "shipment_update": "Your package will arrive on {expectedDate, date, medium}" } Copy code to clipboard {{ t('shipment_update', { expectedDate: luxonDateTime }) }} Copy code to clipboard Your package will arrive on Oct 16, 2023 You can use the `time` format to format the value as a time. Copy code to clipboard { "appointment": "You have an appointment today at {appointmentAt, time, ::h:m a}" } Copy code to clipboard You have an appointment today at 2:48 PM ICU provides a [wide array of patterns](https://unicode-org.github.io/icu/userguide/format_parse/datetime/#date-field-symbol-table) to customize the date-time format. However, not all of them are available via ECMA402's Intl API. Therefore, we only support the following patterns. | Symbol | Description | | --- | --- | | `G` | Era designator | | `y` | year | | `M` | month in year | | `L` | stand-alone month in year | | `d` | day in month | | `E` | day of week | | `e` | local day of week e..eee is not supported | | `c` | stand-alone local day of week c..ccc is not supported | | `a` | AM/PM marker | | `h` | Hour \[1-12\] | | `H` | Hour \[0-23\] | | `K` | Hour \[0-11\] | | `k` | Hour \[1-24\] | | `m` | Minute | | `s` | Second | | `z` | Time Zone | ### [](https://docs.adonisjs.com/guides/digging-deeper/i18n#plural-rules) Plural rules ICU message syntax has first-class support for defining the plural rules within your messages. For example: In the following example, we use YAML over JSON since writing multiline text in YAML is easier. Copy code to clipboard cart_summary: "You have {itemsCount, plural, =0 {no items} one {1 item} other {# items} } in your cart" Copy code to clipboard {{ t('messages.cart_summary', { itemsCount: 1 }) }} Copy code to clipboard You have 1 item in your cart The `#` is a special token to be used as a placeholder for the numeric value. It will be formatted as `{key, number}`. Copy code to clipboard {{ t('messages.cart_summary', { itemsCount: 1000 }) }} {{-- Output --}} {{-- You have 1,000 items in your cart --}} The plural rule uses the `{key, plural, matches}` syntax. The `matches` is a literal value matched to one of the following plural categories. | Category | Description | | --- | --- | | `zero` | This category is used for languages with grammar specialized specifically for zero number of items. (Examples are Arabic and Latvian) | | `one` | This category is used for languages with grammar explicitly specialized for one item. Many languages, but not all, use this plural category. (Many popular Asian languages, such as Chinese and Japanese, do not use this category.) | | `two` | This category is used for languages that have grammar explicitly specialized for two items. (Examples are Arabic and Welsh.) | | `few` | This category is used for languages with grammar explicitly specialized for a small number of items. For some languages, this is used for 2-4 items, for some 3-10 items, and other languages have even more complex rules. | | `many` | This category is used for languages with specialized grammar for a more significant number of items. (Examples are Arabic, Polish, and Russian.) | | `other` | This category is used if the value doesn't match one of the other plural categories. Note that this is used for "plural" for languages (such as English) that have a simple "singular" versus "plural" dichotomy. | | `=value` | This is used to match a specific value regardless of the plural categories of the current locale. | > _The table's content is referenced from [formatjs.io](https://formatjs.io/docs/core-concepts/icu-syntax/#plural-format) > _ ### [](https://docs.adonisjs.com/guides/digging-deeper/i18n#select) Select The `select` format lets you choose the output by matching a value against one of the many choices. Writing gender-specific text is an excellent example of the `select` format. Yaml Copy code to clipboard auto_reply: "{gender, select, male {He} female {She} other {They} } will respond shortly." Copy code to clipboard {{ t('messages.auto_reply', { gender: 'female' }) }} Copy code to clipboard She will respond shortly. ### [](https://docs.adonisjs.com/guides/digging-deeper/i18n#select-ordinal) Select ordinal The `select ordinal` format allows you to choose the output based on the ordinal pluralization rules. The format is similar to the `select` format. However, the value is mapped to an ordinal plural category. Copy code to clipboard anniversary_greeting: "It's my {years, selectordinal, one {#st} two {#nd} few {#rd} other {#th} } anniversary" Copy code to clipboard {{ t('messages.anniversary_greeting', { years: 2 }) }} Copy code to clipboard It's my 2nd anniversary The select ordinal format uses the `{key, selectordinal, matches}` syntax. The match is a literal value and is matched to one of the following plural categories. | Category | Description | | --- | --- | | `zero` | This category is used for languages with grammar specialized specifically for zero number of items. (Examples are Arabic and Latvian.) | | `one` | This category is used for languages with grammar explicitly specialized for one item. Many languages, but not all, use this plural category. (Many popular Asian languages, such as Chinese and Japanese, do not use this category.) | | `two` | This category is used for languages that have grammar explicitly specialized for two items. (Examples are Arabic and Welsh.) | | `few` | This category is used for languages with grammar explicitly specialized for a small number of items. For some languages, this is used for 2-4 items, for some 3-10 items, and other languages have even more complex rules. | | `many` | This category is used for languages with specialized grammar for a larger number of items. (Examples are Arabic, Polish, and Russian.) | | `other` | This category is used if the value doesn't match one of the other plural categories. Note that this is used for "plural" for languages (such as English) that have a simple "singular" versus "plural" dichotomy. | | `=value` | This is used to match a specific value regardless of the plural categories of the current locale. | > _The table's content is referenced from [formatjs.io](https://formatjs.io/docs/core-concepts/icu-syntax/#selectordinal-format) > _ [](https://docs.adonisjs.com/guides/digging-deeper/i18n#formatting-values) Formatting values -------------------------------------------------------------------------------------------- The following methods under the hood use the [Node.js Intl API](https://nodejs.org/dist/latest/docs/api/intl.html) but have better performance. [See benchmarks](https://github.com/poppinss/intl-formatter?tab=readme-ov-file#benchmarks) ### [](https://docs.adonisjs.com/guides/digging-deeper/i18n#formatnumber) formatNumber Format a numeric value using the `Intl.NumberFormat` class. You may pass the following arguments. 1. The value to format. 2. An optional [`options` object](https://developer.mozilla.org/en-US/docs/Web/JavaScript/Reference/Global_Objects/Intl/NumberFormat/NumberFormat#options) . Copy code to clipboard import i18nManager from '@adonisjs/i18n/services/main' i18nManager .locale('en') .formatNumber(123456.789, { maximumSignificantDigits: 3 }) ### [](https://docs.adonisjs.com/guides/digging-deeper/i18n#formatcurrency) formatCurrency Format a numeric value as a currency using the `Intl.NumberFormat` class. The `formatCurrency` method implicitly defines the `style = currency` option. Copy code to clipboard import i18nManager from '@adonisjs/i18n/services/main' i18nManager .locale('en') .formatCurrency(200, { currency: 'USD' }) ### [](https://docs.adonisjs.com/guides/digging-deeper/i18n#formatdate) formatDate Format a date or a luxon date-time object using the `Intl.DateTimeFormat` class. You may pass the following arguments. 1. The value to format. It could be a [Date](https://developer.mozilla.org/en-US/docs/Web/JavaScript/Reference/Global_Objects/Date) object or a [luxon DateTime](https://moment.github.io/luxon/api-docs/index.html) object. 2. An optional [`options` object](https://developer.mozilla.org/en-US/docs/Web/JavaScript/Reference/Global_Objects/Intl/DateTimeFormat/DateTimeFormat#options) . Copy code to clipboard import i18nManager from '@adonisjs/i18n/services/main' import { DateTime } from 'luxon' i18nManager .locale('en') .formatDate(new Date(), { dateStyle: 'long' }) // Format luxon date time instance i18nManager .locale('en') .formatDate(DateTime.local(), { dateStyle: 'long' }) ### [](https://docs.adonisjs.com/guides/digging-deeper/i18n#formattime) formatTime Format a date value to a time string using the `Intl.DateTimeFormat` class. The `formatTime` method implicitly defines the `timeStyle = medium` option. Copy code to clipboard import i18nManager from '@adonisjs/i18n/services/main' i18nManager .locale('en') .formatTime(new Date()) ### [](https://docs.adonisjs.com/guides/digging-deeper/i18n#formatrelativetime) formatRelativeTime The `formatRelativeTime` method uses the `Intl.RelativeTimeFormat` class to format a value to a relative time representation string. The method accepts the following arguments. * The value to format. * The formatting unit. Along with the [officially supported units](https://developer.mozilla.org/en-US/docs/Web/JavaScript/Reference/Global_Objects/Intl/RelativeTimeFormat/format) , we also support an additional `auto` unit. * An optional [options](https://developer.mozilla.org/en-US/docs/Web/JavaScript/Reference/Global_Objects/Intl/RelativeTimeFormat/RelativeTimeFormat#options) object. Copy code to clipboard import { DateTime } from 'luxon' import i18nManager from '@adonisjs/i18n/services/main' const luxonDate = DateTime.local().plus({ hours: 2 }) i18nManager .locale('en') .formatRelativeTime(luxonDate, 'hours') Set the unit's value to `auto` to display the diff in the best matching unit. Copy code to clipboard const luxonDate = DateTime.local().plus({ hours: 2 }) I18n .locale('en') .formatRelativeTime(luxonDate, 'auto') // In 2 hours 👈 Copy code to clipboard const luxonDate = DateTime.local().plus({ hours: 200 }) I18n .locale('en') .formatRelativeTime(luxonDate, 'auto') // In 8 days 👈 ### [](https://docs.adonisjs.com/guides/digging-deeper/i18n#formatplural) formatPlural Find the plural category for a number using the `Intl.PluralRules` class. You may pass the following arguments. 1. The numeric value for which to find the plural category. 2. An optional [options](https://developer.mozilla.org/en-US/docs/Web/JavaScript/Reference/Global_Objects/Intl/PluralRules/PluralRules#options) object. Copy code to clipboard import i18nManager from '@adonisjs/i18n/services/main' i18nManager.i18nManager('en').formatPlural(0) // other i18nManager.i18nManager('en').formatPlural(1) // one i18nManager.i18nManager('en').formatPlural(2) // other ### [](https://docs.adonisjs.com/guides/digging-deeper/i18n#formatlist) formatList Format an array of strings to a sentence using the `Intl.ListFormat` class. You may pass the following arguments. 1. The value to format. 2. An optional [options](https://developer.mozilla.org/en-US/docs/Web/JavaScript/Reference/Global_Objects/Intl/ListFormat/ListFormat#options) object. Copy code to clipboard import i18nManager from '@adonisjs/i18n/services/main' i18nManager .locale('en') .formatList(['Me', 'myself', 'I'], { type: 'conjunction' }) // Me, myself and I Copy code to clipboard import i18nManager from '@adonisjs/i18n/services/main' i18nManager .locale('en') .formatList(['5 hours', '3 minutes'], { type: 'unit' }) // 5 hours, 3 minutes ### [](https://docs.adonisjs.com/guides/digging-deeper/i18n#formatdisplaynames) formatDisplayNames Format `currency`, `language`, `region`, and `calendar` codes to their display names using the `Intl.DisplayNames` class. You may pass the following arguments. 1. The code to format. The [value of `code` varies](https://developer.mozilla.org/en-US/docs/Web/JavaScript/Reference/Global_Objects/Intl/DisplayNames/of#code) depending on the `type` of formatting. 2. [Options](https://developer.mozilla.org/en-US/docs/Web/JavaScript/Reference/Global_Objects/Intl/DisplayNames/DisplayNames#options) object. Copy code to clipboard import i18nManager from '@adonisjs/i18n/services/main' i18nManager .locale('en') .formatDisplayNames('INR', { type: 'currency' }) // Indian Rupee Copy code to clipboard import i18nManager from '@adonisjs/i18n/services/main' i18nManager .locale('en') .formatDisplayNames('en-US', { type: 'language' }) // American English [](https://docs.adonisjs.com/guides/digging-deeper/i18n#configuring-the-i18n-ally-vscode-extension) Configuring the i18n Ally VSCode extension ---------------------------------------------------------------------------------------------------------------------------------------------- The [i18n Ally](https://marketplace.visualstudio.com/items?itemName=Lokalise.i18n-ally) extension for VSCode provides an excellent workflow for **storing**, **inspecting**, and **referencing** translations with your code editor. To make the extension work seamlessly with AdonisJS, you must create the following files inside the `.vscode` directory of your project root. Copy code to clipboard mkdir .vscode touch .vscode/i18n-ally-custom-framework.yml touch .vscode/settings.json Copy/paste the following contents inside the `settings.json` file. .vscode/settings.json Copy code to clipboard { "i18n-ally.localesPaths": [\ "resources/lang"\ ], "i18n-ally.keystyle": "nested", "i18n-ally.namespace": true, "i18n-ally.editor.preferEditor": true, "i18n-ally.refactor.templates": [\ {\ "templates": [\ "{{ t('{key}'{args}) }}"\ ],\ "include": [\ "**/*.edge",\ ],\ },\ ] } Copy/paste the following contents inside the `.vscode/i18n-ally-custom-framework.yml` file. .vscode/i18n-ally-custom-framework.yml Copy code to clipboard languageIds: - edge usageMatchRegex: - "[^\\w\\d]t\\(['\"`]({key})['\"`]" sortKeys: true [](https://docs.adonisjs.com/guides/digging-deeper/i18n#listening-for-missing-translations-event) Listening for missing translations event ------------------------------------------------------------------------------------------------------------------------------------------ You may listen to the `i18n:missing:translation` event to get notified about the missing translations in your app. Copy code to clipboard import emitter from '@adonisjs/core/services/emitter' emitter.on('i18n:missing:translation', function (event) { console.log(event.identifier) console.log(event.hasFallback) console.log(event.locale) }) [](https://docs.adonisjs.com/guides/digging-deeper/i18n#force-reloading-translations) Force reloading translations ------------------------------------------------------------------------------------------------------------------ The `@adonisjs/i18n` package reads the translation files when booting the application and stores them within the memory for quick access. However, if you modify the translation files while your application is running, you may use the `reloadTranslations` method to refresh the in-memory cache. Copy code to clipboard import i18nManager from '@adonisjs/i18n/services/main' await i18nManager.reloadTranslations() [](https://docs.adonisjs.com/guides/digging-deeper/i18n#creating-a-custom-translation-loader) Creating a custom translation loader ---------------------------------------------------------------------------------------------------------------------------------- A translations loader is responsible for loading translations from a persistent store. We ship with a file system loader and provide an API to register custom loaders. A loader must implement the [TranslationsLoaderContract](https://github.com/adonisjs/i18n/blob/main/src/types.ts#L73) interface and define the `load` method that returns an object with key-value pair. The key is the locale code, and the value is a flat object with a list of translations. Copy code to clipboard import type { LoaderFactory, TranslationsLoaderContract, } from '@adonisjs/i18n/types' /** * Type for the configuration */ export type DbLoaderConfig = { connection: string tableName: string } /** * Loader implementation */ export class DbLoader implements TranslationsLoaderContract { constructor(public config: DbLoaderConfig) { } async load() { return { en: { 'messages.greeting': 'Hello world', }, fr: { 'messages.greeting': 'Bonjour le monde', } } } } /** * Factory function to reference the loader * inside the config file. */ export function dbLoader(config: DbLoaderConfig): LoaderFactory { return () => { return new DbLoader(config) } } In the above code example, we export the following values. * `DbLoaderConfig`: TypeScript type for the configuration you want to accept. * `DbLoader`: The loaders's implementation as a class. It must adhere to the `TranslationsLoaderContract` interface. * `dbLoader`: Finally, a factory function to reference the loader inside the config file. ### [](https://docs.adonisjs.com/guides/digging-deeper/i18n#using-the-loader) Using the loader Once the loader has been created, you can reference it inside the config file using the `dbLoader` factory function. Copy code to clipboard import { defineConfig } from '@adonisjs/i18n' import { dbLoader } from 'my-custom-package' const i18nConfig = defineConfig({ loaders: [\ dbLoader({\ connection: 'pg',\ tableName: 'translations'\ })\ ] }) [](https://docs.adonisjs.com/guides/digging-deeper/i18n#creating-a-custom-translation-formatter) Creating a custom translation formatter ---------------------------------------------------------------------------------------------------------------------------------------- Translation formatters are responsible for formatting the translations as per a specific format. We ship with an implementation for the ICU message syntax and provide additional APIs to register custom formatters. A formatter must implement the [TranslationsFormatterContract](https://github.com/adonisjs/i18n/blob/main/src/types.ts#L54) interface and define the `format` method to format a translation message. Copy code to clipboard import type { FormatterFactory, TranslationsLoaderContract, } from '@adonisjs/i18n/types' /** * Formatter implementation */ export class FluentFormatter implements TranslationsFormatterContract { format( message: string, locale: string, data?: Record ): string { // return formatted value } } /** * Factory function to reference the formatter * inside the config file. */ export function fluentFormatter(): FormatterFactory { return () => { return new FluentFormatter() } } ### [](https://docs.adonisjs.com/guides/digging-deeper/i18n#using-the-formatter) Using the formatter Once the formatter has been created, you can reference it inside the config file using the `fluentFormatter` factory function. Copy code to clipboard import { defineConfig } from '@adonisjs/i18n' import { fluentFormatter } from 'my-custom-package' const i18nConfig = defineConfig({ formatter: fluentFormatter() }) * * * [Digging deeper\ \ Health checks](https://docs.adonisjs.com/guides/digging-deeper/health-checks) [Digging deeper\ \ Locks](https://docs.adonisjs.com/guides/digging-deeper/locks) © 2025 AdonisJS [Edit this page](https://github.com/adonisjs/v6-docs/blob/main/content/docs/digging_deeper/i18n.md) --- # Mail (Digging deeper) | AdonisJS Documentation Toggle docs menu Mail [](https://docs.adonisjs.com/guides/digging-deeper/mail#mail) Mail ================================================================== You can send emails from your AdonisJS application using the `@adonisjs/mail` package. The mail package is built on top of [Nodemailer](https://nodemailer.com/) , bringing the following quality of life improvements over Nodemailer. * Fluent API to configure mail messages. * Ability to define emails as classes for better organization and easier testing. * An extensive suite of officially maintained transports. It includes `smtp`, `ses`, `mailgun`, `sparkpost`, `resend`, and `brevo`. * Improved testing experience using the Fakes API. * Mail messenger to queue emails. * Functional APIs to generate calendar events. [](https://docs.adonisjs.com/guides/digging-deeper/mail#installation) Installation ---------------------------------------------------------------------------------- Install and configure the package using the following command: Copy code to clipboard node ace add @adonisjs/mail # Pre-define transports to use via CLI flag node ace add @adonisjs/mail --transports=resend --transports=smtp See steps performed by the add command 1. Installs the `@adonisjs/mail` package using the detected package manager. 2. Registers the following service provider and command inside the `adonisrc.ts` file. Copy code to clipboard { commands: [\ // ...other commands\ () => import('@adonisjs/mail/commands')\ ], providers: [\ // ...other providers\ () => import('@adonisjs/mail/mail_provider')\ ] } 3. Create the `config/mail.ts` file. 4. Defines the environment variables and their validations for the selected mail services [](https://docs.adonisjs.com/guides/digging-deeper/mail#configuration) Configuration ------------------------------------------------------------------------------------ The configuration for the mail package is stored inside the `config/mail.ts` file. Inside this file, you may configure multiple email services as `mailers` to use them within your application. See also: [Config stub](https://github.com/adonisjs/mail/blob/main/stubs/config/mail.stub) Copy code to clipboard import env from '#start/env' import { defineConfig, transports } from '@adonisjs/mail' const mailConfig = defineConfig({ default: 'smtp', /** * A static address for the "from" property. It will be * used unless an explicit from address is set on the * Email */ from: { address: '', name: '', }, /** * A static address for the "reply-to" property. It will be * used unless an explicit replyTo address is set on the * Email */ replyTo: { address: '', name: '', }, /** * The mailers object can be used to configure multiple mailers * each using a different transport or the same transport with different * options. */ mailers: { smtp: transports.smtp({ host: env.get('SMTP_HOST'), port: env.get('SMTP_PORT'), }), resend: transports.resend({ key: env.get('RESEND_API_KEY'), baseUrl: 'https://api.resend.com', }), }, }) default The name of the mailer to use by default for sending emails. from A static global address to use for the `from` property. The global address will be used unless an explicit `from` address is defined on the email. replyTo A static global address to use for the `reply-to` property. The global address will be used unless an explicit `replyTo` address is defined on the email. mailers The `mailers` object is used to configure one or more mailers you want to use for sending emails. You can switch between the mailers at runtime using the `mail.use` method. [](https://docs.adonisjs.com/guides/digging-deeper/mail#transports-config) Transports config -------------------------------------------------------------------------------------------- Following is a complete reference of configuration options accepted by the officially supported transports. See also: [TypeScript types for config object](https://github.com/adonisjs/mail/blob/main/src/types.ts#L261) Mailgun config The following configuration options are sent to the Mailgun's [`/messages.mime`](https://documentation.mailgun.com/en/latest/api-sending.html#sending) API endpoint. Copy code to clipboard { mailers: { mailgun: transports.mailgun({ baseUrl: 'https://api.mailgun.net/v3', key: env.get('MAILGUN_API_KEY'), domain: env.get('MAILGUN_DOMAIN'), /** * The following options can be overridden at * runtime when calling the `mail.send` method. */ oDkim: true, oTags: ['transactional', 'adonisjs_app'], oDeliverytime: new Date(2024, 8, 18), oTestMode: false, oTracking: false, oTrackingClick: false, oTrackingOpens: false, headers: { // h:prefixed headers }, variables: { appId: '', userId: '', // v:prefixed variables } }) } } SMTP config The following configuration options are forwarded to Nodemailer as it is. So please check the [Nodemailer documentation](https://nodemailer.com/smtp/) as well. Copy code to clipboard { mailers: { smtp: transports.smtp({ host: env.get('SMTP_HOST'), port: env.get('SMTP_PORT'), secure: false, auth: { type: 'login', user: env.get('SMTP_USERNAME'), pass: env.get('SMTP_PASSWORD') }, tls: {}, ignoreTLS: false, requireTLS: false, pool: false, maxConnections: 5, maxMessages: 100, }) } } SES config The following configuration options are forwarded to Nodemailer as it is. So please check the [Nodemailer documentation](https://nodemailer.com/transports/ses/) as well. Make sure to install the `@aws-sdk/client-ses` package to use the SES transport. Copy code to clipboard { mailers: { ses: transports.ses({ /** * Forwarded to aws sdk */ apiVersion: '2010-12-01', region: 'us-east-1', credentials: { accessKeyId: env.get('AWS_ACCESS_KEY_ID'), secretAccessKey: env.get('AWS_SECRET_ACCESS_KEY'), }, /** * Nodemailer specific */ sendingRate: 10, maxConnections: 5, }) } } SparkPost config The following configuration options are sent to the SparkPost's [`/transmissions`](https://developers.sparkpost.com/api/transmissions/#header-request-body) API endpoint. Copy code to clipboard { mailers: { sparkpost: transports.sparkpost({ baseUrl: 'https://api.sparkpost.com/api/v1', key: env.get('SPARKPOST_API_KEY'), /** * The following options can be overridden at * runtime when calling the `mail.send` method. */ startTime: new Date(), openTracking: false, clickTracking: false, initialOpen: false, transactional: true, sandbox: false, skipSuppression: false, ipPool: '', }) } } Resend config The following configuration options are sent to the Resend's [`/emails`](https://resend.com/docs/api-reference/emails/send-email) API endpoint. Copy code to clipboard { mailers: { resend: transports.resend({ baseUrl: 'https://api.resend.com', key: env.get('RESEND_API_KEY'), /** * The following options can be overridden at * runtime when calling the `mail.send` method. */ tags: [\ {\ name: 'category',\ value: 'confirm_email'\ }\ ] }) } } [](https://docs.adonisjs.com/guides/digging-deeper/mail#basic-example) Basic example ------------------------------------------------------------------------------------ Once the initial configuration is completed, you may send emails using the `mail.send` method. The mail service is a singleton instance of the [MailManager](https://github.com/adonisjs/mail/blob/main/src/mail_manager.ts) class created using the config file. The `mail.send` method passes an instance of the [Message](https://github.com/adonisjs/mail/blob/main/src/message.ts) class to the callback and delivers the email using the `default` mailer configured inside the config file. In the following example, we trigger an email from the controller after creating a new user account. Copy code to clipboard import User from '#models/user' import { HttpContext } from '@adonisjs/core/http' import mail from '@adonisjs/mail/services/main' export default class UsersController { async store({ request }: HttpContext) { /** * For demonstration only. You should validate the data * before storing it inside the database. */ const user = await User.create(request.all()) await mail.send((message) => { message .to(user.email) .from('info@example.org') .subject('Verify your email address') .htmlView('emails/verify_email', { user }) }) } } [](https://docs.adonisjs.com/guides/digging-deeper/mail#queueing-emails) Queueing emails ---------------------------------------------------------------------------------------- Since sending emails can be time-consuming, you might want to push them to a queue and send emails in the background. You can do the same using the `mail.sendLater` method. The `sendLater` method accepts the same parameters as the `send` method. However, instead of sending the email immediately, it will use the **Mail messenger** to queue it. Copy code to clipboard await mail.send((message) => { await mail.sendLater((message) => { message .to(user.email) .from('info@example.org') .subject('Verify your email address') .htmlView('emails/verify_email', { user }) }) By default, the **mail messenger uses an in-memory queue**, meaning the queue will drop the jobs if your process dies with pending jobs. This might not be a huge deal if your application UI allows re-sending emails with manual actions. However, you can always configure a custom messenger and use a database-backed queue. ### [](https://docs.adonisjs.com/guides/digging-deeper/mail#using-bullmq-for-queueing-emails) Using bullmq for queueing emails Copy code to clipboard npm i bullmq In the following example, we use the `mail.setMessenger` method to configure a custom queue that uses `bullmq` under the hood for storing jobs. We store the compiled email, runtime configuration, and the mailer name inside the job. Later, we will use this data to send emails inside a worker process. Copy code to clipboard import { Queue } from 'bullmq' import mail from '@adonisjs/mail/services/main' const emailsQueue = new Queue('emails') mail.setMessenger((mailer) => { return { async queue(mailMessage, config) { await emailsQueue.add('send_email', { mailMessage, config, mailerName: mailer.name, }) } } }) Finally, let's write the code for the queue Worker. Depending on your application workflow, you may have to start another process for the workers to process the jobs. In the following example: * We process jobs named `send_email` from the `emails` queue. * Access compiled mail message, runtime config, and the mailer name from the job data. * And send the email using the `mailer.sendCompiled` method. Copy code to clipboard import { Worker } from 'bullmq' import mail from '@adonisjs/mail/services/main' new Worker('emails', async (job) => { if (job.name === 'send_email') { const { mailMessage, config, mailerName } = job.data await mail .use(mailerName) .sendCompiled(mailMessage, config) } }) That's all! You may continue using the `mail.sendLater` method. However, the emails will be queued inside a Redis database this time. [](https://docs.adonisjs.com/guides/digging-deeper/mail#switching-between-mailers) Switching between mailers ------------------------------------------------------------------------------------------------------------ You may switch between the configured mailers using the `mail.use` method. The `mail.use` method accepts the name of the mailer (as defined inside the config file) and returns an instance of the [Mailer](https://github.com/adonisjs/mail/blob/main/src/mailer.ts) class. Copy code to clipboard import mail from '@adonisjs/mail/services/main' mail.use() // Instance of default mailer mail.use('mailgun') // Mailgun mailer instance You may call the `mailer.send` or `mailer.sendLater` methods to send email using a mailer instance. For example: Copy code to clipboard await mail .use('mailgun') .send((message) => { }) Copy code to clipboard await mail .use('mailgun') .sendLater((message) => { }) The mailer instances are cached for the lifecycle of the process. You may use the `mail.close` method to destroy an existing instance and re-create a new instance from scratch. Copy code to clipboard import mail from '@adonisjs/mail/services/main' /** * Close transport and remove instance from * cache */ await mail.close('mailgun') /** * Create a fresh instance */ mail.use('mailgun') [](https://docs.adonisjs.com/guides/digging-deeper/mail#configuring-the-template-engine) Configuring the template engine ------------------------------------------------------------------------------------------------------------------------ By default, the mail package is configured to use the [Edge template engine](https://docs.adonisjs.com/guides/views-and-templates/introduction#configuring-edge) for defining the email **HTML** and **Plain text** contents. However, as shown in the following example, you may also register a custom template engine by overriding the `Message.templateEngine` property. See also: [Defining email contents](https://docs.adonisjs.com/guides/digging-deeper/mail#defining-email-contents) Copy code to clipboard import { Message } from '@adonisjs/mail' Message.templateEngine = { async render(templatePath, data) { return someTemplateEngine.render(templatePath, data) } } [](https://docs.adonisjs.com/guides/digging-deeper/mail#events) Events ---------------------------------------------------------------------- Please check the [events reference guide](https://docs.adonisjs.com/guides/references/events#mailsending) to view the list of events dispatched by the `@adonisjs/mail` package. [](https://docs.adonisjs.com/guides/digging-deeper/mail#configuring-message) Configuring message ------------------------------------------------------------------------------------------------ The properties of an email are defined using the [Message](https://github.com/adonisjs/mail/blob/main/src/message.ts) class. An instance of this class is provided to the callback function created using the `mail.send`, or `mail.sendLater` methods. Copy code to clipboard import { Message } from '@adonisjs/mail' import mail from '@adonisjs/mail/services/main' await mail.send((message) => { console.log(message instanceof Message) // true }) await mail.sendLater((message) => { console.log(message instanceof Message) // true }) ### [](https://docs.adonisjs.com/guides/digging-deeper/mail#defining-subject-and-sender) Defining subject and sender You may define the email subject using the `message.subject` method and the email's sender using the `message.from` method. Copy code to clipboard await mail.send((message) => { message .subject('Verify your email address') .from('info@example.org') }) The `from` method accepts the email address as a string or an object with the sender name and the email address. Copy code to clipboard message .from({ address: 'info@example.com', name: 'AdonisJS' }) The sender can also be defined globally within the config file. The global sender will be used if no explicit sender is defined for an individual message. Copy code to clipboard const mailConfig = defineConfig({ from: { address: 'info@example.com', name: 'AdonisJS' } }) ### [](https://docs.adonisjs.com/guides/digging-deeper/mail#defining-recipients) Defining recipients You may define the email recipients using the `message.to`, `message.cc`, and the `message.bcc` methods. These methods accept the email address as a string or an object with the recipient name and the email address. Copy code to clipboard await mail.send((message) => { message .to(user.email) .cc(user.team.email) .bcc(user.team.admin.email) }) Copy code to clipboard await mail.send((message) => { message .to({ address: user.email, name: user.fullName, }) .cc({ address: user.team.email, name: user.team.name, }) .bcc({ address: user.team.admin.email, name: user.team.admin.fullName, }) }) You can define multiple `cc` and `bcc` recipients as an array of email addresses or an array of objects with the recipient name and email address. Copy code to clipboard await mail.send((message) => { message .cc(['first@example.com', 'second@example.com']) .bcc([\ {\ name: 'First recipient',\ address: 'first@example.com'\ },\ {\ name: 'Second recipient',\ address: 'second@example.com'\ }\ ]) }) You may also define the `replyTo` email address using the `message.replyTo` method. Copy code to clipboard await mail.send((message) => { message .from('info@example.org') .replyTo('noreply@example.org') }) ### [](https://docs.adonisjs.com/guides/digging-deeper/mail#defining-email-contents) Defining email contents You may define the **HTML** and **Plain text** contents for an email using `message.html` or `message.text` methods. Copy code to clipboard await mail.send((message) => { /** * HTML contents */ message.html(`

Verify email address

Click here to verify your email address `) /** * Plain text contents */ message.text(` Verify email address Please visit https://myapp.com to verify your email address `) }) #### [](https://docs.adonisjs.com/guides/digging-deeper/mail#using-edge-templates) Using Edge templates Since writing inline content could be cumbersome, you may use Edge templates instead. If you have already [configured Edge](https://docs.adonisjs.com/guides/views-and-templates/introduction#configuring-edge) , you may use the `message.htmlView` and `message.textView` methods to render templates. Create templates Copy code to clipboard node ace make:view emails/verify_email_html node ace make:view emails/verify_email_text Use them for defining contents Copy code to clipboard await mail.send((message) => { message.htmlView('emails/verify_email_html', stateToShare) message.textView('emails/verify_email_text', stateToShare) }) #### [](https://docs.adonisjs.com/guides/digging-deeper/mail#using-mjml-for-email-markup) Using MJML for email markup MJML is a markup language for creating emails without writing all the complex HTML to make your emails look good in every email client. The first step is to install the [mjml](https://npmjs.com/mjml) package from npm. Copy code to clipboard npm i mjml Once done, you can write MJML markup inside your Edge templates by wrapping it inside the `@mjml` tag. Since the output of MJML contains the `html`, `head`, and `body` tags, it is unnecessary to define them within your Edge templates. Copy code to clipboard @mjml() Hello World! @end You may pass the [MJML configuration options](https://documentation.mjml.io/#inside-node-js) as props to the `@mjml` tag. Copy code to clipboard @mjml({ keepComments: false, fonts: { Lato: 'https://fonts.googleapis.com/css?family=Lato:400,500,700' } }) ### [](https://docs.adonisjs.com/guides/digging-deeper/mail#attaching-files) Attaching files You may use the `message.attach` method to send attachments in an email. The `attach` method accepts an absolute path or a file system URL of a file you want to send as an attachment. Copy code to clipboard import app from '@adonisjs/core/services/app' await mail.send((message) => { message.attach(app.makePath('uploads/invoice.pdf')) }) You may define the filename for the attachment using the `options.filename` property. Copy code to clipboard message.attach(app.makePath('uploads/invoice.pdf'), { filename: 'invoice_october_2023.pdf' }) The complete list of options accepted by the `message.attach` method follows. | Option | Description | | --- | --- | | `filename` | The display name for the attachment. Defaults to the basename of the attachment path. | | `contentType` | The content type for the attachment. If not set, the `contentType` will be inferred from the file extension. | | `contentDisposition` | Content disposition type for the attachment. Defaults to `attachment` | | `headers` | Custom headers for the attachment node. The headers property is a key-value pair | #### [](https://docs.adonisjs.com/guides/digging-deeper/mail#attaching-files-from-streams-and-buffers) Attaching files from streams and buffers You may create email attachments from streams and buffers using the `message.attachData` method. The method accepts a readable stream or the buffer as the first argument and the options object as the second argument. The `message.attachData` method should not be used when queueing emails using the `mail.sendLater` method. Since queued jobs are serialized and persisted inside a database, attaching raw data will increase the storage size. Moreover, queueing an email will fail if you attach a stream using the `message.attachData` method. Copy code to clipboard message.attachData(fs.createReadStream('./invoice.pdf'), { filename: 'invoice_october_2023.pdf' }) Copy code to clipboard message.attachData(Buffer.from('aGVsbG8gd29ybGQh'), { encoding: 'base64', filename: 'greeting.txt', }) ### [](https://docs.adonisjs.com/guides/digging-deeper/mail#embedding-images) Embedding images You may embed images within the contents of your email using the `embedImage` view helper. The `embedImage` method under the hood uses [CID](https://sendgrid.com/en-us/blog/embedding-images-emails-facts#1-cid-embedded-images-inline-images) to mark the image as an attachment and uses its content id as the source of the image. Copy code to clipboard Following will be the output HTML Copy code to clipboard The following attachment will be defined automatically on the email payload. Copy code to clipboard { attachments: [{\ path: '/root/app/assets/hero.jpg',\ filename: 'hero.jpg',\ cid: 'a-random-content-id'\ }] } #### [](https://docs.adonisjs.com/guides/digging-deeper/mail#embedding-images-from-buffers) Embedding images from buffers Like the `embedImage` method, you may use the `embedImageData` method to embed an image from raw data. Copy code to clipboard ### [](https://docs.adonisjs.com/guides/digging-deeper/mail#attaching-calendar-events) Attaching calendar events You may attach calendar events to an email using the `message.icalEvent` method. The `icalEvent` method accepts the event contents as the first parameter and the `options` object as the second parameter. Copy code to clipboard const contents = 'BEGIN:VCALENDAR\r\nPRODID:-//ACME/DesktopCalendar//EN\r\nMETHOD:REQUEST\r\n...' await mail.send((message) => { message.icalEvent(contents, { method: 'PUBLISH', filename: 'invite.ics', }) }) Since defining the event file contents manually can be cumbersome, you may pass a callback function to the `icalEvent` method and generate the invite contents using JavaScript API. The `calendar` object provided to the callback function is a reference of the [ical-generator](https://www.npmjs.com/package/ical-generator) npm package, so make sure to go through the package's README file as well. Copy code to clipboard message.icalEvent((calendar) => { calendar .createEvent({ summary: 'Adding support for ALS', start: DateTime.local().plus({ minutes: 30 }), end: DateTime.local().plus({ minutes: 60 }), }) }, { method: 'PUBLISH', filename: 'invite.ics', }) #### [](https://docs.adonisjs.com/guides/digging-deeper/mail#reading-invite-contents-from-a-file-or-a-url) Reading invite contents from a file or a URL You may define the invite contents from a file or an HTTP URL using the `icalEventFromFile` or `icalEventFromUrl` methods. Copy code to clipboard message.icalEventFromFile( app.resourcesPath('calendar-invites/invite.ics'), { filename: 'invite.ics', method: 'PUBLISH' } ) Copy code to clipboard message.icalEventFromUrl( 'https://myapp.com/users/1/invite.ics', { filename: 'invite.ics', method: 'PUBLISH' } ) ### [](https://docs.adonisjs.com/guides/digging-deeper/mail#defining-email-headers) Defining email headers You may define additional email headers using the `message.header` method. The method accepts the header key as the first parameter and the value as the second parameter. Copy code to clipboard message.header('x-my-key', 'header value') /** * Define an array of values */ message.header('x-my-key', ['header value', 'another value']) By default, the email headers are encoded and folded to meet the requirement of having plain ASCII messages with lines no longer than 78 bytes. However, if you want to bypass the encoding rules, you may set a header using the `message.preparedHeader` method. Copy code to clipboard message.preparedHeader( 'x-unprocessed', 'a really long header or value with non-ascii characters 👮', ) ### [](https://docs.adonisjs.com/guides/digging-deeper/mail#defining-list-headers) Defining `List` headers The message class includes helper methods to define complex headers like [List-Unsubscribe](https://sendgrid.com/en-us/blog/list-unsubscribe) or [List-Help](https://support.optimizely.com/hc/en-us/articles/4413200569997-Setting-up-the-List-Help-header#heading-2) with ease. You can learn about the encoding rules for `List` headers on the [nodemailer website](https://nodemailer.com/message/list-headers/) . Copy code to clipboard message.listHelp('admin@example.com?subject=help') // List-Help: Copy code to clipboard message.listUnsubscribe({ url: 'http://example.com', comment: 'Comment' }) // List-Unsubscribe: (Comment) Copy code to clipboard /** * Repeating header multiple times */ message.listSubscribe('admin@example.com?subject=subscribe') message.listSubscribe({ url: 'http://example.com', comment: 'Subscribe' }) // List-Subscribe: // List-Subscribe: (Subscribe) For all other arbitrary `List` headers, you may use the `addListHeader` method. Copy code to clipboard message.addListHeader('post', 'http://example.com/post') // List-Post: [](https://docs.adonisjs.com/guides/digging-deeper/mail#class-based-emails) Class-based emails ---------------------------------------------------------------------------------------------- Instead of writing emails inside the `mail.send` method closure, you may move them to dedicated mail classes for better organization and [easier testing](https://docs.adonisjs.com/guides/digging-deeper/mail#testing-mail-classes) . The mail classes are stored inside the `./app/mails` directory, and each file represents a single email. You may create a mail class by running the `make:mail` ace command. See also: [Make mail command](https://docs.adonisjs.com/guides/references/commands#makemail) Copy code to clipboard node ace make:mail verify_email The mail class extends the [BaseMail](https://github.com/adonisjs/mail/blob/main/src/base_mail.ts) class and is scaffolded with the following properties and methods. You may configure the mail message inside the `prepare` method using the `this.message` property. Copy code to clipboard import User from '#models/user' import { BaseMail } from '@adonisjs/mail' export default class VerifyEmailNotification extends BaseMail { from = 'sender_email@example.org' subject = 'Verify email' prepare() { this.message.to('user_email@example.org') } } from Configure the sender's email address. If you omit this property, you must call the `message.from` method to define the sender. subject Configure the email subject. If you omit this property, you must use the `message.subject` method to define the email subject. replyTo Configure the `replyTo` email address. prepare The `prepare` method is called automatically by the `build` method to prepare the mail message for sending. You must define the email contents, attachments, recipients, etc, within this method. build Inherited The `build` method is inherited from the `BaseMail` class. The method is called automatically at the time of sending the email. Make sure to reference the [original implementation](https://github.com/adonisjs/mail/blob/main/src/base_mail.ts#L81) if you decide to override this method. ### [](https://docs.adonisjs.com/guides/digging-deeper/mail#sending-email-using-the-mail-class) Sending email using the mail class You may call the `mail.send` method and pass it an instance of the mail class to send the email. For example: Send mail Copy code to clipboard import mail from '@adonisjs/mail/services/main' import VerifyEmailNotification from '#mails/verify_email' await mail.send(new VerifyEmailNotification()) Queue mail Copy code to clipboard import mail from '@adonisjs/mail/services/main' import VerifyEmailNotification from '#mails/verify_email' await mail.sendLater(new VerifyEmailNotification()) You may share data with the mail class using constructor arguments. For example: Copy code to clipboard /** * Creating a user */ const user = await User.create(payload) await mail.send( /** * Passing user to the mail class */ new VerifyEmailNotification(user) ) ### [](https://docs.adonisjs.com/guides/digging-deeper/mail#testing-mail-classes) Testing mail classes One of the primary benefits of using [Mail classes](https://docs.adonisjs.com/guides/digging-deeper/mail#class-based-emails) is a better testing experience. You can build mail classes without sending them and write assertions for the message properties. Copy code to clipboard import { test } from '@japa/runner' import VerifyEmailNotification from '#mails/verify_email' test.group('Verify email notification', () => { test('prepare email for sending', async () => { const email = new VerifyEmailNotification() /** * Build email message and render templates to * compute the email HTML and plain text * contents */ await email.buildWithContents() /** * Write assertions to ensure the message is built * as expected */ email.message.assertTo('user@example.org') email.message.assertFrom('info@example.org') email.message.assertSubject('Verify email address') email.message.assertReplyTo('no-reply@example.org') }) }) You may write assertions for the message contents as follows. Copy code to clipboard const email = new VerifyEmailNotification() await email.buildWithContents() email.message.assertHtmlIncludes( ` Verify email address ` ) email.message.assertTextIncludes('Verify email address') Also, you may write assertions for the attachments. The assertions only work with file-based attachments and not for streams or raw content. Copy code to clipboard const email = new VerifyEmailNotification() await email.buildWithContents() email.message.assertAttachment( app.makePath('uploads/invoice.pdf') ) Feel free to look at the [Message](https://github.com/adonisjs/mail/blob/main/src/message.ts) class source code for all the available assertion methods. [](https://docs.adonisjs.com/guides/digging-deeper/mail#fake-mailer) Fake mailer -------------------------------------------------------------------------------- You may want to use the Fake mailer during testing to prevent your application from sending emails. The Fake mailer collects all outgoing emails within memory and offers an easy-to-use API for writing assertions against them. In the following example: * We start by creating an instance of the [FakeMailer](https://github.com/adonisjs/mail/blob/main/src/fake_mailer.ts) using the `mail.fake` method. * Next, we call the `/register` endpoint API. * Finally, we use the `mails` property from the fake mailer to assert the `VerifyEmailNotification` was sent. Copy code to clipboard import { test } from '@japa/runner' import mail from '@adonisjs/mail/services/main' import VerifyEmailNotification from '#mails/verify_email' test.group('Users | register', () => { test('create a new user account', async ({ client, route }) => { /** * Turn on the fake mode */ const { mails } = mail.fake() /** * Make an API call */ await client .post(route('users.store')) .send(userData) /** * Assert the controller indeed sent the * VerifyEmailNotification mail */ mails.assertSent(VerifyEmailNotification, ({ message }) => { return message .hasTo(userData.email) .hasSubject('Verify email address') }) }) }) Once you are done writing the test, you must restore the fake using the `mail.restore` method. Copy code to clipboard test('create a new user account', async ({ client, route, cleanup }) => { const { mails } = mail.fake() /** * The cleanup hooks are executed after the test * finishes successfully or with an error. */ cleanup(() => { mail.restore() }) }) ### [](https://docs.adonisjs.com/guides/digging-deeper/mail#writing-assertions) Writing assertions The `mails.assertSent` method accepts the mail class constructor as the first argument and throws an exception when unable to find any emails for the expected class. Copy code to clipboard const { mails } = mail.fake() /** * Assert the email was sent */ mails.assertSent(VerifyEmailNotification) You may pass a callback function to the `assertSent` method to further check if the email was sent to the expected recipient or has correct subject. The callback function receives an instance of the mail class and you can use the `.message` property to get access to the [message](https://docs.adonisjs.com/guides/digging-deeper/mail#configuring-message) object. Copy code to clipboard mails.assertSent(VerifyEmailNotification, (email) => { return email.message.hasTo(userData.email) }) You may run assertions on the `message` object within the callback. For example: Copy code to clipboard mails.assertSent(VerifyEmailNotification, (email) => { email.message.assertTo(userData.email) email.message.assertFrom('info@example.org') email.message.assertSubject('Verify your email address') /** * All assertions passed, so return true to consider the * email as sent. */ return true }) #### [](https://docs.adonisjs.com/guides/digging-deeper/mail#assert-email-was-not-sent) Assert email was not sent You may use the `mails.assertNotSent` method to assert an email was not sent during the test. This method is the opposite of the `assertSent` method and accepts the same arguments. Copy code to clipboard const { mails } = mail.fake() mails.assertNotSent(PasswordResetNotification) #### [](https://docs.adonisjs.com/guides/digging-deeper/mail#assert-emails-count) Assert emails count Finally, you can assert the count of sent emails using the `assertSentCount` and `assertNoneSent` methods. Copy code to clipboard const { mails } = mail.fake() // Assert 2 emails were sent in total mails.assertSentCount(2) // Assert only one VerifyEmailNotification was sent mails.assertSentCount(VerifyEmailNotification, 1) Copy code to clipboard const { mails } = mail.fake() // Assert zero emails were sent mails.assertNoneSent() ### [](https://docs.adonisjs.com/guides/digging-deeper/mail#writing-assertions-for-queued-emails) Writing assertions for queued emails If you have queued emails using the `mail.sendLater` method, you may use the following methods to write assertions for them. Copy code to clipboard const { mails } = mail.fake() /** * Assert "VerifyEmailNotification" email was queued * Optionally, you may pass the finder function to * narrow down the email */ mails.assertQueued(VerifyEmailNotification) /** * Assert "VerifyEmailNotification" email was not queued * Optionally, you may pass the finder function to * narrow down the email */ mails.assertNotQueued(PasswordResetNotification) /** * Assert two emails were queued in total. */ mails.assertQueuedCount(2) /** * Assert "VerifyEmailNotification" email was queued * only once */ mails.assertQueuedCount(VerifyEmailNotification , 1) /** * Assert nothing was queued */ mails.assertNoneQueued() ### [](https://docs.adonisjs.com/guides/digging-deeper/mail#getting-a-list-of-sent-or-queued-emails) Getting a list of sent or queued emails You may use the `mails.sent` or `mails.queued` methods to get an array of emails sent/queued during tests. Copy code to clipboard const { mails } = mail.fake() const sentEmails = mails.sent() const queuedEmails = mails.queued() const email = sentEmails.find((email) => { return email instanceof VerifyEmailNotification }) if (email) { email.message.assertTo(userData.email) email.message.assertFrom(userData.email) email.message.assertHtmlIncludes(' Verify your email address') } [](https://docs.adonisjs.com/guides/digging-deeper/mail#creating-custom-transports) Creating custom transports -------------------------------------------------------------------------------------------------------------- AdonisJS Mail transports are built on top of [Nodemailer transports](https://nodemailer.com/plugins/create/#transports) ; therefore, you must create/use a nodemailer transport before you can register it with the Mail package. In this guide, we will wrap the [nodemailer-postmark-transport](https://www.npmjs.com/package/nodemailer-postmark-transport) to an AdonisJS Mail transport. Copy code to clipboard npm i nodemailer nodemailer-postmark-transport As you can see in the following example, the heavy lifting of sending an email is done by the Nodemailer. The AdonisJS transport acts as an adapter forwarding the message to nodemailer and normalizing its response to an instance of [MailResponse](https://github.com/adonisjs/mail/blob/main/src/mail_response.ts) . Copy code to clipboard import nodemailer from 'nodemailer' import nodemailerTransport from 'nodemailer-postmark-transport' import { MailResponse } from '@adonisjs/mail' import type { NodeMailerMessage, MailTransportContract } from '@adonisjs/mail/types' /** * Configuration accepted by the transport */ export type PostmarkConfig = { auth: { apiKey: string } } /** * Transport implementation */ export class PostmarkTransport implements MailTransportContract { #config: PostmarkConfig constructor(config: PostmarkConfig) { this.#config = config } #createNodemailerTransport(config: PostmarkConfig) { return nodemailer.createTransport(nodemailerTransport(config)) } async send( message: NodeMailerMessage, config?: PostmarkConfig ): Promise { /** * Create nodemailer transport */ const transporter = this.#createNodemailerTransport({ ...this.#config, ...config, }) /** * Send email */ const response = await transporter.sendMail(message) /** * Normalize response to an instance of the "MailResponse" class */ return new MailResponse(response.messageId, response.envelope, response) } } ### [](https://docs.adonisjs.com/guides/digging-deeper/mail#creating-the-config-factory-function) Creating the config factory function To reference the above transport inside the `config/mail.ts` file, you must create a factory function that returns an instance of the transport. You may write the following code within the same file as your transport's implementation. Copy code to clipboard import type { NodeMailerMessage, MailTransportContract, MailManagerTransportFactory } from '@adonisjs/mail/types' export function PostmarkTransport( config: PostmarkConfig ): MailManagerTransportFactory { return () => { return new PostmarkTransport(config) } } ### [](https://docs.adonisjs.com/guides/digging-deeper/mail#using-the-transport) Using the transport Finally, you can reference the transport inside your config file using the `postmarkTransport` helper. Copy code to clipboard import env from '#start/env' import { defineConfig } from '@adonisjs/mail' import { postmarkTransport } from 'my-custom-package' const mailConfig = defineConfig({ mailers: { postmark: postmarkTransport({ auth: { apiKey: env.get('POSTMARK_API_KEY'), }, }), }, }) * * * [Digging deeper\ \ Logger](https://docs.adonisjs.com/guides/digging-deeper/logger) [Digging deeper\ \ Repl](https://docs.adonisjs.com/guides/digging-deeper/repl) © 2025 AdonisJS [Edit this page](https://github.com/adonisjs/v6-docs/blob/main/content/docs/digging_deeper/mail.md) --- # Inertia (Views & Templates) | AdonisJS Documentation Toggle docs menu Inertia [](https://docs.adonisjs.com/guides/views-and-templates/inertia#inertia) Inertia ================================================================================ [Inertia](https://inertiajs.com/) is a framework-agnostic way to create single-page applications without much of the complexity of modern SPAs. It is a great middle ground between traditional server-rendered applications (with templating engines) and modern SPAs (with client-side routing and state management). Using Inertia will allow you to create a SPA with your favorite frontend framework (Vue.js, React, Svelte or Solid.js) without creating a separate API. app/controllers/users\_controller.ts inertia/pages/users/index.vue Copy code to clipboard import type { HttpContext } from '@adonisjs/core/http' export default class UsersController { async index({ inertia }: HttpContext) { const users = await User.all() return inertia.render('users/index', { users }) } } Copy code to clipboard [](https://docs.adonisjs.com/guides/views-and-templates/inertia#installation) Installation ------------------------------------------------------------------------------------------ Are you starting a new project and want to use Inertia? Check out the [Inertia starter kit](https://docs.adonisjs.com/guides/getting-started/installation#inertia-starter-kit) . Install the package from the npm registry running: npm Copy code to clipboard npm i @adonisjs/inertia Once done, run the following command to configure the package. Copy code to clipboard node ace configure @adonisjs/inertia See steps performed by the configure command 1. Registers the following service provider and command inside the `adonisrc.ts` file. Copy code to clipboard { providers: [\ // ...other providers\ () => import('@adonisjs/inertia/inertia_provider')\ ] } 2. Registers the following middleware inside the `start/kernel.ts` file Copy code to clipboard router.use([() => import('@adonisjs/inertia/inertia_middleware')]) 3. Create the `config/inertia.ts` file. 4. Copy a few stubs into your application to help you start quickly. Each copied file is adapted to the frontend framework previously selected. 5. Create a `./resources/views/inertia_layout.edge` file that will be used to render the HTML page used to boot Inertia. 6. Create a `./inertia/css/app.css` file with the content needed to style the `inertia_layout.edge` view. 7. Create a `./inertia/tsconfig.json` file to differentiate between the server and client-side TypeScript configuration. 8. Create a `./inertia/app/app.ts` for bootstrapping Inertia and your frontend framework. 9. Create a `./inertia/pages/home.{tsx|vue|svelte}` file to render the home page of your application. 10. Create a `./inertia/pages/server_error.{tsx|vue|svelte}` and `./inertia/pages/not_found.{tsx|vue|svelte}` files to render the error pages. 11. Add the correct vite plugin to compile your frontend framework in the `vite.config.ts` file. 12. Add a dumb route at `/` in your `start/routes.ts` file to render the home page with Inertia as an example. 13. Install packages based on the selected frontend framework. Once done, you should be ready to use Inertia in your AdonisJS application. Start your development server, and visit `localhost:3333` to see the home page rendered using Inertia with your selected frontend framework. **Read the [Inertia official documentation](https://inertiajs.com/) **. Inertia is a backend-agnostic library. We just created an adapter to make it work with AdonisJS. You should be familiar with the Inertia concepts before reading this documentation. **We will only cover AdonisJS's specific parts in this documentation.** [](https://docs.adonisjs.com/guides/views-and-templates/inertia#client-side-entrypoint) Client-side entrypoint -------------------------------------------------------------------------------------------------------------- If you used the `configure` or `add` command, the package will have created an entrypoint file at `inertia/app/app.ts` so you can skip this step. Basically, this file will be the main entrypoint for your frontend application and will be used to bootstrap Inertia and your frontend framework. This file should be the entrypoint loaded by your root Edge template with the `@vite` tag. Vue React Svelte Solid Copy code to clipboard import { createApp, h } from 'vue' import type { DefineComponent } from 'vue' import { createInertiaApp } from '@inertiajs/vue3' import { resolvePageComponent } from '@adonisjs/inertia/helpers' const appName = import.meta.env.VITE_APP_NAME || 'AdonisJS' createInertiaApp({ title: (title) => {{ `${title} - ${appName}` }}, resolve: (name) => { return resolvePageComponent( `../pages/${name}.vue`, import.meta.glob('../pages/**/*.vue'), ) }, setup({ el, App, props, plugin }) { createApp({ render: () => h(App, props) }) .use(plugin) .mount(el) }, }) Copy code to clipboard import { createRoot } from 'react-dom/client'; import { createInertiaApp } from '@inertiajs/react'; import { resolvePageComponent } from '@adonisjs/inertia/helpers' const appName = import.meta.env.VITE_APP_NAME || 'AdonisJS' createInertiaApp({ progress: { color: '#5468FF' }, title: (title) => `${title} - ${appName}`, resolve: (name) => { return resolvePageComponent( `./pages/${name}.tsx`, import.meta.glob('./pages/**/*.tsx'), ) }, setup({ el, App, props }) { const root = createRoot(el); root.render(); }, }); Copy code to clipboard import { createInertiaApp } from '@inertiajs/svelte' import { resolvePageComponent } from '@adonisjs/inertia/helpers' const appName = import.meta.env.VITE_APP_NAME || 'AdonisJS' createInertiaApp({ progress: { color: '#5468FF' }, title: (title) => `${title} - ${appName}`, resolve: (name) => { return resolvePageComponent( `./pages/${name}.svelte`, import.meta.glob('./pages/**/*.svelte'), ) }, setup({ el, App, props }) { new App({ target: el, props }) }, }) Copy code to clipboard import { render } from 'solid-js/web' import { createInertiaApp } from 'inertia-adapter-solid' import { resolvePageComponent } from '@adonisjs/inertia/helpers' const appName = import.meta.env.VITE_APP_NAME || 'AdonisJS' createInertiaApp({ progress: { color: '#5468FF' }, title: (title) => `${title} - ${appName}`, resolve: (name) => { return resolvePageComponent( `./pages/${name}.tsx`, import.meta.glob('./pages/**/*.tsx'), ) }, setup({ el, App, props }) { render(() => , el) }, }) The role of this file is to create an Inertia app and to resolve the page component. The page component you write when using `inertia.render` will be passed down the the `resolve` function and the role of this function is to return the component that need to be rendered. [](https://docs.adonisjs.com/guides/views-and-templates/inertia#rendering-pages) Rendering pages ------------------------------------------------------------------------------------------------ While configuring your package, a `inertia_middleware` has been registered inside the `start/kernel.ts` file. This middleware is responsible for setting up the `inertia` object on the [`HttpContext`](https://docs.adonisjs.com/guides/concepts/http-context) . To render a view using Inertia, use the `inertia.render` method. The method accepts the view name and the data to be passed to the component as props. app/controllers/home\_controller.ts Copy code to clipboard export default class HomeController { async index({ inertia }: HttpContext) { return inertia.render('home', { user: { name: 'julien' } }) } } Do you see the `home` passed to the `inertia.render` method? It should be the path to the component file relative to the `inertia/pages` directory. We render the `inertia/pages/home.(vue,tsx)` file here. Your frontend component will receive the `user` object as a prop : Vue React Svelte Solid Copy code to clipboard Copy code to clipboard export default function Home(props: { user: { name: string } }) { return

Hello {props.user.name}

} Copy code to clipboard

Hello {user.name}

Copy code to clipboard export default function Home(props: { user: { name: string } }) { return

Hello {props.user.name}

} As simple as that. While passing data to the frontend, everything is serialized to JSON. Do not expect to pass instances of models, dates, or other complex objects. ### [](https://docs.adonisjs.com/guides/views-and-templates/inertia#root-edge-template) Root Edge template The Root template is a regular Edge template that will be loaded on the first-page visit of your application. It is the place where you should include your CSS and Javascript files and also where you should include the `@inertia` tag. A typical root template looks like this : Vue React Svelte Solid Copy code to clipboard AdonisJS x Inertia @inertiaHead() @vite(['inertia/app/app.ts', `inertia/pages/${page.component}.vue`]) @inertia() Copy code to clipboard AdonisJS x Inertia @inertiaHead() @viteReactRefresh() @vite(['inertia/app/app.tsx', `inertia/pages/${page.component}.tsx`]) @inertia() Copy code to clipboard AdonisJS x Inertia @inertiaHead() @vite(['inertia/app/app.ts', `inertia/pages/${page.component}.svelte`]) @inertia() Copy code to clipboard AdonisJS x Inertia @inertiaHead() @vite(['inertia/app/app.tsx', `inertia/pages/${page.component}.tsx`]) @inertia() You can configure the root template path in the `config/inertia.ts` file. By default, it assumes your template is at `resources/views/inertia_layout.edge`. Copy code to clipboard import { defineConfig } from '@adonisjs/inertia' export default defineConfig({ // The path to the root template relative // to the `resources/views` directory rootView: 'app_root', }) If needed, you can pass a function to the `rootView` prop to dynamically decide which root template should be used. Copy code to clipboard import { defineConfig } from '@adonisjs/inertia' import type { HttpContext } from '@adonisjs/core/http' export default defineConfig({ rootView: ({ request }: HttpContext) => { if (request.url().startsWith('/admin')) { return 'admin_root' } return 'app_root' } }) ### [](https://docs.adonisjs.com/guides/views-and-templates/inertia#root-template-data) Root template data You may want to share data with your root Edge template. For example, for adding a meta title or open graph tags. You can do so by using the 3rd argument of the `inertia.render` method : app/controllers/posts\_controller.ts Copy code to clipboard export default class PostsController { async index({ inertia }: HttpContext) { return inertia.render('posts/details', post, { title: post.title, description: post.description }) } } The `title` and `description` will now be available to the root Edge template : resources/views/root.edge Copy code to clipboard {{ title }} @inertia() ctx.auth?.user, // 👈 Scoped to the current request }, }) ### [](https://docs.adonisjs.com/guides/views-and-templates/inertia#share-from-a-middleware) Share from a middleware Sometimes, sharing data from a middleware rather than the `config/inertia.ts` file might be more convenient. You can do so by using the `inertia.share` method : Copy code to clipboard import type { HttpContext } from '@adonisjs/core/http' import type { NextFn } from '@adonisjs/core/types/http' export default class MyMiddleware { async handle({ inertia, auth }: HttpContext, next: NextFn) { inertia.share({ appName: 'My App', user: (ctx) => ctx.auth?.user }) } } [](https://docs.adonisjs.com/guides/views-and-templates/inertia#partial-reloads--lazy-data-evaluation) Partial reloads & Lazy data evaluation --------------------------------------------------------------------------------------------------------------------------------------------- First read the [official documentation](https://inertiajs.com/partial-reloads) to understand what partial reloads are and how they work. About lazy data evaluation, here is how it works in AdonisJS : Copy code to clipboard export default class UsersController { async index({ inertia }: HttpContext) { return inertia.render('users/index', { // ALWAYS included on first visit. // OPTIONALLY included on partial reloads. // ALWAYS evaluated users: await User.all(), // ALWAYS included on first visit. // OPTIONALLY included on partial reloads. // ONLY evaluated when needed users: () => User.all(), // NEVER included on first visit. // OPTIONALLY included on partial reloads. // ONLY evaluated when needed users: inertia.optional(() => User.all()) }), } } [](https://docs.adonisjs.com/guides/views-and-templates/inertia#types-sharing) Types sharing -------------------------------------------------------------------------------------------- Usually, you will want to share the types of the data you are passing to your frontend pages components. A simple way to do this is to use the `InferPageProps` type. app/controllers/users\_controller.ts inertia/pages/users/index.tsx Copy code to clipboard export class UsersController { index() { return inertia.render('users/index', { users: [\ { id: 1, name: 'julien' },\ { id: 2, name: 'virk' },\ { id: 3, name: 'romain' },\ ] }) } } Copy code to clipboard import { InferPageProps } from '@adonisjs/inertia/types' import type { UsersController } from '../../controllers/users_controller.ts' export function UsersPage( // 👇 It will be correctly typed based // on what you passed to inertia.render // in your controller props: InferPageProps ) { return ( // ... ) } If you're using Vue, you'll have to manually define each property in your `defineProps`. This is an annoying limitation of Vue, see [this issue](https://github.com/vitejs/vite-plugin-vue/issues/167) for more information. Copy code to clipboard ### [](https://docs.adonisjs.com/guides/views-and-templates/inertia#reference-directives) Reference Directives Since your Inertia Application is a separate TypeScript project (with its own `tsconfig.json`), you will need to help TypeScript understand some types. Many of our official packages use [module augmentation](https://www.typescriptlang.org/docs/handbook/declaration-merging.html#module-augmentation) to add certain types to your AdonisJS project. For example, the `auth` property on the `HttpContext` and its typing will only be available when you import `@adonisjs/auth/initialize_auth_middleware` into your project. Now, the issue is that we don't import this module in our Inertia project, so if you try to infer the page props from a controller that uses `auth`, then you will likely receive a TypeScript error or an invalid type. To resolve this issue, you can use [reference directives](https://www.typescriptlang.org/docs/handbook/triple-slash-directives.html#-reference-path-) to help TypeScript understand certain types. To do this, you need to add the following line in your `inertia/app/app.ts` file: Copy code to clipboard /// Depending on the types you use, you may need to add other reference directives, such as references to certain configuration files that also use module augmentation. Copy code to clipboard /// /// /// ### [](https://docs.adonisjs.com/guides/views-and-templates/inertia#type-level-serialization) Type-level Serialization An important thing to know about `InferPageProps` is that it will "serialize at the type level" the data you pass. For example, if you pass a `Date` object to `inertia.render`, the resulting type from `InferPageProps` will be `string`: app/controllers/users\_controller.ts inertia/pages/users/index.tsx Copy code to clipboard export default class UsersController { async index({ inertia }: HttpContext) { const users = [\ { id: 1, name: 'John Doe', createdAt: new Date() }\ ] return inertia.render('users/index', { users }) } } Copy code to clipboard import type { InferPageProps } from '@adonisjs/inertia/types' export function UsersPage( props: InferPageProps ) { props.users // ^? { id: number, name: string, createdAt: string }[] } This makes total sense, as dates are serialized to string when they are passed over the network in JSON. ### [](https://docs.adonisjs.com/guides/views-and-templates/inertia#model-serialization) Model Serialization Keeping the last point in mind, another important thing to know is that if you pass an AdonisJS model to `inertia.render`, then the resulting type from `InferPageProps` will be a `ModelObject`: a type that contains almost no information. This can be problematic. To solve this issue, you have several options: * Cast your model to a simple object before passing it to `inertia.render`: * Use a DTO (Data Transfer Object) system to transform your models into simple objects before passing them to `inertia.render`. Casting DTOs Copy code to clipboard class UsersController { async edit({ inertia, params }: HttpContext) { const user = users.serialize() as { id: number name: string } return inertia.render('user/edit', { user }) } } Copy code to clipboard class UserDto { constructor(private user: User) {} toJson() { return { id: this.user.id, name: this.user.name } } } class UsersController { async edit({ inertia, params }: HttpContext) { const user = await User.findOrFail(params.id) return inertia.render('user/edit', { user: new UserDto(user).toJson() }) } } You will now have accurate types in your frontend component. ### [](https://docs.adonisjs.com/guides/views-and-templates/inertia#shared-props) Shared Props To have the types of your [shared data](https://docs.adonisjs.com/guides/views-and-templates/inertia#sharing-data-with-all-views) in your components, ensure you have performed module augmentation in your `config/inertia.ts` file as follows: Copy code to clipboard // file: config/inertia.ts const inertiaConfig = defineConfig({ sharedData: { appName: 'My App', }, }); export default inertiaConfig; declare module '@adonisjs/inertia/types' { export interface SharedProps extends InferSharedProps { // If necessary, you can also manually add some shared props, // such as those shared from a middleware for example propsSharedFromAMiddleware: number; } } Also, make sure to add this [reference directive](https://docs.adonisjs.com/guides/views-and-templates/inertia#reference-directives) in your `inertia/app/app.ts` file: Copy code to clipboard /// Once this is done, you will have access to your shared props in your components via `InferPageProps`. `InferPageProps` will contain the types of your shared props and the props passed by `inertia.render`: Copy code to clipboard // file: inertia/pages/users/index.tsx import type { InferPageProps } from '@adonisjs/inertia/types' export function UsersPage( props: InferPageProps ) { props.appName // ^? string props.propsSharedFromAMiddleware // ^? number } If needed, you can access only the types of your shared props via the `SharedProps` type: Copy code to clipboard import type { SharedProps } from '@adonisjs/inertia/types' const page = usePage() [](https://docs.adonisjs.com/guides/views-and-templates/inertia#csrf) CSRF -------------------------------------------------------------------------- If you enabled [CSRF protection](https://docs.adonisjs.com/guides/security/securing-ssr-applications#csrf-protection) for your application, enable the `enableXsrfCookie` option in the `config/shield.ts` file. Enabling this option will ensure that the `XSRF-TOKEN` cookie is set on the client side and sent back to the server with every request. No additional configuration is needed to make Inertia work with CSRF protection. [](https://docs.adonisjs.com/guides/views-and-templates/inertia#asset-versioning) Asset versioning -------------------------------------------------------------------------------------------------- When re-deploying your application, your users should always get the latest version of your client-side assets. It is something supported out-of-the-box by the Inertia protocol and AdonisJS. By default, the `@adonisjs/inertia` package will compute a hash for the `public/assets/manifest.json` file and use it as the version of your assets. If you want to tweak this behavior, you can edit the `config/inertia.ts` file. The `assetsVersion` prop defines the version of your assets and can be a string or a function. Copy code to clipboard import { defineConfig } from '@adonisjs/inertia' export default defineConfig({ assetsVersion: 'v1' }) Read the [official documentation](https://inertiajs.com/asset-versioning) for more information. [](https://docs.adonisjs.com/guides/views-and-templates/inertia#ssr) SSR ------------------------------------------------------------------------ ### [](https://docs.adonisjs.com/guides/views-and-templates/inertia#enabling-ssr) Enabling SSR [Inertia Starter Kit](https://docs.adonisjs.com/guides/getting-started/installation#starter-kits) comes with server-side rendering (SSR) support out of the box. So make sure to use it if you want to enable SSR for your application. If you started your application without enabling SSR, you can always enable it later by following the following steps : #### [](https://docs.adonisjs.com/guides/views-and-templates/inertia#adding-a-server-entrypoint) Adding a server entrypoint We need to add a server entrypoint that looks super similar to the client entrypoint. This entrypoint will render the first-page visit on the server and not on the browser. You must create a `inertia/app/ssr.ts` that default export a function like this : Vue React Svelte Solid Copy code to clipboard import { createInertiaApp } from '@inertiajs/vue3' import { renderToString } from '@vue/server-renderer' import { createSSRApp, h, type DefineComponent } from 'vue' export default function render(page) { return createInertiaApp({ page, render: renderToString, resolve: (name) => { const pages = import.meta.glob('../pages/**/*.vue') return pages[`../pages/${name}.vue`]() }, setup({ App, props, plugin }) { return createSSRApp({ render: () => h(App, props) }).use(plugin) }, }) } Copy code to clipboard import ReactDOMServer from 'react-dom/server' import { createInertiaApp } from '@inertiajs/react' export default function render(page) { return createInertiaApp({ page, render: ReactDOMServer.renderToString, resolve: (name) => { const pages = import.meta.glob('./pages/**/*.tsx', { eager: true }) return pages[`./pages/${name}.tsx`] }, setup: ({ App, props }) => , }) } Copy code to clipboard import { createInertiaApp } from '@inertiajs/svelte' import createServer from '@inertiajs/svelte/server' export default function render(page) { return createInertiaApp({ page, resolve: name => { const pages = import.meta.glob('./pages/**/*.svelte', { eager: true }) return pages[`./pages/${name}.svelte`] }, }) } Copy code to clipboard import { hydrate } from 'solid-js/web' import { createInertiaApp } from 'inertia-adapter-solid' export default function render(page: any) { return createInertiaApp({ page, resolve: (name) => { const pages = import.meta.glob('./pages/**/*.tsx', { eager: true }) return pages[`./pages/${name}.tsx`] }, setup({ el, App, props }) { hydrate(() => , el) }, }) } #### [](https://docs.adonisjs.com/guides/views-and-templates/inertia#update-the-config-file) Update the config file Head over to the `config/inertia.ts` file and update the `ssr` prop to enable it. Also, point to your server entrypoint if you use a different path. Copy code to clipboard import { defineConfig } from '@adonisjs/inertia' export default defineConfig({ // ... ssr: { enabled: true, entrypoint: 'inertia/app/ssr.ts' } }) #### [](https://docs.adonisjs.com/guides/views-and-templates/inertia#update-the-vite-config) Update the Vite config First, make sure you have registered the `inertia` vite plugin. Once done, you should update the path to the server entrypoint in the `vite.config.ts` file if you use a different path. Copy code to clipboard import { defineConfig } from 'vite' import inertia from '@adonisjs/inertia/client' export default defineConfig({ plugins: [\ inertia({\ ssr: {\ enabled: true,\ entrypoint: 'inertia/app/ssr.ts'\ }\ })\ ] }) You should now be able to render the first-page visit on the server and then continue with the client-side rendering. ### [](https://docs.adonisjs.com/guides/views-and-templates/inertia#ssr-allowlist) SSR Allowlist When using SSR, you may want to not server-side render all your components. For example, you are building an admin dashboard gated by authentication, so these routes have no reason to be rendered on the server. But on the same application, you may have a landing page that could benefit from SSR to improve SEO. So, you can add the pages that should be rendered on the server in the `config/inertia.ts` file. Copy code to clipboard import { defineConfig } from '@adonisjs/inertia' export default defineConfig({ ssr: { enabled: true, pages: ['home'] } }) You can also pass a function to the `pages` prop to dynamically decide which pages should be rendered on the server. Copy code to clipboard import { defineConfig } from '@adonisjs/inertia' export default defineConfig({ ssr: { enabled: true, pages: (ctx, page) => !page.startsWith('admin') } }) [](https://docs.adonisjs.com/guides/views-and-templates/inertia#testing) Testing -------------------------------------------------------------------------------- There are several ways to test your frontend code: * End-to-end testing. You can use the [Browser Client](https://docs.adonisjs.com/guides/browser-tests) , a seamless integration between Japa and Playwright. * Unit testing. We recommend using testing tools adapted for the frontend ecosystem, particularly [Vitest](https://vitest.dev/) . And finally, you can also test your Inertia endpoints to ensure they return the correct data. For that, we have a few test helpers available in Japa. First, make sure to configure the `inertiaApiClient` and `apiClient` plugins in your `test/bootsrap.ts` file if you haven't already done so: tests/bootstrap.ts Copy code to clipboard import { assert } from '@japa/assert' import app from '@adonisjs/core/services/app' import { pluginAdonisJS } from '@japa/plugin-adonisjs' import { apiClient } from '@japa/api-client' import { inertiaApiClient } from '@adonisjs/inertia/plugins/api_client' export const plugins: Config['plugins'] = [\ assert(), \ pluginAdonisJS(app),\ apiClient(),\ inertiaApiClient(app)\ ] Next, we can request our Inertia endpoint using `withInertia()` to ensure the data is correctly returned in JSON format. Copy code to clipboard test('returns correct data', async ({ client }) => { const response = await client.get('/home').withInertia() response.assertStatus(200) response.assertInertiaComponent('home/main') response.assertInertiaProps({ user: { name: 'julien' } }) }) Let's take a look at the various assertions available to test your endpoints: ### [](https://docs.adonisjs.com/guides/views-and-templates/inertia#withinertia) `withInertia()` Adds the `X-Inertia` header to the request. It ensures that data is correctly returned in JSON format. ### [](https://docs.adonisjs.com/guides/views-and-templates/inertia#assertinertiacomponent) `assertInertiaComponent()` Checks that the component returned by the server is the one expected. Copy code to clipboard test('returns correct data', async ({ client }) => { const response = await client.get('/home').withInertia() response.assertInertiaComponent('home/main') }) ### [](https://docs.adonisjs.com/guides/views-and-templates/inertia#assertinertiaprops) `assertInertiaProps()` Checks that the props returned by the server are exactly those passed as parameters. Copy code to clipboard test('returns correct data', async ({ client }) => { const response = await client.get('/home').withInertia() response.assertInertiaProps({ user: { name: 'julien' } }) }) ### [](https://docs.adonisjs.com/guides/views-and-templates/inertia#assertinertiapropscontains) `assertInertiaPropsContains()` Checks that the props returned by the server contain some of the props passed as parameters. It uses [`containsSubset`](https://japa.dev/docs/plugins/assert#containssubset) under the hood. Copy code to clipboard test('returns correct data', async ({ client }) => { const response = await client.get('/home').withInertia() response.assertInertiaPropsContains({ user: { name: 'julien' } }) }) ### [](https://docs.adonisjs.com/guides/views-and-templates/inertia#additional-properties) Additional properties In addition to this, you can access the following properties on `ApiResponse` : Copy code to clipboard test('returns correct data', async ({ client }) => { const response = await client.get('/home').withInertia() // 👇 The component returned by the server console.log(response.inertiaComponent) // 👇 The props returned by the server console.log(response.inertiaProps) }) [](https://docs.adonisjs.com/guides/views-and-templates/inertia#faq) FAQ ------------------------------------------------------------------------ ### [](https://docs.adonisjs.com/guides/views-and-templates/inertia#why-my-server-is-constantly-reloading-when-updating-my-frontend-code) Why my server is constantly reloading when updating my frontend code? Let's say you are using React. Every time you update your frontend code, the server will reload and the browser will refresh. You are not benefiting from the hot module replacement (HMR) feature. You need to exclude `inertia/**/*` from your root `tsconfig.json` file to make it work. Copy code to clipboard { "compilerOptions": { // ... }, "exclude": ["inertia/**/*"] } Because, the AdonisJS process that is responsible for restarting the server is watching files included in the `tsconfig.json` file. ### [](https://docs.adonisjs.com/guides/views-and-templates/inertia#why-my-production-build-is-not-working-) Why my production build is not working ? If you are facing an error like this one: Copy code to clipboard X [ERROR] Failed to load url inertia/app/ssr.ts (resolved id: inertia/app/ssr.ts). Does the file exist? A common issue is that you just forgot to set `NODE_ENV=production` when running your production build. Copy code to clipboard NODE_ENV=production node build/server.js ### [](https://docs.adonisjs.com/guides/views-and-templates/inertia#top-level-await-is-not-available) `Top-level await is not available...` If you are facing an error like this one: Copy code to clipboard X [ERROR] Top-level await is not available in the configured target environment ("chrome87", "edge88", "es2020", "firefox78", "safari14" + 2 overrides) node_modules/@adonisjs/core/build/services/hash.js:15:0: 15 │ await app.booted(async () => { ╵ ~~~~~ Then it's highly likely that you're importing backend code into your frontend. Taking a closer look at the error, which is generated by Vite, we see that it's trying to compile code from `node_modules/@adonisjs/core`. So, this means our backend code will end up in the frontend bundle. That's probably not what you want. Generally, this error occurs when you try to share a type with your frontend. If this what you are trying to achieve, make sure to always import this type only via `import type` rather than `import`: Copy code to clipboard // ✅ Correct import type { User } from '#models/user' // ❌ Incorrect import { User } from '#models/user' `` * * * [Views & Templates\ \ EdgeJS](https://docs.adonisjs.com/guides/views-and-templates/edgejs) [Testing\ \ Introduction](https://docs.adonisjs.com/guides/testing/introduction) © 2025 AdonisJS [Edit this page](https://github.com/adonisjs/v6-docs/blob/main/content/docs/views-and-templates/inertia.md) ---