# Table of Contents
- [Base44 Docs - Base44 Support Documentation](#base44-docs-base44-support-documentation)
- [Billing and plans - Base44 Support Documentation](#billing-and-plans-base44-support-documentation)
- [Student and educator discount - Base44 Support Documentation](#student-and-educator-discount-base44-support-documentation)
- [Managing your workspace members - Base44 Support Documentation](#managing-your-workspace-members-base44-support-documentation)
- [Credits - Base44 Support Documentation](#credits-base44-support-documentation)
- [Referral Program - Base44 Support Documentation](#referral-program-base44-support-documentation)
- [Deleting your app's user data - Base44 Support Documentation](#deleting-your-app-s-user-data-base44-support-documentation)
- [Joining the Base44 Partner Program - Base44 Support Documentation](#joining-the-base44-partner-program-base44-support-documentation)
- [Setting up your enterprise workspace domain - Base44 Support Documentation](#setting-up-your-enterprise-workspace-domain-base44-support-documentation)
- [Base44 for enterprises - Base44 Support Documentation](#base44-for-enterprises-base44-support-documentation)
- [Community - Base44 Support Documentation](#community-base44-support-documentation)
- [Single sign-on for enterprise workspaces - Base44 Support Documentation](#single-sign-on-for-enterprise-workspaces-base44-support-documentation)
- [Setting up SSO for Okta - Base44 Support Documentation](#setting-up-sso-for-okta-base44-support-documentation)
- [Setting up SCIM provisioning for Okta - Base44 Support Documentation](#setting-up-scim-provisioning-for-okta-base44-support-documentation)
- [Understanding the potential risks of using generative AI tools - Base44 Support Documentation](#understanding-the-potential-risks-of-using-generative-ai-tools-base44-support-documentation)
- [Setting up SSO for Microsoft Entra ID - Base44 Support Documentation](#setting-up-sso-for-microsoft-entra-id-base44-support-documentation)
- [Creating and managing your Base44 profile - Base44 Support Documentation](#creating-and-managing-your-base44-profile-base44-support-documentation)
- [Managing apps and Superagents in your enterprise workspace - Base44 Support Documentation](#managing-apps-and-superagents-in-your-enterprise-workspace-base44-support-documentation)
- [AI service providers - Base44 Support Documentation](#ai-service-providers-base44-support-documentation)
- [Managing enterprise workspace members - Base44 Support Documentation](#managing-enterprise-workspace-members-base44-support-documentation)
- [Managing workspace secrets - Base44 Support Documentation](#managing-workspace-secrets-base44-support-documentation)
- [Setting up SCIM provisioning for Microsoft Entra ID - Base44 Support Documentation](#setting-up-scim-provisioning-for-microsoft-entra-id-base44-support-documentation)
- [Updates to the Base44 Terms of Service (June 2026) - Base44 Support Documentation](#updates-to-the-base44-terms-of-service-june-2026-base44-support-documentation)
- [Getting started as an enterprise workspace member - Base44 Support Documentation](#getting-started-as-an-enterprise-workspace-member-base44-support-documentation)
- [Managing connector availability for your workspace - Base44 Support Documentation](#managing-connector-availability-for-your-workspace-base44-support-documentation)
- [Privacy and security - Base44 Support Documentation](#privacy-and-security-base44-support-documentation)
- [Adding an IP allowlist for your workspace - Base44 Support Documentation](#adding-an-ip-allowlist-for-your-workspace-base44-support-documentation)
- [Contacting Base44 for Support - Base44 Support Documentation](#contacting-base44-for-support-base44-support-documentation)
- [SCIM provisioning - Base44 Support Documentation](#scim-provisioning-base44-support-documentation)
- [Getting started as an enterprise admin - Base44 Support Documentation](#getting-started-as-an-enterprise-admin-base44-support-documentation)
- [Troubleshooting Issues - Base44 Support Documentation](#troubleshooting-issues-base44-support-documentation)
- [Setting up SSO for your enterprise workspace - Base44 Support Documentation](#setting-up-sso-for-your-enterprise-workspace-base44-support-documentation)
- [Adding and using npm packages - Base44 Support Documentation](#adding-and-using-npm-packages-base44-support-documentation)
- [Creating and using your app on mobile - Base44 Support Documentation](#creating-and-using-your-app-on-mobile-base44-support-documentation)
- [Creating automations for your app - Base44 Support Documentation](#creating-automations-for-your-app-base44-support-documentation)
- [Managing your app pages - Base44 Support Documentation](#managing-your-app-pages-base44-support-documentation)
- [Using the AI Chat in Base44 - Base44 Support Documentation](#using-the-ai-chat-in-base44-base44-support-documentation)
- [Uploading and managing media - Base44 Support Documentation](#uploading-and-managing-media-base44-support-documentation)
- [Creating workflows for your app - Base44 Support Documentation](#creating-workflows-for-your-app-base44-support-documentation)
- [Using the canvas - Base44 Support Documentation](#using-the-canvas-base44-support-documentation)
- [Hiring a Base44 partner - Base44 Support Documentation](#hiring-a-base44-partner-base44-support-documentation)
- [Managing your app data - Base44 Support Documentation](#managing-your-app-data-base44-support-documentation)
- [Import from Figma into Base44 - Base44 Support Documentation](#import-from-figma-into-base44-base44-support-documentation)
- [Using app templates - Base44 Support Documentation](#using-app-templates-base44-support-documentation)
- [Setting up an AI agent for your app - Base44 Support Documentation](#setting-up-an-ai-agent-for-your-app-base44-support-documentation)
- [Prompt library - Base44 Support Documentation](#prompt-library-base44-support-documentation)
- [Writing effective prompts in Base44 - Base44 Support Documentation](#writing-effective-prompts-in-base44-base44-support-documentation)
- [Building a website - Base44 Support Documentation](#building-a-website-base44-support-documentation)
- [Managing your workspace apps - Base44 Support Documentation](#managing-your-workspace-apps-base44-support-documentation)
- [About workspaces - Base44 Support Documentation](#about-workspaces-base44-support-documentation)
- [Managing MCP connections - Base44 Support Documentation](#managing-mcp-connections-base44-support-documentation)
- [Changing your account settings - Base44 Support Documentation](#changing-your-account-settings-base44-support-documentation)
- [Base44 Developer Platform - Base44 Support Documentation](#base44-developer-platform-base44-support-documentation)
- [Unknown](#unknown)
- [Enterprise APIs - Base44 Support Documentation](#enterprise-apis-base44-support-documentation)
- [Enterprise Monitoring API Overview - Base44 Support Documentation](#enterprise-monitoring-api-overview-base44-support-documentation)
- [Code Tab - Base44 Support Documentation](#code-tab-base44-support-documentation)
- [Rate Limits - Base44 Support Documentation](#rate-limits-base44-support-documentation)
- [Audit Logs API Overview - Base44 Support Documentation](#audit-logs-api-overview-base44-support-documentation)
- [Activity Monitor - Base44 Support Documentation](#activity-monitor-base44-support-documentation)
- [Project Structure - Base44 Support Documentation](#project-structure-base44-support-documentation)
- [GitHub Integration - Base44 Support Documentation](#github-integration-base44-support-documentation)
- [Introduction - Base44 Support Documentation](#introduction-base44-support-documentation)
- [Base44 Docs MCP - Base44 Support Documentation](#base44-docs-mcp-base44-support-documentation)
- [Base44 MCP server - Base44 Support Documentation](#base44-mcp-server-base44-support-documentation)
- [Creating workspace templates - Base44 Support Documentation](#creating-workspace-templates-base44-support-documentation)
- [Managing a workspace - Base44 Support Documentation](#managing-a-workspace-base44-support-documentation)
- [Managing workspace skills - Base44 Support Documentation](#managing-workspace-skills-base44-support-documentation)
- [Introduction - Base44 Support Documentation](#introduction-base44-support-documentation)
- [Skills - Base44 Support Documentation](#skills-base44-support-documentation)
- [About Agents - Base44 Support Documentation](#about-agents-base44-support-documentation)
- [deploy - Base44 Support Documentation](#deploy-base44-support-documentation)
- [Entities Overview - Base44 Support Documentation](#entities-overview-base44-support-documentation)
- [Backend Functions Overview - Base44 Support Documentation](#backend-functions-overview-base44-support-documentation)
- [Base44 client - Base44 Support Documentation](#base44-client-base44-support-documentation)
- [Authentication - Base44 Support Documentation](#authentication-base44-support-documentation)
- [Backend Service Basics - Base44 Support Documentation](#backend-service-basics-base44-support-documentation)
- [create - Base44 Support Documentation](#create-base44-support-documentation)
- [Authentication - Base44 Support Documentation](#authentication-base44-support-documentation)
- [agents pull - Base44 Support Documentation](#agents-pull-base44-support-documentation)
- [Pricing - Base44 Support Documentation](#pricing-base44-support-documentation)
- [Common SDK uses - Base44 Support Documentation](#common-sdk-uses-base44-support-documentation)
- [Link an Existing Backend Project - Base44 Support Documentation](#link-an-existing-backend-project-base44-support-documentation)
- [logout - Base44 Support Documentation](#logout-base44-support-documentation)
- [functions delete - Base44 Support Documentation](#functions-delete-base44-support-documentation)
- [secrets list - Base44 Support Documentation](#secrets-list-base44-support-documentation)
- [whoami - Base44 Support Documentation](#whoami-base44-support-documentation)
- [login - Base44 Support Documentation](#login-base44-support-documentation)
- [secrets delete - Base44 Support Documentation](#secrets-delete-base44-support-documentation)
- [functions list - Base44 Support Documentation](#functions-list-base44-support-documentation)
- [functions pull - Base44 Support Documentation](#functions-pull-base44-support-documentation)
- [exec - Base44 Support Documentation](#exec-base44-support-documentation)
- [auth social-login - Base44 Support Documentation](#auth-social-login-base44-support-documentation)
- [secrets set - Base44 Support Documentation](#secrets-set-base44-support-documentation)
- [connectors pull - Base44 Support Documentation](#connectors-pull-base44-support-documentation)
- [logs - Base44 Support Documentation](#logs-base44-support-documentation)
- [connectors push - Base44 Support Documentation](#connectors-push-base44-support-documentation)
- [Enterprise APIs - Base44 Support Documentation](#enterprise-apis-base44-support-documentation)
- [types generate - Base44 Support Documentation](#types-generate-base44-support-documentation)
- [functions deploy - Base44 Support Documentation](#functions-deploy-base44-support-documentation)
- [agents push - Base44 Support Documentation](#agents-push-base44-support-documentation)
- [dashboard open - Base44 Support Documentation](#dashboard-open-base44-support-documentation)
- [dev - Base44 Support Documentation](#dev-base44-support-documentation)
- [entities push - Base44 Support Documentation](#entities-push-base44-support-documentation)
- [Rate Limits - Base44 Support Documentation](#rate-limits-base44-support-documentation)
- [App user connectors - Base44 Support Documentation](#app-user-connectors-base44-support-documentation)
- [Connectors overview - Base44 Support Documentation](#connectors-overview-base44-support-documentation)
- [Dynamic Types - Base44 Support Documentation](#dynamic-types-base44-support-documentation)
- [Work with data - Base44 Support Documentation](#work-with-data-base44-support-documentation)
- [auth password-login - Base44 Support Documentation](#auth-password-login-base44-support-documentation)
- [Security - Base44 Support Documentation](#security-base44-support-documentation)
- [auth pull - Base44 Support Documentation](#auth-pull-base44-support-documentation)
- [User Schema - Base44 Support Documentation](#user-schema-base44-support-documentation)
- [site deploy - Base44 Support Documentation](#site-deploy-base44-support-documentation)
- [Connect to third-party APIs - Base44 Support Documentation](#connect-to-third-party-apis-base44-support-documentation)
- [eject - Base44 Support Documentation](#eject-base44-support-documentation)
- [site open - Base44 Support Documentation](#site-open-base44-support-documentation)
- [link - Base44 Support Documentation](#link-base44-support-documentation)
- [auth push - Base44 Support Documentation](#auth-push-base44-support-documentation)
- [Entity Schemas - Base44 Support Documentation](#entity-schemas-base44-support-documentation)
- [Local development - Base44 Support Documentation](#local-development-base44-support-documentation)
- [Build with AI - Base44 Support Documentation](#build-with-ai-base44-support-documentation)
- [AI development tools overview - Base44 Support Documentation](#ai-development-tools-overview-base44-support-documentation)
- [Troubleshoot your project - Base44 Support Documentation](#troubleshoot-your-project-base44-support-documentation)
- [Backend only - Base44 Support Documentation](#backend-only-base44-support-documentation)
- [Standalone scripts - Base44 Support Documentation](#standalone-scripts-base44-support-documentation)
- [Automations - Base44 Support Documentation](#automations-base44-support-documentation)
- [Auth - Base44 Support Documentation](#auth-base44-support-documentation)
- [Project Structure - Base44 Support Documentation](#project-structure-base44-support-documentation)
- [React Quickstart - Base44 Support Documentation](#react-quickstart-base44-support-documentation)
- [Shared connectors - Base44 Support Documentation](#shared-connectors-base44-support-documentation)
- [connectors list-available - Base44 Support Documentation](#connectors-list-available-base44-support-documentation)
- [Local development setup - Base44 Support Documentation](#local-development-setup-base44-support-documentation)
- [React Quickstart - Base44 Support Documentation](#react-quickstart-base44-support-documentation)
- [React Native (Expo) Quickstart - Base44 Support Documentation](#react-native-expo-quickstart-base44-support-documentation)
- [Refine Quickstart - Base44 Support Documentation](#refine-quickstart-base44-support-documentation)
- [Hono Quickstart - Base44 Support Documentation](#hono-quickstart-base44-support-documentation)
- [Solid JS Quickstart - Base44 Support Documentation](#solid-js-quickstart-base44-support-documentation)
- [Vue Quickstart - Base44 Support Documentation](#vue-quickstart-base44-support-documentation)
---
# Base44 Docs - Base44 Support Documentation
> Documentation Index
> -------------------
>
> Fetch the complete documentation index at: [/llms.txt](https://docs.base44.com/llms.txt)
>
> Use this file to discover all available pages before exploring further.
[Skip to main content](https://docs.base44.com/#content-area)
[](https://docs.base44.com/#get-started)
Get started
========================================================
Build boldly, iterate quickly, and launch your Base44 app. Start your journey with walkthroughs, best practices, and deep dives into every part of the platform.

Build your app
--------------
Jump right in and build your first Base44 app.
Use AI features
---------------
Use the AI chat to get the results you want.
Connect integrations
--------------------
Connect your app to external tools.
* * *
[](https://docs.base44.com/#build-integrate-secure)
Build, integrate, secure
================================================================================
* Using credits
* Exploring templates
* Managing data and security
* Choosing a plan
[](https://docs.base44.com/#build-with-credits)
Build with credits
----------------------------------------------------------------------
Credits power your app building and operations in Base44. Learn how to best plan projects, avoid limits, and get the most out of your plan.[Start building →](https://docs.base44.com/Account-and-billing/Credits)

[](https://docs.base44.com/#discover-templates)
Discover templates
----------------------------------------------------------------------
Start building your app with pre-built templates. Customize to fit your vision and launch.[Browse templates →](https://base44.com/templates)

[](https://docs.base44.com/#data-and-security-controls)
Data and security controls
--------------------------------------------------------------------------------------
Protect your data by setting who can view, edit, or delete records using visibility controls and security rules.[Secure my app →](https://docs.base44.com/Setting-up-your-app/security-overview)

[](https://docs.base44.com/#choose-your-plan)
Choose your plan
------------------------------------------------------------------
Start for free. Upgrade when you are ready. Explore plan options for every team size and stage.[See plans and pricing →](https://base44.com/pricing)

* * *
[](https://docs.base44.com/#connect-with-the-community)
Connect with the community
======================================================================================
Join Discord
------------
Connect with the community and get tips in our Discord server.
Get support
-----------
Submit a support ticket for personalized help.
Build boldly, iterate quickly, and come back anytime to explore what you can do with Base44.
Was this page helpful?
YesNo
⌘I
Assistant
Responses are generated using AI and may contain mistakes.
Suggestions
Which plans come with a free domain?How are credits used?How do I use Discuss mode?
---
# Billing and plans - Base44 Support Documentation
> Documentation Index
> -------------------
>
> Fetch the complete documentation index at: [/llms.txt](https://docs.base44.com/llms.txt)
>
> Use this file to discover all available pages before exploring further.
[Skip to main content](https://docs.base44.com/Account-and-billing/Billing-and-plans#content-area)
[](https://docs.base44.com/Account-and-billing/Billing-and-plans#choosing-a-plan)
Choosing a plan
-----------------------------------------------------------------------------------------------------
As you build and grow your app, it’s important to choose the right plan to accommodate your needs. The available plans have different features. Read below to learn more about each plan.
Free
Access all of Base44’s core features at no cost and see what it can do.
* **25 message credits** / month
* **100 integration credits** / month
* **Up to 5 apps**
**Plan highlights:**
* Core Base44 features including authentication, database functionality, analytics
* Up to 5 apps
Starter
Build out your first apps for personal projects or early-stage ideas.
* **100 message credits** / month
* **2,000 integration credits** / month
**Plan highlights:**
* Unlimited number of apps
* In-app code edits
Builder
Take your idea to the next level with tools to meet your professional needs.
* **250 message credits** / month
* **10,000 integration credits** / month
**Plan highlights:**
* Unlimited number of apps
* In-app code edits
* Backend functions
* Connect a domain
* Free domain for 1 year (on the yearly plan)
* 25 credits to share with a friend (on the yearly plan)
* Github integration
* Model selection
Pro
Access advanced tools and support for developing complex applications.
* **500 message credits** / month
* **20,000 integration credits** / month
**Plan highlights:**
* Unlimited number of apps
* In-app code edits
* Backend functions
* Connect a domain
* Free domain for 1 year (on the yearly plan)
* 25 credits to share with a friend (on the yearly plan)
* Github integration
* Early access to beta features
Elite
Scale your app effortlessly with top credits and dedicated support. On the Plans page, use the drop-down to choose the amount of message and integration credits you need.
**Plan highlights:**
* Unlimited number of apps
* In-app code edits
* Backend functions
* Connect a domain
* Free domain for 1 year (on the yearly plan)
* 25 credits to share with a friend (on the yearly plan)
* Github integration
* Early access to beta features
* Premium support
Ready to upgrade your plan?
---------------------------
View the available plans and pricing to see which suits you best.
* * *
[](https://docs.base44.com/Account-and-billing/Billing-and-plans#purchasing-a-plan)
Purchasing a plan
---------------------------------------------------------------------------------------------------------
Purchase a Base44 plan from the [Plans page](https://app.base44.com/billing)
or follow the steps below.
**Have a promo code?** You need to apply it directly from **Plan and billing** before completing your plan purchase or upgrade.
**To purchase a plan:**
1. Click your workspace name at the top left of your account.
2. Click **Settings**.
3. Click **Plan and billing**.
4. Click **Upgrade Plan**.
5. Click the plan that’s right for you.
6. Select your preferred billing cycle:
* **Yearly:** Save with an annual discount and extra benefits.
* **Monthly:** Pay month to month.
7. Click **Continue to Checkout**.

* * *
[](https://docs.base44.com/Account-and-billing/Billing-and-plans#upgrading-an-existing-plan)
Upgrading an existing plan
---------------------------------------------------------------------------------------------------------------------------
You can upgrade your plan from the [Plans page](https://app.base44.com/billing)
or follow the steps below. Your plan’s features and usage limits update right away, and billing is automatically adjusted.
**Important:**
* Upgrades take effect immediately after you pay.
* You get instant access to all new features and higher usage limits. Your past credit usage stays the same.
* The amount you’re charged and how your credits are affected can vary depending on your plan and how you upgrade. Any changes to your billing amount or credit limits are shown for your review before you confirm.
**To upgrade an existing plan:**
1. Click your workspace name at the top left of your account.
2. Click **Settings**.
3. Click **Plan and billing**.
4. Click **Upgrade Plan**.
5. Click the plan you want to upgrade to.
6. Select your preferred billing cycle:
* **Yearly:** Save with an annual discount and extra benefits.
* **Monthly:** Pay month to month.
7. Click **Continue to Checkout**.

The Elite plan is the highest plan you can purchase directly, so it cannot be upgraded to a higher plan. This applies to both monthly and yearly Elite plans. If you need more capacity or enterprise features, [contact the Base44 team](https://app.base44.com/support/conversations)
.
* * *
[](https://docs.base44.com/Account-and-billing/Billing-and-plans#managing-your-billing-and-payments)
Managing your billing and payments
-------------------------------------------------------------------------------------------------------------------------------------------
Manage your Base44 payment details, update your billing cycle, download invoices, cancel your subscription, and more.
###
[](https://docs.base44.com/Account-and-billing/Billing-and-plans#switching-from-monthly-to-yearly)
Switching from monthly to yearly
Upgrade to a yearly plan anytime and save with annual pricing. Your new billing cycle starts immediately.
When you upgrade from a monthly to a yearly plan, you are not charged twice for the same period. The amount you already paid for the current month is credited and deducted from your yearly plan cost, so you only pay the difference needed to cover the rest of the year. There is no separate refund.
**To switch from a monthly to a yearly plan:**
1. Click your workspace name at the top left of your account.
2. Click **Settings**.
3. Click **Plan and billing**.
4. Click **Manage Subscription** on your current plan card.
5. Click **Upgrade to Yearly**.
6. Review the yearly plan pricing, benefits, and prorated charge.
7. Click **Confirm Upgrade**.
**Notes:**
* If you want to change both your plan and billing cycle (for example, from Starter monthly to Pro yearly), you need to first upgrade your plan, and then switch to yearly billing.
* Switching to yearly changes how you are billed but does not reset your credits mid-month. If you have already used your monthly credits, you do not receive a fresh set when you switch. Your credits renew on your next monthly reset date.
* * *
###
[](https://docs.base44.com/Account-and-billing/Billing-and-plans#viewing-and-downloading-invoices)
Viewing and downloading invoices
View your billing history and download your invoices to keep records of your payments.
Only workspace owners can access invoices.
1. Click your workspace name at the top left of your account.
2. Click **Settings**.
3. Click **Plan and billing**.
4. In **Billing History**, click the **Download** icon to save a copy.

* * *
###
[](https://docs.base44.com/Account-and-billing/Billing-and-plans#updating-your-billing-information)
Updating your billing information
You can update your name, billing address, and tax ID on any paid plan. **To update your information:**
1. Click your workspace name at the top left of your account.
2. Click **Settings**.
3. Click **Plan and billing**.
4. Click **Manage Plan**.
5. Click **Manage** next to **Billing Information**.
6. Follow the prompts to update your details.
**Important:**
* You must be logged into the specific account that made the purchase.
* If you purchased plans for multiple email addresses, log into each account separately to access its receipts.
* Receipts are available immediately after the payment is processed.
* * *
###
[](https://docs.base44.com/Account-and-billing/Billing-and-plans#canceling-your-subscription)
Canceling your subscription
You can cancel your subscription anytime. You’ll have complete access until the end of your billing period.
1. Click your workspace name at the top left of your account.
2. Click **Settings**.
3. Click **Plan and billing**.
4. Click **Manage Plan**.
5. Click **Cancel Plan**.
6. Click **Cancel Plan** again to confirm.
**Notes:**
* Canceling a subscription stops future renewals, but it does not issue a refund for the current subscription period.
* When you cancel, your workspace downgrades to the free plan at the end of your billing period. This limits features and capabilities, including a maximum of 5 apps. Your apps stay live, but you may lose access to features that are only available on paid plans.
* * *
###
[](https://docs.base44.com/Account-and-billing/Billing-and-plans#managing-subscriptions-on-mobile)
Managing subscriptions on mobile
Manage your payments from your mobile device on the go.
The Manage Payments window opens in a pop-up. You must allow pop-ups on your browser in order to see it. If you are experiencing issues managing your payments from mobile, we recommend doing it from a desktop browser instead.
**To manage subscriptions from mobile:**
1. Click your workspace name at the top left of your account.
2. Click **Settings**.
3. Click **Plan and billing**.
4. Tap **Manage Payments** on your plan. For monthly plans, tap **Manage Payments** again.
5. Scroll down and tap **Cancel subscription**.
6. Confirm by tapping **Cancel subscription** again.

* * *
###
[](https://docs.base44.com/Account-and-billing/Billing-and-plans#apple-app-store-subscriptions)
Apple App Store subscriptions
If you subscribed to Base44 through the iOS app, your plan is managed through the Apple App Store. Apple handles the billing, so some actions work differently from a plan purchased on the web. **To change or cancel an App Store subscription, use your Apple device:**
1. Open **Settings** on your iPhone or iPad.
2. Tap your name.
3. Tap **Subscriptions**.
4. Select your Base44 subscription.
How App Store subscriptions work
--------------------------------
* **One platform at a time:** You can hold an active paid plan on only one platform, either the Apple App Store or the Base44 site, never both at once. While your Apple subscription is active, you cannot also upgrade or buy a plan on the site. To move to a web plan, first cancel your Apple subscription, wait for your account to return to the Free plan, and then purchase your plan on the site.
* **Cancellations, refunds, and billing:** Apple handles all billing for App Store subscriptions, so Base44 cannot process or help with cancellations, refunds, or plan changes. Cancel using the steps above, and request refunds directly from Apple.
* **Upgrade billing:** When you upgrade, Apple charges the full price of the new plan upfront and issues a prorated refund for the unused portion of your previous plan. Your billing date resets to the day you upgraded, so you may see 2 separate transactions in your payment history: a charge for the new plan and a refund for the time left on your old plan. This is expected Apple behavior and is not something Base44 controls.
* * *
[](https://docs.base44.com/Account-and-billing/Billing-and-plans#gift-cards)
Gift cards
-------------------------------------------------------------------------------------------
Base44 gift cards let you give someone a discount toward a Base44 subscription. The recipient applies the gift card value at checkout when purchasing or upgrading a plan.
**Important:**
* Gift cards are not currently available to all users.
* Gift cards are non-transferable and non-refundable. Because gift cards are digital products, Base44 cannot offer returns or refunds of any kind. Check that the recipient details and amount are correct before you complete your purchase.
###
[](https://docs.base44.com/Account-and-billing/Billing-and-plans#purchasing-a-gift-card)
Purchasing a gift card
You can buy a gift card from your account inside Base44.

**To purchase a Base44 gift card:**
1. Click your profile icon at the top right of your account.
2. Click **Send a gift card**.
3. Under **Pick a design**, select a card design.
4. Under **Choose an amount**, do one of the following:
* Click a preset amount.
* Enter a custom amount in the amount field.
5. Under **How would you like to send it?**, choose how to deliver the card:
* **Email to recipient (immediately)** to send the card directly.
* **Email to you (printable)** if you want to print or forward it yourself.
6. Under **Who is it for?**, enter the recipient’s name and email.
7. Write a personal message, or click **Suggest a message**.
8. Under **Who is it from?**, enter how you want your name to appear.
9. Click **Continue to checkout** and complete payment.
* * *
###
[](https://docs.base44.com/Account-and-billing/Billing-and-plans#redeeming-a-gift-card)
Redeeming a gift card
When you receive a Base44 gift card, you can apply it as a discount toward a Base44 subscription. How it works depends on whether you already have a plan:
* **If you don’t have a plan yet:** the gift card value is applied as a discount at checkout. For example, a $100 gift card covers 1 month of a plan that costs $100 per month, 2 months of a plan that costs $50 per month, and so on. If the card value does not cover a full month, it applies as a partial discount toward your next invoice.
* **If you already have an active plan:** the gift card value is applied to your next invoice automatically. You can see the pending credit in **Settings** under **Plan and billing**.

You need to enter a credit card to complete checkout even when redeeming a gift card.
**To redeem a gift card:**
1. Click your workspace name at the top left of your account.
2. Click **Settings**.
3. Click **Credit usage**.
4. Under **Redeem a coupon or gift card**, enter your gift card code and click **Apply**.

5. Choose what to do next:
* **If you don’t have a plan yet:** go to **Plan and billing**, choose your plan and click **Subscribe**. Review the discount shown at checkout and click **Subscribe** to complete your purchase.
* **If you already have an active plan:** your gift card value will be applied to your next invoice automatically.
* * *
[](https://docs.base44.com/Account-and-billing/Billing-and-plans#faqs)
FAQs
-------------------------------------------------------------------------------
Click a question below to learn more about billing and plans.
###
[](https://docs.base44.com/Account-and-billing/Billing-and-plans#plans-and-subscriptions)
Plans and subscriptions
How do I apply a coupon code for a discount on a plan?
If you have a coupon code, make sure to apply it before upgrading, changing, or renewing your plan.**To apply a coupon code:**
1. Go to the [Plans](https://app.base44.com/billing)
page.
2. Choose your plan.
3. On the checkout page, click **Add promotion code** and enter your code.

The discount appears in your billing summary if the code is valid.
Can I pause my current subscription?
No. You can’t pause a subscription.
Can I downgrade my plan?
Yes, you can downgrade your plan anytime. The change takes effect at the end of your current billing period.**To downgrade your plan:**
1. Click your workspace name at the top left of your account.
2. Click **Settings**.
3. Click **Plan and billing**.
4. Click **Downgrade** on the plan you want to switch to.
5. Click **Confirm Downgrade**.
How do I claim the free 1-year domain included with my annual plan?
To claim your free 1-year domain:
1. Click **Dashboard** in your app editor.
2. Click **Domains**.
3. Click **Buy Domain**.
4. Search for your desired domain.
5. Look for the option marked as your free domain in the search results.
6. Select this domain to claim and connect it directly to your app.
Which plans include a free domain?
The Builder, Pro, and Elite plans give you a free domain for one year. You have to have a yearly plan to get the free domain, it is not available on the monthly plan.
Which domain extensions are included with the free domain voucher?
The domain extensions you can get with your free domain voucher depend on your region and on what the domain provider makes available at the time you redeem the voucher. In most regions, country-code top-level domains (ccTLDs) are not included, although there can be regional exceptions.When you redeem your voucher, you only see domain extensions that are currently eligible in your region. If a specific extension does not appear in the search results, it is not available with the voucher and you need to purchase it separately. If you want to check availability for a specific region, contact us with your location and the domain extension you are interested in.
Can I move from a yearly plan to a monthly plan?
You cannot change an active yearly subscription to a monthly plan yourself in your billing settings. According to our [Terms of Use](https://base44.com/terms-of-service)
, yearly plan fees are non-cancelable and non-refundable.If you upgraded to a yearly plan by mistake or your situation has changed, contact us and explain what happened. Our team can review your case and, in some situations, may cancel the yearly upgrade and apply a prorated refund so you can subscribe to a different plan. Any change is decided case by case in line with our Terms of Use.
What can I do if I accidentally upgraded to the wrong plan?
If you upgraded to the wrong plan or chose the wrong billing cycle (for example, yearly instead of monthly), contact Base44 support as soon as you notice the issue. In your ticket, explain what you meant to buy and what was actually charged.Our [Terms of Use](https://base44.com/terms-of-service)
state that fees are non-cancelable and non-refundable, but support can review your case and decide whether an exception is possible. If your request is approved, you receive a prorated refund minus processing fees. Your new billing cycle begins on the day of the adjusted charge.**To avoid this in the future:**
* Check that you selected the right plan and features before confirming payment.
* Make sure you chose the billing cycle you want (monthly or yearly).
* Review the total amount on the checkout page before you complete the purchase.
How much storage space can I use with my plan?
Base44 does not set a fixed overall storage limit per app or per plan.Instead, there are limits on individual uploads (such as maximum file size and supported formats) that apply when you or your app’s visitors upload media or data. These limits can differ by file type (e.g. images, documents, data files).
To check the latest per-file upload limits and supported formats, review the [file limits](https://docs.base44.com/Building-your-app/Using-media)
.
Can I make private apps?
From 6 February, 2026, private apps are a paid feature. You need a Starter plan or above to create new private apps.If you are on the free plan and already have private apps from before February 6th 2026, they will continue to work and you can still edit them. However, you will not be able to change a private app to public and back to private again without upgrading.
Can I cancel and resubscribe to the same plan?
No. When you cancel your plan, it stays active until the end of your current billing cycle. During that period, it is not possible to purchase the same plan again.If you have run out of credits before your cycle ends, the fastest option is to upgrade to a higher plan so your new credits are available immediately. The amount you are charged can vary by plan, but you’ll always see the exact amount before you confirm. You can then downgrade back to your original plan at the end of the cycle if you prefer.
Are there paid plans for using the Base44 backend?
If you are using the [Base44 backend](https://docs.base44.com/developers/backend/overview/backend-service-basics)
platform, it is currently in beta and free to use. It uses your integration credits, not a separate backend subscription. If you need more features or higher credit limits, you can upgrade to one of the regular Base44 plans.
###
[](https://docs.base44.com/Account-and-billing/Billing-and-plans#payments-and-billing)
Payments and billing
What should I do if my payment isn't accepted?
Check that your card details are correct, the card is not expired, and you have sufficient funds. If your payment still does not go through or your plan is marked Past Due, update your payment information in the Billing dashboard. If the issue continues, try a different card or contact your bank for assistance.
Can I get a refund?
We understand that sometimes plans change, and we’re here to support you. All Base44 services are non-refundable per our [Terms of service](https://base44.com/terms-of-service)
. If you’re facing special circumstances, contact us and we’ll see how we can help.
Can I pay for Base44 from China?
Yes. Base44 currently charges in USD. If you are paying from China, you need to pay in USD using a credit card or Link. We do not accept PayPal.
What payment methods does Base44 accept?
Base44 currently accepts payments by major credit and debit cards only. We do not support the following payment methods:
* PayPal
* Bank transfers
* Wire transfers
* Virtual cards
* Cryptocurrency
**If your card is declined or you cannot complete payment, try the following:**
1. Check with your bank about any international transaction limits or blocks.
2. Try a different card if you have one available.
3. Make sure your card is enabled for international online transactions.
For people in regions with stricter payment rules, some banks may block international online payments by default. Contact your bank and ask them to authorize payments to Base44’s payment processor.
Do you offer student discounts?
Yes. Students and educators can get a discounted rate on the Starter or Builder plan after verifying their university or institution email address. The discount is only available to users who have never subscribed to a paid plan before.See [Student and educator discount](https://docs.base44.com/Account-and-billing/Student-discount)
for eligibility details and instructions.
I see a 'Subscription payment overdue' message. What should I do?
A payment can fail for different reasons, for example if 3D Secure authentication failed or there were not enough funds on your card. If you see the ‘Subscription payment overdue’ notification, do the following:
1. Click **Update payment method** and add a valid payment card.
2. [Contact our support team](https://app.base44.com/support/conversations)
to complete the payment and restore full access.
I subscribed through the Apple App Store. Where are my receipts?
Receipts for App Store purchases are kept by Apple, not in your Base44 billing history. To find them on your iPhone or iPad, open **Settings**, tap your name, tap **Media & Purchases**, tap **View Account**, then tap **Purchase History**.
Why does my App Store price differ from the price on the Base44 site?
App Store pricing is set by Apple, so the amount you pay can differ from the prices on the Base44 site and may appear in your local currency. Base44 does not control App Store pricing. Website discounts and promotions, such as the student discount, cannot be applied to App Store purchases. If you have a question about a charge, contact Apple Support.
###
[](https://docs.base44.com/Account-and-billing/Billing-and-plans#gift-cards-2)
Gift cards
Can I resend a gift card email?
You can see all the gift cards you have sent, along with their status, amount, recipient, and code, from the Gift Cards page.**To view your purchase history:**
1. Click your profile icon at the top right of your account.
2. Click **Send a gift card**.
3. Click the **Purchase history** tab.
What if I entered the wrong email when buying a gift card?
If you think you entered the wrong recipient email when purchasing a gift card, contact Base44 support as soon as possible. Base44 cannot guarantee that a gift card can be re-delivered after it has been sent, but the support team can review your case and let you know what options are available.
I have an older gift card that gave me message credits. Does it still work?
Yes. Gift cards purchased before 12th April, 2026 added message credits to your account and continue to work as message credits until they expire.
Do Base44 gift cards expire?
Gift cards expire 5 years from the date of purchase.
Was this page helpful?
YesNo
[Changing your account settings](https://docs.base44.com/documentation/account-and-billing/managing-your-account)
⌘I
Assistant
Responses are generated using AI and may contain mistakes.
Suggestions
Which plans come with a free domain?How are credits used?How do I use Discuss mode?
---
# Student and educator discount - Base44 Support Documentation
> Documentation Index
> -------------------
>
> Fetch the complete documentation index at: [/llms.txt](https://docs.base44.com/llms.txt)
>
> Use this file to discover all available pages before exploring further.
[Skip to main content](https://docs.base44.com/Account-and-billing/Student-discount#content-area)
Students and educators can get a discounted rate on a Starter or Builder plan after verifying their university or institution email address. The discount is one-time and applies to your first paid subscription.
If you are part of a higher education institution, you can also learn about Base44’s higher education offerings at [base44.com/highered](https://base44.com/highered)
.
[](https://docs.base44.com/Account-and-billing/Student-discount#discount-details)
Discount details
------------------------------------------------------------------------------------------------------
| Billing cycle | Discount |
| --- | --- |
| Monthly | 30% off for up to 12 months |
| Annual | 50% off for the first year |
The discount applies to the **Starter** and **Builder** plans.
[](https://docs.base44.com/Account-and-billing/Student-discount#who-is-eligible)
Who is eligible
----------------------------------------------------------------------------------------------------
You are eligible for the student and educator discount if:
* You have a valid university or institution email address recognized by Base44
* You have never subscribed to a Base44 paid plan before
The discount can only be claimed once per verified email address.
[](https://docs.base44.com/Account-and-billing/Student-discount#how-to-claim-the-discount)
How to claim the discount
------------------------------------------------------------------------------------------------------------------------
The discount offer appears as a banner on the [Plans](https://app.base44.com/billing)
page. Click the banner to open the verification flow and complete the steps below.
###
[](https://docs.base44.com/Account-and-billing/Student-discount#step-1-verify-your-university-email)
Step 1: Verify your university email
Enter your university or institution email address. Base44 checks it against a list of recognized academic domains, including .edu, .ac.uk, .ac.jp, and other academic top-level domains.
If your email domain is not recognized automatically, contact [Base44 support](https://docs.base44.com/Account-and-billing/Student-discount#)
to request that it be added.
###
[](https://docs.base44.com/Account-and-billing/Student-discount#step-2-confirm-the-verification-code)
Step 2: Confirm the verification code
A 6-digit verification code is sent to the university email address you entered. Enter the code to confirm that you have access to that inbox.
###
[](https://docs.base44.com/Account-and-billing/Student-discount#step-3-complete-the-survey)
Step 3: Complete the survey
Answer a few short questions about how you plan to use Base44:
* **Role:** Student or educator
* **Field of study**
* **Graduation date**
* **Intended use**
After you submit the survey, the discount is applied to your account automatically.
[](https://docs.base44.com/Account-and-billing/Student-discount#purchasing-with-the-discount)
Purchasing with the discount
------------------------------------------------------------------------------------------------------------------------------
Once you complete verification, the discount is applied at checkout when you subscribe to a Starter or Builder plan. **To purchase a plan with the discount:**
1. Click your workspace name at the top left of your account.
2. Click **Settings**.
3. Click **Plan and billing**.
4. Click **Subscribe** on the Starter or Builder plan.
5. Select your billing cycle. The discounted price is shown before you confirm.
6. Click **Continue to Checkout** and complete your purchase.
[](https://docs.base44.com/Account-and-billing/Student-discount#faqs)
FAQs
------------------------------------------------------------------------------
Click a question below to learn more about the student and educator discount.
My email domain is not recognized. What can I do?
If your university or institution email is not automatically recognized, contact [Base44 support](https://docs.base44.com/Account-and-billing/Student-discount#)
and provide your email domain. The team can review and add it to the recognized domain list.
Does the discount renew automatically?
On a monthly plan, the 30% discount applies for up to 12 consecutive months and then expires. On an annual plan, the 50% discount applies to the first year only. After the discount period ends, your plan renews at the standard rate.
Can I apply the student discount and a promo code at the same time?
No. The student discount and a promo code cannot be combined. If you have both, the student discount is applied automatically at checkout.
What happens if I cancel my plan during the discount period?
If you cancel your plan, you lose access to the discount. The student and educator discount can only be claimed once, so if you resubscribe later you will be charged at the standard rate.
Was this page helpful?
YesNo
[Credits](https://docs.base44.com/Account-and-billing/Credits)
[About workspaces](https://docs.base44.com/documentation/account-and-billing/about-workspaces)
⌘I
Assistant
Responses are generated using AI and may contain mistakes.
Suggestions
Which plans come with a free domain?How are credits used?How do I use Discuss mode?
---
# Managing your workspace members - Base44 Support Documentation
> Documentation Index
> -------------------
>
> Fetch the complete documentation index at: [/llms.txt](https://docs.base44.com/llms.txt)
>
> Use this file to discover all available pages before exploring further.
[Skip to main content](https://docs.base44.com/Account-and-billing/Managing-your-workspaces#content-area)
Workspace members are the people you collaborate with on your Base44 apps. You can invite new teammates, assign roles, and control each person’s permissions so your workspace stays secure and organized. As your team changes, you can update roles or remove members whenever you need. Everyone you invite uses the workspace’s shared plan and credits. They do not need their own paid plan to access what you give them in your workspace.
* * *
[](https://docs.base44.com/Account-and-billing/Managing-your-workspaces#viewing-your-members)
Viewing your members
----------------------------------------------------------------------------------------------------------------------
View everyone in your workspace from **Settings** → **Members**. The Members page lists each member with their role, credit usage, and activity, and summary cards give you a quick overview.

Summary cards at the top of the **Members** page give you a quick overview of your workspace:
* **Members:** Total number of workspace members, with a breakdown by role.
* **Guests:** Number of guest collaborators invited to specific apps.
* **Credits usage:** Credits the workspace has used in the current billing cycle, and how many remain. Click the arrow to open the full [Credit usage](https://docs.base44.com/Account-and-billing/Credits)
page.
* **Top builders:** The members who used the most credits this billing cycle. Visible to workspace owners and admins.
The **Credit limit** column in the members table is only available on Enterprise workspaces. See [Managing enterprise workspace members](https://docs.base44.com/Enterprise/managing-enterprise-members#credit-limits)
for details.
The members table includes the following columns. Click a column header to sort by that column.
* **People:** The member’s name and email, with a count of everyone in the list.
* **Role:** The member’s workspace role. Click it to assign a different role.
* **Monthly credits used:** Credits the member has used in the current billing cycle.
* **Credit limit:** The member’s monthly credit cap. Shown on Enterprise workspaces only.
* **Apps:** Number of apps the member owns in the workspace.
* **Agents:** Number of agents the member owns in the workspace.
* **Last active:** When the member was last active in the workspace.
Use the search box to find members by name, email, or role, or click **Filter by** to narrow the list by role, invite status, credits used, custom credit limit, apps, agents, or last active.
* * *
[](https://docs.base44.com/Account-and-billing/Managing-your-workspaces#inviting-members-to-your-workspace)
Inviting members to your workspace
--------------------------------------------------------------------------------------------------------------------------------------------------
Bring people into your workspace to collaborate and work together on building your apps. You can invite members by email, in bulk via CSV, or by sharing an invite link. To invite someone to a single app without giving them full workspace access, see [Inviting collaborators to your app](https://docs.base44.com/Setting-up-your-app/Managing-access#inviting-collaborators-to-your-app)
.
###
[](https://docs.base44.com/Account-and-billing/Managing-your-workspaces#sending-an-individual-invite)
Sending an individual invite
Invite a teammate directly by entering their email address and assigning them a role.
**Important:**
* Email invitations expire after 60 days.
* Invitees must click **Accept Invitation** and sign in or create a Base44 account to join.
**To send an individual invite:**
1. Click your workspace name at the top left of your account.
2. Click **Settings**.
3. Click **Members** under **Workspace**.
4. Click **Invite Members** and select **Invite by email**.
5. Enter their details and choose a role: **Admin**, **Editor**, or **Viewer**.
6. Click **Send invite**.

###
[](https://docs.base44.com/Account-and-billing/Managing-your-workspaces#inviting-members-in-bulk)
Inviting members in bulk
Save time by uploading a CSV file to invite multiple teammates at once.
**Before you begin:** Prepare a CSV file with the email addresses you want to invite. You can also click **Download Template** to get a ready-made file you can edit.
**To invite members in bulk:**
1. Click your workspace name at the top left of your account.
2. Click **Settings**.
3. Click **Members** under **Workspace**.
4. Click **Invite Members** and select **Bulk invite (CSV)**.
5. (Optional) Click **Download Template** to get a sample CSV to fill out.
6. Prepare your CSV with the following columns:
* **email** (required)
* **role** (optional)
7. Drag and drop your CSV file, or click **Choose file**.
8. Click **Send Invitations**.
If **role** is empty, the default role is **Viewer**.

###
[](https://docs.base44.com/Account-and-billing/Managing-your-workspaces#creating-an-invite-link)
Creating an invite link
Generate a shareable link that anyone can use to join your workspace without needing an individual email invite. Only workspace owners and admins can create and manage invite links. **To create an invite link:**
1. Click your workspace name at the top left of your account.
2. Click **Settings**.
3. Click **Members** under **Workspace**.
4. Click the **More Actions** icon and select **Manage Invite Links**.
5. Click **Create Invite Link**.
6. Choose a **Role** for people who join using this link: **Viewer** or **Editor**.
7. Set a **Maximum uses** limit (default: 10 uses).
8. (Optional) Expand **Advanced options** to set an expiry date, add a link name, or restrict sign-ups to specific email domains.
9. Click **Create**, then copy the link and share it.

Links expire after 14 days by default. To delete a link before it expires, go to **Manage Invite Links** and click the delete icon next to it.
After inviting an Editor or Viewer, you need to invite them as a collaborator on each app you want them to access. They will not see any apps in the workspace until you do.
###
[](https://docs.base44.com/Account-and-billing/Managing-your-workspaces#controlling-guest-invitations)
Controlling guest invitations
The **External Collaborators** setting controls who in your workspace can invite people from outside the workspace to collaborate on apps. When enabled, only workspace owners and admins can invite external guests. When disabled, any workspace member can send guest invitations.
Only workspace owners and admins can change this setting.
**To manage the external collaborators setting:**
1. Click your workspace name at the top left.
2. Click **Settings**.
3. Click **Auth and security**.
4. Toggle **External Collaborators** on or off.

* * *
[](https://docs.base44.com/Account-and-billing/Managing-your-workspaces#managing-your-members)
Managing your members
------------------------------------------------------------------------------------------------------------------------
Manage members directly from the **Members** page. Change roles, set credit limits, remove people, or act on several members at once.
###
[](https://docs.base44.com/Account-and-billing/Managing-your-workspaces#roles-and-their-limits)
Roles and their limits
Each role grants a different level of access. Expand a role to see what it can do and the rules that apply when you assign it. For how roles, plans, and credits fit together, see [About workspaces](https://docs.base44.com/documentation/account-and-billing/about-workspaces#workspace-roles)
.
You cannot change your own role, even as an owner or admin. Ask another workspace owner or admin to update it for you.
Owner
* Has full control over the whole workspace, including billing, members, settings, apps, and credits.
* Each workspace has one owner.
Admin
* Manages members and workspace settings.
* Does not handle billing.
* Available on Enterprise workspaces only. On other plans, the Admin option is locked in the role dropdown with an upgrade prompt.
Editor
* Creates and edits the apps they are invited to.
* Invited as a collaborator on each app individually, so they do not automatically see every app in the workspace.
Viewer
* Views only the specific apps they are invited to.
* Cannot edit apps, use the AI chat, or access most of the app dashboard.
* Does not consume credits, so you cannot set a credit limit for them.
Guest
* A collaborator invited to specific apps, not the whole workspace.
* Can be promoted to Editor or Viewer from the **Role** column, but not directly to Admin.
See [Managing guests](https://docs.base44.com/Account-and-billing/Managing-your-workspaces#managing-guests)
for more.
###
[](https://docs.base44.com/Account-and-billing/Managing-your-workspaces#changing-a-member%E2%80%99s-role)
Changing a member’s role
Change a member’s role at any time from the **Members** page. **To change a member’s role:**
1. Click your workspace name at the top left of your account.
2. Click **Settings**.
3. Click **Members** under **Workspace**.
4. Find the member you want to update.
5. Click their current role and select a new one.

###
[](https://docs.base44.com/Account-and-billing/Managing-your-workspaces#removing-a-member)
Removing a member
Remove a member to revoke their access to the workspace and all its apps. **To remove a member:**
1. Click your workspace name at the top left of your account.
2. Click **Settings**.
3. Click **Members** under **Workspace**.
4. Find the member you want to remove.
5. Click the **More Actions** icon next to their name.
6. Click **Remove member** and confirm.

###
[](https://docs.base44.com/Account-and-billing/Managing-your-workspaces#selecting-multiple-members)
Selecting multiple members
Select several members at once to update them together instead of one at a time, up to 200 at once. Use the checkboxes in the first column to select individual members, or the checkbox in the header row to select everyone in the list. When you select one or more members, a toolbar appears above the table with the actions you can apply to your selection:
* **Change role:** Update the role for all selected members at once.
* **Remove from workspace:** Remove the selected members and revoke their access to all apps.
* **Export:** Click the download icon and choose **Only selected** to download a CSV of the selected members.

On Enterprise workspaces, the toolbar also includes **Set credit limit**, which sets a monthly credit cap for the selected members. Leave it empty to remove an existing limit. This action does not appear on non-Enterprise workspaces.
###
[](https://docs.base44.com/Account-and-billing/Managing-your-workspaces#exporting-members)
Exporting members
To export the member list, click the download icon next to the search box and choose what to export:
* **All people:** Every member in the workspace.
* **Current filter:** Only the members that match the filters you have applied.
* **Only selected:** Only the members you selected with the checkboxes.

* * *
[](https://docs.base44.com/Account-and-billing/Managing-your-workspaces#managing-guests)
Managing guests
------------------------------------------------------------------------------------------------------------
Guests are added to your workspace when you invite someone to a specific app who is not already a workspace member. You can manage guests from **Settings** → **Members**. A guest can open only the apps they were invited to. In workspace settings, they can view only **Basic information** and their own **Account settings**, and they cannot create apps, see other workspace apps, or invite collaborators. To promote a guest to a full member, click their role in the **Role** column and choose **Editor** or **Viewer**. To see which apps a guest can open, click the **More Actions** icon next to their name and select **View app access**.

Was this page helpful?
YesNo
[Managing a workspace](https://docs.base44.com/documentation/account-and-billing/managing-your-workspace-members)
[Managing workspace apps](https://docs.base44.com/documentation/using-your-workspaces/managing-your-workspace-apps)
⌘I
Assistant
Responses are generated using AI and may contain mistakes.
Suggestions
Which plans come with a free domain?How are credits used?How do I use Discuss mode?
---
# Credits - Base44 Support Documentation
> Documentation Index
> -------------------
>
> Fetch the complete documentation index at: [/llms.txt](https://docs.base44.com/llms.txt)
>
> Use this file to discover all available pages before exploring further.
[Skip to main content](https://docs.base44.com/Account-and-billing/Credits#content-area)
[](https://docs.base44.com/Account-and-billing/Credits#about-credits-in-base44)
About credits in Base44
-----------------------------------------------------------------------------------------------------------
Credits are the units Base44 uses when you interact with Base44’s AI or connect your app to external tools. Credit usage adjusts dynamically based on how much work the builder needs to do behind the scenes.
###
[](https://docs.base44.com/Account-and-billing/Credits#types-of-credits)
Types of credits
Base44 uses 2 types of credits to support your [app building](https://base44.com/ai-app-builder)
and operations:
Message credits
Used when you interact with Base44’s AI while building apps. Message credits are used for prompts that plan, update, or fix parts of your app.**Examples:**
* Asking the AI to add or refine a small feature.
* Debugging or fixing logic in a specific part of your app.
* Getting the AI to rewrite copy or microcopy.
* Applying AI-suggested changes from the chat.
Integration credits
Used whenever your app uses Base44’s built-in services, such as sending an email, generating an image, running an LLM call, or using [in-app agents](https://docs.base44.com/Building-your-app/AI-agents-for-apps)
. Integration credits are not used if you call external services through your own API keys or backend functions.[See the full cost breakdown.](https://docs.base44.com/Account-and-billing/Credits#integration-credit-examples)
* * *
[](https://docs.base44.com/Account-and-billing/Credits#how-credits-are-used)
How credits are used
-----------------------------------------------------------------------------------------------------
There is no set credit amount used per message. Different actions use credits in different ways, depending on what you ask the AI to do. Short, focused prompts usually require less work behind the scenes, while broader prompts that touch several pages or components can require more. Manual visual edits, such as dragging elements, changing layouts, or editing text directly in the editor, do not use credits. Even when a request looks simple or your message is very short, the AI still has a lot to do in the background. It needs to read what you already built, understand your request, figure out the safest way to change it, and apply the update without breaking other parts of your app. Credits are based on how much work the system has to do, not on how small the change looks. This is why something that feels like a quick tweak, such as “translate the whole app” or “rebuild this page for mobile,” can still use a few credits as the AI has to review many files and make complex updates that you do not always see.
**Important:**
* The credit amounts shown on this page are estimates based on standard models and average complexity, provided as a guide rather than exact figures. They are subject to change at Base44’s discretion. For details, see the [Base44 Terms of Service](https://base44.com/terms-of-service)
.
* The credits used for a given action can vary and are calculated after the action runs, so the actual cost may be higher or lower than the figure shown here. To see how many credits you have used, check your [credit usage](https://docs.base44.com/Account-and-billing/Credits#checking-your-credit-balance)
.
* There is no way to preview an integration credit cost before running an action. To estimate it, run the action in a controlled test and review the execution logs afterward.
###
[](https://docs.base44.com/Account-and-billing/Credits#message-credit-examples)
Message credit examples
These are rough ranges. Actual usage depends on how much work the AI needs to do behind the scenes.
| Scope of change | What it usually involves | Typical credits used |
| --- | --- | --- |
| Simple visual or text change | A lightweight update to a single element or short piece of text. | ~0.5 credits |
| Improving a small feature | Adjusting logic across a few files, higher than a simple style tweak. | ~1 credit |
| Adding a complex module | Entities, flows, and logic across multiple files, requiring deeper planning. | ~2 credits |
| Large-scale or app-wide change | Touching many pages, components, or the full app structure. | ~3–4 credits |
###
[](https://docs.base44.com/Account-and-billing/Credits#integration-credit-examples)
Integration credit examples
Each call to a Base44 built-in service uses integration credits. Open a category below to see the cost for each integration.
Built-in integrations
| Integration | What it does | Cost |
| --- | --- | --- |
| [SendEmail](https://docs.base44.com/documentation/building-your-app/sending-emails) | Sends an email from your app | 1 credit per email |
| [SendEmail](https://docs.base44.com/documentation/building-your-app/sending-emails) with custom domain | Sends an email from your own domain address | 2 credits per email |
| [UploadFile](https://docs.base44.com/Integrations/built-in-integrations#uploading-files) | Handles a file upload in your app | 1 credit per upload |
| [ExtractDataFromUploadedFile](https://docs.base44.com/Integrations/built-in-integrations#extracting-data-from-uploaded-files) | Extracts structured data from an uploaded file | 1 credit per call |
| [GenerateImage](https://docs.base44.com/Integrations/built-in-integrations#generating-images) | Generates an image with AI | 1 credit per image |
| [GenerateVideo](https://docs.base44.com/Integrations/built-in-integrations#generating-videos) | Generates a video with AI | 5 credits per second of video |
| [GenerateSpeech](https://docs.base44.com/Integrations/built-in-integrations#generating-speech) | Converts text to audio | 1 credit per 50 characters (maximum 100 per call) |
| [invokeLLM](https://docs.base44.com/Integrations/built-in-integrations#running-llm-calls) (Automatic) | Runs an LLM call in a flow or backend function | ~3 credits per call |
| [invokeLLM](https://docs.base44.com/Integrations/built-in-integrations#running-llm-calls) (Gemini 3 Flash) | Stronger reasoning at moderate cost | ~5 credits per call |
| [invokeLLM](https://docs.base44.com/Integrations/built-in-integrations#running-llm-calls) (GPT-5) | Complex analysis and high-accuracy tasks | ~15 credits per call |
In-app agents
Each message sent to an [in-app agent](https://docs.base44.com/Building-your-app/AI-agents-for-apps)
uses integration credits. Cost varies based on the AI model selected.
| Model | Best for | Cost |
| --- | --- | --- |
| Automatic | General-purpose, fast responses | ~3 credits per message |
| Gemini 3 Flash | Stronger reasoning at moderate cost | ~5 credits per message |
| GPT-5 | Complex analysis and high-accuracy tasks | ~15 credits per message |
Automations
Each time an [automation](https://docs.base44.com/Building-your-app/Creating-automations)
runs, it uses 1 integration credit, regardless of type (scheduled, data event, in-app agent trigger, or connector). Any built-in integrations called inside the automation are charged separately on top of that.For example, an automation that calls invokeLLM and then sends an email costs the 1-credit automation run plus ~3 credits for the LLM call plus 1 credit for the email, roughly 5 credits each time it fires. Automations that run frequently or chain several actions can add up quickly.
To estimate an automation’s credit cost, run it once manually and check the execution logs in your app dashboard.
Social content
| Action | What it does | Cost |
| --- | --- | --- |
| [Generate content plan](https://docs.base44.com/promoting-your-app/social-content) | Generates a social media content plan | 10 credits per plan |
| [Improve with AI or Regenerate image](https://docs.base44.com/promoting-your-app/social-content) | Refines a post or regenerates its image | 1 credit per action |
###
[](https://docs.base44.com/Account-and-billing/Credits#viewing-credits-used-per-message)
Viewing credits used per message
You can see how many credits a prompt used. Click the **More Actions** icon under your prompt to open the menu, then look under **Credits Used** to see the cost for that specific message.

###
[](https://docs.base44.com/Account-and-billing/Credits#maximizing-your-credits)
Maximizing your credits
Get more out of your Base44 credits with these practical tips. Open each tip below to see how you can save credits and keep your workflow efficient.
Plan your builds before prompting
Planning before you start helps you save both time and credits.Start by deciding what your app should do and outlining its main parts. You can use any AI tool to organize your thoughts and write a clear prompt. List the key features you want and describe how people will use your app, step by step.You can also ask another AI tool to help you draft a ready-to-use prompt for Base44, then paste it directly into your project.
Use the automatic AI model
Keep the AI model set to **Automatic** unless you have a specific need to choose a manual model. Base44 automatically routes each prompt to the AI models best suited for your task, so you get accurate results while your credit usage stays efficient, without needing to worry about the technical details.Manually choosing a model is less predictable and can use more credits, especially for complex work.
Keep your prompts focused
Write short, focused prompts for each message instead of one very broad request. Focused prompts often use fewer credits and lead to better results. Ask the AI to work on specific files, pages, or functions instead of your entire app, and clearly state what change you want to make.For example, you could say: `Update the Home page text to match the new pricing plan`.
Use Discuss mode to explore ideas
Use **Discuss** mode to brainstorm, ask questions, or refine ideas without changing your app. Each message in Discuss mode uses **0.3 message credits**. When you are ready to apply changes, switch back to the regular chat. [Learn more about Discuss mode](https://docs.base44.com/Building-your-app/AI-chat-modes#discuss-mode)
.Use the regular chat mode only when you are ready to make direct changes to your app.
Use Edit mode
For UI tweaks, select the element in **Edit** mode before you describe the change so the AI does not need to scan your entire layout.
Avoid repeated automatic fixes
If a change is not what you wanted, click the **Revert** icon on that message instead of using extra prompts to debug or undo it.If you encounter errors, try using the automatic fix once or twice. If the problem is not resolved, avoid repeating the auto-fix. Switch to **Discuss** mode, explain what is not working, and ask the AI to help you find a solution.
Add and test features in small steps
Add new features or make changes to your app one step at a time. Start by building the basics, such as pages, navigation, and a consistent design. Then add new features like forms, search, analytics, or integrations gradually, testing after each change.This step-by-step method helps you catch issues early, makes troubleshooting easier, and reduces the risk of using more credits on major fixes.
Track your credit usage
Keep an eye on your credit usage by checking your balance while editing your app, or from your workspace settings.Monitoring your credits helps you spot actions that use the most credits and plan resets or upgrades if needed, so you can avoid interruptions to your workflow.You can also see [how many credits a specific prompt used](https://docs.base44.com/Account-and-billing/Credits#viewing-credits-used-per-message)
from the **More Actions** icon under that prompt in the builder.
* * *
[](https://docs.base44.com/Account-and-billing/Credits#credit-resets)
Credit resets
---------------------------------------------------------------------------------------
Your credits refresh automatically based on your plan:
* **Free plan:** You can use up to 5 credits a day, up to a total of 25 credits each month. Once you reach your daily limit, features that require credits are unavailable until your daily balance resets, as long as you still have monthly credits left.
* **Paid plans:** Message and integration credits reset monthly on your reset date, which is the same day of the month you subscribed. For example, if you subscribed on July 5, your credits reset on the 5th of every month.
Unused monthly credits expire at the end of your credit cycle and do not carry over to the next month. If you upgrade mid-cycle, how any added credits apply can vary depending on your plan. Any changes are shown for your review before you confirm.
If you reach your credit limit, actions that require credits pause until your next reset. If you prefer not to wait, you can upgrade or adjust your plan from your [**billing dashboard**](https://app.base44.com/billing?utm_source=Mintlify&utm_medium=Billing&utm_content=credits)
.
* * *
[](https://docs.base44.com/Account-and-billing/Credits#checking-your-credit-balance)
Checking your credit balance
---------------------------------------------------------------------------------------------------------------------
Your credit balance shows how many message credits and integration credits you have available in the current billing cycle. You can also drill into how credits are distributed across your apps and track your daily usage over time.
You can also view your remaining credits while working in your app editor by clicking the Base44 logo at the top left.
**To check your balance:**
1. Click your workspace name at the top left of your workspace.
2. Click **Settings**.
3. Click **Credit usage** under **Workspace**.
4. Review your available **Message credits** and **Integration credits** shown at the top of the page.

###
[](https://docs.base44.com/Account-and-billing/Credits#viewing-credit-usage-per-app)
Viewing credit usage per app
Both the **Message credit usage distribution by app** and **Integration credit usage distribution by app** sections show how each credit type is distributed across your apps in the current billing cycle. Expand either section to see a ranked list of your apps with a bar chart and credit totals for each.

###
[](https://docs.base44.com/Account-and-billing/Credits#daily-credit-usage)
Daily credit usage
The **Daily usage** chart shows how many message or integration credits you used each day. Use the **Message credits** and **Integration credits** tabs at the top to switch between the two views.

###
[](https://docs.base44.com/Account-and-billing/Credits#viewing-usage-for-a-single-app)
Viewing usage for a single app
The **App usage** page breaks down your app’s message and integration credit spend for the current billing cycle, so you can track and manage your credit usage more effectively. Credits are shared across every app in the workspace, and the date they renew is shown at the top of the page. **To view a single app’s usage:**
1. Click **Dashboard** in the app editor.
2. Click **Overview**.
3. Click **App usage**.
For each credit type, you see:
* **This app:** Credits this app has used in the current cycle.
* **Other apps:** Credits used by every other app in your workspace.
* **Remaining:** Credits left out of your workspace total.
Under **Integration credits**, the **By source** section breaks down what used integration credits this cycle, such as automations, AI, and tools. Select **Show details** to see a ranked list of the specific sources and how many credits each one used.

* * *
[](https://docs.base44.com/Account-and-billing/Credits#using-credits-with-teams)
Using credits with teams
-------------------------------------------------------------------------------------------------------------
Credits in your workspace are shared across everyone you invite. When any member builds or uses apps, credits are drawn from the workspace’s shared pool.
* **Message credits:** Drawn from the workspace pool whenever anyone in the workspace sends a prompt.
* **Integration credits:** Drawn from the workspace pool whenever an app triggers a built-in Base44 service, such as sending an email, generating an image, or calling an LLM.
* * *
[](https://docs.base44.com/Account-and-billing/Credits#sharing-your-app-and-earning-credits)
Sharing your app and earning credits
-------------------------------------------------------------------------------------------------------------------------------------
You can earn 20 credits by sharing your Base44 project on LinkedIn or X. Spread the word about your app and get rewarded with extra credits to keep building. Once your post is approved, the credits are added to your account and work like regular credits.
**Notes:**
* You can only earn these credits once per Base44 account by sharing an app on **LinkedIn or X**.
* Your account must have more than 100 followers.

**To earn free credits:**
1. Click the **Base44** icon at the top left corner of your app editor.
2. Click **Win Free Credits**.
3. In the popup, review the **Sharing Guidelines**.
4. After you share, copy the link to your **LinkedIn** or **X** post.
5. In the same popup, click **support system**.
**Note:** This opens the support system where you can submit a ticket that connects directly to your app.
6. Write in the ticket that you have shared a social link, paste the link to your post and submit it.
The support ticket that you submit needs to be handled by an expert. The credits cannot be given automatically. Please make sure that your ticket is escalated.
* * *
[](https://docs.base44.com/Account-and-billing/Credits#faqs)
FAQs
---------------------------------------------------------------------
Click a question below to learn more about credits.
How does credit usage differ between prompts?
Credit usage depends on how much work the builder needs to do behind the scenes.Simple, focused prompts usually require fewer steps, so they tend to use fewer credits. For example, changing a button color or adjusting padding is often a lightweight update.Larger or more complex prompts, such as adding new pages, features, or integrations, often involve planning, updating multiple files, and running more checks. These usually use more credits, although in some cases the builder can complete a large task efficiently in a single pass.
Is there a minimum or maximum number of integration credits per action?
There is no fixed minimum or maximum. A simple automation with no additional calls costs 1 integration credit as a baseline, but the total scales with every action it triggers. For example, an automation that calls invokeLLM and sends an email costs the 1-credit run plus the LLM call plus the email send. LLM calls also vary by model — lighter models cost fewer credits than advanced ones.Because the range is wide, run the action in a controlled test and check the execution logs to understand the cost for your specific workflow.
Do database queries cost integration credits?
No. Reading and writing data to your app’s database does not use integration credits. Integration credits are only charged when your app calls a Base44 built-in service, such as sending an email, generating an image, running an LLM call, or triggering an automation. Standard database operations are included at no extra credit cost.
Why does Base44 use two types of credits?
Message credits cover your building process, while integration credits cover your app’s live operations and automations. Separating them makes it easier to understand and manage the cost of development versus runtime activity.
Why were credits deducted for AI mistakes, and how do I request a refund or reset?
We understand that issues can arise, and we are here to support you. Credits are non-refundable for tool behavior and AI mistakes. Each prompt still requires work from the builder, even if the result is not what you expected.If something remains unresolved or you need further assistance, contact support with a detailed description of the issue, screenshots, and a link to your app.
What are promotional and free credits?
Base44 may issue extra credits for sign-ups, campaigns, or promo codes. These credits appear in your dashboard and work like regular credits, but are often one-time or limited-time.For example, you can earn credits by sharing your project on LinkedIn or X.
How do I redeem a coupon code?
Base44 may provide coupon codes that add extra credits to your account.**To redeem a coupon code:**
1. Click your workspace name at the top left of your workspace.
2. Click **Settings**.
3. Click **Credit usage** under **Workspace**.
4. Enter your code in the field next to **Redeem a coupon or gift card**.
5. Click **Apply**.

Do automatic AI fixes use credits?
On the Free plan, both **Resolve with AI** and automatic error fix messages consume message credits. Each message and automatic fix counts as work, so both draw from your message credit balance.On paid plans, automatic AI fixes are free and do not use credits.
What happens if I run out of integration credits?
If you are using integrations and run out of integration credits:
* We email you when your integration credits run out.
* Any action you perform that requires integration credits fails and shows an error that you have used all your integration credits.
If someone using your app attempts an action that uses integration credits, for example subscribing to your app and triggering an email, they receive a generic error message without any reference to integration credits:
Why haven't my credits refreshed yet?
Your message and integration credits reset each cycle at the exact time your subscription was purchased, based on Coordinated Universal Time (UTC), not just on the calendar date in your own time zone.For example, if your reset date is the 5th and you are several hours behind UTC, your credits may refresh while it is still the 4th where you are, or later in the day on the 5th.If your credits have not refreshed after your reset time has passed in UTC and you checked your billing cycle and current credit usage, wait and check again later in the day. Your credits should update once your reset time passes.
Why are my backend functions blocked on a paid plan?
Backend functions are available on the Builder plan and above. If your workspace is on a Builder plan or higher and backend functions are still blocked, check that the app owner’s workspace has the right plan. If the app was created in a different workspace, backend functions follow the plan of that workspace.
What should I do if the AI chat gets stuck or will not revert changes?
If AI chat is unresponsive, gets stuck processing, or does not undo changes as expected, there are a few ways to recover.For step-by-step solutions, including how to use **Version History** or the **Revert** option, unstick a frozen prompt, or get help if the chat panel is completely unresponsive, see the [Troubleshooting Issues](https://docs.base44.com/Community-and-support/Troubleshooting)
article.
Was this page helpful?
YesNo
[Connecting a custom MCP](https://docs.base44.com/documentation/account-and-billing/setting-up-a-custom-mcp)
[Student & educator discount](https://docs.base44.com/Account-and-billing/Student-discount)
⌘I
Assistant
Responses are generated using AI and may contain mistakes.
Suggestions
Which plans come with a free domain?How are credits used?How do I use Discuss mode?
---
# Referral Program - Base44 Support Documentation
> Documentation Index
> -------------------
>
> Fetch the complete documentation index at: [/llms.txt](https://docs.base44.com/llms.txt)
>
> Use this file to discover all available pages before exploring further.
[Skip to main content](https://docs.base44.com/Community-and-support/Referral-program#content-area)
[](https://docs.base44.com/Community-and-support/Referral-program#inviting-friends-to-base44-and-earning-credits)
Inviting friends to Base44 and earning credits
--------------------------------------------------------------------------------------------------------------------------------------------------------------------
Share your referral link to invite friends to Base44. They get 10 bonus credits when they sign up, and you earn 10 credits once they publish their first app. You can invite up to 5 friends who are eligible for referral credits.

**To share your referral link:**
1. Click the **Gift** icon at the top right of your workspace.
2. Click **Copy** to copy your referral link.
3. Share the link with your friends.

**Notes:**
* Only new Base44 accounts are eligible for referral credits, and you can earn referral credits for up to 5 friends in total.
* Check your friends’ email addresses carefully before they sign up with your link. Referral emails and credits cannot be edited or reset later, and the Base44 team cannot change or reissue referral links.
[](https://docs.base44.com/Community-and-support/Referral-program#faqs)
FAQs
--------------------------------------------------------------------------------
Click a question below to learn more about the referral program.
How many credits does my friend get when joining with my link?
They receive **10 bonus credits** immediately after signing up with your referral link, as long as they are creating a new Base44 account and you have not reached the 5 referral limit.
When do I receive my credits?
You earn **10 credits** once your friend publishes their first app on Base44.
How many people can I invite?
You can invite up to 5 friends with your referral link. After 5 successful referrals, your link no longer gives bonus credits to new signups.
Who qualifies as a new user?
Anyone who has never created a Base44 account before is considered new and is eligible for referral credits, as long as they sign up through a live referral link that has not reached the 5 referral limit.
Do referral credits renew each month?
No, referral credits do not renew each month. At your monthly renewal date, your message credits reset to the standard credits that come with the plan you are on, regardless of any additional credits you received through referrals.For example, if your plan includes 25 monthly message credits and you earn 10 extra credits from referrals (for a total of 35 credits), your balance resets to 25 credits at the start of the next renewal period.
Can I reset my referral link or fix a typo?
No. Once your referral link has been used or has reached the 5 referral limit, it cannot be reset or changed.If a friend signs up with the wrong email address or without using your link, referral credits cannot be added or moved later, and the Base44 team cannot adjust these referrals manually.
Was this page helpful?
YesNo
[Partner Program](https://docs.base44.com/Community-and-support/partner-program)
[Troubleshooting](https://docs.base44.com/Community-and-support/Troubleshooting)
⌘I
Assistant
Responses are generated using AI and may contain mistakes.
Suggestions
Which plans come with a free domain?How are credits used?How do I use Discuss mode?
---
# Deleting your app's user data - Base44 Support Documentation
> Documentation Index
> -------------------
>
> Fetch the complete documentation index at: [/llms.txt](https://docs.base44.com/llms.txt)
>
> Use this file to discover all available pages before exploring further.
[Skip to main content](https://docs.base44.com/Community-and-support/Deleting-user-data#content-area)
As an app owner, you may collect personal information from the people who interact with your Base44 app. In some regions, such as the European Union, privacy laws like the General Data Protection Regulation (GDPR) can give your users a right to ask you to delete their personal data. Base44 gives you the tools you need to remove a specific user’s data from your app. In practice, you do this by deleting that person’s records wherever they appear in your app.
* * *
[](https://docs.base44.com/Community-and-support/Deleting-user-data#where-user-data-is-stored)
Where user data is stored
----------------------------------------------------------------------------------------------------------------------------
A user’s personal data can appear in different parts of your app, depending on how you set it up. For most apps, there are two main places to check:
* The **Users** section: This is where you manage registered app accounts and credentials.
* The **Data** tab: This is where you store custom data in tables, such as form submissions, survey answers, or other records.
You should always review both areas when you receive a deletion request.
Deleting a user from the **Users** section or from tables in the **Data** tab is permanent. Make sure you identify the correct person before you delete any records.
Base44 provides the tools to store and delete data, but you are responsible for handling your users’ personal data in line with any laws that apply to you. For legal details about how Base44 processes data on your behalf, review the Base44 [Data Processing Addendum (DPA)](https://base44.com/dpa)
.
* * *
[](https://docs.base44.com/Community-and-support/Deleting-user-data#deleting-a-user)
Deleting a user
--------------------------------------------------------------------------------------------------------
Removing a user from the **Users** section deletes their app account and the core profile that you manage there.

**To delete a user from the Users section:**
1. Click **Dashboard** in your app editor.
2. Click **Users**.
3. Search for the person who requested deletion, for example by name or email address and select the relevant profile.
4. Click **Remove User**.
5. Confirm that you want to delete this user and their account data.
* * *
[](https://docs.base44.com/Community-and-support/Deleting-user-data#deleting-a-user%E2%80%99s-data)
Deleting a user’s data
------------------------------------------------------------------------------------------------------------------------------
If your app uses custom data tables, you may also store personal data such as form submissions, survey responses, support tickets, or orders in the **Data** tab. You should remove any records that relate to the person who asked you to delete their data.

**To delete a user’s records from the Data tab:**
1. Click **Dashboard** in your app editor.
2. Click **Data**.
3. Open each table that might contain personal data, such as contacts, orders, or form submissions.
4. Use filters or search fields to find records that belong to the person who requested deletion, for example by email address, user ID, or another unique identifier.
5. Select the records that relate to this person.
6. Delete the selected records from the table.
7. Repeat steps 3 to 6 for any other tables where this person’s data may appear.
Was this page helpful?
YesNo
[AI risks and safe use](https://docs.base44.com/Community-and-support/using-generative-ai)
⌘I
Assistant
Responses are generated using AI and may contain mistakes.
Suggestions
Which plans come with a free domain?How are credits used?How do I use Discuss mode?
---
# Joining the Base44 Partner Program - Base44 Support Documentation
> Documentation Index
> -------------------
>
> Fetch the complete documentation index at: [/llms.txt](https://docs.base44.com/llms.txt)
>
> Use this file to discover all available pages before exploring further.
[Skip to main content](https://docs.base44.com/Community-and-support/partner-program#content-area)
The Base44 Partner Program helps you turn Base44 building into client work. Join to set up your partner profile, manage client projects across workspaces, and grow your visibility as you complete milestones.

You can join the Partner Program once you reach **Maker (Level 2)**.
Ready to join as a partner?
---------------------------
Go to Base44 Partners and join the program.
* * *
[](https://docs.base44.com/Community-and-support/partner-program#joining-the-partner-program)
Joining the Partner Program
-----------------------------------------------------------------------------------------------------------------------------
Once you reach **Maker (Level 2)**, you can join the program, set up your partner profile, and unlock tools for managing client projects. **To join the Partner Program:**
1. Go to [Base44 Partners](https://app.base44.com/partners)
.
2. Click **Join as a Partner**.
3. On the Partner Program page, click **Join as a Partner** again.
4. In the **Join the Partner Program** dialog, click **Continue**.
5. Set up your partner profile:
* Choose whether you are joining as an **Individual** or **Agency**.
* Add your name and short description.
* Set your location, pricing, services you offer, and languages.
6. Click **Join the program**.

By joining the Partner Program, you agree to the [Base44 Partner Terms of Use](https://app.base44.com/partners/terms)
.
* * *
[](https://docs.base44.com/Community-and-support/partner-program#using-partner-tools)
Using partner tools
-------------------------------------------------------------------------------------------------------------
When you join the Partner Program, you unlock tools for managing client work, setting up your partner profile, and growing your visibility on Base44.
Unified workspace view
----------------------
Manage apps across client workspaces from one place.
App transfer
------------
Transfer a finished app to a client workspace when the project is complete.
Credit delegation
-----------------
Use your own Base44 credits while working in a client workspace.
Public rate & contact
---------------------
Show your rate on your Base44 profile and let clients contact you.
Early access
------------
Get access to selected new Base44 features before wider release.
Partner webinars & content
--------------------------
Access partner-only webinars and guides for running client work.
* * *
[](https://docs.base44.com/Community-and-support/partner-program#unlocking-more-as-you-level-up)
Unlocking more as you level up
-----------------------------------------------------------------------------------------------------------------------------------
Build your reputation as you complete milestones and grow your Base44 profile. As you reach higher levels, you unlock more ways to get discovered, build trust, and reach clients. Public discovery benefits unlock when you reach **Specialist (Level 3)**.
Partner Directory listing
-------------------------
Your public partner profile can appear in the Partner Directory, where clients can find you by service, language, and location.
Verified Partner badge
----------------------
Your Base44 profile shows a Verified Partner badge, helping clients recognize you as a Base44 Partner.
Go to your Base44 profile to see your current level. Open **Milestones** to check what you need to complete to reach the next level.
* * *
[](https://docs.base44.com/Community-and-support/partner-program#managing-your-partner-profile)
Managing your partner profile
---------------------------------------------------------------------------------------------------------------------------------
You can manage your partner profile from your [Base44 profile](https://docs.base44.com/Community-and-support/user-profile)
after joining the Partner Program. Update your profile to keep your bio, apps, services, pricing, response time, and contact details up to date. Keeping these details current helps your profile stay ready for client discovery. Under **Work & rates**, you can control how your partner details appear:
* Turn on **Show on profile** to display your partner details on your public profile.
* Turn on **Open to new project requests** to show that you are available for client requests.
* Turn off **Open to new project requests** when you are not accepting new projects.
* * *
[](https://docs.base44.com/Community-and-support/partner-program#faqs)
FAQs
-------------------------------------------------------------------------------
Click a question below to learn more about the Base44 Partner Program.
Who can join the Base44 Partner Program?
Base44 Builders who reach **Maker (Level 2)** can join the Partner Program.
How do I check my builder level?
Go to your [Base44 profile](https://docs.base44.com/Community-and-support/user-profile)
and open **Milestones**. You can see your current level and what you need to complete to reach the next level.
Do I need approval to join?
No. Once you reach **Maker (Level 2)**, you can join the Partner Program from Base44 Partners. You do not need approval to join.
Can I join before reaching Maker?
No. You need to reach **Maker (Level 2)** before you can join the Partner Program.
Am I listed in the Partner Directory as soon as I join?
No. You can join the Partner Program at **Maker (Level 2)**. Once you reach **Specialist (Level 3)**, your public partner profile can appear in the Partner Directory.
When do I get the Verified Partner badge?
Once you reach **Specialist (Level 3)**, your Base44 profile shows a Verified Partner badge.
Can I update my partner profile after joining?
Yes. You can update your partner profile from your **Base44 profile**. You can edit your bio, apps, services, pricing, response time, contact details, and project availability.
How do clients contact me?
Clients can contact you from your partner profile. When they click **Contact**, they fill out a short form with their project details and contact information. Base44 sends the request to you, and you continue the conversation directly from there.
Does Base44 manage payments between partners and clients?
No. Payments and agreements are managed directly between you and the client.
Can I leave the Partner Program?
Yes. You can leave the Partner Program from your account settings. Leaving the Partner Program removes your partner abilities and benefits, including managing client apps, choosing credit consumption settings, and appearing in the Partner Directory.**To leave the Partner Program:**
1. Click your **profile icon**.
2. Click **Account settings**.
3. Scroll to **Partner Settings**.
4. Click **Leave partner program**.
5. Review the confirmation dialog, then click **Leave program**.
You can rejoin the program at any time from the [Base44 Partners page](https://app.base44.com/partners)
.
Was this page helpful?
YesNo
[Builder profile](https://docs.base44.com/Community-and-support/user-profile)
[Referral Program](https://docs.base44.com/Community-and-support/Referral-program)
⌘I
Assistant
Responses are generated using AI and may contain mistakes.
Suggestions
Which plans come with a free domain?How are credits used?How do I use Discuss mode?
---
# Setting up your enterprise workspace domain - Base44 Support Documentation
> Documentation Index
> -------------------
>
> Fetch the complete documentation index at: [/llms.txt](https://docs.base44.com/llms.txt)
>
> Use this file to discover all available pages before exploring further.
[Skip to main content](https://docs.base44.com/Enterprise/Enterprise-workspace-domain#content-area)
Connecting a domain to your enterprise workspace gives your organization a recognizable, trusted address for accessing Base44. It also enables domain-based access rules, so you can control who can join your workspace based on their email domain. Your workspace domain is verified using a DNS TXT record. Once verified, Base44 uses it to enforce access policies and streamline onboarding for your team.
Only workspace owners and admins can configure the workspace domain.
* * *
[](https://docs.base44.com/Enterprise/Enterprise-workspace-domain#setting-up-your-workspace-domain)
Setting up your workspace domain
----------------------------------------------------------------------------------------------------------------------------------------
Enter your organization’s domain in your workspace settings to get started. Base44 generates a TXT record you need to add to your domain provider to verify ownership. **To set up your workspace domain:**
1. Click your workspace name at the top left of your account.
2. Click **Settings**.
3. Click **Auth and security**.
4. Under **Domain Verification**, enter your domain in the **Workspace domain** field.
5. Click **Check**.

* * *
[](https://docs.base44.com/Enterprise/Enterprise-workspace-domain#verifying-your-domain)
Verifying your domain
------------------------------------------------------------------------------------------------------------------
Verifying your domain confirms that you control it and allows Base44 to use it for access policies and SSO. You do this by adding a TXT record to your domain provider’s DNS settings.
DNS verification can take a few minutes depending on your domain provider. Once your DNS records are updated, Base44 automatically verifies your domain. If verification does not complete, click **Reset** to generate a new TXT record and try again.
**To verify your domain:**
1. After running a check (see above), copy the **Host / Name** and **Value** details shown in the **Add DNS records** panel.
2. In a new tab, sign in to your domain provider.
3. Go to the DNS settings for your domain.
4. Add a new **TXT** record using the exact **Host / Name** and **Value** shown in your workspace.
5. Save your DNS changes.
6. Return to your workspace settings. Base44 checks your DNS records automatically and updates the status under **Domain Verification**.

* * *
[](https://docs.base44.com/Enterprise/Enterprise-workspace-domain#faqs)
FAQs
--------------------------------------------------------------------------------
Click a question below to learn more.
Can I change my workspace domain after I set it?
Yes. You can update the workspace domain from **Auth and security** in your workspace settings at any time. After updating, you need to verify the new domain.
What happens if verification doesn't complete?
DNS changes can take a few minutes to propagate. If verification has not completed after some time, click **Reset** in the Domain Verification section to generate a new TXT record and try again. If the issue continues, check that the TXT record was added correctly in your domain provider’s DNS settings.
How does the workspace domain relate to SSO?
Verifying your workspace domain is required before you can use domain-based access rules with SSO. Once verified, new members with your approved email domain can be automatically added to your workspace. Learn more about [setting up SSO for your workspace](https://docs.base44.com/Enterprise/SSO-for-enterprise-workspace)
.
Was this page helpful?
YesNo
[Workspace IP allowlist](https://docs.base44.com/Enterprise/IP-allowlist)
[Apps and Superagents](https://docs.base44.com/Enterprise/Enterprise-SSO-and-app-visibility)
⌘I
Assistant
Responses are generated using AI and may contain mistakes.
Suggestions
Which plans come with a free domain?How are credits used?How do I use Discuss mode?
---
# Base44 for enterprises - Base44 Support Documentation
> Documentation Index
> -------------------
>
> Fetch the complete documentation index at: [/llms.txt](https://docs.base44.com/llms.txt)
>
> Use this file to discover all available pages before exploring further.
[Skip to main content](https://docs.base44.com/Enterprise/Base44-for-enterprises#content-area)
Base44 enterprise solutions give your organization the tools to manage access, enforce security policies, and scale confidently. From single sign-on to automated provisioning and network-level controls, every feature is built for teams that need full control over how their workspace runs.
Ready to start using Base44 enterprise solutions?
-------------------------------------------------
Get in touch with our sales team
* * *
[](https://docs.base44.com/Enterprise/Base44-for-enterprises#enterprise-solutions-features)
Enterprise solutions features
-----------------------------------------------------------------------------------------------------------------------------
Single Sign-On
--------------
Connect Base44 to your identity provider so your team signs in with their company credentials. New members with your approved email domain are added to the workspace automatically.
SSO for apps
------------
Enforce workspace SSO across every app in your workspace so all users authenticate through a single, centrally managed provider.
Superagent controls
-------------------
Disable Superagents across your entire workspace if your organization has not approved AI agents for use.
Workspace domain
----------------
Connect your organization’s domain to your Base44 workspace for a recognizable, branded address and domain-based access control.
Publishing permissions
----------------------
Control who can publish apps and which visibility levels each role can use, keeping sensitive data confidential from day one.
SCIM provisioning
-----------------
Automatically sync your identity provider with your workspace. When members join or leave your organization, their Base44 access updates instantly with no manual work needed.
IP allowlist
------------
Restrict workspace and app access to approved IP addresses, ranges, and subnets so only people on your trusted networks can sign in.
Workspace secrets
-----------------
Create and manage workspace-owned API keys for programmatic access to audit logs and workspace data via the Monitoring API.
Data residency
--------------
Choose where your workspace app data is stored (US, EU, or UK) to meet your organization’s data sovereignty and compliance requirements.
External collaborators
----------------------
Control whether any member or only admins and owners can invite external guests to collaborate on apps in your workspace.
Member credit limits
--------------------
Set a default monthly credit cap for all workspace members, with the option to override limits for individual members.
Connector management
--------------------
Control which external services are available in your workspace and how apps connect to them. Manage shared and app user credentials separately, and block connectors that should not be used across apps, Superagents, and in-app agents.
* * *
[](https://docs.base44.com/Enterprise/Base44-for-enterprises#additional-benefits)
Additional benefits
---------------------------------------------------------------------------------------------------------
Tailored onboarding
-------------------
Custom training designed around your team’s roles, goals, and workflows so everyone is productive from day one.
Dedicated account manager
-------------------------
A single point of contact for ongoing guidance and fast support as your organization’s needs evolve.
Priority support
----------------
A direct support channel with guaranteed response times so help is always available when you need it.
Secure hosting
--------------
All your applications are hosted on continuously monitored, private infrastructure.
Was this page helpful?
YesNo
[For admins](https://docs.base44.com/Enterprise/getting-started-admin)
⌘I
Assistant
Responses are generated using AI and may contain mistakes.
Suggestions
Which plans come with a free domain?How are credits used?How do I use Discuss mode?
---
# Community - Base44 Support Documentation
> Documentation Index
> -------------------
>
> Fetch the complete documentation index at: [/llms.txt](https://docs.base44.com/llms.txt)
>
> Use this file to discover all available pages before exploring further.
[Skip to main content](https://docs.base44.com/Community-and-support/Community#content-area)
Launchpad
---------
Discover apps built by the Base44 community, vote for your favorites, and submit your own public app.
Hire a Partner
--------------
Find a Base44 partner who can help you build, improve, or launch your app.
Affiliate Program
-----------------
Earn rewards by promoting Base44 through our Affiliate Program.
Feature request
---------------
Share your ideas to help improve Base44 on our Feature Request board.
Roadmap
-------
Take a look at what’s coming next in our product roadmap.
Discord
-------
Connect with the community and exchange tips on our Discord channel.
* * *
[](https://docs.base44.com/Community-and-support/Community#launchpad)
Launchpad
-----------------------------------------------------------------------------------
Launchpad is where you share your published app with the Base44 community. Browse apps other builders submit, vote for your favorites, and submit your own public app for a chance to win credits and get featured.

**To open Launchpad:**
1. Log in to Base44.
2. Go to **Community** in the sidebar.
3. Click **Launchpad**.
For submission requirements and full steps, see [Submitting your app to Launchpad](https://docs.base44.com/promoting-your-app/submitting-to-launchpad)
.
* * *
[](https://docs.base44.com/Community-and-support/Community#weekly-office-hours)
Weekly office hours
-------------------------------------------------------------------------------------------------------
Join live sessions with the Base44 community team on Discord every week at 5 PM UTC.
| Day | Session | Best for |
| --- | --- | --- |
| Tuesday | 15-minute walkthrough + 45 minutes for Q&A | Getting started with Base44 |
| Wednesday | Open drop-in session | App questions, blockers, and feedback |
| Thursday | Deep dives | Custom API integrations and advanced features |
[Join the Base44 Discord](https://discord.com/invite/ThpYPZpVts)
to participate.
* * *
[](https://docs.base44.com/Community-and-support/Community#faqs)
FAQs
-------------------------------------------------------------------------
Click a question below to learn more.
How can I get feedback on my app?
Join the [Base44 Discord](https://discord.com/invite/ThpYPZpVts)
and share your app link in the #🌟showcase channel to get feedback from the community.
How do I submit my app to Launchpad?
Submit a public, published app from **Launchpad** under **Community** in your workspace. For full steps, see [Submitting your app to Launchpad](https://docs.base44.com/promoting-your-app/submitting-to-launchpad)
.
Who can vote on Launchpad?
Anyone can view Launchpad, but people need to sign in to [Base44](https://app.base44.com/)
to vote for apps.
How can I find someone to help build my app?
Hire a Base44 partner to help you build, improve, or launch your app. Learn more about [hiring a partner](https://docs.base44.com/Getting-Started/Hiring-a-partner)
.
How do I become a Base44 affiliate?
Join the Base44 Affiliate Program to earn commission for new subscribers. To get started, visit the [Affiliate Program page](https://base44.com/affiliates)
to learn more and sign up. After you join, you receive a unique referral link to share.
Was this page helpful?
YesNo
[Adding workspace skills](https://docs.base44.com/documentation/using-your-workspaces/adding-workspace-skills)
[Builder profile](https://docs.base44.com/Community-and-support/user-profile)
⌘I
Assistant
Responses are generated using AI and may contain mistakes.
Suggestions
Which plans come with a free domain?How are credits used?How do I use Discuss mode?
---
# Single sign-on for enterprise workspaces - Base44 Support Documentation
> Documentation Index
> -------------------
>
> Fetch the complete documentation index at: [/llms.txt](https://docs.base44.com/llms.txt)
>
> Use this file to discover all available pages before exploring further.
[Skip to main content](https://docs.base44.com/Enterprise/SSO-for-enterprise-workspace#content-area)
Single Sign-On (SSO) lets your organization’s members access Base44 using your company’s login credentials instead of separate passwords. When you enable SSO, your team can sign in using your organization’s identity provider (such as Google or Microsoft Entra ID), which streamlines onboarding and reduces security risks from weak or reused passwords.
When SSO is enabled, anyone with a verified email domain will see SSO on the login page. After they sign in, they are automatically added to the workspace with the default role you configure.
* * *
[](https://docs.base44.com/Enterprise/SSO-for-enterprise-workspace#supported-sso-providers)
Supported SSO providers
-----------------------------------------------------------------------------------------------------------------------
Choose your provider to set it up, or follow the general [SSO setup guide](https://docs.base44.com/Enterprise/Set-up-SSO)
.
Google Workspace
----------------
Microsoft Entra ID
------------------
Okta
----
GitHub
------
Any OIDC provider
-----------------
* * *
[](https://docs.base44.com/Enterprise/SSO-for-enterprise-workspace#verified-domains)
Verified domains
---------------------------------------------------------------------------------------------------------
Verified domains control which users see SSO on the login page. When you verify a domain, any user with a matching email address is prompted to sign in with SSO automatically. This includes members who have been invited to your workspace but have not yet signed in for the first time. You can add as many domains as you need, which is useful if your organization has multiple email domains. **To add a verified domain:**
1. Click your workspace name at the top left of your account.
2. Click **Settings**.
3. Click **Auth and security**.
4. In the **Verified Domains** section, type your domain (for example, company.org) and click **Verify**.
5. Add the DNS TXT record shown to your domain provider and wait for it to propagate.
Once verified, the domain appears in the list with a green checkmark. To remove a domain, click **Remove** next to it.
Adding a verified domain does not affect members already added via SCIM or invitation. It only controls SSO discovery on the login page.
* * *
[](https://docs.base44.com/Enterprise/SSO-for-enterprise-workspace#default-role-for-new-members)
Default role for new members
---------------------------------------------------------------------------------------------------------------------------------
When a user signs in with SSO for the first time and is added to your workspace automatically, they receive the default role you configure here. This applies only to users added through just-in-time (JIT) provisioning, not to members already added via SCIM or invitation. **To set the default role:**
1. Click your workspace name at the top left of your account.
2. Click **Settings**.
3. Click **Auth and security**.
4. Under **Default role for SSO auto-provisioned users**, select **Viewer** or **Editor** from the dropdown.

* * *
[](https://docs.base44.com/Enterprise/SSO-for-enterprise-workspace#require-sso-for-all-workspace-members)
Require SSO for all workspace members
---------------------------------------------------------------------------------------------------------------------------------------------------
By default, members can sign in to your workspace either through SSO or with the login method set on their Base44 account. To tighten access, you can require every workspace member to sign in through your SSO provider. This is different from [enforcing SSO for all apps](https://docs.base44.com/Enterprise/Enterprise-SSO-and-app-visibility#managing-sso-for-app-access)
, which controls how your published app’s users sign in, not how your workspace members sign in. This setting appears in **Auth and security** once SSO is enabled for your workspace. **To require SSO for all workspace members:**
1. Click your workspace name at the top left of your account.
2. Click **Settings**.
3. Click **Auth and security**.
4. Turn on **Require SSO for all workspace members**.

**How enforcement takes effect:**
* It applies only after a workspace admin completes a successful SSO sign-in. Until then, the setting shows **Not active yet**, so you cannot lock yourself out.
* Turn on **Exempt guests from SSO** to let guest members keep signing in with a password or Google.
* * *
[](https://docs.base44.com/Enterprise/SSO-for-enterprise-workspace#sso-login-flows)
SSO login flows
-------------------------------------------------------------------------------------------------------
How members reach the right workspace depends on their accounts and how many SSO workspaces they belong to.
###
[](https://docs.base44.com/Enterprise/SSO-for-enterprise-workspace#signing-in-with-a-matching-personal-account)
Signing in with a matching personal account
If a member was invited through your SSO provider and also has a personal Base44 account registered with the same email, they see two options on the login screen:
* **Sign in with SSO:** Takes them to your organization’s workspace.
* **Sign in with email and password:** Takes them to their personal workspace.
If you have [required SSO for all workspace members](https://docs.base44.com/Enterprise/SSO-for-enterprise-workspace#require-sso-for-all-workspace-members)
, the member cannot reach your organization’s workspace with their personal email and password. They must sign in with SSO.
###
[](https://docs.base44.com/Enterprise/SSO-for-enterprise-workspace#belonging-to-more-than-one-sso-workspace)
Belonging to more than one SSO workspace
If a member belongs to 2 or more workspaces that use SSO, even with different providers, they see a workspace picker at login to choose where to go. Inside their Base44 account, they can also use the workspace switcher to move between workspaces.
* * *
[](https://docs.base44.com/Enterprise/SSO-for-enterprise-workspace#two-factor-authentication-2fa)
Two-factor authentication (2FA)
-------------------------------------------------------------------------------------------------------------------------------------
Once you set up SSO, all members authenticate through SSO, and 2FA is handled at your identity provider (IdP) level before anyone reaches Base44. Each individual member can optionally set up additional 2FA in their [Base44 account settings](https://docs.base44.com/documentation/account-and-billing/managing-your-account)
. Base44 does not enforce 2FA at the workspace level, but you can [require SSO for all workspace members](https://docs.base44.com/Enterprise/SSO-for-enterprise-workspace#require-sso-for-all-workspace-members)
so everyone signs in through your identity provider, where your organization’s 2FA and other security policies apply. For enterprise deployments, 2FA is typically managed and enforced by your identity provider.
* * *
[](https://docs.base44.com/Enterprise/SSO-for-enterprise-workspace#faqs)
FAQs
---------------------------------------------------------------------------------
Select a question below to learn more.
Can I enable SSO for only some members of my workspace?
No. Once SSO is enabled for your workspace, all members with a matching email domain are required to use SSO for login.
How do I test that SSO is working after setup?
Invite a colleague with the approved email domain to log in using SSO. If they can sign in and are added as a member, your SSO configuration is working.
Can I disable SSO later if my organization's needs change?
Yes. Workspace admins can disable SSO from **Auth and security** in your workspace settings at any time.
Was this page helpful?
YesNo
[For members](https://docs.base44.com/Enterprise/getting-started-member)
[Set up SSO](https://docs.base44.com/Enterprise/Set-up-SSO)
⌘I
Assistant
Responses are generated using AI and may contain mistakes.
Suggestions
Which plans come with a free domain?How are credits used?How do I use Discuss mode?
---
# Setting up SSO for Okta - Base44 Support Documentation
> Documentation Index
> -------------------
>
> Fetch the complete documentation index at: [/llms.txt](https://docs.base44.com/llms.txt)
>
> Use this file to discover all available pages before exploring further.
[Skip to main content](https://docs.base44.com/Enterprise/Okta-SSO#content-area)
Okta lets your team sign in to your Base44 enterprise workspace with their existing Okta credentials. You create an OpenID Connect (OIDC) application in Okta, allow Base44 to use it, then add its details to your workspace.
**Important:**
* Workspace single sign-on is available on enterprise workspaces only. If you do not see this option, contact your Base44 account team.
* To add and update members automatically, use [SCIM provisioning for Okta](https://docs.base44.com/Enterprise/Okta-SCIM)
.
* * *
[](https://docs.base44.com/Enterprise/Okta-SSO#how-it-works)
How it works
-----------------------------------------------------------------------------
Base44 signs your team in through Okta using OIDC. To do this, you need to create an OIDC app in Okta, then enter 3 values into your Base44 workspace under **Settings** > **Auth and security**:
* **Client ID:** From your Okta app.
* **Client Secret:** From your Okta app.
* **Okta domain:** Your Okta subdomain (for example, `your-company`).
The steps below walk you through creating the app in Okta and finding each value. Base44 fills in the **Scope** and, in most cases, the **Discovery URL** for you.

* * *
[](https://docs.base44.com/Enterprise/Okta-SSO#setting-up-single-sign-on)
Setting up single sign-on
-------------------------------------------------------------------------------------------------------
Follow these steps to create the Okta app, allow Base44 to use it, and connect it to your Base44 workspace.
**Before you begin,** make sure you have:
* Owner or admin access to your Base44 enterprise workspace.
* Admin access to your Okta organization.
* Your **workspace ID**, the string of characters after `/workspace/` in your enterprise workspace URL.
* Your **Okta domain**, the part before `.okta.com` (for example, `your-company`).
###
[](https://docs.base44.com/Enterprise/Okta-SSO#step-1-create-an-oidc-app)
Step 1: Create an OIDC app
Create the OIDC application that represents Base44 sign-in. **To create the app:**
1. In the Okta Admin Console, go to **Applications** > **Applications**, then click **Create App Integration**.
2. Set **Sign-in method** to **OIDC - OpenID Connect**.
3. Set **Application type** to **Web Application**.
4. Click **Next**.

###
[](https://docs.base44.com/Enterprise/Okta-SSO#step-2-configure-the-app)
Step 2: Configure the app
Set the app name, redirect URIs, and who can use it. **To configure the app:**
1. Enter an **App name**, for example `Base44 - your workspace name`.
2. Under **Sign-in redirect URIs**, add your workspace callback URL, replacing `{{WORKSPACE_ID}}` with your workspace ID: `https://app.base44.com/api/workspaces/{{WORKSPACE_ID}}/auth/sso/callback`
3. Under **Sign-out redirect URIs**, add `https://app.base44.com`.
4. Under **Controlled access**, choose who can use the app, for example **Allow everyone in your organization to access**.
5. Click **Save**.

###
[](https://docs.base44.com/Enterprise/Okta-SSO#step-3-get-your-credentials)
Step 3: Get your credentials
Base44 needs 3 values to connect to your Okta app.
* **Client ID:** On the app’s **General** tab.
* **Client Secret:** On the app’s **General** tab.
* **Okta domain:** Your subdomain only (for example, `your-company`, not `your-company.okta.com`).
###
[](https://docs.base44.com/Enterprise/Okta-SSO#step-4-allow-base44-in-your-authorization-server)
Step 4: Allow Base44 in your authorization server
Okta only issues tokens to apps that an authorization server policy allows. **To add an access policy rule:**
1. Go to **Security** > **API** > **Authorization Servers**, then open the **default** server.
2. On the **Access Policies** tab, click **Add Rule**, or edit an existing rule.
3. Name the rule (for example, `Allow Base44`), set the grant type to **Authorization Code**, and apply it to your Base44 app (or all clients), all users, and any scopes.
4. Click **Create Rule**.
In your Base44 app’s **General** tab in Okta, turn **Federation Broker Mode** off. With it on, sign-in can fail with “You are not allowed to access this app.”
###
[](https://docs.base44.com/Enterprise/Okta-SSO#step-5-add-your-details-in-base44)
Step 5: Add your details in Base44
Add the OIDC app credentials to your workspace. **To configure SSO in Base44:**
1. Click your workspace name at the top left of your account.
2. Click **Settings**.
3. Click **Auth and security**.
4. Enable the toggle next to **Single Sign-On Configuration**.
5. In **Select SSO Provider**, choose **Okta**.
6. Enter your **Client ID**, **Client Secret**, and **Okta Domain** (the subdomain only).
7. Keep **Scope** as `openid email profile`.
8. The **Discovery URL** fills in automatically from your Okta domain.
9. Click **Enable SSO**.
The auto-generated Discovery URL is correct only for a standard Okta org on its default `.okta.com` domain. If either case below applies, the default is wrong and sign-in fails, so set Okta up through **Advanced / Manual configuration** instead and enter the Discovery URL by hand:
* **Use the `/oauth2/default` Discovery URL:** Point Base44 at your Okta authorization server so the `email` claim is returned: `https://your-domain.okta.com/oauth2/default/.well-known/openid-configuration`. If your org does not have a custom authorization server, this address returns a 404. In that case, use `https://your-domain.okta.com/.well-known/openid-configuration` and map the `email` claim in your Okta app profile.
* **Custom Okta domain:** If your team signs in through a custom branded domain (for example, `login.your-company.com`), use that exact domain in the Discovery URL, not the default `your-company.okta.com`. Okta issues tokens from the domain people sign in through, so a mismatch fails issuer (`iss`) validation and sign-in breaks.
###
[](https://docs.base44.com/Enterprise/Okta-SSO#step-6-assign-users)
Step 6: Assign users
Your team can sign in once you assign them to your Okta app. **To assign users:**
1. In your Okta app, go to the **Assignments** tab.
2. Click **Assign**, then **Assign to People** or **Assign to Groups**.
3. Select the users or groups that should be able to sign in, then click **Assign** and **Save and Go Back**.
To add and update members automatically instead of assigning them by hand, set up [SCIM provisioning for Okta](https://docs.base44.com/Enterprise/Okta-SCIM)
.
* * *
[](https://docs.base44.com/Enterprise/Okta-SSO#faqs)
FAQs
-------------------------------------------------------------
Select a question below to learn more about Okta SSO.
Why does sign-in fail with 'You are not allowed to access this app'?
Add an access policy rule on the default authorization server (Step 4), turn off **Federation Broker Mode** in the app’s **General** tab, and confirm the user is assigned to the app.
Why does sign-in fail with an email error?
Okta’s default authorization server does not always return the `email` claim. Set Okta up through **Advanced / Manual configuration** and use the `/oauth2/default` Discovery URL so the email is returned. See the warning in Step 5.
Do I need separate Okta apps for SSO and SCIM?
Yes. Okta OIDC apps do not support SCIM, so SSO uses an OIDC app and SCIM uses a separate SCIM 2.0 app. See [SCIM provisioning for Okta](https://docs.base44.com/Enterprise/Okta-SCIM)
.
Was this page helpful?
YesNo
[Microsoft Entra ID SSO](https://docs.base44.com/Enterprise/Microsoft-Entra-SSO)
[SCIM provisioning](https://docs.base44.com/Enterprise/SCIM-provisioning)
⌘I
Assistant
Responses are generated using AI and may contain mistakes.
Suggestions
Which plans come with a free domain?How are credits used?How do I use Discuss mode?
---
# Setting up SCIM provisioning for Okta - Base44 Support Documentation
> Documentation Index
> -------------------
>
> Fetch the complete documentation index at: [/llms.txt](https://docs.base44.com/llms.txt)
>
> Use this file to discover all available pages before exploring further.
[Skip to main content](https://docs.base44.com/Enterprise/Okta-SCIM#content-area)
SCIM provisioning keeps your Base44 enterprise workspace membership in sync with Okta. Because Okta OIDC apps do not support SCIM, you create a separate SCIM app, connect it to Base44, map attributes, and turn on provisioning so members are added, updated, and removed for you. To let your team sign in, set up [SSO for Okta](https://docs.base44.com/Enterprise/Okta-SSO)
separately.
SCIM provisioning is available on enterprise workspaces only. If you do not see this option, contact your Base44 account team.
* * *
[](https://docs.base44.com/Enterprise/Okta-SCIM#before-you-begin)
Before you begin
--------------------------------------------------------------------------------------
Make sure you have:
* Owner or admin access to your Base44 enterprise workspace.
* Admin access to your Okta organization.
* Your **SCIM Base URL**, found in **Settings** > **Auth and security**.
* A **Workspace API key**, found in **Settings** > **Secrets**.
* * *
[](https://docs.base44.com/Enterprise/Okta-SCIM#set-up-scim-provisioning)
Set up SCIM provisioning
------------------------------------------------------------------------------------------------------
Create a SCIM app in Okta, connect it to Base44, map your roles and attributes, then turn on provisioning.
###
[](https://docs.base44.com/Enterprise/Okta-SCIM#step-1-create-a-scim-app)
Step 1: Create a SCIM app
Okta OIDC apps do not support SCIM, so you need a separate SCIM app. **To create the SCIM app:**
1. In the Okta Admin Console, go to **Applications** > **Browse App Catalog**.
2. Search for **SCIM 2.0 Test App (Header Auth)**.
3. Click **Add Integration**.
4. Name the app (for example, `Base44 - SCIM Provisioning`), then click **Done**.

###
[](https://docs.base44.com/Enterprise/Okta-SCIM#step-2-connect-to-base44)
Step 2: Connect to Base44
Point Okta at your Base44 workspace using your SCIM Base URL and Workspace API key. **To configure the API integration:**
1. Open your new SCIM app and go to the **Provisioning** tab.
2. Click **Configure API Integration**, then check **Enable API integration**.
3. Set **SCIM 2.0 Base URL** to your SCIM Base URL from **Settings** > **Auth and security**.
4. Set **API Token** to your Workspace API key, with no `Bearer` prefix.
5. Click **Test API Credentials**. You should see a success confirmation.
6. Click **Save**.

###
[](https://docs.base44.com/Enterprise/Okta-SCIM#step-3-enable-provisioning-actions)
Step 3: Enable provisioning actions
Choose which actions Okta can perform on your Base44 workspace members. **To enable provisioning:**
1. In the **Provisioning** tab, click **To App**, then **Edit**.
2. Enable **Create Users**, **Update User Attributes**, and **Deactivate Users**.
3. Click **Save**.

###
[](https://docs.base44.com/Enterprise/Okta-SCIM#step-4-add-custom-attributes)
Step 4: Add custom attributes
Base44’s role and credit limit fields are not in Okta’s default profile, so add them first. In the Profile Editor you can also remove attributes Base44 does not use, keeping `userName`, `givenName`, and `familyName`. **To add the `role` attribute:**
1. Go to **Directory** > **Profile Editor** and open your SCIM app.
2. Click **Add Attribute** and set:
* **Data type:** String
* **Display name:** Role
* **Variable name:** `role`
* **External name:** `role`
* **External namespace:** `urn:base44:params:scim:schemas:extension:user:2.0`
* **Enum:** Check **Define enumerated list of values** and add `admin`, `editor`, and `viewer`.
* **Attribute required:** No
3. Click **Save**.
**To add the `creditLimit` attribute (optional):** Skip this if you do not want per-member credit caps. The default is no cap.
1. In the same Profile Editor, click **Add Attribute** and set:
* **Data type:** Integer
* **Display name:** Credit Limit
* **Variable name:** `creditLimit`
* **External name:** `creditLimit`
* **External namespace:** `urn:base44:params:scim:schemas:extension:user:2.0`
* **Attribute required:** No
2. Click **Save**.

###
[](https://docs.base44.com/Enterprise/Okta-SCIM#step-5-map-attributes-and-assign-users)
Step 5: Map attributes and assign users
Map the Base44 attributes, then assign users so they are provisioned. **To map the attributes:**
1. Go to your SCIM app > **Provisioning** > **To App** > **Attribute Mappings**.
2. Set:
* `userName` to `user.email`
* `role` to `"editor"`, or map it from your IdP’s role attribute
* `creditLimit` to your preferred value or IdP attribute, if you added it
3. Remove any unsupported mappings, such as `firstName`, `lastName`, and `displayName`.
4. Click **Save**.
**To assign and test a user:**
1. Go to the **Assignments** tab, click **Assign**, then **Assign to People**.
2. Select a user, set their `role` and optionally their `creditLimit`, then click **Save and Go Back** and **Done**.
3. Check your Base44 workspace members to confirm the user appears.

**To test deactivation:**
1. On the **Assignments** tab, click **Unassign** next to the user, then confirm.
2. Check that the user is no longer an active member in Base44 and their seat is released.
Assign each user to both your Okta SSO app and your SCIM app. Assigning to the SCIM app only provisions the user but does not let them sign in.
* * *
[](https://docs.base44.com/Enterprise/Okta-SCIM#roles-and-credit-limits)
Roles and credit limits
----------------------------------------------------------------------------------------------------
Base44 accepts only the following roles via SCIM. Map your Okta `role` attribute to these exact values.
| Role | What they can do |
| --- | --- |
| `admin` | Manage members, billing, and workspace settings |
| `editor` | Build, edit, and run apps; uses credits from the workspace pool |
| `viewer` | Read-only access to apps; does not consume credits |
`owner`, `member`, and `guest` cannot be assigned via SCIM. Credit limits apply only to `admin` and `editor` roles, since viewers do not consume credits. Setting a credit limit of `0` is treated as no cap. You can also set credit limits directly in your workspace, without SCIM. See [Managing enterprise workspace members](https://docs.base44.com/Enterprise/managing-enterprise-members#per-member-credit-limits)
.
Workspace owners cannot be updated or deactivated through SCIM. Promote or demote owners from your workspace settings instead.
* * *
[](https://docs.base44.com/Enterprise/Okta-SCIM#faqs)
FAQs
--------------------------------------------------------------
Select a question below to learn more about Okta SCIM provisioning.
The API credentials test failed
Check that your API token is your Workspace API key with no `Bearer` prefix, and that the SCIM Base URL was copied from **Settings** > **Auth and security** with the correct workspace ID.
The Deactivate Users option is missing
Okta OIDC apps do not support SCIM. Use the **SCIM 2.0 Test App (Header Auth)** from the App Catalog instead.
A user is not being provisioned
Check your Okta provisioning logs for errors, and confirm `role` is one of `admin`, `editor`, or `viewer`. `owner`, `member`, and `guest` are rejected.
Why must I assign users to both apps?
The SCIM app provisions the member, and the SSO app lets them sign in. Assigning to only one means they either cannot sign in or are not provisioned.
Was this page helpful?
YesNo
[Microsoft Entra ID SCIM](https://docs.base44.com/Enterprise/Microsoft-Entra-SCIM)
[Managing members](https://docs.base44.com/Enterprise/managing-enterprise-members)
⌘I
Assistant
Responses are generated using AI and may contain mistakes.
Suggestions
Which plans come with a free domain?How are credits used?How do I use Discuss mode?
---
# Understanding the potential risks of using generative AI tools - Base44 Support Documentation
> Documentation Index
> -------------------
>
> Fetch the complete documentation index at: [/llms.txt](https://docs.base44.com/llms.txt)
>
> Use this file to discover all available pages before exploring further.
[Skip to main content](https://docs.base44.com/Community-and-support/using-generative-ai#content-area)
The Base44 platform uses generative AI tools and models that give you powerful ways to create your app. While these tools and models offer exciting possibilities, generative AI also comes with risks that you should understand. Generative AI can be an amazing resource, but the technology is not flawless. The sections below explain the main risks of using generative AI tools.
* * *
[](https://docs.base44.com/Community-and-support/using-generative-ai#bias-and-discrimination)
Bias and discrimination
-------------------------------------------------------------------------------------------------------------------------
Generative AI tools may sometimes generate content that reflects societal biases embedded in the data sources used to train the model. This can lead to unintended biases in the tools’ outputs, which may read as discrimination or the reinforcement of stereotypes within generated content. Biased outputs could inadvertently reflect gender, racial, or cultural biases, which could harm your app’s inclusivity and credibility.
* * *
[](https://docs.base44.com/Community-and-support/using-generative-ai#copyright-infringement)
Copyright infringement
-----------------------------------------------------------------------------------------------------------------------
AI-generated content can significantly speed up the creative process, but it may sometimes generate content that resembles copyrighted materials or trademarks of other companies. This could put you at risk of infringing on copyright and trademark laws in cases where the AI-generated content is identical or closely resembles existing protected content.
* * *
[](https://docs.base44.com/Community-and-support/using-generative-ai#data-protection)
Data protection
---------------------------------------------------------------------------------------------------------
Base44 takes your privacy seriously and wants to protect your privacy as well as the privacy of your app users. Due to the nature of generative AI models, it is possible that some generated content may include the personal information of others.
* * *
[](https://docs.base44.com/Community-and-support/using-generative-ai#misinformation-and-accuracy-of-ai-tools)
Misinformation and accuracy of AI tools
---------------------------------------------------------------------------------------------------------------------------------------------------------
AI-generated content, while often high quality, is not guaranteed to be accurate or truthful. Sometimes these tools produce outputs that may contain misinformation or inadvertently promote false narratives. This can be especially concerning if you rely on this content to convey important information on your app, which may lead to a loss of credibility.
* * *
[](https://docs.base44.com/Community-and-support/using-generative-ai#recommendations-for-safe-and-responsible-ai-use)
Recommendations for safe and responsible AI use
-------------------------------------------------------------------------------------------------------------------------------------------------------------------------
When you use the Base44 platform, you have an essential role in responsible AI usage. You can reduce the risks above by following these best practices:
* Always recheck generated AI outputs to confirm that they meet your expectations, that the information is accurate, and that it reflects your intention. Approach each output with a critical eye and verify any factual information before publishing it on your app.
* Remember that even if content is generated by AI, you are still responsible for it. Make sure that the content complies with the Base44 Responsible Use Policy.
* Be mindful of possible biases within AI-generated content and edit as necessary to align with your values and intended purposes.
* Avoid creating or promoting deepfake content or misinformation, as it can damage your credibility and be harmful to your app users or others.
* Do not copy or use others’ content as part of your input without permission, as this may cause the AI tools to generate copyrighted material.
* Avoid using AI outputs that appear too similar to existing works of art, paintings, or trademarks and logos of other companies, unless you have the right license or consent to do so.
* Consider editing AI outputs to ensure that the final result is uniquely your own.
* Only use personal information within your input when necessary. AI outputs are not always predictable, and you should make every effort to keep your personal information secure.
* Don’t use others’ personal information as part of your input without consent and permission.
* Check the output to see if it includes personal details or real individuals, and consider changing identifying details if they appear in the generated content.
* Consider informing your app users that some content was AI-generated, to provide transparency and maintain trust.
* When you use Base44, ensure you comply with your local and applicable laws, regulations, and policies, especially regulations related to AI technology (such as the EU AI Act).
**Important:**
* Base44 cannot guarantee or ensure that the use of our services is compliant with all local AI laws and regulations.
* You are responsible for reviewing the generated content and complying with local legislation and regulations with respect to the actual use of the AI tools and the generated content. The explanations and information provided here are only general and high-level explanations and information.
* You should not rely on this article as legal advice or as recommendations regarding what you should do. We recommend that you seek legal advice to help you understand and assist you in using AI tools.
Was this page helpful?
YesNo
[AI service providers](https://docs.base44.com/Community-and-support/ai-service-providers)
[Deleting user data](https://docs.base44.com/Community-and-support/Deleting-user-data)
⌘I
Assistant
Responses are generated using AI and may contain mistakes.
Suggestions
Which plans come with a free domain?How are credits used?How do I use Discuss mode?
---
# Setting up SSO for Microsoft Entra ID - Base44 Support Documentation
> Documentation Index
> -------------------
>
> Fetch the complete documentation index at: [/llms.txt](https://docs.base44.com/llms.txt)
>
> Use this file to discover all available pages before exploring further.
[Skip to main content](https://docs.base44.com/Enterprise/Microsoft-Entra-SSO#content-area)
Microsoft Entra ID (formerly Azure AD) lets your team sign in to your Base44 enterprise workspace with their existing company credentials. You create an Entra App registration for sign-in, then add its details to your workspace.
**Important:**
* Workspace single sign-on is available on enterprise workspaces only. If you do not see this option, contact your Base44 account team.
* To add and update members automatically, use [SCIM provisioning for Microsoft Entra ID](https://docs.base44.com/Enterprise/Microsoft-Entra-SCIM)
.
* * *
[](https://docs.base44.com/Enterprise/Microsoft-Entra-SSO#how-it-works)
How it works
----------------------------------------------------------------------------------------
Base44 signs your team in through Microsoft Entra ID using OpenID Connect (OIDC). To do this, you need to register an app in Entra, then enter 3 of its values into your Base44 workspace under **Settings** > **Auth and security**:
* **Client ID:** The app’s Application (client) ID from Entra.
* **Client Secret:** A secret you generate for the app.
* **Tenant ID:** Your Directory (tenant) ID, which controls who is allowed to sign in.
The steps below walk you through creating the app in Entra and finding each value. Base44 fills in the **Scope** and **Discovery URL** for you.

* * *
[](https://docs.base44.com/Enterprise/Microsoft-Entra-SSO#setting-up-single-sign-on)
Setting up single sign-on
------------------------------------------------------------------------------------------------------------------
Follow these steps to register the Entra app, create its secret, and connect it to your Base44 workspace.
**Before you begin,** make sure you have:
* Owner or admin access to your Base44 enterprise workspace.
* Admin access to the [Microsoft Entra admin center](https://entra.microsoft.com/)
.
* Your **workspace ID**, the string of characters after `/workspace/` in your enterprise workspace URL.
###
[](https://docs.base44.com/Enterprise/Microsoft-Entra-SSO#step-1-register-the-app)
Step 1: Register the app
Create the Entra App registration that represents Base44 sign-in. **To register the app:**
1. In the Microsoft Entra admin center, go to **App registrations**.
2. Click **New registration**.
3. Enter a name that identifies your workspace, for example your company name.
4. Under **Supported account types**, choose the option that matches your organization. If you are unsure, click **Help me choose**.
5. Under **Redirect URI**, select **Web** and enter your workspace callback URL, replacing `{{WORKSPACE_ID}}` with your workspace ID: `https://app.base44.com/api/workspaces/{{WORKSPACE_ID}}/auth/sso/callback`
6. Click **Register**.

After registering, open **API permissions** and confirm the app has **User.Read** and the **openid**, **email**, and **profile** permissions. These let Entra return the user’s email at sign-in. New app registrations include `User.Read` by default, so you usually only need to confirm it is there.
###
[](https://docs.base44.com/Enterprise/Microsoft-Entra-SSO#step-2-create-a-client-secret)
Step 2: Create a client secret
Generate the secret Base44 uses to authenticate with Entra. **To create a client secret:**
1. In your app, go to **Certificates & secrets**.
2. Click **New client secret**, add a description that helps you recognize this workspace, then click **Add**.
3. Copy the secret from the **Value** column, not the **Secret ID**, and store it somewhere safe.

The client secret **Value** appears only once. Once you leave the page it is hidden, so copy it before navigating away. If you lose it, create a new secret.
###
[](https://docs.base44.com/Enterprise/Microsoft-Entra-SSO#step-3-copy-your-ids)
Step 3: Copy your IDs
Base44 needs two IDs from your app, both shown on its **Overview** page.
* **Application (client) ID:** This is your **Client ID** in Base44.
* **Directory (tenant) ID:** This is your **Tenant ID** in Base44.

###
[](https://docs.base44.com/Enterprise/Microsoft-Entra-SSO#step-4-add-your-details-in-base44)
Step 4: Add your details in Base44
Add the SSO app credentials to your workspace. **To configure SSO in Base44:**
1. Click your workspace name at the top left of your account.
2. Click **Settings**.
3. Click **Auth and security**.
4. Enable the toggle next to **Single Sign-On Configuration**.
5. In **Select SSO Provider**, choose **Microsoft Azure AD**.
6. Enter your **Client ID** and **Client Secret** from the SSO app.
7. In the **Tenant ID** field, enter a value based on which accounts you want to allow:
* Your **directory (tenant) ID** from Entra: Only users from your organization.
* `common`: Personal Microsoft accounts and work or school (Microsoft 365) accounts.
* `organizations`: Work and school accounts only (Microsoft 365).
8. Keep **Scope** as `openid email profile`.
9. The **Discovery URL** fills in automatically from your tenant ID. Confirm it looks correct before continuing.
10. Click **Enable SSO**.
To control which users see SSO on the login page and what role new members get, set up [verified domains and the default role](https://docs.base44.com/Enterprise/SSO-for-enterprise-workspace#verified-domains)
in the same **Auth and security** settings.
###
[](https://docs.base44.com/Enterprise/Microsoft-Entra-SSO#step-5-give-your-team-access)
Step 5: Give your team access
Your team can sign in once you assign them to the SSO app in Entra. **To let users sign in:**
1. In the Microsoft Entra admin center, go to **Enterprise applications** and open your SSO app.
2. Click **Users and groups**, then **Add user/group**.
3. Select the users or groups that should be able to sign in, then click **Assign**.
To add and update members automatically instead of assigning them by hand, set up [SCIM provisioning for Microsoft Entra ID](https://docs.base44.com/Enterprise/Microsoft-Entra-SCIM)
.
* * *
[](https://docs.base44.com/Enterprise/Microsoft-Entra-SSO#faqs)
FAQs
------------------------------------------------------------------------
Select a question below to learn more about Entra SSO.
Do I need separate Entra apps for SSO and SCIM?
Yes. Base44 signs in over OIDC, so SSO uses an **App registration**, while SCIM provisioning uses a separate **Enterprise application**. Use the App registration’s Client ID, Client Secret, and Tenant ID for SSO, and set up provisioning separately. See [SCIM provisioning for Microsoft Entra ID](https://docs.base44.com/Enterprise/Microsoft-Entra-SCIM)
.
Why does sign-in fail with an email error?
Confirm your app has the **openid**, **email**, and **profile** API permissions and that **Scope** in Base44 is `openid email profile`. These let Entra return the email address Base44 needs to create the member’s account.
Can I disable SSO later?
Yes. Workspace admins can disable SSO from **Auth and security** in your workspace settings at any time.
Was this page helpful?
YesNo
[Set up SSO](https://docs.base44.com/Enterprise/Set-up-SSO)
[Okta SSO](https://docs.base44.com/Enterprise/Okta-SSO)
⌘I
Assistant
Responses are generated using AI and may contain mistakes.
Suggestions
Which plans come with a free domain?How are credits used?How do I use Discuss mode?
---
# Creating and managing your Base44 profile - Base44 Support Documentation
> Documentation Index
> -------------------
>
> Fetch the complete documentation index at: [/llms.txt](https://docs.base44.com/llms.txt)
>
> Use this file to discover all available pages before exploring further.
[Skip to main content](https://docs.base44.com/Community-and-support/user-profile#content-area)
Create a Base44 profile to showcase the apps you’ve built, highlight your progress, and share your builder identity. Customize your profile with a cover image, profile photo, username, bio, links, and location, and feature your published apps. Complete milestones to advance through levels, build your reputation, and show what you’ve achieved in Base44. You can also connect Base44 to LinkedIn from your profile to show your builder activity.

Your profile is public. Share only details you want people to see when they visit your profile.
* * *
[](https://docs.base44.com/Community-and-support/user-profile#setting-up-your-profile)
Setting up your profile
------------------------------------------------------------------------------------------------------------------
Start by adding the details you want to include, such as your bio, links, location, and apps. You can update your profile at any time. **To set up your profile:**
1. Log in to [Base44](https://app.base44.com/)
.
2. Click your **profile icon**.
3. Click **View Profile**.
4. Click **Edit**.
5. Fill in any of the following:
* **Cover image:** Choose one of our custom gradients or upload your own banner image at the top of your profile. Use a wide image for best results.
* **Profile photo:** Your public profile photo.
* **Username:** Your Base44 handle, used in your profile URL.
* **Bio:** A short public bio about yourself, up to 220 characters.
* **Location:** Your geographic location.
* **Display your account email:** Choose whether to display your account email.
* **Social links:** Add links for **Instagram**, **LinkedIn**, **X**, and custom links.
6. Click **Choose from my apps** to select the apps you want to showcase, and then click **Save**.
7. Toggle **Show on profile** next to **Activity** to choose whether to display your activity heatmap.
8. Click **Save changes**.

Only published apps appear for selection. You can still share your profile before adding apps, and add published apps later.
* * *
[](https://docs.base44.com/Community-and-support/user-profile#tracking-your-milestones)
Tracking your milestones
--------------------------------------------------------------------------------------------------------------------
Your profile includes a **Milestones** tab that shows your badges, levels, and progress as you build in Base44. Complete milestones to advance through 5 levels: Explorer, Maker, Specialist, Architect, and Legend. Milestones reflect actions and outcomes across Base44, such as creating your first app, publishing apps, earning your first sale, using Superagents, connecting integrations, getting real users, generating revenue, and reaching activity streaks.

###
[](https://docs.base44.com/Community-and-support/user-profile#connecting-base44-to-linkedin)
Connecting Base44 to LinkedIn
You can connect Base44 to LinkedIn from the **Milestones** tab to show what you’ve achieved as a builder. Base44 appears as a connected app on your LinkedIn profile, with a capabilities summary based on your Base44 activity. Your Base44 details on LinkedIn update automatically as your Base44 progress changes.

**To connect Base44 to LinkedIn:**
1. Click your **profile icon**.
2. Click **View Profile**.
3. Click the **Milestones** tab.
4. Click **Add level to LinkedIn**.
5. Sign in to LinkedIn and review the requested permissions.
6. Click **Allow**.
* * *
[](https://docs.base44.com/Community-and-support/user-profile#sharing-your-profile)
Sharing your profile
------------------------------------------------------------------------------------------------------------
Anyone with the link can view your profile without logging in to Base44. **To copy your profile link:**
1. Go to your profile.
2. Click **View Profile**.
3. Copy the link from your browser’s address bar.
Your profile includes:
* **Profile header:** Your cover image, profile photo, name, username, and level badge.
* **Bio:** Your short public bio.
* **Joined date:** The month and year you joined.
* **Displayed apps:** The apps you selected to showcase.
* **Activity section:** A heatmap of your activity in Base44.
* **Public links:** Your social and custom links.
* **Milestones:** Your badges, reputation level, and completed milestones.
* * *
[](https://docs.base44.com/Community-and-support/user-profile#managing-your-profile)
Managing your profile
--------------------------------------------------------------------------------------------------------------
You can update your profile at any time, including your bio, displayed apps, activity heatmap, and username.
###
[](https://docs.base44.com/Community-and-support/user-profile#showcasing-your-apps)
Showcasing your apps
Choose which published apps to showcase on your profile. You can also reorder them to control how they appear. **To manage your displayed apps:**
1. Click your **profile icon**.
2. Click **View Profile**.
3. Click **Manage apps**.
4. Select the published apps you want to show.
5. Click **Save**.

Drag and drop your apps to change the order they appear on your profile.
###
[](https://docs.base44.com/Community-and-support/user-profile#showing-activity)
Showing activity
Choose whether to show your Base44 **Activity** on your profile. Activity includes your streak and a heatmap that reflects your building activity over time. **To show or hide your activity:**
1. Click your **profile icon**.
2. Click **View Profile**.
3. Click **Edit**.
4. Scroll to **Activity**.
5. Toggle **Show on profile** on or off, then select **6 Months** or **1 Year** to choose how much activity to display.
6. Click **Save changes**.

###
[](https://docs.base44.com/Community-and-support/user-profile#updating-your-username)
Updating your username
Change your username from the profile editor. Your username is part of your public profile URL: `https://app.base44.com/@yourusername`. Base44 checks availability before you can claim a new username. Once saved, your profile URL updates automatically. **To change your username:**
1. Click your **profile icon**.
2. Click **View Profile**.
3. Click **Edit**.
4. Click the **Username** field.
5. Enter a username to check if it’s available.
6. Click **Claim Username**.
7. Click **Save changes**.

Changing your username also updates your profile URL.
* * *
[](https://docs.base44.com/Community-and-support/user-profile#faqs)
FAQs
----------------------------------------------------------------------------
Click a question below to learn more about your Base44 profile.
Can anyone see my Base44 profile?
Yes. Your public profile is visible to anyone, including people who aren’t logged in to Base44.
Can I change my username?
Yes. You can update your username from the profile editor. Changing your username also changes your public profile URL, and old links will stop working.
What can I add to my profile?
You can add a cover image, profile photo, username, bio, location, social links, custom links, and choose whether to display your account email.
How do I choose which apps to show on my profile?
Click **Manage apps** to choose which of your published apps appear on your public profile.
How do I show my email on my profile?
You can turn **Display your account email** on or off in the profile editor.
What activity does my profile show?
Your public profile can include an **Activity** section with your streak and a heatmap view of your activity in Base44. You can choose to show activity from the last **6 Months** or **1 Year**.
Can I hide my activity heatmap?
Yes. Go to your profile and click **Edit**. Scroll to **Activity** and toggle off **Show on profile**.
What are milestones?
Milestones are achievements you complete as you build in Base44. They can include actions and outcomes like creating your first app, publishing apps, earning your first sale, using Superagents, connecting integrations, getting real users, generating revenue, and reaching activity streaks.
How do levels work?
Levels show your progress as a Base44 builder. Complete milestones to advance through levels and build your reputation.
Where does Base44 appear on LinkedIn?
Base44 appears in the **Connected apps** section of your LinkedIn profile. LinkedIn shows a capabilities summary based on your Base44 activity.
How does Base44 update on LinkedIn?
After you connect Base44 to LinkedIn, your Base44 details on LinkedIn update automatically as your Base44 progress changes.
How do I stop showing Base44 on LinkedIn?
You can disconnect LinkedIn from **Account Settings** in Base44. Base44 is removed from your LinkedIn profile and no longer syncs as you progress.
Was this page helpful?
YesNo
[Community](https://docs.base44.com/Community-and-support/Community)
[Partner Program](https://docs.base44.com/Community-and-support/partner-program)
⌘I
Assistant
Responses are generated using AI and may contain mistakes.
Suggestions
Which plans come with a free domain?How are credits used?How do I use Discuss mode?
---
# Managing apps and Superagents in your enterprise workspace - Base44 Support Documentation
> Documentation Index
> -------------------
>
> Fetch the complete documentation index at: [/llms.txt](https://docs.base44.com/llms.txt)
>
> Use this file to discover all available pages before exploring further.
[Skip to main content](https://docs.base44.com/Enterprise/Enterprise-SSO-and-app-visibility#content-area)
Enterprise workspace settings give admins centralized control over how apps and Superagents behave for everyone in the workspace. You can enforce SSO across all apps, set per-role publishing permissions and visibility policies, and disable Superagents entirely if they are not appropriate for your organization.
* * *
[](https://docs.base44.com/Enterprise/Enterprise-SSO-and-app-visibility#managing-sso-for-app-access)
Managing SSO for app access
------------------------------------------------------------------------------------------------------------------------------------
Enterprise admins can enforce SSO across all apps in a workspace through a single provider. This makes it effortless for people to sign in to multiple apps and ensures your security standards are applied everywhere. For example, if your company has 10 different apps in a Base44 workspace, enabling SSO for app access means everyone logs in with their central company credentials, instead of creating new logins for each app.
**Important:**
* Only enterprise admins can manage SSO for app access. Once enabled, app users use your organization’s SSO credentials to access every app in the workspace.
* To enforce workspace SSO for all apps, you must add an additional redirect URI to your identity provider (IdP) configuration: `https://app.base44.com/api/workspace_apps/{{WORKSPACE_ID}}/auth/sso/callback`
**To set up SSO for all apps in the workspace:**
1. Set up your [enterprise workspace SSO](https://docs.base44.com/Enterprise/SSO-for-enterprise-workspace)
.
2. Click your workspace name at the top left of your account.
3. Click **Settings**.
4. Click **Apps configuration**.
5. Click the **Enforce workspace SSO for all apps** toggle.
* **Enabled:** All apps in your workspace automatically use the workspace SSO settings, and app-level configuration is disabled. This includes apps published as **Public (no login)**, which now require users to sign in through your SSO provider at runtime, for both the app and its API.
* **Disabled:** Your app builders can decide if they want to turn on the workspace SSO in their [app’s authentication settings](https://docs.base44.com/Setting-up-your-app/Managing-login-and-registration)
.

* * *
[](https://docs.base44.com/Enterprise/Enterprise-SSO-and-app-visibility#publishing-permissions)
Publishing permissions
--------------------------------------------------------------------------------------------------------------------------
Publishing permissions let you control what each role (Owner, Admin, Editor, and Guest) can do when publishing apps: whether they can publish, which visibility levels they can choose from, and which is set by default. When a member’s role blocks a publish action, they can send you a [publish approval request](https://docs.base44.com/Enterprise/Enterprise-SSO-and-app-visibility#publish-approval-requests)
instead, so work keeps moving without loosening your policies.
**Notes:**
* The Owner role always has publish rights and can use any visibility level, so its settings cannot be changed.
* Members with a role that cannot publish can still build and edit their apps.
###
[](https://docs.base44.com/Enterprise/Enterprise-SSO-and-app-visibility#setting-publishing-permissions)
Setting publishing permissions
Configure publishing rights and visibility levels for each role from your workspace settings.

**To set publishing permissions by role:**
1. Click your workspace name at the top left of your account.
2. Click **Settings**.
3. Click **Apps configuration**.
4. In the **Publishing permissions** table, find the role you want to configure.
5. Use the **Can publish** toggle to allow or block publishing for that role.
6. Under **Allowed visibility**, select the visibility levels the role can use. Keep at least one level selected:
* **All:** The role can use any visibility level.
* **Private:** Only users you explicitly invite can access.
* **Workspace:** All workspace members can access.
* **Public (login required):** Anyone with a Base44 account can access, including people outside your workspace.
* **Public (no login):** Anyone on the internet can access. No account needed.
7. Under **Default visibility**, choose the visibility level that is selected automatically when someone with the role publishes. You can only choose from the levels you allowed in the previous step.
To return every role to its original settings, click **Reset to defaults**.
For governance tracking, changes to publishing permissions are recorded in your workspace audit logs as governance rule changes, along with every app publish, unpublish, and publish approval request event. You can retrieve these events with the [Audit Logs API](https://docs.base44.com/developers/references/audit-logs-api/get-started/overview)
.
###
[](https://docs.base44.com/Enterprise/Enterprise-SSO-and-app-visibility#publish-approval-requests)
Publish approval requests
When someone in your workspace tries to publish but their role does not have permission, or the visibility level they choose is not allowed for their role, they can send a publish request instead of being blocked. You and the other workspace owners and admins are notified by email and in your Base44 notifications, under the **Bell** icon at the top of your workspace. Clicking the notification opens the app in the editor, where any of you can review and publish it on the member’s behalf. On the member’s side, the **Publish** panel in their app editor shows a **Request to publish** button. It opens a short request form where they select the visibility they want for the app, optionally add a message for the reviewer, and click **Send request**.

Each request shows you the member’s email address, the visibility they requested, and their message.
* * *
[](https://docs.base44.com/Enterprise/Enterprise-SSO-and-app-visibility#managing-superagents)
Managing Superagents
----------------------------------------------------------------------------------------------------------------------
You can prevent workspace members from creating, accessing, or interacting with Superagents. When this setting is enabled, Superagents are hidden from all members across the workspace. This is useful if your organization has not approved AI agents for use, or if you want to roll out Superagents gradually to specific teams.
Only workspace owners and admins can enable or disable Superagents for the workspace.
**To disable Superagents for your workspace:**
1. Click your workspace name at the top left of your account.
2. Click **Settings**.
3. Click **Basic information**.
4. Enable the **Disable Superagents** toggle.

* * *
[](https://docs.base44.com/Enterprise/Enterprise-SSO-and-app-visibility#faqs)
FAQs
--------------------------------------------------------------------------------------
Select a question below to learn more about app SSO and visibility.
What happens to existing apps when I enable workspace SSO?
Existing apps automatically use your workspace SSO settings if enforcement is enabled. App-level SSO settings are locked and can only be managed by enterprise admins.
Can app builders override workspace SSO?
No. When workspace SSO enforcement is enabled, all workspace apps use the company’s SSO provider. App builders can choose SSO settings only if enforcement is disabled by an admin.
Can I update visibility after an app is created?
Yes, you can change an app’s visibility in the app settings at any time, unless restricted by workspace policies.
What setup is recommended if we have both internal and external apps?
For organizations with both internal and customer-facing apps, configure your workspace like this:**Workspace Level:**
* Workspace SSO: ON (employees use company credentials)
* Enforce SSO for all apps: OFF (don’t force it globally)
**App Level:**
* Internal apps: Enable workspace SSO individually
* Customer-facing apps: Use their own auth (email/password, Google) with appropriate visibility controls
This gives you flexibility to protect internal tools while keeping customer apps accessible.
What happens when I migrate an app with existing authentication to this workspace?
App-level auth settings carry over to the new workspace, but keep these considerations in mind:
1. If your workspace has Enforce workspace SSO for all apps turned on, workspace SSO will override any app-level auth settings immediately.
2. Existing app users are preserved, but if the app previously used a login method that is not configured in the new workspace (such as a custom SSO with a different redirect URI), users may hit login issues until auth is reconfigured.
3. If the app has connectors set up (OAuth connections to Google, Slack, etc.) that are tied to the individual who set them up rather than the app itself, those connections may need to be re-authorized in the new workspace context.
Was this page helpful?
YesNo
[Workspace domain](https://docs.base44.com/Enterprise/Enterprise-workspace-domain)
[Connector management](https://docs.base44.com/Enterprise/workspace-connectors)
⌘I
Assistant
Responses are generated using AI and may contain mistakes.
Suggestions
Which plans come with a free domain?How are credits used?How do I use Discuss mode?
---
# AI service providers - Base44 Support Documentation
> Documentation Index
> -------------------
>
> Fetch the complete documentation index at: [/llms.txt](https://docs.base44.com/llms.txt)
>
> Use this file to discover all available pages before exploring further.
[Skip to main content](https://docs.base44.com/Community-and-support/ai-service-providers#content-area)
To help provide our services, Base44 may use third-party AI service providers. We encourage you to read and understand their policies before using Base44’s Platform.
| Name | Terms of service | Additional policies |
| --- | --- | --- |
| Anthropic | [Anthropic Terms of Service](https://www.anthropic.com/legal/consumer-terms) | [Anthropic Usage Policy](https://www.anthropic.com/legal/aup) |
| Google | [Google Generative AI Additional Terms of Service](https://policies.google.com/terms/generative-ai) | [Google Generative AI Prohibited Use Policy](https://policies.google.com/terms/generative-ai/use-policy) |
| OpenAI | [OpenAI Terms of Service](https://openai.com/policies) | [OpenAI Usage Policy](https://openai.com/policies/usage-policies) , [OpenAI Sharing Publication Policy](https://openai.com/policies/sharing-publication-policy) |
Was this page helpful?
YesNo
[Privacy and security](https://docs.base44.com/Community-and-support/Privacy-and-security)
[AI risks and safe use](https://docs.base44.com/Community-and-support/using-generative-ai)
⌘I
Assistant
Responses are generated using AI and may contain mistakes.
Suggestions
Which plans come with a free domain?How are credits used?How do I use Discuss mode?
---
# Managing enterprise workspace members - Base44 Support Documentation
> Documentation Index
> -------------------
>
> Fetch the complete documentation index at: [/llms.txt](https://docs.base44.com/llms.txt)
>
> Use this file to discover all available pages before exploring further.
[Skip to main content](https://docs.base44.com/Enterprise/managing-enterprise-members#content-area)
Enterprise workspaces include additional controls for managing your team at scale. You can assign the Admin role to trusted members, cap how many credits individual members can use each month, and control who can invite external collaborators to your apps. For general member management, including inviting members, updating roles, and removing members, see [Managing workspace members](https://docs.base44.com/Account-and-billing/Managing-your-workspaces)
.
* * *
[](https://docs.base44.com/Enterprise/managing-enterprise-members#workspace-roles)
Workspace roles
------------------------------------------------------------------------------------------------------
Enterprise workspaces include an additional **Admin** role alongside the standard Owner, Editor, and Viewer roles.
| Role | What they can do |
| --- | --- |
| **Owner** | Manages billing, members, settings, apps, and credits. Each workspace has one owner. |
| **Admin** | Manages members and workspace settings, but does not handle billing. Enterprise plan only. |
| **Editor** | Builds and edits apps, and uses credits from the workspace pool. |
| **Viewer** | Has read-only access to specific apps and does not consume credits. |
If a workspace downgrades from the Enterprise plan, any members with the Admin role are automatically moved to the Editor role.
* * *
[](https://docs.base44.com/Enterprise/managing-enterprise-members#credit-limits)
Credit limits
--------------------------------------------------------------------------------------------------
You can control how many credits workspace members can use per month. There are two levels: a workspace default that applies to everyone, and individual overrides for specific members. Credit limits apply to the Admin and Editor roles only. Viewers do not consume credits, so a credit limit cannot be set on a Viewer.
###
[](https://docs.base44.com/Enterprise/managing-enterprise-members#default-credit-limit)
Default credit limit
The default credit limit sets a monthly cap that applies to all workspace members automatically. If you also set a limit on a specific member, that individual limit takes priority over the default. **To set a default credit limit:**
1. Click your workspace name at the top left.
2. Click **Settings**.
3. Click **Members**.
4. Click the **More Actions** icon at the top right of the members list.
5. Click **Set default credit limit**, enter the limit, and click **Set credit limit**.
To remove the default limit, open the same dialog and click **Clear limit**.

###
[](https://docs.base44.com/Enterprise/managing-enterprise-members#per-member-credit-limits)
Per-member credit limits
You can set a credit limit for a specific member to override the workspace default. **To set a credit limit for a member:**
1. Click your workspace name at the top left.
2. Click **Settings**.
3. Click **Members**.
4. Click the **More Actions** icon next to the relevant member.
5. Click **Set credit limit**, enter the limit, and click **Save**.

You can also set credit limits automatically when provisioning users through SCIM. See [SCIM provisioning](https://docs.base44.com/Enterprise/SCIM-provisioning#per-member-credit-limits)
.
* * *
[](https://docs.base44.com/Enterprise/managing-enterprise-members#external-collaborators)
External collaborators
--------------------------------------------------------------------------------------------------------------------
You can restrict who is allowed to invite external guests to your apps. See [Controlling guest invitations](https://docs.base44.com/Account-and-billing/Managing-your-workspaces#controlling-guest-invitations)
.
Was this page helpful?
YesNo
[Okta SCIM](https://docs.base44.com/Enterprise/Okta-SCIM)
[Workspace IP allowlist](https://docs.base44.com/Enterprise/IP-allowlist)
⌘I
Assistant
Responses are generated using AI and may contain mistakes.
Suggestions
Which plans come with a free domain?How are credits used?How do I use Discuss mode?
---
# Managing workspace secrets - Base44 Support Documentation
> Documentation Index
> -------------------
>
> Fetch the complete documentation index at: [/llms.txt](https://docs.base44.com/llms.txt)
>
> Use this file to discover all available pages before exploring further.
[Skip to main content](https://docs.base44.com/Enterprise/workspace-secrets#content-area)
Workspace secrets let you create and manage API keys for programmatic access to your workspace. Use these keys to stream audit logs or pull workspace data into an external system via the Monitoring API. Keys are workspace-owned, so they stay active even if the member who created them leaves the workspace.
**Important:**
* Workspace secrets are available on Enterprise plans only.
* Only workspace owners and admins can view and manage secrets.

For a full list of supported APIs, [see the API reference](https://docs.base44.com/developers/references/audit-logs-api/get-started/overview)
.
* * *
[](https://docs.base44.com/Enterprise/workspace-secrets#creating-an-api-key)
Creating an API key
----------------------------------------------------------------------------------------------------
You can create up to 10 API keys per workspace.
**Important:**
* Copy your key immediately after creating it. You will not be able to see it again.
* Treat it like a password: it grants access to your workspace data via the API.
**To create an API key:**
1. Click your workspace name at the top left and click **Settings**.
2. Click **Secrets** in the sidebar.
3. Click **\+ Create API Key**.
4. Enter a name for the key (required) and an optional description.
5. Click **Create Key**.
6. Copy the key and store it somewhere safe.
7. Click **Done**.

* * *
[](https://docs.base44.com/Enterprise/workspace-secrets#managing-your-api-keys)
Managing your API keys
----------------------------------------------------------------------------------------------------------
From the **Secrets** page, you can view all your keys along with who created them, when they were created, and when they were last used. Click the **More Actions** icon next to a key to edit, disable, or delete it. **To manage an API key:**
1. Click your workspace name at the top left and click **Settings**.
2. Click **Secrets** in the sidebar.
3. Click the **More Actions** icon next to the key you want to manage and select an option:
* **Edit:** Update the key’s name or description.
* **Disable key:** Temporarily prevent the key from being used without deleting it.
* **Enable key:** Re-enable a previously disabled key.
* **Delete key:** Permanently remove the key.

Was this page helpful?
YesNo
[Connector management](https://docs.base44.com/Enterprise/workspace-connectors)
⌘I
Assistant
Responses are generated using AI and may contain mistakes.
Suggestions
Which plans come with a free domain?How are credits used?How do I use Discuss mode?
---
# Setting up SCIM provisioning for Microsoft Entra ID - Base44 Support Documentation
> Documentation Index
> -------------------
>
> Fetch the complete documentation index at: [/llms.txt](https://docs.base44.com/llms.txt)
>
> Use this file to discover all available pages before exploring further.
[Skip to main content](https://docs.base44.com/Enterprise/Microsoft-Entra-SCIM#content-area)
SCIM provisioning keeps your Base44 enterprise workspace membership in sync with Microsoft Entra ID (formerly Azure AD). You create a separate enterprise application, connect it to Base44, map roles, and turn on automatic syncing so members are added, updated, and removed for you. To let your team sign in, set up [SSO for Microsoft Entra ID](https://docs.base44.com/Enterprise/Microsoft-Entra-SSO)
separately.
SCIM provisioning is available on enterprise workspaces only. If you do not see this option, contact your Base44 account team.
* * *
[](https://docs.base44.com/Enterprise/Microsoft-Entra-SCIM#before-you-begin)
Before you begin
-------------------------------------------------------------------------------------------------
Make sure you have:
* Owner or admin access to your Base44 enterprise workspace.
* Admin access to the [Microsoft Entra admin center](https://entra.microsoft.com/)
.
* Your **SCIM Base URL**, found in **Settings** > **Auth and security**.
* A **Workspace API key**, found in **Settings** > **Secrets**.

* * *
[](https://docs.base44.com/Enterprise/Microsoft-Entra-SCIM#set-up-scim-provisioning)
Set up SCIM provisioning
-----------------------------------------------------------------------------------------------------------------
Create a dedicated Entra enterprise application, connect it to Base44, map your roles and attributes, then turn on automatic syncing.
###
[](https://docs.base44.com/Enterprise/Microsoft-Entra-SCIM#step-1-create-the-scim-app)
Step 1: Create the SCIM app
Create a separate, non-gallery enterprise application for provisioning. **To create the SCIM app:**
1. In the Microsoft Entra admin center, go to **Identity** > **Applications** > **Enterprise applications**.
2. Click **New application**, then **Create your own application**.
3. Enter a name (for example, `Base44 SCIM Provisioning`) and select **Integrate any other application you don’t find in the gallery**.
4. Click **Create**.
###
[](https://docs.base44.com/Enterprise/Microsoft-Entra-SCIM#step-2-connect-to-base44)
Step 2: Connect to Base44
Point Entra at your Base44 workspace using your SCIM Base URL and a Workspace API key. If you do not have an API key yet, create one first. **To create a Workspace API key:**
1. In your workspace **Settings**, click **Secrets**.
2. Click **Create API Key**.
3. Enter a name (for example, `Entra SCIM`), add an optional description, then click **Create Key**.

Base44 shows the full key only once. Copy it before you close the dialog and store it somewhere safe, since you use it as the **Secret Token** below.

**To configure provisioning:**
1. Open the app and go to **Provisioning**, then click **Get started**.
2. Set **Provisioning Mode** to **Automatic**.
3. Under **Admin Credentials**, set:
* **Tenant URL:** Your SCIM Base URL with `?aadOptscim062020` added to the end. The result looks like `https://app.base44.com/scim/v2/organizations/{{WORKSPACE_ID}}?aadOptscim062020`.
* **Secret Token:** Your Workspace API key.
4. Click **Test Connection** to confirm a successful connection.
5. Click **Save**.
Before continuing, run **Test Connection** and confirm it succeeds. A failed test usually means the Tenant URL or Secret Token is wrong.

Entra requires the `?aadOptscim062020` suffix on the Tenant URL. Without it, the connection test or provisioning can fail. This suffix is specific to Entra, so do not add it for other identity providers.
###
[](https://docs.base44.com/Enterprise/Microsoft-Entra-SCIM#step-3-map-externalid)
Step 3: Map externalId
By default Entra matches users on a value that can change. Mapping `externalId` to `objectId`, a stable unique identifier, lets Base44 reliably match each user for updates and deactivation. **To update the mapping:**
1. Under **Mappings**, click **Provision Microsoft Entra ID Users**.
2. In the mapping table, find the row where the **Target attribute** is exactly `externalId`.
3. Click that row and change the **Source attribute** to `objectId`.
4. Click **Ok**, then **Save**.

After you save, the updated mapping appears in the attribute table, with `externalId` mapped to `objectId`.

###
[](https://docs.base44.com/Enterprise/Microsoft-Entra-SCIM#step-4-add-custom-attributes)
Step 4: Add custom attributes
Base44’s role and credit limit fields are not in Entra’s default target list, so add them before you can map them. **To add the attributes:**
1. On the **Provision Microsoft Entra ID Users** mapping screen, scroll to the bottom and check **Show advanced options**.
2. Click **Edit attribute list for** your app.
3. At the bottom of the list, add:
* **Role:** `urn:base44:params:scim:schemas:extension:user:2.0:role`, with **Type** set to `String`.
* **Credit limit (optional):** `urn:base44:params:scim:schemas:extension:user:2.0:creditLimit`, with **Type** set to `Integer`.
4. Click **Save** and confirm the change.

###
[](https://docs.base44.com/Enterprise/Microsoft-Entra-SCIM#step-5-create-app-roles)
Step 5: Create app roles
You create roles in **App registrations**, not in **Enterprise applications**. Enterprise applications are only where you assign them. **To create app roles:**
1. In the Microsoft Entra admin center, go to **App registrations** and open the **All applications** tab.
2. Select your SCIM app.
3. Click **App roles**, then **Create app role**.
4. Create a separate role for each Base44 permission level: `admin`, `editor`, and `viewer`.
5. In the **Value** field, type the exact lowercase string Base44 expects (`admin`, `editor`, or `viewer`).
6. Click **Apply**.

Create one role for each permission level. Once created, all 3 appear in the app’s **App roles** list.

###
[](https://docs.base44.com/Enterprise/Microsoft-Entra-SCIM#step-6-map-role-and-credit-limit)
Step 6: Map role and credit limit
Entra stores roles as an array, but Base44 expects a single text value, so the role must be mapped with an expression rather than a direct mapping. **To map the role:**
1. Go to **Enterprise applications** > your SCIM app > **Provisioning** > **Edit attribute mapping** > **Provision Microsoft Entra ID Users**.
2. Click **Add New Mapping**, or edit the existing role row.
3. Set **Mapping type** to **Expression**.
4. In the **Expression** field, enter: `SingleAppRoleAssignment([appRoleAssignments])`
5. Set **Target attribute** to `urn:base44:params:scim:schemas:extension:user:2.0:role`.
6. Set **Match objects using this attribute** to **No**, and **Apply this mapping** to **Always**.
7. Click **Ok**.

Setting a credit limit is optional. Without one, the member draws from the shared workspace credit pool with no individual cap. Add a credit limit only if you want to limit how many credits a specific member can use per month. **To map a credit limit (optional):**
1. Enter the credit limit value in the user’s Entra profile under a built-in extension field, for example `extensionAttribute1`.
2. Click **Add New Mapping** and set **Mapping type** to **Direct**.
3. Set **Source attribute** to `extensionAttribute1`.
4. Set **Target attribute** to `urn:base44:params:scim:schemas:extension:user:2.0:creditLimit`.
5. Click **Ok**, then **Save**.
###
[](https://docs.base44.com/Enterprise/Microsoft-Entra-SCIM#step-7-assign-and-provision)
Step 7: Assign and provision
Choose who to provision, give them a role, and start the sync. **To assign users:**
1. Go to **Enterprise applications** > your SCIM app > **Users and groups**.
2. Click **Add user/group** and select the users or groups to provision.
3. Under **Select a role**, choose the role you created (`admin`, `editor`, or `viewer`), then click **Assign**.
**To turn on provisioning:**
1. Go to **Provisioning**.
2. Set **Provisioning Status** to **On**.
Entra begins syncing the assigned users to your Base44 workspace.
If the **Edit** button for a user is grayed out, check the box next to the user, click **Remove**, then add them again with the correct role.
###
[](https://docs.base44.com/Enterprise/Microsoft-Entra-SCIM#step-8-refresh-existing-users)
Step 8: Refresh existing users
If you changed the `externalId` mapping after some users were already provisioned, refresh their records so they pick up the correct `objectId`. **To update existing users:**
1. Go to **Provisioning** > **Provision on demand**.
2. Search for the user and run provisioning to patch their record.
3. To apply this to everyone, go back to the main **Provisioning** page and click **Restart provisioning**.
* * *
[](https://docs.base44.com/Enterprise/Microsoft-Entra-SCIM#roles-and-credit-limits)
Roles and credit limits
---------------------------------------------------------------------------------------------------------------
Base44 accepts only the following roles via SCIM. Map your Entra app roles to these exact values.
| Role | What they can do |
| --- | --- |
| `admin` | Manage members, billing, and workspace settings |
| `editor` | Build, edit, and run apps; uses credits from the workspace pool |
| `viewer` | Read-only access to apps; does not consume credits |
Credit limits apply only to `admin` and `editor` roles, since viewers do not consume credits. Setting a credit limit of `0` is treated as no cap. You can also set credit limits directly in your workspace, without SCIM. See [Managing enterprise workspace members](https://docs.base44.com/Enterprise/managing-enterprise-members#per-member-credit-limits)
.
Workspace owners cannot be updated or deactivated through SCIM. Promote or demote owners from your workspace settings instead.
* * *
[](https://docs.base44.com/Enterprise/Microsoft-Entra-SCIM#faqs)
FAQs
-------------------------------------------------------------------------
Select a question below to learn more about Entra SCIM provisioning.
Do I need separate Entra apps for SSO and SCIM?
Yes. SCIM provisioning uses a dedicated **Enterprise application**, while sign-in uses a separate **App registration**. Configure provisioning on the Enterprise application, and set up sign-in separately. See [SSO for Microsoft Entra ID](https://docs.base44.com/Enterprise/Microsoft-Entra-SSO)
.
Why does the SCIM connection test fail?
Confirm your Tenant URL ends with `?aadOptscim062020` and that the Secret Token is your Workspace API key from **Settings** > **Secrets**. Verify the SCIM Base URL was copied from **Settings** > **Auth and security** and has not been changed.
Why is the role not syncing, or why does provisioning fail on the role field?
Entra stores roles as an array, so a **Direct** mapping fails. Set the role mapping type to **Expression** and use `SingleAppRoleAssignment([appRoleAssignments])`. Make sure each app role’s **Value** is exactly `admin`, `editor`, or `viewer` in lowercase.
Why is my Base44 custom attribute not in the Target attribute dropdown?
Add it first. On the mapping screen, check **Show advanced options**, click **Edit attribute list**, add the full URN (for example, `urn:base44:params:scim:schemas:extension:user:2.0:role`), then save. The field becomes available in the dropdown afterward.
Why are users updated to the wrong record after re-provisioning?
Make sure `externalId` is mapped to `objectId`. If users were provisioned before you changed this mapping, use **Provision on demand** to refresh each user, or **Restart provisioning** to refresh everyone.
Was this page helpful?
YesNo
[SCIM provisioning](https://docs.base44.com/Enterprise/SCIM-provisioning)
[Okta SCIM](https://docs.base44.com/Enterprise/Okta-SCIM)
⌘I
Assistant
Responses are generated using AI and may contain mistakes.
Suggestions
Which plans come with a free domain?How are credits used?How do I use Discuss mode?
---
# Updates to the Base44 Terms of Service (June 2026) - Base44 Support Documentation
> Documentation Index
> -------------------
>
> Fetch the complete documentation index at: [/llms.txt](https://docs.base44.com/llms.txt)
>
> Use this file to discover all available pages before exploring further.
[Skip to main content](https://docs.base44.com/Community-and-support/terms-of-service-update-june-2026#content-area)
We have updated the Base44 Terms of Service, effective **June 21, 2026**, to better align the Base44 Terms with industry standards. This article summarizes the main changes. The full governing text is in the [Base44 Terms of Service](https://base44.com/terms-of-service)
. We encourage you to read them in full.
By continuing to use Base44 after the effective date, you accept the updated Terms.
* * *
[](https://docs.base44.com/Community-and-support/terms-of-service-update-june-2026#subscriptions)
Subscriptions
-------------------------------------------------------------------------------------------------------------------
* We’ve added a dedicated section explaining how our AI credits work.
* We clarified that you have the right to cancel the auto-renewal of your subscription at any time.
* We have removed your obligation to pay interest due to delayed payments.
* * *
[](https://docs.base44.com/Community-and-support/terms-of-service-update-june-2026#accepting-payments-through-your-apps)
Accepting payments through your apps
-----------------------------------------------------------------------------------------------------------------------------------------------------------------
* The new Terms address how you can sell products and services through apps you build on Base44.
* We also clarified matters related to tax payment responsibilities.
* * *
[](https://docs.base44.com/Community-and-support/terms-of-service-update-june-2026#prohibited-uses)
Prohibited uses
-----------------------------------------------------------------------------------------------------------------------
* The Terms now clarify that any use that is prohibited under applicable law isn’t allowed, including practices which are considered “prohibited” according to the EU AI Act.
* Additionally, if you use Base44 for high-risk purposes (as defined in applicable laws), you are responsible for complying with the relevant regulations.
* * *
[](https://docs.base44.com/Community-and-support/terms-of-service-update-june-2026#additional-rights-for-israeli-customers)
Additional rights for Israeli customers
-----------------------------------------------------------------------------------------------------------------------------------------------------------------------
We’ve added an addendum for certain Israeli users covering updated cancellation rights and refund policy.
* * *
[](https://docs.base44.com/Community-and-support/terms-of-service-update-june-2026#licenses)
Licenses
---------------------------------------------------------------------------------------------------------
* The new Terms now state that Base44’s services (for premium users) are intended for use by businesses and organizations.
* We also made some changes to the license to better support our ability to provide our service to you, including by using and training AI models.
* The new Terms allow us to send you promotional messages and use certain content you create for promotional purposes.
* * *
[](https://docs.base44.com/Community-and-support/terms-of-service-update-june-2026#warranties-liabilities-and-indemnification)
Warranties, liabilities and indemnification
------------------------------------------------------------------------------------------------------------------------------------------------------------------------------
* We redrafted the warranty section. As Base44 is an AI platform, we specifically disclaim warranties relating to AI outputs, which can sometimes be inaccurate.
* You are responsible for independently reviewing AI-generated output before relying on it.
* We also updated the sections on liability and indemnification, which include your obligation to indemnify Base44 in cases where your breach of the Terms or laws caused damages to Base44.
* We clarified that you are responsible for exporting your data before your subscription ends, if you wish to do so.
This summary is provided for convenience and does not replace the Base44 Terms of Service. If there is any conflict between this article and the Terms, the Terms control.
Was this page helpful?
YesNo
⌘I
Assistant
Responses are generated using AI and may contain mistakes.
Suggestions
Which plans come with a free domain?How are credits used?How do I use Discuss mode?
---
# Getting started as an enterprise workspace member - Base44 Support Documentation
> Documentation Index
> -------------------
>
> Fetch the complete documentation index at: [/llms.txt](https://docs.base44.com/llms.txt)
>
> Use this file to discover all available pages before exploring further.
[Skip to main content](https://docs.base44.com/Enterprise/getting-started-member#content-area)
Your enterprise workspace is a shared space where your team builds and collaborates on apps together. Depending on your role, you can build apps as an Editor or view apps you have been invited to as a Viewer. Learn how to join, what you can do, and where to get help.
* * *
[](https://docs.base44.com/Enterprise/getting-started-member#accepting-your-invitation)
Accepting your invitation
---------------------------------------------------------------------------------------------------------------------
Your workspace admin will send you an invitation by email. Invitation links are valid for 60 days. **To join your workspace:**
1. Open the invitation email and click **Accept Invitation**.
2. Sign in to Base44 or create an account if you do not have one.
If your workspace uses Single Sign-On (SSO), you sign in with your company credentials instead of a Base44 password. Your admin can confirm which sign-in method to use. If SSO is enabled, you may be added to the workspace automatically the first time you sign in with no invite needed.
* * *
[](https://docs.base44.com/Enterprise/getting-started-member#accessing-your-workspace)
Accessing your workspace
-------------------------------------------------------------------------------------------------------------------
Once you have accepted your invitation, click your workspace name at the top left of Base44 and select your enterprise workspace from the menu.

* * *
[](https://docs.base44.com/Enterprise/getting-started-member#understanding-your-role)
Understanding your role
-----------------------------------------------------------------------------------------------------------------
Your role controls what you can see and do in the workspace.
| Role | What you can do |
| --- | --- |
| **Admin** | Manage members, settings, and workspace configuration. |
| **Editor** | Create new apps and collaborate on apps you are invited to. Uses workspace credits. |
| **Viewer** | View apps you are invited to. Cannot edit apps or use the AI chat. |
If you need a different level of access, contact your workspace admin.
Your admin may have set a monthly credit limit for your account. If you reach your limit before the end of the month, contact your admin to request an increase.
* * *
[](https://docs.base44.com/Enterprise/getting-started-member#building-and-accessing-apps)
Building and accessing apps
-------------------------------------------------------------------------------------------------------------------------
As an **Editor**, you can create new apps from the Base44 home screen and collaborate on apps that others invite you to. Each app you build or run uses credits from the shared workspace pool. As a **Viewer**, you can only access apps that you have been specifically invited to collaborate on. Your admin or the app owner will send you an invitation to each app. Once you have access to an app, it appears on your Base44 home screen.
* * *
[](https://docs.base44.com/Enterprise/getting-started-member#using-superagents)
Using Superagents
-----------------------------------------------------------------------------------------------------
If your workspace has Superagents enabled, you can create and interact with AI agents directly from the Base44 home screen. Select the **Superagents** tab to get started.

If you do not see the Superagents tab, your workspace admin may have disabled it for your organization.
* * *
[](https://docs.base44.com/Enterprise/getting-started-member#getting-help)
Getting help
-------------------------------------------------------------------------------------------
If you run into issues or have questions, here are the best ways to get support.
* **Documentation:** Browse guides at [docs.base44.com](https://docs.base44.com/)
* **Support:** Open a ticket from the Help menu inside Base44 for bugs, troubleshooting, or app-building questions
* **Your admin:** For workspace access, role changes, or credit limit increases, contact your workspace admin directly
* * *
[](https://docs.base44.com/Enterprise/getting-started-member#next-steps)
Next steps
---------------------------------------------------------------------------------------
Build your first app
--------------------
Follow the quick start guide to create and launch your first Base44 app.
Explore Superagents
-------------------
Learn how to create an AI agent that runs tasks and works for you around the clock.
Get help
--------
Find support options and contact the Base44 team.
Was this page helpful?
YesNo
[For admins](https://docs.base44.com/Enterprise/getting-started-admin)
[SSO overview](https://docs.base44.com/Enterprise/SSO-for-enterprise-workspace)
⌘I
Assistant
Responses are generated using AI and may contain mistakes.
Suggestions
Which plans come with a free domain?How are credits used?How do I use Discuss mode?
---
# Managing connector availability for your workspace - Base44 Support Documentation
> Documentation Index
> -------------------
>
> Fetch the complete documentation index at: [/llms.txt](https://docs.base44.com/llms.txt)
>
> Use this file to discover all available pages before exploring further.
[Skip to main content](https://docs.base44.com/Enterprise/workspace-connectors#content-area)
As a workspace owner or admin, you can control which connectors are available across your workspace. Choose which external services workspace members can use, and how apps connect to them. Connectors you disable are blocked across the workspace, including in apps, Superagents, and in-app agents that use them.
**Before you begin:** You need to be a workspace owner or admin on an Enterprise plan to manage connector availability.

* * *
[](https://docs.base44.com/Enterprise/workspace-connectors#connector-types)
Connector types
-----------------------------------------------------------------------------------------------
Connectors have 2 credential types you can manage separately, depending on how apps in your workspace should connect to external services. You can enable both credential types for the same connector.
Shared Credential
-----------------
One account connects the app to an external service. Everyone who uses the app uses that same connected account for connector actions.Use this when an app should work from a team or company account, such as a shared Slack channel or company email account.
App user credential
-------------------
Each person connects their own account to the app. The app uses that person’s connected account for connector actions.Use this when each person should work with their own data, such as calendar events, files, or inbox.
* * *
[](https://docs.base44.com/Enterprise/workspace-connectors#managing-workspace-connectors)
Managing workspace connectors
---------------------------------------------------------------------------------------------------------------------------
Set workspace-level rules for connector access. Choose which external services are available to builders, and block connectors that should not be used in your workspace. You can manage both credential types separately for each connector, so apps can authenticate with one shared account, each app user’s own account, or both.
Disabling a connector can affect apps, Superagents, and in-app agents that already use it. Review the confirmation message before disabling the connector.
**To manage workspace connectors:**
1. Click your workspace name at the top left of your account.
2. Click **Settings**.
3. Under **Integrations** in the left sidebar, click **Connectors**.
4. Click **Manage connectors** at the top right.
5. Find the connector you want to manage.
6. Choose what you want to do:
* **Shared Credential:** Click the toggle to enable or disable shared credentials. To disable shared credentials, review the confirmation message and any affected apps, Superagents, or in-app agents, then click **Disable** to confirm.
* **App user credential:** Click the toggle to enable or disable app user credentials. If **Set up** appears instead, click **Set up** to add this connector as an app user connector to your workspace. To disable app user credentials, review the confirmation message and any affected apps, Superagents, or in-app agents, then click **Disable** to confirm.
###
[](https://docs.base44.com/Enterprise/workspace-connectors#setting-up-app-user-connectors)
Setting up app user connectors
Set up an app user connector when each person using an app should connect their own account to an external service.
Do not share client secrets, access tokens, or other private credentials in screenshots, support tickets, or public documentation.
**To set up an app user connector:**
1. Click your workspace name at the top left of your account.
2. Click **Settings**.
3. Under **Integrations** in the left sidebar, click **Connectors**.
4. Click **Manage connectors**.
5. Find the connector you want to set up.
6. In the **App user credential** column, click **Set up**.
7. Complete the setup dialog:
* Enter a name in the **Connector name** field.
* Enter the client ID in the **Client ID** field.
* Enter the client secret in the **Client Secret** field.
* Select the scopes your app needs in the **Scopes** field.
* (Optional) Add extra scopes in the **Additional scopes** field.
* Click **Add Connector**.
For full setup guidance, see [Setting up connectors for app users](https://docs.base44.com/Integrations/user-connectors)
.
###
[](https://docs.base44.com/Enterprise/workspace-connectors#managing-app-user-connectors)
Managing app user connectors
After an app user connector is set up, click **View Connections** to add another OAuth credential configuration or edit an existing one. **To manage an app user connector:**
1. Click your workspace name at the top left of your account.
2. Click **Settings**.
3. Under **Integrations** in the left sidebar, click **Connectors**.
4. Click **Manage connectors**.
5. Find the connector you want to manage.
6. In the **App user credential** column, click **View Connections**.
7. Choose what you want to do:
* **Add a connection:** Click **Add Connection**.
* **Edit a connection:** Hover over the connection you want to edit, then click **Edit**.
* * *
[](https://docs.base44.com/Enterprise/workspace-connectors#managing-connectors-in-bulk)
Managing connectors in bulk
-----------------------------------------------------------------------------------------------------------------------
Use bulk actions to allow or block multiple connectors across your workspace at once. **To manage connectors in bulk:**
1. Click your workspace name at the top left of your account.
2. Click **Settings**.
3. Under **Integrations** in the left sidebar, click **Connectors**.
4. Click **Manage connectors** at the top right.
5. Select the checkbox next to each connector you want to manage. To select all visible connectors, click the checkbox at the top of the list.
6. In the bulk action bar at the bottom, choose what you want to update:
* **Set shared credential:** Choose whether to enable or disable shared credentials for the selected connectors.
* **Set app user credential:** Choose whether to enable or disable app user credentials for the selected connectors.
7. Click **Apply**.
8. If you are disabling credentials, review the confirmation message and any affected apps, Superagents, or in-app agents, then click **Disable** to confirm.
* * *
[](https://docs.base44.com/Enterprise/workspace-connectors#faqs)
FAQs
-------------------------------------------------------------------------
Click a question below to learn more about managing connector availability.
Who can manage connector availability in a workspace?
Workspace owners and admins on an Enterprise plan can manage connector availability from **Connector Management**.
Can I enable shared credentials and app user credentials for the same connector?
Yes. You can enable both credential types for the same connector. The app builder chooses which credential type to use when building the app.
Can I add multiple connections for the same app user connector?
Yes. After the app user connector is set up, click **View Connections**, then click **Add Connection** to add another OAuth app credential configuration.
What happens when I disable a connector in my workspace?
When you disable a connector, Base44 shows a confirmation message before applying the change. If the connector is already used, you can review the affected apps, Superagents, in-app agents, and active connections before disabling it.After you disable the connector, it becomes unavailable across the workspace immediately. This includes apps, Superagents, and in-app agents that use it.
What happens when I set up an app user connector?
After you set up an app user connector, workspace members can use it in apps. The **App user credential** column shows a toggle and **View Connections**, so you can turn app user credential access on or off and manage its OAuth configuration.
Was this page helpful?
YesNo
[Apps and Superagents](https://docs.base44.com/Enterprise/Enterprise-SSO-and-app-visibility)
[Workspace secrets](https://docs.base44.com/Enterprise/workspace-secrets)
⌘I
Assistant
Responses are generated using AI and may contain mistakes.
Suggestions
Which plans come with a free domain?How are credits used?How do I use Discuss mode?
---
# Privacy and security - Base44 Support Documentation
> Documentation Index
> -------------------
>
> Fetch the complete documentation index at: [/llms.txt](https://docs.base44.com/llms.txt)
>
> Use this file to discover all available pages before exploring further.
[Skip to main content](https://docs.base44.com/Community-and-support/Privacy-and-security#content-area)
[](https://docs.base44.com/Community-and-support/Privacy-and-security#overview)
Overview
--------------------------------------------------------------------------------------------
Your trust matters to us. Keeping your account secure and your data private is at the heart of Base44. From advanced encryption and transparent ownership to GDPR compliance, Base44 gives you powerful tools and clear controls to stay in charge of your information. You have control over your data, clear ownership of your work, and peace of mind knowing your privacy is a priority.
* * *
[](https://docs.base44.com/Community-and-support/Privacy-and-security#protecting-your-personal-information)
Protecting your personal information
----------------------------------------------------------------------------------------------------------------------------------------------------
Base44 puts privacy and security first. Robust authentication tools and best-in-class encryption secure your account and any data you store or process in the platform.
* Your personal account information and access permissions are protected with strong security protocols.
* User management and authentication systems are built in, using industry-standard encryption and security practices to protect your data and your users’ information.
* Industry-standard methods secure both your account and your workspace, so your projects and personal details remain private.
* Base44 is compliant with SOC 2 Type II. This independent audit reviews how Base44 protects your data and systems. Because the full report contains sensitive security details, it is shared only under a non-disclosure agreement (NDA). To review Base44’s security, privacy, and compliance practices or request a copy of the SOC 2 report, go to the [Base44 Security Trust Center](https://base44.com/security)
and request the SOC report. A security specialist will contact you to continue the process.
* Base44 is ISO 27001 certified. ISO 27001 is an international standard for managing information security and privacy controls in an information security management system. This certification confirms that Base44 follows a repeatable, audited process to protect data across people, processes, and technology. [See the certification here](https://base44.com/security)
.
* * *
[](https://docs.base44.com/Community-and-support/Privacy-and-security#recognizing-legitimate-base44-emails)
Recognizing legitimate Base44 emails
----------------------------------------------------------------------------------------------------------------------------------------------------
When your app sends emails, Base44 uses specific domains so you can confirm that messages are legitimate.
* Emails sent by apps built on Base44 use the `base44-apps.com` domain and its subdomains (for example, `url1234.base44-apps.com`). These messages come from your apps and automations.
* Emails sent directly by Base44, such as account notifications or billing updates, use the `base44.com` domain.
* Check that links in Base44-related emails point to `base44.com` or `base44-apps.com` domains before you click them.
* * *
[](https://docs.base44.com/Community-and-support/Privacy-and-security#reporting-abuse-and-misuse)
Reporting abuse and misuse
--------------------------------------------------------------------------------------------------------------------------------
If you see suspicious behavior or messages that look abusive or unsafe, you can report them so Base44 can investigate.
* If you suspect a malicious or abusive app, or you receive an email that you believe violates Base44 policies, forward the message or report it to `abuse@base44.com`. This address is the correct contact for security, misuse, and abuse reports.
* Do not send support or product questions to `app@base44.com`. This address is not monitored and only sends automatic replies.
* For details on what counts as misuse, how Base44 investigates abuse, and what you can expect after sending a report, see the [Base44 misuse policy](https://base44.com/misuse)
.
* * *
[](https://docs.base44.com/Community-and-support/Privacy-and-security#your-data-choices-and-controls)
Your data choices and controls
----------------------------------------------------------------------------------------------------------------------------------------
Learn how to access your personal information, request account deletion, and manage data stored in Base44.
* **Deleting your Base44 account:** To permanently delete your account, follow the [Requesting account deletion guide](https://docs.base44.com/documentation/account-and-billing/managing-your-account#requesting-account-deletion)
.
* **Deleting your app data:** Go to the dashboard in your app editor, click **Settings**, then **App Settings** and scroll to **Danger Zone**. Click **Delete App** to permanently remove your app and all its data.
This is an irreversible action.
* If you would like a copy of the personal data that Base44 holds about you, email your request to [compliance@base44.com](mailto:compliance@base44.com)
from the email associated with your account.
* * *
[](https://docs.base44.com/Community-and-support/Privacy-and-security#data-storage-locations-and-compliance)
Data storage locations and compliance
------------------------------------------------------------------------------------------------------------------------------------------------------
Understanding where your data lives and how Base44 fulfills privacy regulations:
* All Base44 servers are currently located in the United States. By default, data for all workspaces is stored in the US.
* All of our vendors who receive personal information from Base44 are bound by strict data processing agreements, which govern the transfer of data to the US, and where applicable, the use of approved transfer mechanisms like adequacy, Standard Contractual Clauses (SCCs), or subscription to the Data Privacy Framework (DPF).
* If you want to request support for additional data storage regions, you can [submit or upvote a feature request](https://feedback.base44.com/)
. Base44 regularly reviews customer feedback and looks for ways to improve data storage options in the future.
Base44 is committed to privacy and data protection. For the most up-to-date information on data privacy, including GDPR and our DPA, please review our [**Terms of Service**](https://base44.com/terms-of-service)
and [**Data Processing Agreement**](https://base44.com/dpa)
.
####
[](https://docs.base44.com/Community-and-support/Privacy-and-security#changing-your-workspace-data-residency)
Changing your workspace data residency
As of April 16, 2026, if you have the Elite or Enterprise plan, you can choose to store your app data in EU or UK clusters instead of the default US region. This setting applies to apps created after that date; it does not affect apps created before.
**Important:**
* This feature is rolling out gradually and may not be available in your workspace yet.
* Data residency controls where your data is stored, not where it is processed. When your app runs, requests may be handled by Base44 services in another region before the result is saved to your chosen region.
* Data residency applies to your app’s data and users, as found under the **Data** and **Users** sections of your app dashboard. Other data such as media files uploaded to your app, your Base44 account details, and billing information remains stored in the US regardless of this setting.
**To change your workspace data residency:**
1. Click your workspace name at the top left and click **Settings**.
2. Click **Basic information**.
3. Click **Edit** next to **Data residency**.
4. Select your preferred region and click **Save**.

Any apps you create after saving this change will use the new data residency region. Existing apps are not affected.
####
[](https://docs.base44.com/Community-and-support/Privacy-and-security#viewing-your-apps%E2%80%99-data-residency)
Viewing your apps’ data residency
1. Click your workspace name at the top left and click **Settings**.
2. Click **Basic information**.
3. Click **View data residency for all workspace apps**.

####
[](https://docs.base44.com/Community-and-support/Privacy-and-security#moving-an-app-to-a-different-region)
Moving an app to a different region
If you want to change the data residency of an app created before April 16, 2026, clone the app after updating your workspace data residency setting, then transfer your data to the clone.
App users are not copied when you clone an app and cannot be exported. Users will need to sign up to the cloned app as normal.
**To move your app to a different region:**
1. Update your workspace data residency setting first (see above).
2. [Clone your app](https://docs.base44.com/documentation/using-your-workspaces/managing-your-workspace-apps#cloning-your-app)
. The clone is created in your workspace’s current data residency region.
3. In the original app, go to the dashboard and [export your data](https://docs.base44.com/Building-your-app/Managing-your-app-data#exporting-data)
.
4. In the cloned app, go to the dashboard and [import the exported data](https://docs.base44.com/Building-your-app/Managing-your-app-data#importing-data)
.
Want automatic app migration between regions? [Vote for this feature](https://feedback.base44.com/en/p/higher-security-and-eu-data-residence)
to help prioritize it.
* * *
[](https://docs.base44.com/Community-and-support/Privacy-and-security#account-and-app-ownership)
Account and app ownership
------------------------------------------------------------------------------------------------------------------------------
You always retain ownership of your account and any apps you create on the Base44 platform.
* According to the [**Base44 Terms of Service**](https://base44.com/terms-of-service)
, ownership of an app belongs to the person who created the app on the platform.
* If you need access to an app, you should request access directly from the current owner. Base44 does not grant access to an app against the creator’s will or participate in any ownership disputes. If another individual currently owns the app, you must resolve the dispute directly with them.
* If you believe your access to an app is being unlawfully restricted, you should seek advice from a local legal adviser to understand your options. If you receive a court order granting you access, Base44 will be happy to cooperate after receipt of the order.
* * *
[](https://docs.base44.com/Community-and-support/Privacy-and-security#useful-links)
Useful links
----------------------------------------------------------------------------------------------------
See the links below for more information about Base44.
* [Privacy Policy](https://base44.com/privacy-policy)
* [Terms of Service](https://base44.com/terms-of-service)
* [Security](https://base44.com/security)
* [Report Misuse](https://base44.com/misuse)
* [Responsible Use Policy](https://base44.com/responsible-use)
* [Accessibility Statement](https://base44.com/accessibility-statement)
Was this page helpful?
YesNo
[Contacting support](https://docs.base44.com/Community-and-support/Contacting-support)
[AI service providers](https://docs.base44.com/Community-and-support/ai-service-providers)
⌘I
Assistant
Responses are generated using AI and may contain mistakes.
Suggestions
Which plans come with a free domain?How are credits used?How do I use Discuss mode?
---
# Adding an IP allowlist for your workspace - Base44 Support Documentation
> Documentation Index
> -------------------
>
> Fetch the complete documentation index at: [/llms.txt](https://docs.base44.com/llms.txt)
>
> Use this file to discover all available pages before exploring further.
[Skip to main content](https://docs.base44.com/Enterprise/IP-allowlist#content-area)
IP allowlist lets you restrict access to your enterprise workspace and its apps so that only people on specific networks can sign in. This is useful if your team connects from a known office network or VPN and you want to block access from other locations. Requests from IP addresses that are not in the allowlist receive a 403 Forbidden response. When IP allowlist is enabled, all apps in the workspace are protected by the allowlist.
**Important:**
* IP allowlist is only available for enterprise workspaces.
* Only workspace owners and admins can view or change IP allowlist settings.
* Blocked access covers:
* Published apps (people using the app)
* Apps in builder mode (development and editing)
* Supported IP formats:
* Single IP: `192.168.1.5`
* CIDR notation: `192.168.1.0/24`
* IP range: `192.168.1.5-192.168.1.50`
* IPv6 address: `2001:db8::1`
* IPv6 CIDR: `2001:db8::/32`
* Authorized Base44 support staff may bypass the IP allowlist as part of support operations.
* * *
[](https://docs.base44.com/Enterprise/IP-allowlist#setting-up-an-ip-allowlist)
Setting up an IP allowlist
-------------------------------------------------------------------------------------------------------------
You can enable and configure your IP allowlist from **Auth and security** in your workspace settings. **To set up an IP allowlist:**
1. Click your workspace name at the top left of your account.
2. Click **Settings**.
3. Click **Auth and security**.
4. Scroll to the **IP Allowlist** section.
5. Enable the **IP Allowlist** toggle.
6. In the list, enter the IP addresses or ranges you want to allow.
7. Click **Add**.

* * *
[](https://docs.base44.com/Enterprise/IP-allowlist#faqs)
FAQs
-----------------------------------------------------------------
Click a question below to learn more about using IP allowlist for your workspace.
What if my internet provider changes my IP address?
If your public IP changes, you need to update the allowlist with the new IP. If your IP changes often, it is usually better to route access through a stable VPN endpoint or office network instead of adding individual home IPs.
Does IP allowlist replace authentication or SSO?
No. IP allowlist adds a network-level restriction on top of your existing sign-in and SSO setup. People still need valid credentials to sign in, even if they connect from an allowed IP.
Does IP allowlist affect outgoing connections from my apps?
No. IP allowlist controls who can access your workspace and its apps. It does not block or filter outbound connections that your apps make to external services or APIs.
Was this page helpful?
YesNo
[Managing members](https://docs.base44.com/Enterprise/managing-enterprise-members)
[Workspace domain](https://docs.base44.com/Enterprise/Enterprise-workspace-domain)
⌘I
Assistant
Responses are generated using AI and may contain mistakes.
Suggestions
Which plans come with a free domain?How are credits used?How do I use Discuss mode?
---
# Contacting Base44 for Support - Base44 Support Documentation
> Documentation Index
> -------------------
>
> Fetch the complete documentation index at: [/llms.txt](https://docs.base44.com/llms.txt)
>
> Use this file to discover all available pages before exploring further.
[Skip to main content](https://docs.base44.com/Community-and-support/Contacting-support#content-area)
Docs & FAQs
-----------
Find answers in guides and FAQs.
Discord
-------
Chat with the team and community.
Support
-------
Submit a support ticket for personalized help.
* * *
[](https://docs.base44.com/Community-and-support/Contacting-support#support-scope)
Support scope
----------------------------------------------------------------------------------------------------
Base44 support focuses on making sure the Base44 platform works as expected and on helping you with billing, account, and other platform-related questions. It does not provide hands-on debugging or fixes for your individual app code, prompts, or architecture. **Base44 support covers:**
* General guidance on how to use Base44 features
* Billing questions and account management
* Base44 offered connectors and GitHub sync (not third-party or open-source integrations)
* Platform bugs and errors
* Workarounds or solutions to known issues
* Clarifying which part of an issue belongs to Base44 and which part belongs to an external system or your own implementation
For help with building your app, you can get guidance from the Base44 community in [Discord](https://discord.com/channels/1303811506080841758/1303811506848272521)
or work with a [Base44 partner](https://docs.base44.com/Getting-Started/Hiring-a-partner)
.
* * *
[](https://docs.base44.com/Community-and-support/Contacting-support#using-the-docs-ai-assistant)
Using the docs AI assistant
--------------------------------------------------------------------------------------------------------------------------------
Click **Ask a question** at the bottom of any documentation page to get instant answers to your questions. You can ask anything related to building, integrations, setup, or troubleshooting. The AI uses context from the page you’re on to give better results.  **Try asking:**
How do I connect a custom domain?
How do I set up authentication?
Can I add multiple collaborators to my app?
How can I integrate my app with other apps?
* * *
[](https://docs.base44.com/Community-and-support/Contacting-support#troubleshooting-and-quick-fixes)
Troubleshooting and quick fixes
----------------------------------------------------------------------------------------------------------------------------------------
Before submitting a ticket, try these quick fixes:
* **Search the docs:** Look up your exact error message or setting name.
* **Browser basics:** Log out and back in, or try incognito mode.
* **Check recent changes:** Review the [changelog](https://base44.com/changelog)
for updates.
* **Network check:** Make sure your internet connection is stable.
* **Clear cache:** Clear browser cache and Base44 cookies.
* **Simplify the issue:** Reproduce the issue in a minimal test app.
* **Gather context:** Save any error messages or timestamps.
Check out our [troubleshooting guide](https://docs.base44.com/Community-and-support/Troubleshooting)
for more solutions. If the issue persists, submit a ticket with as much detail as possible so our team can assist you faster.
* * *
[](https://docs.base44.com/Community-and-support/Contacting-support#submitting-a-ticket)
Submitting a ticket
----------------------------------------------------------------------------------------------------------------
If you still need help after checking the docs or asking the AI, submit a ticket to get personalized support. You can track your ticket anytime under **My Support Tickets**.
**What to include in your ticket:**
* The link to your app.
* What you expected to happen.
* What is actually happening.
* Any actions you took right before the issue occurred.
* A screenshot (if it helps explain the problem).
Avoid opening duplicate tickets for the same issue. Instead, reply to your existing ticket with any updates.
* * *
[](https://docs.base44.com/Community-and-support/Contacting-support#support-terms-of-use)
Support Terms of Use
------------------------------------------------------------------------------------------------------------------
Base44 Support is here to help you with your Base44 products and services. You can help us by adhering to our expected code of conduct which is listed below. Customer Care interactions may be recorded, stored, and processed to improve our services and support quality. For more information, see our [Privacy Policy](https://base44.com/privacy-policy)
.
###
[](https://docs.base44.com/Community-and-support/Contacting-support#general-rules)
General rules
1. By sending an email to Base44 Support, or otherwise requesting support from Base44, you agree to all of the rules stated on this Terms of Use page as well as to the full [Base44 Terms of Use](https://base44.com/terms-of-service)
.
2. Debates and discussions with Base44 Support team members are fine; however, we will not tolerate the following:
* Support requests (including any emails or other communications with Base44 Support) that are insulting and provocative by nature.
* Personal attacks, name calling, and discriminatory remarks.
* Making unfounded allegations (slander).
* Support requests contesting Base44’s policies.
* Publicly lobbying against Base44 actions and policies.
* Intentional attempts to disrupt the workload of the Base44 Support team by multiple or duplicated support request submissions.
* Support requests that are sexual in nature, discriminatory, harmful, threatening, abusive, defamatory, obscene, hateful, racially or ethnically offensive.
* Support requests that contain sexually explicit remarks or excessive obscene or vulgar language.
* Support requests which discuss or illustrate illegal activity such as software and music piracy or other intellectual property violations.
* Links to sites that contain any of the aforementioned (a-i).
3. Base44 reserves the right to remove, ignore, or cease responding to any support requests that violate these Terms of Use without warning or explanation.
4. Base44 reserves the right to restrict, suspend or permanently revoke access to Base44 Support for anyone who wilfully violates these Terms of Use.
5. The Base44 team shall be the sole arbitrator of what does and what does not violate these Terms of Use.
6. Base44 reserves the right to take any actions we deem appropriate to ensure Base44 Support is not disrupted or abused in any way, including any legal action.
7. We have a zero tolerance anti-spam policy. Spammers’ support access will be revoked and all their support requests (including legitimate requests) will be removed.
If you believe your support access was mistakenly restricted, please contact [abuse@base44.com](mailto:abuse@base44.com)
.
* * *
[](https://docs.base44.com/Community-and-support/Contacting-support#faqs)
FAQs
----------------------------------------------------------------------------------
Click below to learn more about getting support for your Base44 app.
What is the fastest way to get help with my app?
Use the [documentation](https://docs.base44.com/)
and **Ask AI** for guides, quick how-to questions, setup tips, and troubleshooting. Join [Discord](https://discord.com/invite/ThpYPZpVts)
for real-time help from the community and the Base44 team. For account-specific or sensitive issues, submit a support ticket and include the details listed above.
How do I submit a support ticket?
Go to [My Support Tickets](https://app.base44.com/support/conversations)
and click **\+ New Ticket**. Include expected vs. actual behavior, steps to reproduce, relevant links, and screenshots or logs.
Where can I check my ticket status?
Go to [My Support Tickets](https://app.base44.com/support/conversations)
to view updates or add new information.
Is there a feature roadmap?
Yes. Visit the [Base44 feature roadmap](https://feedback.base44.com/roadmap)
to see what’s planned, in progress, or recently launched. You can vote or suggest new ideas to help shape upcoming releases.
Where can I give feedback or request features?
Use the [Feedback board](https://feedback.base44.com/)
or post in Discord’s [**#💡feature-requests**](https://discord.com/channels/1303811506080841758/1303811506848272517)
channel.
Why has support not responded to my ticket yet?
Response times vary based on ticket volume and issue urgency. If your issue is ongoing, reply to your existing ticket with any new details so we can continue troubleshooting. Please don’t open a duplicate ticket for the same issue.
Is support available in languages other than English?
The Base44 platform and AI chat are available in multiple languages, including English, German, Spanish, French, Japanese, and Portuguese.However, our human support team operates in English only. If you submit a support ticket in another language, our team may ask you to rewrite it in English so we can help you as quickly as possible.
Was this page helpful?
YesNo
[Troubleshooting](https://docs.base44.com/Community-and-support/Troubleshooting)
[Privacy and security](https://docs.base44.com/Community-and-support/Privacy-and-security)
⌘I
Assistant
Responses are generated using AI and may contain mistakes.
Suggestions
Which plans come with a free domain?How are credits used?How do I use Discuss mode?
---
# SCIM provisioning - Base44 Support Documentation
> Documentation Index
> -------------------
>
> Fetch the complete documentation index at: [/llms.txt](https://docs.base44.com/llms.txt)
>
> Use this file to discover all available pages before exploring further.
[Skip to main content](https://docs.base44.com/Enterprise/SCIM-provisioning#content-area)
SCIM (System for Cross-domain Identity Management) lets your identity provider (IdP) automatically manage Base44 workspace members. When someone joins or leaves your organization in your IdP, Base44 is updated automatically, with no manual invites or removals needed.
SCIM provisioning is available on enterprise workspaces only.
Base44 supports SCIM 2.0 with the following identity providers:
* **Okta**, set up in the dedicated [Okta SCIM guide](https://docs.base44.com/Enterprise/Okta-SCIM)
* **Microsoft Entra ID** (formerly Azure AD), set up in the dedicated [Microsoft Entra ID SCIM guide](https://docs.base44.com/Enterprise/Microsoft-Entra-SCIM)
* **Custom IdP**, any SCIM 2.0-compatible identity provider
* * *
[](https://docs.base44.com/Enterprise/SCIM-provisioning#before-you-begin)
Before you begin
----------------------------------------------------------------------------------------------
Before setting up SCIM, make sure you have:
* Owner or admin access to your Base44 workspace
* A Workspace API key (found in **Settings** → **Secrets**)
* Your SCIM Base URL (found in **Settings** → **Auth and security**)

* * *
[](https://docs.base44.com/Enterprise/SCIM-provisioning#custom-idp)
Custom IdP
----------------------------------------------------------------------------------
Okta and Microsoft Entra ID have their own guides, linked above. Any other SCIM 2.0-compatible identity provider can connect to Base44 using the following settings.
###
[](https://docs.base44.com/Enterprise/SCIM-provisioning#connection-settings)
Connection settings
Use the following values when configuring SCIM in your IdP.
| Setting | Value |
| --- | --- |
| **SCIM base URL** | Copy from **Settings** → **Auth and security** in your Base44 workspace |
| **Authentication** | HTTP header: `Authorization: YOUR_WORKSPACE_API_KEY` |
| **SCIM version** | 2.0 |
Your Workspace API key goes directly in the `Authorization` header. Both `Authorization: YOUR_API_KEY` and `Authorization: Bearer YOUR_API_KEY` are accepted.
###
[](https://docs.base44.com/Enterprise/SCIM-provisioning#attribute-mapping)
Attribute mapping
Map the following attributes in your IdP:
| SCIM field | Value | Notes |
| --- | --- | --- |
| `userName` | User’s email address | Required |
| `urn:base44:params:scim:schemas:extension:user:2.0:role` | `admin`, `editor`, or `viewer` | Defaults to `viewer` if omitted |
| `urn:base44:params:scim:schemas:extension:user:2.0:creditLimit` | Non-negative integer | Optional. Leave empty for no per-member cap. Setting this to `0` is treated as no cap. |
When sending extension attributes, include the Base44 extension schema URI in the `schemas` array of your SCIM request:
urn:base44:params:scim:schemas:extension:user:2.0
* * *
[](https://docs.base44.com/Enterprise/SCIM-provisioning#managing-your-members)
Managing your members
--------------------------------------------------------------------------------------------------------
Once SCIM is set up, your IdP handles membership changes automatically. Here is what happens in Base44 for each action.
###
[](https://docs.base44.com/Enterprise/SCIM-provisioning#adding-members)
Adding members
When you assign a user to your SCIM app, Base44 creates their workspace membership automatically. The user can sign in to Base44 using SSO once they are provisioned.
###
[](https://docs.base44.com/Enterprise/SCIM-provisioning#updating-members)
Updating members
When you update a user’s attributes in your IdP (such as their role or credit limit), Base44 updates their workspace membership to match.
Workspace owners cannot be updated or deactivated via SCIM. Owners must be promoted or demoted from the workspace settings directly.
###
[](https://docs.base44.com/Enterprise/SCIM-provisioning#removing-members)
Removing members
When you unassign a user from your SCIM app, Base44 removes them from the workspace. Their platform-wide Base44 account is not deleted, and they retain access to any other workspaces they belong to. If you need to re-add a previously removed member, re-assign them in your IdP. Base44 will create a new workspace membership.
* * *
[](https://docs.base44.com/Enterprise/SCIM-provisioning#roles)
Roles
------------------------------------------------------------------------
Base44 uses roles to control what each member can do. You assign a role when provisioning a user via SCIM, and you can update it at any time.
| Role | What they can do |
| --- | --- |
| `admin` | Manage members, billing, and workspace settings |
| `editor` | Build, edit, and run apps; uses credits from the workspace pool |
| `viewer` | Read-only access to apps; does not consume credits |
`owner`, `member`, and `guest` roles cannot be assigned via SCIM. If your IdP has groups mapped to those roles, update the mapping to use `admin`, `editor`, or `viewer` instead.
###
[](https://docs.base44.com/Enterprise/SCIM-provisioning#per-member-credit-limits)
Per-member credit limits
You can optionally cap how many credits a single member can use per month. Set `creditLimit` to a positive integer to apply a cap, or leave it empty for no limit. Credit limits only apply to `admin` and `editor` roles. Viewers cannot consume credits, so setting a credit limit on a viewer returns an error. Setting `creditLimit` to `0` is treated as no cap. You can also set credit limits directly from your workspace settings without going through SCIM. See [Managing enterprise workspace members](https://docs.base44.com/Enterprise/managing-enterprise-members#per-member-credit-limits)
.
* * *
[](https://docs.base44.com/Enterprise/SCIM-provisioning#troubleshooting)
Troubleshooting
--------------------------------------------------------------------------------------------
If provisioning is not working as expected, the steps below cover the most common errors and how to fix them.
API credentials test failed
Check that your Workspace API key is correct. Verify the SCIM Base URL was copied from Settings → Auth and security and has not been modified.
User is not being provisioned
Check your IdP’s provisioning logs for specific errors. Confirm `role` is set to `admin`, `editor`, or `viewer`.
Workspace owner cannot be updated or deactivated
This is by design. Workspace owners must be promoted or demoted from the Base44 dashboard. SCIM cannot modify owner memberships.
Cannot set a credit limit for viewers error
`creditLimit` can only be set on `admin` or `editor` roles. Either change the role to `editor` or `admin`, or remove the `creditLimit` value.
Was this page helpful?
YesNo
[Okta SSO](https://docs.base44.com/Enterprise/Okta-SSO)
[Microsoft Entra ID SCIM](https://docs.base44.com/Enterprise/Microsoft-Entra-SCIM)
⌘I
Assistant
Responses are generated using AI and may contain mistakes.
Suggestions
Which plans come with a free domain?How are credits used?How do I use Discuss mode?
---
# Getting started as an enterprise admin - Base44 Support Documentation
> Documentation Index
> -------------------
>
> Fetch the complete documentation index at: [/llms.txt](https://docs.base44.com/llms.txt)
>
> Use this file to discover all available pages before exploring further.
[Skip to main content](https://docs.base44.com/Enterprise/getting-started-admin#content-area)
As a workspace owner or admin, you are responsible for setting up your enterprise workspace for your team. Learn the key tasks to get everything configured and ready.
Before you start
----------------
Make sure your Base44 account manager has confirmed that your enterprise workspace is created and that you have owner or admin access to it.
**Have the following ready before you begin:**
* Your organization’s domain name
* Your identity provider details (if you plan to set up SSO)
* Email addresses for your team members
* * *
[](https://docs.base44.com/Enterprise/getting-started-admin#1-invite-your-team)
1\. Invite your team
--------------------------------------------------------------------------------------------------------
Start by adding your team members to the workspace. You can invite people individually or upload a CSV to invite in bulk. Each person is assigned a role that controls what they can do.
| Role | What they can do |
| --- | --- |
| **Admin** | Manages members and workspace settings. Does not handle billing. |
| **Editor** | Builds and edits apps, and uses credits from the workspace pool. |
| **Viewer** | Has read-only access to specific apps and does not consume credits. |
**To invite members:**
1. Click your workspace name at the top left.
2. Click **Settings**.
3. Click **Members**.
4. Click **Invite member** to add someone individually, or **Bulk Invite** to upload a CSV.

If you plan to use SCIM provisioning to sync members automatically from your identity provider, you can skip manual invites for those users. See step 5.
For full details on roles and credit limits, see [Managing enterprise workspace members](https://docs.base44.com/Enterprise/managing-enterprise-members)
.
* * *
[](https://docs.base44.com/Enterprise/getting-started-admin#2-connect-your-workspace-domain)
2\. Connect your workspace domain
----------------------------------------------------------------------------------------------------------------------------------
Connect your organization’s domain to your workspace for a branded address and domain-based access control. Your domain is also required before you can set up SSO. If your organization uses more than one email domain, you can connect several domains to the same workspace.
This is also a good time to decide your data residency region. You can choose where your workspace app data is stored: US, EU, or UK. See [Privacy and security](https://docs.base44.com/Community-and-support/Privacy-and-security)
for details.
Learn how to [connect your workspace domain](https://docs.base44.com/Enterprise/Enterprise-workspace-domain)
.
* * *
[](https://docs.base44.com/Enterprise/getting-started-admin#3-set-up-single-sign-on)
3\. Set up Single Sign-On
------------------------------------------------------------------------------------------------------------------
Enable SSO so your team signs in with their existing company credentials. Once enabled, anyone with your approved email domain is added to the workspace automatically as a Viewer when they first sign in. Learn how to [set up SSO for your workspace](https://docs.base44.com/Enterprise/SSO-for-enterprise-workspace)
.
* * *
[](https://docs.base44.com/Enterprise/getting-started-admin#4-configure-workspace-policies)
4\. Configure workspace policies
--------------------------------------------------------------------------------------------------------------------------------
Control how apps, Superagents, connectors, and external access behave for everyone in the workspace.
* **[Require SSO for all workspace members](https://docs.base44.com/Enterprise/SSO-for-enterprise-workspace#require-sso-for-all-workspace-members)
:** Require every workspace member to sign in through your SSO provider to access the workspace
* **[Enforce SSO for all apps](https://docs.base44.com/Enterprise/Enterprise-SSO-and-app-visibility#managing-sso-for-app-access)
:** Require app users to authenticate through your SSO provider
* **[Publishing permissions](https://docs.base44.com/Enterprise/Enterprise-SSO-and-app-visibility#publishing-permissions)
:** Control who can publish apps and which visibility levels each role can use
* **[Connector management](https://docs.base44.com/Enterprise/workspace-connectors)
:** Control which external services are available in your workspace, and whether apps can use shared credentials, app user credentials, or both
* **[Disable Superagents](https://docs.base44.com/Enterprise/Enterprise-SSO-and-app-visibility#managing-superagents)
:** Hide Superagents from all workspace members if your organization has not approved AI agents for use
* **[External collaborators](https://docs.base44.com/Account-and-billing/Managing-your-workspaces#controlling-guest-invitations)
:** Control whether any member or only admins can invite people from outside the workspace to collaborate on apps
* * *
[](https://docs.base44.com/Enterprise/getting-started-admin#5-set-up-automated-provisioning-optional)
5\. Set up automated provisioning (optional)
------------------------------------------------------------------------------------------------------------------------------------------------------
If your organization uses Okta or Microsoft Entra ID, set up SCIM to automatically sync workspace membership. When someone joins or leaves your organization in your identity provider, their Base44 access updates instantly with no manual work needed. Learn how to [set up automated provisioning with SCIM](https://docs.base44.com/Enterprise/SCIM-provisioning)
.
* * *
[](https://docs.base44.com/Enterprise/getting-started-admin#6-set-credit-limits-optional)
6\. Set credit limits (optional)
------------------------------------------------------------------------------------------------------------------------------
Set a default monthly credit cap that applies to all workspace members, with the option to override limits for specific individuals. This is useful for preventing any one member from consuming a disproportionate share of the workspace credit pool. Learn how to [set credit limits for your members](https://docs.base44.com/Enterprise/managing-enterprise-members#credit-limits)
.
* * *
[](https://docs.base44.com/Enterprise/getting-started-admin#7-move-existing-apps-optional)
7\. Move existing apps (optional)
--------------------------------------------------------------------------------------------------------------------------------
If you or your team have apps in a personal workspace that you want to bring into the enterprise workspace, you can move them from the app dashboard. Because each app can only be moved by its owner, this is a 2-step process between you and each app owner.
**Before anyone can move an app:**
* The app owner must be an active member of the enterprise workspace
* App transfers must be enabled in the source workspace (**Settings** → **Apps configuration** → **App Transfers**)
* The app cannot be a purchased app
**Step 1: You invite the app owner (performed by the enterprise workspace admin)**
1. Click your workspace name at the top left.
2. Click **Settings** → **Members** → **Invite member**.
3. Enter the app owner’s email address.
4. Assign a role. **Editor** or higher is recommended so the app owner can build and contribute in the workspace.
5. Click **Send Invite**.
**Step 2: The app owner accepts the invite and moves the app**
1. Open the invitation email from Base44 and click **Accept Invitation**.
2. Open the app in its current workspace.
3. Go to the app dashboard and click **Overview**.
4. Click **Move App** next to **Move to Workspace**.
5. Select the enterprise workspace from the list.
6. Click **Move App** to confirm.

After moving, the app uses the enterprise workspace’s credit pool. The published app URL does not change and all app data, media, and configurations remain intact.
For full details on moving and transferring apps, see [Managing workspace apps](https://docs.base44.com/documentation/using-your-workspaces/managing-your-workspace-apps)
.
* * *
[](https://docs.base44.com/Enterprise/getting-started-admin#8-explore-more-enterprise-features)
8\. Explore more enterprise features
----------------------------------------------------------------------------------------------------------------------------------------
Once the basics are in place, explore additional security and access controls.
* [IP allowlist](https://docs.base44.com/documentation/enterprise/ip-allowlist)
: Restrict workspace access to approved IP addresses and networks
* [Workspace secrets](https://docs.base44.com/Enterprise/workspace-secrets)
: Create API keys for programmatic access to audit logs and workspace data via the Monitoring API
* [Connector management](https://docs.base44.com/Enterprise/workspace-connectors)
: Manage connector availability across your workspace, review affected apps before disabling access, and control how apps connect to external services
* * *
[](https://docs.base44.com/Enterprise/getting-started-admin#setup-checklist)
Setup checklist
------------------------------------------------------------------------------------------------
Setup checklist
---------------
**[Invite your team](https://docs.base44.com/Enterprise/getting-started-admin#1-invite-your-team)
:** Add members by email and assign each the right role
**[Connect your workspace domain](https://docs.base44.com/Enterprise/getting-started-admin#2-connect-your-workspace-domain)
:** Give your workspace a branded address and domain-based access control
**[Set up Single Sign-On](https://docs.base44.com/Enterprise/getting-started-admin#3-set-up-single-sign-on)
:** Let your team sign in with your company’s identity provider, and verify your email domains
**[Configure workspace policies](https://docs.base44.com/Enterprise/getting-started-admin#4-configure-workspace-policies)
:** Control publishing permissions, app visibility, Superagents, and external collaborators
**[Configure connector management](https://docs.base44.com/Enterprise/workspace-connectors)
:** Choose which external services apps can use and how they connect
**[Set up the IP allowlist](https://docs.base44.com/documentation/enterprise/ip-allowlist)
:** Restrict workspace and app access to your trusted networks
**[Store API keys and credentials as Secrets](https://docs.base44.com/Enterprise/workspace-secrets)
:** Keep credentials out of your app dashboards
**[Set up automated provisioning](https://docs.base44.com/Enterprise/getting-started-admin#5-set-up-automated-provisioning-optional)
:** Sync workspace membership from Okta or Entra with SCIM _(optional)_
**[Set credit limits](https://docs.base44.com/Enterprise/getting-started-admin#6-set-credit-limits-optional)
:** Cap monthly credit use per member _(optional)_
**[Move existing apps](https://docs.base44.com/Enterprise/getting-started-admin#7-move-existing-apps-optional)
:** Bring apps from personal workspaces into the enterprise workspace _(optional)_
For a full overview of security features available in Base44, see [Security overview](https://docs.base44.com/Setting-up-your-app/security-overview)
.
* * *
[](https://docs.base44.com/Enterprise/getting-started-admin#getting-help)
Getting help
------------------------------------------------------------------------------------------
As an enterprise customer, you have access to dedicated support.
* **Dedicated account manager:** Your account manager is your main point of contact for guidance and ongoing support
* **Priority support:** Use the Help menu inside Base44 to open a support ticket with guaranteed response times
Was this page helpful?
YesNo
[Overview](https://docs.base44.com/Enterprise/Base44-for-enterprises)
[For members](https://docs.base44.com/Enterprise/getting-started-member)
⌘I
Assistant
Responses are generated using AI and may contain mistakes.
Suggestions
Which plans come with a free domain?How are credits used?How do I use Discuss mode?
---
# Troubleshooting Issues - Base44 Support Documentation
> Documentation Index
> -------------------
>
> Fetch the complete documentation index at: [/llms.txt](https://docs.base44.com/llms.txt)
>
> Use this file to discover all available pages before exploring further.
[Skip to main content](https://docs.base44.com/Community-and-support/Troubleshooting#content-area)
Sometimes things do not go as planned, but you can quickly fix most problems and get back on track. Use this guide to troubleshoot common issues with publishing, login, chat, and other key features.
**Quick troubleshooting tips:**
* If something in your app is not working as expected and you do not see a clear error, type ‘Something is wrong’ in the AI chat. Base44 analyzes what is happening in your app, surfaces possible issues, and suggests fixes directly in context so you can resolve problems faster before trying manual troubleshooting steps.
* Check the [Base44 status page](https://status.base44.com/)
to see if there are system-wide problems.
* * *
[](https://docs.base44.com/Community-and-support/Troubleshooting#editor-and-dashboard)
Editor and Dashboard
---------------------------------------------------------------------------------------------------------------
Unable to access the landing page of my app
You cannot access your app’s landing page because of how Base44 manages privacy settings for apps with both public and private areas.By default, Base44 requires every app to set one privacy level for all its pages. If your app’s privacy is set to “Private (Login Required),” all pages, including the landing page, will require a login. At this time, Base44 does not support making one page public (like a landing page) while the rest of the app stays private.To fix it, you need to make your app public so everyone can access your landing page.
1. Go to your app’s dashboard.
2. Click **Overview**.
3. Under **App Visibility**, select **Public**.
**If your app needs both public and private areas, follow this workaround:**
1. Create a separate app for your public landing page.
2. Publish both apps.
3. Link this landing app to your main, private app.
4. Assign your primary domain to the landing page app, and a subdomain to your private app.
Tip: Try viewing in an incognito window to check access without being logged in.
**Alternative workaround:**
If you want a single app with both a public landing page and private content, you can set up row-level security (RLS) to block all pages except your landing page.
* Ask the AI to create a public landing page, set it as default for all users.
* Lock all other pages behind RLS (so only logged-in users can see them).
* Configure redirects: Anyone logged out is sent to landing, logged-in users are sent to dashboard.
* Prompt suggestion:
“Please implement a landing page for our app that allows users to login/signup at /Login utilizing our existing theme. Make sure all pages except the landing page are secured behind RLS and that logged-in users can’t access the landing page but are redirected to the dashboard.”
For more on privacy settings, see the [Authentication](https://docs.base44.com/Setting-up-your-app/Managing-login-and-registration)
guide.
The screen is white when I click on something in my app
If you see a white screen in the editor, this usually points to a technical problem that needs further review.**Here are some steps you can try:**
1. Click the **Revert** icon on a chat message to restore your app to a previous working version.
2. Open the Version History (the clock icon in AI chat) and roll back to an older version where clicking on something did not cause a white screen.
3. Try describing your problem to AI chat with more specific details, such as exactly where, when, and how the issue appears.
If these steps do not resolve the problem, this might be a bug in your app’s code or configuration. In this case, submit a support ticket with detailed information about what triggers the white screen, which device/browser you are using, and any screenshots or error messages you see. This will help the Base44 team investigate and resolve the issue.
Error message: "Failed to load app: Error serializing to JSON: UnicodeEncodeError"
This error can happen if your app name contains an emoji or a special character that is not supported. When this error occurs, you will not be able to open the app editor or rename your app.If you encounter this issue, contact Base44 support so the team can help escalate your case.
App editor won't load or is slow
When you try to open the Base44 app editor, you might see a blank screen, get stuck on the loading icon, or notice that everything is running slowly or unresponsive. This can happen for several reasons related to your browser, internet connection, or temporary platform issues.**Try these steps:**
1. Check that you’re using an up-to-date, supported browser.
2. Clear your browser cache and Base44 cookies.
3. Turn off browser extensions, especially ad blockers or privacy tools.
4. Open the editor in an incognito window or try a different browser.
5. Check the Discord [community](https://discord.com/invite/ThpYPZpVts)
for any reported outages.
6. If the editor still isn’t working, take a screenshot of any errors (especially from your browser’s console), and [contact Base44 support](https://docs.base44.com/Community-and-support/Contacting-support)
with your browser and operating system details.
Can't see my published changes live
Sometimes after publishing your app, updates such as new content, design changes, or bug fixes don’t appear on your live site. This can be caused by caching, deployment issues, or missed steps in the publishing process.**Try these steps:**
1. Clear your browser and device cache, then reload your app.
2. Double-check your app from a different browser or device.
3. Make sure you clicked **Publish** and saw a “success” message.
4. If you updated a backend function, redeploy it from the dashboard.
5. Look for any error logs in your Base44 dashboard.
6. If nothing works, include your app link and details about what’s missing when you [contact Base44 support](https://docs.base44.com/Community-and-support/Contacting-support)
.
Blank screens and JSON schema errors after publishing
If you see a blank screen after publishing your app, or get an error such as “**Uncaught Error: Error in json schema: properties is required for object type**,” there is usually a mismatch between your field definitions and the data being saved.For example, if you use a flexible object or a custom input (like `meal_preferences`), make sure the input type and value type match your schema. Any mismatch can cause your app to load incorrectly or display a blank screen.Check your JSON schema and make sure your field types and the data being stored are aligned. If you need to insert a flexible object, only use JsonSchemaForm if the properties are clearly defined in advance.
> **Tip:** If your app code and settings look correct in the editor but your live app still shows blank screens or missing updates, double-check your field schemas and saved data. Hidden schema mismatches are a common cause.
* * *
[](https://docs.base44.com/Community-and-support/Troubleshooting#ai-chat)
AI Chat
-------------------------------------------------------------------------------------
Using too many credits when chatting with the AI
If you notice your credits are being used up faster than expected, it may be because you are chatting with the AI in regular mode instead of **Discuss** mode. When you work with the AI in regular mode, each interaction spends more credits. Discuss mode helps save credits by letting you plan and review steps without triggering costly AI actions.**To save credits while chatting with the AI:**
1. Click **Discuss** in the AI chat window before you start chatting. The **Discuss** button should be highlighted.
2. Plan, ask questions, and talk through your ideas with the AI.
3. When you are finished discussing and ready for the AI to take action or build something, click **Discuss** again to turn it off. The **Discuss** button will no longer be highlighted, and then you can ask the AI to implement your changes.

**Tip:** Always use **Discuss** mode for planning and brainstorming. Turn it off only when you want the AI to perform actions, generate outputs, or make changes. The **Discuss** mode only uses 0.3 credits per request.
For more information about how credits work and the best ways to manage them, [learn more about your credits](https://docs.base44.com/Account-and-billing/Credits)
.
The AI is not fixing my issue
This can happen when you describe a problem in general terms, and the AI starts guessing where the issue is.Try this workflow when you want to explain a specific bug, for example, a button that does nothing, a form that will not submit, or a feature that behaves unexpectedly.**Point the AI to the exact element (Visual Edit + Discuss):**
1. Click **Visual Edit** and **Discuss** in the AI chat.
2. Click the element in your app preview that you want to work on, for example, a button, form, input, or table row.
3. Click **Discuss** on the element to open a focused chat linked to that component.
4. In the AI chat, explain what is happening and what should happen.

Include the expected outcome. This helps the AI understand the current logic and what you want it to do.**Examples:**
* This button does not react when clicked, check its `onClick` handler.
* After clicking this button, a PDF should download, but currently nothing happens.
* This button should take me to the Orders page, but I stay on the same screen.
The AI chat isn't responding
Sometimes the AI chat panel may fail to load, get stuck processing, or not respond at all. This can happen if your prompt is too long or complex, due to browser or network issues, or temporarily from system updates.**Try these steps:**
1. Click the **Revert** icon on a chat message, or go back to the last version of your app that was working correctly. This can reset the AI’s state and often resolves the issue.
2. Click the **Stop** button on the chat if it is stuck in a state such as ‘thinking’, ‘applying changes’, or ‘undoing’.
3. If your AI request is very long or complex, split it into smaller, more manageable parts. This helps the AI process your instructions accurately.
4. Refresh your browser and check your internet connection
5. Clear your browser cache and turn off browser extensions that could block scripts
6. Open your app in a private or incognito window
7. If it’s still not working, check [Discord](https://discord.com/invite/ThpYPZpVts)
for reported issues.
If the chat processing state lasts longer than 10 minutes or does not provide updates, click the **Stop** button and let the support team know, including the following details:
* Where the AI got stuck (location or function in the app)
* The prompt or action you were performing
* How long the processing state lasted
Error: 'dict' object has no attribute 'lower'
You may see the error **‘dict’ object has no attribute ‘lower’** when using the chat prompt or trying to send a message. This usually happens when the chat expects text but receives an unexpected object, often due to a temporary glitch.**To resolve this error:**
1. Revert your last message, as suggested by the error.
2. Refresh the page fully:
* On Windows or Linux, press **Ctrl + Shift + R** or **Ctrl + F5**.
* On Mac, press **Cmd + Shift + R**.
3. Try clearing the chat section and start a new prompt.
4. If the error continues, contact support and include details about your prompt and the error.
AI chat is stuck on "Thinking..." after my first prompt to create the app
If AI chat stays on “Thinking…” after your first prompt and the app does not progress, try these steps.**Often, the app has been partially created. Try cloning the app:**
1. Go to your app **Dashboard**.
2. Go to **Settings** and then **App settings**.
3. Click **Clone app**.
4. Open the cloned app.
**If cloning does not help, create a new app:**
1. Copy your original prompt text.
2. Create a new app.
3. Paste the same prompt into the AI chat and run it again.
**Tips to prevent this:**
* For complex prompts, break your request into smaller, sequential prompts.
* Very long first prompts with many details can cause the chat to get stuck.
* Complex first prompts can sometimes take 10 to 15 minutes to complete. If nothing changes after that time, try one of the steps above.
* * *
[](https://docs.base44.com/Community-and-support/Troubleshooting#data-and-security)
Data and Security
---------------------------------------------------------------------------------------------------------
Row-level security (RLS) is not restricting data access correctly
Row-level security (RLS) rules control which users can access specific data in your app. If unauthorized users can see or edit data, or RLS rules are not working as expected, use the built-in security check to find and fix issues.**To troubleshoot RLS problems:**
1. Go to your app’s dashboard and click **Security**.
2. Click **Start security check** to scan for missing or misconfigured RLS rules.
3. Review the issues found and click **Apply Fixes** to use the recommended safe defaults, or adjust rules for each data entity manually.
4. Sign in with different user roles to confirm only authorized people can access each type of data.
For more details on setting up and managing security rules, see the [**guide to managing security settings**](https://docs.base44.com/Setting-up-your-app/Managing-security-settings)
.
* * *
[](https://docs.base44.com/Community-and-support/Troubleshooting#performance-and-speed)
Performance and Speed
-----------------------------------------------------------------------------------------------------------------
Error 500 appears when loading, saving, or using your app
You may see a “500 Internal Server Error” message while loading your app, saving data, accessing pages, or using platform features like forms or dashboards. This can lead to blank screens, missing data, lost progress, or features not working.This issue is usually caused by a problem on the Base44 backend or with the platform configuration, such as an invalid App ID, server outages, deployment issues, API problems, or overloaded resources. It can affect both published and development versions of your app.A 500 error means something went wrong on the server side, and you usually cannot fix it yourself.**What you should do:**
1. Refresh the page or try again later, as some 500 errors are temporary.
2. Check the status page or [Discord channels](https://discord.com/channels/1303811506080841758)
to see if there is a known platform incident.
If the problem continues, contact Base44 support. Include the following details:
* Your app name
* Where and when the error happens
* Any error messages from the console (screenshots if possible)
* What steps led to the problem
App does not load or shows a blank/white screen
Sometimes, an app fails to load and only displays a blank screen, loading spinner, or basic header. You might see this after making edits, trying to preview your app, or after publishing. The issue can occur on both web and mobile devices and can include issues such as:
* The app loads briefly, then disappears.
* Clicking the app link shows nothing but a white page or loading wheel.
* Some pages, tabs, or features remain frozen and unresponsive.
* The app crashes when clicking buttons or making selections.
* Nothing appears when trying to access the dashboard, preview, or key pages.
Most loading issues are caused by a problem in your app’s code or a temporary platform issue.**Try the following steps:**
1. Refresh the page or open the app in a new browser window.
2. Clear your browser cache and cookies, then try loading again.
3. Make sure your internet connection is stable.
4. Switch browsers or devices to see if the issue persists elsewhere.
5. If you made recent edits before the issue started, try reverting your most recent changes if possible.
6. Wait a few minutes. Sometimes the platform is updating or experiencing temporary downtime.
**If your app still won’t load, contact Base44 support and provide:**
* A description of what you see (e.g. blank page/spinner)
* When the issue began and any recent edits you made
* The app name or link
* Any error messages shown in your browser console (if possible)
The support team will investigate and work with you to restore your app.
If you’re stuck in an infinite loading state after using all your credits or after a large edit, mention this in your message.
My prompt or stop button is stuck and I can't revert
If your prompt keeps running and the stop button does nothing, try these steps:
1. Use Version History to quickly revert your app to before the stuck prompt. This is the fastest way to get back to a previous state.
2. Change the LLM in your app settings, switch to Discuss mode, and send any prompt (for example, “hi”) to break the stuck state.
3. Use Visual Edit mode to make a small change—such as adding an extra space or updating text—to force a state change.
4. If possible, open your app on a mobile device, enable Discuss mode, and send a prompt.
Everything is broken and reverting in chat does nothing
If your app is broken but asking the AI to revert in chat does not work:
1. Every prompt in your chat history has a **Revert** button. Click this to roll your app back to just before that change.
2. Rolling back your app by “asking” the AI in chat never actually undoes prompt changes—only the **Revert** button or Version History will fix it.
3. If the **Revert** button does not work, use **Version History** (usually found near the dashboard or preview). This lets you restore to an earlier app version.
4. If both **Revert** and Version History do not work, contact Base44 support for further help.
Tailwind CDN script is injected by the platform and cannot be removed
If you see any warnings in your browser or development tools about the Tailwind CDN script (such as “cdn.tailwindcss.com should not be used in production”), there’s no need to worry. The Tailwind CDN script is added automatically by the Base44 platform and is required for your app’s styling. This script cannot be removed or disabled at this time.The warning does not affect your app’s functionality or security. The script ensures consistent styling and a stable experience across all Base44 apps.Base44 is working on a solution for this in the near future. For now, please keep the script as part of your app setup.
* * *
[](https://docs.base44.com/Community-and-support/Troubleshooting#apps-and-integrations)
Apps and Integrations
-----------------------------------------------------------------------------------------------------------------
Backend functions are returning 404 errors at public URLs
Backend functions are designed to handle POST requests and are not accessible in a browser. If you visit a backend function URL in your browser, you will always see an error. However, if all your backend functions return 404 Not Found errors, especially when using the dashboard test tool or in your external integrations, this is a critical issue. It usually points to a problem with your app’s routing or deployment, not your code or configuration.Follow the steps below to test your backend function using the dashboard, and then proceed to the troubleshooting steps.
Step 1 | Test your backend function
1. Click **Dashboard** in your app editor.
2. Click **Code**.
3. Click **Functions**.
4. Select the relevant function.
5. Click **Test Function** at the bottom right.
6. (Optional) Copy the function URL from the top right sidebar for use in integrations.
* **If the test passes:** Your backend function is working. Errors from visiting the URL in a browser are normal.
* **If the test returns a 404 error** **or none of your integrations are working**: Continue with the troubleshooting steps below.
Step 2 | Troubleshooting persistent 404 errors
1. **Confirm your plan supports backend functions:** Make sure you are on the Builder plan or higher.
2. **Verify file locations and naming:**
* Make sure your function files (e.g. ebayAuth) are in the correct directory.
* Check file and function names for typos.
* Each file should export the function using `Deno.serve()`.
3. **Redeploy your app:** Redeploy from the dashboard to trigger a fresh deployment and update app routing.
4. **Review recent build and deployment:** If your app was recently updated, check that all build and deployment steps completed successfully.
If the problem continues after these checks, this is likely a platform-level routing or deployment issue rather than something wrong with your app setup. Contact Base44 support and include:
* The link to your app
* A list of affected backend function names (for example, ebayAuth)
* Screenshots showing the 404 errors at each endpoint
* When the issue started, such as after a deploy, migration, or platform update
Tip: Mentioning when the issue began helps the support team troubleshoot the problem faster.
Base44 unable to fetch API key
For security reasons, external services like Stripe, OpenAI, or Notion don’t let third parties (even Base44) access your credentials automatically. API keys are like passwords for services. Keeping them private and user-controlled keeps your data safe and ensures only _you_ authorize access.**Instead, you need to:**
1. Log in to the service.
2. Go to the API or developer section.
3. Generate your key.
4. Paste it into Base44 as a _Secret._
Once added, your app can use that key behind the scenes safely, and without code.
Error when opening backend function URL in browser
Backend functions in Base44 now support both GET and POST requests. You can use either method to call your backend functions, depending on your use case.
* **GET requests** let you pass data in the query string of the URL.
* **POST requests** allow you to send data securely in the request body.
If you see an error when opening a backend function URL in your browser, check that your request is formatted correctly for either GET or POST. Make sure to pass any required data using the appropriate method so your backend function receives it as expected.
500 error when making a POST request to webhook function
A 500 error usually means the URL for your webhook POST request is incorrect. Make sure you are using your app’s default Base44 app link as the base URL in your function endpoint.For example: `https://app--your-app-name.base44.app/api/apps/your-app-id/functions/yourFunctionName`If you have a custom domain connected, it is still recommended to use the default app link for POST requests to ensure proper routing and fewer errors. Double-check the structure of your URL and update your integration as needed.
Error ISOLATE\_INTERNAL\_FAILURE in backend functions
You might see the `ISOLATE_INTERNAL_FAILURE` error when you try to save or deploy a backend function. This usually means that one of the files in your `/functions` folder does not follow the platform requirements and cannot start in Base44’s Deno environment.**Common causes:**
1. **Missing Deno.serve entrypoint:** Each function file in the `/functions` folder must use `Deno.serve()` as the entrypoint. For example: `Deno.serve((request) => { ... })`
2. **Utility files or empty files in** `/functions:` Utility modules or completely empty files inside the `/functions` folder can trigger this error, even if they are not meant to be real endpoints. Helper files should be moved out of `/functions` or excluded from deployment.
3. **Invalid imports:** Backend functions must be self contained. Keep only imports from supported npm packages. Do not import:
* Frontend components
* Shared project utilities from other folders
* Other backend functions directly
4. **Unsupported APIs:** The Deno runtime does not support some Node.js built ins or browser only APIs. Remove or replace things like:
* Node.js modules such as `fs`, `path`, `process`, `crypto`
* DOM or window based browser APIs
**How to fix ISOLATE\_INTERNAL\_FAILURE errors:**
1. **Check the entrypoint:** Make sure every file in `/functions` that is deployed as a backend function defines a `Deno.serve()` block as its entrypoint.
2. **Clean up the** `/functions`**folder**
* Remove or move out any empty files or pure utility modules that should not be deployed as functions.
* Make sure only actual function files live in `/functions`.
3. **Fix imports and APIs**
* Remove local imports of frontend components, shared utilities, or other backend functions.
* Replace unsupported Node.js or browser specific APIs with supported alternatives.
* Keep only imports from supported npm packages.
4. **Save and publish:** Save your changes and publish your app so the backend functions can be rebuilt and deployed.
5. **Ask the Base44 AI to refactor the function:** If you still see the error, copy the function code into the Base44 AI chat and say something like: “This backend function returns ISOLATE\_INTERNAL\_FAILURE. Make it self contained and compatible with Deno.serve without changing what it does.” The AI can help rewrite the function so it follows the correct Deno patterns while keeping your logic the same.
App link does not open in other browsers
If your app opens for you but not when you paste the link into a different browser or device, it is usually related to publishing, domain setup, or app visibility.**To check that your app is published:**
1. Go to your app dashboard.
2. Click **Publish** in the top right.
3. Select **Publish app** if the app is not already published.
**To check your app visibility:**
1. In your app dashboard, click **Overview**.
2. Under **App visibility**, select **Public (No login required)** or **Public (Login required)**, depending on who should access your app.
3. If the app is set to **Private (Base44 login required)**, only email addresses you explicitly invite can open the link.
**To check your domain configuration:**
1. If you use a custom domain instead of the default Base44 app URL, make sure the domain is connected and verified in your Base44 settings.
2. Try opening the default Base44 app URL directly to confirm that the app itself loads as expected.
If your app link still does not open after these checks, contact support with the exact app URL, whether the app is published, and whether you are using a custom domain. This helps the team investigate more quickly.
* * *
[](https://docs.base44.com/Community-and-support/Troubleshooting#domains)
Domains
-------------------------------------------------------------------------------------
Domain is stuck in 'Pending'
When your domain is stuck on “pending” after updating DNS to add it to Base44, this usually means there’s an issue with your DNS configuration or propagation.First, check that your nameservers are set up correctly. Read our [guide on domains](https://docs.base44.com/Setting-up-your-app/Setting-up-your-custom-domain)
to check this. If you are still having issues, follow the steps below.**Troubleshooting steps:**
1. Remove any AAAA (IPv6) records for your domain, as these can interfere with proper setup.
2. Wait 48-72 hours for changes to fully propagate across the internet.
3. Use a tool like [whatsmydns.net](http://whatsmydns.net/)
to confirm your updated records are visible globally.
4. Double-check that you entered the exact record values.
5. If the status is still pending after about 30 minutes, try unlinking the domain in Base44, then re-adding it.
**If your domain still does not connect, contact support with:**
* A screenshot of your DNS records
* Your domain name
* Your Base44 app link
Domain from Base44 is not connecting
If you purchased your domain in Base44, you need to verify it first. If you skip this step, your domain will not connect.You need to confirm your domain ownership by verifying your email address with IONOS.
Check your inbox for an email from [support@ionos.com](mailto:support@ionos.com)
with the subject “Please Confirm the Contact Details for Your Domain.” Open this email and click the “Confirm Email Address” button within 14 days. This step is required by ICANN to keep your domain active and ensure your contact details are valid.If you do not confirm your email address within 14 days, your domain may be deactivated according to ICANN’s requirements. If you cannot find the email, check your spam or junk folders. If the email or link has expired, contact IONOS support to request a new confirmation email.**Here’s what you need to do:**
1. Open the IONOS email and click the link to confirm your email address.
2. In Base44, go to your app’s Dashboard and click **Domains**, select the domain, and click **Unlink domain**.
3. Connect the domain again.
4. Wait a few minutes for the connection to complete.
Domain is stuck in 'Connecting'
If your domain is stuck in ‘Connecting’ status for longer than 30 minutes, go to your app’s dashboard and click **Domains**, then unlink and link the domain again.
Domain is connected but it is not working and the site is not loading
Run through this checklist to set that it is set up correctly:
* Make sure DNS records match exactly what’s shown in this guide for your setup type.
* Remove any **AAAA (IPv6)** records, as they can block connections.
* Double-check for typos. Be sure to copy and paste values exactly from this guide.
* Ensure both www and the root domain are set up correctly.
* Confirm your domain is renewed and active.
* Wait up to 72 hours for changes to take effect.
**Advanced troubleshooting:**
* Double check CNAME and ANAME/ALIAS record requirements:
* www → [base44.onrender.com](http://base44.onrender.com/)
(CNAME)
* root / @ → [base44.onrender.com](http://base44.onrender.com/)
(ANAME/ALIAS or A record if ANAME/ALIAS is not supported)
* If using A record, set @ → 216.24.57.1
* Remove any AAAA records. Base44 only supports IPv4 and AAAA records can break domain resolution.
* For IONOS domains, try unlinking and relinking the domain to resolve most issues.
* If you tried these steps and are still seeing problems after full DNS propagation, contact support.
**Tip:** If your domain uses a DNS manager like Cloudflare, update the records there instead of at your registrar. During setup or troubleshooting, set Base44 related records to **DNS only** (grey cloud) so Cloudflare only answers DNS and does not proxy traffic. This does not turn off SSL in Base44. It just removes an extra proxy layer while you fix the connection.
SSL setup issues or ERR\_SSL\_PROTOCOL\_ERROR after connecting a custom domain
If you encounter SSL errors or an ERR\_SSL\_PROTOCOL\_ERROR after connecting your custom domain to Base44, follow these steps to resolve the issue:
* Check that your domain’s DNS records match exactly what is shown in your Base44 dashboard.
* Remove any AAAA (IPv6) records from your DNS settings, as these can block secure connections.
* Carefully check for typos or missing values in your DNS entries.
* Make sure both your www and root domain point to the correct Base44 IP addresses or CNAME.
* Verify that your domain registration is active and has been confirmed.
* Allow up to 72 hours for DNS and SSL changes to fully propagate worldwide.
* If you use a DNS service like Cloudflare, update your records directly within that service and set Base44 related records to **DNS only** (grey cloud) while you set up or troubleshoot.
**If you still see SSL errors after completing these steps, submit a support ticket and include:**
* A screenshot of your current DNS records
* Your domain name
* A link to your Base44 app
Unable to connect a domain to a new app after deleting the previous app
If you’ve deleted an app and are trying to connect the domain to a new app, you might see an error saying the domain already exists. This can happen if the domain is still registered in our system, even after the old app is removed.You won’t be able to fix this on your own right now. Please contact our support team for help on this.
Did not receive the domain verification email after purchasing a domain from Base44
After purchasing a domain from us, you need to verify your contact information to activate it. If you have not received a verification email from IONOS (the domain registrar), your domain may not connect or work as expected. This can prevent your website from going live.**To resolve this issue:**
1. Check your inbox, spam, and junk folders for an email from IONOS.
2. If you cannot find the email, contact IONOS (the domain registrar) and request a new verification email.
3. When you contact IONOS, provide your domain name and explain that you have not received the verification email after purchasing your domain.
4. Follow the steps from IONOS to complete your domain verification.
429 error when reconnecting domain
A 429 error usually appears due to a temporary limit on the Base44 side. This issue resolves itself automatically.
Wait a few minutes before trying to reconnect your domain. If the problem continues after waiting, try again later.
Public DNS tools show an extra A record that I cannot see in my registrar's DNS
When you look up your domain in public DNS tools (such as Google Dig or Whatsmydns), you might see an extra A record pointing to an IP address you do not recognize. However, when you check your registrar’s DNS zone, that A record is not listed. This usually happens because domain forwarding, URL redirect, or parking is enabled at the registrar, which silently creates an A record in the background and can interfere with connecting your domain or generating SSL.**To fix this issue:**
1. Open a public DNS lookup tool and look up your domain’s A records.
2. Compare the IPs you see there with the A records in your registrar’s DNS zone and confirm that one IP appears only in the public tool.
3. Sign in to your domain registrar account and open the management page for your domain.
4. Look for sections named Domain forwarding, URL redirect, Web forwarding, or Parking.
5. If any forwarding, redirect, or parking option is turned on for your domain, turn it off or delete it, then save your changes.
6. If you are not sure where the extra IP comes from, copy the IP address from the DNS tool and run a WHOIS lookup on it.
7. If the IP belongs to your registrar (such as GoDaddy or Namecheap), it is almost certainly a default parking or forwarding page. Make sure all forwarding and parking features are fully disabled for this domain.
8. Wait for DNS changes to propagate and then check your domain connection or SSL status again.
If you are still having problems with your domain, contact [**Base44 support**](https://app.base44.com/support/conversations)
and include:
* A screenshot of your DNS records
* Your domain name
* A link to your Base44 app
* * *
[](https://docs.base44.com/Community-and-support/Troubleshooting#content-and-media)
Content and Media
---------------------------------------------------------------------------------------------------------
Unable to upload videos to the AI chat
You can upload videos to the AI chat if they use a supported format and meet the file size limit.**To fix the issue:**
1. Check that your video is one of the supported formats: MP4, WEBM, MOV, AVI, MKV, M4V, WMV, OGV, 3GP, or 3G2.
2. Make sure your video is 100MB or less per video.
3. Try uploading the video again.
4. If the upload still does not work, refresh the editor and try again.
For more details on supported files, see the [Media guide](https://docs.base44.com/Building-your-app/Using-media)
.
Error message: Invalid MIME type
This error appears when you try to upload a file format that is not supported by the AI chat, or when the file type does not match what Base44 expects.**To fix the issue:**
1. Check that your file is one of the supported formats.
2. Make sure your file does not exceed the size limit for that file type.
3. If you accidentally uploaded the wrong file, click **Revert** on the message to undo the last prompt.
4. Try uploading your file again using a supported format.
For more details on supported files, see the [Media guide](https://docs.base44.com/Building-your-app/Using-media)
.
Error message: Image does not match the provided media type
This error appears if you upload an image where the file’s actual format does not match its file extension or what Base44 expected. This often happens if you rename a file from another format, for example from .webp to .png, without converting it properly, or if the image was saved in a different format than its extension indicates.**To resolve this error:**
1. Revert your last message, especially if the image upload was in your previous step.
2. Open the file in an image editor and re-save or export it in a supported format, such as PNG, JPG, or JPEG, instead of just renaming the file extension.
3. Check that your file meets the [limits for AI chat](https://docs.base44.com/Building-your-app/Using-media#file-upload-limits)
.
4. Try uploading the newly exported image again using a supported format.
Always use images exported or saved as PNG, JPG, or JPEG from an image editor. Renaming a file’s extension does not convert it to a proper format and may cause upload errors.
* * *
[](https://docs.base44.com/Community-and-support/Troubleshooting#error-codes)
Error Codes
---------------------------------------------------------------------------------------------
200 - Things are working as expected
The action you tried completed successfully. You usually will not see this code in the Base44 interface, but you might spot it in API responses, logs, or integration tools.**What should you do?** No action is needed. This means everything is working correctly.
400 - Bad request
A 400 error means the Base44 server could not process your request, often because some information is missing or in the wrong format.**Examples:**
* Submitting a form with missing required fields.
* Calling an API with the wrong data format.
**What should you do?** Check the information you entered and try again. If using an API, make sure your request matches the expected format.
401 - Unauthorized
You are not logged in, or your login session has expired. The requested action requires authentication.**Examples:**
* Trying to view a dashboard page without signing in.
* Calling an API or integration feature with invalid credentials or an expired token.
**What should you do?** Sign in to Base44 and try again. If using integrations, update your API keys or login credentials.
403 - Forbidden
You are signed in but do not have permission to perform this action or access the resource. This can happen if your role or permissions are limited, or if Row-Level Security (RLS) settings for certain data entities are not properly set.**Examples:**
* Trying to change settings in an app you do not have access to.
* Attempting to access data or pages restricted by your role or RLS rules in your app.
**What should you do?** Check with your workspace admin to see if your permissions need to be updated. If you are an admin or developer, review the RLS rules for any relevant data entities and make sure the correct access is set up for the actions you want to take.Note that backend functions are only available on the Builder plan and higher.**If you see 403 errors when connecting webhooks from external services (like Telegram or WhatsApp):**Some external services, such as Telegram or WhatsApp, send webhook requests from their servers but do not support including authentication credentials (like an `api_key` or custom headers). If your webhook or backend function requires authentication, these services return a 403 error.
* Make sure your webhook endpoint does not require any authentication for services that can’t send credentials. The endpoint must be public to work with these types of integrations.
* If you want to keep authentication for other integrations, set up a separate public-only function or endpoint for these services, and only use it for actions that are not sensitive.
After making your endpoint public, the external service should connect without a 403 error.
404 - Not found
The page, link, or resource you tried to access does not exist.**Examples:**
* Entering an incorrect URL for your app or dashboard.
* Accessing a deleted or moved file.
**What should you do?** Check for typos and confirm you have the correct link. If the resource should exist, check with your workspace admin or teammates to make sure it has not been moved or deleted. If you still can’t access it, contact Base44 support.
429 – Too many requests
You tried to perform an action too many times in a short time period. This triggers a temporary rate limit that protects performance and stability.**Examples:**
* Rapidly clicking to reconnect a domain or repeat the same action in your dashboard.
* Sending many repeated requests in a short time via the API, backend functions, or automations.
**What should you do?** Wait a short time before trying again. When you retry, avoid repeating the same action quickly so you do not hit the limit again.**Additional info:**
* Rate limits apply per person, so capacity scales with the number of people using your app.
* Spread requests out over time instead of sending them all at once.
* Use batch requests where your integration supports them.
* Add caching so you do not call the same endpoint for the same data again and again.
* Add retry logic that waits a short time before sending a new request after a 429 response.
* If 429 errors appear during normal activity, contact Base44 support with the time of the error and what you were trying to do.
500 – Internal server error
There was a problem with the Base44 server when processing your request.**Examples:**
* Seeing a “500 Internal Server Error” page.
* Features failing when saving or loading data.
**What should you do?** Refresh and try again. If the issue keeps happening, check the [Base44 Discord](https://discord.com/channels/1303811506080841758/1303811506848272516)
for known issues or contact support with details about the error.
Was this page helpful?
YesNo
[Referral Program](https://docs.base44.com/Community-and-support/Referral-program)
[Contacting support](https://docs.base44.com/Community-and-support/Contacting-support)
⌘I
Assistant
Responses are generated using AI and may contain mistakes.
Suggestions
Which plans come with a free domain?How are credits used?How do I use Discuss mode?
---
# Setting up SSO for your enterprise workspace - Base44 Support Documentation
> Documentation Index
> -------------------
>
> Fetch the complete documentation index at: [/llms.txt](https://docs.base44.com/llms.txt)
>
> Use this file to discover all available pages before exploring further.
[Skip to main content](https://docs.base44.com/Enterprise/Set-up-SSO#content-area)
You configure SSO in your workspace settings, not in an individual app’s dashboard. First create an app with your identity provider, then add its credentials to your workspace.
**Before you begin:** Find your workspace ID. You need it for the redirect URI. It is the string of characters after `/workspace/` in your enterprise workspace URL. Your redirect URI is `https://app.base44.com/api/workspaces/{{WORKSPACE_ID}}/auth/sso/callback`.
* * *
[](https://docs.base44.com/Enterprise/Set-up-SSO#setting-up-your-identity-provider)
Setting up your identity provider
-------------------------------------------------------------------------------------------------------------------------
Follow the steps for your provider to create the app and collect the values you enter in Base44.
###
[](https://docs.base44.com/Enterprise/Set-up-SSO#microsoft-entra-id)
Microsoft Entra ID
Microsoft Entra ID uses a dedicated app registration and also supports SCIM provisioning. Follow the full flow in [Setting up SSO for Microsoft Entra ID](https://docs.base44.com/Enterprise/Microsoft-Entra-SSO)
.
###
[](https://docs.base44.com/Enterprise/Set-up-SSO#okta)
Okta
Okta uses an OIDC app plus a couple of authorization-server settings. Follow the full flow in [Setting up SSO for Okta](https://docs.base44.com/Enterprise/Okta-SSO)
.
###
[](https://docs.base44.com/Enterprise/Set-up-SSO#google-workspace)
Google Workspace
Create an OAuth 2.0 client in Google Cloud, then enter its credentials in Base44. **To create the Google app:**
1. In the [Google Cloud Console](https://console.cloud.google.com/apis/credentials)
, create an **OAuth 2.0 Client ID** of type **Web application**.
2. Under **Authorized redirect URIs**, add your workspace redirect URI.
3. Copy the **Client ID** and **Client Secret**.
###
[](https://docs.base44.com/Enterprise/Set-up-SSO#github)
GitHub
Create a GitHub OAuth app, then enter its credentials in Base44. **To create the GitHub app:**
1. In [GitHub Developer Settings](https://github.com/settings/developers)
, create an **OAuth app**.
2. Set the **Authorization callback URL** to your workspace redirect URI.
3. Copy the **Client ID** and generate a **Client Secret**.
###
[](https://docs.base44.com/Enterprise/Set-up-SSO#other-oidc-providers)
Other OIDC providers
Connect any OpenID Connect provider by creating a client and entering its details in Base44. **To create the app:**
1. Create an OIDC client with your provider, using your workspace redirect URI.
2. Copy the **Client ID** and **Client Secret**.
3. Find your provider’s **Discovery URL**, or its individual OIDC endpoints.
* * *
[](https://docs.base44.com/Enterprise/Set-up-SSO#adding-your-credentials-in-base44)
Adding your credentials in Base44
-------------------------------------------------------------------------------------------------------------------------
Once you have your provider’s credentials, add them to your workspace. For Microsoft Entra ID and Okta, follow their dedicated guides above instead, which include this step. **To add your SSO credentials:**
1. Click your workspace name at the top left of your account.
2. Click **Settings**.
3. Click **Auth and security**.
4. Enable the toggle next to **Single Sign-On Configuration**.
5. In **Select SSO Provider**, choose your provider, or **Advanced / Manual Configuration** for another OIDC provider.
6. Enter your **Client ID** and **Client Secret**, and keep **Scope** as `openid email profile`.
7. For Advanced / Manual Configuration, also add your **Discovery URL** or the individual endpoints from your provider.
8. Click **Enable SSO**.
Members can sign in once you verify their email domain. Set up [verified domains and the default role](https://docs.base44.com/Enterprise/SSO-for-enterprise-workspace#verified-domains)
in the same **Auth and security** settings.
* * *
[](https://docs.base44.com/Enterprise/Set-up-SSO#testing-your-sso-login)
Testing your SSO login
---------------------------------------------------------------------------------------------------
Confirm that sign-in works before you roll SSO out to your team. The first time someone signs in, Base44 adds them to the workspace automatically with your default role. **To test SSO:**
1. Log out of Base44, or open a private browser window.
2. Go to your workspace’s login page.
3. Enter an email address from one of your verified domains. Base44 then shows the SSO option for that domain.
4. Click **Log in with SSO** and sign in through your identity provider.
5. Confirm that you are redirected back to Base44 and added to the workspace as a member with your default role.
If sign-in fails, check that the redirect URI uses `/api/workspaces/{{WORKSPACE_ID}}/...`, your provider credentials are correct, and the email’s domain is verified. For provider-specific errors, see the [Microsoft Entra ID](https://docs.base44.com/Enterprise/Microsoft-Entra-SSO)
or [Okta](https://docs.base44.com/Enterprise/Okta-SSO)
guide.
Was this page helpful?
YesNo
[SSO overview](https://docs.base44.com/Enterprise/SSO-for-enterprise-workspace)
[Microsoft Entra ID SSO](https://docs.base44.com/Enterprise/Microsoft-Entra-SSO)
⌘I
Assistant
Responses are generated using AI and may contain mistakes.
Suggestions
Which plans come with a free domain?How are credits used?How do I use Discuss mode?
---
# Adding and using npm packages - Base44 Support Documentation
> Documentation Index
> -------------------
>
> Fetch the complete documentation index at: [/llms.txt](https://docs.base44.com/llms.txt)
>
> Use this file to discover all available pages before exploring further.
[Skip to main content](https://docs.base44.com/Building-your-app/NPM-packages#content-area)
[](https://docs.base44.com/Building-your-app/NPM-packages#what-are-npm-packages)
What are npm packages?
-----------------------------------------------------------------------------------------------------------
Use npm packages to add powerful features and tools to your Base44 applications without having to build everything yourself. Base44 is an [ai app builder](https://base44.com/ai-app-builder)
that gives you access to reliable, up-to-date code libraries for things like animations, data formatting, and charts, all created by expert developers. When you use npm packages, you can add advanced features in minutes, rely on well-tested code, and focus on creating what makes your app unique.

Think of npm packages as little boxes of ready-made code you can plug into your app. Someone else already wrote the code. You just need to install the package and can use all its abilities instantly.
Base44 makes it simple to add npm packages to your app. You can request to add npm packages, review the request, and approve installation, all from the AI chat inside your app editor.
Examples of npm packages
------------------------
* Animation libraries (for example, anime.js)
* Chart and graph utilities
* Date and time helpers
* UI components
* Drag and drop logic
**Important:**All npm packages are created and maintained by third parties. Base44 can’t guarantee the quality, reliability, or security of any external package you install. Always test and validate packages carefully to make sure they work correctly in your app. You are responsible for ensuring that any third-party packages you use meet your project’s needs.
* * *
[](https://docs.base44.com/Building-your-app/NPM-packages#browsing-npm-packages)
Browsing npm packages
----------------------------------------------------------------------------------------------------------
You can find npm packages in the public registry. Each package README includes detailed instructions, usage examples, and peer dependency details, so you can get started right away.
Use the Base44 [**npm Playground**](https://npm-playground.base44.app/)
to preview npm packages in action and plug them directly into your app.
**To browse Base44 npm packages:**
1. Go to [npmjs.com](https://npmjs.com/)
to see all available public packages.
2. Click the package you want to use to open its details page.
* * *
[](https://docs.base44.com/Building-your-app/NPM-packages#adding-an-npm-package-to-your-app)
Adding an npm package to your app
----------------------------------------------------------------------------------------------------------------------------------
In Base44, you can add npm packages by chatting with the AI. No terminal or manual install commands required. **To add an npm package to your app:**
1. Go to your app editor.
2. Type in the AI chat the npm package you want to install.
3. When prompted, click **Approve** in the chat.

* * *
[](https://docs.base44.com/Building-your-app/NPM-packages#example-of-using-an-npm-package)
Example of using an npm package
------------------------------------------------------------------------------------------------------------------------------
You can use anime.js to create polished entrance animations for your app’s pages and elements. For example, you might want to animate cards, buttons, or charts when a page loads to make your site feel more engaging. Simply add a prompt such as:
Install the npm anime.js and make my app beautiful
The AI chat will ask you to approve the installation and the package is installed right into your app.

Once it is installed, you can use anime.js to animate page sections, icons, and more.
* * *
[](https://docs.base44.com/Building-your-app/NPM-packages#faqs)
FAQs
------------------------------------------------------------------------
Click a question below to learn more.
Is there an official Base44 SDK?
Base44 does not currently offer a public SDK. However, you can vote for this feature on our [Product Roadmap](https://feedback.base44.com/roadmap/main?q=sdk)
.For advanced developers, the `npm-base44/sdk` package is available. This package allows you to perform specific backend functions.
What should I do if an NPM package fails to install?
If your npm package does not install or gets stuck on pending, try these steps:
1. Check the chat messages for error details. Sometimes, the AI chat will explain about dependency or compatibility issues with the package you are requesting to install.
2. Make sure your request matches the exact package name and version.
3. If install requires approval, verify that you have approved the request in the chat panel.
4. If the install fails, try re-requesting the package using the chat.
Can I remove or update a package after installing it?
Once you have added an npm package, you cannot remove it from your app. However, if you are not using an npm package in the code but have it installed, it has no affect on your app.If an npm package needs updating, you can simply ask the AI chat to do it for you.
Can I see which packages are installed?
To find out which npm packages you have installed on your app, you can ask the AI chat.
How can I choose reliable npm packages?
Choose the right npm packages by following the recommendations below. Doing a little research on each package, instead of installing it immediately, can help you find reliable options and prevent issues down the line.
* **Download statistics:** Look up how many downloads the package has on npm. Packages with a strong download history are generally seen as dependable within the development community.
* **Documentation quality:** Well-documented packages usually make setup and troubleshooting much easier. Look for clear usage instructions, examples, and API references.
* **License type:** Make sure the package’s license fits your project’s requirements, especially if you’re building something commercial or open-source.
* **Bundle size and dependencies:** Consider how the package will affect your app’s performance and whether it adds many new dependencies. Lightweight, focused packages reduce potential conflicts and bloat.
* **Update activity:** Review the project’s repository, such as on GitHub, to see if updates are recent and if maintainers are addressing questions or bug reports. Packages that are kept up to date are usually safer and more compatible with modern tools.
* **Community input:** Explore comments, ratings, and discussions from npm, GitHub, or programming forums. Other developers’ experiences can alert you to potential issues or give you a better sense of how the package performs in practice.
Was this page helpful?
YesNo
[Using the canvas](https://docs.base44.com/Building-your-app/Canvas)
[Managing your app data](https://docs.base44.com/Building-your-app/Managing-your-app-data)
⌘I
Assistant
Responses are generated using AI and may contain mistakes.
Suggestions
Which plans come with a free domain?How are credits used?How do I use Discuss mode?
---
# Creating and using your app on mobile - Base44 Support Documentation
> Documentation Index
> -------------------
>
> Fetch the complete documentation index at: [/llms.txt](https://docs.base44.com/llms.txt)
>
> Use this file to discover all available pages before exploring further.
[Skip to main content](https://docs.base44.com/Building-your-app/Mobile-experience#content-area)
Base44 gives you full flexibility on mobile. Build and edit from a mobile browser or the Base44 app, share your app with users so they can add it to their home screen, and submit it to the App Store or Google Play when you’re ready.

* * *
[](https://docs.base44.com/Building-your-app/Mobile-experience#using-base44-from-a-mobile-browser)
Using Base44 from a mobile browser
-----------------------------------------------------------------------------------------------------------------------------------------
You can create, edit, and manage your apps directly from a mobile browser, without needing to download anything. This lets you capture ideas, make quick changes, and keep your work moving wherever you are.
###
[](https://docs.base44.com/Building-your-app/Mobile-experience#creating-an-app-on-mobile)
Creating an app on mobile
Start a new app project wherever you are, using just your mobile device. This helps you capture ideas, build quickly, and manage your work even when you’re away from your computer. **To create a new app from your mobile browser:**
1. Open your browser on your mobile device.
2. Go to [**base44.com**](http://base44.com/)
and tap **Start Building.**
3. Sign up or log in.
4. Write your prompt and start building.
###
[](https://docs.base44.com/Building-your-app/Mobile-experience#editing-your-app-on-mobile)
Editing your app on mobile
Update your app directly from your mobile browser, making it easy to adjust content, add features, or make quick changes while on the go.
Some features such as connecting a domain and managing your app’s security are not available on mobile. You need to go to a desktop to make changes to these.
**To edit your app from your mobile browser:**
1. Open your browser on your mobile device.
2. Go to [**base44.com**](http://base44.com/)
and tap **Start Building.**
3. Log in to your account.
4. Tap your app.
5. Tap **Chat to Edit** to make changes using AI.

* * *
[](https://docs.base44.com/Building-your-app/Mobile-experience#base44-mobile-apps)
Base44 mobile apps
---------------------------------------------------------------------------------------------------------
Download the Base44 app to build, edit, and manage your apps on the go.

###
[](https://docs.base44.com/Building-your-app/Mobile-experience#android)
Android
The Base44 Android app is available on Google Play. Download it to build, edit, and manage your apps directly from your Android device. [Download from Google Play](https://play.google.com/store/apps/details?id=com.base44.android&pcampaignid=web_share)
###
[](https://docs.base44.com/Building-your-app/Mobile-experience#ios)
iOS
The Base44 iOS app is available on the Apple App Store. Download it to build, edit, and manage your apps directly from your iPhone or iPad. [Download from the App Store](https://apps.apple.com/il/app/base44-build-with-ai/id6757432427)
**Important:**
* The price shown in the iOS app may differ from the price on base44.com, as Apple applies its own fees.
* To manage, change, or cancel your subscription, go to your Apple ID subscription settings. You cannot do this from your Base44 account.
* If you have a billing issue with a subscription purchased through the iOS app, you need to contact Apple Support directly. We are not able to help with billing issues processed by Apple.
* * *
[](https://docs.base44.com/Building-your-app/Mobile-experience#sharing-and-installing-your-app)
Sharing and installing your app
-----------------------------------------------------------------------------------------------------------------------------------
Your app works in any mobile browser without needing to be in an app store. [Share the link](https://docs.base44.com/Setting-up-your-app/Managing-access#sharing-your-app)
to your published app and let your users know they do not need to download anything.   For the best experience, recommend that your users add the app to their home screen. When someone adds your app to their home screen, their device uses your app’s logo as the icon. It appears alongside other apps and opens with a single tap, just like a native app.

Your app updates automatically, so everyone opening it from the home screen always sees the latest version.
**To add your app to the home screen:**
1. Open the app link in your mobile browser.
2. Tap the share option in your browser.
3. Tap **Add to Home Screen**.
4. Edit the shortcut name if you want, then tap **Add**.

* * *
[](https://docs.base44.com/Building-your-app/Mobile-experience#submitting-your-app-to-app-stores)
Submitting your app to app stores
---------------------------------------------------------------------------------------------------------------------------------------
You can prepare your app for the Apple App Store and Google Play directly from the app editor. Scan your app against store guidelines, use AI to fix issues, and generate the IPA and AAB files that you need to upload in your Apple and Google developer accounts.
You need a [Builder plan or higher](https://app.base44.com/billing)
to download the files for app stores.
Learn how to [submit your app to app stores](https://docs.base44.com/documentation/building-your-app/uploading-to-app-stores)
.
* * *
[](https://docs.base44.com/Building-your-app/Mobile-experience#exporting-your-app)
Exporting your app
---------------------------------------------------------------------------------------------------------
If you have a Builder plan or higher, you can export your app’s code to GitHub or download it as a ZIP file. This lets you work with external tools and workflows outside of Base44. You can then use third-party tools such as Capacitor, PWABuilder, or Trusted Web Activities (TWA) to wrap your app’s URL or exported code, making it possible to distribute your app on mobile app stores. These wrappers are managed outside of Base44, and any native-only features like push notifications must be set up separately. If you export your frontend and data, you can host the frontend elsewhere and connect it to your own backend system if you wish.
What can I export from Base44 (on Builder plan or higher)?
**Frontend (app codebase) and functions:** Your app’s code by clicking the export button in the top-right corner of the app editor (GitHub or ZIP). The export includes all client-side code (HTML, CSS, JavaScript, assets) and backend functions.**Backend (data):** Your database collections as CSV files. Go to **Data** in your app editor, select a collection, click the More Actions icon and then **Export**.
What can't I export?
Managed hosting, authentication system, or database infrastructure.
For advanced help and community support, visit the [Base44 Discord community](https://discord.com/channels/1303811506080841758/1368653043071058100)
to connect with other builders and share tips.
* * *
[](https://docs.base44.com/Building-your-app/Mobile-experience#faqs)
FAQs
-----------------------------------------------------------------------------
Click a question below to learn more about using your app on mobile.
Can I customize how my app looks on mobile?
Yes. Your app automatically adjusts its layout for any device, but you can fine-tune how it looks and works on mobile. See [Customizing your app for mobile](https://docs.base44.com/documentation/building-your-app/design#customizing-your-app-for-mobile)
in the design doc.
Are push notifications supported in Base44 apps?
Push notifications are not currently supported in Base44 apps. There are no push notification settings in the dashboard or app settings. If you want native push notifications in the future, you can suggest or upvote this feature on the Feedback board.[Add your vote on the feature request for push notifications.](https://feedback.base44.com/p/feature-request-native-push-notifications-support)
Do my users need to update the app?
No. Any time you make or publish changes, your visitors automatically see the latest version.
Can my users interact with forms, features, and all content on mobile?
Yes, every element, form, and feature of your app works on both desktop and mobile devices. We recommend testing your entire app on mobile and making any necessary adjustments in the app editor to ensure the best experience for your users.
How do I add or configure the manifest.json file for my PWA?
You do not need to create or upload a manifest.json file for your app. Base44 automatically generates and manages the manifest.json for you.You can view your app’s manifest at:
`https://yourdomain.com/api/apps/manifests/YOUR_APP_ID/manifest.json`To change what appears in the manifest, update your app information instead of editing the file directly:
1. Go to your **App Dashboard** and click **Overview**.
2. Update your app name, descriptions, icons, and other branding details.
These changes are reflected automatically in your manifest.json file.
Are all app editing features available on mobile?
Some features in Base44 are only available from desktop so you can manage them more easily on a larger screen. These include Visual Edits, security settings (RLS), editing code, working with APIs, app templates, and more.If you do not see a feature in the mobile app editor, open it from a desktop browser to access the full set of options.
Was this page helpful?
YesNo
[Payments in Israel](https://docs.base44.com/Setting-up-your-app/accepting-payments-israel)
[Submitting to app stores](https://docs.base44.com/documentation/building-your-app/uploading-to-app-stores)
⌘I
Assistant
Responses are generated using AI and may contain mistakes.
Suggestions
Which plans come with a free domain?How are credits used?How do I use Discuss mode?
---
# Creating automations for your app - Base44 Support Documentation
> Documentation Index
> -------------------
>
> Fetch the complete documentation index at: [/llms.txt](https://docs.base44.com/llms.txt)
>
> Use this file to discover all available pages before exploring further.
[Skip to main content](https://docs.base44.com/Building-your-app/Creating-automations#content-area)
Use automations when you want to take work off your plate, such as sending summary emails, generating reports, syncing or cleaning up data, or running recurring maintenance tasks. When [building an app](https://base44.com/ai-app-builder)
in Base44, automations help you run backend functions automatically, on a schedule, when data changes, or when a connected integration sends an event through a connector. You create and manage automations using the AI chat in your app’s dashboard.
**Workflows is replacing automations.** It is rolling out gradually, so some apps now show **Workflows** instead of **Automations**. If your app shows Workflows, see [Creating workflows](https://docs.base44.com/Building-your-app/Creating-workflows)
.

What can I use automations for?
-------------------------------
You can use automations for any backend work you want to happen automatically. Common examples include:
* Sending emails or messages, such as daily welcome emails or weekly newsletters.
* Generating reports or summaries, for example a daily revenue report.
* Checking conditions and alerting only when something changes, such as low inventory.
* Reacting to changes in your data, such as sending admins a message when a new product is added.
* Scheduling posts on social media.
* Running recurring maintenance or housekeeping tasks, like archiving old records or refreshing caches.
* Backing up your app’s data (e.g. to Google Drive) every week.
* Sending notifications to external tools when something happens, for example posting salon booking updates into a Slack channel when calendar events change.
* * *
[](https://docs.base44.com/Building-your-app/Creating-automations#how-automations-work)
How automations work
----------------------------------------------------------------------------------------------------------------
When you create an automation, you choose how it starts. It can run on a schedule you define, in response to a data event such as a record being created, updated, or deleted, when an app user starts a conversation with an in-app agent, or when a connected integration sends an event using a connector. Each automation runs a backend function in your app and records the run so you can see what happened. Every automation has logs so you can always see when it ran, whether it succeeded, and any errors that occurred. This keeps everything transparent and easy to debug.
**Important:**
* You must have a **Builder plan** or higher to use automations.
* Each time an automation runs, it uses **1 integration credit**.
* Each automation run can last for a maximum of 3 minutes. If it takes longer, the run fails. For example, if your automation sends 1,000 emails but can only send 600 within 3 minutes, only the first 600 are sent and the rest are not processed.
* The minimum interval between automation runs is 5 minutes.
* * *
[](https://docs.base44.com/Building-your-app/Creating-automations#types-of-automations)
Types of automations
----------------------------------------------------------------------------------------------------------------
There are 4 types of automations you can create. When describing what you want to the AI chat, it helps to know which type fits your use case.
###
[](https://docs.base44.com/Building-your-app/Creating-automations#scheduled-automations)
Scheduled automations
Scheduled automations run at a time or interval you define. Use these for recurring tasks like daily digests, weekly reports, or regular maintenance jobs. Example prompts:
* `Send me a daily summary of all new orders to my email every morning at 8:00.`
* `Archive trip records that have been completed for more than 30 days, every Sunday at midnight.`
###
[](https://docs.base44.com/Building-your-app/Creating-automations#data-event-automations)
Data event automations
Data event automations run in response to changes in your app’s data, such as a record being created, updated, or deleted. Use these to react to activity in real time. Example prompts:
* `Send a push notification whenever I add a new WishlistPlace and write any needed backend function for me.`
* `Send the admin an email whenever a new booking is created.`
###
[](https://docs.base44.com/Building-your-app/Creating-automations#in-app-agent-automations)
In-app agent automations
In-app agent automations run when an app user starts a new conversation with an in-app agent. Use these to stay on top of who is reaching out, for example to get notified when a customer starts a chat, automatically add them to your contacts, or send yourself a summary at the end of the day. Example prompts:
* `Email me whenever someone starts a new conversation with my agent.`
* `Add the person to my Contacts list when they start a chat with my agent.`
###
[](https://docs.base44.com/Building-your-app/Creating-automations#connector-automations)
Connector automations
Connector automations run when a connected integration sends an event, such as a new email arriving in Gmail or a calendar event being updated in Google Calendar. Use these to keep your app in sync with external tools. Example prompts:
* `When a new email arrives in Gmail with the subject "Book appointment", parse it and add a new booking to my app.`
* `When a Google Calendar event is cancelled, update the booking in my app and post a message in the #salon-general Slack channel.`
Connector automations are currently available for Gmail, Google Calendar, Google Drive, Microsoft Outlook and Microsoft OneDrive.
* * *
[](https://docs.base44.com/Building-your-app/Creating-automations#creating-an-automation)
Creating an automation
--------------------------------------------------------------------------------------------------------------------
When you click **New Automation**, Base44 shows suggestions based on your app’s context. You can pick one of those or click **Create from scratch** to choose your automation type and describe what you want in the AI chat.
###
[](https://docs.base44.com/Building-your-app/Creating-automations#using-a-suggestion)
Using a suggestion
Each suggestion includes a short description of what it does. Clicking one sends a pre-filled prompt to the AI chat, where you can review and adjust it before the AI sets it up. **To create an automation from a suggestion:**
1. Click **Dashboard** in your app editor.
2. Click **Automations**.
3. Click **New Automation**.
4. Browse the suggestions under **Suggested for you**.
5. Click a suggestion to send it to the AI chat as a pre-filled prompt.
6. Review the prompt, make any changes, and send it.
7. The AI sets up the automation and adds it to your **Automations** list.

* * *
###
[](https://docs.base44.com/Building-your-app/Creating-automations#creating-from-scratch)
Creating from scratch
If none of the suggestions fit what you need, create your automation from scratch. You choose the trigger type first, then describe what you want in the AI chat. **To create an automation from scratch:**
1. Click **Dashboard** in your app editor.
2. Click **Automations**.
3. Click **New Automation**.
4. Click **Create from scratch**.
5. Select the trigger type: **Scheduled**, **Data event**, **In-app agent**, or **Connector**.
6. In the AI chat, describe the automation you want. For example: `Set up recurring email reminders to my email name@email.com for my tasks on my to-do list every Sunday at 17:00.`
7. The AI creates the automation and adds it to your **Automations** list.
If you need a new backend function for your automation, just mention it in your prompt and the AI will write it for you.
* * *
[](https://docs.base44.com/Building-your-app/Creating-automations#managing-automations)
Managing automations
----------------------------------------------------------------------------------------------------------------
After you start using automations, you can control when they run, change their settings, trigger them on demand, or clean up automations you no longer need. You can pause automations without deleting them, and you can duplicate an existing automation when you want a similar setup with small changes.
When you turn an automation off, Base44 stops scheduling future runs, but existing logs stay available. You can turn the automation back on at any time.
###
[](https://docs.base44.com/Building-your-app/Creating-automations#turning-an-automation-on-or-off)
Turning an automation on or off
Pause an automation at any time if you want to stop it running, and turn it on again when you need it. **To turn an automation on or off:**
1. Click **Dashboard** in your app editor.
2. Click **Automations**.
3. Click the toggle on the left of the automation name to turn it on or off.

**Automatic pause for failing automations:** If a scheduled automation fails repeatedly, Base44 pauses it automatically and notifies you so you can investigate and fix the issue before re-enabling it.
* * *
###
[](https://docs.base44.com/Building-your-app/Creating-automations#editing-an-automation)
Editing an automation
Make changes to an automation at any time. The changes affect future runs only. **To edit an automation:**
1. Click **Dashboard** in your app editor.
2. Click **Automations**.
3. Click the **More Actions** icon on the automation.
4. Click **Edit automation**.
5. Update the automation details.
6. Click **Save**.

* * *
###
[](https://docs.base44.com/Building-your-app/Creating-automations#duplicating-an-automation)
Duplicating an automation
Create new automations by duplicating existing ones and editing the new automation. **To duplicate an automation:**
1. Click **Dashboard** in your app editor.
2. Click **Automations**.
3. Click the **More Actions** icon on the automation.
4. Click **Duplicate**.
5. Update the new automation’s details if needed, and click **Save**.

* * *
###
[](https://docs.base44.com/Building-your-app/Creating-automations#running-an-automation-immediately)
Running an automation immediately
Run an automation right away when you want to trigger its backend function on demand. This helps you test changes, confirm that your configuration works, or handle something urgent between scheduled runs.
Run now triggers the backend function one time in addition to any schedule or data event you configured. The run appears in the automation logs.
**To run an automation:**
1. Click **Dashboard** in your app editor.
2. Click **Automations**.
3. Click the **More Actions** icon on the automation.
4. Select **Run now**.

* * *
###
[](https://docs.base44.com/Building-your-app/Creating-automations#archiving-an-automation)
Archiving an automation
If you do not need an automation anymore, you can move it to Archive to keep your active list clean. **To archive an automation:**
1. Click **Dashboard** in your app editor.
2. Click **Automations**.
3. Find the relevant automation in the list.
4. Click the **More Actions** icon on the automation.
5. Click **Archive**.

* * *
[](https://docs.base44.com/Building-your-app/Creating-automations#monitoring-runs-and-using-logs)
Monitoring runs and using logs
------------------------------------------------------------------------------------------------------------------------------------
Every automation keeps its own log so you can see when it ran, how long it took, and whether it succeeded. When something goes wrong, logs help you understand what failed and where to look in your backend code, without guessing.
Use logs to confirm that new automations are running at the right time after you first set them up.
**To view logs for an automation:**
1. Click **Dashboard** in your app editor.
2. Click **Automations**.
3. Click the automation you want to inspect.
4. Click the **Logs** tab.
5. Review the list of runs, including the timestamp, duration, and status of each run.

* * *
[](https://docs.base44.com/Building-your-app/Creating-automations#automations-and-integration-credits)
Automations and integration credits
----------------------------------------------------------------------------------------------------------------------------------------------
Each automation run uses at least 1 integration credit, plus additional credits for any built-in integrations called inside it. For example, an automation that calls invokeLLM and sends an email costs the 1-credit automation run plus credits for each action it triggers. [See the full credit breakdown.](https://docs.base44.com/Account-and-billing/Credits#integration-credit-examples)
Automations that run frequently or chain several actions can drain your credit balance quickly. Here are some ways to keep usage under control:
* **Add specific trigger conditions.** Narrow the criteria that cause an automation to fire so it does not run unnecessarily.
* **Consolidate redundant automations.** If multiple automations perform overlapping tasks, combine them into fewer, smarter workflows.
* **Resolve failing automations promptly.** Automations that error can still consume credits on each retry. Check your logs regularly and fix or disable problem automations as soon as you spot them.
* **Review the frequency of scheduled tasks.** Consider whether recurring automations, such as daily reports or reminders, need to run as often as configured.
* **Minimize invokeLLM calls.** Each invokeLLM call inside an automation is a separate credit charge. Only call the LLM when the result cannot be pre-determined.
* **Test in a controlled environment first.** Run automations manually on a small dataset and check the execution logs to estimate the per-run credit cost before enabling them at scale.
* **Use Discuss mode when designing automations.** Discuss mode costs roughly 0.3 message credits and lets you plan automation logic before applying changes, reducing trial and error.
* * *
[](https://docs.base44.com/Building-your-app/Creating-automations#faqs)
FAQs
--------------------------------------------------------------------------------
Click a question below to learn more.
Can I add conditions to control when an automation fires?
Yes. Ask the AI chat to add trigger conditions to any automation. For example:
Only run this automation when the order status is "pending".
The automation then only fires when the trigger event also matches the conditions you describe. Conditions are shown in the **Advanced** section of the automation panel once set, and can only be changed by asking the AI chat — they cannot be edited manually.
How do I investigate a failed automation run?
When an automation fails, you see a **Failed** label in the **Last run** column and a **Fix with AI** option on the same row.**To fix a failed run:**
1. Click **Dashboard** in your app editor.
2. Click **Automations**.
3. Click **Fix with AI** on the failed automation.
4. In the AI chat, review the explanation of what went wrong and how it affects your automation. Accept the suggested fix so the AI can update your code or automation configuration.
5. When the AI finishes applying the fix, use the **Run now** action from **Automations** and check the logs to confirm the automation succeeds.
For more detail about what happened, open the automation, go to the **Logs** tab, and review the failed run entry. You can also ask the AI in your dashboard to explain any error messages that appear.
Which connector events can I use in connector automations?
The available events depend on which connector you are using. Here is a full list:
| Connector | Event | Description |
| --- | --- | --- |
| Gmail | mailbox | New emails arriving in your mailbox |
| Google Calendar | events | Any calendar event change, including created, updated, and deleted |
| Google Drive | changes | Any change in the drive, including files added, modified, or deleted |
| Google Drive | file | Any change to a specific file (requires a file ID) |
| Google Drive | file.update | File content or properties changed (requires a file ID) |
| Google Drive | file.trash | File moved to trash (requires a file ID) |
| Google Drive | file.untrash | File restored from trash (requires a file ID) |
| Google Drive | file.delete | File permanently deleted (requires a file ID) |
| Microsoft Outlook | created | A new email, calendar event, or contact is created |
| Microsoft Outlook | updated | An email or calendar event is updated |
| Microsoft Outlook | deleted | An email or calendar event is deleted |
| Microsoft OneDrive | updated | Any file or folder change, including created, modified, and deleted |
Make sure the connector is connected and configured in **Integrations** in your app’s dashboard before creating a connector automation.
Was this page helpful?
YesNo
[AI agents for your app](https://docs.base44.com/Building-your-app/AI-agents-for-apps)
[Creating workflows](https://docs.base44.com/Building-your-app/Creating-workflows)
⌘I
Assistant
Responses are generated using AI and may contain mistakes.
Suggestions
Which plans come with a free domain?How are credits used?How do I use Discuss mode?
---
# Managing your app pages - Base44 Support Documentation
> Documentation Index
> -------------------
>
> Fetch the complete documentation index at: [/llms.txt](https://docs.base44.com/llms.txt)
>
> Use this file to discover all available pages before exploring further.
[Skip to main content](https://docs.base44.com/Building-your-app/managing-your-pages#content-area)
Pages are the core screens of your Base44 app. Each page has its own URL path (such as `/`, `/Home`, or `/Products`) and appears in the page drop-down at the top of the [app editor](https://base44.com/ai-app-builder)
. You can add new pages, access pages, and decide which pages are visible in your menus or used for login and landing experiences.

* * *
[](https://docs.base44.com/Building-your-app/managing-your-pages#adding-pages)
Adding pages
-----------------------------------------------------------------------------------------------
You can add pages at any time. The fastest way is to describe the page you want in AI chat.
###
[](https://docs.base44.com/Building-your-app/managing-your-pages#adding-a-new-page)
Adding a new page
1. Go to your app editor.
2. In AI chat, describe the page you want. For example:
`Create a new About page with a hero section, text about our company, and a contact button.`

###
[](https://docs.base44.com/Building-your-app/managing-your-pages#duplicating-a-page)
Duplicating a page
1. Open the page you want to reuse in the editor.
2. In AI chat, describe what you want to duplicate. For example:
`Duplicate this page and keep the same layout, but change the title to "Pricing".`
3. After the AI chat has finished, open the new page from the page drop-down to customize the content.

* * *
[](https://docs.base44.com/Building-your-app/managing-your-pages#switching-between-pages)
Switching between pages
---------------------------------------------------------------------------------------------------------------------
You can move between pages from the page drop-down above the preview. **To switch pages in the app editor:**
1. Go to your app editor.
2. Click the page drop-down.
3. Click the page you want to open.

If you are not sure what a page is called, ask the AI: `Show me a list of all pages in this app and what each one does.`
* * *
[](https://docs.base44.com/Building-your-app/managing-your-pages#searching-for-pages)
Searching for pages
-------------------------------------------------------------------------------------------------------------
When your app has many pages, it can be hard to remember every page name. Start typing the page name in the pages drop-down to search for the one you need.

**Tip:** You can also ask AI chat to help you find the right page by name, URL path, or purpose. For example:
* `Which page is used as the checkout page?`
* `Which page handles the /Success route?`
* `Find the page that shows the list of projects.`
* * *
[](https://docs.base44.com/Building-your-app/managing-your-pages#managing-your-page-navigation)
Managing your page navigation
---------------------------------------------------------------------------------------------------------------------------------
A clear navigation menu helps people move between pages, discover key areas of your app, and understand how your content is organized. It also improves internal linking, which can help search engines understand your app structure. Some apps start with a single page and do not have a visible navigation menu at first. As you add more pages, you can ask the AI to create a header, sidebar, or footer menu and wire it up to your main routes. Use the AI chat to create a navigation menu when your app does not yet have a header, sidebar, or footer with links.
If you want the same navigation on every page, ask AI to make the menu global. For example: `Add the header navigation to all pages in the app.`
###
[](https://docs.base44.com/Building-your-app/managing-your-pages#adding-a-header-menu)
Adding a header menu
1. Go to your app editor.
2. In the AI chat, describe the menu you want. For example:
* `Add a header navigation bar with links to /Home and /Products.`
* `Create a top navigation menu that includes Home and Contact.`
3. Once the AI has finished, check the preview to make sure the new navigation appears where you expect and test the links.

###
[](https://docs.base44.com/Building-your-app/managing-your-pages#adding-a-sidebar-menu)
Adding a sidebar menu
1. Go to your app editor.
2. In AI chat, explain what you need. For example:
* `Add a vertical sidebar navigation on the left with links to /Dashboard, /Reports, and /Settings.`
* `Add a footer navigation with links to Privacy Policy and Terms of Service.`
3. Once the AI has finished, check the preview to make sure the new navigation appears where you expect and test the links.

###
[](https://docs.base44.com/Building-your-app/managing-your-pages#changing-the-menu-style)
Changing the menu style
You can use different navigation styles to match your app’s layout and audience, such as a horizontal bar, tabs, or a hamburger menu that collapses on smaller screens. **To change your navigation style with AI chat:**
1. Go to your app editor.
2. In AI chat, describe the style you want. For example:
* Tabs: `Change the main navigation into a tab-style menu at the top of the page.`
* Sidebar: `Move the navigation into a vertical sidebar on the left.`
* Hamburger menu: `Turn the main navigation into a hamburger menu that opens a panel on the right.`
3. Once the AI has finished, check the preview to make sure the navigation appears where you expect and test the links.
You can combine styles. For example, keep a horizontal menu with tabs on desktop and use a hamburger menu on smaller screens. Describe both behaviors clearly in your AI prompt.
###
[](https://docs.base44.com/Building-your-app/managing-your-pages#changing-the-menu-items)
Changing the menu items
Once a navigation menu exists, you can add, remove, or rename links so people can reach the right pages. Make sure the page you want to link to already exists if you are adding a new item. **To manage your menu items with AI chat:**
1. Go to your app editor.
2. In AI chat, describe how the menu should change. For example:
* `Add a "Shop" link to the main navigation that points to the /Products page.`
* `Add an "About" item to the top menu that links to /About and place it after Home.`
* `Remove the "Blog" link from the header navigation.`
* `Rename the "Shop All" menu item to "All Products".`
* `Reorder the menu so that Home, Shop, About, and Contact appear in that order.`
3. Check the preview and click your menu items to confirm that everything looks and behaves as expected.
If your app uses multiple navigation areas (such as a top menu and a footer menu), be specific in your prompt. For example: `Update only the header navigation, not the footer links.`
* * *
[](https://docs.base44.com/Building-your-app/managing-your-pages#working-with-hidden-pages)
Working with hidden pages
-------------------------------------------------------------------------------------------------------------------------
Some pages are meant to be internal, such as admin dashboards, success screens, or callback pages. You may want them available in your app without showing them in navigation or search results.
###
[](https://docs.base44.com/Building-your-app/managing-your-pages#hiding-pages-from-your-menu)
Hiding pages from your menu
You can remove any page from your visible menus while still keeping it live and functional. **To hide a page from your navigation with AI chat:**
1. Go to your app editor.
2. In AI chat, describe what should be hidden. For example:
`Remove the /Success page from all visible navigation, but keep it working as a redirect after checkout.`
3. Check that the link no longer appears in the header, sidebar, or footer.

A page that is hidden from your navigation can still be opened directly if someone knows its URL, or if you add a button or link to it elsewhere in your app.
###
[](https://docs.base44.com/Building-your-app/managing-your-pages#creating-an-admin-only-area)
Creating an admin-only area
You can keep sensitive pages, such as dashboards or management tools, available only to admins by placing them in an admin section of your navigation and protecting access. **To create an admin-only navigation area with AI chat:**
1. Go to your app editor.
2. In AI chat, describe the admin section you want. For example:
* `Add an Admin section in the sidebar that only admins can see, and move the /Wishlist page into it.`
* `Create an admin-only area in the header navigation with links to /AdminDashboard and /Reports.`

To test your admin-only pages with **Act as**, click **Act as** in the preview toolbar, choose an admin role and check that the admin section and its pages are visible to them, then use **Act as** again to switch to a non-admin role and confirm that the admin section is hidden from the navigation and that admin-only pages cannot be opened directly.
###
[](https://docs.base44.com/Building-your-app/managing-your-pages#hiding-pages-from-search-results)
Hiding pages from search results
Base44 automatically includes all public, published pages in your sitemap at `/sitemap.xml` so search engines can find them. There are no per-page SEO switches such as “noindex” or page-level robots.txt controls. To keep a page out of search engines, make sure the page is not public, or avoid linking to that page from any public parts of your app.
For full details on how indexing works, see our [SEO guide](https://docs.base44.com/Performance-and-SEO/SEO-and-search-visibility)
.
* * *
[](https://docs.base44.com/Building-your-app/managing-your-pages#public-landing-page-with-private-pages)
Public landing page with private pages
---------------------------------------------------------------------------------------------------------------------------------------------------
Base44 does not currently support making some pages public and others private using visibility settings alone. Instead, you can use a combination of a public landing page and logic that redirects people to login for private areas. **To set up a public landing page with login for other pages:**
1. Set your app to **Public (no login required)** in your app visibility settings.
2. Use the AI chat to create a landing page, for example:
`Create a landing page with login and sign-up buttons and make it my main page.`
3. Ask the AI to require login on the rest of your app. For example:
`Require login for all non-landing pages and redirect visitors who are not logged in back to the landing page.`
It is not currently possible to mark individual pages as public or private using a per-page visibility setting. All visibility is controlled at the app level, combined with your routing and data access rules.
* * *
[](https://docs.base44.com/Building-your-app/managing-your-pages#faqs)
FAQs
-------------------------------------------------------------------------------
Click a question below to learn more about pages, login, and navigation.
How do I change the page people see first when they open my app?
**To change your landing page:**
1. Click **Dashboard** in your app editor.
2. Click **Settings** and then **App Settings**.
3. In the **Main Page** drop-down under **General Settings**, select the page you want as your default landing page.
You can also ask AI chat to change your landing page.
Are there limits on how many pages my app can have?
Yes. Base44 apps support up to 600 pages. However, page count is not the only factor that affects build stability — the total number of files in your app and your overall source size also matter.If your app has more than 600 pages, or has a very large number of files or source code (for example, thousands of JavaScript files or tens of megabytes of source), you may see issues such as:
* The builder becoming unavailable or very slow.
* Pages not loading correctly in the editor or live app.
* Publishing failures or out-of-memory errors when you build or deploy updates.
* The AI returning incomplete edits.
**To stay within the limits:**
1. Review your existing pages and remove any that are no longer needed.
2. Consolidate similar content into fewer pages when possible.
3. Use entities and filtered views instead of creating a separate static page for every item.
4. Keep your overall file count and source size as lean as possible, especially if your app has many components.
Keeping your app below 600 pages and managing overall file count and source size helps the editor stay responsive and keeps your app stable.
Was this page helpful?
YesNo
[Managing your media](https://docs.base44.com/Building-your-app/Using-media)
[Using the canvas](https://docs.base44.com/Building-your-app/Canvas)
⌘I
Assistant
Responses are generated using AI and may contain mistakes.
Suggestions
Which plans come with a free domain?How are credits used?How do I use Discuss mode?
---
# Using the AI Chat in Base44 - Base44 Support Documentation
> Documentation Index
> -------------------
>
> Fetch the complete documentation index at: [/llms.txt](https://docs.base44.com/llms.txt)
>
> Use this file to discover all available pages before exploring further.
[Skip to main content](https://docs.base44.com/Building-your-app/AI-chat-modes#content-area)
[](https://docs.base44.com/Building-your-app/AI-chat-modes#about-the-ai-chat)
About the AI chat
---------------------------------------------------------------------------------------------------
The Base44 AI chat is more than just a code generator. It works as your intelligent assistant, understands your goal, and uses the right tools to get you there. Your apps become more accurate, context-aware, and flexible, so you can focus on building complex features quickly, with smart automation working in the background. Unlike traditional AI that only responds with text, the agentic AI knows when to search the web, check your files, or pull in data from other sources. It also uses automatic model selection to choose state-of-the-art models based on what your prompt needs, so you get real solutions without needing to manage models or technical details yourself.
What does this mean in practice? Here are some examples:
--------------------------------------------------------
* Share a public website link with the chat to instantly copy the design, layout, and visible content into your app. For example: “Copy the layout from `https://example.com`.”
* Ask the agent to help you follow best practices by searching for ready-made code or common solutions. For example: “Show me the standard pattern for user authentication.”
* Pull lists or content from other websites and use it in your app, such as importing product catalogs or gathering site text and images. For example: “Import the product list from `https://example.com`.”
* Directly update your app’s database with simple, clear instructions. For example: “Give Emily a point for doing her homework.”
After the AI applies your changes, it automatically checks the output in the background and fixes any errors it finds, without interrupting your workflow or requiring any input from you. The AI chat also suggests useful next steps as you build. These suggestions appear below the chat and are tailored to your current workflow, helping you discover new features and make the most of your app. 
* * *
[](https://docs.base44.com/Building-your-app/AI-chat-modes#using-the-ai-chat-modes)
Using the AI chat modes
---------------------------------------------------------------------------------------------------------------
Base44’s [AI app builder](https://base44.com/ai-app-builder)
includes 3 chat modes for building your app:
* **Default:** Acts instantly on your prompts.
* **Discuss:** Lets you plan and refine ideas safely before applying changes.
* **Edit:** Lets you click elements in your preview to adjust visuals directly.
You can switch between modes anytime to brainstorm ideas, make design tweaks, or apply instant changes, all in one chat.
###
[](https://docs.base44.com/Building-your-app/AI-chat-modes#default-mode)
Default mode
Type what you need, and the AI acts right away. This mode is perfect for quick edits and feature requests. To get the best results, be as specific as possible. The more detail you give, the more precisely the AI builds your app.
> **For example:** Ask the AI to create a new page to your app.

For more examples and prompt frameworks, check out the [Prompt Guide](https://docs.base44.com/Getting-Started/Prompt-guide)
.
###
[](https://docs.base44.com/Building-your-app/AI-chat-modes#discuss-mode)
Discuss mode
Click **Discuss** in the AI chat to have a conversation with the AI to brainstorm, clarify, or explore ideas before making any changes to your app. It is a safe space to ask questions, get suggestions, or talk through options without affecting your project. In Discuss mode, you can freely chat and refine your goals with the AI, but no app changes take place. Each message in Discuss mode uses 0.3 credits.
Discuss mode helps you save credits by avoiding unnecessary trial and error before finalizing changes.
Once you are ready for the AI to implement changes in your app, turn off **Discuss** and ask the AI to make the changes.
> **For example:** Discuss the best way for users to invite their friends to their app.

Discuss mode uses its own AI model regardless of the model you have selected in your app. This keeps Discuss mode costs low and consistent at 0.3 credits per message.
###
[](https://docs.base44.com/Building-your-app/AI-chat-modes#edit-mode)
Edit mode
Use **Edit** mode to make changes to the design of your app. You can do it manually or ask the AI to make the changes for you. Your edits save automatically as you work. You can undo and redo up to 50 steps within the same visual edit session using the undo/redo buttons at the top of the editor, and your edits remain through preview reloads. If you try to leave with unsaved changes, your browser warns you before you go. Your edits also appear in [**Version History**](https://docs.base44.com/Building-your-app/AI-chat-modes#restoring-or-publishing-a-previous-version)
, so you can restore a previous set of manual edits at any time. **To make changes to the design of your app:**
1. Go to the AI chat in your app editor.
2. Click **Edit**.
3. Make changes to the design:
* **Manually:** Select an element in your app preview to make the changes directly. For example, you can change background colors, text colors, or spacing. You can also quickly access the element’s code to make changes, adjust tailwind classes directly to fine-tune spacing, typography, layout, and responsiveness, or remove the selected element or section with the **Delete** icon in the Edit toolbar. This method does not use credits.

* **Using the AI chat:** Select an element in the app preview and then click **Edit Element**. Write what you want to change about the element and the AI will take care of it. This method uses message credits. The number of credits depends on the size and complexity of the change.

If you have multiple elements that repeat, you can apply bulk changes to them. Click the element and all repeating elements are highlighted, so you can apply changes to all of them at once.
* * *
[](https://docs.base44.com/Building-your-app/AI-chat-modes#queuing-messages-in-the-chat)
Queuing messages in the chat
-------------------------------------------------------------------------------------------------------------------------
When the AI chat is already working on a prompt, you do not need to wait before asking something else. You can keep typing, add more prompts, and attach files. The AI chat adds them to a message queue and sends them one by one as each response finishes.

**Notes:**
* The queue appears above the chat input and shows all pending prompts in the order they will run.
* You can queue up to 7 messages at once.
* Queued messages do not send if you close the app editor. When you reopen the editor, any queued messages will resume.
You can edit your queue at any time. Drag and drop messages to change their order, edit a queued message inline before it is sent, remove individual messages or clear the entire queue if you change your mind. You can also pause or resume the queue whenever you need.
* * *
[](https://docs.base44.com/Building-your-app/AI-chat-modes#customizing-the-ai-chat)
Customizing the AI chat
---------------------------------------------------------------------------------------------------------------
You can tailor how the AI behaves and set custom controls.
###
[](https://docs.base44.com/Building-your-app/AI-chat-modes#choosing-your-ai-model)
Choosing your AI model
Choose a model manually when you want more control. Each model brings unique strengths, so you can pick the best fit for your prompt.
**Notes:**
* You need a [**Builder plan**](https://base44.com/pricing)
or higher to choose an AI model.
* When you choose a model manually, credit usage varies by model and may use more credits than **Automatic**. Check the exact cost under **Credits Used** for each message.
* **Base 1:** Base44’s first in-house model, trained on real building patterns from across the platform. A well-rounded, general-purpose choice for both everyday building and conversation.
* **Sonnet 5:** A well-balanced choice for day-to-day building, writing, refactoring, and troubleshooting, with a strong mix of quality and speed.
* **Opus 4.8:** The most advanced reasoning model, built for the hardest problems. Use it for complex multi-step logic, intricate architecture decisions, and edge cases where you need the highest level of accuracy.
* **Fable 5:** Great for complex, multi-step builds and detailed debugging, when you want thorough, high-quality results.
* **GPT-5.5:** A strong choice for complex reasoning and multi-step planning, with improved accuracy and consistency across large or evolving projects.
**Tips:**
* You can choose your AI model from the very first prompt in Base44, and also change it while building your app from the app editor.
* Not sure which model to choose? Keep **Automatic** and Base44 selects the best model for each request.
**To choose a model manually:**
1. Go to your app editor.
2. Click the **Settings** icon at the bottom of the chat.
3. Click **AI Model**.
4. Select the model you want to use, or keep **Automatic** to let Base44 pick the best model for each request.

###
[](https://docs.base44.com/Building-your-app/AI-chat-modes#setting-ai-controls)
Setting AI controls
AI controls let you define how the AI interacts with your app. They help you set consistent rules and protect important areas from accidental edits. Click the **Settings** icon at the bottom of the chat, then select **AI Controls** to open the panel:
* **Custom Instructions:** Add default guidance for every AI interaction, such as tone, design standards, or preferred behavior.
* **Freeze Files:** Lock specific files or entities so the AI does not modify them.

Clear, well-defined AI controls keep your app consistent and prevent accidental overwrites.
* * *
[](https://docs.base44.com/Building-your-app/AI-chat-modes#reverting-changes)
Reverting changes
---------------------------------------------------------------------------------------------------
Experiment freely and try new ideas, knowing you can always undo your changes at any time. You can roll your app back to a specific prompt, restore a previous version into the editor, or publish a previous version directly from Version History without changing what you are currently working on.
###
[](https://docs.base44.com/Building-your-app/AI-chat-modes#reverting-a-specific-prompt)
Reverting a specific prompt
Hover over the relevant message in your chat history and click the **Revert** icon under it to roll your app back to the state it was in just before that change. Any changes made after that point are also undone, so you can quickly return to an earlier version of your app. If you want to change what you asked instead of just undoing it, click the **Edit** icon on that earlier message. The chat opens an **Edit this message and resend** panel. When you resend, Base44 reverts any changes made after that message and then applies your updated request.

###
[](https://docs.base44.com/Building-your-app/AI-chat-modes#restoring-or-publishing-a-previous-version)
Restoring or publishing a previous version
Click the **Version History** icon at the top of the chat to open your version list. From there you can preview versions, publish a previous version without changing your current draft, revert your editor to an older version, view the code, or jump back to the chat message that created that version.  Click a version in the list to load it in the preview. For each version, click the **More Actions** icon and choose:
* **Publish this version:** Publish this version to your live app while keeping your current draft open in the editor so you can keep working.
* **Revert to this version:** Replace your current draft in the app editor with this version.
* **View code:** Open the code for this version.
* **Go to message in chat:** Jump to the chat message that created this version.
* * *
[](https://docs.base44.com/Building-your-app/AI-chat-modes#faqs)
FAQs
-------------------------------------------------------------------------
Click a question below to learn more about AI chat modes and controls.
How do I preview my app in full screen?
Click the **Hide chat panel** icon above the preview window to display your app exactly as visitors see it, without any editor panels or chat tools.
What happens when there's a code error in my app preview?
When Base44 detects a JavaScript error in your app preview, an **Issues Found** notification appears in the editor with a description of the error and where it occurred.Click **Resolve with AI** to send the error details to the AI chat. The AI reviews the error and applies a fix. This does not count toward your message credits.To dismiss the notification without fixing it, click **X** to close it.
How can I fix my app if it freezes after an AI action?
If your app freezes or behaves unexpectedly, try these steps to get back on track:
* **Refresh the page** to reload your latest working version.
* **Clear your browser cache** and reload your app to remove any stored conflicts.
* **Try a private window** or another browser to rule out extension conflicts.
* **Disable browser extensions** temporarily if the issue persists.
* **Check your credits and plan limits**, since running out of credits can interrupt AI actions.
* **Revert the last AI action** in the chat by clicking the **Revert** icon under that message, or use **Version History** to roll back to a stable version.
For more help, see the [Troubleshooting guide](https://docs.base44.com/Community-and-support/Troubleshooting)
.
Can I request credit refunds for AI mistakes?
Base44 does not offer refunds or credit reversals for AI actions. You can use [**Version History**](https://docs.base44.com/Building-your-app/AI-chat-modes#reverting-changes)
to undo changes and restore your app.
What can the Base44 agentic AI do with its tools?
The agentic AI uses a wide range of tools to help you build and manage your app, including:**Database tools:**
* Read, create, update, and delete records in your app’s database. It can filter, sort, paginate, or update or delete in bulk. For example, add test people, mark old messages as read, or remove expired records.
**Web tools:**
* Perform web searches to find relevant documentation or features. This works like a search engine with relevant pages, titles, and descriptions.
* Fetch website data from any URL. Retrieve markdown or HTML, for example to scrape documentation or get live page content.
**Code and file tools:**
* Smart file search. Quickly find files or code snippets needed for your workflow.
* Read the contents of any project file before editing. This is useful for reviewing your app’s code structure.
* Modify files in your project. Edit pages, components, entities, functions, or layouts, and support targeted partial edits. For example, fix bugs, add features, or update styling.
* Inspect logs and console output to help with debugging or understanding errors.
**Configuration tools:**
* Set or update environment variables and secrets as needed. For example, add or update API keys like `OPENAI_API_KEY` or `STRIPE_SECRET_KEY`.
The agent automatically chooses and combines these tools based on what you need, so you can focus on describing your goals instead of the technical steps.
Are there things the Base44 agentic AI cannot do?
The agentic AI can fetch and interpret content from public website pages and other static data, but it cannot automatically access or migrate complex backend logic, databases, or private integrations. If your project requires backend features, connections to other services, or secure data, you still need to set these up manually.For example, if you ask the agent to copy content or features from another app, it can match layouts, text, and the overall look based on what is visible on the public site, but it does not copy any backend logic, migrate private integrations, or access protected database content.For any work that goes beyond the public front end, manual setup is required to complete your app.
How is the time zone determined or managed in the builder?
All times in the Base44 builder are managed and displayed using Coordinated Universal Time (UTC). This keeps everything consistent across different regions and makes it easier to coordinate actions or schedules, no matter where you or the people using your app are located. There is no option to change the time zone within the builder at this time.
Can I speak to the AI chat instead of typing?
Yes, you can use your voice to interact with the AI chat in Base44. Click the microphone icon in the chat box to turn on speech-to-text, then speak your question or request. The AI transcribes your speech and responds as usual, so you can get help hands-free.

What should I do if AI chat gets stuck or cannot revert changes?
If AI chat is unresponsive, gets stuck processing, or does not undo changes as expected, there are ways to recover.Check out the full troubleshooting guide for step-by-step solutions, including how to:
* Use Version History or **Revert** under a previous message to safely undo actions.
* Unstick a frozen prompt or stop button.
* Get help if the chat panel is completely unresponsive.
For detailed instructions and workarounds, see the [Troubleshooting Issues](https://docs.base44.com/Community-and-support/Troubleshooting)
article.
How does automatic model selection work?
Base44 uses automatic model selection to match each request with the engine best suited for the job. Design tweaks, layout changes, and deep logic updates may all use different AI models. The chat handles this in the background, so you can stay focused on describing what you want to build.
* For small visual or copy tweaks, it chooses fast, efficient models that optimize for speed and responsiveness.
* For larger architectural changes or data flows, it uses deeper reasoning models that can plan across files, entities, and logic.
* When something fails or runs into an error, it can switch strategies or models to recover and try again.
Note that Discuss mode uses its own fixed model regardless of your selection. [Learn more about Discuss mode.](https://docs.base44.com/Building-your-app/AI-chat-modes#discuss-mode)
Was this page helpful?
YesNo
[App templates](https://docs.base44.com/Getting-Started/App-templates)
[Prompt library](https://docs.base44.com/Getting-Started/Prompt-library)
⌘I
Assistant
Responses are generated using AI and may contain mistakes.
Suggestions
Which plans come with a free domain?How are credits used?How do I use Discuss mode?
---
# Uploading and managing media - Base44 Support Documentation
> Documentation Index
> -------------------
>
> Fetch the complete documentation index at: [/llms.txt](https://docs.base44.com/llms.txt)
>
> Use this file to discover all available pages before exploring further.
[Skip to main content](https://docs.base44.com/Building-your-app/Using-media#content-area)
Media files such as images, videos, audio, documents, and data files help you create a rich, interactive app experience for people using your app. You can upload files while [building your app](https://base44.com/ai-app-builder)
and in your live app, giving people new ways to share and engage.

You can also add a custom logo that appears when someone adds your app to their home screen. The logo is also used as the browser favicon, so your app always looks professional and on-brand from both desktop and mobile.
* * *
[](https://docs.base44.com/Building-your-app/Using-media#using-your-file-library)
Using your file library
-------------------------------------------------------------------------------------------------------------
Your app has its own file library where Base44 stores files that you upload or generate while you build. This gives you one place to organize and reuse media and reference files across your app. You can keep images, videos, brand guides, PRDs, and data exports in your file library, then use them in your app or add them to the AI chat as context. Any images and videos the AI generates and any files you upload from the editor or AI chat are automatically stored in the file library, and when you add a file from the library to the AI chat, the AI uses it as context for your prompts.
The file library is per app. Files saved in one app’s library are not shared with other apps in your workspace.

**To access your file library:**
1. Go to your app editor.
2. Click the **Add** icon in the AI chat.
3. Click **Choose from library**.

* * *
[](https://docs.base44.com/Building-your-app/Using-media#adding-files-to-your-app)
Adding files to your app
---------------------------------------------------------------------------------------------------------------
You can add files to your app from your file library, from your computer, or from Google Drive. All files you add this way are stored in your app’s file library so you can reuse them across your app and in the AI chat. For example, you can keep product photos or demo videos in your file library and then attach them in the AI chat when you ask the AI to design a new section.
You can also ask the AI to generate and add images or videos to your app.
###
[](https://docs.base44.com/Building-your-app/Using-media#from-your-file-library)
From your file library
Use your file library whenever you want to reuse existing media instead of uploading a new file.
Adding files in the AI chat
**To add a file from the library in the AI chat:**
1. Go to your app editor.
2. Click the **Add** icon in the AI chat.
3. Click **Choose from library**.
4. In the **Select files** dialog, search or browse to find the file you want.
5. Select the file and click **Add**.
6. Type your message to explain what you want the AI to do with the file, then send it.
Replacing images in your app
You can replace standalone images in your app using **Edit** mode. This does not work for images that are part of components, such as a gallery. For that, use the AI chat or edit the data directly from **Data** in the dashboard.**To replace an image using your file library:**
1. Go to your app editor.
2. Click **Edit** in the chat.
3. Click the file you want to change.
4. Click **Replace**.
5. Search or browse your file library to find the new file.
6. Select the file and click **Replace**.

###
[](https://docs.base44.com/Building-your-app/Using-media#from-your-computer)
From your computer
Upload files that are saved locally on your device when you want to share images, videos, documents, or data files directly with the AI chat. **To upload a file from your computer:**
1. Go to your app editor.
2. Click the **Add** icon in the AI chat.
3. Click **Upload from computer**.
4. Select the file you want to use and confirm.
5. Type your message to explain what you want the AI to do with the file, then send it.

###
[](https://docs.base44.com/Building-your-app/Using-media#from-google-drive)
From Google Drive
Connect Google Drive if you want the AI chat to work directly with Docs, Sheets, and Slides stored in your Drive without downloading them first.

When you connect Google Drive, only the files you select are accessed. Base44 stores a copy of each selected file in your app’s file library so the AI chat can use the content as context.
**To add a file from Google Drive:**
1. Go to your app editor.
2. Click the **Add** icon in the AI chat.
3. Click **Add from Google Drive**.
4. Review the information in the **Connect to Google Drive** window and click **Connect Google Drive**.
5. Complete the Google sign-in flow and approve access if this is your first time connecting.
6. Choose the Docs, Sheets, or Slides files you want to use from your Google Drive and confirm.
7. Type your message to explain what you want the AI to do with the file content, then send it.
**Tip:** You can also add files from Google Drive in your very first prompt:

###
[](https://docs.base44.com/Building-your-app/Using-media#file-upload-limits)
File upload limits
These limits apply to files you upload into your app’s file library while building your app, whether you add them from the AI chat or directly from the editor.
File upload limits while building
---------------------------------
**Images:** PNG, JPG, JPEG, GIF, WEBP, SVG
* Max size: 40MB (SVG: 5MB)
* Max dimensions: 1024x1024 pixels (larger images are resized automatically)
* Example: Upload a screenshot of a website you like and say: “Use this header style for my homepage.”
**Videos:** MP4, WEBM, MOV, AVI, MKV, M4V, WMV, OGV, 3GP, 3G2
* Max size: 100MB per video
* Example: Upload a product demo, walkthrough, or reference video and ask the AI to use it as context while building your app.
**Documents and text files:** PDF, TXT, HTML, DOCX, MD
* Max size:
* PDF: 10MB
* TXT and HTML: 5MB
* DOCX and MD: 5MB
* Example: Upload a PRD or brand guide so the AI follows your product and style rules, or share a markdown file with requirements for a new app.
**Data files:** CSV, XLS, XLSX, JSON
* Max size:
* CSV and JSON: 10MB
* XLS and XLSX: 15MB
* Example: Upload a CSV, Excel, or JSON file with your existing business data and ask the AI to analyze it, suggest entities and fields, propose a data model for your app, or prepare the data for import. To learn how to import the data into your tables, see [Managing your app data](https://docs.base44.com/Building-your-app/Managing-your-app-data)
.
**Audio:** MP3, WAV
* Max size: 100MB
**Zip files**
* Max size: 25MB
* * *
[](https://docs.base44.com/Building-your-app/Using-media#sharing-media-on-your-live-app)
Sharing media on your live app
---------------------------------------------------------------------------------------------------------------------------
Let your users upload media directly in your live app. You and your users can share, download, or interact with content to create a more engaging experience. Just tell the AI chat what you want your users to be able to do, and the AI will set it up for you. This feature uses the built-in UploadFile integration. 
###
[](https://docs.base44.com/Building-your-app/Using-media#file-upload-limits-for-your-app)
File upload limits for your app
These limits apply to files that people upload through your live app using the UploadFile integration.
File upload limits on your live app
-----------------------------------
* **Images:** PNG, JPG, JPEG, WEBP, SVG (max size: 50MB)
* **Documents:** PDF, TXT, HTML (max size: 50MB)
* **Data files:** CSV, XLS, XLSX, JSON (max size: 50MB)
* **Videos:** MP4, WEBM, MOV, AVI, MKV, M4V, WMV, OGV, 3GP, 3G2 (max size: 100MB per video)
* **Audio:** MP3, WAV (max size: 50MB)
* * *
[](https://docs.base44.com/Building-your-app/Using-media#customizing-your-app%E2%80%99s-logo)
Customizing your app’s logo
-----------------------------------------------------------------------------------------------------------------------------
Personalize your app by adding a logo. Your logo is visible to users when they add your [app to their home screen](https://docs.base44.com/Building-your-app/Mobile-experience#installing-your-app-to-the-home-screen)
and also appears as the browser favicon.
###
[](https://docs.base44.com/Building-your-app/Using-media#changing-your-logo)
Changing your logo
1. Go to your app’s dashboard and click **Overview**.
2. Click the **Edit** icon on the logo and either:
* Upload your own image file
* Click **Generate Logo** to create a new one with the AI

Logos generated in Base44 can only be used within your app and cannot be exported.
###
[](https://docs.base44.com/Building-your-app/Using-media#file-limits-for-your-logo)
File limits for your logo
Use these limits when you choose or generate a logo image for your app.
File limits for your logo
-------------------------
* **Image formats:** PNG, JPG, JPEG
* **Max size:** 5MB
* **Max dimensions:** 1024x1024 pixels (larger images are resized automatically)
For best results, use a clear, square image with a transparent background.
* * *
[](https://docs.base44.com/Building-your-app/Using-media#setting-your-social-image)
Setting your social image
-----------------------------------------------------------------------------------------------------------------
Add a social image to control how your app looks when someone shares its link on social platforms like Slack, WhatsApp, or iMessage. The image appears in the preview card alongside your app name and description.

**To add a social image:**
1. Go to your app’s dashboard and click **Settings**.
2. Click **App Settings**.
3. In the **App Info** section, click or drag an image into the **Social image** upload area.
Use an image that is 1200x630 pixels for the best results across platforms.
**To replace or remove your social image:**
1. Go to your app’s dashboard and click **Settings**.
2. Click **App Settings**.
3. In the **App Info** section, hover over the social image:
* Click the **Upload** icon to replace it with a new image.
* Click the **Delete** icon to remove it.
###
[](https://docs.base44.com/Building-your-app/Using-media#file-limits-for-your-social-image)
File limits for your social image
File limits for your social image
---------------------------------
* **Image formats:** PNG, JPG, WEBP
* **Recommended size:** 1200x630 pixels
* **Max size:** 5MB
For best results, avoid text-heavy images as they may be cropped on some platforms.
* * *
[](https://docs.base44.com/Building-your-app/Using-media#faqs)
FAQs
-----------------------------------------------------------------------
Click a question below to learn more.
Why isn't my file uploading to the AI chat?
If your file isn’t uploading to the chat, it’s most likely because the file is too large or the wrong format. Review the limits above and try again.
Why am I seeing an error that my file does not match the provided media type?
This error can happen if you upload a file that was renamed without converting it properly. For example, changing the file name from `.webp` to `.png` or from one video format to another does not convert the file.**To fix this:**
* Try reverting your last message if you just uploaded the file.
* Check that your file is one of the supported formats listed in the [Media guide](https://docs.base44.com/Building-your-app/Using-media)
and has not simply been renamed from another file type.
* Make sure your file does not exceed the size limits set in the Media guide.
* Try uploading your file again using a supported format.
If you still have trouble after these steps, [contact support](https://docs.base44.com/Community-and-support/Contacting-support)
for help.
How do I disconnect Google Drive from Base44?
You can disconnect Google Drive at any time from your account settings.**To disconnect Google Drive:**
1. Click your profile icon at the top-right of Base44.
2. Click **Settings**.
3. Click **Account settings** under **Account**.
4. Scroll to the **Chat Settings** section.
5. In the **Google Drive** card, click **Disconnect**.
6. Confirm the disconnection.
Can I change my logo at any time?
Yes, you can replace your logo image at any time from your dashboard inside the app editor. The new logo appears once your changes are published.
Do I need a social image?
No, a social image is optional. If you do not set one, social platforms show a generic preview when your app link is shared. Adding a social image gives you control over how your app appears and can make it more recognizable.
Is there a storage limit for my app?
There is no hard storage limit per app. You can store as many files as your app needs. The only constraints are on individual file sizes, see the limits above for each file type.
Was this page helpful?
YesNo
[Foundations & layout](https://docs.base44.com/Building-your-app/Design-foundations-and-layout)
[Managing your pages](https://docs.base44.com/Building-your-app/managing-your-pages)
⌘I
Assistant
Responses are generated using AI and may contain mistakes.
Suggestions
Which plans come with a free domain?How are credits used?How do I use Discuss mode?
---
# Creating workflows for your app - Base44 Support Documentation
> Documentation Index
> -------------------
>
> Fetch the complete documentation index at: [/llms.txt](https://docs.base44.com/llms.txt)
>
> Use this file to discover all available pages before exploring further.
[Skip to main content](https://docs.base44.com/Building-your-app/Creating-workflows#content-area)
Use workflows when you want to take work off your plate, such as welcoming new customers, sending summary emails, syncing data between tools, or running multi-step processes that wait, check conditions, and react automatically. When [building an app](https://base44.com/ai-app-builder)
in Base44, workflows run backend work for you automatically. A workflow can start on a schedule, when your data changes, when an app user talks to an in-app agent, or when a connected integration sends an event. You create and manage workflows using the AI chat in your app’s dashboard.

**Important:** Workflows replaces automations. Apps created from July 6, 2026 use workflows, while apps created before then may still use [automations](https://docs.base44.com/Building-your-app/Creating-automations)
. Your app has one or the other, not both. Everything you could do with automations, you can do with workflows, plus more:
* **Multiple steps:** Chain several actions together in one flow, instead of a single action.
* **Conditions:** Take different paths depending on your data, so the right steps run in each situation.
* **Delays:** Pause for minutes, hours, or even days between steps, then continue automatically.
* **Step-by-step visibility:** Watch each run in real time and see exactly which step succeeded or failed.
What can I use workflows for?
-----------------------------
Workflows handle almost any backend work you want to happen automatically, especially when a task takes more than one step. For example:
* **Nurture leads:** When a new lead signs up, send a welcome email, wait 2 days, then follow up only if they have not replied or booked a call.
* **Alert on conditions:** Check inventory on a schedule and message your admins only when an item drops below its threshold.
* **React to data changes:** When a new product is added, notify your team and create a task to review it before it goes live.
* **Keep tools in sync:** When a Google Calendar event is cancelled, update the matching booking and email the customer.
* **Send scheduled summaries:** Every morning, email yourself a recap of the previous day’s orders and post the total to a Slack channel.
* * *
[](https://docs.base44.com/Building-your-app/Creating-workflows#how-workflows-work)
How workflows work
----------------------------------------------------------------------------------------------------------
A workflow is made of a trigger and one or more steps. The trigger decides when the workflow starts. The steps decide what happens, in order, each time it runs: a step can run a backend function (code the AI writes for you), wait for a set amount of time, or take a different path based on a condition. When you describe what you want in the AI chat, Base44 builds the workflow for you. It appears in two places: your app’s file tree and the **Workflows** dashboard. Opening it shows a visual diagram that flows from the trigger through each step. Each run is recorded, so you can review what happened and fix any issues quickly.

> **Example: welcoming a new lead.** When a lead is created, the workflow sends a welcome email matched to their fitness goal, waits 2 days, then checks whether they booked a call. If they did, it adds the call to your calendar; if not, it sends a follow-up nudge.
* * *
[](https://docs.base44.com/Building-your-app/Creating-workflows#choosing-a-trigger)
Choosing a trigger
----------------------------------------------------------------------------------------------------------
There are 4 ways a workflow can start. When describing what you want to the AI chat, it helps to know which trigger fits your use case. Read more about each one below.
| Trigger | Best for | Keep in mind |
| --- | --- | --- |
| [**Scheduled**](https://docs.base44.com/Building-your-app/Creating-workflows#scheduled) | Recurring jobs, or a one-time job at a set time | Recurring runs happen at most once every 5 minutes |
| [**Entity**](https://docs.base44.com/Building-your-app/Creating-workflows#entity) | Reacting to changes in your app’s data | Add a condition so it does not run on every change |
| [**In-app agent**](https://docs.base44.com/Building-your-app/Creating-workflows#in-app-agent) | Reacting when someone starts an agent conversation | Runs once per new conversation, not per message |
| [**Connector**](https://docs.base44.com/Building-your-app/Creating-workflows#connector) | Reacting to events from a connected tool | The tool must support workflow triggers |
###
[](https://docs.base44.com/Building-your-app/Creating-workflows#scheduled)
Scheduled
Scheduled workflows run at a time you define in your timezone. You can run one time, on a recurring schedule, or on an interval, for example every 30 minutes. Use these for recurring tasks like daily digests and weekly reports, or for a one-time job at a specific date and time. Example prompts:
* `Send me a daily summary of all new orders to my email every morning at 8:00.`
* `Archive trip records that have been completed for more than 30 days, every Sunday at midnight.`
Keep these in mind for scheduled workflows:
* Recurring schedules run at most once every 5 minutes, and you can set them to end on a date or after a number of runs.
* A schedule that reaches its end, including a one-time schedule after it runs, is archived automatically.
* A recurring schedule with no end keeps running until you deactivate or archive it.
###
[](https://docs.base44.com/Building-your-app/Creating-workflows#entity)
Entity
Entity workflows run in response to changes in your app’s data, such as a record being created, updated, or deleted. Use these to react to activity in real time. Example prompts:
* `Send a push notification whenever I add a new WishlistPlace and write any needed backend function for me.`
* `Send the admin an email whenever a new booking is created.`
Keep an entity workflow focused:
* Add a condition so it only runs when it should, for example only when an order’s status changes to shipped, rather than on every update.
* Avoid having a workflow update the same record that triggers it, which can make it run in a loop.
###
[](https://docs.base44.com/Building-your-app/Creating-workflows#in-app-agent)
In-app agent
In-app agent workflows run once when an app user starts a new conversation with an in-app agent, not on every message they send. Use these to stay on top of who is reaching out, for example to get notified when a customer starts a chat, add them to your contacts, or send yourself a summary at the end of the day. Example prompts:
* `Email me whenever someone starts a new conversation with my agent.`
* `Add the person to my Contacts list when they start a chat with my agent.`
###
[](https://docs.base44.com/Building-your-app/Creating-workflows#connector)
Connector
Connector workflows run when a connected tool sends an event, such as a new email arriving in Gmail or a calendar event being updated in Google Calendar. The tool must be connected first, and it must support workflow triggers, such as Gmail, Google Calendar, Google Drive, Microsoft Outlook, Microsoft OneDrive, and Slack. You can add a condition so a workflow only runs for the events you care about. This matters most for busy tools like Slack, where you might want to run only for messages in a certain channel or from a certain person. Example prompts:
* `When a new email arrives in Gmail with the subject "Book appointment", parse it and add a new booking to my app.`
* `When a Google Calendar event is cancelled, update the booking in my app and post a message in the #salon-general Slack channel.`
If a tool does not support workflow triggers, you can still bring its events in. For example, to act on new Stripe payments, use a webhook or backend function to save each payment as a record in your app, then use an [Entity](https://docs.base44.com/Building-your-app/Creating-workflows#entity)
workflow that runs when a new payment record is created. Or, instead of waiting for the tool to notify you, run a scheduled workflow that checks the tool on a regular basis, for example every hour, and handles anything new since the last check.
* * *
[](https://docs.base44.com/Building-your-app/Creating-workflows#creating-a-workflow)
Creating a workflow
------------------------------------------------------------------------------------------------------------
To create a workflow, click **Create workflow** in your app dashboard. Base44 opens a **Create a new workflow** canvas, where you either start from a trigger or pick one of the suggestions based on your app. From there, you describe what you want in the AI chat and it creates the workflow, asking any questions it needs. You keep refining it in the chat until it works the way you need.
###
[](https://docs.base44.com/Building-your-app/Creating-workflows#starting-from-a-trigger)
Starting from a trigger
Start from a trigger when you already know how the workflow should begin. **To create a workflow from a trigger:**
1. Click **Dashboard** in your app editor.
2. Click **Workflows**.
3. Click **Create workflow**.
4. On the canvas, click **Add trigger**, then choose how the workflow starts: a scheduled trigger (**One time**, **Recurring**, or **On an interval**), a **connector**, an **in-app agent**, or an **entity**.
5. In the AI chat, describe what the workflow should do, and answer any follow-up questions the AI asks.
6. The AI creates the workflow and adds it to your **Workflows** list.

###
[](https://docs.base44.com/Building-your-app/Creating-workflows#starting-from-a-suggestion)
Starting from a suggestion
Start from a suggestion when you want a ready-made idea tailored to your app. **To create a workflow from a suggestion:**
1. Click **Dashboard** in your app editor.
2. Click **Workflows**.
3. Click **Create workflow**.
4. Under **Or start from these suggestions**, choose a suggestion.
5. Review the pre-filled prompt in the AI chat, adjust it if needed, and send it.
6. The AI creates the workflow and adds it to your **Workflows** list.

Get the best results from the AI:
* Describe each step and outcome clearly so they show up in the diagram.
* For a condition, give each path a distinct action, otherwise the AI might put the logic inside a single backend function instead of showing a separate path.
* If a step needs a new backend function, just mention it and the AI writes it for you.
* * *
[](https://docs.base44.com/Building-your-app/Creating-workflows#managing-workflows)
Managing workflows
----------------------------------------------------------------------------------------------------------
After you start using workflows, you can control when they run, change what they do, rename them, trigger them on demand, or clean up workflows you no longer need. Each workflow shows an **Active** or **Inactive** status, and you can deactivate one to pause it and reactivate it whenever you need it.
###
[](https://docs.base44.com/Building-your-app/Creating-workflows#turning-a-workflow-on-or-off)
Turning a workflow on or off
Deactivate a workflow when you want to stop it running, and activate it again when you need it. Deactivating stops new runs from starting, but the run history stays available. **To turn a workflow on or off:**
1. Click **Dashboard** in your app editor.
2. Click **Workflows**.
3. Click the **More Actions** icon on the workflow.
4. Click **Deactivate** or **Activate**.
You can also open a workflow and use the **Active** toggle in the details panel.

###
[](https://docs.base44.com/Building-your-app/Creating-workflows#editing-a-workflow)
Editing a workflow
To change what a workflow does, edit it from its diagram or just describe the change in the AI chat. Every edit option opens the AI chat with a pre-filled prompt and the AI makes the change for you, so there is nothing to edit by hand.
Editing a step
Click a step’s **Edit** icon to change what the step does or replace it with a different step.

Editing the trigger
* Click the trigger’s **Edit** icon to change which events trigger the workflow.
* Click the **Replace trigger** icon to switch to a different trigger, such as a scheduled, connector, in-app agent, or entity trigger.

Adding a step
Click the add button below a step, then choose **Action** or **Condition**.

Changing a workflow’s steps creates a new version. Runs already in progress finish on the version they started with, and new runs use the latest version.
###
[](https://docs.base44.com/Building-your-app/Creating-workflows#renaming-a-workflow)
Renaming a workflow
Give a workflow a clearer name at any time. Renaming does not create a new version. **To rename a workflow:**
1. Click **Dashboard** in your app editor.
2. Click **Workflows**.
3. Click the **More Actions** icon on the workflow.
4. Click **Rename** and enter the new name.

###
[](https://docs.base44.com/Building-your-app/Creating-workflows#running-a-workflow-immediately)
Running a workflow immediately
Run a workflow right away when you want to start it on demand. This helps you test changes, confirm that your configuration works, or handle something urgent between scheduled runs.
**Important:** Run now executes real actions using your current configuration, such as sending real emails or updating real records. It is a one-time manual run that does not affect your schedule or trigger, and it appears in the run history labeled as a test. When earlier runs exist, you can also replay the workflow using the data from a previous run.
**To run a workflow:**
1. Click **Dashboard** in your app editor.
2. Click **Workflows**.
3. Click the workflow to open it.
4. Click **Run now** in the details panel.
5. In the confirmation dialog, click **Run now** again.

###
[](https://docs.base44.com/Building-your-app/Creating-workflows#cancelling-a-run)
Cancelling a run
If a workflow is running and you need to stop it, you can cancel the run while it is still in progress. The cancelled run shows as **Cancelled** in the run history. **To cancel a run:**
1. Click **Dashboard** in your app editor.
2. Click **Workflows**.
3. Click the workflow to open it.
4. Click the run that is in progress, then click **Cancel run**.
###
[](https://docs.base44.com/Building-your-app/Creating-workflows#archiving-a-workflow)
Archiving a workflow
If you do not need a workflow anymore, you can archive it to keep your active list clean. **To archive a workflow:**
1. Click **Dashboard** in your app editor.
2. Click **Workflows**.
3. Click the **More Actions** icon on the workflow.
4. Click **Archive**.

To see or restore archived workflows, click the **More Actions** icon next to **Create workflow**, then click **View archive**.
* * *
[](https://docs.base44.com/Building-your-app/Creating-workflows#monitoring-runs)
Monitoring runs
----------------------------------------------------------------------------------------------------
Every workflow records each run so you can watch it happen in real time and review it afterward. Review a single workflow’s runs from its details panel, or see runs across all your workflows on the **Activity** tab.
As a workflow runs, each step in the diagram shows a green checkmark when it completes successfully, so you can confirm at a glance that it works and see exactly where it stops if a step fails.
###
[](https://docs.base44.com/Building-your-app/Creating-workflows#viewing-a-workflow%E2%80%99s-runs)
Viewing a workflow’s runs
When you open a workflow, the details panel shows its **Success rate**, **Avg. runtime**, and a **Run history** of every run. When something goes wrong, the run shows the exact step that failed and the error, so you know where to look without guessing. **To view a workflow’s runs:**
1. Click **Dashboard** in your app editor.
2. Click **Workflows**.
3. Click the workflow you want to inspect.
4. In the details panel, review **Run history**, where each run shows its time and status, such as **Completed**.
5. Click a run to open its **Run log**, including the start time, end time, and runtime.

###
[](https://docs.base44.com/Building-your-app/Creating-workflows#using-the-activity-tab)
Using the Activity tab
The **Activity** tab under **Workflows** in your app dashboard brings together runs from all your workflows in one place.
Runs you start with **Run now** are labeled **TEST**, so you can tell them apart from runs that fired automatically.
**To view activity across workflows:**
1. Click **Dashboard** in your app editor.
2. Click **Workflows**.
3. Click the **Activity** tab.
4. Review the list of runs, where each one shows its workflow, status, start time, and run time. Filter by status (**Running**, **Completed**, **Failed**, or **Cancelled**) or by time range.
5. Click **View** on a run to open it in the workflow’s diagram alongside its run log.

* * *
[](https://docs.base44.com/Building-your-app/Creating-workflows#workflows-and-integration-credits)
Workflows and integration credits
----------------------------------------------------------------------------------------------------------------------------------------
Workflows are billed by the steps that run. Each step that runs a backend function uses a fraction of an integration credit, and the charges add up across all the steps in a single run. Built-in integrations that a step uses, such as sending an email or calling an AI model, can use credits too, as they do elsewhere in your app. A workflow with several steps therefore costs more per run than a single-step one, so keep an eye on how often your workflows run and what each step does. If you run out of integration credits while a run is in progress, that run is cancelled. [Learn more about credits.](https://docs.base44.com/Account-and-billing/Credits)
Tips for managing credit usage
------------------------------
Workflows that run frequently or chain several actions can drain your credit balance quickly. Here are some ways to keep usage under control:
* **Add specific trigger conditions:** Narrow the criteria that start a workflow so it does not run unnecessarily.
* **Use conditions to skip unneeded steps:** Branch the workflow so expensive steps only run when they are actually needed.
* **Consolidate redundant workflows:** If several workflows perform overlapping tasks, combine them into fewer, smarter ones.
* **Resolve failing workflows promptly:** Workflows that error can still consume credits on each retry. Check your run history regularly and fix or disable problem workflows as soon as you spot them.
* **Review the frequency of scheduled workflows:** Consider whether recurring workflows, such as daily reports or reminders, need to run as often as configured.
* **Be sparing with AI calls:** If a step calls an AI model, that uses credits too, so only call it when you actually need the result.
* **Test on a small dataset first:** Run a workflow manually and check its run history to estimate the per-run credit cost before enabling it at scale.
* * *
[](https://docs.base44.com/Building-your-app/Creating-workflows#faqs)
FAQs
------------------------------------------------------------------------------
Click a question below to learn more.
Can I add conditions to control when a step runs?
Yes. Ask the AI chat to add conditions to any workflow or step. For example:
After the wait, only send the reminder when the task is still incomplete.
The workflow then takes different paths based on the conditions you describe, so different steps run depending on your data. A condition can have several paths, plus a catch-all for anything that does not match, and the diagram shows each path separately.
What happens when a workflow fails?
Open the workflow and check its **Run history** to find the step that failed. Ask the AI in your dashboard to explain the error and suggest a fix, then use **Run now** to confirm the workflow succeeds. If a workflow fails repeatedly, Base44 deactivates it automatically and notifies you, so you can fix the issue before turning it back on.
Why does Run now ask me to choose a previous run?
It depends on how the workflow starts. A scheduled workflow can run on demand at any time, because it does not need any input. A workflow that starts from an entity, connector, or in-app agent trigger needs the trigger’s data to run, such as the specific task that was created, so **Run now** replays the data from a previous run. This means the workflow has to run at least once before you can run it on demand.If you see **No previous runs**, trigger the workflow for real once, for example by creating a task for the task follow-up workflow, and then use **Run now** to replay that run.
Can I manage workflows from the AI chat?
Yes. Ask the AI to activate, deactivate, archive, or restore a workflow, and it makes the change for you without opening the dashboard menus.

Was this page helpful?
YesNo
[Creating automations](https://docs.base44.com/Building-your-app/Creating-automations)
[Using developer tools](https://docs.base44.com/documentation/building-your-app/developer-tools)
⌘I
Assistant
Responses are generated using AI and may contain mistakes.
Suggestions
Which plans come with a free domain?How are credits used?How do I use Discuss mode?
---
# Using the canvas - Base44 Support Documentation
> Documentation Index
> -------------------
>
> Fetch the complete documentation index at: [/llms.txt](https://docs.base44.com/llms.txt)
>
> Use this file to discover all available pages before exploring further.
[Skip to main content](https://docs.base44.com/Building-your-app/Canvas#content-area)
The canvas lets you view and work on all your app pages at once. Every page appears as a live-preview frame on an infinite board that you can arrange, annotate, and build on together with your team. Everything saves automatically as you work.

Use the canvas to plan your app layout, leave notes and feedback for yourself or your team, sketch ideas with drawings, or send instructions straight to the AI chat for implementation.
You can use **Edit** mode on the canvas just as you would in the regular editor. Click **Edit** in the top bar to select and style elements on any page frame.
* * *
[](https://docs.base44.com/Building-your-app/Canvas#accessing-the-canvas)
Accessing the canvas
--------------------------------------------------------------------------------------------------
To access the canvas, open your app editor and click the Canvas icon in the top bar.

When you open the canvas for the first time, it fits all your app pages into view. After that, your zoom level and position are saved per device, so the canvas reopens where you left off.
* * *
[](https://docs.base44.com/Building-your-app/Canvas#collaborating-on-the-canvas)
Collaborating on the canvas
----------------------------------------------------------------------------------------------------------------
Multiple people can work on the canvas at the same time. Each collaborator’s cursor appears as a named pointer as they move around. Colored outlines show which elements each person has selected.

You can add collaborators to your app from the top of the editor. [Learn more about collaborators](https://docs.base44.com/Setting-up-your-app/Managing-access#inviting-collaborators-to-your-app)
* * *
[](https://docs.base44.com/Building-your-app/Canvas#managing-the-page-frames)
Managing the page frames
----------------------------------------------------------------------------------------------------------
Every page in your app appears as a frame on the canvas, showing a live preview of that page.
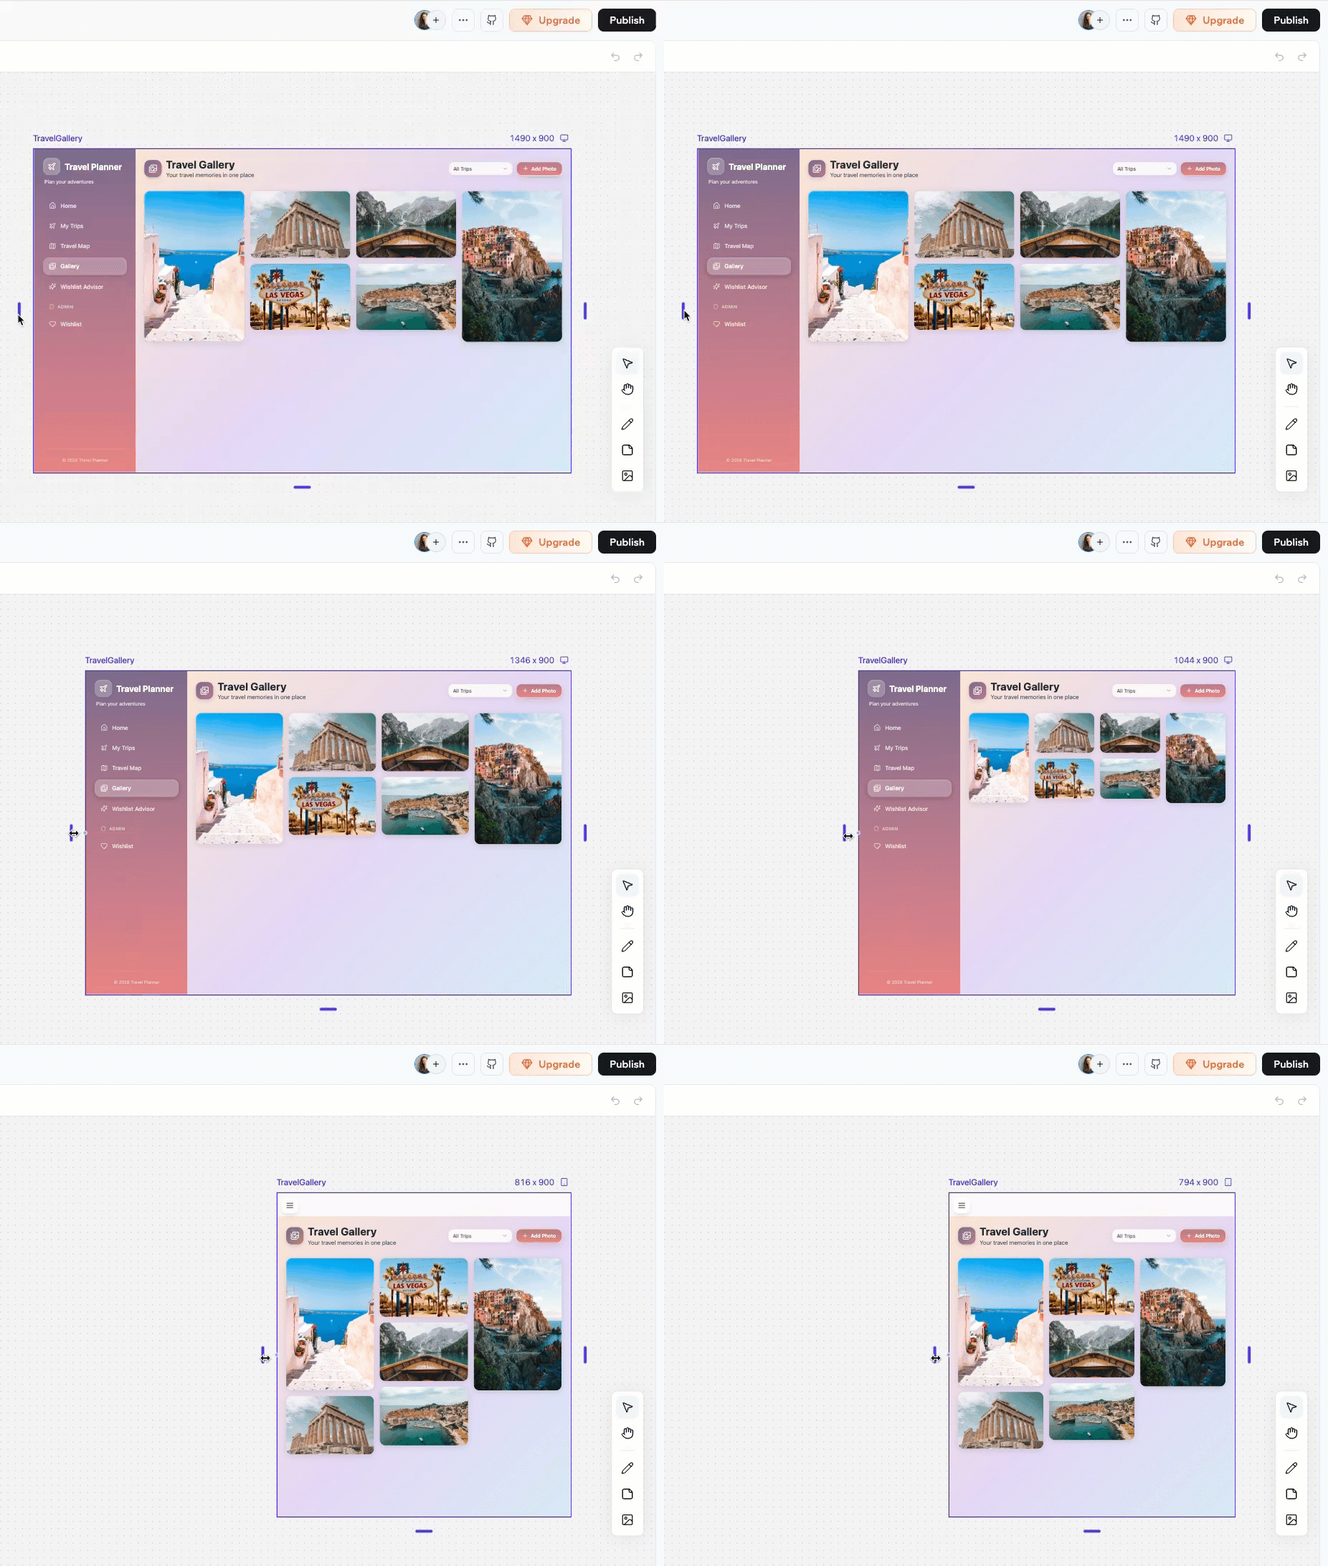
You can do several actions on your page frames.
Moving a page on the canvas
Click the frame to select it first, then click and drag the frame to move it wherever you want on the canvas.
Changing the view (desktop, tablet, phone)
Each frame has a viewport dropdown in the top right of its header. Click it to switch between **Desktop**, **Tablet**, and **Phone** to see how the page looks on different screen sizes.

Resizing a page frame
Click the frame to select it. Resize handles appear on the edges. Drag any handle to adjust the frame’s width and height.
Refreshing a page
Right-click the frame and select **Refresh** to reload the page preview.

Pages cannot be deleted from the canvas. To remove a page, ask the AI chat to delete it for you.
* * *
[](https://docs.base44.com/Building-your-app/Canvas#using-the-canvas-toolbar)
Using the canvas toolbar
----------------------------------------------------------------------------------------------------------
The toolbar on the right side of the canvas gives you access to the main tools.

See what you can do with the toolbar:
| | **Tool** | **Shortcut** | **What it does** |
| --- | --- | --- | --- |
| | **Select** | V | Select, move, and resize elements |
| | **Hand** | H | Pan around the canvas without selecting anything |
| | **Draw** | D | Freehand drawing |
| | **Sticky note** | N | Add sticky notes |
| | **Image** | I | Add images |
Press **Escape** at any time to return to the **Select** tool.
* * *
###
[](https://docs.base44.com/Building-your-app/Canvas#sticky-notes)
Sticky notes
Sticky notes are the main way to leave ideas, feedback, and instructions directly on the canvas.

Learn more about sticky notes:
Adding a sticky note
**To add a sticky note:**
1. Click the **Sticky note** tool in the toolbar or press **N**.
2. Click anywhere on the canvas to place the note.
3. Double-click the note to start typing.
The avatar of the person who created the note appears at the bottom left.
Customizing your note
When a sticky note is selected, a toolbar appears below it with formatting options:
* **Color**: choose a background color for the note.
* **Aa** **Font family**: choose from four styles: default, handwriting, mono, or serif.
* **S** **Font size**: Small, Medium, Large, or Extra large.
* **B** **Bold**: make the text bold.
* **Bullet list**: format the note as a bulleted list.
Changing the status of a note
Each sticky note has a **Status** dropdown at the top. Click it to set the status:
* To do (orange)
* In progress (blue)
* Done (green)
Connecting a sticky note to a page
Connect a sticky note to a page frame to show which page it relates to.**To connect a sticky note to a page:**
1. Hover over the note to reveal the connection handles on its edges.
2. Drag from a handle to the page frame you want to connect.
Sending a note to the AI chat
Once you write a note, you can send its content to the AI chat for implementation. Hover over or select the note, then click **Send to chat** at the bottom right of the note.
* If the note is connected to a page frame, the AI applies the change to that specific page.
* If the note is not connected to a page, the AI decides which page to update based on the content of the note.
* * *
###
[](https://docs.base44.com/Building-your-app/Canvas#drawings)
Drawings
The draw tool lets you sketch freehand anywhere on the canvas.

Learn more about drawing on the canvas:
Drawing on the canvas
**To draw on the canvas:**
1. Click the **Draw** tool in the toolbar or press **D**.
2. Click and drag on the canvas to draw.
Customizing the drawing
When the draw tool is active, you can customize it:
* **Stroke color** : Click the drawing to open the color picker and choose your drawing color, or enter a hex value directly.
* **Stroke weight** : Click the drawing and drag the slider to adjust the thickness of your stroke.
* **Flip**: Right-click a drawing and select **Flip horizontal** or **Flip vertical**, or use the **⇧H** and **⇧V** shortcuts.
* * *
###
[](https://docs.base44.com/Building-your-app/Canvas#images)
Images
You can add images to the canvas from multiple sources. Images are placed in the center of your current view.

Learn more about adding images to the canvas:
Adding an image
**To add an image:**
1. Click the **Image** tool in the toolbar or press **I**.
2. Choose where to get the image from:
* **Upload from computer**: Select a file from your device.
* **Import from Drive**: Pick a file from your connected Google Drive.
* **Add from file library**: Choose from your app’s existing assets.
Customizing an image
Select the image to access the toolbar below it:
* **Replace image:** Swap the image for a different one.
* **Crop:** Trim the image.
* **Border:** Add or adjust a border around the image.
* **Flip:** Right-click to flip the image horizontally or vertically.
* * *
###
[](https://docs.base44.com/Building-your-app/Canvas#right-click-actions)
Right-click actions
Right-click any sticky note, drawing, or image to open its context menu. The following actions are available:
| Action | Keyboard shortcut |
| --- | --- |
| Cut | ⌘X |
| Copy | ⌘C |
| Paste | ⌘V |
| Paste to replace | ⇧⌘R |
| Duplicate | ⌘D |
| Delete | Delete or Backspace |
| Bring to front | \] |
| Send to back | \[ |\
| Flip horizontal (drawings and images) | ⇧H |\
| Flip vertical (drawings and images) | ⇧V |\
| Lock / Unlock | ⇧⌘L |\
\
* * *\
\
[](https://docs.base44.com/Building-your-app/Canvas#adding-arrows)\
\
Adding arrows\
------------------------------------------------------------------------------------\
\
You can connect any two elements on the canvas with an arrow to show relationships, for example linking a sticky note to the page it refers to.\
\
\
\
**To create an arrow:**\
\
1. Hover over an element to reveal the connection handles on its edges.\
2. Drag from a handle to another element.\
\
To remove an arrow, select it and press **Delete** on your keyboard.\
\
* * *\
\
[](https://docs.base44.com/Building-your-app/Canvas#locking-elements)\
\
Locking elements\
------------------------------------------------------------------------------------------\
\
Locking an element prevents anyone from moving, resizing, or editing it until it is unlocked. This helps avoid conflicts when multiple people are working on the same canvas. You can lock sticky notes, drawings, and images.\
\
\
\
**To lock or unlock an element:**\
\
* Right-click the element and select **Lock** or **Unlock**.\
* Or select the element and press **⇧⌘L**.\
\
* * *\
\
[](https://docs.base44.com/Building-your-app/Canvas#undoing-and-redoing-changes)\
\
Undoing and redoing changes\
----------------------------------------------------------------------------------------------------------------\
\
You can undo and redo your recent canvas edits using keyboard shortcuts or the undo/redo buttons that appear in the toolbar when there is history to step through. Undo and redo cover most canvas actions: creating, moving, resizing, editing, deleting, locking, and connecting elements.\
\
| Action | Mac | Windows |\
| --- | --- | --- |\
| Undo | ⌘Z | Ctrl+Z |\
| Redo | ⇧⌘Z | Ctrl+Shift+Z or Ctrl+Y |\
\
Undo and redo are personal. Your history is separate from your collaborators’, so undoing a change only reverses your own edits, not theirs. The canvas keeps up to 50 steps of history.\
\
* * *\
\
[](https://docs.base44.com/Building-your-app/Canvas#zoom-and-navigation)\
\
Zoom and navigation\
------------------------------------------------------------------------------------------------\
\
The zoom bar sits at the bottom right of the canvas.\
\
| Control | Shortcut | Action |\
| --- | --- | --- |\
| **Zoom to fit** | ⌘1 | Fit the whole canvas into view |\
| **−** | ⌘- | Zoom out one step |\
| Percentage | | Click to open a dropdown with preset zoom levels |\
| **+** | ⌘+ or ⌘= | Zoom in one step |\
| | ⌘0 | Reset to 100% |\
\
Was this page helpful?\
\
YesNo\
\
[Managing your pages](https://docs.base44.com/Building-your-app/managing-your-pages)\
[Adding npm packages](https://docs.base44.com/Building-your-app/NPM-packages)\
\
⌘I\
\
Assistant\
\
Responses are generated using AI and may contain mistakes.\
\
Suggestions\
\
Which plans come with a free domain?How are credits used?How do I use Discuss mode?
---
# Hiring a Base44 partner - Base44 Support Documentation
> Documentation Index
> -------------------
>
> Fetch the complete documentation index at: [/llms.txt](https://docs.base44.com/llms.txt)
>
> Use this file to discover all available pages before exploring further.
[Skip to main content](https://docs.base44.com/Getting-Started/Hiring-a-partner#content-area)
[Base44 Partners](https://base44.com/hire-a-partner)
helps you find experts, freelancers, and agencies who specialize in Base44 apps and workflows. Whether you need help building features, customizing your workflow, or creating an integration, you can connect with a partner who matches your needs.

Ready to choose a partner?
--------------------------
Browse Base44 Partners, choose a partner, and contact them directly.
Payments and agreements are managed directly between you and the partner you choose.
* * *
[](https://docs.base44.com/Getting-Started/Hiring-a-partner#choosing-a-base44-partner)
Choosing a Base44 partner
--------------------------------------------------------------------------------------------------------------------
Choosing the right partner helps set your project up for success. Each partner lists their skills, experience, and pricing options, so you can make an informed choice. You can also filter the partners by services and languages to find the best match for you.
Tips for choosing the right partner
-----------------------------------
* **Check their profile:** Review the partner’s profile, website, and portfolio to see their past work and experience.
* **Meet with them:** Arrange an intro call to align on expectations.
* **Request a clear proposal:** Include scope, pricing, deliverables, and timeline.
* **Check availability:** Make sure the partner can meet your timeline before work begins.
* **Look for transparency:** Reliable partners explain what they can deliver, how long the work takes, and what you receive.
* * *
[](https://docs.base44.com/Getting-Started/Hiring-a-partner#contacting-a-base44-partner)
Contacting a Base44 partner
------------------------------------------------------------------------------------------------------------------------
You can search partner profiles, filter by service or language, and contact a partner directly from Base44 Partners. **To contact a partner:**
1. Go to [Base44 Partners](https://app.base44.com/partners)
.
2. Search for a partner or use the **Service** and **Language** filters.
3. Review the partner’s profile card, including their services, languages, and pricing.
4. Click **Contact** on the partner you want to reach.
5. Fill out the form with your project details and contact information.
* * *
[](https://docs.base44.com/Getting-Started/Hiring-a-partner#collaborating-with-your-partner)
Collaborating with your partner
--------------------------------------------------------------------------------------------------------------------------------
Once you have found the right partner, set your project up for a productive and secure experience.
* **Communicate clearly:** Maintain open and professional communication with your partner at every stage of the project. Define milestones and delivery checkpoints early so expectations stay aligned.
* **Keep records:** Document all agreements in writing, even a short email is enough. Confirm the project scope, pricing, payment schedule, and timeline **before** work begins.
* **Agree on payments:** Each partner sets their own pricing model. Some charge an hourly rate, others a fixed project fee, or both. You can also use milestone-based payments, such as a deposit followed by installments as work progresses. Decide together which approach works best and use a payment method you trust.
Base44 does not charge commissions and does not mediate disputes or payments.
* * *
Want to become a Base44 partner?
--------------------------------
If you build apps or services for clients, you may be eligible to join the Base44 Partner Program. Learn about eligibility, partner tools, and setting up your partner profile.
* * *
[](https://docs.base44.com/Getting-Started/Hiring-a-partner#faqs)
FAQs
--------------------------------------------------------------------------
Click a question below to learn more about Base44 partners.
Do I have to pay to use Base44 Partners?
No. Base44 does not charge a fee to use Base44 Partners. You agree on project payments directly with the partner you choose.
Can I hire more than one partner?
Yes, you can hire multiple partners for your project. Many people choose to work with different experts for areas like design, development, and integrations.
Can I change partners mid-project?
Yes, you can switch partners during a project if needed. Keep in mind that changing partners may involve additional costs, but it’s often better to make a change than continue with a partnership that isn’t working.
Will I receive an invoice or receipt?
Some partners, such as legally registered freelancers or agencies, can provide invoices or receipts. Be sure to confirm this with your partner before starting the project.
How does communication with partners work?
When you click **Contact**, you fill out a short form with your project details and contact information. Base44 sends your request to the partner, and you continue the conversation directly from there.
Can I work with a Fiverr expert instead of a Base44 partner?
Yes. In addition to Base44 Partners, you may see an option to connect with an expert at Fiverr directly from the [Base44 Partners page](https://app.base44.com/partners)
.This experience is provided by Fiverr, not Base44. It is designed for quick help, such as reviews, targeted troubleshooting, or small changes. You can chat instantly or schedule a time soon, and get offers at a fixed hourly rate shown in Fiverr.For larger or ongoing projects, complex integrations, or long-term strategic work, a Base44 partner may be a better fit.
The Fiverr option is not available to everyone yet.
Got feedback about Base44 Partners?
-----------------------------------
Contact us for questions, issues, or suggestions about Base44 Partners.
Was this page helpful?
YesNo
[Importing from Figma](https://docs.base44.com/Getting-Started/import-from-figma)
[App templates](https://docs.base44.com/Getting-Started/App-templates)
⌘I
Assistant
Responses are generated using AI and may contain mistakes.
Suggestions
Which plans come with a free domain?How are credits used?How do I use Discuss mode?
---
# Managing your app data - Base44 Support Documentation
> Documentation Index
> -------------------
>
> Fetch the complete documentation index at: [/llms.txt](https://docs.base44.com/llms.txt)
>
> Use this file to discover all available pages before exploring further.
[Skip to main content](https://docs.base44.com/Building-your-app/Managing-your-app-data#content-area)
* * *
In Base44, your app’s data is the information that brings everything to life. It includes all the information that your app holds, such as people who sign in, the content you show, orders you process, and the activities that happen in your app.

* * *
[](https://docs.base44.com/Building-your-app/Managing-your-app-data#understanding-your-data)
Understanding your data
------------------------------------------------------------------------------------------------------------------------
All of your app’s data is organized in tables, just like a spreadsheet. Each table groups one type of info (such as people or products) and sorts it into columns called fields, such as names, dates, or prices. For example, if you [create an app](https://base44.com/ai-app-builder)
to run your shop’s business, you can use the data tables in Base44 to keep everything organized. You might have a **Users** data table to store your customers’ names and email addresses, a **Products** table listing what you sell, and an **Orders** table to track every purchase. Each new customer, product, or order is automatically added as a new row in the right table, so you can quickly find, update, or manage your shop’s information.
* * *
[](https://docs.base44.com/Building-your-app/Managing-your-app-data#data-field-types)
Data field types
----------------------------------------------------------------------------------------------------------
When you, or the AI, add a field (column) to your table, you choose what type of information it stores. Some common field types include:
* **Text:** For words, phrases, or descriptions (such as customer names or product details)
* **Number:** For prices, quantities, or measurements
* **Yes/No (Boolean):** For fields that are true or false (such as “Is active?”)
* **Date/Time:** To save dates such as sign-up day, order date, or event time
* **File:** For images, documents, or other files
* **Reference:** To link this table to another table (for example, linking each order to the right customer)
* **Object:** For advanced cases, this lets you add structured information such as a JSON object
* * *
[](https://docs.base44.com/Building-your-app/Managing-your-app-data#accessing-your-app%E2%80%99s-data)
Accessing your app’s data
------------------------------------------------------------------------------------------------------------------------------------
It is easy to see all the information your app collects. You can view your data at any time from the dashboard, where each table gives you a clear, organized look at your people, products, orders, and more. This helps you track what is happening in your app and keep everything up to date.
###
[](https://docs.base44.com/Building-your-app/Managing-your-app-data#viewing-your-app%E2%80%99s-data)
Viewing your app’s data
The **Data** page shows every table in your app as a card. Click a card to open its records.
1. Click **Dashboard** in your app editor.
2. Click **Data**.
3. Select the relevant data set (table).

Each card has a **More Actions** icon with quick options for that table: **View Data**, **Export**, **Schema**, **Recently Deleted**, and **Delete All**. A warning icon on a card means the table has a row-level security risk. See [Fixing permission risks](https://docs.base44.com/Building-your-app/Managing-your-app-data#fixing-permission-risks)
to review and fix who can access its data.

You can also access an entity’s data table directly from **Edit** mode. Click any element that displays data from an entity and select **Edit data**.

###
[](https://docs.base44.com/Building-your-app/Managing-your-app-data#searching-for-specific-data)
Searching for specific data
Use the search bar above the table to quickly find relevant rows. The search looks through all text fields in your data, so you can jump straight to a specific row instead of scrolling. **To search for data:**
1. Click **Dashboard** in your app editor.
2. Click **Data**.
3. Enter a word, number or phrase in the search bar above the table.

###
[](https://docs.base44.com/Building-your-app/Managing-your-app-data#filtering-your-data)
Filtering your data
Use filters to turn a long table into a focused view, for example to see only shipped features, items owned by your team, or work planned for a specific quarter. The filters displayed come from the fields in your data set, so each table has its own relevant list of filter options. **To filter your data:**
1. Click **Dashboard** in your app editor.
2. Click **Data**.
3. Click **Filters** in the top right of the table and select your filters.

* * *
[](https://docs.base44.com/Building-your-app/Managing-your-app-data#adding-and-updating-data)
Adding and updating data
--------------------------------------------------------------------------------------------------------------------------
Base44 automatically collects and updates your app’s data as people interact with your app. The AI sets up your tables so the right information is saved and kept up to date for you. However, if you want to manually add information (for example, add a product, update a record, or input test data), you can do it easily from your app’s dashboard inside your app editor.
###
[](https://docs.base44.com/Building-your-app/Managing-your-app-data#manually-adding-data)
Manually adding data
1. Click **Dashboard** in your app editor.
2. Click **Data**.
3. Select the relevant data set (table).
4. Click **Add Item**.
5. Enter the data and click **Submit**.

###
[](https://docs.base44.com/Building-your-app/Managing-your-app-data#editing-data)
Editing data
To edit a data record, click the row of the table that you want to edit, complete the details and click **Submit**.
###
[](https://docs.base44.com/Building-your-app/Managing-your-app-data#deleting-data)
Deleting data
Delete your app’s data at any time.
**Note:** You can view and restore recently deleted records from any data table. Deleted records are kept for 30 days, so you have time to recover information if needed. Click the **More Actions** icon on the top of the data table and click **Recently Deleted** to see and restore deleted records. After 30 days the data is permanently deleted and cannot be restored.
To delete a single record, click the **Delete** icon on the relevant row of the table.

To delete all the records in a table, click the **More Actions** icon on the data entity and click **Delete All**. You can also ask the AI chat to delete records for you. The AI prepares the delete action and asks for your approval before anything is removed. **To delete data with the AI chat:**
1. Open the AI chat in your app editor.
2. Describe what you want to delete, for example: `Delete the data for Italy in the TripItem entity.`
3. Review the delete request that the AI suggests, including the entity name.
4. Click **Approve** to confirm the deletion, or **Reject** to cancel.

* * *
[](https://docs.base44.com/Building-your-app/Managing-your-app-data#importing-data)
Importing data
------------------------------------------------------------------------------------------------------
Sometimes you want to bring in lots of information to your app at once. You can import data in 2 ways, depending on whether you want to work directly in the dashboard or ask the AI chat to help.
Imports add new rows to your tables. They do not update or overwrite existing records. If you want your file to replace the data in a table, first delete the current records in that table, then run the import again with your file.
###
[](https://docs.base44.com/Building-your-app/Managing-your-app-data#using-the-ai-chat)
Using the AI chat
Use the AI chat to turn existing data files into entities and records in your app. This is helpful when you already have information in a spreadsheet or JSON file and want to bring it into Base44. You can upload structured data files and ask the AI to create or update entities for you, including setting up tables and mapping fields. Supported formats for importing data:
* CSV (.csv)
* Excel (.xlsx, .xls)
* JSON (.json)
If you upload an Excel file with multiple sheets, you can ask the AI to import a single sheet or import all sheets into their matching entities.
Example prompts you can use:
----------------------------
* `Import this data into the Customers entity.`
* `Import this JSON file into my Orders entity.`
* `Import the ‘Orders’ sheet into the Orders entity.`
* `Here is a CSV of my Products. Create a Products entity with matching fields and import these rows.`
**To import data using the AI chat:**
1. Create the entity you want to import into (for example, Products, Contacts, Orders).
2. Open the AI chat in your app editor.
3. Click the **Upload files** icon and select your data file.
4. Ask the AI to import the data.
5. Review the response and approve the import in the chat.

When you import data this way, Base44 analyzes your file structure and maps columns to your entity fields. It can create or update entities if your schema needs to change, adding new entities or fields, or adjusting field types to match your file. It does not update or overwrite existing records; it always appends new rows. If something does not match, the AI updates the schema where it is safe to do so, then retries the import so you do not need to fix everything manually.
For file size limits and more details about uploading files to the AI chat, see [Uploading and managing files](https://docs.base44.com/Building-your-app/Using-media)
.
**To use the AI chat to replace existing data:** If you want the content of a file to replace all the current records in an entity, you need to clear the entity first, then import the new rows from your file.
**Tip:** Before you delete records, consider exporting the table so you have a backup copy of your original data.
1. Ask the AI chat to delete the records in the relevant entity (for example, `Delete all records from the Orders entity.`).
2. Confirm that you want to delete the records.
3. Click the **Upload files** icon and select your data file.
4. Ask the AI chat to import the file into the same entity.
###
[](https://docs.base44.com/Building-your-app/Managing-your-app-data#directly-in-the-dashboard)
Directly in the dashboard
Use this option when you already have a CSV that matches your table and you simply want the rows to appear in your data. Dashboard imports currently support CSV (.csv) files.

**To import data from the dashboard:**
1. Click **Dashboard** in your app editor.
2. Click **Data**.
3. Select the relevant data set (table).
4. Click the **More Actions** icon and click **Import**.
5. Choose your CSV file and click **Open**.
**Note:** Imports from the dashboard also add new rows only. They do not update or overwrite existing records. If you want to replace everything in a table with the content of a CSV file, first click **Delete All** on that table to clear the records, then import the CSV.
Example: Export your customer list from another tool as a CSV, adjust the columns to match your **Customers** table, then import the file so you can manage those customers directly in Base44.
* * *
[](https://docs.base44.com/Building-your-app/Managing-your-app-data#exporting-data)
Exporting data
------------------------------------------------------------------------------------------------------
You might want to take your app’s data out for backup, analysis, or to use in other tools. To do this, you can use the **Export** option. For example, you might want to export your store orders or people lists to share with your accountant, or use the data to create custom reports. Your data downloads as a CSV file you can open in spreadsheet software such as Excel or Google Sheets. **To export your app’s data:**
1. Click **Dashboard** in your app editor.
2. Click **Data**.
3. Select the relevant data set (table).
4. Click the **More Actions** icon and click **Export**.

* * *
[](https://docs.base44.com/Building-your-app/Managing-your-app-data#changing-data-permissions)
Changing data permissions
----------------------------------------------------------------------------------------------------------------------------
Each data table has its own security settings, controlling who can **read** and **write** its data. **Read Access**: Who can view records
**Write Access**: Who can create, update, or delete records
**Note:** For more detailed explanations, see the [Managing security settings guide](https://docs.base44.com/Setting-up-your-app/Managing-security-settings)
.
**To change the permissions for your data:**
1. Click **Dashboard** in your app editor.
2. Click **Security**.
3. Click the relevant data entity and set the permissions.

###
[](https://docs.base44.com/Building-your-app/Managing-your-app-data#fixing-permission-risks)
Fixing permission risks
When a table has a row-level security risk, a warning icon appears on its card on the **Data** page. Open the table to see a **Permission risks detected** banner that explains the risk and the recommended rules.
* Click **Fix** to apply the recommended rules automatically.
* Click **More details** to review the risk and the suggested changes first.

* * *
[](https://docs.base44.com/Building-your-app/Managing-your-app-data#connecting-your-data-to-another-app)
Connecting your data to another app
------------------------------------------------------------------------------------------------------------------------------------------------
You can let another app read or write data from your Base44 app. This is useful if you want to sync information, automate tasks, or give access to outside tools.
1. Click **Dashboard** in your app editor.
2. Click **API**.
3. Select the relevant data entity from the drop-down menu.
4. Choose which code sample you need (for example, JavaScript or Python).
5. Copy the provided code for reading or updating data.
6. Paste this code into the other app or tool, so it knows how to connect to your table.

* * *
[](https://docs.base44.com/Building-your-app/Managing-your-app-data#faqs)
FAQs
----------------------------------------------------------------------------------
Select a question below to learn more about your app’s data.
Can I merge my apps together?
It is not currently possible to automatically merge two separate apps into a single app in Base44. Each app is managed as an independent project with its own codebase, settings, permissions, and integrations.If you want to combine the features of two apps, you need to manually recreate or copy code, components, and settings from one app to the other. After combining the code and functionality, thoroughly test the new app to make sure everything works as expected.
Can I delete all the data I created while I was testing my app?
Yes, to delete your data, go to **Data** in your app’s dashboard. On the relevant data tab, click **More Actions** and then **Delete All**. You can access and restore the deleted data for 30 days but after that it is permanently deleted.
Can I recover my data after deletion?
You can access and restore your deleted data for 30 days. After that, deleted data is permanently removed and cannot be restored.
Is it safe to let the AI add test data?
Yes. You can safely ask the AI chat to add mock data for testing. By default, it adds new records without changing or removing existing ones, so your important information stays protected.For structured testing, it is better to use the built-in test data feature instead of adding ad hoc mock records to your live tables. Test data lets you quickly generate, reset, and remove sample records without affecting your real production data. Learn more in [Testing your data](https://docs.base44.com/documentation/managing-app-data/testing-your-data)
.If you do choose to add test records directly to a table with the AI chat, you can clear them later from the dashboard by deleting those records.
Can the AI chat delete my existing data?
The AI chat focuses on adding and importing data. It does not remove records unless you clearly ask it to delete data from a specific entity and confirm the action.If you want to replace all data in an entity with the content of a file, the safe pattern is:
* Export the current table if you want a backup.
* Ask the AI chat to delete the records in the relevant entity.
* Upload your file and ask the AI chat to import it into the same entity.
This makes sure the entity is cleared first, then filled with the new rows from your file.
Can I change the table structure (data schema)?
If you want to add a new column (field) or make other changes to your data tables, ask the AI chat to do it for you. The AI chat handles updates to your data schema, you just need to describe what you want to change.For example, if you want to add a “Notes” column to one of your data tables, prompt the chat to add it. It is best if you use Discuss mode in the chat to help the AI decide how to go about the change before implementing it.
Is there a limit to how many items I can pull with one data request?
Starting November 27, 2025, there is a limit of 5,000 items per request to help keep performance fast, stable, and reliable.If your app currently pulls everything in one large request, you may need to update it to load data in smaller pieces. Once this change goes live, double-check your flows to make sure everything still works as expected.
**Tip:** To make sure you are within the limitation, you can paste this message into the Base44 AI chat: “Make sure all data pull requests are limited to 5,000 items.”
Why do I only see some of my data? Have I lost the rest?
You have not lost your data. When a collection has more than 5,000 records, the system limits how many items can load at once to protect performance. What you see depends on where you are looking:
* **In your dashboard**: The data table only shows up to 5,000 items, even if your collection contains more. All of your records are still stored. To review everything, export the collection to CSV from the dashboard so you can see all items outside the table view.
* **In your app pages**: Pages that try to fetch the entire collection in one request also only show up to 5,000 items. The rest of the records are still there, but they are not loaded on that page. Set up pagination so your app loads data in smaller chunks, for example 50 to 200 items at a time. You can ask the AI chat to add pagination for you.
Can I fetch and display data from my app on the free plan?
Yes. If the data is stored inside your Base44 app, you can read from your entities and display it on any plan, including the free plan. Basic data fetching and display does not require backend functions or a paid plan.Backend functions are only needed when you want to connect to an external service or API outside of Base44, such as Strava, Stripe, or a third-party database. Connecting to external APIs requires the **Builder plan** or higher.
Can I build custom roles and hierarchies (for example, managers and teams) in my app?
Yes. You can build a full role and hierarchy system in your app, including managers, teams, and even separate spaces for each customer if you are building a SaaS app.At a high level, the pattern works like this:
* People sign up and sign in through the normal Base44 login flow. Their account details are stored in the built-in **User** entity. You do not change the security rules of this entity.
* You create your own entities to model your business, for example Company, Team, and TeamMember.
* Each record in these entities links back to a User record using a reference field, such as userId. This lets you connect login accounts with your own business roles.
* You use data permissions and row-level security on your entities so each person only sees the records they should see.
For example:
* In a SaaS app, each Company record can represent one of your customers. Data permissions make sure people from one company cannot see another company’s data.
* Within each company, TeamMember records can store fields such as role, manager, and team. You can then set rules so managers see all records for their team, while individual team members only see their own records or items assigned to them.
* Global admins in your app can have a role that allows them to see and manage all records across companies and teams.
This approach lets you support complex, multi-level apps (sometimes called “User of User” or UoU) while Base44 continues to manage login and the core User entity securely. To design the exact rules, use the data permissions and row-level security options described in the [Managing security settings](https://docs.base44.com/Setting-up-your-app/Managing-security-settings)
guide.
Was this page helpful?
YesNo
[Adding npm packages](https://docs.base44.com/Building-your-app/NPM-packages)
[Testing your app with test data](https://docs.base44.com/documentation/managing-app-data/testing-your-data)
⌘I
Assistant
Responses are generated using AI and may contain mistakes.
Suggestions
Which plans come with a free domain?How are credits used?How do I use Discuss mode?
---
# Import from Figma into Base44 - Base44 Support Documentation
> Documentation Index
> -------------------
>
> Fetch the complete documentation index at: [/llms.txt](https://docs.base44.com/llms.txt)
>
> Use this file to discover all available pages before exploring further.
[Skip to main content](https://docs.base44.com/Getting-Started/import-from-figma-guidelines#content-area)
[](https://docs.base44.com/Getting-Started/import-from-figma-guidelines#before-you-import-from-figma)
Before you import from Figma
--------------------------------------------------------------------------------------------------------------------------------------
Preparing your Figma file correctly helps Base44 read your design and recreate it as a working layout.
* Make sure you are working in a **Figma Design** file. FigJam, Slides, and other file types are not supported.

* Select a **single frame or section** that you want to import. Do not use a full document or page-level link.
* In Figma, click **Share** and under **Who has access**, set the link to **Anyone with the link – Can view**. Copy the link for the selected frame or section and paste it into **Import from Figma** in Base44. After the import is complete, you can set the Figma file permissions back to private if you prefer.
Import from Figma focuses on the selected frame or section. Other parts of the Figma file are not brought into Base44 unless you import them separately.
* * *
[](https://docs.base44.com/Getting-Started/import-from-figma-guidelines#structuring-your-figma-layout)
Structuring your Figma layout
----------------------------------------------------------------------------------------------------------------------------------------
A clear structure in Figma makes it easier for Base44 to build a responsive layout that matches your intent.
A well-structured home page with clear sections and consistent components gives the best results when you extend the design into a full app.
* **Divide the page into logical sections:** Wrap related content (for example, a hero, feature row, or footer) inside frames or groups so each area of the page is clearly defined.
* **Use auto layout for hierarchy:** Apply `Auto Layout` to components such as cards, navigation bars, and repeating content blocks. For example, an info card with an image, title and description should be grouped as `Frame` or `Group`, or preferably `Auto Layout`. This helps Base44 understand how elements relate to each other and how they should resize.

* **Keep nesting meaningful:** Group elements that belong together (for example, image + title + description in a card), and avoid deep, unnecessary nesting that does not reflect the visual structure.

* **Align and space consistently:** Use consistent padding, gaps, and alignment inside your frames so Base44 can preserve your spacing and hierarchy.
* * *
[](https://docs.base44.com/Getting-Started/import-from-figma-guidelines#working-with-vectors-and-shapes)
Working with vectors and shapes
--------------------------------------------------------------------------------------------------------------------------------------------
Cleaning up vector elements before import makes positioning and rendering more accurate. Flattening and simplifying vectors reduces surprises in how elements align, scale, and render once they are in Base44.
* **Flatten complex vectors:** If a vector is built from many separate paths (for example, an icon made from multiple shapes), flatten it into a single vector whenever you can.

* **Outline strokes before flattening:** For lines, circles, stars, and similar shapes:
* Use **Outline Stroke** then flatten the result into a single vector element.
* **Remove hidden elements:** Delete layers that are completely hidden or pushed far off canvas so they do not interfere with the imported layout.

* **Simplify fills:** If an element has multiple fills, keep only what you actually need. Base44 only imports the last fill on an element.

* * *
[](https://docs.base44.com/Getting-Started/import-from-figma-guidelines#fonts-effects-and-other-limitations)
Fonts, effects, and other limitations
------------------------------------------------------------------------------------------------------------------------------------------------------
Some parts of your Figma design are adapted during import so the resulting layout works reliably in Base44.
* **Fonts:**
* Only Google Fonts are fully supported.
* Custom fonts are replaced with a default font during import. You can update typography later inside Base44.
* **Design effects that may not be preserved exactly:**
* Image filters
* Multiple background layers on a single element
* Variables and variable-driven styles
* **Layout refinements:**
* Fine-tune spacing, responsiveness, and interactions after import using the AI chat or Visual Edit mode.
* If something does not look right, adjust the structure directly in Base44 or update your Figma file and import again from a cleaner frame.
If your design relies heavily on unsupported effects or complex variable setups, expect visual differences after import and plan to refine the result inside Base44.
* * *
[](https://docs.base44.com/Getting-Started/import-from-figma-guidelines#add-a-page-from-figma)
Add a page from Figma
------------------------------------------------------------------------------------------------------------------------
Once your app is in the builder, you can keep adding Figma frames as new pages. You are not limited to the initial import: each frame you add becomes a new page in your app. **To add a page from Figma:**
1. Open your app in the builder.
2. In the chat input, click the **+** icon.
3. Select **Add page from Figma**.
4. Paste a link to the Figma frame you want to import.
5. Click **Add page**.
Base44 generates a new page from your design and adds it to your app. The same file setup requirements apply: make sure your frame link is set to **Anyone with the link – Can view** before you add it.
Editor access is required to add pages from Figma. Viewers cannot add pages. The app also cannot be processing another prompt at the same time. Wait for any active generation to finish before adding a page.
Importing frames from the same Figma file keeps fonts, colors, and spacing consistent across pages. After adding a page, ask the AI chat to connect navigation between your existing pages and the new one.
* * *
[](https://docs.base44.com/Getting-Started/import-from-figma-guidelines#building-the-rest-of-your-app)
Building the rest of your app
----------------------------------------------------------------------------------------------------------------------------------------
Once your Figma frame is imported, you can treat the new page as the foundation for a full app or website.
* Use the imported page as your **home page** and main reference for structure, layout, and visual language.
* Ask the AI chat to:
* Identify which additional pages are missing (for example, About, Pricing, Blog, or Contact).
* Create new pages that follow the same design language and layout principles.
* Connect buttons, menus, and links on the home page to the new internal pages.
**You can use a prompt like:**
> `Review the home page carefully, including both its content and its design style. Use the home page as the main reference to understand the website’s structure and design language. Identify which additional pages are needed to create a complete website. Create the missing pages while maintaining the same design language, layout principles, and visual style as the home page, so they feel like a direct continuation and not disconnected. When finished, return to the home page and connect all relevant buttons and links so each one navigates to the appropriate internal page.`
If you see repeated patterns in your imported design (such as cards, feature rows, or call-to-action blocks), mention them in your prompt so the AI can reuse those patterns on the new pages.
Was this page helpful?
YesNo
⌘I
Assistant
Responses are generated using AI and may contain mistakes.
Suggestions
Which plans come with a free domain?How are credits used?How do I use Discuss mode?
---
# Using app templates - Base44 Support Documentation
> Documentation Index
> -------------------
>
> Fetch the complete documentation index at: [/llms.txt](https://docs.base44.com/llms.txt)
>
> Use this file to discover all available pages before exploring further.
[Skip to main content](https://docs.base44.com/Getting-Started/App-templates#content-area)
[](https://docs.base44.com/Getting-Started/App-templates#about-the-template-marketplace)
About the template marketplace
---------------------------------------------------------------------------------------------------------------------------
The template marketplace is your shortcut to [building great apps](https://base44.com/ai-app-builder)
on Base44. Browse a wide range of ready-made templates created by talented creators in the community. If you are unsure where to start or want to skip hiring a partner, templates make it easy to get going right away. Just choose a template and customize it to fit your needs. If you prefer to keep templates private to your team, you can create workspace templates instead of listing them publicly. Workspace templates reuse your app across a single workspace without appearing in the public marketplace. Learn how to [create and manage workspace templates](https://docs.base44.com/Account-and-billing/Managing-your-workspaces#managing-workspace-templates)
. You can also earn money by publishing public templates for others to use in the marketplace. Set your own price or make them free and reach a wider audience while showcasing your skills. For internal-only use, keep templates as workspace templates so they are available only to your team.
* * *
[](https://docs.base44.com/Getting-Started/App-templates#accessing-templates)
Accessing templates
-----------------------------------------------------------------------------------------------------
Go to [**App Templates**](https://base44.com/templates)
in the **Community** tab in your workspace to browse all available templates. App Templates include:
* **Community:** Templates shared by the community and available to all Base44 users. These listings can be free or sold for a price.
* **Workspace:** Templates created and saved by your team. Workspace templates are private to your workspace, and only members of your workspace can see them.

When you use a template, it is copied into your own workspace where you can rename it, change the content, update the design, and modify how it works.
**Notes:**
* You need to be logged in to your Base44 account to view and use app templates.
* If you want to use a template that uses backend functions, you need to have a Builder plan or higher.
**To access app templates:**
1. In your Base44 workspace, go to [App Templates](https://app.base44.com/app-templates)
.
2. Hover over a template and click **View details** to see more information, images, and usage stats.
3. (Optional) Use the **Workspace** tab to view templates created and saved in your workspace. These templates are only visible to members of your workspace.
4. Click **Use Template** (for free templates) or **Purchase** (for paid templates).
* * *
[](https://docs.base44.com/Getting-Started/App-templates#publishing-and-selling-public-templates)
Publishing and selling public templates
---------------------------------------------------------------------------------------------------------------------------------------------
You don’t need to create something complex to share as a public template. Simple apps, reusable layouts, or creative tools can all be helpful to others. If you have made something useful or fun, you can add it to the community app templates library. You can choose to offer your template for free or set a price for others to use it via the marketplace. When managing your template, keep in mind how updates work. If you publish changes to your app’s functionality (like bug fixes), new users receive the latest version automatically without you needing to resubmit anything. However, if you change the listing details (like the description or price), you must resubmit the listing for approval.

**Notes:**
* When someone uses one of your public templates, it is copied into their workspace and your original app stays the same.
* You can only publish a public template if you own the app and have published it at least once.
* Selling public templates for a price is currently in Beta and requires a Starter plan or higher. You receive the price you set, with no commission taken by Base44.
* Earnings from paid templates are paid out once your total confirmed earnings reach at least USD 200, following the payout timelines in the Base44 Marketplace Terms.
**Before submitting your app, make sure:**
* You test it to ensure it works and includes full functionality.
* You add real-looking sample content.
* Your app is secure. [Learn more about security and using the security check](https://docs.base44.com/Setting-up-your-app/running-a-security-scan)
.
**To publish a public template:**
1. Go to your app’s editor.
2. Click **Dashboard**.
3. Click **Settings**.
4. Click **App Template**.
5. Select **Public template** and click **Create**.
6. Enter the **Basic info** for your template:
* **Template Name:** Enter a clear name for your template.
* **Description:** Describe what makes your app worth trying.
* **Select Categories:** Select the checkboxes next to the categories that best describe your app (e.g. Education, Operations).
7. Select a listing type in the **Template Pricing** section:
* **Free listing:** Offer your template for free.
* **Paid listing:** Set a price for your template. Enter the price details.
8. In the **Template Screenshots** section, click **Add Images** and upload at least one screenshot of your published app.
**Tip:** Click **Preview App** to open your published app and take screenshots.
9. Select the **I agree to the Base44 Terms and Marketplace Terms** checkbox.
10. Click **Create** at the top right.

* * *
[](https://docs.base44.com/Getting-Started/App-templates#improving-your-listing)
Improving your listing
-----------------------------------------------------------------------------------------------------------
If you want your template to stand out, start by focusing on solving a clear problem for others and choosing a catchy title. Add a helpful image and description that show your app in action and make its purpose easy to understand. The most successful templates have clear and friendly language, and include strong visuals that highlight your app’s value.
Tips for improving your listing
-------------------------------
**Images:**
* Show your app in action with real-looking data
* Use clean, full-screen views
* Avoid blurry or empty screens
* Use horizontal images: 1200x675 pixels (16:9)
**Description:**
* Say clearly what your app is for and who it helps
* Use short, friendly sentences
* Avoid overly technical or complex language
**Tags and categories**
* Pick tags that describe what your app does (like “productivity” or “social”)
* Avoid adding too many tags
* * *
[](https://docs.base44.com/Getting-Started/App-templates#the-approval-process)
The approval process
-------------------------------------------------------------------------------------------------------
After you submit your listing, the Base44 team reviews it to make sure it meets community guidelines. Listings that don’t follow these guidelines may be rejected. If your app is approved, it appears in App Templates for others to discover and use. **Base44 may decline or remove a listing if:**
* **Spam or broken:** The app listing is spam or is not functioning.
* **Private setting:** The app is set to private, which prevents others from viewing it.
* **Community rules violation:** The app includes content that breaks community rules.
* **Screenshots do not match:** The submitted screenshots do not reflect the actual appearance or features of the app.
* **Missing security settings:** Apps must complete a security check to be eligible for publishing.
* **Broken functionality:** Some features in the app are not working as intended.
* **Invalid or non-compliant app name:** The app name uses terms like “template,” version numbers, or other values not allowed by store policy.
* **Duplicated app without chat:** If your app is a duplicate and does not include chat functionality, please send the original app with chat history.
* **Mismatched categories:** The categories selected do not match the app’s purpose or functionality.
* **App has never been published:** Apps must be published at least once before being submitted for review.
**Important:**
* Final approval depends on Base44’s internal guidelines. The team may remove listings that do not meet broader community quality standards, even if a specific reason is not listed above.
* The approval process may take some time. We appreciate your patience.
* * *
[](https://docs.base44.com/Getting-Started/App-templates#managing-your-listings)
Managing your listings
-----------------------------------------------------------------------------------------------------------
From your app’s dashboard you can manage your template listing. **To manage a template listing:**
1. Go to your app’s editor.
2. Click **Dashboard**.
3. Click **Settings**.
4. Click **App Templates**.
5. Choose what you want to do:
* **Edit your listing:** Click **Submit Update** and make the changes to the listing. Then click **Submit Update** to confirm.
* **See your app in the marketplace:** Click the **More Actions** icon and click **See on App Templates.**
* **Remove your template from the marketplace:** Click the **More Actions** icon and click **Remove from App Templates.**

* * *
[](https://docs.base44.com/Getting-Started/App-templates#faqs)
FAQs
-----------------------------------------------------------------------
Click a question below to learn more.
Can I see how many people used my template?
Yes! When you click your template in App Templates, you can see how many times your app has been used.
How do I get paid for paid templates?
You become eligible for payout once your total earnings reach USD 200. Payouts are generally processed within 90 days after you reach this threshold, in accordance with the [Base44 Marketplace Terms](https://app.base44.com/marketplace/terms)
. The paid template feature is in Beta and payout details may change over time.
Can I publish multiple templates?
Yes, you can publish any number of templates, and each listing is reviewed individually to ensure it meets Base44’s guidelines.
Where can I see all my template listings?
In App Templates, click the **My Templates** tab to view templates created by you or others in your workspace. 
Can I update my template after it’s published, and do I need to resubmit it?
Yes. How the update works depends on what you are changing:
* **App functionality (e.g. bug fixes, new features):** Simply publish the changes in your app editor. New users who install the template automatically receive the latest version. You do **not** need to resubmit the template.
* **Listing details (e.g. description, price, name):** You must submit an update in the **App Template** settings.
* **Workspace templates:** The listing updates automatically.
* **Public templates:** The update requires approval from Base44 before appearing in the library.
**Note:** In all cases, changes do not affect users who have already installed the template.
If I remove my template listing, does it affect people who already used it?
No, removing or hiding your template does not impact anyone who has already added it to their workspace.
What happens if my template has backend functions and secrets?
Backend functions or secrets included in a template will not transfer to users who add the template. Each user needs to set up their own backend functions and secrets in their own workspace for security and privacy.
What happens if my template uses paid third-party integrations or APIs?
If your template uses paid third-party services, users who add your template to their workspace will need to set up their own accounts and connect those services themselves.
Can I change a template from free to paid, or paid to free later?
Yes, you can change your template’s price at any time in the settings. This will only affect future users, not those who have already used your template.
Can I limit the number of apps a user can create from my template?
No. Once purchased, the user can create as many copies as they wish.
Was this page helpful?
YesNo
[Hiring a partner](https://docs.base44.com/Getting-Started/Hiring-a-partner)
[Using the AI chat](https://docs.base44.com/Building-your-app/AI-chat-modes)
⌘I
Assistant
Responses are generated using AI and may contain mistakes.
Suggestions
Which plans come with a free domain?How are credits used?How do I use Discuss mode?
---
# Setting up an AI agent for your app - Base44 Support Documentation
> Documentation Index
> -------------------
>
> Fetch the complete documentation index at: [/llms.txt](https://docs.base44.com/llms.txt)
>
> Use this file to discover all available pages before exploring further.
[Skip to main content](https://docs.base44.com/Building-your-app/AI-agents-for-apps#content-area)
AI agents turn simple chats into actions in your Base44 app. Instead of only replying with text, they update records, trigger workflows, and connect to tools so you can run more of your process through one conversation.

Each agent understands your app’s data and can search the web, call backend functions, and follow detailed guidelines you define. You can shape its tone and persona, decide which tools it can use, and choose the AI model that powers its reasoning. By default, agents use an **Automatic** model that is optimized for fast, cost-effective responses, so everything keeps working the same as before unless you decide to change it. Memory is on by default for new agents, so every interaction feels more personal and consistent from the start. Your agent can remember important details across conversations, such as preferences, past choices, or shared knowledge, and bring that context back the next time someone reaches out. Agents automatically figure out which tool to use based on your app and request.
Examples:
* “Mark my summer vacation booking as done” → uses the **update\_task** tool.
* “What was the most visited location in Europe in 2024?” → uses the **google\_search** tool.
* “Add 15 new tasks” → uses the **insert\_task\_records** tool.
* * *
[](https://docs.base44.com/Building-your-app/AI-agents-for-apps#setting-up-an-ai-agent)
Setting up an AI agent
------------------------------------------------------------------------------------------------------------------
Before you can start working with AI agents, you need to enable them in your app dashboard. Then you can start creating them using the AI chat. You can enable agents for all new apps by default in your account settings in your workspace.
When you chat with an AI agent, Base44 uses **integration credits**. Pricing starts at around **3 integration credits per message** with the default model and then varies based on the model you select and the length of the response.
**To set up an AI agent:**
1. Go to **Dashboard** in your app editor.
2. Click **Agents**.
3. Choose a suggested agent template or click **Create from scratch** to define your own.

**Tips:**
* Use a suggested template to get started quickly with a pre-built agent role and instructions you can customize.
* If you choose **Create from scratch**, describe what you want in the AI chat and the agent will be built based on your input.
* You can enable agents for all new apps by default in your account settings.
* * *
[](https://docs.base44.com/Building-your-app/AI-agents-for-apps#customizing-your-ai-agent)
Customizing your AI agent
------------------------------------------------------------------------------------------------------------------------
Each agent has its own configuration panel with the following sections:
* **Guidelines:** Define the agent’s behavior, persona, AI model, and context files.
* **Tools:** Control what data and tools the agent can use.
* **Connectors:** Let app users connect their own external accounts to the agent via OAuth.
* **Skills:** Add reusable instruction sets that give the agent specific behaviors or expertise.
* **Memory:** Decide how the agent remembers information across conversations.
* **WhatsApp:** Connect the agent to WhatsApp so people can chat from their phone.
* **Telegram:** Connect the agent to Telegram so people can chat from anywhere.
* **LINE:** Connect the agent to LINE so people can chat from the LINE app.
###
[](https://docs.base44.com/Building-your-app/AI-agents-for-apps#configuring-guidelines)
Configuring guidelines
Use the **Guidelines** tab to set how your agent behaves and which AI model it uses.

**To customize your agent’s guidelines:**
1. Go to **Dashboard** in your app editor.
2. Click **Agents**.
3. Click **Edit Agent** on the relevant agent.
4. Click **Guidelines**.
5. Update the **Description** to define the agent’s role and high-level behavior.
6. Update **Instructions** with detailed rules your agent should follow.
7. Under **Context Files**, click **Upload files** or **Choose from library** to add reference material the agent can use to answer questions. For example, product manuals, pricing documents, policies, or FAQs. You can add up to 10 files.
8. Under **AI Model**, select the model that powers your agent. Keep **Automatic** selected for fast, cost-effective responses, or choose a model from Google Gemini, OpenAI GPT, or Anthropic Claude for more advanced reasoning.
9. Click **Save**.
Choosing an AI model
--------------------
For most agents you can use the **Automatic** option. It is optimized for general-purpose tasks and interactive workflows and typically costs about **3 integration credits per message**.If you need more control, you can pick a different model. Below is an estimation of credit usage with different models:
| Model | Best for | Approx. credits / message |
| --- | --- | --- |
| Automatic | General-purpose, fast responses | ~3 |
| Gemini 3 Flash | Stronger reasoning at moderate cost | ~5 |
| GPT-5 | Complex analysis and accuracy-critical tasks | ~15 |
Credits are approximate and vary based on response length. Lighter models use fewer credits, while more powerful models use more. You can switch models at any time if your needs change.
If you are not sure which model to use, leave **Automatic** selected. You can always move to a more powerful model later for advanced reasoning or analysis-heavy workflows.
###
[](https://docs.base44.com/Building-your-app/AI-agents-for-apps#allowing-anonymous-access)
Allowing anonymous access
By default, people need to log in to your app before they can use an agent. You can let visitors chat with an agent without signing in by turning on anonymous access for that agent, so anyone can start a conversation straight away. You can view anonymous conversations in the **Users** tab in your **Agents** dashboard, just like logged-in user conversations. [See how to view agent conversations.](https://docs.base44.com/Building-your-app/AI-agents-for-apps#viewing-who-uses-your-agents)
This feature is not available to all users yet.
When anonymous access is on, visitors can chat with the agent without signing in, on the web and on connected channels (WhatsApp and Telegram). Anonymous users can’t access per-user private data, so keep this off for agents that manage personal data. Anonymous conversations also draw integration credits from your workspace pool, the same as logged-in users, so only turn this on for agents you want open to everyone. The setting is off by default and you control it per agent. **To allow anonymous access for an agent:**
1. Go to **Dashboard** in your app editor.
2. Click **Agents**.
3. Click **Edit Agent** on the relevant agent.
4. Click **Guidelines**.
5. Turn on the **Allow anonymous access** toggle.
6. Click **Save**.

###
[](https://docs.base44.com/Building-your-app/AI-agents-for-apps#managing-tools-and-data-access)
Managing tools and data access
Use the **Tools** tab to decide what your agent can do and which data it can access.
You can ask the AI chat to add or update tools for your agent. Describe what you want the agent to do and the AI configures the right tools automatically, without you having to set them up in the **Tools** tab.

**To manage an agent’s tools:**
1. Go to **Dashboard** in your app editor.
2. Click **Agents**.
3. Click **Edit Agent** on the relevant agent.
4. Click **Tools**.
5. Choose which tools the agent can use. For example:
* Entity tools to create, read, update, or delete records.
* Backend functions to send notifications, trigger automations, or call external APIs.
6. Adjust any tool-specific permissions so the agent only accesses the data it needs.
7. Click **Save**.
You can add or remove tools at any time as your app evolves. For example, you might start with read-only entity tools and later allow updates once you have tested the agent.
###
[](https://docs.base44.com/Building-your-app/AI-agents-for-apps#adding-user-connectors)
Adding user connectors
Use the **Connectors** tab to let your app users connect their own external accounts to the agent. When a connector is enabled, the agent can create OAuth connect links so each person can authorize access to their own account in that service directly from a conversation. For example, in a travel advisor app, each user could connect their own Google Calendar so the agent can plan and schedule itineraries on their behalf. [Learn more about setting up connectors for app users.](https://docs.base44.com/Integrations/user-connectors)
**To add a user connector for your agent:**
1. In the AI chat, ask the agent to add a user connector, for example: `I want my app users to connect their own LinkedIn account to this agent.`
2. When the form appears, fill in the required details. These vary by provider but typically include a connector name, Client ID, Client Secret, and the scopes your app needs.
3. Follow the on-screen instructions to authorize the connector and choose the permissions your app users will be asked to grant.
4. Click **Approve**.

**Tips:**
* Before filling in the form when adding a connector, make sure you have already created an OAuth app in the provider’s developer console and have your Client ID, Client Secret, and required scopes ready.
* If a user connector is already set up in your workspace, it appears in the **Connectors** tab automatically. Go to **Edit Agent**, click **Connectors**, toggle it on, and click **Save**.
* The **Connectors** tab also shows which backend functions are using each connector, so you can see exactly what the agent can do with it.
###
[](https://docs.base44.com/Building-your-app/AI-agents-for-apps#adding-agent-skills)
Adding agent skills
Skills are reusable instruction sets you attach to an agent to give it specific behaviors, expertise, or policies. You can attach up to 10 skills per agent.

There are two types of skills:
* **App Skills:** Skills you create for a specific app. Once created, they can be reused across all agents in that app.
* **Workspace Skills:** Skills shared across your workspace. [Learn more about managing workspace skills.](https://docs.base44.com/documentation/using-your-workspaces/adding-workspace-skills)
**To add an app skill to your agent:**
1. Go to **Dashboard** in your app editor.
2. Click **Agents**.
3. Click **Edit Agent** on the relevant agent.
4. Click **Skills**.
5. Click **Add Skill** under **App Skills**.
6. Choose how to create the skill:
* Select **Start from scratch** to write your own instructions.
* Select a template such as **refund-policy**, **support-escalation**, **pricing-and-plans**, or **brand-voice** to start from a ready-made structure.
7. Enter a **Skill name**, an optional **Description**, and your **Instructions**.
8. Turn on the **Enable for current agent** toggle if you want the skill to be active right away.
9. Click **Create Skill**.
10. Click **Save**.
To use a workspace skill, scroll to **Workspace Skills** and toggle on any skill you want to enable for this agent.
###
[](https://docs.base44.com/Building-your-app/AI-agents-for-apps#configuring-memory)
Configuring memory
Agent memory lets your agent remember important information across conversations, such as preferences, key facts, or shared knowledge. You control whether memories are shared across everyone or kept specific to each person.
Memory is turned on by default for new agents.

**To turn on memory for your agent:**
1. Go to **Dashboard** in your app editor.
2. Click **Agents**.
3. Click **Edit Agent** on the relevant agent.
4. Click **Memory**.
5. Click the **Enable Memory** toggle to turn memory on.
6. Under **Memory Scope**, choose how this agent saves memories:
* **Global & Per User:** The agent can create shared memories for everyone and personal memories for each person.
* **Global Only:** The agent creates memories that are shared across everyone who chats with it.
* **Per User Only:** The agent creates memories that are specific to each person.
7. In **Memory Instructions**, enter guidance that explains when to save memories and what to include.
8. After your agent has a few conversations, review **Saved Memories** to see what the agent has stored. Click **Refresh** to load new memories.
9. Click **Save**.
Use memory instructions to keep your agent focused. For example:
* Save global memories for product updates, company announcements, and shared knowledge.
* Save user memories for personal preferences such as communication style, tone, and specific interests.
* * *
[](https://docs.base44.com/Building-your-app/AI-agents-for-apps#connecting-to-messaging-channels)
Connecting to messaging channels
--------------------------------------------------------------------------------------------------------------------------------------
Connect your agent to outside messaging apps so people can chat with it without opening your app. Each connected channel has the same capabilities as your in-app agent, and you set up and connect each one separately.
###
[](https://docs.base44.com/Building-your-app/AI-agents-for-apps#whatsapp)
WhatsApp
Connect your agent to WhatsApp so people can message your app’s agent directly from their phone, without even opening the app.

A WhatsApp-connected agent can do everything your in-app agent does. This includes creating, reading, updating, or deleting entities in your app, triggering backend functions such as sending notifications or starting automations, and managing your app’s data, like updating tasks and adding records. If your agent can do it inside your app, it can do it in WhatsApp too.

Information about using WhatsApp with your agent
------------------------------------------------
* This feature is available for free on all plans.
* A total of 3 in-app agents can be connected to WhatsApp across all your apps. This limit is separate from [Superagent WhatsApp connections](https://docs.base44.com/superagents/customizing-your-superagent#whatsapp-and-whatsapp-groups)
, which have their own pool. If you try to connect more than 3, you’ll be prompted to disconnect one before continuing.
* Each agent is assigned its own WhatsApp number.
* WhatsApp agents use **integration credits only**. No message credits are charged. Each message sent or received uses **1 integration credit** for the WhatsApp relay, plus additional integration credits for agent actions such as LLM calls, image generation, or sending emails.
* Your app visitors don’t need to install anything to use WhatsApp agents. They simply tap the WhatsApp button in your app to start a chat. People must send the first message, to help prevent spam and keep them safe. Once the conversation begins, the agent can reply just like it does inside your app.
* WhatsApp conversation supports both images and voice messages.
* If your app is public, people need to log in to your app before they can use the WhatsApp agent. This makes sure the agent can identify who it is chatting with and respond based on their data. To let people chat without logging in, turn on **Allow anonymous access** in the agent’s **Guidelines** tab. Anonymous users can’t access per-user private data.
**To enable WhatsApp for your agent:**
1. Go to **Dashboard** in your app editor.
2. Click **Agents**.
3. Click **Edit Agent** on the relevant agent.
4. Click **WhatsApp**.
5. Click **Send to Chat** under **Add WhatsApp to Your App** to add a WhatsApp button to your app.
6. Customize the WhatsApp welcome message.
7. Click **Save**.

###
[](https://docs.base44.com/Building-your-app/AI-agents-for-apps#telegram)
Telegram
Connect your agent to Telegram so people can message it directly from Telegram, without opening your app. A Telegram-connected agent has the same capabilities as your in-app agent. It can create, read, update, or delete records, trigger backend functions, and manage your app’s data.
Information about using Telegram with your agent
------------------------------------------------
* All web chat features work seamlessly in Telegram, including tools and data access.
* Users can send voice notes and images for natural interaction.
* Your Telegram bot is created and connected instantly with no manual configuration needed.
* To start a conversation, users open your bot in Telegram and send `/start`.
* You can add a Telegram button to your app so users can open the bot directly from your app.
**To enable Telegram for your agent:**
1. Go to **Dashboard** in your app editor.
2. Click **Agents**.
3. Click **Edit Agent** on the relevant agent.
4. Click **Telegram**.
5. Click **Connect Telegram Bot**.
6. Follow the prompts in Telegram to create and connect your bot.
7. Click **Send to Chat** under **Add Telegram to Your App** to add a Telegram button to your app.
8. Customize the Telegram welcome message.
9. Click **Save**.

###
[](https://docs.base44.com/Building-your-app/AI-agents-for-apps#line)
LINE
Connect your agent to LINE so people can message it directly from the LINE app, without opening your app. A LINE-connected agent has the same capabilities as your in-app agent. It can create, read, update, or delete records, trigger backend functions, and manage your app’s data.
**Notes:**
* LINE is only available in Japan.
* LINE replies are plain text only. Avoid using markdown or HTML in your welcome message or guidelines.
**To enable LINE for your agent:**
1. Go to **Dashboard** in your app editor.
2. Click **Agents**.
3. Click **Edit Agent** on the relevant agent.
4. Click **LINE**.
5. Scan the QR code or copy the activation code, open LINE on your phone, add the Base44 bot, and send the activation code to connect.
6. Click **Send to Chat** under **Add LINE to Your App** to add a LINE button to your app.
7. Customize the LINE welcome message.
8. Click **Save**.
Activation codes expire after 30 minutes. If yours has expired, click **Regenerate Code** to get a new one.

* * *
[](https://docs.base44.com/Building-your-app/AI-agents-for-apps#viewing-who-uses-your-agents)
Viewing who uses your agents
------------------------------------------------------------------------------------------------------------------------------
The **Users** tab in your **Agents** dashboard shows every app user who has chatted with one of your agents. For each user you can see their role, how many agents they have used, their total conversations, and credits used. You can sort the list by agents, conversations, or credits.

You can drill down from a user into their conversations with a specific agent, and open any conversation to read the full transcript. **To view agent users:**
1. Go to **Dashboard** in your app editor.
2. Click **Agents**.
3. Click the **Users** tab.
4. Click a user row to see which agents they have chatted with and how many conversations and credits each agent used.
5. Click **View** next to an agent to see that user’s full conversation list for it.
6. Click a conversation to read the full transcript, including messages, tool calls, and credits used.
**Tips:**
* Use the search bar to find someone by name or email.
* Use **Filter by** to filter by agent or role (User, Editor, or Admin).
* Use the date picker to filter by today, the last 7 days, the last 30 days, or all time.
* Click a column header to sort by agents, conversations, or credits.
* * *
[](https://docs.base44.com/Building-your-app/AI-agents-for-apps#faqs)
FAQs
------------------------------------------------------------------------------
Click a question below to learn more about AI agents.
Why do I see a "Failed to send message" or 404 error when messaging an agent?
This can happen if there’s an empty entity in the agent’s **Tools and Capabilities** settings.**To resolve this:**
1. Open your agent’s settings.
2. Click the **Tools and Capabilities** tab.
3. Either update or remove the empty entity.
4. Click **Save**. 
After updating, you should be able to send messages without errors.
Can I use agents on the free plan?
Yes. Agents are available on all plans, including the Free plan.
Can I enable agents for all apps in my account?
You can turn agents on by default for every new app you create.When the **Enable agents for new apps by default** toggle is on in your **Account settings**, each new app automatically has the **AI Agents** toggle enabled in its dashboard so you can start adding and configuring agents right away.This setting does not change existing apps. To enable or disable agents for an existing app, open that app’s **Dashboard**, click **Agents**, and adjust the **AI Agents** toggle there.**To turn on agents by default for new apps:**
1. Click your profile icon at the top right of your workspace.
2. Click **Settings**.
3. Click **Account settings**.
4. Turn on the **Enable agents for new apps by default** toggle in the **Default Agents** section.

What are the benefits of using agents?
Agents are flexible powerful tools that help you:
* Automate repetitive tasks.
* Get informed, real-time answers.
* Keep your workflow inside one app.
* Pick the right tools automatically.
Where can I find my conversation history with an agent?
Go to **Dashboard**, click **Agents**, and click the **Users** tab. Click a user to see their conversations per agent, then click **View** to open the conversation list. Click any conversation to read the full transcript.
How does the AI model I choose affect credits and behavior?
The AI model you choose affects both how your agent behaves and how many integration credits it uses.
* The default **Automatic** option (based on Gemini 2.5 Flash) gives you fast, general-purpose responses at around **3 credits per message**.
* Models such as **Gemini 3 Flash** provide stronger reasoning at a moderate increase in credits.
* Higher-end models such as **GPT-5** are designed for complex analysis and accuracy-critical decisions and generally use more credits per message.
If you are not sure which model to use, keep **Automatic** selected so you get a good balance of speed, quality, and cost.
How many skills can I add to an agent?
You can attach up to 10 skills per agent. Skills can be a mix of app skills you create yourself and workspace skills shared across your workspace.
How do I see how many credits my agent has used?
From **Agents** in your app’s dashboard, you can see the total credits used by an agent directly below its name.
What is the difference between app skills and workspace skills?
App skills are created inside a specific app and can be reused across all agents in that app. Workspace skills are shared across your entire workspace and are managed in your workspace settings. You can toggle workspace skills on or off for individual agents without editing the skill itself.
Can I trigger an automation when someone starts a conversation with my agent?
Yes. You can set up an in-app agent automation that runs the moment a new conversation starts with your agent. Use this to get notified when a customer reaches out, add them to your contacts automatically, or send yourself a summary at the end of the day.When you click **New Automation**, Base44 shows suggestions based on your app’s context. If your app has an agent, in-app agent triggers appear in the **Suggested for you** list automatically. You can also click **Create from scratch** and select **In-app agent** as the trigger type.[Learn more about creating automations.](https://docs.base44.com/Building-your-app/Creating-automations)
Was this page helpful?
YesNo
[Sending emails](https://docs.base44.com/documentation/building-your-app/sending-emails)
[Creating automations](https://docs.base44.com/Building-your-app/Creating-automations)
⌘I
Assistant
Responses are generated using AI and may contain mistakes.
Suggestions
Which plans come with a free domain?How are credits used?How do I use Discuss mode?
---
# Prompt library - Base44 Support Documentation
> Documentation Index
> -------------------
>
> Fetch the complete documentation index at: [/llms.txt](https://docs.base44.com/llms.txt)
>
> Use this file to discover all available pages before exploring further.
[Skip to main content](https://docs.base44.com/Getting-Started/Prompt-library#content-area)
This library is your go-to source of proven prompts for building with Base44, a [no-code app builder](https://base44.com/ai-app-builder)
. Every prompt here is designed to be copied, pasted, and made your own. Use one as-is to get started fast, or tweak the details to match your idea.
**Two ways to shape a stronger prompt:**
* **Use the formula:** Describe the function, the layout, and the visual style you want. See how in the [Prompt guide](https://docs.base44.com/Getting-Started/Prompt-guide)
.
* **Turn on Plan mode:** Toggle **Plan** in the prompt box before you build. Base44 asks you a few questions about your app, then expands your answers into a full, structured prompt you can adjust. It does not use credits until you start building. [Learn more about plan mode](https://docs.base44.com/Getting-Started/Quick-start-guide#use-plan-mode)
.
* * *
[](https://docs.base44.com/Getting-Started/Prompt-library#starter-prompts)
Starter prompts
----------------------------------------------------------------------------------------------
These are simple, flexible prompts that get you building in minutes. They work well on their own, and they are easy to extend once your app is running. **Task manager:**
Build a task manager where I can add tasks, check them off, and sort them into
categories. Show a streak counter for tasks I complete several days in a row.
**Idea tracker:**
Create a private app where I can log business and product ideas. Each entry
should have a title, notes, a category, and a rating for how excited I am
about it.
**Daily journal:**
Build a journaling app where I can write one entry per day and tag my mood.
Include a calendar view and a way to search past entries by keyword.
**Event RSVP tracker:**
Create an RSVP app for small events. Hosts can enter event details, guests can
RSVP and leave a note, and hosts can see all responses in a simple dashboard.
* * *
[](https://docs.base44.com/Getting-Started/Prompt-library#business-and-productivity-apps)
Business and productivity apps
----------------------------------------------------------------------------------------------------------------------------
These prompts help you build tools for running a business, managing clients, and staying organized. **Client portal:**
Build a client portal where clients log in to view their deliverables, leave
comments, and approve or request revisions. I can upload new versions and mark
projects as complete.
Level this up by adding email notifications, per-project permissions, or invoicing.
**Proposal generator:**
Create an app where I fill out a short form and generate a branded proposal.
Include preset pricing tiers and editable sections, and let me export the
proposal as a PDF.
**Invoice tracker:**
Build an app for freelancers to create invoices, track whether each one is paid,
and get a reminder when a payment is overdue. Include an option to export
invoices as a PDF.
**Time tracker:**
Build an app where I can start and stop a timer to log hours against different
projects. Show total hours per week and let me export the data.
* * *
[](https://docs.base44.com/Getting-Started/Prompt-library#knowledge-and-content-tools)
Knowledge and content tools
----------------------------------------------------------------------------------------------------------------------
These prompts help you organize and share information with very little setup. **Knowledge base:**
Create an internal tool where my team can write, tag, and search help articles.
Include a way to flag an article as outdated so we know to review it.
**Course companion:**
Build an app where an instructor posts weekly lessons and uploads files, and
each student gets a private dashboard to view lessons and track their progress.
**Content calendar:**
Create a content calendar where I can plan blog posts and social updates. Each
item has a title, a channel, a status of idea, drafting, or published, and a
publish date shown on a calendar.
* * *
[](https://docs.base44.com/Getting-Started/Prompt-library#personal-and-lifestyle-apps)
Personal and lifestyle apps
----------------------------------------------------------------------------------------------------------------------
These prompts are great for hobbies, side projects, and everyday life. **Meal planner:**
Build a meal planner where I can plan meals for the week and generate a shopping
list from the recipes I choose. Include filters for dietary needs like
vegetarian or gluten-free.
**Habit tracker:**
Create a habit tracker where I can set daily habits and mark them complete.
Show my streaks and a weekly chart of how consistent I have been.
Grow this one over time: start with the tracker, add friendly challenges, then add rewards for hitting streaks.
**Gift list organizer:**
Build a private app to track gift ideas for friends and family. Each idea has
the person's name, a budget, notes, and whether I have bought it yet.
* * *
[](https://docs.base44.com/Getting-Started/Prompt-library#experimental-and-niche-apps)
Experimental and niche apps
----------------------------------------------------------------------------------------------------------------------
These prompts are a starting point for more unusual or ambitious ideas. **Personal AI assistant:**
Build an app where I can chat with an AI assistant tailored to my profession,
such as a teacher, marketer, or wellness coach. Let me pick the role and save
past conversations.
**Feedback collector:**
Create an app where I can build feedback forms and view all responses in one
place. Summarize the overall sentiment and let me filter responses by tag.
**File summary tool:**
Build an app where I upload a document and get a short AI summary of it. Save
each summary so I can search and reread them later.
* * *
[](https://docs.base44.com/Getting-Started/Prompt-library#just-for-fun-apps)
Just-for-fun apps
--------------------------------------------------------------------------------------------------
These prompts are pure fun, and they make great first projects for getting comfortable with Base44. **Internet name generator:**
Create an app that generates funny, charming names for internet-famous animals.
Let me pick a category like animal, food, or place, then get a random result
with a short backstory.
**Conspiracy theory generator:**
Build an app that generates lighthearted, obviously fake conspiracy theories
with made-up evidence and charts. Include a randomizer and a share button.
**Beige flag analyzer:**
Create an app where I type in a quirky dating habit and the app labels it a
green, red, or beige flag, complete with an emoji rating and a short
explanation.
* * *
[](https://docs.base44.com/Getting-Started/Prompt-library#prompt-pathways)
Prompt pathways
----------------------------------------------------------------------------------------------
The best apps grow one step at a time. A prompt pathway is a sequence of prompts that turns a simple idea into a richer app, adding one feature per round so each change is easy to review.
Example: growing a client portal
**To build up a client portal step by step:**
1. “Create a basic client portal where clients can log in and see their project status.”
2. “Add file uploads with versions, plus approve and request-changes buttons.”
3. “Send an email notification when a file is uploaded or a project is marked complete.”
4. “Add a chat for each project so clients and I can message about it.”
* * *
[](https://docs.base44.com/Getting-Started/Prompt-library#micro-prompts-to-add-polish)
Micro-prompts to add polish
----------------------------------------------------------------------------------------------------------------------
Small refinements can take your app from functional to delightful. These work well once your app is running, and you can also fold them into your first prompt for a more styled result from the start.
* Add hover effects so buttons gently lift when I point at them.
* Use a clean, modern style similar to Notion.
* Add soft drop shadows around cards for a subtle sense of depth.
* Use a rounded sans-serif font and a calm, muted color palette.
* Add smooth transitions between tabs and sections.
* Show a confetti animation when someone completes a task.
* Make it feel like a friendly mobile app, with large touch targets and playful icons.
Was this page helpful?
YesNo
[Using the AI chat](https://docs.base44.com/Building-your-app/AI-chat-modes)
[Prompt guide](https://docs.base44.com/Getting-Started/Prompt-guide)
⌘I
Assistant
Responses are generated using AI and may contain mistakes.
Suggestions
Which plans come with a free domain?How are credits used?How do I use Discuss mode?
---
# Writing effective prompts in Base44 - Base44 Support Documentation
> Documentation Index
> -------------------
>
> Fetch the complete documentation index at: [/llms.txt](https://docs.base44.com/llms.txt)
>
> Use this file to discover all available pages before exploring further.
[Skip to main content](https://docs.base44.com/Getting-Started/Prompt-guide#content-area)
A prompt is simply a description of what you want, written in your own words. There is no code, no syntax, and no special commands to learn. You describe your app, and Base44 builds it. Because your whole app is built from what you type, your words are your building material. The clearer the picture you paint, the closer the result will be to what you had in mind. This guide walks you through painting that picture, from your very first prompt to the small refinements that make an app feel finished.
* * *
[](https://docs.base44.com/Getting-Started/Prompt-guide#how-building-with-prompts-works)
How building with prompts works
----------------------------------------------------------------------------------------------------------------------------
Building in Base44 is a loop, not a single instruction you have to get right on the first try. You describe, Base44 builds, and you shape the result together over a few rounds. Each round looks like this:
* **Describe:** You say what you want in plain language.
* **Build:** Base44 creates or updates your app in seconds.
* **Review:** You look at what changed and decide what comes next.
* **Refine:** You give feedback, and the app updates again.
Treat your first result as a rough draft you can mold, not a final answer. That mindset takes the pressure off, and it is how the best apps come together.
* * *
[](https://docs.base44.com/Getting-Started/Prompt-guide#writing-your-first-prompt)
Writing your first prompt
----------------------------------------------------------------------------------------------------------------
Your first prompt is the foundation for everything that follows, so aim to describe the heart of your app rather than every detail. You can always add more later. Focus on what the app is, who it is for, and the main things people should be able to do. A quick way to shape this is to think through the who, what, and why of your app:
* **Who:** Who will use it, such as freelancers, students, or your whole team.
* **What:** What it helps them do, such as track expenses or book appointments.
* **Why:** Why it is useful to them, such as saving time or keeping everything in one place.
Here is that thinking turned into a prompt:
Build an expense tracker for freelancers who bill several clients at once.
People can log an expense, tag it to a client and a category, and see a
monthly total for each client. The goal is to make tax season painless.
Not sure where to start? Turn on **Plan mode** before your first build. Toggle **Plan** in the prompt box and Base44 asks you a few questions about your app, then turns your answers into a structured plan you can adjust before anything is built. It does not use credits until you start building. [Learn more about plan mode](https://docs.base44.com/Getting-Started/Quick-start-guide#use-plan-mode)
Ready to get started?
---------------------
Take me to Base44 to build my app
* * *
[](https://docs.base44.com/Getting-Started/Prompt-guide#describing-your-app-clearly)
Describing your app clearly
--------------------------------------------------------------------------------------------------------------------
The gap between a rough result and a great one usually comes down to how much of the picture you share. These 5 moves help Base44 build the app you actually pictured, whether it is your first prompt or your fiftieth.
###
[](https://docs.base44.com/Getting-Started/Prompt-guide#paint-the-screen-not-just-the-idea)
Paint the screen, not just the idea
Base44 fills in anything you leave out with its best guess, so describe what you want to see on the page. The more concrete you are, the less it has to invent.
* **Vague:** “Make a dashboard for my sales.”
* **Clear:** “Make a sales dashboard with 3 cards along the top for total revenue, deals won, and deals lost, then a bar chart below showing revenue by month.”
###
[](https://docs.base44.com/Getting-Started/Prompt-guide#say-why-you-want-it)
Say why you want it
When you explain the reason behind a request, Base44 can make smarter choices about the details you did not spell out. The why is often more useful than the what.
* **Just the what:** “Put the sign-up button at the top.”
* **With the why:** “Put the sign-up button at the top so it is the first thing a new visitor sees.”
###
[](https://docs.base44.com/Getting-Started/Prompt-guide#borrow-from-apps-you-already-like)
Borrow from apps you already like
You do not have to describe a look from nothing. Naming an app people know is a fast shortcut to the feel you want, as long as you say which part you mean.
* “Organize it like Trello, with cards I can drag between columns.”
* “Make it feel as calm and uncluttered as Notion, but keep my own brand colors.”
###
[](https://docs.base44.com/Getting-Started/Prompt-guide#build-one-piece-at-a-time)
Build one piece at a time
Packing an entire app into a single prompt makes the result harder to get right and harder to fix when something is off. Start with the core, get it working, then layer features on one by one.
Start: Build a booking app where clients pick a service and an open time slot.
Next: Now email the client a confirmation as soon as they book.
Next: Now hide time slots that are already taken so nothing gets double-booked.
Focused prompts also tend to be gentler on your credits, because a small, clear change is less work behind the scenes than a broad one that touches many pages. Dragging elements or editing text yourself with Visual Edits does not use credits at all. [Learn more about credits](https://docs.base44.com/Account-and-billing/Credits)
###
[](https://docs.base44.com/Getting-Started/Prompt-guide#ask-for-the-fix-not-the-flaw)
Ask for the fix, not the flaw
When something looks off, describe where you want to end up rather than only what is wrong. Base44 builds from your target, not from your frustration.
* **The flaw:** “The homepage looks cluttered and cramped.”
* **The fix:** “Give the homepage more room to breathe: fewer items per row and more space between the sections.”
* * *
[](https://docs.base44.com/Getting-Started/Prompt-guide#a-recipe-for-look-and-feel)
A recipe for look and feel
------------------------------------------------------------------------------------------------------------------
When the design matters to you, describe 3 things together: what the app does, how it is laid out, and the mood it should have. Combining them gives Base44 a full picture in a single prompt.
###
[](https://docs.base44.com/Getting-Started/Prompt-guide#function)
Function
Tell Base44 the job your app is doing, because an online store and a personal portfolio should not look the same. A store needs clear product grids and a fast path to checkout, while a portfolio needs personality and a strong first impression.
###
[](https://docs.base44.com/Getting-Started/Prompt-guide#layout)
Layout
Tell Base44 how to arrange things on the screen so it does not have to guess. For example:
* **Grid of cards:** Content sits in tidy boxes, which suits dashboards and feature-heavy apps.
* **One long scroll:** The app is a single page where sections appear as you scroll, which suits stories and landing pages.
* **Split screen:** The screen is divided in 2, often with text on one side and a visual on the other.
###
[](https://docs.base44.com/Getting-Started/Prompt-guide#visual-style)
Visual style
Tell Base44 the mood you want, and go further than “clean” or “modern.” For example:
* **Calm and professional:** Soft colors, plenty of white space, and simple type.
* **Bold and playful:** Bright colors, rounded shapes, and friendly icons.
* **Sleek and premium:** A dark background, high contrast, and elegant fonts.
* * *
[](https://docs.base44.com/Getting-Started/Prompt-guide#refining-your-app-as-you-go)
Refining your app as you go
--------------------------------------------------------------------------------------------------------------------
Once your app exists, most of your time goes into refining it through the AI chat. The phrases below are reliable ways to ask for a change, each with a tip to sharpen the result.
| Technique | When to use it | Example | Pro tip |
| --- | --- | --- | --- |
| ”Make it more…” or “Make it less…” | Adjusting tone, layout, or emphasis | ”Make the header less bold.” | Add the reason: “Make the call to action more prominent because it is the last step people take." |
| "Add a…” or “Remove the…” | Adding or removing a feature or section | ”Add a comments section to each task.” | Group related changes: “Add a comments section and place it below the task list." |
| "Change \[this\] to \[that\]“ | Editing text, colors, or components | ”Change the Submit button to say Send request.” | Layer in context: “Change the button text to match the friendly tone used across the app." |
| "It should feel like…” | Borrowing a familiar app’s style | ”It should feel like a mix of Duolingo and Airtable.” | Say which parts: “Use Duolingo’s playful tone and Airtable’s table layout." |
| "Add logic for…” | Adding a rule or flow without code | ”Hide completed items from the default view.” | Describe the outcome: “Remind people if they have not logged in for a week." |
| "Group or organize…” | Structuring content for clarity | ”Group tasks by category.” | Mention the reason: “Group tasks by category so people find what they need quickly." |
| "Only show… when…” | Adding behavior that depends on a condition | ”Only show the download button after payment is confirmed.” | Start simple, then expand: “Add this condition first, then I will add variations per user type." |
| "Let people…” | Framing a feature from the user’s point of view | ”Let people bookmark resources for later.” | Add the value: “Let people tag their documents so they can find them again easily.” |
* * *
[](https://docs.base44.com/Getting-Started/Prompt-guide#getting-more-from-base44%E2%80%99s-tools)
Getting more from Base44’s tools
--------------------------------------------------------------------------------------------------------------------------------------
The chat box is not your only way to communicate. These tools let you point, plan, and protect your work, and they often reach the result faster than words alone.
* **Point instead of describe:** With Visual Edits, click straight on the element you mean and describe the change right there. It is the clearest way to say “this one, not that one.” [Learn more about the AI chat](https://docs.base44.com/Building-your-app/AI-chat-modes)
* **Plan before you build:** Use Discuss mode to talk an idea through with the AI before it changes anything, so you can agree on a plan without touching your live app or spending credits on changes. [Learn more about the chat modes](https://docs.base44.com/Building-your-app/AI-chat-modes)
* **Show, do not just tell:** If you have a design in mind, [import it from Figma](https://docs.base44.com/Getting-Started/import-from-figma)
so Base44 can match something real instead of a description.
* **Set your rules once:** Use AI controls to add instructions the AI should remember on every prompt, and to limit changes to only the areas you want touched. [Learn more about AI controls](https://docs.base44.com/Building-your-app/AI-chat-modes#setting-ai-controls)
* **Experiment without fear:** Restore any earlier version of your app at any time, so you can try bold ideas knowing you can always go back. [Learn more about reverting changes](https://docs.base44.com/Building-your-app/AI-chat-modes#reverting-changes)
Need a starting point?
----------------------
Browse the Prompt library for ready-made prompts you can copy, remix, and build on.
* * *
[](https://docs.base44.com/Getting-Started/Prompt-guide#common-mistakes-to-avoid)
Common mistakes to avoid
--------------------------------------------------------------------------------------------------------------
A few habits trip people up early on. Keeping these in mind will save you time and lead to better results.
* **Being too vague:** Requests like “make it better” or “fix it” give Base44 nothing to work with. Say what you want changed and how.
* **Asking for everything at once:** Cramming payments, reviews, analytics, and inventory into one prompt invites confusion. Build the core first, then add features step by step.
* **Assuming the AI remembers other chats:** If you are picking up an idea from a different conversation or a while back, briefly remind Base44 of the context.
* **Expecting it to read your mind:** If you have a specific layout or flow in your head, describe it as clearly as you can rather than hoping Base44 lands on it.
* * *
[](https://docs.base44.com/Getting-Started/Prompt-guide#faqs)
FAQs
----------------------------------------------------------------------
Here are answers to common questions about writing prompts and working with the AI chat.
Why isn't the AI following my instructions correctly?
It can take a few attempts to land on the right result, especially when a request is open to interpretation. To get closer faster:
* Use Visual Edits to click the exact element you want to change and describe the change there.
* Explain what you want to happen, rather than what looks wrong.
* If a prompt is not working after a couple of tries, rephrase it and use words like redesign or rebuild.
* Keep your language simple and natural. The clearer the request, the more accurate the result.
Why does the AI change parts of my app I didn't mention?
Use AI controls to limit the AI’s changes to only the areas you want updated. This is especially helpful when other parts of your app keep getting altered unintentionally. [Learn more about AI controls](https://docs.base44.com/Building-your-app/AI-chat-modes#setting-ai-controls)
How can I review ideas before using credits on changes?
Use Discuss mode at the bottom of the AI chat. It lets you talk through ideas, review logic, and plan steps with the AI before any changes are made or credits are used. [Learn more about the chat modes](https://docs.base44.com/Building-your-app/AI-chat-modes)
What should I do if AI responses are slow or get stuck?
If the AI is taking too long or seems stuck, try refreshing the page or resending your prompt. This usually gets things moving again.
Why can't I build the feature I want?
Some features might not be supported yet. If you are unsure whether something is possible, ask in our [Discord](https://discord.gg/ThpYPZpVts)
help channel.
Was this page helpful?
YesNo
[Prompt library](https://docs.base44.com/Getting-Started/Prompt-library)
[Customizing design](https://docs.base44.com/Building-your-app/Design)
⌘I
Assistant
Responses are generated using AI and may contain mistakes.
Suggestions
Which plans come with a free domain?How are credits used?How do I use Discuss mode?
---
# Building a website - Base44 Support Documentation
> Documentation Index
> -------------------
>
> Fetch the complete documentation index at: [/llms.txt](https://docs.base44.com/llms.txt)
>
> Use this file to discover all available pages before exploring further.
[Skip to main content](https://docs.base44.com/Getting-Started/building-a-website#content-area)
[](https://docs.base44.com/Getting-Started/building-a-website#building-a-website-with-base44)
Building a website with Base44
--------------------------------------------------------------------------------------------------------------------------------
Base44 is not only for building apps. It is also an AI-powered [website builder](https://base44.com/ai-website-builder)
, so you can create a full website just by describing what you want. You do not need any coding or design skills. Base44 builds it for you, including the design, pages, content, hosting, and everything running behind the scenes.

A website is one of the most popular things to build on Base44. Whether you want a simple page to share your work or a full site for your business, Base44 handles the technical side so you can focus on your content and your brand.
Examples of websites you can build on Base44
--------------------------------------------
* A business or agency website
* A landing page for a product or event
* A personal portfolio or resume site
* An online store or product catalog
* A blog or content site
* A booking or contact page for your services
Ready to build your website?
----------------------------
Build my website now
* * *
[](https://docs.base44.com/Getting-Started/building-a-website#step-1-|-describe-your-website)
Step 1 | Describe your website
--------------------------------------------------------------------------------------------------------------------------------
Start by going to [Base44](https://app.base44.com/)
and telling it what kind of website you want in your own words. You can describe the purpose, the pages you need, and the style you are going for. For example, “a clean one-page site for my photography business with a gallery and a contact form.” When you begin, you are asked to sign up so your work is saved and you can return to your website anytime.
Use our [Prompt guide](https://docs.base44.com/Getting-Started/Prompt-guide)
to help you write your first prompt and get more out of the AI chat.
There are a few ways to start, depending on what you already have.
###
[](https://docs.base44.com/Getting-Started/building-a-website#use-a-prompt)
Use a prompt
Write what you want in plain language. Share as much detail as you like about your pages, sections, and the look and feel. This first prompt gets your website started, and you can refine the design, copy, and structure later.

###
[](https://docs.base44.com/Getting-Started/building-a-website#use-plan-mode)
Use plan mode
Turn on **Plan** under the first prompt when you want help shaping your website before you build. The AI asks about your goals, your audience, and the pages you need, then turns your answers into a structured plan you can adjust. When the plan is ready, click **Start building** to turn it into a website.
Plan mode does not use credits. Credits are used once you click **Start building** and Base44 begins creating your website.
###
[](https://docs.base44.com/Getting-Started/building-a-website#start-from-an-existing-website)
Start from an existing website
Use **Start from URL** to begin from a website you already own. Base44 recreates the visible front end, including the page structure, key content sections, and visual style, so you get a recognizable starting point to refine instead of building from scratch. You can reuse both the content and design, or just the design.
You must be the rightful owner of the website you start from, or have full rights to its content, design, and images. Do not use third-party or copyrighted sites without permission.
If you are moving an existing site or project onto Base44, see [Migrating a project to Base44](https://docs.base44.com/Getting-Started/migrating-an-existing-app)
.
###
[](https://docs.base44.com/Getting-Started/building-a-website#start-from-a-figma-design)
Start from a Figma design
Use **Import from Figma** to turn an existing Figma design into a working website. Base44 recreates the layout, structure, and visual style from your frame. For steps and requirements, see [Importing from Figma](https://docs.base44.com/Getting-Started/import-from-figma)
.
* * *
[](https://docs.base44.com/Getting-Started/building-a-website#step-2-|-see-your-website-come-to-life)
Step 2 | See your website come to life
------------------------------------------------------------------------------------------------------------------------------------------------
Once you share your idea, Base44 builds your website automatically. It designs the layout, chooses colors and fonts, arranges your sections, and adds the pages and features you asked for, such as a contact form, a gallery, or a booking section. Everything technical is handled for you in the background, including hosting, data storage, and any login or signup flows your site needs. Watch your website appear in the preview window as Base44 works, and click through it to try it out right away.
* * *
[](https://docs.base44.com/Getting-Started/building-a-website#step-3-|-customize-your-design-and-content)
Step 3 | Customize your design and content
--------------------------------------------------------------------------------------------------------------------------------------------------------
Once your website is built, you can make it your own. The easiest way is with the AI chat. Type what you want to change, and Base44 updates your site. For example, “Change the main color to deep green,” or “Add an About page with our team photos and a short story.”
To brainstorm or ask questions before making changes, use Discuss mode in the AI chat. It uses fewer credits. [Learn more about the AI chat modes](https://docs.base44.com/Building-your-app/AI-chat-modes)
.
There are lots of ways to shape your website:
Customize the look and feel
Change colors, fonts, spacing, and styling to match your brand. You can apply changes across the whole site or to a single page. See [Customizing the design of your app](https://docs.base44.com/Building-your-app/Design)
.
Keep your design consistent
Set up a design system, responsive layouts, and reusable page structures so every page feels part of the same site. See [Design foundations and layout](https://docs.base44.com/Building-your-app/Design-foundations-and-layout)
.
Add and manage pages
Add new pages, control which pages appear in your navigation, and decide which are public. See [Managing your app pages](https://docs.base44.com/Building-your-app/managing-your-pages)
.
Add images and media
Upload your logo, photos, videos, and other files to make your website stand out. See [Uploading and managing media](https://docs.base44.com/Building-your-app/Using-media)
.
* * *
[](https://docs.base44.com/Getting-Started/building-a-website#step-4-|-make-your-website-accessible)
Step 4 | Make your website accessible
----------------------------------------------------------------------------------------------------------------------------------------------
An accessible website works for everyone, including people who use screen readers, navigate with a keyboard, or need larger text and clear contrast. Accessibility also improves your search visibility, since the same structure that helps people helps search engines understand your pages. **To build accessibility into your website, keep these in mind:**
1. Use clear heading levels so each page has one main heading and a logical structure.
2. Add descriptive alt text to your images so screen readers can describe them.
3. Choose color combinations with enough contrast between text and background.
4. Write descriptive link text, such as “Read our pricing,” instead of “Click here.”
5. Make sure people can reach every menu, button, and form using only a keyboard.
You can ask the AI chat to help, for example “Check my homepage for accessibility issues and fix the color contrast.” For more on building an accessible, well-structured site, see [Design foundations and layout](https://docs.base44.com/Building-your-app/Design-foundations-and-layout)
.
* * *
[](https://docs.base44.com/Getting-Started/building-a-website#step-5-|-test-your-website)
Step 5 | Test your website
------------------------------------------------------------------------------------------------------------------------
Before you share your website, test how it looks and works from your visitors’ perspective.
* Click through the preview like a visitor. Follow your menus, fill out forms, and check every link.
* Check your site on both desktop and mobile to catch layout or navigation issues.
* Open your site in an incognito or private browser window to see what a first-time visitor experiences.
* Ask the AI chat to help you test key flows, such as submitting your contact form.
* * *
[](https://docs.base44.com/Getting-Started/building-a-website#step-6-|-connect-a-domain)
Step 6 | Connect a domain
----------------------------------------------------------------------------------------------------------------------
Your website is live on a Base44 web address as soon as it is built. Connecting your own domain, such as `yourbusiness.com`, makes your site look professional, easier to remember, and easier to share. It also has a big impact on your search ranking, since search engines treat sites on a custom domain as more trustworthy than ones on a shared subdomain. **You have a few ways to set up a domain:**
* Buy a domain directly from Base44 for the simplest setup, with DNS and SSL handled for you. See [Buying a domain from Base44](https://docs.base44.com/Setting-up-your-app/Buying-a-domain-from-Base44)
.
* Connect a domain you already own by updating your DNS records. See [Connecting an external domain](https://docs.base44.com/Setting-up-your-app/Connecting-an-external-domain)
.
* Send your website’s emails from your own domain, such as `hello@yourbusiness.com`. See [Sending emails from a custom domain](https://docs.base44.com/Setting-up-your-app/Sending-emails-from-a-custom-domain)
.
For an overview of how domains work in Base44, see [Connecting a domain to your app](https://docs.base44.com/Setting-up-your-app/Setting-up-your-custom-domain)
.
* * *
[](https://docs.base44.com/Getting-Started/building-a-website#step-7-|-publish-and-share-your-website)
Step 7 | Publish and share your website
--------------------------------------------------------------------------------------------------------------------------------------------------
When you are ready to go live, click **Publish** in the top bar. Publishing pushes your latest changes to your live website so visitors can see them. **From the publish menu, you can:**
* Copy your website’s web address.
* Click **Connect a custom domain** or **Get Domain** to use your own address.
* Click **Share your app** to get a link you can send by email or post on social.
* Use **App Visibility** to choose who can access your site.
* Click **Publish App** to push your latest changes live.

* * *
[](https://docs.base44.com/Getting-Started/building-a-website#step-8-|-optimize-for-search-and-ai-visibility)
Step 8 | Optimize for search and AI visibility
----------------------------------------------------------------------------------------------------------------------------------------------------------------
Once your website is published and connected to a domain, you can help people find it. Base44 handles the technical foundation of search engine optimization (SEO) and generative engine optimization (GEO) for you, so your site can show up both in search engines like Google and in AI tools like ChatGPT and Gemini.
Your website must be published before search engines and AI tools can reach it. Connecting a custom domain is the single biggest improvement you can make to your search visibility.
The **SEO & GEO** page in your app dashboard is where you manage this. Run a scan to get a score and a prioritized checklist, set custom titles and descriptions for each page, and control indexing and structured data.

**To get your website found:**
1. Learn the fundamentals in [Getting your app found in search](https://docs.base44.com/Performance-and-SEO/SEO-and-search-visibility)
.
2. Run a scan and fix issues from your dashboard. See [Optimizing your app’s SEO & GEO](https://docs.base44.com/Performance-and-SEO/checking-your-seo-and-geo)
.
* * *
[](https://docs.base44.com/Getting-Started/building-a-website#step-9-|-promote-and-grow-your-website)
Step 9 | Promote and grow your website
------------------------------------------------------------------------------------------------------------------------------------------------
With your website live, you can start bringing people to it.
* Generate a social promotion strategy and ready-to-post content for your site. See [Promoting your app](https://docs.base44.com/promoting-your-app/social-content)
.
* Submit your site to Launchpad for a chance to get featured and reach the Base44 community. See [Submitting your app to Launchpad](https://docs.base44.com/promoting-your-app/submitting-to-launchpad)
.
* * *
[](https://docs.base44.com/Getting-Started/building-a-website#faqs)
FAQs
----------------------------------------------------------------------------
Click a question below to learn more.
Do I need a custom domain to publish my website?
No. Your website is live on a Base44 web address as soon as it is built, and you can share that address right away. A custom domain is optional, but it makes your site look more professional and has a big impact on your search ranking.
Will my website work on mobile?
Yes. Base44 automatically adapts your website for mobile devices. Use the device menu in the top bar to switch to the mobile view and check how everything looks. If you want to adjust the mobile layout, ask the AI chat to do it for you.
How do I get my website to show up on Google?
Publish your website, connect a custom domain, then run an SEO & GEO scan from your app dashboard and fix the issues it finds. For the full process, see [Optimizing your app’s SEO & GEO](https://docs.base44.com/Performance-and-SEO/checking-your-seo-and-geo)
.
Can I set my own page titles and descriptions for search results?
Yes. The **Meta tags** tab on the **SEO & GEO** page lets you set a custom title and description for each public page. These control what appears in search results and when someone shares a link to your site. See [Optimizing your app’s SEO & GEO](https://docs.base44.com/Performance-and-SEO/checking-your-seo-and-geo)
.
Can I update my website after it is published?
Yes. Keep editing your website with the AI chat or manual changes at any time. Your changes go live the next time you click **Publish**.
Can I connect a payment provider to sell on my website?
Yes, on the Builder plan or higher. You can connect a payment provider such as Stripe to accept payments. See how to [set up payments](https://docs.base44.com/Setting-up-your-app/setting-up-wix-payments)
for your site.
**Need more help or inspiration?**Explore [Base44’s templates](https://app.base44.com/app-templates)
to start your website from a ready-made base.
Was this page helpful?
YesNo
[Building an app](https://docs.base44.com/Getting-Started/Quick-start-guide)
[Migrating a project to Base44](https://docs.base44.com/Getting-Started/migrating-an-existing-app)
⌘I
Assistant
Responses are generated using AI and may contain mistakes.
Suggestions
Which plans come with a free domain?How are credits used?How do I use Discuss mode?
---
# Managing your workspace apps - Base44 Support Documentation
> Documentation Index
> -------------------
>
> Fetch the complete documentation index at: [/llms.txt](https://docs.base44.com/llms.txt)
>
> Use this file to discover all available pages before exploring further.
[Skip to main content](https://docs.base44.com/documentation/using-your-workspaces/managing-your-workspace-apps#content-area)
The **Apps** page is your central hub for everything you build in Base44. Group apps into folders to keep your workspace tidy as your project list grows, share them with collaborators or external users, and manage the full lifecycle of each app from renaming and cloning through to deletion.

To move an app to a different workspace or transfer ownership to another collaborator, open the app itself and manage those actions from there.
* * *
[](https://docs.base44.com/documentation/using-your-workspaces/managing-your-workspace-apps#searching-and-filtering-your-apps)
Searching and filtering your apps
--------------------------------------------------------------------------------------------------------------------------------------------------------------------
Use the search bar and filters at the top of the Apps page to find exactly what you need. You can also switch between a grid view and a list view.

**To search or filter your apps:**
1. Go to **Apps** in your Base44 workspace.
2. Use the options at the top of the page:
* **Search:** Click the search bar and type the name of your app.
* **Filter by ownership:** Click the **Created by me** drop-down and select **Created by me** to see only your apps, or **All apps** to see all apps in the workspace.
* **Sort:** Click the **Last updated** drop-down and choose how to order your apps: **Last updated**, **Last created**, **Name (A-Z)**, or **Name (Z-A)**.
* **Switch view:** Click the **grid view** or **list view** icon at the top right to change how your apps are displayed.
Star any app to add it to your **Favorites** section in the left sidebar of your workspace for quick access.
* * *
[](https://docs.base44.com/documentation/using-your-workspaces/managing-your-workspace-apps#organizing-your-apps-into-folders)
Organizing your apps into folders
--------------------------------------------------------------------------------------------------------------------------------------------------------------------
Group your apps into folders to keep your workspace organized. Folders are visible to everyone in your workspace. Apps that are in a folder no longer appear in the main apps list.
Each app can only be in one folder at a time.

###
[](https://docs.base44.com/documentation/using-your-workspaces/managing-your-workspace-apps#creating-a-folder)
Creating a folder
Folders appear at the top of your Apps page, so your most important groups are always easy to find. Once created, you can add any of your apps to a folder from the Apps page. **To create a folder:**
1. Go to **Apps** in your Base44 workspace.
2. Click **Add new folder** at the top right.
3. Enter a name in the **Folder name** field.
4. Click **Create**.

###
[](https://docs.base44.com/documentation/using-your-workspaces/managing-your-workspace-apps#adding-apps-to-a-folder)
Adding apps to a folder
You can add apps to a folder from the Apps page or from inside the folder itself. **To add apps to a folder:**
1. Go to **Apps** in your Base44 workspace.
2. Click the **More Actions** icon on the folder card, or open the folder and click the **More Actions** icon next to the folder name.
3. Click **Add apps**.
4. Search for or select the apps you want to add.
5. Click **Move**.

You can also move an app to a folder from the app card. Click the **More Actions** icon on the app, click **Move to folder**, and select the folder you want to move it to.
###
[](https://docs.base44.com/documentation/using-your-workspaces/managing-your-workspace-apps#removing-an-app-from-a-folder)
Removing an app from a folder
Move an app out of a folder at any time without deleting it. The app returns to the main apps list. **To remove an app from a folder:**
1. Go to **Apps** in your Base44 workspace.
2. Click the folder that contains the app.
3. Click the **More Actions** icon on the app card.
4. Click **Remove from folder**.
###
[](https://docs.base44.com/documentation/using-your-workspaces/managing-your-workspace-apps#managing-your-folders)
Managing your folders
You can rename or delete a folder at any time from the folder’s actions menu.
Renaming a folder
**To rename a folder:**
1. Go to **Apps** in your Base44 workspace.
2. Click the **More Actions** icon on the folder card.
3. Click **Rename**.
4. Enter a new name and click **Save**.
Deleting a folder
**To delete a folder:**
1. Go to **Apps** in your Base44 workspace.
2. Click the **More Actions** icon on the folder card.
3. Click **Delete**.
4. Click **Delete** again to confirm.
Deleting a folder does not delete the apps inside it. The apps remain in your workspace.

* * *
[](https://docs.base44.com/documentation/using-your-workspaces/managing-your-workspace-apps#viewing-your-live-app)
Viewing your live app
--------------------------------------------------------------------------------------------------------------------------------------------
Open your published app directly from the Apps page to see how it looks and behaves for your users.

**To view your live app:**
1. Go to **Apps** in your Base44 workspace.
2. Click the **More Actions** icon on the app card.
3. Click **View live app**.
* * *
[](https://docs.base44.com/documentation/using-your-workspaces/managing-your-workspace-apps#sharing-your-app)
Sharing your app
----------------------------------------------------------------------------------------------------------------------------------
You can share your app by sending an invitation to a specific person or by copying a shareable link.

**To share your app:**
1. Go to **Apps** in your Base44 workspace.
2. Click the **More Actions** icon on the app card.
3. Click **Share**.
4. Choose how you want to share your app:
* **Send invitation:** Enter an email address in the field, select a role from the **User** drop-down, and click **Invite**.
* **Share live app link:** Click **Copy link** to copy a link to your live app. Anyone with the link can view your app, based on your app’s visibility settings.
To control who can access your app via the link, update your app’s visibility in App Settings.
* * *
[](https://docs.base44.com/documentation/using-your-workspaces/managing-your-workspace-apps#renaming-your-app)
Renaming your app
------------------------------------------------------------------------------------------------------------------------------------
Update your app’s name at any time. Keep in mind that renaming an app also updates its URL, so make sure to share the new link with anyone who had the old one. **To rename your app:**
1. Go to **Apps** in your Base44 workspace.
2. Click the **More Actions** icon on the app card.
3. Click **Rename**.
4. Enter a new name in the field.
5. Click **Save**.

* * *
[](https://docs.base44.com/documentation/using-your-workspaces/managing-your-workspace-apps#cloning-your-app)
Cloning your app
----------------------------------------------------------------------------------------------------------------------------------
Make a full copy of an app’s layout, pages, and design to use as a starting point for a new project.

**To clone your app:**
1. Go to **Apps** in your Base44 workspace.
2. Click the **More Actions** icon on the app card.
3. Click **Clone app**.
Cloning copies your app’s full code, including pages, design, backend functions, and logic. Your app’s data is not included, so the cloned app starts with an empty database. Any connected integrations are copied but will need to be reconnected.
* * *
[](https://docs.base44.com/documentation/using-your-workspaces/managing-your-workspace-apps#accessing-app-settings)
Accessing app settings
----------------------------------------------------------------------------------------------------------------------------------------------
Open your app’s settings to manage its logo, description, visibility, authentication, and more.

**To open your app’s settings:**
1. Go to **Apps** in your Base44 workspace.
2. Click the **More Actions** icon on the app card.
3. Click **App settings**.
* * *
[](https://docs.base44.com/documentation/using-your-workspaces/managing-your-workspace-apps#moving-an-app-between-workspaces)
Moving an app between workspaces
------------------------------------------------------------------------------------------------------------------------------------------------------------------
Move an app from its current workspace to another workspace you belong to. After the move, the app follows the target workspace’s permissions and settings, and you remain the app owner.
**Before you begin:**
* You must be the **app owner**.
* You must be a member of the target workspace, and it must be different from the current workspace.
* App transfers must be enabled in the current workspace.
* The app cannot be a purchased app.
**To move your app:**
1. Open your app in its current workspace.
2. Go to your app’s dashboard and click **Overview**.
3. Click **Move App** next to **Move to Workspace**.
4. Select the workspace to move your app to.
5. Click **Move App** to confirm.

* * *
[](https://docs.base44.com/documentation/using-your-workspaces/managing-your-workspace-apps#transferring-app-ownership)
Transferring app ownership
------------------------------------------------------------------------------------------------------------------------------------------------------
App owners can transfer ownership of an app to another collaborator so the right person manages billing, permissions, and app settings. This is useful when responsibilities shift or when someone changes roles. The new owner must accept the transfer by email before it takes effect.
**Before you begin:** The new owner must be a member of the workspace.
**Important:**
* Only the current app owner can transfer ownership.
* Both the current and new app owner must be on a **Builder** plan or higher. The app will follow the new owner’s current plan limits and features.
* If the new owner’s plan does not support features already used in the app, those features may not work as expected.
* After the transfer, all future edits, updates, and app usage use credits from the workspace the app belongs to.
* Transferring ownership does not move the app between workspaces or change its visibility.
* **Guests cannot own apps in a workspace.** If you want to transfer ownership to a Guest, either move the app to their own workspace first, or change their workspace role to Editor or Viewer before initiating the transfer.
**To transfer ownership of your app:**
1. Go to your app editor.
2. Click the **Invite collaborators** icon at the top right.
3. Find the collaborator you want to transfer ownership to.
4. Click the **More Actions** icon next to their name and click **Make app owner**.
5. Confirm the transfer details:
* Select the checkbox to confirm that the selected person becomes the new owner, including all app data, media, and connected third-party services and accounts.
* Select the **Disconnect integrations after transfer** checkbox if you want to remove existing external connections for security. The new owner can reconnect their own accounts after the transfer.
6. Click **Change Ownership**.
7. Ask the new owner to open the email from Base44 and click the confirmation link to accept the new ownership.

* * *
[](https://docs.base44.com/documentation/using-your-workspaces/managing-your-workspace-apps#deleting-an-app)
Deleting an app
--------------------------------------------------------------------------------------------------------------------------------
Remove an app from your workspace when you no longer need it.
Deleting an app permanently erases all app data, history, users, domains, and integrations. This action cannot be undone. If you think you might need the app again, consider cloning it before deleting.
**To delete an app:**
1. Go to **Apps** in your Base44 workspace.
2. Click the **More Actions** icon on the app card.
3. Click **Delete**.
4. Click **Delete this app** to confirm.

###
[](https://docs.base44.com/documentation/using-your-workspaces/managing-your-workspace-apps#deleting-an-app-you-don%E2%80%99t-own)
Deleting an app you don’t own
Workspace owners and admins can delete any app in their workspace, even if they are not the app’s creator. When you delete an app you don’t own, the delete dialog shows a warning with the app owner’s email address. The app owner automatically receives an in-app notification and email letting them know their app was deleted and by whom.
* * *
[](https://docs.base44.com/documentation/using-your-workspaces/managing-your-workspace-apps#faqs)
FAQs
----------------------------------------------------------------------------------------------------------
Click a question below to learn more.
What happens after I move an app to a different workspace?
After moving an app to another workspace:
* The app follows the target workspace’s permissions and settings.
* The published app URL does not change.
* All app data, media, and configurations remain with the app.
* The app uses credits from the target workspace going forward.
Can I move my app back after transferring it to another workspace?
Yes. You can move an app again as long as:
* You are the app owner.
* App transfers are enabled in the current workspace.
* You are a member of the target workspace.
If transfer policies restrict moving the app out, you may need a workspace admin to adjust the settings.
Why can't I move my app to another workspace?
You may not be able to move an app if:
* You are not the app owner.
* The app is a purchased app.
* App transfers are disabled in the current workspace.
* You are not a member of the target workspace.
How do I enable app transfers in my workspace?
Workspace owners can control who is allowed to move apps out of the workspace.**To enable app transfers in your workspace:**
1. Click your workspace name at the top left of your account.
2. Click **Settings**.
3. Under **Workspace**, click **Apps configuration**.
4. Under **App Transfers**, choose who can move apps out of this workspace:
* **Workspace admins and owners**
* **Workspace owners only**
* **Disabled**

Was this page helpful?
YesNo
[Managing workspace members](https://docs.base44.com/Account-and-billing/Managing-your-workspaces)
[Creating workspace templates](https://docs.base44.com/documentation/using-your-workspaces/creating-and-using-workspace-templates)
⌘I
Assistant
Responses are generated using AI and may contain mistakes.
Suggestions
Which plans come with a free domain?How are credits used?How do I use Discuss mode?
---
# About workspaces - Base44 Support Documentation
> Documentation Index
> -------------------
>
> Fetch the complete documentation index at: [/llms.txt](https://docs.base44.com/llms.txt)
>
> Use this file to discover all available pages before exploring further.
[Skip to main content](https://docs.base44.com/documentation/account-and-billing/about-workspaces#content-area)
A workspace is your main hub for [app development](https://base44.com/ai-app-builder)
and team collaboration in Base44. When you join Base44, a workspace is created for you automatically. You can purchase a plan for your workspace to get credits and unlock additional features. You can switch between workspaces at any time. Click your workspace name at the top left of your account to see your workspaces and access settings. Workspaces you have been invited to also appear here.
* * *
[](https://docs.base44.com/documentation/account-and-billing/about-workspaces#how-workspaces-work)
How workspaces work
--------------------------------------------------------------------------------------------------------------------------
Each workspace has its own plan and a shared pool of credits. Everyone you invite to a workspace builds and runs apps using those shared credits. Apps always belong to the workspace where they were created and use that workspace’s plan and credits regardless of who is working on them. You can be a member of up to 3 workspaces at the same time. You are the owner of workspaces that belong to your account, and you can also be a member of workspaces that others have invited you to. Learn more about how credits work in [Credits](https://docs.base44.com/Account-and-billing/Credits)
.
* * *
[](https://docs.base44.com/documentation/account-and-billing/about-workspaces#workspace-roles)
Workspace roles
------------------------------------------------------------------------------------------------------------------
When you invite someone to your workspace, you assign them a role. Roles control what each person can see and do.
* **Owner:** Manages billing, members, settings, apps, and credits for the workspace. Each workspace has one owner.
* **Admin:** _(Enterprise plan only)_ Manages members and workspace settings, but does not handle billing.
* **Editor:** Can be invited as a collaborator on specific apps to create and edit them. Editors do not automatically see all apps in the workspace; they need to be invited to each app they should have access to.
* **Viewer:** Can be invited as a collaborator on specific apps, but can only view them. Viewers cannot edit apps, use the AI chat, or access most of the app dashboard.
* **Guest:** Can edit specific apps they are invited to, but cannot create new apps, view other workspace apps, or access workspace settings. Guests are added through app invitations, not workspace invitations.
Everyone you invite uses the workspace’s shared credits when they build or use apps. They do not need their own paid plan to access what you give them in your workspace. However, if they want to build apps or use credits in their own workspace, they will need a paid plan for that workspace separately.
If a workspace downgrades from the Enterprise plan, any members with the Admin role are automatically moved to an Editor role.
Learn how to invite and manage members in [Managing workspace members](https://docs.base44.com/Account-and-billing/Managing-your-workspaces)
.
* * *
[](https://docs.base44.com/documentation/account-and-billing/about-workspaces#faqs)
FAQs
--------------------------------------------------------------------------------------------
Click a question below to learn more.
How many workspaces can I have?
You can be a member of up to 3 workspaces at the same time. This includes workspaces you own and workspaces you have been invited to.
Do members need their own paid plan?
No. Members do not need their own paid plan to access what you give them in your workspace. However, if they want to build apps or use credits in their own workspace, they will need a paid plan for that workspace separately.
How do credits work when I am in more than one workspace?
Credits are not shared between workspaces. Each workspace has its own plan and credit pool. Activity in one workspace does not affect the credits of any other workspace you belong to.
Why can't my Editor see any apps in the workspace?
Editors need to be invited as a collaborator on each app before they can see or edit it. Go to the app in the app editor, click the **Invite collaborators** icon, and invite them from there.
What can a Viewer do in my workspace?
Viewers can be invited as a collaborator on specific apps to view them, but they cannot edit apps, use the AI chat, or access most of the app dashboard. If you need someone to actively contribute to an app, invite them as an Editor instead.
Do I own the apps I create in Base44?
Yes. All applications and content you create in Base44 belong to you. Base44 does not claim ownership of anything you build.
Was this page helpful?
YesNo
[Student & educator discount](https://docs.base44.com/Account-and-billing/Student-discount)
[Managing a workspace](https://docs.base44.com/documentation/account-and-billing/managing-your-workspace-members)
⌘I
Assistant
Responses are generated using AI and may contain mistakes.
Suggestions
Which plans come with a free domain?How are credits used?How do I use Discuss mode?
---
# Managing MCP connections - Base44 Support Documentation
> Documentation Index
> -------------------
>
> Fetch the complete documentation index at: [/llms.txt](https://docs.base44.com/llms.txt)
>
> Use this file to discover all available pages before exploring further.
[Skip to main content](https://docs.base44.com/documentation/account-and-billing/setting-up-a-custom-mcp#content-area)
MCP connections let you connect custom MCP servers to your Base44 account so the AI chat can access external tools and data for context while you build. You configure MCP connections once per account, and they are available in the AI chat for every app in every workspace your account can access.
You need a **Builder plan** or higher to connect custom MCPs.

* * *
[](https://docs.base44.com/documentation/account-and-billing/setting-up-a-custom-mcp#what-you-can-use-mcps-for)
What you can use MCPs for
---------------------------------------------------------------------------------------------------------------------------------------------
MCPs work best when you want to bring real, structured data from a third-party service into your app build. Common examples include:
* **Amplitude or Mixpanel:** Build dashboards pre-loaded with your actual product metrics
* **Linear or Jira:** Scaffold a project tracker from your real backlog and issue structure
* **Salesforce or HubSpot:** Build CRM apps that reflect your live data model
* **Figma:** Pull design components and apply them while building
* **Internal MCP servers:** Connect proprietary tools, enforce company dev guidelines, or load enterprise-specific data schemas
Use Base44 from Claude, ChatGPT, or Cursor
------------------------------------------
Base44 also works in the other direction. Connect Base44 as an MCP server so external AI tools like Claude, ChatGPT, and Cursor can create and manage your apps directly.
* * *
[](https://docs.base44.com/documentation/account-and-billing/setting-up-a-custom-mcp#how-mcp-connections-work)
How MCP connections work
-------------------------------------------------------------------------------------------------------------------------------------------
Base44’s AI treats MCP connections as tools it can call when your request requires external data or actions. It decides when to use them based on your prompt and the MCP’s description. You do not have to name an MCP explicitly, but it usually works best if you say what you want to use, such as “Use the GitHub MCP to list open issues.” Each connection stores the server URL, authentication method, and any headers that need to be sent with every request.
Using MCP connections can increase your credit usage, because the AI processes more information when it connects to external apps and data sources.
* * *
[](https://docs.base44.com/documentation/account-and-billing/setting-up-a-custom-mcp#adding-a-custom-mcp-connection)
Adding a custom MCP connection
-------------------------------------------------------------------------------------------------------------------------------------------------------
Each account can connect up to 20 MCP servers. If you reach this limit, you must remove an existing server to add a new one. **To add a custom MCP connection:**
1. Click your profile icon at the top-right of Base44.
2. Click **Settings**.
3. Under **Account**, click **MCP connections**.
4. Click **Add custom MCP**.
5. Enter the details for your MCP:
* **Name:** Enter a clear name for your MCP server so collaborators can recognize it.
* **URL:** Enter the MCP server URL, such as `https://mcp.deepwiki.com/sse`.
* **Authentication:** Choose how Base44 should connect:
* **Not required:** Select this option if the server does not require credentials.
* **OAuth:** Select this option if the server uses OAuth. You complete the authorization in the next step after testing and adding the server.
* **Custom headers** (optional): Add any headers that need to be sent with every request, such as API keys:
1. Click **Add header**.
2. Enter the **Header name**.
3. Enter the **Header value**.
Add a header only if your MCP server requires one, such as an API key or bearer token. Check your MCP server or API documentation to see if a header is needed. If nothing is mentioned, leave this section empty and test the connection.
6. Click **Test** to check that Base44 can reach the MCP server with the configuration you entered.
7. Click **Test & add** to test the connection and save the new MCP server to your account.

* * *
[](https://docs.base44.com/documentation/account-and-billing/setting-up-a-custom-mcp#turning-a-custom-mcp-on-or-off)
Turning a custom MCP on or off
-------------------------------------------------------------------------------------------------------------------------------------------------------
Turn an MCP connection on or off without removing its configuration. **To turn a custom MCP connection on or off:**
1. Click your profile icon at the top-right of Base44.
2. Click **Settings**.
3. Under **Account**, click **MCP connections**.
4. Find the relevant MCP server in the list.
5. Click the toggle on the right to enable or disable that server for your account.
* * *
[](https://docs.base44.com/documentation/account-and-billing/setting-up-a-custom-mcp#editing-or-removing-a-custom-mcp)
Editing or removing a custom MCP
-----------------------------------------------------------------------------------------------------------------------------------------------------------
Make changes to an existing MCP connection or remove it completely from your account.

**To edit or remove a custom MCP connection:**
1. Click your profile icon at the top-right of Base44.
2. Click **Settings**.
3. Under **Account**, click **MCP connections**.
4. Next to the relevant MCP server, click the **More actions** icon.
5. Choose what you want to do:
* **Edit Details:** Update the server name, URL, authentication, or custom headers, then save your changes.
* **Remove MCP:** Permanently remove the MCP server from your account.
Use clear, descriptive names for each MCP server so collaborators can quickly see which external tools or data sources the AI chat can use.
* * *
[](https://docs.base44.com/documentation/account-and-billing/setting-up-a-custom-mcp#faqs)
FAQs
---------------------------------------------------------------------------------------------------
Click a question below to learn more about MCP connections.
Does my app call MCP servers directly?
No. MCP connections only control what the AI chat can access while you build. Your app code, APIs, and other integrations do not call MCP servers through this settings page.The AI chat uses an MCP server only when your prompt asks for something that requires that server. It does not call every connected MCP for each message.
Can I use MCP connections in app logic or automations?
No. MCP connections are only available in the editor chat while you build. They cannot be called from app flows, automations, backend functions, or via invokeLLM at runtime. If you need to connect to an external service from within your live app, use [connectors](https://docs.base44.com/Integrations/Connectors)
instead.
Does data the AI pulls from an MCP update live in my published app?
No. When the AI uses an MCP to fetch data while you build, that data is written into your app at build time. It does not refresh automatically when your published app is running. If you need live data in your app, connect the data source as a connector or custom integration instead.
My MCP is not responding in the editor chat. What should I check?
Try the following steps in order:
1. Go to **Settings** → **MCP connections** and confirm the MCP is toggled on.
2. Click **Test** next to the MCP server to check that Base44 can still reach it.
3. If the MCP uses OAuth, try re-authenticating. Your session may have expired.
4. Check that the server URL and any custom headers are still correct.
5. Be explicit in your prompt. Name the MCP and describe what you need it to fetch, for example: `Use the GitHub MCP to list open issues.`
How do I define shared AI rules for a workspace?
To define shared rules and best practices for how the AI builds apps in a workspace, use workspace skills.[Learn how to add skills](https://docs.base44.com/documentation/using-your-workspaces/adding-workspace-skills)
.
Can I temporarily disable an MCP server without removing it?
Yes. Go to **Settings** → **MCP connections** and use the toggle next to the relevant MCP server to turn it off. When it is off, the AI chat no longer uses that server.You can turn the same server back on later without re-entering its configuration.
Who can use my MCP connections?
Any collaborator who can open the AI chat for an app you can access can benefit from your MCP connections in that chat. Because MCP connections are configured per account, they are available in all apps and all workspaces that your account has access to. The AI decides when to use each MCP based on the prompt and the MCP configuration.
How do I connect Base44 to Claude, ChatGPT, or Cursor?
Base44 exposes its own MCP server so external AI tools can interact with your workspace directly. See [Using Base44 as an MCP server](https://docs.base44.com/developers/backend/overview/mcp-server)
for setup instructions for each supported client.
Does the Base44 MCP server work with third-party MCP gateways?
No. The Base44 MCP server supports direct connections from Claude, ChatGPT, and Cursor only. Third-party MCP gateway tools are not supported at this time.
Was this page helpful?
YesNo
[Changing your account settings](https://docs.base44.com/documentation/account-and-billing/managing-your-account)
[Credits](https://docs.base44.com/Account-and-billing/Credits)
⌘I
Assistant
Responses are generated using AI and may contain mistakes.
Suggestions
Which plans come with a free domain?How are credits used?How do I use Discuss mode?
---
# Changing your account settings - Base44 Support Documentation
> Documentation Index
> -------------------
>
> Fetch the complete documentation index at: [/llms.txt](https://docs.base44.com/llms.txt)
>
> Use this file to discover all available pages before exploring further.
[Skip to main content](https://docs.base44.com/documentation/account-and-billing/managing-your-account#content-area)
Your Base44 account settings bring together everything that is personal to you, from your name and profile image to how new apps behave and how you send messages in chats. Use this page to keep your details accurate, protect access with two-factor authentication and API key management, fine-tune chat behavior, and delete your account when you no longer need it.

* * *
[](https://docs.base44.com/documentation/account-and-billing/managing-your-account#accessing-your-account-settings)
Accessing your account settings
-------------------------------------------------------------------------------------------------------------------------------------------------------
You can manage all your personal account options from the profile menu. **To open your account settings:**
1. Click your profile icon at the top right of your workspace.
2. Click **Account settings**.

* * *
[](https://docs.base44.com/documentation/account-and-billing/managing-your-account#updating-your-account-details)
Updating your account details
---------------------------------------------------------------------------------------------------------------------------------------------------
Keep your personal details up to date so teammates know who you are and how to reach you. **To update your details:**
1. Click your profile icon at the top right of your workspace.
2. Click **Account settings**.
3. Update the relevant fields including name, phone number and profile image.
* * *
[](https://docs.base44.com/documentation/account-and-billing/managing-your-account#managing-default-settings-for-new-apps)
Managing default settings for new apps
---------------------------------------------------------------------------------------------------------------------------------------------------------------------
Default settings control how new apps behave the moment you create them. You can choose whether they can have agents and test data enabled. **To manage default settings for new apps:**
1. Click your profile icon at the top right of your workspace.
2. Click **Account settings**.
3. Review the default settings for new apps in the account:
* **Default Agents**: Enable agents for new apps by default so new apps can run autonomous tasks and use tools as soon as you create them.
* **Default Test Data**: Enable test data for new apps by default so new apps start with test data turned on and you can experiment without affecting live data.
* * *
[](https://docs.base44.com/documentation/account-and-billing/managing-your-account#managing-your-api-key)
Managing your API key
-----------------------------------------------------------------------------------------------------------------------------------
Your API key lets external tools and scripts access your Base44 workspace. Treat it like a password and keep it private. **To view your API key:**
1. Click your profile icon at the top right of your workspace.
2. Click **Account settings**.
3. Go to the **API Key** field and either copy the key or click **Regenerate** to create a new one.
**Important:** After regenerating your API key, update any integrations, scripts, or tools that use the old key so they continue to work with your workspace.
* * *
[](https://docs.base44.com/documentation/account-and-billing/managing-your-account#customizing-your-chat-settings)
Customizing your chat settings
-----------------------------------------------------------------------------------------------------------------------------------------------------
Chat settings control how you send messages and when you hear sound notifications in Base44 chats.

###
[](https://docs.base44.com/documentation/account-and-billing/managing-your-account#keyboard-shortcuts)
Keyboard shortcuts
1. Click your profile icon at the top right of your workspace.
2. Click **Account settings**.
3. Scroll down to **Chat Settings**.
4. Click the **Send message shortcut** drop-down and choose how you want to send messages (for example, **Enter** or **Shift + Enter**).
5. Click the **Insert new line shortcut** drop-down and choose how you want to insert a new line in a message.
###
[](https://docs.base44.com/documentation/account-and-billing/managing-your-account#sound-preferences)
Sound preferences
1. Click your profile icon at the top right of your workspace.
2. Click **Account settings**.
3. Scroll down to **Chat Settings**.
4. Click the **Sound Preferences** drop-down.
5. Choose when you want to hear notification sounds:
* **On first prompt only:** Play a sound only when the first response in a conversation is ready.
* **On every prompt completion:** Play a sound every time a response finishes.
* **Disable notification sounds:** Turn off all chat notification sounds.
###
[](https://docs.base44.com/documentation/account-and-billing/managing-your-account#browser-notifications)
Browser notifications
Use the **Browser Notifications** setting to control when you receive browser alerts when prompts finish running.
**To receive notifications, you also need to check the following:**
* Your browser must allow notifications from your Base44 domain in its notification or site settings.
* Your operating system must allow notifications for your browser, with any focus or “Do Not Disturb” modes turned off or configured to show them.
**To set your browser notifications:**
1. Click your profile icon at the top right of your workspace.
2. Click **Account settings**.
3. Scroll down to **Chat Settings**.
4. Choose an option from the **Browser Notifications** drop-down:
* **On first prompt only:** Receive a browser notification when the first prompt in your session finishes.
* **On every prompt completion:** Receive a browser notification each time a prompt finishes.
* **Disable browser notifications:** Turn off all browser notifications from Base44.

**Test your browser notifications**After you set up notifications in Base44, your browser, and your operating system, run a quick test to make sure everything works. Set **Browser Notifications** to **On every prompt completion**, run a prompt that takes a short time to finish, then switch to another tab or window and wait to see if a notification appears when the prompt completes. If nothing appears, check that notifications are not blocked in your browser or system settings.
* * *
[](https://docs.base44.com/documentation/account-and-billing/managing-your-account#two-factor-authentication)
Two-factor authentication
-------------------------------------------------------------------------------------------------------------------------------------------
Two-factor authentication adds an extra layer of protection when you sign in to Base44. After you turn it on, Base44 asks for both your password and a verification code each time you sign in. You can choose one or both verification methods:
* **Authenticator app**: Use an app like Google Authenticator or Duo to generate secure sign-in codes on your phone.
* **Text messages**: Get sign-in codes sent to your phone by text message. Standard message and data rates may apply when you receive text messages.
Text message (SMS) verification is available on paid plans only. If you are on the Free plan, the text message option does not appear, so secure your account with the authenticator app instead.
**To set up two-factor authentication:**
1. Click your profile icon at the top right of your workspace.
2. Click **Account settings**.
3. Scroll down to **Two-factor authentication**.
4. Click **Enable** next to each method you want to use and follow the on-screen instructions to complete setup:
* **Authenticator app:** Base44 generates a QR code and a manual key that you add to your authenticator app.
* **Text messages:** Confirm your phone number so Base44 knows where to send verification codes.

* * *
[](https://docs.base44.com/documentation/account-and-billing/managing-your-account#deleting-your-base44-account)
Deleting your Base44 account
-------------------------------------------------------------------------------------------------------------------------------------------------
Deleting your Base44 account schedules your account, personal information, and all associated data for permanent deletion. Your account is scheduled to be permanently deleted 7 days after you request deletion.
###
[](https://docs.base44.com/documentation/account-and-billing/managing-your-account#important-information)
Important information
**Warning:**
* When your account deletion completes, Base44 deletes your personal data from all Base44 systems and sub-processors as part of a GDPR compliant deletion process. This includes services such as SendGrid and Stripe. You do not need to contact Base44 separately to request GDPR deletion.
* Once deletion is completed, the following are removed and cannot be recovered:
* Your Base44 account and profile
* Any subscriptions
* All apps you own and their data
* All workspaces you own (including pending invitations)
* Uploaded files and media
* Connected domains (they are released and can be used by others)
* Billing and subscription data
* Account deletion is permanent. After your account is deleted, you cannot reopen your Base44 account or restore deleted workspaces, apps, domains, or data.
* Subscription cancellation as part of account deletion is final with no refunds.
* If your subscription is scheduled to renew during the 7 days before deletion, the renewal still occurs unless you cancel the subscription manually before the renewal date.
* Base44 may retain data that we are legally obligated to, or if required for the establishment, exercise, or defense of legal claims.
* If you are a member of workspaces you do not own, you are removed from those workspaces when your account is deleted.
* Account deletion is not available for enterprise users. Contact your organization admin to manage your account.
###
[](https://docs.base44.com/documentation/account-and-billing/managing-your-account#requesting-account-deletion)
Requesting account deletion
**Before you begin:**
* Make sure you understand what will be removed and how it affects you.
* Export or copy any data you want to keep from your workspaces.
* Transfer ownership or access if teammates still need to use any apps you created.
* Check your billing or subscriptions and update them as needed so you do not lose access you still need.
**To request account deletion:**
1. Click your profile icon at the top right of your workspace.
2. Click **Account settings**.
3. Scroll to the bottom and click **Delete account**.
* If you own workspaces with members, a confirmation dialog appears listing those workspaces. Review the details and click **Delete anyway** to continue.
* If you own workspaces, type each workspace name to confirm deletion, then click **Delete Account**.
4. In the **Delete Your Account** dialog, review what will be deleted and the scheduled deletion date.
5. Click **Continue** if you are sure you want to proceed.

**What happens after you request deletion:**
* Your account is scheduled to be permanently deleted in 7 days from the request date. You continue to have access to your account for those 7 days. At the end of the 7 days, your account and data are permanently deleted.
* If you had an active subscription, it is canceled as part of the deletion process.
* You can cancel the deletion request at any time before the scheduled deletion date by using the cancel option in the confirmation email.
* * *
[](https://docs.base44.com/documentation/account-and-billing/managing-your-account#faqs)
FAQs
-------------------------------------------------------------------------------------------------
Click a question below to learn more about your account.
How do I change my Base44 account password?
You can change your Base44 account password by using the password reset flow from the login page, even if you can still sign in.**To change your password:**
1. Go to the Base44 login page.
2. Click **Forgot password**.
3. Enter the email address associated with your Base44 account.
4. Check your inbox for the password reset email and open it.
5. Click the reset link in the email.
6. Enter and confirm your new password.
If you do not see the reset email after a few minutes, check your spam or promotions folders, then request another reset email.
Can I change the email address on my Base44 account?
No. At the moment, you cannot change the email address on your Base44 account. If you want to use a different email, create a new Base44 account with that email and move your apps to the new account.You can do this in 2 ways:**Option 1 | Transfer the app to a new account**Use this option if you want to move an app, keep its data, and continue using the same live URL.**To transfer an app:**
1. Make sure both accounts are on a plan that lets you build and own apps (the **Builder** plan or higher).
2. Sign in with your original account and open the app.
3. Invite your new email as an **Admin** collaborator on the app.
4. Sign out, then sign in to Base44 with the new email.
5. Open the app and transfer ownership to your new account.
After you move all apps you need, you can manage or cancel the plan on the original account from your billing settings if you no longer need it.
**Option 2 | Clone the app using the platform badge**Use this option if you want to start fresh on the new account but keep the same app structure.**To clone your app to a new account:**
1. Sign in with your original account and open the app.
2. In the app settings, enable the **Edit with Base44** platform badge and publish the app.
3. Create a new Base44 account with your new email.
4. In the new account, open the live app URL and click the **Edit with Base44** badge.
5. Follow the prompts to clone the app into your new account.
Cloning copies the app’s structure but not its data or app users. Export data entities from the original app and import them into the clone if needed, and ask people to sign up again in the new app. If your app uses backend functions or external integrations, reconnect any secrets and integrations in the cloned app.
Notifications used to work but stopped. What changed?
This usually means something changed in one of the 3 layers that control notifications.Common reasons include:
* You changed **Browser Notifications** in **Account settings** to **Disable browser notifications**.
* You blocked notifications for your Base44 domain in your browser.
* Your operating system turned on a focus or “Do Not Disturb” mode that hides notifications for your browser.
Check each of these settings and then run a quick test by setting **Browser Notifications** to **On every prompt completion** and running a prompt.
Why am I not receiving browser notifications even though they are enabled?
Browser notifications only appear when all of the following are enabled:
* **Browser Notifications** in **Account settings** is set to **On first prompt only** or **On every prompt completion**.
* Your browser allows notifications for your Base44 domain.
* Your operating system allows notifications for your browser and is not blocking them with a focus or “Do Not Disturb” mode.
You also need to have a Base44 tab open in your browser at the time the prompt finishes so the notification can appear.If any of these conditions are not met, notifications do not appear even if they are enabled in your chat settings.
Do I need to contact Base44 separately to delete my data for GDPR?
No. When you delete your Base44 account, Base44 starts a GDPR compliant deletion process for your personal data across all systems and subprocessors, including services such as SendGrid and Stripe. You do not need to submit an extra deletion request.
**Notes:**
* Standard message and data rates may apply when you receive text messages.
* After you enable two-factor authentication, Base44 asks for both your password and a verification code each time you sign in.
* * *
[](https://docs.base44.com/documentation/account-and-billing/managing-your-account#deleting-your-base44-account-2)
Deleting your Base44 account
---------------------------------------------------------------------------------------------------------------------------------------------------
Deleting your Base44 account schedules your account, personal information, and all associated data for permanent deletion. Your account is scheduled to be permanently deleted 7 days after you request deletion.
###
[](https://docs.base44.com/documentation/account-and-billing/managing-your-account#important-information-2)
Important information
**Warning:**
* When your account deletion completes, Base44 deletes your personal data from all Base44 systems and sub-processors as part of a GDPR compliant deletion process. This includes services such as SendGrid and Stripe. You do not need to contact Base44 separately to request GDPR deletion.
* Once deletion is completed, the following are removed and cannot be recovered:
* Your Base44 account and profile
* Any subscriptions
* All apps you own and their data
* All workspaces you own (including pending invitations)
* Uploaded files and media
* Connected domains (they are released and can be used by others)
* Billing and subscription data
* Account deletion is permanent. After your account is deleted, you cannot reopen your Base44 account or restore deleted workspaces, apps, domains, or data.
* Subscription cancellation as part of account deletion is final with no refunds.
* If your subscription is scheduled to renew during the 7 days before deletion, the renewal still occurs unless you cancel the subscription manually before the renewal date.
* Base44 may retain data that we are legally obligated to, or if required for the establishment, exercise, or defense of legal claims.
* If you are a member of workspaces you do not own, you are removed from those workspaces when your account is deleted.
* Account deletion is not available for enterprise users. Contact your organization admin to manage your account.
###
[](https://docs.base44.com/documentation/account-and-billing/managing-your-account#requesting-account-deletion-2)
Requesting account deletion
**Before you begin:**
* Make sure you understand what will be removed and how it affects you.
* Export or copy any data you want to keep from your workspaces.
* Transfer ownership or access if teammates still need to use any apps you created.
* Check your billing or subscriptions and update them as needed so you do not lose access you still need.
**To request account deletion:**
1. Click your profile icon at the top right of your workspace.
2. Click **Account settings**.
3. Scroll to the bottom and click **Delete account**.
* If you own workspaces with members, a confirmation dialog appears listing those workspaces. Review the details and click **Delete anyway** to continue.
* If you own workspaces, type each workspace name to confirm deletion, then click **Delete Account**.
4. In the **Delete Your Account** dialog, review what will be deleted and the scheduled deletion date.
5. Click **Continue** if you are sure you want to proceed.

**What happens after you request deletion:**
* Your account is scheduled to be permanently deleted in 7 days from the request date. You continue to have access to your account for those 7 days. At the end of the 7 days, your account and data are permanently deleted.
* If you had an active subscription, it is canceled as part of the deletion process.
* You can cancel the deletion request at any time before the scheduled deletion date by using the cancel option in the confirmation email.
Was this page helpful?
YesNo
[Billing & plans](https://docs.base44.com/Account-and-billing/Billing-and-plans)
[Connecting a custom MCP](https://docs.base44.com/documentation/account-and-billing/setting-up-a-custom-mcp)
⌘I
Assistant
Responses are generated using AI and may contain mistakes.
Suggestions
Which plans come with a free domain?How are credits used?How do I use Discuss mode?
---
# Base44 Developer Platform - Base44 Support Documentation
> Documentation Index
> -------------------
>
> Fetch the complete documentation index at: [/llms.txt](https://docs.base44.com/llms.txt)
>
> Use this file to discover all available pages before exploring further.
[Skip to main content](https://docs.base44.com/developers/home#content-area)
[](https://docs.base44.com/developers/home#start-building-with-base44)
Start building with Base44
-----------------------------------------------------------------------------------------------------
Backend Platform
----------------
Managed backend designed for AI agents. Define everything in code.[Explore >](https://docs.base44.com/developers/backend/overview/introduction)
App Code
--------
Customize Base44-generated apps using developer tools.[Explore >](https://docs.base44.com/developers/app-code/overview/introduction)
CLI
---
Create backend projects from the command line.[Explore >](https://docs.base44.com/developers/references/cli/get-started/overview)
SDK Reference
-------------
Access Base44 services from frontend or backend code.[Explore >](https://docs.base44.com/developers/references/sdk/getting-started/overview)
[](https://docs.base44.com/developers/home#backend-platform)
Backend Platform
---------------------------------------------------------------------------------
The same backend that powers Base44’s app editor, available as a standalone service. Build with any frontend framework while Base44 handles:
* **[Data management](https://docs.base44.com/developers/backend/resources/entities/overview)
**: Store and query data with flexible schemas and realtime updates
* **[Backend functions](https://docs.base44.com/developers/backend/resources/backend-functions/overview)
**: Custom server-side logic in a secure runtime
* **[AI agents](https://docs.base44.com/developers/backend/resources/agents-config)
**: Define AI assistants with custom tools and data permissions
* **[Integrations](https://docs.base44.com/developers/references/sdk/docs/type-aliases/integrations)
**: Pre-built connections to AI, email, file storage, and more
* **[Authentication](https://docs.base44.com/developers/references/sdk/docs/interfaces/auth)
**: Built-in login, social auth, and session handling
* **[Hosting](https://docs.base44.com/developers/references/cli/commands/deploy)
**: Deploy with a single command, automatic HTTPS included
###
[](https://docs.base44.com/developers/home#get-started)
Get started
Get started by letting an AI coding agent set up your project, or set it up yourself with the CLI and then continue building with AI.
* Let AI set it up
* Set it up yourself
Install [Base44 skills](https://docs.base44.com/developers/backend/overview/skills)
so your coding agent can assist with Base44 development:
npx skills add base44/skills -g
Then open your AI coding tool and try a prompt like this:_“Create a new Base44 project for a task management app with users, tasks with due dates and priority levels, and team assignments. Add authentication and deploy it.”_Your agent will install the CLI, create the project, define entities, write code, and deploy. [Learn more about skills >](https://docs.base44.com/developers/backend/overview/skills)
You may be prompted to authenticate with Base44 during setup.
To set up a backend project yourself, run the following commands:
Get started
npm install -g base44@latest # Install the CLI
base44 login # Authenticate
base44 create # Create a project
Your project comes with [Base44 skills](https://docs.base44.com/developers/backend/overview/skills)
pre-installed. Open the project with your AI coding tool and describe what you want to build next, or explore the documentation to understand how your project is structured and what you can build.Or start with one of our templates:
Create a backend-only project
-----------------------------
Create a project with React
---------------------------
View example apps
-----------------
[](https://docs.base44.com/developers/home#develop-and-debug-your-app)
Develop and debug your app
-----------------------------------------------------------------------------------------------------
* Code Tab
* Activity Monitor
* GitHub Integration
* Project Structure
###
[](https://docs.base44.com/developers/home#work-directly-in-your-code)
Work directly in your code
The Code tab lets you view and edit your app’s source code directly, giving you control over your app’s functionality, design, and behavior while seeing changes immediately.
[Learn More >](https://docs.base44.com/developers/app-code/editor/code-tab)

###
[](https://docs.base44.com/developers/home#debug-and-monitor-api-requests)
Debug and monitor API requests
The Activity Monitor shows every request your app makes while you are in preview. Check which endpoints are called, see status codes and timing, and inspect request and response details to debug problems.
[Learn More >](https://docs.base44.com/developers/app-code/editor/activity-monitor)

###
[](https://docs.base44.com/developers/home#connect-your-app-to-github)
Connect your app to GitHub
Connect your app to GitHub to write code in your local development environment or in Base44 and keep them in sync with each other.
[Learn More >](https://docs.base44.com/developers/app-code/local-development/github)

###
[](https://docs.base44.com/developers/home#understand-your-app%E2%80%99s-file-organization)
Understand your app’s file organization
Base44 apps are standard React apps built with Vite. Your project includes modern web development tools and seamless Base44 backend integration.
[Learn More >](https://docs.base44.com/developers/app-code/overview/project-structure)
src
pages
components
api
hooks
lib
utils
entities
functions
[](https://docs.base44.com/developers/home#mcp-servers)
MCP servers
-----------------------------------------------------------------------
Base44 provides two MCP servers: one for building and managing backend projects, and one for searching the documentation.
{
"mcpServers": {
"base44": {
"type": "http",
"url": "https://app.base44.com/mcp"
},
"base44-docs": {
"type": "http",
"url": "https://docs.base44.com/mcp"
}
}
}
* **[Base44 MCP server](https://docs.base44.com/developers/backend/overview/mcp-server)
** (`app.base44.com/mcp`): Create and manage projects, list your projects, and query project data. Requires OAuth sign-in.
* **[Docs MCP server](https://docs.base44.com/developers/backend/overview/base44-docs-mcp)
** (`docs.base44.com/mcp`): Search Base44 documentation from your AI tool. No authentication required.
[](https://docs.base44.com/developers/home#explore)
Explore
---------------------------------------------------------------
Edit generated code
-------------------
Add serverless functions
------------------------
Define data models
------------------
Deploy a project
----------------
User authentication
-------------------
Configure AI agents
-------------------
Was this page helpful?
YesNo
⌘I
Assistant
Responses are generated using AI and may contain mistakes.
Suggestions
Which plans come with a free domain?How are credits used?How do I use Discuss mode?
---
# Unknown
\# Base44 Documentation > Base44 is an AI-powered app builder. Describe your idea and the AI builds it — including design, databases, user management, and hosting. These docs cover the no-code builder, the developer backend service, the JavaScript SDK, and the CLI. ## Getting started - \[Building an app\](https://docs.base44.com/Getting-Started/Quick-start-guide.md): Learn how to build your first Base44 app, use the editor, and manage your credits. - \[Building a website\](https://docs.base44.com/Getting-Started/building-a-website.md): Build a website on Base44 that looks great, works for everyone, and gets found in search. Describe your idea, customize the design, connect a domain, and optimize for SEO and AI visibility. - \[Migrating a project to Base44\](https://docs.base44.com/Getting-Started/migrating-an-existing-app.md): Bring your existing apps, projects or websites into Base44 from other platforms, including your actual data, schema, and frontend code. - \[Importing from Figma\](https://docs.base44.com/Getting-Started/import-from-figma.md): Turn your Figma designs into working apps and pages. Import a frame to start a new app, or add Figma pages to an existing app at any point in the app editor. - \[Hiring a Base44 partner\](https://docs.base44.com/Getting-Started/Hiring-a-partner.md): Find Base44 partners for development, design, consulting, and integrations, and learn how to choose and work with the right expert. ## Building your app - \[Using app templates\](https://docs.base44.com/Getting-Started/App-templates.md): Explore ready-to-use app templates from the Base44 community and from your workspace. Find inspiration, launch your next project in minutes, or share your own templates to earn revenue or reuse them across your team. - \[Using the AI Chat in Base44\](https://docs.base44.com/Building-your-app/AI-chat-modes.md): Describe your idea, and the AI builds it for you. Use chat modes and AI controls to fine-tune your app and get the results you want. - \[Prompt library\](https://docs.base44.com/Getting-Started/Prompt-library.md): A collection of ready-made prompts you can copy, remix, and build on to start your next app in minutes. - \[Writing effective prompts in Base44\](https://docs.base44.com/Getting-Started/Prompt-guide.md): Describe the app you want in plain words, and Base44 builds it. Learn how to write prompts that get you there faster. ## Designing your app - \[Customizing the design of your app\](https://docs.base44.com/Building-your-app/Design.md): Customize your Base44 app's look with the Theme panel, Edit mode, and AI chat: colors, fonts, per-element styling, themes, and motion. - \[Design foundations and layout\](https://docs.base44.com/Building-your-app/Design-foundations-and-layout.md): Keep your Base44 app consistent and well-structured: design systems, images and visual assets, responsive layout, page types, advanced customization, and accessibility. - \[Uploading and managing media\](https://docs.base44.com/Building-your-app/Using-media.md): Make your app stand out with images, videos, documents, data files, audio, and your own branding. - \[Managing your app pages\](https://docs.base44.com/Building-your-app/managing-your-pages.md): Learn how to add pages, move between them, control which pages appear in your navigation, and understand how pages relate to login and visibility in Base44. - \[Using the canvas\](https://docs.base44.com/Building-your-app/Canvas.md): View and work on all your app pages at once. Add notes, drawings, and images, collaborate with your team in real time, and send ideas straight to the AI chat. - \[Adding and using npm packages\](https://docs.base44.com/Building-your-app/NPM-packages.md): Extend your app with pre-built code libraries. ## Managing app data - \[Managing your app data\](https://docs.base44.com/Building-your-app/Managing-your-app-data.md): Stay organized and power your app with easy, flexible data management. - \[Testing your app with test data\](https://docs.base44.com/documentation/managing-app-data/testing-your-data.md): Test your app in a safe environment without affecting your live production data - \[Testing your app's flows\](https://docs.base44.com/documentation/managing-app-data/testing-agent.md): Use the testing agent to run browser-based end-to-end tests on your app's key flows and catch issues before your users do. ## Adding logic to your app - \[Sending emails from your app\](https://docs.base44.com/documentation/building-your-app/sending-emails.md): Choose the best way to send emails from your Base44 app. - \[Setting up an AI agent for your app\](https://docs.base44.com/Building-your-app/AI-agents-for-apps.md): Turn chats into smart assistants that take action, connect to tools, and help you get more done in your Base44 app. - \[Creating automations for your app\](https://docs.base44.com/Building-your-app/Creating-automations.md): Run backend work automatically, on a schedule or when data changes. - \[Creating workflows for your app\](https://docs.base44.com/Building-your-app/Creating-workflows.md): Automate multi-step work that runs on a schedule, when data changes, or when a connected tool sends an event. - \[Base44 developer tools\](https://docs.base44.com/documentation/building-your-app/developer-tools.md): Build, debug, and ship smarter on Base44. ## Selling on your app - \[Setting up Base44 Payments powered by Wix\](https://docs.base44.com/Setting-up-your-app/setting-up-wix-payments.md): Accept and manage payments in your app with Base44 Payments powered by Wix, including cards, wallets, payouts, refunds, and reports. - \[Setting up Stripe\](https://docs.base44.com/documentation/setting-up-your-app/setting-up-payments.md): Set up and test Stripe payments on your app before going live with real customers. - \[Accepting payments in Israel\](https://docs.base44.com/Setting-up-your-app/accepting-payments-israel.md): Accept payments from customers in Israel using Tranzila or Max by Hyp in your Base44 app. ## Using on mobile - \[Creating and using your app on mobile\](https://docs.base44.com/Building-your-app/Mobile-experience.md): Create, edit, and manage your Base44 app from your mobile device. Let anyone open and use your app right from their own home screen, just like a native app. - \[Submitting your app to app stores\](https://docs.base44.com/documentation/building-your-app/uploading-to-app-stores.md): Get your Base44 app store-ready by scanning, improving, and packaging it for the Apple App Store and Google Play. ## Domains - \[Connecting a domain to your app\](https://docs.base44.com/Setting-up-your-app/Setting-up-your-custom-domain.md): Connect your Base44 app to your own domain to show your brand at the front and make your app easy to find, remember, and share. - \[Buying a domain from Base44\](https://docs.base44.com/Setting-up-your-app/Buying-a-domain-from-Base44.md): Buy a domain directly from Base44 for the simplest setup, with DNS and SSL handled for you. - \[Connecting an external domain\](https://docs.base44.com/Setting-up-your-app/Connecting-an-external-domain.md): Connect a domain you already own to your Base44 app by updating your DNS records at your provider. - \[Sending emails from a custom domain\](https://docs.base44.com/Setting-up-your-app/Sending-emails-from-a-custom-domain.md): Send your app's emails from your own domain, such as support@your-domain.com, instead of the default Base44 address. ## Securing your app - \[Base44 security: An overview\](https://docs.base44.com/Setting-up-your-app/security-overview.md): An overview of Base44's security features, including data permissions, SSO, security scanning, and enterprise controls. - \[Managing login and registration\](https://docs.base44.com/Setting-up-your-app/Managing-login-and-registration.md): Choose how people sign up and access your app with authentication. - \[Choosing who can access your app\](https://docs.base44.com/Setting-up-your-app/Managing-access.md): Control app visibility, invite users, set roles, and manage collaborator access to keep your app secure. - \[Managing data permissions\](https://docs.base44.com/Setting-up-your-app/Managing-security-settings.md) - \[Running a security scan\](https://docs.base44.com/Setting-up-your-app/running-a-security-scan.md): Check your app for security issues before you publish and fix them with a single click. - \[Setting up Single Sign-On (SSO) for your app\](https://docs.base44.com/Setting-up-your-app/Setting-up-SSO.md): Let your team log in to your Base44 app using providers like Google, Microsoft, GitHub, Okta, Apple, or other OIDC identity providers instead of separate logins. ## Measuring your app - \[Viewing and customizing your app analytics\](https://docs.base44.com/documentation/performance-and-seo/app-analytics.md): Track traffic, sales, customize your dashboard, and measure the actions that matter most in your Base44 app. - \[Recording and replaying user sessions\](https://docs.base44.com/documentation/performance-and-seo/session-recordings.md): Record how people use your published app, replay their sessions to spot friction like rage clicks and errors, and get AI summaries of what happened. - \[Optimizing App Performance\](https://docs.base44.com/Performance-and-SEO/App-performance.md): Check your app’s performance metrics and optimize loading speed and responsiveness. ## Growing your app's reach - \[Getting your app found in search\](https://docs.base44.com/Performance-and-SEO/SEO-and-search-visibility.md): Base44 provides a solid technical SEO and GEO foundation for your app so you can focus on content, trust, and visibility. - \[Optimizing your app's SEO & GEO\](https://docs.base44.com/Performance-and-SEO/checking-your-seo-and-geo.md): Manage your app's search engine and AI search visibility, scan and fix issues directly from your dashboard. - \[Promoting your app\](https://docs.base44.com/promoting-your-app/social-content.md): Generate a social promotion strategy and ready-to-post content for your app. - \[Submitting your app to Launchpad\](https://docs.base44.com/promoting-your-app/submitting-to-launchpad.md): Submit your app to Launchpad for a chance to win credits, get featured, and reach more people in the Base44 community. ## Superagents - \[Building a Superagent\](https://docs.base44.com/Getting-Started/superagent.md): Build Superagents that handle tasks, connect your tools, and automate work across your workspace. - \[Creating a Superagent\](https://docs.base44.com/superagents/creating-a-superagent.md): Create a Superagent, start chatting, and customize how it looks and works. - \[Customizing your Superagent\](https://docs.base44.com/superagents/customizing-your-superagent.md): Configure how your Superagent responds, remembers context, connects to channels, and manages access. - \[Managing your Superagents\](https://docs.base44.com/superagents/managing-your-superagents.md): Find, organize, and manage your Superagents from the All Agents page. - \[Creating a Superagent for your Wix site\](https://docs.base44.com/superagents/superagents-for-wix.md): Create a Superagent for your Wix site to handle orders, messages, bookings, and run your business in the background. ## Integrations - \[Using Integrations\](https://docs.base44.com/Integrations/Using-integrations.md): Connect your Base44 apps, workspaces, and account to external tools and services - \[About Connectors\](https://docs.base44.com/Integrations/Connectors.md): Connect your app to popular tools like Google Workspace, BigQuery, Slack, Salesforce, GitHub, Snowflake, Databricks, and more using managed integrations. - \[Connectors catalog\](https://docs.base44.com/Integrations/connectors-catalog.md): Browse available connectors, explore example prompts, and review permissions. - \[Setting up shared connectors\](https://docs.base44.com/Integrations/setting-up-shared-connectors.md): Connect your app to popular tools like Google Workspace, BigQuery, Slack, Salesforce, GitHub, and more using secure OAuth connections without managing API keys. - \[Using the Slack connectors\](https://docs.base44.com/Integrations/slack-connectors.md): Connect your Base44 app to Slack or Slack Bot to send messages, read channel history, and automate workspace notifications without managing API keys. - \[Using the Gmail connector\](https://docs.base44.com/Integrations/gmail-connector.md): Connect your Base44 app to Gmail to send emails, create digests, and automate notifications without managing API keys. - \[Using the LinkedIn connector\](https://docs.base44.com/Integrations/linkedin-connector.md): Connect your Base44 app to LinkedIn to publish posts, share updates, display profile or organization data, and automate LinkedIn workflows without managing API keys. - \[Using the GitHub connector\](https://docs.base44.com/Integrations/github-connector.md): Connect your Base44 app to GitHub and manage repositories, list issues, review pull requests, and automate workflows connected to your codebase. - \[Using the Google Search Console connector\](https://docs.base44.com/Integrations/google-search-console-connector.md): Connect your Base44 app to Google Search Console to access search performance data, sitemaps, URL inspection, and indexing status. - \[Setting up connectors for app users\](https://docs.base44.com/Integrations/user-connectors.md): Let each person using your app connect their own account to services like Google, Slack, or Notion. - \[Setting up data connectors\](https://docs.base44.com/Integrations/data-connectors.md): Connect Snowflake and Databricks to query and work with external data while building apps. - \[Setting up the Snowflake connector\](https://docs.base44.com/Integrations/snowflake-connector.md): Connect Snowflake to query and work with external data while building apps. - \[Setting up the Databricks connector\](https://docs.base44.com/Integrations/databricks-connector.md): Connect Databricks to query and work with external data while building apps. - \[Using Base44 built-in integrations\](https://docs.base44.com/Integrations/built-in-integrations.md): Learn how to use Base44 built-in integrations to power smart features in your apps. - \[Managing and using custom integrations\](https://docs.base44.com/documentation/integrations/using-custom-integrations.md): Connect shared APIs once and reuse them across every app in your workspace. - \[AI Integrations in Base44\](https://docs.base44.com/Integrations/AI-integrations.md): Connect your Base44 app to popular AI services like OpenAI, Claude, Groq, Mistral or any other AI platform that uses an API key. - \[Resend Integration \](https://docs.base44.com/Integrations/Resend-integration.md): Connect your Base44 app with Resend to send emails like confirmations, updates, and newsletters from your own domain with minimal setup. - \[ElevenLabs Integration\](https://docs.base44.com/Integrations/Elevenlabs-integration.md): Connect your Base44 app with ElevenLabs to create lifelike audio using state-of-the-art voice models for content, voiceovers, accessibility, and more - \[Zapier\](https://docs.base44.com/Integrations/Zapier-integration.md): Automate your Base44 app by connecting it to Zapier, so actions in your app can trigger tasks in thousands of other apps like sending calendar invites, updating spreadsheets, or posting messages. - \[Airtable Integration\](https://docs.base44.com/Integrations/Airtable-integration.md): Connect your Base44 app to Airtable to bring your live data into dashboards, tools, and workflows. - \[Google Places Integration\](https://docs.base44.com/Integrations/Google-places-integration.md): Connect your app to Google Places to easily search, suggest, and display real-world places. - \[Slack Integration\](https://docs.base44.com/Integrations/Slack-integration.md): Connect your Base44 app to Slack so it can send real-time messages whenever something important happens like a new task being created or a status changing. This is a great way to keep your team updated directly inside Slack without switching between tools. ## Developers: Home - \[Base44 Developer Platform\](https://docs.base44.com/developers/home.md): Build and deploy full-stack apps with a managed backend designed for AI agents. ## Developers: Backend — Overview - \[Introduction\](https://docs.base44.com/developers/backend/overview/introduction.md): Backend-as-a-service built with AI agents in mind - \[Backend Service Basics\](https://docs.base44.com/developers/backend/overview/backend-service-basics.md): What the Base44 backend service is, who it's for, and how it fits with the main Base44 platform - \[Features\](https://docs.base44.com/developers/backend/overview/features.md): What the Base44 backend service includes - \[Pricing\](https://docs.base44.com/developers/backend/overview/pricing.md): Backend service pricing and credit usage - \[Troubleshoot your project\](https://docs.base44.com/developers/backend/overview/troubleshooting.md): Debug deployed functions, check platform status, and find help when something goes wrong. ## Developers: Backend — Quickstarts - \[Build with AI\](https://docs.base44.com/developers/backend/quickstart/quickstart-with-ai.md): Set up a Base44 project using your AI coding agent - \[Backend only\](https://docs.base44.com/developers/backend/quickstart/templates/quickstart-backend-only.md): Create a backend only project with Base44 - \[React Quickstart\](https://docs.base44.com/developers/backend/quickstart/templates/quickstart-react-template.md): Create a full-stack Base44 project with a Base44 backend and a Vite-powered React frontend - \[React Quickstart\](https://docs.base44.com/developers/backend/quickstart/frameworks/quickstart-with-react.md): Add a Base44 backend to your React project - \[Vue Quickstart\](https://docs.base44.com/developers/backend/quickstart/frameworks/quickstart-vue.md): Add a Base44 backend to your Vue project - \[Solid JS Quickstart\](https://docs.base44.com/developers/backend/quickstart/frameworks/quickstart-solid-js.md): Add a Base44 backend to your Solid JS project - \[Refine Quickstart\](https://docs.base44.com/developers/backend/quickstart/frameworks/quickstart-refine.md): Add Base44 to your Refine project - \[Hono Quickstart\](https://docs.base44.com/developers/backend/quickstart/frameworks/quickstart-hono.md): Add Base44 to your Hono project - \[React Native (Expo) Quickstart\](https://docs.base44.com/developers/backend/quickstart/frameworks/quickstart-with-react-native.md): Add a Base44 backend to your React Native Expo project ## Developers: Backend — Project - \[Project Structure\](https://docs.base44.com/developers/backend/overview/project-structure.md): Understanding the Base44 project structure for local development - \[Start from an Existing Base44 App\](https://docs.base44.com/developers/backend/overview/start-from-existing-app.md): Clone a Base44 app into a separate local project with its own backend on Base44 - \[Link an Existing Backend Project\](https://docs.base44.com/developers/backend/overview/link-existing-project.md): Set up and run existing Base44 backend project code, such as example apps - \[Local development\](https://docs.base44.com/developers/backend/overview/local-dev/local-development-overview.md): Develop and test your backend project locally with base44 dev - \[Local development setup\](https://docs.base44.com/developers/backend/overview/local-dev/get-started.md): Set up the Base44 dev server and connect your frontend to it - \[Standalone scripts\](https://docs.base44.com/developers/backend/overview/run-scripts.md): Run standalone scripts against your app ## Developers: Backend — AI Development Tools - \[AI development tools overview\](https://docs.base44.com/developers/backend/overview/agent-extensions.md): Tools that help AI assistants work more effectively with Base44 - \[Skills\](https://docs.base44.com/developers/backend/overview/skills.md): Reusable instructions that teach AI coding agents how to perform Base44-specific tasks - \[Base44 MCP server\](https://docs.base44.com/developers/backend/overview/mcp-server.md): Create and manage Base44 backend projects from AI assistants like ChatGPT, Claude, and Cursor - \[Base44 Docs MCP\](https://docs.base44.com/developers/backend/overview/base44-docs-mcp.md): Let AI assistants search Base44 documentation while you develop ## Developers: Backend — Resources - \[About Agents\](https://docs.base44.com/developers/backend/resources/agents-config.md): Define AI agents using local configuration files - \[Auth\](https://docs.base44.com/developers/backend/resources/auth.md): Manage your app's login methods using local configuration files - \[Backend Functions Overview\](https://docs.base44.com/developers/backend/resources/backend-functions/overview.md): Write custom backend logic with Deno-powered serverless functions - \[Automations\](https://docs.base44.com/developers/backend/resources/backend-functions/automations.md): Schedule recurring tasks and trigger functions automatically based on database events or connector webhook events - \[Connectors overview\](https://docs.base44.com/developers/backend/resources/connectors.md): Connect your app to third-party services using OAuth or managed provisioning - \[Shared connectors\](https://docs.base44.com/developers/backend/resources/connectors/shared-connectors.md): Connect a single service account that all app users share - \[App user connectors\](https://docs.base44.com/developers/backend/resources/connectors/app-user-connectors.md): Let each app user connect their own third-party account - \[Entities Overview\](https://docs.base44.com/developers/backend/resources/entities/overview.md): Learn about Base44's entity system for defining data models with built-in CRUD operations, validation, and security. - \[Entity Schemas\](https://docs.base44.com/developers/backend/resources/entities/entity-schemas.md): Define custom data structures using a JSON Schema with validation rules and field types - \[User Schema\](https://docs.base44.com/developers/backend/resources/entities/user-schema.md): Extend the built-in User entity with additional fields for your app. - \[Security\](https://docs.base44.com/developers/backend/resources/entities/security.md): Control access to your entity data with row level and field level security rules. ## Developers: App Code — Overview - \[Introduction\](https://docs.base44.com/developers/app-code/overview/introduction.md): Build and edit Base44 apps with AI assistance and developer tools. - \[Project Structure\](https://docs.base44.com/developers/app-code/overview/project-structure.md): Understand the organization and key files in your Base44 app project ## Developers: App Code — Base44 Editor - \[Code Tab\](https://docs.base44.com/developers/app-code/editor/code-tab.md): Edit your app's source code directly in Base44's Code tab with live preview and full developer control. - \[Activity Monitor\](https://docs.base44.com/developers/app-code/editor/activity-monitor.md): Monitor and debug your app's API requests and responses in realtime during development. ## Developers: App Code — Local Development - \[GitHub Integration\](https://docs.base44.com/developers/app-code/local-development/github.md): Connect your Base44 app to GitHub for version control, local development, and collaboration. ## Developers: App Code — Enterprise - \[Enterprise APIs\](https://docs.base44.com/developers/references/enterprise-apis.md): REST APIs for enterprise workspace management ## Developers: SDK — Get Started - \[SDK overview\](https://docs.base44.com/developers/references/sdk/getting-started/overview.md): Introduction to the Base44 JavaScript SDK - \[Base44 client\](https://docs.base44.com/developers/references/sdk/getting-started/client.md): Learn how to work with the Base44 client - \[Work with data\](https://docs.base44.com/developers/references/sdk/getting-started/work-with-data.md): Create, read, update, and delete data in your Base44 app - \[Dynamic Types\](https://docs.base44.com/developers/references/sdk/getting-started/dynamic-types.md): Get full type safety and autocomplete with TypeScript types that stay in sync with your backend - \[Common SDK uses\](https://docs.base44.com/developers/references/sdk/getting-started/work-with-sdk.md): Work with authentication, integrations, functions, and error handling - \[Connect to third-party APIs\](https://docs.base44.com/developers/references/sdk/getting-started/third-party-apis.md): Choose the right approach for integrating external services into your Base44 app ## Developers: SDK Reference - \[createClient\](https://docs.base44.com/developers/references/sdk/docs/functions/createClient.md) - \[createClientFromRequest\](https://docs.base44.com/developers/references/sdk/docs/functions/createClientFromRequest.md) - \[agents\](https://docs.base44.com/developers/references/sdk/docs/interfaces/agents.md) - \[analytics\](https://docs.base44.com/developers/references/sdk/docs/interfaces/analytics.md) - \[app-logs\](https://docs.base44.com/developers/references/sdk/docs/interfaces/app-logs.md) - \[auth\](https://docs.base44.com/developers/references/sdk/docs/interfaces/auth.md) - \[connectors\](https://docs.base44.com/developers/references/sdk/docs/interfaces/connectors.md) - \[functions\](https://docs.base44.com/developers/references/sdk/docs/interfaces/functions.md) - \[entities\](https://docs.base44.com/developers/references/sdk/docs/type-aliases/entities.md) - \[integrations\](https://docs.base44.com/developers/references/sdk/docs/type-aliases/integrations.md) ## Developers: CLI — Get Started - \[CLI Overview\](https://docs.base44.com/developers/references/cli/get-started/overview.md): Build and manage Base44 apps from the command line - \[CLI Commands Overview\](https://docs.base44.com/developers/references/cli/commands/introduction.md): Complete reference for all Base44 CLI commands ## Developers: CLI — Commands - \[login\](https://docs.base44.com/developers/references/cli/commands/login.md): Authenticate with Base44 using device code flow - \[logout\](https://docs.base44.com/developers/references/cli/commands/logout.md): Sign out and clear stored credentials - \[whoami\](https://docs.base44.com/developers/references/cli/commands/whoami.md): Display the current authenticated user - \[create\](https://docs.base44.com/developers/references/cli/commands/create.md): Create a new Base44 project - \[link\](https://docs.base44.com/developers/references/cli/commands/link.md): Link a local project to a Base44 project - \[eject\](https://docs.base44.com/developers/references/cli/commands/eject.md): Clone an existing Base44 app into a separate local project - \[dashboard open\](https://docs.base44.com/developers/references/cli/commands/dashboard-open.md): Open the app dashboard in your browser - \[functions pull\](https://docs.base44.com/developers/references/cli/commands/functions-pull.md): Download deployed functions to your local project - \[functions deploy\](https://docs.base44.com/developers/references/cli/commands/functions-deploy.md): Deploy local functions to Base44 - \[functions delete\](https://docs.base44.com/developers/references/cli/commands/functions-delete.md): Delete one or more deployed backend functions - \[functions list\](https://docs.base44.com/developers/references/cli/commands/functions-list.md): List all deployed backend functions - \[entities push\](https://docs.base44.com/developers/references/cli/commands/entities-push.md): Push local entity schemas to Base44 - \[agents pull\](https://docs.base44.com/developers/references/cli/commands/agents-pull.md): Pull agent configurations from Base44 to local files - \[agents push\](https://docs.base44.com/developers/references/cli/commands/agents-push.md): Push local agent configurations to Base44 - \[connectors list-available\](https://docs.base44.com/developers/references/cli/commands/connectors-list-available.md): List all available integration types - \[connectors pull\](https://docs.base44.com/developers/references/cli/commands/connectors-pull.md): Pull connector configurations from Base44 to local files - \[connectors push\](https://docs.base44.com/developers/references/cli/commands/connectors-push.md): Push local connector configurations to Base44 - \[auth password-login\](https://docs.base44.com/developers/references/cli/commands/auth-password-login.md): Enable or disable username and password login in your local auth config - \[auth social-login\](https://docs.base44.com/developers/references/cli/commands/auth-social-login.md): Enable or disable social login providers in your local auth config - \[auth pull\](https://docs.base44.com/developers/references/cli/commands/auth-pull.md): Pull auth config from Base44 to your local project - \[auth push\](https://docs.base44.com/developers/references/cli/commands/auth-push.md): Push local auth config to Base44 - \[secrets set\](https://docs.base44.com/developers/references/cli/commands/secrets-set.md): Set one or more project secrets - \[secrets list\](https://docs.base44.com/developers/references/cli/commands/secrets-list.md): List project secrets - \[secrets delete\](https://docs.base44.com/developers/references/cli/commands/secrets-delete.md): Delete one or more project secrets - \[dev\](https://docs.base44.com/developers/references/cli/commands/dev.md): Start a local development server - \[exec\](https://docs.base44.com/developers/references/cli/commands/exec.md): Run a script with the Base44 SDK pre-authenticated - \[types generate\](https://docs.base44.com/developers/references/cli/commands/types-generate.md): Generate TypeScript types from project resources - \[site open\](https://docs.base44.com/developers/references/cli/commands/site-open.md): Open the deployed site in your browser - \[logs\](https://docs.base44.com/developers/references/cli/commands/logs.md): View function logs - \[deploy\](https://docs.base44.com/developers/references/cli/commands/deploy.md): Deploy all project resources to Base44 - \[site deploy\](https://docs.base44.com/developers/references/cli/commands/site-deploy.md): Deploy built site files to Base44 hosting ## Developers: Skills — base44-cli - \[Base44 CLI\](https://docs.base44.com/developers/skills/base44-cli/index.md): Create and manage Base44 apps (projects) using the Base44 CLI tool. - \[base44 agents pull\](https://docs.base44.com/developers/skills/base44-cli/references/agents-pull.md): Pull AI agent configurations from Base44 to local files. Agents are conversational AI assistants that can interact with users, access your app's entities, and call backend functions. - \[base44 agents push\](https://docs.base44.com/developers/skills/base44-cli/references/agents-push.md): Push local AI agent configurations to Base44. Agents are conversational AI assistants that can interact with users, access your app's entities, and call backend functions. - \[base44 login\](https://docs.base44.com/developers/skills/base44-cli/references/auth-login.md): Authenticate with Base44 using device code flow. - \[base44 logout\](https://docs.base44.com/developers/skills/base44-cli/references/auth-logout.md): Logout from current device and clear stored authentication data. - \[base44 auth password-login\](https://docs.base44.com/developers/skills/base44-cli/references/auth-password-login.md): Enable or disable username & password authentication for your Base44 app. - \[base44 auth pull\](https://docs.base44.com/developers/skills/base44-cli/references/auth-pull.md): Pull the auth configuration from Base44 to local files. - \[base44 auth push\](https://docs.base44.com/developers/skills/base44-cli/references/auth-push.md): Push the local auth configuration to Base44. - \[base44 auth social-login\](https://docs.base44.com/developers/skills/base44-cli/references/auth-social-login.md): Enable or disable social login providers for your app (Google, Microsoft, Facebook, Apple). Auth config changes are local until you run base44 auth push or base44 deploy. - \[base44 auth sso\](https://docs.base44.com/developers/skills/base44-cli/references/auth-sso.md): Configure an SSO (Single Sign-On) identity provider for your app. Supports Google, Microsoft, GitHub, Okta, and custom OIDC providers. Auth config changes are local until you run base44 auth push o... - \[base44 whoami\](https://docs.base44.com/developers/skills/base44-cli/references/auth-whoami.md): Display the currently authenticated user. - \[Creating Connectors\](https://docs.base44.com/developers/skills/base44-cli/references/connectors-create.md): Connectors are OAuth integrations that let your Base44 app connect to external services like Google Calendar, Slack, Notion, and more. Once connected, you can use access tokens in backend functions... - \[base44 connectors initiate\](https://docs.base44.com/developers/skills/base44-cli/references/connectors-initiate.md): Initialize a connector on an app and start its OAuth flow. Unlike connectors push, this works projectless — it only needs an app id, not a local project directory. - \[base44 connectors list-available\](https://docs.base44.com/developers/skills/base44-cli/references/connectors-list-available.md): List all integration types available in the Base44 connector catalog. - \[base44 connectors pull\](https://docs.base44.com/developers/skills/base44-cli/references/connectors-pull.md): Pull connector configurations from Base44 to local files. Replaces all local connector configs with the remote versions. - \[base44 connectors push\](https://docs.base44.com/developers/skills/base44-cli/references/connectors-push.md): Push local connector configurations to Base44, synchronizing scopes and handling OAuth authorization. - \[base44 create\](https://docs.base44.com/developers/skills/base44-cli/references/create.md): Creates a new Base44 project from a template. This command is framework-agnostic and can either scaffold a complete project or add Base44 configuration to an existing project. - \[base44 dashboard open\](https://docs.base44.com/developers/skills/base44-cli/references/dashboard.md): Opens the Base44 app dashboard in your default web browser. - \[base44 deploy\](https://docs.base44.com/developers/skills/base44-cli/references/deploy.md): Deploys all project resources (entities, functions, agents, connectors, and site) to Base44 in a single command. - \[base44 dev\](https://docs.base44.com/developers/skills/base44-cli/references/dev.md): Start local development for a linked Base44 project. - \[base44 eject\](https://docs.base44.com/developers/skills/base44-cli/references/eject.md): Download the code for an existing Base44 project to your local machine. - \[Creating Entities\](https://docs.base44.com/developers/skills/base44-cli/references/entities-create.md): Base44 entities are defined locally in your project and then pushed to the Base44 backend. - \[base44 entities push\](https://docs.base44.com/developers/skills/base44-cli/references/entities-push.md): Push local entity definitions to Base44. - \[base44 exec\](https://docs.base44.com/developers/skills/base44-cli/references/exec.md): Run a script with the Base44 SDK pre-authenticated as the current user. Reads the script from stdin. - \[Creating Functions\](https://docs.base44.com/developers/skills/base44-cli/references/functions-create.md): Base44 functions are serverless backend functions that run on Deno. They are defined locally in your project and deployed to the Base44 backend. - \[base44 functions delete\](https://docs.base44.com/developers/skills/base44-cli/references/functions-delete.md): Delete one or more deployed functions from Base44. - \[base44 functions deploy\](https://docs.base44.com/developers/skills/base44-cli/references/functions-deploy.md): Deploy local function definitions to Base44. - \[base44 functions list\](https://docs.base44.com/developers/skills/base44-cli/references/functions-list.md): List all deployed functions on Base44 remote. - \[base44 functions pull\](https://docs.base44.com/developers/skills/base44-cli/references/functions-pull.md): Pull deployed functions from Base44 to local files. - \[base44 link\](https://docs.base44.com/developers/skills/base44-cli/references/link.md): Links an existing local Base44 project to a Base44 app in the cloud. Use this when you have a base44/config.jsonc but haven't connected it to a Base44 app yet. - \[RLS Examples\](https://docs.base44.com/developers/skills/base44-cli/references/rls-examples.md): Practical Row-Level Security patterns for common application types. - \[base44 scaffold\](https://docs.base44.com/developers/skills/base44-cli/references/scaffold.md): Scaffolds a local project for an existing Base44 app. Use this when you already have a Base44 app (you know its app ID) and want to set up the local project files to work with it. Runs fully non-in... - \[base44 secrets delete\](https://docs.base44.com/developers/skills/base44-cli/references/secrets-delete.md): Delete a secret from the current project. - \[base44 secrets list\](https://docs.base44.com/developers/skills/base44-cli/references/secrets-list.md): List the names of all secrets configured for the current project. - \[base44 secrets set\](https://docs.base44.com/developers/skills/base44-cli/references/secrets-set.md): Set one or more project secrets (environment variables stored in Base44). - \[base44 site deploy\](https://docs.base44.com/developers/skills/base44-cli/references/site-deploy.md): Deploy built site files to Base44 hosting. - \[base44 site open\](https://docs.base44.com/developers/skills/base44-cli/references/site-open.md): Opens the published site in your default web browser. - \[\`base44 types generate\`\](https://docs.base44.com/developers/skills/base44-cli/references/types-generate.md): Generate TypeScript declaration file (types.d.ts) from project resources (entities, functions, agents, connectors). ## Developers: Skills — base44-remote-dev - \[Remotely develop a Base44 app over MCP\](https://docs.base44.com/developers/skills/base44-remote-dev/index.md): Vendored from base44-dev/apper PR #11608 ## Developers: Skills — base44-sandbox - \[Base44 in the Cloud Sandbox\](https://docs.base44.com/developers/skills/base44-sandbox/index.md): Author Base44 app code inside Base44's cloud sandbox with your own coding agent. There is no local checkout: you read, write, and run files through the sandbox tools (over MCP or the base44 sandbox... ## Developers: Skills — base44-sdk - \[Base44 Coder\](https://docs.base44.com/developers/skills/base44-sdk/index.md): Build apps on the Base44 platform using the Base44 JavaScript SDK. - \[Base44 SDK Quick Reference\](https://docs.base44.com/developers/skills/base44-sdk/references/QUICK\_REFERENCE.md): Compact method signatures for all SDK modules. Verify against this before writing code. - \[Analytics Module\](https://docs.base44.com/developers/skills/base44-sdk/references/analytics.md): Track custom events and user activity via base44.analytics. - \[App Logs Module\](https://docs.base44.com/developers/skills/base44-sdk/references/app-logs.md): Log user activity in your app via base44.appLogs. - \[Auth Module\](https://docs.base44.com/developers/skills/base44-sdk/references/auth.md): User authentication, registration, and session management via base44.auth. - \[Agents Module\](https://docs.base44.com/developers/skills/base44-sdk/references/base44-agents.md): AI agent conversations and messages via base44.agents. - \[Client Setup\](https://docs.base44.com/developers/skills/base44-sdk/references/client.md): How to create and configure the Base44 client. - \[Connectors Module\](https://docs.base44.com/developers/skills/base44-sdk/references/connectors.md): OAuth token management for external services. - \[Entities Module\](https://docs.base44.com/developers/skills/base44-sdk/references/entities.md): CRUD operations on data models. Access via base44.entities.EntityName.method(). - \[Functions Module\](https://docs.base44.com/developers/skills/base44-sdk/references/functions.md): Invoke custom backend functions via base44.functions. - \[Integrations Module\](https://docs.base44.com/developers/skills/base44-sdk/references/integrations.md): Access third-party services via base44.integrations. - \[SSO Module\](https://docs.base44.com/developers/skills/base44-sdk/references/sso.md): Single Sign-On (SSO) support for authenticating Base44 users with external systems. Available via base44.asServiceRole.sso. - \[Users Module\](https://docs.base44.com/developers/skills/base44-sdk/references/users.md): Invite users to the app via base44.users. ## Developers: Skills — base44-troubleshooter - \[Troubleshoot Production Issues\](https://docs.base44.com/developers/skills/base44-troubleshooter/index.md): Verify authentication before fetching logs: - \[base44 logs\](https://docs.base44.com/developers/skills/base44-troubleshooter/references/project-logs.md): Fetch function logs for this app. ## Account & billing - \[Billing and plans\](https://docs.base44.com/Account-and-billing/Billing-and-plans.md): Start for free. Upgrade when you're ready. - \[Changing your account settings\](https://docs.base44.com/documentation/account-and-billing/managing-your-account.md): Take control of your profile, security, app defaults, and chat experience so Base44 works exactly the way you do. - \[Managing MCP connections\](https://docs.base44.com/documentation/account-and-billing/setting-up-a-custom-mcp.md): Connect and manage custom MCP servers that the AI chat can use while you build. - \[Credits\](https://docs.base44.com/Account-and-billing/Credits.md): Credits power your app building and operations in Base44. Learn how credits work so you can build confidently without hitting limits. - \[Student and educator discount\](https://docs.base44.com/Account-and-billing/Student-discount.md): Get a discounted rate on a Starter or Builder plan if you are a student or educator. ## Account & Billing: Workspaces - \[About workspaces\](https://docs.base44.com/documentation/account-and-billing/about-workspaces.md): Learn about workspaces in your Base44 account and how to manage them. - \[Managing a workspace\](https://docs.base44.com/documentation/account-and-billing/managing-your-workspace-members.md): Set up and manage your workspaces in Base44. - \[Managing your workspace members\](https://docs.base44.com/Account-and-billing/Managing-your-workspaces.md): Invite teammates to your Base44 workspace and give each person the right level of access. - \[Managing your workspace apps\](https://docs.base44.com/documentation/using-your-workspaces/managing-your-workspace-apps.md): Keep your apps organized and under control. Group them into folders, share them with others, clone them as starting points for new projects, and manage the full lifecycle of everything you build. - \[Creating workspace templates\](https://docs.base44.com/documentation/using-your-workspaces/creating-and-using-workspace-templates.md): Turn your best apps into reusable blueprints for your team or the Base44 community. - \[Managing workspace skills\](https://docs.base44.com/documentation/using-your-workspaces/adding-workspace-skills.md): Create and manage AI skills that guide how the AI chat builds apps in your workspace. ## Account & Billing: Community & support - \[Community\](https://docs.base44.com/Community-and-support/Community.md): Discover community apps, shape the roadmap, and get rewarded for building with Base44. - \[Creating and managing your Base44 profile\](https://docs.base44.com/Community-and-support/user-profile.md): Showcase your apps, track your progress, and build your reputation in Base44. - \[Joining the Base44 Partner Program\](https://docs.base44.com/Community-and-support/partner-program.md): Join the Base44 Partner Program and unlock tools for working with clients. - \[Referral Program\](https://docs.base44.com/Community-and-support/Referral-program.md): Invite friends to Base44 and earn bonus credits together. - \[Troubleshooting Issues\](https://docs.base44.com/Community-and-support/Troubleshooting.md): Get help with common issues in Base44 so you can keep working without interruptions. Find quick solutions for publishing, domain problems, and more. - \[Contacting Base44 for Support\](https://docs.base44.com/Community-and-support/Contacting-support.md): Get help building your app. Search our documentation, ask the AI assistant, or submit a support ticket for personalized support. ## Account & Billing: Legal & privacy - \[Privacy and security\](https://docs.base44.com/Community-and-support/Privacy-and-security.md): Stay confident. Your privacy and security come first at Base44. - \[AI service providers\](https://docs.base44.com/Community-and-support/ai-service-providers.md): See which third-party AI providers Base44 uses and review their terms and usage policies. - \[Understanding the potential risks of using generative AI tools\](https://docs.base44.com/Community-and-support/using-generative-ai.md): Learn about the main risks of generative AI in Base44 and how to use it responsibly. - \[Deleting your app's user data\](https://docs.base44.com/Community-and-support/Deleting-user-data.md): Remove one of your user's personal data from your Base44 app to support privacy and compliance obligations. ## Enterprise: Get started - \[Base44 for enterprises\](https://docs.base44.com/Enterprise/Base44-for-enterprises.md): Take control of your organization's collaboration and security with advanced authentication, access control, and centralized app policies. - \[Getting started as an enterprise admin\](https://docs.base44.com/Enterprise/getting-started-admin.md): Set up your enterprise workspace, invite your team, and configure security and app policies. - \[Getting started as an enterprise workspace member\](https://docs.base44.com/Enterprise/getting-started-member.md): Accept your invitation, sign in to your enterprise workspace, and start building and collaborating on apps. ## Enterprise: SSO - \[Single sign-on for enterprise workspaces\](https://docs.base44.com/Enterprise/SSO-for-enterprise-workspace.md): How single sign-on works for your Base44 enterprise workspace, and how to manage providers, verified domains, and member roles. - \[Setting up SSO for your enterprise workspace\](https://docs.base44.com/Enterprise/Set-up-SSO.md): Connect your identity provider to your Base44 enterprise workspace so your team signs in with their company credentials. - \[Setting up SSO for Microsoft Entra ID\](https://docs.base44.com/Enterprise/Microsoft-Entra-SSO.md): Let your team sign in to your Base44 enterprise workspace with their Microsoft Entra ID credentials. - \[Setting up SSO for Okta\](https://docs.base44.com/Enterprise/Okta-SSO.md): Let your team sign in to your Base44 enterprise workspace with their Okta credentials. ## Enterprise: SCIM - \[SCIM provisioning\](https://docs.base44.com/Enterprise/SCIM-provisioning.md): Automatically sync your identity provider's users with your Base44 enterprise workspace using SCIM 2.0. - \[Setting up SCIM provisioning for Microsoft Entra ID\](https://docs.base44.com/Enterprise/Microsoft-Entra-SCIM.md): Automatically sync your Microsoft Entra ID users with your Base44 enterprise workspace using SCIM. - \[Setting up SCIM provisioning for Okta\](https://docs.base44.com/Enterprise/Okta-SCIM.md): Automatically sync your Okta users with your Base44 enterprise workspace using SCIM. ## Enterprise: Members & access - \[Managing enterprise workspace members\](https://docs.base44.com/Enterprise/managing-enterprise-members.md): Control member roles, set per-member credit limits, and manage who can invite external collaborators in your enterprise workspace. - \[Adding an IP allowlist for your workspace\](https://docs.base44.com/Enterprise/IP-allowlist.md): Control who can access your workspace by allowing sign-in only from approved IP addresses. ## Enterprise: Workspace settings - \[Setting up your enterprise workspace domain\](https://docs.base44.com/Enterprise/Enterprise-workspace-domain.md): Give your team one trusted address for secure, branded access to your workspace. - \[Managing apps and Superagents in your enterprise workspace\](https://docs.base44.com/Enterprise/Enterprise-SSO-and-app-visibility.md): Control app access, visibility, and Superagent availability across your enterprise workspace. - \[Managing connector availability for your workspace\](https://docs.base44.com/Enterprise/workspace-connectors.md): Manage which connectors your workspace can use and how apps connect to them. - \[Managing workspace secrets\](https://docs.base44.com/Enterprise/workspace-secrets.md): Create and manage API keys for programmatic access to your workspace. ## Enterprise Monitoring API - \[Enterprise Monitoring API Overview\](https://docs.base44.com/developers/references/monitoring-api/get-started/overview.md): Get started with the Base44 Enterprise Monitoring API - \[Authentication\](https://docs.base44.com/developers/references/monitoring-api/get-started/authentication.md): How to authenticate with the Enterprise Monitoring API - \[Rate Limits\](https://docs.base44.com/developers/references/monitoring-api/get-started/rate-limits.md): Enterprise Monitoring API rate limits and throttling behavior ## Audit Logs API - \[Audit Logs API Overview\](https://docs.base44.com/developers/references/audit-logs-api/get-started/overview.md): Get started with the Base44 Audit Logs API - \[Authentication\](https://docs.base44.com/developers/references/audit-logs-api/get-started/authentication.md): How to authenticate with the Audit Logs API - \[Rate Limits\](https://docs.base44.com/developers/references/audit-logs-api/get-started/rate-limits.md): Audit Logs API rate limits and throttling behavior - \[Event Types\](https://docs.base44.com/developers/references/audit-logs-api/get-started/event-types.md): All audit log event types available for filtering ## API Specifications - \[monitoring-openapi\](https://docs.base44.com/developers/references/monitoring-api/monitoring-openapi.json) - \[audit-logs-openapi\](https://docs.base44.com/developers/references/audit-logs-api/audit-logs-openapi.json)
---
# Enterprise APIs - Base44 Support Documentation
> Documentation Index
> -------------------
>
> Fetch the complete documentation index at: [/llms.txt](https://docs.base44.com/llms.txt)
>
> Use this file to discover all available pages before exploring further.
[Zum Hauptinhalt springen](https://docs.base44.com/de/developers/references/enterprise-apis#content-area)
Base44 bietet REST-APIs für Workspaces mit Enterprise-Plan. Diese APIs geben Workspace-Admins und -Inhabern programmatischen Zugriff auf Monitoring-Daten und Audit-Logs.
[](https://docs.base44.com/de/developers/references/enterprise-apis#monitoring-api)
Monitoring API
------------------------------------------------------------------------------------------------------
Die Monitoring API bietet Einblick in Workspace-Aktivitäten, Nutzungsdaten der Anwender und App-Analysen. [Referenz der Monitoring API ansehen](https://docs.base44.com/developers/references/monitoring-api/get-started/overview)
[](https://docs.base44.com/de/developers/references/enterprise-apis#audit-logs-api)
Audit Logs API
------------------------------------------------------------------------------------------------------
Die Audit Logs API bietet Workspace-bezogenen Zugriff auf Audit-Ereignisse für Sicherheitsüberwachung, Compliance und SIEM-Integrationen. [Referenz der Audit Logs API ansehen](https://docs.base44.com/developers/references/audit-logs-api/get-started/overview)
Diese Seite wurde mit KI übersetzt. Für die genauesten und aktuellsten Informationen siehe die [englische Version](https://docs.base44.com/)
.
War diese Seite hilfreich?
JaNein
[GitHub-Integration](https://docs.base44.com/de/developers/app-code/local-development/github)
⌘I
Assistent
Antworten werden von KI generiert und können Fehler enthalten.
---
# Enterprise Monitoring API Overview - Base44 Support Documentation
> Documentation Index
> -------------------
>
> Fetch the complete documentation index at: [/llms.txt](https://docs.base44.com/llms.txt)
>
> Use this file to discover all available pages before exploring further.
[Skip to main content](https://docs.base44.com/developers/references/monitoring-api/get-started/overview#content-area)
The Monitoring API provides visibility into your Base44 workspace, including user activity, resource consumption, and app configurations. Use the Monitoring API to:
* Track credit usage across your workspace and by individual users.
* Monitor your workspace credit pool and per-member credit limits.
* Monitor user activity and identify inactive accounts.
* Audit app security settings.
* Analyze engagement with views, active users, and usage trends.
[](https://docs.base44.com/developers/references/monitoring-api/get-started/overview#workspaces)
Workspaces
---------------------------------------------------------------------------------------------------------------
A [workspace](https://docs.base44.com/documentation/account-and-billing/about-workspaces)
is a shared environment where teams collaborate on apps. The Monitoring API provides workspace owners and admins with aggregate data across the users and apps in a specific workspace.
###
[](https://docs.base44.com/developers/references/monitoring-api/get-started/overview#workspace-id)
Workspace ID
Most endpoints require a `workspace_id` in the URL path, and you must have admin or owner role in that workspace to access them. To get your `workspace_id`, navigate to your workspace management page:
1. Click your profile icon at the top right of your account.
2. Hover over the relevant workspace and click **Manage**.
3. The workspace ID is the last part of the workspace management page URL.
[](https://docs.base44.com/developers/references/monitoring-api/get-started/overview#credit-pools-and-member-limits)
Credit pools and member limits
-------------------------------------------------------------------------------------------------------------------------------------------------------
Your workspace shares a single credit pool for each credit reset period. The pool tracks message and integration credits separately, and each reports its limit, the amount used, and the amount remaining. The reset period matches the one shown in your billing page. For yearly subscriptions that reset monthly, this is the monthly window. The [`Get analytics`](https://docs.base44.com/api-reference/analytics/get-analytics)
response returns this data in the `credit_pool` object, including your tier, daily message limits, bonus credits, gift card balance, and over-limit flags. Workspaces can also set per-member credit limits on how many message credits each member draws from the shared pool. A member’s limit comes from either an individual override or a workspace default. The `member_allocations` object in the analytics response summarizes these limits across your workspace, and the `member_allocation` object on each user in [`Get user`](https://docs.base44.com/api-reference/users/get-user)
reports an individual member’s limit and usage.
Per-member credit limits depend on your workspace tier. When your tier does not support them, members draw from the pool without an individual limit, and the per-member fields return `null`.
The `seats` and `user_distribution.by_seat_type` fields, the `seat_type` query parameter, and the per-user `seat_type` field reflect a legacy seats model and are deprecated. Workspaces on the current billing model share a credit pool and report zeros for these fields. Use `credit_pool`, `member_allocations`, and the `tier` query parameter instead.
[](https://docs.base44.com/developers/references/monitoring-api/get-started/overview#example-workflows)
Example workflows
-----------------------------------------------------------------------------------------------------------------------------
Here are some common ways to use the Monitoring API.
###
[](https://docs.base44.com/developers/references/monitoring-api/get-started/overview#compare-monthly-usage)
Compare monthly usage
1
[](https://docs.base44.com/developers/references/monitoring-api/get-started/overview#)
Get current month analytics
Call [`Get analytics`](https://docs.base44.com/api-reference/analytics/get-analytics)
with this month’s date range to get current credit consumption and user activity.
2
[](https://docs.base44.com/developers/references/monitoring-api/get-started/overview#)
Get previous month analytics
Call [`Get analytics`](https://docs.base44.com/api-reference/analytics/get-analytics)
again with last month’s date range to compare trends.
###
[](https://docs.base44.com/developers/references/monitoring-api/get-started/overview#analyze-user-activity)
Analyze user activity
1
[](https://docs.base44.com/developers/references/monitoring-api/get-started/overview#)
List users
Call [`List users`](https://docs.base44.com/api-reference/users/list-users)
to get all users with summary consumption data for the current billing period.
2
[](https://docs.base44.com/developers/references/monitoring-api/get-started/overview#)
Get user
Call [`Get user`](https://docs.base44.com/api-reference/users/get-user)
to get consumption data for a specific user over a custom date range.
###
[](https://docs.base44.com/developers/references/monitoring-api/get-started/overview#find-members-over-their-credit-limit)
Find members over their credit limit
1
[](https://docs.base44.com/developers/references/monitoring-api/get-started/overview#)
List users over their limit
Call [`List users`](https://docs.base44.com/api-reference/users/list-users)
with `over_member_limit=true` to return only members who have exceeded their per-member credit limit in the current credit reset period.
2
[](https://docs.base44.com/developers/references/monitoring-api/get-started/overview#)
Get member allocation detail
Call [`Get user`](https://docs.base44.com/api-reference/users/get-user)
for a specific member to see their `member_allocation`, including the limit, the source of the limit, and the credits remaining.
###
[](https://docs.base44.com/developers/references/monitoring-api/get-started/overview#audit-an-app)
Audit an app
1
[](https://docs.base44.com/developers/references/monitoring-api/get-started/overview#)
List users
Call [`List users`](https://docs.base44.com/api-reference/users/list-users)
to find users in your workspace.
2
[](https://docs.base44.com/developers/references/monitoring-api/get-started/overview#)
List user apps
Call [`List user apps`](https://docs.base44.com/api-reference/users/list-user-apps)
to get app IDs for a specific user.
3
[](https://docs.base44.com/developers/references/monitoring-api/get-started/overview#)
Get app analytics
Call [`Get app analytics`](https://docs.base44.com/api-reference/apps/get-app-analytics)
to get detailed metrics and governance flags for the app.
Was this page helpful?
YesNo
[Authentication](https://docs.base44.com/developers/references/monitoring-api/get-started/authentication)
⌘I
Assistant
Responses are generated using AI and may contain mistakes.
Suggestions
Which plans come with a free domain?How are credits used?How do I use Discuss mode?
---
# Code Tab - Base44 Support Documentation
> Documentation Index
> -------------------
>
> Fetch the complete documentation index at: [/llms.txt](https://docs.base44.com/llms.txt)
>
> Use this file to discover all available pages before exploring further.
[Skip to main content](https://docs.base44.com/developers/app-code/editor/code-tab#content-area)
The Code tab lets you view and edit your app’s source code directly, giving you control over your app’s functionality, design, and behavior while seeing changes immediately.
The Code tab is for developers who want more control. For simpler changes, use Base44’s visual editor and AI tools.

[](https://docs.base44.com/developers/app-code/editor/code-tab#access-the-code-tab)
Access the Code tab
-----------------------------------------------------------------------------------------------------------
**To open the Code tab:**
1. Go to your app’s dashboard.
2. Click the **Code** tab.
The Code tab displays your [project files](https://docs.base44.com/developers/app-code/overview/project-structure)
in a file explorer on the left, with the code editor taking up the main space.

[](https://docs.base44.com/developers/app-code/editor/code-tab#navigate-your-codebase)
Navigate your codebase
-----------------------------------------------------------------------------------------------------------------
Use the **Files used in this page** feature to see which files power the page you’re previewing. This shows you exactly which code files are running, so you know where to go when you want to edit the page or investigate an issue. Each entry in the list shows the file name and its folder path, grouped by location in your project such as pages or components. **To view files used on a page:**
1. Go to your app editor.
2. Click the **More Actions** icon at the top right.
3. Click **Files used in this page**.

If you want to move from this focused view into the full file structure, click **See all files**. This takes you to the complete code files view so you can keep exploring from there.
[](https://docs.base44.com/developers/app-code/editor/code-tab#edit-with-live-preview)
Edit with live preview
-----------------------------------------------------------------------------------------------------------------
The Code tab offers a split-screen view that shows your code on one side and a live preview of your app on the other. This lets you see changes instantly without switching contexts.

**To edit with live preview:**
1. Open a file in the Code tab.
2. Click the split-screen toggle in the top right corner.
3. Edit your code on the left and see your changes on the right.
**Every time you make changes to the code:**
* Click **Save** at the bottom of the screen to apply your changes and refresh the preview with the latest code.
* Click **Discard** at the bottom of the screen if you want to drop all unsaved edits and return to the last saved version of the file.
**Important:** If you make changes to your app’s code, make sure to click **Publish** for them to go live on your app.
When you are ready to leave the split screen, click **Exit split**. For local development with your own IDE, see [GitHub Integration](https://docs.base44.com/developers/app-code/local-development/github)
.
[](https://docs.base44.com/developers/app-code/editor/code-tab#review-ai-code-changes)
Review AI code changes
-----------------------------------------------------------------------------------------------------------------
When the AI edits your app, you can open the **Code changes** modal to see exactly what it changed before publishing. The modal shows every file the AI touched, grouped by folder, with a diff view for each one. **To open the Code changes modal:**
1. Go to the AI chat in your app editor.
2. Hover over a message where the AI edited or created a file.
3. Click the three dots icon next to that change and select **View Changes**.
A modal opens with a file tree on the left and the diff for the selected file on the right. A stats bar at the top breaks down how many files were added, modified, and deleted. Files in the tree are color coded by state:
* **Green** for newly added files.
* **Amber** for modified files, which open in a side-by-side diff view.
* **Red** for deleted files.
Click any file in the tree to jump straight to its diff.
[](https://docs.base44.com/developers/app-code/editor/code-tab#faqs)
FAQs
-----------------------------------------------------------------------------
Can I edit every part of my app's code?
Yes. You can open and edit any code file that appears in the Code files panel, including pages, components, layouts, and entity helpers. If a part of the app is generated for you, it still appears as regular code that you can modify.
Do I need to use split screen to edit code?
No. You can work in the full width code editor if you prefer more space. Split screen is helpful when you want to see the preview next to your code, but you can turn it off at any time and reopen it later.
What happens if I click Discard?
Discard removes all unsaved changes in the active file and restores the last saved version. This is useful if you try something that does not work and want to go back quickly. Once you click Discard, you cannot recover the unsaved code from that session.
Do I need to be an experienced developer to edit the code?
You don’t need to be an expert, but basic familiarity with React and JSX helps. You can start with small changes such as updating text, swapping components, or changing simple styles, then move on to more advanced logic as you gain confidence
Was this page helpful?
YesNo
[Project Structure](https://docs.base44.com/developers/app-code/overview/project-structure)
[Activity Monitor](https://docs.base44.com/developers/app-code/editor/activity-monitor)
⌘I
Assistant
Responses are generated using AI and may contain mistakes.
Suggestions
Which plans come with a free domain?How are credits used?How do I use Discuss mode?
---
# Rate Limits - Base44 Support Documentation
> Documentation Index
> -------------------
>
> Fetch the complete documentation index at: [/llms.txt](https://docs.base44.com/llms.txt)
>
> Use this file to discover all available pages before exploring further.
[Skip to main content](https://docs.base44.com/developers/references/monitoring-api/get-started/rate-limits#content-area)
Rate limits are applied per authenticated user using a token-bucket algorithm.
[](https://docs.base44.com/developers/references/monitoring-api/get-started/rate-limits#limits-by-endpoint)
Limits by endpoint
----------------------------------------------------------------------------------------------------------------------------------
| Endpoint | Limit |
| --- | --- |
| [Get analytics](https://docs.base44.com/api-reference/analytics/get-analytics) | 50 req/min |
| [List users](https://docs.base44.com/api-reference/users/list-users) | 50 req/min |
| [Get user](https://docs.base44.com/api-reference/users/get-user) | 75 req/min |
| [List user apps](https://docs.base44.com/api-reference/users/list-user-apps) | 50 req/min |
| [Get app analytics](https://docs.base44.com/api-reference/apps/get-app-analytics) | 50 req/min |
Enterprise users have doubled rate limits across all endpoints.
[](https://docs.base44.com/developers/references/monitoring-api/get-started/rate-limits#exceeding-rate-limits)
Exceeding rate limits
----------------------------------------------------------------------------------------------------------------------------------------
If you exceed the rate limit, you’ll receive a `429 Too Many Requests` response. Wait before retrying.
Was this page helpful?
YesNo
[Authentication](https://docs.base44.com/developers/references/monitoring-api/get-started/authentication)
[Health check](https://docs.base44.com/api-reference/system/health-check)
⌘I
Assistant
Responses are generated using AI and may contain mistakes.
Suggestions
Which plans come with a free domain?How are credits used?How do I use Discuss mode?
---
# Audit Logs API Overview - Base44 Support Documentation
> Documentation Index
> -------------------
>
> Fetch the complete documentation index at: [/llms.txt](https://docs.base44.com/llms.txt)
>
> Use this file to discover all available pages before exploring further.
[Skip to main content](https://docs.base44.com/developers/references/audit-logs-api/get-started/overview#content-area)
The Audit Logs API provides workspace-scoped access to audit events for security monitoring, compliance, and SIEM integrations. Use the Audit Logs API to:
* Stream audit events into your SIEM or security tooling.
* Investigate user activity across all apps in a workspace.
* Monitor authentication events, entity changes, and administrative actions.
* Build compliance reports with full event detail.
[](https://docs.base44.com/developers/references/audit-logs-api/get-started/overview#prerequisites)
Prerequisites
---------------------------------------------------------------------------------------------------------------------
* An Enterprise plan workspace.
* A workspace API key. See [Authentication](https://docs.base44.com/developers/references/audit-logs-api/get-started/authentication)
to create one.
[](https://docs.base44.com/developers/references/audit-logs-api/get-started/overview#workspaces)
Workspaces
---------------------------------------------------------------------------------------------------------------
A [workspace](https://docs.base44.com/documentation/account-and-billing/about-workspaces)
is a shared environment where teams collaborate on apps. The Audit Logs API returns events across all apps in a workspace.
###
[](https://docs.base44.com/developers/references/audit-logs-api/get-started/overview#workspace-id)
Workspace ID
The endpoints in the Audit Logs API require a `workspace_id` in the URL path. You must have admin or owner role in that workspace. To get your `workspace_id`:
1. Click your profile icon at the top right of your account.
2. Hover over the relevant workspace and click **Manage**.
3. The workspace ID is the last part of the workspace management page URL.
Was this page helpful?
YesNo
[Authentication](https://docs.base44.com/developers/references/audit-logs-api/get-started/authentication)
⌘I
Assistant
Responses are generated using AI and may contain mistakes.
Suggestions
Which plans come with a free domain?How are credits used?How do I use Discuss mode?
---
# Activity Monitor - Base44 Support Documentation
> Documentation Index
> -------------------
>
> Fetch the complete documentation index at: [/llms.txt](https://docs.base44.com/llms.txt)
>
> Use this file to discover all available pages before exploring further.
[Skip to main content](https://docs.base44.com/developers/app-code/editor/activity-monitor#content-area)
The Activity Monitor shows every request your app makes while you are in preview. Check which endpoints are called, see status codes and timing, and inspect request and response details to debug problems. For each entry you can see the method, the path, when it happened, and the status code. Use the search field at the top left to filter by method, path, or other text.
[](https://docs.base44.com/developers/app-code/editor/activity-monitor#access-the-activity-monitor)
Access the Activity Monitor
-----------------------------------------------------------------------------------------------------------------------------------
To open the Activity Monitor:
1. Go to your app editor.
2. Click the **More Actions** icon () at the top right.
3. Click **Activity Monitor**.

[](https://docs.base44.com/developers/app-code/editor/activity-monitor#inspect-a-request)
Inspect a request
---------------------------------------------------------------------------------------------------------------
Click any entry in the list to see its details. The details panel has three tabs:
* **General**: Full URL, HTTP method, status code, total time, and timestamps.
* **Request**: What your app sent, including headers, query parameters, and request body.
* **Response**: What the endpoint returned, including headers, body, or error message.

Use this information to confirm your app sends the expected data and the backend returns what you expect. For more on editing your app’s code, see [Code Tab](https://docs.base44.com/developers/app-code/editor/code-tab)
.
Was this page helpful?
YesNo
[Code Tab](https://docs.base44.com/developers/app-code/editor/code-tab)
[GitHub Integration](https://docs.base44.com/developers/app-code/local-development/github)
⌘I
Assistant
Responses are generated using AI and may contain mistakes.
Suggestions
Which plans come with a free domain?How are credits used?How do I use Discuss mode?
---
# Project Structure - Base44 Support Documentation
> Documentation Index
> -------------------
>
> Fetch the complete documentation index at: [/llms.txt](https://docs.base44.com/llms.txt)
>
> Use this file to discover all available pages before exploring further.
[Skip to main content](https://docs.base44.com/developers/app-code/overview/project-structure#content-area)
Base44 apps are standard React apps built with Vite. Your project includes modern web development tools and seamless Base44 backend integration.
[](https://docs.base44.com/developers/app-code/overview/project-structure#project-structure)
Project structure
------------------------------------------------------------------------------------------------------------------
In the [Code Tab](https://docs.base44.com/developers/app-code/editor/code-tab)
and when you [connect to GitHub](https://docs.base44.com/developers/app-code/local-development/github)
, you’ll see the complete React/Vite project structure:
src
pages
components
api
hooks
lib
utils
entities
functions
package.json
vite.config.js
tailwind.config.js
index.html
###
[](https://docs.base44.com/developers/app-code/overview/project-structure#project-directories)
Project directories
Your project contains the following directories:
* **`src/`** - Frontend app code organized into these directories:
* `pages` - The pages in your app. Each file is a route. `Home.jsx` becomes `/`, `Settings.jsx` becomes `/settings`.
* `components` - Reusable UI elements. The `ui/` subfolder contains pre-built UI components.
* `api` - Base44 SDK client configuration for communicating with your backend.
* `hooks` - Custom React hooks for UI and state management.
* `lib` - Base44 integration and app configuration code.
* `utils` - Utility functions and helper methods.
* **`entities/`** - Your data model definitions. Each entity has a JSON schema file that defines its fields.
* **`functions/`** - Backend functions for backend logic. Each TypeScript file in this directory is a separate function.
**Entities:** When using GitHub 2-way integration, entities are managed in Base44 and are not included in your local repository.
###
[](https://docs.base44.com/developers/app-code/overview/project-structure#configuration-files)
Configuration files
The root directory includes all the configuration needed to run independently:
* `package.json` - Dependencies and scripts (includes @base44/sdk)
* `vite.config.js` - Build configuration with Base44 plugin
* `tailwind.config.js` - Styling configuration
* `index.html` - Main HTML entry point
[](https://docs.base44.com/developers/app-code/overview/project-structure#run-locally)
Run locally
------------------------------------------------------------------------------------------------------
To run the exported project locally: `npm install` then `npm run dev`.
Was this page helpful?
YesNo
[Base44 for Devs](https://docs.base44.com/developers/app-code/overview/introduction)
[Code Tab](https://docs.base44.com/developers/app-code/editor/code-tab)
⌘I
Assistant
Responses are generated using AI and may contain mistakes.
Suggestions
Which plans come with a free domain?How are credits used?How do I use Discuss mode?
---
# GitHub Integration - Base44 Support Documentation
> Documentation Index
> -------------------
>
> Fetch the complete documentation index at: [/llms.txt](https://docs.base44.com/llms.txt)
>
> Use this file to discover all available pages before exploring further.
[Skip to main content](https://docs.base44.com/developers/app-code/local-development/github#content-area)
Set up GitHub integration to edit your Base44 app locally and sync changes automatically.
[](https://docs.base44.com/developers/app-code/local-development/github#sync-your-app-with-github)
Sync your app with GitHub
--------------------------------------------------------------------------------------------------------------------------------
Connect your app to GitHub to write code in your local development environment or in Base44 and keep them in sync with each other.

**Important:**
* GitHub 2 way sync requires the [**Builder plan**](https://base44.com/pricing)
or higher.
* Only app owners can perform the initial connection to a repository.
* To reconnect in case of a connection issue, you must be either an app owner or the user who originally connected the repository.
* If you previously connected to GitHub using the legacy Export to GitHub 1-way integration, click **Looking for the old setup?** in the GitHub panel to disconnect it and reconnect using 2-way sync.
* When you connect your app to GitHub, your changes are synced to the connected repository automatically. There’s no option to manually push updates from your Base44 app to GitHub.
* GitHub sync is permanent. You can’t disconnect or transfer the project back to Base44.
* After you connect GitHub to your app, you cannot use Version History to revert to versions from before the GitHub integration. Those older versions are not stored in your GitHub repository, so trying to revert to them results in an error. Only versions that exist in the connected GitHub repo are available to restore.
**To sync your app with GitHub:**
1. Click **Dashboard** in your app editor.
2. Click the **GitHub** icon at the top-right and click **Connect to GitHub**.
3. Click **Connect GitHub**.
4. Click **Authorize Base44 Builder**.
5. Choose where to install the **Base44 Builder**:
* Select the GitHub **organization** or account.
* Choose which **repositories** to allow access.
6. Click **Install**.
7. Create a repository for your app:
* Choose the GitHub **organization** or account.
* Enter a name for the new repository.
* Click **Create Repository**.
After connecting, click the **GitHub** icon in the top panel, then click **Go to Repository**.

[](https://docs.base44.com/developers/app-code/local-development/github#set-up-your-local-development-environment)
Set up your local development environment
----------------------------------------------------------------------------------------------------------------------------------------------------------------
After connecting to GitHub, set up your local repository to start editing code in your preferred development environment. To set up your local repository:
1. Clone the repository using the project’s Git URL.
2. Navigate to the project directory.
3. Install dependencies: `npm install`.
4. Create an `.env.local` file and set the environment variables:
VITE_BASE44_APP_ID=your_app_id
VITE_BASE44_APP_BASE_URL=your_backend_url
_Example:_
VITE_BASE44_APP_ID=cbef744a8545c389ef439ea6
VITE_BASE44_APP_BASE_URL=https://my-to-do-list-81bfaad7.base44.app
**Run the app locally:**
npm run dev
For details on the exported file structure, see [Project Structure](https://docs.base44.com/developers/app-code/overview/project-structure)
.
###
[](https://docs.base44.com/developers/app-code/local-development/github#sync-local-changes-to-base44)
Sync local changes to Base44
To sync your local changes to Base44, merge the changes to the main git branch. This branch must be named `main`. Other default branch names, such as `master`, currently aren’t supported. The changes will then be visible on your Base44 app.
After syncing, click **Publish** in the top right corner of your Base44 app to make the changes live for users.
[](https://docs.base44.com/developers/app-code/local-development/github#invite-collaborators)
Invite collaborators
----------------------------------------------------------------------------------------------------------------------
Invite teammates to work on your app’s GitHub repository. **To invite collaborators:**
1. Open your app’s **Dashboard**.
2. Click the **GitHub** icon in the top panel.
3. Click the **Invite Collaborator** tab.
4. Enter their **GitHub username**.
5. Click **Invite**.

[](https://docs.base44.com/developers/app-code/local-development/github#disconnect-from-github)
Disconnect from GitHub
--------------------------------------------------------------------------------------------------------------------------
You can disconnect a specific app from its GitHub repository or disconnect your GitHub account from Base44 entirely.
###
[](https://docs.base44.com/developers/app-code/local-development/github#disconnect-your-repository)
Disconnect your repository
Disconnect your app from its GitHub repository if you no longer want to sync changes. **To disconnect your repository:**
1. Open the code tab.
2. Click **GitHub**.
3. Click the **More Actions** icon .
4. Click **Disconnect**.
The disconnect process takes approximately 30 seconds and is only available when the AI agent is not actively making changes to your app.
After disconnecting, you cannot reconnect to the same repository. If you want to reconnect to GitHub later, you’ll need to use a different repository name.
###
[](https://docs.base44.com/developers/app-code/local-development/github#disconnect-your-github-account)
Disconnect your GitHub account
Disconnect your GitHub account if you no longer want to create new repository connections. This does not affect any repositories already connected to your apps and they will continue to sync normally. You can reconnect this account or connect a different GitHub account later. **To disconnect your GitHub account:**
1. Go to **Account settings**.
2. Find the **GitHub account** section.
3. Click the **More Actions** icon .
4. Click **Disconnect**.
Was this page helpful?
YesNo
[Activity Monitor](https://docs.base44.com/developers/app-code/editor/activity-monitor)
[Enterprise APIs](https://docs.base44.com/developers/references/enterprise-apis)
⌘I
Assistant
Responses are generated using AI and may contain mistakes.
Suggestions
Which plans come with a free domain?How are credits used?How do I use Discuss mode?
---
# Introduction - Base44 Support Documentation
> Documentation Index
> -------------------
>
> Fetch the complete documentation index at: [/llms.txt](https://docs.base44.com/llms.txt)
>
> Use this file to discover all available pages before exploring further.
[Skip to main content](https://docs.base44.com/developers/app-code/overview/introduction#content-area)
Take full control of your Base44 apps with direct code access. Edit code directly, debug API calls, and integrate with GitHub while keeping AI assistance available when you need it.
[](https://docs.base44.com/developers/app-code/overview/introduction#developer-tools)
Developer tools
---------------------------------------------------------------------------------------------------------
* **[Code tab](https://docs.base44.com/developers/app-code/editor/code-tab)
**: Direct access to edit your React/Vite codebase with live preview and full IDE features.
* **[Activity monitor](https://docs.base44.com/developers/app-code/editor/activity-monitor)
**: Debug and monitor API requests in realtime during development.
* **[Project structure](https://docs.base44.com/developers/app-code/overview/project-structure)
**: Understand your app’s file organization and Base44 integration.
* **[GitHub integration](https://docs.base44.com/developers/app-code/local-development/github)
**: Connect your app to GitHub for version control, collaboration, and deployment.
* **[CLI](https://docs.base44.com/developers/references/cli/get-started/overview)
**: Tail logs, run scripts, and manage secrets from your terminal against any of your apps.
* **[Eject to local development](https://docs.base44.com/developers/backend/overview/start-from-existing-app)
**: Create a one-time local copy of your app with a new app id. For ongoing development with sync, use the GitHub integration above.
* **[AI assistance](https://docs.base44.com/Building-your-app/AI-chat-modes)
**: Leverage Base44’s AI to accelerate development while maintaining code control.
[](https://docs.base44.com/developers/app-code/overview/introduction#tech-stack)
Tech stack
-----------------------------------------------------------------------------------------------
Base44 apps use a modern frontend stack with a fully managed backend: **Frontend**
* React with React Router
* Vite for fast builds and hot reload
* Tailwind CSS for styling
* shadcn/ui component library
**Backend**
* Managed NoSQL database
* Built-in user authentication
* Serverless backend functions (Deno runtime)
* Realtime updates via WebSocket
**Base44 SDK** Your interface to all Base44 backend services. Use it in your frontend components or backend functions to access data, auth, integrations, and more. [See the SDK overview →](https://docs.base44.com/developers/references/sdk/getting-started/overview)
[](https://docs.base44.com/developers/app-code/overview/introduction#get-started)
Get started
-------------------------------------------------------------------------------------------------
Start with the [Code Tab](https://docs.base44.com/developers/app-code/editor/code-tab)
to explore and edit your app’s source code.
Was this page helpful?
YesNo
[Project Structure](https://docs.base44.com/developers/app-code/overview/project-structure)
⌘I
Assistant
Responses are generated using AI and may contain mistakes.
Suggestions
Which plans come with a free domain?How are credits used?How do I use Discuss mode?
---
# Base44 Docs MCP - Base44 Support Documentation
> Documentation Index
> -------------------
>
> Fetch the complete documentation index at: [/llms.txt](https://docs.base44.com/llms.txt)
>
> Use this file to discover all available pages before exploring further.
[Skip to main content](https://docs.base44.com/developers/backend/overview/base44-docs-mcp#content-area)
The Base44 Docs MCP server lets AI assistants like Cursor, Claude Desktop, and VS Code search Base44 documentation directly. Ask questions about the SDK, CLI, entities, or any Base44 feature and get answers with links to the relevant docs. Results come from live documentation, so you always get the latest information.
[](https://docs.base44.com/developers/backend/overview/base44-docs-mcp#connect-your-ai-assistant)
Connect your AI assistant
-------------------------------------------------------------------------------------------------------------------------------
Add it to your AI tool’s MCP configuration:
"base44-docs": {
"type": "http",
"url": "https://docs.base44.com/mcp"
}
Some tools require a restart to pick up new MCP configurations.
[](https://docs.base44.com/developers/backend/overview/base44-docs-mcp#available-tools)
Available tools
-----------------------------------------------------------------------------------------------------------
The server provides a single search tool that can:
* **Search all documentation:** Query guides, API references, and tutorials.
* **Return code examples:** Get SDK usage examples and implementation patterns.
* **Filter results:** Narrow searches by version, language, API-only, or code-only content.
* **Link to sources:** Every result includes a direct link to the documentation page.
[](https://docs.base44.com/developers/backend/overview/base44-docs-mcp#example-prompts)
Example prompts
-----------------------------------------------------------------------------------------------------------
Once connected, ask your AI assistant questions like:
* “How do I create an entity with the Base44 SDK?”
* “What types of authentication can I use?”
* “What CLI commands are available for deployment?”
* “How do security rules work in Base44?”
The AI will search the documentation and return relevant information with links to learn more.
[](https://docs.base44.com/developers/backend/overview/base44-docs-mcp#see-also)
See also
---------------------------------------------------------------------------------------------
* [Base44 MCP server](https://docs.base44.com/developers/backend/overview/mcp-server)
: Create and manage backend projects from AI assistants
* [Skills](https://docs.base44.com/developers/backend/overview/skills)
: Reusable instructions that teach AI coding agents how to perform Base44-specific tasks
Was this page helpful?
YesNo
[Base44 MCP server](https://docs.base44.com/developers/backend/overview/mcp-server)
[Agents](https://docs.base44.com/developers/backend/resources/agents-config)
⌘I
Assistant
Responses are generated using AI and may contain mistakes.
Suggestions
Which plans come with a free domain?How are credits used?How do I use Discuss mode?
---
# Base44 MCP server - Base44 Support Documentation
> Documentation Index
> -------------------
>
> Fetch the complete documentation index at: [/llms.txt](https://docs.base44.com/llms.txt)
>
> Use this file to discover all available pages before exploring further.
[Skip to main content](https://docs.base44.com/developers/backend/overview/mcp-server#content-area)
The Base44 MCP server exposes your Base44 account to any MCP-compatible AI assistant. Once connected, you can describe what you want to build or change and the AI will create or update projects on your behalf. To connect, you must authenticate with OAuth. After that, Base44 only acts on your account with your explicit permission.
[](https://docs.base44.com/developers/backend/overview/mcp-server#connect-your-ai-assistant)
Connect your AI assistant
--------------------------------------------------------------------------------------------------------------------------
The server is available at:
https://app.base44.com/mcp
Add it to your AI tool’s MCP configuration:
"base44": {
"type": "http",
"url": "https://app.base44.com/mcp"
}
After adding the configuration, your AI tool will prompt you to sign in to Base44 through the standard OAuth flow. You only need to do this once.
Some tools require a restart to pick up new MCP configurations.
[](https://docs.base44.com/developers/backend/overview/mcp-server#available-tools)
Available tools
------------------------------------------------------------------------------------------------------
The server exposes the following tools to your AI assistant.
| Tool | What it does |
| --- | --- |
| `create_base44_app` | Create a new project from a text description |
| `edit_base44_app` | Make changes to an existing project |
| `list_user_apps` | List your projects, optionally filtered by name |
| `list_entity_schemas` | Get the entity schemas for a project |
| `query_entities` | Query records from an entity in a project |
Internal tools
Two additional tools are used internally by specific MCP clients to poll build progress. They are not intended to be called directly.
| Tool | What it does |
| --- | --- |
| `get_app_status` | Check whether a project build is complete |
| `get_app_preview_url` | Get the preview link for a project once its build is ready |
[](https://docs.base44.com/developers/backend/overview/mcp-server#example-prompts)
Example prompts
------------------------------------------------------------------------------------------------------
Once connected, you can ask your AI assistant things like:
* “Create a Base44 project for tracking job applications with status, company name, and interview notes.”
* “Edit my CRM project to add a follow-up date field to the Contacts entity.”
* “List all my Base44 projects.”
* “Add 10 sample products to my inventory project so I can test the UI.”
* “Query the first 10 orders from my e-commerce project that have status pending.”
The AI interprets your request and calls the appropriate tool. For `create_base44_app` and `edit_base44_app`, the build runs in the background and you get a link to the Base44 editor when it’s ready.
[](https://docs.base44.com/developers/backend/overview/mcp-server#see-also)
See also
----------------------------------------------------------------------------------------
* [Docs MCP server](https://docs.base44.com/developers/backend/overview/base44-docs-mcp)
: Let AI assistants search Base44 documentation directly
* [Skills](https://docs.base44.com/developers/backend/overview/skills)
: Reusable instructions that teach AI coding agents how to perform Base44-specific tasks
* [Entities](https://docs.base44.com/developers/backend/resources/entities/overview)
: Learn about the data model that `list_entity_schemas` and `query_entities` operate on
Was this page helpful?
YesNo
[Skills](https://docs.base44.com/developers/backend/overview/skills)
[Docs MCP server](https://docs.base44.com/developers/backend/overview/base44-docs-mcp)
⌘I
Assistant
Responses are generated using AI and may contain mistakes.
Suggestions
Which plans come with a free domain?How are credits used?How do I use Discuss mode?
---
# Creating workspace templates - Base44 Support Documentation
> Documentation Index
> -------------------
>
> Fetch the complete documentation index at: [/llms.txt](https://docs.base44.com/llms.txt)
>
> Use this file to discover all available pages before exploring further.
[Skip to main content](https://docs.base44.com/documentation/using-your-workspaces/creating-and-using-workspace-templates#content-area)
Workspace templates help you save time by reusing a polished app as a starting point instead of rebuilding from scratch. You can create internal templates to keep your team’s apps consistent, or publish public templates so others can use or purchase your work.
**Important:**
* To list any template, you must first publish the app.
* Only workspace administrators can create template listings for apps owned by that workspace.
* To sell public templates, you must have a Starter plan or higher.
* Publishing changes to your app automatically updates the workspace template. Unlike public templates, you only need to submit updates to workspace templates if you change the listing details (e.g. name or description).
* * *
[](https://docs.base44.com/documentation/using-your-workspaces/creating-and-using-workspace-templates#creating-a-workspace-template)
Creating a workspace template
----------------------------------------------------------------------------------------------------------------------------------------------------------------------
**To create a workspace template:**
1. Go to the app editor of the app you want to turn into a template.
2. Publish the app.
3. Click **Dashboard** in your app editor.
4. Click **Settings**.
5. Click **App Template**.
6. Select the type of template you want to create:
* **Public template:** Create a public template you can share with all Base44 users and choose whether to offer it for free or sell it. Learn more about [creating public templates](https://docs.base44.com/Getting-Started/App-templates#publishing-and-selling-public-templates)
.
* **Workspace-only:** Create a template that can only be shared with your workspace members.
7. Click **Create**.
8. Enter a template name and description and select the relevant categories under **Basic info**.
9. (Public templates only) Under **Template Pricing**, select the listing type:
* **Free listing:** Offer your app for free.
* **Paid listing:** Sell your app for a chosen price. Enter the price details.
10. In the **Template Screenshots** section, click **Add Images** and upload at least one screenshot of your published app.
Click **Preview App** to open your published app and take screenshots.
11. (Public templates only) Select the **I agree to the Base44 Terms and Marketplace Terms** checkbox.
12. Click **Create**.
* * *
[](https://docs.base44.com/documentation/using-your-workspaces/creating-and-using-workspace-templates#viewing-your-templates)
Viewing your templates
--------------------------------------------------------------------------------------------------------------------------------------------------------
**To view your workspace templates:**
1. Click [App Templates](https://app.base44.com/app-templates)
at the top of your workspace.
2. Click the **My Templates** tab.
3. Hover over the template you would like to view and click **View details**.
4. Choose what you want to do:
* **Use Template:** Create a new app from the template.
* **View app:** View the published app that the template was created from.
* **Manage Listing:** Submit an update to the listing or remove it from App Templates.

* * *
[](https://docs.base44.com/documentation/using-your-workspaces/creating-and-using-workspace-templates#updating-a-template-listing)
Updating a template listing
------------------------------------------------------------------------------------------------------------------------------------------------------------------
You only need to update the template listing if you want to change the template’s name, description, or screenshots.
If you made changes to the app’s functionality or design, simply publish the app. The template updates automatically for new users without needing to submit changes.
**To update the workspace template listing:**
1. Go to the app editor of the app you used to create the template.
2. Make your changes to the app and publish it.
3. Click **Dashboard** in your app editor.
4. Click **Settings**.
5. Click **App Template**.
6. Click **Submit Update** on the existing workspace template listing.
7. (If needed) Update the template listing.
8. Click **Submit Update** when you’re ready to update the template listing.
Was this page helpful?
YesNo
[Managing workspace apps](https://docs.base44.com/documentation/using-your-workspaces/managing-your-workspace-apps)
[Adding workspace skills](https://docs.base44.com/documentation/using-your-workspaces/adding-workspace-skills)
⌘I
Assistant
Responses are generated using AI and may contain mistakes.
Suggestions
Which plans come with a free domain?How are credits used?How do I use Discuss mode?
---
# Managing a workspace - Base44 Support Documentation
> Documentation Index
> -------------------
>
> Fetch the complete documentation index at: [/llms.txt](https://docs.base44.com/llms.txt)
>
> Use this file to discover all available pages before exploring further.
[Skip to main content](https://docs.base44.com/documentation/account-and-billing/managing-your-workspace-members#content-area)
Setting up your workspace helps you organize collaboration, security, and branding before you start [building apps](https://base44.com/ai-app-builder)
with your team. From your workspace settings, you can create new workspaces, control who has access, connect a branded domain, and configure security options such as SSO.
* * *
[](https://docs.base44.com/documentation/account-and-billing/managing-your-workspace-members#creating-a-new-workspace)
Creating a new workspace
---------------------------------------------------------------------------------------------------------------------------------------------------
When you create a new workspace, you are automatically the workspace owner and only you can manage it until you invite others.
You can create up to 2 additional workspaces per Base44 account.
**To create a workspace:**
1. Click your workspace name at the top left of your account.
2. Click **Create new workspace** at the bottom of the dropdown.
3. Enter a name for your workspace.
4. Click **Create Workspace**.

* * *
[](https://docs.base44.com/documentation/account-and-billing/managing-your-workspace-members#setting-up-a-workspace)
Setting up a workspace
-----------------------------------------------------------------------------------------------------------------------------------------------
As an owner or admin of a workspace, you can customize your workspace settings to match your team’s needs. From workspace settings, you can manage your workspace name and description, plan and billing, credit usage, members, and authentication and security. In enterprise workspaces, you can also configure app-level options from **Apps configuration**. **To set up your workspace:**
1. Click your workspace name at the top left of your account.
2. Click **Settings**.
3. Under **Workspace**, click **Basic information**.
4. Update your settings, including your **Workspace name** and **Workspace description**.

* * *
[](https://docs.base44.com/documentation/account-and-billing/managing-your-workspace-members#setting-up-sso-for-your-workspace)
Setting up SSO for your workspace
---------------------------------------------------------------------------------------------------------------------------------------------------------------------
Single Sign-On (SSO) lets everyone in your organization access Base44 with your company login instead of separate passwords. When you enable SSO for your workspace, your identity provider (such as Google or Microsoft) controls who can sign in, which helps keep access secure and onboarding simple. To connect your workspace to your identity provider and turn on SSO, follow the steps in [Setting up SSO](https://docs.base44.com/Setting-up-your-app/Setting-up-SSO)
.
* * *
[](https://docs.base44.com/documentation/account-and-billing/managing-your-workspace-members#verifying-your-workspace-domain)
Verifying your workspace domain
-----------------------------------------------------------------------------------------------------------------------------------------------------------------
Verifying your workspace domain confirms that you control the domain you entered and lets you safely use it with SSO and email-based access rules in your workspace.
DNS verification can take a few minutes, depending on your domain provider. Once your DNS records are updated, Base44 automatically verifies your domain. If verification does not complete after some time, click **Reset** in the Domain Verification section to generate a new TXT record and try again.
**To verify your workspace domain:**
1. Click your workspace name at the top left of your account.
2. Click **Settings**.
3. Click **Auth and security** under **Workspace**.
4. Update the **Workspace domain** field.
5. Click **Check**.
6. In the **Add DNS records for \[your-domain\]** panel, copy the **Host / Name** and **Value** details for the TXT record.
7. In a new tab, sign in to your domain provider.
8. Go to the DNS settings for your domain.
9. Add a new **TXT** record using the exact **Host / Name** and **Value** shown in your workspace.
10. Save your DNS changes with your domain provider.
11. Return to your workspace and wait while Base44 checks your DNS records. You see the status update under **Domain Verification**.

* * *
[](https://docs.base44.com/documentation/account-and-billing/managing-your-workspace-members#faqs)
FAQs
-----------------------------------------------------------------------------------------------------------
Can I delete a workspace?
No, you cannot delete a workspace directly. You can remove all members and apps from it, but the workspace itself stays active.However, if you delete your Base44 account, any workspaces you own are permanently deleted as part of that process. [Learn more about deleting your account](https://docs.base44.com/documentation/account-and-billing/managing-your-account#deleting-your-base44-account)
.
Can I leave a workspace?
Yes. If you are a member of a workspace, you can leave it at any time from **Basic information** in your workspace settings. When you leave, you lose access to all associated apps, and ownership of any apps you own transfers to the workspace owner.If you are the only owner of a workspace, you cannot leave it.

How do I rename a workspace?
Only workspace owners and admins can rename a workspace.**To rename a workspace:**
1. Click your workspace name at the top left of your account.
2. Click **Settings**.
3. Under **Workspace**, click **Basic information**.
4. Enter a new name under **Workspace name**.

Was this page helpful?
YesNo
[About workspaces](https://docs.base44.com/documentation/account-and-billing/about-workspaces)
[Managing workspace members](https://docs.base44.com/Account-and-billing/Managing-your-workspaces)
⌘I
Assistant
Responses are generated using AI and may contain mistakes.
Suggestions
Which plans come with a free domain?How are credits used?How do I use Discuss mode?
---
# Managing workspace skills - Base44 Support Documentation
> Documentation Index
> -------------------
>
> Fetch the complete documentation index at: [/llms.txt](https://docs.base44.com/llms.txt)
>
> Use this file to discover all available pages before exploring further.
[Skip to main content](https://docs.base44.com/documentation/using-your-workspaces/adding-workspace-skills#content-area)
Skills are saved instruction sets that shape how the AI chat builds your apps. They activate when needed so the AI can follow your rules and best practices automatically across your workspace. Workspace skills apply to every app in the workspace for anyone who can work in that workspace. This helps you keep design patterns, copy rules, and data practices consistent, no matter which app you are building.

You can use skills to give the AI specialized abilities for different kinds of work, such as:
* **Design skill:** Help the AI think like a designer by applying layout logic, spacing rules, hierarchy, and component best practices as it builds your UI.
* **Copy skill:** Help the AI focus on clear headlines, product descriptions, landing pages, and in-app text that match your tone and goals.
* **Data skill:** Help the AI behave like an analyst, interpret metrics, spot patterns, and reason about decisions using your structured data.
The AI chat decides when to use a skill based on what you type and the skill’s description and instructions. The AI can invoke relevant skills automatically, but it usually works best if you mention the skill or its purpose directly in your prompt, such as “Apply our accessibility skill to this flow” or “Use our brand-guidelines skill for this page.”
You need a Builder plan or higher to add skills to your workspace.
* * *
[](https://docs.base44.com/documentation/using-your-workspaces/adding-workspace-skills#adding-a-workspace-skill)
Adding a workspace skill
---------------------------------------------------------------------------------------------------------------------------------------------
You can create skills from scratch or start from built-in presets.
Each workspace can have up to 100 skills. If you reach this limit, you must delete an existing skill before adding a new one.

**To add a workspace skill:**
1. Click your workspace name at the top left of your account.
2. Click **Settings**.
3. Under **Workspace**, click **Skills**.
4. Click **Add skill**.
5. In the **Add skill or start from scratch** window, choose how you want to start:
* **Start from scratch:** Create a completely custom skill.
* **Preset skill:** Under **Presets**, click **Add** on a template.
6. In the **Skill name** field, enter a short, recognizable name, such as `brand-guidelines` or `checkout-copy-style`.
7. In the **Description** field, describe when the AI should use this skill. For example, explain which pages or tasks it applies to, or which team or brand it belongs to.
8. In the **Instructions** field, add the step-by-step rules the AI should follow when the skill activates. Treat this like training a new team member, with clear headings, examples, and priorities.
9. (Optional) Click **Refine & review** to have the AI refine and adjust the skill description and instructions while keeping your intent.
10. In the **Review your skill** window, compare the refined version with your original text:
* Click **Back to original** if you prefer your original version.
* Click **Save skill** to save the refined version, or **Cancel** to close the review window without saving changes.
11. Click **Add skill** to add the skill to your workspace.
* * *
[](https://docs.base44.com/documentation/using-your-workspaces/adding-workspace-skills#turning-a-workspace-skill-on-or-off)
Turning a workspace skill on or off
-------------------------------------------------------------------------------------------------------------------------------------------------------------------
You can temporarily disable a skill without deleting it. When a skill is off, the AI ignores its rules during conversations. **To turn a workspace skill on or off:**
1. Click your workspace name at the top left of your account.
2. Click **Settings**.
3. Under **Workspace**, click **Skills**.
4. Click the toggle on the relevant skill to enable or disable that skill.
* * *
[](https://docs.base44.com/documentation/using-your-workspaces/adding-workspace-skills#editing-or-deleting-a-workspace-skill)
Editing or deleting a workspace skill
-----------------------------------------------------------------------------------------------------------------------------------------------------------------------
Update a skill when your guidelines change, or delete it if you no longer need it.

**To edit or delete a workspace skill:**
1. Click your workspace name at the top left of your account.
2. Click **Settings**.
3. Under **Workspace**, click **Skills**.
4. Next to the relevant skill, click the **More actions** icon .
5. Choose what you want to do:
* **Edit Skill:** Open the skill editor to make changes. You can update the **Skill name**, **Description**, or **Instructions**, and optionally click **Refine & review** again to have the AI improve your updates before you save.
* **Delete Skill:** Remove the skill from your workspace.
* * *
[](https://docs.base44.com/documentation/using-your-workspaces/adding-workspace-skills#best-practices-for-writing-skills)
Best practices for writing skills
---------------------------------------------------------------------------------------------------------------------------------------------------------------
Skills are static text. They cannot pull live data, check current conditions, or adapt based on what is in your app. For live data needs, use [MCP connections](https://docs.base44.com/documentation/account-and-billing/setting-up-a-custom-mcp)
instead. Skills influence AI behavior in the editor chat only — they do not enforce code standards, access controls, or data policies at the platform level.
* **Keep each skill focused on one concern.** Skills for design, copy, data, and security are easier to maintain, toggle, and invoke precisely than a single broad skill that tries to cover everything.
* **Edit and update rather than delete and rebuild.** As your standards evolve, update the skill’s instructions. Deleting and starting over loses your history and risks gaps.
* **Avoid complex conditional logic.** Instructions like “if X then Y, but if Z then W” can produce inconsistent results. Keep rules clear and direct.
* **Mention the skill in your prompt for best results.** The AI can invoke skills automatically, but being explicit — for example, “Apply the brand-guidelines skill to this page” — produces more reliable results.
* * *
[](https://docs.base44.com/documentation/using-your-workspaces/adding-workspace-skills#faqs)
FAQs
-----------------------------------------------------------------------------------------------------
Click a question below to learn more about workspace skills.
When does the AI use a workspace skill?
The AI decides whether to use a skill based on your prompt and the skill’s description and instructions. It can invoke relevant skills automatically when they match what you are trying to do.For best results, mention the skill or its purpose directly in your prompt, such as “Apply our accessibility skill to this form.”
Do workspace skills apply to all apps in my workspace?
Yes. Workspace skills are available to the AI chat in every app in that workspace for anyone who can work in that workspace.
How do workspace skills relate to MCP connections?
Workspace skills define shared rules and best practices for how the AI builds apps in a specific workspace.MCP connections are configured once per account and let the AI chat use external tools and live data across all the apps and workspaces your account can access.[Learn how to add MCP connections.](https://docs.base44.com/documentation/account-and-billing/setting-up-a-custom-mcp)
What happens if I delete a workspace skill?
When you delete a skill, the AI chat no longer uses its rules in any app in that workspace. You need to recreate the skill if you want to restore those guidelines in the future.
Was this page helpful?
YesNo
[Creating workspace templates](https://docs.base44.com/documentation/using-your-workspaces/creating-and-using-workspace-templates)
[Community](https://docs.base44.com/Community-and-support/Community)
⌘I
Assistant
Responses are generated using AI and may contain mistakes.
Suggestions
Which plans come with a free domain?How are credits used?How do I use Discuss mode?
---
# Introduction - Base44 Support Documentation
> Documentation Index
> -------------------
>
> Fetch the complete documentation index at: [/llms.txt](https://docs.base44.com/llms.txt)
>
> Use this file to discover all available pages before exploring further.
[Skip to main content](https://docs.base44.com/developers/backend/overview/introduction#content-area)
The Base44 backend service and the CLI are currently in beta. We’re actively improving the platform and documentation based on user feedback. Share your thoughts and feature requests on our [GitHub Discussions page](https://github.com/orgs/base44/discussions)
.
The Base44 [backend service](https://base44.com/backend)
provides [everything you need](https://docs.base44.com/developers/backend/overview/features)
to build and deploy your applications. Your entire backend is defined in code and configuration files, making it easy for AI coding agents to build and manage your project.
[](https://docs.base44.com/developers/backend/overview/introduction#get-started)
Get started
------------------------------------------------------------------------------------------------
Get started by letting an AI coding agent set up your project, or set it up yourself with the CLI and then continue building with AI.
* Let AI set it up
* Set it up yourself
Install [Base44 skills](https://docs.base44.com/developers/backend/overview/skills)
so your coding agent can assist with Base44 development:
npx skills add base44/skills -g
Then open your AI coding tool and try a prompt like this:_“Create a new Base44 project for a task management app with users, tasks with due dates and priority levels, and team assignments. Add authentication and deploy it.”_Your agent will install the CLI, create the project, define entities, write code, and deploy. [Learn more about skills >](https://docs.base44.com/developers/backend/overview/skills)
You may be prompted to authenticate with Base44 during setup.
To set up a backend project yourself, run the following commands:
npm install -g base44@latest # Install the CLI
base44 login # Authenticate
base44 create # Create a project
Your project comes with [Base44 skills](https://docs.base44.com/developers/backend/overview/skills)
pre-installed. Open it in your AI coding tool and describe what you want to build next, or explore the documentation to understand how your project is structured and what you can build.
[](https://docs.base44.com/developers/backend/overview/introduction#build-with-ai)
Build with AI
----------------------------------------------------------------------------------------------------
With [Base44 skills](https://docs.base44.com/developers/backend/overview/skills)
installed, your AI coding agent can handle the full development lifecycle. Define entity schemas, write backend functions, configure AI agents, set up authentication, and deploy to production. Describe what you need and your agent will make the changes across your project.
[](https://docs.base44.com/developers/backend/overview/introduction#quickstarts-and-example-apps)
Quickstarts and Example apps
----------------------------------------------------------------------------------------------------------------------------------
Learn how to get started on your own, see what your AI agent is doing when setting up your project, or explore how everything fits together in our example apps.
Backend only
------------
Create a backend-only project
React
-----
Create a full-stack project with React
Start from an existing Base44 app
---------------------------------
Create a new project from an existing Base44 app
Example apps
------------
Learn from working examples and use them as starting points
[](https://docs.base44.com/developers/backend/overview/introduction#get-oriented)
Get oriented
--------------------------------------------------------------------------------------------------
To understand how this compares to Base44’s app editor and whether it’s right for you, see [Backend service basics](https://docs.base44.com/developers/backend/overview/backend-service-basics)
. If you already know why you want a backend service, continue to the [features overview](https://docs.base44.com/developers/backend/overview/features)
.
[](https://docs.base44.com/developers/backend/overview/introduction#security)
Security
------------------------------------------------------------------------------------------
Base44 and its backend platform is built with enterprise-grade protection and compliance at its core, and ensures your app stays secure and private at any scale. For our security manifest, see our [security page](https://base44.com/security)
. For security certifications, data privacy, and compliance, see [our documentation](https://docs.base44.com/Community-and-support/Privacy-and-security)
.
[](https://docs.base44.com/developers/backend/overview/introduction#see-also)
See also
------------------------------------------------------------------------------------------
* Explore the [features](https://docs.base44.com/developers/backend/overview/features)
included in the backend service.
* Learn about [project structure](https://docs.base44.com/developers/backend/overview/project-structure)
and configuration files.
* Read the [CLI command reference](https://docs.base44.com/developers/references/cli/commands/introduction)
for all available commands.
* Explore the [JavaScript SDK](https://docs.base44.com/developers/references/sdk/getting-started/overview)
documentation.
* [Troubleshoot your project](https://docs.base44.com/developers/backend/overview/troubleshooting)
when something goes wrong.
Was this page helpful?
YesNo
[Backend Service Basics](https://docs.base44.com/developers/backend/overview/backend-service-basics)
⌘I
Assistant
Responses are generated using AI and may contain mistakes.
Suggestions
Which plans come with a free domain?How are credits used?How do I use Discuss mode?
---
# Skills - Base44 Support Documentation
> Documentation Index
> -------------------
>
> Fetch the complete documentation index at: [/llms.txt](https://docs.base44.com/llms.txt)
>
> Use this file to discover all available pages before exploring further.
[Skip to main content](https://docs.base44.com/developers/backend/overview/skills#content-area)
Base44 skills help external AI tools like Claude, Cursor, or other AI coding assistants work more effectively with Base44. They provide reusable instructions and context that these tools can use when helping you build and manage your Base44 apps.
[](https://docs.base44.com/developers/backend/overview/skills#about-skills)
About skills
--------------------------------------------------------------------------------------------
Base44 skills are self-contained instructions that teach AI agents how to perform specific tasks with Base44. They follow the open [Agent Skills specification](https://agentskills.io/specification)
and consist of a `SKILL.md` file containing metadata and instructions, along with any additional background information the agent may need. Each skill includes:
* **Name and description**: Helps agents identify when to use the skill.
* **Instructions**: Step-by-step guidance for performing the task.
* **Optional resources**: Scripts, reference docs, and assets the agent can use.
If you want to use Base44 skills to create new projects, install them globally:
npx skills add base44/skills -g
Base44 skills are automatically included in projects created with the CLI. If you installed the skills globally, your AI agent will typically use the project-level Base44 skills. Base44 skills are maintained in the [base44/skills](https://github.com/base44/skills)
repository.
[](https://docs.base44.com/developers/backend/overview/skills#available-skills)
Available skills
----------------------------------------------------------------------------------------------------
Base44 provides three skills that cover the full development workflow:
* [base44-cli](https://docs.base44.com/developers/backend/overview/skills#base44-cli)
: Project setup, resource management, and deployment.
* [base44-sdk](https://docs.base44.com/developers/backend/overview/skills#base44-sdk)
: Feature implementation with the JavaScript SDK.
* [base44-troubleshooter](https://docs.base44.com/developers/backend/overview/skills#base44-troubleshooter)
: Production debugging and log analysis.
###
[](https://docs.base44.com/developers/backend/overview/skills#base44-cli)
base44-cli
The CLI skill teaches agents how to manage Base44 projects using the command-line interface. This is your agent’s first stop when starting a new project or performing infrastructure tasks.
####
[](https://docs.base44.com/developers/backend/overview/skills#capabilities)
Capabilities
Capabilities of this skill include:
* Create and link Base44 projects from templates.
* Define [entity schemas](https://docs.base44.com/developers/backend/resources/entities/overview)
with proper field types, formats, and RLS rules.
* Configure [backend functions](https://docs.base44.com/developers/backend/resources/backend-functions/overview)
with automations.
* Set up [AI agents](https://docs.base44.com/developers/backend/resources/agents-config)
with tool permissions.
* Configure [OAuth connectors](https://docs.base44.com/developers/references/sdk/docs/type-aliases/integrations)
for external services such as Google Calendar, Slack, and Notion.
* Generate TypeScript types from your project resources.
* Deploy resources to production, including site deployment to Base44 hosting.
* Authenticate with Base44 and manage CLI sessions.
* Configure project settings.
####
[](https://docs.base44.com/developers/backend/overview/skills#example-prompts)
Example prompts
* “Create a new Base44 project for a todo app”.
* “Add a User entity with email, name, and role fields”.
* “Deploy all my changes to production”.
* “Set up RLS so users can only see their own tasks”.
* “Add a Google Calendar connector to my project”.
* “Generate TypeScript types for my entities”.
###
[](https://docs.base44.com/developers/backend/overview/skills#base44-sdk)
base44-sdk
The SDK skill teaches agents how to build features using the Base44 JavaScript SDK. Once your project is initialized, this skill guides implementation work.
####
[](https://docs.base44.com/developers/backend/overview/skills#capabilities-2)
Capabilities
Capabilities of this skill include:
* Write frontend code that interacts with [entities](https://docs.base44.com/developers/backend/resources/entities/overview)
.
* Implement [authentication](https://docs.base44.com/developers/references/sdk/docs/interfaces/auth)
and user management.
* Integrate [AI agents](https://docs.base44.com/developers/backend/resources/agents-config)
into your app.
* Call [backend functions](https://docs.base44.com/developers/backend/resources/backend-functions/overview)
from the frontend.
* Use [integrations](https://docs.base44.com/developers/references/sdk/docs/type-aliases/integrations)
for AI, email, and file uploads.
* Implement [real-time features](https://docs.base44.com/developers/references/sdk/docs/type-aliases/entities#subscribe)
with subscriptions.
* Build [backend functions](https://docs.base44.com/developers/backend/resources/backend-functions/overview)
with service role access.
* Use [OAuth connectors](https://docs.base44.com/developers/references/sdk/docs/type-aliases/integrations)
to get access tokens for external services in backend functions.
* [Invite users](https://docs.base44.com/developers/references/sdk/docs/interfaces/auth)
to your app.
* Track [analytics](https://docs.base44.com/developers/references/sdk/docs/interfaces/analytics)
and [log user activity](https://docs.base44.com/developers/references/sdk/docs/interfaces/analytics)
with the app logs module.
####
[](https://docs.base44.com/developers/backend/overview/skills#example-prompts-2)
Example prompts
* “Add a login page with email and password”.
* “Show a list of all pending tasks for the current user”.
* “Create a chat interface for the support agent”.
* “Send an email notification when a new order is created”.
* “Use the Slack connector to post a message from a backend function”.
###
[](https://docs.base44.com/developers/backend/overview/skills#base44-troubleshooter)
base44-troubleshooter
The troubleshooter skill teaches agents how to investigate production issues by fetching and analyzing backend function logs.
####
[](https://docs.base44.com/developers/backend/overview/skills#capabilities-3)
Capabilities
Capabilities of this skill include:
* Fetch backend function logs with filtering by function name, log level, and time range.
* Identify errors across all project functions.
* Drill into specific function logs for targeted debugging.
* Correlate log timestamps with user-reported issues.
* Analyze stack traces and error messages from function executions.
####
[](https://docs.base44.com/developers/backend/overview/skills#example-prompts-3)
Example prompts
* “Show me all errors from the checkout function today”.
* “Pull the last 100 log entries for my send-email function”.
* “Check for any errors in the last hour across all functions”.
* “Get warning and error logs from the process-payment function since yesterday”.
[](https://docs.base44.com/developers/backend/overview/skills#keep-skills-in-sync)
Keep skills in sync
----------------------------------------------------------------------------------------------------------
Base44 skills work best when they match your Base44 CLI version. When you update the CLI, you should also update your Base44 skills:
# Update Base44 skills in current project
npx skills add base44/skills
# Update Base44 skills globally
npx skills add base44/skills -g
This updates existing Base44 skills and installs any newly added ones from the repository.
[](https://docs.base44.com/developers/backend/overview/skills#see-also)
See also
------------------------------------------------------------------------------------
* [Base44 MCP server](https://docs.base44.com/developers/backend/overview/mcp-server)
: Create and manage backend projects from AI assistants
* [Docs MCP server](https://docs.base44.com/developers/backend/overview/base44-docs-mcp)
: Let AI assistants search Base44 documentation while you develop
* [Project structure](https://docs.base44.com/developers/backend/overview/project-structure)
: Base44 project organization
* [CLI reference](https://docs.base44.com/developers/references/cli/get-started/overview)
: Complete CLI documentation
* [SDK reference](https://docs.base44.com/developers/references/sdk/getting-started/overview)
: Complete SDK documentation
Was this page helpful?
YesNo
[Overview](https://docs.base44.com/developers/backend/overview/agent-extensions)
[Base44 MCP server](https://docs.base44.com/developers/backend/overview/mcp-server)
⌘I
Assistant
Responses are generated using AI and may contain mistakes.
Suggestions
Which plans come with a free domain?How are credits used?How do I use Discuss mode?
---
# About Agents - Base44 Support Documentation
> Documentation Index
> -------------------
>
> Fetch the complete documentation index at: [/llms.txt](https://docs.base44.com/llms.txt)
>
> Use this file to discover all available pages before exploring further.
[Skip to main content](https://docs.base44.com/developers/backend/resources/agents-config#content-area)
You’re viewing developer documentation
This documentation is for developers working with the Base44 developer platform. For information about AI agents in the app editor, see [Setting up an AI agent](https://docs.base44.com/Building-your-app/AI-agents-for-apps)
.
[AI agents](https://docs.base44.com/Building-your-app/AI-agents-for-apps)
are customizable AI assistants that take action and connect to tools to help team members and end users. Define agent behavior, permissions, and tools using local JSONC configuration files.
[](https://docs.base44.com/developers/backend/resources/agents-config#create-agents)
Create agents
------------------------------------------------------------------------------------------------------
Create JSONC configuration files in your `base44/agents/` directory (one file per agent), then run [`agents push`](https://docs.base44.com/developers/references/cli/commands/agents-push)
to sync them to Base44.
[](https://docs.base44.com/developers/backend/resources/agents-config#example)
Example
------------------------------------------------------------------------------------------
{
"name": "customer_support",
"description": "Handles customer support inquiries and ticket management",
"instructions": "You are a friendly customer support agent. Help users resolve their issues politely and efficiently. If you cannot help, escalate to a human agent.",
"model": "anthropic/claude-sonnet-4-20250514",
"tool_configs": [\
{\
"entity_name": "tickets",\
"allowed_operations": ["read", "create", "update"],\
},\
{\
"entity_name": "customers",\
"allowed_operations": ["read"],\
},\
{\
"function_name": "send_notification",\
"description": "Sends a push notification to the customer",\
},\
{\
"function_name": "escalate_to_human",\
"description": "Escalates the conversation to a human support agent",\
},\
],
"whatsapp_greeting": "Hi, I'm your support assistant. How can I help you today?",
}
[](https://docs.base44.com/developers/backend/resources/agents-config#field-reference)
Field reference
----------------------------------------------------------------------------------------------------------
Agent configurations use JSONC. Each agent is defined in a separate file in the `base44/agents/` directory.
###
[](https://docs.base44.com/developers/backend/resources/agents-config#required-fields)
Required fields
[](https://docs.base44.com/developers/backend/resources/agents-config#param-name)
name
string
required
Unique identifier for the agent. Use lowercase letters and underscores. The name should match the filename, so an agent named `customer_support` would be in `customer_support.jsonc`.
[](https://docs.base44.com/developers/backend/resources/agents-config#param-description)
description
string
required
Brief description of what the agent does.
[](https://docs.base44.com/developers/backend/resources/agents-config#param-instructions)
instructions
string
required
System prompt that defines the agent’s behavior, personality, and guidelines.
[](https://docs.base44.com/developers/backend/resources/agents-config#param-model)
model
string
required
The AI model to use, in the format `provider/model-name`.Supported models:
* `anthropic/claude-sonnet-4-20250514`
* `anthropic/claude-3-5-sonnet-20241022`
* `openai/gpt-4o`
* `openai/gpt-4o-mini`
###
[](https://docs.base44.com/developers/backend/resources/agents-config#optional-fields)
Optional fields
[](https://docs.base44.com/developers/backend/resources/agents-config#param-tool-configs)
tool\_configs
array
Tools the agent can use to interact with your app. See [Tool configuration](https://docs.base44.com/developers/backend/resources/agents-config#tool-configuration)
.
[](https://docs.base44.com/developers/backend/resources/agents-config#param-whatsapp-greeting)
whatsapp\_greeting
string
Welcome message for WhatsApp conversations with this agent.
[](https://docs.base44.com/developers/backend/resources/agents-config#tool-configuration)
Tool configuration
----------------------------------------------------------------------------------------------------------------
The `tool_configs` array defines what capabilities your agent has. There are two types: **entity tools** and **function tools**.
###
[](https://docs.base44.com/developers/backend/resources/agents-config#entity-tools)
Entity tools
Entity tools allow the agent to perform CRUD operations on your app’s [entities](https://docs.base44.com/developers/backend/resources/entities/overview)
.
[](https://docs.base44.com/developers/backend/resources/agents-config#param-entity-name)
entity\_name
string
required
Name of the entity. Must match an existing entity in your app.
[](https://docs.base44.com/developers/backend/resources/agents-config#param-allowed-operations)
allowed\_operations
array
required
Operations the agent can perform on this entity. Valid values are `"read"`, `"create"`, `"update"`, and `"delete"`.
###
[](https://docs.base44.com/developers/backend/resources/agents-config#function-tools)
Function tools
Function tools allow the agent to invoke your app’s [backend functions](https://docs.base44.com/developers/backend/resources/backend-functions/overview)
.
[](https://docs.base44.com/developers/backend/resources/agents-config#param-function-name)
function\_name
string
required
Name of the function. Must match an existing function in your app.
[](https://docs.base44.com/developers/backend/resources/agents-config#param-description-1)
description
string
required
Description of what the function does. The agent uses this to decide when to call it.
[](https://docs.base44.com/developers/backend/resources/agents-config#typescript-types)
TypeScript types
------------------------------------------------------------------------------------------------------------
Generate TypeScript types from your agent configurations to get type safety and autocomplete for agent names in your SDK code. Learn more about [dynamic types](https://docs.base44.com/developers/references/sdk/getting-started/dynamic-types)
.
[](https://docs.base44.com/developers/backend/resources/agents-config#see-also)
See also
--------------------------------------------------------------------------------------------
* [`agents pull`](https://docs.base44.com/developers/references/cli/commands/agents-pull)
: Sync agent configurations from Base44 to your local project
* [`agents push`](https://docs.base44.com/developers/references/cli/commands/agents-push)
: Deploy your local agent configurations to Base44
* [`agents`](https://docs.base44.com/developers/references/sdk/docs/interfaces/agents)
: SDK reference for working with agents in your code
* [Setting up AI agents](https://docs.base44.com/Building-your-app/AI-agents-for-apps)
: Guide to creating and configuring AI agents
Was this page helpful?
YesNo
[Docs MCP server](https://docs.base44.com/developers/backend/overview/base44-docs-mcp)
[Auth](https://docs.base44.com/developers/backend/resources/auth)
⌘I
Assistant
Responses are generated using AI and may contain mistakes.
Suggestions
Which plans come with a free domain?How are credits used?How do I use Discuss mode?
---
# deploy - Base44 Support Documentation
> Documentation Index
> -------------------
>
> Fetch the complete documentation index at: [/llms.txt](https://docs.base44.com/llms.txt)
>
> Use this file to discover all available pages before exploring further.
[Skip to main content](https://docs.base44.com/developers/references/cli/commands/deploy#content-area)
Deploy all your project resources to Base44 in a single command. This includes [entities](https://docs.base44.com/developers/backend/resources/entities/overview)
, [functions](https://docs.base44.com/developers/backend/resources/backend-functions/overview)
, [connectors](https://docs.base44.com/developers/backend/resources/connectors)
, [auth config](https://docs.base44.com/developers/backend/resources/auth)
, and the build code for your frontend. The command provides a summary of what will be deployed and asks for confirmation before proceeding. If any connectors require OAuth authorization, the deploy command will prompt you to authorize them in your browser, similar to running [`connectors push`](https://docs.base44.com/developers/references/cli/commands/connectors-push)
. You can also deploy resources individually using [`entities push`](https://docs.base44.com/developers/references/cli/commands/entities-push)
, [`functions deploy`](https://docs.base44.com/developers/references/cli/commands/functions-deploy)
, [`connectors push`](https://docs.base44.com/developers/references/cli/commands/connectors-push)
, [`auth push`](https://docs.base44.com/developers/references/cli/commands/auth-push)
, and [`site deploy`](https://docs.base44.com/developers/references/cli/commands/site-deploy)
. Before running this command, ensure that your built frontend files are in the directory specified by `site.outputDirectory` in your [`config.jsonc`](https://docs.base44.com/developers/backend/overview/project-structure#config-jsonc)
file.
[](https://docs.base44.com/developers/references/cli/commands/deploy#usage)
Usage
-------------------------------------------------------------------------------------
base44 deploy
[](https://docs.base44.com/developers/references/cli/commands/deploy#flags)
Flags
-------------------------------------------------------------------------------------
| Flag | Description |
| --- | --- |
| `-y, --yes` | Skip the confirmation prompt |
[](https://docs.base44.com/developers/references/cli/commands/deploy#sync-behavior)
Sync behavior
-----------------------------------------------------------------------------------------------------
The deploy command creates and updates all resource types, but handles deletions differently for functions than for entities and connectors.
###
[](https://docs.base44.com/developers/references/cli/commands/deploy#entities-and-connectors)
Entities and connectors
Entities and connectors are fully synced. Remote resources not found locally are removed:
| Local state | Remote state | Result |
| --- | --- | --- |
| Resource exists | Resource exists | Remote resource is updated |
| Resource exists | Resource missing | New resource is created |
| Resource missing | Resource exists | Remote resource is removed |
Removing an entity removes its schema from Base44. Existing data is not deleted, but the entity will no longer be accessible through the SDK.Removing a connector removes the OAuth connection from Base44. Functions that use the connector will fail until it’s reconnected.
###
[](https://docs.base44.com/developers/references/cli/commands/deploy#functions)
Functions
Functions are deployed but not pruned. Remote functions not found locally are left unchanged. To remove remote functions that are no longer in your project, use [`functions deploy --force`](https://docs.base44.com/developers/references/cli/commands/functions-deploy)
.
[](https://docs.base44.com/developers/references/cli/commands/deploy#see-also)
See also
-------------------------------------------------------------------------------------------
* [Entities](https://docs.base44.com/developers/backend/resources/entities/overview)
: Learn about database schema configuration
* [Connectors](https://docs.base44.com/developers/backend/resources/connectors)
: Set up OAuth connections to third-party services
* [Backend Functions](https://docs.base44.com/developers/backend/resources/backend-functions/overview)
: Create serverless API endpoints
* [`functions deploy`](https://docs.base44.com/developers/references/cli/commands/functions-deploy)
: Deploy functions individually with selective deploy and pruning options
Was this page helpful?
YesNo
[logs](https://docs.base44.com/developers/references/cli/commands/logs)
[site deploy](https://docs.base44.com/developers/references/cli/commands/site-deploy)
⌘I
Assistant
Responses are generated using AI and may contain mistakes.
Suggestions
Which plans come with a free domain?How are credits used?How do I use Discuss mode?
---
# Entities Overview - Base44 Support Documentation
> Documentation Index
> -------------------
>
> Fetch the complete documentation index at: [/llms.txt](https://docs.base44.com/llms.txt)
>
> Use this file to discover all available pages before exploring further.
[Skip to main content](https://docs.base44.com/developers/backend/resources/entities/overview#content-area)
You’re viewing developer documentation
This documentation is for developers working with the Base44 developer platform. For information about managing your app data using the app editor, see [Managing app data](https://docs.base44.com/Building-your-app/Managing-your-app-data)
.
Entities are the data models for your Base44 app. Each entity is a schema that defines the structure for documents in a collection, stored in Base44’s NoSQL database. The database is MongoDB-compatible, so you can use MongoDB operators when querying through the SDK. When you define an entity, you automatically get full CRUD operations through the [entities module](https://docs.base44.com/developers/references/sdk/docs/type-aliases/entities)
in the SDK. Entities support:
* **Schema flexibility:** You can update your data model at any point without running migrations.
* **Realtime updates:** Subscribe to changes to receive updates when records are created, updated, or deleted.
* **Fine-grained security:** Row-level and field-level security rules control who can access which records and fields.
[](https://docs.base44.com/developers/backend/resources/entities/overview#define-entities)
Define entities
--------------------------------------------------------------------------------------------------------------
Define entities as JSON files in your project’s entities directory. By default the entities directory is `base44/entities/`, but you can customize the path in your [project configuration](https://docs.base44.com/developers/backend/overview/project-structure#configjsonc)
.
[](https://docs.base44.com/developers/backend/resources/entities/overview#test-locally)
Test locally
--------------------------------------------------------------------------------------------------------
Test your entities locally with [`base44 dev`](https://docs.base44.com/developers/references/cli/commands/dev)
. The dev server picks up schema changes automatically. See [Local development](https://docs.base44.com/developers/backend/overview/local-dev/local-development-overview)
for details.
[](https://docs.base44.com/developers/backend/resources/entities/overview#deploy-entities)
Deploy entities
--------------------------------------------------------------------------------------------------------------
Deploy entities with [`entities push`](https://docs.base44.com/developers/references/cli/commands/entities-push)
or [`deploy`](https://docs.base44.com/developers/references/cli/commands/deploy)
to push all project resources at once.
[](https://docs.base44.com/developers/backend/resources/entities/overview#entity-schemas)
Entity schemas
------------------------------------------------------------------------------------------------------------
Entity schemas are JSON Schema definitions that specify the fields, types, and validation rules for your data. Learn more about [entity schemas](https://docs.base44.com/developers/backend/resources/entities/entity-schemas)
.
[](https://docs.base44.com/developers/backend/resources/entities/overview#typescript-types)
TypeScript types
----------------------------------------------------------------------------------------------------------------
Generate TypeScript types from your entity schemas to get full type safety and autocomplete in your SDK code. Learn more about [dynamic types](https://docs.base44.com/developers/references/sdk/getting-started/dynamic-types)
.
[](https://docs.base44.com/developers/backend/resources/entities/overview#user-schema)
User schema
------------------------------------------------------------------------------------------------------
Every Base44 app includes a built-in User entity that stores information about your app’s users. You can extend it with additional fields to store custom user data like company, phone number, or preferences. User fields can be referenced in security rules to control data access based on user attributes. Learn more about the [User schema](https://docs.base44.com/developers/backend/resources/entities/user-schema)
.
[](https://docs.base44.com/developers/backend/resources/entities/overview#security)
Security
------------------------------------------------------------------------------------------------
Control access to your data with row-level and field-level security rules. Define who can create, read, update, and delete records based on user attributes. Learn more about [security rules](https://docs.base44.com/developers/backend/resources/entities/security)
.
Was this page helpful?
YesNo
[App user connectors](https://docs.base44.com/developers/backend/resources/connectors/app-user-connectors)
[Entity Schemas](https://docs.base44.com/developers/backend/resources/entities/entity-schemas)
⌘I
Assistant
Responses are generated using AI and may contain mistakes.
Suggestions
Which plans come with a free domain?How are credits used?How do I use Discuss mode?
---
# Backend Functions Overview - Base44 Support Documentation
> Documentation Index
> -------------------
>
> Fetch the complete documentation index at: [/llms.txt](https://docs.base44.com/llms.txt)
>
> Use this file to discover all available pages before exploring further.
[Skip to main content](https://docs.base44.com/developers/backend/resources/backend-functions/overview#content-area)
You’re viewing developer documentation
This documentation is for developers working with the Base44 developer platform. For information about backend functions in the app editor, see[Using Integrations](https://docs.base44.com/Integrations/Using-integrations#activating-backend-functions)
.
Backend functions let you run custom backend code in a secure, isolated environment. Use functions to implement business logic that shouldn’t run in the browser, connect to third-party APIs with protected credentials, process webhooks, or extend your app with custom endpoints. Backend functions run on [Deno](https://docs.deno.com/runtime/)
, a modern TypeScript runtime. Call functions from your frontend [using the SDK](https://docs.base44.com/developers/references/sdk/docs/interfaces/functions)
, which handles authentication automatically. Each function also gets its own HTTP endpoint for webhooks and external integrations. Functions can also run automatically using [automations](https://docs.base44.com/developers/backend/resources/backend-functions/automations)
. Schedule functions to run at specific times or trigger them in response to database events like creating, updating, or deleting records.
Each project supports a maximum of 50 backend functions.
[](https://docs.base44.com/developers/backend/resources/backend-functions/overview#create-functions)
Create functions
-------------------------------------------------------------------------------------------------------------------------
Create backend functions as TypeScript files in your project’s functions directory. By default the functions directory is `base44/functions/`, but you can customize the path in your [project configuration](https://docs.base44.com/developers/backend/overview/project-structure#config-jsonc)
. Each function lives in its own subdirectory with an `entry.ts` or `entry.js` file:
functions
entry.ts
The CLI uses the directory path relative to the functions root as the function name. For example, `functions/sendWelcomeEmail/entry.ts` creates a function named `sendWelcomeEmail`. You can also nest functions in subdirectories for organization. `functions/email/send/entry.ts` creates a function named `email/send`.
###
[](https://docs.base44.com/developers/backend/resources/backend-functions/overview#adding-a-configuration-file)
Adding a configuration file
For advanced needs like custom function names or [automations](https://docs.base44.com/developers/backend/resources/backend-functions/automations)
, add a `function.jsonc` file:
functions
entry.ts
function.jsonc
The configuration file defines the function’s name and entry point:
{
"name": "sendWelcomeEmail",
"entry": "entry.ts",
}
| Property | Description |
| --- | --- |
| `name` | Optional. Unique identifier for the function. Used when invoking via SDK or HTTP. Defaults to the directory path relative to the functions root. |
| `entry` | The file containing the function code. |
| `automations` | Optional. Array of automation configurations to run the function on a schedule or in response to database events. See [Automations](https://docs.base44.com/developers/backend/resources/backend-functions/automations) for details. |
###
[](https://docs.base44.com/developers/backend/resources/backend-functions/overview#entry-ts)
entry.ts
The code file contains your function logic. Functions must use the `Deno.serve()` wrapper and return `Response` objects:
import { createClientFromRequest } from "npm:@base44/sdk";
Deno.serve(async (req) => {
try {
const base44 = createClientFromRequest(req);
const user = await base44.auth.me();
if (!user) {
return Response.json({ error: "Unauthorized" }, { status: 401 });
}
const { name } = await req.json();
return Response.json({
message: `Hello, ${name || user.full_name}!`,
});
} catch (error) {
return Response.json({ error: error.message }, { status: 500 });
}
});
[](https://docs.base44.com/developers/backend/resources/backend-functions/overview#test-locally)
Test locally
-----------------------------------------------------------------------------------------------------------------
Run your functions locally with [`base44 dev`](https://docs.base44.com/developers/references/cli/commands/dev)
to test changes without deploying. See [Local development](https://docs.base44.com/developers/backend/overview/local-dev/local-development-overview)
for details.
[](https://docs.base44.com/developers/backend/resources/backend-functions/overview#deploy-functions)
Deploy functions
-------------------------------------------------------------------------------------------------------------------------
Deploy functions with [`functions deploy`](https://docs.base44.com/developers/references/cli/commands/functions-deploy)
or [`deploy`](https://docs.base44.com/developers/references/cli/commands/deploy)
to push all project resources at once. You can deploy specific functions by name with `functions deploy `, or use `--force` to remove remote functions not found locally. To download deployed functions to your local project, use [`functions pull`](https://docs.base44.com/developers/references/cli/commands/functions-pull)
. To see what’s currently deployed, use [`functions list`](https://docs.base44.com/developers/references/cli/commands/functions-list)
.
[](https://docs.base44.com/developers/backend/resources/backend-functions/overview#call-functions)
Call functions
---------------------------------------------------------------------------------------------------------------------
Call backend functions from your frontend using the SDK, or via HTTP for webhooks and external integrations.
###
[](https://docs.base44.com/developers/backend/resources/backend-functions/overview#via-the-sdk)
Via the SDK
Use [`base44.functions.invoke()`](https://docs.base44.com/developers/references/sdk/docs/interfaces/functions)
to call functions from your frontend. The SDK handles authentication automatically, passing the current user’s credentials to your function.
import { base44 } from "@/api/base44Client";
const response = await base44.functions.invoke("sendWelcomeEmail", {
name: "Alice",
});
###
[](https://docs.base44.com/developers/backend/resources/backend-functions/overview#via-http)
Via HTTP
Each deployed function gets an HTTP endpoint at:
https:///functions/
This is useful for:
* **Webhooks:** Receive callbacks from external services like Stripe or GitHub.
* **External integrations:** Allow other systems to interact with your app.
* **Testing:** Call functions directly with tools like cURL or Postman.
**Example usage**
curl -X POST https://your-app.base44.app/functions/sendWelcomeEmail \
-H "Content-Type: application/json" \
-d '{"name": "Alice"}'
When calling functions via direct HTTP (like cURL or webhooks), there’s no authenticated user context. Use `asServiceRole` for all operations in these cases.
[](https://docs.base44.com/developers/backend/resources/backend-functions/overview#use-the-sdk-in-functions)
Use the SDK in functions
-----------------------------------------------------------------------------------------------------------------------------------------
Inside your backend functions, you can access your app’s data, authentication, and integrations through the Base44 SDK. Use [`createClientFromRequest()`](https://docs.base44.com/developers/references/sdk/docs/functions/createClientFromRequest)
to create a client from the incoming request. The authentication context depends on how the function was called:
* **When called via the SDK from your frontend:** The user’s authentication is passed through automatically. You can access the current user with `base44.auth.me()` and perform operations with their permissions. To read or write data without entity access rules applying, use [`asServiceRole`](https://docs.base44.com/developers/references/sdk/docs/functions/createClientFromRequest#asservicerole)
.
* **When called via direct HTTP (cURL, webhooks, external services):** There’s no authenticated user, so use `asServiceRole` for all operations.
[](https://docs.base44.com/developers/backend/resources/backend-functions/overview#connect-to-third-party-apis)
Connect to third-party APIs
-----------------------------------------------------------------------------------------------------------------------------------------------
Backend functions are one of several ways to [connect to third-party APIs](https://docs.base44.com/developers/references/sdk/getting-started/third-party-apis)
. They’re ideal when you need full control over requests or want to store API keys securely as environment variables. Use [`secrets set`](https://docs.base44.com/developers/references/cli/commands/secrets-set)
to configure environment variables from the CLI.
[](https://docs.base44.com/developers/backend/resources/backend-functions/overview#view-logs)
View logs
-----------------------------------------------------------------------------------------------------------
During [local development](https://docs.base44.com/developers/backend/overview/local-dev/local-development-overview)
, function output is printed directly to your terminal without needing the `logs` command. For deployed functions, view logs with the [`logs`](https://docs.base44.com/developers/references/cli/commands/logs)
command. The logs include console output, errors, and timing information. You can filter by function name or time range. If you’re using an AI coding agent, the [base44-troubleshooter](https://docs.base44.com/developers/backend/overview/skills#base44-troubleshooter)
skill can fetch and analyze these logs automatically.
[](https://docs.base44.com/developers/backend/resources/backend-functions/overview#typescript-types)
TypeScript types
-------------------------------------------------------------------------------------------------------------------------
Generate TypeScript types from your function configurations to get type safety and autocomplete for function names in your SDK code. Learn more about [dynamic types](https://docs.base44.com/developers/references/sdk/getting-started/dynamic-types)
.
[](https://docs.base44.com/developers/backend/resources/backend-functions/overview#see-also)
See also
---------------------------------------------------------------------------------------------------------
* [Automations](https://docs.base44.com/developers/backend/resources/backend-functions/automations)
: Schedule functions or trigger them on database events
* [`functions` module](https://docs.base44.com/developers/references/sdk/docs/interfaces/functions)
: SDK reference for invoking functions
* [`createClientFromRequest`](https://docs.base44.com/developers/references/sdk/docs/functions/createClientFromRequest)
: Creating a client in backend functions
* [`functions deploy`](https://docs.base44.com/developers/references/cli/commands/functions-deploy)
: Deploy local functions to Base44
* [`functions pull`](https://docs.base44.com/developers/references/cli/commands/functions-pull)
: Download deployed functions to your local project
* [`functions list`](https://docs.base44.com/developers/references/cli/commands/functions-list)
: List all deployed functions
* [`functions delete`](https://docs.base44.com/developers/references/cli/commands/functions-delete)
: Delete deployed functions
* [`logs`](https://docs.base44.com/developers/references/cli/commands/logs)
: View function logs
* [`exec`](https://docs.base44.com/developers/references/cli/commands/exec)
: Test functions in isolation from standalone scripts
Was this page helpful?
YesNo
[Auth](https://docs.base44.com/developers/backend/resources/auth)
[Automations](https://docs.base44.com/developers/backend/resources/backend-functions/automations)
⌘I
Assistant
Responses are generated using AI and may contain mistakes.
Suggestions
Which plans come with a free domain?How are credits used?How do I use Discuss mode?
---
# Base44 client - Base44 Support Documentation
> Documentation Index
> -------------------
>
> Fetch the complete documentation index at: [/llms.txt](https://docs.base44.com/llms.txt)
>
> Use this file to discover all available pages before exploring further.
[Skip to main content](https://docs.base44.com/developers/references/sdk/getting-started/client#content-area)
The Base44 client is your interface to the Base44 SDK. It provides access to all SDK modules and automatically manages authentication tokens. You can use the client in two ways:
* **Inside Base44 apps**: The client is automatically created and configured for you.
* **External apps**: Create the client yourself to use Base44 as a backend for your own app.
[](https://docs.base44.com/developers/references/sdk/getting-started/client#inside-base44-apps)
Inside Base44 apps
----------------------------------------------------------------------------------------------------------------------
When Base44 generates your app, the SDK client is pre-configured and ready to use.
###
[](https://docs.base44.com/developers/references/sdk/getting-started/client#frontend-client)
Frontend client
In your frontend code, the client is already imported and available as `base44`.
Frontend code
import { base44 } from "@/api/base44Client";
// The client is pre-configured and ready to use
const user = await base44.auth.me();
const userTasks = await base44.entities.Task.filter({
assignedTo: user.id,
status: "pending",
});
console.log(`${user.name} has ${userTasks.length} pending tasks`);
###
[](https://docs.base44.com/developers/references/sdk/getting-started/client#backend-functions)
Backend functions
In Base44-hosted backend functions, create the client from the incoming request. Base44 injects the necessary authentication headers automatically.
Backend function
import { createClientFromRequest } from "npm:@base44/sdk";
Deno.serve(async (req) => {
const base44 = createClientFromRequest(req);
// Get the current user and their data
const user = await base44.auth.me();
const userTasks = await base44.entities.Task.filter({
assignedTo: user.id,
status: "pending",
});
return Response.json({
user: user.name,
pendingTasks: userTasks.length,
});
});
[](https://docs.base44.com/developers/references/sdk/getting-started/client#external-apps)
External apps
------------------------------------------------------------------------------------------------------------
When building your own app that uses Base44 as a backend, create and configure the client yourself using `createClient()`.
###
[](https://docs.base44.com/developers/references/sdk/getting-started/client#installation)
Installation
Install the SDK via npm:
npm install @base44/sdk
###
[](https://docs.base44.com/developers/references/sdk/getting-started/client#create-the-client)
Create the client
Create a client by providing your app ID, which you can find in the Base44 editor URL:
https://app.base44.com/apps//editor/...
Create client
import { createClient } from "@base44/sdk";
// Create a client for your Base44 app
const base44 = createClient({
appId: "your-app-id", // Find this in the Base44 editor URL
});
// Read public data (anonymous access)
const products = await base44.entities.Products.list();
###
[](https://docs.base44.com/developers/references/sdk/getting-started/client#user-authentication)
User authentication
Authenticate users with email and password or through social providers. The client automatically applies the token to subsequent requests. Social authentication is available for Google, Microsoft, Facebook, and Apple using [`loginWithProvider()`](https://docs.base44.com/developers/references/sdk/docs/interfaces/auth#loginwithprovider)
.
Email and password
Social login
import { createClient } from "@base44/sdk";
const base44 = createClient({
appId: "your-app-id",
});
// Authenticate a user (token is automatically set)
await base44.auth.loginViaEmailPassword("user@example.com", "password");
// Now operations use the authenticated user's permissions
const userOrders = await base44.entities.Orders.list();
[](https://docs.base44.com/developers/references/sdk/getting-started/client#service-role)
Service role
----------------------------------------------------------------------------------------------------------
By default, the client operates with user-level permissions, limiting access to what the current user can see and do. The service role provides elevated permissions for backend operations and is only available in Base44-hosted backend functions.
Service role authentication is only available in Base44-hosted backend functions. External backends can’t use service role permissions.
A client with service role authentication allows backend code to:
* Read and write any data in the app. Entity access rules and field-level security are bypassed entirely.
* Use admin modules like the [`connectors`](https://docs.base44.com/developers/references/sdk/docs/interfaces/connectors)
module.
To use service role authentication, access modules through `base44.asServiceRole` instead of directly on the client. For example, `base44.asServiceRole.entities.Task.list()` bypasses access rules, while `base44.entities.Task.list()` uses the current user’s permissions. When using `createClientFromRequest()` in a backend function, the service role is automatically available:
Backend function with service role
import { createClientFromRequest } from "npm:@base44/sdk";
Deno.serve(async (req) => {
const base44 = createClientFromRequest(req);
// Bypasses access rules on the Orders entity
const allOrders = await base44.asServiceRole.entities.Orders.list();
return Response.json({ orders: allOrders });
});
Service role access skips every access rule on the entity. Use it only for trusted backend logic. If your function needs access checks, you’re responsible for enforcing them yourself.
[](https://docs.base44.com/developers/references/sdk/getting-started/client#see-more)
See more
--------------------------------------------------------------------------------------------------
createClient()
--------------
Complete API reference
createClientFromRequest()
-------------------------
Backend client creation
Was this page helpful?
YesNo
[SDK overview](https://docs.base44.com/developers/references/sdk/getting-started/overview)
[Work with data](https://docs.base44.com/developers/references/sdk/getting-started/work-with-data)
⌘I
Assistant
Responses are generated using AI and may contain mistakes.
Suggestions
Which plans come with a free domain?How are credits used?How do I use Discuss mode?
---
# Authentication - Base44 Support Documentation
> Documentation Index
> -------------------
>
> Fetch the complete documentation index at: [/llms.txt](https://docs.base44.com/llms.txt)
>
> Use this file to discover all available pages before exploring further.
[Skip to main content](https://docs.base44.com/developers/references/audit-logs-api/get-started/authentication#content-area)
All Audit Logs API requests require authentication using a workspace API key.
The Audit Logs API is available on **Enterprise plans** only. Workspace API keys are managed in the **[Secrets](https://docs.base44.com/Enterprise/workspace-secrets)
** section of your workspace settings.
[](https://docs.base44.com/developers/references/audit-logs-api/get-started/authentication#required-role)
Required role
---------------------------------------------------------------------------------------------------------------------------
Only workspace **owners** and **admins** can create and manage workspace API keys. Regular workspace members do not have access to the Secrets page in workspace settings. To learn about workspace roles, see [Managing your workspace members](https://docs.base44.com/Account-and-billing/Managing-your-workspaces#managing-your-workspace-members)
.
[](https://docs.base44.com/developers/references/audit-logs-api/get-started/authentication#workspace-api-key)
Workspace API key
-----------------------------------------------------------------------------------------------------------------------------------
Include your workspace API key in the `api_key` header with all requests:
api_key: YOUR_API_KEY
###
[](https://docs.base44.com/developers/references/audit-logs-api/get-started/authentication#example-request)
Example request
curl --request POST \
--url https://app.base44.com/api/v1/audit-logs/{workspace_id}/list \
--header 'api_key: ' \
--header 'Content-Type: application/json' \
--data '{
"event_types": ["auth.login"],
"limit": 50
}'
###
[](https://docs.base44.com/developers/references/audit-logs-api/get-started/authentication#get-your-workspace-api-key)
Get your workspace API key
1. Click your workspace name at the top left and click **Settings**.
2. Click **Secrets** in the sidebar.
3. Click **\+ Create API Key**.
4. Enter a name for the key and an optional description, then click **Create Key**.
5. Copy the key immediately and store it securely.
For the full guide on creating and managing workspace API keys, see [Managing workspace secrets](https://docs.base44.com/Enterprise/workspace-secrets)
.
Copy your API key immediately after creating it. You won’t be able to see it again. Treat it like a password and do not share it or commit it to version control.
Was this page helpful?
YesNo
[Audit Logs API Overview](https://docs.base44.com/developers/references/audit-logs-api/get-started/overview)
[Rate Limits](https://docs.base44.com/developers/references/audit-logs-api/get-started/rate-limits)
⌘I
Assistant
Responses are generated using AI and may contain mistakes.
Suggestions
Which plans come with a free domain?How are credits used?How do I use Discuss mode?
---
# Backend Service Basics - Base44 Support Documentation
> Documentation Index
> -------------------
>
> Fetch the complete documentation index at: [/llms.txt](https://docs.base44.com/llms.txt)
>
> Use this file to discover all available pages before exploring further.
[Skip to main content](https://docs.base44.com/developers/backend/overview/backend-service-basics#content-area)
The Base44 [backend service](https://base44.com/backend)
is the same backend that powers [Base44’s app editor](https://base44.com/ai-app-builder)
, available as a standalone service. It’s a complete backend-as-a-service (BaaS) that includes:
* **Data management**: Store and query data without managing servers.
* **User authentication**: Built-in login, social auth, and session handling.
* **Backend functions**: Custom backend code, callable from your app or externally.
* **Integrations**: Pre-built connections to AI, email, file storage, and more.
* **Hosting**: Deploy your frontend with HTTPS and custom domains.
For more details on these features and others, see [Features](https://docs.base44.com/developers/backend/overview/features)
.
[](https://docs.base44.com/developers/backend/overview/backend-service-basics#base44-app-editor-vs-the-base44-backend-service)
Base44 app editor vs the Base44 backend service
----------------------------------------------------------------------------------------------------------------------------------------------------------------------------------
The Base44 app editor generates complete apps, frontend and backend together. The Base44 backend service gives you just the backend, so you can build your own frontend or skip the frontend entirely.
| | Base44 App Editor | Base44 Backend Service |
| --- | --- | --- |
| **What you get** | AI-generated frontend + backend | Backend only |
| **How you build** | Describe what you want in chat | Code in your own IDE, or use an AI coding assistant |
| **Frontend** | Auto-generated React app | Bring your own on any framework, or don’t have one at all |
| **Best for** | Non-developers, quick builds | Developers, custom projects |
| **Starting point** | base44.com | [Base44 CLI](https://docs.base44.com/developers/references/cli/commands/introduction) , or [skills](https://docs.base44.com/developers/backend/overview/base44-skills) in your AI coding assistant |
**Use the backend service if you:**
* Need pixel-perfect control over your frontend design and UX.
* Have an existing frontend project that needs a backend.
* Want to build for platforms the app editor doesn’t support, like mobile.
* Want to integrate Base44’s backend into a larger system.
**You might prefer the app editor if you:**
* Want to build entirely in Base44’s interface.
* Want the fastest path from idea to working app.
* Prefer a guided, visual experience over a code-first workflow.
[](https://docs.base44.com/developers/backend/overview/backend-service-basics#how-the-backend-service-works)
How the backend service works
----------------------------------------------------------------------------------------------------------------------------------------------
You create and manage backend service projects using the Base44 CLI. The CLI sets up a local project structure where you define your backend resources, such as entities and functions, and optionally include frontend code. You interact with your backend using the [JavaScript SDK](https://docs.base44.com/developers/references/sdk/getting-started/overview)
. This is the same SDK used in Base44’s AI-generated apps. Use it in your own frontend, or from any other app or service that needs to connect to your backend. When you’re ready, deploy your project with a single CLI command. Your backend resources and any frontend files are deployed to Base44’s infrastructure.
[](https://docs.base44.com/developers/backend/overview/backend-service-basics#example-use-cases)
Example use cases
----------------------------------------------------------------------------------------------------------------------
* **Custom-designed web apps**: Design your own frontend when you need full creative control. Match your brand exactly or craft unique experiences. Use any framework while Base44 handles the backend.
* **Headless apps**: Build apps without a traditional frontend, like a Telegram bot that calls your backend functions via HTTP.
* **Mobile apps**: Build a mobile app with a JavaScript-based mobile framework like React Native, using the SDK to connect to your Base44 backend.
* **Extend existing projects**: Add Base44’s data management, authentication, or backend logic to a project you’ve already built.
Get started
-----------
Set up the CLI and create your first project.
Explore features
----------------
Learn more about what the backend service includes.
Was this page helpful?
YesNo
[Introduction](https://docs.base44.com/developers/backend/overview/introduction)
[Features](https://docs.base44.com/developers/backend/overview/features)
⌘I
Assistant
Responses are generated using AI and may contain mistakes.
Suggestions
Which plans come with a free domain?How are credits used?How do I use Discuss mode?
---
# create - Base44 Support Documentation
> Documentation Index
> -------------------
>
> Fetch the complete documentation index at: [/llms.txt](https://docs.base44.com/llms.txt)
>
> Use this file to discover all available pages before exploring further.
[Skip to main content](https://docs.base44.com/developers/references/cli/commands/create#content-area)
Create a new Base44 project with all necessary configuration files and folder structure. You’ll be guided through setup with interactive prompts.
If you’ve cloned or downloaded existing Base44 project files, such as an example app, use [`base44 link`](https://docs.base44.com/developers/backend/overview/link-existing-project)
instead. The `create` command generates new code, while `link` connects existing code files to a backend.
[](https://docs.base44.com/developers/references/cli/commands/create#usage)
Usage
-------------------------------------------------------------------------------------
base44 create [name]
[](https://docs.base44.com/developers/references/cli/commands/create#arguments)
Arguments
---------------------------------------------------------------------------------------------
| Argument | Description | Required |
| --- | --- | --- |
| `name` | Project name | No |
[](https://docs.base44.com/developers/references/cli/commands/create#flags)
Flags
-------------------------------------------------------------------------------------
| Flag | Description |
| --- | --- |
| `-p, --path ` | Directory path for the new project |
| `-t, --template ` | Template ID. Options: `backend-only`, `backend-and-client` |
| `--deploy` | Build and deploy the site after creation |
| `--no-skills` | Skip AI agent skills installation |
When providing a project `name` together with the `--path` flag, the command runs in non-interactive mode. The template defaults to `backend-only` unless specified with `--template`.
[](https://docs.base44.com/developers/references/cli/commands/create#project-options)
Project options
---------------------------------------------------------------------------------------------------------
When you run this command, you’ll be prompted to choose what kind of project to create:
* **Create a basic project:** Minimal Base44 backend for defining your data models and logic. See the [backend-only quickstart](https://docs.base44.com/developers/backend/quickstart/templates/quickstart-backend-only)
for detailed instructions.
* **Start from a template:** Full-stack example with a Base44 backend and a Vite + React client app. See the [React quickstart](https://docs.base44.com/developers/backend/quickstart/templates/quickstart-react-template)
for detailed instructions.
[](https://docs.base44.com/developers/references/cli/commands/create#example)
Example
-----------------------------------------------------------------------------------------
Create a full-stack project with a Vite + React frontend and a Base44 backend, and deploy it:
base44 create my-app --path ./my-app --template backend-and-client --deploy
[](https://docs.base44.com/developers/references/cli/commands/create#see-also)
See also
-------------------------------------------------------------------------------------------
* [Project Structure](https://docs.base44.com/developers/backend/overview/project-structure)
: How project files are organized
* [`entities push`](https://docs.base44.com/developers/references/cli/commands/entities-push)
: Deploy entity schemas to Base44
Was this page helpful?
YesNo
[whoami](https://docs.base44.com/developers/references/cli/commands/whoami)
[link](https://docs.base44.com/developers/references/cli/commands/link)
⌘I
Assistant
Responses are generated using AI and may contain mistakes.
Suggestions
Which plans come with a free domain?How are credits used?How do I use Discuss mode?
---
# Authentication - Base44 Support Documentation
> Documentation Index
> -------------------
>
> Fetch the complete documentation index at: [/llms.txt](https://docs.base44.com/llms.txt)
>
> Use this file to discover all available pages before exploring further.
[Skip to main content](https://docs.base44.com/developers/references/monitoring-api/get-started/authentication#content-area)
All Monitoring API endpoints require authentication, except for the health check endpoint (`GET /health`).
[](https://docs.base44.com/developers/references/monitoring-api/get-started/authentication#required-role)
Required role
---------------------------------------------------------------------------------------------------------------------------
You must have **admin** or **owner** role in the workspace to access the Monitoring API. Regular workspace members cannot access these endpoints. Requests without the proper role return a `401 Unauthorized` error. To learn about workspace roles, see [Managing your workspace members](https://docs.base44.com/Account-and-billing/Managing-your-workspaces#managing-your-workspace-members)
.
[](https://docs.base44.com/developers/references/monitoring-api/get-started/authentication#api-key)
API key
---------------------------------------------------------------------------------------------------------------
The Monitoring API accepts both [personal API keys](https://docs.base44.com/developers/references/monitoring-api/get-started/authentication#personal-api-key)
and [workspace API keys](https://docs.base44.com/developers/references/monitoring-api/get-started/authentication#workspace-api-key)
. Include an API key in the `api_key` header with all requests:
api_key: YOUR_API_KEY
###
[](https://docs.base44.com/developers/references/monitoring-api/get-started/authentication#example-request)
Example request
curl --request GET \
--url http://localhost:3000/api/v1/monitoring/analytics/{workspace_id} \
--header 'api_key: '
###
[](https://docs.base44.com/developers/references/monitoring-api/get-started/authentication#personal-api-key)
Personal API key
To get your personal API key:
1. Click your profile icon at the top right of your account.
2. Click **Settings**.
3. Select the **Account** tab.
4. Scroll down to the **API Key** section.
###
[](https://docs.base44.com/developers/references/monitoring-api/get-started/authentication#workspace-api-key)
Workspace API key
Enterprise workspaces can also use workspace API keys. To create one:
1. Click your workspace name at the top left and click **Settings**.
2. Click **Secrets** in the sidebar.
3. Click **\+ Create API Key**.
4. Enter a name for the key and an optional description, then click **Create Key**.
5. Copy the key immediately and store it securely.
For the full guide, see [Managing workspace secrets](https://docs.base44.com/Enterprise/workspace-secrets)
.
Your API key provides access to your workspace data. Treat it like a password and do not share it or commit it to version control.
Was this page helpful?
YesNo
[Enterprise Monitoring API Overview](https://docs.base44.com/developers/references/monitoring-api/get-started/overview)
[Rate Limits](https://docs.base44.com/developers/references/monitoring-api/get-started/rate-limits)
⌘I
Assistant
Responses are generated using AI and may contain mistakes.
Suggestions
Which plans come with a free domain?How are credits used?How do I use Discuss mode?
---
# agents pull - Base44 Support Documentation
> Documentation Index
> -------------------
>
> Fetch the complete documentation index at: [/llms.txt](https://docs.base44.com/llms.txt)
>
> Use this file to discover all available pages before exploring further.
[Skip to main content](https://docs.base44.com/developers/references/cli/commands/agents-pull#content-area)
Download [AI agent configurations](https://docs.base44.com/developers/backend/resources/agents-config)
from Base44 to local JSONC files. The command saves all agents to your agents directory, one file per agent. By default the agents directory is `base44/agents/`, but you can customize the path in your [project configuration](https://docs.base44.com/developers/backend/overview/project-structure#config-jsonc)
.
This is a full sync. Local agents not present remotely will be deleted. See the Sync behavior table below for details.
[](https://docs.base44.com/developers/references/cli/commands/agents-pull#usage)
Usage
------------------------------------------------------------------------------------------
base44 agents pull
[](https://docs.base44.com/developers/references/cli/commands/agents-pull#sync-behavior)
Sync behavior
----------------------------------------------------------------------------------------------------------
| Remote state | Local state | Result |
| --- | --- | --- |
| Agent exists | Agent exists | Local file is replaced with remote. |
| Agent exists | Agent doesn’t exist | Local file is created. |
| Agent doesn’t exist | Agent exists | Local file is deleted. |
[](https://docs.base44.com/developers/references/cli/commands/agents-pull#see-also)
See also
------------------------------------------------------------------------------------------------
* [`agents push`](https://docs.base44.com/developers/references/cli/commands/agents-push)
: Deploy your local agent configurations
* [Agent Configurations](https://docs.base44.com/developers/backend/resources/agents-config)
: Learn how to configure AI agents
* [Setting up AI agents](https://docs.base44.com/Building-your-app/AI-agents-for-apps)
: Guide to creating AI agents
Was this page helpful?
YesNo
[entities push](https://docs.base44.com/developers/references/cli/commands/entities-push)
[agents push](https://docs.base44.com/developers/references/cli/commands/agents-push)
⌘I
Assistant
Responses are generated using AI and may contain mistakes.
Suggestions
Which plans come with a free domain?How are credits used?How do I use Discuss mode?
---
# Pricing - Base44 Support Documentation
> Documentation Index
> -------------------
>
> Fetch the complete documentation index at: [/llms.txt](https://docs.base44.com/llms.txt)
>
> Use this file to discover all available pages before exploring further.
[Skip to main content](https://docs.base44.com/developers/backend/overview/pricing#content-area)
[](https://docs.base44.com/developers/backend/overview/pricing#backend-service-pricing)
Backend service pricing
-------------------------------------------------------------------------------------------------------------------
The Base44 backend service is currently in **beta** and **free to use**. There is no separate backend subscription or additional charges for using backend features.
###
[](https://docs.base44.com/developers/backend/overview/pricing#how-it-works)
How it works
Backend operations use your workspace’s **integration credits**, which are included in all Base44 plans. If you need higher credit limits or additional features, you can upgrade to one of the regular Base44 plans.
View plans and pricing
----------------------
See all available Base44 plans, credit limits, and features
[](https://docs.base44.com/developers/backend/overview/pricing#see-also)
See also
-------------------------------------------------------------------------------------
* [Backend features](https://docs.base44.com/developers/backend/overview/features)
: Learn what’s included in the backend service
* [Credits](https://docs.base44.com/Account-and-billing/Credits)
: Understand how credits work across Base44
Was this page helpful?
YesNo
[Features](https://docs.base44.com/developers/backend/overview/features)
[Troubleshooting](https://docs.base44.com/developers/backend/overview/troubleshooting)
⌘I
Assistant
Responses are generated using AI and may contain mistakes.
Suggestions
Which plans come with a free domain?How are credits used?How do I use Discuss mode?
---
# Common SDK uses - Base44 Support Documentation
> Documentation Index
> -------------------
>
> Fetch the complete documentation index at: [/llms.txt](https://docs.base44.com/llms.txt)
>
> Use this file to discover all available pages before exploring further.
[Skip to main content](https://docs.base44.com/developers/references/sdk/getting-started/work-with-sdk#content-area)
Beyond data management, the Base44 SDK provides modules for authentication, integrations, custom backend functions, and more. This guide covers common patterns for working with these features.
[](https://docs.base44.com/developers/references/sdk/getting-started/work-with-sdk#authentication)
Authentication
---------------------------------------------------------------------------------------------------------------------
The `auth` module provides methods for working with user authentication. The most common use case is getting information about the currently authenticated user.
Get current user
Check authentication status
Log out
const user = await base44.auth.me();
console.log(user.email, user.name, user.role);
[](https://docs.base44.com/developers/references/sdk/getting-started/work-with-sdk#core-integrations)
Core integrations
---------------------------------------------------------------------------------------------------------------------------
Base44 provides built-in integrations for common tasks like working with AI, sending emails, and handling files. Access these through the `integrations.Core` module.
Generate AI responses
Send an email
Upload a file
Generate an image
const response = await base44.integrations.Core.InvokeLLM({
prompt: "Write a welcome email for a new user",
responseFormat: "text",
});
[](https://docs.base44.com/developers/references/sdk/getting-started/work-with-sdk#backend-functions)
Backend functions
---------------------------------------------------------------------------------------------------------------------------
The `functions` module lets you invoke custom backend functions defined in your app. Pass any data your function needs as parameters.
Invoke a function
const result = await base44.functions.invoke("processOrder", {
orderId: "123",
action: "fulfill",
});
[](https://docs.base44.com/developers/references/sdk/getting-started/work-with-sdk#error-handling)
Error handling
---------------------------------------------------------------------------------------------------------------------
All SDK errors are instances of `Base44Error`, which includes the HTTP status code and error details. Use this to handle different error scenarios gracefully.
Handle errors
import { Base44Error } from "@base44/sdk";
try {
const result = await base44.entities.Task.list();
} catch (error) {
if (error instanceof Base44Error) {
console.error(`Status: ${error.status}`);
console.error(`Message: ${error.message}`);
console.error(`Code: ${error.code}`);
} else {
console.error("Unexpected error:", error);
}
}
[](https://docs.base44.com/developers/references/sdk/getting-started/work-with-sdk#see-more)
See more
---------------------------------------------------------------------------------------------------------
Base44 client
-------------
Work with the client in different contexts
auth module
-----------
Complete authentication API reference
integrations module
-------------------
Complete integrations API reference
functions module
----------------
Complete functions API reference
Was this page helpful?
YesNo
[Dynamic Types](https://docs.base44.com/developers/references/sdk/getting-started/dynamic-types)
[Connect to third-party APIs](https://docs.base44.com/developers/references/sdk/getting-started/third-party-apis)
⌘I
Assistant
Responses are generated using AI and may contain mistakes.
Suggestions
Which plans come with a free domain?How are credits used?How do I use Discuss mode?
---
# Link an Existing Backend Project - Base44 Support Documentation
> Documentation Index
> -------------------
>
> Fetch the complete documentation index at: [/llms.txt](https://docs.base44.com/llms.txt)
>
> Use this file to discover all available pages before exploring further.
[Skip to main content](https://docs.base44.com/developers/backend/overview/link-existing-project#content-area)
You can link existing Base44 backend project code, such as from an [example app](https://github.com/base44/apps-examples)
, to a backend on Base44. Use this when you already have Base44 backend project files locally. If you don’t have any project files yet, use [`base44 create`](https://docs.base44.com/developers/references/cli/commands/create)
to generate a new project instead.
* This guide is for linking existing Base44 backend project code, such as example apps or projects shared by team members. If you created an app with the [Base44 app editor](https://base44.com/)
and want to develop it locally, set up the [GitHub integration](https://docs.base44.com/developers/app-code/local-development/github)
for ongoing sync, or use [`base44 eject`](https://docs.base44.com/developers/backend/overview/start-from-existing-app)
for a one-time local copy.
* The CLI requires Node.js 20.19.0 or higher.
[](https://docs.base44.com/developers/backend/overview/link-existing-project#understanding-local-code-vs-backend-projects)
Understanding local code vs. backend projects
----------------------------------------------------------------------------------------------------------------------------------------------------------------------------
When working with Base44, there are two separate components:
* **Local code:** The project files on your computer, such as your frontend code, entity schemas and backend functions.
* **Base44 backend project:** The backend infrastructure on Base44’s servers, including the database, endpoints, hosting, and so on.
Linking connects your local code to a backend project so your app can use Base44’s infrastructure. During the linking process, you’ll choose one of two options:
* **Create a new project:** Creates a fresh backend on Base44 for your code. Choose this if you’re setting up this code for the first time.
* **Link to existing:** Connects to a backend that already exists on Base44. Choose this if you’re reconnecting to a backend you set up earlier, or if you’re joining a team project where the backend has already been created.
[](https://docs.base44.com/developers/backend/overview/link-existing-project#link-a-project)
Link a project
---------------------------------------------------------------------------------------------------------------
1
[](https://docs.base44.com/developers/backend/overview/link-existing-project#)
Get the project code
Clone an example app or download existing project code, then navigate to the project directory.The project should already contain a `base44/` folder with a `config.jsonc` file.
2
[](https://docs.base44.com/developers/backend/overview/link-existing-project#)
Install dependencies
Install the project dependencies:
npm install
3
[](https://docs.base44.com/developers/backend/overview/link-existing-project#)
Install the Base44 CLI
Install the Base44 CLI globally:
npm install -g base44@latest
4
[](https://docs.base44.com/developers/backend/overview/link-existing-project#)
Authenticate
Log in to your Base44 account:
base44 login
The CLI generates a device code. Open the provided URL, enter the code, and complete authentication in your browser.
5
[](https://docs.base44.com/developers/backend/overview/link-existing-project#)
Link the project
Link your local project to a Base44 backend:
base44 link
The CLI will prompt you to either create a new backend project or link to an existing one. This creates an `.app.jsonc` file in your `base44/` directory with your app ID:
{
"id": "your-app-id"
}
The `.app.jsonc` file should never be committed to version control. It’s automatically added to `.gitignore` and is specific to each developer and deployment environment.
6
[](https://docs.base44.com/developers/backend/overview/link-existing-project#)
Set up environment variables (if needed)
Your app ID is required when configuring an SDK client. Projects typically store their app ID in an environment variable and retrieve it to create a client. Check the project’s documentation or configuration files for instructions on setting the required environment variables.
7
[](https://docs.base44.com/developers/backend/overview/link-existing-project#)
Build the frontend if the project has one
If your project includes a frontend, build it so it’s ready to deploy in the next step.
8
[](https://docs.base44.com/developers/backend/overview/link-existing-project#)
Push resources
Sync your project’s resources to your Base44 backend:
base44 deploy
This pushes entities, functions, and the site if your project has one.If your project has agents, push them as well:
base44 agents push
[](https://docs.base44.com/developers/backend/overview/link-existing-project#next-steps)
Next steps
-------------------------------------------------------------------------------------------------------
Now that your project is set up and running, you can:
* Use the [SDK](https://docs.base44.com/developers/references/sdk/getting-started/overview)
to add more functionality to your frontend, if the project has one.
* Add [entities](https://docs.base44.com/developers/backend/resources/entities/overview)
, [backend functions](https://docs.base44.com/developers/backend/resources/backend-functions/overview)
, and [agents](https://docs.base44.com/developers/backend/resources/agents-config)
.
* Continue building and deploy updates with [`base44 deploy`](https://docs.base44.com/developers/references/cli/commands/deploy)
.
[](https://docs.base44.com/developers/backend/overview/link-existing-project#see-also)
See also
---------------------------------------------------------------------------------------------------
* [CLI Command Reference](https://docs.base44.com/developers/references/cli/commands/introduction)
: All available CLI commands
* [Project Structure](https://docs.base44.com/developers/backend/overview/project-structure)
: How project files are organized
* [JavaScript SDK Documentation](https://docs.base44.com/developers/references/sdk/getting-started/overview)
: Connect your app to the backend
* [Base44 Skills](https://docs.base44.com/developers/backend/overview/base44-skills)
: Teach AI assistants to work with Base44
* [Example apps repository](https://github.com/base44/apps-examples)
: Sample projects to learn from
Was this page helpful?
YesNo
[Start from an Existing Base44 App](https://docs.base44.com/developers/backend/overview/start-from-existing-app)
[Overview](https://docs.base44.com/developers/backend/overview/local-dev/local-development-overview)
⌘I
Assistant
Responses are generated using AI and may contain mistakes.
Suggestions
Which plans come with a free domain?How are credits used?How do I use Discuss mode?
---
# logout - Base44 Support Documentation
> Documentation Index
> -------------------
>
> Fetch the complete documentation index at: [/llms.txt](https://docs.base44.com/llms.txt)
>
> Use this file to discover all available pages before exploring further.
[Skip to main content](https://docs.base44.com/developers/references/cli/commands/logout#content-area)
End your current CLI session and remove stored authentication credentials from your device.
[](https://docs.base44.com/developers/references/cli/commands/logout#usage)
Usage
-------------------------------------------------------------------------------------
base44 logout
[](https://docs.base44.com/developers/references/cli/commands/logout#what-gets-removed)
What gets removed
-------------------------------------------------------------------------------------------------------------
Running `logout` deletes the authentication file at `~/.base44/auth/auth.json`. This file contains your:
* Authentication token
* Stored user email
* Stored user display name
After logging out, you’ll need to run [`base44 login`](https://docs.base44.com/developers/references/cli/commands/login)
to authenticate again.
[](https://docs.base44.com/developers/references/cli/commands/logout#see-also)
See also
-------------------------------------------------------------------------------------------
* [`login`](https://docs.base44.com/developers/references/cli/commands/login)
: Sign in to the CLI
* [`whoami`](https://docs.base44.com/developers/references/cli/commands/whoami)
: Check your logged-in user
Was this page helpful?
YesNo
[login](https://docs.base44.com/developers/references/cli/commands/login)
[whoami](https://docs.base44.com/developers/references/cli/commands/whoami)
⌘I
Assistant
Responses are generated using AI and may contain mistakes.
Suggestions
Which plans come with a free domain?How are credits used?How do I use Discuss mode?
---
# functions delete - Base44 Support Documentation
> Documentation Index
> -------------------
>
> Fetch the complete documentation index at: [/llms.txt](https://docs.base44.com/llms.txt)
>
> Use this file to discover all available pages before exploring further.
[Skip to main content](https://docs.base44.com/developers/references/cli/commands/functions-delete#content-area)
Delete deployed [backend functions](https://docs.base44.com/developers/backend/resources/backend-functions/overview)
from Base44. This removes the remote deployment only. Local function files in your project are not affected. You can delete a single function or multiple functions at once.
Deleting a function removes it from Base44. Any endpoints, SDK calls, or automations that depend on this function will stop working.
[](https://docs.base44.com/developers/references/cli/commands/functions-delete#usage)
Usage
-----------------------------------------------------------------------------------------------
base44 functions delete
[](https://docs.base44.com/developers/references/cli/commands/functions-delete#arguments)
Arguments
-------------------------------------------------------------------------------------------------------
| Argument | Description | Required |
| --- | --- | --- |
| `` | One or more function names, separated by spaces or commas | Yes |
[](https://docs.base44.com/developers/references/cli/commands/functions-delete#see-also)
See also
-----------------------------------------------------------------------------------------------------
* [Backend Functions](https://docs.base44.com/developers/backend/resources/backend-functions/overview)
: Learn about backend functions
* [`functions deploy`](https://docs.base44.com/developers/references/cli/commands/functions-deploy)
: Deploy local functions to Base44
* [`functions list`](https://docs.base44.com/developers/references/cli/commands/functions-list)
: List all deployed functions
* [`functions pull`](https://docs.base44.com/developers/references/cli/commands/functions-pull)
: Download deployed functions to your local project
Was this page helpful?
YesNo
[functions deploy](https://docs.base44.com/developers/references/cli/commands/functions-deploy)
[functions list](https://docs.base44.com/developers/references/cli/commands/functions-list)
⌘I
Assistant
Responses are generated using AI and may contain mistakes.
Suggestions
Which plans come with a free domain?How are credits used?How do I use Discuss mode?
---
# secrets list - Base44 Support Documentation
> Documentation Index
> -------------------
>
> Fetch the complete documentation index at: [/llms.txt](https://docs.base44.com/llms.txt)
>
> Use this file to discover all available pages before exploring further.
[Skip to main content](https://docs.base44.com/developers/references/cli/commands/secrets-list#content-area)
List all secrets configured for your project. Secret values are masked. Only names and partially redacted values are shown.
[](https://docs.base44.com/developers/references/cli/commands/secrets-list#usage)
Usage
-------------------------------------------------------------------------------------------
base44 secrets list
[](https://docs.base44.com/developers/references/cli/commands/secrets-list#see-also)
See also
-------------------------------------------------------------------------------------------------
* [`secrets set`](https://docs.base44.com/developers/references/cli/commands/secrets-set)
: Set one or more secrets
* [`secrets delete`](https://docs.base44.com/developers/references/cli/commands/secrets-delete)
: Delete one or more secrets
* [Backend Functions](https://docs.base44.com/developers/backend/resources/backend-functions/overview)
: Use secrets as environment variables in your functions
Was this page helpful?
YesNo
[secrets set](https://docs.base44.com/developers/references/cli/commands/secrets-set)
[secrets delete](https://docs.base44.com/developers/references/cli/commands/secrets-delete)
⌘I
Assistant
Responses are generated using AI and may contain mistakes.
Suggestions
Which plans come with a free domain?How are credits used?How do I use Discuss mode?
---
# whoami - Base44 Support Documentation
> Documentation Index
> -------------------
>
> Fetch the complete documentation index at: [/llms.txt](https://docs.base44.com/llms.txt)
>
> Use this file to discover all available pages before exploring further.
[Skip to main content](https://docs.base44.com/developers/references/cli/commands/whoami#content-area)
Show information about your current CLI session, including your name and email address.
[](https://docs.base44.com/developers/references/cli/commands/whoami#usage)
Usage
-------------------------------------------------------------------------------------
base44 whoami
[](https://docs.base44.com/developers/references/cli/commands/whoami#example-output)
Example output
-------------------------------------------------------------------------------------------------------
Logged in as Jane Smith (jane@example.com)
[](https://docs.base44.com/developers/references/cli/commands/whoami#see-also)
See also
-------------------------------------------------------------------------------------------
* [`login`](https://docs.base44.com/developers/references/cli/commands/login)
: Sign in to the CLI
* [`logout`](https://docs.base44.com/developers/references/cli/commands/logout)
: Sign out from the CLI
Was this page helpful?
YesNo
[logout](https://docs.base44.com/developers/references/cli/commands/logout)
[create](https://docs.base44.com/developers/references/cli/commands/create)
⌘I
Assistant
Responses are generated using AI and may contain mistakes.
Suggestions
Which plans come with a free domain?How are credits used?How do I use Discuss mode?
---
# login - Base44 Support Documentation
> Documentation Index
> -------------------
>
> Fetch the complete documentation index at: [/llms.txt](https://docs.base44.com/llms.txt)
>
> Use this file to discover all available pages before exploring further.
[Skip to main content](https://docs.base44.com/developers/references/cli/commands/login#content-area)
Authenticate your CLI session with Base44. The CLI uses a secure device code flow, so you’ll receive a code to enter in your browser to complete authentication. For a walkthrough of the authentication process, see the [Backend only](https://docs.base44.com/developers/backend/quickstart/templates/quickstart-backend-only)
or [React](https://docs.base44.com/developers/backend/quickstart/templates/quickstart-react-template)
quickstart.
[](https://docs.base44.com/developers/references/cli/commands/login#usage)
Usage
------------------------------------------------------------------------------------
base44 login
[](https://docs.base44.com/developers/references/cli/commands/login#authentication-storage)
Authentication storage
----------------------------------------------------------------------------------------------------------------------
On successful login, your credentials are stored at `~/.base44/auth/auth.json`. This file contains your:
* Authentication token
* User email
* User display name
Your token remains valid until you explicitly log out or it expires. You don’t need to log in before every command.
[](https://docs.base44.com/developers/references/cli/commands/login#see-also)
See also
------------------------------------------------------------------------------------------
* [Quickstart - Backend only](https://docs.base44.com/developers/backend/quickstart/templates/quickstart-backend-only)
: Create your first backend-only project
* [Quickstart - React](https://docs.base44.com/developers/backend/quickstart/templates/quickstart-react-template)
: Build a full-stack React app
* [`logout`](https://docs.base44.com/developers/references/cli/commands/logout)
: Sign out from the CLI
* [`whoami`](https://docs.base44.com/developers/references/cli/commands/whoami)
: Check your logged-in user
Was this page helpful?
YesNo
[CLI Commands Overview](https://docs.base44.com/developers/references/cli/commands/introduction)
[logout](https://docs.base44.com/developers/references/cli/commands/logout)
⌘I
Assistant
Responses are generated using AI and may contain mistakes.
Suggestions
Which plans come with a free domain?How are credits used?How do I use Discuss mode?
---
# secrets delete - Base44 Support Documentation
> Documentation Index
> -------------------
>
> Fetch the complete documentation index at: [/llms.txt](https://docs.base44.com/llms.txt)
>
> Use this file to discover all available pages before exploring further.
[Skip to main content](https://docs.base44.com/developers/references/cli/commands/secrets-delete#content-area)
Delete secrets from your project. When you delete a secret, any deployed backend functions that reference it are automatically redeployed.
If a backend function references a deleted secret, it may fail when trying to access the missing value. Remove the secret from your function code before deleting it.
[](https://docs.base44.com/developers/references/cli/commands/secrets-delete#usage)
Usage
---------------------------------------------------------------------------------------------
base44 secrets delete
[](https://docs.base44.com/developers/references/cli/commands/secrets-delete#arguments)
Arguments
-----------------------------------------------------------------------------------------------------
| Argument | Description | Required |
| --- | --- | --- |
| `` | One or more secret names, separated by spaces | Yes |
[](https://docs.base44.com/developers/references/cli/commands/secrets-delete#example)
Example
-------------------------------------------------------------------------------------------------
base44 secrets delete API_KEY DATABASE_URL
[](https://docs.base44.com/developers/references/cli/commands/secrets-delete#see-also)
See also
---------------------------------------------------------------------------------------------------
* [`secrets list`](https://docs.base44.com/developers/references/cli/commands/secrets-list)
: List configured secrets
* [`secrets set`](https://docs.base44.com/developers/references/cli/commands/secrets-set)
: Set one or more secrets
* [Backend Functions](https://docs.base44.com/developers/backend/resources/backend-functions/overview)
: Use secrets as environment variables in your functions
Was this page helpful?
YesNo
[secrets list](https://docs.base44.com/developers/references/cli/commands/secrets-list)
[dev](https://docs.base44.com/developers/references/cli/commands/dev)
⌘I
Assistant
Responses are generated using AI and may contain mistakes.
Suggestions
Which plans come with a free domain?How are credits used?How do I use Discuss mode?
---
# functions list - Base44 Support Documentation
> Documentation Index
> -------------------
>
> Fetch the complete documentation index at: [/llms.txt](https://docs.base44.com/llms.txt)
>
> Use this file to discover all available pages before exploring further.
[Skip to main content](https://docs.base44.com/developers/references/cli/commands/functions-list#content-area)
List all [backend functions](https://docs.base44.com/developers/backend/resources/backend-functions/overview)
currently deployed to your Base44 project. Functions with [automations](https://docs.base44.com/developers/backend/resources/backend-functions/automations)
show the automation count next to the name.
[](https://docs.base44.com/developers/references/cli/commands/functions-list#usage)
Usage
---------------------------------------------------------------------------------------------
base44 functions list
[](https://docs.base44.com/developers/references/cli/commands/functions-list#see-also)
See also
---------------------------------------------------------------------------------------------------
* [Backend Functions](https://docs.base44.com/developers/backend/resources/backend-functions/overview)
: Learn about backend functions
* [`functions deploy`](https://docs.base44.com/developers/references/cli/commands/functions-deploy)
: Deploy local functions to Base44
* [`functions pull`](https://docs.base44.com/developers/references/cli/commands/functions-pull)
: Download deployed functions to your local project
* [`functions delete`](https://docs.base44.com/developers/references/cli/commands/functions-delete)
: Delete deployed functions
Was this page helpful?
YesNo
[functions delete](https://docs.base44.com/developers/references/cli/commands/functions-delete)
[entities push](https://docs.base44.com/developers/references/cli/commands/entities-push)
⌘I
Assistant
Responses are generated using AI and may contain mistakes.
Suggestions
Which plans come with a free domain?How are credits used?How do I use Discuss mode?
---
# functions pull - Base44 Support Documentation
> Documentation Index
> -------------------
>
> Fetch the complete documentation index at: [/llms.txt](https://docs.base44.com/llms.txt)
>
> Use this file to discover all available pages before exploring further.
[Skip to main content](https://docs.base44.com/developers/references/cli/commands/functions-pull#content-area)
Download deployed [backend functions](https://docs.base44.com/developers/backend/resources/backend-functions/overview)
from Base44 to your local functions directory. For each function, the command creates a `function.jsonc` configuration file and writes all source files. Functions whose local files already match the remote content are skipped. By default the functions directory is `base44/functions/`, but you can customize the path in your [project configuration](https://docs.base44.com/developers/backend/overview/project-structure#config-jsonc)
.
This command overwrites local files with the remote version.
[](https://docs.base44.com/developers/references/cli/commands/functions-pull#usage)
Usage
---------------------------------------------------------------------------------------------
base44 functions pull [name]
[](https://docs.base44.com/developers/references/cli/commands/functions-pull#arguments)
Arguments
-----------------------------------------------------------------------------------------------------
| Argument | Description | Required |
| --- | --- | --- |
| `[name]` | Pull a single function by name. If omitted, pulls all functions. | No |
[](https://docs.base44.com/developers/references/cli/commands/functions-pull#see-also)
See also
---------------------------------------------------------------------------------------------------
* [Backend Functions](https://docs.base44.com/developers/backend/resources/backend-functions/overview)
: Learn about backend functions
* [`functions delete`](https://docs.base44.com/developers/references/cli/commands/functions-delete)
: Delete deployed functions
* [`functions deploy`](https://docs.base44.com/developers/references/cli/commands/functions-deploy)
: Deploy local functions to Base44
* [`functions list`](https://docs.base44.com/developers/references/cli/commands/functions-list)
: List all deployed functions
Was this page helpful?
YesNo
[dashboard open](https://docs.base44.com/developers/references/cli/commands/dashboard-open)
[functions deploy](https://docs.base44.com/developers/references/cli/commands/functions-deploy)
⌘I
Assistant
Responses are generated using AI and may contain mistakes.
Suggestions
Which plans come with a free domain?How are credits used?How do I use Discuss mode?
---
# exec - Base44 Support Documentation
> Documentation Index
> -------------------
>
> Fetch the complete documentation index at: [/llms.txt](https://docs.base44.com/llms.txt)
>
> Use this file to discover all available pages before exploring further.
[Skip to main content](https://docs.base44.com/developers/references/cli/commands/exec#content-area)
Run a TypeScript or JavaScript script with the Base44 SDK pre-authenticated as the current user. The SDK is available as a global `base44` variable. Scripts are executed locally using Deno. For a full walkthrough, use cases, and prerequisites, see the [Standalone scripts](https://docs.base44.com/developers/backend/overview/run-scripts)
guide.
[](https://docs.base44.com/developers/references/cli/commands/exec#usage)
Usage
-----------------------------------------------------------------------------------
Pipe a script file to exec:
cat ./script.ts | base44 exec
Or pass inline code:
echo "console.log(await base44.entities.Tasks.list())" | base44 exec
By default `exec` targets the app linked in the current project’s `.app.jsonc`. To run a script against any other app on your account, pass `--app-id` or set the `BASE44_APP_ID` environment variable. This works from anywhere on your machine, including against apps you built in the Base44 online app editor and never linked locally.
echo "console.log(await base44.entities.Tasks.list())" | base44 exec --app-id
[](https://docs.base44.com/developers/references/cli/commands/exec#flags)
Flags
-----------------------------------------------------------------------------------
| Flag | Description |
| --- | --- |
| `--app-id ` | Target the specified app. Defaults to the app linked in the current project. See [Select a target app](https://docs.base44.com/developers/references/cli/commands/introduction#select-a-target-app) . |
[](https://docs.base44.com/developers/references/cli/commands/exec#see-also)
See also
-----------------------------------------------------------------------------------------
* [Standalone scripts](https://docs.base44.com/developers/backend/overview/run-scripts)
: Full guide with use cases and prerequisites
Was this page helpful?
YesNo
[dev](https://docs.base44.com/developers/references/cli/commands/dev)
[types generate](https://docs.base44.com/developers/references/cli/commands/types-generate)
⌘I
Assistant
Responses are generated using AI and may contain mistakes.
Suggestions
Which plans come with a free domain?How are credits used?How do I use Discuss mode?
---
# auth social-login - Base44 Support Documentation
> Documentation Index
> -------------------
>
> Fetch the complete documentation index at: [/llms.txt](https://docs.base44.com/llms.txt)
>
> Use this file to discover all available pages before exploring further.
[Skip to main content](https://docs.base44.com/developers/references/cli/commands/auth-social-login#content-area)
Configure whether end users can sign in to your app with a social identity provider, such as Google, Microsoft, Facebook, or Apple. This is the CLI equivalent of toggling social login options in your app’s [authentication settings](https://docs.base44.com/Setting-up-your-app/Managing-login-and-registration)
. This command updates your local auth config file. To apply the change to your deployed app, run [`auth push`](https://docs.base44.com/developers/references/cli/commands/auth-push)
or [`deploy`](https://docs.base44.com/developers/references/cli/commands/deploy)
.
[](https://docs.base44.com/developers/references/cli/commands/auth-social-login#usage)
Usage
------------------------------------------------------------------------------------------------
Enable a social login provider:
base44 auth social-login google enable
Enable Google with your own OAuth credentials:
base44 auth social-login google enable --client-id < id > --client-secret < secret >
Disable a social login provider:
base44 auth social-login microsoft disable
[](https://docs.base44.com/developers/references/cli/commands/auth-social-login#arguments)
Arguments
--------------------------------------------------------------------------------------------------------
| Argument | Description | Required |
| --- | --- | --- |
| `` | Social login provider: `google`, `microsoft`, `facebook`, or `apple` | Yes |
| `` | Whether to enable or disable the provider | Yes |
If disabling a provider would leave your app with no active login methods, the command warns that users will be locked out. Enable an alternative login method before disabling the last one.
[](https://docs.base44.com/developers/references/cli/commands/auth-social-login#flags)
Flags
------------------------------------------------------------------------------------------------
The following flags configure custom OAuth credentials. They are currently supported for Google only. Other providers use Base44-managed credentials.
| Flag | Description |
| --- | --- |
| `--client-id ` | Custom OAuth client ID. |
| `--client-secret ` | Custom OAuth client secret. |
| `--client-secret-stdin` | Read the client secret from stdin. |
| `--env-file ` | Read the client secret from a `.env` file. The file must contain a `google_oauth_client_secret` key. |
[](https://docs.base44.com/developers/references/cli/commands/auth-social-login#see-also)
See also
------------------------------------------------------------------------------------------------------
* [`auth password-login`](https://docs.base44.com/developers/references/cli/commands/auth-password-login)
: Enable or disable email and password login
* [`auth pull`](https://docs.base44.com/developers/references/cli/commands/auth-pull)
: Fetch auth config from Base44 to your local project
* [`auth push`](https://docs.base44.com/developers/references/cli/commands/auth-push)
: Push local auth config to Base44
* [`secrets set`](https://docs.base44.com/developers/references/cli/commands/secrets-set)
: Set project secrets manually
* [`deploy`](https://docs.base44.com/developers/references/cli/commands/deploy)
: Deploy all project resources, including auth config
* [Managing login and registration](https://docs.base44.com/Setting-up-your-app/Managing-login-and-registration)
: Configure login options in the dashboard
Was this page helpful?
YesNo
[auth password-login](https://docs.base44.com/developers/references/cli/commands/auth-password-login)
[auth pull](https://docs.base44.com/developers/references/cli/commands/auth-pull)
⌘I
Assistant
Responses are generated using AI and may contain mistakes.
Suggestions
Which plans come with a free domain?How are credits used?How do I use Discuss mode?
---
# secrets set - Base44 Support Documentation
> Documentation Index
> -------------------
>
> Fetch the complete documentation index at: [/llms.txt](https://docs.base44.com/llms.txt)
>
> Use this file to discover all available pages before exploring further.
[Skip to main content](https://docs.base44.com/developers/references/cli/commands/secrets-set#content-area)
Set secrets for your project. Secrets are available to your [backend functions](https://docs.base44.com/developers/backend/resources/backend-functions/overview)
as environment variables via `Deno.env.get()`. When you set a secret, any deployed backend functions that reference it are automatically redeployed with the new value. If a secret with the same name already exists, its value is overwritten. You can provide secrets as inline `KEY=VALUE` pairs or load them from an `.env` file.
[](https://docs.base44.com/developers/references/cli/commands/secrets-set#usage)
Usage
------------------------------------------------------------------------------------------
Set one or more secrets inline, separated by spaces:
base44 secrets set
Or load from an `.env` file:
base44 secrets set --env-file
You cannot combine inline KEY=VALUE pairs with `--env-file` in the same command.
[](https://docs.base44.com/developers/references/cli/commands/secrets-set#arguments)
Arguments
--------------------------------------------------------------------------------------------------
| Argument | Description | Required |
| --- | --- | --- |
| `` | One or more KEY=VALUE pairs, separated by spaces | Yes (unless using `--env-file`) |
[](https://docs.base44.com/developers/references/cli/commands/secrets-set#flags)
Flags
------------------------------------------------------------------------------------------
| Flag | Description |
| --- | --- |
| `--env-file ` | Path to a `.env` file containing `KEY=VALUE` pairs |
[](https://docs.base44.com/developers/references/cli/commands/secrets-set#example)
Example
----------------------------------------------------------------------------------------------
base44 secrets set API_KEY=sk-abc123 DATABASE_URL=postgres://localhost/mydb
[](https://docs.base44.com/developers/references/cli/commands/secrets-set#see-also)
See also
------------------------------------------------------------------------------------------------
* [`secrets list`](https://docs.base44.com/developers/references/cli/commands/secrets-list)
: List configured secrets
* [`secrets delete`](https://docs.base44.com/developers/references/cli/commands/secrets-delete)
: Delete one or more secrets
* [Backend Functions](https://docs.base44.com/developers/backend/resources/backend-functions/overview)
: Use secrets as environment variables in your functions
Was this page helpful?
YesNo
[auth push](https://docs.base44.com/developers/references/cli/commands/auth-push)
[secrets list](https://docs.base44.com/developers/references/cli/commands/secrets-list)
⌘I
Assistant
Responses are generated using AI and may contain mistakes.
Suggestions
Which plans come with a free domain?How are credits used?How do I use Discuss mode?
---
# connectors pull - Base44 Support Documentation
> Documentation Index
> -------------------
>
> Fetch the complete documentation index at: [/llms.txt](https://docs.base44.com/llms.txt)
>
> Use this file to discover all available pages before exploring further.
[Skip to main content](https://docs.base44.com/developers/references/cli/commands/connectors-pull#content-area)
Download [connector configurations](https://docs.base44.com/developers/backend/resources/connectors/shared-connectors)
from Base44 to local `.jsonc` files. The command fetches all connectors and saves them to your connectors directory, one file per connector. By default the connectors directory is `base44/connectors/`, but you can customize the path in your [project configuration](https://docs.base44.com/developers/backend/overview/project-structure#config-jsonc)
.
This is a full sync. Local connectors not present remotely will be deleted. See the Sync behavior table below for details.
[](https://docs.base44.com/developers/references/cli/commands/connectors-pull#usage)
Usage
----------------------------------------------------------------------------------------------
base44 connectors pull
[](https://docs.base44.com/developers/references/cli/commands/connectors-pull#sync-behavior)
Sync behavior
--------------------------------------------------------------------------------------------------------------
| Remote state | Local state | Result |
| --- | --- | --- |
| Connector exists | Connector exists | Local file is replaced with remote. |
| Connector exists | Connector doesn’t exist | Local file is created. |
| Connector doesn’t exist | Connector exists | Local file is deleted. |
[](https://docs.base44.com/developers/references/cli/commands/connectors-pull#see-also)
See also
----------------------------------------------------------------------------------------------------
* [`connectors push`](https://docs.base44.com/developers/references/cli/commands/connectors-push)
: Push local connector configurations to Base44
* [Shared connectors](https://docs.base44.com/developers/backend/resources/connectors/shared-connectors)
: Learn how to configure connectors
* [Using Connectors](https://docs.base44.com/Integrations/Connectors)
: Guide to using connectors in your app
Was this page helpful?
YesNo
[connectors list-available](https://docs.base44.com/developers/references/cli/commands/connectors-list-available)
[connectors push](https://docs.base44.com/developers/references/cli/commands/connectors-push)
⌘I
Assistant
Responses are generated using AI and may contain mistakes.
Suggestions
Which plans come with a free domain?How are credits used?How do I use Discuss mode?
---
# logs - Base44 Support Documentation
> Documentation Index
> -------------------
>
> Fetch the complete documentation index at: [/llms.txt](https://docs.base44.com/llms.txt)
>
> Use this file to discover all available pages before exploring further.
[Skip to main content](https://docs.base44.com/developers/references/cli/commands/logs#content-area)
View logs from your [backend functions](https://docs.base44.com/developers/backend/resources/backend-functions/overview)
in the terminal. By default the command returns the 50 most recent log entries across all functions for the target app. Use flags to filter by function name, time range, or adjust the number of results.
[](https://docs.base44.com/developers/references/cli/commands/logs#usage)
Usage
-----------------------------------------------------------------------------------
base44 logs
Run from a linked project directory to fetch logs for the app in `.app.jsonc`, or target any app on your account by passing [`--app-id`](https://docs.base44.com/developers/references/cli/commands/introduction#select-a-target-app)
or setting the `BASE44_APP_ID` environment variable. With an explicit app id, you can run `logs` from anywhere on your machine, including against apps you built in the Base44 online app editor and never linked locally.
[](https://docs.base44.com/developers/references/cli/commands/logs#flags)
Flags
-----------------------------------------------------------------------------------
| Flag | Description |
| --- | --- |
| `--app-id ` | Target the specified app. Defaults to the app linked in the current project. See [Select a target app](https://docs.base44.com/developers/references/cli/commands/introduction#select-a-target-app) . |
| `--function ` | Filter by function name. Accepts a comma-separated list. If omitted, fetches logs for all functions. |
| `--since ` | Show logs from this time onward. Accepts [ISO 8601](https://en.wikipedia.org/wiki/ISO_8601) format. |
| `--until ` | Show logs up to this time. Accepts [ISO 8601](https://en.wikipedia.org/wiki/ISO_8601) format. |
| `-n, --limit ` | Maximum number of results to return, between `1` and `1000`. Defaults to `50`. |
| `--order ` | Sort order: `asc` or `desc`. Defaults to `desc`. |
[](https://docs.base44.com/developers/references/cli/commands/logs#output-format)
Output format
---------------------------------------------------------------------------------------------------
The output is a list of log entries sorted by time. Each entry shows the timestamp, level, function name in brackets, and log message. For example:
Showing 4 function log entries
2026-02-24 08:23:37 ERROR [send-email] Failed to deliver to user@example.com: connection timed out
2026-02-24 08:23:37 INFO [send-email] Sending welcome email to user@example.com
2026-02-24 08:23:36 INFO [process-order] Order #1042 processed successfully
2026-02-24 08:23:36 DEBUG [process-order] isolate start time: 350.47 ms (user time: 69.32 ms)
The log level reflects the console method used in your function code:
| Console method | Log level |
| --- | --- |
| `console.log` | `INFO` |
| `console.info` | `INFO` |
| `console.error` | `ERROR` |
| `console.warn` | `WARNING` |
| `console.debug` | `DEBUG` |
The output also includes system-level entries from Deno Deploy, such as isolate startup times. The log level for these entries is assigned by Deno Deploy.
The [base44-troubleshooter](https://docs.base44.com/developers/backend/overview/skills#base44-troubleshooter)
skill teaches your agent to fetch and analyze logs for you. Try asking it to “show me all errors from the last hour.”
[](https://docs.base44.com/developers/references/cli/commands/logs#see-also)
See also
-----------------------------------------------------------------------------------------
* [Backend Functions](https://docs.base44.com/developers/backend/resources/backend-functions/overview)
: Learn about serverless functions
* [`deploy`](https://docs.base44.com/developers/references/cli/commands/deploy)
: Deploy all project resources to Base44
* [`functions deploy`](https://docs.base44.com/developers/references/cli/commands/functions-deploy)
: Deploy local functions to Base44
* [`functions list`](https://docs.base44.com/developers/references/cli/commands/functions-list)
: List all deployed functions
Was this page helpful?
YesNo
[site open](https://docs.base44.com/developers/references/cli/commands/site-open)
[deploy](https://docs.base44.com/developers/references/cli/commands/deploy)
⌘I
Assistant
Responses are generated using AI and may contain mistakes.
Suggestions
Which plans come with a free domain?How are credits used?How do I use Discuss mode?
---
# connectors push - Base44 Support Documentation
> Documentation Index
> -------------------
>
> Fetch the complete documentation index at: [/llms.txt](https://docs.base44.com/llms.txt)
>
> Use this file to discover all available pages before exploring further.
[Skip to main content](https://docs.base44.com/developers/references/cli/commands/connectors-push#content-area)
Upload local [connector configurations](https://docs.base44.com/developers/backend/resources/connectors/shared-connectors)
to Base44. The command reads all `.json` and `.jsonc` files in your connectors directory and syncs them with Base44. By default the connectors directory is `base44/connectors/`, but you can customize the path in your [project configuration](https://docs.base44.com/developers/backend/overview/project-structure#config-jsonc)
. After pushing, the CLI handles each connector based on its type:
* **OAuth connectors** require browser-based authorization. The CLI prompts you to authorize each one sequentially, suggesting to open your browser automatically. You can also use the displayed OAuth URLs to authorize manually. You can push without completing authorization, but the connector won’t be usable until you do. Run `connectors push` again later to complete it. If you push a connector with the same scopes it already has, you won’t need to reauthorize.
* **Stripe** is provisioned automatically. The CLI creates a Stripe sandbox for your app and returns a claim URL to complete onboarding. No OAuth flow is needed.
Connectors cannot be created or configured through the Base44 dashboard. You must define them in local configuration files and push them using the CLI.
This is a full sync. Remote connectors not present locally will be removed. See the Sync behavior table below for details.
[](https://docs.base44.com/developers/references/cli/commands/connectors-push#usage)
Usage
----------------------------------------------------------------------------------------------
base44 connectors push
[](https://docs.base44.com/developers/references/cli/commands/connectors-push#sync-behavior)
Sync behavior
--------------------------------------------------------------------------------------------------------------
The command performs a full sync for connectors:
| Local state | Remote state | Result |
| --- | --- | --- |
| Connector exists | Connector exists | Remote connector scopes are updated. |
| Connector exists | Connector doesn’t exist | New connector is created. OAuth connectors require authorization; Stripe is provisioned automatically. |
| Connector doesn’t exist | Connector exists | Remote connector is removed. |
[](https://docs.base44.com/developers/references/cli/commands/connectors-push#see-also)
See also
----------------------------------------------------------------------------------------------------
* [Shared connectors](https://docs.base44.com/developers/backend/resources/connectors/shared-connectors)
* [deploy](https://docs.base44.com/developers/references/cli/commands/deploy)
* [SDK connectors module](https://docs.base44.com/developers/references/sdk/docs/interfaces/connectors)
* [Using Connectors](https://docs.base44.com/Integrations/Connectors)
Was this page helpful?
YesNo
[connectors pull](https://docs.base44.com/developers/references/cli/commands/connectors-pull)
[auth password-login](https://docs.base44.com/developers/references/cli/commands/auth-password-login)
⌘I
Assistant
Responses are generated using AI and may contain mistakes.
Suggestions
Which plans come with a free domain?How are credits used?How do I use Discuss mode?
---
# Enterprise APIs - Base44 Support Documentation
> Documentation Index
> -------------------
>
> Fetch the complete documentation index at: [/llms.txt](https://docs.base44.com/llms.txt)
>
> Use this file to discover all available pages before exploring further.
[Skip to main content](https://docs.base44.com/developers/references/enterprise-apis#content-area)
Base44 provides REST APIs for enterprise plan workspaces. These APIs give workspace admins and owners programmatic access to monitoring data and audit logs.
[](https://docs.base44.com/developers/references/enterprise-apis#monitoring-api)
Monitoring API
---------------------------------------------------------------------------------------------------
The Monitoring API provides visibility into workspace activity, user consumption, and app analytics. [View Monitoring API Reference](https://docs.base44.com/developers/references/monitoring-api/get-started/overview)
[](https://docs.base44.com/developers/references/enterprise-apis#audit-logs-api)
Audit Logs API
---------------------------------------------------------------------------------------------------
The Audit Logs API provides workspace-scoped access to audit events for security monitoring, compliance, and SIEM integrations. [View Audit Logs API Reference](https://docs.base44.com/developers/references/audit-logs-api/get-started/overview)
Was this page helpful?
YesNo
[GitHub Integration](https://docs.base44.com/developers/app-code/local-development/github)
⌘I
Assistant
Responses are generated using AI and may contain mistakes.
Suggestions
Which plans come with a free domain?How are credits used?How do I use Discuss mode?
---
# types generate - Base44 Support Documentation
> Documentation Index
> -------------------
>
> Fetch the complete documentation index at: [/llms.txt](https://docs.base44.com/llms.txt)
>
> Use this file to discover all available pages before exploring further.
[Skip to main content](https://docs.base44.com/developers/references/cli/commands/types-generate#content-area)
Generate a TypeScript declaration file (`types.d.ts`) from your local project resources. The command reads your [entities](https://docs.base44.com/developers/backend/resources/entities/overview)
, [functions](https://docs.base44.com/developers/backend/resources/functions)
, [agents](https://docs.base44.com/developers/backend/resources/agents-config)
, and [connectors](https://docs.base44.com/developers/references/sdk/docs/interfaces/connectors)
, and produces a type file that augments the `@base44/sdk` module with project-specific types. This gives you autocomplete for resource names, compile-time type checking, and typed data when reading or writing entities. The generated file is written to `base44/.types/types.d.ts`. If a `tsconfig.json` file exists in your project root, the command automatically adds `base44/.types/*.d.ts` to its `include` array so TypeScript picks up the types without any manual configuration.
Re-run this command whenever you add, remove, or modify a resource to keep the types in sync.
[](https://docs.base44.com/developers/references/cli/commands/types-generate#usage)
Usage
---------------------------------------------------------------------------------------------
base44 types generate
[](https://docs.base44.com/developers/references/cli/commands/types-generate#what-gets-generated)
What gets generated
-------------------------------------------------------------------------------------------------------------------------
**Entities** generate a TypeScript interface for each entity from its JSON schema. Fields are typed with required/optional markers and nested object types. An `EntityTypeRegistry` interface maps each entity name to its generated interface. **Functions**, **agents**, and **connectors** generate name registries only (`FunctionNameRegistry`, `AgentNameRegistry`, and `ConnectorTypeRegistry`). These list the names of your functions, agents, and connector integration types so your editor can autocomplete them, but they don’t include parameter types, return types, or other configuration details.
[](https://docs.base44.com/developers/references/cli/commands/types-generate#see-also)
See also
---------------------------------------------------------------------------------------------------
* [Dynamic Types](https://docs.base44.com/developers/references/sdk/getting-started/dynamic-types)
: Learn how to use generated types in your code
* [Entities](https://docs.base44.com/developers/backend/resources/entities/overview)
: Learn about database schema configuration
* [Backend Functions](https://docs.base44.com/developers/backend/resources/backend-functions/overview)
: Create serverless API endpoints
* [Agent Configurations](https://docs.base44.com/developers/backend/resources/agents-config)
: Configure AI agents for your app
* [Project Structure](https://docs.base44.com/developers/backend/overview/project-structure)
: How types fit into your project
Was this page helpful?
YesNo
[exec](https://docs.base44.com/developers/references/cli/commands/exec)
[site open](https://docs.base44.com/developers/references/cli/commands/site-open)
⌘I
Assistant
Responses are generated using AI and may contain mistakes.
Suggestions
Which plans come with a free domain?How are credits used?How do I use Discuss mode?
---
# functions deploy - Base44 Support Documentation
> Documentation Index
> -------------------
>
> Fetch the complete documentation index at: [/llms.txt](https://docs.base44.com/llms.txt)
>
> Use this file to discover all available pages before exploring further.
[Skip to main content](https://docs.base44.com/developers/references/cli/commands/functions-deploy#content-area)
Deploy local [backend functions](https://docs.base44.com/developers/backend/resources/backend-functions/overview)
to Base44. The command reads function directories, validates their configurations, and deploys them individually with per-function progress and status reporting. By default the functions directory is `base44/functions/`, but you can customize the path in your [project configuration](https://docs.base44.com/developers/backend/overview/project-structure#config-jsonc)
.
Each project supports a maximum of 50 backend functions.
[](https://docs.base44.com/developers/references/cli/commands/functions-deploy#usage)
Usage
-----------------------------------------------------------------------------------------------
base44 functions deploy [names...]
[](https://docs.base44.com/developers/references/cli/commands/functions-deploy#arguments)
Arguments
-------------------------------------------------------------------------------------------------------
| Argument | Description | Required |
| --- | --- | --- |
| `[names]` | One or more function names to deploy, separated by spaces or commas. If omitted, deploys all local functions. | No |
[](https://docs.base44.com/developers/references/cli/commands/functions-deploy#flags)
Flags
-----------------------------------------------------------------------------------------------
| Flag | Description |
| --- | --- |
| `--force` | Delete remote functions that are not found locally. Can’t be used together with specific function names. |
The `--force` flag deletes remote functions that are not present locally. Any endpoints, SDK calls, or automations that depend on a deleted function will stop working.
[](https://docs.base44.com/developers/references/cli/commands/functions-deploy#see-also)
See also
-----------------------------------------------------------------------------------------------------
* [Backend Functions](https://docs.base44.com/developers/backend/resources/backend-functions/overview)
: Learn about backend functions
* [`functions pull`](https://docs.base44.com/developers/references/cli/commands/functions-pull)
: Download deployed functions to your local project
* [`functions list`](https://docs.base44.com/developers/references/cli/commands/functions-list)
: List all deployed functions
* [`functions delete`](https://docs.base44.com/developers/references/cli/commands/functions-delete)
: Delete deployed functions
Was this page helpful?
YesNo
[functions pull](https://docs.base44.com/developers/references/cli/commands/functions-pull)
[functions delete](https://docs.base44.com/developers/references/cli/commands/functions-delete)
⌘I
Assistant
Responses are generated using AI and may contain mistakes.
Suggestions
Which plans come with a free domain?How are credits used?How do I use Discuss mode?
---
# agents push - Base44 Support Documentation
> Documentation Index
> -------------------
>
> Fetch the complete documentation index at: [/llms.txt](https://docs.base44.com/llms.txt)
>
> Use this file to discover all available pages before exploring further.
[Skip to main content](https://docs.base44.com/developers/references/cli/commands/agents-push#content-area)
Upload local [AI agent configurations](https://docs.base44.com/developers/backend/resources/agents-config)
to Base44. The command reads all `.json` and `.jsonc` files in your agents directory and pushes them to Base44. By default the agents directory is `base44/agents/`, but you can customize the path in your [project configuration](https://docs.base44.com/developers/backend/overview/project-structure#config-jsonc)
.
This is a full sync. Remote agents not present locally will be deleted. See the Sync behavior table below for details.
[](https://docs.base44.com/developers/references/cli/commands/agents-push#usage)
Usage
------------------------------------------------------------------------------------------
base44 agents push
[](https://docs.base44.com/developers/references/cli/commands/agents-push#sync-behavior)
Sync behavior
----------------------------------------------------------------------------------------------------------
| Local state | Remote state | Result |
| --- | --- | --- |
| Agent exists | Agent exists | Remote agent configuration is replaced. |
| Agent exists | Agent doesn’t exist | New agent is created in Base44. |
| Agent doesn’t exist | Agent exists | Remote agent is deleted. |
[](https://docs.base44.com/developers/references/cli/commands/agents-push#see-also)
See also
------------------------------------------------------------------------------------------------
* [`agents pull`](https://docs.base44.com/developers/references/cli/commands/agents-pull)
: Sync agent configurations from Base44 to local
* [Agent Configurations](https://docs.base44.com/developers/backend/resources/agents-config)
: Learn how to configure AI agents
* [Setting up AI agents](https://docs.base44.com/Building-your-app/AI-agents-for-apps)
: Guide to creating AI agents
Was this page helpful?
YesNo
[agents pull](https://docs.base44.com/developers/references/cli/commands/agents-pull)
[connectors list-available](https://docs.base44.com/developers/references/cli/commands/connectors-list-available)
⌘I
Assistant
Responses are generated using AI and may contain mistakes.
Suggestions
Which plans come with a free domain?How are credits used?How do I use Discuss mode?
---
# dashboard open - Base44 Support Documentation
> Documentation Index
> -------------------
>
> Fetch the complete documentation index at: [/llms.txt](https://docs.base44.com/llms.txt)
>
> Use this file to discover all available pages before exploring further.
[Skip to main content](https://docs.base44.com/developers/references/cli/commands/dashboard-open#content-area)
Open the Base44 dashboard for your current project in your default browser.
[](https://docs.base44.com/developers/references/cli/commands/dashboard-open#usage)
Usage
---------------------------------------------------------------------------------------------
base44 dashboard open
[](https://docs.base44.com/developers/references/cli/commands/dashboard-open#see-also)
See also
---------------------------------------------------------------------------------------------------
* [`link`](https://docs.base44.com/developers/references/cli/commands/link)
: Connect your local project to a Base44 app
* [Project Structure](https://docs.base44.com/developers/backend/overview/project-structure)
: How project files are organized
Was this page helpful?
YesNo
[eject](https://docs.base44.com/developers/references/cli/commands/eject)
[functions pull](https://docs.base44.com/developers/references/cli/commands/functions-pull)
⌘I
Assistant
Responses are generated using AI and may contain mistakes.
Suggestions
Which plans come with a free domain?How are credits used?How do I use Discuss mode?
---
# dev - Base44 Support Documentation
> Documentation Index
> -------------------
>
> Fetch the complete documentation index at: [/llms.txt](https://docs.base44.com/llms.txt)
>
> Use this file to discover all available pages before exploring further.
[Skip to main content](https://docs.base44.com/developers/references/cli/commands/dev#content-area)
Start a local development server that runs your project backend locally on your machine. When your project defines [`site.serveCommand`](https://docs.base44.com/developers/backend/overview/project-structure)
in `base44/config.jsonc`, `dev` also spawns your frontend dev server and manages both processes together. Learn more about local development, including setup and supported features, in the [Local development](https://docs.base44.com/developers/backend/overview/local-dev/local-development-overview)
guide.
[](https://docs.base44.com/developers/references/cli/commands/dev#usage)
Usage
----------------------------------------------------------------------------------
base44 dev
[](https://docs.base44.com/developers/references/cli/commands/dev#flags)
Flags
----------------------------------------------------------------------------------
| Flag | Description |
| --- | --- |
| `-p, --port ` | Port for the development server. Defaults to `4400`. |
[](https://docs.base44.com/developers/references/cli/commands/dev#frontend-dev-server)
Frontend dev server
--------------------------------------------------------------------------------------------------------------
If `site.serveCommand` is set in your project config, `dev` runs that command from the project root and:
* Injects `VITE_BASE44_APP_ID` (your app’s id) and `VITE_BASE44_APP_BASE_URL` (the local backend URL) into the frontend process’s environment, so the SDK auto-points at the local backend.
* Streams the frontend’s output alongside the backend’s, prefixed with `[backend]` and `[frontend]`.
* Shuts both processes down together when you press Ctrl-C, and tears the backend down if the frontend exits on its own.
If `site.serveCommand` is not set, `dev` runs only the backend and you can start your frontend in a separate terminal.
[](https://docs.base44.com/developers/references/cli/commands/dev#see-also)
See also
----------------------------------------------------------------------------------------
* [Local development](https://docs.base44.com/developers/backend/overview/local-dev/local-development-overview)
: Setup and supported features
* [Project structure](https://docs.base44.com/developers/backend/overview/project-structure)
: `site.serveCommand` and other config fields
* [`deploy`](https://docs.base44.com/developers/references/cli/commands/deploy)
: Deploy all project resources to Base44
Was this page helpful?
YesNo
[secrets delete](https://docs.base44.com/developers/references/cli/commands/secrets-delete)
[exec](https://docs.base44.com/developers/references/cli/commands/exec)
⌘I
Assistant
Responses are generated using AI and may contain mistakes.
Suggestions
Which plans come with a free domain?How are credits used?How do I use Discuss mode?
---
# entities push - Base44 Support Documentation
> Documentation Index
> -------------------
>
> Fetch the complete documentation index at: [/llms.txt](https://docs.base44.com/llms.txt)
>
> Use this file to discover all available pages before exploring further.
[Skip to main content](https://docs.base44.com/developers/references/cli/commands/entities-push#content-area)
Synchronize your local [entity schema definitions](https://docs.base44.com/developers/backend/resources/entities/overview)
with your Base44 project. The command reads all `.json` and `.jsonc` files in your entities directory, validates them, and pushes them to Base44. By default the entities directory is `base44/entities/`, but you can customize the path in your [project configuration](https://docs.base44.com/developers/backend/overview/project-structure#config-jsonc)
.
[](https://docs.base44.com/developers/references/cli/commands/entities-push#usage)
Usage
--------------------------------------------------------------------------------------------
base44 entities push
[](https://docs.base44.com/developers/references/cli/commands/entities-push#sync-behavior)
Sync behavior
------------------------------------------------------------------------------------------------------------
The command performs a full sync operation. For each entity, the action taken is determined by its state locally and remotely:
| Local state | Remote state | Result |
| --- | --- | --- |
| Entity exists | Entity exists | Remote schema is replaced |
| Entity exists | Entity missing | New entity is created |
| Entity missing | Entity exists | Remote entity is removed. See the warning below |
Deleting an entity removes its schema from Base44. Existing data in that entity is not automatically deleted, but the entity will no longer be accessible through the SDK.
[](https://docs.base44.com/developers/references/cli/commands/entities-push#see-also)
See also
--------------------------------------------------------------------------------------------------
* [Project Structure](https://docs.base44.com/developers/backend/overview/project-structure)
: How entity schemas fit into your project
* [Quickstart - Backend only](https://docs.base44.com/developers/backend/quickstart/templates/quickstart-backend-only)
: Create your first backend-only project
* [Quickstart - React](https://docs.base44.com/developers/backend/quickstart/templates/quickstart-react-template)
: Build a full-stack React app with Base44
Was this page helpful?
YesNo
[functions list](https://docs.base44.com/developers/references/cli/commands/functions-list)
[agents pull](https://docs.base44.com/developers/references/cli/commands/agents-pull)
⌘I
Assistant
Responses are generated using AI and may contain mistakes.
Suggestions
Which plans come with a free domain?How are credits used?How do I use Discuss mode?
---
# Rate Limits - Base44 Support Documentation
> Documentation Index
> -------------------
>
> Fetch the complete documentation index at: [/llms.txt](https://docs.base44.com/llms.txt)
>
> Use this file to discover all available pages before exploring further.
[Skip to main content](https://docs.base44.com/developers/references/audit-logs-api/get-started/rate-limits#content-area)
Rate limits are applied per API key using a token-bucket algorithm.
[](https://docs.base44.com/developers/references/audit-logs-api/get-started/rate-limits#limits)
Limits
----------------------------------------------------------------------------------------------------------
| Endpoint | Limit |
| --- | --- |
| [List audit logs](https://docs.base44.com/audit-logs/audit-logs/list-audit-logs) | 100 req/min |
Enterprise workspaces get 2x the standard rate limits.
[](https://docs.base44.com/developers/references/audit-logs-api/get-started/rate-limits#exceeding-rate-limits)
Exceeding rate limits
----------------------------------------------------------------------------------------------------------------------------------------
If you exceed the rate limit, you’ll receive a `429 Too Many Requests` response. Wait before retrying.
Was this page helpful?
YesNo
[Authentication](https://docs.base44.com/developers/references/audit-logs-api/get-started/authentication)
[Event Types](https://docs.base44.com/developers/references/audit-logs-api/get-started/event-types)
⌘I
Assistant
Responses are generated using AI and may contain mistakes.
Suggestions
Which plans come with a free domain?How are credits used?How do I use Discuss mode?
---
# App user connectors - Base44 Support Documentation
> Documentation Index
> -------------------
>
> Fetch the complete documentation index at: [/llms.txt](https://docs.base44.com/llms.txt)
>
> Use this file to discover all available pages before exploring further.
[Skip to main content](https://docs.base44.com/developers/backend/resources/connectors/app-user-connectors#content-area)
You’re viewing developer documentation
This documentation is for developers working with the Base44 developer platform. For information about connectors in the app editor, see [Using Connectors](https://docs.base44.com/Integrations/Connectors)
.
App user connectors let each signed-in app user connect their own third-party account. Each app user gets their own OAuth token. Use this when actions need to happen as the individual app user, like sending email from their Gmail account, posting to their personal LinkedIn, or reading their own Google Calendar events. Unlike shared connectors, where one account is shared across all app users, app user connectors store a separate OAuth token per user. The OAuth flow runs under your registered OAuth application, so app users see your app’s name on the provider’s consent screen.
App user connectors require a Builder plan or higher.
[](https://docs.base44.com/developers/backend/resources/connectors/app-user-connectors#set-up)
Set up
---------------------------------------------------------------------------------------------------------
Before app users can connect their accounts, register your OAuth app credentials in your workspace. This requires workspace admin access. You also need a client ID and client secret from the external service. Register the connector from your Workspace Settings. See [Setting up connectors for app users](https://docs.base44.com/Integrations/user-connectors)
for step-by-step instructions. After you register the connector, the workspace assigns it an ID. Use that ID to connect and disconnect app users in your frontend code and retrieve their tokens in your backend functions.
[](https://docs.base44.com/developers/backend/resources/connectors/app-user-connectors#connect-and-disconnect-in-your-frontend)
Connect and disconnect in your frontend
---------------------------------------------------------------------------------------------------------------------------------------------------------------------------
Use `base44.connectors` in your frontend code to start and end the OAuth flow for each app user. To connect an app user, call [`connectAppUser`](https://docs.base44.com/developers/references/sdk/docs/interfaces/connectors#connectappuser)
with the connector ID. It returns a redirect URL. Navigate the app user to that URL to start the OAuth flow.
const redirectUrl = await base44.connectors.connectAppUser("YOUR_CONNECTOR_ID");
window.location.href = redirectUrl;
After the app user completes the flow, their token is stored [and your backend functions can retrieve it](https://docs.base44.com/developers/backend/resources/connectors/app-user-connectors)
.
* * *
To disconnect an app user, call [`disconnectAppUser`](https://docs.base44.com/developers/references/sdk/docs/interfaces/connectors#disconnectappuser)
with the connector ID. It removes the stored token for the currently signed-in app user.
await base44.connectors.disconnectAppUser("YOUR_CONNECTOR_ID");
[](https://docs.base44.com/developers/backend/resources/connectors/app-user-connectors#retrieve-the-token-in-a-backend-function)
Retrieve the token in a backend function
-----------------------------------------------------------------------------------------------------------------------------------------------------------------------------
Use [`createClientFromRequest()`](https://docs.base44.com/developers/references/sdk/docs/functions/createClientFromRequest)
to create the SDK client in your backend function. It reads the app user’s identity from the incoming request automatically, so the SDK knows which user’s token to return. Then call [`getCurrentAppUserConnection()`](https://docs.base44.com/developers/references/sdk/docs/interfaces/connectors#getcurrentappuserconnection)
with the connector ID to retrieve the token for the app user making the current request.
import { createClientFromRequest } from "@base44/sdk";
export default async function handler(req: Request) {
const base44 = createClientFromRequest(req);
const { accessToken } =
await base44.asServiceRole.connectors.getCurrentAppUserConnection(
"YOUR_CONNECTOR_ID",
);
const response = await fetch(
"https://www.googleapis.com/calendar/v3/calendars/primary/events",
{
headers: { Authorization: `Bearer ${accessToken}` },
},
);
const events = await response.json();
return Response.json(events);
}
[](https://docs.base44.com/developers/backend/resources/connectors/app-user-connectors#see-also)
See also
-------------------------------------------------------------------------------------------------------------
* [Connectors overview](https://docs.base44.com/developers/backend/resources/connectors)
* [Shared connectors](https://docs.base44.com/developers/backend/resources/connectors/shared-connectors)
* [Setting up connectors for app users](https://docs.base44.com/Integrations/user-connectors)
* [SDK connectors reference](https://docs.base44.com/developers/references/sdk/docs/interfaces/connectors#getcurrentappuserconnection)
* [createClientFromRequest](https://docs.base44.com/developers/references/sdk/docs/functions/createClientFromRequest)
* [Backend Functions](https://docs.base44.com/developers/backend/resources/backend-functions/overview)
Was this page helpful?
YesNo
[Shared connectors](https://docs.base44.com/developers/backend/resources/connectors/shared-connectors)
[Overview](https://docs.base44.com/developers/backend/resources/entities/overview)
⌘I
Assistant
Responses are generated using AI and may contain mistakes.
Suggestions
Which plans come with a free domain?How are credits used?How do I use Discuss mode?
---
# Connectors overview - Base44 Support Documentation
> Documentation Index
> -------------------
>
> Fetch the complete documentation index at: [/llms.txt](https://docs.base44.com/llms.txt)
>
> Use this file to discover all available pages before exploring further.
[Skip to main content](https://docs.base44.com/developers/backend/resources/connectors#content-area)
You’re viewing developer documentation
This documentation is for developers working with the Base44 developer platform. For information about connectors in the app editor, see [Using Connectors](https://docs.base44.com/Integrations/Connectors)
.
Connectors give your app OAuth access tokens for third-party services, which you use to call those services’ APIs directly. Base44 handles the OAuth flow and credential storage. Base44 supports two connector types:
* **[Shared connectors](https://docs.base44.com/developers/backend/resources/connectors/shared-connectors)
:** One account is connected for the whole app. All app users share the same token. Best for service accounts, like posting to a company Slack channel or reading from a shared Google Calendar.
* **[App user connectors](https://docs.base44.com/developers/backend/resources/connectors/app-user-connectors)
:** Each signed-in app user connects their own account. Each user gets their own OAuth token. Best for actions that need to happen as the individual user, like sending email from their Gmail account or posting to their personal LinkedIn.
[](https://docs.base44.com/developers/backend/resources/connectors#supported-services)
Supported services
-------------------------------------------------------------------------------------------------------------
All services listed below support both shared and app user connections. See [Shared connectors](https://docs.base44.com/developers/backend/resources/connectors/shared-connectors)
or [App user connectors](https://docs.base44.com/developers/backend/resources/connectors/app-user-connectors)
for setup instructions.
| Service | Type identifier | Auth model |
| --- | --- | --- |
| Airtable | `airtable` | OAuth |
| BambooHR | `bamboohr` | OAuth |
| Box | `box` | OAuth |
| Calendly | `calendly` | OAuth |
| ClickUp | `clickup` | OAuth |
| Contentful | `contentful` | OAuth |
| Databricks | `databricks` | OAuth |
| Discord | `discord` | OAuth |
| Dropbox | `dropbox` | OAuth |
| GitHub | `github` | OAuth |
| GitLab | `gitlab` | OAuth |
| Gmail | `gmail` | OAuth |
| Google Ads | `googleads` | OAuth |
| Google Analytics | `google_analytics` | OAuth |
| Google BigQuery | `googlebigquery` | OAuth |
| Google Calendar | `googlecalendar` | OAuth |
| Google Classroom | `google_classroom` | OAuth |
| Google Docs | `googledocs` | OAuth |
| Google Drive | `googledrive` | OAuth |
| Google Meet | `googlemeet` | OAuth |
| Google Search Console | `google_search_console` | OAuth |
| Google Sheets | `googlesheets` | OAuth |
| Google Slides | `googleslides` | OAuth |
| Google Tasks | `googletasks` | OAuth |
| HubSpot | `hubspot` | OAuth |
| Hugging Face | `hugging_face` | OAuth |
| Instagram Business | `instagram` | OAuth |
| Linear | `linear` | OAuth |
| LinkedIn | `linkedin` | OAuth |
| Microsoft Teams | `microsoft_teams` | OAuth |
| Microsoft OneDrive | `one_drive` | OAuth |
| Notion | `notion` | OAuth |
| Outlook | `outlook` | OAuth |
| QuickBooks | `quickbooks` | OAuth |
| Salesforce | `salesforce` | OAuth |
| SharePoint | `share_point` | OAuth |
| Slack User | `slack` | OAuth |
| Slack Bot | `slackbot` | OAuth |
| Snowflake | `snowflake` | OAuth |
| Splitwise | `splitwise` | OAuth |
| Stripe | `stripe` | Managed |
| Supabase | `supabase` | OAuth |
| TikTok | `tiktok` | OAuth |
| Typeform | `typeform` | OAuth |
| Wix | `wix` | OAuth |
| Wrike | `wrike` | OAuth |
Run [`connectors list-available`](https://docs.base44.com/developers/references/cli/commands/connectors-list-available)
to see the latest available integrations, including descriptions and any required connection config fields.
See [connector permissions and scopes](https://docs.base44.com/Integrations/Connectors#connector-permissions)
for the OAuth scopes each service may request.
[](https://docs.base44.com/developers/backend/resources/connectors#see-also)
See also
-----------------------------------------------------------------------------------------
* [Shared connectors](https://docs.base44.com/developers/backend/resources/connectors/shared-connectors)
* [App user connectors](https://docs.base44.com/developers/backend/resources/connectors/app-user-connectors)
* [SDK connectors reference](https://docs.base44.com/developers/references/sdk/docs/interfaces/connectors)
* [connectors list-available](https://docs.base44.com/developers/references/cli/commands/connectors-list-available)
* [connectors pull](https://docs.base44.com/developers/references/cli/commands/connectors-pull)
* [connectors push](https://docs.base44.com/developers/references/cli/commands/connectors-push)
* [deploy](https://docs.base44.com/developers/references/cli/commands/deploy)
Was this page helpful?
YesNo
[Automations](https://docs.base44.com/developers/backend/resources/backend-functions/automations)
[Shared connectors](https://docs.base44.com/developers/backend/resources/connectors/shared-connectors)
⌘I
Assistant
Responses are generated using AI and may contain mistakes.
Suggestions
Which plans come with a free domain?How are credits used?How do I use Discuss mode?
---
# Dynamic Types - Base44 Support Documentation
> Documentation Index
> -------------------
>
> Fetch the complete documentation index at: [/llms.txt](https://docs.base44.com/llms.txt)
>
> Use this file to discover all available pages before exploring further.
[Skip to main content](https://docs.base44.com/developers/references/sdk/getting-started/dynamic-types#content-area)
When you work with Base44 in a TypeScript project, you can use dynamic types. Your [entities](https://docs.base44.com/developers/references/sdk/docs/type-aliases/entities)
, [functions](https://docs.base44.com/developers/references/sdk/docs/interfaces/functions)
, [agents](https://docs.base44.com/developers/references/sdk/docs/interfaces/agents)
, and [connectors](https://docs.base44.com/developers/references/sdk/docs/interfaces/connectors)
have corresponding TypeScript types that provide:
* **Autocomplete**: Your IDE suggests available entities, fields, functions, agents, and connector integration types.
* **Type safety**: Catch typos and invalid fields at compile time instead of runtime.
* **Documentation**: Hover over types in your IDE to see field descriptions and types.
[](https://docs.base44.com/developers/references/sdk/getting-started/dynamic-types#how-it-works)
How it works
-----------------------------------------------------------------------------------------------------------------
Base44 reads your backend configuration and creates a `base44/.types/types.d.ts` file that augments the SDK with types from your project. The types file includes:
* Entity schemas with typed fields and CRUD operations
* Function names for autocomplete
* Agent names for autocomplete
* Connector integration type names for autocomplete
[](https://docs.base44.com/developers/references/sdk/getting-started/dynamic-types#entity-types)
Entity types
-----------------------------------------------------------------------------------------------------------------
Dynamic types provide full type safety for all entity operations. Your entity fields, return types, and parameters are all strongly typed.
CRUD operations
Field selection
Filtering
import type { EntityRecord } from "@base44/sdk";
type TaskRecord = EntityRecord["Task"];
// All fields are typed
const task = await base44.entities.Task.create({
title: "Complete documentation",
status: "in-progress",
priority: "high",
});
// Return type includes both your fields and server fields
console.log(task.id); // Server field
console.log(task.created_date); // Server field
console.log(task.title); // Your field
// Get with full type safety
const retrieved = await base44.entities.Task.get(task.id);
// Update with type checking
await base44.entities.Task.update(task.id, {
status: "completed",
});
[](https://docs.base44.com/developers/references/sdk/getting-started/dynamic-types#function-types)
Function types
---------------------------------------------------------------------------------------------------------------------
Function names are typed for autocomplete when invoking functions:
// Autocomplete shows all available functions
const result = await base44.functions.invoke("calculateTotal", {
items: ["item1", "item2"],
});
Function parameter types are not generated. Refer to your function implementation for expected parameters.
[](https://docs.base44.com/developers/references/sdk/getting-started/dynamic-types#agent-types)
Agent types
---------------------------------------------------------------------------------------------------------------
Agent names are typed for autocomplete when working with conversations:
// Autocomplete shows all available agents
const conversation = await base44.agents.createConversation("SupportBot");
[](https://docs.base44.com/developers/references/sdk/getting-started/dynamic-types#connector-types)
Connector types
-----------------------------------------------------------------------------------------------------------------------
Connector integration type names are typed for autocomplete when retrieving connections:
// Autocomplete shows all available connector integration types
const { accessToken } = await base44.asServiceRole.connectors.getConnection(
"googlecalendar"
);
The connectors module is only available in service role mode (backend environments).
[](https://docs.base44.com/developers/references/sdk/getting-started/dynamic-types#generate-types)
Generate types
---------------------------------------------------------------------------------------------------------------------
To generate or update your types file, run the [`types generate`](https://docs.base44.com/developers/references/cli/commands/types-generate)
command:
base44 types generate
Re-run `types generate` whenever you modify entities, add functions, or change agents to keep types up to date.
[](https://docs.base44.com/developers/references/sdk/getting-started/dynamic-types#see-also)
See also
---------------------------------------------------------------------------------------------------------
* [`types generate`](https://docs.base44.com/developers/references/cli/commands/types-generate)
: CLI command to generate types from your project
* [`entities`](https://docs.base44.com/developers/references/sdk/docs/type-aliases/entities)
: SDK reference for working with entities
* [`functions`](https://docs.base44.com/developers/references/sdk/docs/interfaces/functions)
: SDK reference for invoking backend functions
* [`agents`](https://docs.base44.com/developers/references/sdk/docs/interfaces/agents)
: SDK reference for working with AI agents
* [`connectors`](https://docs.base44.com/developers/references/sdk/docs/interfaces/connectors)
: SDK reference for managing OAuth tokens
Was this page helpful?
YesNo
[Work with data](https://docs.base44.com/developers/references/sdk/getting-started/work-with-data)
[Common SDK uses](https://docs.base44.com/developers/references/sdk/getting-started/work-with-sdk)
⌘I
Assistant
Responses are generated using AI and may contain mistakes.
Suggestions
Which plans come with a free domain?How are credits used?How do I use Discuss mode?
---
# Work with data - Base44 Support Documentation
> Documentation Index
> -------------------
>
> Fetch the complete documentation index at: [/llms.txt](https://docs.base44.com/llms.txt)
>
> Use this file to discover all available pages before exploring further.
[Skip to main content](https://docs.base44.com/developers/references/sdk/getting-started/work-with-data#content-area)
The [`entities`](https://docs.base44.com/developers/references/sdk/docs/type-aliases/entities)
module lets you work with your app’s data. Each entity type in your app has methods for creating, reading, updating, and deleting records. You access entity methods through your entity name: `base44.entities.YourEntityName.methodName()`. For example, if you have a `Task` entity, you use [`base44.entities.Task.list()`](https://docs.base44.com/developers/references/sdk/docs/type-aliases/entities#list)
to get a list of tasks.
Generate TypeScript types from your entities to get autocomplete and type safety. Run [`base44 types generate`](https://docs.base44.com/developers/references/cli/commands/types-generate)
in your project, and all entity fields, methods, and return types will be fully typed. Learn more about [dynamic types](https://docs.base44.com/developers/references/sdk/getting-started/dynamic-types)
.
[](https://docs.base44.com/developers/references/sdk/getting-started/work-with-data#permissions)
Permissions
----------------------------------------------------------------------------------------------------------------
Data access is controlled by the client’s authentication mode and your app’s permission rules. You can configure the permissions for each entity in your app’s security settings. Learn more about [changing data permissions](https://docs.base44.com/Building-your-app/Managing-your-app-data#changing-data-permissions)
.
* **Anonymous users**: Can only access entities marked as public.
* **Authenticated users**: Can access entities and records they have permission to view or modify based on your app’s configured access rules.
* **Service role**: Bypasses entity access rules and field-level security entirely. Has full read and write access to every entity and record in the app.
In backend code, you can use the [service role to access data without access-rule restrictions](https://docs.base44.com/developers/references/sdk/getting-started/work-with-data#service-role-data-access)
.
[](https://docs.base44.com/developers/references/sdk/getting-started/work-with-data#create-records)
Create records
----------------------------------------------------------------------------------------------------------------------
Use [`create()`](https://docs.base44.com/developers/references/sdk/docs/type-aliases/entities#create)
to add new records to an entity:
Create a record
With generated types
const newTask = await base44.entities.Task.create({
title: "Complete documentation",
status: "pending",
dueDate: "2024-12-31",
});
[](https://docs.base44.com/developers/references/sdk/getting-started/work-with-data#read-records)
Read records
------------------------------------------------------------------------------------------------------------------
Retrieve data using [`get()`](https://docs.base44.com/developers/references/sdk/docs/type-aliases/entities#get)
for a single record, [`list()`](https://docs.base44.com/developers/references/sdk/docs/type-aliases/entities#list)
for all records, or [`filter()`](https://docs.base44.com/developers/references/sdk/docs/type-aliases/entities#filter)
for records matching specific criteria. Use [`get()`](https://docs.base44.com/developers/references/sdk/docs/type-aliases/entities#get)
with a record ID to retrieve a specific record:
Get by ID
const task = await base44.entities.Task.get(taskId);
Use [`list()`](https://docs.base44.com/developers/references/sdk/docs/type-aliases/entities#list)
to retrieve all records. The method supports sorting, pagination, and field selection:
List all
Sort results
Paginate results
Select specific fields
const tasks = await base44.entities.Task.list();
Use [`filter()`](https://docs.base44.com/developers/references/sdk/docs/type-aliases/entities#filter)
to find records that match specific criteria:
Filter by single field
Filter by multiple fields
Filter with sorting
Filter with pagination
const pendingTasks = await base44.entities.Task.filter({
status: "pending",
});
[](https://docs.base44.com/developers/references/sdk/getting-started/work-with-data#update-records)
Update records
----------------------------------------------------------------------------------------------------------------------
Use [`update()`](https://docs.base44.com/developers/references/sdk/docs/type-aliases/entities#update)
to modify an existing record:
Update a record
await base44.entities.Task.update(taskId, {
status: "completed",
});
[](https://docs.base44.com/developers/references/sdk/getting-started/work-with-data#delete-records)
Delete records
----------------------------------------------------------------------------------------------------------------------
Use [`delete()`](https://docs.base44.com/developers/references/sdk/docs/type-aliases/entities#delete)
to remove a single record:
Delete a record
await base44.entities.Task.delete(taskId);
Use [`deleteMany()`](https://docs.base44.com/developers/references/sdk/docs/type-aliases/entities#deletemany)
to remove multiple records matching specific criteria:
Delete multiple records
const result = await base44.entities.Task.deleteMany({
status: "completed",
priority: "low",
});
[](https://docs.base44.com/developers/references/sdk/getting-started/work-with-data#bulk-operations)
Bulk operations
------------------------------------------------------------------------------------------------------------------------
Use [`bulkCreate()`](https://docs.base44.com/developers/references/sdk/docs/type-aliases/entities#bulkcreate)
to create multiple records in a single request:
Create multiple records
const tasks = await base44.entities.Task.bulkCreate([\
{ title: "Task 1", status: "pending" },\
{ title: "Task 2", status: "pending" },\
{ title: "Task 3", status: "in-progress" },\
]);
Use [`importEntities()`](https://docs.base44.com/developers/references/sdk/docs/type-aliases/entities#importentities)
to import records from a CSV file. This is useful for migrating data or bulk uploads from user interfaces:
Import from file
const handleFileUpload = async (event) => {
const file = event.target.files?.[0];
if (file) {
const result = await base44.entities.Task.importEntities(file);
console.log(`Imported ${result.output.length} records`);
}
};
`importEntities()` requires a browser environment and cannot be used in backend code.
[](https://docs.base44.com/developers/references/sdk/getting-started/work-with-data#realtime-subscriptions)
Realtime subscriptions
--------------------------------------------------------------------------------------------------------------------------------------
Use [`subscribe()`](https://docs.base44.com/developers/references/sdk/docs/type-aliases/entities#subscribe)
to receive realtime updates when records are created, updated, or deleted:
Subscribe to changes
const unsubscribe = base44.entities.Task.subscribe((event) => {
console.log(`Task ${event.id} was ${event.type}d`);
console.log("Updated data:", event.data);
});
// Later, clean up the subscription
unsubscribe();
[](https://docs.base44.com/developers/references/sdk/getting-started/work-with-data#service-role-data-access)
Service role data access
------------------------------------------------------------------------------------------------------------------------------------------
By default, data access is scoped to the current user’s permissions. With service role authentication, you can read and write any data in your app. Entity access rules and field-level security are bypassed entirely, regardless of how the entity is configured. Use `base44.asServiceRole.entities` to access data without access-rule restrictions:
Service role access
// User-level access (limited to current user's permissions)
const myTasks = await base44.entities.Task.list();
// Service role access (bypasses entity access rules)
const allTasks = await base44.asServiceRole.entities.Task.list();
Service role access skips every access rule on the entity. Use it only for trusted backend logic. If your function needs access checks, you’re responsible for enforcing them yourself.
[](https://docs.base44.com/developers/references/sdk/getting-started/work-with-data#user-entity)
User entity
----------------------------------------------------------------------------------------------------------------
Every Base44 app includes a built-in `User` entity that stores user account information. This entity has special security rules:
* Regular users can only read and update their own user record
* With service role authentication, you can read, update, and delete any user
* You cannot create users through the entities module - use the `auth` module instead
You can add fields to the User entity to store additional user data, then use those fields in security rules to control data access or in your app to personalize the experience. See [User Schema](https://docs.base44.com/developers/backend/resources/entities/user-schema)
for details.
List all users using the service role
const allUsers = await base44.asServiceRole.entities.User.list();
[](https://docs.base44.com/developers/references/sdk/getting-started/work-with-data#see-more)
See more
----------------------------------------------------------------------------------------------------------
entities module
---------------
Complete API reference
Base44 client
-------------
Learn about the client and service role
Was this page helpful?
YesNo
[Base44 client](https://docs.base44.com/developers/references/sdk/getting-started/client)
[Dynamic Types](https://docs.base44.com/developers/references/sdk/getting-started/dynamic-types)
⌘I
Assistant
Responses are generated using AI and may contain mistakes.
Suggestions
Which plans come with a free domain?How are credits used?How do I use Discuss mode?
---
# auth password-login - Base44 Support Documentation
> Documentation Index
> -------------------
>
> Fetch the complete documentation index at: [/llms.txt](https://docs.base44.com/llms.txt)
>
> Use this file to discover all available pages before exploring further.
[Skip to main content](https://docs.base44.com/developers/references/cli/commands/auth-password-login#content-area)
Configure whether end users can sign in to your app with an email address and password. This is the CLI equivalent of toggling the “Email and password” option in your app’s [authentication settings](https://docs.base44.com/Setting-up-your-app/Managing-login-and-registration)
. This command updates your local auth config file. To apply the change to your deployed app, run [`auth push`](https://docs.base44.com/developers/references/cli/commands/auth-push)
or [`deploy`](https://docs.base44.com/developers/references/cli/commands/deploy)
.
[](https://docs.base44.com/developers/references/cli/commands/auth-password-login#usage)
Usage
--------------------------------------------------------------------------------------------------
Enable username and password login:
base44 auth password-login enable
Disable username and password login:
base44 auth password-login disable
[](https://docs.base44.com/developers/references/cli/commands/auth-password-login#arguments)
Arguments
----------------------------------------------------------------------------------------------------------
| Argument | Description | Required |
| --- | --- | --- |
| `` | Whether to enable or disable password authentication | Yes |
If disabling password login would leave your app with no active login methods, the command warns that users will be locked out. Enable an alternative login method, such as Google or SSO, before disabling password login.
[](https://docs.base44.com/developers/references/cli/commands/auth-password-login#see-also)
See also
--------------------------------------------------------------------------------------------------------
* [`auth social-login`](https://docs.base44.com/developers/references/cli/commands/auth-social-login)
: Enable or disable social login providers
* [`auth pull`](https://docs.base44.com/developers/references/cli/commands/auth-pull)
: Fetch auth config from Base44 to your local project
* [`auth push`](https://docs.base44.com/developers/references/cli/commands/auth-push)
: Push local auth config to Base44
* [`deploy`](https://docs.base44.com/developers/references/cli/commands/deploy)
: Deploy all project resources, including auth config
* [Managing login and registration](https://docs.base44.com/Setting-up-your-app/Managing-login-and-registration)
: Configure login options in the dashboard
Was this page helpful?
YesNo
[connectors push](https://docs.base44.com/developers/references/cli/commands/connectors-push)
[auth social-login](https://docs.base44.com/developers/references/cli/commands/auth-social-login)
⌘I
Assistant
Responses are generated using AI and may contain mistakes.
Suggestions
Which plans come with a free domain?How are credits used?How do I use Discuss mode?
---
# Security - Base44 Support Documentation
> Documentation Index
> -------------------
>
> Fetch the complete documentation index at: [/llms.txt](https://docs.base44.com/llms.txt)
>
> Use this file to discover all available pages before exploring further.
[Skip to main content](https://docs.base44.com/developers/backend/resources/entities/security#content-area)
You’re viewing developer documentation
This documentation is for developers working with the Base44 developer platform. For information about managing your app data using the app editor, see [Managing app data](https://docs.base44.com/Building-your-app/Managing-your-app-data)
.
Entities support two levels of security:
* **Row Level Security (RLS)**: Controls which records users can access.
* **Field Level Security (FLS)**: Controls which fields within records users can access.
[](https://docs.base44.com/developers/backend/resources/entities/security#permission-types)
Permission types
----------------------------------------------------------------------------------------------------------------
Each security level has different permissions you can set. For each permission, you define who is allowed to perform the action.
###
[](https://docs.base44.com/developers/backend/resources/entities/security#row-level-security-rls)
Row Level Security (RLS)
* `create` - Add new records
* `read` - View records
* `update` - Modify records
* `delete` - Remove records
###
[](https://docs.base44.com/developers/backend/resources/entities/security#field-level-security-fls)
Field Level Security (FLS)
* `read` - View the field
* `write` - Create or modify the field
[](https://docs.base44.com/developers/backend/resources/entities/security#permission-values)
Permission values
------------------------------------------------------------------------------------------------------------------
Each permission accepts one of the following values:
* `true` - Allow all users
* `false` - Block all users
* `{}` - Allow users matching the condition
###
[](https://docs.base44.com/developers/backend/resources/entities/security#condition-syntax)
Condition syntax
When using `{}` as a permission value, you can define rules that check user attributes or roles. **1\. Entity-to-user comparison** Compare record fields to the current user’s values. Entity fields you can reference:
* `created_by` - Email of user who created the record
* `created_by_id` - ID of user who created the record
* `entity_name` - Name of the entity type
* `app_id` - App ID
* `environment` - Either `prod` or `dev`
* `is_sample` - Whether it’s sample data
* `is_deleted` - Soft delete flag
* `deleted_date` - When it was deleted
* `data.*` - Any field from your entity schema’s properties
Template variables for user values:
* `{{user.email}}` - User’s email
* `{{user.id}}` - User’s ID
* `{{user.role}}` - User’s role
* `{{user.data.*}}` - Additional user fields you define
Example:
{"created_by": "{{user.email}}"}
{"data.department": "{{user.data.department}}"}
{"data.status": "approved"}
**2\. User condition check** Check user properties directly using `user_condition`. User fields you can check:
* `email` - User’s email
* `id` - User’s ID
* `role` - User’s role
* `data.*` - Custom user fields
Example:
{"user_condition": {"role": "admin"}}
{"user_condition": {"data.level": "senior"}}
**3\. Complex conditions** Combine multiple conditions using operators. Supported operators: `$or`, `$and`, `$nor`, `$in`, `$nin`, `$all` Example:
{
"$or": [\
{"created_by": "{{user.email}}"},\
{"user_condition": {"role": "admin"}}\
]
}
[](https://docs.base44.com/developers/backend/resources/entities/security#row-level-security-rls-example)
Row Level Security (RLS) example
----------------------------------------------------------------------------------------------------------------------------------------------
Add `rls` at the entity level:
{
"name": "task",
"type": "object",
"properties": {...},
"rls": {
"create": true,
"read": {"created_by": "{{user.email}}"},
"update": {"created_by": "{{user.email}}"},
"delete": {"user_condition": {"role": "admin"}}
}
}
[](https://docs.base44.com/developers/backend/resources/entities/security#field-level-security-fls-example)
Field Level Security (FLS) example
--------------------------------------------------------------------------------------------------------------------------------------------------
Add `rls` to individual field properties:
{
"properties": {
"salary": {
"type": "number",
"rls": {
"read": {"user_condition": {"role": "admin"}},
"write": {"user_condition": {"role": "admin"}}
}
}
}
}
[](https://docs.base44.com/developers/backend/resources/entities/security#complete-example-with-security)
Complete example with security
--------------------------------------------------------------------------------------------------------------------------------------------
Here’s an entity schema with both RLS and FLS:
{
"name": "Task",
"type": "object",
"title": "Task",
"description": "A task item with priority, due date, and completion status",
"properties": {
"title": {
"type": "string",
"minLength": 1,
"maxLength": 200
},
"description": {
"type": "string",
"maxLength": 1000
},
"priority": {
"type": "string",
"enum": ["low", "medium", "high"],
"default": "medium"
},
"completed": {
"type": "boolean",
"default": false
},
"due_date": {
"type": "string",
"format": "date"
},
"tags": {
"type": "array",
"items": {"type": "string"}
},
"internal_notes": {
"type": "string",
"rls": {
"read": {"user_condition": {"role": "admin"}},
"write": {"user_condition": {"role": "admin"}}
}
}
},
"required": ["title"],
"rls": {
"create": true,
"read": {"created_by": "{{user.email}}"},
"update": {"created_by": "{{user.email}}"},
"delete": {"created_by": "{{user.email}}"}
}
}
[](https://docs.base44.com/developers/backend/resources/entities/security#deploying-security-rules)
Deploying security rules
--------------------------------------------------------------------------------------------------------------------------------
Security rules are part of your entity schema. After adding or updating security rules, deploy using [`entities push`](https://docs.base44.com/developers/references/cli/commands/entities-push)
. Security rules are also deployed automatically when you run the [`deploy`](https://docs.base44.com/developers/references/cli/commands/deploy)
command to deploy your entire project.
[](https://docs.base44.com/developers/backend/resources/entities/security#see-also)
See also
------------------------------------------------------------------------------------------------
* [Entities Overview](https://docs.base44.com/developers/backend/resources/entities/overview)
: Learn about database schema configuration
* [Entity Schemas](https://docs.base44.com/developers/backend/resources/entities/entity-schemas)
: Define your entity structure
* [User Schema](https://docs.base44.com/developers/backend/resources/entities/user-schema)
: Special built-in entity for user authentication
* [Project Structure](https://docs.base44.com/developers/backend/overview/project-structure)
: How entity schemas fit into your project
Was this page helpful?
YesNo
[User Schema](https://docs.base44.com/developers/backend/resources/entities/user-schema)
⌘I
Assistant
Responses are generated using AI and may contain mistakes.
Suggestions
Which plans come with a free domain?How are credits used?How do I use Discuss mode?
---
# auth pull - Base44 Support Documentation
> Documentation Index
> -------------------
>
> Fetch the complete documentation index at: [/llms.txt](https://docs.base44.com/llms.txt)
>
> Use this file to discover all available pages before exploring further.
[Skip to main content](https://docs.base44.com/developers/references/cli/commands/auth-pull#content-area)
Download your app’s [authentication configuration](https://docs.base44.com/developers/backend/resources/auth)
from Base44 to a local file. The command fetches the current login method settings and saves them to your auth directory. By default the auth directory is `base44/auth/`, but you can customize the path in your [project configuration](https://docs.base44.com/developers/backend/overview/project-structure#config-jsonc)
.
This overwrites your local auth config with the remote version. Any unsaved local changes will be lost.
[](https://docs.base44.com/developers/references/cli/commands/auth-pull#usage)
Usage
----------------------------------------------------------------------------------------
base44 auth pull
[](https://docs.base44.com/developers/references/cli/commands/auth-pull#see-also)
See also
----------------------------------------------------------------------------------------------
* [`auth push`](https://docs.base44.com/developers/references/cli/commands/auth-push)
: Push local auth config to Base44
* [`auth password-login`](https://docs.base44.com/developers/references/cli/commands/auth-password-login)
: Enable or disable password login
* [`auth social-login`](https://docs.base44.com/developers/references/cli/commands/auth-social-login)
: Enable or disable social login providers
* [Managing login and registration](https://docs.base44.com/Setting-up-your-app/Managing-login-and-registration)
: Configure login options in the dashboard
Was this page helpful?
YesNo
[auth social-login](https://docs.base44.com/developers/references/cli/commands/auth-social-login)
[auth push](https://docs.base44.com/developers/references/cli/commands/auth-push)
⌘I
Assistant
Responses are generated using AI and may contain mistakes.
Suggestions
Which plans come with a free domain?How are credits used?How do I use Discuss mode?
---
# User Schema - Base44 Support Documentation
> Documentation Index
> -------------------
>
> Fetch the complete documentation index at: [/llms.txt](https://docs.base44.com/llms.txt)
>
> Use this file to discover all available pages before exploring further.
[Skip to main content](https://docs.base44.com/developers/backend/resources/entities/user-schema#content-area)
You’re viewing developer documentation
This documentation is for developers working with the Base44 developer platform. For information about managing your app data using the app editor, see [Managing app data](https://docs.base44.com/Building-your-app/Managing-your-app-data)
.
The User entity exists in every Base44 project by default and stores information about your app’s users. You can add fields to store additional user data, then use those fields in [security rules](https://docs.base44.com/developers/backend/resources/entities/security)
to control data access or in your app to personalize the experience.
[](https://docs.base44.com/developers/backend/resources/entities/user-schema#built-in-fields)
Built-in fields
-----------------------------------------------------------------------------------------------------------------
Every User entity includes a set of built-in fields by default.
| Field | Type | Description |
| --- | --- | --- |
| `full_name` | string | User’s display name |
| `email` | string | User’s email address |
| `role` | string | Either `admin` or `user` |
The User entity also has the [general built-in fields](https://docs.base44.com/developers/backend/resources/entities/entity-schemas#built-in-fields)
that exist on all entities , such as `id`, and `created_date`. These fields are managed by the system and can’t be redefined in your schema.
[](https://docs.base44.com/developers/backend/resources/entities/user-schema#custom-fields)
Custom fields
-------------------------------------------------------------------------------------------------------------
To add custom fields, define a User schema containing only your additional fields. Trying to redefine any built-in fields will cause a validation error. Create a `User.json` or `User.jsonc` file in your project’s entities directory. By default this is `base44/entities/`, but you can customize the path in your [project configuration](https://docs.base44.com/developers/backend/overview/project-structure#configjsonc)
.
entities/User.json
{
"type": "object",
"properties": {
"company": { "type": "string" },
"phone": { "type": "string" },
"job_title": { "type": "string" },
"bio": {
"type": "string",
"maxLength": 500
}
},
"required": ["company"]
}
Then push your entities to Base44 using [`entities push`](https://docs.base44.com/developers/references/cli/commands/entities-push)
or [`deploy`](https://docs.base44.com/developers/references/cli/commands/deploy)
.
[](https://docs.base44.com/developers/backend/resources/entities/user-schema#complete-example)
Complete example
-------------------------------------------------------------------------------------------------------------------
Here’s a complete User schema with various field types:
{
"type": "object",
"properties": {
"company": {
"type": "string"
},
"phone": {
"type": "string"
},
"job_title": {
"type": "string",
"maxLength": 100
},
"bio": {
"type": "string",
"maxLength": 500
},
"website": {
"type": "string",
"format": "uri"
},
"preferences": {
"type": "object",
"properties": {
"theme": {
"type": "string",
"enum": ["light", "dark"],
"default": "light"
},
"notifications": {
"type": "boolean",
"default": true
}
}
}
},
"required": ["company"]
}
[](https://docs.base44.com/developers/backend/resources/entities/user-schema#use-your-fields)
Use your fields
-----------------------------------------------------------------------------------------------------------------
Once you’ve defined and pushed your User schema, you can reference your fields in security rules and access them in your app code.
###
[](https://docs.base44.com/developers/backend/resources/entities/user-schema#in-security-rules)
In security rules
You can use user fields to control access to other entities. For example, you might restrict users to only see records that belong to their company. To reference user fields in [security rules](https://docs.base44.com/developers/backend/resources/entities/security)
, use the `{{user.data.*}}` template syntax:
{
"rls": {
"read": {"data.company": "{{user.data.company}}"},
"update": {"data.company": "{{user.data.company}}"}
}
}
This rule ensures users can only read and update records where the record’s `company` field matches their own.
###
[](https://docs.base44.com/developers/backend/resources/entities/user-schema#in-code)
In code
Access user fields through the [SDK](https://docs.base44.com/developers/references/sdk/getting-started/overview)
:
// Get current user's fields
const currentUser = await base44.auth.me();
console.log(currentUser.company); // "Acme Inc"
// Update current user's fields
await base44.auth.updateMe({
phone: "+1-555-0123",
job_title: "Senior Developer"
});
// List all users with service role (backend functions only)
const allUsers = await base44.asServiceRole.entities.User.list();
This example uses a `base44` client. See [Setting up the client](https://docs.base44.com/developers/references/sdk/getting-started/client)
for setup instructions.
[](https://docs.base44.com/developers/backend/resources/entities/user-schema#see-also)
See also
---------------------------------------------------------------------------------------------------
* [Entities Overview](https://docs.base44.com/developers/backend/resources/entities/overview)
: Learn about database schema configuration
* [Entity Schemas](https://docs.base44.com/developers/backend/resources/entities/entity-schemas)
: Define your entity structure
* [Security](https://docs.base44.com/developers/backend/resources/entities/security)
: Configure row-level security rules
* [Project Structure](https://docs.base44.com/developers/backend/overview/project-structure)
: How entity schemas fit into your project
Was this page helpful?
YesNo
[Entity Schemas](https://docs.base44.com/developers/backend/resources/entities/entity-schemas)
[Security](https://docs.base44.com/developers/backend/resources/entities/security)
⌘I
Assistant
Responses are generated using AI and may contain mistakes.
Suggestions
Which plans come with a free domain?How are credits used?How do I use Discuss mode?
---
# site deploy - Base44 Support Documentation
> Documentation Index
> -------------------
>
> Fetch the complete documentation index at: [/llms.txt](https://docs.base44.com/llms.txt)
>
> Use this file to discover all available pages before exploring further.
[Skip to main content](https://docs.base44.com/developers/references/cli/commands/site-deploy#content-area)
Deploy your built frontend app to Base44’s hosting platform. The command uploads your build output to Base44, making your site available at your app’s URL. Before running this command, ensure that your built frontend files are in the directory specified by `site.outputDirectory` in your [`config.jsonc`](https://docs.base44.com/developers/backend/overview/project-structure#config-jsonc)
file.
[](https://docs.base44.com/developers/references/cli/commands/site-deploy#usage)
Usage
------------------------------------------------------------------------------------------
base44 site deploy
[](https://docs.base44.com/developers/references/cli/commands/site-deploy#flags)
Flags
------------------------------------------------------------------------------------------
| Flag | Description |
| --- | --- |
| `-y, --yes` | Skip the confirmation prompt |
[](https://docs.base44.com/developers/references/cli/commands/site-deploy#configuration)
Configuration
----------------------------------------------------------------------------------------------------------
The `site.outputDirectory` in your [`base44/config.jsonc`](https://docs.base44.com/developers/backend/overview/project-structure)
tells the CLI where your build tool outputs the compiled frontend files so that it knows which files to deploy to Base44 hosting.
{
"name": "my-project",
"site": {
"outputDirectory": "./dist"
}
}
[](https://docs.base44.com/developers/references/cli/commands/site-deploy#see-also)
See also
------------------------------------------------------------------------------------------------
* [`site open`](https://docs.base44.com/developers/references/cli/commands/site-open)
: Open the deployed site in your browser
* [Project Structure](https://docs.base44.com/developers/backend/overview/project-structure)
: How project files are organized
* [Quickstart - React](https://docs.base44.com/developers/backend/quickstart/templates/quickstart-react-template)
: Build a full-stack React app with Base44
Was this page helpful?
YesNo
[deploy](https://docs.base44.com/developers/references/cli/commands/deploy)
⌘I
Assistant
Responses are generated using AI and may contain mistakes.
Suggestions
Which plans come with a free domain?How are credits used?How do I use Discuss mode?
---
# Connect to third-party APIs - Base44 Support Documentation
> Documentation Index
> -------------------
>
> Fetch the complete documentation index at: [/llms.txt](https://docs.base44.com/llms.txt)
>
> Use this file to discover all available pages before exploring further.
[Skip to main content](https://docs.base44.com/developers/references/sdk/getting-started/third-party-apis#content-area)
Base44 provides several ways to connect your app to external APIs. Each approach has different trade-offs around setup complexity, credential management, and flexibility.
Connectors
----------
OAuth login to services like Slack, Google Calendar, or Discord
Custom integrations
-------------------
Workspace-wide API access via OpenAPI specs
Backend functions
-----------------
Backend code with full control over requests
[](https://docs.base44.com/developers/references/sdk/getting-started/third-party-apis#connectors)
Connectors
----------------------------------------------------------------------------------------------------------------
Connectors give you a raw OAuth access token for a third-party service, which you use to call that service’s API directly. Base44 handles the OAuth flow and credential storage. There are two types:
* **Shared connectors:** One account is connected for the whole app. All app users share the same token. Best for service accounts, like posting to a company Slack channel or reading from a shared calendar.
* **App user connectors:** Each signed-in app user connects their own account. Each user gets their own token. Best for actions that need to happen as the individual user, like sending email from their Gmail account.
Shared connector
App user connector
const { accessToken } = await base44.asServiceRole.connectors.getConnection(
"googlecalendar"
);
const response = await fetch(
"https://www.googleapis.com/calendar/v3/calendars",
{ headers: { Authorization: `Bearer ${accessToken}` } }
);
const calendars = await response.json();
connectors
----------
Complete API reference
[](https://docs.base44.com/developers/references/sdk/getting-started/third-party-apis#custom-integrations)
Custom integrations
----------------------------------------------------------------------------------------------------------------------------------
Custom integrations let you call external APIs using shared credentials that aren’t specific to a user or app. A workspace administrator imports an OpenAPI specification, configures the credentials, and then any app in the workspace can call that API through the SDK. Requests are proxied through Base44’s backend, so secrets never reach the browser. Once an integration is set up, all apps in the workspace share it. Developers never handle API keys directly, so the admin can rotate credentials without touching app code.
Call a custom integration
const response = await base44.integrations.custom.call(
"my-crm", // integration slug
"get:/contacts", // endpoint: method:path format
{
pathParams: { id: "123" },
queryParams: { limit: 10 },
}
);
if (response.success) {
console.log(response.data);
}
custom integrations
-------------------
Complete API reference
[](https://docs.base44.com/developers/references/sdk/getting-started/third-party-apis#backend-functions)
Backend functions
------------------------------------------------------------------------------------------------------------------------------
Backend functions run on the server, so you can safely store API keys and secrets as environment variables without exposing them to the browser. Use backend functions when you need full control over API requests, want to add custom logic or data transformation, or are working with APIs that don’t have a custom integration available. Your frontend calls the backend function, which then makes the external API request and returns the result.
Backend function
Call from frontend
// In your backend function
export default async function handler(request: Request) {
const apiKey = process.env.EXTERNAL_API_KEY;
const response = await fetch("https://api.example.com/data", {
headers: {
Authorization: `Bearer ${apiKey}`,
"Content-Type": "application/json",
},
});
return Response.json(await response.json());
}
functions
---------
Learn more about backend functions
Was this page helpful?
YesNo
[Common SDK uses](https://docs.base44.com/developers/references/sdk/getting-started/work-with-sdk)
[createClient](https://docs.base44.com/developers/references/sdk/docs/functions/createClient)
⌘I
Assistant
Responses are generated using AI and may contain mistakes.
Suggestions
Which plans come with a free domain?How are credits used?How do I use Discuss mode?
---
# eject - Base44 Support Documentation
> Documentation Index
> -------------------
>
> Fetch the complete documentation index at: [/llms.txt](https://docs.base44.com/llms.txt)
>
> Use this file to discover all available pages before exploring further.
[Skip to main content](https://docs.base44.com/developers/references/cli/commands/eject#content-area)
Clone an existing Base44 app into a separate local project. This command downloads the frontend code and backend resources from a selected app and creates a new project with its own app ID. Your original app stays in Base44 unchanged.
The ejected project has an empty database. Your entity schemas are copied, but not your data. Your original Base44 app remains unchanged and the 2 projects are independent after ejection.
For a step-by-step guide, see [Start from an Existing Base44 App](https://docs.base44.com/developers/backend/overview/start-from-existing-app)
.
[](https://docs.base44.com/developers/references/cli/commands/eject#usage)
Usage
------------------------------------------------------------------------------------
base44 eject
The command guides you through an interactive flow:
1. Prompts you to select from your existing Base44 apps.
2. Downloads the frontend code from the selected app.
3. Downloads entity schemas and other backend resources, but not your data.
4. Creates a new backend project with a unique ID.
5. Sets up a local [project structure](https://docs.base44.com/developers/backend/overview/project-structure)
with all resources.
[](https://docs.base44.com/developers/references/cli/commands/eject#flags)
Flags
------------------------------------------------------------------------------------
| Flag | Description |
| --- | --- |
| `--app-id ` | App to eject. Skips the picker prompt. Required in non-interactive mode. |
| `-p, --path ` | Directory to write the project to. Required in non-interactive mode. |
| `-y, --yes` | Skip confirmation prompts. |
[](https://docs.base44.com/developers/references/cli/commands/eject#non-interactive-usage)
Non-interactive usage
--------------------------------------------------------------------------------------------------------------------
For scripts or CI environments, pass `--app-id` and `--path` to skip all prompts:
base44 eject --app-id --path ./my-ejected-app --yes
[](https://docs.base44.com/developers/references/cli/commands/eject#see-also)
See also
------------------------------------------------------------------------------------------
* [Start from an Existing Base44 App](https://docs.base44.com/developers/backend/overview/start-from-existing-app)
: Clone an existing Base44 project
* [`create`](https://docs.base44.com/developers/references/cli/commands/create)
: Start a new project from scratch
* [`link`](https://docs.base44.com/developers/references/cli/commands/link)
: Connect local project files to Base44
Was this page helpful?
YesNo
[link](https://docs.base44.com/developers/references/cli/commands/link)
[dashboard open](https://docs.base44.com/developers/references/cli/commands/dashboard-open)
⌘I
Assistant
Responses are generated using AI and may contain mistakes.
Suggestions
Which plans come with a free domain?How are credits used?How do I use Discuss mode?
---
# site open - Base44 Support Documentation
> Documentation Index
> -------------------
>
> Fetch the complete documentation index at: [/llms.txt](https://docs.base44.com/llms.txt)
>
> Use this file to discover all available pages before exploring further.
[Skip to main content](https://docs.base44.com/developers/references/cli/commands/site-open#content-area)
Open the [deployed](https://docs.base44.com/developers/references/cli/commands/site-deploy)
site for your current project in your default browser.
[](https://docs.base44.com/developers/references/cli/commands/site-open#usage)
Usage
----------------------------------------------------------------------------------------
base44 site open
[](https://docs.base44.com/developers/references/cli/commands/site-open#see-also)
See also
----------------------------------------------------------------------------------------------
* [`site deploy`](https://docs.base44.com/developers/references/cli/commands/site-deploy)
: Deploy built site files to Base44 hosting
* [`dashboard open`](https://docs.base44.com/developers/references/cli/commands/dashboard-open)
: Open the app dashboard in your browser
* [`link`](https://docs.base44.com/developers/references/cli/commands/link)
: Connect your local project to a Base44 app
Was this page helpful?
YesNo
[types generate](https://docs.base44.com/developers/references/cli/commands/types-generate)
[logs](https://docs.base44.com/developers/references/cli/commands/logs)
⌘I
Assistant
Responses are generated using AI and may contain mistakes.
Suggestions
Which plans come with a free domain?How are credits used?How do I use Discuss mode?
---
# link - Base44 Support Documentation
> Documentation Index
> -------------------
>
> Fetch the complete documentation index at: [/llms.txt](https://docs.base44.com/llms.txt)
>
> Use this file to discover all available pages before exploring further.
[Skip to main content](https://docs.base44.com/developers/references/cli/commands/link#content-area)
Link a local project to Base44. You can create a new backend project or link to an existing one created with the CLI. The command writes the project ID to your [`.app.jsonc`](https://docs.base44.com/developers/backend/overview/project-structure#app-jsonc)
file. You can only link to Base44 backend projects, not Base44 apps. Use this when you have a local project but haven’t yet connected it to Base44.
If you don’t have any project files yet, use [`base44 create`](https://docs.base44.com/developers/references/cli/commands/create)
to generate a new project. The `create` command generates new code, while `link` connects existing code files to a backend. For a complete guide, see [Link an Existing Backend Project](https://docs.base44.com/developers/backend/overview/link-existing-project)
.
[](https://docs.base44.com/developers/references/cli/commands/link#requirements)
Requirements
-------------------------------------------------------------------------------------------------
* Must be run from a directory containing a `base44/config.jsonc` file.
* Project must not already be linked. If an [`.app.jsonc`](https://docs.base44.com/developers/backend/overview/project-structure#app-jsonc)
file with an app ID already exists, the command will fail.
[](https://docs.base44.com/developers/references/cli/commands/link#usage)
Usage
-----------------------------------------------------------------------------------
base44 link
An interactive prompt will guide you through creating a new project or selecting an existing one. For a step-by-step guide on linking existing projects, see [Link an Existing Backend Project](https://docs.base44.com/developers/backend/overview/link-existing-project)
.
[](https://docs.base44.com/developers/references/cli/commands/link#flags)
Flags
-----------------------------------------------------------------------------------
| Flag | Description |
| --- | --- |
| `-c, --create` | Create a new backend project on Base44. This skips the selection prompt |
| `-n, --name ` | Project name. Required when using `--create` |
| `-d, --description ` | Project description |
| `-e, --existing` | Link to an existing project. This skips the selection prompt |
| `--app-id ` | App ID. Required when using `--existing` |
[](https://docs.base44.com/developers/references/cli/commands/link#non-interactive-usage)
Non-interactive usage
-------------------------------------------------------------------------------------------------------------------
For scripts or CI environments, use the flags to skip prompts: Create a new project:
base44 link --create --name "my-project" --description "My app"
Link to an existing project:
base44 link --existing --app-id "your-app-id"
[](https://docs.base44.com/developers/references/cli/commands/link#see-also)
See also
-----------------------------------------------------------------------------------------
* [`create`](https://docs.base44.com/developers/references/cli/commands/create)
: Create a new Base44 project
* [`dashboard open`](https://docs.base44.com/developers/references/cli/commands/dashboard-open)
: Open your app in the dashboard
* [`site open`](https://docs.base44.com/developers/references/cli/commands/site-open)
: Open the deployed site in your browser
* [Project Structure](https://docs.base44.com/developers/backend/overview/project-structure)
: How project files are organized
Was this page helpful?
YesNo
[create](https://docs.base44.com/developers/references/cli/commands/create)
[eject](https://docs.base44.com/developers/references/cli/commands/eject)
⌘I
Assistant
Responses are generated using AI and may contain mistakes.
Suggestions
Which plans come with a free domain?How are credits used?How do I use Discuss mode?
---
# auth push - Base44 Support Documentation
> Documentation Index
> -------------------
>
> Fetch the complete documentation index at: [/llms.txt](https://docs.base44.com/llms.txt)
>
> Use this file to discover all available pages before exploring further.
[Skip to main content](https://docs.base44.com/developers/references/cli/commands/auth-push#content-area)
Upload your local [authentication configuration](https://docs.base44.com/developers/backend/resources/auth)
to Base44. The command reads the config file in your auth directory and applies it to your live app. By default the auth directory is `base44/auth/`, but you can customize the path in your [project configuration](https://docs.base44.com/developers/backend/overview/project-structure#config-jsonc)
.
If the config you’re pushing has no login methods enabled, the command warns that users will be locked out. You’ll be asked to confirm before proceeding.
[](https://docs.base44.com/developers/references/cli/commands/auth-push#usage)
Usage
----------------------------------------------------------------------------------------
base44 auth push
[](https://docs.base44.com/developers/references/cli/commands/auth-push#flags)
Flags
----------------------------------------------------------------------------------------
| Flag | Description |
| --- | --- |
| `-y, --yes` | Skip the confirmation prompt. |
[](https://docs.base44.com/developers/references/cli/commands/auth-push#see-also)
See also
----------------------------------------------------------------------------------------------
* [`auth pull`](https://docs.base44.com/developers/references/cli/commands/auth-pull)
: Fetch auth config from Base44 to your local project
* [`auth password-login`](https://docs.base44.com/developers/references/cli/commands/auth-password-login)
: Enable or disable password login
* [`auth social-login`](https://docs.base44.com/developers/references/cli/commands/auth-social-login)
: Enable or disable social login providers
* [`deploy`](https://docs.base44.com/developers/references/cli/commands/deploy)
: Deploy all project resources, including auth config
* [Managing login and registration](https://docs.base44.com/Setting-up-your-app/Managing-login-and-registration)
: Configure login options in the dashboard
Was this page helpful?
YesNo
[auth pull](https://docs.base44.com/developers/references/cli/commands/auth-pull)
[secrets set](https://docs.base44.com/developers/references/cli/commands/secrets-set)
⌘I
Assistant
Responses are generated using AI and may contain mistakes.
Suggestions
Which plans come with a free domain?How are credits used?How do I use Discuss mode?
---
# Entity Schemas - Base44 Support Documentation
> Documentation Index
> -------------------
>
> Fetch the complete documentation index at: [/llms.txt](https://docs.base44.com/llms.txt)
>
> Use this file to discover all available pages before exploring further.
[Skip to main content](https://docs.base44.com/developers/backend/resources/entities/entity-schemas#content-area)
You’re viewing developer documentation
This documentation is for developers working with the Base44 developer platform. For information about managing your app data using the app editor, see [Managing app data](https://docs.base44.com/Building-your-app/Managing-your-app-data)
.
Entities are defined using a JSON Schema that describes the data structure and validation rules.
[](https://docs.base44.com/developers/backend/resources/entities/entity-schemas#basic-schema-structure)
Basic schema structure
----------------------------------------------------------------------------------------------------------------------------------
Entity schemas are defined in JSON files in your project’s entities directory. By default, this is `base44/entities/`, but you can customize the path in your [project configuration](https://docs.base44.com/developers/backend/overview/project-structure#config-jsonc)
. The filename determines the entity name. For example, `Task.json` creates a `Task` entity. Here’s an entity schema template:
{
"name": "my_entity",
"type": "object",
"title": "My Entity",
"description": "Description of what this entity represents",
"properties": {
"": {
"type": "",
"