# Table of Contents
- [Overview | OpenNHP Documentation](#overview-opennhp-documentation)
- [Features | OpenNHP Documentation](#features-opennhp-documentation)
- [NHP Quick Start | OpenNHP Documentation](#nhp-quick-start-opennhp-documentation)
- [Comparison | OpenNHP Documentation](#comparison-opennhp-documentation)
- [Cryptography | OpenNHP Documentation](#cryptography-opennhp-documentation)
- [How to Deploy | OpenNHP Documentation](#how-to-deploy-opennhp-documentation)
- [Understand the Code | OpenNHP Documentation](#understand-the-code-opennhp-documentation)
- [DHP Quick Start | OpenNHP Documentation](#dhp-quick-start-opennhp-documentation)
- [How to Build | OpenNHP Documentation](#how-to-build-opennhp-documentation)
- [Server Plugins | OpenNHP Documentation](#server-plugins-opennhp-documentation)
- [Unknown](#unknown)
- [Unknown](#unknown)
- [About | OpenNHP Documentation](#about-opennhp-documentation)
- [中文版 | OpenNHP Documentation](#-opennhp-documentation)
- [OpenNHP简介 | OpenNHP Documentation](#opennhp-opennhp-documentation)
- [功能列表 | OpenNHP Documentation](#-opennhp-documentation)
- [NHP快速开始 | OpenNHP Documentation](#nhp-opennhp-documentation)
- [加密算法 | OpenNHP Documentation](#-opennhp-documentation)
- [Client SDKs | OpenNHP Documentation](#client-sdks-opennhp-documentation)
- [对比NHP与SPA | OpenNHP Documentation](#-nhp-spa-opennhp-documentation)
- [DHP快速开始 | OpenNHP Documentation](#dhp-opennhp-documentation)
- [关于我们 | OpenNHP Documentation](#-opennhp-documentation)
- [编译源代码 | OpenNHP Documentation](#-opennhp-documentation)
- [部署OpenNHP | OpenNHP Documentation](#-opennhp-opennhp-documentation)
- [服务器插件开发 | OpenNHP Documentation](#-opennhp-documentation)
- [源代码解读 | OpenNHP Documentation](#-opennhp-documentation)
- [客户端SDK | OpenNHP Documentation](#-sdk-opennhp-documentation)
- [404 | OpenNHP Documentation](#404-opennhp-documentation)
- [404 | OpenNHP Documentation](#404-opennhp-documentation)
- [404 | OpenNHP Documentation](#404-opennhp-documentation)
---
# Overview | OpenNHP Documentation
[Skip to main content](https://docs.opennhp.org/#main-content)
Link Menu Expand (external link) Document Search Copy Copied
[](https://docs.opennhp.org/)
[](https://docs.opennhp.org/#opennhp-documentation)
OpenNHP Documentation
=========================================================================
A lightweight cryptography-driven zero trust networking protocol at the OSI 5th layer to hide your server and data from attackers.
[中文版](https://docs.opennhp.org/zh-cn/)
* * *
[](https://docs.opennhp.org/#1-opennhp-architecture)
1\. OpenNHP Architecture
-----------------------------------------------------------------------------
The OpenNHP architecture is inspired by the NIST Zero Trust Architecture standard. It follows a modular design with the following core components:
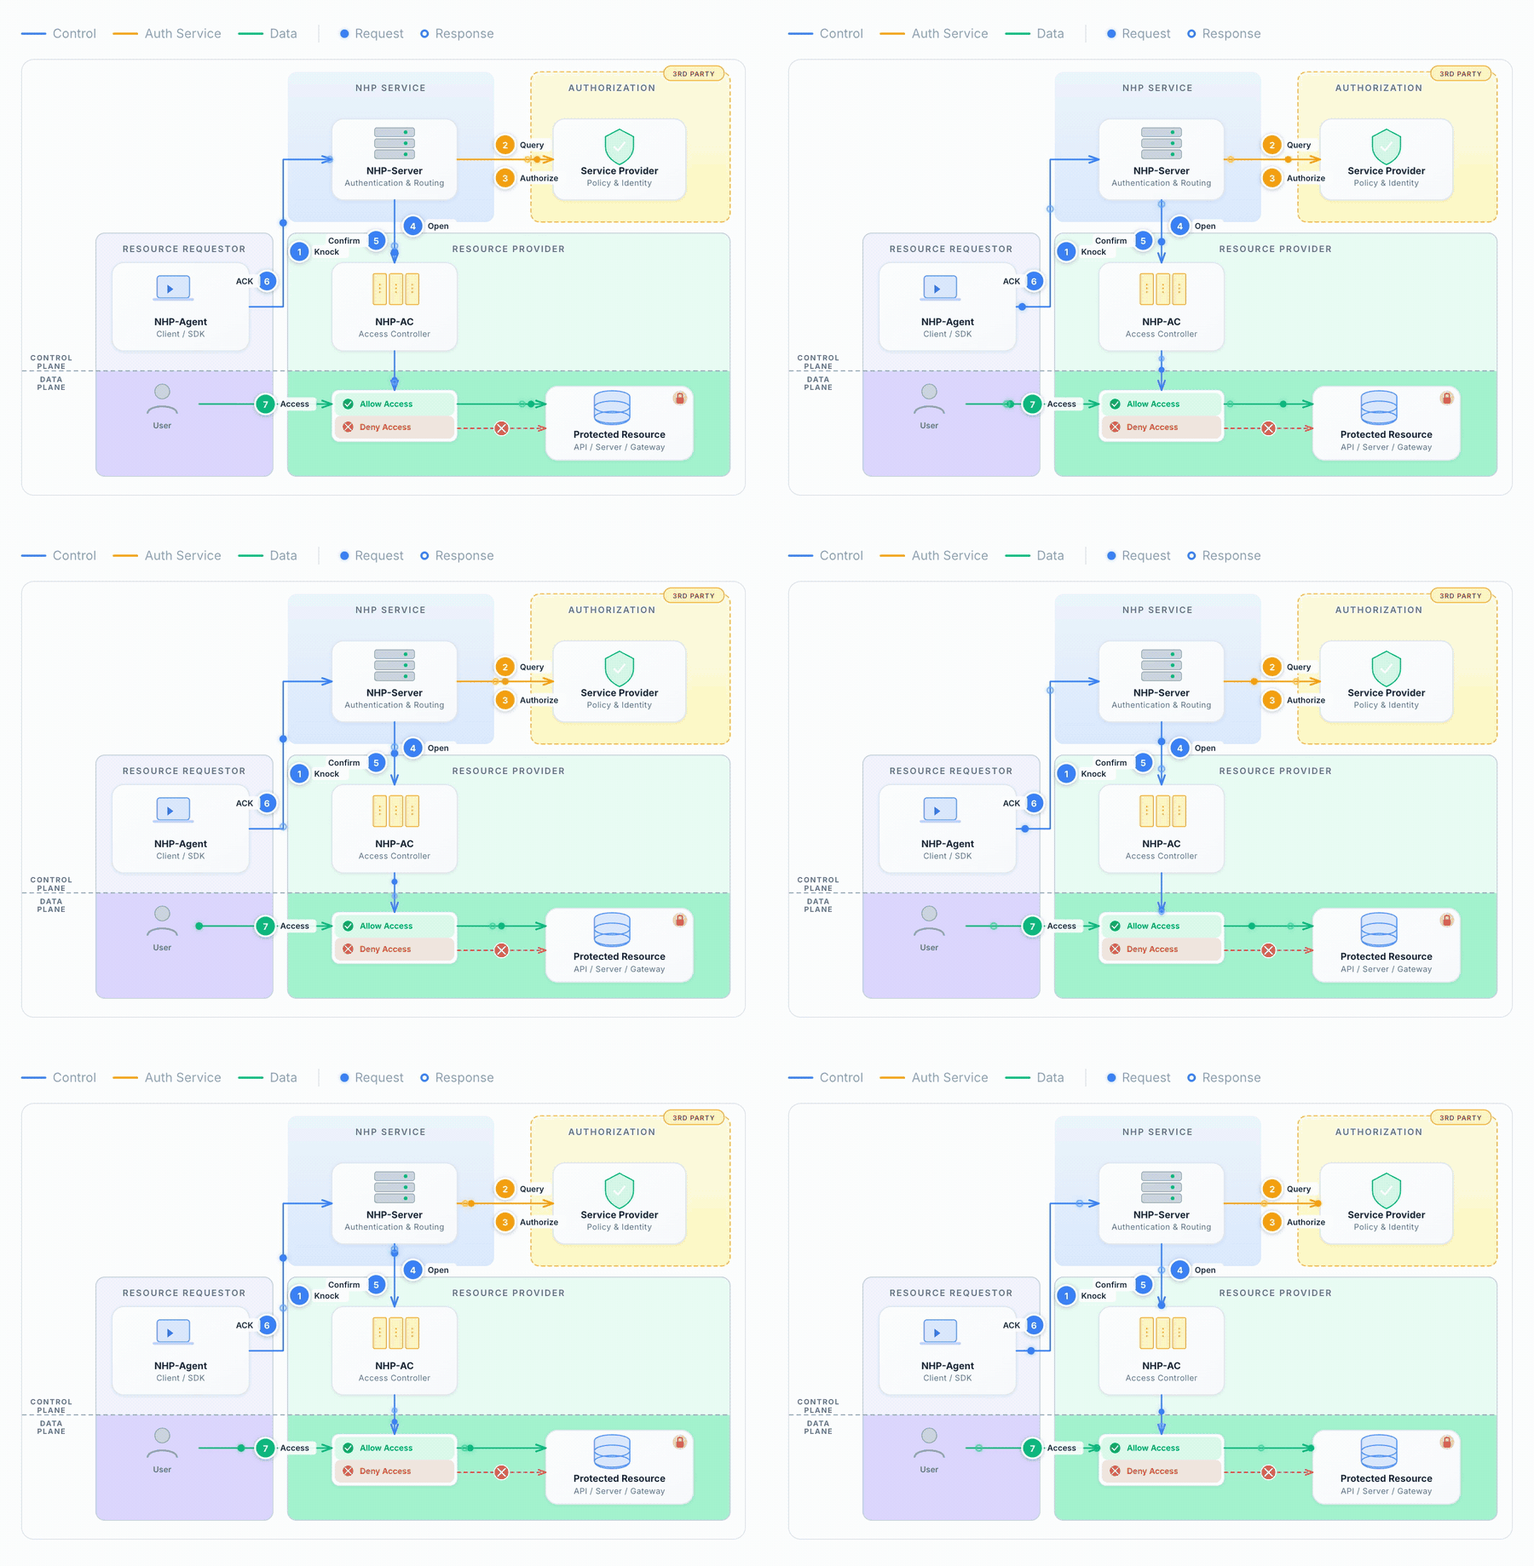
### [](https://docs.opennhp.org/#2-opennhp-core-components)
2\. OpenNHP Core Components:
#### [](https://docs.opennhp.org/#21-nhp-agent)
2.1 NHP-Agent
The NHP-Agent is a client-side component that initiates communication and requests access to protected resources. It can be implemented as:
* A standalone client application
* An SDK integrated into existing applications
* A browser plugin
* A mobile app
The agent is responsible for:
* Generating and sending knock requests to the NHP-Server
* Maintaining secure communication channels
* Handling authentication flows
#### [](https://docs.opennhp.org/#22-nhp-server)
2.2 NHP-Server
The NHP-Server is the central controller that:
* Processes and validates knock requests from agents
* Interacts with the Authorization Service Provider for policy decisions
* Manages NHP-AC components to allow/deny access
* Handles key management and cryptographic operations
It can be deployed in a distributed or clustered configuration for high availability and scalability.
#### [](https://docs.opennhp.org/#23-nhp-ac)
2.3 NHP-AC
NHP-AC (Access Control) components enforce access policies on protected resources. Key functions:
* Implement default deny-all rules
* Open/close access based on NHP-Server instructions
* Ensure network invisibility of protected resources
* Log access attempts
### [](https://docs.opennhp.org/#3-components-that-interact-with-opennhp)
3\. Components that interact with OpenNHP:
* **Protected Resources:** The resource provider is responsible for protecting these resources, such as API interfaces, application servers, gateways, routers, network devices, etc. In the SDP scenario, the Protected Resources are the SDP Gateway and Controller.
* **Authorization Service Provider (ASP):** This provider validates access policies and provides the actual access addresses of Protected Resources. In the SDP Scenario, the ASP may be the SDP Controller.
### [](https://docs.opennhp.org/#4-workflow)
4\. Workflow
The workflow of OpenNHP is illustrated as the below diagram. 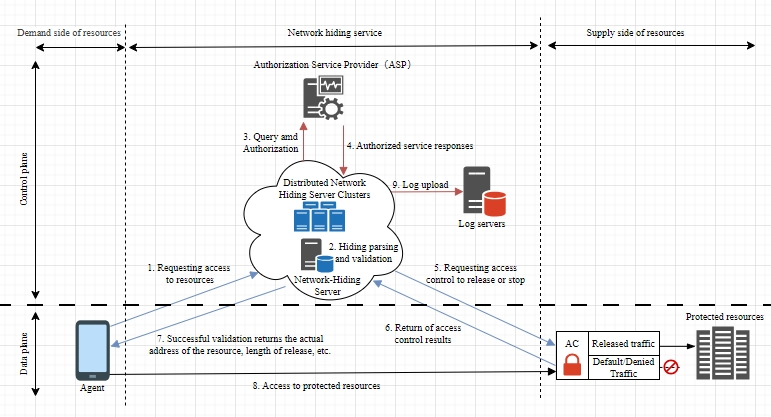
1. `NHP-Agent` sends knock request to `NHP-Server`
2. `NHP-Server` validates request and retrieves agent info
3. `NHP-Server` queries Authorization Service Provider
4. If authorized, `NHP-Server` instructs `NHP-AC` to allow access
5. `NHP-AC` opens connection and notifies `NHP-Server`
6. `NHP-Server` provides resource access details to `NHP-Agent`
7. `NHP-Agent` can now access the protected resource
8. Access is logged for auditing purposes
* * *
---
# Features | OpenNHP Documentation
[Skip to main content](https://docs.opennhp.org/features/#main-content)
Link Menu Expand (external link) Document Search Copy Copied
[](https://docs.opennhp.org/)
[](https://docs.opennhp.org/features/#opennhp-feature-list)
OpenNHP Feature List
================================================================================
OpenNHP offers robust security, excellent performance, and scalability to protect your network resources.
[中文版](https://docs.opennhp.org/zh-cn/features/)
* * *
* **Mitigate vulnerability risk:** The openness of TCP/IP protocols leads to a “trust by default” connection model, allowing anyone to establish a connection to a server port that provides services. Attackers exploit this openness to target server vulnerabilities. The NHP protocol implements the zero trust principle “never trust, always verify” by enforcing “deny-all” rules by default on the server side, only allowing authorized hosts to establish connections. This effectively mitigates vulnerability exploitation, particularly zero-day exploits.
* **Mitigate phishing attacks:** DNS hijacking is a serious threat to internet security and is used for malicious purposes such as phishing, stealing sensitive information, or spreading malware. The NHP protocol can function as an encrypted DNS resolution service to mitigate this problem. When the NHP-Agent on the client side sends a knock request to the controller component NHP-Server with the identifier (e.g., the domain name) of the protected resource, the NHP-Server will return the IP address and port number of the protected resource if the NHP-Agent is successfully authenticated. Since NHP communication is encrypted and mutually verified, the risk of DNS hijacking is effectively mitigated.
* **Mitigate DDoS attacks:** As mentioned above, a client cannot obtain the IP address and port number of protected resources without authentication. If the protected resources are distributed across multiple locations, the NHP server may return different IP addresses to different clients, making DDoS attacks significantly more difficult and expensive to execute.
* **Attack attribution:** The connection model of TCP/IP protocols is IP-based. With NHP, the connection model becomes identity (ID)-based. The connection initiator’s identity must be authenticated before establishing the connection, making attacks much more identifiable and traceable.
* **Default-deny access control**: All resources are hidden by default, only becoming accessible after authentication and authorization.
* **Identity and device-based authentication**: Ensures that only known users on approved devices can gain access.
* **Encrypted DNS resolution**: Prevents DNS hijacking and associated phishing attacks.
* **DDoS mitigation**: Distributed infrastructure design helps protect against Distributed Denial of Service attacks.
* **Scalable architecture**: Decoupled components allow for flexible deployment and scaling.
* **IAM integration**: Works with your existing Identity and Access Management systems.
* **Flexible deployment**: Supports various models including client-to-gateway, client-to-server, and more.
* **Strong cryptography**: Utilizes modern algorithms like ECC, Noise Protocol, and IBC for robust security.
* Mitigates vulnerability exploitation by enforcing “deny-all” rules by default
* Prevents phishing attacks through encrypted DNS resolution
* Protects against DDoS attacks by hiding infrastructure
* Enables attack attribution through identity-based connections
* Default-deny access control for all protected resources
* Identity and device-based authentication before network access
* Encrypted DNS resolution to prevent DNS hijacking
* Distributed infrastructure to mitigate DDoS attacks
* Scalable architecture with decoupled components
* Integration with existing identity and access management systems
* Support for various deployment models (client-to-gateway, client-to-server, etc)
* Cryptographically secure using modern algorithms (ECC, Noise Protocol, IBC)
* * *
---
# NHP Quick Start | OpenNHP Documentation
[Skip to main content](https://docs.opennhp.org/nhp_quick_start/#main-content)
Link Menu Expand (external link) Document Search Copy Copied
[](https://docs.opennhp.org/)
[](https://docs.opennhp.org/nhp_quick_start/#nhp-quick-start)
NHP Quick Start
=============================================================================
A locally built Docker debugging environment, simulating nhp-server, nhp-ac, traefik, web-app, etc. This environment can be used for:
* Quickly understanding how opennhp works
* Plugin debugging
* Basic logic validation
* Partial performance stress testing
[中文版](https://docs.opennhp.org/zh-cn/nhp_quick_start/)
* * *
[](https://docs.opennhp.org/nhp_quick_start/#1-overview)
1\. Overview
---------------------------------------------------------------------
This Quick Start guide helps developers rapidly set up the OpenNHP Docker environment, build the source code, and test key features of OpenNHP. Whether you’re exploring how OpenNHP makes servers “invisible” to unauthorized scans or integrating it into existing Zero Trust architectures, this guide provides the essential steps to get you up and running quickly.
### [](https://docs.opennhp.org/nhp_quick_start/#11-network-topology)
1.1 Network Topology
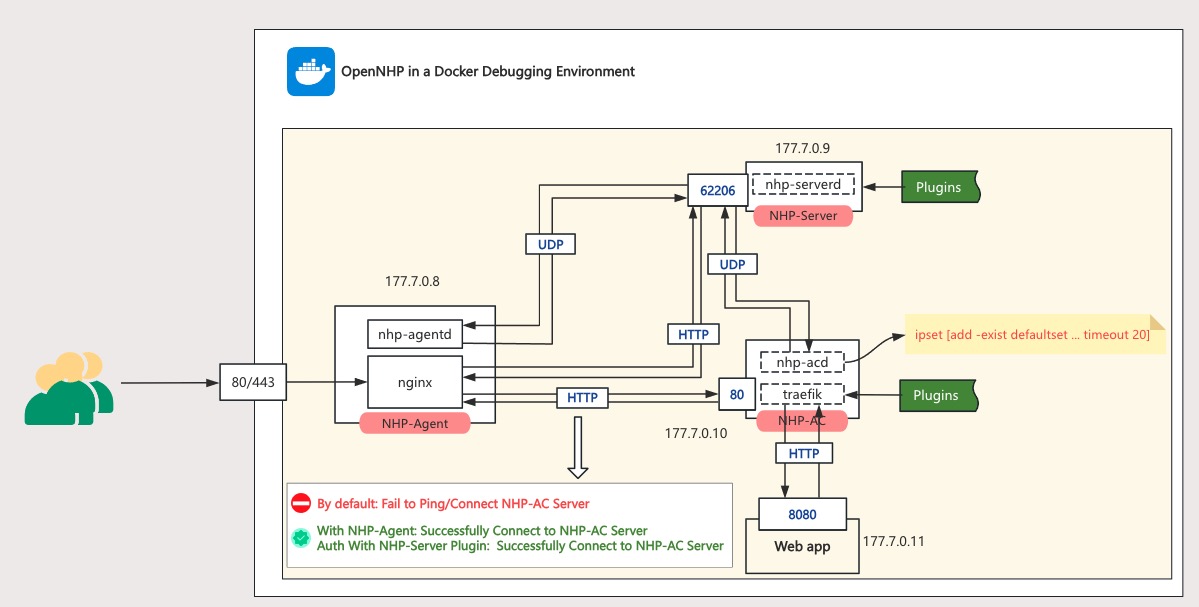
| Container Name | IP | Description |
| --- | --- | --- |
| NHP-Agent | 177.7.0.8 | Runs nhp-agentd & nginx (both disabled by default). Port mapping: 443→AC:80, 80→NHP-Server:62206 |
| NHP-Server | 177.7.0.9 | Runs nhp-serverd with exposed port 62206 |
| NHP-AC | 177.7.0.10 | Runs nhp-acd & traefik. All ports blocked by default |
| Web App | 177.7.0.11 | Protected web application. Only allows NHP-AC access on port 8080 |
### [](https://docs.opennhp.org/nhp_quick_start/#12-test-scenarios)
1.2 Test Scenarios
| State | Expected Result |
| --- | --- |
| Scenario 1 | Invisibility (for unauthorized users), Ping or direct access to NHP-AC Server’s proxied Web-app fails |
| Scenario 2 | After “knocking” via NHP-Agent, can successfully access the NHP-AC protected Web-app |
| Scenario 3 | After web identity authentication “knock”, can successfully access the NHP-AC protected Web-app |
[](https://docs.opennhp.org/nhp_quick_start/#2-installing-docker-environment)
2\. Installing Docker Environment
---------------------------------------------------------------------------------------------------------------
### [](https://docs.opennhp.org/nhp_quick_start/#21-docker-desktop-for-mac)
2.1 Docker Desktop for Mac
brew install --cask docker
Alternative: Download the .dmg package directly from Docker’s official website: [https://www.docker.com/products/docker-desktop/](https://www.docker.com/products/docker-desktop/)
### [](https://docs.opennhp.org/nhp_quick_start/#22-docker-desktop-for-windows)
2.2 Docker Desktop for Windows
* System Requirements:
* Windows 10/11 (64-bit, Pro/Enterprise/Home editions)
* WSL 2 enabled (recommended) or Hyper-V
* Installation Steps:
* Download Docker Desktop from the official website
* Run the installer and follow the setup wizard
Launch Docker Desktop after installation completes
[](https://docs.opennhp.org/nhp_quick_start/#3-building-base-images-from-source-code)
3\. Building base images from Source Code
-------------------------------------------------------------------------------------------------------------------------------
### [](https://docs.opennhp.org/nhp_quick_start/#31-clone-the-latest-code)
3.1 Clone the latest code
git clone https://github.com/OpenNHP/opennhp.git
### [](https://docs.opennhp.org/nhp_quick_start/#32-quick-start-script-recommended)
3.2 Quick Start Script (Recommended)
The easiest way to build and manage the Docker environment is using the `quick_start.sh` script:
cd ./docker
# Run the interactive menu
./quick_start.sh
# For users in China, use --china flag to enable mirrors
./quick_start.sh --china
The script provides an interactive menu with the following options:
| Option | Description |
| --- | --- |
| **1** | **Build ALL and Start (Recommended for first-time users)** |
| 2 | Build Base Image (opennhp-base) |
| 3 | Build NHP-Server |
| 4 | Build NHP-AC |
| 5 | Build NHP-Agent |
| 6 | Build Web-App |
| 7 | Start All Services |
| 8 | Stop All Services |
| 9 | Restart All Services |
| 10-12 | View Logs (nhp-server/nhp-ac/nhp-agent) |
| 13 | Clean Docker Images |
| 14 | Clean ALL (images + volumes + networks) |
| 15 | Toggle China Mirror |
### [](https://docs.opennhp.org/nhp_quick_start/#33-manual-build-opennhp-base-docker-image)
3.3 Manual Build: opennhp-base Docker Image
If you prefer manual commands:
cd ./docker
docker build --no-cache -t opennhp-base:latest -f Dockerfile.base ..
**Build Arguments:**
You can override `GO_VERSION` and `GOPROXY` by adding build arguments:
# For users in China, use goproxy.cn and mirrors.aliyun.com for faster downloads
docker build --build-arg GOPROXY=https://goproxy.cn,direct --build-arg APT_MIRROR=mirrors.aliyun.com --no-cache -t opennhp-base:latest -f Dockerfile.base ..
# To specify a different Go version (default: 1.25.6)
docker build --build-arg GO_VERSION=1.25.6 --no-cache -t opennhp-base:latest -f Dockerfile.base ..
**Troubleshooting - BuildKit Builder Issue:**
If `docker compose build` fails with error like `pull access denied, repository does not exist`, it may be because your Docker is using a `docker-container` buildx builder which cannot access local images. Fix it by switching to the default builder:
# Check current builder
docker buildx ls
# Switch to docker driver builder
docker buildx use desktop-linux
# or
docker buildx use default
[](https://docs.opennhp.org/nhp_quick_start/#4-running-and-testing-the-environment)
4\. Running and Testing the Environment
---------------------------------------------------------------------------------------------------------------------------
The following startup command will build nhp-server, nhp-ac, web-app, and nhp-agent images during the startup process.
### [](https://docs.opennhp.org/nhp_quick_start/#41-start-all-services)
4.1 Start All Services
**Using quick\_start.sh (Recommended):**
cd ./docker
./quick_start.sh # Select option [7] Start All Services
./quick_start.sh --china # For users in China
**Using docker compose directly:**
cd ./docker
docker compose up -d
For users in China, pass `GOPROXY` and `APT_MIRROR` environment variables for faster builds:
GOPROXY=https://goproxy.cn,direct APT_MIRROR=mirrors.aliyun.com docker compose up -d
### [](https://docs.opennhp.org/nhp_quick_start/#42-scenario-1-invisibility-for-unauthorized-users)
4.2 Scenario 1: Invisibility (for unauthorized users)
Enter the nhp agentd container for verification
cd ./docker
docker exec -it nhp-agent bash
By default, the following error occurs when using curl NHP-AC (under protection)
root@68a230812459:/workdir# curl -i http://177.7.0.10
curl: (28) Failed to connect to 177.7.0.10 port 80: Connection timed out
Port scan verification, enter the NHP Agent container and install nmap
root@ee88ec992447:/# docker exec -it nhp-agent bash
root@ee88ec992447:/# apt-get update && apt-get install -y nmap
Scanning NHP-AC through NHP-Agent cannot detect any ports
root@ee88ec992447:/# nmap 177.7.0.10
Starting Nmap 7.93 ( https://nmap.org ) at 2025-07-03 07:33 UTC
Nmap scan report for nhp-ac.docker_nginx (177.7.0.10)
Host is up (0.000044s latency).
All 1000 scanned ports on nhp-ac.docker_nginx (177.7.0.10) are in ignored states.
Not shown: 1000 filtered tcp ports (no-response)
MAC Address: 12:B4:5C:EB:72:F4 (Unknown)
Nmap done: 1 IP address (1 host up) scanned in 21.84 seconds
### [](https://docs.opennhp.org/nhp_quick_start/#43-scenario-2-using-nhp-agentd-service-to-knock-on-the-door)
4.3 Scenario 2: Using nhp-agentd service to knock on the door
After starting the nhp agentd service with the command `nohup /nhp-agent/nhp-agentd run 2>&1 &`, the access is normal as follows:
root@68a230812459:/workdir# nohup /nhp-agent/nhp-agentd run 2>&1 &
root@6e21724b68f1:/workdir# curl -i http://177.7.0.10
HTTP/1.1 200 OK
Content-Length: 26
Content-Type: application/json; charset=utf-8
Date: Tue, 08 Jul 2025 06:21:10 GMT
{"message":"Hello World!"}
When NHP agent starts, it can scan to port 80 of NHP-AC
root@ee88ec992447:/# nmap 177.7.0.10
Starting Nmap 7.93 ( https://nmap.org ) at 2025-07-03 07:37 UTC
Nmap scan report for nhp-ac.docker_nginx (177.7.0.10)
Host is up (0.000094s latency).
Not shown: 999 filtered tcp ports (no-response)
PORT STATE SERVICE
80/tcp open http
MAC Address: 12:B4:5C:EB:72:F4 (Unknown)
Nmap done: 1 IP address (1 host up) scanned in 4.96 seconds
### [](https://docs.opennhp.org/nhp_quick_start/#44-scenario-3-using-simulated-authorization-service-login-to-verify)
4.4 Scenario 3: Using simulated authorization service login to verify
Stop the nhp-agentd service and start nginx in the NHP-Agent container
root@6e21724b68f1:/workdir# ps -aux|grep nhp-agentd
root 38 0.3 0.2 1974072 20448 pts/0 Sl 02:55 0:00 /nhp-agent/nhp-agentd run
root 51 0.0 0.0 2844 1424 pts/0 S+ 02:55 0:00 grep --color=auto nhp-agentd
root@6e21724b68f1:/workdir# kill 38
root@6e21724b68f1:/workdir# nginx
visit: [http://localhost/plugins/example?resid=demo&action=login](http://localhost/plugins/example?resid=demo&action=login)
* Expected page to display normally
* Visit before knocking on the door: [https://localhost/](https://localhost/)
Timeout (504 Gateway Time out)
* Click login (after knocking on the door), the page will jump to normal and can be accessed normally [https://localhost/](https://localhost/)
(Note: The opening time is 15 seconds, and access is prohibited after 15 seconds)
* In the NHP Agent container, use `curl - i http://177.7.0.10` Can display content normally
* When clicking on login (after knocking on the door), you can scan to port 80 of NHP-AC
root@ee88ec992447:/# nmap 177.7.0.10
Starting Nmap 7.93 ( https://nmap.org ) at 2025-07-03 07:37 UTC
Nmap scan report for nhp-ac.docker_nginx (177.7.0.10)
Host is up (0.000094s latency).
Not shown: 999 filtered tcp ports (no-response)
PORT STATE SERVICE
80/tcp open http
MAC Address: 12:B4:5C:EB:72:F4 (Unknown)
Nmap done: 1 IP address (1 host up) scanned in 4.96 seconds
### [](https://docs.opennhp.org/nhp_quick_start/#45-verify-if-the-ipset-rules-are-effective)
4.5 Verify if the ipset rules are effective
docker exec -it nhp-ac ipset list
After knocking on the door through nhp-agentd or authorized plugins, if the following result appears in NHP-AC’s ipset, it indicates that the rule was successfully written, which means that the knocking was successful: **_Name: defaultset Rules_**
Name: defaultset
Type: hash:ip,port,ip
Revision: 5
Header: family inet hashsize 1024 maxelem 1000000 timeout 120 counters
Size in memory: 656
References: 7
Number of entries: 2
Members:
177.7.0.8,udp:80,177.7.0.10 timeout 8 packets 0 bytes 0
177.7.0.8,tcp:80,177.7.0.10 timeout 8 packets 90 bytes 14565
Name: defaultset_down
Type: hash:ip,port,ip
Revision: 5
Header: family inet hashsize 1024 maxelem 1000000 timeout 121 counters
Size in memory: 208
References: 2
Number of entries: 0
Members:
Name: tempset
Type: hash:net,port
Revision: 7
Header: family inet hashsize 1024 maxelem 1000000 timeout 5 counters
Size in memory: 456
References: 2
Number of entries: 0
Members:
[](https://docs.opennhp.org/nhp_quick_start/#5-edit-the-code-and-rebuild)
5\. Edit the Code and Rebuild
-------------------------------------------------------------------------------------------------------
After modifying the code, you can rebuild individual services or all services for debugging.
### [](https://docs.opennhp.org/nhp_quick_start/#51-code-editing)
5.1 Code editing
You can use your IDE (such as VSCode) to open the project and modify the OpenNHP code.
### [](https://docs.opennhp.org/nhp_quick_start/#52-rebuild-using-quick_startsh-recommended)
5.2 Rebuild Using quick\_start.sh (Recommended)
The `quick_start.sh` script provides the easiest way to rebuild services:
cd ./docker
./quick_start.sh # Interactive menu
./quick_start.sh --china # For users in China
| Option | Service | Description |
| --- | --- | --- |
| 3 | nhp-server | Rebuild and restart NHP-Server |
| 4 | nhp-ac | Rebuild and restart NHP-AC |
| 5 | nhp-agent | Rebuild and restart NHP-Agent |
| 6 | web-app | Rebuild and restart Web-App |
| 1 | ALL | Full rebuild including base image |
### [](https://docs.opennhp.org/nhp_quick_start/#53-manual-rebuild-commands)
5.3 Manual Rebuild Commands
If you prefer manual commands instead of using `quick_start.sh`:
cd ./docker
# Rebuild a specific service (replace SERVICE_NAME with: nhp-server, nhp-ac, nhp-agent, or web-app)
docker compose build --no-cache SERVICE_NAME
docker stop SERVICE_NAME && docker rm SERVICE_NAME
docker compose up -d SERVICE_NAME
# Rebuild all services
docker compose build --no-cache
docker compose down
docker compose up -d
For users in China, add environment variables:
cd ./docker
# Rebuild a specific service
GOPROXY=https://goproxy.cn,direct APT_MIRROR=mirrors.aliyun.com docker compose build --no-cache SERVICE_NAME
docker stop SERVICE_NAME && docker rm SERVICE_NAME
docker compose up -d SERVICE_NAME
# Rebuild all services
GOPROXY=https://goproxy.cn,direct APT_MIRROR=mirrors.aliyun.com docker compose build --no-cache
docker compose down
docker compose up -d
### [](https://docs.opennhp.org/nhp_quick_start/#54-view-logs)
5.4 View Logs
Using quick\_start.sh (options 10-12) or docker compose:
# View nhp-server logs
docker compose logs -f nhp-server
# View nhp-ac logs
docker compose logs -f nhp-ac
# View nhp-agent logs
docker compose logs -f nhp-agent
### [](https://docs.opennhp.org/nhp_quick_start/#55-clean-up)
5.5 Clean Up
Using quick\_start.sh (options 13-14) or manual commands:
# Remove all OpenNHP images
docker rmi opennhp-base:latest opennhp-server:latest opennhp-ac:latest opennhp-agent:latest web-app:latest
# Stop and remove containers, networks, volumes
docker compose down -v
* * *
---
# Comparison | OpenNHP Documentation
[Skip to main content](https://docs.opennhp.org/comparison/#main-content)
Link Menu Expand (external link) Document Search Copy Copied
[](https://docs.opennhp.org/)
[](https://docs.opennhp.org/comparison/#comparison-between-nhp-and-spa)
Comparison between NHP and SPA
======================================================================================================
Note: The following content is extracted from the journal paper “AHAC: Advanced Network-Hiding Access Control Framework” published in Volume 14, Issue 13 of the journal _Applied Sciences_ in 2024. It is worth noting that the AHAC framework is a key component of the NHP (OpenNHP) technology system.
[中文版](https://docs.opennhp.org/zh-cn/comparison/)
* * *
* [Comparison between NHP and SPA](https://docs.opennhp.org/comparison/#comparison-between-nhp-and-spa)
* [Table Of Content:](https://docs.opennhp.org/comparison/#table-of-content)
* [1\. Advantage Comparison](https://docs.opennhp.org/comparison/#1-advantage-comparison)
* [2\. Performance Comparison](https://docs.opennhp.org/comparison/#2-performance-comparison)
* [2.1 Encryption Algorithm Overhead](https://docs.opennhp.org/comparison/#21-encryption-algorithm-overhead)
* [2.2 Performance Overhead](https://docs.opennhp.org/comparison/#22-performance-overhead)
* [3\. High Availability Comparison](https://docs.opennhp.org/comparison/#3-high-availability-comparison)
* [4\. Scalability Comparison](https://docs.opennhp.org/comparison/#4-scalability-comparison)
* [4.1 Integration with DNS](https://docs.opennhp.org/comparison/#41-integration-with-dns)
* [4.2 Integration with FIDO](https://docs.opennhp.org/comparison/#42-integration-with-fido)
* [5\. Compatibility Comparison](https://docs.opennhp.org/comparison/#5-compatibility-comparison)
[](https://docs.opennhp.org/comparison/#1-advantage-comparison)
1\. Advantage Comparison
----------------------------------------------------------------------------------------
NHP combines the Noise protocol, key pairs, and ECDH algorithm to provide a robust bidirectional authentication mechanism. Compared to traditional methods, NHP offers significant advantages in terms of performance, scalability, and security. It supports multiple programming languages (such as C/C++, Python, Java, and Go) and provides a highly scalable architecture that enhances device authentication, defends against replay attacks, and fully addresses IP amplification issues. NHP is particularly well-suited for scenarios requiring strong authentication and encryption, such as enterprise IAM systems and secure resource access. It optimizes performance and enhances high availability, ensuring seamless compatibility and high security in complex environments. In contrast, while SPA has certain strengths, it still cannot match NHP in security, performance, and scalability.
| | SPA | NHP |
| --- | --- | --- |
| Development Language | C, C++ | C/C++, Python, Java, Go |
| Communication | Single-packet authorization | Noise protocol, ECDH |
| Architecture | Complexity, encrypted packets, firewall | Advanced, scalable, Noise protocol |
| Authentication | UDP port knocking, IP amplification issue | Device fingerprint, UDP and TCP port knocking |
| Cryptography Framework | RSA, AES | Noise protocol, ECDH |
| Performance | Moderate overhead, efficient | Optimized, minimal overhead |
| Network Hiding Capability | Only service/application port | Domain name, IP, and port |
| Availability | High load | High availability, scalable clusters |
| Scalability | Complex implementation | FIDO+NHP, highly scalable, easy integration |
| Compatibility | Various systems, potential integration needed | High, cross-platform, future-oriented |
| Security | Strong encryption, key management risk | Address hiding, mutual authentication |
| Use Cases | High-security scenarios | Scalable, high-security environments |
[](https://docs.opennhp.org/comparison/#2-performance-comparison)
2\. Performance Comparison
--------------------------------------------------------------------------------------------
### [](https://docs.opennhp.org/comparison/#21-encryption-algorithm-overhead)
2.1 Encryption Algorithm Overhead
SPA uses the RSA encryption algorithm, while NHP utilizes ECC encryption. We compared the cost-effectiveness of RSA and ECC based on security strength and key length, as shown in the table below. Under the same security standards, the key length of ECC is significantly shorter than that of RSA. Additionally, the ciphertext generated by RSA message signatures is roughly equal to the key length. Therefore, when verifying network message identities, NHP uses shorter ECC random keys (32 bytes or 64 bytes) for ECDH exchange instead of transmitting larger RSA2048 message signatures (256 bytes) for validation. This not only reduces computational overhead but also efficiently saves valuable bandwidth resources. This strategy highlights that NHP has a significant advantage over SPA in terms of improving system efficiency and resource utilization.
| Security Strength (bits) | SPA (Minimum Public Key Length (bits)) | NHP (Minimum Public Key Length (bits)) | NHP vs SPA (Key Length Ratio) | Validity Period |
| --- | --- | --- | --- | --- |
| 80 | 1024 | 160-223 | 1:6 | Until 2010 |
| 112 | 2048 | 224-255 | 1:9 | Until 2010 |
| 128 | 3072 | 256-383 | 1:12 | After 2031 |
| 192 | 7680 | 384-511 | 1:20 | |
| 256 | 15360 | 512+ | 1:30 | |
We measured the encryption and decryption times of RSA and ECC through experiments, with the detailed results shown in the table below. The experiments increased the number of encryption and decryption cycles to test the performance of both algorithms under different conditions. The results show that although the encryption and decryption times for both RSA and ECC increased with the number of cycles, the time overhead for ECC remained consistently much lower than that of RSA. Especially as the number of cycles increased, the advantage of ECC became more pronounced, with RSA’s time overhead reaching up to 800 times that of ECC. This significant gap demonstrates that NHP is vastly superior to SPA in terms of encryption and decryption efficiency, providing strong support for selecting a more efficient encryption algorithm in practical applications.
| Cycle Times | SPA | NHP |
| --- | --- | --- |
| 1 | 0.34s | 687us |
| 10 | 2.48s | 3.60ms |
| 100 | 27.54s | 0.03s |
| 200 | 61.18s | 0.06s |
| 500 | 136.23s | 0.16s |
| 1000 | 287.61s | 0.32s |
| 10000 | 2832.42s | 3.81s |
### [](https://docs.opennhp.org/comparison/#22-performance-overhead)
2.2 Performance Overhead
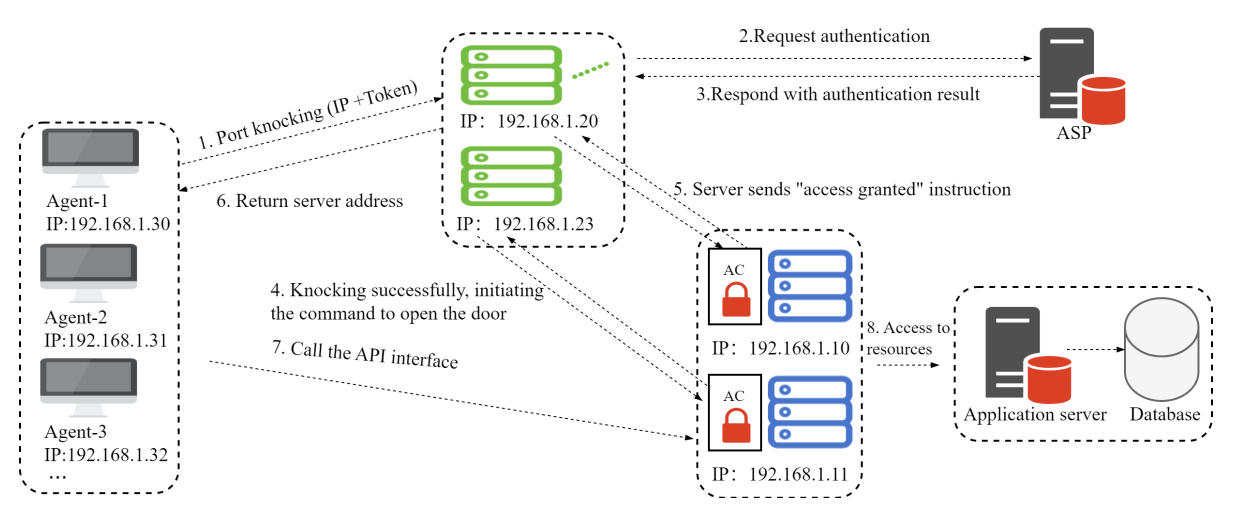
To comprehensively evaluate the performance of NHP, we set up the experimental environment shown in the figure below and conducted load performance tests for both NHP and SPA. The environment consists of two main areas: the Agent deployment area and the network stealth deployment area.
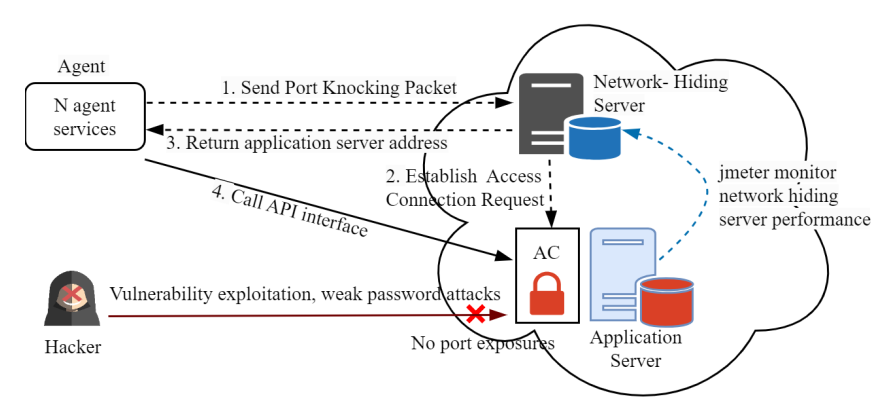
In the network stealth deployment area, we integrated a network stealth server and an application server as key components. To ensure the stability and consistency of the test environment, we selected three machines with identical configurations, each equipped with a 4-core CPU and 8GB of memory. In the agent deployment area, we launched `n` agent services that communicated with the network stealth server at a frequency of sending a port knocking request per second. At the same time, JMeter components were deployed on the network stealth server to simulate and monitor its performance. On the application server side, JMeter services were also deployed to track the performance resource consumption of the network stealth server in real time. With this setup, we were able to comprehensively monitor and compare the performance of NHP and SPA.
While maintaining the consistency of the experimental environment, we selected 1, 10, 20, 30, 40, and 50 agents according to the deployment plan and conducted performance tests for NHP and SPA. The test results are shown in Table 4, where the horizontal axis represents the number of agents involved in the experiment, and the vertical axis displays the variation in CPU utilization during the test period. With this setup, we can visually observe the different performance of NHP and SPA in terms of CPU resource consumption as the number of agents increases.
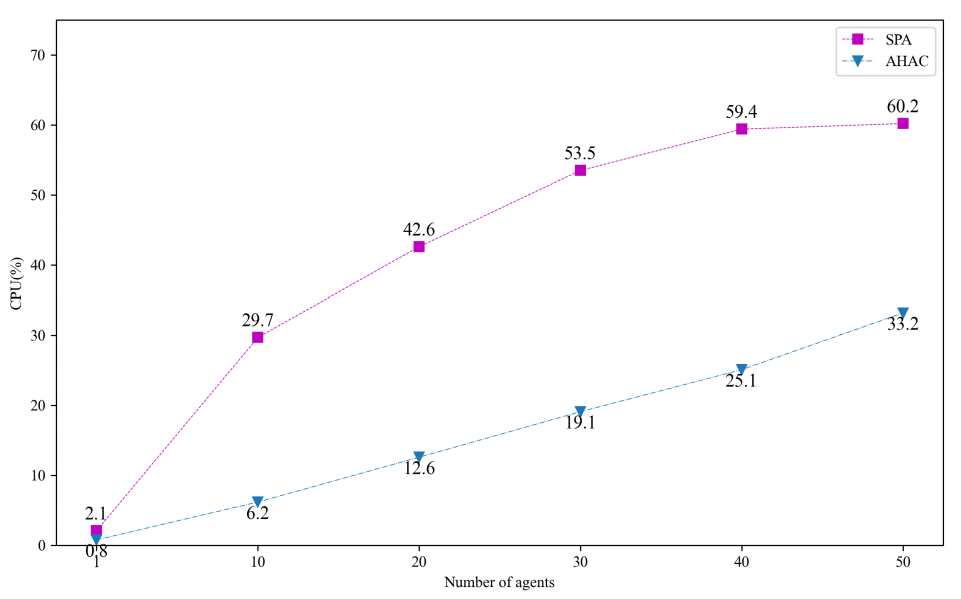
The experimental results show that as the number of agents increases, the CPU load for both NHP and SPA rises. However, with further increases in the number of agents, the performance advantage of NHP becomes more pronounced, with its CPU load remaining approximately half that of SPA, demonstrating a significant improvement in efficiency.
_(Note: Although theoretically NHP performance should be approximately 1000 times better than SPA, actual tests showed only about a 1-fold improvement. The primary factors contributing to this discrepancy include the significant impact of network overhead on performance, performance losses due to the garbage collection mechanism, and differences in hardware environments. Additionally, despite choosing the memory-safe Go language for code security and encryption algorithm implementation, its garbage collection mechanism also had a certain impact on performance.)_
[](https://docs.opennhp.org/comparison/#3-high-availability-comparison)
3\. High Availability Comparison
--------------------------------------------------------------------------------------------------------
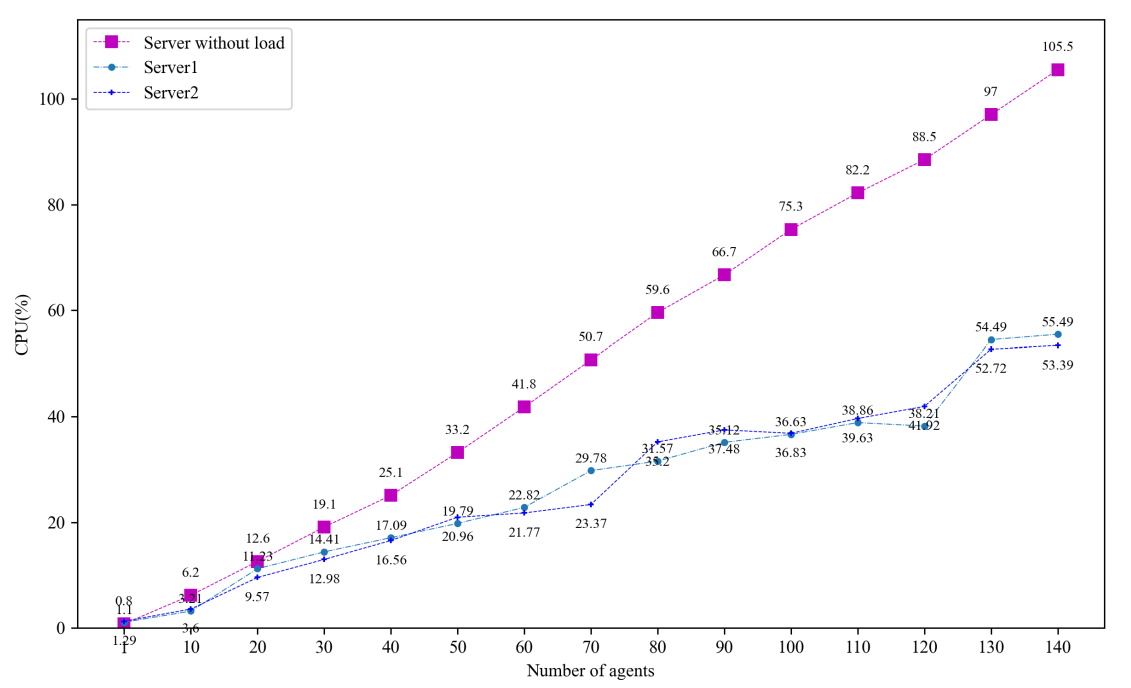
NHP achieves high availability for zero trust services through a distributed architecture, ensuring that the port knocking module and the access control module are deployed on different hosts to avoid resource contention and enhance elastic scaling. Even in the event of a failure, seamless service switching can maintain system functionality and response speed. This design enhances the robustness and stability of the system, reducing the impact of service failures on the overall system, as shown in the figure below.
NHP supports horizontal elastic scaling for port knocking verification services, allowing the number of service instances to be dynamically adjusted based on real-time load. This feature provides high flexibility and scalability, ensuring that services remain responsive and stable even under high load. Each service instance can handle port knocking requests and maintain business sessions, which not only enhances processing capacity but also improves fault tolerance, ensuring business continuity and stability. According to the test results, NHP significantly outperforms SPA in terms of high availability.
[](https://docs.opennhp.org/comparison/#4-scalability-comparison)
4\. Scalability Comparison
--------------------------------------------------------------------------------------------
Although NHP is designed to provide a trusted, controllable, reliable, and verifiable foundation for data communication, it also needs to have good scalability to adapt to various customization needs due to the diversity and complexity of communication scenarios and environments. The scalability of NHP is reflected in several aspects:
* Its bidirectional communication mechanism, compared to SPA’s unidirectional port knocking mechanism, offers richer expansion capabilities. It can hide the true IP addresses of resources and support key exchanges before and after data communication, enhancing the security of privacy computing and data flow scenarios.
* Through the Authorization Service Provider (ASP) interface, NHP can pass resource request contents to the ASP, enabling stricter identity authentication and access control.
* NHP’s resource identifiers support arbitrary string formats, including Chinese and English characters and symbols, providing stronger descriptive capabilities for data resources. It also has DNS resolution functionality, offering more secure, encrypted, and private domain name resolution services.
Therefore, NHP’s scalable architecture covers typical application scenarios such as integration with DNS and FIDO.
### [](https://docs.opennhp.org/comparison/#41-integration-with-dns)
4.1 Integration with DNS
DNS is a crucial foundational service for internet operations, but its security has long been overlooked. Due to the use of the unreliable UDP protocol, there are numerous security vulnerabilities, such as DNS hijacking and denial-of-service attacks. Therefore, strengthening DNS security is essential. By integrating network stealth technology, DNS resolution is conducted through a bidirectional encrypted channel, ensuring confidentiality and tamper-resistance. Additionally, only authenticated users are allowed to perform resolution, effectively defending against DDoS attacks and hijacking. The specific implementation is shown in the figure below, and our approach significantly enhances DNS security, providing users with a more reliable DNS service.
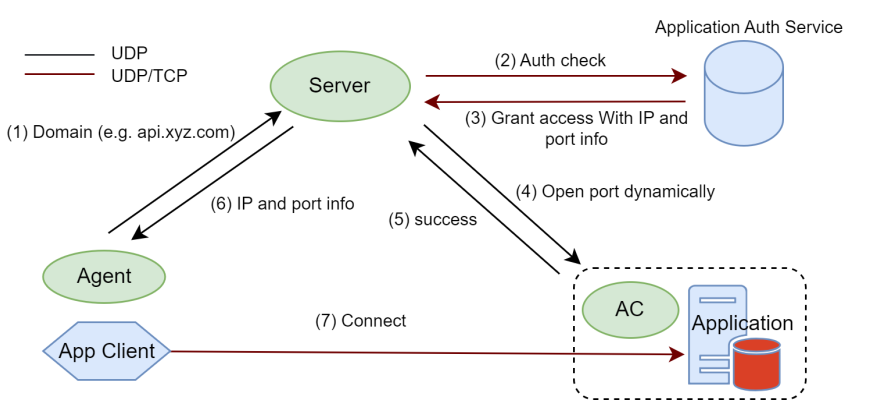
* (1) The Agent (such as a client, browser, etc.) initiates a request to the Network-Hiding Server (i.e., Server) using a domain name.
* (2) Once the Server receives the domain name data packet request from the Agent, it immediately sends an authentication query request to the application authentication server to verify the legality and permissions of the request.
* (3) Upon receiving the authentication request message from the Server, the authentication server undergoes a strict verification process. Once the identity is confirmed to be authentic and valid, it grants access permissions. Subsequently, the authentication server promptly replies to the Server with an authorized access credential containing critical information such as the real IP address and port number of the target resource.
* (4) After successfully passing the authentication query, the Server quickly initiates an access request to the access control system of the target resource. This request aims to ensure that the Agent can access the required target resource seamlessly, facilitating subsequent operations.
* (5) Upon receiving the access request from the Server, the access control system immediately performs a rigorous verification procedure. This process ensures that the requested target resource matches the protected resource exactly, thereby ensuring the security and reliability of the system. Once verified, the AC system swiftly establishes a connection channel from the Agent to the protected resource, allowing unobstructed access.
* (6) Once the AC system successfully grants access to the Agent, the Server promptly confirms this operation and returns the IP address and port information of the target resource. These details are then quickly transmitted to the Agent, enabling it to accurately locate and access the protected resource (i.e., Application).
* (7) After receiving the IP address and port information of the Application, the Agent immediately initiates normal business access to the Application, achieving efficient and secure resource interaction.
### [](https://docs.opennhp.org/comparison/#42-integration-with-fido)
4.2 Integration with FIDO
Although FIDO performs exceptionally well in web authentication, potential vulnerabilities in servers can still be exploited by hackers to bypass FIDO authentication and directly invade servers for data theft or damage. Integrating FIDO with NHP can effectively address the shortcomings of FIDO in vulnerability protection, providing a more comprehensive defense solution for internet exposure. The specific implementation is shown in the figure below, with detailed implementation steps as follows.
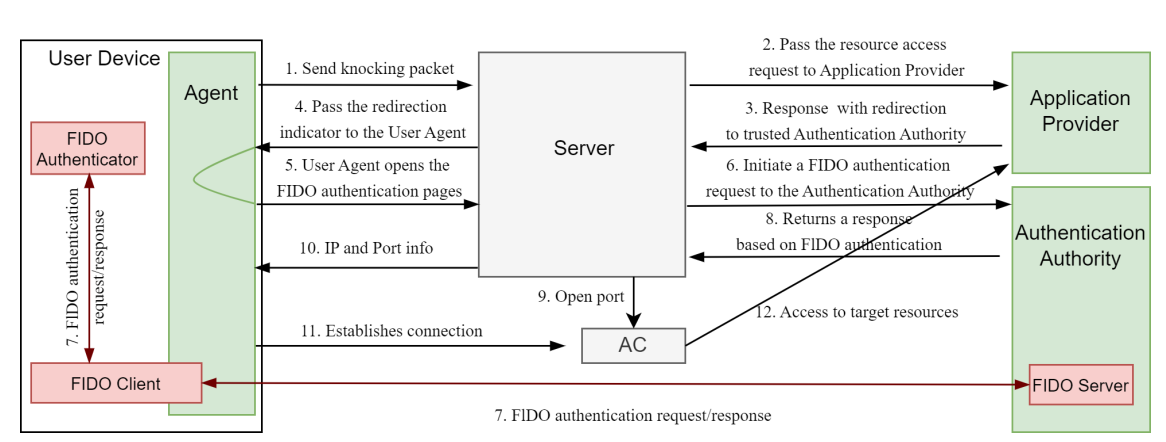
* (1) The User Agent (i.e., Agent) sends a Port Knocking packet to the Network-Hiding Server (i.e., Server) aiming to attempt access to sensitive resources within sessions that have been authenticated but with relatively lower assurance levels.
* (2) Upon receiving the Port Knocking packet, the Server forwards the resource access request to the Application Provider.
* (3) The Application Provider responds and sends a reply message to the Server while redirecting the Port Knocking message to a trusted authentication authority to request a higher assurance FIDO-based authentication.
* (4) After receiving the Application Provider’s response, the Server passes the redirection indicator to the Agent.
* (5) Upon receiving the redirection message, the Agent directly opens the FIDO authentication page.
* (6) The Server, upon receiving the Agent’s FIDO authentication page, promptly initiates a FIDO authentication request to the authentication authority.
* (7) The FIDO server completes the FIDO request and responds after receiving the request message.
* (8) The authentication authority, after a rigorous FIDO verification process, returns a FIDO-based authentication response to the Server.
* (9) Once the FIDO identity is confirmed to be authentic and valid, and the authentication is successful, the Server requests the Access Control (i.e., AC) system to open the Application Provider’s port to accept the Agent’s connection.
* (10) The Server notifies the Agent of the successful authentication and provides the IP/port for resource access.
* (11) The AC system successfully grants access permission to the Agent.
* (12) The Agent establishes a connection with the Application Provider to access the resources.
[](https://docs.opennhp.org/comparison/#5-compatibility-comparison)
5\. Compatibility Comparison
------------------------------------------------------------------------------------------------
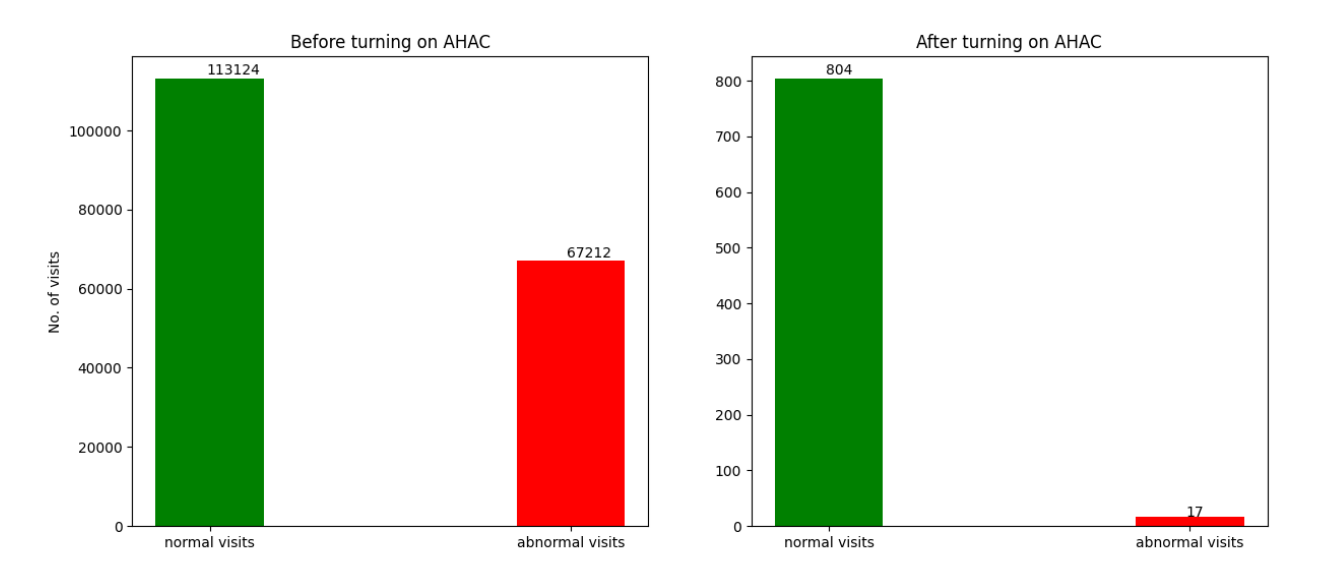
Compared to the SPA protocol, a key goal of NHP is to ensure good compatibility with both the domestic zero trust standards and the innovation-driven environment. In terms of encryption algorithms, NHP supports international cryptographic algorithms (such as RSA, SHA256, AES) as well as national cryptographic algorithms (such as SM2, SM3, SM4), and can adjust encryption time based on the length of the packet header. Regarding hardware and software compatibility, NHP is adapted to major domestic and international CPU hardware and operating systems, including Kunpeng, x86, Loongson, and Shenwei. Additionally, NHP complies with the forthcoming national standard “Information Security Technology - Zero Trust Reference Architecture,” ensuring compatibility with this standard, as shown in the figure below.
* * *
* * *
---
# Cryptography | OpenNHP Documentation
[Skip to main content](https://docs.opennhp.org/cryptography/#main-content)
Link Menu Expand (external link) Document Search Copy Copied
[](https://docs.opennhp.org/)
[](https://docs.opennhp.org/cryptography/#cryptographic-algorithms-in-opennhp)
Cryptographic Algorithms in OpenNHP
==================================================================================================================
Cryptography is at the heart of OpenNHP, providing robust security, excellent performance, and scalability by utilizing cutting-edge cryptographic algorithms.
[中文版](https://docs.opennhp.org/zh-cn/cryptography/)
* * *
This article explains how OpenNHP takes advantages of modern cryptographic algorithms in several critical areas:
1. [Public Key Cryptography](https://docs.opennhp.org/cryptography/#1-public-key-cryptography)
2. [Key Exchange, Data Encryption and Identity Verification](https://docs.opennhp.org/cryptography/#2-key-exchange-data-encryption-and-identity-verification)
3. [Key Distribution and Management](https://docs.opennhp.org/cryptography/#3-key-distribution-and-management)
[](https://docs.opennhp.org/cryptography/#1-public-key-cryptography)
1) Public Key Cryptography
-----------------------------------------------------------------------------------------------
### [](https://docs.opennhp.org/cryptography/#11-introduction)
1.1 Introduction
In the evolving landscape of cybersecurity, securing communications and protecting network resources are essential, especially with the increasing sophistication of cyber threats. The Network Infrastructure Hiding Protocol (NHP), a zero-trust security mechanism, stands at the forefront of efforts to address these concerns by concealing network infrastructure details from attackers and ensuring that only trusted entities can interact with network resources. A key component of NHP’s security model is the use of Elliptic Curve Cryptography (ECC) for public key cryptography. In this article, we explore how ECC integrates into the NHP Zero Trust protocol to provide robust and efficient security.
### [](https://docs.opennhp.org/cryptography/#12-what-is-elliptic-curve-cryptography)
1.2 What is Elliptic Curve Cryptography?
Elliptic Curve Cryptography (ECC) is a modern approach to public key cryptography that provides equivalent levels of security with significantly smaller key sizes compared to traditional methods such as RSA. ECC relies on the mathematical properties of elliptic curves over finite fields, providing a powerful balance of security and performance. Due to its reduced computational overhead, ECC is particularly suitable for resource-constrained environments such as embedded systems or mobile devices.
The advantages of ECC include:
* **Smaller Key Sizes**: ECC achieves a high level of security with smaller keys, which translates to faster operations, less bandwidth usage, and reduced computational requirements.
* **Enhanced Security**: The underlying problem of elliptic curve discrete logarithms is computationally complex, making ECC resistant to common forms of cryptographic attack.
* **Efficiency**: With less processing power needed compared to traditional methods, ECC can handle encryption and decryption more efficiently, which is crucial for zero trust environments requiring frequent cryptographic operations.
### [](https://docs.opennhp.org/cryptography/#13-how-nhp-uses-ecc-for-secure-communication)
1.3 How NHP Uses ECC for Secure Communication
NHP uses ECC in key exchange, data encryption, identity verification with the Noise protocol framework, and key distribution and management with Certificateless Public Key Cryptography (CL-PKC).
#### [](https://docs.opennhp.org/cryptography/#1-key-exchange-mechanism)
1\. **Key Exchange Mechanism**
The secure exchange of encryption keys between communicating entities is the backbone of any secure communication protocol. NHP uses Elliptic Curve Diffie-Hellman (ECDH) for its key exchange mechanism. In the ECDH key exchange, both communicating parties generate a public-private key pair using elliptic curves. The public keys are then exchanged, allowing both parties to compute a shared secret without ever having to transmit it directly over the network.
The benefit of using ECDH in NHP is twofold: first, it provides forward secrecy, meaning that even if the private key of one party is compromised in the future, previously established session keys remain secure. Secondly, because of ECC’s efficiency, the key exchange process is computationally lightweight, ensuring that key establishment is performed quickly without a large computational footprint.
#### [](https://docs.opennhp.org/cryptography/#2-authentication-with-digital-signatures)
2\. **Authentication with Digital Signatures**
In a zero-trust environment, authentication is paramount. NHP utilizes Elliptic Curve Digital Signature Algorithm (ECDSA) to verify the authenticity of entities attempting to access network resources. ECDSA, an ECC-based digital signature scheme, allows devices to prove their identity without revealing sensitive private keys.
In the NHP protocol, when an entity wants to communicate with the network, it must provide a digital signature generated with its private key. The receiving entity can then use the corresponding public key to verify the validity of the signature. This ensures that only legitimate entities can participate in the network, effectively implementing the zero-trust model’s “never trust, always verify” principle.
#### [](https://docs.opennhp.org/cryptography/#3-encryption-for-data-confidentiality)
3\. **Encryption for Data Confidentiality**
NHP employs symmetric encryption for data confidentiality during communication, but symmetric keys must be securely distributed and shared between entities. ECC plays a role in the secure distribution of these symmetric keys through ECDH, providing an encrypted communication channel where symmetric keys are exchanged securely.
Once these keys are exchanged, NHP switches to symmetric encryption for data transfer, benefiting from the speed and efficiency of symmetric encryption algorithms. ECC ensures that the symmetric key exchange is both secure and resource-efficient.
#### [](https://docs.opennhp.org/cryptography/#4-key-distribution-and-management-with-certificateless-public-key-cryptography-cl-pkc)
4\. **Key Distribution and Management with Certificateless Public Key Cryptography (CL-PKC)**
NHP also leverages ECC for key distribution and management using Certificateless Public Key Cryptography (CL-PKC). In traditional public key infrastructure, certificates are used to validate public keys, which introduces complexity in terms of certificate management. CL-PKC eliminates the need for certificates by allowing entities to generate partial private keys in collaboration with a trusted authority, while also generating their own key pairs independently.
This approach simplifies key management and ensures that public keys can be used securely without the overhead of certificate issuance and validation. By using ECC in CL-PKC, NHP provides a lightweight and secure means of key distribution, further enhancing the zero-trust model by removing dependencies on centralized certificate authorities.
### [](https://docs.opennhp.org/cryptography/#the-advantages-of-using-ecc-in-nhp)
The Advantages of Using ECC in NHP
The use of ECC within the NHP zero-trust protocol offers numerous advantages that make it well-suited to its security objectives:
1. **Scalable Security**: ECC’s smaller key sizes provide strong security, which scales well with the increasing computational power of adversaries. With NHP’s goal of providing a zero-trust environment for diverse network deployments, ECC’s scalability is a critical asset.
2. **Resource Efficiency**: ECC reduces the computational burden on network devices compared to traditional public key cryptography. In environments where network resources may be constrained—such as edge devices or IoT components—this efficiency is essential for maintaining high performance without sacrificing security.
3. **Improved Performance**: The combination of ECDH for key exchange, ECDSA for authentication, and efficient symmetric encryption provides a balanced solution for secure communications. This balanced approach allows NHP to achieve the goals of zero trust while keeping latency low, which is crucial in time-sensitive network applications.
### [](https://docs.opennhp.org/cryptography/#conclusion)
Conclusion
The integration of Elliptic Curve Cryptography into the NHP Zero Trust Protocol provides a powerful means of securing network communications with minimal performance impact. By leveraging ECDH for secure key exchanges, ECDSA for robust authentication, and efficient symmetric encryption for data transfer, ECC supports the zero-trust model’s goals of concealing network infrastructure, ensuring only trusted entities can access resources, and maintaining security with low overhead.
As cyber threats become more sophisticated, leveraging advanced cryptographic techniques like ECC in protocols like NHP is vital to staying ahead of attackers. The synergy between ECC and NHP not only helps protect critical network infrastructure but also ensures that security measures are both robust and efficient—a key combination for the success of any modern cybersecurity initiative.
[](https://docs.opennhp.org/cryptography/#2-key-exchange-data-encryption-and-identity-verification)
2) Key Exchange, Data Encryption and Identity Verification
--------------------------------------------------------------------------------------------------------------------------------------------------------------
### [](https://docs.opennhp.org/cryptography/#21-introduction)
2.1 Introduction
The Network Infrastructure Hiding Protocol (NHP) is built around a zero-trust security model, ensuring secure communications even in the presence of potential attackers. To achieve this, NHP integrates the Noise Protocol Framework, a cryptographic framework designed for secure and flexible key exchange, data encryption, and identity verification. This combination provides robust security with minimal computational overhead.
### [](https://docs.opennhp.org/cryptography/#22-key-exchange-with-noise-protocol)
2.2 Key Exchange with Noise Protocol
NHP utilizes the Noise Protocol’s key exchange mechanism to ensure secure, authenticated communication channels between parties. The key exchange begins with a handshake phase where both communicating entities exchange Diffie-Hellman (DH) public keys. In Noise, each party generates an ephemeral key pair, and the exchanged keys are used to derive a shared secret, which is then used to encrypt the following communication.
Noise allows NHP to support both long-term static keys and ephemeral keys for enhanced security. The flexibility of the Noise framework’s handshake patterns enables NHP to customize how the handshake occurs based on the specific use case, providing options for mutual authentication, anonymous initiators, or encryption of the initial handshake itself. By leveraging Noise’s simple yet powerful token-based handshake system, NHP can precisely control the sequence of key exchange messages while keeping identity information confidential.
### [](https://docs.opennhp.org/cryptography/#23-data-encryption)
2.3 Data Encryption
Once the shared key is derived during the handshake, the Noise framework uses symmetric encryption to secure data. NHP takes advantage of the Noise CipherState and SymmetricState objects, which are core components of Noise’s state machine, to manage encryption and decryption keys for the communication session.
In particular, the shared key is used to initialize a symmetric encryption key (k) along with a nonce (n) for encrypting data. Noise supports advanced encryption schemes like ChaCha20-Poly1305 or AESGCM, providing authenticated encryption with associated data (AEAD) to maintain data confidentiality and integrity. The chaining key (ck) and the handshake hash (h) are used to continuously derive fresh keys during the session, enhancing the forward secrecy and ensuring that a compromise of one key does not jeopardize other parts of the communication.
NHP benefits from these cryptographic properties by providing encrypted tunnels for network data, ensuring that any intercepted data cannot be decrypted without knowledge of the derived keys, which are securely exchanged during the handshake.
### [](https://docs.opennhp.org/cryptography/#24-identity-verification)
2.4 Identity Verification
Noise provides mechanisms for identity verification by combining the exchange of static keys with Diffie-Hellman operations. In NHP, identity verification occurs during the handshake, where static keys are encrypted and verified through shared DH operations, effectively binding the public keys of both parties to the derived session key.
During the handshake, Noise uses tokens such as “s” (static) and “e” (ephemeral) to indicate which keys are being exchanged and verified. This token-based approach allows NHP to selectively authenticate one or both parties depending on the specific use case. For example, the “XX” pattern in Noise provides mutual authentication, while the “NK” pattern allows for a one-sided authenticated handshake, giving NHP flexibility in how strictly identity verification is enforced.
To further protect identity information, Noise can encrypt static keys during the handshake. NHP leverages this feature to prevent an eavesdropper from discovering the identities of the participants, thus supporting the zero-trust model by ensuring that the identity of any participant is revealed only to the intended counterpart and not to third parties.
### [](https://docs.opennhp.org/cryptography/#25-algorithms-and-formulas)
2.5 Algorithms and Formulas
The cryptographic strength of NHP’s integration with the Noise Protocol Framework is built on the use of well-defined algorithms and mathematical formulas. Here, we provide an overview of the key algorithms and their corresponding formulas that are used in NHP for key exchange, encryption, and identity verification.
#### [](https://docs.opennhp.org/cryptography/#251-diffie-hellman-key-exchange)
2.5.1 Diffie-Hellman Key Exchange
The Diffie-Hellman (DH) key exchange is used to derive a shared secret between two parties, ( A ) and ( B ). Each party generates a private key (( a ) for ( A ), ( b ) for ( B )) and computes a public key by exponentiating a common generator ( g ) to their private key in a finite cyclic group of prime order ( p ):
* ( A ) computes its public key: ( A\_{pub} = g^a \\mod p )
* ( B ) computes its public key: ( B\_{pub} = g^b \\mod p )
The shared secret ( s ) is then computed by both parties using the other party’s public key:
* ( A ) computes: ( s = B\_{pub}^a \\mod p )
* ( B ) computes: ( s = A\_{pub}^b \\mod p )
The resulting shared secret ( s ) is identical for both parties and is used to derive encryption keys.
#### [](https://docs.opennhp.org/cryptography/#252-symmetric-encryption)
2.5.2 Symmetric Encryption
NHP uses symmetric encryption for data confidentiality. The key ( k ) and nonce ( n ) are used in the encryption function. For authenticated encryption with associated data (AEAD), the ChaCha20-Poly1305 algorithm is commonly used, which combines a stream cipher (ChaCha20) for encryption and a MAC (Poly1305) for authentication.
* Encryption: ( c = ext{ChaCha20}(k, n, ext{plaintext}) )
* | | | |
| --- | --- | --- |
| Authentication: ( ext{tag} = ext{Poly1305}(k, ext{associated data} | | c) ) |
The ciphertext ( c ) and the tag are transmitted together, ensuring both confidentiality and integrity.
#### [](https://docs.opennhp.org/cryptography/#253-key-derivation-and-hashing)
2.5.3 Key Derivation and Hashing
Noise uses a key derivation function (KDF) based on HMAC (Hash-based Message Authentication Code) to derive keys. The HKDF (HMAC-based Key Derivation Function) is used to produce multiple keys from the shared secret ( s ).
* HKDF steps:
* ( ext{temp\_key} = ext{HMAC}( ext{chaining\_key}, ext{input\_key\_material}) )
* ( ext{output1} = ext{HMAC}( ext{temp\_key}, 0x01) )
* | | | |
| --- | --- | --- |
| ( ext{output2} = ext{HMAC}( ext{temp\_key}, ext{output1} | | 0x02) ) |
The derived keys are used for encryption and maintaining the chaining key (( ck )) that evolves with each message, ensuring forward secrecy.
#### [](https://docs.opennhp.org/cryptography/#254-identity-verification)
2.5.4 Identity Verification
Identity verification in NHP involves using static and ephemeral keys to authenticate parties. The Diffie-Hellman operations between static (( s )) and ephemeral (( e )) keys produce unique shared values that verify the identity of the participants.
* For identity verification, a combination of DH operations is performed:
* ( ext{ss} = DH(s\_A, s\_B) )
* ( ext{es} = DH(e\_A, s\_B) ) or ( DH(s\_A, e\_B) )
* ( ext{ee} = DH(e\_A, e\_B) )
These values are hashed together to derive the final session key, effectively binding the identities to the key exchange process and ensuring that only the intended parties can derive the correct session key.
### [](https://docs.opennhp.org/cryptography/#26-summary)
2.6 Summary
NHP’s implementation of the Noise Protocol Framework strengthens its zero-trust architecture by leveraging robust and well-tested cryptographic mechanisms for key exchange, data encryption, and identity verification. The modular nature of Noise allows NHP to adapt the handshake and encryption process based on the threat model, providing a high level of security against active and passive attacks. By incorporating Noise, NHP can maintain secure and authenticated communication channels while hiding the network infrastructure from attackers, achieving its goal of protecting network resources in hostile environments.
[](https://docs.opennhp.org/cryptography/#3-key-distribution-and-management)
3) Key Distribution and Management
---------------------------------------------------------------------------------------------------------------
### [](https://docs.opennhp.org/cryptography/#31-introduction)
3.1 Introduction
Certificateless Public Key Cryptography, originally introduced by Al-Riyami and Paterson in 2003, provides a hybrid solution that eliminates the need for a conventional Certificate Authority (CA) while ensuring strong cryptographic assurances. This article explores how NHP utilizes CL-PKC for efficient and secure key management without relying on certificates, which are typically seen as a vulnerability in many cryptographic systems.
In traditional Public Key Infrastructure (PKI), certificate authorities (CAs) serve as trusted third parties that issue and manage public key certificates to verify the authenticity of users’ keys. While effective, this model introduces complexities and risks, such as dependency on the CA and exposure to attacks targeting these central entities. Certificateless Public Key Cryptography aims to mitigate these issues by eliminating the use of certificates while still ensuring the authenticity of public keys.
In a CL-PKC system, a trusted third party called the Key Generation Center (KGC) is responsible for generating partial private keys for users. However, unlike a CA, the KGC does not have access to the complete private keys, which makes it impossible for the KGC to impersonate users. Each user combines the partial key from the KGC with their own secret value to generate their full private key and public key. This approach reduces the trust placed on any single entity and provides an extra layer of security.
### [](https://docs.opennhp.org/cryptography/#32-advantages-of-using-cl-pkc-in-nhp)
3.2 Advantages of Using CL-PKC in NHP
1. **Reduced Trust Requirements**: Unlike PKI, where trust in the CA is critical, CL-PKC reduces this trust requirement. The KGC cannot generate complete private keys on its own, meaning it cannot impersonate users or decrypt their communications.
2. **Simplified Key Distribution**: There is no need for users to request or renew certificates, which eliminates many administrative burdens associated with traditional PKI.
3. **Resistance to Key Compromise**: Since the user’s full private key is generated in part by the user, compromising the KGC does not allow an adversary to fully recover user keys. This mitigates the impact of a successful attack on the key distribution infrastructure.
4. **Scalability**: The certificateless nature of the system removes the need for managing large certificate databases, which simplifies scalability. This is particularly useful for IoT and other large-scale deployments where the overhead of certificate management would be prohibitive.
### [](https://docs.opennhp.org/cryptography/#33-key-management-in-nhp-using-certificateless-cryptography)
3.3 Key Management in NHP Using Certificateless Cryptography
The NHP Zero Trust protocol integrates CL-PKC to manage the distribution and verification of keys for its secure communication framework. Below, we explain how the various mechanisms of CL-PKC contribute to the key management process in NHP.
#### [](https://docs.opennhp.org/cryptography/#331-key-generation-and-distribution)
3.3.1 Key Generation and Distribution
In NHP, the Key Generation Center (KGC) is responsible for creating system-wide parameters, including the master public-private key pair. The master private key is kept confidential by the KGC, while the master public key is distributed to all participants. When a new user wants to join the network, the KGC performs the following steps:
1. **Partial Key Generation**: The KGC generates a partial private key for the user using their unique identifier (e.g., an email or other identity information). This ensures that each user’s partial key is bound to their identity, providing identity-based security.
2. **User-Specific Key Pair Generation**: The user then selects their own secret value and combines it with the partial private key from the KGC to generate their full private key. The public key is computed from the combined secret, which means that while the KGC contributes to the key generation, it does not possess the complete private key.
This key distribution method ensures that the KGC cannot unilaterally determine a user’s private key, mitigating the risks associated with compromised key generation authorities. Additionally, the lack of a need for traditional certificates means that users do not need to rely on external certificate authorities to validate keys, reducing the attack surface for man-in-the-middle (MITM) attacks.
#### [](https://docs.opennhp.org/cryptography/#332-public-key-verification-without-certificates)
3.3.2 Public Key Verification Without Certificates
In certificateless systems like the one implemented in NHP, the authenticity of public keys is verified through implicit methods, rather than relying on certificates signed by a CA. Specifically, the user’s public key is computed using the system parameters, the user’s identifier, and the KGC’s master public key. This computation is deterministic and allows any party to verify the authenticity of a public key without needing to trust a CA or store a large database of certificates.
By removing the need for traditional certificates, NHP is able to streamline the key verification process, eliminating the need for certificate revocation lists (CRLs) and other PKI complexities. This approach not only reduces the communication overhead but also enhances the security by removing dependencies on a trusted third party that could be targeted by attackers.
### [](https://docs.opennhp.org/cryptography/#34-algorithms-in-cl-pkc-for-nhp)
3.4 Algorithms in CL-PKC for NHP
To provide a clearer understanding of how the NHP protocol leverages Certificateless Public Key Cryptography, we describe the key algorithms involved along with their respective formulas.
#### [](https://docs.opennhp.org/cryptography/#341-system-parameter-generation)
3.4.1 System Parameter Generation
The Key Generation Center (KGC) is responsible for generating the system parameters that will be used across the network. These parameters include an elliptic curve ( E ) defined over a finite field ( \\mathbb{F}_q ), a base point ( G ) of prime order ( n ), and the master secret key ( ms ). The KGC computes the master public key ( P_{pub} ) as:
\[ P\_{pub} = \[ms\]G \]
where ( \[ms\]G ) denotes scalar multiplication of the base point ( G ) by the master secret ( ms ).
#### [](https://docs.opennhp.org/cryptography/#342-partial-private-key-generation)
3.4.2 Partial Private Key Generation
For each user with a unique identifier ( ID\_A ), the KGC generates a partial private key. First, the KGC computes a hash value ( H\_A ) based on the user’s identifier and system parameters:
\[ H\_A = H(ENTL\_A \\parallel ID\_A \\parallel a \\parallel b \\parallel x\_G \\parallel y\_G \\parallel x\_{P\_{pub}} \\parallel y\_{P\_{pub}}) \]
where ( ENTL\_A ) is a length value derived from the identifier, and ( (x\_G, y\_G) ) and ( (x\_{P\_{pub}}, y\_{P\_{pub}}) ) are the coordinates of points ( G ) and ( P\_{pub} ), respectively.
The KGC then selects a random value ( w \\in \[1, n-1\] ) and computes:
\[ W\_A = \[w\]G + U\_A \]
where ( U\_A = \[d’\_A\]G ) is a point generated by the user with their own secret value ( d’\_A ).
The partial private key ( t\_A ) is computed as:
\[ t\_A = (w + l \\cdot ms) \\mod n \]
where ( l ) is a hash value computed from the point ( W\_A ) and the hash ( H\_A ).
#### [](https://docs.opennhp.org/cryptography/#343-user-full-private-key-generation)
3.4.3 User Full Private Key Generation
The user generates their full private key ( d\_A ) by combining the partial private key ( t\_A ) with their secret value ( d’\_A ):
\[ d\_A = (t\_A + d’\_A) \\mod n \]
This ensures that only the user knows their complete private key.
#### [](https://docs.opennhp.org/cryptography/#344-public-key-computation)
3.4.4 Public Key Computation
The user’s public key ( P\_A ) is computed as:
\[ P\_A = W\_A + \[l\]P\_{pub} \]
This public key can be verified by anyone using the system parameters, the user’s identifier, and the KGC’s public key.
#### [](https://docs.opennhp.org/cryptography/#345-signature-generation-and-verification)
3.4.5 Signature Generation and Verification
To generate a digital signature on a message ( M ), the user computes a hash ( e ) as follows:
\[ e = H(H\_A \\parallel x\_{W\_A} \\parallel y\_{W\_A} \\parallel M) \]
The signature ( (r, s) ) is generated using the user’s private key ( d\_A ) and a random value ( k ):
\[ \[r\]G = (x\_1, y\_1) \] \[ r = x\_1 \\mod n \] \[ s = (k^{-1}(e + d\_A \\cdot r)) \\mod n \]
To verify the signature, the verifier computes ( P\_A ) and then checks whether:
\[ \[r\]G = \[s\]G + \[e + r\]P\_A \]
If the equality holds, the signature is valid.
### [](https://docs.opennhp.org/cryptography/#35-conclusion)
3.5 Conclusion
NHP’s implementation of Certificateless Public Key Cryptography provides a powerful and efficient approach to key management in Zero Trust environments. By leveraging CL-PKC, NHP is able to mitigate the risks associated with traditional PKI, reduce the reliance on centralized trusted authorities, and simplify the key distribution process. The result is a more secure and scalable system that is well-suited for protecting critical network infrastructure in the face of evolving cyber threats.
The combination of certificateless cryptography and the Zero Trust principles of NHP makes it an attractive solution for securing network resources while minimizing the risks introduced by centralized authorities.
* * *
---
# How to Deploy | OpenNHP Documentation
[Skip to main content](https://docs.opennhp.org/deploy/#main-content)
Link Menu Expand (external link) Document Search Copy Copied
[](https://docs.opennhp.org/)
[](https://docs.opennhp.org/deploy/#deploy-opennhp-binaries)
Deploy OpenNHP Binaries
====================================================================================
OpenNHP is cross-platform software that is easy to deploy.
[中文版](https://docs.opennhp.org/zh-cn/deploy/)
* * *
[](https://docs.opennhp.org/deploy/#1-opennhp-component-overview)
1\. OpenNHP Component Overview
------------------------------------------------------------------------------------------------
After following the build steps from the previous chapter, the build output is placed in the _release_ directory. This directory contains three subdirectories for the three core OpenNHP components: _nhp-agent_, _nhp-server_, and _nhp-ac_.
* **nhp-agent (Agent):** The module that initiates knock requests. Knock requests carry the identity and device information of the data accessor. Typically installed on end-user devices.
* **nhp-server (Server):** The module that processes and validates knock requests. Usually runs as a server program. Its functions include validating knock requests, interacting with external authorization service providers for authentication, and controlling NHP-AC to open access.
* **nhp-ac (Access Controller):** The access control enforcement module. Usually runs as a server program. This module enforces a default “deny all” security policy and ensures the protected resources remain invisible on the network. Typically located on the same host as the protected resources. Responsible for opening access to authorized NHP agents and closing access to agents that have lost authorization, executing pass-through actions based on parameters returned by the NHP server.
[](https://docs.opennhp.org/deploy/#2-developmenttest-environment-setup)
2\. Development/Test Environment Setup
---------------------------------------------------------------------------------------------------------------
### [](https://docs.opennhp.org/deploy/#21-environment-windowsmacos-host--linux-virtual-machines)
2.1 Environment: Windows/macOS Host + Linux Virtual Machines
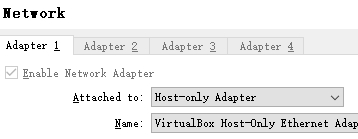
If your development host runs Windows or macOS, you can create a simple OpenNHP test environment by installing a virtualization environment (such as VirtualBox) and creating two Linux virtual machines. When creating virtual machines, set the network adapter option to `"Host-only Adapter"` (as shown below), which places the VM IPs in the same network segment as the development host.
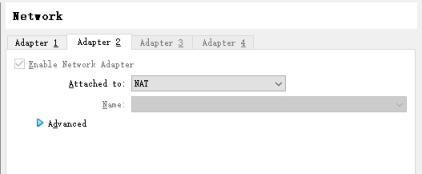
**Tip:** If you need the VM to also have internet access, you can add an additional `"NAT"` network adapter:
With this setup, the three NHP components are deployed as follows:
* **\[nhp-server\]** Runs on a Linux VM with IP address _192.168.56.101_
* **\[nhp-ac\]** Runs on a Linux VM with IP address _192.168.56.102_
* **\[nhp-agent\]** Runs on the Windows/macOS development host with IP address _192.168.56.1_
### [](https://docs.opennhp.org/deploy/#22-network-topology-and-configuration)
2.2 Network Topology and Configuration
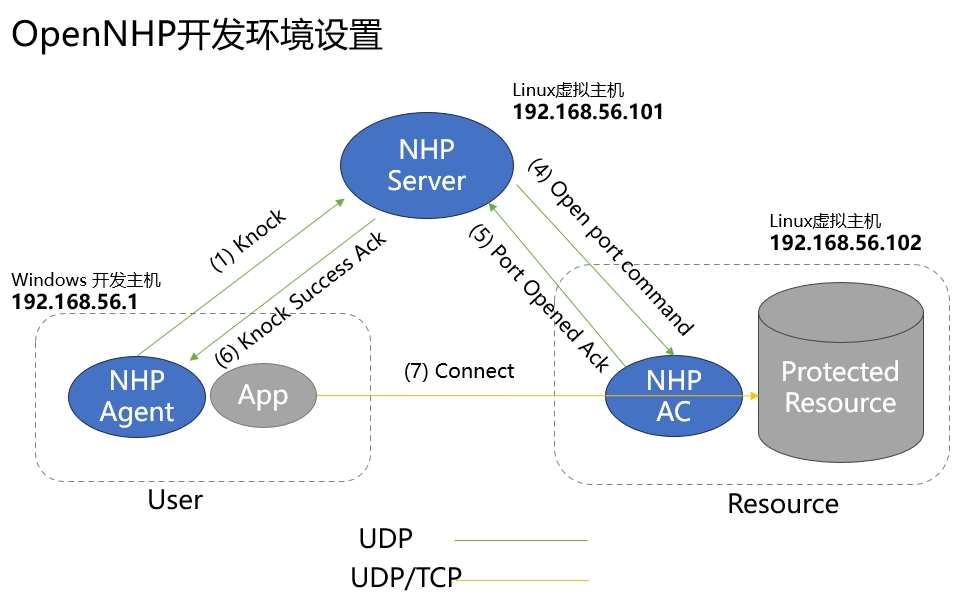
| Server Name | IP Address | Configuration |
| --- | --- | --- |
| NHP-Server | 192.168.56.101 | **Public Key:** WqJxe+Z4+wLen3VRgZx6YnbjvJFmptz99zkONCt/7gc=
**Private Key:** eHdyRHKJy/YZJsResCt5XTAZgtcwvLpSXAiZ8DBc0V4=
**Hostname:** localhost
**ListenPort:** 62206
**aspId:** example |
| NHP-AC | 192.168.56.102 | **Public Key:** Fr5jzZDVpNh5m9AcBDMtHGmbCAczHyPegT8IxQ3XAzE=
**Private Key:** +B0RLGbe+nknJBZ0Fjt7kCBWfSTUttbUqkGteLfIp30=
**ACId:** testAC-1
Protected resource **resId:** test |
| NHP-Agent | 192.168.56.1 | **Public Key:** WnJAolo88/q0x2VdLQYdmZNtKjwG2ocBd1Ozj41AKlo=
**Private Key:** +Jnee2lP6Kn47qzSaqwSmWxORsBkkCV6YHsRqXCegVo=
**UserId:** agent-0 |
**Note:** Each component has corresponding configuration files that must be configured correctly for successful startup. See the “Configuration Files” sections below for each component.
**Tip:** Starting from version 0.3.3, most fields in configuration files support dynamic updates. See the comments in each configuration file for details.
### [](https://docs.opennhp.org/deploy/#23-nhp-server-configuration-and-deployment)
2.3 NHP-Server Configuration and Deployment
#### [](https://docs.opennhp.org/deploy/#231-nhp-server-system-requirements)
2.3.1 NHP-Server System Requirements
* Linux server or Windows
#### [](https://docs.opennhp.org/deploy/#232-running-nhp-server)
2.3.2 Running NHP-Server
Copy the _nhp-server_ directory from the _release_ folder to the target machine. Configure the `toml` files in the _etc_ directory (see next section for detailed parameters), then run `nhp-serverd run`.
* Linux:
nohup ./nhp-serverd run 2>&1 &
* Windows:
nhp-serverd.exe run
_\[Optional\]_ Hide UDP port exposure by running `iptables_default.sh`
#### [](https://docs.opennhp.org/deploy/#233-nhp-server-configuration-files)
2.3.3 NHP-Server Configuration Files
* Base configuration: [config.toml](https://github.com/OpenNHP/opennhp/tree/main/server/main/etc/config.toml)
* Access Controller peer list: [ac.toml](https://github.com/OpenNHP/opennhp/tree/main/server/main/etc/ac.toml)
* Agent peer list: [agent.toml](https://github.com/OpenNHP/opennhp/tree/main/server/main/etc/agent.toml)
* HTTP service configuration: [http.toml](https://github.com/OpenNHP/opennhp/tree/main/server/main/etc/http.toml)
* Server plugin configuration: [resource.toml](https://github.com/OpenNHP/opennhp/tree/main/server/main/etc/resource.toml)
* Source IP mapping list: [srcip.toml](https://github.com/OpenNHP/opennhp/tree/main/server/main/etc/srcip.toml)
### [](https://docs.opennhp.org/deploy/#24-nhp-ac-configuration-and-deployment)
2.4 NHP-AC Configuration and Deployment
#### [](https://docs.opennhp.org/deploy/#241-nhp-ac-system-requirements)
2.4.1 NHP-AC System Requirements
* Linux server with kernel support for **ipset**. Check ipset support with:
lsmod | grep ip_set
#### [](https://docs.opennhp.org/deploy/#242-running-nhp-ac)
2.4.2 Running NHP-AC
Copy the _nhp-ac_ directory from the _release_ folder to the target machine. Configure the `toml` files in the _etc_ directory (see next section for detailed parameters). Run `iptables_default.sh` to add firewall rules—at this point, external connections will be blocked. Then run `nhp-acd run`.
**Note:** Both `nhp-acd` and `iptables_default.sh` require **root** privileges.
* Linux:
su
./iptables_default.sh
nohup ./nhp-acd run 2>&1 &
To revert the iptables changes made by `iptables_default.sh`, run:
iptables -F
#### [](https://docs.opennhp.org/deploy/#243-nhp-ac-configuration-files)
2.4.3 NHP-AC Configuration Files
* Base configuration: [config.toml](https://github.com/OpenNHP/opennhp/tree/main/ac/main/etc/config.toml)
* Server peer list: [server.toml](https://github.com/OpenNHP/opennhp/tree/main/ac/main/etc/server.toml)
### [](https://docs.opennhp.org/deploy/#25-nhp-agent-configuration-and-deployment)
2.5 NHP-Agent Configuration and Deployment
#### [](https://docs.opennhp.org/deploy/#251-nhp-agent-system-requirements)
2.5.1 NHP-Agent System Requirements
* All platforms: Windows, Linux, macOS, Android, iOS
#### [](https://docs.opennhp.org/deploy/#252-running-nhp-agent)
2.5.2 Running NHP-Agent
Copy the _nhp-agent_ directory from the _release_ folder to the target machine. Configure the `toml` files in the _etc_ directory (see next section for detailed parameters), then run `nhp-agentd run`.
* Linux:
nohup ./nhp-agentd run 2>&1 &
* Windows:
nhp-agentd.exe run
#### [](https://docs.opennhp.org/deploy/#253-nhp-agent-configuration-files)
2.5.3 NHP-Agent Configuration Files
* Base configuration: [config.toml](https://github.com/OpenNHP/opennhp/tree/main/agent/main/etc/config.toml)
* Knock target configuration: [resource.toml](https://github.com/OpenNHP/opennhp/tree/main/agent/main/etc/resource.toml)
* Server peer list: [server.toml](https://github.com/OpenNHP/opennhp/tree/main/agent/main/etc/server.toml)
### [](https://docs.opennhp.org/deploy/#26-testing-nhp-network-stealth)
2.6 Testing NHP Network Stealth
To verify NHP network stealth, perform an `nmap scan (using port 80 as an example)` from the nhp-agent host _(IP: 192.168.56.1)_ against the nhp-ac host _(IP: 192.168.56.102)_. You can also perform scans from another VM (simulating an attacker) to observe the stealth effect.
| Test Case | Command | Purpose | Expected Result |
| --- | --- | --- | --- |
| nhp-agent not running | `nmap -sS -p 80 192.168.56.102` | Test AC stealth from Agent | 80/tcp filtered |
| nhp-agent running | `nmap -sS -p 80 192.168.56.102` | Test AC access for Agent | 80/tcp open |
| nhp-agent running | `nmap -sS -p 80 192.168.56.102` | Test AC stealth from attacker | 80/tcp filtered |
[](https://docs.opennhp.org/deploy/#3-docker-deployment-quick-method)
3\. Docker Deployment (Quick Method)
----------------------------------------------------------------------------------------------------------
For rapid setup and testing, OpenNHP provides a Docker-based deployment option.
### [](https://docs.opennhp.org/deploy/#31-prerequisites)
3.1 Prerequisites
* Docker Desktop installed ([Mac](https://www.docker.com/products/docker-desktop/)
, [Windows](https://www.docker.com/products/docker-desktop/)
)
* Git to clone the repository
### [](https://docs.opennhp.org/deploy/#32-quick-start-commands)
3.2 Quick Start Commands
# Clone the repository
git clone https://github.com/OpenNHP/opennhp.git
cd opennhp
# Build the base image
cd docker
docker build --no-cache -t opennhp-base:latest -f Dockerfile.base ../..
# Start all services
docker compose up -d
### [](https://docs.opennhp.org/deploy/#33-docker-network-topology)
3.3 Docker Network Topology
| Container | IP | Description |
| --- | --- | --- |
| NHP-Agent | 177.7.0.8 | Runs nhp-agentd & nginx |
| NHP-Server | 177.7.0.9 | Runs nhp-serverd on port 62206 |
| NHP-AC | 177.7.0.10 | Runs nhp-acd & Traefik |
| Web App | 177.7.0.11 | Protected application on port 8080 |
For detailed Docker testing scenarios and verification steps, see the [NHP Quick Start Guide](https://docs.opennhp.org/nhp_quick_start/)
.
[](https://docs.opennhp.org/deploy/#4-production-deployment-considerations)
4\. Production Deployment Considerations
--------------------------------------------------------------------------------------------------------------------
### [](https://docs.opennhp.org/deploy/#41-architecture-overview)
4.1 Architecture Overview

For high-availability deployments, consider:

### [](https://docs.opennhp.org/deploy/#42-security-hardening)
4.2 Security Hardening
1. **Key Management**
* Generate unique keys for each component using `nhp-serverd keygen`, `nhp-acd keygen`, `nhp-agentd keygen`
* Never reuse keys across environments
* Rotate keys periodically and update peer configuration files
2. **TLS Configuration**
* Enable HTTPS in `http.toml` with valid TLS certificates
* Configure `TLSCertFile` and `TLSKeyFile` paths
* Use certificates from a trusted CA for production
3. **Network Security**
* Run `iptables_default.sh` before starting NHP-AC to ensure deny-all policy
* Consider eBPF/XDP mode (`FilterMode = 1`) for high-performance packet filtering
* Restrict management interfaces to internal networks only
### [](https://docs.opennhp.org/deploy/#43-deployment-checklist)
4.3 Deployment Checklist
**Pre-deployment:**
* [ ] Keys generated for all components
* [ ] Peer public keys exchanged and configured
* [ ] Configuration files validated
* [ ] TLS certificates in place (for HTTPS)
* [ ] System time synchronized across all hosts
**Post-deployment:**
* [ ] Verify NHP-Server is listening on UDP 62206
* [ ] Verify NHP-AC iptables rules are active (`iptables -L`)
* [ ] Test knock sequence from NHP-Agent
* [ ] Verify stealth with nmap from unauthorized host
* [ ] Check log files for errors
### [](https://docs.opennhp.org/deploy/#44-configuration-parameters-reference)
4.4 Configuration Parameters Reference
Key configuration parameters across components:
| Parameter | Component | Description |
| --- | --- | --- |
| `PrivateKeyBase64` | All | Base64-encoded private key (static, requires restart) |
| `ListenPort` | Server | UDP listening port, default 62206 (static) |
| `LogLevel` | All | 0=silent, 1=error, 2=info, 3=audit, 4=debug, 5=trace |
| `DefaultCipherScheme` | All | 0=Curve25519, 1=SM2 |
| `FilterMode` | AC | 0=IPTables, 1=eBPF/XDP |
| `ExpireTime` | Peer configs | Epoch timestamp when peer key expires |
Most configuration fields support dynamic updates without restart. See configuration file comments for details.
[](https://docs.opennhp.org/deploy/#5-logging)
5\. Logging
----------------------------------------------------------
### [](https://docs.opennhp.org/deploy/#51-log-file-locations)
5.1 Log File Locations
Log files are generated in each component’s _logs_ directory, named by date. View logs using `tail`:
* NHP-Server logs:
tail -f release/nhp-server/logs/server-2024-03-10.log
* NHP-AC logs:
tail -f release/nhp-ac/logs/ac-2024-03-10.log
* NHP-Agent logs:
tail -f release/nhp-agent/logs/agent-2024-03-10.log
### [](https://docs.opennhp.org/deploy/#52-log-format)
5.2 Log Format
Log format:
Timestamp CodeLocation ComponentName [LogLevel] LogMessage
Log levels:
* Error
* Critical
* Warning
* Info
* Debug
[](https://docs.opennhp.org/deploy/#6-troubleshooting-faq)
6\. Troubleshooting FAQ
----------------------------------------------------------------------------------
* **Q:** Windows build error: `running gcc failed: exec: "gcc": executable file not found in %PATH%` **A:** GCC compiler is not installed. Follow the GCC installation steps in the build documentation.
* **Q:** Log shows error: `NHP-AC [Critical] received stale packet from 192.168.56.101:62206, drop packet` **Cause:** The receiver requires packets to be received within 10 minutes of being sent. **Fix:** Synchronize system time between machines.
* **Q:** How do I adjust the access duration after authentication? How do I restrict access to specific ports? **A:** In the corresponding plugin module under `nhp-server/plugins/`, find `etc/resource.toml`. This file configures resource ports, duration, ID, etc. For nhp-agent knocking, the default plugin is `example`. For WeChat QR code knocking, use the `wxweb` plugin.
* **Q:** How do I verify configuration is working? **A:** Check server and AC logs. You can also run `ipset -L` on the AC to view authorized source IPs, destination ports, and durations.
* **Q:** nhp-agent knock succeeds but cannot access the resource. **Possible cause:** The resource target IP in the ipset record added by nhp-server to nhp-ac doesn’t match the requested resource. This can occur when the resource and nhp-ac are on the same server.
Manual ipset rule for debugging:
sudo ipset add defaultset [SourceIP],tcp:80,[ResourceIP]
* _SourceIP_: The agent’s public IP (verify via tcpdump or ipset list)
* _ResourceIP_: The resource IP from `nhp-server/plugins/example/etc/resource.toml`
If the IPs don’t match, knocking succeeds but access fails.
Debug with packet capture on nhp-ac:
tcpdump -i any port 80
**Solution:** Configure the correct IP in `nhp-server/plugins/example/etc/resource.toml` under `Addr.Ip`.
* * *
---
# Understand the Code | OpenNHP Documentation
[Skip to main content](https://docs.opennhp.org/code/#main-content)
Link Menu Expand (external link) Document Search Copy Copied
[](https://docs.opennhp.org/)
[](https://docs.opennhp.org/code/#understand-the-source-code)
Understand the Source Code
========================================================================================
This article explains the architecture and structure of the OpenNHP codebase.
[中文版](https://docs.opennhp.org/zh-cn/code/)
* * *
[](https://docs.opennhp.org/code/#repository-structure)
Repository Structure
----------------------------------------------------------------------------
OpenNHP uses a multi-module Go architecture:
opennhp/
├── nhp/ # Core protocol library (github.com/OpenNHP/opennhp/nhp)
├── endpoints/ # Network daemons (github.com/OpenNHP/opennhp/endpoints)
├── examples/ # Example implementations
├── docs/ # Documentation (Jekyll)
├── docker/ # Container configurations
└── release/ # Build outputs
[](https://docs.opennhp.org/code/#core-library-nhp)
Core Library (`nhp/`)
-------------------------------------------------------------------------
The `nhp` module contains the core NHP protocol implementation:
| Directory | Purpose |
| --- | --- |
| `core/` | Protocol implementation: packets, encryption, device management |
| `common/` | Shared types, message structures, error definitions |
| `utils/` | Helper functions: IP utilities, iptables, crypto helpers |
| `plugins/` | Server plugin system interfaces |
| `log/` | Async logging framework |
| `etcd/` | etcd integration for distributed configuration |
| `ebpf/` | eBPF programs for XDP and traffic control |
| `test/` | Unit tests |
### [](https://docs.opennhp.org/code/#key-files-in-core)
Key Files in `core/`
* `device.go` - NHP device lifecycle and connection management
* `packet.go` - Packet structure and header definitions
* `crypto.go` - Cryptographic primitives (ECDH, AEAD)
* `initiator.go` - Client-side message encryption
* `responder.go` - Server-side message decryption
[](https://docs.opennhp.org/code/#network-daemons-endpoints)
Network Daemons (`endpoints/`)
-------------------------------------------------------------------------------------------
The `endpoints` module contains executable daemons:
| Component | Binary | Purpose |
| --- | --- | --- |
| `agent/` | `nhp-agent` | Client that sends knock requests |
| `server/` | `nhp-server` | Central server handling knock validation |
| `ac/` | `nhp-ac` | Access Controller managing firewall rules |
| `db/` | `nhp-db` | Data broker for DHP (Data Hiding Protocol) |
| `kgc/` | `nhp-kgc` | Key Generation Center for IBC keys |
Each daemon follows a similar structure:
agent/
├── main/ # Entry point and CLI
│ ├── main.go # CLI commands
│ ├── export.go # C FFI exports for SDK
│ └── etc/ # Configuration files
├── udpagent.go # UDP transport implementation
├── config.go # Configuration handling
└── msghandler.go # Message processing
[](https://docs.opennhp.org/code/#cryptographic-schemes)
Cryptographic Schemes
------------------------------------------------------------------------------
OpenNHP supports two cipher schemes:
| Scheme | Algorithms | Use Case |
| --- | --- | --- |
| `CIPHER_SCHEME_CURVE` | Curve25519 + ChaCha20-Poly1305 + BLAKE2s | International |
| `CIPHER_SCHEME_GMSM` | SM2 + SM4-GCM + SM3 | Chinese standards |
See [Cryptography](https://docs.opennhp.org/cryptography/)
for detailed protocol documentation.
[](https://docs.opennhp.org/code/#plugin-system)
Plugin System
--------------------------------------------------------------
Server plugins extend NHP server functionality:
type PluginHandler interface {
Init(helper *NhpServerPluginHelper) error
Close() error
AuthWithNHP(req *AuthRequest) (*AuthResponse, error)
AuthWithHttp(req *HttpAuthRequest) (*HttpAuthResponse, error)
}
See [Server Plugin Development](https://docs.opennhp.org/server_plugin/)
for implementation guide.
[](https://docs.opennhp.org/code/#sdk-architecture)
SDK Architecture
--------------------------------------------------------------------
The agent provides SDKs for multiple platforms:
| Platform | Output | Build Target |
| --- | --- | --- |
| Linux | `nhp-agent.so` | `make linuxagentsdk` |
| macOS | `nhp-agent.dylib` | `make macosagentsdk` |
| iOS | `nhpagent.xcframework` | `make iosagentsdk` |
| Android | `libnhpagent.so` | `make androidagentsdk` |
See [Agent SDK](https://docs.opennhp.org/agent_sdk/)
for integration documentation.
[](https://docs.opennhp.org/code/#building-from-source)
Building from Source
----------------------------------------------------------------------------
# Initialize dependencies
make init
# Build all binaries
make
# Build specific components
make agentd # nhp-agent
make serverd # nhp-server
make acd # nhp-ac
# Development commands
make test # Run tests
make fmt # Format code
make clean # Clean build artifacts
[](https://docs.opennhp.org/code/#testing)
Testing
--------------------------------------------------
Tests are located in `nhp/test/` and `endpoints/test/`:
# Run all tests
make test
# Run with race detection
make test-race
# Run with coverage
make coverage
[](https://docs.opennhp.org/code/#contributing)
Contributing
------------------------------------------------------------
See [CONTRIBUTING.md](https://github.com/OpenNHP/opennhp/blob/main/CONTRIBUTING.md)
for development guidelines.
* * *
---
# DHP Quick Start | OpenNHP Documentation
[Skip to main content](https://docs.opennhp.org/dhp_quick_start/#main-content)
Link Menu Expand (external link) Document Search Copy Copied
[](https://docs.opennhp.org/)
[](https://docs.opennhp.org/dhp_quick_start/#dhp-quick-start)
DHP Quick Start
=============================================================================
A locally built Docker debugging environment, simulating nhp-server, nhp-db and nhp-agent. This environment can be used for:
* Quickly understanding how opendhp works
* Basic logic validation
[中文版](https://docs.opennhp.org/zh-cn/dhp_quick_start/)
* * *
[](https://docs.opennhp.org/dhp_quick_start/#1-overview)
1\. Overview
---------------------------------------------------------------------
The primary purpose of OpenDHP is to enforce data sovereigenty, ensure data invisibility while maintaining availability, and uphold data privacy throughout the entire data lifecycle.
This Quick Start guide helps developers rapidly set up the OpenDHP Docker environment, build the source code, and test key features of OpenDHP. The environment is designed to be lightweight and easy to use, making it ideal for developers who want to quickly test and debug OpenDHP.
### [](https://docs.opennhp.org/dhp_quick_start/#11-architecture)
1.1 Architecture
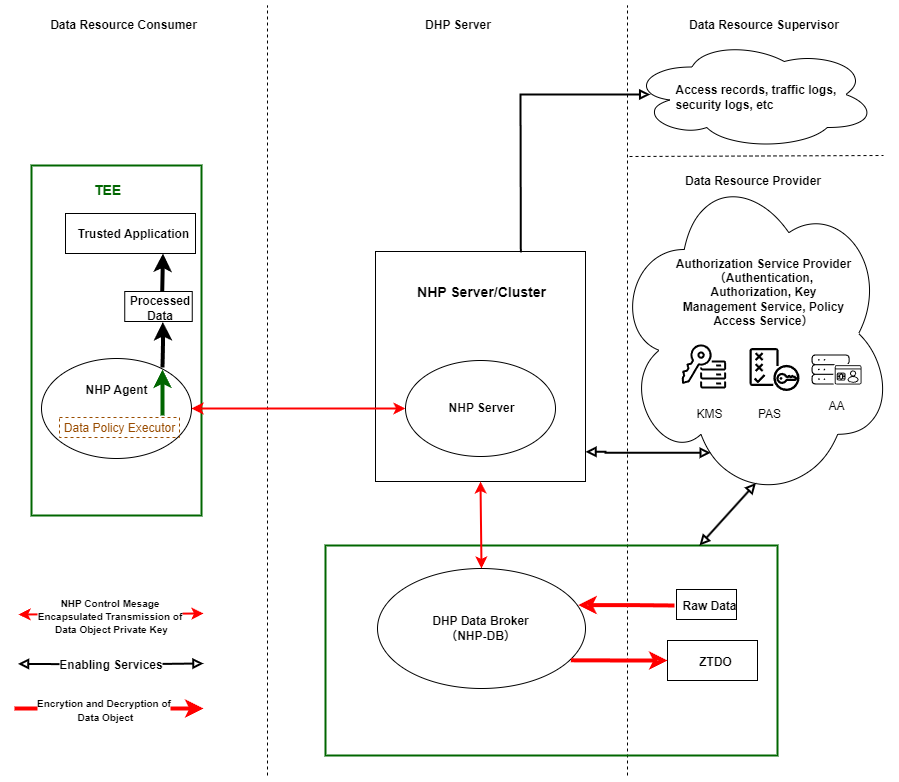
#### [](https://docs.opennhp.org/dhp_quick_start/#111-network-topology)
1.1.1 Network Topology
| Container Name | IP | Description |
| --- | --- | --- |
| NHP-Agent | 177.7.0.8 | Runs nhp-agentd. Port mapping: 443→Host: 8443 |
| NHP-Server | 177.7.0.9 | Runs nhp-serverd with exposed port 62206 |
| NHP-DB | 177.7.0.12 | Runs nhp-db. Used to publish data |
### [](https://docs.opennhp.org/dhp_quick_start/#12-test-scenario)
1.2 Test Scenario
#### [](https://docs.opennhp.org/dhp_quick_start/#121-scenario-description)
1.2.1 Scenario Description
To enhance the comprehensiveness and accuracy of identifying risk-involved accounts, in addition to internal risk-control identification, banks can also conduct joint verification by using the information of risk-involved accounts provided by other banks, payment institutions, public security departments, or regulatory platforms. To ensure data security and user privacy, all participating parties use confidential computing technology to collaboratively determine whether a certain account has risk-related behaviors, thus avoiding the direct exposure of user data in plaintext.
#### [](https://docs.opennhp.org/dhp_quick_start/#122-scenario-architecture)
1.2.2 Scenario Architecture
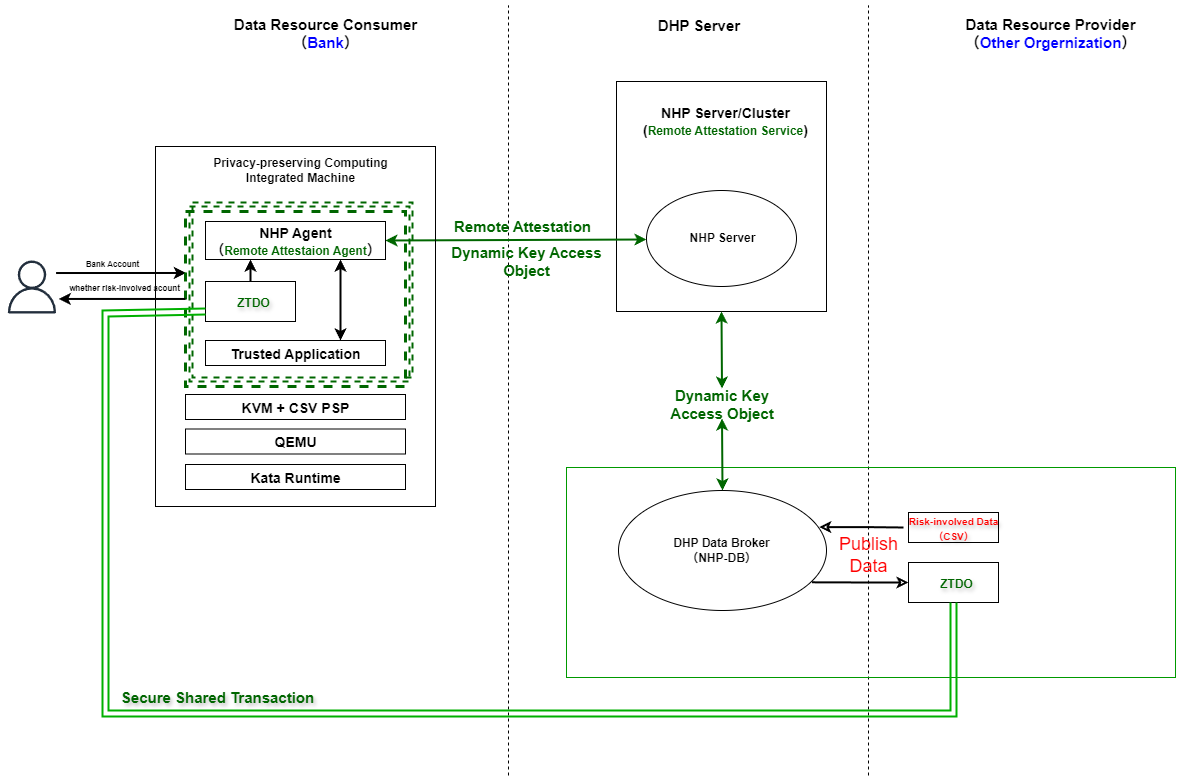
[](https://docs.opennhp.org/dhp_quick_start/#2-installing-docker-environment)
2\. Installing Docker Environment
---------------------------------------------------------------------------------------------------------------
For this part, please refer to the corresponding chapter in [NHP Quick Start](https://docs.opennhp.org/quick_start)
for details.
[](https://docs.opennhp.org/dhp_quick_start/#3-running-and-configuring-the-environment)
3\. Running and configuring the Environment
-----------------------------------------------------------------------------------------------------------------------------------
The following startup command will build nhp-server, nhp-db, and nhp-agent images during the startup process.
### [](https://docs.opennhp.org/dhp_quick_start/#31-start-all-services)
3.1 Start All Services
cd ./docker
docker compose -f docker-compose.dhp.yaml up -d
### [](https://docs.opennhp.org/dhp_quick_start/#32-start-nhp-agent-with-dhp-mode)
3.2 Start nhp-agent with DHP mode
Since nhp-agent does not start by default, you need to start it manually.
docker exec -it nhp-agent /bin/bash
/nhp-agent/nhp-agentd dhp
### [](https://docs.opennhp.org/dhp_quick_start/#33-start-nhp-db)
3.3 Start nhp-db
Since nhp-db does not start by default, you need to start it manually.
docker exec -it nhp-db /bin/bash
/nhp-db/nhp-db run
### [](https://docs.opennhp.org/dhp_quick_start/#34-configure-dhp-related-parameters)
3.4 Configure DHP-related parameters
Since agent and tee key is generated during the 1st startup, you need to configure agent public key in nhp-server for trustworthiness, tee public key in nhp-db for trustworthiness. In addition, you need to configure trusted execution environment in nhp-server for appraising attestation report.
#### [](https://docs.opennhp.org/dhp_quick_start/#341-configure-agent-public-key-in-nhp-server)
3.4.1 Configure agent public key in nhp-server
With this default docker environment, 8443 port is exposed to host for nhp-agent. So, you can access nhp-agent http endpoints from host using https://localhost:8443. You can use below curl command to get agent public key.
curl --insecure https://localhost:8443/api/v1/key/agent
{"publicKey":"f+HWVbhQ6ZR3e+INU7ZSGyn3XNls5TUdbZWlPmj/1v890WLDW7RcnnbJmqqufymK+Yb99dadX+PlhK4qFYxtOg=="}
Next, you need to configure agent public key in nhp-server.
docker exec -it nhp-server /bin/bash
vi /nhp-server/etc/agent.toml
# list the agent peers for the server under [[Agents]] table
# PubKeyBase64: public key for the agent in base64 format.
# ExpireTime (epoch timestamp in seconds): peer key validation will fail when it expires.
[[Agents]]
PubKeyBase64 = "f+HWVbhQ6ZR3e+INU7ZSGyn3XNls5TUdbZWlPmj/1v890WLDW7RcnnbJmqqufymK+Yb99dadX+PlhK4qFYxtOg=="
ExpireTime = 1924991999
After configuring the agent public key, you can check agent status with the following curl command:
curl --insecure https://localhost:8443/api/v1/status/agent
{"attestationVerified":false,"running":true,"trustedByNHPDB":false,"trustedByNHPServer":true}
You will see that trustedByNHPServer is true which means the agent is trusted by the NHP server.
#### [](https://docs.opennhp.org/dhp_quick_start/#342-configure-tee-attestation-in-nhp-server)
3.4.2 Configure TEE attestation in nhp-server
You can use below curl command to get TEE attestation report.
**Notes:** The attestation report is generated according to container information in non-TEE environment, non-TEE environment is only for test purpose.
curl --insecure https://localhost:8443/api/v1/attestation/tee
{"measure":"3460bc69b9d273ad15c91074d8fd41abc5d5ccac50730d2e0495d08558848e34","serial number":"3460bc69b9d273ad15c91074d8fd41abc5d5ccac50730d2e0495d08558848e34"}
Next, you need to configure attestation in nhp-server.
docker exec -it nhp-server /bin/bash
vi /nhp-server/etc/tee.toml
# list trusted execution environments under [[TEEs]] table
# Measure: cryptographic hashes that ensure the integrity of software and data within the TEE.
# SerialNumber: unique serial number of the TEE.
[[TEEs]]
Measure = "19178a674248bbca705863bbf75ecaa049fcf3dfcc5ff59a80dcc5cbb60dae59"
SerialNumber = "TMEX300023050201"
[[TEEs]]
Measure = "3460bc69b9d273ad15c91074d8fd41abc5d5ccac50730d2e0495d08558848e34"
SerialNumber = "3460bc69b9d273ad15c91074d8fd41abc5d5ccac50730d2e0495d08558848e34"
After configuring the agent public key, you can check agent status with the following curl command:
curl --insecure https://localhost:8443/api/v1/status/agent
{"attestationVerified":true,"running":true,"trustedByNHPDB":false,"trustedByNHPServer":true}
You will see that attestationVerified is true which means TEE is trusted by the NHP server.
#### [](https://docs.opennhp.org/dhp_quick_start/#343-configure-tee-public-key-in-nhp-db)
3.4.3 Configure TEE public key in nhp-db
You can use below curl command to get TEE public key.
curl --insecure https://localhost:8443/api/v1/key/tee
{"publicKey":"pup5OzTTZjddv+WBgbUBkvHuBgJoBg0DU+I2c7Qj4lHlrVM8N/Yl9F6DEnbGFBWB89xrN6VLhYAIM4Xv+mu4KA=="}
Next, you need to configure TEE public key in nhp-db.
docker exec -it nhp-db /bin/bash
vi /nhp-db/etc/tee.toml
# Configuration for trusted execution environment.
# TEEPublicKeyBase64: base64 encoded public key of TEE (Trusted Execution Environment).
[[TEEs]]
TEEPublicKeyBase64 = "pup5OzTTZjddv+WBgbUBkvHuBgJoBg0DU+I2c7Qj4lHlrVM8N/Yl9F6DEnbGFBWB89xrN6VLhYAIM4Xv+mu4KA=="
ExpireTime = 1924991999
[](https://docs.opennhp.org/dhp_quick_start/#4-testing-with-risk-involved-account-scenario)
4\. Testing with risk-involved account scenario
-------------------------------------------------------------------------------------------------------------------------------------------
### [](https://docs.opennhp.org/dhp_quick_start/#41-publishing-data-resource)
4.1 Publishing data resource
You can publish a data resource with the following command:
docker exec -it nhp-db /bin/bash
cd /nhp-db
./nhp-db run --mode encrypt --data-source-type online --source ./demo/risk.involved.accounts.csv --output ./risk.involved.accounts.csv.demo.ztdo --smart-policy ./demo/smart.policy.json --metadata ./demo/metadata.json
If the message `Successfully register or update data object which doId is .` is printed, it means the data resource has been published successfully.
### [](https://docs.opennhp.org/dhp_quick_start/#42-requesting-data-resource)
4.2 Requesting data resource
#### [](https://docs.opennhp.org/dhp_quick_start/#421-write-and-compile-trusted-application)
4.2.1 Write and Compile trusted application
To enable easy and unified communication with the trusted application, we use the Model Context Protocol (MCP). This means the trusted application is implemented as an MCP server, while the client, built into the NHP Agent, acts as the MCP client to communicate with the trusted application. Since the MCP framework is supported by almost all programming languages, implementing a trusted application in any language is easy and straightforward.
Following is a simple example of a trusted application written in Golang, and it is used in this demonstration.
package main
import (
"context"
"encoding/csv"
"fmt"
"io"
"os"
"github.com/mark3labs/mcp-go/mcp"
"github.com/mark3labs/mcp-go/server"
)
func main() {
s := server.NewMCPServer("trusted application", "1.0.0",
server.WithToolCapabilities(true),
)
s.AddTool(
mcp.NewTool("verify_account",
mcp.WithDescription("Verify account to check whether there are any risk factors associated with the account"),
mcp.WithString("path",
mcp.Required(),
mcp.Description("path to file which records the account details"),
),
mcp.WithString("account_id",
mcp.Description("account id"),
mcp.Required(),
),
),
verifyAccountHandler,
)
// Start STDIO server
if err := server.ServeStdio(s); err != nil {
fmt.Fprintf(os.Stderr, "Server error: %v\n", err)
os.Exit(1)
}
}
func verifyAccountHandler(ctx context.Context, req mcp.CallToolRequest) (*mcp.CallToolResult, error) {
path, err := req.RequireString("path")
if err != nil {
return mcp.NewToolResultError(err.Error()), nil
}
accountId, err := req.RequireString("account_id")
if err != nil {
return mcp.NewToolResultError(err.Error()), nil
}
is_risk, err := findRecord(path, accountId)
if err != nil {
return mcp.NewToolResultError(err.Error()), nil
}
return mcp.NewToolResultText(fmt.Sprintf(`{"account_id":"%s","is_risk": %t}`, accountId, is_risk)), nil
}
func findRecord(path string, accountId string) (bool, error) {
f, err := os.Open(path)
if err != nil {
return false, err
}
defer f.Close()
r := csv.NewReader(f)
r.Comma = ','
for {
record, err := r.Read()
if err != nil {
if err == csv.ErrFieldCount {
continue
}
if err == io.EOF {
return false, nil
}
return false, err
}
if record[0] == accountId {
return true, nil
}
}
}
Suppose we have built it as binary which name is `ta`.
#### [](https://docs.opennhp.org/dhp_quick_start/#422-register-trusted-application)
4.2.2 Register trusted application
You can use following command to register trusted application:
curl --insecure --request POST --url https://localhost:8443/api/v1/ta/register --header 'content-type: multipart/form-data' --form file=@ta --form 'description=trusted application demo'
[\
{\
"method": "POST",\
"name": "/api/v1/ta/ceca4572-644b-4bde-a4b6-ac6048f8fba6/verify_account",\
"description": "Verify account to check whether there are any risk factors associated with the account",\
"params": [\
{\
"name": "doId",\
"description": "identifier of the data object",\
"type": "string"\
},\
{\
"name": "account_id",\
"description": "account id",\
"type": "string"\
}\
]\
}\
]
After success registration, you can get the HTTP RESTful API which is exposed by trusted application.
#### [](https://docs.opennhp.org/dhp_quick_start/#423-execute-task)
4.2.3 Execute task
You can invoke those exposed RESTful API to perform privacy-preserving compututation using following curl command:
curl --insecure --request POST --url https://localhost:8443/api/v1/ta/ceca4572-644b-4bde-a4b6-ac6048f8fba6/verify_account --header 'content-type: application/json' --data '{"doId": "47d2b67c-ef80-45fc-814d-effd23baf788", "account_id": "62230121012345678901"}'
After execution, you will get response `{"account_id":"62230121012345678901","is_risk":false}` which means the account is not a risk-involved account.
Since the NHP Agent, the trusted application, and the data are all protected by a Trusted Execution Environment (TEE), the data resource consumer CAN NOT access the data resource directly. Instead, all interactions with the data MUST go through controlled and verified execution within the TEE, ensuring that the data remains confidential and is only processed according to the associated smart data policy. Then entire design of DHP guarantees that the consumer can use the data without ever seeing or extracting the raw content.
* * *
---
# How to Build | OpenNHP Documentation
[Skip to main content](https://docs.opennhp.org/build/#main-content)
Link Menu Expand (external link) Document Search Copy Copied
[](https://docs.opennhp.org/)
[](https://docs.opennhp.org/build/#build-opennhp-source-code)
Build OpenNHP Source Code
=======================================================================================
This article explains how to build OpenNHP from source code.
[中文版](https://docs.opennhp.org/zh-cn/build/)
* * *
[](https://docs.opennhp.org/build/#1-wsl-environment-setup)
1\. WSL Environment Setup
-------------------------------------------------------------------------------------
**Note:** You can run Linux through the WSL subsystem on Windows 10/11. For details, see the official WSL documentation: https://learn.microsoft.com/en-us/windows/wsl/install
* **【Enable the WSL function】** On Win10, you need to enable WSL first to use it for installing Linux. See the settings interface in the image below.
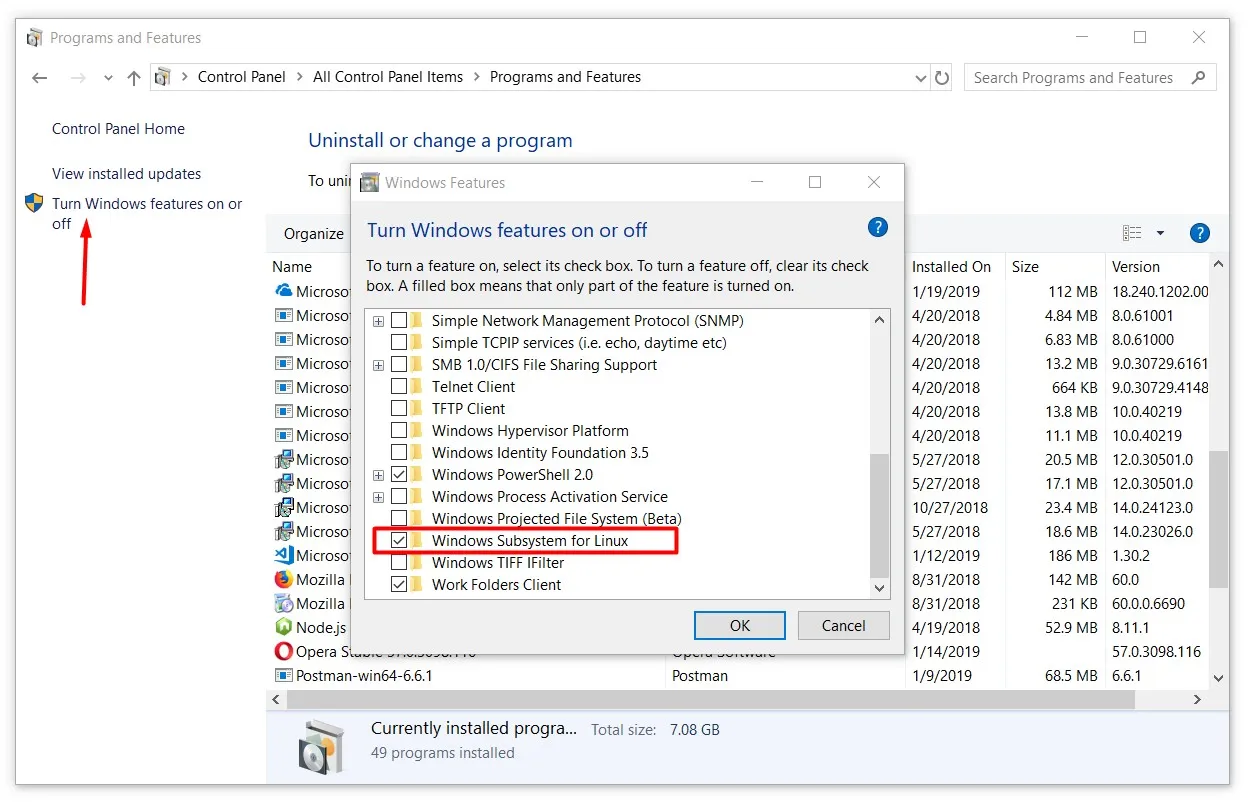
* **【Install Linux on WSL】** It is recommended to install Ubuntu Linux on WSL by running the following command through PowerShell:
wsl --update
wsl --install -d Ubuntu
If you encounter the following problems, refer to:[https://blog.csdn.net/weixin\_44293949/article/details/121863559](https://blog.csdn.net/weixin_44293949/article/details/121863559)
From 'https://raw.githubusercontent.com/microsoft/WSL/master/distributions/DistributionInfo.json' to extract the distribution list. The server name or address could not be resolved
Error code: Wsl/WININET_E_NAME_NOT_RESOLVED
* **【IP address of the WSL environment】** In the Linux environment of WSL, run the following command to get the IP address:
| Host machine | Command to view the IP address |
| --- | --- |
| Linux hosts in WSL | `hostname -I \\| awk '{print $1}'` |
| WSL hosts the Windows host | `ip route show \\| grep -i default \\| awk '{ print $3}'` |
[](https://docs.opennhp.org/build/#2-system-requirement)
2\. System requirement
-------------------------------------------------------------------------------
* 2.1 ‘Go Language’ environment: **Go 1.23** . Installation package download: [https://go.dev/dl/](https://go.dev/dl/)
* **Windows and macOS**Environment, install Go through the downloaded installer.
* **Linux** environment can be installed directly through the management tool: `sudo apt install golang`
* After the installation is successful, run the command `go version`to see the Go version number.
* **Windows and macOS**environment,Install Go through the downloaded installer.
* **Linux**Environment can be installed directly through the management tool:`sudo apt install golang` Or install it manually with the following command:
1. sudo apt-get update
2. wget https://go.dev/dl/go1.21.0.linux-amd64.tar.gz
3. sudo tar -xvf go1.21.0.linux-amd64.tar.gz
4. sudo mv go /usr/local
5. export GOROOT=/usr/local/go
6. export GOPATH=$HOME/go
7. export PATH=$GOPATH/bin:$GOROOT/bin:$PATH
8. source ~/.profile
* After the installation is successful, run the command `go version` to see the Go version number.
* 2.2 `GCC`environment:
* **Linux and macOS**:**GCC 8.0**or above。
* To view the GCC version of the command:`gcc -v`
* To install GCC: `sudo apt install build-essential`
* **Windows**:
1. Step 1: **Install mingw64**. mingw64 can be downloaded from msys2’s package management tool. Installation requirements, downloads, and installation tutorials for msys2 are available at [https://www.msys2.org/](https://www.msys2.org/)
.
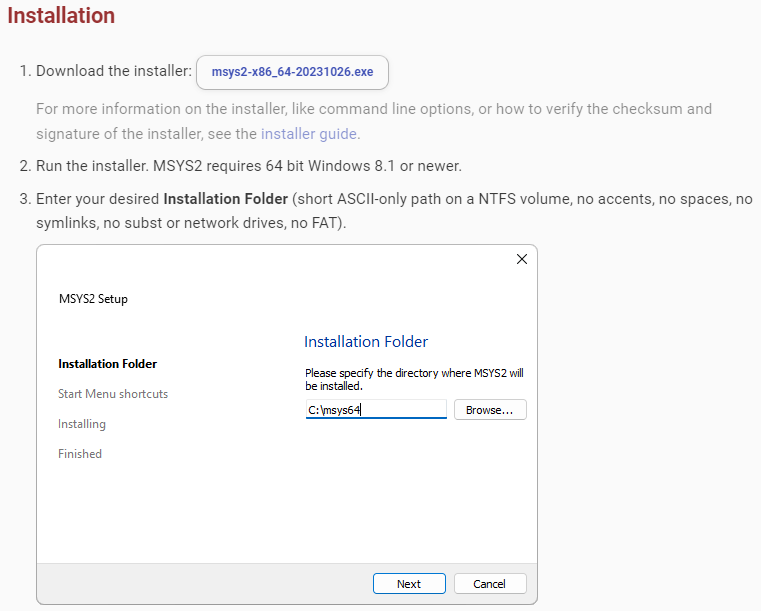
1. Step 2: **Install GCC**. Enter the command in msys2’s console:
pacman -S mingw-w64-ucrt-x86_64-gcc
2. Step 3: **Configure GCC**. Add the GCC tool PATH to the Windows _%PATH%_ environment variable. For example, if the installation path of mingw-w64-gcc is`C:\Program Files\MSYS2\` , run the command
setx PATH "%PATH%;C:\Program Files\MSYS2\ucrt64\bin
After successful execution, open a new command line window and check the version number of _gcc_
gcc --version
* **Tip:** Under Windows can be \` WSL \` subsystem to run Linux, details please see WSL official document: < https://learn.microsoft.com/zh-cn/windows/wsl/install >
* It is recommended to run the latest version of Ubuntu v22 on WSL and install it by running the following command from PowerShell on Windows:
wsl --install --distribution Ubuntu-22.04
_Note: If 2.1 and 2.2 are complete, when executing the compile command `.\build.bat` directly in the project directory, you will usually encounter `the system cannot find the specified path` or `'lib' is not an internal or external command, nor is it a runnable program or batch file`The mistake. 2.3 Provides a solution to this problem for reference._
* 2.3 `lib`environment:
* The lib utility is used in the compile run command, which is a tool for generating.lib files, usually for linking static libraries or exporting symbol tables (the.lib file is generated in Windows to work with the.dll file). The error message lib is not an internal or external command, indicating that the system cannot find the lib utility.
* **To solve the problem (‘lib’ is not an internal or external command, nor is it a runnable program or batch file) :** Install Visual Studio and Visual Studio tools.
* The lib tool is Microsoft’s library management tool and is usually installed with Microsoft Build Tools for Visual Studio. Make sure you have Visual Studio installed and have selected the C++ Build Tools components, including lib.exe.
* If you do not have Visual Studio installed, you can download and install it from the official Visual Studio website: https://visualstudiomicrosoft.com/zh-hans/ when installation, select the desktop development (c + +) “the workload, it contains the lib. Exe and other necessary tools.
* After installing Visual Studio, make sure to use the Visual Studio Developer Command Prompt to run the `build.bat` file that contains the lib command. This command line tool automatically loads environment variables for the build tool, such as lib.exe
* **To resolve the problem (the system cannot find the specified path) :** Change the path in the `build.bat` file
* Open the `build.bat` file and find it
call "C:\Program Files (x86)\Microsoft Visual Studio\2019\Community\VC\Auxiliary\Build\vcvarsall.bat" x64
* Change the installation path to your own visual studio directory. For example:
call "F:\develop\visualstu\VC\Auxiliary\Build\vcvarsall.bat" x64
* 2.4 `clang` environment (optional):
* **Note:**
* Regarding the clang compiler tool, clang is only supported on Linux and not available on Windows, Windows don’t need to install clang.
* Regarding eBPF module compilation, eBPF is not supported on Windows, eBPF is only supported on Linux with kernel version 5.6 or higher.
* To check clang version: `clang --version`
* **For Linux Ubuntu**:
* Install clang, llvm, and libbpf-dev: `sudo apt install clang llvm libbpf-dev`
* **For Linux CentOS**:
* Install clang, llvm, and libbpf-dev: `sudo yum install clang llvm libbpf-dev -y`
[](https://docs.opennhp.org/build/#3-compile)
3\. compile
---------------------------------------------------------
1. Pull the code repository
git clone https://github.com/OpenNHP/opennhp.git
2. Go environment Settings
go env -w GOPROXY="https://goproxy.cn,direct"
3. Compile and build
* **Linux and macOS**:Run the script in the code root directory `make`
* **Windows**:Run the _BAT_ file in the code root directory `build.bat`
_(Note: If an error occurs during the compilation process under windows, try this compilation method: In the Visual Studio developer command prompt for VS command window, switch to the project directory and execute the `./build.bat` command)_
* **Compiling eBPF on Linux**: Run the script in the code root directory `make ebpf`
_(Note: The command `make ebpf` will also compile the eBPF module)_
[](https://docs.opennhp.org/build/#4-result)
4\. result
-------------------------------------------------------
Compiled binaries are in the code directory under the `release` subdirectory.
* **NHP-Server** executable and configuration files: `release\nhp-server` subdirectory
* **NHP-AC** executable and configuration files: `release\nhp-ac` subdirectory
* **NHP-Agent** executable and configuration files: `release\nhp-agent` subdirectory
* **NHP-DB** executable and configuration files: `release\nhp-db` subdirectory
* **NHP-KGC** executable and configuration files: `release\nhp-kgc` subdirectory
* All binaries are packaged into a `tar` file: `release\archive` subdirectory
[中文版](https://docs.opennhp.org/zh-cn/build/)
* * *
* * *
---
# Server Plugins | OpenNHP Documentation
[Skip to main content](https://docs.opennhp.org/server_plugin/#main-content)
Link Menu Expand (external link) Document Search Copy Copied
[](https://docs.opennhp.org/)
[](https://docs.opennhp.org/server_plugin/#opennhp-plugin-development-guide)
OpenNHP Plugin Development Guide
=============================================================================================================
[中文版](https://docs.opennhp.org/zh-cn/server_plugin/)
* * *
[](https://docs.opennhp.org/server_plugin/#table-of-contents)
Table of Contents
-------------------------------------------------------------------------------
* [Introduction](https://docs.opennhp.org/server_plugin/#introduction)
* [1\. The Necessity of Applying OpenNHP Plugins](https://docs.opennhp.org/server_plugin/#1-the-necessity-of-applying-opennhp-plugins)
* [1.1 Protocol Compatibility and Technical Limitations](https://docs.opennhp.org/server_plugin/#11-protocol-compatibility-and-technical-limitations)
* [1.2 Customization Needs for Authentication](https://docs.opennhp.org/server_plugin/#12-customization-needs-for-authentication)
* [2\. How the Plugin Works](https://docs.opennhp.org/server_plugin/#2-how-the-plugin-works)
* [2.1 User Initiates an HTTP Request via Browser](https://docs.opennhp.org/server_plugin/#21-user-initiates-an-http-request-via-browser)
* [2.2 NHP Server Parses the URL and Calls the Appropriate Plugin](https://docs.opennhp.org/server_plugin/#22-nhp-server-parses-the-url-and-calls-the-appropriate-plugin)
* [2.3 The Plugin Executes Core Functionality](https://docs.opennhp.org/server_plugin/#23-the-plugin-executes-core-functionality)
* [2.4 Plugin Completes the Code Execution Process](https://docs.opennhp.org/server_plugin/#24-plugin-completes-the-code-execution-process)
* [2.5 NHP Server Responds to the User with the HTTP Request Results](https://docs.opennhp.org/server_plugin/#25-nhp-server-responds-to-the-user-with-the-http-request-results)
* [3\. Plugin Development Principles](https://docs.opennhp.org/server_plugin/#3-plugin-development-principles)
* [3.1 Environment Setup](https://docs.opennhp.org/server_plugin/#31-environment-setup)
* [3.2 Project Initialization](https://docs.opennhp.org/server_plugin/#32-project-initialization)
* [3.3 Plugin Function Design](https://docs.opennhp.org/server_plugin/#33-plugin-function-design)
* [3.4 Core Code Development](https://docs.opennhp.org/server_plugin/#34-core-code-development)
* [3.5 Plugin Compilation, Testing, and Deployment](https://docs.opennhp.org/server_plugin/#35-plugin-compilation-testing-and-deployment)
* [Conclusion](https://docs.opennhp.org/server_plugin/#conclusion)
[](https://docs.opennhp.org/server_plugin/#introduction)
Introduction
---------------------------------------------------------------------
Plugins in the NHP server are modules that add specific features to the main application. They are designed to be highly modular and loosely coupled with the core application, allowing developers to add, remove, or update plugins without affecting the main functionality of the server.
[](https://docs.opennhp.org/server_plugin/#1-the-necessity-of-applying-opennhp-plugins)
1\. The Necessity of Applying OpenNHP Plugins
-------------------------------------------------------------------------------------------------------------------------------------
The development of OpenNHP plugins solves the compatibility issues between the UDP protocol and web-based HTTP requests, while also addressing the customization needs for authentication in government platforms. Developing plugins is crucial for further extending the NHP framework and adapting it to the flexible needs of government data flow applications. The reasons are as follows:
### [](https://docs.opennhp.org/server_plugin/#11-protocol-compatibility-and-technical-limitations)
1.1 Protocol Compatibility and Technical Limitations
The NHP standard protocol communicates over the UDP protocol, which is lightweight and fast, making it suitable for large-scale, high-frequency data transmissions. However, in certain scenarios, especially web-based interactions (e.g., HTML5 web pages), JavaScript running in a browser can only make HTTP requests and cannot directly send UDP requests. This creates a protocol incompatibility issue. Many modern government applications rely on web interactions, making plugin development essential to overcome this technical limitation.
By developing OpenNHP plugins, the NHP server can receive HTTP requests from web clients (often “knock packets”) and convert them into the UDP protocol needed for internal communication. This mechanism ensures seamless integration between web applications based on HTTP and the NHP server, extending the NHP framework’s application scope. It particularly enhances flexibility and compatibility in data transmission in scenarios involving browser-to-backend service interactions.
### [](https://docs.opennhp.org/server_plugin/#12-customization-needs-for-authentication)
1.2 Customization Needs for Authentication
Government data flow involves highly secure identity authentication and access management. However, standard authentication protocols cannot meet the complex needs of government scenarios. Different government platforms have their own authentication mechanisms and demand highly customized authentication processes. Traditional standard protocols are too rigid to flexibly integrate with these platforms.
OpenNHP plugins can interface with different government platforms by offering custom services to accommodate their authentication processes. The plugins allow developers to tailor the authentication mechanisms according to the specific requirements of different platforms, ensuring seamless integration with the NHP framework. This not only enhances authentication security but also ensures compliance and flexibility in data flow management.
[](https://docs.opennhp.org/server_plugin/#2-how-the-plugin-works)
2\. How the Plugin Works
-------------------------------------------------------------------------------------------
The entire plugin execution process covers the complete flow from user requests, server plugin parsing, plugin logic execution, to final feedback to the user. Each step ensures that the NHP server, via the plugin, meets the demands of various request processing scenarios, especially in authentication and “knock packet” handling.
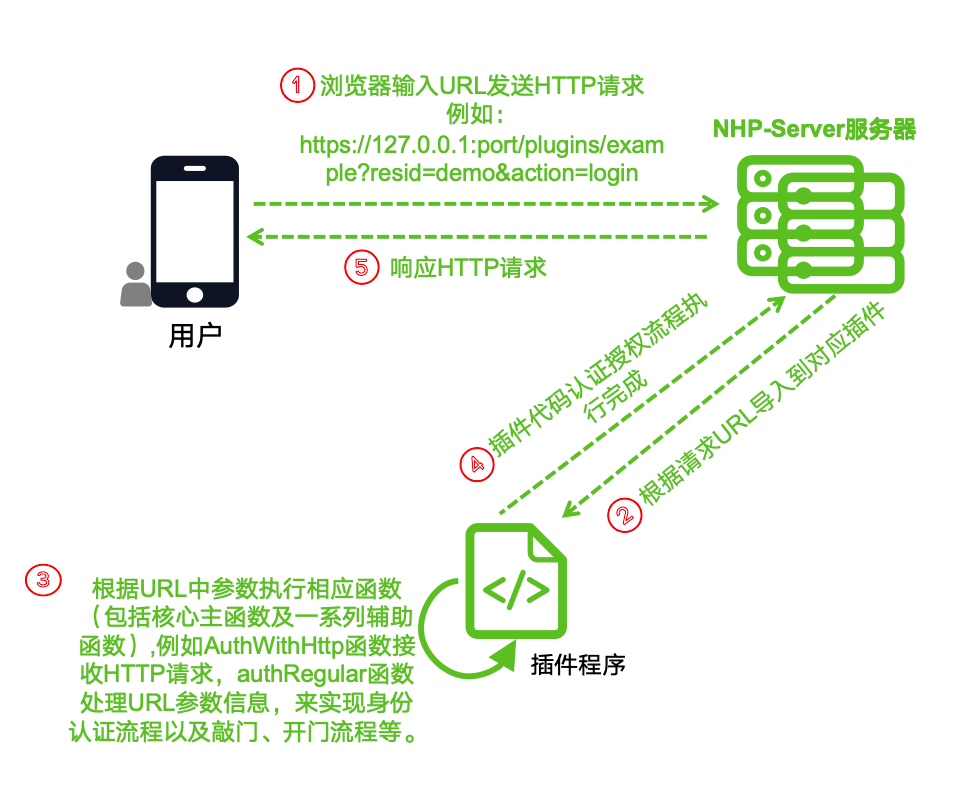
**_Figure 1: Plugin Workflow Diagram_**
### [](https://docs.opennhp.org/server_plugin/#21-user-initiates-an-http-request-via-browser)
2.1 User Initiates an HTTP Request via Browser
The user inputs a specific URL address in their browser, sending an HTTP request to the NHP server. For example, a user accesses the following URL:
* `http://127.0.0.1:port/plugins/example?resid=demo&action=login`
This is the starting point of the entire process, typically initiated by a webpage or application request that needs to be handled by the plugin.
| URL Component | Description |
| --- | --- |
| `127.0.0.1:port` | The first part is the IP address of the NHP server, followed by the port number |
| `plugins` | Plugin directory |
| `example` | Plugin name |
| `resid` | Plugin resource ID |
| `action` | The action to be executed, used to determine which auxiliary function the plugin performs |
**_Table 1: URL Component Breakdown_**
### [](https://docs.opennhp.org/server_plugin/#22-nhp-server-parses-the-url-and-calls-the-appropriate-plugin)
2.2 NHP Server Parses the URL and Calls the Appropriate Plugin
After the HTTP request reaches the NHP server, the server parses the URL path and parameters to determine which plugin to call. During this process, the NHP server identifies the `plugins/example` part of the URL and routes the request to the “example” plugin for processing.
### [](https://docs.opennhp.org/server_plugin/#23-the-plugin-executes-core-functionality)
2.3 The Plugin Executes Core Functionality
Based on the parameters in the URL (such as `resid=demo` and `action=login`), the plugin executes the corresponding functionality. The core functions of the plugin include authentication and a series of “knock packet” processing steps. The core functionality handles the main logic, while auxiliary functions provide support for tasks such as authentication and resource access.
### [](https://docs.opennhp.org/server_plugin/#24-plugin-completes-the-code-execution-process)
2.4 Plugin Completes the Code Execution Process
After processing the request and completing the authentication or other custom services, the plugin finishes its code execution process. This step is key to the core functionality of the plugin, where all authentication, authorization, or other logic is executed.
### [](https://docs.opennhp.org/server_plugin/#25-nhp-server-responds-to-the-user-with-the-http-request-results)
2.5 NHP Server Responds to the User with the HTTP Request Results
Once the plugin finishes its process, the result is sent back to the NHP server, which responds to the user via HTTP. The user will eventually see a feedback message in their browser, such as a confirmation message or relevant data or page update.
[](https://docs.opennhp.org/server_plugin/#3-plugin-development-principles)
3\. Plugin Development Principles
-------------------------------------------------------------------------------------------------------------
### [](https://docs.opennhp.org/server_plugin/#31-environment-setup)
3.1 Environment Setup
Before developing OpenNHP plugins, ensure the following environment is properly set up:
1. **Development Language**: Go language is used for development.
2. **Development Tools**: IDEs like IntelliJ IDEA or VS Code are recommended.
3. **OpenNHP source code**: Download and integrate the latest version of the OpenNHP code from GitHub into your development environment. Download URL: [https://github.com/OpenNHP/opennhp](https://github.com/OpenNHP/opennhp)
.
### [](https://docs.opennhp.org/server_plugin/#32-project-initialization)
3.2 Project Initialization
First, create a new plugin project under the `server/plugins` directory. For example, let’s create a plugin named “example.”
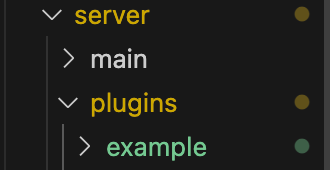
**_Figure 2: Example Plugin Parent Directory_**
Each plugin in the NHP server is typically structured as a separate Go package. For instance, the “example” plugin would be located in the `NHP/server/plugins/example` directory and would have its own `example.go` file.
The initialized project structure includes basic configuration files and the plugin framework, primarily consisting of the `etc` directory with configuration files (`config.toml`, `resource.toml`), the main program file `main.go`, and the automation build file `Makefile`. If the plugin requires integration with front-end pages, the `templates` directory and corresponding front-end HTML files can also be added.
A typical plugin file, such as `example.go`, contains the following:
* Necessary import statements
* Constants and variables related to the plugin
* Helper functions
* Main plugin function
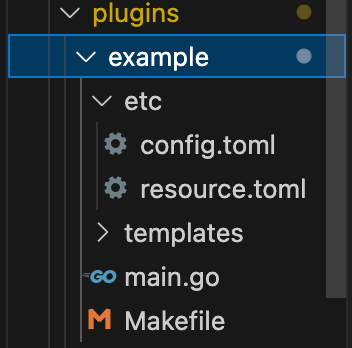
**_Figure 3: Example Plugin Directory Structure_**
| **_File/Directory Name_** | **_Purpose_** |
| --- | --- |
| etc | Contains configuration and resource files for the plugin |
| config.toml | Defines configuration details for the plugin during runtime |
| resource.toml | Defines resource-related information for the plugin |
| templates | Stores integrated front-end page templates (optional) |
| main.go | Main program file defining core functions and helper logic |
| Makefile | Automation build file |
**_Table 2: Plugin Directory and File Purposes_**
[](https://docs.opennhp.org/server_plugin/#33-plugin-function-design)
3.3 Plugin Function Design
------------------------------------------------------------------------------------------------
In the plugin function design phase, the following core points need to be clarified:
**_Data Flow Scenarios_**: Define the participants, permissions, and flow paths involved in the data circulation process.
**_Security Policies_**: Establish strict access control and verification mechanisms through a zero-trust architecture.
**_Logging and Auditing_**: Design comprehensive logging functionalities for subsequent tracing and auditing.
For example, the main functionality to be implemented by the “example” plugin is as follows:
1. Submit a form containing user name and password on the H5 page;
2. The NHP-Server server receives the form for verification. After the verification is successful, it initiates a knock on the NHP-AC server;
3. After NHP-AC successfully opens the door, it returns the application server address to the client;
4. Access application server resources.
[](https://docs.opennhp.org/server_plugin/#34-core-code-development)
3.4 Core Code Development
----------------------------------------------------------------------------------------------
The steps for developing the plugin for the NHP server are as follows:
1. Create a new directory for your plugin under NHP/server/plugins. The directory name should be the name of your plugin.
2. In the plugin directory, create a new Go file. The file name should be the same as the directory name. For example, for a plugin named myplugin, you would create a file named myplugin.go.
3. Define your plugin functions. Your plugin should have at least one main function that executes the core functionality of the plugin. You can also define auxiliary functions as needed.
4. Import your plugin in the main application. In the main application file (main.go), import your plugin package and call your plugin functions as needed.
Refer to the plug-in function design for code development. Taking the “example” plug-in as an example, the AuthWithHttp function is designed to receive and process HTTP requests, the authRegular function verifies the user name and password and knocks on the door, the authAndShowLogin function loads login page resources, etc., and verification auxiliary functions need to be designed to implement the functions. Expansion and development can be carried out according to specific functional requirements.



**_Figures 4, 5, 6 Example Plugin Core Code and Auxiliary Code Function Example_**
[](https://docs.opennhp.org/server_plugin/#35-plugin-compilation-testing-and-deployment)
3.5 Plugin Compilation Testing and Deployment
--------------------------------------------------------------------------------------------------------------------------------------
Testing and deployment of the plugin are crucial steps to ensure the completeness and stability of plugin functionality. Through local environment testing and optimization, developers can deploy the plugin in a way that ensures the correctness of its functionality. In the production environment, the plugin must be accurately configured, combined with security and operation strategies, to ensure that it meets business needs and runs stably in real applications. The specific steps are as follows:
**1\. Plugin Compilation**
The compilation process ensures that the plugin’s code is consistent with the main project, while the task dependencies in the Makefile ensure that the plugin’s build process is closely integrated with the main system’s compilation, achieving an integrated build and release process. The specific steps are as follows:
**_Define Plugin Directory_**: At the top of the Makefile, we can see a line of code defining the plugin directory, as shown in the image below:
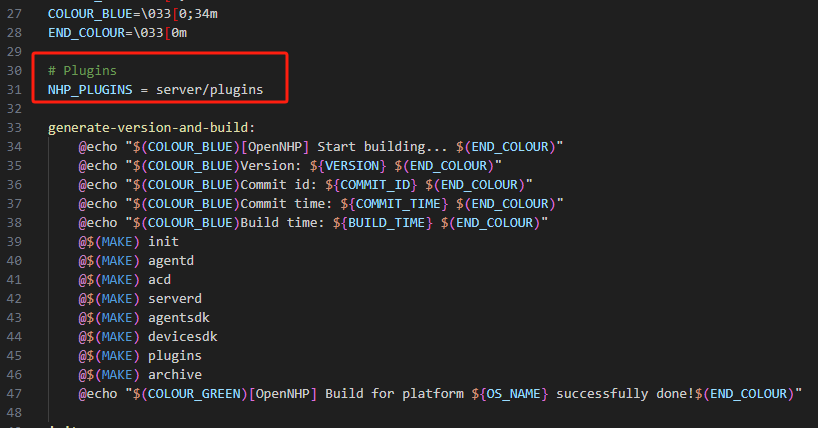
**_Figure 7 Define Plugin Directory_**
This line of code specifies the storage location of the plugin, which is the server/plugins directory. All plugin source codes and configuration files will be placed in this directory. When starting the NHP service, to ensure the plugin loads correctly, the plugin file path needs to be configured in the NHP-Server’s etc/resource.toml configuration file.
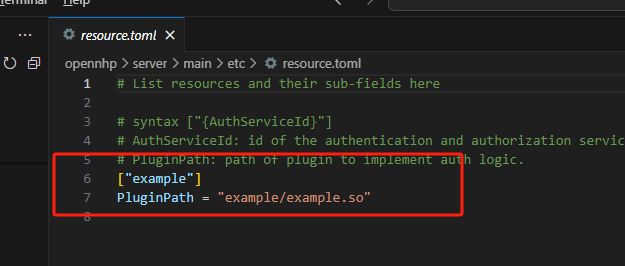
**_Figure 8 Plugin File Path Configuration_**
**_Generate Version Information and Start Build_**: The generate-version-and-build task includes a series of steps to generate version numbers, commit IDs, build times, and other information. This information is helpful for tracking the version and build status of the plugin.
**_Plugin Compilation Logic_**: In the Makefile, the plugins: task is responsible for executing the plugin compilation, as shown in the image below:
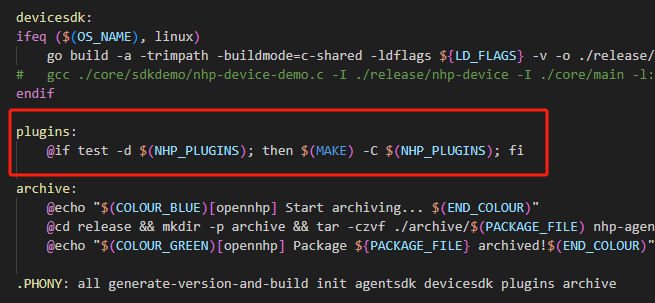
**_Figure 9 Plugin Compilation Task plugins_**
Plugin Directory Check: test -d $(NHP\_SERVER\_PLUGINS) checks if the defined plugin directory (server/plugins) exists.
Execute Compilation: If the plugin directory exists, $(MAKE) -C $(NHP\_SERVER\_PLUGINS) enters that directory and executes the Makefile within it, performing the compilation operation for the plugin.
**_Overall Compilation Process_**: During the overall project build process (Linux and macOS: run the script make in the root directory; Windows: run the BAT file build.bat in the root directory), the plugins task in the Makefile will be called. If the plugin directory exists and is valid, the plugin’s Makefile will be executed to complete the plugin’s build. During compilation, plugin binary files or other forms of output files may be generated for use by the NHP server.
**2\. Local Environment Function Testing**
To test your plugin, you can write a separate \_test.go file in the same directory as the plugin file to write unit tests. Go’s built-in testing package (testing) can be used to write and run tests.
Once the plugin development is complete and compiled successfully, it is necessary to perform functional testing in the local environment first. This step is primarily used to verify whether the core functionality of the plugin has been correctly implemented and to ensure that all functional modules of the plugin are working correctly. You can simulate actual application scenario requests to verify whether the plugin’s response meets expectations and check the logs for potential issues. Common testing steps include:
1. Initiate HTTP or UDP requests to test the plugin’s response;
2. Verify whether the identity authentication, knocking, opening, and authorization processes in the plugin are executed as expected;
3. Test the plugin’s error handling and exception capture mechanisms;
During the local testing phase, developers can use debugging tools, logging, and breakpoint debugging to thoroughly investigate and resolve potential issues in the code, ensuring the logic of the plugin is rigorous and free of major vulnerabilities.
**3\. Function Confirmation and Optimization**
After local environment testing passes, developers need to confirm and optimize the plugin’s functionality. Confirm whether the core functions of the plugin fully meet the description in the requirements document, and whether all expected functionalities have been correctly implemented. If certain functions of the plugin are found to be below expectations or have further optimization potential during testing, code adjustments and functionality optimizations can be made based on the test results.
**4\. Configuration and Deployment in Actual Application Scenarios**
Once local testing and optimization are complete, the plugin can proceed to the deployment phase in actual application scenarios. To deploy your plugin, simply build and run the main application. Your plugin will be included in the build and will be available when the server runs. During plugin deployment, it is usually necessary to configure according to the specific needs of the application scenario. The specific steps are as follows:
**_Deployment Environment Preparation_**: Ensure that the server configuration in the production environment is consistent or close to that of the local testing environment, including the operating system, network configuration, dependency libraries, etc.
**_Plugin Installation and Configuration_**: Deploy the tested plugin code to the production server, configuring it according to the requirements of the actual application scenario, including plugin paths, interface addresses, access control server addresses, authentication mechanisms, etc.
**_Logging and Monitoring Setup_**: After deployment, improve log level configuration to facilitate timely detection and resolution of issues during actual application.
**_Start NHP Service to Check Plugin Loading Status_**: Start the NHP service according to the NHP service startup process, check the plugin loading status based on the log files in the log directory, and verify whether the plugin functions normally according to the local plugin testing process.
**5\. Production Environment Validation and Maintenance**
After the plugin deployment is complete, it is necessary to validate its functionality in the actual application environment to ensure that the plugin works correctly in the production environment. After the plugin goes live, regular maintenance should also be carried out to continuously monitor the plugin’s performance, record operation data, and timely perform necessary updates and maintenance to ensure that the plugin remains in optimal condition during long-term use.
[](https://docs.opennhp.org/server_plugin/#conclusion)
Conclusion
-----------------------------------------------------------------
Developing plugins for the NHP server can extend the server’s functionality in a modular and maintainable way. By following the steps outlined above, you can create your own plugins and contribute to the NHP server project.
* * *
---
# Unknown
OpenClaw + DHP 安全增强架构
=====================
通过 **DHP(数据隐藏协议)** 对 **OpenClaw** 进行安全增强。用户的敏感数据(照片、邮件等)通过 NHP-DB(DHP数据经纪件)以零信任数据对象(ZTDO)的形式加密存储。当用户发起 AI 任务时,任务在**可信执行环境(TEE)**中运行,NHP代理在NHP服务器的控制下从NHP-DB获取加密数据并在TEE内解密,**全程敏感数据不出可信执行环境**。
核心安全特性
------
* **数据不出TEE**: 敏感数据仅在可信执行环境内解密和使用,AI任务处理完成后仅返回结果
* **远程证明**: NHP服务器通过远程证明验证TEE环境的完整性和可信度
* **一用一密**: 每次数据访问使用动态密钥,防止密钥泄露和重放攻击
* **零信任数据对象(ZTDO)**: 数据以加密形式存储和传输,一文一钥确保数据安全
---
# Unknown
OpenNHP Architecture
====================
The OpenNHP architecture follows the **NIST Zero Trust Architecture** standard with a modular design. Hover over components to learn more, or click **Show Flow** to see the protocol in action.
Protocol Highlights
-------------------
* **Default Deny-All**: All resources are hidden until authenticated access is granted
* **Encrypted UDP Knock**: Uses Noise Protocol Framework for secure communication
* **Time-Limited Access**: Opened paths automatically expire after the configured TTL
---
# About | OpenNHP Documentation
[Skip to main content](https://docs.opennhp.org/about/#main-content)
Link Menu Expand (external link) Document Search Copy Copied
[](https://docs.opennhp.org/)
[](https://docs.opennhp.org/about/#about-opennhp-project)
About OpenNHP Project
===============================================================================
OpenNHP is developed by a global community of passionate modern security enthusiasts.
[中文版](https://docs.opennhp.org/zh-cn/about/)
* * *
* * *
---
# 中文版 | OpenNHP Documentation
[Skip to main content](https://docs.opennhp.org/zh-cn/#main-content)
Link Menu Expand (external link) Document Search Copy Copied
[](https://docs.opennhp.org/)
[](https://docs.opennhp.org/zh-cn/#opennhp%E4%B8%AD%E6%96%87%E7%89%88%E6%96%87%E6%A1%A3)
OpenNHP中文版文档
=====================================================================================================
[English](https://docs.opennhp.org/)
* * *
* * *
Table of contents
-----------------
* [OpenNHP简介](https://docs.opennhp.org/zh-cn/overview/)
* [NHP快速开始](https://docs.opennhp.org/zh-cn/nhp_quick_start/)
* [DHP快速开始](https://docs.opennhp.org/zh-cn/dhp_quick_start/)
* [功能列表](https://docs.opennhp.org/zh-cn/features/)
* [加密算法](https://docs.opennhp.org/zh-cn/cryptography/)
* [对比NHP与SPA](https://docs.opennhp.org/zh-cn/comparison/)
* [部署OpenNHP](https://docs.opennhp.org/zh-cn/deploy/)
* [编译源代码](https://docs.opennhp.org/zh-cn/build/)
* [源代码解读](https://docs.opennhp.org/zh-cn/code/)
* [服务器插件开发](https://docs.opennhp.org/zh-cn/server_plugin/)
* [客户端SDK](https://docs.opennhp.org/zh-cn/agent_sdk/)
* [关于我们](https://docs.opennhp.org/zh-cn/about/)
* * *
---
# OpenNHP简介 | OpenNHP Documentation
[Skip to main content](https://docs.opennhp.org/zh-cn/overview/#main-content)
Link Menu Expand (external link) Document Search Copy Copied
[](https://docs.opennhp.org/)
[](https://docs.opennhp.org/zh-cn/overview/#opennhp%E9%9B%B6%E4%BF%A1%E4%BB%BB%E7%BD%91%E7%BB%9C%E9%9A%90%E8%BA%AB%E5%8D%8F%E8%AE%AE)
OpenNHP:零信任网络隐身协议
=======================================================================================================================================================
[English](https://docs.opennhp.org/)
* * *
[](https://docs.opennhp.org/zh-cn/overview/#%E7%AC%AC%E4%B8%80%E7%AB%A0%E5%AF%BC%E8%AF%BB)
第一章:导读
-------------------------------------------------------------------------------------------------
**NHP**是由中国计算机学会CCF发布的零信任网络隐身协议,对比零信任SDP(软件定义边界)中的**单包授权协议SPA**,具有更好的隐身性、更强的性能和可靠性、更灵活的扩展性、以及良好的信创兼容性。
**OpenNHP**是基于NHP标准的开发的开源软件项目。在上手OpenNHP项目前,建议阅读以下文章:
关于OpenNHP的代码结构与技术详解,请阅读:
* [《OpenNHP代码解读文档》](https://docs.opennhp.org/zh-cn/code/)
[](https://docs.opennhp.org/zh-cn/overview/#%E7%AC%AC%E4%BA%8C%E7%AB%A0opennhp%E7%9A%84%E5%85%BC%E5%AE%B9%E6%80%A7)
第二章:OpenNHP的兼容性
-----------------------------------------------------------------------------------------------------------------------------------
OpenNHP具备良好的兼容性,尤其是对信创生态的支持,以下是OpenNHP兼容的密码算法和软硬件。
### [](https://docs.opennhp.org/zh-cn/overview/#21-%E5%AF%86%E7%A0%81%E7%AE%97%E6%B3%95)
2.1 密码算法
| 国产密码算法 | _SM2、SM3、SM4_ |
| --- | --- |
| **国际密码算法** | **_Curve25519、AES、SHA256_** |
### [](https://docs.opennhp.org/zh-cn/overview/#22-%E6%93%8D%E4%BD%9C%E7%B3%BB%E7%BB%9F)
2.2 操作系统
| 操作系统 | 兼容性 |
| --- | --- |
| Windows | ✅ |
| 苹果MacOS | ✅ |
| 统信UOS | ✅ |
| 麒麟KylinOS | ✅ |
| 中电科普华OS | ✅ |
| 苹果iOS | ✅ |
| 安卓Android | ✅ |
### [](https://docs.opennhp.org/zh-cn/overview/#23-cpu%E6%8C%87%E4%BB%A4%E9%9B%86)
2.3 CPU指令集
| CPU类型 | 兼容性 |
| --- | --- |
| x86 | ✅ |
| ARM华为鲲鹏 | ✅ |
| LoongArch龙芯 | ✅ |
| SW申威 | ✅ |
* * *
---
# 功能列表 | OpenNHP Documentation
[Skip to main content](https://docs.opennhp.org/zh-cn/features/#main-content)
Link Menu Expand (external link) Document Search Copy Copied
[](https://docs.opennhp.org/)
[](https://docs.opennhp.org/zh-cn/features/#opennhp%E5%8A%9F%E8%83%BD%E5%88%97%E8%A1%A8)
OpenNHP功能列表
====================================================================================================
[English](https://docs.opennhp.org/features/)
* * *
* * *
---
# NHP快速开始 | OpenNHP Documentation
[Skip to main content](https://docs.opennhp.org/zh-cn/nhp_quick_start/#main-content)
Link Menu Expand (external link) Document Search Copy Copied
[](https://docs.opennhp.org/)
[](https://docs.opennhp.org/zh-cn/nhp_quick_start/#nhp%E5%BF%AB%E9%80%9F%E5%BC%80%E5%A7%8B)
NHP快速开始
===================================================================================================
一个本地搭建的 Docker 调试环境,模拟 nhp-server、nhp-ac、traefik、web-app 等。此环境可用于:
* 快速理解 opennhp 的运作方式
* 插件调试
* 基本逻辑验证
* 局部性能压力测试
[English](https://docs.opennhp.org/nhp_quick_start/)
* * *
[](https://docs.opennhp.org/zh-cn/nhp_quick_start/#1-%E6%A6%82%E8%BF%B0)
1\. 概述
-------------------------------------------------------------------------------
快速入门指南帮助开发人员快速设置 OpenNHP Docker 环境,构建源代码,并测试 OpenNHP 的关键功能。无论您是在探索 OpenNHP 如何使服务器对未经授权的扫描“不可见”,还是将其集成到现有的零信任架构中,本指南都提供了快速启动和运行的基本步骤。
### [](https://docs.opennhp.org/zh-cn/nhp_quick_start/#11-%E7%BD%91%E7%BB%9C%E6%8B%93%E6%89%91)
1.1 网络拓扑

| 容器名 | IP | 说明 |
| --- | --- | --- |
| NHP-Agent | 177.7.0.8 | nhp-agentd & nginx(默认均不运行),443->AC:80, 80-> NHP-Server:62206 |
| NHP-Server | 177.7.0.9 | nhp-serverd,开放端口 62206 |
| NHP-AC | 177.7.0.10 | nhp-acd & traefik,禁止任何端口访问 |
| Web app | 177.7.0.11 | 被保护的 Web app,只允许 NHP-AC 访问 8080 端口 |
### [](https://docs.opennhp.org/zh-cn/nhp_quick_start/#12-%E6%B5%8B%E8%AF%95%E5%9C%BA%E6%99%AF)
1.2 测试场景
| 场景 | 状态 | 期望结果 |
| --- | --- | --- |
| 场景一 | 隐身(对于未授权的用户) | ping 或者访问 NHP-AC Server 代理的 Web-app 失败 |
| 场景二 | 通过 NHP-Agent 敲门后 | 能正常访问通过 NHP-AC 防护的 Web-app |
| 场景三 | 通过 web 身份认证敲门后 | 能正常访问通过 NHP-AC 防护的 Web-app |
[](https://docs.opennhp.org/zh-cn/nhp_quick_start/#2-%E5%AE%89%E8%A3%85-docker-%E7%8E%AF%E5%A2%83)
2\. 安装 Docker 环境
-------------------------------------------------------------------------------------------------------------------
### [](https://docs.opennhp.org/zh-cn/nhp_quick_start/#21-docker-desktop-for-mac)
2.1 Docker Desktop for Mac
brew install --cask docker
或者从 Docker 官网下载 .dmg 文件手动安装: [https://www.docker.com/products/docker-desktop/](https://www.docker.com/products/docker-desktop/)
### [](https://docs.opennhp.org/zh-cn/nhp_quick_start/#22-docker-desktop-for-windows)
2.2 Docker Desktop for Windows
* 系统要求:
* Windows 10/11(64 位,专业版/企业版/家庭版)
* 启用 WSL 2(推荐)或 Hyper-V
* 安装步骤
* 下载 Docker Desktop:官网下载
* 运行安装程序,按提示完成安装。
安装完成后,启动 Docker Desktop。
[](https://docs.opennhp.org/zh-cn/nhp_quick_start/#3-%E6%A0%B9%E6%8D%AE%E6%9C%80%E6%96%B0%E4%BB%A3%E7%A0%81%E6%9E%84%E5%BB%BA%E5%9F%BA%E7%A1%80%E9%95%9C%E5%83%8F)
3\. 根据最新代码构建基础镜像
-----------------------------------------------------------------------------------------------------------------------------------------------------------------------------------
### [](https://docs.opennhp.org/zh-cn/nhp_quick_start/#31-%E8%8E%B7%E5%8F%96%E6%9C%80%E6%96%B0%E4%BB%A3%E7%A0%81)
3.1 获取最新代码
git clone https://github.com/OpenNHP/opennhp.git
### [](https://docs.opennhp.org/zh-cn/nhp_quick_start/#32-%E6%9E%84%E5%BB%BA-opennhp-base-%E9%95%9C%E5%83%8F)
3.2 构建 opennhp-base 镜像
**_注意: 先进入到 docker 目录(cd ./docker)_**
cd ./docker
docker build --no-cache -t opennhp-base:latest -f Dockerfile.base ../..
[](https://docs.opennhp.org/zh-cn/nhp_quick_start/#4-%E8%BF%90%E8%A1%8C%E4%B8%8E%E6%B5%8B%E8%AF%95)
4\. 运行与测试
-------------------------------------------------------------------------------------------------------------
以下启动命令,在启动过程会相应的构建 nhp-server、nhp-ac、web-app、nhp-agent 镜像,在实际调试过程中,可使用 `docker compose build [container_name]`(如:`docker compose build nhp-ac` 编译 nhp-ac)对服务单独编译
### [](https://docs.opennhp.org/zh-cn/nhp_quick_start/#41-%E5%90%AF%E5%8A%A8%E6%89%80%E6%9C%89%E6%9C%8D%E5%8A%A1)
4.1 启动所有服务
**_注意: 先进入到 docker 目录(cd ./docker)_**
cd ./docker
docker compose up -d
### [](https://docs.opennhp.org/zh-cn/nhp_quick_start/#42-%E5%9C%BA%E6%99%AF%E4%B8%80-%E9%9A%90%E8%BA%AB%E5%AF%B9%E4%BA%8E%E6%9C%AA%E6%8E%88%E6%9D%83%E7%9A%84%E7%94%A8%E6%88%B7)
4.2 场景一: 隐身(对于未授权的用户)
进入 nhp-agentd 容器进行验证 **_注意: 先进入到 docker 目录(cd ./docker)_**
cd ./docker
docker exec -it nhp-agent bash
默认情况下,通过 curl NHP-AC 会出现以下错误(保护中)
root@68a230812459:/workdir# curl -i http://177.7.0.10
curl: (28) Failed to connect to 177.7.0.10 port 80: Connection timed out
端口扫描验证,进入 NHP-Agent 容器 并安装 nmap
root@ee88ec992447:/# docker exec -it nhp-agent bash
root@ee88ec992447:/# apt-get update && apt-get install -y nmap
通过 NHP-Agent 扫描 NHP-AC 扫描不到任何端口
root@ee88ec992447:/# nmap 177.7.0.10
Starting Nmap 7.93 ( https://nmap.org ) at 2025-07-03 07:33 UTC
Nmap scan report for nhp-ac.docker_nginx (177.7.0.10)
Host is up (0.000044s latency).
All 1000 scanned ports on nhp-ac.docker_nginx (177.7.0.10) are in ignored states.
Not shown: 1000 filtered tcp ports (no-response)
MAC Address: 12:B4:5C:EB:72:F4 (Unknown)
Nmap done: 1 IP address (1 host up) scanned in 21.84 seconds
### [](https://docs.opennhp.org/zh-cn/nhp_quick_start/#43-%E5%9C%BA%E6%99%AF%E4%BA%8C-%E4%BD%BF%E7%94%A8-nhp-agentd-%E6%9C%8D%E5%8A%A1%E6%9D%A5%E6%95%B2%E9%97%A8)
4.3 场景二: 使用 nhp-agentd 服务来敲门
通过`nohup /nhp-agent/nhp-agentd run 2>&1 &` 命令来启动 nhp-agentd 服务后,访问正常,如下:
root@68a230812459:/workdir# nohup /nhp-agent/nhp-agentd run 2>&1 &
root@6e21724b68f1:/workdir# curl -i http://177.7.0.10
HTTP/1.1 200 OK
Content-Length: 26
Content-Type: application/json; charset=utf-8
Date: Tue, 08 Jul 2025 06:21:10 GMT
{"message":"Hello World!"}
当 nhp-agent 启动,可以扫描到 NHP-AC 的 80 端口
root@ee88ec992447:/# nmap 177.7.0.10
Starting Nmap 7.93 ( https://nmap.org ) at 2025-07-03 07:37 UTC
Nmap scan report for nhp-ac.docker_nginx (177.7.0.10)
Host is up (0.000094s latency).
Not shown: 999 filtered tcp ports (no-response)
PORT STATE SERVICE
80/tcp open http
MAC Address: 12:B4:5C:EB:72:F4 (Unknown)
Nmap done: 1 IP address (1 host up) scanned in 4.96 seconds
### [](https://docs.opennhp.org/zh-cn/nhp_quick_start/#44-%E5%9C%BA%E6%99%AF%E4%B8%89-%E4%BD%BF%E7%94%A8%E6%A8%A1%E6%8B%9F%E6%8E%88%E6%9D%83%E6%9C%8D%E5%8A%A1%E7%9A%84%E7%99%BB%E5%BD%95%E6%9D%A5%E9%AA%8C%E8%AF%81)
4.4 场景三: 使用模拟授权服务的登录来验证
停止 nhp-agentd 服务,并启动 NHP-Agent 容器中的 nginx
root@6e21724b68f1:/workdir# ps -aux|grep nhp-agentd
root 38 0.3 0.2 1974072 20448 pts/0 Sl 02:55 0:00 /nhp-agent/nhp-agentd run
root 51 0.0 0.0 2844 1424 pts/0 S+ 02:55 0:00 grep --color=auto nhp-agentd
root@6e21724b68f1:/workdir# kill 38
root@6e21724b68f1:/workdir# nginx
访问:[http://localhost/plugins/example?resid=demo&action=login](http://localhost/plugins/example?resid=demo&action=login)
* 预期页面正常显示
* 敲门前访问:[https://localhost/](https://localhost/)
超时(504 Gateway Time-out)
* 点击登录(敲门后),页面正常跳转,并能正常访问 [https://localhost/](https://localhost/)
(注:开门时间为 15s,15s后禁止访问)
* 在 NHP-Agent 容器内,通过 `curl -i http://177.7.0.10` 能正常显示内容
* 当点击登录(敲门后),可以扫描到 NHP-AC 的 80 端口
root@ee88ec992447:/# nmap 177.7.0.10
Starting Nmap 7.93 ( https://nmap.org ) at 2025-07-03 07:37 UTC
Nmap scan report for nhp-ac.docker_nginx (177.7.0.10)
Host is up (0.000094s latency).
Not shown: 999 filtered tcp ports (no-response)
PORT STATE SERVICE
80/tcp open http
MAC Address: 12:B4:5C:EB:72:F4 (Unknown)
Nmap done: 1 IP address (1 host up) scanned in 4.96 seconds
### [](https://docs.opennhp.org/zh-cn/nhp_quick_start/#45-%E9%AA%8C%E8%AF%81-ipset-%E8%A7%84%E5%88%99%E6%98%AF%E5%90%A6%E7%94%9F%E6%95%88)
4.5 验证 ipset 规则是否生效
docker exec -it nhp-ac ipset list
通过 nhp-agentd 或 授权插件敲门后,如果 NHP-AC 的 ipset 中出现以下结果,则表示规则写入成功,这意味着敲门成功: **_Name: defaultset Rules_**
Name: defaultset
Type: hash:ip,port,ip
Revision: 5
Header: family inet hashsize 1024 maxelem 1000000 timeout 120 counters
Size in memory: 656
References: 7
Number of entries: 2
Members:
177.7.0.8,udp:80,177.7.0.10 timeout 8 packets 0 bytes 0
177.7.0.8,tcp:80,177.7.0.10 timeout 8 packets 90 bytes 14565
Name: defaultset_down
Type: hash:ip,port,ip
Revision: 5
Header: family inet hashsize 1024 maxelem 1000000 timeout 121 counters
Size in memory: 208
References: 2
Number of entries: 0
Members:
Name: tempset
Type: hash:net,port
Revision: 7
Header: family inet hashsize 1024 maxelem 1000000 timeout 5 counters
Size in memory: 456
References: 2
Number of entries: 0
Members:
[](https://docs.opennhp.org/zh-cn/nhp_quick_start/#5-%E4%BF%AE%E6%94%B9%E4%BB%A3%E7%A0%81%E9%87%8D%E6%96%B0%E6%9E%84%E5%BB%BA%E9%95%9C%E5%83%8F%E5%B9%B6%E8%B0%83%E8%AF%95)
5\. 修改代码重新构建镜像并调试
---------------------------------------------------------------------------------------------------------------------------------------------------------------------------------------------
在实际的调试中,修改完代码后,可以使用 `docker compose build [container_name]` (如:`docker compose build nhp-ac` 构建 nhp-ac 镜像) 来重新构建相应的服务来进行调试
### [](https://docs.opennhp.org/zh-cn/nhp_quick_start/#51-%E4%BB%A3%E7%A0%81%E4%BF%AE%E6%94%B9)
5.1 代码修改
用 IDE 打开项目(如:vscode)并修改 OpenNHP 源代码。
### [](https://docs.opennhp.org/zh-cn/nhp_quick_start/#52-%E9%87%8D%E6%96%B0%E6%9E%84%E5%BB%BA%E6%9C%8D%E5%8A%A1%E5%B9%B6%E8%B0%83%E8%AF%95)
5.2 重新构建服务并调试
采用以下方式对相应修改的服务进行重新构建并调试
### [](https://docs.opennhp.org/zh-cn/nhp_quick_start/#521-%E9%87%8D%E6%96%B0%E6%9E%84%E5%BB%BA-nhp-server-%E5%B9%B6%E5%90%AF%E5%8A%A8)
5.2.1 重新构建 nhp-server 并启动
cd ./docker
docker compose build nhp-server
docker stop nhp-server && docker rm nhp-server
docker compose up -d
### [](https://docs.opennhp.org/zh-cn/nhp_quick_start/#522-%E9%87%8D%E6%96%B0%E6%9E%84%E5%BB%BA-nhp-ac-%E5%B9%B6%E5%90%AF%E5%8A%A8)
5.2.2 重新构建 nhp-ac 并启动
cd ./docker
docker compose build nhp-ac
docker stop nhp-ac && docker rm nhp-ac
docker compose up -d
* * *
---
# 加密算法 | OpenNHP Documentation
[Skip to main content](https://docs.opennhp.org/zh-cn/cryptography/#main-content)
Link Menu Expand (external link) Document Search Copy Copied
[](https://docs.opennhp.org/)
[](https://docs.opennhp.org/zh-cn/cryptography/#%E5%8A%A0%E5%AF%86%E7%AE%97%E6%B3%95)
加密算法
==========================================================================================
加密是 OpenNHP 的核心,通过利用尖端的加密算法提供强大的安全性、卓越的性能和可扩展性。
[English](https://docs.opennhp.org/cryptography/)
* * *
本文解释了 OpenNHP 如何在多个关键领域中利用现代加密算法的优势:
1. [公私钥加密算法](https://docs.opennhp.org/zh-cn/cryptography/#1-%E5%85%AC%E7%A7%81%E9%92%A5%E5%8A%A0%E5%AF%86%E7%AE%97%E6%B3%95)
2. [密钥交换、数据加密和身份认证](https://docs.opennhp.org/zh-cn/cryptography/#2%E5%AF%86%E9%92%A5%E4%BA%A4%E6%8D%A2%E6%95%B0%E6%8D%AE%E5%8A%A0%E5%AF%86%E5%92%8C%E8%BA%AB%E4%BB%BD%E8%AE%A4%E8%AF%81)
3. [密钥分发和管理](https://docs.opennhp.org/zh-cn/cryptography/#3-%E5%AF%86%E9%92%A5%E7%AE%A1%E7%90%86%E4%B8%8E%E5%88%86%E5%8F%91)
[](https://docs.opennhp.org/zh-cn/cryptography/#1-%E5%85%AC%E7%A7%81%E9%92%A5%E5%8A%A0%E5%AF%86%E7%AE%97%E6%B3%95)
1) 公私钥加密算法
-----------------------------------------------------------------------------------------------------------------------------
### [](https://docs.opennhp.org/zh-cn/cryptography/#11-%E7%AE%80%E4%BB%8B)
1.1 简介
在不断变化的网络安全环境中,保护通信和网络资源至关重要,特别是在网络威胁日益复杂的情况下。网络基础设施隐藏协议(NHP),作为一种零信任安全机制,致力于通过隐藏网络基础设施细节来防止攻击者入侵,并确保只有受信任的实体能够与网络资源交互。NHP 安全模型的关键组件是椭圆曲线加密(ECC)用于公钥加密。在本文中,我们将探讨 ECC 如何集成到 NHP 零信任协议中,以提供强大且高效的安全性。
椭圆曲线加密(ECC)是一种现代公钥加密方法,相较于传统方法如 RSA,它能在显著更小的密钥尺寸下提供相同级别的安全性。ECC 依赖于有限域上椭圆曲线的数学特性,提供了安全性与性能之间的良好平衡。由于其降低了计算开销,ECC 特别适用于资源受限的环境,如嵌入式系统或移动设备。公钥加密是基于非对称密钥对的加密方法,通常包括一个公开的公钥和一个私密的私钥。通过公钥加密,可以实现安全的数据传输、身份验证和数字签名等功能,从而确保通信双方的数据安全性和身份真实性。
### [](https://docs.opennhp.org/zh-cn/cryptography/#12-%E4%BB%80%E4%B9%88%E6%98%AF%E6%A4%AD%E5%9C%86%E6%9B%B2%E7%BA%BF%E5%8A%A0%E5%AF%86)
1.2 什么是椭圆曲线加密?
椭圆曲线加密(ECC)是一种基于椭圆曲线数学理论的公钥加密技术。它通过椭圆曲线方程上的点运算,提供与传统方法(如 RSA)相同的安全性,但密钥尺寸更小,计算效率更高。ECC 的安全性源于椭圆曲线离散对数问题,其计算复杂度使得破解难度极大。
在 ECC 中,参与方通过生成公私钥对,利用椭圆曲线 Diffie-Hellman(ECDH)协议来交换密钥。ECC 的数学基础是使用有限域上的椭圆曲线方程:
y^2 = x^3 + ax + b
其中 a 和 b 是定义曲线特性的常数,曲线上的点集具有特定的加法运算规则。
ECC 的主要优势包括:
* **更小的密钥尺寸**:ECC 能在更小的密钥长度下实现相同的安全性,从而降低了存储和计算的负担。
* **增强的安全性**:ECC 基于椭圆曲线离散对数问题,其数学复杂性使其非常难以破解。
* **高效性**:相比传统加密方法如 RSA,ECC 的加密和解密操作速度更快,适用于资源受限的设备(如嵌入式系统和移动设备)。
NHP 使用 ECC 进行密钥交换、数据加密和身份验证,以及通过无证书公钥加密(CL-PKC)进行密钥分发和管理。
### [](https://docs.opennhp.org/zh-cn/cryptography/#13-%E5%AE%89%E5%85%A8%E9%80%9A%E4%BF%A1%E4%B8%AD%E7%9A%84-ecc)
1.3 安全通信中的 ECC
#### [](https://docs.opennhp.org/zh-cn/cryptography/#131-%E5%AF%86%E9%92%A5%E4%BA%A4%E6%8D%A2%E6%9C%BA%E5%88%B6)
1.3.1 密钥交换机制
加密密钥的安全交换是任何安全通信协议的核心。NHP 使用椭圆曲线 Diffie-Hellman(ECDH)作为其密钥交换机制。在 ECDH 密钥交换中,通信双方使用椭圆曲线生成公私密钥对,然后交换公钥,以便双方计算出共享密钥,而无需直接在网络上传递。
使用 ECDH 的好处有两个方面:首先,它提供了前向安全性,即使在未来某一方的私钥被泄露,先前建立的会话密钥仍然是安全的。其次,由于 ECC 的高效性,密钥交换过程计算负担较轻,确保密钥建立过程快速完成且计算成本低。
#### [](https://docs.opennhp.org/zh-cn/cryptography/#132-%E6%95%B0%E5%AD%97%E7%AD%BE%E5%90%8D%E8%BA%AB%E4%BB%BD%E9%AA%8C%E8%AF%81)
1.3.2 数字签名身份验证
在零信任环境中,身份验证至关重要。NHP 使用椭圆曲线数字签名算法(ECDSA)来验证试图访问网络资源的实体的身份。ECDSA 是一种基于 ECC 的数字签名方案,它允许设备在不暴露敏感私钥的情况下证明其身份。
在 NHP 协议中,当某个实体希望与网络通信时,它必须使用其私钥生成数字签名,接收方可以使用相应的公钥来验证签名的有效性。这确保了只有合法的实体可以参与网络,从而有效地实施零信任模型的 “永不信任,始终验证” 原则。
#### [](https://docs.opennhp.org/zh-cn/cryptography/#133-%E6%95%B0%E6%8D%AE%E4%BF%9D%E5%AF%86%E5%8A%A0%E5%AF%86)
1.3.3 数据保密加密
NHP 在通信过程中使用对称加密来确保数据的保密性,但对称密钥必须在实体之间安全地分发和共享。ECC 通过 ECDH 提供安全的对称密钥分发渠道,确保对称密钥可以安全地交换。
一旦这些密钥交换完成,NHP 就会切换到对称加密进行数据传输,从中受益于对称加密算法的速度和效率。ECC 确保对称密钥交换既安全又高效。
#### [](https://docs.opennhp.org/zh-cn/cryptography/#134-%E6%97%A0%E8%AF%81%E4%B9%A6%E5%85%AC%E9%92%A5%E5%8A%A0%E5%AF%86%E4%B8%AD%E7%9A%84%E5%AF%86%E9%92%A5%E7%AE%A1%E7%90%86%E4%B8%8E%E5%88%86%E5%8F%91)
1.3.4 无证书公钥加密中的密钥管理与分发
NHP 还通过无证书公钥加密(CL-PKC)使用 ECC 进行密钥管理和分发。在传统的公钥基础设施中,证书被用来验证公钥,这在证书管理方面引入了复杂性。CL-PKC 通过允许实体与受信任的中心合作生成部分私钥,同时独立生成自己的密钥对,从而消除了证书的需要。
这种方法简化了密钥管理,确保公钥可以在没有证书颁发和验证的情况下安全使用。通过在 CL-PKC 中使用 ECC,NHP 提供了一种轻量级且安全的密钥分发方式,通过消除对集中式证书机构的依赖,进一步增强了零信任模型。
### [](https://docs.opennhp.org/zh-cn/cryptography/#14-%E4%BD%BF%E7%94%A8-ecc-%E7%9A%84%E4%BC%98%E5%8A%BF)
1.4 使用 ECC 的优势
NHP 零信任协议中使用 ECC 提供了众多符合其安全目标的优势:
* **可扩展安全性**:ECC 较小的密钥尺寸提供了强大的安全性,能很好地适应对抗对手计算能力不断增强的情况。随着 NHP 致力于为多样化的网络部署提供零信任环境,ECC 的可扩展性是一项关键资产。
* **资源效率**:相比传统公钥加密,ECC 减少了网络设备的计算负担。在网络资源可能受限的环境中——如边缘设备或物联网组件——这种高效性对于在不牺牲安全性的情况下保持高性能至关重要。
* **性能提升**:结合 ECDH 的密钥交换、ECDSA 的身份验证以及高效的对称加密提供了一个平衡的安全通信解决方案。这种平衡的方法使得 NHP 能够实现零信任的目标,同时保持较低的延迟,这对时间敏感的网络应用尤为关键。
### [](https://docs.opennhp.org/zh-cn/cryptography/#15-%E7%BB%93%E8%AE%BA)
1.5 结论
将椭圆曲线加密集成到 NHP 零信任协议中,提供了一种在最小性能影响下保护网络通信的强大手段。通过利用 ECDH 进行安全的密钥交换、ECDSA 进行可靠的身份验证,以及高效的对称加密进行数据传输,ECC 支持零信任模型的目标,即隐藏网络基础设施,确保只有受信任的实体可以访问资源,并以低开销保持安全性。
随着网络威胁变得越来越复杂,像 ECC 这样的先进加密技术在 NHP 协议中的应用对于保持对攻击者的优势至关重要。ECC 和 NHP 之间的协同作用不仅有助于保护关键的网络基础设施,还确保安全措施既强大又高效——这是任何现代网络安全项目成功的关键组合。
网络基础设施隐藏协议(NHP)基于零信任安全模型构建,确保即使在潜在攻击者的存在下也能实现安全通信。为此,NHP 集成了 Noise 协议框架,这是一个用于安全且灵活的密钥交换、数据加密和身份验证的加密框架。该组合以最小的计算开销提供了强大的安全性。
[](https://docs.opennhp.org/zh-cn/cryptography/#2%E5%AF%86%E9%92%A5%E4%BA%A4%E6%8D%A2%E6%95%B0%E6%8D%AE%E5%8A%A0%E5%AF%86%E5%92%8C%E8%BA%AB%E4%BB%BD%E8%AE%A4%E8%AF%81)
2)密钥交换、数据加密和身份认证
----------------------------------------------------------------------------------------------------------------------------------------------------------------------------------------
### [](https://docs.opennhp.org/zh-cn/cryptography/#21-%E7%AE%80%E4%BB%8B)
2.1 简介
#### [](https://docs.opennhp.org/zh-cn/cryptography/#211-%E5%AF%86%E9%92%A5%E4%BA%A4%E6%8D%A2%E6%9C%BA%E5%88%B6)
2.1.1. 密钥交换机制
NHP 利用 Noise 协议的密钥交换机制来确保通信双方之间的安全认证通道。密钥交换从握手阶段开始,双方交换 Diffie-Hellman (DH) 公钥。在 Noise 中,每一方生成一个临时密钥对,并使用交换的公钥派生出共享密钥,该共享密钥随后用于加密后续通信。
Noise 允许 NHP 支持长期静态密钥和临时密钥以增强安全性。Noise 框架的握手模式的灵活性使得 NHP 能够根据特定使用场景定制握手过程,提供相互认证、匿名发起者或初始握手本身加密的选项。通过利用 Noise 的基于令牌的握手系统,NHP 可以精确控制密钥交换消息的顺序,同时保持身份信息的机密性。
#### [](https://docs.opennhp.org/zh-cn/cryptography/#212-%E6%95%B0%E6%8D%AE%E5%8A%A0%E5%AF%86)
2.1.2 数据加密
共享密钥在握手期间派生出来后,Noise 框架使用对称加密来保护数据。NHP 利用 Noise 的 CipherState 和 SymmetricState 对象,这些是 Noise 状态机的核心组件,用于管理通信会话的加密和解密密钥。
特别地,握手期间派生的共享密钥用于初始化对称加密密钥(k)和随机数(n),用于数据加密。Noise 支持高级加密方案,如 ChaCha20-Poly1305 或 AES-GCM,提供带有附加数据认证加密(AEAD),以维护数据的保密性和完整性。链式密钥(ck)和握手散列(h)用于在会话过程中不断派生新的密钥,增强前向安全性,确保一个密钥的泄露不会危及通信的其他部分。
NHP 通过这些加密属性提供网络数据的加密通道,确保任何被拦截的数据在没有派生密钥的情况下无法被解密。
#### [](https://docs.opennhp.org/zh-cn/cryptography/#213-%E8%BA%AB%E4%BB%BD%E9%AA%8C%E8%AF%81)
2.1.3 身份验证
Noise 通过将静态密钥的交换与 Diffie-Hellman 操作相结合来实现身份验证。在 NHP 中,身份验证发生在握手期间,其中静态密钥被加密并通过共享的 DH 操作进行验证,有效地将双方的公钥绑定到派生的会话密钥上。
在握手过程中,Noise 使用诸如 “s”(静态)和 “e”(临时)等令牌来指示正在交换和验证哪些密钥。这种基于令牌的方法使得 NHP 能够根据具体的使用场景选择性地认证单方或双方。例如,Noise 中的 “XX” 模式提供相互认证,而 “NK” 模式允许单方认证的握手,赋予 NHP 在身份验证严格性方面的灵活性。
为了进一步保护身份信息,Noise 可以在握手期间加密静态密钥。NHP 利用这一特性来防止窃听者发现参与者的身份,从而支持零信任模型,确保参与者的身份只对预期的对方可见,而不对第三方泄露。
### [](https://docs.opennhp.org/zh-cn/cryptography/#22-%E7%AE%97%E6%B3%95%E5%92%8C%E5%85%AC%E5%BC%8F)
2.2 算法和公式
#### [](https://docs.opennhp.org/zh-cn/cryptography/#221-diffie-hellman-%E5%AF%86%E9%92%A5%E4%BA%A4%E6%8D%A2)
2.2.1 Diffie-Hellman 密钥交换
Diffie-Hellman(DH)密钥交换用于在两方之间派生共享密钥,每一方生成一个私钥(a 对于 A,b 对于 B)并计算公共密钥:
* A 计算其公钥:A\_pub = g^a mod p
* B 计算其公钥:B\_pub = g^b mod p
共享密钥 s 通过以下方式计算:
* A 计算:s = B\_pub^a mod p
* B 计算:s = A\_pub^b mod p
该共享密钥 s 对于双方是相同的,用于派生加密密钥。
#### [](https://docs.opennhp.org/zh-cn/cryptography/#222-%E5%AF%B9%E7%A7%B0%E5%8A%A0%E5%AF%86)
2.2.2 对称加密
NHP 使用对称加密确保数据机密性。密钥(k)和随机数(n)用于加密函数。对于带有附加数据认证加密(AEAD),通常使用 ChaCha20-Poly1305 算法,该算法结合了流密码(ChaCha20)和消息验证码(Poly1305)。
* 加密:c = ChaCha20(k, n, plaintext)
* | | | |
| --- | --- | --- |
| 认证:tag = Poly1305(k, associated data | | c) |
密文(c)和标签一起传输,确保数据的机密性和完整性。
#### [](https://docs.opennhp.org/zh-cn/cryptography/#223-%E5%AF%86%E9%92%A5%E6%B4%BE%E7%94%9F%E5%92%8C%E6%95%A3%E5%88%97)
2.2.3 密钥派生和散列
Noise 使用基于 HMAC 的密钥派生函数(KDF)来派生密钥。HKDF(基于 HMAC 的密钥派生函数)用于从共享密钥(s)生成多个密钥。
HKDF 步骤:
* temp\_key = HMAC(chaining\_key, input\_key\_material)
* output1 = HMAC(temp\_key, 0x01)
* | | | |
| --- | --- | --- |
| output2 = HMAC(temp\_key, output1 | | 0x02) |
派生的密钥用于加密和维护链式密钥(ck),以确保前向安全性。
#### [](https://docs.opennhp.org/zh-cn/cryptography/#224-%E8%BA%AB%E4%BB%BD%E8%AE%A4%E8%AF%81)
2.2.4 身份认证
身份验证在 NHP 中涉及静态和临时密钥的交换,以验证参与方。静态(s)和临时(e)密钥之间的 Diffie-Hellman 操作产生唯一的共享值,用于验证参与方的身份。
身份验证操作包括:
* ss = DH(s\_A, s\_B)
* es = DH(e\_A, s\_B) 或 DH(s\_A, e\_B)
* ee = DH(e\_A, e\_B)
这些值通过散列结合起来派生最终的会话密钥,有效地将身份绑定到密钥交换过程中,确保只有预期的参与方能够派生出正确的会话密钥。
### [](https://docs.opennhp.org/zh-cn/cryptography/#23-%E7%BB%93%E8%AE%BA)
2.3 结论
Noise 协议框架为 NHP 提供了灵活且强大的加密机制,确保了通信的安全性和参与方身份的验证。通过支持多种握手模式和加密方案,Noise 框架增强了网络的前向安全性和身份保护能力,有效支持了零信任环境下的安全通信需求。结合 Diffie-Hellman 密钥交换、对称加密和基于令牌的身份验证,Noise 框架为 NHP 提供了实现其零信任目标的强大工具。
[](https://docs.opennhp.org/zh-cn/cryptography/#3-%E5%AF%86%E9%92%A5%E7%AE%A1%E7%90%86%E4%B8%8E%E5%88%86%E5%8F%91)
3) 密钥管理与分发
-----------------------------------------------------------------------------------------------------------------------------
### [](https://docs.opennhp.org/zh-cn/cryptography/#31-%E7%AE%80%E4%BB%8B)
3.1 简介
无证书公钥加密(Certificateless Public Key Cryptography,CL-PKC),最初由 Al-Riyami 和 Paterson 在 2003 年提出,提供了一种混合解决方案,在不依赖传统证书机构(CA)的情况下确保强加密保证。本文探讨了 NHP 如何利用 CL-PKC 在不依赖证书的情况下实现高效且安全的密钥管理。
在传统的公钥基础设施(PKI)中,证书机构(CAs)作为可信的第三方,负责签发和管理公钥证书以验证用户密钥的真实性。虽然这种模型有效,但它引入了复杂性和风险,例如对 CA 的依赖以及 CA 受到攻击时的风险。无证书公钥加密旨在通过消除证书的使用来缓解这些问题,同时确保公钥的真实性。
在 CL-PKC 系统中,一个称为密钥生成中心(KGC)的可信第三方负责为用户生成部分私钥。然而,与 CA 不同的是,KGC 无法访问完整的私钥,因此不可能冒充用户。每个用户将 KGC 提供的部分私钥与他们自己的秘密值结合起来,生成完整的私钥和公钥。这种方法减少了对任何单一实体的信任,并提供了额外的安全层。
NHP 零信任协议集成了 CL-PKC 来管理其安全通信框架的密钥分发和验证。下面,我们解释 CL-PKC 的各种机制如何为 NHP 的密钥管理过程做出贡献。
#### [](https://docs.opennhp.org/zh-cn/cryptography/#311-%E9%83%A8%E5%88%86%E5%AF%86%E9%92%A5%E7%94%9F%E6%88%90)
3.1.1. 部分密钥生成
KGC 负责创建系统范围的参数,包括主公私钥对。主私钥由 KGC 保密,而主公钥则分发给所有参与者。当新用户希望加入网络时,KGC 执行以下步骤:
* 生成用户的部分私钥,使用他们的唯一标识符(例如电子邮件或其他身份信息)。这确保每个用户的部分密钥与其身份绑定,提供基于身份的安全性。
##### [](https://docs.opennhp.org/zh-cn/cryptography/#312-%E7%94%A8%E6%88%B7%E7%89%B9%E5%AE%9A%E5%AF%86%E9%92%A5%E5%AF%B9%E7%94%9F%E6%88%90)
3.1.2 用户特定密钥对生成
用户随后选择自己的秘密值,并将其与 KGC 提供的部分私钥结合起来,生成完整的私钥。具体步骤如下:
* 用户选择一个秘密值 (d’\_A),并使用它来生成一个点 U\_A:
U\_A = \[d’\_A\]G
* 用户将 KGC 提供的部分私钥 (t\_A) 与自己的秘密值 (d’\_A) 相结合,计算出完整的私钥 (d\_A):
d\_A = (t\_A + d’\_A) mod n
* 用户使用完整的私钥生成相应的公钥 (P\_A):
P\_A = W\_A + \[l\]P\_pub
用户随后选择自己的秘密值,并将其与 KGC 提供的部分私钥结合起来,生成完整的私钥。用户的公钥也相应生成。
这种密钥分发方法确保 KGC 无法单方面确定用户的私钥,从而降低了密钥生成中心被攻破的风险。此外,不需要传统证书意味着用户无需依赖外部证书机构来验证密钥,从而减少了中间人(MITM)攻击的攻击面。
在像 NHP 实施的这种无证书系统中,公钥的真实性通过隐式的方法而不是依赖 CA 签发的证书来验证。具体来说,用户的公钥是使用系统参数、用户标识符和 KGC 的主公钥计算出来的。该计算是确定性的,允许任何一方在无需信任 CA 或存储大量证书数据库的情况下验证公钥的真实性。
通过消除传统证书的需要,NHP 能够简化密钥验证过程,消除证书吊销列表(CRLs)和其他 PKI 复杂性。这种方法不仅减少了通信开销,还通过消除对可信第三方的依赖增强了安全性,因为这些第三方可能成为攻击者的目标。
### [](https://docs.opennhp.org/zh-cn/cryptography/#32-%E7%AE%97%E6%B3%95%E5%92%8C%E5%85%AC%E5%BC%8F)
3.2 算法和公式
#### [](https://docs.opennhp.org/zh-cn/cryptography/#321-%E7%B3%BB%E7%BB%9F%E5%8F%82%E6%95%B0%E7%94%9F%E6%88%90)
3.2.1 系统参数生成
密钥生成中心(KGC)负责生成系统参数,这些参数包括椭圆曲线 (E) 定义在有限域 (ℚ\_q) 上,基点 (G) 的素数阶 (n),以及主私钥 (ms)。KGC 计算主公钥 (P\_pub) 如下:
P\_pub = \[ms\]G
其中 \[ms\]G 表示基点 G 与主私钥 ms 的标量乘法。
#### [](https://docs.opennhp.org/zh-cn/cryptography/#322-%E9%83%A8%E5%88%86%E7%A7%81%E9%92%A5%E7%94%9F%E6%88%90)
3.2.2 部分私钥生成
对于每个用户(标识符为 ID\_A),KGC 生成部分私钥。首先,KGC 根据用户的标识符和系统参数计算哈希值 (H\_A):
| | | | | | | | | | | | | | | |
| --- | --- | --- | --- | --- | --- | --- | --- | --- | --- | --- | --- | --- | --- | --- |
| H\_A = H(ENTL\_A | | ID\_A | | a | | b | | x\_G | | y\_G | | x\_P\_pub | | y\_P\_pub) |
其中 (ENTL\_A) 是由标识符派生的长度值,(x\_G, y\_G) 和 (x\_P\_pub, y\_P\_pub) 分别是点 G 和 P\_pub 的坐标。
KGC 选择一个随机值 (w ∈ \[1, n-1\]) 并计算:
W\_A = \[w\]G + U\_A
其中 (U\_A = \[d’\_A\]G) 是用户使用其自身的秘密值 (d’\_A) 生成的点。
部分私钥 (t\_A) 计算如下:
t\_A = (w + l · ms) mod n
其中 (l) 是根据点 (W\_A) 和哈希 (H\_A) 计算的值。
#### [](https://docs.opennhp.org/zh-cn/cryptography/#323-%E7%94%A8%E6%88%B7%E5%AE%8C%E6%95%B4%E7%A7%81%E9%92%A5%E7%94%9F%E6%88%90)
3.2.3 用户完整私钥生成
用户通过将部分私钥 (t\_A) 与其秘密值 (d’\_A) 结合生成完整的私钥:
d\_A = (t\_A + d’\_A) mod n
这确保只有用户自己知道其完整的私钥。
#### [](https://docs.opennhp.org/zh-cn/cryptography/#324-%E5%85%AC%E9%92%A5%E8%AE%A1%E7%AE%97)
3.2.4 公钥计算
用户的公钥 (P\_A) 计算如下:
P\_A = W\_A + \[l\]P\_pub
任何人可以使用系统参数、用户标识符和 KGC 的公钥验证该公钥。
#### [](https://docs.opennhp.org/zh-cn/cryptography/#325-%E7%AD%BE%E5%90%8D%E7%94%9F%E6%88%90%E4%B8%8E%E9%AA%8C%E8%AF%81)
3.2.5 签名生成与验证
用户对消息 (M) 生成数字签名时,计算哈希 (e) 如下:
| | | | | | | |
| --- | --- | --- | --- | --- | --- | --- |
| e = H(H\_A | | x\_W\_A | | y\_W\_A | | M) |
签名 (r, s) 使用用户私钥 (d\_A) 和一个随机值 (k) 生成:
\[r\]G = (x\_1, y\_1) r = x\_1 mod n s = (k^{-1}(e + d\_A · r)) mod n
验证签名时,验证者计算 (P\_A),然后检查是否满足:
\[r\]G = \[s\]G + \[e + r\]P\_A
如果等式成立,签名即为有效。
### [](https://docs.opennhp.org/zh-cn/cryptography/#33-%E7%BB%93%E8%AE%BA)
3.3 结论
NHP 实施的无证书公钥加密为零信任环境中的密钥管理提供了一种强大且高效的方法。通过利用 CL-PKC,NHP 能够缓解传统 PKI 相关的风险,减少对集中可信机构的依赖,并简化密钥分发过程。结果是一个更安全且可扩展的系统,适合在面对不断发展的网络威胁时保护关键网络基础设施。
将无证书加密与 NHP 的零信任原则相结合,使其成为在最小化集中机构引入的风险的同时保护网络资源的理想解决方案。
Copyright © 2024 OpenNHP Open Source Project.
* * *
---
# Client SDKs | OpenNHP Documentation
[Skip to main content](https://docs.opennhp.org/agent_sdk/#main-content)
Link Menu Expand (external link) Document Search Copy Copied
[](https://docs.opennhp.org/)
[](https://docs.opennhp.org/agent_sdk/#client-sdks)
Client SDKs
===============================================================
[中文版](https://docs.opennhp.org/zh-cn/agent_sdk/)
* * *
[](https://docs.opennhp.org/agent_sdk/#1-client-agent-sdk-introduction)
1 Client Agent SDK Introduction
-------------------------------------------------------------------------------------------------------
### [](https://docs.opennhp.org/agent_sdk/#11-introduction)
1.1 Introduction
The OpenNHP Client Agent SDK is a standardized encapsulation of the OpenNHP Agent service. By integrating this SDK, applications can directly call the interface methods it provides to quickly achieve integration with OpenNHP. In different runtime environments, you only need to compile the SDK program into the corresponding system’s SDK file format:
| Operating System | Dynamic Library File |
| --- | --- |
| Linux | nhp-agent.so |
| Windows | nhp-agent.dll |
| MacOS | nhp-agent.dylib |
| Android | libnhpagent.so |
| IOS | nhpagent.xcframework |
### [](https://docs.opennhp.org/agent_sdk/#12-sdk-development)
1.2 SDK Development
OpenNHP provides sample SDK source code. The samples include methods that might be used, such as initializing the agent, starting cyclic knocking, stopping cyclic knocking, single knock, canceling a single knock, adding nhp-server services, setting client user information, and key registration. SDK developers can directly compile the SDK source code samples provided in the OpenNHP project into the corresponding SDK files for direct invocation, or refer to the SDK source code samples to complete custom SDK development.
SDK Sample Source Code: **_opennhp/endpoints/agent/main/export.go_**
package main
/*
#include
*/
import "C"
import (
"encoding/base64"
"encoding/json"
"fmt"
"strings"
"unsafe"
"github.com/OpenNHP/opennhp/endpoints/agent"
"github.com/OpenNHP/opennhp/nhp/common"
"github.com/OpenNHP/opennhp/nhp/core"
)
var gAgentInstance *agent.UdpAgent
var gWorkingDir string
var gLogLevel int
func deepCopyCString(c_str *C.char) string {
if c_str == nil {
return ""
}
goStr := C.GoString(c_str)
return strings.Clone(goStr)
}
// Release the memory of the string buffer generated by NHPSDK.
//
//export nhp_free_cstring
func nhp_free_cstring(ptr *C.char) {
C.free(unsafe.Pointer(ptr))
}
// Initialization of the nhp_agent instance working directory path:
// The configuration files to be read are located under workingdir/etc/,
// and log files will be generated under workingdir/logs/.
//
// Input:
// workingDir: the working directory path for the agent
// logLevel: 0: silent, 1: error, 2: info, 3: debug, 4: verbose
//
// Return:
// Whether agent instance has been initialized successfully.
//
//export nhp_agent_init
func nhp_agent_init(workingDir *C.char, logLevel C.int) bool {
if gAgentInstance != nil {
return true
}
gAgentInstance = &agent.UdpAgent{}
err := gAgentInstance.Start(deepCopyCString(workingDir), int(logLevel))
if err != nil {
return false
}
return true
}
// Synchronously stop and release nhp_agent.
//
//export nhp_agent_close
func nhp_agent_close() {
if gAgentInstance == nil {
return
}
gAgentInstance.Stop()
gAgentInstance = nil
}
// Read the user information, resource information, server information,
// and other configuration files written under workingdir/etc,
// and asynchronously start the loop knocking thread.
//
// Input: None
//
// Return:
// -1: Uninitialized error
// >=0: The number of resources requested to knock by the knocking thread at the time of the call
//
// (knocking resources will be synchronized with changes in the configuration in workingdir/etc/resource.toml).
//
//export nhp_agent_knockloop_start
func nhp_agent_knockloop_start() C.int {
if gAgentInstance == nil {
return -1
}
count := gAgentInstance.StartKnockLoop()
return C.int(count)
}
// Synchronously stop the loop, knock-on sub thread.
//
//export nhp_agent_knockloop_stop
func nhp_agent_knockloop_stop() {
if gAgentInstance == nil {
return
}
gAgentInstance.StopKnockLoop()
}
// Setting agent's represented user information
//
// Input:
// userId: User identification (optional, but not recommended to be empty)
// devId: Device identification (optional)
// orgId: Organization or company identification (optional)
// userData: Additional fields required to interface with backend services (json format string, optional)
//
// Return:
// Whether the user information is set successfully
//
//export nhp_agent_set_knock_user
func nhp_agent_set_knock_user(userId *C.char, devId *C.char, orgId *C.char, userData *C.char) bool {
if gAgentInstance == nil {
return false
}
jsonStr := deepCopyCString(userData)
var data map[string]any
if len(jsonStr) > 0 {
err := json.Unmarshal([]byte(jsonStr), &data)
if err != nil {
return false
}
}
gAgentInstance.SetDeviceId(deepCopyCString(devId))
gAgentInstance.SetKnockUser(deepCopyCString(userId), deepCopyCString(orgId), data)
return true
}
// Add an NHP server information to the agent for use in knocking on the door
// (the agent can initiate different knocking requests to multiple NHP servers).
//
// Input:
// pubkey: Public key of the NHP server
// ip: IP address of the NHP server
// host: Domain name of the NHP server (if a domain name is set, the ip item is optional)
// port: Port number for the NHP server to operate (if set to 0, the default port 62206 will be used)
// expire: Expiration time of the NHP server's public key (in epoch seconds, set to 0 for permanent)
//
// Return:
// Whether the server information has been successfully added.
//
//export nhp_agent_add_server
func nhp_agent_add_server(pubkey *C.char, ip *C.char, host *C.char, port C.int, expire int64) bool {
if gAgentInstance == nil {
return false
}
if pubkey == nil || (ip == nil && host == nil) {
return false
}
serverPort := int(port)
if serverPort == 0 {
serverPort = 62206 // use default server listening port
}
serverPeer := &core.UdpPeer{
Type: core.NHP_SERVER,
PubKeyBase64: deepCopyCString(pubkey),
Ip: deepCopyCString(ip),
Port: serverPort,
Hostname: deepCopyCString(host),
ExpireTime: expire,
}
gAgentInstance.AddServer(serverPeer)
return true
}
// Delete NHP server information from the agent
//
// Input:
// pubkey: NHP server public key
//
//export nhp_agent_remove_server
func nhp_agent_remove_server(pubkey *C.char) {
if gAgentInstance == nil {
return
}
if pubkey == nil {
return
}
gAgentInstance.RemoveServer(deepCopyCString(pubkey))
}
// Please add a resource information for the agent to use for knocking on the door
// (the agent can initiate a knock-on request for different resources)
//
// Input:
// aspId: Authentication Service Provider Identifier
// resId: Resource Identifier
// serverIp: NHP server IP address or domain name (the NHP server managing the resource)
// serverHostname: NHP server domain name (the NHP server managing the resource)
// serverPort: NHP server port (the NHP server managing the resource)
//
// Return:
// Whether the resource information has been added successfully
//
//export nhp_agent_add_resource
func nhp_agent_add_resource(aspId *C.char, resId *C.char, serverIp *C.char, serverHostname *C.char, serverPort C.int) bool {
if gAgentInstance == nil {
return false
}
if aspId == nil || resId == nil || (serverIp == nil && serverHostname == nil) {
return false
}
resource := &agent.KnockResource{
AuthServiceId: deepCopyCString(aspId),
ResourceId: deepCopyCString(resId),
ServerIp: deepCopyCString(serverIp),
ServerHostname: deepCopyCString(serverHostname),
ServerPort: int(serverPort),
}
err := gAgentInstance.AddResource(resource)
return err == nil
}
// Delete resource information from the agent
//
// Input:
// aspId: Authentication Service Provider Identifier
// resId: Resource Identifier
//
//export nhp_agent_remove_resource
func nhp_agent_remove_resource(aspId *C.char, resId *C.char) {
if gAgentInstance == nil {
return
}
if aspId == nil || resId == nil {
return
}
gAgentInstance.RemoveResource(deepCopyCString(aspId), deepCopyCString(resId))
}
// The agent initiates a single knock on the door request to the server hosting the resource
//
// Input:
// aspId: Authentication service provider identifier
// resId: Resource identifier
// serverIp: NHP server IP address or domain name (the NHP server managing the resource)
// serverHostname: NHP server domain name (the NHP server managing the resource)
// serverPort: NHP server port (the NHP server managing the resource)
//
// Returns:
// The server's response message (json format string buffer pointer):
// "errCode": Error code (string, "0" indicates success)
// "errMsg": Error message (string)
// "resHost": Resource server address ("resHost": {"Server Name 1":"Server Hostname 1", "Server Name 2":"Server Hostname 2", ...})
// "opnTime": Door opening duration (integer, in seconds)
// "aspToken": Token generated after authentication by the ASP (optional)
// "agentAddr": Agent's IP address from the perspective of the NHP server
// "preActs": Pre-connection information related to the resource (optional)
// "redirectUrl": HTTP redirection link (optional)
//
// It is necessary to call nhp_agent_add_server before calling,
// to add the NHP server's public key, address, and other information to the agent
// The caller is responsible for calling nhp_free_cstring to release the returned char* pointer
//
//export nhp_agent_knock_resource
func nhp_agent_knock_resource(aspId *C.char, resId *C.char, serverIp *C.char, serverHostname *C.char, serverPort C.int) *C.char {
ackMsg := &common.ServerKnockAckMsg{}
func() {
if gAgentInstance == nil {
ackMsg.ErrCode = common.ErrNoAgentInstance.ErrorCode()
ackMsg.ErrMsg = common.ErrNoAgentInstance.Error()
return
}
if aspId == nil || resId == nil || (serverIp == nil && serverHostname == nil) {
ackMsg.ErrCode = common.ErrInvalidInput.ErrorCode()
ackMsg.ErrMsg = common.ErrInvalidInput.Error()
return
}
resource := &agent.KnockResource{
AuthServiceId: deepCopyCString(aspId),
ResourceId: deepCopyCString(resId),
ServerIp: deepCopyCString(serverIp),
ServerHostname: deepCopyCString(serverHostname),
ServerPort: int(serverPort),
}
peer := gAgentInstance.FindServerPeerFromResource(resource)
if peer == nil {
ackMsg.ErrCode = common.ErrKnockServerNotFound.ErrorCode()
ackMsg.ErrMsg = common.ErrKnockServerNotFound.Error()
return
}
target := &agent.KnockTarget{
KnockResource: *resource,
ServerPeer: peer,
}
ackMsg, _ = gAgentInstance.Knock(target)
}()
bytes, _ := json.Marshal(ackMsg)
ret := C.CString(string(bytes))
return ret
}
// The agent explicitly informs the NHP server to exit its access permission to the resource.
//
// Input:
// aspId: Authentication Service Provider Identifier
// resId: Resource Identifier
// serverIp: NHP server IP address or domain name (the NHP server managing the resource)
// serverHostname: NHP server domain name (the NHP server managing the resource)
// serverPort: NHP server port (the NHP server managing the resource)
//
// Return:
// Whether the exit was successful
//
// It is necessary to call nhp_agent_add_server before calling, to add the NHP server's public key, address, and other information to the agent.
//
//export nhp_agent_exit_resource
func nhp_agent_exit_resource(aspId *C.char, resId *C.char, serverIp *C.char, serverHostname *C.char, serverPort C.int) bool {
var err error
ackMsg := &common.ServerKnockAckMsg{}
func() {
if gAgentInstance == nil {
ackMsg.ErrCode = common.ErrNoAgentInstance.ErrorCode()
ackMsg.ErrMsg = common.ErrNoAgentInstance.Error()
err = common.ErrNoAgentInstance
return
}
if aspId == nil || resId == nil || (serverIp == nil && serverHostname == nil) {
ackMsg.ErrCode = common.ErrInvalidInput.ErrorCode()
ackMsg.ErrMsg = common.ErrInvalidInput.Error()
err = common.ErrInvalidInput
return
}
resource := &agent.KnockResource{
AuthServiceId: deepCopyCString(aspId),
ResourceId: deepCopyCString(resId),
ServerIp: deepCopyCString(serverIp),
ServerHostname: deepCopyCString(serverHostname),
ServerPort: int(serverPort),
}
peer := gAgentInstance.FindServerPeerFromResource(resource)
if peer == nil {
ackMsg.ErrCode = common.ErrKnockServerNotFound.ErrorCode()
ackMsg.ErrMsg = common.ErrKnockServerNotFound.Error()
err = common.ErrKnockServerNotFound
return
}
target := &agent.KnockTarget{
KnockResource: *resource,
ServerPeer: peer,
}
ackMsg, err = gAgentInstance.ExitKnockRequest(target)
}()
return err == nil
}
// cipherType: 0-curve25519; 1-sm2
// result: "privatekey"|"publickey"
// caller is responsible to free the returned char* pointer
//
//export nhp_generate_keys
func nhp_generate_keys(cipherType C.int) *C.char {
var e core.Ecdh
switch core.EccTypeEnum(cipherType) {
case core.ECC_SM2:
e = core.NewECDH(core.ECC_SM2)
case core.ECC_CURVE25519:
fallthrough
default:
e = core.NewECDH(core.ECC_CURVE25519)
}
pub := e.PublicKeyBase64()
priv := e.PrivateKeyBase64()
res := fmt.Sprintf("%s|%s", priv, pub)
pRes := C.CString(res)
return pRes
}
// cipherType: 0-curve25519; 1-sm2
// privateBase64: private key in base64 format
// result: "publickey"
// caller is responsible to free the returned char* pointer
//
//export nhp_privkey_to_pubkey
func nhp_privkey_to_pubkey(cipherType C.int, privateBase64 *C.char) *C.char {
privKey := deepCopyCString(privateBase64)
privKeyBytes, err := base64.StdEncoding.DecodeString(privKey)
if err != nil {
return nil
}
e := core.ECDHFromKey(core.EccTypeEnum(cipherType), privKeyBytes)
if e == nil {
return nil
}
pub := e.PublicKeyBase64()
pPub := C.CString(pub)
return pPub
}
[](https://docs.opennhp.org/agent_sdk/#2-client-agent-sdk-adaptation)
2 Client Agent SDK Adaptation
---------------------------------------------------------------------------------------------------
### [](https://docs.opennhp.org/agent_sdk/#21-desktop-sdk)
2.1 Desktop SDK
#### [](https://docs.opennhp.org/agent_sdk/#211-windows)
2.1.1 Windows
##### [](https://docs.opennhp.org/agent_sdk/#2111-environment-preparation)
2.1.1.1 Environment Preparation
Set up the compilation environment for Windows by referring to the Windows section in the **_System requirement_** chapter of **Build OpenNHP Source Code**.
##### [](https://docs.opennhp.org/agent_sdk/#2112-compiling-the-sdk)
2.1.1.2 Compiling the SDK
* **Method 1**:Run the _BAT_ file in the code root directory `build.bat`
_(Note: If an error occurs during the compilation process under windows, try this compilation method: In the Visual Studio developer command prompt for VS command window, switch to the project directory and execute the `./build.bat` command)_
* Method 2: Command to compile the .dll file for the SDK separately:
Navigate to the `opennhp/endpoints/agent/main/` directory and execute:
`go build -trimpath -buildmode=c-shared -ldflags '-s -w' -v -o nhp-agent.dll main.go export.go`
_(Note: Because export.go does not contain a main method, main.go is included in the build command. For custom SDK code files that include a main method, the build command only needs the SDK code file and does not need to include main.go.)_
##### [](https://docs.opennhp.org/agent_sdk/#2113-sdk-adaptation)
2.1.1.3 SDK Adaptation
* **java**
Java programs can call SDK methods using JNA:
* OpennhpLibrary interface loads the OpenNHP agent SDK
package org.example;
import com.sun.jna.Library;
import com.sun.jna.Native;
/**
* OpenNHP agent sdk interface
*
* @author haochangjiu
* @version JDK 8
* @className OpennhpLibrary
* @date 2025/10/27
*/
public interface OpennhpLibrary extends Library {
// load OpenNHP agent sdk
OpennhpLibrary INSTANCE = Native.load("nhp-agent", OpennhpLibrary.class);
/**
* @description Initialization of the nhp_agent instance working directory path:
* The configuration files to be read are located under workingdir/etc/,
* and log files will be generated under workingdir/logs/.
* @param workingDir: the working directory path for the agent
* @param logLevel: 0: silent, 1: error, 2: info, 3: debug, 4: verbose
* return boolean Whether agent instance has been initialized successfully.
* @return boolean
* @author haochangjiu
* @date 2025/10/27
* {@link boolean}
*/
boolean nhp_agent_init(String workingDir, int logLevel);
/**
* @description Synchronously stop and release nhp_agent.
* @author haochangjiu
* @date 2025/10/27
*/
void nhp_agent_close();
/**
* @description Read the user information, resource information, server information,
* and other configuration files written under workingdir/etc,
* and asynchronously start the loop knocking thread.
* @return int
* @author haochangjiu
* @date 2025/10/27
* {@link int}
*/
int nhp_agent_knockloop_start();
/**
* @description Synchronously stop the loop, knock-on sub thread
* @author hangchangjiu
* @date 2025/10/27
*/
void nhp_agent_knockloop_stop();
}
* Application main entry, calling the SDK
package org.example;
import java.util.Scanner;
/**
* Application for calling the OpenNHP agent SDK
*
* @author haochangjiu
* @version JDK 8
* @className App
* @date 2025/10/27
*/
public class App {
public static void main(String[] args) throws Exception {
// Initialize and start the OpenNHP agent SDK service
boolean initFlag = OpennhpLibrary.INSTANCE.nhp_agent_init("D:\\console-workspace\\opennhp-knock", 3);
if (!initFlag) {
System.out.println("NHP Agent init failed");
System.exit(0);
}
// Invoke methods in the OpenNHP agent SDK via input commands
Scanner scanner = new Scanner(System.in);
while (true) {
System.out.print("> ");
if (scanner.hasNextLine()) {
String input = scanner.nextLine().trim();
if ("knock".equalsIgnoreCase(input)) {
System.out.println("start the loop knocking thread...");
OpennhpLibrary.INSTANCE.nhp_agent_knockloop_start();
} else if ("cancel".equalsIgnoreCase(input)) {
System.out.println("stop the loop knocking thread...");
OpennhpLibrary.INSTANCE.nhp_agent_knockloop_stop();
} else if ("exit".equalsIgnoreCase(input)) {
System.out.println("exit nhp agent service...");
OpennhpLibrary.INSTANCE.nhp_agent_close();
break;
} else {
System.out.println("invalid input");
}
}
}
scanner.close();
}
}
* **c/c++**
C/C++ programs can refer to the sample SDK calling program in the project opennhp/endpoints/agent/sdkdemo/nhp-agent-demo.c to integrate the client agent SDK.
#include
#include
#include "nhp-agent.h"
int main() {
// Initialize nhp_agent, only one nhp_agent singleton is allowed per process.
nhp_agent_init(".", 3);
// Set the user information for the knock-on-the-door feature.
nhp_agent_set_knock_user("zengl", NULL, NULL, NULL);
// Set NHP server information
// If there is already a configuration file for the server, the call to nhp_agent_add_server can be omitted
// Timestamp date is visible at https://unixtime.org/
nhp_agent_add_server("replace_with_actual_publickeybase64", "192.168.1.66", NULL, 62206, 1748908471);
// Send a request to the server to access the resource example/demo, and return information in the form of a JSON format string
// Note: The resource information here is an independent input, and is unrelated to the resource information saved in the configuration file
char *ret = nhp_agent_knock_resource("example", "demo", "192.168.1.66", NULL, 62206);
printf("knock return: %s\n", ret);
// Immediately close the agent's access to the example/demo resources,
// if not invoked, access permission will automatically close after the door opening duration has passed.
nhp_agent_exit_resource("example", "demo", "192.168.1.66", NULL, 62206);
// Turn off and release nhp_agent.
nhp_agent_close();
return 0;
}
* **python**
Use Python’s standard ctypes library to integrate the SDK.
import ctypes
from time import sleep
# Windows
nhp_agent = ctypes.CDLL('nhp-agent.dll')
# Linux
# mylib = ctypes.CDLL('./nhp-agent.so')
# macOS
# mylib = ctypes.CDLL('./nhp-agent.dylib')
nhp_agent.nhp_agent_init.argtypes = [ctypes.c_char_p, ctypes.c_int]
nhp_agent.nhp_agent_init.restype = ctypes.c_bool
nhp_agent.nhp_agent_init.restype = ctypes.c_int
if __name__ == '__main__':
flag = nhp_agent.nhp_agent_init(ctypes.c_char_p(b"D:\\nhpagent"),3)
if flag:
print("nhp-agent init success")
else:
print("nhp-agent init failed")
# start the loop knocking thread
status = nhp_agent.nhp_agent_knockloop_start()
if status >= 0:
print("nhp-agent knockloop success")
# Delay between calls
sleep(30)
else:
print("nhp-agent knockloop failed")
# stop nhp_agent
nhp_agent.nhp_agent_close()
* **Other Languages**
Other development languages (C#, Rust, Go, Nodejs) can adapt the SDK according to their unique methods for calling SDK files. Among them, Go can also introduce the source code of the agent part from OpenNHP to adapt to OpenNHP without developing an SDK.
#### [](https://docs.opennhp.org/agent_sdk/#212-linux)
2.1.2 Linux
##### [](https://docs.opennhp.org/agent_sdk/#2121-environment-preparation)
2.1.2.1 Environment Preparation
Set up the compilation environment for Linux by referring to the Linux section in the **_System requirement_** chapter of **Build OpenNHP Source Code**.
##### [](https://docs.opennhp.org/agent_sdk/#2122-compiling-the-sdk)
2.1.2.2 Compiling the SDK
* Method 1: Run the script in the project root directory. `make`
* Method 2: Command to compile the .so file for the SDK separately:
Navigate to the `opennhp/endpoints/agent/main/` directory and execute:
`go build -trimpath -buildmode=c-shared -ldflags '-s -w' -v -o nhp-agent.so main.go export.go`
_(Note: Because export.go does not contain a main method, main.go is included in the build command. For custom SDK code files that include a main method, the build command only needs the SDK code file and does not need to include main.go.)_
##### [](https://docs.opennhp.org/agent_sdk/#2123-sdk-adaptation)
2.1.2.3 SDK Adaptation
The SDK adaptation on Linux is the same as on Windows. Refer to section 2.1.1.3 for the code.
_(Note: Ensure the program can normally load the SDK’s .so file.)_
#### [](https://docs.opennhp.org/agent_sdk/#213-macos)
2.1.3 MacOS
##### [](https://docs.opennhp.org/agent_sdk/#2131-environment-preparation)
2.1.3.1 Environment Preparation
Set up the compilation environment for MacOS by referring to the MacOS section in the **_System requirement_** chapter of **Build OpenNHP Source Code**.
##### [](https://docs.opennhp.org/agent_sdk/#2132-compiling-the-sdk)
2.1.3.2 Compiling the SDK
* Method 1: Run the script in the project root directory. `make`
* Method 2: Command to compile the .dylib file for the SDK separately:
Navigate to the `opennhp/endpoints/agent/main/` directory and execute the build command:
`GOOS=darwin GOARCH=arm64 CGO_ENABLED=1 go build -buildmode=c-shared -o nhp-agent.dylib main.go export.go`
_(Note: Because export.go does not contain a main method, main.go is included in the build command. For custom SDK code files that include a main method, the build command only needs the SDK code file and does not need to include main.go.)_
##### [](https://docs.opennhp.org/agent_sdk/#2133-sdk-adaptation)
2.1.3.3 SDK Adaptation
The SDK adaptation on MacOS is the same as on Windows. Refer to section 2.1.1.3 for the code.
_(Note: Ensure the program can normally load the SDK’s .dylib file.)_
### [](https://docs.opennhp.org/agent_sdk/#22-mobile-sdk)
2.2 Mobile SDK
#### [](https://docs.opennhp.org/agent_sdk/#221-android)
2.2.1 Android
##### [](https://docs.opennhp.org/agent_sdk/#2211-environment-preparation)
2.2.1.1 Environment Preparation
* Compile the Android client agent SDK on Linux. Set up the compilation environment by referring to the Linux section in the **_System requirement_** chapter of **Build OpenNHP Source Code**.
* Android NDK Environment:
* Download and install Android NDK.
`wget https://dl.google.com/android/repository/android-ndk-r25b-linux.zip unzip android-ndk-r25b-linux.zip`
* Set environment variables.
* Edit the bashrc file.
`vim ~/.bashrc`
* Add environment variables.
# Set NDK path (according to your actual installation path)
export ANDROID_NDK_HOME=/opt/android-ndk-r25b/
export TOOLCHAIN=$ANDROID_NDK_HOME/toolchains/llvm/prebuilt/linux-x86_64
* Make the configuration effective.
`source ~/.bashrc`
##### [](https://docs.opennhp.org/agent_sdk/#2212-compiling-the-sdk)
2.2.1.2 Compiling the SDK
* Method 1: Run the script in the project root directory. `make`
_(Note: The Android NDK must be installed, otherwise the Android SDK will fail to compile.)_
* Method 2: Command to compile the .so file for the SDK separately:
Navigate to the `opennhp/endpoints/agent/main/` directory and execute the build command:
`GOOS=android GOARCH=arm64 CGO_ENABLED=1 CC=$TOOLCHAIN/bin/aarch64-linux-android21-clang CXX=$TOOLCHAIN/bin/aarch64-linux-android21-clang++ go build -buildmode=c-shared -o libnhpagent.so main.go export.go`
_(Note: When an Android project loads .so files via JNA, it adds ‘lib’ to the front of the input .so file name. When compiling the SDK, the name should start with ‘lib’, e.g., libnhpagent.so.)_
##### [](https://docs.opennhp.org/agent_sdk/#2213-sdk-adaptation)
2.2.1.3 SDK Adaptation
* **Android Configuration (Applicable for both Kotlin and Java)**:
* 1.Add the following configuration in build.gradle (app):
Add under the `android` section:
sourceSets {
main {
jniLibs.srcDirs = ['src/main/jniLibs', 'libs']
}
}
Add the following dependencies under the `dependencies` section:
// Note: It is recommended for Android to use an adapted JNA version, e.g., 5.13.0 or higher.`implementation 'net.java.dev.jna:jna:5.13.0@aar'`
// Permission request framework: https://github.com/getActivity/XXPermissions `implementation libs.xxpermissions`
In the libs.versions.toml file: Under `[versions]`, add: `xxpermissions = "18.6"` Under `[libraries]`, add: `xxpermissions = { module = "com.github.getActivity:XXPermissions", version.ref = "xxpermissions" }`
* 2.Add file storage read and write permissions in the AndroidManifest.xml file:
* **Kotlin**
Kotlin Sample Code for Android Application SDK Adaptation
package com.example.androidtestsoapp
import android.os.Bundle
import android.os.Environment
import android.util.Log
import androidx.activity.ComponentActivity
import androidx.activity.compose.setContent
import androidx.activity.enableEdgeToEdge
import androidx.compose.foundation.layout.fillMaxSize
import androidx.compose.foundation.layout.padding
import androidx.compose.material3.Scaffold
import androidx.compose.material3.Text
import androidx.compose.runtime.Composable
import androidx.compose.ui.Modifier
import androidx.compose.ui.tooling.preview.Preview
import com.example.androidtestsoapp.ui.theme.AndroidTestSoAppTheme
import com.hjq.permissions.Permission
import com.hjq.permissions.XXPermissions
import java.io.File
class MainActivity : ComponentActivity() {
override fun onCreate(savedInstanceState: Bundle?) {
super.onCreate(savedInstanceState)
enableEdgeToEdge()
setContent {
AndroidTestSoAppTheme {
Scaffold(modifier = Modifier.fillMaxSize()) { innerPadding ->
Greeting(
name = "Android",
modifier = Modifier.padding(innerPadding)
)
}
}
}
// Request permissions - read/write
XXPermissions.with(this)
.permission(Permission.WRITE_EXTERNAL_STORAGE)
.permission(Permission.READ_MEDIA_IMAGES)
.permission(Permission.READ_MEDIA_VIDEO)
.permission(Permission.READ_MEDIA_AUDIO)
.request { permissions, allGranted ->
if (allGranted) {
Log.d("MainActivity", "Permissions granted")
performFileOperations()
} else {
Log.d("MainActivity", "Permissions not granted")
}
}
}
}
/**
* Need to place the nhp folder containing the etc folder in the phone's download folder
* After reading the phone storage download directory, call OpennhpLibrary
*/
private fun performFileOperations() {
// Read phone storage download directory
val appDir = Environment.getExternalStorageDirectory().toString() + File.separator + "download"
// Check if zero folder exists in download
val file = File(appDir)
if (!file.exists()) {
Log.d("MainActivity", "Download folder does not exist")
return
}
Log.d("MainActivity", "Download folder exists")
val appDir1 = Environment.getExternalStorageDirectory().toString() + File.separator + "download" + File.separator + "nhp"
// Check if nhp folder exists in download
val file1 = File(appDir1)
if (!file1.exists()) {
Log.d("MainActivity", "nhp folder does not exist")
return
}
val appDir2 = Environment.getExternalStorageDirectory().toString() + File.separator + "download" + File.separator + "nhp"+ File.separator + "etc"
// Check if etc folder exists in download
val file2 = File(appDir2)
if (!file2.exists()) {
Log.d("MainActivity", "Etc folder does not exist")
return
}
val initFlag = OpennhpLibrary.INSTANCE.nhp_agent_init(appDir1, 2)
if (!initFlag) {
println("NHP Agent init failed")
return
}
println("start the loop knocking thread...")
val flag:Int = OpennhpLibrary.INSTANCE.nhp_agent_knockloop_start()
// Print result
if (flag > 0) {
println("NHP Agent knockloop start success")
} else {
println("NHP Agent knockloop start failed")
}
}
@Composable
fun Greeting(name: String, modifier: Modifier = Modifier) {
Text(
text = "Hello $name!",
modifier = modifier
)
}
@Preview(showBackground = true)
@Composable
fun GreetingPreview() {
AndroidTestSoAppTheme {
Greeting("Android")
}
}
* **java**
* Create the OpennhpLibrary interface to load the OpenNHP agent SDK.
_(Note: When introducing .so files in an Android project, ‘lib’ is added before the dynamic library file name. That is, the SDK name loaded in the code is ‘nhpagent’, but the actual SDK loaded by the program is the ‘libnhpagent.so’ file.)_
package org.example;
import com.sun.jna.Library;
import com.sun.jna.Native;
/**
* OpenNHP agent sdk interface
*
* @author haochangjiu
* @version JDK 8
* @className OpennhpLibrary
* @date 2025/10/27
*/
public interface OpennhpLibrary extends Library {
// load OpenNHP agent sdk
OpennhpLibrary INSTANCE = Native.load("nhpagent", OpennhpLibrary.class);
/**
* @description Initialization of the nhp_agent instance working directory path:
* The configuration files to be read are located under workingdir/etc/,
* and log files will be generated under workingdir/logs/.
* @param workingDir: the working directory path for the agent
* @param logLevel: 0: silent, 1: error, 2: info, 3: debug, 4: verbose
* return boolean Whether agent instance has been initialized successfully.
* @return boolean
* @author haochangjiu
* @date 2025/10/27
* {@link boolean}
*/
boolean nhp_agent_init(String workingDir, int logLevel);
/**
* @description Synchronously stop and release nhp_agent.
* @author haochangjiu
* @date 2025/10/27
*/
void nhp_agent_close();
/**
* @description Read the user information, resource information, server information,
* and other configuration files written under workingdir/etc,
* and asynchronously start the loop knocking thread.
* @return int
* @author haochangjiu
* @date 2025/10/27
* {@link int}
*/
int nhp_agent_knockloop_start();
/**
* @description Synchronously stop the loop, knock-on sub thread
* @author hangchangjiu
* @date 2025/10/27
*/
void nhp_agent_knockloop_stop();
}
* Calling the SDK: In the sample, the configuration file etc folder is placed in the nhp directory under the phone’s download directory.
package org.example;
import android.os.Bundle;
import android.os.Environment;
import android.util.Log;
import androidx.appcompat.app.AppCompatActivity;
import com.OpennhpLibrary;
import com.fancy.zerotrust.R;
import java.io.File;
public class MainActivity extends AppCompatActivity {
@Override
protected void onCreate(Bundle savedInstanceState) {
super.onCreate(savedInstanceState);
// Read the phone's storage download directory.
String appDir = Environment.getExternalStorageDirectory() + File.separator + "download";
// Does the nhp directory exist in the downloads
File file = new File(appDir);
if (!file.exists()) {
Log.d("MainActivity","download file not exist!");
return;
}
Log.d("MainActivity","download file exist!");
String appDir1 = Environment.getExternalStorageDirectory() + File.separator + "download"+ File.separator + "nhp";
boolean initFlag = OpennhpLibrary.INSTANCE.nhp_agent_init(appDir1, 3);
if (!initFlag) {
System.out.println("NHP Agent init failed");
System.exit(0);
}
System.out.println("start the loop knocking thread...");
OpennhpLibrary.INSTANCE.nhp_agent_knockloop_start();
}
}
#### [](https://docs.opennhp.org/agent_sdk/#222-ios)
2.2.2 IOS
##### [](https://docs.opennhp.org/agent_sdk/#2221-environment-preparation)
2.2.2.1 Environment Preparation
* Compile the IOS client agent SDK on MacOS. Set up the compilation environment by referring to the MacOS section in the **_System requirement_** chapter of **Build OpenNHP Source Code**.
* Ensure Xcode is installed. If not, install it from the App Store.
* Install gomobile:
* Install
`go install golang.org/x/mobile/cmd/gomobile@latest`
* Initialize
`gomobile init`
##### [](https://docs.opennhp.org/agent_sdk/#2222-sdk-sample)
2.2.2.2 SDK Sample
When compiling the .xcframework file required for IOS, the names of the exported methods must start with a capital letter, and the parameter types must be standard Go language types, not C.int and C.char. Another important point is that the code cannot be under package main. Move the program to a newly created iossdk directory.
Modified code based on the export.go file in OpenNHP is as follows: **_opennhp/endpoints/agent/iossdk/export.go_**
package iossdk
import "C"
import (
"encoding/base64"
"encoding/json"
"fmt"
"github.com/OpenNHP/opennhp/endpoints/agent"
"github.com/OpenNHP/opennhp/nhp/common"
"github.com/OpenNHP/opennhp/nhp/core"
_ "golang.org/x/mobile/bind"
)
var gAgentInstance *agent.UdpAgent
var gWorkingDir string
var gLogLevel int
// Initialization of the nhp_agent instance working directory path:
// The configuration files to be read are located under workingdir/etc/,
// and log files will be generated under workingdir/logs/.
//
// Input:
// workingDir: the working directory path for the agent
// logLevel: 0: silent, 1: error, 2: info, 3: debug, 4: verbose
//
// Return:
// Whether agent instance has been initialized successfully.
func NhpAgentInit(workingDir string, logLevel int) bool {
if gAgentInstance != nil {
return true
}
gAgentInstance = &agent.UdpAgent{}
err := gAgentInstance.Start(workingDir, logLevel)
if err != nil {
return false
}
return true
}
// Synchronously stop and release nhp_
func NhpAgentClose() {
if gAgentInstance == nil {
return
}
gAgentInstance.Stop()
gAgentInstance = nil
}
// Read the user information, resource information, server information,
// and other configuration files written under workingdir/etc,
// and asynchronously start the loop knocking thread.
//
// Input: None
//
// Return:
// -1: Uninitialized error
// >=0: The number of resources requested to knock by the knocking thread at the time of the call
//
// (knocking resources will be synchronized with changes in the configuration in workingdir/etc/resource.toml).
//
//export NhpAgentKnockloopStart
func NhpAgentKnockloopStart() int {
if gAgentInstance == nil {
return -1
}
count := gAgentInstance.StartKnockLoop()
return count
}
// Synchronously stop the loop, knock-on sub thread.
func NhpAgentKnockloopStop() {
if gAgentInstance == nil {
return
}
gAgentInstance.StopKnockLoop()
}
// Setting agent's represented user information
//
// Input:
// userId: User identification (optional, but not recommended to be empty)
// devId: Device identification (optional)
// orgId: Organization or company identification (optional)
// userData: Additional fields required to interface with backend services (json format string, optional)
//
// Return:
// Whether the user information is set successfully
func NhpAgentSetKnockUser(userId string, devId string, orgId string, userData string) bool {
if gAgentInstance == nil {
return false
}
var data map[string]any
if len(userData) > 0 {
err := json.Unmarshal([]byte(userData), &data)
if err != nil {
return false
}
}
gAgentInstance.SetDeviceId(devId)
gAgentInstance.SetKnockUser(userId, orgId, data)
return true
}
// Add an NHP server information to the agent for use in knocking on the door
// (the agent can initiate different knocking requests to multiple NHP servers).
//
// Input:
// pubkey: Public key of the NHP server
// ip: IP address of the NHP server
// host: Domain name of the NHP server (if a domain name is set, the ip item is optional)
// port: Port number for the NHP server to operate (if set to 0, the default port 62206 will be used)
// expire: Expiration time of the NHP server's public key (in epoch seconds, set to 0 for permanent)
//
// Return:
// Whether the server information has been successfully added.
func NhpAgentAddServer(pubkey string, ip string, host string, port int, expire int64) bool {
if gAgentInstance == nil {
return false
}
if len(pubkey) == 0 || (len(ip) == 0 && len(host) == 0) {
return false
}
serverPort := int(port)
if serverPort == 0 {
serverPort = 62206 // use default server listening port
}
serverPeer := &core.UdpPeer{
Type: core.NHP_SERVER,
PubKeyBase64: pubkey,
Ip: ip,
Port: serverPort,
Hostname: host,
ExpireTime: expire,
}
gAgentInstance.AddServer(serverPeer)
return true
}
// Delete NHP server information from the agent
//
// Input:
// pubkey: NHP server public key
func NhpAgentRemoveServer(pubkey string) {
if gAgentInstance == nil {
return
}
if len(pubkey) == 0 {
return
}
gAgentInstance.RemoveServer(pubkey)
}
// Please add a resource information for the agent to use for knocking on the door
// (the agent can initiate a knock-on request for different resources)
//
// Input:
// aspId: Authentication Service Provider Identifier
// resId: Resource Identifier
// serverIp: NHP server IP address or domain name (the NHP server managing the resource)
// serverHostname: NHP server domain name (the NHP server managing the resource)
// serverPort: NHP server port (the NHP server managing the resource)
//
// Return:
// Whether the resource information has been added successfully
func NhpAgentAddResource(aspId string, resId string, serverIp string, serverHostname string, serverPort int) bool {
if gAgentInstance == nil {
return false
}
if len(aspId) == 0 || len(resId) == 0 || (len(serverIp) == 0 && len(serverHostname) == 0) {
return false
}
resource := &agent.KnockResource{
AuthServiceId: aspId,
ResourceId: resId,
ServerIp: serverIp,
ServerHostname: serverHostname,
ServerPort: serverPort,
}
err := gAgentInstance.AddResource(resource)
return err == nil
}
// Delete resource information from the agent
//
// Input:
// aspId: Authentication Service Provider Identifier
// resId: Resource Identifier
func NhpAgentRemoveResource(aspId string, resId string) {
if gAgentInstance == nil {
return
}
if len(aspId) == 0 || len(resId) == 0 {
return
}
gAgentInstance.RemoveResource(aspId, resId)
}
// The agent initiates a single knock on the door request to the server hosting the resource
//
// Input:
// aspId: Authentication service provider identifier
// resId: Resource identifier
// serverIp: NHP server IP address or domain name (the NHP server managing the resource)
// serverHostname: NHP server domain name (the NHP server managing the resource)
// serverPort: NHP server port (the NHP server managing the resource)
//
// Returns:
// The server's response message (json format string buffer pointer):
// "errCode": Error code (string, "0" indicates success)
// "errMsg": Error message (string)
// "resHost": Resource server address ("resHost": {"Server Name 1":"Server Hostname 1", "Server Name 2":"Server Hostname 2", ...})
// "opnTime": Door opening duration (integer, in seconds)
// "aspToken": Token generated after authentication by the ASP (optional)
// "agentAddr": Agent's IP address from the perspective of the NHP server
// "preActs": Pre-connection information related to the resource (optional)
// "redirectUrl": HTTP redirection link (optional)
//
// It is necessary to call NhpAgentAddServer before calling,
// to add the NHP server's public key, address, and other information to the agent
// The caller is responsible for calling NhpFreeCstring to release the returned char* pointer
func NhpAgentKnockResource(aspId string, resId string, serverIp string, serverHostname string, serverPort int) string {
ackMsg := &common.ServerKnockAckMsg{}
func() {
if gAgentInstance == nil {
ackMsg.ErrCode = common.ErrNoAgentInstance.ErrorCode()
ackMsg.ErrMsg = common.ErrNoAgentInstance.Error()
return
}
if len(aspId) == 0 || len(resId) == 0 || (len(serverIp) == 0 && len(serverHostname) == 0) {
ackMsg.ErrCode = common.ErrInvalidInput.ErrorCode()
ackMsg.ErrMsg = common.ErrInvalidInput.Error()
return
}
resource := &agent.KnockResource{
AuthServiceId: aspId,
ResourceId: resId,
ServerIp: serverIp,
ServerHostname: serverHostname,
ServerPort: serverPort,
}
peer := gAgentInstance.FindServerPeerFromResource(resource)
if peer == nil {
ackMsg.ErrCode = common.ErrKnockServerNotFound.ErrorCode()
ackMsg.ErrMsg = common.ErrKnockServerNotFound.Error()
return
}
target := &agent.KnockTarget{
KnockResource: *resource,
ServerPeer: peer,
}
ackMsg, _ = gAgentInstance.Knock(target)
}()
bytes, _ := json.Marshal(ackMsg)
return string(bytes)
}
// The agent explicitly informs the NHP server to exit its access permission to the resource.
//
// Input:
// aspId: Authentication Service Provider Identifier
// resId: Resource Identifier
// serverIp: NHP server IP address or domain name (the NHP server managing the resource)
// serverHostname: NHP server domain name (the NHP server managing the resource)
// serverPort: NHP server port (the NHP server managing the resource)
//
// Return:
// Whether the exit was successful
//
// It is necessary to call NhpAgentAddServer before calling, to add the NHP server's public key, address, and other information to the
func NhpAgentExitResource(aspId string, resId string, serverIp string, serverHostname string, serverPort int) bool {
var err error
ackMsg := &common.ServerKnockAckMsg{}
func() {
if gAgentInstance == nil {
ackMsg.ErrCode = common.ErrNoAgentInstance.ErrorCode()
ackMsg.ErrMsg = common.ErrNoAgentInstance.Error()
err = common.ErrNoAgentInstance
return
}
if len(aspId) == 0 || len(resId) == 0 || (len(serverIp) == 0 && len(serverHostname) == 0) {
ackMsg.ErrCode = common.ErrInvalidInput.ErrorCode()
ackMsg.ErrMsg = common.ErrInvalidInput.Error()
err = common.ErrInvalidInput
return
}
resource := &agent.KnockResource{
AuthServiceId: aspId,
ResourceId: resId,
ServerIp: serverIp,
ServerHostname: serverHostname,
ServerPort: serverPort,
}
peer := gAgentInstance.FindServerPeerFromResource(resource)
if peer == nil {
ackMsg.ErrCode = common.ErrKnockServerNotFound.ErrorCode()
ackMsg.ErrMsg = common.ErrKnockServerNotFound.Error()
err = common.ErrKnockServerNotFound
return
}
target := &agent.KnockTarget{
KnockResource: *resource,
ServerPeer: peer,
}
ackMsg, err = gAgentInstance.ExitKnockRequest(target)
}()
return err == nil
}
// cipherType: 0-curve25519; 1-sm2
// result: "privatekey"|"publickey"
// caller is responsible to free the returned char* pointer
//
//export NhpGenerateKeys
func NhpGenerateKeys(cipherType int) string {
var e core.Ecdh
switch core.EccTypeEnum(cipherType) {
case core.ECC_SM2:
e = core.NewECDH(core.ECC_SM2)
case core.ECC_CURVE25519:
fallthrough
default:
e = core.NewECDH(core.ECC_CURVE25519)
}
pub := e.PublicKeyBase64()
priv := e.PrivateKeyBase64()
res := fmt.Sprintf("%s|%s", priv, pub)
return res
}
// cipherType: 0-curve25519; 1-sm2
// privateBase64: private key in base64 format
// result: "publickey"
// caller is responsible to free the returned char* pointer
//
//export NhpPrivkeyToPubkey
func NhpPrivkeyToPubkey(cipherType int, privateBase64 string) string {
privKey := privateBase64
privKeyBytes, err := base64.StdEncoding.DecodeString(privKey)
if err != nil {
return ""
}
e := core.ECDHFromKey(core.EccTypeEnum(cipherType), privKeyBytes)
if e == nil {
return ""
}
pub := e.PublicKeyBase64()
return pub
}
##### [](https://docs.opennhp.org/agent_sdk/#2223-compiling-the-sdk)
2.2.2.3 Compiling the SDK
* Method 1: Run the script in the project root directory. `make`
* Method 2: Command to compile the .xcframework file for the SDK separately:
Navigate to the `opennhp/endpoints/agent/iossdk/` directory and execute the build command._(Note: The re-edited sdk source code files are placed under opennhp/endpoints/agent/iossdk/)_
`gomobile bind -target ios -o nhpagent.xcframework .`
##### [](https://docs.opennhp.org/agent_sdk/#2224-sdk-adaptation)
2.2.2.4 SDK Adaptation
* **Objective-C**
* FileCopyManager.h: Declares methods to copy SDK configuration files to the sandbox.
//
// FileCopyManager.h
// TestXCFramework
//
// Created by haochangjiu on 2025/10/30.
//
#import
NS_ASSUME_NONNULL_BEGIN
@interface FileCopyManager : NSObject
/// Copy the specified file(s) to the etc and certs directories in the application's home directory
+ (void)copyFilesToSandboxEtc;
@end
NS_ASSUME_NONNULL_END
* FileCopyManager.m: Implementation of FileCopyManager.h.
//
// FileCopyManager.m
// TestXCFramework
//
// Created by haochangjiu on 2025/10/30.
//
#import "FileCopyManager.h"
#import
@implementation FileCopyManager
/// Copy the specified file(s) to the etc and certs directories in the application's home directory
+ (void)copyFilesToSandboxEtc {
// 1. Retrieve the sandboxed Documents directory
NSArray *documentsURLs = [[NSFileManager defaultManager] URLsForDirectory:NSDocumentDirectory inDomains:NSUserDomainMask];
NSURL *documentsURL = [documentsURLs firstObject];
if (!documentsURL) {
NSLog(@"Failed to retrieve Documents directory");
return;
}
// 2. Define paths for etc and certs directories within the sandbox
NSURL *etcURL = [documentsURL URLByAppendingPathComponent:@"etc"];
NSURL *certsURL = [etcURL URLByAppendingPathComponent:@"certs"];
// 3. Create etc and certs directories (if they don't exist)
[self createDirectoryIfNotExists:etcURL];
[self createDirectoryIfNotExists:certsURL];
// 4. Copy toml files to the etc directory
NSArray *tomlFiles = @[@"server.toml", @"config.toml", @"dhp.toml", @"resource.toml"];
for (NSString *fileName in tomlFiles) {
[self copyFileFromBundle:fileName toDestinationURL:etcURL];
}
// 5. Copy certificate files to the etc/certs directory
NSArray *certFiles = @[@"server.crt", @"server.key"];
for (NSString *fileName in certFiles) {
[self copyFileFromBundle:fileName toDestinationURL:certsURL];
}
}
/// Create directory if it does not exist
+ (void)createDirectoryIfNotExists:(NSURL *)directoryURL {
NSFileManager *fileManager = [NSFileManager defaultManager];
if (![fileManager fileExistsAtPath:directoryURL.path]) {
NSError *error;
BOOL success = [fileManager createDirectoryAtURL:directoryURL\
withIntermediateDirectories:YES\
attributes:nil\
error:&error];
if (success) {
NSLog(@"Directory created successfully: %@", directoryURL.path);
} else {
NSLog(@"Failed to create directory: %@, error: %@", directoryURL.path, error.localizedDescription);
}
} else {
NSLog(@"Directory already exists: %@", directoryURL.path);
}
}
/// Copy file from Bundle to destination path
+ (void)copyFileFromBundle:(NSString *)fileName toDestinationURL:(NSURL *)destinationURL {
// Get the file path in the Bundle
NSURL *sourceURL = [[NSBundle mainBundle] URLForResource:[fileName stringByDeletingPathExtension]\
withExtension:[fileName pathExtension]];
if (!sourceURL) {
NSLog(@"File not found in Bundle: %@", fileName);
return;
}
// Destination file path (destination directory + file name)
NSURL *destFileURL = [destinationURL URLByAppendingPathComponent:fileName];
// Copy file (if it doesn't exist)
NSFileManager *fileManager = [NSFileManager defaultManager];
if (![fileManager fileExistsAtPath:destFileURL.path]) {
NSError *error;
BOOL success = [fileManager copyItemAtURL:sourceURL toURL:destFileURL error:&error];
if (success) {
NSLog(@"File copied successfully: %@ -> %@", fileName, destFileURL.path);
} else {
NSLog(@"File copy failed: %@, error: %@", fileName, error.localizedDescription);
}
} else {
NSLog(@"File already exists: %@", destFileURL.path);
}
}
@end
* ViewController.m: Program main entry, calling SDK methods.
//
// ViewController.m
// TestXCFramework
//
// Created by haochangjiu on 2025/10/30.
//
#import "ViewController.h"
#import
#import "FileCopyManager.h"
@interface ViewController ()
@end
@implementation ViewController
- (void)viewDidLoad {
[super viewDidLoad];
// Do any additional setup after loading the view.
// Invoke method to copy files from etc folder to sandbox etc directory
[FileCopyManager copyFilesToSandboxEtc];
// Retrieve the sandbox target path (Documents), which is the parent directory of the etc folder
NSArray *documentsURLs = [[NSFileManager defaultManager] URLsForDirectory:NSDocumentDirectory inDomains:NSUserDomainMask];
NSURL *documentsURL = [documentsURLs firstObject];
if (!documentsURL) {
NSLog(@"Error: Failed to read Documents directory");
}
// Get the parent directory path of the etc folder
NSString *etcPath = documentsURL.path;
// SdkNhpAgentInit
BOOL initFlag = IossdkNhpAgentInit(etcPath, 3);
if (!initFlag) {
NSLog(@"NHP Agent init failed");
return;
}
// knockloop_start
long value = IossdkNhpAgentKnockloopStart();
NSLog(@"SdkNhpAgentKnockloopStart value : %ld", value);
}
@end
* **Swift**
* FileCopyManager.swift: Methods to copy SDK configuration files to the sandbox.
//
// FileCopyManager.swift
// TestXCFrameworkSwift
//
// Created by haochangjiu on 2025/10/30.
//
import UIKit
import Foundation
class FileCopyManager {
/// Copy specified files to the etc and certs directories in the sandbox
static func copyFilesToSandboxEtc() {
// 1. Get the Documents directory in the sandbox
guard let documentsURL = FileManager.default.urls(for: .documentDirectory, in: .userDomainMask).first else {
print("Failed to get Documents directory")
return
}
// 2. Define paths for etc and certs directories in the sandbox
let etcURL = documentsURL.appendingPathComponent("etc")
let certsURL = etcURL.appendingPathComponent("certs")
// 3. Create etc and certs directories (if they don't exist)
createDirectoryIfNotExists(at: etcURL)
createDirectoryIfNotExists(at: certsURL)
// 4. Copy toml files to the etc directory
let tomlFiles = ["server.toml", "config.toml", "dhp.toml", "resource.toml"]
tomlFiles.forEach { fileName in
copyFileFromBundle(fileName: fileName, to: etcURL)
}
// 5. Copy certificate files to the etc/certs directory
let certFiles = ["server.crt", "server.key"]
certFiles.forEach { fileName in
copyFileFromBundle(fileName: fileName, to: certsURL)
}
}
/// Create directory if it doesn't exist
private static func createDirectoryIfNotExists(at url: URL) {
let fileManager = FileManager.default
guard !fileManager.fileExists(atPath: url.path) else {
print("Directory already exists: \(url.path)")
return
}
do {
try fileManager.createDirectory(at: url, withIntermediateDirectories: true, attributes: nil)
print("Directory created successfully: \(url.path)")
} catch {
print("Failed to create directory: \(url.path), error: \(error.localizedDescription)")
}
}
/// Copy file from Bundle to destination path
private static func copyFileFromBundle(fileName: String, to destinationURL: URL) {
// Split filename and extension (handling files with extensions)
let fileNameWithoutExt = (fileName as NSString).deletingPathExtension
let fileExt = (fileName as NSString).pathExtension
// Get the file path in the Bundle
guard let sourceURL = Bundle.main.url(forResource: fileNameWithoutExt, withExtension: fileExt) else {
print("File not found in Bundle: \(fileName)")
return
}
// Destination file path (destination directory + filename)
let destFileURL = destinationURL.appendingPathComponent(fileName)
let fileManager = FileManager.default
// Copy file (if it doesn't exist)
guard !fileManager.fileExists(atPath: destFileURL.path) else {
print("File already exists: \(destFileURL.path)")
return
}
do {
try fileManager.copyItem(at: sourceURL, to: destFileURL)
print("File copied successfully: \(fileName) -> \(destFileURL.path)")
} catch {
print("File copy failed: \(fileName), error: \(error.localizedDescription)")
}
}
}
* ViewController.swift: Program main entry, calling SDK methods.
//
// ViewController.swift
// TestXCFrameworkSwift
//
// Created by haochangjiu on 2025/10/30.
//
import UIKit
import Nhpagent
class ViewController: UIViewController {
override func viewDidLoad() {
super.viewDidLoad()
// Do any additional setup after loading the view.
// Call method to copy files from etc folder to sandbox etc directory
FileCopyManager.copyFilesToSandboxEtc()
// Retrieve the sandbox target path (Documents), which is the parent directory of the etc folder
guard let documentsURL = FileManager.default.urls(for: .documentDirectory, in: .userDomainMask).first else {
print("Error: Failed to read Documents directory")
return
}
// Get the parent directory path of the etc folder
let etcPath: String = documentsURL.path
// Call SdkNhpAgentInit for initialization
let initFlag: Bool = IossdkNhpAgentInit(etcPath, 3)
if !initFlag {
print("NHP Agent init failed")
}
// Call knockloop_start
let value = IossdkNhpAgentKnockloopStart()
print("SdkNhpAgentKnockloopStart value: %ld", value)
}
}
* * *
---
# 对比NHP与SPA | OpenNHP Documentation
[Skip to main content](https://docs.opennhp.org/zh-cn/comparison/#main-content)
Link Menu Expand (external link) Document Search Copy Copied
[](https://docs.opennhp.org/)
[](https://docs.opennhp.org/zh-cn/comparison/#%E5%AF%B9%E6%AF%94nhp%E4%B8%8Espa)
对比NHP与SPA
==========================================================================================
注: 以下内容摘自《Applied Sciences》杂志2024年第14卷第13期的期刊论文《AHAC: Advanced Network-Hiding Access Control Framework》论文,值得特别指出的是,AHAC框架是NHP(OpenNHP)技术体系中的一个关键组成部分。
[English](https://docs.opennhp.org/comparison/)
* * *
* [NHP与SPA的对比](https://docs.opennhp.org/zh-cn/comparison/#nhp%E4%B8%8Espa%E7%9A%84%E5%AF%B9%E6%AF%94)
* [目录:](https://docs.opennhp.org/zh-cn/comparison/#%E7%9B%AE%E5%BD%95)
* [1\. 优势对比](https://docs.opennhp.org/zh-cn/comparison/#1-%E4%BC%98%E5%8A%BF%E5%AF%B9%E6%AF%94)
* [2\. 性能对比](https://docs.opennhp.org/zh-cn/comparison/#2-%E6%80%A7%E8%83%BD%E5%AF%B9%E6%AF%94)
* [2.1 加密算法开销](https://docs.opennhp.org/zh-cn/comparison/#21-%E5%8A%A0%E5%AF%86%E7%AE%97%E6%B3%95%E5%BC%80%E9%94%80)
* [2.2 性能开销](https://docs.opennhp.org/zh-cn/comparison/#22-%E6%80%A7%E8%83%BD%E5%BC%80%E9%94%80)
* [](https://docs.opennhp.org/zh-cn/comparison/#)
* [3\. 高可用性对比](https://docs.opennhp.org/zh-cn/comparison/#3-%E9%AB%98%E5%8F%AF%E7%94%A8%E6%80%A7%E5%AF%B9%E6%AF%94)
* [4\. 扩展性对比](https://docs.opennhp.org/zh-cn/comparison/#4-%E6%89%A9%E5%B1%95%E6%80%A7%E5%AF%B9%E6%AF%94)
* [4.1 与DNS集成](https://docs.opennhp.org/zh-cn/comparison/#41-%E4%B8%8Edns%E9%9B%86%E6%88%90)
* [4.2 与FIDO集成](https://docs.opennhp.org/zh-cn/comparison/#42-%E4%B8%8Efido%E9%9B%86%E6%88%90)
* [5\. 兼容性对比](https://docs.opennhp.org/zh-cn/comparison/#5-%E5%85%BC%E5%AE%B9%E6%80%A7%E5%AF%B9%E6%AF%94)
[](https://docs.opennhp.org/zh-cn/comparison/#1-%E4%BC%98%E5%8A%BF%E5%AF%B9%E6%AF%94)
1\. 优势对比
----------------------------------------------------------------------------------------------
NHP通过结合噪声协议、密钥对和ECDH算法,提供强大的双向认证机制。与传统方法相比,NHP在性能、可扩展性和安全性上有显著优势。它支持多种编程语言(如C/C++、Python、Java和Go),并提供高度可扩展的架构,增强设备验证能力,防御重放攻击,彻底解决IP放大问题。NHP特别适合企业IAM系统和安全资源访问等需要强认证和加密的场景,优化了性能并提升了高可用性,确保在复杂环境中的无缝兼容性和高安全性。相比之下,SPA虽然具有一定优势,但在安全性、性能和可扩展性方面仍无法与NHP媲美。
| | SPA | NHP |
| --- | --- | --- |
| 开发语言 | C , C++ | C/C++ , Python , Java , Go |
| 通信 | 单包授权 | 噪声协议 , ECDH |
| 体系架构 | 复杂性 , 加密的数据包 , 防火墙 | 先进性 , 可扩展性 , 噪声协议 |
| 认证 | UDP 敲门 ,IP 放大问题 | 设备指纹,UDP 和 TCP 敲门 |
| 密码框架 | RSA , AES | 噪声协议 , ECDH |
| 性能 | 中等开销 ,高效 | 优化 ,最小化开销 |
| 隐藏网络能力 | 仅服务/应用的端口 | 域名 、IP和端口 |
| 可用性 | 高负载 | 高可用性 ,可扩展集群 |
| 可扩展性 | 复杂实现 | FIDO+NHP,高度可扩展,易于集成 |
| 兼容性 | 各种系统,可能需要集成 | 较高,跨平台,面向未来 |
| 安全性 | 强加密,密钥管理风险 | 地址隐藏,相互认证 |
| 应用场景 | 高安全性场景 | 可扩展的,高安全环境 |
[](https://docs.opennhp.org/zh-cn/comparison/#2-%E6%80%A7%E8%83%BD%E5%AF%B9%E6%AF%94)
2\. 性能对比
----------------------------------------------------------------------------------------------
### [](https://docs.opennhp.org/zh-cn/comparison/#21-%E5%8A%A0%E5%AF%86%E7%AE%97%E6%B3%95%E5%BC%80%E9%94%80)
2.1 加密算法开销
SPA 采用的是 RSA 加密算法,而 NHP 采用的是 ECC 加密算法。我们根据安全强度和密钥长度比较了 RSA 和 ECC 的性价比,如下表所示。在相同的安全标准下,ECC 算法的密钥长度显著短于 RSA 算法。此外,RSA 消息签名生成的密文大小大致等于密钥长度。因此,在验证网络消息身份时,NHP 使用更短的 ECC 随机密钥(32 字节或 64 字节)进行 ECDH 交换,而不是传输较大的 RSA2048 消息签名(256 字节)进行验证,不仅降低了计算开销,还更加高效地节省了宝贵的带宽资源。这一策略表明,NHP 在提高系统效率和资源利用率方面相较于 SPA 具有显著优势。
| 安全强度(比特) | SPA (最小值公钥长度(位)) | NHP(最小值公钥长度(位)) | NHP vs SPA(密钥长度比) | 有效期 |
| --- | --- | --- | --- | --- |
| 80 | 1024 | 160-223 | 1:6 | 直到2010年 |
| 112 | 2048 | 224-255 | 1:9 | 直到2010年 |
| 128 | 3072 | 256-383 | 1:12 | 2031年以后 |
| 192 | 7680 | 384-511 | 1:20 | |
| 256 | 15360 | 512+ | 1:30 | |
我们通过实验测量了 RSA 和 ECC 的加解密时间,具体结果见下表。实验增加了加密和解密的循环次数,测试两种算法在不同情况下的性能。结果显示,尽管 RSA 和 ECC 的加解密时间随着循环次数的增加而上升,但 ECC 的时间开销始终远低于 RSA。尤其在循环次数增多时,ECC 的优势更加明显,RSA 的时间开销最高达到 ECC 的约 800 倍。这一显著差距表明,NHP 在加解密效率上明显优于 SPA,为实际应用中选择更高效的加密算法提供了有力的依据。
| 循环次数(次) | SPA | NHP |
| --- | --- | --- |
| 1 | 0.34s | 687us |
| 10 | 2.48s | 3.60ms |
| 100 | 27.54s | 0.03s |
| 200 | 61.18s | 0.06s |
| 500 | 136.23s | 0.16s |
| 1000 | 287.61s | 0.32s |
| 10000 | 2832.42s | 3.81s |
### [](https://docs.opennhp.org/zh-cn/comparison/#22-%E6%80%A7%E8%83%BD%E5%BC%80%E9%94%80)
2.2 性能开销
为了全面评估 NHP 的性能表现,我们搭建了一个下图所示的实验环境,针对 NHP 和 SPA 进行了负载性能测试。该环境由两个主要区域组成:Agent 部署区域和网络隐身部署区域。

在网络隐身部署区域,我们集成了网络隐身服务器和应用服务器作为关键组件。为了确保测试环境的稳定性和一致性,我们选用了三台配置相同的机器,每台配备 4 核 CPU 和 8G 内存。在 agent 部署区域,我们启动了 n 个 agent 服务,这些服务以每秒发送一次敲门请求的频率与网络隐身服务器通信。同时,在网络隐身服务器上部署了 JMeter 组件,用于模拟和监控其性能表现。应用服务器端同样部署了 JMeter 服务,实时跟踪网络隐身服务器的性能资源消耗情况。通过这种设置,我们能够全面监控和比较 NHP 与 SPA 的性能表现。
在保持实验环境一致性的前提下,我们按照部署方案分别选取了1、10、20、30、40、50个agent,对NHP和SPA进行了性能测试。测试结果如表4所示,其中横轴表示参与实验的agent数量,纵轴则显示测试期间的CPU占用率变化。通过这种设置,我们能够直观地观察到随着agent数量的增加,NHP和SPA在CPU资源消耗方面的不同表现。

实验结果显示,随着 Agent 数量的增加,NHP 和 SPA 的 CPU 负载均呈现上升趋势。然而,随着 Agent 数量的进一步增加,NHP 的性能优势逐渐凸显,其 CPU 负载大约维持在 SPA 的一半左右,展现出显著的效率提升。
> 注:尽管理论上 NHP 的性能应较 SPA 提升约 1000 倍,但实际测试中仅提升约 1 倍。分析原因,主要因素包括网络开销对性能的显著影响、垃圾回收机制导致的性能损失,以及硬件环境差异。此外,尽管出于代码安全性和加密算法实现的考虑,我们选择了内存安全的 Go 语言开发,但其垃圾回收机制也对性能产生了一定影响。
[](https://docs.opennhp.org/zh-cn/comparison/#3-%E9%AB%98%E5%8F%AF%E7%94%A8%E6%80%A7%E5%AF%B9%E6%AF%94)
3\. 高可用性对比
------------------------------------------------------------------------------------------------------------------
NHP 通过分布式架构实现零信任服务的高可用性,确保敲门模块和门禁模块在不同主机上部署,以避免资源占用和提升弹性扩展。即使发生故障,也能无缝切换服务,维持系统功能和响应速度。这种设计增强了系统的稳健性和稳定性,降低了服务故障对整体系统的影响,如下图所示。

NHP 支持敲门验证服务的横向弹性扩展,能够根据实时负载动态调整服务实例数。这一功能提供了极高的弹性和可扩展性,确保在高负载下服务依然快速响应且稳定。每个服务实例均能处理敲门请求并维持业务会话,这种设计不仅提升了处理能力,还增强了容错性,保证了业务连续性和稳定性。从测试结果来看,NHP 在高可用性方面相较于 SPA 显著提升

[](https://docs.opennhp.org/zh-cn/comparison/#4-%E6%89%A9%E5%B1%95%E6%80%A7%E5%AF%B9%E6%AF%94)
4\. 扩展性对比
--------------------------------------------------------------------------------------------------------
尽管NHP设计为数据通信提供了可信、可控、可靠和可证的基础保障,但考虑到通信场景和环境的多样性和复杂性,NHP还需具备良好的扩展性以适应不同的定制需求。NHP的扩展性体现在几个方面:
* 其双向通信机制相比SPA的单向敲门机制,提供了更丰富的扩展能力,可以隐藏资源的真实IP地址并支持数据通信前后的密钥交换,增强隐私计算和数据流通场景的安全性。
* 通过授权服务提供商(ASP)接口,NHP能够将资源请求方的请求内容透传给ASP,实现更严格的身份认证与权限控制。
* NHP的资源标识支持任意字符串形式,包括中英文及符号,为数据资源提供更强的描述性,并具备DNS解析功能,提供更安全、加密和隐私的域名解析服务。
因此,NHP的扩展性架构涵盖了与DNS和FIDO的集成等典型应用场景。
### [](https://docs.opennhp.org/zh-cn/comparison/#41-%E4%B8%8Edns%E9%9B%86%E6%88%90)
4.1 与DNS集成
DNS作为互联网基础服务在网站运行中至关重要,但其安全性长期未被重视,且因使用不可靠的UDP协议,存在诸多安全漏洞,如DNS劫持和拒绝服务攻击。因此,加强DNS安全至关重要。通过集成网络隐身技术,DNS解析通过双向加密通道进行,确保了保密性和防篡改能力,同时只有经过身份认证的用户才能解析,从而有效防御DDoS攻击和劫持。具体实现方案如下图所示,我们的方法能够显著提升了DNS的安全性,为用户提供了更可靠的DNS服务。

* 步骤1:网络隐身代理(如客户端、浏览器等)通过域名与网络隐身服务器发起请求。
* 步骤2:一旦网络隐身服务器接收到来自网络隐身代理的域名数据包请求,它会随即向应用认证服务器发起查询认证请求,以验证该请求的合法性和权限。
* 步骤3:认证服务器在接收到网络隐身服务器发出的认证请求消息后,经过严格的验证流程,一旦确认其身份真实有效,便会授予其访问权限。随后,认证服务器会迅速向网络隐身服务器回复一份包含目标资源真实IP地址、端口号等关键信息的授权访问凭据。
* 步骤4:在成功通过授权查询之后,网络隐身服务器会迅速向目标资源所在的门禁系统发起开门请求。这一请求旨在确保网络隐身代理能够畅通无阻地访问到所需的目标资源,从而顺利完成后续操作。
* 步骤5:门禁系统在接收到网络隐身服务器发出的开门请求后,会立即执行严格的验证程序。这一验证过程旨在确保所请求的目标资源与被保护资源完全吻合,以确保系统的安全性和可靠性。一旦验证通过,门禁系统将迅速开通从网络隐身代理到被保护资源的连接通道,从而允许其进行无障碍的访问。
* 步骤6:一旦门禁系统成功为网络隐身代理开启了访问权限,网络隐身服务器会迅速确认这一操作,并返回目标资源的IP地址和端口信息。随后,这些信息将被迅速传递给网络隐身代理,以便其能够准确地定位并访问目标资源。
* 步骤7:网络隐身代理在接收到被保护资源的IP地址和端口信息后,随即启动对目标资源的正常业务访问权限,确保访问过程顺畅无阻,实现高效且安全的资源交互。
### [](https://docs.opennhp.org/zh-cn/comparison/#42-%E4%B8%8Efido%E9%9B%86%E6%88%90)
4.2 与FIDO集成
尽管FIDO在Web身份认证方面表现出色,但服务器的潜在漏洞仍可能被黑客利用,从而绕过FIDO的认证,直接入侵服务器进行数据盗窃或破坏。将FIDO与NHP集成,可以有效弥补FIDO在漏洞防护方面的不足,为互联网暴露面提供更全面的防御方案。具体实现方案如下图所示,详细实现步骤如下。

* (1) 用户代理(即代理)向网络隐身服务器(即服务器)发送一个端口敲门数据包,旨在尝试访问会话中已认证但保证水平相对较低的敏感资源。
* (2) 服务器在接收到端口敲门数据包后,将资源访问请求转发给应用提供商。
* (3) 应用提供商响应并将回复消息发送给服务器,同时将端口敲门消息重定向到可信的认证机构请求更高保证级别的基于FIDO的认证。
* (4) 服务器在收到应用提供商的响应后,将重定向指示器传递给代理。
* (5) 代理在收到重定向消息后,直接打开FIDO认证页面。
* (6) 服务器在接收到代理的FIDO认证页面后,迅速向认证机构发起FIDO认证请求。
* (7) FIDO服务器在收到请求消息后完成FIDO请求并响应。
* (8) 认证机构在经过严格的FIDO验证过程后,向服务器返回基于FIDO的认证响应。
* (9) 一旦FIDO身份确认真实有效且认证成功,服务器请求访问控制(即AC)系统打开应用提供商的端口以接受代理的连接。
* (10) 服务器通知代理认证成功,并提供资源访问的IP/端口。
* (11) AC系统成功授予代理访问权限。
* (12) 代理与应用提供商建立连接以访问资源。
[](https://docs.opennhp.org/zh-cn/comparison/#5-%E5%85%BC%E5%AE%B9%E6%80%A7%E5%AF%B9%E6%AF%94)
5\. 兼容性对比
--------------------------------------------------------------------------------------------------------
与SPA协议相比,NHP的一个关键目标是对信创环境以及国内零信任标准体系的良好兼容性。在加密算法方面,NHP支持国际密码算法(如RSA、SHA256、AES)和国密算法(如SM2、SM3、SM4),并能根据数据包头的长度调整加密时间。在软硬件兼容性方面,NHP适配了国内外主流的CPU硬件和操作系统,包括鲲鹏、x86、龙芯、申威等。此外,NHP符合即将颁布的国家标准《信息安全技术零信任参考体系架构》的规范要求,确保了与该标准的兼容性,如下图所示。

* [英文版](https://docs.opennhp.org/docs/comparison.md)
* * *
* * *
---
# DHP快速开始 | OpenNHP Documentation
[Skip to main content](https://docs.opennhp.org/zh-cn/dhp_quick_start/#main-content)
Link Menu Expand (external link) Document Search Copy Copied
[](https://docs.opennhp.org/)
[](https://docs.opennhp.org/zh-cn/dhp_quick_start/#dhp%E5%BF%AB%E9%80%9F%E5%BC%80%E5%A7%8B)
DHP快速开始
===================================================================================================
一个本地搭建的 Docker 调试环境,模拟 nhp-server、nhp-db和nhp-agent。此环境可用于:
* 快速理解 opendhp 的运作方式
* 基本逻辑验证
[English](https://docs.opennhp.org/dhp_quick_start/)
* * *
[](https://docs.opennhp.org/zh-cn/dhp_quick_start/#1-%E6%A6%82%E8%BF%B0)
1\. 概述
-------------------------------------------------------------------------------
OpenDHP的主要目的是加强数据主权,在保持数据可用性的同时确保数据不可见性,并在整个数据生命周期中维护数据隐私。
本快速入门指南帮助开发人员快速搭建OpenDHP Docker环境、构建源代码并测试OpenDHP的关键功能。该环境设计得轻量且易于使用,非常适合希望快速测试和调试OpenDHP的开发人员。
### [](https://docs.opennhp.org/zh-cn/dhp_quick_start/#11-%E6%9E%B6%E6%9E%84)
1.1 架构
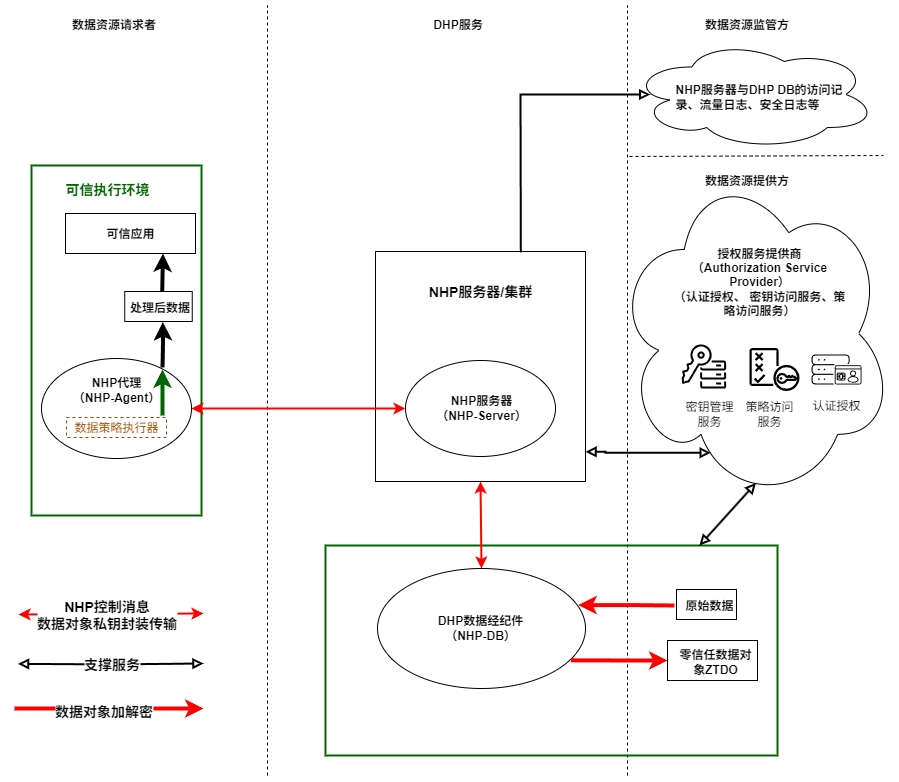
#### [](https://docs.opennhp.org/zh-cn/dhp_quick_start/#111-%E7%BD%91%E7%BB%9C%E6%8B%93%E6%89%91)
1.1.1 网络拓扑
| 容器名 | IP | 说明 |
| --- | --- | --- |
| NHP-Agent | 177.7.0.8 | nhp-agentd, 端口映射: 443→Host: 8443 |
| NHP-Server | 177.7.0.9 | nhp-serverd, 开放端口 62206 |
| NHP-DB | 177.7.0.12 | nhp-db, 用来发布数据 |
### [](https://docs.opennhp.org/zh-cn/dhp_quick_start/#12-%E6%B5%8B%E8%AF%95%E5%9C%BA%E6%99%AF)
1.2 测试场景
#### [](https://docs.opennhp.org/zh-cn/dhp_quick_start/#121-%E5%9C%BA%E6%99%AF%E6%8F%8F%E8%BF%B0)
1.2.1 场景描述
为提升涉险账户识别的全面性与准确性,银行在内部风控识别基础上,还可通过与其他银行、支付机构、公安或监管平台提供的涉险账户信息联合验证。为保障数据安全与用户隐私,各参与方通过机密计算技术协同判断某账户是否存在风险行为,避免直接明文暴露用户数据。
#### [](https://docs.opennhp.org/zh-cn/dhp_quick_start/#122-%E5%9C%BA%E6%99%AF%E6%9E%B6%E6%9E%84)
1.2.2 场景架构
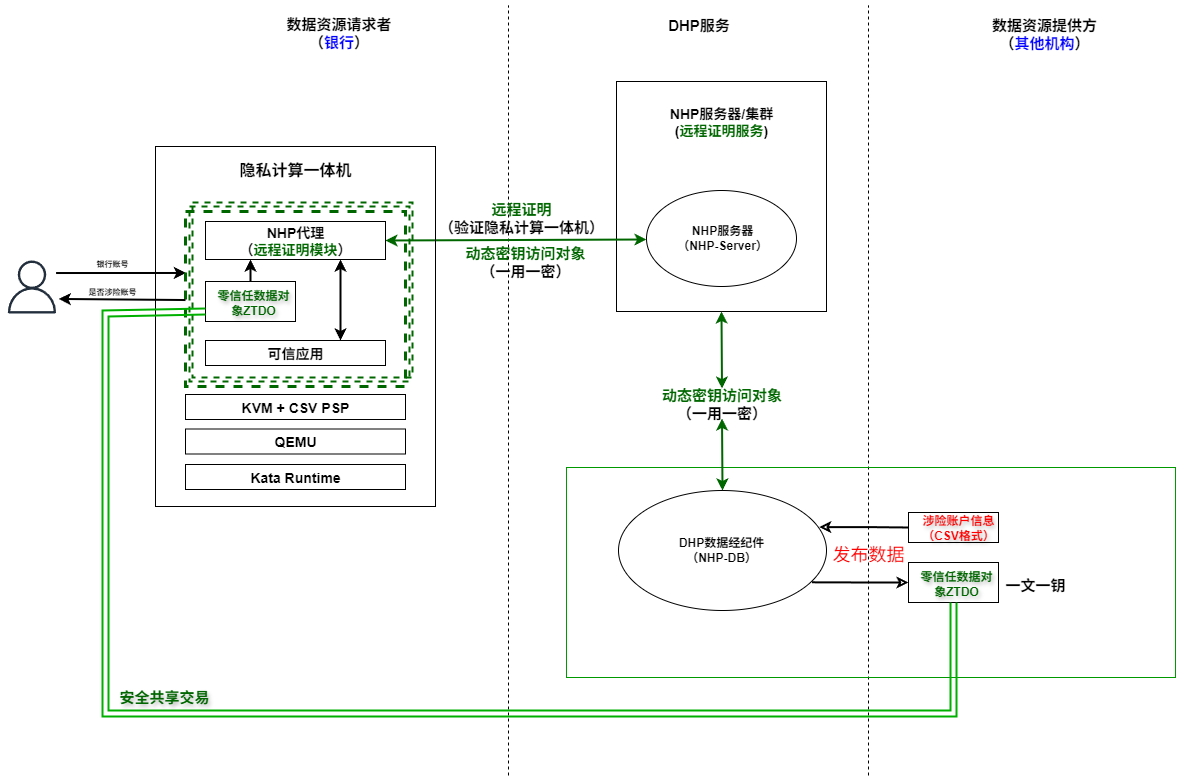
[](https://docs.opennhp.org/zh-cn/dhp_quick_start/#2-%E5%AE%89%E8%A3%85docker%E7%8E%AF%E5%A2%83)
2\. 安装Docker环境
---------------------------------------------------------------------------------------------------------------
关于这部分,请参考[NHP快速开始](https://docs.opennhp.org/zh-cn/quick_start/)
的相应章节。
[](https://docs.opennhp.org/zh-cn/dhp_quick_start/#3-%E8%BF%90%E8%A1%8C%E5%92%8C%E9%85%8D%E7%BD%AE%E7%8E%AF%E5%A2%83)
3\. 运行和配置环境
---------------------------------------------------------------------------------------------------------------------------------
以下启动命令,在启动过程会相应的构建 nhp-server、nhp-db和nhp-agent镜像。
### [](https://docs.opennhp.org/zh-cn/dhp_quick_start/#31-%E5%90%AF%E5%8A%A8%E6%89%80%E6%9C%89%E6%9C%8D%E5%8A%A1)
3.1 启动所有服务
cd ./docker
docker compose -f docker-compose.dhp.yaml up -d
### [](https://docs.opennhp.org/zh-cn/dhp_quick_start/#32-%E4%BB%A5dhp%E6%A8%A1%E5%BC%8F%E5%90%AF%E5%8A%A8nhp-agent)
3.2 以DHP模式启动nhp-agent
由于 `nhp-agent` 默认不会自动启动,因此需要手动启动它。
docker exec -it nhp-agent /bin/bash
/nhp-agent/nhp-agentd dhp
### [](https://docs.opennhp.org/zh-cn/dhp_quick_start/#33-%E5%90%AF%E5%8A%A8nhp-db)
3.3 启动nhp-db
由于 `nhp-db` 默认不会自动启动,因此需要手动启动它。
docker exec -it nhp-db /bin/bash
/nhp-db/nhp-db run
### [](https://docs.opennhp.org/zh-cn/dhp_quick_start/#34-%E9%85%8D%E7%BD%AEdhp%E7%9B%B8%E5%85%B3%E7%9A%84%E5%8F%82%E6%95%B0)
3.4 配置DHP相关的参数
由于代理和 TEE 密钥在首次启动时生成,因此需要在nhp-server中配置代理公钥以建立信任,在nhp-db中配置TEE公钥以建立信任。此外,还需要在nhp-server中配置受信任的执行环境,用于评估远程证明报告。
#### [](https://docs.opennhp.org/zh-cn/dhp_quick_start/#341-%E9%85%8D%E7%BD%AEagent%E5%85%AC%E9%92%A5%E5%88%B0nhp-server)
3.4.1 配置agent公钥到nhp-server
在此默认的 Docker 环境中,8443端口已为nhp-agent映射到主机,因此可以通过https://localhost:8443从主机访问nhp-agent的 HTTP 接口。你可以使用以下curl命令获取代理的公钥。
curl --insecure https://localhost:8443/api/v1/key/agent
{"publicKey":"f+HWVbhQ6ZR3e+INU7ZSGyn3XNls5TUdbZWlPmj/1v890WLDW7RcnnbJmqqufymK+Yb99dadX+PlhK4qFYxtOg=="}
接下来,配置agent公钥在nhp-server中。
docker exec -it nhp-server /bin/bash
vi /nhp-server/etc/agent.toml
# list the agent peers for the server under [[Agents]] table
# PubKeyBase64: public key for the agent in base64 format.
# ExpireTime (epoch timestamp in seconds): peer key validation will fail when it expires.
[[Agents]]
PubKeyBase64 = "f+HWVbhQ6ZR3e+INU7ZSGyn3XNls5TUdbZWlPmj/1v890WLDW7RcnnbJmqqufymK+Yb99dadX+PlhK4qFYxtOg=="
ExpireTime = 1924991999
配置完代理公钥后,你可以使用以下curl命令检查代理状态:
curl --insecure https://localhost:8443/api/v1/status/agent
{"attestationVerified":false,"running":true,"trustedByNHPDB":false,"trustedByNHPServer":true}
你将看到`trustedByNHPServer`为`true`,这表示该代理已被 NHP 服务器信任。
#### [](https://docs.opennhp.org/zh-cn/dhp_quick_start/#342-%E9%85%8D%E7%BD%AEtee%E8%AF%81%E6%98%8E%E5%88%B0nhp-server)
3.4.2 配置TEE证明到nhp-server
你可以使用以下curl命令获取 TEE 远程证明报告。
**注意:**该远程证明报告是在非 TEE 环境下根据容器信息生成,非TEE环境仅用于测试目的。
curl --insecure https://localhost:8443/api/v1/attestation/tee
{"measure":"3460bc69b9d273ad15c91074d8fd41abc5d5ccac50730d2e0495d08558848e34","serial number":"3460bc69b9d273ad15c91074d8fd41abc5d5ccac50730d2e0495d08558848e34"}
接下来,你需要在nhp-server中配置远程证明信息。
docker exec -it nhp-server /bin/bash
vi /nhp-server/etc/tee.toml
# list trusted execution environments under [[TEEs]] table
# Measure: cryptographic hashes that ensure the integrity of software and data within the TEE.
# SerialNumber: unique serial number of the TEE.
[[TEEs]]
Measure = "19178a674248bbca705863bbf75ecaa049fcf3dfcc5ff59a80dcc5cbb60dae59"
SerialNumber = "TMEX300023050201"
[[TEEs]]
Measure = "3460bc69b9d273ad15c91074d8fd41abc5d5ccac50730d2e0495d08558848e34"
SerialNumber = "3460bc69b9d273ad15c91074d8fd41abc5d5ccac50730d2e0495d08558848e34"
配置代理公钥后,你可以使用以下curl命令检查代理状态:
curl --insecure https://localhost:8443/api/v1/status/agent
{"attestationVerified":true,"running":true,"trustedByNHPDB":false,"trustedByNHPServer":true}
你将看到`attestationVerified`为`true`,这表示TEE已被NHP服务器信任。
#### [](https://docs.opennhp.org/zh-cn/dhp_quick_start/#343-%E9%85%8D%E7%BD%AEtee%E5%85%AC%E9%92%A5%E5%88%B0nhp-db)
3.4.3 配置TEE公钥到nhp-db
你可以使用以下curl命令获取TEE公钥。
curl --insecure https://localhost:8443/api/v1/key/tee
{"publicKey":"pup5OzTTZjddv+WBgbUBkvHuBgJoBg0DU+I2c7Qj4lHlrVM8N/Yl9F6DEnbGFBWB89xrN6VLhYAIM4Xv+mu4KA=="}
接下来,你需要在nhp-db中配置TEE公钥。
docker exec -it nhp-db /bin/bash
vi /nhp-db/etc/tee.toml
# Configuration for trusted execution environment.
# TEEPublicKeyBase64: base64 encoded public key of TEE (Trusted Execution Environment).
[[TEEs]]
TEEPublicKeyBase64 = "pup5OzTTZjddv+WBgbUBkvHuBgJoBg0DU+I2c7Qj4lHlrVM8N/Yl9F6DEnbGFBWB89xrN6VLhYAIM4Xv+mu4KA=="
ExpireTime = 1924991999
[](https://docs.opennhp.org/zh-cn/dhp_quick_start/#4-%E6%B5%8B%E8%AF%95%E9%93%B6%E8%A1%8C%E6%B6%89%E9%99%A9%E8%B4%A6%E6%88%B7%E5%9C%BA%E6%99%AF)
4\. 测试银行涉险账户场景
---------------------------------------------------------------------------------------------------------------------------------------------------------------
### [](https://docs.opennhp.org/zh-cn/dhp_quick_start/#41-%E5%8F%91%E5%B8%83%E6%95%B0%E6%8D%AE%E8%B5%84%E6%BA%90)
4.1 发布数据资源
你可以使用以下命令发布数据资源:
docker exec -it nhp-db /bin/bash
cd /nhp-db
./nhp-db run --mode encrypt --data-source-type online --source ./demo/risk.involved.accounts.csv --output ./risk.involved.accounts.csv.demo.ztdo --smart-policy ./demo/smart.policy.json --metadata ./demo/metadata.json
如果出现信息`Successfully register or update data object which doId is .`,表示数据资源已成功发布。
### [](https://docs.opennhp.org/zh-cn/dhp_quick_start/#42-%E8%AF%B7%E6%B1%82%E6%95%B0%E6%8D%AE%E8%B5%84%E6%BA%90)
4.2 请求数据资源
#### [](https://docs.opennhp.org/zh-cn/dhp_quick_start/#421-%E7%BC%96%E5%86%99%E5%92%8C%E7%BC%96%E8%AF%91%E5%8F%AF%E4%BF%A1%E5%BA%94%E7%94%A8)
4.2.1 编写和编译可信应用
为了实现与可信应用的简便且统一的通信,我们采用了模型上下文协议(Model Context Protocol,简称 MCP)。这意味着可信应用被实现为MCP服务器,而内置于NHP Agent中的客户端则作为MCP客户端与可信应用进行通信。由于MCP框架几乎支持所有编程语言,因此使用任何语言实现可信应用都十分简单和直接。
以下是一个用 Golang 编写的简单可信应用示例,该示例在本演示中使用。
package main
import (
"context"
"encoding/csv"
"fmt"
"io"
"os"
"github.com/mark3labs/mcp-go/mcp"
"github.com/mark3labs/mcp-go/server"
)
func main() {
s := server.NewMCPServer("trusted application", "1.0.0",
server.WithToolCapabilities(true),
)
s.AddTool(
mcp.NewTool("verify_account",
mcp.WithDescription("Verify account to check whether there are any risk factors associated with the account"),
mcp.WithString("path",
mcp.Required(),
mcp.Description("path to file which records the account details"),
),
mcp.WithString("account_id",
mcp.Description("account id"),
mcp.Required(),
),
),
verifyAccountHandler,
)
// Start STDIO server
if err := server.ServeStdio(s); err != nil {
fmt.Fprintf(os.Stderr, "Server error: %v\n", err)
os.Exit(1)
}
}
func verifyAccountHandler(ctx context.Context, req mcp.CallToolRequest) (*mcp.CallToolResult, error) {
path, err := req.RequireString("path")
if err != nil {
return mcp.NewToolResultError(err.Error()), nil
}
accountId, err := req.RequireString("account_id")
if err != nil {
return mcp.NewToolResultError(err.Error()), nil
}
is_risk, err := findRecord(path, accountId)
if err != nil {
return mcp.NewToolResultError(err.Error()), nil
}
return mcp.NewToolResultText(fmt.Sprintf(`{"account_id":"%s","is_risk": %t}`, accountId, is_risk)), nil
}
func findRecord(path string, accountId string) (bool, error) {
f, err := os.Open(path)
if err != nil {
return false, err
}
defer f.Close()
r := csv.NewReader(f)
r.Comma = ','
for {
record, err := r.Read()
if err != nil {
if err == csv.ErrFieldCount {
continue
}
if err == io.EOF {
return false, nil
}
return false, err
}
if record[0] == accountId {
return true, nil
}
}
}
假设我们已将其编译为名为 `ta` 的二进制文件。
#### [](https://docs.opennhp.org/zh-cn/dhp_quick_start/#422-%E6%B3%A8%E5%86%8C%E5%8F%AF%E4%BF%A1%E5%BA%94%E7%94%A8)
4.2.2 注册可信应用
你可以使用以下命令来注册可信应用:
curl --insecure --request POST --url https://localhost:8443/api/v1/ta/register --header 'content-type: multipart/form-data' --form file=@ta --form 'description=trusted application demo'
[\
{\
"method": "POST",\
"name": "/api/v1/ta/ceca4572-644b-4bde-a4b6-ac6048f8fba6/verify_account",\
"description": "Verify account to check whether there are any risk factors associated with the account",\
"params": [\
{\
"name": "doId",\
"description": "identifier of the data object",\
"type": "string"\
},\
{\
"name": "account_id",\
"description": "account id",\
"type": "string"\
}\
]\
}\
]
注册成功后,你可以访问由可信应用暴露的HTTP RESTful API。
#### [](https://docs.opennhp.org/zh-cn/dhp_quick_start/#423-%E6%89%A7%E8%A1%8C%E4%BB%BB%E5%8A%A1)
4.2.3 执行任务
你可以使用以下curl命令调用这些暴露的RESTful API来执行隐私保护计算:
curl --insecure --request POST --url https://localhost:8443/api/v1/ta/ceca4572-644b-4bde-a4b6-ac6048f8fba6/verify_account --header 'content-type: application/json' --data '{"doId": "47d2b67c-ef80-45fc-814d-effd23baf788", "account_id": "62230121012345678901"}'
执行后,你将收到响应 `{"account_id":"62230121012345678901","is_risk":false}`,表示该账户不是涉险账户。
由于NHP Agent、可信应用和数据均受可信执行环境(TEE)保护,数据资源消费者无法直接访问数据资源。所有对数据的操作必须通过TEE内部受控且经过验证的执行流程进行,确保数据始终保持机密性,并且按照关联的智能数据策略进行处理。整个DHP设计保证了消费者能够使用数据,却永远无法查看或提取数据的原始内容。
* * *
---
# 关于我们 | OpenNHP Documentation
[Skip to main content](https://docs.opennhp.org/zh-cn/about/#main-content)
Link Menu Expand (external link) Document Search Copy Copied
[](https://docs.opennhp.org/)
[](https://docs.opennhp.org/zh-cn/about/#%E5%85%B3%E4%BA%8Eopennhp%E5%BC%80%E6%BA%90%E9%A1%B9%E7%9B%AE)
关于OpenNHP开源项目
=====================================================================================================================
[](https://docs.opennhp.org/zh-cn/about/#english)
[English](https://docs.opennhp.org/about/)
---------------------------------------------------------------------------------------------
* * *
---
# 编译源代码 | OpenNHP Documentation
[Skip to main content](https://docs.opennhp.org/zh-cn/build/#main-content)
Link Menu Expand (external link) Document Search Copy Copied
[](https://docs.opennhp.org/)
[](https://docs.opennhp.org/zh-cn/build/#%E7%BC%96%E8%AF%91opennhp)
编译OpenNHP
=============================================================================
[English](https://docs.opennhp.org/build/)
* * *
[](https://docs.opennhp.org/zh-cn/build/#1-wsl%E7%8E%AF%E5%A2%83%E5%87%86%E5%A4%87)
1\. WSL环境准备
-----------------------------------------------------------------------------------------------
**提示:** Windows 10/11下可以通过`WSL`子系统来运行Linux,详细请见WSL官方文档:[https://learn.microsoft.com/zh-cn/windows/wsl/install](https://learn.microsoft.com/zh-cn/windows/wsl/install)
* **【开启WSL功能】** 在Win10上,需要首先开启WSL才能使用WSL安装Linux,设置界面请见下图。 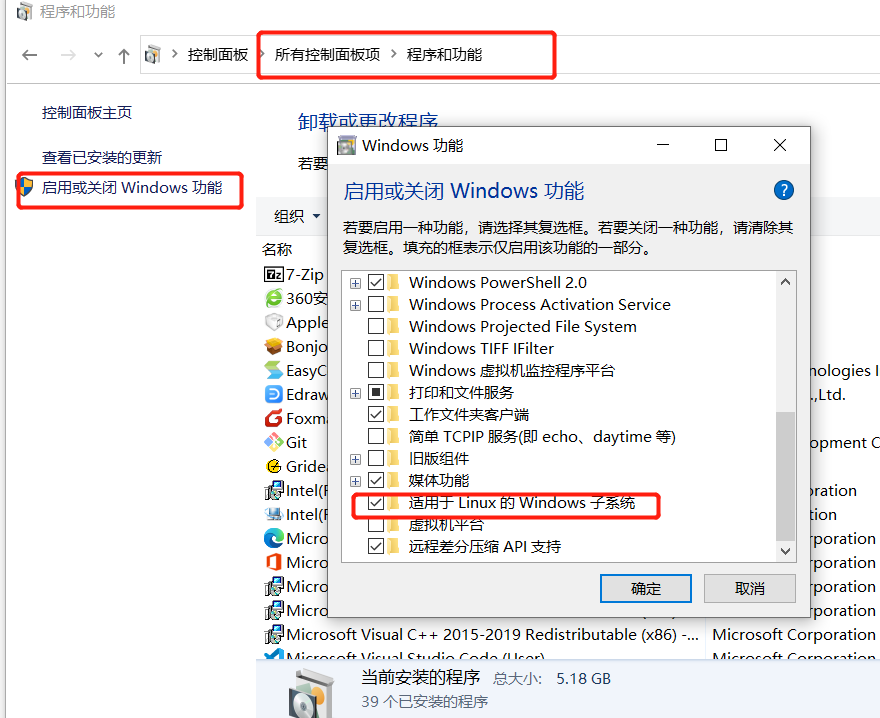
* **【WSL上安装Linux】** 推荐在WSL上安装Ubuntu Linux,通过PowerShell运行以下命令安装:
wsl --update
wsl --install -d Ubuntu
如果遇到以下问题,参考:[https://blog.csdn.net/weixin\_44293949/article/details/121863559](https://blog.csdn.net/weixin_44293949/article/details/121863559)
无法从 'https://raw.githubusercontent.com/microsoft/WSL/master/distributions/DistributionInfo.json’提取列表分发。无法解析服务器的名称或地址
Error code: Wsl/WININET_E_NAME_NOT_RESOLVED
* **【WSL环境的IP地址】** 在WSL的Linux环境中,运行以下命令获取IP地址:
| 主机 | 查看IP地址的命令 |
| --- | --- |
| WSL中Linux主机 | `hostname -I \\| awk '{print $1}'` |
| WSL宿主Windows主机 | `ip route show \\| grep -i default \\| awk '{ print $3}'` |
[](https://docs.opennhp.org/zh-cn/build/#2-%E7%B3%BB%E7%BB%9F%E9%9C%80%E6%B1%82)
2\. 系统需求
-----------------------------------------------------------------------------------------
* 2.1 `Go语言`环境:**Go 1.23** 。安装包下载地址: [https://go.dev/dl/](https://go.dev/dl/)
* **Windows与macOS**环境下,通过下载的安装程序来安装Go。
* **Linux**环境下可以直接通过管理工具安装: `sudo apt install golang`
* 安装成功后,运行命令`go version` 来查看Go版本号。
* **Windows与macOS**环境下,通过下载的安装程序来安装Go。
* **Linux**环境下可以直接通过管理工具安装:`sudo apt install golang` 或者通过以下命令手动安装:
1. sudo apt-get update
2. wget https://go.dev/dl/go1.21.0.linux-amd64.tar.gz
3. sudo tar -xvf go1.21.0.linux-amd64.tar.gz
4. sudo mv go /usr/local
5. export GOROOT=/usr/local/go
6. export GOPATH=$HOME/go
7. export PATH=$GOPATH/bin:$GOROOT/bin:$PATH
8. source ~/.profile
* 安装成功后,运行命令`go version` 来查看Go版本号。
* 2.2 `GCC`环境:
* **Linux与macOS**:**GCC 8.0**或以上。
* 查看GCC版本的命令:`gcc -v`
* 安装GCC: `sudo apt install build-essential`
* **Windows**:
1. 第一步:**安装mingw64**。mingw64可以通过msys2的包管理工具进行下载。安装msys2系统要求、下载与安装教程见:[https://www.msys2.org/](https://www.msys2.org/)
。 
2. 第二步:**安装GCC**。在msys2的控制台输入命令:
pacman -S mingw-w64-ucrt-x86_64-gcc
3. 第三步:**配置GCC**。将GCC工具路径加入Windows的 _%PATH%_ 环境变量。例如:mingw-w64-gcc的安装路径为`C:\Program Files\MSYS2\`, 则需要运行命令
setx PATH "%PATH%;C:\Program Files\MSYS2\ucrt64\bin
执行成功之后,打开新的命令行窗口,检查_gcc_的版本号
gcc --version
* **提示:** Windows下可以通过`WSL`子系统来运行Linux,详细请见WSL官方文档:[https://learn.microsoft.com/zh-cn/windows/wsl/install](https://learn.microsoft.com/zh-cn/windows/wsl/install)
* 推荐在WSL上运行Ubuntu最新版v22,在Windows上的PowerShell运行以下命令安装:
wsl --install --distribution Ubuntu-22.04
_注:如果 2.1 和 2.2 已完成,直接在项目目录下执行编译命令 `.\build.bat` 时,通常会遇到 `系统找不到指定的路径`或 \` ‘lib’ 不是内部或外部命令,也不是可运行的程序或批处理文件。\` 的错误。2.3 提供了解决该问题的方法,供参考使用。_
* 2.3 `lib`环境:
* 在编译运行的命令中使用了 lib 工具,这是用于生成 .lib 文件的工具,通常用于链接静态库或导出符号表(在 Windows 中生成 .lib 文件以便与 .dll 文件配合使用)。遇到的错误提示 lib 不是内部或外部命令,表示系统找不到 lib 工具。
* **解决(’lib’ 不是内部或外部命令,也不是可运行的程序或批处理文件)问题 :** 安装 Visual Studio 和 Visual Studio tools。
* lib 工具是微软的库管理工具,通常随 Visual Studio 的 Microsoft Build Tools 安装。确保你已安装 Visual Studio,并且选择了 C++ 生成工具(C++ Build Tools)组件,其中包括 lib.exe。
* 如果还没有安装 Visual Studio,可以从 Visual Studio 官方网站下载安装:https://visualstudiomicrosoft.com/zh-hans/ 安装时,选择“桌面开发(C++)”工作负载,它包含 lib.exe 及其他必要的工具。
* 安装 Visual Studio 后,确保使用 Visual Studio 开发者命令行(Developer Command Prompt) 来运行包含 lib 命令的 `build.bat` 文件。这个命令行工具会自动加载构建工具的环境变量,如 lib.exe
* **解决(系统找不到指定路径的错误)问题 :** 更改`bulid.bat`文件中的路径
* 打开 `build.bat` 文件,找到
call "C:\Program Files (x86)\Microsoft Visual Studio\2019\Community\VC\Auxiliary\Build\vcvarsall.bat" x64
* 修改为你自己的 visual studio目录下安装路径。比如:
call "F:\develop\visualstu\VC\Auxiliary\Build\vcvarsall.bat" x64
* 2.4 `clang`编译环境(可选):
* **提示:**
* 关于clang编译工具,clang 只支持Linux,不支持windows,windows下无需安装clang。
* 关于eBPF模块编译,eBPF不支持windows,eBPF只支持Linux及内核5.6版本以上。
* 查看clang版本的命令:`clang --version`
* **Linux Ubuntu**:
* 安装clang llvm libbpf-dev:`sudo apt install clang llvm libbpf-dev`
* **Linux Centos**:
* 安装clang llvm libbpf-dev:`sudo yum install clang llvm libbpf-dev -y`
[](https://docs.opennhp.org/zh-cn/build/#3-%E7%BC%96%E8%AF%91)
3\. 编译
---------------------------------------------------------------------
1. 拉取代码仓库
git clone https://github.com/OpenNHP/opennhp.git
2. Go环境
go env -w GOPROXY="https://goproxy.cn,direct"
3. 编译构建
* **Linux与macOS**:运行代码根目录下脚本 `make`
* **Windows**:运行代码根目录下_BAT_文件 `build.bat`
_(注:如果在windows下编译过程中出现错误,请尝试此编译方法:在Visual Studio的developer command prompt for VS命令窗口中,切换到项目目录,执行`./build.bat`命令)_
* **Linux下编译eBPF**: 运行代码根目录下脚本 `make ebpf`
_(注:命令 `make ebpf`,会连带编译ebpf模块)_
[](https://docs.opennhp.org/zh-cn/build/#4-%E7%BB%93%E6%9E%9C)
4\. 结果
---------------------------------------------------------------------
编译出来的二进制文件都在代码目录下的`release`子目录下。
* **NHP-Server**的可执行文件和配置文件: `release\nhp-server` 子目录下
* **NHP-AC**的可执行文件和配置文件: `release\nhp-ac` 子目录下
* **NHP-Agent**的可执行文件和配置文件: `release\nhp-agent` 子目录下
* **NHP-DB**的可执行文件和配置文件: `release\nhp-db` 子目录下
* **NHP-KGC**的可执行文件和配置文件: `release\nhp-kgc` 子目录下
* 所有二进制文件打包成一个`tar`文件: `release\archive` 子目录下
* * *
* * *
---
# 部署OpenNHP | OpenNHP Documentation
[Skip to main content](https://docs.opennhp.org/zh-cn/deploy/#main-content)
Link Menu Expand (external link) Document Search Copy Copied
[](https://docs.opennhp.org/)
[](https://docs.opennhp.org/zh-cn/deploy/#%E9%83%A8%E7%BD%B2opennhp)
部署OpenNHP
==============================================================================
[English](https://docs.opennhp.org/deploy/)
* * *
[](https://docs.opennhp.org/zh-cn/deploy/#1-opennhp%E7%BB%84%E4%BB%B6%E8%AF%B4%E6%98%8E)
1\. OpenNHP组件说明
--------------------------------------------------------------------------------------------------------
根据上一章中的构建步骤,构建结果将输出到 _release_ 目录下,该目录下的三个子目录分别包含OpenNHP的三大核心组件:_nhp-agent_、_nhp-server_和_nhp-ac_。
* **nhp-agent代理:** 发起敲门请求的模块,敲门请求中带有数据访问者的身份和设备信息,通常安装在用户终端的设备上。
* **nhp-server服务器:** 处理并验证敲门请求的模块,通常是服务器程序。其功能包括验证敲门请求并与外部授权服务提供商进行交互实现鉴权操作,以及控制NHP门禁进行开门动作。
* **nhp-ac门禁:** 访问控制的执行模块,通常是服务器程序。该模块执行默认“拒绝一切”(deny all)的安全策略并确保被保护资源的网络隐身状态,通常位于被保护资源所在的同一主机上。负责向已授权的NHP代理开放访问权限或向已失去授权的NHP代理关闭访问权限,并根据NHP服务器返回参数执行针对NHP代理的放行动作。
[](https://docs.opennhp.org/zh-cn/deploy/#2-opennhp%E5%BC%80%E5%8F%91%E6%B5%8B%E8%AF%95%E7%8E%AF%E5%A2%83%E6%90%AD%E5%BB%BA)
2\. OpenNHP开发测试环境搭建
------------------------------------------------------------------------------------------------------------------------------------------------
### [](https://docs.opennhp.org/zh-cn/deploy/#21-%E5%BC%80%E5%8F%91%E6%B5%8B%E8%AF%95%E7%8E%AF%E5%A2%83windowsmacos%E5%BC%80%E5%8F%91%E4%B8%BB%E6%9C%BA--linux%E8%99%9A%E6%8B%9F%E6%9C%BA)
2.1 开发测试环境:Windows/MacOS开发主机 + Linux虚拟机
假设开发主机为Windows或者macOS,可通过安装虚拟机环境(如VirualBox)并创建两台Linux虚拟机来搭建简单的OpenNHP测试环境。在创建虚拟机时,请将网卡选项设置为`"Host-only Adapter"`(如下图),可使虚拟机的IP与开发主机IP在同一个网段。

**提示:** 如需该虚拟机同时具备访问互联网能力,可以另外增加一个`"NAT"`网卡: 
至此,NHP三大组件的环境搭建如下:
* 【nhp-server】 运行在Linux虚拟主机上,IP地址为_192.168.56.101_
* 【nhp-ac】 运行在Linux虚拟主机上,IP地址为_192.168.56.102_
* 【nhp-agent】 运行在Windows/macOS开发主机上,IP地址为_192.168.56.1_
### [](https://docs.opennhp.org/zh-cn/deploy/#22-%E5%BC%80%E5%8F%91%E6%B5%8B%E8%AF%95%E7%8E%AF%E5%A2%83%E7%9A%84%E7%BD%91%E7%BB%9C%E6%8B%93%E6%89%91%E4%B8%8E%E5%9F%BA%E7%A1%80%E4%BF%A1%E6%81%AF)
2.2 开发测试环境的网络拓扑与基础信息

| 服务器名称 | IP地址 | 基础配置信息 |
| --- | --- | --- |
| NHP-Server | 192.168.56.101 | **公钥:** WqJxe+Z4+wLen3VRgZx6YnbjvJFmptz99zkONCt/7gc=
**私钥:** eHdyRHKJy/YZJsResCt5XTAZgtcwvLpSXAiZ8DBc0V4=
**Hostname:** localhost
**ListenPort:** 62206
**aspId:** example |
| NHP-AC | 192.168.56.102 | **公钥:** Fr5jzZDVpNh5m9AcBDMtHGmbCAczHyPegT8IxQ3XAzE=
**私钥:** +B0RLGbe+nknJBZ0Fjt7kCBWfSTUttbUqkGteLfIp30=
**ACId:** testAC-1
被保护资源的 **resId:** test |
| NHP-Agent | 192.168.56.1 | **公钥:** WnJAolo88/q0x2VdLQYdmZNtKjwG2ocBd1Ozj41AKlo=
**私钥:** +Jnee2lP6Kn47qzSaqwSmWxORsBkkCV6YHsRqXCegVo=
**UserId:** agent-0 |
**【注意】** 每个组件都有对应的配置文件,需要配置正确才能成功启动。关于配置文件的格式,请见下文中各个组件的“配置文件”相关信息。
**【提示】** 从0.3.3版本起,各组件配置文件中的大多数字段都支持动态更新,详见各配置文件注释说明。
### [](https://docs.opennhp.org/zh-cn/deploy/#23-nhp-server%E7%9A%84%E9%85%8D%E7%BD%AE%E4%B8%8E%E8%BF%90%E8%A1%8C)
2.3 NHP-Server的配置与运行
#### [](https://docs.opennhp.org/zh-cn/deploy/#231-nhp-server%E7%B3%BB%E7%BB%9F%E8%A6%81%E6%B1%82)
2.3.1 NHP-Server系统要求
* Linux服务器或者Windows
#### [](https://docs.opennhp.org/zh-cn/deploy/#232-nhp-server%E8%BF%90%E8%A1%8C)
2.3.2 NHP-Server运行
将_release_目录下_nhp-server_目录复制到目标机器上。配置好_etc_目录下 `toml`文件(详细参数见下一节),运行`nhp-serverd run`。
* Linux环境:
nohup ./nhp-serverd run 2>&1 &
* Windows环境:
nhp-serverd.exe run
_【可选项】_ 禁止UDP端口暴露:运行`iptables_default.sh`
#### [](https://docs.opennhp.org/zh-cn/deploy/#233-nhp-server%E6%9C%8D%E5%8A%A1%E5%99%A8%E7%9A%84%E9%85%8D%E7%BD%AE%E6%96%87%E4%BB%B6)
2.3.3 NHP-Server服务器的配置文件
* 基础配置:[config.toml](https://github.com/OpenNHP/opennhp/tree/main/server/main/etc/config.toml)
* 门禁peer列表配置:[ac.toml](https://github.com/OpenNHP/opennhp/tree/main/server/main/etc/ac.toml)
* 客户端peer列表配置:[agent.toml](https://github.com/OpenNHP/opennhp/tree/main/server/main/etc/agent.toml)
* http服务配置:[http.toml](https://github.com/OpenNHP/opennhp/tree/main/server/main/etc/http.toml)
* 服务器插件读取配置:[resource.toml](https://github.com/OpenNHP/opennhp/tree/main/server/main/etc/resource.toml)
* 源地址关联列表:[srcip.toml](https://github.com/OpenNHP/opennhp/tree/main/server/main/etc/srcip.toml)
* 服务器插件资源配置:[resource.toml](https://github.com/OpenNHP/opennhp/tree/main/server/main/etc/resource.toml)
### [](https://docs.opennhp.org/zh-cn/deploy/#24-nhp-ac%E7%9A%84%E9%85%8D%E7%BD%AE%E4%B8%8E%E8%BF%90%E8%A1%8C)
2.4 NHP-AC的配置与运行
#### [](https://docs.opennhp.org/zh-cn/deploy/#241-nhp-ac%E7%B3%BB%E7%BB%9F%E8%A6%81%E6%B1%82)
2.4.1 NHP-AC系统要求
* Linux服务器,内核需支持**ipset**。可通过以下命令查看ipset支持情况
lsmod | grep ip_set
#### [](https://docs.opennhp.org/zh-cn/deploy/#242-nhp-ac%E8%BF%90%E8%A1%8C)
2.4.2 NHP-AC运行
将_release_目录下_nhp-ac_目录复制到目标机器上。配置好_etc_目录下 `toml`文件(详细参数见下一章),运行`iptables_default.sh`,添加防火墙规则,此时外部连接将无法建立。再运行`nhp-acd run`。
**【注意】** `nhp-acd` 以及 `iptables_default.sh` 需要在**root**权限下运行。
* Linux环境:
su
./iptables_default.sh
nohup ./nhp-acd run 2>&1 &
如果想恢复`iptables_default.sh`对iptables的改动,可以运行以下命令来清除:
iptables -F
#### [](https://docs.opennhp.org/zh-cn/deploy/#243-nhp-ac%E9%97%A8%E7%A6%81%E9%85%8D%E7%BD%AE%E6%96%87%E4%BB%B6)
2.4.3 NHP-AC门禁配置文件
* 基础配置:[config.toml](https://github.com/OpenNHP/opennhp/tree/main/ac/main/etc/config.toml)
* 服务器peer列表:[server.toml](https://github.com/OpenNHP/opennhp/tree/main/ac/main/etc/server.toml)
### [](https://docs.opennhp.org/zh-cn/deploy/#25-nhp-agent%E7%9A%84%E9%85%8D%E7%BD%AE%E4%B8%8E%E8%BF%90%E8%A1%8C)
2.5 NHP-Agent的配置与运行
#### [](https://docs.opennhp.org/zh-cn/deploy/#251-nhp-agent%E7%B3%BB%E7%BB%9F%E8%A6%81%E6%B1%82)
2.5.1 NHP-Agent系统要求
* 所有平台:Windows、Linux、macOS、Android、iOS
#### [](https://docs.opennhp.org/zh-cn/deploy/#252-nhp-agent%E8%BF%90%E8%A1%8C)
2.5.2 NHP-Agent运行
将_release_目录下_nhp-agent_目录复制到目标机器上。配置好_etc_目录下 `toml`文件(详细参数见下一章),运行`nhp-agentd run`。
* Linux环境:
nohup ./nhp-agentd run 2>&1 &
* Windows环境:
nhp-agentd.exe run
#### [](https://docs.opennhp.org/zh-cn/deploy/#253-nhp-agent%E7%9A%84%E9%85%8D%E7%BD%AE%E6%96%87%E4%BB%B6)
2.5.3 NHP-Agent的配置文件
* 基础配置:[config.toml](https://github.com/OpenNHP/opennhp/tree/main/agent/main/etc/config.toml)
* 敲门目标配置:[resource.toml](https://github.com/OpenNHP/opennhp/tree/main/agent/main/etc/resource.toml)
* 服务器peer列表:[server.toml](https://github.com/OpenNHP/opennhp/tree/main/agent/main/etc/server.toml)
### [](https://docs.opennhp.org/zh-cn/deploy/#26-%E6%B5%8B%E8%AF%95nhp%E7%BD%91%E7%BB%9C%E9%9A%90%E8%BA%AB%E6%95%88%E6%9E%9C)
2.6 测试NHP网络隐身效果
验证NHP网络隐身效果,可以通过nhp-agent主机 _(IP:192.168.56.1)_进行`nmap扫描(以80端口为例)` nhp-ac主机 _(IP:192.168.56.102)_来测试。此外,可以在另外一台虚拟机(模拟黑客扫描攻击),扫描nhp-ac 主机查看效果。
| 测试用例 | 测试命令 | 测试目的 | 预期结果 |
| --- | --- | --- | --- |
| nhp-agent未运行 | `nmap -sS -p 80 192.168.56.102` | 测试AC对Agent隐身 | 80/tcp filtered |
| nhp-agent已运行 | `nmap -sS -p 80 192.168.56.102` | 测试AC对Agent开放 | 80/tcp open |
| nhp-agent已运行 | `nmap -sS -p 80 192.168.56.102` | 测试AC对黑客隐身 | 80/tcp filtered |
[](https://docs.opennhp.org/zh-cn/deploy/#3-%E6%97%A5%E5%BF%97%E8%AF%B4%E6%98%8E)
3\. 日志说明
------------------------------------------------------------------------------------------
### [](https://docs.opennhp.org/zh-cn/deploy/#31-%E6%97%A5%E5%BF%97%E6%96%87%E4%BB%B6%E4%BD%8D%E7%BD%AE)
3.1 日志文件位置
日志文件生成于每个组件各自的_logs_目录下,以日期作为文件名,可通过`tail`命令查看。
* 查看nhp-server的日志
tail -f release/nhp-server/logs/server-2024-03-10.log
* 查看nhp-ac的日志
tail -f release/nhp-ac/logs/ac-2024-03-10.log
* 查看nhp-agent的日志
tail -f release/nhp-agent/logs/agent-2024-03-10.log
### [](https://docs.opennhp.org/zh-cn/deploy/#32-%E6%97%A5%E5%BF%97%E6%96%87%E4%BB%B6%E6%A0%BC%E5%BC%8F)
3.2 日志文件格式
日志的格式如下:
时间戳 代码位置 NHP组件名 [日志权重] 日志消息
日志权重分成以下几个级别:
* Error
* Critical
* Warning
* Info
* Debug
[](https://docs.opennhp.org/zh-cn/deploy/#4-%E9%99%84%E5%BD%95a%E5%B8%B8%E8%A7%81%E9%97%AE%E9%A2%98faq)
4\. 附录A:常见问题FAQ
-----------------------------------------------------------------------------------------------------------------------
* **Q:** Windows平台上编译错误:`running gcc failed: exec: "gcc": executable file not found in %PATH%` **A:** 原因是没有安装`gcc`编译工具。请按照上文中3.1.3中步骤安装GCC。
* 日志中显示错误:`NHP-AC [Critical] received stale packet from 192.168.56.101:62206, drop packet` 。 【原因】接收方对包的接收时间有要求,数据包发送时间不能早于接收方10分钟以上。 【修复】两台机器的时间同步
* 怎么调整一次认证后开通的时间? 怎么限制只开放指定的端口? 【方法】在nhp-server/plugins/下对应的插件模块中,找到etc/resource.toml文件,里面能配置资源的端口、时长、id等信息;如果用的是nhp-agent敲门,则默认是example插件。如果是微信扫码敲门,用的是wxweb插件。
* 如何检查配置是否生效? 【方法】server和ac的日志里有记录。也可以在ac的系统里输入ipset -L命令查看授权的源ip目的端口和时长。
* nhp-agent 敲门成功,但访问不通可能的原因。
问题原因:**_可能原因是 nhp-server 下发到 nhp-ac 进行 ipset,所添加记录中的 resource 目标没和请求中对应的 resource 目标的 IP 对上_**,这种情况可能出现在 resource 与 nhp-ac 在同一台服务器上的情况。可以先手动配置 ipset 规则:
sudo ipset add defaultset [SourceIP],tcp:80,[ResourceIP]
**_SourceIP 来源IP,即 Agent 的公有 IP,可通过 tcpdump 或 ipset list 确认_** **_ResourceIP 请求资源的 IP_** 该IP 对应 nhp-server 中 ./plugins/example/etc/resource.toml,如果与请求对应不上,则会出现敲门成功但无法请求问题。
抓包调试:在 `nhp-ac` 侧 `tcpdump -i any port 80`(根据具体情况调整)
解决方案:将可用的 IP 配置在 nhp-server 的 `./plugins/example/etc/resource.toml` 配置中的 `Addr.Ip = ""`
* * *
---
# 服务器插件开发 | OpenNHP Documentation
[Skip to main content](https://docs.opennhp.org/zh-cn/server_plugin/#main-content)
Link Menu Expand (external link) Document Search Copy Copied
[](https://docs.opennhp.org/)
[](https://docs.opennhp.org/zh-cn/server_plugin/#opennhp%E6%8F%92%E4%BB%B6%E5%BC%80%E5%8F%91%E6%95%99%E7%A8%8B)
OpenNHP插件开发教程
=============================================================================================================================
[English](https://docs.opennhp.org/server_plugin/)
* * *
* [简介](https://docs.opennhp.org/zh-cn/server_plugin/#%E7%AE%80%E4%BB%8B)
* [1\. 应用OpenNHP插件的必要性](https://docs.opennhp.org/zh-cn/server_plugin/#1-%E5%BA%94%E7%94%A8opennhp%E6%8F%92%E4%BB%B6%E7%9A%84%E5%BF%85%E8%A6%81%E6%80%A7)
* [1.1 协议兼容性与技术限制](https://docs.opennhp.org/zh-cn/server_plugin/#11-%E5%8D%8F%E8%AE%AE%E5%85%BC%E5%AE%B9%E6%80%A7%E4%B8%8E%E6%8A%80%E6%9C%AF%E9%99%90%E5%88%B6)
* [1.2 身份认证的定制化需求](https://docs.opennhp.org/zh-cn/server_plugin/#12-%E8%BA%AB%E4%BB%BD%E8%AE%A4%E8%AF%81%E7%9A%84%E5%AE%9A%E5%88%B6%E5%8C%96%E9%9C%80%E6%B1%82)
* [2\. 插件工作原理](https://docs.opennhp.org/zh-cn/server_plugin/#2-%E6%8F%92%E4%BB%B6%E5%B7%A5%E4%BD%9C%E5%8E%9F%E7%90%86)
* [2.1 用户通过浏览器发起HTTP请求](https://docs.opennhp.org/zh-cn/server_plugin/#21-%E7%94%A8%E6%88%B7%E9%80%9A%E8%BF%87%E6%B5%8F%E8%A7%88%E5%99%A8%E5%8F%91%E8%B5%B7http%E8%AF%B7%E6%B1%82)
* [2.2 NHP服务器解析URL并调用对应插件](https://docs.opennhp.org/zh-cn/server_plugin/#22-nhp%E6%9C%8D%E5%8A%A1%E5%99%A8%E8%A7%A3%E6%9E%90url%E5%B9%B6%E8%B0%83%E7%94%A8%E5%AF%B9%E5%BA%94%E6%8F%92%E4%BB%B6)
* [2.3 插件程序执行核心功能](https://docs.opennhp.org/zh-cn/server_plugin/#23-%E6%8F%92%E4%BB%B6%E7%A8%8B%E5%BA%8F%E6%89%A7%E8%A1%8C%E6%A0%B8%E5%BF%83%E5%8A%9F%E8%83%BD)
* [2.4 插件完成代码执行流程](https://docs.opennhp.org/zh-cn/server_plugin/#24-%E6%8F%92%E4%BB%B6%E5%AE%8C%E6%88%90%E4%BB%A3%E7%A0%81%E6%89%A7%E8%A1%8C%E6%B5%81%E7%A8%8B)
* [2.5 NHP服务器向用户响应HTTP请求](https://docs.opennhp.org/zh-cn/server_plugin/#25-nhp%E6%9C%8D%E5%8A%A1%E5%99%A8%E5%90%91%E7%94%A8%E6%88%B7%E5%93%8D%E5%BA%94http%E8%AF%B7%E6%B1%82)
* [3\. 插件开发原理](https://docs.opennhp.org/zh-cn/server_plugin/#3-%E6%8F%92%E4%BB%B6%E5%BC%80%E5%8F%91%E5%8E%9F%E7%90%86)
* [3.1 环境准备](https://docs.opennhp.org/zh-cn/server_plugin/#31-%E7%8E%AF%E5%A2%83%E5%87%86%E5%A4%87)
* [3.2 初始化项目](https://docs.opennhp.org/zh-cn/server_plugin/#32-%E5%88%9D%E5%A7%8B%E5%8C%96%E9%A1%B9%E7%9B%AE)
* [3.3 插件功能设计](https://docs.opennhp.org/zh-cn/server_plugin/#33-%E6%8F%92%E4%BB%B6%E5%8A%9F%E8%83%BD%E8%AE%BE%E8%AE%A1)
* [3.4 核心代码开发](https://docs.opennhp.org/zh-cn/server_plugin/#34-%E6%A0%B8%E5%BF%83%E4%BB%A3%E7%A0%81%E5%BC%80%E5%8F%91)
* [3.5 插件的编译测试与部署](https://docs.opennhp.org/zh-cn/server_plugin/#35-%E6%8F%92%E4%BB%B6%E7%9A%84%E7%BC%96%E8%AF%91%E6%B5%8B%E8%AF%95%E4%B8%8E%E9%83%A8%E7%BD%B2)
* [结论](https://docs.opennhp.org/zh-cn/server_plugin/#%E7%BB%93%E8%AE%BA)
[](https://docs.opennhp.org/zh-cn/server_plugin/#%E7%AE%80%E4%BB%8B)
简介
=======================================================================
NHP服务器中的插件是添加特定功能到主应用程序的模块。它们被设计为高度模块化,与主应用程序松散耦合,允许开发人员添加、删除或更新插件,而不影响服务器的核心功能。
[](https://docs.opennhp.org/zh-cn/server_plugin/#1-%E5%BA%94%E7%94%A8opennhp%E6%8F%92%E4%BB%B6%E7%9A%84%E5%BF%85%E8%A6%81%E6%80%A7)
1\. 应用OpenNHP插件的必要性
-------------------------------------------------------------------------------------------------------------------------------------------------------
OpenNHP插件的开发一方面解决了UDP协议与网页端HTTP请求之间的兼容性问题,另一方面通过定制化身份认证服务满足了政务平台多样化的需求。插件的开发是NHP框架进一步扩展和灵活适应政务数据流通应用的关键步骤。具体原因如下:
### [](https://docs.opennhp.org/zh-cn/server_plugin/#11-%E5%8D%8F%E8%AE%AE%E5%85%BC%E5%AE%B9%E6%80%A7%E4%B8%8E%E6%8A%80%E6%9C%AF%E9%99%90%E5%88%B6)
1.1 协议兼容性与技术限制
NHP标准协议基于UDP协议进行通信,UDP具有轻量、快速的特点,适合大规模、高频次的数据传输。然而,在某些应用场景中,尤其是基于网页的应用,如HTML5网页,浏览器中的JavaScript只能发起HTTP请求,无法直接发送UDP请求。这就带来了协议不兼容的问题。由于很多现代政务应用通过网页端进行操作和数据交互,插件的开发变得非常必要,以弥补这个技术差距。
通过开发OpenNHP插件,NHP服务器能够接收来自网页端的HTTP请求(通常是网页中的敲门包),并转换为UDP协议进行内部通信。这种机制确保了基于HTTP请求的网页应用与NHP服务器的无缝对接,从而拓展了NHP框架的应用范围,特别是在依赖浏览器与后台服务交互的场景中,提升了数据传输的灵活性和兼容性。
### [](https://docs.opennhp.org/zh-cn/server_plugin/#12-%E8%BA%AB%E4%BB%BD%E8%AE%A4%E8%AF%81%E7%9A%84%E5%AE%9A%E5%88%B6%E5%8C%96%E9%9C%80%E6%B1%82)
1.2 身份认证的定制化需求
政务数据流通涉及到高度安全的身份认证与权限管理。然而,标准的身份认证协议无法满足政务场景中的复杂需求。不同的政务平台有各自的认证机制,它们的身份认证流程具有很高的定制化需求。传统的标准协议在应对这些平台时显得过于僵化,无法灵活对接各自的认证系统。
OpenNHP插件可以通过定制化服务来对接不同的政务平台,根据具体平台的要求,灵活适配其身份认证流程。插件提供了定制化开发的能力,允许开发者根据不同政务平台的需求对身份认证机制进行调整,使NHP框架能够与不同平台无缝集成。这不仅提高了身份认证的安全性,还确保了数据流通的合规性和灵活性。
[](https://docs.opennhp.org/zh-cn/server_plugin/#2-%E6%8F%92%E4%BB%B6%E5%B7%A5%E4%BD%9C%E5%8E%9F%E7%90%86)
2\. 插件工作原理
---------------------------------------------------------------------------------------------------------------------
整个插件的执行流程涵盖了从用户发起请求、服务器解析插件、插件执行逻辑再到最终反馈给用户的完整过程。每一步都起着关键作用,确保了NHP服务器能够通过插件来满足不同场景下的请求处理需求,特别是在身份验证和敲门包机制上。

**_图一 插件工作原理架构图_**
### [](https://docs.opennhp.org/zh-cn/server_plugin/#21-%E7%94%A8%E6%88%B7%E9%80%9A%E8%BF%87%E6%B5%8F%E8%A7%88%E5%99%A8%E5%8F%91%E8%B5%B7http%E8%AF%B7%E6%B1%82)
2.1 用户通过浏览器发起HTTP请求
用户在浏览器中输入指定的URL地址,向NHP服务器发送HTTP请求。例如,用户访问URL:
* http://127.0.0.1:port/plugins/example?resid=demo&action=login.
这是整个流程的起点,通常由网页或应用发出的请求,需要通过插件来处理。
| URL组成部分 | 说明 |
| --- | --- |
| 127.0.0.1:port | 前半部分为NHP-Server服务器IP地址,后半部分为NHP服务端口号 |
| plugin | 插件目录 |
| example | 插件名称 |
| resid | 插件资源id |
| action | 执行的动作,用于在插件程序代码中判断所要执行的辅助函数 |
**_表一 URL组成部分说明_**
### [](https://docs.opennhp.org/zh-cn/server_plugin/#22-nhp%E6%9C%8D%E5%8A%A1%E5%99%A8%E8%A7%A3%E6%9E%90url%E5%B9%B6%E8%B0%83%E7%94%A8%E5%AF%B9%E5%BA%94%E6%8F%92%E4%BB%B6)
2.2 NHP服务器解析URL并调用对应插件
NHP服务器接收到来自浏览器的HTTP请求后,会根据请求的URL路径和参数解析出需要调用的插件。在这个过程中,NHP服务器识别出plugins/example部分,并将请求导入到名为“example”的插件中进行进一步处理。
### [](https://docs.opennhp.org/zh-cn/server_plugin/#23-%E6%8F%92%E4%BB%B6%E7%A8%8B%E5%BA%8F%E6%89%A7%E8%A1%8C%E6%A0%B8%E5%BF%83%E5%8A%9F%E8%83%BD)
2.3 插件程序执行核心功能
插件程序根据URL中的参数(如resid=demo和action=login),执行相应的功能。插件的核心功能包括身份认证和一系列的“敲门包”(Knock)请求处理步骤。具体流程可以是根据这些参数执行一系列函数,核心函数处理主逻辑,辅助函数则提供支持,以完成身份验证、资源访问等任务。
### [](https://docs.opennhp.org/zh-cn/server_plugin/#24-%E6%8F%92%E4%BB%B6%E5%AE%8C%E6%88%90%E4%BB%A3%E7%A0%81%E6%89%A7%E8%A1%8C%E6%B5%81%E7%A8%8B)
2.4 插件完成代码执行流程
插件在处理请求时,经过身份验证或其他定制化服务的逻辑后,插件的代码流程执行完成。这一步是插件实现其核心功能的关键,所有的认证、授权或其他逻辑在此步完成。
### [](https://docs.opennhp.org/zh-cn/server_plugin/#25-nhp%E6%9C%8D%E5%8A%A1%E5%99%A8%E5%90%91%E7%94%A8%E6%88%B7%E5%93%8D%E5%BA%94http%E8%AF%B7%E6%B1%82)
2.5 NHP服务器向用户响应HTTP请求
插件处理完毕后,将结果反馈给NHP服务器,NHP服务器则通过HTTP协议将处理结果响应给用户。用户最终会在浏览器端接收到返回的内容,可能是操作成功的确认信息,或是相关数据、页面更新等内容。
[](https://docs.opennhp.org/zh-cn/server_plugin/#3-%E6%8F%92%E4%BB%B6%E5%BC%80%E5%8F%91%E5%8E%9F%E7%90%86)
3\. 插件开发原理
---------------------------------------------------------------------------------------------------------------------
### [](https://docs.opennhp.org/zh-cn/server_plugin/#31-%E7%8E%AF%E5%A2%83%E5%87%86%E5%A4%87)
3.1 环境准备
在开发OpenNHP插件之前,确保以下开发环境已经搭建完成:
**1.开发语言**:选择Golang语言进行开发。
**2.开发工具**:推荐使用IDEA、VS Code等集成开发环境。
**3.OpenNHP源码**:从GitHub下载最新版本的opennhp代码,并集成至开发环境。下载地址:https://github.com/OpenNHP/opennhp。
### [](https://docs.opennhp.org/zh-cn/server_plugin/#32-%E5%88%9D%E5%A7%8B%E5%8C%96%E9%A1%B9%E7%9B%AE)
3.2 初始化项目
首先在server/plugins目录下创建新的插件项目,例如现在我需要创建一个名为”example”的插件项目。

**_图二 example插件上级目录_**
NHP 服务器中的每个插件通常都结构化为一个单独的 Go 包。例如,example 插件位于 NHP/server/plugins/example 目录下,并且有自己的 example.go 文件。
初始化后的项目结构包括基础的配置文件和插件框架,主体包括etc目录及该目录下的配置文件(config.toml、resource.toml)、主程序文件main.go、自动化编译文件Makefile等。如果待开发插件需要集成前端页面,则可添加templates目录及该目录下的前端html页面.
典型的插件文件,如 example.go,包含以下内容:
* 必要包的导入语句
* 与插件相关的常量和变量
* 辅助函数
* 主插件函数

**_图三 example插件目录结构示例_**
| **_文件(夹)名称_** | **_作用_** |
| --- | --- |
| etc | 目录下包含插件配置文件和资源文件 |
| config.toml | 定义了插件代码运行过程中的一些配置文件信息 |
| resource.toml | 定义了插件资源信息 |
| templates | 存放集成的前端页面模版,如不需要可忽略 |
| main.go | 插件主程序文件,定义了核心主函数和一系列辅助函数的功能 |
| Makefile | 自动化编译文件 |
**_表二 插件目录及文件作用_**
### [](https://docs.opennhp.org/zh-cn/server_plugin/#33-%E6%8F%92%E4%BB%B6%E5%8A%9F%E8%83%BD%E8%AE%BE%E8%AE%A1)
3.3 插件功能设计
在插件功能设计阶段,需明确以下几个核心点:
**_数据流通场景_**:定义数据流通过程中的参与者、权限及流转路径。
**_安全策略_**:通过零信任架构设置严格的访问控制和验证机制。
**_日志与审计_**:设计完善的日志记录功能,以便后续追溯和审计。
例如“example”插件所要实现的功能主体为:
1. 在H5页面提交包含用户名、密码的表单;
2. NHP-Server服务器接收表单进行验证,验证成功后向NHP-AC服务器发起敲门;
3. NHP-AC开门成功后返回应用服务器地址给客户端;
4. 访问应用服务器资源。
### [](https://docs.opennhp.org/zh-cn/server_plugin/#34-%E6%A0%B8%E5%BF%83%E4%BB%A3%E7%A0%81%E5%BC%80%E5%8F%91)
3.4 核心代码开发
以下是为 NHP 服务器开发插件的步骤:
1. 在 NHP/server/plugins 下创建您的插件的新目录。目录名称应为您的插件名称。
2. 在插件目录中创建一个新的 Go 文件。文件名应与目录名称相同。例如,对于名为 myplugin 的插件,您将创建一个名为 myplugin.go 的文件。
3. 定义您的插件函数。您的插件应至少有一个执行插件核心功能的主要函数。您还可以根据需要定义辅助函数。
4. 在主应用程序中导入您的插件。在主应用程序文件 (main.go) 中,导入您的插件包并根据需要调用您的插件函数。
参照插件功能设计进行代码开发,以“example”插件为例,设计AuthWithHttp函数接收处理HTTP请求,authRegular函数验证用户名密码并进行敲门,authAndShowLogin函数加载登录页面资源等,并且需要设计验辅助函数来实现功能。按照具体功能要求可进行拓展开发。



**_图四、五、六 example插件核心代码以及辅助代码函数示例_**
### [](https://docs.opennhp.org/zh-cn/server_plugin/#35-%E6%8F%92%E4%BB%B6%E7%9A%84%E7%BC%96%E8%AF%91%E6%B5%8B%E8%AF%95%E4%B8%8E%E9%83%A8%E7%BD%B2)
3.5 插件的编译测试与部署
插件的测试与部署是确保插件功能完备、性能稳定的关键步骤。通过本地环境测试和优化,开发者可以在保证插件功能正确性的基础上进行实际部署。在生产环境中,需对插件进行精确配置,并结合安全与运维策略,确保插件在实际应用中能够满足业务需求并长期稳定运行。具体步骤如下:
**1.插件的编译**
编译过程确保插件的代码与主项目保持一致,同时通过 Makefile 中的任务依赖关系,保证了插件的构建流程和主系统的编译紧密结合,实现一体化的构建与发布流程。具体步骤如下:
**_定义插件目录_**: 在 Makefile 的顶部,我们可以看到一行定义插件目录的代码,如下图所示:

**_图七 定义插件目录_**
这行代码指定了插件的存放位置,即 server/plugins 目录。所有插件的源码和配置文件将会放在这个目录下,在启动NHP服务时,要确保插件能够正常加载,需要在NHP-Server的etc/resource.toml配置文件中配置插件文件路径。

**_图八 插件文件路径配置_**
**_生成版本信息并开始构建_**: 在 generate-version-and-build 任务中,包含了一系列步骤用于生成版本号、提交 ID、构建时间等信息。这些信息有助于跟踪插件的版本和构建状态。
**_插件的编译逻辑_**: 在 Makefile 中的 plugins: 任务负责执行插件的编译,如下图:

**_图九 插件编译任务plugins_**
插件目录检查: test -d $(NHP\_SERVER\_PLUGINS) 用于检查是否存在定义好的插件目录 (server/plugins)。
执行编译: 如果插件目录存在,$(MAKE) -C $(NHP\_SERVER\_PLUGINS) 会进入该目录并执行其中的 Makefile,即在插件目录内执行插件的编译操作。
**_整体编译过程_**:在整体项目构建过程中(Linux与macOS:运行代码根目录下脚本 make; Windows:运行代码根目录下BAT文件 build.bat),Makefile 中的 plugins 任务会被调用。如果插件目录存在且有效,插件的 Makefile 会被执行以完成插件的构建。在编译的过程中,可能会生成插件的二进制文件或其他形式的输出文件,以供 NHP 服务器使用。
**2.本地环境功能测试**
要测试您的插件,您可以在与插件文件相同的目录中编写一个单独的 \_test.go 文件来编写单元测试。Go 的内置测试包 (testing) 可用于编写和运行测试。
插件开发完成,且编译成功后,首先需要在本地环境进行功能测试。这一步主要用于验证插件的核心功能是否正确实现,确保插件的所有功能模块能够正常工作。可以通过模拟实际应用场景的请求,验证插件的响应是否符合预期,并观察日志记录以查找可能存在的问题。常见的测试步骤包括:
1. 发起HTTP请求或UDP请求,测试插件的响应情况;
2. 验证插件中的身份认证、敲门、开门、授权流程是否按预期执行;
3. 测试插件的错误处理和异常捕获机制;
在本地测试阶段,开发者可以通过调试工具、日志记录以及断点调试来细致排查和解决代码中的潜在问题,确保插件的逻辑严谨且无重大漏洞。
**3.功能确认与优化**
在本地环境测试通过后,开发者需要对插件的功能进行确认与优化。确认插件的核心功能是否完全符合需求文档的描述,是否所有预期的功能都得到了正确的实现。如果在测试中发现插件的某些功能未达预期或有进一步优化空间,此时可以根据测试结果进行相应的代码调整和功能优化。
**4.实际应用场景的配置与部署**
本地测试和优化完成后,插件即可进入实际应用场景的部署阶段。要部署您的插件,只需构建并运行主应用程序。您的插件将包含在构建中,并在服务器运行时可用。在部署插件时,通常需要根据应用场景的具体需求进行配置。具体步骤如下:
**_部署环境准备_**:确保生产环境的服务器配置与本地测试环境一致或接近,包括操作系统、网络配置、依赖库等。
**_插件安装与配置_**:将经过测试的插件代码部署到生产服务器上,按照实际应用场景的要求进行相应的配置,包括配置插件路径、接口地址、门禁服务器地址、身份认证机制等。
**_日志与监控设置_**:在部署完成后,完善日志等级配置,便于在实际应用中及时发现和解决问题。
**_启动NHP服务查看插件加载情况_**:按照NHP服务启动流程启动NHP服务,根据log目录下的日志文件查看插件的加载情况,并且按照本地插件测试流程验证插件功能是否正常。
**5\. 生产环境验证与运维**
插件部署完成后,需要在实际应用环境中对其进行功能验证,确保在生产环境下插件能够正常工作。在插件上线后,还应定期进行运维,持续监控插件的表现,记录运行数据,并及时进行必要的更新和维护,确保插件在长期使用中保持最佳状态。
[](https://docs.opennhp.org/zh-cn/server_plugin/#%E7%BB%93%E8%AE%BA)
结论
=======================================================================
为 NHP 服务器开发插件可以以一种模块化和可维护的方式扩展服务器的功能。通过遵循上述步骤,您可以创建自己的插件并为 NHP 服务器项目做出贡献。
* * *
---
# 源代码解读 | OpenNHP Documentation
[Skip to main content](https://docs.opennhp.org/zh-cn/code/#main-content)
Link Menu Expand (external link) Document Search Copy Copied
[](https://docs.opennhp.org/)
[](https://docs.opennhp.org/zh-cn/code/#openhp%E4%BB%A3%E7%A0%81%E8%A7%A3%E8%AF%BB)
OpeNHP代码解读
==============================================================================================
[English](https://docs.opennhp.org/code/)
* * *
[](https://docs.opennhp.org/zh-cn/code/#1-%E5%B1%82%E7%BA%A7%E6%9E%B6%E6%9E%84)
1\. 层级架构
----------------------------------------------------------------------------------------
1. 上层逻辑组件层负责UDP的连接建立、维护与断开
2. Device层负责:1.将上层的消息明文转为NHP报文并发送到连接;2.将从连接收到的NHP报文转化为消息明文并提供上层处理
3. 上层逻辑组件提供 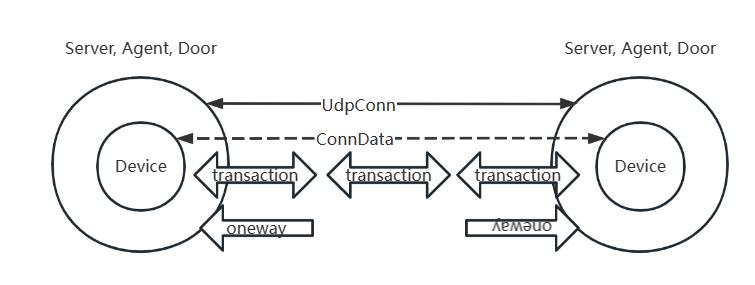
[](https://docs.opennhp.org/zh-cn/code/#2-%E8%BF%9E%E6%8E%A5%E7%AE%A1%E7%90%86)
2\. 连接管理
----------------------------------------------------------------------------------------
1. 上层逻辑组件可以建立并维护多个连接UdpConn,根据实际需求创建所需对象成员。每一个UdpConn起一个线程进行收发包操作。
2. 每一个UdpConn需要建立一个Device层的ConnData,并向Device ConnData传递实际连接中的远端地址,报文收发通道,cookie等。
3. 每一个UdpConn允许进行多次双向的transaction或单向发包。(agent除外,原则上agent每次请求都创建一个新的连接)
4. 每一个transaction都建立一个自身的线程和通道用于维持交互操作,超时后自行销毁。Local transaction(本地创建的交互)由device统一管理,Remote transaction(远端创建的交互)由远端连接管理,transaction的回应在收发包时需要找出相应的transaction线程进行后续操作。
[](https://docs.opennhp.org/zh-cn/code/#3-%E5%AF%B9%E8%B1%A1%E5%91%BD%E5%90%8D)
3\. 对象命名
----------------------------------------------------------------------------------------
1. 上层逻辑组件在收发方向上可能具有多重身份,Device层中使用initiator和responder表示发起方和接收方。
[](https://docs.opennhp.org/zh-cn/code/#4-%E6%8A%A5%E6%96%87%E7%BC%93%E5%86%B2%E5%8C%BA%E7%9A%84%E5%88%9B%E5%BB%BA%E4%B8%8E%E9%94%80%E6%AF%81%E5%9B%9E%E6%94%B6)
4\. 报文缓冲区的创建与销毁(回收)
------------------------------------------------------------------------------------------------------------------------------------------------------------------------------------
1. 为了提高吞吐率,报文缓冲区不采用自动垃圾回收机制而采用waitpool分配回收机制。
2. 接收:device创建报文缓冲区接收网络数据,根据NHP包头对报文进行解析与校验。解析结果存储在ResponderSessionParams结构中(名称不好理解,可能会改变)。明文消息仍然会使用报文缓冲区。缓冲区的销毁分两种情况,单向通信的结构体在上层应用获取明文消息后销毁。transaction接收缓冲区在transaction结束后销毁。
3. 发送:device创建报文缓冲区,填充包头并对消息进行加密后存储在InitiatorSessionParams结构中并发送。transaction发送在未收到对端回应时会重试发送。缓冲区的销毁分两种情况,单向通信的结构体在发送后销毁。transaction发送的缓冲区在transaction结束后销毁。
**消息的加密与解密:** 连接中接收到的UDP原始数据会被device解析并放入device的MsgToPacketQueue队列中,等待后端处理。 发送消息到连接时,需构建initiatorsessionstarter结构传入消息信息与连接信息,放入device的MsgToPacketQueue队列中,device会将消息进行加密发出。
[](https://docs.opennhp.org/zh-cn/code/#5-nhp-device-%E6%9E%B6%E6%9E%84%E8%AE%BE%E8%AE%A1)
5\. NHP-Device 架构设计
--------------------------------------------------------------------------------------------------------------
1. Device负责NHP报文与消息的转换。Device初始化时需要指定类型和私钥。Device视自身类型只对相应的包进行处理。
2. 用于承载发送和接收报文的buffer比较大,所以由Device的内存Pool统一发放并回收(如果依赖于Go后台垃圾回收,高并发时会造成大量内存开销)。所以在开发时一定要注意buffer的分配**Device.AllocatePoolPacket()** 和回收**Device.ReleasePoolPacket()**。
* 报文buffer回收点位于
* 发送报文被发送后(本地transaction除外)
* 接收报文解析完毕时(远程transaction除外)
* 本地或远程transaction线程停止时
3. 上层逻辑调用接口**SendMsgToPacket**将消息转换成加密报文并发送到连接。
4. 上层逻辑调用接口**RecvPacketToMsg**将加密报文解析成消息后放入**DecryptedMsgQueue**队列并等待处理(通常情况)。
* 特殊情况:如果请求发起方已指定接收通道,解析后的消息会被送到请求方指定的消息通道**ResponseMsgCh**,而不放进常规消息队列进行排队。
5. 交互(**transaction**):一次请求需要等待一次回复的操作称为交互。一次由Device发起的交互请求为本地交互(**LocalTransaction**),一次由Device接收到的交互请求为远程交互(**RemoteTransaction**)。由于回应报文需要继承请求报文生成的**ChainKey**,所以所有的交互分发由Device进行管理。
6. 连接上下文(**ConnectionData**):由上层逻辑传入的与连接相关的所有信息,Device在加密消息后将报文发送到连接。一个连接可以进行多个**transaction**。
7. 在建立发送请求时,需要创建**MsgAssembler**结构体。
* Agent和AC必须填写消息类型**HeaderType**、对端**RemoteAddr**、对端公钥**PeerPk**和消息明文**Message**(如无特殊情况都采用消息压缩)。将填写好的**MsgAssembler**发给各自的**sendMessageRoutine()** 即可进行新连接的建立或寻找已存在连接并进行转换后报文的发送。
* Server必须填写消息类型**HeaderType**、连接上下文**ConnData**、对端公钥**PeerPk**和消息明文**Message**(如无特殊情况都采用消息压缩)。将填写好的**MsgAssembler**发给**Device.SendMsgToPacket()** 即可进行转换后报文的发送。
* 如果存在交互,可以直接使用上一条获得的 **\*PacketParserData**填入**MsgAssembler**结构体的**PrevParserData**字段,从而可以省略填写**RemoteAddr**、**ConnData**、**PeerPk**。
* 如果请求期待回复数据,需要创建一个接收**PacketParserData**的通道,并对**MsgAssembler**结构体的**ResponseMsgCh**字段赋值。
[](https://docs.opennhp.org/zh-cn/code/#6-nhp-server)
6\. NHP-Server
--------------------------------------------------------------------
### [](https://docs.opennhp.org/zh-cn/code/#61-nhp-server-%E6%9E%B6%E6%9E%84%E8%AE%BE%E8%AE%A1)
6.1 NHP-Server 架构设计
1. Server启动时监听特定端口,等待Agent和AC进行连接。并由Agent或AC主动触发向Server的通信。不存在Server向Agent或AC主动建立连接的情况,通常情况下这种连接会跨防火墙或NAT导致不能建立。
* 特殊情况:Server在收到Agent发起的敲门处理时,鉴权后需要主动向AC发起开门请求,并等待回应。
2. 发送消息时,向**sendMsgCh**发送创建好的**MsgAssembler**(必须从已有连接中指定**ConnData**)。**MsgAssembler**经过加密后会从此连接发出
3. 接收到报文时,会将报文进行解密获取明文消息。由**msghandler**分别进行处理。
### [](https://docs.opennhp.org/zh-cn/code/#62-nhp-server-%E9%85%8D%E7%BD%AE%E6%96%87%E4%BB%B6)
6.2 NHP-Server 配置文件
`etc/config.json`
{
// (mandatory) private key in base64 format
"privateKey": "eHdyRHKJy/YZJsResCt5XTAZgtcwvLpSXAiZ8DBc0V4=",
// (mandatory) specify the udp listening port
"listenPort": 62206,
// whether to validate peer's public key when receiving NHP packet from agent. If true, server must have a pre-recorded public key pool (in "agents" field) of all allowed agents. If false, server skip public key validation, so it reduces secure level.
"disableAgentValidation": false,
// list of preset allowed AC peers. only public key and expire time are needed. It has the same effect as AddACPeer()
"acs": [\
{\
// type: NHP-AC\
"type": 3,\
// public key in base64 format\
"pubKeyBase64": "Fr5jzZDVpNh5m9AcBDMtHGmbCAczHyPegT8IxQ3XAzE=",\
// expire time for the public key (seconds from epoch)\
"expireTime": 1716345064\
}\
],
// list of preset allowed agent peers. only public key and expire time are needed. It has the same effect as AddAgentPeer()
"agents": [\
{\
// type: NHP-Agent\
"type": 1,\
// public key in base64 format\
"pubKeyBase64": "WnJAolo88/q0x2VdLQYdmZNtKjwG2ocBd1Ozj41AKlo=",\
// expire time for the public key (seconds from epoch)\
"expireTime": 1716345064\
}\
],
// (optional) placeholder of preset url for possible authorization service provider
"asps": {
"abc.com": {
"aspId": "abc.com",
"urlAddr": "http://120.92.16.228:30088",
"urlOTP": "/nhp/api/v1/preAuth",
"urlReg": "/nhp/api/v1/registerAgent",
"urlAuth": "/nhp/api/v1/verifyAuth",
"urlList": "/nhp/api/v1/resourceList"
}
},
// (optional) specify other source IP addresses to be opened by the ac that may come along with certain agent IP address
"srcAsscAddrs": {
"192.168.2.27": [\
{\
"ip": "192.168.2.26",\
"port": 54222\
},\
{\
"ip": "192.168.2.28",\
"port": 54223\
}\
]
},
// preset resources for udp knocking
"udpRess": {
// ID of authorization service provider
"abc_group": {
// ID of resource group
"app_resource_group_000": {
// skip service provider authorization and use this preset resource group
"skipAuth": true,
// set the desired open time for this resource group (in second)
"opnTime": 120,
"resInfo": {
// name of resource
"apiServer": {
// (optional) hostname overrides addr.ip at knock feedback
"host": "api.abc.com",
// (mandatory) request ac to open which layer 4 address and protocol of this resource
"addr": {
// (mandatory) request ac to open traffic destinated to the public IP address of this resource
"ip": "12.34.56.78",
// (optional) request ac to open traffic destinated to the port number where this resource hosts on. empty or 0 means open all port numbers.
"port": 443,
// (optional) protocol, "tcp": request ac to open only tcp traffic, "udp": request ac to open only udp traffic, empty: request ac to open tcp + udp + icmp echo traffic
"proto": "tcp"
},
}
}
}
}
},
// preset resources for http knocking
"httpRess": {
// ID of authorization service provider
"abc_group": {
// ID of the resource group, usually it means AppId
"app_resource_group_001": {
// set the desired open time for this resource group (in second)
"opnTime": 120,
// contains multiple resources
"resInfo": {
// name of resource
"apiServer": {
// (optional) hostname overrides addr.ip at knock feedback
"host": "api.abc.com",
// (mandatory) request ac to open which layer 4 address and protocol of this resource
"addr": {
// (mandatory) request ac to open traffic destinated to the public IP address of this resource
"ip": "12.34.56.78",
// (optional) request ac to open traffic destinated to the port number where this resource hosts on. empty or 0 means open all port numbers.
"port": 443,
// (optional) protocol, "tcp": request ac to open only tcp traffic, "udp": request ac to open only udp traffic, empty: request ac to open tcp + udp + icmp echo traffic
"proto": "tcp"
},
// (optional) the private layer 4 address of the ac. In some network, server may communicate with ac using private addresses.
"acAddr": {
"ip": "172.16.1.2",
"port": 443
},
// whether to append ":port" at the end of hostname/ip at knock feedback. For example, set this field to false if this resource use https and requesting ac to open port 443.
"portSuffix": false
},
// another resource
"webServer": {
"host": "www.abc.com",
"addr": {
"ip": "23.45.67.89",
"port": 8080,
"proto": ""
},
"portSuffix": true
}
},
// (optional) additional key info for server calling further authroization APIs
"accessKey": "b3458c581ef0efb7b669",
"secretKey": "f21c2a02c09a641a11cf"
}
},
// another authorization service provider
"xyz_org": {
"abcd1234": {
"opnTime": 120,
"resInfo": {
"udpServer": {
"host": "server.xyz.net",
"addr": {
"ip": "1.2.3.4",
"port": 443,
"proto": "udp"
},
"portSuffix": false
}
},
// (optional) additional key info for server calling further authroization APIs
"appKey": "demo-l2T0J3U3mQZ3",
"appSecret": "hVqd8eOqCFg5cc1D2ouACs3q"
}
}
}
}
[](https://docs.opennhp.org/zh-cn/code/#7-nhp-ac)
7\. NHP-AC
------------------------------------------------------------
### [](https://docs.opennhp.org/zh-cn/code/#71-nhp-ac-%E6%9E%B6%E6%9E%84%E8%AE%BE%E8%AE%A1)
7.1 NHP-AC 架构设计
1. AC支持与多台Server互相进行通信。所有连接均为AC主动向Server发起。AC通过发送心跳包和NHP-AOL包维持与Server的连接。
2. AC与Server通信失效后,将尝试重新建立连接,如果一直无法与任何一台Server建立连接,则进入失效状态。
3. AC在启动后即开始与预设的服务器周期性建立连接并保持连接(AC很有可能在内网,所以不能由服务器先发连接)。连接时发送NHP\_DOL消息,在收到服务器的回应后确认连接。连接期间视情况进行发送NHP\_KPL消息保持连接。由**maintainServerConnectionRoutine**实现。
4. AC处理服务器发送过来的NHP\_DOP消息,判断请求方的serviceId, appId是否匹配并进行IPSET操作,完成后返回NHP\_DRT消息。
5. 发送消息时,向**sendMsgCh**发送创建好的**MsgAssembler**(必须指定**RemoteAddr**)。如果连接没有建立,AC会尝试建立并记录该连接。同时对此连接开启接收线程。**MsgAssembler**经过加密后会从此连接发出
6. 接收到报文时,会将报文进行解密获取明文消息。由**msghandler**分别进行处理。
### [](https://docs.opennhp.org/zh-cn/code/#72-nhp-ac-ip%E6%94%BE%E8%A1%8C%E6%A8%A1%E5%BC%8F)
7.2 NHP-AC IP放行模式
IP放行模式分为两种:
1. ipPassMode为0(默认)时为立即放行模式,门禁开门时将以敲门来源IP地址为准。
2. ipPassMode为1时为预访问模式,门禁开门前将先开启对应协议的临时端口并返回server临时端口和临时访问token,在短时间内需由agent携带临时访问token进行临时连接,如果临时连接有效,则开门时放行将以此次临时连接的来源IP为准。
### [](https://docs.opennhp.org/zh-cn/code/#73-nhp-ac-%E9%85%8D%E7%BD%AE%E6%96%87%E4%BB%B6)
7.3 NHP-AC 配置文件
`etc/config.toml`
[AC]
# (optional) assign an unique id for this ac
ACId = "abc_group_ac_001"
# (mandatory) specify the private key in base64 format
ACPrivateKey = "+B0RLGbe+nknJBZ0Fjt7kCBWfSTUttbUqkGteLfIp30="
# 0: default, passing the knock source IP
# 1: use pre-access procedure to determine the passing source IP
IpPassMode = 0
# (optional) ID of authorization service provider this ac belongs to
AuthServiceId = "abc_group"
# (optional) ID of resources controlled by this ac
ResourceIds = ["abc_group_web_server", "abc_group_api_server"]
# (optional) ID of organization
OrganizationId = "5f3e36149fa95c0414408ad4"
# server peers list
[[Servers]]
# (optional) the server's hostname. Its resolved address overrides the "Ip" field
Host = ""
# IP address of the server peer
Ip = "192.168.80.35"
# listening port for the server peer
Port = 62206
# type: NHP-Server
Type = 2
# specify the server peer's public key in base64 format
PublicKey = "WqJxe+Z4+wLen3VRgZx6YnbjvJFmptz99zkONCt/7gc="
# expire timestamp of the public key (seconds from epoch)
ExpireTime = 1716345064
# another server
#[[Servers]]
# Ip = "192.168.135.1"
# Port = 7776
# Type = 2
# PublicKey = "dstv1KlD2oVXiwgOxWtgZd+YmrOhU46W3emTGrHRADk="
# ExpireTime = 1716345064
[](https://docs.opennhp.org/zh-cn/code/#8-nhp-agent)
8\. NHP-Agent
------------------------------------------------------------------
### [](https://docs.opennhp.org/zh-cn/code/#81-nhp-agent-%E6%9E%B6%E6%9E%84%E8%AE%BE%E8%AE%A1)
8.1 NHP-Agent 架构设计
1. Agent只与Server之间进行通信。Agent主动向Server发起短连接。不存在Agent在未建立连接时被动接收Server消息的情况。
2. 发送消息时,向**sendMsgCh**发送创建好的**MsgAssembler**(必须指定**RemoteAddr**)。如果连接没有建立,agent会尝试建立并记录该连接。同时对此连接开启接收线程。**MsgAssembler**经过加密后会从此连接发出
3. 接收到报文时,会将报文进行解密获取明文消息。由**msghandler**分别进行处理。
### [](https://docs.opennhp.org/zh-cn/code/#82-nhp-agent-%E9%85%8D%E7%BD%AE%E6%96%87%E4%BB%B6)
8.2 NHP-Agent 配置文件
`etc/config.json`
{
// (mandatory) specify the private key in base64 format
"privateKey": "+Jnee2lP6Kn47qzSaqwSmWxORsBkkCV6YHsRqXCegVo=",
// (optional) ID of authorization service provider this agent belongs to
"aspId": "abc_group",
// (mandatory) an user object is necessary to carry out knock requests
"user": {
"userId": "zengl",
"devId": "0123456789abcdef",
"orgId": "abc.com.cn"
},
// preset resources to begin knock after start
"knockRess": [\
{\
"aspId": "abc_group",\
"resId": "app_resource_group_001",\
"serverKey": "WqJxe+Z4+wLen3VRgZx6YnbjvJFmptz99zkONCt/7gc="\
}\
],
// list of preset allowed server peers to send knock request. It has the same effect as AddServer()
"servers": [\
{\
// (optional) the server's hostname. Its resolved address overrides the "Ip" field\
"host": "",\
// IP address of the server peer\
"ip": "192.168.80.35",\
// listening port for the server peer\
"port": 62206,\
// type: NHP-Server\
"type": 2,\
// public key in base64 format\
"pubKeyBase64": "WqJxe+Z4+wLen3VRgZx6YnbjvJFmptz99zkONCt/7gc=",\
/// expire time for the public key (seconds from epoch)\
"expireTime": 1716345064\
}\
]
}
[](https://docs.opennhp.org/zh-cn/code/#9-log-%E8%AE%BE%E8%AE%A1)
9\. Log 设计
----------------------------------------------------------------------------
日志log设计为异步写入,相比同步日志写入,在调用时不会立即进行写入日志文件的I/O操作而影响正常业务逻辑,在高并发时可以聚合多条日志并合并为一次文件写入,大幅减少文件I/O操作次数。
Logger对象可以单独创建使用(**NewLogger()**),也可以在应用程序启动时指定Package全局变量**glbLogger**,供整个工程使用。
注意:应用程序结束前,需调用Logger.Close(),确保最后缓存的日志能够写入文件。
* * *
---
# 客户端SDK | OpenNHP Documentation
[Skip to main content](https://docs.opennhp.org/zh-cn/agent_sdk/#main-content)
Link Menu Expand (external link) Document Search Copy Copied
[](https://docs.opennhp.org/)
[](https://docs.opennhp.org/zh-cn/agent_sdk/#%E5%AE%A2%E6%88%B7%E7%AB%AFsdk)
客户端SDK
===================================================================================
[English](https://docs.opennhp.org/agent_sdk/)
* * *
[](https://docs.opennhp.org/zh-cn/agent_sdk/#1-%E5%AE%A2%E6%88%B7%E7%AB%AF%E4%BB%A3%E7%90%86sdk%E4%BB%8B%E7%BB%8D)
1 客户端代理SDK介绍
-------------------------------------------------------------------------------------------------------------------------------
### [](https://docs.opennhp.org/zh-cn/agent_sdk/#11-%E4%BB%8B%E7%BB%8D)
1.1 介绍
OpenNHP客户端代理SDK是对OpenNHP Agent服务的标准化封装。应用程序通过集成此SDK,可直接调用其提供的接口方法,快速实现应用程序与OpenNHP的整合。
在不同的运行环境下仅需将SDK程序编译成对应系统的SDK文件格式:
| 操作系统 | 动态库文件 |
| --- | --- |
| Linux | nhp-agent.so |
| Windows | nhp-agent.dll |
| MacOS | nhp-agent.dylib |
| Android | libnhpagent.so |
| IOS | nhpagent.xcframework |
### [](https://docs.opennhp.org/zh-cn/agent_sdk/#12-sdk%E7%9A%84%E5%BC%80%E5%8F%91)
1.2 SDK的开发
OpenNHP中提供了SDK样例源码,样例中包含可能用到的初始化代理、循环敲门、取消循环敲门、单次敲门、取消单次敲门、增加nhp-server服务、设置客户端用户信息及密钥注册等方法。SDK开发人员可直接将OpenNHP项目中提供的SDK源码样例编程成相应的SDK文件直接进行调用,或参照SDK源码样例完成自定义的SDK开发。
SDK样例源码:**_opennhp/endpoints/agent/main/export.go_**
package main
/*
#include
*/
import "C"
import (
"encoding/base64"
"encoding/json"
"fmt"
"strings"
"unsafe"
"github.com/OpenNHP/opennhp/endpoints/agent"
"github.com/OpenNHP/opennhp/nhp/common"
"github.com/OpenNHP/opennhp/nhp/core"
)
var gAgentInstance *agent.UdpAgent
var gWorkingDir string
var gLogLevel int
func deepCopyCString(c_str *C.char) string {
if c_str == nil {
return ""
}
goStr := C.GoString(c_str)
return strings.Clone(goStr)
}
// Release the memory of the string buffer generated by NHPSDK.
//
//export nhp_free_cstring
func nhp_free_cstring(ptr *C.char) {
C.free(unsafe.Pointer(ptr))
}
// Initialization of the nhp_agent instance working directory path:
// The configuration files to be read are located under workingdir/etc/,
// and log files will be generated under workingdir/logs/.
//
// Input:
// workingDir: the working directory path for the agent
// logLevel: 0: silent, 1: error, 2: info, 3: debug, 4: verbose
//
// Return:
// Whether agent instance has been initialized successfully.
//
//export nhp_agent_init
func nhp_agent_init(workingDir *C.char, logLevel C.int) bool {
if gAgentInstance != nil {
return true
}
gAgentInstance = &agent.UdpAgent{}
err := gAgentInstance.Start(deepCopyCString(workingDir), int(logLevel))
if err != nil {
return false
}
return true
}
// Synchronously stop and release nhp_agent.
//
//export nhp_agent_close
func nhp_agent_close() {
if gAgentInstance == nil {
return
}
gAgentInstance.Stop()
gAgentInstance = nil
}
// Read the user information, resource information, server information,
// and other configuration files written under workingdir/etc,
// and asynchronously start the loop knocking thread.
//
// Input: None
//
// Return:
// -1: Uninitialized error
// >=0: The number of resources requested to knock by the knocking thread at the time of the call
//
// (knocking resources will be synchronized with changes in the configuration in workingdir/etc/resource.toml).
//
//export nhp_agent_knockloop_start
func nhp_agent_knockloop_start() C.int {
if gAgentInstance == nil {
return -1
}
count := gAgentInstance.StartKnockLoop()
return C.int(count)
}
// Synchronously stop the loop, knock-on sub thread.
//
//export nhp_agent_knockloop_stop
func nhp_agent_knockloop_stop() {
if gAgentInstance == nil {
return
}
gAgentInstance.StopKnockLoop()
}
// Setting agent's represented user information
//
// Input:
// userId: User identification (optional, but not recommended to be empty)
// devId: Device identification (optional)
// orgId: Organization or company identification (optional)
// userData: Additional fields required to interface with backend services (json format string, optional)
//
// Return:
// Whether the user information is set successfully
//
//export nhp_agent_set_knock_user
func nhp_agent_set_knock_user(userId *C.char, devId *C.char, orgId *C.char, userData *C.char) bool {
if gAgentInstance == nil {
return false
}
jsonStr := deepCopyCString(userData)
var data map[string]any
if len(jsonStr) > 0 {
err := json.Unmarshal([]byte(jsonStr), &data)
if err != nil {
return false
}
}
gAgentInstance.SetDeviceId(deepCopyCString(devId))
gAgentInstance.SetKnockUser(deepCopyCString(userId), deepCopyCString(orgId), data)
return true
}
// Add an NHP server information to the agent for use in knocking on the door
// (the agent can initiate different knocking requests to multiple NHP servers).
//
// Input:
// pubkey: Public key of the NHP server
// ip: IP address of the NHP server
// host: Domain name of the NHP server (if a domain name is set, the ip item is optional)
// port: Port number for the NHP server to operate (if set to 0, the default port 62206 will be used)
// expire: Expiration time of the NHP server's public key (in epoch seconds, set to 0 for permanent)
//
// Return:
// Whether the server information has been successfully added.
//
//export nhp_agent_add_server
func nhp_agent_add_server(pubkey *C.char, ip *C.char, host *C.char, port C.int, expire int64) bool {
if gAgentInstance == nil {
return false
}
if pubkey == nil || (ip == nil && host == nil) {
return false
}
serverPort := int(port)
if serverPort == 0 {
serverPort = 62206 // use default server listening port
}
serverPeer := &core.UdpPeer{
Type: core.NHP_SERVER,
PubKeyBase64: deepCopyCString(pubkey),
Ip: deepCopyCString(ip),
Port: serverPort,
Hostname: deepCopyCString(host),
ExpireTime: expire,
}
gAgentInstance.AddServer(serverPeer)
return true
}
// Delete NHP server information from the agent
//
// Input:
// pubkey: NHP server public key
//
//export nhp_agent_remove_server
func nhp_agent_remove_server(pubkey *C.char) {
if gAgentInstance == nil {
return
}
if pubkey == nil {
return
}
gAgentInstance.RemoveServer(deepCopyCString(pubkey))
}
// Please add a resource information for the agent to use for knocking on the door
// (the agent can initiate a knock-on request for different resources)
//
// Input:
// aspId: Authentication Service Provider Identifier
// resId: Resource Identifier
// serverIp: NHP server IP address or domain name (the NHP server managing the resource)
// serverHostname: NHP server domain name (the NHP server managing the resource)
// serverPort: NHP server port (the NHP server managing the resource)
//
// Return:
// Whether the resource information has been added successfully
//
//export nhp_agent_add_resource
func nhp_agent_add_resource(aspId *C.char, resId *C.char, serverIp *C.char, serverHostname *C.char, serverPort C.int) bool {
if gAgentInstance == nil {
return false
}
if aspId == nil || resId == nil || (serverIp == nil && serverHostname == nil) {
return false
}
resource := &agent.KnockResource{
AuthServiceId: deepCopyCString(aspId),
ResourceId: deepCopyCString(resId),
ServerIp: deepCopyCString(serverIp),
ServerHostname: deepCopyCString(serverHostname),
ServerPort: int(serverPort),
}
err := gAgentInstance.AddResource(resource)
return err == nil
}
// Delete resource information from the agent
//
// Input:
// aspId: Authentication Service Provider Identifier
// resId: Resource Identifier
//
//export nhp_agent_remove_resource
func nhp_agent_remove_resource(aspId *C.char, resId *C.char) {
if gAgentInstance == nil {
return
}
if aspId == nil || resId == nil {
return
}
gAgentInstance.RemoveResource(deepCopyCString(aspId), deepCopyCString(resId))
}
// The agent initiates a single knock on the door request to the server hosting the resource
//
// Input:
// aspId: Authentication service provider identifier
// resId: Resource identifier
// serverIp: NHP server IP address or domain name (the NHP server managing the resource)
// serverHostname: NHP server domain name (the NHP server managing the resource)
// serverPort: NHP server port (the NHP server managing the resource)
//
// Returns:
// The server's response message (json format string buffer pointer):
// "errCode": Error code (string, "0" indicates success)
// "errMsg": Error message (string)
// "resHost": Resource server address ("resHost": {"Server Name 1":"Server Hostname 1", "Server Name 2":"Server Hostname 2", ...})
// "opnTime": Door opening duration (integer, in seconds)
// "aspToken": Token generated after authentication by the ASP (optional)
// "agentAddr": Agent's IP address from the perspective of the NHP server
// "preActs": Pre-connection information related to the resource (optional)
// "redirectUrl": HTTP redirection link (optional)
//
// It is necessary to call nhp_agent_add_server before calling,
// to add the NHP server's public key, address, and other information to the agent
// The caller is responsible for calling nhp_free_cstring to release the returned char* pointer
//
//export nhp_agent_knock_resource
func nhp_agent_knock_resource(aspId *C.char, resId *C.char, serverIp *C.char, serverHostname *C.char, serverPort C.int) *C.char {
ackMsg := &common.ServerKnockAckMsg{}
func() {
if gAgentInstance == nil {
ackMsg.ErrCode = common.ErrNoAgentInstance.ErrorCode()
ackMsg.ErrMsg = common.ErrNoAgentInstance.Error()
return
}
if aspId == nil || resId == nil || (serverIp == nil && serverHostname == nil) {
ackMsg.ErrCode = common.ErrInvalidInput.ErrorCode()
ackMsg.ErrMsg = common.ErrInvalidInput.Error()
return
}
resource := &agent.KnockResource{
AuthServiceId: deepCopyCString(aspId),
ResourceId: deepCopyCString(resId),
ServerIp: deepCopyCString(serverIp),
ServerHostname: deepCopyCString(serverHostname),
ServerPort: int(serverPort),
}
peer := gAgentInstance.FindServerPeerFromResource(resource)
if peer == nil {
ackMsg.ErrCode = common.ErrKnockServerNotFound.ErrorCode()
ackMsg.ErrMsg = common.ErrKnockServerNotFound.Error()
return
}
target := &agent.KnockTarget{
KnockResource: *resource,
ServerPeer: peer,
}
ackMsg, _ = gAgentInstance.Knock(target)
}()
bytes, _ := json.Marshal(ackMsg)
ret := C.CString(string(bytes))
return ret
}
// The agent explicitly informs the NHP server to exit its access permission to the resource.
//
// Input:
// aspId: Authentication Service Provider Identifier
// resId: Resource Identifier
// serverIp: NHP server IP address or domain name (the NHP server managing the resource)
// serverHostname: NHP server domain name (the NHP server managing the resource)
// serverPort: NHP server port (the NHP server managing the resource)
//
// Return:
// Whether the exit was successful
//
// It is necessary to call nhp_agent_add_server before calling, to add the NHP server's public key, address, and other information to the agent.
//
//export nhp_agent_exit_resource
func nhp_agent_exit_resource(aspId *C.char, resId *C.char, serverIp *C.char, serverHostname *C.char, serverPort C.int) bool {
var err error
ackMsg := &common.ServerKnockAckMsg{}
func() {
if gAgentInstance == nil {
ackMsg.ErrCode = common.ErrNoAgentInstance.ErrorCode()
ackMsg.ErrMsg = common.ErrNoAgentInstance.Error()
err = common.ErrNoAgentInstance
return
}
if aspId == nil || resId == nil || (serverIp == nil && serverHostname == nil) {
ackMsg.ErrCode = common.ErrInvalidInput.ErrorCode()
ackMsg.ErrMsg = common.ErrInvalidInput.Error()
err = common.ErrInvalidInput
return
}
resource := &agent.KnockResource{
AuthServiceId: deepCopyCString(aspId),
ResourceId: deepCopyCString(resId),
ServerIp: deepCopyCString(serverIp),
ServerHostname: deepCopyCString(serverHostname),
ServerPort: int(serverPort),
}
peer := gAgentInstance.FindServerPeerFromResource(resource)
if peer == nil {
ackMsg.ErrCode = common.ErrKnockServerNotFound.ErrorCode()
ackMsg.ErrMsg = common.ErrKnockServerNotFound.Error()
err = common.ErrKnockServerNotFound
return
}
target := &agent.KnockTarget{
KnockResource: *resource,
ServerPeer: peer,
}
ackMsg, err = gAgentInstance.ExitKnockRequest(target)
}()
return err == nil
}
// cipherType: 0-curve25519; 1-sm2
// result: "privatekey"|"publickey"
// caller is responsible to free the returned char* pointer
//
//export nhp_generate_keys
func nhp_generate_keys(cipherType C.int) *C.char {
var e core.Ecdh
switch core.EccTypeEnum(cipherType) {
case core.ECC_SM2:
e = core.NewECDH(core.ECC_SM2)
case core.ECC_CURVE25519:
fallthrough
default:
e = core.NewECDH(core.ECC_CURVE25519)
}
pub := e.PublicKeyBase64()
priv := e.PrivateKeyBase64()
res := fmt.Sprintf("%s|%s", priv, pub)
pRes := C.CString(res)
return pRes
}
// cipherType: 0-curve25519; 1-sm2
// privateBase64: private key in base64 format
// result: "publickey"
// caller is responsible to free the returned char* pointer
//
//export nhp_privkey_to_pubkey
func nhp_privkey_to_pubkey(cipherType C.int, privateBase64 *C.char) *C.char {
privKey := deepCopyCString(privateBase64)
privKeyBytes, err := base64.StdEncoding.DecodeString(privKey)
if err != nil {
return nil
}
e := core.ECDHFromKey(core.EccTypeEnum(cipherType), privKeyBytes)
if e == nil {
return nil
}
pub := e.PublicKeyBase64()
pPub := C.CString(pub)
return pPub
}
[](https://docs.opennhp.org/zh-cn/agent_sdk/#2-%E5%AE%A2%E6%88%B7%E7%AB%AF%E4%BB%A3%E7%90%86sdk%E7%9A%84%E9%80%82%E9%85%8D)
2 客户端代理SDK的适配
-----------------------------------------------------------------------------------------------------------------------------------------
### [](https://docs.opennhp.org/zh-cn/agent_sdk/#21-%E6%A1%8C%E9%9D%A2%E7%89%88sdk)
2.1 桌面版SDK
#### [](https://docs.opennhp.org/zh-cn/agent_sdk/#211-windows)
2.1.1 Windows
##### [](https://docs.opennhp.org/zh-cn/agent_sdk/#2111-%E7%8E%AF%E5%A2%83%E5%87%86%E5%A4%87)
2.1.1.1 环境准备
Windows下的编译环境参照**编译源代码**中**_系统需求_**章节windows部分完成编译环境的搭建。
##### [](https://docs.opennhp.org/zh-cn/agent_sdk/#2112-%E7%BC%96%E8%AF%91sdk)
2.1.1.2 编译SDK
* 方法一:运行代码根目录下_BAT_文件,该方法可在编译整个OpenNHP执行文件的同时完成SDK样例的编译 `build.bat`
_(注:如果在windows下编译过程中出现错误,请尝试此编译方法:在Visual Studio的developer command prompt for VS命令窗口中,切换到项目目录,执行`./build.bat`命令)_
* 方法二:单独编译SDK的.dll文件指令:
在`opennhp/endpoints/agent/main/`目录下执行
`go build -trimpath -buildmode=c-shared -ldflags '-s -w' -v -o nhp-agent.dll main.go export.go`
_(注:因为export.go文件中没有main方法,所有编译命令中加入了main.go,自定义的SDK代码文件中在加入main方法后,在编译时编译指令只需要SDK代码文件,不需要在引入main.go文件)_
##### [](https://docs.opennhp.org/zh-cn/agent_sdk/#2113-sdk%E9%80%82%E9%85%8D)
2.1.1.3 SDK适配
* **java**
java程序可以通过jna来完成对SDK的方法调用:
* OpennhpLibrary接口加载OpenNHP agent SDK
package org.example;
import com.sun.jna.Library;
import com.sun.jna.Native;
/**
* OpenNHP agent sdk interface
*
* @author haochangjiu
* @version JDK 8
* @className OpennhpLibrary
* @date 2025/10/27
*/
public interface OpennhpLibrary extends Library {
// load OpenNHP agent sdk
OpennhpLibrary INSTANCE = Native.load("nhp-agent", OpennhpLibrary.class);
/**
* @description Initialization of the nhp_agent instance working directory path:
* The configuration files to be read are located under workingdir/etc/,
* and log files will be generated under workingdir/logs/.
* @param workingDir: the working directory path for the agent
* @param logLevel: 0: silent, 1: error, 2: info, 3: debug, 4: verbose
* return boolean Whether agent instance has been initialized successfully.
* @return boolean
* @author haochangjiu
* @date 2025/10/27
* {@link boolean}
*/
boolean nhp_agent_init(String workingDir, int logLevel);
/**
* @description Synchronously stop and release nhp_agent.
* @author haochangjiu
* @date 2025/10/27
*/
void nhp_agent_close();
/**
* @description Read the user information, resource information, server information,
* and other configuration files written under workingdir/etc,
* and asynchronously start the loop knocking thread.
* @return int
* @author haochangjiu
* @date 2025/10/27
* {@link int}
*/
int nhp_agent_knockloop_start();
/**
* @description Synchronously stop the loop, knock-on sub thread
* @author hangchangjiu
* @date 2025/10/27
*/
void nhp_agent_knockloop_stop();
}
* 程序主入口,调用SDK
package org.example;
import java.util.Scanner;
/**
* Application for calling the OpenNHP agent SDK
*
* @author haochangjiu
* @version JDK 8
* @className App
* @date 2025/10/27
*/
public class App {
public static void main(String[] args) throws Exception {
// Initialize and start the OpenNHP agent SDK service
boolean initFlag = OpennhpLibrary.INSTANCE.nhp_agent_init("D:\\console-workspace\\opennhp-knock", 3);
if (!initFlag) {
System.out.println("NHP Agent init failed");
System.exit(0);
}
// Invoke methods in the OpenNHP agent SDK via input commands
Scanner scanner = new Scanner(System.in);
while (true) {
System.out.print("> ");
if (scanner.hasNextLine()) {
String input = scanner.nextLine().trim();
if ("knock".equalsIgnoreCase(input)) {
System.out.println("start the loop knocking thread...");
OpennhpLibrary.INSTANCE.nhp_agent_knockloop_start();
} else if ("cancel".equalsIgnoreCase(input)) {
System.out.println("stop the loop knocking thread...");
OpennhpLibrary.INSTANCE.nhp_agent_knockloop_stop();
} else if ("exit".equalsIgnoreCase(input)) {
System.out.println("exit nhp agent service...");
OpennhpLibrary.INSTANCE.nhp_agent_close();
break;
} else {
System.out.println("invalid input");
}
}
}
scanner.close();
}
}
* **c/c++**
c/c++程序参照项目中SDK调用样例程序**_opennhp/endpoints/agent/sdkdemo/nhp-agent-demo.c_**来完成对客户端代理SDK的整合
#include
#include
#include "nhp-agent.h"
int main() {
// Initialize nhp_agent, only one nhp_agent singleton is allowed per process.
nhp_agent_init(".", 3);
// Set the user information for the knock-on-the-door feature.
nhp_agent_set_knock_user("zengl", NULL, NULL, NULL);
// Set NHP server information
// If there is already a configuration file for the server, the call to nhp_agent_add_server can be omitted
// Timestamp date is visible at https://unixtime.org/
nhp_agent_add_server("replace_with_actual_publickeybase64", "192.168.1.66", NULL, 62206, 1748908471);
// Send a request to the server to access the resource example/demo, and return information in the form of a JSON format string
// Note: The resource information here is an independent input, and is unrelated to the resource information saved in the configuration file
char *ret = nhp_agent_knock_resource("example", "demo", "192.168.1.66", NULL, 62206);
printf("knock return: %s\n", ret);
// Immediately close the agent's access to the example/demo resources,
// if not invoked, access permission will automatically close after the door opening duration has passed.
nhp_agent_exit_resource("example", "demo", "192.168.1.66", NULL, 62206);
// Turn off and release nhp_agent.
nhp_agent_close();
return 0;
}
* **python**
使用Python标准库中的ctypes完成对SDK的整合
import ctypes
from time import sleep
# Windows
nhp_agent = ctypes.CDLL('nhp-agent.dll')
# Linux
# mylib = ctypes.CDLL('./nhp-agent.so')
# macOS
# mylib = ctypes.CDLL('./nhp-agent.dylib')
nhp_agent.nhp_agent_init.argtypes = [ctypes.c_char_p, ctypes.c_int]
nhp_agent.nhp_agent_init.restype = ctypes.c_bool
nhp_agent.nhp_agent_init.restype = ctypes.c_int
if __name__ == '__main__':
flag = nhp_agent.nhp_agent_init(ctypes.c_char_p(b"D:\\nhpagent"),3)
if flag:
print("nhp-agent init success")
else:
print("nhp-agent init failed")
# start the loop knocking thread
status = nhp_agent.nhp_agent_knockloop_start()
if status >= 0:
print("nhp-agent knockloop success")
# Delay between calls
sleep(30)
else:
print("nhp-agent knockloop failed")
# stop nhp_agent
nhp_agent.nhp_agent_close()
* **其他语言**
其他开发语言(C#、Rust、Go、Nodejs)可根据各语言独有的对SDK文件调用方法来完成SDK适配,其中Go也可以引入OpenNHP中agent部分源码,来完成对OpenNHP的适配,不需要开发SDK。
#### [](https://docs.opennhp.org/zh-cn/agent_sdk/#212-linux)
2.1.2 Linux
##### [](https://docs.opennhp.org/zh-cn/agent_sdk/#2121-%E7%8E%AF%E5%A2%83%E5%87%86%E5%A4%87)
2.1.2.1 环境准备
Linux下的编译环境参照**编译源代码**中**_系统需求_**章节Linux部分完成编译环境的搭建。
##### [](https://docs.opennhp.org/zh-cn/agent_sdk/#2122-%E7%BC%96%E8%AF%91sdk)
2.1.2.2 编译SDK
* 方法一:运行代码根目录下脚本 `make`
* 方法二:单独编译SDK的.so文件指令:
在`opennhp/endpoints/agent/main/`目录下执行
`go build -trimpath -buildmode=c-shared -ldflags '-s -w' -v -o nhp-agent.so main.go export.go`
_(注:因为export.go文件中没有main方法,所有编译命令中加入了main.go,自定义的SDK代码文件中在加入main方法后,在编译时编译指令只需要SDK代码文件,不需要在引入main.go文件)_
##### [](https://docs.opennhp.org/zh-cn/agent_sdk/#2123-sdk%E9%80%82%E9%85%8D)
2.1.2.3 SDK适配
Linux下对SDK的适配与Windows一致,代码参照章节**2.1.1.3**
_(注:需确保程序能正常加载到SDK的.so文件)_
#### [](https://docs.opennhp.org/zh-cn/agent_sdk/#213-macos)
2.1.3 MacOS
##### [](https://docs.opennhp.org/zh-cn/agent_sdk/#2131-%E7%8E%AF%E5%A2%83%E5%87%86%E5%A4%87)
2.1.3.1 环境准备
MacOS下的编译环境参照**编译源代码**中**_系统需求_**章节MacOS部分完成编译环境的搭建。
##### [](https://docs.opennhp.org/zh-cn/agent_sdk/#2132-%E7%BC%96%E8%AF%91sdk)
2.1.3.2 编译SDK
* 方法一:运行代码根目录下脚本 `make`
* 方法二:单独编译SDK的.dylib文件指令:
在`opennhp/endpoints/agent/main/`目录下执行编译指令
`GOOS=darwin GOARCH=arm64 CGO_ENABLED=1 go build -buildmode=c-shared -o nhp-agent.dylib main.go export.go`
_(注:因为export.go文件中没有main方法,所有编译命令中加入了main.go,自定义的SDK代码文件中在加入main方法后,在编译时编译指令只需要SDK代码文件,不需要在引入main.go文件)_
##### [](https://docs.opennhp.org/zh-cn/agent_sdk/#2133-sdk%E9%80%82%E9%85%8D)
2.1.3.3 SDK适配
MacOS下对SDK的适配与Windows一致,代码参照章节**2.1.1.3**
_(注:需确保程序能正常加载到SDK的.dylib文件)_
### [](https://docs.opennhp.org/zh-cn/agent_sdk/#22-%E7%A7%BB%E5%8A%A8%E7%89%88sdk)
2.2 移动版SDK
#### [](https://docs.opennhp.org/zh-cn/agent_sdk/#221-android)
2.2.1 Android
##### [](https://docs.opennhp.org/zh-cn/agent_sdk/#2211-%E7%8E%AF%E5%A2%83%E5%87%86%E5%A4%87)
2.2.1.1 环境准备
* 在Linux上完成Android的客户端代理SDK编译,需要参照**编译源代码**中**_系统需求_**章节Linux部分完成编译环境的搭建。
* Android NDK环境:
* 下载并安装Android NDK
`wget https://dl.google.com/android/repository/android-ndk-r25b-linux.zip`
`unzip android-ndk-r25b-linux.zip`
* 设置环境变量
* 编辑bashrc文件
`vim ~/.bashrc`
* 增加环境变量
#设置 NDK 路径(根据你的实际安装路径)
export ANDROID_NDK_HOME=/opt/android-ndk-r25b/
export TOOLCHAIN=$ANDROID_NDK_HOME/toolchains/llvm/prebuilt/linux-x86_64
* 使配置生效
`source ~/.bashrc`
##### [](https://docs.opennhp.org/zh-cn/agent_sdk/#2212-%E7%BC%96%E8%AF%91sdk)
2.2.1.2 编译SDK
* 方法一:运行代码根目录下脚本 `make`
_(注:确保Android NDK已安装,如果没有安装,Android SDK将不会编译)_
* 方法二:单独编译SDK的.so文件指令:
在`opennhp/endpoints/agent/main/`目录下执行编译指令
`GOOS=android GOARCH=arm64 CGO_ENABLED=1 CC=$TOOLCHAIN/bin/aarch64-linux-android21-clang CXX=$TOOLCHAIN/bin/aarch64-linux-android21-clang++ go build -buildmode=c-shared -o libnhpagent.so main.go export.go`
_(注:Android项目在通过jna加载.so文件时会在输入的.so文件名称前增加lib,在编译SDK时名称应以lib开头,例如:libnhpagent.so)_
##### [](https://docs.opennhp.org/zh-cn/agent_sdk/#2213-sdk%E9%80%82%E9%85%8D)
2.2.1.3 SDK适配
* **Android配置(Kotlin和java通用)**:
* 1、在build.gradle(app)中加入如下配置: 在android下加入
sourceSets {
main {
jniLibs.srcDirs = ['src/main/jniLibs', 'libs']
}
}
dependencies 下加入如下依赖 // 注意:安卓推荐使用适配的 JNA 版本,如 5.13.0 及以上 `implementation 'net.java.dev.jna:jna:5.13.0@aar'` // 权限请求框架:https://github.com/getActivity/XXPermissions `implementation libs.xxpermissions`
libs.versions.toml文件 \[versions\]下加入 `xxpermissions = "18.6"` \[libraries\]下加入 `xxpermissions = { module = "com.github.getActivity:XXPermissions", version.ref = "xxpermissions" }`
* 2、AndroidManifest.xml文件加入文件存储读写权限
* **Kotlin**
Kotlin开发Android应用适配SDK样例
package com.example.androidtestsoapp
import android.os.Bundle
import android.os.Environment
import android.util.Log
import androidx.activity.ComponentActivity
import androidx.activity.compose.setContent
import androidx.activity.enableEdgeToEdge
import androidx.compose.foundation.layout.fillMaxSize
import androidx.compose.foundation.layout.padding
import androidx.compose.material3.Scaffold
import androidx.compose.material3.Text
import androidx.compose.runtime.Composable
import androidx.compose.ui.Modifier
import androidx.compose.ui.tooling.preview.Preview
import com.example.androidtestsoapp.ui.theme.AndroidTestSoAppTheme
import com.hjq.permissions.Permission
import com.hjq.permissions.XXPermissions
import java.io.File
class MainActivity : ComponentActivity() {
override fun onCreate(savedInstanceState: Bundle?) {
super.onCreate(savedInstanceState)
enableEdgeToEdge()
setContent {
AndroidTestSoAppTheme {
Scaffold(modifier = Modifier.fillMaxSize()) { innerPadding ->
Greeting(
name = "Android",
modifier = Modifier.padding(innerPadding)
)
}
}
}
// Request permissions - read/write
XXPermissions.with(this)
.permission(Permission.WRITE_EXTERNAL_STORAGE)
.permission(Permission.READ_MEDIA_IMAGES)
.permission(Permission.READ_MEDIA_VIDEO)
.permission(Permission.READ_MEDIA_AUDIO)
.request { permissions, allGranted ->
if (allGranted) {
Log.d("MainActivity", "Permissions granted")
performFileOperations()
} else {
Log.d("MainActivity", "Permissions not granted")
}
}
}
}
/**
* Need to place the nhp folder containing the etc folder in the phone's download folder
* After reading the phone storage download directory, call OpennhpLibrary
*/
private fun performFileOperations() {
// Read phone storage download directory
val appDir = Environment.getExternalStorageDirectory().toString() + File.separator + "download"
// Check if zero folder exists in download
val file = File(appDir)
if (!file.exists()) {
Log.d("MainActivity", "Download folder does not exist")
return
}
Log.d("MainActivity", "Download folder exists")
val appDir1 = Environment.getExternalStorageDirectory().toString() + File.separator + "download" + File.separator + "nhp"
// Check if nhp folder exists in download
val file1 = File(appDir1)
if (!file1.exists()) {
Log.d("MainActivity", "nhp folder does not exist")
return
}
val appDir2 = Environment.getExternalStorageDirectory().toString() + File.separator + "download" + File.separator + "nhp"+ File.separator + "etc"
// Check if etc folder exists in download
val file2 = File(appDir2)
if (!file2.exists()) {
Log.d("MainActivity", "Etc folder does not exist")
return
}
val initFlag = OpennhpLibrary.INSTANCE.nhp_agent_init(appDir1, 2)
if (!initFlag) {
println("NHP Agent init failed")
return
}
println("start the loop knocking thread...")
val flag:Int = OpennhpLibrary.INSTANCE.nhp_agent_knockloop_start()
// Print result
if (flag > 0) {
println("NHP Agent knockloop start success")
} else {
println("NHP Agent knockloop start failed")
}
}
@Composable
fun Greeting(name: String, modifier: Modifier = Modifier) {
Text(
text = "Hello $name!",
modifier = modifier
)
}
@Preview(showBackground = true)
@Composable
fun GreetingPreview() {
AndroidTestSoAppTheme {
Greeting("Android")
}
}
* **java**
* 创建OpennhpLibrary接口来加载OpenNHP agent SDK。 _(注:Android项目在引入.so文件时,会在动态库文件前加入lib,即代码中加载的SDK名称为nhpagent,实际程序加载的SDK为libnhpagent.so文件)_
package org.example;
import com.sun.jna.Library;
import com.sun.jna.Native;
/**
* OpenNHP agent sdk interface
*
* @author haochangjiu
* @version JDK 8
* @className OpennhpLibrary
* @date 2025/10/27
*/
public interface OpennhpLibrary extends Library {
// load OpenNHP agent sdk
OpennhpLibrary INSTANCE = Native.load("nhpagent", OpennhpLibrary.class);
/**
* @description Initialization of the nhp_agent instance working directory path:
* The configuration files to be read are located under workingdir/etc/,
* and log files will be generated under workingdir/logs/.
* @param workingDir: the working directory path for the agent
* @param logLevel: 0: silent, 1: error, 2: info, 3: debug, 4: verbose
* return boolean Whether agent instance has been initialized successfully.
* @return boolean
* @author haochangjiu
* @date 2025/10/27
* {@link boolean}
*/
boolean nhp_agent_init(String workingDir, int logLevel);
/**
* @description Synchronously stop and release nhp_agent.
* @author haochangjiu
* @date 2025/10/27
*/
void nhp_agent_close();
/**
* @description Read the user information, resource information, server information,
* and other configuration files written under workingdir/etc,
* and asynchronously start the loop knocking thread.
* @return int
* @author haochangjiu
* @date 2025/10/27
* {@link int}
*/
int nhp_agent_knockloop_start();
/**
* @description Synchronously stop the loop, knock-on sub thread
* @author hangchangjiu
* @date 2025/10/27
*/
void nhp_agent_knockloop_stop();
}
* 调用SDK:样例中将配置文件的etc文件夹放在手机下载目录的nhp目录下
package org.example;
import android.os.Bundle;
import android.os.Environment;
import android.util.Log;
import androidx.appcompat.app.AppCompatActivity;
import com.OpennhpLibrary;
import com.fancy.zerotrust.R;
import java.io.File;
public class MainActivity extends AppCompatActivity {
@Override
protected void onCreate(Bundle savedInstanceState) {
super.onCreate(savedInstanceState);
// Read the phone's storage download directory.
String appDir = Environment.getExternalStorageDirectory() + File.separator + "download";
// Does the nhp directory exist in the downloads
File file = new File(appDir);
if (!file.exists()) {
Log.d("MainActivity","download file not exist!");
return;
}
Log.d("MainActivity","download file exist!");
String appDir1 = Environment.getExternalStorageDirectory() + File.separator + "download"+ File.separator + "nhp";
boolean initFlag = OpennhpLibrary.INSTANCE.nhp_agent_init(appDir1, 3);
if (!initFlag) {
System.out.println("NHP Agent init failed");
System.exit(0);
}
System.out.println("start the loop knocking thread...");
OpennhpLibrary.INSTANCE.nhp_agent_knockloop_start();
}
}
#### [](https://docs.opennhp.org/zh-cn/agent_sdk/#222-ios)
2.2.2 IOS
##### [](https://docs.opennhp.org/zh-cn/agent_sdk/#2221-%E7%8E%AF%E5%A2%83%E5%87%86%E5%A4%87)
2.2.2.1 环境准备
* 在MacOS上完成IOS的客户端代理SDK编译,需要参照**编译源代码**中**_系统需求_**章节MacOS部分完成编译环境的搭建。
* 确保已完成Xcode,如未安装Xcode需去App Store下载安装。
* 安装gomobile:
* 安装gomobile
`go install golang.org/x/mobile/cmd/gomobile@latest`
* 初始化gomobile
`gomobile init`
##### [](https://docs.opennhp.org/zh-cn/agent_sdk/#2222-sdk%E6%A0%B7%E4%BE%8B)
2.2.2.2 SDK样例
在编译IOS所需的.xcframework文件时,需要导出的方法名称必须大写开头,同时参数类型为标准的Go语言类型,不能是C.int和C.char。另外一点需要注意的是代码不能在**package main**下,将程序移动到新建的iossdk目录下。
根据OpenNHP中的export.go文件进行修改如下:**_opennhp/endpoints/agent/iossdk/export.go_**
package iossdk
import "C"
import (
"encoding/base64"
"encoding/json"
"fmt"
"github.com/OpenNHP/opennhp/endpoints/agent"
"github.com/OpenNHP/opennhp/nhp/common"
"github.com/OpenNHP/opennhp/nhp/core"
_ "golang.org/x/mobile/bind"
)
var gAgentInstance *agent.UdpAgent
var gWorkingDir string
var gLogLevel int
// Initialization of the nhp_agent instance working directory path:
// The configuration files to be read are located under workingdir/etc/,
// and log files will be generated under workingdir/logs/.
//
// Input:
// workingDir: the working directory path for the agent
// logLevel: 0: silent, 1: error, 2: info, 3: debug, 4: verbose
//
// Return:
// Whether agent instance has been initialized successfully.
func NhpAgentInit(workingDir string, logLevel int) bool {
if gAgentInstance != nil {
return true
}
gAgentInstance = &agent.UdpAgent{}
err := gAgentInstance.Start(workingDir, logLevel)
if err != nil {
return false
}
return true
}
// Synchronously stop and release nhp_
func NhpAgentClose() {
if gAgentInstance == nil {
return
}
gAgentInstance.Stop()
gAgentInstance = nil
}
// Read the user information, resource information, server information,
// and other configuration files written under workingdir/etc,
// and asynchronously start the loop knocking thread.
//
// Input: None
//
// Return:
// -1: Uninitialized error
// >=0: The number of resources requested to knock by the knocking thread at the time of the call
//
// (knocking resources will be synchronized with changes in the configuration in workingdir/etc/resource.toml).
//
//export NhpAgentKnockloopStart
func NhpAgentKnockloopStart() int {
if gAgentInstance == nil {
return -1
}
count := gAgentInstance.StartKnockLoop()
return count
}
// Synchronously stop the loop, knock-on sub thread.
func NhpAgentKnockloopStop() {
if gAgentInstance == nil {
return
}
gAgentInstance.StopKnockLoop()
}
// Setting agent's represented user information
//
// Input:
// userId: User identification (optional, but not recommended to be empty)
// devId: Device identification (optional)
// orgId: Organization or company identification (optional)
// userData: Additional fields required to interface with backend services (json format string, optional)
//
// Return:
// Whether the user information is set successfully
func NhpAgentSetKnockUser(userId string, devId string, orgId string, userData string) bool {
if gAgentInstance == nil {
return false
}
var data map[string]any
if len(userData) > 0 {
err := json.Unmarshal([]byte(userData), &data)
if err != nil {
return false
}
}
gAgentInstance.SetDeviceId(devId)
gAgentInstance.SetKnockUser(userId, orgId, data)
return true
}
// Add an NHP server information to the agent for use in knocking on the door
// (the agent can initiate different knocking requests to multiple NHP servers).
//
// Input:
// pubkey: Public key of the NHP server
// ip: IP address of the NHP server
// host: Domain name of the NHP server (if a domain name is set, the ip item is optional)
// port: Port number for the NHP server to operate (if set to 0, the default port 62206 will be used)
// expire: Expiration time of the NHP server's public key (in epoch seconds, set to 0 for permanent)
//
// Return:
// Whether the server information has been successfully added.
func NhpAgentAddServer(pubkey string, ip string, host string, port int, expire int64) bool {
if gAgentInstance == nil {
return false
}
if len(pubkey) == 0 || (len(ip) == 0 && len(host) == 0) {
return false
}
serverPort := int(port)
if serverPort == 0 {
serverPort = 62206 // use default server listening port
}
serverPeer := &core.UdpPeer{
Type: core.NHP_SERVER,
PubKeyBase64: pubkey,
Ip: ip,
Port: serverPort,
Hostname: host,
ExpireTime: expire,
}
gAgentInstance.AddServer(serverPeer)
return true
}
// Delete NHP server information from the agent
//
// Input:
// pubkey: NHP server public key
func NhpAgentRemoveServer(pubkey string) {
if gAgentInstance == nil {
return
}
if len(pubkey) == 0 {
return
}
gAgentInstance.RemoveServer(pubkey)
}
// Please add a resource information for the agent to use for knocking on the door
// (the agent can initiate a knock-on request for different resources)
//
// Input:
// aspId: Authentication Service Provider Identifier
// resId: Resource Identifier
// serverIp: NHP server IP address or domain name (the NHP server managing the resource)
// serverHostname: NHP server domain name (the NHP server managing the resource)
// serverPort: NHP server port (the NHP server managing the resource)
//
// Return:
// Whether the resource information has been added successfully
func NhpAgentAddResource(aspId string, resId string, serverIp string, serverHostname string, serverPort int) bool {
if gAgentInstance == nil {
return false
}
if len(aspId) == 0 || len(resId) == 0 || (len(serverIp) == 0 && len(serverHostname) == 0) {
return false
}
resource := &agent.KnockResource{
AuthServiceId: aspId,
ResourceId: resId,
ServerIp: serverIp,
ServerHostname: serverHostname,
ServerPort: serverPort,
}
err := gAgentInstance.AddResource(resource)
return err == nil
}
// Delete resource information from the agent
//
// Input:
// aspId: Authentication Service Provider Identifier
// resId: Resource Identifier
func NhpAgentRemoveResource(aspId string, resId string) {
if gAgentInstance == nil {
return
}
if len(aspId) == 0 || len(resId) == 0 {
return
}
gAgentInstance.RemoveResource(aspId, resId)
}
// The agent initiates a single knock on the door request to the server hosting the resource
//
// Input:
// aspId: Authentication service provider identifier
// resId: Resource identifier
// serverIp: NHP server IP address or domain name (the NHP server managing the resource)
// serverHostname: NHP server domain name (the NHP server managing the resource)
// serverPort: NHP server port (the NHP server managing the resource)
//
// Returns:
// The server's response message (json format string buffer pointer):
// "errCode": Error code (string, "0" indicates success)
// "errMsg": Error message (string)
// "resHost": Resource server address ("resHost": {"Server Name 1":"Server Hostname 1", "Server Name 2":"Server Hostname 2", ...})
// "opnTime": Door opening duration (integer, in seconds)
// "aspToken": Token generated after authentication by the ASP (optional)
// "agentAddr": Agent's IP address from the perspective of the NHP server
// "preActs": Pre-connection information related to the resource (optional)
// "redirectUrl": HTTP redirection link (optional)
//
// It is necessary to call NhpAgentAddServer before calling,
// to add the NHP server's public key, address, and other information to the agent
// The caller is responsible for calling NhpFreeCstring to release the returned char* pointer
func NhpAgentKnockResource(aspId string, resId string, serverIp string, serverHostname string, serverPort int) string {
ackMsg := &common.ServerKnockAckMsg{}
func() {
if gAgentInstance == nil {
ackMsg.ErrCode = common.ErrNoAgentInstance.ErrorCode()
ackMsg.ErrMsg = common.ErrNoAgentInstance.Error()
return
}
if len(aspId) == 0 || len(resId) == 0 || (len(serverIp) == 0 && len(serverHostname) == 0) {
ackMsg.ErrCode = common.ErrInvalidInput.ErrorCode()
ackMsg.ErrMsg = common.ErrInvalidInput.Error()
return
}
resource := &agent.KnockResource{
AuthServiceId: aspId,
ResourceId: resId,
ServerIp: serverIp,
ServerHostname: serverHostname,
ServerPort: serverPort,
}
peer := gAgentInstance.FindServerPeerFromResource(resource)
if peer == nil {
ackMsg.ErrCode = common.ErrKnockServerNotFound.ErrorCode()
ackMsg.ErrMsg = common.ErrKnockServerNotFound.Error()
return
}
target := &agent.KnockTarget{
KnockResource: *resource,
ServerPeer: peer,
}
ackMsg, _ = gAgentInstance.Knock(target)
}()
bytes, _ := json.Marshal(ackMsg)
return string(bytes)
}
// The agent explicitly informs the NHP server to exit its access permission to the resource.
//
// Input:
// aspId: Authentication Service Provider Identifier
// resId: Resource Identifier
// serverIp: NHP server IP address or domain name (the NHP server managing the resource)
// serverHostname: NHP server domain name (the NHP server managing the resource)
// serverPort: NHP server port (the NHP server managing the resource)
//
// Return:
// Whether the exit was successful
//
// It is necessary to call NhpAgentAddServer before calling, to add the NHP server's public key, address, and other information to the
func NhpAgentExitResource(aspId string, resId string, serverIp string, serverHostname string, serverPort int) bool {
var err error
ackMsg := &common.ServerKnockAckMsg{}
func() {
if gAgentInstance == nil {
ackMsg.ErrCode = common.ErrNoAgentInstance.ErrorCode()
ackMsg.ErrMsg = common.ErrNoAgentInstance.Error()
err = common.ErrNoAgentInstance
return
}
if len(aspId) == 0 || len(resId) == 0 || (len(serverIp) == 0 && len(serverHostname) == 0) {
ackMsg.ErrCode = common.ErrInvalidInput.ErrorCode()
ackMsg.ErrMsg = common.ErrInvalidInput.Error()
err = common.ErrInvalidInput
return
}
resource := &agent.KnockResource{
AuthServiceId: aspId,
ResourceId: resId,
ServerIp: serverIp,
ServerHostname: serverHostname,
ServerPort: serverPort,
}
peer := gAgentInstance.FindServerPeerFromResource(resource)
if peer == nil {
ackMsg.ErrCode = common.ErrKnockServerNotFound.ErrorCode()
ackMsg.ErrMsg = common.ErrKnockServerNotFound.Error()
err = common.ErrKnockServerNotFound
return
}
target := &agent.KnockTarget{
KnockResource: *resource,
ServerPeer: peer,
}
ackMsg, err = gAgentInstance.ExitKnockRequest(target)
}()
return err == nil
}
// cipherType: 0-curve25519; 1-sm2
// result: "privatekey"|"publickey"
// caller is responsible to free the returned char* pointer
//
//export NhpGenerateKeys
func NhpGenerateKeys(cipherType int) string {
var e core.Ecdh
switch core.EccTypeEnum(cipherType) {
case core.ECC_SM2:
e = core.NewECDH(core.ECC_SM2)
case core.ECC_CURVE25519:
fallthrough
default:
e = core.NewECDH(core.ECC_CURVE25519)
}
pub := e.PublicKeyBase64()
priv := e.PrivateKeyBase64()
res := fmt.Sprintf("%s|%s", priv, pub)
return res
}
// cipherType: 0-curve25519; 1-sm2
// privateBase64: private key in base64 format
// result: "publickey"
// caller is responsible to free the returned char* pointer
//
//export NhpPrivkeyToPubkey
func NhpPrivkeyToPubkey(cipherType int, privateBase64 string) string {
privKey := privateBase64
privKeyBytes, err := base64.StdEncoding.DecodeString(privKey)
if err != nil {
return ""
}
e := core.ECDHFromKey(core.EccTypeEnum(cipherType), privKeyBytes)
if e == nil {
return ""
}
pub := e.PublicKeyBase64()
return pub
}
##### [](https://docs.opennhp.org/zh-cn/agent_sdk/#2223-%E7%BC%96%E8%AF%91sdk)
2.2.2.3 编译SDK
* 方法一:运行代码根目录下脚本 `make`
* 方法二:单独编译SDK的.xcframework文件指令:
在`opennhp/endpoints/agent/sdk/`目录下执行编译指令_(注:重新编辑的sdk源码文件放在了opennhp/endpoints/agent/sdk/下)_
\` gomobile bind -target ios -o nhpagent.xcframework .\`
##### [](https://docs.opennhp.org/zh-cn/agent_sdk/#2224-sdk%E9%80%82%E9%85%8D)
2.2.2.4 SDK适配
* **Objective-C**
* FileCopyManager.h:声明将SDK所需配置文件拷贝到沙盒方法
//
// FileCopyManager.h
// TestXCFramework
//
// Created by haochangjiu on 2025/10/30.
//
#import
NS_ASSUME_NONNULL_BEGIN
@interface FileCopyManager : NSObject
/// Copy the specified file(s) to the etc and certs directories in the application's home directory
+ (void)copyFilesToSandboxEtc;
@end
NS_ASSUME_NONNULL_END
* FileCopyManager.m:FileCopyManager.h的实现
//
// FileCopyManager.m
// TestXCFramework
//
// Created by haochangjiu on 2025/10/30.
//
#import "FileCopyManager.h"
#import
@implementation FileCopyManager
/// Copy the specified file(s) to the etc and certs directories in the application's home directory
+ (void)copyFilesToSandboxEtc {
// 1. Retrieve the sandboxed Documents directory
NSArray *documentsURLs = [[NSFileManager defaultManager] URLsForDirectory:NSDocumentDirectory inDomains:NSUserDomainMask];
NSURL *documentsURL = [documentsURLs firstObject];
if (!documentsURL) {
NSLog(@"Failed to retrieve Documents directory");
return;
}
// 2. Define paths for etc and certs directories within the sandbox
NSURL *etcURL = [documentsURL URLByAppendingPathComponent:@"etc"];
NSURL *certsURL = [etcURL URLByAppendingPathComponent:@"certs"];
// 3. Create etc and certs directories (if they don't exist)
[self createDirectoryIfNotExists:etcURL];
[self createDirectoryIfNotExists:certsURL];
// 4. Copy toml files to the etc directory
NSArray *tomlFiles = @[@"server.toml", @"config.toml", @"dhp.toml", @"resource.toml"];
for (NSString *fileName in tomlFiles) {
[self copyFileFromBundle:fileName toDestinationURL:etcURL];
}
// 5. Copy certificate files to the etc/certs directory
NSArray *certFiles = @[@"server.crt", @"server.key"];
for (NSString *fileName in certFiles) {
[self copyFileFromBundle:fileName toDestinationURL:certsURL];
}
}
/// Create directory if it does not exist
+ (void)createDirectoryIfNotExists:(NSURL *)directoryURL {
NSFileManager *fileManager = [NSFileManager defaultManager];
if (![fileManager fileExistsAtPath:directoryURL.path]) {
NSError *error;
BOOL success = [fileManager createDirectoryAtURL:directoryURL\
withIntermediateDirectories:YES\
attributes:nil\
error:&error];
if (success) {
NSLog(@"Directory created successfully: %@", directoryURL.path);
} else {
NSLog(@"Failed to create directory: %@, error: %@", directoryURL.path, error.localizedDescription);
}
} else {
NSLog(@"Directory already exists: %@", directoryURL.path);
}
}
/// Copy file from Bundle to destination path
+ (void)copyFileFromBundle:(NSString *)fileName toDestinationURL:(NSURL *)destinationURL {
// Get the file path in the Bundle
NSURL *sourceURL = [[NSBundle mainBundle] URLForResource:[fileName stringByDeletingPathExtension]\
withExtension:[fileName pathExtension]];
if (!sourceURL) {
NSLog(@"File not found in Bundle: %@", fileName);
return;
}
// Destination file path (destination directory + file name)
NSURL *destFileURL = [destinationURL URLByAppendingPathComponent:fileName];
// Copy file (if it doesn't exist)
NSFileManager *fileManager = [NSFileManager defaultManager];
if (![fileManager fileExistsAtPath:destFileURL.path]) {
NSError *error;
BOOL success = [fileManager copyItemAtURL:sourceURL toURL:destFileURL error:&error];
if (success) {
NSLog(@"File copied successfully: %@ -> %@", fileName, destFileURL.path);
} else {
NSLog(@"File copy failed: %@, error: %@", fileName, error.localizedDescription);
}
} else {
NSLog(@"File already exists: %@", destFileURL.path);
}
}
@end
* ViewController.m:程序主入口,进行SDK方法调用
//
// ViewController.m
// TestXCFramework
//
// Created by haochangjiu on 2025/10/30.
//
#import "ViewController.h"
#import
#import "FileCopyManager.h"
@interface ViewController ()
@end
@implementation ViewController
- (void)viewDidLoad {
[super viewDidLoad];
// Do any additional setup after loading the view.
// Invoke method to copy files from etc folder to sandbox etc directory
[FileCopyManager copyFilesToSandboxEtc];
// Retrieve the sandbox target path (Documents), which is the parent directory of the etc folder
NSArray *documentsURLs = [[NSFileManager defaultManager] URLsForDirectory:NSDocumentDirectory inDomains:NSUserDomainMask];
NSURL *documentsURL = [documentsURLs firstObject];
if (!documentsURL) {
NSLog(@"Error: Failed to read Documents directory");
}
// Get the parent directory path of the etc folder
NSString *etcPath = documentsURL.path;
// SdkNhpAgentInit
BOOL initFlag = IossdkNhpAgentInit(etcPath, 3);
if (!initFlag) {
NSLog(@"NHP Agent init failed");
return;
}
// knockloop_start
long value = IossdkNhpAgentKnockloopStart();
NSLog(@"SdkNhpAgentKnockloopStart value : %ld", value);
}
@end
* **Swift**
* FileCopyManager.swift:将SDK所需配置文件拷贝到沙盒方法
//
// FileCopyManager.swift
// TestXCFrameworkSwift
//
// Created by haochangjiu on 2025/10/30.
//
import UIKit
import Foundation
class FileCopyManager {
/// Copy specified files to the etc and certs directories in the sandbox
static func copyFilesToSandboxEtc() {
// 1. Get the Documents directory in the sandbox
guard let documentsURL = FileManager.default.urls(for: .documentDirectory, in: .userDomainMask).first else {
print("Failed to get Documents directory")
return
}
// 2. Define paths for etc and certs directories in the sandbox
let etcURL = documentsURL.appendingPathComponent("etc")
let certsURL = etcURL.appendingPathComponent("certs")
// 3. Create etc and certs directories (if they don't exist)
createDirectoryIfNotExists(at: etcURL)
createDirectoryIfNotExists(at: certsURL)
// 4. Copy toml files to the etc directory
let tomlFiles = ["server.toml", "config.toml", "dhp.toml", "resource.toml"]
tomlFiles.forEach { fileName in
copyFileFromBundle(fileName: fileName, to: etcURL)
}
// 5. Copy certificate files to the etc/certs directory
let certFiles = ["server.crt", "server.key"]
certFiles.forEach { fileName in
copyFileFromBundle(fileName: fileName, to: certsURL)
}
}
/// Create directory if it doesn't exist
private static func createDirectoryIfNotExists(at url: URL) {
let fileManager = FileManager.default
guard !fileManager.fileExists(atPath: url.path) else {
print("Directory already exists: \(url.path)")
return
}
do {
try fileManager.createDirectory(at: url, withIntermediateDirectories: true, attributes: nil)
print("Directory created successfully: \(url.path)")
} catch {
print("Failed to create directory: \(url.path), error: \(error.localizedDescription)")
}
}
/// Copy file from Bundle to destination path
private static func copyFileFromBundle(fileName: String, to destinationURL: URL) {
// Split filename and extension (handling files with extensions)
let fileNameWithoutExt = (fileName as NSString).deletingPathExtension
let fileExt = (fileName as NSString).pathExtension
// Get the file path in the Bundle
guard let sourceURL = Bundle.main.url(forResource: fileNameWithoutExt, withExtension: fileExt) else {
print("File not found in Bundle: \(fileName)")
return
}
// Destination file path (destination directory + filename)
let destFileURL = destinationURL.appendingPathComponent(fileName)
let fileManager = FileManager.default
// Copy file (if it doesn't exist)
guard !fileManager.fileExists(atPath: destFileURL.path) else {
print("File already exists: \(destFileURL.path)")
return
}
do {
try fileManager.copyItem(at: sourceURL, to: destFileURL)
print("File copied successfully: \(fileName) -> \(destFileURL.path)")
} catch {
print("File copy failed: \(fileName), error: \(error.localizedDescription)")
}
}
}
* ViewController.swift:程序主入口,进行SDK方法调用
//
// ViewController.swift
// TestXCFrameworkSwift
//
// Created by haochangjiu on 2025/10/30.
//
import UIKit
import Nhpagent
class ViewController: UIViewController {
override func viewDidLoad() {
super.viewDidLoad()
// Do any additional setup after loading the view.
// Call method to copy files from etc folder to sandbox etc directory
FileCopyManager.copyFilesToSandboxEtc()
// Retrieve the sandbox target path (Documents), which is the parent directory of the etc folder
guard let documentsURL = FileManager.default.urls(for: .documentDirectory, in: .userDomainMask).first else {
print("Error: Failed to read Documents directory")
return
}
// Get the parent directory path of the etc folder
let etcPath: String = documentsURL.path
// Call SdkNhpAgentInit for initialization
let initFlag: Bool = IossdkNhpAgentInit(etcPath, 3)
if !initFlag {
print("NHP Agent init failed")
}
// Call knockloop_start
let value = IossdkNhpAgentKnockloopStart()
print("SdkNhpAgentKnockloopStart value: %ld", value)
}
}
* * *
---
# 404 | OpenNHP Documentation
[Skip to main content](https://docs.opennhp.org/quick_start#main-content)
Link Menu Expand (external link) Document Search Copy Copied
[](https://docs.opennhp.org/)
404
===
**Page not found :(**
The requested page could not be found.
* * *
---
# 404 | OpenNHP Documentation
[Skip to main content](https://docs.opennhp.org/docs/comparison.md#main-content)
Link Menu Expand (external link) Document Search Copy Copied
[](https://docs.opennhp.org/)
404
===
**Page not found :(**
The requested page could not be found.
* * *
---
# 404 | OpenNHP Documentation
[Skip to main content](https://docs.opennhp.org/zh-cn/quick_start/#main-content)
Link Menu Expand (external link) Document Search Copy Copied
[](https://docs.opennhp.org/)
404
===
**Page not found :(**
The requested page could not be found.
* * *
---