# Table of Contents
- [What is Primus | primus](#what-is-primus-primus)
- [Hello | primus](#hello-primus)
- [Markdown page example | primus](#markdown-page-example-primus)
- [Installation | primus](#installation-primus)
- [Installation | primus](#installation-primus)
- [Error Code | primus](#error-code-primus)
- [Example | primus](#example-primus)
- [DVC (Data Verification and Computation) | primus](#dvc-data-verification-and-computation-primus)
- [Attestation Structure | primus](#attestation-structure-primus)
- [Developer Hub | primus](#developer-hub-primus)
- [Overview | primus](#overview-primus)
- [Simple Example | primus](#simple-example-primus)
- [Error Code | primus](#error-code-primus)
- [Mutual TLS | primus](#mutual-tls-primus)
- [Handling Multiple URLs | primus](#handling-multiple-urls-primus)
- [zkTLS Operations | primus](#zktls-operations-primus)
- [Overview | primus](#overview-primus)
- [Connect data source | primus](#connect-data-source-primus)
- [Create attestations | primus](#create-attestations-primus)
- [Earn achievements | primus](#earn-achievements-primus)
- [Participate events | primus](#participate-events-primus)
- [Manage data | primus](#manage-data-primus)
- [Data dashboard | primus](#data-dashboard-primus)
- [Settings | primus](#settings-primus)
- [Sign in | primus](#sign-in-primus)
- [Submit attestation on-chain | primus](#submit-attestation-on-chain-primus)
- [Main Functions | primus](#main-functions-primus)
- [Start | primus](#start-primus)
- [FAQ | primus](#faq-primus)
- [About Demo | primus](#about-demo-primus)
- [Introduction | primus](#introduction-primus)
- [Prerequisites | primus](#prerequisites-primus)
- [AO Worker Guides | primus](#ao-worker-guides-primus)
- [SDK | primus](#sdk-primus)
- [EigenLayer Operator Guides | primus](#eigenlayer-operator-guides-primus)
- [Overview | primus](#overview-primus)
- [Confidential DeFi | primus](#confidential-defi-primus)
- [Confidential ERC-20 | primus](#confidential-erc-20-primus)
- [Data Computation Network | primus](#data-computation-network-primus)
- [Confidential Transaction | primus](#confidential-transaction-primus)
- [Blind Auction | primus](#blind-auction-primus)
- [Dark Pool | primus](#dark-pool-primus)
- [On-Chain Games | primus](#on-chain-games-primus)
- [Overview | primus](#overview-primus)
- [What is Threshold-FHE? | primus](#what-is-threshold-fhe-primus)
- [Confidential Voting | primus](#confidential-voting-primus)
- [Peer-to-Peer Data Sharing | primus](#peer-to-peer-data-sharing-primus)
- [What is Multi-Key FHE? | primus](#what-is-multi-key-fhe-primus)
- [Confidential Payment | primus](#confidential-payment-primus)
- [Confidential DePin | primus](#confidential-depin-primus)
- [Oblivious Message Retrieval | primus](#oblivious-message-retrieval-primus)
- [Privacy-Preserving AI | primus](#privacy-preserving-ai-primus)
- [What is Single-Key FHE? | primus](#what-is-single-key-fhe-primus)
- [Attestation Structure | primus](#attestation-structure-primus)
- [Installation | primus](#installation-primus)
- [DVC (Data Verification and Computation) | primus](#dvc-data-verification-and-computation-primus)
- [Error Code | primus](#error-code-primus)
- [Example&Parameters | primus](#example-parameters-primus)
- [Overview | primus](#overview-primus)
- [Suport NetWork | primus](#suport-network-primus)
- [Workflows | primus](#workflows-primus)
- [Composable Attestations | primus](#composable-attestations-primus)
- [Quick Start | primus](#quick-start-primus)
- [Decentralized Creator Economy | primus](#decentralized-creator-economy-primus)
- [Interoperable and Composable Social Graphs | primus](#interoperable-and-composable-social-graphs-primus)
- [Decentralized Hiring and Dating | primus](#decentralized-hiring-and-dating-primus)
- [Quick Start | primus](#quick-start-primus)
- [Cross-Platform Fraud Detection | primus](#cross-platform-fraud-detection-primus)
- [Primary Use Cases | primus](#primary-use-cases-primus)
- [Error Code | primus](#error-code-primus)
- [Handling Multiple URLs | primus](#handling-multiple-urls-primus)
- [Simple Example | primus](#simple-example-primus)
- [Overview | primus](#overview-primus)
- [Introduction | primus](#introduction-primus)
- [PoR Support Chains | primus](#por-support-chains-primus)
- [zkTLS Operations | primus](#zktls-operations-primus)
- [Installation | primus](#installation-primus)
- [Quick Start | primus](#quick-start-primus)
- [Code Example | primus](#code-example-primus)
- [Introduction | primus](#introduction-primus)
- [Installation | primus](#installation-primus)
- [Automating Verification Process | primus](#automating-verification-process-primus)
- [Data Quality Control | primus](#data-quality-control-primus)
- [Introduction | primus](#introduction-primus)
- [Crypto Lending with Proofs of Dynamic Assets | primus](#crypto-lending-with-proofs-of-dynamic-assets-primus)
- [Production Example | primus](#production-example-primus)
- [Test Example | primus](#test-example-primus)
- [Crypto On-Ramp and Off-Ramp | primus](#crypto-on-ramp-and-off-ramp-primus)
- [Proof of Assets | primus](#proof-of-assets-primus)
- [Private Dataset for AI Models | primus](#private-dataset-for-ai-models-primus)
- [Glossary | primus](#glossary-primus)
- [Identity Verification | primus](#identity-verification-primus)
- [zkTLS-based Crypto Payment | primus](#zktls-based-crypto-payment-primus)
- [Why Primus | primus](#why-primus-primus)
- [Tutorial for AlphaNet | primus](#tutorial-for-alphanet-primus)
- [Attestor Node Guide | primus](#attestor-node-guide-primus)
- [Attestor Security | primus](#attestor-security-primus)
- [Overview of zkTLS | primus](#overview-of-zktls-primus)
- [FAQ for AlphaNet | primus](#faq-for-alphanet-primus)
- [Privacy Policy | primus](#privacy-policy-primus)
- [Understand Primus Network | primus](#understand-primus-network-primus)
- [Useful Links | primus](#useful-links-primus)
- [Page Not Found | primus](#page-not-found-primus)
---
# What is Primus | primus
[Skip to main content](https://docs.primuslabs.xyz/#docusaurus_skipToContent_fallback)
On this page

What is Primus[](https://docs.primuslabs.xyz/#what-is-primus "Direct link to What is Primus")
-----------------------------------------------------------------------------------------------
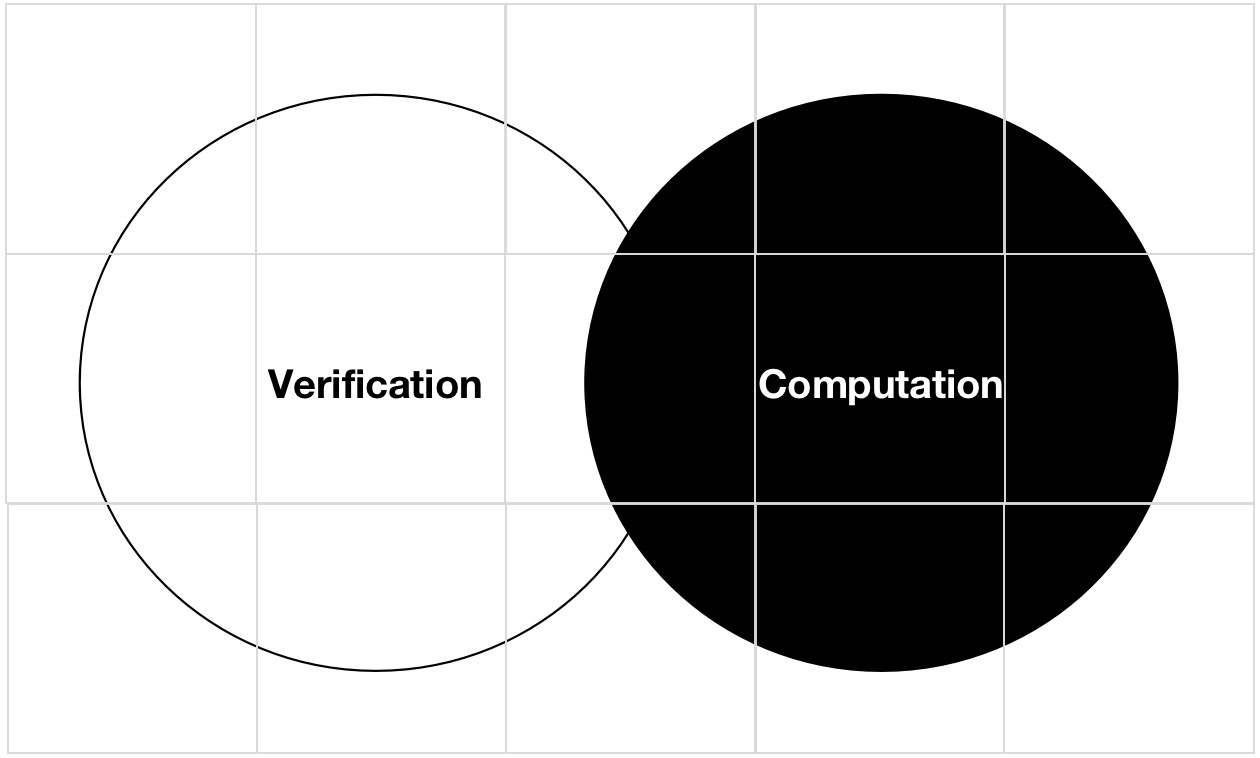
Primus (formerly "PADO") is building the future of data interoperability. The mission of Primus is to enable secure, permissionless data verification and computation in blockchain and AI.
### The Problems[](https://docs.primuslabs.xyz/#the-problems "Direct link to The Problems")
* As blockchain and decentralized technologies continue to evolve, they encounter critical challenges, including limited on-chain data, fragmentation between Web2 and Web3 systems, and the difficulty mature industries face in leveraging decentralized networks effectively. Traditional systems fail to deliver the privacy, scalability, and interoperability required to overcome these obstacles.
* A key issue with AI in decentralized systems is the absence of transparency and accountability. Without verifiable mechanisms, users cannot trust AI’s actions, decisions, or data management, raising concerns about potential manipulation, security vulnerabilities, and privacy breaches.
### Our Solutions[](https://docs.primuslabs.xyz/#our-solutions "Direct link to Our Solutions")
The challenges we face today point to one clear solution: a cryptographic layer. This layer securely connects off-chain data with blockchain and AI systems. Primus tackles this by leveraging verification and encrypted computation to introduce valuable data into these ecosystems, empowering data owners and enabling a world where data can flow freely, unlocking its full potential.
Primus also provides developers with easy-to-use APIs. Think of it as a bridge, linking foundational blockchain and AI ecosystems with the diverse applications being built on top.
### Core Technologies[](https://docs.primuslabs.xyz/#core-technologies "Direct link to Core Technologies")
Our technology focuses on two key innovations: [zkTLS](https://docs.primuslabs.xyz/primus-network/tech-intro)
and zkFHE. zkTLS builds on the Transport Layer Security (TLS) protocol by adding zero-knowledge proofs, so you can verify data authenticity without revealing the data itself. zkFHE takes this a step further, ensuring computations on encrypted data are secure and tamper-proof, even when outsourced.
* zkTLS Resources:
* [Whitepaper](https://eprint.iacr.org/2023/964)
* [QuickSilver](https://eprint.iacr.org/2021/076)
* zkFHE Resources:
* [GINX](https://eprint.iacr.org/2014/283.pdf)
* [What is Primus](https://docs.primuslabs.xyz/#what-is-primus)
* [The Problems](https://docs.primuslabs.xyz/#the-problems)
* [Our Solutions](https://docs.primuslabs.xyz/#our-solutions)
* [Core Technologies](https://docs.primuslabs.xyz/#core-technologies)
---
# Hello | primus
[Skip to main content](https://docs.primuslabs.xyz/helloMarkdown#docusaurus_skipToContent_fallback)
Edit `pages/helloReact.js` and save to reload.
---
# Markdown page example | primus
[Skip to main content](https://docs.primuslabs.xyz/markdown-page#docusaurus_skipToContent_fallback)
Markdown page example
=====================
You don't need React to write simple standalone pages.
---
# Installation | primus
[Skip to main content](https://docs.primuslabs.xyz/build/for-dapp/install#docusaurus_skipToContent_fallback)
On this page

Installing the Primus Network-JS-SDK[](https://docs.primuslabs.xyz/build/for-dapp/install#installing-the-primus-network-js-sdk "Direct link to Installing the Primus Network-JS-SDK")
---------------------------------------------------------------------------------------------------------------------------------------------------------------------------------------
Welcome to the first step in integrating Primus Network-JS-SDK into your project! This guide will walk you through the installation process and help you get started quickly.
### Prerequisites[](https://docs.primuslabs.xyz/build/for-dapp/install#prerequisites "Direct link to Prerequisites")
Before you begin, make sure you have:
* Node.js(version 18 or later)installed on your system
* npm (usually comes with Node.js) or yarn as your package manager
### Installation Steps[](https://docs.primuslabs.xyz/build/for-dapp/install#installation-steps "Direct link to Installation Steps")
#### 1\. Install the SDK[](https://docs.primuslabs.xyz/build/for-dapp/install#1-install-the-sdk "Direct link to 1. Install the SDK")
Open your terminal and navigate to your project directory. Then run one of the following commands:
* Using npm:
npm install --save @primuslabs/network-js-sdk
* Using yarn:
yarn add --save @primuslabs/network-js-sdk
This command will download and install the Primus Network SDK and its dependencies into your project.
#### 2\. Verify Installation[](https://docs.primuslabs.xyz/build/for-dapp/install#2-verify-installation "Direct link to 2. Verify Installation")
To ensure the SDK was installed correctly, you can check your `package.json` file. You should see `@primuslabs/network-js-sdk` listed in the `dependencies` section.
### Importing the SDK[](https://docs.primuslabs.xyz/build/for-dapp/install#importing-the-sdk "Direct link to Importing the SDK")
After installation, you can import the SDK in your JavaScript or TypeScript files. Here's how:
import { PrimusNetwork } from "@primuslabs/network-js-sdk"
### Next Steps[](https://docs.primuslabs.xyz/build/for-dapp/install#next-steps "Direct link to Next Steps")
Congratulations! You've successfully installed the Primus Network SDK. Here's what you can do next:
**Quick Start**: Explore our [Example](https://docs.primuslabs.xyz/build/for-dapp/example)
to quickly experience the project in action.
If you need further support, feel free to reach out through our [Telegram Group](https://t.me/primuslabs)
or [community on Discord](https://discord.com/invite/pdrNxRrApX)
.
* [Installing the Primus Network-JS-SDK](https://docs.primuslabs.xyz/build/for-dapp/install#installing-the-primus-network-js-sdk)
* [Prerequisites](https://docs.primuslabs.xyz/build/for-dapp/install#prerequisites)
* [Installation Steps](https://docs.primuslabs.xyz/build/for-dapp/install#installation-steps)
* [1\. Install the SDK](https://docs.primuslabs.xyz/build/for-dapp/install#1-install-the-sdk)
* [2\. Verify Installation](https://docs.primuslabs.xyz/build/for-dapp/install#2-verify-installation)
* [Importing the SDK](https://docs.primuslabs.xyz/build/for-dapp/install#importing-the-sdk)
* [Next Steps](https://docs.primuslabs.xyz/build/for-dapp/install#next-steps)
---
# Installation | primus
[Skip to main content](https://docs.primuslabs.xyz/build/for-backend/install#docusaurus_skipToContent_fallback)
On this page

About Primus Network-Core-SDK[](https://docs.primuslabs.xyz/build/for-backend/install#about-primus-network-core-sdk "Direct link to About Primus Network-Core-SDK")
---------------------------------------------------------------------------------------------------------------------------------------------------------------------
Network-Core-SDK is a special SDK for builders to integrate with their applications. Unlike the Network-JS-SDK, the Network-Core-SDK does not require the Primus Extension to be installed. This avoids additional steps and user concerns, and can improve the overall user experience in certain scenarios.
Network-Core-SDK does not rely on browser-side features such as network request interception provided by the Primus Extension. While Network-JS-SDK uses these capabilities (after installing the Primus Extension) to act as a zkTLS client and communicate with destination data source servers, Network-Core-SDK instead directly initiate zkTLS protocols directly via configured API endpoints and user credentials.
Based on the fact that user credentials should be configured and stored at the application backend, typical use cases that Network-Core-SDK can work with include
* AI agent program: the agent program can delegate the user to perform transactions and other operations, while zkTLS-based data verification can also be completed by the agent with a pre-configured credential profile.
* Proof-of-Reserve application: asset managers/trading firms can provide verifiable, privacy-preserving proofs on underlying assets and balances, with the goal of further improving transparency and credibility without revealing sensitive data.
Installing the Primus Network-Core-SDK[](https://docs.primuslabs.xyz/build/for-backend/install#installing-the-primus-network-core-sdk "Direct link to Installing the Primus Network-Core-SDK")
------------------------------------------------------------------------------------------------------------------------------------------------------------------------------------------------
Welcome to the first step in integrating Primus Network-Core-SDK into your project. This guide will walk you through the installation process and help you get started quickly.
### Prerequisites[](https://docs.primuslabs.xyz/build/for-backend/install#prerequisites "Direct link to Prerequisites")
Before you begin, make sure you have:
* Node.js(version 18 or later)installed on your system
* npm (usually comes with Node.js) or yarn as your package manager
### Installation Steps[](https://docs.primuslabs.xyz/build/for-backend/install#installation-steps "Direct link to Installation Steps")
#### 1\. Install the SDK[](https://docs.primuslabs.xyz/build/for-backend/install#1-install-the-sdk "Direct link to 1. Install the SDK")
Open your terminal and navigate to your project directory. Then run one of the following commands:
* Using npm:
npm install --save @primuslabs/network-core-sdk
* Using yarn:
yarn add --save @primuslabs/network-core-sdk
This command will download and install the Primus Network Core SDK and its dependencies into your project.
#### 2\. Verify Installation[](https://docs.primuslabs.xyz/build/for-backend/install#2-verify-installation "Direct link to 2. Verify Installation")
To ensure the SDK was installed correctly, you can check your `package.json` file. You should see `@primuslabs/network-core-sdk` listed in the `dependencies` section.
### Importing the SDK[](https://docs.primuslabs.xyz/build/for-backend/install#importing-the-sdk "Direct link to Importing the SDK")
After installation, you can import the SDK in your JavaScript or TypeScript files. Here's how:
const { PrimusNetwork } = require("@primuslabs/network-core-sdk");
### Next Steps[](https://docs.primuslabs.xyz/build/for-backend/install#next-steps "Direct link to Next Steps")
You can refer to the [simple example](https://docs.primuslabs.xyz/build/for-backend/simpleexample)
to see an example about how to integrate Network Core SDK into your project.
If you need further support, feel free to reach out through our [community on Discord](https://discord.com/invite/pdrNxRrApX)
.
* [About Primus Network-Core-SDK](https://docs.primuslabs.xyz/build/for-backend/install#about-primus-network-core-sdk)
* [Installing the Primus Network-Core-SDK](https://docs.primuslabs.xyz/build/for-backend/install#installing-the-primus-network-core-sdk)
* [Prerequisites](https://docs.primuslabs.xyz/build/for-backend/install#prerequisites)
* [Installation Steps](https://docs.primuslabs.xyz/build/for-backend/install#installation-steps)
* [1\. Install the SDK](https://docs.primuslabs.xyz/build/for-backend/install#1-install-the-sdk)
* [2\. Verify Installation](https://docs.primuslabs.xyz/build/for-backend/install#2-verify-installation)
* [Importing the SDK](https://docs.primuslabs.xyz/build/for-backend/install#importing-the-sdk)
* [Next Steps](https://docs.primuslabs.xyz/build/for-backend/install#next-steps)
---
# Error Code | primus
[Skip to main content](https://docs.primuslabs.xyz/build/misc/error-code#docusaurus_skipToContent_fallback)
On this page

Error Code[](https://docs.primuslabs.xyz/build/misc/error-code#error-code "Direct link to Error Code")
--------------------------------------------------------------------------------------------------------
We have defined some error codes in the SDK. When an error occurs during the data verification process, you can refer to the following list for troubleshooting.
### 1\. General Errors[](https://docs.primuslabs.xyz/build/misc/error-code#1-general-errors "Direct link to 1. General Errors")
| Error Code | Situation |
| --- | --- |
| 00000 | Operation too frequent. Please try again later. |
| 00001 | Algorithm startup exception. |
| 00002 | The verification process timed out. |
| 00003 | A verification process is in progress. Please try again later. |
| 00004 | The user closes or cancels the verification process. |
| 00005 | Wrong SDK parameters. |
| 00012 | Invalid Template ID. |
| 00013 | Target data missing. Please check that the JSON path of the data in the response from the request URL matches your template. |
| 00104 | Not met the verification requirements. |
| \-1002001 | Invalid App ID. |
| \-1002002 | Invalid App Secret. |
### 2\. zkTLS Related Errors[](https://docs.primuslabs.xyz/build/misc/error-code#2-zktls-related-errors "Direct link to 2. zkTLS Related Errors")
| Error Code | Situation |
| --- | --- |
| 10001 ~ 10004 | Unstable internet connection. Please try again. |
| 20001 | An internal error occurred. |
| 20003 | Invalid algorithm parameters. |
| 20005 | An internal error occurred. |
| 30001 | Response error. Please try again. |
| 30002 | Response check error. |
| 30004 | Response parse error. |
| 40002 | SSL certificate error. |
| 50001 | An internal error occurred. |
| 50003 | The client encountered an unexpected error. |
| 50004 | The client not started. Please try again. |
| 50006 | The algorithm server not started. Please try again. |
| 50007 | Algorithm execution issues. |
| 50008 | Abnormal execution results. |
| 50009 | Algorithm service timed out. |
| 50010 | Compatibility issues during algorithm execution. |
| 50011 | Unsupported TLS version. |
| 99999 | Undefined error. |
Please contact our [Community](https://discord.com/invite/pdrNxRrApX)
for assistance in resolving the issues.
* [Error Code](https://docs.primuslabs.xyz/build/misc/error-code#error-code)
* [1\. General Errors](https://docs.primuslabs.xyz/build/misc/error-code#1-general-errors)
* [2\. zkTLS Related Errors](https://docs.primuslabs.xyz/build/misc/error-code#2-zktls-related-errors)
---
# Example | primus
[Skip to main content](https://docs.primuslabs.xyz/build/for-dapp/example#docusaurus_skipToContent_fallback)
On this page

Example[](https://docs.primuslabs.xyz/build/for-dapp/example#example "Direct link to Example")
------------------------------------------------------------------------------------------------
This part will help you understand the fundamental steps to integrate Primus Network-JS-SDK and complete a basic data verification process through your application. You can learn about the integration process through this simple [demo](https://github.com/primus-labs/zktls-demo/tree/main/network-sdk-example)
.
### Prerequisites[](https://docs.primuslabs.xyz/build/for-dapp/example#prerequisites "Direct link to Prerequisites")
Before you begin, ensure you have the following:
* A valid Template ID. (obtainable from the [Primus Developer Hub](https://dev.primuslabs.xyz/)
)
* The SDK installed. (see [Installation Guide](https://docs.primuslabs.xyz/build/for-dapp/install)
for instructions)
### Key Features[](https://docs.primuslabs.xyz/build/for-dapp/example#key-features "Direct link to Key Features")
#### **1\. SDK Initialization**[](https://docs.primuslabs.xyz/build/for-dapp/example#1-sdk-initialization "Direct link to 1-sdk-initialization")
Connect to specified blockchain networks.
Function Name: `init`
##### **Parameter Description**:[](https://docs.primuslabs.xyz/build/for-dapp/example#parameter-description "Direct link to parameter-description")
| Parameter Name | Type | Required | Description |
| --- | --- | --- | --- |
| `provider` | `Provider` | Yes | Web3 provider, can be:
\- An instance of `ethers.providers.JsonRpcProvider`
\- An instance of `ethers.providers.Web3Provider`
\- An instance of `ethers.providers.JsonRpcSigner` |
| `chainId` | `number` | Yes | The blockchain network ID to connect to. Must be one of [the supported chain IDs](https://docs.primuslabs.xyz/build/for-dapp/example#6-list-of-supported-chains) |
#### **2\. Task Submission**[](https://docs.primuslabs.xyz/build/for-dapp/example#2-task-submission "Direct link to 2-task-submission")
Submit tasks to require an attestation from the network.
Function Name: `submitTask`
##### **Parameter Description**:[](https://docs.primuslabs.xyz/build/for-dapp/example#parameter-description-1 "Direct link to parameter-description-1")
| Parameter Name | Type | Required | Description |
| --- | --- | --- | --- |
| `templateId` | `string` | Yes | Template ID |
| `address` | `string` | Yes | User address |
#### **3\. Attestation Execution**[](https://docs.primuslabs.xyz/build/for-dapp/example#3-attestation-execution "Direct link to 3-attestation-execution")
Execute the zkTLS protocol with the network attestor node, and return an attestation issued by the attestor node.
Function Name: `attest`
##### **Parameter Description**:[](https://docs.primuslabs.xyz/build/for-dapp/example#parameter-description-2 "Direct link to parameter-description-2")
| Parameter Name | Type | Required | Description |
| --- | --- | --- | --- |
| `templateId` | `string` | Yes | Template ID |
| `address` | `string` | Yes | User address |
| `taskId` | `string` | Yes | Task ID |
| `taskTxHash` | `string` | Yes | Task transaction hash |
| `taskAttestors` | `Array` | Yes | Array of attestor IDs |
| `additionParams` | `string` | No | Extended parameters in JSON format. Developers can include custom business parameters (e.g., user IDs, session info),These parameters will be returned with the final results `const additionParams = JSON.stringify({ YOUR_CUSTOM_KEY: "YOUR_CUSTOM_VALUE" })` |
| `attMode` | `string` | No | proxytls or mpctls,default is proxytls. you can refer to [Overview](https://docs.primuslabs.xyz/primus-network/tech-intro)
section for more details. |
| `attConditions` | `Array` | No | By default, the zkTLS SDK retrieves a plaintext verification result. We offer two types of verification logic to accommodate different requirements:
1.Hashed result `const attConditions = [[{field: "YOUR_CUSTOM_DATA_FIELD",op: "SHA256"}]]`
2.Conditions result `const attConditions = [[{field: "YOUR_CUSTOM_DATA_FIELD",op: ">",value: "YOUR_CUSTOM_TARGET_DATA_VALUE"}]]`.you can refer to the [Verification Logics](https://docs.primuslabs.xyz/enterprise/zk-tls-sdk/overview#verification-logics)
and [zkTLS operations](https://docs.primuslabs.xyz/build/op#how-to-use-the-zktls-operations-in-sdks)
sections for more details. |
#### **4\. Verify & Poll Task Result**[](https://docs.primuslabs.xyz/build/for-dapp/example#4-verify--poll-task-result "Direct link to 4-verify--poll-task-result")
Verify and poll task results. The function is additonally provided for any use case that requires to double check the validity of an created attestation through Primus contracts.
Function Name: `verifyAndPollTaskResult`
##### **Parameter Description**:[](https://docs.primuslabs.xyz/build/for-dapp/example#parameter-description-3 "Direct link to parameter-description-3")
| Parameter Name | Type | Required | Description |
| --- | --- | --- | --- |
| `taskId` | `string` | Yes | The ID of the task to poll |
| `reportTxHash` | `string` | No | Report transaction hash (optional) |
| `intervalMs` | `number` | No | Polling interval in milliseconds, default is 2000 |
| `timeoutMs` | `number` | No | Total timeout duration in milliseconds, default is 1 minute |
#### **5\. Balance Withdrawal**[](https://docs.primuslabs.xyz/build/for-dapp/example#5-balance-withdrawal "Direct link to 5-balance-withdrawal")
Retrieve the fees for unsettled tasks.
Function Name: `withdrawBalance`
##### **Parameter Description**:[](https://docs.primuslabs.xyz/build/for-dapp/example#parameter-description-4 "Direct link to parameter-description-4")
| Parameter Name | Type | Required | Description |
| --- | --- | --- | --- |
| `tokenSymbol` | `TokenSymbol` | No | Token type to withdraw, default is ETH |
| `limit` | `number` | No | Withdrawal amount limit, default is 100 |
#### **6\. List of Supported Chains**[](https://docs.primuslabs.xyz/build/for-dapp/example#6-list-of-supported-chains "Direct link to 6-list-of-supported-chains")
Property Name:`supportedChainIds`
Currently supports **Base Sepolia** and **Base mainnet**, additional chains will be added in upcoming releases.
### Using Attestations in zkVM[](https://docs.primuslabs.xyz/build/for-dapp/example#using-attestations-in-zkvm "Direct link to Using Attestations in zkVM")
To retrieve a proof validated using hashed verification logic, you may use **getAllJsonResponse** to collect the associated HTTP response payloads. These two components — the attestation (**_hashed data_**) and the HTTP responses (**_raw data_**) — can then be jointly submitted to the zkVM for further computation and verification.
const attestParams = { ...submitTaskParams, ...submitTaskResult, attConditions: [ [ { field: "YOUR_FIELD_NAME", op: "SHA256", }, ], ] allJsonResponseFlag: 'true',// optional, default is 'false', Must be set to true to allow getAllJsonResponse to return the HTTP response.};let attestResult = await primusNetwork.attest(attestParams);const allJsonResponse = await primusNetwork.getAllJsonResponse( attestResult[0].taskId);
Complete Example[](https://docs.primuslabs.xyz/build/for-dapp/example#complete-example "Direct link to Complete Example")
---------------------------------------------------------------------------------------------------------------------------
import { PrimusNetwork } from "@primuslabs/network-js-sdk";async function main() { const provider = window.ethereum; const primusNetwork = new PrimusNetwork(); console.log(primusNetwork.supportedChainIds); // [84532, 8453] try { // 1. Initialize await primusNetwork.init(provider, 84532); // The Base chain changes 84532 to 8453 console.log("SDK initialized"); // 2. Submit task, set TemplateID and user address. const submitTaskParams = { templateId: "YOUR_TEMPLATEID", address: "YOUR_USER_ADDRESS", }; const submitTaskResult = await primusNetwork.submitTask(submitTaskParams); console.log("Task submitted:", submitTaskResult); // 3. Perform attestation const attestParams = { ...submitTaskParams, ...submitTaskResult, // extendedParams: JSON.stringify({ attUrlOptimization: true }), //Optional,optimization the url of attestation. }; const attestResult = await primusNetwork.attest(attestParams); console.log("Attestation completed:", attestResult); // 4. Verify & poll task result const verifyAndPollTaskResultParams = { taskId: attestResult[0].taskId, reportTxHash: attestResult[0].reportTxHash, }; const taskResult = await primusNetwork.verifyAndPollTaskResult( verifyAndPollTaskResultParams ); console.log("Final result:", taskResult); // Optional withdrawal // const settledTaskIds = await primusNetwork.withdrawBalance(); // console.log('Withdrawn:', settledTaskIds ); } catch (error) { console.error("Main flow error:", error); }}main();
### Understanding the Attestation Structure[](https://docs.primuslabs.xyz/build/for-dapp/example#understanding-the-attestation-structure "Direct link to Understanding the Attestation Structure")
When a successful data verification process is completed, you will receive an zkTLS attestation (proof) from the attestor.
For more information about the attestation structure, see the [section](https://docs.primuslabs.xyz/build/misc/attestation-structure)
.
### Error Codes[](https://docs.primuslabs.xyz/build/for-dapp/example#error-codes "Direct link to Error Codes")
We have defined several error codes in the SDK. If an error occurs during the data verification process, you can refer to the [error code list](https://docs.primuslabs.xyz/build/misc/error-code)
for troubleshooting.
* [Example](https://docs.primuslabs.xyz/build/for-dapp/example#example)
* [Prerequisites](https://docs.primuslabs.xyz/build/for-dapp/example#prerequisites)
* [Key Features](https://docs.primuslabs.xyz/build/for-dapp/example#key-features)
* [**1\. SDK Initialization**](https://docs.primuslabs.xyz/build/for-dapp/example#1-sdk-initialization)
* [**2\. Task Submission**](https://docs.primuslabs.xyz/build/for-dapp/example#2-task-submission)
* [**3\. Attestation Execution**](https://docs.primuslabs.xyz/build/for-dapp/example#3-attestation-execution)
* [**4\. Verify & Poll Task Result**](https://docs.primuslabs.xyz/build/for-dapp/example#4-verify--poll-task-result)
* [**5\. Balance Withdrawal**](https://docs.primuslabs.xyz/build/for-dapp/example#5-balance-withdrawal)
* [**6\. List of Supported Chains**](https://docs.primuslabs.xyz/build/for-dapp/example#6-list-of-supported-chains)
* [Using Attestations in zkVM](https://docs.primuslabs.xyz/build/for-dapp/example#using-attestations-in-zkvm)
* [Complete Example](https://docs.primuslabs.xyz/build/for-dapp/example#complete-example)
* [Understanding the Attestation Structure](https://docs.primuslabs.xyz/build/for-dapp/example#understanding-the-attestation-structure)
* [Error Codes](https://docs.primuslabs.xyz/build/for-dapp/example#error-codes)
---
# DVC (Data Verification and Computation) | primus
[Skip to main content](https://docs.primuslabs.xyz/build/dvc#docusaurus_skipToContent_fallback)
On this page

Introduction[](https://docs.primuslabs.xyz/build/dvc#introduction "Direct link to Introduction")
--------------------------------------------------------------------------------------------------
DVC (Data Verification and Computation) mode is a workflow where:
1. one uses zkTLS to verify the correctness and authenticity of HTTPS requests and responses by proving the encrypted TLS transcript directly, without executing any business logic itself.
2. one uses zkVM to consume and compute the verified private data for business logic execution.
The advantages of the DVC pattern are clear: user data privacy is strongly protected, while the value or insights derived from the data can be extracted and consumed through an external zkVM program. This separation keeps the workflow clean, modular, and easy to maintain. Moreover, the output of the zkVM programm, a.k.a., a zkSNARK proof, can be publicly verified through zk verifier contract on-chain.
The Reference Implementation[](https://docs.primuslabs.xyz/build/dvc#the-reference-implementation "Direct link to The Reference Implementation")
--------------------------------------------------------------------------------------------------------------------------------------------------
Developers can check the details of the [repository](https://github.com/primus-labs/DVC-Intro)
for a complete implementation guide.
Comparison with Native zkTLS Operations[](https://docs.primuslabs.xyz/build/dvc#comparison-with-native-zktls-operations "Direct link to Comparison with Native zkTLS Operations")
-----------------------------------------------------------------------------------------------------------------------------------------------------------------------------------
The [zkTLS Operations](https://docs.primuslabs.xyz/build/op)
is another approah to process with private data, which also provide a certain type of computation in the zkTLS algorithm layer. However, The method of using zkTLS operations provides less public verifiability, since the output of a zkVM circuit, namely a SNARK proof, can be publicly verified on-chain.
* [Introduction](https://docs.primuslabs.xyz/build/dvc#introduction)
* [The Reference Implementation](https://docs.primuslabs.xyz/build/dvc#the-reference-implementation)
* [Comparison with Native zkTLS Operations](https://docs.primuslabs.xyz/build/dvc#comparison-with-native-zktls-operations)
---
# Attestation Structure | primus
[Skip to main content](https://docs.primuslabs.xyz/build/misc/attestation-structure#docusaurus_skipToContent_fallback)
On this page

Attestation Structure in Primus Network[](https://docs.primuslabs.xyz/build/misc/attestation-structure#attestation-structure-in-primus-network "Direct link to Attestation Structure in Primus Network")
----------------------------------------------------------------------------------------------------------------------------------------------------------------------------------------------------------
When a successful data verification process is completed, the client will receive a zkTLS attestation issued by the network attestor. The attestation is defined with the following structure.
[ { "attestor": "ATTESTOR_ADDRESS", // attestor's address "taskId": "TASK_ID", // the task id "attestation": { "recipient": "YOUR_USER_ADDRESS", // user's wallet address "request": [ { "url": "REQUEST_URL", // request url "header": "REQUEST_HEADER", // request header "method": "REQUEST_METHOD", // request method "body": "REQUEST_BODY" // request body } ], "responseResolve": [ { "oneUrlResponseResolve": [ { "keyName": "VERIFY_DATA_ITEMS", // the "verify data items" you set in the template "parseType": "", "parsePath": "DARA_ITEM_PATH" // json path of the data for verification } ] } ], "data": "{ACTUAL_DATA}", // actual data items in the request, stringified JSON object "attConditions": "[RESPONSE_CONDITIONS]", // response conditions, stringified JSON object "timestamp": TIMESTAMP_OF_VERIFICATION_EXECUTION, // timestamp of execution "additionParams": "", // additionParams from zkTLS sdk } } ]
* [Attestation Structure in Primus Network](https://docs.primuslabs.xyz/build/misc/attestation-structure#attestation-structure-in-primus-network)
---
# Developer Hub | primus
[Skip to main content](https://docs.primuslabs.xyz/build/developer-hub#docusaurus_skipToContent_fallback)
On this page

Developer Hub[](https://docs.primuslabs.xyz/build/developer-hub#developer-hub "Direct link to Developer Hub")
---------------------------------------------------------------------------------------------------------------
Primus offers a [Dev Hub](https://dev.primuslabs.xyz/)
where developers can easily configure verified internet data and utilize zkTLS capabilities across various application scenarios, such as executing zkTLS protocols in a web-based DApp and implicitly running zkTLS in a backend server.
As a developer, two main features you need to be involved with:
**1\. Create Data Verification Templates**
We provide a streamlined process to help you quickly locate and identify the network requests required for data verification. This straightforward process enables seamless integration of verified data without the need to understand complex algorithm implementations or intricate system configurations.
By creating a **Data Verification Template** (“Template” for short), you can define the data source URL and the network request containing the verified data. The request URL is essential when initiating a zkTLS process.
You can create different templates to meet various application needs. When **integrating with web-based DApp**, you only need to configure the **template ID** (which can be flexibly replaced based on requirements) to complete the data verification process.
All templates you create are visible and usable only by you. However, you can also publish them to the **Templates Market** to support other developers.
**2\. Create Projects**
We offer a developer-friendly integration approach that allows you to create **a unique pair of appID and appSecret** for each project. The appID and appSecret are used to manage and authenticate the project’s associated entities.
Please note that the appSecret is only visible once when you create the project.
We're excited to see what you'll build using our Developer Hub and the zkTLS SDK. If you need any help, feel free to contact us through our [Discord Community](https://discord.com/invite/pdrNxRrApX)
.
* [Developer Hub](https://docs.primuslabs.xyz/build/developer-hub#developer-hub)
---
# Overview | primus
[Skip to main content](https://docs.primuslabs.xyz/build/for-backend/overview#docusaurus_skipToContent_fallback)
On this page

Overview[](https://docs.primuslabs.xyz/build/for-backend/overview#overview "Direct link to Overview")
-------------------------------------------------------------------------------------------------------
When integrating data verification solutions into your backend server, you can utilize the **Primus Network Core SDK**. For integrating primus network capabilities with DApps, please refer to the [DApp Integration](https://docs.primuslabs.xyz/build/for-dapp/install)
guide.
The Network Core SDK allows you to verify data through **webpage endpoint responses**, with support for repeated verification without additional calls. An authorized token is required to request private data.
Primus Core SDK supports two modes: the [Proxy TLS mode](https://docs.primuslabs.xyz/primus-network/tech-intro#proxy-model)
and the [MPC TLS mode](https://docs.primuslabs.xyz/primus-network/tech-intro#mpc-model)
. You can specify the desired mode by setting the "algorithmType" parameter during SDK integration.
### Interact with Blockchains[](https://docs.primuslabs.xyz/build/for-backend/overview#interact-with-blockchains "Direct link to Interact with Blockchains")
The Primus zkTLS protocol is compatible with multiple blockchains. We provide smart contracts that can be deployed on various blockchains to verify data proofs generated by users via the Network Core SDK.
Currently, support is available for several testnets and mainnets. TODO
### Quick Start for Beginners[](https://docs.primuslabs.xyz/build/for-backend/overview#quick-start-for-beginners "Direct link to Quick Start for Beginners")
1. [Installation](https://docs.primuslabs.xyz/build/for-backend/install)
Get the SDK set up in your project.
2. [Simple Example](https://docs.primuslabs.xyz/build/for-backend/simpleexample)
Understand how to use the Network Core SDK.
### Stay Connected[](https://docs.primuslabs.xyz/build/for-backend/overview#stay-connected "Direct link to Stay Connected")
Keep up with the latest Primus developments:
* Star our [GitHub Repository](https://github.com/primus-labs/network-core-sdk)
* Join our [Discord Community](https://discord.com/invite/pdrNxRrApX)
* [Overview](https://docs.primuslabs.xyz/build/for-backend/overview#overview)
* [Interact with Blockchains](https://docs.primuslabs.xyz/build/for-backend/overview#interact-with-blockchains)
* [Quick Start for Beginners](https://docs.primuslabs.xyz/build/for-backend/overview#quick-start-for-beginners)
* [Stay Connected](https://docs.primuslabs.xyz/build/for-backend/overview#stay-connected)
---
# Simple Example | primus
[Skip to main content](https://docs.primuslabs.xyz/build/for-backend/simpleexample#docusaurus_skipToContent_fallback)
On this page

Simple Example[](https://docs.primuslabs.xyz/build/for-backend/simpleexample#simple-example "Direct link to Simple Example")
------------------------------------------------------------------------------------------------------------------------------
This guide will walk you through the fundamental steps to integrate Primus's Network-Core-SDK and complete a basic data verification process through your server. You can learn about the integration process through this simple [demo](https://github.com/primus-labs/zktls-demo/tree/main/network-core-sdk-example)
.
### Prerequisites[](https://docs.primuslabs.xyz/build/for-backend/simpleexample#prerequisites "Direct link to Prerequisites")
Before you begin, ensure you have:
* Installed the SDK (see [Installation Guide](https://docs.primuslabs.xyz/build/for-backend/install)
)
### zkTLS Modes[](https://docs.primuslabs.xyz/build/for-backend/simpleexample#zktls-modes "Direct link to zkTLS Modes")
We offer two modes in various user scenarios:
1. proxytls
2. mpctls
For more details about these two modes, you can refer to the [Overview](https://docs.primuslabs.xyz/primus-network/tech-intro)
section.
// Set zkTLS modelet attestParams = { // ... other parameters attMode: { algorithmType: "proxytls", // optional, default is 'proxytls' },};primusNetwork.attest(attestParams);
### Verification Logics[](https://docs.primuslabs.xyz/build/for-backend/simpleexample#verification-logics "Direct link to Verification Logics")
By default, the Primus Network-Core-SDK retrieves a plaintext verification result. We offer two types of verification logic to accommodate different requirements:
1. Hashed result
Setting example :
// Set Attestation conditionsconst responseResolves = [ [ { ...otherParams, op: "SHA256", // optional, default is 'REVEAL_STRING' }, ],];const attestParams = { ...submitTaskParams, ...submitTaskResult, requests, responseResolves,};let attestResult = await primusNetwork.attest(attestParams);
2. Conditions result
Setting example :
// Set Attestation conditionsconst responseResolves = [ [ { ...otherParams, op: ">", value: "YOUR_CUSTOM_TARGET_DATA_VALUE", }, ],];const attestParams = { ...submitTaskParams, ...submitTaskResult, requests, responseResolves,};let attestResult = await primusNetwork.attest(attestParams);
For more details about these two verification logics, you can refer to the [Verification Logics](https://docs.primuslabs.xyz/enterprise/zk-tls-sdk/overview#verification-logics)
section.
### Using Attestations in zkVM[](https://docs.primuslabs.xyz/build/for-backend/simpleexample#using-attestations-in-zkvm "Direct link to Using Attestations in zkVM")
After obtaining the attestation through the Hashed Verification Logic, you may use **getAllJsonResponse** to collect the associated HTTP response payloads. These two components — the attestation (**_hashed data_**) and the HTTP responses (**_raw data_**) — can then be jointly submitted to the zkVM for further computation.
This approach of handling the attestation data in another computing module like zkVM, is a powerful verifiable data usage pattern so-called data verification and computation (DVC). You can refer to this [part](https://docs.primuslabs.xyz/build/dvc)
for more details.
const responseResolves = [ [ { ...otherParams, op: "SHA256", // optional, default is 'REVEAL_STRING' }, ],];const attestParams = { ...submitTaskParams, ...submitTaskResult, requests, responseResolves, getAllJsonResponse: "true", // optional, default is 'false', Must be set to true to allow getAllJsonResponse to return the HTTP response.};let attestResult = await primusNetwork.attest(attestParams);const allJsonResponse = await primusNetwork.getAllJsonResponse( attestResult[0].taskId);
### Implementation[](https://docs.primuslabs.xyz/build/for-backend/simpleexample#implementation "Direct link to Implementation")
const PRIVATEKEY = "YOUER_PRIVATEKEY";const address = "0xYOUER_ADDRESS";const chainId = 84532; // Base Sepolia (or 8453 for Base mainnet)const baseSepoliaRpcUrl = "https://sepolia.base.org"; // (or 'https://mainnet.base.org' for Base mainnet)// The request and response can be customized as needed.const requests = [ { url: "https://www.okx.com/api/v5/public/instruments?instType=SPOT&instId=BTC-USD", method: "GET", header: {}, body: "", },];const responseResolves = [ [ { keyName: "instType", parseType: "json", parsePath: "$.data[0].instType", // op: "SHA256", // optional, default is 'REVEAL_STRING' }, ],];const provider = new ethers.providers.JsonRpcProvider(baseSepoliaRpcUrl);const wallet = new ethers.Wallet(PRIVATEKEY, provider);try { const primusNetwork = new PrimusNetwork(); // Initialize the network with wallet const initResult = await primusNetwork.init(wallet, chainId); // Submit task const submitTaskParams = { address, }; let submitTaskResult = await primusNetwork.submitTask(submitTaskParams); console.log("Submit task result:", submitTaskResult); // Compose params for attest const attestParams = { ...submitTaskParams, ...submitTaskResult, requests, responseResolves, // attMode: { // algorithmType: "proxytls", // optional, default is 'proxytls' // }, // getAllJsonResponse: "true", // optional, default is 'false' }; let attestResult = await primusNetwork.attest(attestParams); console.log("Attest result:", attestResult); // Verify and poll task result const verifyParams = { taskId: attestResult[0].taskId, reportTxHash: attestResult[0].reportTxHash, }; const taskResult = await primusNetwork.verifyAndPollTaskResult(verifyParams); console.log("Task result:", taskResult); // const allResponse= await primusNetwork.getAllResponse(attestResult[0].taskId) // console.log('allResponse:', allResponse)} catch (error) { console.error("Unexpected error:", error); throw error;}
### Understanding the Attestation Structure[](https://docs.primuslabs.xyz/build/for-backend/simpleexample#understanding-the-attestation-structure "Direct link to Understanding the Attestation Structure")
When a successful data verification process is completed, you will receive an attestation from the attestor. For more information about the attestation structure, see the [section](https://docs.primuslabs.xyz/build/misc/attestation-structure)
.
### Error Codes[](https://docs.primuslabs.xyz/build/for-backend/simpleexample#error-codes "Direct link to Error Codes")
We have defined several error codes in the SDK. If an error occurs during the data verification process, you can refer to the [error code list](https://docs.primuslabs.xyz/build/misc/error-code)
for troubleshooting.
* [Simple Example](https://docs.primuslabs.xyz/build/for-backend/simpleexample#simple-example)
* [Prerequisites](https://docs.primuslabs.xyz/build/for-backend/simpleexample#prerequisites)
* [zkTLS Modes](https://docs.primuslabs.xyz/build/for-backend/simpleexample#zktls-modes)
* [Verification Logics](https://docs.primuslabs.xyz/build/for-backend/simpleexample#verification-logics)
* [Using Attestations in zkVM](https://docs.primuslabs.xyz/build/for-backend/simpleexample#using-attestations-in-zkvm)
* [Implementation](https://docs.primuslabs.xyz/build/for-backend/simpleexample#implementation)
* [Understanding the Attestation Structure](https://docs.primuslabs.xyz/build/for-backend/simpleexample#understanding-the-attestation-structure)
* [Error Codes](https://docs.primuslabs.xyz/build/for-backend/simpleexample#error-codes)
---
# Error Code | primus
[Skip to main content](https://docs.primuslabs.xyz/build/for-dapp/errorcode#docusaurus_skipToContent_fallback)
On this page

Error Code[](https://docs.primuslabs.xyz/build/for-dapp/errorcode#error-code "Direct link to Error Code")
-----------------------------------------------------------------------------------------------------------
We have defined some error codes in the SDK. When an error occurs during the data verification process, you can refer to the following list for troubleshooting.
### 1\. General Errors[](https://docs.primuslabs.xyz/build/for-dapp/errorcode#1-general-errors "Direct link to 1. General Errors")
| Error Code | Situation |
| --- | --- |
| 00000 | Operation too frequent. Please try again later. |
| 00001 | Algorithm startup exception. |
| 00002 | The verification process timed out. |
| 00003 | A verification process is in progress. Please try again later. |
| 00004 | The user closes or cancels the verification process. |
| 00005 | Wrong SDK parameters. |
| 00012 | Invalid Template ID. |
| 00013 | Target data missing. Please check that the JSON path of the data in the response from the request URL matches your template. |
| 00104 | Not met the verification requirements. |
| \-500 | Unexpected attestor node program failure. |
| \-10100 | Task cannot be executed again due to unexpected failure. |
| \-10101 | This task has already been completed. No need to resubmit. |
| \-10102 | This task is still in progress. No need to resubmit. |
| \-10103 | Submission limit reached for this task. Initiate a new task to continue. |
| \-10104 | Failed to get task details. Please check the attestor node condition or task ID. |
| \-10105 | Invalid attestation parameters. Please check the connection between the node and the template server. |
| \-10106 | Attestation template ID mismatch between task and attestor node. |
| \-10107 | The user wallet address provided during attestation mismatch with submission. |
| \-10108 | Invalid task ID. Please ensure the submitted ID matches the task. |
| \-10109 | Task cannot be executed again. Please check your task fees. |
| \-10110 | Attestor node mismatch. Ensure the node matches the task specification and resubmit. |
| \-10111 | Task submitted past the allowed time limit (15 minutes). |
### 2\. Network Related Errors[](https://docs.primuslabs.xyz/build/for-dapp/errorcode#2-network-related-errors "Direct link to 2. Network Related Errors")
| Error Code | Situation |
| --- | --- |
| 10001 ~ 10004 | Unstable internet connection. Please try again. |
| 20001 | An internal error occurred. |
| 20003 | Invalid algorithm parameters. |
| 20005 | An internal error occurred. |
| 30001 | Response error. Please try again. |
| 30002 | Response check error. |
| 30004 | Response parse error. |
| 40002 | SSL certificate error. |
| 50001 | An internal error occurred. |
| 50003 | The client encountered an unexpected error. |
| 50004 | The client not started. Please try again. |
| 50006 | The algorithm server not started. Please try again. |
| 50007 | Algorithm execution issues. |
| 50008 | Abnormal execution results. |
| 50009 | Algorithm service timed out. |
| 50010 | Compatibility issues during algorithm execution. |
| 50011 | Unsupported TLS version. |
| 99999 | Undefined error. |
Please contact our [Community](https://discord.com/invite/pdrNxRrApX)
for assistance in resolving the issues.
* [Error Code](https://docs.primuslabs.xyz/build/for-dapp/errorcode#error-code)
* [1\. General Errors](https://docs.primuslabs.xyz/build/for-dapp/errorcode#1-general-errors)
* [2\. Network Related Errors](https://docs.primuslabs.xyz/build/for-dapp/errorcode#2-network-related-errors)
---
# Mutual TLS | primus
[Skip to main content](https://docs.primuslabs.xyz/build/mtls#docusaurus_skipToContent_fallback)
On this page

Introduction[](https://docs.primuslabs.xyz/build/mtls#introduction "Direct link to Introduction")
---------------------------------------------------------------------------------------------------
mTLS (Mutual Transport Layer Security) is a security mechanism in which both the client and the server authenticate each other using X.509 certificates during the TLS handshake. Primus zkTLS SDKs support mTLS by allowing the client certificate to be examined during the handshake phase.
Using mTLS in the Network-Core-SDK[](https://docs.primuslabs.xyz/build/mtls#using-mtls-in-the-network-core-sdk "Direct link to Using mTLS in the Network-Core-SDK")
---------------------------------------------------------------------------------------------------------------------------------------------------------------------
Using mTLS in the SDKs is straightforward. Developers simply provide the client certificate and corresponding private key via the `mTLS` parameter, and then invoke the `attest` function. For platform independence, the certificate and private key should be provided as strings.
// Compose params for attest const mTLS = { clientKey: fs.readFileSync(CLIENT_KEY).toString(), clientCrt: fs.readFileSync(CLIENT_CRT).toString(), } const attestParams = { ...submitTaskParams, ...submitTaskResult, requests, responseResolves, mTLS }; let attestResult = await primusNetwork.attest(attestParams);
You can check this [demo example](https://github.com/primus-labs/zktls-demo/tree/main/network-core-sdk-mtls-example)
for more details.
* [Introduction](https://docs.primuslabs.xyz/build/mtls#introduction)
* [Using mTLS in the Network-Core-SDK](https://docs.primuslabs.xyz/build/mtls#using-mtls-in-the-network-core-sdk)
---
# Handling Multiple URLs | primus
[Skip to main content](https://docs.primuslabs.xyz/build/multi-url#docusaurus_skipToContent_fallback)
On this page

The Problem[](https://docs.primuslabs.xyz/build/multi-url#the-problem "Direct link to The Problem")
-----------------------------------------------------------------------------------------------------
In many use cases, one may want to create an aggregated attestation for multiple request URLs. For example, you can generate one zkTLS attestation which contains both the token A's USDT price and token B's USDT price from an exchange market data service.
Primus zkTLS tools including _network-core-sdk_ support the multiple URLs aggregation.
The Usage in Network-Core-SDK[](https://docs.primuslabs.xyz/build/multi-url#the-usage-in-network-core-sdk "Direct link to The Usage in Network-Core-SDK")
-----------------------------------------------------------------------------------------------------------------------------------------------------------
The adoption of multiple urls in network-core-sdk is quite simple, you're only required to define the multiple URLs and related resolves in the array structures of `requests` and `responseResolves` paramters respectively in the `attestParams`.
**The Defined `Requests` and `ResponseResolves`**
// contruct the requests and responseResolves for multiple urls const requests = [ { url: "https://www.okx.com/api/v5/market/index-tickers?instId=BTC-USDT", method: "GET", header: {}, body: "", }, { url: "https://www.okx.com/api/v5/market/index-tickers?instId=SOL-USDT", method: "GET", header: {}, body: "", } ]; const responseResolves = [ [ { keyName: "btc-idxPx", parseType: "json", parsePath: "$.data[0].idxPx" }, { keyName: "btc-high24h", parseType: "json", parsePath: "$.data[0].high24h" }, ], [ { keyName: "sol-idxPx", parseType: "json", parsePath: "$.data[0].idxPx" }, ] ];
**Encode the `attestParams`\***
Add the `requests` and the `responseResolves` in the `attestParams`, and then call the `attest()` function.
// add the requests and responseResolves in the attestParams, and then execute the attest() functionconst attestParams = { ...submitTaskParams, ...submitTaskResult, requests, responseResolves,};let attestResult = await primusNetwork.attest(attestParams);
**The Attestation Structure**
The returned attestation contains the `data` field, where the first part of the data are returned from the first request URL, including `btc-high24h` and `btc-idexPx`, and the second part of the data are returned from the second request URL, including `sol-idxPx`.
Attest result: [ { attestation: { recipient: '0x8F0D4188307496926d785fB00E08Ed772f3be890', request: [Array], responseResolves: [Array], data: '{"btc-high24h":"89622.8","btc-high24h.count":"1","btc-idxPx":"89016.4","btc-idxPx.count":"1","sol-idxPx":"126.23","sol-idxPx.count":"1"}', // the verified raw data to be processed attConditions: '', timestamp: 1766377317483, additionParams: '{"algorithmType":"proxytls"}' }, attestor: '0x0de886e31723e64aa72e51977b14475fb66a9f72', signature: '0x3d28a1d67690b625e57e232cfdcb7829e35cee50ac63094c881e5435068d678e7dd7e4f50c0512e198ac90af06d139da27599993e5aa22584207485ade7bc3f71b', reportTxHash: '0xf1ccb79d8a6d7b829ebe7d601a4120da877654dd60bfc119cbac8cc9aa36bc39', taskId: '0x5ea66847c66388c528398e4cf86a7856541a768ab209636306e6af5d149f53ae', attestationTime: 15094, attestorUrl: 'd511b29f688cd0c2d7d9ec3e148e51b63a5390cf-18080.dstack-base-prod7.phala.network' }]
* [The Problem](https://docs.primuslabs.xyz/build/multi-url#the-problem)
* [The Usage in Network-Core-SDK](https://docs.primuslabs.xyz/build/multi-url#the-usage-in-network-core-sdk)
---
# zkTLS Operations | primus
[Skip to main content](https://docs.primuslabs.xyz/build/op#docusaurus_skipToContent_fallback)
On this page

The Issue of Handling Private Data[](https://docs.primuslabs.xyz/build/op#the-issue-of-handling-private-data "Direct link to The Issue of Handling Private Data")
-------------------------------------------------------------------------------------------------------------------------------------------------------------------
Traditional zkTLS algorithms provide data authenticity for applications. In this model, the zkTLS client ultimately receives an attestation from the attestor, where the embedded raw data and its corresponding signature together prove that a zkTLS session was executed correctly and successfully verified by the attestor.
In many scenarios, offering the raw data is not considered as a good option if privacy is preferred. Handling the data computation within the attestation is a proper approach. Primus SDKs offers zkTLS operations to further adapt to the privacy-preserving applications.
Supported zkTLS Operations[](https://docs.primuslabs.xyz/build/op#supported-zktls-operations "Direct link to Supported zkTLS Operations")
-------------------------------------------------------------------------------------------------------------------------------------------
Using comparison operations expressed as boolean conditions within the zkTLS attestation is an effective way to handle private data securely. During attestation generation, various comparison operators can be applied to specific data fields. Each comparison produces a boolean result—true or false—indicating whether the condition is satisfied.
The supported comparison operators within Primus SDKs include:
* '**\>**' (greater than): verifies if the data item is greater than a target value
* '**<**' (less than): verifies if the data item is less than a target value
* '**\=**' (equal to): verifies if the data item is equal to a target value
* '**!=**' (not equal to): verifies if the data item is not equal to a target value
* '**\>=**' (greater than or equal to): verifies if the data item is greater than or equal to a target value
* '**<=**' (less than or equal to): verifies if the data item is less than or equal to a target value
**Hash (SHA256)**
The Primus SDKs also support hashing the proved data to provide strong privacy guarantees with SHA-256 hash functions. This operation ensures that even the attestor cannot learn any details of the proved data, only that the zkTLS session was correctly executed in a black-box manner. The op code is `SHA256`.
**Multiple Hashes (SHA256\_EX)** To hide the multiple data fields within multiple URLs, you can use the extended hash operations instead, where the op code is `SHA256_EX`.
### How to Use the zkTLS Operations in SDKs?[](https://docs.primuslabs.xyz/build/op#how-to-use-the-zktls-operations-in-sdks "Direct link to How to Use the zkTLS Operations in SDKs?")
#### 1\. Network-JS-SDK[](https://docs.primuslabs.xyz/build/op#1-network-js-sdk "Direct link to 1. Network-JS-SDK")
For dapps that build on Primus network and use Network-JS-SDK, the zkTLS operations are supported in the `attConditions` parameter when calling the `attest` function.
| Parameter Name | Type | Required | Description |
| --- | --- | --- | --- |
| `attConditions` | `Array` | No | By default, the SDK retrieves a plaintext verification result. We offer two types of verification logic to accommodate different requirements:
1.Hashed result `const attConditions = [[{field: "YOUR_CUSTOM_DATA_FIELD",op: "SHA256"}]]`
2.Conditions result `const attConditions = [[{field: "YOUR_CUSTOM_DATA_FIELD",op: ">",value: "YOUR_CUSTOM_TARGET_DATA_VALUE"}]]`. |
#### 2\. Network-Core-SDK[](https://docs.primuslabs.xyz/build/op#2-network-core-sdk "Direct link to 2. Network-Core-SDK")
When using Primus Network-Core-SDK, You can simple enable the comparison and hash operations in the zkTLS attestation generation, by the following example code.
// Set Attestation conditionsconst responseResolves = [ [ { ...otherParams, op: ">", value: "YOUR_CUSTOM_TARGET_DATA_VALUE", }, ],];const attestParams = { ...submitTaskParams, ...submitTaskResult, requests, responseResolves,};let attestResult = await primusNetwork.attest(attestParams);
const responseResolves = [ [ { ...otherParams, op: "SHA256", // optional, default is 'REVEAL_STRING', if you want to hide multiple data fields, use `SHA256_EX` op code. }, ],];const attestParams = { ...submitTaskParams, ...submitTaskResult, requests, responseResolves,};let attestResult = await primusNetwork.attest(attestParams);
Comparison with DVC Pattern[](https://docs.primuslabs.xyz/build/op#comparison-with-dvc-pattern "Direct link to Comparison with DVC Pattern")
----------------------------------------------------------------------------------------------------------------------------------------------
zkTLS operations natively support performing data computations directly over the attestation. In contrast, the DVC (Data Verification and Computation) pattern leverages a zkVM to shift the computation into a zkVM circuit. While zkTLS operations offer a level of privacy comparable to DVC, they provide less public verifiability and trustlessness, since the output of a zkVM circuit, namely a SNARK proof, can be publicly verified on-chain. Even so, zkTLS remains an efficient and architecturally simple approach for enabling application-level privacy.
* [The Issue of Handling Private Data](https://docs.primuslabs.xyz/build/op#the-issue-of-handling-private-data)
* [Supported zkTLS Operations](https://docs.primuslabs.xyz/build/op#supported-zktls-operations)
* [How to Use the zkTLS Operations in SDKs?](https://docs.primuslabs.xyz/build/op#how-to-use-the-zktls-operations-in-sdks)
* [1\. Network-JS-SDK](https://docs.primuslabs.xyz/build/op#1-network-js-sdk)
* [2\. Network-Core-SDK](https://docs.primuslabs.xyz/build/op#2-network-core-sdk)
* [Comparison with DVC Pattern](https://docs.primuslabs.xyz/build/op#comparison-with-dvc-pattern)
---
# Overview | primus
[Skip to main content](https://docs.primuslabs.xyz/build/overview#docusaurus_skipToContent_fallback)
On this page

Overview[](https://docs.primuslabs.xyz/build/overview#overview "Direct link to Overview")
-------------------------------------------------------------------------------------------
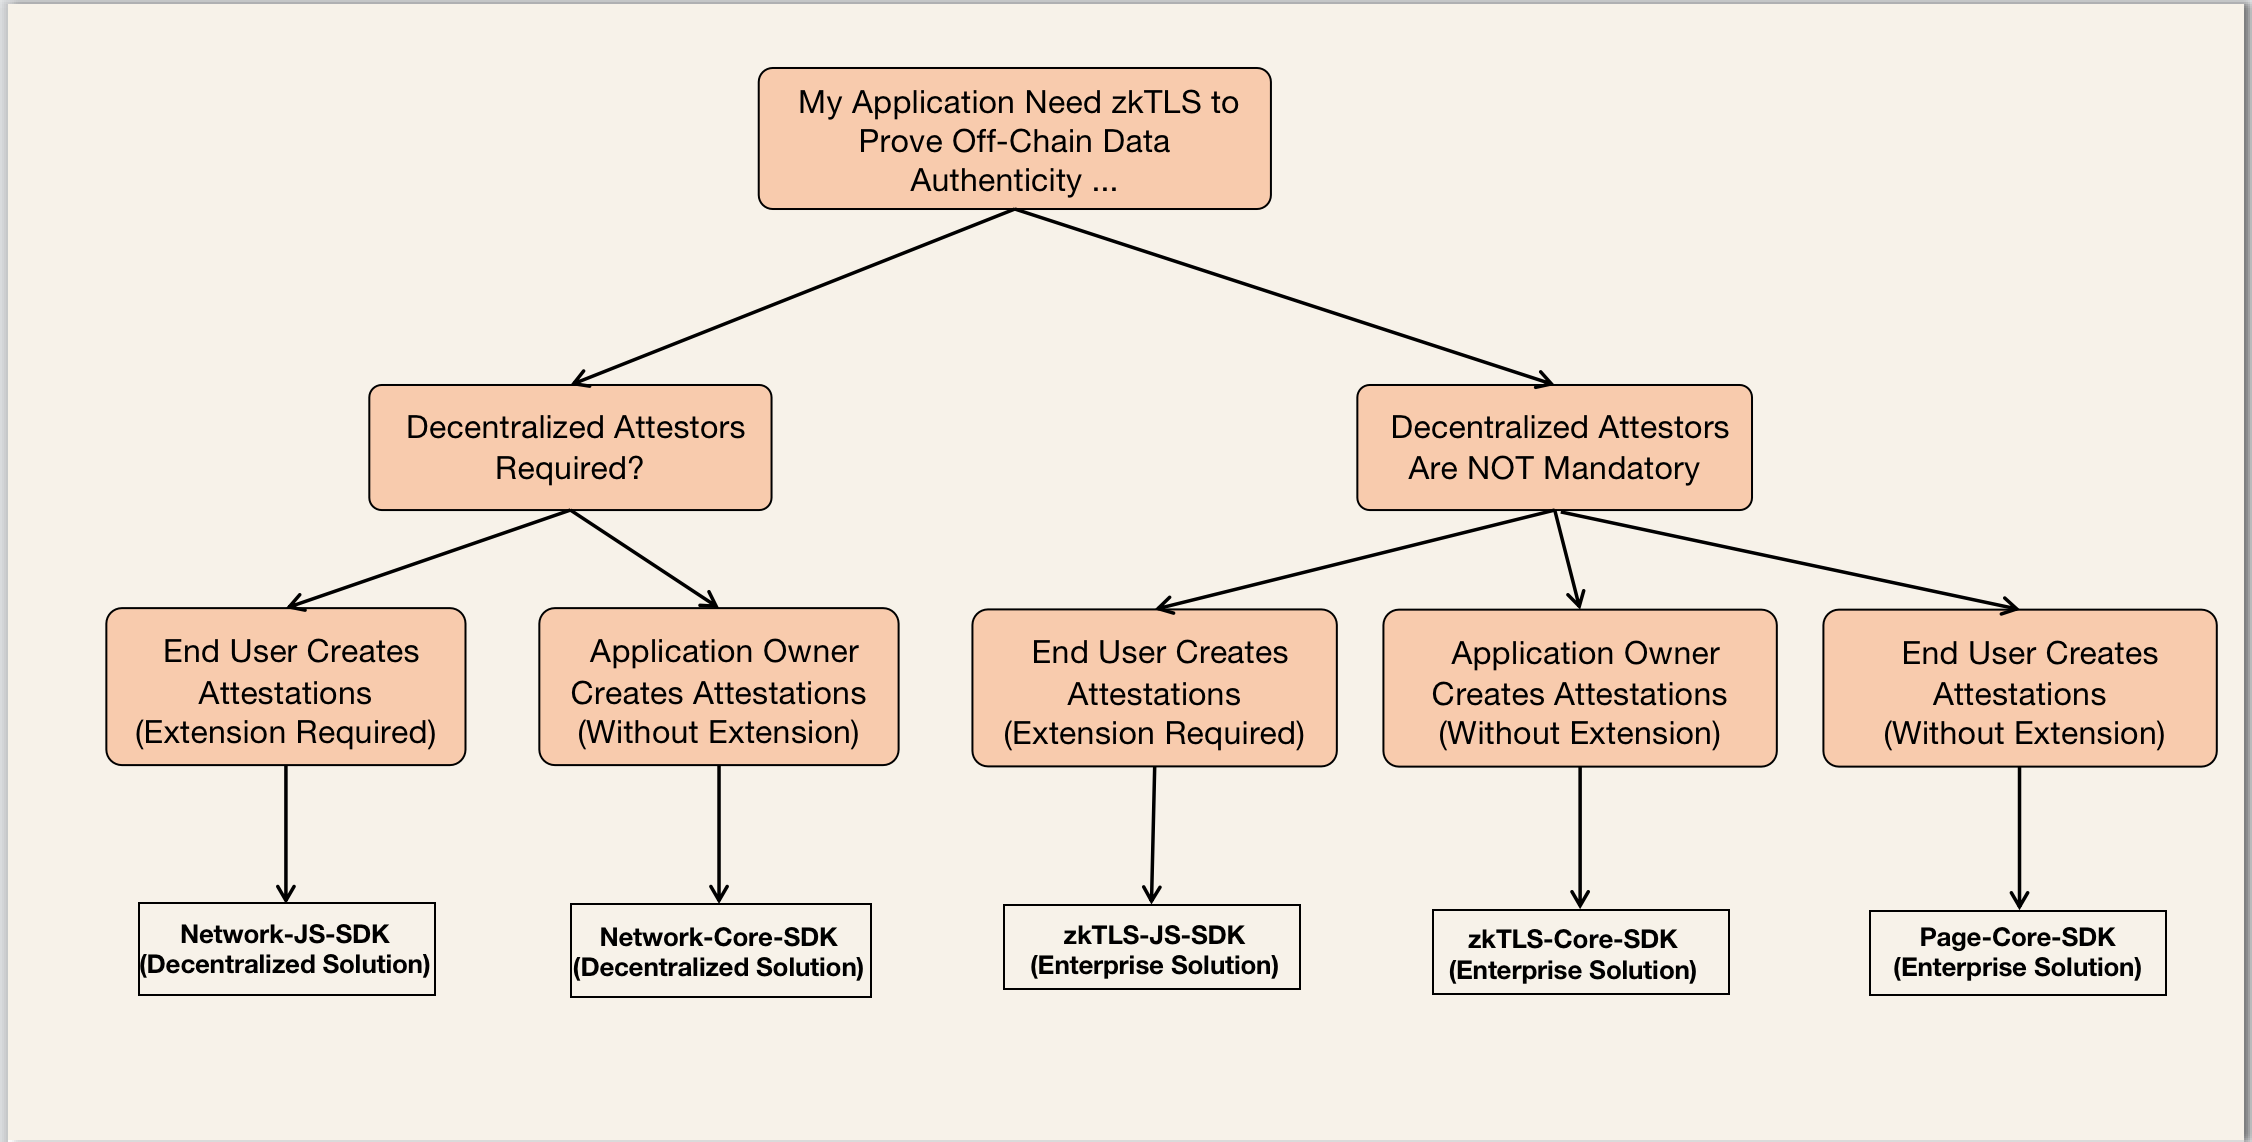
Here we'll explain about how to create off-data verification applications with **Primus Network SDKs**. Note all applications using Primus network SDKs are interacted with Primus Network, a.k.a., decentralized attestors, where the attestations are generated in a decentralized process with a high hardware security level. Please note Primus Labs also offers [zkTLS enterprise solutions](https://docs.primuslabs.xyz/enterprise/zk-tls-sdk/overview)
and [Lightweight Web SDK](https://docs.primuslabs.xyz/enterprise/page-sdk/overview)
for different use cases and requirements, particularly for builders where decentralization is not a mandatory requirement.
With the vision of creating a decentralized data verification and computation network, Primus Labs provides two types of Network SDKs for different applications to leverage the zkTLS capability from the network attestors.
* For web-based applications, we recommend to use the **Network-JS-SDK** (see the [DApp Integration Guide](https://docs.primuslabs.xyz/build/for-dapp/example)
). This is the most straightforward tool that allows end users to create zkTLS attestations through this SDK. Note the end user is required to install [Primus extension](https://docs.primuslabs.xyz/build/primus-extension/overview)
to perform the zkTLS session with the network attestor.
* For backend integration of zkTLS features, we recommend to use the **Network-Core-SDK** (see the [Backend Integration Guide](https://docs.primuslabs.xyz/build/for-backend/simpleexample)
). Note in the backend integration situation, the developer usually proves their off-chain data in their built application, and the Primus extension is not required. Typical scenarios include proof of reserves, in which a configured web page periodically proves that the stablecoin issuer holds sufficient collateral across off-chain platforms.
How to Choose The Correct Primus SDK?[](https://docs.primuslabs.xyz/build/overview#how-to-choose-the-correct-primus-sdk "Direct link to How to Choose The Correct Primus SDK?")
---------------------------------------------------------------------------------------------------------------------------------------------------------------------------------
* [Overview](https://docs.primuslabs.xyz/build/overview#overview)
* [How to Choose The Correct Primus SDK?](https://docs.primuslabs.xyz/build/overview#how-to-choose-the-correct-primus-sdk)
---
# Connect data source | primus
[Skip to main content](https://docs.primuslabs.xyz/build/primus-extension/extension-walkthrough/connect-data-source#docusaurus_skipToContent_fallback)
Connect data source
===================
The browser extension is a wholly user-controlled application. It provides the easiest way to access and fetch your data from various websites, such as social connections or assets information (with your login permission). You'll find easy access points on both the Home page and the Data Source page.
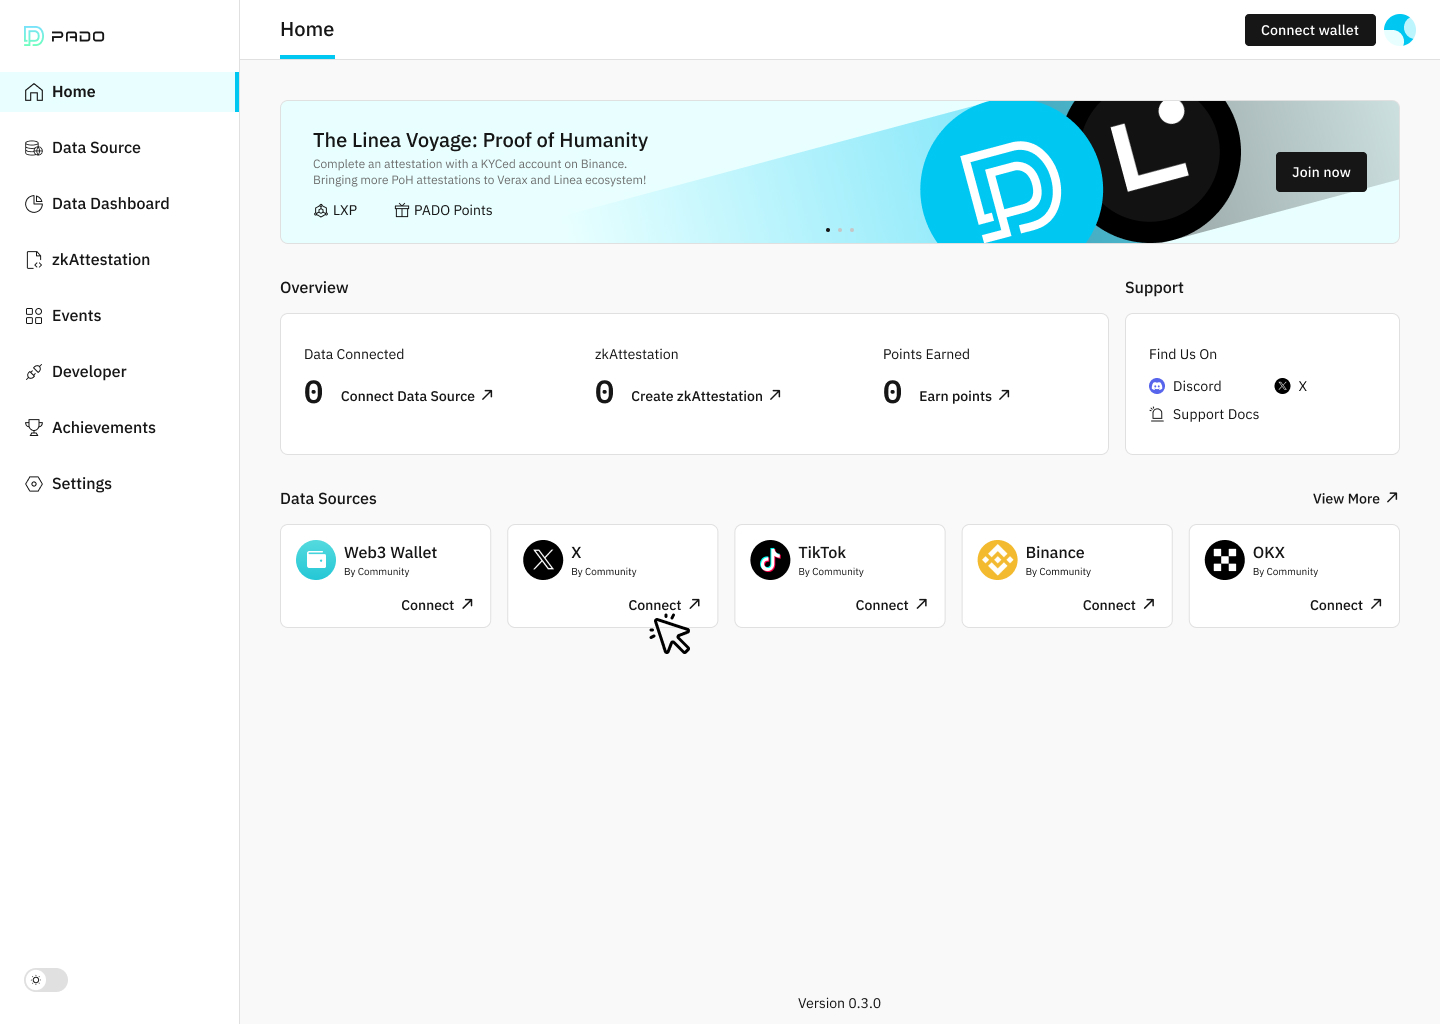
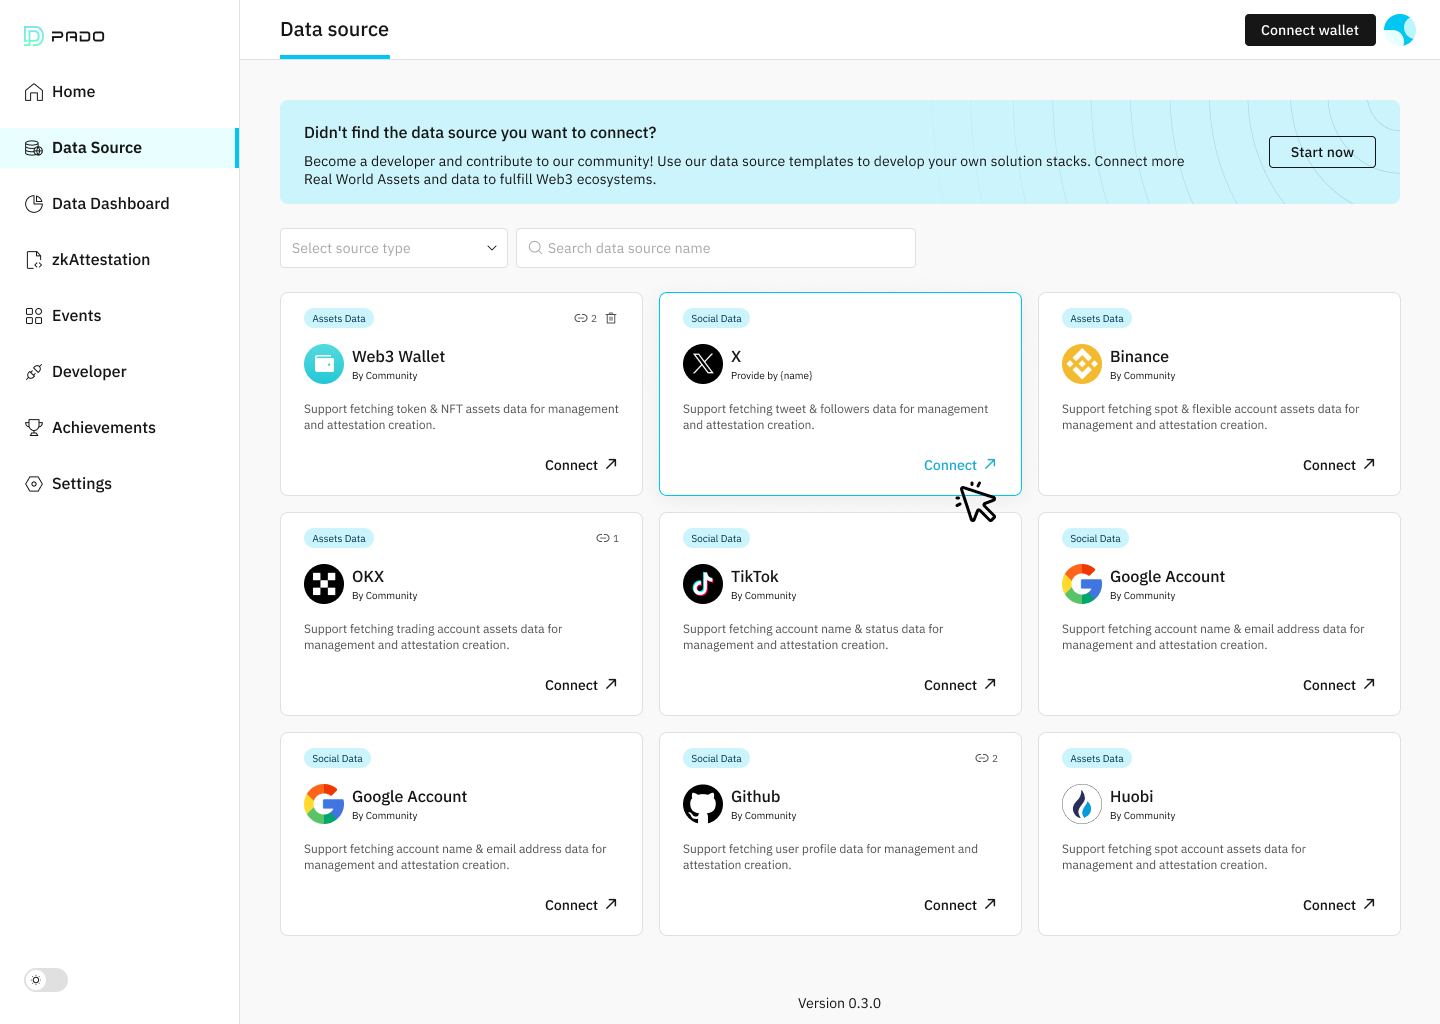
Clicking on a data source card takes you to the website's login page. Once you log in, a confirmation window will appear in the bottom right corner. Clicking "confirm" initiates the data fetching process, which happens entirely locally on your device. Primus servers are not involved in this process. The data is fetched directly to your locally installed extension. Remember, deleting the browser extension also removes the fetched data, as it's stored locally and cannot be recovered.

Once you've connected and fetched data, you can view and manage it in the details page. This includes deleting individual data points at any time. For data sources that support attestation, the details page offers a "Create attestation" section for easy creation.
It's important to note that data connections rely on your website login session. If your session expires, a red info icon will appear on the data source card. To ensure real-time data updates, simply reconnect through the source again.
---
# Create attestations | primus
[Skip to main content](https://docs.primuslabs.xyz/build/primus-extension/extension-walkthrough/create-attestations#docusaurus_skipToContent_fallback)
Create attestations
===================
The attestation page lets you create different attestations about your data. Currently supports:
* Asset Verification: Attest your asset balance or token holdings on an exchange.
* Humanity Verification: Attest your KYC completion status on an exchange or ownership of a social media account.
* Social Connections: Attest your followers number from social media.
To create attestations on the attestation page, you'll need a web3 wallet. The connected wallet address will be used to generate your attestation and act as your ID for web3 projects to verify if you meet their attestation requirements.
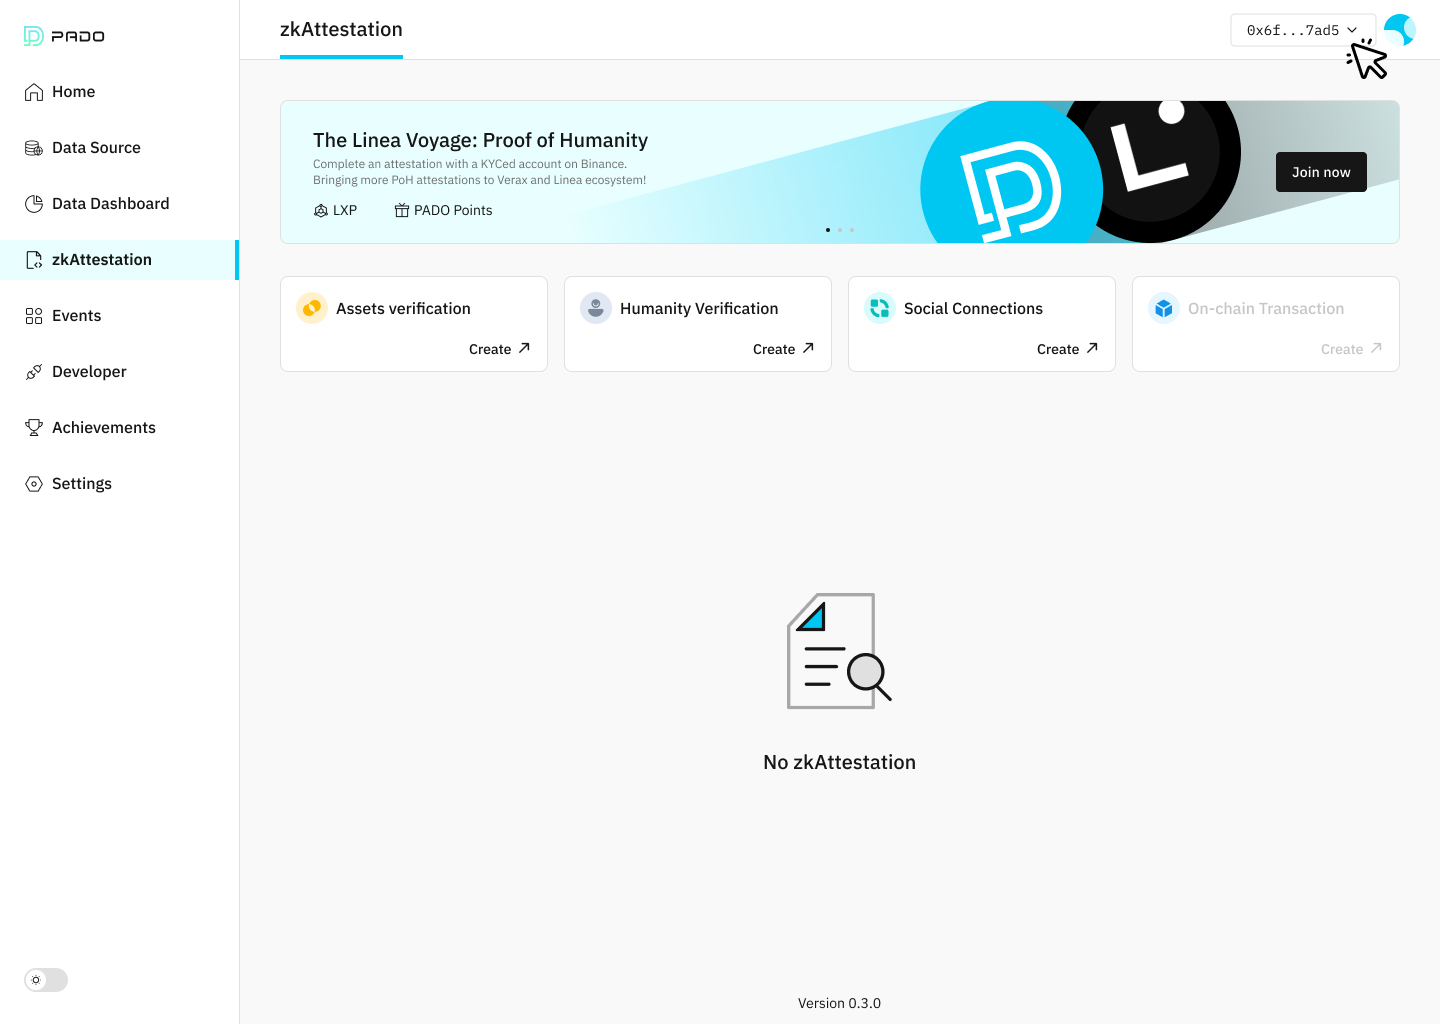
All attestations leverage MPC-TLS and ZKP techniques to ensure your data remains anonymous and up-to-date throughout the process. Creating attestation relies on the network situation, so a good internet connection is recommended. If you encounter any error messages (e.g., connection issues, data format errors), feel free to check our FAQ content or reach out to us on Discord chanel for assistance.

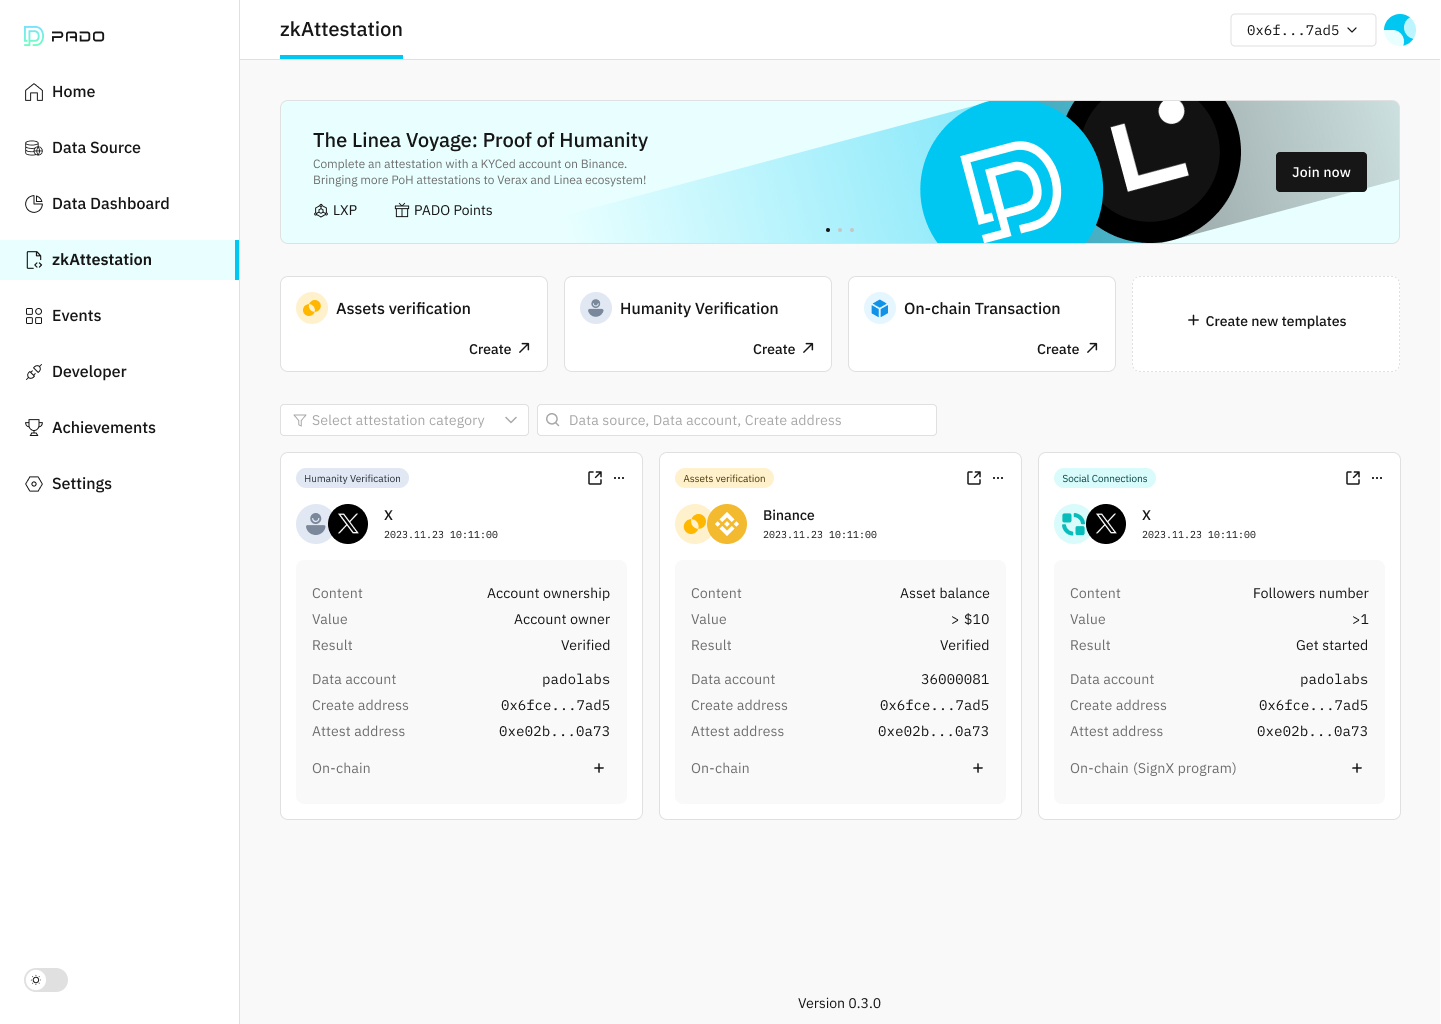
After completing an attestation, a successful attestation result card will appear on the attestation page. This card displays details about your attestation:
* Attested information: Specific details verified during the attestation process (e.g., asset balance, followers count).
* Attest data source account: The account associated with the data source you connected.
* Created wallet address: The web3 wallet address used to generate your attestation.
* Attest address: The attestation issuer’s address.
---
# Earn achievements | primus
[Skip to main content](https://docs.primuslabs.xyz/build/primus-extension/extension-walkthrough/earn-achievements#docusaurus_skipToContent_fallback)
Earn achievements
=================
Primus's reward points program launches with this version! Earn rewards by completing tasks listed on the Achievements page. The more you participate, the more you can achieve.
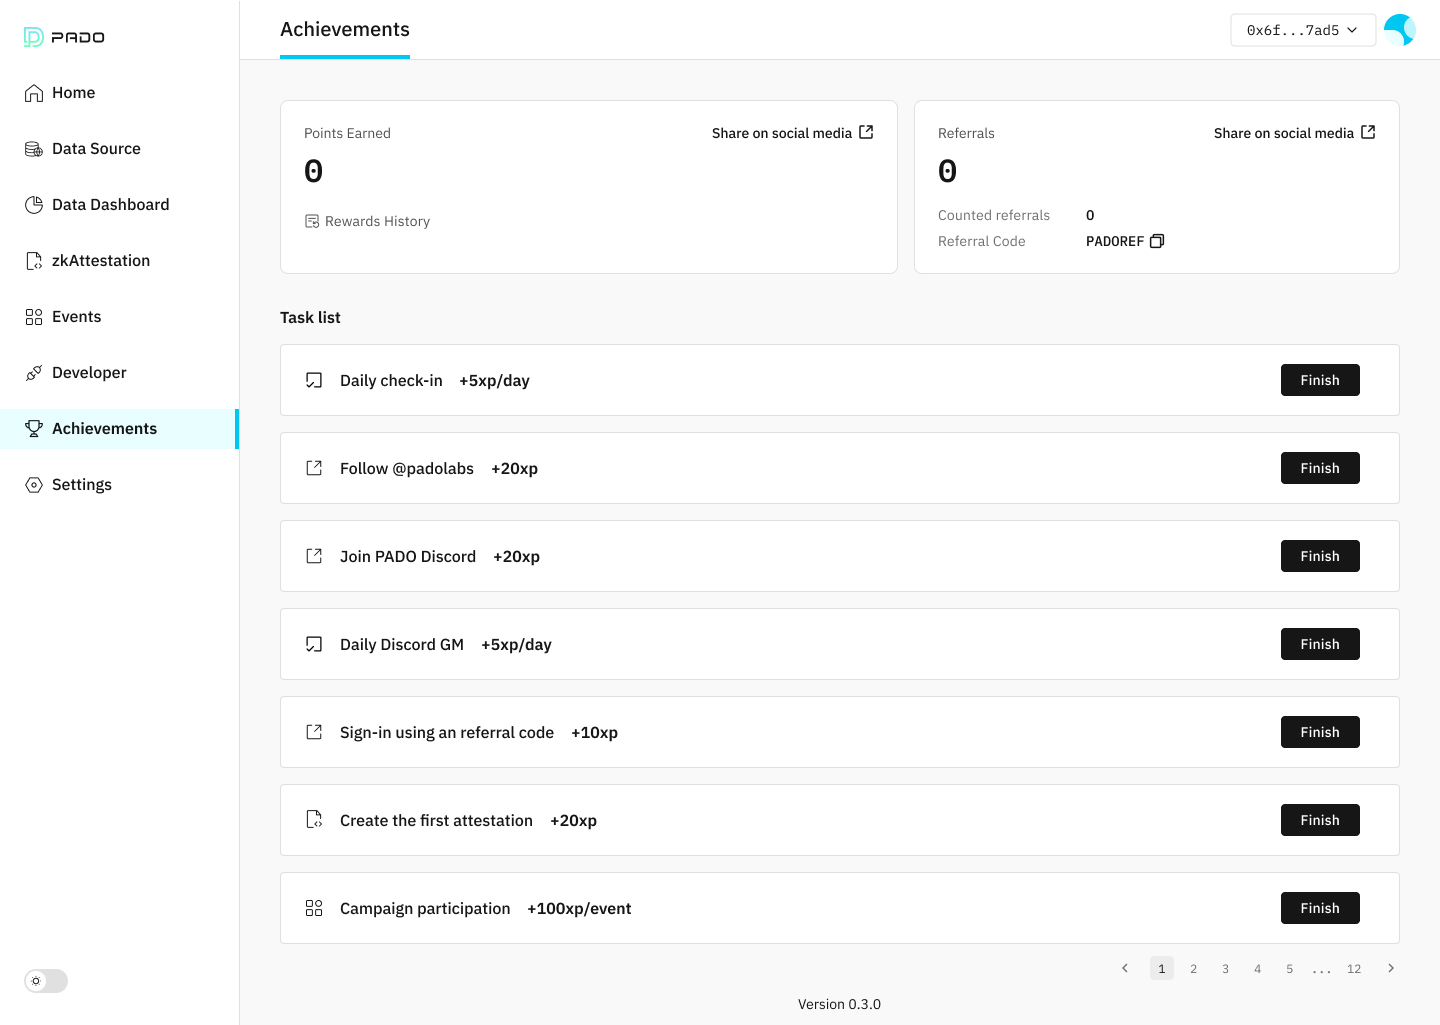
No worries if you switch computers or browsers! Simply connect the same web3 wallet (the address is shown in the Settings page as your Account) to your new Primus browser extension. Your points and completed tasks will automatically sync, so you can pick up right where you left off!
All your earned points are displayed in detail within the Achievements page's rewards history.
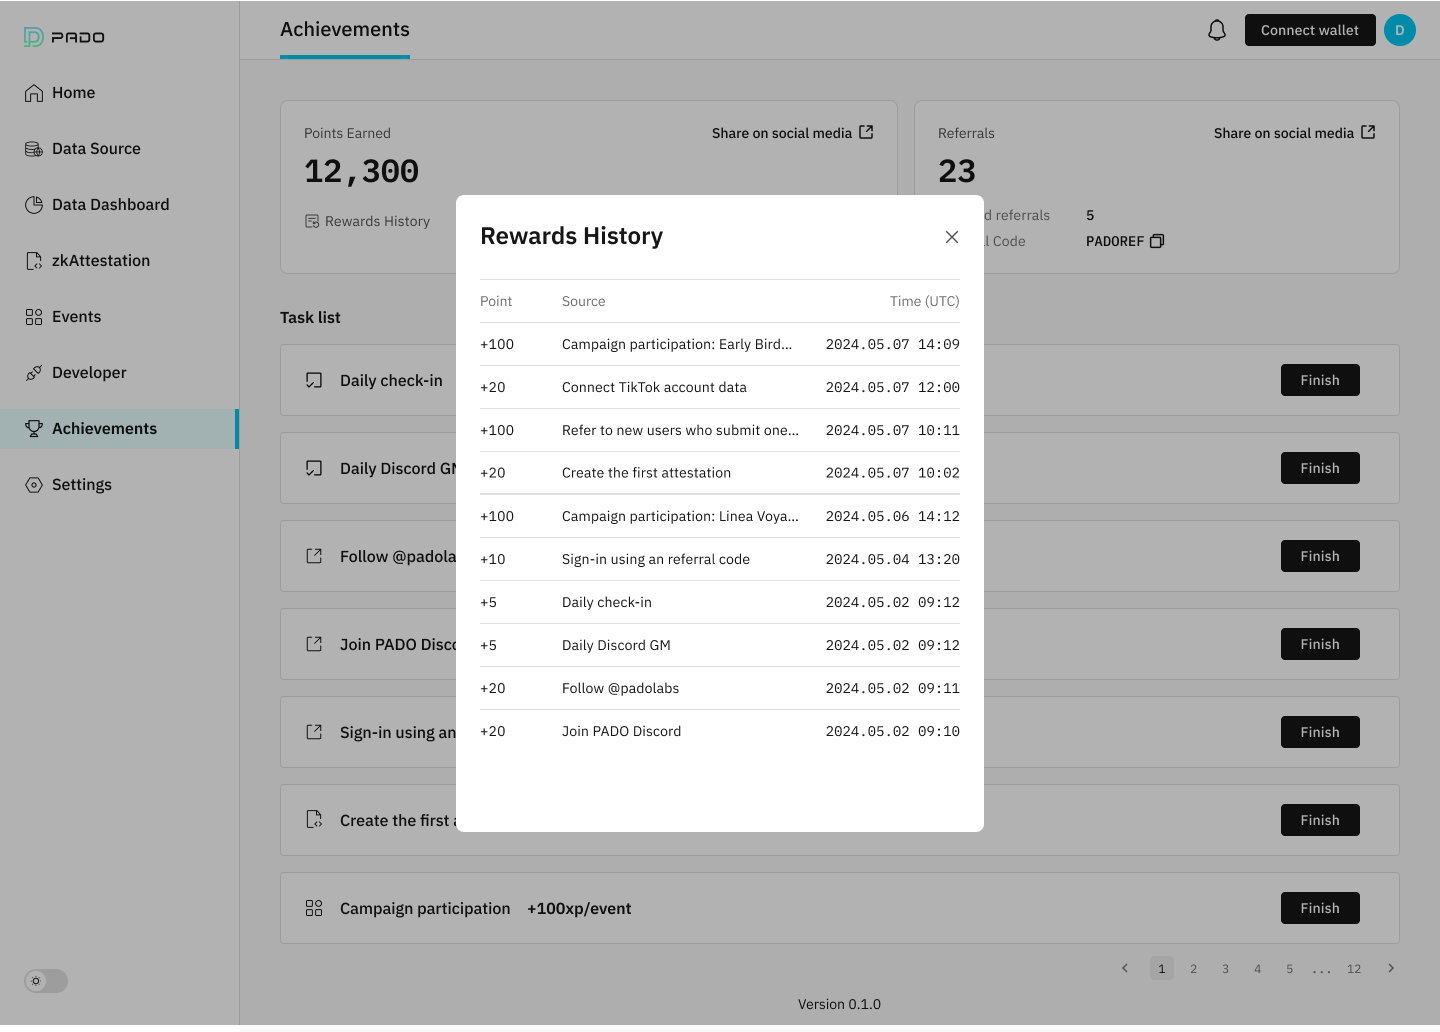
Here's how you earn points for attestations and campaigns:
* Submitted attestations: Primus records attestations submitted to Linea, Scroll, or Arbitrum blockchains after April 1, 2024.
* Campaign participation:
* This update automatically tracks points for three events you've already completed: Lucky Draw, Scroll zkAttestation, and Early Bird NFT Rewards. If you participated in any of these events using your connected wallet, you'll receive points after clicking the "Campaign Participation" task.
* For other events, we're still working on integrating activity tracking from smart contracts. We'll announce progress and award points for those events soon.
---
# Participate events | primus
[Skip to main content](https://docs.primuslabs.xyz/build/primus-extension/extension-walkthrough/participate-events#docusaurus_skipToContent_fallback)
Participate events
==================
Primus has several on-going attestation campaigns for you to participate in and earn rewards. Head over to the Events page to discover current campaigns and start earning.
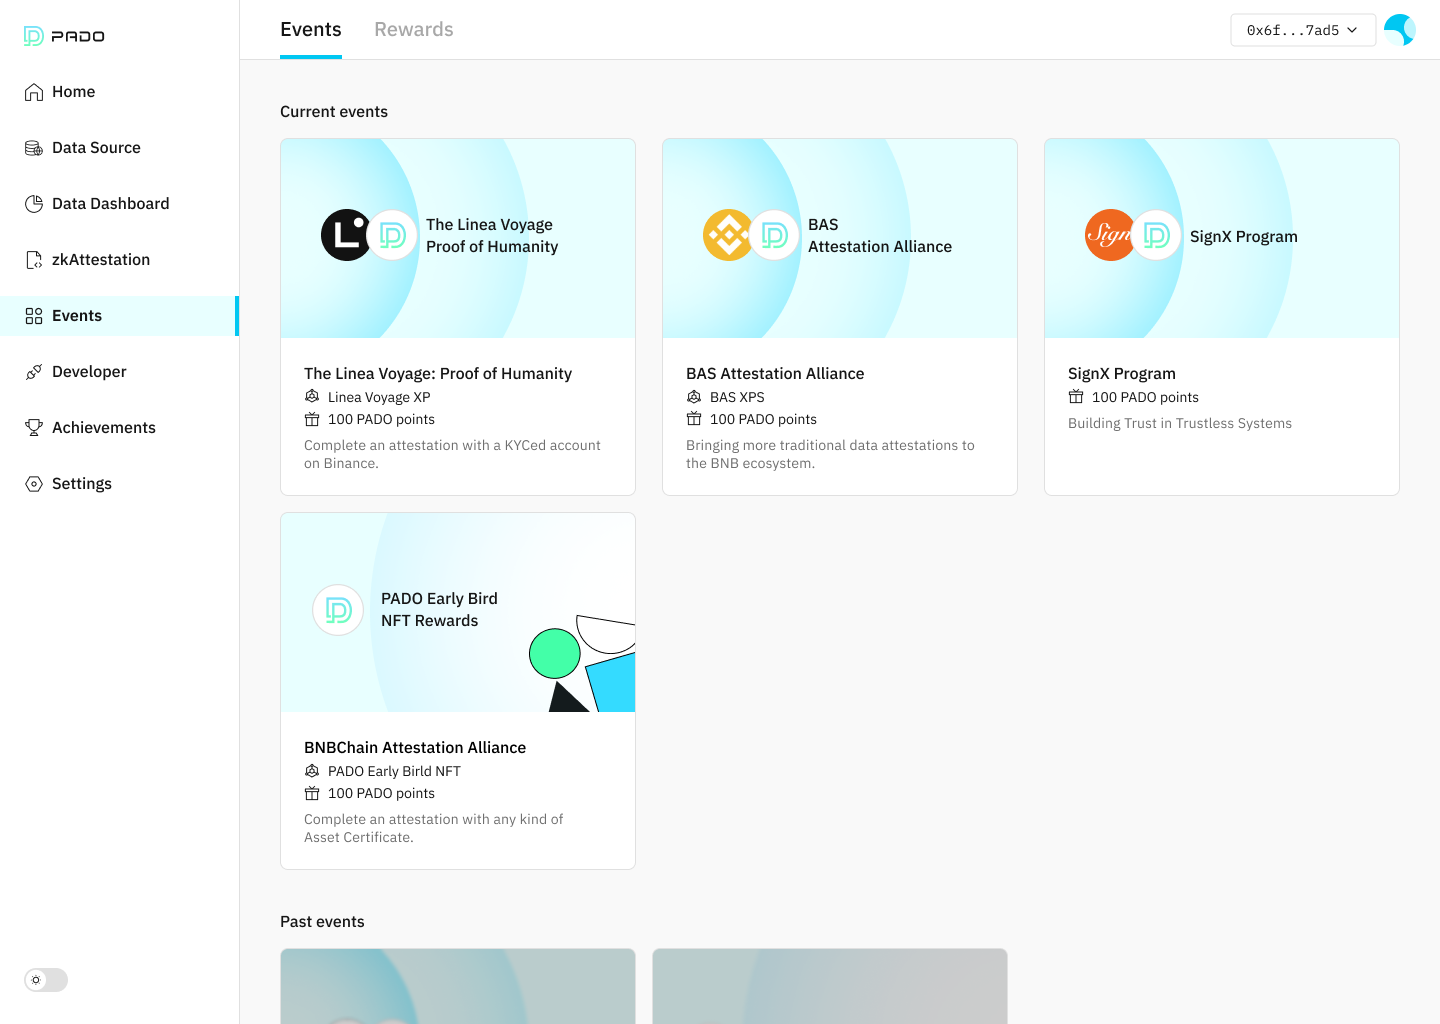
Click into each campaign, you will find detailed tasks and should complete in succession. Take the **Linea Voyage Campaign** as an example:
**Task 1** : Follow Primus social media.
* In this task, you have to follow Primus’s twitter account and join the Primus Discord server, all of this is a must.

**Task 2** : Complete an attestation with a KYC verified account on Binance.
* As demanded by the Linea, this task will links your connected wallet address to the KYCed Binance account used as a uniqueness requirements.

**Task 3** : Submit to Linea.
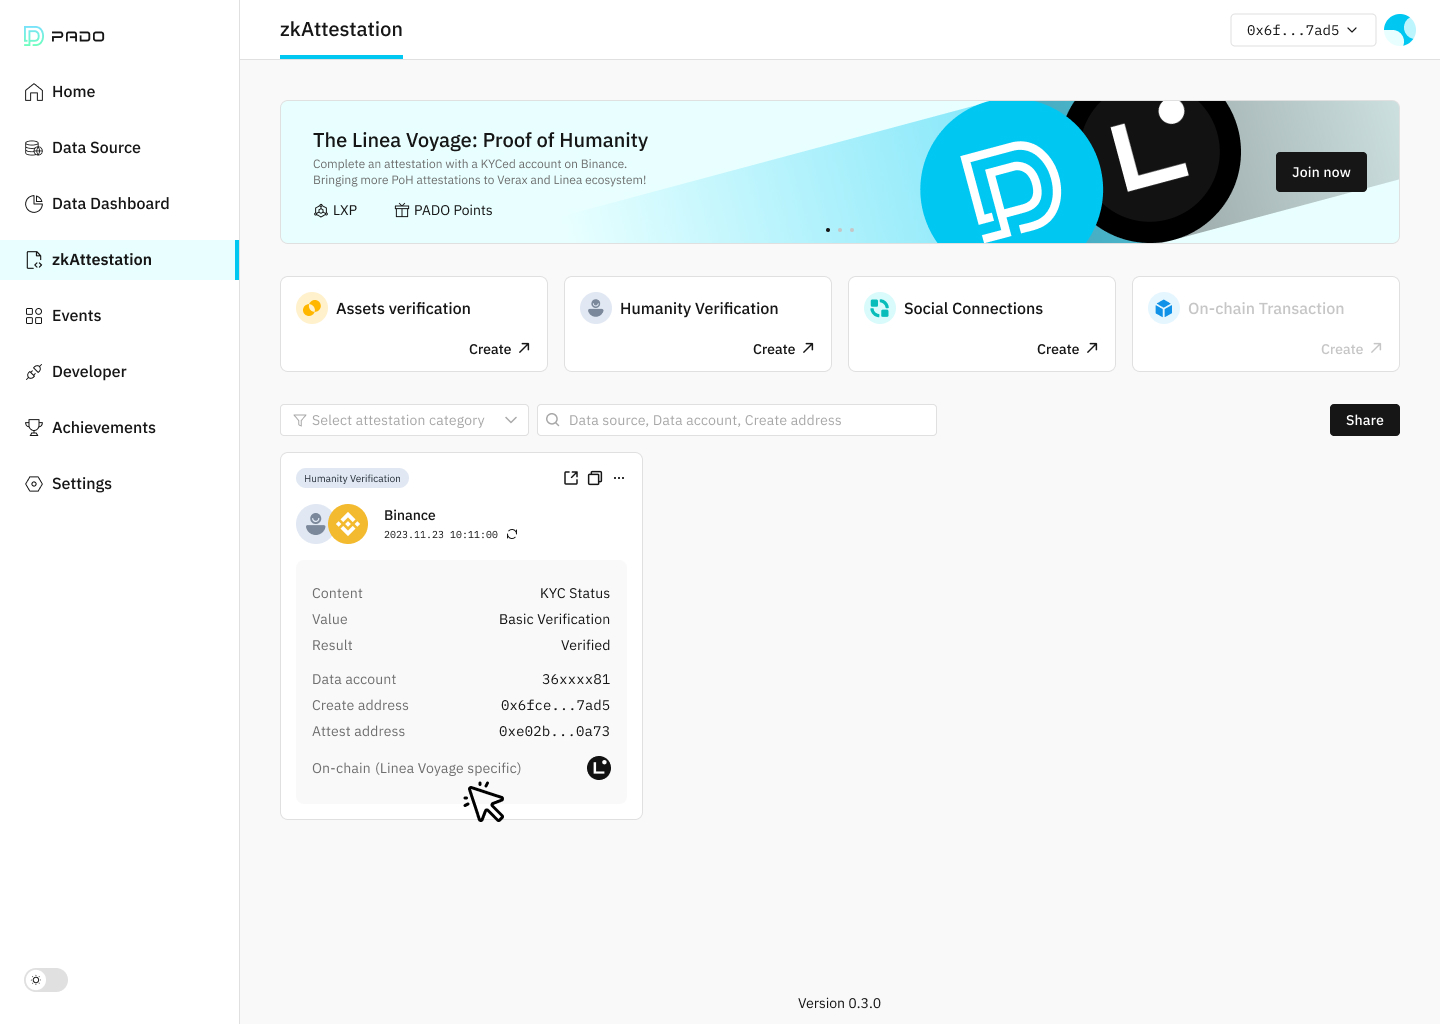
* By clicking submit to Linea, the extension will activate your MetaMask wallet to switch to the Linea mainnet (if needed) and submit a transaction. This might involve signing a confirmation in your MetaMask wallet.
* After successful submission, you will see an attestation card in the attestation page with a Linea icon and an event tag on the lower right corner.
* **Important**: Make sure you complete this event through the Events page or through the events banner. Otherwise, your attestation will not be correctly tagged and verified by Linea.
**Task 4** : Check status on Linea event page.
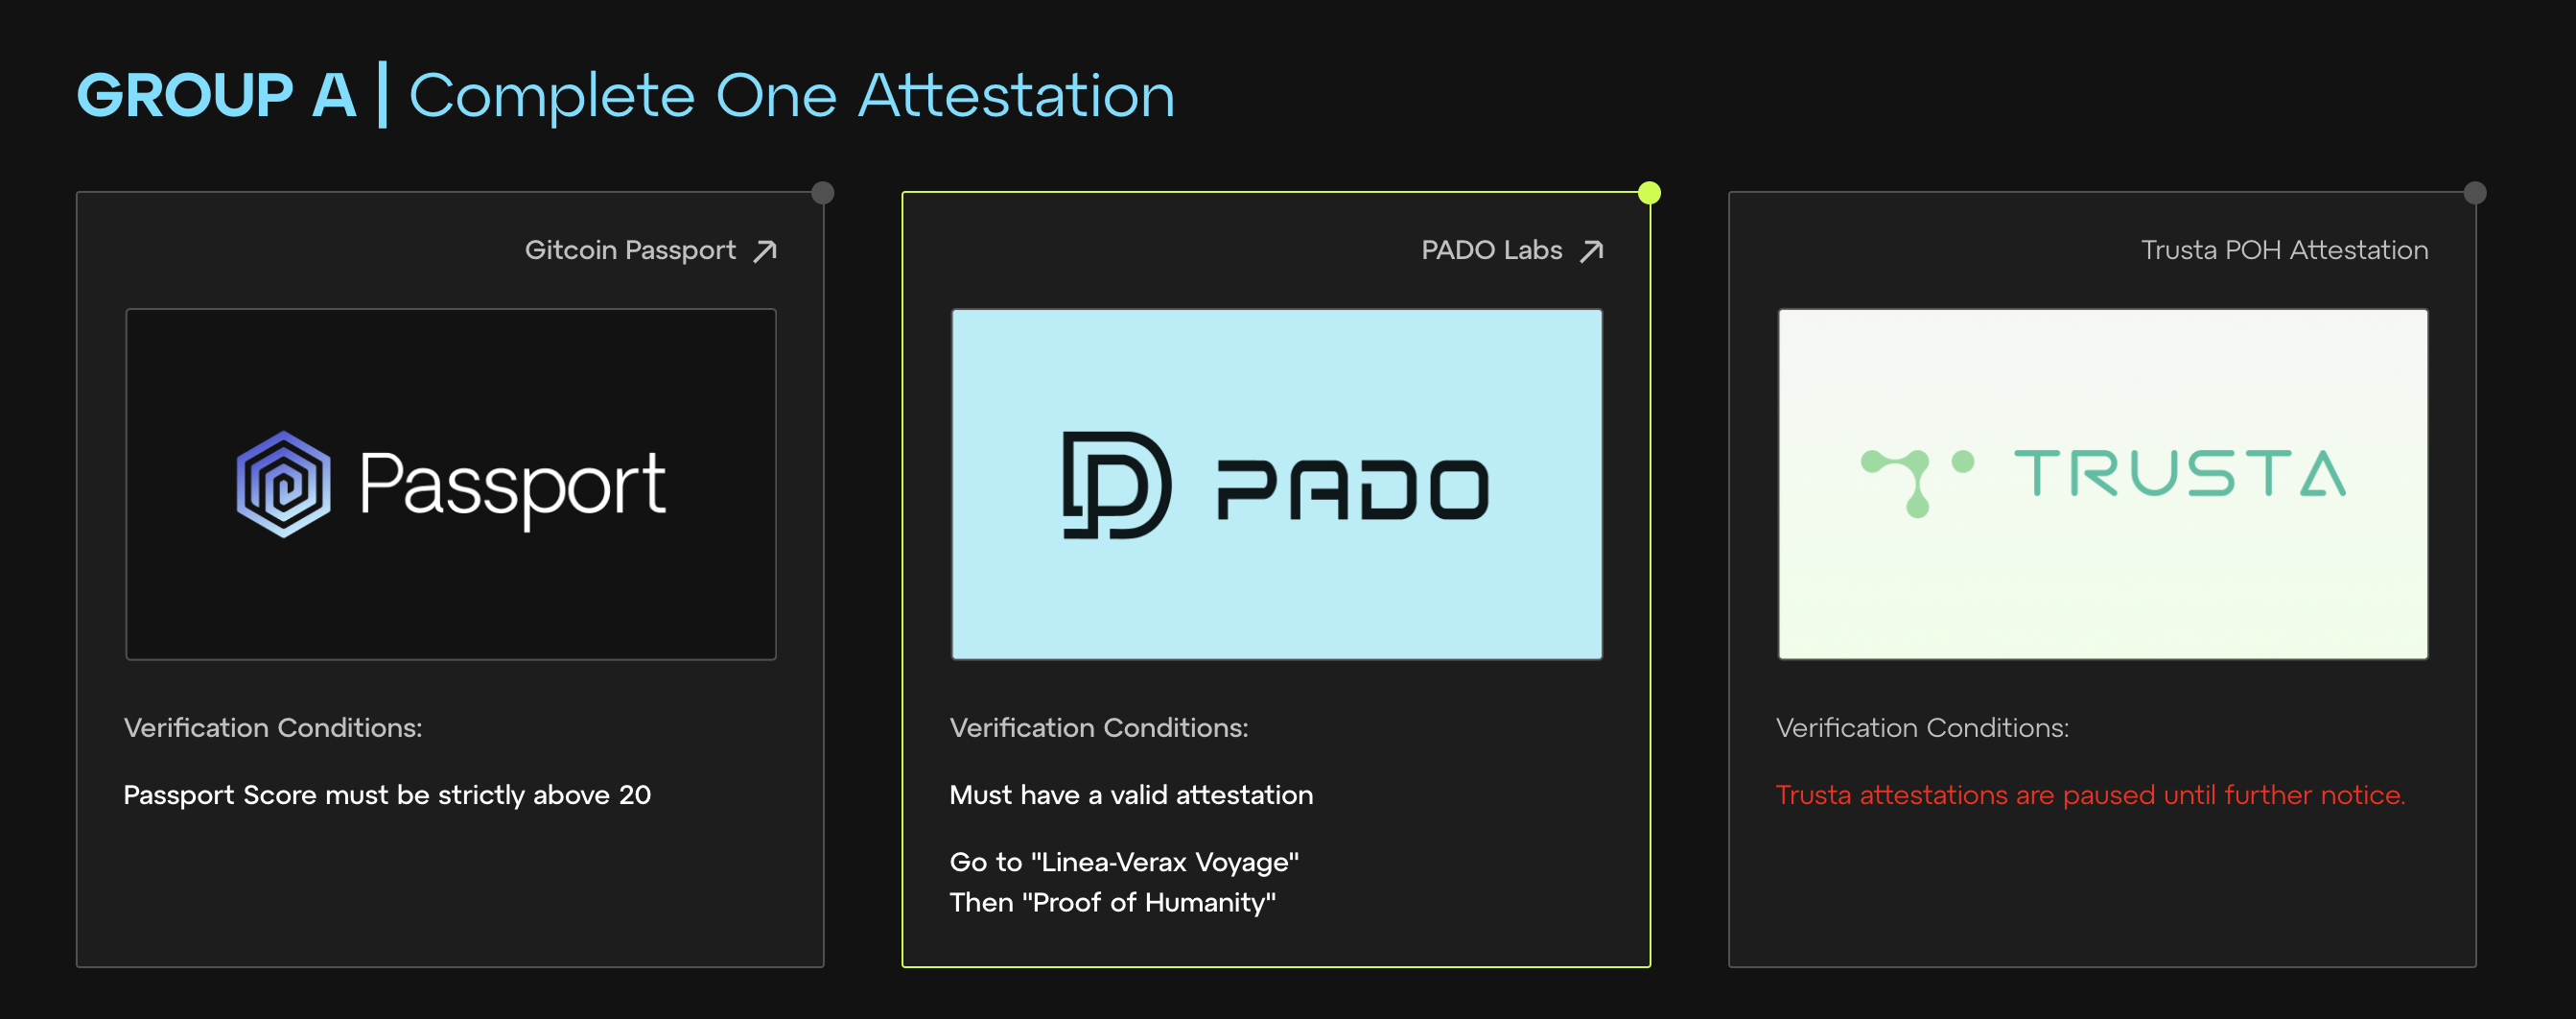
* This task will direct you to the Linea PoH event page("poh.linea.build").
* If you connect the same wallet used on the extension, you will see a green checkmark around the PADO card.
* **Note**: Completing additional 2 tasks in Group B on the Linea PoH event page is required to fully participate in the Linea PoH campaign.
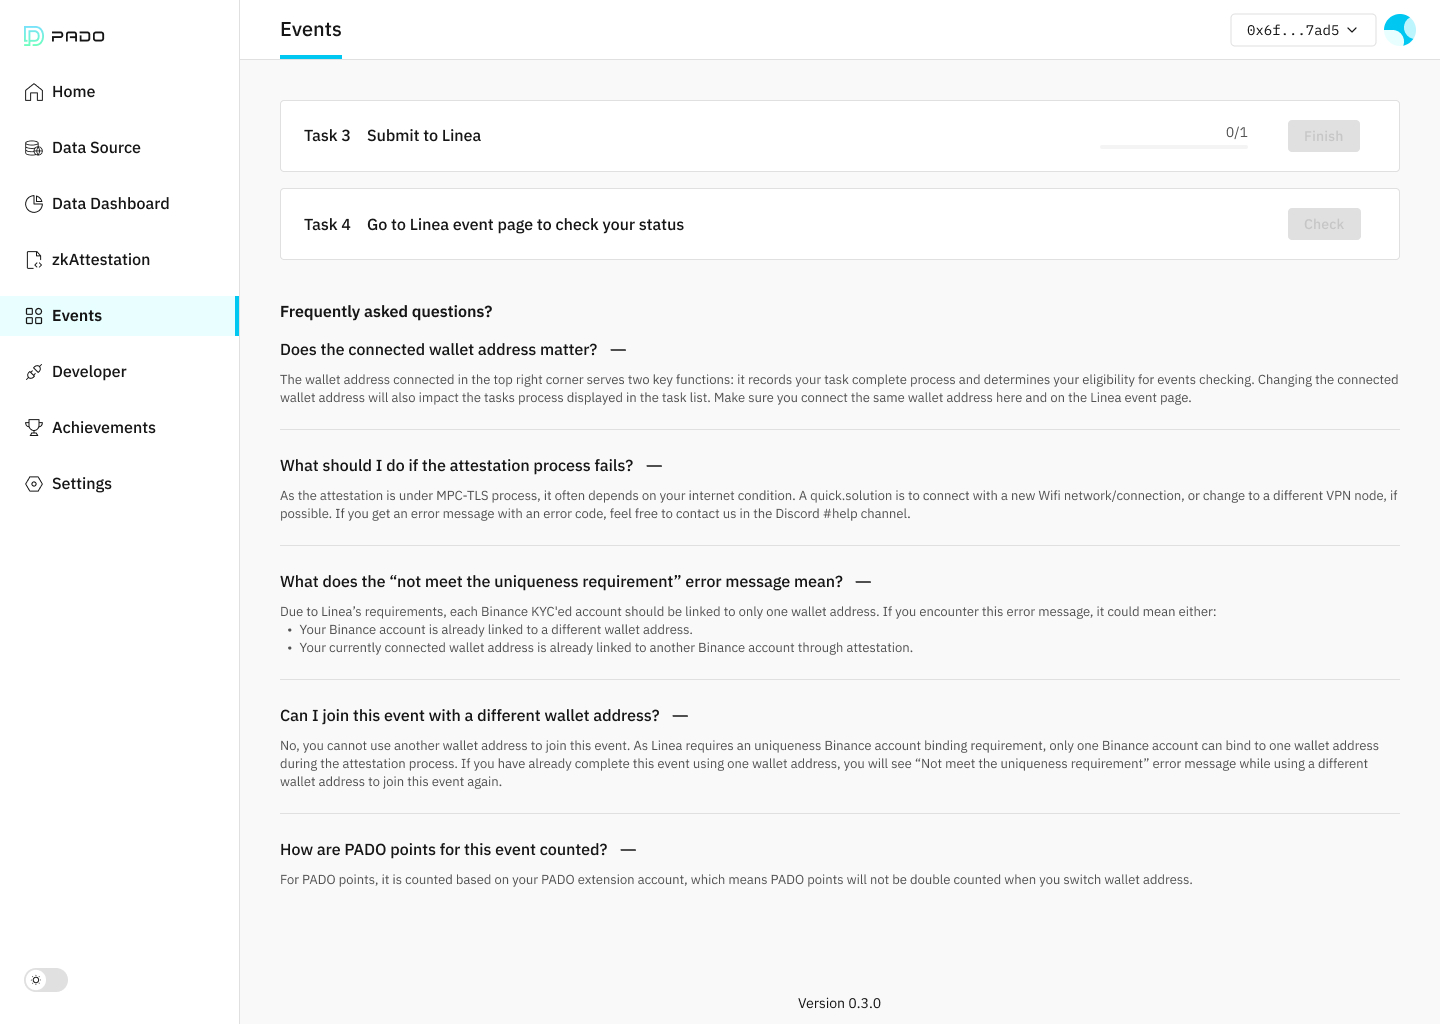
For any questions, you can refer to the "Frequently Asked Questions" section at the bottom of the page.
---
# Manage data | primus
[Skip to main content](https://docs.primuslabs.xyz/build/primus-extension/extension-walkthrough/manage-data#docusaurus_skipToContent_fallback)
Manage data
===========
Your data, your control. Everything you do within the PADO extension stays on your computer only, for maximum privacy and control over your information. Easily manage and delete your connected data whenever you want.

Unsubmitted attestations are stored locally and won't be available after deletion.

---
# Data dashboard | primus
[Skip to main content](https://docs.primuslabs.xyz/build/primus-extension/extension-walkthrough/data-dashboard#docusaurus_skipToContent_fallback)
Data dashboard
==============
A highlight feature of the browser extension is the data analysis dashboard. It provides an aggregate view, allowing you to clearly and efficiently track changes in your connected assets and social data on a single page.
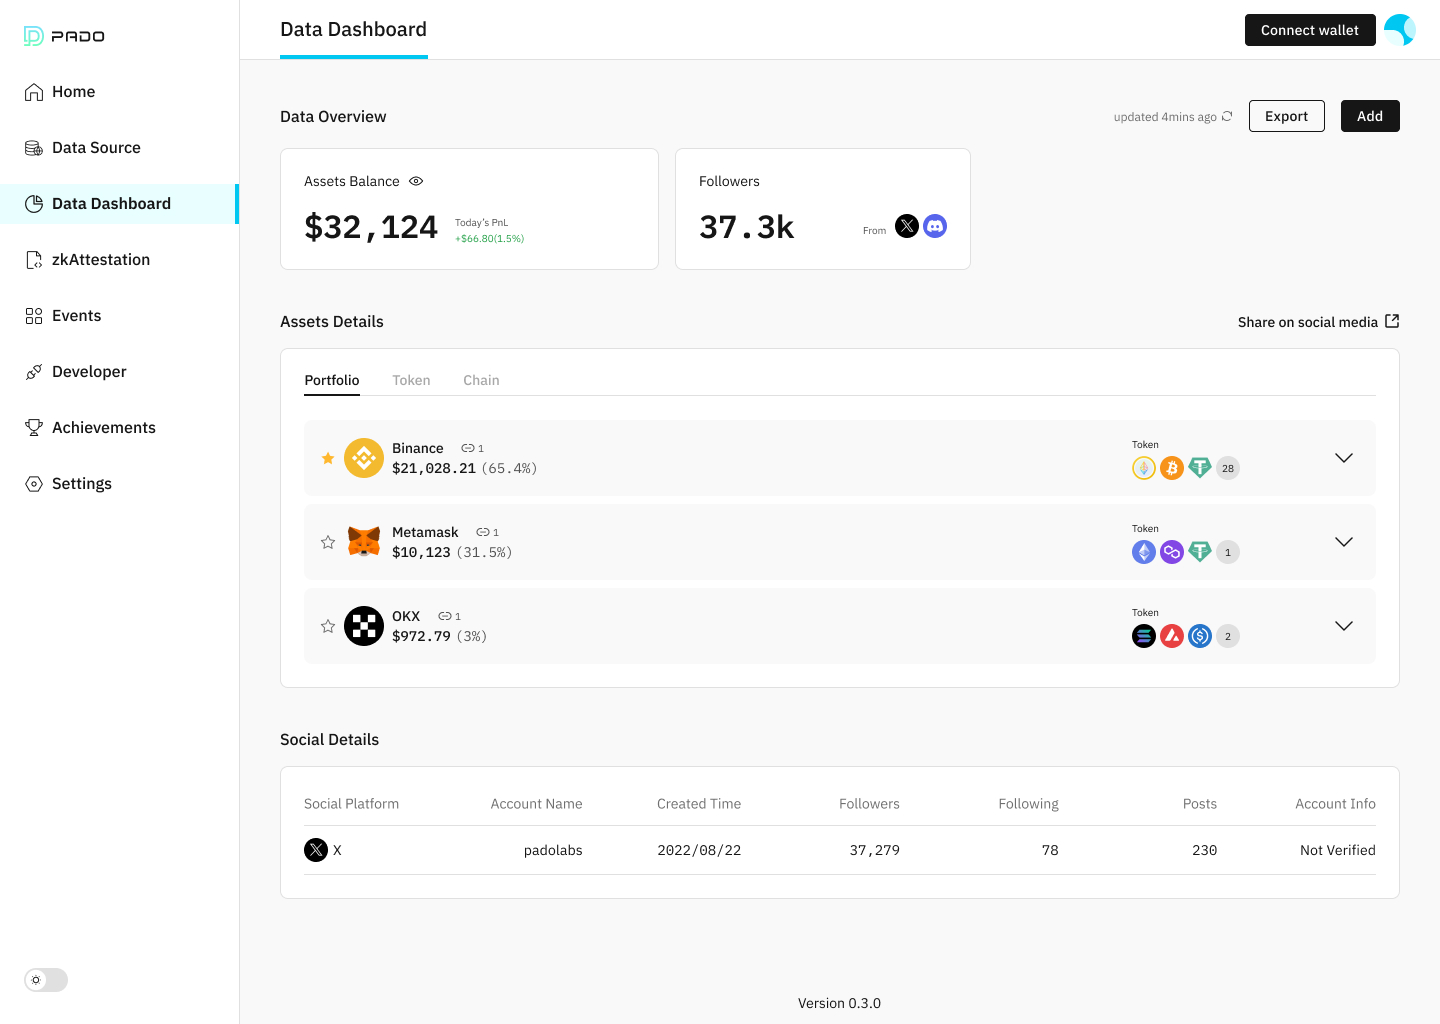
The Dashboard page offers a categorized data inventory, providing a in-time overview of all your connected data and categorized by type.
In the “Assets Details” part, You can easily understand your asset status through portfolio distribution, token distribution, and on-chain asset distribution. All data will be updated every 5 minutes.

The 0.3.0 and above version connects to a wide range of 12 different asset and social data sources, allowing you to manage all your data in one convenient location! Can't find the one you need? Contact us and become a developer to contribute to our upcoming Developer Platform and help us expand the possibilities!
---
# Settings | primus
[Skip to main content](https://docs.primuslabs.xyz/build/primus-extension/extension-walkthrough/settings#docusaurus_skipToContent_fallback)
Settings
========
The Settings page lets you customize your preferences:
* Asset Currency: Choose your preferred currency to view your asset values. (USD is currently selected).
* Data Refresh Rate: Set how often your data updates to keep your information fresh. (10 minutes is currently selected).
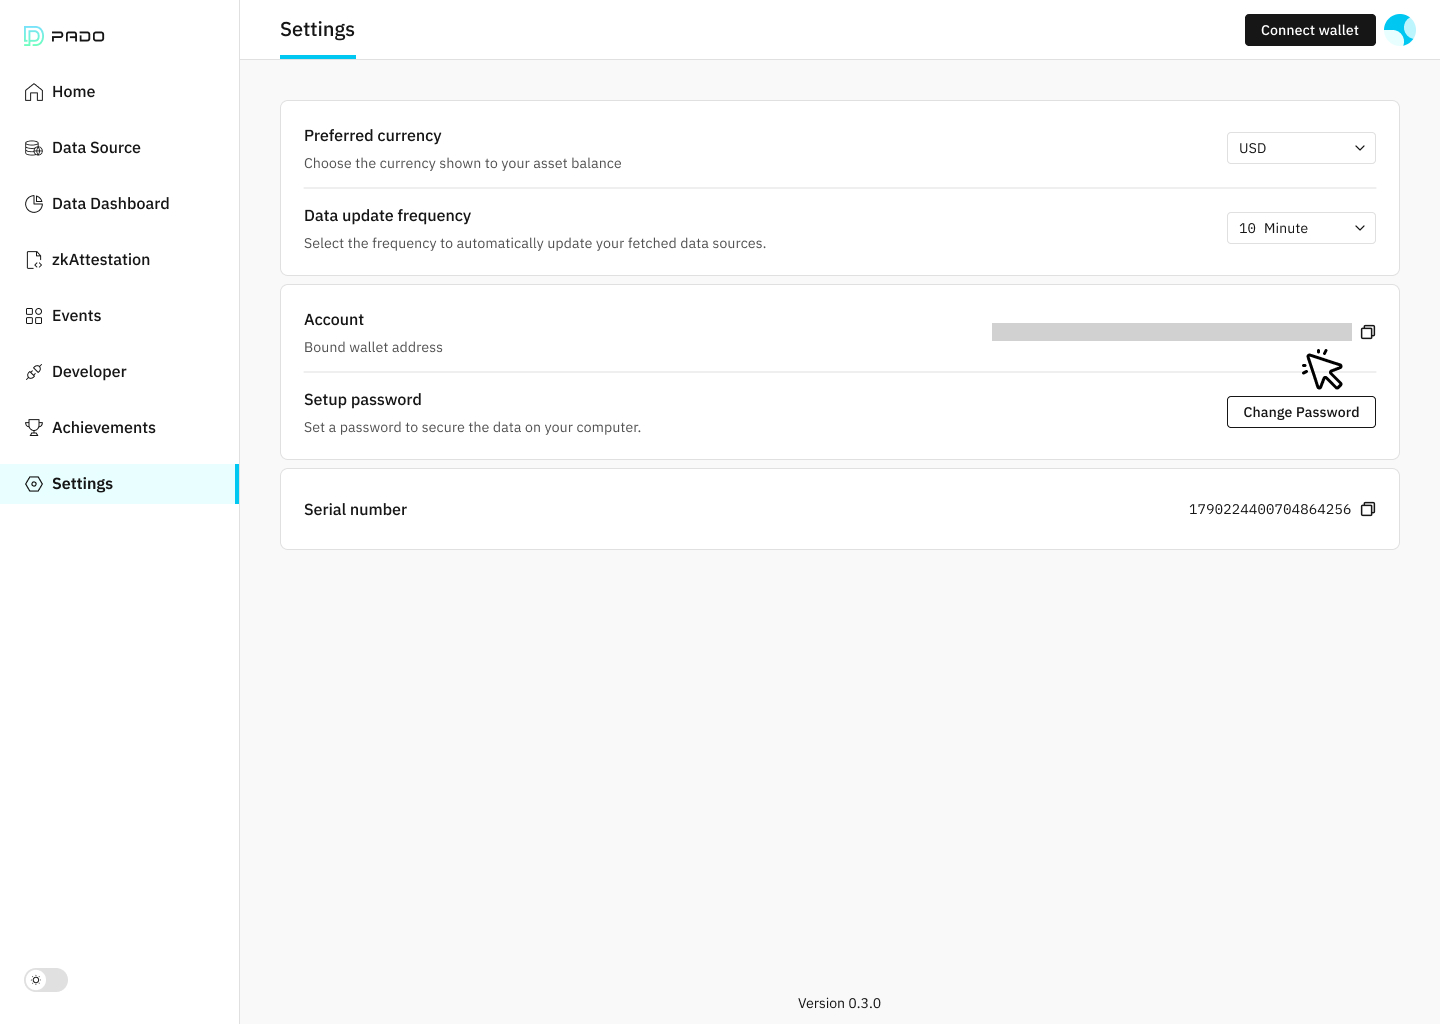
* Password Management: Set or change your password for secure access.
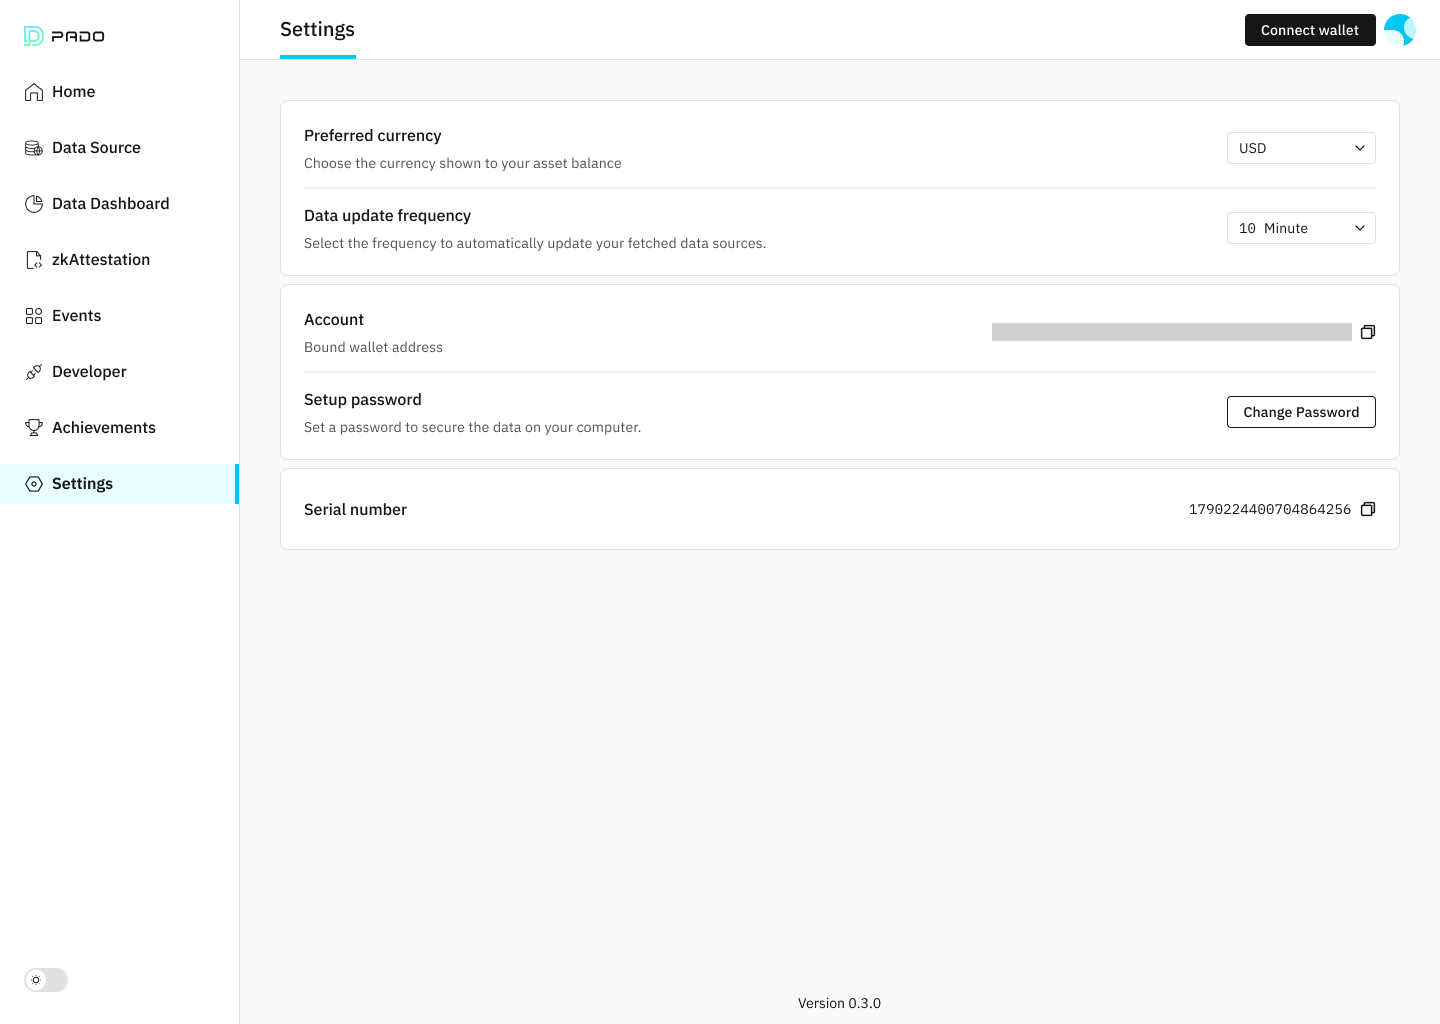
**Your Account**: The Settings page displays your account information. This is typically the first web3 wallet address you connected to the browser extension. Primus uses this address to track your reward points.
---
# Sign in | primus
[Skip to main content](https://docs.primuslabs.xyz/build/primus-extension/extension-walkthrough/sign-in#docusaurus_skipToContent_fallback)
Sign in
=======
Upon installing or updating the Chrome browser extension to the latest version, you'll be guided through an onboarding flow to discover its exciting new features. Whether you're new or updating from a previous version, this flow will help you get started.

At the end of the onboarding flow, you can enter a referral code received from other users to earn extra reward points. If you don’t have a referral code at first, you can still enter it later on the Achievements page through the task “Sign-in using a referral code” and claim your points.
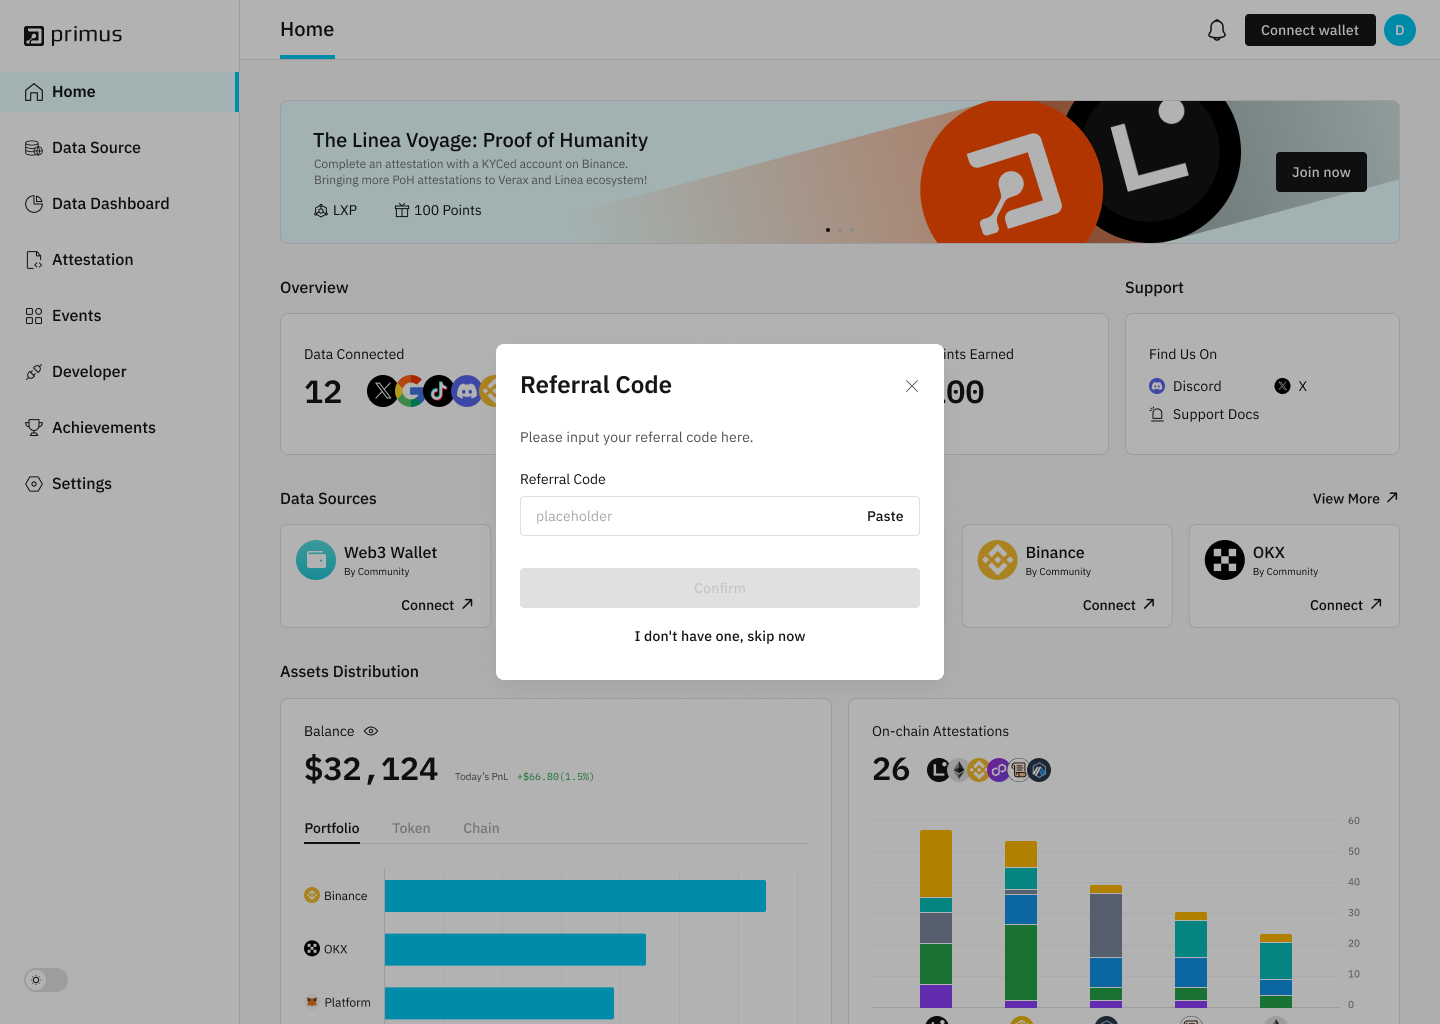
After signing in, you will land on the Home page, which provides a quick overview to help you see everything at a glance.
---
# Submit attestation on-chain | primus
[Skip to main content](https://docs.primuslabs.xyz/build/primus-extension/extension-walkthrough/submit-attestation-on-chain#docusaurus_skipToContent_fallback)
Submit attestation on-chain
===========================
To allow web3 projects or dapps to verify your attestations, you need to submit them on-chain. The extension currently supports five blockchains: Linea, BNB Chain, opBNB, Arbitrum, and Scroll. We're constantly expanding this network, giving you more flexibility for your attestations!
Once submitted, a blockchain icon will appear in the bottom right corner of your attestation result card, indicating the network it's recorded. Remember, each attestation can only be submitted to one blockchain network once.

---
# Main Functions | primus
[Skip to main content](https://docs.primuslabs.xyz/build/primus-extension/mainfunctions#docusaurus_skipToContent_fallback)
On this page

Main Functions[](https://docs.primuslabs.xyz/build/primus-extension/mainfunctions#main-functions "Direct link to Main Functions")
-----------------------------------------------------------------------------------------------------------------------------------
This guide walks you through the main functions of the Primus Extension. All functions are listed on the left navigation bar in the extension.
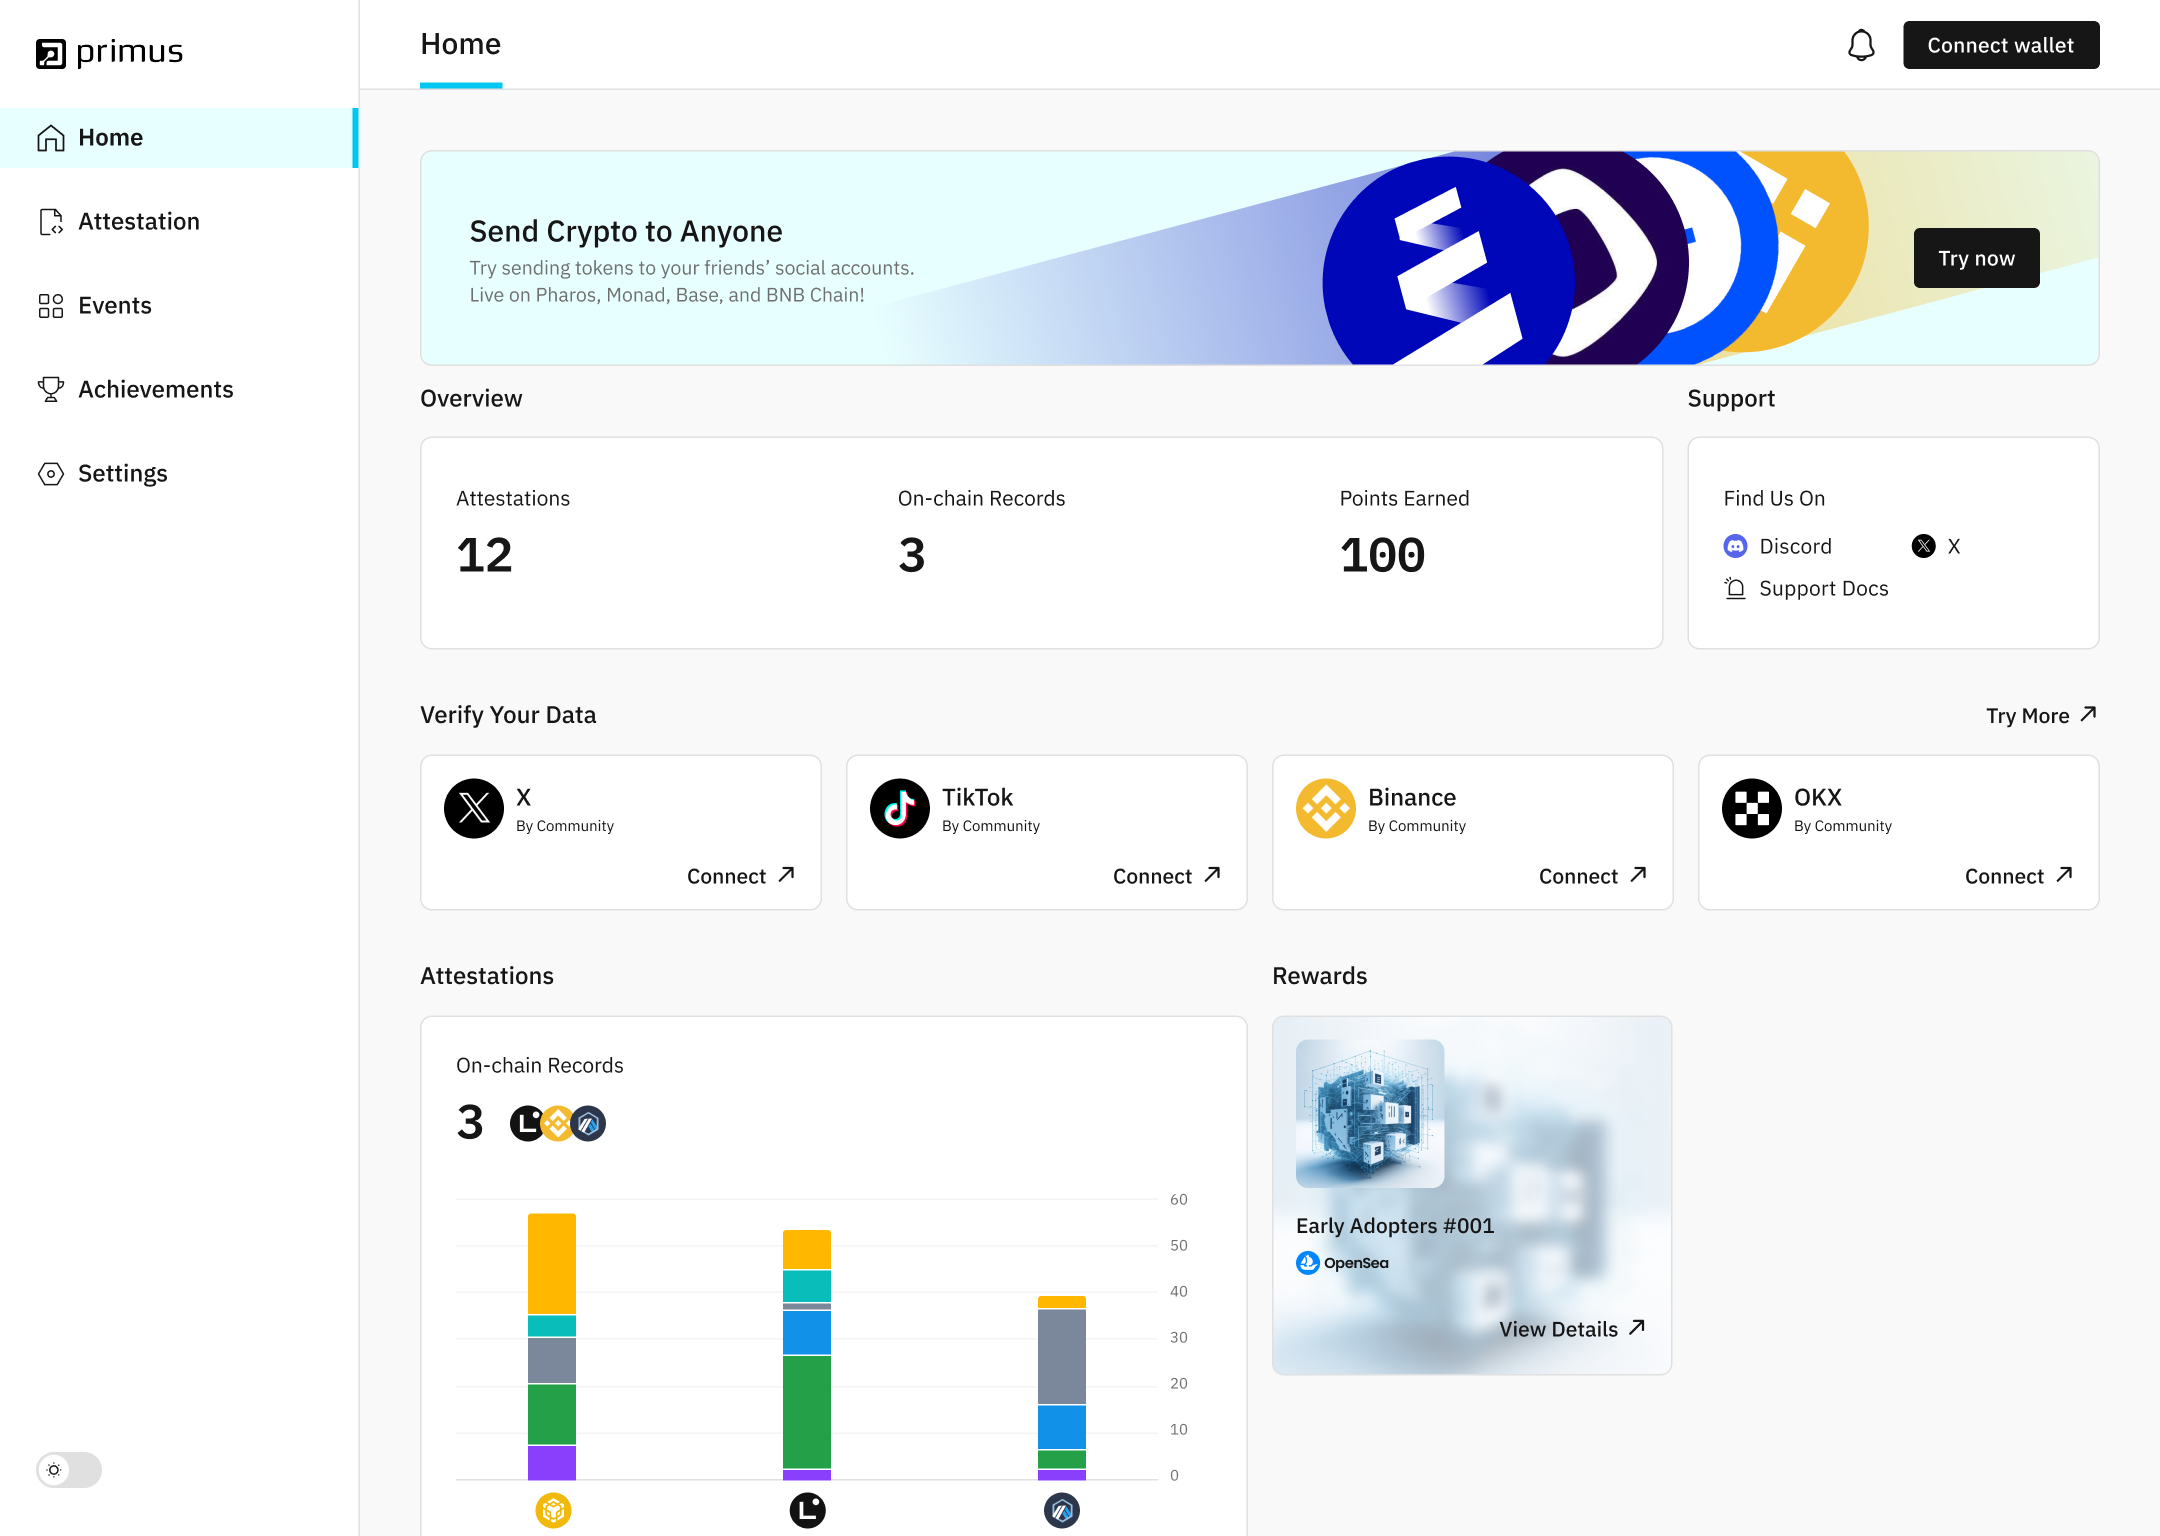
### 1\. Attestataion[](https://docs.primuslabs.xyz/build/primus-extension/mainfunctions#1-attestataion "Direct link to 1. Attestataion")
#### (1) Create attestation[](https://docs.primuslabs.xyz/build/primus-extension/mainfunctions#1-create-attestation "Direct link to (1) Create attestation")
The **attestation** function allows you to create verifiable proofs from various types of internet data. Currently supported options include:
* **Asset Verification**: Attest your asset balance, token holdings, or 30-day spot trading volume on an exchange.
* **Humanity Verification**: Attest your KYC completion status on an exchange or prove ownership of a social media account.
* **Social Connections**: Attest your follower count on social media platforms.
To start a verification, first connect your Web3 wallet. The connected wallet address will be used to generate your attestation and serve as your identity for Web3 projects that require verification.
This function leverages zkTLS techniques to ensure your data remains anonymous and up-to-date throughout the verification process.
A stable internet connection is required. If you encounter errors (e.g., network issues or data format problems), please reach out to us on our Discord channel for assistance.
#### (2) Submit proof on-chian[](https://docs.primuslabs.xyz/build/primus-extension/mainfunctions#2-submit-proof-on-chian "Direct link to (2) Submit proof on-chian")
To allow web3 projects or dApps to verify your attestations, you need to submit them on-chain. The extension currently supports the following blockchains:
* Linea
* BNB Chain
* opBNB
* Arbitrum
* Scroll
Once submitted, a blockchain icon will appear in the bottom-right corner of your attestation card, indicating the network where it’s recorded.
Note: Each attestation can only be submitted to one blockchain network once.
### 2\. Events[](https://docs.primuslabs.xyz/build/primus-extension/mainfunctions#2-events "Direct link to 2. Events")
Primus hosts several ongoing attestation campaigns that let you participate and earn rewards from different projects. Simply click on each campaign to view its detailed tasks, which should be completed in sequence.
When you complete a data verification process through a campaign, an event tag will appear in the lower-right corner of your attestation card. This tag is also submitted on-chain as proof of your participation.
For further questions, refer to the “FAQ” section at the bottom of the page.
### 3\. Achievements[](https://docs.primuslabs.xyz/build/primus-extension/mainfunctions#3-achievements "Direct link to 3. Achievements")
The Primus extension reward program is available starting from version 0.3.0. You can earn rewards by completing tasks listed on the Achievements page. All earned points and rewards are displayed in detail in your Rewards History section.
After the launch of [Primus AlphaNet](https://app.primuslabs.xyz/)
, all points accumulated from the extension have been recorded. You can now participate in new events through Primus AlphaNet.
### 4\. Settings[](https://docs.primuslabs.xyz/build/primus-extension/mainfunctions#4-settings "Direct link to 4. Settings")
Customize your preferences from the Settings page:
* Password Management: Set or change your password for secure access.
**Note**: The account information displayed is the first web3 wallet address you connected to this extension. Primus uses this address to track your reward points.
* [Main Functions](https://docs.primuslabs.xyz/build/primus-extension/mainfunctions#main-functions)
* [1\. Attestataion](https://docs.primuslabs.xyz/build/primus-extension/mainfunctions#1-attestataion)
* [(1) Create attestation](https://docs.primuslabs.xyz/build/primus-extension/mainfunctions#1-create-attestation)
* [(2) Submit proof on-chian](https://docs.primuslabs.xyz/build/primus-extension/mainfunctions#2-submit-proof-on-chian)
* [2\. Events](https://docs.primuslabs.xyz/build/primus-extension/mainfunctions#2-events)
* [3\. Achievements](https://docs.primuslabs.xyz/build/primus-extension/mainfunctions#3-achievements)
* [4\. Settings](https://docs.primuslabs.xyz/build/primus-extension/mainfunctions#4-settings)
---
# Start | primus
[Skip to main content](https://docs.primuslabs.xyz/build/primus-extension/extension-walkthrough/start#docusaurus_skipToContent_fallback)
Start
=====
We will guide through the main function of Primus browser extension.
**Download**
The Primus browser extension, downloadable from the Chrome Web Store (versions greater than 0.3.0), is currently compatible with Chrome and Edge browsers. Support for other browsers is planned for the future.
**For Mac users**
Search PADO in the Chrome Web Store, click the “Add to Chrome” button, the extension will install automatically. For the MetaMask wallet, remember to download from the chrome web store as well, make sure you update the MetaMask to the version above 11.8.0.
**For Edge users**
Please use the Edge browser in windows, other browsers may face compatibility issues. Search PADO in the Chrome Web Store, click the “Get” button, the extension will install automatically. For the MetaMask wallet, remember to download from the chrome web store as well, make sure you update the MetaMask to the version above 11.8.0.
---
# FAQ | primus
[Skip to main content](https://docs.primuslabs.xyz/data-computation/build-with-primus/for-developers/faq#docusaurus_skipToContent_fallback)
On this page

FAQ
===
"Error: connect ENETUNREACH" or "Error: connect ETIMEDOUT" appears while using Arweave?[](https://docs.primuslabs.xyz/data-computation/build-with-primus/for-developers/faq#error-connect-enetunreach-or-error-connect-etimedout-appears-while-using-arweave "Direct link to "Error: connect ENETUNREACH" or "Error: connect ETIMEDOUT" appears while using Arweave?")
------------------------------------------------------------------------------------------------------------------------------------------------------------------------------------------------------------------------------------------------------------------------------------------------------------------------------------------------------------------------
TypeError: fetch failed at Object.fetch (node:internal/deps/undici/undici:11372:11) at process.processTicksAndRejections (node:internal/process/task_queues:95:5) ... cause: AggregateError ... code: 'ETIMEDOUT', [errors]: [ Error: connect ETIMEDOUT 118.184.26.113:443 at createConnectionError (node:net:1634:14) at Timeout.internalConnectMultipleTimeout (node:net:1685:38) at listOnTimeout (node:internal/timers:575:11) at process.processTimers (node:internal/timers:514:7) { errno: -110, code: 'ETIMEDOUT', syscall: 'connect', address: '118.184.26.113', port: 443 }, Error: connect ENETUNREACH 2a03:2880:f102:183:face:b00c:0:25de:443 - Local (:::0) at internalConnectMultiple (node:net:1176:40) at Timeout.internalConnectMultipleTimeout (node:net:1687:3) at listOnTimeout (node:internal/timers:575:11) at process.processTimers (node:internal/timers:514:7) { errno: -101, code: 'ENETUNREACH', syscall: 'connect', address: '2a03:2880:f102:183:face:b00c:0:25de', port: 443 }\
\
This is usually a network or proxy issue. There is a way to set up a proxy.\
\
* Copy the following code into a js file such as `proxy.js`.\
\
import { ProxyAgent } from 'undici';if (process.env.HTTPS_PROXY) { const proxyAgent = new ProxyAgent(process.env.HTTPS_PROXY); const nodeFetch = globalThis.fetch globalThis.fetch = function (url, options) { return nodeFetch(url, { ...options, dispatcher: proxyAgent }) }}\
\
* Add `import "./proxy.js"` to your `.ts` script.\
\
* Export `HTTPS_PROXY=your-proxy` in your terminal where you want to run the script.\
\
\
"ConnectTimeoutError: Connect Timeout Error" appears while using Arweave?[](https://docs.primuslabs.xyz/data-computation/build-with-primus/for-developers/faq#connecttimeouterror-connect-timeout-error-appears-while-using-arweave "Direct link to "ConnectTimeoutError: Connect Timeout Error" appears while using Arweave?")\
\
---------------------------------------------------------------------------------------------------------------------------------------------------------------------------------------------------------------------------------------------------------------------------------------------------------------------------------\
\
Error while trying to download chunked data for ...TypeError: fetch failed at Object.fetch (node:internal/deps/undici/undici:11118:11) at process.processTicksAndRejections (node:internal/process/task_queues:95:5) ... cause: ConnectTimeoutError: Connect Timeout Error ... code: 'UND_ERR_CONNECT_TIMEOUT' ...\
\
This is usually a network or proxy issue. It's handled the same way as **Error: connect ENETUNREACH**.\
\
"Error: Unable to get transaction offset: Not Found" appears while trying to download chunked data from Arweave?[](https://docs.primuslabs.xyz/data-computation/build-with-primus/for-developers/faq#error-unable-to-get-transaction-offset-not-found-appears-while-trying-to-download-chunked-data-from-arweave "Direct link to "Error: Unable to get transaction offset: Not Found" appears while trying to download chunked data from Arweave?")\
\
-----------------------------------------------------------------------------------------------------------------------------------------------------------------------------------------------------------------------------------------------------------------------------------------------------------------------------------------------------------------------------------------------------------------------------------------------------\
\
Error while trying to download chunked data for JqcyW81tMRZj3VWI7aQaTcGVhYaryGcnBFOkjSQrIKEError: Unable to get transaction offset: Not Found at Chunks.getTransactionOffset (..../node_modules/arweave/node/chunks.js:38:15) at process.processTicksAndRejections (node:internal/process/task_queues:95:5) at async Chunks.downloadChunkedData (..../node_modules/arweave/node/chunks.js:56:32) at async Transactions.getData (..../node_modules/arweave/node/transactions.js:120:20) at async getDataFromAR (..../node_modules/@padolabs/pado-ao-sdk/dist/padoarweave.js:46:18) at async getResult (..../node_modules/@padolabs/pado-ao-sdk/dist/index.js:149:20) at async main (..../dist/data_consumer.js:37:25)Falling back to gateway cache for JqcyW81tMRZj3VWI7aQaTcGVhYaryGcnBFOkjSQrIKE\
\
This is because data uploaded to Arweave by the data provider has not been packaged yet. You'll have to wait a while before you try again.\
\
* `Unable to get transaction offset: Not Found` means this transaction isn't done yet. (Also, this transaction is not yet visible in [https://viewblock.io/arweave](https://viewblock.io/arweave)\
).\
* `Falling back to gateway cache for ...` means that the data is fetched from the gateway cache.\
\
* ["Error: connect ENETUNREACH" or "Error: connect ETIMEDOUT" appears while using Arweave?](https://docs.primuslabs.xyz/data-computation/build-with-primus/for-developers/faq#error-connect-enetunreach-or-error-connect-etimedout-appears-while-using-arweave)\
\
* ["ConnectTimeoutError: Connect Timeout Error" appears while using Arweave?](https://docs.primuslabs.xyz/data-computation/build-with-primus/for-developers/faq#connecttimeouterror-connect-timeout-error-appears-while-using-arweave)\
\
* ["Error: Unable to get transaction offset: Not Found" appears while trying to download chunked data from Arweave?](https://docs.primuslabs.xyz/data-computation/build-with-primus/for-developers/faq#error-unable-to-get-transaction-offset-not-found-appears-while-trying-to-download-chunked-data-from-arweave)
---
# About Demo | primus
[Skip to main content](https://docs.primuslabs.xyz/data-computation/build-with-primus/for-developers/demo#docusaurus_skipToContent_fallback)
On this page

About Demo
==========
Overview[](https://docs.primuslabs.xyz/data-computation/build-with-primus/for-developers/demo#overview "Direct link to Overview")
-----------------------------------------------------------------------------------------------------------------------------------
Here, we will introduce the steps for using the [Primus NETWORK SDK](https://docs.primuslabs.xyz/data-computation/build-with-primus/for-developers/sdk)
with examples.
Preparations[](https://docs.primuslabs.xyz/data-computation/build-with-primus/for-developers/demo#preparations "Direct link to Preparations")
-----------------------------------------------------------------------------------------------------------------------------------------------
* **Node.js >= 18**
**MetaMask** (if the chain is `ethereum` or `holesky`)
* Ensure you have enough `ETH` in your wallet for gas and computation fees.
* EverPay
* Ensure you have enough `ETH` in EverPay to cover storage fees. You can refer to the [SDK Documentation](https://docs.primuslabs.xyz/data-computation/build-with-primus/for-developers/sdk#instantiate-client)
for more information.
**ArConnect** (if the chain is `ao`)
* Ensure you have enough `wAR` in your wallet.
How to run demo[](https://docs.primuslabs.xyz/data-computation/build-with-primus/for-developers/demo#how-to-run-demo "Direct link to How to run demo")
--------------------------------------------------------------------------------------------------------------------------------------------------------
* clone the repo
git clone https://github.com/pado-labs/pado-network-sdk.gitcd pado-network-sdkcd demo
* install packages
npm install
* run demo
npm run dev
* The demo will be served at http://localhost:5173.
Usage[](https://docs.primuslabs.xyz/data-computation/build-with-primus/for-developers/demo#usage "Direct link to Usage")
--------------------------------------------------------------------------------------------------------------------------
### Installation[](https://docs.primuslabs.xyz/data-computation/build-with-primus/for-developers/demo#installation "Direct link to Installation")
npm install --save @padolabs/pado-network-sdk
### Init Client[](https://docs.primuslabs.xyz/data-computation/build-with-primus/for-developers/demo#init-client "Direct link to Init Client")
#### chain is `ao`[](https://docs.primuslabs.xyz/data-computation/build-with-primus/for-developers/demo#chain-is-ao "Direct link to chain-is-ao")
Make sure that you have installed the [Arconnect](https://chromewebstore.google.com/detail/arconnect/einnioafmpimabjcddiinlhmijaionap)
in chrome and that you have enough AR
const wallet = window.arweaveWallet;const padoNetworkClient = new PadoNetworkContractClient('ao', wallet, 'arweave');
#### chain is `ethereum` or `holesky`[](https://docs.primuslabs.xyz/data-computation/build-with-primus/for-developers/demo#chain-is-ethereum-or-holesky "Direct link to chain-is-ethereum-or-holesky")
Make sure you have installed `MetaMask` in Chrome and have enough `ETH` to cover computation and gas fees, as well as enough `ETH` in `EverPay` to pay for storage.
const wallet = window.ethereum;const padoNetworkClient = new PadoNetworkContractClient('holesky', wallet, 'arseeding');
### Data Provider[](https://docs.primuslabs.xyz/data-computation/build-with-primus/for-developers/demo#data-provider "Direct link to Data Provider")
#### Upload Data[](https://docs.primuslabs.xyz/data-computation/build-with-primus/for-developers/demo#upload-data "Direct link to Upload Data")
##### prepare data[](https://docs.primuslabs.xyz/data-computation/build-with-primus/for-developers/demo#prepare-data "Direct link to prepare data")
// data in Uint8Array formatconst data = new Uint8Array(fileContent);//for example//const data = new Uint8Array([1, 2, 3, 4, 5, 6, 7, 8]);//or read from file
##### tag for the data[](https://docs.primuslabs.xyz/data-computation/build-with-primus/for-developers/demo#tag-for-the-data "Direct link to tag for the data")
// tag for the data, you can save filename and subffix hereconst dataTag = {'name': 'test','subffix':'txt'};
##### price for the data[](https://docs.primuslabs.xyz/data-computation/build-with-primus/for-developers/demo#price-for-the-data "Direct link to price for the data")
###### if chainName is `holesky` or `ethereum`[](https://docs.primuslabs.xyz/data-computation/build-with-primus/for-developers/demo#if-chainname-is-holesky-or-ethereum "Direct link to if-chainname-is-holesky-or-ethereum")
//this means price of the data is 0.0000001ETHconst priceInfo = { price: 1_000_000_000_000, symbol: 'ETH'};
###### if chainName is `ao`[](https://docs.primuslabs.xyz/data-computation/build-with-primus/for-developers/demo#if-chainname-is-ao "Direct link to if-chainname-is-ao")
> NOTE: Currently, only wAR(the Wrapped AR in AO) is supported. In the example, 200000000 means 0.0002 wAR.
// price for the dataconst priceInfo = { price: '200000000', symbol: 'wAR'};
###### dataPermissions[](https://docs.primuslabs.xyz/data-computation/build-with-primus/for-developers/demo#datapermissions "Direct link to dataPermissions")
//The addresses of the checkers. If you have no checkers, you can pass an empty array.const dataPermissions=[]
###### encryption schema[](https://docs.primuslabs.xyz/data-computation/build-with-primus/for-developers/demo#encryption-schema "Direct link to encryption schema")
//Parameters required for data encryption//n: Number of nodes involved in the computing//t: Minimum number of nodes required to report task results//Make sure that, n>=t>1//Default is: {t:2,n:3}const schema = { t:2, n:3}
###### upload data[](https://docs.primuslabs.xyz/data-computation/build-with-primus/for-developers/demo#upload-data-1 "Direct link to upload data")
const dataId = await padoNetworkClient.uploadData(data, dataTag, priceInfo, dataPermissions, schema);
If everything is fine and there are no exceptions, you will get the `dataId`, and you can query the data you uploaded based on that ID.
#### Retrieve the withdrawable balance and proceed with the withdrawal.[](https://docs.primuslabs.xyz/data-computation/build-with-primus/for-developers/demo#retrieve-the-withdrawable-balance-and-proceed-with-the-withdrawal "Direct link to Retrieve the withdrawable balance and proceed with the withdrawal.")
When data is purchased, the data provider is able to receive a token reward, you can check the withdrawable balance and withdraw it in the following ways.
> **_Note:_**
>
> Currently, `getBalance` and `withdrawToken` are only supported on the **_Holesky_** and **_Ethereum_** chains is supported, and only **_ETH_** is supported.
##### Get balance[](https://docs.primuslabs.xyz/data-computation/build-with-primus/for-developers/demo#get-balance "Direct link to Get balance")
const balance = await padoNetworkClient.getBalance(address, 'ETH');console.log(balance.locked.toString());console.log(balance.free.toString());const transaction = await padoNetworkClient.withdrawToken(metamaskAddress, 'ETH', balance.free);console.log(transaction);
### Data User[](https://docs.primuslabs.xyz/data-computation/build-with-primus/for-developers/demo#data-user "Direct link to Data User")
#### Generate key pair[](https://docs.primuslabs.xyz/data-computation/build-with-primus/for-developers/demo#generate-key-pair "Direct link to Generate key pair")
You should generates a pair of public and secret keys for encryption and decryption.
import {Utils} from "@padolabs/pado-network-sdk";const keyInfo = await new Utils().generateKey();
#### Submit task[](https://docs.primuslabs.xyz/data-computation/build-with-primus/for-developers/demo#submit-task "Direct link to Submit task")
Here, you need a [dataId](https://docs.primuslabs.xyz/data-computation/build-with-primus/for-developers/demo#data_id)
, which is returned by the Data Provider through the [`uploadData`](https://docs.primuslabs.xyz/data-computation/build-with-primus/for-developers/demo#upload_data)
.
const taskId = await padoNetworkClient.submitTask(TaskType.DATA_SHARING, userDataId, keyInfo.pk)
This will return a task id which used for getting the result.
#### Get task result[](https://docs.primuslabs.xyz/data-computation/build-with-primus/for-developers/demo#get-task-result "Direct link to Get task result")
//If you don't get the result after the timeout(default 60000 milesconds), a timeout error will be returned and you can re-call this method until you get the result.//Ensure that the keyInfo is the same object as the parameter passed to submitTaskconst data = await padoNetworkClient.getTaskResult(taskId, keyInfo.sk);
If nothing goes wrong, you will get the `data` of the Data Provider. The data type returned is Uint8Array, you can do further processing.
* [Overview](https://docs.primuslabs.xyz/data-computation/build-with-primus/for-developers/demo#overview)
* [Preparations](https://docs.primuslabs.xyz/data-computation/build-with-primus/for-developers/demo#preparations)
* [How to run demo](https://docs.primuslabs.xyz/data-computation/build-with-primus/for-developers/demo#how-to-run-demo)
* [Usage](https://docs.primuslabs.xyz/data-computation/build-with-primus/for-developers/demo#usage)
* [Installation](https://docs.primuslabs.xyz/data-computation/build-with-primus/for-developers/demo#installation)
* [Init Client](https://docs.primuslabs.xyz/data-computation/build-with-primus/for-developers/demo#init-client)
* [chain is `ao`](https://docs.primuslabs.xyz/data-computation/build-with-primus/for-developers/demo#chain-is-ao)
* [chain is `ethereum` or `holesky`](https://docs.primuslabs.xyz/data-computation/build-with-primus/for-developers/demo#chain-is-ethereum-or-holesky)
* [Data Provider](https://docs.primuslabs.xyz/data-computation/build-with-primus/for-developers/demo#data-provider)
* [Upload Data](https://docs.primuslabs.xyz/data-computation/build-with-primus/for-developers/demo#upload-data)
* [Retrieve the withdrawable balance and proceed with the withdrawal.](https://docs.primuslabs.xyz/data-computation/build-with-primus/for-developers/demo#retrieve-the-withdrawable-balance-and-proceed-with-the-withdrawal)
* [Data User](https://docs.primuslabs.xyz/data-computation/build-with-primus/for-developers/demo#data-user)
* [Generate key pair](https://docs.primuslabs.xyz/data-computation/build-with-primus/for-developers/demo#generate-key-pair)
* [Submit task](https://docs.primuslabs.xyz/data-computation/build-with-primus/for-developers/demo#submit-task)
* [Get task result](https://docs.primuslabs.xyz/data-computation/build-with-primus/for-developers/demo#get-task-result)
---
# Introduction | primus
[Skip to main content](https://docs.primuslabs.xyz/data-computation/build-with-primus/for-developers/introduction#docusaurus_skipToContent_fallback)
On this page

Introduction[](https://docs.primuslabs.xyz/data-computation/build-with-primus/for-developers/introduction#introduction "Direct link to Introduction")
-------------------------------------------------------------------------------------------------------------------------------------------------------
Developers can use [Primus Network SDK](https://docs.primuslabs.xyz/data-computation/build-with-primus/for-developers/sdk)
to create confidential dApps and send confidential computation tasks on Ethereum or AO.
### Data-Sharing Computation[](https://docs.primuslabs.xyz/data-computation/build-with-primus/for-developers/introduction#data-sharing-computation "Direct link to Data-Sharing Computation")
Primus builds the computation network from simple use cases to a comprehensive suite. Currently, the peer-to-peer data-sharing is supported, which provides a secure and practical way to transfer accessability of the private data from the data owner to a third party. In particular, it completes the following peer-to-peer data-sharing process.
1. Alice encrypts her private text/image/video, and stores it on a storage blockchain, e.g., Arweave.
2. Bob sees the metadata information about Alice's data from a data marketplace, and completes a token transfer through the smart contract, e.g., either Ethereum smart contracts or AO processes.
3. Primus network runs a confidential computation, and the result will be private data owned by Alice and encrypted by Bob's public key. Bob downloads the encrypted data and decrypts it locally to recover the plain data file.
The core technique within this data-sharing paradigm primarily involves linear homomorphic encryption. Initially, the content encryption key **K** for the private data is split into multiple shares, with each share encrypted using the public keys of three distinct workers. During the confidential computation phase, all key shares are decrypted and subsequently re-encrypted using Bob's public key. These re-encrypted ciphertexts are then linearly combined to produce a single ciphertext that securely encrypts **K** with Bob's public key. A threshold encryption scheme is employed to enhance network robustness. One can also find more technical details in the [post](https://medium.com/@padolabs/a-quick-glance-at-zkfhe-computation-on-ao-75bc73c9518c)
and the [repository](https://github.com/pado-labs/threshold-zk-LHE)
.
### Main Components[](https://docs.primuslabs.xyz/data-computation/build-with-primus/for-developers/introduction#main-components "Direct link to Main Components")
The data sharing and incentive workflow allows data providers to share their data securely and privately with data users. Key components are listed as follows:
1. **Primus SDK**
Through the SDK developers can upload a user's encrypted data, and decrypt the ciphertext data.
The github link: [Primus SDK](https://github.com/pado-labs/pado-network-sdk)
.
2. **Primus Contract**
Primus Contract, which mainly manages data, nodes, verifiable confidential computing tasks and related results. The contract also handles computation costs.
The github link of Ethereum: [Primus Network Contracts](https://github.com/pado-labs/pado-network-contracts)
.
The github link of AO: [Primus AO Process](https://github.com/pado-labs/pado-ao-process)
.
3. **Primus Node**
Primus Node is an environment that truly performs verifiable confidential computations. Mainly to obtain verifiable confidential computing tasks, execute tasks, and report results.
The github link: [Primus Node](https://github.com/pado-labs/pado-network/tree/main/padonode)
. The [WASM wrapper](https://github.com/pado-labs/pado-network/blob/main/lib/lhe/README.md)
for [threshold-zk-LHE](https://github.com/pado-labs/threshold-zk-LHE)
.
### Workflow[](https://docs.primuslabs.xyz/data-computation/build-with-primus/for-developers/introduction#workflow "Direct link to Workflow")
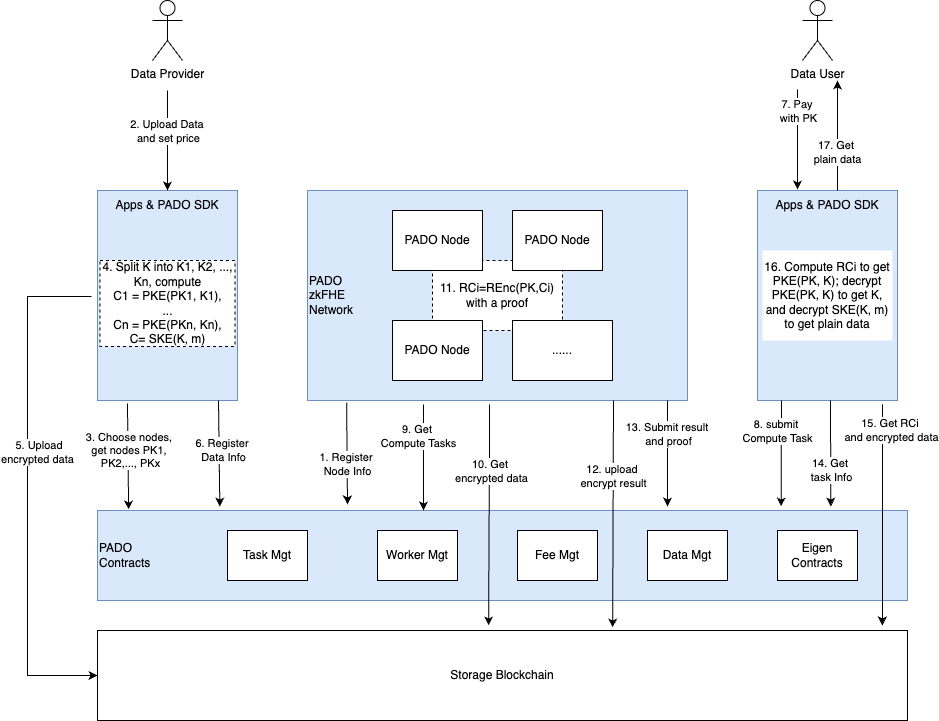
1. **Register Primus Node**
After the Primus Node is started, it shall be registered in the Worker Management Contract. The registered information includes name, description, public key, owner address, etc.
2. **Upload data**
Data Providers can upload encrypted data through dapp based on the Primus SDK and set data prices at the time of upload. The data encrypted by the FHE algorithm and the Primus Node public key will be uploaded to Arweave, and the data information will be registered to the Data Management Contract.
3. **Submit task**
Data users can submit computation tasks with their public keys through dapp based on Primus SDK, and pay certain computation fees and data usage fees. The computation tasks will be submitted to the Task Management Contract.
4. **Task execution**
Primus Node obtains computing tasks from the Task Management Contract and storage blockchain, uses the LHE algorithm to compute the tasks, and reports the results to the Task Management Contract and storage blockchain after computation. Task Management Contract verifies the results. After completing the verification, the fee is distributed to the data provider and Primus Nodes.
5. **Get Result**
Data users obtain encrypted data from Arweave, obtain task results and related information from the contracts and storage blockchain, and then use the LHE algorithm with their private key in the SDK to decrypt the results.
* [Introduction](https://docs.primuslabs.xyz/data-computation/build-with-primus/for-developers/introduction#introduction)
* [Data-Sharing Computation](https://docs.primuslabs.xyz/data-computation/build-with-primus/for-developers/introduction#data-sharing-computation)
* [Main Components](https://docs.primuslabs.xyz/data-computation/build-with-primus/for-developers/introduction#main-components)
* [Workflow](https://docs.primuslabs.xyz/data-computation/build-with-primus/for-developers/introduction#workflow)
---
# Prerequisites | primus
[Skip to main content](https://docs.primuslabs.xyz/build/primus-extension/overview#docusaurus_skipToContent_fallback)
On this page

Prerequisites[](https://docs.primuslabs.xyz/build/primus-extension/overview#prerequisites "Direct link to Prerequisites")
---------------------------------------------------------------------------------------------------------------------------
The Primus Extension is a **Chrome-based extension** and should be installed directly from the Chrome Web Store. The official link is [Primus Extension](https://chromewebstore.google.com/detail/pado/oeiomhmbaapihbilkfkhmlajkeegnjhe)
.
This extension is currently compatible with both **Chrome** and **Edge** browsers. Support for other browsers is planned for the future.
For the web3 wallet, remember to download MetaMask from the Chrome Web Store, and make sure you update to version 11.8.0 or above.
* [Prerequisites](https://docs.primuslabs.xyz/build/primus-extension/overview#prerequisites)
---
# AO Worker Guides | primus
[Skip to main content](https://docs.primuslabs.xyz/data-computation/build-with-primus/for-workers/ao-worker-guides#docusaurus_skipToContent_fallback)
On this page

AO Worker Guides[](https://docs.primuslabs.xyz/data-computation/build-with-primus/for-workers/ao-worker-guides#ao-worker-guides "Direct link to AO Worker Guides")
--------------------------------------------------------------------------------------------------------------------------------------------------------------------
### Software/Hardware Requirement[](https://docs.primuslabs.xyz/data-computation/build-with-primus/for-workers/ao-worker-guides#softwarehardware-requirement "Direct link to Software/Hardware Requirement")
* vCPUs: 2+
* Memory: 4GiB+
* Storage: 100GiB+
### Install[](https://docs.primuslabs.xyz/data-computation/build-with-primus/for-workers/ao-worker-guides#install "Direct link to Install")
Please reference to official documentation: [Install Docker Engine](https://docs.docker.com/engine/install/)
.
Next, pull the image:
docker pull padolabs/pado-network:latest
Clone [pado-labs/pado-worker-setup](https://github.com/pado-labs/pado-worker-setup)
:
git clone https://github.com/pado-labs/pado-worker-setup.gitcd pado-worker-setup/pado-node
### Basic Configurations[](https://docs.primuslabs.xyz/data-computation/build-with-primus/for-workers/ao-worker-guides#basic-configurations "Direct link to Basic Configurations")
Copy `./config-files/.env.ao` into `./.env`. Edit the `./.env` and update the values for your own setups.
#### Node Info[](https://docs.primuslabs.xyz/data-computation/build-with-primus/for-workers/ao-worker-guides#node-info "Direct link to Node Info")
Set a name to identify yourself, these will be used on the node itself and will be shown on performance metrics in the future.
NODE_NAME="Your Node Name"NODE_DESCRIPTION="Your Node Name's Description"
#### Arweave Wallet[](https://docs.primuslabs.xyz/data-computation/build-with-primus/for-workers/ao-worker-guides#arweave-wallet "Direct link to Arweave Wallet")
If you don't have an Arweave wallet, you can install one from [ArConnect](https://www.arconnect.io/download)
, and then export the wallet from ArConnect and store it to somewhere.
Next, fill in the file path of the Arweave wallet,
AR_WALLET_PATH='/path/to/your/arwallet.json'
#### LHE Key[](https://docs.primuslabs.xyz/data-computation/build-with-primus/for-workers/ao-worker-guides#lhe-key "Direct link to LHE Key")
The LHE key is used for data sharing, use the following command to generate it.
bash ./run.sh generate-lhe-key [--key-name ]
The default output is `./keys/default.lhe.key.json`, you can specify the key name via `--key-name `.
**IMPORTANT!** Don't lose this file and save it to a safe place!
Next, fill in the file path of the LHE key you have generated.
LHE_KEY_PATH='/path/to/your/lhe.key.json'
### Register to Primus AO Process[](https://docs.primuslabs.xyz/data-computation/build-with-primus/for-workers/ao-worker-guides#register-to-primus-ao-process "Direct link to Register to Primus AO Process")
**NOTE:** _Please contact [Primus Labs](https://discord.com/invite/pdrNxRrApX)
to add your wallet address to the WHITELIST before being able to successfully register!_
Once the configuration is complete, you can run:
bash ./run.sh ao:register
In general, you only need to perform the registry step once.
### Run Task[](https://docs.primuslabs.xyz/data-computation/build-with-primus/for-workers/ao-worker-guides#run-task "Direct link to Run Task")
Once successfully registered, you can start the task program. If necessary, e.g. in a production environment, it is recommended to start the program as a background process.
bash ./run.sh task []
It will start a container named `pado-network[-name]` in the background. Some logs will output to `./logs/*.log`.
You can Stop/Start/Restart/Remove the container by running `docker stop/start/restart/rm pado-network[-name]`.
### Add New Workers[](https://docs.primuslabs.xyz/data-computation/build-with-primus/for-workers/ao-worker-guides#add-new-workers "Direct link to Add New Workers")
**NOTE:** _Add New Workers is optional. If you want to execute Ethereum and AO tasks at the same time, you can execute the following command. Otherwise, you do not need to execute the following command._
#### Add EigenLayer Worker[](https://docs.primuslabs.xyz/data-computation/build-with-primus/for-workers/ao-worker-guides#add-eigenlayer-worker "Direct link to Add EigenLayer Worker")
Step 1: Reference `./config-files/.env.holesky`(Holesky), mainly copy and append the following options and their value to `.env`:
ENABLE_EIGEN_LAYERETH_RPC_URLREGISTRY_COORDINATOR_ADDRESSROUTER_ADDRESSECDSA_KEY_FILEECDSA_KEY_PASSWORDBLS_KEY_FILEBLS_KEY_PASSWORD
Step 2: Set your own `ECDSA_KEY_FILE`, `ECDSA_KEY_PASSWORD`, `BLS_KEY_FILE`, `BLS_KEY_PASSWORD`. Reference [Register as Operator on EigenLayer](https://docs.primuslabs.xyz/data-computation/build-with-primus/for-workers/eigenlayer-operator-guides#register-as-operator-on-eigenlayer)
and [ECDSA and BLS Key](https://docs.primuslabs.xyz/data-computation/build-with-primus/for-workers/eigenlayer-operator-guides#ecdsa-and-bls-key)
.
Step 3: Deposit some ETH to everPay. Reference [Storage](https://docs.primuslabs.xyz/data-computation/build-with-primus/for-workers/eigenlayer-operator-guides#storage)
.
Step 4: Register to Primus AO Process. Reference [Register to Primus AVS](https://docs.primuslabs.xyz/data-computation/build-with-primus/for-workers/eigenlayer-operator-guides#register-to-pado-avs)
.
Step 5: Remove the old container and re-run the task. Reference [Run Task](https://docs.primuslabs.xyz/data-computation/build-with-primus/for-workers/ao-worker-guides#run-task)
.
You can see the full configuration options from `./config-files/.env.holesky-and-ao`.
* [AO Worker Guides](https://docs.primuslabs.xyz/data-computation/build-with-primus/for-workers/ao-worker-guides#ao-worker-guides)
* [Software/Hardware Requirement](https://docs.primuslabs.xyz/data-computation/build-with-primus/for-workers/ao-worker-guides#softwarehardware-requirement)
* [Install](https://docs.primuslabs.xyz/data-computation/build-with-primus/for-workers/ao-worker-guides#install)
* [Basic Configurations](https://docs.primuslabs.xyz/data-computation/build-with-primus/for-workers/ao-worker-guides#basic-configurations)
* [Node Info](https://docs.primuslabs.xyz/data-computation/build-with-primus/for-workers/ao-worker-guides#node-info)
* [Arweave Wallet](https://docs.primuslabs.xyz/data-computation/build-with-primus/for-workers/ao-worker-guides#arweave-wallet)
* [LHE Key](https://docs.primuslabs.xyz/data-computation/build-with-primus/for-workers/ao-worker-guides#lhe-key)
* [Register to Primus AO Process](https://docs.primuslabs.xyz/data-computation/build-with-primus/for-workers/ao-worker-guides#register-to-primus-ao-process)
* [Run Task](https://docs.primuslabs.xyz/data-computation/build-with-primus/for-workers/ao-worker-guides#run-task)
* [Add New Workers](https://docs.primuslabs.xyz/data-computation/build-with-primus/for-workers/ao-worker-guides#add-new-workers)
* [Add EigenLayer Worker](https://docs.primuslabs.xyz/data-computation/build-with-primus/for-workers/ao-worker-guides#add-eigenlayer-worker)
---
# SDK | primus
[Skip to main content](https://docs.primuslabs.xyz/data-computation/build-with-primus/for-developers/sdk#docusaurus_skipToContent_fallback)
On this page

SDK
===
note
_Currently only the Ethereum holesky test network and AO are supported, and the Ethereum main network and other networks will be gradually supported in the future._
Overview[](https://docs.primuslabs.xyz/data-computation/build-with-primus/for-developers/sdk#overview "Direct link to Overview")
----------------------------------------------------------------------------------------------------------------------------------
The pado-network-sdk helps developers use Primus Network, which provides trustless and confidential computing capabilities. You can learn more about [Introduction](https://docs.primuslabs.xyz/data-computation/build-with-primus/for-developers/introduction)
.
Quick Start[](https://docs.primuslabs.xyz/data-computation/build-with-primus/for-developers/sdk#quick-start "Direct link to Quick Start")
-------------------------------------------------------------------------------------------------------------------------------------------
* [A Demo](https://docs.primuslabs.xyz/data-computation/build-with-primus/for-developers/demo)
Usage[](https://docs.primuslabs.xyz/data-computation/build-with-primus/for-developers/sdk#usage "Direct link to Usage")
-------------------------------------------------------------------------------------------------------------------------
### Installation[](https://docs.primuslabs.xyz/data-computation/build-with-primus/for-developers/sdk#installation "Direct link to Installation")
#### Install package by npmx[](https://docs.primuslabs.xyz/data-computation/build-with-primus/for-developers/sdk#install-package-by-npmx "Direct link to Install package by npmx")
npm install --save @padolabs/pado-network-sdk
#### import wasm[](https://docs.primuslabs.xyz/data-computation/build-with-primus/for-developers/sdk#import-wasm "Direct link to import wasm")
Introduce `lhe.js` into the HTML file as follows:
If you meet the following error in your browser's console:
_stream_writable.js:57 Uncaught ReferenceError: process is not defined at node_modules/readable-stream/lib/_stream_writable.js (_stream_writable.js:57:18) at __require2 (chunk-BYPFWIQ6.js?v=4d6312bd:19:50)
You can refer to project using vite. [link](https://github.com/pado-labs/pado-ao-demo/blob/main/vite.config.ts)
### Getting Started[](https://docs.primuslabs.xyz/data-computation/build-with-primus/for-developers/sdk#getting-started "Direct link to Getting Started")
#### Utils[](https://docs.primuslabs.xyz/data-computation/build-with-primus/for-developers/sdk#utils "Direct link to Utils")
##### Generate Key [](https://docs.primuslabs.xyz/data-computation/build-with-primus/for-developers/sdk#generate-key- "Direct link to generate-key-")
Generate public-private key pairs for submitting tasks and retrieving task results.
generateKey(param_obj?: any): Promise;
* Example
import {Utils} from "@padolabs/pado-network-sdk";//The generated key pair will be used for submitTask() and `getTaskResult()const keyInfo = await new Utils().generateKey();
#### PadoNetworkContractClient[](https://docs.primuslabs.xyz/data-computation/build-with-primus/for-developers/sdk#padonetworkcontractclient "Direct link to PadoNetworkContractClient")
##### Import Client[](https://docs.primuslabs.xyz/data-computation/build-with-primus/for-developers/sdk#import-client "Direct link to Import Client")
import {PadoNetworkContractClient} from '@padolabs/pado-network-sdk'
##### Instantiate Client[](https://docs.primuslabs.xyz/data-computation/build-with-primus/for-developers/sdk#instantiate-client "Direct link to Instantiate Client")
The constructor for the `PadoNetworkContractClient`.
constructor(chainName: ChainName, wallet: any, storageType: StorageType = StorageType.ARSEEDING);
**Parameters**
* **chainName:** The blockchain the client wants to connect to. Learn more about [ChainName](https://docs.primuslabs.xyz/data-computation/build-with-primus/for-developers/sdk#chain_name_enum)
* **wallet:** The wallet that interacts with the blockchain.
* **storageType (optional):** The storage option the client wants to use for data. The **_default_** is `StorageType.ARSEEDING`. Learn more about [StorageType](https://docs.primuslabs.xyz/data-computation/build-with-primus/for-developers/sdk#storage_type_enum)
**_Note:_**
> * By default, `StorageType` is `ARWEAVE` when `chainName` is `ao`, and `ARSEEDING` when `chainName` is `holesky` or `ethereum`.
>
> * When using **ARSEEDING** as storage, user need to **_deposit ETH_** to **_EverPay_** to cover storage, computation, data, and other costs. You can learn more about EverPay at:
>
> * **Homepage:** [https://everpay.io/](https://everpay.io/)
>
> * **Docs:** [https://docs.everpay.io/en/docs/guide/overview](https://docs.everpay.io/en/docs/guide/overview)
>
> * **Deposit:** [https://app.everpay.io/deposit/ethereum-eth-0x0000000000000000000000000000000000000000](https://app.everpay.io/deposit/ethereum-eth-0x0000000000000000000000000000000000000000)
>
> * When using **ARWEAVE** as storage, user will pay AR to cover storage, computation, data, and other costs by ArConnect.
>
| chainName | storageType | Wallet |
| --- | --- | --- |
| ao | ARWEAVE | window.arweaveWallet(ArConnect) |
| holesky | ARSEEDING | window.ethereum(metamask) |
| ethereum | ARSEEDING | window.ethereum(metamask) |
* **Returns**
* **Example**
const chainName = 'holesky';const storageType = StorageType.ARSEEDING;//if chainName is holesky or ethereum, wallet should be window.ethereum;//if chainName is ao, wallet should be window.arweaveWallet;const wallet = window.ethereum;const padoNetworkClient = new PadoNetworkContractClient(chainName, wallet, storageType);
##### Upload Data[](https://docs.primuslabs.xyz/data-computation/build-with-primus/for-developers/sdk#upload-data "Direct link to Upload Data")
Uploading data to the storage chain.
uploadData(data: Uint8Array, dataTag: CommonObject, priceInfo: PriceInfo, permissionCheckers?: string[], encryptionSchema?: EncryptionSchema): Promise;
* **Parameters**
* **data:** The data to be uploaded, which should be of type `Uint8Array`.
* **dataTag:** The data's metadata object. **Note: Please use an object format, not a string.**
* **priceInfo:** The data price symbol. Leran more bout [PriceInfo](https://docs.primuslabs.xyz/data-computation/build-with-primus/for-developers/sdk#price_info_enum)
Different `chainName` values correspond to different symbols.
| chainName | symbol | minimum price(1 means) |
| --- | --- | --- |
| ao | wAR(the Wrapped AR in AO) | 0.000000000001 wAR |
| holesky | ETH | 1 wei |
| ethereum | ETH | 1 wei |
* **permissionCheckers(optional)**: The addresses of the checkers. The default is an empty array. Learn more about [IDataPermission](https://docs.primuslabs.xyz/data-computation/build-with-primus/for-developers/sdk#solidity_data_permission)
* **encryptionSchema(optional)**: Parameters used by the algorithm. The default is:
{ t: '2', n: '3'}
* **Returns**
* **`dataId`**: A unique identifier for the data.
* **Example**
//padoNetworkClient is the object instantiated in the previous section const data = new Uint8Array([1, 2, 3, 4, 5, 6, 7, 8]);const dataTag = { 'filename': 'testFileName' };const priceInfo = { price: '200000000', symbol: 'wAR' };//No data permission check by defaultconst dataId = await padoNetworkClient.uploadData(data, dataTag, priceInfo);//If you want to set data permission checking contractsconst permissionCheckers = ['0x.....','0x.......']const dataId = await padoNetworkClient.uploadData(data, dataTag, priceInfo, permissionCheckers);
##### Submit Task [](https://docs.primuslabs.xyz/data-computation/build-with-primus/for-developers/sdk#submit-task- "Direct link to submit-task-")
Submit a task to the PADO Network. You must pay both the data fee corresponding to the `data provider` and the computing fee for the `workers`.
submitTask(taskType: TaskType, dataId: string, dataUserPk: string): Promise;
* **Parameters**
* **taskType:** The type of the task. Just support `TaskType.DATA_SHARING` now. Leran more about [TaskType](https://docs.primuslabs.xyz/data-computation/build-with-primus/for-developers/sdk#task_type_enum)
* **dataId:** The `dataId` returned by the `uploadData` interface.
* **dataUserPk:** The The user's public key generated by generateKey of Utils..
* **Returns**
* **`taskId`**: The ID of the task.
* **Example**
const userDataId = 'returned by the uploadData';const taskId = await padoNetworkClient.submitTask(TaskType.DATA_SHARING, userDataId, keyInfo.pk);
**_Note:_**
> keyInfo is generated at [Generate Key](https://docs.primuslabs.xyz/data-computation/build-with-primus/for-developers/sdk#generate_key)
##### Get Task Result[](https://docs.primuslabs.xyz/data-computation/build-with-primus/for-developers/sdk#get-task-result "Direct link to Get Task Result")
Get the result of the task.
getTaskResult(taskId: string, dataUserSk: string, timeout?: number): Promise;
* **Parameters**
* **taskId**: taskId returned by `submitTask`
* **dataUserSk**: The user's secret key generated by generateKey of Utils
* **timeout(optional)**: The timeout in milliseconds for getting the result, if you wait longer than this time a `timeout` exception will be thrown. **_Default 60000(60 seconds)._**
* **Returns**
* **Uint8Array**: The result of the task in plain text.
* **Example**
const taskId = 'returned by the getTaskResult';const timeout = 20000;//milliseconds//The format of data is Uint8Array, you should handle this data additionally, such as saving it to a file etc.const data = await padoNetworkClient.getTaskResult(taskId, keyInfo.sk, timeout);
**_Note_**
> You need to make sure that the dataUserSk used and the dataUserPk used by the [submitTask](https://docs.primuslabs.xyz/data-computation/build-with-primus/for-developers/sdk#submit_task)
> are part of the same key pair. keyInfo is generated at [Generate Key](https://docs.primuslabs.xyz/data-computation/build-with-primus/for-developers/sdk#generate_key)
##### Get balance can withdraw[](https://docs.primuslabs.xyz/data-computation/build-with-primus/for-developers/sdk#get-balance-can-withdraw "Direct link to Get balance can withdraw")
Get the balance of your wallet that can be withdrawn
getBalance(userAddress: Address, tokenSymbol: string): Promise;
* **Parameters**
* **userAddress**: Address to search
* **tokenSymbol**: What token to search for. Now is `ETH`
* **Returns**
* **Balance**: The token of the address. Leran more about [Balance](https://docs.primuslabs.xyz/data-computation/build-with-primus/for-developers/sdk#balance_info)
* **Example**
const balance = await padoNetworkClient.getBalance(address, 'ETH');console.log(balance.locked.toString());//The amount of free can be withdrawnconsole.log(balance.free.toString());
##### Withdraw token[](https://docs.primuslabs.xyz/data-computation/build-with-primus/for-developers/sdk#withdraw-token "Direct link to Withdraw token")
Withdraw token.
withdrawToken(toAddress: Address, tokenSymbol: string, amount: Uint256): Promise;
* **Parameters**
* **toAddress**: Address to receive token
* **tokenSymbol**: Which token to withdraw. Now is `ETH`
* **amoun**: The amount you want to withdraw needs to be less than `free` above.
* **Returns**
* **Transaction**: Transaction infomation.
* **Example**
const amount = balance.free;debuggerconst transaction = await padoNetworkClient.withdrawToken(address, 'ETH', amount);console.log(transaction);
#### Type And Enum[](https://docs.primuslabs.xyz/data-computation/build-with-primus/for-developers/sdk#type-and-enum "Direct link to Type And Enum")
##### KeyInfo [](https://docs.primuslabs.xyz/data-computation/build-with-primus/for-developers/sdk#keyinfo- "Direct link to keyinfo-")
type KeyInfo = { //publick key pk: string; //private key sk: string;};
##### ChainName [](https://docs.primuslabs.xyz/data-computation/build-with-primus/for-developers/sdk#chainname- "Direct link to chainname-")
type ChainName = 'ao' | 'holesky' | 'ethereum';
##### StorageType [](https://docs.primuslabs.xyz/data-computation/build-with-primus/for-developers/sdk#storagetype- "Direct link to storagetype-")
enum StorageType { ARWEAVE = "arweave", ARSEEDING = "arseeding"}
##### PriceInfo [](https://docs.primuslabs.xyz/data-computation/build-with-primus/for-developers/sdk#priceinfo-- "Direct link to priceinfo--")
/** * Price of data * if symbol is 'wAR'(chainName is ao), a price of 1 means that the data price is 0.000000000001 wAR. * if symbol is 'ETH'(chainName is holesky or ethereum),a price of 1 means that the data price is 1wei * price: The price of data * symbol: The token symbol of price */interface PriceInfo { price: string; symbol: string;}
##### TaskType [](https://docs.primuslabs.xyz/data-computation/build-with-primus/for-developers/sdk#tasktype- "Direct link to tasktype-")
enum TaskType{ DATA_SHARING = 'dataSharing'}
#### Balance [](https://docs.primuslabs.xyz/data-computation/build-with-primus/for-developers/sdk#balance- "Direct link to balance-")
type Balance = { free: Uint256; locked: Uint256;}
#### Solidity: IDataPermission[](https://docs.primuslabs.xyz/data-computation/build-with-primus/for-developers/sdk#solidity-idatapermission "Direct link to solidity-idatapermission")
Developers should implement the [IDataPermission](https://github.com/pado-labs/pado-network-contracts/blob/main/contracts/interface/IDataPermission.sol)
contract to create custom checking logic. Data provider can assign a `checker contract address` for data permission checking while uploading data. When task submitted by a data user, the `Primus Network Contract` requests permission from the assigned contract and then decides whether to continue or terminate the task based on the results returned.
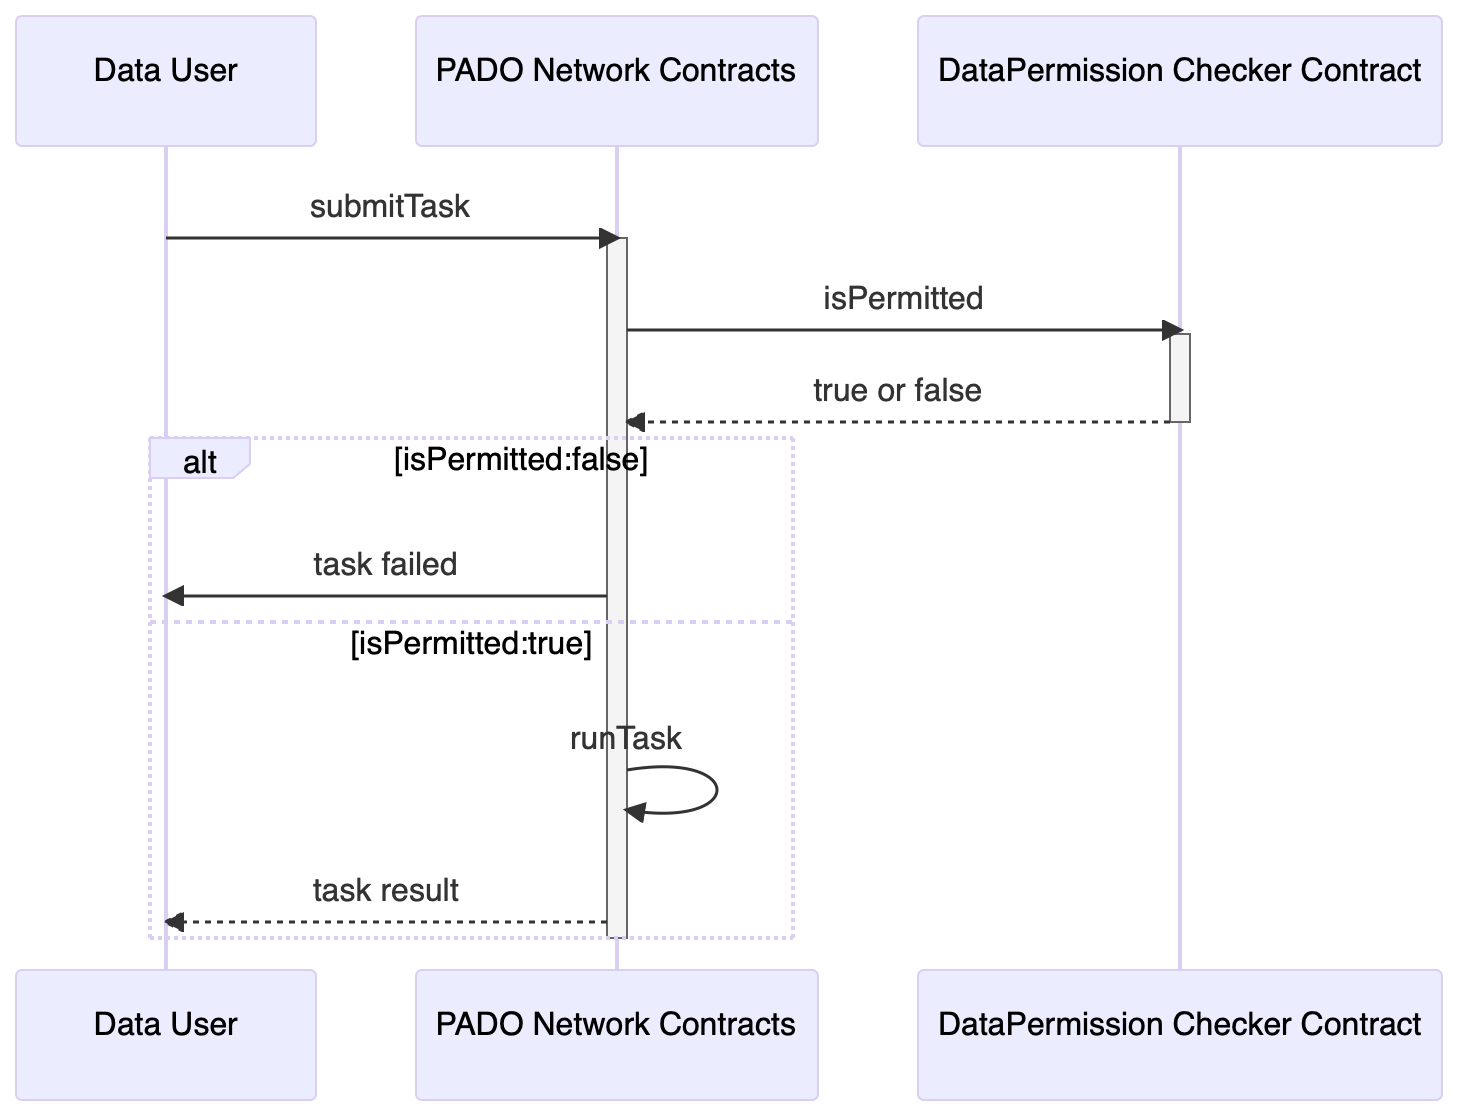
* IDataPermission.sol
interface IDataPermission { /** * @notice Check whether data user can buy the data * @param dataUser The data user to buy the data. * @param dataId The data id. * @return Return true if the data user can buy the data, else false. */ function isPermitted(address dataUser, bytes32 dataId) external returns (bool);;}
An example for checking data whitelisting can be found at [WhiteListDataPermission](https://github.com/pado-labs/pado-network-sdk/blob/main/demo/contracts/WhiteListDataPermission.sol)
* [Overview](https://docs.primuslabs.xyz/data-computation/build-with-primus/for-developers/sdk#overview)
* [Quick Start](https://docs.primuslabs.xyz/data-computation/build-with-primus/for-developers/sdk#quick-start)
* [Usage](https://docs.primuslabs.xyz/data-computation/build-with-primus/for-developers/sdk#usage)
* [Installation](https://docs.primuslabs.xyz/data-computation/build-with-primus/for-developers/sdk#installation)
* [Install package by npmx](https://docs.primuslabs.xyz/data-computation/build-with-primus/for-developers/sdk#install-package-by-npmx)
* [import wasm](https://docs.primuslabs.xyz/data-computation/build-with-primus/for-developers/sdk#import-wasm)
* [Getting Started](https://docs.primuslabs.xyz/data-computation/build-with-primus/for-developers/sdk#getting-started)
* [Utils](https://docs.primuslabs.xyz/data-computation/build-with-primus/for-developers/sdk#utils)
* [PadoNetworkContractClient](https://docs.primuslabs.xyz/data-computation/build-with-primus/for-developers/sdk#padonetworkcontractclient)
* [Type And Enum](https://docs.primuslabs.xyz/data-computation/build-with-primus/for-developers/sdk#type-and-enum)
* [Balance](https://docs.primuslabs.xyz/data-computation/build-with-primus/for-developers/sdk#balance-)
* [Solidity: IDataPermission](https://docs.primuslabs.xyz/data-computation/build-with-primus/for-developers/sdk#solidity-idatapermission)
---
# EigenLayer Operator Guides | primus
[Skip to main content](https://docs.primuslabs.xyz/data-computation/build-with-primus/for-workers/eigenlayer-operator-guides#docusaurus_skipToContent_fallback)
On this page

EigenLayer Operator Guides[](https://docs.primuslabs.xyz/data-computation/build-with-primus/for-workers/eigenlayer-operator-guides#eigenlayer-operator-guides "Direct link to EigenLayer Operator Guides")
------------------------------------------------------------------------------------------------------------------------------------------------------------------------------------------------------------
note
_Currently only the Ethereum holesky test network and AO are supported, and the Ethereum main network and other networks will be gradually supported in the future._
### Software/Hardware Requirement[](https://docs.primuslabs.xyz/data-computation/build-with-primus/for-workers/eigenlayer-operator-guides#softwarehardware-requirement "Direct link to Software/Hardware Requirement")
* vCPUs: 2+
* Memory: 4GiB+
* Storage: 100GiB+
### Install[](https://docs.primuslabs.xyz/data-computation/build-with-primus/for-workers/eigenlayer-operator-guides#install "Direct link to Install")
Please reference to official documentation: [Install Docker Engine](https://docs.docker.com/engine/install/)
.
Next, pull the image:
docker pull padolabs/pado-network:latest
Clone [pado-labs/pado-worker-setup](https://github.com/pado-labs/pado-worker-setup)
:
git clone https://github.com/pado-labs/pado-worker-setup.gitcd pado-worker-setup/pado-node
### Register as Operator on EigenLayer[](https://docs.primuslabs.xyz/data-computation/build-with-primus/for-workers/eigenlayer-operator-guides#register-as-operator-on-eigenlayer "Direct link to Register as Operator on EigenLayer")
**NOTE**: _You may skip this section if you are already a registered operator on the EigenLayer testnet and mainnet._
This setup step focuses on generating ecdsa key, bls key, and registering yourself as an operator on EigenLayer.
Complete the following steps according to [EigenLayer guide](https://docs.eigenlayer.xyz/eigenlayer/operator-guides/operator-installation)
:
* [Install EigenLayer CLI](https://docs.eigenlayer.xyz/eigenlayer/operator-guides/operator-installation#cli-installation)
.
* [Generate ECDSA and BLS keypair](https://docs.eigenlayer.xyz/eigenlayer/operator-guides/operator-installation#create-and-list-keys)
. You can also import existing ECDSA and BLS keys.
* **Fund some ETH to the ECDSA address** above generated. These ETH will be used to cover the gas cost for operator registration and doing task in the subsequent steps.
* [Register on EigenLayer as an operator](https://docs.eigenlayer.xyz/eigenlayer/operator-guides/operator-installation#operator-configuration-and-registration)
.
### Basic Configurations[](https://docs.primuslabs.xyz/data-computation/build-with-primus/for-workers/eigenlayer-operator-guides#basic-configurations "Direct link to Basic Configurations")
For the Ethernet Testnet(Holesky), copy `./config-files/.env.holesky` into `./.env`. Edit the `./.env` and update the values for your own setups.
**NOTE**: _If you plan to operate on Mainnet, then copy `.env.mainnet` instead of `.env.holesky`_.
#### Node Info[](https://docs.primuslabs.xyz/data-computation/build-with-primus/for-workers/eigenlayer-operator-guides#node-info "Direct link to Node Info")
Set a name to identify yourself, these will be used on the node itself and will be shown on performance metrics in the future.
NODE_NAME="Your Node Name"NODE_DESCRIPTION="Your Node Name's Description"
#### ECDSA and BLS Key[](https://docs.primuslabs.xyz/data-computation/build-with-primus/for-workers/eigenlayer-operator-guides#ecdsa-and-bls-key "Direct link to ECDSA and BLS Key")
Fill in the file path and password of the ECDSA and BLS key you have generated according to [Register as Operator on EigenLayer](https://docs.primuslabs.xyz/data-computation/build-with-primus/for-workers/eigenlayer-operator-guides#register-as-operator-on-eigenlayer)
.
ECDSA_KEY_FILE=/path/to/keyname.ecdsa.key.jsonECDSA_KEY_PASSWORD=''BLS_KEY_FILE=/path/to/keyname.bls.key.jsonBLS_KEY_PASSWORD=''
#### LHE Key[](https://docs.primuslabs.xyz/data-computation/build-with-primus/for-workers/eigenlayer-operator-guides#lhe-key "Direct link to LHE Key")
The LHE key is used for data sharing, use the following command to generate it.
bash ./run.sh generate-lhe-key [--key-name ]
The default output is `./keys/default.lhe.key.json`, you can specify the key name via `--key-name `.
**IMPORTANT!** Don't lose this file and save it to a safe place!
Next, fill in the file path of the LHE key you have generated.
LHE_KEY_PATH='/path/to/your/lhe.key.json'
### Storage[](https://docs.primuslabs.xyz/data-computation/build-with-primus/for-workers/eigenlayer-operator-guides#storage "Direct link to Storage")
Storing data on a contract is expensive, so we are currently using [Arweave](https://www.arweave.org/)
as the storage blockchain which is cheaper to store data.
By default, we can use Arweave directly. However, the Arweave ecosystem itself has [some issues](https://web3infra.dev/docs/arseeding/introduction/lightNode/#why-we-need-arseeding)
. In order **not** to suffer from these issues, we using [Arseeding](https://web3infra.dev/docs/arseeding/introduction/lightNode)
instead.
In order to use Arseeding, we need to first transfer/deposit some mainnet ETH to [everPay](https://app.everpay.io/)
, **which wallet corresponds to the ecdsa key previously mentioned above**.
**Alternatively**, you can also deposit on EverPay with the following command:
# here set your ethereum wallet pathexport WALLET_PATH=/path/to/your/ethereum/wallet.json# bash ./utils.sh everpay:deposit --chain --symbol --amount # e.g.:# bash ./utils.sh everpay:deposit --chain ethereum --symbol ETH --amount 0.0003
Meanwhile, you can check the balance on EverPay by:
bash ./utils.sh everpay:balance --account [--symbol ]
### Register to Primus AVS[](https://docs.primuslabs.xyz/data-computation/build-with-primus/for-workers/eigenlayer-operator-guides#register-to-primus-avs "Direct link to Register to Primus AVS")
If you have registered as an operator on the EigenLayer, you can register to the AVS of Primus.
**NOTE:** _Please contact [Primus Labs](https://discord.com/invite/pdrNxRrApX)
to add your wallet address to the WHITELIST before being able to successfully register!_
The following parameters are relevant. All have default values, you may set them according to your actual needs.
# Time after which the operator's signature becomes invalid. Default: 3600OPERATOR_SIGNATURE_EXPIRY_SECONDS=# The operator socket. Default: ""OPERATOR_SOCKET_IP_PORT=
Next, register the operator to AVS by:
# special a quorum id or quorum id list split by comma. e.g.:# bash ./run.sh el:register 0# bash ./run.sh el:register 0,1bash ./run.sh el:register [--quorum-id-list ]
**NOTE**: The Primus AVS now only supports quorum ids of `0`. The default value of `quorum-id-list` is `0`.
In general, you only need to perform the registry step once.
Once you have successfully registered to avs, you can get the operator id by:
bash ./run.sh el:get-operator-id
### Metrics (Optional)[](https://docs.primuslabs.xyz/data-computation/build-with-primus/for-workers/eigenlayer-operator-guides#metrics-optional "Direct link to Metrics (Optional)")
**NOTE:** _If you want to [monitor](https://docs.primuslabs.xyz/data-computation/build-with-primus/for-workers/eigenlayer-operator-guides#monitoring-optional)
some metrics, you should set `NODE_ENABLE_METRICS` to `true` to enable it_.
Metrics can be enabled/disabled by setting `NODE_ENABLE_METRICS` to `true/false`. The default value is `false`. You can also set a port by `NODE_METRICS_PORT` for the metrics service, which defaults to `9094`.
### Run Task[](https://docs.primuslabs.xyz/data-computation/build-with-primus/for-workers/eigenlayer-operator-guides#run-task "Direct link to Run Task")
Once successfully registered, you can start the task program.
bash ./run.sh task []
It will start a container named `pado-network[-name]` in the background. Some logs will output to `./logs/*.log`.
You can Stop/Start/Restart/Remove the container by running `docker stop/start/restart/rm pado-network[-name]`.
### Monitoring (Optional)[](https://docs.primuslabs.xyz/data-computation/build-with-primus/for-workers/eigenlayer-operator-guides#monitoring-optional "Direct link to Monitoring (Optional)")
If you have enabled [Metrics](https://docs.primuslabs.xyz/data-computation/build-with-primus/for-workers/eigenlayer-operator-guides#metrics-optional)
, you can start monitoring by following the steps below.
#### Switch folder[](https://docs.primuslabs.xyz/data-computation/build-with-primus/for-workers/eigenlayer-operator-guides#switch-folder "Direct link to Switch folder")
Switch to the `pado-worker-setup/monitoring` folder.
#### Configurations[](https://docs.primuslabs.xyz/data-computation/build-with-primus/for-workers/eigenlayer-operator-guides#configurations "Direct link to Configurations")
Config `./prometheus.yml`:
- job_name: "pado-node" scrape_interval: 5s static_configs: # FORMAT container:port # container: pado-node container name # port: NODE_METRICS_PORT - targets: ["pado-network:9094"]
Note:
* contrainer: If the node started with a name, such as `bash ./run.sh task somename`, you should update the **container** to `pado-network-somename`. The default value is `pado-network`.
* port: set by `NODE_METRICS_PORT`. The default value is `9094`.
#### Usage[](https://docs.primuslabs.xyz/data-computation/build-with-primus/for-workers/eigenlayer-operator-guides#usage "Direct link to Usage")
* Start
docker compose up -d
Ensure Prometheus is run in the same Docker network as Primus Network Node. Run the following command for this purpose:
docker network connect pado-network prometheus
You should be able to navigate to `http://host:3000` and login with `admin/admin` (default).
* Stop
docker compose stop
### Add New Workers (Optional)[](https://docs.primuslabs.xyz/data-computation/build-with-primus/for-workers/eigenlayer-operator-guides#add-new-workers-optional "Direct link to Add New Workers (Optional)")
**NOTE:** _Add New Workers is optional. If you want to execute Ethereum and AO tasks at the same time, you can execute the following command. Otherwise, you do not need to execute the following command._
#### Add AO Worker[](https://docs.primuslabs.xyz/data-computation/build-with-primus/for-workers/eigenlayer-operator-guides#add-ao-worker "Direct link to Add AO Worker")
Step 1: Switch to the `pado-worker-setup/pado-node` folder. Reference `./config-files/.env.ao`, mainly copy and append the following options and their value to `.env`:
ENABLE_AOAO_DATAREGISTRY_PROCESS_IDAO_NODEREGISTRY_PROCESS_IDAO_TASKS_PROCESS_IDAR_WALLET_PATH
Step 2: Set your own `AR_WALLET_PATH`. Reference [Arweave Wallet](https://docs.primuslabs.xyz/data-computation/build-with-primus/for-workers/ao-worker-guides#arweave-wallet)
.
Step 3: Register to Primus AO Process. Reference [Register to Primus AO Process](https://docs.primuslabs.xyz/data-computation/build-with-primus/for-workers/ao-worker-guides#register-to-pado-ao-process)
.
Step 4: Remove the old container and re-run the task. Reference [Run Task](https://docs.primuslabs.xyz/data-computation/build-with-primus/for-workers/eigenlayer-operator-guides#run-task)
.
You can see the full configuration options from `./config-files/.env.holesky-and-ao`.
### Utilities[](https://docs.primuslabs.xyz/data-computation/build-with-primus/for-workers/eigenlayer-operator-guides#utilities "Direct link to Utilities")
Utilities are tool scripts that does not need to be executed during startup.
#### Worker Withdraw[](https://docs.primuslabs.xyz/data-computation/build-with-primus/for-workers/eigenlayer-operator-guides#worker-withdraw "Direct link to Worker Withdraw")
As a worker, you'll get some tokens for each task you complete. Before executing the following script, switch to the `pado-worker-setup/pado-node` folder.
You can get the balance(free, locked) by:
bash ./run.sh worker:balance
and withdraw by (If no amount is specified, the entire free balance is withdrawn):
bash ./run.sh worker:withdraw [--amount ]
* [EigenLayer Operator Guides](https://docs.primuslabs.xyz/data-computation/build-with-primus/for-workers/eigenlayer-operator-guides#eigenlayer-operator-guides)
* [Software/Hardware Requirement](https://docs.primuslabs.xyz/data-computation/build-with-primus/for-workers/eigenlayer-operator-guides#softwarehardware-requirement)
* [Install](https://docs.primuslabs.xyz/data-computation/build-with-primus/for-workers/eigenlayer-operator-guides#install)
* [Register as Operator on EigenLayer](https://docs.primuslabs.xyz/data-computation/build-with-primus/for-workers/eigenlayer-operator-guides#register-as-operator-on-eigenlayer)
* [Basic Configurations](https://docs.primuslabs.xyz/data-computation/build-with-primus/for-workers/eigenlayer-operator-guides#basic-configurations)
* [Node Info](https://docs.primuslabs.xyz/data-computation/build-with-primus/for-workers/eigenlayer-operator-guides#node-info)
* [ECDSA and BLS Key](https://docs.primuslabs.xyz/data-computation/build-with-primus/for-workers/eigenlayer-operator-guides#ecdsa-and-bls-key)
* [LHE Key](https://docs.primuslabs.xyz/data-computation/build-with-primus/for-workers/eigenlayer-operator-guides#lhe-key)
* [Storage](https://docs.primuslabs.xyz/data-computation/build-with-primus/for-workers/eigenlayer-operator-guides#storage)
* [Register to Primus AVS](https://docs.primuslabs.xyz/data-computation/build-with-primus/for-workers/eigenlayer-operator-guides#register-to-primus-avs)
* [Metrics (Optional)](https://docs.primuslabs.xyz/data-computation/build-with-primus/for-workers/eigenlayer-operator-guides#metrics-optional)
* [Run Task](https://docs.primuslabs.xyz/data-computation/build-with-primus/for-workers/eigenlayer-operator-guides#run-task)
* [Monitoring (Optional)](https://docs.primuslabs.xyz/data-computation/build-with-primus/for-workers/eigenlayer-operator-guides#monitoring-optional)
* [Switch folder](https://docs.primuslabs.xyz/data-computation/build-with-primus/for-workers/eigenlayer-operator-guides#switch-folder)
* [Configurations](https://docs.primuslabs.xyz/data-computation/build-with-primus/for-workers/eigenlayer-operator-guides#configurations)
* [Usage](https://docs.primuslabs.xyz/data-computation/build-with-primus/for-workers/eigenlayer-operator-guides#usage)
* [Add New Workers (Optional)](https://docs.primuslabs.xyz/data-computation/build-with-primus/for-workers/eigenlayer-operator-guides#add-new-workers-optional)
* [Add AO Worker](https://docs.primuslabs.xyz/data-computation/build-with-primus/for-workers/eigenlayer-operator-guides#add-ao-worker)
* [Utilities](https://docs.primuslabs.xyz/data-computation/build-with-primus/for-workers/eigenlayer-operator-guides#utilities)
* [Worker Withdraw](https://docs.primuslabs.xyz/data-computation/build-with-primus/for-workers/eigenlayer-operator-guides#worker-withdraw)
---
# Overview | primus
[Skip to main content](https://docs.primuslabs.xyz/data-computation/build-with-primus/overview#docusaurus_skipToContent_fallback)
On this page

Overview[](https://docs.primuslabs.xyz/data-computation/build-with-primus/overview#overview "Direct link to Overview")
------------------------------------------------------------------------------------------------------------------------
Here we'll explain everything about how to become a Primus worker, and how to create privacy-preserving applications with Primus' SDK as a developer.
The Primus worker is an essential role within Primus network, and undertakes the important responsibility of providing idle computing power for cryptographic computation such as zkFHE. The capability can be invoked by developers via Primus SDK.
Different types of worker guides are provided to facilitate zkFHE computations on multiple public blockchains like Ethereum and AO. In particular, Primus has integrated with EigenLayer and you may [register to Primus AVS](https://docs.primuslabs.xyz/data-computation/build-with-primus/for-workers/eigenlayer-operator-guides)
and become an EigenLayer operator to run the zkFHE node.
The SDK is the standard way to use zkFHE technique provided by Primus workers. It adopts iterative update, currently supports peer-to-peer data-sharing computation based on linear homomorphic encryption (LHE), and will gradually increase ZK-based verifiability and various FHE computation types in the future.
* [Overview](https://docs.primuslabs.xyz/data-computation/build-with-primus/overview#overview)
---
# Confidential DeFi | primus
[Skip to main content](https://docs.primuslabs.xyz/data-computation/use-cases/defi#docusaurus_skipToContent_fallback)
Confidential DeFi
=================
Darkpool is one of the significant trade models used in traditional finance. A dark pool is a financial trading venue where investors can buy and sell financial instruments, such as equities and derivatives, without revealing their trading intention. When an investor submits a buy or sell order into the dark pool the order is not disclosed for other market participants to view. Rather, the order will wait “in the dark” until it is either removed by the owner, or until a matching counterparty order is discovered, at which point a trade will execute between the buyer and the seller (the exact mechanism used for matching orders varies between venues).
Protocols were introduced for three auction mechanisms commonly used in financial markets: (i) a continuous double auction (CDA), where buyers and sellers can post bids and offers at any time and a limit order book is used to perform continuous matching; (ii) a periodic double auction, where buyers and sellers first submit bids and offers during an open auction period before a single clearing price is calculated for all matches; and (iii) a periodic volume match, where orders submitted during the open period contain a value for quantity only (i.e., orders contain no limit price) and all matches trade at a single price determined by some external reference value (e.g., the current mid-price on the primary exchange).
---
# Confidential ERC-20 | primus
[Skip to main content](https://docs.primuslabs.xyz/data-computation/use-cases/confidential-erc20#docusaurus_skipToContent_fallback)
Confidential ERC-20
===================
Coming soon...
---
# Data Computation Network | primus
[Skip to main content](https://docs.primuslabs.xyz/data-computation/understand-zkfhe-network#docusaurus_skipToContent_fallback)
On this page

Data Computation Network[](https://docs.primuslabs.xyz/data-computation/understand-zkfhe-network#data-computation-network "Direct link to Data Computation Network")
----------------------------------------------------------------------------------------------------------------------------------------------------------------------
### Overview[](https://docs.primuslabs.xyz/data-computation/understand-zkfhe-network#overview "Direct link to Overview")
The potential value of data is increasingly recognized by enterprises and individuals. People's daily behavioral data provides corrections and feedback for different technology products, creating economic value and social impact. The effective mining of data value and the avoidance of individual privacy violations as much as possible are the main pain points in the process of data monetization.
Existing systems built from either zero-knowledge proofs, multi-party computations or other privacy-enhancing techniques cannot fully resolve the paradox of privacy protection and utilization of sensitive data, and various computational issues during data processing require further reliable integrity measures.
Leveraging the benefits of traceability and programmability from blockchain-like techniques, Primus' zkFHE protocol enables an open infrastructure for librating data value with verifiable and confidential data processes while individual and organization developers can selectively contribute with either security, functional scalability and effectivity to the network.
The core advantages of zkFHE lie in its natural abilities from both zero-knowledge proofs and fully homomorphic encryptions, to perform customizable computations on encrypted data, with the correctness guaranteed by validity proofs for the whole computation circuits. The validity proofs solids the whole computation framework with cryptographic and computational trustlessness to facilitate the necessary security requirements of applications.
### Roles in Data Computation Network[](https://docs.primuslabs.xyz/data-computation/understand-zkfhe-network#roles-in-data-computation-network "Direct link to Roles in Data Computation Network")
#### Data Provider[](https://docs.primuslabs.xyz/data-computation/understand-zkfhe-network#data-provider "Direct link to Data Provider")
A _data provider_ is an individual or organization that provides computing data to Primus Network. The data from the data provider is encrypted by the FHE algorithm and then uploaded to decentralized storage blockchains such as Arweave and Filecoin. A data provider can receive a portion of the computation fee for the data usage.
#### Worker[](https://docs.primuslabs.xyz/data-computation/understand-zkfhe-network#worker "Direct link to Worker")
A _worker_ is a node of Primus data computation network, providing computing resources, running the zkFHE algorithm on encrypted data, and providing with a confidential computing environment and resources. A worker needs to generate a zero-knowledge proof while computing.
A worker also needs to provide the Data Encryption Public Key to a data provider to encrypt the data, and meanwhile, it needs to re-encrypt the confidential computation results into results that only the caller can decrypt.
zkFHE algorithm naturally guarantees data confidentiality and computation integrity. Workers can earn computation fees from the successful execution of a computation task.
#### Caller[](https://docs.primuslabs.xyz/data-computation/understand-zkfhe-network#caller "Direct link to Caller")
A _caller_ is an individual or organization that uses the computation capability and data resources of the network. The caller can specify the encrypted data uploaded by the data provider to initiate a computation task and obtain the result from the task execution. Caller shall pay for the computation service.
### Network Architecture[](https://docs.primuslabs.xyz/data-computation/understand-zkfhe-network#network-architecture "Direct link to Network Architecture")
With comprehensive consideration of decentralization, security and scalability, the network is designed to separate consensus and computation for scalability. Workers mainly use the zkFHE algorithm to run confidential computations and generate proofs for integrity assurance. The proofs are verified through Primus contracts. Meanwhile, multiple modules including worker management, data management, task management, fee management, and worker incentives, compose Primus contracts.
#### Components of Primus Data Computation Network[](https://docs.primuslabs.xyz/data-computation/understand-zkfhe-network#components-of-primus-data-computation-network "Direct link to Components of Primus Data Computation Network")
**Worker**
As mentioned [here](https://docs.primuslabs.xyz/data-computation/understand-zkfhe-network#001)
, workers are the key components that support confidential computation tasks to maintain the network liveness.
**Primus Contracts**
Primus Contracts are a collection of blockchain-like smart contracts deployed in multiple blockchains, including Ethereum, L2s, AO, and others. Primus Contracts consist of multiple modules including worker management, data management, task management, fee management, worker incentives, etc.
**Primus Network SDK**
Primus Network SDK is a collection of developer tools. Developers can leverage the data computation capability of Primus Network through this SDK and implement various privacy-centric applications that can be alive in the Network.
**Primus Scan**
Primus Scan is a user interface for exploring the information of Primus data computation network. Through Primus Scan, one can find the details about workers, computable data, tasks, etc.
#### Logical Architecture[](https://docs.primuslabs.xyz/data-computation/understand-zkfhe-network#logical-architecture "Direct link to Logical Architecture")
The following figures show the logical architecture within the network.
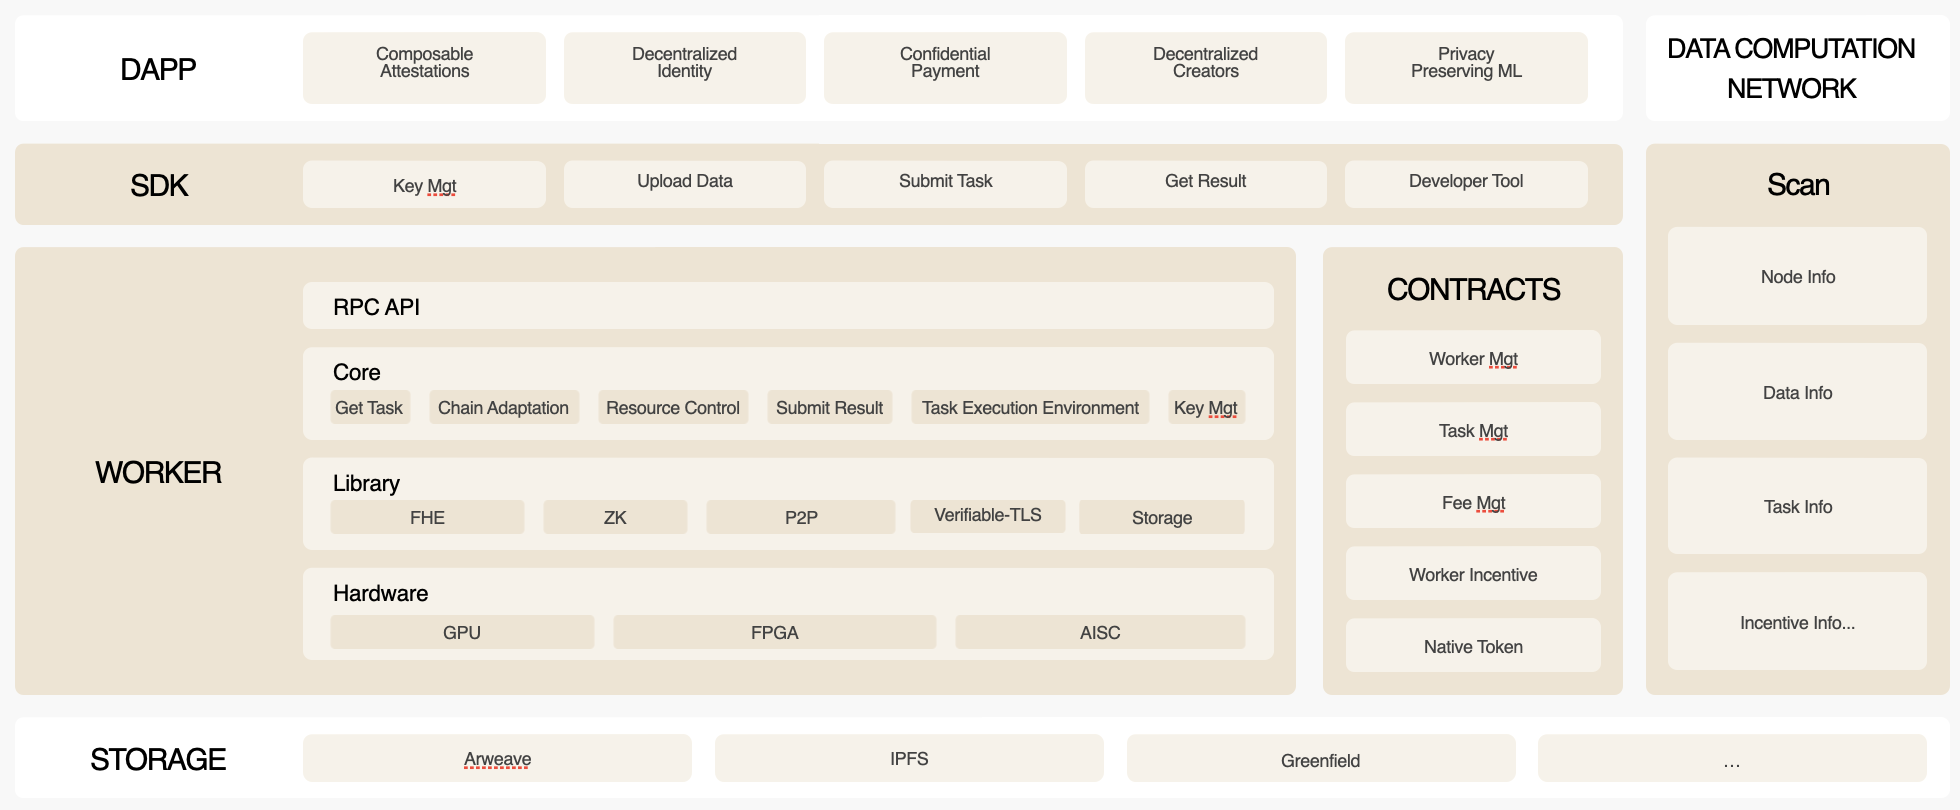
#### Workflow[](https://docs.primuslabs.xyz/data-computation/understand-zkfhe-network#workflow "Direct link to Workflow")
According to the classification of data encryption keys, the patterns of FHE algorithms execution within Primus data computation network, can be divided into the following three categories. One may find more explanation about the three types of [application modes](https://docs.primuslabs.xyz/data-computation/use-cases/overview#use-case-variants)
that adapt to different types of callers.
* Threshold FHE: Use the shared public generated by multiple Workers to encrypt data. Note this is a technical representative of joint-worker mode.
* Single-Key FHE: Use the user's own key to encrypt data. Note this is a technical representative of single-user mode.
* Multi-Key FHE: Use the public keys of multiple Workers to encrypt data. Note this is a technical representative of selective multi-worker mode. We emphasis the name of "Multi-Key FHE" here is differ from the Multi-Key FHE algorithm in academia.
Core workflow can be divided into three categories accordingly.
##### 1\. Threshold FHE Core Workflow[](https://docs.primuslabs.xyz/data-computation/understand-zkfhe-network#1-threshold-fhe-core-workflow "Direct link to 1. Threshold FHE Core Workflow")
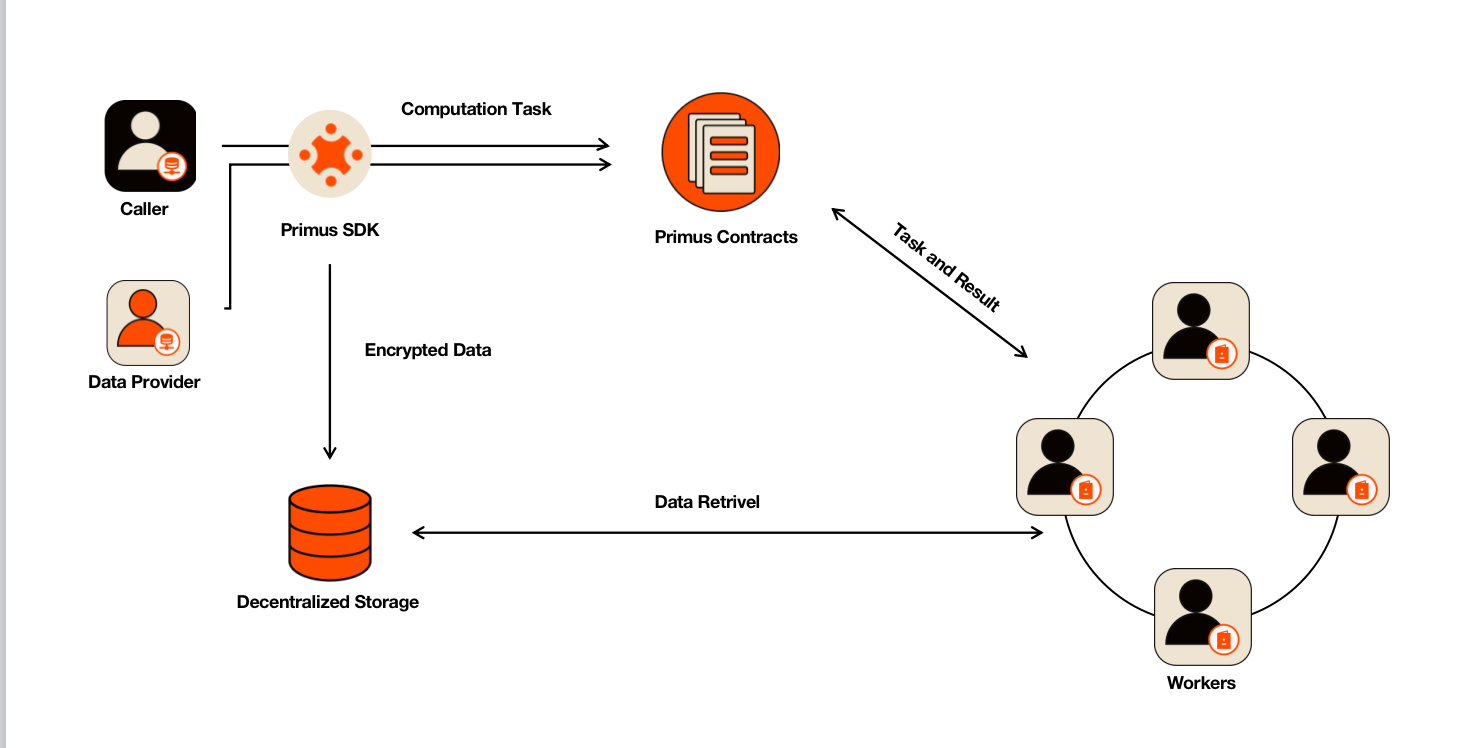
**Worker Registration**
An eligible worker must be registered with the worker management module of Primus contracts. Confidential computation tasks shall only be dispatched to successfully registered workers. The registered information includes name, description, owner address, machine resources, RPC address and port, worker's public key, etc.
**Task Submission and Data Encryption Public Key Generation**
A caller can submit a confidential computing task through an application developed based on Primus Network SDK. To launch a confidential computation task, it is essential to pay the required fees for the computation and data resources. When a caller initiates a task, he shall publish his own public key, for which the final encrypted computation result is only derivable with regard to the private key paired to that public key.
Then the Primus Network SDK forwards the `submit_task` request to the task management module. The task management module selects a group of workers who generate the data encryption public keys, and another group of workers who execute the task. In practice, the two worker groups can be the same. The first group of workers returns the data encryption public keys to the task management contract.
**Data Upload**
A data provider uses Primus Network SDK to obtain the data encryption public keys required by the task from the task management module. The data provider uses the FHE algorithm with those data encryption public keys to encrypt the data and upload the ciphertexts to a storage blockchain such as Arweave.
**zkFHE Computation**
The Workers who are designated to execute the task shall get the task information from the task management module, and also retrieve the encrypted data from the storage blockchain. They execute the zkFHE computation and output both the encrypted result and a validity proof.
**Re-encryption of Result**
The Workers who generate the data encryption public keys shall re-encrypt the encrypted result after the task execution, using the caller's public key, so that only the caller can decrypt the result correctly.
**Proof Verification and Fee Settlement**
After the task execution, workers upload the encrypted result with the validity proof to the task management module. After the task management module successfully verifies the proof, it will invoke the fee management module for fee settlement. The fee will be distributed to the data providers and workers according to the requirements specified in the task.
**Decryption of Result**
The caller uses its own private key through the FHE algorithm of Primus Network SDK for decryption, and obtains the raw result.
##### 2\. Single-Key FHE Core Workflow[](https://docs.primuslabs.xyz/data-computation/understand-zkfhe-network#2-single-key-fhe-core-workflow "Direct link to 2. Single-Key FHE Core Workflow")
Single-Key FHE core workflow is similar to the Threshold FHE core workflow, with the following main differences:
* The Caller and Data Provider are the same person.
* When selecting Workers, you only need to select the Workers that execute the task, not the Workers that generate the data encryption key. This is because the Single-Key FHE uses the user's own key to encrypt data.
* The Result Re-encryption process is not required because the data is encrypted using its own key.
##### 3\. Multi-Key FHE Core Workflow[](https://docs.primuslabs.xyz/data-computation/understand-zkfhe-network#3-multi-key-fhe-core-workflow "Direct link to 3. Multi-Key FHE Core Workflow")
**Register Worker**
The Multi-Key FHE register worker process is the same as Threshold FHE Register Worker.
**Get Workers Public Keys and Upload Data**
Data Provider submits data upload request to Task Management of Primus contracts. The Task Management selects which Workers' public keys will be used to encrypt the data, and these workers will be responsible for executing tasks based on this data.
And Data Provider uses Primus Network SDK to obtain the Workers' public keys required by the data upload request from Task Management of Primus contacts.
Then Data Provider use the FHE algorithm of Primus Network SDK and the Workers' public keys to encrypt the data and upload it to Storage Blockchain such as Arweave and Filecoin.
**Submit Task**
Caller can submit a confidential computing task through an application developed based on Primus Network SDK. Initiating a confidential computing task requires paying a certain amount of computing and data fees. When Caller initiates a task, it will pass its own Caller Public Key, and the final encrypted computation result is only the private key corresponding to the Caller Public Key can be decrypted.
**zkFHE Computing**
The Multi-Key zkFHE Computing process is the same as Threshold zkFHE Computing, but run different zkFHE algorithms.
**Proof Verify and Fee Settlement**
The Multi-Key FHE Proof Verify and Fee Settlement process is the same as Threshold FHE Proof Verify and Fee Settlement.
**Decrypt Result**
The Multi-Key FHE Decrypt Result process is the same as Threshold FHE Decrypt Result.
* [Data Computation Network](https://docs.primuslabs.xyz/data-computation/understand-zkfhe-network#data-computation-network)
* [Overview](https://docs.primuslabs.xyz/data-computation/understand-zkfhe-network#overview)
* [Roles in Data Computation Network](https://docs.primuslabs.xyz/data-computation/understand-zkfhe-network#roles-in-data-computation-network)
* [Data Provider](https://docs.primuslabs.xyz/data-computation/understand-zkfhe-network#data-provider)
* [Worker](https://docs.primuslabs.xyz/data-computation/understand-zkfhe-network#worker)
* [Caller](https://docs.primuslabs.xyz/data-computation/understand-zkfhe-network#caller)
* [Network Architecture](https://docs.primuslabs.xyz/data-computation/understand-zkfhe-network#network-architecture)
* [Components of Primus Data Computation Network](https://docs.primuslabs.xyz/data-computation/understand-zkfhe-network#components-of-primus-data-computation-network)
* [Logical Architecture](https://docs.primuslabs.xyz/data-computation/understand-zkfhe-network#logical-architecture)
* [Workflow](https://docs.primuslabs.xyz/data-computation/understand-zkfhe-network#workflow)
---
# Confidential Transaction | primus
[Skip to main content](https://docs.primuslabs.xyz/data-computation/use-cases/joint-worker-mode/confidential-tx#docusaurus_skipToContent_fallback)
On this page

Confidential Transaction
========================
**_Confidential transactions_** (CT) in blockchain are a cryptographic method used to enhance privacy by keeping the details of transactions hidden from the public while still allowing verification of the transaction's validity. Key Features of confidential transactions include:
* Hidden Transaction Amounts: Confidential Transactions conceal the amounts being transferred in a transaction, ensuring that only the sender and receiver know the actual amounts. This is achieved through cryptographic techniques that obfuscate the amounts while still allowing network nodes to validate the transaction.
* Verifiable Transactions: Despite hiding the transaction amounts, CTs allow network participants to verify the validity of transactions. This means that nodes can ensure no new money is created out of thin air (i.e., no double-spending) without knowing the exact amounts involved.
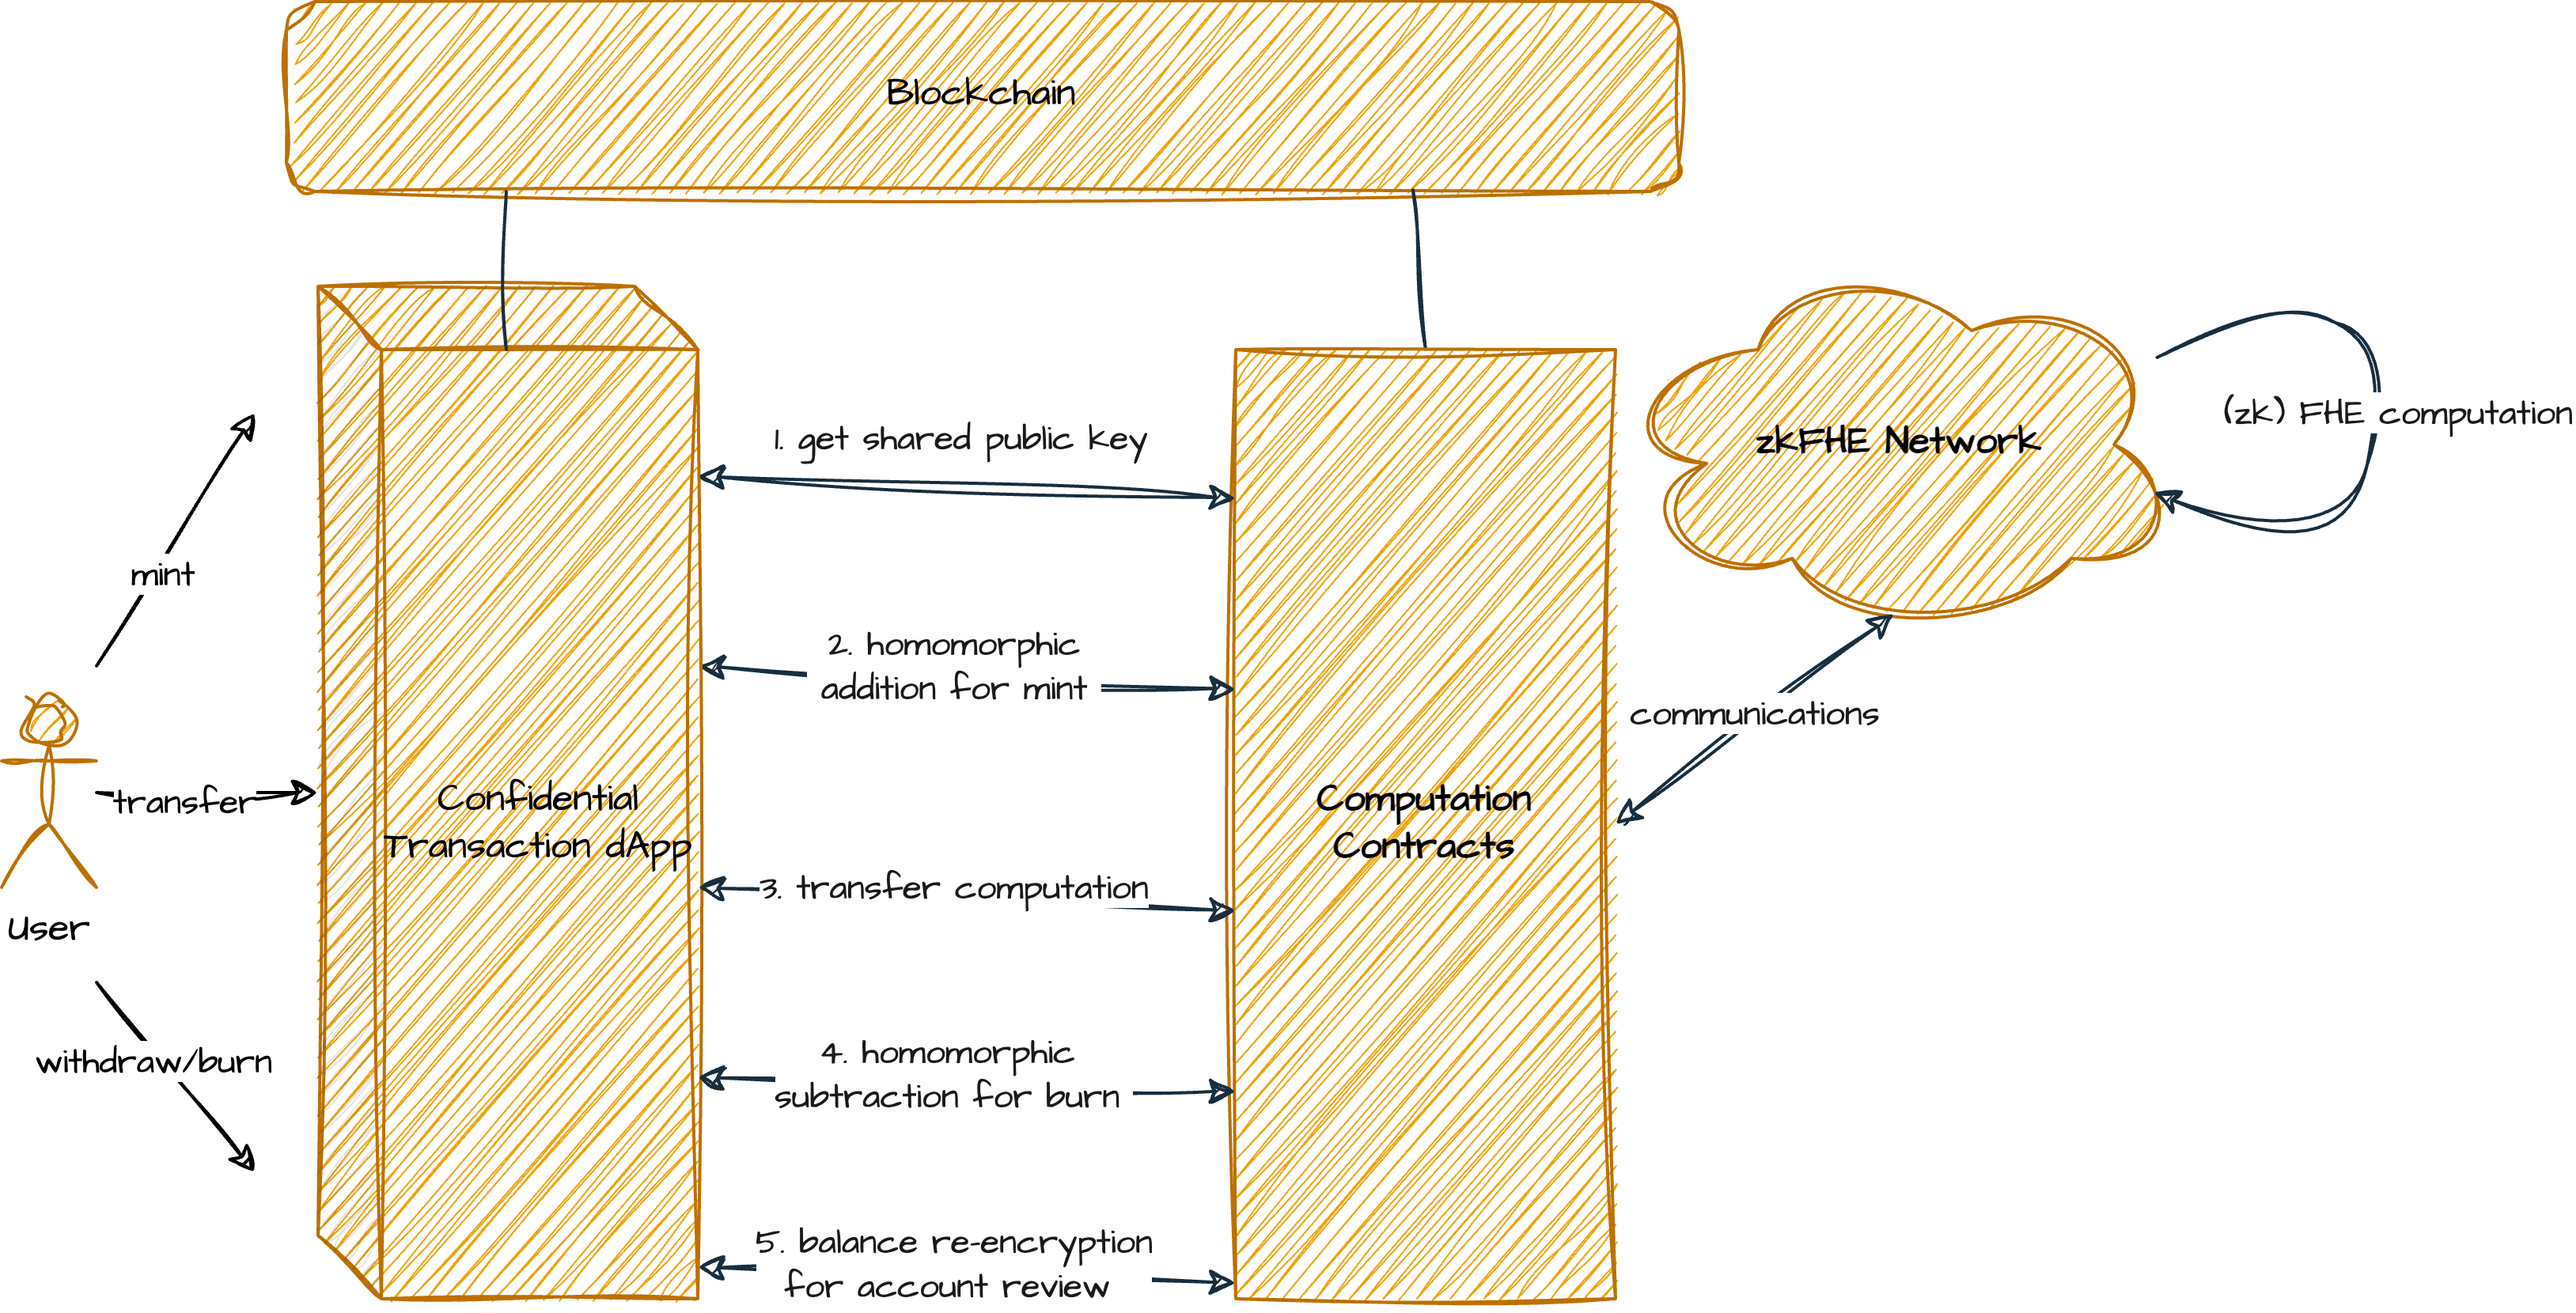
Setup[](https://docs.primuslabs.xyz/data-computation/use-cases/joint-worker-mode/confidential-tx#setup "Direct link to Setup")
--------------------------------------------------------------------------------------------------------------------------------
At the beginning, the confidential transaction dApp shall communicate with zkFHE network and require a subset of zkFHE nodes to create a shared public key **PK**. Note the account balances are encrypted as unsigned integers.
Mint[](https://docs.primuslabs.xyz/data-computation/use-cases/joint-worker-mode/confidential-tx#mint "Direct link to Mint")
-----------------------------------------------------------------------------------------------------------------------------
Minting tokens can be implemented by encrypting the mint amount with the shared public key, and added to the encrypted account balance. Note an account registration is also enabled by encrypting the first minted tokens as the account balance.
Burn[](https://docs.primuslabs.xyz/data-computation/use-cases/joint-worker-mode/confidential-tx#burn "Direct link to Burn")
-----------------------------------------------------------------------------------------------------------------------------
Note if the confidential transaction application is intended to handle an external plain token asset, i.e., wrapping the public asset into a private asset, we shall allow the private asset to be burned for a withdrawal on the plain asset. Furthermore, any obfuscation measure like a random mint/burn is meaningless because the functions performed on the plain asset will always disclose the amount.
The burnt amount shall be homomorphically subtracted from the encrypted account balance. Also, the burnt amount shall be threshold decrypted and revealed to reduce the value from the total supply.
Transfer[](https://docs.primuslabs.xyz/data-computation/use-cases/joint-worker-mode/confidential-tx#transfer "Direct link to Transfer")
-----------------------------------------------------------------------------------------------------------------------------------------
Transferring tokens involves several steps to ensure security and confidentiality. Initially, the encrypted amount to be transferred is verified as a positive value. Then we shall confirm that the sender’s balance is sufficient to cover the amount, preventing overspending. Finally, the transfer is completed by homomorphically subtracting the amount from the sender’s balance and adding it to the recipient’s balance.
View Account Balance[](https://docs.primuslabs.xyz/data-computation/use-cases/joint-worker-mode/confidential-tx#view-account-balance "Direct link to View Account Balance")
-----------------------------------------------------------------------------------------------------------------------------------------------------------------------------
To enable a user to view his balance, the dApp instructs the zkFHE network to re-encrypt the balance from the network's shared public key to the user's public key. This is achieved directly through a simple view function. However, this view function requires authentication by having the user provide a signature when calling the contract method, ensuring the network can verify the user’s ownership of the balance.
* [Setup](https://docs.primuslabs.xyz/data-computation/use-cases/joint-worker-mode/confidential-tx#setup)
* [Mint](https://docs.primuslabs.xyz/data-computation/use-cases/joint-worker-mode/confidential-tx#mint)
* [Burn](https://docs.primuslabs.xyz/data-computation/use-cases/joint-worker-mode/confidential-tx#burn)
* [Transfer](https://docs.primuslabs.xyz/data-computation/use-cases/joint-worker-mode/confidential-tx#transfer)
* [View Account Balance](https://docs.primuslabs.xyz/data-computation/use-cases/joint-worker-mode/confidential-tx#view-account-balance)
---
# Blind Auction | primus
[Skip to main content](https://docs.primuslabs.xyz/data-computation/use-cases/joint-worker-mode/auction#docusaurus_skipToContent_fallback)
On this page

Blind Auction
=============
A blind auction is a type of auction where bidders submit their bids without knowing the bids of other participants. The highest bidder typically wins the auction, but the process of submitting bids and determining the winner can vary. Key characteristics of a blind auction include:
1. Sealed Bids: Bids are submitted in a sealed manner, meaning that no bidder knows the amount bid by others.
2. One-Time Submission: Bidders submit their bids once, without any opportunity to adjust their bids based on others' offers.
3. Winner Determination: The auctioneer opens all bids simultaneously after the submission period ends and determines the winner based on the highest bid (or other predefined criteria).
Integrating blind auctions with blockchain and smart contracts offers significant improvements in terms of security, transparency, and trust, making it an attractive option for various industries and applications. However, the privacy of blind auction is unable to be achieved without cryptographic techniques.
FHE-based Blind Auction[](https://docs.primuslabs.xyz/data-computation/use-cases/joint-worker-mode/auction#fhe-based-blind-auction "Direct link to FHE-based Blind Auction")
------------------------------------------------------------------------------------------------------------------------------------------------------------------------------
We explain a basic solution that integrates blind auction with zkFHE network.
### Setup[](https://docs.primuslabs.xyz/data-computation/use-cases/joint-worker-mode/auction#setup "Direct link to Setup")
The blind auction contract communicates with zkFHE network and requires a subset of zkFHE nodes to create a shared public key **PK**.
### Bidding Phase[](https://docs.primuslabs.xyz/data-computation/use-cases/joint-worker-mode/auction#bidding-phase "Direct link to Bidding Phase")
Bid Submission: Participants submit their bids in a sealed manner. This can be achieved by encrypting each bid with the shared public key **PK**.
Deposit/Collateral: Participants may be required to lock a certain amount of funds or tokens in the smart contract as a guarantee of their bid.
### Bid Closing[](https://docs.primuslabs.xyz/data-computation/use-cases/joint-worker-mode/auction#bid-closing "Direct link to Bid Closing")
The bidding phase ends at a predefined time, and no further bids are accepted. Optionally, in some blind auction implementations, participants may need to reveal their bids prior to determining the winner. This can be achieved by threshold decrypting the bids with zkFHE network.
### Winner Determination[](https://docs.primuslabs.xyz/data-computation/use-cases/joint-worker-mode/auction#winner-determination "Direct link to Winner Determination")
The zkFHE network evaluates all submitted bids according to the auction rules and this can be achieved by homomorphically comparing and sorting the bids. For example, it identifies the highest bid in a first-price sealed-bid auction or the second-highest bid in a Vickrey auction.
The winning bid shall be revealed by threshold decrypting the bid. The blind auction contract announces the winner and the winning bid. This information is recorded on the blockchain for transparency.
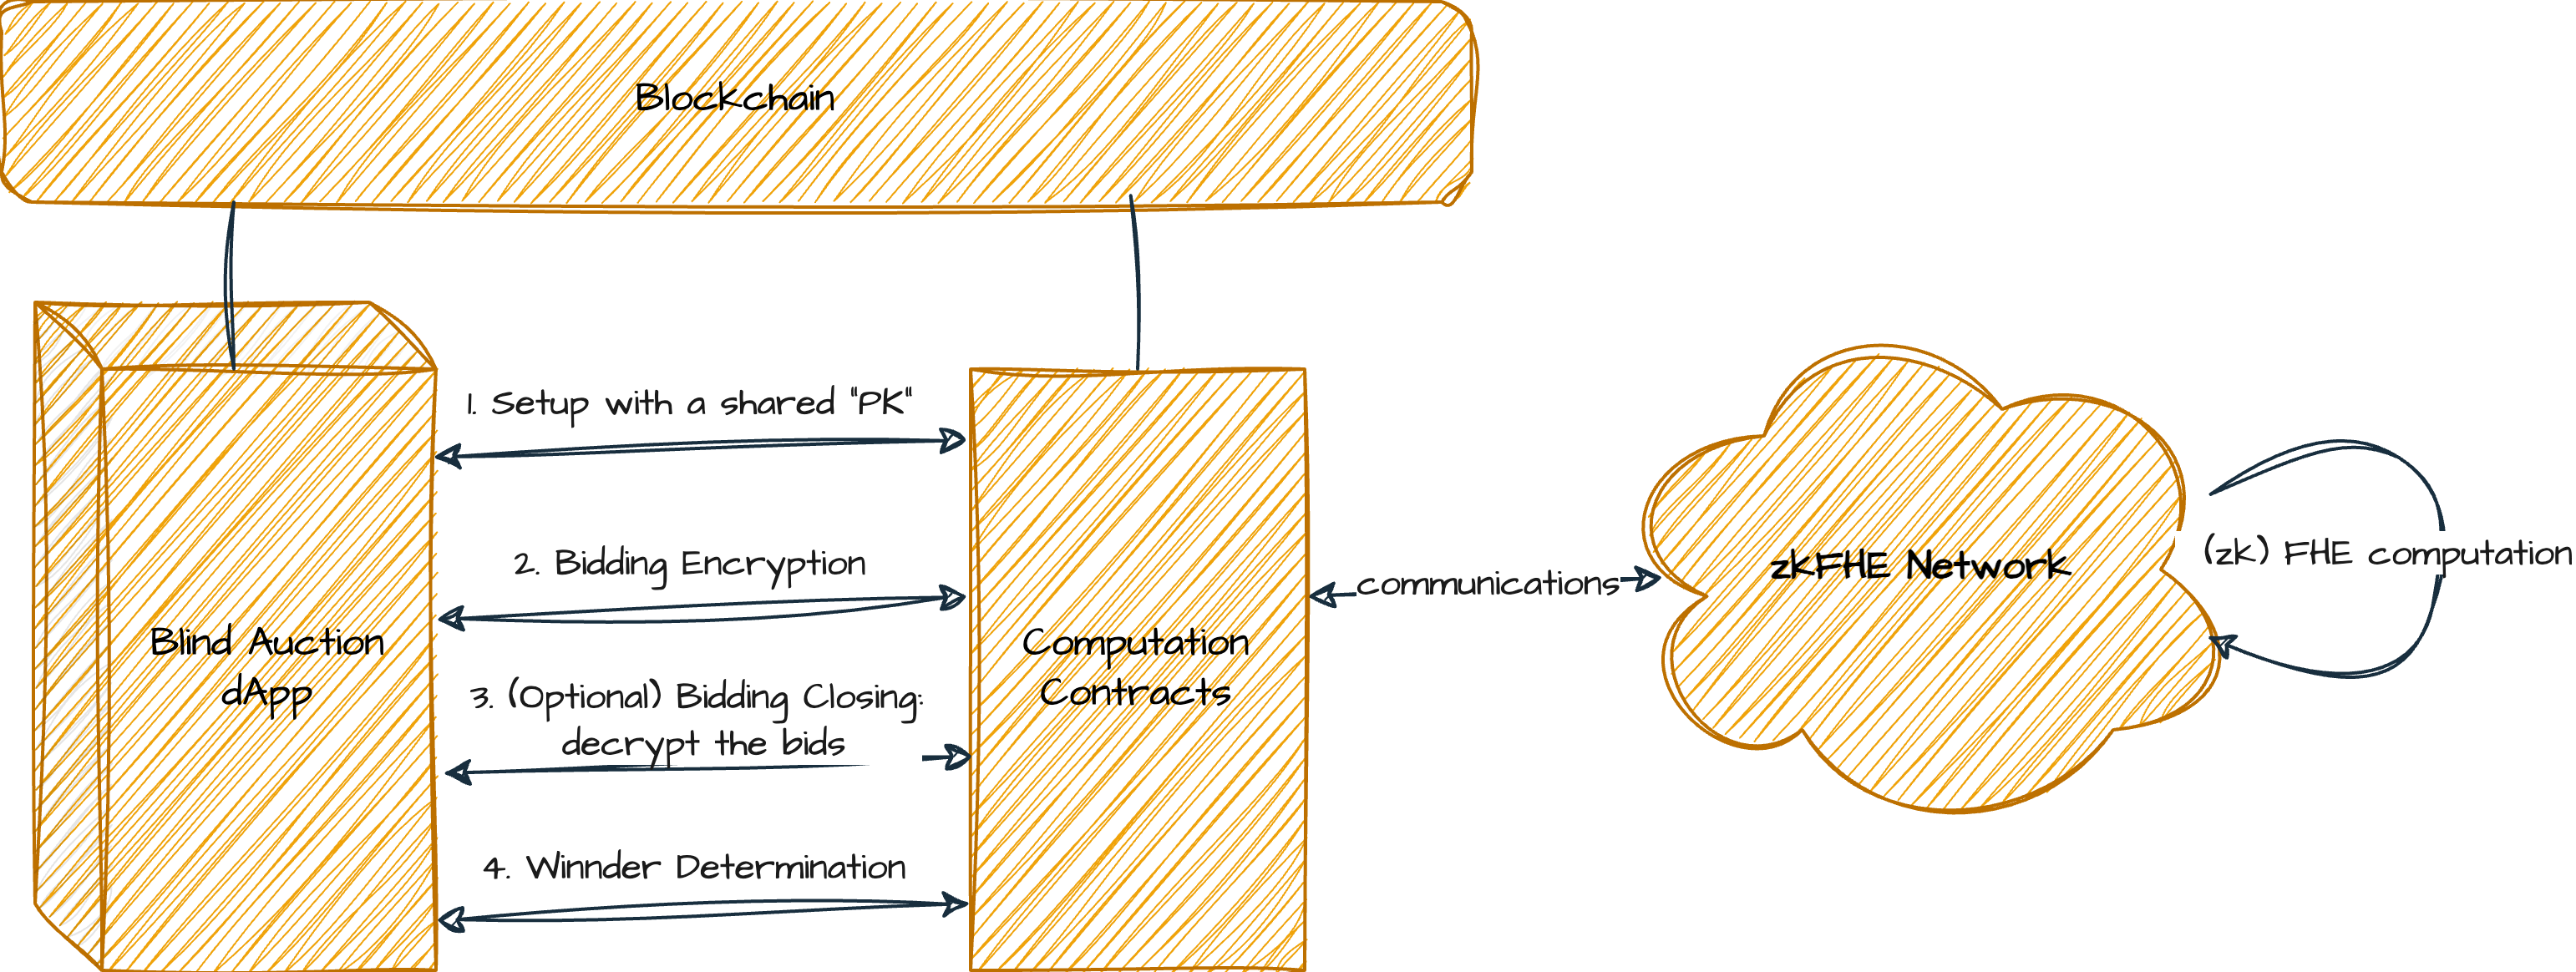
* [FHE-based Blind Auction](https://docs.primuslabs.xyz/data-computation/use-cases/joint-worker-mode/auction#fhe-based-blind-auction)
* [Setup](https://docs.primuslabs.xyz/data-computation/use-cases/joint-worker-mode/auction#setup)
* [Bidding Phase](https://docs.primuslabs.xyz/data-computation/use-cases/joint-worker-mode/auction#bidding-phase)
* [Bid Closing](https://docs.primuslabs.xyz/data-computation/use-cases/joint-worker-mode/auction#bid-closing)
* [Winner Determination](https://docs.primuslabs.xyz/data-computation/use-cases/joint-worker-mode/auction#winner-determination)
---
# Dark Pool | primus
[Skip to main content](https://docs.primuslabs.xyz/data-computation/use-cases/joint-worker-mode/darkpool#docusaurus_skipToContent_fallback)
On this page

Dark Pool
=========
A blockchain-based dark pool is a private financial exchange designed for trading securities, derivatives, or other financial instruments while maintaining high levels of privacy and anonymity. Unlike traditional exchanges where order books and trade details are publicly visible, dark pools operate in secrecy, revealing minimal information to the public.
By integrating blockchain technology, these dark pools enhance trustless and programmability through smart contracts and decentralized protocols. One major concern is that implementing the core features to protect the transaction information remains a big challenge.
FHE-based Solution[](https://docs.primuslabs.xyz/data-computation/use-cases/joint-worker-mode/darkpool#fhe-based-solution "Direct link to FHE-based Solution")
----------------------------------------------------------------------------------------------------------------------------------------------------------------
With FHE and zkFHE, the dark pool can be enabled allowing participants to trade without disclosing their identities or the specifics of their orders. We explain the key steps of the idea.
### Initial Setup[](https://docs.primuslabs.xyz/data-computation/use-cases/joint-worker-mode/darkpool#initial-setup "Direct link to Initial Setup")
Let's assume a dApp `DP` provides the core features of a dark pool. At the beginning, the dApp shall communicate with zkFHE network and require a subset of zkFHE nodes to create a shared public key **PK**.
### Order Submission[](https://docs.primuslabs.xyz/data-computation/use-cases/joint-worker-mode/darkpool#order-submission "Direct link to Order Submission")
For each new order, the participant shall request an encryption computation prior to submitting it to the dark pool. This can be achieved by encrypting the order field with **PK**. This includes encrypting details such as asset type, quantity, and price. For example, `Enc(price, PK)` is part of the encrypted order, where `price` is a _signed number_ representing a buy order or a sell order.
### Matching and Execution[](https://docs.primuslabs.xyz/data-computation/use-cases/joint-worker-mode/darkpool#matching-and-execution "Direct link to Matching and Execution")
The matching process shall be designed to match buy and sell orders based on parameters such as price and quantity. This can be enabled by periodically requesting a matching computation from zkFHE network. Typical computations for matching orders on the same asset type are:
delta_price = Enc(price1, PK) + Enc(price2, PK)matched = Compare(delta_price, zero); // an encrypted boolean value
The operations check if the buy and sell orders can match the deal by comparing the signed addition value with the encrypted zero, and threshold decrypting `matched` to check the truth.
### Account Settlement[](https://docs.primuslabs.xyz/data-computation/use-cases/joint-worker-mode/darkpool#account-settlement "Direct link to Account Settlement")
Once matching orders are found, the matched quantities are `mq= Min(Enc(quantity1, PK), Enc(quantity2, PK))`. The dark pool executes the trades by adjusting the encrypted balances of the participants with `mq`. The execution process involves updating encrypted account balances with homomorphically addition or subtraction without decrypting any data.
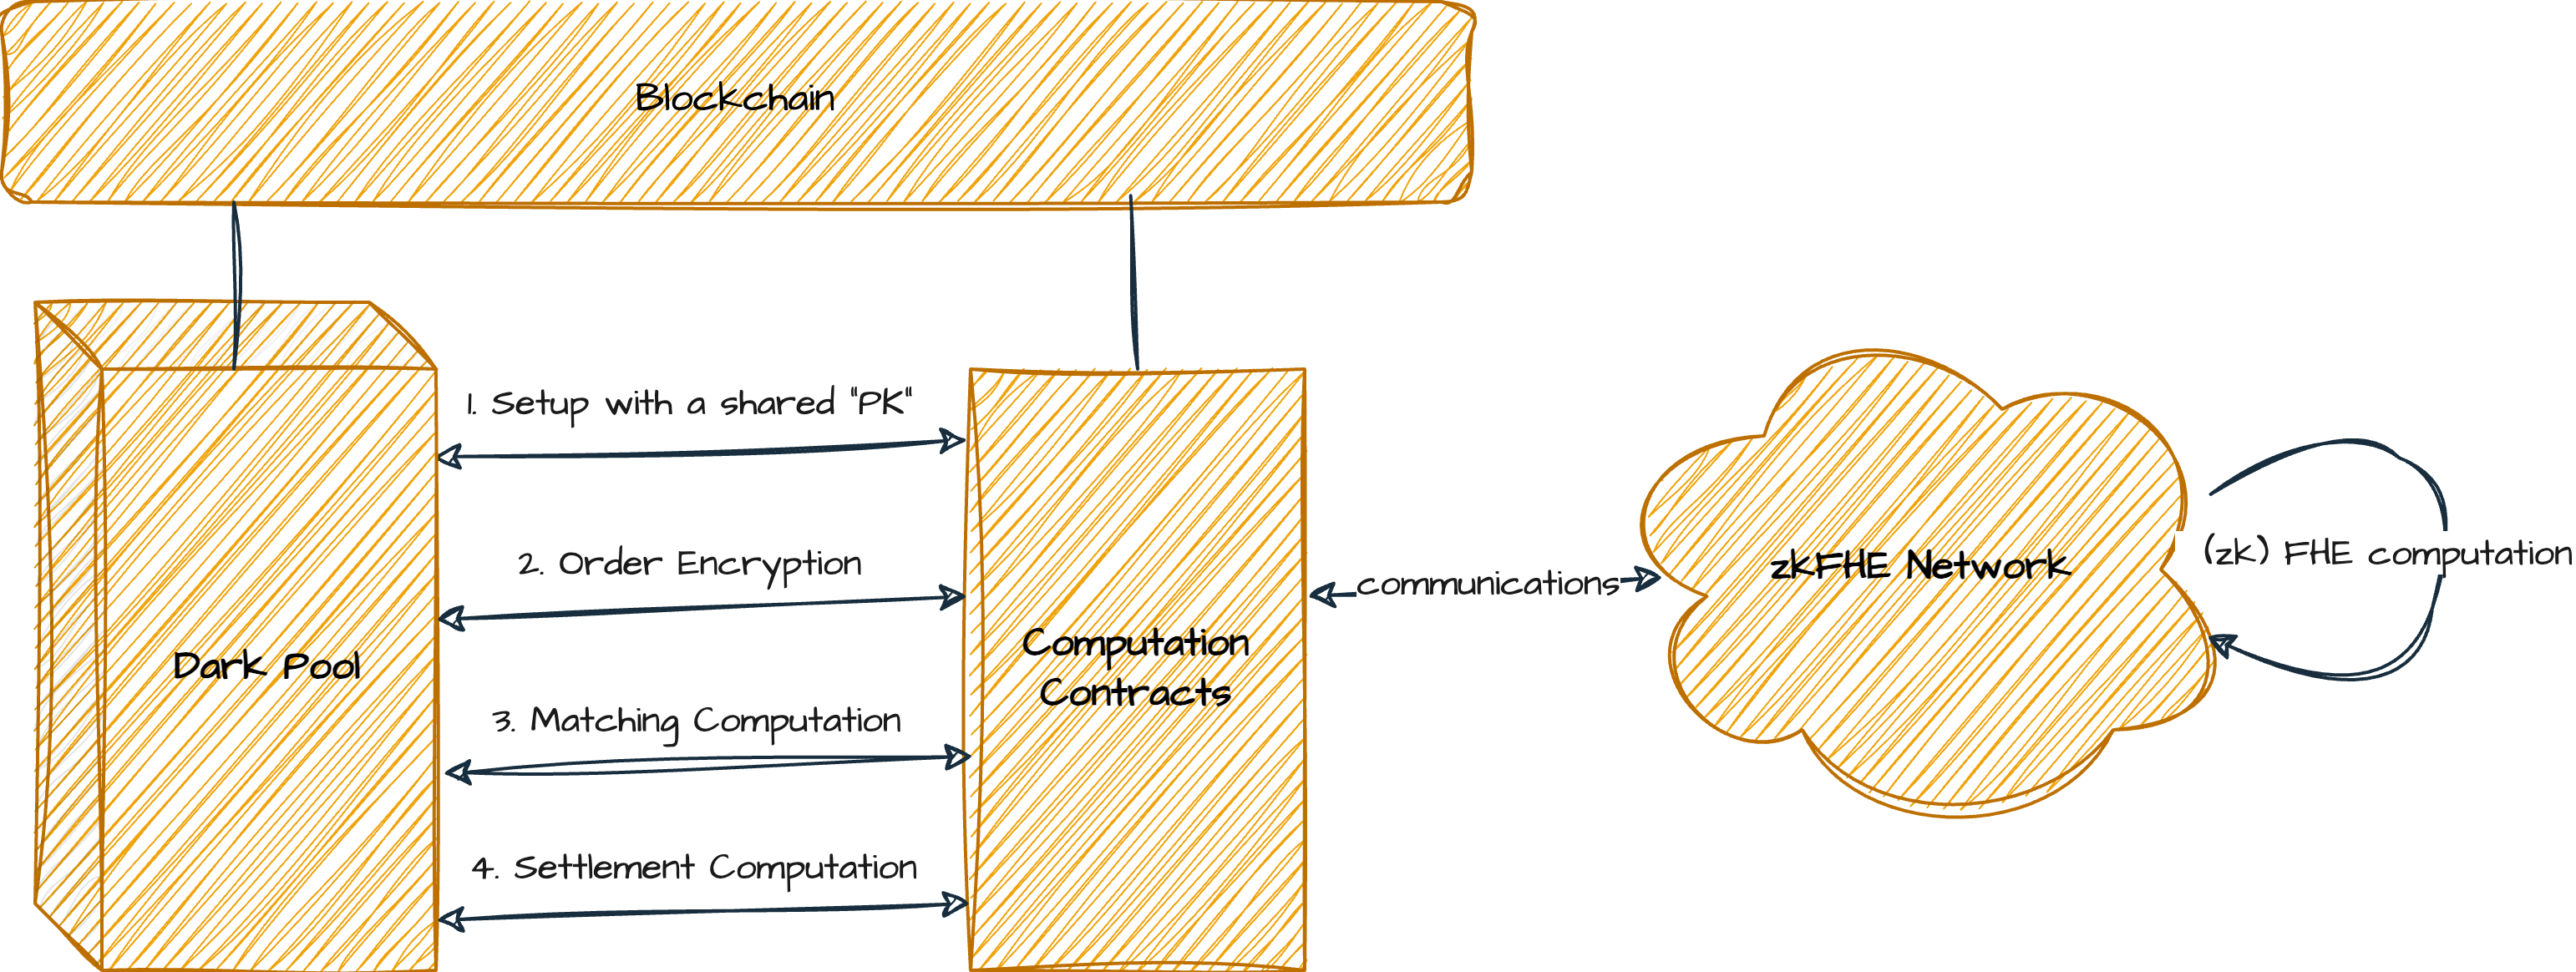
A practical dark pool system will be more complicated than the above idea. However, we can still believe that it is possible to fully implement a feature-complete and low-latency on-chain dark pool application using (zk)FHE techniques.
* [FHE-based Solution](https://docs.primuslabs.xyz/data-computation/use-cases/joint-worker-mode/darkpool#fhe-based-solution)
* [Initial Setup](https://docs.primuslabs.xyz/data-computation/use-cases/joint-worker-mode/darkpool#initial-setup)
* [Order Submission](https://docs.primuslabs.xyz/data-computation/use-cases/joint-worker-mode/darkpool#order-submission)
* [Matching and Execution](https://docs.primuslabs.xyz/data-computation/use-cases/joint-worker-mode/darkpool#matching-and-execution)
* [Account Settlement](https://docs.primuslabs.xyz/data-computation/use-cases/joint-worker-mode/darkpool#account-settlement)
---
# On-Chain Games | primus
[Skip to main content](https://docs.primuslabs.xyz/data-computation/use-cases/joint-worker-mode/game#docusaurus_skipToContent_fallback)
On this page

On-Chain Games
==============
The primary benefit of FHE is its ability to improve application privacy, which can significantly increase the appeal of certain gaming scenarios.
The combination of zkFHE with games can enhance gaming experiences by either enabling the necessary privacy measures for simulating the desktop games on-chain, or creating "fog-of-war" versions, adding an element of surprise and excitement to games with variants and different rules, thereby increasing the overall enjoyment and engagement for players. Below, highlight a common example of such variations.
On-Chain Poker[](https://docs.primuslabs.xyz/data-computation/use-cases/joint-worker-mode/game#on-chain-poker "Direct link to On-Chain Poker")
------------------------------------------------------------------------------------------------------------------------------------------------
Most Poker games can be built on-chain if we take appropriate measures like FHE to provide privacy as in offline games.
[**Blackjack**](https://en.wikipedia.org/wiki/Blackjack)
, also known as 21, is a popular casino card game. The basic rules are straightforward. The goal is to beat the dealer by either:
* Having a hand value that is closer to 21 than the dealer's hand without going over 21, or
* The dealer's hand going over 21 (busting) while your hand does not.
The card rules are quite simple. Number cards (2-10) are worth their face value. Face cards (Jack, Queen, King) are worth 10 points each. Aces (A) can be worth either 1 or 11 points, depending on which value helps the hand more without exceeding 21.
Each round of the game has some flexible rules, including double down, surrendering, splitting cards, etc., which are beyond the scope of this example.
We explain the (zk)FHE integrated process.
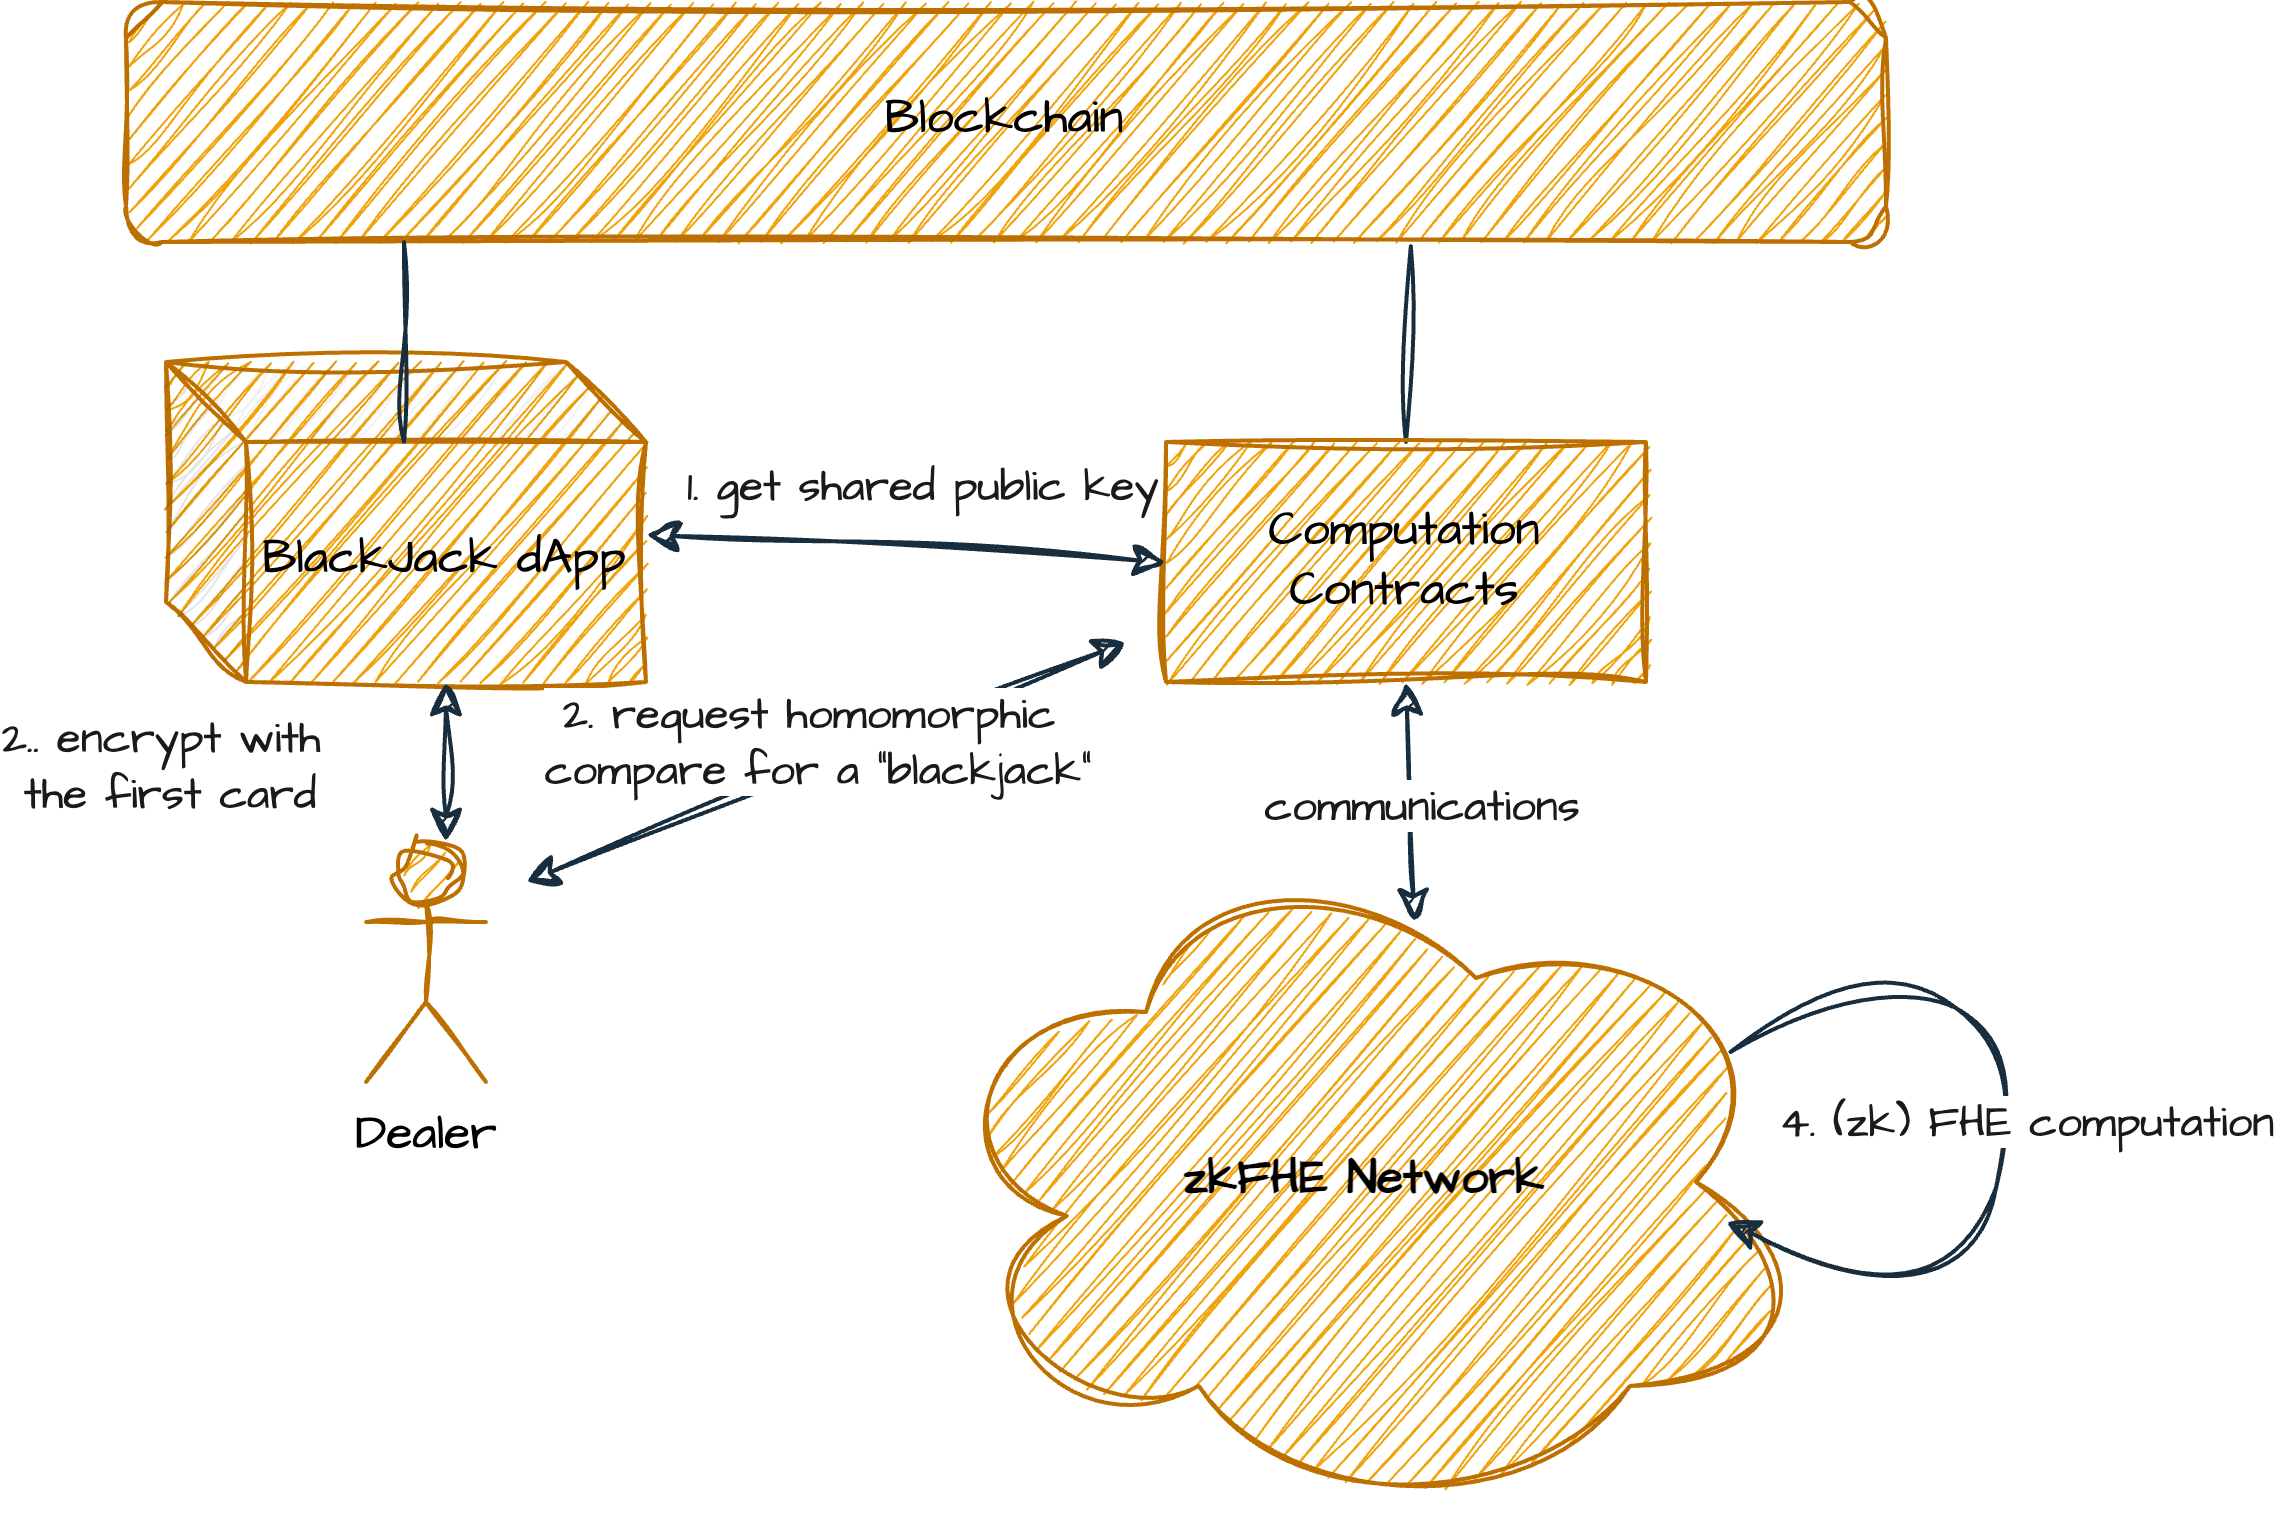
### Game Setup[](https://docs.primuslabs.xyz/data-computation/use-cases/joint-worker-mode/game#game-setup "Direct link to Game Setup")
The Blackjack dApp integrates with zkFHE network and requests a shared public key **PK** from a certain zkFHE working group. Note here we suggest using a threshold-FHE algorithm to provide the card value privacy.
### Initial Round[](https://docs.primuslabs.xyz/data-computation/use-cases/joint-worker-mode/game#initial-round "Direct link to Initial Round")
Like in the plain game, each player including the dealer is allocated two cards via the dApp service. The first card (called the "hole") of the dealer's will be dealt face down by encrypting with the shared public key **PK** and then distributing it.
### Player's Round[](https://docs.primuslabs.xyz/data-computation/use-cases/joint-worker-mode/game#players-round "Direct link to Player's Round")
Each player will be allocated a new card if he wants until he feels the hand value is enough close to 21. If the hand value is over 21, the play busts and loses this round.
### Dealer's Turn[](https://docs.primuslabs.xyz/data-computation/use-cases/joint-worker-mode/game#dealers-turn "Direct link to Dealer's Turn")
If the dealer's hand value is a **_blackjack_**, i.e., a combination of A and J/Q/K/10, he shall reveal it immediately and win the round before moving to the next round. Note this can be achieved by homomorphically comparing the first card value with the "J/Q/K/10" or "Ace" depending on the other card value, and then revealing it publicly by threshold decrypting the card.
* [On-Chain Poker](https://docs.primuslabs.xyz/data-computation/use-cases/joint-worker-mode/game#on-chain-poker)
* [Game Setup](https://docs.primuslabs.xyz/data-computation/use-cases/joint-worker-mode/game#game-setup)
* [Initial Round](https://docs.primuslabs.xyz/data-computation/use-cases/joint-worker-mode/game#initial-round)
* [Player's Round](https://docs.primuslabs.xyz/data-computation/use-cases/joint-worker-mode/game#players-round)
* [Dealer's Turn](https://docs.primuslabs.xyz/data-computation/use-cases/joint-worker-mode/game#dealers-turn)
---
# Overview | primus
[Skip to main content](https://docs.primuslabs.xyz/data-computation/use-cases/overview/#docusaurus_skipToContent_fallback)
On this page

Overview
========
The adoption of FHE algorithms can be categorized into different types, due to the diversity of FHE algorithms and use patterns.
FHE Variants[](https://docs.primuslabs.xyz/data-computation/use-cases/overview/#fhe-variants "Direct link to FHE Variants")
-----------------------------------------------------------------------------------------------------------------------------
Literately, there are different types of FHE algorithms, according to the key numbers, including:
* **Single-Key FHE:** it refers to an FHE scheme where all the homomorphic operations are performed using the same encryption key. This means that the same key is used to both encrypt the data and perform computations on the encrypted data. In a single-key FHE system, there is only one encryption key that is used to encrypt data, perform homomorphic operations, and ultimately decrypt the data. This simplifies the key management process as there is no need to handle multiple keys.
* **Threshold FHE:** it combines both FHE and threshold cryptography, to enable secure computations on encrypted data in a distributed manner. In a threshold FHE protocol, a group of nodes work together to create a shared public key, and each node possesses the a part of the decryption key. Any homomorphic computation shall be performed on the ciphertext that is encrypted from the shared public key. The computation result can be threshold decrypted by a subset of the group.
Use Case Variants[](https://docs.primuslabs.xyz/data-computation/use-cases/overview/#use-case-variants "Direct link to Use Case Variants")
--------------------------------------------------------------------------------------------------------------------------------------------
Within Primus' zkFHE network, all callers (applications) can invoke the FHE computation from the Primus workers. In general, there are three types of application modes that adapt to different types of callers. You can explore further workflow details of these three modes in the [technical section](https://docs.padolabs.org/technical-overview/understand-pado-network)
.
* **Single-User Mode:** There could be one or many pieces of data supplied by one user in a FHE computation task, and all pieces of input data are encrypted with the user's public key. Note this is a standard way of FHE-based outsourced computation where the user only delegates the encrypted computation and leverages the computing power of zkFHE network.
* **Joint-Worker Mode:** There could be one or many pieces of data supplied by multiple users in a FHE computation task, all pieces of input data are encrypted with a shared public key which is produced by a group of Primus workers. Node this is a typical usage of Threshold FHE under Primus' network.
* **Selective Multi-Worker Mode:** There could be one or many pieces of data supplied by one or multiple users, and all pieces of input data are encrypted with different workers' public key. Like in the Joint-worker mode, the group of workers are selected by the caller in advance. Note in most cases, any piece of user data is NOT recommended to be encrypted with any worker's public key, which could increase the privacy leakage risk.
* [FHE Variants](https://docs.primuslabs.xyz/data-computation/use-cases/overview/#fhe-variants)
* [Use Case Variants](https://docs.primuslabs.xyz/data-computation/use-cases/overview/#use-case-variants)
---
# What is Threshold-FHE? | primus
[Skip to main content](https://docs.primuslabs.xyz/data-computation/use-cases/joint-worker-mode/threshold-fhe/#docusaurus_skipToContent_fallback)
What is Threshold-FHE?
======================
Unlike Single-Key FHE and Multi-Key FHE, Threshold-FHE is another variant of FHE schemes that is used heavily in Web3. In short, Threshold-FHE combines both FHE and threshold cryptography, to enable secure computations on encrypted data in a distributed manner. Here’s how it works:
**Data Encryption**: Data is encrypted using a fully homomorphic encryption scheme.
**Distribution of Decryption Key**: The decryption key is split into multiple shares and distributed among several parties using threshold cryptography.
**Secure Computation**: Encrypted data can be processed (e.g., computations can be performed on it) without decrypting it. This computation is possible due to the homomorphic properties of the encryption.
**Threshold Decryption**: To decrypt the result of the computation, a minimum threshold of parties (e.g., t out of n) must cooperate to combine their key shares. This ensures that no single party can decrypt the data alone, enhancing security.
Threshold-FHE can be very useful, especially when working with native blockchain applications like DeFi, Game, Governance, etc.
---
# Confidential Voting | primus
[Skip to main content](https://docs.primuslabs.xyz/data-computation/use-cases/joint-worker-mode/voting/#docusaurus_skipToContent_fallback)
On this page

Confidential Voting
===================
Confidential voting is a privacy-preserving voting system that can provide privacy on voting choices and other side information. In the world of decentralized governance, tools like Snapshot and Tally have become essential for managing proposals and voting. Snapshot offers off-chain voting with results stored on IPFS or Arweave, while Tally provides a fully on-chain solution utilizing ERC20 and ERC721 token contracts. By combining the strengths of both systems and incorporating the zkFHE technique, we can design a secure, decentralized voting system that offers both confidentiality and integrity.
Snapshot[](https://docs.primuslabs.xyz/data-computation/use-cases/joint-worker-mode/voting/#snapshot "Direct link to Snapshot")
---------------------------------------------------------------------------------------------------------------------------------
[Snapshot](https://snapshot.org/#/)
allows anyone to create a voting proposal by confirming the block height corresponding to the proposal. Users' voting power is calculated based on their token balance at that block height. They can vote (for, against, abstain) and the results are calculated once the voting period ends. Proposal and voting information can be stored on IPFS (or Arweave). Additionally, users can delegate or withdraw their voting power to/from other addresses within the domain.
Tally[](https://docs.primuslabs.xyz/data-computation/use-cases/joint-worker-mode/voting/#tally "Direct link to Tally")
------------------------------------------------------------------------------------------------------------------------
[Tally](https://www.tally.xyz/)
’s DAO voting system relies on token and governor contracts. The token contract (ERC20 or ERC721) is a prerequisite for the governor contract, which manages proposals and voting. Users submit proposals by sending transactions to the governor contract and vote on active proposals through on-chain transactions. Tally ensures all voting information is recorded on-chain, offering transparency and security. Similar to Snapshot, Tally allows delegation of voting power.
A zkFHE Solution[](https://docs.primuslabs.xyz/data-computation/use-cases/joint-worker-mode/voting/#a-zkfhe-solution "Direct link to A zkFHE Solution")
---------------------------------------------------------------------------------------------------------------------------------------------------------
By leveraging zkFHE computation and integrating the features of Snapshot or Tally, we can create a confidential voting dApp `CV` that combines on-chain or off-chain governance with enhanced security and confidentiality.
The dApp shall integrate with the zkFHE network with proper approaches initially. The key steps are creating a proposal, voting and tallying.
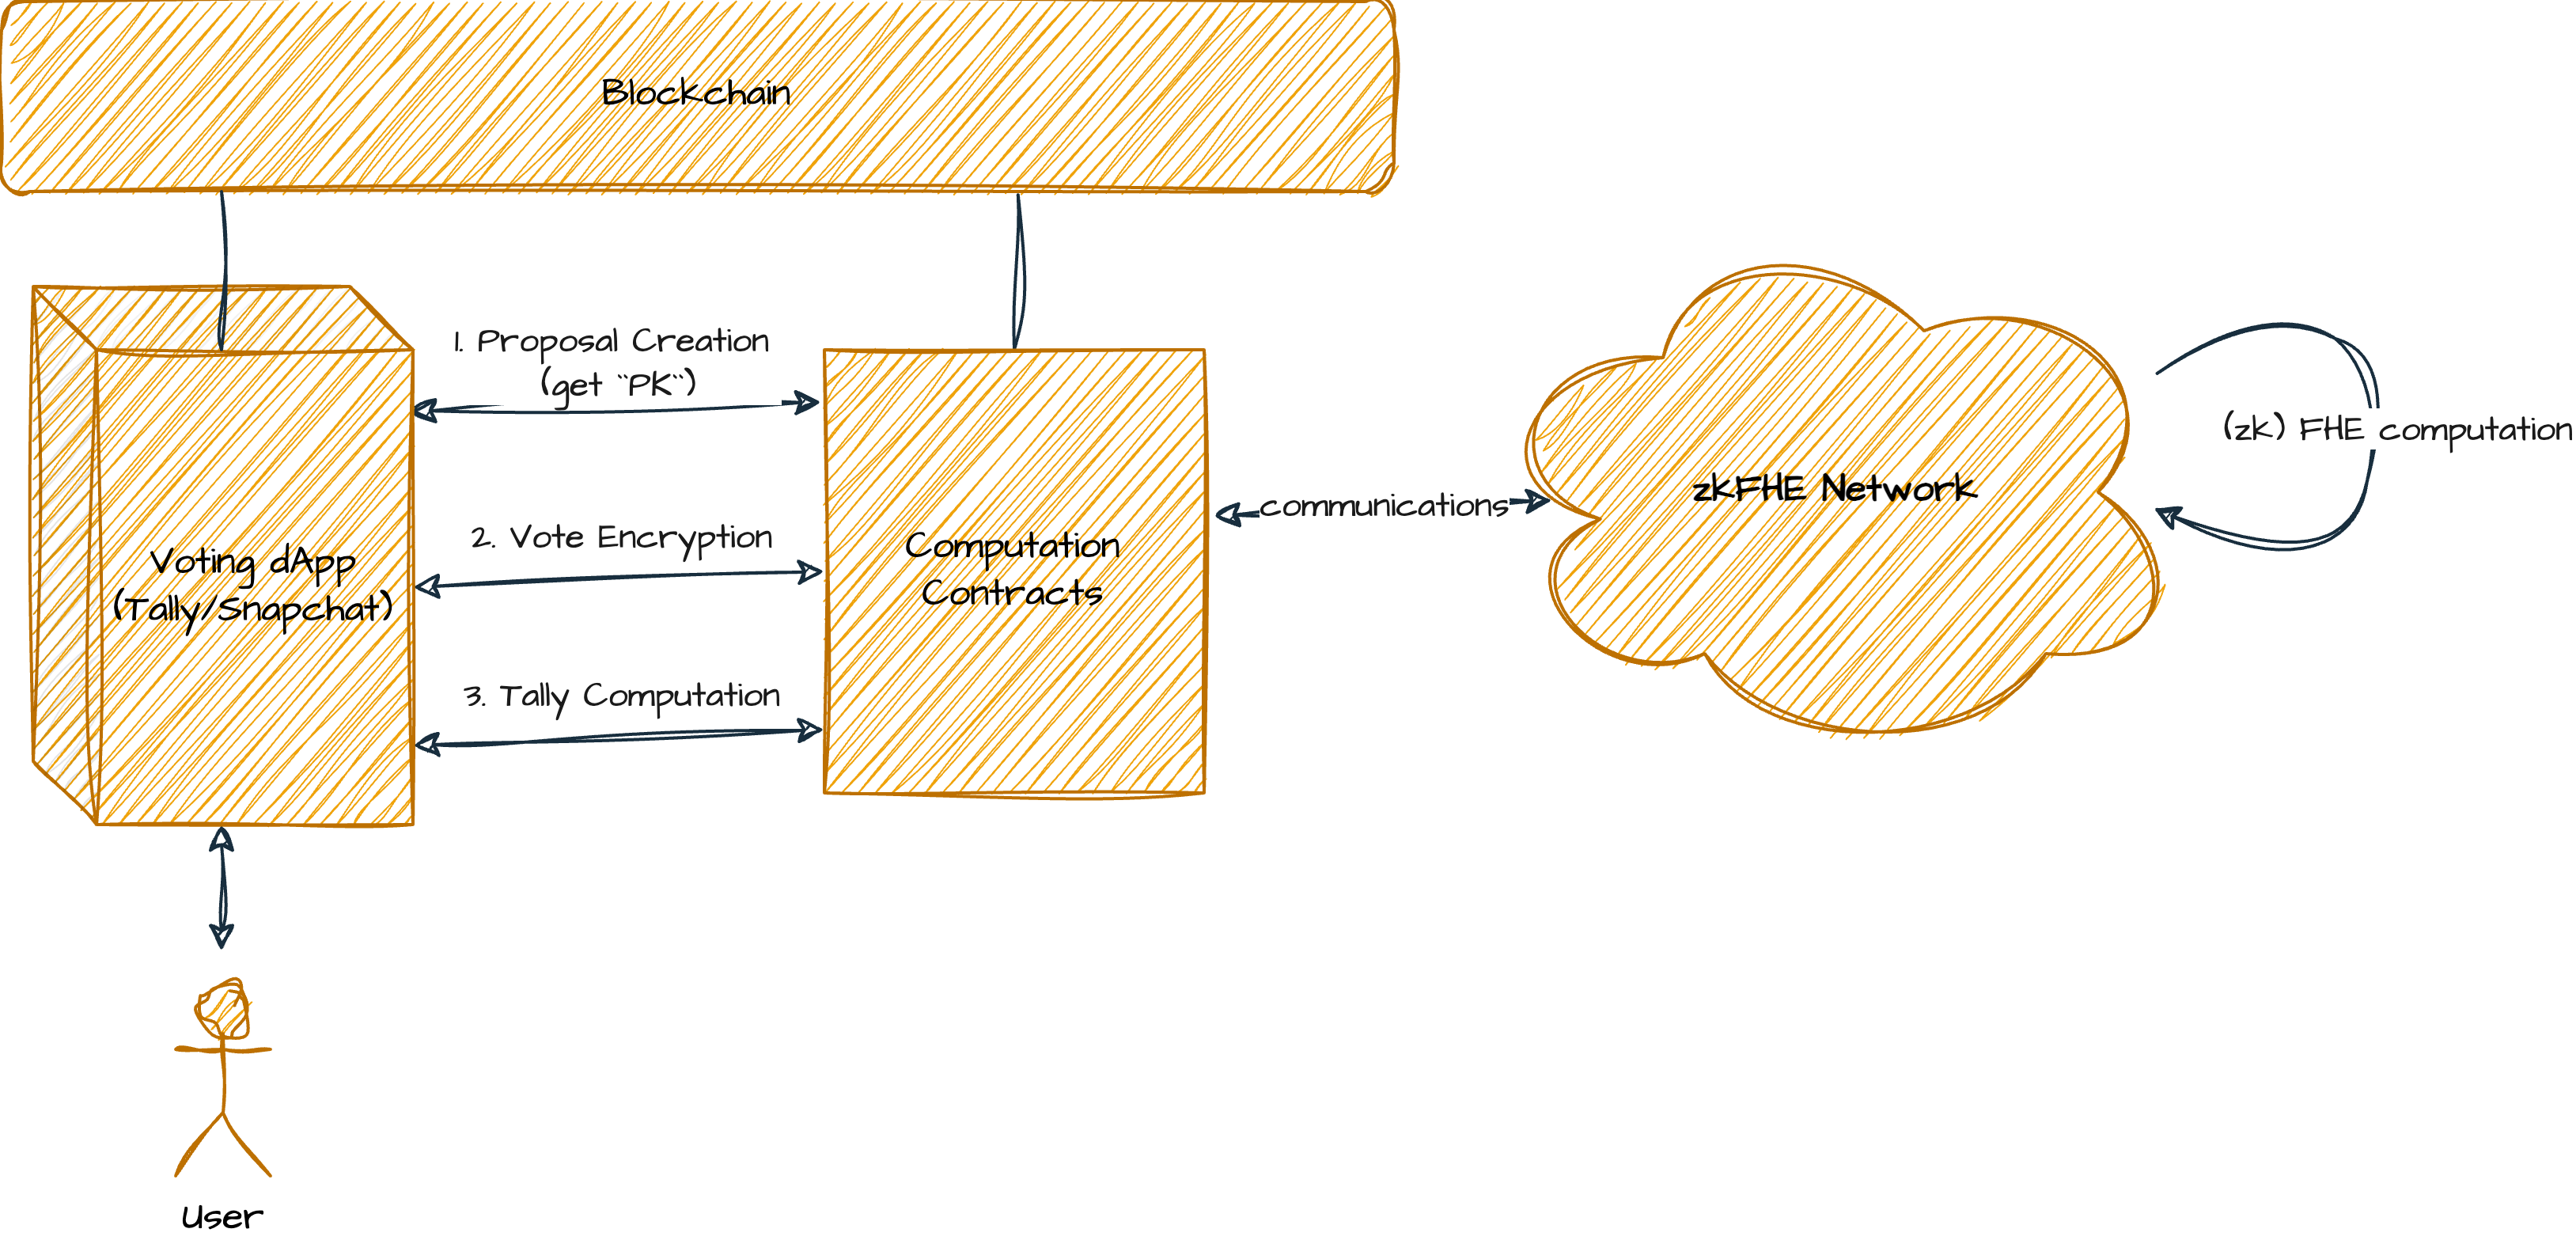
**Proposal Creation**: Any user can create a proposal through `CV`, and publish it on-chain (Tally) or off-chain (Snapshot). The metadata of the proposal shall specify the voting strategy. The dApp `CV` communicates with Primus' contracts and requires a subset of zkFHE nodes to create a shared public key **PK** for that proposal.
**User Voting**: A user chooses a voting option `m1` a the created proposal. Meanwhile, he uses **PK** to encrypt with the option `m1` and sends the encrypted vote `Enc(m1, PK)`.
**Tally and Publish** On receiving enough encrypted votes, the dApp shall tally up on that proposal. This can be achieved by performing a homomorphic computation on all the votes, i.e.,
C = Compute(Enc(m1,PK),Enc(m2,PK),...Enc(m99,PK))
Note the vote `m1` can be a simple boolean value for a "yes" or "no" option, or it can be a weighted vote that can be linearly computed as `m1=a1*b1`, where `a1` is the token quantities and `b1` is the vote option. Note we cannot hide the token quantities as the snapshot block height is public, and token balances can be queried from block data, exposing the voting power.
The ciphertext `C` is an encryption of the voting result, which can be threshold decrypted to recover the plain result `R`.
Advantages[](https://docs.primuslabs.xyz/data-computation/use-cases/joint-worker-mode/voting/#advantages "Direct link to Advantages")
---------------------------------------------------------------------------------------------------------------------------------------
* Integration with Existing Frameworks The proposed solution can integrate with both Tally and Snapshot, enabling both on-chain and off-chain governance with confidential voting. Delegation of voting power can also be enabled through standard application logic within the solution.
* Enhanced Security and Decentralization: Compared to a traditional ZKP-based [solution](https://medium.com/@horizenlabs-tech/protecting-voter-privacy-in-daos-5fbddb295ae5)
, the above approach eliminates the need for a central tallying authority, reducing centralization risks.
* [Snapshot](https://docs.primuslabs.xyz/data-computation/use-cases/joint-worker-mode/voting/#snapshot)
* [Tally](https://docs.primuslabs.xyz/data-computation/use-cases/joint-worker-mode/voting/#tally)
* [A zkFHE Solution](https://docs.primuslabs.xyz/data-computation/use-cases/joint-worker-mode/voting/#a-zkfhe-solution)
* [Advantages](https://docs.primuslabs.xyz/data-computation/use-cases/joint-worker-mode/voting/#advantages)
---
# Peer-to-Peer Data Sharing | primus
[Skip to main content](https://docs.primuslabs.xyz/data-computation/use-cases/selective-multi-worker-mode/data-sharing/#docusaurus_skipToContent_fallback)
On this page

Peer-to-Peer Data Sharing
=========================
Background[](https://docs.primuslabs.xyz/data-computation/use-cases/selective-multi-worker-mode/data-sharing/#background "Direct link to Background")
-------------------------------------------------------------------------------------------------------------------------------------------------------
Centralized platforms such as YouTube, Instagram, TikTok, and Patreon have been the backbone of the Creator Economy thus far. These platforms provide creators with avenues to generate revenue via advertising, sponsorships, and fan support. However, they come with inherent drawbacks, including platform dependency, revenue sharing, and limited content ownership.
On the other hand, the existing Web3 creator platform fails to achieve censorship-resistance and data value sharing, due to the lack of data confidentiality measurement on transparent blockchains. Such an issue makes a creator unwilling or unable to share a worthy plain file with a paid customer through blockchains.
A straightforward way is to create a peer-to-peer data-sharing application on the blockchain with cryptography-ensured confidentiality. Within such a use case, the process of data-sharing is completely processed via smart contracts, by which the transaction atomicity is achieved. To achieve confidentiality, the data shall be encrypted and stored on decentralized storage, and further be accessed by the paid customer after the FHE computation on the encrypted data.
A Multi-key FHE Solution[](https://docs.primuslabs.xyz/data-computation/use-cases/selective-multi-worker-mode/data-sharing/#a-multi-key-fhe-solution "Direct link to A Multi-key FHE Solution")
-------------------------------------------------------------------------------------------------------------------------------------------------------------------------------------------------
The general process of peer-to-peer data sharing is shown in the following figure. We discuss the process that is integrated with Primus' zkFHE network on the task level. It is important that the data provider does not use their own encryption key. Allowing the provider to use their secret key would involve them in the sharing process and create an additional dependency. On the other hand, we shall not allow a single third party with his public key to run the outsourced encryption, which breaks the data confidentiality. A decent approach is to let the data provider encrypt data with a couple of public keys from a certain group to minimize the trust assumption. This is where Multi-key FHE is applied.
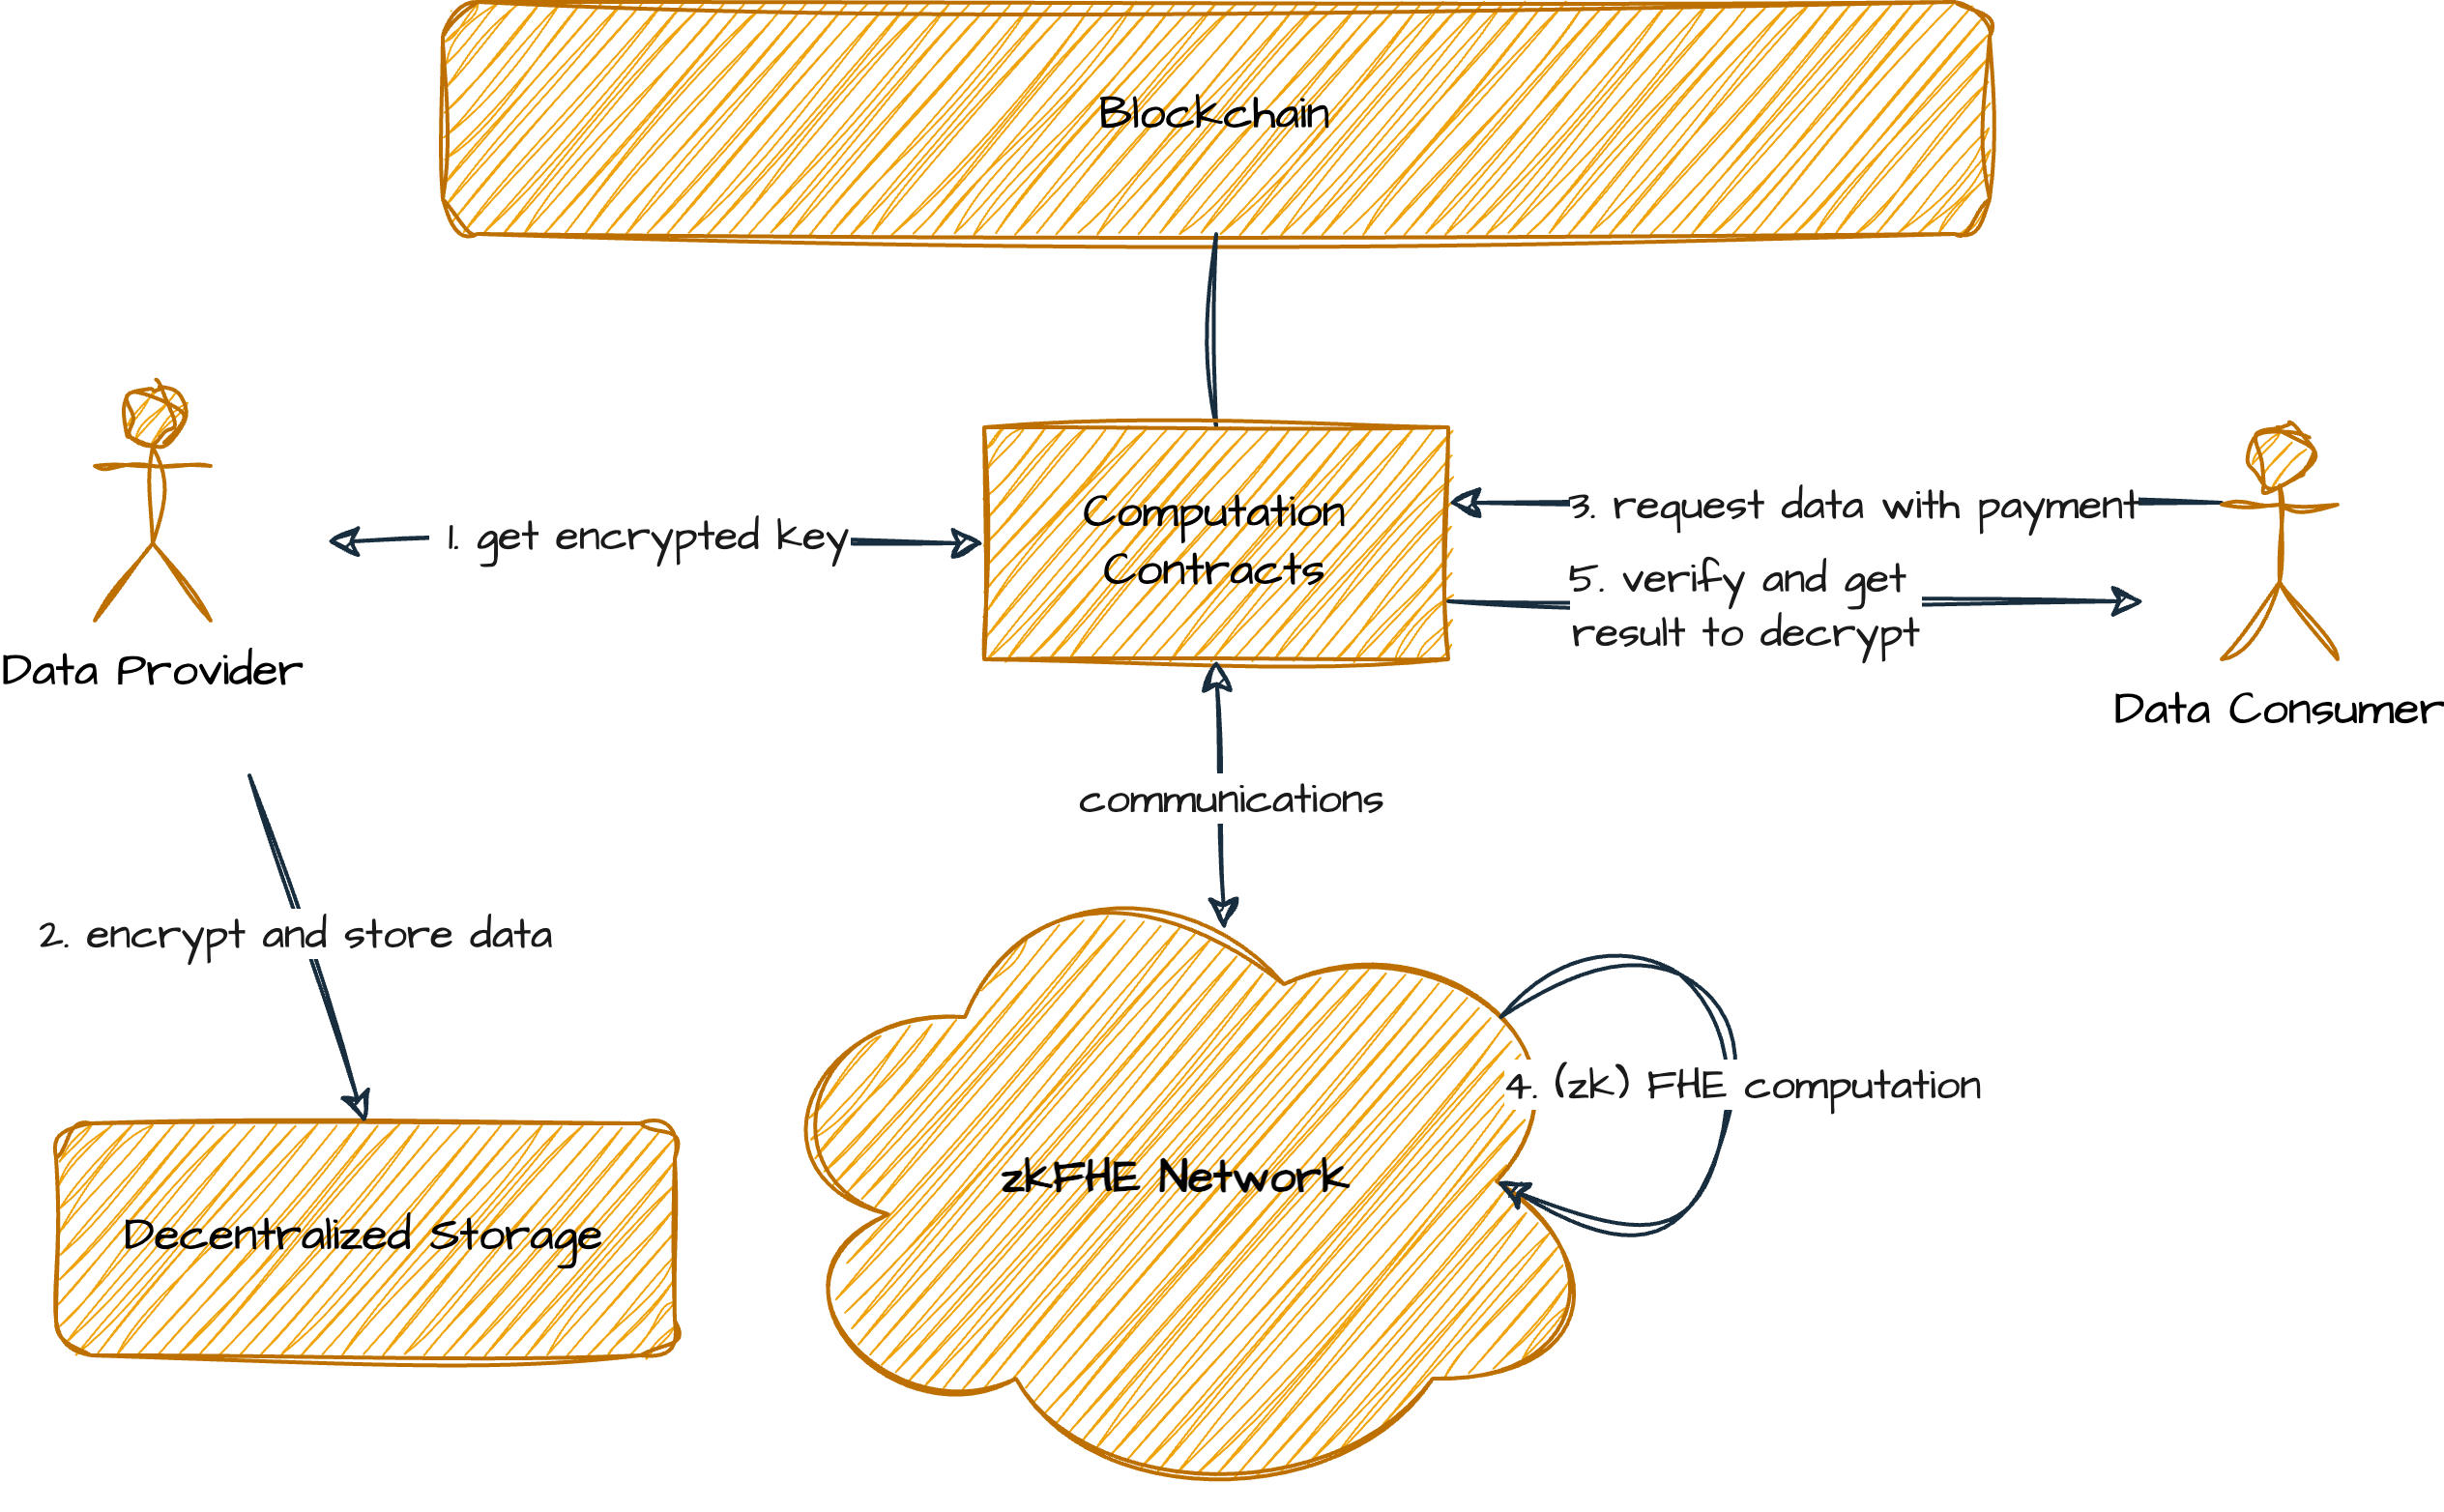
### Encrypt Data[](https://docs.primuslabs.xyz/data-computation/use-cases/selective-multi-worker-mode/data-sharing/#encrypt-data "Direct link to Encrypt Data")
Let's assume there is a dApp that provides the peer-to-peer data-sharing feature for its end-users.
The data provider uses the dApp and requires a group of public keys from the zkFHE network and uses that public key set to encrypt the data. Here we suggest a hybrid encryption shall be applied, i.e., use a secret key **K** to encrypt the data content with a symmetric encryption algorithm and use different public keys to encrypt the shares of **K** with (zk)FHE algorithms.
The data provider then stores all the ciphertexts into a storage system, which can be either a storage blockchain or a centralized storage service.
### Share Encrypted Data[](https://docs.primuslabs.xyz/data-computation/use-cases/selective-multi-worker-mode/data-sharing/#share-encrypted-data "Direct link to Share Encrypted Data")
A data consumer uses the dApp and sends some crypto assets to the dApp contract. In addition, the data consumer shall also send his public key to the dApp contract for decrypting the shared result which can only be accessed by himself. The dApp contract shall assign the computation task with the consumer's public key, to the computation network and requires FHE computation for the encrypted data-sharing.
After the computation execution, the result will be a new ciphertext that encrypts the data with the consumer's public key. The data consumer can receive that result and decrypt it locally to recover the plain data.
* [Background](https://docs.primuslabs.xyz/data-computation/use-cases/selective-multi-worker-mode/data-sharing/#background)
* [A Multi-key FHE Solution](https://docs.primuslabs.xyz/data-computation/use-cases/selective-multi-worker-mode/data-sharing/#a-multi-key-fhe-solution)
* [Encrypt Data](https://docs.primuslabs.xyz/data-computation/use-cases/selective-multi-worker-mode/data-sharing/#encrypt-data)
* [Share Encrypted Data](https://docs.primuslabs.xyz/data-computation/use-cases/selective-multi-worker-mode/data-sharing/#share-encrypted-data)
---
# What is Multi-Key FHE? | primus
[Skip to main content](https://docs.primuslabs.xyz/data-computation/use-cases/selective-multi-worker-mode/multikey-fhe/#docusaurus_skipToContent_fallback)
What is Multi-Key FHE?
======================
Multi-key FHE allows computations on ciphertexts encrypted under different public keys. Specifically, given ciphertexts encrypted under different public keys, it is possible to homomorphically evaluate a function f on these ciphertexts to obtain an encrypted result. This result can be jointly decrypted by the holders of the corresponding private keys.
---
# Confidential Payment | primus
[Skip to main content](https://docs.primuslabs.xyz/data-computation/use-cases/single-user-mode/confidential-payment/#docusaurus_skipToContent_fallback)

Confidential Payment
====================
The feasibility of processing encrypted transaction data makes zkFHE naturally suitable for creating confidential transactions on the blockchain. There are a couple of technical solutions to doing so by recuriting FHE as a building block.
An auditable anonymous and confidential payment (AACP) system uses zkFHE to provide necessary features including:
* Confidentiality: meaning the payload data of the transaction cannot be revealed.
* Anonymous: meaning the sender and the receiver of the transaction are not identified in the financial system.
* auditability: meaning the transaction shall be fully administrable to a specific entity, to facilitates comprehensive compliance audits while ensuring the security of user funds.
Such a payment system can be deployed on programmable blockchains, and it is particularly suitable for B2B payment. A rough idea of deploying such a sysytem is as the following.
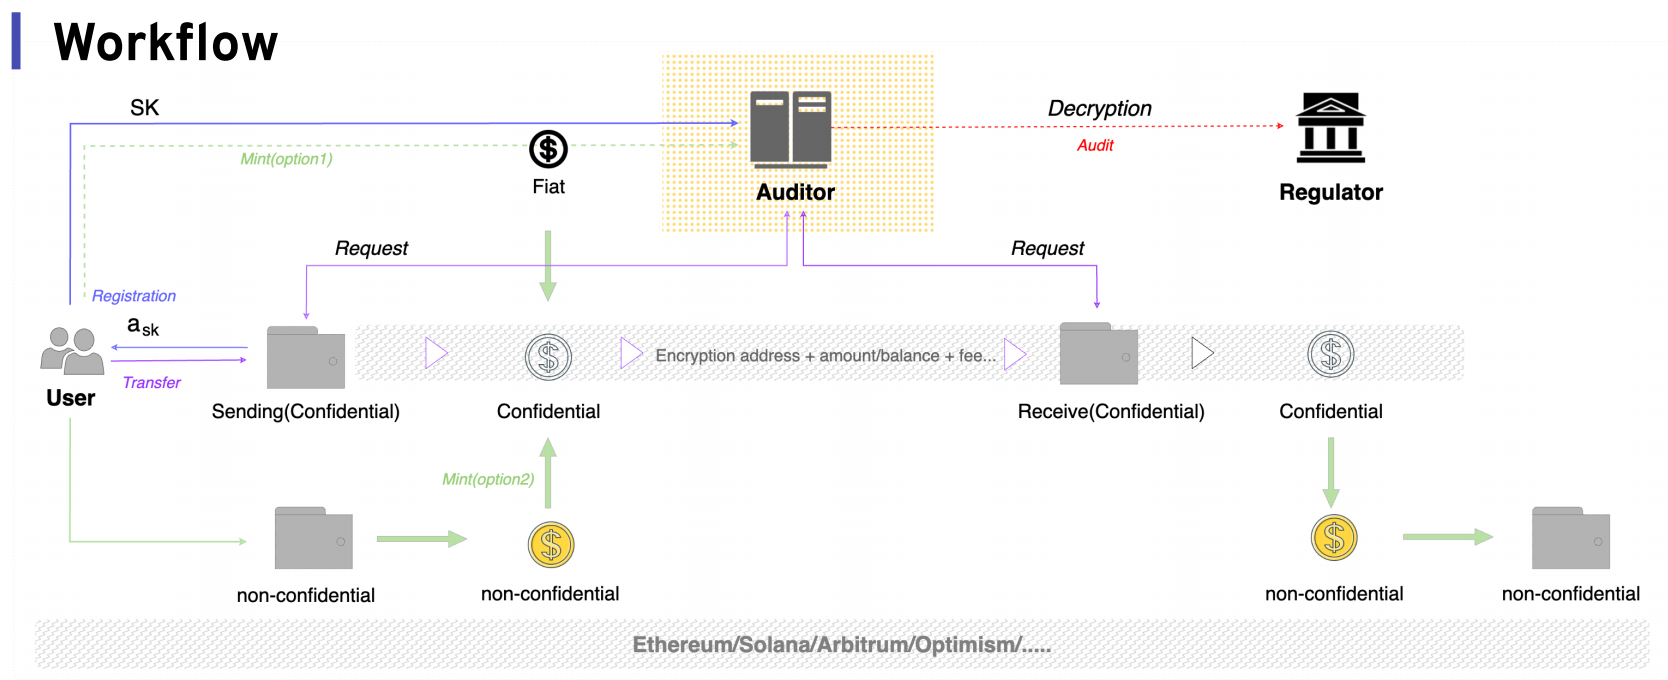
* **System setup** The auditor generates a global FHE key pair `(PK,SK)`, where `PK` is used as the global parameter, and `SK` is used for auditing.
* **User registration**: The user chooses a uniformly random address secret key `a_sk`. The auditor can also requre KYC of the user for registration.
* **Mint**: Two ways can be used for mint, either the auditor initial a special transaction to mint the token for the user, or the user sends a public transaction to the smart contract.
* **Transfer**: The sender requests a credential from the auditor. The addresses, amount, and balance information will be encrypted. The encrypted transaction will be processed under off-chain FHE computation.
* **Audit**: The auditor have the ability to uncover the payment transactions and balances of all users within the system. However, the auditor can not steal the assets from the users.
---
# Confidential DePin | primus
[Skip to main content](https://docs.primuslabs.xyz/data-computation/use-cases/single-user-mode/depin/#docusaurus_skipToContent_fallback)
Confidential DePin
==================
Coming soon...
---
# Oblivious Message Retrieval | primus
[Skip to main content](https://docs.primuslabs.xyz/data-computation/use-cases/single-user-mode/omr/#docusaurus_skipToContent_fallback)

Oblivious Message Retrieval
===========================
Anonymous message delivery systems, such as private messaging services and privacy-preserving payment systems, require a method for recipients to retrieve their messages without revealing metadata or allowing messages to be linked back to them. The challenge lies in ensuring that the process of retrieving messages does not expose any identifying information or communication patterns.
One naive solution is for recipients to download all posted messages and individually scan for those addressed to them. While this method maintains privacy, it is highly inefficient, resulting in excessive communication and computation costs, particularly as the system scales up. This approach would quickly become impractical with a large number of users and messages, leading to significant network congestion and high processing demands on each recipient's device.
Oblivious message retrieval (OMR), proposed by Ziyu and Eran in their [paper](https://eprint.iacr.org/2021/1256.pdf)
, is a cryptographic protocol that can address such privacy leakages.
Using OMR in a Private Blockchain
=================================
A private blockchain like Zcash, keeps the contents of every transaction hidden from all but the counterparties to the transaction, using cryptographic protocols utilizing encryption and zero-knowledge proofs. However, the current Zcash lightwallet architecture faces several challenges: performance issues for wallet users, privacy leaks through metadata exposure when using _lightwalletd_, and inefficiencies in data retrieval. Downloading all transactions to maintain privacy is impractical due to large blockchain sizes, leading to high bandwidth and computational costs. Light wallets perform computationally intensive trial decryption for each shielded transaction and require additional data from lightwalletd to construct new transactions, further exposing metadata.
OMR can improve the metadata privacy of a private blockchain by combining it with fully homomorphic encryptions (FHE).
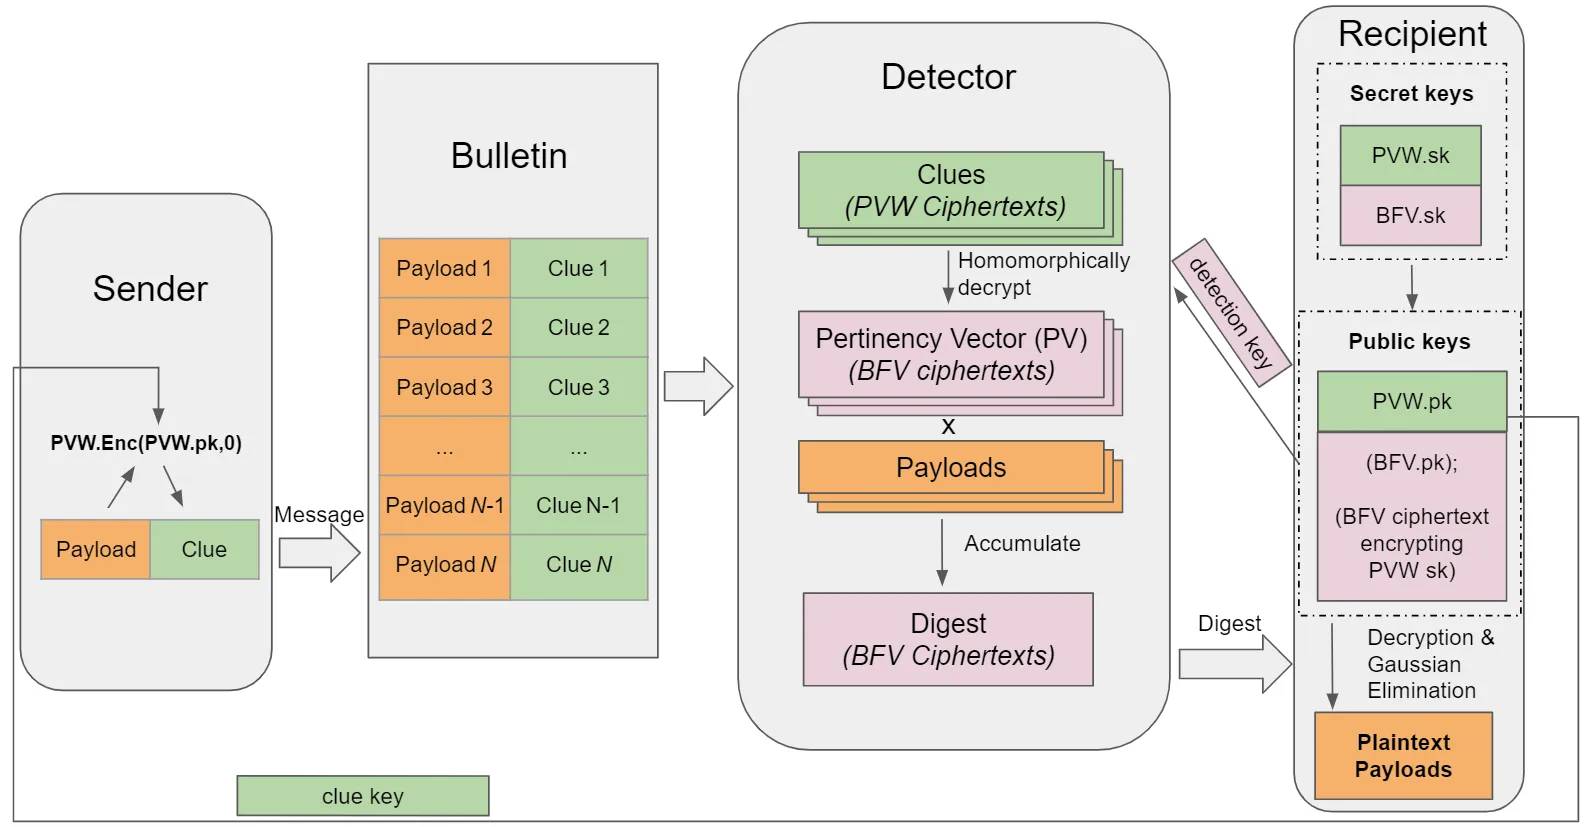
At a high level, this is how a Zcash implementation featuring OMR might operate.
* A user generates a Zcash address that includes a new clue key `PVW.pk`.
* The sender creates a shielded transaction, plus a clue ciphertext, which is an encryption to a vector of 0s with the recipient's clue key `PVM.pk`. Note in practice, the size is about 1KB of additional data per shielded output.
* To detect and receive any pertaining transactions, the user generates a detection key and registers that with an OMR-supporting Zcash full node. The node uses that detection key to scan all the shielded transactions on the chain and their attached clue ciphertexts. The scanning involves taking all the transactions, including the clue ciphertexts, and fully-homomorphically, trying to use the detection key to decrypt the clue ciphertexts associated with the shielded transactions.
* Note the decryption key is a BFV encryption of the clue private key `PVW.sk`, and such a homomorphic decryption will output a result that is an encryption of a bit vector (a Pertinency Vector) `PV`, for which if this transaction is pertinent to this recipient, then `PV` will encrypt of 0s, and if the transaction is impertinent, then `PV` will encrypt of random bits.
* By linearly operating the bit vector `PV` with all the transaction payloads, the resulting message digest will be retrieved by the user.
* The user decrypts the digest to get the plain payload of all the pertaining transactions.
Both PVW and BFV are homomorphic encryption schemes used in the OMR protocol, where the sender encrypts the clue using PVW scheme and clues are decrypted homomorphically to generate pertinency ciphertexts using BFV scheme. This technique of switching encryption scheme is generally known as _transciphering_.
---
# Privacy-Preserving AI | primus
[Skip to main content](https://docs.primuslabs.xyz/data-computation/use-cases/single-user-mode/privacy-preserving-ai/#docusaurus_skipToContent_fallback)
On this page

Privacy-Preserving AI
=====================
The Privacy Issues of AI Industry[](https://docs.primuslabs.xyz/data-computation/use-cases/single-user-mode/privacy-preserving-ai/#the-privacy-issues-of-ai-industry "Direct link to The Privacy Issues of AI Industry")
--------------------------------------------------------------------------------------------------------------------------------------------------------------------------------------------------------------------------
The key privacy problems in AI and machine learning areas are multifaceted and involve concerns related to data collection, model training, inference, and deployment. Here are some of the primary privacy issues:
* **Data Collection and Storage:** AI systems often require large amounts of personal data, which can include sensitive information such as medical records, financial data, and personal communications. The collection, storage, and use of this data raise significant privacy concerns. For instance, data collected for one purpose may be repurposed for another, which can violate privacy expectations and regulations. Data Anonymization is another problem during the collection and storage phases. Even when data is anonymized, there is a risk of re-identification, where anonymized data can be matched with other data sources to reveal individuals' identities.
* **Model Training and Deployment:** During the training process, models can inadvertently memorize and leak sensitive information from the training data. This can happen through overfitting or improper handling of the data. During the model usage, attackers can infer sensitive information about the training data by querying the model. For example, membership inference attacks determine whether a specific data point is part of the training set.
* **Data Breaches and Security:** AI systems are susceptible to data breaches and cyber-attacks, which can result in unauthorized access to sensitive data. Meanwhile, protecting the models themselves from theft or tampering is crucial, as compromised models can be used to leak or manipulate sensitive data.
* **Regulatory Compliance:** Ensuring compliance with regulations like the General Data Protection Regulation (GDPR) and the California Consumer Privacy Act (CCPA) is complex. These regulations impose strict requirements on data privacy, user consent, and data usage. Managing data privacy across different jurisdictions with varying regulations can be challenging for global AI applications.
Solutions[](https://docs.primuslabs.xyz/data-computation/use-cases/single-user-mode/privacy-preserving-ai/#solutions "Direct link to Solutions")
--------------------------------------------------------------------------------------------------------------------------------------------------
Fully homomorphic encryption is essential in AI and machine learning to enable secure and privacy-preserving data processing. FHE allows computation on encrypted data without the need to decrypt it, ensuring that sensitive information remains hidden throughout the entire data processing pipeline. By using FHE, AI and machine learning workflows can harness the potential of shared data in a secure and inclusive manner, safeguarding privacy while maximizing the insights gained from multiple data sources. This aligns with the increasing public demand for privacy preservation. FHE addresses the critical need to train AI models with encrypted data sets without exposing the secret key, providing a security gap when processing data and ensuring security and privacy at rest, in transit, and during processing.
Furthermore, FHE enables practical and efficient privacy-preserving machine learning (PPML) training and facilitates the development of privacy-preserving AI models, which is highly relevant in the context of increasingly stringent privacy regulations and the societal demand for privacy protection. The potential of FHE in securing machine learning workflows lies in its ability to maintain data security and privacy at every stage of processing, thereby fostering trust and confidence in AI and machine learning applications.
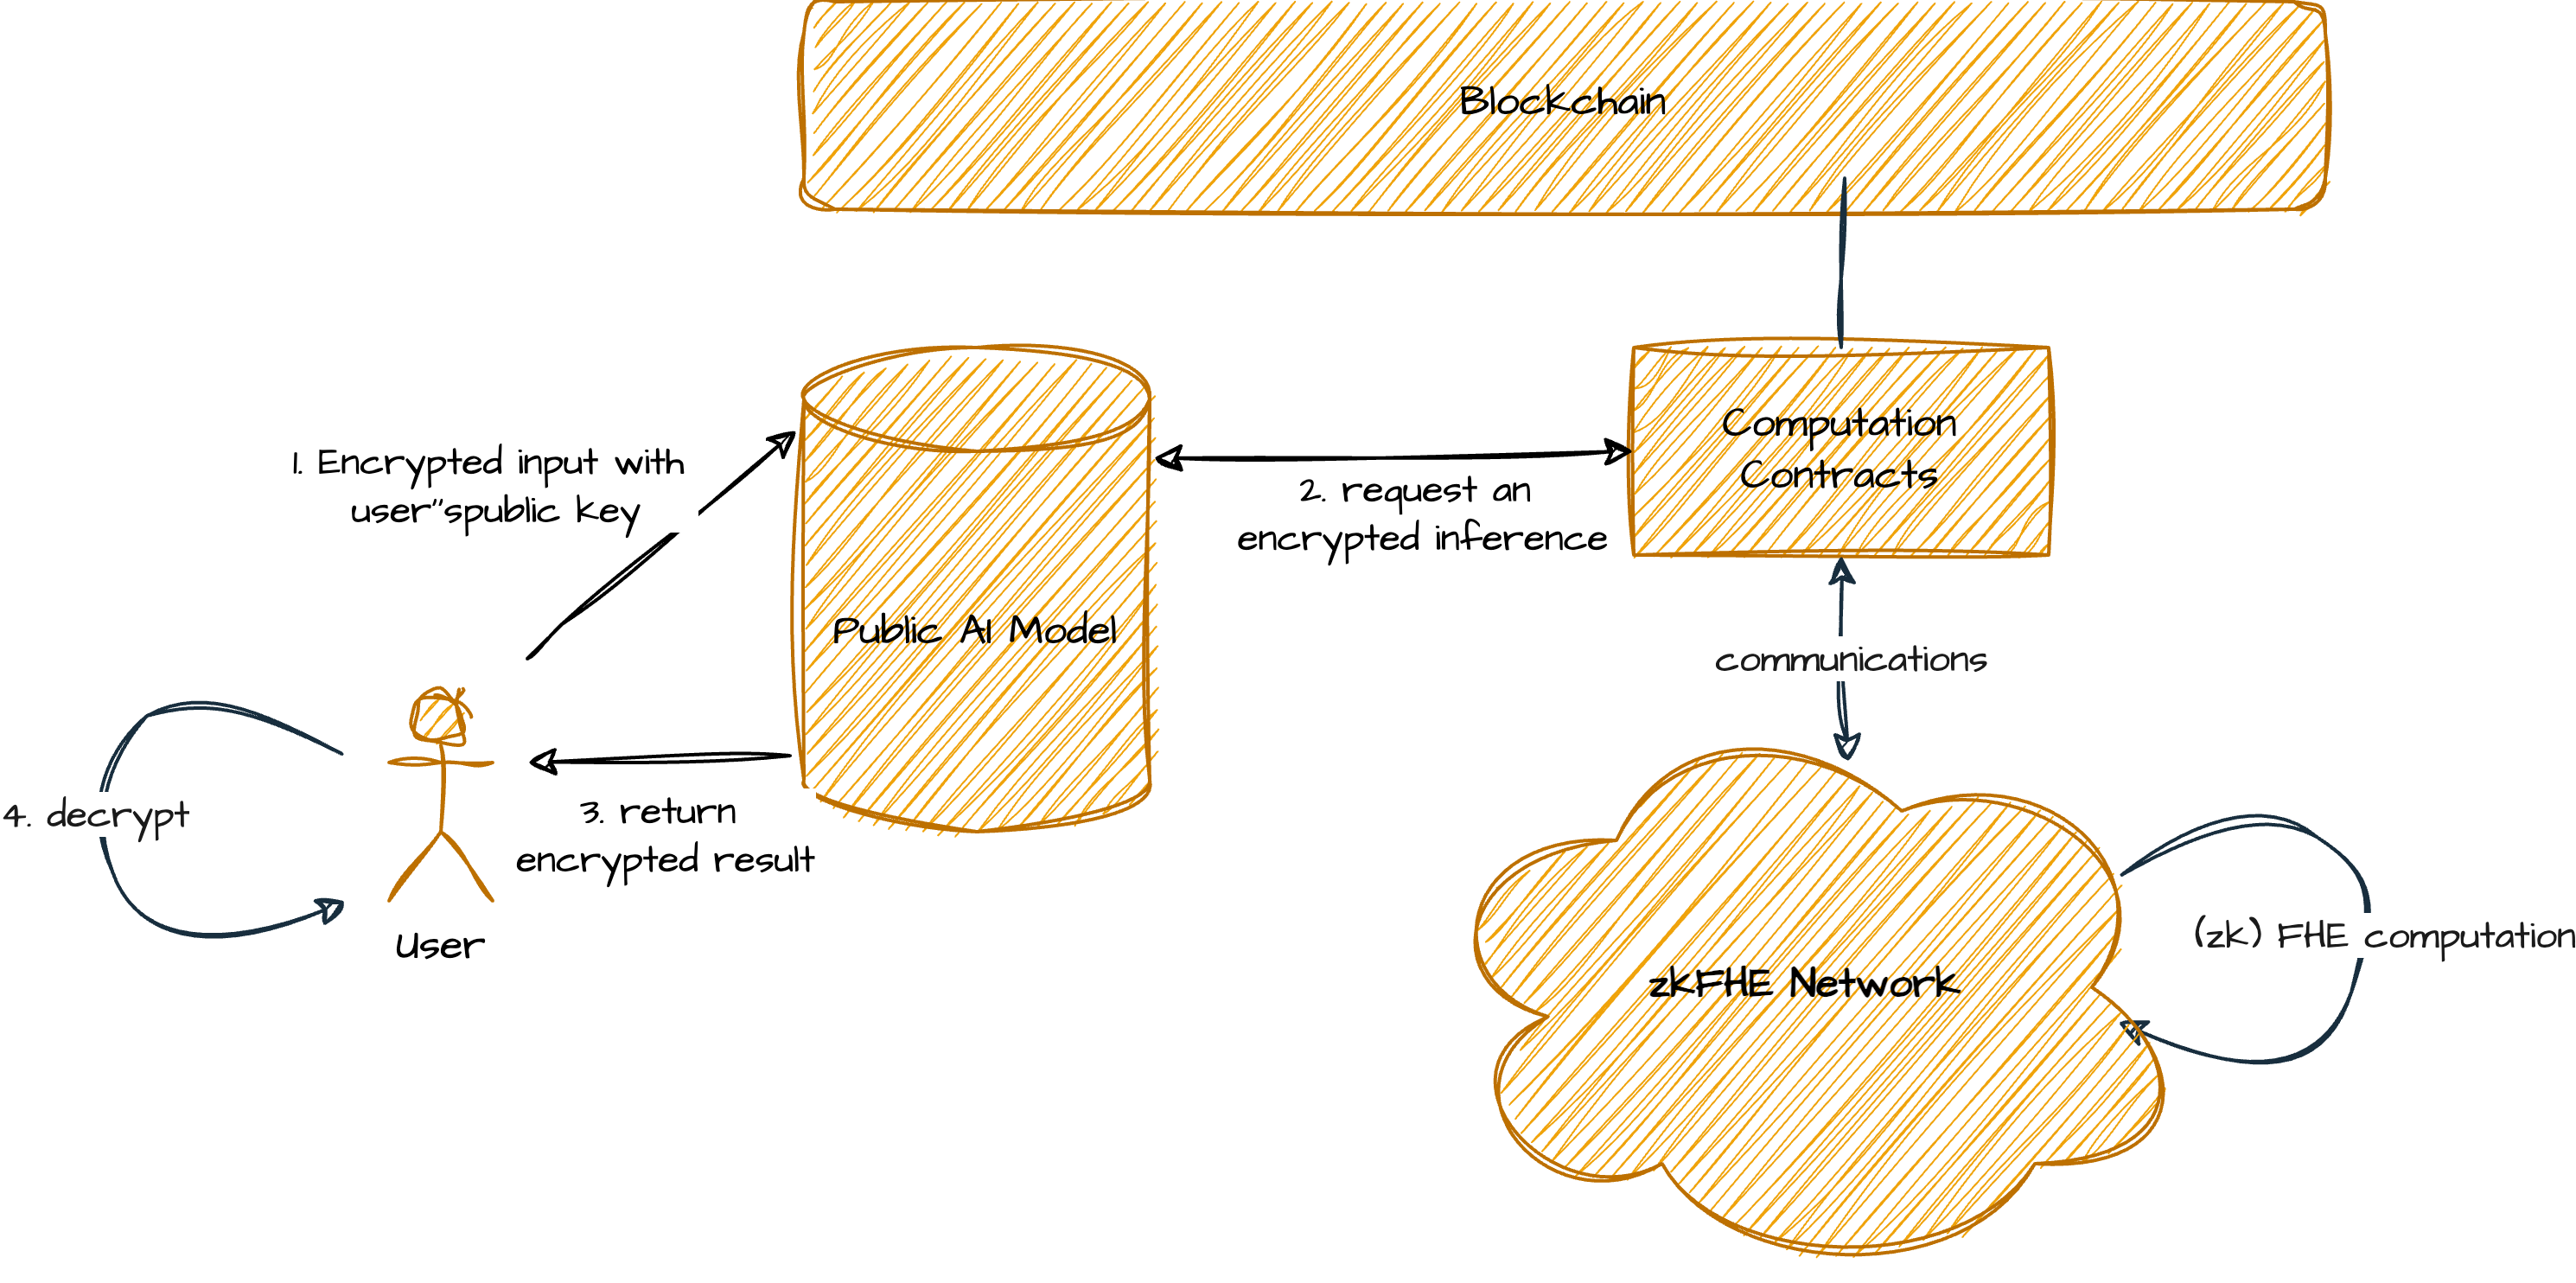
### Privacy-Preserving Model Inference[](https://docs.primuslabs.xyz/data-computation/use-cases/single-user-mode/privacy-preserving-ai/#privacy-preserving-model-inference "Direct link to Privacy-Preserving Model Inference")
Fully Homomorphic Encryption (FHE) enables privacy-preserving model inference by allowing users to encrypt their private data before sending it to a public AI model hosted by a service provider. Here’s how it works:
Users encrypt their private data locally using FHE, ensuring it remains confidential during transmission. The encrypted data is then sent to the service provider with the AI model.
The service provider, equipped with FHE capabilities, computes on the encrypted data directly. This means the AI model can perform inference and generate encrypted results without accessing the plaintext data.
After computation, the service provider sends back the encrypted result to the user.
Using their private decryption key, the user decrypts the result to obtain the inference outcome. Throughout this process, the user’s original data remains encrypted, ensuring data privacy and compliance with regulations.
FHE for privacy-preserving model inference offers benefits like end-to-end data privacy and trust between users and service providers. However, challenges include computational demands and secure management of encryption keys. As encryption technologies evolve, FHE holds promise for enhancing data security and enabling safe deployment of AI in sensitive applications.
### Federated Learning[](https://docs.primuslabs.xyz/data-computation/use-cases/single-user-mode/privacy-preserving-ai/#federated-learning "Direct link to Federated Learning")
Federated Learning (FL) is a distributed machine learning approach that allows for the training of a global model across multiple decentralized devices holding local data, without sharing the data itself. This technique preserves data privacy by keeping the data on local devices and only sharing model updates with a central server, which aggregates these updates to refine the global model. This process iteratively improves the global model through repeated cycles of local training and central aggregation, making it ideal for scenarios where data privacy and security are critical.
FL is particularly useful in applications such as healthcare, finance, mobile and IoT services, and smart cities. It enables collaborative model training while adhering to data protection regulations and reducing the risk of data breaches. Despite its advantages, Federated Learning faces challenges such as privacy and security concerns. Combining Federated Learning (FL) with Fully Homomorphic Encryption (FHE) can enhance privacy and security in distributed machine learning. In this approach, model updates are encrypted using FHE before being transmitted to the aggregator. FHE allows computations to be performed on encrypted data, so the aggregator can aggregate the encrypted model updates without ever decrypting them. This ensures that sensitive information remains confidential throughout the process.
* [The Privacy Issues of AI Industry](https://docs.primuslabs.xyz/data-computation/use-cases/single-user-mode/privacy-preserving-ai/#the-privacy-issues-of-ai-industry)
* [Solutions](https://docs.primuslabs.xyz/data-computation/use-cases/single-user-mode/privacy-preserving-ai/#solutions)
* [Privacy-Preserving Model Inference](https://docs.primuslabs.xyz/data-computation/use-cases/single-user-mode/privacy-preserving-ai/#privacy-preserving-model-inference)
* [Federated Learning](https://docs.primuslabs.xyz/data-computation/use-cases/single-user-mode/privacy-preserving-ai/#federated-learning)
---
# What is Single-Key FHE? | primus
[Skip to main content](https://docs.primuslabs.xyz/data-computation/use-cases/single-user-mode/singlekey-fhe/#docusaurus_skipToContent_fallback)
What is Single-Key FHE?
=======================
Single-key Fully Homomorphic Encryption (FHE) refers to an FHE scheme where all the homomorphic operations are performed using the same encryption key. This means that the same key is used to both encrypt the data and perform computations on the encrypted data. Here’s a more detailed explanation:
Key Characteristics of Single-Key FHE include:
**Single Encryption Key:**
In a single-key FHE system, there is only one encryption key that is used to encrypt data, perform homomorphic operations, and ultimately decrypt the data. This simplifies the key management process as there is no need to handle multiple keys.
**Homomorphic Operations:**
The core feature of FHE is the ability to perform arbitrary computations on ciphertexts, which results in a ciphertext that, when decrypted, matches the result of the operations as if they were performed on the plaintext. Single-key FHE maintains this capability using the same encryption key for all steps. Security:
Single-key FHE is useful in scenarios where a single entity needs to perform computations on encrypted data while ensuring privacy, such as secure data storage and processing. Typical applications are cloud computing and secure out-sourced data processing.
---
# Attestation Structure | primus
[Skip to main content](https://docs.primuslabs.xyz/enterprise/attestation-structure/#docusaurus_skipToContent_fallback)
On this page

Attestation Structure[](https://docs.primuslabs.xyz/enterprise/attestation-structure/#attestation-structure "Direct link to Attestation Structure")
-----------------------------------------------------------------------------------------------------------------------------------------------------
When a successful data verification process is completed, the client will receive a zkTLS attestation issued by the attestor. The attestation is defined with the following structure. You may find the attestation structure is a little bit different from the network-based [attestation](https://docs.primuslabs.xyz/build/misc/attestation-structure)
.
{ "recipient": "YOUR_USER_ADDRESS", // user's wallet address "request": { "url": "REQUEST_URL", // request url "header": "REQUEST_HEADER", // request header "method": "REQUEST_METHOD", // request method "body": "REQUEST_BODY" // request body }, "reponseResolve": [ { "keyName": "VERIFY_DATA_ITEMS", // the "verify data items" you set in the template "parseType": "", "parsePath": "DARA_ITEM_PATH" // json path of the data for verification } ], "data": "{ACTUAL_DATA}", // actual data items in the request, stringified JSON object "attConditions": "[RESPONSE_CONDITIONS]", // response conditions, stringified JSON object "timestamp": TIMESTAMP_OF_VERIFICATION_EXECUTION, // timestamp of execution "additionParams": "", // additionParams from zkTLS sdk "attestors": [ // information of the attestors { "attestorAddr": "ATTESTOR_ADDRESS", // the address of the attestor "url": "https://primuslabs.org" // the attestor's url } ], "signatures": [ "SIGNATURE_OF_THIS_VERIFICATION" // attestor's signature for this verification ]}
* [Attestation Structure](https://docs.primuslabs.xyz/enterprise/attestation-structure/#attestation-structure)
---
# Installation | primus
[Skip to main content](https://docs.primuslabs.xyz/enterprise/core-sdk/install/#docusaurus_skipToContent_fallback)
On this page

Installing the Primus Core SDK[](https://docs.primuslabs.xyz/enterprise/core-sdk/install/#installing-the-primus-core-sdk "Direct link to Installing the Primus Core SDK")
---------------------------------------------------------------------------------------------------------------------------------------------------------------------------
Welcome to the first step in integrating Primus zkTLS-Core-SDK into your project. This guide will walk you through the installation process and help you get started quickly.
### Prerequisites[](https://docs.primuslabs.xyz/enterprise/core-sdk/install/#prerequisites "Direct link to Prerequisites")
Before you begin, make sure you have:
* Node.js(version 18 or later)installed on your system
* npm (usually comes with Node.js) or yarn as your package manager
### Installation Steps[](https://docs.primuslabs.xyz/enterprise/core-sdk/install/#installation-steps "Direct link to Installation Steps")
#### 1\. Install the SDK[](https://docs.primuslabs.xyz/enterprise/core-sdk/install/#1-install-the-sdk "Direct link to 1. Install the SDK")
Open your terminal and navigate to your project directory. Then run one of the following commands:
* Using npm:
npm install --save @primuslabs/zktls-core-sdk
* Using yarn:
yarn add --save @primuslabs/zktls-core-sdk
This command will download and install the Primus zkTLS-Core-SDK and its dependencies into your project.
#### 2\. Verify Installation[](https://docs.primuslabs.xyz/enterprise/core-sdk/install/#2-verify-installation "Direct link to 2. Verify Installation")
To ensure the SDK was installed correctly, you can check your `package.json` file. You should see `@primuslabs/zktls-core-sdk` listed in the `dependencies` section.
### Importing the SDK[](https://docs.primuslabs.xyz/enterprise/core-sdk/install/#importing-the-sdk "Direct link to Importing the SDK")
After installation, you can import the SDK in your JavaScript or TypeScript files. Here's how:
const { PrimusCoreTLS } = require("@primuslabs/zktls-core-sdk");
### Next Steps[](https://docs.primuslabs.xyz/enterprise/core-sdk/install/#next-steps "Direct link to Next Steps")
You can refer to the [simple example](https://docs.primuslabs.xyz/enterprise/core-sdk/simpleexample)
to see an example about how to integrate the SDK into your project.
If you need further support, feel free to reach out through our [community on Discord](https://discord.com/invite/pdrNxRrApX)
.
* [Installing the Primus Core SDK](https://docs.primuslabs.xyz/enterprise/core-sdk/install/#installing-the-primus-core-sdk)
* [Prerequisites](https://docs.primuslabs.xyz/enterprise/core-sdk/install/#prerequisites)
* [Installation Steps](https://docs.primuslabs.xyz/enterprise/core-sdk/install/#installation-steps)
* [1\. Install the SDK](https://docs.primuslabs.xyz/enterprise/core-sdk/install/#1-install-the-sdk)
* [2\. Verify Installation](https://docs.primuslabs.xyz/enterprise/core-sdk/install/#2-verify-installation)
* [Importing the SDK](https://docs.primuslabs.xyz/enterprise/core-sdk/install/#importing-the-sdk)
* [Next Steps](https://docs.primuslabs.xyz/enterprise/core-sdk/install/#next-steps)
---
# DVC (Data Verification and Computation) | primus
[Skip to main content](https://docs.primuslabs.xyz/enterprise/dvc/#docusaurus_skipToContent_fallback)
On this page

Introduction[](https://docs.primuslabs.xyz/enterprise/dvc/#introduction "Direct link to Introduction")
--------------------------------------------------------------------------------------------------------
DVC (Data Verification and Computation) mode is a workflow where:
1. one uses zkTLS to verify the correctness and authenticity of HTTPS requests and responses by proving the encrypted TLS transcript directly, without executing any business logic itself.
2. one uses zkVM to consume and compute the verified private data for business logic execution.
The advantages of the DVC pattern are clear: user data privacy is strongly protected, while the value or insights derived from the data can be extracted and consumed through an external zkVM program. This separation keeps the workflow clean, modular, and easy to maintain. Moreover, the output of the zkVM programm, a.k.a., a zkSNARK proof, can be publicly verified through zk verifier contract on-chain.
The Reference Implementation[](https://docs.primuslabs.xyz/enterprise/dvc/#the-reference-implementation "Direct link to The Reference Implementation")
--------------------------------------------------------------------------------------------------------------------------------------------------------
Developers can check the details of the [repository](https://github.com/primus-labs/DVC-Intro)
for a complete implementation guide.
Comparison with Native zkTLS Operations[](https://docs.primuslabs.xyz/enterprise/dvc/#comparison-with-native-zktls-operations "Direct link to Comparison with Native zkTLS Operations")
-----------------------------------------------------------------------------------------------------------------------------------------------------------------------------------------
The [zkTLS Operations](https://docs.primuslabs.xyz/enterprise/op)
is another approah to process with private data, which also provide a certain type of computation in the zkTLS algorithm layer. However, The method of using zkTLS operations provides less public verifiability, since the output of a zkVM circuit, namely a SNARK proof, can be publicly verified on-chain.
* [Introduction](https://docs.primuslabs.xyz/enterprise/dvc/#introduction)
* [The Reference Implementation](https://docs.primuslabs.xyz/enterprise/dvc/#the-reference-implementation)
* [Comparison with Native zkTLS Operations](https://docs.primuslabs.xyz/enterprise/dvc/#comparison-with-native-zktls-operations)
---
# Error Code | primus
[Skip to main content](https://docs.primuslabs.xyz/enterprise/zk-tls-sdk/errorcode/#docusaurus_skipToContent_fallback)
On this page

Error Code[](https://docs.primuslabs.xyz/enterprise/zk-tls-sdk/errorcode/#error-code "Direct link to Error Code")
-------------------------------------------------------------------------------------------------------------------
We have defined some error codes in the SDK. When an error occurs during the data verification process, you can refer to the following list for troubleshooting.
### 1\. General Errors[](https://docs.primuslabs.xyz/enterprise/zk-tls-sdk/errorcode/#1-general-errors "Direct link to 1. General Errors")
| Error Code | Situation |
| --- | --- |
| 00000 | Operation too frequent. Please try again later. |
| 00001 | Algorithm startup exception. |
| 00002 | The verification process timed out. |
| 00003 | A verification process is in progress. Please try again later. |
| 00004 | The user closes or cancels the verification process. |
| 00005 | Wrong SDK parameters. |
| 00012 | Invalid Template ID. |
| 00013 | Target data missing. Please check that the JSON path of the data in the response from the request URL matches your template. |
| 00104 | Not met the verification requirements. |
| \-1002001 | Invalid App ID. |
| \-1002002 | Invalid App Secret. |
### 2\. zkTLS Related Errors[](https://docs.primuslabs.xyz/enterprise/zk-tls-sdk/errorcode/#2-zktls-related-errors "Direct link to 2. zkTLS Related Errors")
| Error Code | Situation |
| --- | --- |
| 10001 ~ 10004 | Unstable internet connection. Please try again. |
| 20001 | An internal error occurred. |
| 20003 | Invalid algorithm parameters. |
| 20005 | An internal error occurred. |
| 30001 | Response error. Please try again. |
| 30002 | Response check error. |
| 30004 | Response parse error. |
| 40002 | SSL certificate error. |
| 50001 | An internal error occurred. |
| 50003 | The client encountered an unexpected error. |
| 50004 | The client not started. Please try again. |
| 50006 | The algorithm server not started. Please try again. |
| 50007 | Algorithm execution issues. |
| 50008 | Abnormal execution results. |
| 50009 | Algorithm service timed out. |
| 50010 | Compatibility issues during algorithm execution. |
| 50011 | Unsupported TLS version. |
| 99999 | Undefined error. |
Please contact our [Community](https://discord.com/invite/pdrNxRrApX)
for assistance in resolving the issues.
* [Error Code](https://docs.primuslabs.xyz/enterprise/zk-tls-sdk/errorcode/#error-code)
* [1\. General Errors](https://docs.primuslabs.xyz/enterprise/zk-tls-sdk/errorcode/#1-general-errors)
* [2\. zkTLS Related Errors](https://docs.primuslabs.xyz/enterprise/zk-tls-sdk/errorcode/#2-zktls-related-errors)
---
# Example&Parameters | primus
[Skip to main content](https://docs.primuslabs.xyz/enterprise/zk-tls-sdk/example/#docusaurus_skipToContent_fallback)
On this page

Data Verification Capabilities Example[](https://docs.primuslabs.xyz/enterprise/zk-tls-sdk/example/#data-verification-capabilities-example "Direct link to Data Verification Capabilities Example")
-----------------------------------------------------------------------------------------------------------------------------------------------------------------------------------------------------
In this initial version, the data source URL, attestation data fields, and supported blockchains are pre-configured. **A future developer platform will allow customization.**
Data Verification Capabilities[](https://docs.primuslabs.xyz/enterprise/zk-tls-sdk/example/#data-verification-capabilities "Direct link to Data Verification Capabilities")
-----------------------------------------------------------------------------------------------------------------------------------------------------------------------------
### 1.Attestable Details[](https://docs.primuslabs.xyz/enterprise/zk-tls-sdk/example/#1attestable-details "Direct link to 1.Attestable Details")
#### (1)Internet Data[](https://docs.primuslabs.xyz/enterprise/zk-tls-sdk/example/#1internet-data "Direct link to (1)Internet Data")
| Data Sources | Attestation Data Fields | Input Value | Attestation Result |
| --- | --- | --- | --- |
| [https://www.binance.com](https://www.binance.com/) | Asset balance in the Spot account | USD value, numeric, minimum value of 0.000001, restricted to a 6-decimal-place number | if the "attestation content" is greater than "input value" |
| | Token holding in the Spot account | Token name, alphabet | if the "input value" is equivalent to more than USD 0.1 |
| | Spot 30-day trade volume | USD value, numeric, minimum value of 0.000001, restricted to a 6-decimal-place number | if the "attestation content" is greater than "input value" |
| | KYC Status | N/A | if the "attestation content" passed basic KYC verification |
| | Account ownership | N/A | if the "attestation content" owns the associated account |
| [https://www.okx.com](https://www.okx.com/) | Total asset balance | USD value, numeric, minimum value of 0.000001, restricted to a 6-decimal-place number | if the "attestation content" is greater than "input value" |
| | Token holding | Token name, alphabet | if the "input value" is equivalent to more than USD 0.1 |
| | Spot 30-day trade volume | USD value, numeric, minimum value of 0.000001, restricted to a 6-decimal-place number | if the "attestation content" is greater than "input value" |
| | KYC Status | N/A | if the "attestation content" passed basic KYC verification |
| [https://www.tiktok.com](https://www.tiktok.com/) | Account ownership | N/A | if the "attestation content" owns the associated account |
| [https://www.x.com](https://www.x.com/) | Account ownership | N/A | if the "attestation content" owns the associated account |
| | Social connections | Followers number, numeric, minimum value of 0 | value of 0 if the "attestation content" is greater than "input value" |
#### (2)Web3 Data[](https://docs.primuslabs.xyz/enterprise/zk-tls-sdk/example/#2web3-data "Direct link to (2)Web3 Data")
Integrate the [Brevis'](https://docs.brevis.network/)
SDK to enable on-chain transaction proof, allowing verification of whether a user has had on-chain transactions on the BNB Chain since July 2024.
### 2.Supported Blockchains[](https://docs.primuslabs.xyz/enterprise/zk-tls-sdk/example/#2supported-blockchains "Direct link to 2.Supported Blockchains")
For the attestation contract, we currently deployed EAS and Verax attestation schemas to the following blockchains:
* Linea
* BNB Chain
* opBNB
* Arbitrum
* Scroll
If you have further needs for other blockchains, please contact us through our [community](https://discord.com/invite/pdrNxRrApX)
for support.
* * *
### [](https://docs.primuslabs.xyz/enterprise/zk-tls-sdk/example/#a-idparamsdatailsa "Direct link to a-idparamsdatailsa")
Parameters Details[](https://docs.primuslabs.xyz/enterprise/zk-tls-sdk/example/#parameters-details "Direct link to Parameters Details")
-----------------------------------------------------------------------------------------------------------------------------------------
### 1\. chainID (number)[](https://docs.primuslabs.xyz/enterprise/zk-tls-sdk/example/#1-chainid-number "Direct link to 1. chainID (number)")
The ID of the blockchain to which you want users to submit their proof.
console.log(sdkInstance.supportedChainList); // text: 'BlockChainName', value: chainID// Output: [// {text: 'Linea', value: 59144 },// {text: 'BNB Chain', value: 56 },// {text: 'opBNB', value: 204 },// {text: 'Arbitrum', value: 42161 },// {text: 'Scroll', value: 534352 },// {text: 'Sepolia', value: 11155111 },// {text: 'BNB Testnet', value: 97 },// {text: 'opBNB Testnet', value: 5611 },// {text: 'Scroll Sepolia', value: 534351 },// ]
note
To test your integration and business workflow, simply input the chainID parameter using one of the four test networks we support: Sepolia, BSC Testnet, opBNB Testnet, and Scroll Sepolia.
### 2.walletAddress (string)[](https://docs.primuslabs.xyz/enterprise/zk-tls-sdk/example/#2walletaddress-string "Direct link to 2.walletAddress (string)")
The wallet address of the user. This address will be used as an index for queries on the blockchain.
### 3.attestationTypeID (string)[](https://docs.primuslabs.xyz/enterprise/zk-tls-sdk/example/#3attestationtypeid-string "Direct link to 3.attestationTypeID (string)")
We have assigned different IDs to each attestation type, which can be transmitted to initialize the associated data verification process.
console.log(sdkInstance.supportedAttestationTypeList); // text: 'A function of an application.', value: 'attestationTypeID'// Output: [// {text: 'binance kyc status', value: '1' },// {text: 'binance account ownership', value: '2' },// {text: 'x account ownership', value: '3' },// {text: 'okx kyc status', value: '4' },// {text: 'tiktok account ownership', value: '6' },// {text: 'binance assets balance', value: '9' },// {text: 'binance token holding', value: '10' },// {text: 'okx assets balance', value: '11' },// {text: 'okx token holding', value: '12' },// {text: 'X social connections', value: '15' },// {text: 'binance spot 30d trade vol', value: '16' },// {text: 'okx spot 30d trade vol', value: '17' },// {text: 'On-chain transactions on BNB Chain since 2024 July', value: '101' },// ]
### 4.attestationParameters (array)[](https://docs.primuslabs.xyz/enterprise/zk-tls-sdk/example/#4attestationparameters-array "Direct link to 4.attestationParameters (array)")
#### 4.1 For the attestationTypeID **1, 2, 3, 4, and 6**, you need to transmit a default value \[\] in attestationParameters, like this:[](https://docs.primuslabs.xyz/enterprise/zk-tls-sdk/example/#41-for-the-attestationtypeid-1-2-3-4-and-6-you-need-to-transmit-a-default-value--in-attestationparameters-like-this "Direct link to 41-for-the-attestationtypeid-1-2-3-4-and-6-you-need-to-transmit-a-default-value--in-attestationparameters-like-this")
{ chainID: 56, walletAddress: '0x', attestationTypeID: '1', attestationParameters: [] }
#### 4.2 For attestationTypeID **9, 10, 11, 12, 15, 16, 17, and 101**, you need to transmit with different inputs.[](https://docs.primuslabs.xyz/enterprise/zk-tls-sdk/example/#42-for-attestationtypeid-9-10-11-12-15-16-17-and-101-you-need-to-transmit-with-different-inputs "Direct link to 42-for-attestationtypeid-9-10-11-12-15-16-17-and-101-you-need-to-transmit-with-different-inputs")
* (1)For attestationTypeID 9 & 11 The attestationParameters should include a USD value (numeric), with a minimum value of 0.000001 and restricted to a 6-decimal-place. If the attestationParameters is set to `['100']`, it will complete a data verification process to verify if the user's **asset balance is greater than USD 100**.
{ chainID: 56, walletAddress: '0x', attestationTypeID: '11', attestationParameters: ['100'], }
* (2)For attestationTypeID 10 & 12 The attestationParameters should include a token name (alphabet). If the attestationParameters is set to `['USDT']`, it will complete a data verification process to verify if the user holds **USDT equivalent to more than USD 0.1**.
{ chainID: 56, walletAddress: '0x', attestationTypeID: '10', attestationParameters: ['USDT'], }
* (3)For attestationTypeID 15 The attestationParameters should include a follower number (numeric), with a minimum value of 0. If the attestationParameters is set to `['10']`, it will complete a data verification process to verify if the user has **more than 10 X followers**.
{ chainID: 56, walletAddress: '0x', attestationTypeID: '15', attestationParameters: ['10'], }
* (4)For attestationTypeID 16 & 17 The attestationParameters should include a USD value (numeric), with a minimum value of 0.000001 and restricted to a 6-decimal-place. If the attestationParameters is set to \['500'\], it will complete a data verification process to verify if the user's **spot 30-day trade volume is greater than USD 500**.
{ chainID: 56, walletAddress: '0x', attestationTypeID: '16', attestationParameters: ['500'], }
* (5)For attestationTypeID 101
This attestation integrates the [Brevis'](https://docs.brevis.network/)
SDK to enable on-chain transaction proof, allowing verification of whether a user has conducted on-chain transactions on the BNB Chain since July 2024.
The attestationParameters should include a signature from the user’s wallet address, which needs to be attested to confirm ownership of the address, along with a timestamp indicating the time of the signature. **The input should follow this order: first, ‘user signature’; second, ‘timestamp’**.
{ chainID: 56, walletAddress: '0x', attestationTypeID: '101', attestationParameters: ['0xxx....', '1728546495272'], }
note
In order to confirm that the user truly owns the address to be attested, you must verify that the transmitted ‘user signature’ was signed from that address. The verification method is:
import { ethers } from "ethers"; const connectedAddress = '0x' const timestamp = +new Date() + ""; // '1728546495272' const provider = new ethers.providers.Web3Provider(window.ethereum); const typedData = { types: { EIP712Domain: [{ name: "name", type: "string" }], Request: [ { name: "desc", type: "string" }, { name: "address", type: "string" }, { name: "timestamp", type: "string" }, ], }, primaryType: "Request", domain: { name: "PADO Labs", }, message: { desc: "PADO Labs", address: connectedAddress, timestamp, }, }; const userSignature = await provider.send("eth_signTypedData_v4", [ connectedAddress, typedData, ]); console.log("userSignature", userSignature); // 0xxx....
* [Data Verification Capabilities Example](https://docs.primuslabs.xyz/enterprise/zk-tls-sdk/example/#data-verification-capabilities-example)
* [Data Verification Capabilities](https://docs.primuslabs.xyz/enterprise/zk-tls-sdk/example/#data-verification-capabilities)
* [1.Attestable Details](https://docs.primuslabs.xyz/enterprise/zk-tls-sdk/example/#1attestable-details)
* [(1)Internet Data](https://docs.primuslabs.xyz/enterprise/zk-tls-sdk/example/#1internet-data)
* [(2)Web3 Data](https://docs.primuslabs.xyz/enterprise/zk-tls-sdk/example/#2web3-data)
* [2.Supported Blockchains](https://docs.primuslabs.xyz/enterprise/zk-tls-sdk/example/#2supported-blockchains)
* [](https://docs.primuslabs.xyz/enterprise/zk-tls-sdk/example/#a-idparamsdatailsa)
* [Parameters Details](https://docs.primuslabs.xyz/enterprise/zk-tls-sdk/example/#parameters-details)
* [1\. chainID (number)](https://docs.primuslabs.xyz/enterprise/zk-tls-sdk/example/#1-chainid-number)
* [2.walletAddress (string)](https://docs.primuslabs.xyz/enterprise/zk-tls-sdk/example/#2walletaddress-string)
* [3.attestationTypeID (string)](https://docs.primuslabs.xyz/enterprise/zk-tls-sdk/example/#3attestationtypeid-string)
* [4.attestationParameters (array)](https://docs.primuslabs.xyz/enterprise/zk-tls-sdk/example/#4attestationparameters-array)
* [4.1 For the attestationTypeID **1, 2, 3, 4, and 6**, you need to transmit a default value \[\] in attestationParameters, like this:](https://docs.primuslabs.xyz/enterprise/zk-tls-sdk/example/#41-for-the-attestationtypeid-1-2-3-4-and-6-you-need-to-transmit-a-default-value--in-attestationparameters-like-this)
* [4.2 For attestationTypeID **9, 10, 11, 12, 15, 16, 17, and 101**, you need to transmit with different inputs.](https://docs.primuslabs.xyz/enterprise/zk-tls-sdk/example/#42-for-attestationtypeid-9-10-11-12-15-16-17-and-101-you-need-to-transmit-with-different-inputs)
---
# Overview | primus
[Skip to main content](https://docs.primuslabs.xyz/enterprise/zk-tls-sdk/solidity/overview/#docusaurus_skipToContent_fallback)
On this page

Overview[](https://docs.primuslabs.xyz/enterprise/zk-tls-sdk/solidity/overview/#overview "Direct link to Overview")
---------------------------------------------------------------------------------------------------------------------
The Primus zkTLS protocol is compatible with multiple blockchains. We provide smart contracts that can be deployed on different blockchains to verify data proofs generated by users through the zkTLS SDK.
### How to Interact[](https://docs.primuslabs.xyz/enterprise/zk-tls-sdk/solidity/overview/#how-to-interact "Direct link to How to Interact")
1. Your dApp requests proofs from the user using the zkTLS SDK in the front end.
2. Submit the proof to your smart contract.
3. Verify the proof on-chain via the smart contract.
4. Extract relevant data from the verified proof.
5. Use the extracted data in your business logic.
Contract Code in GitHub[](https://docs.primuslabs.xyz/enterprise/zk-tls-sdk/solidity/overview/#contract-code-in-github "Direct link to Contract Code in GitHub")
------------------------------------------------------------------------------------------------------------------------------------------------------------------
We already published the smart contract code on GitHub, you can refer to it [here](https://github.com/primus-labs/zktls-contracts)
.
Quick Start[](https://docs.primuslabs.xyz/enterprise/zk-tls-sdk/solidity/overview/#quick-start "Direct link to Quick Start")
------------------------------------------------------------------------------------------------------------------------------
### EVM Blockchains[](https://docs.primuslabs.xyz/enterprise/zk-tls-sdk/solidity/overview/#evm-blockchains "Direct link to EVM Blockchains")
You can find example smart contracts for quick integration in the [Quick Start for EVM blockchains](https://docs.primuslabs.xyz/enterprise/zk-tls-sdk/solidity/quickstart#evm-blockchains)
.
#### Mainnets[](https://docs.primuslabs.xyz/enterprise/zk-tls-sdk/solidity/overview/#mainnets "Direct link to Mainnets")
##### Linea[](https://docs.primuslabs.xyz/enterprise/zk-tls-sdk/solidity/overview/#linea "Direct link to Linea")
| Contract | Address |
| --- | --- |
| Primus | 0xe6a7E3d26B898e96fA8bC00fFE6e51b25Dc24d6a |
##### BNB Chain[](https://docs.primuslabs.xyz/enterprise/zk-tls-sdk/solidity/overview/#bnb-chain "Direct link to BNB Chain")
| Contract | Address |
| --- | --- |
| Primus | 0xF24199D5D431bE869af3Da61162CbBb58C389324 |
##### Arbitrum[](https://docs.primuslabs.xyz/enterprise/zk-tls-sdk/solidity/overview/#arbitrum "Direct link to Arbitrum")
| Contract | Address |
| --- | --- |
| Primus | 0x982Cef8d9F184566C2BeC48c4fb9b6e7B0b4A58B |
##### Scroll[](https://docs.primuslabs.xyz/enterprise/zk-tls-sdk/solidity/overview/#scroll "Direct link to Scroll")
| Contract | Address |
| --- | --- |
| Primus | 0x06c3c00dc556d2493A661E6a929d3E17f5F097a4 |
##### opBNB[](https://docs.primuslabs.xyz/enterprise/zk-tls-sdk/solidity/overview/#opbnb "Direct link to opBNB")
| Contract | Address |
| --- | --- |
| Primus | 0xadd538D8C857072eFC29C4c05F574c68f94137eF |
##### Taiko[](https://docs.primuslabs.xyz/enterprise/zk-tls-sdk/solidity/overview/#taiko "Direct link to Taiko")
| Contract | Address |
| --- | --- |
| Primus | 0x3760aB354507a29a9F5c65A66C74353fd86393FA |
##### Camp[](https://docs.primuslabs.xyz/enterprise/zk-tls-sdk/solidity/overview/#camp "Direct link to Camp")
| Contract | Address |
| --- | --- |
| Primus | 0xCE7cefB3B5A7eB44B59F60327A53c9Ce53B0afdE |
##### Base[](https://docs.primuslabs.xyz/enterprise/zk-tls-sdk/solidity/overview/#base "Direct link to Base")
| Contract | Address |
| --- | --- |
| Primus | 0xCE7cefB3B5A7eB44B59F60327A53c9Ce53B0afdE |
#### Testnets[](https://docs.primuslabs.xyz/enterprise/zk-tls-sdk/solidity/overview/#testnets "Direct link to Testnets")
##### Sepolia[](https://docs.primuslabs.xyz/enterprise/zk-tls-sdk/solidity/overview/#sepolia "Direct link to Sepolia")
| Contract | Address |
| --- | --- |
| Primus | 0x3760aB354507a29a9F5c65A66C74353fd86393FA |
##### Holesky[](https://docs.primuslabs.xyz/enterprise/zk-tls-sdk/solidity/overview/#holesky "Direct link to Holesky")
| Contract | Address |
| --- | --- |
| Primus | 0xB3d8DDDc793F75a930313785e5d1612747093f25 |
##### BNB Chain Testnet[](https://docs.primuslabs.xyz/enterprise/zk-tls-sdk/solidity/overview/#bnb-chain-testnet "Direct link to BNB Chain Testnet")
| Contract | Address |
| --- | --- |
| Primus | 0xBc074EbE6D39A97Fb35726832300a950e2D94324 |
##### opBNB Testnet[](https://docs.primuslabs.xyz/enterprise/zk-tls-sdk/solidity/overview/#opbnb-testnet "Direct link to opBNB Testnet")
| Contract | Address |
| --- | --- |
| Primus | 0x3760aB354507a29a9F5c65A66C74353fd86393FA |
##### Taiko Hekla Testnet[](https://docs.primuslabs.xyz/enterprise/zk-tls-sdk/solidity/overview/#taiko-hekla-testnet "Direct link to Taiko Hekla Testnet")
| Contract | Address |
| --- | --- |
| Primus | 0x3760aB354507a29a9F5c65A66C74353fd86393FA |
##### Scroll Sepolia Testnet[](https://docs.primuslabs.xyz/enterprise/zk-tls-sdk/solidity/overview/#scroll-sepolia-testnet "Direct link to Scroll Sepolia Testnet")
| Contract | Address |
| --- | --- |
| Primus | 0x5267380F548EEcA48E57Cd468a66F846e1dEfD6e |
##### Base Sepolia Testnet[](https://docs.primuslabs.xyz/enterprise/zk-tls-sdk/solidity/overview/#base-sepolia-testnet "Direct link to Base Sepolia Testnet")
| Contract | Address |
| --- | --- |
| Primus | 0xCE7cefB3B5A7eB44B59F60327A53c9Ce53B0afdE |
##### Monad Testnet[](https://docs.primuslabs.xyz/enterprise/zk-tls-sdk/solidity/overview/#monad-testnet "Direct link to Monad Testnet")
| Contract | Address |
| --- | --- |
| Primus | 0x1Ad7fD53206fDc3979C672C0466A1c48AF47B431 |
##### Pharos Testnet[](https://docs.primuslabs.xyz/enterprise/zk-tls-sdk/solidity/overview/#pharos-testnet "Direct link to Pharos Testnet")
| Contract | Address |
| --- | --- |
| Primus | 0xCE7cefB3B5A7eB44B59F60327A53c9Ce53B0afdE |
##### Sophon Testnet[](https://docs.primuslabs.xyz/enterprise/zk-tls-sdk/solidity/overview/#sophon-testnet "Direct link to Sophon Testnet")
| Contract | Address |
| --- | --- |
| Primus | 0x7068da2522c3Ba1f24594ce20E7d7A8EF574E89f |
##### Unichain Sepolia Testnet[](https://docs.primuslabs.xyz/enterprise/zk-tls-sdk/solidity/overview/#unichain-sepolia-testnet "Direct link to Unichain Sepolia Testnet")
| Contract | Address |
| --- | --- |
| Primus | 0xCE7cefB3B5A7eB44B59F60327A53c9Ce53B0afdE |
### Starknet[](https://docs.primuslabs.xyz/enterprise/zk-tls-sdk/solidity/overview/#starknet "Direct link to Starknet")
You can find example smart contracts for quick integration in the [Quick Start for Starknet](https://docs.primuslabs.xyz/enterprise/zk-tls-sdk/solidity/quickstart#straknet-blockchains)
.
##### Starknet Sepolia Testnet[](https://docs.primuslabs.xyz/enterprise/zk-tls-sdk/solidity/overview/#starknet-sepolia-testnet "Direct link to Starknet Sepolia Testnet")
| Contract | Address |
| --- | --- |
| Primus | 0x00f24a364a932e6eeb8b7a9ed6d2337baaa78dcffa3a6d54e5e1b6c1c227deaa |
### SUI[](https://docs.primuslabs.xyz/enterprise/zk-tls-sdk/solidity/overview/#sui "Direct link to SUI")
#### Mainnet[](https://docs.primuslabs.xyz/enterprise/zk-tls-sdk/solidity/overview/#mainnet "Direct link to Mainnet")
| ID | Address |
| --- | --- |
| Package ID | 0xcbe9ca8cee83ee454cbc114b8f9825b49ed945f89e6ef4f26a07417a10525f42 |
| Object ID | 0x08edfc73afa9ce6b5ac3211c5dcfe52837325fedce491f06812aece0ce21d0fd |
#### Testnet[](https://docs.primuslabs.xyz/enterprise/zk-tls-sdk/solidity/overview/#testnet "Direct link to Testnet")
| ID | Address |
| --- | --- |
| Package ID | 0x16af016d8516f0d0a64f38786b0cbdb7687032415b8995e5487d0b2e3e0f67f2 |
| Object ID | 0x45470ee02c709409e9debd73320df48fc77a7e7ac9f891bf5a80cf7ec0fd37ad |
If you have further needs for other blockchains, please contact us through our [Community](https://discord.com/invite/pdrNxRrApX)
for support.
* [Overview](https://docs.primuslabs.xyz/enterprise/zk-tls-sdk/solidity/overview/#overview)
* [How to Interact](https://docs.primuslabs.xyz/enterprise/zk-tls-sdk/solidity/overview/#how-to-interact)
* [Contract Code in GitHub](https://docs.primuslabs.xyz/enterprise/zk-tls-sdk/solidity/overview/#contract-code-in-github)
* [Quick Start](https://docs.primuslabs.xyz/enterprise/zk-tls-sdk/solidity/overview/#quick-start)
* [EVM Blockchains](https://docs.primuslabs.xyz/enterprise/zk-tls-sdk/solidity/overview/#evm-blockchains)
* [Mainnets](https://docs.primuslabs.xyz/enterprise/zk-tls-sdk/solidity/overview/#mainnets)
* [Testnets](https://docs.primuslabs.xyz/enterprise/zk-tls-sdk/solidity/overview/#testnets)
* [Starknet](https://docs.primuslabs.xyz/enterprise/zk-tls-sdk/solidity/overview/#starknet)
* [SUI](https://docs.primuslabs.xyz/enterprise/zk-tls-sdk/solidity/overview/#sui)
* [Mainnet](https://docs.primuslabs.xyz/enterprise/zk-tls-sdk/solidity/overview/#mainnet)
* [Testnet](https://docs.primuslabs.xyz/enterprise/zk-tls-sdk/solidity/overview/#testnet)
---
# Suport NetWork | primus
[Skip to main content](https://docs.primuslabs.xyz/enterprise/zk-tls-sdk/solidity/support/#docusaurus_skipToContent_fallback)
On this page

Supported Networks
==================
Contract Address[](https://docs.primuslabs.xyz/enterprise/zk-tls-sdk/solidity/support/#contract-address "Direct link to Contract Address")
--------------------------------------------------------------------------------------------------------------------------------------------
### Mainnets[](https://docs.primuslabs.xyz/enterprise/zk-tls-sdk/solidity/support/#mainnets "Direct link to Mainnets")
#### Ethereum[](https://docs.primuslabs.xyz/enterprise/zk-tls-sdk/solidity/support/#ethereum "Direct link to Ethereum")
| Contract | Address |
| --- | --- |
| Primus | 0x0000 |
#### Linea[](https://docs.primuslabs.xyz/enterprise/zk-tls-sdk/solidity/support/#linea "Direct link to Linea")
| Contract | Address |
| --- | --- |
| Primus | 0x0000 |
#### BNB[](https://docs.primuslabs.xyz/enterprise/zk-tls-sdk/solidity/support/#bnb "Direct link to BNB")
| Contract | Address |
| --- | --- |
| Primus | 0x0000 |
#### Arbitrum[](https://docs.primuslabs.xyz/enterprise/zk-tls-sdk/solidity/support/#arbitrum "Direct link to Arbitrum")
| Contract | Address |
| --- | --- |
| Primus | 0x0000 |
#### Scroll[](https://docs.primuslabs.xyz/enterprise/zk-tls-sdk/solidity/support/#scroll "Direct link to Scroll")
| Contract | Address |
| --- | --- |
| Primus | 0x0000 |
### Testnets[](https://docs.primuslabs.xyz/enterprise/zk-tls-sdk/solidity/support/#testnets "Direct link to Testnets")
#### sepolia[](https://docs.primuslabs.xyz/enterprise/zk-tls-sdk/solidity/support/#sepolia "Direct link to sepolia")
| Contract | Address |
| --- | --- |
| Primus | 0x0000 |
#### bsctestnet[](https://docs.primuslabs.xyz/enterprise/zk-tls-sdk/solidity/support/#bsctestnet "Direct link to bsctestnet")
| Contract | Address |
| --- | --- |
| Primus | 0x0000 |
#### opbnbtestnet[](https://docs.primuslabs.xyz/enterprise/zk-tls-sdk/solidity/support/#opbnbtestnet "Direct link to opbnbtestnet")
| Contract | Address |
| --- | --- |
| Primus | 0x0000 |
* [Contract Address](https://docs.primuslabs.xyz/enterprise/zk-tls-sdk/solidity/support/#contract-address)
* [Mainnets](https://docs.primuslabs.xyz/enterprise/zk-tls-sdk/solidity/support/#mainnets)
* [Ethereum](https://docs.primuslabs.xyz/enterprise/zk-tls-sdk/solidity/support/#ethereum)
* [Linea](https://docs.primuslabs.xyz/enterprise/zk-tls-sdk/solidity/support/#linea)
* [BNB](https://docs.primuslabs.xyz/enterprise/zk-tls-sdk/solidity/support/#bnb)
* [Arbitrum](https://docs.primuslabs.xyz/enterprise/zk-tls-sdk/solidity/support/#arbitrum)
* [Scroll](https://docs.primuslabs.xyz/enterprise/zk-tls-sdk/solidity/support/#scroll)
* [Testnets](https://docs.primuslabs.xyz/enterprise/zk-tls-sdk/solidity/support/#testnets)
* [sepolia](https://docs.primuslabs.xyz/enterprise/zk-tls-sdk/solidity/support/#sepolia)
* [bsctestnet](https://docs.primuslabs.xyz/enterprise/zk-tls-sdk/solidity/support/#bsctestnet)
* [opbnbtestnet](https://docs.primuslabs.xyz/enterprise/zk-tls-sdk/solidity/support/#opbnbtestnet)
---
# Workflows | primus
[Skip to main content](https://docs.primuslabs.xyz/enterprise/zk-tls-sdk/workflow/#docusaurus_skipToContent_fallback)

Primus Workflows
================
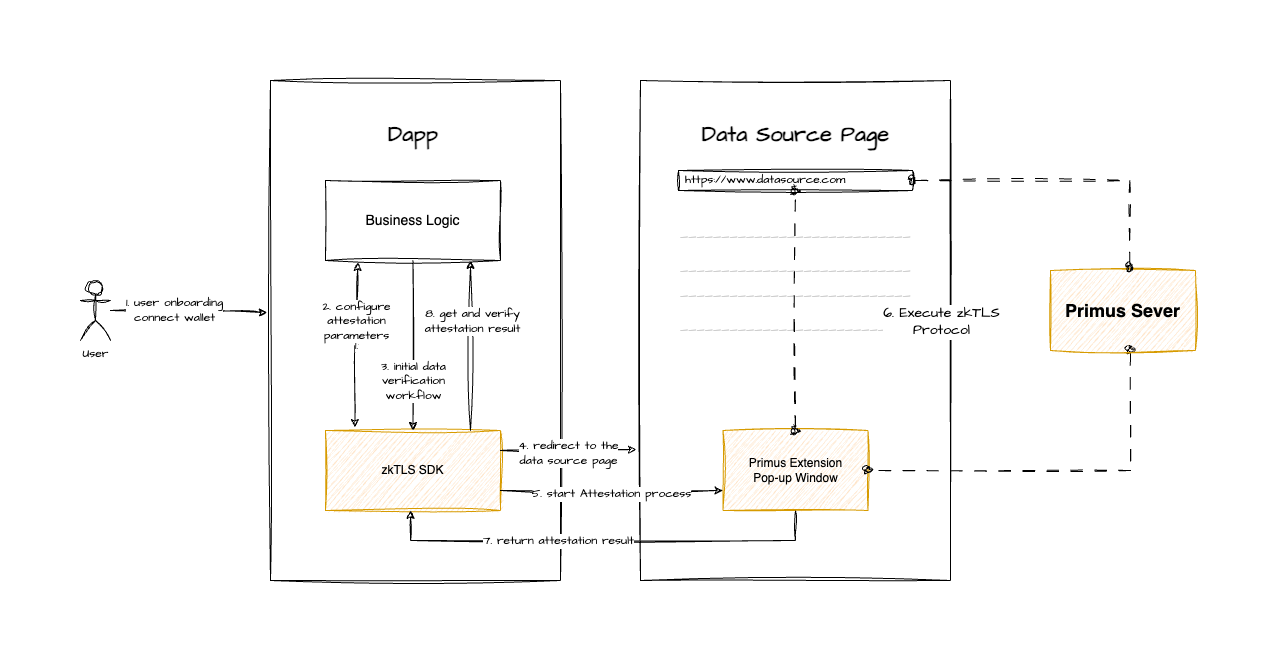
**The [Primus Extension](https://chromewebstore.google.com/detail/pado/oeiomhmbaapihbilkfkhmlajkeegnjhe)
is required to complete the zk-TLS process on the data source page. When using the zk-TLS SDK, prompt users in your dApp to install the latest version (above 0.3.15) of the Extension, as it is required.**
**1\. Create/Search Template:** Log in to the Primus developer console and create or search for an application template, which is a key step in app creation.
**2\. Create App:** Use the template to create an app, set its name, and describe the required information for integrating the Primus zkTLS SDK.
**3\. Configure Verification Parameters:** Ensure the SDK parameters are properly configured before starting the verification process.
**4\. Redirect to Data Source:** The dApp redirects the user to the data source page. After logging in, a pop-up window will appear in the top-right corner.
**5\. Start Verification Process:** The user clicks the "Start" button in the pop-up to initiate the verification process. If login is required, complete it first.
**6\. Execute zk-TLS Protocol:** The zk-TLS protocol completes the privacy-preserving verification during the process.
**7\. Verify Attestation Result:** The dApp retrieves the result from the SDK and verifies Primus' signature to ensure its trustworthiness.
**8\. Execute Business Logic:** Based on the verification result, the dApp performs the corresponding business logic, such as submitting the proof on-chain or other operations.
---
# Composable Attestations | primus
[Skip to main content](https://docs.primuslabs.xyz/implementation-scenarios/composable-attestations/#docusaurus_skipToContent_fallback)

Composable Attestations
=======================
Primus' off-chain attestation can be combined with on-chain attestations to meet the specific requirements of decentralized applications (dApps).
In the realm of decentralized finance (DeFi), protocols can establish specific pools with predetermined conditions to cater to authorized users. For example, a user could receive a particular fee discount from a pool created by Uniswap hooks if they provide evidence of their largest swap in Uniswap from [Brevis](https://docs.brevis.network/)
and proof of CEX trading statistics from Primus. To enable this composable attestation scenario, users should be able to submit both off-chain and on-chain attestations through the Primus/Brevis frontend. The pool contract can then access these attestations from a public attestation service like EAS and Verax, allowing any dApps and smart contracts to finely access the attestations. When a user interacts with the DeFi frontend, the pool contract verifies the satisfaction of the pre-conditions based on the on-chain and off-chain attestations before proceeding with the user's transactions.
Hybrid scenarios also arise in non-DeFi contexts. For instance, individuals can provide proofs of humanity to a dApp to resist Sybil attacks. These proofs should be multi-dimensional to mitigate security risks, often including on-chain analytical results, lightweight KYC proof, and even proof of physical identity. Another example involves a GameFi platform that may require users to provide their off-chain gaming data, such as total playing time, along with on-chain trading data in order to incentivize specific user groups with game rewards.
The verification of Primus' off-chain attestations on smart contracts, along with zero-knowledge proofs of users' on-chain behaviors, is crucial for these hybrid use cases. Fortunately, Primus' off-chain attestations and any on-chain attestations from third-parties can be technically decoupled, providing Primus' builders with the flexibility to integrate with all zero-knowledge coprocessors.
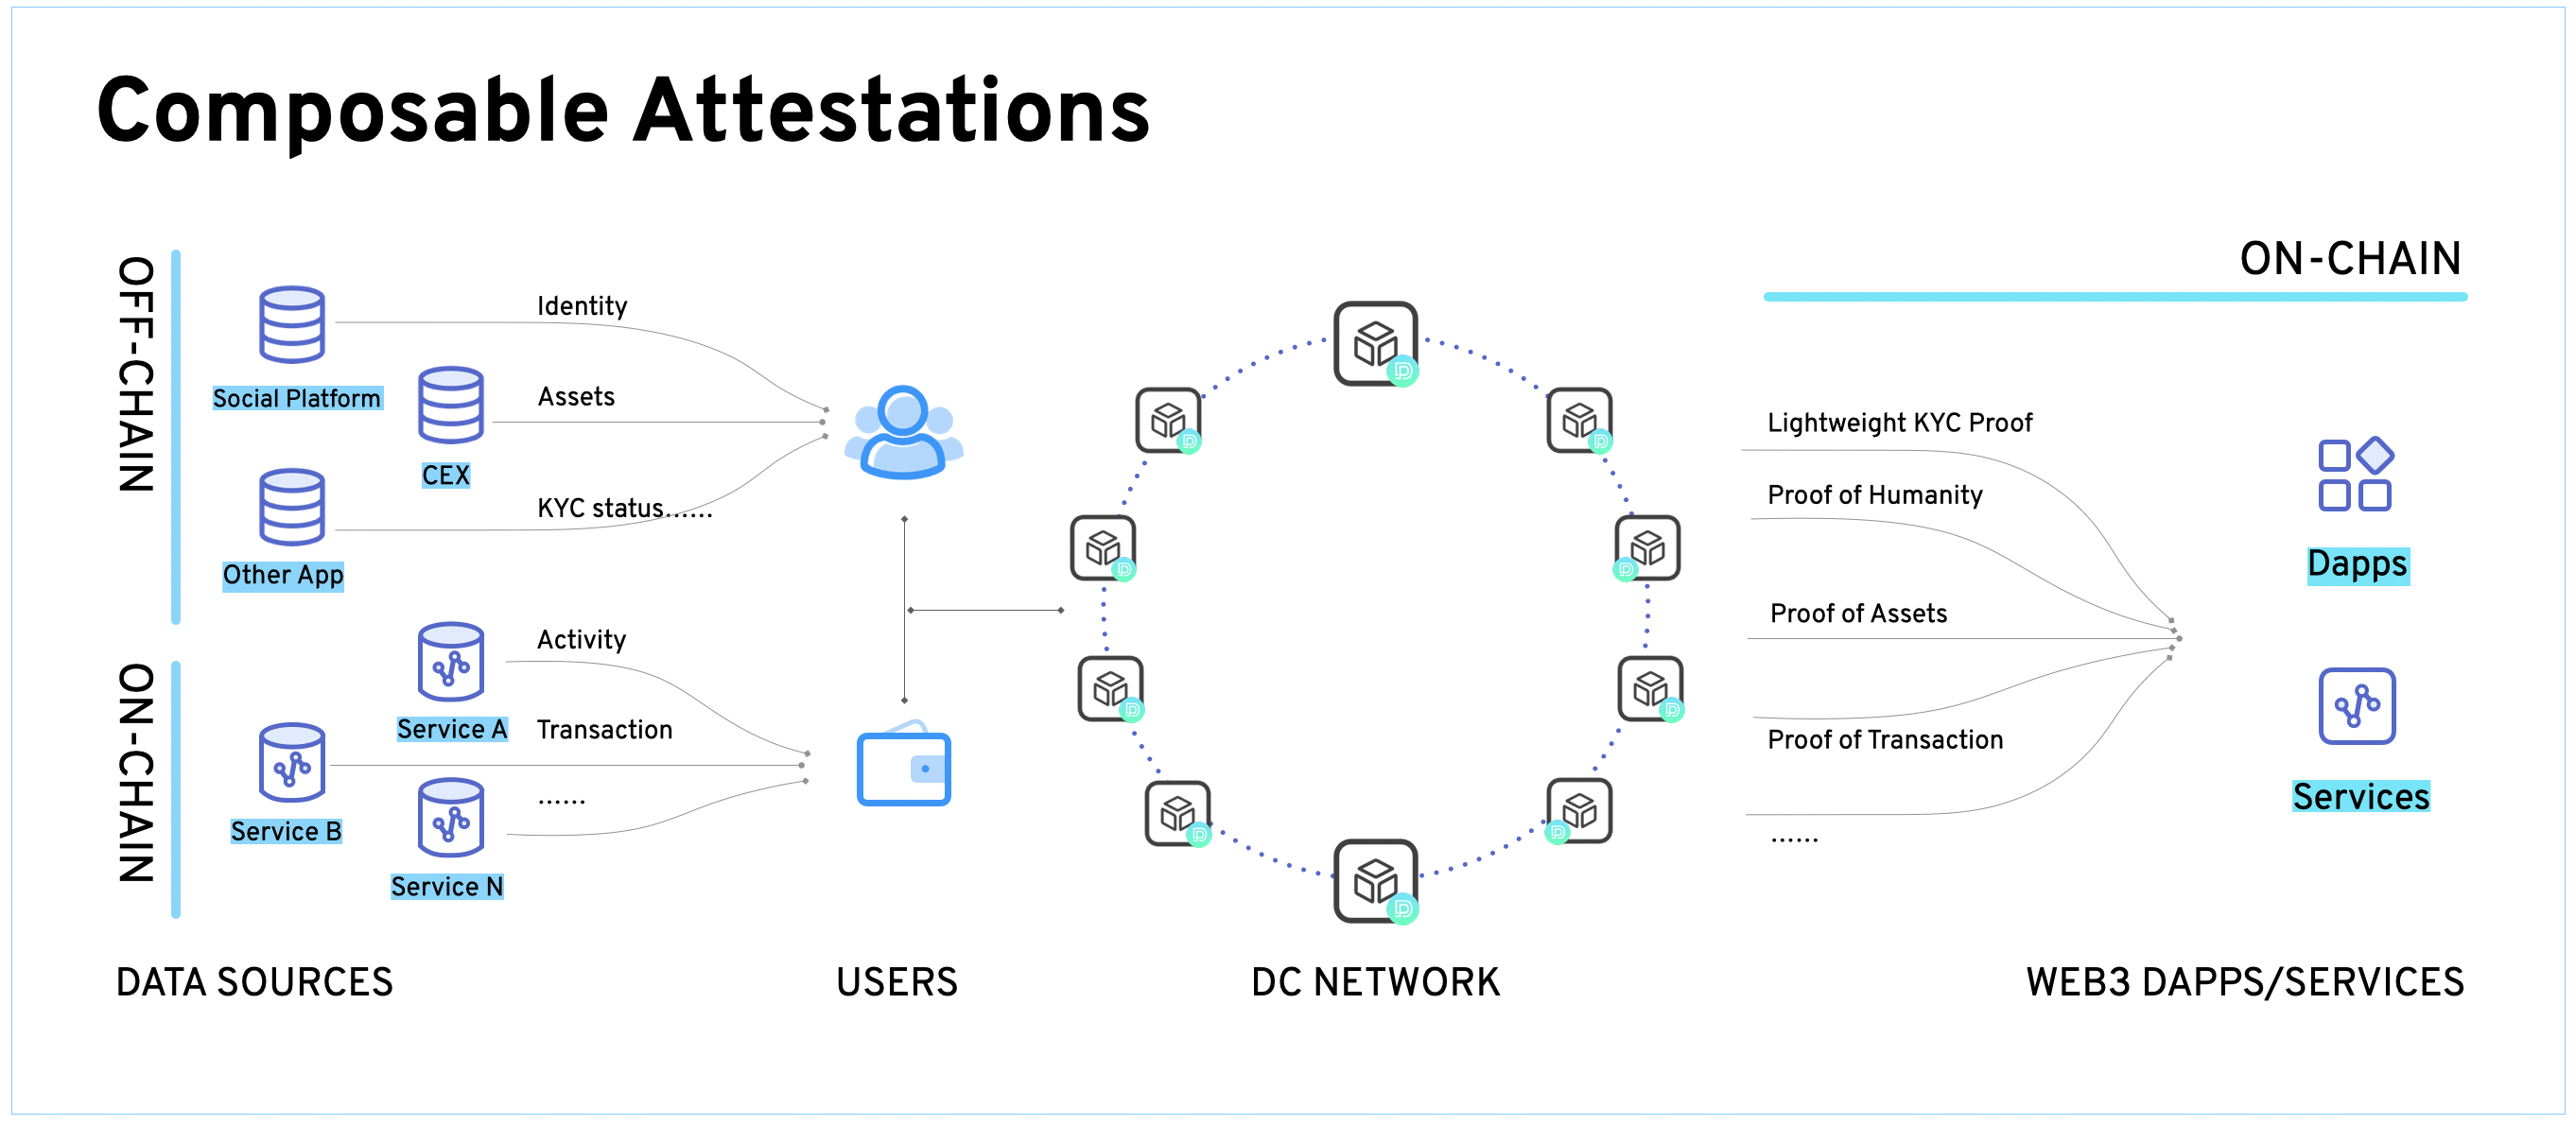
---
# Quick Start | primus
[Skip to main content](https://docs.primuslabs.xyz/enterprise/zk-tls-sdk/quickstart/#docusaurus_skipToContent_fallback)
On this page

Frontend Example: Integrating MPC-TLS SDK in a Application
==========================================================
This guide will walk you through the fundamental steps to integrate Primus's proof verification system into your application.
note
_**We need to register your dApps' domain to maintain the whitelist for production usage. If you are only debugging locally, simply follow the steps below to complete the call.** For better tech support, please contact the Primus team through our **[community](https://discord.com/invite/pdrNxRrApX)
**._
1\. Prerequisites[](https://docs.primuslabs.xyz/enterprise/zk-tls-sdk/quickstart/#1-prerequisites "Direct link to 1. Prerequisites")
--------------------------------------------------------------------------------------------------------------------------------------
Before you begin, ensure you have:
* Installed the SDK (see [Installation Guide](https://docs.primuslabs.xyz/enterprise/zk-tls-sdk/install)
)
### [](https://docs.primuslabs.xyz/enterprise/zk-tls-sdk/quickstart/#a-idstep2a "Direct link to a-idstep2a")
2\. InitAttestation[](https://docs.primuslabs.xyz/enterprise/zk-tls-sdk/quickstart/#2-initattestation "Direct link to 2. InitAttestation")
--------------------------------------------------------------------------------------------------------------------------------------------
To integrate zk-TLS SDK requires initialization
init(appId: string, appSecret?: string): Promise { this.appId = appId this.appSecret = appSecret if (appSecret) { this.isAppServer = true this.isInitialized = true return Promise.resolve(true) } else { this.isInstalled = !!window.primus if (this.isInstalled) { window.postMessage({ target: "padoExtension", origin: "padoZKAttestationJSSDK", name: "initAttestation", }); } else { const errorCode = '00006' return Promise.reject(new ZkAttestationError( errorCode )) } console.time('initAttestationCost') return new Promise((resolve, reject) => { const eventListener = (event: any) => { const { target, name, params } = event.data; if (target === "padoZKAttestationJSSDK") { if (name === "initAttestationRes") { console.log('sdk receive initAttestationRes', event.data) const { result, errorData, data } = params if (result) { this.isInitialized = params?.result if (data?.padoExtensionVersion) { this.padoExtensionVersion = data.padoExtensionVersion } console.timeEnd('initAttestationCost') window?.removeEventListener('message', eventListener); resolve(this.padoExtensionVersion); } else { window?.removeEventListener('message', eventListener); // console.log('sdk-initAttestationRes-errorData:',errorData) if (errorData) { const { code } = errorData reject(new ZkAttestationError(code)) } } } } } window.addEventListener("message", eventListener); }); } }
### [](https://docs.primuslabs.xyz/enterprise/zk-tls-sdk/quickstart/#a-idstep3a "Direct link to a-idstep3a")
3\. Start zk-TLS process[](https://docs.primuslabs.xyz/enterprise/zk-tls-sdk/quickstart/#3-start-zk-tls-process "Direct link to 3. Start zk-TLS process")
-----------------------------------------------------------------------------------------------------------------------------------------------------------
Note: You can call startAttestation only after the initAttestation method is called.
Before starting the data verification process, a few parameters should be configured and transmitted to the MPC-TLS SDK. This configuration is required regardless of how you set up your users' operation steps in you dApp.
The parameters should be configured in the following order:
* 1.chainID (must)
* 2.walletAddress (must)
* 3.attestationTypeID (must)
* 4.attestationParameters (must, according to different attestationTypeID)
Parameters detail you can see: [Parameters details](https://docs.primuslabs.xyz/enterprise/zk-tls-sdk/example#paramsDatails)
try { const startAttestaionResult = await sdkInstance.startAttestation({ chainID: 56, walletAddress: '0x', attestationTypeID: '9', attestationParameters: ['100'], }); console.log(startAttestaionResult); // Output: // { // eip712MessageRawDataWithSignature: // { // types: { // Attest: [ // { // name: "schema", // type: "bytes32", // }, // { // name: "recipient", // type: "address", // }, // { // name: "expirationTime", // type: "uint64", // }, // { // name: "revocable", // type: "bool", // }, // { // name: "refUID", // type: "bytes32", // }, // { // name: "data", // type: "bytes", // }, // { // name: "deadline", // type: "uint64", // }, // ], // }, // primaryType: "Attest", // message: { // schema: "0x", // recipient: "0x", // expirationTime: 0, // revocable: true, // data: "0x", // refUID: // "0x0000000000000000000000000000000000000000000000000000000000000000", // deadline: 0, // }, // domain: { // name: "xxx", // version: "xxx", // chainId: "xxx", // verifyingContract: "0x", // salt: null, // }, // uid: null, // signature: { // v: 28, // r: "0x", // s: "0x", // }, // } // }; console.log("Attest successfully!");} catch (e) { alert(`Attest failed,code: ${e.code} ,message: ${e.message}`);}
### [](https://docs.primuslabs.xyz/enterprise/zk-tls-sdk/quickstart/#a-idstep4a "Direct link to a-idstep4a")
4\. Verify attestation result[](https://docs.primuslabs.xyz/enterprise/zk-tls-sdk/quickstart/#4-verify-attestation-result "Direct link to 4. Verify attestation result")
--------------------------------------------------------------------------------------------------------------------------------------------------------------------------
After receiving the verified result, you need to verify whether the result is trustworthy.
* **Parameters**
* **startAttestationReturnParams:StartAttestationReturnParams** An object containing the properties of `eip712MessageRawDataWithSignature`, which is the return value of the `startAttestation` method.
* **Return:boolean** Whether the signature is successfully verified.
* **Example**
const verifyAttestationResult = sdkInstance.verifyAttestation( startAttestaionResult);console.log(verifyAttestation); // Output: true
### [](https://docs.primuslabs.xyz/enterprise/zk-tls-sdk/quickstart/#a-idstep5a "Direct link to a-idstep5a")
5\. Submit the verified data result (proof) to the blockchain[](https://docs.primuslabs.xyz/enterprise/zk-tls-sdk/quickstart/#5-submit-the-verified-data-result-proof-to-the-blockchain "Direct link to 5. Submit the verified data result (proof) to the blockchain")
------------------------------------------------------------------------------------------------------------------------------------------------------------------------------------------------------------------------------------------------------------------------
You can only submit the proof to the chainID associated with the configuration in [3.Start MPC-TLS process](https://docs.primuslabs.xyz/enterprise/zk-tls-sdk/quickstart#step3)
.
* Parameters
* **startAttestationReturnParams:StartAttestationReturnParams** An object containing the properties of `eip712MessageRawDataWithSignature`, which is the return value of the `startAttestation` method.
* **wallet:any** The wallet object
* **Return:string** Transaction details URL
* **Example**
try { const sendToChainResult = sdkInstance.sendToChain( startAttestaionResult, window.ethereum ); console.log(sendToChainResult); // Output: https://bascan.io/attestation/0x console.log("SendToChain successfully!");} catch (e) { alert(`SendToChain failed,code: ${e.code} ,message: ${e.message}`);}
### [](https://docs.primuslabs.xyz/enterprise/zk-tls-sdk/quickstart/#a-idstep6a "Direct link to a-idstep6a")
6.Check the submitted proof on-chain[](https://docs.primuslabs.xyz/enterprise/zk-tls-sdk/quickstart/#6check-the-submitted-proof-on-chain "Direct link to 6.Check the submitted proof on-chain")
-------------------------------------------------------------------------------------------------------------------------------------------------------------------------------------------------
After completing the submission, you can find the on-chain details using the corresponding blockchain links below.
### 6.1 Mainnet[](https://docs.primuslabs.xyz/enterprise/zk-tls-sdk/quickstart/#61-mainnet "Direct link to 6.1 Mainnet")
* Linea Mainnet:[https://lineascan.build/](https://lineascan.build/)
* BNB Chain:[https://bascan.io/](https://bascan.io/)
* opBNB:[https://scan.sign.global/](https://scan.sign.global/)
* Arbitrum:[https://arbitrum.easscan.org/](https://arbitrum.easscan.org/)
* Scroll Mainnet:[https://scrollscan.com/](https://scrollscan.com/)
### 6.2 Testnet[](https://docs.primuslabs.xyz/enterprise/zk-tls-sdk/quickstart/#62-testnet "Direct link to 6.2 Testnet")
* Sepolia: [https://sepolia.easscan.org/](https://sepolia.easscan.org/)
* BNBTestnet: [https://testnet.bascan.io/](https://testnet.bascan.io/)
* opBNBTestnet: [https://testnet-scan.sign.global/](https://testnet-scan.sign.global/)
* Scroll Sepolia: [https://sepolia.scrollscan.com/](https://sepolia.scrollscan.com/)
### [](https://docs.primuslabs.xyz/enterprise/zk-tls-sdk/quickstart/#a-idexamplesa "Direct link to a-idexamplesa")
Examples of the zkTLS SDK operations[](https://docs.primuslabs.xyz/enterprise/zk-tls-sdk/quickstart/#examples-of-the-zktls-sdk-operations "Direct link to Examples of the zkTLS SDK operations")
--------------------------------------------------------------------------------------------------------------------------------------------------------------------------------------------------
Here's a simple example demonstrating how to perform basic operations with the zkTLS SDK.
import MPCTLSJSSDK from "@padolabs/mpctls-js-sdk";const sdkInstance = new MPCTLSJSSDK();try { const initAttestaionResult = await sdkInstance.initAttestation( "yourdAppSymbol" ); // Initialize the SDK console.log(initAttestaionResult); //Output: 0.3.15 console.log(sdkInstance.supportedChainList); // View supported chains console.log(sdkInstance.supportedAttestationTypeList); // View supported attestation types // Generate attestation process const startAttestaionResult = await sdkInstance.startAttestation({ chainID: 56, // Select from the supported chain list walletAddress: "0x", // User's wallet address attestationTypeID: "9", // Select from the supported attestation types attestationParameters: ["100"], // Input the corresponding fields (if needed) according to the selected attestationTypeID }); // Verify attestation result const verifyAttestationResult = await sdkInstance.verifyAttestati(startAttestaionResult); // Upload Proof to Blockchain const sendToChainResult = await sdkInstance.sendToChain( startAttestaionResult, window.ethereum ); console.log("Generated Proof:", startAttestaionResult); console.log("Proof on Chain:", sendToChainResult); console.log("Is Proof Valid:", verifyAttestationResult);} catch (e) { alert(`Failed, code: ${e.code} , message: ${e.message}`);}
* * *
### [](https://docs.primuslabs.xyz/enterprise/zk-tls-sdk/quickstart/#a-iderrorcodesa "Direct link to a-iderrorcodesa")
Error Codes[](https://docs.primuslabs.xyz/enterprise/zk-tls-sdk/quickstart/#error-codes "Direct link to Error Codes")
-----------------------------------------------------------------------------------------------------------------------
We have defined some error codes in the SDK. When an error occurs during the data verification process, you can refer to the following list for troubleshooting.
### 1\. General errors[](https://docs.primuslabs.xyz/enterprise/zk-tls-sdk/quickstart/#1-general-errors "Direct link to 1. General errors")
| Error Code | Situation |
| --- | --- |
| 00001 | The zkTLS algorithm has not been initialized. Please restart the process. |
| 00002 | The process did not respond within 5 minutes. |
| 00003 | A data verification process is currently being generated. Please try again later. |
| 00004 | The user closes or cancels the attestation process. |
| 00005 | Wrong parameters! |
| 00006 | No extension version 0.3.15 or above was detected as installed. |
| 00007 | Insufficient wallet balance. |
| 00008 | Failed to submit the proof on-chain. Or other errors in the Wallet operations. |
| 00009 | Your dApp is not registered. Please contact the Primus team. |
| 99999 | Undefined error. Contact the Primus team for further support |
### 2\. Data source related errors[](https://docs.primuslabs.xyz/enterprise/zk-tls-sdk/quickstart/#2-data-source-related-errors "Direct link to 2. Data source related errors")
| Error Code | Situation |
| --- | --- |
| 00102 | Attestation requirements not met. Insufficient assets balance in Binance Spot Account. |
| 00104 | Attestation requirements not met. |
### 3\. zkTLS related errors[](https://docs.primuslabs.xyz/enterprise/zk-tls-sdk/quickstart/#3-zktls-related-errors "Direct link to 3. zkTLS related errors")
| Error Code | Situation |
| --- | --- |
| 10001 | The internet condition is not stable enough to complete the data verification flow. Please try again later. |
| 10002 | The attestation process has been interrupted due to some unknown network error. Please try again later. |
| 10003 | Can't connect attestation server due to unstable internet condition. Please try again later. |
| 10004 | Can't connect data source server due to unstable internet condition. Please try again later. |
| 20005 | Can't complete the attestation due to some workflow error. Please try again later. |
| 30001 ~ 30004 | Can't complete the attestation flow due to response error. Please try again later. |
| 50007 | Can't complete the attestation due to algorithm execution issues. |
| 50008 | Can't complete the attestation due to abnormal execution results. |
| 50009 | The algorithm service did not respond within 5 minutes. |
| 50010 | Can't complete the attestation due to some compatibility issues. |
| 50011 | Can't complete the attestation due to algorithm version issues. |
For any other error codes not mentioned here, please contact our [community](https://discord.com/invite/pdrNxRrApX)
for further support.
* [1\. Prerequisites](https://docs.primuslabs.xyz/enterprise/zk-tls-sdk/quickstart/#1-prerequisites)
* [](https://docs.primuslabs.xyz/enterprise/zk-tls-sdk/quickstart/#a-idstep2a)
* [2\. InitAttestation](https://docs.primuslabs.xyz/enterprise/zk-tls-sdk/quickstart/#2-initattestation)
* [](https://docs.primuslabs.xyz/enterprise/zk-tls-sdk/quickstart/#a-idstep3a)
* [3\. Start zk-TLS process](https://docs.primuslabs.xyz/enterprise/zk-tls-sdk/quickstart/#3-start-zk-tls-process)
* [](https://docs.primuslabs.xyz/enterprise/zk-tls-sdk/quickstart/#a-idstep4a)
* [4\. Verify attestation result](https://docs.primuslabs.xyz/enterprise/zk-tls-sdk/quickstart/#4-verify-attestation-result)
* [](https://docs.primuslabs.xyz/enterprise/zk-tls-sdk/quickstart/#a-idstep5a)
* [5\. Submit the verified data result (proof) to the blockchain](https://docs.primuslabs.xyz/enterprise/zk-tls-sdk/quickstart/#5-submit-the-verified-data-result-proof-to-the-blockchain)
* [](https://docs.primuslabs.xyz/enterprise/zk-tls-sdk/quickstart/#a-idstep6a)
* [6.Check the submitted proof on-chain](https://docs.primuslabs.xyz/enterprise/zk-tls-sdk/quickstart/#6check-the-submitted-proof-on-chain)
* [6.1 Mainnet](https://docs.primuslabs.xyz/enterprise/zk-tls-sdk/quickstart/#61-mainnet)
* [6.2 Testnet](https://docs.primuslabs.xyz/enterprise/zk-tls-sdk/quickstart/#62-testnet)
* [](https://docs.primuslabs.xyz/enterprise/zk-tls-sdk/quickstart/#a-idexamplesa)
* [Examples of the zkTLS SDK operations](https://docs.primuslabs.xyz/enterprise/zk-tls-sdk/quickstart/#examples-of-the-zktls-sdk-operations)
* [](https://docs.primuslabs.xyz/enterprise/zk-tls-sdk/quickstart/#a-iderrorcodesa)
* [Error Codes](https://docs.primuslabs.xyz/enterprise/zk-tls-sdk/quickstart/#error-codes)
* [1\. General errors](https://docs.primuslabs.xyz/enterprise/zk-tls-sdk/quickstart/#1-general-errors)
* [2\. Data source related errors](https://docs.primuslabs.xyz/enterprise/zk-tls-sdk/quickstart/#2-data-source-related-errors)
* [3\. zkTLS related errors](https://docs.primuslabs.xyz/enterprise/zk-tls-sdk/quickstart/#3-zktls-related-errors)
---
# Decentralized Creator Economy | primus
[Skip to main content](https://docs.primuslabs.xyz/implementation-scenarios/creator-economy/#docusaurus_skipToContent_fallback)

Decentralized Creator Economy
=============================
Under the paradigm of Web3, the relationship between creators, users, and value distribution will be redefined, ushering in a new era for the creator economy.
Freed from the grip of centralized platforms, creators will have complete ownership of their works and data, no longer subject to hefty commissions imposed by centralized entities. They can escape unfair censorship, showcasing their creative talents and engaging directly with consumers to converse, inspire, and even co-create.
Picture a decentralized platform akin to Docsend or TikTok. Creators encrypt their works and upload them to decentralized storage solutions like Arweave or Greenfield. A preview of the work is available on the dapp. Interested users can choose to pay-per-view or opt for a membership to access additional services.
In this process, Primus' FHE technology facilitates the swift implementation of encryption and decryption for works. This ensures the privacy and security of works and data stored in a decentralized manner. Collaborating with smart contracts allows for seamless on-chain purchases and sharing. For specific users or members, Primus' attestation service can be utilized to verify their identity before sharing (e.g., sharing a business plan with partners).
This is just the beginning—imagine and explore more possibilities with creators.
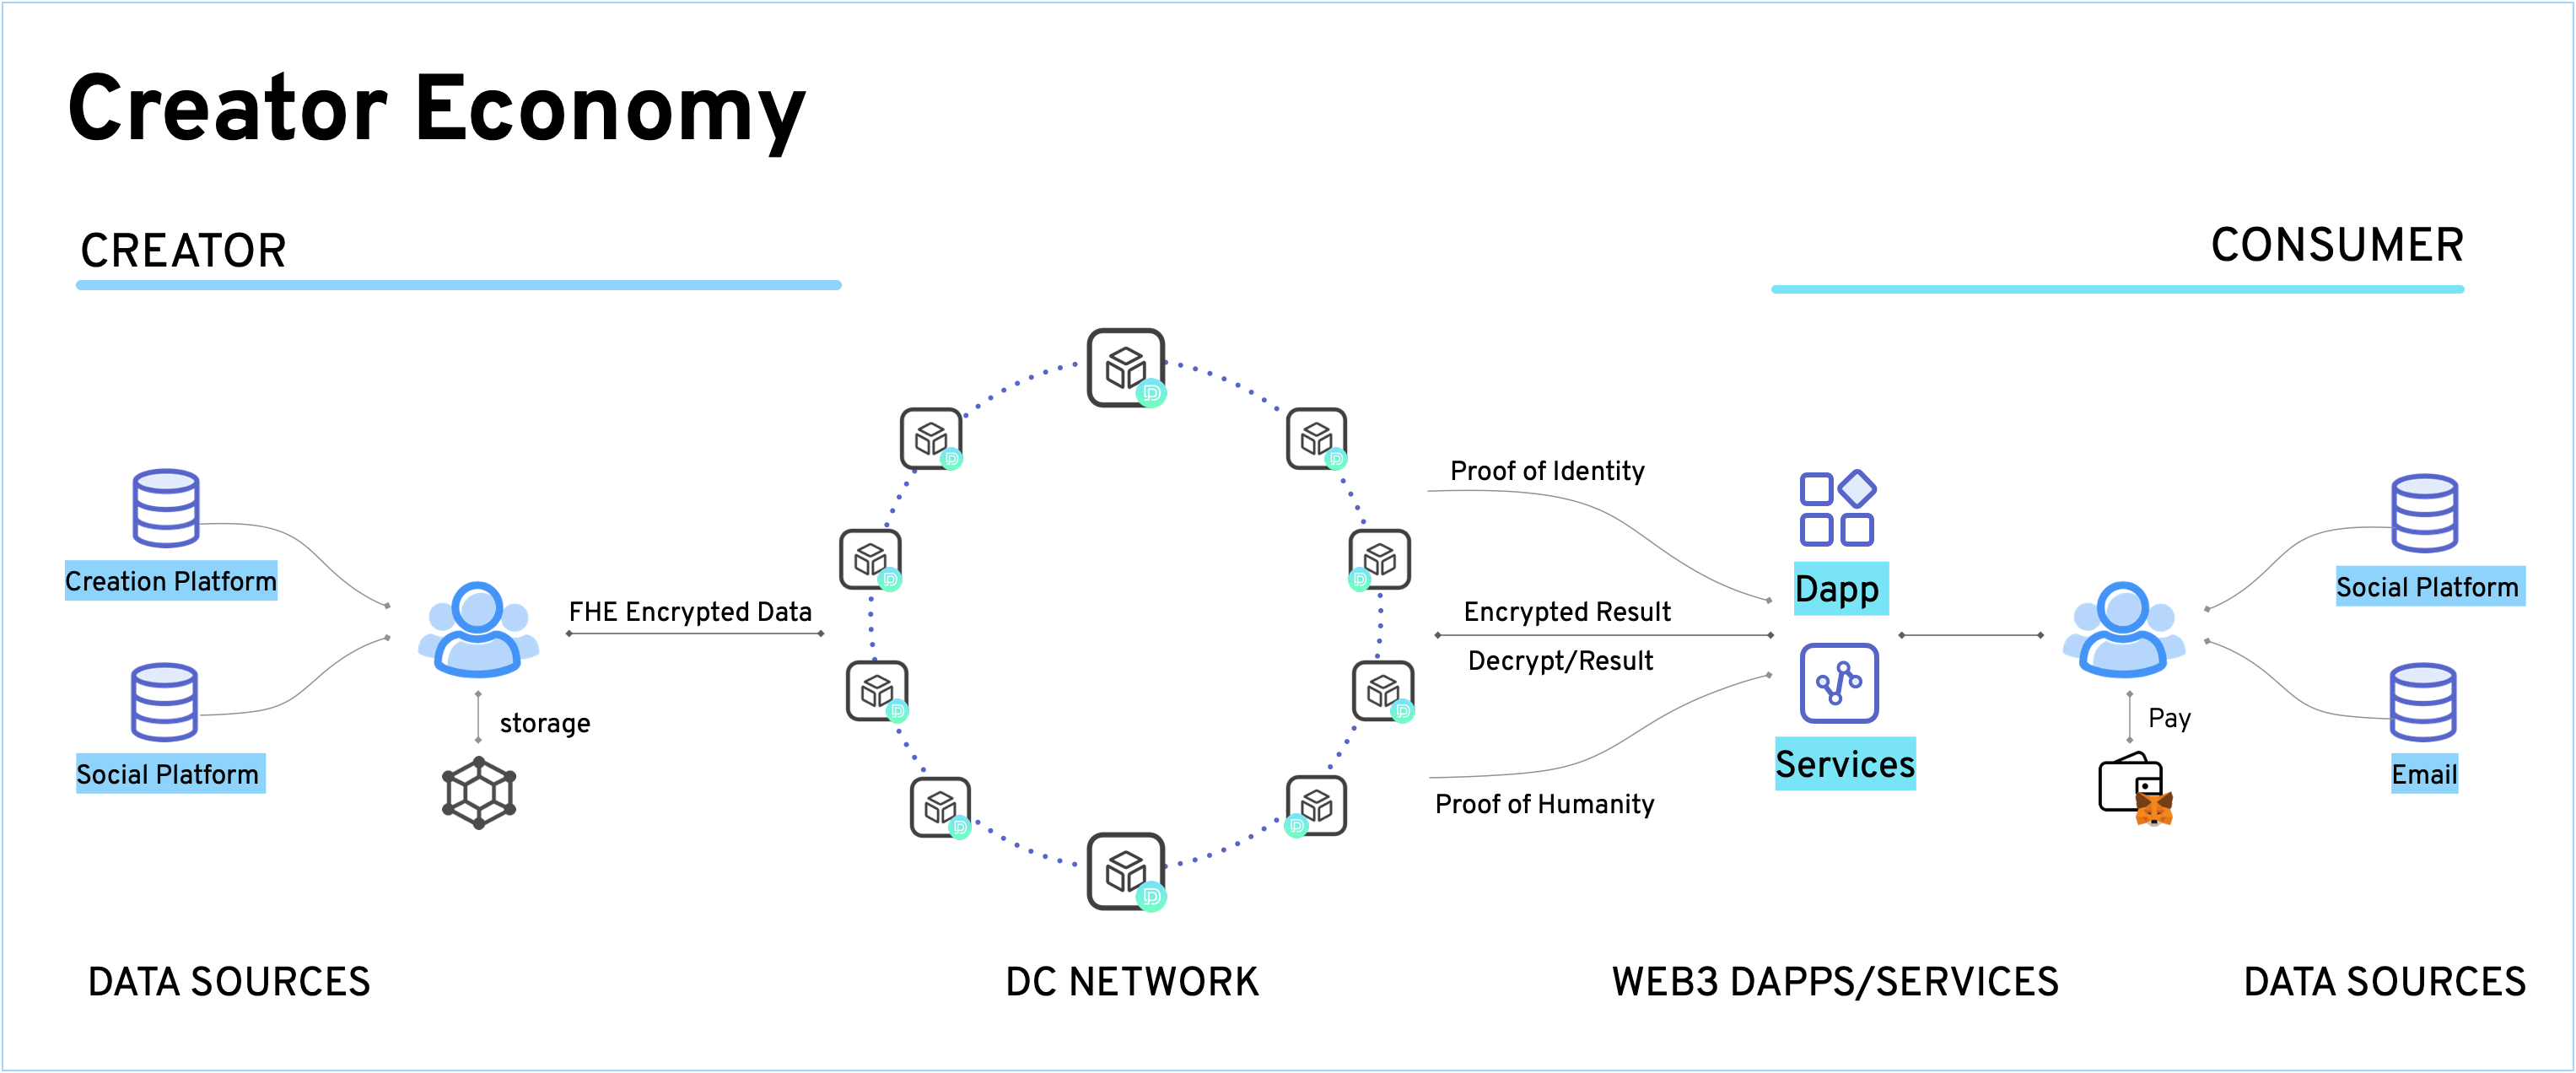
---
# Interoperable and Composable Social Graphs | primus
[Skip to main content](https://docs.primuslabs.xyz/implementation-scenarios/expand-social-graph/#docusaurus_skipToContent_fallback)
On this page

Interoperable and Composable Social Graphs
==========================================
Traditional social media platforms like Twitter and Facebook suffer from fragmentation and isolation, with users' social connections being incompatible with other networks. However, Primus presents a groundbreaking solution that empowers social media users to create their own attestations of social behaviors in an authentic and privacy-preserving manner.
With Primus, users can generate attestations that validate their social activities in both public and private contexts. For example:
* Public social attestations can certify that Alice has amassed over 100,000 Twitter followers.
* Private social attestations can verify that Bob has created more than 10 private repositories and made over 100 commits.
Unlocking Composable Web3 Social Applications[](https://docs.primuslabs.xyz/implementation-scenarios/expand-social-graph/#unlocking-composable-web3-social-applications "Direct link to Unlocking Composable Web3 Social Applications")
-----------------------------------------------------------------------------------------------------------------------------------------------------------------------------------------------------------------------------------------
Standardized social attestations provided by Primus open up new possibilities for Web3 social applications. These attestations can be leveraged in a composable way to create more meaningful scenarios. By bridging the gaps between fragmented social networks, Primus paves the way for decentralized social platforms through the following key features:
* Privacy First: Primus prioritizes privacy by adhering to data minimization principles when sharing information. Users have control over their data and can selectively disclose only the necessary piece of information while keeping the rest private.
* Data Authenticity: All exported and composable social relations, i.e., the social attestations, are guaranteed to be authentic and reliable. Primus ensures the integrity of data origin, providing a foundation of trust for social interactions within the network.
By leveraging Primus' capabilities, a new generation of innovative and unique social applications can emerge. A more trustworthy and interoperable social network has become a reality, enabling seamless interactions and empowering users with greater control over their social data.
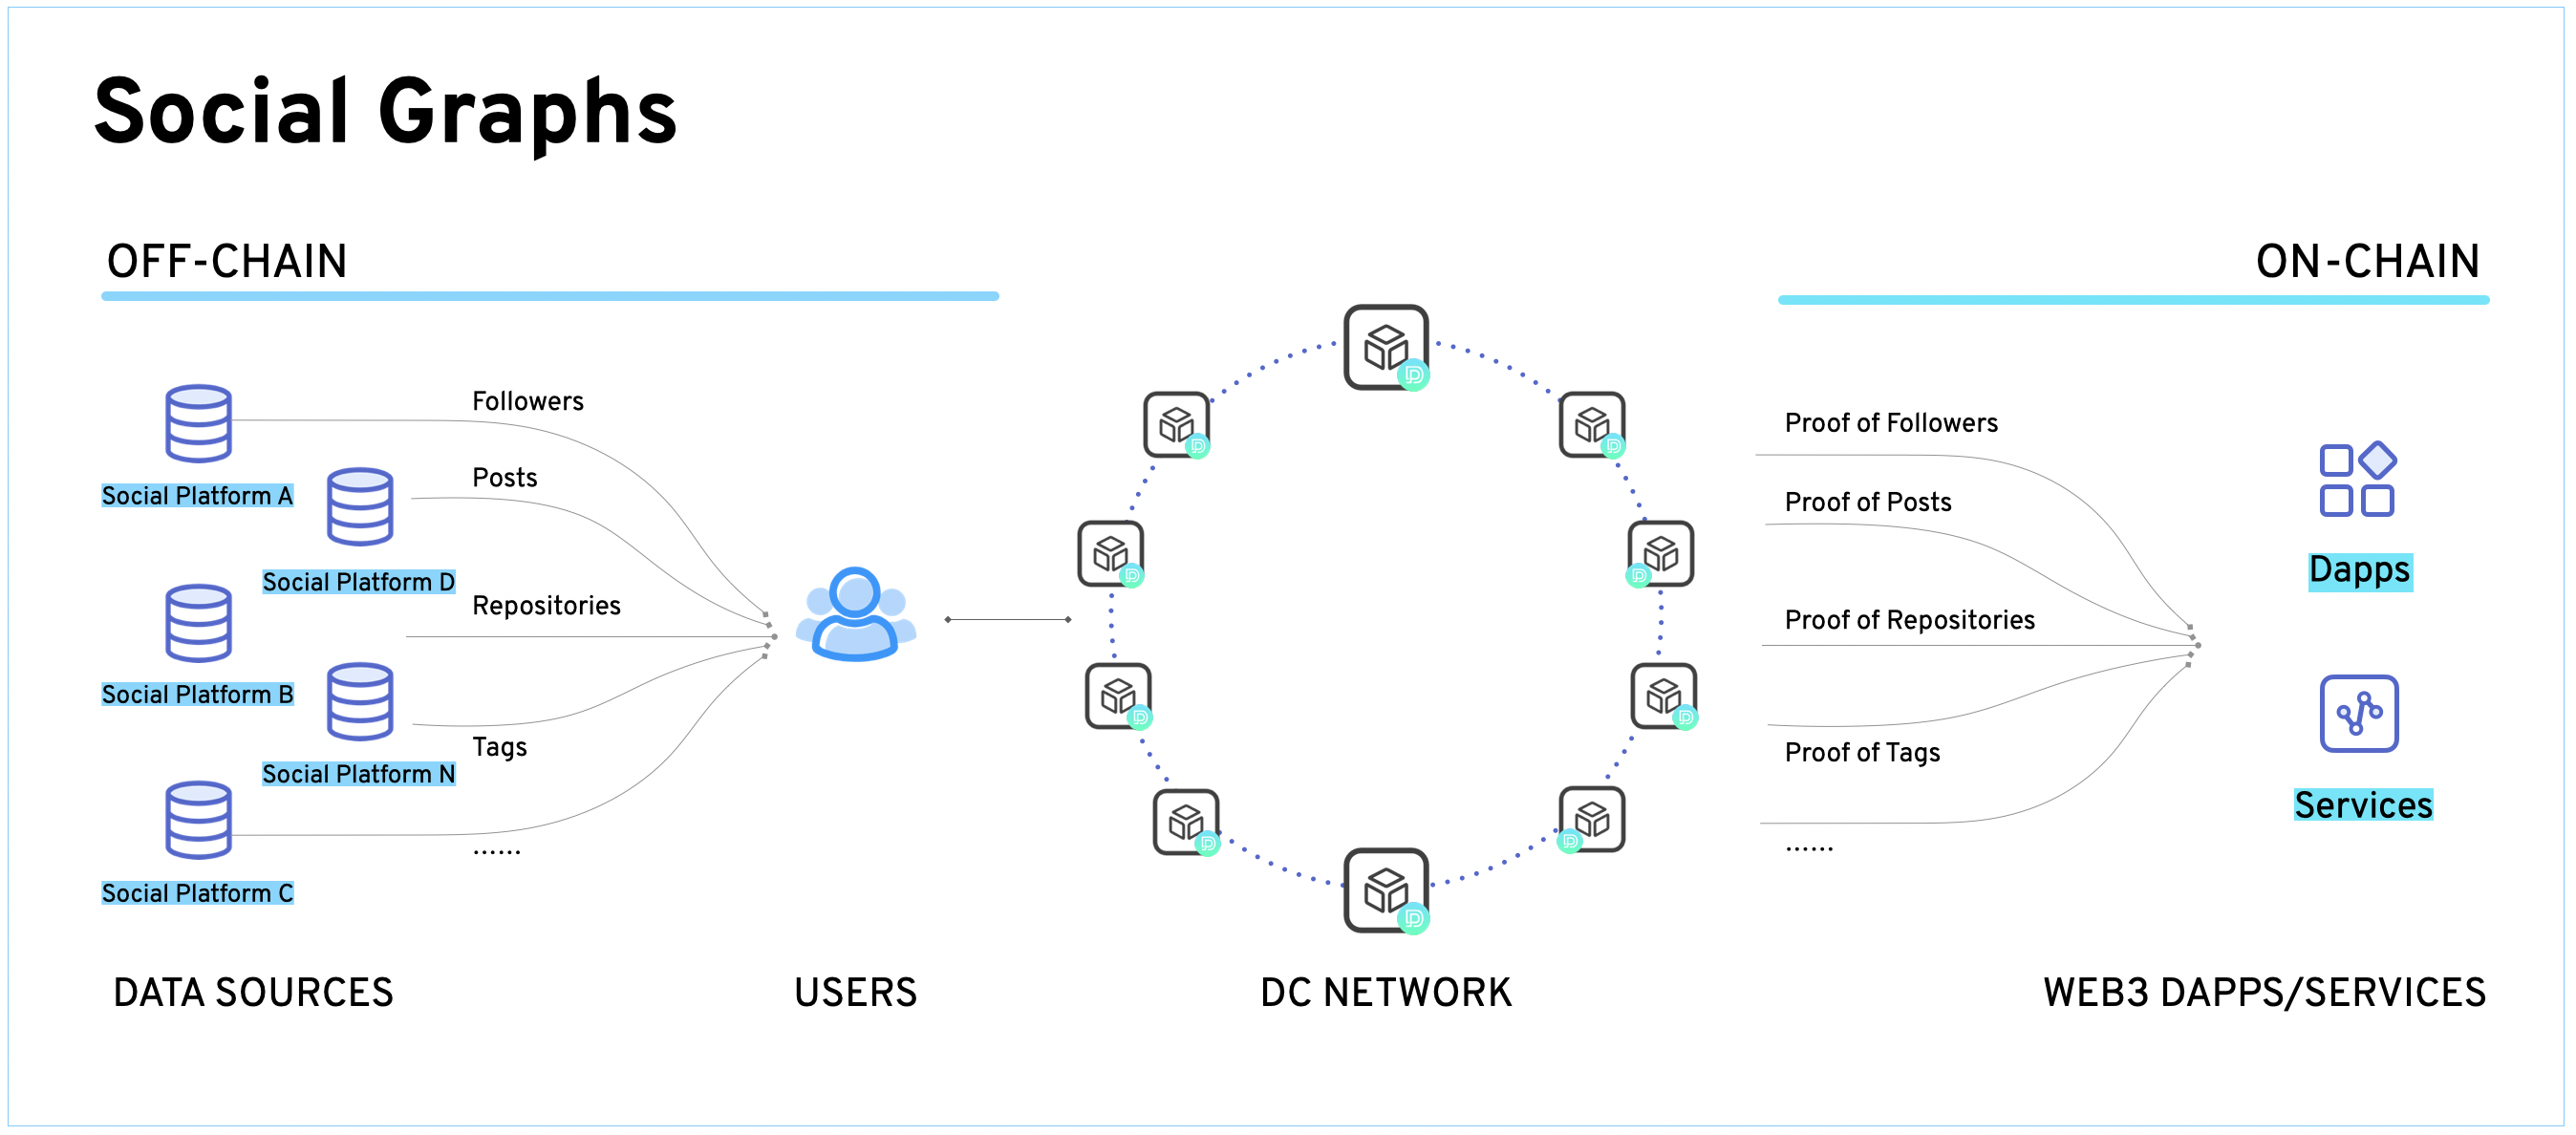
* [Unlocking Composable Web3 Social Applications](https://docs.primuslabs.xyz/implementation-scenarios/expand-social-graph/#unlocking-composable-web3-social-applications)
---
# Decentralized Hiring and Dating | primus
[Skip to main content](https://docs.primuslabs.xyz/implementation-scenarios/hiring-dating/#docusaurus_skipToContent_fallback)

Decentralized Hiring and Dating
===============================
As Web3 continues to attract more users, diverse application models are emerging, including recruitment platforms and dating applications based on Web3.
One outstanding feature of Web3 projects is the global nature of their teams. Geographical restrictions do not apply, and teams can be found across various locations worldwide. With remote work being a prevalent choice, especially among Generation Z, the distributed nature of these projects poses recruitment challenges. To address this, implementing a verification system for identity, academic background, skills, health, credit, etc., enables a quicker and more efficient screening process for suitable candidates. This method not only benefits recruiters but also enhances the applicant's experience by reducing redundant resume submissions and safeguarding personal privacy.
Similar verification applications can be employed on dating platforms, tailoring proof requirements to include interests, income, assets, and more.
This innovative approach harnesses smart contracts to facilitate the right person finding the right job and people with shared interests connecting romantically. Such applications contribute to the diversification and enjoyment of Web3 applications.
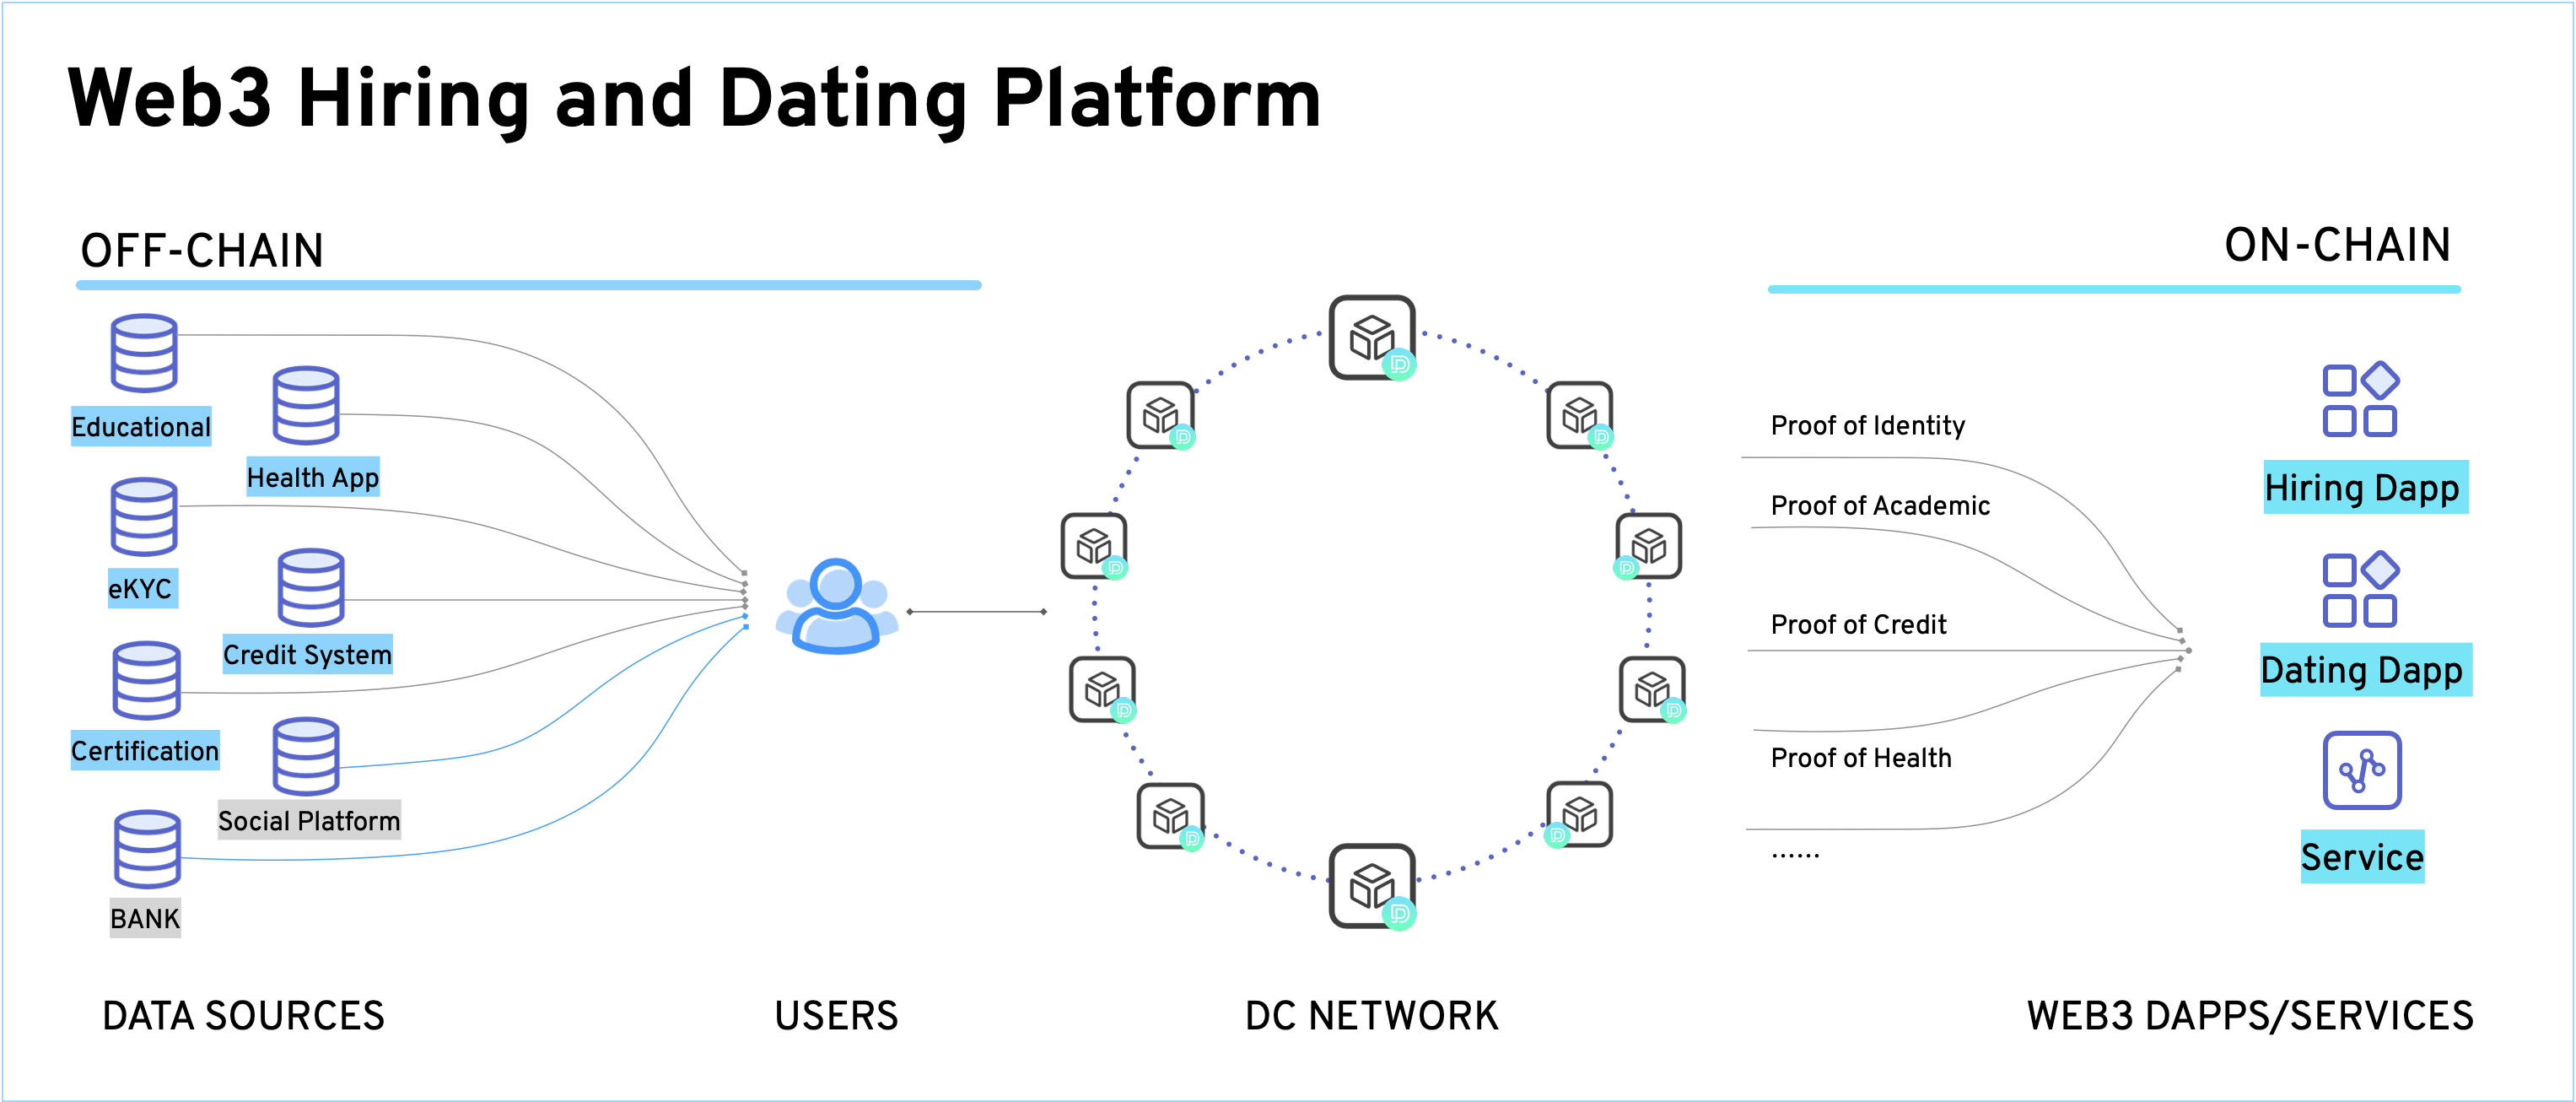
---
# Quick Start | primus
[Skip to main content](https://docs.primuslabs.xyz/enterprise/zk-tls-sdk/solidity/quickstart/#docusaurus_skipToContent_fallback)
On this page

EVM Blockchains[](https://docs.primuslabs.xyz/enterprise/zk-tls-sdk/solidity/quickstart/#evm-blockchains "Direct link to EVM Blockchains")
--------------------------------------------------------------------------------------------------------------------------------------------
This section walks you through deploying and integrating a Primus contract into your Solidity project.
### Install the Contract[](https://docs.primuslabs.xyz/enterprise/zk-tls-sdk/solidity/quickstart/#install-the-contract "Direct link to Install the Contract")
When setting up your smart contract project, you need to pull out the smart contract library first.
* Using Hardhat: `npm install @primuslabs/zktls-contracts`
* Using Foundry: `forge install primus-labs/zktls-contracts`
### Deploy a Smart Contract[](https://docs.primuslabs.xyz/enterprise/zk-tls-sdk/solidity/quickstart/#deploy-a-smart-contract "Direct link to Deploy a Smart Contract")
Deploy the following contract to any EVM-compatible network of your choice. For this walkthrough, we'll use Ethereum as an example.
// SPDX-License-Identifier: MITpragma solidity ^0.8.20;// if you are using foundry, you can use the following conf:// you can edit import information like this in your local project remappings.txt:// @primuslabs/zktls-contracts=lib/zktls-contracts/import { IPrimusZKTLS, Attestation } from "@primuslabs/zktls-contracts/src/IPrimusZKTLS.sol";contract AttestorTest { address public primusAddress; constructor(address _primusAddress) { // Replace with the network you are deploying on primusAddress = _primusAddress; } function verifySignature(Attestation calldata attestation) public view returns(bool) { IPrimusZKTLS(primusAddress).verifyAttestation(attestation); // Business logic checks, such as attestation content and timestamp checks // do your own business logic return true; }}
### On-chain Interactions[](https://docs.primuslabs.xyz/enterprise/zk-tls-sdk/solidity/quickstart/#on-chain-interactions "Direct link to On-chain Interactions")
The following code helps developers interact with the [Test example](https://docs.primuslabs.xyz/enterprise/zk-tls-sdk/test)
or [Production example](https://docs.primuslabs.xyz/enterprise/zk-tls-sdk/production)
contracts on-chain. This can be done using the zkTLS SDK after completing the smart contract development and deployment.
.... .... //start attestation process const attestation = await primusZKTLS.startAttestation(signedRequestStr); console.log("attestation=", attestation); if (verifyResult === true) { // Business logic checks, such as attestation content and timestamp checks // Do your own business logic // Interacting with Smart Contracts // Set contract address and ABI const contractData = {"YOUR_CONTRACT_ABI_JSON_DATA"}; const abi = contractData.abi; const contractAddress = "YOUR_CONTRACT_ADDRESS_YOU_DEPLOYED"; // Use ethers.js connect to the smart contract const provider = new ethers.providers.JsonRpcProvider("YOUR_RPC_URL"); const contract = new ethers.Contract(contractAddress, abi, provider); try { // Call verifyAttestation func const tx = await contract.verifySignature(attestation); console.log("Transaction:", tx); } catch (error) { console.error("Error in verifyAttestation:", error); } } else { //not the primus sign, error business logic }
Straknet Blockchains[](https://docs.primuslabs.xyz/enterprise/zk-tls-sdk/solidity/quickstart/#straknet-blockchains "Direct link to Straknet Blockchains")
-----------------------------------------------------------------------------------------------------------------------------------------------------------
This section walks you through deploying and integrating a Primus contract into your cairo project.
### Install the Contract[](https://docs.primuslabs.xyz/enterprise/zk-tls-sdk/solidity/quickstart/#install-the-contract-1 "Direct link to Install the Contract")
When setting up your smart contract project, you need to reference the Primus contract library first. Make the following configuration in the Scarb.toml file.
[dependencies]primus_zktls = { git = "https://github.com/primus-labs/zktls-starknet-contracts.git" }
### Deploy a Smart Contract[](https://docs.primuslabs.xyz/enterprise/zk-tls-sdk/solidity/quickstart/#deploy-a-smart-contract-1 "Direct link to Deploy a Smart Contract")
Deploy the following contract to Starknet. For this walkthrough.
use primus_zktls::IPrimusZKTLS::Attestation;#[starknet::interface]pub trait IAttestorTest { fn verifySignature(self: @TState, attestation: Attestation) -> bool;}#[starknet::contract]mod AttestorTest { use primus_zktls::IPrimusZKTLS::{ Attestation, IPrimusZKTLSDispatcher, IPrimusZKTLSDispatcherTrait, }; use starknet::ContractAddress; use starknet::storage::{StoragePointerReadAccess, StoragePointerWriteAccess}; #[storage] struct Storage { address: ContractAddress, } #[constructor] fn constructor(ref self: ContractState, _primusAddress: ContractAddress) { // Replace with the network you are deploying on self.address.write(_primusAddress); } #[abi(embed_v0)] impl IAttestorTest of super::IAttestorTest { fn verifySignature(self: @ContractState, attestation: Attestation) -> bool { IPrimusZKTLSDispatcher { contract_address: self.address.read() } .verifyAttestation(attestation); // Business logic checks, such as attestation content and timestamp checks // do your own business logic return true; } }}
### On-chain Interactions[](https://docs.primuslabs.xyz/enterprise/zk-tls-sdk/solidity/quickstart/#on-chain-interactions-1 "Direct link to On-chain Interactions")
The following code helps developers interact with the [Test example](https://docs.primuslabs.xyz/enterprise/zk-tls-sdk/test)
or [Production example](https://docs.primuslabs.xyz/enterprise/zk-tls-sdk/production)
contracts on-chain. This can be done using the zkTLS SDK after completing the smart contract development and deployment.
.... .... //start attestation process const attestation = await primusZKTLS.startAttestation(signedRequestStr); console.log("attestation=", attestation); if (verifyResult === true) { // Business logic checks, such as attestation content and timestamp checks // Do your own business logic // Interacting with Smart Contracts // Set contract address and ABI // Use starknet.js connect to the cairo contract const account = YOUR_ACCOUNT_OBJECT; const rpcUrl = "YOUR_RPC_NODE_URL"; const contractAddress = "YOUR_CONTRACT_ADDRESS_YOU_DEPLOYED"; const provider = new RpcProvider({ nodeUrl: rpcUrl }); const compiledContract = await provider.getClassAt(contractAddress); const abi = compiledContract.abi; const contract = new Contract(abi, contractAddress, provider); contract.connect(account); try { // Call verifyAttestation func // hexStringToByteArray is to convert hex string signature to byte array attestation.signatures[0] = hexStringToByteArray(attestation.signatures[0]); const tx = await contract.verifySignature(attestation); console.log("Transaction:", tx); } catch (error) { console.error("Error in verifyAttestation:", error); } } else { //not the primus sign, error business logic }
* [EVM Blockchains](https://docs.primuslabs.xyz/enterprise/zk-tls-sdk/solidity/quickstart/#evm-blockchains)
* [Install the Contract](https://docs.primuslabs.xyz/enterprise/zk-tls-sdk/solidity/quickstart/#install-the-contract)
* [Deploy a Smart Contract](https://docs.primuslabs.xyz/enterprise/zk-tls-sdk/solidity/quickstart/#deploy-a-smart-contract)
* [On-chain Interactions](https://docs.primuslabs.xyz/enterprise/zk-tls-sdk/solidity/quickstart/#on-chain-interactions)
* [Straknet Blockchains](https://docs.primuslabs.xyz/enterprise/zk-tls-sdk/solidity/quickstart/#straknet-blockchains)
* [Install the Contract](https://docs.primuslabs.xyz/enterprise/zk-tls-sdk/solidity/quickstart/#install-the-contract-1)
* [Deploy a Smart Contract](https://docs.primuslabs.xyz/enterprise/zk-tls-sdk/solidity/quickstart/#deploy-a-smart-contract-1)
* [On-chain Interactions](https://docs.primuslabs.xyz/enterprise/zk-tls-sdk/solidity/quickstart/#on-chain-interactions-1)
---
# Cross-Platform Fraud Detection | primus
[Skip to main content](https://docs.primuslabs.xyz/implementation-scenarios/fraud-detection/#docusaurus_skipToContent_fallback)

Cross-Platform Fraud Detection
==============================
By unifying user information across platforms, Primus offers enhanced fraud prevention capabilities. It ensures the authenticity and integrity of data, reducing incidences of financial crimes or identity theft.
For example, despite additional security measures such as 2FA, most airdrop processes face identity theft. With Primus' strategies, reliable identity authentication with multi-dimensional verification from multiple identity providers and attestors is feasible. With additional identity credentials, impersonation could be significantly reduced.
---
# Primary Use Cases | primus
[Skip to main content](https://docs.primuslabs.xyz/implementation-scenarios/use-cases/#docusaurus_skipToContent_fallback)

Primary Use Cases
=================
Primus' technique enables a compliant and privacy-preserving pattern for which applications can capture the value of users' private data in various aspects. This new pattern opens up a door for Web3 dApps to take the benefits of data analytics and model intelligence in the traditional Internet economy, while still reserving fairness and sovereignty for end users.
* Targeted Brand Expansion and Marketing: With Primus' toolkit, businesses can leverage user data to enhance their marketing strategies. The data amalgamation process enables more precise targeting, improving customer acquisition efforts.
* Cross-Platform Fraud Detection: By unifying user information across platforms, Primus offers enhanced fraud prevention capabilities. It ensures the authenticity and integrity of data, reducing incidences of financial crimes or identity theft.
* Enhanced Ad Distribution: The capacity to compile user data enables businesses to distribute more targeted advertisements, enhancing campaign performance, conversion rates, and ROI.
* Credibility Boost on Community and Recruitment Platforms: In addition to fraud detection, Primus also boosts credibility by enabling businesses to showcase verified reputations across community and recruitment platforms.
* Personalized AI Assistants: To further enhance user experience, Primus allows the customization of AI assistants through enriched user profiles. This ensures accurate and personalized responses based on individual feedback and preferences.
More use cases and the details can be found in this section:
| | |
| --- | --- |
| [Identity Verification](https://docs.primuslabs.xyz/implementation-scenarios/verify-digital-identity) | lightweight and reusable identity verification |
| [Social Networking](https://docs.primuslabs.xyz/implementation-scenarios/expand-social-graph) | interoperable and composable social graphs |
| [Provable Assets](https://docs.primuslabs.xyz/implementation-scenarios/proof-of-assets) | privacy-preserving attestation of crypto asset holdings |
| [Crypto Lending](https://docs.primuslabs.xyz/implementation-scenarios/lending) | composable off-chain and on-chain attestations |
| [Crypto On & Off Ramps](https://docs.primuslabs.xyz/implementation-scenarios/otc) | lending with proofs of dynamic assets |
| [Hiring and Dating](https://docs.primuslabs.xyz/implementation-scenarios/hiring-dating) | decentralized matching platforms |
| [Enhanced fraud detection](https://docs.primuslabs.xyz/implementation-scenarios/fraud-detection) | enhanced fraud detection on identity crime |
| [Composable Attestations](https://docs.primuslabs.xyz/implementation-scenarios/composable-attestations) | composable off-chain and on-chain attestations |
| [Creator Economy](https://docs.primuslabs.xyz/implementation-scenarios/creator-economy) | secure creator economy with equipped FHE |
---
# Error Code | primus
[Skip to main content](https://docs.primuslabs.xyz/enterprise/error-code/#docusaurus_skipToContent_fallback)
On this page

Error Code[](https://docs.primuslabs.xyz/enterprise/error-code/#error-code "Direct link to Error Code")
---------------------------------------------------------------------------------------------------------
We have defined some error codes in the SDK. When an error occurs during the data verification process, you can refer to the following list for troubleshooting.
### 1\. General Errors[](https://docs.primuslabs.xyz/enterprise/error-code/#1-general-errors "Direct link to 1. General Errors")
| Error Code | Situation |
| --- | --- |
| 00000 | Operation too frequent. Please try again later. |
| 00001 | Algorithm startup exception. |
| 00002 | The verification process timed out. |
| 00003 | A verification process is in progress. Please try again later. |
| 00004 | The user closes or cancels the verification process. |
| 00005 | Wrong SDK parameters. |
| 00012 | Invalid Template ID. |
| 00013 | Target data missing. Please check that the JSON path of the data in the response from the request URL matches your template. |
| 00104 | Not met the verification requirements. |
| \-1002001 | Invalid App ID. |
| \-1002002 | Invalid App Secret. |
### 2\. zkTLS Related Errors[](https://docs.primuslabs.xyz/enterprise/error-code/#2-zktls-related-errors "Direct link to 2. zkTLS Related Errors")
| Error Code | Situation |
| --- | --- |
| 10001 ~ 10004 | Unstable internet connection. Please try again. |
| 20001 | An internal error occurred. |
| 20003 | Invalid algorithm parameters. |
| 20005 | An internal error occurred. |
| 30001 | Response error. Please try again. |
| 30002 | Response check error. |
| 30004 | Response parse error. |
| 40002 | SSL certificate error. |
| 50001 | An internal error occurred. |
| 50003 | The client encountered an unexpected error. |
| 50004 | The client not started. Please try again. |
| 50006 | The algorithm server not started. Please try again. |
| 50007 | Algorithm execution issues. |
| 50008 | Abnormal execution results. |
| 50009 | Algorithm service timed out. |
| 50010 | Compatibility issues during algorithm execution. |
| 50011 | Unsupported TLS version. |
| 99999 | Undefined error. |
Please contact our [Community](https://discord.com/invite/pdrNxRrApX)
for assistance in resolving the issues.
* [Error Code](https://docs.primuslabs.xyz/enterprise/error-code/#error-code)
* [1\. General Errors](https://docs.primuslabs.xyz/enterprise/error-code/#1-general-errors)
* [2\. zkTLS Related Errors](https://docs.primuslabs.xyz/enterprise/error-code/#2-zktls-related-errors)
---
# Handling Multiple URLs | primus
[Skip to main content](https://docs.primuslabs.xyz/enterprise/multi-url/#docusaurus_skipToContent_fallback)
On this page

The Problem[](https://docs.primuslabs.xyz/enterprise/multi-url/#the-problem "Direct link to The Problem")
-----------------------------------------------------------------------------------------------------------
In many use cases, one may want to create an aggregated attestation for multiple request URLs. For example, you can generate one zkTLS attestation which contains both the token A's USDT price and token B's USDT price from an exchange market data service.
Primus zkTLS tools including _network-core-sdk_ and _zktls-core-sdk_ support the multiple URLs aggregation. The _zktls-js-sdk_ can be configured to support multiple URLs as well. This feature is available upon request; please contact the Primus team.
The Usage in zkTLS-Core-SDK[](https://docs.primuslabs.xyz/enterprise/multi-url/#the-usage-in-zktls-core-sdk "Direct link to The Usage in zkTLS-Core-SDK")
-----------------------------------------------------------------------------------------------------------------------------------------------------------
The adoption of multiple urls in zkTLS-Core-SDK is a little bit different from the usage in Network-Core-SDK.
**The Defined `Requests` and `ResponseResolves`**
Note this part is the same as the use in Network-Core-SDK.
let request = [ { url: "https://www.okx.com/api/v5/public/instruments?instType=SPOT&instId=BTC-USD", method: "GET", header: {}, body: "", }, { url: "https://www.okx.com/api/v5/public/time", method: "GET", header: {}, body: "", } ]; const responseResolves = [ [ { keyName: "instType", parseType: "json", parsePath: "$.data[0].instType" } ], [ { keyName: "time", parseType: "json", parsePath: "$.data[0].ts", } ] ];
**Encode the `attestParams`**
You can use the following code segement to add the `requests` and the `responseResolves` in the attestation parameters, and then call the `startAttestation()` function.
// Generate attestation request.const generateRequest = zkTLS.generateRequestParams(request, responseResolves);// Start attestation process.const attestation = await zkTLS.startAttestation(generateRequest);
**The Attestation Structure**
Note the returned attestation encoding is different from the above multi-URL attestation in the usage of Network-Core-SDK.
Specifically, multi-URL requests and their response resolutions are encoded as two-dimensional arrays. In the returned attestation, the `data` contains all the requested data fields for both URLs, like in the Network-Core-SDK.
The `request` and `responseResolve` params for the first request URL appears directly in the attestation payload, while the related params for second request URL are wrapped and presented within the `additionalParams` field.
attestation= { recipient: '0x0000000000000000000000000000000000000000', request: { url: 'https://www.okx.com/api/v5/market/index-tickers?instId=BTC-USDT', header: '', method: 'GET', body: '' }, reponseResolve: [ { keyName: 'btc-idxPx', parseType: '', parsePath: '$.data[0].idxPx' }, { keyName: 'btc-high24h', parseType: '', parsePath: '$.data[0].high24h' } ], data: '{"sol-idxPx.count":"1","btc-high24h":"89622.8","btc-high24h.count":"1","sol-idxPx":"126.37","btc-idxPx":"89083.8","btc-idxPx.count":"1"}', // the data for two requests, the `count` field can be ignored attConditions: '[{"op":"REVEAL_STRING","field":"$.data[0].idxPx"},{"op":"REVEAL_STRING","field":"$.data[0].high24h"},{"op":"REVEAL_STRING","field":"$.data[0].idxPx"}]', timestamp: 1766389694836, additionParams: '{"algorithmType":"proxytls","requests[1].url":"https://www.okx.com/api/v5/market/index-tickers?instId=SOL-USDT","requests[1].method":"GET","requests[1].body":"","requests[1].header":"","reponseResolves[1][0].keyName":"sol-idxPx","reponseResolves[1][0].parseType":"","reponseResolves[1][0].parsePath":"$.data[0].idxPx"}', // the additonal params for the request param and responseResolve param in the second URL attestors: [ { attestorAddr: '0xdb736b13e2f522dbe18b2015d0291e4b193d8ef6', url: 'https://primuslabs.xyz' } ], signatures: [ '0xc4b714d23c28866c503b3d7b9caa637b65c21f962f6cf38dc6b2c91a5c837504048a9ffecd5b5e8f63dbb3d8ee40f075fd19667b7789b88bcc884d38d5669b6a1b' ]}
* [The Problem](https://docs.primuslabs.xyz/enterprise/multi-url/#the-problem)
* [The Usage in zkTLS-Core-SDK](https://docs.primuslabs.xyz/enterprise/multi-url/#the-usage-in-zktls-core-sdk)
---
# Simple Example | primus
[Skip to main content](https://docs.primuslabs.xyz/enterprise/core-sdk/simpleexample/#docusaurus_skipToContent_fallback)
On this page

Simple Example[](https://docs.primuslabs.xyz/enterprise/core-sdk/simpleexample/#simple-example "Direct link to Simple Example")
---------------------------------------------------------------------------------------------------------------------------------
This guide will walk you through the fundamental steps to integrate Primus's zkTLS-Core-SDK and complete a basic data verification process through your server. You can learn about the integration process through this simple [demo](https://github.com/primus-labs/zktls-demo/tree/main/core-sdk-example)
.
### Prerequisites[](https://docs.primuslabs.xyz/enterprise/core-sdk/simpleexample/#prerequisites "Direct link to Prerequisites")
Before you begin, ensure you have:
* Installed the SDK (see [Installation Guide](https://docs.primuslabs.xyz/enterprise/core-sdk/install)
)
### zkTLS Modes[](https://docs.primuslabs.xyz/enterprise/core-sdk/simpleexample/#zktls-modes "Direct link to zkTLS Modes")
We offer two modes in various user scenarios:
1. proxytls
2. mpctls
For more details about these two modes, you can refer to the [Overview](https://docs.primuslabs.xyz/primus-network/tech-intro)
section.
// Set zkTLS mode, default is proxy mode.primusZKTLS.setAttMode({ algorithmType: "proxytls",});
### Implementation[](https://docs.primuslabs.xyz/enterprise/core-sdk/simpleexample/#implementation "Direct link to Implementation")
You can get the `PRIMUS_APP_ID` and `PRIMUS_APP_SECRET` from the [Primus Developer Hub](https://dev.primuslabs.xyz/)
.
const { PrimusCoreTLS } = require("@primuslabs/zktls-core-sdk");async function primusProofTest() { // Initialize parameters, the init function is recommended to be called when the program is initialized. const appId = "PRIMUS_APP_ID"; const appSecret= "PRIMUS_APP_SECRET"; const zkTLS = new PrimusCoreTLS(); const initResult = await zkTLS.init(appId, appSecret); console.log("primusProof initResult=", initResult); // Set request and responseResolves. const request ={ url: "YOUR_CUSTOM_URL", // Request endpoint. method: "REQUEST_METHOD", // Request method. header: {}, // Request headers. body: "" // Request body. }; // The responseResolves is the response structure of the url. // For example the response of the url is: {"data":[{ ..."instFamily": "","instType":"SPOT",...}]}. const responseResolves = [ { keyName: 'CUSTOM_KEY_NAME', // According to the response keyname, such as: instType. parsePath: 'CUSTOM_PARSE_PATH', // According to the response parsePath, such as: $.data[0].instType. } ]; // Generate attestation request. const generateRequest = zkTLS.generateRequestParams(request, responseResolves); // Set zkTLS mode, default is proxy mode. (This is optional) generateRequest.setAttMode({ algorithmType: "proxytls" }); // Start attestation process. const attestation = await zkTLS.startAttestation(generateRequest); console.log("attestation=", attestation); const verifyResult = zkTLS.verifyAttestation(attestation); console.log("verifyResult=", verifyResult); if (verifyResult === true) { // Business logic checks, such as attestation content and timestamp checks // do your own business logic. } else { // If failed, define your own logic. }}
### Understanding the Attestation Structure[](https://docs.primuslabs.xyz/enterprise/core-sdk/simpleexample/#understanding-the-attestation-structure "Direct link to Understanding the Attestation Structure")
When a successful data verification process is completed, you will receive a zkTLS attestation (proof) from the attestor.
For more information about the attestation structure, see the [section](https://docs.primuslabs.xyz/enterprise/attestation-structure)
.
### Submit Attestation On-chain (optional)[](https://docs.primuslabs.xyz/enterprise/core-sdk/simpleexample/#submit-attestation-on-chain-optional "Direct link to Submit Attestation On-chain (optional)")
To submit the verified data result (proof) to the blockchain, you’ll need to invoke the appropriate smart contract method. For detailed instructions, please refer to the [onchain interactions](https://docs.primuslabs.xyz/enterprise/onchain-interaction/overview)
.
### Error Codes[](https://docs.primuslabs.xyz/enterprise/core-sdk/simpleexample/#error-codes "Direct link to Error Codes")
We have defined several error codes in the SDK. If an error occurs during the data verification process, you can refer to the [error code list](https://docs.primuslabs.xyz/build/misc/error-code)
for troubleshooting.
* [Simple Example](https://docs.primuslabs.xyz/enterprise/core-sdk/simpleexample/#simple-example)
* [Prerequisites](https://docs.primuslabs.xyz/enterprise/core-sdk/simpleexample/#prerequisites)
* [zkTLS Modes](https://docs.primuslabs.xyz/enterprise/core-sdk/simpleexample/#zktls-modes)
* [Implementation](https://docs.primuslabs.xyz/enterprise/core-sdk/simpleexample/#implementation)
* [Understanding the Attestation Structure](https://docs.primuslabs.xyz/enterprise/core-sdk/simpleexample/#understanding-the-attestation-structure)
* [Submit Attestation On-chain (optional)](https://docs.primuslabs.xyz/enterprise/core-sdk/simpleexample/#submit-attestation-on-chain-optional)
* [Error Codes](https://docs.primuslabs.xyz/enterprise/core-sdk/simpleexample/#error-codes)
---
# Overview | primus
[Skip to main content](https://docs.primuslabs.xyz/enterprise/onchain-interaction/overview/#docusaurus_skipToContent_fallback)
On this page

Overview[](https://docs.primuslabs.xyz/enterprise/onchain-interaction/overview/#overview "Direct link to Overview")
---------------------------------------------------------------------------------------------------------------------
The Enterprise Solutions of Primus zkTLS protocol are compatible with multiple blockchains. We provide smart contracts that can be deployed on different blockchains to verify data proofs generated through the Enterprise zkTLS SDKs.
### How to Interact[](https://docs.primuslabs.xyz/enterprise/onchain-interaction/overview/#how-to-interact "Direct link to How to Interact")
1. Your dApp requests proofs from the user using the zkTLS SDK in the front end.
2. Submit the proof to your smart contract.
3. Verify the proof on-chain via the smart contract.
4. Extract relevant data from the verified proof.
5. Use the extracted data in your business logic.
Contract Code in GitHub[](https://docs.primuslabs.xyz/enterprise/onchain-interaction/overview/#contract-code-in-github "Direct link to Contract Code in GitHub")
------------------------------------------------------------------------------------------------------------------------------------------------------------------
We already published the smart contract code on GitHub, you can refer to it [here](https://github.com/primus-labs/zktls-contracts)
.
Quick Start[](https://docs.primuslabs.xyz/enterprise/onchain-interaction/overview/#quick-start "Direct link to Quick Start")
------------------------------------------------------------------------------------------------------------------------------
### EVM Blockchains[](https://docs.primuslabs.xyz/enterprise/onchain-interaction/overview/#evm-blockchains "Direct link to EVM Blockchains")
You can find example smart contracts for quick integration in the [Quick Start for EVM blockchains](https://docs.primuslabs.xyz/enterprise/onchain-interaction/overview#evm-blockchains)
.
#### Mainnets[](https://docs.primuslabs.xyz/enterprise/onchain-interaction/overview/#mainnets "Direct link to Mainnets")
##### Linea[](https://docs.primuslabs.xyz/enterprise/onchain-interaction/overview/#linea "Direct link to Linea")
| Contract | Address |
| --- | --- |
| Primus | 0xe6a7E3d26B898e96fA8bC00fFE6e51b25Dc24d6a |
##### BNB Chain[](https://docs.primuslabs.xyz/enterprise/onchain-interaction/overview/#bnb-chain "Direct link to BNB Chain")
| Contract | Address |
| --- | --- |
| Primus | 0xF24199D5D431bE869af3Da61162CbBb58C389324 |
##### Arbitrum[](https://docs.primuslabs.xyz/enterprise/onchain-interaction/overview/#arbitrum "Direct link to Arbitrum")
| Contract | Address |
| --- | --- |
| Primus | 0x982Cef8d9F184566C2BeC48c4fb9b6e7B0b4A58B |
##### Scroll[](https://docs.primuslabs.xyz/enterprise/onchain-interaction/overview/#scroll "Direct link to Scroll")
| Contract | Address |
| --- | --- |
| Primus | 0x06c3c00dc556d2493A661E6a929d3E17f5F097a4 |
##### opBNB[](https://docs.primuslabs.xyz/enterprise/onchain-interaction/overview/#opbnb "Direct link to opBNB")
| Contract | Address |
| --- | --- |
| Primus | 0xadd538D8C857072eFC29C4c05F574c68f94137eF |
##### Taiko[](https://docs.primuslabs.xyz/enterprise/onchain-interaction/overview/#taiko "Direct link to Taiko")
| Contract | Address |
| --- | --- |
| Primus | 0x3760aB354507a29a9F5c65A66C74353fd86393FA |
##### Camp[](https://docs.primuslabs.xyz/enterprise/onchain-interaction/overview/#camp "Direct link to Camp")
| Contract | Address |
| --- | --- |
| Primus | 0xCE7cefB3B5A7eB44B59F60327A53c9Ce53B0afdE |
##### Base[](https://docs.primuslabs.xyz/enterprise/onchain-interaction/overview/#base "Direct link to Base")
| Contract | Address |
| --- | --- |
| Primus | 0xCE7cefB3B5A7eB44B59F60327A53c9Ce53B0afdE |
#### Testnets[](https://docs.primuslabs.xyz/enterprise/onchain-interaction/overview/#testnets "Direct link to Testnets")
##### Sepolia[](https://docs.primuslabs.xyz/enterprise/onchain-interaction/overview/#sepolia "Direct link to Sepolia")
| Contract | Address |
| --- | --- |
| Primus | 0x3760aB354507a29a9F5c65A66C74353fd86393FA |
##### Holesky[](https://docs.primuslabs.xyz/enterprise/onchain-interaction/overview/#holesky "Direct link to Holesky")
| Contract | Address |
| --- | --- |
| Primus | 0xB3d8DDDc793F75a930313785e5d1612747093f25 |
##### BNB Chain Testnet[](https://docs.primuslabs.xyz/enterprise/onchain-interaction/overview/#bnb-chain-testnet "Direct link to BNB Chain Testnet")
| Contract | Address |
| --- | --- |
| Primus | 0xBc074EbE6D39A97Fb35726832300a950e2D94324 |
##### opBNB Testnet[](https://docs.primuslabs.xyz/enterprise/onchain-interaction/overview/#opbnb-testnet "Direct link to opBNB Testnet")
| Contract | Address |
| --- | --- |
| Primus | 0x3760aB354507a29a9F5c65A66C74353fd86393FA |
##### Taiko Hekla Testnet[](https://docs.primuslabs.xyz/enterprise/onchain-interaction/overview/#taiko-hekla-testnet "Direct link to Taiko Hekla Testnet")
| Contract | Address |
| --- | --- |
| Primus | 0x3760aB354507a29a9F5c65A66C74353fd86393FA |
##### Scroll Sepolia Testnet[](https://docs.primuslabs.xyz/enterprise/onchain-interaction/overview/#scroll-sepolia-testnet "Direct link to Scroll Sepolia Testnet")
| Contract | Address |
| --- | --- |
| Primus | 0x5267380F548EEcA48E57Cd468a66F846e1dEfD6e |
##### Base Sepolia Testnet[](https://docs.primuslabs.xyz/enterprise/onchain-interaction/overview/#base-sepolia-testnet "Direct link to Base Sepolia Testnet")
| Contract | Address |
| --- | --- |
| Primus | 0xCE7cefB3B5A7eB44B59F60327A53c9Ce53B0afdE |
##### Monad Testnet[](https://docs.primuslabs.xyz/enterprise/onchain-interaction/overview/#monad-testnet "Direct link to Monad Testnet")
| Contract | Address |
| --- | --- |
| Primus | 0x1Ad7fD53206fDc3979C672C0466A1c48AF47B431 |
##### Pharos Testnet[](https://docs.primuslabs.xyz/enterprise/onchain-interaction/overview/#pharos-testnet "Direct link to Pharos Testnet")
| Contract | Address |
| --- | --- |
| Primus | 0xCE7cefB3B5A7eB44B59F60327A53c9Ce53B0afdE |
##### Sophon Testnet[](https://docs.primuslabs.xyz/enterprise/onchain-interaction/overview/#sophon-testnet "Direct link to Sophon Testnet")
| Contract | Address |
| --- | --- |
| Primus | 0x7068da2522c3Ba1f24594ce20E7d7A8EF574E89f |
##### Unichain Sepolia Testnet[](https://docs.primuslabs.xyz/enterprise/onchain-interaction/overview/#unichain-sepolia-testnet "Direct link to Unichain Sepolia Testnet")
| Contract | Address |
| --- | --- |
| Primus | 0xCE7cefB3B5A7eB44B59F60327A53c9Ce53B0afdE |
### Starknet[](https://docs.primuslabs.xyz/enterprise/onchain-interaction/overview/#starknet "Direct link to Starknet")
You can find example smart contracts for quick integration in the [Quick Start for Starknet](https://docs.primuslabs.xyz/enterprise/onchain-interaction/quickstart#straknet-blockchains)
.
##### Starknet Sepolia Testnet[](https://docs.primuslabs.xyz/enterprise/onchain-interaction/overview/#starknet-sepolia-testnet "Direct link to Starknet Sepolia Testnet")
| Contract | Address |
| --- | --- |
| Primus | 0x00f24a364a932e6eeb8b7a9ed6d2337baaa78dcffa3a6d54e5e1b6c1c227deaa |
### SUI[](https://docs.primuslabs.xyz/enterprise/onchain-interaction/overview/#sui "Direct link to SUI")
#### Mainnet[](https://docs.primuslabs.xyz/enterprise/onchain-interaction/overview/#mainnet "Direct link to Mainnet")
| ID | Address |
| --- | --- |
| Package ID | 0xcbe9ca8cee83ee454cbc114b8f9825b49ed945f89e6ef4f26a07417a10525f42 |
| Object ID | 0x08edfc73afa9ce6b5ac3211c5dcfe52837325fedce491f06812aece0ce21d0fd |
#### Testnet[](https://docs.primuslabs.xyz/enterprise/onchain-interaction/overview/#testnet "Direct link to Testnet")
| ID | Address |
| --- | --- |
| Package ID | 0x16af016d8516f0d0a64f38786b0cbdb7687032415b8995e5487d0b2e3e0f67f2 |
| Object ID | 0x45470ee02c709409e9debd73320df48fc77a7e7ac9f891bf5a80cf7ec0fd37ad |
If you have further needs for other blockchains, please contact us through our [Community](https://discord.com/invite/pdrNxRrApX)
for support.
* [Overview](https://docs.primuslabs.xyz/enterprise/onchain-interaction/overview/#overview)
* [How to Interact](https://docs.primuslabs.xyz/enterprise/onchain-interaction/overview/#how-to-interact)
* [Contract Code in GitHub](https://docs.primuslabs.xyz/enterprise/onchain-interaction/overview/#contract-code-in-github)
* [Quick Start](https://docs.primuslabs.xyz/enterprise/onchain-interaction/overview/#quick-start)
* [EVM Blockchains](https://docs.primuslabs.xyz/enterprise/onchain-interaction/overview/#evm-blockchains)
* [Mainnets](https://docs.primuslabs.xyz/enterprise/onchain-interaction/overview/#mainnets)
* [Testnets](https://docs.primuslabs.xyz/enterprise/onchain-interaction/overview/#testnets)
* [Starknet](https://docs.primuslabs.xyz/enterprise/onchain-interaction/overview/#starknet)
* [SUI](https://docs.primuslabs.xyz/enterprise/onchain-interaction/overview/#sui)
* [Mainnet](https://docs.primuslabs.xyz/enterprise/onchain-interaction/overview/#mainnet)
* [Testnet](https://docs.primuslabs.xyz/enterprise/onchain-interaction/overview/#testnet)
---
# Introduction | primus
[Skip to main content](https://docs.primuslabs.xyz/enterprise/core-sdk/overview/#docusaurus_skipToContent_fallback)
On this page

note
This section covers **enterprise integration** using Primus’ proprietary Attestor for zkTLS applications running in backend. For development on the Primus Network, refer [here](https://docs.primuslabs.xyz/build/for-backend/install)
.
Overview[](https://docs.primuslabs.xyz/enterprise/core-sdk/overview/#overview "Direct link to Overview")
----------------------------------------------------------------------------------------------------------
When integrating data verification solutions into your backend server, you can utilize the **zkTLS-Core-SDK**. For integrating zkTLS capabilities with DApps, please refer to the [DApp Integration](https://docs.primuslabs.xyz/enterprise/zk-tls-sdk/overview)
guide.
The SDK allows you to verify data through **webpage endpoint responses**, with support for repeated verification without additional calls. An authorized token or other type of user credential is required to access user private data.
To integrate, **create a project** in the [Primus Developer Hub](https://dev.primuslabs.xyz/)
to obtain a paired appID and appSecret. Then, configure these credentials in your backend server to utilize the Core SDK and APIs.
Primus zkTLS-Core-SDK supports two modes: the [Proxy TLS mode](https://docs.primuslabs.xyz/primus-network/tech-intro#proxy-model)
and the [MPC TLS mode](https://docs.primuslabs.xyz/primus-network/tech-intro#mpc-model)
. You can specify the desired mode by setting the "algorithmType" parameter during SDK integration.
For more details on setting up your project, refer to the [Developer Hub](https://docs.primuslabs.xyz/build/developer-hub)
.
### How it Works[](https://docs.primuslabs.xyz/enterprise/core-sdk/overview/#how-it-works "Direct link to How it Works")
Here's a simplified flow of how the Primus zkTLS-Core-SDK works on your server:
**1\. Create Project:** Create a project on the [Primus Developer Hub](https://dev.primuslabs.xyz/)
to obtain a paired appID and appSecret, then configure them in your backend server.
**2\. Configure Verification Parameters:** Ensure that two key parameters, including the request parameters and response data paths, are configured correctly. Refer to the [simple example](https://docs.primuslabs.xyz/enterprise/core-sdk/simpleexample)
for guidance.
**3\. Execute zkTLS Protocol:** Invoke the zkTLS protocol via your server to initiate the data verification process.
**4\. Verify Data Verification Result:** Your server retrieves the verification result from the Core SDK and validates Primus' signature to ensure trustworthiness.
**5\. Execute Business Logic:** Based on the verification result, your server executes the relevant business logic, such as submitting the proof on-chain or triggering other operations.
### Interact with Blockchains[](https://docs.primuslabs.xyz/enterprise/core-sdk/overview/#interact-with-blockchains "Direct link to Interact with Blockchains")
The Primus zkTLS protocol is compatible with multiple blockchains. We provide smart contracts that can be deployed on various blockchains to verify data proofs generated by users via the SDK.
Currently, support is available for several testnets and mainnets. For more details, refer to the [on-chain interactions](https://docs.primuslabs.xyz/enterprise/onchain-interaction/overview)
section.
### Quick Start for Beginners[](https://docs.primuslabs.xyz/enterprise/core-sdk/overview/#quick-start-for-beginners "Direct link to Quick Start for Beginners")
1. [Installation](https://docs.primuslabs.xyz/enterprise/core-sdk/install)
Get the SDK set up in your project.
2. [Simple Example](https://docs.primuslabs.xyz/enterprise/core-sdk/simpleexample)
Understand how to use the Core SDK.
### Stay Connected[](https://docs.primuslabs.xyz/enterprise/core-sdk/overview/#stay-connected "Direct link to Stay Connected")
Keep up with the latest Primus developments:
* Star our [GitHub Repository](https://github.com/primus-labs/zktls-core-sdk)
* Join our [Discord Community](https://discord.com/invite/pdrNxRrApX)
* [Overview](https://docs.primuslabs.xyz/enterprise/core-sdk/overview/#overview)
* [How it Works](https://docs.primuslabs.xyz/enterprise/core-sdk/overview/#how-it-works)
* [Interact with Blockchains](https://docs.primuslabs.xyz/enterprise/core-sdk/overview/#interact-with-blockchains)
* [Quick Start for Beginners](https://docs.primuslabs.xyz/enterprise/core-sdk/overview/#quick-start-for-beginners)
* [Stay Connected](https://docs.primuslabs.xyz/enterprise/core-sdk/overview/#stay-connected)
---
# PoR Support Chains | primus
[Skip to main content](https://docs.primuslabs.xyz/primus-network/por-support-chains/#docusaurus_skipToContent_fallback)
On this page

PoR Support Chains[](https://docs.primuslabs.xyz/primus-network/por-support-chains/#por-support-chains "Direct link to PoR Support Chains")
---------------------------------------------------------------------------------------------------------------------------------------------
* [PoR Support Chains](https://docs.primuslabs.xyz/primus-network/por-support-chains/#por-support-chains)
---
# zkTLS Operations | primus
[Skip to main content](https://docs.primuslabs.xyz/enterprise/op/#docusaurus_skipToContent_fallback)
On this page

The Issue of Handling Private Data[](https://docs.primuslabs.xyz/enterprise/op/#the-issue-of-handling-private-data "Direct link to The Issue of Handling Private Data")
-------------------------------------------------------------------------------------------------------------------------------------------------------------------------
Traditional zkTLS algorithms provide data authenticity for applications. In this model, the zkTLS client ultimately receives an attestation from the attestor, where the embedded raw data and its corresponding signature together prove that a zkTLS session was executed correctly and successfully verified by the attestor.
In many scenarios, offering the raw data is not considered as a good option if privacy is preferred. Handling the data computation within the attestation is a proper approach. Primus SDKs offers zkTLS operations to further adapt to the privacy-preserving applications.
Supported zkTLS Operations[](https://docs.primuslabs.xyz/enterprise/op/#supported-zktls-operations "Direct link to Supported zkTLS Operations")
-------------------------------------------------------------------------------------------------------------------------------------------------
Using comparison operations expressed as boolean conditions within the zkTLS attestation is an effective way to handle private data securely. During attestation generation, various comparison operators can be applied to specific data fields. Each comparison produces a boolean result—true or false—indicating whether the condition is satisfied.
The supported comparison operators within Primus SDKs include:
* '**\>**' (greater than): verifies if the data item is greater than a target value
* '**<**' (less than): verifies if the data item is less than a target value
* '**\=**' (equal to): verifies if the data item is equal to a target value
* '**!=**' (not equal to): verifies if the data item is not equal to a target value
* '**\>=**' (greater than or equal to): verifies if the data item is greater than or equal to a target value
* '**<=**' (less than or equal to): verifies if the data item is less than or equal to a target value
**Hash (SHA256)**
The Primus SDKs also support hashing the proved data to provide strong privacy guarantees with SHA-256 hash functions. This operation ensures that even the attestor cannot learn any details of the proved data, only that the zkTLS session was correctly executed in a black-box manner. The op code is `SHA256`.
**Multiple Hashes (SHA256\_EX)** To hide the multiple data fields within multiple URLs, you can use the extended hash operations instead, where the op code is `SHA256_EX`.
### How to Use the zkTLS Operations in zkTLS-JS-SDK and zkTLS-Core-SDK[](https://docs.primuslabs.xyz/enterprise/op/#how-to-use-the-zktls-operations-in-zktls-js-sdk-and-zktls-core-sdk "Direct link to How to Use the zkTLS Operations in zkTLS-JS-SDK and zkTLS-Core-SDK")
When using Primus zkTLS-JS-SDK or zkTLS-Core-SDK, You can simple enable the comparison and hash operations in the zkTLS attestation generation, by the following example code.
// enable zkTLS computation operations. // 1. Hashed result const attConditions = [ [ { field:'YOUR_CUSTOM_DATA_FIELD', op:'SHA256', }, ], ]; // 2. Conditional result const attConditions = [ [ { field: "YOUR_CUSTOM_DATA_FIELD", op: ">", value: "YOUR_CUSTOM_TARGET_DATA_VALUE", }, ], ]; request.setAttConditions(attConditions);
Comparison with DVC Pattern[](https://docs.primuslabs.xyz/enterprise/op/#comparison-with-dvc-pattern "Direct link to Comparison with DVC Pattern")
----------------------------------------------------------------------------------------------------------------------------------------------------
zkTLS operations natively support performing data computations directly over the attestation. In contrast, the DVC (Data Verification and Computation) pattern leverages a zkVM to shift the computation into a zkVM circuit. While zkTLS operations offer a level of privacy comparable to DVC, they provide less public verifiability and trustlessness, since the output of a zkVM circuit, namely a SNARK proof, can be publicly verified on-chain. Even so, zkTLS remains an efficient and architecturally simple approach for enabling application-level privacy.
* [The Issue of Handling Private Data](https://docs.primuslabs.xyz/enterprise/op/#the-issue-of-handling-private-data)
* [Supported zkTLS Operations](https://docs.primuslabs.xyz/enterprise/op/#supported-zktls-operations)
* [How to Use the zkTLS Operations in zkTLS-JS-SDK and zkTLS-Core-SDK](https://docs.primuslabs.xyz/enterprise/op/#how-to-use-the-zktls-operations-in-zktls-js-sdk-and-zktls-core-sdk)
* [Comparison with DVC Pattern](https://docs.primuslabs.xyz/enterprise/op/#comparison-with-dvc-pattern)
---
# Installation | primus
[Skip to main content](https://docs.primuslabs.xyz/enterprise/page-sdk/install/#docusaurus_skipToContent_fallback)
On this page

Installation[](https://docs.primuslabs.xyz/enterprise/page-sdk/install/#installation "Direct link to Installation")
---------------------------------------------------------------------------------------------------------------------
We will go through the developer flow for the installation and usage of page core sdk.
### Installation Steps[](https://docs.primuslabs.xyz/enterprise/page-sdk/install/#installation-steps "Direct link to Installation Steps")
Open your terminal and navigate to your project directory. Then run one of the following commands:
* Using npm:
npm install --save @primuslabs/zktls-page-core-sdk
* Using yarn:
yarn add --save @primuslabs/zktls-page-core-sdk
### Importing the SDK[](https://docs.primuslabs.xyz/enterprise/page-sdk/install/#importing-the-sdk "Direct link to Importing the SDK")
After installation, you can import the SDK in your JavaScript or TypeScript files. Here's how:
import { PrimusPageCoreTLS } from "@primuslabs/zktls-page-core-sdk"
Project Config[](https://docs.primuslabs.xyz/enterprise/page-sdk/install/#project-config "Direct link to Project Config")
---------------------------------------------------------------------------------------------------------------------------
The Primus Page Core SDK algorithm must be run in a separate js tag and must support SharedArrayBuffer, so the following configuration is required.
### vite.config.js[](https://docs.primuslabs.xyz/enterprise/page-sdk/install/#viteconfigjs "Direct link to vite.config.js")
When the page is compiled, copy the 4 files directly to the extension build directory. `vite.config.js` needs to add the following configuration. You can refer to [demo vite.config.js](https://github.com/primus-labs/zktls-demo/blob/main/page-core-sdk-example/vite.config.js)
.
export default defineConfig({ plugins: [ react(), viteStaticCopy({ targets: [ { src: 'node_modules/@primuslabs/zktls-page-core-sdk/dist/algorithm/client_plugin.wasm', dest: './' }, { src: 'node_modules/@primuslabs/zktls-page-core-sdk/dist/algorithm/client_plugin.worker.js', dest: './' }, { src: 'node_modules/@primuslabs/zktls-page-core-sdk/dist/algorithm/client_plugin.js', dest: './' }, { src: 'node_modules/@primuslabs/zktls-page-core-sdk/dist/algorithm/primus_zk.js', dest: './' } ] }) ], server: { headers: { // to support SharedArrayBuffer 'Cross-Origin-Opener-Policy': 'same-origin', 'Cross-Origin-Embedder-Policy': 'require-corp' } }, optimizeDeps: { esbuildOptions: { // Enable esbuild polyfill plugins plugins: [ NodeModulesPolyfillPlugin() ] }, include: ['react', 'react-dom'], force: true, },})
### Index html[](https://docs.primuslabs.xyz/enterprise/page-sdk/install/#index-html "Direct link to Index html")
You need to import two js files in your index html.
...... ......
* [Installation](https://docs.primuslabs.xyz/enterprise/page-sdk/install/#installation)
* [Installation Steps](https://docs.primuslabs.xyz/enterprise/page-sdk/install/#installation-steps)
* [Importing the SDK](https://docs.primuslabs.xyz/enterprise/page-sdk/install/#importing-the-sdk)
* [Project Config](https://docs.primuslabs.xyz/enterprise/page-sdk/install/#project-config)
* [vite.config.js](https://docs.primuslabs.xyz/enterprise/page-sdk/install/#viteconfigjs)
* [Index html](https://docs.primuslabs.xyz/enterprise/page-sdk/install/#index-html)
---
# Quick Start | primus
[Skip to main content](https://docs.primuslabs.xyz/enterprise/onchain-interaction/quickstart/#docusaurus_skipToContent_fallback)
On this page

EVM Blockchains[](https://docs.primuslabs.xyz/enterprise/onchain-interaction/quickstart/#evm-blockchains "Direct link to EVM Blockchains")
--------------------------------------------------------------------------------------------------------------------------------------------
This section walks you through deploying and integrating a Primus contract into your Solidity project.
### Install the Contract[](https://docs.primuslabs.xyz/enterprise/onchain-interaction/quickstart/#install-the-contract "Direct link to Install the Contract")
When setting up your smart contract project, you need to pull out the smart contract library first.
* Using Hardhat: `npm install @primuslabs/zktls-contracts`
* Using Foundry: `forge install primus-labs/zktls-contracts`
### Deploy a Smart Contract[](https://docs.primuslabs.xyz/enterprise/onchain-interaction/quickstart/#deploy-a-smart-contract "Direct link to Deploy a Smart Contract")
Deploy the following contract to any EVM-compatible network of your choice. For this walkthrough, we'll use Ethereum as an example.
// SPDX-License-Identifier: MITpragma solidity ^0.8.20;// if you are using foundry, you can use the following conf:// you can edit import information like this in your local project remappings.txt:// @primuslabs/zktls-contracts=lib/zktls-contracts/import { IPrimusZKTLS, Attestation } from "@primuslabs/zktls-contracts/src/IPrimusZKTLS.sol";contract AttestorTest { address public primusAddress; constructor(address _primusAddress) { // Replace with the network you are deploying on primusAddress = _primusAddress; } function verifySignature(Attestation calldata attestation) public view returns(bool) { IPrimusZKTLS(primusAddress).verifyAttestation(attestation); // Business logic checks, such as attestation content and timestamp checks // do your own business logic return true; }}
### On-chain Interactions[](https://docs.primuslabs.xyz/enterprise/onchain-interaction/quickstart/#on-chain-interactions "Direct link to On-chain Interactions")
The following code helps developers interact with the [Test example](https://docs.primuslabs.xyz/enterprise/zk-tls-sdk/test)
or [Production example](https://docs.primuslabs.xyz/enterprise/zk-tls-sdk/production)
contracts on-chain. This can be done using the zkTLS SDK after completing the smart contract development and deployment.
.... .... //start attestation process const attestation = await primusZKTLS.startAttestation(signedRequestStr); console.log("attestation=", attestation); if (verifyResult === true) { // Business logic checks, such as attestation content and timestamp checks // Do your own business logic // Interacting with Smart Contracts // Set contract address and ABI const contractData = {"YOUR_CONTRACT_ABI_JSON_DATA"}; const abi = contractData.abi; const contractAddress = "YOUR_CONTRACT_ADDRESS_YOU_DEPLOYED"; // Use ethers.js connect to the smart contract const provider = new ethers.providers.JsonRpcProvider("YOUR_RPC_URL"); const contract = new ethers.Contract(contractAddress, abi, provider); try { // Call verifyAttestation func const tx = await contract.verifySignature(attestation); console.log("Transaction:", tx); } catch (error) { console.error("Error in verifyAttestation:", error); } } else { //not the primus sign, error business logic }
Straknet Blockchains[](https://docs.primuslabs.xyz/enterprise/onchain-interaction/quickstart/#straknet-blockchains "Direct link to Straknet Blockchains")
-----------------------------------------------------------------------------------------------------------------------------------------------------------
This section walks you through deploying and integrating a Primus contract into your cairo project.
### Install the Contract[](https://docs.primuslabs.xyz/enterprise/onchain-interaction/quickstart/#install-the-contract-1 "Direct link to Install the Contract")
When setting up your smart contract project, you need to reference the Primus contract library first. Make the following configuration in the Scarb.toml file.
[dependencies]primus_zktls = { git = "https://github.com/primus-labs/zktls-starknet-contracts.git" }
### Deploy a Smart Contract[](https://docs.primuslabs.xyz/enterprise/onchain-interaction/quickstart/#deploy-a-smart-contract-1 "Direct link to Deploy a Smart Contract")
Deploy the following contract to Starknet. For this walkthrough.
use primus_zktls::IPrimusZKTLS::Attestation;#[starknet::interface]pub trait IAttestorTest { fn verifySignature(self: @TState, attestation: Attestation) -> bool;}#[starknet::contract]mod AttestorTest { use primus_zktls::IPrimusZKTLS::{ Attestation, IPrimusZKTLSDispatcher, IPrimusZKTLSDispatcherTrait, }; use starknet::ContractAddress; use starknet::storage::{StoragePointerReadAccess, StoragePointerWriteAccess}; #[storage] struct Storage { address: ContractAddress, } #[constructor] fn constructor(ref self: ContractState, _primusAddress: ContractAddress) { // Replace with the network you are deploying on self.address.write(_primusAddress); } #[abi(embed_v0)] impl IAttestorTest of super::IAttestorTest { fn verifySignature(self: @ContractState, attestation: Attestation) -> bool { IPrimusZKTLSDispatcher { contract_address: self.address.read() } .verifyAttestation(attestation); // Business logic checks, such as attestation content and timestamp checks // do your own business logic return true; } }}
### On-chain Interactions[](https://docs.primuslabs.xyz/enterprise/onchain-interaction/quickstart/#on-chain-interactions-1 "Direct link to On-chain Interactions")
The following code helps developers interact with the [Test example](https://docs.primuslabs.xyz/enterprise/zk-tls-sdk/test)
or [Production example](https://docs.primuslabs.xyz/enterprise/zk-tls-sdk/production)
contracts on-chain. This can be done using the zkTLS SDK after completing the smart contract development and deployment.
.... .... //start attestation process const attestation = await primusZKTLS.startAttestation(signedRequestStr); console.log("attestation=", attestation); if (verifyResult === true) { // Business logic checks, such as attestation content and timestamp checks // Do your own business logic // Interacting with Smart Contracts // Set contract address and ABI // Use starknet.js connect to the cairo contract const account = YOUR_ACCOUNT_OBJECT; const rpcUrl = "YOUR_RPC_NODE_URL"; const contractAddress = "YOUR_CONTRACT_ADDRESS_YOU_DEPLOYED"; const provider = new RpcProvider({ nodeUrl: rpcUrl }); const compiledContract = await provider.getClassAt(contractAddress); const abi = compiledContract.abi; const contract = new Contract(abi, contractAddress, provider); contract.connect(account); try { // Call verifyAttestation func // hexStringToByteArray is to convert hex string signature to byte array attestation.signatures[0] = hexStringToByteArray(attestation.signatures[0]); const tx = await contract.verifySignature(attestation); console.log("Transaction:", tx); } catch (error) { console.error("Error in verifyAttestation:", error); } } else { //not the primus sign, error business logic }
* [EVM Blockchains](https://docs.primuslabs.xyz/enterprise/onchain-interaction/quickstart/#evm-blockchains)
* [Install the Contract](https://docs.primuslabs.xyz/enterprise/onchain-interaction/quickstart/#install-the-contract)
* [Deploy a Smart Contract](https://docs.primuslabs.xyz/enterprise/onchain-interaction/quickstart/#deploy-a-smart-contract)
* [On-chain Interactions](https://docs.primuslabs.xyz/enterprise/onchain-interaction/quickstart/#on-chain-interactions)
* [Straknet Blockchains](https://docs.primuslabs.xyz/enterprise/onchain-interaction/quickstart/#straknet-blockchains)
* [Install the Contract](https://docs.primuslabs.xyz/enterprise/onchain-interaction/quickstart/#install-the-contract-1)
* [Deploy a Smart Contract](https://docs.primuslabs.xyz/enterprise/onchain-interaction/quickstart/#deploy-a-smart-contract-1)
* [On-chain Interactions](https://docs.primuslabs.xyz/enterprise/onchain-interaction/quickstart/#on-chain-interactions-1)
---
# Code Example | primus
[Skip to main content](https://docs.primuslabs.xyz/enterprise/page-sdk/example/#docusaurus_skipToContent_fallback)
On this page

Test Example[](https://docs.primuslabs.xyz/enterprise/page-sdk/example/#test-example "Direct link to Test Example")
---------------------------------------------------------------------------------------------------------------------
The appSecret from Primus Developer Hub needs to sign the proof request parameters. For security reasons, appSecret cannot be configured on the Page side. The Test Example configures appSecret in the Page code to better illustrate the process.
This Test Example guide will walk you through the fundamental steps to integrate Primus's zkTLS Page Core SDK and complete a basic data verification process through your Page. You can learn about the integration process through this simple [demo](https://github.com/primus-labs/zktls-demo/blob/main/page-core-sdk-example/src/testprimus.js)
.
### Implementation[](https://docs.primuslabs.xyz/enterprise/page-sdk/example/#implementation "Direct link to Implementation")
import { PrimusPageCoreTLS } from "@primuslabs/zktls-page-core-sdk"async function primusProofTest() { // Initialize parameters, the init function is recommended to be called when the program is initialized. const appId = "PRIMUS_APP_ID"; const appSecret= "PRIMUS_APP_SECRET"; const zkTLS = new PrimusPageCoreTLS(); const initResult = await zkTLS.init(appId, appSecret); console.log("primusProof initResult=", initResult); // Set request and responseResolves. const request ={ url: "YOUR_CUSTOM_URL", // Request endpoint. method: "REQUEST_METHOD", // Request method. header: {}, // Request headers. body: "" // Request body. }; // The responseResolves is the response structure of the url. // For example the response of the url is: {"data":[{ ..."instFamily": "","instType":"SPOT",...}]}. const responseResolves = [ { keyName: 'CUSTOM_KEY_NAME', // According to the response keyname, such as: instType. parsePath: 'CUSTOM_PARSE_PATH', // According to the response parsePath, such as: $.data[0].instType. } ]; // Generate attestation request. const generateRequest = zkTLS.generateRequestParams(request, responseResolves); // Set zkTLS mode, default is proxy model. (This is optional) generateRequest.setAttMode({ algorithmType: "proxytls" }); // Transfer request object to string. const generateRequestStr = generateRequest.toJsonString(); // Sign request. const signedRequestStr = await zkTLS.sign(generateRequestStr); // Start attestation process. const attestation = await zkTLS.startAttestation(signedRequestStr); console.log("attestation=", attestation); const verifyResult = zkTLS.verifyAttestation(attestation); console.log("verifyResult=", verifyResult); if (verifyResult === true) { // Business logic checks, such as attestation content and timestamp checks // do your own business logic. } else { // If failed, define your own logic. }}
Production Example[](https://docs.primuslabs.xyz/enterprise/page-sdk/example/#production-example "Direct link to Production Example")
---------------------------------------------------------------------------------------------------------------------------------------
The Production Example and Test Example processes are the same. The difference is that the appSecret is stored on your server, and when signing the attestation request parameters, the parameters are passed to your server, which signs them and then passes them to the extension.
### zkTLS Models[](https://docs.primuslabs.xyz/enterprise/page-sdk/example/#zktls-models "Direct link to zkTLS Models")
We offer two modes in various user scenarios:
1. proxytls
2. mpctls
// Set zkTLS mode, default is proxy model.generateRequest.setAttMode({ algorithmType: "proxytls",});
### Extra Data[](https://docs.primuslabs.xyz/enterprise/page-sdk/example/#extra-data "Direct link to Extra Data")
Developers can include custom additional parameters as auxiliary data when submitting an attestation request. These parameters will be returned alongside the proof results. For example, developers can pass the user's ID or other business-related parameters.
// Set additionParams.const additionParams = JSON.stringify({ YOUR_CUSTOM_KEY: "YOUR_CUSTOM_VALUE", YOUR_CUSTOM_KEY2: "YOUR_CUSTOM_VALUE2",});generateRequest.setAdditionParams(additionParams);
### Frontend Implementation[](https://docs.primuslabs.xyz/enterprise/page-sdk/example/#frontend-implementation "Direct link to Frontend Implementation")
Extension does not require appSecret parameter to initialize SDK.
import { PrimusPageCoreTLS } from "@primuslabs/zktls-page-core-sdk"async function primusProofTest() { // Initialize parameters, the init function is recommended to be called when the program is initialized. const appId = "PRIMUS_APP_ID"; const zkTLS = new PrimusPageCoreTLS(); const initResult = await zkTLS.init(appId); console.log("primusProof initResult=", initResult); // Set request and responseResolves. const request ={ url: "YOUR_CUSTOM_URL", // Request endpoint. method: "REQUEST_METHOD", // Request method. header: {}, // Request headers. body: "" // Request body. }; // The responseResolves is the response structure of the url. // For example the response of the url is: {"data":[{ ..."instFamily": "","instType":"SPOT",...}]}. const responseResolves = [ { keyName: 'CUSTOM_KEY_NAME', // According to the response keyname, such as: instType. parsePath: 'CUSTOM_PARSE_PATH', // According to the response parsePath, such as: $.data[0].instType. } ]; // Generate attestation request. const generateRequest = zkTLS.generateRequestParams(request, responseResolves); // Set zkTLS mode, default is proxy model. (This is optional) generateRequest.setAttMode({ algorithmType: "proxytls" }); // Transfer request object to string. const generateRequestStr = generateRequest.toJsonString(); // Get signed resopnse from backend. const response = await fetch(`http://YOUR_URL:PORT?YOUR_CUSTOM_PARAMETER=${encodeURIComponent(generateRequestStr)}`); const responseJson = await response.json(); const signedRequestStr = responseJson.signResult; // Start attestation process. const attestation = await zkTLS.startAttestation(signedRequestStr); console.log("attestation=", attestation); const verifyResult = zkTLS.verifyAttestation(attestation); console.log("verifyResult=", verifyResult); if (verifyResult === true) { // Business logic checks, such as attestation content and timestamp checks // do your own business logic. } else { // If failed, define your own logic. }}
### Server Implementation[](https://docs.primuslabs.xyz/enterprise/page-sdk/example/#server-implementation "Direct link to Server Implementation")
The server is mainly responsible for obtaining the attestation parameters generated by the extension, and then using appSecret to sign the proof parameters.
const express = require("express");const cors = require("cors");const { PrimusPageCoreTLS } = require("@primuslabs/zktls-page-core-sdk");const app = express();const port = YOUR_PORT;// Just for test, developers can modify it.app.use(cors());// Listen to the client's signature request and sign the attestation request.app.get("/primus/sign", async (req, res) => { const appId = "YOUR_APPID"; const appSecret = "YOUR_SECRET"; // Create a PrimusZKTLS object. const zkTLS = new PrimusPageCoreTLS(); // Set appId and appSecret through the initialization function. await zkTLS.init(appId, appSecret); // Sign the attestation request. const signParams = decodeURIComponent(req.query.signParams); console.log("signParams=", signParams); const signResult = await zkTLS.sign(signParams); console.log("signResult=", signResult); // Return signed result. res.json({ signResult });});app.listen(port, () => { console.log(`Server is running at http://localhost:${port}`);});
* [Test Example](https://docs.primuslabs.xyz/enterprise/page-sdk/example/#test-example)
* [Implementation](https://docs.primuslabs.xyz/enterprise/page-sdk/example/#implementation)
* [Production Example](https://docs.primuslabs.xyz/enterprise/page-sdk/example/#production-example)
* [zkTLS Models](https://docs.primuslabs.xyz/enterprise/page-sdk/example/#zktls-models)
* [Extra Data](https://docs.primuslabs.xyz/enterprise/page-sdk/example/#extra-data)
* [Frontend Implementation](https://docs.primuslabs.xyz/enterprise/page-sdk/example/#frontend-implementation)
* [Server Implementation](https://docs.primuslabs.xyz/enterprise/page-sdk/example/#server-implementation)
---
# Introduction | primus
[Skip to main content](https://docs.primuslabs.xyz/enterprise/page-sdk/overview/#docusaurus_skipToContent_fallback)
On this page

Overview[](https://docs.primuslabs.xyz/enterprise/page-sdk/overview/#overview "Direct link to Overview")
----------------------------------------------------------------------------------------------------------
The [**Primus page core SDK**](https://github.com/primus-labs/zktls-page-core-sdk)
is a wrapped zkTLS algorithm, designed for developers who want to build applications **without relying on the Primus Extension**. This SDK allows web pages to directly invoke the Primus zkTLS algorithm interface and generate zkTLS attestations (proofs) by interacting with a Primus Attestor.
The differences of page core SDK with other SDKs are demonstrated in this [figure](https://docs.primuslabs.xyz/build/overview#how-to-choose-the-correct-primus-sdk)
.
While the Primus Page Core SDK streamlines the user experience by eliminating the dependency on the Primus Extension, the resulting web application still needs user credentials to access the underlying data source, as the zkTLS protocol is initiated from the client side.
How it Works[](https://docs.primuslabs.xyz/enterprise/page-sdk/overview/#how-it-works "Direct link to How it Works")
----------------------------------------------------------------------------------------------------------------------
Here's a simplified flow of how the Primus Page Core SDK works on your project:
**1\. Create Project:** Create a project on the [Primus Developer Hub](https://dev.primuslabs.xyz/)
to obtain a paired appID and appSecret, then configure them in your project.
**2\. Configure Verification Parameters:** Ensure that two key parameters, including the request parameters and response data paths, are configured correctly. Refer to the Test Example for guidance.
**3\. Execute zkTLS Protocol:** Invoke the zkTLS protocol to initiate the data verification process.
**4\. Verify Data Verification Result:** Your Page retrieves the verification result from the Page Core SDK and validates Primus' signature to ensure trustworthiness.
**5\. Execute Business Logic:** Based on the verification result, your page executes the relevant business logic, such as submitting the proof on-chain or triggering other operations.
* [Overview](https://docs.primuslabs.xyz/enterprise/page-sdk/overview/#overview)
* [How it Works](https://docs.primuslabs.xyz/enterprise/page-sdk/overview/#how-it-works)
---
# Installation | primus
[Skip to main content](https://docs.primuslabs.xyz/enterprise/zk-tls-sdk/install/#docusaurus_skipToContent_fallback)
On this page

Installing the Primus zkTLS-JS-SDK[](https://docs.primuslabs.xyz/enterprise/zk-tls-sdk/install/#installing-the-primus-zktls-js-sdk "Direct link to Installing the Primus zkTLS-JS-SDK")
-----------------------------------------------------------------------------------------------------------------------------------------------------------------------------------------
Welcome to the first step in integrating Primus zkTLS-JS-SDK into your project. This guide will walk you through the installation process and help you get started quickly.
> \[!TIP\] **Free Tier & Quota:** Each **appID** is provisioned with **100 free Proof generations**. To increase your quota, set up a monthly subscription, or request custom enterprise features, please [contact our team](https://t.me/primuslabs)
> .
### Prerequisites[](https://docs.primuslabs.xyz/enterprise/zk-tls-sdk/install/#prerequisites "Direct link to Prerequisites")
Before you begin, make sure you have:
* Node.js(version 18 or later)installed on your system
* npm (usually comes with Node.js) or yarn as your package manager
### Installation Steps[](https://docs.primuslabs.xyz/enterprise/zk-tls-sdk/install/#installation-steps "Direct link to Installation Steps")
#### 1\. Install the SDK[](https://docs.primuslabs.xyz/enterprise/zk-tls-sdk/install/#1-install-the-sdk "Direct link to 1. Install the SDK")
Open your terminal and navigate to your project directory. Then run one of the following commands:
* Using npm:
npm install --save @primuslabs/zktls-js-sdk
* Using yarn:
yarn add --save @primuslabs/zktls-js-sdk
This command will download and install the Primus zkTLS SDK and its dependencies into your project.
#### 2\. Verify Installation[](https://docs.primuslabs.xyz/enterprise/zk-tls-sdk/install/#2-verify-installation "Direct link to 2. Verify Installation")
To ensure the SDK was installed correctly, you can check your `package.json` file. You should see `@primuslabs/zktls-js-sdk` listed in the `dependencies` section.
### Importing the SDK[](https://docs.primuslabs.xyz/enterprise/zk-tls-sdk/install/#importing-the-sdk "Direct link to Importing the SDK")
After installation, you can import the SDK in your JavaScript or TypeScript files. Here's how:
import { PrimusZKTLS } from "@primuslabs/zktls-js-sdk";
### Next Steps[](https://docs.primuslabs.xyz/enterprise/zk-tls-sdk/install/#next-steps "Direct link to Next Steps")
Congratulations! You've successfully installed the Primus zkTLS-JS-SDK. Here's what you can do next:
1. **Quick Start**: Explore our [Test Example](https://docs.primuslabs.xyz/enterprise/zk-tls-sdk/test)
to quickly experience the project in action.
2. **Real-World Usage**: Check out the [Production Example](https://docs.primuslabs.xyz/enterprise/zk-tls-sdk/production)
to learn how to use the SDK in a real-world application and create your first proof request.
If you need further support, feel free to reach out through our [community on Telegram](https://t.me/primuslabs)
.
* [Installing the Primus zkTLS-JS-SDK](https://docs.primuslabs.xyz/enterprise/zk-tls-sdk/install/#installing-the-primus-zktls-js-sdk)
* [Prerequisites](https://docs.primuslabs.xyz/enterprise/zk-tls-sdk/install/#prerequisites)
* [Installation Steps](https://docs.primuslabs.xyz/enterprise/zk-tls-sdk/install/#installation-steps)
* [1\. Install the SDK](https://docs.primuslabs.xyz/enterprise/zk-tls-sdk/install/#1-install-the-sdk)
* [2\. Verify Installation](https://docs.primuslabs.xyz/enterprise/zk-tls-sdk/install/#2-verify-installation)
* [Importing the SDK](https://docs.primuslabs.xyz/enterprise/zk-tls-sdk/install/#importing-the-sdk)
* [Next Steps](https://docs.primuslabs.xyz/enterprise/zk-tls-sdk/install/#next-steps)
---
# Automating Verification Process | primus
[Skip to main content](https://docs.primuslabs.xyz/implementation-scenarios/automate-verification/#docusaurus_skipToContent_fallback)
Automating Verification Process
===============================
Automating manual verification processes represents a transformative opportunity where data proofs can significantly reduce operational costs and improve efficiency. Tasks that traditionally relied on human validation can now be streamlined with zkTLS technology. For instance, an dapp can leverage data proofs to automate the verification of influencer engagement metrics, eliminating the need for screenshots and tedious manual reviews. zkTLS-based data proofs can provide verifiable evidence of such claims, distinguishing genuine influencers from those making exaggerated or false statements.
Another compelling use case could be in job marketplaces, where verifying resumes and matching candidates to jobs is often labor-intensive. A large number of applicants include inaccurate information in their applications, forcing companies to rely on extensive background checks, including calls to universities and past employers. Data proofs can automate this process, enabling instant, trustworthy verification and bringing significant disruption to the recruitment industry in a positive way.
---
# Data Quality Control | primus
[Skip to main content](https://docs.primuslabs.xyz/implementation-scenarios/data-quality/#docusaurus_skipToContent_fallback)
Data Quality Control
====================
Big AI companies need to do reinforcement learning from human feedbacks, to get high-quality labeling on images and other media data to train AIs for accuracy. Some companies usually do this in regions where labor is cheap. Labeling tasks like medical or legal, need expert to complete the job. It is crucial to verify that the labelers have sufficient knowledge and skills to accurately label in these domains, e.g., by proving they are indeed an MD or JD.
zkTLS-based data proofs are an efficient way to verify the eligibility of labelers and weed out the bad actors lying about their credentials and providing inaccurate training data in these specific domains. Automating credential verification with data proofs can improve the integrity of AI training data sets but also streamline operations, cutting costs and increasing trust in the data pipeline.
---
# Introduction | primus
[Skip to main content](https://docs.primuslabs.xyz/enterprise/zk-tls-sdk/overview/#docusaurus_skipToContent_fallback)
On this page

note
This section covers **enterprise integration** using Primus’ proprietary Attestor for zkTLS applications. For development on the Primus Network, refer [here](https://docs.primuslabs.xyz/build/overview)
.
Overview[](https://docs.primuslabs.xyz/enterprise/zk-tls-sdk/overview/#overview "Direct link to Overview")
------------------------------------------------------------------------------------------------------------
When integrating data verification solutions with your DApps, especially **web-based DApps**, you can utilize the **Primus zkTLS-JS-SDK**. Note in this type of integration, primus extension is required to enable an user side end-to-end attestation creation. If you prefer a non-extension mode to create a dapp, you can refer to the [part](https://docs.primuslabs.xyz/enterprise/page-sdk/overview)
and integrate with Primus Page Sdk.
For server-side integration of zkTLS capabilities, please refer to the [Backend Integration](https://docs.primuslabs.xyz/enterprise/core-sdk/overview)
guide.
With the zkTLS-JS-SDK, you can verify any data from the internet, generate proofs, and enable on-chain verifications. To verify custom data from your users, follow these simple steps:
* **Create a Template**: Use the [Primus Developer Hub](https://dev.primuslabs.xyz/)
to easily set up a data verification template. This template includes the target data items, allowing you to test the verification process.
* **Create a Project**: Obtain a paired appID and appSecret, then configure them in your DApp to integrate the [zkTLS SDK](https://docs.primuslabs.xyz/enterprise/zk-tls-sdk/test)
and APIs.
For more details on creating templates and setting up your project, refer to the [Developer Hub](https://docs.primuslabs.xyz/build/developer-hub)
.
### How to Integrate[](https://docs.primuslabs.xyz/enterprise/zk-tls-sdk/overview/#how-to-integrate "Direct link to How to Integrate")
Here's a simplified flow of how Primus zkTLS-JS-SDK integrates with a web-based DApp:
**1\. Create/Search Template:** Login to the [Primus Developer Hub](https://dev.primuslabs.xyz/)
to create or search for a Template containing the data you need to verify. This is a key step in integrating the SDK into your DApp.
**2\. Create Project:** Create a Project on the [Primus Developer Hub](https://dev.primuslabs.xyz/)
to obtain a paired appID and appSecret, which are required to use the SDK.
**3\. Configure Verification Parameters:** Ensure the SDK parameters are configured correctly. Refer to the [test example](https://docs.primuslabs.xyz/enterprise/zk-tls-sdk/test)
and the [production example](https://docs.primuslabs.xyz/enterprise/zk-tls-sdk/production)
for guidance.
**4\. Execute zkTLS Protocol:** Invoke the zkTLS protocol via your DApp to initiate the data verification process.
**5\. Verify Data Verification Result:** Your DApp retrieves the verification result from the SDK and validates Primus' signature to ensure trustworthiness.
**6\. Execute Business Logic:** Based on the verification result, your DApp executes the relevant business logic, such as submitting the proof on-chain or triggering other operations.
### Set Verification Patterns[](https://docs.primuslabs.xyz/enterprise/zk-tls-sdk/overview/#set-verification-patterns "Direct link to Set Verification Patterns")
####
Verification Modes
[](https://docs.primuslabs.xyz/enterprise/zk-tls-sdk/overview/#verification-modes "Direct link to verification-modes")
Primus zkTLS SDK supports two modes: the [Proxy TLS mode](https://docs.primuslabs.xyz/primus-network/tech-intro#proxy-model)
and the [MPC TLS mode](https://docs.primuslabs.xyz/primus-network/tech-intro#mpc-model)
. You can specify the desired mode by setting the "algorithmType" parameter during SDK integration.
####
Verification Logics
[](https://docs.primuslabs.xyz/enterprise/zk-tls-sdk/overview/#verification-logics "Direct link to verification-logics")
For each data verification process, you can predefine the verification logic, such as whether the process returns plaintext or hashed text, or whether additional verification conditions need to be incorporated into the data verification process.
Supported logics:
* **Hashed result**
By default, our zkTLS-JS-SDK retrieves a plaintext verification result. If, in some cases, you want to keep the user’s data private, a hashed verification result is preferred. In the hashed result case, a ‘SHA256’ hashed data item will be returned to your DApp.
* **Conditions result**
For more flexible verification requirements, several different comparison operators can be added to the data items during the verification process, and a true or false result will be returned based on the comparison. The comparison operators include:
* '**\>**' (greater than): verifies if the data item is greater than a target value
* '**<**' (less than): verifies if the data item is less than a target value
* '**\=**' (equal to): verifies if the data item is equal to a target value
* '**!=**' (not equal to): verifies if the data item is not equal to a target value
* '**\>=**' (greater than or equal to): verifies if the data item is greater than or equal to a target value
* '**<=**' (less than or equal to): verifies if the data item is less than or equal to a target value
All of this logic should be configured during the SDK integration process. For configuration details, refer to the [test example](https://docs.primuslabs.xyz/enterprise/zk-tls-sdk/test)
and the [production example](https://docs.primuslabs.xyz/enterprise/zk-tls-sdk/production)
for guidance.
### Interact with Blockchains[](https://docs.primuslabs.xyz/enterprise/zk-tls-sdk/overview/#interact-with-blockchains "Direct link to Interact with Blockchains")
The Primus zkTLS protocol is compatible with multiple blockchains. We provide smart contracts that can be deployed on various blockchains to verify data proofs generated by users via the zkTLS-JS-SDK.
Currently, support is available for several testnets and mainnets. For more details, refer to the [on-chain interactions](https://docs.primuslabs.xyz/enterprise/onchain-interaction/overview)
section.
### Free Tier & Quota[](https://docs.primuslabs.xyz/enterprise/zk-tls-sdk/overview/#free-tier--quota "Direct link to Free Tier & Quota")
To help you get started, each **appID** is automatically credited with **100 free Proof generations**.
If you need to:
* Increase your proof generation quota or set up a monthly subscription
* Explore custom enterprise-grade features
Please feel free to [Contact Our Team](https://t.me/primuslabs)
.
### Quick Start for Beginners[](https://docs.primuslabs.xyz/enterprise/zk-tls-sdk/overview/#quick-start-for-beginners "Direct link to Quick Start for Beginners")
1. [Installation](https://docs.primuslabs.xyz/enterprise/zk-tls-sdk/install)
Get the SDK set up in your project.
2. [Test Example](https://docs.primuslabs.xyz/enterprise/zk-tls-sdk/test)
Understand how to use the zkTLS SDK.
### Stay Connected[](https://docs.primuslabs.xyz/enterprise/zk-tls-sdk/overview/#stay-connected "Direct link to Stay Connected")
Keep up with the latest Primus developments:
* Star our [GitHub Repository](https://github.com/primus-labs/zktls-js-sdk)
* Join our [Discord Community](https://discord.com/invite/pdrNxRrApX)
* [Overview](https://docs.primuslabs.xyz/enterprise/zk-tls-sdk/overview/#overview)
* [How to Integrate](https://docs.primuslabs.xyz/enterprise/zk-tls-sdk/overview/#how-to-integrate)
* [Set Verification Patterns](https://docs.primuslabs.xyz/enterprise/zk-tls-sdk/overview/#set-verification-patterns)
* [Verification Modes](https://docs.primuslabs.xyz/enterprise/zk-tls-sdk/overview/#verification-modes)
* [Verification Logics](https://docs.primuslabs.xyz/enterprise/zk-tls-sdk/overview/#verification-logics)
* [Interact with Blockchains](https://docs.primuslabs.xyz/enterprise/zk-tls-sdk/overview/#interact-with-blockchains)
* [Free Tier & Quota](https://docs.primuslabs.xyz/enterprise/zk-tls-sdk/overview/#free-tier--quota)
* [Quick Start for Beginners](https://docs.primuslabs.xyz/enterprise/zk-tls-sdk/overview/#quick-start-for-beginners)
* [Stay Connected](https://docs.primuslabs.xyz/enterprise/zk-tls-sdk/overview/#stay-connected)
---
# Crypto Lending with Proofs of Dynamic Assets | primus
[Skip to main content](https://docs.primuslabs.xyz/implementation-scenarios/lending/#docusaurus_skipToContent_fallback)

Crypto Lending with Credit Scores
=================================
Unlike traditional financial lending, most on-chain loans require collateral from users. In the traditional financial system, credit is a broader form of lending that doesn't necessitate collateral and is based on credit information. However, in the DeFi world, due to the characteristics of trustlessness, permissionlessness, and the lack of KYC, it becomes challenging for DeFi developers to restrict borrowers based on off-chain behavior.
While many projects are exploring on-chain credit lending methods, it is undoubtedly a challenging task. The difficulty lies in how to lock off-chain assets and how to effectively recover them. Nevertheless, attempting to enhance the lending rate and asset utilization through a combination of dynamic asset proofs is worth considering.
Providers of funds can request borrowers to provide proof of identity, assets, credit, etc., off-chain, and then conduct risk assessments based on on-chain data to increase the original lending rate (e.g., from 70% to a higher ratio like 75%). Simultaneously, borrowers are required to provide proofs of dynamic asset at an agreed frequency. When assets change within a specified range, repayment and liquidation will be triggered.
From increasing lending rates to exploring on-chain microcredit lending, the utilization of combined on-chain and off-chain data presents an opportunity to innovate DeFi applications once again.
In general, with zkTLS-based data proofs, offchain credit data including FICO scores, income statements, and payment histories can be securely verified onchain in a privacy-preserving way with arbitrary disclosure, and used for onchain credit score verification. Achieving credible onchain credit for our digital identities would enable a wide range of new DeFi products around personalized lending rates, dynamic collateral requirements, and risk-based interest models. Defaults would penalize onchain creditworthiness and reputation of the digital identity.
---
# Production Example | primus
[Skip to main content](https://docs.primuslabs.xyz/enterprise/zk-tls-sdk/production/#docusaurus_skipToContent_fallback)
On this page

Production Example[](https://docs.primuslabs.xyz/enterprise/zk-tls-sdk/production/#production-example "Direct link to Production Example")
--------------------------------------------------------------------------------------------------------------------------------------------
This guide will walk you through the fundamental steps to integrate Primus's zkTLS-JS-SDK and complete a basic data verification process through your application. You can learn about the integration process through this simple [demo](https://github.com/primus-labs/zktls-demo/tree/main/production-example)
.
note
Integration in a production environment requires proper server setup and configuration of specific SDK parameters.
### Prerequisites[](https://docs.primuslabs.xyz/enterprise/zk-tls-sdk/production/#prerequisites "Direct link to Prerequisites")
Before you begin, ensure you have the following:
* A paired appId and appSecret, along with a selected Template ID. These can be obtained from the [Primus Developer Hub](https://dev.primuslabs.xyz/)
* The SDK installed. For installation instructions, refer to the [Installation Guide](https://docs.primuslabs.xyz/enterprise/zk-tls-sdk/install)
.
### Customized Parameters[](https://docs.primuslabs.xyz/enterprise/zk-tls-sdk/production/#customized-parameters "Direct link to Customized Parameters")
// Generate attestation request. const request = primusZKTLS.generateRequestParams(attTemplateID, userAddress);
#### 1\. Extra Data[](https://docs.primuslabs.xyz/enterprise/zk-tls-sdk/production/#1-extra-data "Direct link to 1. Extra Data")
Developers can include custom additional parameters as auxiliary data when submitting an attestation request. These parameters will be returned alongside the proof results. For example, developers can pass the user's ID or other business-related parameters.
// Set additionParams.const additionParams = JSON.stringify({ YOUR_CUSTOM_KEY: "YOUR_CUSTOM_VALUE", YOUR_CUSTOM_KEY2: "YOUR_CUSTOM_VALUE2",});request.setAdditionParams(additionParams);
#### 2\. zkTLS Modes[](https://docs.primuslabs.xyz/enterprise/zk-tls-sdk/production/#2-zktls-modes "Direct link to 2. zkTLS Modes")
We offer two modes in various user scenarios:
1. proxytls
2. mpctls
For more details about these two modes, you can refer to [Overview](https://docs.primuslabs.xyz/primus-network/tech-intro)
section.
// Set zkTLS mode, default is proxy mode.request.setAttMode({ algorithmType: "proxytls",});
#### 3\. Device Parameter[](https://docs.primuslabs.xyz/enterprise/zk-tls-sdk/production/#3-device-parameter "Direct link to 3. Device Parameter")
If your application is intended for use only on PCs, you do not need to include this parameter.
However, if your application also runs on mobile devices, you must include this parameter. It is used to detect the user’s device type, such as **Android, iPhone, or PC**. If you want to restrict usage to Android devices only, set the value to 'android'.
// Set the device parameter to detect the user’s device type when your application supports both PC and mobile. Currently, only Android devices are supported. iOS is coming soon.let platformDevice = "pc";if (navigator.userAgent.toLocaleLowerCase().includes("android")) { platformDevice = "android";} else if (navigator.userAgent.toLocaleLowerCase().includes("iphone")) { platformDevice = "ios";}const initAttestaionResult = await primusZKTLS.init(appId, "", {platform: platformDevice});
#### 4\. Verification Logics[](https://docs.primuslabs.xyz/enterprise/zk-tls-sdk/production/#4-verification-logics "Direct link to 4. Verification Logics")
By default, the zkTLS SDK retrieves a plaintext verification result. We offer two types of verification logic to accommodate different requirements:
1. Hashed result
Setting example :
// Set Attestation conditionsrequest.setAttConditions([ [ { field: 'YOUR_CUSTOM_DATA_FIELD', op: 'SHA256', }, ],]);
2. Conditions result
Setting example :
// Set Attestation conditionsrequest.setAttConditions([ [ { field: 'YOUR_CUSTOM_DATA_FIELD', op: '>', value: 'YOUR_CUSTOM_TARGET_DATA_VALUE', }, ],]);
For more details about these two verification logics, you can refer to the [Verification Logics](https://docs.primuslabs.xyz/enterprise/zk-tls-sdk/overview#verification-logics)
section.
### Frontend Implementation[](https://docs.primuslabs.xyz/enterprise/zk-tls-sdk/production/#frontend-implementation "Direct link to Frontend Implementation")
note
Integration in a production environment involves configuring some [customized parameters](https://docs.primuslabs.xyz/enterprise/zk-tls-sdk/production#customized-parameters)
. The examples provide default configurations for these parameters, which can be adjusted to suit your specific requirements.
import { PrimusZKTLS } from "@primuslabs/zktls-js-sdk";// Initialize parameters, the init function is recommended to be called when the page is initialized.const primusZKTLS = new PrimusZKTLS();const appId = "YOUR_APPID";const initAttestaionResult = await primusZKTLS.init(appId);// Set the device parameter to detect the user’s device type when your application supports both PC and mobile. Currently, only Android devices are supported. iOS is coming soon.// let platformDevice = "pc";// if (navigator.userAgent.toLocaleLowerCase().includes("android")) {// platformDevice = "android";// } else if (navigator.userAgent.toLocaleLowerCase().includes("iphone")) {// platformDevice = "ios";// }// const initAttestaionResult = await primusZKTLS.init(appId, "", {platform: platformDevice});console.log("primusProof initAttestaionResult=", initAttestaionResult);export async function primusProof() { // Set TemplateID and user address. const attTemplateID = "YOUR_TEMPLATEID"; const userAddress = "YOUR_USER_ADDRESS"; // Generate attestation request. const request = primusZKTLS.generateRequestParams(attTemplateID, userAddress); // Set additionParams. (This is optional) const additionParams = JSON.stringify({ YOUR_CUSTOM_KEY: "YOUR_CUSTOM_VALUE", }); request.setAdditionParams(additionParams); // Set zkTLS mode, default is proxy mode. (This is optional) const workMode = "proxytls"; request.setAttMode({ algorithmType: workMode, }); // Set attestation conditions. (These are optional) // 1. Hashed result. // const attConditions = [ // [ // { // field:'YOUR_CUSTOM_DATA_FIELD', // op:'SHA256', // }, // ], // ]; // 2. Conditions result. //const attConditions = [ // [ // { // field: "YOUR_CUSTOM_DATA_FIELD", // op: ">", // value: "YOUR_CUSTOM_TARGET_DATA_VALUE", // }, // ], // ]; // request.setAttConditions(attConditions); // Transfer request object to string. const requestStr = request.toJsonString(); // Get signed resopnse from backend. const response = await fetch(`http://YOUR_URL:PORT?YOUR_CUSTOM_PARAMETER`); const responseJson = await response.json(); const signedRequestStr = responseJson.signResult; // Start attestation process. const attestation = await primusZKTLS.startAttestation(signedRequestStr); console.log("attestation=", attestation); // Verify siganture const verifyResult = await primusZKTLS.verifyAttestation(attestation); console.log("verifyResult=", verifyResult); if (verifyResult === true) { // Business logic checks, such as attestation content and timestamp checks // do your own business logic. } else { // If failed, define your own logic. }}
### Backend Implementation[](https://docs.primuslabs.xyz/enterprise/zk-tls-sdk/production/#backend-implementation "Direct link to Backend Implementation")
Here’s a basic example of how to configure and initialize the Primus zkTLS SDK on the backend:
const express = require("express");const cors = require("cors");const { PrimusZKTLS } = require("@primuslabs/zktls-js-sdk");const app = express();const port = YOUR_PORT;// Just for test, developers can modify it.app.use(cors());// Listen to the client's signature request and sign the attestation request.app.get("/primus/sign", async (req, res) => { const appId = "YOUR_APPID"; const appSecret = "YOUR_SECRET"; // Create a PrimusZKTLS object. const primusZKTLS = new PrimusZKTLS(); // Set appId and appSecret through the initialization function. await primusZKTLS.init(appId, appSecret); // Sign the attestation request. console.log("signParams=", req.query.signParams); const signResult = await primusZKTLS.sign(req.query.signParams); console.log("signResult=", signResult); // Return signed result. res.json({ signResult });});app.listen(port, () => { console.log(`Server is running at http://localhost:${port}`);});
### Understanding the Attestation Structure[](https://docs.primuslabs.xyz/enterprise/zk-tls-sdk/production/#understanding-the-attestation-structure "Direct link to Understanding the Attestation Structure")
When a successful data verification process is completed, you will receive a zkTLS attestation (proof) from the attestor.
For more information about the attestation structure, see the [section](https://docs.primuslabs.xyz/enterprise/attestation-structure)
.
### Submit Attestation On-chain (optional)[](https://docs.primuslabs.xyz/enterprise/zk-tls-sdk/production/#submit-attestation-on-chain-optional "Direct link to Submit Attestation On-chain (optional)")
To submit the verified data result (proof) to the blockchain, you’ll need to invoke the appropriate smart contract method. For detailed instructions, please refer to the [onchain interactions](https://docs.primuslabs.xyz/enterprise/onchain-interaction/overview)
.
### Error Codes[](https://docs.primuslabs.xyz/enterprise/zk-tls-sdk/production/#error-codes "Direct link to Error Codes")
We have defined several error codes in the SDK. If an error occurs during the data verification process, you can refer to the [error code list](https://docs.primuslabs.xyz/build/misc/error-code)
for troubleshooting.
* [Production Example](https://docs.primuslabs.xyz/enterprise/zk-tls-sdk/production/#production-example)
* [Prerequisites](https://docs.primuslabs.xyz/enterprise/zk-tls-sdk/production/#prerequisites)
* [Customized Parameters](https://docs.primuslabs.xyz/enterprise/zk-tls-sdk/production/#customized-parameters)
* [1\. Extra Data](https://docs.primuslabs.xyz/enterprise/zk-tls-sdk/production/#1-extra-data)
* [2\. zkTLS Modes](https://docs.primuslabs.xyz/enterprise/zk-tls-sdk/production/#2-zktls-modes)
* [3\. Device Parameter](https://docs.primuslabs.xyz/enterprise/zk-tls-sdk/production/#3-device-parameter)
* [4\. Verification Logics](https://docs.primuslabs.xyz/enterprise/zk-tls-sdk/production/#4-verification-logics)
* [Frontend Implementation](https://docs.primuslabs.xyz/enterprise/zk-tls-sdk/production/#frontend-implementation)
* [Backend Implementation](https://docs.primuslabs.xyz/enterprise/zk-tls-sdk/production/#backend-implementation)
* [Understanding the Attestation Structure](https://docs.primuslabs.xyz/enterprise/zk-tls-sdk/production/#understanding-the-attestation-structure)
* [Submit Attestation On-chain (optional)](https://docs.primuslabs.xyz/enterprise/zk-tls-sdk/production/#submit-attestation-on-chain-optional)
* [Error Codes](https://docs.primuslabs.xyz/enterprise/zk-tls-sdk/production/#error-codes)
---
# Test Example | primus
[Skip to main content](https://docs.primuslabs.xyz/enterprise/zk-tls-sdk/test/#docusaurus_skipToContent_fallback)
On this page

Test Example[](https://docs.primuslabs.xyz/enterprise/zk-tls-sdk/test/#test-example "Direct link to Test Example")
--------------------------------------------------------------------------------------------------------------------
This guide will walk you through the fundamental steps to integrate Primus's zkTLS-JS-SDK and complete a basic data verification process through your application. You can learn about the integration process through this simple [demo](https://github.com/primus-labs/zktls-demo/tree/main/test-example)
.
note
This example demonstrates how developers can create a frontend project and run Primus' data verification process locally for testing purposes. **We strongly recommend not using this method in a formal production environment.** For guidance on configuring a production environment, please refer to the [Production Example](https://docs.primuslabs.xyz/enterprise/zk-tls-sdk/production)
### Prerequisites[](https://docs.primuslabs.xyz/enterprise/zk-tls-sdk/test/#prerequisites "Direct link to Prerequisites")
Before you begin, make sure you have the following:
* A paired appId and appSecret, along with a selected Template ID. These can be obtained from the [Primus Developer Hub](https://dev.primuslabs.xyz/)
* The SDK installed. For installation instructions, refer to the [Installation Guide](https://docs.primuslabs.xyz/enterprise/zk-tls-sdk/install)
.
### Implementation[](https://docs.primuslabs.xyz/enterprise/zk-tls-sdk/test/#implementation "Direct link to Implementation")
Here’s a basic example of how to use Primus zkTLS-JS-SDK from the frontend. Note that this implementation is intended for testing purposes only.
import { PrimusZKTLS } from "@primuslabs/zktls-js-sdk"// Initialize parameters, the init function is recommended to be called when the page is initialized.const primusZKTLS = new PrimusZKTLS();const appId = "YOUR_APPID";const appSecret= "YOUR_SECRET"; // Just for testing, appSecret cannot be written in the front-end codeconst initAttestaionResult = await primusZKTLS.init(appId, appSecret);// Set the device parameter to detect the user’s device type when your application supports both PC and mobile. Currently, only Android devices are supported. iOS is coming soon.// let platformDevice = "pc";// if (navigator.userAgent.toLocaleLowerCase().includes("android")) {// platformDevice = "android";// } else if (navigator.userAgent.toLocaleLowerCase().includes("iphone")) {// platformDevice = "ios";// }// const initAttestaionResult = await primusZKTLS.init(appId, appSecret, {platform: platformDevice});console.log("primusProof initAttestaionResult=", initAttestaionResult);export async function primusProof() { // Set TemplateID and user address. const attTemplateID = "YOUR_TEMPLATEID"; const userAddress = "YOUR_USER_ADDRESS"; // Generate attestation request. const request = primusZKTLS.generateRequestParams(attTemplateID, userAddress); // Set zkTLS mode, default is proxy mode. (This is optional) const workMode = "proxytls"; request.setAttMode({ algorithmType: workMode, }); // Set attestation conditions. (These are optional) // 1. Hashed result. // const attConditions = [ // [ // { // field:'YOUR_CUSTOM_DATA_FIELD', // op:'SHA256', // }, // ], // ]; // 2. Conditions result. // const attConditions = [ // [ // { // field: "YOUR_CUSTOM_DATA_FIELD", // op: ">", // value: "YOUR_CUSTOM_TARGET_DATA_VALUE", // }, // ], // ]; // request.setAttConditions(attConditions); // Transfer request object to string. const requestStr = request.toJsonString(); // Sign request. const signedRequestStr = await primusZKTLS.sign(requestStr); // Start attestation process. const attestation = await primusZKTLS.startAttestation(signedRequestStr); console.log("attestation=", attestation); // Verify siganture. const verifyResult = await primusZKTLS.verifyAttestation(attestation) console.log("verifyResult=", verifyResult); if (verifyResult === true) { // Business logic checks, such as attestation content and timestamp checks // do your own business logic. } else { // If failed, define your own logic. }}
### zkTLS Modes[](https://docs.primuslabs.xyz/enterprise/zk-tls-sdk/test/#zktls-modes "Direct link to zkTLS Modes")
We offer two modes in various user scenarios:
1. proxytls
2. mpctls
For more details about these two modes, you can refer to the [Overview](https://docs.primuslabs.xyz/primus-network/tech-intro)
section.
// Set zkTLS mode, default is proxy mode.primusZKTLS.setAttMode({ algorithmType: "proxytls",});
### Device Parameter[](https://docs.primuslabs.xyz/enterprise/zk-tls-sdk/test/#device-parameter "Direct link to Device Parameter")
If your application is intended for use only on PCs, you do not need to include this parameter.
However, if your application also runs on mobile devices, you must include this parameter. It is used to detect the user’s device type, such as **Android, iPhone, or PC**. If you want to restrict usage to Android devices only, set the value to 'android'.
// Set the device parameter to detect the user’s device type when your application supports both PC and mobile. Currently, only Android devices are supported. iOS is coming soon.let platformDevice = "pc";if (navigator.userAgent.toLocaleLowerCase().includes("android")) { platformDevice = "android";} else if (navigator.userAgent.toLocaleLowerCase().includes("iphone")) { platformDevice = "ios";}const initAttestaionResult = await primusZKTLS.init(appId, appSecret, {platform: platformDevice});
### Verification Logics[](https://docs.primuslabs.xyz/enterprise/zk-tls-sdk/test/#verification-logics "Direct link to Verification Logics")
By default, the zkTLS-JS-SDK retrieves a plaintext verification result. We offer two types of verification logic to accommodate different requirements:
1. Hashed result
Setting example :
// Set Attestation conditionsrequest.setAttConditions([ [ { field: 'YOUR_CUSTOM_DATA_FIELD', op: 'SHA256', }, ],]);
2. Conditions result
Setting example :
// Set Attestation conditionsrequest.setAttConditions([ [ { field: 'YOUR_CUSTOM_DATA_FIELD', op: '>', value: 'YOUR_CUSTOM_TARGET_DATA_VALUE', }, ],]);
For more details about these two verification logics, you can refer to the [Verification Logics](https://docs.primuslabs.xyz/enterprise/zk-tls-sdk/overview#verification-logics)
section.
### Submit Attestation On-chain (optional)[](https://docs.primuslabs.xyz/enterprise/zk-tls-sdk/test/#submit-attestation-on-chain-optional "Direct link to Submit Attestation On-chain (optional)")
To submit the verified data result (proof) to the blockchain, you’ll need to invoke the appropriate smart contract method. For detailed instructions, please refer to the [onchain interactions](https://docs.primuslabs.xyz/enterprise/onchain-interaction/overview)
.
* [Test Example](https://docs.primuslabs.xyz/enterprise/zk-tls-sdk/test/#test-example)
* [Prerequisites](https://docs.primuslabs.xyz/enterprise/zk-tls-sdk/test/#prerequisites)
* [Implementation](https://docs.primuslabs.xyz/enterprise/zk-tls-sdk/test/#implementation)
* [zkTLS Modes](https://docs.primuslabs.xyz/enterprise/zk-tls-sdk/test/#zktls-modes)
* [Device Parameter](https://docs.primuslabs.xyz/enterprise/zk-tls-sdk/test/#device-parameter)
* [Verification Logics](https://docs.primuslabs.xyz/enterprise/zk-tls-sdk/test/#verification-logics)
* [Submit Attestation On-chain (optional)](https://docs.primuslabs.xyz/enterprise/zk-tls-sdk/test/#submit-attestation-on-chain-optional)
---
# Crypto On-Ramp and Off-Ramp | primus
[Skip to main content](https://docs.primuslabs.xyz/implementation-scenarios/otc/#docusaurus_skipToContent_fallback)

Crypto On-Ramp and Off-Ramp
===========================
Crypto on-ramp and off-ramp is an intractable issue to the crypto users, due to the fairness, security and compliance problems.
With Primus zkTLS technique, one can create a secure end-to-end crypto on and off-ramps solution on the blockchain. Suppose Alice want to buy some crypto tokens with fiat from Bob. The general workflow of such an on/off-ramp protocol can be as the following.
* Deploy an on-chain escrow smart contract to securely hold tokens (e.g., USDC, ETH). These tokens are released only after verifying the corresponding off-chain payment. The escrow is pre-funded by Bob.
* Alice initiates a payment using platforms like Paypal or similar Web2 payment services.
* Using zkTLS, Alice creates a data proof, which validates key transaction details, including sender, recipient, and payment amount.
* The verified proof is submitted to the on-chain escrow smart contract, which processes it. Once the proof is confirmed, the escrow releases the tokens directly to Alice's wallet.
---
# Proof of Assets | primus
[Skip to main content](https://docs.primuslabs.xyz/implementation-scenarios/proof-of-assets/#docusaurus_skipToContent_fallback)

Proof of Assets
===============
Digital assets, including Bitcoin, ERC-20 tokens, NFTs, and other cryptocurrencies, are revolutionizing the financial landscape. These assets represent value and are recorded on secure distributed ledgers using cryptographic techniques. While proof of on-chain assets can be easily obtained by examining the on-chain data associated with a specific account, proving ownership of off-chain assets has been a challenge due to the opacity of centralized exchanges (CEXs).
Primus presents an innovative approach that allows users to prove ownership of their off-chain assets to attestors while leveraging the power of zkTLS and IZK (Interactive Zero-Knowledge Proofs). With Primus, users can establish proof of off-chain assets and obtain attestor signatures, enabling them to present verifiable evidence, i.e., attestations, to third parties.
Primus' ability to provide proof of off-chain assets opens up a wide range of use cases within the ecosystem. Here are a few examples:
* Alice wants to obtain an undercollateralized loan from a lending protocol. She can leverage Primus to prove to the protocol that she possesses over 10,000 USDT in her CEX account, composed of various cryptocurrencies. This created attestation allows Alice to demonstrate her credit and qualify for the loan.
* Bob participates in a Gamefi platform and wants to receive exclusive airdrops such as game props, skins, or other privileges. By using Primus, Bob can prove that he holds a specific amount of Gamefi tokens, enabling him to unlock these rewards based on his ownership.
* Cindy is an active on-chain derivatives trader and wants to engage with a derivative protocol. She can provide a zero-knowledge proof using Primus, sharing her trading history and derivative positions without revealing sensitive details. This proof establishes her credibility as a long-term trader and allows the protocol to incentivize her with tokens or other benefits.
Primus is a groundbreaking solution that empowers users to prove ownership of off-chain assets securely and verifiably. By leveraging zkTLS, Primus enables users to obtain attestor signatures, establishing proof of ownership (attestations) that can be presented to third parties. With Primus, the potential of off-chain asset proof is unlocked, opening up new opportunities in lending, Gamefi, derivatives, and other areas within the Web3 ecosystem.
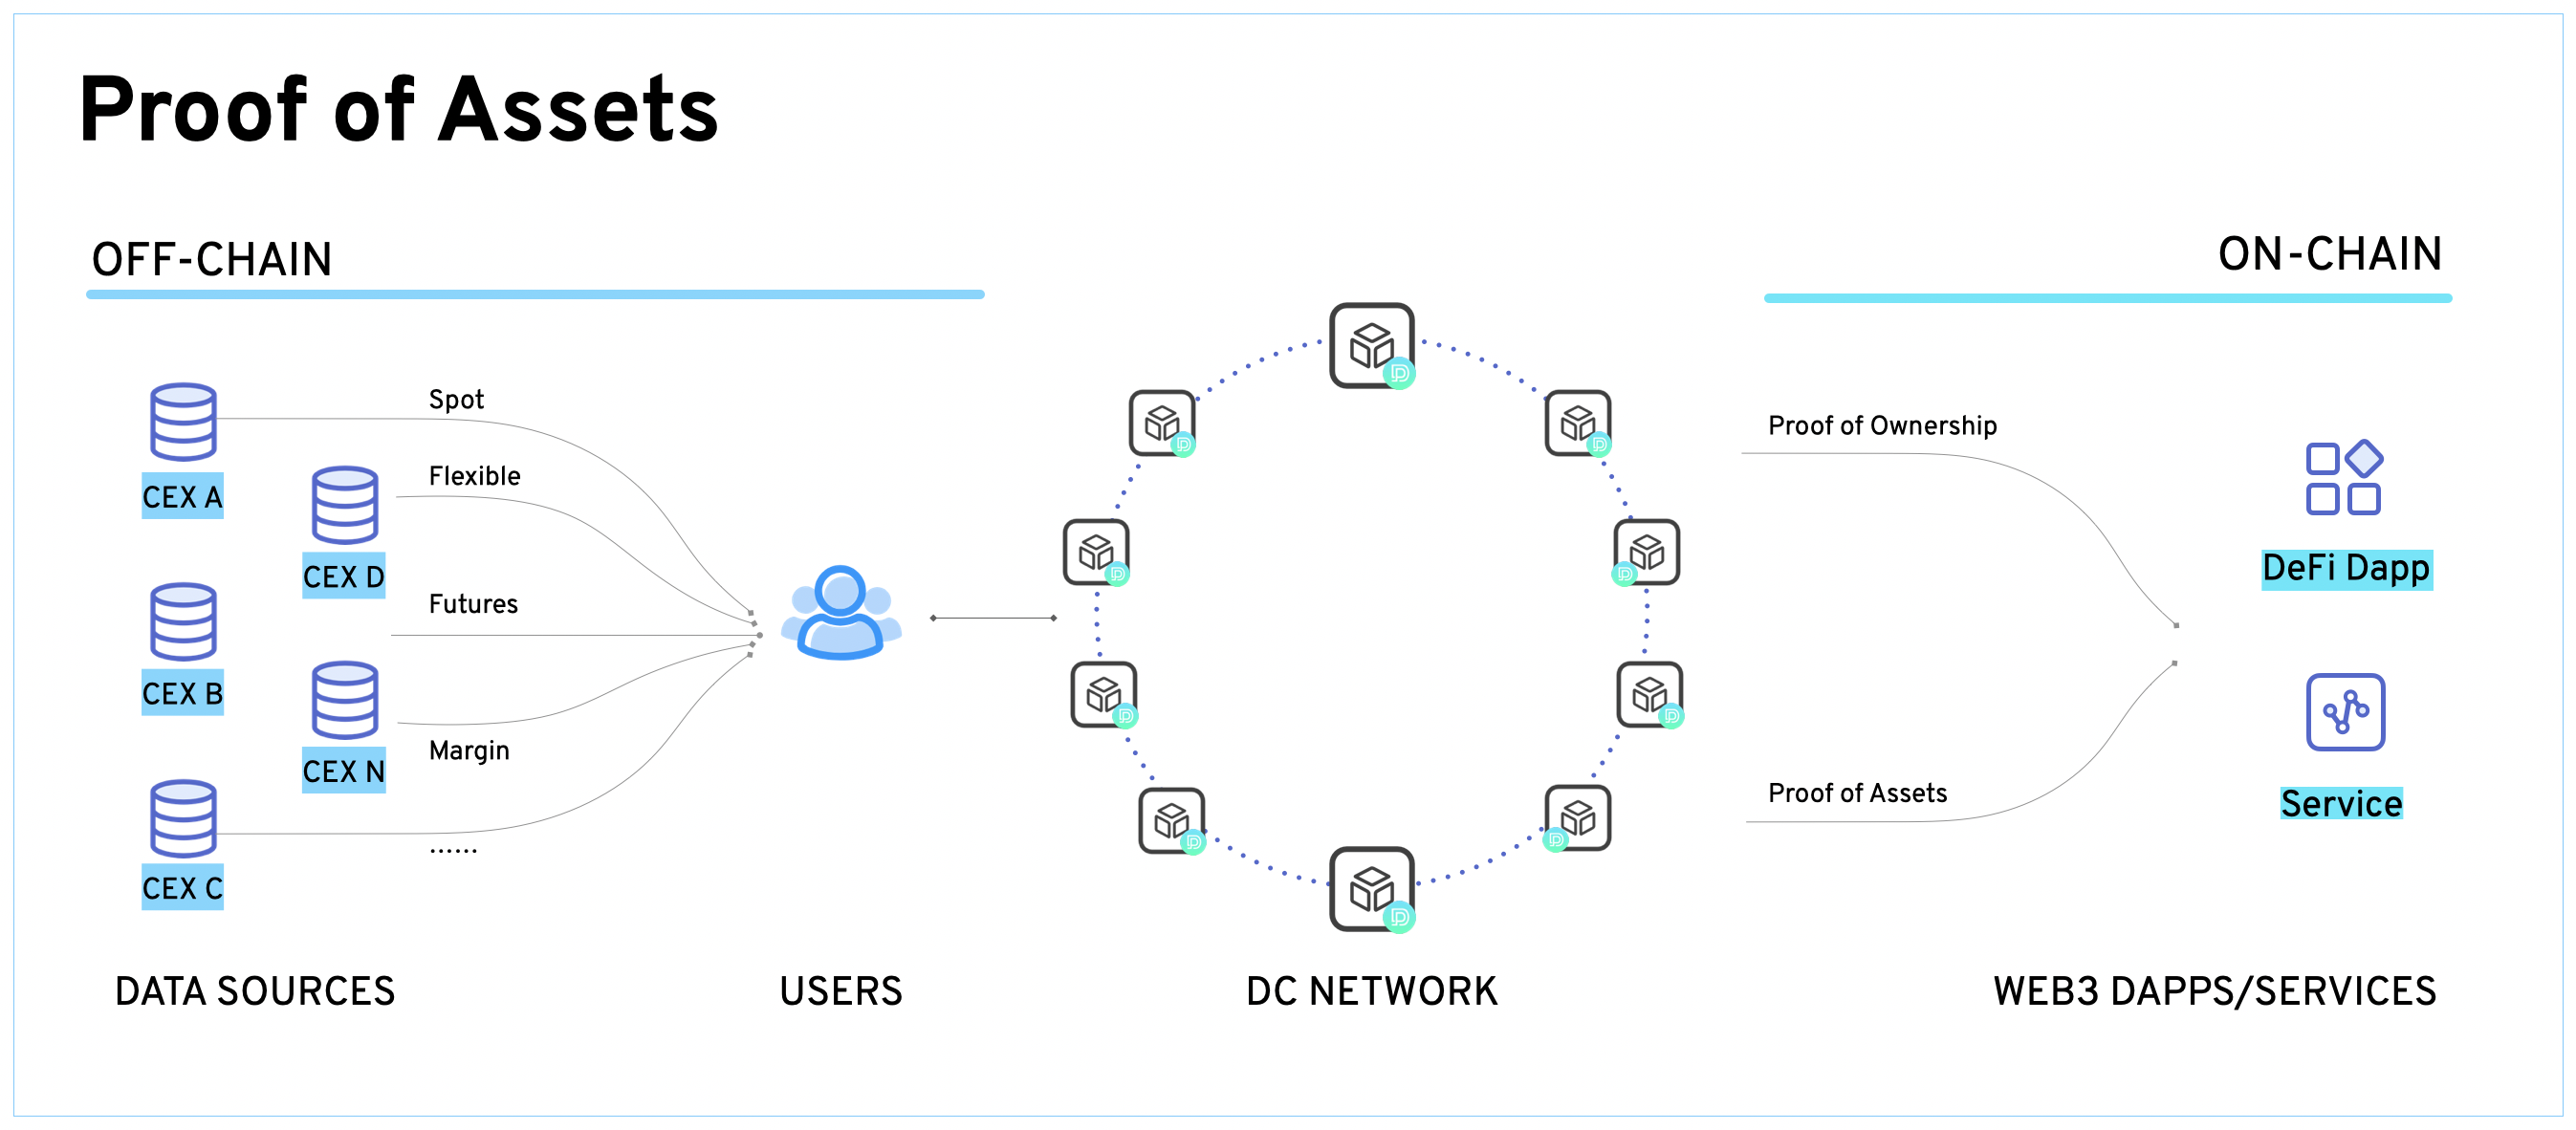
---
# Private Dataset for AI Models | primus
[Skip to main content](https://docs.primuslabs.xyz/implementation-scenarios/private-datasets/#docusaurus_skipToContent_fallback)
Private Dataset for AI Models
=============================
AI models, especially LLMs, need access to more personalized data to improve the performance, as public datasets are exhausted nowadays. However, the traditional way of using private data like user behavior and transaction history, suffers from privacy and integrity challenges.
zkTLS-based data proofs offers a secure and verifiable way to access high-quality private data for AI model training. In particular, data proofs address the issues by allowing AI developers to verify the provenance and authenticity of private data without revealing privacy-compromising details. It enhances the value of data shared for training by making it verifiable, which significantly increases its economic worth. Verifiable data also mitigates the risks of data poisoning or manipulation during the training process.
zkTLS-based data proofs have compelling economic implications. They enable users to retain control over their private data, selectively sharing only what they choose in a competitive marketplace where AI developers strive to build the best models. This approach unlocks new opportunities for AI applications in privacy-sensitive fields such as healthcare, parenting, and finance.
---
# Glossary | primus
[Skip to main content](https://docs.primuslabs.xyz/resources/glossary/#docusaurus_skipToContent_fallback)

Glossary
========
| Term | Explanation |
| --- | --- |
| **ZKP** | Zero-Knowledge Proofs |
| **MPC** | Multi-Party Computation |
| **IZK** | Interactive Zero-Knowledge Proof |
| **NIZK** | Non-Interactive Zero-Knowledge Proof |
| **FHE** | Fully Homomorphic Encryption |
| **TLS** | Transport Layer Security |
| **ZKFHE** | Fully Homomorphic Encryption with Zero Knowledge Proof Ensured Integrity |
| **GC** | Garbled Circuits |
| **OT** | Oblivious Transfer |
| **2PC** | Two-Party Computation |
---
# Identity Verification | primus
[Skip to main content](https://docs.primuslabs.xyz/implementation-scenarios/verify-digital-identity/#docusaurus_skipToContent_fallback)
On this page

Identity Verification
=====================
Traditional identity verification struggles with privacy concerns, centralized storage risks, high costs, time-consuming processes, data inefficiencies, lack of interoperability, compliance complexities, and fraud risks. zkTLS enables users to prove eligibility without revealing specific details, ensuring seamless privacy compliance. Some typical examples include age-like verification and reusable verification.
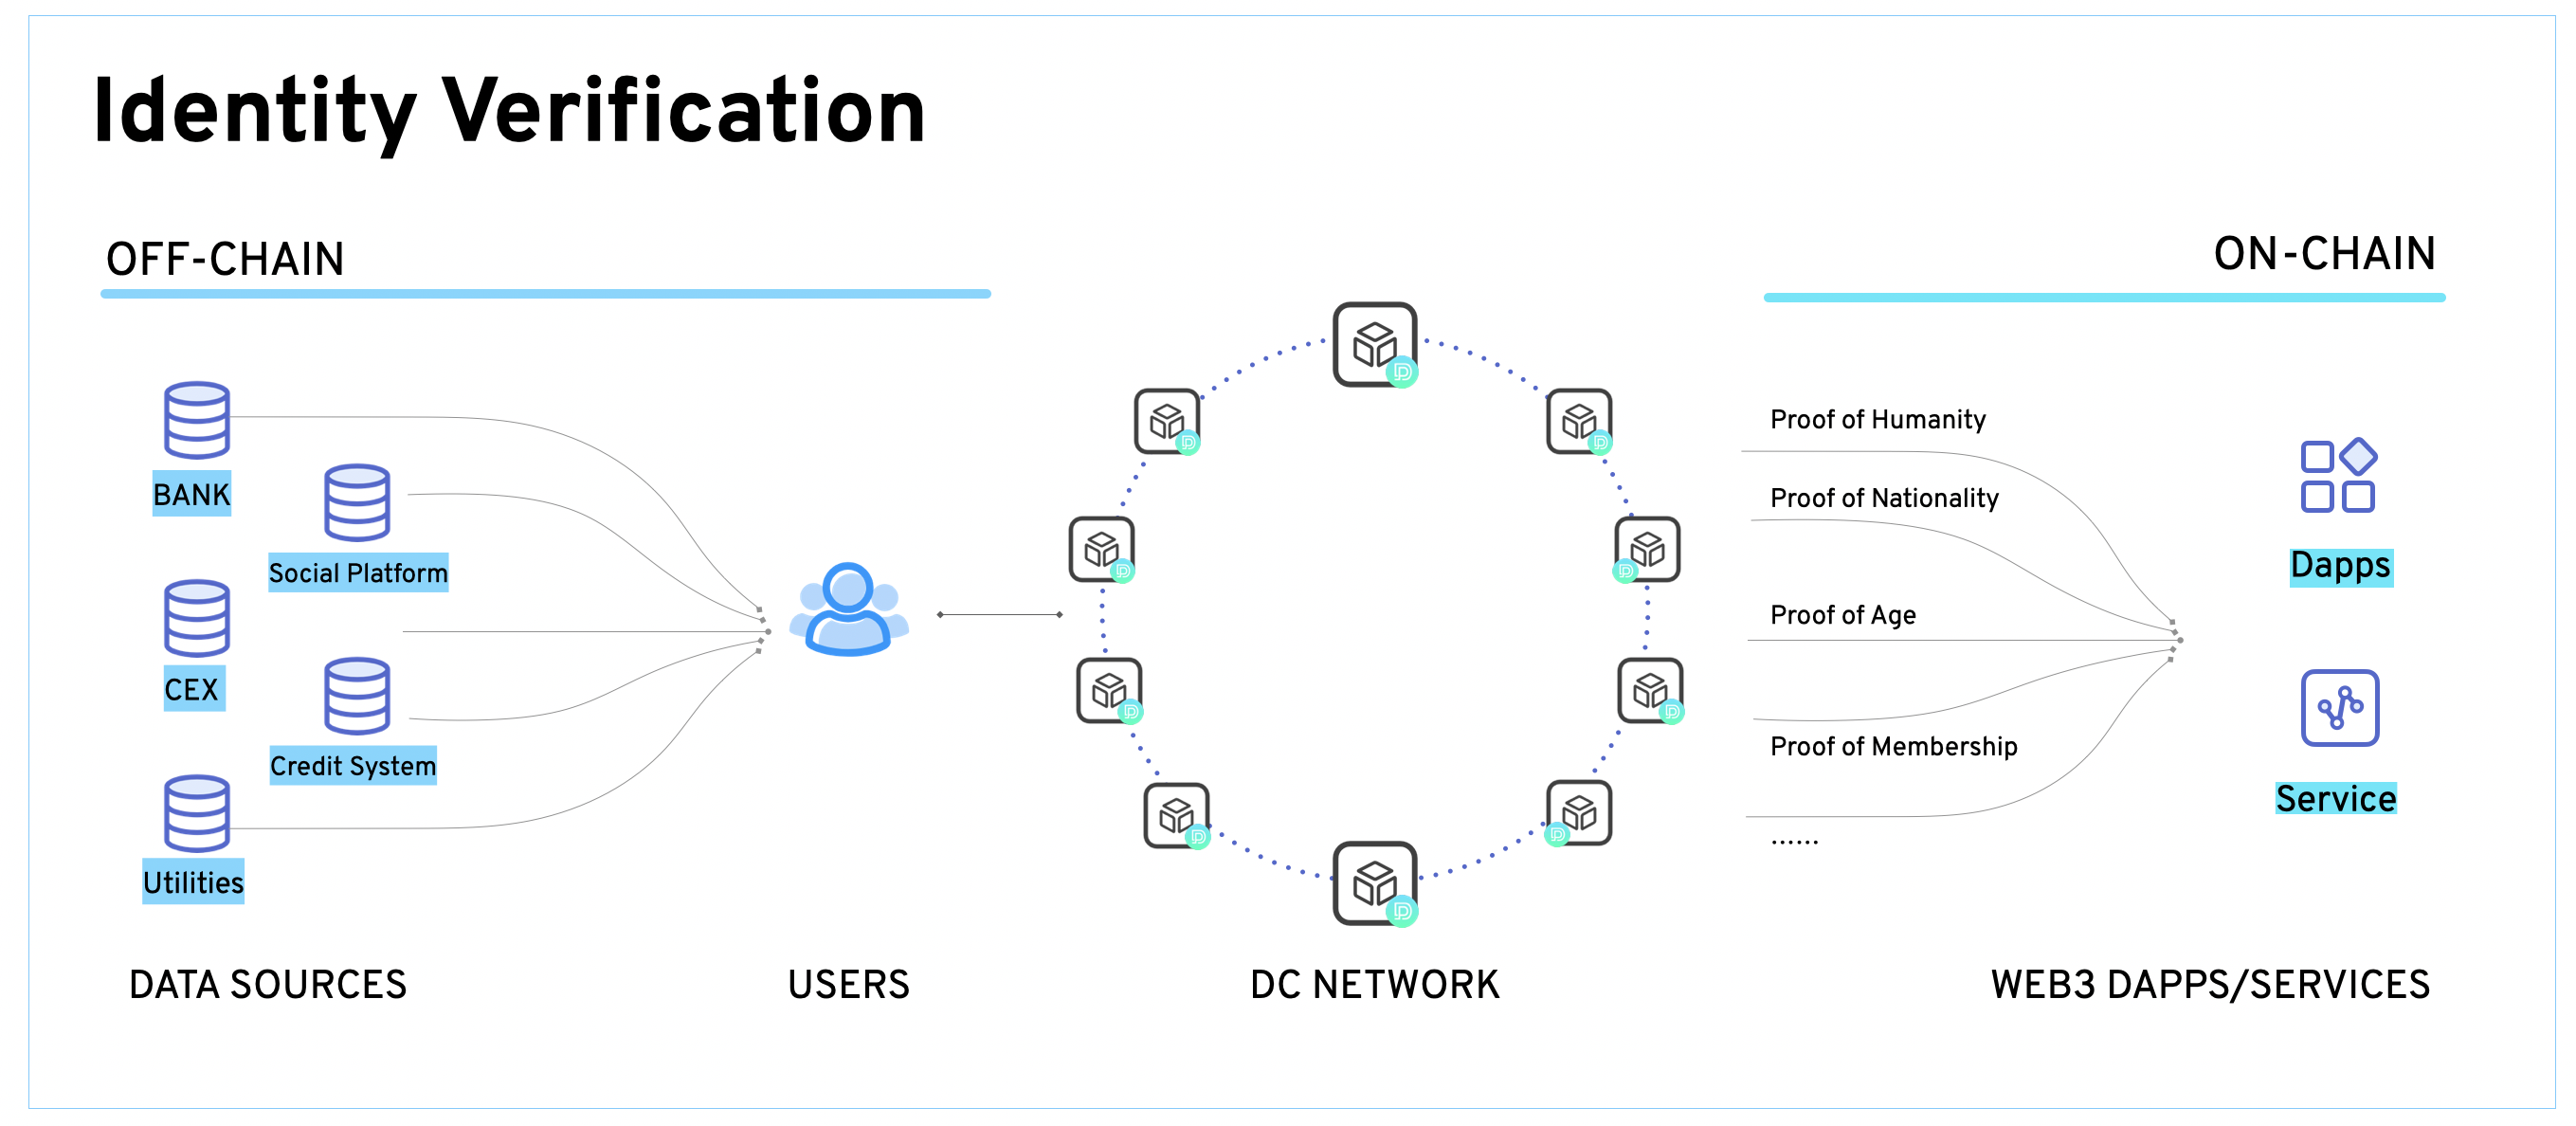
Age-like Verification[](https://docs.primuslabs.xyz/implementation-scenarios/verify-digital-identity/#age-like-verification "Direct link to Age-like Verification")
---------------------------------------------------------------------------------------------------------------------------------------------------------------------
Personal information like age, location and nationality, is very sensitive and considered as core factors of identification risks. Primus' zkTLS technique achieves complete data minimization, which only provides the final result after applying the computable condition to the sensitive data. For instance, an age attestation can provide the satisfiability towards a gaming service to ensure age compliance, without disclosing the exact age or birth date.
As long as the sensitive data is an input to a computable function, the verification can be well constructed by using ZKP. Other examples include:
* one can provide proof of eligible nationality, by cryptographically showing the user's nationality is NOT in the blacklist which may contain a couple of restricted countries and regions.
* one can provide proof of qualified address to confirm the user's area falls in the designated region.
Reusable Verification[](https://docs.primuslabs.xyz/implementation-scenarios/verify-digital-identity/#reusable-verification "Direct link to Reusable Verification")
---------------------------------------------------------------------------------------------------------------------------------------------------------------------
Proof of Humanity (PoH) is crucial in ensuring that online participants are genuine individuals rather than bots or fake identities. Existing PoH methods, such as CAPTCHA and hCAPTCHA, focus on human verification tests to achieve Sybil resistance for Web3 applications.
Primus introduces a new approach to PoH by re-using existing identity/KYC results. For example, consider the case of Alice, an active Twitter user seeking access to a chat service provided by a new decentralized social protocol. Primus can create an attestation for Alice after verifying that she has posted more than 100 tweets within the last quarter. This attestation can then be re-used by the new protocol to ensure Alice's humanity, utilizing the verification results from Primus.
Primus' innovative solution enhances Web3 identity systems by reducing trust assumptions and integrating specialized verifiable attestations. By binding these attestations to specific Web2 data sources, Primus ensures authentication and privacy preservation. Additionally, Primus introduces a new type of Proof of Humanity by leveraging existing identity/KYC information, enabling the creation of more secure and trustworthy Web3 applications.
**Applications**
Try out a sample application powered by Primus:
[https://app.primuslabs.xyz/home](https://app.primuslabs.xyz/home)
* [Age-like Verification](https://docs.primuslabs.xyz/implementation-scenarios/verify-digital-identity/#age-like-verification)
* [Reusable Verification](https://docs.primuslabs.xyz/implementation-scenarios/verify-digital-identity/#reusable-verification)
---
# zkTLS-based Crypto Payment | primus
[Skip to main content](https://docs.primuslabs.xyz/implementation-scenarios/zkTLS-pay/#docusaurus_skipToContent_fallback)
zkTLS-based Crypto Payment
==========================
Crypto payment is one of the most compelling applications of blockchain and decentralized technologies. It enables permissionless, censorship-resistant transfer of assets across the globe.
With zkTLS, crypto payment can be further simplified and abstracted away from wallet addresses. Instead of requiring a recipient’s wallet address, senders can specify a social account (e.g., email, Twitter, GitHub) as the payment destination. The recipient can later prove ownership of that account via zkTLS and securely claim the tokens into their own wallet.
Developers can implement such a payment flow by:
* Deploying smart contracts to manage payment records on-chain (from sender to recipient identity).
* Mapping social accounts to verifiable claims using zkTLS proofs.
* Allowing recipients to generate zero-knowledge proofs to withdraw assets to their preferred address.
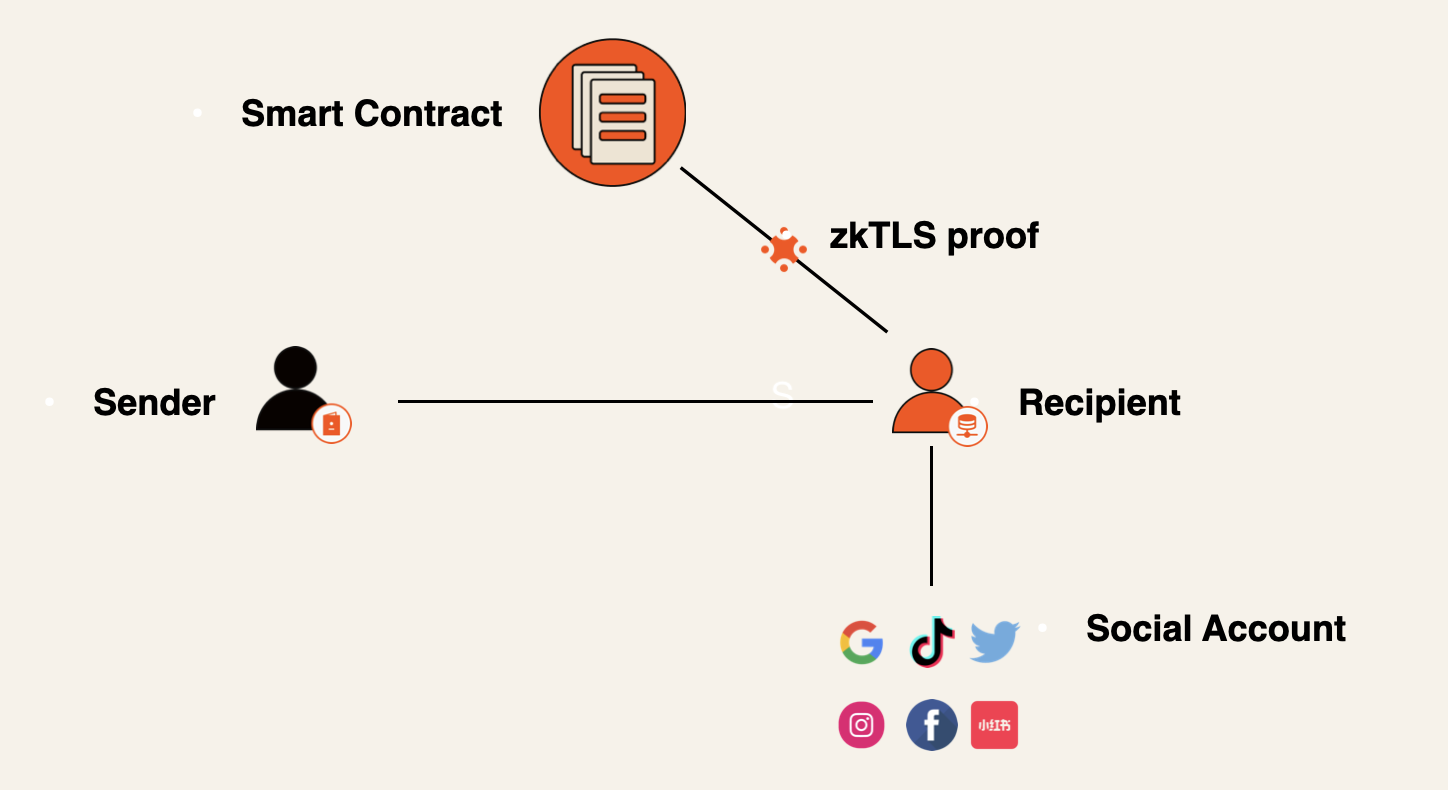
**User Benefits**
With zkTLS-based crypto payments, users no longer need to manage or disclose their wallet addresses. Instead, they can receive assets by simply proving ownership of an existing identity—such as a social account or email—without exposing sensitive information on-chain. This approach ensures end-to-end privacy, as the user’s identity remains completely hidden from the public ledger, reducing both privacy risks and friction in participation.
The experience is seamless for both Web3-native users and those from traditional Web2 environments, making it significantly easier for anyone to access and benefit from crypto-based systems. By removing the technical complexity often associated with wallet management for newbies, this mechanism lowers the barrier to entry and creates a more intuitive, flexible, and inclusive way to send and receive crypto assets in a peer-to-peer manner.
**Applications**
Try out a sample payment application powered by zkTLS, built by the Primus team:
[https://pay.primuslabs.xyz](https://pay.primuslabs.xyz/)
---
# Why Primus | primus
[Skip to main content](https://docs.primuslabs.xyz/introduction/why-need-primus/#docusaurus_skipToContent_fallback)
On this page

Why Primus[](https://docs.primuslabs.xyz/introduction/why-need-primus/#why-primus "Direct link to Why Primus")
----------------------------------------------------------------------------------------------------------------
Primus offers numerous benefits to community developers and network participants:
### **Chain-Agnostic**[](https://docs.primuslabs.xyz/introduction/why-need-primus/#chain-agnostic "Direct link to chain-agnostic")
* Primus’ data verification and computation capabilities are chain-agnostic, enabling dApps across various blockchains to seamlessly interact with cryptographic computations without technical barriers. By bridging the gap between off-chain and on-chain data, Primus empowers blockchain ecosystems to support more diverse and data-driven applications.
### **Openness**[](https://docs.primuslabs.xyz/introduction/why-need-primus/#openness "Direct link to openness")
* Primus’ core technologies are open and freely accessible to all developers. Additionally, the network incentivizes contributions from a wide range of communities—including cryptography, distributed systems, DeFi, AI, and others—to collaboratively build a trustless and privacy-centric ecosystem.
### **High Performance**[](https://docs.primuslabs.xyz/introduction/why-need-primus/#high-performance "Direct link to high-performance")
* zkTLS: [Primus zkTLS](https://eprint.iacr.org/2023/964)
is a state-of-the-art solution that is over 10x faster than existing alternatives and is compatible with diverse environments, from browsers to mobile apps. Powered by the innovative [QuickSilver](https://eprint.iacr.org/2021/076)
interactive zero-knowledge proof system, Primus zkTLS sets a new industry standard and is the first solution capable of efficiently proving large-scale content, such as ChatGPT conversations.
* zkFHE: Primus zkFHE introduces a groundbreaking protocol with the proving time about 340x faster than existing systems. This advancement makes zkFHE practical for real-world applications, such as confidential voting, auctions, and FHE rollups.
* [Why Primus](https://docs.primuslabs.xyz/introduction/why-need-primus/#why-primus)
* [**Chain-Agnostic**](https://docs.primuslabs.xyz/introduction/why-need-primus/#chain-agnostic)
* [**Openness**](https://docs.primuslabs.xyz/introduction/why-need-primus/#openness)
* [**High Performance**](https://docs.primuslabs.xyz/introduction/why-need-primus/#high-performance)
---
# Tutorial for AlphaNet | primus
[Skip to main content](https://docs.primuslabs.xyz/primus-network/alphanet/tutorials/#docusaurus_skipToContent_fallback)
On this page

Tutorial for Primus AlphaNet Campaign[](https://docs.primuslabs.xyz/primus-network/alphanet/tutorials/#tutorial-for-primus-alphanet-campaign "Direct link to Tutorial for Primus AlphaNet Campaign")
------------------------------------------------------------------------------------------------------------------------------------------------------------------------------------------------------
This tutorial gives you a step-by-step walkthrough for users to verify their social identities with zkTLS proofs on the Primus AlphaNet Campaign.
1. Go to [https://app.primuslabs.xyz](https://app.primuslabs.xyz/)
, open your browser, click the “Connect Wallet” button, and choose a wallet that you use to log into the dapp. 
2. Click the “Enable Extension” button to install the Primus extension from the Chrome Web Store. 
3. Choose a task (X/TikTok/Github/Luma/Spotify), and click the “Verify Now” link to generate your zkTLS proof. 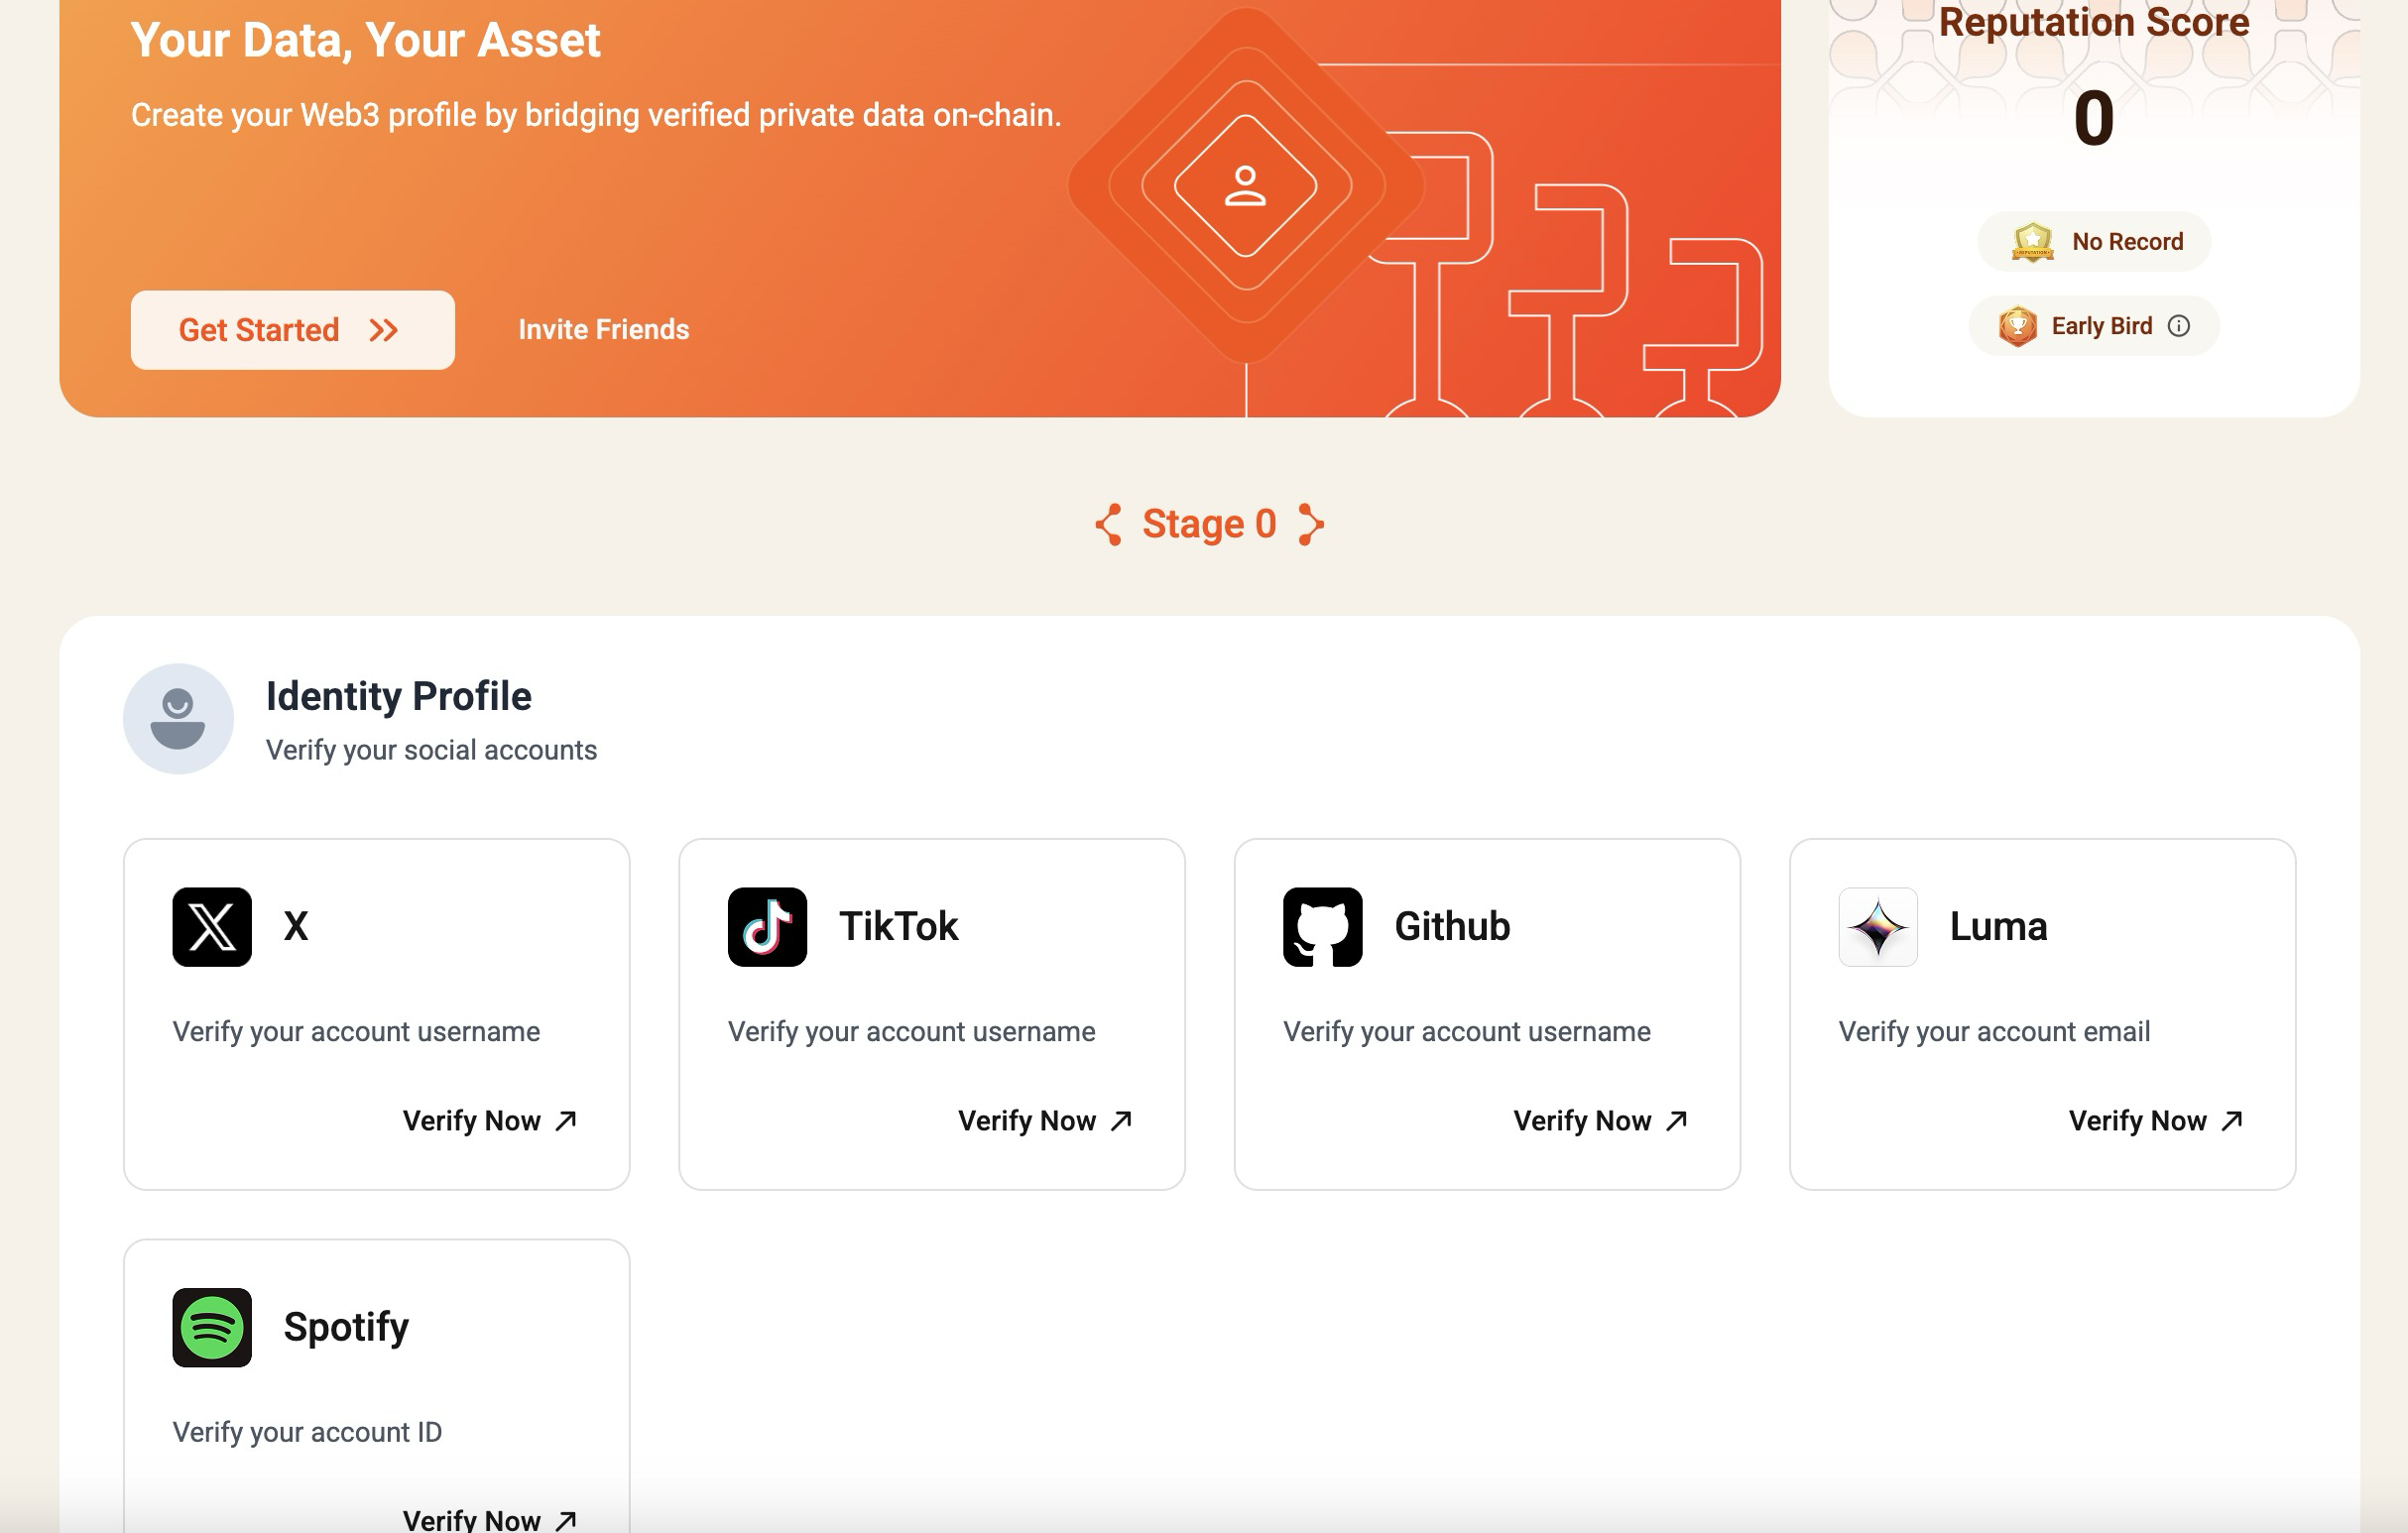
4. If you select the “X” task, you shall follow the Primus X account (@primus\_labs) and repost the tweet before generating your proof. 
5. To verify your X profile, you are required to deposit a small amount of $ETH (~0.000035 ETH) to pay the network fee. Note, you also need to pay the gas fee, which is very minimal on the Base chain for the deposit transaction. If the task fails, the deposited money will be refunded in a short while. 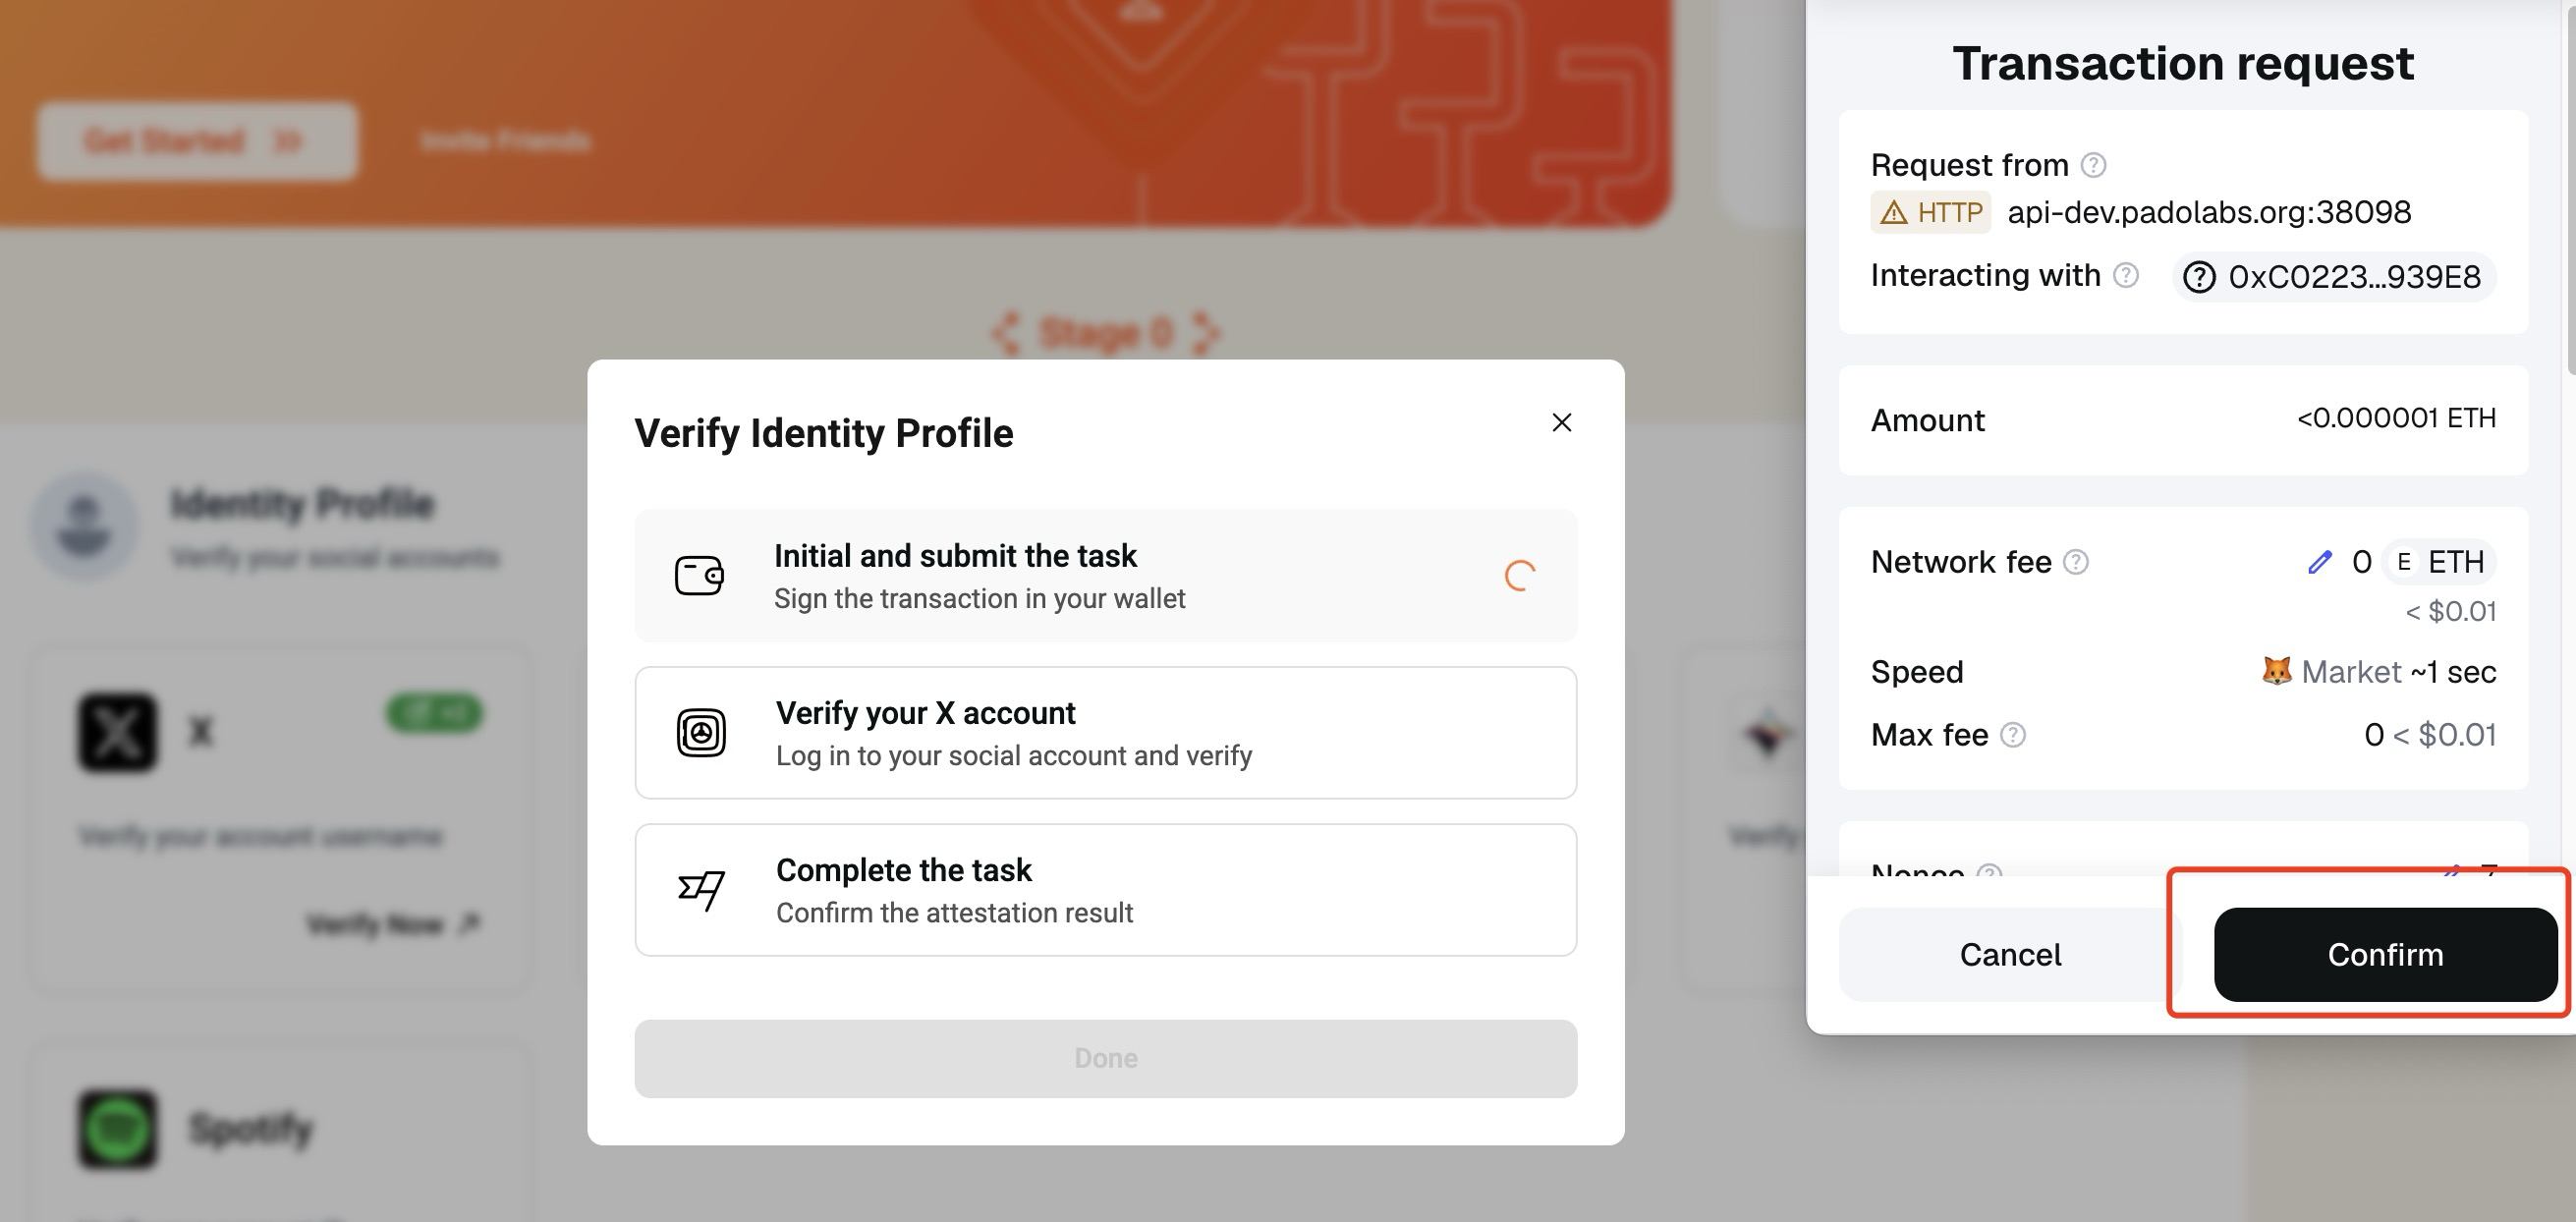
6. The zkTLS proof will be generated automatically on the X page. 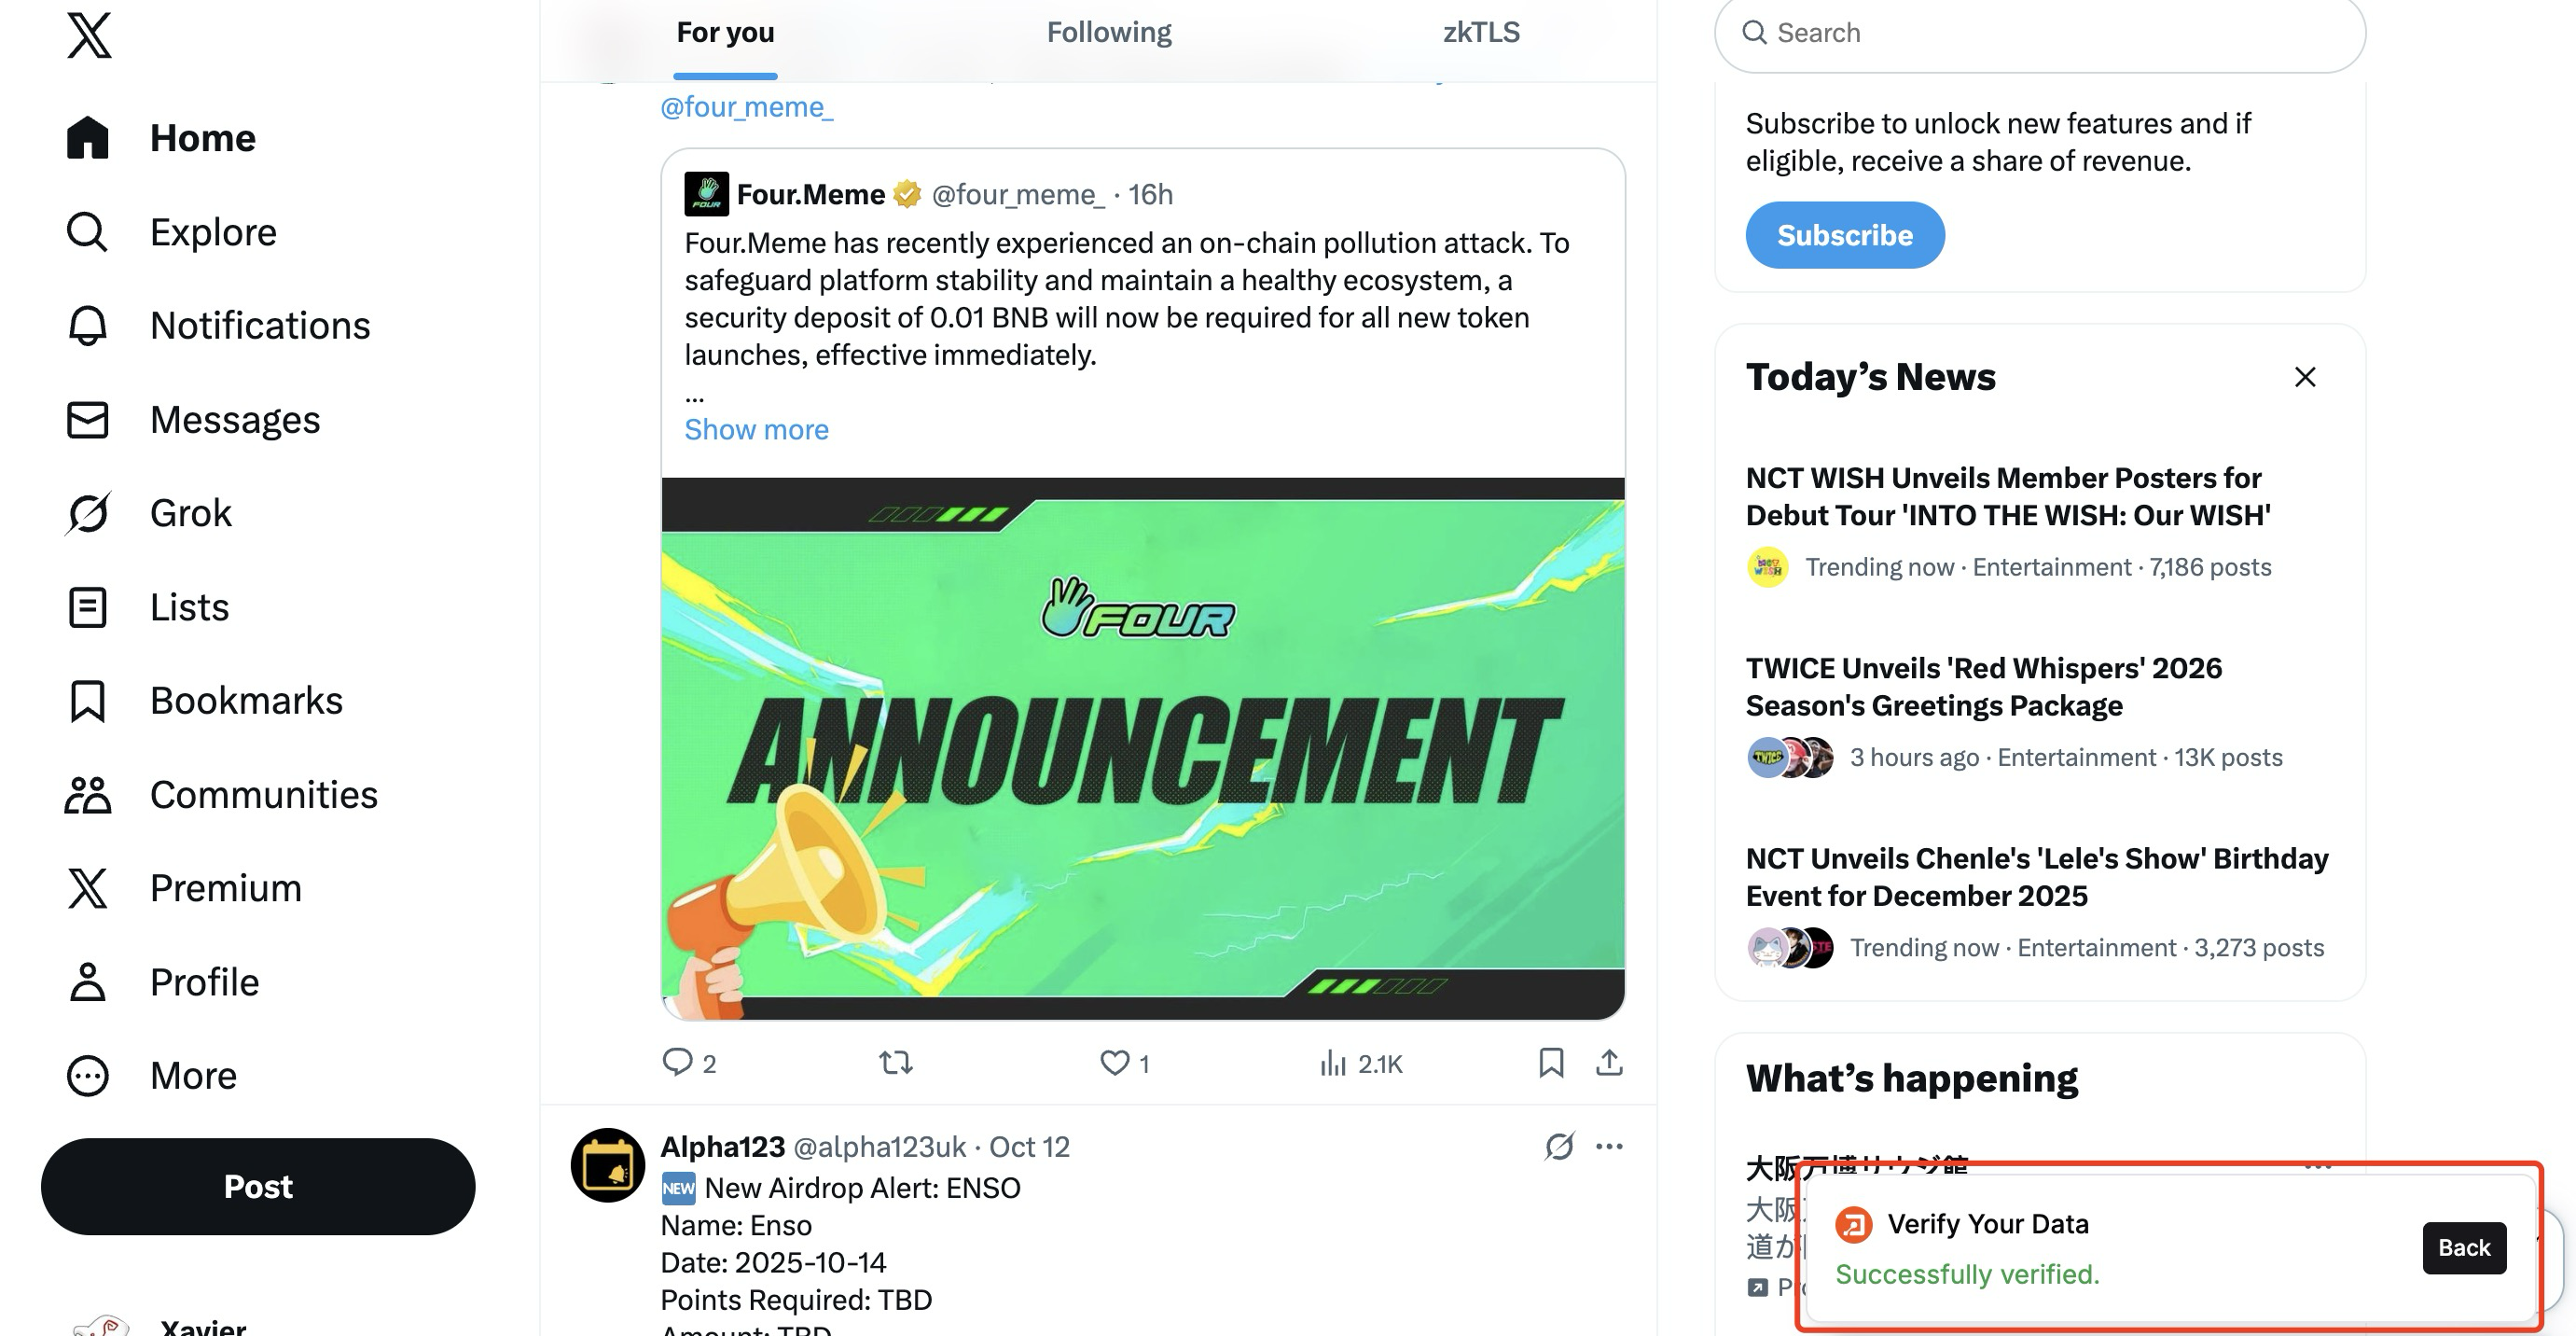
7. Once the proof is successfully generated, you will find a green icon shown in your X task card, which represents your counted verified X account status. 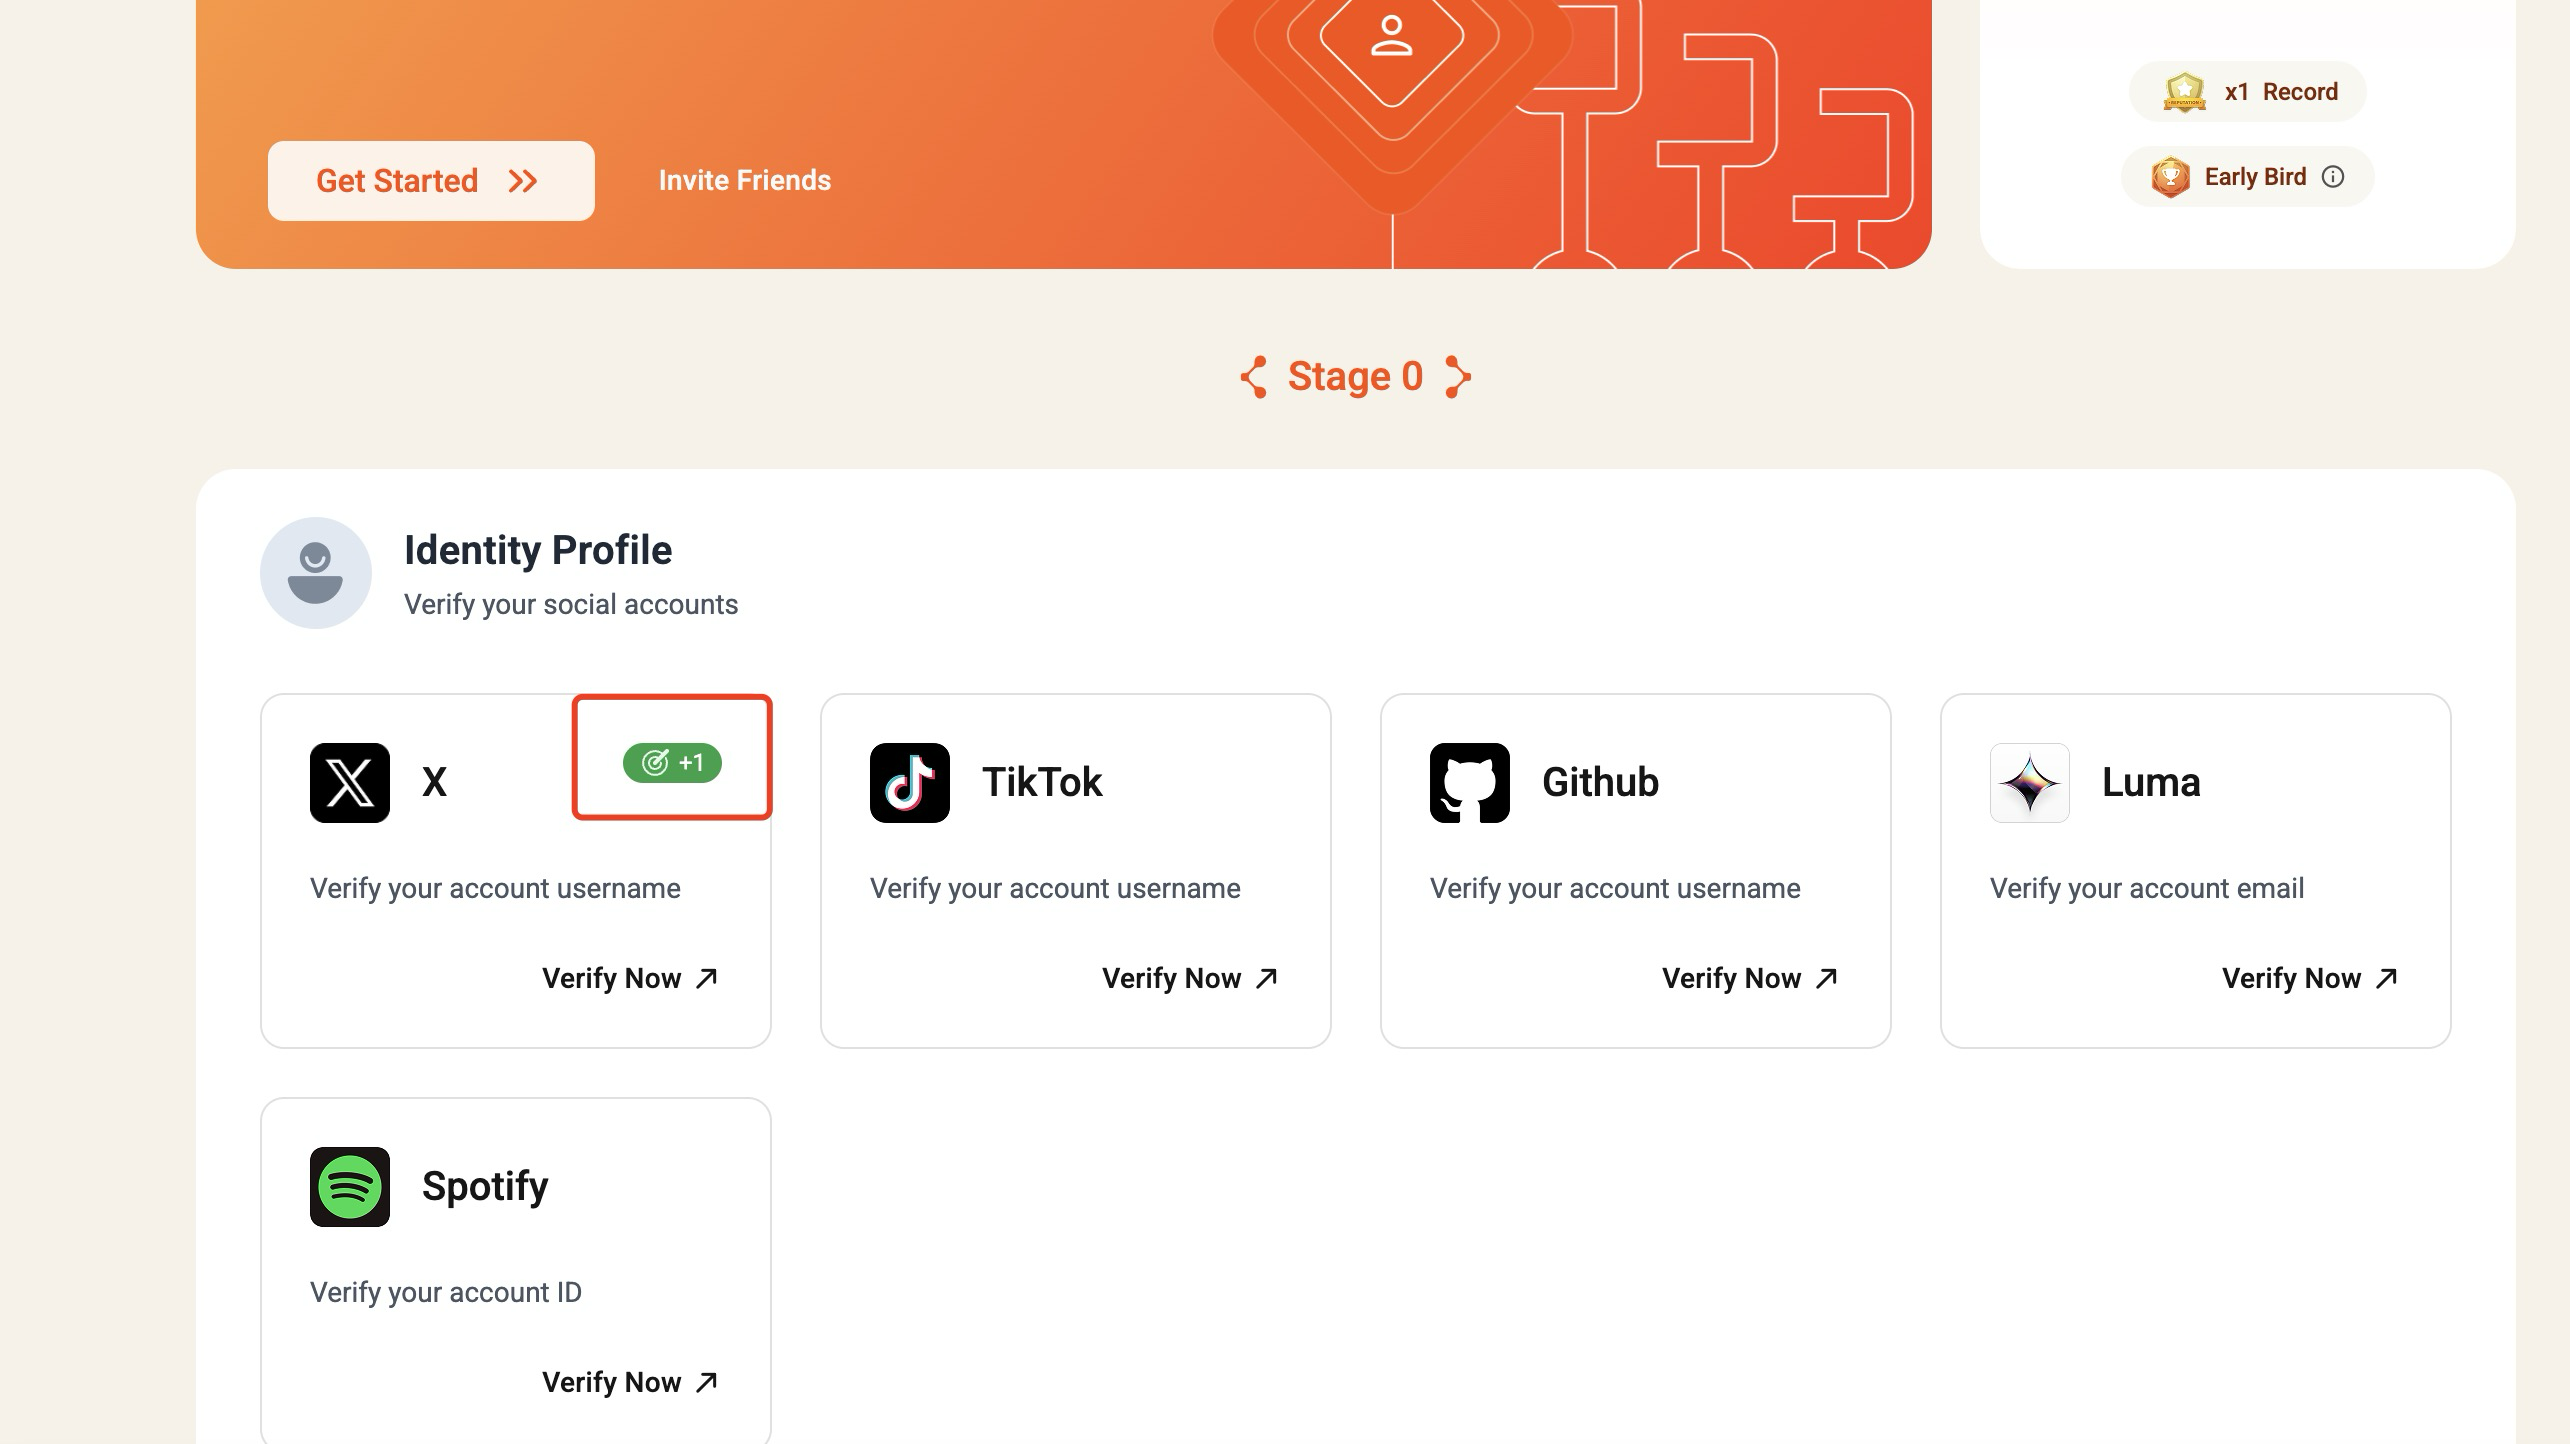
8. You can further complete the other tasks to gain more reputation score, which is shown in the top banner of the page. 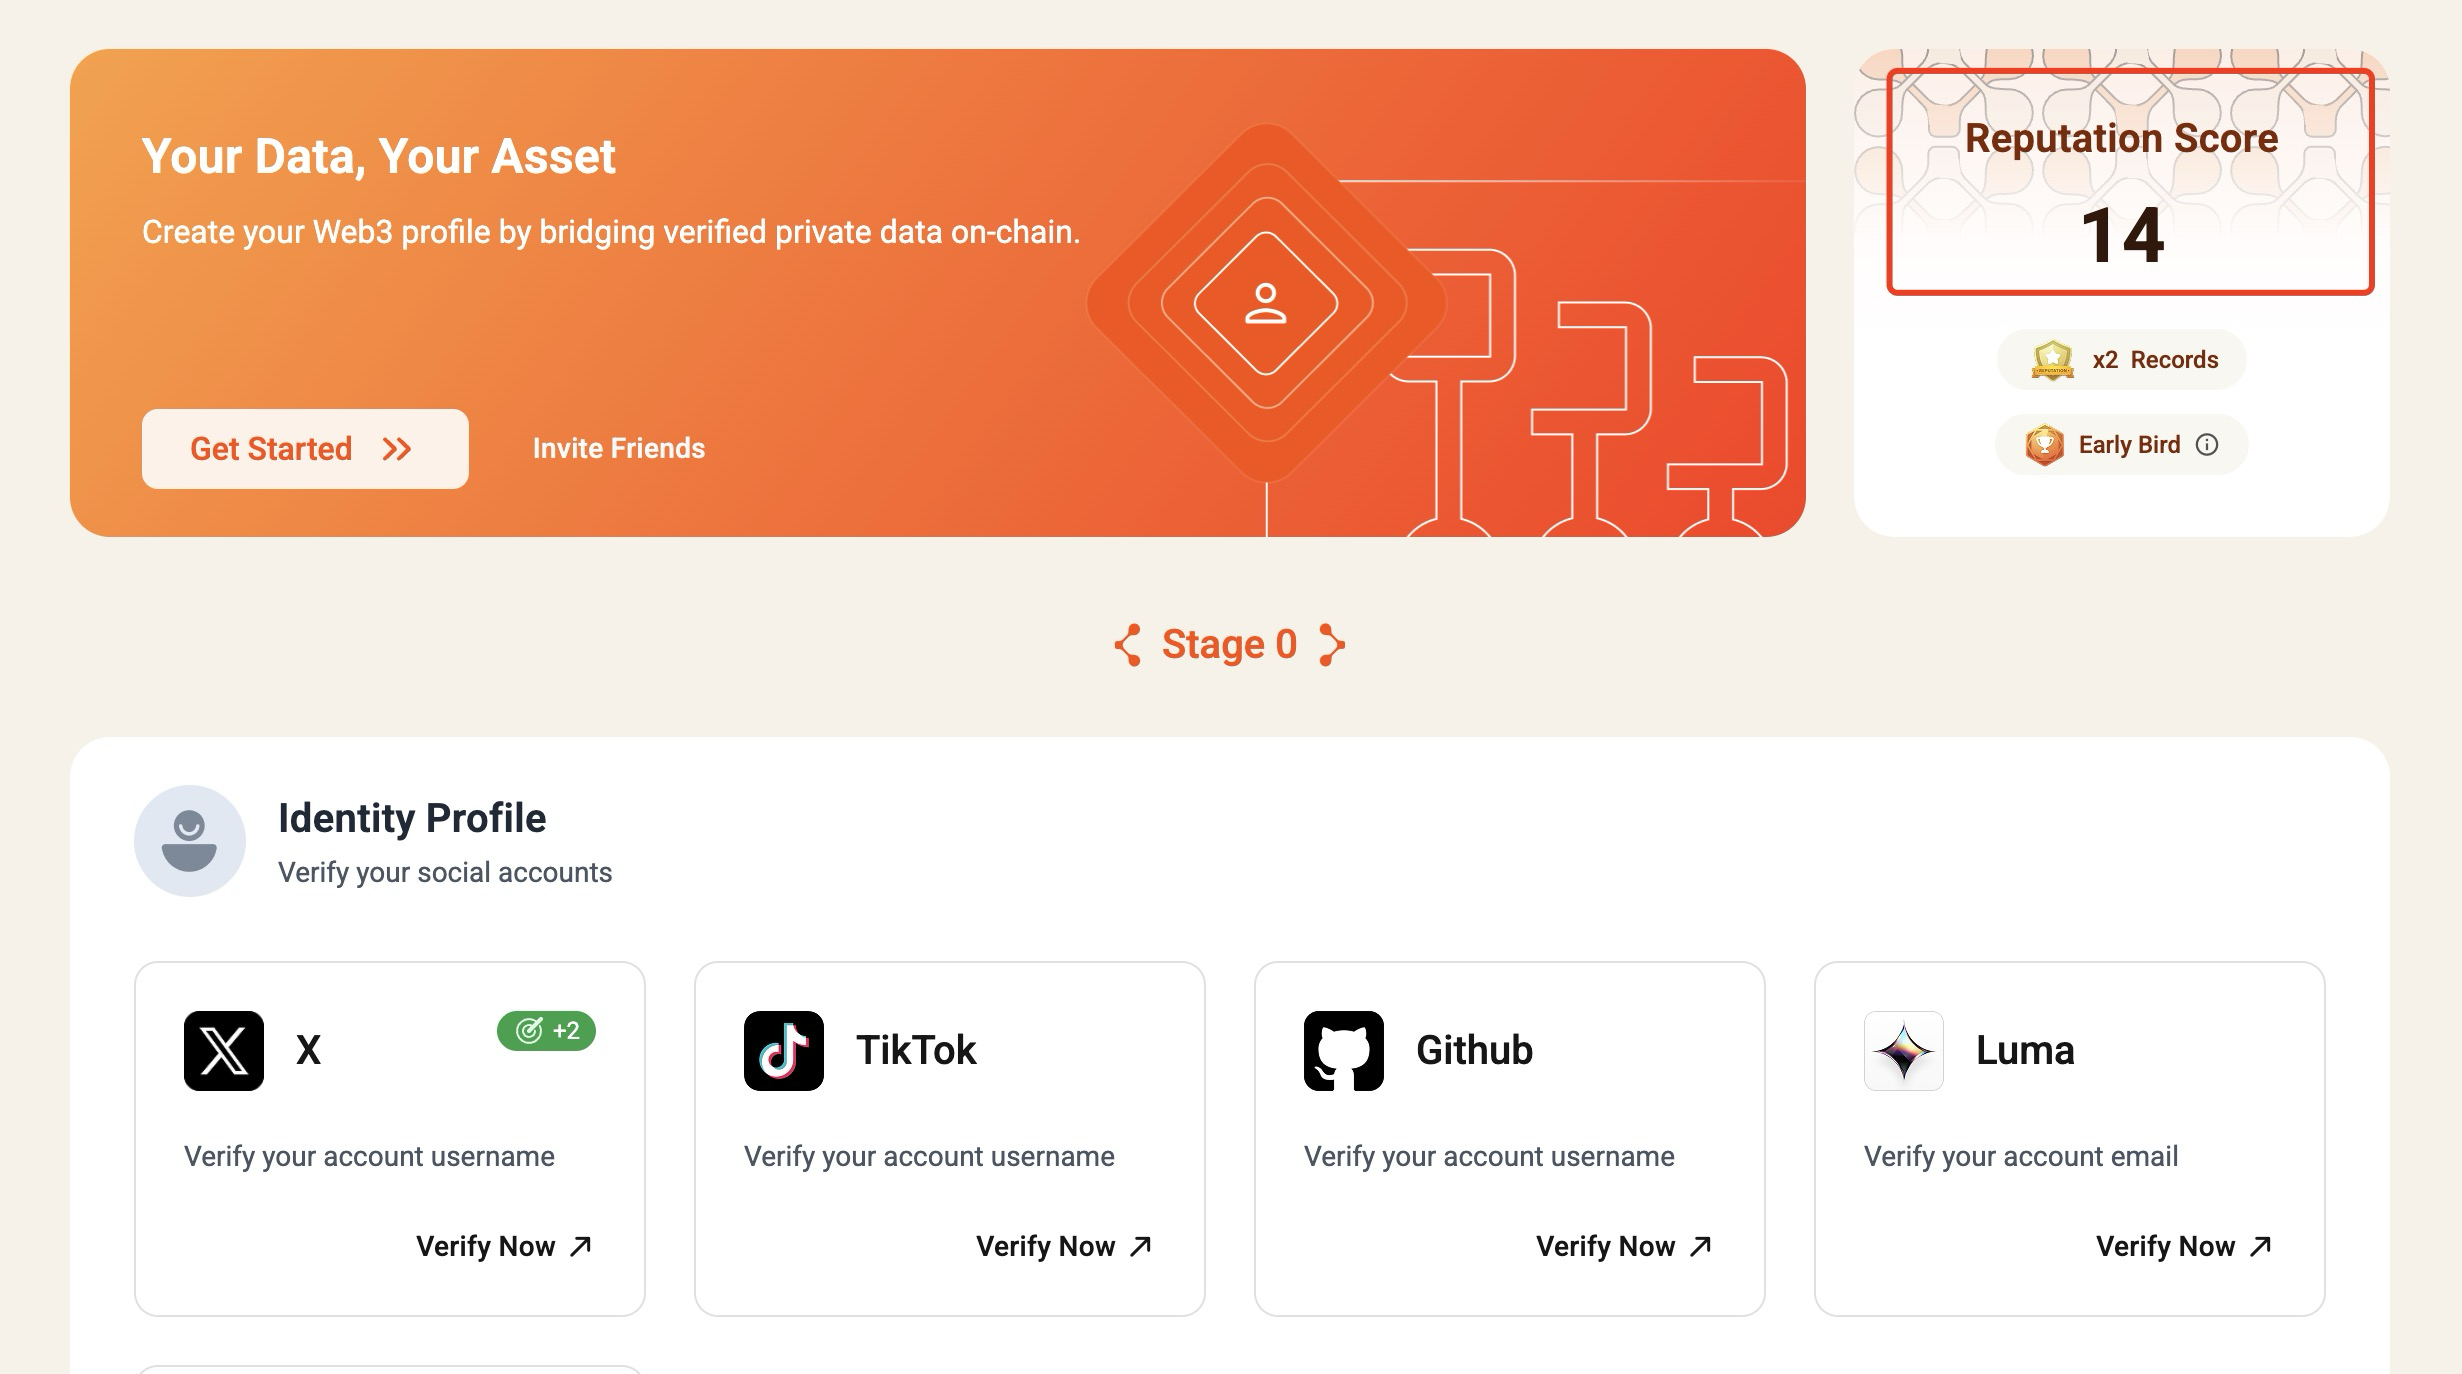
* [Tutorial for Primus AlphaNet Campaign](https://docs.primuslabs.xyz/primus-network/alphanet/tutorials/#tutorial-for-primus-alphanet-campaign)
---
# Attestor Node Guide | primus
[Skip to main content](https://docs.primuslabs.xyz/primus-network/attestor-node-guides/#docusaurus_skipToContent_fallback)
On this page

Attestor Node Guide[](https://docs.primuslabs.xyz/primus-network/attestor-node-guides/#attestor-node-guide "Direct link to Attestor Node Guide")
--------------------------------------------------------------------------------------------------------------------------------------------------
The Primus Attestor Node is an essential role within Primus network, and undertakes the important responsibility of providing zkTLS verification capabilities. The capability can be invoked by developers via Primus Network SDK. The client can run the zkTLS protocol with the Attestor Node in the network and then generate a zkTLS attestation. After successfully running the task, the Attestor Node will receive a certain amount of task fees from the Client.
The Primus Network SDK is provided to developers to develop data verification applications. Developers can use the SDK to create a verification task, and then run the zkTLS protocol with the corresponding Attestor Node to generate an attestation.
This guide explains how to deploy the Primus Network Attestor Node using TEE (provided by [Phala](https://cloud.phala.network/dashboard)
) in production environments.
### 1\. Supported Chains[](https://docs.primuslabs.xyz/primus-network/attestor-node-guides/#1-supported-chains "Direct link to 1. Supported Chains")
| Chain | ChainId | Task Contract Address | Support |
| --- | --- | --- | --- |
| base-mainnet | 8453 | 0x151cb5eD5D10A42B607bB172B27BDF6F884b9707 | ✅ |
| base-sepolia | 84532 | 0xC02234058caEaA9416506eABf6Ef3122fCA939E8 | ✅ |
### 2\. Deploy the Node using TEE[](https://docs.primuslabs.xyz/primus-network/attestor-node-guides/#2-deploy-the-node-using-tee "Direct link to 2. Deploy the Node using TEE")
#### 2.1 Register a Phala Account[](https://docs.primuslabs.xyz/primus-network/attestor-node-guides/#21-register-a-phala-account "Direct link to 2.1 Register a Phala Account")
1. If you don't have a Phala account, you can register one [here](https://cloud.phala.network/register)
.
#### 2.2 Deploy the Node[](https://docs.primuslabs.xyz/primus-network/attestor-node-guides/#22-deploy-the-node "Direct link to 2.2 Deploy the Node")
##### 1\. Visit the [deployment template](https://cloud.phala.network/templates/primus-attestor-node)
and click `Deploy` button.[](https://docs.primuslabs.xyz/primus-network/attestor-node-guides/#1-visit-the-deployment-template-and-click-deploy-button "Direct link to 1-visit-the-deployment-template-and-click-deploy-button")
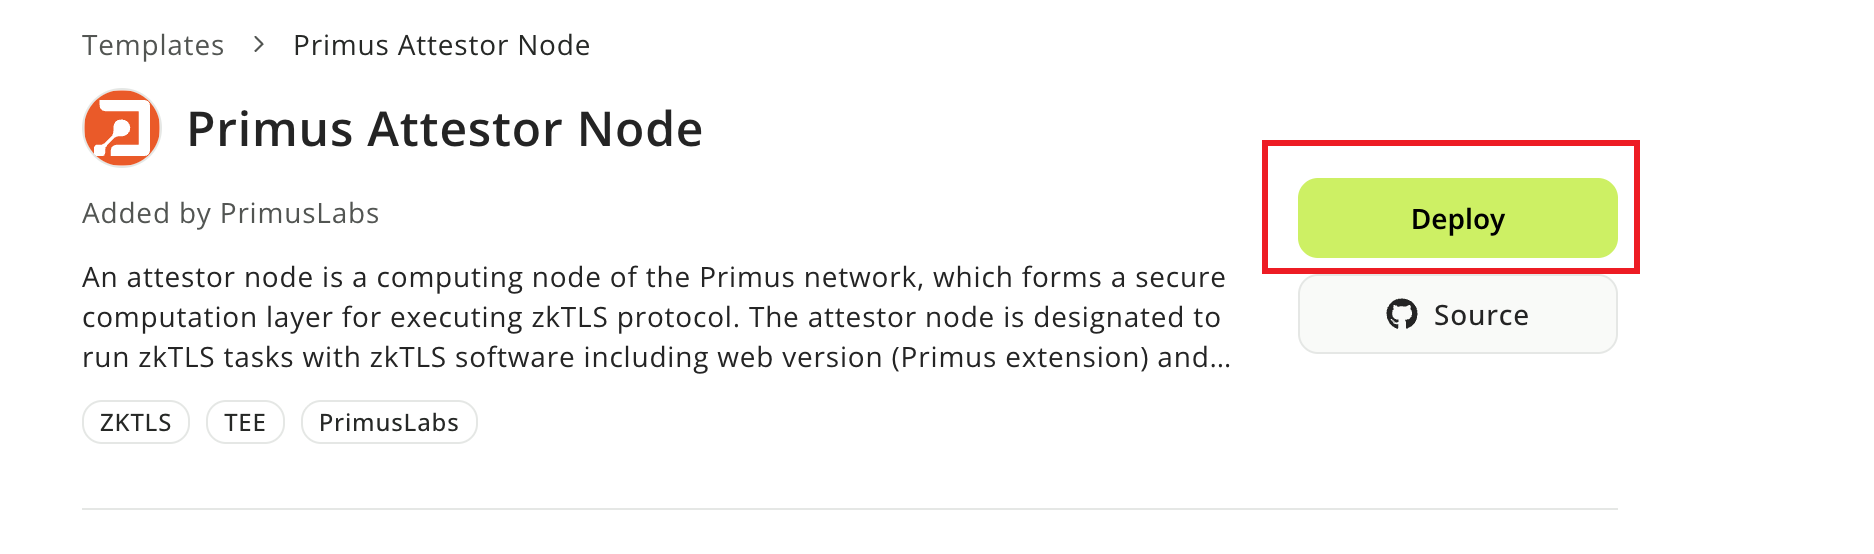
##### 2\. Please fill in the required fields:[](https://docs.primuslabs.xyz/primus-network/attestor-node-guides/#2-please-fill-in-the-required-fields "Direct link to 2. Please fill in the required fields:")
* **Name**: This node's name, **_you should use the default name_**.
* **KMS Provider**: Only supports `Base`
* **Node**: `prod7`
* **Instance Type**: Use `Large TDX Instance(4 vCPU, 8 GB)`
* **Storage**: Larger than `20 GB`
* **Operating System**: `dstack-0.5.4.1`
* **Encrypted Secrets**: Please set `PRIVATE_KEY`, `BASE_RPC_URL`. **`PRIVATE_KEY` should start with `0x`. `PRIVATE_KEY` acts as the owner of the node, used to report results, and will also be used to [register the node](https://docs.primuslabs.xyz/primus-network/attestor-node-guides/#3-register-the-node)
**. **The whitelist address referenced in the [register the node](https://docs.primuslabs.xyz/primus-network/attestor-node-guides/#3-register-the-node)
section is the address derived from this private key**. **We recommend creating a dedicated `PRIVATE_KEY` for running the node**.
`BASE_TASK_CONTRACT_ADDRESS`,`BASE_CHAIN_ID` and `IMAGE_TAG` please use the default values.
> **_NOTE_**: If you want to deploy `Primus Network` on `Base Sepolia` , please modify `BASE_TASK_CONTRACT_ADDRESS`,`BASE_CHAIN_ID` and `BASE_RPC_URL` .These values can be found under [Supported Chains](https://docs.primuslabs.xyz/primus-network/attestor-node-guides/#1-supported-chains)
> .
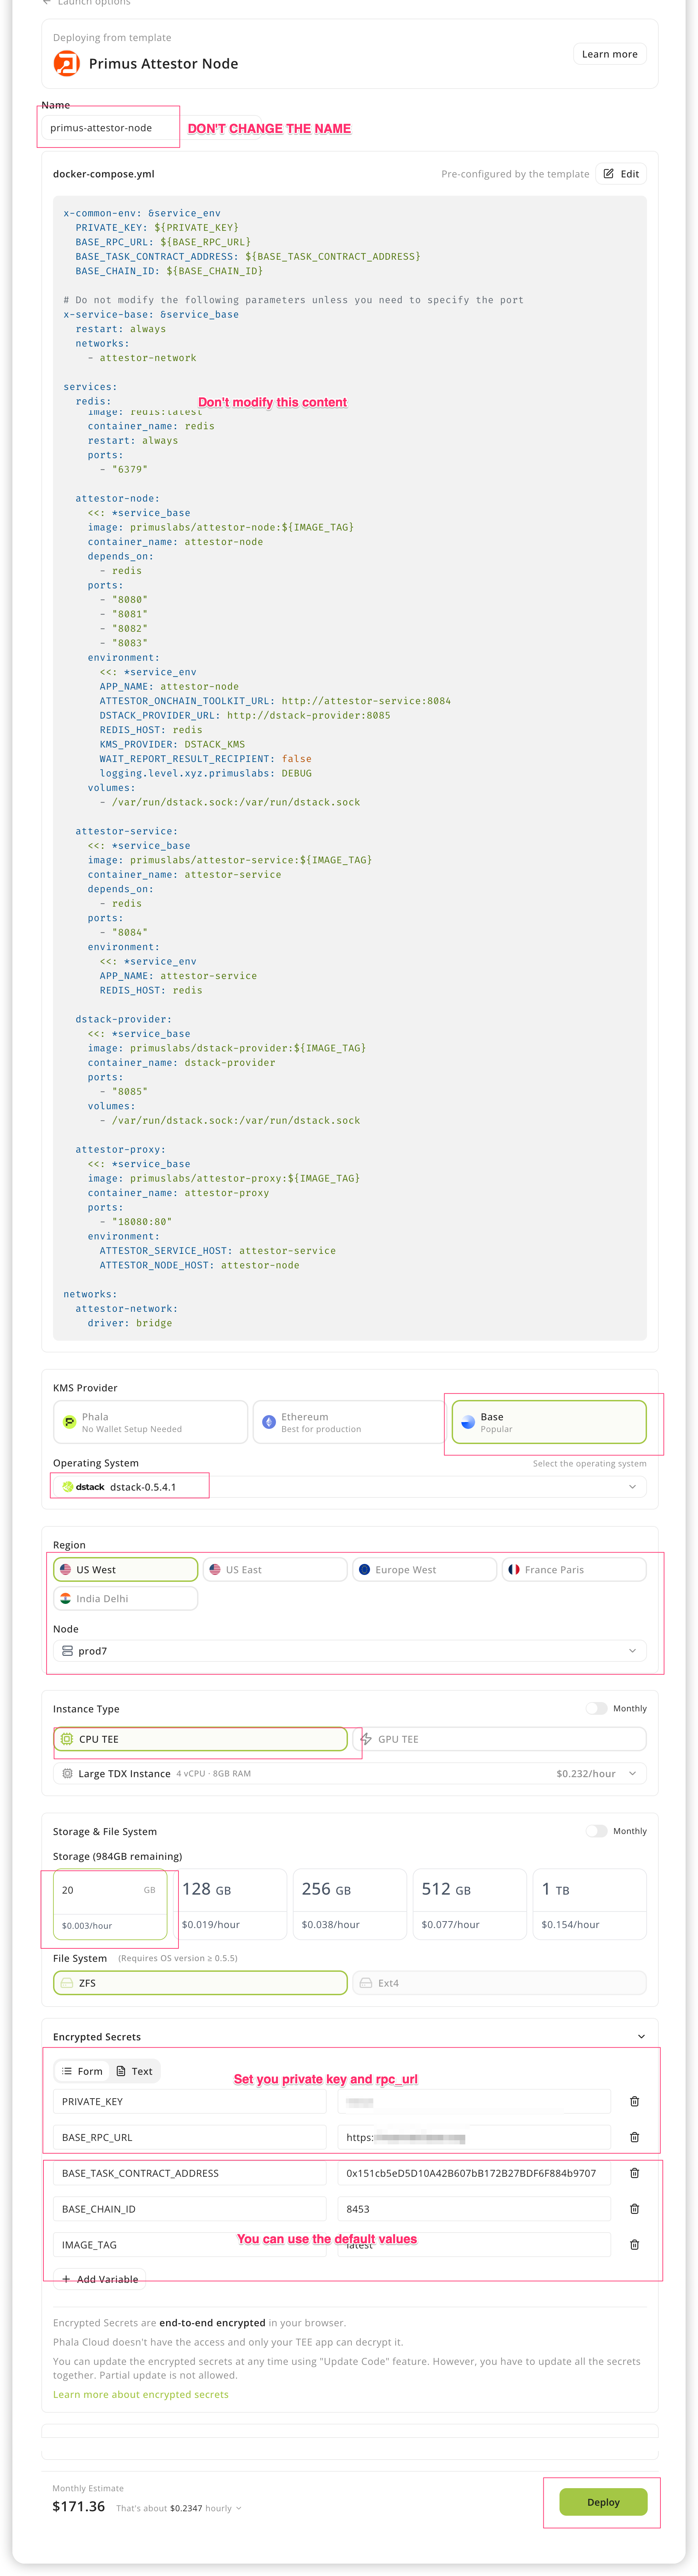
##### 3\. Click `Deploy` to start the deployment process.[](https://docs.primuslabs.xyz/primus-network/attestor-node-guides/#3-click-deploy-to-start-the-deployment-process "Direct link to 3-click-deploy-to-start-the-deployment-process")
##### 4\. Click the detail button to view the deployment status.[](https://docs.primuslabs.xyz/primus-network/attestor-node-guides/#4-click-the-detail-button-to-view-the-deployment-status "Direct link to 4. Click the detail button to view the deployment status.")
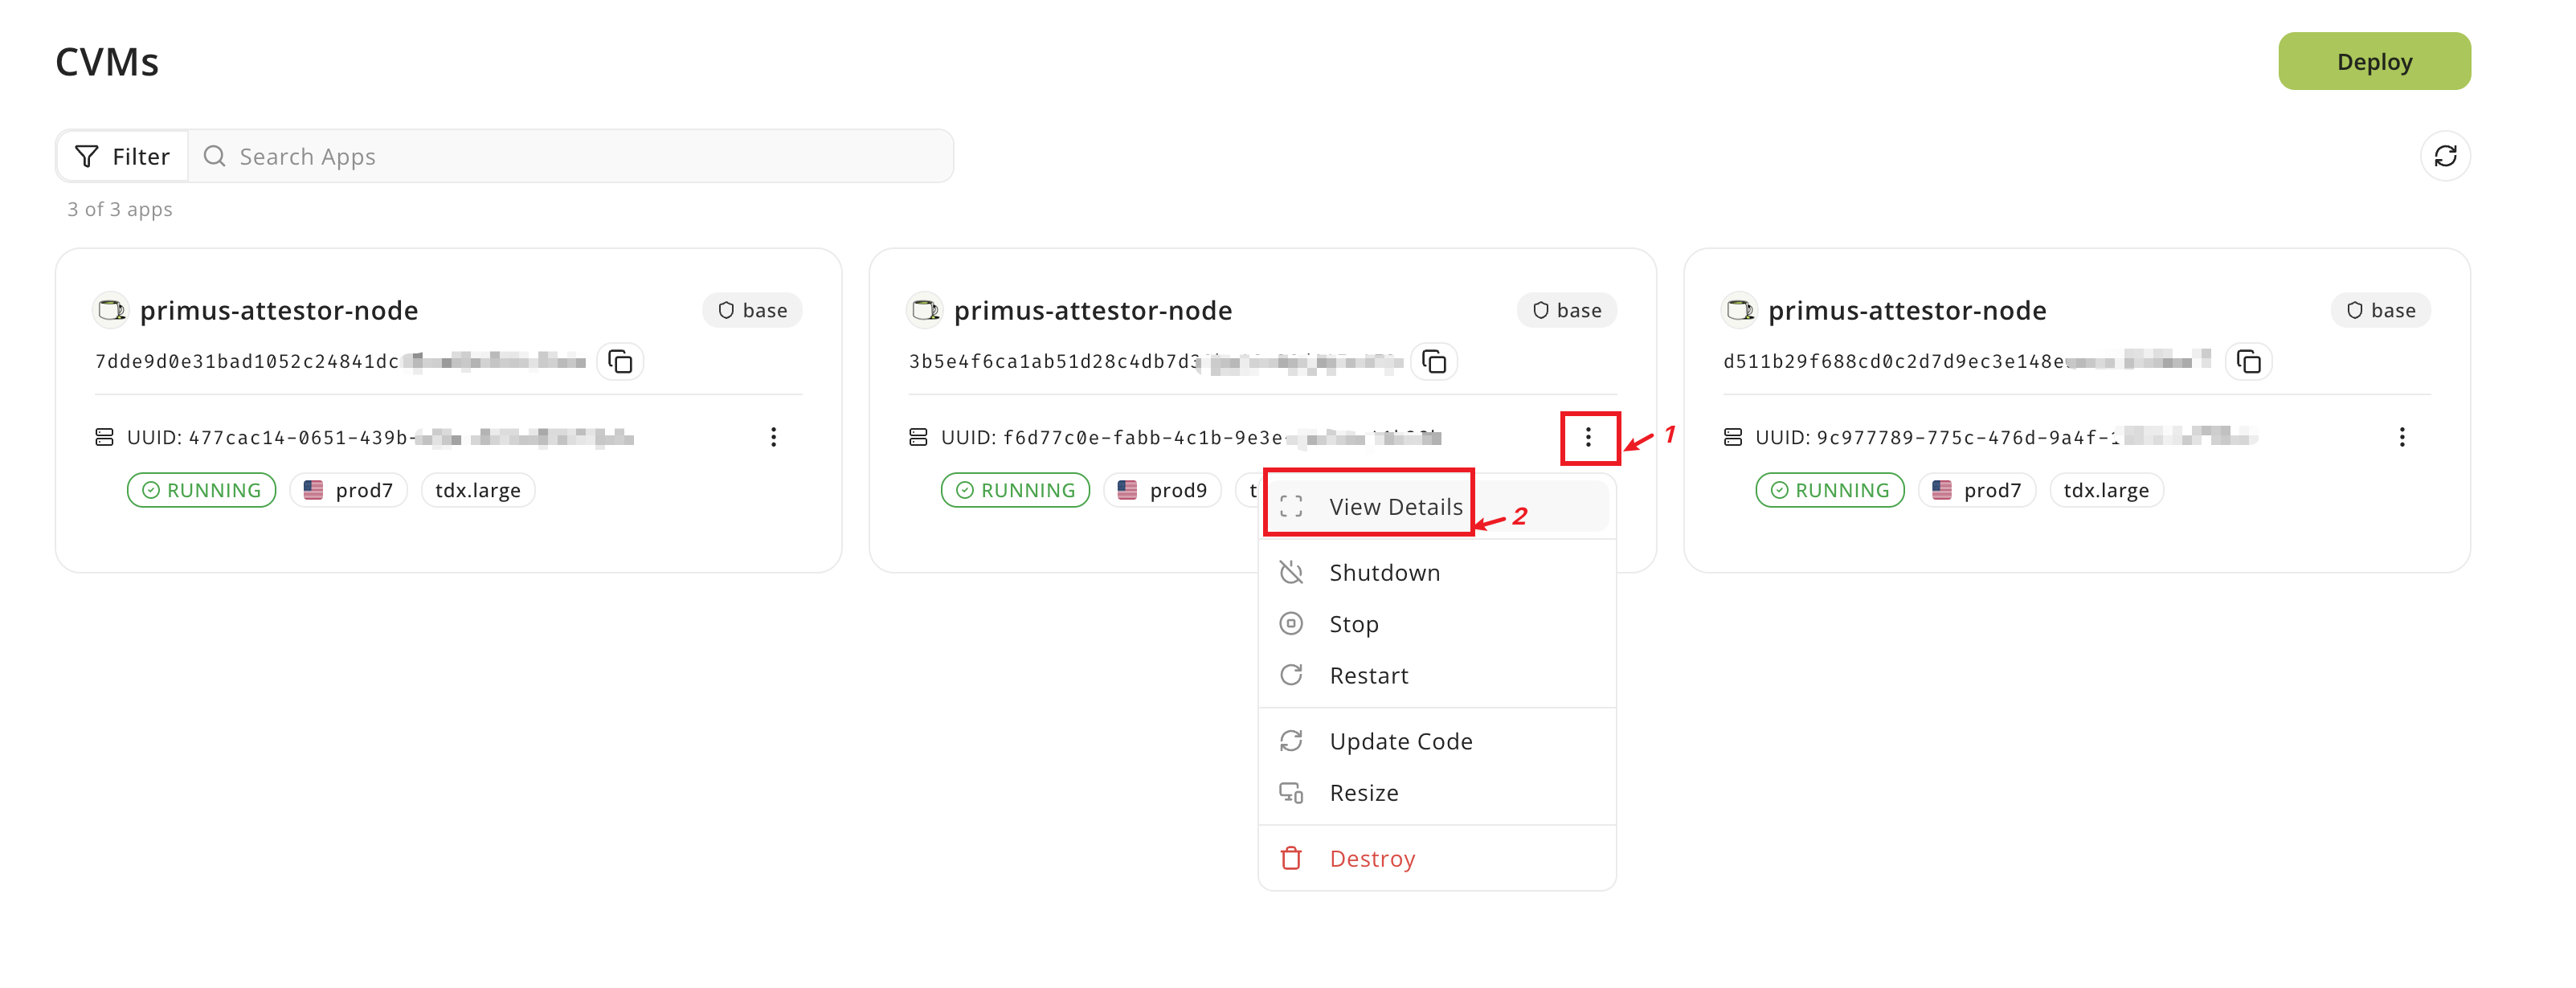
##### 5\. If everything is successful, you will see the following services:[](https://docs.primuslabs.xyz/primus-network/attestor-node-guides/#5-if-everything-is-successful-you-will-see-the-following-services "Direct link to 5. If everything is successful, you will see the following services:")
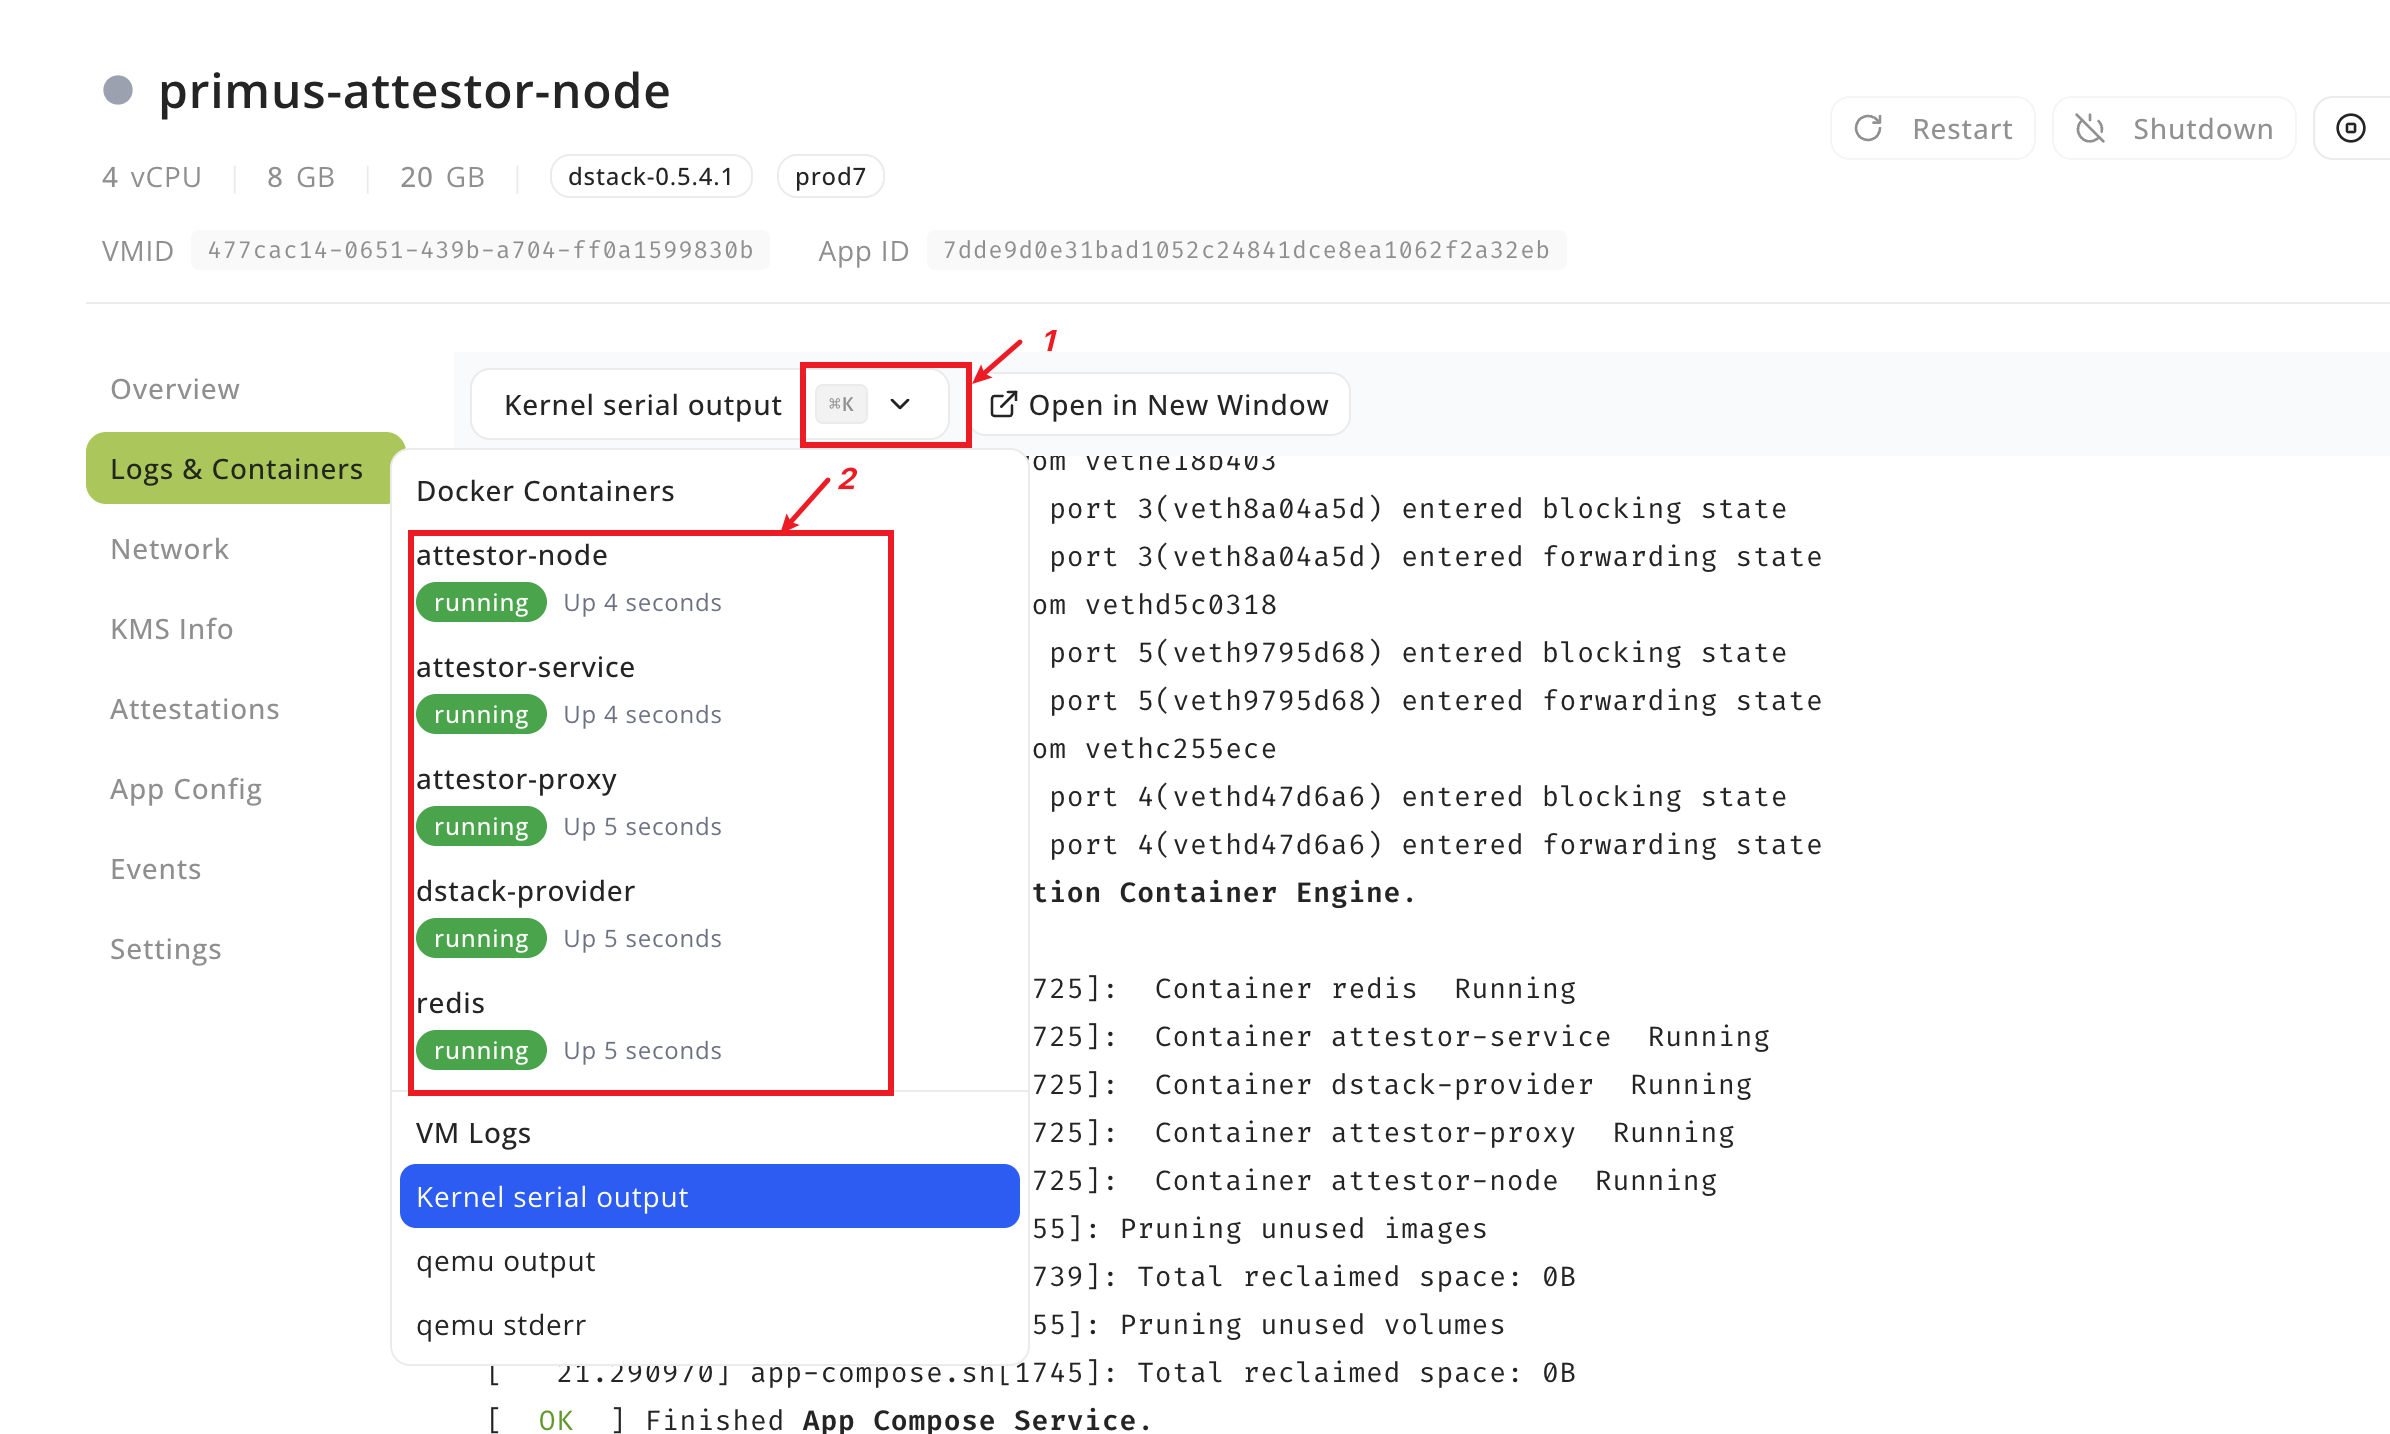
##### 6\. Click the `attestor-node` service to view the node's log. You will find the attestor's address in the log. **_Please save this address as you will need it when [registering the node](https://docs.primuslabs.xyz/primus-network/attestor-node-guides/#3-register-the-node)
_**.[](https://docs.primuslabs.xyz/primus-network/attestor-node-guides/#6-click-the-attestor-node-service-to-view-the-nodes-log-you-will-find-the-attestors-address-in-the-log-please-save-this-address-as-you-will-need-it-when-registering-the-node "Direct link to 6-click-the-attestor-node-service-to-view-the-nodes-log-you-will-find-the-attestors-address-in-the-log-please-save-this-address-as-you-will-need-it-when-registering-the-node")
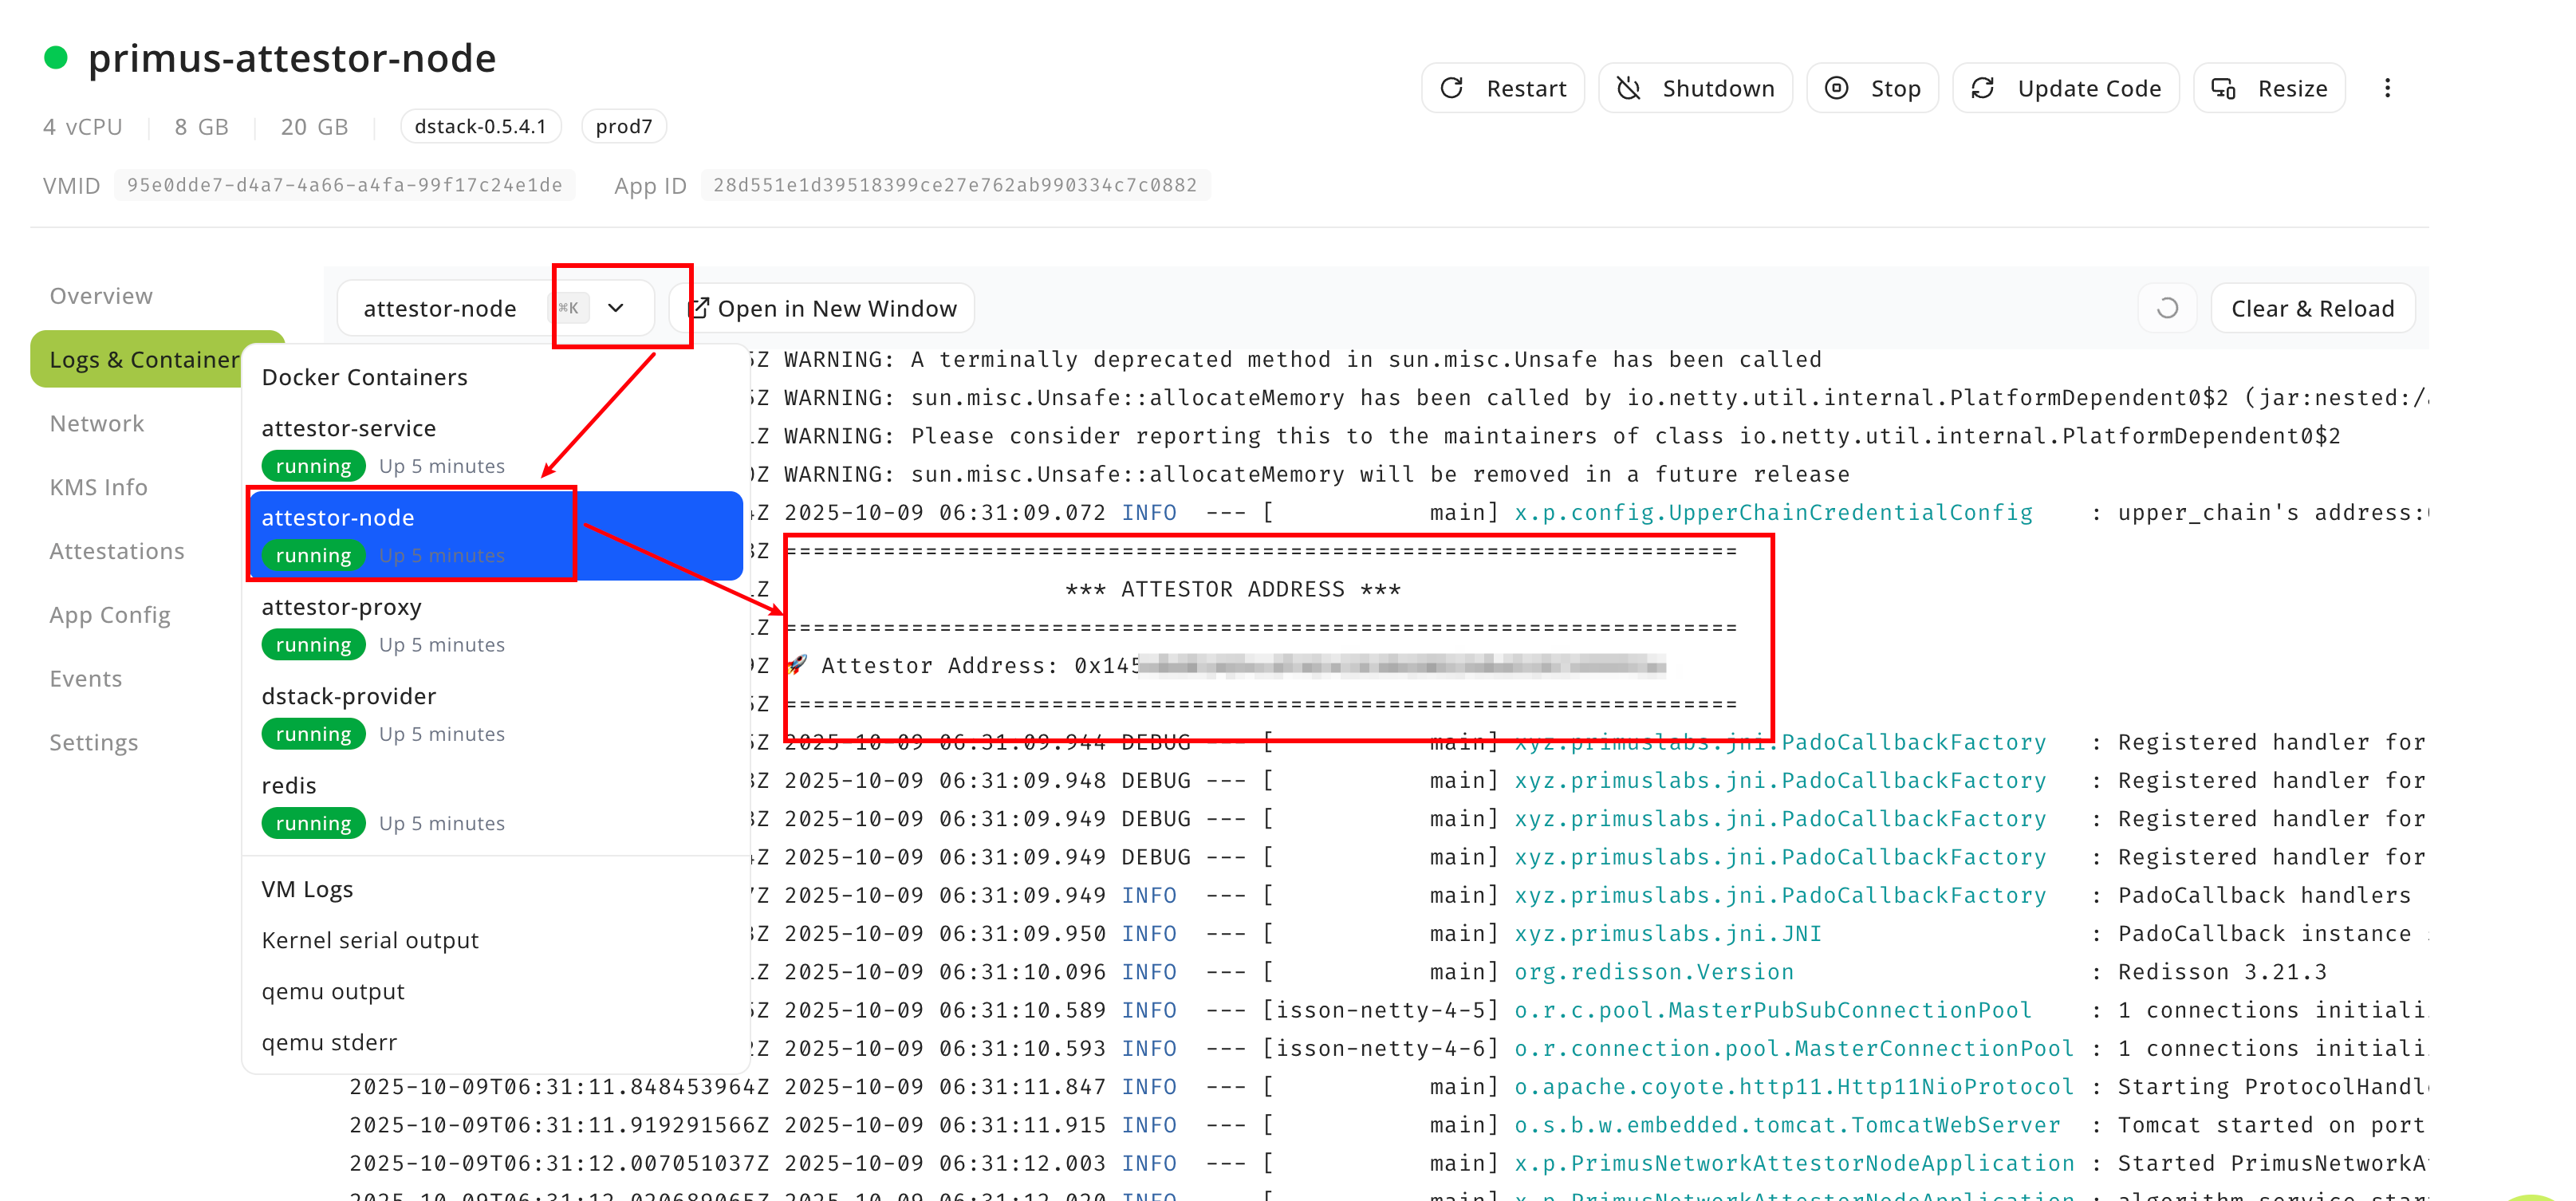
##### 7\. Click the `Network` tab to check your `Network Information`. **_Please save this `endpoint` for [registering the node](https://docs.primuslabs.xyz/primus-network/attestor-node-guides/#3-register-the-node)
_**.[](https://docs.primuslabs.xyz/primus-network/attestor-node-guides/#7-click-the-network-tab-to-check-your-network-information-please-save-this-endpoint--for-registering-the-node "Direct link to 7-click-the-network-tab-to-check-your-network-information-please-save-this-endpoint--for-registering-the-node")
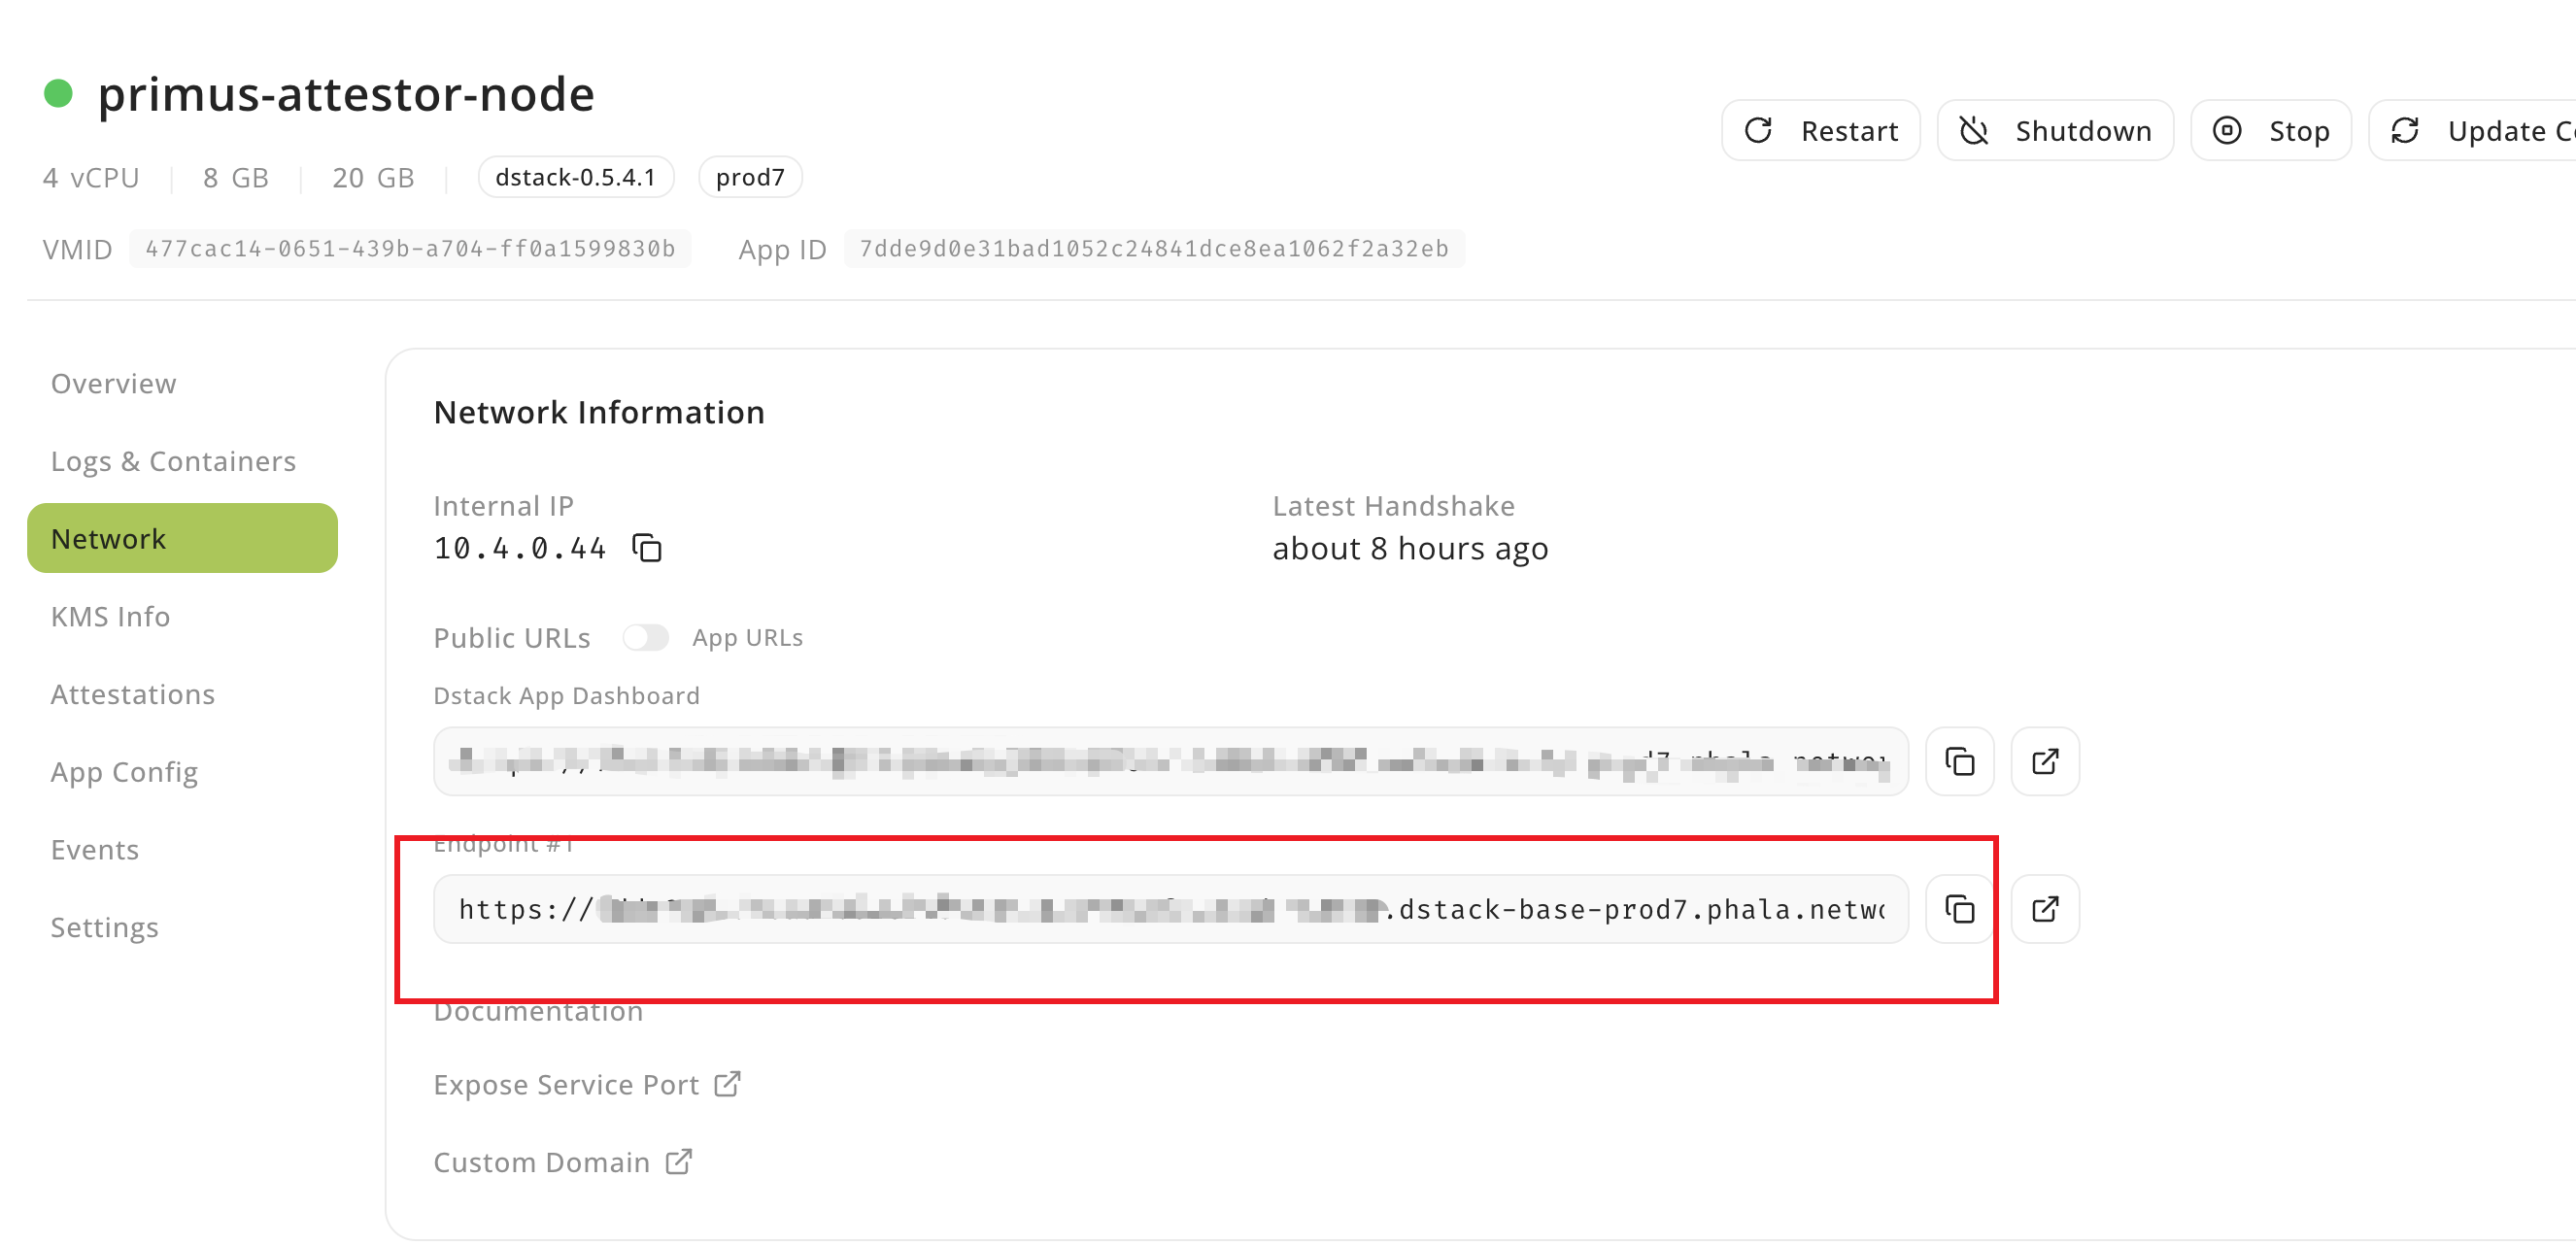
##### 8\. Copy the `endpoint` from step 7 to your browser and you will see the following information:[](https://docs.primuslabs.xyz/primus-network/attestor-node-guides/#8-copy-the-endpoint-from-step-7-to-your-browser-and-you-will-see-the-following-information "Direct link to 8-copy-the-endpoint-from-step-7-to-your-browser-and-you-will-see-the-following-information")
 If you see `Hi, PRIMUS NETWORK!`, it means you have successfully deployed the node.
### 3\. Register the Node[](https://docs.primuslabs.xyz/primus-network/attestor-node-guides/#3-register-the-node "Direct link to 3. Register the Node")
> **_NOTE: Before managing a node, you must first contact the [primuslabs team](https://discord.com/invite/pdrNxRrApX)
> to add the node owner address to the whitelist._**
#### 3.1 Prerequisites[](https://docs.primuslabs.xyz/primus-network/attestor-node-guides/#31-prerequisites "Direct link to 3.1 Prerequisites")
Make sure Docker is installed on your system.
#### 3.2 Clone and Prepare[](https://docs.primuslabs.xyz/primus-network/attestor-node-guides/#32-clone-and-prepare "Direct link to 3.2 Clone and Prepare")
git clone https://github.com/primus-labs/primus-network-startup.gitcd primus-network-startupchmod +x ./run.sh
#### 3.3 Set Environment Variables[](https://docs.primuslabs.xyz/primus-network/attestor-node-guides/#33-set-environment-variables "Direct link to 3.3 Set Environment Variables")
Based on the chain where your node is located, run the following command:
cp env_files/.env. .env
Then set your private key, RPC URL, and other parameters:
PRIVATE_KEY=0xRPC=NODE_CONTRACT_ADDRESS=ATTESTOR_ADDRESS=RECIPIENT_ADDRESS=ATTESTOR_URLS=NODE_META_URL=https://api-dev.primuslabs.xyz/node1-meta.json
1. **PRIVATE\_KEY**: **This is the node’s owner key and must be the same `PRIVATE_KEY` used in [above](https://docs.primuslabs.xyz/primus-network/attestor-node-guides/#2-please-fill-in-the-required-fields)
**. We recommend depositing 0.01 ETH to this address. If you set it as the `RECIPIENT_ADDRESS` below, it will automatically receive task fees. This ensures sufficient balance for reporting results. Otherwise, you must manually monitor and maintain the balance.
2. **RPC**: rpc for the chain.
3. **NODE\_CONTRACT\_ADDRESS**: This is the address of the node contract. You can use the default value from `env_files/.env.`.
4. **ATTESTOR\_ADDRESS**: Attestor's address to sign attestations, this address is from above [attestor-node](https://docs.primuslabs.xyz/primus-network/attestor-node-guides/#6-click-the-attestor-node-service-to-view-the-nodes-log-you-will-find-the-attestors-address-in-the-log-please-save-this-address-as-you-will-need-it-when-registering-the-node)
.
5. **RECIPIENT\_ADDRESS**:Address to receive task fees. This address can be set to the node owner address corresponding to the PRIVATE\_KEY above, or to any other address.
6. **ATTESTOR\_URLS**: Attestor node domain names. This domain is from [endpoint above](https://docs.primuslabs.xyz/primus-network/attestor-node-guides/#7-click-the-network-tab-to-check-your-network-information-please-save-this-endpoint--for-registering-the-node)
, and remove `https://`, just the domain name like: `dd26063786a0fccd8e4cc499374b4515d4df1e87-18080.dstack-base-prod7.phala.network`.If you have multiple URLs, separate them with commas.
7. **NODE\_META\_URL**: Attestor node metadata url. The metadata should be a JSON document containing the following fields:
{ "name": "Your node name", "description": "Introduce your node", "website": "Your website URL", "x": "https://x.com/", "logo": ""}
**_MAKE SURE `NODE_META_URL` IS PUBLICLY ACCESSIBLE ON THE INTERNET._**
#### 3.4 Register the Node[](https://docs.primuslabs.xyz/primus-network/attestor-node-guides/#34-register-the-node "Direct link to 3.4 Register the Node")
sudo ./run.sh register
> If you want to unregister from the Primus network, run the following command:
>
> sudo ./run.sh unregister
>
> **_Please note_**: Unregistering from the network means you will no longer receive any tasks and will not earn any income.
* [Attestor Node Guide](https://docs.primuslabs.xyz/primus-network/attestor-node-guides/#attestor-node-guide)
* [1\. Supported Chains](https://docs.primuslabs.xyz/primus-network/attestor-node-guides/#1-supported-chains)
* [2\. Deploy the Node using TEE](https://docs.primuslabs.xyz/primus-network/attestor-node-guides/#2-deploy-the-node-using-tee)
* [2.1 Register a Phala Account](https://docs.primuslabs.xyz/primus-network/attestor-node-guides/#21-register-a-phala-account)
* [2.2 Deploy the Node](https://docs.primuslabs.xyz/primus-network/attestor-node-guides/#22-deploy-the-node)
* [3\. Register the Node](https://docs.primuslabs.xyz/primus-network/attestor-node-guides/#3-register-the-node)
* [3.1 Prerequisites](https://docs.primuslabs.xyz/primus-network/attestor-node-guides/#31-prerequisites)
* [3.2 Clone and Prepare](https://docs.primuslabs.xyz/primus-network/attestor-node-guides/#32-clone-and-prepare)
* [3.3 Set Environment Variables](https://docs.primuslabs.xyz/primus-network/attestor-node-guides/#33-set-environment-variables)
* [3.4 Register the Node](https://docs.primuslabs.xyz/primus-network/attestor-node-guides/#34-register-the-node)
---
# Attestor Security | primus
[Skip to main content](https://docs.primuslabs.xyz/primus-network/attestor-security/#docusaurus_skipToContent_fallback)
On this page

Security of Attestor Nodes[](https://docs.primuslabs.xyz/primus-network/attestor-security/#security-of-attestor-nodes "Direct link to Security of Attestor Nodes")
--------------------------------------------------------------------------------------------------------------------------------------------------------------------
The security of attestor nodes is critical and must be safeguarded to protect both node maintainers and network clients. A key security concern in the zkTLS protocol is how to enforce the computational integrity of the attestor node. Note this aspect is not covered by the original protocol security.
To strengthen attestor security, the Primus network adopts a hardware-based approach. Specifically, [Phala’s TEE technology](https://docs.phala.com/phala-cloud/what-is/what-is-phala-cloud)
is integrated with the Primus attestor node software to ensure nodes always execute correctly, while critical assets such as node keys remain protected and securely utilized.
### Key Management[](https://docs.primuslabs.xyz/primus-network/attestor-security/#key-management "Direct link to Key Management")
The attestor node leverages Phala’s TEE solution, including a secure Key Management Service (KMS), to safeguard node keys throughout their entire lifecycle. These node keys are the most critical assets within the attestor node, primarily used for signing zkTLS sessions and issuing proofs. Key generation is performed exclusively by the KMS inside the TEE, ensuring that the attestor node software never has direct access to the key material. Signing operations can only be performed within TEE, and only after the correct execution of the zkTLS protocol.
### Version Managemnt[](https://docs.primuslabs.xyz/primus-network/attestor-security/#version-managemnt "Direct link to Version Managemnt")
Another security concern involves the attestor’s DevOps process. To prevent attacks such as code injection or malware hijacking, only official, verified software versions are allowed to be deployed and maintained within the network. This policy is further enforced by TEE, as the entire attestor node software always runs inside the enclave, ensuring runtime integrity and protection against unauthorized modifications.
* [Security of Attestor Nodes](https://docs.primuslabs.xyz/primus-network/attestor-security/#security-of-attestor-nodes)
* [Key Management](https://docs.primuslabs.xyz/primus-network/attestor-security/#key-management)
* [Version Managemnt](https://docs.primuslabs.xyz/primus-network/attestor-security/#version-managemnt)
---
# Overview of zkTLS | primus
[Skip to main content](https://docs.primuslabs.xyz/primus-network/tech-intro/#docusaurus_skipToContent_fallback)
On this page

Overview of zkTLS[](https://docs.primuslabs.xyz/primus-network/tech-intro/#overview-of-zktls "Direct link to Overview of zkTLS")
----------------------------------------------------------------------------------------------------------------------------------
zkTLS (also known as "web proofs") is a cryptographic technology that verifies the authenticity of TLS data while preserving privacy, all without requiring modifications to the data source servers. This innovation enables the secure utilization of personal data stored in siloed Web2 servers, facilitating seamless and cost-effective cross-platform data flow.
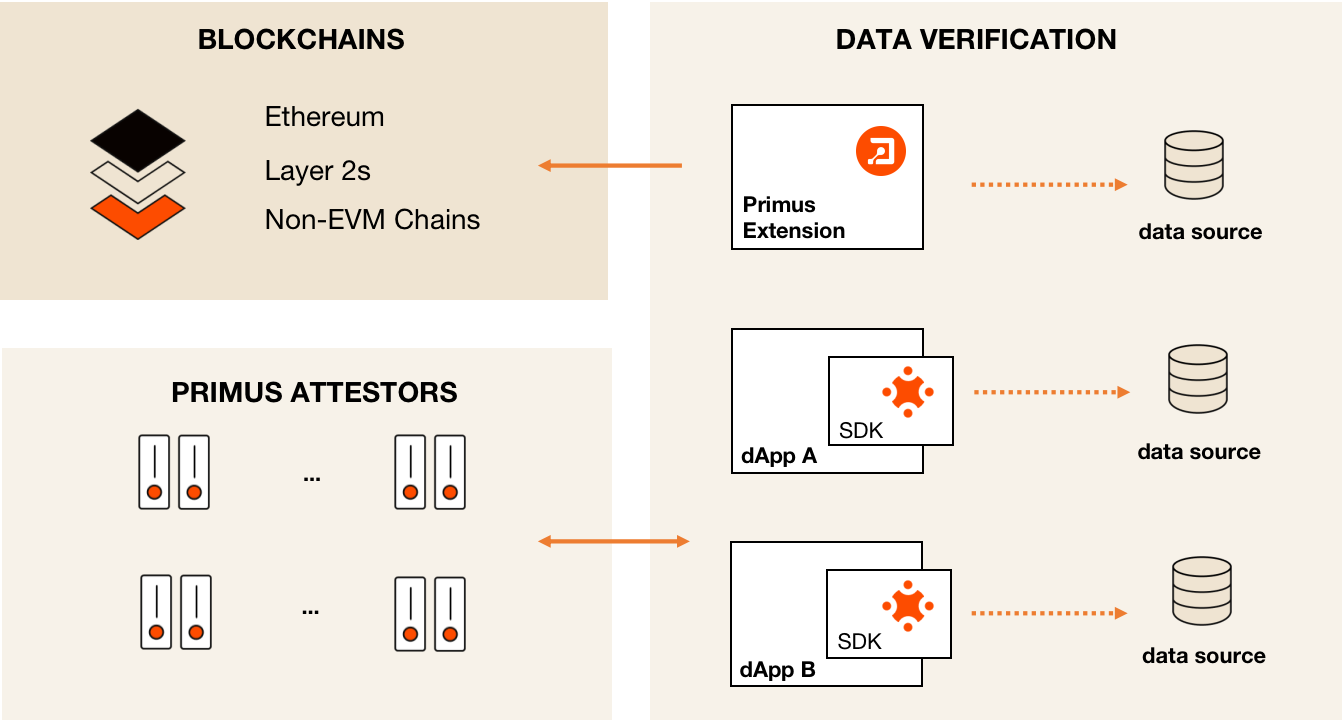
In the industry, two primary modes are commonly used for zkTLS: the **MPC mode** and the **Proxy mode**. Each mode presents its own trade-offs in terms of security and performance. Primus addresses these differences by providing unified APIs, allowing developers to choose the most suitable mode based on the specific requirements of their applications.
### MPC Mode[](https://docs.primuslabs.xyz/primus-network/tech-intro/#mpc-mode "Direct link to MPC Mode")
In the MPC mode, the attestor and the client collaboratively execute a secure multi-party computation protocol to generate the materials needed to set up a TLS session with the data source server. This ensures that the client cannot control or modify the TLS data before the attestor sends back its share of the session key.
The key advantage of Primus' MPC mode is its use of the highly efficient and lightweight interactive zero-knowledge proof system, [QuickSilver](https://eprint.iacr.org/2021/076)
, developed by the Primus team. QuickSilver significantly reduces both computational and communication overhead, enhancing performance. For more details, please refer to our technical [whitepaper](https://eprint.iacr.org/2023/964)
.
The diagram below illustrates the general workflow of how the MPC mode operates.
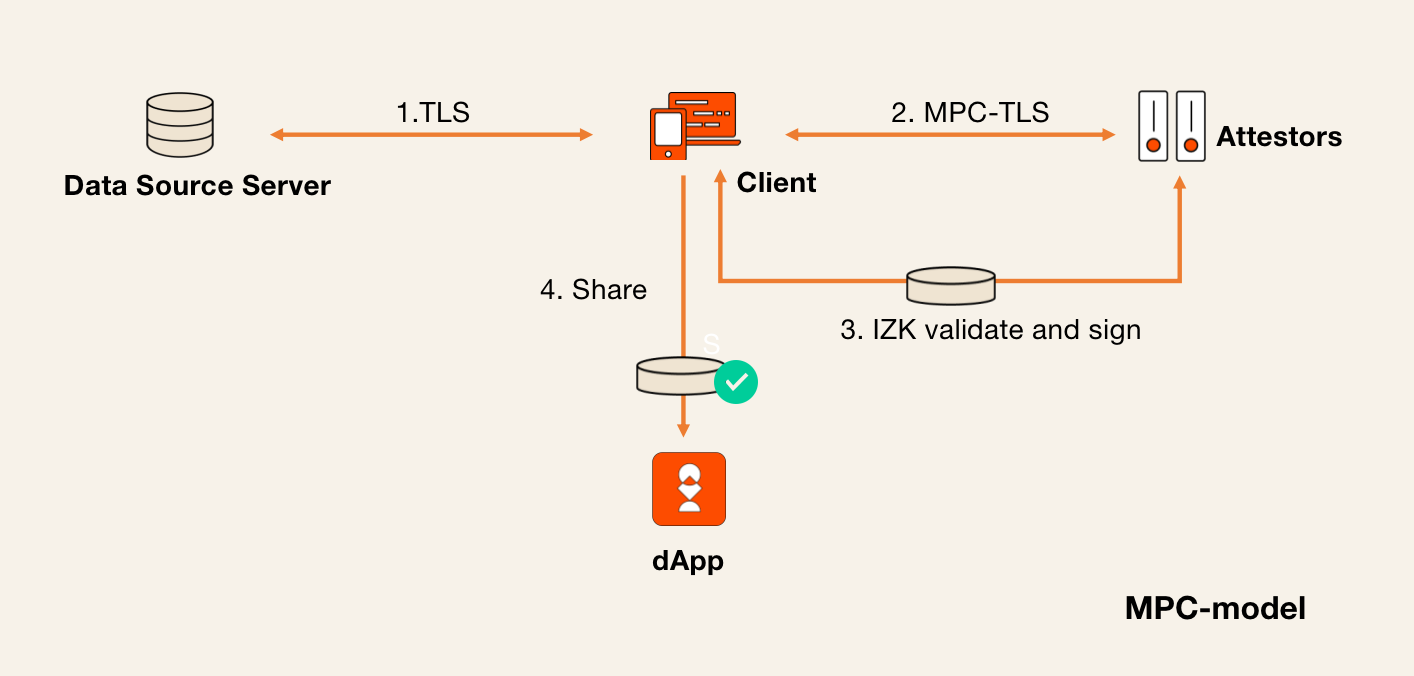
### Proxy Mode[](https://docs.primuslabs.xyz/primus-network/tech-intro/#proxy-mode "Direct link to Proxy Mode")
In the Proxy mode, the attestor acts as an intermediary between the client and the data source server, forwarding TLS traffic between them. Additionally, the attestor records all ciphertexts exchanged between the client and the server. At the end of the session, the client must prove to the attestor that it knows the plaintext messages underlying the ciphertexts.
The Proxy mode can offer better performance than the MPC mode, as it avoids the computational overhead of the multi-party computation protocol. However, it introduces a new network assumption: the attestor must ensure that it is indeed communicating with the intended server, mitigating any potential risks of miscommunication or attacks.
Primus’ Proxy mode differs from others in the industry by leveraging the highly efficient [QuickSilver](https://eprint.iacr.org/2021/076)
protocol during the proof process. Additionally, it proves the Key Derivation Functions (KDFs) during the TLS connection establishment, which is typically inefficient in zk-SNARK alternatives. This approach also eliminates the need for extra padding, which can be limiting and lack generality.
The diagram below illustrates the general workflow of how the Proxy mode operates.
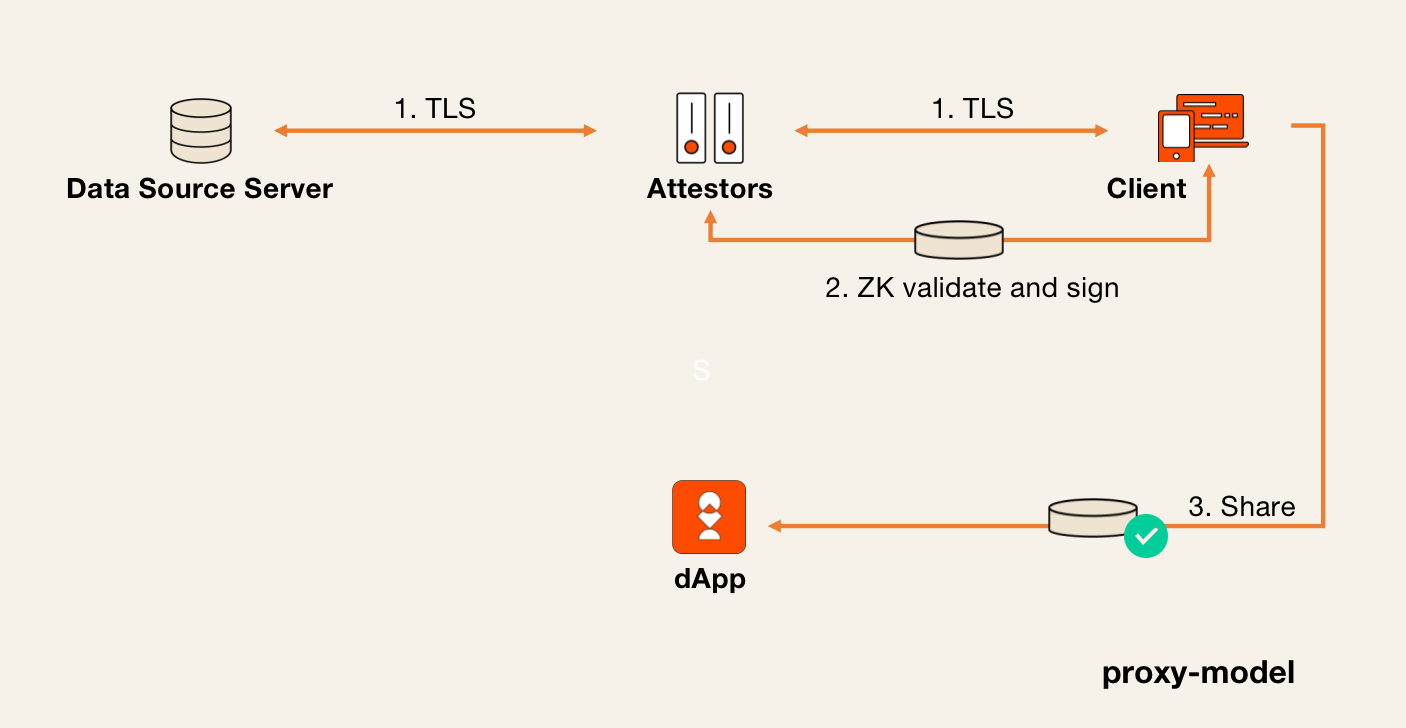
* [Overview of zkTLS](https://docs.primuslabs.xyz/primus-network/tech-intro/#overview-of-zktls)
* [MPC Mode](https://docs.primuslabs.xyz/primus-network/tech-intro/#mpc-mode)
* [Proxy Mode](https://docs.primuslabs.xyz/primus-network/tech-intro/#proxy-mode)
---
# FAQ for AlphaNet | primus
[Skip to main content](https://docs.primuslabs.xyz/primus-network/alphanet/faq/#docusaurus_skipToContent_fallback)
On this page

FAQ for AlphaNet Campaign[](https://docs.primuslabs.xyz/primus-network/alphanet/faq/#faq-for-alphanet-campaign "Direct link to FAQ for AlphaNet Campaign")
------------------------------------------------------------------------------------------------------------------------------------------------------------
**Q:** How can I complete the tasks?
**A:** You can follow the [tutorial](https://docs.primuslabs.xyz/primus-network/alphanet-tutorials)
to complete the tasks.
* * *
**Q:** AlphaNet is live. Where can I see my earlier points from the extension?
**A:** The XPs are legacy points that represent the activities in the Primus ecosystem. If the **"Early Bird"** badge appears on the page, it confirms that you earned XPs in the past campaigns, which is still shown in the Primus extension. All your previous XPs are still valid and recorded. However, no new XPs can be earned from UTC 7 am, 16 Oct.
The reputation score on the AlphaNet is a different type of points from the legacy XPs, which represents your social reputation off-chain.
* * *
**Q:** How much do I need to pay to verify my X profile and other data?
**A:** To generate a zkTLS proof on your X data or other data, You need to deposit approximately **0.000035 ETH** for the task fee, plus a very small amount of **gas fee** on the Base chain. If verification fails, your deposited tokens will be refunded in a short while.
* * *
**Q:** How long will the campaign last?
**A:** The campaign is ongoing, with no specific end date announced.
* * *
**Q:** Is my data safely stored on the AlphaNet?
**A:** Yes. Your private data is securely stored within the dApp. Thanks to zkTLS technology, no one can access or view your private data during the proof generation process.
* * *
**Q: What should I do with error codes: 10001, 10002, 10003, 10004?**
**A:** These error codes always come out with not stable internet connections or bad network conditions. You can switch to another network or use a VPN node to the region near UK/Poland/US/Singapore/Japan/India/Israel. Remember to close the browser and re-open it (**this step is very crucial!**), and re-do the task.
* [FAQ for AlphaNet Campaign](https://docs.primuslabs.xyz/primus-network/alphanet/faq/#faq-for-alphanet-campaign)
---
# Privacy Policy | primus
[Skip to main content](https://docs.primuslabs.xyz/resources/privacy-policy/#docusaurus_skipToContent_fallback)

Privacy Policy
==============
**Update Date: May 1st, 2023**
This privacy statement describes how Ideal Function Limited ("the Company", "we", "our") collects, uses, and stores personal information of users ("you", "your") through our products and services, including websites, applications, and APIs (collectively "Products and Services").
By using our services, you agree to the terms of this statement. If you have not yet accessed our Services, we recommend that you review these Terms before doing so. If you do not agree with any part of this privacy statement, please do not use any of our services.
**What personal information do we collect?**
When you use our Products and Services, we collect the minimum amount of information necessary to fulfill the purposes of the Products and Services. This may include:
* Account information: such as the account ID you create and account information you authorize through OAuth.
* Contact information: such as your email address.
* Technical information: such as the blockchain address you bind, device and browser type, operating system, and other technical data.
In addition, we do not collect or store any other personal information about you, and any personal information you obtain from other platforms through our Products and Services will be stored on your local device and will not be collected, analyzed, or tracked by us. We will never ask you to share your private key or wallet mnemonic. Never trust anyone or any website that asks you to enter your private key or wallet seed.
**How do we use personal information?**
We do not have access to the personal information stored on your local device. The minimal personal information we collect will be used in the following ways:
* Use of our Products and Services: To enable you to access and use the Services and to provide and deliver products and services that you may request.
* Make better communication: We utilize your personal information to inform you of potential promotions, upcoming events, and other relevant updates about our products and services, as well as those of our carefully selected partners.
* Optimize our platform: To optimize your user experience, we may use your information to respond to your comments and questions about the Services and to provide general customer service to you and other users.
**How do we share personal information?**
We do not share the personal information you provide to us with other organizations without your consent. We only share personal information with third parties under the following circumstances:
* Affiliates: We will share personal information with our affiliates to maintain a consistent user experience between the products and services we provide to you.
* Business Transfer: When we enter into or negotiate a business transaction, we may share personal information related to the sale or transfer of all or part of our business or assets. These transactions may include any merger, financing, acquisition or bankruptcy transaction or procedure.
* Legal reasons: We may share personal information for legal, protection, and security purposes.
* Professional Advisors and Service Providers: We may share information with individuals or companies that require information to work for us, including third-party companies and individuals who represent and provide services, as well as lawyers, bankers, auditors, and insurance companies.
The personal information we provide in our Products and Services is shared directly by you with other companies or entities you choose, and you can choose to use a clear/privacy-proof method for them to use.
**Privacy Rights and Choices**
You may access the information you voluntarily provide through your account on the Services, and update or delete such information yourself. You can request [contact@primuslabs.xyz](mailto:contact@primuslabs.xyz)
to view, correct or delete information on the server.
**Minors**
We do not allow individuals under the age of 16 to register for an account. If we become aware that a child or minor under the age of 16 has used our Products and Services, we will use notice to inform them that they may not use the Website, and then we will stop serving that account and delete the information.
**Changes to the Privacy Statement**
We may update this Privacy Statement from time to time and will post the updated Privacy Statement on our website with the "Last Updated" date at the top. We recommend checking the Privacy Statement periodically for the latest information. Nevertheless, ongoing utilization of our Products or Services subsequent to posting any modified Privacy Policy will signify your acceptance of the revised Terms and Conditions as per the modified Privacy Policy.
This Privacy Statement does not apply to any products, services, websites or content that are provided or owned by third parties with their own privacy policies.
**Contact Us**
If you have any questions or concerns regarding this Privacy Statement, please email us at [contact@primuslabs.xyz](mailto:contact@primuslabs.xyz)
.
---
# Understand Primus Network | primus
[Skip to main content](https://docs.primuslabs.xyz/primus-network/understand-primus-network/#docusaurus_skipToContent_fallback)
On this page

Understand Primus Network[](https://docs.primuslabs.xyz/primus-network/understand-primus-network/#understand-primus-network "Direct link to Understand Primus Network")
-------------------------------------------------------------------------------------------------------------------------------------------------------------------------
Primus network is fundamental layer of the zkTLS protocols that provides decentralized security and robustness, with driving the demand for data verifications and monetizations.
### Roles of The Network[](https://docs.primuslabs.xyz/primus-network/understand-primus-network/#roles-of-the-network "Direct link to Roles of The Network")
#### 1\. Attestor Node[](https://docs.primuslabs.xyz/primus-network/understand-primus-network/#1-attestor-node "Direct link to 1. Attestor Node")
An attestor node is a computing node of the Primus network, which forms a secure computation layer for executing zkTLS protocol. The attestor node is designated to run zkTLS tasks with zkTLS software including web version (Primus extension) and mobile versions (Primus AppClips and Primus Instant Apps) on indicated data sources. For [security consideration](https://docs.primuslabs.xyz/primus-network/attestor-security)
, the attestor node runs inside a Trusted Execution Environment (TEE), ensuring runtime integrity and providing stronger version control.
Any operator of the attestor node is required to stake a certain amount of tokens as collateral to secure his participation in the network activities. The attestor can earn incomes on successfully running the network task. If the zkTLS task is not run correctly, it will also be punished.
#### 2\. Developer[](https://docs.primuslabs.xyz/primus-network/understand-primus-network/#2-developer "Direct link to 2. Developer")
A developer within Primus network builds zkTLS app by utilizing Primus network SDK.
#### 3\. Client[](https://docs.primuslabs.xyz/primus-network/understand-primus-network/#3-client "Direct link to 3. Client")
A client is an end user who directly allocates a zkTLS task to the network through a dapp built by a developer.
### Network Architecture and Workflow[](https://docs.primuslabs.xyz/primus-network/understand-primus-network/#network-architecture-and-workflow "Direct link to Network Architecture and Workflow")
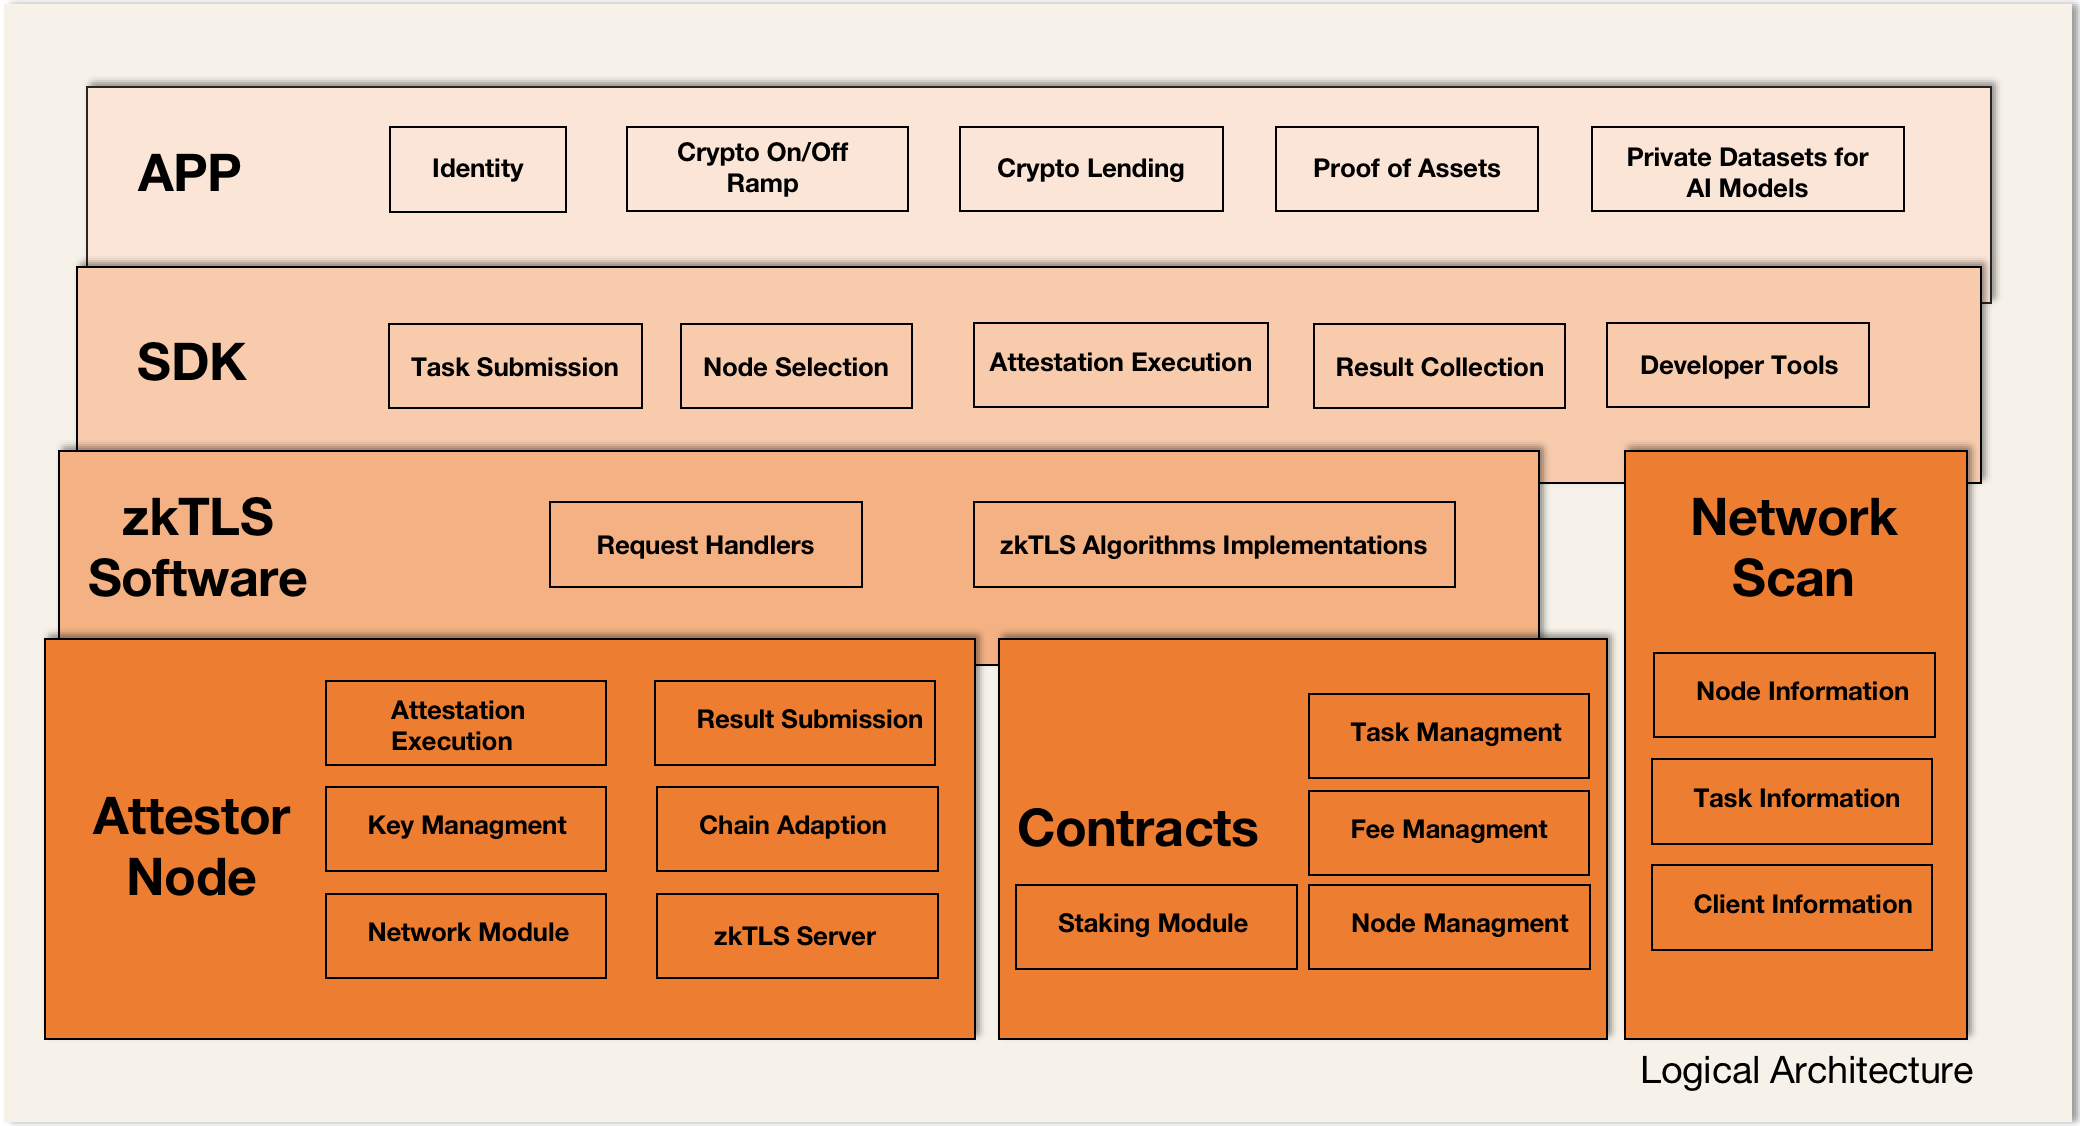
The Primus system contracts act as the core hub and the dispatcher to manage the network activities. They need to handle fee settlement, stakings, rewards, and penalties about zkTLS tasks. In the network, normally a session starts with a task created by a client. The task is sent to the contracts to be processed by the network attestors.
Within the task session, a selected attestor will perform a chosen zkTLS protocol (MPC Mode or Proxy Mode) with the client, to verify the web data which is specified in the task (dapp) and issue zkTLS proofs.
Another core component is **Primus network SDK**, which is used implicitly in the network activities. The SDK is normally integrated and used by the zkTLS dapps, to send tasks to the contracts and locate the selected attestor. The SDK is the true vehicle to run the zkTLS protocol with the attestor, and create the related zkTLS proofs.
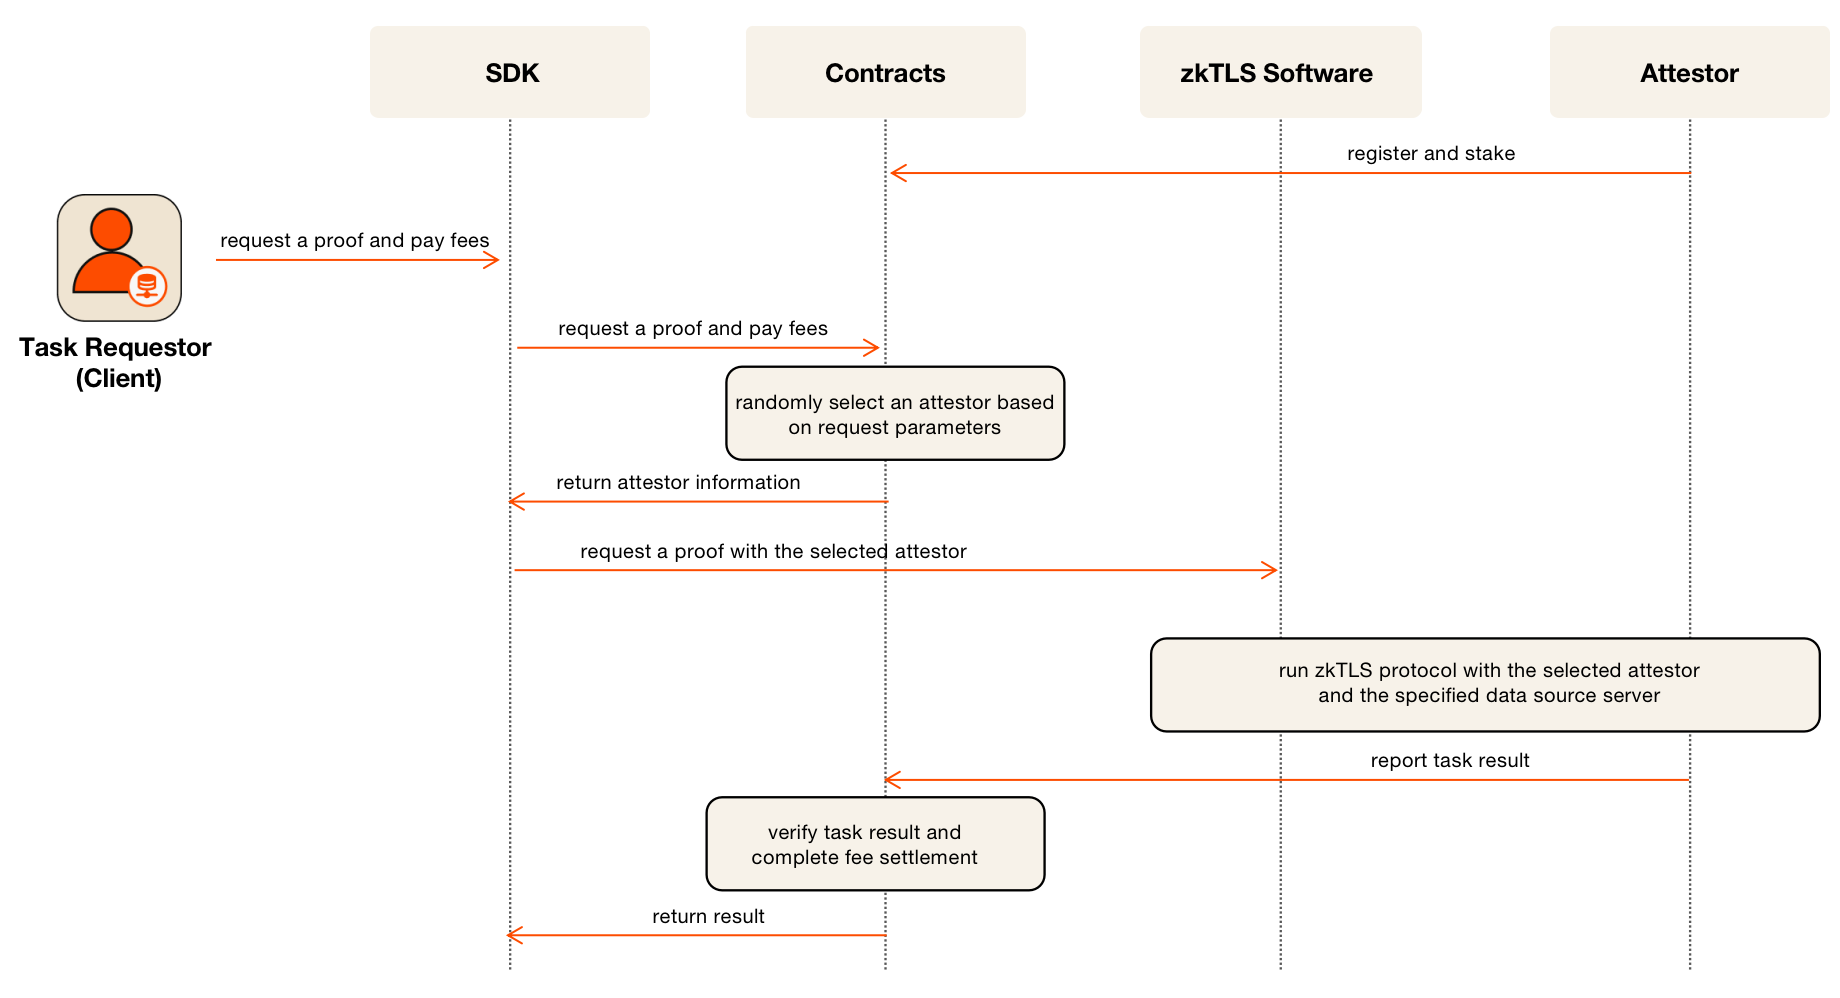
### Network Economics[](https://docs.primuslabs.xyz/primus-network/understand-primus-network/#network-economics "Direct link to Network Economics")
Clients shall pay task fees with crypto tokens to the verification service provided by the network. The fee shall be paid to the system contracts prior to the task execution. The fees from the executed task will be shared by the attestor which actually runs the zkTLS session with the client, and the protocol.
Attestor shall stake a certain number of tokens and waits for a while before it can onboard as an official node. Attestor will have to wait for a certain period to exit the staking before returning the locked funds.
### Penalties[](https://docs.primuslabs.xyz/primus-network/understand-primus-network/#penalties "Direct link to Penalties")
If an attestor does not execute the zkTLS protocol honestly and instead arbitrarily signs on the zkTLS session, penalties will apply. The correctness of the protocol execution is validated through TEE attestation.
If a node’s instability leads to execution failures or timeouts, the task output must be reported to the system contracts. A pre-defined threshold will determine whether penalties apply: within a given time window, a certain failure rate may be tolerated without punishment, while exceeding a specified timeout rate will trigger penalties.
The penalty mechanism is designed as an incremental means of network security, and will not be introduced on the first day of the mainnet launch. In the staging phases, there will be no penalty mechanism, only authorized nodes will be allowed to join the network. When the penalty mechanism is formally introduced, task execution will be verified through TEE attestations, ensuring that correctness of the cryptographic operations can be enforced and validated.
### Network Governance[](https://docs.primuslabs.xyz/primus-network/understand-primus-network/#network-governance "Direct link to Network Governance")
The governance mechanism will primarily be responsible for network upgrades, parameter adjustments, and other key decisions affecting the system. In the early stages, governance will not be activated, allowing the network to focus on stability and adoption. Once introduced, governance will cover parameters such as the minimum staking requirement for attestor nodes, the unbonding period for attestor nodes, the minimum staking requirement for clients, the unbonding period for regular stakers, and the allowable range for the proportion of staking rewards distributed by regular stakers to their delegated attestor nodes.
* [Understand Primus Network](https://docs.primuslabs.xyz/primus-network/understand-primus-network/#understand-primus-network)
* [Roles of The Network](https://docs.primuslabs.xyz/primus-network/understand-primus-network/#roles-of-the-network)
* [1\. Attestor Node](https://docs.primuslabs.xyz/primus-network/understand-primus-network/#1-attestor-node)
* [2\. Developer](https://docs.primuslabs.xyz/primus-network/understand-primus-network/#2-developer)
* [3\. Client](https://docs.primuslabs.xyz/primus-network/understand-primus-network/#3-client)
* [Network Architecture and Workflow](https://docs.primuslabs.xyz/primus-network/understand-primus-network/#network-architecture-and-workflow)
* [Network Economics](https://docs.primuslabs.xyz/primus-network/understand-primus-network/#network-economics)
* [Penalties](https://docs.primuslabs.xyz/primus-network/understand-primus-network/#penalties)
* [Network Governance](https://docs.primuslabs.xyz/primus-network/understand-primus-network/#network-governance)
---
# Useful Links | primus
[Skip to main content](https://docs.primuslabs.xyz/resources/useful-links/#docusaurus_skipToContent_fallback)
On this page

Useful Links[](https://docs.primuslabs.xyz/resources/useful-links/#useful-links "Direct link to Useful Links")
----------------------------------------------------------------------------------------------------------------
* zkTLS Resources:
* [Whitepaper](https://eprint.iacr.org/2023/964)
* [QuickSilver](https://eprint.iacr.org/2021/076)
* zkFHE Resources:
* [GINX](https://eprint.iacr.org/2014/283.pdf)
* [Primus Extension](https://chromewebstore.google.com/detail/primus-prev-pado/oeiomhmbaapihbilkfkhmlajkeegnjhe)
### Social Links[](https://docs.primuslabs.xyz/resources/useful-links/#social-links "Direct link to Social Links")
Twitter: [https://x.com/primus\_labs](https://x.com/primus_labs)
Discord: [https://discord.com/invite/pdrNxRrApX](https://discord.com/invite/pdrNxRrApX)
Github: [https://github.com/primus-labs](https://github.com/primus-labs)
Medium: [https://medium.com/@primuslabs](https://medium.com/@primuslabs)
* [Useful Links](https://docs.primuslabs.xyz/resources/useful-links/#useful-links)
* [Social Links](https://docs.primuslabs.xyz/resources/useful-links/#social-links)
---
# Page Not Found | primus
[Skip to main content](https://docs.primuslabs.xyz/primus-network/alphanet-tutorials#docusaurus_skipToContent_fallback)
Page Not Found
==============
We could not find what you were looking for.
Please contact the owner of the site that linked you to the original URL and let them know their link is broken.
---