# Table of Contents
- [Preface · Learning C with Pebble](#preface-learning-c-with-pebble)
- [Chapter 1: Introduction · Learning C with Pebble](#chapter-1-introduction-learning-c-with-pebble)
- [Chapter 3: Variables and Other Basics · Learning C with Pebble](#chapter-3-variables-and-other-basics-learning-c-with-pebble)
- [Chapter 8: Pointers and Memory Allocation · Learning C with Pebble](#chapter-8-pointers-and-memory-allocation-learning-c-with-pebble)
- [Chapter 4: Making Decisions and Conditional Execution · Learning C with Pebble](#chapter-4-making-decisions-and-conditional-execution-learning-c-with-pebble)
- [Chapter 2: First Things First · Learning C with Pebble](#chapter-2-first-things-first-learning-c-with-pebble)
- [Chapter 15: Using the C Preprocessor · Learning C with Pebble](#chapter-15-using-the-c-preprocessor-learning-c-with-pebble)
- [Chapter 16: Standard C File I/O · Learning C with Pebble](#chapter-16-standard-c-file-i-o-learning-c-with-pebble)
- [Chapter 14: Putting C to Work with Pebble Smartwatch Sensors · Learning C with Pebble](#chapter-14-putting-c-to-work-with-pebble-smartwatch-sensors-learning-c-with-pebble)
- [Chapter 17: Pebble Smartwatch File I/O · Learning C with Pebble](#chapter-17-pebble-smartwatch-file-i-o-learning-c-with-pebble)
- [Appendix A: Data Types and Compatibility · Learning C with Pebble](#appendix-a-data-types-and-compatibility-learning-c-with-pebble)
- [Chapter 21: Writing High-Quality, Debuggable Code · Learning C with Pebble](#chapter-21-writing-high-quality-debuggable-code-learning-c-with-pebble)
- [Chapter 5: Loops and Iteration · Learning C with Pebble](#chapter-5-loops-and-iteration-learning-c-with-pebble)
- [Chapter 6: Working with Functions · Learning C with Pebble](#chapter-6-working-with-functions-learning-c-with-pebble)
- [Appendix B: Development Environments for Pebble Projects · Learning C with Pebble](#appendix-b-development-environments-for-pebble-projects-learning-c-with-pebble)
- [Appendix C: Pebble Developer Communities · Learning C with Pebble](#appendix-c-pebble-developer-communities-learning-c-with-pebble)
- [Chapter 13: Storage Classes and Qualifiers · Learning C with Pebble](#chapter-13-storage-classes-and-qualifiers-learning-c-with-pebble)
- [Chapter 7: Arrays · Learning C with Pebble](#chapter-7-arrays-learning-c-with-pebble)
- [Chapter 9: Strings · Learning C with Pebble](#chapter-9-strings-learning-c-with-pebble)
- [Chapter 10: Structured Data Types · Learning C with Pebble](#chapter-10-structured-data-types-learning-c-with-pebble)
- [Chapter 11: How C Programs Execute · Learning C with Pebble](#chapter-11-how-c-programs-execute-learning-c-with-pebble)
- [Chapter 20: Communication and Data Exchange · Learning C with Pebble](#chapter-20-communication-and-data-exchange-learning-c-with-pebble)
- [Chapter 12: Bit Manipulation · Learning C with Pebble](#chapter-12-bit-manipulation-learning-c-with-pebble)
- [Chapter 18: User Interface Development · Learning C with Pebble](#chapter-18-user-interface-development-learning-c-with-pebble)
- [Chapter 19: Drawing and Graphics · Learning C with Pebble](#chapter-19-drawing-and-graphics-learning-c-with-pebble)
---
# Preface · Learning C with Pebble
[Powered by **GitBook**](https://www.gitbook.com/?utm_source=public_site_legacy&utm_medium=referral&utm_campaign=trademark&utm_term=pebble&utm_content=powered_by)
[](https://pebble.gitbooks.io/learning-c-with-pebble/content/#)
[](https://pebble.gitbooks.io/learning-c-with-pebble/content/#)
FacebookGoogle+TwitterWeiboInstapaper
[](https://pebble.gitbooks.io/learning-c-with-pebble/content/#)
[](https://pebble.gitbooks.io/learning-c-with-pebble/content/#)
[](https://pebble.gitbooks.io/learning-c-with-pebble/content/#)
AA
SerifSans
WhiteSepiaNight
[Preface](https://pebble.gitbooks.io/learning-c-with-pebble/content/)
======================================================================
Preface
=======
Welcome to Learning C with Pebble. I'm glad you are (at least considering) spending some time with this book.
This book is a lot different than most books you will encounter. The first difference you will see is how you got here: it's published online in open source format. Publishing on [gitbook.com](http://gitbook.com/)
means a couple of things that makes this different:
* It means that this book represents a work in progress. It will be released incrementally, sections at a time. It will be updated regularly: errors will be fixed and new content will be added. Instead of issuing "editions", we will work on one continual edition, in versions.
* It means you can have your own copy for free. You can read the book right here or you can download it in PDF or several eBook formats.
* It means you can get a source copy and add your own content. The source of the book is in [Markdown](https://en.wikipedia.org/wiki/Markdown)
formatting, which is a text-based format with formatting directives in the text. It's easy to work with and easy to extend.
This book is also different because of the Project Exercises at the end of every chapter. Many books on C programming will include questions or short exercises with each chapter. For this book, we have produced "project" exercises. These are complete Pebble smartwatch applications that start you off with something to work on and ask you to make changes. The "answers" are also produced and available for you to view. And the work is specified in the context of the [CloudPebble](http://cloudpebble.net/)
online IDE. You can work with each project in an online emulator or directly on a real Pebble smartwatch.
These project exercises can be effective in a number of ways. They are a great way to highlight the topics of each chapter. They are also a great way to learn how to build C programs that work on a [Pebble smartwatch](https://www.pebble.com/)
. They give you many examples from which you can derive your own apps. And they can teach you to be more comfortable with code that is unfamiliar. This helps you build applications from a foundation of other example code.
There are a lot of people involved with this book to whom I am very grateful. The first is to my wife, Peg, who puts up with my many obsessions, including Pebble smartwatches and writing this document.
There are several people at Pebble who had crucial roles with getting this book published. [Cat Haines](https://twitter.com/_cathaines)
, [Jon Barlow](https://twitter.com/orviwan)
and [Katharine Berry](https://twitter.com/KatharineBerry)
were instrumental in making these chapters a reality. They worked with day-to-day updates and were my direct line to Pebble. [Thomas Sarlandie](https://twitter.com/sarfata)
and [Kevin Conley](https://twitter.com/kevindcon)
fielded my first ideas and saw some worth in them, connecting me with Cat and Jon.
Finally, some really smart people from the [Pebble community on Slack](http://slack.pbldev.io/)
proofread the chapters and helped make the Project Exercises a reality. They worked on the code, made their own suggestions, and produced some very effective learning tools. Here's a list:
* [Allan Findlay](https://twitter.com/allanf175)
* David J Groom
* [Johannes Neubrand](https://twitter.com/JNeubrand)
* [Paul Niven](https://twitter.com/NiVZ)
* [Mathew Reiss](https://twitter.com/mydogsnowy)
* [Rob Spiess](https://twitter.com/robisodd)
Finally, a special thanks to [Juan Sanchez](https://twitter.com/juansanchez)
for his beautiful artwork and to [Ryan Perry-Nguyen](http://twitter.com/rperryng)
for his meticulous attention to editing.
So, enjoy the book. Some very intelligent people have worked hard to produce something that is readable and packed with examples and code and projects. We all hope you find this a great way to learn the C programming language on Pebble smartwatches.

Mike Jipping
Hope College
Holland, Michigan USA
[jipping@hope.edu](mailto:jipping@hope.edu)
results matching ""
===================
No results matching ""
======================
---
# Chapter 1: Introduction · Learning C with Pebble
[Powered by **GitBook**](https://www.gitbook.com/?utm_source=public_site_legacy&utm_medium=referral&utm_campaign=trademark&utm_term=pebble&utm_content=powered_by)
[](https://pebble.gitbooks.io/learning-c-with-pebble/content/chapter01.html#)
[](https://pebble.gitbooks.io/learning-c-with-pebble/content/chapter01.html#)
FacebookGoogle+TwitterWeiboInstapaper
[](https://pebble.gitbooks.io/learning-c-with-pebble/content/chapter01.html#)
[](https://pebble.gitbooks.io/learning-c-with-pebble/content/chapter01.html#)
[](https://pebble.gitbooks.io/learning-c-with-pebble/content/chapter01.html#)
AA
SerifSans
WhiteSepiaNight
[Chapter 1: Introduction](https://pebble.gitbooks.io/learning-c-with-pebble/content/)
======================================================================================
Chapter 1: Introduction
=======================
In 1571, Robert Dudley, the first Earl of Leicester, wanted to impress the queen of England, Queen Elizabeth I. He found a unique gift for her; he gave her a time piece to be worn on her arm and called it an “arm watch”. It was a jeweled masterpiece, with diamonds and pearls and gold. Among all the glamour, it contained a small clock piece, which kept time mechanically. The queen was so impressed with her new watch that she commissioned several time pieces, even one set into a ring, with an "alarm" that used a small armature to scratch her finger.
Since that first gifting, the wrist watch has gone through many stages of evolution to become a valuable source of information. Watches were simply decorations on bracelets until the late 1800’s, when “wristlets” that could strap pocket watches to wrists became popular. German innovation popularized the mechanical wrist watch and shrank its size. Quartz technology in the 1960's moved watches from mechanical, spring-driven movement to electrical, and most mass-produced watches from the 1980's on were driven by quartz movement. The first digital watches were developed in the 1970's. They combined quartz movement with electronics for display. As watch technology developed into this century, extra features were added to standard time and date displays, such as phases of the moon, timers, and alarm functions.
Watches have become popular because they are a source of valuable information, strapped to a very convenient and accessible location. One’s wrist as a source for information is easily accessible and very visible. It makes sense, then, that a watch on the wrist is used for more than just time.
### The Pebble Smartwatch
In 2008, Eric Migicovsky was an engineering student at the University of Waterloo. He wanted to build a device that allowed him to use his phone while riding a bicycle. His solution was to combine a cell phone (a Nokia 3310 at the time) with an Arduino processor to produce a prototype for a "watch computer" that could obtain data from a phone. For Migicovsky, this mashup of phone and computer was a student project, but it worked well enough to inspire him. Migicovsky called this project the inPulse. By 2010, with some ingenuity that stuffed electronics inside a 3D printed casing, the first prototype of the inPulse was created. It was the start of what a smartwatch could do and it allowed people to imagine having a computer on their wrist.
Having gone through this first experience with inPulse, Migicovsky came up a new project: a watch called “Pebble.” This time, the watch project was funded by backers through Kickstarter, a Web site for crowdfunding projects. On April 11, 2012, the Pebble project launched with a goal of raising $100,000. That goal was reached within 2 hours. Within 28 hours, $1 million was raised. By the end of the 30 day funding period, more than $10 million was raised from over 68,000 backers, breaking Kickstarter records (at the time). These original Pebble smartwatches began shipping in January 2013.
Since the original Pebble, several other Pebble models have been released. As of this writing, there are 5 models in the Pebble family. The original Pebble smartwatch and its steel sibling -- the Pebble Steel -- continue to have a wide user base. These are watches with a monochrome display and a battery life of up to 7 days. The current line of watches -- the Pebble Time, Pebble Time Steel, and Pebble Time Round -- have color displays and and battery lives that range from 10 days for the Pebble Time Steel, to 2 days for the Pebble Time Round.
Figure 1.1 shows the Pebble Time and the Pebble Time Steel and Figure 1.2 show the Pebble Time Round.
* * *
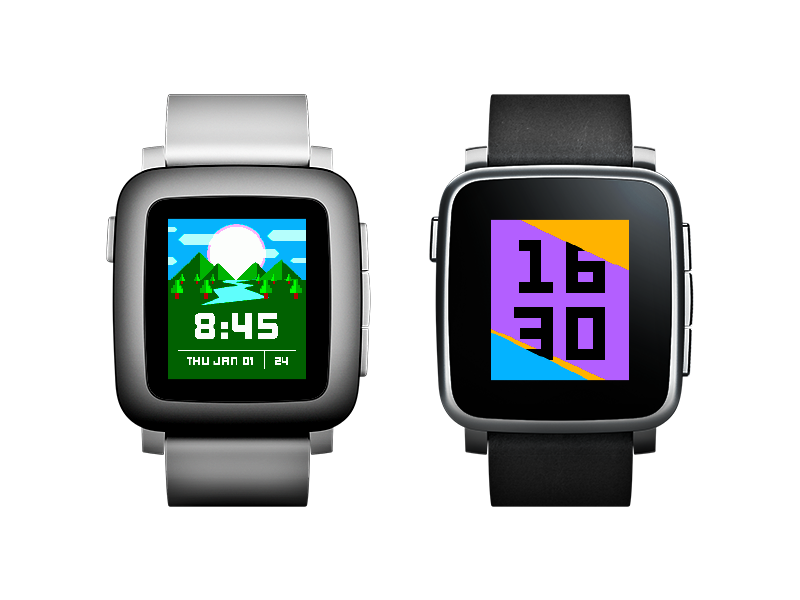
**Figure 1.1:** The Pebble Time and Pebble Time Steel
* * *
* * *
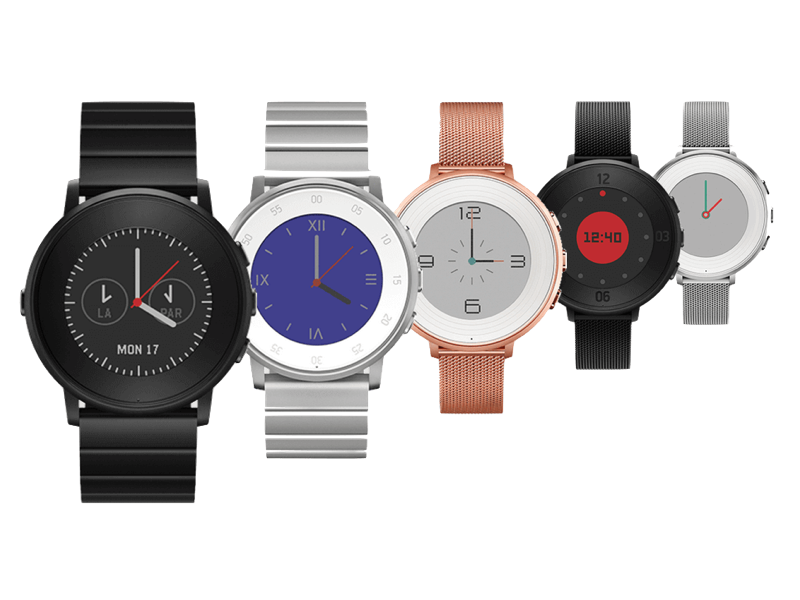
**Figure 1.2:** The Pebble Time Round
* * *
Several features of Pebble smartwatches have proven to be attractive. The extended battery life is a distinct advantage, when compared to other smartwatches. The color displays can be viewed from many angles and outside in direct sunlight. The watches are light and easily worn. One of the best features, however, is the easy way the watch can be programmed. One can write applications that create new watch faces as well as applications that use all features of the watch: the display, the sensors, and the button inputs. All Pebble smartwatches have the same programming system: apps are written in C, turned into CPU instructions, then uploaded to the watch through the Pebble app on a smartphone.
This means that, to take advantage of the easy programming features and write apps for the watch, one should learn the C programming language. And that is what this book will help you to do.
### The Pebble Hardware
Pebble smartwatches have different configurations, but have several common elements.
Inside a Pebble smartwatch is a display that can stay on without using a lot of battery power. Called "e-paper", the display is a reflective LCD display. The current displays are capable of displaying 64 colors. The Pebble Time and Pebble Time Steel smartwatches have a resolution of 144 by 168 pixels; the Pebble Time Round has a resolution of 180 by 180 pixels. Each display has a refresh rate of 30 frames per second, which enables rapid animations that look smooth and render with excellent image integrity.
> **Why Does Refresh Rate Matter?**
>
> When the Pebble smartwatch was first introduced as a proposed design, one of the features that excited potential users was the screen's refresh rate. Refresh rate measures the number of times images are redrawn on the watch's display. This matters because it affects the smoothness of animation across the watch display. While the human eye and brain are actually wired to perceive and process roughly 1000 frames per second, humans generally perceive data at approximately 45 frames per second. Video is typically produced at 30 frames per second, which is well within the human capacity to process. The Pebble smartwatch refresh rate of 30 frames per second ensures that watch wearers will perceive animation as smooth and consistent.
Each Pebble model has the same methods of interaction. The watches do not have a touchscreen, but rely on buttons for input. As shown in Figure 1.3, there is one button on the left, designated as the _back_ button. There are three buttons on the right, typically referred to as the _up_, _select_, and _down_ buttons. These designations are only the typical uses; these buttons may be used for any purpose. In addition to button input, the Pebble Time models include a microphone. Each watch also has a vibration motor.
* * *
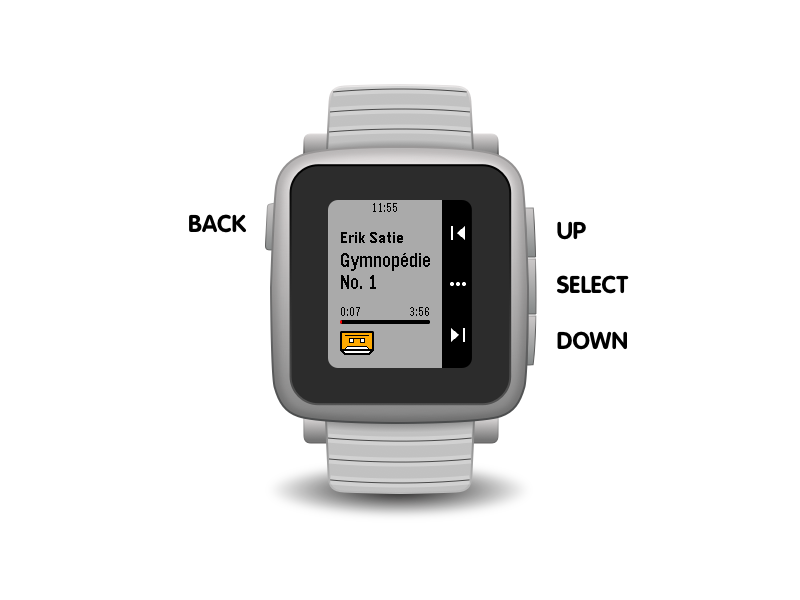
**Figure 1.3:** The button on a Pebble smartwatch
* * *
The processors in the various models of the Pebble smartwatch are all _system on a chip_ (SoC) designs. SoC designs are built with a processor and various components that the processor needs to operate efficiently, all on a single chip. For example, the Pebble Classic has an ARM Cortex-M3 processor, running at 80 MHz, with 512 KB of storage, communication ports, and several power modes all built into a single chip. The Pebble Time's SoC is similar, using an ARM Cortex-M4 running at 100 MHz, with 1 MB of storage and encryption and audio capabilities built in. It is interesting to note that the Pebble Time's SoC includes a floating point coprocessor, although it is not yet exposed to developers. It is also interesting that the Pebble Time's processor can run faster than 100 MHz, but is limited to that speed for power efficiency reasons.
The CPU uses storage as it runs an application, but there is also nonvolatile storage on each watch model. The Pebble Classic and Pebble Steel have either 4 MB or 8 MB of such storage, depending when the watch was manufactured. The Pebble Time models had 16 MB of storage. These storage capacities are built from flash memory and are external to the processor, which means they are not used for running applications, but are used to store data and watchapps. In addition, there is read-only memory (ROM) storage that holds the bootloader, responsible for booting a watch, and the firmware, the software that runs the watch. Random access memory (RAM) is also provided, used for temporary space in which applications execute. The Pebble Classic and the Pebble Steel have 128 kB of RAM; Pebble Time models have 256 KB of RAM. This memory is used by the system, to run the operating system software, by background programs, and by the currently running application.
Pebble smartwatches have several sensors built into them. Each model has an ambient light sensor that reads and delivers data on how bright the light is around the watch. Each model has a 3-axis magnetometer that can act as a compass and delivers directional data. Each model includes a 3-axis accelerometer, which can render information about how the watch is oriented in space in 3 dimensions. In addition, Pebble Time smartwatches also have a microphone built in. We will discuss access to sensors and their data, including the microphone, in a future chapter of this book.
All Pebble smartwatches have the ability to communicate with other devices through Bluetooth connections. Each watch is able to communicate using Bluetooth standards version 2.1 (so called "Bluetooth Classic") and 4.0 ("Bluetooth LE" or Low Energy).
Smartstraps were introduced with the Pebble Time. A smartstrap is a watch strap that has extra electrical contacts that allow the strap to communicate with the watch. The strap's contacts cover the power connector, which does multiple duties of connecting to power and connecting the straps to the watch's hardware. Figure 1.4 has a depiction from Pebble's documentation of how a smartstrap's connectors are configured.
* * *
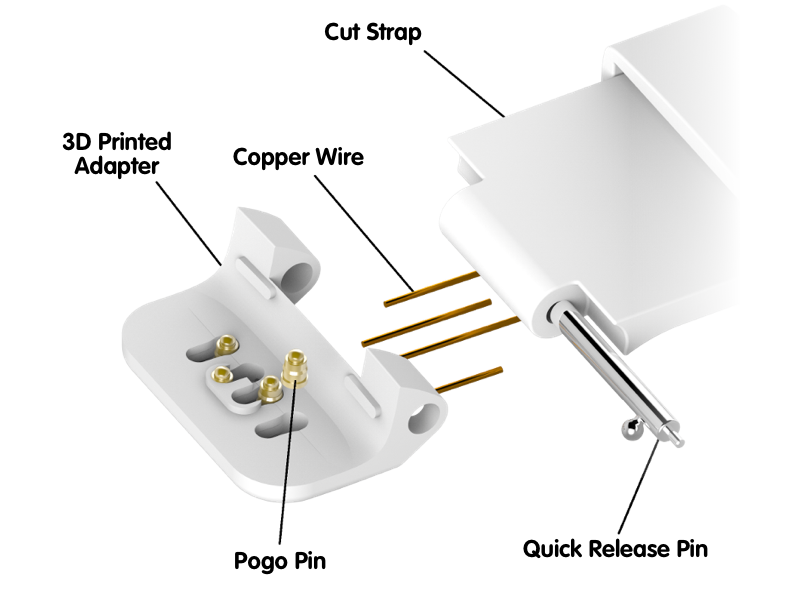
**Figure 1.4:** Pebble Time's Smartstrap connectors
* * *
There are currently [several projects described](http://makezine.com/2015/09/25/hacking-on-the-pebble-smartstrap/)
online that take advantage of this smartstrap technology.
### The Pebble Software
While hardware forms the foundation of the Pebble smartwatch models, it is the software that makes the watch come alive to the user. As with most computing devices, the hardware is usually taken for granted and the software becomes the focus of use. So with the Pebble: while the Cortex-M3 vs the Cortex-M4 forms a major upgrade between the Pebble Classic and the Pebble Time, the color display and what you can do with it is the most accessible and most exciting upgrade.
Perhaps the most basic piece of software on each Pebble smartwatch is the Pebble operating system, aka Pebble OS. An operating system provides access for software to the hardware of the computing device. Pebble OS provides an interface for software to access the watch hardware. It uses metaphors to provide this access, so the developers of software can more easily access this hardware.
Operating system software may provide access to hardware in increments. Not all hardware will be accessible to software developers. For example, the Pebble Steel model included an LED light on the face that could display light in various colors. While it was perhaps the intention of operating system developers to provide access to this light, it never made it into the software interface provided by the operating system. The system's magnetometer sensor, on the other hand, was built into the very first Pebble, but was only made available to software developers in Pebble OS version 2. Metaphors and appropriate, consistent software access take time to design properly.
Another element that an operating system provides is a user interface. In the case of a Pebble smartwatch, the user interface is extremely important. The only methods of user interaction are buttons and microphone (on the Pebble Time models), and the display and vibration make up the output to the wearer. Button input is quite flexible; Pebble OS will distinguish between single, double, and long presses and can detect when multiple buttons are used together.
Since version 3.0, Pebble OS has built in a timeline interface in addition to watchfaces and watchapps. The _timeline_ is a user interface metaphor that presents time related information to the user through a timeline populated with time events. This timeline can be accessed from the watchface display through use of the up and down buttons. The timeline incorporates the use of _pins_, event and notification items that are tagged with time and displayed chronologically. Figure 1.5 shows an example of a timeline pin and the details from that pin.
* * *
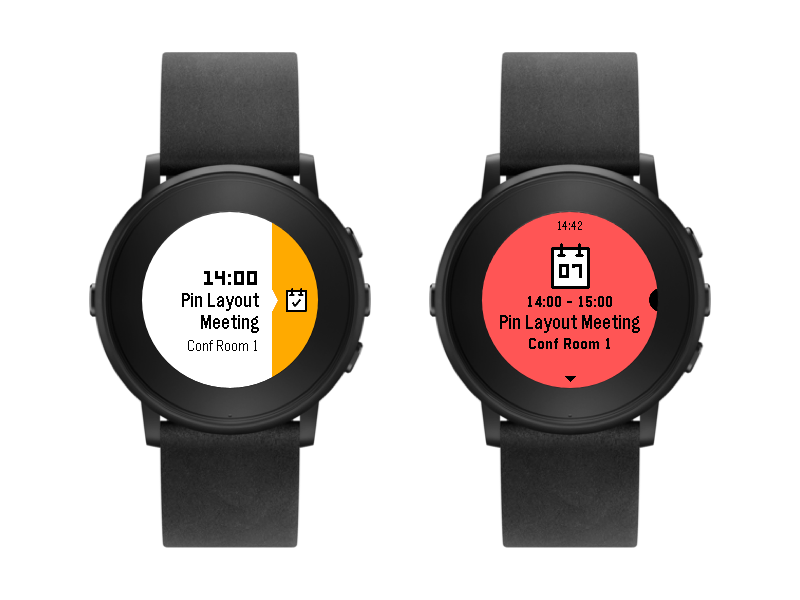
**Figure 1.5:** An example timeline pin and the details from it.
* * *
Pins are strongly linked to Web services on the Internet. They can be placed on timelines by programs and they can be shared between several different users. We will discuss the timeline and pins in a future chapter.
There are currently three different software platforms when one considers writing software for Pebble OS. The Pebble Classic models use the _Aplite_ platform. This platform focuses on monochrome rectangular displays. The _Basalt_ platform was introduced with the Pebble Time, accommodating color displays that are also rectangular. The Pebble Time Round necessitated another software platform, called the _Chalk_ platform, that moves common user interface elements from a rectangular interface to a round interface. As an example, Figure 1.6 shows Basalt and Chalk side by side. By using proper coding elements, a programmer can use the same code for all three platforms.
* * *
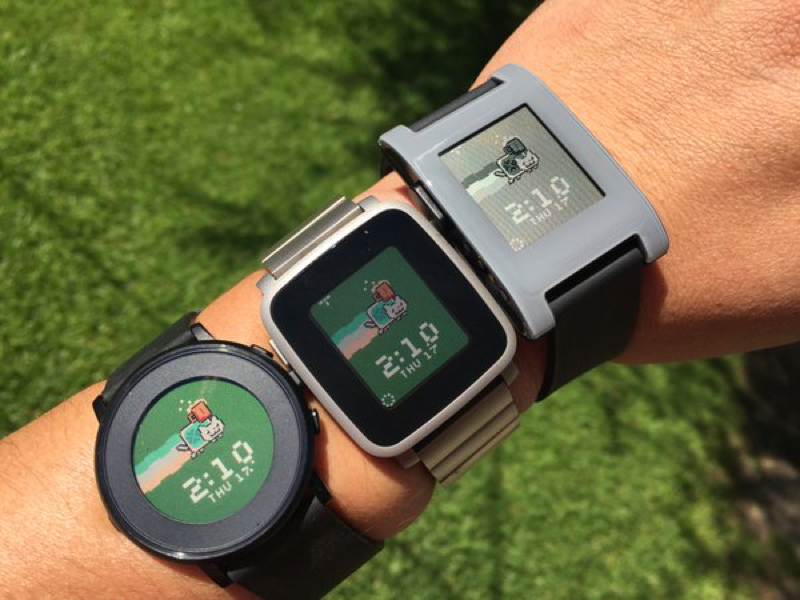
**Figure 1.6:** Aplite, Basalt, and Chalk software platforms.
* * *
There are two types of applications that one can write for Pebble OS: watchfaces and watchapps. Both types are written in much the same way. However, watchfaces usually focus on (naturally) displays that mark time, restricting watchface access to watch buttons. Watchapps expand the possibilities of an application, using the watch like a computer and controlling all elements of the interface. In a sense, watchfaces are watchapps, but there is a specific way of programming a watchface that makes it unique; for example, watchfaces cannot receive input from the watch buttons.
> **The Watchface Generator**
>
> A human can write watchface programs in many different styles. However, watchface programs can also be derived from fixed templates so that they can be written by a computer. The Watchface Generator Web site (at [http://www.watchface-generator.de](http://www.watchface-generator.de/)
> ) lets users design their own custom watchface, then writes the code necessary to implement that watchface and generates the right software package ready for installation. While you can still write your own watchface code that might be more flexible or have more capability, the Watchface Generator can produce attractive and interesting watchfaces with no user coding.
### The Phone App
Pebble smartwatches are made to work with mobile phones. When a watch is turned on for the first time, it looks for a phone to help download operating system firmware. The Pebble phone app is key to the operation of watches.
The phone app works on iOS or Android devices. It delivers messages and notifications to the watch. It acts as a transfer agent between network services and the watch. Since the release of Pebble Time models, the app has had a locker that holds watch faces and watchapps. The app represents a storage extension for the watch; when watch faces or watchapps are needed but not present on the watch, they are retrieved from the phone app.
Pebble smartwatches access local and network resources through the phone app. Software written for each watch model can access network resources, but only through the watchapp. Any access to URLs or network based functionality must go through the phone app.
So it is safe to say that the Pebble platform depends on the phone app for functionality. This is mostly an advantage for Pebble smartwatches, because it allows the watch to be thinner (hardware like WiFi chips can be left off) and it allows the phone to share processing with the watch.
### How to Use This Book
This book is designed to help you learn C programming by using the Pebble smartwatch platform to demonstrate and execute programs. The book is online for several reasons:
* The online accessibility means you can read this book from any device.
* The book is accessible through Web browsers so it can use Internet resources.
* This book is on the Gitbook Web site. This means you can fork the book, add your own content and submit it to us as pull requests.
* Finally, exercises can be run in CloudPebble through GitHub.
This book should be accessible by beginners as well as those who know the C language but want to write Pebble applications. If you are just starting in C programming, then you should start at chapter 2 and work through each chapter in sequence. If you are already a C programmer, you should also read chapter 2, but then find those features that focus on Pebble smartwatches, such as the user interface or sensor programming. Seasoned C programmers could start at chapter 15, once it is available.
Finally, note that this is a BIP: a Book In Progress. The contents will change over time. Errors will be corrected, content added, and exercises will be modified or added. This is one of the reasons the book is published on gitbook.com, so that we can make this a better and more effective learning tool.
results matching ""
===================
No results matching ""
======================
---
# Chapter 3: Variables and Other Basics · Learning C with Pebble
[Powered by **GitBook**](https://www.gitbook.com/?utm_source=public_site_legacy&utm_medium=referral&utm_campaign=trademark&utm_term=pebble&utm_content=powered_by)
[](https://pebble.gitbooks.io/learning-c-with-pebble/content/chapter03.html#)
[](https://pebble.gitbooks.io/learning-c-with-pebble/content/chapter03.html#)
FacebookGoogle+TwitterWeiboInstapaper
[](https://pebble.gitbooks.io/learning-c-with-pebble/content/chapter03.html#)
[](https://pebble.gitbooks.io/learning-c-with-pebble/content/chapter03.html#)
[](https://pebble.gitbooks.io/learning-c-with-pebble/content/chapter03.html#)
AA
SerifSans
WhiteSepiaNight
[Chapter 3: Variables and Other Basics](https://pebble.gitbooks.io/learning-c-with-pebble/content/)
====================================================================================================
Chapter 3: Variables and Other Basics
=====================================
As we use high level programming languages to write our programs, we learn that programming languages specialize in _abstraction_. Abstraction is a way of hiding irrelevant detail and focusing on the things that matter. Programming languages focus our attention on algorithms and the data we need to power those algorithms, ignoring the actual details of making those algorithms work on specific CPU architectures.
We start looking at the C programming language by working with abstractions of computer memory. _Variables_ are abstractions of memory words; when we work with variables, we are really working with memory. But the gory details of _how_ we are working with memory are hidden and we are left with the niceties that we get in C.
We will start out by defining variables and how we work them. We will also need to define _data types_, as they are central to how we work with variables. We will also look at the unique ways C lets us manipulate memory through variables, and we will look at how this all works in a Pebble smartwatch.
### Defining Variables
Variables are symbols that stand for words in a computer's memory. As such, they have a value that can be set and that is remembered until it is changed. That value can also be referenced for use in computations.
Let's take an example.
miles = 230;
gallons = 12;
milesPerGallon = miles / gallons;
In this simple example, we are working with three variables, which stand for three memory words. The first two lines assign values to two variables; the third line uses the values we assigned to compute and assign a value to a third variable.
In the example, we used a number of _operators_ to manipulate values of variables. Which operator we may use depends on the kind of value we are using (see the next section on _data types_ for more), but the _assignment operator_ is always defined for all variables. The assignment operator takes the value on the right of the "=" sign and makes it the value of the variable on the left of the "=" sign. When a variable is referenced on the right of the "=" operator, it gives up its value. So when the third line in the above example is executed, it's the same as as executing `milesPerGallon = 230 / 12`.
Let's consider another example:
positionX = 72;
positionY = 25;
acceleration = 1;
x_velocity = 3;
y_velocity = x_velocity;
First, note that there are rules for variable names. Variables names must be comprised of a combination letters, numbers, and an underscore ("\_"). They must start with either a letter or an underscore and they may be of any length. By convention, as in the example above, variable names that could logically be made up of multiple words ("x velocity") are given a name with an underscore replacing any spaces (`x_velocity`).
Second, note that C is case-sensitive when it comes to variable names. This means that capital letters are considered different than lowercase letters. `positionX` is not the same variable as `positionx`.
It is indeed possible to use a variable without first assigning it a value. However, remember that variables are simply abstractions for memory words. The result of using a variable without initializing is an unpredictable value; you get whatever was left over in memory from the last time the memory word was used. Programmers often incorrectly assume that variables are automatically initialized to zero when a program starts; it is actually best to assume that any left over data is just useless.
> **Different Compiler Behavior**
>
> Sometimes, C compilers behave differently with small details like using variables without initialization. There have been several attempts to standardize C, but compilers -- particularly the variety of open source compilers -- don't all adhere to the same standard. In addition, standards don't always address details like variable initialization. This leaves compiler writers free to choose. So, in regard to variable initialization, most compilers do not automatically initialize variables, but some do. Make sure you check your compiler before you rely on this behavior.
### Data Types
Variables have two important properties: what _values_ can be assigned to them and what _operations_ can be done to them. Together, these two properties are called a _data type_. Every variable used in a C program must have a data type.
Consider the example code below:
int radius;
float pi;
double circumference;
Here, we have _declared_ three variables: `radius`, which can take on integer values, `pi`, which can take on floating point values in memory words, and `circumference`, which take on floating point values that are _double_ the size of other floating point values. Note that an _integer_ is a whole number without any decimal points and a floating point number has a decimal point and is capable of representing fractional numbers. Note, too, that a variable must be declared before it is used in a C program; the C compiler must know what values and operations are to be used with a variable before it works with that variable.
Once we have declared the variables as in the example above, we can work with them like in this example:
radius = 23;
pi = 3.14159;
circumference = 2 * pi * radius;
Since `pi` can take on floating point (i.e., fractional) values, we can use a decimal point in its assignment.
Note that, given each variable's declaration, values outside the declared value set are considered an error. For example, trying to assign a floating point value to an integer variable would be flagged as an error:
radius = 23.1;
Since setting a variable to an initial value is such a common exercise, declarations allow assignments in the declaration statement. So, we can combine the above declaration and assignment examples like this:
int radius = 23;
float pi = 3.14159;
double circumference = 2 * pi * radius;
### Literals
As we have seen, literals have a data type. The absence of a decimal point in a number usually indicates that the number is an integer. Likewise, the presence of a decimal point usually indicates that the number is a float data type.
However, there are ways of designating numbers that get around these assumptions. This typically means that you put a letter at the end of the number. For example, `23` is an integer, but `23L` is a long integer and `23F` is a floating point number.
The table below shows letter designations for data types and gives some examples.
| | | | | |
| --- | --- | --- | --- | --- |
| **Literal** | **Declaring Keyword** | **Description** | Example | Illegal Example |
| Integer | `int` | A whole number in decimal, octal, or hexadecimal form. Integers can have prefixes that explain the base in which they are specified and suffixes that explain the type of the integer. | 23
23L
0x23
0o23L
0b1011 | 23.0
0o238 |
| Floating-Point | `float` | A number with an integer part, a decimal point, a fractional part, and an exponent part. Floating point numbers can be expressed in decimal or exponential form. Suffixes of F or E are allowed to indicate floating-point or start exponent expression. | 15.6
156E-1 | 25.
100.0E |
| Double Floating-Point | `double` | A floating point number with double the memory space for storage. | 15.6
156E-1 | 25.
100.0E |
| Character | `char` | A representation of letters and other character data. Pebble smartwatches use UTF-8 representations for characters, so a single character might not fir into a \`char\` type. | 'A'
'5'
'#' | "A"
"string" |
| Boolean | `int` | A representation of true and false values. Boolean operators are logical operators. | true
false
1
0 | "true"
"false"
T
FALSE |
### Other Basic Data Types
The table in the previous sections adds two data types to ones we have discussed. _Character_ data types are declared with the `char` keyword and hold single-byte characters/symbols as their value. On a Pebble smartwatch, these values come from the [Unicode](http://www.unicode.org/charts)
character set. Unicode contains a Western style alphabet in the first 128 characters and a large collection of the other alphabets in the rest of the set. The UTF-8 encoding of Unicode, which Pebble uses, can use multiple bytes and therefore could expand into multiple `char`s. In fact, only the first 128 characters fit into a single `char`. Note that character data types include numbers as characters, so that `'5'` is not the same as `5`. Character literals are represented using single quotes.
> **Characters are not Strings**
>
> It is useful to emphasize that char data types only hold a single-byte character (like "h"), not a string of characters or a multi-byte character (like "é"). Strings are not built into C as they are in some other languages. Strings are represented by arrays of characters -- sequences -- and will be discussed at length in Chapter 9.
Sometimes character data cannot be represented very easily. For example, how does C represent a newline character? A newline cannot appear in a character or string literal, but newlines are very useful. For these issues, C uses _escape sequences_. An escape sequence begins with an _escape character_ and include either a letter or a number sequence to reference the characters Unicode value. The number sequence is useful to reference characters that do not have a symbol with which to refer to them.
Let's look at an example.
char letter = 'A';
char letter2 = 'a';
char letter3 = '\092';
char letter4 = letter + 32;
char letter5 = '\n';
int difference = letter2 - letter3;
The first three declarations are not unusual; we just defined character literals as having representations like these. Note that even `letter3` has the same value as the previous 2 variables. The declaration of `letter4` demonstrates type conversion. Technically, the `+` operator is not defined for characters, so `letter` has to be converted to an integer before addition. Then the type of the resulting expression (`int`) is converted back to `char` before assignment to `letter4`. When converting a character to an integer, the UTF-8 value of the character is used. This means that the last declaration declares `difference` to be an integer that has the value of `0`. Finally, `letter5` takes on the newline character, represented with an escape sequence.
The last basic data type in C isn't really a data type. C does not include the definition of a boolean type as most programming languages do. A boolean data type would take on the values `true` or `false` and use logical operators, such as _and_ and _or_. C supports boolean operations, but does not have an explicit boolean type. This means that comparisons can generate boolean values, but C does not have boolean literals.
Notice the literal table in the last section. It lists `1` and `0` as boolean literals. C considers 0 to be false and non-zero values to be true. This means that the integer data type also serves as the boolean data type for C.
Consider this example:
int true=1, false=0;
int x, y;
x = true;
y = (x == true);
We can _simulate_ boolean operations and values by using integer data types. In this example, `x` is treated as a boolean, and is given the value `true`, which makes sense because `true` is also an integer. However, `y` gets its value from a _comparison_, something that gives a true or false value. And that comparison value is assigned to an integer.
If we were to print the values of `x` and `y`, both would have the value `1`, or `true`.
Let's look at another example, using the definitions of `true` and `false` from the previous example.
int retired = true;
int still_working = true;
int gets_a_pension = (retired && ! still_working) || (age > 65 && hours < 20);
This demonstrates a _boolean expression_, which is computed from boolean values. Boolean values come from variables or operations that give up boolean results. So `retired` takes on the value `false` (really `0` as the literal value), but `gets_a_pension` computes its value from boolean operations and comparison operations. Consider the table of boolean operators below
| | | | |
| --- | --- | --- | --- |
| **Operator Name** | **Syntax** | **Meaning** | **Example** |
| AND | a **&&** b | Result is true when _both operands_ are true | true && false
(miles < traveled) && still\_running |
| OR | a **\|** b | Result is true when _at least one_ of the operands is true | true \| false
(miles < traveled) \| still\_running |
| NOT | **!**a | Result is true when the operand is false; result is false when the operand is true | !true
!(miles < traveled) |
Let's assume that `age` equals 70 and `hours` equals 25. We can then compute the expression as the figure below:
* * *

**Figure 3.1:** Computation Order for the Boolean Expression Example
* * *
The final result of the expression in Figure 3.1 is `false` (or `0`).
> **Using Boolean Types in Pebble Programs**
>
> Pebble programs already have definitions of a `bool` data type, with `true` and `false` values (defined as `1` and `0`) built into them. If you want to use the `bool` data type, therefore, you don't have to include these definitions into your code.
### Type Conversion
There are many times when the values in one data type could be used with another data type. For example, the value `23` can be used for integer and floating point numbers. When the value of one type can be used for another, we say that the value is _converted_ from one type to another. That value is converted before it is assigned. So, for example, consider the code below:
int radius = 23;
float pi = 3.14159;
float extra = 23;
double circumference = 2 * pi * radius;
In the first line, an integer is assigned to an integer variable. In the second line, a floating point number is assigned to a floating point variable. In the third line, however, an integer value is assigned to a floating point variable. Technically, this does not work: the two sides are different types. However, the integer type is _type compatible_ with the floating point type and C automatically converts `23` to `23.0` and the assignment is made without problems.
The fourth line of the example is interesting. We have to determine the data type of the right hand computation in order to see if it can be assigned to the double floating point on the left. In C, the data type of expressions is determined by the data type that has the most values represented. So, in the example, the right hand side of the assignment takes on a floating point data type after converting `2` and the value of `radius`(`23`) to floating point. Then the expression is computed, giving a floating point result. Finally, the floating point result is converted to double and the assignment is made.
The point here is that conversions are necessary to follow the typing rules of C and, if it can happen, this conversion happens automatically. The data typing rules of C enforce a kind of data typing called _static typing_. Static typing dictates that the types of variables are derived once (at declaration) and do not change throughout the execution of a program.
> **Dynamic Data Typing**
>
> There are other data type rules. The opposite of static typing is _dynamic typing_. In dynamic typing, variables change their data type depending on the values assigned to them. Variables need no declaration because they have no initial data type. If the example above were dynamically typed, the last line does not convert the result to double before assignment, the variable takes on a float data type to match the right hand expression's data type.
>
> Javascript is an example of a dynamically typed language. In Javascript, variables are declared, but they are simply declared as "var" to indicate they are variables. The data type of a variable is assigned when a value is assigned.
In C, variables are also _strongly typed_. This means that once variables are bound to a data type, they stay bound to that type. Which means that they cannot change types, but require other types to be converted to their data type before they are assigned.
> **Weak Data Typing**
>
> The opposite of strong typing is _weak typing_, where variables can change their data types during the execution of a program. PHP is an example of a weakly typed language. In PHP, you could execute `$peb = "a"; $peb = $peb + 2`, which is an error in some languages. The variable `peb` in this case changes types from a character to an integer as the program executes.
Let's consider one more example.
angle = (angle + 1) % 360;
int dangle = TRIG_MAX_ANGLE * angle / 360;
Here, we see the use of the `%` operator -- the modulo or remainder operator -- and we have to decide about division. The modulo operator is an integer operator that produces the _remainder_ of a division of the two operands. In this case, the variable `angle` will increment, then get divided by `360`, with the remainder assigned back to `angle`. If this code were repeated many times, the value of `angle` would cycle between 0 and 360.
The division in the second line could produce one of several values, depending on the data type of the variables used. If we assume that this code does not produce an error, the declaration data type of `int` says that `dangle` needs an integer value and the right side had better produce it. That means that no part of the expression on the right should be of a floating point or double data type. The integer version of the division operator will discard any fractional result. This means that if the left side of the division is less than 360, the result will be 0.
### Declaration Modifiers
Since variables are just abstractions of memory words, declarations in C provide information for the compiler about the size of memory word to use for the declared variable. C defines some _declaration modifiers_ that provide a little more detail about the memory word that will be used to represent a variable. These modifiers are included in a variable's declaration.
As an example, consider the declarations below:
short int si;
unsigned char uc;
long double ld;
The `short` modifier tells C that, instead of a regular integer, the declaration only needs _half_ of the space normally required. `unsigned` declares that the character may use one more bit to represent itself in memory (that bit is normally reserved as a sign bit; for characters, it is just reserved, but not used). The `long` modifier declares that the double-wide floating point number should be stored in space that is _twice_ as long as that which is used for the `double` type.
A list of modifers is below.
| | | |
| --- | --- | --- |
| **Modifier** | **Meaning** | **Examples** |
| `short` | Halves the capacity of the data type, mostly in terms of possible values | `short int`
`short short` |
| `long` | Double the capacity of the data type, mostly in terms of possible values | `long int`
`long long` |
| `unsigned` | Use the sign bit of a number to store value, essentially doubling the values that can be used | `unsigned int`
`unsigned char` |
| `const` | The declared variable is a constant. | `const int top = 100`
`const unsigned char A = 0x41;` |
| `static` | The declared variable is allocated before code is run, and is not accessible outside the current file. | `static int x_velocity;`
`static float mortgage;` |
A note should be made about the `const` modifier. Any variable declared with the `const` modifier must (a) include an initialization and (b) not be changed throughout the program.
Let's consider one more example.
short int position_x;
static int x_velocity;
const int ball_radius = 10;
The first representation here declares `position_x` as a "half integer". The actual size of the memory word depends on the CPU; for Pebble watches, integers are 32 bits wide. So, `position_x` is a 16 bit integer, which means it can have values between -32,768 and 32,767. The variable `ball_radius` is a constant, initialized to `10`, and cannot be changed.
Note the last entry in the modifier table is `static`. Static variables are placed in memory words, allocated before a program is run and deallocated only at the end of the program. Normally, variables are allocated in memory when the block they are declared in is encountered by the program's execution (for more info on block, see the coming section on "Accessiblity Rules"). The fact that static variables are allocated once means that no matter how many times a block of code is encountered in a program's execution, the static variables in that block are allocated once. This is compared to the non-static variables, which are allocated again and again as a code block is executed.
### Casting
There are times when C cannot determine the data type conversion that is needed or we want to force a conversion to take place. Consider the example below:
int total=100, number=50;
float percentage=0.0;
percentage = number / total * 100;
In this example, the division produces a value of the integer type: two integers are divided and C would consider the result an integer. Multiplication of two integers -- the division times 100 -- would also give an integer. The value is then converted to float and assignment operator assigns the value. The value that gets assigned is `0`.
You might desire the result assigned to `percentage` to be `0.5`. However, remember that all values on the right are integer, so the result is integer, and the integer division gives 0. If we wanted to force the floating point division, we would have to make one of the operands into a floating point. We could cast one of the operands this way:
percentage = (float)number / total * 100;
The type in parentheses converts the immediately adjacent value, which is, in this case, `number`. The result is a floating point value, because a floating point value (`number`) was included in the computation. The result of this expression is indeed `50.0`.
### Expressions and Precedence
When combinations of constants and variables are connected with operators, the result is called an _expression_. Expressions represent a computation, using the values represented to produce a single result value. That result has a data type that can be used just like single representations of literals or variables. In fact, we consider a single literal or variable as the most simple expression.
We have already seen simple expressions. In the example in the previous section, `number / total * 100` represents an expression; two variables are combined with a division operation and multiplied by a third variable. The computation will result in a `0` value with an integer data type.
When we consider an expression, the _order of operations_ is important. It is tempting to simply compute an expression in a left-to-right direction. Consider the expression below:
x = 6 + 15 / 3 * 7 - 20;
A left-to-right evaluation of the expression would yield a value of `22`. However, C has a different order of evaluation. The rules that specify the order of evaluation are called _precedence rules_. A short set of precedence rules are given in the table below (a complete table is given in Appendix A).
| | |
| --- | --- |
| **Precedence(s)** | **Operator** |
| 1 | `()` |
| 2 | unary `+ -!` |
| 3 | `* / %` |
| 4 | `+ -` |
| 5 | comparison operators |
| 6 | assignment and shortcuts |
This means the result of the expression above is actually `28`, evaluated in the order shown below:
* * *
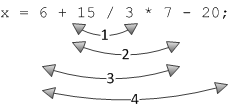
**Figure 3.2:** Order of Evaluation of Expression Example
* * *
Let's consider a more complicated example.
color_distance = sqrt( (red2 - red1) * (red2 - red1) + (green2 - green1) * (green2 - green1) + (blue2 - blue1) * (blue2 - blue1) );
The "color distance" between two pixels can be calculated as the square root of the summation of the squares of the differences between pixel color components. Note the parentheses. Those are done first, before the multiplication and division operators. So in this expression, the subtractions are done first, then the squaring/multiplications, then the additions.
> **Why Do We Have Precedence Rules?**
>
> After working through all the precedence rules for expression evaluation, one might ask _why?_ Wouldn't it just be simpler to evaluate left to right? The short answer is **YES!** For humans, it is probably easier to evaluate expressions left to right.
>
> However, it turns out that for compiler to parse through complicated C syntax, grouping operators into groups is actually makes it simpler and easier to parse. By defining programming languages using _grammars_, compilers process groups of operators as grammar definitions, and defining C using these definitions is a clean way to specify the language.
>
> However, this is not a very satisfying reason and grouping like this seems arbitrary. Various sources actually claim that some rules -- say, multiplication before addition -- find their origin in how algebraic operations are expressed: _ax + b_ seems to imply that _ax_ should be computed first. This type of expression goes back to the 1400's; see [this Web site](http://jeff560.tripod.com/grouping.html)
> for a review of early grouping symbols.
>
> The truth is that we really don't have a reliable explanation as to where this came from. However, it's the rule now for C (as well as many other languages), so we deal with it.
We need to consider one more set of rules for expression evaluation. _Associativity_ is a property of operators in the C language. For example, the expression `15 - - 2` might seem at first glance to be illegal, until one realizes that the righthand `-` sign is a negation operator and is _associated_ with the `2` in the expression. Associativity plays a role in expression evaluation and is considered first before operator precedence.
The complete table of C precedence rules combined with associativity properties can be found in Appendix A.
### Notation Shortcuts
There are a few notational shortcuts we can make in C. We can use them to shorten expressions and to relate algorithms more concisely.
Most shortcuts involve assignment. For example, instead of
x = x + 1;
we can use the shortcut of the _increment_ operator like so:
x += 1;
This type of shortcut extends to several operators. The operators `-=`, `%=`, `*=`, and `/=` operate in the same way.
Two more shortcuts are used in C. As analogs to `+=` and `-=` for increment and decrement operators, C includes `++` and `--`. Consider the following example:
x = 10;
x = x + 1;
x += 1;
x++;
After the first initialization, each following line increments `x` by 1.
y = 360;
y = y - 1;
y -= 1;
y--;
Again, after the first initialization, each following line decrements `y` by 1.
Just to make things more complicated, C specifies that these two operators can appear before or after another value in an expression. Therefore, we can have `x++` as well as `++x` in an expression. They are subtly different.
* `x++` increments `x`, then evaluates to new value.
* `++x` evaluates to the value of `x`, _then_ increments the variable.
Let's look at an example.
int x = 10;
int z = ++x + 25 / x++ - --x - x--;
What is the resulting value of `z`? The computation goes as in Figure 3.3:
* * *
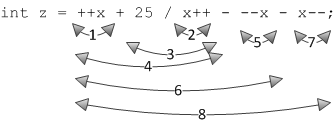
**Figure 3.3:** Computation Order for the Shortcut Example
* * *
1. increment `x`, evaluate `x` to 11
2. evaluate `x` to 11, increment `x` to 12
3. perform integer division, giving 2
4. perform the addition: `11 + 2` giving 13
5. decrement `x`, evaluate to 10
6. perform the subtraction: `13 - 10` giving 3
7. evaluate `x` to 10, decrement `x`
8. evaluate the final subraction: `3 - 10`, giving -7
The table below shows all the compound shortcuts in C.
| | |
| --- | --- |
| **Operators** | **Description** |
| += and -= | Addition and subtraction operators |
| \*= and /= | Multiplication and division operators |
| %= | Modulo (remainder) operator |
| &=, \|=, and ^= | Logical operators: and, or, and not |
| \>>= and <<= | Shifting operators: right and left shifting |
> **Where Did These Shortcuts Come From?**
>
> The C programming language has a long history. In the days it was first developed and implemented, statements in C had a very close connection to the instructions that were generated by the C compiler. Therefore, machine language that was generated by the compiler had a strong effect on the syntax of the language. This means that `x++` would generate one instruction and `++x` would generate another. These forms begat other forms, both as instruction substitutes and programmer shorthand.
### Statements and Control Flow
As we have been giving examples, we have been showing _statements_ in C. A statement is a section of C code that -- for lack of a better term -- does something. It is a unit that performs an executable action. As we have seen them, statements are comprised of variables, literals, and operators. In future chapters, we will expand our idea of statements.
Note two special considerations about statements.
1. Statements are terminated with a semicolon. We have seen this in the examples given so far in the chapter.
2. Statements can be comprised of other statements. By using curly brackets -- `{` and `}` -- we can group several statements in one compound statement.
This means that this is a statement:
int miles = 0;
and this is a statement
{
radius = 14.1;
circumference = 2 * pi * radius;
}
The last form, that is, a compound statement counting as a statement, will be very useful as we consider more complex statements like conditional or looping statements.
A statement is actually an expression. This idea can lead to confusing C statements. As we will note later in this chapter, an assignment operator can indeed be an expression, so using an assignment operation as a statement makes sense. However, we could also just have expressions, as below:
x;
y < 2;
x++;
The last statement is often used. Since `x++` is shorthand for `x = x + 1`, using either expression as a statement makes sense. However, the first two lines are confusing, even though they are legal.
The control in a C program is _sequential_. That is, unless otherwise directed by statements, execution in a program starts at the first statement and moves in sequential order from that statement until the last. There are many statements that redirect execution -- and we will examine them starting in the next chapter -- but underlying every statement is sequential control flow of a computer's program execution.
### Accessibility Rules
Variables and other entities in C may be declared in many places. Because C is _block structured_, we can define names in many different blocks. For example, consider this:
int positionX = 10;
{
int positionY = positionX + 20;
float proportion = (float) positionY / positionZ;
}
int positionZ = positionY + porportion*positionX;
This is a bit contrived, but it makes a point. There are two blocks here: an outer block where the declarations of `positionX` and `positionZ` happen and an inner block where the declarations of `positionY` and `proportion` happen. The curly brackets are block delimiters.
Here are two rules about accessibility -- or scope -- of declared names in C:
1. You must declare names before you use them.
2. Code can only access names declared at the current block level and outer block levels.
These rules mean that names at inner block levels are inaccessible. So in the above example, the declaration of `proportion` that uses the variable `positionZ` is actually illegal; the use of both `proportion` and `positionY` in the declaration of `positionZ` is also illegal. The reference to `positionX` in the declaration of `positionY` is fine, because `positionX` is declared in the outer block.
Accessibility rules can seem very complex. The key is to remember the outer/inner block rule. The complexity comes in what how blocks are defined. We will visit block formation and accessibility in future chapters as we define new language constructs that can define blocks.
### Assignment as an Operator
We have mentioned that the assignment operator is indeed an _operator_. This means that we can combine it with other operators in potentially confusing expressions. To make sense of this, we need to remember that, as an operator, assignment evaluates to the value from the right side of the `=` sign.
Consider this example.
int x = 10;
int y = x + 10 - (x = 5) - (x = 3);
In the evaluation of the expression, the first reference to `x` gives 10, the first assignment gives 5, and the second assignment gives 3. The expression therefore evaluates to `10 + 10 - 5 - 3` or 12. After the last statement, `x` will equal 3 (via the last assignment operator evaluated) and `y` will equal 12.
### Exploiting The Rules and Making Big Messes
At this point in the chapter, we have seen some straightforward rules about C and expressions. We have also seen some interesting and odd combinations of expression shortcuts, type conversions, and precedence rules. If programmers are not careful with the code they write, they could be creating a big mess. The syntax rules are given for flexibility, but they can be exploited with some strange results.
To make code as clear and straightforward as possible, consider these programming guidelines:
1. **Use meaningful variable names and expressions, even when literals will work.** Words are much more meaningful than numbers and you should be using variables as part of the documentation of your code. Code like `circumference = 2 * pi * radius;` is much clearer than `circumference = 2 * 3.14159 * 4;`
2. **Use names for boolean values rather than literals.** Using the name `true` for a value conveys a lot of information -- what types you are dealing with and the value you are using -- rather than using `1`.
3. **Use assignment operators as statements only, not in expressions.**
As with many C constructs, being allowed to use assignments in expressions does not mean you should do it. Assignments in expressions is one of the most confusing syntax rules of C.
4. **Avoid using shortcuts in expressions.** As with assignment statements, shortcuts are just too confusing to be used in expressions. Used by themselves as statements, shortcuts can be convenient and expressive. And even though shortcuts used to influence compilers when they generated instructions, few modern compilers pay attention to them anymore.
5. **Limit all name access to the tightest possible block.** Variables should be declared as close to their use as possible. Avoid global variables and stick with local declarations.
6. **Use casting to make sure types are converted.** Expressions can get complex and type conversion does not always work in the obvious way. When in doubt, use casting.
We could give many examples of convoluted C code. However, there is an annual contest to determine the most obfuscated C code written; see the Web site at [ioccc.org](http://www.ioccc.org/index.html)
for great example of obfuscated C code.
### Comments and Documentation
One of the most important guidelines for writing good, understandable code is to document the code you write. C provides two mechanisms for inserting comments and documentation into your code.
First, anything on one line that is included after a "//" sequence is considered a comment and is ignored by compilers. So lines like
// x = x + 2;
means nothing, because it is ignored. Everything to the end of the current line is considered part of the comment.
The second mechanism for documenting is a "/\*" ... "\*/" sequence. Anything between the two symbol sequences is considered a comment and is ignored by the compiler. This can be a single line, multiple lines, or even just part of one line. Consider these examples:
/* This is a single line comment. */
/* This comment
spans several
lines.
*/
x = x /* small comment */ + 10;
### Project Exercises
In this section -- for this and future chapters -- we will use projects that are comprised of existing code on GitHub. We will bring that code into the CloudPebble environment for examination and experimentation. Instructions on how to do this were discussed in Chapter 2.
#### Project 3.1
[You can access the starting code for Project 3.1 using this link.](https://cloudpebble.net/ide/import/github/learning-c-with-pebble/project-3-1)
When you have successfully brought the project into your CloudPebble environment, you can run the code. It implements a simple program with a ball bouncing up and down on the Pebble's display when you click the "select" button.
* * *
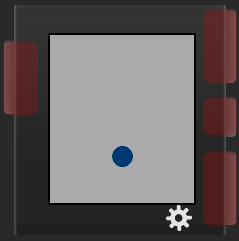
**Figure 3.4:** Screenshot of Project 3.1 Running
* * *
You can ignore a lot of the code in Project 3.1; much of it is required to make the program run on a Pebble watch. Let's start with the declarations. Consider the declarations for the X and Y positioning of the ball:
static int position_x, position_y;
static int x_velocity, y_velocity;
const int ball_radius = 10;
Now look at line 48. These variables are used to draw the ball and used to determine it's speed on the display.
Try these exercises using the code from Project 3.1.
1. Change the declaration in the code to make the ball bigger. Notice that the statement at line 48 uses the `ball_radius` variable to draw the ball. Change this variable to make the ball bigger. (Keep it less than 30 or the ball won't bounce. Can you figure out why?)
2. Now make the ball _faster_. The two velocity variables -- `x_velocity` and `y_velocity` -- are initialized at line 16. At line 36, the velocity is used to move the ball in the Y position (up or down) by changing `position_y` variable. Change the velocity to make the ball move faster.
3. The ball only bounces up and down. Now add a line under line 36 to also change the `position_x` variable to that the ball will also move in the X direction.
4. Look for the two functions listed below:
static void up\_click\_handler(ClickRecognizerRef recognizer, void \*context) {
}
static void down\_click\_handler(ClickRecognizerRef recognizer, void \*context) {
}
The code in these functions are run when the top and bottom buttons are pressed, respectively. Add some code to the \`up\_click\_handler\` function -- between the curly braces (\`{}\`) that will make the ball bigger when the button is pressed. You can do it in one line. Use the shorthand notation for incrementing a variable.
5. If you simply try to increment \`ball\_radius\`, you will have a compilation error. Why? Change the declaration of \`ball\_radius\` to implement the up button click correctly.
6. Do the same thing for \`down\_click\_handler\`, except make the ball smaller when you click the bottom button. Use the shorthand code for decrement.
7. Now add a line to the \`up\_click\_handler\` function that also makes the ball go faster when you click the top button.
8. Do the same thing for \`down\_click\_handler\`, except \*slow\* the ball down when you click the bottom button.
9. Finally, add some comments to the file to claim the code as your own and to identify what you have done!
[A completed project exercise for Project 3.1 can be found here.](https://cloudpebble.net/ide/import/github/learning-c-with-pebble/project-3-1-answer)
#### Project 3.2
Now let's start a new project. [Using this link](https://cloudpebble.net/ide/import/github/learning-c-with-pebble/project-3-2)
, import Project 3.2 into CloudPebble and run it. You should get a letter traveling around a circle on the Pebble's display.
This code is a great example of expressions and of floating points vs integer computation. The main code we want to pay attention to is in the function `move_letter()`:
angle = (angle + 1) % 360;
int dangle = TRIG_MAX_ANGLE * angle / 360;
position_x = center_point_x + (radius*sin_lookup(dangle)/TRIG_MAX_RATIO);
position_y = center_point_y + (radius*cos_lookup(dangle)/TRIG_MAX_RATIO);
Every time this code is run (when a timer goes off), the angle is incremented by 1. Notice that the modulo operator (`%`) is used, which advances the variable `angle` from 0 to 359, then starts over at 0. Also notice that the variable `dangle` is declared inside a block of code, showing that declarations don't always have to appear before code (but always before use).
The computations of `position_x` and `position_y` need some explanation. When we do computation on a Pebble CPU, we want to as much integer computation as possible. All the operations and variables are integers. Notice that we took special care to make the computation integer. We compute the `dangle` as an integer and we form sine and cosine computations as table lookups of precomputed values. These are all faster than doing floating point computations.
> **Why Are Floating Point Computations So Bad?**
>
> So why are floating point computations so bad to do on the Pebble smartwatch CPU? Floating point operations can be up to 3 times slower. First, floating point numbers are stored in an encoded form called [IEEE 754 format](https://en.wikipedia.org/wiki/Single-precision_floating-point_format "IEEE 754 format")
> . Every use of a floating point number means unpacking and repacking the values for computation.
>
> Second, because floating point numbers have binary points and are stored with exponents, floating point computations can be very slow. Addition and subtraction have a long algorithm ([see here for an example](https://www.cs.umd.edu/class/sum2003/cmsc311/Notes/BinMath/addFloat.html)
> ) and multiplication and division is even longer ([this YouTube video is good at showing the long algorithm](https://www.youtube.com/watch?v=DuOwT2hZOiw)
> ). Most CPUs that can handle floating point operations use an additional floating point coprocessor. The Pebble smartwatch CPU does not have that extra coprocessor, and in a CPU where we have to be very stingy about when to do floating-point operations, doing as much as possible with integers makes sense.
1. You will again find functions that implement the top and bottom buttons. Put code in each to move to the next letter in the alphabet and the previous letter in the alphabet when the top or bottom buttons are pressed, respectively.
2. Now add a line to the `up_click_handler` function that also makes the letter go faster when you click the top button.
3. Do the same thing for `down_click_handler` as you did in the previous exercise, slowing the letter down when you click the bottom button. What happens when you go too slow?
4. Find the `select_click_handler` function. The code defined in this function will execute when the _select_ (middle) button is clicked/pressed. Define a variable called `direction` (where would you declare this?) and initialize it to have the value `1`. In the `select_click_handler` function, "toggle" this to negative or positive on each click of the select button. Use this `direction` variable in the computation of the new `position_x` to change direction of rotation when the select button is clicked.
5. Add comments to the code to claim the code and to explain what it does.
[A completed project exercise for Project 3.2 can be found here.](https://cloudpebble.net/ide/import/github/learning-c-with-pebble/project-3-2-answer)
results matching ""
===================
No results matching ""
======================
---
# Chapter 8: Pointers and Memory Allocation · Learning C with Pebble
[Powered by **GitBook**](https://www.gitbook.com/?utm_source=public_site_legacy&utm_medium=referral&utm_campaign=trademark&utm_term=pebble&utm_content=powered_by)
[](https://pebble.gitbooks.io/learning-c-with-pebble/content/chapter08.html#)
[](https://pebble.gitbooks.io/learning-c-with-pebble/content/chapter08.html#)
FacebookGoogle+TwitterWeiboInstapaper
[](https://pebble.gitbooks.io/learning-c-with-pebble/content/chapter08.html#)
[](https://pebble.gitbooks.io/learning-c-with-pebble/content/chapter08.html#)
[](https://pebble.gitbooks.io/learning-c-with-pebble/content/chapter08.html#)
AA
SerifSans
WhiteSepiaNight
[Chapter 8: Pointers and Memory Allocation](https://pebble.gitbooks.io/learning-c-with-pebble/content/)
========================================================================================================
Chapter 8: Pointers and Memory Allocation
=========================================
We have discussed many abstractions that are built into the C programming language. Most of these abstractions intentionally obscure something central to storage: the address in memory where something is stored. Pointers are a way to get closer to memory and to manipulate the contents of memory directly.
In this chapter, we will discuss pointers and how pointers are used to work with memory. We will discuss how memory can be dynamically allocated and manipulated using pointers. And we will see that arrays and pointer are very closely connected.
### Pointer Basics
We know variables in C are abstractions of memory, holding a value. That value is _typed_, defined by a data type definition in the variable declaration.
A pointer is no different. A pointer is a variable whose value is an address, typed by its declaration. Pointers "point to" a variable (memory) with a typed value by referencing that variable, not by name, but by address.
#### Declarations
Pointers are declared to point to a typed value. This is the syntax of a declaration:
_datatype_ \*_variable\_name_
Here are some examples:
int *ptr1;
float *ptr2;
char *ptr3;
These declare `ptr1` to hold the address of an integer, `ptr2` to hold the address of a floating point number, and `ptr3` to hold the address of a character.
Like all variables, _pointer variables do not have a value simply by being declared_. That fact might seem intuitive for other data types, but it's hard to remember for pointers. In the above examples, the variables are meant to contain the address of other variables, but they have not been initialized yet.
> **Declaration Notation**
>
> At first glance, the notation used to declare pointers might seem wrong. Since a pointer variable points to another variable of the declared data type, you might expect the declaration to look like this:
>
> int* ptr1;
>
>
> Instead, the `*` symbol is associated with the variable name in the declaration. This is intentional. If we associate the `*` symbol with the variable name, we can declare a list of variable names, some of which are not pointers. Here is an example:
>
> int *ptr1, width, height, *mem;
>
>
> Note that not everything in the list is a pointer. This is possible only if we associate the `*` with the variable name. If we were to use the notation `int* ptr1, mem;` only the first item in the list would be a pointer.
#### Variables and Addresses
If pointers contain addresses, there should be a way to give them an address as a value. All variables have an address, a designation of where they are stored in memory. We can derive the address of a variable by placing a "&" symbol in front of the variable name. Here is an example:
int distance = 10;
int *ptri = &distance;
printf("%u\n", ptri);
The variable `ptri` is assigned the address of the variable `distance` as its value. The value of `distance` is not changed.
Now if we were to print the value of `ptri`, we would get a large number that really makes no sense _to us_, but makes sense to the computer runtime system. The `printf` function call above might print this as its value:
3216074448
That value makes sense to the computer, but it is of no use to programmers. Knowing the address does not help us work with the pointer or what it points to.
#### Dereferencing a Pointer
Once a pointer has an address of a variable name, we can use it to work with the variable it references. To do this, we have to _dereference_ the pointer, that is, get to the variable or memory it points to.
Dereferencing a pointer uses the same asterisk notation that we used to declare a pointer. Consider the following example.
int payment = 10;
int *p = &payment;
*p = 15;
This code starts by assigning the value `10` to the variable `payment`. Then the pointer `p` takes the address of `payment` as its value. The third statement changes `payment` to `15` by actually assigning the value 15 to the variable to which `p` points. The `*p` in the statement is a dereference.
Using the same syntax to declare pointers and to dereference pointers can be a bit confusing, especially if the declaration is used with an initial value, like in the above example. Unfortunately, you just have to remember the difference between declaration and dereferencing.
Let's look at one more example of dereferencing.
int distance = 250, fuel = 10;
float economy1, economy2;
int *pd, *pf;
pd = &distance;
*pd = *pd + 10;
pf = &fuel;
*pf = *pf +5;
economy1 = distance / fuel;
*(&economy2) = economy1;
In this example, the variable `distance` is set to `250` and incremented by `10` by dereferencing the pointer `pd`. Likewise, the variable `fuel` is set to `10`, then incremented by `5` by dereferencing the pointer `pf`. The last statement is there to show that you can even dereference an address operator. By dereferencing what the address of `economy2` points to, we just reference the variable `economy2`.
### Allocating Memory
While you can work with declared variables using the "&" operator, you can also create memory space while a program is executing and allow a pointer to reference it. This memory space does not even need a name associated with it.
You create space in memory using the `malloc` function. To create space, you need to know the _type_ of space you want to create and the _size_ in bytes of that space. Fortunately, you don't have to know the size of everything in C; you can use an operator to compute that.
The `sizeof` operator will return the number of bytes its type parameter uses. For example,
sizeof(int)
should return the value `4`: a variable declared to be of type `int` will take up 4 bytes in memory.
Once we know the number of bytes we want to allocate, calling `malloc` with the right size will create a space in memory of that size and will return the address of that space. So, consider this example:
int *p = malloc(sizeof(int));
Here, we have allocated enough memory to store a single integer and returned the address of that space to be assigned to the pointer `p`. Now, the _only_ way to work with that space is through the pointer. But if we use dereferencing correctly, this space can be used as if we have a variable, _because we do!_ We do indeed have a variable; it just does not have a name associated with it.
Here's another example:
int *pa = malloc(5*sizeof(int));
In this allocation, we have created a space that is big enough to store 5 integers.
Since this space is contiguous, that is, created from sequential memory locations, we have essentially created an array of 5 integers. We will examine this further, but we need to first figure out how to access each integer in this space by doing arithmetic on pointers.
Pointers are _typed_ in C. When a pointer is declared, the data type it points to is recorded. As with other variables, if we try to assign values from incompatible types, errors will result.
### Pointer Arithmetic
We have said that a pointer contains an address into memory. If addresses are just numbers, then we can do computations with them. Indeed, we can do pointer arithmetic in an intuitive fashion.
As you might think, pointer arithmetic uses operators `+` and `-` to increment or decrement addresses. However, to increment a pointer means to add enough to its value to move to the next element of the data type to which it points. For example, if a pointer contains the address of an integer, then adding one to that pointer means skipping 4 bytes to point to the next integer. If the data type is larger, the increment will increase the pointer the correct amount of bytes. Decrement works in an analogous way.
This is especially useful when a pointer points to the beginning of an allocated area in memory. Let's say that we have code that just allocated space in memory for 20 integers:
int *bigspace = malloc(20 * sizeof(int));
*bigspace = 10;
By dereferencing the pointer, we gain access to the first integer in the space. The rest of the integers are accessible through pointer arithmetic. Consider the following code:
*(bigspace + 1) = 20;
*(bigspace + 2) = 30;
This code assigns the values `20` and `30` to the the second and third integers in the space, respectively. This is how we would access all integers in the allocated space.
There's a few notes we need to make about pointer arithmetic.
* The result of pointer arithmetic is a pointer. As seen in the example above, we do the arithmetic inside the parentheses _and then_ treat the result like it was a declared pointer. In the example above, we dereferenced the result of the addition and it worked.
* As with all expressions, the above example simply computes where the next integer is located, but does not change the pointer itself.
* There is no way to derive _where_ a pointer points in the allocated space. We could get the pointer's value, which is an address, but that would not give us much information about which allocation element a pointer points to.
Let's walk through one more example.
long *bigints = malloc(100 * sizeof(long));
for (int i=0; i<100; i++, bigints++) *bigints = 0;
bigints -= 100;
In this example, we allocate 100 long integers and initializing each long integer in the space to the value `0`. Then we "rewind" the pointer by subtracting `100*sizeof(long)` from it. It is our only way to access all the long integers in the allocated space and we must be careful to work with the pointer so it accurately points to the elements we need.
### Pointers and Arrays
We have defined arrays as a collection of elements of the same type, organized in sequence so that we can reference them with an integer index. We have also described memory allocation as a way to create a collection of elements of the same type, placed sequentially in memory. These two ideas are so very close that C treats them the same.
We will demonstrate that _pointers are arrays and arrays are pointers._
#### Pointers and Array References
C allows the same syntax to be used for both arrays and pointers. Let's consider a previous example:
int *bigspace = malloc(20 * sizeof(int));
We accessed and assigned values to memory in this way:
*bigspace = 10;
*(bigspace + 1) = 20;
*(bigspace + 2) = 30;
We could just as easily have used array reference syntax:
bigspace[0] = 10;
bigspace[1] = 20;
bigspace[2] = 30;
Declaring `bigspace` as an array also works:
int bigspace[20];
And both methods of accessing the memory space are still equally valid.
Pointers and arrays may be exchanged in assignment statements as well. For example, consider the following:
int space1[20];
int *space2 = space1;
*space1 = 10;
space2[1] = 20;
The first two elements of the array `space1` have been initialized to `10` and `20`, respectively. The reverse is true as well:
int *space2 = malloc(20 * sizeof(int));
int space1 = space2;
*space1 = 10;
space2[1] = 20;
This illustrates our point: pointers are arrays and arrays are pointers.
> **Are Pointers and Arrays Really the Same Thing?**
>
> If pointers are arrays and arrays are pointers, then why are there two different concepts?
>
> Pointers and array are not the same thing and are really not treated the same by a C compiler. The point we are making here is that _array notation and pointer notation are interchangeable._
>
> There are indeed differences between the two structures. The `sizeof` function will return different values for a pointer (which is a variable that fits into a memory word) and an array (which is a _collection_ of data). A C compiler will treat storage of dynamically allocated memory differently than an array initialized as a string. They have similar uses, but also different uses.
>
> So, while it helps to be able to use notation that works for both, arrays and pointers are really different types of data with a variety of different uses.
#### Pointer Arithmetic and Array Indicies
As we saw in the previous section, pointer arithmetic and using indicies and array notation are interchangeable. We have also seen how to use pointer arithmetic to move pointers through allocated memory space.
As declared and initialized to a memory space, pointers point to the base, the first element, of that space. This is item number 0 in array notation. Whenever we add 1 to a pointer, the system computes the size, in bytes, of the data type that the pointer points to and increments that pointer the number of bytes that make up that data type. Thus, an increment for the pointer is the same as an increment in array notation.
For example, consider this code:
short sa[10], *ps;
long sl[10], *pl;
ps = sa;
pl = sl;
Now, `ps` points to `sa[0]` and `pl` points to `sl[0]`. Now if we increment both pointers by 1, like this:
ps++;
pl++;
`ps` points to `sa[1]` and `pl` points to `sl[1]`. Even though both pointers were incremented by 1, the addresses were incremented by a different number of bytes.
If we wanted a pointer to start in the middle of an array, instead of the beginning, we would need to use the address of a selected item from that array. For example, if we wanted `ps` from the example above to point to `sa[4]`, we would need to derive the address of `sa[4]` like this:
ps = &sa[4];
Now, `ps` points into the array and not at the beginning.
#### Pointers and Multidimensional Arrays
Now let's consider how pointers interact with multidimensional arrays. The syntax starts to get a bit clumsy, but if we remember how pointers work with memory, the syntax is easier to understand.
Let's start with two dimensions: rows and columns. Remember that a two-dimensional array is really just a big memory space, _organized_ as rows and columns. If that's true, then a pointer into that space could actually just work as we have described it so far. Here's an example:
long table[10][20];
long *ptr = table;
This code describes a space comprised of 200 long integers. We could work with `ptr` as if it was pointing into that 200 long integer space. We could reference `ptr[30]` or `(ptr+30)` and it would work, referencing a long integer, 30 items into that space.
However, if we are declaring an array to have two dimensions, then it makes sense to try to use pointers in two dimensions. When we have an array of two dimensions, we can think of it as an "array of arrays". Using one dimension references an entire array from that collection. So referencing `table[3]` references an entire array at the 4th row of the table.
To use pointers with two dimensions, we need to think like this. If one pointer reference points to an array, then we really need a _double_ reference: one to the the array/row and one more to get the item at the column in the array/row. Consider this type of declaration:
long table[10][20];
long **ptr = table;
Note the double asterisk: one for rows and one for columns. Now, it would be an error to reference `ptr[30]` because there are not 30 rows in the table, only 10. In addition, `(ptr+5)` skips over the first 5 arrays, or 100 long integers, giving us access to the array at `table[5]`.
The same works to other dimensional arrays. Three dimensions could work like this:
long bigtable[5][10][20];
long ***ptr;
Other dimensions work analogously.
### Typed Pointers and Untyped Pointers
We have seen that, in C, pointers can be typed. The data type that a pointer points to informs the compiler on how many bytes to increment a pointer's address when using pointer arithmetic and how to work with pointers in situations where data types matter (like computations or some types of parameters). For example, in this code:
float x, y, *pf;
int a, b, *pi;
we cannot mix pointers to floats and integers in the same situations we can't mix actual floats and integers. For example:
*pf = 12.5;
a = 10;
pf = &a;
b = *pf + a;
The last line is an error, because it mixes a floating point number and an integer, producing a floating point number, and tries to assign it to an integer.
There are situations where untyped pointers are appropriate. Untyped pointers are declared to point to a "void" type and may point to values of _any_ type. However, since they have no data type themselves, in order to dereference such a pointer, we must tell the compiler what it points to. Consider this example.
void main() {
int numbers[6] = {10, 20, 1, 5, 19, 50};
float average;
void *p;
p = &numbers[3];
p = &average;
average = computeAverage(numbers, 6);
printf("Average of these values is %f\n", *(float*)p);
}
In this code, assume that `computeAverage` computes the average of the integers in the array and returns that value as a float (we saw this example in Chapter 7). First, note that the pointer `p` takes an address of an integer variable, then takes the address of a float variable, and that a compiler would think this is correct. Second, in the call to `printf`, we had to inform the compiler that `p` was currently pointing to a float variable, and then we could dereference it.
Untyped pointers are also useful as formal parameters to functions. Using a void type for a pointer in a function specification allows flexibility in the actual parameter. Untyped pointers can also be useful as return values; for instance, `malloc` returns an untyped pointer. We will discuss these ideas further in the next section.
### Pointers as Function Parameters
Pointers are the only way parameters can be changed in functions in a way that the caller of the function can access.
We have said in Chapter 6 that functions use pass-by-value for function parameters. In other words, values are copied from actual parameters to formal parameters when the call is made, but not copied back when the function returns. This implies that it is impossible to send changed values back to a function caller.
However, using pointers as parameters to functions makes this type of change possible. If we send a pointer to memory to a function, any changes to the pointer itself will be ignored, but the function can dereference the pointer and make changes to memory that the pointer references. That memory is not part of the parameter list of the function and those changes will be reflected back to the caller.
Let's consider the following example.
void swap_integers(int first, int second) {
int temp;
temp = first;
first = second;
second = temp;
}
Now, because C uses pass-by-value, calling this code like this will not swap anything:
int x = 10, y = 20;
swap_integers(x, y);
The variables `x` and `y` will retain the same values after the function call.
Now, let's change the parameters of `swap_integers` into pointers. The code would look like this:
void swap_integers(int *first, int *second) {
int temp;
temp = *first;
*first = *second;
*second = temp;
}
Because the parameters are now pointers, we have to dereference them to get at the actual values to be swapped. But now, since we are not changing the parameters, but rather the memory to which they point, memory is changed.
We would call this function this way:
int x = 10, y = 20;
swap_integers(&x, &y);
And the values are actually swapped.
> **Can We Make "swap" Generic with void Pointers?**
>
> If we can use typed pointers in a `swap_integers` function, could we use untyped pointers in a generic `swap` function? That is, by using "void" pointers, could we swap values of _any_ type?
>
> The answer, unfortunately, is "NO". While we can certainly specify parameters that are `void *` parameters, we cannot dereference a void pointer without knowing the data type to which it points. In addition, because we assign a value to `temp` in the above code, we must know what data types `first` and `second` point to, so the compiler knows how to make the assignment.
### NULL Pointers
We have stated that pointers contain memory addresses as their values. In addition to addresses, pointers can have a "no address" value, called "null". This null value is actually a special value (many compilers make this value 0, although it could be another special value). Null values are unique; null pointers of _any_ type are guaranteed to be equal.
Null pointers should not be confused with uninitialized pointers. Uninitialized pointers, like uninitialized variables, have no defined value; they occupy space in memory and take on whatever value was left there by the previous variable that occupied that space. Null pointers have a specific null value; uninitialized pointers have an undefined value.
Null pointers typically signify the end of data or an error condition. Dereferencing a null pointer will typically cause a program-crashing error.
### Freeing up Memory
Dynamically creating memory with `malloc` is a great way to only take up the memory that your program needs. Memory on a Pebble smartwatch is limited, and using pointers in this way is frugal.
To continue this frugality, memory space that is allocated by your program must also be deallocated by your program. To deallocate memory that was allocated with `malloc`, use the `free` function call. Here's an example of allocating and immediately freeing up memory:
long *racing = malloc(40 * sizeof(long));
free(racing);
It's as easy as that. It should be done in your program as soon as memory space is not needed.
When freeing memory space, you need to be aware of certain rules:
* You cannot free memory that was not allocated by `malloc`. For example, if you assign a pointer the address of a declared variable, freeing that pointer's memory will cause an error. Declared variables are allocated differently than dynamically allocated memory space.
* You cannot free a null pointer. Null pointers are pointers with "no address" values and freeing them will cause an error.
* You cannot free uninitialized pointers. These pointers do not point to anything and trying to free them will cause a program error.
Sometimes, memory is allocated by function calls within functions. That kind of allocation is usually freed up by a companion function to the function that allocated the space. (See below in "Pointers and Pebble Programming" for examples.)
### How to Avoid Messy Coding with Pointers
Pointers are notorious for creating messy, confusing code. Here are some examples:
intar[i];
*(intar+i);
*(i+intar);
These are all equivalent references; they can be used with either `int intar[10]` or `int *intar = malloc(10*sizeof(int));` declarations. Here's another example:
char *c = "Hello World";
while (*c) printf("%c", *c++);
As we will see in the next chapter, strings in C are arrays of characters, ending with a character with a 0 value (a "null" character). Knowing this, the above code will print each character of a string, incrementing to the next character for the next iteration of the loop. Here's one more example:
int main()
{
int i, sum;
int *ptr = malloc(5 * sizeof(int));
for (i=0; i<5; i++)
*(ptr + i) = i;
sum = *ptr++;
sum += (*ptr)++;
sum += *ptr;
sum += *++ptr;
sum += ++*ptr;
printf("Sum = %d\n", sum);
}
Running this example will print the value `8`, when the intention is to print the value `10`. The confusion here is the various ways that pointer arithmetic has been done.
Here a few tips to remember to avoid confusion with pointers.
1. Never forget to initialize pointers. This is a simple rule, but it is very confusing when a pointer uses old values.
2. Using array syntax with pointers can be a lot clearer than pointer syntax. This is especially true of multidimensional arrays and array spaces.
3. Be painfully clear when using pointer arithmetic. Using shortcut arithmetic with dereferencing can be very confusing, as we see in the examples above.
4. When using memory allocation, always use the most flexible and meaningful expressions. Calling `malloc(16)` is not very expressive, but using `malloc( 4 * sizeof(int) )` is much more informative.
> **Pointer Jokes**
>
> Pointers can be messy and useful. They can also be funny. [This link is an xkcd pointer joke.](https://xkcd.com/138/)
> Enjoy!
### Pointers and Pebble Programming
Pointers feature prominently in software written for Pebble smartwatches. You have seen this in the many project exercises that have been given in past chapters. For example, every Pebble program needs a window on the screen so that it can interact with the user. This window is declared like this:
static Window *window;
and is created like this:
window = window_create();
The call to `window_create` returns a pointer to a `Window`. This type of allocation is deallocated by a companion to `window_create`:
window_destroy(window);
Pebble programming uses pointers for most system calls that work with the operating system. Doing so allows these system objects to be allocated in memory and thus hidden from programmers. The fact that they are hidden enhances the abstractness of using them: usually, programmers just care that they work as they are documented and they really don't want to examine every byte of the data used. Using pointers for system calls also allows Pebble to update the system data structures without having to change app source code.
The pattern of allocation, use and deallocation is very common among all system interfaces. The creation/deallocation functions all have different, but similar, names. You should get used to this pattern as you write more Pebble code.
### Project Exercises
#### Project 8.1
We have said that pointers are arrays and arrays are pointers. In this project exercise, you are asked to prove it! Start with the Bubble Sort in Project 7.1, [available at this link](https://cloudpebble.net/ide/import/github/learning-c-with-pebble/project-7-1-answer)
, and (1) leave the array _declarations_ alone, but (2) change all the array references to pointer references. You may add any variables you need.
Don't forget the parameters to the sorting functions and the assignment of the `number_sorted` array from the `number` array in the `handle_init` function.
[You can find a solution here.](https://cloudpebble.net/ide/import/github/learning-c-with-pebble/project-8-1-answer)
> **You Cannot Use "void \*" Here**
>
> At first glance, you might think you could make this work with any type by using "void \*" to declare the parameters to the sorting functions, like this:
void bubble_sort(void *array)
This is fine, but it makes the comparisons in the function code invalid. If the `array` can be of any type, then how do you know that the `<` operator works with the specific type that is used at runtime? You could fix the code to use "int \*" for comparison like this:
void bubble_sort(void *array)
{
for (int i=0; i < NUMBERS_MAX - 1; i++) {
for (int j=0; j < NUMBERS_MAX - 1; j++) {
if (*(int *)(array+j) > *(int *)(array+(j+1))) {
int temp = *(int *)(array+j);
*(int *)(array+j) = *(int *)(array+(j+1));
*(int *)(array+(j+1)) = temp;
}
}
}
}
But this code defeats the purpose of using "void \*". It says that you can send any type to the sort code, but the code will compare them as integers. And this means we need to be specific about the data type used as function parameters.
#### Project 8.2
This exercise revisits Project 6.2 again (like we did for Project 7.2). That project, [whose answer can be found here](https://cloudpebble.net/ide/import/github/learning-c-with-pebble/project-7-2-answer)
, creates an array of strings, which are simply a sequence of characters. These characters are in groups of three, drawing 5 rows of three squares. Note the declaration of the `digit_array` strings:
char *digit_array[10] = {
"111101101101111",
"001001001001001",
"111001111100111",
"111001111001111",
"101101111001001",
"111100111001111",
"111100111101111",
"111001001001001",
"111101111101111",
"111101111001111"};
So, this collection is a set of 10 pointers to character sequences/arrays. The reference `*digit_array[0]` will get the first character in the first array, a value of `'1'`.
In the function `draw_digit` in the code for Project 7.2, the function receives a sequence of characters in an array. It selects the proper character and renders a square if that character has the value "1".
You are make some changes to `draw_digit`:
1. Change the parameter `digit` to a `int` data type. You will send the function the actual digit to render.
2. Use a `char *` variable to be assigned an array from the `digit_array` selection. Use array notation, since it will be simpler.
3. Now use pointer arithmetic to get to the right character inside the nested for loops.
4. Dereference that pointer in the if statement that tests if the choice has the value "1".
5. Finally, change the call to `draw_digit` to use the `choice` variable to send the actual digit chosen by the random selection.
[You can find an answer to these changes here.](https://cloudpebble.net/ide/import/github/learning-c-with-pebble/project-8-2-answer)
**Extra Challenge**: For an extra challenge, write `draw_digit` with _no array references at all_. The easiest way is to replace the `digit_array` reference with a reference that selects the character sequence via pointer arithmetic. Nothing else changes! [You can find the answer to this challenge at this link.](https://cloudpebble.net/ide/import/github/learning-c-with-pebble/project-8-2-challenge1-answer)
#### Project 8.3
Remember Project 5.2? [You can find the answer to that project here.](https://cloudpebble.net/ide/import/github/learning-c-with-pebble/project-5-2-answer)
This project asked you to change the colors of pixels by examining each one in a loop and changing the ones that matched a certain color. The main code for this project was a function called `replace_colors`, whose code is below:
void replace_colors(int pixel_width, int pixel_height, GColor old_color, GColor new_color){
int max_y = pixel_height;
int max_x = pixel_width;
for(int y = 0; y < max_y; y++){
for(int x = 0; x < max_x; x++){
GColor pixel_color = get_pixel_color(x,y);
if(gcolor_equal(pixel_color, old_color)){
set_pixel_color(x, y, new_color);
}
}
}
}
In this code, there was a bitmap that was allocated using a pointer, but referenced using an array. The function `set_pixel_color` is a good example:
void set_pixel_color(int x, int y, GColor color){
bitmap_data[y*bytes_per_row + x] = color.argb;
}
You are to rewrite this code to use pointers to access the bitmap data. To do this you must (1) remove the functions `get_pixel_color` and `set_pixel_color` and (2) you must rewrite the nested loops in `replace_color` to use a single loop and to reference the pixel colors with a pointer.
[You can find an answer here.](https://cloudpebble.net/ide/import/github/learning-c-with-pebble/project-8-3-answer)
> **An Easier Way to Change the Colors in an Image**
>
> This exercise makes an example of converting array notation into pointer arithmetic. And it show how to directly manipulate image pixel data. However, there is a different, perhaps easier, way to change the image's colors.
>
> Instead of changing, say `bitmap_data[0]` to `GColorBlue`, we can change the _color palette_ of the image. Image data does not actually reference a _color_; each pixel references a palette position, which has a color. If we leave the position reference of the image alone, but change the color at a position in the color, it's faster and simpler.
>
> [Here is a link to this exercise implemented by changing the color pallete and not the image.](https://cloudpebble.net/ide/import/github/learning-c-with-pebble/project-8-3-palette)
#### Project 8.4
[For Project 8.4, you can get a started with a basic project here.](https://cloudpebble.net/ide/import/github/learning-c-with-pebble/project-8-4)
If you run the initial code, you will see that it's a simple rectangle that bounces around the screen, reminiscent of the bouncing ball from Chapter 3. There is a function, `update_block`, that computes the position for the image's X and Y coordinates. This function take reference parameters, that are the previous X or Y and the amount to adjust these coodinates. Based on the previous X or Y, the new value is computed.
We want a program that makes the image move randomly when the up button is pressed and in a bouncing manner when the bottom button is pressed. You will need to add code in `up_click_handler` and `down_click_handler` to change between the two modes and you will need to add a function, similar to `update_block`, that randomly assigns new coordinates. Remember to keep the reference parameters. You can check Project 8.2 for how to generate random coordinates.
[A completed project can be found here.](https://cloudpebble.net/ide/import/github/learning-c-with-pebble/project-8-4-answer)
results matching ""
===================
No results matching ""
======================
---
# Chapter 4: Making Decisions and Conditional Execution · Learning C with Pebble
[Powered by **GitBook**](https://www.gitbook.com/?utm_source=public_site_legacy&utm_medium=referral&utm_campaign=trademark&utm_term=pebble&utm_content=powered_by)
[](https://pebble.gitbooks.io/learning-c-with-pebble/content/chapter04.html#)
[](https://pebble.gitbooks.io/learning-c-with-pebble/content/chapter04.html#)
FacebookGoogle+TwitterWeiboInstapaper
[](https://pebble.gitbooks.io/learning-c-with-pebble/content/chapter04.html#)
[](https://pebble.gitbooks.io/learning-c-with-pebble/content/chapter04.html#)
[](https://pebble.gitbooks.io/learning-c-with-pebble/content/chapter04.html#)
AA
SerifSans
WhiteSepiaNight
[Chapter 4: Making Decisions and Conditional Execution](https://pebble.gitbooks.io/learning-c-with-pebble/content/)
====================================================================================================================
Chapter 4: Making Decisions and Conditional Execution
=====================================================
There is a theorem in programming language theory that states that there are only three types of statements needed for programming. In a 1966 paper, Corrado Böhm and Giuseppe Jacopini show that we only need sequential execution, conditional execution of statements, and looping repeated execution of statements to write a program.
We have already described sequential execution in a C program in Chapter 3. In this chapter, we will discuss conditional execution and its various forms. We will discuss loops and iteration in Chapter 5.
> **Böhm and Jacopini**
>
> The Böhm/Jacopini theorem can be found in "Flow diagram, Turing machines, and language with only two formation rules" in _Communications of the ACM_, Vol. 9, May 1966. It's discussed as a "folk theorem" (read that as a theorem on the level of folklore) in [this paper by David Harel](http://www.wisdom.weizmann.ac.il/~dharel/SCANNED.PAPERS/OnFolkTheorems.pdf)
> . In addition, it's been argued that the theorem is not correct; see [this paper by Kozen and Tseng](http://www.cs.cornell.edu/~kozen/papers/bohmjacopini.pdf)
> .
### Conditions and Comparisons
Conditional execution is based on boolean decision making: should code block #1 or code block #2 be executed? This decision making is binary, based on true or false values. Therefore, in order to discuss conditional execution, we have to first define what conditions are in C.
As we discuss conditions, it is important to remember what we discussed about booleans in Chapter 3. There is no boolean data type in C; C considers an integer value of 0 to evaluate as "false" and every other integer value to evaluate as "true". This means that
if (x != 0) {...}
is the same as using
if (x) {...}
We will discuss pitfalls and the messy ways we can express boolean values at the end of this chapter.
#### Comparisons
There are six ways to compare values in C, listed in the table below.
| | | |
| --- | --- | --- |
| **Name** | **Symbol** | **Description** |
| Greater than | `>` | x > y is true when x has a greater value than y and is false otherwise |
| Greater than or equal to | `>=` | x >= y is true when x has a greater value than y or is equal to y and is false otherwise |
| Less than | `<` | x < y is true when x has a lesser value than y and is false otherwise |
| Lesser than or equal to | `<=` | x <= y is true when x has a lesser value than y or is equal to y and is false otherwise |
| Equals | `==` | x == y is true when the value of x is equal to the value of y and is false otherwise |
| Not equal | `!=` | x != y is true when the value of x is not equal to the value of y and is false otherwise |
Comparisons act as you would think they would, except C implements boolean values with integers. So, trying to print a boolean value gets an integer result:
int a = 1;
int b = 2;
printf("a 65 && hours < 20);
In Chapter 3, we had a diagram of the order of evaluation of the boolean expression:
* * *

**Figure 4.1/3.1:** Computation Order for the Boolean Expression Example
* * *
Note that the parentheses served as grouping symbols, and the left-to-right association for the `!` operator made it the first operator to be evaluated. The second and third steps were evaluating `age > 65` and `hours < 20` respectively. This shows that comparison operators have a higher precedence than logical operators.
#### Short Circuiting
Consider the following example:
float fuel_cost = 2.09;
float fuel_level = 0.4;
int do_we_buy_fuel = fuel_level < 0.25 || fuel_level < 0.5 && fuel_cost < 2.50;
Here, the decision to by fuel is based on two considerations: if the tank is below 25% full or the tank is below half and fuel costs less than 2.5. Note that if the fuel level is below 25% we are going to refuel and we can skip the right hand side of the expression.
This is an example of where we can _short circuit_ the evaluation of the boolean expression. Consider that `false &&` _anything_ has the value `false` and `true ||` _anything_ has the value `true`. Short circuiting the evaluation of a boolean expression means that we can stop evaluation when we are certain of the value of the outcome.
C uses short circuiting in the evaluation of boolean expressions. This is a very acceptable way to streamline evaluation and not waste execution time.
Here's another example:
if (a < b || c == x-21 && d+2 == e)
printf("We are here...\n");
In this example, we can find several ways to short circuit the expression evaluation.
* If `a` has the value 10 and `b` has the value 20, `a < b` will evaluate to true and the rest of the expression will be ignored.
* If `a` has the value 10, `b` has the value 5, `c` has the value 30, and `x` has the value 40, `a < b` will evaluate to false as will `c == x-21`. Evaluation will stop, because the left side of the `&&` operator guarantees the expression will evaluate to false.
> **Short Circuiting Pitfalls**
>
> You have to be careful with short circuiting. When a boolean expression is short circuited, the unevaluated portion of the expression is not even examined. Bad values, bugs, and incorrect code can exist, but may not be revealed until the entire expression is evaluated. Consider this example:
>
> int zero = 0;
> int five = 5;
> int ten = 10;
> int condition = ten / five < 3 || 10 / zero == zero;
>
>
> When the right side of the `condition` assignment is evaluated, the left part of the expression will always be true, and will force the evaluation to never evaluate the right side of the `||` operator, which will cause a "division by zero" error. Should the value of `ten` become `15` or greater, the right side _will_ evaluate and the program will likely crash. These kinds of conditional errors are extremely hard to track down and fix.
### If Statements
C has several statements that use comparison and boolean expressions to choose statements to execute. The if statement is used the most. It has the following two forms:
if (_expression_) _statement_
and
if (_expression_)
_statement1_
else
_statement2_
#### If and Only If
The first form of the if statement can be called the "if and only if" statement. The _statement_ is executed if and only if the _expression_ evaluates to a true value. For example,
if (x + y > z) a++;
If the sum of `x` and `y` is greater than the value of `z`, then `a` is incremented. If the sum is less than or equal to `z`, `a` is not incremented.
The boolean expression that the conditional execution hinges on is exactly the type of boolean expression -- the combination of comparisons and logical operations -- that we have seen in this chapter's first section. In fact, remembering that boolean is the same as integer, you can really put any expression -- boolean or otherwise -- as the expression on which the execution of _statement_ depends.
Each of these are valid if statements
if (a + b == c - d && f > g) x++;
if (a && b) y--;
if ( (miles_traveled < miles_requested) ||
(miles_traveled - miles_requested == 0) )
miles_reimbursed = miles_traveled;
As expressions get more complicated, it becomes very important to (a) use explanatory names and (b) format your code for readability. Also, remember that short circuiting applies to boolean expression evaluation; in this example, if `miles_traveled < miles_requested`, the remainder of the expression will not be evaluated.
Because the if statement is itself a statement, you can _nest_ if statements inside each other. For example,
if (x_coord1 < x_coord2)
if (y_coord1 < y_coord2)
quadrant = 2;
In this example, the inner if statement forms the conditionally executed statement for the outer if statement. The inner if statement is considered only if the expression for the outer if statement evaluates to a true value. For this form of the if statement, using outer and inner conditions is the same as using a logical AND operator to combine the boolean expressions. The example below behaves the same as the above example:
if ( (x_coord1 < x_coord2) && (y_coord1 < y_coord2) ) quadrant = 2;
This is good place to remember that C uses the idea of _compound statements_. Statements surrounded by `{}` brackets can be considered to be a single statement and, therefore, fit into the template of a if statement. Consider this example.
if ((position_x - ball_radius < 0)
|| (position_x + ball_radius > window_frame_width)) {
x_velocity = x_velocity * -1;
ball_radius ++;
}
Here, we have two statements forming one statement when surrounded by `{}` brackets. The statements are indented inside the brackets to improve readability.
#### If-Else
The second form of the if statement uses an "else" part. In this form, there are two statements: one that gets executed if the _expression_ evaluates to a true value (_statement1_) and one that executes if the _expression_ evaluates to a false value (_statement2_). All of the semantics from the "if and only if" version apply, except that, in the false case, we add the execution of a second statement.
Let's consider a simple example.
if (checking_account < 100) {
savings_account -= 100;
checking_account += 100;
} else {
savings_account += 100;
checking_account -= 100;
}
Here, if the checking account balance is less than $100, we move money from the savings account to the checking account. Otherwise, we shift $100 in the opposite direction. Note that we do _something_, that is, we either execute the "true part" or the "false part".
While this form of the if statement may seem straightforward, haphazard uses of "else" can make this confusing. Consider this example:
if (n < 10)
if (z > 4)
x = 5;
else
y = 6;
To which "if" does the "else" give an alternative? It's not clear from indentation or compound statement braces. The rule in C is that an "else" is associated with the closest "else-less if". So, using indentation to show association, the code will behave like this:
if (n < 10)
if (z > 4)
x = 5;
else
y = 6;
If the programmer really wanted the else associated with the other "if", then braces must be used, like this:
if (n < 10) {
if (z > 4)
x = 5;
} else
y = 6;
#### Else-If
As we have seen previously, the if statement is indeed a statement, so it may be used after an if statement -- or as the else part of an if statement. This last construct makes if possible to string together if statements that explore multiple possibilities. Consider this example.
if (checking_account < 100) {
savings_account -= 100;
checking_account += 100;
} else if (checking >= 100 && checking_account < 300) {
savings_account += 50;
checking_account -= 50;
} else if (checking >= 300 && checking_account < 500) {
savings_account += 75;
checking_account -= 75;
} else {
savings_account += 100;
checking_account -= 100;
}
Here, there are 4 possible scenarios for moving money between the checking and the savings accounts. We can string them together using this "else-if" construct. This neatly constrasts all the choices.
> **Remember It's a Trick!**
>
> Remember, this way of using if statements and else parts is _really_ a trick of text formatting. The "else if" is really just an if statement inside an else statement. We could really just write it like this (with braces) to show this:
>
> if (checking_account < 100) {
> savings_account -= 100;
> checking_account += 100;
> } else {
> if (checking >= 100 && checking_account < 300) {
> savings_account += 50;
> checking_account -= 50;
> } else {
> if (checking >= 300 && checking_account < 500) {
> savings_account += 75;
> checking_account -= 75;
> } else {
> savings_account += 100;
> checking_account -= 100;
> }
> }
> }
>
>
> Using "else-if" constructions makes for a cleaner, more contrasted set of statements.
### Switch Statements
Consider an "else-if" construct where one expression is being examined in a case-by-case basis:
if (x_coord == 10)
x_color = GColorBlack;
else if (x_coord == 20)
x_color = GColorBlue;
else if (x_coord == 30)
x_color = GColorRed;
else if (x_coord == 40)
x_color = GColorGreen;
else
x_color = GColorWhite;
Note that the color values (`GColorBlack`, `GColorBlue`, etc) are Pebble color values. In this example, we repetitively examine `x_coord` in a way that might get lost in all the syntax.
A switch statement is designed to be used for situations like the example above: where single comparisons are made in if statements. The general form of a switch statement looks like this.
switch (_expression_) {
case _constant1_:
_statements1_
case _constant2_:
_statements2_
...
default:
_statementsn_
}
Using a switch statement, we might rewrite the "else-if" example as this:
switch (x_coord) {
case 10:
x_color = GColorBlack;
break;
case 20:
x_color = GColorBlue;
break;
case 30:
x_color = GColorRed;
break;
case 40:
x_color = GColorGreen;
break;
default:
x_color = GColorWhite;
break;
}
There are several interesting elements in this switch statement. First, note that only one value is used in each case. Each case is _not_ a list; it is a single value. Second, note that the "default" part serves the function of the "else" part of the if statement -- a kind of "catch-all" statement. Finally, note that each set of statements ends with a break statement. The break statement stops execution of the current statement (it applies to several other statements as well). Without it, one case's statement execution would flow into the next one.
To that last point, let's say that we left out a couple of break statements. Let's rewrite our example like this:
switch (x_coord) {
case 10:
x_color = GColorBlack;
case 20:
x_color = GColorBlue;
break;
case 30:
x_color = GColorRed;
case 40:
x_color = GColorGreen;
break;
default:
x_color = GColorWhite;
break;
}
For this code, the first case (`x_coord == 10`) merges with the second case (`x_coord == 20`). There is no reevaluation of the condition. The above switch statement would be equivalent to this if statement set:
if (x_coord == 10) {
x_color = GColorBlack;
x_color = GColorBlue;
} else if (x_coord == 20)
x_color = GColorBlue;
else if (x_coord == 30) {
x_color = GColorRed;
x_color = GColorGreen;
} else if (x_coord == 40)
x_color = GColorGreen;
else
x_color = GColorWhite;
Along the same lines, also note that the last "break" is technically not needed. The execution will fall through, but there is no other statement, so the case statement ends. Developing a habit of adding a break is good, however, so adding a break here works as well.
Finally, there are valid reasons to leave out "break" statements. In the example above, when `x_coord` has the value 10, there might be two valid operations to handle (other than changing colors twice). Leaving out the "break" statement then, is a great way to add functionality withot needlessly duplicating code.
> **Syntactic Sugar**
>
> The switch statement, and some other statements in C and other programming languages, have been called "syntactic sugar". It is a more convenient (and perhaps aesthetic) way of expressing the same semantics as a series of if statements. For some, "convenient" and/or "aesthetic" are not good enough reasons to choose one code structure over another.
>
> In response to that argument, others note the aesthetic code looks better and, as a result, reads better. It's a better fit for the concept that is being coded and, therefore, is better documentation for the algorithm being implemented.
### Inline Conditionals
Conditional execution is often used to decide what value to assign to a variable. Let's revisit our checking account example:
if (checking_account < 100) {
savings_account -= 100;
checking_account += 100;
} else {
savings_account += 100;
checking_account -= 100;
}
The amount that is assigned to variables is determined by the condition `checking_account < 100`.
Inline conditional assignment flips the perspective. Instead of using an if statement to determine assignment, we can embed a conditional into the assignment statement itself to choose between two expressions. The form of this looks like
_variable_ = _condition_ ? _expression1_ : _expression2_;
The choice between _expression1_ and _expression2_ works like you would expect: if the _condition_ evaluates to a true value, the first expression is used otherwise the second expression is used.
Using inline conditionals requires a change in perspective. The focus is on the assignment, not the if statement. The checking account example would have only two lines if we used inline conditionals:
savings_account = checking_account<100 ? savings_account-100 : savings_account+100;
checking_account = checking_account<100 ? checking_account+100 : checking_account-100;
There is still a fair amount of complexity here, but the focus is now on the assignment and the conditional has been worked into an expression.
Inline conditionals can be very useful if they focus attention on the right programming element. If the focus is on assignment and expressions, then inline conditionals can document and express an algorithm nicely. If, however, the focus in an algorithm is on a larger segment of code chosen by a conditional, then an if statement is probably more appropriate.
### Big Messes and How to Avoid Them
As we have seen, C allows some interesting shortcuts that, when combined with its boolean-as-integer approach and inline conditionals, can get pretty messy. Let's take some examples, then give some guidelines to follow to avoid messy code.
One big pitfall happens when assignment is used as part of the conditional. For example,
if ( (x = 2) == 5 ) {...}
or worse without parentheses:
if ( y=x+1==z-1 ) {...}
Here, precedence rules matter a great deal. The assignment happens first, producing a value that is then used in the evaluation of the `==` comparison.
In fact, precedence rules can fool you. Consider this statement:
if (2 + 5 > 6 ? 1 : 0 > 0) return true; else return false;
It's hard to figure out which part gets evaluated first. Breaking this out into if statements helps and, as pointed out before, using parentheses helps. Here, the `2 + 5` part is evaluated before the comparisons.
Using integers as booleans can be messy. For example,
if ( x-4 || y+2 ) {...}
This statement relies on the fact that `x-4==0` means false. It's hard to remember integers are boolean values as well.
Other problems arise when inline conditionals are nested. For example,
x = y>2 ? x>4 ? a ? b : c : d : e;
Figuring out the grouping is hard when nesting is itself nested.
Here are some guidelines to follow to avoid messy conditional code.
1. Avoid using integers as booleans, even if it makes sense in the code you are writing. For example,
if (x != 0) {...}
makes much more sense than
if (x) {...}
2. Use assignment operators as statements; avoid using them in conditionals.
3. Parentheses are your friends. They are difficult to overuse; parentheses should be used liberally to clarify expressions and conditions. As an example, this rewritten assignment is much clearer than the inline conditional above:
x = y>2 ? (x>4 ? (a ? b : c) : d) : e;
4. Braces are also your friends. Even if there is a single statement in an if statement, using braces around that statement clarifies groupings and minimizes confusion.
### Project Exercises
The exercises for this chapter have you working with projects that implement clock-like features. They all deal with watchface applications. So this means there will be some code that you are expected to understand yet. However, the ability to deal with complexity while not completely understanding is a very good skill to develop. It will help working with code you did not write.
#### Project 4.1
[Click here to get started with Project 4.1.](https://cloudpebble.net/ide/import/github/learning-c-with-pebble/project-4-1)
This application implements a second hand that sweeps in a circle and displays the numbers on a clock at 5 second intervals. Run the application, then work through the following questions and challenges.
1. Add comments that explain the use of `second % 5 == 0` in the if statement in the `mark_the_second` function.
2. The switch statement in the `mark_the_second` function works but is rather unwieldy. Each of the cases 1 - 9 do the same thing. Rewrite the switch statement into a compound if/else-if statement that does what the switch statement does.
3. The declaration `char text[3]` is a way to declare a string of (3) characters. Strings will be discussed in detail later; right now, it's enough to know that a string is a sequence of characters, ending in a character whose integer value is zero. Explain what the line `text[0] = 48 + number;` means by adding some comments to the code.
4. Notice that the text is drawn with a font called `FONT_KEY_GOTHIC_24` (lines 46-48). Add code to make the number "12" drawn with the font `FONT_KEY_GOTHIC_28_BOLD`.
5. This question is a bit challenging. You will notice, as the hand sweeps around the clock, that the numbers are displayed in awkward positions, not the positions you would expect for clock numbers. Numbers are drawn in a 30 x 30 box, with the upper left corner the origin point (0,0).
* The text is drawn by the `graphics_draw_text` function at the end of the `mark_the_second` function. Find the `GRect(position_x,position_y,30,30)` function. Change `position_x` and `position_y` to new variables `text_x` and `text_y`. Declare these variables at the top of `mark_the_second`. Just before the `graphics_draw_text` function, make `text_x` and `text_y` equal to `position_x` and `position_y`. Your code should now run the same way it did before these changes.
* Now add a switch statement that will change `text_x` and `text_y` for each number around the clock. For example, for "3", the correct coordinates are halfway down the left side of the 30 x 30 box surrounding the number. For this, `text_x` should still equal `position_x`, but `text_y` should equal `position_y +15`. Add cases for all clock number 1 through 12.
6. Finally, claim the code by putting your name and the date in the header comments.
You can find the answers and implementations for the assignments [above at this link.](https://cloudpebble.net/ide/import/github/learning-c-with-pebble/project-4-1-answer)
#### Project 4.2
Now let's examine Project 4.2; [click here to import the project from Github into CloudPebble](https://cloudpebble.net/ide/import/github/learning-c-with-pebble/project-4-2)
.
This application puts time on the Pebble screen as text. It's a simple program that updates once per second. Most of the work is done in the `handle_tick` function, shown below:
static void handle_tick(struct tm *tick_time, TimeUnits units_changed) {
int hour = tick_time->tm_hour;
int minute = tick_time->tm_min;
int second = tick_time->tm_sec;
static char time_string[] = "00:00:00";
strftime(time_string, sizeof(time_string), "%T", tick_time);
text_layer_set_text(text_layer, time_string);
}
Let's walk through this code, since we have not seen much of it yet.
* In the first declaration, we retrieve the hour and store it in the variable `hour`.
* In the second declaration, we get minutes after the hour and store the number in `minute`.
* Next we declare the `second` variable and store the seconds in there.
* Next, we declare a string of characters, stored in an _array_. An array is a sequence of memory words or variables, stored sequentially in memory, so we can refer to them by number.
* The next statement stores the current time, formatted neatly in the string.
* The last statement puts that string, which is now formatted with the time, on the Pebble screen.
We will make changes in this code by focusing on the `handle_tick` function. Work through the following assignments.
1. Make the watch app vibrate on the quarter hour. To do this, we need to use use one of two functions. On the top of the hour, make the watch give a long vibrate by calling the `vibes_long_pulse()` function (use that function call as a statement, like others we have seen). On each of the other quarter hour marks, call the `vibes_short_pulse()` function to give a short vibration. Find the `handle_tick()` function and check the value of `minute` to see if it is divisible by 15.
2. Make the watch app slowly change the color of the time string as the hour progresses. At the top of the hour, display the time in red; as the hour progresses, fade from red into white. To do this, you have to declare a variable to hold the text color; this variable needs to be of the `GColor8` type. Then, use the `text_layer_set_text_color` function to set the text color.
At the top of the hour, call `text_layer_set_text_color(text_layer, GColorRed)`. For every other minute, you need to compute the color. Use a fraction of time passed times the distance between red and white. Use something like this:
`text_color.argb = GColorRedARGB8 + (minute / 60.0) * (GColorRedARGB8 - GColorWhiteARGB8));`
Technically, that won't work. You have to figure out how to cast some of the computations to the right data type. But this will compute the fade. Work it into the code with the right if statement.
3. Finally, claim the code by putting your name and the date in the header comments.
You can find the implementations for the assignments [above at this link.](https://cloudpebble.net/ide/import/github/learning-c-with-pebble/project-4-2-answer)
results matching ""
===================
No results matching ""
======================
---
# Chapter 2: First Things First · Learning C with Pebble
[Powered by **GitBook**](https://www.gitbook.com/?utm_source=public_site_legacy&utm_medium=referral&utm_campaign=trademark&utm_term=pebble&utm_content=powered_by)
[](https://pebble.gitbooks.io/learning-c-with-pebble/content/chapter02.html#)
[](https://pebble.gitbooks.io/learning-c-with-pebble/content/chapter02.html#)
FacebookGoogle+TwitterWeiboInstapaper
[](https://pebble.gitbooks.io/learning-c-with-pebble/content/chapter02.html#)
[](https://pebble.gitbooks.io/learning-c-with-pebble/content/chapter02.html#)
[](https://pebble.gitbooks.io/learning-c-with-pebble/content/chapter02.html#)
AA
SerifSans
WhiteSepiaNight
[Chapter 2: First Things First](https://pebble.gitbooks.io/learning-c-with-pebble/content/)
============================================================================================
Chapter 2: First Things First: Developing Apps for Pebble smartwatches
======================================================================
A professional craftsman is nothing without a toolbox. Tool sets are often unique to the person using them; certain tools are effective for certain people and not for others. However, most professionals in a trade will all work with certain kinds of tools, but the specific choices vary widely.
So it is with programmers. Each programmer, for example, needs to use a _text editor_. This tool allows its user to enter text into a file. But if you want to touch off an argument in a group -- online or offline -- of programmers, ask a question about the best text editor. And stand back! If you want to get a list of text editors to try out, [search for "best text editors" on Reddit](https://www.reddit.com/r/pebble/search?q=best+text+editors)
.
Developing applications for Pebble smartwatches requires a set of tools and a sequence of steps. This chapter will explain and explore the process of developing, compiling, and running code for Pebble smartwatches. We will look at programming environments and what it takes to properly debug a program that is not working correctly. We will develop an example application that will run on a Pebble smartwatch.
### The Development Cycle
Developing an application for a Pebble smartwatch -- or any computer -- starts with an algorithm expressed in a programming language.
An algorithm is a collection of instructions. Algorithms have different names in different contexts. When you are cooking food, an algorithm is a _recipe_ -- a collection of ingredients and instructions that, when followed, produces culinary delights. When you are putting together things you bought in the store, an algorithm is usually printed for you and called an _instruction manual_. On a computer, an algorithm is called a _program_.
A program is usually expressed in several forms. It begins as a general, big picture set of algorithm steps. As it gets refined, this set of steps eventually is expressed as a set of high level instructions in a programming language. A programming language is a medium that represents a compromise between human-readable text and a format that can be parsed by a computer. Programs must be expressed using consistent rules so computers can detect the various program elements and convert them into language that can be executed on a CPU. At the same time, programs need to be flexible enough to embrace the original big picture set of instructions. This is not an easy task.
C is a programming language developed by Dennis Ritchie in 1972 for use with the Unix operating system. It was developed as a successor to the language B, which was one of the early higher level programming languages. The language B was designed as an easier way to influence low-level instructions without the tedium of writing machine language. A drawback to B was that it was "type-less": variables could take on any value without regard to data types. C retained much of the syntax of B and added data types and a few other changes. The C language had a powerful mix of high-level functionality and the detailed features required to program an operating system.
Machine language is the language of processors. It is comprised of primitive instructions that match the primitive functionality of a CPU. A high level statement that increments a variable might take three or four instructions at the machine language level. Therefore, there must be tools that can convert from a high level language such as C to the low level language of a processor.
That "converter" is called a _compiler_. A compiler must parse a program, convert the syntax and semantics of that program to internal structures, and then generate machine language code based on those internal structures. To a programmer, the execution of the generated machine language code must match the semantics of the original high level program. This is the ultimate test of a compiler.
A compiler generates pieces of machine code that need to be put together into an _executable package_. This package is typically built by a tool called a _linker_ that puts the pieces from the programmer together with any system code that is necessary. The end result is a package of several pieces of code and information that will allow an operating system to start executing a program.
> **Influencing Machine Instructions**
>
> Notice that the B language was designed as a way to influence how machine instructions were used. In its early days, C retained this goal: there are many language elements in C that are meant to influence which machine instructions are used in the final executable. As C compilers developed and processors became more complex, the connection between a program in C and its representation in machine language has been relegated to the compiler. C programs retain the syntax that was used to choose machine instructions, but C compilers are no longer required to obey constructs that programmers put into a C program.
>
> We will point out such elements as we describe the C programming language.
### Compiling and Running Programs for a Pebble Smartwatch
As we saw in Chapter 1, Pebble smartwatches are built with a version of an ARM processor. Any program written for a Pebble smartwatch must be comprised of machine instructions for an ARM. There are a number of steps from an application idea to an installed Pebble app, as pictured in Figure 2.1.
* * *
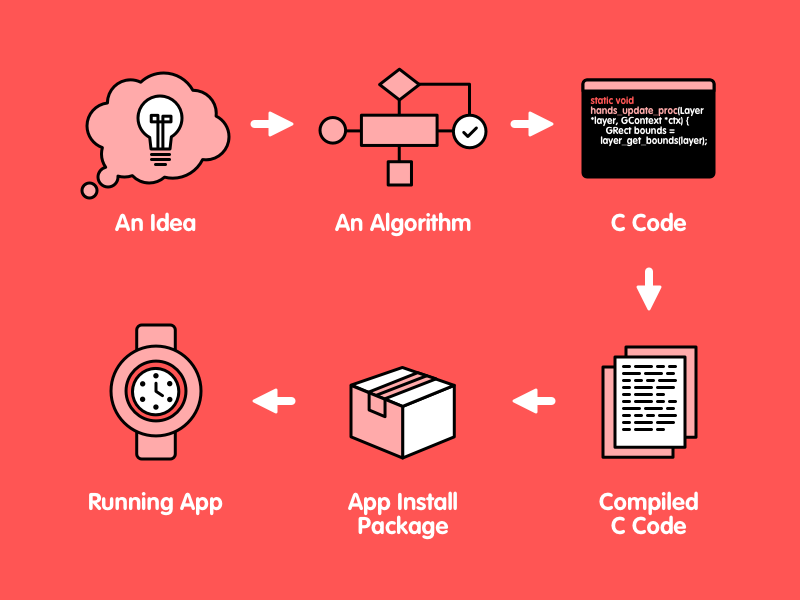
**Figure 2.1:** The Development Process
* * *
First, you have to get an idea for a watchface or a watchapp. This idea-gathering is outside the scope of this book, so it's your job to get creative.
Expressing this idea as an algorithm is the second step, and is also outside the scope of this book. There are many methods to devising an algorithm from a set of ideas.
The third step is to express your algorithm as a C or JavaScript program. These are the two languages that can be used to write watchfaces or apps for the Pebble. You are reading this book because you want to take the C approach and that's what we'll assume from here on.
Once you have a C program in a text file, the next step is to convert that C code to ARM machine language. As we stated in the previous section, you do this with a compiler. The Pebble software development kit supports developers by supplying compilers for Mac OS and Linux. These compilers will take a C program, verify its syntax and semantics, and generate a program in machine language in a format that can be installed on a Pebble watch. This file is in PBW format: a collection of files that gives the machine language for a program, a set of checksums for security, and a file of maintenance information about the program (e.g., size, time it was created, etc).
The PBW file must now be installed on a watch. There are several tools that can do this, and each one does it through the phone app. You can even transfer a PBW file to your phone and open it, at which point the phone app will take over and install the file.
### Developing Our First Program
Let's take an example. Let's say that we want to develop a simple first program for a Pebble Time watch. It's just going to display "Hello, Pebble!" on the watch screen. You can read a tutorial on how to do this at [https://developer.getpebble.com/tutorials/beginner/hello-pebble/](https://developer.getpebble.com/tutorials/beginner/hello-pebble/)
.
Programs start with an idea. Ours is a simple "Hello". To get started coding this idea, we will need a C code program file. As demonstrated in the tutorial page, we can accomplish this by using the following code, as given in the tutorial:
#include
Window *window;
TextLayer *text_layer;
void init() {
window = window_create();
text_layer = text_layer_create(GRect(0, 0, 144, 40));
text_layer_set_text(text_layer, "Hello, Pebble!);
layer_add_child(window_get_root_layer(window),
text_layer_get_layer(text_layer));
window_stack_push(window, true);
}
void deinit() {
text_layer_destroy(text_layer);
window_destroy(window);
}
int main() {
init();
app_event_loop();
deinit();
return 0;
}
We will discuss all of the above code elements in future chapters. There are two important lines in `init` function of the above code, just after the `void init()` line: one where we create a text layer for a screen window and the next line where we set the text of the layer to be "Hello, Pebble". This code is part of a larger program, where the remaining code is necessary to take advantage of the model the Pebble developers have established for working with the Pebble operating system.
Once the code from the tutorial is written and stored in a file -- call it "hello.c" -- we then must compile the code to get a machine language conversion. We can invoke the compiler on the complete file of code and we get the following output from the program:
../src/hello.c: In function 'init':
../src/hello.c:9:35: error: missing terminating " character [-Werror]
../src/hello.c:9:3: error: missing terminating " character
../src/hello.c:11:54: error: expected ')' before ';' token
../src/hello.c:13:1: error: invalid use of void expression
../src/hello.c:13:1: error: expected ';' before '}' token
cc1: all warnings being treated as errors
This output is fairly cryptic, but there's an error. The first line tells us that the error is in the file "hello.c" (the only file we have) and, further, in the function "init". The second line tells us that the error is in line 9 (you have to decode `../src/hello.c:9:35:` as the file "hello.c" in the "src" directory, with error code 35 at line 9). There is a missing quote character. Examining the code above, at line 35, you will discover that, indeed, we have the string `Hello, Pebble!` starting with a quote, but not ending with a quote. Inserting a quote at the end of the string will make the code compile correctly.
As we will encounter many times, one error in a program often causes a cascade of other errors. In our case, one missing quote caused 4 other errors. So we will fix one error and see if the others go away.
When the compilation process is completed correctly, the process creates a PBW file ready for installation. The SDK tools provided by Pebble for compilation and development also provide a way to install this on a watch. Figure 2.2 shows the code running on a watch.
* * *
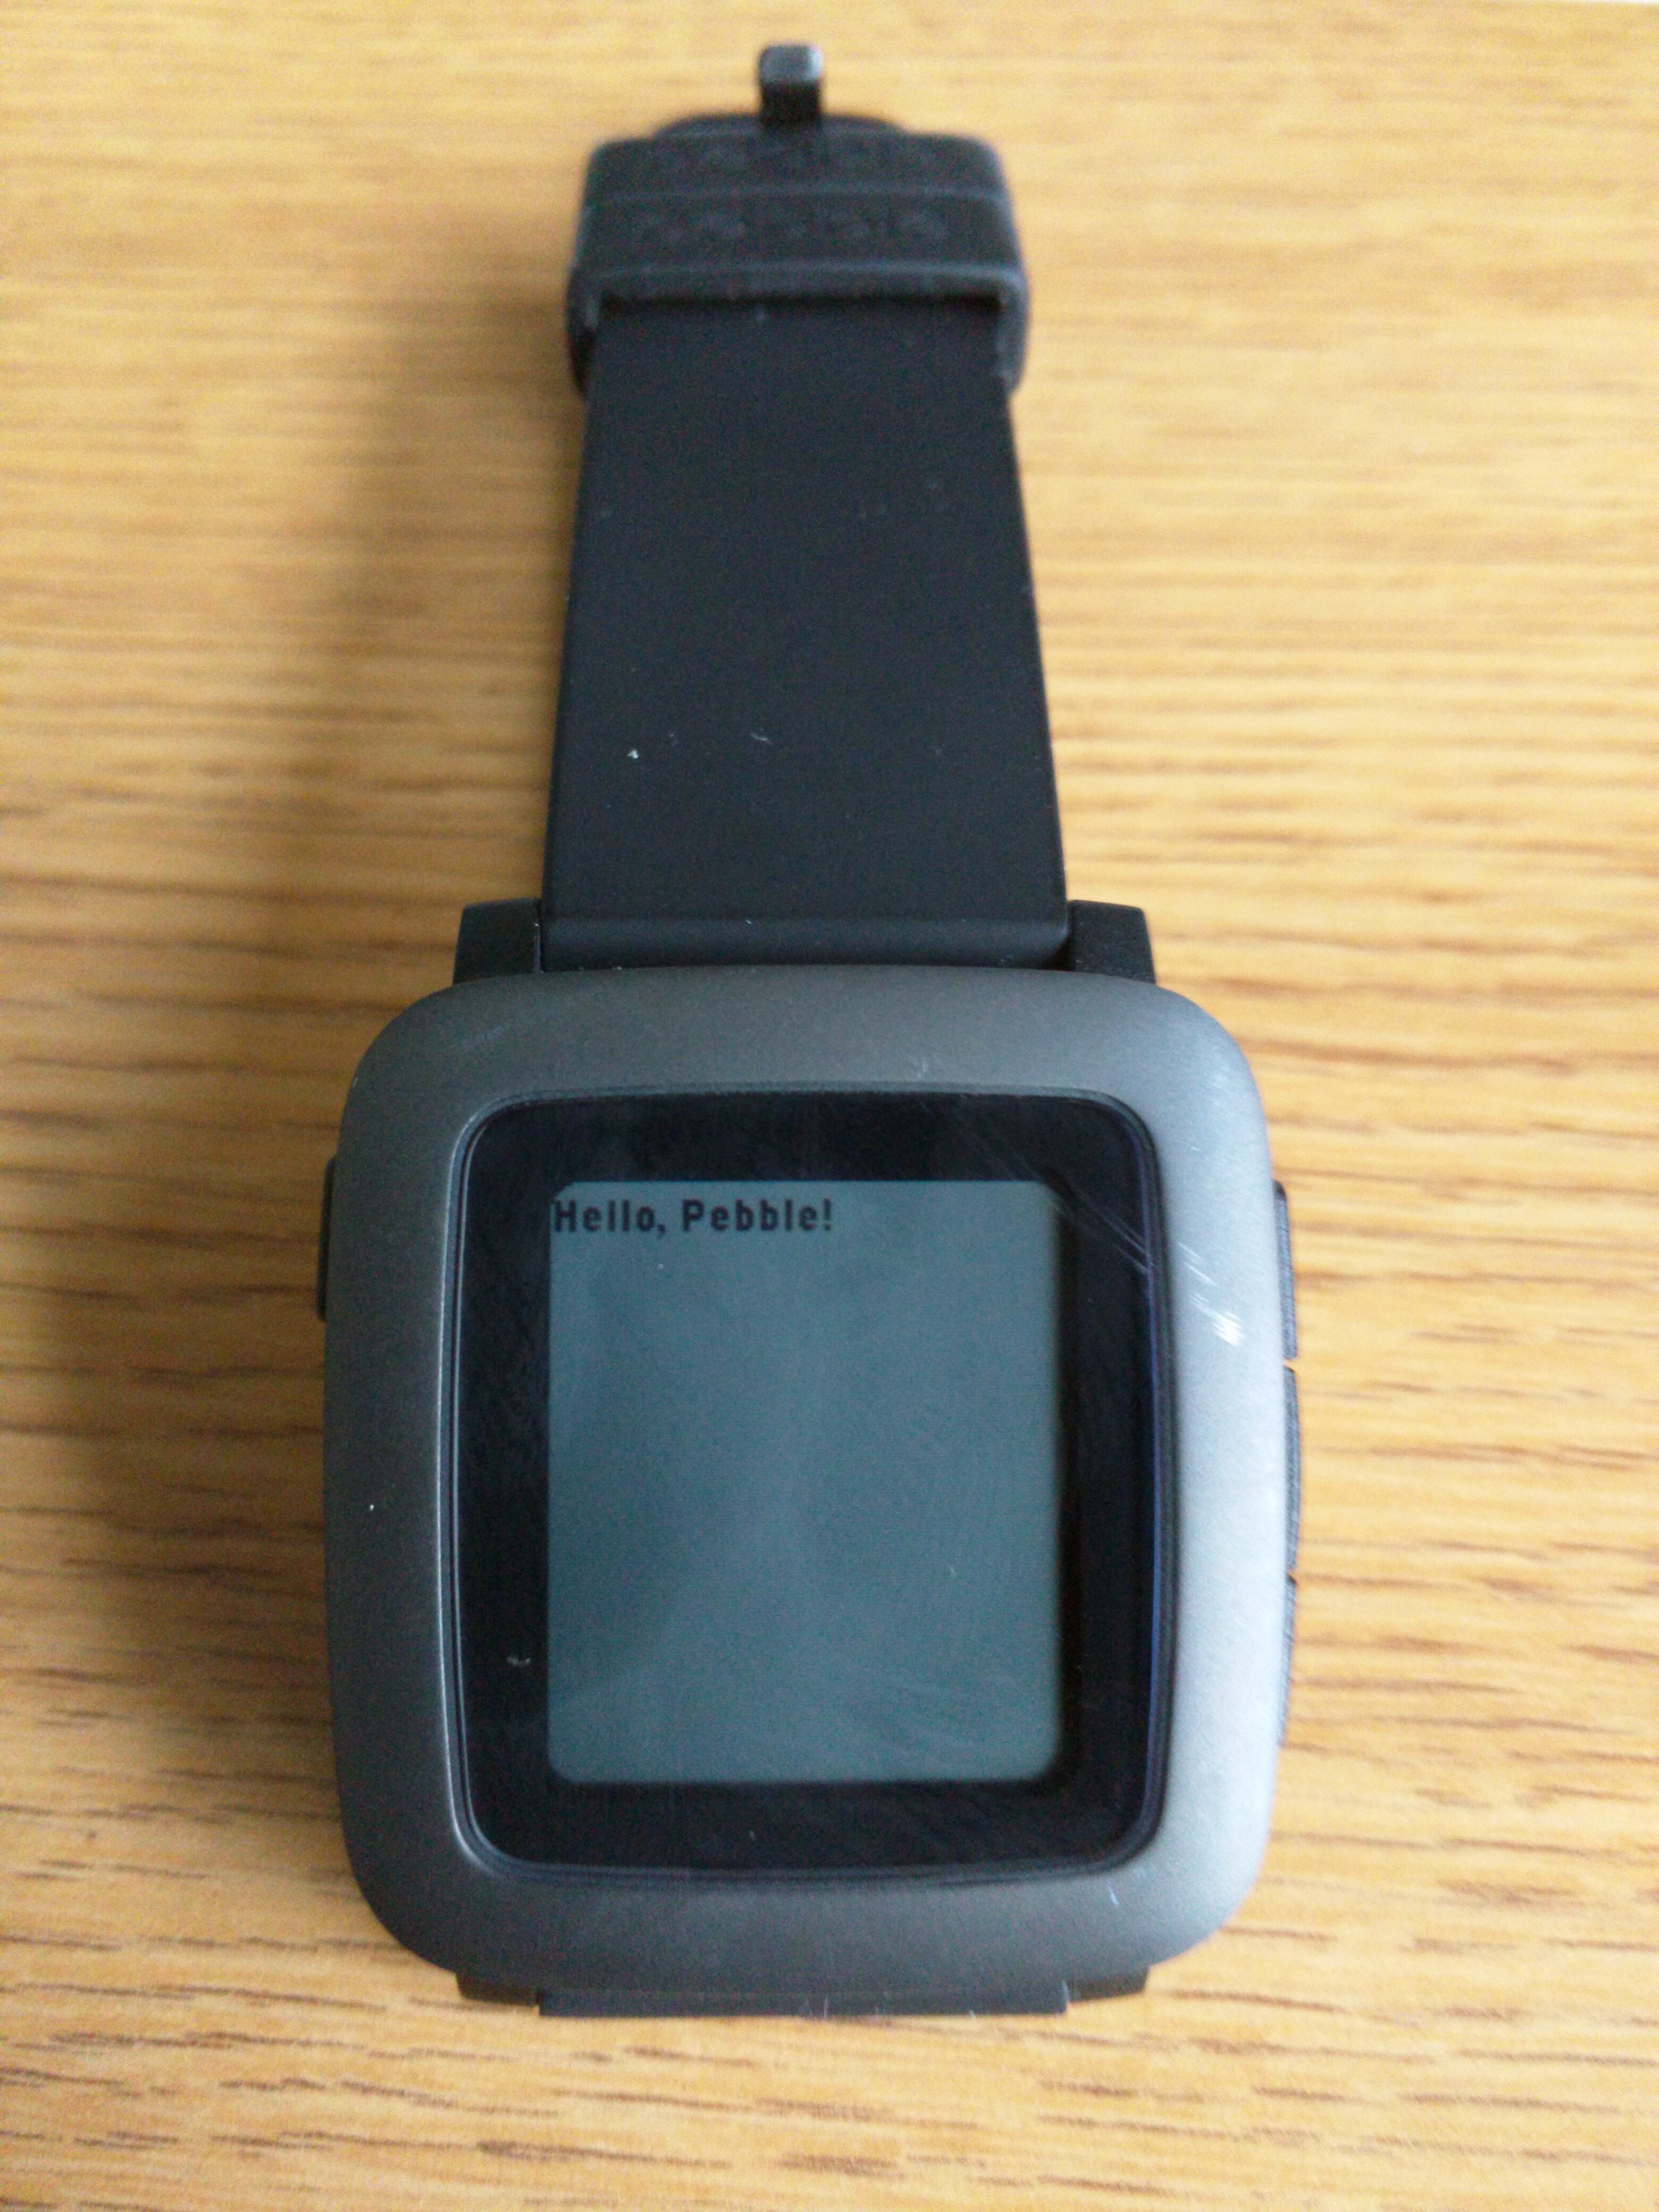
**Figure 2.2:** Our Hello Idea on a Watch
* * *
### Programming Environments
The development process -- from idea to running watchapp -- is a process that involves many tools. From editors to compilers to PBW generators, the process has many steps with many software applications. To make the process easier, we combine these tools into an _integrated development environment_.
An integrated development environment, or IDE, focuses on the process of software development by combining software tool steps together into actions that a developer initiates through a user interface. For example, if code compiles correctly, it could be assumed that the next step is to run that code. So those actions could be combined into, say, a button on a graphic user interface. That button could check to see if the code is saved into a file, compile the code, and, if the code compiles correctly, download the code to a watch for execution.
In addition to streamlining the development process, IDEs offer enhanced coding tools. There can be tools that analyze code; there can be editors that error-check your code as you write it.
[CloudPebble](http://cloudpebble.net/)
is an online IDE that is specifically targeted to the Pebble smartwatch platform. It has the following elements:
* A code-completing editor with syntax checking
* A file server that will store your program files for you
* A compiler that will work from the files stored on the file server
* A Pebble watch emulator that can emulate any of the three Pebble watch platforms
* An installer that will install code onto a watch over an online connection.
CloudPebble is supported by Pebble and is used frequently by many developers. It is often the IDE of choice when doing Pebble development.
> **What Other IDEs Are There?**
>
> There are many IDEs that software developers use. Anything that combines tools together with convenient access could be considered an IDE. For C programming, many people use [Eclipse](http://eclipse.org/)
> and [NetBeans](https://netbeans.org/features/cpp/)
> . MacOS comes with Xcode, an IDE that covers several languages, including C. There are many open source IDEs -- Eclipse is one -- including [Code::Blocks](http://www.codeblocks.org/)
> and [Codelite](http://codelite.org/)
> .
>
> There's even a large group of proponents that warn _against_ using an IDE. These folks claim all you need is an editor and compiler, all available from the command line of your favorite operating system. The most that this group will allow is an editor called Emacs, which allows you to start the command line compiler through an editor command.
>
> Even though there are other IDEs available, none are configured to work with the editing/compilation/installation process needed for Pebble watch development. Several, such as Eclipse and Code::Blocks, allow extensive configuration and could be setup for Pebble.
### Debugging an Application
If you could write perfect code with no errors the first time you developed a project, you would be efficient, productive, and rich (employers would all want someone who can write code perfectly). Unfortunately, as humans, we make mistakes and we write imperfect code. One valuable aspect of an IDE is the extent to which it helps us find and eliminate errors in coding. This process is called _debugging_.
Syntax errors are the easiest mistakes to make. Forgetting a semicolon or a parenthesis is easy to do when you are concentrating on how the code works. CloudPebble helps out with this problem by error-checking your code as you type it. It will flag syntax errors and some semantic errors -- like using a name before you declare it -- as you type in the code and before you compile it. As we saw in the "Hello" example above, if we try to compile code with syntax errors, the compiler will flag them in an error message and not generate any machine code.
Even if a program has no syntax errors and passes compilation, the program could have semantic or logic errors. IDEs provide several methods to help you track down these types of errors. _Breakpointing_ is the method of setting up a stopping point where executing code will pause and allow you examine the values of variables and the state of other programming elements. _Inspecting_ or _watchpointing_ are ways of watching code execute -- even slowing the execution down -- so you can watch programming elements change at execution time. _Profiling_ is a way of collecting statistics on sections of code and providing ways of pinpointing inefficient or broken coding elements. _Tracing_ is a method of depicting which parts of code execution as used (and, conversely, finding parts of code that are _not_ used).
These methods work when the IDE can directly execute the code and can directly affect that execution. When execution is done on a different device -- such as it is with the case of Pebble development -- many times there is little an IDE can do to _control_ execution. In these cases, the easiest method is the best method: inserting code into the program being developed that prints messages and values. Pebble OS collects text output like this into a _log file_ and makes that file available using development tools. CloudPebble makes access to log files easy by providing options during app execution to view the log file as it is being generated.
### Using GitHub and CloudPebble for Projects in this Book
This book uses _project exercises_ at the end of each chapter. A project exercise is a complete watchapp that will run on a Pebble smartwatch. You are asked to read the code, then change the code. You can check your work against an "answer" project that is also provided.
You will be working with project exercises through the CloudPebble IDE. The code you will start from is stored on GitHub, a Web site that uses a _version control system_ called "git". You will be given a URL with each project that will get you to the CloudPebble IDE and automatically import the project code into CloudPebble.
As an example, [here is a link to the example "Hello" code we used previously in this chapter](https://cloudpebble.net/ide/import/github/learning-c-with-pebble/project-2-1)
. Click on the link, and you will import the (simple) code from the above example into your CloudPebble account. (Remember to set up a CloudPebble account before you click on the link.)
### Project Exercises
As an introduction to CloudPebble and the projects we will be doing in this book, click on the link above and import Project 2.1 into CloudPebble. Follow these instructions to make sure you can import projects and get them to run.
* Click on the filename "hello.c" on the left under "SOURCE FILES".
* In the comment at line 5, change "Mike Jipping" to your name and change the date to the current date.
* At line 15, change `"Hello, Pebble!"` to `"Love ya, Pebble!"`.
* Click on the white arrow in the green box at the top right. The code should compile, the emulator should boot, and your code should run in the emulator.
The way the final project should look is [here as an "answer" project](https://cloudpebble.net/ide/import/github/learning-c-with-pebble/project-2-1-answer)
.
This will be the way we will do exercises at the end of each chapter.
results matching ""
===================
No results matching ""
======================
---
# Chapter 15: Using the C Preprocessor · Learning C with Pebble
[Powered by **GitBook**](https://www.gitbook.com/?utm_source=public_site_legacy&utm_medium=referral&utm_campaign=trademark&utm_term=pebble&utm_content=powered_by)
[](https://pebble.gitbooks.io/learning-c-with-pebble/content/chapter15.html#)
[](https://pebble.gitbooks.io/learning-c-with-pebble/content/chapter15.html#)
FacebookGoogle+TwitterWeiboInstapaper
[](https://pebble.gitbooks.io/learning-c-with-pebble/content/chapter15.html#)
[](https://pebble.gitbooks.io/learning-c-with-pebble/content/chapter15.html#)
[](https://pebble.gitbooks.io/learning-c-with-pebble/content/chapter15.html#)
AA
SerifSans
WhiteSepiaNight
[Chapter 15: Using the C Preprocessor](https://pebble.gitbooks.io/learning-c-with-pebble/content/)
===================================================================================================
Chapter 15: Using the C Preprocessor
====================================
In 1972, as the C programming language was maturing, it became necessary to develop syntax that would include the text of external files into the current program being compiled. The compiler writers also saw the utility of widespread string replacement in a program file, to textually replace one string with another automatically throughout a program.
Hence, the C preprocessor was invented. Initially, the preprocessor was a program that took the text of a C program and obeyed directives in that program, including text from external files and replacing one string for another. Soon after its introduction, the preprocessor was extended to include parameterized macros and to enable conditional compilation.
The C preprocessor, therefore, is not actually part of the C programming language. However, it is integral to programming in C and most C compilers assume the preprocessor is an external and use it extensively. In fact, some compilers actually incorporate it into the compiler program. This means that understanding how the preprocessor works and how it is used is important for programming in C, especially for programming in C on Pebble smartwatches.
### The Basics of the Preprocessor
Whether the C preprocessor (we will refer to it as the "CPP") is implemented as a separate program or as part of a C compiler itself, it represents a separate text processing phase that takes place _before_ compilation happens. Preprocessing is really two operations: directive handling and text processing. Directives that appear in the text being processed are consumed and executed. Text that is not part of a directive is analyzed for possible text substitution and/or replacement.
Let's consider an example. The CPP uses macros, that is, text substitution directives, to change text in a C program. Consider this example:
#define two 2
#define times *
int four = two times two;
In this example, preprocessing the C code before compiling it would produce the following processed code
int four = 2 * 2;
before compiling this statement. The directives would be eliminated since they are not part of the C language itself and the text would be replaced with processed text. This processed text would then be fed to the compiler.
> **Using the CPP for Text Processing**
>
> The CPP is so effective that users can be tempted to use the CPP on text from other programming languages and even regular text documents. For example, it is convenient for Web page authors use the CPP to maintain Web pages in HTML. This is most useful when the CPP is a program separate from the compiler, although many C compilers have options to only use the preprocessor and to not engage compilation.
>
> This use of the CPP should be done with care. The CPP parses C code just as a compiler would so that it can effectively implement CPP directives. This means error messages and mishandling of text might occur. For example, comments are not processed by the CPP; anything that looks like a comment that appears in in regular text would be ignored. As another example, a contraction like "don't" might be flagged as an error (with an error message) because the single quote implies a character constant in C.
>
> If you are eager to use the CPP for purposes other than C compilation, look for options to the CPP program that turn off C language processing. Also, there are implementations of preprocessing that are geared for general text purposes; seek out these programs. The "m4" program in Linux is an example of a general text preprocessor.
### Preprocessor Directives
Preprocessor directives begin with a "#" symbol, typically placed in column 1 of a C program (note that some CPP implementations allow the directive to begin in any column, as long as it is alone on a text line). There are many directives defined; here is a list of a few directives that are more applicable to Pebble software developement.
* **#define and #undef** This directive defines _macros_, which implement text substitution. There are many ways to use macros with the preprocessor; these are outlined in the next section below.
* **#if, #ifdef, #ifndef, #else, #elif, #endif** These macros implement conditional processing. This use of directives is extremely useful and is outlined in a section below as well.
* **#include** This directive takes a file name and is substituted by the CPP with the contents of that file. For example, most Pebble programs use
#include
as the first line in their code. This line makes the preprocessor find the "pebble.h" file, read its contents, and substitute the "#include" line with the contents of the "pebble.h" file.
* **#error and #warning** These directives take a message string as a parameter and allow the preprocessor to issue an error or warning message. If the message is an error message, processing stops.
* **#pragma** This directive provides additional information to the compiler. A C compiler is free to define any pragmas wants. Pragmas to the GCC compiler have the syntax
#pragma GCC directive
For example,
#pragma GCC warning message
issues a warning with the message given, much like the "#warning" directive. For other pragmas, see [this documentation](https://gcc.gnu.org/onlinedocs/cpp/Pragmas.html#index-g_t_0023pragma-GCC-dependency-101)
.
* **#line** This directive takes either a line number or a line number and a filename as parameters. It informs the compiler as to the line number in the source code where the code following the directive is found. This helps the compiler issue more informative error messages, particularly when lots of text inclusion or macro expansions might change the line numbers from the original file.
> **Pebble Preprocessor Definitions**
>
> We have used definitions from the Pebble SDK throughout this book. Now we can see where these definitions come from. We use angle brackets with the "pebble.h" reference, which means this file can reside among system include files. In the current SDK, this means it's in ".pebble-sdks/SDKs/current/sdk-core/pebble/basalt/include/pebble.h" in your home directory (assuming you are using Linux and assuming you are compiling for the basalt smartwatch architecture). This specific location may (and likely will) change over the course of several SDKs; it certainly changes when you change smartwatch architectures. Using the angle-bracket notation assures that the compiler will find the file no matter where it ends up.
#### Defining and Using Macros
There are two types of macros: those with parameters and those without parameters. Let's look at macros without parameters first.
Macros without parameters define the substitution of the first parameter with the rest of the line. For example,
#define STRING_LENGTH 64
will direct the CPP to replace every occurence of "STRING\_LENGTH" with the number "64". This text replacement is called a _macro expansion_. It is conventional to write macros in uppercase.
The macro definition ends at the end of the "#define" line. If you need to continue the definition onto multiple lines, you can use a backslash-newline combination. The result, however, will be generated on one line.
For example, consider the following macro definition:
#define DIMENSIONS { 144, \
168 }
int sizes[] = DIMENSIONS;
would be replaced with the code below:
int sizes[] = { 144, 168 };
Order of definition makes a difference. Consider the following example:
#define WIDTHS APWIDTH, BASWIDTH, CHWIDTH
int widths[] = { WIDTHS };
#define APWIDTH 144
#define BASWIDTH 144
#define CHWIDTH 180
int newwidths[] = { WIDTHS };
This code would look like this after preprocessing:
int widths[] = { APWIDTH, BASWIDTH, CHWIDTH };
int newwidths[] = { 144, 144, 180 };
This means that textual substitution is done with whatever definitions are available at the time of substitution. For the declaration of `widths`, definitions of `APWIDTH`, `BASWIDTH`, and `CHWIDTH` were not available, so the text was used. For the declaration of `newwidths`, the three identifiers now were defined as their own macros, so those macros definitions were used.
To change the definitions of a macro, you must first _undefine_ the macro name, then redefine it. The "#undef" directive undefines a macro. Thus, the following definitions would work:
#define APWIDTH 144
#define BASWIDTH 144
#define CHWIDTH 180
int newwidths[] = { WIDTHS };
#undef APWIDTH
#define APWIDTH 120
#undef CHWIDTH
int newwidths[] = { WIDTHS };
This code looks like this after preprocessing:
int newwidths[] = { 144, 144, 180 };
int newwidths[] = { 120, 144, CHWIDTH };
Note that we did not give `CHWIDTH` a new definition after we undefined it, so the name of the identifier was used in the macro expansion.
Macros can be defined with parameters. Here, parameters that are specified in the original string and the same names are used in the expansion string. Parentheses are used in the original string to indicate the parameter list (just like function definitions without type names).
Consider this example:
#define WRITE_TEXT(TEXT, FONT) graphics_draw_text(ctx, TEXT, FONT, bounds, \
GTextOverflowModeWordWrap, \
GTextAlignmentCenter, NULL);
Now, we can use `WRITE_TEXT(code, myfont)` and it will expand to
graphics_draw_text(ctx, code, myfont, bounds, GTextOverflowModeWordWrap, GTextAlignmentCenter, NULL);
Note here that the conventional uppercase of macro definitions is a big help when trying to figure out where the parameters go in the substituted text.
Definitions that have expandable macros embedded will expand as expected:
#define OVERFLOW GTextOverflowModeWordWrap
#define ALIGNMENT GTextAlignmentCenter
#define WRITE_TEXT(TEXT, FONT, OFMETHOD, AMETHOD) \
graphics_draw_text(ctx, TEXT, FONT, bounds, \
OFMETHOD, \
AMETHOD, NULL);
WRITE_TEXT(code, myfont, OVERFLOW, ALIGNMENT);
This also expands to the expansion above.
Macro definitions can include conditional code inclusion, as we will discuss in the next section.
#### Conditional Code Inclusion
The CPP allows for the conditional inclusion of code by using the directives "#if", "#ifdef", and "#ifundef". Each of these conditionals can work with an "#else". They all require an #endif" directive to complete the conditional inclusion.
The "#if" directive takes an expression as a "parameter". That expression can contain constants and arithemtic operators, other macros, and references to the "defined()" operator. Let's consider an example:
#if defined(TABLE_SIZE)
#if TABLE_SIZE > 100
#undef TABLE_SIZE
#define TABLE_SIZE 100
int boundary = 200;
#else
int boundary = 100;
#endif
#else
#define TABLE_SIZE 50;
int boundary = 100;
#endif
This looks a bit confusing without whitespace or indentation. We could rewrite it as follows:
#if defined(TABLE_SIZE)
#if TABLE_SIZE > 100
#undef TABLE_SIZE
#define TABLE_SIZE 100
int boundary = 200;
#else
int boundary = 100;
#endif
#else
#define TABLE_SIZE 50;
int boundary = 100;
#endif
Now this reads better. Note that directives can be indented (with most preprocessors, including the GCC CPP that the Pebble SDK uses).
In this example, there are several assumptions made. If `TABLE_SIZE` is defined, it is assumed to have an integer value. If `defined(TABLE_SIZE)` evaluates to the value "true", then `TABLE_SIZE` is assumed to be a macro symbol. The "defined" question is actually a "defined as a macro" question, as opposed to "defined as a C name" question.
When an "if" statement is used, it's natural to think about an "else" part. For CPP directives, "#else" parts work as you might expect: they represent the alternative or false part to the "#if" directive. In the example above, if `TABLE_SIZE` is not defined, the bottom "#else" part is activated. "#else" directives can be nested, as the above example shows.
"#elif" directives combine "#else" and "#if" directives.
Checking to see if macros are defined is done so often that there is a directive to check this. "#ifdef" checks for defined macros and and "#ifndef" checks for undefined macros. The above check for `defined(TABLE_SIZE)` could be written as
#ifdef TABLE_SIZE
#### Pebble-Specific Definitions
Pebble applications can take advantage of preprocessor definitions to make a single file of code that applies to several different Pebble smartwatch platforms.
There are definitions that reflect services or architectural features.
* `PBL_COLOR` is "true" when the smartwatch has a color display and "false" when it does not.
* `PBL_ROUND` is "true" when the smartwatch has a round display and "false" when it has a rectangular display.
These definitions are suitable for use with directives like "#ifdef" like this:
#ifdef PBL_COLOR
graphics_context_set_text_color(ctx, GColorRed);
#else
graphics_context_set_text_color(ctx, GColorBlack);
#endif
In this example, the `PBL_COLOR` macro is defined when the compilation of this code is for a platform that has color.
In addition, there are macro definitions that check for services or hardware properties. In general, these work in your C code to include one of several possible pieces of code, depending on the presence or absense of a service or hardware feature. For example, we could set text color for an application, but we want the code to work with a Pebble Classic and a Pebble Time. We would do this:
graphics_context_set_text_color(ctx, PBL_IF_COLOR_ELSE(GColorRed, GColorBlack));
The Pebble Time would get a substitution of `GColorRed` for the macro; a Pebble Classic would get `GColorBlack`.
The macros that can check features and services include:
* `PBL_IF_COLOR_ELSE(true_code, false_code)` will include the `true_part` if the platform supports color and the `false_part` if not.
* `PBL_IF_BW_ELSE(if_true, if_false)` is the converse of the `PBL_IF_COLOR_ELSE`, substituting the `true_part` if the smartwatch supports only a monochrome screen and `false_part` if not.
* `PBL_IF_MICROPHONE_ELSE(if_true, if_false)` will use the `if_true` part if the hardware supports a microphone, using the `false_part` if not.
* `PBL_IF_RECT_ELSE(if_true, if_false)` will use the `true_part` if the screen is rectangular and the `false_part` if not.
* `PBL_IF_ROUND_ELSE(if_true, if_false)` will substitute with the `true_part` if the platform has a round screen, that is, is a Pebble Time Round, and will substitute with `false_part` for everything else.
* `PBL_IF_HEALTH_ELSE(if_true, if_false)` will use the `true_part` if the platform supports Pebble Health, otherwise it will use the `false_part`
It's important to remember that these are _not run-time definitions_; they are _compile-time definitions_. These definitions make it easier to write one set of code, that is, one set of files, but target the same code to different platforms. The result is still a set of PBW files, meaning there are still several sets of install packages with slightly different code adapted for specific smartwatch platforms. But you can generate these different install packages from the same set of files.
### Guidelines for Using the CPP
With the introduction of the preprocessor, we have one of the easiest ways to write really confusing code. There are aspects of CPP definitions that make extensive use of the CPP a dangerous thing to do. Here are some dangers to stay away from and guidelines to help make the CPP useful.
1. **Remember that macro definitions are text substitutions that are substituted and removed before compilation.** This means that _macro definitions cannot be debugged_. The problem here is that the compiler sees only the end result of text substitution and there is no connection to the original macro definition. Where this applies to literals or variables, use "enum" definitions and constant declarations. Where functions are substituted for other text, use actual functions with real, debuggable definitions.
2. **Always be aware of the text substitution and where is is placed.** Remember that macro substitution is a _verbatim_ text replacement. Often expansions can have strange results. Consider this example:
#define SQUARE(x) ((x) * (x))
int y = 15;
int z = SQUARE(y++);
When this is expanded, we get something we did not intend: `z = ((y++) * (y++));` which is _not_ the square of 15 (the result is `15 * 16`). Be especially careful when using replacements for expressions; use parentheses as much as you can.
3. **Watch name conflicts.** The CPP processes text without regard to where it's defined or if the resulting code even works. When a name you chose in your code conflicts with a macro defined elsewhere, that name will still be replaced, often with unexpected consequences.
4. **Naming becomes extremely important with macros.** Macros are the worst place to use cryptic or short names, because of the definitions that result.
5. **Comments in macros are very dangerous.** Consider this:
#define true 1 // booleans as integer
#define false 0 // this too!
while (true) {
x ++;
}
When this expands, the comment at the end of the `true` definitions will make the rest of the "while" syntax appear in a comment. The code will not compile correctly and the reason will be very hard to track down.
### Obfuscation
We can use the CPP to our advantage, making flexible code that easier to read and use. We can also have some fun with it and make some terribly ofuscated code.
Consider the code to the first program we saw in Chapter 2. The program started out like this:
#include
Window *window;
TextLayer *text_layer;
void init() {
window = window_create();
text_layer = text_layer_create(GRect(0, 0, 144, 40));
text_layer_set_text(text_layer, "Hello, Pebble!);
layer_add_child(window_get_root_layer(window),
text_layer_get_layer(text_layer));
window_stack_push(window, true);
}
We can obfuscate this code with some macro definitions. Consider this new starting code:
#include
#define l1l window
#define l11l Window
#define l1l1l layer
#define l111l Layer
#define ll1ll(l) text_##l
#define l11ll(l) Text##l
#define ll11l layer
l11l *l1l;
l11ll(Layer) *ll1ll(ll11l);
void init() {
l1l = window_create();
ll1ll(ll11l) = ll1ll(layer_create)(GRect(0, 0, 144, 40));
ll1ll(layer_set_text)(ll1ll(ll11l), "Love ya, Pebble!");
layer_add_child(window_get_root_layer(l1l),
ll1ll(layer_get_layer)(ll1ll(ll11l)));
window_stack_push(l1l, true);
}
We will leave code "half" obfuscated, so we can see the resemblence to the original. Note that this code compiles just fine.
This code demonstrates a few tricks we can do with macros. First, this code exploits the similarity between the letter "ell" (l) and the numeral one ("1"). When placed together with a typewriter-style font, they look very much the same. Second, using odd representations for regular keywords, names and symbols will start to make the code cryptic. Simply transforming variable names like "window" and giving multiple representations of "layer" confuses this code. Finally, note the use the "##" sequence. To the CPP, this sequence will paste parts of a macro definition together. For example, if we used this definition in place of the definition above:
#define ll1ll(l) text_l
in hopes of using the parameter in the final text name, it would not work. `ll1ll(layer)` and `ll1ll(layer_get_layer)` would both be substituted with `text_l`. But using "##" as the "glue" for the definition makes two different substitutions.
### Standard CPP Features
There are a few standard features that the CPP uses. We have already seen one in the last section: using the "##" sequence to glue parameters into a single name. There are a few others.
* The names "\_\_FILE\_\_" and "\_\_LINE\_\_" will be substituted for the name of the file being evaluated and the current line being worked on.
* Definitions can have variable sets of parameters. If you include the characters "..." as the last "parameter" in a macro name, you can refer to parameters that might have been included in the macro use by the name "\_\_VA\_ARGS\_\_" (for "variable arguments") in the substitution text. For example, if we specify a macro like this:
#define checkvalue(COND, ...) if (!COND) { __VA_ARGS__ }
We could then have use this to check values and execute statements if values are not in line with expectations. We could use
checkvalue(miles >= 0, APP_LOG(APP_LOG_INFO_LEVEL, "Miles out of range."));
* The CPP uses a single "#" symbol to convert what follows the symbol to a string. We could define
#define PRINT_ENUM(enumeration) printf(strcat(#enumeration, " is %d"), enumeration)
that would print the name and value of an enum that we went to the macro. Quotes are automatically added.
* The CPP defines a double "#" symbol to work with the "\_\_VA\_ARGS\_\_" definition. Consider this definition:
#define debug_variable(var, fmt, ...) \
printf( "DBG: " __FILE__ "(%d) " #var " = " fmt, __LINE__, var, __VA_ARGS__);
Now consider what happens when the "\_\_VA\_ARGS\_\_" argument is empty, that is, when the macro is called with only two arguments. When the macro expands, the list is left with a comma on the right, resulting in a syntax error. This where the "##" sequence is used. If we change the macro definition to the following, we don't get the syntax error:
#define debug_variable(var, fmt, ...) \
printf( "DBG: " __FILE__ "(%d) " #var " = " fmt, __LINE__, var, ##__VA_ARGS__);
The "##" deletes the character to the left of the "##\_\_VA\_ARGS\_\_" if "\_\_VA\_ARGS\_\_" is empty.
### Useful Preprocessor Uses
While there are preprocessor hazards to avoid, there are many convenient uses for the CPP. We have already discussed the basics: text substitution and conditional code inclusion. There are a few other handy uses for CPP code.
* **Mass Removal of Code:** If you have a large section of code you need to remove from consideration by the compiler, you could prepend each line with the "//" sequence for comments. You could also begin the entire section with `#if 0` (always false) and `#endif` directives.
* **Include Guards** In a project with many included files, one of the easy mistakes to make is to include the text from a file multiple times. The compiler would not like multiple definitions, so include guards can be used. These guards look like:
#ifndef _FILE_NAME_H_
#define _FILE_NAME_H_
/* code */
#endif
Here, code is included only if the file `_FILE_NAME_H_` name is not defined and, when the file is first included, the name gets a definition. This means that the contents of `file_name.h` get included only once.
* **Multiple Definitions** Sometimes it is necessary to define a name in multiple ways to test how multiple definitions work or to see what the best definition is. Using macros is a good way to do this, especially if the definition is used several times throughout the code. By using one version of the macro definition, then using the macro in the code, you can simply change the definition of the macro to try out different versions in the code.
### Project Exercises
#### Project 15.1
Back in Chapter 3, we specified a project exercise, [Project 3.1](https://cloudpebble.net/ide/import/github/programming-pebble-in-c/project-3-1-answer)
, that displayed a bouncing ball around the Pebble smartwatch screen. Make following changes to the code using macros:
1. If the Pebble smartwatch is a Classic, start the ball in the top left corner; otherwise start the ball in the top right corner.
2. If the Pebble smartwatch is a Classic, start the velocity of the ball off at 10; otherwise, start the velocity at 5.
3. Find the macro that makes the ball `GColorCobaltBlue` or `GColorBlack` depending on whther color is available. Remove this `\#if` and make the code work with a macro in a single function call.
4. Define a macro called `WRAPAROUND`. Do not give it a value. Now change the code in this project to bounce the ball off walls (as it is currently) if `WRAPAROUND` is _not_ defined, but also to wrap the ball to the other wall in only the X direction if the macro _is_ defined.
[You can find an answer to this project here.](https://cloudpebble.net/ide/import/github/programming-pebble-in-c/project-15-1-answer)
#### Project 15.2
Developing code using the CloudPebble IDE is very convenient, but there are few debugging features built into the environment. Most of the debugging in CloudPebble amounts to printing values and using logging messages. Let's write a few macros that will help with debugging.
* Start by defining a name that will control debugging. If the name is defined, debugging macros will print what we ask; it the name is not defined, the debugging macros will do nothing. A simple "#define" is all that's needed here.
* Now define a macro called "MY\_DEBUG" that uses the `printf` function we have seen before to print a logging message. You will need the variable parameters specification. You are writing a macro like `APP_LOG`, [described here](https://developer.pebble.com/docs/c/Foundation/Logging/#APP_LOG)
, without the logging level.
* Define a "MY\_ASSERT" macro that will accept a condition and will print one of two messages. If the condition is true, the first message prints and if the message is false, the second message prints.
There are several other macros you could write. Devise one.
Finally, read through [this discussion on StackOverflow](http://stackoverflow.com/questions/1644868/c-define-macro-for-debug-printing)
about debugging macros.
[An answer for this project with some demonstration code from a simple Pebble app can be found here.](https://cloudpebble.net/ide/import/github/programming-pebble-in-c/project-15-2-answer)
> **Assertion Macros**
>
> Assertions are extremely useful in C code. They serve their most useful purpose in debugging, where code will report an error and stop if properties of variables and data are not met. The "MY\_ASSERT" macro above is an example of an assertion.
>
> Standard C defines a macro called "assert", in an include file called "assert.h", that takes an integer parameter. The integer is evaluated as if it represents a boolean value: the value 0 is evaluated as false and all other non-zero values are evaluated as true. This means that boolean expressions can be used in an assert call. Calls like `assert(x < y)` or `assert(ticket != null)` are useful; when the parameter evaluates to false, there is a report and the code halts.
>
> Pebble SDKs do not include the "assert.h" file. Because of this, using your own version of "assert", like the example above, creates a very useful tool.
#### Project 15.3
Have some fun with obfuscation. Pick some Project Exercise code and obfuscate it. How much can you obliterate and still have the code compile correctly and do the same thing it did before obfuscation? How many symbols, names, and syntax can you make into different symbols?
[Here is an example of obfuscation of Project Exercise 6.4.](https://cloudpebble.net/ide/import/github/programming-pebble-in-c/project-15-3-answer)
We have stated it before, but lots of obfuscated C can be found at the [Obfuscated C Contest Web site](http://www.ioccc.org/)
.
results matching ""
===================
No results matching ""
======================
---
# Chapter 16: Standard C File I/O · Learning C with Pebble
[Powered by **GitBook**](https://www.gitbook.com/?utm_source=public_site_legacy&utm_medium=referral&utm_campaign=trademark&utm_term=pebble&utm_content=powered_by)
[](https://pebble.gitbooks.io/learning-c-with-pebble/content/chapter16.html#)
[](https://pebble.gitbooks.io/learning-c-with-pebble/content/chapter16.html#)
FacebookGoogle+TwitterWeiboInstapaper
[](https://pebble.gitbooks.io/learning-c-with-pebble/content/chapter16.html#)
[](https://pebble.gitbooks.io/learning-c-with-pebble/content/chapter16.html#)
[](https://pebble.gitbooks.io/learning-c-with-pebble/content/chapter16.html#)
AA
SerifSans
WhiteSepiaNight
[Chapter 16: Standard C File I/O](https://pebble.gitbooks.io/learning-c-with-pebble/content/)
==============================================================================================
Chapter 16: Standard C File I/O
===============================
This chapter takes a look at one of the most difficult features to include in a programming language: file input and output. File I/O is such a problem because it is highly dependent on the operating system of the computer that is executing your program. The C language is supposed to remain the same across operating systems, but there is a wide variety in the way different operating systems implement file handling.
To accommodate this, C takes file I/O out of the language. That is to say that there is no syntax that drives file I/O. Rather, it is handled in C by functions, implemented in the standard C library that accompanies implementations on different operating systems. This makes sense because functions can hide the actual implementation of file I/O in each operating system while providing the programmer with a consistent interface.
We will examine file I/O functions in C in this chapter. We will overview basic, general file I/O here and at file I/O on a Pebble smartwatch in the next chapter.
### A Little Perspective
File I/O in C owes much to its history. The way file I/O is done is heavily based on the roots of the C language in Unix, the operating system on which C first ran. Unix and C were developed concurrently, and the way file I/O is implemented is an artifact of this concurrent development.
To reiterate, there are no native, syntax-driven components to the C programming language that are connected to file I/O. Instead, all file I/O is done through function calls. The implementation of these functions are part of a standard C library, called "stdio"; this library is linked in when C programs are compiled and the resulting executable is generated. This C library is standardized across operating systems; it is based on a specific model of file contents that is consistent in all implementations. This model is a Unix model, but is implemented for all operating systems on which C runs.
Finally, note that file I/O needs a file system. Some of the features we will discuss are connected to "standard input" and "standard output", i.e., the keyboard and the screen. But other features are based on nonvolatile storage that exists in a file system on the computer on which the C code executable is running. On a Pebble smartwatch, this can be an issue. While we can pinpoint a "screen" or "output", there is no keyboard input to a Pebble smartwatch and there is no file system. This means that, while Pebble's implementation of file I/O includes screen output, most other standard file I/O operations are not supported. There are file I/O operations for Pebble programs; they are discussed in the next chapter.
### A General Overview
In general, C considers a file to be a container of bytes. This container has no specific structure other than that the bytes are in a sequential order. This is different than some other file implementations; some operating systems have predefined structures for files. But C is modeled after the Unix view of file systems, which is very simple and abstract.
In order to use a file, the file must first be _opened_. Once opened, the file contents can be _read_ from the file or _written_ to the file in a sequential manner. When a program is done with a file, that file should be _closed_. Files are maintained with the concept of a _positional pointer_, that is, a specific position within the sequential bytes that make up a file. When a read or a write operation is performed, that operation happens at the location of the positional pointer and that pointer is moved to the next byte. That position can be changed by an operation called _seeking_, which is the act of explicitly moving the positional pointer to a specific place in the file.
> **C and Random Access Files**
>
> Often, in other operating systems and other languages, there is special treatment given to _random access files_, or special files where the positional pointer can be changed at any time. In keeping with simplicity and abstractness, C does not have special treatment for random access files. Indeed, _every_ file is a random access file and functions that adjust the positional pointer work on all files.
C programs view file contents in two different ways. One way is as a container of _text_: all data in a file is considered to be 8-bit or 16-bit characters (depending on the character encoding scheme used). The other way is as a container of raw _binary data_: all file data is a set of bytes with no particular interpretation connected to them. There are sets of functions that apply to each of these categories. If a file has text, then there are likely concepts that build on text, like words and lines, that file functions can work with. If a file has raw binary data, then the only assumption that can be made is it is made up of bytes, and file functions work with that assumption.
### Opening and Closing a File
Before the contents of a file can be used, the file must be opened. We open files with the function `fopen()`. When our use of a file is completed, files should be closed. We close files with the function `fclose()`.
The `fopen()` function has the following prototype:
FILE *fopen( const char *filename, const char *mode );
The function takes two parameters: `filename`, which is the name of the file to open, and `mode`, which is a string of characters that depict the way the file will be accessed. Both parameters are `const char*` parameters, so literal strings can be used as actual parameters. The mode specifier can be a combination of the following characters:
* "r" specifies the file is to be used for reading
* "w" specifies the file is to be used for writing, starting with an empty file
* "a" means the file contents will be appended: used for writing but without emptying the file first
* "b" specifies a binary (raw, byte-wise) file rather than a text file
* "+" specifies that both reading and a form of writing (on an empty file or appending). When used as "r+", the file must exist first.
Consider some examples. "rb" would indicate opening a file for reading bytes. "w" would open an empty text file for writing. "r+b" will open an empty binary file for reading and writing.
Note that the function returns a value of the datatype `FILE`. This is a struct, called a _file descriptor_, that describes the file being opened. The value returned must be used in the subsequent function calls that pertain to manipulating the file.
For example, let's say we wanted to write some text to a file. We might do it this way:
const char *filename="threebears.txt";
const char *mytext="Once upon a time there were three bears.";
FILE *storyfd = fopen(filename, "wb") ;
if (storyfd) {
fwrite(mytext, sizeof(char), strlen(mytext), storyfd);
fclose(storyfd);
}
This example opens a file using the mode "wb", which inidicates the file is used for writing raw bytes. Note that if there was an error with opening the file, the `storyfd` descriptor would have a NULL value; this is checked in the example by the "if" statement.
As demonstrated by the example, the `fclose()` function has the following prototype:
int fclose(FILE *descriptor);
This function closes the file referenced by the descriptor, freeing up all system resources allocated to that file and rendering the descriptor invalid.
You can change the way a file is handled by using the `freopen()` function. It has the prototype below:
FILE *freopen(const char *filename, const char *mode, FILE *fd);
This reassociates the filename given and the file mode with the descriptor `fd`. This function works like an `fclose()` followed by an `freopen()`.
### Direct, Non-specific File I/O
Reading and writing raw byte-wise data from and to a file is the most generic way to work with files. Both text and binary data can be written with this method.
The function `fread()` will read bytes from an opened file. It has the prototype below:
size_t fread(void *buffer, size_t size, size_t num, FILE *fd);
This function needs space in memory (`buffer`), the size of a single unit in that space (`size`), the number of units in that space (`num`), and the file descriptor of the file to read from (`fd`). The file needs to have been previously opened. The number of bytes to read is computed and a read is attempted from the current file position. The function returns the number of bytes read.
The `fwrite()` function works much the same way, except it (naturally) writes instead of reads. It has the following prototype:
size_t fwrite(const void *buffer, size_t size, size_t num, FILE *fd);
The parameters match those of `fread()`. Again, the file needs to have been previously opened.
Consider the example above. The `fwrite()` call looked like this:
fwrite(mytext, sizeof(char), strlen(mytext), storyfd);
`mytext` is a pointer to a string. Each unit in the string is a character, whose size is `sizeof(char)`, and the string has `strlen(mytext)`, or the string's length, number of characters/units. Finally, the `storyfd` is the file descriptor that was returned by a previous `fopen()` call.
Finally, the `feof()` function can be used with binary data files to test if the file position pointer is at the end of the file. The prototype for this function is:
int feof(FILE *fd);
It returns a boolean-style indicator if the file position pointer for the file described by the file descriptor is at the end of the file. Note that the end of a file is not detected until a program tries to read _past_ the end of file. This means that the last valid read of file data will not detect the end of file.
> **Detecting The End of a File**
>
> Detecting the end of a file can be a tricky procedure. The operating system maintains an "end of file" flag for each open file that indicates if the end of the file has been reached. However, as we stated above, the end of file is not reached until a file read has _gone past_ the end of the file. This means that this code is not correct:
fd = fopen(myfilename, "r");
while (!feof(fd)) {
// get a character from the file
c = getc(f);
// do something with it
putchar(c);
}
> The code to get the character is fine. If it reads past the end of file, it will return a special character, designated with the constant `EOF`. But this character is not a valid, printable character, so you can't do anything with it once you get it. In order to properly work with the end of a file, you need to test if the character is valid before doing anything with it.
### Text File I/O
Text file I/O functions build on binary data I/O functions to view files as collections of text objects: characters, strings, and lines. These functions reflect these text objects.
The simplest function that reads text objects from a file is `fgetc()`, whose prototype is below:
int fgetc(FILE *fd);
This function reads a character from the file described by the file descriptor `fd`. The function returns the character read, or in case of an error, it returns `EOF`.
Alongside `fgetc()` is `fgets()`, which gets a string of a specified length from a file. The prototype for `fgets()` is below:
char *fgets(char *buffer, int bufsize, FILE *fd);
This function reads up to _bufsize-1_ characters from the file described by `fd`. It copies this string into the buffer `buffer`, and appends a NULL character to terminate the string.
Let's consider an example. Let's say we want to print all the lines of a file to the screen. We could use code like this:
int c;
FILE *fd;
fd = fopen("example.txt", "r");
if (fd) {
while ((c = fgetc(fd)) != EOF)
putchar(c);
fclose(fd);
}
This example demonstrates several things. As we saw before, the `fopen()` function opens the file requested, returning either the file descriptor or a `NULL` (0). Here, we put the assignment in the "while" loop, testing for the end of file. Note the end of the file is denoted with a special character that we can test for. We use the function `putchar()` to print the character to the screen. Finally, `fclose()` closes out the file when we are done.
> **Is This Bad Code?**
>
> We have stated that using an assignment statement in another statement is very bad form. However, this way of processing data from files just fits: any other way of processing the character would be unwieldy and more unreadable. It is probably the _only_ situation where an assignment statement could be used in a while conditional.
The above code is nice because it does not require us to use an array or dynamic memory to store a line of text. However, we could try something different and process the file using strings and an allocated buffer like this:
#define CHUNK 256
char buf[CHUNK];
FILE *fd;
fd = fopen("example.txt", "r");
if (fd) {
while (fgets(buf, sizeof(buf), fd) != 0)
fputs(buf, stdout);
fclose(fd);
}
Here we process the file in a series of strings. Each successive value of `buf` contains one line from the text file, including the terminating line feed character, ended with a NULL terminator. We stop the loop when the `fgets()` call indicates we have read no characters (note that we are not looking for the `EOF` character here). There are some issues with this approach, the biggest one being the waste of space in the large array declared for the buffer.
Note that we could have just processed the file in chunks of text like this:
#define CHUNK 256
char buf[CHUNK];
FILE *fd;
size_t nread;
fd = fopen("example.txt", "r");
if (fd) {
while ((nread = fread(buf, 1, sizeof buf, file)) > 0)
fwrite(buf, 1, nread, stdout);
fclose(file);
}
This code uses `fread()` that we saw in the previous section and it points out that even text files can be processed as raw files of byte data. Note that this use of `fread()` ends when the number of characters read is zero or negative, the latter case indicating an error. Note, too, the use of the file descriptor `stdout`. This indicates the screen, which we will review in the next section.
Writing text files works in analogous ways, using analogous functions. Writing characters to a file can be done with the `fputc()` function, whose prototype is below:
int fputc(int c, FILE *fd);
This writes a single character, as an unsigned char or byte, to the file indicated by the file descriptor `fd`.
The function `fputs()` writes a string to a file, without the string's NULL terminator. Its prototype is below:
int fputs(const char *s, FILE *fd);
This function writes the sequence of characters indicated by the pointer to the file.
Let's take another example. We can write code to copy the contents of one to another in a number of ways. First, we could do it character-by-character:
int c;
FILE *srcfd;
FILE *destfd;
srcfd = fopen("example.txt", "r");
destfd = fopen("example2.txt", "w");
if (srcfd && destfd) {
while ((c = fgetc(srcfd)) != EOF)
fputc(c, destfd);
fclose(srcfd);
fclose(destfd);
}
This code reads characters from a source file, writing them to a destination file.
We could do this by strings in a similar way:
#define CHUNK 256
char buf[CHUNK];
FILE *srcfd;
FILE *destfd;
srcfd = fopen("example.txt", "r");
destfd = fopen("example2.txt", "w");
if (srcfd && destfd) {
while (fgets(buf, sizeof(buf), srcfd) != 0)
fputs(buf, destfd);
fclose(srcfd);
fclose(destfd);
}
### File Constants and Variables
The "stdio" system defines several constants and variables that can be used by the functions in the I/O system.
There are three predefined file descriptors, describing input and output features in a fixed manner:
* `stdin` is a file descriptor, describing a "default" input source of data. In most computer systems, this usually means the computer's keyboard.
* `stdout` is a file descriptor that describes the "default" destination for output of data. For most computer systems, this usually means the computer's screen.
* `stderr` is a file descriptor that depicts the "default" destination for error messages and other diagnostic output. In most system, this also usually means the computer screen.
Using these definitions, we can expand our selection of file I/O functions. For example, the function described by this prototype:
char *gets(char *s);
is equivalent to `fgets(s, stdin)`. Likewise, there is an output function:
int puts(const char *s);
which is equivalent to `fputs(s, stdout)`. In addition, there are functions:
int getchar(void);
int puts(const char *s);
which are the same as `fgetc(stdin)` and `fputc(s, stdout)`.
> **Predefined File Descriptors Reflect Unix**
>
> The use of these predefined file descriptors reflects C's beginnings on Unix. Unix, and now Linux, treats device I/O in file I/O terms: sending data to a device uses file descriptors for the device and file I/O functions for manipulating the device. It makes sense, then, that sending data to the computer screen or getting data from the keyboard would involve writing and reading the "files" that represented the screen and keyboard devices.
>
> The use of predefined file descriptors like "stdin" and "stdout" have stayed with C implementations, even on non-Unix operating systems.
We have already mentioned another predefined constant: the value that defines the end of a file. The "EOF" constant represents a value that ca be used to detect the end of a file. When a character has the "EOF" value, the end of a file has been reached.
### The Bottom Level
We have discussed file-oriented function calls that implement file I/O for C programs. It is useful to briefly mention that these functions are not at the bottom of the I/O chain; there is one more set of more general functions on which file I/O functions are based.
The `read()` and `write()` functions available to C represent the most general functions used to read and write to various devices in a computer. These functions are used generally for interfacing C programs with devices in a computer system.
The prototype for the `read()` function is below:
ssize_t read(int fd, void *buf, size_t count);
Note that, like file I/O functions, it uses a file descriptor (`fd`). This reflect the Unix model of interfacing with devices as if they were files. The buffer to read data into is the second parameter (`buf`) and the size of this buffer (`count`) is given as the third parameter. The function returns the number of bytes read.
The prototype for the `write()` function is below:
ssize_t write(int fd, const void *buf, size_t count);
Again, this function uses a file descriptor (`fd`), reflecting the Unix device model. The buffer that contains data to write (`buf`) and the size of this buffer (`count`) are also given as parameters.
These functions are used for many device I/O applications, including file I/O. Using the higher-level functions allows programmers to focus on using files rather than devices.
### Functions That are Useful for Pebble: printf and sprintf
Before we conclude our look at C file I/O, we should describe some file I/O functions that actually have an application on a Pebble smartwatch. The `printf()` function and its variants can be used on a Pebble smartwatch and have some very flexible ways to generate output.
Let's look at `printf()` first; its variants work very much this first function. `printf()` has the following prototype:
int printf(const char *format, ...);
This function produces output to `stdout` in the format specified by the string `format`, given as the first parameter. The format string contains characters to write to the output combined with zero or more _directives_. Directives are placeholders where the values of variables will be inserted in the format string. These directives specify the way to construct the output.
Let's illustrate with an example. Let's say we are writing a table of data, where each row contains a country name as a string, a floating point percentage, and an integer number. We might use a `printf()` function like the one below to print a row:
printf("%s | %f%% | %d", country_name, percent, population);
The format of the output line is given as a string which contains characters to be output and directives. Each directive begins with a "%" character. In the above example, there are three directives: a string (`%s`), a floating point number (`%f`) and an integer (`%d`). The format string is followed by three parameters, whose values are inserted into the string as the directive describes. `country_name` will be inserted into a string field; `percent` will be fit into the floating point field; and `population` will be fit into an integer field. Note the `%%` sequence; this is the way to represent a "%" character.
However, for a neat table output, the above `printf()` might not be enough. The columns will probably not be vertically straight. For this example, the exact number of characters for a string will be inserted. For country names of varying length, this will not result in straight columns. If we can fix the width of fields, we can have a nicer output.
We can fix field with in our example like this:
printf("%25s | %5.2f%% | %15d", country_name, percent, population);
Here, we put the field width after the percent sign but before the specifier. Here, the country name will be right-justified and left-padded by spaces in a field that is 25 characters wide; the percentage will be output in a field 5 characters wide with 2 numbers right of the decimal point, and the population will be output in a field that is 15 character wide.
The `printf()` set of functions are extremely flexible for a number of reasons.
* The number of directives, and therefore the number of parameters that follow the format string, are variable.
* The properties of the output, including field width, precision, and value type, can be specified in the format string.
* The `printf()` function set has a number of implementations, including those that write data to files and those that format strings.
It is this last point that make these functions useful for those writing applications for Pebble smartwatches. The `printf()` function set has a number functions, including:
* `fprintf()`, a function that works like the functions ourlined in this chapter, writing data to files.
* `sprintf()`, a function that creates a string using the specified format and variables.
* `snprintf()`, a function that works like a safer version of `sprintf()`, taking a total string length specifier.
Let's conclude with an example of this last function, which is included in the I/O functions implemented by the Pebble SDK. For Project Exercise 17.1, we did some manipulating of madlibs. We inserted random words into a sentence. We did not use `printf()`, but we could have done something like this:
sprintf(sentence, "We %s very fast and %s our %s out", verb1, verb2, noun);
Unfortunately, we don't know if the final string with the directives filled in will be able to completely fit into the variable `sentence`. If the final string extends beyond the bounds of the `sentence` variable, we have a memory leak and it could damage the values of other variables or cause of program crash. The safer way to do this is to specify the length of sentence and not allow the constructed result to grow beyond that length. So `snprintf()` should be used as follows:
snprintf(sentence, 80, "We %s very fast and %s our %s out", verb1, verb2, noun);
For a complete specification of `printf()` functions, include a detailed description of format strings, see the Wikipedia entry on these functions at [this link](https://en.wikipedia.org/wiki/Printf_format_string#Format_placeholder_specification)
.
results matching ""
===================
No results matching ""
======================
---
# Chapter 14: Putting C to Work with Pebble Smartwatch Sensors · Learning C with Pebble
[Powered by **GitBook**](https://www.gitbook.com/?utm_source=public_site_legacy&utm_medium=referral&utm_campaign=trademark&utm_term=pebble&utm_content=powered_by)
[](https://pebble.gitbooks.io/learning-c-with-pebble/content/chapter14.html#)
[](https://pebble.gitbooks.io/learning-c-with-pebble/content/chapter14.html#)
FacebookGoogle+TwitterWeiboInstapaper
[](https://pebble.gitbooks.io/learning-c-with-pebble/content/chapter14.html#)
[](https://pebble.gitbooks.io/learning-c-with-pebble/content/chapter14.html#)
[](https://pebble.gitbooks.io/learning-c-with-pebble/content/chapter14.html#)
AA
SerifSans
WhiteSepiaNight
[Chapter 14: Putting C to Work with Pebble Smartwatch Sensors](https://pebble.gitbooks.io/learning-c-with-pebble/content/)
===========================================================================================================================
Chapter 14: Putting C to Work with Pebble Smartwatch APIs
=========================================================
We have spent a considerable number of chapters learning and practicing C programming. We have a few more things to discuss, but this is a good place to pause and review how we can use C effectively on a Pebble Smartwatch. Through the Project Exercises, we have seen many applications that use drawing, color, timers and other system tools to create many applications. In this chapter, we are going to put our knowledge of C to work in an area we have not explored: smartwatch sensors.
As we have seen back in Chapter 1, there are several sensors packed into Pebble smartwatches. The sensors available depend on the model of smartwatch, but many smartwatches have a 3-axis accelerometer, a magnetometer, and an ambient light sensor. We will also access the battery information, even though it is technically not a sensor. Accessing the timer is also not a sensor, but we will discuss it anyway. We will also consider how to work with the vibrating motor.
We will spend time in this chapter reviewing each of these features and the structures provided by Pebble to access them using C.
### Some General Notes
Let's make a few notes that apply across all sensor access methods.
First, it's important to remember that the contents of this chapter are an _application_ of C, not part of the C programming language. Discussing these topics is very instructive, because it serves as a great example of the information we have covered. It's good practice to work with these features of smartwatches. But the information provided here is specific to Pebble smartwatches and not available anywhere else.
Second, accessing the data provided by these services and sensors provides a great example of feature access in general. This kind of access and the data it provides are usually provided in their own struct declaration, dynamically allocated, and accessed through pointers. All the practice we have done up until now will be very useful, since these dynamic structures will require careful allocation, deallocation, and access.
Finally, the programming interfaces we will discuss for the access detailed here are provided by Pebble and are subject to change. We will try to keep up with any changes in this book, but new versions of the SDK might slip in changes before we add them here.
### Programming the Accelerometer
The accelerometer on a Pebble smartwatch records the watch's acceleration in 3 dimensions. This this information can be used to determine the watch's orientation and movement. The real data collection contains _acceleration_ data in 3 dimensions. If you could start a smartwatch moving in a direction, then continuing moving at exactly the same speed, the data collected would register zero movement. But this is not (typically) possible, so collecting acceleration data is quite effective.
Acceleration data comes in two forms: raw data and processed data. Raw acceleration data is an actual sample of accelerometer data, given in three dimensions. Processed acceleration data includes a raw data sample, a timestamp of when the sample of the data was made and an interpretation of whether the smartwatch vibrated when the sample data was collected.
In addition to acceleration data, a Pebble smartwatch also registers _tap_ data. Tap data is an abstraction of accelerometer data that forms a _tap event_. A certain pattern of acceleration data can be translated to a tap event, and since this is useful data to know, tap events are available in addition to acceleration data.
When sampling accelerometer data, we can sample in two ways. We can sample _manually_, calling a function to get data whenever that data is needed, or _subscribe to events_ in much the say we have seen before. With subscriptions, a callback function is called whenever an event is detected and data is sampled.
#### Raw Accelerometer Data
Let's consider the raw data structure `AccelRawData`:
typedef struct __attribute__((__packed__)) {
int16_t x;
int16_t y;
int16_t z;
} AccelRawData;
Here, we see that raw acceleration data is an _(x, y, z)_ struct of acceleration data in 16-bit integers. Note that we have the GNU C compiler attribute specifier `__attribute__` specifying the `__packed__` attribute for the struct. Remember this from Chapter 13: there is no padding to be inserted anywhere in this struct; the data is stored in a linear sequence.
Raw accelerometer data can only be obtained through event subscription. The function to subscribe to raw sample events has the following prototype:
void accel_raw_data_service_subscribe(uint32_t samples_per_update, AccelRawDataHandler handler)
The parameters are the number of samples to save in a buffer before calling the event handler (`samples_per_update`) and the name of the event handler itself (`handler`). The sample event handler must have the following form:
void raw_data_handler(AccelRawData *data, uint32_t num_samples, uint64_t timestamp)
The parameters sent to this function are the latest data sample (in `data`), the number of samples available since that data event (`num_samples`), and the time the first sample occurred (`timestamp`). Note that the maximum number of samples waiting to be analyzed is 25, so some data might be lost if more than 25 samples were taken between data events.
Let's take an example. Consider a simple application where accelerometer data is collected and displayed to an application log. We start with this call in the `init` code for the app:
accel_raw_data_service_subscribe(10, raw_data_handler);
Here we specify that we want 10 samples taken before the handler is called. We can use a simple data handler such as that below:
void raw_data_handler(AccelRawData *data, uint32_t num_samples, uint64_t timestamp) {
APP_LOG(APP_LOG_LEVEL_INFO, "In Raw Data Handler, samples = %u, time = %lu",
(unsigned int)num_samples, (long unsigned int)timestamp);
APP_LOG(APP_LOG_LEVEL_INFO, "X = %d, Y = %d, and Z = %d", data->x, data->y, data->z);
}
Note that, while this handler gets an array of data elements, this code just prints the first one. We get the following automatic output:
[INFO] raw_data_handler.c:8: In Raw Data Handler, samples = 10, time = 3828525699
[INFO] raw_data_handler.c:9: X = 0, Y = 0, and Z = -1000
[INFO] raw_data_handler.c:8: In Raw Data Handler, samples = 10, time = 3828526774
[INFO] raw_data_handler.c:9: X = 0, Y = 0, and Z = -1000
[INFO] raw_data_handler.c:8: In Raw Data Handler, samples = 10, time = 3828527774
[INFO] raw_data_handler.c:9: X = 0, Y = 0, and Z = -1000
and more printing every second. This is simulated data in the CloudPebble emulator, which does not move. If we run this on a real smartwatch, we get the following output:
[INFO] raw_data_handler.c:8: In Raw Data Handler, samples = 10, time = 1506648424
[INFO] raw_data_handler.c:9: X = 22, Y = -443, and Z = -848
[INFO] raw_data_handler.c:8: In Raw Data Handler, samples = 10, time = 1506649428
[INFO] raw_data_handler.c:9: X = -41, Y = -508, and Z = -867
[INFO] raw_data_handler.c:8: In Raw Data Handler, samples = 10, time = 1506650436
[INFO] raw_data_handler.c:9: X = 9, Y = -465, and Z = -877
Note also that the timesatamp is in "Unix epoch format", that is, seconds since 12:00 am on January 1, 1970.
> **Data Collection Frequency**
>
> The amount of samples you specify in the collection function also specifies the frequency of data collection. In turn, this specifies the frequency of the data handler callback getting called by the system. This frequency is computed as the AccelSamplingRate of the sensor divided by the number of samples you set in the service subscription call.
>
> For example, let's say you subscribe to the accelerometer service like this:
>
> accel_service_set_sampling_rate(ACCEL_SAMPLING_100HZ);
> accel_raw_data_service_subscribe(25, raw_data_handler);
>
>
> Then you would set up calling the `raw_data_handler` function 4 times per second. This is computed by dividing 100 samples per second (100Hz) divided by samples per set.
#### Processed Accelerometer Data
The processed accelerometer data has the following format:
typedef struct __attribute__((__packed__)) AccelData {
int16_t x;
int16_t y;
int16_t z;
bool did_vibrate;
uint64_t timestamp;
} AccelData;
Here, we can see that an indication of vibration and a timestamp have been added to the raw accelerometer data we saw in the previous section.
Processed data is available manually or by subscription. To get a data sample manually, we use the `accel_service_peek` function call and make sure that we do not subscribe to sampling events. For example, we can connect a manual data sample collection to occur when "select" button is pressed. The "select" button click handler would look like the following:
static void select_click_handler(ClickRecognizerRef recognizer, void *context) {
AccelData *data = (AccelData *)malloc(sizeof(AccelData));
accel_service_peek(data);
APP_LOG(APP_LOG_LEVEL_INFO, "In the select click handler, time = %lu",
(long unsigned int)(data->timestamp));
APP_LOG(APP_LOG_LEVEL_INFO, "X = %d, Y = %d, and Z = %d", data->x, data->y, data->z);
free(data);
}
Note here that we sent the `accel_service_peek` function an `AccelData` object that was already allocated. The function filled in the structure and returned an indication of error. An integer value is returned: 0 if no error occured, -1 if an error occured, -2 if a previous subscription is in place.
Subscriptions are handled in much the same way they are done with raw data samples. Subscription to the event service is done through `accel_data_service_subscribe`, the header for which is shown below:
void accel_data_service_subscribe(uint32_t samples_per_update, AccelDataHandler handler)
When you subscribe to the accelerometer service, you must give the number of samples in each event update (`samples_per_update`) and a function that will be called when that many samples have been collected. The handler looks a lot like the handler for raw data:
void processed_data_handler(AccelData *data, uint32_t num_samples)
Here, the handler would be called with the latest data (in `data`) and the number of samples in the data queue (`num_samples`). Note that the information _not_ included in the raw data structure are included here, but they are just the data that included as parameters to the raw data handler.
Note, finally, that you should not use the manual `accel_service_peek` method while subscribed to the data service. Such a call will return an error.
#### Tap Events
Tap events are a combination of accelerometer data samplings that, taken together, can be interpreted as a tap. "Tap" is not the most accurate description of the event; "shake" or "flick" is really the best description. Taps will likely _not_ be recorded because the cause very little movement of the smartwatch.
Since a tap is really an abstraction of several data samples taken together, there is no "raw" data for a tap and there is no manual tap sampling. The only way to get taps is to register a callback to be called when taps happen.
To register for tap events, you need to call `accel_tap_service_subscribe`, whose header looks like this:
void accel_tap_service_subscribe(AccelTapHandler handler)
An `AccelTapHandler` is a function whose prototype looks like that below:
void tap_handler(AccelAxisType axis, int32_t direction)
Here, we get some interesting information. The `axis` parameter will depict what axis the tap occured on; this is an enum value, one of `ACCEL_AXIS_X`, `ACCEL_AXIS_Y`, or `ACCEL_AXIS_Z`. The `direction` parameter describe which direction along the axis the tap occured; its value is either `1` or `-1` for positive or negative (respectively) movement along the tap.
Let's take an example. Suppose we simply want to be notified if a tap event has occured. We can use a tap handler like this:
void tap_handler(AccelAxisType axis, int32_t direction){
APP_LOG(APP_LOG_LEVEL_INFO, "Tap! along axis %s, direction = %d",
(axis == ACCEL_AXIS_X ? "X" :
(axis == ACCEL_AXIS_Y ? "Y" : "Z")), (int)direction);
}
and we subscribe to the tap event service with this call in the `init` function of our app:
accel_tap_service_subscribe(tap_handler);
Now flicks of your wrist will produce output like that below:
[INFO] tap_handler.c:10: Tap! along axis Y, direction = -1
[INFO] tap_handler.c:10: Tap! along axis Z, direction = 1
[INFO] tap_handler.c:10: Tap! along axis Z, direction = -1
[INFO] tap_handler.c:10: Tap! along axis Z, direction = 1
[INFO] tap_handler.c:10: Tap! along axis X, direction = -1
[INFO] tap_handler.c:10: Tap! along axis Y, direction = 1
### Accessing Magnetometer and Compass Data
A magnetometer is an instrument that measures the direction and strength of a magnetic field. In a Pebble smartwatch, a magnetometer can be used to calculate the smartwatch's position relative to the Earth's magnetic north. The operating system combines magnetometer measurements with accelerometer data to both calibrate a compass and to provide data on the heading of smartwatch with respect to magnetic north.
As with the accelerometer, access to the magnetometer data can be manual or based on a subscription. Manual access to this data is done using `compass_service_peek` with this prototype:
int compass_service_peek(CompassHeadingData *data)
The `CompassHeadingData` is a struct:
typedef struct {
CompassHeading magnetic_heading;
CompassHeading true_heading;
CompassStatus compass_status;
bool is_declination_valid;
} CompassHeadingData;
`CompassHeading` is a 32-bit integer and describes the angle from the current orientation of the smartwatch to magnetic north. `CompassStatus` is an enum that describes the current state of compass calibration: calibrating with invalid data (`CompassStatusDatatInvalid`), calibrating with valid data (`CompassStatusCalibrating`), and calibration completed (`CompassStatusCalibrated`). `true_heading` is currently the same value as `magnetic_heading`. The boolean field `is_declination_valid` is not used in the current version of the SDK.
Note that `CompassHeading` is measured like coordinates around a circle: counter-clockwise. This is perhaps opposite of how we intuitively measure directions with a compass. We can calculate the heading clockwise from north as
int clockwise_heading = TRIG_MAX_ANGLE - heading_data.magnetic_heading;
The operating system also provides a compass subscription service that makes updates as to directional heading. To get updated on compass heading, you must subscribe using `compass_service_subscribe`, which has this prototype:
void compass_service_subscribe(CompassHeadingHandler handler)
The `CompassHeadingHandler` is a function that has the following prototype:
void compass_heading_handler(CompassHeadingData heading)
As an example, let's use a simple heading handler that gives the direction we are heading. We could write a handler that looks like this:
void heading_handler(CompassHeadingData heading) {
uint16_t degrees = TRIGANGLE_TO_DEG(TRIG_MAX_ANGLE - heading.magnetic_heading);
APP_LOG(APP_LOG_LEVEL_INFO, "Compass heading is %d degrees from north.",
degrees);
}
and we register with the compass service this way:
compass_service_subscribe(heading_handler);
So let's say that we use this code as the handler for the select button:
static void select_click_handler(ClickRecognizerRef recognizer, void *context) {
CompassHeadingData data;
int compass = compass_service_peek(&data);
APP_LOG(APP_LOG_LEVEL_INFO, "In the selectclick handler, CompassHeading = %d, status = %d",
(int)data.magnetic_heading, (int)data.compass_status);
}
We want to see the values for the magnetic heading and for the status of the compass. We would expect the compass status to be `CompassStatusCalibrated` and we should get some valid data we can use as a directional heading. We get several lines of output that look like this:
[INFO] button_click.c:52: In the selectclick handler, CompassHeading = 58556, status = 0
This is an odd value for the heading and `0` is not the value we expected for the status. The enum value for this status is "CompassStatusDataInvalid". This value says that the sensor is calibrating and we need to be patient and wait for it. In addition, the compass heading value must be adjusted and compared to magnetic north. Fortunately, there's a macro define for this. We need to use
TRIGANGLE_TO_DEG(TRIG_MAX_ANGLE - data.magnetic_north)
Remember that heading is measured counter-clockwise on Pebble smartwatches. When we use this converter, the heading becomes approximately 51 degrees, or east (from magnetic north), which makes more sense.
### Accessing Battery Information
The Pebble smartwatch battery level is available much like other sensor information: _manually_ and _through subscription_.
Battery charge information is revealed in a struct, as below:
typedef struct {
uint8_t charge_percent;
bool is_charging;
bool is_plugged;
} BatteryChargeState;
The percentage of charge for the battery is given, along with information about whether the watch charging and plugged in.
Manual retrieval of battery information is done through the `battery_state_service_peek` function, whose prototype is below:
BatteryChargeState battery_state_service_peek(void)
It needs no parameters (hence, the `void` declaration) and returns a `BatteryChargeState` struct.
As an example, let's say we want to check the battery charge state when we press the "select" smartwatch button. Here's a version of `select_click_handler` that would do this:
static void select_click_handler(ClickRecognizerRef recognizer, void *context) {
BatteryChargeState charge = battery_state_service_peek();
APP_LOG(APP_LOG_LEVEL_INFO, "In the selectclick handler, battery level = %d", charge.charge_percent);
APP_LOG(APP_LOG_LEVEL_INFO, "pebble is %s plugged in and is %s charging.",
(charge.is_plugged ? "" : "not"), (charge.is_charging ? "" : "not"));
}
This gives the following output:
[INFO] select_click_handler.c:50: In the selectclick handler, battery level = 40
[INFO] select_click_handler.c:52: pebble is not plugged in and is not charging.
This is indeed the case when the watch is on your wrist.
Subscriptions follow the pattern we have seen before. There is a function to register a callback function and to subscribe to a charge service; there is a function to unsubscribe from the service. To subscribe to the service, the prototype is as follows:
void battery_state_service_subscribe(BatteryStateHandler handler)
The "BatteryStateHandler" is a callback for the system to use when the battery's charge changes. The prototype for this callback is below:
void battery_state_handler(BatteryChargeState charge)
### Using Timers
In a smartwatch, timers are an essential concept to implement. In Pebble smartwatches, timers have a rich implementation.
There are actually _two_ types of timers used by Pebble smartwatches: _tick_ timers and _app_ timers. These timers are similar in that they both call a callback function when the timer expires. The difference between them is tick timers _automatically_ renew and call the callback function in specific intervals while app timers only fire once, calling their callback function only once, and need to be renewed explicitly in the program code.
To use a tick timer, we need a tick timer callback function, described by the prototype below:
void tick_handler(struct tm *tick_time, TimeUnits units_changed)
Here, the `struct tm` structure is a standard way to reference time, and looks like:
struct tm {
int tm_sec; /* seconds */
int tm_min; /* minutes */
int tm_hour; /* hours */
int tm_mday; /* day of the month */
int tm_mon; /* month */
int tm_year; /* year */
int tm_wday; /* day of the week */
int tm_yday; /* day in the year */
int tm_isdst; /* daylight saving time */
};
The `TimeUnits` is an enum that contains information about what time unit changed from the last call to this one:
typedef enum {
SECOND_UNIT = 1 << 0,
MINUTE_UNIT = 1 << 1,
HOUR_UNIT = 1 << 2,
DAY_UNIT = 1 << 3,
MONTH_UNIT = 1 << 4,
YEAR_UNIT = 1 << 5
} TimeUnits;
This enum is interesting because there could be several different units represented in the same bitmask. For example, if the `MINUTE_UNIT` changed _and_ the `HOUR_UNIT` changed, you could represent them both as
MINUTE_UNIT | HOUR_UNIT
because they are each set up to be represented by a unique bit position. This kind of reply is very handy; we can use this to perform certain operations only when needed. Instead of calling more functions to check the time in a app, for instance, we only have to check this parameter to see which time unit changed.
App timers work as expected: the callback registered by the call to `app_timer_register` will be called when the timer expires. This function has the prototype:
AppTimer *app_timer_register(uint32_t timeout_ms, AppTimerCallback callback, void *callback_data)
The `timeout_ms` parameters specifies the amount of time, in milliseconds, until the timer exprires. The `callback` specifies a callback function, whose header must be
void timer_callback(void *data)
Note that the type of the `data` parameter here is not specified; it is given by the `callback_data` parameter in the `app_timer_register` call.
We have seen app timer calls in previous chapters. For example, in the snake game for Project 10.2 (Chapter 10), we used the app timer to power the snake. Every time the app timer expired, we moved the snake over a square. For example, the timer was initialized with this call:
app_timer_register(TICK_TIME_MS, refresh_timer_callback, NULL);
The `TICK_TIME_MS` parameter in the app was a macro that had the value `400`, which made this time expire after 400 milliseconds. The callback function `refresh_timer_callback` was called upon time expiration, with `NULL` as the set of parameters, that is, no parameters. The `refresh_timer_callback` function looked like this:
void refresh_timer_callback(void *data) {
layer_mark_dirty(window_get_root_layer(window)); // Tell the layer it needs to redraw.
}
It was defined to mark the graphics layer as dirty/redrawable. The drawing function for the graphics layer reset the time by calling the timer register function again.
We should note that this type of application is probably better run with a tick timer. The fact that the example always reregisters the timer when the screen is redrawn demonstrates a tick timer would also be useful here.
### Bonus: Running the Vibrating Motor
While making a smartwatch vibrate is not exactly a sensor (it's more a user interface item), it allows for a "custom vibration pattern", which uses structs and arrays in an interesting way. And this corresponds to the reason for this chapter.
First, there are fixed patterns of vibrations that can be initiated. The following calls will fire off certain patterns, identifiable by their names.
void vibes_short_pulse();
void vibes_long_pulse();
void vibes_double_pulse();
And there is a cancellation function call, to cancel any vibration that is currently in progress:
void vibes_cancel();
The custom pattern vibration call is the most interesting. A vibration pattern is characterized by an array of integers that describe the durations of on/off specifications, and an integer indicating the number of "segments" in the vibration pattern. There must be at least one integer (naturally), but there can be many.
For example, we wanted to signal S.O.S. in Morse Code. This pattern would be three short vibrations, followed by three long vibrations, followed by three short ones again. We could specify this as follows:
uint32_t vibrations[] = { 100, 100, 100, 100, 100, 100,
300, 100, 300, 100, 300, 100,
100, 100, 100, 100, 100};
VibePattern sos = {
.durations = vibrations,
.num_segments = 17
};
This assumes that a short vibration is 100 milliseconds, followed by 100 milliseconds of no vibration. Long vibrations are 300 milliseconds. Now, when we call `vibes_enqueue_custom_pattern(sos)`, we will get the S.O.S. vibration pattern on the watch.
### Summary: Style and Practice
We have spent considerable time and space in this chapter discussing how to work with sensors on a Pebble smartwatch. However, the point to this chapter was not really to understand sensor programming, although that's a good result, but to understand the techniques that system programming in C uses and to practice working with those techniques. In particular, here's a few lessons that should stand out from this chapter.
1. **System data are gathered into collections, most often structs.**
Whenever system data need to be gathered into one place, focused on a specific function or interface, structs are used. There are probably several ways to store system data, but structs are the best way to collect varied data for a specific purpose. This way of organizing data is used in most system programming, such as PebbleOS and Linux systems.
2. **Dynamic allocation of space for structs is the best way to work with system data.**
The way system structs are used is to dynamically allocate space for them when they are needed. System data structures can be large, sometime nesting structs within structs, and memory space is best managed dynamically, with programmers paying close attention to allocating and freeing memory as needed.
3. **System structures for the Pebble SDK system have a specific style.** We have discussed style and pattern of declarations before. Pebble structures have a specific style. Here's the battery information as an example.
typedef struct { uint8\_t charge\_percent; bool is\_charging; bool is\_plugged; } BatteryChargeState;
Here, a typedef is used with an unnamed struct. When structures are declared this way, further uses of `BatteryChargeState` can be done without the use of the `struct` keyword. This makes declarations clearer and less wordy.
4. **Sometimes, writing your own functions and structures to "rephrase" the system structures will help you access the Pebble system structure.** Abstraction is a tool we can use to make things clearer and more straight forward. There are many data structures in a Pebble application and we can use our own designs to abstract away unused details. Using compass information is a good example here. There are several steps that are involved with using the compass, from obtaining inforamtion and converting it, and writing our own function to focus on the information we need would help sort through those steps. This is a common: writing our own code to focus on the specific refinement of a data structure that we need.
5. **Practicing with system structures and style will help to make you comfortable with the large number of system structures.** Writing applications that access all the Pebble smartwatch subsystems can be daunting. There are many facets to a Pebble smartwatch and many different data structures that need to be used. Practicing with these structures will make you more comfortable with them and more confident with manipulating data and shaping that data into smartwatch functionality. Practice with small programs like those in the project exercises in this book and you will gain confidence to take on larger applications.
### Project Exercises
#### Project 14.1
This project will get you to work with accelerometer data. [Start with the starter code, available here.](https://cloudpebble.net/ide/import/github/programming-pebble-in-c/project-14-1)
This code has the hooks in that will detect / measure accelerometer changes.
Add to the code to detect the _speed_ of gesture changes for the watch. You should be able to detect the difference between fast and slow movements of the watch. Then add vibrations for both fast and slow movements: short vibrations for fast movements and longer vibrations for slower movements.
There are two issues here:
1. How do you compute gesture speed? You are given three pieces of data, movement data in 3 axes, and you need to compute a single number for comparison purposes. Here's a great place to start: [the Physics area of StackExchange](http://physics.stackexchange.com/questions/41653/how-do-i-get-the-total-acceleration-from-3-axes)
.
2. Should you use a manual data gathering method or a subscription method? Somehow you need to sense when data is available. You could use a timer, then gather the data. Or you could subscribe to the data service. Either should work, although one is more convenient than the other.
[You can find an answer to the project here.](https://cloudpebble.net/ide/import/github/programming-pebble-in-c/project-14-1-answer)
#### Project 14.2
Remember Project 10.2? It created a snake game that used the "up" and "down" buttons to change the movement of a snake on the screen. [You can find an answer to Project 10.2 here.](https://cloudpebble.net/ide/import/github/programming-pebble-in-c/project-10-2-answer)
Change the code to replace "up" and "down" button presses with wrist gestures. A gesture "up" will move the snake up or left and a "down" gesture will move the snake down or right. You should be able to detect _direction_ of a wrist movement. In addition, add code to vibrate the watch when the snake turns.
You can find an answer to this project here.
#### Project 14.3
One more project with the snake game. Starting with either [Project 10.2](https://cloudpebble.net/ide/import/github/programming-pebble-in-c/project-10-2-answer)
or [the answer to the last project](https://cloudpebble.net/ide/import/github/programming-pebble-in-c/project-14-2-answer)
, change the direction of the snake when the wrist moves in the direct desired. This is different than a "flick" type of gesture; you will need magnetometer data here. Imagine a wrist held flat, but moving in two dimensions: from north to west for a left turn and north to east for a right turn.
You will need to pay attention to some issues here.
1. What service, or services, should you subscribe to for the appropriate data? You have two competing services here: the timer service and the compass service. Should you subscribe to both or only one? (**Hint:** subscribe to only one. But what do you think happens when both are subscribed to?)
2. What will your code do while the compass is calibrating? This might take several minutes and movement of the smartwatch is quite helpful.
3. You will need to pay attention to the _granularity_ of the data. Even minute movements of the smartwatch you use will register changes. You will need to consider if every movement warrants a change in the snake's direction or only larger movements.
[You can find an answer here for this project.](https://cloudpebble.net/ide/import/github/programming-pebble-in-c/project-14-3-answer)
results matching ""
===================
No results matching ""
======================
---
# Chapter 17: Pebble Smartwatch File I/O · Learning C with Pebble
[Powered by **GitBook**](https://www.gitbook.com/?utm_source=public_site_legacy&utm_medium=referral&utm_campaign=trademark&utm_term=pebble&utm_content=powered_by)
[](https://pebble.gitbooks.io/learning-c-with-pebble/content/chapter17.html#)
[](https://pebble.gitbooks.io/learning-c-with-pebble/content/chapter17.html#)
FacebookGoogle+TwitterWeiboInstapaper
[](https://pebble.gitbooks.io/learning-c-with-pebble/content/chapter17.html#)
[](https://pebble.gitbooks.io/learning-c-with-pebble/content/chapter17.html#)
[](https://pebble.gitbooks.io/learning-c-with-pebble/content/chapter17.html#)
AA
SerifSans
WhiteSepiaNight
[Chapter 17: Pebble Smartwatch File I/O](https://pebble.gitbooks.io/learning-c-with-pebble/content/)
=====================================================================================================
Chapter 17: Pebble Smartwatch File I/O
======================================
In the last chapter, we overviewed the kind of file I/O that was part of standard C. We also noted that, because of the nature of Pebble smartwatches, very little of that standard file I/O is available on a Pebble smartwatch platform.
In this chapter, we will examine what file I/O is possible on a Pebble smartwatch. Many of the same file concepts will apply here. However, the _source_ and _location_ of the files was well as the _methods we use_ to access those files will be different.
We should note that, just like the last chapter, file I/O on a smartwatch is not part of C syntax or semantics. It is all based on function calls provided by the Pebble SDK libraries. Like in the last chapter, our discussion here will focus on which functions we need and how to use them.
### An Introduction
There are two sources for files on a Pebble smartwatch. _Resources_ are files that are included with the smartwatch app install package, the PBW file, that includes the smartwatch executable application. Like files that were accessed with standard C file I/O, these files must be opened before they are used and accessed with read operations. Unlike files accessed with standard C file I/O, these files are read-only, that is, no writing is possible, and they do not need to be closed.
The second file source is _persistent storage_ that resides on a smartwatch itself. This storage can be compared to a single file where data is stored in a key/value pair format. There is only one source of persistent data; it does not need to be opened or closed; and it cannot be accessed as a raw set of bytes. Rather, it is accessed solely as keyed data, where data is retrieved as a data object associated with a specific integer key.
### File I/O with Resources
File I/O with install package resources starts with the creation of the install package. When the install package is built, external files are included in the build process. How to include files is outside of our scope here, but you can read instructions, as well as the many types of files you can include, in the [Pebble documentation at this link.](https://developer.pebble.com/guides/app-resources/)
We will concentrate our file I/O discussion on raw data files. This will most closely match the discussion from the last chapter, because it focuses on files as sequences of bytes.
In order to read from a resource file, you must have given that file a _file ID_ when you built the install package. This ID will be used to open the file.
#### Opening a Resource File
To open a resource file, you must use the `resource_get_handle()` function. A _resource handle_ is analogous to a file descriptor; it is a system structure that is used to access a resource file. The data type of a resource handle is `ResHandle` and prototype of the opener function is
ResHandle resource_get_handle(uint32_t resource_id);
The `resource_id` is a 32-bit unsigned integer that is the ID of the file you need from the install package. You don't need you know the actual value of this resource ID; the name of this ID in the program is specified by a constant with the prefix "RESOURCE\_ID\_" combined with the ID name you gave the file when the install package was built.
Let's take an example. Back in chapter 9, Project 9.3 introduced the game of "madlibs", where you would fill in blanks in a sentence with random words. These random words were chosen from files that were included with the code. There are four files that were included with this project:
* "madlibs.txt" is a file of madlibs, with the ID "MADLIBS".
* "nouns.txt" is a file of nouns, one per line, with the ID "NOUNS".
* "verbs.txt" is a file of verbs, one per line, with the ID "VERBS".
* "adjectives.txt" is a file of adjectives, one per line, with the ID "ADJECTIVES".
The code for using the data in these files declared four handles, one per file:
static ResHandle madlib_handle;
static ResHandle noun_handle;
static ResHandle verb_handle;
static ResHandle adjective_handle;
Each file was opened, and its handle initialized, by a call to `resource_get_handle`:
madlib_handle = resource_get_handle(RESOURCE_ID_MADLIBS);
noun_handle = resource_get_handle(RESOURCE_ID_NOUNS);
verb_handle = resource_get_handle(RESOURCE_ID_VERBS);
adjective_handle = resource_get_handle(RESOURCE_ID_ADJECTIVES);
At this point, each file was opened and was accessible using its respective handle.
#### Resource File Size
The number of bytes in a resource file can be derived using a call to the function `resource_size()`. The prototype for this function is given here:
size_t resource_size(ResHandle h);
Given a valid resource handle, this function will return the number of bytes in the file.
For the madlibs application, this information was helpful. For example, to generate a random noun from the noun file, we picked a random file position between 0 and the number of bytes in the file. We got the number of bytes in the file this way:
static size_t madlibsize;
static size_t nounsize;
static size_t verbsize;
static size_t adjectivesize;
...
madlibsize = resource_size(madlib_handle);
nounsize = resource_size(noun_handle);
verbsize = resource_size(verb_handle);
adjectivesize = resource_size(adjective_handle);
`size_t` is a data type that depicts the idea of "size"; on Pebble smartwatches, this is an unsigned 32-bit integer.
In the above example, we derive the size of each file, that is, the number of bytes, by using the resource handle for the file in the function call.
#### Reading from Resource Files
To read from resource files, we use the resource handle in functions that implement two types of read operations.
To read all the data in a resource file in one operation, we can use the `resource_load()` function. The prototype for this function is as follows:
size_t resource_load(ResHandle h, uint8_t *buffer, size_t max_length);
We need a resource handle for the file we are reading from (`h`), a buffer allocated to have the correct number of bytes we expect (`buffer`), and a maximum number of bytes to read from the file (`max_length`).
We did not use this type of read operation for the madlibs application. However, if we did, we would use the file size data. In the code above, we derived the size of each file after we opened it, so we can use this size to allocation a buffer and to cap the loading of data from the resource file.
For example, if we were read all the nouns from the "nouns.txt" file, we might do it this way:
uint8_t *noun_buffer = (uint8_t *) malloc(nounsize * sizeof(uint8_t));
size_t numbytes = resource_load(noun_handle, noun_buffer, nounsize);
Note that the number of bytes actually copied from the resource file is returned by calling this function. This example would fill the `noun_buffer` with all the bytes/characters from the noun file.
The second way to read data from a resource file is to read a range of bytes, rather than all the bytes, from a file. We can use the `resource_load_byte_range()` function for this, who prototype is below:
size_t resource_load_byte_range(ResHandle h, uint32_t start_offset, uint8_t * buffer, size_t num_bytes);
Here, we need the resource handle of the file we want to read from (`h`), the byte at which to start reading (`start_offset`), the buffer to copy the byte range to (`buffer`), and the number of bytes to copy (`num_bytes`).
For our madlibs example, we used this method of reading the resource files in a number of ways. Let's say we need to find a random noun. Here's a description of the steps we use to find the noun:
1. Generate a random number between 0 and the number of bytes in a file. We use this as the "current" position in the file.
2. Since the nouns are in the file one per line, we look backwards for a line feed character that ends the previous line, then forwards to find the line feed character for the current line. The chosen noun lies between the two line feeds.
3. Read the file starting at the previous line feed to the next line feed for the noun.
We first generate our random file position:
position = rand()%nounsize;
Then we find the noun with steps 2 and 3 from above:
int start = findlinefeed(noun_handle, position, noun_size, BACKWARD);
if (start != 0) start++;
int end = findlinefeed(noun_handle, position, noun_size, FORWARD);
if (end <= start) end = findlinefeed(noun_handle, position+1, noun_size, FORWARD);
int length = end-start;
uint8_t ubuffer = (uint8_t *)malloc((length+1)*sizeof(uint8_t));
resource_load_byte_range(noun_handle, start, ubuffer, length);
ubuffer[length] = '\0';
In this code, `BACKWARD` has the value `-1` and `FORWARD` has the value `1`. When we first use the function `findlinefeed()`, we move backward to find the line feed. Then we call the function again and we move characters forward to find it. After we figure out where the previous and next line feeds are, we call `resource_load_byte_range()` to extract the character sequence that represents the noun from the file.
Note here that the function returns a byte sequence, not a string. The code above inserts a NULL character to treat the byte sequence like an actual string.
As one more example, let's look at the code for `findlinefeed()`. This code is interesting because it walks through the reasource file a single character/byte at a time, looking for the line feed character.
int findlinefeed(ResHandle handle, int startpos, int filesize, int direction) {
int position = startpos;
char c = 0;
uint8_t character[1];
while (position >= 0 && position < filesize) {
resource_load_byte_range(handle, position, character, 1);
c = character[0];
if (c == '\n') break;
position += direction;
}
return position;
}
The code above uses a 1-character buffer in the call to `resource_load_byte_range()`. Note that the buffer here is not dynamically allocated; it is a statically declared array of size 1.
### File I/O Using Persistent Storage
Resource files accompany the executable file in the installation package transferred to the smartwatch. There is also accessible storage that exists on a smartwatch itself, regardless of what applications are installed. This storage is represented as a single file, always open, structured as a set of key/value pairs. This osmartwatch storage is persistent; it is present on a smartwatch between power cycles and no matter which applications are installed.
Persistent storage is always open. There is no function needed to open persistent storage. Storage is always associated with specific applications; each application is prevented from accessing another application's storage. The maximum size that each application's storage space can take up is (currently) 4,096 bytes.
Persistent storage is based on key/value pairs. A "key" is a 32-bit unsigned integer that is tied to a specific value. If a value is connected to a specific key and then written, that value can be retrieved by using that same key. For example, if we wanted to store the number of milliseconds for a timer, we might use the key "1234" and store the number of milliseconds (an integer) this way:
status_t status = persist_write_int(1234, milliseconds);
We could then retrieve the number of milliseconds later using a read function:
int millis = persist_read_int(1234);
This function would look for an integer value that was previous written using the key "1234" and would return it.
Access to persistent storage is through a set of functions provided by the Pebble operating system. In general, we would use functions that adhere to the pattern below to write data:
status_t persist_write_TYPE(const uint32_t key, const TYPE value);
_TYPE_ can be one of "bool" for booleans, "int" for integers, "string" for strings, and "data" for arrays of 8-bit bytes. Each function returns a `status_t` type, which is a 32-bit integer. This return type represents either the number of bytes written, if the number is positive, or an error code, if the number if negative.
Let's look at a madlib example. Let's say that we want to record the noun that we use, because we don't want to use the same nouns the next time we run the madlib application. We will get nouns for NOUN and NOUN2 designations. We will generate nouns and save them. Using our definitions in the code, we process NOUN and NOUN2 designations like this:
thing = random_thing(NOUN);
replace_string(madlibstr, "", thing);
free(thing);
thing = random_thing(NOUN);
replace_string(madlibstr, "", thing);
free(thing);
Now, we need to add definitions of the integer keys:
#define SAVE_NOUN 1000
#define SAVE_NOUN2 1001
And we can save our nouns to persistent storage this way:
thing = random_thing(NOUN);
replace_string(madlibstr, "", thing);
persistent_write_string(SAVE_NOUN, thing);
free(thing);
thing = random_thing(NOUN);
replace_string(madlibstr, "", thing);
persistent_write_string(SAVE_NOUN2, thing);
free(thing);
Like writing, reading persistent storage depends on functions whose names adhere to the following pattern:
TYPE persist_read_TYPE(const uint32_t key);
Again, the _TYPE_ is to be one of "bool" for booleans, "int" for integers, "string" for strings, and "data" for arrays of 8-bit bytes. Each function returns the type it is reading.
If we were to add reading of persistent data to our example, we would want to read the nouns, then compare them to the random nouns read from the file. For the first noun, we could use this changed code:
char saved[30];
thing = random_thing(NOUN);
int numbytes = persist_read_string(SAVE_NOUN, saved, 30);
do {thing = random_thing(NOUN);} while (strcmp(saved, thing));
replace_string(madlibstr, "", thing);
persist_write_string(SAVE_NOUN, thing);
free(thing);
We would use similar code for NOUN2.
Three more functions help us to work with persistent data.
* `persist_exists()` returns a boolean value that tells us if a value has been set for a certain key. For example, we could test if a noun has been saved to persistent storage by calling `persist_exists(SAVE_NOUN)`.
* `persist_delete()` will delete the value connected with the key parameter. If we wanted to make sure that our saved nouns were deleted, we would call `persist_delete(SAVE_NOUN)` and `persist_delete(SAVE_NOUN2)`.
* `persist_get_size()` will get the number of bytes in storage for the key given as the parameter. If we wanted to see how many bytes were stored for the nouns we saved, we would call `persist_get_size(SAVE_NOUN)` and `persist_get_size(SAVE_NOUN2)`. This function returns an integer size or an error code (`E_DOES_NOT_EXIST`, a negative number) if there is no storage for the key given.
### Project Exercises
#### Project 17.1
Let's work with the madlib example again. [Start by loading the Project Exercise 9.3 into CloudPebble](https://cloudpebble.net/ide/import/github/programming-pebble-in-c/project-9-3-answer)
.
You are to add adverbs to the madlib sentence. Adverbs are words that modify a verb, often ending in "ly". So "stiffly" is an adverb in this sentence: "The injured person walked stiffly to the car." You can find a file of adverbs here. You can find a small set of new madlibs with "" placeholders here.
Get an adverb from the file in the same way we got nouns, verbs, and adjectives. Get a new sentence from the madlib file and replace the "" placeholder with that adverb. Display the results on the smartwatch screen.
[You can find an answer to this project here.](https://cloudpebble.net/ide/import/github/learning-c-with-pebble/project-17-1-answer)
#### Project 17.2
Let's modify the adverb project to use persistent data. [Starting with the Project 17.1 answer](https://cloudpebble.net/ide/import/github/learning-c-with-pebble/project-17-1-answer)
, use persistent storage to store the adverb that is used and to prevent the same adverb from being used twice in a row. You can use the same pattern that we used for the NOUN example in the chapter.
How should you handle the case where no adverb had been written? How do you detect this?
[You can find an example answer here.](https://cloudpebble.net/ide/import/github/learning-c-with-pebble/project-17-2-answer)
#### Project 17.3
[Let's make some changes again to Project 17.1.](https://cloudpebble.net/ide/import/github/learning-c-with-pebble/project-17-1-answer)
Using persistent storage, add the necessary statements to keep track of the number of nouns, verbs, adjectives, and adverbs that have been read from the resource files. Display these on the screen when the "up" or "down" buttons are pressed.
[You can find an answer to this project here.](https://cloudpebble.net/ide/import/github/learning-c-with-pebble/project-17-3-answer)
results matching ""
===================
No results matching ""
======================
---
# Appendix A: Data Types and Compatibility · Learning C with Pebble
[Powered by **GitBook**](https://www.gitbook.com/?utm_source=public_site_legacy&utm_medium=referral&utm_campaign=trademark&utm_term=pebble&utm_content=powered_by)
[](https://pebble.gitbooks.io/learning-c-with-pebble/content/appendixa.html#)
[](https://pebble.gitbooks.io/learning-c-with-pebble/content/appendixa.html#)
FacebookGoogle+TwitterWeiboInstapaper
[](https://pebble.gitbooks.io/learning-c-with-pebble/content/appendixa.html#)
[](https://pebble.gitbooks.io/learning-c-with-pebble/content/appendixa.html#)
[](https://pebble.gitbooks.io/learning-c-with-pebble/content/appendixa.html#)
AA
SerifSans
WhiteSepiaNight
[Appendix A: Data Types and Compatibility](https://pebble.gitbooks.io/learning-c-with-pebble/content/)
=======================================================================================================
Appendix A: Data Types and Compatibility
========================================
As we consider data types in C and how they are compatible with each other, let's recall the rules of compatibility. Here are a few notes:
1. C uses static typing, which dictates that the types of variables are derived once (at declaration) and do not change throughout the execution of a program.
2. C uses strong typing, which means that once variables are bound to a data type (at declaration), they stay bound to that type. They cannot not change types, but require values to be converted to their data type before they are assigned.
3. In general, type A is compatible with type B when (a) the operations of A are also the operations of B and (b) the values that variables of type A can have are at least a subset of the values that variables of type B can have.
4. Type modifiers have an effect on the values that a variable can take on and, thus, affect type compatibility.
The table below contains modifiers where appropriate. These modifiers are:
* "signed" and "unsigned": This determines the capability to represent negative numbers. Unsigned types are not wider than signed types, but they represent different number ranges.
* "short": This typically specifies a width that is half of the type it modifies.
* "long": This modifier represents a width double the width of the type it modifies.
| | | |
| --- | --- | --- |
| Type | Description | Compatibility |
| `char` | Single byte units with characters as their value. On Pebble OS, these values come from the [Unicode character set.](http://www.unicode.org/charts)
While characters can be converted to integers, they do not have a sign bit. This means the integer range is 0 to 255. | Any numeric type |
| `signed char` | Single byte units, represented as integers. Signed char types have a range from -127 to 128. | Any numeric type |
| `unsigned char` | Single byte units, represented as numbers without a sign bit. This is the same as the \`char\` type. Integer range is 0 to 255. | Any numeric type |
| `int`
`signed`
`signed int` | Representation of standard integer. On Pebble OS, this type is 32 bits wide and uses 2's complement for negative representation. Range is -231\-1 to +231. | Any numeric type |
| `short`
`short int`
`signed short`
`signed short int` | Representation of a signed integer. It is usually half the width of integers; on Pebble OS, this is 16 bits. Range is -32,767 to 32,768. Uses 2's complement for negative representation. | Any numeric type |
| `unsigned short`
`unsigned short int` | Representation of an unsigned integer. It is usually half-width with no sign; on Pebble OS, this is 16 bits. Range is 0 to 65,535. | Any numeric type |
| `long`
`long int`
`signed long`
`signed long int` | This represents a signed double width integer. On Pebble OS, the width is the same as signed integers: 32 bits (which is allowed by the C standard). Range is -231\-1 to +231. It uses 2's complement for negative representation. | Any numeric type |
| `unsigned long`
`unsigned long int` | Representation of an unsigned long integer. This is usually double the width of an unsigned integer, however on Pebble OS this is 32 bits. Range is 0 to +232\-1. | Any numeric type |
| `long long`
`long long int`
`signed long long`
`signed long long int` | This represents a signed double long integer. It can be double to quad width; on Pebble OS, it is 64 bits. Range is -263\-1 to +263 Uses 2's complement for negative representation. | Any numeric type |
| `unsigned long long`
`unsigned long long int` | Representation of an unsigned double long integer. This is usually double the long width; on Pebble OS, this means 64 bits. Range is 0 to +264\-1. | Any numeric type |
| `float` | Single precision floating point number, 32 bits wide in [IEEE 754 format.](https://en.wikipedia.org/wiki/Single-precision_floating-point_format)
All float types are signed. | Other float types |
| `double` | Double precision floating point number. 64 bits wide in [IEEE 754 format](https://en.wikipedia.org/wiki/Double-precision_floating-point_format)
for double precision numbers. All float types are signed. | Other float types |
| `long double` | Extended, or quadruple, precision floating point numbers, 128 bits wide in [IEEE 754 format](https://en.wikipedia.org/wiki/Quadruple-precision_floating-point_format)
for quadruple precision numbers. All float types are signed. | Other float types |
| `_Bool`
`bool` | Represents boolean values. Includes macros for `true` and `false`. Part of the C standard, but not included in Pebble SDKs. | numeric types |
We can write a smartwatch app to see how these definitions are implemented on a Pebble smartwatch. You can view and run the code yourself [in CloudPebble with this link](https://cloudpebble.net/ide/import/github/learning-c-with-pebble/appendix-a)
, but the relevant snippet is shown below. The output is done using the `APP_LOG` macro.
static void display_chars() {
APP_LOG(APP_LOG_LEVEL_INFO, "\nCHARACTER SIZES\n char = %d, max char = %d\n unsigned char = %d",
sizeof(char), CHAR_MAX, sizeof(unsigned char));
}
static void display_integers() {
APP_LOG(APP_LOG_LEVEL_INFO, "\nINTEGER SIZES\n short = %d, max short = %d\n int = %d, max int = %d",
sizeof(short int), SHRT_MAX, sizeof(int), INT_MAX);
APP_LOG(APP_LOG_LEVEL_INFO, "\n unsigned short = %d, max unsigned short = %d",
sizeof(unsigned short int), USHRT_MAX);
APP_LOG(APP_LOG_LEVEL_INFO, "\n unsigned int = %d, unsigned max int = %u",
sizeof(unsigned int), UINT_MAX);
APP_LOG(APP_LOG_LEVEL_INFO, "\n long = %d, max long = %li\n long long = %d, max long long = %lli",
sizeof(long), LONG_MAX, sizeof(long long), LLONG_MAX);
APP_LOG(APP_LOG_LEVEL_INFO, "\n unsigned long = %d, unsigned max long = %lu",
sizeof(unsigned long), ULONG_MAX);
APP_LOG(APP_LOG_LEVEL_INFO, "\n unsigned long long = %d, max unsigned long long = %llu",
sizeof(long long), ULLONG_MAX);
}
The code measures size of each type by using the `sizeof()` operator, which measures in bytes. The output of `display_chars()` is given below (cleaned up from the log display) and shows that character and unsigned character types match up with the table above. Both are single bytes wide.
CHARACTER SIZES
char = 1, max char = 255
unsigned char = 1
The size of short and regular integers, as well as the maximum values, are also in line with the table above. As we described, there is no difference long integers and regular integers. The size and max value of regular integers and long integers (and their unsigned counterparts) are the same. Based on long integers, long long integers are on track: double the size and their max values match accordingly. The output for `display_integers()` is below:
INTEGER SIZES
short = 2, max short = 32767
int = 4, max int = 2147483647
unsigned short = 2, max unsigned short = 65535
unsigned int = 4, unsigned max int = 4294967295
long = 4, max long = 2147483647
long long = 8, max long long = 92233720368547758
unsigned long = 4, unsigned max long = 4294967295
unsigned long long = 8, max unsigned long long = 18446744073709551615
Notice that we did not compute the max values, but rather used defined constants. Every C compiler has a set of constants defined that outline the maximum values for that installation.
Also note that we did not test floating point numbers. As pointed out in Chapter 3, floating point numbers are difficult for small embedded processors like those in Pebble smartwatches.
results matching ""
===================
No results matching ""
======================
---
# Chapter 21: Writing High-Quality, Debuggable Code · Learning C with Pebble
[Powered by **GitBook**](https://www.gitbook.com/?utm_source=public_site_legacy&utm_medium=referral&utm_campaign=trademark&utm_term=pebble&utm_content=powered_by)
[](https://pebble.gitbooks.io/learning-c-with-pebble/content/chapter21.html#)
[](https://pebble.gitbooks.io/learning-c-with-pebble/content/chapter21.html#)
FacebookGoogle+TwitterWeiboInstapaper
[](https://pebble.gitbooks.io/learning-c-with-pebble/content/chapter21.html#)
[](https://pebble.gitbooks.io/learning-c-with-pebble/content/chapter21.html#)
[](https://pebble.gitbooks.io/learning-c-with-pebble/content/chapter21.html#)
AA
SerifSans
WhiteSepiaNight
[Chapter 21: Writing High-Quality, Debuggable Code](https://pebble.gitbooks.io/learning-c-with-pebble/content/)
================================================================================================================
Chapter 21: Writing High-Quality, Debuggable Code
=================================================
At this point in the book, we have studied the C programming language and have had lots of practice writing code for Pebble smartwatches. In most chapters, we have outlined how to write good C code. While it is essentially impossible to write perfect code, we can write simple, understandable code with as little undocumented magic as possible. In this chapter, we will conclude this book with a look at how to write high-quality code that is easy to read and debug.
This chapter will contain an outline of tips and techniques that make C code readable. We will conclude the chapter with an examination of software tools that help with readable code, include integrated development environments and Pebble packages.
### Standards and Definitions
We start this look at good coding by looking at standards. We want define "high-quality" and "debuggable" with C language standards.
First, let's look at the C compiler itself. The current compiler used to compile Pebble smartwatch apps is GCC version 4.7.2. This compiler supports many C language standards (see [this link](https://gcc.gnu.org/onlinedocs/gcc/Standards.html)
for a list), but we focus here on the fact that it supports standard "c11". This means "C standard from 2011".
Next, we should define what we mean by "high-quality" code and code that is "debuggable". Often, there's a "I know it when I see it" definition to what good code can be, but that's not very satisfying, or repeatable, when we want to write good code. Here are several properties to apply to a definition of code quality.
* Good code is _readable_ code. Your code should be readable by yourself and others. Readable code is like a good book: you enjoy reading it and it just makes sense to you. It has an elegant property to it that makes you want to continue working with it.
* Good code is _simple_ code. Simple code is concise, focused, and organized. It does a single thing well.
* Good code is _efficient_ code. This means that your code is economical. It uses resources quickly and cleanly. Again, it does a single thing well. Efficiency takes design effort from the beginning of writing your code.
* Good code is _maintainable_ code. This is often phrased in terms of other developers. Good code is code that can be maintained by developers other than the code's creator. Code maintenance can be defined as code that can be understood, explained, and extended by other developers.
* Good code is _clear_ code. In a way, clear code is summation of the above properties. Programming faces the constant challenge of managing complexity. Maintainable code that others can understand and read well is clear code. Code that is simple and efficient is clear code.
So, clear, simple, readable code that is efficient and maintainable is our goal.
Of course, the computer in your smartwatch does not care if your code is good or bad quality code. High-quality standards are for humans.
Finally, note that the code that we write is likely a balance of the above traits. Sometimes, simple code is not as efficient as we like. So thinking of art of creating high-quality, debuggable code as a balancing act can help when your code does not exactly have every property.
### Design and Organize Your Code First
We began this book discussing abstraction and how a programmer can exploit abstraction to make good, clear code. The first step towards high-quality code is to revisit abstraction. Designing and organizing your code to focus on the algorithm and events you are using is essential.
Before writing C code, take a few minutes to write out the steps to your algorithm and which functions will implement each step. Write out the parameters each function needs. Write out the global and local pieces of information (i.e., variables) each function will need. Finally, draw calling relationships between the functions. Do this before writing new functions into your program.
Note that Cloud Pebble will build a minimal framework for you if you request it. It's a good idea to start with this, because the framework for window initialization and events is then already in place. Begin with a diagram of this framework, including the global definitions.
The important thing here is that your program logic use functions without regard to their implementation details. If a function does too much, break it up. Each function can be written in terms of yet lower level functions. The goal is to arrive at subtasks that are simple to implement with relatively few statements. This approach is an excellent aid to program development; if the subtasks are simple enough, it is easier to produce bug-free reliable programs.
### Clear, Obvious, Simple
In Chapter 3, we gave several ways to write good, clear code. These included:
* Use meaningful variable names and expressions, even when literals will work.
* Use names for boolean values rather than literals.
* Use assignment operators as statements only, not in expressions.
* Avoid using shortcuts in expressions.
* Limit all name access to the tightest possible block.
* Use casting to make sure types are converted.
These items all ensure that code is clear, obvious, and simple. It's tempting not to use obvious code. Often, it can be tedious to use code that seems too simple. In fact, it's even more fun to demonstrate coding prowess by writing algorithms that are a challenge to read. However, this standard test applies: can you easily understand your code 6 months from now, when the context and coding problem are no longer part of your thinking?
This also applies to functions. Make functions short and simple, implementing a algorithm step.
See this link for an xkcd spin on bad code: [here](https://xkcd.com/1513/)
.
### Comment Comment Comment
Another obvious assist to good code can also be a bit tedious: commenting your code. Adding comments as you are coding is the best approach and the hardest to convince yourself to do. After all, why comment code that you obviously know how it works? Again, you must apply the 6-month test: can you read it clearly after 6 months away from the code's creation?
### Loosely Coupled
Coupling refers to the degree of association or dependence of one segment of code or a function with another. The goal in well-written code is have functions and code segments that are loosely coupled with one another.
We often describe coupling like this: if a function or code block were to change, how would that affect other parts of the code?
Here's an example. Let's say that a section of code has two variables and two functions defined inside it. If both functions were to rely on those two global variables in some way, we say that's a tight coupling. The outer block cannot change how those variables are manipulated without hurting the operation of the two inner functions. Now let's say that each function were to define two parameters and the caller must send the global variables as parameters. This is now a looser coupling, because each function only uses parameters, which the outer block has to send. In fact, the outer block can change those two variables any way it can, as long as it sends the function the right parameters.
Coupling is kept more loose when abstraction is higher, data is separated or data and interfaces are standardized. Using standard formats for images, like PNG formats, is a way to make coupling looser, because the formats are very likely to stay consistent. Writing separate "getter" functions for each piece of data makes for looser coupling than receiving data in a big chunk, because data can be retrieved in any order rather than forced into a specific order.
### Use External Code
Sometimes organization needs modularization. To properly design your code into modules and organize those modules, place them in external files, linked together by prototype ".h" files. Prototype files list the prototypes of each function defined externally; they are all you need to reference the functions, since the system will merge your code modules together before creating the executable program.
### Don't Repeat Yourself
If you use the same sequence of code several times over, that is, if you catch yourself cutting and pasting the same code several times, it makes more sense to write the code into function and call the function. It's been said that good programmers are lazy programmers because they don't want to repeat code over and over.
Using a function for repeated code not only saves repetition, but, if naming is done correctly, it helps to document the code.
### Assert Conditions and Handle Errors
If you have a code design and you have code that is organized into loosely coupled functions or code blocks, then it's possible to establish _pre- and post-conditions_ to your code. These are data values and other configurations that should exist before your code executes and after execution is completed.
For example, perhaps divisors should be non-zero or time values should not be negative.
When these types of conditions exist, your code should check those conditions _and act on them if they are violated._ The last part of the previous sentence is extremely important. It is easier to write code that works as it should than it is to catch conditions that would make code fail. Handling errors can mean setting return values to default values, that is, silently handling errors. Or it could mean flagging an error condition and terminating. In C, without something called an "exception", the best way to handle errors is to return error values, ones that would not work correctly given the operating of the function in question.
### Read a lot
Good coders get better in the same way as good writers: they read a lot. Reading good code helps you write good code. Just as practice coding makes you a better coder, reading other people's code helps you be more critical of your own code.
Great places to read other Pebble projects are [Pebble's own documentation](https://developer.pebble.com/examples/)
or looking for [Pebble smartwatch apps on Github](https://github.com/search?utf8=%E2%9C%93&q=pebble+watch&type=Repositories&ref=searchresults)
.
### Let Others Read Your Code
Code reviews, the practice of presenting your code to others and/or letting others read through your code, is an excellent way to find problems in your code and to learn from the expertise of others.
When you are finished with some code or a complete application, allow another developer to look over the code. Consider questions like
* Are there obvious logic errors?
* Are all data cases fully implemented?
* Are there better ways to implement an algorithm?
* Does the code adhere to coding standards: clear, obvious, and simple?
Code reviews expose you to new ideas, new and better techniques, and faster ways to correct and well-written code. They are a great way to mentor others and have others mentor you. They allow you to share the load of writing effective code.
### Tools
These are great bits of advice. Sticking to them can be difficult, especially if you don't have established habits.
There are software tools that can help you create and maintain high-quality software and acquire good software habits. We will outline them briefly here.
#### IDEs
Back in Chapter 2, we introduced the idea of an integrated development environment, or IDE. An IDE merges several tools crucial to the software development process together into one software platform. Throughout this book, we have used the CloudPebble IDE as a way to write and experment with applications for the Pebble smartwatch. CloudPebble is specifically targeted to the Pebble smartwatch platform and combines an editor, a compiler, an emulator and an installer with cloud-based storage. It's a great example of an IDE.
There are other IDEs that integrate more advanced software tools to support quality code development. In particular, interactive debugging and code analysis are two tools that are useful. Version control is also a way to support experimentation with different versions of software and backing up these versions.
#### Interactive Debugging
Debugging is characterized by the methods you use to find errors in your applications. Debugging could be very simple, like putting `printf()` statements in your code to print the values of variables, or it could be complex, using a IDE's mechanisms for tracing and stopping code and analyze runtime properties. _Interactive debugging_ is the use of an IDE to mix stepping through code with code analysis. An IDE can make this process easy; there are also command line tools that ease debugging.
As we discussed in Chapter 2, interactive debugging can take several forms. _Breakpointing_ is the setting up of a stopping point where executing code will pause and allow you examine the values of variables and the state of other programming elements. _Inspecting_ or _watchpointing_ are ways of watching code execute -- even slowing the execution down -- so you can watch programming elements change at execution time. _Profiling_ is a way of collecting statistics on sections of code and providing ways of pinpointing inefficient or broken coding elements. _Tracing_ is a method of depicting which parts of code execution as used (and, conversely, finding parts of code that are not used).
While CloudPebble does not use interactive debugging, other tools included with the Pebble SDK do indeed implement this. Most of these tools are command-line based. The most widely used of these is _GDB_, or the Gnu Debugger. GDB is an interactive, text-based debugging application that works with the Pebble SDK and the smartwatch emulator. GDB implements all the interactive debugging elements above. It is an extremely useful application.
For more information on GDB see [Pebble documentation](https://developer.pebble.com/guides/debugging/debugging-with-gdb)
.
#### Version Control
Version control tools allow you to manage changes to your code files. It encourages tracking code changes and experimenting with multiple versions of the same software project. Version control enables collaborative software development, where several developers use the same code base and interact with each other about which parts of a project each is working on.
At its simplest level, a version control system is a backup copy of your code. Taking backups frequently and maintaining multiple backups allows for multiple versions of your project. However, this method can be quite inefficient, because each backup is likely to be almost identical to previous backups. In addition, if several developers were to collaborate on a project, permission and code sharing issues are likely to lead to mistakes and add complexity to simple backup copies.
Version control systems manage these issues. While VCS systems do indeed make backup copies, the copies are typically stored as a set of changes to file contents rather than as the files themselves. In addition, these systems manage multiple developers per project, allowing collaborative code use and managing the merging of code changes. These systems can automate this process, maintaining integrity of source code. Using a distributed system that tracks code changes by developer helps manage code ownership and responsibility.
There are several VCS in use today. The most popular is Git: a distributed version control system designed to maintain local code files for each developer coupled to remote code systems that link developers together. It uses concepts like _branching_ to allow development on copies of code files while maintaining original code files untouched. Then merging code branches, sometimes from many separate developers, allows code files to be updated by many developers at once. Git code bases are used in this book.
There are many Git repository services available for use over the Internet. Github and BitBucket are two service available for use with Git.
#### Pebble Packages
Pebble packages are a way to bundle code together in a modular fashion. These bundles can be included in different projects without change and can be shared among developers. Packages are meant as a way to encapsulate functionality together in a bundle that can be used without including source code into a software project. Packages can include C code as well as JavaScript code and resource files.
Packages are a great way to take advantage of abstraction. They are collections of code resources that can be used without considering the source code or the algorithms they use. You include them with your software project and use them as you would externally referenced code files.
Documentation on packages is available in the Pebble collection; instructions on [creating](https://developer.pebble.com/guides/pebble-packages/creating-packages/)
and [using](https://developer.pebble.com/guides/pebble-packages/using-packages/)
packages are available.
results matching ""
===================
No results matching ""
======================
---
# Chapter 5: Loops and Iteration · Learning C with Pebble
[Powered by **GitBook**](https://www.gitbook.com/?utm_source=public_site_legacy&utm_medium=referral&utm_campaign=trademark&utm_term=pebble&utm_content=powered_by)
[](https://pebble.gitbooks.io/learning-c-with-pebble/content/chapter05.html#)
[](https://pebble.gitbooks.io/learning-c-with-pebble/content/chapter05.html#)
FacebookGoogle+TwitterWeiboInstapaper
[](https://pebble.gitbooks.io/learning-c-with-pebble/content/chapter05.html#)
[](https://pebble.gitbooks.io/learning-c-with-pebble/content/chapter05.html#)
[](https://pebble.gitbooks.io/learning-c-with-pebble/content/chapter05.html#)
AA
SerifSans
WhiteSepiaNight
[Chapter 5: Loops and Iteration](https://pebble.gitbooks.io/learning-c-with-pebble/content/)
=============================================================================================
Chapter 5: Loops and Iteration
==============================
As you invent solutions for various programming challenges, there will be many times when you must execute a statement many times. This kind of iterative code is very common and C provides several choices on how to execute statements in a loop.
In this chapter, we examine how C supports statement iteration via looping structures. Loops provide a way to repeat blocks of code and to control that repetition. We will also briefly consider the goto statement, an infamous programming feature that was around before C was invented.
### Looping Concepts
C provides different types of loops for different situations. First, there are conditional and counted loops. A _conditional_ loop is used when the end of iteration is dependent on a condition -- and can't be known ahead of time. A _counted_ loop is used when you know -- or can compute -- the number of times a loop will execute.
C also provides loops that differ on where the decision to terminate the loop is tested. _Pretest_ loops test for termination before the body of code in the loop is executed. _Post test_ loops test for termination at the end of loop code execution. Pretest loops may never execute their code, because the first termination test might succeed. Likewise, post test loops will _always_ execute their code at least once, because their first termination test is after the first pass through the loop code.
C gives us while and do/while loops as conditional loops and for loops as counted loops. It also has while and for loops as pretest loops and the do/while loop as a post test loop. The goto can be any kind of the loop you want...which we will see can be a problem.
### The While Loop
The while loop has the following standard form:
while (_condition_)
_statement_
The _condition_ is the same boolean expression-based condition we have seen before with the if statement. The loop evaluates the _condition_ and, if the evaluation produces a true value, executes the statement. Then it evaluates again. It continues the evaluation/execution pattern until _condition_ evaluates to a false value.
Let's consider this example.
int x = 10;
int y = 20;
while (x > 0) {
y ++;
x /= 2;
}
In this simple example, the condition `x > 0` is evaluated repeatedly and, as long as it's true, the code block will be executed. Eventually, `x/2` will give a zero value, because of integer arithmetic, which will cause the condition to fail and the loop to stop.
Let's take another example. Let's say we want to compute a factorial. Assume we have an integer value stored in the variable `number` and we want to compute a value (the factorial of `number`) which will be stored in the variable `factorial`. This while loop should do the job:
factorial = 1;
while (number > 0) {
factorial = factorial * number;
number--;
}
In this code, assuming `number` is non-negative to begin with, decrementing the variable each iteration will eventually make it equal to zero and the loop will terminate.
As a pretest loop, the while loop might never execute it's loop statement code. In the above example, if `number` were negative or zero before the loop statement, the loop would terminate without execution.
### The For Loop
The for loop is a pretest loop that you would use when you know, or can compute, the number of iterations in a loop. The for loop, in fact, is a while loop in disguise. You can always interchange the two.
The for loop has this form:
for (_initialization_; _continuation condition_; _increment_)
_statement_
We can rewrite a for loop as a while loop, which may make it easier to understand. We can rewrite it as a while loop this way:
_initialization_
while (_continuation condition_) {
_statement_
_increment_
}
Consider this simple example:
for (int i=0; i<10; i++) {
sum += i;
}
This loop initializes `i` to zero, then tests the condition `i<10`. While the condition evaluates to a true value, the loop statement executes, followed by the increment `i++`. Then we test the condition again. Eventually, `i` will take on the value 10 and the loop will terminate.
For another example, we can rewrite the factorial code from the previous section as follows:
for (; number > 0; number--)
factorial = factorial * number;
Notice we left the _initialization_ part empty. Our example assumed we already had a number value, therefore we did not need to initialize anything. The loop will work without any kind of initialization.
In fact, we can leave all parts empty:
for (;;) { ... }
This would be an infinite loop we would have to break out of from in the loop body.
We mentioned that for loops are just while loops. We can rewrite our first simple example to be represented as a while loop like this:
int i=0;
while (i<10) {
sum += 1;
i++;
}
The semantics between the two forms is the same.
If it takes multiple statements to complete any part of the for loop specification, you can combine statements with commas. For example:
for (x=2,y=3; x+y < 20; x++,y++) {...}
This code will execute the initialization assignments _in order_, which might make a difference if the statements between the parentheses depend on each other. So the above code is the same as executing this code sequence:
x = 2;
y = 3;
for (; x+y < 20; ) {
...
x++;
y++;
}
Finally, let's note that a for loop is a code block, which is especially important to know for name accessibility. Consider the loops below:
for (int row=0; row < total_rows; row++) {
for (int column=0; row < total_columns, column++) {
if (color_distance(get_pixel(row, column), GColorBlue) < 5) {
setPixelColor(row, column, GColorBlack);
}
}
printf("We ended up on column %d\n", column);
}
printf("We finished on row %d\n", row);
Here we have two loops, one nested inside the other, working on the pixels of an image. Both of the `printf` function calls have errors. For the inner `printf`, the `column` variable is not accessible outside the for loop. Likewise for the outer `printf`, the variable `row` is not accessible outside the outer for loop. The reason for this is that it is declared in the for loop specification. If we had pulled the declaration of the variables outside the loops, everything would be correct, as below:
int row, column;
for (row=0; row < total_rows; row++) {
for (column=0; row < total_columns, column++) {
if (color_distance(get_pixel(row, column), GColorBlue) < 5) {
setPixelColor(row, column, GColorBlack);
}
}
printf("We ended up on column %d\n", column);
}
printf("We finished on row %d\n", row);
It is best to keep accessibility of variables and other names as tight as possible. However, with for loops, sometimes that rule conflicts with convenience, so it's up to the programmer which method to choose.
> **Variable Name Accessibility And Other Habits**
>
> C is an extremely flexible language that allows many good and bad programming elements. A programmer needs to build good habits to navigate programming in C. Variable name accessibility is a good example. Keeping a tight boundary around the area where names are used is a good habit to get into. Using that rule means that if you accidentally use the variable where you _thought_ it was accessible, but it really wasn't, the compiler error will alert you to your mistake. Compiler errors are much easier to fix than execution errors later.
>
> Other habits could be declaring variable names together at the beginning of code sections and using curly braces to implement code blocks even when one statement is in the block. We will point out others as we develop our understanding of C.
### The Do/While Statement
We have mentioned that while loops and for loops are _pretest_ loops. The condition for termination is tested before the loop code and it's possible that the loop code will never execute. Sometimes, an algorithm makes more sense if the condition is tested after the loop code executes. We have called this a _post test_ loop.
C implements this with a do/while loop. The form of a do/while loop is below.
do
_statement_
while (_condition_);
This loop will execute the _statement_ as long the _condition_ returns a true value.
Let's take another look at the factorial example. We can write for do/while loops as follows:
factorial = 1;
do {
factorial = factorial * number;
number--;
} while (number > 0);
This computes a factorial just like the original example, except for the case when `number` is equal to 0. Then this will give a result that is in error (`factorial` will be equal to 0; we know that 0! = 1). So, the factorial example is a good example of an algorithm that needs the condition checked before loop execution, when it's possible that no loop execution will happen.
Let's look at another example. Let's write some code that will compute the first _n_ numbers in a Fibonnaci sequence, where each term is equal to the sum of the two previous terms. Note that this assumes that _n_ is greater than 0, which means that at least 1 term will be generated, which means we will execute loop code at least once, which means we can use a do/while.
int first=0, second=1, next;
do {
next = first + second;
first = second;
second = next;
printf("%d\n",next);
number --;
} while (number > 1);
Here, `number` is assumed to have a value greater than 0 and is the number of Fibonnaci terms to produce.
### The Break and Continue Statements
Occasionally, it is necessary in an algorithm to stop a loop prematurely or to skip an execution of a loop body, moving to the next iteration. The break and continue statements are used for these situations.
The break statement will terminate the execution of a loop. Whenever the break statement is encountered, everything is terminated and execution continues after the loop statement. As an example, we could repair our do/while loop implementation of factorials this way:
factorial = 1;
do {
if (number == 0) break;
factorial = factorial * number;
number--;
} while (number > 0);
Here, we check `number` for quality to zero. A true evaluation will shut down the loop and start execution at the next statement after the while.
The continue statement simply terminates the current execution of loop code and starts the next iteration. A simple example might be code that counts by twos:
int sum=0;
for (i=0; i<20; i++) {
if (i%2 != 0) continue;
sum += i;
}
This code skips the summation for every time `i` is not even. Of course, by using `i += 2` instead of `i++` in the for loop set up specification would mean we don't need the continue line. But it's a good example.
### Infinite Loops
An infinite loop is a loop whose termination condition is _never_ true. Most often, infinite loops are an error by a programmer who actually meant something different.
Consider this example:
for (int x=100; x!=50; x++) {...}
this code would be an infinite loop because `x` will never be equal to 50.
Most of the time, infinite loops are not so obvious. Try this one:
for (int y=10; y=100; y++) {...}
This is also an infinite loop. The use of the assignment statement instead of the an equality for the continuation condition will always result in a true value (the assignment statement returns the value `100`, which is true).
Here's another common error:
int n=100;
while (n > 50);
{
sum += n;
n--;
}
In this example, the semicolon after the while specification will cause the while loop to run an empty statement infinitely.
Most infinite loops happen because of errors in your code. Perhaps, like above, an assignment is used instead of an equality. Or, perhaps, the condition used in a while loop is always true because of code somewhere else. Infinite loops can be hard track down. The key is to work with the variables in the loop conditional parts and make sure you know their values.
Occasionally, however, an infinite loop can be useful, especially when combined with a break statement. There are situations where the decision to terminate a loop must occur in the middle of the loop body, not at the beginning or the end. In these cases, a break statement is needed -- with an if statement attached -- to terminate the loop.
The Infamous Goto Statement
---------------------------
The C language supports a goto statement. Goto statements include a label that marks some other statement. When a goto statement is encountered, execution is paused, then resumed at the statement marked with a label. The general form is:
goto _label_;
...
_label_: _statement_
The _label_ name format must adhere to C naming rules (like variable name rules) and must be accessible.
Goto statements can jump forward or backward. Consider this example:
int x=10;
LOOP: while (x < 20) {
x++;
if (x == 15) {
goto LOOP;
} else {
printf("The value of x is %d\n", x);
}
}
This code will print values of `x` from 10 to 19, but it will skip 15. When `x` equals 15, the goto statement will force execution to start back at the top of the loop. The behavior here is like a continue statement.
In fact, we can use a goto statement to rewrite many code structures. We can implement the while loop from the above example this way:
int x=10;
LOOP: if (x >= 20) goto LOOPEND;
x++;
if (x == 15) goto LOOP;
printf("The value of x is %d\n", x);
goto LOOP;
LOOPEND: ...
which is semantically equivalent. However, this code also points out problems with the goto statement. The biggest problem is that code can look chaotic with goto statements. Compare the two examples above. The while loop is much more expressive about the algorithm being described than the goto implementation. In fact, if we eliminated the goto entirely, it would be much more elegant and expressive:
int x=10;
while (x < 20) {
x++;
if (x != 15) {
printf("The value of x is %d\n", x);
}
}
The problem with the goto statement is that it encourages very bad code. As threads of execution start to wind around blocks of code, a program can be very hard to follow. _Structured programming constructs_, like while loops and for loops, were invented to eliminate the goto statement with statements that directly addressed the logic that the goto was implementing.
In addition to code that is hard to understand, the goto statement poses some very difficult problems when it interacts to more structure program components. For example, consider this code:
int x=10;
LOOP: while (x < 20) {
x++;
if (x == 15) {
goto LOOPEND;
} else {
printf("The value of x is %d\n", x);
}
}
LOOPEND: x = y-2;
y++;
goto LOOP;
This code forces a jump to code _outside_ the loop, then continues the loop. This is very bad form and is quite hard to understand.
For these reasons -- and some others -- the goto statement is considered to be a statement that should never be used. There are some languages that don't even include a goto statement. Suffice it to say you should never use it and that every situation where you think a goto could be used can be addressed by another language construct.
> **More on the GOTO Statement Evil**
>
> The goto statement has long been considered "harmful" by computer scientists and language designers. Back in 1968, computer pioneer Edsger Dijkstra [wrote a letter to the editor](http://homepages.cwi.nl/~storm/teaching/reader/Dijkstra68.pdf)
> of _Communications of the ACM_ that became a famous treatise against the goto statement. The campaign against the goto statement is, in part, what led to structure programming languages. These languages built structures -- like while loops and switch statements -- that make goto statements unnecessary. [Dijkstra also has come things to say about that too.](http://www.cs.utexas.edu/~EWD/ewd13xx/EWD1308.PDF)
### Avoiding Messy Loop Code
C provides many opportunities for messy loop code. Because integers can stand for conditions and for loop specification can have many forms, code can get very difficult to read.
Consider this example:
for (; y **Compile Time or Run Time**
>
> The errors that can be caught when the program is being compiled are called _compile time_ errors; the errors that are caught when the program is executing are called _run time_ errors. Which are easier to find?
>
> Compile time errors are static errors. Static errors are those that are in the syntax of the code or the semantics of the code. Static errors don't change until you change the text of the code; a compiler can find then each time a program is compiled.
>
> Run time errors are often dynamic errors. They present themselves only when the conditions are right. When run time conditions force the code with errors to be executed, the errors surface.
>
> Static errors are much easier to find than dynamic errors. You can find static errors when you review code with a sharp eye. Dynamic errors often are not caught until you run code with certain input. On a Pebble smartwatch, dynamic errors might come to light only at certain times of the day.
### Function Headers
The specification of the return type of a function, along with the order and types of the parameters, is called a _function header_. Because some functions are abstract (some are not -- see the next section), this header tells the programmer _how_ to call the function and _what to expect_ as the return value.
As an example, the header for the `sqrt` function is
double sqrt(double x)
This specifies the name of the function as "sqrt", it returns a double data type, and it takes 1 double parameter. That's all a programmer needs to use this function.
Consider the header for the function `text_layer_set_text` that we have seen before. It has a more complicated header:
void text_layer_set_text(TextLayer * text_layer, const char * text)
For this function, there are two parameters. The first is a _pointer_ to a text layer variable (we'll go over pointers in Chapter 8). The second parameter is a _pointer_ to a character variable, which we have seen as a string. The function does not return a value, specified by the use of `void` for the return type.
When using functions that are already coded for you, like those supplied by a standard C library or by Pebble for use with watches, all you need is the header to know how to use the function.
### Building Your Own Functions
Functions can be supplied to you already coded. You can also build your own functions.
To build your own function, you need to supply _both_ the function header -- giving name, return type, and parameters -- and the code that implements the function and computes the return value.
#### The Basics
To design your own function, your code must adhere to the following form:
_return\_type_ _function\_name_(_parameter\_list_)
{
_function\_body\_code_
}
Let's go through each of these elements:
* The _return\_type_ is a declaration of the return value's data type. In the examples we have seen, the `sqrt` function returns a "double" data type value and the `text_layer_set_text` function returns a "void" type. The value you return (see below) must match this data type. In the case of "void", the function should return no value at all.
* The _function\_name_ is the name that will be used to call the function. This name must abide by the same rules as variable names: a combination of letters, numbers, and an underscore, starting with a letter or underscore.
* The _parameter\_list_ can be empty or can specify parameters needed for the function. Parameters have a huge amount of flexibility and will be discussed in the next section. But at this point, it is sufficient to note that a parameter list needs parameter data types and name, separated by commas.
* The _function\_body\_code_ is a set of statements that perform the purpose of the function. The code can manipulate program data and parameters and can return values to the caller.
Let's take an example. Remember the second hand project in chapter 4 (Project 4.1). We computed the second hand position using this code:
int dangle = TRIG_MAX_ANGLE * second / 60;
position_x = center_point_x + (radius*direction*sin_lookup(dangle)/TRIG_MAX_RATIO);
position_y = center_point_y + (-radius*cos_lookup(dangle)/TRIG_MAX_RATIO);
Let's say we want to make two functions: one to compute the X position and one to compute the Y position. Here's the steps we might go through to write those functions:
1. **Return type:** The return value of each of the function is assigned to an integer variable. So it makes sense that the return type of each function is "int".
2. **Function name:** Here, we can be as creative as we want. As with variables, names should be descriptive. We will name the functions `secondhand_x` and `secondhand_y`.
3. **Parameter list:** The computations above use several pieces of information. The X computation uses the variables `center_point_x`, `radius`, `direction`, and `second`, all of which are integers. The Y computation uses `center_point_y`, `radius` and `second`, which are also all integers. Note that we do not need to use the same names for parameters that we did when they were variables, but we should still use descriptive names.
4. **Function body code:** We can write these functions as below:
int secondhand_x(int center, int rad, int dir, int sec)
{
int dangle = TRIG_MAX_ANGLE * sec / 60;
int pos = center + (rad*dir*sin_lookup(dangle)/TRIG_MAX_RATIO);
return pos;
}
int secondhand_y(int center, int rad, int sec)
{
int dangle = TRIG_MAX_ANGLE * sec / 60;
int pos = center + (-rad*cos_lookup(dangle)/TRIG_MAX_RATIO);
return pos;
}
Notice that we have changed some of the names of the parameters / variables slightly. In this definition, the parameters are known by the names given in the parameter list. Also notice that we declared our own variables inside the function and used those variables rather than variables outside the function definition. If our goal is to implement abstraction, then each function needs to be as independent from the surrounding code as possible. Finally, notice how we return a value with the "return" statement; more on this is below.
We would call these function definitions as follows:
position_x = secondhand_x(center_point_x, radius, direction, second);
position_y = secondhand_y(center_point_y, radius, second);
#### Parameters
Parameters are the main way we communicate between the caller code and the function code. To help discuss parameters, we should first understand that there are two types of parameters: _formal_ and _actual_ parameters. Formal parameters are those defined in the function specification. Actual parameters are those used in the function call.
We make this distinction for a couple of reasons. First, the function specification can only access the formal parameters and must be written using the formal parameters, assuming they have a value. In the examples above, we had to define the functions using the parameter named `center` even though we called the functions with the variables named `center_point_x` and `center_point_y`. The parameters are separate entities from the variables that are used to call the functions.
Second, we can now discuss how values are transmitted from actual to formal parameters during the function call. In the function definition, the formal parameters are treated like variables. This makes sense, because at execution time, these formal parameters do indeed stand for memory locations. The formal parameters receive values from the actual parameters in the function call like assignment statements.
Finally, this distinction allows us to discuss assignment issues like type casting and static typing. These issues are at play just like they are at play with variables and assignment.
Let's take a simple example.
float sum (int a, float b) {
return a+b;
}
This simple function requires two parameters in a function call: an integer and a float. It returns a float value. Let's say we call this function like this:
float s = sum (5,6);
The execution of the function definition will start after the values are passed between actual and formal parameters. The parameter `a` will take on the value `5` and the parameter `b` will take on the value `6.0`, after the integer parameter's value is cast to a float. Then the sum will be computed as a float value and returned as `11.0`.
Notice in the above example that we have to work with `a` and `b` as formal parameters regardless of what parameters are used during the function call. This is a great example of the abstractions provided by the C programming language.
#### Parameter Passing Modes
In the previous section, we discussed parameter passing like it was assignment of variables: formal parameters are assigned the values of the actual parameters. This mode of passing parameters from actual to formal is called _pass by value_. The values of the actual parameters are evaluated and passed/assigned to the formal parameters before the function is executed.
If you think of passing parameters as an assignment operation, then pass by value makes sense. But this parameter passing mode restricts assignment to one way: from the actual to the formal parameters. Consider this example:
float sum2(int a, float b) {
a++;
return a + b;
}
Now, if we call this function like this:
int x = 10;
float s2 = sum2(x, 10);
You might think that, if `a` is changed, the changed value is sent back to the caller, changing the value of `x`. But this is not the case. Pass by value only passes values one way: from the caller to the function definition, from actual parameter to formal. In this example, `x` does not change its value. Because of this one way assignment, we can still call the new function like this:
float s3 = sum2(100,200);
and not worry that somehow the value 100 changes to 101!
There is one more parameter passing mode in C: call by reference. This mode passes a _reference_ or _pointer_ to a parameter, rather than the value of the parameter. When the variable that the parameter references changes, the value changes immediately for the caller as well. We will complete this discussion in the next chapter, after we have discussed pointers.
> **There are Other Parameter Passing Modes**
>
> Pass by value and pass by reference modes are common in programming languages. But, there are other parameter passing modes.
>
> _Pass by value-result_: Also known as "copy-in, copy out", this method is used in only a few older languages. Parameters as assigned to formal parameters, then the values of the formal parameters are assigned back to the actual parameters when the functions return. When this mode is used, only variables may be used in a function call; literal values cannot be used.
>
> _Pass by Name_: This is an interesting parameter passing mode used by early programming languages (e.g., Algol). When pass by name is used, the effect is like the _name_ is passed and the calculation is deferred until the value is needed. Like pass by value-result, variables must be used in a call.
#### Returning Values
Functions are designed to return a value. Values are returned to the caller by using the "return" statement. We have seen this in examples. The form of the return statement is this:
return expression;
When the return statement is executed, the expression is computed, execution of the function stops, and execution resumes at the point after where the function was called, with the computed expression value substituting for the calling statement.
The data type that results from computing the expression in the return statement must be compatible with the data type given in the function header. If the data type in the function header is given as "void", then the expression for the return statement should be omitted. Note that the return statement should still be there, directing the function to return control to its caller, but the expression should be removed because the function does not return a value.
As an example, consider this function header:
double max(double num1, double num2)
This function will return the maximum of the two parameters it is sent. The return statements used must have an expression that results in something that is of data type "double". Let's finish the function:
double max(double num1, double num2) {
if (param1 > param2) {
return param1;
} else {
return param2;
}
}
It's quite simple to verify that each return statement is returning a "double". Note that any valid C expression will suffice for a return statement. We could easily have written this function as this:
double max(double num1, double num2) {
return param1>param2 ? param1 : param2;
}
Here's an example of a "void" return value:
void announce (int age) {
printf("It's birthday time! We celebrate an age of %d!\n", age);
}
No returned value is needed because the function is performing an action, not a computation.
There is a common error in function returns that we should note. It is easy to build a function with unreachable statements. For example, consider this function:
int absolute(int value) {
if (value < 0)
return -1*value;
return value;
}
This is a correct way to return the absolute value of an integer parameter. So let's say that, upon reflection, the programmer decides to write an else part to the if statement, which he feels would be better programming. The function now looks like this:
int absolute(int value) {
if (value < 0)
return -1*value;
else
return value;
return value;
}
The mistake here is that the last return statement will never be reached. The if statement will result in some value being returned and execution will never reach that last statement.
### Functions as Parameters
Let's say we need to write a function that must print a list, using a `get_list_item` function to get an item to print. You might write a function to do this like this one:
void print_list() {
int num;
for (int i=0; i 0) {
factorial = factorial * number;
number--;
}
We can also define a recursive version, remembering that _n! = n \\_ (n-1)!\*
int fact(int n) {
if (n <= 1)
return 1;
else
return n * fact(n-1);
}
For recursion to work correctly, the problem being solved must have have two properties: a _base case_ that defines where the recursion stops and a _next case_ that defines how the next step is computed, given the current step has a value. In the factorial example, the _base case_ is _n = 1_, where we simply define that _1! = 1_. The _next case_ is the step where, given we have the value `n`, we generate a factorial as `n * fact(n-1)`.
Another classic example of recursion is the computation of Fibonacci sequences. In Chapter 5, we gave the an example of this computation using a do/while loop:
int first=0, second=1, next;
do {
next = first + second;
first = second;
second = next;
printf("%d\n",next);
number--;
} while (number > 1);
In the code above, we can see two base cases. The first number in the sequence is 0 and second is 1. The remaining terms are equal to the sum of the two previous terms. That's the next case. We can write this as follows:
int fibonacci(int n) {
if(n == 0)
return 0;
else if(n == 1)
return 1;
else
return fibonacci(n - 1) + fibonacci(n - 2);
}
If you are considering using recursion, you should consider the following issues.
1. _The memory requirements of recursion are considerable._ Each function that is called takes up memory to store its variables and information about the calling structure. This memory is released and reused when a function returns. Recursion forces each instance of the recursive function to remain in memory while a new instance is formed. Many recursive steps will take up extensive amounts of memory. The execution environment may limit the number of recursive calls a program may make.
2. _Infinite recursion is easy to fall into._ Recursion is a concept that is twisted enough from regular programming that it is easy to make mistakes with it. A common error is to write code in which the base case is never reached. In the `fibonacci` definition above, if we called `fibonacci(n+1) + fibonacci(n+2)` instead of the correct code in the example, the base case of `n == 0` or `n == 1` would never be reached and code would call itself infinitely. Then, like the previous note, memory would fill up and the program (and perhaps the computer) would freeze and/or crash.
3. _Recursion can (and should) be rewritten as iteration when possible._ While some problems lend themselves to a recursive solution, iteration is usually the better form to use. Iteration is clearer in its description of the solution algorithm. Iteration is also less memory and resource intensive. So if you can, you should write a solution using loops rather than recursion.
### Functions, Organization, and Algorithm Development
Functions are very useful tools for a number of reasons. As a C programmer, you should develop habits that include using functions wherever you can.
First, functions can reflect the development steps one goes through to develop a program. By exploiting abstraction, functions can be used where steps appear in an algorithm, allowing the programmer to ignore implementation while the algorithm is being built. Functions without implementation become placeholders; functions with implementation reflect the algorithm design and help document it.
A second reason to use functions is that their code can be reused. They are particularly handy when the same steps are used in several places in a program. Instead of copying statements, a function can be called. In addition, function code can be reused in other programs. Spending lots of time crafting an incredibly useful function that will send email, for example, can pay off many times over when you include it other programs.
Finally, using functions makes your program more modular. Modularity is a property of program code that makes functions independent from each other. When code is modular, functions can be easily replaced by improved functions. Errors are more easily found because modular code isolates functionality into specific functions. Code that implements functions with specific, focused purposes is code that can be understood better.
### Project Exercises
#### Project 6.1
We started this chapter talking about changes to Project 4.1 from Chapter 4. For this project exercise, actually make those changes and get the resulting code to run. [You can start with project 4.1 here.](https://cloudpebble.net/ide/import/github/learning-c-with-pebble/project-4-1-answer)
Given the walk through in that "Basics" section, you should be able to create something with functions easily.
[An answer can be found here.](https://cloudpebble.net/ide/import/github/learning-c-with-pebble/project-6-1-answer)
#### Project 6.2
[Consider the code in Project 6.2, available here.](https://cloudpebble.net/ide/import/github/learning-c-with-pebble/project-6-2)
This code will display a pattern, as depicted by bits in a string. In this starting code for Project 6.2, the string "111101111101111" can be broken into 5 rows of 3 bits each, which can be displayed like this:
* * *
**Figure 6.3:** Emulator running Project 6.2
* * *
Make the following changes to the code:
1. Move the nested for loop to a function, with this header: `void draw_digit(GContext *ctx, char * digit)`. Call that function from the `canvas_update_proc`.
2. Add code and additional parameters to the function to draw the pattern at any (x,y) coordinate. You will have to use these new parameters in the function definition.
3. Now use the function in `canvas_update_proc` to fill the screen with the pattern. You might think about these questions: How do you know how many patterns fit onto the screen? How do you call `draw_digit` with the appropriate parameters? Add a variable that stores the size of the individual tiles used to draw the digit to make the calculations easier. As an experiment, see what happens to your display if you change the size stored in the tile size variable.
4. Now, draw four digits grouped together in the center using similar calculations in the loop. We will revisit this method in upcoming chapters as a watchface. This can also be influenced by changing the size of the tile size variable. (Note that you can find the center of the screen from the variable `s_main_window_center`. You can reference the X and Y coordinates as `s_main_window_center.x` and `s_main_window_center.y` respectively. We'll discuss this way of using structs soon.)
Finish this project by placing comments at the beginning of the code that identifies the code by project and adds your name.
[You can find an answer here.](https://cloudpebble.net/ide/import/github/learning-c-with-pebble/project-6-2-answer)
#### Project 6.3
[You can find starting code for Project 6.3 here.](https://cloudpebble.net/ide/import/github/learning-c-with-pebble/project-6-3)
This project asks you to work with drawing text.
Examine the starting code for this project. In its current state, the code will not run, because `graphics_layer_update_callback` calls a function that you must define that is currently not in the code. The initial code calls this function `fill_the_rectangle` and sends it two parameters: width and height.
Add this function to the code. This function should draw a rectangle of a given size (width and height) with as much text as possible using the font specification sent as a parameter. You will need to design the name of the function, the parameters, and the code. Repeat the text several times if necessary.
In order to draw the text, you will need to use several functions. First, you will likely need the size on the screen that the text will take up. You can get this as:
GSize size = graphics_text_layout_get_content_size(text_string, font,
GRect(0,0, width, height),
GTextOverflowModeTrailingEllipsis, GTextAlignmentLeft);
The `GSize` data type is a struct (we will see these in Chapter 10); you can access the width of your text as `size.w` and the height of your text as `size.h`. You will also need to use a function to draw the text; the function below will draw `text_string` in the font `font` at (`position_x`, `position_y`).
graphics_draw_text(ctx, text_string, font,
GRect(position_x, position_y, text_width, text_height),
GTextOverflowModeTrailingEllipsis, GTextAlignmentLeft, NULL);
`ctx` is a graphics context that must be passed as a parameter. You don't need to know this everything about this function to make it work (remember abstraction!).
Add comments at the beginning of the code that identifies the code by project and adds your name.
[You can find an answer here.](https://cloudpebble.net/ide/import/github/learning-c-with-pebble/project-6-3-answer)
#### Project 6.4
[Consider the project code for Project 6.4, available here.](https://cloudpebble.net/ide/import/github/learning-c-with-pebble/project-6-4)
This program draws concentric circles on the Pebble screen (which looks hypnotizing on a Pebble Time Round). Examine the code. The function `draw_circles` draws the concentric circles by using a for loop.
Your job is to remove the for loop, but draw the same screen by using recursion. Think about these things:
* Should your function start with the largest circle or the smallest?
* When should you stop (that's the base case)?
* How should you structure your function's data, including parameters, to communicate when the function should stop?
When you are done, claim the code by adding comments to identify you and the project.
[There is an answer to this problem at this link.](https://cloudpebble.net/ide/import/github/learning-c-with-pebble/project-6-4-answer)
results matching ""
===================
No results matching ""
======================
---
# Appendix B: Development Environments for Pebble Projects · Learning C with Pebble
[Powered by **GitBook**](https://www.gitbook.com/?utm_source=public_site_legacy&utm_medium=referral&utm_campaign=trademark&utm_term=pebble&utm_content=powered_by)
[](https://pebble.gitbooks.io/learning-c-with-pebble/content/appendixb.html#)
[](https://pebble.gitbooks.io/learning-c-with-pebble/content/appendixb.html#)
FacebookGoogle+TwitterWeiboInstapaper
[](https://pebble.gitbooks.io/learning-c-with-pebble/content/appendixb.html#)
[](https://pebble.gitbooks.io/learning-c-with-pebble/content/appendixb.html#)
[](https://pebble.gitbooks.io/learning-c-with-pebble/content/appendixb.html#)
AA
SerifSans
WhiteSepiaNight
[Appendix B: Development Environments for Pebble Projects](https://pebble.gitbooks.io/learning-c-with-pebble/content/)
=======================================================================================================================
Appendix B: Development Environments for Pebble Projects
========================================================
There are two environments that you can use to develop Pebble apps. This appendix is a brief outline of these environments.
### CloudPebble
The CloudPebble environment is the way we have presented Project Exercises in this book. It is a easy and fast way to get started with Pebble app development. Accessible via "[http://cloudpebble.net](http://cloudpebble.net/)
", this environment is an integrated development environment with the following tools:
* _Editor:_ This tool is used to create source code. While saving is automatic when you hit the compilation button, it's a good idea to get into the habit of saving often. Hit the save button or press Ctrl-S on the keyboard.The editor attempts code completion when it can and attempts code syntax error-checking as you type code.
* _Compiler:_ The Gnu C compiler we have discussed in the chapter text is embedded in this IDE. Clicking on the compile/run button automatically saves what the contents of the editor and attempts to compile the current project. Compilation results are displayed in the "Build Log", with compilation errors linked back into the source code.
* _Dependency Management:_ Your code can depend on packages of precompiled code. CloudPebble can include these packages when it works with your code. You can include your own packages or packages from the NPM JavaScript repository (found at [https://www.npmjs.com](https://www.npmjs.com/)
).
* _Version Control System:_ CloudPebble has configurable connections to [GitHub](http://www.github.com/)
. You can pull code from repositories and push your own code.
* _Storage:_ The CloudPebble site will also store your projects on its own storage space. Storage is organized by project and does not present a file system. File handling is restricted to renaming and deletion using buttons on the right of the editor.
* _Runtime Environment:_ The IDE includes two ways to run code. There is an emulator built into the IDE, which is the default runtime system for new projects. You can run your code on all Pebble platforms and can even work with real smartwatch sensor functions by connecting with your phone over a Web site. You can also run your code on a smartwatch; CloudPebble downloads apps to your smartwatch by connecting to your phone through the developer connection in the Pebble app.
In addition to these tools, access to all Pebble documentation is available as well as simple project management.
The CloudPebble platform should be all you need for basic app developmet. Try it at [http://cloudpebble.net](http://cloudpebble.net/)
.
### The Pebble Software Development Kit
The Pebble SDK is an extensive set of software libraries and tools that enable smartwatch app development on Linux and MacOS platforms. By using the Pebble SDK, you can choose your own set of development tools and can have access to implementations of compilation, software management, and debugging not available on CloudPebble. Emulation is available at a finer grain with the SDK than is available with CloudPebble.
Get started with the SDK at [http://developer.pebble.com/sdk](http://developer.pebble.com/sdk)
.
results matching ""
===================
No results matching ""
======================
---
# Appendix C: Pebble Developer Communities · Learning C with Pebble
[Powered by **GitBook**](https://www.gitbook.com/?utm_source=public_site_legacy&utm_medium=referral&utm_campaign=trademark&utm_term=pebble&utm_content=powered_by)
[](https://pebble.gitbooks.io/learning-c-with-pebble/content/appendixc.html#)
[](https://pebble.gitbooks.io/learning-c-with-pebble/content/appendixc.html#)
FacebookGoogle+TwitterWeiboInstapaper
[](https://pebble.gitbooks.io/learning-c-with-pebble/content/appendixc.html#)
[](https://pebble.gitbooks.io/learning-c-with-pebble/content/appendixc.html#)
[](https://pebble.gitbooks.io/learning-c-with-pebble/content/appendixc.html#)
AA
SerifSans
WhiteSepiaNight
[Appendix C: Pebble Developer Communities](https://pebble.gitbooks.io/learning-c-with-pebble/content/)
=======================================================================================================
Appendix C: Pebble Developer Communities
========================================
Pebble users and developers have built communities online where you can discuss, praise, criticize, and emote about Pebble smartwatches and where you can ask questions about usage and development of smartwatch apps. Here is a list a some of communities.
* _Pebble Forums:_ Pebble runs its own set of forums at [http://forums.pebble.com](http://forums.pebble.com/)
. There is actually only one forum with many categories. While you can read each category without signing up, signing up allows you to post.
* _Pebble Developer Blog_: Pebble employees maintain a developer blog at [https://developer.pebble.com/blog](https://developer.pebble.com/blog/)
. This is used for communicating news pertinent to developers straight from the folks at Pebble.
* _Reddit:_ There are several subreddit groups at reddit.com that pertain to Pebble. The two most active are the Pebble subreddit (at [https://www.reddit.com/r/pebble](https://www.reddit.com/r/pebble/)
) and the Pebble Developers subreddit (at [https://www.reddit.com/r/pebbledevelopers](https://www.reddit.com/r/pebbledevelopers/)
.
* _Twitter:_ There are two Twitter feeds that are maintained by Pebble: [@pebble](https://twitter.com/Pebble)
and [@pebbledev](https://twitter.com/PebbleDev)
.
* _Slack:_ Slack is a service where messages and files are exchanged between users. The Pebble Developer team on Slack, found at [http://slack.pbldev.io/](http://slack.pbldev.io/)
has many subgroups organized under topic channels. You need to sign up for the Slack service and request to be added to the Slack Pebble developer team, but it's easy and free. And very informative.
* _Facebook:_ Pebble maintains a Facebook presence at [https://www.facebook.com/getpebble](https://www.facebook.com/getpebble)
. There is also a group of Pebble users that contribute to the Pebble Junkies group at [https://www.facebook.com/groups/pebble.junkies](https://www.facebook.com/groups/pebble.junkies/)
.
results matching ""
===================
No results matching ""
======================
---
# Chapter 13: Storage Classes and Qualifiers · Learning C with Pebble
[Powered by **GitBook**](https://www.gitbook.com/?utm_source=public_site_legacy&utm_medium=referral&utm_campaign=trademark&utm_term=pebble&utm_content=powered_by)
[](https://pebble.gitbooks.io/learning-c-with-pebble/content/chapter13.html#)
[](https://pebble.gitbooks.io/learning-c-with-pebble/content/chapter13.html#)
FacebookGoogle+TwitterWeiboInstapaper
[](https://pebble.gitbooks.io/learning-c-with-pebble/content/chapter13.html#)
[](https://pebble.gitbooks.io/learning-c-with-pebble/content/chapter13.html#)
[](https://pebble.gitbooks.io/learning-c-with-pebble/content/chapter13.html#)
AA
SerifSans
WhiteSepiaNight
[Chapter 13: Storage Classes and Qualifiers](https://pebble.gitbooks.io/learning-c-with-pebble/content/)
=========================================================================================================
Chapter 13: Storage Classes and Qualifiers
==========================================
We have seen that storage in C takes the form of variables declared in C programs. Over the lifetime of a C program, the specific locations that variables are declared and where they are referenced in a program will determine where they are stored in memory and how long they exist. This "lifetime" of variable storage is something that can be controlled by a programmer.
This chapter will discuss storage and ways to control how storage is implemented for programs. This control will take the form of special types of declaration syntax that will describe how storage is to be used. We will be describing two types of syntax: _storage classes_ and _storage qualifiers_. We will be defining the differences between these and how they can be used effectively. We will conclude with a brief look at storage declarations in Pebble programs.
### The Lifetime and Accessibility of Storage
Variable storage, that is, memory usage, has a lifetime in a C program. The idea of variable lifetime goes together with the idea of variable name accessibility. We have considered this before: global variables are accessible throughout a C program; local variables are only accessible inside the block in which they are declared. It would make sense, then, for variables to be allocated only when they are accessible. Allocating memory for every variable when a program starts would be very inefficient.
In addition, program semantics demand that variables are allocated when the block in which they are declared is entered. Consider recursive functions. When a function calls itself, the newly called function instance needs a new set of variables allocated, separate from the caller's variables, even if they are the same function and have the same set of declarations.
This management of memory is achieved by the use of _activation records_ or _stack frames_. When a function is called, its declared memory requirements are allocated in a group, together with any other data items needed to run the function (for example, the place in the code to return to when the function completes). This group becomes the activation record and is pushed onto a system stack. The record at the top of the stack is always the one used for the function currently being executed. When a function calls another function, a new activation record is formed and pushed. When a function is completed its activation record is popped and the memory is reused.
Consider an integer variable declared in the outermost block of a C program. This storage will be allocated when a program begins execution and deleted when a program is terminated. This means that there is always at least one activation record pushed onto the stack, that of the outermost, global block.
Consider local variables declared inside a function's block. Part of the overhead of a function call is the creation of storage in the AR and the manipulation of the stack.
One exception to this rule is the class of dynamically allocated storage. Memory that is dynamically allocated is referenced by pointer variables that exist in an activation record. However, while these pointer variables exist in the AR, the actual memory is allocated in a different area of memory called a _heap_. Activation records are chunks of memory that are fixed in size; their size can be computed by the compiler from the source code. This means that ARs can be pushed onto the stack in fixed amounts. Dynamic memory, however, is not fixed in size; the amount of dynamic memory cannot be determined by analyzing a program's source code. Using a separate area of memory is the best way to accommodate the changing needs of dynamic memory.
Using a heap also has accessibility implications. Because the entire heap is accessible to all program code, dynamic memory is available to all parts of an application. Note, however, that, because dynamic memory is only available through pointer variables, and pointer variables have accessibility restrictions, access to dynamic memory is also restricted through access to its pointer variables.
We can control the lifetime and accessibility of variables and memory through storage classes and descriptors.
### The "auto" Storage Class
The _auto_ storage class is the storage class for all local variables. It is the default storage class for variables without an explicit storage class declared. Variables exist in the auto storage class with or without explicit declarations.
The term "auto" refers to storage that is automatically allocated when the block surrounding the variables is entered. This refers to the activation record method of variable storage.
For example, consider this example:
void collect() {
int a, b, c;
auto float x, y;
float z;
...
}
Each of these variables are local to the `collect` function and are in the auto storage class. Some are explicitly declared as "auto"; all are in the auto class. They will be automatically allocated in the function block's activation record and pushed onto the system stack while the function is executing.
### The "static" Storage Class
Variables in the _static_ storage class are allocated just before a program begins execution and are maintained throughout the lifetime of the program. While these might seem like global variables (especially when compared to the auto class), there are a few subtle differences between static and other types of variables:
* Static variables are allocated before program code is executed. Variables global to the main program are created in an activation record and pushed onto the system stack. Since static variables are allocated first, they are less restrained by memory restrictions.
* Static variables are initialized once, before program code is executed.
* Static variables exist throughout the lifetime of a program. It is possible to make local variables static; this allows them to keep their values between function calls.
The last point above needs some examination. Consider the example below:
void shout() {
static int counter = 10;
i++
printf("counter is %d\n", counter);
}
...
for (int i=0; i<5; i++) shout();
Here, the local variable `counter` is initialized _once_, even though memory space for the function `shout` is created every time it is called. The output looks like this:
counter is 11
counter is 12
counter is 13
counter is 14
counter is 15
If the "static" declaration was left off, the counter would be initialized to 10 at every call and every line would read `counter is 11`.
### The "extern" Storage Class
C programs can exist in multiple files, each of which contains code and definitions (hopefully organized to belong together). These are combined when the executable code is being generated. Sometimes, definitions that are given in one file are needed in another.
These types of declarations, those that are required but external, are declared as "extern". Such external definitions are considered global to the code being defined, while contained in the file of the declaration. Both variable and function declarations can be declared as "extern".
Consider this example:
extern int distance;
extern char *replace(char *string, char *original, char *replacement);
Here, the variable `distance` is actually declared in an external file. This might seem like a redundant declaration; the variable is declared in two places, as an integer. However, this variable is now shared between two files: both global variables, actually sharing the same location in memory. This type of declaration is convenient for organizational purposes.
The function `replace` in the above example is given in prototype form and the `extern` keyword specifies its definition is in a separate file. Without the `extern` keyword, this prototype declaration would require the function definition to be given later in the same file. However, here the definition _is assumed_ to be in another file.
Note that the compiler _assumes_ an external definition exists in an external file, but does not check to see if it actually exists. When the executable is being built from all the files that make up the application, the linker will check to see if all definitions have been given. An error will occur at that stage if the external definitions are not given in some file.
### The "register" Storage Class
Sometimes it is useful to require that a variable be stored in a register instead of memory. This is desirable because register access is faster than memory access. Placing the keyword "register" before a declaration specifies that the variable should be stored in a register.
For example, consider this code:
register int xaxis, yaxis;
int zaxis;
Here, two variables are specified as stored in a register. The third variable is simply stored in memory.
Register declarations can seem to be very useful. However, they restrict how variables can be allocated and used.
* Variables allocated to a register can only be a large as a register, usually a single word. For example, "double" size variables cannot be allocated to registers.
* Variables allocated to registers cannot be used with a unary "&" operator. Recall that this operator gives the address in memory of storage. Variables stored in registers have no memory address.
In addition, compilers are free to ignore the "register" directive. This means that, while the above restrictions are enforced, a "register" variable _might_ be stored in a register. Or not. And a compiler might store a variable in a register _without_ the "register" request, depending on how it is used.
### The "const" Storage Qualifier
The "const" keyword in declarations does not declare a storage class, but rather a way to use the declared variable. If a variable is declared with the "const" keyword, it can be assigned a value _once_, in the declaration, and it cannot be changed again.
Consider this example:
const int distance = 532;
const float pi = 3.14159;
distance = 561;
Here we have two constants, initialized once. Any further attempt to change the value of these variables will result in a compiler error. The last line will be trapped by the compiler with the error below:
../src/test.c:51:5: error: assignment of read-only variable 'distance'
Note that program code can change variable values in subtle and unexpected ways and these are also prevented by "const" declarations. Assignment statements are obvious ways that variable can change values and these statements would not be allowed. Variables can also change values through memory references. Consider the following declarations:
const int distance = 10;
int *dist = &distance;
*dist = 15;
The compiler will not allow the pointer to address constant memory. It give an error on the above code at the pointer delcaration:
../src/test.c:47:17: error: initialization discards 'const' qualifier from pointer target type [-Werror]
The "const" keyword is also useful in function parameter declaration. When used with parameter declaration, it specifies that the parameter may not be changed. This may seem superfluous, since C uses call-by-value semantics to pass parameters. However, it is especially useful for pointers in parameter lists; this use says that the memory referenced by the pointer cannot be changed.
Consider this example:
void load_memory(const char *location, char *mem) { ... }
Let's assume this function uses the value of `location` to find data that it loads into the memory pointed to by `mem`. We could call this function like this:
char *loc = "details.txt";
load_memory(loc, memory);
But we could also call this function like this:
load_memory("details.txt", memory);
Using "const" in the parameter declaration guarantees no changes to the memory pointed to by the first parameter. This means we can use a string literal as the first parameter. If we removed the "const" declarator, we could only call this function using the first method, because we could not guarantee that changes to memory would not occur.
Using "const" helps the developer to avoid accidental side effects, that is, changing a parameter by accident. This keyword also lets the compiler make optimizations, storing constant variables as literals in a table rather than in memory. It is generally encouraged that parameters be declared as "const" whenever possible.
### The "volatile" Storage Qualifier
The "volatile" keyword is a qualifier that, like "const", is used when a variable is declared. It tells the compiler that the value of the variable may change at any time. This may seem obvious, we are declaring a _variable_ after all, but this keyword implies that changes may happen _at any time_, even outside code that finds this variable accessible.
This situation occurs when the program being compiled interfaces with the hardware of the computer. Often, when these kinds of interfaces occur, the system connects memory/variable storage to a register that represents a device interface. When that device has data that a program needs, it moves that data to the connected register, which shows up to the program as a variable that has the same value as that register.
The compiler uses information of the volatility of data to _not_ optimize or check variables. When a compiler optimizes code, it can change the order of statements or remove variable storage altogether if these changes do not affect the outcome of the code. If a variable's value is changed by the device data rather than the code being compiled, such optimization should not be done. Declaring such a variable as "volatile" will inform the compiler to treat the variable as special and not optimize code around it.
Let's take a simple example. Consider this code:
int flag = 0;
while (flag == 0) { ... }
If we assume that the `flag` variable is not changed by the code of the while loop, the compiler will likely remove the equality check, replacing it with a simple `while (true) { ... }` substitute. If, however, `flag` was tied to some hardware register that changes outside the control of the program, removing the equality check would not be recommended. Instead, we should change the `flag` declaraion:
volatile int flag = 0;
while (flag == 0) { ... }
Now the compiler will leave the equality check alone and it will behave as we expect.
### The "**attribute**" Qualifier of GNU C
Pebble SDKs use the GNU C compiler (GCC) to compile code for its smartwatches. The GCC recognizes a keyword that serves to instruct the compiler about how to generate code about storage structures. While this is unique to the GCC, it fits in this chapter because it is focused on storage.
The "**attribute**" keyword instructs the compiler to manipulate types in specific ways. The keyword is followed by an attribute specification inside double parentheses. There are many attributes, even special ones that apply only to specific CPU architectures.
In the Pebble SDK, the attribute that is used most often is "**packed**". The "**packed**" attribute specifies that each member (other than zero-width, padding, bit fields) of the structure or union being declared is placed to minimize the memory required. This means no padding is inserted by the compiler to fit better in memory (such as aligning with memory words). This can be used with an with a declaration; it then indicates that the smallest usable type should be used for values.
For example, the next chapter will consider data from the accelerometer sensor. That data is structured with the `AccelRawData` struct, shown below:
typedef struct __attribute__((__packed__)) {
int16_t x;
int16_t y;
int16_t z;
} AccelRawData;
By specifying the structure is "**packed**", the designer means to have these data items placed directly next to each other in memory, even in the same memory word. The compiler might decide to place each of these 16-bit items in their own 32-bit memory space, but the "**packed**" attribute stipulates that these items be packed together as tightly as possible. In this case, it is likely they will end up in 2 memory words.
There is a tradeoff between memory and performance when using packed structures. Access to data is faster when data is aligned on word boundaries in memory. Packed structures are not aligned on word boundaries; they are packed tightly and can be stored in any byte in memory. This means that packed structures that are not on word boundaries will take longer to access. Packed structures save space but suffer from performance degradation.
### Storage Designators in Pebble Smartwatch Programs
There are some storage classes and qualifiers that are common in Pebble Smartwatch programs.
Much of the storage in Pebble programs fall into the "auto" storage class. Most storage does not need special consideration or handling.
In most Pebble programs, you will see is that many global definitions of Pebble system structures are declared as "static". Static variables declared in one file are not accessible to other files; this allows developers to limit access to variables and create "private" variables and functions in specific files. A great example of this is when developers split windows into separate files. This is an important feature supporting modular code.
Looking at the declaration of system data structures, you will see that most are declared with a "**packed**" attribute. As an example, consider the `AccelRawData` structure in the previous section. Packing data structures makes sense since it is best to be as efficient with memory as possible, which means leaving as little space unused as possible.
Larger Pebble programs can be nicely organized into a set of files, necessitating the use of the "extern" storage class. Developers also use ".h" files to describe their code's data and functions. This allows code to be organized into files focused on functionality. By sharing data this way, static declarations can be used to keep data private and local.
results matching ""
===================
No results matching ""
======================
---
# Chapter 7: Arrays · Learning C with Pebble
[Powered by **GitBook**](https://www.gitbook.com/?utm_source=public_site_legacy&utm_medium=referral&utm_campaign=trademark&utm_term=pebble&utm_content=powered_by)
[](https://pebble.gitbooks.io/learning-c-with-pebble/content/chapter07.html#)
[](https://pebble.gitbooks.io/learning-c-with-pebble/content/chapter07.html#)
FacebookGoogle+TwitterWeiboInstapaper
[](https://pebble.gitbooks.io/learning-c-with-pebble/content/chapter07.html#)
[](https://pebble.gitbooks.io/learning-c-with-pebble/content/chapter07.html#)
[](https://pebble.gitbooks.io/learning-c-with-pebble/content/chapter07.html#)
AA
SerifSans
WhiteSepiaNight
[Chapter 7: Arrays](https://pebble.gitbooks.io/learning-c-with-pebble/content/)
================================================================================
Chapter 7: Arrays
=================
At this point in this book, we have discussed data as scalar data types. There are many applications that require data to be structured. Data items are grouped with other similar data items to form a _collection_ or _aggregate_ of items. C supports two such collections: arrays and structs. We will handle arrays in this chapter and structs in Chapter 9.
### Array Basics
Arrays are collections of data where each data item is identical and arranged in a sequence so that they can be referenced with integers. Arrays in C start at 0 and, once declared, are fixed in length.
Arrays in C are declared like this:
_data\_type_ _array\_name_\[_length_\]
For example, consider this declaration:
int arr[10];
This declares an array of 10 integers, stored adjacent to each other in memory.
Once declared, individual data items can be referenced by their position in the collection. References are formed from the array name with the position number in square brackets. The first element in the array collection always starts at position 0. For example, we can reference items from the above array as
arr[3] = 12;
Here, the fourth element of the collection is assigned the value `12`.
Array references are just like variable references, except the memory word used is _calculated_ from the index given in the reference. These references work well:
miles = arr[1] * arr[3];
x = 6;
arr[x] = 15;
arr[x + 2] = arr[x-3] -4;
These references may look somewhat random or arbitrary, but the real genius of arrays comes in the ability to calculate an array reference, especially when we use array references in a for loop with a loop index. For example, consider this code to compute a summation:
for (int i=0; i<10; i++) sum += arr[i];
You can't do that with regular scalar variable names.
The biggest danger with arrays is that an array reference might select an item from the array that's beyond the boundaries of the array. This type of error is called an _out of bounds_ reference. For example, given the declaration above, the boundaries of the array are from index 0 to index 9. Referencing index 10 would be an error, because it would be outside those boundaries.
> **Complications With Out of Bounds References**
>
> You might expect that when an error occurs when running a program, the runtime system would likely stop with an error message. However, even though it's an error to reference arrays outside their boundaries, C will usually allow this _without_ an error message.
>
> Technically, the standard for the C language specifies out of bounds references as "undefined behavior," which means compilers can handle these any way they want. The reality is that an out of bounds reference will access memory outside of the memory allocated for the array. It will either access other variables in the program or it will access memory from protected areas, like memory dedicated to other running programs. In the former case, such a reference constitutes a bug, changing memory in unintended ways. In the latter case, the program will likely crash.
>
> For a further explanation on YouTube, [follow this link.](https://www.youtube.com/watch?v=ucQI5HpiFrI&t=42m47s)
Let's look at an array example that's a little more complex.
float numbers[20];
int temp;
int i, j;
for (i=0; i<20; i++) numbers[i] = rand();
for (i=0; i<19; i++)
for (j=0; j<19; j++) {
if (numbers[j] > numbers[j+1]) {
temp = numbers[j];
numbers[j] = numbers[j+1];
numbers[j+1] = temp;
}
}
}
Here, we have an array of 20 integer numbers, initialized with a for loop to have random numbers as their values. Then we use a Bubble Sort algorithm to sort the items in the array in ascending order. A Bubble Sort is really an inefficient algorithm, but it is a very nice example of array manipulation. We repeatedly go through the array, swapping adjacent array elements that are out of order.
As an algorithm, the Bubble Sort is not very good in terms of performance. However, the example above is an especially bad version of the Bubble Sort. Exercise 7.1 will ask you to make it perform better.
> **More Information on the Bubble Sort**
>
> For more information on the Bubble Sort, also known as an exchange or sinking sort, check out [the Wikipedia page on it](https://en.wikipedia.org/wiki/Bubble_sort)
> .
Notice all the array references in the Bubble Sort example. The first line declares 20 elements in an array called `numbers`. Each reference in the code is just like a variable reference. Note that the for loop is careful to stop _before_ `i` reaches 19; any further and there would be an out of bounds reference if, say, `i[19]` were to be compared to `i[20]`. Since array references start at 0, reference item 20 would be out of bounds.
### Multidimensional Arrays
We have seen that arrays are collections of identical items, arranged adjacent to each other in memory, referenced by position. We can put anything into an array. We can even have arrays of arrays; these are called two-dimensional arrays.
Two-dimensional arrays have two indicies: one to select the internal, one-dimensional array, and one to select the element from that array. Here's an example of declaring a two-dimensional array:
int arr[10][20];
Here, we have 10 arrays, each of which holds 20 integers. In general, declarations and references look like:
array\_name\[array\_number\]\[item\_number\];
Now if we were to use this to select items from the above example, we could write something like this:
x = arr[2][4] + arr[3][7];
Here, the fifth item (remember, arrays start at index 0) in the third array is added to the eighth item in the fourth array.
It's not likely, however, that you will use arrays so arbitrarily. It is more likely that you will use two-dimensional arrays as part of a larger structure, probably accessed by indicies in loops. Consider the code below, for example:
for (int i=0; i<10; i++) sum[i] = 0;
for (int i=0; i<10; i++) {
for (int j=0; j<20; j++) {
sum[i] += arr[i][j];
}
}
Here, the two loops provide a way to make a summation of the arrays declared above. Presumably, `sum` is an integer array with at least 10 items.
Two-dimensional arrays are often used as tables, structured as rows and columns. This means that a table can be declared as an array with rows of columns:
int rows = 10;
int columns = 20;
int table[rows][columns];
This means that to find the fifth column in the second row, you would access `table[1][4]`, remembering that each index starts at 0.
> **Rows of Columns or Columns of Rows**
>
> Are tables built as row of columns or columns of rows? With an array built as a table, should you select the column first, then the row, or the other way around?
>
> There has been some good discussion on this. Some people refer to the source code of the compiler. Some people pull examples from higher mathematics. Most people have a personal preference.
>
> The real truth is that it does not matter. If you reference a two-dimensional array in a consistent manner, it will work in either configuration.
If two-dimensional arrays are possible, one would think that more dimensions are possible. Three-dimensional arrays work like a collection of tables, each of which has rows and columns. A declaration like this:
int threeD[10][20][30];
declares 10 tables, each having 20 rows and 30 columns. And we could go to four and five dimensions if we wanted to. However, as the dimensions go higher, the usefulness of the array decreases dramatically.
A final note should be made on the memory requirements of multidimensional arrays. To estimate the amount of memory used by an array, multiply the indicies together. A 10 by 20 integer array holding 10 rows of 20 columns is using 200 integers. A table that size might be usable, but beware of creating tables of large arbitrary size just because you "might" need the space. A 200 by 200 floating point table contains 40,000 floats, which will likely overflow the memory allocated to a program on a Pebble watch. Only use arrays as sparingly and tightly controlled as possible and keep the amount of memory used to a minimum.
### Common Array Operations
Arrays are very useful data structures. There are several operations that are commonly done on arrays that make them so useful. Let's review some of these.
We have seen where it is useful to initialize variables before we use them. We have mentioned how it would be a mistake to assume that variable values are automatically initialized to 0. The same is true for arrays.
Arrays are commonly initialized with for loops. Since we know the starting index of arrays and the size of an array (from the declaration), for loops are a great choice for iterating over all array elements to initialize them. For example, we could initialize our two-dimensional table from the above example this way:
for (int i=0; i **Deriving Array Length**
>
> Deriving an array's length can be a useful operation. It can help a program make decisions about arrays and can help a program to keep references inside the array's boundaries. It is true that you cannot derive the number of array elements that hold initialized values. However, you _can_ derive the total allocated length of an array by computing `sizeof(array) / sizeof(data_type)`: the total allocated memory space divided by the size of the data type of each array element.
### Arrays as Function Parameters
Arrays can be passed as parameters to functions. There are three ways to declare an array as a formal parameter in a function.
The first way is _as a sized array_. You include all parts of a "regular" array declaration in the function header, like so:
int func(int param[10]) {...}
This is the most restricted way to declare a parameter. The actual parameter must be an integer array and must only have 10 elements declared for it.
The second way to declare an array as a function parameter is _as an unsized array_. This is just like the last method, except the number of array element is left out. Here's an example:
int func(int param[]) {...}
This method will allow any array declared to have any number of integer elements.
Let's consider a bigger example. Let's assume we have a main function that looks like this:
void main() {
int numbers[6] = {10, 20, 1, 5, 19, 50};
float average;
average = computeAverage(numbers, 6);
printf("Average of these values is %f\n", average);
}
This code assumes that a function called `computeAverage` exists and takes an array with an array size as parameters. Note we have to send the number of valid elements (`asize`) along with array because, as we stated previously, we cannot derive that number from the array itself. We can define the function using either method above. Here it is with a sized array as a parameter:
float computeAverage(int nums[6], int asize) {
float sum = 0.0;
for (int i=0; i **What About Arrays with Out Of Bounds Sizes?**
>
> If you declare an array in the parameters of a function, and that array is declared to have a size, then the compiler can check if the arrays used as actual parameters fit that size. Out of bounds actual parameters are errors, right?
>
> You might think so, but earlier in this chapter, we discussed out of bounds references. They are not caught by the compiler and might work in the runtime system. It is actually up to the compiler writers whether this type of error is flagged and, in many compilers, it is not.
There is one more way to declare an array as a function parameter. As a preview for the next chapter, we could declare the array as a _pointer_ to an integer in memory. This would look like:
int func(int *param) {...}
As we will deal with this in the next chapter, we won't say any more about this method here.
### Project Exercises
#### Project 7.1
Consider the Bubble Sort example from the beginning of this chapter. [Get the example code into CloudPebble by clicking this link.](https://cloudpebble.net/ide/import/github/learning-c-with-pebble/project-7-1)
We mentioned how the Bubble Sort works, but here's a reminder. The algorithm examines each element in an array and compares that element to the next one. If the elements are out of order, that is, the first is greater than the second, the algorithm swaps the two array elements. The basic version of the algorithm makes a pass over the entire array for every element in the array. This can be extremely inefficient, because so many passes are often not necessary. For example, if the array was sorted to begin with, each element would be examined, but no swapping would take place.
There are at least three ways to make the algorithm perform better.
* One way still uses two for loops, but assumes the first part of the array is sorted and adjusts the index of the second loop accordingly for every pass through the first loop.
* A second way uses a while loop as the outside loop, looping until a boolean variable (`sorted`) is `true`. In this method, the variable set to `true` at the beginning of every pass and set to `false` whenever a swap happens.
* A third way combines these two.
Rewrite the example code to demonstrate each of these methods. Add new functions and call those function instead of `bubble_sort`.
Be sure to comment your code and leave your name on it.
[A demonstration of these methods can be found here.](https://cloudpebble.net/ide/import/github/learning-c-with-pebble/project-7-1-answer)
#### Project 7.2
This exercise revisits Project 6.2. That project, [whose answer can be found here](https://cloudpebble.net/ide/import/github/learning-c-with-pebble/project-6-2-answer)
, takes a sequence of characters in a string and considers them in groups of three, drawing 5 rows of three squares.
Starting with the result of Project 6.2, change the code to draw four numbers instead of one. The digits can be represented using these 10 string (digits 0 through 9):
| | | |
| --- | --- | --- |
| **Digit** | **Representation** | **Image** |
| 0 | 111101101101111 |  |
| 1 | 001001001001001 |  |
| 2 | 111001111100111 |  |
| 3 | 111001111001111 |  |
| 4 | 101101111001001 |  |
| 5 | 111100111001111 |  |
| 6 | 111100111101111 |  |
| 7 | 111001001001001 |  |
| 8 | 111101111101111 |  |
| 9 | 111101111001111 |  |
1. Change the single digit `char *digit = '111101111101111'` string from Project 6.2 to a 10 element array called `digit_array` that describes in 1's and 0's how to draw all the digits from 0 to 9. Because a string is just an array of characters, you can refer to each character from the string with an array reference. Therefore, changing the one string into an array of strings will actually change the structure to a two-dimensional array of characters. Set this array to be initialized with the strings above when it is declared.
2. In `canvas_update_proc`, add code to draw four random digits. Generate a random number between 0 and 9 (inclusive) by this statement:
choice = rand()%10;
To use the random number generator, you will have to add the statement `srand(time(NULL));` to the `init` function. This starts the random number generator algorithm and gives it a unique number (the current time in milliseconds) as a starting point for computing random numbers.
Call the `draw_digit` function four times to draw rand numbers at top left, top right, bottom left and bottom right corners of the screen. Note that you can compute where the X coordinate of the top left using this:
s_main_window_center.x-digit_width-(tile_size/2)
In a similar fashion, the Y coordinate can be computing as
s_main_window_center.y-digit_height-(tile_size/2)
We will leave you to figure out where the other three digits are to be placed.
As an extra challenge, add code to regenerate the random numbers by making the `s_canvas_layer` dirty when the middle button is pressed. (This is really not that big of a challenge; see Project Exercise 7.3 to figure this out.)
We will get to strings in all their glory in Chapter 9.
Comment your code and claim it.
[You can find an answer here.](https://cloudpebble.net/ide/import/github/learning-c-with-pebble/project-7-2-answer)
#### Project 7.3
[Take look at the starter code for Project 7.3.](https://cloudpebble.net/ide/import/github/learning-c-with-pebble/project-7-3)
This code generates a maze in the two-dimensional array called `maze`. This array is an array of boolean values. If a value in the (x,y) position in the array is `true`, then there is a wall at that (x,y) coordinate. If the value is false, then the space at the (x,y) coordinate is open. Consider this maze:
* * *

**Figure 7.1:** An example maze.
* * *
The first value at position at `(0,0)` is false; the value at the position to the right is true. Mazes always begin at `(0,0)` and end in the bottom right corner at `(MAZE_WIDTH, MAZE_HEIGHT)`.
Have a look at the `generate_maze` function. Using a a random number generator, this function goes through the maze in a recursive manner, randomly setting paths. Because clearing the maze sets all values to true (with a wall), this function wanders through the maze, setting a clear (false) path from beginning to end, with some dead ends in-between.
This project ask you to do three things. These things are connected to the button on the watch.
1. **Draw the maze on the Pebble screen.** The bottom button is connected to the code that (a) clears any solution that has been generated, (b) clears the maze on the screen, and (c) generates a new maze. Then it flags the maze and solution layers as "dirty", that is, in need of update. This means that the function `maze_layer_update` will be called. Find this function and add code to replace the comment:
// [Put your maze drawing code here]
That code should check each row and column, from `(0,0)` to `(MAZE_WIDTH, MAZE_HEIGHT)`, and draw a rectangle in each spot. The code below should be useful:
graphics_context_set_fill_color(ctx, maze[x][y] ? GColorWhite : GColorBlack);
cell = GRect((x * CELL_SIZE), (y * CELL_SIZE), CELL_SIZE, CELL_SIZE);
graphics_fill_rect(ctx, cell, 0, GCornerNone);
This code puts a white or black rectangle at the coordinate (x,y), depending on the boolean value in `maze[x][y]`.
2. **Solve the maze.** The select (middle) button is connected to code that generates a solution to the currently generated maze and draws the solution. Find the function `solve_maze`. Generate a solution to the current maze by adding code to replace the comment
// [Put your maze solving code here]
To help you think about how to design a way to solve the maze, look at the the `generate_maze` function. This function sets up the `maze` array in a recursive manner, using the `can_go` function to determine if a move is possible in a certain direction. Your solution should be patterned like this, but now you will be changing the array called `solved_maze`. A true value in an array variable means a solved position along the solution path and a false value means an open position.
3. **Draw the solution on the Pebble screen.** The solution is drawn in the code by calling the function named `solution_layer_update`. Fill in this code to draw the solution contained in the `solved_maze` array. Like with the `maze_layer_update` function, your code should go through the array's values, but now only draw a red rectangle if the corresponding square in your solution is `true`. Pattern your drawing using the code above and the color `GColorRed`.
Comment the code, especially the functions that implement the solution.
[An answer can be found here.](https://cloudpebble.net/ide/import/github/learning-c-with-pebble/project-7-3-answer)
results matching ""
===================
No results matching ""
======================
---
# Chapter 9: Strings · Learning C with Pebble
[Powered by **GitBook**](https://www.gitbook.com/?utm_source=public_site_legacy&utm_medium=referral&utm_campaign=trademark&utm_term=pebble&utm_content=powered_by)
[](https://pebble.gitbooks.io/learning-c-with-pebble/content/chapter09.html#)
[](https://pebble.gitbooks.io/learning-c-with-pebble/content/chapter09.html#)
FacebookGoogle+TwitterWeiboInstapaper
[](https://pebble.gitbooks.io/learning-c-with-pebble/content/chapter09.html#)
[](https://pebble.gitbooks.io/learning-c-with-pebble/content/chapter09.html#)
[](https://pebble.gitbooks.io/learning-c-with-pebble/content/chapter09.html#)
AA
SerifSans
WhiteSepiaNight
[Chapter 9: Strings](https://pebble.gitbooks.io/learning-c-with-pebble/content/)
=================================================================================
Chapter 9: Strings
==================
Of all the structures in the C programming language, strings are perhaps the most paradoxical. They are extremely useful, yet their use can lead to of most convoluted code in C. They are necessary for writing programs, but using them can be extremely annoying. They are conceptually easy and practically difficult.
This chapter will work through the ease and the difficulty that strings represent. We will start off with the easy part: the idea and usefulness of strings. And we will end with the difficult part: the messy code that using strings can generate.
### The Basics of Strings
Strings are simply sequences of characters. The word "sequence" should remind you that arrays are sequences of identically typed elements. Therefore, we can think of strings as arrays of characters.
String literals are sequences of characters, surrounded by double quotes. For example:
"Hello, World!"
"Nice to see you."
"Tea. Earl Grey. Hot!"
These are all string literals. In C, unlike some languages, the quotes are not interchangeable. Single quotes are used to depict single character literals, not strings. Strings require double quotes.
### Strings are Arrays and Pointers
As we stated above, we can think of strings as arrays of characters. In fact, there is no "string" data type in C; we declare strings exactly as we would declare an array of characters. For example,
char title[40];
This declares an array that contains 40 characters, which can also be treated as a string with 40 characters.
Since strings are arrays, we can initialize strings the same way we initialize strings. For example,
char title[40] =
{ 'E', 'n', 'c', 'o', 'u', 'n', 't', 'e', 'r', ' ',
'a', 't', ' ', 'F', 'a', 'r', 'p', 'o', 'i', 'n', 't' };
char registry[10] = { 'N', 'C', 'C', '-', '1', '7', '0', '1' };
This will initialize the character array `title` to contain the string `Encounter at Farpoint` and the character array `registry` to contain the string `NCC-1701`. Note that, in the last declaration, numbers can be characters (here, for example, the character '1' has the integer value `49`, not actually `1`).
While this method of initializing works, it's pretty tedious. C also allows a more convenient initialization of strings:
char title[40] = "Encounter at Farpoint";
From Chapter 8, we know that array and pointer notation is are interchangeable. So strings can also be manipulated by pointer notation as well as by array notation. We can do the following:
char quote[40] = "Make it ";
char *select = quote;
select += 8;
*select = 's';
*(select + 1) = 'o';
*(select + 2) = '!';
*(select + 3) = '\0';
select = quote;
It should be clear that we can manipulate strings using array and pointer notation in ways to which we are, by now, accustomed. Note as well the last line, which places a null character marker at the end of the copied string. We will examine such terminators in the next section.
One warning needs to be made about string assignment. We can initialize strings, but we cannot assign strings through the assignment operator. Consider this code:
char quote[40] = "Make it so";
quote = "Engage!";
The first line works because it is an initialization within a declaration. The second line is an error, because we cannot assign arrays to each other. To make assignment of strings work, you must _copy_ one string to another character-by-character. There are functions that we can use for this; see the "String Functions" section below for description of string copy functions we can use to interact with strings.
Finally, remember from Chapter 7 that we can use _unsized_ arrays. With strings, that makes sense because the compiler can figure out the size of the array from the initialization. So, we can see this in this example:
char another[] = "Engage!";
Here, the `another` array would be implicitly declared to be 8 characters long (to include the null terminator symbol, see the next section).
### Strings are Null Terminated
If we are going to work with a string, we are going to have to know the length of a string. In C, even though we use arrays of a fixed length for strings, the length of the array represents a _maximum_ length. The string stored in an array may be shorter than the full length of the array. We can't actually encode the length of a string into the string itself, so we place a marker at the _end_ of a string. By knowing what the marker looks like, we can count the characters in a string and compute its length.
In C, strings are terminated by a character whose integer value is 0, called the "null" character.
This is a judicious choice for a termination character. Consider how array initializations are made. When we initialize a string with a value shorter then the full size of an array, like with `title` in the example above, C semantics dictate that the remainder of the array is initialized to the value 0. This is convenient, and makes all the string examples we have given automatically terminated with a null character. Even the pointer manipulation example produces a correct string because the part of the string array not initialized or changed is a collection of 0 values, terminating whatever string is created.
This choice for a termination character also makes certain computations about strings very easy. Consider how we could compute the size of an array:
int size = 0;
while (!title[size]) {
size++;
}
Eventually, `title[size]` will have the value 0 when the computation is at the end of the string. With pointers, we can abbreviate this code to
int size = 0;
for (select = title; *select; size++,select++);
This is a computation done by the `strlen` function to compute the length of strings; this function will be looked at in the "String Functions" section below.
Using a null character for termination also means that we have to be careful when manipulating the array of characters that makes up a string. For example, we can truncate a string easily, almost by accident, this way:
char title[40] = "Encounter at Farpoint";
title[9] = '\0';
Now the string contained in the array `title` has the value "Encounter" because it is terminated by a value of 0 in the character position after the "r". There are actually 2 strings now in the `title` array, each terminated with a 0 value.
We also have to be careful about filling the array up to capacity; we have to remember that the last character must have the value 0. This mean, for example, that a string stored in an array of size 40 can only be maximally 39 characters long.
> **Strings are Not Objects**
>
> It's important to emphasize here that strings in C are just character arrays. In other languages, they are specialized datatypes or data objects. In Java, for instance, a "String" is a built-in class and, once assigned, you can work with objects from that class in many built-in ways. Length is determined by calling a function built into the class; various functions are also built-in: concatenation, reverse, up- and lower-casing.
>
> In C, all we have is a character array, with the string terminated with a null character. We have to compute the size and do operations like concatenation and reverse by manipulating the characters in the actual array. The next section details functions that do this computation and manipulation.
### String Functions
C provides a number of functions that work with strings. They are provided in a library of standard C functions that can be used from any program.
One of the most common functions is a string copy. Let's say you have two strings, declared as below:
char quote1[60] = "I will take your word for it. This is very amusing.";
char quote2[60];
As we have noted before, simply assigning one array to the other will not copy the contents, but, instead, make both arrays work with the same data. To make a copy, we must copy each individual character from one array to the other. Again, the choice of a 0 value was a judicious choice to terminate a string, because we can have code like this:
int i = 0;
while (quote1[i] != '\0') {
quote2[i] = quote1[i];
i++;
}
This is rather clunky, but it copies each character from `quote1` to `quote2` until the code reaches the terminator. However, the terminator is _not_ copied, so this is not correct. We can condense this code, and make it correct, in the following way:
char *ptr = quote2;
while(*quote2++=*quote1++);
quote2 = ptr;
Here, we use pointer dereferencing and pointer arithmetic to copy the strings. It's more cryptic than you might normally use and it uses operations we have advised against before, but it works.
We could have just used the `strcpy` function. The prototype for this function looks like:
void strcpy(char *dest, char *src);
And we could have used it with our example as follows:
strcpy(quote2, quote1);
That looks a little simpler to use. Note that `strcpy` works with string literals as well. Outside of initialization in declaration, we cannot use assignment to set up strings. We need something like this:
strcpy(quote2, "Tell him he is a pretty cat.");
There are several other common functions that are very useful.
* `size_t strlen(char *string);`
This function counts the number of characters in a string, without the terminator, thus returning its length. `strlen(quote1)` returns 51. Note that the "size\_t" data type is equivalent to an unsigned integer data type (which, in this case, is more accurate, because lengths cannot be negative).
* `char *strcat(char *string1, char *string2);`
This function returns a new string that contains the contents of `string1` concatenated with the contents of `string2`. Consider this example:
char day1[40] = "I would be chasing an untamed ";
char day2[20] = "ornithoid without cause.";
char *days = strcat(day1, day2);
This would give `days` the value "I would be chasing an untamed ornithoid without cause.", describing a wild goose chase.
* `int strcmp(char *string1, char *string2)`
This function compares `string1` to `string2` lexicographically, that is, alphabetically. and returns an integer: -1 if `string1` alphabetically precedes `string2`; 0 if `string1` is equal to `string2`; and 1 if `string1` alphabetically follows `string2`.
There are "n" versions of these functions: `strncpy`, `strncat`, and `strncmp`. These "n" versions take an extra integer as the last parameter and work for a maximum of the number of characters in the value of this parameter. For example,
char reg1[10] = "1701 C";
char reg2[20] = "1701 E";
int cmp = strncmp(reg1, reg2, 4);
In this code, `cmp` would have value 0, because the first 4 characters of each string are the same. Note that if the length of each string's contents are less than the length given in the function, the functions work like you would expect. Calling `strncmp(reg1, reg2, 15)` would have returned `-1`.
> **Safe String Functions**
>
> The "n" versions of string function are the _safe versions_ of string functions. In fact, since you have a choice of which string functions to use, you should always use these "n" versions.
>
> This is especially true when you are working with strings of unequal length. Copying a string of, say, length 20 into a string of length 10 will overflow the buffer of the destination string, likely causing bad program consequences and not copying the terminator symbol. Using `strncpy` allows the programmer to specify the length of destination string as the number of characters to copy, thus safely copying characters and correctly terminating the destination.
>
> Unsafe functions are included in the Pebble C library for completeness, but you are highly encouraged to use the safer "n" versions of string functions.
There are several other functions in the C string library that work with strings. [Here is a good listing link to check them out.](http://www.cplusplus.com/reference/cstring/)
. While this is a reference to C++, the list of C functions is identical.
### Common Pitfalls with Strings
Because strings are closely related to both arrays and pointers, we have to be careful when handling them. There are many ways to fall down when using strings. Here are a few bits to guide your string handling.
* Beware accidentally handling the null character. Placing a 0 value in the middle of a string will truncate it.
* Because strings are character arrays, you have to be careful with boundaries. When you work with string values rather than individual characters and indexes, it's easy to make out of bounds references. For example:
char data[40] = "The need for more research is clearly indicated.";
This reference will overflow the boundaries of the `data` array, because the string is longer than 40 characters. However, because of the way C works with out-of-bounds references, it is not defined how this overflow will affect program code and/or other variables. Note that this is also a great place to use unsized array declarations: declaring `char data[] ...` would permit us not to bother counting characters.
* Be aware that using `strncpy` to copy fixed numbers of characters may not work as expected. If the destination string is not as long as the source string, this function will fill the destination, but will not terminate the string with the null character terminator. If you are routinely working with strings of differing lengths, use `strncpy`, but explicitly assign the last character of the destination with the NULL terminator.
* Be aware that calling string functions typically analyzes each string array for every call. This means that code like this: for (int i=0; i" sequence. Consider this example, given the declaration above:
strcpy(newapp->appname, "shockster");
newapp->cost = 1.00;
newapp->when_purchased = 1470139200;
newapp->days_used = 15;
The pointer notation works as well as the dot notation. Each allows access to the data items of the struct.
When the application is done with the space allocated, it should free up the space for use later. This is especially useful on a Pebble smartwatch, since memory used for each application is restricted.
free(newapp);
> **Orthogonal Notation**
>
> Given the penchant for C to allow crazy notations, you can combine the ideas of the "&" operator and pointer notation for structs. You can to this, using the declarations of `watchapp4` above:
>
> (&watchapp4)->cost = 1.00;
>
>
> Note the use of the parentheses to make sure the pointer notation is associated with the result of the "&" operator.
>
> This is an example of _orthogonal_ design. Orthogonal design is design of language features that are independent and can be used together when they cross at useful points. So the design of "&" operator, pointer variables and pointer notation of structs are orthogonal to each other. They work independently of each other, but can be useful when they cross, as above.
#### Initializing Structs
Just like we have special syntax for initializing arrays as we declare them, we can also use syntax to initialize structs as they are being declared.
The syntax for initialization is similiar to that used for arrays. We can use bracket notation like this:
struct app_props myapp = { "zapme", 2.5, 1470229200, 10 };
Each item in the struct gets a value here, organized left-to-right, top-to-bottom. Note that we can assign strings in this way like we have done before, without the need for `strcpy`.
Nested structures also work with initializing syntax. Consider the `new_app_props` declaration above. We could initialize a declaration this way:
struct new_app_props myapp2 = { { "Miguel", "Rodriguez"}, {"zapme", 2.5, 1470229200, 10 } };
This syntax assumes that _every_ element of a struct is to be initialized. Partial initialization is also possible. To initialize only a segment of a struct, you should reference the data items directly with dot notation or you can initialize nested elements completely. Consider this example:
struct new_app_props myapp3 = { { "Ester", "Williams" } };
In this case, the remainder of the `myapp3` struct will be initialized to "intuitive" values, that is, zeroes and blank strings. In the above example, `myapp3.props.appname` will be blank, `myapp3.props.cost` will have the value `0.0`, and `myapp3.props.when_purchased` and `myapp3.props.days_used` will both have the value `0`.
Consider this declaration:
struct new_app_props myapp4 = {
.owner = {"Ester", "Williams"},
.props.cost=4.3
};
In this example, we used dot notation to reference parts of the struct. Since we are already in the context of a declaration of the struct `new_app_props`, we can use partial dot notation. `.owner` references that part of the struct being declared. In this example, `myapp4.props.appname` will be blank and `myapp4.props.when_purchased` and `myapp4.props.days_used` will both have the value `0`. `myapp4.props.cost` will have the value 4.3.
#### Passing Structs as Parameters to Functions
Using structs is a convenient way to package data together. However, structs can be very inconvenient when they get to be large collections. Using structs as parameters to function must be done with some care, especially when passing large structs.
As we mentioned before, when specifying structs as parameters to function, it's important to remember that the type name of a struct parameter includes the word "struct" and the struct name. For example:
void listprops (struct app_props props) { ... }
This declaration needs a struct as an actual parameter, which gets copied to the formal struct parameter `props`.
Remember that parameters in C are passed either by copy or by reference. So when we note that the actual struct parameter is _copied_ to the formal struct parameter, an actual copy takes place. In the case of our example, the size of a `struct app_props` data type is _only_ 40 bytes (as counted by `sizeof`), but even 40 bytes can take up more precious time that we want to devote to other parts of an app's execution. Further note that the data of the struct is copied, but if that data is an address (like a pointer), that address will be also. So if pointers are included in a struct, those pointers are passed along and remain pointers to allocated data.
To avoid copying structs to function parameters, it is best to use pass-by-reference when passing struct parameters. We can retool the definition of `listprops` above to enforce passing by reference:
void listprops (struct app_props *props) { ... }
Now, references can be quickly passed from actual parameter to formal parameter. In addition, changes can be made to the formal parameter that can be reflected back to the actual parameter of the caller.
> **Remember Side Effects**
>
> Remember back in Chapter 6, we discussed side effects of functions. Here is a great example. Passing parameters by reference allows functions to return a value _and_ change the value of a parameter. Programmers need to be very careful here, because changing a referenced value is not expected and often difficult to locate if it needs fixing.
#### Comparing Structs and Classes
Structs are often compared to classes from object-oriented languages. Many programmers have had experience in object-oriented languages and have used classes and objects. Structs are a kind of precursor to classes.
Structs are simliar to classes in several ways. Both are ways to encapsulate different kinds of data into one structure. Both constructs allow dynamic allocation of instances. Dot notation is used in both structures.
However, there are some fundamental differences between structs and classes. Structs do not contain methods as classes do, which means they cannot contain constructors or destructors. In most languages that use classes, objects are declared separately and can only be used when instantiated. In C, variables declared as structs can be used directly without being instantiated as objects. In languages that use classes, those classes encapsulate _both_ data and functions. In C, only data is allowed in a struct.
In addition, object assignment in most object-oriented languages is done using references or pointers. Passing classes as parameters is also pass-by-reference. Structs, on the other hand, are assigned by copying the contents of one variable to another. Passing structs as parameters will also copy from the source to the destination, unless the parameters are explicitly declared as pointers.
### The Basics of Unions
Unions are collections of data items, like structs, that may be of different data types. Unlike structs, the data items in a union are defined to occupy the same memory space.
Compare an integer and a character. The output of this code fragment shows the size of each.
int integer;
char character;
printf("Size of int = %d and size of char = %d\n", sizeof(int), sizeof(char));
As output from the `printf` function call, we get
Size of int = 4 and size of char = 1
Integers are 4 bytes long and characters are 1 byte. So, if we stored them in the same memory word, they would like Figure 10.1:
* * *
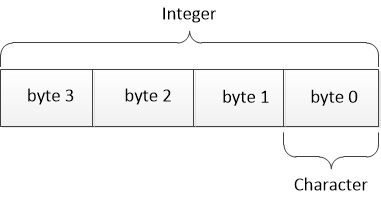
**Figure 10.1:**A Character and an Integer Stored Together
* * *
(For you hardware purists, we are just ignoring issues of endianness. Note that ARM processors are actually bi-endian. But let's just use little-endian representation.)
If we assigned `integer` to have the value 65, and we overlaid the two variables, it would look like Figure 10.2 on a Pebble smartwatch (in binary):
* * *
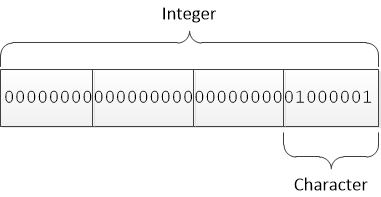
**Figure 10.2:**Character and Integer Values Stored Together
* * *
From this example, we can see that we can assign 65 to `integer` and `character` would have the value 'A'.
This is what happens with unions. Unions are declared just like structs. Consider the example below:
union example1 {
int integer;
char character;
} ex1, ex2;
In this union declaration, there are two variables, each of which are made up of an integer overlaid with a character in memory. Each variable takes up one memory word, even though there are two fields declared within it. This declaration mirrors our example above.
Using the above example, we can work with the union using dot notation as we have before.
ex1.integer = 65;
printf("Character = %c\n", ex1.character);
The output of this printf statement is the letter "A" _even though we made no assignment to that field of the union_. Because the parts occupy the same memory space, assigning a value to `ex1.integer` automatically makes an assignment to `ex.character`.
The space that is allocated for unions is space for the largest data item contained within them. For example, if an array stored in a single variable is the largest single declaration, all other fields will be stored in the space allocated for that array. Consider this code:
union example2 {
int bigarray[50];
struct inner {
char label[20];
float cost;
} in;
float computations[10];
} ex3;
There are three fields here: an integer array, a struct, and a float array. They will all occupy the same memory space. This means that the following code will make intertesting assignments to the `bigarray` field:
strcpy(ex3.in.label, "Union Fun!");
ex3.in.cost = 17.1;
int i;
for (i=0; i<49; i++) printf("int at %d = %d\n");
This code will print the following output (let's only consider the first several lines):
OUTPUT
Unions have a limited but important usefulness. They are very useful to extract information from packed data. For example, consider the format of a pixel in an image. In 32 bits, a pixel packs 4 values, depicting red, green and blue colors, and a transparency (alpha) value.
In chapter 12, we will discuss the many ways we can manipulate bits, but remembering shifting and boolean operations, we can extract the information in a pixel like this:
int pixel = get_pixel(…);
char blue = pixel & 0xFF;
char green = pixel >> 8 & 0xFF;
char red = pixel >> 16 & 0xFF;
char alpha = pixel >> 24 & 0xFF;
We could also get the same values by using a union like this:
union {
int pxl;
struct {
char blue;
char green;
char red;
char alpha;
} parts;
} pixel;
pixel.pxl = get_pixel(…);
Once a value is assigned to `pixel.pxl`, we can reference `pixel.parts.blue` or `pixel.parts.red`. We use `char` in the declarations, because it is 8 bits wide and four of them fit neatly inside an integer, splitting it into the necessary parts. In this example, if `pixel.pxl` gets a value of `0x01020A0F`, then `pixel.parts.blue` will have the value `0x0F`; `pixel.parts.green` will have the value `0x0A`; `pixel.parts.red` will have the value `0x02`; and `pixel.parts.alpha` will have the value `0x01`.
> **History of Unions**
>
> Unions go as far back as the language COBOL. COBOL was invented in 1959 and uses the `RENAMES` keyword to implement a union-type of declaration. Algol 68 also influenced the creation of unions. Despite being invented in 1971, C did not adopt unions until 1976, when it was introduced with _typedef_ and some other interesting type definitions.
>
> COBOL and Algol 68 were high level languages in which a mechanism like unions might seem out of place. Given how close some features of C come to assembly and machine language, it is appropriate to have a mechanism to easily dissect data formats and to manipulate how data is represented is.
>
> More history of the C language can be found in a paper by Dennis Ritchie, [which can be found here](https://www.bell-labs.com/usr/dmr/www/chist.html)
> .
### Using Enums
When one programs in C, integer frequently represent concepts that are not typically associated with the data type. Because of this, they are not very descriptive. For example, you could use integers to represent directions on a compass, with "1" meaning "NORTH" and "2" meaning "EAST", etc, but even if you documented this with comments, you would be likely to forget this from time to time. Connecting the value "1" to "NORTH" is just not obvious.
There are ways to make this better. One way is to use a _macro_. Macros are textual elements that can be stand for other textual elements and are expanded in C code by the C preprocessor (we will discuss all the details of the C preprocessor in Chapter 15). To work with compass directions, we could make the following definitions:
#define NORTH 0
#define EAST 1
#define SOUTH 2
#define WEST 3
This would work fairly well; we could work with these definitions in the following way:
int direction = get_compass(…);
if (direction == NORTH) {
….
}
There are still some issues with this approach. We still define a "direction" as an integer. This applies to declarations, as well as to function definitions and program code. It is still easy to forget that when a variable is defined as an integer you need to think of it in a separate context, such as a direction. In addition, because macros are replaced by the C preprocessor before the compiler gets the code, all debugging information about compass directions will be handled as integers. Finally, because macros definitions are replaced before compilation, they are, in a sense, global to the entire program and are not subject to accessibility rules.
A better way to make this kind of definition would be to create an entirely new data type. To do this, we need to define values and operations for that data type. _Enum_ types in C will take care of this quite well.
Enums are declared with the following form:
enum \[tag\] { constant\_list }
As an example, we can define our compass directions as follows:
enum Compass {
NORTH,
EAST,
SOUTH,
WEST
};
We would use this definition like this:
enum Compass direction = get_compass(...);
if (direction == NORTH) { ... }
Now we have a more descriptive, if not more verbose, declaration for `direction`. As long as the function `get_compass` returns something of the Compass enum type, this code works.
In the interest of complete disclosure, enums in C are actually integers. This should not be surprising, since many language elements are implemented with integers, and the C language design is quite transparent about these integer implementation.
So, in terms of a new data type, we have the values in an enum defined, and we have the operations to complete the data type definition. Without specific assignment, named values start at 0 and increment by 1 throughout the list. This also means that, because enums are integers, integer operations apply to them. So, while it makes very little sense, we can add "NORTH" to "EAST" and get "EAST", because `0 + 1 = 1`.
We can influence the assignment of values to our enum constants. Here is an example:
enum Months { January=10, February=20, March=100, April=200,
May, June, July, August, September, October, November,
December=1000 } calendar;
With this declaration, the constant `January` will be represented with the integer `10`, `February` with `20`, `March` with `100`, `April` with 200, `May` with `201`, `June` with `202`, `July` with `203`, etc. When there is not a specific assignment, the compiler will assign a value that is 1 greater than the previous value.
There are other limitations with enums. First, because enums are integers, they are signed. When they must work with unsigned types, enums will not work. Second, because enums are integers, the actual values assigned to enums are limited to integer values (not, for example, float or long types).
> **Enums or Macros?**
>
> Enums and macros are both useful, though neither completely defines a new data type. In general, it's better to use language contructs (such as variables or structs) than preprocessor substitution (such as macros), but in this case, there is really no clear winner.
>
> The most convincing reason to use enums over macros is readbility. It makes more sense to declare a function to take a "Compass" data type for a parameter than an "int" for the same parameter. "Compass" is simply more descriptive. However, one can use a typedef (see next section) to make typename aliases. So a macro with a typedef can be just as descriptive.
>
> An enum name can be used where type names are used. This goes along with expressiveness. Defining a parameter to a function as an "int" rather than a "Compass" will make it less expressive. However, the previous comment about using "typedef" statements applies here too.
>
> There really is no wrong answer to the "which is better" question. The choice here is really up to developer preference.
### Typedefs Make Declarations Easier
This chapter has described several ways to structure data. Each structured data method is described by a declaration, then variables are declared to have the described structure. These declarations can be a bit verbose and typedefs are here to help declarations to be more succinct.
To see how declarative verbosity gets in the way, let's reconsider the example we discussed in the struct section. We described a structure that could be used for application properties:
struct app_props {
char appname[25];
float cost;
long when_purchased;
int days_used;
} watchapp3, watchapp4;
We can use this to declare pointers to structures and to allocate memory for these structures this way:
struct app_props *props = malloc(sizeof(struct app_props));
That's a lot of repetition.
A typedef defines names that can stand in the place of other declarations, perhaps serving to reduce wordiness or to clarify syntax. A typedef looks like this
typedef type\_description substitute
Once a typedef name is defined, it can be used anywhere the _type\_definition_ could be used.
For our example above, we could use this typedef:
typedef struct app_props properties;
Using this definition, we can streamline the memory allocation like this:
properties *props = malloc(sizeof(properties));
Another reason for using typedef definitions is to ensure compatibility as software changes. If definitions change, typedefs with the appropriate "old" definition can make designs use the same declarations with newer, updated software.
For example, consider the `properties` definition above. If `app_props` were to be changed to `application_props` in a future version of the software, we only have to change the typedef definition to
typedef struct application_props properties;
This would change all references to `struct app_props` to `struct application_props` without a lot of work.
### Avoiding Structured Messes
We have seen a lot of messy programming in C. Now that we have explored structured types, we have many more opportunities to write convoluted code. Here are some tips that will help avoid messy programming with structured data types.
1. Reminder: avoid anonymous declarations. It's good to reinterate there that good solid naming conventions are essential for clear code. Use tagged structs to assist in typing and in reading code.
2. Initialize all parts of structs. We have recommended initializing variables before, but now the problem has multiplied. We now have variables with lots of parts, collected into a struct package. Make sure they all are initialized before you use them. This _especially_ applies to dynamically allocated structures (those created with a call to `malloc`). It's easy to forget to initialize them, because they are not in a declaration statement.
3. By refering to field names, you can make partial references to structures. It's best, however, to use completely qualified references whenever possible. This especially applies to initializing larger structures. It's easy to lose sight of the parts that are being initialized, so use full references to remind you.
4. Use unions _very_ sparingly. Unions have their place, but those use cases are few. As always, be obvious and clear when manipulating data.
### Project Exercises
#### Project 10.1
Let's start by creating a watchface. Recall Project 8.2: we generated random digits and drew them on the smartwatch screen. Now let's replace the random digits with the time.
Start with [the answer to Project 8.2, available here.](https://cloudpebble.net/ide/import/github/learning-c-with-pebble/project-8-2-answer)
Work through the following changes to the code.
1. In the function `canvas_update_proc`, remove the four `choice = rand()%10;` statements.
2. Locate the `main_window_load` function and add the following call to subscribe to the "tick timer", making a call to `tick_handler` every minute:
tick_timer_service_subscribe(MINUTE_UNIT, tick_handler);
3. Add the following code in `main_window_unload` to unsubscribe from the "tick timer":
tick_timer_service_unsubscribe();
4. Add `tick_handler` before `main_window_unload`:
static void tick_handler(struct tm *tick_time, TimeUnits units_changed){
layer_mark_dirty(s_canvas_layer);
}
5. Finally, in `canvas_update_proc`, add these statements before the drawing of the 4 digits to get the current time:
time_t now = time(NULL);
struct tm *t = localtime(&now);
Now, we have the time in a pointer to `struct tm`. This is a well-defined struct; [look up the contents of this structure here](https://sourceware.org/newlib/libc.html#Timefns)
. It contains many time elements; we are only concerned about the hour and the minute.
Now, make the following changes to the code:
1. Separate the tens digit and the ones digit for the hour and the minute. You will need to reference the struct elements through the pointer `t`.
2. Using the same `draw_digit` calls as the starter code, draw these digits in the right place.
Now you have a working watchface. [See the answer to this project here.](https://cloudpebble.net/ide/import/github/learning-c-with-pebble/project-10-1-answer)
**Extra Challenge:** Add a seconds indicator. Change `MINUTE_UNIT` to `SECOND_UNIT` in the call to `tick_timer_service_subscribe`. Then in `canvas_update_proc` draw a block with colors that alternatively draws and erases every other second.
#### Project 10.2
Snake is a game where a snake moves around the screen, directed by user input. The user moves the snake to eat some fruit, which causes the snake to grow. If the snake crosses the edge boundary or crosses itself, the game ends. It's a basic game most devices with good graphics will implement. It's a sort of "Hello World" for user interaction.
[Find starter code for a snake game here.](https://cloudpebble.net/ide/import/github/learning-c-with-pebble/project-10-2)
. It's based on [an original Snake game by Nick Reynolds](https://github.com/thenickreynolds/pebblesnake)
for the Pebble Classic smartwatch. Take a few moments to review the code. Run the code to make sure you know it works. Answer these questions as you review the code.
1. Notice all the lines that begin with #define. These are preprocessor statements (see Chapter 13) that define textual substitutions. How are all these #define statements used?
2. Find the structs in the code: one for `Position` and one for `Snake`. They are declared with a mix of typedef with an unnamed struct. Why do you think this declaration method was used?
3. There are no enum declarations here. Which #define statements would be suitable for an enum?
4. In many of the functions, parameters that are `Position` types are declared as pointers. Why would this be helpful (or necessary)?
Change the code in the following way.
1. Establish a direction enum to depict the values `UP`, `RIGHT`, `DOWN` and `LEFT`. You also have to change `DIRECTION_COUNT`? How does that have to be declared? Does the code have to change any further?
2. Make an enum for `CLOCKWISE` and `COUNTER_CLOCKWISE` values. Again, how much does the code need to change?
3. You are to add an "autopilot mode" to the game. When the "select" button is pressed, the game toggle between autopilot mode and regular mode. Autopilot mode means that when the snake comes up to the edge of the screen, it automatically switches positions without an error. It also grows when it hits the edge until the snake is a certain length (determine this yourself), then it resets. The up and down buttons should be ignored in autopilot mode.
[An answer to this project can be found here.](https://cloudpebble.net/ide/import/github/learning-c-with-pebble/project-10-2-answer)
**Extra Challenge #1:** In autopilot mode, the snake should not turn in one direction only. Make sure the snake turns randomly in either direction. Decide the probability of turning clockwise or counter clockwise.
**Extra Challenge #2:** In autopilot mode, the snake will eventually follow the edge of screen. Help the snake by making it turn at the fruit position as well. Make it turn toward the fruit.
[An answer to these challenges can be found here.](https://cloudpebble.net/ide/import/github/learning-c-with-pebble/project-10-2-challenges-answer)
#### Project 10.3
After Project 10.2, we have a snake that can go on autopilot. Using your knowledge of the time struct and your new snake skills, let's make a snake watchface.
Start with the answer code from Project 10.2. Change your code to make the snake _always_ work in autopilot mode. Remove any random direction turning; only turn in one direction. However, make the snake turn at the fruit position.
Draw the time on the snake's tail. You will have to add code to `tick_game()` so that the time is drawn after the tail and follows the snake. Try to keep the numbers in the proper orientation!
[An answer to this project can be found here.](https://cloudpebble.net/ide/import/github/learning-c-with-pebble/project-10-3-answer)
**Extra Challenge:** Make the time digits part of the snake's body. Use either the first squares or the last ones.
#### Project 10.4
Recall Project 8.4: the bouncing rectangle. It bounced and randomly jumped all over the Pebble screen. [You can find the answer to this project here.](https://cloudpebble.net/ide/import/github/learning-c-with-pebble/project-8-4-answer)
Locate the function `update_display`. In this function, the fill color for the rectangle is set to `GColorWhite`. You are to change this to gradually change the color of the rectangle through reds, greens, and blues. Do this in the following way:
1. Set up a union that can change colors using the Pebble definitions. [Check this link for the way color definitions are declared.](https://developer.pebble.com/docs/c/Graphics/Graphics_Types/Color_Definitions/)
2. Set up the code to reset the color to `GColorWhite` when the "select" button is pressed.
3. Every time the `update_display` is called, change the color just a bit and use this new color in the `graphics_context_set_fill_color` function.
[An answer to this project can be found here.](https://cloudpebble.net/ide/import/github/learning-c-with-pebble/project-10-4-answer)
**Extra Challenge:** Instead of computing colors here, can you use an enum and simply step through colors? Could that enum be based on the Pebble `GColor` type?
results matching ""
===================
No results matching ""
======================
---
# Chapter 11: How C Programs Execute · Learning C with Pebble
[Powered by **GitBook**](https://www.gitbook.com/?utm_source=public_site_legacy&utm_medium=referral&utm_campaign=trademark&utm_term=pebble&utm_content=powered_by)
[](https://pebble.gitbooks.io/learning-c-with-pebble/content/chapter11.html#)
[](https://pebble.gitbooks.io/learning-c-with-pebble/content/chapter11.html#)
FacebookGoogle+TwitterWeiboInstapaper
[](https://pebble.gitbooks.io/learning-c-with-pebble/content/chapter11.html#)
[](https://pebble.gitbooks.io/learning-c-with-pebble/content/chapter11.html#)
[](https://pebble.gitbooks.io/learning-c-with-pebble/content/chapter11.html#)
AA
SerifSans
WhiteSepiaNight
[Chapter 11: How C Programs Execute](https://pebble.gitbooks.io/learning-c-with-pebble/content/)
=================================================================================================
Chapter 11: How C Programs Execute
==================================
Writing a Pebble smartwatch program is only the first part of the process to getting that program to execute on a smartwatch. There are several steps to get a C program to execute and this chapter discusses each of them.
### Compilation
Let's review the development process we spelled out in Chapter 2.
* * *

**Figure 11.1:** The Development Process Again
* * *
The first three steps are from the programmer. From an idea to an algorithm to actual C code, these are steps that the computer can help with, but steps that must ultimately come from you.
Compilation is where the computer starts to take over. This is where the process of getting a Pebble app to execute really starts.
The compilation process converts the C code written by you into compiled code, or ARM machine language. The compiler used by the Pebble SDK is a version of the GNU C compiler (GCC). The compiler takes a syntactically and semantically correct C program and creates ARM machine language that correctly implements the algorithm represented by the C code. Once created, this machine language is stored in a file.
> **The Linker and Machine Language Files**
>
> Once your code is compiled, a file is generated that contains the translation of your C program to ARM machine language. If you have multiple C program files in your project, multiple machine language files, called "object files", are generated: one for each C program file. These files will have the ".o" extension.
>
> In the end, a single ARM machine language file is what is desired. The combining of object files into an ARM executable file is the job of the linker. The linker builds one file by linking all the object files together, resolving the external references into local references and adding in references to any external libraries that are needed. The result is a single file that can be loaded into memory and executed.
### App Install Package
In order to run on a Pebble smartwatch, the newly created machine language file needs a few other pieces of information. This information is bundled with the program in "PBW" format: a collection of files that gives information about the program along with resources the program needs to run.
The PBW file contains the following items in a compressed (ZIP) format.
* [A meta-data file](https://developer.pebble.com/guides/tools-and-resources/app-metadata/)
* Folders for each platform that the program can run on (e.g., "aplite" or "basalt")
* Inside platform folders:
* The machine language file for the program
* More meta-data for the program
* Resources needed to run the program: files, images, etc
If we remember that there is no permanent file system on a Pebble smartwatch, then this collection makes some sense. The PBW file contains all the information a program needs to run, in a compressed package. Each smartwatch can hold a limited number of these packages and keeps the rest on the phone connected to the smartwatch. The PBW files are transferred to the smartwatch as they are needed.
### Starting A Program
Whatever operating system you are using to run your program, executing a program means loading the machine language for that program into memory and starting execution at an _entry point_ for the program.
For programs written in C, the entry point for the code is a function called `main`. Every program must include a function called `main`, with the following prototype, somewhere in its code:
int main (int argcount, char *args[])
On a general purpose computer, where programs are typically started on a command line, programs can be started with "arguments". These are options that are given with the program invocation as part of the command. They can give direction to the program. For these programs, `argcount` will be given the number of command line arguments and the `args` array will hold the values of these arguments. The program name is typically the first argument.
On a Pebble smartwatch, arguments are not used, as apps are not started by users on a command line. For these types of execution models, there is a version of `main` that does not have any parameters (or one `void` parameter to indicate no parameters).
On a Pebble smartwatch, execution occurs in a tight, resource-limited environment. There is no real storage space other than memory. The smartwatch RAM is volatile memory that is used for apps. There is a 4Kb area assigned to each application where persistent storage needed by an program can be stored. When Pebble programs need more than 4Kb of persistent storage, the information may be persisted on the phone.
When a program begins running on a smartwatch, it runs in a separate, restricted section of RAM set aside for apps. An app has its own thread, stack, and heap. All this data exists in a section of memory reserved for app execution. When a program is launched on a Pebble smartwatch, a number of things happen:
1. Data from the currently executing app, including app thread instructions and heap data, are freed up. This includes data that the Pebble operating system is keeping for the current app.
2. The app program is loaded into its RAM section.
3. Data areas are initialized. Static variables are created and given initial values and the dynamic memory allocation area, called the heap, is initialized from what is left over in the app's memory space (after the app code and static variables are loaded into it)
4. The program's code is started by placing the address of the entry point into the CPU's program counter.
5. The operating system manages the app and enables memory protection to prevent the app from accessing memory outside of its reserved area.
On a Pebble smartwatch, the section of memory that is allocated for program execution is limited. On the Pebble Classic series of smatwatches, this area is 24 Kb; on the Pebble Time series, this area is 64 Kb. This means that all program code, variable memory, and dynamically allocated memory must fit into this area. Large programs with lots of dynamic memory needs will not work well on a Pebble smartwatch.
> **More Information on Pebble OS**
>
> If you are really interested in how Pebble OS manages threads or shares the CPU between apps and background workers, the Pebble operating system is derived from Free RTOS, an open source real time operating system. More information can be found at [http://www.freertos.org](http://www.freertos.org/)
> .
### Event Driven Programming
In our previous discussions about code execution, we have always referred to execution as _sequential_, that is, moving from statement to statement in a controlled, sequential, predictable manner. However, there are many ways that users interact with computers and programs that require a different perspective on code execution.
Consider a program for a Pebble smartwatch. While there is probably some simple code that could be done in the `main` function, most code is run as a response to _events_ that happen in real time. These events include button presses, timer expirations, windows being loaded and unloaded, and various ways we have marked a graphics layer as "dirty". _Event driven programming_ is a structured way to program, one that defines events and ways to respond to those events. When using this type of programming, there is a little setup, then control is turned over to some unseen system that listens for events and uses the program code to handle to those events. The code that defined to handle an event is called a _callback_, which in most event-managed systems is a function registered by the program as the response to a specific event.
In the main function code on a Pebble smartwatch, we usually use the following code:
int main(void) {
init();
app_event_loop();
deinit();
}
To set up a program for events, there is a small amount of initialization. This is handled by `init()` in this example, a function that is defined by the program. Likewise, there is likely a bit of clean up that should happen before a program terminates; this is handled by the function `deinit()`, defined again by the program. Between initialization and clean up is a call to `app_event_loop()`, a function that is _not_ defined by the program. This function is supplied by the system and implements an _event loop_, a segment of code that waits for events to happen and uses callbacks to take care of those events.
Initialization might include creating a window to draw in or to display some text in. There might be some random number generator seeding to do or some program variables might need initialization. Initialization will almost certainly inform the system of what events are expected and the callbacks that will handle those events.
Consider this example of an initialization function (from the snake project in Project 10.3):
static void init(void) {
window = window_create();
window_set_click_config_provider(window, click_config_provider);
layer_set_update_proc(window_get_root_layer(window), update_display);
window_stack_push(window, true);
time_t now = time(NULL);
srand(now);
reset_game();
layer_mark_dirty(window_get_root_layer(window));
}
This code creates a window and establishes an update function to be called when that window is made "dirty" (that is, when it receives graphics activity). It then pushes the newly created window onto the "window stack", which is the data structure that gets checked for events by the operating system. Then the random number generator is initialized and the snake game is reset. Finally, the code "manually" makes the graphics window dirty, firing the event that will be handled as soon as the system starts listening for events.
Clean up might include program algorithm cleanup, perhaps the freeing up of dynamically allocated memory, and will usually undo any window or graphics initialization that was done earlier. Consider the example above. Based on this initialization, clean up should be pretty simple. We created a window, so we should dispose of the window we created. Everything else here can be left alone. So the clean up code looks like this:
static void deinit(void) {
window_destroy(window);
}
### When a Program Terminates
When a program is done executing, the operating system has to do a few things. The program must be removed from the queue of executing programs and its data will be deallocated and removed from any data areas. Finally, the program must be removed from the system resource tables.
In the case of a Pebble smartwatch, most of these duties are very simple. Because there is only one program executing a time (two, if you include the background worker), there is no queue of executing programs and there are very few system tables. The code can be left in memory and memory resources, such as the heap, can be left alone in the program's old memory segment. Clean up of "old" memory usually happens when a program is placed into memory (since there is only one spot to place an executing program), so clean up is minimal.
There is one thing that a general purpose runtime system does that a Pebble smartwatch does not do. On a general purpose operating system, dynamically allocated memory can expand beyond the original memory allocated for a program. To properly reclaim this memory, freeing up dynamically allocations is a good habit to get into. On a Pebble smartwatch, the confines of the original memory segment are strict and not expandable. While freeing up dynamic memory is still a good habit, _not_ freeing up memory has very little effect on the runtime of the smartwatch system.
results matching ""
===================
No results matching ""
======================
---
# Chapter 20: Communication and Data Exchange · Learning C with Pebble
[Powered by **GitBook**](https://www.gitbook.com/?utm_source=public_site_legacy&utm_medium=referral&utm_campaign=trademark&utm_term=pebble&utm_content=powered_by)
[](https://pebble.gitbooks.io/learning-c-with-pebble/content/chapter20.html#)
[](https://pebble.gitbooks.io/learning-c-with-pebble/content/chapter20.html#)
FacebookGoogle+TwitterWeiboInstapaper
[](https://pebble.gitbooks.io/learning-c-with-pebble/content/chapter20.html#)
[](https://pebble.gitbooks.io/learning-c-with-pebble/content/chapter20.html#)
[](https://pebble.gitbooks.io/learning-c-with-pebble/content/chapter20.html#)
AA
SerifSans
WhiteSepiaNight
[Chapter 20: Communication and Data Exchange](https://pebble.gitbooks.io/learning-c-with-pebble/content/)
==========================================================================================================
iniChapter 20: Communication and Data Exchange
==============================================
One of the interesting and exciting features of a Pebble smartwatch is that it exchanges data with a phone. Through that exchange of data, many features can be implemented, including working with data from the Internet. In addition to Web pages and images, custom data exchanges can be made between apps on a phone and apps on a Pebble smartwatch.
This chapter will outline the concepts of phone-to-smartwatch communication and how that communication is implemented in C on a Pebble smartwatch. We will overview the model of the communication implemented by the Pebble SDK and we will review how to send and receive custom data objects through the Pebble SDK AppMessage system. We will include a look at communicating with large sets of data.
As with some previous chapters, this chapter is designed to introduce the concepts and programming foundation that is needed to programming Pebble smartwatch communication in C. There is a list of references to advanced features at the end of this chapter.
### General Concepts
Before digging into communication implementation on Pebble smartwatches, we need to discuss some general concepts and ideas that influence the way communication is done.
By definition, communication happens between at least two parties: a sender and a receiver. (We actually could implement multipoint communication, between a sender and multiple receivers, but that's not what we are concerned about here.) Most of the time, the sender and the receiver are different entities. In our case, the two parties are a phone and a Pebble smartwatch.
Because they are two separate entities, communication between a phone and a Pebble smartwatch is asynchronous. We cannot make any assumptions about timing of the communication between the two. Data might arrive any time and might even be dropped accidentally, through interference or some error condition on either sender or receiver. A data receiver can never assume that data will be received on time, in order, or even at all.
We have seen other asynchronous processing. For example, user interaction is asynchronous; no assumptions can be made about when buttons will be pressed. We have handled this situation in user interfaces by using event-driven programming, where callbacks are registered as event handlers and called by the operating system when events happen. We can also use event-driven programming with communication; we will handle the asynchronicity of communication by registering callbacks with the operating system. These callbacks will be called when communication events occur: for example, data arrival or data being sent.
Data is usually sent and received as a series of data items in a stream. These data items, or packets, are necessary because sending and receving a long sequence of bytes can have very bad consequences. The long time devoted to the long data stream consumes the "attention" (i.e., CPU time and memory) of both the sender and the receiver. In addition, should errors occur in the data, it is easier to correct errors when the stream is sent in pieces: you correct and resend a small piece, not the whole data stream.
Because data is sent in smaller packets, callbacks will be called often as data packets arrive. It is important, then, to understand and record the _state_ of communication. The communication state is a way to remember where we are in the process of sending and receiving data. It should be part of a program's design. This designation can change as various data are exchanged to indicate the progress of the exchange.
Communication is usually _transactional_: data is either sent or it is not. That sounds obvious, but it means that the acknowledgment of the receipt of data packets is an important action (an "ACK") and not acknowledging is also significant. The sender of data can set a timer; if the timer period expires without an ACK, it can result in a resend or in an error condition. Data communication between a phone and a Pebble will depend on these types of acknowledgements.
Finally, we should make a note about _protocols_. Protocols (from a programming perspective) are the rules and procedures used to exchange data between two parties. Protocols are easily demonstrated by watching two people who know each other approach in a hallway. There might be an exchange like this (let's assume their names are Katharine and Jon):
Katharine: "Hello Jon."
Jon: "Good morning, Katharine."
Katharine: "Are you going to be at the lunch meeting today?"
Jon: "No, I'm leaving for vacation at noon."
Katharine: "OK...enjoy!"
Jon: "See you next week."
There was a lot of data exchanged in that brief communication. But notice the protocol. There was an initial "handshake": someone started by greeting the other, and there was a response greeting. That set up the communication and implied an order of speakers. Notice that each speaker responded to what the other said (an acknowledgement) and added new information. In addition, there was a terminating exchange, after which both persons could walk away.
The above exchange is an example of how communication protocols work. There is often an initial sequence of data exchanged to establish sender/receiver relationships and to start data flowing. Then data is exchanged, often using acknowledgements to mark that data has arrived. Finally, the data exchange is terminated with a final sequence of data.
Protocols exist on many levels. It would be prudent to design a brief protocol when data is exchanged at the program level between a smartwatch app and a phone app. But there are also protocols that are implemented behind the scenes. These are designed to correctly carry the data exchange and to relay information about how that exchange is controlled. Errors and delays in exchanges are handled invisibly by these protocols. Fortunately, the Pebble communication system handles these lower level protocols for us.
### PebbleKit
Communication with a phone depends on the right software being used on the phone. The software libraries and interfaces that make the phone side of communication possible are put together in a collection called "PebbleKit". There are versions of PebbleKit for [Android](https://developer.pebble.com/guides/communication/using-pebblekit-android/)
and [iOS](https://developer.pebble.com/guides/communication/using-pebblekit-ios/)
phone operating systems as well as [Javascript](https://developer.pebble.com/guides/communication/using-pebblekit-js/)
.
It is beyond the scope of this book to walk through how each PebbleKit version works. There is good documentation at the links above. In addition, the barcode app example we discussed in Chapter 18 and used in this chapter is also an example of PebbleKit for Android.
### Sending and Receiving Data
Pebble apps send and receive data by using the Pebble AppMessage system. This way of sending and receiving data defines a packet structure (called a _dictionary_) and an event programming model as we discussed above. In this section, we will first discuss the basics of the system, examine the dictionary structure, and then look at how to receive and send data driven by events.
#### The AppMessage System
The AppMessage system is a communication system that enables an exchange of messages between a phone and a Pebble smartwarch. The system defines a data packet structure called a _dictionary_ and a protocol for exchanging those dictionaries. The AppMessage system has mechanisms for serializing, sending and reconstructing packet structures.
To use the AppMessage system, a smartwatch app must go through the following steps:
1. Signal intention to send or receive message by "opening" the AppMessage system.
2. Register callback functions that will handle AppMessage system events.
3. Wait for events, initiate sending, and handle the receipt or sending of dictionaries with callbacks.
This pattern should be familiar: it is the pattern used by the user interface event system and is typical of event-driven programing systems.
Opening the AppMessage system is done through the function `app_message_open()`. The function uses two parameters; its prototype is below:
AppMessageResult app_message_open(const uint32_t size_inbound, const uint32_t size_outbound);
The function takes two parameters, which indicate the sizes of the _inbox_ and the _outbox_. The inbox is the buffer that will be used to store incoming dictionary messages. Likewise, the outbox is the buffer that will be used to store outgoing dictionary messages.
It is important to set these sizes correctly, since messages larger than its box will be rejected. There are several ways to compute the buffer size you might need:
* You can use a minimum size set by the operating system. There are constants, called `APP_MESSAGE_INBOX_SIZE_MINIMUM` and `APP_MESSAGE_OUTBOX_SIZE_MINIMUM`, set by the Pebble SDK. Setting up a buffer using these constants will always work.
* You can ask for the maximum size that the operating system can provide by using `app_message_inbox_size_maximum()` and `app_message_outbox_size_maximum()`. These functions will provide the largest message sizes.
* You can use a convenience function to compute the size needed for an incoming or outgoing buffer. The `dict_calc_buffer_size()` function takes the number of key/value pairs and a list of sizes of value types and computes the size the buffer needs to be. The function `dict_calc_buffer_size_from_tuplets()` can also be used; see the next section for a description of tuplets.
Registering callbacks means telling the operating system which functions to call when one of several events occurs. There are four events that need callbacks:
* An event is generated when a message is received. This event's callback is registered with the function `app_message_register_inbox_received()`.
* When a message is received but dropped, an event is generated. This could happen for a number of reasons; setting a inbox too small is an example. The callback for this event is registered with `app_message_register_inbox_dropped()`.
* Sending a message from the outbox generates an event. The callback for this event is registered with the function `app_message_register_outbox_sent()`.
* If sending a message from the outbox fails, an event is generated. Registering for this event is done with the function `app_message_register_outbox_failed()`.
Only one callback per event may be registered; registering multiple callbacks replaces previous callbacks. Also, "registering" NULL as a callback will deregister the callback for a specific event. Calling the function `app_message_deregister_callbacks()` deregisters all callbacks.
Examples of registration and of how specific callback functions are defined will be given in the sections on sending a receiving below.
The actions of opening the AppMessage system and registering the callbacks is typically done in the initialization section of the user interface. No "closing" of the AppMessage systen is necessary.
#### Dictionaries
The AppMessage system starts with a definition of data packets called _dictionaries_. Dictionaries are a set of data, organized as key/value pairs, limited to small sizes. They are _serializations_ of data: the organization of data into packets of bytes for both sending and receiving. The AppMessage system has mechanisms for serializing and reconstructing data structures.
Dictionaries begin with a _dictionary iterator_, a structure that holds dictionary information, and a buffer that the key/value pairs of a dictionary. Dictionaries are contructed like this:
1. Declare a dictionary iterator that will be used to organize the dictionary and a buffer that will hold the serialized bytes of the dictionary.
2. Start the construction process by calling `dict_write_begin()`, specifying the iterator and the buffer.
3. Write data to the dictionary by calling "write" functions for each type of data and using the same dictionary iterator and buffer in each call.
4. End the process by calling `dict_write_end()`.
There are many "write" functions; each works with a specific C type, string, or integer array.
Consider an example. Let's say that a phone holds a list of barcodes and a smartwatch app needs to get the name of a barcode at a specific position in the list. We might build a dictionary that holds the request for the name list as follows:
#define COMMAND 0x0
#define NAMELIST_REQUEST 0x11
uint32_t buffer_size = dict_calc_buffer_size(1, sizeof(int));
uint8_t buffer[buffer_size];
DictionaryIterator iter;
dict_write_begin(&iter, buffer, sizeof(buffer));
dict_write_uint8(&iter, COMMAND, NAMELIST_REQUEST);
dict_write_end(&iter);
This is a simple dictionary, holding an integer. Note we need a _pointer_ to an iterator in the dictionary write calls; we use "&" to generate the address of the iterator we declared. Also note that we used a convenience function to compute the size we needed for the buffer. The `dict_calc_buffer_size()` function takes the number of key/value pairs and a list of sizes of value types and computes the size the buffer needs to be.
As a convenience for constructing dictionaries, the Pebble SDK defines _tuples_ and _tuplets_. A tuple is a key/value pair and a tuplet is a structure that focuses on the value of a tuple. We could have used tuples and tuplets to create the dictionary above using this code:
#define COMMAND 0x0
#define NAMELIST_REQUEST 0x11
uint32_t buffer_size = dict_calc_buffer_size(1, sizeof(int));
uint8_t buffer[buffer_size];
DictionaryIterator iter;
Tuplet request = TupletInteger(COMMAND, cmd);
dict_write_begin(&iter, buffer, sizeof(buffer));
dict_write_tuplet(&iter, &request);
dict_write_end(&iter);
This might not seem like it's any more convenient, but the convenience will be demonstrated when we have a lot of data to put in a dictionary.
#### Sending Messages
Messages are sent using the outbox of an app. Remember that, in order for the outbox to be used, its size must have been set up by a call to `app_message_open()`.
Three steps need to be followed to send a message to a phone:
1. Inform the message system of the dictionary that will be used to send a message.
2. Construct the message dictionary.
3. Tell the system to send from the outbox.
The sequence is started by calling `app_message_outbox_begin()` to tell the system which dictionary to use. This function has the prototype below:
AppMessageResult app_message_outbox_begin(DictionaryIterator **iterator);
It returns an `AppMessageResult` result. This type is an enumeration of all the possible errors that could go wrong with sending a message. The non-error result you should look for is `APP_MSG_OK`.
To send a dictionary, the function `app_message_outbox_send()` needs to be called. Since the system is informed about which dictionary to use, sending a message is initiated with that dictionary. This call returns an `AppMessageResult` result. Since the process is asynchronous, a return value of `APP_MSG_OK` only signifies that the message sending process has begun correctly.
Let's consider another example. In the barcode display example, we can send a request to the phone about its barcode collection. There are many pieces of information we might ask the phone; all requests have a request key with the specific request code as the value. We built an example in the previous section that requested the list of barcode names.
We can build a function that makes generic requests of the phone this way:
static void send_request(uint8_t request, uint16_t data) {
Tuplet value = TupletInteger(request, data);
DictionaryIterator *iter;
if (app_message_outbox_begin(&iter) == APP_MSG_OK) {
dict_write_tuplet(iter, &value);
dict_write_end(iter);
app_message_outbox_send();
}
}
This function builds a dictionary using tuplets and can be used for any request for information from the phone. For example, if we need a specific barcode image, we would call this way: `send_request(SEND_BARCODE, value);` where `SEND_BARCODE` has a specific code value that makes sense to both the phone and the smartwatch app and `value` is the list position of the barcode.
When sending a message, callbacks can be useful in a number of ways. A "sent" callback can report a successful operation to the user with a message or vibration. Uses for a "dropped" callback might be to report an error or to resend the dictionary. An interesting use for a "sent" callback is to implement a timer for a successful send operation. If we set the timer when we send the dictionary, then the "sent" callback can cancel the timer. If the "sent" callback is not called and the timer expires, we can use the timer callback to resend the dictionary.
#### Receiving Message
Messages are received via an app's inbox. This inbox's size must have been previously set up with a call to `app_message_open()`. If a message arrives that is larger than the inbox, it is dropped.
Receipt of messages is done entirely by callback. The receipt callback has to be registered for messages to be received. It is also advisable to register a callback for dropped messages. The receipt callback has the following prototype:
void received_callback(DictionaryIterator *iterator, void *context);
The `iterator` parameter is the pointer to the message represented as a dictionary. The `context` parameter is additional data set up by calling `app_message_set_context()` prior to receiving a message.
When a message arrives, it will be in the form of a dictionary, accessible by the iterator sent to the receipt callback. Reading a dictionary is done entirely by using tuplets. The way to parse a message is to get the first tuplet using `dict_read_first()`, extract the key and value, process the key and value, then repeat the sequence using `dict_read_next()`. When the return from either of these function is `NULL`, there are no tuplets left.
Another way to process a message is to specifically look for certain keys. If you know which key should be present, you can extract the tuplet using `dict_find()`. This function takes a dictionary iterator and a key, and will return the tuple where the tuple's key matches the search key.
Once we have a tuple, we can process the data structure. The struct representation of a tuple looks like this:
typedef struct __attribute__((__packed__)) {
uint32_t key;
TupleType type:8;
uint16_t length;
union {
uint8_t data[0];
char cstring[0];
uint8_t uint8;
uint16_t uint16;
uint32_t uint32;
int8_t int8;
int16_t int16;
int32_t int32;
} value[];
} Tuple;
There are 4 fields in a `Tuple` struct: a 32-bit integer key, a designator of the type of the value, the length of the value, and the value itself, an array of bytes. The type of the value is one 4 possible types, designated by a `TupleType` enumerated type:
typedef enum {
TUPLE_BYTE_ARRAY = 0,
TUPLE_CSTRING = 1,
TUPLE_UINT = 2,
TUPLE_INT = 3,
} TupleType;
The value of a `Tuple` is extracted by working directly with the above struct. Note that the value is an array of 32-bit quantities.
Let's look at the barcode example. When a message arrives from the phone, the first thing that is checked is if it contains an error message. We do this as follows:
#define BARCODE_ERROR 0xFF
Tuple *tuple;
char *msg;
error = false;
tuple = dict_find(received, BARCODE_ERROR);
if (tuple != NULL) {
msg = (char *)malloc(tuple->length+8);
strcpy(msg, "ERROR: ");
strcat(msg, tuple->value->cstring);
state = STATE_ERROR;
}
We start by looking for a tuple with the key with the value `0xFF`, defined in the code by the name `BARCODE_ERROR`. If a tuple with that key value exists, then we create a string and build an error message based on the string value in the tuple. We access all parts of the tuple through the pointer returned by the call to `dict_find()`. We access the message as a C string, terminated by a NULL character. (The app on the phone must make sure the string is sent terminated this way.)
Consider another example. Let's say that we have requested the name of a barcode from a specific position in the barcode list from the phone. The phone sends that name along with the format of a barcode (barcodes can have many different formats). This information comes as two different tuples in the same dictionary. We can process it like this:
#define NAME_BUFFER_SIZE 10
#define BARCODE_NAME 0x12
#define BARCODE_FORMAT 0x19
static char *nameBuffer[NAME_BUFFER_SIZE];
static char *formatBuffer[NAME_BUFFER_SIZE];
tuple = dict_find(received, BARCODE_NAME);
if (tuple != NULL) {
nameBuffer[position] = (char *) malloc(tuple->length);
strcpy(nameBuffer[position], tuple->value->cstring);
tuple = dict_find(received, BARCODE_FORMAT);
formatBuffer[position] = (char *) malloc(tuple->length);
strcpy(formatBuffer[position], tuple->value->cstring);
}
Here, we look for a tuple with key having the value depicted by `BARCODE_NAME`. We create space for two strings and extract those strings from the tuple. We do this by accessing the value field in the tuple struct directly.
> **Processing Several Different Key Values**
>
> It is common to have several different types of tuples arrive from a phone application. Since the tuples are grouped into the single `DictionaryIterator` object, we can process each one individually. We can either process them in sequence using `dict_read_first()` and `dict_read_next()` or we can look for specific keys.
### Communicating with Complex Data
Using the dictionary model of messaging, we can send and receive data that is quite complex. In this section, we will overview how one might work with several types of complex data.
#### Sending Multiple Tuplets
In the previous section, we gave an example of how we might process multiple tuplets from same message or dictionary. We can also send messages that have multiple parts; we construct this type of dictionary using either multiple "dict\_write" calls or by using an array of tuplets. We can do either one easily by repeating the method we use to add key/value pairs and postponing the `dict_write_end()` call until all pairs have been added.
Let's say we wanted to send multiple requests to the phone for barcode information. For this example, let's say we want the length of the barcode list and the name of the first barcode. We can do this without tuples in the code below:
#define REQUEST_BARCODE_LIST_LENGTH 0x11
#define SEND_BARCODE_NAME 0x13
uint32_t buffer_size = dict_calc_buffer_size(2, sizeof(int));
uint8_t buffer[buffer_size];
DictionaryIterator iter;
dict_write_begin(&iter, buffer, sizeof(buffer));
dict_write_uint8(&iter, REQUEST_BARCODE_LIST_LENGTH, 0);
dict_write_uint8(&iter, SEND_BARCODE_NAME, 0);
dict_write_end(&iter);
app_message_outbox_send();
This is a simple extension of our previous example, extending the size of the buffer and making more than one write call. This is just as simple in the use of tuples:
Tuplet length_request = TupletInteger(REQUEST_BARCODE_LIST_LENGTH, 0);
Tuplet name_request = TupletInteger(SEND_BARCODE_NAME, 0);
DictionaryIterator *iter;
if (app_message_outbox_begin(&iter) == APP_MSG_OK) {
dict_write_tuplet(iter, &length_request);
dict_write_tuplet(iter, &name_request);
dict_write_end(iter);
app_message_outbox_send();
}
#### Techniques for Large Data Sets
When sending or receiving large amounts of data, there are techniques that we can use that exploit the AppMessage system to make the exchange efficient. Here are a few of those techniques.
* **Break the data up into sections.** Often it is not possible (or efficient or error-tolerant) to send data in one big package. This means that the data set should be broken into pieces. Do the separation along logical lines: break images up by rows or divide sensor data by time.
* **Send as large of sections as possible.** Use the functions `app_message_inbox_size_maximum()` and `app_message_outbox_size_maximum()` to determine the maximum size of the inbox and outbox. Use these sizes to scale your data sections. The size of these boxes can change from SDK to SDK, and using the functions will catch these changes and allow your code to adapt.
* **Manage and label each data package through the key of a data set.** Use keys to tag each section of the data set and to keep them in order. The key is simply an integer and incrementing that integer for each section sent can keep the data stream organized. Make sure you use a special key value that signals the stream is completely sent.
* **Make the outbox sent callback send the next data set.** Sometimes, sending needs to be a quick and efficient as possible. Using the callback for data sent from the outbox to send the next section of data is the most efficient method. [See this Pebble guide for an example.](https://developer.pebble.com/guides/communication/advanced-communication/#sending-a-list-to-the-phone)
### Advanced Features
This chapter is designed to overview the AppMessage system and to give enough information to get you started with communication. There are a number of more advanced topics that are covered in the Pebble SDK documentation that are beyond our scope here.
* **Merging Dictionaries:** Occasionally, it is neccessary to merge dictionaries together. While you could write some code to do this, the Pebble SDK provides the capability to do this. The function is `dict_merge()` and provide a great deal of flexibility in the way dictionaries are merged. [Read more about this here.](https://developer.pebble.com/docs/c/Foundation/Dictionary/#dict_merge)
* **Data Logging:** Obviously, communication between a smartwatch and a phone requires the two to be connected. When the two are not connected, the potential exists for errors and timeouts in an app that depends on that connection. Data logging allows a buffer of data to collect on the smartwatch when there is no connection and to be transferred when the connection is made. [Read more here on how this is implemented.](https://developer.pebble.com/guides/communication/datalogging/)
* **Working with Image Data:** Image formats usually compress image data for a variety of reasons. Portable Network Graphics format is used by the Pebble system as a means to exchange compressed image data with a phone. The Pebble SDK details a number of ways to work with PNG image data. [Read about the here.](https://developer.pebble.com/guides/communication/advanced-communication/#sending-image-data)
* **The Sports Interface:** Every Pebble smartwarch has a Sports app as a system application. This app displays sports-related information in several different configurations. The Pebble system defines a standard way to transfer that information from a phone. [You can read about the PebbleKit definitions here.](https://developer.pebble.com/guides/communication/using-the-sports-api/)
### Project Exercises
For exercises that involve communication, we need both sender and receiver. MORE about JS
#### Project 20.1
[The starter code for this project can be found here.](https://github.com/learning-c-with-pebble/project-20-1)
The JavaScript component of this project produces the national debt of the United States. There are two message keys defined:
* `MESSAGE_KEY_ASK`: This is a message sent from the smartwatch side to the JavaScript side. The message key should be sent as an integer, but can have any non-zero value. It tells the JavaScript side to find, process, and produce a string that depicts the U.S. national debt.
* `MESSAGE_KEY_DEBT`: This is a message sent from the JavaScript side to the smartwatch side. It is has a string value indicating the U.S. national debt, including a starting "$" symbol.
You are write code to display the current U.S. national debt on the Pebble smartwatch screen. To do this, you will need to fill in the definition of the `ask_for_debt()` function and the `in_received_handler()` function. The `ask_for_debt()` function will have to send a message to the JavaScript side that contains the `MESSAGE_KEY_ASK` as a key and the `in_received_handler()` function will have to look for the `MESSAGE_KEY_DEBT` key in a received message and process the string that accompanies the key.
The U.S. national debt increases at a rate of approximately $44,000 per second. Add a timer to the code that will check the debt every 5 seconds and refresh the screen.
[An answer for this project can be found here.](https://cloudpebble.net/ide/import/github/learning-c-with-pebble/project-20-1-answer)
> **U.S. Debt Details**
>
> For an excruciatingly detailed look at the U.S. national debt, check out [the US Debt Clock](http://www.usdebtclock.org/)
> .
#### Project 20.2
Let's revisit the U.S. national debt to give us a little more information. [Start with the answer to the previous project](https://cloudpebble.net/ide/import/github/learning-c-with-pebble/project-20-1-answer)
.
In addition to the national debt, let's display how much debt is on each American citizen. This means you need the debt number as an integer, not a string. Since the largest (signed) 32-bit integer is 2,147,483,647, we need to represent, and communicate, this number differently. We are going to send the debt number in two strings from the JavaScript side and "build" our floating point debt representation on the smartwatch side.
The following messages and keys are defined on the JavaScript side:
* `MESSAGE_KEY_RIGHTMOST`: This message is sent with an integer value. The JavaScript side with reply with _same key_ and a C string that comprises the rightmost number of characters requested by the original message.
* `MESSAGE_KEY_LEFTMOST`: This message is sent with an integer value. The JavaScript side with reply with _same key_ and a C string that comprises the leftmost number of characters requested by the original message.
* `MESSAGE_KEY_USPOPULATION`: This message has no meaningful payload. The JavaScript side will reply with two keys: `MESSAGE_KEY_USPOPULATION` will have a 32-bit integer that is the current population of the U.S. and a `MESSAGE_KEY_DEBT` key that is paired with a string representation of the U.S. debt. This is to show that multiple key/value pairs can be sent with dictionaries.
You are to request the information you need to display the amount of the U.S. debt that each person might owe. Ask for each of "leftmost" and "rightmost" parts of the debt, assemble the debt, collect the number or people in the U.S., and do the simple arithmetic to figure out the per-person amount. Display this on the watch screen.
[An answer for this project can be found here.](https://cloudpebble.net/ide/import/github/learning-c-with-pebble/project-20-2-answer)
#### Project 20.3
This project is going to work with GPS coordinates and the address of your current location. [Click here for the starter code for this project.](https://cloudpebble.net/ide/import/github/learning-c-with-pebble/project-20-3)
The JavaScript side of this project will respond to two types of requests, defined with the following keys:
* `MESSAGE_KEY_LATLONG`: This request will cause the JavaScript side to respond with a dictionary with 4 key/value pairs:
* `MESSAGE_KEY_LATITUDE`: the latitude of your current position.
* `MESSAGE_KEY_LONGITUDE`: the longitude of your current position.
* `MESSAGE_KEY_ALTITUDE`: the altitude in meters of your current position.
* `MESSAGE_KEY_ACCURACY`: the accuracy in meters of your current position.
* `MESSAGE_KEY_ADDRESS`: The payload of this message must have an array of unsigned, 8-bit integers that comprise a latitude and longitude (see below). The response from the JavaScript side is a string depicting the address of the location.
There is one issue with data transfer using the AppMessage system: there is no _native_ way to transfer floating point data. And yet GPS coordinates are floating point numbers. So here are the formats of the data that gets transferred.
* When the JavaScript side transfers data to the C side, it multiplies the float point number by 100, then truncates the number to an integer. For example, "39.0437" becomes "3904".
* When the C side transfers data to the JavaScript side, the payload is a bundle: an array built from both latitude and longitude. In this case, we are further restricted that we can only send arrays of unsigned 8-bit numbers. So, the C side sends 4 unsigned integers as an array: the left of the decimal point and the right of the decimal point for each of latitude and longitude. Use `dict_write_data()` to set up the data.
Also note that the smartwatch emulator that CloudPebble uses only simulates the GPS location and it might not be accurate.
Use the starter implementation and complete the starter code. Your answer should display the longitude and latitude of your current location on the smartwatch screen when the "up" button is pressed and the address of your current location when the "down" button is pressed.
[An answer to this project is online here.](https://cloudpebble.net/ide/import/github/learning-c-with-pebble/project-20-3-answer)
results matching ""
===================
No results matching ""
======================
---
# Chapter 12: Bit Manipulation · Learning C with Pebble
[Powered by **GitBook**](https://www.gitbook.com/?utm_source=public_site_legacy&utm_medium=referral&utm_campaign=trademark&utm_term=pebble&utm_content=powered_by)
[](https://pebble.gitbooks.io/learning-c-with-pebble/content/chapter12.html#)
[](https://pebble.gitbooks.io/learning-c-with-pebble/content/chapter12.html#)
FacebookGoogle+TwitterWeiboInstapaper
[](https://pebble.gitbooks.io/learning-c-with-pebble/content/chapter12.html#)
[](https://pebble.gitbooks.io/learning-c-with-pebble/content/chapter12.html#)
[](https://pebble.gitbooks.io/learning-c-with-pebble/content/chapter12.html#)
AA
SerifSans
WhiteSepiaNight
[Chapter 12: Bit Manipulation](https://pebble.gitbooks.io/learning-c-with-pebble/content/)
===========================================================================================
Chapter 12: Bit Manipulation
============================
At their core, computers are all about data and represent all data as binary bits. C has several powerful features that allow us to manipulate data at the bit level. This chapter will discuss how to work with binary data and the C features that manipulate that data.
### All Data Are Binary
Before we get started with with bits and binary operations, we should note that _all data are binary_.
While this may seem like a very simple statement, it needs mentioning. It is often tempting to think of "converting" data to binary in a program before we use it. For example, if we declare a variable to be an integer or a character, it is easy to make the mistake that we must somehow convert that variable to binary before we manipulate it.
The truth is that all numbers, all structured data, all collections, are binary. Binary is the _only_ way to represent data in a computer's volatile or non-volatile storage. This means that bitwise binary operators that we will discuss in this chapter are applicable to all pieces of data, no matter how they are declared or used.
Now that we have stated this, we should also state that it does not make sense to use binary operations on _everything_. Consider this example.
int datumi;
float datumf;
datumf = 12.6;
datumi = (int) datumf;
It indeed true that `datumf` is stored in memory as binary and in IEEE 754 format for floating point numbers. But because the C programming language uses higher level abstraction to represent data, the exact binary sequence that represents `datumf` is not directly available in the above code. All that we can do with assignment is to cast `datumf` to an integer, which is defined to truncate the value at the decimal point. We cannot, for example, extract just the mantissa or just the exponent through bitwise operations (although we can do this through unions, as we will show in a section below).
This means that data that can be represented as integers or that can be cleanly and completely cast to integers can be manipulated with bitwise operations. While it does not make sense to use bitwise operators on all data, we can, as we will see, manipulate _any_ data object using unions.
### Standard Bitwise Operators
We have described "true" values as compatible with the integer value `1` and "false" values as compatible with the integer value `0`. This analogy also helps with bitwise arithmetic.
Translating "true" to `1` and "false" to `0`, we can rewrite our boolean / logical operations as bitwise arithmetic operations, as below:
| | | |
| --- | --- | --- |
| **Operator Name** | **Syntax** | **Meaning** |
| AND | a **&** b | Result is true when _both operands_ are true |
| OR | a **\|** b | Result is true when _at least one_ of the operands is true |
| XOR | a **^** b | Result is true when _exactly one_ of the operands is true |
| NOT | **!** a | Result is true when the operand is false; result is false when the operand is true |
Bitwise operators do their work on the individual bits on integer values. A number may have the integer decimal value of "72", but the binary representation is (in 8 bits) "01001000". When we perform bitwise operations on integers, we are focused on the binary representation, not the decimal representation.
Let's look at some examples.
char pattern1 = 0b100101;
char pattern2 = 0b1001;
char pattern3 = pattern1 & pattern2;
char pattern4 = pattern1 | pattern2;
char pattern5 = ! pattern4;
char pattern6 = pattern1 ^ pattern2;
First note that we have declared these patterns to be of the type `char`, which represents 8 bits. Second, note that these bit patterns (we know they are bit patterns because they start with the "0b" prefix) are indeed integer values. `pattern1` has the decimal value `37` and `pattern2` has the decimal value `9`. This means that the value of `pattern3` is `1`:
100101
& 1001
--------
000001
and the value of `pattern4` is a decimal `45`:
100101
| 1001
--------
101101
By complementing the bits of `pattern4`, `pattern5` gets a binary value of `11111111111111111111111111010010` for a 32 bit integer, which is a decimal value of `-46` (using 2's complement representation of negative numbers, which is what C does).
The `^` operator makes `pattern6` in the example above has the value `101100`, calculated as follows:
100101
^ 1001
--------
101100
> **Two's Complement Negative Representation**
>
> Negative numbers need to be represented in an integer just like positive numbers. 2's complement is an encoding method that represents negative numbers such that integer arithmetic works like it should without special considerations.
>
> The 2's complement representation of a negative number works like this: if a number is negative, complement all bits in the number and add the value `1`. For example, `20` has an 8-bit binary representation of `00010100`, so `-20` has an 8-bit representation of `11101100`, calculated as:
>
> 2010 = 0b00010100
> -2010 = !0b00010100 + 1 = 0b11101011 + 1 = 0b11101100
>
>
> This method of representing negative numbers has some implications of number ranges that can be represented. Unsigned integers that are _n_ bits long can represent numbers from 0 to 2_n_\-1. 2's complement negative representation splits that range into two parts, negative and positive, and therefore the maximum positive integer that can be represented is half of that for unsigned integers: -2_n-1_ to 2_n-1_\-1. So a 32-bit computer can represent integers from -2,147,483,648 to 2,147,483,647.
As with other operations, C combines bitwise operations with the assignment operator. Each of and, or, and xor has an assignment abbreviation: `&=`, `|=`, and `^=`.
### Shifting Operators
In addition to bitwise operators, C also includes operators to shift entire bit sequences.
Bits can be shifted right or left for a specific number of positions. The operator `<<` shifts left and the operator `>>` shifts right. Shift operators only work on integers, although casting is performed first if the operand is a compatible type. Let's consider an example:
int pat1 = 10, pat2 = 0b101100;
int pat3, pat4;
pat3 = pat1 << 4;
pat4 = pat2 >> 3;
In this example, `pat3` now has the value `160`. When the value of `pat1`, which is `1010` in binary, gets shifted 4 bits left, the result is `0b1010000`, which is a decimal 160. `pat4` is assigned the value `5`, which is `0b101100` shifted right 3 bits, resulting in the binary `0b000101`, or simply `0b101`.
Consider another example:
short int pat5 = 0b1111111100010000;
pat5 = pat5 << 8;
This example demonstrates that _left_ shifting is _logical_ shifting. The bits shifted off to the left are discarded. The bits shifted in from the right are `0`. The value of `pat5` in this example ends up to be `0b0001000000000000` when discarding the 8 leftmost bits.
However, shifting _right_ is actually an _arithmetic_ shift. Arithmetic shifting preserves the sign bit and does not consider the leftmost bit part of the bit sequence is eligible to be shifted. In the example above, `pat5` is initialized to have the value `-240` and has the value `4096` after shifting left. But if we were to shift the original value right 8 bits, we would get `0b1111111111111111`, which is a `-1` in 2's complement.
Some programming languages include a _circular_ shift operator. Also known as rotation, circular shifting takes the bits shifted off and inserts them in the opposite side of the bit sequence. If the left shift in the above example had been a circular shift, the result in `pat5` would have been `0b0001000011111111` in binary or `4351` in decimal.
There is no _circular_ shift operator in C. However, we can implement circular shifting in C using the function below:
int leftrotate(int original, int numbits) {
return (original << numbits) | (original >> (sizeof(original)*8 - numbits));
}
For example, if we wanted to use a circular shift for the example above, we would call `leftrotate(pat5, 8)`. It would return
(0b1111111100010000 << 8) | (0b1111111100010000 >> (16 - 8))
= 0001000000000000 | 0000000011111111 = 0001000011111111
We could write a similar function for rotating right.
> **Shifting Implements Multiplication and Division**
>
> If we use an arithmetic shift, shifting left 1 bit is actually the equivalent to multiplying by 2. Analogously, shifting right is division by 2. Multiple bit shifts are equivalent to multiplying or dividing by powers of 2.
>
> Multiplication and division are very complicated and time-consuming when compared to shifting. In fact, compilers will often turn multiplications and divisions into shifts and additions or subtractions.
### Higher Level Operations with Bits
While it is useful to be able to use basic bitwise arithmetic, we can build these bitwise operators into higher level, more abstract, operations. These include _extraction_, _inverting_, _clearing_, and _setting_ spans of bits inside a number. Each of these operations requires a binary operator and a mask, or pattern, of bits.
Extraction is the operation of creating a new bit sequence comprised of the bits taken from certain bit positions in the operand and 0 values for the other positions. This requires an and operation and a mask with 1 values in the positions we want to extract. For example, consider the code below:
short int bitstring1 = 0b1010000111110010;
short int mask1 = 0b1111111100000000;
short int extraction = bitstring1 & mask1;
Here, we have an extraction operation that extracts the leftmost 8 bits from the `bitstring1` variable. The value of `extraction` therefore is `1010000100000000`.
An invert operation complements specific bit in an operand and ignores the rest of the bits. This needs an xor operation with a mask where 1 values mark the positions to invert and the 0 values mark the positions to ignore. Here is an example:
short int bitstring2 = 0b1010101000011110;
short int mask2 = 0b0000111111110000;
short int inversion = bitstring2 ^ mask2;
In this example, we are inverting the middle 8 bits of this 16 bit sequence. The resulting value of `inversion` is `1010010111101110`.
A clear operation turns certain specific bit positions in the operand to 0. The operation is an and and the mask uses 0 values on the positions to clear, with 1 values everywhere else. Consider this example:
short int bitstring3 = 0b1111010100001010;
short int mask3 = 0b0000111111111111;
short int clearing = bitstring3 & mask3;
This example clears the leftmost 4 bits, giving `clearing` the value `0000010100001010`.
As you might expect, a setting operating does the opposite of clearing. It sets specific bits to 1. The operation is an or and the mask puts 1 values on the positions to set, with 0 values elsewhere. Here's one more example:
short int bitstring4 = 0b0000110100001010;
short int mask4 = 0b0000111111110000;
short int setting = bitstring4 | mask4;
This example makes sure that the middle 8 bits are set, resulting in `setting` having the value `0000111111111010`.
Let's consider one more example here. If a programmer wants to make an app that responds to time events, then the TickTimerService needs to be used. This service be configured to call a handler function every time a specific Time component changes. This is very important for watchfaces. In order to subscribe to the TickTimerService, you must construct a bitmask of the units you are interested in. For example, let's say we want to call a TickTimerService handler function every minute. We might execute code like this:
short int mask = MINUTE_UNIT;
tick_timer_service_subscribe(mask, tick_handler);
This code assumes that `tick_handler` exists. An example of a tick handler is below:
void tick_handler(struct tm *tick_time, TimeUnits units_changed) {
short int minutes_changed = units_changed & MINUTE_UNIT;
short int hours_changed = units_changed & HOUR_UNIT;
if (minutes_changed) { ... }
if (hours_changed) { ... }
}
This code checks to see if the minutes changed and the hours changed. Because we suscribed to the TickTimerService with the mas `MINUTE_UNIT`, we can probably assume that the minutes unit has changed. But the hours might have changed as well and we can use bit extraction to test that.
For a more detailed discussion of the TickTimerService, including and examination of the `TimeUnits` enum type, see Chapter 14.
### Bit Fields
A discussion of bit manipulation should include a mention of the topic of bitfields. Bitfields are limited in their usefulness, but deserve a look.
A bitfield is part of a struct or union declaration that restricts the storage space for the variable being declared to a specific number of bits. Consider this example:
struct {
int bfield1 :8;
int bfield2 :4;
unsigned :4;
unsigned bfield3 :2;
signed int bfield4 :1;
} fields;
fields.bfield1 = 40;
fields.bfield2 = fields.bfield1 - 20;
fields.bfield3 = 5;
Bitfields are specified with a colon and the number of bits the variable is supposed to be allocated. In the above example, `fields.bfield1` is declared to be 8 bits wide. The variable is signed and so may take on values `-128` to `127` (remember 2's complement). In this example, `fields.bfield2` is given 4 bits and is signed. It is assigned the value `20`, but that value is truncated to the rightmost 4 bits, giving the value `4` (the value `0b10100` is truncated to `0b0100`). The last statement in the example would actually be flagged as an error by the compiler; the compiler can see that a variable that has only 2 bits allocated to it cannot take on the value `5`.
Note the declaration in the example that has a type name without a variable name. The declaration between `bfield2` and `bfield3` can take up space and skip over bits with being assigned a value. It's a kind of padding specification.
Bitfields and padding declarations are more useful when they are used with unions. Consider this example:
union {
unsigned short data;
struct {
unsigned x :4;
unsigned y :4;
unsigned :2;
unsigned z :4;
unsigned :2;
};
} dfields;
dfields.data = 14079;
The integer value `14079` can be represented in binary as `0b0011011011111111`. By assigning `dfields.data` to this value, we can lay the struct on top of this bit sequence and carve up the bits. But here is where the word of warning we mentioned in Chapter 10 comes to play: because the processor used in Pebble smartwatches is big-endian, the values are assigned right to left. `x` gets the value `15`; `y` has the value `15`, and `z` has the value `13`. Notice that the padding specification are useful here to put some "bit space" between `y` and `z`. Figure 12.1 illustrates how the original integer value was split up.
* * *
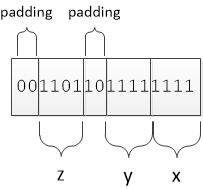
**Figure 12.1:**Splitting Up an Integer value with Bitfields
* * *
### The Utility of Unions and Binary Data
The previous section pointed out one place where unions are useful: binary data and bitfields. Assembling bit sequences that are made up of segments of other binary data can be tedious and cryptic with binary operations, but much easier with unions.
Let's consider an example. Let's say that we invent an "encryption" for a letter by rotating that letter through the alphabet (this was invented long ago; it's called a Ceasar cipher). 'A' might be rotated by 5 to become 'F'; 'd' might be rotated by 10 to become 'n'; 'y' might be rotated by 5 around to the beginning of the alphabet at 'c'. We might transfer data encrypted this way by packing the code with the rotation like this:
* * *

**Figure 12.2:**Ceasar Cipher Example
* * *
We might pack this using C code in the following way:
int packed = rotation << 5 | character;
Specifying this with a union would be clearer:
union code_format {
short unsigned rotation :5;
short unsigned character :8;
};
We only need 5 bits for rotation because 26 (maximum rotation) can be encoded in 5 bits.
We would pack a character like this:
union code_format packed;
packed.rotation = 10;
packed.character = 'n';
The code is longer, but the meaning is clearer.
Coding with color definitions shows this off in a big way, as we see in the next section.
### Putting Bit Operations to Work: Color Manipulation
Let's look at how bit manipulation can be used with color.
The usual standard for color representation is a combination of red, green, and blue values, each taking 8 bits. These values are put together with a measure of transparency, called an "alpha" measure, which is also 8 bits. This results in 32 bits, with 256 values possible for each red, green, blue, and alpha values, which results in millions of possible colors.
However, the Pebble smartwatch screen has 64 different possible colors, not millions. This means that we only need 6 bits to represent the color: 2 bits for each of red, green, and blue values. If we add 2 bits for transparency, we're able to represent Pebble's full spectrum of available colors using only 8 bits instead of 32. Here is the definition of `GColor8`, the 8-bit color representation:
typedef union GColor8 {
uint8_t argb;
struct {
uint8_t b:2; //!< Blue
uint8_t g:2; //!< Green
uint8_t r:2; //!< Red
uint8_t a:2; //!< Alpha.
};
} GColor8;
As we described the screen's color needs, there are 2 bits for each base color and 2 bits for the transparency value. With this definition, the `GColor` definition is made equivalent to this 8 bit representation with a typedef statement:
typedef GColor8 GColor;
But we still have standard, 32-bit RGB color specifications. So the Pebble SDK defines some conversion code. For example, `GColorFromRGBA(red, green, blue, alpha)` is defined as
((GColor8){ \
.a = (uint8_t)(alpha) >> 6, \
.r = (uint8_t)(red) >> 6, \
.g = (uint8_t)(green) >> 6, \
.b = (uint8_t)(blue) >> 6, \
})
(Ignore the '\\' character for now; this definition is actually a macro definition and we will discuss macros in a future chapter on the C preprocessor. Also remember that `uint_8` is an 8-bit unsigned integer type.)
This example shows that 32-bit to 8-bit conversion is done by taking the most significant bits of each color (losing the other bit by shifting right 6 bits) and assembling the resulting bit pattern through the union. The Pebble SDK also defines an RGB value without an alpha part to be a color specification with the alpha designation completely opaque, as below:
GColorFromRGBA(red, green, blue, 255);
Let's look at a conversion example. According to the color picker tool in the Pebble documentation ([available here](https://developer.pebble.com/guides/tools-and-resources/color-picker)
), the color "Jaeger Green" is comprised of no red, with green having a value of 170 and blue having a value of 85. To convert these value to a Pebble screen color, we would make the following call:
GColor jaeger_green = GColorFromRGB(0, 170, 85);
This is equivalent to the following code:
GColor jaeger_green = (GColor8){ .a = 255 >> 6, .r = 0 >> 6, .g = 170 >> 6, .b = 85 >> 6 };
This, in turn, is equivalent to
GColor jaeger_green = (GColor8){ .a = 0b11111111 >> 6, .r = 0b00000000 >> 6,
.g = 0b10101010 >> 6, .b = 0b01010101 >> 6 };
This turns into
GColor jaeger_green = (GColor8){ .a = 0b11, .r = 0b00, .g = 0b10, .b = 0b01 };
And this is equivalent to
GColor jaeger_green = (GColor8){ .argb = 201 };
because 0b11001001 is 201 decimal.
### Avoiding Messy Bit Operations
Working with bits can get messy quickly when we start combining operators and abbreviated notation. Here's a few tips to making bitwise opeartions as clear as possible.
1. **Use names for values whenever possible rather than literals.** Colors are great example here. The name "Jaeger Green" is much more descriptive than "201" or "GColorFromRGB(0, 170, 65)" or "0b11001001". Naming values with names that depict how they are used is a very good habit to have.
2. **Use names for values affecting shifting and bit positions.** This means that naming the position values when shifting or masking makes more sense than simply using an integer literal. It's much clearer to use something like `extraction = bitstring1 & mask1;` than it is to use `bitstring &= 240;`.
3. **Use whitespace to align bits in expressions.** This may seem silly or not necessary, but when using bits expressed literally, use bitwise notation ("0b...") and use whitespace to align values in operations. It is much easier (and more meaningful) to work with columns of operations when the bits are aligned.
4. **Use unions with bitfields as documentation and easy conversion tools.** Unions with bitfields are extremely valuable to document the format of data and to facilitate easy conversion between values. It's clearer when reading data values to use a union to split the data into component pieces than it is to work with shifting and bitwise operators.
### Project Exercises
#### Project 12.1
Recall that we did an example in this chapter involving Ceasar ciphers: rotating letters through the alphbet. We described a possible format for letters in an "encryption": the rotation number in the leftmost 8 bits and the actual letter in the rightmost 8 bits. We actually don't need 8 bits to represent rotation, 5 bits will be able to represent 0 through 25 values of rotation.
You are to read a file of numbers that are specified using this "Ceasar Cipher Format" (CCF) notation: 5 bits of rotation followed by 8 bits of character representation. You are to translate the message in file and display it on the Pebble screen.
[You can find starter code here.](https://cloudpebble.net/ide/import/github/programming-pebble-in-c/project-12-1)
The starter code reads the file of numbers, which are encoded letters (they form a message). The code implements a function called `get_decoded_line` that gets a sentence from the file and decodes it. This function calls `decode_next_letter` for each letter in the message. Look for this function. It will give you the next encoded CCF letter from the file and decodes it. You are fill this definition in. Note the parameters. The position is passed as a pointer to an integer so it can change (why?).
[You can find an answer here.](https://cloudpebble.net/ide/import/github/programming-pebble-in-c/project-12-1-answer)
#### Project 12.2
For this project, you will take the starter code ([available here](https://cloudpebble.net/ide/import/github/programming-pebble-in-c/project-12-2)
) and add code to fill in the screen of the Pebble in color gradations from `GColorBlack` (0b11000000) to `GColorWhite` (0b11111111). Vertically or horizontally, you should be able to go through two gradation sequences.
There are several ways to work through the colors here. From simple addition to manipulation of colors through unions, you should be able to implement different methods. Use at least two to have the same gradation effect.
[You can find an answer using several gradation implementations here.](https://cloudpebble.net/ide/import/github/programming-pebble-in-c/project-12-2-answer)
The code is currently set up to use the first defined code. Change the definition
#define USE_METHOD_ONE
to
#undef USE_METHOD_ONE
to use the second algorithm.
#### Project 12.3
[Find the starter code for this project here.](https://cloudpebble.net/ide/import/github/programming-pebble-in-c/project-12-3)
For this project, you are going to tie Pebble screen color changes to button presses. The "up" button should manipulate red; the "select" button should manipulate green; the "down" button should manipulate blue. Each button will cycle through all values for it's assigned color; there are only 4 values for each one.
Start the screen background with a `GColorBlack` color. Change the background based on the values of red, green, and blue given by button presses.
Like the previous project, there are several ways to implement this. The best way, however, is to maintain a color value for each color and build the background color from the three base color values and a fixed transparency.
[You can find an answer at this link.](https://cloudpebble.net/ide/import/github/programming-pebble-in-c/project-12-3-answer)
results matching ""
===================
No results matching ""
======================
---
# Chapter 18: User Interface Development · Learning C with Pebble
[Powered by **GitBook**](https://www.gitbook.com/?utm_source=public_site_legacy&utm_medium=referral&utm_campaign=trademark&utm_term=pebble&utm_content=powered_by)
[](https://pebble.gitbooks.io/learning-c-with-pebble/content/chapter18.html#)
[](https://pebble.gitbooks.io/learning-c-with-pebble/content/chapter18.html#)
FacebookGoogle+TwitterWeiboInstapaper
[](https://pebble.gitbooks.io/learning-c-with-pebble/content/chapter18.html#)
[](https://pebble.gitbooks.io/learning-c-with-pebble/content/chapter18.html#)
[](https://pebble.gitbooks.io/learning-c-with-pebble/content/chapter18.html#)
AA
SerifSans
WhiteSepiaNight
[Chapter 18: User Interface Development](https://pebble.gitbooks.io/learning-c-with-pebble/content/)
=====================================================================================================
Chapter 18: Pebble User Interface Development
=============================================
The user interface (UI) of an application is perhaps the most important part of a Pebble smartwatch app. Your code can be perfectly accurate in what it does, but if it has a poor UI, it will likely be difficult to use. The designers at Pebble have spent a lot of time and intellectual energy designing methods and guildelines that will help you make a great UI for your application.
This chapter will outline the concepts used to develop user interfaces for smartwatch applications. We will focus on three areas: windows, layers, and buttons. This chapter is by no means meant to be a final definition of UI development; Pebble has an extensive set of developer guildelines for that. Rather, our purpose here is to review the foundational UI elements, to place these elements in perspective and to provide some examples in C that will allow you to get familiar using these elements for UI development. As always, we will provide some exercises for you to practice your UI skills.
After reading the material here, make sure you consult the Pebble guides as well. Documentation links for these can be found at the end of the chapter.
### Basic UI Components
Two basic components of a Pebble smartwatch user interface are _windows_ and _layers_.
#### Windows
A window is an area where user interaction, both input and output, takes place. A window is the focus of UI for a given moment in time. Windows always fill the screen and every app has at least one window.
Windows represent the system's interaction with the user: they manage button clicks, have background and foreground colors, and can store data for use at a later time.
Let's consider a simple program, the "Hello" program [from chapter 2 and the Pebble tutorial](https://developer.pebble.com/tutorials/beginner/hello-pebble)
.
#include
Window *window;
TextLayer *text_layer;
void init() {
window = window_create();
text_layer = text_layer_create(GRect(0, 0, 144, 40));
text_layer_set_text(text_layer, "Hello, Pebble!");
layer_add_child(window_get_root_layer(window),
text_layer_get_layer(text_layer));
window_stack_push(window, true);
}
void deinit() {
text_layer_destroy(text_layer);
window_destroy(window);
}
int main() {
init();
app_event_loop();
deinit();
return 0;
}
In the code above, notice the way the main window is used. The code initializes the UI in the function `init()`, creating a window assigned to the variable `window` by calling `window_create()`. The window is created, used to hold a text layer, and put to use by pushing it onto the window stack (more on this below). When the program terminates, it calls `deinit()` which destroys the main window through a call to `window_destroy()`. This pattern of creation/usage/destruction is how windows are used in all Pebble smartwatch apps.
An application can have multiple windows. Consider an application that allows a user to choose a barcode from a list, then displays that barcode. This application could be designed around two windows: one that interacts with the user through a barcode list and one that interacts by displaying a barcode image. Each window reacts to user actions differently: the list might use "up" and "down" buttons to navigate the list and "select" to choose the barcode while the barcode display might only respond to a "back" button press. Each window could also have other UI elements: the list window might have an action bar across the top while the image display would have just the barcode displayed. Because there are several display uses and interactions that are different, windows become a package of sorts that wrap these different type of uses.
At any point in an application, only one window is responsible for interacting with the user. Multiple windows are organized into the _window stack_; the window at the top of the stack is the one responsible for interacting with the user. The act of pushing the window causes the pushed window to be displayed and used for the UI. Only windows on the stack will be part of the UI.
Even if there is only one window, it must be on the stack. In the example code above, notice that, after the window is created, it is pushed onto the application's window stack via a call to `window_stack_push()`. The first parameter is the window being pushed; the second parameter dictates if the window is introduced to the smartwatch screen with sliding animation.
Windows can be pushed and popped from the window stack. Think about the barcode app example. Once the barcode is chosen, it is displayed by creating a second window, pushed on top of the first, that holds the barcode image. This window is popped when the user is done with the image. After the popping of the image window, the underlying window, the one displaying the list, is redisplayed because it is then on top of the stack.
#### Layers
A layer is display device. It displays graphical components.
There are several "graphical components" that can be displayed in a layer. Each graphical component has its own type of layer. Here is a short list:
* _Text layers_ display textual components. These obviously include letters and words, but these letters and words have specific properties, like sizes, colors, and fonts.
* _Bitmap layers_ display bitmap images. Bitmap images have attributes that include image data (naturally), alignment within a layer, background color, and rendering properties. There is also a type of layer that will automatically rotate an image.
* _Menu layers_ display list-based menus. There are also simple menu layers that have very few configurable properties.
* _Scroll layers_ can wrap other content and supply a scroll bar with scrolling action.
* _Status bars_, with data displayed at the top of a screen, and _action bars_, with control data displayed on the right of the screen, are displayed in their own layers.
As an example, consider the example code from the previous section. In the `init()` function, after the main window is created, a text layer is created with a call to `text_layer_create()`. That create function needs the dimensions that are applied to the newly created layer. Layers have dimensions that do not have to match those of the window they are part of. In the example above, the text layer is created to be the width of the screen, but only with a height of 40 pixels. Layers also have a specific location within the window in which they are created. In the example above, the text layer starts at the coordinates `(0,0)`.
Once created, layers must be attached to windows. In the code above, the layer is added to the application's main window with a call to `layer_add_child()`. When added to a window, a layer becomes a "child" of the window. These hierarchies are discussed in detail in the next section.
It's easy to imagine that a window could have multiple layers. In fact, there is a rich set of tools available for manipulating layers within a window. A single window could have text, a menu, a status bar, and an image. Each of these components would have their own layers: a text layer, a menu layer, and so forth. Layers obscure or show other layers; layers can be displayed or hidden. This set of tools is designed for maximum flexibility.
When an application is done using a layer, that layer should be destroyed. We destroy the text layer in the above example with a call to `text_layer_destroy()` in the `deinit()` function.
Consider the barcode app example. We saw that there could be two windows for this example. The first window, displaying the barcode list, has a menu layer that contains the list and a text layer that displays a "wait" message. These are created and added as children to the barcode list window. The second window that displays the barcode in a bitmap layer, created and added as a child.
There are times when a layer must be _updated_. Updating a layer can mean a number of things: redrawing the layer, refreshing the text in a layer, or rewriting a menu. Updating a layer happens in a number of circumstances; these circumstances can be automatic (updating by the system) or "manual" (layers can be forced to redraw when marked as "dirty"). By default, updating done by a system function; this function can be overridden by using `layer_set_update_proc()`. Using this update function is a common way to manage the contents of a layer.
#### Hierarchies and Roots
As we just discussed, an application can have multiple windows and multiple layers in those multiple windows. Together, these windows and layers form a sort of "family tree" of UI elements.
In this hierarchy, there is a _root window_. Each application must have at least one window; this first window becomes the root of the window stack. Other windows, when created, are displayed by being pushed onto the window stack; the root window is the first, and is last one to be popped from the stack.
Visual, graphic components are usually displayed in the window that fills a smartwatch screen. Therefore, in each window, there is a at least one layer, the root layer for that window.
Unlike the window hierarchy, each layer in a window can have siblings and multiple layers could be displayed on the screen at the same time.
The layer hierarchy is especially useful when determining which layers need updating. When other layers in the hierarchy request a redraw, when the parent window is shown or hidden, when the layer heirarchy changes, or some kind of object is drawn over a layer all cause layer updates.
### Event Programming and UI Interaction
User interfaces are based on the event-driven programming model we introduced in Chapter 11. Event-driven programming uses a pattern that looks like this:
1. Set up the user interface through an initial set of function calls.
2. Register UI events with the operating system along with the callbacks that will be called when the registered events occur.
3. Wait.
4. Respond to user events by allowing the operating system to call callback functions.
5. Tear down the user interface, freeing up memory, when the app terminates.
Let's reexamine the basic loop from the example `main` function definition:
int main() {
init();
app_event_loop();
deinit();
return 0;
}
Here is the UI event pattern in a nutshell: setup the interface by calling `init()`, wait and respond to events by calling `app_event_loop()`, tear down the app by calling `deinit()`.
As we design event-response functions, we need to remember that there are both user-initiated and software- or system-initiated events. Here are some examples:
* The user presses one of the watch buttons (user-initiated).
* A layer is set to "dirty" (system-initiated).
* A tap event is sensed when the user flicks her wrist (user-initiated).
* A menu is drawn on the display (system-initiated).
In addition, certain software UI elements define their own reaction to events. For example, in the barcode app, we create a barcode list in a menu layer. By doing so, we don't have to react to "up" and "down" buttons as these are automtically programmed into the menu layer. Other examples are UI elements: each one has their own unique reaction to UI events. See the Pebble documentation on "Example Implementations" for examples of UI elements with built-in reactions.
### Using the Click Interface
One set of UI events that can be under programmer control is the set of button presses. This set of events is an excellent example of event-driven programming. A button press is defined as a "click" for the Pebble smartwatch UI.
There are several types of clicks in the Pebble smartwatch UI. First, there are single clicks and multiple clicks. A single click is a single press/release sequence on a smartwatch button. A multiple click is a rapid sequence of single clicks: double and even triple clicks are recognized. Secondly, the UI recognizes long clicks: longer press/hold/release sequences. Finally, there are "raw" events: events that are not combined into higher level events. For example, a single click is composed of two raw events: a button press and a button release.
Windows register with the operating system to receive and process click events. Each window has a _click config provider_, that is, a function that configures which click events are valid and which callbacks are used to respond to click events. The function `window_set_click_config_provider()` sets up the provider for a window. For example, to set the function `configure_clicks()` as the click config provider for a window called `window`, you would make the following call:
window_set_click_config_provider(window, (ClickConfigProvider) configure_clicks);
This potentially needs to be done for each window in an interface. However, if a window does not need to pay attention to buttons, then no click config provider needs to be set.
The click config provider is called every time the window is made visible; this usually occurs when a window is pushed onto the stack or windows above it in the stack are popped off. This click config provider is then responsibile for setting up the clicks that will be used and the callbacks that will respond to click events.
Consider our barcode example. Let's say that we want the "up" and "down" buttons to switch between barcode renderings from the menu that was displayed. We would set up the window with call like we described above:
window_set_click_config_provider(window, click_config_provider);
The `click_config_provider` function could determine how many barcodes could be displayed and use that in its subscription of click events:
static void click_config_provider(void *context) {
if (num_barcodes > 1) {
window_single_click_subscribe(BUTTON_ID_UP, display_previous_barcode);
window_single_click_subscribe(BUTTON_ID_DOWN, display_next_barcode);
}
}
Here, we subscribe to click events only if there are more than one barcode, as there is no need to display other barcodes if there is only one. Also note that the "select" button is really not needed, so we don't subscribe to "select" button presses.
Finally, note that the `click_config_provider` function does need to be called each time the window is pushed onto the window stack. The number of barcodes is likely to change from one rendering to the next time a rendering is needed and the `click_config_provider()` function needs to be called to resubscribe to click events as needed.
There are other ways to set up click responder callbacks. For example, the menu layer has the function `menu_layer_set_callbacks()` that can set all the callbacks for several different events for a menu layer. In the barcode example, the menu layer callbacks are set with this call:
menu_layer_set_callbacks(mainMenu, NULL, (MenuLayerCallbacks){
.get_num_sections = mainMenu_get_num_sections,
.get_num_rows = mainMenu_get_num_rows_in_section,
.get_header_height = mainMenu_get_header_height,
.draw_header = mainMenu_draw_header,
.draw_row = mainMenu_draw_row,
.select_click = mainMenu_select_click,
.select_long_click = mainMenu_select_long_click,
});
The `MenuLayerCallbacks` struct is initialized and set with this call. Several components of drawing a menu as well as click response callbacks are set here. Menu layers and scroll layers set callbacks this way; action bars, menu layers, and scroll layers also allow you set up click config providers in alternative ways.
When click event callbacks are registered and events are subscribed to, we need to include the actual callback functions that respond to button clicks. For example, to display the previous barcode, we might register a function that starts like this:
static void display_previous_barcode(ClickRecognizerRef recognizer, void *context) {
...
}
The first parameter in the click handler is a `ClickRecognizerRef`. This is a reference to the system handler that recognized the click and called the click handler.
Note the `context` parameters in both the click config provider and the click event handler. It is described in the parameter list as a `void` parameter; "void" is the C way of describing "unspecified". It can be set to specialized data that accompanies the callback call. By default, it is set to the window that is displayed when the subscribed button is clicked. You can extract the window from the default value of this parameter like this:
Window *window = (Window *)context;
You can set the data sent to a callback several ways. You can set all click events that are subscribed from a specific window with one call, an alternate to `window_set_click_config_provider()`:
void window_set_click_config_provider_with_context(Window * window,
ClickConfigProvider click_config_provider,
void * context);
You can also set a specific button's context data with a call to `window_set_click_context()`:
void window_set_click_context(ButtonId button_id, void * context);
Let's consider the barcode example again. To display a barcode, the app must request barcode data from the phone connected to the smartwatch and it must know the position number of the barcode in the barcode list. That position could be made known to the function that displays the barcode by making the context point to the position number. Using this, the function that displays the barcode could use a parameter instead of a global variable.
To subscribe to multiclick events, the process is the same as with single-click events, but now we must define what "multiclick" means. Here is the prototype of the subscription call:
void window_multi_click_subscribe(ButtonId button_id,
uint8_t min_clicks, uint8_t max_clicks, uint16_t timeout,
bool last_click_only,
ClickHandler handler)
Here, we are telling the system to use `handler` as the handler for multiclicks to the `button_id` button. We define multiclicks to this function as any number of clicks from `min_clicks` to `max_clicks` that fall into the time block defined by `timeout`. Handlers for all multiclicks detected will be called unless `last_click_only` is true; when it is true, only the handler for the last multiclick sequence will be used. Zero values for `max_clicks` and `timeout` indicate default values: `min_clicks` for `max_clicks` and 300ms for `timeout`.
Let's say we want to implement a "redraw" of a barcode image, connected to the "select" button. We don't want to use a single-click, in case that's used by accident, because it's a lot of data to retreive from the phone by accident. So we want a triple-click to cause a redraw. We might use the following call to register this:
window_multi_click_subscribe(BUTTON_ID_SELECT, 3, 0, 0, true, redraw_bitmap);
This subscribes to clicks with a "select" button handler called `redraw_bitmap`, called when we have a minimum of 3 and a maximum of 3 clicks in a 300ms window.
To manage repeating clicks, we use a subscription function that defines the time interval for a button press to be considered a repeat. Here is the prototype:
window_single_repeating_click_subscribe(ButtonId button_id,
uint16_t repeat_interval_ms, ClickHandler handler)
Here, we are saying that any button press that is longer than `repeat_interval_ms` is considered a repeat button press. The system default value for this configuration parameter is 30ms.
Let's say that we want a long period of time for considering a button press. This would be useful if the user of our app had difficulty using her hands or might take longer to press a button. (For example, older users of a Pebble smartwatch might need longer time to perform button presses.) We might extend the 30ms repeat interval with this call:
window_single_repeating_click_subscribe(BUTTON_ID_SELECT, 750, select_button_handler);
This call defines repeat clicks as those for which the "select" button is pressed for longer than three-quarters of a second. This might help certain users with button presses.
Like repeating clicks, long clicks need a time interval for a definition. Since long clicks are defined by holding a button for a long interval, handling a press event differently from a release event might be useful. All of this information can be given in the subscription call; here is the prototype:
void window_long_click_subscribe(ButtonId button_id,
uint16_t delay_ms,
ClickHandler down_handler, ClickHandler up_handler)
This call defines a long click as an event that happens when a button is held for `delay_ms` milliseconds. When the `button_id` is pressed, the `down_handler` is called and when the `button_id` is released, the `up_handler` is called. Either handler can be specified as `NULL` to indicate that there is no handler.
Raw click data can be subscribed to as well. However, there is no abstraction into long clicks or multiclicks; you just get the actual button presses. Like the long click, you get the press and the release. Here's the prototype:
void window_raw_click_subscribe(ButtonId button_id,
ClickHandler down_handler, ClickHandler up_handler,
void * context)
As with the long click, you can specify a function to call for a button press and a button release. Here, however, you also have the opportunity of supplying a context variable.
Finally, you can get information about clicks. You can call functions to get the number of clicks (`click_number_of_clicks_counted()`), the actual button ID that triggered a callback (`click_recognizer_get_button_id()`), and whether the event being handled is a repeating click (`click_recognizer_is_repeating()`). Each of these is especially helpful when a number of events is handled by the same handler.
> **The Back Button**
>
> Using the back button produces a special event. Although it's "just" a button, like the others, it has special duties. It's primary function is to pop windows from the window stack (and terminating the app if the last window is the root window). Both `window_single_click_subscribe()` and `window_multi_click_subscribe()` can modify the back button's behavior, but a long press will always terminate the app and return to the main menu. This means other subscriptions are not possible.
### An Example: Displaying Barcodes on a Pebble Smartwatch
Let's tie this chapter together by looking at an example. We have looked at a barcode display app in this chapter and this would be a good application to consider as an example of user interaction. You can find [the source code for this app here](https://github.com/frethop/wyb-pebble)
and [the source code for the Android companion app here](https://github.com/frethop/wyb-android)
.
We will look at the UI elements of this app here. We will ignore the communication components, but we will cover those in Chapter 20.
Let's start with design. As we mentioned previously, we need two separate interface areas: one to display a menu of barcodes and one to display the barcode selected from the list. This can be accomplished best with two windows: one for menu interactions, with buttons used for navigating and selecting menu items, and one for a bitmap image display. The menu window would be like that shown in Figure 18.1: it has a title and a list of barcodes.
* * *
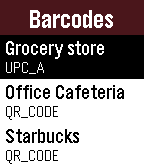
**Figure 18.1:**The Menu List in the Barcode App
* * *
When a menu item is selected, we create and push the barcode display window. The app needs to display "please wait" text like that in Figure 18.2 asking the use to wait while the barcode image loads. This means that the barcode window needs two layers: one to display the barcode (an instance of `BitmapLayer`) and one to display the wait message (and instance of `TextLayer`). An example bitmap display is shown in Figure 18.3.
* * *

**Figure 18.2:**The Waiting Message in the Barcode App
* * *
* * *

**Figure 18.3:**The Barcode Display Window in the Barcode App
* * *
Let's focus on user interaction. Most of the button clicks we need to manage the screen are built into the layers we will use to manage the screen display. The menu layer is declared as a `MenuLayer`, which manages "up" and "down" buttons for list navigation. We will want to install code to manage the selection of a menu item (barcode) using the "select" button. The code also manages a long click of the "select" button; this will refresh the smartwatch screen by loading the barcode list from the phone app. The only user interaction from the barcode display window is go back using the "back" button; other button presses are ignored.
Let's look at the `main` function in the watchapp.
int main(void) {
state = STATE_NONE;
window = window_create();
window_set_window_handlers(window, (WindowHandlers) {
.load = window_load,
.unload = window_unload,
});
window_stack_push(window, true);
app_event_loop();
window_destroy(window);
}
Here, we set the communication state (via the `state` variable), create the main menu window, set the main window's handlers (via load and unload callbacks) and push the main window onto the window stack. This causes this window to be displayed; it's an empty window until the menu layer is activated and the layer's callbacks are called. Then we wait for window events with `app_event_loop()`. When the app terminates, the `app_event_loop()` function returns and the main window is destroyed as the app exits.
The barcode list window loads when the main window is created and displayed on the watch screen. This happens when the function `window_load()` is called. Let's look at the UI part of its code:
static void window_load(Window *window) {
Layer *window_layer = window_get_root_layer(window);
GRect bounds = layer_get_frame(window_layer);
mainMenu = menu_layer_create(bounds);
// Set all of our callbacks.
menu_layer_set_callbacks(mainMenu, NULL, (MenuLayerCallbacks){
.get_num_sections = mainMenu_get_num_sections,
.get_num_rows = mainMenu_get_num_rows_in_section,
.get_header_height = mainMenu_get_header_height,
.draw_header = mainMenu_draw_header,
.draw_row = mainMenu_draw_row,
.select_click = mainMenu_select_click,
.select_long_click = mainMenu_select_long_click,
});
// Bind the menu layer's click config provider to the window for interactivity
menu_layer_set_click_config_onto_window(mainMenu, window);
// Add it to the window for display
layer_add_child(window_layer, menu_layer_get_layer(mainMenu));
barcode_window = window_create();
window_set_window_handlers(barcode_window, (WindowHandlers) {
.load = barcode_window_load,
.unload = barcode_window_unload,
});
}
In this code, we get the bounds (height, width, and coordinates) of the root window and create the menu layer so that it completely fills the root window. The menu layer is very configurable, and we then configure the menu layer to call various functions when it needs information, when drawing must be done, or when the select button is clicked. We then merge the window's click handler with the menu layer's and we add the menu layer as a child of the root window's root layer with `layer_add_child()`. Finally, we create the barcode window and configure the functions to call when the barcode window is loaded.
Completely examining all the app code is not feasible here, but let's look at the code that selects a menu item. This will walk us through pushing a new window and creating the image layer.
According to the code above, the following code is executed when the "select" button is pressed in the menu window.
static void mainMenu_select_click(MenuLayer *menu_layer, MenuIndex *cell_index, void *data)
{
if (barcodeNameCount == 0) {
state = STATE_NONE;
} else {
window_stack_push(barcode_window, true /* Animated */);
state = STATE_RECEIVING_BARCODE;
send_request(SEND_BARCODE, cell_index->row);
justSelected = cell_index->row;
}
}
The parameters to the function relay the menu layer that was displayed when the button was pressed (unnecessary in our case, since there is only one menu layer), the index (from 0) of the item selected, and any item-specific data that was attached to the item (none for our example). We consider how many barcode names we have; if none, we reset our communication state and do nothing else, because there is nothing to display for selection. If our barcode count is non-zero, we push the barcode window (remember, it has already been created in the initialization phase) and start the image receiving process. Pushing the barcode window means that it will be displayed and it's window load handler will be called. That code is below:
static void barcode_window_load(Window *window) {
Layer *window_layer = window_get_root_layer(window);
GRect bounds = layer_get_frame(window_layer);
barcodeImageData = (uint8_t *)malloc(BYTES_PER_SCREEN);
memset(barcodeImageData, -1, BYTES_PER_SCREEN);
pleaseWait = text_layer_create(GRect(0,65,bounds.size.w,140));
text_layer_set_text_alignment(pleaseWait, GTextAlignmentCenter);
text_layer_set_font(pleaseWait, fonts_get_system_font(FONT_KEY_GOTHIC_28_BOLD));
text_layer_set_text(pleaseWait, "Please wait...");
layer_add_child(window_layer, text_layer_get_layer(pleaseWait));
layer_set_hidden(text_layer_get_layer(pleaseWait), true);
barcodeImageLayer = bitmap_layer_create(GRect(0,0,bounds.size.w,bounds.size.h));
layer_set_update_proc(bitmap_layer_get_layer(barcodeImageLayer), bitmap_layer_update_callback);
layer_add_child(window_layer, bitmap_layer_get_layer(barcodeImageLayer));
}
Here, we create two layers. The first contains our "please wait" message, created to be located at the coordinates `(0,65)`. The second is the barcode display layer. We create this layer as big as the bitmap window so that it completely fills that bitmap window. For this bitmap layer, we create a memory area, meant to hold the image transmitted from the phone, and we register a function to call when the bitmap layer needs updating. We add both layers to the root layer of the bitmap window, but we set the text window to be hidden until we need it.
This type of interaction is typical. Click handlers are called for button presses; these handlers manipulate layers that are children of windows. Layers are also managed by handlers that draw in them or fill them with image bits.
There is some user interaction that is already implemented for certain windows and layers. We already saw that menu navigation is built into the menu layer; we merged the root windows button management with the menu layer's management. The behavior of the "back" button is also built into each window; the default behavior is to unload the current window, which means calling the window's unload handler.
### Designing Excellent UI Interfaces
There are many sources of information on how to design and implement an excellent user interface. Pebble itself has an extensive set of documentation on how to build a user interface for a smartwatch (there are refereces in the next section). There are four principles we should review here; each of these are amplified by the Pebble documentation.
1. _Keep it simple._ The best user interface designs are simple designs. They don't stand out; they don't get in the way. In fact, they are almost invisible.
2. _Keep it consistent._ Use UI elements consistently. Don't use non-standard elements. Consistent use of familar elements puts users at ease and allows patterns to emerge in interface use. Patterns will grow into habits, which make interfaces feel invisible and create skills that are transferrable to other parts of the app.
3. _Keep it intentional._ Always be purposeful in the layout of windows and layers. Be strategic in the use of interface elements such as fonts, colors, and messages.
4. _Keep it communicating._ Your app should brim with information, always informing the user about actions, changes, and errors.
Applications that build interfaces that follow these rules are easily used and feel familiar even when they haven't been used in a while. Take some time to review the Pebble UI design guidelines to get some feeling for how these principles apply to smartwatch interface design.
### Documentation
As we stated at the beginning of this chapter, the discussion here is not meant to be the definitive guide to writing user interfaces. Rather, we have discussed the basics in detail: windows, layers, and clicks. There are excellent documents that describe other components of user interfaces and detail user interface design principles and guidelines. The links below will help you build on the concepts we have discussed in this chapters.
* There are other components of user interfaces that we have not discussed here. These include [animation](https://developer.pebble.com/guides/graphics-and-animations/animations/)
, [vibration](https://developer.pebble.com/docs/c/User_Interface/Vibes/)
(and the material presented in Chapter 14), and the [backlight](https://developer.pebble.com/docs/c/User_Interface/Light/)
.
* Configuration and settings play a role in how users interact with apps. [A guide to app configuration can be found here.](https://developer.pebble.com/guides/user-interfaces/app-configuration/)
* [There is a guide to user interface design here, including a great discussion of UI design principles, here.](https://developer.pebble.com/guides/design-and-interaction)
* [Guidelines to how to build user interface components, including some of the material we have discussed in this chapter, can be found here.](https://developer.pebble.com/guides/user-interfaces)
### Project Exercises
#### Project 18.1
Let's reconsider Project 3.1, [the answer to which can be found here](https://cloudpebble.net/ide/import/github/learning-c-with-pebble/project-3-1-answer)
. In this project, we bounced a ball around the screen. Make the following changes:
* The "up" and "down" buttons in the project changed the size and speed of the ball, with "up" increasing both and "down" decreasing both. Separate these functions: a single click on these buttons should increase or decrease size of the ball and a long click on these buttons should increase or decrease speed.
* The "select" button was used to restart the ball. Make the select button restart the ball on a double click only.
* Make a long click on the "select" button change the color of the ball. Experiment with how long the long click should be. Make the long click very long: 2 seconds or more.
[You can find answer to this project here.](https://cloudpebble.net/ide/import/github/learning-c-with-pebble/project-18-1-answer)
#### Project 18.2.1
Let's reconsider Project 6.4. [The starter code drew concentric circles using a loop; the final project answer converted the loop version to a recursive version.](https://cloudpebble.net/ide/import/github/learning-c-with-pebble/project-6-4-answer)
We are going draw concentric circles with color. If we reverse the loop and draw the circles inside each other, we can get a nice coloration. Here's a rewrite of `draw_circles` that does this:
static void draw_circles(GContext *ctx) {
GColor color = GColorBlack;
graphics_context_set_stroke_color(ctx, GColorBlack);
for(int radius = screen_width / 2; radius >= 0; radius -= 10) {
color.argb += 5;
graphics_context_set_fill_color(ctx, color);
graphics_fill_circle(ctx, center, radius);
graphics_draw_circle(ctx, center, radius);
}
}
**Step 1:** Alter the code in `drawing_layer_update_callback()` to log a message before it calls `draw_circles()`. It should look like this:
static void drawing_layer_update_callback(Layer *me, GContext *ctx) {
APP_LOG(APP_LOG_LEVEL_INFO, "The drawing layer is updating.");
draw_circles(ctx);
}
_Question #1:_ Examine the app log to see the logging messages. Count the number of messages. Can you explain why the number of updates occured like they did?
**Step 2:** Use the function `layer_mark_dirty()` to mark the drawing layer as dirty and to force a redraw. You can put this call as the last line in `drawing_layer_update_callback()` or in `draw_circles()`.
_Question #2:_ Go to the app log and count the updates to the layer. Can you explain these results?
#### Project 18.2.2
The goal of this project is to draw circles by drawing one circle on its own layer and stacking the layers up.
Here's a couple of thoughts:
* We cannot simply replace the code of `draw_circles()` with code to create these new layers. This is because the function is a layer update function and redrawing the base layer will call `draw_circles()` again, which will create layers all over again. This will repeat and fill up memory unneccessarily.
* What will be update callback for these new layers? Each callback will draw one circle on the layer. You will need a new callback.
* How will each layer know what the radius of its circle needs to be? We could compute the radius for each layer, but we would need to know something about where a layer appears in the hierarchy.
Implement a program that maintains a table of layers. Each layer must search for itself in the layer table and use the table position to inform how big a circle to draw.
[An implementation of this solution can be found here.](https://cloudpebble.net/ide/import/github/learning-c-with-pebble/project-18-2-2-answer)
#### Project 18.3
[Find the starter code to Project 18.3 here.](https://cloudpebble.net/ide/import/github/learning-c-with-pebble/project-18-3)
It reads through a file of headlines; calling the function `get_headline()` to get a string with the "next" headline.
You are to write code that declares three text layers. Write the following code:
1. Write a function that will display a headline in a text layer, then display the next line after the "select" button is pressed. You will need to create the text layer and add it to the root window as well.
2. Write a function that displays the headlines, but while one is displayed, a second text layer is used to display the next headline. Swap these after the "button" is pressed and fill the hidden layer with the next headline. You will need code to create and add this second text layer.
3. Write a function that will display a "high priority" text layer. The letters should be in red and the background should be yellow. Make the next headline read from the file be a high priority headline if the "select" button is long pressed. Again you will have to create, configure, and add this layer.
Now, answer some questions about this. Was there any advantage to using two layers? Was there any advantage to using a high priority layer? Would it be just as easy to change the text and colors of one layer?
[You can find an answer to this project here.](https://cloudpebble.net/ide/import/github/learning-c-with-pebble/project-18-3-answer)
#### Project 18.4
This exercise is a bit challenging, mostly because we have not gone over the menu layer in detail.
[Find the starter code for Project 18.4 here.](https://cloudpebble.net/ide/import/github/learning-c-with-pebble/project-18-4)
It reads a file of headlines (like the previous exercise) but adds a second line as the "article" to be read from the headlines. The function `next_headline()` will give you a string that represents the next headline from the file. The function `get_article()` takes an integer and returns a string that represents the article at the position specified by the parameter.
You are implement a menu layer that holds a menu of headlines drawn from the file. When the select button is pressed on a headline, the menu is hidden and the article text is displayed. When the select button is pressed in the article display, the menu is redisplayed. The "back" button will also implement this latter functionality.
Before you implement this, ask some questions. How many windows do you need? What layers should be in those windows? How should your code change the responses to buttons?
You can find information about the menu layer from the barcode example we discussed in this chapter. [The documentation on the menu layer can be found here.](https://developer.pebble.com/docs/c/User_Interface/Layers/MenuLayer/)
[An answer to this project can be found here.](https://cloudpebble.net/ide/import/github/learning-c-with-pebble/project-18-4-answer)
results matching ""
===================
No results matching ""
======================
---
# Chapter 19: Drawing and Graphics · Learning C with Pebble
[Powered by **GitBook**](https://www.gitbook.com/?utm_source=public_site_legacy&utm_medium=referral&utm_campaign=trademark&utm_term=pebble&utm_content=powered_by)
[](https://pebble.gitbooks.io/learning-c-with-pebble/content/chapter19.html#)
[](https://pebble.gitbooks.io/learning-c-with-pebble/content/chapter19.html#)
FacebookGoogle+TwitterWeiboInstapaper
[](https://pebble.gitbooks.io/learning-c-with-pebble/content/chapter19.html#)
[](https://pebble.gitbooks.io/learning-c-with-pebble/content/chapter19.html#)
[](https://pebble.gitbooks.io/learning-c-with-pebble/content/chapter19.html#)
AA
SerifSans
WhiteSepiaNight
[Chapter 19: Drawing and Graphics](https://pebble.gitbooks.io/learning-c-with-pebble/content/)
===============================================================================================
Chapter 19: Graphics
====================
One of the exciting and interesting features of a Pebble smartwatch is the screen. The high-resolution capabilities of the display together with a rich set of graphics APIs give us many ways to render images, draw objects, and display text. This chapter will explore the basics of graphics functionality of the Pebble smatwatch platform.
As with the last chapter, this chapter is by no means meant to be the definitive guide to graphics on a Pebble smartwatch. Rather, the purpose here is to describe the basic concepts of graphics on a Pebble smartwatch and to provide some examples in C that will allow you to practice drawing and rendering on the Pebble smartwatch display. We will finish by providing references for you to read further and some exercises for you to practice your graphics strength.
### Basic Graphics Concepts
There are some basic concepts that we should discuss before diving into the Pebble smartwatch graphics APIs. These concepts come from general graphics ideas and apply to more than just Pebble smartwatches. We will focus on the concepts that apply to Pebble APIs.
#### Pixels and Objects
At its core, a display is a set of _pixels_, arranged in a two-dimensional matrix. A pixel is a point in a display or image; it has size and color. It represents the smallest element of a display or image that can be individually manipulated.
The size of pixels matters to the display or image. Larger pixels make images look "pixelated" or "jaggy"; smaller pixels make images look more detailed or sharper. The size of pixels is usually characterized by a measure of an image or display: pixels per inch (or PPI) is a measure used to resolution of an image. More pixels per inch means more detail and higher resolution.
Pixels have color. A pixel is a sample of an original image and has a single color to represent the area it sampled. In computer systems, a color is typically represented by three component intensities: red, green, and blue. We have reviewed color values on Pebble smartwatch displays in Chapter 12; on a Pebble smartwatch display, a pixel can have up to 64 different colors: 4 values from each of red, green, or blue for a total of 6 bits per pixel.
Images are typically discussed in terms of pixels, but when we discuss graphics and drawing primitives, we can group pixels into shapes or text. Shapes are a basic object of graphics drawing capabilities: shapes like rectangles, circles, and elipses. Shapes have common properties; for example, shapes can be drawn as an outline or filled and with solid colors or grandients. Text is drawn from a set of predesigned shapes called a font. Object drawing functions are usually phrased in terms of shapes; text drawing functions usually include a specification of font.
#### Graphics Context
There are many properties that govern the way a shape or text is drawn. Lines have color and width; shape fill has color. The properties that will affect how an object is drawn are grouped together into something called a _graphics context_.
There are several properties included in a graphics context.
* current fill and line colors
* line widths
* drawing and clipping box
* compositing mode
* antialiasing
We should discuss the last three properties.
The drawing and clipping boxes are the bounds of the graphics areas on a display. Drawing boxes outline the entire area used to draw; clipping boxes are a (usually) temporary constraint on the area to draw. Without specifically setting clipping boxes, drawing graphics will be done in the constraints of the drawing box.
For example, let's say that a drawing box starts at coordinate `(60,60)` on a smartwatch screen and is 100 pixels wide with a height of 100 pixels. If we draw a line from `(10,10)` to `(30, 10)` in the drawing box, the line will actually be drawn from `(70,70)` to `(100,70)` on the screen. Now, we add a clipping box at `(20,10)` that is 20 pixels wide and 20 pixels high, the line will appear in the clipping box only. The drawing will have been clipped by the box to only 10 pixels long.
Compositing mode controls how the graphics are rendered on the screen. Sometimes compositing can be thought of as an operation of blending. For example, if an image's pixels were copied to from the image directly to the screen without change, the compositing mode is called "assignment". If the image's pixels were inverted before being copied, the compositing mode used is called "inverted assignment". In both of these cases, there is no blending of of the image pixels with the pixels already on the screen.
There are six compositing modes available for rendering images:
* **Assignment** (GCompOpAssign): Pixel values are copied directly from the source image to the destination. Because pixels are not changed or blended with any other pixels, this mode is available on all Pebble smartwatch platforms.
* **Inverted Assignment** (GCompOpAssignInverted): Pixel values are _inverted_ and then copied from source image to destination. Because pixel inversion only really makes sense for 1 bit displays, this mode is only supported on non-color displays.
* **OR Assignment**(GCompOpOr): Pixel values are or'd (bitwise) with the destination pixel value, with the result copied to the designation. This is supported only on non-color displays.
* **AND Assignment**(GCompOpOr): Pixel values are and'd (bitwise) with the destination pixel value, with the result copied to the designation. Because a bitwise operation really make sense only with 1-bit displays, this is supported only on non-color displays.
* **Clear** (GCompOpClear): Using the source image as a mask, the destination image is cleared (pixels have a 0 value, or black color). If the bit in the source is 1, the destination bit is cleared at that coordinate. Again, because this only makes sense for 1-bit displays, this mode is supported only on non-color displays.
* **Set** (GCompOpSet): Using the source image as a mask, the bits in the destination are set. This mode is used to apply transparency to images.
Antialiasing is a technique used to smooth images. Because pixels are square, images can look like they are composed of squares, which would make lines and borders have "jaggy" edges. Antialiasing reduces these jaggy edges by surrounding them with shades of color. The jaggy edges become visually less prominent. However, the image also becomes blurrier and less focused. Thus, antialiasing is a balanced technique.
We group these properties together in a graphics context so that we don't have to specify each one every time something is drawn on the screen. We usually include a specification of the context when we call a drawing function, but we don't itemize each property. When we want to change a property, we change it in the context that is specified with drawing functions.
There is usually a default context for a specific drawing instance. Therefore, there is rarely any need to create a context and specify every single property. Contexts are send to all callbacks that need to do drawing and those functions can change contexts as they need to.
As an example, let's consider the "concentric circles" project we looked at in the last chapter's Project Exercises. We can draw concentric circles using a loop and a graphics context like this:
static void draw_circles(GContext *ctx) {
GColor color = GColorBlack;
graphics_context_set_stroke_color(ctx, GColorBlack);
for(int radius = screen_width / 2; radius >= 0; radius -= 10) {
color.argb += 5;
graphics_context_set_fill_color(ctx, color);
graphics_fill_circle(ctx, center, radius);
graphics_draw_circle(ctx, center, radius);
}
}
In this example, we set the "stroke color", that is, the line color, to be `GColorBlack` using `graphics_context_set_stroke_color()`. Whenever we draw a line, or use a "draw" graphics function call, until we change the stroke color, lines will be black. In the loop, we set the "fill color", that is, the color that fills shapes when we use "fill" graphics calls, to the variable `color`, which increments through the possible colors. We use the function `graphics_context_set_fill_color()` to do this. Note that each time we change the context, we include the context variable `ctx`. The example includes two calls to draw circles using this `ctx` context and the circles are drawn using the properties we set.
The example produces a display like that in Figure 19.1:
* * *

**Figure 19.1:**An Example of Concentric Circles
* * *
Now, let's add a call to turn off antialiasing. The circles are not drawn like those in Figure 19.2:
* * *

**Figure 19.2:**An Example of Concentric Circles Without Antialiasing
* * *
The lines in Figure 19.3 are noticeably smoother than those in Figure 19.4.
#### Vectors and Bitmaps
We have seen that drawing or rendering to a Pebble smartwatch screen can be done using many different techniques. However, there are really only two methods for representing and storing objects on a Pebble smartwatch: using _bitmaps_ or _vector graphics_.
Bitmaps are used for pictures and graphics that can be stored as a set of pixels with a numeric value per pixel. Each pixel in a bitmap image is stored as a combination of red, green, and blue colors along with a representation of transparency. We have discussed this for a Pebble smartwatch display as a range of 64 different colors: 4 values from each of red, green, or blue or 8 bits per pixel with transparency. A big advantage to bitmap images is that we can manipulate them algorithmically; we can analyze and possibly alter an image because we can examine each point of color that makes up the image.
Vector graphics take a different approach to images. This approach uses geometric primitives such as lines and curves. In this case, a picture file is made up of a series of instructions describing the primitives making up the image and their locations. One advantage of vector images is that they can be scaled both up and down to be displayed at any resolution. Storing images as vector images usually results in smaller files than their bitmap counterparts, since a line, for example, requires storage of only 2 points, rather than the color values of each individual pixel.
> **Bitmap Compression**
>
> Bitmaps can be large files, especially for high-resolution data. For example, at 8 bits per pixel, a 12MP camera generates 12 MB of data. We can use bitmap compression formats to reduce this size. The same camera data in Portable Network Graphics (PNG) format is just under 7 MB. A JPG format of this data is around 2.5 MB.
>
> There are many bitmap compression formats and algorithms. One of the differences between them is the amount of data lost in compression. PNG is a _lossless_ format: pixels are compressed as much as possible without losing any data. JPG is a _lossy_ format: its compression algorithm loses some data (rationalized as hardly detectable when decompressed) in exchange for greater compression rates.
>
> The Pebble SDK supports the use of PNG bitmap files.
Both bitmaps and vector graphics are embraced by Pebble SDKs. Bitmaps are richly supported using "gbitmap\_" functions; [see Pebble docmentation on graphics types](https://developer.pebble.com/docs/c/Graphics/Graphics_Types/)
. There are drawing functions as well as analysis and construction functions.
Vector graphics are supported through "gdraw\_" functions; [see Pebble documentation on draw commands](https://developer.pebble.com/docs/c/Graphics/Draw_Commands/)
. Many of these general vector functions are made specific in the use of drawing paths, common shape drawing functions (circles, rectangles, and lines), and text drawing.
### The Basics of Drawing
#### Drawing Common Objects
Drawing common graphics objects is made easier in the Pebble SDK by functions that are focused on them. These common objects are:
* pixels
* lines
* rectangles
* circles
* arcs
* bitmaps
Each of these objects have their own drawing functions. In the case of rectangles and circles, there are both outline drawing functions and filled drawing functions. For rectangles, there is a function that will draw a rectangle with rounded corners.
As an example, consider the `draw_circles()` function from the last section. That example drew concentric circles using the `graphics_fill_circle()` function, which draws a outline around the circle specified, and the `graphics_draw_circle()` function, which draws a filled circle.
Similar functions are defined for the other "shaped" objects.
In the case of bitmaps, You can only draw a bitmap in a defined rectangle area. This clips the bitmap if it is outside the bounds of the rectangle specified. You can also rotate a bitmap before drawing. Rotation uses antialiasing.
#### Drawing Bitmaps
A bitmap is a collection of pixels that make up an image. The display on a Pebble smartwatch is also made up of pixels. A bitmap is the closest thing to working directly with a display. The Pebble SDK has many tools for working with bitmaps.
First, we need to define what _format_ a bitmap could have. A bitmap could be composed of single-bit values that represent colors: 0 for white and 1 for black. A bitmap could also be a color bitmap, using 8-bit values. We have discussed several times how 6 bits represent mixes of red, green, and blue. The remaining 2 bits defines levels of transparency: zero for opaque and all ones for completely transparent.
A bitmap is a large area in memory, so we really could just allocate and use a set of bytes to contain pixel value for a bitmap. But there are many ways to work with a bitmap, so using the Pebble SDK functions is much more convenient. In addition, a `GBitmap` is a struct with more information in it than just an array of pixel data.
Creation of a bitmap can be done in a number of ways. Creating a blank, zero-filled bitmap can be done through the `gbitmap_create_blank()` function, whose prototype is below:
GBitmap * gbitmap_create_blank(GSize size, GBitmapFormat format);
Here we need the number of pixels and format of those pixel specified. This is the simplest way to create a bitmap, but there are other ways to create one, including functions that use predefined data. Here is a list:
* create a blank bitmap with a color palette (`gbitmap_create_blank_with_palette()`)
* create a bitmap from data in a resource file (`gbitmap_create_with_resource()`)
* create a bitmap from raw PNG format data (read from a file or created)(`gbitmap_create_from_png_data()`)
* create a bitmap from part of another bitmap (`gbitmap_create_as_sub_bitmap()`)
Once created, blank bitmaps need to be filled with data. This is done using the `gbitmap_set_data()` function, the prototype for which is below:
void gbitmap_set_data(GBitmap * bitmap, uint8_t * data, GBitmapFormat format, uint16_t row_size_bytes,
bool free_on_destroy);
This function needs the bitmap to fill (`bitmap`), the data to fill it with (`data`), the format to use (`format`), the number of bytes per row (`row_size_bytes`), and a determination of whether to free the data when the bitmap is destroyed (`free_on_destroy`).
When a bitmap is created and has data, it will likely need to be drawn on the display. Bitmaps must be drawn in a rectangle area. The `graphics_draw_bitmap_in_rect()` function does this; the prototype is below:
void graphics_draw_bitmap_in_rect(GContext * ctx, const GBitmap * bitmap, GRect rect);
The graphics context is needed (`ctx`), as usual, along with the bitmap to draw (`bitmap`) and the rectangle to draw it in (`rect`).
When an app is done with a bitmap, it needs to be destroyed to free up resources. The `gbitmap_destroy()` function does this:
void gbitmap_destroy(GBitmap * bitmap);
Let's take an example. In chapter 5, we gave a Project Exercise 5.2, where you were to replace the colors in an image. The declarations in the program declares two bitmaps and sets up the width and height of the the screen and the bitmaps:
GBitmap *old_image, *image;
uint8_t *bitmap_data;
int bytes_per_row;
// Set the correct screen height and width (checking for Pebble Time Round)
int HEIGHT = PBL_IF_RECT_ELSE(168,180);
int WIDTH = PBL_IF_RECT_ELSE(144,180);
// Set the height and width of the image
int IMAGE_HEIGHT = 76;
int IMAGE_WIDTH = 56;
Note that the bitmap data is a set of 8-bit bytes; we use the system type `uint8_t` for this data.
Now, we create the bitmaps using this code:
image = gbitmap_create_with_resource(RESOURCE_ID_IMAGE);
old_image = gbitmap_create_with_resource(RESOURCE_ID_IMAGE);
The `RESOURCE_ID_IMAGE` is a file that is included in the application install package (we discuss resource files in Chapter 17). Both bitmaps are created with the same data from the same file.
We are going to display both bitmaps, but change the colors in one of them. To do this, we also need some data derived from the bitmaps. We need the actual byte data, so we can look at each pixel, and the number of bytes per row:
bitmap_data = gbitmap_get_data(image);
bytes_per_row = gbitmap_get_bytes_per_row(image);
In the project code, we examine each bitmap pixel and change one color to another. After we replace the colors in the bitmaps, we draw the bitmaps to the screen:
void draw(Layer *layer, GContext *ctx){
graphics_context_set_compositing_mode(ctx, GCompOpSet);
graphics_draw_bitmap_in_rect(ctx, old_image, GRect((WIDTH-IMAGE_WIDTH)/2, 4, IMAGE_WIDTH, IMAGE_HEIGHT));
graphics_draw_bitmap_in_rect(ctx, image, GRect((WIDTH-IMAGE_WIDTH)/2, HEIGHT-4-IMAGE_HEIGHT, IMAGE_WIDTH, IMAGE_HEIGHT));
graphics_context_set_stroke_color(ctx, GColorBlack);
graphics_draw_line(ctx, GPoint(0,HEIGHT/2), GPoint(WIDTH,HEIGHT/2));
}
In this code, we set the compositing mode in the graphics context to "set" (only the pixels where the bits are non-zero are set). Next, we draw each image in a rectangles that is both `IMAGE_WIDTH` wide and `IMAGE_HEIGHT` high. However, each starts at a different location: 4 pixels from the top for the old image and 4 pixels from the center for the new image. Both images are centered horizontally. We end this code by drawing a black line through the vertical center.
#### Drawing Text
We can draw many things on a Pebble smartwatch screen; we also draw text. For a smartwatch screen, drawing text is the only way we display text. Since we are able to draw text, we can use graphics contexts to manipulate text attributes.
Text renderings have several attributes that can be manipulated.
* **Font** is the most obvious attribute. Fonts govern the style of the characters in the text.
* **Alignment** is an attribute that dictates placement within a box or space.
* **Color** specifies the color of characters in a font.
* **Overflow mode** specifies how to handle text that does not fit into a box or space.
Often, text is specified as being drawn in a box or space. Like a clipping box, this text box defines boundaries that text will be rendered into. Alignment and overflow are defined with respect to this box; the box can clip text that is too big to be completely rendered into it.
Let's consider an example. Let's put some text over the circles from the previous section. Here's the code:
static void draw_circles(GContext *ctx) {
GColor color = GColorBlack;
graphics_context_set_stroke_color(ctx, GColorBlack);
for(int radius = screen_width / 2; radius >= 0; radius -= 10) {
color.argb += 5;
graphics_context_set_fill_color(ctx, color);
graphics_fill_circle(ctx, center, radius);
graphics_draw_circle(ctx, center, radius);
}
graphics_context_set_text_color(ctx, GColorRed);
graphics_draw_text(ctx,
"Getting Dizzy",
fonts_get_system_font(FONT_KEY_GOTHIC_24_BOLD),
GRect(0,80,144,100),
GTextOverflowModeTrailingEllipsis, GTextAlignmentCenter, NULL);
}
Notice the text color is set in the graphics context. The call to draw text include the context, the text to be drawn, and specifications of the attributes listed above: font, alignment, and overflow mode. The text box is given as a box 144 by 100 pixels, starting at point `(0, 80)`. This renders the image in Figure 19.3.
* * *

**Figure 19.3:**An Example of Concentric Circles with Text
* * *
Now let's adjust some of these attributes.
static void draw_circles(GContext *ctx) {
GColor color = GColorBlack;
graphics_context_set_stroke_color(ctx, GColorBlack);
for(int radius = screen_width / 2; radius >= 0; radius -= 10) {
color.argb += 5;
graphics_context_set_fill_color(ctx, color);
graphics_fill_circle(ctx, center, radius);
graphics_draw_circle(ctx, center, radius);
}
graphics_context_set_stroke_width(ctx, 4);
graphics_context_set_text_color(ctx, GColorBlue);
graphics_draw_text(ctx,
"Getting Dizzy",
fonts_get_system_font(FONT_KEY_GOTHIC_24_BOLD),
GRect(0,80,75,30),
GTextOverflowModeTrailingEllipsis, GTextAlignmentCenter, NULL);
}
Here, we change the stroke width and the text box size. The result is shown in Figure 19.4. In this example, the stroke width means nothing with respect to text. However, the box size is too small and therefore the overflow mode means something. The text is truncated and ellipses are added.
* * *

**Figure 19.4:**An Example of Concentric Circles
* * *
More experiments with text can be found below in the Project Exercises.
#### Drawing Paths
The Pebble SDKs have drawing functions that draw circles and rectangles; drawing other shapes requires that we use a _drawing path_. A drawing path is a set of points that can be moved or rotated.
Let's take an example. Let's say we want to draw an animal. We don't have an image to render, but if we work with some graph paper and a steady hand, we can get a set of points that might draw one. From a set of 43 points, here is a chameleon:
* * *

**Figure 19.5:**A Green Chameleon Drawn by Drawing Paths
* * *
To specify this drawing, we need a set of points that could make up a path. The type `GPathInfo` is a struct with two elements: `num_points` giving the number of points and `points` giving the actual points. To draw our lizard, we could specify this:
static const GPathInfo lizard_points = {
.num_points = 43,
.points = (GPoint []) {
// head
{0,72}, {58,72}, {42,88}, {12,72}, {52,14}, {54,29}, {72,9},
// body
{110,23}, {126,43}, {133,73},
// tail to tip
{115,118}, {92,124}, {74,108}, {84,80}, {105,88}, {111,102},
{98,113}, {84, 104}, {91,96}, {100,101},
// tip to foot
{93,101}, {90,105}, {97,107}, {104,100},
{92,91}, {79,108}, {96,116}, {113,104}, {110,80},
// foot
{104,74}, {93,71}, {100,68}, {96,58},
// other foot
{72,72}, {72,91}, {65,101}, {49,101}, {52,97}, {65,90},
// the rest
{58,45}, {58,72}, {51,14}, {58, 72}
}
};
We need a path, created from these points. The path must have a `GPath` type and is created with the `gpath_create()` function, like this:
GPath *lizard_path = gpath_create(&lizard_points);
Now we have a path, which we need to draw on the screen. We can draw the path filled with a color or we can just draw the outline. For our example, we do both.
graphics_context_set_fill_color(ctx, GColorGreen);
gpath_draw_filled(ctx, lizard_path);
graphics_context_set_stroke_color(ctx, GColorBlack);
gpath_draw_outline(ctx, lizard_path);
Notice we still use a graphics context to specify colors and other properties.
Now that we have gone through all the trouble of plotting points for a drawing, let's say we now need to move the drawing down 20 pixels and 10 pixels to the right. In addition, we need to rotate it 20 degrees. We could replot all the points, but we could use path movement and rotation functions, like this:
GPath *lizard_path = gpath_create(&lizard_points);
gpath_rotate_to(lizard_path, TRIG_MAX_ANGLE / 360 * 20);
gpath_move_to(lizard_path, GPoint(20, 10));
graphics_context_set_fill_color(ctx, GColorGreen);
gpath_draw_filled(ctx, lizard_path);
graphics_context_set_stroke_color(ctx, GColorBlack);
gpath_draw_outline(ctx, lizard_path);
And the final result looks like that in Figure 19.6.
* * *

**Figure 19.6:**The Green Chameleon Moved and Rotated
* * *
We should make a final note about _closed_ and _open_ paths. A closed path is one that starts and ends at the same point. An open path is one that does not end at the point it started on. Only closed paths can be drawn filled. Open paths can be drawn with an outline. The `gpath_draw_outline()` function draws an through a closed path; the `gpath_draw_outline_open()` function draws an outline through an open path.
### Drawing to the Framebuffer
In a way, everything we have discussed to this point has been slightly abstract: we have ignored the details of what it takes to actually draw to the screen. In a Pebble smartwatch, the _framebuffer_ is the connection between the software of the smartwatch and the hardware of the screen. Drawing directly to the framebuffer has several advantages, but the higher level concepts of bitmaps, shapes, and pixels are not available.
In order to work directly with the framebuffer, we must "capture" and "release" it. Once the framebuffer is accessed in this way, it is made unavailable for higher-level drawing functions. To capture the framebuffer, we must use the `graphics_capture_frame_buffer()` function. It's prototype is here:
GBitmap * graphics_capture_frame_buffer(GContext *ctx);
When the framebuffer is captured, the framebuffer data is delivered in the form of a bitmap in memory, pointed to by the `GBitmap` pointer returned by the capture function. This bitmap may be manipulated by the functions that the Pebble SDK provides for bitmaps (see below for references). Any changes made to the bitmap are committed to the framebuffer when the framebuffer is released.
To release the framebuffer, you need the `graphics_release_frame_buffer()` function, whose prototype is:
void graphics_release_frame_buffer(GContext *ctx, GBitmap *fb);
Note you have to include the framebuffer bitmap when releasing the framebuffer. This applies the bitmap to the framebuffer directly.
The advantage of drawing bitmaps directly to the framebffer is speed. It is faster to render a bitmap to the framebuffer than it is to draw with other, higher-level functions. The big disadvantage is the loss of those higher-level abilities to work with graphics objects. For example, drawing paths cannot ge rendered to the framebuffer.
### Pebble Documentation References
The point of this chapter is not to define graphics on a Pebble smartwatch but to discuss the basics, give examples, and to help you practice. There are documents that describe graphics in detail. The links below will help you build on the concepts we have discussed in this chapter.
* Basic graphics elements, with extensive functions on bitmaps, [are available here](https://developer.pebble.com/docs/c/Graphics/Graphics_Types/)
.
* Graphics contexts [are covered here](https://developer.pebble.com/docs/c/Graphics/Graphics_Context/)
.
* Basic drawing is [covered here along with a brief dicussion of bitmaps](https://developer.pebble.com/guides/graphics-and-animations/drawing-primitives-images-and-text/)
.
* Very basic drawing functions, including a set of functions for designing animations, [are available here](https://developer.pebble.com/docs/c/Graphics/Draw_Commands/)
.
* Text drawing [is described here](https://developer.pebble.com/docs/c/Graphics/Drawing_Text/)
and fonts [are discussed here](https://developer.pebble.com/docs/c/Graphics/Drawing_Text/)
.
* Drawing to the framebuffer [is discussed here](https://developer.pebble.com/guides/graphics-and-animations/framebuffer-graphics/)
.
### Project Exercises
#### Project 19.1
For this exercise, make your own starter code. We are going to immediately draw an animal without fielding any events. In order to draw an animal, [go to the Web site at this link](http://www.how-to-draw-funny-cartoons.com/draw-animals.html)
. There is a large collection of animals there. Each is drawn with basic shapes you can draw with the Pebble SDK.
Pick an animal and write the code to draw that animal on a Pebble smartwatch screen. Make sure you cite where you found the drawing of the animal.
These types of drawing sometimes are better done using graph paper. You can print free graph paper at many Web sites ([for example, like this one](http://www.printfreegraphpaper.com/)
).
[An example answer is available here.](https://cloudpebble.net/ide/import/github/learning-c-with-pebble/project-19-1-answer)
#### Project 19.2
For this project, we are going to work with the chameleon we gave in this chapter as an example. [You can find the complete program that generates the chameleon here.](https://cloudpebble.net/ide/import/github/learning-c-with-pebble/project-19-2)
The chameleon still needs a few features. Change the code to draw the following items:
* There should be a bug at the end of its tongue. Draw a diamond there. Fill the diamond with black.
* The lizard needs an eye. Draw a filled circle where its eye should be. This needs to be small and filled with black. Draw another circle around the eye, only an outline, to give the eye an eye socket.
* The tongue needs to be longer. Use the `gpath_move_to()` function to move the drawing to the right, then draw a line to extend the tongue. Make sure the bug stays at the end of the tongue.
* The lizard needs a name. Put text under the drawing that gives announces the lizard's name.
[An answer to this project can be found here.](https://cloudpebble.net/ide/import/github/learning-c-with-pebble/project-19-2-answer)
#### Project 19.3
This project will make some changes to Project 5.2, discussed in this chapter. [Start with that code.](https://cloudpebble.net/ide/import/github/learning-c-with-pebble/project-5-2-answer)
Write code to replicate the little man on the display. Each time the "up" button is pressed, double the number of images on the display. Each time the "down" button is pressed, reduce the number by half. Remove the line drawn on the screen.
The images should be displayed evenly without overlapping. Do this by computation, not hardcoding. Eventually, you won't be able to add to the screen without overlapping; when that happens, do replicate further. Likewise when there is only one image on the display, ignore the "down" button.
[An answer to this project can be found here.](https://cloudpebble.net/ide/import/github/learning-c-with-pebble/project-19-3-answer)
#### Project 19.4
[Get this project's starter code here.](https://cloudpebble.net/ide/import/github/learning-c-with-pebble/project-19-4)
It contains 3 files: an image of a chameleon, a picture of water, and an image of a city street. The starter code reads in the files.
For this project you are to put the water or the street images behind the chameleon. To do this, examine each pixel of the chameleon image. When the pixel color is exactly blue, that is, the blue value is maximal blue with no red or green values, copy the pixel at the same location in either the water image or the street image to the new chameleon image. Organize this by button press: when the "up" button is pressed, put the chameleon in water; when the "down" button is pressed, put the chameleon on the street.
This the same method used by weather forcasters on television: the weather map is digitally placed on the TV screen by a computer while the forecaster is standing in from of a blue screen.
Much of the bitmap creation and destruction is in the starter code. You need to fill in the code for `reload_images()`.
[You can find an answer to this project here.](https://cloudpebble.net/ide/import/github/learning-c-with-pebble/project-19-4-answer)
results matching ""
===================
No results matching ""
======================
---