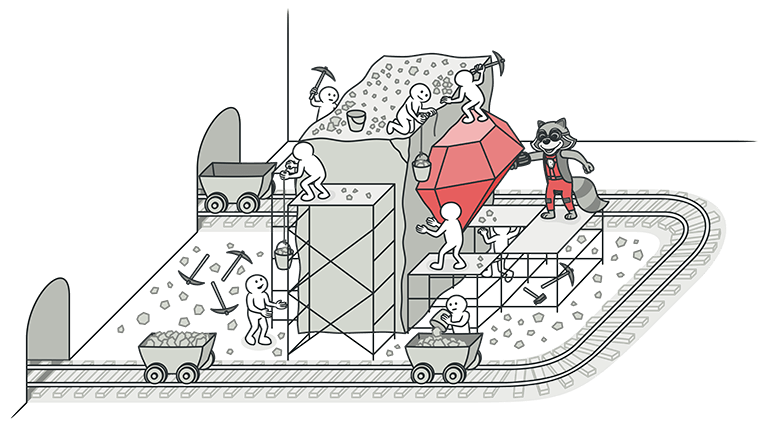
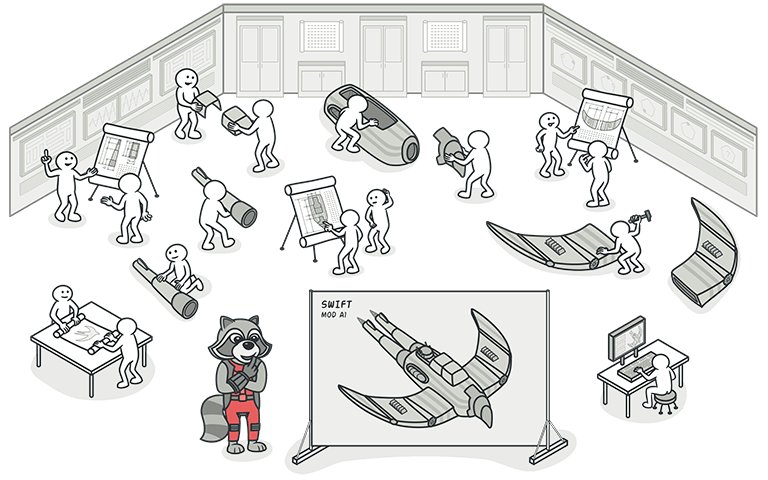
# Table of Contents - [Design Patterns](#design-patterns) - [What's a design pattern?](#what-s-a-design-pattern-) - [The Catalog of Design Patterns](#the-catalog-of-design-patterns) - [Why should I learn patterns?](#why-should-i-learn-patterns-) - [Classification of patterns](#classification-of-patterns) - [Criticism of patterns](#criticism-of-patterns) - [History of patterns](#history-of-patterns) - [Creational Design Patterns](#creational-design-patterns) - [Structural Design Patterns](#structural-design-patterns) - [Factory Method](#factory-method) - [Abstract Factory](#abstract-factory) - [Prototype](#prototype) - [Singleton](#singleton) - [Builder](#builder) - [Behavioral Design Patterns](#behavioral-design-patterns) - [Adapter](#adapter) - [Composite](#composite) - [Bridge](#bridge) - [Facade](#facade) - [Decorator](#decorator) - [Proxy](#proxy) - [Flyweight](#flyweight) - [Iterator](#iterator) - [Chain of Responsibility](#chain-of-responsibility) - [Command](#command) - [Modern Book on Design Patterns: Dive Into Design Patterns](#modern-book-on-design-patterns-dive-into-design-patterns) - [Mediator](#mediator) - [Memento](#memento) - [Observer](#observer) - [State](#state) - [Strategy](#strategy) - [Template Method](#template-method) - [Code Examples of Design Patterns](#code-examples-of-design-patterns) - [Design Patterns in C++](#design-patterns-in-c-) - [Design Patterns in C#](#design-patterns-in-c-) - [Visitor](#visitor) - [Design Patterns in Java](#design-patterns-in-java) - [Design Patterns in Go](#design-patterns-in-go) - [Design Patterns in PHP](#design-patterns-in-php) - [Design Patterns in Python](#design-patterns-in-python) - [Design Patterns in Ruby](#design-patterns-in-ruby) - [Design Patterns in Rust](#design-patterns-in-rust) - [Patrones de diseño / Design patterns](#patrones-de-dise-o-design-patterns) - [Design Patterns in Swift](#design-patterns-in-swift) - [Patrons de conception / Design patterns](#patrons-de-conception-design-patterns) - [디자인 패턴들](#-) - [デザインパターン](#-) - [Wzorce projektowe / Design patterns](#wzorce-projektowe-design-patterns) - [Патерни/шаблони проектування](#-) - [Padrões de Projeto](#padr-es-de-projeto) - [Паттерны/шаблоны проектирования](#-) - [Qu’est-ce qu’un patron de conception ?](#qu-est-ce-qu-un-patron-de-conception-) - [¿Qué es un patrón de diseño?](#-qu-es-un-patr-n-de-dise-o-) - [デザインパターンとは?](#-) - [디자인 패턴이란?](#-) - [Czym jest wzorzec projektowy?](#czym-jest-wzorzec-projektowy-) - [O que é um padrão de projeto?](#o-que-um-padr-o-de-projeto-) - [Design Patterns in TypeScript](#design-patterns-in-typescript) - [Abstract Factory in C++ / Design Patterns](#abstract-factory-in-c-design-patterns) - [Abstract Factory in Go / Design Patterns](#abstract-factory-in-go-design-patterns) - [Abstract Factory in C# / Design Patterns](#abstract-factory-in-c-design-patterns) - [Abstract Factory in Ruby / Design Patterns](#abstract-factory-in-ruby-design-patterns) - [Abstract Factory in PHP / Design Patterns](#abstract-factory-in-php-design-patterns) - [Abstract Factory in Python / Design Patterns](#abstract-factory-in-python-design-patterns) - [Abstract Factory in Rust / Design Patterns](#abstract-factory-in-rust-design-patterns) - [Abstract Factory in Java / Design Patterns](#abstract-factory-in-java-design-patterns) - [Abstract Factory in TypeScript / Design Patterns](#abstract-factory-in-typescript-design-patterns) - [Adapter in C# / Design Patterns](#adapter-in-c-design-patterns) - [Adapter in Go / Design Patterns](#adapter-in-go-design-patterns) - [Abstract Factory in Swift / Design Patterns](#abstract-factory-in-swift-design-patterns) - [Adapter in Ruby / Design Patterns](#adapter-in-ruby-design-patterns) - [Adapter in Rust / Design Patterns](#adapter-in-rust-design-patterns) - [Adapter in PHP / Design Patterns](#adapter-in-php-design-patterns) - [Adapter in Python / Design Patterns](#adapter-in-python-design-patterns) - [Adapter in C++ / Design Patterns](#adapter-in-c-design-patterns) - [Adapter in TypeScript / Design Patterns](#adapter-in-typescript-design-patterns) - [Adapter in Swift / Design Patterns](#adapter-in-swift-design-patterns) - [Adapter in Java / Design Patterns](#adapter-in-java-design-patterns) - [Bridge in C# / Design Patterns](#bridge-in-c-design-patterns) - [Bridge in C++ / Design Patterns](#bridge-in-c-design-patterns) - [Bridge in Go / Design Patterns](#bridge-in-go-design-patterns) - [Bridge in Ruby / Design Patterns](#bridge-in-ruby-design-patterns) - [Bridge in Java / Design Patterns](#bridge-in-java-design-patterns) - [Bridge in Python / Design Patterns](#bridge-in-python-design-patterns) - [Bridge in TypeScript / Design Patterns](#bridge-in-typescript-design-patterns) - [Builder in C++ / Design Patterns](#builder-in-c-design-patterns) - [Bridge in Swift / Design Patterns](#bridge-in-swift-design-patterns) - [Bridge in Rust / Design Patterns](#bridge-in-rust-design-patterns) - [Builder in C# / Design Patterns](#builder-in-c-design-patterns) - [Builder in Go / Design Patterns](#builder-in-go-design-patterns) - [Builder in Ruby / Design Patterns](#builder-in-ruby-design-patterns) - [Ejemplos de código de patrones de diseño](#ejemplos-de-c-digo-de-patrones-de-dise-o) - [Patrones creacionales](#patrones-creacionales) - [Adapter en C++ / Patrones de diseño](#adapter-en-c-patrones-de-dise-o) - [Bridge en Python / Patrones de diseño](#bridge-en-python-patrones-de-dise-o) - [Bridge en C# / Patrones de diseño](#bridge-en-c-patrones-de-dise-o) - [Bridge en Rust / Patrones de diseño](#bridge-en-rust-patrones-de-dise-o) - [Bridge](#bridge) - [Adapter](#adapter) - [Bridge en Java / Patrones de diseño](#bridge-en-java-patrones-de-dise-o) - [Bridge en PHP / Patrones de diseño](#bridge-en-php-patrones-de-dise-o) - [Bridge en TypeScript / Patrones de diseño](#bridge-en-typescript-patrones-de-dise-o) - [Bridge en Go / Patrones de diseño](#bridge-en-go-patrones-de-dise-o) - [Builder en Go / Patrones de diseño](#builder-en-go-patrones-de-dise-o) - [Builder en Ruby / Patrones de diseño](#builder-en-ruby-patrones-de-dise-o) - [Bridge en Swift / Patrones de diseño](#bridge-en-swift-patrones-de-dise-o) - [Builder en Python / Patrones de diseño](#builder-en-python-patrones-de-dise-o) - [Builder en C# / Patrones de diseño](#builder-en-c-patrones-de-dise-o) - [Builder](#builder) - [Libro moderno sobre patrones de diseño: Sumérgete en los patrones de diseño](#libro-moderno-sobre-patrones-de-dise-o-sum-rgete-en-los-patrones-de-dise-o) - [Comparación de fábricas](#comparaci-n-de-f-bricas) - [Builder en Rust / Patrones de diseño](#builder-en-rust-patrones-de-dise-o) - [Clasificación de los patrones](#clasificaci-n-de-los-patrones) - [Abstract Factory en TypeScript / Patrones de diseño](#abstract-factory-en-typescript-patrones-de-dise-o) - [Chain of Responsibility en Python / Patrones de diseño](#chain-of-responsibility-en-python-patrones-de-dise-o) - [Command en C++ / Patrones de diseño](#command-en-c-patrones-de-dise-o) - [Builder en Java / Patrones de diseño](#builder-en-java-patrones-de-dise-o) - [Chain of Responsibility en C# / Patrones de diseño](#chain-of-responsibility-en-c-patrones-de-dise-o) - [Command en Ruby / Patrones de diseño](#command-en-ruby-patrones-de-dise-o) - [Chain of Responsibility en Ruby / Patrones de diseño](#chain-of-responsibility-en-ruby-patrones-de-dise-o) - [Command en C# / Patrones de diseño](#command-en-c-patrones-de-dise-o) - [Builder en Swift / Patrones de diseño](#builder-en-swift-patrones-de-dise-o) - [Composite en C++ / Patrones de diseño](#composite-en-c-patrones-de-dise-o) - [Builder en PHP / Patrones de diseño](#builder-en-php-patrones-de-dise-o) - [Command en Go / Patrones de diseño](#command-en-go-patrones-de-dise-o) - [Builder en TypeScript / Patrones de diseño](#builder-en-typescript-patrones-de-dise-o) - [Chain of Responsibility en C++ / Patrones de diseño](#chain-of-responsibility-en-c-patrones-de-dise-o) - [Chain of Responsibility en Go / Patrones de diseño](#chain-of-responsibility-en-go-patrones-de-dise-o) - [Chain of Responsibility en Java / Patrones de diseño](#chain-of-responsibility-en-java-patrones-de-dise-o) - [El catálogo de patrones de diseño](#el-cat-logo-de-patrones-de-dise-o) - [Composite en Ruby / Patrones de diseño](#composite-en-ruby-patrones-de-dise-o) - [Crítica de los patrones](#cr-tica-de-los-patrones) - [Adapter en Python / Patrones de diseño](#adapter-en-python-patrones-de-dise-o) - [Abstract Factory en Ruby / Patrones de diseño](#abstract-factory-en-ruby-patrones-de-dise-o) - [Adapter en Rust / Patrones de diseño](#adapter-en-rust-patrones-de-dise-o) - [Composite en Python / Patrones de diseño](#composite-en-python-patrones-de-dise-o) - [Command en Python / Patrones de diseño](#command-en-python-patrones-de-dise-o) - [Chain of Responsibility en TypeScript / Patrones de diseño](#chain-of-responsibility-en-typescript-patrones-de-dise-o) - [Composite en Go / Patrones de diseño](#composite-en-go-patrones-de-dise-o) - [Command en Java / Patrones de diseño](#command-en-java-patrones-de-dise-o) - [Chain of Responsibility en PHP / Patrones de diseño](#chain-of-responsibility-en-php-patrones-de-dise-o) - [Chain of Responsibility en Rust / Patrones de diseño](#chain-of-responsibility-en-rust-patrones-de-dise-o) - [Composite en TypeScript / Patrones de diseño](#composite-en-typescript-patrones-de-dise-o) - [Composite en Rust / Patrones de diseño](#composite-en-rust-patrones-de-dise-o) - [Decorator en Go / Patrones de diseño](#decorator-en-go-patrones-de-dise-o) - [Composite en C# / Patrones de diseño](#composite-en-c-patrones-de-dise-o) - [Command en TypeScript / Patrones de diseño](#command-en-typescript-patrones-de-dise-o) - [Decorator en C# / Patrones de diseño](#decorator-en-c-patrones-de-dise-o) - [Decorator en Ruby / Patrones de diseño](#decorator-en-ruby-patrones-de-dise-o) - [Adapter en Java / Patrones de diseño](#adapter-en-java-patrones-de-dise-o) - [Adapter en C# / Patrones de diseño](#adapter-en-c-patrones-de-dise-o) - [Abstract Factory en Python / Patrones de diseño](#abstract-factory-en-python-patrones-de-dise-o) - [Bridge en C++ / Patrones de diseño](#bridge-en-c-patrones-de-dise-o) - [Abstract Factory en Rust / Patrones de diseño](#abstract-factory-en-rust-patrones-de-dise-o) - [Composite en Swift / Patrones de diseño](#composite-en-swift-patrones-de-dise-o) - [Chain of Responsibility en Swift / Patrones de diseño](#chain-of-responsibility-en-swift-patrones-de-dise-o) - [Composite en Java / Patrones de diseño](#composite-en-java-patrones-de-dise-o) - [Command en Swift / Patrones de diseño](#command-en-swift-patrones-de-dise-o) - [Chain of Responsibility](#chain-of-responsibility) - [Composite](#composite) - [Adapter en Ruby / Patrones de diseño](#adapter-en-ruby-patrones-de-dise-o) - [Facade en Python / Patrones de diseño](#facade-en-python-patrones-de-dise-o) - [Decorator en C++ / Patrones de diseño](#decorator-en-c-patrones-de-dise-o) - [Decorator en TypeScript / Patrones de diseño](#decorator-en-typescript-patrones-de-dise-o) - [Adapter en PHP / Patrones de diseño](#adapter-en-php-patrones-de-dise-o) - [Adapter en Go / Patrones de diseño](#adapter-en-go-patrones-de-dise-o) - [Decorator en Rust / Patrones de diseño](#decorator-en-rust-patrones-de-dise-o) - [Command en PHP / Patrones de diseño](#command-en-php-patrones-de-dise-o) - [Facade en Ruby / Patrones de diseño](#facade-en-ruby-patrones-de-dise-o) - [Facade en Rust / Patrones de diseño](#facade-en-rust-patrones-de-dise-o) - [Decorator en Python / Patrones de diseño](#decorator-en-python-patrones-de-dise-o) - [Facade en TypeScript / Patrones de diseño](#facade-en-typescript-patrones-de-dise-o) - [Facade en C++ / Patrones de diseño](#facade-en-c-patrones-de-dise-o) - [Composite en PHP / Patrones de diseño](#composite-en-php-patrones-de-dise-o) - [Bridge en Ruby / Patrones de diseño](#bridge-en-ruby-patrones-de-dise-o) - [Facade en PHP / Patrones de diseño](#facade-en-php-patrones-de-dise-o) - [Decorator](#decorator) - [Decorator en PHP / Patrones de diseño](#decorator-en-php-patrones-de-dise-o) - [Facade](#facade) - [Factory Method en Rust / Patrones de diseño](#factory-method-en-rust-patrones-de-dise-o) - [Patrones de comportamiento](#patrones-de-comportamiento) - [Factory Method en Ruby / Patrones de diseño](#factory-method-en-ruby-patrones-de-dise-o) - [Factory Method en C# / Patrones de diseño](#factory-method-en-c-patrones-de-dise-o) - [Facade en Go / Patrones de diseño](#facade-en-go-patrones-de-dise-o) - [Decorator en Java / Patrones de diseño](#decorator-en-java-patrones-de-dise-o) - [Factory Method en Python / Patrones de diseño](#factory-method-en-python-patrones-de-dise-o) - [Adapter en Swift / Patrones de diseño](#adapter-en-swift-patrones-de-dise-o) - [Builder en C++ / Patrones de diseño](#builder-en-c-patrones-de-dise-o) - [Facade en C# / Patrones de diseño](#facade-en-c-patrones-de-dise-o) - [Decorator en Swift / Patrones de diseño](#decorator-en-swift-patrones-de-dise-o) - [Facade en Java / Patrones de diseño](#facade-en-java-patrones-de-dise-o) - [Patrones de diseño en C#](#patrones-de-dise-o-en-c-) - [Command](#command) - [Factory Method en Go / Patrones de diseño](#factory-method-en-go-patrones-de-dise-o) - [Factory Method en C++ / Patrones de diseño](#factory-method-en-c-patrones-de-dise-o) - [Facade en Swift / Patrones de diseño](#facade-en-swift-patrones-de-dise-o) - [Command en Rust / Patrones de diseño](#command-en-rust-patrones-de-dise-o) - [Factory Method](#factory-method) - [Patrones de diseño en C++](#patrones-de-dise-o-en-c-) - [Factory Method en Java / Patrones de diseño](#factory-method-en-java-patrones-de-dise-o) - [Factory Method en PHP / Patrones de diseño](#factory-method-en-php-patrones-de-dise-o) - [Adapter en TypeScript / Patrones de diseño](#adapter-en-typescript-patrones-de-dise-o) - [Что такое Паттерн?](#-) - [Що таке Патерн?](#-) - [Patrones de diseño en Ruby](#patrones-de-dise-o-en-ruby) - [Patrones de diseño en Swift](#patrones-de-dise-o-en-swift) - [Patrones de diseño en Go](#patrones-de-dise-o-en-go) - [Ланцюжок обов'язків на Java](#-java) - [Patrones de diseño en Python](#patrones-de-dise-o-en-python) - [Мост на PHP](#-php) - [Proxy](#proxy) - [Каталог патернів проектування](#-) - [Легковес](#-) - [Критика патернів](#-) - [Міст](#-) - [Состояние](#-) - [Спостерігач на Python](#-python) - [Паттерны проектирования на C#](#-c-) - [C++로 작성된 디자인 패턴들](#c-) - [Factory Method を PHP で / デザインパターン](#factory-method-php-) - [Polecenie w języku Rust / Wzorce projektowe](#polecenie-w-j-zyku-rust-wzorce-projektowe) - [Команда](#-) - [Fabrique en Rust / Patrons de conception](#fabrique-en-rust-patrons-de-conception) - [Adaptateur en TypeScript / Patrons de conception](#adaptateur-en-typescript-patrons-de-conception) - [Фабричный метод на Go](#-go) - [Адаптер на Swift](#-swift) - [Padrões de Projeto em C#](#padr-es-de-projeto-em-c-) - [デザインパターンを C++ で](#-c-) - [Адаптер](#-) - [Facade em Swift / Padrões de Projeto](#facade-em-swift-padr-es-de-projeto) - [Фабричный метод на C++](#-c-) - [Fabrique abstraite en Swift / Patrons de conception](#fabrique-abstraite-en-swift-patrons-de-conception) - [Будівельник на C++](#-c-) - [Наблюдатель](#-) - [Фасад на C#](#-c-) - [Fasada w języku Swift / Wzorce projektowe](#fasada-w-j-zyku-swift-wzorce-projektowe) - [자바로 작성된 팩토리 메서드 / 디자인 패턴들](#-) - [Фасад на PHP](#-php) - [Фасад на Java](#-java) - [Декоратор на Swift](#-swift) - [Строитель на C++](#-c-) - [Fabrique en PHP / Patrons de conception](#fabrique-en-php-patrons-de-conception) - [Фасад на TypeScript](#-typescript) - [Фасад на C++](#-c-) - [Factory Method em C++ / Padrões de Projeto](#factory-method-em-c-padr-es-de-projeto) - [Factory Method を Java で / デザインパターン](#factory-method-java-) - [Адаптер на Swift](#-swift) - [Фасад на Java](#-java) - [Decorator](#decorator) - [Міст на Ruby](#-ruby) - [Компонувальник на PHP](#-php) - [Фасад на C#](#-c-) - [Factory Method em Go / Padrões de Projeto](#factory-method-em-go-padr-es-de-projeto) - [Спостерігач на C#](#-c-) - [Наблюдатель на TypeScript](#-typescript) - [러스트로 작성된 커맨드 / 디자인 패턴들](#-) - [Command](#command) - [Снимок на Ruby](#-ruby) - [ビジターと二重ディスパッチ](#-) - [Посредник на Rust](#-rust) - [Dekorator w języku PHP / Wzorce projektowe](#dekorator-w-j-zyku-php-wzorce-projektowe) - [Прототип на C++](#-c-) - [Patrones de diseño en TypeScript](#patrones-de-dise-o-en-typescript) - [Prototype em C# / Padrões de Projeto](#prototype-em-c-padr-es-de-projeto) - [C#으로 작성된 프록시 / 디자인 패턴들](#c-) - [파이썬으로 작성된 프로토타입 / 디자인 패턴들](#-) - [패턴에 대한 비판](#-) - [Спостерігач на Go](#-go) - [Спостерігач на Rust](#-rust) - [Patrones de diseño en Rust](#patrones-de-dise-o-en-rust) - [Prototype em Rust / Padrões de Projeto](#prototype-em-rust-padr-es-de-projeto) - [Спостерігач на C++](#-c-) - [Pamiątka w języku TypeScript / Wzorce projektowe](#pami-tka-w-j-zyku-typescript-wzorce-projektowe) - [Декоратор на Swift](#-swift) - [Prototype em Go / Padrões de Projeto](#prototype-em-go-padr-es-de-projeto) - [Memento em C# / Padrões de Projeto](#memento-em-c-padr-es-de-projeto) - [Prototype を Java で / デザインパターン](#prototype-java-) - [Prototype を TypeScript で / デザインパターン](#prototype-typescript-) - [Прототип на Ruby](#-ruby) - [Observer em Swift / Padrões de Projeto](#observer-em-swift-padr-es-de-projeto) - [Mediator w języku PHP / Wzorce projektowe](#mediator-w-j-zyku-php-wzorce-projektowe) - [Obserwator w języku PHP / Wzorce projektowe](#obserwator-w-j-zyku-php-wzorce-projektowe) - [루비로 작성된 프록시 / 디자인 패턴들](#-) - [Proxy を C++ で / デザインパターン](#proxy-c-) - [Go로 작성된 프록시 / 디자인 패턴들](#go-) - [Memento を Swift で / デザインパターン](#memento-swift-) - [Шаблонний метод на Rust](#-rust) - [Memento を PHP で / デザインパターン](#memento-php-) - [Шаблонний метод на Java](#-java) - [Посетитель на Rust](#-rust) - [Prototype を PHP で / デザインパターン](#prototype-php-) - [Template Method](#template-method) - [Patrones estructurales](#patrones-estructurales) - [Шаблонный метод на Swift](#-swift) - [Шаблонний метод на PHP](#-php) - [Посетитель на TypeScript](#-typescript) - [Шаблонный метод на TypeScript](#-typescript) - [Абстрактная фабрика на C#](#-c-) - [Visitor em Java / Padrões de Projeto](#visitor-em-java-padr-es-de-projeto) - [Стратегія на PHP](#-php) - [파이썬으로 작성된 어댑터 / 디자인 패턴들](#-) - [State em PHP / Padrões de Projeto](#state-em-php-padr-es-de-projeto) - [Fabryka abstrakcyjna w języku Go / Wzorce projektowe](#fabryka-abstrakcyjna-w-j-zyku-go-wzorce-projektowe) - [Шаблонний метод на Python](#-python) - [Абстрактная фабрика на C++](#-c-) - [Bridge を C++ で / デザインパターン](#bridge-c-) - [Strategy em Swift / Padrões de Projeto](#strategy-em-swift-padr-es-de-projeto) - [Visitor em Python / Padrões de Projeto](#visitor-em-python-padr-es-de-projeto) - [Odwiedzający w języku Ruby / Wzorce projektowe](#odwiedzaj-cy-w-j-zyku-ruby-wzorce-projektowe) - [Adaptateur en Ruby / Patrons de conception](#adaptateur-en-ruby-patrons-de-conception) - [Odwiedzający w języku Go / Wzorce projektowe](#odwiedzaj-cy-w-j-zyku-go-wzorce-projektowe) --- # Design Patterns [There are patterns of patterns now! \ My friend's project: MetaPatterns.io](https://metapatterns.io/)  [](https://refactoring.guru/design-patterns/#checkout) [](https://refactoring.guru/design-patterns/#checkout) ![](https://refactoring.guru/images/patterns/content/index/full/patterns-01-2x.png?id=3c9d28bb5e9f11205b3878c6b9fcf566) ![](https://refactoring.guru/images/patterns/content/index/full/patterns-02-2x.png?id=cf09c144c61a2e0f178c2bea34806f48) ![](https://refactoring.guru/images/patterns/content/index/full/patterns-03-2x.png?id=34a621d1e23d676c86eb33d8008c1d3d) ![](https://refactoring.guru/images/patterns/content/index/full/patterns-04-2x.png?id=31b2315c8c58c7db9b68ce228f03ecb7) ![](https://refactoring.guru/images/patterns/content/index/full/patterns-05-2x.png?id=ef1937518b72b7cb4afe2674b4806790) ![](https://refactoring.guru/images/patterns/content/index/full/patterns-06-2x.png?id=b4ffdc5d1e46dddf925fe0ab5534d6f9) ![](https://refactoring.guru/images/patterns/content/index/full/patterns-07-2x.png?id=cd9158569a4aedec02096f52057656de) Design Patterns =============== [![Design Patterns](https://refactoring.guru/images/patterns/content/index/patterns-i1-3x.png)](https://refactoring.guru/design-patterns/what-is-pattern "Intro to design patterns") **Design patterns** are typical solutions to common problems in software design. Each pattern is like a blueprint that you can customize to solve a particular design problem in your code. [What's a design pattern?](https://refactoring.guru/design-patterns/what-is-pattern) ### Catalog of patterns [![Catalog of patterns](https://refactoring.guru/images/patterns/content/index/patterns-i2-3x.png)](https://refactoring.guru/design-patterns/catalog "Catalog of patterns") List of 22 classic design patterns, grouped by their intent. [Look inside the catalog »](https://refactoring.guru/design-patterns/catalog) ### Benefits of patterns [![Benefits of patterns](https://refactoring.guru/images/patterns/content/index/patterns-i3-3x.png)](https://refactoring.guru/design-patterns/why-learn-patterns "Benefits of patterns") Patterns are a toolkit of solutions to common problems in software design. They define a common language that helps your team communicate more efficiently. [More about the benefits »](https://refactoring.guru/design-patterns/why-learn-patterns) ### Classification [![Classification of patterns](https://refactoring.guru/images/patterns/content/index/patterns-i4-3x.png)](https://refactoring.guru/design-patterns/classification "Classification of patterns") Design patterns differ by their complexity, level of detail and scale of applicability. In addition, they can be categorized by their intent and divided into three groups. [More about the categories »](https://refactoring.guru/design-patterns/classification) ### History of patterns [![History of patterns](https://refactoring.guru/images/patterns/content/index/patterns-i5-3x.png)](https://refactoring.guru/design-patterns/history "History of patterns") Who invented patterns and when? Can you use patterns outside software development? How do you do that? [More about the history »](https://refactoring.guru/design-patterns/history) ### Criticism of patterns [![Criticism of patterns](https://refactoring.guru/images/patterns/content/index/patterns-i6-3x.png)](https://refactoring.guru/design-patterns/criticism "Criticism of patterns") Are patterns as good as advertised? Is it always possible to use them? Can patterns sometimes be harmful? [More about the criticism »](https://refactoring.guru/design-patterns/criticism) ### Dive Into Design Patterns [![Design patterns book](https://refactoring.guru/images/patterns/banners/patterns-book-banner-3-3x.png)](https://refactoring.guru/design-patterns/book "Design patterns book: Dive Into Design Patterns") Check out our ebook on design patterns and principles. It's available in PDF/ePUB/MOBI formats and includes the archive with code examples in Java, C#, C++, PHP, Python, Ruby, Go, Swift, & TypeScript. [Learn more about the book](https://refactoring.guru/design-patterns/book) [](https://refactoring.guru/design-patterns/book) --- # What's a design pattern? [There are patterns of patterns now! \ My friend's project: MetaPatterns.io](https://metapatterns.io/)  [](https://refactoring.guru/design-patterns/what-is-pattern#checkout) [](https://refactoring.guru/design-patterns/what-is-pattern#checkout) [](https://refactoring.guru/) / [Design Patterns](https://refactoring.guru/design-patterns) What's a design pattern? ======================== **Design patterns** are typical solutions to commonly occurring problems in software design. They are like pre-made blueprints that you can customize to solve a recurring design problem in your code. You can’t just find a pattern and copy it into your program, the way you can with off-the-shelf functions or libraries. The pattern is not a specific piece of code, but a general concept for solving a particular problem. You can follow the pattern details and implement a solution that suits the realities of your own program. Patterns are often confused with algorithms, because both concepts describe typical solutions to some known problems. While an algorithm always defines a clear set of actions that can achieve some goal, a pattern is a more high-level description of a solution. The code of the same pattern applied to two different programs may be different. An analogy to an algorithm is a cooking recipe: both have clear steps to achieve a goal. On the other hand, a pattern is more like a blueprint: you can see what the result and its features are, but the exact order of implementation is up to you. What does the pattern consist of? --------------------------------- Most patterns are described very formally so people can reproduce them in many contexts. Here are the sections that are usually present in a pattern description: * **Intent** of the pattern briefly describes both the problem and the solution. * **Motivation** further explains the problem and the solution the pattern makes possible. * **Structure** of classes shows each part of the pattern and how they are related. * **Code example** in one of the popular programming languages makes it easier to grasp the idea behind the pattern. Some pattern catalogs list other useful details, such as applicability of the pattern, implementation steps and relations with other patterns. --- # The Catalog of Design Patterns [There are patterns of patterns now! \ My friend's project: MetaPatterns.io](https://metapatterns.io/)  [](https://refactoring.guru/design-patterns/catalog#checkout) [](https://refactoring.guru/design-patterns/catalog#checkout) The Catalog of Design Patterns ============================== ### Creational patterns These patterns provide various object creation mechanisms, which increase flexibility and reuse of existing code. [![Factory Method](https://refactoring.guru/images/patterns/cards/factory-method-mini-3x.png) Factory Method](https://refactoring.guru/design-patterns/factory-method) [![Abstract Factory](https://refactoring.guru/images/patterns/cards/abstract-factory-mini-3x.png) Abstract Factory](https://refactoring.guru/design-patterns/abstract-factory) [![Builder](https://refactoring.guru/images/patterns/cards/builder-mini-3x.png) Builder](https://refactoring.guru/design-patterns/builder) [![Prototype](https://refactoring.guru/images/patterns/cards/prototype-mini-3x.png) Prototype](https://refactoring.guru/design-patterns/prototype) [![Singleton](https://refactoring.guru/images/patterns/cards/singleton-mini-3x.png) Singleton](https://refactoring.guru/design-patterns/singleton) ### Structural patterns These patterns explain how to assemble objects and classes into larger structures while keeping these structures flexible and efficient. [![Adapter](https://refactoring.guru/images/patterns/cards/adapter-mini-3x.png) Adapter](https://refactoring.guru/design-patterns/adapter) [![Bridge](https://refactoring.guru/images/patterns/cards/bridge-mini-3x.png) Bridge](https://refactoring.guru/design-patterns/bridge) [![Composite](https://refactoring.guru/images/patterns/cards/composite-mini-3x.png) Composite](https://refactoring.guru/design-patterns/composite) [![Decorator](https://refactoring.guru/images/patterns/cards/decorator-mini-3x.png) Decorator](https://refactoring.guru/design-patterns/decorator) [![Facade](https://refactoring.guru/images/patterns/cards/facade-mini-3x.png) Facade](https://refactoring.guru/design-patterns/facade) [![Flyweight](https://refactoring.guru/images/patterns/cards/flyweight-mini-3x.png) Flyweight](https://refactoring.guru/design-patterns/flyweight) [![Proxy](https://refactoring.guru/images/patterns/cards/proxy-mini-3x.png) Proxy](https://refactoring.guru/design-patterns/proxy) ### Behavioral patterns These patterns are concerned with algorithms and the assignment of responsibilities between objects. [![Chain of Responsibility](https://refactoring.guru/images/patterns/cards/chain-of-responsibility-mini-3x.png) Chain of Responsibility](https://refactoring.guru/design-patterns/chain-of-responsibility) [![Command](https://refactoring.guru/images/patterns/cards/command-mini-3x.png) Command](https://refactoring.guru/design-patterns/command) [![Iterator](https://refactoring.guru/images/patterns/cards/iterator-mini-3x.png) Iterator](https://refactoring.guru/design-patterns/iterator) [![Mediator](https://refactoring.guru/images/patterns/cards/mediator-mini-3x.png) Mediator](https://refactoring.guru/design-patterns/mediator) [![Memento](https://refactoring.guru/images/patterns/cards/memento-mini-3x.png) Memento](https://refactoring.guru/design-patterns/memento) [![Observer](https://refactoring.guru/images/patterns/cards/observer-mini-3x.png) Observer](https://refactoring.guru/design-patterns/observer) [![State](https://refactoring.guru/images/patterns/cards/state-mini-3x.png) State](https://refactoring.guru/design-patterns/state) [![Strategy](https://refactoring.guru/images/patterns/cards/strategy-mini-3x.png) Strategy](https://refactoring.guru/design-patterns/strategy) [![Template Method](https://refactoring.guru/images/patterns/cards/template-method-mini-3x.png) Template Method](https://refactoring.guru/design-patterns/template-method) [![Visitor](https://refactoring.guru/images/patterns/cards/visitor-mini-3x.png) Visitor](https://refactoring.guru/design-patterns/visitor) --- # Why should I learn patterns? [There are patterns of patterns now! \ My friend's project: MetaPatterns.io](https://metapatterns.io/)  [](https://refactoring.guru/design-patterns/why-learn-patterns#checkout) [](https://refactoring.guru/design-patterns/why-learn-patterns#checkout) [](https://refactoring.guru/) / [Design Patterns](https://refactoring.guru/design-patterns) Why should I learn patterns? ============================ The truth is that you might manage to work as a programmer for many years without knowing about a single pattern. A lot of people do just that. Even in that case, though, you might be implementing some patterns without even knowing it. So why would you spend time learning them? * Design patterns are a toolkit of **tried and tested solutions** to common problems in software design. Even if you never encounter these problems, knowing patterns is still useful because it teaches you how to solve all sorts of problems using principles of object-oriented design. * Design patterns define a common language that you and your teammates can use to communicate more efficiently. You can say, “Oh, just use a Singleton for that,” and everyone will understand the idea behind your suggestion. No need to explain what a singleton is if you know the pattern and its name. --- # Classification of patterns [There are patterns of patterns now! \ My friend's project: MetaPatterns.io](https://metapatterns.io/)  [](https://refactoring.guru/design-patterns/classification#checkout) [](https://refactoring.guru/design-patterns/classification#checkout) [](https://refactoring.guru/) / [Design Patterns](https://refactoring.guru/design-patterns) Classification of patterns ========================== Design patterns differ by their complexity, level of detail and scale of applicability to the entire system being designed. I like the analogy to road construction: you can make an intersection safer by either installing some traffic lights or building an entire multi-level interchange with underground passages for pedestrians. The most basic and low-level patterns are often called _idioms_. They usually apply only to a single programming language. The most universal and high-level patterns are _architectural patterns_. Developers can implement these patterns in virtually any language. Unlike other patterns, they can be used to design the architecture of an entire application. In addition, all patterns can be categorized by their _intent_, or purpose. This book covers three main groups of patterns: * **Creational patterns** provide object creation mechanisms that increase flexibility and reuse of existing code. * **Structural patterns** explain how to assemble objects and classes into larger structures, while keeping these structures flexible and efficient. * **Behavioral patterns** take care of effective communication and the assignment of responsibilities between objects. --- # Criticism of patterns [There are patterns of patterns now! \ My friend's project: MetaPatterns.io](https://metapatterns.io/)  [](https://refactoring.guru/design-patterns/criticism#checkout) [](https://refactoring.guru/design-patterns/criticism#checkout) [](https://refactoring.guru/) / [Design Patterns](https://refactoring.guru/design-patterns) Criticism of patterns ===================== It seems like only lazy people haven’t criticized design patterns yet. Let’s take a look at the most typical arguments against using patterns. #### Kludges for a weak programming language This point of view was first expressed by Paul Graham in the essay [Revenge of the Nerds](http://www.paulgraham.com/icad.html) . Read more about this on this [Wiki page](http://wiki.c2.com/?AreDesignPatternsMissingLanguageFeatures) Usually the need for patterns arises when people choose a programming language or a technology that lacks the necessary level of abstraction. In this case, patterns become a kludge that gives the language much-needed super-abilities. For example, the [Strategy](https://refactoring.guru/design-patterns/strategy) pattern can be implemented with a simple anonymous (lambda) function in most modern programming languages. #### Inefficient solutions Patterns try to systematize approaches that are already widely used. This unification is viewed by many as a dogma, and they implement patterns “to the letter”, without adapting them to the context of their project. #### Unjustified use > If all you have is a hammer, everything looks like a nail. This is the problem that haunts many novices who have just familiarized themselves with patterns. Having learned about patterns, they try to apply them everywhere, even in situations where simpler code would do just fine. --- # History of patterns [There are patterns of patterns now! \ My friend's project: MetaPatterns.io](https://metapatterns.io/)  [](https://refactoring.guru/design-patterns/history#checkout) [](https://refactoring.guru/design-patterns/history#checkout) [](https://refactoring.guru/) / [Design Patterns](https://refactoring.guru/design-patterns) History of patterns =================== Who invented patterns? That’s a good, but not a very accurate, question. Design patterns aren’t obscure, sophisticated concepts—quite the opposite. Patterns are typical solutions to common problems in object-oriented design. When a solution gets repeated over and over in various projects, someone eventually puts a name to it and describes the solution in detail. That’s basically how a pattern gets discovered. The concept of patterns was first described by Christopher Alexander in [A Pattern Language: Towns, Buildings, Construction](https://refactoring.guru/pattern-language-book) . The book describes a “language” for designing the urban environment. The units of this language are patterns. They may describe how high windows should be, how many levels a building should have, how large green areas in a neighborhood are supposed to be, and so on. The idea was picked up by four authors: Erich Gamma, John Vlissides, Ralph Johnson, and Richard Helm. In 1994, they published [Design Patterns: Elements of Reusable Object-Oriented Software](https://refactoring.guru/gof-book) , in which they applied the concept of design patterns to programming. The book featured 23 patterns solving various problems of object-oriented design and became a best-seller very quickly. Due to its lengthy name, people started to call it “the book by the gang of four” which was soon shortened to simply “the GoF book”. Since then, dozens of other object-oriented patterns have been discovered. The “pattern approach” became very popular in other programming fields, so lots of other patterns now exist outside of object-oriented design as well. --- # Creational Design Patterns [There are patterns of patterns now! \ My friend's project: MetaPatterns.io](https://metapatterns.io/)  [](https://refactoring.guru/design-patterns/creational-patterns#checkout) [](https://refactoring.guru/design-patterns/creational-patterns#checkout) [](https://refactoring.guru/) / [Design Patterns](https://refactoring.guru/design-patterns) / [Catalog](https://refactoring.guru/design-patterns/catalog) Creational Design Patterns ========================== Creational design patterns provide various object creation mechanisms, which increase flexibility and reuse of existing code. [![Factory Method](https://refactoring.guru/images/patterns/cards/factory-method-mini-3x.png) Factory Method\ \ Provides an interface for creating objects in a superclass, but allows subclasses to alter the type of objects that will be created.](https://refactoring.guru/design-patterns/factory-method) [![Abstract Factory](https://refactoring.guru/images/patterns/cards/abstract-factory-mini-3x.png) Abstract Factory\ \ Lets you produce families of related objects without specifying their concrete classes.](https://refactoring.guru/design-patterns/abstract-factory) [![Builder](https://refactoring.guru/images/patterns/cards/builder-mini-3x.png) Builder\ \ Lets you construct complex objects step by step. The pattern allows you to produce different types and representations of an object using the same construction code.](https://refactoring.guru/design-patterns/builder) [![Prototype](https://refactoring.guru/images/patterns/cards/prototype-mini-3x.png) Prototype\ \ Lets you copy existing objects without making your code dependent on their classes.](https://refactoring.guru/design-patterns/prototype) [![Singleton](https://refactoring.guru/images/patterns/cards/singleton-mini-3x.png) Singleton\ \ Lets you ensure that a class has only one instance, while providing a global access point to this instance.](https://refactoring.guru/design-patterns/singleton) --- # Structural Design Patterns [There are patterns of patterns now! \ My friend's project: MetaPatterns.io](https://metapatterns.io/)  [](https://refactoring.guru/design-patterns/structural-patterns#checkout) [](https://refactoring.guru/design-patterns/structural-patterns#checkout) [](https://refactoring.guru/) / [Design Patterns](https://refactoring.guru/design-patterns) / [Catalog](https://refactoring.guru/design-patterns/catalog) Structural Design Patterns ========================== Structural design patterns explain how to assemble objects and classes into larger structures, while keeping these structures flexible and efficient. [![Adapter](https://refactoring.guru/images/patterns/cards/adapter-mini-3x.png) Adapter\ \ Allows objects with incompatible interfaces to collaborate.](https://refactoring.guru/design-patterns/adapter) [![Bridge](https://refactoring.guru/images/patterns/cards/bridge-mini-3x.png) Bridge\ \ Lets you split a large class or a set of closely related classes into two separate hierarchies—abstraction and implementation—which can be developed independently of each other.](https://refactoring.guru/design-patterns/bridge) [![Composite](https://refactoring.guru/images/patterns/cards/composite-mini-3x.png) Composite\ \ Lets you compose objects into tree structures and then work with these structures as if they were individual objects.](https://refactoring.guru/design-patterns/composite) [![Decorator](https://refactoring.guru/images/patterns/cards/decorator-mini-3x.png) Decorator\ \ Lets you attach new behaviors to objects by placing these objects inside special wrapper objects that contain the behaviors.](https://refactoring.guru/design-patterns/decorator) [![Facade](https://refactoring.guru/images/patterns/cards/facade-mini-3x.png) Facade\ \ Provides a simplified interface to a library, a framework, or any other complex set of classes.](https://refactoring.guru/design-patterns/facade) [![Flyweight](https://refactoring.guru/images/patterns/cards/flyweight-mini-3x.png) Flyweight\ \ Lets you fit more objects into the available amount of RAM by sharing common parts of state between multiple objects instead of keeping all of the data in each object.](https://refactoring.guru/design-patterns/flyweight) [![Proxy](https://refactoring.guru/images/patterns/cards/proxy-mini-3x.png) Proxy\ \ Lets you provide a substitute or placeholder for another object. A proxy controls access to the original object, allowing you to perform something either before or after the request gets through to the original object.](https://refactoring.guru/design-patterns/proxy) --- # Factory Method [There are patterns of patterns now! \ My friend's project: MetaPatterns.io](https://metapatterns.io/)  [](https://refactoring.guru/design-patterns/factory-method#checkout) [](https://refactoring.guru/design-patterns/factory-method#checkout) [](https://refactoring.guru/) / [Design Patterns](https://refactoring.guru/design-patterns) / [Creational Patterns](https://refactoring.guru/design-patterns/creational-patterns) Factory Method ============== Also known as: Virtual Constructor Intent ------ **Factory Method** is a creational design pattern that provides an interface for creating objects in a superclass, but allows subclasses to alter the type of objects that will be created. ![Factory Method pattern](https://refactoring.guru/images/patterns/content/factory-method/factory-method-en-2x.png?id=b3961995a4449fb90820a693013511df) Problem ------- Imagine that you’re creating a logistics management application. The first version of your app can only handle transportation by trucks, so the bulk of your code lives inside the `Truck` class. After a while, your app becomes pretty popular. Each day you receive dozens of requests from sea transportation companies to incorporate sea logistics into the app. ![Adding a new transportation class to the program causes an issue](https://refactoring.guru/images/patterns/diagrams/factory-method/problem1-en-2x.png?id=9a4959d9dde4edadf809be33d3da0c74) Adding a new class to the program isn’t that simple if the rest of the code is already coupled to existing classes. Great news, right? But how about the code? At present, most of your code is coupled to the `Truck` class. Adding `Ships` into the app would require making changes to the entire codebase. Moreover, if later you decide to add another type of transportation to the app, you will probably need to make all of these changes again. As a result, you will end up with pretty nasty code, riddled with conditionals that switch the app’s behavior depending on the class of transportation objects. Solution -------- The Factory Method pattern suggests that you replace direct object construction calls (using the `new` operator) with calls to a special _factory_ method. Don’t worry: the objects are still created via the `new` operator, but it’s being called from within the factory method. Objects returned by a factory method are often referred to as _products._ ![The structure of creator classes](https://refactoring.guru/images/patterns/diagrams/factory-method/solution1-2x.png?id=c482b3cd7a4d8dd73b4c8c12dfcaa03c) Subclasses can alter the class of objects being returned by the factory method. At first glance, this change may look pointless: we just moved the constructor call from one part of the program to another. However, consider this: now you can override the factory method in a subclass and change the class of products being created by the method. There’s a slight limitation though: subclasses may return different types of products only if these products have a common base class or interface. Also, the factory method in the base class should have its return type declared as this interface. ![The structure of the products hierarchy](https://refactoring.guru/images/patterns/diagrams/factory-method/solution2-en-2x.png?id=1209a3156e450b9d7c437ca6bb98b219) All products must follow the same interface. For example, both `Truck` and `Ship` classes should implement the `Transport` interface, which declares a method called `deliver`. Each class implements this method differently: trucks deliver cargo by land, ships deliver cargo by sea. The factory method in the `RoadLogistics` class returns truck objects, whereas the factory method in the `SeaLogistics` class returns ships. ![The structure of the code after applying the factory method pattern](https://refactoring.guru/images/patterns/diagrams/factory-method/solution3-en-2x.png?id=542c0ba89e91ac11ea79e94bc0229f70) As long as all product classes implement a common interface, you can pass their objects to the client code without breaking it. The code that uses the factory method (often called the _client_ code) doesn’t see a difference between the actual products returned by various subclasses. The client treats all the products as abstract `Transport`. The client knows that all transport objects are supposed to have the `deliver` method, but exactly how it works isn’t important to the client. Structure --------- ![The structure of the Factory Method pattern](https://refactoring.guru/images/patterns/diagrams/factory-method/structure-2x.png?id=9ea3aa8a47f8be22e12e523c15b448fd)![The structure of the Factory Method pattern](https://refactoring.guru/images/patterns/diagrams/factory-method/structure-indexed-2x.png?id=c794e4f2d05013fb176464a1d1a5d7ab) 1. The **Product** declares the interface, which is common to all objects that can be produced by the creator and its subclasses. 2. **Concrete Products** are different implementations of the product interface. 3. The **Creator** class declares the factory method that returns new product objects. It’s important that the return type of this method matches the product interface. You can declare the factory method as `abstract` to force all subclasses to implement their own versions of the method. As an alternative, the base factory method can return some default product type. Note, despite its name, product creation is **not** the primary responsibility of the creator. Usually, the creator class already has some core business logic related to products. The factory method helps to decouple this logic from the concrete product classes. Here is an analogy: a large software development company can have a training department for programmers. However, the primary function of the company as a whole is still writing code, not producing programmers. 4. **Concrete Creators** override the base factory method so it returns a different type of product. Note that the factory method doesn’t have to **create** new instances all the time. It can also return existing objects from a cache, an object pool, or another source. Pseudocode ---------- This example illustrates how the **Factory Method** can be used for creating cross-platform UI elements without coupling the client code to concrete UI classes. ![The structure of the Factory Method pattern example](https://refactoring.guru/images/patterns/diagrams/factory-method/example-2x.png?id=a2470830778e318263155000dbdc5870) The cross-platform dialog example. The base `Dialog` class uses different UI elements to render its window. Under various operating systems, these elements may look a little bit different, but they should still behave consistently. A button in Windows is still a button in Linux. When the factory method comes into play, you don’t need to rewrite the logic of the `Dialog` class for each operating system. If we declare a factory method that produces buttons inside the base `Dialog` class, we can later create a subclass that returns Windows-styled buttons from the factory method. The subclass then inherits most of the code from the base class, but, thanks to the factory method, can render Windows-looking buttons on the screen. For this pattern to work, the base `Dialog` class must work with abstract buttons: a base class or an interface that all concrete buttons follow. This way the code within `Dialog` remains functional, whichever type of buttons it works with. Of course, you can apply this approach to other UI elements as well. However, with each new factory method you add to the `Dialog`, you get closer to the [Abstract Factory](https://refactoring.guru/design-patterns/abstract-factory) pattern. Fear not, we’ll talk about this pattern later. // The creator class declares the factory method that must // return an object of a product class. The creator's subclasses // usually provide the implementation of this method. class Dialog is // The creator may also provide some default implementation // of the factory method. abstract method createButton():Button // Note that, despite its name, the creator's primary // responsibility isn't creating products. It usually // contains some core business logic that relies on product // objects returned by the factory method. Subclasses can // indirectly change that business logic by overriding the // factory method and returning a different type of product // from it. method render() is // Call the factory method to create a product object. Button okButton = createButton() // Now use the product. okButton.onClick(closeDialog) okButton.render() // Concrete creators override the factory method to change the // resulting product's type. class WindowsDialog extends Dialog is method createButton():Button is return new WindowsButton() class WebDialog extends Dialog is method createButton():Button is return new HTMLButton() // The product interface declares the operations that all // concrete products must implement. interface Button is method render() method onClick(f) // Concrete products provide various implementations of the // product interface. class WindowsButton implements Button is method render(a, b) is // Render a button in Windows style. method onClick(f) is // Bind a native OS click event. class HTMLButton implements Button is method render(a, b) is // Return an HTML representation of a button. method onClick(f) is // Bind a web browser click event. class Application is field dialog: Dialog // The application picks a creator's type depending on the // current configuration or environment settings. method initialize() is config = readApplicationConfigFile() if (config.OS == "Windows") then dialog = new WindowsDialog() else if (config.OS == "Web") then dialog = new WebDialog() else throw new Exception("Error! Unknown operating system.") // The client code works with an instance of a concrete // creator, albeit through its base interface. As long as // the client keeps working with the creator via the base // interface, you can pass it any creator's subclass. method main() is this.initialize() dialog.render() Applicability ------------- Use the Factory Method when you don’t know beforehand the exact types and dependencies of the objects your code should work with. The Factory Method separates product construction code from the code that actually uses the product. Therefore it’s easier to extend the product construction code independently from the rest of the code. For example, to add a new product type to the app, you’ll only need to create a new creator subclass and override the factory method in it. Use the Factory Method when you want to provide users of your library or framework with a way to extend its internal components. Inheritance is probably the easiest way to extend the default behavior of a library or framework. But how would the framework recognize that your subclass should be used instead of a standard component? The solution is to reduce the code that constructs components across the framework into a single factory method and let anyone override this method in addition to extending the component itself. Let’s see how that would work. Imagine that you write an app using an open source UI framework. Your app should have round buttons, but the framework only provides square ones. You extend the standard `Button` class with a glorious `RoundButton` subclass. But now you need to tell the main `UIFramework` class to use the new button subclass instead of a default one. To achieve this, you create a subclass `UIWithRoundButtons` from a base framework class and override its `createButton` method. While this method returns `Button` objects in the base class, you make your subclass return `RoundButton` objects. Now use the `UIWithRoundButtons` class instead of `UIFramework`. And that’s about it! Use the Factory Method when you want to save system resources by reusing existing objects instead of rebuilding them each time. You often experience this need when dealing with large, resource-intensive objects such as database connections, file systems, and network resources. Let’s think about what has to be done to reuse an existing object: 1. First, you need to create some storage to keep track of all of the created objects. 2. When someone requests an object, the program should look for a free object inside that pool. 3. … and then return it to the client code. 4. If there are no free objects, the program should create a new one (and add it to the pool). That’s a lot of code! And it must all be put into a single place so that you don’t pollute the program with duplicate code. Probably the most obvious and convenient place where this code could be placed is the constructor of the class whose objects we’re trying to reuse. However, a constructor must always return **new objects** by definition. It can’t return existing instances. Therefore, you need to have a regular method capable of creating new objects as well as reusing existing ones. That sounds very much like a factory method. How to Implement ---------------- 1. Make all products follow the same interface. This interface should declare methods that make sense in every product. 2. Add an empty factory method inside the creator class. The return type of the method should match the common product interface. 3. In the creator’s code find all references to product constructors. One by one, replace them with calls to the factory method, while extracting the product creation code into the factory method. You might need to add a temporary parameter to the factory method to control the type of returned product. At this point, the code of the factory method may look pretty ugly. It may have a large `switch` statement that picks which product class to instantiate. But don’t worry, we’ll fix it soon enough. 4. Now, create a set of creator subclasses for each type of product listed in the factory method. Override the factory method in the subclasses and extract the appropriate bits of construction code from the base method. 5. If there are too many product types and it doesn’t make sense to create subclasses for all of them, you can reuse the control parameter from the base class in subclasses. For instance, imagine that you have the following hierarchy of classes: the base `Mail` class with a couple of subclasses: `AirMail` and `GroundMail`; the `Transport` classes are `Plane`, `Truck` and `Train`. While the `AirMail` class only uses `Plane` objects, `GroundMail` may work with both `Truck` and `Train` objects. You can create a new subclass (say `TrainMail`) to handle both cases, but there’s another option. The client code can pass an argument to the factory method of the `GroundMail` class to control which product it wants to receive. 6. If, after all of the extractions, the base factory method has become empty, you can make it abstract. If there’s something left, you can make it a default behavior of the method. Pros and Cons ------------- * You avoid tight coupling between the creator and the concrete products. * _Single Responsibility Principle_. You can move the product creation code into one place in the program, making the code easier to support. * _Open/Closed Principle_. You can introduce new types of products into the program without breaking existing client code. * The code may become more complicated since you need to introduce a lot of new subclasses to implement the pattern. The best case scenario is when you’re introducing the pattern into an existing hierarchy of creator classes. Relations with Other Patterns ----------------------------- * Many designs start by using [Factory Method](https://refactoring.guru/design-patterns/factory-method) (less complicated and more customizable via subclasses) and evolve toward [Abstract Factory](https://refactoring.guru/design-patterns/abstract-factory) , [Prototype](https://refactoring.guru/design-patterns/prototype) , or [Builder](https://refactoring.guru/design-patterns/builder) (more flexible, but more complicated). * [Abstract Factory](https://refactoring.guru/design-patterns/abstract-factory) classes are often based on a set of [Factory Methods](https://refactoring.guru/design-patterns/factory-method) , but you can also use [Prototype](https://refactoring.guru/design-patterns/prototype) to compose the methods on these classes. * You can use [Factory Method](https://refactoring.guru/design-patterns/factory-method) along with [Iterator](https://refactoring.guru/design-patterns/iterator) to let collection subclasses return different types of iterators that are compatible with the collections. * [Prototype](https://refactoring.guru/design-patterns/prototype) isn’t based on inheritance, so it doesn’t have its drawbacks. On the other hand, _Prototype_ requires a complicated initialization of the cloned object. [Factory Method](https://refactoring.guru/design-patterns/factory-method) is based on inheritance but doesn’t require an initialization step. * [Factory Method](https://refactoring.guru/design-patterns/factory-method) is a specialization of [Template Method](https://refactoring.guru/design-patterns/template-method) . At the same time, a _Factory Method_ may serve as a step in a large _Template Method_. Code Examples ------------- [![Factory Method in C#](https://refactoring.guru/images/patterns/icons/csharp.svg?id=da64592defc6e86d57c39c66e9de3e58)](https://refactoring.guru/design-patterns/factory-method/csharp/example "Factory Method in C#") [![Factory Method in C++](https://refactoring.guru/images/patterns/icons/cpp.svg?id=f7782ed8b8666246bfcc3f8fefc3b858)](https://refactoring.guru/design-patterns/factory-method/cpp/example "Factory Method in C++") [![Factory Method in Go](https://refactoring.guru/images/patterns/icons/go.svg?id=1a89927eb99b1ea3fde7701d97970aca)](https://refactoring.guru/design-patterns/factory-method/go/example "Factory Method in Go") [![Factory Method in Java](https://refactoring.guru/images/patterns/icons/java.svg?id=e6d87e2dca08c953fe3acd1275ed4f4e)](https://refactoring.guru/design-patterns/factory-method/java/example "Factory Method in Java") [![Factory Method in PHP](https://refactoring.guru/images/patterns/icons/php.svg?id=be1906eb26b71ec1d3b93720d6156618)](https://refactoring.guru/design-patterns/factory-method/php/example "Factory Method in PHP") [![Factory Method in Python](https://refactoring.guru/images/patterns/icons/python.svg?id=6d815d43c0f7050a1151b43e51569c9f)](https://refactoring.guru/design-patterns/factory-method/python/example "Factory Method in Python") [![Factory Method in Ruby](https://refactoring.guru/images/patterns/icons/ruby.svg?id=b065b718c914bf8e960ef731600be1eb)](https://refactoring.guru/design-patterns/factory-method/ruby/example "Factory Method in Ruby") [![Factory Method in Rust](https://refactoring.guru/images/patterns/icons/rust.svg?id=1f5698a4b5ae23fe79413511747e4a87)](https://refactoring.guru/design-patterns/factory-method/rust/example "Factory Method in Rust") [![Factory Method in Swift](https://refactoring.guru/images/patterns/icons/swift.svg?id=0b716c2d52ec3a48fbe91ac031070c1d)](https://refactoring.guru/design-patterns/factory-method/swift/example "Factory Method in Swift") [![Factory Method in TypeScript](https://refactoring.guru/images/patterns/icons/typescript.svg?id=2239d0f16cb703540c205dd8cb0c0cb7)](https://refactoring.guru/design-patterns/factory-method/typescript/example "Factory Method in TypeScript") Extra Content ------------- * Read our [Factory Comparison](https://refactoring.guru/design-patterns/factory-comparison) if you can’t figure out the difference between various factory patterns and concepts. [![](https://refactoring.guru/images/patterns/banners/patterns-book-banner-3-2x.png?id=0cc3f77ab421d1a5c02ee46488231c3a)](https://refactoring.guru/design-patterns/book) ### Support our free website and own the eBook! * 22 design patterns and 8 principles explained in depth. * 409 well-structured, easy to read, jargon-free pages. * 225 clear and helpful illustrations and diagrams. * An archive with code examples in 11 languages. * All devices supported: PDF/EPUB/MOBI/KFX formats. [Learn more…](https://refactoring.guru/design-patterns/book) --- # Abstract Factory [There are patterns of patterns now! \ My friend's project: MetaPatterns.io](https://metapatterns.io/)  [](https://refactoring.guru/design-patterns/abstract-factory#checkout) [](https://refactoring.guru/design-patterns/abstract-factory#checkout) [](https://refactoring.guru/) / [Design Patterns](https://refactoring.guru/design-patterns) / [Creational Patterns](https://refactoring.guru/design-patterns/creational-patterns) Abstract Factory ================ Intent ------ **Abstract Factory** is a creational design pattern that lets you produce families of related objects without specifying their concrete classes. ![Abstract Factory pattern](https://refactoring.guru/images/patterns/content/abstract-factory/abstract-factory-en-2x.png?id=a488ca862db731876fa0513bb2105640) Problem ------- Imagine that you’re creating a furniture shop simulator. Your code consists of classes that represent: 1. A family of related products, say: `Chair` + `Sofa` + `CoffeeTable`. 2. Several variants of this family. For example, products `Chair` + `Sofa` + `CoffeeTable` are available in these variants: `Modern`, `Victorian`, `ArtDeco`. ![Product families and their variants.](https://refactoring.guru/images/patterns/diagrams/abstract-factory/problem-en-2x.png?id=7de667bc24583c3ac03ccb80f3613cfe) Product families and their variants. You need a way to create individual furniture objects so that they match other objects of the same family. Customers get quite mad when they receive non-matching furniture. ![](https://refactoring.guru/images/patterns/content/abstract-factory/abstract-factory-comic-1-en-2x.png?id=e2d4e7bbdd41899a3a85ebefa88bca3e) A Modern-style sofa doesn’t match Victorian-style chairs. Also, you don’t want to change existing code when adding new products or families of products to the program. Furniture vendors update their catalogs very often, and you wouldn’t want to change the core code each time it happens. Solution -------- The first thing the Abstract Factory pattern suggests is to explicitly declare interfaces for each distinct product of the product family (e.g., chair, sofa or coffee table). Then you can make all variants of products follow those interfaces. For example, all chair variants can implement the `Chair` interface; all coffee table variants can implement the `CoffeeTable` interface, and so on. ![The Chairs class hierarchy](https://refactoring.guru/images/patterns/diagrams/abstract-factory/solution1-2x.png?id=eacec286153e058db9255d26541c0529) All variants of the same object must be moved to a single class hierarchy. The next move is to declare the _Abstract Factory_—an interface with a list of creation methods for all products that are part of the product family (for example, `createChair`, `createSofa` and `createCoffeeTable`). These methods must return **abstract** product types represented by the interfaces we extracted previously: `Chair`, `Sofa`, `CoffeeTable` and so on. ![The _Factories_ class hierarchy](https://refactoring.guru/images/patterns/diagrams/abstract-factory/solution2-2x.png?id=b21557081f75ac7b4110427e89a10378) Each concrete factory corresponds to a specific product variant. Now, how about the product variants? For each variant of a product family, we create a separate factory class based on the `AbstractFactory` interface. A factory is a class that returns products of a particular kind. For example, the `ModernFurnitureFactory` can only create `ModernChair`, `ModernSofa` and `ModernCoffeeTable` objects. The client code has to work with both factories and products via their respective abstract interfaces. This lets you change the type of a factory that you pass to the client code, as well as the product variant that the client code receives, without breaking the actual client code. ![](https://refactoring.guru/images/patterns/content/abstract-factory/abstract-factory-comic-2-en-2x.png?id=824023e4cfdc6f4d2457e6dc3e51ccfb) The client shouldn’t care about the concrete class of the factory it works with. Say the client wants a factory to produce a chair. The client doesn’t have to be aware of the factory’s class, nor does it matter what kind of chair it gets. Whether it’s a Modern model or a Victorian-style chair, the client must treat all chairs in the same manner, using the abstract `Chair` interface. With this approach, the only thing that the client knows about the chair is that it implements the `sitOn` method in some way. Also, whichever variant of the chair is returned, it’ll always match the type of sofa or coffee table produced by the same factory object. There’s one more thing left to clarify: if the client is only exposed to the abstract interfaces, what creates the actual factory objects? Usually, the application creates a concrete factory object at the initialization stage. Just before that, the app must select the factory type depending on the configuration or the environment settings. Structure --------- ![Abstract Factory design pattern](https://refactoring.guru/images/patterns/diagrams/abstract-factory/structure-2x.png?id=c4d3634ec2e74e02a0fe1a83ce9b50f6)![Abstract Factory design pattern](https://refactoring.guru/images/patterns/diagrams/abstract-factory/structure-indexed-2x.png?id=cb6d4e1e89826c42966dc7097374f889) 1. **Abstract Products** declare interfaces for a set of distinct but related products which make up a product family. 2. **Concrete Products** are various implementations of abstract products, grouped by variants. Each abstract product (chair/sofa) must be implemented in all given variants (Victorian/Modern). 3. The **Abstract Factory** interface declares a set of methods for creating each of the abstract products. 4. **Concrete Factories** implement creation methods of the abstract factory. Each concrete factory corresponds to a specific variant of products and creates only those product variants. 5. Although concrete factories instantiate concrete products, signatures of their creation methods must return corresponding _abstract_ products. This way the client code that uses a factory doesn’t get coupled to the specific variant of the product it gets from a factory. The **Client** can work with any concrete factory/product variant, as long as it communicates with their objects via abstract interfaces. Pseudocode ---------- This example illustrates how the **Abstract Factory** pattern can be used for creating cross-platform UI elements without coupling the client code to concrete UI classes, while keeping all created elements consistent with a selected operating system. ![The class diagram for the Abstract Factory pattern example](https://refactoring.guru/images/patterns/diagrams/abstract-factory/example-2x.png?id=eb5127b1d6486f6fad73be2d5e444449) The cross-platform UI classes example. The same UI elements in a cross-platform application are expected to behave similarly, but look a little bit different under different operating systems. Moreover, it’s your job to make sure that the UI elements match the style of the current operating system. You wouldn’t want your program to render macOS controls when it’s executed in Windows. The Abstract Factory interface declares a set of creation methods that the client code can use to produce different types of UI elements. Concrete factories correspond to specific operating systems and create the UI elements that match that particular OS. It works like this: when an application launches, it checks the type of the current operating system. The app uses this information to create a factory object from a class that matches the operating system. The rest of the code uses this factory to create UI elements. This prevents the wrong elements from being created. With this approach, the client code doesn’t depend on concrete classes of factories and UI elements as long as it works with these objects via their abstract interfaces. This also lets the client code support other factories or UI elements that you might add in the future. As a result, you don’t need to modify the client code each time you add a new variation of UI elements to your app. You just have to create a new factory class that produces these elements and slightly modify the app’s initialization code so it selects that class when appropriate. // The abstract factory interface declares a set of methods that // return different abstract products. These products are called // a family and are related by a high-level theme or concept. // Products of one family are usually able to collaborate among // themselves. A family of products may have several variants, // but the products of one variant are incompatible with the // products of another variant. interface GUIFactory is method createButton():Button method createCheckbox():Checkbox // Concrete factories produce a family of products that belong // to a single variant. The factory guarantees that the // resulting products are compatible. Signatures of the concrete // factory's methods return an abstract product, while inside // the method a concrete product is instantiated. class WinFactory implements GUIFactory is method createButton():Button is return new WinButton() method createCheckbox():Checkbox is return new WinCheckbox() // Each concrete factory has a corresponding product variant. class MacFactory implements GUIFactory is method createButton():Button is return new MacButton() method createCheckbox():Checkbox is return new MacCheckbox() // Each distinct product of a product family should have a base // interface. All variants of the product must implement this // interface. interface Button is method paint() // Concrete products are created by corresponding concrete // factories. class WinButton implements Button is method paint() is // Render a button in Windows style. class MacButton implements Button is method paint() is // Render a button in macOS style. // Here's the base interface of another product. All products // can interact with each other, but proper interaction is // possible only between products of the same concrete variant. interface Checkbox is method paint() class WinCheckbox implements Checkbox is method paint() is // Render a checkbox in Windows style. class MacCheckbox implements Checkbox is method paint() is // Render a checkbox in macOS style. // The client code works with factories and products only // through abstract types: GUIFactory, Button and Checkbox. This // lets you pass any factory or product subclass to the client // code without breaking it. class Application is private field factory: GUIFactory private field button: Button constructor Application(factory: GUIFactory) is this.factory = factory method createUI() is this.button = factory.createButton() method paint() is button.paint() // The application picks the factory type depending on the // current configuration or environment settings and creates it // at runtime (usually at the initialization stage). class ApplicationConfigurator is method main() is config = readApplicationConfigFile() if (config.OS == "Windows") then factory = new WinFactory() else if (config.OS == "Mac") then factory = new MacFactory() else throw new Exception("Error! Unknown operating system.") Application app = new Application(factory) Applicability ------------- Use the Abstract Factory when your code needs to work with various families of related products, but you don’t want it to depend on the concrete classes of those products—they might be unknown beforehand or you simply want to allow for future extensibility. The Abstract Factory provides you with an interface for creating objects from each class of the product family. As long as your code creates objects via this interface, you don’t have to worry about creating the wrong variant of a product which doesn’t match the products already created by your app. Consider implementing the Abstract Factory when you have a class with a set of [Factory Methods](https://refactoring.guru/design-patterns/factory-method) that blur its primary responsibility. In a well-designed program _each class is responsible only for one thing_. When a class deals with multiple product types, it may be worth extracting its factory methods into a stand-alone factory class or a full-blown Abstract Factory implementation. How to Implement ---------------- 1. Map out a matrix of distinct product types versus variants of these products. 2. Declare abstract product interfaces for all product types. Then make all concrete product classes implement these interfaces. 3. Declare the abstract factory interface with a set of creation methods for all abstract products. 4. Implement a set of concrete factory classes, one for each product variant. 5. Create factory initialization code somewhere in the app. It should instantiate one of the concrete factory classes, depending on the application configuration or the current environment. Pass this factory object to all classes that construct products. 6. Scan through the code and find all direct calls to product constructors. Replace them with calls to the appropriate creation method on the factory object. Pros and Cons ------------- * You can be sure that the products you’re getting from a factory are compatible with each other. * You avoid tight coupling between concrete products and client code. * _Single Responsibility Principle_. You can extract the product creation code into one place, making the code easier to support. * _Open/Closed Principle_. You can introduce new variants of products without breaking existing client code. * The code may become more complicated than it should be, since a lot of new interfaces and classes are introduced along with the pattern. Relations with Other Patterns ----------------------------- * Many designs start by using [Factory Method](https://refactoring.guru/design-patterns/factory-method) (less complicated and more customizable via subclasses) and evolve toward [Abstract Factory](https://refactoring.guru/design-patterns/abstract-factory) , [Prototype](https://refactoring.guru/design-patterns/prototype) , or [Builder](https://refactoring.guru/design-patterns/builder) (more flexible, but more complicated). * [Builder](https://refactoring.guru/design-patterns/builder) focuses on constructing complex objects step by step. [Abstract Factory](https://refactoring.guru/design-patterns/abstract-factory) specializes in creating families of related objects. _Abstract Factory_ returns the product immediately, whereas _Builder_ lets you run some additional construction steps before fetching the product. * [Abstract Factory](https://refactoring.guru/design-patterns/abstract-factory) classes are often based on a set of [Factory Methods](https://refactoring.guru/design-patterns/factory-method) , but you can also use [Prototype](https://refactoring.guru/design-patterns/prototype) to compose the methods on these classes. * [Abstract Factory](https://refactoring.guru/design-patterns/abstract-factory) can serve as an alternative to [Facade](https://refactoring.guru/design-patterns/facade) when you only want to hide the way the subsystem objects are created from the client code. * You can use [Abstract Factory](https://refactoring.guru/design-patterns/abstract-factory) along with [Bridge](https://refactoring.guru/design-patterns/bridge) . This pairing is useful when some abstractions defined by _Bridge_ can only work with specific implementations. In this case, _Abstract Factory_ can encapsulate these relations and hide the complexity from the client code. * [Abstract Factories](https://refactoring.guru/design-patterns/abstract-factory) , [Builders](https://refactoring.guru/design-patterns/builder) and [Prototypes](https://refactoring.guru/design-patterns/prototype) can all be implemented as [Singletons](https://refactoring.guru/design-patterns/singleton) . Code Examples ------------- [![Abstract Factory in C#](https://refactoring.guru/images/patterns/icons/csharp.svg?id=da64592defc6e86d57c39c66e9de3e58)](https://refactoring.guru/design-patterns/abstract-factory/csharp/example "Abstract Factory in C#") [![Abstract Factory in C++](https://refactoring.guru/images/patterns/icons/cpp.svg?id=f7782ed8b8666246bfcc3f8fefc3b858)](https://refactoring.guru/design-patterns/abstract-factory/cpp/example "Abstract Factory in C++") [![Abstract Factory in Go](https://refactoring.guru/images/patterns/icons/go.svg?id=1a89927eb99b1ea3fde7701d97970aca)](https://refactoring.guru/design-patterns/abstract-factory/go/example "Abstract Factory in Go") [![Abstract Factory in Java](https://refactoring.guru/images/patterns/icons/java.svg?id=e6d87e2dca08c953fe3acd1275ed4f4e)](https://refactoring.guru/design-patterns/abstract-factory/java/example "Abstract Factory in Java") [![Abstract Factory in PHP](https://refactoring.guru/images/patterns/icons/php.svg?id=be1906eb26b71ec1d3b93720d6156618)](https://refactoring.guru/design-patterns/abstract-factory/php/example "Abstract Factory in PHP") [![Abstract Factory in Python](https://refactoring.guru/images/patterns/icons/python.svg?id=6d815d43c0f7050a1151b43e51569c9f)](https://refactoring.guru/design-patterns/abstract-factory/python/example "Abstract Factory in Python") [![Abstract Factory in Ruby](https://refactoring.guru/images/patterns/icons/ruby.svg?id=b065b718c914bf8e960ef731600be1eb)](https://refactoring.guru/design-patterns/abstract-factory/ruby/example "Abstract Factory in Ruby") [![Abstract Factory in Rust](https://refactoring.guru/images/patterns/icons/rust.svg?id=1f5698a4b5ae23fe79413511747e4a87)](https://refactoring.guru/design-patterns/abstract-factory/rust/example "Abstract Factory in Rust") [![Abstract Factory in Swift](https://refactoring.guru/images/patterns/icons/swift.svg?id=0b716c2d52ec3a48fbe91ac031070c1d)](https://refactoring.guru/design-patterns/abstract-factory/swift/example "Abstract Factory in Swift") [![Abstract Factory in TypeScript](https://refactoring.guru/images/patterns/icons/typescript.svg?id=2239d0f16cb703540c205dd8cb0c0cb7)](https://refactoring.guru/design-patterns/abstract-factory/typescript/example "Abstract Factory in TypeScript") Extra Content ------------- * Read our [Factory Comparison](https://refactoring.guru/design-patterns/factory-comparison) to learn more about the differences between various factory patterns and concepts. [![](https://refactoring.guru/images/patterns/banners/patterns-book-banner-3-2x.png?id=0cc3f77ab421d1a5c02ee46488231c3a)](https://refactoring.guru/design-patterns/book) ### Support our free website and own the eBook! * 22 design patterns and 8 principles explained in depth. * 409 well-structured, easy to read, jargon-free pages. * 225 clear and helpful illustrations and diagrams. * An archive with code examples in 11 languages. * All devices supported: PDF/EPUB/MOBI/KFX formats. [Learn more…](https://refactoring.guru/design-patterns/book) --- # Prototype [There are patterns of patterns now! \ My friend's project: MetaPatterns.io](https://metapatterns.io/)  [](https://refactoring.guru/design-patterns/prototype#checkout) [](https://refactoring.guru/design-patterns/prototype#checkout) [](https://refactoring.guru/) / [Design Patterns](https://refactoring.guru/design-patterns) / [Creational Patterns](https://refactoring.guru/design-patterns/creational-patterns) Prototype ========= Also known as: Clone Intent ------ **Prototype** is a creational design pattern that lets you copy existing objects without making your code dependent on their classes. ![Prototype Design Pattern](https://refactoring.guru/images/patterns/content/prototype/prototype-2x.png?id=670789c80c8a114e25838ede2da4a881) Problem ------- Say you have an object, and you want to create an exact copy of it. How would you do it? First, you have to create a new object of the same class. Then you have to go through all the fields of the original object and copy their values over to the new object. Nice! But there’s a catch. Not all objects can be copied that way because some of the object’s fields may be private and not visible from outside of the object itself. ![What can go wrong when copying things "from the outside"?](https://refactoring.guru/images/patterns/content/prototype/prototype-comic-1-en-2x.png?id=1f5b9eeb00df663f4630ca6d38c4804d) Copying an object “from the outside” [isn’t](https://refactoring.guru/cargo-cult) always possible. There’s one more problem with the direct approach. Since you have to know the object’s class to create a duplicate, your code becomes dependent on that class. If the extra dependency doesn’t scare you, there’s another catch. Sometimes you only know the interface that the object follows, but not its concrete class, when, for example, a parameter in a method accepts any objects that follow some interface. Solution -------- The Prototype pattern delegates the cloning process to the actual objects that are being cloned. The pattern declares a common interface for all objects that support cloning. This interface lets you clone an object without coupling your code to the class of that object. Usually, such an interface contains just a single `clone` method. The implementation of the `clone` method is very similar in all classes. The method creates an object of the current class and carries over all of the field values of the old object into the new one. You can even copy private fields because most programming languages let objects access private fields of other objects that belong to the same class. An object that supports cloning is called a _prototype_. When your objects have dozens of fields and hundreds of possible configurations, cloning them might serve as an alternative to subclassing. ![Pre-built prototypes](https://refactoring.guru/images/patterns/content/prototype/prototype-comic-2-en-2x.png?id=dda1589983832b69aee763037293beab) Pre-built prototypes can be an alternative to subclassing. Here’s how it works: you create a set of objects, configured in various ways. When you need an object like the one you’ve configured, you just clone a prototype instead of constructing a new object from scratch. Real-World Analogy ------------------ In real life, prototypes are used for performing various tests before starting mass production of a product. However, in this case, prototypes don’t participate in any actual production, playing a passive role instead. ![The cell division](https://refactoring.guru/images/patterns/content/prototype/prototype-comic-3-en-2x.png?id=63dd16812865486d174b646882effd9a) The division of a cell. Since industrial prototypes don’t really copy themselves, a much closer analogy to the pattern is the process of mitotic cell division (biology, remember?). After mitotic division, a pair of identical cells is formed. The original cell acts as a prototype and takes an active role in creating the copy. Structure --------- #### Basic implementation ![The structure of the Prototype design pattern](https://refactoring.guru/images/patterns/diagrams/prototype/structure-2x.png?id=ba75079f42f08028ae4cdbda0cfecc26)![The structure of the Prototype design pattern](https://refactoring.guru/images/patterns/diagrams/prototype/structure-indexed-2x.png?id=74584ac729c0f6b49d2a97a53cc266ff) 1. The **Prototype** interface declares the cloning methods. In most cases, it’s a single `clone` method. 2. The **Concrete Prototype** class implements the cloning method. In addition to copying the original object’s data to the clone, this method may also handle some edge cases of the cloning process related to cloning linked objects, untangling recursive dependencies, etc. 3. The **Client** can produce a copy of any object that follows the prototype interface. #### Prototype registry implementation ![The prototype registry](https://refactoring.guru/images/patterns/diagrams/prototype/structure-prototype-cache-2x.png?id=a1e4514bbcc9b10968b856f19b407105)![The prototype registry](https://refactoring.guru/images/patterns/diagrams/prototype/structure-prototype-cache-indexed-2x.png?id=47b99eb7ae51158bdbb31deea4f5e98f) 1. The **Prototype Registry** provides an easy way to access frequently-used prototypes. It stores a set of pre-built objects that are ready to be copied. The simplest prototype registry is a `name → prototype` hash map. However, if you need better search criteria than a simple name, you can build a much more robust version of the registry. Pseudocode ---------- In this example, the **Prototype** pattern lets you produce exact copies of geometric objects, without coupling the code to their classes. ![The structure of the Prototype pattern example](https://refactoring.guru/images/patterns/diagrams/prototype/example-2x.png?id=80393e0df17ae8130e5ada832d494949) Cloning a set of objects that belong to a class hierarchy. All shape classes follow the same interface, which provides a cloning method. A subclass may call the parent’s cloning method before copying its own field values to the resulting object. // Base prototype. abstract class Shape is field X: int field Y: int field color: string // A regular constructor. constructor Shape() is // ... // The prototype constructor. A fresh object is initialized // with values from the existing object. constructor Shape(source: Shape) is this() this.X = source.X this.Y = source.Y this.color = source.color // The clone operation returns one of the Shape subclasses. abstract method clone():Shape // Concrete prototype. The cloning method creates a new object // in one go by calling the constructor of the current class and // passing the current object as the constructor's argument. // Performing all the actual copying in the constructor helps to // keep the result consistent: the constructor will not return a // result until the new object is fully built; thus, no object // can have a reference to a partially-built clone. class Rectangle extends Shape is field width: int field height: int constructor Rectangle(source: Rectangle) is // A parent constructor call is needed to copy private // fields defined in the parent class. super(source) this.width = source.width this.height = source.height method clone():Shape is return new Rectangle(this) class Circle extends Shape is field radius: int constructor Circle(source: Circle) is super(source) this.radius = source.radius method clone():Shape is return new Circle(this) // Somewhere in the client code. class Application is field shapes: array of Shape constructor Application() is Circle circle = new Circle() circle.X = 10 circle.Y = 10 circle.radius = 20 shapes.add(circle) Circle anotherCircle = circle.clone() shapes.add(anotherCircle) // The \`anotherCircle\` variable contains an exact copy // of the \`circle\` object. Rectangle rectangle = new Rectangle() rectangle.width = 10 rectangle.height = 20 shapes.add(rectangle) method businessLogic() is // Prototype rocks because it lets you produce a copy of // an object without knowing anything about its type. Array shapesCopy = new Array of Shapes. // For instance, we don't know the exact elements in the // shapes array. All we know is that they are all // shapes. But thanks to polymorphism, when we call the // \`clone\` method on a shape the program checks its real // class and runs the appropriate clone method defined // in that class. That's why we get proper clones // instead of a set of simple Shape objects. foreach (s in shapes) do shapesCopy.add(s.clone()) // The \`shapesCopy\` array contains exact copies of the // \`shape\` array's children. Applicability ------------- Use the Prototype pattern when your code shouldn’t depend on the concrete classes of objects that you need to copy. This happens a lot when your code works with objects passed to you from 3rd-party code via some interface. The concrete classes of these objects are unknown, and you couldn’t depend on them even if you wanted to. The Prototype pattern provides the client code with a general interface for working with all objects that support cloning. This interface makes the client code independent from the concrete classes of objects that it clones. Use the pattern when you want to reduce the number of subclasses that only differ in the way they initialize their respective objects. Suppose you have a complex class that requires a laborious configuration before it can be used. There are several common ways to configure this class, and this code is scattered through your app. To reduce the duplication, you create several subclasses and put every common configuration code into their constructors. You solved the duplication problem, but now you have lots of dummy subclasses. The Prototype pattern lets you use a set of pre-built objects configured in various ways as prototypes. Instead of instantiating a subclass that matches some configuration, the client can simply look for an appropriate prototype and clone it. How to Implement ---------------- 1. Create the prototype interface and declare the `clone` method in it. Or just add the method to all classes of an existing class hierarchy, if you have one. 2. A prototype class must define the alternative constructor that accepts an object of that class as an argument. The constructor must copy the values of all fields defined in the class from the passed object into the newly created instance. If you’re changing a subclass, you must call the parent constructor to let the superclass handle the cloning of its private fields. If your programming language doesn’t support method overloading, you won’t be able to create a separate “prototype” constructor. Thus, copying the object’s data into the newly created clone will have to be performed within the `clone` method. Still, having this code in a regular constructor is safer because the resulting object is returned fully configured right after you call the `new` operator. 3. The cloning method usually consists of just one line: running a `new` operator with the prototypical version of the constructor. Note, that every class must explicitly override the cloning method and use its own class name along with the `new` operator. Otherwise, the cloning method may produce an object of a parent class. 4. Optionally, create a centralized prototype registry to store a catalog of frequently used prototypes. You can implement the registry as a new factory class or put it in the base prototype class with a static method for fetching the prototype. This method should search for a prototype based on search criteria that the client code passes to the method. The criteria might either be a simple string tag or a complex set of search parameters. After the appropriate prototype is found, the registry should clone it and return the copy to the client. Finally, replace the direct calls to the subclasses’ constructors with calls to the factory method of the prototype registry. Pros and Cons ------------- * You can clone objects without coupling to their concrete classes. * You can get rid of repeated initialization code in favor of cloning pre-built prototypes. * You can produce complex objects more conveniently. * You get an alternative to inheritance when dealing with configuration presets for complex objects. * Cloning complex objects that have circular references might be very tricky. Relations with Other Patterns ----------------------------- * Many designs start by using [Factory Method](https://refactoring.guru/design-patterns/factory-method) (less complicated and more customizable via subclasses) and evolve toward [Abstract Factory](https://refactoring.guru/design-patterns/abstract-factory) , [Prototype](https://refactoring.guru/design-patterns/prototype) , or [Builder](https://refactoring.guru/design-patterns/builder) (more flexible, but more complicated). * [Abstract Factory](https://refactoring.guru/design-patterns/abstract-factory) classes are often based on a set of [Factory Methods](https://refactoring.guru/design-patterns/factory-method) , but you can also use [Prototype](https://refactoring.guru/design-patterns/prototype) to compose the methods on these classes. * [Prototype](https://refactoring.guru/design-patterns/prototype) can help when you need to save copies of [Commands](https://refactoring.guru/design-patterns/command) into history. * Designs that make heavy use of [Composite](https://refactoring.guru/design-patterns/composite) and [Decorator](https://refactoring.guru/design-patterns/decorator) can often benefit from using [Prototype](https://refactoring.guru/design-patterns/prototype) . Applying the pattern lets you clone complex structures instead of re-constructing them from scratch. * [Prototype](https://refactoring.guru/design-patterns/prototype) isn’t based on inheritance, so it doesn’t have its drawbacks. On the other hand, _Prototype_ requires a complicated initialization of the cloned object. [Factory Method](https://refactoring.guru/design-patterns/factory-method) is based on inheritance but doesn’t require an initialization step. * Sometimes [Prototype](https://refactoring.guru/design-patterns/prototype) can be a simpler alternative to [Memento](https://refactoring.guru/design-patterns/memento) . This works if the object, the state of which you want to store in the history, is fairly straightforward and doesn’t have links to external resources, or the links are easy to re-establish. * [Abstract Factories](https://refactoring.guru/design-patterns/abstract-factory) , [Builders](https://refactoring.guru/design-patterns/builder) and [Prototypes](https://refactoring.guru/design-patterns/prototype) can all be implemented as [Singletons](https://refactoring.guru/design-patterns/singleton) . Code Examples ------------- [![Prototype in C#](https://refactoring.guru/images/patterns/icons/csharp.svg?id=da64592defc6e86d57c39c66e9de3e58)](https://refactoring.guru/design-patterns/prototype/csharp/example "Prototype in C#") [![Prototype in C++](https://refactoring.guru/images/patterns/icons/cpp.svg?id=f7782ed8b8666246bfcc3f8fefc3b858)](https://refactoring.guru/design-patterns/prototype/cpp/example "Prototype in C++") [![Prototype in Go](https://refactoring.guru/images/patterns/icons/go.svg?id=1a89927eb99b1ea3fde7701d97970aca)](https://refactoring.guru/design-patterns/prototype/go/example "Prototype in Go") [![Prototype in Java](https://refactoring.guru/images/patterns/icons/java.svg?id=e6d87e2dca08c953fe3acd1275ed4f4e)](https://refactoring.guru/design-patterns/prototype/java/example "Prototype in Java") [![Prototype in PHP](https://refactoring.guru/images/patterns/icons/php.svg?id=be1906eb26b71ec1d3b93720d6156618)](https://refactoring.guru/design-patterns/prototype/php/example "Prototype in PHP") [![Prototype in Python](https://refactoring.guru/images/patterns/icons/python.svg?id=6d815d43c0f7050a1151b43e51569c9f)](https://refactoring.guru/design-patterns/prototype/python/example "Prototype in Python") [![Prototype in Ruby](https://refactoring.guru/images/patterns/icons/ruby.svg?id=b065b718c914bf8e960ef731600be1eb)](https://refactoring.guru/design-patterns/prototype/ruby/example "Prototype in Ruby") [![Prototype in Rust](https://refactoring.guru/images/patterns/icons/rust.svg?id=1f5698a4b5ae23fe79413511747e4a87)](https://refactoring.guru/design-patterns/prototype/rust/example "Prototype in Rust") [![Prototype in Swift](https://refactoring.guru/images/patterns/icons/swift.svg?id=0b716c2d52ec3a48fbe91ac031070c1d)](https://refactoring.guru/design-patterns/prototype/swift/example "Prototype in Swift") [![Prototype in TypeScript](https://refactoring.guru/images/patterns/icons/typescript.svg?id=2239d0f16cb703540c205dd8cb0c0cb7)](https://refactoring.guru/design-patterns/prototype/typescript/example "Prototype in TypeScript") [![](https://refactoring.guru/images/patterns/banners/patterns-book-banner-3-2x.png?id=0cc3f77ab421d1a5c02ee46488231c3a)](https://refactoring.guru/design-patterns/book) ### Support our free website and own the eBook! * 22 design patterns and 8 principles explained in depth. * 409 well-structured, easy to read, jargon-free pages. * 225 clear and helpful illustrations and diagrams. * An archive with code examples in 11 languages. * All devices supported: PDF/EPUB/MOBI/KFX formats. [Learn more…](https://refactoring.guru/design-patterns/book) --- # Singleton [There are patterns of patterns now! \ My friend's project: MetaPatterns.io](https://metapatterns.io/)  [](https://refactoring.guru/design-patterns/singleton#checkout) [](https://refactoring.guru/design-patterns/singleton#checkout) [](https://refactoring.guru/) / [Design Patterns](https://refactoring.guru/design-patterns) / [Creational Patterns](https://refactoring.guru/design-patterns/creational-patterns) Singleton ========= Intent ------ **Singleton** is a creational design pattern that lets you ensure that a class has only one instance, while providing a global access point to this instance. ![Singleton pattern](https://refactoring.guru/images/patterns/content/singleton/singleton-2x.png?id=accb2cc7594f7a491ce01dddf0d2f876) Problem ------- The Singleton pattern solves two problems at the same time, violating the _Single Responsibility Principle_: 1. **Ensure that a class has just a single instance**. Why would anyone want to control how many instances a class has? The most common reason for this is to control access to some shared resource—for example, a database or a file. Here’s how it works: imagine that you created an object, but after a while decided to create a new one. Instead of receiving a fresh object, you’ll get the one you already created. Note that this behavior is impossible to implement with a regular constructor since a constructor call **must** always return a new object by design. ![The global access to an object](https://refactoring.guru/images/patterns/content/singleton/singleton-comic-1-en-2x.png?id=05678e879d13f7f6a377bab7fba18acc) Clients may not even realize that they’re working with the same object all the time. 2. **Provide a global access point to that instance**. Remember those global variables that you (all right, me) used to store some essential objects? While they’re very handy, they’re also very unsafe since any code can potentially overwrite the contents of those variables and crash the app. Just like a global variable, the Singleton pattern lets you access some object from anywhere in the program. However, it also protects that instance from being overwritten by other code. There’s another side to this problem: you don’t want the code that solves problem #1 to be scattered all over your program. It’s much better to have it within one class, especially if the rest of your code already depends on it. Nowadays, the Singleton pattern has become so popular that people may call something a _singleton_ even if it solves just one of the listed problems. Solution -------- All implementations of the Singleton have these two steps in common: * Make the default constructor private, to prevent other objects from using the `new` operator with the Singleton class. * Create a static creation method that acts as a constructor. Under the hood, this method calls the private constructor to create an object and saves it in a static field. All following calls to this method return the cached object. If your code has access to the Singleton class, then it’s able to call the Singleton’s static method. So whenever that method is called, the same object is always returned. Real-World Analogy ------------------ The government is an excellent example of the Singleton pattern. A country can have only one official government. Regardless of the personal identities of the individuals who form governments, the title, “The Government of X”, is a global point of access that identifies the group of people in charge. Structure --------- ![The structure of the Singleton pattern](https://refactoring.guru/images/patterns/diagrams/singleton/structure-en-2x.png?id=cae4853e43f06db09f249668c35d61a1)![The structure of the Singleton pattern](https://refactoring.guru/images/patterns/diagrams/singleton/structure-en-indexed-2x.png?id=d552220be21d0eda3a8cbe5ccec6dad1) 1. The **Singleton** class declares the static method `getInstance` that returns the same instance of its own class. The Singleton’s constructor should be hidden from the client code. Calling the `getInstance` method should be the only way of getting the Singleton object. Pseudocode ---------- In this example, the database connection class acts as a **Singleton**. This class doesn’t have a public constructor, so the only way to get its object is to call the `getInstance` method. This method caches the first created object and returns it in all subsequent calls. // The Database class defines the \`getInstance\` method that lets // clients access the same instance of a database connection // throughout the program. class Database is // The field for storing the singleton instance should be // declared static. private static field instance: Database // The singleton's constructor should always be private to // prevent direct construction calls with the \`new\` // operator. private constructor Database() is // Some initialization code, such as the actual // connection to a database server. // ... // The static method that controls access to the singleton // instance. public static method getInstance() is if (Database.instance == null) then acquireThreadLock() and then // Ensure that the instance hasn't yet been // initialized by another thread while this one // has been waiting for the lock's release. if (Database.instance == null) then Database.instance = new Database() return Database.instance // Finally, any singleton should define some business logic // which can be executed on its instance. public method query(sql) is // For instance, all database queries of an app go // through this method. Therefore, you can place // throttling or caching logic here. // ... class Application is method main() is Database foo = Database.getInstance() foo.query("SELECT ...") // ... Database bar = Database.getInstance() bar.query("SELECT ...") // The variable \`bar\` will contain the same object as // the variable \`foo\`. Applicability ------------- Use the Singleton pattern when a class in your program should have just a single instance available to all clients; for example, a single database object shared by different parts of the program. The Singleton pattern disables all other means of creating objects of a class except for the special creation method. This method either creates a new object or returns an existing one if it has already been created. Use the Singleton pattern when you need stricter control over global variables. Unlike global variables, the Singleton pattern guarantees that there’s just one instance of a class. Nothing, except for the Singleton class itself, can replace the cached instance. Note that you can always adjust this limitation and allow creating any number of Singleton instances. The only piece of code that needs changing is the body of the `getInstance` method. How to Implement ---------------- 1. Add a private static field to the class for storing the singleton instance. 2. Declare a public static creation method for getting the singleton instance. 3. Implement “lazy initialization” inside the static method. It should create a new object on its first call and put it into the static field. The method should always return that instance on all subsequent calls. 4. Make the constructor of the class private. The static method of the class will still be able to call the constructor, but not the other objects. 5. Go over the client code and replace all direct calls to the singleton’s constructor with calls to its static creation method. Pros and Cons ------------- * You can be sure that a class has only a single instance. * You gain a global access point to that instance. * The singleton object is initialized only when it’s requested for the first time. * Violates the _Single Responsibility Principle_. The pattern solves two problems at the time. * The Singleton pattern can mask bad design, for instance, when the components of the program know too much about each other. * The pattern requires special treatment in a multithreaded environment so that multiple threads won’t create a singleton object several times. * It may be difficult to unit test the client code of the Singleton because many test frameworks rely on inheritance when producing mock objects. Since the constructor of the singleton class is private and overriding static methods is impossible in most languages, you will need to think of a creative way to mock the singleton. Or just don’t write the tests. Or don’t use the Singleton pattern. Relations with Other Patterns ----------------------------- * A [Facade](https://refactoring.guru/design-patterns/facade) class can often be transformed into a [Singleton](https://refactoring.guru/design-patterns/singleton) since a single facade object is sufficient in most cases. * [Flyweight](https://refactoring.guru/design-patterns/flyweight) would resemble [Singleton](https://refactoring.guru/design-patterns/singleton) if you somehow managed to reduce all shared states of the objects to just one flyweight object. But there are two fundamental differences between these patterns: 1. There should be only one Singleton instance, whereas a _Flyweight_ class can have multiple instances with different intrinsic states. 2. The _Singleton_ object can be mutable. Flyweight objects are immutable. * [Abstract Factories](https://refactoring.guru/design-patterns/abstract-factory) , [Builders](https://refactoring.guru/design-patterns/builder) and [Prototypes](https://refactoring.guru/design-patterns/prototype) can all be implemented as [Singletons](https://refactoring.guru/design-patterns/singleton) . Code Examples ------------- [![Singleton in C#](https://refactoring.guru/images/patterns/icons/csharp.svg?id=da64592defc6e86d57c39c66e9de3e58)](https://refactoring.guru/design-patterns/singleton/csharp/example "Singleton in C#") [![Singleton in C++](https://refactoring.guru/images/patterns/icons/cpp.svg?id=f7782ed8b8666246bfcc3f8fefc3b858)](https://refactoring.guru/design-patterns/singleton/cpp/example "Singleton in C++") [![Singleton in Go](https://refactoring.guru/images/patterns/icons/go.svg?id=1a89927eb99b1ea3fde7701d97970aca)](https://refactoring.guru/design-patterns/singleton/go/example "Singleton in Go") [![Singleton in Java](https://refactoring.guru/images/patterns/icons/java.svg?id=e6d87e2dca08c953fe3acd1275ed4f4e)](https://refactoring.guru/design-patterns/singleton/java/example "Singleton in Java") [![Singleton in PHP](https://refactoring.guru/images/patterns/icons/php.svg?id=be1906eb26b71ec1d3b93720d6156618)](https://refactoring.guru/design-patterns/singleton/php/example "Singleton in PHP") [![Singleton in Python](https://refactoring.guru/images/patterns/icons/python.svg?id=6d815d43c0f7050a1151b43e51569c9f)](https://refactoring.guru/design-patterns/singleton/python/example "Singleton in Python") [![Singleton in Ruby](https://refactoring.guru/images/patterns/icons/ruby.svg?id=b065b718c914bf8e960ef731600be1eb)](https://refactoring.guru/design-patterns/singleton/ruby/example "Singleton in Ruby") [![Singleton in Rust](https://refactoring.guru/images/patterns/icons/rust.svg?id=1f5698a4b5ae23fe79413511747e4a87)](https://refactoring.guru/design-patterns/singleton/rust/example "Singleton in Rust") [![Singleton in Swift](https://refactoring.guru/images/patterns/icons/swift.svg?id=0b716c2d52ec3a48fbe91ac031070c1d)](https://refactoring.guru/design-patterns/singleton/swift/example "Singleton in Swift") [![Singleton in TypeScript](https://refactoring.guru/images/patterns/icons/typescript.svg?id=2239d0f16cb703540c205dd8cb0c0cb7)](https://refactoring.guru/design-patterns/singleton/typescript/example "Singleton in TypeScript") [![](https://refactoring.guru/images/patterns/banners/patterns-book-banner-3-2x.png?id=0cc3f77ab421d1a5c02ee46488231c3a)](https://refactoring.guru/design-patterns/book) ### Support our free website and own the eBook! * 22 design patterns and 8 principles explained in depth. * 409 well-structured, easy to read, jargon-free pages. * 225 clear and helpful illustrations and diagrams. * An archive with code examples in 11 languages. * All devices supported: PDF/EPUB/MOBI/KFX formats. [Learn more…](https://refactoring.guru/design-patterns/book) --- # Builder [There are patterns of patterns now! \ My friend's project: MetaPatterns.io](https://metapatterns.io/)  [](https://refactoring.guru/design-patterns/builder#checkout) [](https://refactoring.guru/design-patterns/builder#checkout) [](https://refactoring.guru/) / [Design Patterns](https://refactoring.guru/design-patterns) / [Creational Patterns](https://refactoring.guru/design-patterns/creational-patterns) Builder ======= Intent ------ **Builder** is a creational design pattern that lets you construct complex objects step by step. The pattern allows you to produce different types and representations of an object using the same construction code. ![Builder design pattern](https://refactoring.guru/images/patterns/content/builder/builder-en-2x.png?id=8da2aa97abfdabf265e622579fc448a1) Problem ------- Imagine a complex object that requires laborious, step-by-step initialization of many fields and nested objects. Such initialization code is usually buried inside a monstrous constructor with lots of parameters. Or even worse: scattered all over the client code. ![Lots of subclasses create another problem](https://refactoring.guru/images/patterns/diagrams/builder/problem1-2x.png?id=02ffbd7ad294600e42aa78989d441b4d) You might make the program too complex by creating a subclass for every possible configuration of an object. For example, let’s think about how to create a `House` object. To build a simple house, you need to construct four walls and a floor, install a door, fit a pair of windows, and build a roof. But what if you want a bigger, brighter house, with a backyard and other goodies (like a heating system, plumbing, and electrical wiring)? The simplest solution is to extend the base `House` class and create a set of subclasses to cover all combinations of the parameters. But eventually you’ll end up with a considerable number of subclasses. Any new parameter, such as the porch style, will require growing this hierarchy even more. There’s another approach that doesn’t involve breeding subclasses. You can create a giant constructor right in the base `House` class with all possible parameters that control the house object. While this approach indeed eliminates the need for subclasses, it creates another problem. ![The telescoping constructor](https://refactoring.guru/images/patterns/diagrams/builder/problem2-2x.png?id=5e7975a91c0e4f4ba960f908cc9c2ea2) The constructor with lots of parameters has its downside: not all the parameters are needed at all times. In most cases most of the parameters will be unused, making [the constructor calls pretty ugly](https://refactoring.guru/smells/long-parameter-list) . For instance, only a fraction of houses have swimming pools, so the parameters related to swimming pools will be useless nine times out of ten. Solution -------- The Builder pattern suggests that you extract the object construction code out of its own class and move it to separate objects called _builders_. ![Applying the Builder pattern](https://refactoring.guru/images/patterns/diagrams/builder/solution1-2x.png?id=a9c2ab02f0b2aca1a7512022194dd113) The Builder pattern lets you construct complex objects step by step. The Builder doesn’t allow other objects to access the product while it’s being built. The pattern organizes object construction into a set of steps (`buildWalls`, `buildDoor`, etc.). To create an object, you execute a series of these steps on a builder object. The important part is that you don’t need to call all of the steps. You can call only those steps that are necessary for producing a particular configuration of an object. Some of the construction steps might require different implementation when you need to build various representations of the product. For example, walls of a cabin may be built of wood, but the castle walls must be built with stone. In this case, you can create several different builder classes that implement the same set of building steps, but in a different manner. Then you can use these builders in the construction process (i.e., an ordered set of calls to the building steps) to produce different kinds of objects. ![](https://refactoring.guru/images/patterns/content/builder/builder-comic-1-en-2x.png?id=99728c9881fbf45fd3b6e0e3373935f1) Different builders execute the same task in various ways. For example, imagine a builder that builds everything from wood and glass, a second one that builds everything with stone and iron and a third one that uses gold and diamonds. By calling the same set of steps, you get a regular house from the first builder, a small castle from the second and a palace from the third. However, this would only work if the client code that calls the building steps is able to interact with builders using a common interface. #### Director You can go further and extract a series of calls to the builder steps you use to construct a product into a separate class called _director_. The director class defines the order in which to execute the building steps, while the builder provides the implementation for those steps. ![](https://refactoring.guru/images/patterns/content/builder/builder-comic-2-en-2x.png?id=15035f2ea0317a93eca0177fc7ce2f22) The director knows which building steps to execute to get a working product. Having a director class in your program isn’t strictly necessary. You can always call the building steps in a specific order directly from the client code. However, the director class might be a good place to put various construction routines so you can reuse them across your program. In addition, the director class completely hides the details of product construction from the client code. The client only needs to associate a builder with a director, launch the construction with the director, and get the result from the builder. Structure --------- ![Structure of the Builder design pattern](https://refactoring.guru/images/patterns/diagrams/builder/structure-2x.png?id=dca1b1508e23c266cbedc80ffb84311a)![Structure of the Builder design pattern](https://refactoring.guru/images/patterns/diagrams/builder/structure-indexed-2x.png?id=153eed9a51784cbe00d0ca8b3d6b268d) 1. The **Builder** interface declares product construction steps that are common to all types of builders. 2. **Concrete Builders** provide different implementations of the construction steps. Concrete builders may produce products that don’t follow the common interface. 3. **Products** are resulting objects. Products constructed by different builders don’t have to belong to the same class hierarchy or interface. 4. The **Director** class defines the order in which to call construction steps, so you can create and reuse specific configurations of products. 5. The **Client** must associate one of the builder objects with the director. Usually, it’s done just once, via parameters of the director’s constructor. Then the director uses that builder object for all further construction. However, there’s an alternative approach for when the client passes the builder object to the production method of the director. In this case, you can use a different builder each time you produce something with the director. Pseudocode ---------- This example of the **Builder** pattern illustrates how you can reuse the same object construction code when building different types of products, such as cars, and create the corresponding manuals for them. ![The structure of the Builder pattern example](https://refactoring.guru/images/patterns/diagrams/builder/example-en-2x.png?id=d961b9d70bf16679f472119bbbe214da) The example of step-by-step construction of cars and the user guides that fit those car models. A car is a complex object that can be constructed in a hundred different ways. Instead of bloating the `Car` class with a huge constructor, we extracted the car assembly code into a separate car builder class. This class has a set of methods for configuring various parts of a car. If the client code needs to assemble a special, fine-tuned model of a car, it can work with the builder directly. On the other hand, the client can delegate the assembly to the director class, which knows how to use a builder to construct several of the most popular models of cars. You might be shocked, but every car needs a manual (seriously, who reads them?). The manual describes every feature of the car, so the details in the manuals vary across the different models. That’s why it makes sense to reuse an existing construction process for both real cars and their respective manuals. Of course, building a manual isn’t the same as building a car, and that’s why we must provide another builder class that specializes in composing manuals. This class implements the same building methods as its car-building sibling, but instead of crafting car parts, it describes them. By passing these builders to the same director object, we can construct either a car or a manual. The final part is fetching the resulting object. A metal car and a paper manual, although related, are still very different things. We can’t place a method for fetching results in the director without coupling the director to concrete product classes. Hence, we obtain the result of the construction from the builder which performed the job. // Using the Builder pattern makes sense only when your products // are quite complex and require extensive configuration. The // following two products are related, although they don't have // a common interface. class Car is // A car can have a GPS, trip computer and some number of // seats. Different models of cars (sports car, SUV, // cabriolet) might have different features installed or // enabled. class Manual is // Each car should have a user manual that corresponds to // the car's configuration and describes all its features. // The builder interface specifies methods for creating the // different parts of the product objects. interface Builder is method reset() method setSeats(...) method setEngine(...) method setTripComputer(...) method setGPS(...) // The concrete builder classes follow the builder interface and // provide specific implementations of the building steps. Your // program may have several variations of builders, each // implemented differently. class CarBuilder implements Builder is private field car:Car // A fresh builder instance should contain a blank product // object which it uses in further assembly. constructor CarBuilder() is this.reset() // The reset method clears the object being built. method reset() is this.car = new Car() // All production steps work with the same product instance. method setSeats(...) is // Set the number of seats in the car. method setEngine(...) is // Install a given engine. method setTripComputer(...) is // Install a trip computer. method setGPS(...) is // Install a global positioning system. // Concrete builders are supposed to provide their own // methods for retrieving results. That's because various // types of builders may create entirely different products // that don't all follow the same interface. Therefore such // methods can't be declared in the builder interface (at // least not in a statically-typed programming language). // // Usually, after returning the end result to the client, a // builder instance is expected to be ready to start // producing another product. That's why it's a usual // practice to call the reset method at the end of the // \`getProduct\` method body. However, this behavior isn't // mandatory, and you can make your builder wait for an // explicit reset call from the client code before disposing // of the previous result. method getProduct():Car is product = this.car this.reset() return product // Unlike other creational patterns, builder lets you construct // products that don't follow the common interface. class CarManualBuilder implements Builder is private field manual:Manual constructor CarManualBuilder() is this.reset() method reset() is this.manual = new Manual() method setSeats(...) is // Document car seat features. method setEngine(...) is // Add engine instructions. method setTripComputer(...) is // Add trip computer instructions. method setGPS(...) is // Add GPS instructions. method getProduct():Manual is // Return the manual and reset the builder. // The director is only responsible for executing the building // steps in a particular sequence. It's helpful when producing // products according to a specific order or configuration. // Strictly speaking, the director class is optional, since the // client can control builders directly. class Director is // The director works with any builder instance that the // client code passes to it. This way, the client code may // alter the final type of the newly assembled product. // The director can construct several product variations // using the same building steps. method constructSportsCar(builder: Builder) is builder.reset() builder.setSeats(2) builder.setEngine(new SportEngine()) builder.setTripComputer(true) builder.setGPS(true) method constructSUV(builder: Builder) is // ... // The client code creates a builder object, passes it to the // director and then initiates the construction process. The end // result is retrieved from the builder object. class Application is method makeCar() is director = new Director() CarBuilder builder = new CarBuilder() director.constructSportsCar(builder) Car car = builder.getProduct() CarManualBuilder builder = new CarManualBuilder() director.constructSportsCar(builder) // The final product is often retrieved from a builder // object since the director isn't aware of and not // dependent on concrete builders and products. Manual manual = builder.getProduct() Applicability ------------- Use the Builder pattern to get rid of a “telescoping constructor”. Say you have a constructor with ten optional parameters. Calling such a beast is very inconvenient; therefore, you overload the constructor and create several shorter versions with fewer parameters. These constructors still refer to the main one, passing some default values into any omitted parameters. class Pizza { Pizza(int size) { ... } Pizza(int size, boolean cheese) { ... } Pizza(int size, boolean cheese, boolean pepperoni) { ... } // ... Creating such a monster is only possible in languages that support method overloading, such as C# or Java. The Builder pattern lets you build objects step by step, using only those steps that you really need. After implementing the pattern, you don’t have to cram dozens of parameters into your constructors anymore. Use the Builder pattern when you want your code to be able to create different representations of some product (for example, stone and wooden houses). The Builder pattern can be applied when construction of various representations of the product involves similar steps that differ only in the details. The base builder interface defines all possible construction steps, and concrete builders implement these steps to construct particular representations of the product. Meanwhile, the director class guides the order of construction. Use the Builder to construct [Composite](https://refactoring.guru/design-patterns/composite) trees or other complex objects. The Builder pattern lets you construct products step-by-step. You could defer execution of some steps without breaking the final product. You can even call steps recursively, which comes in handy when you need to build an object tree. A builder doesn’t expose the unfinished product while running construction steps. This prevents the client code from fetching an incomplete result. How to Implement ---------------- 1. Make sure that you can clearly define the common construction steps for building all available product representations. Otherwise, you won’t be able to proceed with implementing the pattern. 2. Declare these steps in the base builder interface. 3. Create a concrete builder class for each of the product representations and implement their construction steps. Don’t forget about implementing a method for fetching the result of the construction. The reason why this method can’t be declared inside the builder interface is that various builders may construct products that don’t have a common interface. Therefore, you don’t know what would be the return type for such a method. However, if you’re dealing with products from a single hierarchy, the fetching method can be safely added to the base interface. 4. Think about creating a director class. It may encapsulate various ways to construct a product using the same builder object. 5. The client code creates both the builder and the director objects. Before construction starts, the client must pass a builder object to the director. Usually, the client does this only once, via parameters of the director’s class constructor. The director uses the builder object in all further construction. There’s an alternative approach, where the builder is passed to a specific product construction method of the director. 6. The construction result can be obtained directly from the director only if all products follow the same interface. Otherwise, the client should fetch the result from the builder. Pros and Cons ------------- * You can construct objects step-by-step, defer construction steps or run steps recursively. * You can reuse the same construction code when building various representations of products. * _Single Responsibility Principle_. You can isolate complex construction code from the business logic of the product. * The overall complexity of the code increases since the pattern requires creating multiple new classes. Relations with Other Patterns ----------------------------- * Many designs start by using [Factory Method](https://refactoring.guru/design-patterns/factory-method) (less complicated and more customizable via subclasses) and evolve toward [Abstract Factory](https://refactoring.guru/design-patterns/abstract-factory) , [Prototype](https://refactoring.guru/design-patterns/prototype) , or [Builder](https://refactoring.guru/design-patterns/builder) (more flexible, but more complicated). * [Builder](https://refactoring.guru/design-patterns/builder) focuses on constructing complex objects step by step. [Abstract Factory](https://refactoring.guru/design-patterns/abstract-factory) specializes in creating families of related objects. _Abstract Factory_ returns the product immediately, whereas _Builder_ lets you run some additional construction steps before fetching the product. * You can use [Builder](https://refactoring.guru/design-patterns/builder) when creating complex [Composite](https://refactoring.guru/design-patterns/composite) trees because you can program its construction steps to work recursively. * You can combine [Builder](https://refactoring.guru/design-patterns/builder) with [Bridge](https://refactoring.guru/design-patterns/bridge) : the director class plays the role of the abstraction, while different builders act as implementations. * [Abstract Factories](https://refactoring.guru/design-patterns/abstract-factory) , [Builders](https://refactoring.guru/design-patterns/builder) and [Prototypes](https://refactoring.guru/design-patterns/prototype) can all be implemented as [Singletons](https://refactoring.guru/design-patterns/singleton) . Code Examples ------------- [![Builder in C#](https://refactoring.guru/images/patterns/icons/csharp.svg?id=da64592defc6e86d57c39c66e9de3e58)](https://refactoring.guru/design-patterns/builder/csharp/example "Builder in C#") [![Builder in C++](https://refactoring.guru/images/patterns/icons/cpp.svg?id=f7782ed8b8666246bfcc3f8fefc3b858)](https://refactoring.guru/design-patterns/builder/cpp/example "Builder in C++") [![Builder in Go](https://refactoring.guru/images/patterns/icons/go.svg?id=1a89927eb99b1ea3fde7701d97970aca)](https://refactoring.guru/design-patterns/builder/go/example "Builder in Go") [![Builder in Java](https://refactoring.guru/images/patterns/icons/java.svg?id=e6d87e2dca08c953fe3acd1275ed4f4e)](https://refactoring.guru/design-patterns/builder/java/example "Builder in Java") [![Builder in PHP](https://refactoring.guru/images/patterns/icons/php.svg?id=be1906eb26b71ec1d3b93720d6156618)](https://refactoring.guru/design-patterns/builder/php/example "Builder in PHP") [![Builder in Python](https://refactoring.guru/images/patterns/icons/python.svg?id=6d815d43c0f7050a1151b43e51569c9f)](https://refactoring.guru/design-patterns/builder/python/example "Builder in Python") [![Builder in Ruby](https://refactoring.guru/images/patterns/icons/ruby.svg?id=b065b718c914bf8e960ef731600be1eb)](https://refactoring.guru/design-patterns/builder/ruby/example "Builder in Ruby") [![Builder in Rust](https://refactoring.guru/images/patterns/icons/rust.svg?id=1f5698a4b5ae23fe79413511747e4a87)](https://refactoring.guru/design-patterns/builder/rust/example "Builder in Rust") [![Builder in Swift](https://refactoring.guru/images/patterns/icons/swift.svg?id=0b716c2d52ec3a48fbe91ac031070c1d)](https://refactoring.guru/design-patterns/builder/swift/example "Builder in Swift") [![Builder in TypeScript](https://refactoring.guru/images/patterns/icons/typescript.svg?id=2239d0f16cb703540c205dd8cb0c0cb7)](https://refactoring.guru/design-patterns/builder/typescript/example "Builder in TypeScript") [![](https://refactoring.guru/images/patterns/banners/patterns-book-banner-3-2x.png?id=0cc3f77ab421d1a5c02ee46488231c3a)](https://refactoring.guru/design-patterns/book) ### Support our free website and own the eBook! * 22 design patterns and 8 principles explained in depth. * 409 well-structured, easy to read, jargon-free pages. * 225 clear and helpful illustrations and diagrams. * An archive with code examples in 11 languages. * All devices supported: PDF/EPUB/MOBI/KFX formats. [Learn more…](https://refactoring.guru/design-patterns/book) --- # Behavioral Design Patterns [There are patterns of patterns now! \ My friend's project: MetaPatterns.io](https://metapatterns.io/)  [](https://refactoring.guru/design-patterns/behavioral-patterns#checkout) [](https://refactoring.guru/design-patterns/behavioral-patterns#checkout) [](https://refactoring.guru/) / [Design Patterns](https://refactoring.guru/design-patterns) / [Catalog](https://refactoring.guru/design-patterns/catalog) Behavioral Design Patterns ========================== Behavioral design patterns are concerned with algorithms and the assignment of responsibilities between objects. [![Chain of Responsibility](https://refactoring.guru/images/patterns/cards/chain-of-responsibility-mini-3x.png) Chain of Responsibility\ \ Lets you pass requests along a chain of handlers. Upon receiving a request, each handler decides either to process the request or to pass it to the next handler in the chain.](https://refactoring.guru/design-patterns/chain-of-responsibility) [![Command](https://refactoring.guru/images/patterns/cards/command-mini-3x.png) Command\ \ Turns a request into a stand-alone object that contains all information about the request. This transformation lets you pass requests as a method arguments, delay or queue a request's execution, and support undoable operations.](https://refactoring.guru/design-patterns/command) [![Iterator](https://refactoring.guru/images/patterns/cards/iterator-mini-3x.png) Iterator\ \ Lets you traverse elements of a collection without exposing its underlying representation (list, stack, tree, etc.).](https://refactoring.guru/design-patterns/iterator) [![Mediator](https://refactoring.guru/images/patterns/cards/mediator-mini-3x.png) Mediator\ \ Lets you reduce chaotic dependencies between objects. The pattern restricts direct communications between the objects and forces them to collaborate only via a mediator object.](https://refactoring.guru/design-patterns/mediator) [![Memento](https://refactoring.guru/images/patterns/cards/memento-mini-3x.png) Memento\ \ Lets you save and restore the previous state of an object without revealing the details of its implementation.](https://refactoring.guru/design-patterns/memento) [![Observer](https://refactoring.guru/images/patterns/cards/observer-mini-3x.png) Observer\ \ Lets you define a subscription mechanism to notify multiple objects about any events that happen to the object they're observing.](https://refactoring.guru/design-patterns/observer) [![State](https://refactoring.guru/images/patterns/cards/state-mini-3x.png) State\ \ Lets an object alter its behavior when its internal state changes. It appears as if the object changed its class.](https://refactoring.guru/design-patterns/state) [![Strategy](https://refactoring.guru/images/patterns/cards/strategy-mini-3x.png) Strategy\ \ Lets you define a family of algorithms, put each of them into a separate class, and make their objects interchangeable.](https://refactoring.guru/design-patterns/strategy) [![Template Method](https://refactoring.guru/images/patterns/cards/template-method-mini-3x.png) Template Method\ \ Defines the skeleton of an algorithm in the superclass but lets subclasses override specific steps of the algorithm without changing its structure.](https://refactoring.guru/design-patterns/template-method) [![Visitor](https://refactoring.guru/images/patterns/cards/visitor-mini-3x.png) Visitor\ \ Lets you separate algorithms from the objects on which they operate.](https://refactoring.guru/design-patterns/visitor) --- # Adapter [There are patterns of patterns now! \ My friend's project: MetaPatterns.io](https://metapatterns.io/)  [](https://refactoring.guru/design-patterns/adapter#checkout) [](https://refactoring.guru/design-patterns/adapter#checkout) [](https://refactoring.guru/) / [Design Patterns](https://refactoring.guru/design-patterns) / [Structural Patterns](https://refactoring.guru/design-patterns/structural-patterns) Adapter ======= Also known as: Wrapper Intent ------ **Adapter** is a structural design pattern that allows objects with incompatible interfaces to collaborate. ![Adapter design pattern](https://refactoring.guru/images/patterns/content/adapter/adapter-en-2x.png?id=e0ab0f6103b0b7b0648a8fda592ffab8) Problem ------- Imagine that you’re creating a stock market monitoring app. The app downloads the stock data from multiple sources in XML format and then displays nice-looking charts and diagrams for the user. At some point, you decide to improve the app by integrating a smart 3rd-party analytics library. But there’s a catch: the analytics library only works with data in JSON format. ![The structure of the app before integration with the analytics library](https://refactoring.guru/images/patterns/diagrams/adapter/problem-en-2x.png?id=f6f4bfbd2d6136a5ae4fb8c899e9854e) You can’t use the analytics library “as is” because it expects the data in a format that’s incompatible with your app. You could change the library to work with XML. However, this might break some existing code that relies on the library. And worse, you might not have access to the library’s source code in the first place, making this approach impossible. Solution -------- You can create an _adapter_. This is a special object that converts the interface of one object so that another object can understand it. An adapter wraps one of the objects to hide the complexity of conversion happening behind the scenes. The wrapped object isn’t even aware of the adapter. For example, you can wrap an object that operates in meters and kilometers with an adapter that converts all of the data to imperial units such as feet and miles. Adapters can not only convert data into various formats but can also help objects with different interfaces collaborate. Here’s how it works: 1. The adapter gets an interface, compatible with one of the existing objects. 2. Using this interface, the existing object can safely call the adapter’s methods. 3. Upon receiving a call, the adapter passes the request to the second object, but in a format and order that the second object expects. Sometimes it’s even possible to create a two-way adapter that can convert the calls in both directions. ![Adapter's solution](https://refactoring.guru/images/patterns/diagrams/adapter/solution-en-2x.png?id=5846ed9b88cad0220993f79bdfe817a8) Let’s get back to our stock market app. To solve the dilemma of incompatible formats, you can create XML-to-JSON adapters for every class of the analytics library that your code works with directly. Then you adjust your code to communicate with the library only via these adapters. When an adapter receives a call, it translates the incoming XML data into a JSON structure and passes the call to the appropriate methods of a wrapped analytics object. Real-World Analogy ------------------ ![The Adapter pattern example](https://refactoring.guru/images/patterns/content/adapter/adapter-comic-1-en-2x.png?id=9bc31312da9412ed2ea8ae8d5d83984f) A suitcase before and after a trip abroad. When you travel from the US to Europe for the first time, you may get a surprise when trying to charge your laptop. The power plug and sockets standards are different in different countries. That’s why your US plug won’t fit a German socket. The problem can be solved by using a power plug adapter that has the American-style socket and the European-style plug. Structure --------- #### Object adapter This implementation uses the object composition principle: the adapter implements the interface of one object and wraps the other one. It can be implemented in all popular programming languages. ![Structure of the Adapter design pattern (the object adapter)](https://refactoring.guru/images/patterns/diagrams/adapter/structure-object-adapter-2x.png?id=03e8052e168c962d6bc369bbb13b0945)![Structure of the Adapter design pattern (the object adapter)](https://refactoring.guru/images/patterns/diagrams/adapter/structure-object-adapter-indexed-2x.png?id=759771515f08d74d53cf4fe500f814a3) 1. The **Client** is a class that contains the existing business logic of the program. 2. The **Client Interface** describes a protocol that other classes must follow to be able to collaborate with the client code. 3. The **Service** is some useful class (usually 3rd-party or legacy). The client can’t use this class directly because it has an incompatible interface. 4. The **Adapter** is a class that’s able to work with both the client and the service: it implements the client interface, while wrapping the service object. The adapter receives calls from the client via the client interface and translates them into calls to the wrapped service object in a format it can understand. 5. The client code doesn’t get coupled to the concrete adapter class as long as it works with the adapter via the client interface. Thanks to this, you can introduce new types of adapters into the program without breaking the existing client code. This can be useful when the interface of the service class gets changed or replaced: you can just create a new adapter class without changing the client code. #### Class adapter This implementation uses inheritance: the adapter inherits interfaces from both objects at the same time. Note that this approach can only be implemented in programming languages that support multiple inheritance, such as C++. ![Adapter design pattern (class adapter)](https://refactoring.guru/images/patterns/diagrams/adapter/structure-class-adapter-2x.png?id=ddca3e3e4d972b7c58207daba8d24866)![Adapter design pattern (class adapter)](https://refactoring.guru/images/patterns/diagrams/adapter/structure-class-adapter-indexed-2x.png?id=9ae1182ef2a34d2ea65f4b4f94a4019e) 1. The **Class Adapter** doesn’t need to wrap any objects because it inherits behaviors from both the client and the service. The adaptation happens within the overridden methods. The resulting adapter can be used in place of an existing client class. Pseudocode ---------- This example of the **Adapter** pattern is based on the classic conflict between square pegs and round holes. ![Structure of the Adapter pattern example](https://refactoring.guru/images/patterns/diagrams/adapter/example-2x.png?id=0ac62d1bc151e8ce6abad8e8502756cf) Adapting square pegs to round holes. The Adapter pretends to be a round peg, with a radius equal to a half of the square’s diameter (in other words, the radius of the smallest circle that can accommodate the square peg). // Say you have two classes with compatible interfaces: // RoundHole and RoundPeg. class RoundHole is constructor RoundHole(radius) { ... } method getRadius() is // Return the radius of the hole. method fits(peg: RoundPeg) is return this.getRadius() >= peg.getRadius() class RoundPeg is constructor RoundPeg(radius) { ... } method getRadius() is // Return the radius of the peg. // But there's an incompatible class: SquarePeg. class SquarePeg is constructor SquarePeg(width) { ... } method getWidth() is // Return the square peg width. // An adapter class lets you fit square pegs into round holes. // It extends the RoundPeg class to let the adapter objects act // as round pegs. class SquarePegAdapter extends RoundPeg is // In reality, the adapter contains an instance of the // SquarePeg class. private field peg: SquarePeg constructor SquarePegAdapter(peg: SquarePeg) is this.peg = peg method getRadius() is // The adapter pretends that it's a round peg with a // radius that could fit the square peg that the adapter // actually wraps. return peg.getWidth() \* Math.sqrt(2) / 2 // Somewhere in client code. hole = new RoundHole(5) rpeg = new RoundPeg(5) hole.fits(rpeg) // true small\_sqpeg = new SquarePeg(5) large\_sqpeg = new SquarePeg(10) hole.fits(small\_sqpeg) // this won't compile (incompatible types) small\_sqpeg\_adapter = new SquarePegAdapter(small\_sqpeg) large\_sqpeg\_adapter = new SquarePegAdapter(large\_sqpeg) hole.fits(small\_sqpeg\_adapter) // true hole.fits(large\_sqpeg\_adapter) // false Applicability ------------- Use the Adapter class when you want to use some existing class, but its interface isn’t compatible with the rest of your code. The Adapter pattern lets you create a middle-layer class that serves as a translator between your code and a legacy class, a 3rd-party class or any other class with a weird interface. Use the pattern when you want to reuse several existing subclasses that lack some common functionality that can’t be added to the superclass. You could extend each subclass and put the missing functionality into new child classes. However, you’ll need to duplicate the code across all of these new classes, which [smells really bad](https://refactoring.guru/smells/duplicate-code) . The much more elegant solution would be to put the missing functionality into an adapter class. Then you would wrap objects with missing features inside the adapter, gaining needed features dynamically. For this to work, the target classes must have a common interface, and the adapter’s field should follow that interface. This approach looks very similar to the [Decorator](https://refactoring.guru/design-patterns/decorator) pattern. How to Implement ---------------- 1. Make sure that you have at least two classes with incompatible interfaces: * A useful _service_ class, which you can’t change (often 3rd-party, legacy or with lots of existing dependencies). * One or several _client_ classes that would benefit from using the service class. 2. Declare the client interface and describe how clients communicate with the service. 3. Create the adapter class and make it follow the client interface. Leave all the methods empty for now. 4. Add a field to the adapter class to store a reference to the service object. The common practice is to initialize this field via the constructor, but sometimes it’s more convenient to pass it to the adapter when calling its methods. 5. One by one, implement all methods of the client interface in the adapter class. The adapter should delegate most of the real work to the service object, handling only the interface or data format conversion. 6. Clients should use the adapter via the client interface. This will let you change or extend the adapters without affecting the client code. Pros and Cons ------------- * _Single Responsibility Principle_. You can separate the interface or data conversion code from the primary business logic of the program. * _Open/Closed Principle_. You can introduce new types of adapters into the program without breaking the existing client code, as long as they work with the adapters through the client interface. * The overall complexity of the code increases because you need to introduce a set of new interfaces and classes. Sometimes it’s simpler just to change the service class so that it matches the rest of your code. Relations with Other Patterns ----------------------------- * [Bridge](https://refactoring.guru/design-patterns/bridge) is usually designed up-front, letting you develop parts of an application independently of each other. On the other hand, [Adapter](https://refactoring.guru/design-patterns/adapter) is commonly used with an existing app to make some otherwise-incompatible classes work together nicely. * [Adapter](https://refactoring.guru/design-patterns/adapter) provides a completely different interface for accessing an existing object. On the other hand, with the [Decorator](https://refactoring.guru/design-patterns/decorator) pattern the interface either stays the same or gets extended. In addition, _Decorator_ supports recursive composition, which isn’t possible when you use _Adapter_. * With [Adapter](https://refactoring.guru/design-patterns/adapter) you access an existing object via different interface. With [Proxy](https://refactoring.guru/design-patterns/proxy) , the interface stays the same. With [Decorator](https://refactoring.guru/design-patterns/decorator) you access the object via an enhanced interface. * [Facade](https://refactoring.guru/design-patterns/facade) defines a new interface for existing objects, whereas [Adapter](https://refactoring.guru/design-patterns/adapter) tries to make the existing interface usable. _Adapter_ usually wraps just one object, while _Facade_ works with an entire subsystem of objects. * [Bridge](https://refactoring.guru/design-patterns/bridge) , [State](https://refactoring.guru/design-patterns/state) , [Strategy](https://refactoring.guru/design-patterns/strategy) (and to some degree [Adapter](https://refactoring.guru/design-patterns/adapter) ) have very similar structures. Indeed, all of these patterns are based on composition, which is delegating work to other objects. However, they all solve different problems. A pattern isn’t just a recipe for structuring your code in a specific way. It can also communicate to other developers the problem the pattern solves. Code Examples ------------- [![Adapter in C#](https://refactoring.guru/images/patterns/icons/csharp.svg?id=da64592defc6e86d57c39c66e9de3e58)](https://refactoring.guru/design-patterns/adapter/csharp/example "Adapter in C#") [![Adapter in C++](https://refactoring.guru/images/patterns/icons/cpp.svg?id=f7782ed8b8666246bfcc3f8fefc3b858)](https://refactoring.guru/design-patterns/adapter/cpp/example "Adapter in C++") [![Adapter in Go](https://refactoring.guru/images/patterns/icons/go.svg?id=1a89927eb99b1ea3fde7701d97970aca)](https://refactoring.guru/design-patterns/adapter/go/example "Adapter in Go") [![Adapter in Java](https://refactoring.guru/images/patterns/icons/java.svg?id=e6d87e2dca08c953fe3acd1275ed4f4e)](https://refactoring.guru/design-patterns/adapter/java/example "Adapter in Java") [![Adapter in PHP](https://refactoring.guru/images/patterns/icons/php.svg?id=be1906eb26b71ec1d3b93720d6156618)](https://refactoring.guru/design-patterns/adapter/php/example "Adapter in PHP") [![Adapter in Python](https://refactoring.guru/images/patterns/icons/python.svg?id=6d815d43c0f7050a1151b43e51569c9f)](https://refactoring.guru/design-patterns/adapter/python/example "Adapter in Python") [![Adapter in Ruby](https://refactoring.guru/images/patterns/icons/ruby.svg?id=b065b718c914bf8e960ef731600be1eb)](https://refactoring.guru/design-patterns/adapter/ruby/example "Adapter in Ruby") [![Adapter in Rust](https://refactoring.guru/images/patterns/icons/rust.svg?id=1f5698a4b5ae23fe79413511747e4a87)](https://refactoring.guru/design-patterns/adapter/rust/example "Adapter in Rust") [![Adapter in Swift](https://refactoring.guru/images/patterns/icons/swift.svg?id=0b716c2d52ec3a48fbe91ac031070c1d)](https://refactoring.guru/design-patterns/adapter/swift/example "Adapter in Swift") [![Adapter in TypeScript](https://refactoring.guru/images/patterns/icons/typescript.svg?id=2239d0f16cb703540c205dd8cb0c0cb7)](https://refactoring.guru/design-patterns/adapter/typescript/example "Adapter in TypeScript") [![](https://refactoring.guru/images/patterns/banners/patterns-book-banner-3-2x.png?id=0cc3f77ab421d1a5c02ee46488231c3a)](https://refactoring.guru/design-patterns/book) ### Support our free website and own the eBook! * 22 design patterns and 8 principles explained in depth. * 409 well-structured, easy to read, jargon-free pages. * 225 clear and helpful illustrations and diagrams. * An archive with code examples in 11 languages. * All devices supported: PDF/EPUB/MOBI/KFX formats. [Learn more…](https://refactoring.guru/design-patterns/book) --- # Composite [There are patterns of patterns now! \ My friend's project: MetaPatterns.io](https://metapatterns.io/)  [](https://refactoring.guru/design-patterns/composite#checkout) [](https://refactoring.guru/design-patterns/composite#checkout) [](https://refactoring.guru/) / [Design Patterns](https://refactoring.guru/design-patterns) / [Structural Patterns](https://refactoring.guru/design-patterns/structural-patterns) Composite ========= Also known as: Object Tree Intent ------ **Composite** is a structural design pattern that lets you compose objects into tree structures and then work with these structures as if they were individual objects. ![Composite design pattern](https://refactoring.guru/images/patterns/content/composite/composite-2x.png?id=8847e6f8e2cb892ed2229faba83bd1b7) Problem ------- Using the Composite pattern makes sense only when the core model of your app can be represented as a tree. For example, imagine that you have two types of objects: `Products` and `Boxes`. A `Box` can contain several `Products` as well as a number of smaller `Boxes`. These little `Boxes` can also hold some `Products` or even smaller `Boxes`, and so on. Say you decide to create an ordering system that uses these classes. Orders could contain simple products without any wrapping, as well as boxes stuffed with products...and other boxes. How would you determine the total price of such an order? ![Structure of a complex order](https://refactoring.guru/images/patterns/diagrams/composite/problem-en-2x.png?id=5c7d443ccce3e46c4308d43fd1e51cca) An order might comprise various products, packaged in boxes, which are packaged in bigger boxes and so on. The whole structure looks like an upside down tree. You could try the direct approach: unwrap all the boxes, go over all the products and then calculate the total. That would be doable in the real world; but in a program, it’s not as simple as running a loop. You have to know the classes of `Products` and `Boxes` you’re going through, the nesting level of the boxes and other nasty details beforehand. All of this makes the direct approach either too awkward or even impossible. Solution -------- The Composite pattern suggests that you work with `Products` and `Boxes` through a common interface which declares a method for calculating the total price. How would this method work? For a product, it’d simply return the product’s price. For a box, it’d go over each item the box contains, ask its price and then return a total for this box. If one of these items were a smaller box, that box would also start going over its contents and so on, until the prices of all inner components were calculated. A box could even add some extra cost to the final price, such as packaging cost. ![Solution suggested by the Composite pattern](https://refactoring.guru/images/patterns/content/composite/composite-comic-1-en-2x.png?id=e2f3fb69d636c211520c2528be94f251) The Composite pattern lets you run a behavior recursively over all components of an object tree. The greatest benefit of this approach is that you don’t need to care about the concrete classes of objects that compose the tree. You don’t need to know whether an object is a simple product or a sophisticated box. You can treat them all the same via the common interface. When you call a method, the objects themselves pass the request down the tree. Real-World Analogy ------------------ ![An example of a military structure](https://refactoring.guru/images/patterns/diagrams/composite/live-example-2x.png?id=b555458f20fc30425ae6dada5da492af) An example of a military structure. Armies of most countries are structured as hierarchies. An army consists of several divisions; a division is a set of brigades, and a brigade consists of platoons, which can be broken down into squads. Finally, a squad is a small group of real soldiers. Orders are given at the top of the hierarchy and passed down onto each level until every soldier knows what needs to be done. Structure --------- ![Structure of the Composite design pattern](https://refactoring.guru/images/patterns/diagrams/composite/structure-en-2x.png?id=fc41be8ae17c7250ea6d29632a239ba4)![Structure of the Composite design pattern](https://refactoring.guru/images/patterns/diagrams/composite/structure-en-indexed-2x.png?id=a5bbb62b1bc218bc52615bacf3fb3b73) 1. The **Component** interface describes operations that are common to both simple and complex elements of the tree. 2. The **Leaf** is a basic element of a tree that doesn’t have sub-elements. Usually, leaf components end up doing most of the real work, since they don’t have anyone to delegate the work to. 3. The **Container** (aka _composite_) is an element that has sub-elements: leaves or other containers. A container doesn’t know the concrete classes of its children. It works with all sub-elements only via the component interface. Upon receiving a request, a container delegates the work to its sub-elements, processes intermediate results and then returns the final result to the client. 4. The **Client** works with all elements through the component interface. As a result, the client can work in the same way with both simple or complex elements of the tree. Pseudocode ---------- In this example, the **Composite** pattern lets you implement stacking of geometric shapes in a graphical editor. ![Structure of the Composite example](https://refactoring.guru/images/patterns/diagrams/composite/example-2x.png?id=d21edef39d3792e8a4c6736727ac7305) The geometric shapes editor example. The `CompoundGraphic` class is a container that can comprise any number of sub-shapes, including other compound shapes. A compound shape has the same methods as a simple shape. However, instead of doing something on its own, a compound shape passes the request recursively to all its children and “sums up” the result. The client code works with all shapes through the single interface common to all shape classes. Thus, the client doesn’t know whether it’s working with a simple shape or a compound one. The client can work with very complex object structures without being coupled to concrete classes that form that structure. // The component interface declares common operations for both // simple and complex objects of a composition. interface Graphic is method move(x, y) method draw() // The leaf class represents end objects of a composition. A // leaf object can't have any sub-objects. Usually, it's leaf // objects that do the actual work, while composite objects only // delegate to their sub-components. class Dot implements Graphic is field x, y constructor Dot(x, y) { ... } method move(x, y) is this.x += x, this.y += y method draw() is // Draw a dot at X and Y. // All component classes can extend other components. class Circle extends Dot is field radius constructor Circle(x, y, radius) { ... } method draw() is // Draw a circle at X and Y with radius R. // The composite class represents complex components that may // have children. Composite objects usually delegate the actual // work to their children and then "sum up" the result. class CompoundGraphic implements Graphic is field children: array of Graphic // A composite object can add or remove other components // (both simple or complex) to or from its child list. method add(child: Graphic) is // Add a child to the array of children. method remove(child: Graphic) is // Remove a child from the array of children. method move(x, y) is foreach (child in children) do child.move(x, y) // A composite executes its primary logic in a particular // way. It traverses recursively through all its children, // collecting and summing up their results. Since the // composite's children pass these calls to their own // children and so forth, the whole object tree is traversed // as a result. method draw() is // 1. For each child component: // - Draw the component. // - Update the bounding rectangle. // 2. Draw a dashed rectangle using the bounding // coordinates. // The client code works with all the components via their base // interface. This way the client code can support simple leaf // components as well as complex composites. class ImageEditor is field all: CompoundGraphic method load() is all = new CompoundGraphic() all.add(new Dot(1, 2)) all.add(new Circle(5, 3, 10)) // ... // Combine selected components into one complex composite // component. method groupSelected(components: array of Graphic) is group = new CompoundGraphic() foreach (component in components) do group.add(component) all.remove(component) all.add(group) // All components will be drawn. all.draw() Applicability ------------- Use the Composite pattern when you have to implement a tree-like object structure. The Composite pattern provides you with two basic element types that share a common interface: simple leaves and complex containers. A container can be composed of both leaves and other containers. This lets you construct a nested recursive object structure that resembles a tree. Use the pattern when you want the client code to treat both simple and complex elements uniformly. All elements defined by the Composite pattern share a common interface. Using this interface, the client doesn’t have to worry about the concrete class of the objects it works with. How to Implement ---------------- 1. Make sure that the core model of your app can be represented as a tree structure. Try to break it down into simple elements and containers. Remember that containers must be able to contain both simple elements and other containers. 2. Declare the component interface with a list of methods that make sense for both simple and complex components. 3. Create a leaf class to represent simple elements. A program may have multiple different leaf classes. 4. Create a container class to represent complex elements. In this class, provide an array field for storing references to sub-elements. The array must be able to store both leaves and containers, so make sure it’s declared with the component interface type. While implementing the methods of the component interface, remember that a container is supposed to be delegating most of the work to sub-elements. 5. Finally, define the methods for adding and removal of child elements in the container. Keep in mind that these operations can be declared in the component interface. This would violate the _Interface Segregation Principle_ because the methods will be empty in the leaf class. However, the client will be able to treat all the elements equally, even when composing the tree. Pros and Cons ------------- * You can work with complex tree structures more conveniently: use polymorphism and recursion to your advantage. * _Open/Closed Principle_. You can introduce new element types into the app without breaking the existing code, which now works with the object tree. * It might be difficult to provide a common interface for classes whose functionality differs too much. In certain scenarios, you’d need to overgeneralize the component interface, making it harder to comprehend. Relations with Other Patterns ----------------------------- * You can use [Builder](https://refactoring.guru/design-patterns/builder) when creating complex [Composite](https://refactoring.guru/design-patterns/composite) trees because you can program its construction steps to work recursively. * [Chain of Responsibility](https://refactoring.guru/design-patterns/chain-of-responsibility) is often used in conjunction with [Composite](https://refactoring.guru/design-patterns/composite) . In this case, when a leaf component gets a request, it may pass it through the chain of all of the parent components down to the root of the object tree. * You can use [Iterators](https://refactoring.guru/design-patterns/iterator) to traverse [Composite](https://refactoring.guru/design-patterns/composite) trees. * You can use [Visitor](https://refactoring.guru/design-patterns/visitor) to execute an operation over an entire [Composite](https://refactoring.guru/design-patterns/composite) tree. * You can implement shared leaf nodes of the [Composite](https://refactoring.guru/design-patterns/composite) tree as [Flyweights](https://refactoring.guru/design-patterns/flyweight) to save some RAM. * [Composite](https://refactoring.guru/design-patterns/composite) and [Decorator](https://refactoring.guru/design-patterns/decorator) have similar structure diagrams since both rely on recursive composition to organize an open-ended number of objects. A _Decorator_ is like a _Composite_ but only has one child component. There’s another significant difference: _Decorator_ adds additional responsibilities to the wrapped object, while _Composite_ just “sums up” its children’s results. However, the patterns can also cooperate: you can use _Decorator_ to extend the behavior of a specific object in the _Composite_ tree. * Designs that make heavy use of [Composite](https://refactoring.guru/design-patterns/composite) and [Decorator](https://refactoring.guru/design-patterns/decorator) can often benefit from using [Prototype](https://refactoring.guru/design-patterns/prototype) . Applying the pattern lets you clone complex structures instead of re-constructing them from scratch. Code Examples ------------- [![Composite in C#](https://refactoring.guru/images/patterns/icons/csharp.svg?id=da64592defc6e86d57c39c66e9de3e58)](https://refactoring.guru/design-patterns/composite/csharp/example "Composite in C#") [![Composite in C++](https://refactoring.guru/images/patterns/icons/cpp.svg?id=f7782ed8b8666246bfcc3f8fefc3b858)](https://refactoring.guru/design-patterns/composite/cpp/example "Composite in C++") [![Composite in Go](https://refactoring.guru/images/patterns/icons/go.svg?id=1a89927eb99b1ea3fde7701d97970aca)](https://refactoring.guru/design-patterns/composite/go/example "Composite in Go") [![Composite in Java](https://refactoring.guru/images/patterns/icons/java.svg?id=e6d87e2dca08c953fe3acd1275ed4f4e)](https://refactoring.guru/design-patterns/composite/java/example "Composite in Java") [![Composite in PHP](https://refactoring.guru/images/patterns/icons/php.svg?id=be1906eb26b71ec1d3b93720d6156618)](https://refactoring.guru/design-patterns/composite/php/example "Composite in PHP") [![Composite in Python](https://refactoring.guru/images/patterns/icons/python.svg?id=6d815d43c0f7050a1151b43e51569c9f)](https://refactoring.guru/design-patterns/composite/python/example "Composite in Python") [![Composite in Ruby](https://refactoring.guru/images/patterns/icons/ruby.svg?id=b065b718c914bf8e960ef731600be1eb)](https://refactoring.guru/design-patterns/composite/ruby/example "Composite in Ruby") [![Composite in Rust](https://refactoring.guru/images/patterns/icons/rust.svg?id=1f5698a4b5ae23fe79413511747e4a87)](https://refactoring.guru/design-patterns/composite/rust/example "Composite in Rust") [![Composite in Swift](https://refactoring.guru/images/patterns/icons/swift.svg?id=0b716c2d52ec3a48fbe91ac031070c1d)](https://refactoring.guru/design-patterns/composite/swift/example "Composite in Swift") [![Composite in TypeScript](https://refactoring.guru/images/patterns/icons/typescript.svg?id=2239d0f16cb703540c205dd8cb0c0cb7)](https://refactoring.guru/design-patterns/composite/typescript/example "Composite in TypeScript") [![](https://refactoring.guru/images/patterns/banners/patterns-book-banner-3-2x.png?id=0cc3f77ab421d1a5c02ee46488231c3a)](https://refactoring.guru/design-patterns/book) ### Support our free website and own the eBook! * 22 design patterns and 8 principles explained in depth. * 409 well-structured, easy to read, jargon-free pages. * 225 clear and helpful illustrations and diagrams. * An archive with code examples in 11 languages. * All devices supported: PDF/EPUB/MOBI/KFX formats. [Learn more…](https://refactoring.guru/design-patterns/book) --- # Bridge [There are patterns of patterns now! \ My friend's project: MetaPatterns.io](https://metapatterns.io/)  [](https://refactoring.guru/design-patterns/bridge#checkout) [](https://refactoring.guru/design-patterns/bridge#checkout) [](https://refactoring.guru/) / [Design Patterns](https://refactoring.guru/design-patterns) / [Structural Patterns](https://refactoring.guru/design-patterns/structural-patterns) Bridge ====== Intent ------ **Bridge** is a structural design pattern that lets you split a large class or a set of closely related classes into two separate hierarchies—abstraction and implementation—which can be developed independently of each other. ![Bridge design pattern](https://refactoring.guru/images/patterns/content/bridge/bridge-2x.png?id=1e905ae5742e5cd10a7eb0e3175ef00d) Problem ------- _Abstraction?_ _Implementation?_ Sound scary? Stay calm and let’s consider a simple example. Say you have a geometric `Shape` class with a pair of subclasses: `Circle` and `Square`. You want to extend this class hierarchy to incorporate colors, so you plan to create `Red` and `Blue` shape subclasses. However, since you already have two subclasses, you’ll need to create four class combinations such as `BlueCircle` and `RedSquare`. ![Bridge pattern problem](https://refactoring.guru/images/patterns/diagrams/bridge/problem-en-2x.png?id=c67b62720e0465821bbcb84debbbaab0) Number of class combinations grows in geometric progression. Adding new shape types and colors to the hierarchy will grow it exponentially. For example, to add a triangle shape you’d need to introduce two subclasses, one for each color. And after that, adding a new color would require creating three subclasses, one for each shape type. The further we go, the worse it becomes. Solution -------- This problem occurs because we’re trying to extend the shape classes in two independent dimensions: by form and by color. That’s a very common issue with class inheritance. The Bridge pattern attempts to solve this problem by switching from inheritance to the object composition. What this means is that you extract one of the dimensions into a separate class hierarchy, so that the original classes will reference an object of the new hierarchy, instead of having all of its state and behaviors within one class. ![Solution suggested by the Bridge pattern](https://refactoring.guru/images/patterns/diagrams/bridge/solution-en-2x.png?id=9439c9a85ac3db0399844b45fbbaecf6) You can prevent the explosion of a class hierarchy by transforming it into several related hierarchies. Following this approach, we can extract the color-related code into its own class with two subclasses: `Red` and `Blue`. The `Shape` class then gets a reference field pointing to one of the color objects. Now the shape can delegate any color-related work to the linked color object. That reference will act as a bridge between the `Shape` and `Color` classes. From now on, adding new colors won’t require changing the shape hierarchy, and vice versa. #### Abstraction and Implementation The GoF book “Gang of Four” is a nickname given to the four authors of the original book about design patterns: _Design Patterns: Elements of Reusable Object-Oriented Software_ [https://refactoring.guru/gof-book](https://refactoring.guru/gof-book) . introduces the terms _Abstraction_ and _Implementation_ as part of the Bridge definition. In my opinion, the terms sound too academic and make the pattern seem more complicated than it really is. Having read the simple example with shapes and colors, let’s decipher the meaning behind the GoF book’s scary words. _Abstraction_ (also called _interface_) is a high-level control layer for some entity. This layer isn’t supposed to do any real work on its own. It should delegate the work to the _implementation_ layer (also called _platform_). Note that we’re not talking about _interfaces_ or _abstract classes_ from your programming language. These aren’t the same things. When talking about real applications, the abstraction can be represented by a graphical user interface (GUI), and the implementation could be the underlying operating system code (API) which the GUI layer calls in response to user interactions. Generally speaking, you can extend such an app in two independent directions: * Have several different GUIs (for instance, tailored for regular customers or admins). * Support several different APIs (for example, to be able to launch the app under Windows, Linux, and macOS). In a worst-case scenario, this app might look like a giant spaghetti bowl, where hundreds of conditionals connect different types of GUI with various APIs all over the code. ![Managing changes is much easier in modular code](https://refactoring.guru/images/patterns/content/bridge/bridge-3-en-2x.png?id=65f98465cec6c4c7e38a635689943822) Making even a simple change to a monolithic codebase is pretty hard because you must understand the _entire thing_ very well. Making changes to smaller, well-defined modules is much easier. You can bring order to this chaos by extracting the code related to specific interface-platform combinations into separate classes. However, soon you’ll discover that there are _lots_ of these classes. The class hierarchy will grow exponentially because adding a new GUI or supporting a different API would require creating more and more classes. Let’s try to solve this issue with the Bridge pattern. It suggests that we divide the classes into two hierarchies: * Abstraction: the GUI layer of the app. * Implementation: the operating systems’ APIs. ![Cross-platform architecture](https://refactoring.guru/images/patterns/content/bridge/bridge-2-en-2x.png?id=bbd64c96e6711636356944b3564ad67e) One of the ways to structure a cross-platform application. The abstraction object controls the appearance of the app, delegating the actual work to the linked implementation object. Different implementations are interchangeable as long as they follow a common interface, enabling the same GUI to work under Windows and Linux. As a result, you can change the GUI classes without touching the API-related classes. Moreover, adding support for another operating system only requires creating a subclass in the implementation hierarchy. Structure --------- ![Bridge design pattern](https://refactoring.guru/images/patterns/diagrams/bridge/structure-en-2x.png?id=77e749744fb5375839b1cf1aa1061648)![Bridge design pattern](https://refactoring.guru/images/patterns/diagrams/bridge/structure-en-indexed-2x.png?id=99713473c8ba3c08ce6a3540f1453ebc) 1. The **Abstraction** provides high-level control logic. It relies on the implementation object to do the actual low-level work. 2. The **Implementation** declares the interface that’s common for all concrete implementations. An abstraction can only communicate with an implementation object via methods that are declared here. The abstraction may list the same methods as the implementation, but usually the abstraction declares some complex behaviors that rely on a wide variety of primitive operations declared by the implementation. 3. **Concrete Implementations** contain platform-specific code. 4. **Refined Abstractions** provide variants of control logic. Like their parent, they work with different implementations via the general implementation interface. 5. Usually, the **Client** is only interested in working with the abstraction. However, it’s the client’s job to link the abstraction object with one of the implementation objects. Pseudocode ---------- This example illustrates how the **Bridge** pattern can help divide the monolithic code of an app that manages devices and their remote controls. The `Device` classes act as the implementation, whereas the `Remote`s act as the abstraction. ![Structure of the Bridge pattern example](https://refactoring.guru/images/patterns/diagrams/bridge/example-en-2x.png?id=19bb8272b4082c5f47c4d047e6cb9967) The original class hierarchy is divided into two parts: devices and remote controls. The base remote control class declares a reference field that links it with a device object. All remotes work with the devices via the general device interface, which lets the same remote support multiple device types. You can develop the remote control classes independently from the device classes. All that’s needed is to create a new remote subclass. For example, a basic remote control might only have two buttons, but you could extend it with additional features, such as an extra battery or a touchscreen. The client code links the desired type of remote control with a specific device object via the remote’s constructor. // The "abstraction" defines the interface for the "control" // part of the two class hierarchies. It maintains a reference // to an object of the "implementation" hierarchy and delegates // all of the real work to this object. class RemoteControl is protected field device: Device constructor RemoteControl(device: Device) is this.device = device method togglePower() is if (device.isEnabled()) then device.disable() else device.enable() method volumeDown() is device.setVolume(device.getVolume() - 10) method volumeUp() is device.setVolume(device.getVolume() + 10) method channelDown() is device.setChannel(device.getChannel() - 1) method channelUp() is device.setChannel(device.getChannel() + 1) // You can extend classes from the abstraction hierarchy // independently from device classes. class AdvancedRemoteControl extends RemoteControl is method mute() is device.setVolume(0) // The "implementation" interface declares methods common to all // concrete implementation classes. It doesn't have to match the // abstraction's interface. In fact, the two interfaces can be // entirely different. Typically the implementation interface // provides only primitive operations, while the abstraction // defines higher-level operations based on those primitives. interface Device is method isEnabled() method enable() method disable() method getVolume() method setVolume(percent) method getChannel() method setChannel(channel) // All devices follow the same interface. class Tv implements Device is // ... class Radio implements Device is // ... // Somewhere in client code. tv = new Tv() remote = new RemoteControl(tv) remote.togglePower() radio = new Radio() remote = new AdvancedRemoteControl(radio) Applicability ------------- Use the Bridge pattern when you want to divide and organize a monolithic class that has several variants of some functionality (for example, if the class can work with various database servers). The bigger a class becomes, the harder it is to figure out how it works, and the longer it takes to make a change. The changes made to one of the variations of functionality may require making changes across the whole class, which often results in making errors or not addressing some critical side effects. The Bridge pattern lets you split the monolithic class into several class hierarchies. After this, you can change the classes in each hierarchy independently of the classes in the others. This approach simplifies code maintenance and minimizes the risk of breaking existing code. Use the pattern when you need to extend a class in several orthogonal (independent) dimensions. The Bridge suggests that you extract a separate class hierarchy for each of the dimensions. The original class delegates the related work to the objects belonging to those hierarchies instead of doing everything on its own. Use the Bridge if you need to be able to switch implementations at runtime. Although it’s optional, the Bridge pattern lets you replace the implementation object inside the abstraction. It’s as easy as assigning a new value to a field. By the way, this last item is the main reason why so many people confuse the Bridge with the [Strategy](https://refactoring.guru/design-patterns/strategy) pattern. Remember that a pattern is more than just a certain way to structure your classes. It may also communicate intent and a problem being addressed. How to Implement ---------------- 1. Identify the orthogonal dimensions in your classes. These independent concepts could be: abstraction/platform, domain/infrastructure, front-end/back-end, or interface/implementation. 2. See what operations the client needs and define them in the base abstraction class. 3. Determine the operations available on all platforms. Declare the ones that the abstraction needs in the general implementation interface. 4. For all platforms in your domain create concrete implementation classes, but make sure they all follow the implementation interface. 5. Inside the abstraction class, add a reference field for the implementation type. The abstraction delegates most of the work to the implementation object that’s referenced in that field. 6. If you have several variants of high-level logic, create refined abstractions for each variant by extending the base abstraction class. 7. The client code should pass an implementation object to the abstraction’s constructor to associate one with the other. After that, the client can forget about the implementation and work only with the abstraction object. Pros and Cons ------------- * You can create platform-independent classes and apps. * The client code works with high-level abstractions. It isn’t exposed to the platform details. * _Open/Closed Principle_. You can introduce new abstractions and implementations independently from each other. * _Single Responsibility Principle_. You can focus on high-level logic in the abstraction and on platform details in the implementation. * You might make the code more complicated by applying the pattern to a highly cohesive class. Relations with Other Patterns ----------------------------- * [Bridge](https://refactoring.guru/design-patterns/bridge) is usually designed up-front, letting you develop parts of an application independently of each other. On the other hand, [Adapter](https://refactoring.guru/design-patterns/adapter) is commonly used with an existing app to make some otherwise-incompatible classes work together nicely. * [Bridge](https://refactoring.guru/design-patterns/bridge) , [State](https://refactoring.guru/design-patterns/state) , [Strategy](https://refactoring.guru/design-patterns/strategy) (and to some degree [Adapter](https://refactoring.guru/design-patterns/adapter) ) have very similar structures. Indeed, all of these patterns are based on composition, which is delegating work to other objects. However, they all solve different problems. A pattern isn’t just a recipe for structuring your code in a specific way. It can also communicate to other developers the problem the pattern solves. * You can use [Abstract Factory](https://refactoring.guru/design-patterns/abstract-factory) along with [Bridge](https://refactoring.guru/design-patterns/bridge) . This pairing is useful when some abstractions defined by _Bridge_ can only work with specific implementations. In this case, _Abstract Factory_ can encapsulate these relations and hide the complexity from the client code. * You can combine [Builder](https://refactoring.guru/design-patterns/builder) with [Bridge](https://refactoring.guru/design-patterns/bridge) : the director class plays the role of the abstraction, while different builders act as implementations. Code Examples ------------- [![Bridge in C#](https://refactoring.guru/images/patterns/icons/csharp.svg?id=da64592defc6e86d57c39c66e9de3e58)](https://refactoring.guru/design-patterns/bridge/csharp/example "Bridge in C#") [![Bridge in C++](https://refactoring.guru/images/patterns/icons/cpp.svg?id=f7782ed8b8666246bfcc3f8fefc3b858)](https://refactoring.guru/design-patterns/bridge/cpp/example "Bridge in C++") [![Bridge in Go](https://refactoring.guru/images/patterns/icons/go.svg?id=1a89927eb99b1ea3fde7701d97970aca)](https://refactoring.guru/design-patterns/bridge/go/example "Bridge in Go") [![Bridge in Java](https://refactoring.guru/images/patterns/icons/java.svg?id=e6d87e2dca08c953fe3acd1275ed4f4e)](https://refactoring.guru/design-patterns/bridge/java/example "Bridge in Java") [![Bridge in PHP](https://refactoring.guru/images/patterns/icons/php.svg?id=be1906eb26b71ec1d3b93720d6156618)](https://refactoring.guru/design-patterns/bridge/php/example "Bridge in PHP") [![Bridge in Python](https://refactoring.guru/images/patterns/icons/python.svg?id=6d815d43c0f7050a1151b43e51569c9f)](https://refactoring.guru/design-patterns/bridge/python/example "Bridge in Python") [![Bridge in Ruby](https://refactoring.guru/images/patterns/icons/ruby.svg?id=b065b718c914bf8e960ef731600be1eb)](https://refactoring.guru/design-patterns/bridge/ruby/example "Bridge in Ruby") [![Bridge in Rust](https://refactoring.guru/images/patterns/icons/rust.svg?id=1f5698a4b5ae23fe79413511747e4a87)](https://refactoring.guru/design-patterns/bridge/rust/example "Bridge in Rust") [![Bridge in Swift](https://refactoring.guru/images/patterns/icons/swift.svg?id=0b716c2d52ec3a48fbe91ac031070c1d)](https://refactoring.guru/design-patterns/bridge/swift/example "Bridge in Swift") [![Bridge in TypeScript](https://refactoring.guru/images/patterns/icons/typescript.svg?id=2239d0f16cb703540c205dd8cb0c0cb7)](https://refactoring.guru/design-patterns/bridge/typescript/example "Bridge in TypeScript") [![](https://refactoring.guru/images/patterns/banners/patterns-book-banner-3-2x.png?id=0cc3f77ab421d1a5c02ee46488231c3a)](https://refactoring.guru/design-patterns/book) ### Support our free website and own the eBook! * 22 design patterns and 8 principles explained in depth. * 409 well-structured, easy to read, jargon-free pages. * 225 clear and helpful illustrations and diagrams. * An archive with code examples in 11 languages. * All devices supported: PDF/EPUB/MOBI/KFX formats. [Learn more…](https://refactoring.guru/design-patterns/book) --- # Facade [There are patterns of patterns now! \ My friend's project: MetaPatterns.io](https://metapatterns.io/)  [](https://refactoring.guru/design-patterns/facade#checkout) [](https://refactoring.guru/design-patterns/facade#checkout) [](https://refactoring.guru/) / [Design Patterns](https://refactoring.guru/design-patterns) / [Structural Patterns](https://refactoring.guru/design-patterns/structural-patterns) Facade ====== Intent ------ **Facade** is a structural design pattern that provides a simplified interface to a library, a framework, or any other complex set of classes. ![Facade design pattern](https://refactoring.guru/images/patterns/content/facade/facade-2x.png?id=b69fce5943703f5f07c0ba38e3baaed0) Problem ------- Imagine that you must make your code work with a broad set of objects that belong to a sophisticated library or framework. Ordinarily, you’d need to initialize all of those objects, keep track of dependencies, execute methods in the correct order, and so on. As a result, the business logic of your classes would become tightly coupled to the implementation details of 3rd-party classes, making it hard to comprehend and maintain. Solution -------- A facade is a class that provides a simple interface to a complex subsystem which contains lots of moving parts. A facade might provide limited functionality in comparison to working with the subsystem directly. However, it includes only those features that clients really care about. Having a facade is handy when you need to integrate your app with a sophisticated library that has dozens of features, but you just need a tiny bit of its functionality. For instance, an app that uploads short funny videos with cats to social media could potentially use a professional video conversion library. However, all that it really needs is a class with the single method `encode(filename, format)`. After creating such a class and connecting it with the video conversion library, you’ll have your first facade. Real-World Analogy ------------------ ![An example of taking a phone order](https://refactoring.guru/images/patterns/diagrams/facade/live-example-en-2x.png?id=db1110e957a690955425d8cb6c0a0f8b) Placing orders by phone. When you call a shop to place a phone order, an operator is your facade to all services and departments of the shop. The operator provides you with a simple voice interface to the ordering system, payment gateways, and various delivery services. Structure --------- ![Structure of the Facade design pattern](https://refactoring.guru/images/patterns/diagrams/facade/structure-2x.png?id=528ca429555bce293b7c3bd90954e097)![Structure of the Facade design pattern](https://refactoring.guru/images/patterns/diagrams/facade/structure-indexed-2x.png?id=4d181bcf1df5d58c533e6c92461e9571) 1. The **Facade** provides convenient access to a particular part of the subsystem’s functionality. It knows where to direct the client’s request and how to operate all the moving parts. 2. An **Additional Facade** class can be created to prevent polluting a single facade with unrelated features that might make it yet another complex structure. Additional facades can be used by both clients and other facades. 3. The **Complex Subsystem** consists of dozens of various objects. To make them all do something meaningful, you have to dive deep into the subsystem’s implementation details, such as initializing objects in the correct order and supplying them with data in the proper format. Subsystem classes aren’t aware of the facade’s existence. They operate within the system and work with each other directly. 4. The **Client** uses the facade instead of calling the subsystem objects directly. Pseudocode ---------- In this example, the **Facade** pattern simplifies interaction with a complex video conversion framework. ![The structure of the Facade pattern example](https://refactoring.guru/images/patterns/diagrams/facade/example-2x.png?id=f2c846d74041626c923ff3e8919b68a9) An example of isolating multiple dependencies within a single facade class. Instead of making your code work with dozens of the framework classes directly, you create a facade class which encapsulates that functionality and hides it from the rest of the code. This structure also helps you to minimize the effort of upgrading to future versions of the framework or replacing it with another one. The only thing you’d need to change in your app would be the implementation of the facade’s methods. // These are some of the classes of a complex 3rd-party video // conversion framework. We don't control that code, therefore // can't simplify it. class VideoFile // ... class OggCompressionCodec // ... class MPEG4CompressionCodec // ... class CodecFactory // ... class BitrateReader // ... class AudioMixer // ... // We create a facade class to hide the framework's complexity // behind a simple interface. It's a trade-off between // functionality and simplicity. class VideoConverter is method convert(filename, format):File is file = new VideoFile(filename) sourceCodec = (new CodecFactory).extract(file) if (format == "mp4") destinationCodec = new MPEG4CompressionCodec() else destinationCodec = new OggCompressionCodec() buffer = BitrateReader.read(filename, sourceCodec) result = BitrateReader.convert(buffer, destinationCodec) result = (new AudioMixer()).fix(result) return new File(result) // Application classes don't depend on a billion classes // provided by the complex framework. Also, if you decide to // switch frameworks, you only need to rewrite the facade class. class Application is method main() is convertor = new VideoConverter() mp4 = convertor.convert("funny-cats-video.ogg", "mp4") mp4.save() Applicability ------------- Use the Facade pattern when you need to have a limited but straightforward interface to a complex subsystem. Often, subsystems get more complex over time. Even applying design patterns typically leads to creating more classes. A subsystem may become more flexible and easier to reuse in various contexts, but the amount of configuration and boilerplate code it demands from a client grows ever larger. The Facade attempts to fix this problem by providing a shortcut to the most-used features of the subsystem which fit most client requirements. Use the Facade when you want to structure a subsystem into layers. Create facades to define entry points to each level of a subsystem. You can reduce coupling between multiple subsystems by requiring them to communicate only through facades. For example, let’s return to our video conversion framework. It can be broken down into two layers: video- and audio-related. For each layer, you can create a facade and then make the classes of each layer communicate with each other via those facades. This approach looks very similar to the [Mediator](https://refactoring.guru/design-patterns/mediator) pattern. How to Implement ---------------- 1. Check whether it’s possible to provide a simpler interface than what an existing subsystem already provides. You’re on the right track if this interface makes the client code independent from many of the subsystem’s classes. 2. Declare and implement this interface in a new facade class. The facade should redirect the calls from the client code to appropriate objects of the subsystem. The facade should be responsible for initializing the subsystem and managing its further life cycle unless the client code already does this. 3. To get the full benefit from the pattern, make all the client code communicate with the subsystem only via the facade. Now the client code is protected from any changes in the subsystem code. For example, when a subsystem gets upgraded to a new version, you will only need to modify the code in the facade. 4. If the facade becomes [too big](https://refactoring.guru/smells/large-class) , consider extracting part of its behavior to a new, refined facade class. Pros and Cons ------------- * You can isolate your code from the complexity of a subsystem. * A facade can become [a god object](https://refactoring.guru/antipatterns/god-object) coupled to all classes of an app. Relations with Other Patterns ----------------------------- * [Facade](https://refactoring.guru/design-patterns/facade) defines a new interface for existing objects, whereas [Adapter](https://refactoring.guru/design-patterns/adapter) tries to make the existing interface usable. _Adapter_ usually wraps just one object, while _Facade_ works with an entire subsystem of objects. * [Abstract Factory](https://refactoring.guru/design-patterns/abstract-factory) can serve as an alternative to [Facade](https://refactoring.guru/design-patterns/facade) when you only want to hide the way the subsystem objects are created from the client code. * [Flyweight](https://refactoring.guru/design-patterns/flyweight) shows how to make lots of little objects, whereas [Facade](https://refactoring.guru/design-patterns/facade) shows how to make a single object that represents an entire subsystem. * [Facade](https://refactoring.guru/design-patterns/facade) and [Mediator](https://refactoring.guru/design-patterns/mediator) have similar jobs: they try to organize collaboration between lots of tightly coupled classes. * _Facade_ defines a simplified interface to a subsystem of objects, but it doesn’t introduce any new functionality. The subsystem itself is unaware of the facade. Objects within the subsystem can communicate directly. * _Mediator_ centralizes communication between components of the system. The components only know about the mediator object and don’t communicate directly. * A [Facade](https://refactoring.guru/design-patterns/facade) class can often be transformed into a [Singleton](https://refactoring.guru/design-patterns/singleton) since a single facade object is sufficient in most cases. * [Facade](https://refactoring.guru/design-patterns/facade) is similar to [Proxy](https://refactoring.guru/design-patterns/proxy) in that both buffer a complex entity and initialize it on its own. Unlike _Facade_, _Proxy_ has the same interface as its service object, which makes them interchangeable. Code Examples ------------- [![Facade in C#](https://refactoring.guru/images/patterns/icons/csharp.svg?id=da64592defc6e86d57c39c66e9de3e58)](https://refactoring.guru/design-patterns/facade/csharp/example "Facade in C#") [![Facade in C++](https://refactoring.guru/images/patterns/icons/cpp.svg?id=f7782ed8b8666246bfcc3f8fefc3b858)](https://refactoring.guru/design-patterns/facade/cpp/example "Facade in C++") [![Facade in Go](https://refactoring.guru/images/patterns/icons/go.svg?id=1a89927eb99b1ea3fde7701d97970aca)](https://refactoring.guru/design-patterns/facade/go/example "Facade in Go") [![Facade in Java](https://refactoring.guru/images/patterns/icons/java.svg?id=e6d87e2dca08c953fe3acd1275ed4f4e)](https://refactoring.guru/design-patterns/facade/java/example "Facade in Java") [![Facade in PHP](https://refactoring.guru/images/patterns/icons/php.svg?id=be1906eb26b71ec1d3b93720d6156618)](https://refactoring.guru/design-patterns/facade/php/example "Facade in PHP") [![Facade in Python](https://refactoring.guru/images/patterns/icons/python.svg?id=6d815d43c0f7050a1151b43e51569c9f)](https://refactoring.guru/design-patterns/facade/python/example "Facade in Python") [![Facade in Ruby](https://refactoring.guru/images/patterns/icons/ruby.svg?id=b065b718c914bf8e960ef731600be1eb)](https://refactoring.guru/design-patterns/facade/ruby/example "Facade in Ruby") [![Facade in Rust](https://refactoring.guru/images/patterns/icons/rust.svg?id=1f5698a4b5ae23fe79413511747e4a87)](https://refactoring.guru/design-patterns/facade/rust/example "Facade in Rust") [![Facade in Swift](https://refactoring.guru/images/patterns/icons/swift.svg?id=0b716c2d52ec3a48fbe91ac031070c1d)](https://refactoring.guru/design-patterns/facade/swift/example "Facade in Swift") [![Facade in TypeScript](https://refactoring.guru/images/patterns/icons/typescript.svg?id=2239d0f16cb703540c205dd8cb0c0cb7)](https://refactoring.guru/design-patterns/facade/typescript/example "Facade in TypeScript") [![](https://refactoring.guru/images/patterns/banners/patterns-book-banner-3-2x.png?id=0cc3f77ab421d1a5c02ee46488231c3a)](https://refactoring.guru/design-patterns/book) ### Support our free website and own the eBook! * 22 design patterns and 8 principles explained in depth. * 409 well-structured, easy to read, jargon-free pages. * 225 clear and helpful illustrations and diagrams. * An archive with code examples in 11 languages. * All devices supported: PDF/EPUB/MOBI/KFX formats. [Learn more…](https://refactoring.guru/design-patterns/book) --- # Decorator [There are patterns of patterns now! \ My friend's project: MetaPatterns.io](https://metapatterns.io/)  [](https://refactoring.guru/design-patterns/decorator#checkout) [](https://refactoring.guru/design-patterns/decorator#checkout) [](https://refactoring.guru/) / [Design Patterns](https://refactoring.guru/design-patterns) / [Structural Patterns](https://refactoring.guru/design-patterns/structural-patterns) Decorator ========= Also known as: Wrapper Intent ------ **Decorator** is a structural design pattern that lets you attach new behaviors to objects by placing these objects inside special wrapper objects that contain the behaviors. ![Decorator design pattern](https://refactoring.guru/images/patterns/content/decorator/decorator-2x.png?id=736ab07b1d8920ab2c7a70c9cb1305cc) Problem ------- Imagine that you’re working on a notification library which lets other programs notify their users about important events. The initial version of the library was based on the `Notifier` class that had only a few fields, a constructor and a single `send` method. The method could accept a message argument from a client and send the message to a list of emails that were passed to the notifier via its constructor. A third-party app which acted as a client was supposed to create and configure the notifier object once, and then use it each time something important happened. ![Structure of the library before applying the Decorator pattern](https://refactoring.guru/images/patterns/diagrams/decorator/problem1-en-2x.png?id=0bf0496ca959de8698bee735e4e62aac) A program could use the notifier class to send notifications about important events to a predefined set of emails. At some point, you realize that users of the library expect more than just email notifications. Many of them would like to receive an SMS about critical issues. Others would like to be notified on Facebook and, of course, the corporate users would love to get Slack notifications. ![Structure of the library after implementing other notification types](https://refactoring.guru/images/patterns/diagrams/decorator/problem2-2x.png?id=28b2c8509b4e78c031d728424b876ebc) Each notification type is implemented as a notifier’s subclass. How hard can that be? You extended the `Notifier` class and put the additional notification methods into new subclasses. Now the client was supposed to instantiate the desired notification class and use it for all further notifications. But then someone reasonably asked you, “Why can’t you use several notification types at once? If your house is on fire, you’d probably want to be informed through every channel.” You tried to address that problem by creating special subclasses which combined several notification methods within one class. However, it quickly became apparent that this approach would bloat the code immensely, not only the library code but the client code as well. ![Structure of the library after creating class combinations](https://refactoring.guru/images/patterns/diagrams/decorator/problem3-2x.png?id=abb7a87b521ce97d7661dd9c0b988cc3) Combinatorial explosion of subclasses. You have to find some other way to structure notifications classes so that their number won’t accidentally break some Guinness record. Solution -------- Extending a class is the first thing that comes to mind when you need to alter an object’s behavior. However, inheritance has several serious caveats that you need to be aware of. * Inheritance is static. You can’t alter the behavior of an existing object at runtime. You can only replace the whole object with another one that’s created from a different subclass. * Subclasses can have just one parent class. In most languages, inheritance doesn’t let a class inherit behaviors of multiple classes at the same time. One of the ways to overcome these caveats is by using _Aggregation_ or _Composition_ _Aggregation_: object A contains objects B; B can live without A. _Composition_: object A consists of objects B; A manages life cycle of B; B can’t live without A. instead of _Inheritance_. Both of the alternatives work almost the same way: one object _has a_ reference to another and delegates it some work, whereas with inheritance, the object itself _is_ able to do that work, inheriting the behavior from its superclass. With this new approach you can easily substitute the linked “helper” object with another, changing the behavior of the container at runtime. An object can use the behavior of various classes, having references to multiple objects and delegating them all kinds of work. Aggregation/composition is the key principle behind many design patterns, including Decorator. On that note, let’s return to the pattern discussion. ![Inheritance vs. Aggregation](https://refactoring.guru/images/patterns/diagrams/decorator/solution1-en-2x.png?id=0acaa7d75290a1647f5402bc5d1c03e7) Inheritance vs. Aggregation “Wrapper” is the alternative nickname for the Decorator pattern that clearly expresses the main idea of the pattern. A _wrapper_ is an object that can be linked with some _target_ object. The wrapper contains the same set of methods as the target and delegates to it all requests it receives. However, the wrapper may alter the result by doing something either before or after it passes the request to the target. When does a simple wrapper become the real decorator? As I mentioned, the wrapper implements the same interface as the wrapped object. That’s why from the client’s perspective these objects are identical. Make the wrapper’s reference field accept any object that follows that interface. This will let you cover an object in multiple wrappers, adding the combined behavior of all the wrappers to it. In our notifications example, let’s leave the simple email notification behavior inside the base `Notifier` class, but turn all other notification methods into decorators. ![The solution with the Decorator pattern](https://refactoring.guru/images/patterns/diagrams/decorator/solution2-2x.png?id=7775f76b94dbd5cd25f711ce81f59262) Various notification methods become decorators. The client code would need to wrap a basic notifier object into a set of decorators that match the client’s preferences. The resulting objects will be structured as a stack. ![Apps might configure complex stacks of notification decorators](https://refactoring.guru/images/patterns/diagrams/decorator/solution3-en-2x.png?id=9a4ef2b4267685a83d0233d78775497b) Apps might configure complex stacks of notification decorators. The last decorator in the stack would be the object that the client actually works with. Since all decorators implement the same interface as the base notifier, the rest of the client code won’t care whether it works with the “pure” notifier object or the decorated one. We could apply the same approach to other behaviors such as formatting messages or composing the recipient list. The client can decorate the object with any custom decorators, as long as they follow the same interface as the others. Real-World Analogy ------------------ ![Example of the Decorator pattern](https://refactoring.guru/images/patterns/content/decorator/decorator-comic-1-2x.png?id=ba869f621b6e0ea173fdc2b535fc7eed) You get a combined effect from wearing multiple pieces of clothing. Wearing clothes is an example of using decorators. When you’re cold, you wrap yourself in a sweater. If you’re still cold with a sweater, you can wear a jacket on top. If it’s raining, you can put on a raincoat. All of these garments “extend” your basic behavior but aren’t part of you, and you can easily take off any piece of clothing whenever you don’t need it. Structure --------- ![Structure of the Decorator design pattern](https://refactoring.guru/images/patterns/diagrams/decorator/structure-2x.png?id=3cfa1f10417a4ef0c12580bc4a63b80d)![Structure of the Decorator design pattern](https://refactoring.guru/images/patterns/diagrams/decorator/structure-indexed-2x.png?id=2733e7d0e322bfb2f150ccf8a878dbf6) 1. The **Component** declares the common interface for both wrappers and wrapped objects. 2. **Concrete Component** is a class of objects being wrapped. It defines the basic behavior, which can be altered by decorators. 3. The **Base Decorator** class has a field for referencing a wrapped object. The field’s type should be declared as the component interface so it can contain both concrete components and decorators. The base decorator delegates all operations to the wrapped object. 4. **Concrete Decorators** define extra behaviors that can be added to components dynamically. Concrete decorators override methods of the base decorator and execute their behavior either before or after calling the parent method. 5. The **Client** can wrap components in multiple layers of decorators, as long as it works with all objects via the component interface. Pseudocode ---------- In this example, the **Decorator** pattern lets you compress and encrypt sensitive data independently from the code that actually uses this data. ![Structure of the Decorator pattern example](https://refactoring.guru/images/patterns/diagrams/decorator/example-2x.png?id=4891323a27d5601a174eec366187d833) The encryption and compression decorators example. The application wraps the data source object with a pair of decorators. Both wrappers change the way the data is written to and read from the disk: * Just before the data is **written to disk**, the decorators encrypt and compress it. The original class writes the encrypted and protected data to the file without knowing about the change. * Right after the data is **read from disk**, it goes through the same decorators, which decompress and decode it. The decorators and the data source class implement the same interface, which makes them all interchangeable in the client code. // The component interface defines operations that can be // altered by decorators. interface DataSource is method writeData(data) method readData():data // Concrete components provide default implementations for the // operations. There might be several variations of these // classes in a program. class FileDataSource implements DataSource is constructor FileDataSource(filename) { ... } method writeData(data) is // Write data to file. method readData():data is // Read data from file. // The base decorator class follows the same interface as the // other components. The primary purpose of this class is to // define the wrapping interface for all concrete decorators. // The default implementation of the wrapping code might include // a field for storing a wrapped component and the means to // initialize it. class DataSourceDecorator implements DataSource is protected field wrappee: DataSource constructor DataSourceDecorator(source: DataSource) is wrappee = source // The base decorator simply delegates all work to the // wrapped component. Extra behaviors can be added in // concrete decorators. method writeData(data) is wrappee.writeData(data) // Concrete decorators may call the parent implementation of // the operation instead of calling the wrapped object // directly. This approach simplifies extension of decorator // classes. method readData():data is return wrappee.readData() // Concrete decorators must call methods on the wrapped object, // but may add something of their own to the result. Decorators // can execute the added behavior either before or after the // call to a wrapped object. class EncryptionDecorator extends DataSourceDecorator is method writeData(data) is // 1. Encrypt passed data. // 2. Pass encrypted data to the wrappee's writeData // method. method readData():data is // 1. Get data from the wrappee's readData method. // 2. Try to decrypt it if it's encrypted. // 3. Return the result. // You can wrap objects in several layers of decorators. class CompressionDecorator extends DataSourceDecorator is method writeData(data) is // 1. Compress passed data. // 2. Pass compressed data to the wrappee's writeData // method. method readData():data is // 1. Get data from the wrappee's readData method. // 2. Try to decompress it if it's compressed. // 3. Return the result. // Option 1. A simple example of a decorator assembly. class Application is method dumbUsageExample() is source = new FileDataSource("somefile.dat") source.writeData(salaryRecords) // The target file has been written with plain data. source = new CompressionDecorator(source) source.writeData(salaryRecords) // The target file has been written with compressed // data. source = new EncryptionDecorator(source) // The source variable now contains this: // Encryption > Compression > FileDataSource source.writeData(salaryRecords) // The file has been written with compressed and // encrypted data. // Option 2. Client code that uses an external data source. // SalaryManager objects neither know nor care about data // storage specifics. They work with a pre-configured data // source received from the app configurator. class SalaryManager is field source: DataSource constructor SalaryManager(source: DataSource) { ... } method load() is return source.readData() method save() is source.writeData(salaryRecords) // ...Other useful methods... // The app can assemble different stacks of decorators at // runtime, depending on the configuration or environment. class ApplicationConfigurator is method configurationExample() is source = new FileDataSource("salary.dat") if (enabledEncryption) source = new EncryptionDecorator(source) if (enabledCompression) source = new CompressionDecorator(source) logger = new SalaryManager(source) salary = logger.load() // ... Applicability ------------- Use the Decorator pattern when you need to be able to assign extra behaviors to objects at runtime without breaking the code that uses these objects. The Decorator lets you structure your business logic into layers, create a decorator for each layer and compose objects with various combinations of this logic at runtime. The client code can treat all these objects in the same way, since they all follow a common interface. Use the pattern when it’s awkward or not possible to extend an object’s behavior using inheritance. Many programming languages have the `final` keyword that can be used to prevent further extension of a class. For a final class, the only way to reuse the existing behavior would be to wrap the class with your own wrapper, using the Decorator pattern. How to Implement ---------------- 1. Make sure your business domain can be represented as a primary component with multiple optional layers over it. 2. Figure out what methods are common to both the primary component and the optional layers. Create a component interface and declare those methods there. 3. Create a concrete component class and define the base behavior in it. 4. Create a base decorator class. It should have a field for storing a reference to a wrapped object. The field should be declared with the component interface type to allow linking to concrete components as well as decorators. The base decorator must delegate all work to the wrapped object. 5. Make sure all classes implement the component interface. 6. Create concrete decorators by extending them from the base decorator. A concrete decorator must execute its behavior before or after the call to the parent method (which always delegates to the wrapped object). 7. The client code must be responsible for creating decorators and composing them in the way the client needs. Pros and Cons ------------- * You can extend an object’s behavior without making a new subclass. * You can add or remove responsibilities from an object at runtime. * You can combine several behaviors by wrapping an object into multiple decorators. * _Single Responsibility Principle_. You can divide a monolithic class that implements many possible variants of behavior into several smaller classes. * It’s hard to remove a specific wrapper from the wrappers stack. * It’s hard to implement a decorator in such a way that its behavior doesn’t depend on the order in the decorators stack. * The initial configuration code of layers might look pretty ugly. Relations with Other Patterns ----------------------------- * [Adapter](https://refactoring.guru/design-patterns/adapter) provides a completely different interface for accessing an existing object. On the other hand, with the [Decorator](https://refactoring.guru/design-patterns/decorator) pattern the interface either stays the same or gets extended. In addition, _Decorator_ supports recursive composition, which isn’t possible when you use _Adapter_. * With [Adapter](https://refactoring.guru/design-patterns/adapter) you access an existing object via different interface. With [Proxy](https://refactoring.guru/design-patterns/proxy) , the interface stays the same. With [Decorator](https://refactoring.guru/design-patterns/decorator) you access the object via an enhanced interface. * [Chain of Responsibility](https://refactoring.guru/design-patterns/chain-of-responsibility) and [Decorator](https://refactoring.guru/design-patterns/decorator) have very similar class structures. Both patterns rely on recursive composition to pass the execution through a series of objects. However, there are several crucial differences. The _CoR_ handlers can execute arbitrary operations independently of each other. They can also stop passing the request further at any point. On the other hand, various _Decorators_ can extend the object’s behavior while keeping it consistent with the base interface. In addition, decorators aren’t allowed to break the flow of the request. * [Composite](https://refactoring.guru/design-patterns/composite) and [Decorator](https://refactoring.guru/design-patterns/decorator) have similar structure diagrams since both rely on recursive composition to organize an open-ended number of objects. A _Decorator_ is like a _Composite_ but only has one child component. There’s another significant difference: _Decorator_ adds additional responsibilities to the wrapped object, while _Composite_ just “sums up” its children’s results. However, the patterns can also cooperate: you can use _Decorator_ to extend the behavior of a specific object in the _Composite_ tree. * Designs that make heavy use of [Composite](https://refactoring.guru/design-patterns/composite) and [Decorator](https://refactoring.guru/design-patterns/decorator) can often benefit from using [Prototype](https://refactoring.guru/design-patterns/prototype) . Applying the pattern lets you clone complex structures instead of re-constructing them from scratch. * [Decorator](https://refactoring.guru/design-patterns/decorator) lets you change the skin of an object, while [Strategy](https://refactoring.guru/design-patterns/strategy) lets you change the guts. * [Decorator](https://refactoring.guru/design-patterns/decorator) and [Proxy](https://refactoring.guru/design-patterns/proxy) have similar structures, but very different intents. Both patterns are built on the composition principle, where one object is supposed to delegate some of the work to another. The difference is that a _Proxy_ usually manages the life cycle of its service object on its own, whereas the composition of _Decorators_ is always controlled by the client. Code Examples ------------- [![Decorator in C#](https://refactoring.guru/images/patterns/icons/csharp.svg?id=da64592defc6e86d57c39c66e9de3e58)](https://refactoring.guru/design-patterns/decorator/csharp/example "Decorator in C#") [![Decorator in C++](https://refactoring.guru/images/patterns/icons/cpp.svg?id=f7782ed8b8666246bfcc3f8fefc3b858)](https://refactoring.guru/design-patterns/decorator/cpp/example "Decorator in C++") [![Decorator in Go](https://refactoring.guru/images/patterns/icons/go.svg?id=1a89927eb99b1ea3fde7701d97970aca)](https://refactoring.guru/design-patterns/decorator/go/example "Decorator in Go") [![Decorator in Java](https://refactoring.guru/images/patterns/icons/java.svg?id=e6d87e2dca08c953fe3acd1275ed4f4e)](https://refactoring.guru/design-patterns/decorator/java/example "Decorator in Java") [![Decorator in PHP](https://refactoring.guru/images/patterns/icons/php.svg?id=be1906eb26b71ec1d3b93720d6156618)](https://refactoring.guru/design-patterns/decorator/php/example "Decorator in PHP") [![Decorator in Python](https://refactoring.guru/images/patterns/icons/python.svg?id=6d815d43c0f7050a1151b43e51569c9f)](https://refactoring.guru/design-patterns/decorator/python/example "Decorator in Python") [![Decorator in Ruby](https://refactoring.guru/images/patterns/icons/ruby.svg?id=b065b718c914bf8e960ef731600be1eb)](https://refactoring.guru/design-patterns/decorator/ruby/example "Decorator in Ruby") [![Decorator in Rust](https://refactoring.guru/images/patterns/icons/rust.svg?id=1f5698a4b5ae23fe79413511747e4a87)](https://refactoring.guru/design-patterns/decorator/rust/example "Decorator in Rust") [![Decorator in Swift](https://refactoring.guru/images/patterns/icons/swift.svg?id=0b716c2d52ec3a48fbe91ac031070c1d)](https://refactoring.guru/design-patterns/decorator/swift/example "Decorator in Swift") [![Decorator in TypeScript](https://refactoring.guru/images/patterns/icons/typescript.svg?id=2239d0f16cb703540c205dd8cb0c0cb7)](https://refactoring.guru/design-patterns/decorator/typescript/example "Decorator in TypeScript") [![](https://refactoring.guru/images/patterns/banners/patterns-book-banner-3-2x.png?id=0cc3f77ab421d1a5c02ee46488231c3a)](https://refactoring.guru/design-patterns/book) ### Support our free website and own the eBook! * 22 design patterns and 8 principles explained in depth. * 409 well-structured, easy to read, jargon-free pages. * 225 clear and helpful illustrations and diagrams. * An archive with code examples in 11 languages. * All devices supported: PDF/EPUB/MOBI/KFX formats. [Learn more…](https://refactoring.guru/design-patterns/book) --- # Proxy [There are patterns of patterns now! \ My friend's project: MetaPatterns.io](https://metapatterns.io/)  [](https://refactoring.guru/design-patterns/proxy#checkout) [](https://refactoring.guru/design-patterns/proxy#checkout) [](https://refactoring.guru/) / [Design Patterns](https://refactoring.guru/design-patterns) / [Structural Patterns](https://refactoring.guru/design-patterns/structural-patterns) Proxy ===== Intent ------ **Proxy** is a structural design pattern that lets you provide a substitute or placeholder for another object. A proxy controls access to the original object, allowing you to perform something either before or after the request gets through to the original object. ![Proxy design pattern](https://refactoring.guru/images/patterns/content/proxy/proxy-2x.png?id=fb3d14e21c210a758d4777f4d93dce09) Problem ------- Why would you want to control access to an object? Here is an example: you have a massive object that consumes a vast amount of system resources. You need it from time to time, but not always. ![Problem solved by Proxy pattern](https://refactoring.guru/images/patterns/diagrams/proxy/problem-en-2x.png?id=50393231365429384bd08c3fe3807f56) Database queries can be really slow. You could implement lazy initialization: create this object only when it’s actually needed. All of the object’s clients would need to execute some deferred initialization code. Unfortunately, this would probably cause a lot of code duplication. In an ideal world, we’d want to put this code directly into our object’s class, but that isn’t always possible. For instance, the class may be part of a closed 3rd-party library. Solution -------- The Proxy pattern suggests that you create a new proxy class with the same interface as an original service object. Then you update your app so that it passes the proxy object to all of the original object’s clients. Upon receiving a request from a client, the proxy creates a real service object and delegates all the work to it. ![Solution with the Proxy pattern](https://refactoring.guru/images/patterns/diagrams/proxy/solution-en-2x.png?id=06d3d96b36666ea5762250dbc8d5e624) The proxy disguises itself as a database object. It can handle lazy initialization and result caching without the client or the real database object even knowing. But what’s the benefit? If you need to execute something either before or after the primary logic of the class, the proxy lets you do this without changing that class. Since the proxy implements the same interface as the original class, it can be passed to any client that expects a real service object. Real-World Analogy ------------------ ![A credit card is a proxy for a bundle of cash](https://refactoring.guru/images/patterns/diagrams/proxy/live-example-2x.png?id=8b8083fa1954d2d92ca84a5a5636ead7) Credit cards can be used for payments just the same as cash. A credit card is a proxy for a bank account, which is a proxy for a bundle of cash. Both implement the same interface: they can be used for making a payment. A consumer feels great because there’s no need to carry loads of cash around. A shop owner is also happy since the income from a transaction gets added electronically to the shop’s bank account without the risk of losing the deposit or getting robbed on the way to the bank. Structure --------- ![Structure of the Proxy design pattern](https://refactoring.guru/images/patterns/diagrams/proxy/structure-2x.png?id=3d54eeca9af4aa373e989a73463539b5)![Structure of the Proxy design pattern](https://refactoring.guru/images/patterns/diagrams/proxy/structure-indexed-2x.png?id=ddf2b3b4807e52330c456c59fc52d504) 1. The **Service Interface** declares the interface of the Service. The proxy must follow this interface to be able to disguise itself as a service object. 2. The **Service** is a class that provides some useful business logic. 3. The **Proxy** class has a reference field that points to a service object. After the proxy finishes its processing (e.g., lazy initialization, logging, access control, caching, etc.), it passes the request to the service object. Usually, proxies manage the full lifecycle of their service objects. 4. The **Client** should work with both services and proxies via the same interface. This way you can pass a proxy into any code that expects a service object. Pseudocode ---------- This example illustrates how the **Proxy** pattern can help to introduce lazy initialization and caching to a 3rd-party YouTube integration library. ![Structure of the Proxy pattern example](https://refactoring.guru/images/patterns/diagrams/proxy/example-2x.png?id=40f22d12d183b9285a380e4a072efb16) Caching results of a service with a proxy. The library provides us with the video downloading class. However, it’s very inefficient. If the client application requests the same video multiple times, the library just downloads it over and over, instead of caching and reusing the first downloaded file. The proxy class implements the same interface as the original downloader and delegates it all the work. However, it keeps track of the downloaded files and returns the cached result when the app requests the same video multiple times. // The interface of a remote service. interface ThirdPartyYouTubeLib is method listVideos() method getVideoInfo(id) method downloadVideo(id) // The concrete implementation of a service connector. Methods // of this class can request information from YouTube. The speed // of the request depends on a user's internet connection as // well as YouTube's. The application will slow down if a lot of // requests are fired at the same time, even if they all request // the same information. class ThirdPartyYouTubeClass implements ThirdPartyYouTubeLib is method listVideos() is // Send an API request to YouTube. method getVideoInfo(id) is // Get metadata about some video. method downloadVideo(id) is // Download a video file from YouTube. // To save some bandwidth, we can cache request results and keep // them for some time. But it may be impossible to put such code // directly into the service class. For example, it could have // been provided as part of a third party library and/or defined // as \`final\`. That's why we put the caching code into a new // proxy class which implements the same interface as the // service class. It delegates to the service object only when // the real requests have to be sent. class CachedYouTubeClass implements ThirdPartyYouTubeLib is private field service: ThirdPartyYouTubeLib private field listCache, videoCache field needReset constructor CachedYouTubeClass(service: ThirdPartyYouTubeLib) is this.service = service method listVideos() is if (listCache == null || needReset) listCache = service.listVideos() return listCache method getVideoInfo(id) is if (videoCache == null || needReset) videoCache = service.getVideoInfo(id) return videoCache method downloadVideo(id) is if (!downloadExists(id) || needReset) service.downloadVideo(id) // The GUI class, which used to work directly with a service // object, stays unchanged as long as it works with the service // object through an interface. We can safely pass a proxy // object instead of a real service object since they both // implement the same interface. class YouTubeManager is protected field service: ThirdPartyYouTubeLib constructor YouTubeManager(service: ThirdPartyYouTubeLib) is this.service = service method renderVideoPage(id) is info = service.getVideoInfo(id) // Render the video page. method renderListPanel() is list = service.listVideos() // Render the list of video thumbnails. method reactOnUserInput() is renderVideoPage() renderListPanel() // The application can configure proxies on the fly. class Application is method init() is aYouTubeService = new ThirdPartyYouTubeClass() aYouTubeProxy = new CachedYouTubeClass(aYouTubeService) manager = new YouTubeManager(aYouTubeProxy) manager.reactOnUserInput() Applicability ------------- There are dozens of ways to utilize the Proxy pattern. Let’s go over the most popular uses. Lazy initialization (virtual proxy). This is when you have a heavyweight service object that wastes system resources by being always up, even though you only need it from time to time. Instead of creating the object when the app launches, you can delay the object’s initialization to a time when it’s really needed. Access control (protection proxy). This is when you want only specific clients to be able to use the service object; for instance, when your objects are crucial parts of an operating system and clients are various launched applications (including malicious ones). The proxy can pass the request to the service object only if the client’s credentials match some criteria. Local execution of a remote service (remote proxy). This is when the service object is located on a remote server. In this case, the proxy passes the client request over the network, handling all of the nasty details of working with the network. Logging requests (logging proxy). This is when you want to keep a history of requests to the service object. The proxy can log each request before passing it to the service. Caching request results (caching proxy). This is when you need to cache results of client requests and manage the life cycle of this cache, especially if results are quite large. The proxy can implement caching for recurring requests that always yield the same results. The proxy may use the parameters of requests as the cache keys. Smart reference. This is when you need to be able to dismiss a heavyweight object once there are no clients that use it. The proxy can keep track of clients that obtained a reference to the service object or its results. From time to time, the proxy may go over the clients and check whether they are still active. If the client list gets empty, the proxy might dismiss the service object and free the underlying system resources. The proxy can also track whether the client had modified the service object. Then the unchanged objects may be reused by other clients. How to Implement ---------------- 1. If there’s no pre-existing service interface, create one to make proxy and service objects interchangeable. Extracting the interface from the service class isn’t always possible, because you’d need to change all of the service’s clients to use that interface. Plan B is to make the proxy a subclass of the service class, and this way it’ll inherit the interface of the service. 2. Create the proxy class. It should have a field for storing a reference to the service. Usually, proxies create and manage the whole life cycle of their services. On rare occasions, a service is passed to the proxy via a constructor by the client. 3. Implement the proxy methods according to their purposes. In most cases, after doing some work, the proxy should delegate the work to the service object. 4. Consider introducing a creation method that decides whether the client gets a proxy or a real service. This can be a simple static method in the proxy class or a full-blown factory method. 5. Consider implementing lazy initialization for the service object. Pros and Cons ------------- * You can control the service object without clients knowing about it. * You can manage the lifecycle of the service object when clients don’t care about it. * The proxy works even if the service object isn’t ready or is not available. * _Open/Closed Principle_. You can introduce new proxies without changing the service or clients. * The code may become more complicated since you need to introduce a lot of new classes. * The response from the service might get delayed. Relations with Other Patterns ----------------------------- * With [Adapter](https://refactoring.guru/design-patterns/adapter) you access an existing object via different interface. With [Proxy](https://refactoring.guru/design-patterns/proxy) , the interface stays the same. With [Decorator](https://refactoring.guru/design-patterns/decorator) you access the object via an enhanced interface. * [Facade](https://refactoring.guru/design-patterns/facade) is similar to [Proxy](https://refactoring.guru/design-patterns/proxy) in that both buffer a complex entity and initialize it on its own. Unlike _Facade_, _Proxy_ has the same interface as its service object, which makes them interchangeable. * [Decorator](https://refactoring.guru/design-patterns/decorator) and [Proxy](https://refactoring.guru/design-patterns/proxy) have similar structures, but very different intents. Both patterns are built on the composition principle, where one object is supposed to delegate some of the work to another. The difference is that a _Proxy_ usually manages the life cycle of its service object on its own, whereas the composition of _Decorators_ is always controlled by the client. Code Examples ------------- [![Proxy in C#](https://refactoring.guru/images/patterns/icons/csharp.svg?id=da64592defc6e86d57c39c66e9de3e58)](https://refactoring.guru/design-patterns/proxy/csharp/example "Proxy in C#") [![Proxy in C++](https://refactoring.guru/images/patterns/icons/cpp.svg?id=f7782ed8b8666246bfcc3f8fefc3b858)](https://refactoring.guru/design-patterns/proxy/cpp/example "Proxy in C++") [![Proxy in Go](https://refactoring.guru/images/patterns/icons/go.svg?id=1a89927eb99b1ea3fde7701d97970aca)](https://refactoring.guru/design-patterns/proxy/go/example "Proxy in Go") [![Proxy in Java](https://refactoring.guru/images/patterns/icons/java.svg?id=e6d87e2dca08c953fe3acd1275ed4f4e)](https://refactoring.guru/design-patterns/proxy/java/example "Proxy in Java") [![Proxy in PHP](https://refactoring.guru/images/patterns/icons/php.svg?id=be1906eb26b71ec1d3b93720d6156618)](https://refactoring.guru/design-patterns/proxy/php/example "Proxy in PHP") [![Proxy in Python](https://refactoring.guru/images/patterns/icons/python.svg?id=6d815d43c0f7050a1151b43e51569c9f)](https://refactoring.guru/design-patterns/proxy/python/example "Proxy in Python") [![Proxy in Ruby](https://refactoring.guru/images/patterns/icons/ruby.svg?id=b065b718c914bf8e960ef731600be1eb)](https://refactoring.guru/design-patterns/proxy/ruby/example "Proxy in Ruby") [![Proxy in Rust](https://refactoring.guru/images/patterns/icons/rust.svg?id=1f5698a4b5ae23fe79413511747e4a87)](https://refactoring.guru/design-patterns/proxy/rust/example "Proxy in Rust") [![Proxy in Swift](https://refactoring.guru/images/patterns/icons/swift.svg?id=0b716c2d52ec3a48fbe91ac031070c1d)](https://refactoring.guru/design-patterns/proxy/swift/example "Proxy in Swift") [![Proxy in TypeScript](https://refactoring.guru/images/patterns/icons/typescript.svg?id=2239d0f16cb703540c205dd8cb0c0cb7)](https://refactoring.guru/design-patterns/proxy/typescript/example "Proxy in TypeScript") [![](https://refactoring.guru/images/patterns/banners/patterns-book-banner-3-2x.png?id=0cc3f77ab421d1a5c02ee46488231c3a)](https://refactoring.guru/design-patterns/book) ### Support our free website and own the eBook! * 22 design patterns and 8 principles explained in depth. * 409 well-structured, easy to read, jargon-free pages. * 225 clear and helpful illustrations and diagrams. * An archive with code examples in 11 languages. * All devices supported: PDF/EPUB/MOBI/KFX formats. [Learn more…](https://refactoring.guru/design-patterns/book) --- # Flyweight [There are patterns of patterns now! \ My friend's project: MetaPatterns.io](https://metapatterns.io/)  [](https://refactoring.guru/design-patterns/flyweight#checkout) [](https://refactoring.guru/design-patterns/flyweight#checkout) [](https://refactoring.guru/) / [Design Patterns](https://refactoring.guru/design-patterns) / [Structural Patterns](https://refactoring.guru/design-patterns/structural-patterns) Flyweight ========= Also known as: Cache Intent ------ **Flyweight** is a structural design pattern that lets you fit more objects into the available amount of RAM by sharing common parts of state between multiple objects instead of keeping all of the data in each object. ![Flyweight design pattern](https://refactoring.guru/images/patterns/content/flyweight/flyweight-2x.png?id=6a8f17d9550c75c3d648a605c4d31b45) Problem ------- To have some fun after long working hours, you decided to create a simple video game: players would be moving around a map and shooting each other. You chose to implement a realistic particle system and make it a distinctive feature of the game. Vast quantities of bullets, missiles, and shrapnel from explosions should fly all over the map and deliver a thrilling experience to the player. Upon its completion, you pushed the last commit, built the game and sent it to your friend for a test drive. Although the game was running flawlessly on your machine, your friend wasn’t able to play for long. On his computer, the game kept crashing after a few minutes of gameplay. After spending several hours digging through debug logs, you discovered that the game crashed because of an insufficient amount of RAM. It turned out that your friend’s rig was much less powerful than your own computer, and that’s why the problem emerged so quickly on his machine. The actual problem was related to your particle system. Each particle, such as a bullet, a missile or a piece of shrapnel was represented by a separate object containing plenty of data. At some point, when the carnage on a player’s screen reached its climax, newly created particles no longer fit into the remaining RAM, so the program crashed. ![Flyweight pattern problem](https://refactoring.guru/images/patterns/diagrams/flyweight/problem-en-2x.png?id=80d8ed54c18cc72473045bbd398f9b43) Solution -------- On closer inspection of the `Particle` class, you may notice that the color and sprite fields consume a lot more memory than other fields. What’s worse is that these two fields store almost identical data across all particles. For example, all bullets have the same color and sprite. ![Flyweight pattern solution](https://refactoring.guru/images/patterns/diagrams/flyweight/solution1-en-2x.png?id=89d70cf5947b93412fe48750a398d8c3) Other parts of a particle’s state, such as coordinates, movement vector and speed, are unique to each particle. After all, the values of these fields change over time. This data represents the always changing context in which the particle exists, while the color and sprite remain constant for each particle. This constant data of an object is usually called the _intrinsic state_. It lives within the object; other objects can only read it, not change it. The rest of the object’s state, often altered “from the outside” by other objects, is called the _extrinsic state_. The Flyweight pattern suggests that you stop storing the extrinsic state inside the object. Instead, you should pass this state to specific methods which rely on it. Only the intrinsic state stays within the object, letting you reuse it in different contexts. As a result, you’d need fewer of these objects since they only differ in the intrinsic state, which has much fewer variations than the extrinsic. ![Flyweight pattern solution](https://refactoring.guru/images/patterns/diagrams/flyweight/solution3-en-2x.png?id=a8679f0aa03f6521dd206fcbc5ed9176) Let’s return to our game. Assuming that we had extracted the extrinsic state from our particle class, only three different objects would suffice to represent all particles in the game: a bullet, a missile, and a piece of shrapnel. As you’ve probably guessed by now, an object that only stores the intrinsic state is called a flyweight. #### Extrinsic state storage Where does the extrinsic state move to? Some class should still store it, right? In most cases, it gets moved to the container object, which aggregates objects before we apply the pattern. In our case, that’s the main `Game` object that stores all particles in the `particles` field. To move the extrinsic state into this class, you need to create several array fields for storing coordinates, vectors, and speed of each individual particle. But that’s not all. You need another array for storing references to a specific flyweight that represents a particle. These arrays must be in sync so that you can access all data of a particle using the same index. ![Flyweight pattern solution](https://refactoring.guru/images/patterns/diagrams/flyweight/solution2-en-2x.png?id=64debda3b847213b134d303bd32613cb) A more elegant solution is to create a separate context class that would store the extrinsic state along with reference to the flyweight object. This approach would require having just a single array in the container class. Wait a second! Won’t we need to have as many of these contextual objects as we had at the very beginning? Technically, yes. But the thing is, these objects are much smaller than before. The most memory-consuming fields have been moved to just a few flyweight objects. Now, a thousand small contextual objects can reuse a single heavy flyweight object instead of storing a thousand copies of its data. #### Flyweight and immutability Since the same flyweight object can be used in different contexts, you have to make sure that its state can’t be modified. A flyweight should initialize its state just once, via constructor parameters. It shouldn’t expose any setters or public fields to other objects. #### Flyweight factory For more convenient access to various flyweights, you can create a factory method that manages a pool of existing flyweight objects. The method accepts the intrinsic state of the desired flyweight from a client, looks for an existing flyweight object matching this state, and returns it if it was found. If not, it creates a new flyweight and adds it to the pool. There are several options where this method could be placed. The most obvious place is a flyweight container. Alternatively, you could create a new factory class. Or you could make the factory method static and put it inside an actual flyweight class. Structure --------- ![Structure of the Flyweight design pattern](https://refactoring.guru/images/patterns/diagrams/flyweight/structure-2x.png?id=a7c8347421bde16435fc90a706f5dd34)![Structure of the Flyweight design pattern](https://refactoring.guru/images/patterns/diagrams/flyweight/structure-indexed-2x.png?id=205e2f7d08b4ac0695f445a9db8989c4) 1. The Flyweight pattern is merely an optimization. Before applying it, make sure your program does have the RAM consumption problem related to having a massive number of similar objects in memory at the same time. Make sure that this problem can’t be solved in any other meaningful way. 2. The **Flyweight** class contains the portion of the original object’s state that can be shared between multiple objects. The same flyweight object can be used in many different contexts. The state stored inside a flyweight is called _intrinsic._ The state passed to the flyweight’s methods is called _extrinsic._ 3. The **Context** class contains the extrinsic state, unique across all original objects. When a context is paired with one of the flyweight objects, it represents the full state of the original object. 4. Usually, the behavior of the original object remains in the flyweight class. In this case, whoever calls a flyweight’s method must also pass appropriate bits of the extrinsic state into the method’s parameters. On the other hand, the behavior can be moved to the context class, which would use the linked flyweight merely as a data object. 5. The **Client** calculates or stores the extrinsic state of flyweights. From the client’s perspective, a flyweight is a template object which can be configured at runtime by passing some contextual data into parameters of its methods. 6. The **Flyweight Factory** manages a pool of existing flyweights. With the factory, clients don’t create flyweights directly. Instead, they call the factory, passing it bits of the intrinsic state of the desired flyweight. The factory looks over previously created flyweights and either returns an existing one that matches search criteria or creates a new one if nothing is found. Pseudocode ---------- In this example, the **Flyweight** pattern helps to reduce memory usage when rendering millions of tree objects on a canvas. ![Flyweight pattern example](https://refactoring.guru/images/patterns/diagrams/flyweight/example-2x.png?id=9423640fe3688a64201389b6e7aa1f48) The pattern extracts the repeating intrinsic state from a main `Tree` class and moves it into the flyweight class `TreeType`. Now instead of storing the same data in multiple objects, it’s kept in just a few flyweight objects and linked to appropriate `Tree` objects which act as contexts. The client code creates new tree objects using the flyweight factory, which encapsulates the complexity of searching for the right object and reusing it if needed. // The flyweight class contains a portion of the state of a // tree. These fields store values that are unique for each // particular tree. For instance, you won't find here the tree // coordinates. But the texture and colors shared between many // trees are here. Since this data is usually BIG, you'd waste a // lot of memory by keeping it in each tree object. Instead, we // can extract texture, color and other repeating data into a // separate object which lots of individual tree objects can // reference. class TreeType is field name field color field texture constructor TreeType(name, color, texture) { ... } method draw(canvas, x, y) is // 1. Create a bitmap of a given type, color & texture. // 2. Draw the bitmap on the canvas at X and Y coords. // Flyweight factory decides whether to re-use existing // flyweight or to create a new object. class TreeFactory is static field treeTypes: collection of tree types static method getTreeType(name, color, texture) is type = treeTypes.find(name, color, texture) if (type == null) type = new TreeType(name, color, texture) treeTypes.add(type) return type // The contextual object contains the extrinsic part of the tree // state. An application can create billions of these since they // are pretty small: just two integer coordinates and one // reference field. class Tree is field x,y field type: TreeType constructor Tree(x, y, type) { ... } method draw(canvas) is type.draw(canvas, this.x, this.y) // The Tree and the Forest classes are the flyweight's clients. // You can merge them if you don't plan to develop the Tree // class any further. class Forest is field trees: collection of Trees method plantTree(x, y, name, color, texture) is type = TreeFactory.getTreeType(name, color, texture) tree = new Tree(x, y, type) trees.add(tree) method draw(canvas) is foreach (tree in trees) do tree.draw(canvas) Applicability ------------- Use the Flyweight pattern only when your program must support a huge number of objects which barely fit into available RAM. The benefit of applying the pattern depends heavily on how and where it’s used. It’s most useful when: * an application needs to spawn a huge number of similar objects * this drains all available RAM on a target device * the objects contain duplicate states which can be extracted and shared between multiple objects How to Implement ---------------- 1. Divide fields of a class that will become a flyweight into two parts: * the intrinsic state: the fields that contain unchanging data duplicated across many objects * the extrinsic state: the fields that contain contextual data unique to each object 2. Leave the fields that represent the intrinsic state in the class, but make sure they’re immutable. They should take their initial values only inside the constructor. 3. Go over methods that use fields of the extrinsic state. For each field used in the method, introduce a new parameter and use it instead of the field. 4. Optionally, create a factory class to manage the pool of flyweights. It should check for an existing flyweight before creating a new one. Once the factory is in place, clients must only request flyweights through it. They should describe the desired flyweight by passing its intrinsic state to the factory. 5. The client must store or calculate values of the extrinsic state (context) to be able to call methods of flyweight objects. For the sake of convenience, the extrinsic state along with the flyweight-referencing field may be moved to a separate context class. Pros and Cons ------------- * You can save lots of RAM, assuming your program has tons of similar objects. * You might be trading RAM over CPU cycles when some of the context data needs to be recalculated each time somebody calls a flyweight method. * The code becomes much more complicated. New team members will always be wondering why the state of an entity was separated in such a way. Relations with Other Patterns ----------------------------- * You can implement shared leaf nodes of the [Composite](https://refactoring.guru/design-patterns/composite) tree as [Flyweights](https://refactoring.guru/design-patterns/flyweight) to save some RAM. * [Flyweight](https://refactoring.guru/design-patterns/flyweight) shows how to make lots of little objects, whereas [Facade](https://refactoring.guru/design-patterns/facade) shows how to make a single object that represents an entire subsystem. * [Flyweight](https://refactoring.guru/design-patterns/flyweight) would resemble [Singleton](https://refactoring.guru/design-patterns/singleton) if you somehow managed to reduce all shared states of the objects to just one flyweight object. But there are two fundamental differences between these patterns: 1. There should be only one Singleton instance, whereas a _Flyweight_ class can have multiple instances with different intrinsic states. 2. The _Singleton_ object can be mutable. Flyweight objects are immutable. Code Examples ------------- [![Flyweight in C#](https://refactoring.guru/images/patterns/icons/csharp.svg?id=da64592defc6e86d57c39c66e9de3e58)](https://refactoring.guru/design-patterns/flyweight/csharp/example "Flyweight in C#") [![Flyweight in C++](https://refactoring.guru/images/patterns/icons/cpp.svg?id=f7782ed8b8666246bfcc3f8fefc3b858)](https://refactoring.guru/design-patterns/flyweight/cpp/example "Flyweight in C++") [![Flyweight in Go](https://refactoring.guru/images/patterns/icons/go.svg?id=1a89927eb99b1ea3fde7701d97970aca)](https://refactoring.guru/design-patterns/flyweight/go/example "Flyweight in Go") [![Flyweight in Java](https://refactoring.guru/images/patterns/icons/java.svg?id=e6d87e2dca08c953fe3acd1275ed4f4e)](https://refactoring.guru/design-patterns/flyweight/java/example "Flyweight in Java") [![Flyweight in PHP](https://refactoring.guru/images/patterns/icons/php.svg?id=be1906eb26b71ec1d3b93720d6156618)](https://refactoring.guru/design-patterns/flyweight/php/example "Flyweight in PHP") [![Flyweight in Python](https://refactoring.guru/images/patterns/icons/python.svg?id=6d815d43c0f7050a1151b43e51569c9f)](https://refactoring.guru/design-patterns/flyweight/python/example "Flyweight in Python") [![Flyweight in Ruby](https://refactoring.guru/images/patterns/icons/ruby.svg?id=b065b718c914bf8e960ef731600be1eb)](https://refactoring.guru/design-patterns/flyweight/ruby/example "Flyweight in Ruby") [![Flyweight in Rust](https://refactoring.guru/images/patterns/icons/rust.svg?id=1f5698a4b5ae23fe79413511747e4a87)](https://refactoring.guru/design-patterns/flyweight/rust/example "Flyweight in Rust") [![Flyweight in Swift](https://refactoring.guru/images/patterns/icons/swift.svg?id=0b716c2d52ec3a48fbe91ac031070c1d)](https://refactoring.guru/design-patterns/flyweight/swift/example "Flyweight in Swift") [![Flyweight in TypeScript](https://refactoring.guru/images/patterns/icons/typescript.svg?id=2239d0f16cb703540c205dd8cb0c0cb7)](https://refactoring.guru/design-patterns/flyweight/typescript/example "Flyweight in TypeScript") [![](https://refactoring.guru/images/patterns/banners/patterns-book-banner-3-2x.png?id=0cc3f77ab421d1a5c02ee46488231c3a)](https://refactoring.guru/design-patterns/book) ### Support our free website and own the eBook! * 22 design patterns and 8 principles explained in depth. * 409 well-structured, easy to read, jargon-free pages. * 225 clear and helpful illustrations and diagrams. * An archive with code examples in 11 languages. * All devices supported: PDF/EPUB/MOBI/KFX formats. [Learn more…](https://refactoring.guru/design-patterns/book) --- # Iterator [There are patterns of patterns now! \ My friend's project: MetaPatterns.io](https://metapatterns.io/)  [](https://refactoring.guru/design-patterns/iterator#checkout) [](https://refactoring.guru/design-patterns/iterator#checkout) [](https://refactoring.guru/) / [Design Patterns](https://refactoring.guru/design-patterns) / [Behavioral Patterns](https://refactoring.guru/design-patterns/behavioral-patterns) Iterator ======== Intent ------ **Iterator** is a behavioral design pattern that lets you traverse elements of a collection without exposing its underlying representation (list, stack, tree, etc.). ![Iterator design pattern](https://refactoring.guru/images/patterns/content/iterator/iterator-en-2x.png?id=2a85705e8e5fab257802b2ce36d6d236) Problem ------- Collections are one of the most used data types in programming. Nonetheless, a collection is just a container for a group of objects. ![Various types of collections](https://refactoring.guru/images/patterns/diagrams/iterator/problem1-2x.png?id=1f4384c3c631be238bfc23d6eb84a0ef) Various types of collections. Most collections store their elements in simple lists. However, some of them are based on stacks, trees, graphs and other complex data structures. But no matter how a collection is structured, it must provide some way of accessing its elements so that other code can use these elements. There should be a way to go through each element of the collection without accessing the same elements over and over. This may sound like an easy job if you have a collection based on a list. You just loop over all of the elements. But how do you sequentially traverse elements of a complex data structure, such as a tree? For example, one day you might be just fine with depth-first traversal of a tree. Yet the next day you might require breadth-first traversal. And the next week, you might need something else, like random access to the tree elements. ![Various traversal algorithms](https://refactoring.guru/images/patterns/diagrams/iterator/problem2-2x.png?id=656b13c109d4d4960ea1f9fa993bae4c) The same collection can be traversed in several different ways. Adding more and more traversal algorithms to the collection gradually blurs its primary responsibility, which is efficient data storage. Additionally, some algorithms might be tailored for a specific application, so including them into a generic collection class would be weird. On the other hand, the client code that’s supposed to work with various collections may not even care how they store their elements. However, since collections all provide different ways of accessing their elements, you have no option other than to couple your code to the specific collection classes. Solution -------- The main idea of the Iterator pattern is to extract the traversal behavior of a collection into a separate object called an _iterator_. ![Iterators implement various traversal algorithms](https://refactoring.guru/images/patterns/diagrams/iterator/solution1-2x.png?id=dcebcad4c197bfa5f25f680382d0e5ac) Iterators implement various traversal algorithms. Several iterator objects can traverse the same collection at the same time. In addition to implementing the algorithm itself, an iterator object encapsulates all of the traversal details, such as the current position and how many elements are left till the end. Because of this, several iterators can go through the same collection at the same time, independently of each other. Usually, iterators provide one primary method for fetching elements of the collection. The client can keep running this method until it doesn’t return anything, which means that the iterator has traversed all of the elements. All iterators must implement the same interface. This makes the client code compatible with any collection type or any traversal algorithm as long as there’s a proper iterator. If you need a special way to traverse a collection, you just create a new iterator class, without having to change the collection or the client. Real-World Analogy ------------------ ![Various ways to walk around Rome](https://refactoring.guru/images/patterns/content/iterator/iterator-comic-1-en-2x.png?id=b90df2dbda9280336db189924683e121) Various ways to walk around Rome. You plan to visit Rome for a few days and visit all of its main sights and attractions. But once there, you could waste a lot of time walking in circles, unable to find even the Colosseum. On the other hand, you could buy a virtual guide app for your smartphone and use it for navigation. It’s smart and inexpensive, and you could be staying at some interesting places for as long as you want. A third alternative is that you could spend some of the trip’s budget and hire a local guide who knows the city like the back of his hand. The guide would be able to tailor the tour to your likings, show you every attraction and tell a lot of exciting stories. That’ll be even more fun; but, alas, more expensive, too. All of these options—the random directions born in your head, the smartphone navigator or the human guide—act as iterators over the vast collection of sights and attractions located in Rome. Structure --------- ![Structure of the Iterator design pattern](https://refactoring.guru/images/patterns/diagrams/iterator/structure-2x.png?id=b7b4708d3f279dd046eb1692f1cba710)![Structure of the Iterator design pattern](https://refactoring.guru/images/patterns/diagrams/iterator/structure-indexed-2x.png?id=d809428b2262e2013972fe69d2434473) 1. The **Iterator** interface declares the operations required for traversing a collection: fetching the next element, retrieving the current position, restarting iteration, etc. 2. **Concrete Iterators** implement specific algorithms for traversing a collection. The iterator object should track the traversal progress on its own. This allows several iterators to traverse the same collection independently of each other. 3. The **Collection** interface declares one or multiple methods for getting iterators compatible with the collection. Note that the return type of the methods must be declared as the iterator interface so that the concrete collections can return various kinds of iterators. 4. **Concrete Collections** return new instances of a particular concrete iterator class each time the client requests one. You might be wondering, where’s the rest of the collection’s code? Don’t worry, it should be in the same class. It’s just that these details aren’t crucial to the actual pattern, so we’re omitting them. 5. The **Client** works with both collections and iterators via their interfaces. This way the client isn’t coupled to concrete classes, allowing you to use various collections and iterators with the same client code. Typically, clients don’t create iterators on their own, but instead get them from collections. Yet, in certain cases, the client can create one directly; for example, when the client defines its own special iterator. Pseudocode ---------- In this example, the **Iterator** pattern is used to walk through a special kind of collection which encapsulates access to Facebook’s social graph. The collection provides several iterators that can traverse profiles in various ways. ![Structure of the Iterator pattern example](https://refactoring.guru/images/patterns/diagrams/iterator/example-2x.png?id=73c3e55f75ca0250bd84e8a1d8cc88d2) Example of iterating over social profiles. The ‘friends’ iterator can be used to go over the friends of a given profile. The ‘colleagues’ iterator does the same, except it omits friends who don’t work at the same company as a target person. Both iterators implement a common interface which allows clients to fetch profiles without diving into implementation details such as authentication and sending REST requests. The client code isn’t coupled to concrete classes because it works with collections and iterators only through interfaces. If you decide to connect your app to a new social network, you simply need to provide new collection and iterator classes without changing the existing code. // The collection interface must declare a factory method for // producing iterators. You can declare several methods if there // are different kinds of iteration available in your program. interface SocialNetwork is method createFriendsIterator(profileId):ProfileIterator method createCoworkersIterator(profileId):ProfileIterator // Each concrete collection is coupled to a set of concrete // iterator classes it returns. But the client isn't, since the // signature of these methods returns iterator interfaces. class Facebook implements SocialNetwork is // ... The bulk of the collection's code should go here ... // Iterator creation code. method createFriendsIterator(profileId) is return new FacebookIterator(this, profileId, "friends") method createCoworkersIterator(profileId) is return new FacebookIterator(this, profileId, "coworkers") // The common interface for all iterators. interface ProfileIterator is method getNext():Profile method hasMore():bool // The concrete iterator class. class FacebookIterator implements ProfileIterator is // The iterator needs a reference to the collection that it // traverses. private field facebook: Facebook private field profileId, type: string // An iterator object traverses the collection independently // from other iterators. Therefore it has to store the // iteration state. private field currentPosition private field cache: array of Profile constructor FacebookIterator(facebook, profileId, type) is this.facebook = facebook this.profileId = profileId this.type = type private method lazyInit() is if (cache == null) cache = facebook.socialGraphRequest(profileId, type) // Each concrete iterator class has its own implementation // of the common iterator interface. method getNext() is if (hasMore()) result = cache\[currentPosition\] currentPosition++ return result method hasMore() is lazyInit() return currentPosition < cache.length // Here is another useful trick: you can pass an iterator to a // client class instead of giving it access to a whole // collection. This way, you don't expose the collection to the // client. // // And there's another benefit: you can change the way the // client works with the collection at runtime by passing it a // different iterator. This is possible because the client code // isn't coupled to concrete iterator classes. class SocialSpammer is method send(iterator: ProfileIterator, message: string) is while (iterator.hasMore()) profile = iterator.getNext() System.sendEmail(profile.getEmail(), message) // The application class configures collections and iterators // and then passes them to the client code. class Application is field network: SocialNetwork field spammer: SocialSpammer method config() is if working with Facebook this.network = new Facebook() if working with LinkedIn this.network = new LinkedIn() this.spammer = new SocialSpammer() method sendSpamToFriends(profile) is iterator = network.createFriendsIterator(profile.getId()) spammer.send(iterator, "Very important message") method sendSpamToCoworkers(profile) is iterator = network.createCoworkersIterator(profile.getId()) spammer.send(iterator, "Very important message") Applicability ------------- Use the Iterator pattern when your collection has a complex data structure under the hood, but you want to hide its complexity from clients (either for convenience or security reasons). The iterator encapsulates the details of working with a complex data structure, providing the client with several simple methods of accessing the collection elements. While this approach is very convenient for the client, it also protects the collection from careless or malicious actions which the client would be able to perform if working with the collection directly. Use the pattern to reduce duplication of the traversal code across your app. The code of non-trivial iteration algorithms tends to be very bulky. When placed within the business logic of an app, it may blur the responsibility of the original code and make it less maintainable. Moving the traversal code to designated iterators can help you make the code of the application more lean and clean. Use the Iterator when you want your code to be able to traverse different data structures or when types of these structures are unknown beforehand. The pattern provides a couple of generic interfaces for both collections and iterators. Given that your code now uses these interfaces, it’ll still work if you pass it various kinds of collections and iterators that implement these interfaces. How to Implement ---------------- 1. Declare the iterator interface. At the very least, it must have a method for fetching the next element from a collection. But for the sake of convenience you can add a couple of other methods, such as fetching the previous element, tracking the current position, and checking the end of the iteration. 2. Declare the collection interface and describe a method for fetching iterators. The return type should be equal to that of the iterator interface. You may declare similar methods if you plan to have several distinct groups of iterators. 3. Implement concrete iterator classes for the collections that you want to be traversable with iterators. An iterator object must be linked with a single collection instance. Usually, this link is established via the iterator’s constructor. 4. Implement the collection interface in your collection classes. The main idea is to provide the client with a shortcut for creating iterators, tailored for a particular collection class. The collection object must pass itself to the iterator’s constructor to establish a link between them. 5. Go over the client code to replace all of the collection traversal code with the use of iterators. The client fetches a new iterator object each time it needs to iterate over the collection elements. Pros and Cons ------------- * _Single Responsibility Principle_. You can clean up the client code and the collections by extracting bulky traversal algorithms into separate classes. * _Open/Closed Principle_. You can implement new types of collections and iterators and pass them to existing code without breaking anything. * You can iterate over the same collection in parallel because each iterator object contains its own iteration state. * For the same reason, you can delay an iteration and continue it when needed. * Applying the pattern can be an overkill if your app only works with simple collections. * Using an iterator may be less efficient than going through elements of some specialized collections directly. Relations with Other Patterns ----------------------------- * You can use [Iterators](https://refactoring.guru/design-patterns/iterator) to traverse [Composite](https://refactoring.guru/design-patterns/composite) trees. * You can use [Factory Method](https://refactoring.guru/design-patterns/factory-method) along with [Iterator](https://refactoring.guru/design-patterns/iterator) to let collection subclasses return different types of iterators that are compatible with the collections. * You can use [Memento](https://refactoring.guru/design-patterns/memento) along with [Iterator](https://refactoring.guru/design-patterns/iterator) to capture the current iteration state and roll it back if necessary. * You can use [Visitor](https://refactoring.guru/design-patterns/visitor) along with [Iterator](https://refactoring.guru/design-patterns/iterator) to traverse a complex data structure and execute some operation over its elements, even if they all have different classes. Code Examples ------------- [![Iterator in C#](https://refactoring.guru/images/patterns/icons/csharp.svg?id=da64592defc6e86d57c39c66e9de3e58)](https://refactoring.guru/design-patterns/iterator/csharp/example "Iterator in C#") [![Iterator in C++](https://refactoring.guru/images/patterns/icons/cpp.svg?id=f7782ed8b8666246bfcc3f8fefc3b858)](https://refactoring.guru/design-patterns/iterator/cpp/example "Iterator in C++") [![Iterator in Go](https://refactoring.guru/images/patterns/icons/go.svg?id=1a89927eb99b1ea3fde7701d97970aca)](https://refactoring.guru/design-patterns/iterator/go/example "Iterator in Go") [![Iterator in Java](https://refactoring.guru/images/patterns/icons/java.svg?id=e6d87e2dca08c953fe3acd1275ed4f4e)](https://refactoring.guru/design-patterns/iterator/java/example "Iterator in Java") [![Iterator in PHP](https://refactoring.guru/images/patterns/icons/php.svg?id=be1906eb26b71ec1d3b93720d6156618)](https://refactoring.guru/design-patterns/iterator/php/example "Iterator in PHP") [![Iterator in Python](https://refactoring.guru/images/patterns/icons/python.svg?id=6d815d43c0f7050a1151b43e51569c9f)](https://refactoring.guru/design-patterns/iterator/python/example "Iterator in Python") [![Iterator in Ruby](https://refactoring.guru/images/patterns/icons/ruby.svg?id=b065b718c914bf8e960ef731600be1eb)](https://refactoring.guru/design-patterns/iterator/ruby/example "Iterator in Ruby") [![Iterator in Rust](https://refactoring.guru/images/patterns/icons/rust.svg?id=1f5698a4b5ae23fe79413511747e4a87)](https://refactoring.guru/design-patterns/iterator/rust/example "Iterator in Rust") [![Iterator in Swift](https://refactoring.guru/images/patterns/icons/swift.svg?id=0b716c2d52ec3a48fbe91ac031070c1d)](https://refactoring.guru/design-patterns/iterator/swift/example "Iterator in Swift") [![Iterator in TypeScript](https://refactoring.guru/images/patterns/icons/typescript.svg?id=2239d0f16cb703540c205dd8cb0c0cb7)](https://refactoring.guru/design-patterns/iterator/typescript/example "Iterator in TypeScript") [![](https://refactoring.guru/images/patterns/banners/patterns-book-banner-3-2x.png?id=0cc3f77ab421d1a5c02ee46488231c3a)](https://refactoring.guru/design-patterns/book) ### Support our free website and own the eBook! * 22 design patterns and 8 principles explained in depth. * 409 well-structured, easy to read, jargon-free pages. * 225 clear and helpful illustrations and diagrams. * An archive with code examples in 11 languages. * All devices supported: PDF/EPUB/MOBI/KFX formats. [Learn more…](https://refactoring.guru/design-patterns/book) --- # Chain of Responsibility [There are patterns of patterns now! \ My friend's project: MetaPatterns.io](https://metapatterns.io/)  [](https://refactoring.guru/design-patterns/chain-of-responsibility#checkout) [](https://refactoring.guru/design-patterns/chain-of-responsibility#checkout) [](https://refactoring.guru/) / [Design Patterns](https://refactoring.guru/design-patterns) / [Behavioral Patterns](https://refactoring.guru/design-patterns/behavioral-patterns) Chain of Responsibility ======================= Also known as: CoR, Chain of Command Intent ------ **Chain of Responsibility** is a behavioral design pattern that lets you pass requests along a chain of handlers. Upon receiving a request, each handler decides either to process the request or to pass it to the next handler in the chain. ![Chain of Responsibility design pattern](https://refactoring.guru/images/patterns/content/chain-of-responsibility/chain-of-responsibility-2x.png?id=cc104b0a00a410f37fb39da80f392b88) Problem ------- Imagine that you’re working on an online ordering system. You want to restrict access to the system so only authenticated users can create orders. Also, users who have administrative permissions must have full access to all orders. After a bit of planning, you realized that these checks must be performed sequentially. The application can attempt to authenticate a user to the system whenever it receives a request that contains the user’s credentials. However, if those credentials aren’t correct and authentication fails, there’s no reason to proceed with any other checks. ![Problem, solved by Chain of Responsibility](https://refactoring.guru/images/patterns/diagrams/chain-of-responsibility/problem1-en-2x.png?id=17786228efa05f83435fd39316cb940c) The request must pass a series of checks before the ordering system itself can handle it. During the next few months, you implemented several more of those sequential checks. * One of your colleagues suggested that it’s unsafe to pass raw data straight to the ordering system. So you added an extra validation step to sanitize the data in a request. * Later, somebody noticed that the system is vulnerable to brute force password cracking. To negate this, you promptly added a check that filters repeated failed requests coming from the same IP address. * Someone else suggested that you could speed up the system by returning cached results on repeated requests containing the same data. Hence, you added another check which lets the request pass through to the system only if there’s no suitable cached response. ![With each new check the code became bigger, messier, and uglier](https://refactoring.guru/images/patterns/diagrams/chain-of-responsibility/problem2-en-2x.png?id=bea31844e04cdd110755cef1571ca088) The bigger the code grew, the messier it became. The code of the checks, which had already looked like a mess, became more and more bloated as you added each new feature. Changing one check sometimes affected the others. Worst of all, when you tried to reuse the checks to protect other components of the system, you had to duplicate some of the code since those components required some of the checks, but not all of them. The system became very hard to comprehend and expensive to maintain. You struggled with the code for a while, until one day you decided to refactor the whole thing. Solution -------- Like many other behavioral design patterns, the **Chain of Responsibility** relies on transforming particular behaviors into stand-alone objects called _handlers_. In our case, each check should be extracted to its own class with a single method that performs the check. The request, along with its data, is passed to this method as an argument. The pattern suggests that you link these handlers into a chain. Each linked handler has a field for storing a reference to the next handler in the chain. In addition to processing a request, handlers pass the request further along the chain. The request travels along the chain until all handlers have had a chance to process it. Here’s the best part: a handler can decide not to pass the request further down the chain and effectively stop any further processing. In our example with ordering systems, a handler performs the processing and then decides whether to pass the request further down the chain. Assuming the request contains the right data, all the handlers can execute their primary behavior, whether it’s authentication checks or caching. ![Handlers are lined-up one by one, forming a chain](https://refactoring.guru/images/patterns/diagrams/chain-of-responsibility/solution1-en-2x.png?id=5942fb6064f55d3894ca71c0c0df3fd8) Handlers are lined up one by one, forming a chain. However, there’s a slightly different approach (and it’s a bit more canonical) in which, upon receiving a request, a handler decides whether it can process it. If it can, it doesn’t pass the request any further. So it’s either only one handler that processes the request or none at all. This approach is very common when dealing with events in stacks of elements within a graphical user interface. For instance, when a user clicks a button, the event propagates through the chain of GUI elements that starts with the button, goes along its containers (like forms or panels), and ends up with the main application window. The event is processed by the first element in the chain that’s capable of handling it. This example is also noteworthy because it shows that a chain can always be extracted from an object tree. ![A chain can be formed from a branch of an object tree](https://refactoring.guru/images/patterns/diagrams/chain-of-responsibility/solution2-en-2x.png?id=3ba9dfc081064c3ecd3882f931431a0e) A chain can be formed from a branch of an object tree. It’s crucial that all handler classes implement the same interface. Each concrete handler should only care about the following one having the `execute` method. This way you can compose chains at runtime, using various handlers without coupling your code to their concrete classes. Real-World Analogy ------------------ ![Talking with tech support can be hard](https://refactoring.guru/images/patterns/content/chain-of-responsibility/chain-of-responsibility-comic-1-en-2x.png?id=169e558d5a5b869b4465f88b697a10ec) A call to tech support can go through multiple operators. You’ve just bought and installed a new piece of hardware on your computer. Since you’re a geek, the computer has several operating systems installed. You try to boot all of them to see whether the hardware is supported. Windows detects and enables the hardware automatically. However, your beloved Linux refuses to work with the new hardware. With a small flicker of hope, you decide to call the tech-support phone number written on the box. The first thing you hear is the robotic voice of the autoresponder. It suggests nine popular solutions to various problems, none of which are relevant to your case. After a while, the robot connects you to a live operator. Alas, the operator isn’t able to suggest anything specific either. He keeps quoting lengthy excerpts from the manual, refusing to listen to your comments. After hearing the phrase “have you tried turning the computer off and on again?” for the 10th time, you demand to be connected to a proper engineer. Eventually, the operator passes your call to one of the engineers, who had probably longed for a live human chat for hours as he sat in his lonely server room in the dark basement of some office building. The engineer tells you where to download proper drivers for your new hardware and how to install them on Linux. Finally, the solution! You end the call, bursting with joy. Structure --------- ![Structure of the Chain Of Responsibility design pattern](https://refactoring.guru/images/patterns/diagrams/chain-of-responsibility/structure-2x.png?id=bb837faaac88e7f2a16f751d0beaa201)![Structure of the Chain Of Responsibility design pattern](https://refactoring.guru/images/patterns/diagrams/chain-of-responsibility/structure-indexed-2x.png?id=4f27e2c48e635f45a78472d707a8df3c) 1. The **Handler** declares the interface, common for all concrete handlers. It usually contains just a single method for handling requests, but sometimes it may also have another method for setting the next handler on the chain. 2. The **Base Handler** is an optional class where you can put the boilerplate code that’s common to all handler classes. Usually, this class defines a field for storing a reference to the next handler. The clients can build a chain by passing a handler to the constructor or setter of the previous handler. The class may also implement the default handling behavior: it can pass execution to the next handler after checking for its existence. 3. **Concrete Handlers** contain the actual code for processing requests. Upon receiving a request, each handler must decide whether to process it and, additionally, whether to pass it along the chain. Handlers are usually self-contained and immutable, accepting all necessary data just once via the constructor. 4. The **Client** may compose chains just once or compose them dynamically, depending on the application’s logic. Note that a request can be sent to any handler in the chain—it doesn’t have to be the first one. Pseudocode ---------- In this example, the **Chain of Responsibility** pattern is responsible for displaying contextual help information for active GUI elements. ![Structure of the Chain of Responsibility example](https://refactoring.guru/images/patterns/diagrams/chain-of-responsibility/example-en-2x.png?id=0f25d3d948f33c87482e832a55c3c680) The GUI classes are built with the Composite pattern. Each element is linked to its container element. At any point, you can build a chain of elements that starts with the element itself and goes through all of its container elements. The application’s GUI is usually structured as an object tree. For example, the `Dialog` class, which renders the main window of the app, would be the root of the object tree. The dialog contains `Panels`, which might contain other panels or simple low-level elements like `Buttons` and `TextFields`. A simple component can show brief contextual tooltips, as long as the component has some help text assigned. But more complex components define their own way of showing contextual help, such as showing an excerpt from the manual or opening a page in a browser. ![Structure of the Chain of Responsibility example](https://refactoring.guru/images/patterns/diagrams/chain-of-responsibility/example2-en-2x.png?id=f6d72166631d9a4a80b013a4fa3d886b) That’s how a help request traverses GUI objects. When a user points the mouse cursor at an element and presses the `F1` key, the application detects the component under the pointer and sends it a help request. The request bubbles up through all the element’s containers until it reaches the element that’s capable of displaying the help information. // The handler interface declares a method for executing a // request. interface ComponentWithContextualHelp is method showHelp() // The base class for simple components. abstract class Component implements ComponentWithContextualHelp is field tooltipText: string // The component's container acts as the next link in the // chain of handlers. protected field container: Container // The component shows a tooltip if there's help text // assigned to it. Otherwise it forwards the call to the // container, if it exists. method showHelp() is if (tooltipText != null) // Show tooltip. else container.showHelp() // Containers can contain both simple components and other // containers as children. The chain relationships are // established here. The class inherits showHelp behavior from // its parent. abstract class Container extends Component is protected field children: array of Component method add(child) is children.add(child) child.container = this // Primitive components may be fine with default help // implementation... class Button extends Component is // ... // But complex components may override the default // implementation. If the help text can't be provided in a new // way, the component can always call the base implementation // (see Component class). class Panel extends Container is field modalHelpText: string method showHelp() is if (modalHelpText != null) // Show a modal window with the help text. else super.showHelp() // ...same as above... class Dialog extends Container is field wikiPageURL: string method showHelp() is if (wikiPageURL != null) // Open the wiki help page. else super.showHelp() // Client code. class Application is // Every application configures the chain differently. method createUI() is dialog = new Dialog("Budget Reports") dialog.wikiPageURL = "http://..." panel = new Panel(0, 0, 400, 800) panel.modalHelpText = "This panel does..." ok = new Button(250, 760, 50, 20, "OK") ok.tooltipText = "This is an OK button that..." cancel = new Button(320, 760, 50, 20, "Cancel") // ... panel.add(ok) panel.add(cancel) dialog.add(panel) // Imagine what happens here. method onF1KeyPress() is component = this.getComponentAtMouseCoords() component.showHelp() Applicability ------------- Use the Chain of Responsibility pattern when your program is expected to process different kinds of requests in various ways, but the exact types of requests and their sequences are unknown beforehand. The pattern lets you link several handlers into one chain and, upon receiving a request, “ask” each handler whether it can process it. This way all handlers get a chance to process the request. Use the pattern when it’s essential to execute several handlers in a particular order. Since you can link the handlers in the chain in any order, all requests will get through the chain exactly as you planned. Use the CoR pattern when the set of handlers and their order are supposed to change at runtime. If you provide setters for a reference field inside the handler classes, you’ll be able to insert, remove or reorder handlers dynamically. How to Implement ---------------- 1. Declare the handler interface and describe the signature of a method for handling requests. Decide how the client will pass the request data into the method. The most flexible way is to convert the request into an object and pass it to the handling method as an argument. 2. To eliminate duplicate boilerplate code in concrete handlers, it might be worth creating an abstract base handler class, derived from the handler interface. This class should have a field for storing a reference to the next handler in the chain. Consider making the class immutable. However, if you plan to modify chains at runtime, you need to define a setter for altering the value of the reference field. You can also implement the convenient default behavior for the handling method, which is to forward the request to the next object unless there’s none left. Concrete handlers will be able to use this behavior by calling the parent method. 3. One by one create concrete handler subclasses and implement their handling methods. Each handler should make two decisions when receiving a request: * Whether it’ll process the request. * Whether it’ll pass the request along the chain. 4. The client may either assemble chains on its own or receive pre-built chains from other objects. In the latter case, you must implement some factory classes to build chains according to the configuration or environment settings. 5. The client may trigger any handler in the chain, not just the first one. The request will be passed along the chain until some handler refuses to pass it further or until it reaches the end of the chain. 6. Due to the dynamic nature of the chain, the client should be ready to handle the following scenarios: * The chain may consist of a single link. * Some requests may not reach the end of the chain. * Others may reach the end of the chain unhandled. Pros and Cons ------------- * You can control the order of request handling. * _Single Responsibility Principle_. You can decouple classes that invoke operations from classes that perform operations. * _Open/Closed Principle_. You can introduce new handlers into the app without breaking the existing client code. * Some requests may end up unhandled. Relations with Other Patterns ----------------------------- * [Chain of Responsibility](https://refactoring.guru/design-patterns/chain-of-responsibility) , [Command](https://refactoring.guru/design-patterns/command) , [Mediator](https://refactoring.guru/design-patterns/mediator) and [Observer](https://refactoring.guru/design-patterns/observer) address various ways of connecting senders and receivers of requests: * _Chain of Responsibility_ passes a request sequentially along a dynamic chain of potential receivers until one of them handles it. * _Command_ establishes unidirectional connections between senders and receivers. * _Mediator_ eliminates direct connections between senders and receivers, forcing them to communicate indirectly via a mediator object. * _Observer_ lets receivers dynamically subscribe to and unsubscribe from receiving requests. * [Chain of Responsibility](https://refactoring.guru/design-patterns/chain-of-responsibility) is often used in conjunction with [Composite](https://refactoring.guru/design-patterns/composite) . In this case, when a leaf component gets a request, it may pass it through the chain of all of the parent components down to the root of the object tree. * Handlers in [Chain of Responsibility](https://refactoring.guru/design-patterns/chain-of-responsibility) can be implemented as [Commands](https://refactoring.guru/design-patterns/command) . In this case, you can execute a lot of different operations over the same context object, represented by a request. However, there’s another approach, where the request itself is a _Command_ object. In this case, you can execute the same operation in a series of different contexts linked into a chain. * [Chain of Responsibility](https://refactoring.guru/design-patterns/chain-of-responsibility) and [Decorator](https://refactoring.guru/design-patterns/decorator) have very similar class structures. Both patterns rely on recursive composition to pass the execution through a series of objects. However, there are several crucial differences. The _CoR_ handlers can execute arbitrary operations independently of each other. They can also stop passing the request further at any point. On the other hand, various _Decorators_ can extend the object’s behavior while keeping it consistent with the base interface. In addition, decorators aren’t allowed to break the flow of the request. Code Examples ------------- [![Chain of Responsibility in C#](https://refactoring.guru/images/patterns/icons/csharp.svg?id=da64592defc6e86d57c39c66e9de3e58)](https://refactoring.guru/design-patterns/chain-of-responsibility/csharp/example "Chain of Responsibility in C#") [![Chain of Responsibility in C++](https://refactoring.guru/images/patterns/icons/cpp.svg?id=f7782ed8b8666246bfcc3f8fefc3b858)](https://refactoring.guru/design-patterns/chain-of-responsibility/cpp/example "Chain of Responsibility in C++") [![Chain of Responsibility in Go](https://refactoring.guru/images/patterns/icons/go.svg?id=1a89927eb99b1ea3fde7701d97970aca)](https://refactoring.guru/design-patterns/chain-of-responsibility/go/example "Chain of Responsibility in Go") [![Chain of Responsibility in Java](https://refactoring.guru/images/patterns/icons/java.svg?id=e6d87e2dca08c953fe3acd1275ed4f4e)](https://refactoring.guru/design-patterns/chain-of-responsibility/java/example "Chain of Responsibility in Java") [![Chain of Responsibility in PHP](https://refactoring.guru/images/patterns/icons/php.svg?id=be1906eb26b71ec1d3b93720d6156618)](https://refactoring.guru/design-patterns/chain-of-responsibility/php/example "Chain of Responsibility in PHP") [![Chain of Responsibility in Python](https://refactoring.guru/images/patterns/icons/python.svg?id=6d815d43c0f7050a1151b43e51569c9f)](https://refactoring.guru/design-patterns/chain-of-responsibility/python/example "Chain of Responsibility in Python") [![Chain of Responsibility in Ruby](https://refactoring.guru/images/patterns/icons/ruby.svg?id=b065b718c914bf8e960ef731600be1eb)](https://refactoring.guru/design-patterns/chain-of-responsibility/ruby/example "Chain of Responsibility in Ruby") [![Chain of Responsibility in Rust](https://refactoring.guru/images/patterns/icons/rust.svg?id=1f5698a4b5ae23fe79413511747e4a87)](https://refactoring.guru/design-patterns/chain-of-responsibility/rust/example "Chain of Responsibility in Rust") [![Chain of Responsibility in Swift](https://refactoring.guru/images/patterns/icons/swift.svg?id=0b716c2d52ec3a48fbe91ac031070c1d)](https://refactoring.guru/design-patterns/chain-of-responsibility/swift/example "Chain of Responsibility in Swift") [![Chain of Responsibility in TypeScript](https://refactoring.guru/images/patterns/icons/typescript.svg?id=2239d0f16cb703540c205dd8cb0c0cb7)](https://refactoring.guru/design-patterns/chain-of-responsibility/typescript/example "Chain of Responsibility in TypeScript") [![](https://refactoring.guru/images/patterns/banners/patterns-book-banner-3-2x.png?id=0cc3f77ab421d1a5c02ee46488231c3a)](https://refactoring.guru/design-patterns/book) ### Support our free website and own the eBook! * 22 design patterns and 8 principles explained in depth. * 409 well-structured, easy to read, jargon-free pages. * 225 clear and helpful illustrations and diagrams. * An archive with code examples in 11 languages. * All devices supported: PDF/EPUB/MOBI/KFX formats. [Learn more…](https://refactoring.guru/design-patterns/book) --- # Command [There are patterns of patterns now! \ My friend's project: MetaPatterns.io](https://metapatterns.io/)  [](https://refactoring.guru/design-patterns/command#checkout) [](https://refactoring.guru/design-patterns/command#checkout) [](https://refactoring.guru/) / [Design Patterns](https://refactoring.guru/design-patterns) / [Behavioral Patterns](https://refactoring.guru/design-patterns/behavioral-patterns) Command ======= Also known as: Action, Transaction Intent ------ **Command** is a behavioral design pattern that turns a request into a stand-alone object that contains all information about the request. This transformation lets you pass requests as a method arguments, delay or queue a request’s execution, and support undoable operations. ![Command design pattern](https://refactoring.guru/images/patterns/content/command/command-en-2x.png?id=6149af804cbbbd5cb18595c30b856d89) Problem ------- Imagine that you’re working on a new text-editor app. Your current task is to create a toolbar with a bunch of buttons for various operations of the editor. You created a very neat `Button` class that can be used for buttons on the toolbar, as well as for generic buttons in various dialogs. ![Problem solved by the Command pattern](https://refactoring.guru/images/patterns/diagrams/command/problem1-2x.png?id=af4c4e9c1d1b4fa2c4104c5f6bb18719) All buttons of the app are derived from the same class. While all of these buttons look similar, they’re all supposed to do different things. Where would you put the code for the various click handlers of these buttons? The simplest solution is to create tons of subclasses for each place where the button is used. These subclasses would contain the code that would have to be executed on a button click. ![Lots of button subclasses](https://refactoring.guru/images/patterns/diagrams/command/problem2-2x.png?id=5eea7d0f6247da011150bb63e423f405) Lots of button subclasses. What can go wrong? Before long, you realize that this approach is deeply flawed. First, you have an enormous number of subclasses, and that would be okay if you weren’t risking breaking the code in these subclasses each time you modify the base `Button` class. Put simply, your GUI code has become awkwardly dependent on the volatile code of the business logic. ![Several classes implement the same functionality](https://refactoring.guru/images/patterns/diagrams/command/problem3-en-2x.png?id=e06878f7cfbe4131980c68db2904878e) Several classes implement the same functionality. And here’s the ugliest part. Some operations, such as copying/pasting text, would need to be invoked from multiple places. For example, a user could click a small “Copy” button on the toolbar, or copy something via the context menu, or just hit `Ctrl+C` on the keyboard. Initially, when our app only had the toolbar, it was okay to place the implementation of various operations into the button subclasses. In other words, having the code for copying text inside the `CopyButton` subclass was fine. But then, when you implement context menus, shortcuts, and other stuff, you have to either duplicate the operation’s code in many classes or make menus dependent on buttons, which is an even worse option. Solution -------- Good software design is often based on the _principle of separation of concerns_, which usually results in breaking an app into layers. The most common example: a layer for the graphical user interface and another layer for the business logic. The GUI layer is responsible for rendering a beautiful picture on the screen, capturing any input and showing results of what the user and the app are doing. However, when it comes to doing something important, like calculating the trajectory of the moon or composing an annual report, the GUI layer delegates the work to the underlying layer of business logic. In the code it might look like this: a GUI object calls a method of a business logic object, passing it some arguments. This process is usually described as one object sending another a _request_. ![The GUI layer may access the business logic layer directly](https://refactoring.guru/images/patterns/diagrams/command/solution1-en-2x.png?id=d66717631fdebf5fae4d28c6c942e5d4) The GUI objects may access the business logic objects directly. The Command pattern suggests that GUI objects shouldn’t send these requests directly. Instead, you should extract all of the request details, such as the object being called, the name of the method and the list of arguments into a separate _command_ class with a single method that triggers this request. Command objects serve as links between various GUI and business logic objects. From now on, the GUI object doesn’t need to know what business logic object will receive the request and how it’ll be processed. The GUI object just triggers the command, which handles all the details. ![Accessing the business logic layer via a command.](https://refactoring.guru/images/patterns/diagrams/command/solution2-en-2x.png?id=b530f7b00b40ed7d3445b91c08009b10) Accessing the business logic layer via a command. The next step is to make your commands implement the same interface. Usually it has just a single execution method that takes no parameters. This interface lets you use various commands with the same request sender, without coupling it to concrete classes of commands. As a bonus, now you can switch command objects linked to the sender, effectively changing the sender’s behavior at runtime. You might have noticed one missing piece of the puzzle, which is the request parameters. A GUI object might have supplied the business-layer object with some parameters. Since the command execution method doesn’t have any parameters, how would we pass the request details to the receiver? It turns out the command should be either pre-configured with this data, or capable of getting it on its own. ![The GUI objects delegate the work to commands](https://refactoring.guru/images/patterns/diagrams/command/solution3-en-2x.png?id=c12bb9971d1ba4f8a3d3717bbced2859) The GUI objects delegate the work to commands. Let’s get back to our text editor. After we apply the Command pattern, we no longer need all those button subclasses to implement various click behaviors. It’s enough to put a single field into the base `Button` class that stores a reference to a command object and make the button execute that command on a click. You’ll implement a bunch of command classes for every possible operation and link them with particular buttons, depending on the buttons’ intended behavior. Other GUI elements, such as menus, shortcuts or entire dialogs, can be implemented in the same way. They’ll be linked to a command which gets executed when a user interacts with the GUI element. As you’ve probably guessed by now, the elements related to the same operations will be linked to the same commands, preventing any code duplication. As a result, commands become a convenient middle layer that reduces coupling between the GUI and business logic layers. And that’s only a fraction of the benefits that the Command pattern can offer! Real-World Analogy ------------------ ![Making an order in a restaurant](https://refactoring.guru/images/patterns/content/command/command-comic-1-2x.png?id=47b3c00b2cfbda7157a1ed9da6ce2948) Making an order in a restaurant. After a long walk through the city, you get to a nice restaurant and sit at the table by the window. A friendly waiter approaches you and quickly takes your order, writing it down on a piece of paper. The waiter goes to the kitchen and sticks the order on the wall. After a while, the order gets to the chef, who reads it and cooks the meal accordingly. The cook places the meal on a tray along with the order. The waiter discovers the tray, checks the order to make sure everything is as you wanted it, and brings everything to your table. The paper order serves as a command. It remains in a queue until the chef is ready to serve it. The order contains all the relevant information required to cook the meal. It allows the chef to start cooking right away instead of running around clarifying the order details from you directly. Structure --------- ![Structure of the Command design pattern](https://refactoring.guru/images/patterns/diagrams/command/structure-2x.png?id=1dfaa84354ffe49ef7ad46ce069482d2)![Structure of the Command design pattern](https://refactoring.guru/images/patterns/diagrams/command/structure-indexed-2x.png?id=e4cc286a44768c7d060af33497da7df6) 1. The **Sender** class (aka _invoker_) is responsible for initiating requests. This class must have a field for storing a reference to a command object. The sender triggers that command instead of sending the request directly to the receiver. Note that the sender isn’t responsible for creating the command object. Usually, it gets a pre-created command from the client via the constructor. 2. The **Command** interface usually declares just a single method for executing the command. 3. **Concrete Commands** implement various kinds of requests. A concrete command isn’t supposed to perform the work on its own, but rather to pass the call to one of the business logic objects. However, for the sake of simplifying the code, these classes can be merged. Parameters required to execute a method on a receiving object can be declared as fields in the concrete command. You can make command objects immutable by only allowing the initialization of these fields via the constructor. 4. The **Receiver** class contains some business logic. Almost any object may act as a receiver. Most commands only handle the details of how a request is passed to the receiver, while the receiver itself does the actual work. 5. The **Client** creates and configures concrete command objects. The client must pass all of the request parameters, including a receiver instance, into the command’s constructor. After that, the resulting command may be associated with one or multiple senders. Pseudocode ---------- In this example, the **Command** pattern helps to track the history of executed operations and makes it possible to revert an operation if needed. ![Structure of the Command pattern example](https://refactoring.guru/images/patterns/diagrams/command/example-2x.png?id=ed44dfd9b02eccf1ae7e2714d018ed36) Undoable operations in a text editor. Commands which result in changing the state of the editor (e.g., cutting and pasting) make a backup copy of the editor’s state before executing an operation associated with the command. After a command is executed, it’s placed into the command history (a stack of command objects) along with the backup copy of the editor’s state at that point. Later, if the user needs to revert an operation, the app can take the most recent command from the history, read the associated backup of the editor’s state, and restore it. The client code (GUI elements, command history, etc.) isn’t coupled to concrete command classes because it works with commands via the command interface. This approach lets you introduce new commands into the app without breaking any existing code. // The base command class defines the common interface for all // concrete commands. abstract class Command is protected field app: Application protected field editor: Editor protected field backup: text constructor Command(app: Application, editor: Editor) is this.app = app this.editor = editor // Make a backup of the editor's state. method saveBackup() is backup = editor.text // Restore the editor's state. method undo() is editor.text = backup // The execution method is declared abstract to force all // concrete commands to provide their own implementations. // The method must return true or false depending on whether // the command changes the editor's state. abstract method execute() // The concrete commands go here. class CopyCommand extends Command is // The copy command isn't saved to the history since it // doesn't change the editor's state. method execute() is app.clipboard = editor.getSelection() return false class CutCommand extends Command is // The cut command does change the editor's state, therefore // it must be saved to the history. And it'll be saved as // long as the method returns true. method execute() is saveBackup() app.clipboard = editor.getSelection() editor.deleteSelection() return true class PasteCommand extends Command is method execute() is saveBackup() editor.replaceSelection(app.clipboard) return true // The undo operation is also a command. class UndoCommand extends Command is method execute() is app.undo() return false // The global command history is just a stack. class CommandHistory is private field history: array of Command // Last in... method push(c: Command) is // Push the command to the end of the history array. // ...first out method pop():Command is // Get the most recent command from the history. // The editor class has actual text editing operations. It plays // the role of a receiver: all commands end up delegating // execution to the editor's methods. class Editor is field text: string method getSelection() is // Return selected text. method deleteSelection() is // Delete selected text. method replaceSelection(text) is // Insert the clipboard's contents at the current // position. // The application class sets up object relations. It acts as a // sender: when something needs to be done, it creates a command // object and executes it. class Application is field clipboard: string field editors: array of Editors field activeEditor: Editor field history: CommandHistory // The code which assigns commands to UI objects may look // like this. method createUI() is // ... copy = function() { executeCommand( new CopyCommand(this, activeEditor)) } copyButton.setCommand(copy) shortcuts.onKeyPress("Ctrl+C", copy) cut = function() { executeCommand( new CutCommand(this, activeEditor)) } cutButton.setCommand(cut) shortcuts.onKeyPress("Ctrl+X", cut) paste = function() { executeCommand( new PasteCommand(this, activeEditor)) } pasteButton.setCommand(paste) shortcuts.onKeyPress("Ctrl+V", paste) undo = function() { executeCommand( new UndoCommand(this, activeEditor)) } undoButton.setCommand(undo) shortcuts.onKeyPress("Ctrl+Z", undo) // Execute a command and check whether it has to be added to // the history. method executeCommand(command) is if (command.execute()) history.push(command) // Take the most recent command from the history and run its // undo method. Note that we don't know the class of that // command. But we don't have to, since the command knows // how to undo its own action. method undo() is command = history.pop() if (command != null) command.undo() Applicability ------------- Use the Command pattern when you want to parameterize objects with operations. The Command pattern can turn a specific method call into a stand-alone object. This change opens up a lot of interesting uses: you can pass commands as method arguments, store them inside other objects, switch linked commands at runtime, etc. Here’s an example: you’re developing a GUI component such as a context menu, and you want your users to be able to configure menu items that trigger operations when an end user clicks an item. Use the Command pattern when you want to queue operations, schedule their execution, or execute them remotely. As with any other object, a command can be serialized, which means converting it to a string that can be easily written to a file or a database. Later, the string can be restored as the initial command object. Thus, you can delay and schedule command execution. But there’s even more! In the same way, you can queue, log or send commands over the network. Use the Command pattern when you want to implement reversible operations. Although there are many ways to implement undo/redo, the Command pattern is perhaps the most popular of all. To be able to revert operations, you need to implement the history of performed operations. The command history is a stack that contains all executed command objects along with related backups of the application’s state. This method has two drawbacks. First, it isn’t that easy to save an application’s state because some of it can be private. This problem can be mitigated with the [Memento](https://refactoring.guru/design-patterns/memento) pattern. Second, the state backups may consume quite a lot of RAM. Therefore, sometimes you can resort to an alternative implementation: instead of restoring the past state, the command performs the inverse operation. The reverse operation also has a price: it may turn out to be hard or even impossible to implement. How to Implement ---------------- 1. Declare the command interface with a single execution method. 2. Start extracting requests into concrete command classes that implement the command interface. Each class must have a set of fields for storing the request arguments along with a reference to the actual receiver object. All these values must be initialized via the command’s constructor. 3. Identify classes that will act as _senders_. Add the fields for storing commands into these classes. Senders should communicate with their commands only via the command interface. Senders usually don’t create command objects on their own, but rather get them from the client code. 4. Change the senders so they execute the command instead of sending a request to the receiver directly. 5. The client should initialize objects in the following order: * Create receivers. * Create commands, and associate them with receivers if needed. * Create senders, and associate them with specific commands. Pros and Cons ------------- * _Single Responsibility Principle_. You can decouple classes that invoke operations from classes that perform these operations. * _Open/Closed Principle_. You can introduce new commands into the app without breaking existing client code. * You can implement undo/redo. * You can implement deferred execution of operations. * You can assemble a set of simple commands into a complex one. * The code may become more complicated since you’re introducing a whole new layer between senders and receivers. Relations with Other Patterns ----------------------------- * [Chain of Responsibility](https://refactoring.guru/design-patterns/chain-of-responsibility) , [Command](https://refactoring.guru/design-patterns/command) , [Mediator](https://refactoring.guru/design-patterns/mediator) and [Observer](https://refactoring.guru/design-patterns/observer) address various ways of connecting senders and receivers of requests: * _Chain of Responsibility_ passes a request sequentially along a dynamic chain of potential receivers until one of them handles it. * _Command_ establishes unidirectional connections between senders and receivers. * _Mediator_ eliminates direct connections between senders and receivers, forcing them to communicate indirectly via a mediator object. * _Observer_ lets receivers dynamically subscribe to and unsubscribe from receiving requests. * Handlers in [Chain of Responsibility](https://refactoring.guru/design-patterns/chain-of-responsibility) can be implemented as [Commands](https://refactoring.guru/design-patterns/command) . In this case, you can execute a lot of different operations over the same context object, represented by a request. However, there’s another approach, where the request itself is a _Command_ object. In this case, you can execute the same operation in a series of different contexts linked into a chain. * You can use [Command](https://refactoring.guru/design-patterns/command) and [Memento](https://refactoring.guru/design-patterns/memento) together when implementing “undo”. In this case, commands are responsible for performing various operations over a target object, while mementos save the state of that object just before a command gets executed. * [Command](https://refactoring.guru/design-patterns/command) and [Strategy](https://refactoring.guru/design-patterns/strategy) may look similar because you can use both to parameterize an object with some action. However, they have very different intents. * You can use _Command_ to convert any operation into an object. The operation’s parameters become fields of that object. The conversion lets you defer execution of the operation, queue it, store the history of commands, send commands to remote services, etc. * On the other hand, _Strategy_ usually describes different ways of doing the same thing, letting you swap these algorithms within a single context class. * [Prototype](https://refactoring.guru/design-patterns/prototype) can help when you need to save copies of [Commands](https://refactoring.guru/design-patterns/command) into history. * You can treat [Visitor](https://refactoring.guru/design-patterns/visitor) as a powerful version of the [Command](https://refactoring.guru/design-patterns/command) pattern. Its objects can execute operations over various objects of different classes. Code Examples ------------- [![Command in C#](https://refactoring.guru/images/patterns/icons/csharp.svg?id=da64592defc6e86d57c39c66e9de3e58)](https://refactoring.guru/design-patterns/command/csharp/example "Command in C#") [![Command in C++](https://refactoring.guru/images/patterns/icons/cpp.svg?id=f7782ed8b8666246bfcc3f8fefc3b858)](https://refactoring.guru/design-patterns/command/cpp/example "Command in C++") [![Command in Go](https://refactoring.guru/images/patterns/icons/go.svg?id=1a89927eb99b1ea3fde7701d97970aca)](https://refactoring.guru/design-patterns/command/go/example "Command in Go") [![Command in Java](https://refactoring.guru/images/patterns/icons/java.svg?id=e6d87e2dca08c953fe3acd1275ed4f4e)](https://refactoring.guru/design-patterns/command/java/example "Command in Java") [![Command in PHP](https://refactoring.guru/images/patterns/icons/php.svg?id=be1906eb26b71ec1d3b93720d6156618)](https://refactoring.guru/design-patterns/command/php/example "Command in PHP") [![Command in Python](https://refactoring.guru/images/patterns/icons/python.svg?id=6d815d43c0f7050a1151b43e51569c9f)](https://refactoring.guru/design-patterns/command/python/example "Command in Python") [![Command in Ruby](https://refactoring.guru/images/patterns/icons/ruby.svg?id=b065b718c914bf8e960ef731600be1eb)](https://refactoring.guru/design-patterns/command/ruby/example "Command in Ruby") [![Command in Rust](https://refactoring.guru/images/patterns/icons/rust.svg?id=1f5698a4b5ae23fe79413511747e4a87)](https://refactoring.guru/design-patterns/command/rust/example "Command in Rust") [![Command in Swift](https://refactoring.guru/images/patterns/icons/swift.svg?id=0b716c2d52ec3a48fbe91ac031070c1d)](https://refactoring.guru/design-patterns/command/swift/example "Command in Swift") [![Command in TypeScript](https://refactoring.guru/images/patterns/icons/typescript.svg?id=2239d0f16cb703540c205dd8cb0c0cb7)](https://refactoring.guru/design-patterns/command/typescript/example "Command in TypeScript") [![](https://refactoring.guru/images/patterns/banners/patterns-book-banner-3-2x.png?id=0cc3f77ab421d1a5c02ee46488231c3a)](https://refactoring.guru/design-patterns/book) ### Support our free website and own the eBook! * 22 design patterns and 8 principles explained in depth. * 409 well-structured, easy to read, jargon-free pages. * 225 clear and helpful illustrations and diagrams. * An archive with code examples in 11 languages. * All devices supported: PDF/EPUB/MOBI/KFX formats. [Learn more…](https://refactoring.guru/design-patterns/book) --- # Modern Book on Design Patterns: Dive Into Design Patterns [There are patterns of patterns now! \ My friend's project: MetaPatterns.io](https://metapatterns.io/)  [](https://refactoring.guru/design-patterns/book#checkout) [](https://refactoring.guru/design-patterns/book#checkout) Dive Into **DESIGN PATTERNS** ============================= An ebook on design patterns and the principles behind them [![Modern Book on Design Patterns: Dive Into Design Patterns](https://refactoring.guru/images/patterns/book/web-cover-en-3x.png)](https://refactoring.guru/design-patterns/book#buy-now) Winter SALE $40.00 $24.95 plus local tax including local tax [Buy now](https://refactoring.guru/design-patterns/book#buy-now) [Buy as a gift](https://refactoring.guru/design-patterns/book#buy-now) [Buy for my team](https://refactoring.guru/design-patterns/book#buy-team) **Design patterns** help you solve commonly-occurring problems in software design. But you can’t just find a pattern and copy it into your program, the way you can with off-the-shelf functions or libraries. A pattern is not a specific piece of code, but a general concept for solving a particular problem. They are like pre-made blueprints that you can customize to solve a recurring design problem in your code. The book _Dive Into Design Patterns_ illustrates 22 classic design patterns, and 8 design principles that these patterns are based on. * Each chapter starts with a real-world software design _problem_, then solves it using one of the patterns. * Then we dive into a detailed review of the pattern's _structure_ and its variations, followed by a _code example_. * Then the book shows various _applications_ of the pattern and teaches how to implement the pattern _step by step_, even in an existing program. * Each chapter concludes with a discussion of _pros and cons_ of the pattern and explores its _relations to, similarities with and differences from_ other patterns. > Why do you need to know patterns? > --------------------------------- > > **Ace interviews and reviews.** Questions about patterns come up at almost every programming job interview and every performance review. Get more jobs and get that raise and promotion you so richly deserve. > > **Extend your programming toolkit.** Patterns let you customize ready-made solutions rather than reinvent the wheel. Your code has fewer mistakes because you are using a proven, standard solution covering all hidden problems. > > **Communicate better with colleagues.** Just share the name of the pattern rather than wasting an hour explaining the details of your cool design and its classes to other programmers. Get the glory without the sweat. Who is this book for? --------------------- **Pattern Beginners.** If you have never studied patterns, the book explains the basic principles of object-oriented programming with real-life examples. Before diving into the patterns, we look at the design values and principles on which the patterns are built. **Pattern Refreshers.** If you studied patterns a while ago, but have forgotten things, the ebook can refresh your memory as serve as a handy reference. Quickly find sections of interest without having to read it from start to finish. **Language Switchers.** If you are switching to one of the OOP languages (C#, C++, Go, Java, PHP, Python, Ruby, Rust, Swift, or TypeScript), you will easily grasp the essence of the text thanks to the many real-world examples and analogies, supported by helpful illustrations and diagrams. > Free Demo > --------- > > [Open in browser](https://refactoring.guru/files/design-patterns-en-demo.pdf) > [Download PDF](https://refactoring.guru/files/design-patterns-en-demo.pdf) > > Check out the quality of the book for yourself. The demo includes the table of contents, several introductory chapters, three design principles, and the Factory Method design pattern. ![100% Satisfaction guaranteed](https://refactoring.guru/images/content-public/landings/100-satisfaction-en-3x.png) 100% Satisfaction guaranteed ---------------------------- Risk nothing by buying now. If within a month of purchase you decide that the book is not helpful, all your money will be returned. No questions asked. Winter SALE $40.00 $24.95 plus local tax including local tax [Buy now \ (It will be more expensive later!)](https://refactoring.guru/design-patterns/book#buy-now) * Your personalized copy of **Dive Into Design Patterns** * 409 pages of great technical writing * 225 (!) illustrations and diagrams * Archive with rich code examples (C#, C++, Go, Java, PHP, Python, Ruby, Rust, Swift, TypeScript) * 30-day money-back guarantee What others say? ---------------- [![](https://refactoring.guru/images/content-public/landings/goodreads-badge-read-reviews.png)](https://www.goodreads.com/book/show/43125355-dive-into-design-patterns) Facebook [Add a review](https://refactoring.guru/login?destination=https%3A%2F%2Ffeedback.refactoring.guru%3Flang%3Dru%26show_feedback_form_private%3Dtrue) Everything is well explained and I like the way all basics are introduced first (UML, SOLID) and then we can go on each design pattern and play with it. The only improvement I see is making printed version available (I prefer paper to pdf) and maybe in another languages. Mickaël Andrieu France Your book is great. I am junior level developer and certainly happy with the purchase! I like the structure of how each pattern is presented, and the UML and examples really clarify things. I also like the "vibe", which keeps it fun yet on-point. I can't think of a con. Thanks for this! Leon Wong Canada The book is awesome, easy-understanding and well-written. Just have a little suggestion to organize the content not in alphabetical order but by categories would be better. And also put some code in it \[rather than having it in separate archive\] so that it would be easier to read on an iPad when travel. Zhang Lingkang Canada I read it the same day I got it, I mostly use it as a refresher on on when I dont see the woods for the trees. I think it's fine the way it is. Christopher Lousberg Czech Republic I have been really busy with work recently. The info you have on design patterns has been a huge help and an excellent reference! I think what you have currently is well done and the organization is superb! Pamela Wheeler USA I only had time to glance at the book but it seems really amazing. I hope to have time since next month to read it. About the things that made me to buy it are the cartoons and UML diagrams that simplifies the understanding of each pattern. I really like them! I would like to suggest you to do something similar (including cartoons) with the most famous programming antipatterns. Alvaro Prieto Spain I have just read the book and I think it is amazing. I have bought both of your patterns books and refactoring course and if you need me to buy from you again I will :) Toni Dezman Slovenia So far I find this book very interesting and useful in terms of examples/diagrams and ideas. I wish you could have the code written in Java. Ion Apostol Romania I am loving the book so far. I'm currently reading it on my Kindle. I'll use it to make dojos with some friends of mine so that we practice the principles of the book. As for suggestions, maybe it's a bit too soon to say since I'm still at the beginning and I'm a slow reader, but maybe exercises? I don't even know if the book presents exercises. Maybe it does and I didn't get there yet. Vinícius Guerra Cardoso Brazil The book is great and makes all the patterns more easier to understand than the books or examples i found on the internet. I like your style of writting, it\`s easy to understand. You are going from the problem to the solution and that process give me the best understanding about pattern. Comparations betweem patterns are helpful alot. Maybe the UML diagrams should have cardinality and the role that a class plays in the relationship because it's difficult for the first reading for every problem follow all properties from the code or from the text. Maybe for some patters you should use the same problem, saving time to understand the new problem but to concentrate just on pattern, and make good comparision of new pattern with the old one. Well it's good to have more different problems for diversity but it's more time consuming and little blury the pattern. Nikola Pajić Serbia I have already started reading the book, though I'm not quite half way yet. My impressions so far is that I like it! I enjoy the UML diagrams high diagrams explaining the connections and the coding examples. I also appreciate the explanation on when to use a particular pattern and what are it's strengths and weaknesses. There is a lot of good information and I have been re-reading sections to make sure I have a firm understanding as to why a particular pattern is beneficial and how to properly implement it before moving on. Akin Delamarre Canada The book is great! I discovered your site a few months ago in my ongoing quest to design better code. I bought the book because it has information on SOLID design principles, and I like that I can read it on a Kindle. I'm a big fan of the illustrations - they're funny and do a good job of illustrating the concepts. Brian Dumez USA I'm a long-term user of your website refactoring.guru from as early as my undergrad era. I have to say the website (refactor.guru and design patterns) are great! It's the 101 for me to learn how to improve my code in a higher level than just learning grammars and best practices of programming languages. To me, the e-book is a modernized Design Patterns: Elements of Reusable Object-Oriented Software. Although I've purchased the old Design Patterns book long before and put it on my bookshelf, I seldom read it. Your book changed this awkward situation, because it has a much better look and more readable contents. It also have updated understandings of trade-off, nice illustrations and better summaries for each of the design patterns. Much more attractive to me. And the book is well organized by chapters, letting me to read it through many times on my phone during leisure time. Sincerely, it's perfect as an e-book to me as a guidebook to improve my skills as a software developer and I have recommended the book to all of my friends. Yet I'm wondering if there is a further plan to make a more "advanced" version. What I mean is that a version with more detailed explanation with the theories behind these design patterns, probably citing some academic researches of software engineering, some industry cases, etc. This advanced book will be the best choice for people who want to dive even deeper into the story behind the scene. Its form might be somehow like that of Peopleware and Pragmatic Programmer where the author introduced the experiences by telling stories or some industry cases they know. Another advice is that it might be a good business decision to make a paper-based version of the e-book. I believe almost every programmer will be willing to put one on his/her shelf. I noticed the e-book has some hyperlinks as part of the organization. But I believe it's possible to make some arrangement to minimize the jumps and make it highly sequentially readable. Again, thank you so much for creating the awesome website and book. It's a huge help to me. The thing is that I found trade-offs in software engineering cannot be taught easily in universities. So in the past a newgrad have to spend several years to learn these experiences by working in a big company for years. However, this might not be everyone's ideal career path. Your website and book made it all flatten and now a newgrad or student can learn very quickly by using your website. It enabled an agile career path directly from a startup (or even "non-profit" career path by simply start to working on open-source projects). Zhaoxiong Cui USA I did read your book. Twice. It is a very comprehensive book and a joy to read and to walk through. It serves great as a reference and I probably won't need another reference book for patterns. I like your writing. No lengthy fluff, no excessive jargon, no just dry code. To the point. Also I like the way you explain the design and SOLID principles. Thank you very much. What I would like to see more in the book is a reference to typical, real life use cases of each pattern. For example, I have heard the command pattern can be used to radio groups or for writing wizards. How is this done? Are there any examples of real life code using the visitor pattern? Are there any simple examples we can study? No need for extra book pages, just a link to a online repo with code examples probably would do. Maybe more examples would help the stick better to the memory. Yes, it is up to me to come up with good use cases for each pattern but as a newbie I find it difficult to remember what each pattern does and what it is good for. Some, like the singleton, the facade, the observer etc. are obvious and easy to remember their purpose and general functionality, others not so much. Also it would be great if there was an option for a dead tree version of the book. I want to keep it as reference. I will feed the PDF to my laser printer but I would like to have it printed and bound looking like a real book. All and all I give your book a solid 5 stars. Thank you very much. Alkis Tsamis Grece I've read a considerable part of the book already. I loved what I read! You explain the concepts in such an easy way. I wish I had the opportunity to read it when I was in college. I don't have, currently, any suggestions to improve it. But it would be great if it were available in more languages. Since I'm from Brazil, I'm not gonna lie, it would be great to have it in Portuguese (so I could tell my non-English speaking friends to get it as well, 'cause they really need some of the knowledge in the book). I stumbled across your website when searching "why refactoring is important" if I'm not mistaken. I immediately saved it to my bookmarks that day and shared it with some of my colleagues. Thank you for the book. Renato Oliveira Brazil I like your book, it is easy to understand even if I'm not good in English and really really beginner, of course the illustrate each pattern make me smile, real world example and class diagram help me better understanding, relation between pattern really help me to understand when and why pattern exist. I hope you can write code in JavaScript, because sometime I convert the code into Typescript/ES7 **Note:** since March, 2019, the book comes with TypeScript examples. Rozaliyana Aushuria Indonesia I am half way through the design patterns book and I must say I am more than 100% happy that I purchased the books. I must say you have a knack of telling the things in the right way. I am really enjoying the book and I am very sure even the refactoring book would be great as well. I like the way topics are presented and the examples. That helped be get the context and better understand them. This way, I will not forget the concepts over a period of time. I wish the SOLID principles content should be expanded a little more by taking a real world complete use case and applying step by step like before and after. I know this kind of thing may be tricky to make, but, it would help. Moreover, I would suggest breaking the design pattern book in to design patterns and also OOAD book. The OOAD book can focus on SOLID principles, OOP in general and how OOAD can be done. The design patterns then can augment the same. I am glad to have purchased the books and they will definitely help me in understanding and applying them at my work. Keep up the good work. I will be watching out for any new content that you put out. Vamsikrishna Koundinya India I like the way you have explained each of design patterns although I have the original GoF books but it's really hard to understand. No suggestion as of now I am still in between and I am happy with my purchase. Thanks! Majed Samyal India The Design Patterns are something I was not very familiar with. I already learned a lot from your book and I hope I will be able soon to get a new role in my career and maybe to teach other people about the patterns. Everything is explained very well, the introductory part includes SOLID and fundamentals of OOP which is very good. I would do more examples if I could. What I would put here is a brief of symptoms of a bad design like rigidity, fragility, imobility and viscosity. But for me, it's exactly what I was looking for - design patterns with explanations and concrete examples in one place. And to be honest it was at the best price - personally I wouldn't do it for this amount. Thank you again and congratulations for your work. I would be glad to share you my pieces of code in the future if you want. Good luck! Daniel Belu Romania This is a very good book you have. This is well explained at the level of the principles and through examples. My only concern is my level of English which is very low and it takes me a lot of time to understand the quite complex designs. I am a symfony developer and currently I am in the process of deciding the use of these patterns at the framwork level. The use of SOLID is quite understandable and I think it is the basis, so I did not have the same problems for the factory. It's the others that I'm investing more. I found, for example, that symfony formlaries are rich enough to find use cases (factoryMethod, builder, composite). This will interest me a lot if you can help me find the use of the symfony designs. Setra Ratefiniaina France I'm still reading the book, but so far I really like it! It has been a helpful refresher to me on OOP principles. I liked the explanation of UML diagram symbols. I'm relatively new to design patterns, but you explain them in a very clear manner which is easy to understand. I enjoy the illustrations and the real-world examples. Other material I had previously read on design patterns was pretty abstract without saying how it would be helpful in real life. But your book makes it all very clear! Edward Gulbransen USA The book is really awesome and explains the concepts in great detail. I read the book completely and I think its the fastest I completed any book.I am also considering to buy the other book on code refactoring. The improvements I would like to see in the book is to add some more design patterns. I guess some design patterns from the Gang of Four missing and also some patterns outside GoF which we use most often. Some information on Anti patterns & code smells and also examples of how multiple patterns can be used together within applications would be great. Raghavendra Somannavar USA I would like to thank you for your excellent book. It's one of the best purchases I have recently made and has helped me a ton with work. I've read the book as soon as I got it after I had read through the examples available on your website, because it convinced me that the information in it would be very useful to me. Since I have got your book, I have kept it open at work on one of the displays as a reference and guidelines for my designs and whenever I extend the functionality of my software I always follow the design patterns presented in the book. What I love about the book is that it is a recent and modern document about design patterns, which is in my experience the bread and butter of object oriented software design. It is very concise, provides many examples and very concrete applications, and actual implementations in all the programming languages I use at work. While the information in the unavoidable "Gang of Four" design patterns book is very good on its own and a great text, I was looking for a book in the same scope, but a recent one to keep up with the new designs, technology and concepts that come and your book is a perfect candidate for that. The text itself is pretty, with very nice diagrams and images, great formatting and typesetting. While these are details, they make the information much more readable and enhances the whole experience. And the cover art is very nice ! I honestly have no idea on how to improve the book. It has been a pleasure to read, and has become a very important tool at work and one of my "definite references", so it's difficult to improve something you are already very satisfied with ! So, thank you again, props to you for making this great text. The first recommendation for books about design patterns and object oriented software design that I would give would be definitely yours, hands down. Julien Belmon France I’m very happy with the book. It’s easier to read than a GoF book. \- I can’t say anything bad. \- Complex structures are explained in an easy to understand way. \- I believe it would be great if a few chapters on anti-patterns were added. Overall, thank you very much for the high-quality material. Evgeny Stelmashok Russia I liked everything, I read it only once for now. And I have not yet found anything that could be improved. I keep it in my favorites as a reference book. Vladislav Karpenko Russia I use your website, and bought the book to support the project! I like everything very much. Simple and user-friendly! Keep it up! Maksim Berezin Russia To my surprise, the book is very well suited for different levels of specialists. That’s why we even added a link to your website as a recommendation. I enjoyed the illustrations and the method of presenting the material. Thank you for popularizing useful educational materials. Andrej Grekov Russia I believe the presentation is ideal: brief, without unnecessary discussion. A clear description of the problem, a way to solve it, a pseudocode: all you need is there. Illustrations also help a lot. If I need to remember why one or another pattern is needed, I just look at the picture and I remember everything. This is what could be improved, in my opinion. Maybe a few more examples of the practical application of a particular pattern. Without a code. Just a description of the situation and its solution using a pattern. I.e. real-life examples. I am, of course, more interested in Web development. Andrej Senichev Russia I'm reading the book right now. The website has almost everything that is written in the book, so technically I could have just read about it on the website. As to what could be improved, it is difficult to say. Sometimes you write about the same thing over and over 10 times, but many of us (including myself) need it for initial understanding. I would love to see more examples, maybe even without code. For example - you can talk with developers from different industries and ask around, where and how they apply this or that pattern. I’m an Android developer and some of your patterns are stacked on commonly occurring screens. Maybe you should add some links to designs of other guys as an example. But overall the book is quite good. The pictures are cool. Sometimes it's hard to figure out what's what, but what can you do? We must persevere. Read again, try again. It would be great to see the version for Kotlin. I actually rewrite your examples in order to learn the language. Dmitry Mitroshin Russia I started reading the book, and I'm very pleased with it. Great, high-quality examples and schemes. Taras Savranskij Russia My first impression is a positive one, the author should continue writing. I'd like to buy the book for a friend. I understand that the only option is to register under a new account. Denis Zaharov Belarus I previously studied these patterns in the book titled “The Gang of Four”. I liked the simplicity of descriptions in your book, as well as the excellent usage examples. I use your book as a reference guide in order to refresh my knowledge about a particular template or to search for a template I may need at the moment. I can't say anything about how the book can be improved, because I haven't even thought about it. The author did a great job creating this book) Dmitry Borodin Russia Thanks for the great material! I'm reading the book in sections, I really like how the material is presented, user-friendly presentation on several levels, interesting examples, clear illustrations. I can't help but compare it to Freeman's “Design Patterns”, and the presentation in your book is more informative in my opinion. It is convenient not only to read the book in a sequential order, but to also use it as a reference guide. I plan to use the materials you have collected to put together training materials, reports inside and outside my company, in the context of front-end development. Andrej Alekseev Russia Truth be told, I bought the book to give back for the work the authors did when creating the website, it helped me and continues to help + I was interested to see how SOLID will be outlined. I think it would be cool for newbies if there were c# examples as well, although everything is quite clear anyway. Since I have a stable Internet connection, I use the website as a reference guide instead of the book. **Note:** the book is supplied with C# examples since spring, 2018. Pavel Bobrovskij Russia I'm reading the book, it's interesting, not boring, and it offers quite an exciting and fresh perspective. I would love to see it a paperback edition as well. Dmitry Udovenko Russia Thank you for the book. The material is presented beautifully and in a user-friendly manner. The examples are clear, the diagrams are accurate, the illustrations are interesting. It works as a reference book, as well as an introductory guide for the topic. I use it for both purposes. Vladimir Lebed Kazakhstan I work as a C# developer. I had read an article online that included many references to patterns. I went to Google and found your website, where I read about the pattern that was of interest to me. Your information is very well structured, but what I liked the most was the style of illustrations. There is something home-like about them)) As a beginner, I really liked the fact that the patterns are described from the point of view of the issues that they solve, and not from the standpoint of the description of the pattern itself. After reading the entire section on patterns on the website, I realized that I wanted to buy the book to thank you for the work you have done collecting and structuring the information. I would like to comment only on one section - “Relationships with other patterns”. Despite the fact that I read about all the patterns, I still don't understand what this section is about. Maybe you could add illustrations there, or even remove this section altogether and add a chapter about using combined patterns? Daniil Doniy Russia The project as a whole, and the book in particular, make an excellent impression. It would seem that there are quite a lot of books written on this topic, but you have structured everything and made it rather fun) Wonderful illustrations that help readers memorize everything in a fun way. I started reading the book right after I purchased it. I've already learned how to apply a couple of the described patterns quite confidently in practice. The book can be improved by publishing it on paper. That way you can give it as a gift, for example. I would like to see examples for PHP and Python, but as I understand, you are already working on it. Thank you for your work, and good luck in your endeavors! **Note:** the book is now supplied with PHP and Python examples. Vasily Jurlov Russia I am completely satisfied with the purchase, I have already read the book from cover to cover. I think that this is the most user-friendly book on patterns I have ever read. I was really happy that I could read it on my iPhone. Thank you for the great book! Alexey Bezruchenkov Ukraine Excellent book, everything is explained in detail and presented in a user-friendly manner. Special thanks for supporting multiple formats and providing the readers with the ability to read the book on the go. Alex Chugaev Ukraine I liked the book; from time to time I apply the solutions from the book in my work. I'm pleased with the book and very thankful for your work. Dmitry Grusheckij Russia I would like to note right away that the book is beautifully illustrated) The information about SOLID, and in particular, about the principle of Barbara Liskov, is presented very well and in a user-friendly manner. I found some new information for myself about the private members of the base classes and the fact that you explicitly separate the restrictions on preconditions by type and attribute values. It is really easier to figure everything out this way. It seemed strange that the book is over 30mb, though Dmitry Bezik Russia The book is great. Excellent illustrations and examples. I am now preparing a report on Design Patterns at work. What can be added: examples with Anti-Patterns, what not to do. Alexandre Fiveg Munich, Germany I do really enjoy your book. And would like to buy printed version to have it on my work place. Sergii Aleksieiev Київ, Україна Everything that is explained using cats is always clear, and the more allegories the better. I haven't finished the book yet, but the first impression is rather good, thank you! Andrej Zemskov Russia I confirm that I bought this book, and am satisfied with the purchase, otherwise I would not have bought it :) I was looking to find some information on the most widely used patterns (builder and factory), and I ended up finding the materials on the website. And everything after that is history - I really liked the design of the website and its structure; other similar resources usually just have a description of random ~5 patterns, and the rest are “coming soon...”. Your website is by far the BEST of all that I have come across on this topic, and that's why I bookmarked it and added the PDF version to the offline library on my tablet. Although I am an experienced “pirate”, I am always happy to pay an ADEQUATE price for the product that I use for my professional activity. Denis Zaharov Russia I almost finished reading the book. I will say right away that I liked it; the book offers real-life examples, the descriptions and the pseudocode are good. Albert Gizetdinov Russia The material is interesting, even though it was a bit unusual to learn on examples with pseudocode. For pros, this approach is, of course, quite acceptable. In general, the book is definitely worth its price. NeonDT Russia [Show next review](https://refactoring.guru/design-patterns/book#) What do you get? ---------------- **A Multilingual eBook in 4 Formats** * Formats: PDF, EPUB, MOBI, KFX * Languages: English, Chinese, French, Korean, Japanese, Portuguese, Polish, Russian, Spanish, Ukrainian * Volume: 409 pages * Graphics: 225 illustrations and diagrams * Updates and Fixes: free as a bird **An archive with code examples** * Examples are in C#, C++, Go, Java, PHP, Python, Ruby, Rust, Swift, and TypeScript ![](https://refactoring.guru/images/patterns/banners/patterns-book-banner-5-en-3x.png) **An ebook in human-friendly, natural language.** Written with minimal jargon and technicalese, maximal code samples and illustrations. ![](https://refactoring.guru/images/patterns/banners/patterns-book-banner-6-3x.png) **Not bound to a specific programming language.** Code examples are in pseudocode, applicable to most modern OOP languages. ![](https://refactoring.guru/images/patterns/banners/patterns-book-banner-3-3x.png) **Readable on any device.** The eBook is available in four formats: * **EPUB** for reading on phones and tablets * **MOBI**, **KFX** for Amazon Kindle readers * **PDF** for reading anywhere or printing ![](https://refactoring.guru/images/patterns/banners/patterns-book-banner-2-2x.png) **Always handy and searchable.** The ebook is a convenient reference guide. Unlike a paperback, it is searchable and impossible to leave behind somewhere. It’s always available on your smartphone, tablet, laptop or desktop. ![](https://refactoring.guru/images/patterns/banners/patterns-book-banner-1-a-3x.png) **Pleasant reading when commuting or relaxing.** Where else can you learn in peace these days, if not during flights and on the bus or subway? Well, maybe in bed… ![](https://refactoring.guru/images/patterns/banners/patterns-book-banner-4-3x.png) **Easy reading day or night.** Good news for night owls! The eBook looks great on a light background for day-reading or a dark one for night-reading. Frequently asked questions -------------------------- What payment methods do you accept? You can pay with credit/debit cards (Visa, MasterCard, AmEx, Discover, JCB, and more), PayPal, Apple Pay, Google Pay, iDeal, NetBanking, WeChat Pay, and Alipay. You can also pay using cryptocurrency. How do you keep my data safe? Your payment information is encrypted and sent directly to the payment gateway. It is never transmitted to or stored on our server. I tried to place the order, but my payment gets failed each time. What do I do? Please make sure that your card is enabled for online transactions and that you're not hitting your online spending limit. Then retry placing the order. If nothing helps, [send us a message](https://refactoring.guru/refactoring/feedback) and we will try to provide you with alternative payment options. Can I get my money back if I’m dissatisfied? Yes! If our book doesn’t help you, just email support@refactoring.guru with your receipt. We will refund your purchase in full, no questions asked. Can I get an invoice after purchase? Yes! You will be able to download the invoice after purchase. Is there a hard copy version of the book? The book has not been published in the paper format yet. It might in the future, though. So, if you're interested, please subscribe to [our newsletter](https://refactoring.guru/sendy/form) to not miss it. Can I buy the book on Amazon? Unfortunately, no. The book can only be bought on Refactoring.Guru. Selling the book from our own website allows us to avoid huge cuts imposed by the 3-rd party platforms and break even while keeping the price affordable. If you're more interested in reviews, you can refer to the book page on [Goodreads](https://www.goodreads.com/book/show/43125355-dive-into-design-patterns) . Do I get all the language versions after purchase? (Spanish, Chinese, etc.) Yes! You get access to all the current and future language versions of the ebook. Have more questions? -------------------- [Send us a forum message](https://refactoring.guru/refactoring/feedback) or email [support@refactoring.guru](mailto:support@refactoring.guru) . We usually respond within a few hours. ### Dive Into **DESIGN PATTERNS** Winter SALE $40.00 $24.95 plus local tax including local tax [Buy now](https://refactoring.guru/design-patterns/book#buy-now) **PDF, EPUB, MOBI, KFX + code examples** / Free updates / **30-day money-back guarantee** [![](https://refactoring.guru/images/patterns/book/web-cover-en-3x.png)](https://refactoring.guru/design-patterns/book#buy-now) Winter SALE $40.00 $24.95 plus local tax including local tax [Buy now](https://refactoring.guru/design-patterns/book#buy-now) [Buy as a gift](https://refactoring.guru/design-patterns/book#buy-now) [Buy for my team](https://refactoring.guru/design-patterns/book#buy-team) ![](https://refactoring.guru/images/content-public/landings/ipadiphone.png) PDF, EPUB, MOBI, KFX \+ code examples ![](https://refactoring.guru/images/content-public/landings/satisf.gif) 30-day money-back guarantee --- # Mediator [There are patterns of patterns now! \ My friend's project: MetaPatterns.io](https://metapatterns.io/)  [](https://refactoring.guru/design-patterns/mediator#checkout) [](https://refactoring.guru/design-patterns/mediator#checkout) [](https://refactoring.guru/) / [Design Patterns](https://refactoring.guru/design-patterns) / [Behavioral Patterns](https://refactoring.guru/design-patterns/behavioral-patterns) Mediator ======== Also known as: Intermediary, Controller Intent ------ **Mediator** is a behavioral design pattern that lets you reduce chaotic dependencies between objects. The pattern restricts direct communications between the objects and forces them to collaborate only via a mediator object. ![Mediator design pattern](https://refactoring.guru/images/patterns/content/mediator/mediator-2x.png?id=250c2bf72ca1fdee2e6d97ed5a4765f2) Problem ------- Say you have a dialog for creating and editing customer profiles. It consists of various form controls such as text fields, checkboxes, buttons, etc. ![Chaotic relations between elements of the user interface](https://refactoring.guru/images/patterns/diagrams/mediator/problem1-en-2x.png?id=e868165bd04a9438857d6ad41528024c) Relations between elements of the user interface can become chaotic as the application evolves. Some of the form elements may interact with others. For instance, selecting the “I have a dog” checkbox may reveal a hidden text field for entering the dog’s name. Another example is the submit button that has to validate values of all fields before saving the data. ![Elements of the UI are interdependent](https://refactoring.guru/images/patterns/diagrams/mediator/problem2-2x.png?id=d298ec82a47fa2938ed6cf64b7da78c1) Elements can have lots of relations with other elements. Hence, changes to some elements may affect the others. By having this logic implemented directly inside the code of the form elements you make these elements’ classes much harder to reuse in other forms of the app. For example, you won’t be able to use that checkbox class inside another form, because it’s coupled to the dog’s text field. You can use either all the classes involved in rendering the profile form, or none at all. Solution -------- The Mediator pattern suggests that you should cease all direct communication between the components which you want to make independent of each other. Instead, these components must collaborate indirectly, by calling a special mediator object that redirects the calls to appropriate components. As a result, the components depend only on a single mediator class instead of being coupled to dozens of their colleagues. In our example with the profile editing form, the dialog class itself may act as the mediator. Most likely, the dialog class is already aware of all of its sub-elements, so you won’t even need to introduce new dependencies into this class. ![UI elements should communicate via the mediator.](https://refactoring.guru/images/patterns/diagrams/mediator/solution1-en-2x.png?id=0a1280789a5d7b1567c9d98e5fcd1125) UI elements should communicate indirectly, via the mediator object. The most significant change happens to the actual form elements. Let’s consider the submit button. Previously, each time a user clicked the button, it had to validate the values of all individual form elements. Now its single job is to notify the dialog about the click. Upon receiving this notification, the dialog itself performs the validations or passes the task to the individual elements. Thus, instead of being tied to a dozen form elements, the button is only dependent on the dialog class. You can go further and make the dependency even looser by extracting the common interface for all types of dialogs. The interface would declare the notification method which all form elements can use to notify the dialog about events happening to those elements. Thus, our submit button should now be able to work with any dialog that implements that interface. This way, the Mediator pattern lets you encapsulate a complex web of relations between various objects inside a single mediator object. The fewer dependencies a class has, the easier it becomes to modify, extend or reuse that class. Real-World Analogy ------------------ ![Air traffic control tower](https://refactoring.guru/images/patterns/diagrams/mediator/live-example-2x.png?id=fd55a9f9d8cf49effa223555c7369504) Aircraft pilots don’t talk to each other directly when deciding who gets to land their plane next. All communication goes through the control tower. Pilots of aircraft that approach or depart the airport control area don’t communicate directly with each other. Instead, they speak to an air traffic controller, who sits in a tall tower somewhere near the airstrip. Without the air traffic controller, pilots would need to be aware of every plane in the vicinity of the airport, discussing landing priorities with a committee of dozens of other pilots. That would probably skyrocket the airplane crash statistics. The tower doesn’t need to control the whole flight. It exists only to enforce constraints in the terminal area because the number of involved actors there might be overwhelming to a pilot. Structure --------- ![Structure of the Mediator design pattern](https://refactoring.guru/images/patterns/diagrams/mediator/structure-2x.png?id=5191daa1c9d4caa36e38af3c5b7d1522)![Structure of the Mediator design pattern](https://refactoring.guru/images/patterns/diagrams/mediator/structure-indexed-2x.png?id=88722da01a5c82b0452078c9339ca497) 1. **Components** are various classes that contain some business logic. Each component has a reference to a mediator, declared with the type of the mediator interface. The component isn’t aware of the actual class of the mediator, so you can reuse the component in other programs by linking it to a different mediator. 2. The **Mediator** interface declares methods of communication with components, which usually include just a single notification method. Components may pass any context as arguments of this method, including their own objects, but only in such a way that no coupling occurs between a receiving component and the sender’s class. 3. **Concrete Mediators** encapsulate relations between various components. Concrete mediators often keep references to all components they manage and sometimes even manage their lifecycle. 4. Components must not be aware of other components. If something important happens within or to a component, it must only notify the mediator. When the mediator receives the notification, it can easily identify the sender, which might be just enough to decide what component should be triggered in return. From a component’s perspective, it all looks like a total black box. The sender doesn’t know who’ll end up handling its request, and the receiver doesn’t know who sent the request in the first place. Pseudocode ---------- In this example, the **Mediator** pattern helps you eliminate mutual dependencies between various UI classes: buttons, checkboxes and text labels. ![Structure of the Mediator pattern example](https://refactoring.guru/images/patterns/diagrams/mediator/example-2x.png?id=02064e5a7c4f065f806747e1b04ac1b0) Structure of the UI dialog classes. An element, triggered by a user, doesn’t communicate with other elements directly, even if it looks like it’s supposed to. Instead, the element only needs to let its mediator know about the event, passing any contextual info along with that notification. In this example, the whole authentication dialog acts as the mediator. It knows how concrete elements are supposed to collaborate and facilitates their indirect communication. Upon receiving a notification about an event, the dialog decides what element should address the event and redirects the call accordingly. // The mediator interface declares a method used by components // to notify the mediator about various events. The mediator may // react to these events and pass the execution to other // components. interface Mediator is method notify(sender: Component, event: string) // The concrete mediator class. The intertwined web of // connections between individual components has been untangled // and moved into the mediator. class AuthenticationDialog implements Mediator is private field title: string private field loginOrRegisterChkBx: Checkbox private field loginUsername, loginPassword: Textbox private field registrationUsername, registrationPassword, registrationEmail: Textbox private field okBtn, cancelBtn: Button constructor AuthenticationDialog() is // Create all component objects by passing the current // mediator into their constructors to establish links. // When something happens with a component, it notifies the // mediator. Upon receiving a notification, the mediator may // do something on its own or pass the request to another // component. method notify(sender, event) is if (sender == loginOrRegisterChkBx and event == "check") if (loginOrRegisterChkBx.checked) title = "Log in" // 1. Show login form components. // 2. Hide registration form components. else title = "Register" // 1. Show registration form components. // 2. Hide login form components if (sender == okBtn && event == "click") if (loginOrRegister.checked) // Try to find a user using login credentials. if (!found) // Show an error message above the login // field. else // 1. Create a user account using data from the // registration fields. // 2. Log that user in. // ... // Components communicate with a mediator using the mediator // interface. Thanks to that, you can use the same components in // other contexts by linking them with different mediator // objects. class Component is field dialog: Mediator constructor Component(dialog) is this.dialog = dialog method click() is dialog.notify(this, "click") method keypress() is dialog.notify(this, "keypress") // Concrete components don't talk to each other. They have only // one communication channel, which is sending notifications to // the mediator. class Button extends Component is // ... class Textbox extends Component is // ... class Checkbox extends Component is method check() is dialog.notify(this, "check") // ... Applicability ------------- Use the Mediator pattern when it’s hard to change some of the classes because they are tightly coupled to a bunch of other classes. The pattern lets you extract all the relationships between classes into a separate class, isolating any changes to a specific component from the rest of the components. Use the pattern when you can’t reuse a component in a different program because it’s too dependent on other components. After you apply the Mediator, individual components become unaware of the other components. They could still communicate with each other, albeit indirectly, through a mediator object. To reuse a component in a different app, you need to provide it with a new mediator class. Use the Mediator when you find yourself creating tons of component subclasses just to reuse some basic behavior in various contexts. Since all relations between components are contained within the mediator, it’s easy to define entirely new ways for these components to collaborate by introducing new mediator classes, without having to change the components themselves. How to Implement ---------------- 1. Identify a group of tightly coupled classes which would benefit from being more independent (e.g., for easier maintenance or simpler reuse of these classes). 2. Declare the mediator interface and describe the desired communication protocol between mediators and various components. In most cases, a single method for receiving notifications from components is sufficient. This interface is crucial when you want to reuse component classes in different contexts. As long as the component works with its mediator via the generic interface, you can link the component with a different implementation of the mediator. 3. Implement the concrete mediator class. Consider storing references to all components inside the mediator. This way, you could call any component from the mediator’s methods. 4. You can go even further and make the mediator responsible for the creation and destruction of component objects. After this, the mediator may resemble a [factory](https://refactoring.guru/design-patterns/abstract-factory) or a [facade](https://refactoring.guru/design-patterns/facade) . 5. Components should store a reference to the mediator object. The connection is usually established in the component’s constructor, where a mediator object is passed as an argument. 6. Change the components’ code so that they call the mediator’s notification method instead of methods on other components. Extract the code that involves calling other components into the mediator class. Execute this code whenever the mediator receives notifications from that component. Pros and Cons ------------- * _Single Responsibility Principle_. You can extract the communications between various components into a single place, making it easier to comprehend and maintain. * _Open/Closed Principle_. You can introduce new mediators without having to change the actual components. * You can reduce coupling between various components of a program. * You can reuse individual components more easily. * Over time a mediator can evolve into a [God Object](https://refactoring.guru/antipatterns/god-object) . Relations with Other Patterns ----------------------------- * [Chain of Responsibility](https://refactoring.guru/design-patterns/chain-of-responsibility) , [Command](https://refactoring.guru/design-patterns/command) , [Mediator](https://refactoring.guru/design-patterns/mediator) and [Observer](https://refactoring.guru/design-patterns/observer) address various ways of connecting senders and receivers of requests: * _Chain of Responsibility_ passes a request sequentially along a dynamic chain of potential receivers until one of them handles it. * _Command_ establishes unidirectional connections between senders and receivers. * _Mediator_ eliminates direct connections between senders and receivers, forcing them to communicate indirectly via a mediator object. * _Observer_ lets receivers dynamically subscribe to and unsubscribe from receiving requests. * [Facade](https://refactoring.guru/design-patterns/facade) and [Mediator](https://refactoring.guru/design-patterns/mediator) have similar jobs: they try to organize collaboration between lots of tightly coupled classes. * _Facade_ defines a simplified interface to a subsystem of objects, but it doesn’t introduce any new functionality. The subsystem itself is unaware of the facade. Objects within the subsystem can communicate directly. * _Mediator_ centralizes communication between components of the system. The components only know about the mediator object and don’t communicate directly. * The difference between [Mediator](https://refactoring.guru/design-patterns/mediator) and [Observer](https://refactoring.guru/design-patterns/observer) is often elusive. In most cases, you can implement either of these patterns; but sometimes you can apply both simultaneously. Let’s see how we can do that. The primary goal of _Mediator_ is to eliminate mutual dependencies among a set of system components. Instead, these components become dependent on a single mediator object. The goal of _Observer_ is to establish dynamic one-way connections between objects, where some objects act as subordinates of others. There’s a popular implementation of the _Mediator_ pattern that relies on _Observer_. The mediator object plays the role of publisher, and the components act as subscribers which subscribe to and unsubscribe from the mediator’s events. When _Mediator_ is implemented this way, it may look very similar to _Observer_. When you’re confused, remember that you can implement the Mediator pattern in other ways. For example, you can permanently link all the components to the same mediator object. This implementation won’t resemble _Observer_ but will still be an instance of the Mediator pattern. Now imagine a program where all components have become publishers, allowing dynamic connections between each other. There won’t be a centralized mediator object, only a distributed set of observers. Code Examples ------------- [![Mediator in C#](https://refactoring.guru/images/patterns/icons/csharp.svg?id=da64592defc6e86d57c39c66e9de3e58)](https://refactoring.guru/design-patterns/mediator/csharp/example "Mediator in C#") [![Mediator in C++](https://refactoring.guru/images/patterns/icons/cpp.svg?id=f7782ed8b8666246bfcc3f8fefc3b858)](https://refactoring.guru/design-patterns/mediator/cpp/example "Mediator in C++") [![Mediator in Go](https://refactoring.guru/images/patterns/icons/go.svg?id=1a89927eb99b1ea3fde7701d97970aca)](https://refactoring.guru/design-patterns/mediator/go/example "Mediator in Go") [![Mediator in Java](https://refactoring.guru/images/patterns/icons/java.svg?id=e6d87e2dca08c953fe3acd1275ed4f4e)](https://refactoring.guru/design-patterns/mediator/java/example "Mediator in Java") [![Mediator in PHP](https://refactoring.guru/images/patterns/icons/php.svg?id=be1906eb26b71ec1d3b93720d6156618)](https://refactoring.guru/design-patterns/mediator/php/example "Mediator in PHP") [![Mediator in Python](https://refactoring.guru/images/patterns/icons/python.svg?id=6d815d43c0f7050a1151b43e51569c9f)](https://refactoring.guru/design-patterns/mediator/python/example "Mediator in Python") [![Mediator in Ruby](https://refactoring.guru/images/patterns/icons/ruby.svg?id=b065b718c914bf8e960ef731600be1eb)](https://refactoring.guru/design-patterns/mediator/ruby/example "Mediator in Ruby") [![Mediator in Rust](https://refactoring.guru/images/patterns/icons/rust.svg?id=1f5698a4b5ae23fe79413511747e4a87)](https://refactoring.guru/design-patterns/mediator/rust/example "Mediator in Rust") [![Mediator in Swift](https://refactoring.guru/images/patterns/icons/swift.svg?id=0b716c2d52ec3a48fbe91ac031070c1d)](https://refactoring.guru/design-patterns/mediator/swift/example "Mediator in Swift") [![Mediator in TypeScript](https://refactoring.guru/images/patterns/icons/typescript.svg?id=2239d0f16cb703540c205dd8cb0c0cb7)](https://refactoring.guru/design-patterns/mediator/typescript/example "Mediator in TypeScript") [![](https://refactoring.guru/images/patterns/banners/patterns-book-banner-3-2x.png?id=0cc3f77ab421d1a5c02ee46488231c3a)](https://refactoring.guru/design-patterns/book) ### Support our free website and own the eBook! * 22 design patterns and 8 principles explained in depth. * 409 well-structured, easy to read, jargon-free pages. * 225 clear and helpful illustrations and diagrams. * An archive with code examples in 11 languages. * All devices supported: PDF/EPUB/MOBI/KFX formats. [Learn more…](https://refactoring.guru/design-patterns/book) --- # Memento [There are patterns of patterns now! \ My friend's project: MetaPatterns.io](https://metapatterns.io/)  [](https://refactoring.guru/design-patterns/memento#checkout) [](https://refactoring.guru/design-patterns/memento#checkout) [](https://refactoring.guru/) / [Design Patterns](https://refactoring.guru/design-patterns) / [Behavioral Patterns](https://refactoring.guru/design-patterns/behavioral-patterns) Memento ======= Also known as: Snapshot Intent ------ **Memento** is a behavioral design pattern that lets you save and restore the previous state of an object without revealing the details of its implementation. ![Memento design pattern](https://refactoring.guru/images/patterns/content/memento/memento-en-2x.png?id=6782c5bbd8e036321dfd86558b540dda) Problem ------- Imagine that you’re creating a text editor app. In addition to simple text editing, your editor can format text, insert inline images, etc. At some point, you decided to let users undo any operations carried out on the text. This feature has become so common over the years that nowadays people expect every app to have it. For the implementation, you chose to take the direct approach. Before performing any operation, the app records the state of all objects and saves it in some storage. Later, when a user decides to revert an action, the app fetches the latest snapshot from the history and uses it to restore the state of all objects. ![Reverting operations in the editor](https://refactoring.guru/images/patterns/diagrams/memento/problem1-en-2x.png?id=566e033ea5d3ab01e47fc4fc8697f994) Before executing an operation, the app saves a snapshot of the objects’ state, which can later be used to restore objects to their previous state. Let’s think about those state snapshots. How exactly would you produce one? You’d probably need to go over all the fields in an object and copy their values into storage. However, this would only work if the object had quite relaxed access restrictions to its contents. Unfortunately, most real objects won’t let others peek inside them that easily, hiding all significant data in private fields. Ignore that problem for now and let’s assume that our objects behave like hippies: preferring open relations and keeping their state public. While this approach would solve the immediate problem and let you produce snapshots of objects’ states at will, it still has some serious issues. In the future, you might decide to refactor some of the editor classes, or add or remove some of the fields. Sounds easy, but this would also require changing the classes responsible for copying the state of the affected objects. ![How to make a copy of the object's private state?](https://refactoring.guru/images/patterns/diagrams/memento/problem2-en-2x.png?id=0fa1afcb7eaf54093e64722a2f187f8c) How to make a copy of the object’s private state? But there’s more. Let’s consider the actual “snapshots” of the editor’s state. What data does it contain? At a bare minimum, it must contain the actual text, cursor coordinates, current scroll position, etc. To make a snapshot, you’d need to collect these values and put them into some kind of container. Most likely, you’re going to store lots of these container objects inside some list that would represent the history. Therefore the containers would probably end up being objects of one class. The class would have almost no methods, but lots of fields that mirror the editor’s state. To allow other objects to write and read data to and from a snapshot, you’d probably need to make its fields public. That would expose all the editor’s states, private or not. Other classes would become dependent on every little change to the snapshot class, which would otherwise happen within private fields and methods without affecting outer classes. It looks like we’ve reached a dead end: you either expose all internal details of classes, making them too fragile, or restrict access to their state, making it impossible to produce snapshots. Is there any other way to implement the "undo"? Solution -------- All problems that we’ve just experienced are caused by broken encapsulation. Some objects try to do more than they are supposed to. To collect the data required to perform some action, they invade the private space of other objects instead of letting these objects perform the actual action. The Memento pattern delegates creating the state snapshots to the actual owner of that state, the _originator_ object. Hence, instead of other objects trying to copy the editor’s state from the “outside,” the editor class itself can make the snapshot since it has full access to its own state. The pattern suggests storing the copy of the object’s state in a special object called _memento_. The contents of the memento aren’t accessible to any other object except the one that produced it. Other objects must communicate with mementos using a limited interface which may allow fetching the snapshot’s metadata (creation time, the name of the performed operation, etc.), but not the original object’s state contained in the snapshot. ![The originator has full access to the memento, whereas the caretaker can only access the metadata](https://refactoring.guru/images/patterns/diagrams/memento/solution-en-2x.png?id=cfba1b6b9f65659c29178f7399e30b49) The originator has full access to the memento, whereas the caretaker can only access the metadata. Such a restrictive policy lets you store mementos inside other objects, usually called _caretakers_. Since the caretaker works with the memento only via the limited interface, it’s not able to tamper with the state stored inside the memento. At the same time, the originator has access to all fields inside the memento, allowing it to restore its previous state at will. In our text editor example, we can create a separate history class to act as the caretaker. A stack of mementos stored inside the caretaker will grow each time the editor is about to execute an operation. You could even render this stack within the app’s UI, displaying the history of previously performed operations to a user. When a user triggers the undo, the history grabs the most recent memento from the stack and passes it back to the editor, requesting a roll-back. Since the editor has full access to the memento, it changes its own state with the values taken from the memento. Structure --------- #### Implementation based on nested classes The classic implementation of the pattern relies on support for nested classes, available in many popular programming languages (such as C++, C#, and Java). ![Memento based on nested classes](https://refactoring.guru/images/patterns/diagrams/memento/structure1-2x.png?id=d4e77295e51c2417f22b7abb396d5977)![Memento based on nested classes](https://refactoring.guru/images/patterns/diagrams/memento/structure1-indexed-2x.png?id=62fea7bdbc96420568869ea3bd25f6ad) 1. The **Originator** class can produce snapshots of its own state, as well as restore its state from snapshots when needed. 2. The **Memento** is a value object that acts as a snapshot of the originator’s state. It’s a common practice to make the memento immutable and pass it the data only once, via the constructor. 3. The **Caretaker** knows not only “when” and “why” to capture the originator’s state, but also when the state should be restored. A caretaker can keep track of the originator’s history by storing a stack of mementos. When the originator has to travel back in history, the caretaker fetches the topmost memento from the stack and passes it to the originator’s restoration method. 4. In this implementation, the memento class is nested inside the originator. This lets the originator access the fields and methods of the memento, even though they’re declared private. On the other hand, the caretaker has very limited access to the memento’s fields and methods, which lets it store mementos in a stack but not tamper with their state. #### Implementation based on an intermediate interface There’s an alternative implementation, suitable for programming languages that don’t support nested classes (yeah, PHP, I’m talking about you). ![Memento without nested classes](https://refactoring.guru/images/patterns/diagrams/memento/structure2-2x.png?id=aa7fb5d0f622d4344a2cb590f437f8c8)![Memento without nested classes](https://refactoring.guru/images/patterns/diagrams/memento/structure2-indexed-2x.png?id=2fb637daef1110dfa89f15b2d4627894) 1. In the absence of nested classes, you can restrict access to the memento’s fields by establishing a convention that caretakers can work with a memento only through an explicitly declared intermediary interface, which would only declare methods related to the memento’s metadata. 2. On the other hand, originators can work with a memento object directly, accessing fields and methods declared in the memento class. The downside of this approach is that you need to declare all members of the memento public. #### Implementation with even stricter encapsulation There’s another implementation which is useful when you don’t want to leave even the slightest chance of other classes accessing the state of the originator through the memento. ![Memento with strict encapsulation](https://refactoring.guru/images/patterns/diagrams/memento/structure3-2x.png?id=988c37f92059457153d26ba3458d371e)![Memento with strict encapsulation](https://refactoring.guru/images/patterns/diagrams/memento/structure3-indexed-2x.png?id=fef9ae2a0151c105976075aafb8939dd) 1. This implementation allows having multiple types of originators and mementos. Each originator works with a corresponding memento class. Neither originators nor mementos expose their state to anyone. 2. Caretakers are now explicitly restricted from changing the state stored in mementos. Moreover, the caretaker class becomes independent from the originator because the restoration method is now defined in the memento class. 3. Each memento becomes linked to the originator that produced it. The originator passes itself to the memento’s constructor, along with the values of its state. Thanks to the close relationship between these classes, a memento can restore the state of its originator, given that the latter has defined the appropriate setters. Pseudocode ---------- This example uses the Memento pattern alongside the [Command](https://refactoring.guru/design-patterns/command) pattern for storing snapshots of the complex text editor’s state and restoring an earlier state from these snapshots when needed. ![Structure of the Memento example](https://refactoring.guru/images/patterns/diagrams/memento/example-2x.png?id=41a73f3cc22bc3dd180f53e6968974d4) Saving snapshots of the text editor’s state. The command objects act as caretakers. They fetch the editor’s memento before executing operations related to commands. When a user attempts to undo the most recent command, the editor can use the memento stored in that command to revert itself to the previous state. The memento class doesn’t declare any public fields, getters or setters. Therefore no object can alter its contents. Mementos are linked to the editor object that created them. This lets a memento restore the linked editor’s state by passing the data via setters on the editor object. Since mementos are linked to specific editor objects, you can make your app support several independent editor windows with a centralized undo stack. // The originator holds some important data that may change over // time. It also defines a method for saving its state inside a // memento and another method for restoring the state from it. class Editor is private field text, curX, curY, selectionWidth method setText(text) is this.text = text method setCursor(x, y) is this.curX = x this.curY = y method setSelectionWidth(width) is this.selectionWidth = width // Saves the current state inside a memento. method createSnapshot():Snapshot is // Memento is an immutable object; that's why the // originator passes its state to the memento's // constructor parameters. return new Snapshot(this, text, curX, curY, selectionWidth) // The memento class stores the past state of the editor. class Snapshot is private field editor: Editor private field text, curX, curY, selectionWidth constructor Snapshot(editor, text, curX, curY, selectionWidth) is this.editor = editor this.text = text this.curX = x this.curY = y this.selectionWidth = selectionWidth // At some point, a previous state of the editor can be // restored using a memento object. method restore() is editor.setText(text) editor.setCursor(curX, curY) editor.setSelectionWidth(selectionWidth) // A command object can act as a caretaker. In that case, the // command gets a memento just before it changes the // originator's state. When undo is requested, it restores the // originator's state from a memento. class Command is private field backup: Snapshot method makeBackup() is backup = editor.createSnapshot() method undo() is if (backup != null) backup.restore() // ... Applicability ------------- Use the Memento pattern when you want to produce snapshots of the object’s state to be able to restore a previous state of the object. The Memento pattern lets you make full copies of an object’s state, including private fields, and store them separately from the object. While most people remember this pattern thanks to the “undo” use case, it’s also indispensable when dealing with transactions (i.e., if you need to roll back an operation on error). Use the pattern when direct access to the object’s fields/getters/setters violates its encapsulation. The Memento makes the object itself responsible for creating a snapshot of its state. No other object can read the snapshot, making the original object’s state data safe and secure. How to Implement ---------------- 1. Determine what class will play the role of the originator. It’s important to know whether the program uses one central object of this type or multiple smaller ones. 2. Create the memento class. One by one, declare a set of fields that mirror the fields declared inside the originator class. 3. Make the memento class immutable. A memento should accept the data just once, via the constructor. The class should have no setters. 4. If your programming language supports nested classes, nest the memento inside the originator. If not, extract a blank interface from the memento class and make all other objects use it to refer to the memento. You may add some metadata operations to the interface, but nothing that exposes the originator’s state. 5. Add a method for producing mementos to the originator class. The originator should pass its state to the memento via one or multiple arguments of the memento’s constructor. The return type of the method should be of the interface you extracted in the previous step (assuming that you extracted it at all). Under the hood, the memento-producing method should work directly with the memento class. 6. Add a method for restoring the originator’s state to its class. It should accept a memento object as an argument. If you extracted an interface in the previous step, make it the type of the parameter. In this case, you need to typecast the incoming object to the memento class, since the originator needs full access to that object. 7. The caretaker, whether it represents a command object, a history, or something entirely different, should know when to request new mementos from the originator, how to store them and when to restore the originator with a particular memento. 8. The link between caretakers and originators may be moved into the memento class. In this case, each memento must be connected to the originator that had created it. The restoration method would also move to the memento class. However, this would all make sense only if the memento class is nested into originator or the originator class provides sufficient setters for overriding its state. Pros and Cons ------------- * You can produce snapshots of the object’s state without violating its encapsulation. * You can simplify the originator’s code by letting the caretaker maintain the history of the originator’s state. * The app might consume lots of RAM if clients create mementos too often. * Caretakers should track the originator’s lifecycle to be able to destroy obsolete mementos. * Most dynamic programming languages, such as PHP, Python and JavaScript, can’t guarantee that the state within the memento stays untouched. Relations with Other Patterns ----------------------------- * You can use [Command](https://refactoring.guru/design-patterns/command) and [Memento](https://refactoring.guru/design-patterns/memento) together when implementing “undo”. In this case, commands are responsible for performing various operations over a target object, while mementos save the state of that object just before a command gets executed. * You can use [Memento](https://refactoring.guru/design-patterns/memento) along with [Iterator](https://refactoring.guru/design-patterns/iterator) to capture the current iteration state and roll it back if necessary. * Sometimes [Prototype](https://refactoring.guru/design-patterns/prototype) can be a simpler alternative to [Memento](https://refactoring.guru/design-patterns/memento) . This works if the object, the state of which you want to store in the history, is fairly straightforward and doesn’t have links to external resources, or the links are easy to re-establish. Code Examples ------------- [![Memento in C#](https://refactoring.guru/images/patterns/icons/csharp.svg?id=da64592defc6e86d57c39c66e9de3e58)](https://refactoring.guru/design-patterns/memento/csharp/example "Memento in C#") [![Memento in C++](https://refactoring.guru/images/patterns/icons/cpp.svg?id=f7782ed8b8666246bfcc3f8fefc3b858)](https://refactoring.guru/design-patterns/memento/cpp/example "Memento in C++") [![Memento in Go](https://refactoring.guru/images/patterns/icons/go.svg?id=1a89927eb99b1ea3fde7701d97970aca)](https://refactoring.guru/design-patterns/memento/go/example "Memento in Go") [![Memento in Java](https://refactoring.guru/images/patterns/icons/java.svg?id=e6d87e2dca08c953fe3acd1275ed4f4e)](https://refactoring.guru/design-patterns/memento/java/example "Memento in Java") [![Memento in PHP](https://refactoring.guru/images/patterns/icons/php.svg?id=be1906eb26b71ec1d3b93720d6156618)](https://refactoring.guru/design-patterns/memento/php/example "Memento in PHP") [![Memento in Python](https://refactoring.guru/images/patterns/icons/python.svg?id=6d815d43c0f7050a1151b43e51569c9f)](https://refactoring.guru/design-patterns/memento/python/example "Memento in Python") [![Memento in Ruby](https://refactoring.guru/images/patterns/icons/ruby.svg?id=b065b718c914bf8e960ef731600be1eb)](https://refactoring.guru/design-patterns/memento/ruby/example "Memento in Ruby") [![Memento in Rust](https://refactoring.guru/images/patterns/icons/rust.svg?id=1f5698a4b5ae23fe79413511747e4a87)](https://refactoring.guru/design-patterns/memento/rust/example "Memento in Rust") [![Memento in Swift](https://refactoring.guru/images/patterns/icons/swift.svg?id=0b716c2d52ec3a48fbe91ac031070c1d)](https://refactoring.guru/design-patterns/memento/swift/example "Memento in Swift") [![Memento in TypeScript](https://refactoring.guru/images/patterns/icons/typescript.svg?id=2239d0f16cb703540c205dd8cb0c0cb7)](https://refactoring.guru/design-patterns/memento/typescript/example "Memento in TypeScript") [![](https://refactoring.guru/images/patterns/banners/patterns-book-banner-3-2x.png?id=0cc3f77ab421d1a5c02ee46488231c3a)](https://refactoring.guru/design-patterns/book) ### Support our free website and own the eBook! * 22 design patterns and 8 principles explained in depth. * 409 well-structured, easy to read, jargon-free pages. * 225 clear and helpful illustrations and diagrams. * An archive with code examples in 11 languages. * All devices supported: PDF/EPUB/MOBI/KFX formats. [Learn more…](https://refactoring.guru/design-patterns/book) --- # Observer [There are patterns of patterns now! \ My friend's project: MetaPatterns.io](https://metapatterns.io/)  [](https://refactoring.guru/design-patterns/observer#checkout) [](https://refactoring.guru/design-patterns/observer#checkout) [](https://refactoring.guru/) / [Design Patterns](https://refactoring.guru/design-patterns) / [Behavioral Patterns](https://refactoring.guru/design-patterns/behavioral-patterns) Observer ======== Also known as: Event-Subscriber, Listener Intent ------ **Observer** is a behavioral design pattern that lets you define a subscription mechanism to notify multiple objects about any events that happen to the object they’re observing. ![Observer Design Pattern](https://refactoring.guru/images/patterns/content/observer/observer-2x.png?id=d5a83e115528e9fd633f04ad2650f1db) Problem ------- Imagine that you have two types of objects: a `Customer` and a `Store`. The customer is very interested in a particular brand of product (say, it’s a new model of the iPhone) which should become available in the store very soon. The customer could visit the store every day and check product availability. But while the product is still en route, most of these trips would be pointless. ![Visiting store vs. sending spam](https://refactoring.guru/images/patterns/content/observer/observer-comic-1-en-2x.png?id=8e89674eb83b01e82203987e600ba59e) Visiting the store vs. sending spam On the other hand, the store could send tons of emails (which might be considered spam) to all customers each time a new product becomes available. This would save some customers from endless trips to the store. At the same time, it’d upset other customers who aren’t interested in new products. It looks like we’ve got a conflict. Either the customer wastes time checking product availability or the store wastes resources notifying the wrong customers. Solution -------- The object that has some interesting state is often called _subject_, but since it’s also going to notify other objects about the changes to its state, we’ll call it _publisher_. All other objects that want to track changes to the publisher’s state are called _subscribers_. The Observer pattern suggests that you add a subscription mechanism to the publisher class so individual objects can subscribe to or unsubscribe from a stream of events coming from that publisher. Fear not! Everything isn’t as complicated as it sounds. In reality, this mechanism consists of 1) an array field for storing a list of references to subscriber objects and 2) several public methods which allow adding subscribers to and removing them from that list. ![Subscription mechanism](https://refactoring.guru/images/patterns/diagrams/observer/solution1-en-2x.png?id=a6bc643488b8fbc8bbb309539139c316) A subscription mechanism lets individual objects subscribe to event notifications. Now, whenever an important event happens to the publisher, it goes over its subscribers and calls the specific notification method on their objects. Real apps might have dozens of different subscriber classes that are interested in tracking events of the same publisher class. You wouldn’t want to couple the publisher to all of those classes. Besides, you might not even know about some of them beforehand if your publisher class is supposed to be used by other people. That’s why it’s crucial that all subscribers implement the same interface and that the publisher communicates with them only via that interface. This interface should declare the notification method along with a set of parameters that the publisher can use to pass some contextual data along with the notification. ![Notification methods](https://refactoring.guru/images/patterns/diagrams/observer/solution2-en-2x.png?id=630cfb84753c258aa4e8500e189c0b65) Publisher notifies subscribers by calling the specific notification method on their objects. If your app has several different types of publishers and you want to make your subscribers compatible with all of them, you can go even further and make all publishers follow the same interface. This interface would only need to describe a few subscription methods. The interface would allow subscribers to observe publishers’ states without coupling to their concrete classes. Real-World Analogy ------------------ ![Magazine and newspaper subscriptions](https://refactoring.guru/images/patterns/content/observer/observer-comic-2-en-2x.png?id=2147046fb16c427533db8ed85e8cce4c) Magazine and newspaper subscriptions. If you subscribe to a newspaper or magazine, you no longer need to go to the store to check if the next issue is available. Instead, the publisher sends new issues directly to your mailbox right after publication or even in advance. The publisher maintains a list of subscribers and knows which magazines they’re interested in. Subscribers can leave the list at any time when they wish to stop the publisher sending new magazine issues to them. Structure --------- ![Structure of the Observer design pattern](https://refactoring.guru/images/patterns/diagrams/observer/structure-2x.png?id=228af9bded4d6ee6daf43a0e23cca9ff)![Structure of the Observer design pattern](https://refactoring.guru/images/patterns/diagrams/observer/structure-indexed-2x.png?id=910eec855bc41f05199e510494078926) 1. The **Publisher** issues events of interest to other objects. These events occur when the publisher changes its state or executes some behaviors. Publishers contain a subscription infrastructure that lets new subscribers join and current subscribers leave the list. 2. When a new event happens, the publisher goes over the subscription list and calls the notification method declared in the subscriber interface on each subscriber object. 3. The **Subscriber** interface declares the notification interface. In most cases, it consists of a single `update` method. The method may have several parameters that let the publisher pass some event details along with the update. 4. **Concrete Subscribers** perform some actions in response to notifications issued by the publisher. All of these classes must implement the same interface so the publisher isn’t coupled to concrete classes. 5. Usually, subscribers need some contextual information to handle the update correctly. For this reason, publishers often pass some context data as arguments of the notification method. The publisher can pass itself as an argument, letting subscriber fetch any required data directly. 6. The **Client** creates publisher and subscriber objects separately and then registers subscribers for publisher updates. Pseudocode ---------- In this example, the **Observer** pattern lets the text editor object notify other service objects about changes in its state. ![Structure of the Observer pattern example](https://refactoring.guru/images/patterns/diagrams/observer/example-2x.png?id=e2838e1562325e485fc7c2828a8ca445) Notifying objects about events that happen to other objects. The list of subscribers is compiled dynamically: objects can start or stop listening to notifications at runtime, depending on the desired behavior of your app. In this implementation, the editor class doesn’t maintain the subscription list by itself. It delegates this job to the special helper object devoted to just that. You could upgrade that object to serve as a centralized event dispatcher, letting any object act as a publisher. Adding new subscribers to the program doesn’t require changes to existing publisher classes, as long as they work with all subscribers through the same interface. // The base publisher class includes subscription management // code and notification methods. class EventManager is private field listeners: hash map of event types and listeners method subscribe(eventType, listener) is listeners.add(eventType, listener) method unsubscribe(eventType, listener) is listeners.remove(eventType, listener) method notify(eventType, data) is foreach (listener in listeners.of(eventType)) do listener.update(data) // The concrete publisher contains real business logic that's // interesting for some subscribers. We could derive this class // from the base publisher, but that isn't always possible in // real life because the concrete publisher might already be a // subclass. In this case, you can patch the subscription logic // in with composition, as we did here. class Editor is public field events: EventManager private field file: File constructor Editor() is events = new EventManager() // Methods of business logic can notify subscribers about // changes. method openFile(path) is this.file = new File(path) events.notify("open", file.name) method saveFile() is file.write() events.notify("save", file.name) // ... // Here's the subscriber interface. If your programming language // supports functional types, you can replace the whole // subscriber hierarchy with a set of functions. interface EventListener is method update(filename) // Concrete subscribers react to updates issued by the publisher // they are attached to. class LoggingListener implements EventListener is private field log: File private field message: string constructor LoggingListener(log\_filename, message) is this.log = new File(log\_filename) this.message = message method update(filename) is log.write(replace('%s',filename,message)) class EmailAlertsListener implements EventListener is private field email: string private field message: string constructor EmailAlertsListener(email, message) is this.email = email this.message = message method update(filename) is system.email(email, replace('%s',filename,message)) // An application can configure publishers and subscribers at // runtime. class Application is method config() is editor = new Editor() logger = new LoggingListener( "/path/to/log.txt", "Someone has opened the file: %s") editor.events.subscribe("open", logger) emailAlerts = new EmailAlertsListener( "admin@example.com", "Someone has changed the file: %s") editor.events.subscribe("save", emailAlerts) Applicability ------------- Use the Observer pattern when changes to the state of one object may require changing other objects, and the actual set of objects is unknown beforehand or changes dynamically. You can often experience this problem when working with classes of the graphical user interface. For example, you created custom button classes, and you want to let the clients hook some custom code to your buttons so that it fires whenever a user presses a button. The Observer pattern lets any object that implements the subscriber interface subscribe for event notifications in publisher objects. You can add the subscription mechanism to your buttons, letting the clients hook up their custom code via custom subscriber classes. Use the pattern when some objects in your app must observe others, but only for a limited time or in specific cases. The subscription list is dynamic, so subscribers can join or leave the list whenever they need to. How to Implement ---------------- 1. Look over your business logic and try to break it down into two parts: the core functionality, independent from other code, will act as the publisher; the rest will turn into a set of subscriber classes. 2. Declare the subscriber interface. At a bare minimum, it should declare a single `update` method. 3. Declare the publisher interface and describe a pair of methods for adding a subscriber object to and removing it from the list. Remember that publishers must work with subscribers only via the subscriber interface. 4. Decide where to put the actual subscription list and the implementation of subscription methods. Usually, this code looks the same for all types of publishers, so the obvious place to put it is in an abstract class derived directly from the publisher interface. Concrete publishers extend that class, inheriting the subscription behavior. However, if you’re applying the pattern to an existing class hierarchy, consider an approach based on composition: put the subscription logic into a separate object, and make all real publishers use it. 5. Create concrete publisher classes. Each time something important happens inside a publisher, it must notify all its subscribers. 6. Implement the update notification methods in concrete subscriber classes. Most subscribers would need some context data about the event. It can be passed as an argument of the notification method. But there’s another option. Upon receiving a notification, the subscriber can fetch any data directly from the notification. In this case, the publisher must pass itself via the update method. The less flexible option is to link a publisher to the subscriber permanently via the constructor. 7. The client must create all necessary subscribers and register them with proper publishers. Pros and Cons ------------- * _Open/Closed Principle_. You can introduce new subscriber classes without having to change the publisher’s code (and vice versa if there’s a publisher interface). * You can establish relations between objects at runtime. * Subscribers are notified in random order. Relations with Other Patterns ----------------------------- * [Chain of Responsibility](https://refactoring.guru/design-patterns/chain-of-responsibility) , [Command](https://refactoring.guru/design-patterns/command) , [Mediator](https://refactoring.guru/design-patterns/mediator) and [Observer](https://refactoring.guru/design-patterns/observer) address various ways of connecting senders and receivers of requests: * _Chain of Responsibility_ passes a request sequentially along a dynamic chain of potential receivers until one of them handles it. * _Command_ establishes unidirectional connections between senders and receivers. * _Mediator_ eliminates direct connections between senders and receivers, forcing them to communicate indirectly via a mediator object. * _Observer_ lets receivers dynamically subscribe to and unsubscribe from receiving requests. * The difference between [Mediator](https://refactoring.guru/design-patterns/mediator) and [Observer](https://refactoring.guru/design-patterns/observer) is often elusive. In most cases, you can implement either of these patterns; but sometimes you can apply both simultaneously. Let’s see how we can do that. The primary goal of _Mediator_ is to eliminate mutual dependencies among a set of system components. Instead, these components become dependent on a single mediator object. The goal of _Observer_ is to establish dynamic one-way connections between objects, where some objects act as subordinates of others. There’s a popular implementation of the _Mediator_ pattern that relies on _Observer_. The mediator object plays the role of publisher, and the components act as subscribers which subscribe to and unsubscribe from the mediator’s events. When _Mediator_ is implemented this way, it may look very similar to _Observer_. When you’re confused, remember that you can implement the Mediator pattern in other ways. For example, you can permanently link all the components to the same mediator object. This implementation won’t resemble _Observer_ but will still be an instance of the Mediator pattern. Now imagine a program where all components have become publishers, allowing dynamic connections between each other. There won’t be a centralized mediator object, only a distributed set of observers. Code Examples ------------- [![Observer in C#](https://refactoring.guru/images/patterns/icons/csharp.svg?id=da64592defc6e86d57c39c66e9de3e58)](https://refactoring.guru/design-patterns/observer/csharp/example "Observer in C#") [![Observer in C++](https://refactoring.guru/images/patterns/icons/cpp.svg?id=f7782ed8b8666246bfcc3f8fefc3b858)](https://refactoring.guru/design-patterns/observer/cpp/example "Observer in C++") [![Observer in Go](https://refactoring.guru/images/patterns/icons/go.svg?id=1a89927eb99b1ea3fde7701d97970aca)](https://refactoring.guru/design-patterns/observer/go/example "Observer in Go") [![Observer in Java](https://refactoring.guru/images/patterns/icons/java.svg?id=e6d87e2dca08c953fe3acd1275ed4f4e)](https://refactoring.guru/design-patterns/observer/java/example "Observer in Java") [![Observer in PHP](https://refactoring.guru/images/patterns/icons/php.svg?id=be1906eb26b71ec1d3b93720d6156618)](https://refactoring.guru/design-patterns/observer/php/example "Observer in PHP") [![Observer in Python](https://refactoring.guru/images/patterns/icons/python.svg?id=6d815d43c0f7050a1151b43e51569c9f)](https://refactoring.guru/design-patterns/observer/python/example "Observer in Python") [![Observer in Ruby](https://refactoring.guru/images/patterns/icons/ruby.svg?id=b065b718c914bf8e960ef731600be1eb)](https://refactoring.guru/design-patterns/observer/ruby/example "Observer in Ruby") [![Observer in Rust](https://refactoring.guru/images/patterns/icons/rust.svg?id=1f5698a4b5ae23fe79413511747e4a87)](https://refactoring.guru/design-patterns/observer/rust/example "Observer in Rust") [![Observer in Swift](https://refactoring.guru/images/patterns/icons/swift.svg?id=0b716c2d52ec3a48fbe91ac031070c1d)](https://refactoring.guru/design-patterns/observer/swift/example "Observer in Swift") [![Observer in TypeScript](https://refactoring.guru/images/patterns/icons/typescript.svg?id=2239d0f16cb703540c205dd8cb0c0cb7)](https://refactoring.guru/design-patterns/observer/typescript/example "Observer in TypeScript") [![](https://refactoring.guru/images/patterns/banners/patterns-book-banner-3-2x.png?id=0cc3f77ab421d1a5c02ee46488231c3a)](https://refactoring.guru/design-patterns/book) ### Support our free website and own the eBook! * 22 design patterns and 8 principles explained in depth. * 409 well-structured, easy to read, jargon-free pages. * 225 clear and helpful illustrations and diagrams. * An archive with code examples in 11 languages. * All devices supported: PDF/EPUB/MOBI/KFX formats. [Learn more…](https://refactoring.guru/design-patterns/book) --- # State [There are patterns of patterns now! \ My friend's project: MetaPatterns.io](https://metapatterns.io/)  [](https://refactoring.guru/design-patterns/state#checkout) [](https://refactoring.guru/design-patterns/state#checkout) [](https://refactoring.guru/) / [Design Patterns](https://refactoring.guru/design-patterns) / [Behavioral Patterns](https://refactoring.guru/design-patterns/behavioral-patterns) State ===== Intent ------ **State** is a behavioral design pattern that lets an object alter its behavior when its internal state changes. It appears as if the object changed its class. ![State Design Pattern](https://refactoring.guru/images/patterns/content/state/state-en-2x.png?id=dfd427a938223ae880291c2850f3e34a) Problem ------- The State pattern is closely related to the concept of a _Finite-State Machine_ Finite-State Machine: [https://refactoring.guru/fsm](https://refactoring.guru/fsm) . ![Finite-State Machine](https://refactoring.guru/images/patterns/diagrams/state/problem1-2x.png?id=ae03c2233939eace11d44925ddeb912d) Finite-State Machine. The main idea is that, at any given moment, there’s a _finite_ number of _states_ which a program can be in. Within any unique state, the program behaves differently, and the program can be switched from one state to another instantaneously. However, depending on a current state, the program may or may not switch to certain other states. These switching rules, called _transitions_, are also finite and predetermined. You can also apply this approach to objects. Imagine that we have a `Document` class. A document can be in one of three states: `Draft`, `Moderation` and `Published`. The `publish` method of the document works a little bit differently in each state: * In `Draft`, it moves the document to moderation. * In `Moderation`, it makes the document public, but only if the current user is an administrator. * In `Published`, it doesn’t do anything at all. ![Possible states of a document object](https://refactoring.guru/images/patterns/diagrams/state/problem2-en-2x.png?id=916d1d80335d02b94bec972db93fd94b) Possible states and transitions of a document object. State machines are usually implemented with lots of conditional statements (`if` or `switch`) that select the appropriate behavior depending on the current state of the object. Usually, this “state” is just a set of values of the object’s fields. Even if you’ve never heard about finite-state machines before, you’ve probably implemented a state at least once. Does the following code structure ring a bell? class Document is field state: string // ... method publish() is switch (state) "draft": state = "moderation" break "moderation": if (currentUser.role == "admin") state = "published" break "published": // Do nothing. break // ... The biggest weakness of a state machine based on conditionals reveals itself once we start adding more and more states and state-dependent behaviors to the `Document` class. Most methods will contain monstrous conditionals that pick the proper behavior of a method according to the current state. Code like this is very difficult to maintain because any change to the transition logic may require changing state conditionals in every method. The problem tends to get bigger as a project evolves. It’s quite difficult to predict all possible states and transitions at the design stage. Hence, a lean state machine built with a limited set of conditionals can grow into a bloated mess over time. Solution -------- The State pattern suggests that you create new classes for all possible states of an object and extract all state-specific behaviors into these classes. Instead of implementing all behaviors on its own, the original object, called _context_, stores a reference to one of the state objects that represents its current state, and delegates all the state-related work to that object. ![Document delegates the work to a state object](https://refactoring.guru/images/patterns/diagrams/state/solution-en-2x.png?id=73ae9e51f65b2ee61d4abe481dcfc430) Document delegates the work to a state object. To transition the context into another state, replace the active state object with another object that represents that new state. This is possible only if all state classes follow the same interface and the context itself works with these objects through that interface. This structure may look similar to the [Strategy](https://refactoring.guru/design-patterns/strategy) pattern, but there’s one key difference. In the State pattern, the particular states may be aware of each other and initiate transitions from one state to another, whereas strategies almost never know about each other. Real-World Analogy ------------------ The buttons and switches in your smartphone behave differently depending on the current state of the device: * When the phone is unlocked, pressing buttons leads to executing various functions. * When the phone is locked, pressing any button leads to the unlock screen. * When the phone’s charge is low, pressing any button shows the charging screen. Structure --------- ![Structure of the State design pattern](https://refactoring.guru/images/patterns/diagrams/state/structure-en-2x.png?id=69d9c6da31574e2aeafcf39abdd6b74d)![Structure of the State design pattern](https://refactoring.guru/images/patterns/diagrams/state/structure-en-indexed-2x.png?id=d9b987cad93ddb1dfa48e1abe85b0971) 1. **Context** stores a reference to one of the concrete state objects and delegates to it all state-specific work. The context communicates with the state object via the state interface. The context exposes a setter for passing it a new state object. 2. The **State** interface declares the state-specific methods. These methods should make sense for all concrete states because you don’t want some of your states to have useless methods that will never be called. 3. **Concrete States** provide their own implementations for the state-specific methods. To avoid duplication of similar code across multiple states, you may provide intermediate abstract classes that encapsulate some common behavior. State objects may store a backreference to the context object. Through this reference, the state can fetch any required info from the context object, as well as initiate state transitions. 4. Both context and concrete states can set the next state of the context and perform the actual state transition by replacing the state object linked to the context. Pseudocode ---------- In this example, the **State** pattern lets the same controls of the media player behave differently, depending on the current playback state. ![Structure of the State pattern example](https://refactoring.guru/images/patterns/diagrams/state/example-2x.png?id=cd81e3ffb8aba5883983a59c111b805f) Example of changing object behavior with state objects. The main object of the player is always linked to a state object that performs most of the work for the player. Some actions replace the current state object of the player with another, which changes the way the player reacts to user interactions. // The AudioPlayer class acts as a context. It also maintains a // reference to an instance of one of the state classes that // represents the current state of the audio player. class AudioPlayer is field state: State field UI, volume, playlist, currentSong constructor AudioPlayer() is this.state = new ReadyState(this) // Context delegates handling user input to a state // object. Naturally, the outcome depends on what state // is currently active, since each state can handle the // input differently. UI = new UserInterface() UI.lockButton.onClick(this.clickLock) UI.playButton.onClick(this.clickPlay) UI.nextButton.onClick(this.clickNext) UI.prevButton.onClick(this.clickPrevious) // Other objects must be able to switch the audio player's // active state. method changeState(state: State) is this.state = state // UI methods delegate execution to the active state. method clickLock() is state.clickLock() method clickPlay() is state.clickPlay() method clickNext() is state.clickNext() method clickPrevious() is state.clickPrevious() // A state may call some service methods on the context. method startPlayback() is // ... method stopPlayback() is // ... method nextSong() is // ... method previousSong() is // ... method fastForward(time) is // ... method rewind(time) is // ... // The base state class declares methods that all concrete // states should implement and also provides a backreference to // the context object associated with the state. States can use // the backreference to transition the context to another state. abstract class State is protected field player: AudioPlayer // Context passes itself through the state constructor. This // may help a state fetch some useful context data if it's // needed. constructor State(player) is this.player = player abstract method clickLock() abstract method clickPlay() abstract method clickNext() abstract method clickPrevious() // Concrete states implement various behaviors associated with a // state of the context. class LockedState extends State is // When you unlock a locked player, it may assume one of two // states. method clickLock() is if (player.playing) player.changeState(new PlayingState(player)) else player.changeState(new ReadyState(player)) method clickPlay() is // Locked, so do nothing. method clickNext() is // Locked, so do nothing. method clickPrevious() is // Locked, so do nothing. // They can also trigger state transitions in the context. class ReadyState extends State is method clickLock() is player.changeState(new LockedState(player)) method clickPlay() is player.startPlayback() player.changeState(new PlayingState(player)) method clickNext() is player.nextSong() method clickPrevious() is player.previousSong() class PlayingState extends State is method clickLock() is player.changeState(new LockedState(player)) method clickPlay() is player.stopPlayback() player.changeState(new ReadyState(player)) method clickNext() is if (event.doubleclick) player.nextSong() else player.fastForward(5) method clickPrevious() is if (event.doubleclick) player.previous() else player.rewind(5) Applicability ------------- Use the State pattern when you have an object that behaves differently depending on its current state, the number of states is enormous, and the state-specific code changes frequently. The pattern suggests that you extract all state-specific code into a set of distinct classes. As a result, you can add new states or change existing ones independently of each other, reducing the maintenance cost. Use the pattern when you have a class polluted with massive conditionals that alter how the class behaves according to the current values of the class’s fields. The State pattern lets you extract branches of these conditionals into methods of corresponding state classes. While doing so, you can also clean temporary fields and helper methods involved in state-specific code out of your main class. Use State when you have a lot of duplicate code across similar states and transitions of a condition-based state machine. The State pattern lets you compose hierarchies of state classes and reduce duplication by extracting common code into abstract base classes. How to Implement ---------------- 1. Decide what class will act as the context. It could be an existing class which already has the state-dependent code; or a new class, if the state-specific code is distributed across multiple classes. 2. Declare the state interface. Although it may mirror all the methods declared in the context, aim only for those that may contain state-specific behavior. 3. For every actual state, create a class that derives from the state interface. Then go over the methods of the context and extract all code related to that state into your newly created class. While moving the code to the state class, you might discover that it depends on private members of the context. There are several workarounds: * Make these fields or methods public. * Turn the behavior you’re extracting into a public method in the context and call it from the state class. This way is ugly but quick, and you can always fix it later. * Nest the state classes into the context class, but only if your programming language supports nesting classes. 4. In the context class, add a reference field of the state interface type and a public setter that allows overriding the value of that field. 5. Go over the method of the context again and replace empty state conditionals with calls to corresponding methods of the state object. 6. To switch the state of the context, create an instance of one of the state classes and pass it to the context. You can do this within the context itself, or in various states, or in the client. Wherever this is done, the class becomes dependent on the concrete state class that it instantiates. Pros and Cons ------------- * _Single Responsibility Principle_. Organize the code related to particular states into separate classes. * _Open/Closed Principle_. Introduce new states without changing existing state classes or the context. * Simplify the code of the context by eliminating bulky state machine conditionals. * Applying the pattern can be overkill if a state machine has only a few states or rarely changes. Relations with Other Patterns ----------------------------- * [Bridge](https://refactoring.guru/design-patterns/bridge) , [State](https://refactoring.guru/design-patterns/state) , [Strategy](https://refactoring.guru/design-patterns/strategy) (and to some degree [Adapter](https://refactoring.guru/design-patterns/adapter) ) have very similar structures. Indeed, all of these patterns are based on composition, which is delegating work to other objects. However, they all solve different problems. A pattern isn’t just a recipe for structuring your code in a specific way. It can also communicate to other developers the problem the pattern solves. * [State](https://refactoring.guru/design-patterns/state) can be considered as an extension of [Strategy](https://refactoring.guru/design-patterns/strategy) . Both patterns are based on composition: they change the behavior of the context by delegating some work to helper objects. _Strategy_ makes these objects completely independent and unaware of each other. However, _State_ doesn’t restrict dependencies between concrete states, letting them alter the state of the context at will. Code Examples ------------- [![State in C#](https://refactoring.guru/images/patterns/icons/csharp.svg?id=da64592defc6e86d57c39c66e9de3e58)](https://refactoring.guru/design-patterns/state/csharp/example "State in C#") [![State in C++](https://refactoring.guru/images/patterns/icons/cpp.svg?id=f7782ed8b8666246bfcc3f8fefc3b858)](https://refactoring.guru/design-patterns/state/cpp/example "State in C++") [![State in Go](https://refactoring.guru/images/patterns/icons/go.svg?id=1a89927eb99b1ea3fde7701d97970aca)](https://refactoring.guru/design-patterns/state/go/example "State in Go") [![State in Java](https://refactoring.guru/images/patterns/icons/java.svg?id=e6d87e2dca08c953fe3acd1275ed4f4e)](https://refactoring.guru/design-patterns/state/java/example "State in Java") [![State in PHP](https://refactoring.guru/images/patterns/icons/php.svg?id=be1906eb26b71ec1d3b93720d6156618)](https://refactoring.guru/design-patterns/state/php/example "State in PHP") [![State in Python](https://refactoring.guru/images/patterns/icons/python.svg?id=6d815d43c0f7050a1151b43e51569c9f)](https://refactoring.guru/design-patterns/state/python/example "State in Python") [![State in Ruby](https://refactoring.guru/images/patterns/icons/ruby.svg?id=b065b718c914bf8e960ef731600be1eb)](https://refactoring.guru/design-patterns/state/ruby/example "State in Ruby") [![State in Rust](https://refactoring.guru/images/patterns/icons/rust.svg?id=1f5698a4b5ae23fe79413511747e4a87)](https://refactoring.guru/design-patterns/state/rust/example "State in Rust") [![State in Swift](https://refactoring.guru/images/patterns/icons/swift.svg?id=0b716c2d52ec3a48fbe91ac031070c1d)](https://refactoring.guru/design-patterns/state/swift/example "State in Swift") [![State in TypeScript](https://refactoring.guru/images/patterns/icons/typescript.svg?id=2239d0f16cb703540c205dd8cb0c0cb7)](https://refactoring.guru/design-patterns/state/typescript/example "State in TypeScript") [![](https://refactoring.guru/images/patterns/banners/patterns-book-banner-3-2x.png?id=0cc3f77ab421d1a5c02ee46488231c3a)](https://refactoring.guru/design-patterns/book) ### Support our free website and own the eBook! * 22 design patterns and 8 principles explained in depth. * 409 well-structured, easy to read, jargon-free pages. * 225 clear and helpful illustrations and diagrams. * An archive with code examples in 11 languages. * All devices supported: PDF/EPUB/MOBI/KFX formats. [Learn more…](https://refactoring.guru/design-patterns/book) --- # Strategy [There are patterns of patterns now! \ My friend's project: MetaPatterns.io](https://metapatterns.io/)  [](https://refactoring.guru/design-patterns/strategy#checkout) [](https://refactoring.guru/design-patterns/strategy#checkout) [](https://refactoring.guru/) / [Design Patterns](https://refactoring.guru/design-patterns) / [Behavioral Patterns](https://refactoring.guru/design-patterns/behavioral-patterns) Strategy ======== Intent ------ **Strategy** is a behavioral design pattern that lets you define a family of algorithms, put each of them into a separate class, and make their objects interchangeable. ![Strategy design pattern](https://refactoring.guru/images/patterns/content/strategy/strategy-2x.png?id=1cee47d05a76fddf07dce9c67b700748) Problem ------- One day you decided to create a navigation app for casual travelers. The app was centered around a beautiful map which helped users quickly orient themselves in any city. One of the most requested features for the app was automatic route planning. A user should be able to enter an address and see the fastest route to that destination displayed on the map. The first version of the app could only build the routes over roads. People who traveled by car were bursting with joy. But apparently, not everybody likes to drive on their vacation. So with the next update, you added an option to build walking routes. Right after that, you added another option to let people use public transport in their routes. However, that was only the beginning. Later you planned to add route building for cyclists. And even later, another option for building routes through all of a city’s tourist attractions. ![The code of the navigator became very bloated](https://refactoring.guru/images/patterns/diagrams/strategy/problem-2x.png?id=3974fb99c97aec525dd0ffcff2e48e78) The code of the navigator became bloated. While from a business perspective the app was a success, the technical part caused you many headaches. Each time you added a new routing algorithm, the main class of the navigator doubled in size. At some point, the beast became too hard to maintain. Any change to one of the algorithms, whether it was a simple bug fix or a slight adjustment of the street score, affected the whole class, increasing the chance of creating an error in already-working code. In addition, teamwork became inefficient. Your teammates, who had been hired right after the successful release, complain that they spend too much time resolving merge conflicts. Implementing a new feature requires you to change the same huge class, conflicting with the code produced by other people. Solution -------- The Strategy pattern suggests that you take a class that does something specific in a lot of different ways and extract all of these algorithms into separate classes called _strategies_. The original class, called _context_, must have a field for storing a reference to one of the strategies. The context delegates the work to a linked strategy object instead of executing it on its own. The context isn’t responsible for selecting an appropriate algorithm for the job. Instead, the client passes the desired strategy to the context. In fact, the context doesn’t know much about strategies. It works with all strategies through the same generic interface, which only exposes a single method for triggering the algorithm encapsulated within the selected strategy. This way the context becomes independent of concrete strategies, so you can add new algorithms or modify existing ones without changing the code of the context or other strategies. ![Route planning strategies](https://refactoring.guru/images/patterns/diagrams/strategy/solution-2x.png?id=66b5ee048ea2ad25c4b20f180ebf94d7) Route planning strategies. In our navigation app, each routing algorithm can be extracted to its own class with a single `buildRoute` method. The method accepts an origin and destination and returns a collection of the route’s checkpoints. Even though given the same arguments, each routing class might build a different route, the main navigator class doesn’t really care which algorithm is selected since its primary job is to render a set of checkpoints on the map. The class has a method for switching the active routing strategy, so its clients, such as the buttons in the user interface, can replace the currently selected routing behavior with another one. Real-World Analogy ------------------ ![Various transportation strategies](https://refactoring.guru/images/patterns/content/strategy/strategy-comic-1-en-2x.png?id=7eb14bd7920ad630c1ecf448d40602df) Various strategies for getting to the airport. Imagine that you have to get to the airport. You can catch a bus, order a cab, or get on your bicycle. These are your transportation strategies. You can pick one of the strategies depending on factors such as budget or time constraints. Structure --------- ![Structure of the Strategy design pattern](https://refactoring.guru/images/patterns/diagrams/strategy/structure-2x.png?id=5bd791857c3bab419bcf4fa86877439d)![Structure of the Strategy design pattern](https://refactoring.guru/images/patterns/diagrams/strategy/structure-indexed-2x.png?id=9f8e2f838f16705775411e2b4616820e) 1. The **Context** maintains a reference to one of the concrete strategies and communicates with this object only via the strategy interface. 2. The **Strategy** interface is common to all concrete strategies. It declares a method the context uses to execute a strategy. 3. **Concrete Strategies** implement different variations of an algorithm the context uses. 4. The context calls the execution method on the linked strategy object each time it needs to run the algorithm. The context doesn’t know what type of strategy it works with or how the algorithm is executed. 5. The **Client** creates a specific strategy object and passes it to the context. The context exposes a setter which lets clients replace the strategy associated with the context at runtime. Pseudocode ---------- In this example, the context uses multiple **strategies** to execute various arithmetic operations. // The strategy interface declares operations common to all // supported versions of some algorithm. The context uses this // interface to call the algorithm defined by the concrete // strategies. interface Strategy is method execute(a, b) // Concrete strategies implement the algorithm while following // the base strategy interface. The interface makes them // interchangeable in the context. class ConcreteStrategyAdd implements Strategy is method execute(a, b) is return a + b class ConcreteStrategySubtract implements Strategy is method execute(a, b) is return a - b class ConcreteStrategyMultiply implements Strategy is method execute(a, b) is return a \* b // The context defines the interface of interest to clients. class Context is // The context maintains a reference to one of the strategy // objects. The context doesn't know the concrete class of a // strategy. It should work with all strategies via the // strategy interface. private strategy: Strategy // Usually the context accepts a strategy through the // constructor, and also provides a setter so that the // strategy can be switched at runtime. method setStrategy(Strategy strategy) is this.strategy = strategy // The context delegates some work to the strategy object // instead of implementing multiple versions of the // algorithm on its own. method executeStrategy(int a, int b) is return strategy.execute(a, b) // The client code picks a concrete strategy and passes it to // the context. The client should be aware of the differences // between strategies in order to make the right choice. class ExampleApplication is method main() is Create context object. Read first number. Read last number. Read the desired action from user input. if (action == addition) then context.setStrategy(new ConcreteStrategyAdd()) if (action == subtraction) then context.setStrategy(new ConcreteStrategySubtract()) if (action == multiplication) then context.setStrategy(new ConcreteStrategyMultiply()) result = context.executeStrategy(First number, Second number) Print result. Applicability ------------- Use the Strategy pattern when you want to use different variants of an algorithm within an object and be able to switch from one algorithm to another during runtime. The Strategy pattern lets you indirectly alter the object’s behavior at runtime by associating it with different sub-objects which can perform specific sub-tasks in different ways. Use the Strategy when you have a lot of similar classes that only differ in the way they execute some behavior. The Strategy pattern lets you extract the varying behavior into a separate class hierarchy and combine the original classes into one, thereby reducing duplicate code. Use the pattern to isolate the business logic of a class from the implementation details of algorithms that may not be as important in the context of that logic. The Strategy pattern lets you isolate the code, internal data, and dependencies of various algorithms from the rest of the code. Various clients get a simple interface to execute the algorithms and switch them at runtime. Use the pattern when your class has a massive conditional statement that switches between different variants of the same algorithm. The Strategy pattern lets you do away with such a conditional by extracting all algorithms into separate classes, all of which implement the same interface. The original object delegates execution to one of these objects, instead of implementing all variants of the algorithm. How to Implement ---------------- 1. In the context class, identify an algorithm that’s prone to frequent changes. It may also be a massive conditional that selects and executes a variant of the same algorithm at runtime. 2. Declare the strategy interface common to all variants of the algorithm. 3. One by one, extract all algorithms into their own classes. They should all implement the strategy interface. 4. In the context class, add a field for storing a reference to a strategy object. Provide a setter for replacing values of that field. The context should work with the strategy object only via the strategy interface. The context may define an interface which lets the strategy access its data. 5. Clients of the context must associate it with a suitable strategy that matches the way they expect the context to perform its primary job. Pros and Cons ------------- * You can swap algorithms used inside an object at runtime. * You can isolate the implementation details of an algorithm from the code that uses it. * You can replace inheritance with composition. * _Open/Closed Principle_. You can introduce new strategies without having to change the context. * If you only have a couple of algorithms and they rarely change, there’s no real reason to overcomplicate the program with new classes and interfaces that come along with the pattern. * Clients must be aware of the differences between strategies to be able to select a proper one. * A lot of modern programming languages have functional type support that lets you implement different versions of an algorithm inside a set of anonymous functions. Then you could use these functions exactly as you’d have used the strategy objects, but without bloating your code with extra classes and interfaces. Relations with Other Patterns ----------------------------- * [Bridge](https://refactoring.guru/design-patterns/bridge) , [State](https://refactoring.guru/design-patterns/state) , [Strategy](https://refactoring.guru/design-patterns/strategy) (and to some degree [Adapter](https://refactoring.guru/design-patterns/adapter) ) have very similar structures. Indeed, all of these patterns are based on composition, which is delegating work to other objects. However, they all solve different problems. A pattern isn’t just a recipe for structuring your code in a specific way. It can also communicate to other developers the problem the pattern solves. * [Command](https://refactoring.guru/design-patterns/command) and [Strategy](https://refactoring.guru/design-patterns/strategy) may look similar because you can use both to parameterize an object with some action. However, they have very different intents. * You can use _Command_ to convert any operation into an object. The operation’s parameters become fields of that object. The conversion lets you defer execution of the operation, queue it, store the history of commands, send commands to remote services, etc. * On the other hand, _Strategy_ usually describes different ways of doing the same thing, letting you swap these algorithms within a single context class. * [Decorator](https://refactoring.guru/design-patterns/decorator) lets you change the skin of an object, while [Strategy](https://refactoring.guru/design-patterns/strategy) lets you change the guts. * [Template Method](https://refactoring.guru/design-patterns/template-method) is based on inheritance: it lets you alter parts of an algorithm by extending those parts in subclasses. [Strategy](https://refactoring.guru/design-patterns/strategy) is based on composition: you can alter parts of the object’s behavior by supplying it with different strategies that correspond to that behavior. _Template Method_ works at the class level, so it’s static. _Strategy_ works on the object level, letting you switch behaviors at runtime. * [State](https://refactoring.guru/design-patterns/state) can be considered as an extension of [Strategy](https://refactoring.guru/design-patterns/strategy) . Both patterns are based on composition: they change the behavior of the context by delegating some work to helper objects. _Strategy_ makes these objects completely independent and unaware of each other. However, _State_ doesn’t restrict dependencies between concrete states, letting them alter the state of the context at will. Code Examples ------------- [![Strategy in C#](https://refactoring.guru/images/patterns/icons/csharp.svg?id=da64592defc6e86d57c39c66e9de3e58)](https://refactoring.guru/design-patterns/strategy/csharp/example "Strategy in C#") [![Strategy in C++](https://refactoring.guru/images/patterns/icons/cpp.svg?id=f7782ed8b8666246bfcc3f8fefc3b858)](https://refactoring.guru/design-patterns/strategy/cpp/example "Strategy in C++") [![Strategy in Go](https://refactoring.guru/images/patterns/icons/go.svg?id=1a89927eb99b1ea3fde7701d97970aca)](https://refactoring.guru/design-patterns/strategy/go/example "Strategy in Go") [![Strategy in Java](https://refactoring.guru/images/patterns/icons/java.svg?id=e6d87e2dca08c953fe3acd1275ed4f4e)](https://refactoring.guru/design-patterns/strategy/java/example "Strategy in Java") [![Strategy in PHP](https://refactoring.guru/images/patterns/icons/php.svg?id=be1906eb26b71ec1d3b93720d6156618)](https://refactoring.guru/design-patterns/strategy/php/example "Strategy in PHP") [![Strategy in Python](https://refactoring.guru/images/patterns/icons/python.svg?id=6d815d43c0f7050a1151b43e51569c9f)](https://refactoring.guru/design-patterns/strategy/python/example "Strategy in Python") [![Strategy in Ruby](https://refactoring.guru/images/patterns/icons/ruby.svg?id=b065b718c914bf8e960ef731600be1eb)](https://refactoring.guru/design-patterns/strategy/ruby/example "Strategy in Ruby") [![Strategy in Rust](https://refactoring.guru/images/patterns/icons/rust.svg?id=1f5698a4b5ae23fe79413511747e4a87)](https://refactoring.guru/design-patterns/strategy/rust/example "Strategy in Rust") [![Strategy in Swift](https://refactoring.guru/images/patterns/icons/swift.svg?id=0b716c2d52ec3a48fbe91ac031070c1d)](https://refactoring.guru/design-patterns/strategy/swift/example "Strategy in Swift") [![Strategy in TypeScript](https://refactoring.guru/images/patterns/icons/typescript.svg?id=2239d0f16cb703540c205dd8cb0c0cb7)](https://refactoring.guru/design-patterns/strategy/typescript/example "Strategy in TypeScript") [![](https://refactoring.guru/images/patterns/banners/patterns-book-banner-3-2x.png?id=0cc3f77ab421d1a5c02ee46488231c3a)](https://refactoring.guru/design-patterns/book) ### Support our free website and own the eBook! * 22 design patterns and 8 principles explained in depth. * 409 well-structured, easy to read, jargon-free pages. * 225 clear and helpful illustrations and diagrams. * An archive with code examples in 11 languages. * All devices supported: PDF/EPUB/MOBI/KFX formats. [Learn more…](https://refactoring.guru/design-patterns/book) --- # Template Method [There are patterns of patterns now! \ My friend's project: MetaPatterns.io](https://metapatterns.io/)  [](https://refactoring.guru/design-patterns/template-method#checkout) [](https://refactoring.guru/design-patterns/template-method#checkout) [](https://refactoring.guru/) / [Design Patterns](https://refactoring.guru/design-patterns) / [Behavioral Patterns](https://refactoring.guru/design-patterns/behavioral-patterns) Template Method =============== Intent ------ **Template Method** is a behavioral design pattern that defines the skeleton of an algorithm in the superclass but lets subclasses override specific steps of the algorithm without changing its structure. ![Template method design pattern](https://refactoring.guru/images/patterns/content/template-method/template-method-2x.png?id=4e164dc41be4dcfa122628864c2be210) Problem ------- Imagine that you’re creating a data mining application that analyzes corporate documents. Users feed the app documents in various formats (PDF, DOC, CSV), and it tries to extract meaningful data from these docs in a uniform format. The first version of the app could work only with DOC files. In the following version, it was able to support CSV files. A month later, you “taught” it to extract data from PDF files. ![Data mining classes contained a lot of duplicate code](https://refactoring.guru/images/patterns/diagrams/template-method/problem-2x.png?id=fc8b434afec7b6135043d0d2f48189f0) Data mining classes contained a lot of duplicate code. At some point, you noticed that all three classes have a lot of similar code. While the code for dealing with various data formats was entirely different in all classes, the code for data processing and analysis is almost identical. Wouldn’t it be great to get rid of the code duplication, leaving the algorithm structure intact? There was another problem related to client code that used these classes. It had lots of conditionals that picked a proper course of action depending on the class of the processing object. If all three processing classes had a common interface or a base class, you’d be able to eliminate the conditionals in client code and use polymorphism when calling methods on a processing object. Solution -------- The Template Method pattern suggests that you break down an algorithm into a series of steps, turn these steps into methods, and put a series of calls to these methods inside a single _template method._ The steps may either be `abstract`, or have some default implementation. To use the algorithm, the client is supposed to provide its own subclass, implement all abstract steps, and override some of the optional ones if needed (but not the template method itself). Let’s see how this will play out in our data mining app. We can create a base class for all three parsing algorithms. This class defines a template method consisting of a series of calls to various document-processing steps. ![Template method defines the skeleton of the algorithm](https://refactoring.guru/images/patterns/diagrams/template-method/solution-en-2x.png?id=4980d5dfb1fe07f065650e09756f5614) Template method breaks the algorithm into steps, allowing subclasses to override these steps but not the actual method. At first, we can declare all steps `abstract`, forcing the subclasses to provide their own implementations for these methods. In our case, subclasses already have all necessary implementations, so the only thing we might need to do is adjust signatures of the methods to match the methods of the superclass. Now, let’s see what we can do to get rid of the duplicate code. It looks like the code for opening/closing files and extracting/parsing data is different for various data formats, so there’s no point in touching those methods. However, implementation of other steps, such as analyzing the raw data and composing reports, is very similar, so it can be pulled up into the base class, where subclasses can share that code. As you can see, we’ve got two types of steps: * _abstract steps_ must be implemented by every subclass * _optional steps_ already have some default implementation, but still can be overridden if needed There’s another type of step, called _hooks_. A hook is an optional step with an empty body. A template method would work even if a hook isn’t overridden. Usually, hooks are placed before and after crucial steps of algorithms, providing subclasses with additional extension points for an algorithm. Real-World Analogy ------------------ ![Mass housing construction](https://refactoring.guru/images/patterns/diagrams/template-method/live-example-2x.png?id=89083a3dcd1fe2b627b9b6e6ff4986dc) A typical architectural plan can be slightly altered to better fit the client’s needs. The template method approach can be used in mass housing construction. The architectural plan for building a standard house may contain several extension points that would let a potential owner adjust some details of the resulting house. Each building step, such as laying the foundation, framing, building walls, installing plumbing and wiring for water and electricity, etc., can be slightly changed to make the resulting house a little bit different from others. Structure --------- ![Structure of the Template Method design pattern](https://refactoring.guru/images/patterns/diagrams/template-method/structure-2x.png?id=25082d6d6a76f51c6b64d8aeeaffdbb5)![Structure of the Template Method design pattern](https://refactoring.guru/images/patterns/diagrams/template-method/structure-indexed-2x.png?id=86f28789cdcc5a4c415d6a1100de56fc) 1. The **Abstract Class** declares methods that act as steps of an algorithm, as well as the actual template method which calls these methods in a specific order. The steps may either be declared `abstract` or have some default implementation. 2. **Concrete Classes** can override all of the steps, but not the template method itself. Pseudocode ---------- In this example, the **Template Method** pattern provides a “skeleton” for various branches of artificial intelligence in a simple strategy video game. ![Structure of the Template Method pattern example](https://refactoring.guru/images/patterns/diagrams/template-method/example-2x.png?id=d8b309659c4b722237ec97733da935bd) AI classes of a simple video game. All races in the game have almost the same types of units and buildings. Therefore you can reuse the same AI structure for various races, while being able to override some of the details. With this approach, you can override the orcs’ AI to make it more aggressive, make humans more defense-oriented, and make monsters unable to build anything. Adding a new race to the game would require creating a new AI subclass and overriding the default methods declared in the base AI class. // The abstract class defines a template method that contains a // skeleton of some algorithm composed of calls, usually to // abstract primitive operations. Concrete subclasses implement // these operations, but leave the template method itself // intact. class GameAI is // The template method defines the skeleton of an algorithm. method turn() is collectResources() buildStructures() buildUnits() attack() // Some of the steps may be implemented right in a base // class. method collectResources() is foreach (s in this.builtStructures) do s.collect() // And some of them may be defined as abstract. abstract method buildStructures() abstract method buildUnits() // A class can have several template methods. method attack() is enemy = closestEnemy() if (enemy == null) sendScouts(map.center) else sendWarriors(enemy.position) abstract method sendScouts(position) abstract method sendWarriors(position) // Concrete classes have to implement all abstract operations of // the base class but they must not override the template method // itself. class OrcsAI extends GameAI is method buildStructures() is if (there are some resources) then // Build farms, then barracks, then stronghold. method buildUnits() is if (there are plenty of resources) then if (there are no scouts) // Build peon, add it to scouts group. else // Build grunt, add it to warriors group. // ... method sendScouts(position) is if (scouts.length > 0) then // Send scouts to position. method sendWarriors(position) is if (warriors.length > 5) then // Send warriors to position. // Subclasses can also override some operations with a default // implementation. class MonstersAI extends GameAI is method collectResources() is // Monsters don't collect resources. method buildStructures() is // Monsters don't build structures. method buildUnits() is // Monsters don't build units. Applicability ------------- Use the Template Method pattern when you want to let clients extend only particular steps of an algorithm, but not the whole algorithm or its structure. The Template Method lets you turn a monolithic algorithm into a series of individual steps which can be easily extended by subclasses while keeping intact the structure defined in a superclass. Use the pattern when you have several classes that contain almost identical algorithms with some minor differences. As a result, you might need to modify all classes when the algorithm changes. When you turn such an algorithm into a template method, you can also pull up the steps with similar implementations into a superclass, eliminating code duplication. Code that varies between subclasses can remain in subclasses. How to Implement ---------------- 1. Analyze the target algorithm to see whether you can break it into steps. Consider which steps are common to all subclasses and which ones will always be unique. 2. Create the abstract base class and declare the template method and a set of abstract methods representing the algorithm’s steps. Outline the algorithm’s structure in the template method by executing corresponding steps. Consider making the template method `final` to prevent subclasses from overriding it. 3. It’s okay if all the steps end up being abstract. However, some steps might benefit from having a default implementation. Subclasses don’t have to implement those methods. 4. Think of adding hooks between the crucial steps of the algorithm. 5. For each variation of the algorithm, create a new concrete subclass. It _must_ implement all of the abstract steps, but _may_ also override some of the optional ones. Pros and Cons ------------- * You can let clients override only certain parts of a large algorithm, making them less affected by changes that happen to other parts of the algorithm. * You can pull the duplicate code into a superclass. * Some clients may be limited by the provided skeleton of an algorithm. * You might violate the _Liskov Substitution Principle_ by suppressing a default step implementation via a subclass. * Template methods tend to be harder to maintain the more steps they have. Relations with Other Patterns ----------------------------- * [Factory Method](https://refactoring.guru/design-patterns/factory-method) is a specialization of [Template Method](https://refactoring.guru/design-patterns/template-method) . At the same time, a _Factory Method_ may serve as a step in a large _Template Method_. * [Template Method](https://refactoring.guru/design-patterns/template-method) is based on inheritance: it lets you alter parts of an algorithm by extending those parts in subclasses. [Strategy](https://refactoring.guru/design-patterns/strategy) is based on composition: you can alter parts of the object’s behavior by supplying it with different strategies that correspond to that behavior. _Template Method_ works at the class level, so it’s static. _Strategy_ works on the object level, letting you switch behaviors at runtime. Code Examples ------------- [![Template Method in C#](https://refactoring.guru/images/patterns/icons/csharp.svg?id=da64592defc6e86d57c39c66e9de3e58)](https://refactoring.guru/design-patterns/template-method/csharp/example "Template Method in C#") [![Template Method in C++](https://refactoring.guru/images/patterns/icons/cpp.svg?id=f7782ed8b8666246bfcc3f8fefc3b858)](https://refactoring.guru/design-patterns/template-method/cpp/example "Template Method in C++") [![Template Method in Go](https://refactoring.guru/images/patterns/icons/go.svg?id=1a89927eb99b1ea3fde7701d97970aca)](https://refactoring.guru/design-patterns/template-method/go/example "Template Method in Go") [![Template Method in Java](https://refactoring.guru/images/patterns/icons/java.svg?id=e6d87e2dca08c953fe3acd1275ed4f4e)](https://refactoring.guru/design-patterns/template-method/java/example "Template Method in Java") [![Template Method in PHP](https://refactoring.guru/images/patterns/icons/php.svg?id=be1906eb26b71ec1d3b93720d6156618)](https://refactoring.guru/design-patterns/template-method/php/example "Template Method in PHP") [![Template Method in Python](https://refactoring.guru/images/patterns/icons/python.svg?id=6d815d43c0f7050a1151b43e51569c9f)](https://refactoring.guru/design-patterns/template-method/python/example "Template Method in Python") [![Template Method in Ruby](https://refactoring.guru/images/patterns/icons/ruby.svg?id=b065b718c914bf8e960ef731600be1eb)](https://refactoring.guru/design-patterns/template-method/ruby/example "Template Method in Ruby") [![Template Method in Rust](https://refactoring.guru/images/patterns/icons/rust.svg?id=1f5698a4b5ae23fe79413511747e4a87)](https://refactoring.guru/design-patterns/template-method/rust/example "Template Method in Rust") [![Template Method in Swift](https://refactoring.guru/images/patterns/icons/swift.svg?id=0b716c2d52ec3a48fbe91ac031070c1d)](https://refactoring.guru/design-patterns/template-method/swift/example "Template Method in Swift") [![Template Method in TypeScript](https://refactoring.guru/images/patterns/icons/typescript.svg?id=2239d0f16cb703540c205dd8cb0c0cb7)](https://refactoring.guru/design-patterns/template-method/typescript/example "Template Method in TypeScript") [![](https://refactoring.guru/images/patterns/banners/patterns-book-banner-3-2x.png?id=0cc3f77ab421d1a5c02ee46488231c3a)](https://refactoring.guru/design-patterns/book) ### Support our free website and own the eBook! * 22 design patterns and 8 principles explained in depth. * 409 well-structured, easy to read, jargon-free pages. * 225 clear and helpful illustrations and diagrams. * An archive with code examples in 11 languages. * All devices supported: PDF/EPUB/MOBI/KFX formats. [Learn more…](https://refactoring.guru/design-patterns/book) --- # Code Examples of Design Patterns [There are patterns of patterns now! \ My friend's project: MetaPatterns.io](https://metapatterns.io/)  [](https://refactoring.guru/design-patterns/examples#checkout) [](https://refactoring.guru/design-patterns/examples#checkout) Design Patterns in **different** programming languages ====================================================== [![Design Patterns in C#](https://refactoring.guru/images/patterns/icons/csharp.svg?id=da64592defc6e86d57c39c66e9de3e58)](https://refactoring.guru/design-patterns/csharp "Design Patterns in C#") [![Design Patterns in C++](https://refactoring.guru/images/patterns/icons/cpp.svg?id=f7782ed8b8666246bfcc3f8fefc3b858)](https://refactoring.guru/design-patterns/cpp "Design Patterns in C++") [![Design Patterns in Go](https://refactoring.guru/images/patterns/icons/go.svg?id=1a89927eb99b1ea3fde7701d97970aca)](https://refactoring.guru/design-patterns/go "Design Patterns in Go") [![Design Patterns in Java](https://refactoring.guru/images/patterns/icons/java.svg?id=e6d87e2dca08c953fe3acd1275ed4f4e)](https://refactoring.guru/design-patterns/java "Design Patterns in Java") [![Design Patterns in PHP](https://refactoring.guru/images/patterns/icons/php.svg?id=be1906eb26b71ec1d3b93720d6156618)](https://refactoring.guru/design-patterns/php "Design Patterns in PHP") [![Design Patterns in Python](https://refactoring.guru/images/patterns/icons/python.svg?id=6d815d43c0f7050a1151b43e51569c9f)](https://refactoring.guru/design-patterns/python "Design Patterns in Python") [![Design Patterns in Ruby](https://refactoring.guru/images/patterns/icons/ruby.svg?id=b065b718c914bf8e960ef731600be1eb)](https://refactoring.guru/design-patterns/ruby "Design Patterns in Ruby") [![Design Patterns in Rust](https://refactoring.guru/images/patterns/icons/rust.svg?id=1f5698a4b5ae23fe79413511747e4a87)](https://refactoring.guru/design-patterns/rust "Design Patterns in Rust") [![Design Patterns in Swift](https://refactoring.guru/images/patterns/icons/swift.svg?id=0b716c2d52ec3a48fbe91ac031070c1d)](https://refactoring.guru/design-patterns/swift "Design Patterns in Swift") [![Design Patterns in TypeScript](https://refactoring.guru/images/patterns/icons/typescript.svg?id=2239d0f16cb703540c205dd8cb0c0cb7)](https://refactoring.guru/design-patterns/typescript "Design Patterns in TypeScript") --- # Design Patterns in C++ [There are patterns of patterns now! \ My friend's project: MetaPatterns.io](https://metapatterns.io/)  [](https://refactoring.guru/design-patterns/cpp#checkout) [](https://refactoring.guru/design-patterns/cpp#checkout) ![Design Patterns in C++](https://refactoring.guru/images/patterns/languages/cpp-3x.png) ![Design Patterns in C++](https://refactoring.guru/images/patterns/languages/mini/cpp-3x.png) Design Patterns in C++ ====================== The Catalog of **C++** Examples ------------------------------- #### Creational Patterns ![Abstract Factory](https://refactoring.guru/images/patterns/cards/abstract-factory-mini-3x.png) #### Abstract Factory Lets you produce families of related objects without specifying their concrete classes. [Main article](https://refactoring.guru/design-patterns/abstract-factory) [Usage in C++](https://refactoring.guru/design-patterns/abstract-factory/cpp/example#lang-features) [Code example](https://refactoring.guru/design-patterns/abstract-factory/cpp/example#example-0) ![Builder](https://refactoring.guru/images/patterns/cards/builder-mini-3x.png) #### Builder Lets you construct complex objects step by step. The pattern allows you to produce different types and representations of an object using the same construction code. [Main article](https://refactoring.guru/design-patterns/builder) [Usage in C++](https://refactoring.guru/design-patterns/builder/cpp/example#lang-features) [Code example](https://refactoring.guru/design-patterns/builder/cpp/example#example-0) ![Factory Method](https://refactoring.guru/images/patterns/cards/factory-method-mini-3x.png) #### Factory Method Provides an interface for creating objects in a superclass, but allows subclasses to alter the type of objects that will be created. [Main article](https://refactoring.guru/design-patterns/factory-method) [Usage in C++](https://refactoring.guru/design-patterns/factory-method/cpp/example#lang-features) [Code example](https://refactoring.guru/design-patterns/factory-method/cpp/example#example-0) ![Prototype](https://refactoring.guru/images/patterns/cards/prototype-mini-3x.png) #### Prototype Lets you copy existing objects without making your code dependent on their classes. [Main article](https://refactoring.guru/design-patterns/prototype) [Usage in C++](https://refactoring.guru/design-patterns/prototype/cpp/example#lang-features) [Code example](https://refactoring.guru/design-patterns/prototype/cpp/example#example-0) ![Singleton](https://refactoring.guru/images/patterns/cards/singleton-mini-3x.png) #### Singleton Lets you ensure that a class has only one instance, while providing a global access point to this instance. [Main article](https://refactoring.guru/design-patterns/singleton) [Usage in C++](https://refactoring.guru/design-patterns/singleton/cpp/example#lang-features) [Naïve Singleton](https://refactoring.guru/design-patterns/singleton/cpp/example#example-0) [Thread-safe Singleton](https://refactoring.guru/design-patterns/singleton/cpp/example#example-1) #### Structural Patterns ![Adapter](https://refactoring.guru/images/patterns/cards/adapter-mini-3x.png) #### Adapter Allows objects with incompatible interfaces to collaborate. [Main article](https://refactoring.guru/design-patterns/adapter) [Usage in C++](https://refactoring.guru/design-patterns/adapter/cpp/example#lang-features) [Conceptual example](https://refactoring.guru/design-patterns/adapter/cpp/example#example-0) [Multiple inheritance](https://refactoring.guru/design-patterns/adapter/cpp/example#example-1) ![Bridge](https://refactoring.guru/images/patterns/cards/bridge-mini-3x.png) #### Bridge Lets you split a large class or a set of closely related classes into two separate hierarchies—abstraction and implementation—which can be developed independently of each other. [Main article](https://refactoring.guru/design-patterns/bridge) [Usage in C++](https://refactoring.guru/design-patterns/bridge/cpp/example#lang-features) [Code example](https://refactoring.guru/design-patterns/bridge/cpp/example#example-0) ![Composite](https://refactoring.guru/images/patterns/cards/composite-mini-3x.png) #### Composite Lets you compose objects into tree structures and then work with these structures as if they were individual objects. [Main article](https://refactoring.guru/design-patterns/composite) [Usage in C++](https://refactoring.guru/design-patterns/composite/cpp/example#lang-features) [Code example](https://refactoring.guru/design-patterns/composite/cpp/example#example-0) ![Decorator](https://refactoring.guru/images/patterns/cards/decorator-mini-3x.png) #### Decorator Lets you attach new behaviors to objects by placing these objects inside special wrapper objects that contain the behaviors. [Main article](https://refactoring.guru/design-patterns/decorator) [Usage in C++](https://refactoring.guru/design-patterns/decorator/cpp/example#lang-features) [Code example](https://refactoring.guru/design-patterns/decorator/cpp/example#example-0) ![Facade](https://refactoring.guru/images/patterns/cards/facade-mini-3x.png) #### Facade Provides a simplified interface to a library, a framework, or any other complex set of classes. [Main article](https://refactoring.guru/design-patterns/facade) [Usage in C++](https://refactoring.guru/design-patterns/facade/cpp/example#lang-features) [Code example](https://refactoring.guru/design-patterns/facade/cpp/example#example-0) ![Flyweight](https://refactoring.guru/images/patterns/cards/flyweight-mini-3x.png) #### Flyweight Lets you fit more objects into the available amount of RAM by sharing common parts of state between multiple objects instead of keeping all of the data in each object. [Main article](https://refactoring.guru/design-patterns/flyweight) [Usage in C++](https://refactoring.guru/design-patterns/flyweight/cpp/example#lang-features) [Code example](https://refactoring.guru/design-patterns/flyweight/cpp/example#example-0) ![Proxy](https://refactoring.guru/images/patterns/cards/proxy-mini-3x.png) #### Proxy Lets you provide a substitute or placeholder for another object. A proxy controls access to the original object, allowing you to perform something either before or after the request gets through to the original object. [Main article](https://refactoring.guru/design-patterns/proxy) [Usage in C++](https://refactoring.guru/design-patterns/proxy/cpp/example#lang-features) [Code example](https://refactoring.guru/design-patterns/proxy/cpp/example#example-0) #### Behavioral Patterns ![Chain of Responsibility](https://refactoring.guru/images/patterns/cards/chain-of-responsibility-mini-3x.png) #### Chain of Responsibility Lets you pass requests along a chain of handlers. Upon receiving a request, each handler decides either to process the request or to pass it to the next handler in the chain. [Main article](https://refactoring.guru/design-patterns/chain-of-responsibility) [Usage in C++](https://refactoring.guru/design-patterns/chain-of-responsibility/cpp/example#lang-features) [Code example](https://refactoring.guru/design-patterns/chain-of-responsibility/cpp/example#example-0) ![Command](https://refactoring.guru/images/patterns/cards/command-mini-3x.png) #### Command Turns a request into a stand-alone object that contains all information about the request. This transformation lets you pass requests as a method arguments, delay or queue a request's execution, and support undoable operations. [Main article](https://refactoring.guru/design-patterns/command) [Usage in C++](https://refactoring.guru/design-patterns/command/cpp/example#lang-features) [Code example](https://refactoring.guru/design-patterns/command/cpp/example#example-0) ![Iterator](https://refactoring.guru/images/patterns/cards/iterator-mini-3x.png) #### Iterator Lets you traverse elements of a collection without exposing its underlying representation (list, stack, tree, etc.). [Main article](https://refactoring.guru/design-patterns/iterator) [Usage in C++](https://refactoring.guru/design-patterns/iterator/cpp/example#lang-features) [Code example](https://refactoring.guru/design-patterns/iterator/cpp/example#example-0) ![Mediator](https://refactoring.guru/images/patterns/cards/mediator-mini-3x.png) #### Mediator Lets you reduce chaotic dependencies between objects. The pattern restricts direct communications between the objects and forces them to collaborate only via a mediator object. [Main article](https://refactoring.guru/design-patterns/mediator) [Usage in C++](https://refactoring.guru/design-patterns/mediator/cpp/example#lang-features) [Code example](https://refactoring.guru/design-patterns/mediator/cpp/example#example-0) ![Memento](https://refactoring.guru/images/patterns/cards/memento-mini-3x.png) #### Memento Lets you save and restore the previous state of an object without revealing the details of its implementation. [Main article](https://refactoring.guru/design-patterns/memento) [Usage in C++](https://refactoring.guru/design-patterns/memento/cpp/example#lang-features) [Code example](https://refactoring.guru/design-patterns/memento/cpp/example#example-0) ![Observer](https://refactoring.guru/images/patterns/cards/observer-mini-3x.png) #### Observer Lets you define a subscription mechanism to notify multiple objects about any events that happen to the object they're observing. [Main article](https://refactoring.guru/design-patterns/observer) [Usage in C++](https://refactoring.guru/design-patterns/observer/cpp/example#lang-features) [Code example](https://refactoring.guru/design-patterns/observer/cpp/example#example-0) ![State](https://refactoring.guru/images/patterns/cards/state-mini-3x.png) #### State Lets an object alter its behavior when its internal state changes. It appears as if the object changed its class. [Main article](https://refactoring.guru/design-patterns/state) [Usage in C++](https://refactoring.guru/design-patterns/state/cpp/example#lang-features) [Code example](https://refactoring.guru/design-patterns/state/cpp/example#example-0) ![Strategy](https://refactoring.guru/images/patterns/cards/strategy-mini-3x.png) #### Strategy Lets you define a family of algorithms, put each of them into a separate class, and make their objects interchangeable. [Main article](https://refactoring.guru/design-patterns/strategy) [Usage in C++](https://refactoring.guru/design-patterns/strategy/cpp/example#lang-features) [Code example](https://refactoring.guru/design-patterns/strategy/cpp/example#example-0) ![Template Method](https://refactoring.guru/images/patterns/cards/template-method-mini-3x.png) #### Template Method Defines the skeleton of an algorithm in the superclass but lets subclasses override specific steps of the algorithm without changing its structure. [Main article](https://refactoring.guru/design-patterns/template-method) [Usage in C++](https://refactoring.guru/design-patterns/template-method/cpp/example#lang-features) [Code example](https://refactoring.guru/design-patterns/template-method/cpp/example#example-0) ![Visitor](https://refactoring.guru/images/patterns/cards/visitor-mini-3x.png) #### Visitor Lets you separate algorithms from the objects on which they operate. [Main article](https://refactoring.guru/design-patterns/visitor) [Usage in C++](https://refactoring.guru/design-patterns/visitor/cpp/example#lang-features) [Code example](https://refactoring.guru/design-patterns/visitor/cpp/example#example-0) --- # Design Patterns in C# [There are patterns of patterns now! \ My friend's project: MetaPatterns.io](https://metapatterns.io/)  [](https://refactoring.guru/design-patterns/csharp#checkout) [](https://refactoring.guru/design-patterns/csharp#checkout) ![Design Patterns in C#](https://refactoring.guru/images/patterns/languages/csharp-3x.png) ![Design Patterns in C#](https://refactoring.guru/images/patterns/languages/mini/csharp-3x.png) Design Patterns in C# ===================== The Catalog of **C#** Examples ------------------------------ #### Creational Patterns ![Abstract Factory](https://refactoring.guru/images/patterns/cards/abstract-factory-mini-3x.png) #### Abstract Factory Lets you produce families of related objects without specifying their concrete classes. [Main article](https://refactoring.guru/design-patterns/abstract-factory) [Usage in C#](https://refactoring.guru/design-patterns/abstract-factory/csharp/example#lang-features) [Code example](https://refactoring.guru/design-patterns/abstract-factory/csharp/example#example-0) ![Builder](https://refactoring.guru/images/patterns/cards/builder-mini-3x.png) #### Builder Lets you construct complex objects step by step. The pattern allows you to produce different types and representations of an object using the same construction code. [Main article](https://refactoring.guru/design-patterns/builder) [Usage in C#](https://refactoring.guru/design-patterns/builder/csharp/example#lang-features) [Code example](https://refactoring.guru/design-patterns/builder/csharp/example#example-0) ![Factory Method](https://refactoring.guru/images/patterns/cards/factory-method-mini-3x.png) #### Factory Method Provides an interface for creating objects in a superclass, but allows subclasses to alter the type of objects that will be created. [Main article](https://refactoring.guru/design-patterns/factory-method) [Usage in C#](https://refactoring.guru/design-patterns/factory-method/csharp/example#lang-features) [Code example](https://refactoring.guru/design-patterns/factory-method/csharp/example#example-0) ![Prototype](https://refactoring.guru/images/patterns/cards/prototype-mini-3x.png) #### Prototype Lets you copy existing objects without making your code dependent on their classes. [Main article](https://refactoring.guru/design-patterns/prototype) [Usage in C#](https://refactoring.guru/design-patterns/prototype/csharp/example#lang-features) [Code example](https://refactoring.guru/design-patterns/prototype/csharp/example#example-0) ![Singleton](https://refactoring.guru/images/patterns/cards/singleton-mini-3x.png) #### Singleton Lets you ensure that a class has only one instance, while providing a global access point to this instance. [Main article](https://refactoring.guru/design-patterns/singleton) [Usage in C#](https://refactoring.guru/design-patterns/singleton/csharp/example#lang-features) [Naïve Singleton](https://refactoring.guru/design-patterns/singleton/csharp/example#example-0) [Thread-safe Singleton](https://refactoring.guru/design-patterns/singleton/csharp/example#example-1) #### Structural Patterns ![Adapter](https://refactoring.guru/images/patterns/cards/adapter-mini-3x.png) #### Adapter Allows objects with incompatible interfaces to collaborate. [Main article](https://refactoring.guru/design-patterns/adapter) [Usage in C#](https://refactoring.guru/design-patterns/adapter/csharp/example#lang-features) [Code example](https://refactoring.guru/design-patterns/adapter/csharp/example#example-0) ![Bridge](https://refactoring.guru/images/patterns/cards/bridge-mini-3x.png) #### Bridge Lets you split a large class or a set of closely related classes into two separate hierarchies—abstraction and implementation—which can be developed independently of each other. [Main article](https://refactoring.guru/design-patterns/bridge) [Usage in C#](https://refactoring.guru/design-patterns/bridge/csharp/example#lang-features) [Code example](https://refactoring.guru/design-patterns/bridge/csharp/example#example-0) ![Composite](https://refactoring.guru/images/patterns/cards/composite-mini-3x.png) #### Composite Lets you compose objects into tree structures and then work with these structures as if they were individual objects. [Main article](https://refactoring.guru/design-patterns/composite) [Usage in C#](https://refactoring.guru/design-patterns/composite/csharp/example#lang-features) [Code example](https://refactoring.guru/design-patterns/composite/csharp/example#example-0) ![Decorator](https://refactoring.guru/images/patterns/cards/decorator-mini-3x.png) #### Decorator Lets you attach new behaviors to objects by placing these objects inside special wrapper objects that contain the behaviors. [Main article](https://refactoring.guru/design-patterns/decorator) [Usage in C#](https://refactoring.guru/design-patterns/decorator/csharp/example#lang-features) [Code example](https://refactoring.guru/design-patterns/decorator/csharp/example#example-0) ![Facade](https://refactoring.guru/images/patterns/cards/facade-mini-3x.png) #### Facade Provides a simplified interface to a library, a framework, or any other complex set of classes. [Main article](https://refactoring.guru/design-patterns/facade) [Usage in C#](https://refactoring.guru/design-patterns/facade/csharp/example#lang-features) [Code example](https://refactoring.guru/design-patterns/facade/csharp/example#example-0) ![Flyweight](https://refactoring.guru/images/patterns/cards/flyweight-mini-3x.png) #### Flyweight Lets you fit more objects into the available amount of RAM by sharing common parts of state between multiple objects instead of keeping all of the data in each object. [Main article](https://refactoring.guru/design-patterns/flyweight) [Usage in C#](https://refactoring.guru/design-patterns/flyweight/csharp/example#lang-features) [Code example](https://refactoring.guru/design-patterns/flyweight/csharp/example#example-0) ![Proxy](https://refactoring.guru/images/patterns/cards/proxy-mini-3x.png) #### Proxy Lets you provide a substitute or placeholder for another object. A proxy controls access to the original object, allowing you to perform something either before or after the request gets through to the original object. [Main article](https://refactoring.guru/design-patterns/proxy) [Usage in C#](https://refactoring.guru/design-patterns/proxy/csharp/example#lang-features) [Code example](https://refactoring.guru/design-patterns/proxy/csharp/example#example-0) #### Behavioral Patterns ![Chain of Responsibility](https://refactoring.guru/images/patterns/cards/chain-of-responsibility-mini-3x.png) #### Chain of Responsibility Lets you pass requests along a chain of handlers. Upon receiving a request, each handler decides either to process the request or to pass it to the next handler in the chain. [Main article](https://refactoring.guru/design-patterns/chain-of-responsibility) [Usage in C#](https://refactoring.guru/design-patterns/chain-of-responsibility/csharp/example#lang-features) [Code example](https://refactoring.guru/design-patterns/chain-of-responsibility/csharp/example#example-0) ![Command](https://refactoring.guru/images/patterns/cards/command-mini-3x.png) #### Command Turns a request into a stand-alone object that contains all information about the request. This transformation lets you pass requests as a method arguments, delay or queue a request's execution, and support undoable operations. [Main article](https://refactoring.guru/design-patterns/command) [Usage in C#](https://refactoring.guru/design-patterns/command/csharp/example#lang-features) [Code example](https://refactoring.guru/design-patterns/command/csharp/example#example-0) ![Iterator](https://refactoring.guru/images/patterns/cards/iterator-mini-3x.png) #### Iterator Lets you traverse elements of a collection without exposing its underlying representation (list, stack, tree, etc.). [Main article](https://refactoring.guru/design-patterns/iterator) [Usage in C#](https://refactoring.guru/design-patterns/iterator/csharp/example#lang-features) [Code example](https://refactoring.guru/design-patterns/iterator/csharp/example#example-0) ![Mediator](https://refactoring.guru/images/patterns/cards/mediator-mini-3x.png) #### Mediator Lets you reduce chaotic dependencies between objects. The pattern restricts direct communications between the objects and forces them to collaborate only via a mediator object. [Main article](https://refactoring.guru/design-patterns/mediator) [Usage in C#](https://refactoring.guru/design-patterns/mediator/csharp/example#lang-features) [Code example](https://refactoring.guru/design-patterns/mediator/csharp/example#example-0) ![Memento](https://refactoring.guru/images/patterns/cards/memento-mini-3x.png) #### Memento Lets you save and restore the previous state of an object without revealing the details of its implementation. [Main article](https://refactoring.guru/design-patterns/memento) [Usage in C#](https://refactoring.guru/design-patterns/memento/csharp/example#lang-features) [Code example](https://refactoring.guru/design-patterns/memento/csharp/example#example-0) ![Observer](https://refactoring.guru/images/patterns/cards/observer-mini-3x.png) #### Observer Lets you define a subscription mechanism to notify multiple objects about any events that happen to the object they're observing. [Main article](https://refactoring.guru/design-patterns/observer) [Usage in C#](https://refactoring.guru/design-patterns/observer/csharp/example#lang-features) [Code example](https://refactoring.guru/design-patterns/observer/csharp/example#example-0) ![State](https://refactoring.guru/images/patterns/cards/state-mini-3x.png) #### State Lets an object alter its behavior when its internal state changes. It appears as if the object changed its class. [Main article](https://refactoring.guru/design-patterns/state) [Usage in C#](https://refactoring.guru/design-patterns/state/csharp/example#lang-features) [Code example](https://refactoring.guru/design-patterns/state/csharp/example#example-0) ![Strategy](https://refactoring.guru/images/patterns/cards/strategy-mini-3x.png) #### Strategy Lets you define a family of algorithms, put each of them into a separate class, and make their objects interchangeable. [Main article](https://refactoring.guru/design-patterns/strategy) [Usage in C#](https://refactoring.guru/design-patterns/strategy/csharp/example#lang-features) [Code example](https://refactoring.guru/design-patterns/strategy/csharp/example#example-0) ![Template Method](https://refactoring.guru/images/patterns/cards/template-method-mini-3x.png) #### Template Method Defines the skeleton of an algorithm in the superclass but lets subclasses override specific steps of the algorithm without changing its structure. [Main article](https://refactoring.guru/design-patterns/template-method) [Usage in C#](https://refactoring.guru/design-patterns/template-method/csharp/example#lang-features) [Code example](https://refactoring.guru/design-patterns/template-method/csharp/example#example-0) ![Visitor](https://refactoring.guru/images/patterns/cards/visitor-mini-3x.png) #### Visitor Lets you separate algorithms from the objects on which they operate. [Main article](https://refactoring.guru/design-patterns/visitor) [Usage in C#](https://refactoring.guru/design-patterns/visitor/csharp/example#lang-features) [Code example](https://refactoring.guru/design-patterns/visitor/csharp/example#example-0) --- # Visitor [There are patterns of patterns now! \ My friend's project: MetaPatterns.io](https://metapatterns.io/)  [](https://refactoring.guru/design-patterns/visitor#checkout) [](https://refactoring.guru/design-patterns/visitor#checkout) [](https://refactoring.guru/) / [Design Patterns](https://refactoring.guru/design-patterns) / [Behavioral Patterns](https://refactoring.guru/design-patterns/behavioral-patterns) Visitor ======= Intent ------ **Visitor** is a behavioral design pattern that lets you separate algorithms from the objects on which they operate. ![Visitor Design Pattern](https://refactoring.guru/images/patterns/content/visitor/visitor-2x.png?id=2c5d9ab3046d782c19809d3b80650d65) Problem ------- Imagine that your team develops an app which works with geographic information structured as one colossal graph. Each node of the graph may represent a complex entity such as a city, but also more granular things like industries, sightseeing areas, etc. The nodes are connected with others if there’s a road between the real objects that they represent. Under the hood, each node type is represented by its own class, while each specific node is an object. ![Exporting the graph into XML](https://refactoring.guru/images/patterns/diagrams/visitor/problem1-2x.png?id=2e5d5143ac55af218754f28761bec17e) Exporting the graph into XML. At some point, you got a task to implement exporting the graph into XML format. At first, the job seemed pretty straightforward. You planned to add an export method to each node class and then leverage recursion to go over each node of the graph, executing the export method. The solution was simple and elegant: thanks to polymorphism, you weren’t coupling the code which called the export method to concrete classes of nodes. Unfortunately, the system architect refused to allow you to alter existing node classes. He said that the code was already in production and he didn’t want to risk breaking it because of a potential bug in your changes. ![The XML export method had to be added into all node classes](https://refactoring.guru/images/patterns/diagrams/visitor/problem2-en-2x.png?id=8a241a88057253b879e7b756023b52a1) The XML export method had to be added into all node classes, which bore the risk of breaking the whole application if any bugs slipped through along with the change. Besides, he questioned whether it makes sense to have the XML export code within the node classes. The primary job of these classes was to work with geodata. The XML export behavior would look alien there. There was another reason for the refusal. It was highly likely that after this feature was implemented, someone from the marketing department would ask you to provide the ability to export into a different format, or request some other weird stuff. This would force you to change those precious and fragile classes again. Solution -------- The Visitor pattern suggests that you place the new behavior into a separate class called _visitor_, instead of trying to integrate it into existing classes. The original object that had to perform the behavior is now passed to one of the visitor’s methods as an argument, providing the method access to all necessary data contained within the object. Now, what if that behavior can be executed over objects of different classes? For example, in our case with XML export, the actual implementation will probably be a little bit different across various node classes. Thus, the visitor class may define not one, but a set of methods, each of which could take arguments of different types, like this: class ExportVisitor implements Visitor is method doForCity(City c) { ... } method doForIndustry(Industry f) { ... } method doForSightSeeing(SightSeeing ss) { ... } // ... But how exactly would we call these methods, especially when dealing with the whole graph? These methods have different signatures, so we can’t use polymorphism. To pick a proper visitor method that’s able to process a given object, we’d need to check its class. Doesn’t this sound like a nightmare? foreach (Node node in graph) if (node instanceof City) exportVisitor.doForCity((City) node) if (node instanceof Industry) exportVisitor.doForIndustry((Industry) node) // ... } You might ask, why don’t we use method overloading? That’s when you give all methods the same name, even if they support different sets of parameters. Unfortunately, even assuming that our programming language supports it at all (as Java and C# do), it won’t help us. Since the exact class of a node object is unknown in advance, the overloading mechanism won’t be able to determine the correct method to execute. It’ll default to the method that takes an object of the base `Node` class. However, the Visitor pattern addresses this problem. It uses a technique called [Double Dispatch](https://refactoring.guru/design-patterns/visitor-double-dispatch) , which helps to execute the proper method on an object without cumbersome conditionals. Instead of letting the client select a proper version of the method to call, how about we delegate this choice to objects we’re passing to the visitor as an argument? Since the objects know their own classes, they’ll be able to pick a proper method on the visitor less awkwardly. They “accept” a visitor and tell it what visiting method should be executed. // Client code foreach (Node node in graph) node.accept(exportVisitor) // City class City is method accept(Visitor v) is v.doForCity(this) // ... // Industry class Industry is method accept(Visitor v) is v.doForIndustry(this) // ... I confess. We had to change the node classes after all. But at least the change is trivial and it lets us add further behaviors without altering the code once again. Now, if we extract a common interface for all visitors, all existing nodes can work with any visitor you introduce into the app. If you find yourself introducing a new behavior related to nodes, all you have to do is implement a new visitor class. Real-World Analogy ------------------ ![Insurance agent](https://refactoring.guru/images/patterns/content/visitor/visitor-comic-1-2x.png?id=439032451eb49ebbcb5257f25ecee790) A good insurance agent is always ready to offer different policies to various types of organizations. Imagine a seasoned insurance agent who’s eager to get new customers. He can visit every building in a neighborhood, trying to sell insurance to everyone he meets. Depending on the type of organization that occupies the building, he can offer specialized insurance policies: * If it’s a residential building, he sells medical insurance. * If it’s a bank, he sells theft insurance. * If it’s a coffee shop, he sells fire and flood insurance. Structure --------- ![Structure of the Visitor design pattern](https://refactoring.guru/images/patterns/diagrams/visitor/structure-en-2x.png?id=8f0367e7fdc92dbe05df3a86f2d0db45)![Structure of the Visitor design pattern](https://refactoring.guru/images/patterns/diagrams/visitor/structure-en-indexed-2x.png?id=16068894aa794946000a539b5f950086) 1. The **Visitor** interface declares a set of visiting methods that can take concrete elements of an object structure as arguments. These methods may have the same names if the program is written in a language that supports overloading, but the type of their parameters must be different. 2. Each **Concrete Visitor** implements several versions of the same behaviors, tailored for different concrete element classes. 3. The **Element** interface declares a method for “accepting” visitors. This method should have one parameter declared with the type of the visitor interface. 4. Each **Concrete Element** must implement the acceptance method. The purpose of this method is to redirect the call to the proper visitor’s method corresponding to the current element class. Be aware that even if a base element class implements this method, all subclasses must still override this method in their own classes and call the appropriate method on the visitor object. 5. The **Client** usually represents a collection or some other complex object (for example, a [Composite](https://refactoring.guru/design-patterns/composite) tree). Usually, clients aren’t aware of all the concrete element classes because they work with objects from that collection via some abstract interface. Pseudocode ---------- In this example, the **Visitor** pattern adds XML export support to the class hierarchy of geometric shapes. ![Structure of the Visitor pattern example](https://refactoring.guru/images/patterns/diagrams/visitor/example-2x.png?id=f44438b98f13fcb50898baefad67ffff) Exporting various types of objects into XML format via a visitor object. // The element interface declares an \`accept\` method that takes // the base visitor interface as an argument. interface Shape is method move(x, y) method draw() method accept(v: Visitor) // Each concrete element class must implement the \`accept\` // method in such a way that it calls the visitor's method that // corresponds to the element's class. class Dot implements Shape is // ... // Note that we're calling \`visitDot\`, which matches the // current class name. This way we let the visitor know the // class of the element it works with. method accept(v: Visitor) is v.visitDot(this) class Circle implements Shape is // ... method accept(v: Visitor) is v.visitCircle(this) class Rectangle implements Shape is // ... method accept(v: Visitor) is v.visitRectangle(this) class CompoundShape implements Shape is // ... method accept(v: Visitor) is v.visitCompoundShape(this) // The Visitor interface declares a set of visiting methods that // correspond to element classes. The signature of a visiting // method lets the visitor identify the exact class of the // element that it's dealing with. interface Visitor is method visitDot(d: Dot) method visitCircle(c: Circle) method visitRectangle(r: Rectangle) method visitCompoundShape(cs: CompoundShape) // Concrete visitors implement several versions of the same // algorithm, which can work with all concrete element classes. // // You can experience the biggest benefit of the Visitor pattern // when using it with a complex object structure such as a // Composite tree. In this case, it might be helpful to store // some intermediate state of the algorithm while executing the // visitor's methods over various objects of the structure. class XMLExportVisitor implements Visitor is method visitDot(d: Dot) is // Export the dot's ID and center coordinates. method visitCircle(c: Circle) is // Export the circle's ID, center coordinates and // radius. method visitRectangle(r: Rectangle) is // Export the rectangle's ID, left-top coordinates, // width and height. method visitCompoundShape(cs: CompoundShape) is // Export the shape's ID as well as the list of its // children's IDs. // The client code can run visitor operations over any set of // elements without figuring out their concrete classes. The // accept operation directs a call to the appropriate operation // in the visitor object. class Application is field allShapes: array of Shapes method export() is exportVisitor = new XMLExportVisitor() foreach (shape in allShapes) do shape.accept(exportVisitor) If you wonder why we need the `accept` method in this example, my article [Visitor and Double Dispatch](https://refactoring.guru/design-patterns/visitor-double-dispatch) addresses this question in detail. Applicability ------------- Use the Visitor when you need to perform an operation on all elements of a complex object structure (for example, an object tree). The Visitor pattern lets you execute an operation over a set of objects with different classes by having a visitor object implement several variants of the same operation, which correspond to all target classes. Use the Visitor to clean up the business logic of auxiliary behaviors. The pattern lets you make the primary classes of your app more focused on their main jobs by extracting all other behaviors into a set of visitor classes. Use the pattern when a behavior makes sense only in some classes of a class hierarchy, but not in others. You can extract this behavior into a separate visitor class and implement only those visiting methods that accept objects of relevant classes, leaving the rest empty. How to Implement ---------------- 1. Declare the visitor interface with a set of “visiting” methods, one per each concrete element class that exists in the program. 2. Declare the element interface. If you’re working with an existing element class hierarchy, add the abstract “acceptance” method to the base class of the hierarchy. This method should accept a visitor object as an argument. 3. Implement the acceptance methods in all concrete element classes. These methods must simply redirect the call to a visiting method on the incoming visitor object which matches the class of the current element. 4. The element classes should only work with visitors via the visitor interface. Visitors, however, must be aware of all concrete element classes, referenced as parameter types of the visiting methods. 5. For each behavior that can’t be implemented inside the element hierarchy, create a new concrete visitor class and implement all of the visiting methods. You might encounter a situation where the visitor will need access to some private members of the element class. In this case, you can either make these fields or methods public, violating the element’s encapsulation, or nest the visitor class in the element class. The latter is only possible if you’re lucky to work with a programming language that supports nested classes. 6. The client must create visitor objects and pass them into elements via “acceptance” methods. Pros and Cons ------------- * _Open/Closed Principle_. You can introduce a new behavior that can work with objects of different classes without changing these classes. * _Single Responsibility Principle_. You can move multiple versions of the same behavior into the same class. * A visitor object can accumulate some useful information while working with various objects. This might be handy when you want to traverse some complex object structure, such as an object tree, and apply the visitor to each object of this structure. * You need to update all visitors each time a class gets added to or removed from the element hierarchy. * Visitors might lack the necessary access to the private fields and methods of the elements that they’re supposed to work with. Relations with Other Patterns ----------------------------- * You can treat [Visitor](https://refactoring.guru/design-patterns/visitor) as a powerful version of the [Command](https://refactoring.guru/design-patterns/command) pattern. Its objects can execute operations over various objects of different classes. * You can use [Visitor](https://refactoring.guru/design-patterns/visitor) to execute an operation over an entire [Composite](https://refactoring.guru/design-patterns/composite) tree. * You can use [Visitor](https://refactoring.guru/design-patterns/visitor) along with [Iterator](https://refactoring.guru/design-patterns/iterator) to traverse a complex data structure and execute some operation over its elements, even if they all have different classes. Code Examples ------------- [![Visitor in C#](https://refactoring.guru/images/patterns/icons/csharp.svg?id=da64592defc6e86d57c39c66e9de3e58)](https://refactoring.guru/design-patterns/visitor/csharp/example "Visitor in C#") [![Visitor in C++](https://refactoring.guru/images/patterns/icons/cpp.svg?id=f7782ed8b8666246bfcc3f8fefc3b858)](https://refactoring.guru/design-patterns/visitor/cpp/example "Visitor in C++") [![Visitor in Go](https://refactoring.guru/images/patterns/icons/go.svg?id=1a89927eb99b1ea3fde7701d97970aca)](https://refactoring.guru/design-patterns/visitor/go/example "Visitor in Go") [![Visitor in Java](https://refactoring.guru/images/patterns/icons/java.svg?id=e6d87e2dca08c953fe3acd1275ed4f4e)](https://refactoring.guru/design-patterns/visitor/java/example "Visitor in Java") [![Visitor in PHP](https://refactoring.guru/images/patterns/icons/php.svg?id=be1906eb26b71ec1d3b93720d6156618)](https://refactoring.guru/design-patterns/visitor/php/example "Visitor in PHP") [![Visitor in Python](https://refactoring.guru/images/patterns/icons/python.svg?id=6d815d43c0f7050a1151b43e51569c9f)](https://refactoring.guru/design-patterns/visitor/python/example "Visitor in Python") [![Visitor in Ruby](https://refactoring.guru/images/patterns/icons/ruby.svg?id=b065b718c914bf8e960ef731600be1eb)](https://refactoring.guru/design-patterns/visitor/ruby/example "Visitor in Ruby") [![Visitor in Rust](https://refactoring.guru/images/patterns/icons/rust.svg?id=1f5698a4b5ae23fe79413511747e4a87)](https://refactoring.guru/design-patterns/visitor/rust/example "Visitor in Rust") [![Visitor in Swift](https://refactoring.guru/images/patterns/icons/swift.svg?id=0b716c2d52ec3a48fbe91ac031070c1d)](https://refactoring.guru/design-patterns/visitor/swift/example "Visitor in Swift") [![Visitor in TypeScript](https://refactoring.guru/images/patterns/icons/typescript.svg?id=2239d0f16cb703540c205dd8cb0c0cb7)](https://refactoring.guru/design-patterns/visitor/typescript/example "Visitor in TypeScript") Extra Content ------------- * Puzzled why we can’t simply replace the Visitor pattern with method overloading? Read my article [Visitor and Double Dispatch](https://refactoring.guru/design-patterns/visitor-double-dispatch) to learn about the nasty details. [![](https://refactoring.guru/images/patterns/banners/patterns-book-banner-3-2x.png?id=0cc3f77ab421d1a5c02ee46488231c3a)](https://refactoring.guru/design-patterns/book) ### Support our free website and own the eBook! * 22 design patterns and 8 principles explained in depth. * 409 well-structured, easy to read, jargon-free pages. * 225 clear and helpful illustrations and diagrams. * An archive with code examples in 11 languages. * All devices supported: PDF/EPUB/MOBI/KFX formats. [Learn more…](https://refactoring.guru/design-patterns/book) --- # Design Patterns in Java [There are patterns of patterns now! \ My friend's project: MetaPatterns.io](https://metapatterns.io/)  [](https://refactoring.guru/design-patterns/java#checkout) [](https://refactoring.guru/design-patterns/java#checkout) ![Design Patterns in Java](https://refactoring.guru/images/patterns/languages/java-3x.png) ![Design Patterns in Java](https://refactoring.guru/images/patterns/languages/mini/java-3x.png) Design Patterns in Java ======================= The Catalog of **Java** Examples -------------------------------- #### Creational Patterns ![Abstract Factory](https://refactoring.guru/images/patterns/cards/abstract-factory-mini-3x.png) #### Abstract Factory Lets you produce families of related objects without specifying their concrete classes. [Main article](https://refactoring.guru/design-patterns/abstract-factory) [Usage in Java](https://refactoring.guru/design-patterns/abstract-factory/java/example#lang-features) [Code example](https://refactoring.guru/design-patterns/abstract-factory/java/example#example-0) ![Builder](https://refactoring.guru/images/patterns/cards/builder-mini-3x.png) #### Builder Lets you construct complex objects step by step. The pattern allows you to produce different types and representations of an object using the same construction code. [Main article](https://refactoring.guru/design-patterns/builder) [Usage in Java](https://refactoring.guru/design-patterns/builder/java/example#lang-features) [Code example](https://refactoring.guru/design-patterns/builder/java/example#example-0) ![Factory Method](https://refactoring.guru/images/patterns/cards/factory-method-mini-3x.png) #### Factory Method Provides an interface for creating objects in a superclass, but allows subclasses to alter the type of objects that will be created. [Main article](https://refactoring.guru/design-patterns/factory-method) [Usage in Java](https://refactoring.guru/design-patterns/factory-method/java/example#lang-features) [Code example](https://refactoring.guru/design-patterns/factory-method/java/example#example-0) ![Prototype](https://refactoring.guru/images/patterns/cards/prototype-mini-3x.png) #### Prototype Lets you copy existing objects without making your code dependent on their classes. [Main article](https://refactoring.guru/design-patterns/prototype) [Usage in Java](https://refactoring.guru/design-patterns/prototype/java/example#lang-features) [Code example](https://refactoring.guru/design-patterns/prototype/java/example#example-0) ![Singleton](https://refactoring.guru/images/patterns/cards/singleton-mini-3x.png) #### Singleton Lets you ensure that a class has only one instance, while providing a global access point to this instance. [Main article](https://refactoring.guru/design-patterns/singleton) [Usage in Java](https://refactoring.guru/design-patterns/singleton/java/example#lang-features) [Naïve Singleton](https://refactoring.guru/design-patterns/singleton/java/example#example-0) [Thread-safe Singleton](https://refactoring.guru/design-patterns/singleton/java/example#example-2) #### Structural Patterns ![Adapter](https://refactoring.guru/images/patterns/cards/adapter-mini-3x.png) #### Adapter Allows objects with incompatible interfaces to collaborate. [Main article](https://refactoring.guru/design-patterns/adapter) [Usage in Java](https://refactoring.guru/design-patterns/adapter/java/example#lang-features) [Code example](https://refactoring.guru/design-patterns/adapter/java/example#example-0) ![Bridge](https://refactoring.guru/images/patterns/cards/bridge-mini-3x.png) #### Bridge Lets you split a large class or a set of closely related classes into two separate hierarchies—abstraction and implementation—which can be developed independently of each other. [Main article](https://refactoring.guru/design-patterns/bridge) [Usage in Java](https://refactoring.guru/design-patterns/bridge/java/example#lang-features) [Code example](https://refactoring.guru/design-patterns/bridge/java/example#example-0) ![Composite](https://refactoring.guru/images/patterns/cards/composite-mini-3x.png) #### Composite Lets you compose objects into tree structures and then work with these structures as if they were individual objects. [Main article](https://refactoring.guru/design-patterns/composite) [Usage in Java](https://refactoring.guru/design-patterns/composite/java/example#lang-features) [Code example](https://refactoring.guru/design-patterns/composite/java/example#example-0) ![Decorator](https://refactoring.guru/images/patterns/cards/decorator-mini-3x.png) #### Decorator Lets you attach new behaviors to objects by placing these objects inside special wrapper objects that contain the behaviors. [Main article](https://refactoring.guru/design-patterns/decorator) [Usage in Java](https://refactoring.guru/design-patterns/decorator/java/example#lang-features) [Code example](https://refactoring.guru/design-patterns/decorator/java/example#example-0) ![Facade](https://refactoring.guru/images/patterns/cards/facade-mini-3x.png) #### Facade Provides a simplified interface to a library, a framework, or any other complex set of classes. [Main article](https://refactoring.guru/design-patterns/facade) [Usage in Java](https://refactoring.guru/design-patterns/facade/java/example#lang-features) [Code example](https://refactoring.guru/design-patterns/facade/java/example#example-0) ![Flyweight](https://refactoring.guru/images/patterns/cards/flyweight-mini-3x.png) #### Flyweight Lets you fit more objects into the available amount of RAM by sharing common parts of state between multiple objects instead of keeping all of the data in each object. [Main article](https://refactoring.guru/design-patterns/flyweight) [Usage in Java](https://refactoring.guru/design-patterns/flyweight/java/example#lang-features) [Code example](https://refactoring.guru/design-patterns/flyweight/java/example#example-0) ![Proxy](https://refactoring.guru/images/patterns/cards/proxy-mini-3x.png) #### Proxy Lets you provide a substitute or placeholder for another object. A proxy controls access to the original object, allowing you to perform something either before or after the request gets through to the original object. [Main article](https://refactoring.guru/design-patterns/proxy) [Usage in Java](https://refactoring.guru/design-patterns/proxy/java/example#lang-features) [Code example](https://refactoring.guru/design-patterns/proxy/java/example#example-0) #### Behavioral Patterns ![Chain of Responsibility](https://refactoring.guru/images/patterns/cards/chain-of-responsibility-mini-3x.png) #### Chain of Responsibility Lets you pass requests along a chain of handlers. Upon receiving a request, each handler decides either to process the request or to pass it to the next handler in the chain. [Main article](https://refactoring.guru/design-patterns/chain-of-responsibility) [Usage in Java](https://refactoring.guru/design-patterns/chain-of-responsibility/java/example#lang-features) [Code example](https://refactoring.guru/design-patterns/chain-of-responsibility/java/example#example-0) ![Command](https://refactoring.guru/images/patterns/cards/command-mini-3x.png) #### Command Turns a request into a stand-alone object that contains all information about the request. This transformation lets you pass requests as a method arguments, delay or queue a request's execution, and support undoable operations. [Main article](https://refactoring.guru/design-patterns/command) [Usage in Java](https://refactoring.guru/design-patterns/command/java/example#lang-features) [Code example](https://refactoring.guru/design-patterns/command/java/example#example-0) ![Iterator](https://refactoring.guru/images/patterns/cards/iterator-mini-3x.png) #### Iterator Lets you traverse elements of a collection without exposing its underlying representation (list, stack, tree, etc.). [Main article](https://refactoring.guru/design-patterns/iterator) [Usage in Java](https://refactoring.guru/design-patterns/iterator/java/example#lang-features) [Code example](https://refactoring.guru/design-patterns/iterator/java/example#example-0) ![Mediator](https://refactoring.guru/images/patterns/cards/mediator-mini-3x.png) #### Mediator Lets you reduce chaotic dependencies between objects. The pattern restricts direct communications between the objects and forces them to collaborate only via a mediator object. [Main article](https://refactoring.guru/design-patterns/mediator) [Usage in Java](https://refactoring.guru/design-patterns/mediator/java/example#lang-features) [Code example](https://refactoring.guru/design-patterns/mediator/java/example#example-0) ![Memento](https://refactoring.guru/images/patterns/cards/memento-mini-3x.png) #### Memento Lets you save and restore the previous state of an object without revealing the details of its implementation. [Main article](https://refactoring.guru/design-patterns/memento) [Usage in Java](https://refactoring.guru/design-patterns/memento/java/example#lang-features) [Code example](https://refactoring.guru/design-patterns/memento/java/example#example-0) ![Observer](https://refactoring.guru/images/patterns/cards/observer-mini-3x.png) #### Observer Lets you define a subscription mechanism to notify multiple objects about any events that happen to the object they're observing. [Main article](https://refactoring.guru/design-patterns/observer) [Usage in Java](https://refactoring.guru/design-patterns/observer/java/example#lang-features) [Code example](https://refactoring.guru/design-patterns/observer/java/example#example-0) ![State](https://refactoring.guru/images/patterns/cards/state-mini-3x.png) #### State Lets an object alter its behavior when its internal state changes. It appears as if the object changed its class. [Main article](https://refactoring.guru/design-patterns/state) [Usage in Java](https://refactoring.guru/design-patterns/state/java/example#lang-features) [Code example](https://refactoring.guru/design-patterns/state/java/example#example-0) ![Strategy](https://refactoring.guru/images/patterns/cards/strategy-mini-3x.png) #### Strategy Lets you define a family of algorithms, put each of them into a separate class, and make their objects interchangeable. [Main article](https://refactoring.guru/design-patterns/strategy) [Usage in Java](https://refactoring.guru/design-patterns/strategy/java/example#lang-features) [Code example](https://refactoring.guru/design-patterns/strategy/java/example#example-0) ![Template Method](https://refactoring.guru/images/patterns/cards/template-method-mini-3x.png) #### Template Method Defines the skeleton of an algorithm in the superclass but lets subclasses override specific steps of the algorithm without changing its structure. [Main article](https://refactoring.guru/design-patterns/template-method) [Usage in Java](https://refactoring.guru/design-patterns/template-method/java/example#lang-features) [Code example](https://refactoring.guru/design-patterns/template-method/java/example#example-0) ![Visitor](https://refactoring.guru/images/patterns/cards/visitor-mini-3x.png) #### Visitor Lets you separate algorithms from the objects on which they operate. [Main article](https://refactoring.guru/design-patterns/visitor) [Usage in Java](https://refactoring.guru/design-patterns/visitor/java/example#lang-features) [Code example](https://refactoring.guru/design-patterns/visitor/java/example#example-0) --- # Design Patterns in Go [There are patterns of patterns now! \ My friend's project: MetaPatterns.io](https://metapatterns.io/)  [](https://refactoring.guru/design-patterns/go#checkout) [](https://refactoring.guru/design-patterns/go#checkout) ![Design Patterns in Go](https://refactoring.guru/images/patterns/languages/go-3x.png) ![Design Patterns in Go](https://refactoring.guru/images/patterns/languages/mini/go-3x.png) Design Patterns in Go ===================== The Catalog of **Go** Examples ------------------------------ #### Creational Patterns ![Abstract Factory](https://refactoring.guru/images/patterns/cards/abstract-factory-mini-3x.png) #### Abstract Factory Lets you produce families of related objects without specifying their concrete classes. [Main article](https://refactoring.guru/design-patterns/abstract-factory) [Code example](https://refactoring.guru/design-patterns/abstract-factory/go/example#example-0) ![Builder](https://refactoring.guru/images/patterns/cards/builder-mini-3x.png) #### Builder Lets you construct complex objects step by step. The pattern allows you to produce different types and representations of an object using the same construction code. [Main article](https://refactoring.guru/design-patterns/builder) [Code example](https://refactoring.guru/design-patterns/builder/go/example#example-0) ![Factory Method](https://refactoring.guru/images/patterns/cards/factory-method-mini-3x.png) #### Factory Method Provides an interface for creating objects in a superclass, but allows subclasses to alter the type of objects that will be created. [Main article](https://refactoring.guru/design-patterns/factory-method) [Code example](https://refactoring.guru/design-patterns/factory-method/go/example#example-0) ![Prototype](https://refactoring.guru/images/patterns/cards/prototype-mini-3x.png) #### Prototype Lets you copy existing objects without making your code dependent on their classes. [Main article](https://refactoring.guru/design-patterns/prototype) [Code example](https://refactoring.guru/design-patterns/prototype/go/example#example-0) ![Singleton](https://refactoring.guru/images/patterns/cards/singleton-mini-3x.png) #### Singleton Lets you ensure that a class has only one instance, while providing a global access point to this instance. [Main article](https://refactoring.guru/design-patterns/singleton) [Code example](https://refactoring.guru/design-patterns/singleton/go/example#example-0) #### Structural Patterns ![Adapter](https://refactoring.guru/images/patterns/cards/adapter-mini-3x.png) #### Adapter Allows objects with incompatible interfaces to collaborate. [Main article](https://refactoring.guru/design-patterns/adapter) [Code example](https://refactoring.guru/design-patterns/adapter/go/example#example-0) ![Bridge](https://refactoring.guru/images/patterns/cards/bridge-mini-3x.png) #### Bridge Lets you split a large class or a set of closely related classes into two separate hierarchies—abstraction and implementation—which can be developed independently of each other. [Main article](https://refactoring.guru/design-patterns/bridge) [Code example](https://refactoring.guru/design-patterns/bridge/go/example#example-0) ![Composite](https://refactoring.guru/images/patterns/cards/composite-mini-3x.png) #### Composite Lets you compose objects into tree structures and then work with these structures as if they were individual objects. [Main article](https://refactoring.guru/design-patterns/composite) [Code example](https://refactoring.guru/design-patterns/composite/go/example#example-0) ![Decorator](https://refactoring.guru/images/patterns/cards/decorator-mini-3x.png) #### Decorator Lets you attach new behaviors to objects by placing these objects inside special wrapper objects that contain the behaviors. [Main article](https://refactoring.guru/design-patterns/decorator) [Code example](https://refactoring.guru/design-patterns/decorator/go/example#example-0) ![Facade](https://refactoring.guru/images/patterns/cards/facade-mini-3x.png) #### Facade Provides a simplified interface to a library, a framework, or any other complex set of classes. [Main article](https://refactoring.guru/design-patterns/facade) [Code example](https://refactoring.guru/design-patterns/facade/go/example#example-0) ![Flyweight](https://refactoring.guru/images/patterns/cards/flyweight-mini-3x.png) #### Flyweight Lets you fit more objects into the available amount of RAM by sharing common parts of state between multiple objects instead of keeping all of the data in each object. [Main article](https://refactoring.guru/design-patterns/flyweight) [Code example](https://refactoring.guru/design-patterns/flyweight/go/example#example-0) ![Proxy](https://refactoring.guru/images/patterns/cards/proxy-mini-3x.png) #### Proxy Lets you provide a substitute or placeholder for another object. A proxy controls access to the original object, allowing you to perform something either before or after the request gets through to the original object. [Main article](https://refactoring.guru/design-patterns/proxy) [Code example](https://refactoring.guru/design-patterns/proxy/go/example#example-0) #### Behavioral Patterns ![Chain of Responsibility](https://refactoring.guru/images/patterns/cards/chain-of-responsibility-mini-3x.png) #### Chain of Responsibility Lets you pass requests along a chain of handlers. Upon receiving a request, each handler decides either to process the request or to pass it to the next handler in the chain. [Main article](https://refactoring.guru/design-patterns/chain-of-responsibility) [Code example](https://refactoring.guru/design-patterns/chain-of-responsibility/go/example#example-0) ![Command](https://refactoring.guru/images/patterns/cards/command-mini-3x.png) #### Command Turns a request into a stand-alone object that contains all information about the request. This transformation lets you pass requests as a method arguments, delay or queue a request's execution, and support undoable operations. [Main article](https://refactoring.guru/design-patterns/command) [Code example](https://refactoring.guru/design-patterns/command/go/example#example-0) ![Iterator](https://refactoring.guru/images/patterns/cards/iterator-mini-3x.png) #### Iterator Lets you traverse elements of a collection without exposing its underlying representation (list, stack, tree, etc.). [Main article](https://refactoring.guru/design-patterns/iterator) [Code example](https://refactoring.guru/design-patterns/iterator/go/example#example-0) ![Mediator](https://refactoring.guru/images/patterns/cards/mediator-mini-3x.png) #### Mediator Lets you reduce chaotic dependencies between objects. The pattern restricts direct communications between the objects and forces them to collaborate only via a mediator object. [Main article](https://refactoring.guru/design-patterns/mediator) [Code example](https://refactoring.guru/design-patterns/mediator/go/example#example-0) ![Memento](https://refactoring.guru/images/patterns/cards/memento-mini-3x.png) #### Memento Lets you save and restore the previous state of an object without revealing the details of its implementation. [Main article](https://refactoring.guru/design-patterns/memento) [Code example](https://refactoring.guru/design-patterns/memento/go/example#example-0) ![Observer](https://refactoring.guru/images/patterns/cards/observer-mini-3x.png) #### Observer Lets you define a subscription mechanism to notify multiple objects about any events that happen to the object they're observing. [Main article](https://refactoring.guru/design-patterns/observer) [Code example](https://refactoring.guru/design-patterns/observer/go/example#example-0) ![State](https://refactoring.guru/images/patterns/cards/state-mini-3x.png) #### State Lets an object alter its behavior when its internal state changes. It appears as if the object changed its class. [Main article](https://refactoring.guru/design-patterns/state) [Code example](https://refactoring.guru/design-patterns/state/go/example#example-0) ![Strategy](https://refactoring.guru/images/patterns/cards/strategy-mini-3x.png) #### Strategy Lets you define a family of algorithms, put each of them into a separate class, and make their objects interchangeable. [Main article](https://refactoring.guru/design-patterns/strategy) [Code example](https://refactoring.guru/design-patterns/strategy/go/example#example-0) ![Template Method](https://refactoring.guru/images/patterns/cards/template-method-mini-3x.png) #### Template Method Defines the skeleton of an algorithm in the superclass but lets subclasses override specific steps of the algorithm without changing its structure. [Main article](https://refactoring.guru/design-patterns/template-method) [Code example](https://refactoring.guru/design-patterns/template-method/go/example#example-0) ![Visitor](https://refactoring.guru/images/patterns/cards/visitor-mini-3x.png) #### Visitor Lets you separate algorithms from the objects on which they operate. [Main article](https://refactoring.guru/design-patterns/visitor) [Code example](https://refactoring.guru/design-patterns/visitor/go/example#example-0) --- # Design Patterns in PHP [There are patterns of patterns now! \ My friend's project: MetaPatterns.io](https://metapatterns.io/)  [](https://refactoring.guru/design-patterns/php#checkout) [](https://refactoring.guru/design-patterns/php#checkout) ![Design Patterns in PHP](https://refactoring.guru/images/patterns/languages/php-3x.png) ![Design Patterns in PHP](https://refactoring.guru/images/patterns/languages/mini/php-3x.png) Design Patterns in PHP ====================== The Catalog of **PHP** Examples ------------------------------- #### Creational Patterns ![Abstract Factory](https://refactoring.guru/images/patterns/cards/abstract-factory-mini-3x.png) #### Abstract Factory Lets you produce families of related objects without specifying their concrete classes. [Main article](https://refactoring.guru/design-patterns/abstract-factory) [Usage in PHP](https://refactoring.guru/design-patterns/abstract-factory/php/example#lang-features) [Conceptual example](https://refactoring.guru/design-patterns/abstract-factory/php/example#example-0) [Real-world example](https://refactoring.guru/design-patterns/abstract-factory/php/example#example-1) ![Builder](https://refactoring.guru/images/patterns/cards/builder-mini-3x.png) #### Builder Lets you construct complex objects step by step. The pattern allows you to produce different types and representations of an object using the same construction code. [Main article](https://refactoring.guru/design-patterns/builder) [Usage in PHP](https://refactoring.guru/design-patterns/builder/php/example#lang-features) [Conceptual example](https://refactoring.guru/design-patterns/builder/php/example#example-0) [Real-world example](https://refactoring.guru/design-patterns/builder/php/example#example-1) ![Factory Method](https://refactoring.guru/images/patterns/cards/factory-method-mini-3x.png) #### Factory Method Provides an interface for creating objects in a superclass, but allows subclasses to alter the type of objects that will be created. [Main article](https://refactoring.guru/design-patterns/factory-method) [Usage in PHP](https://refactoring.guru/design-patterns/factory-method/php/example#lang-features) [Conceptual example](https://refactoring.guru/design-patterns/factory-method/php/example#example-0) [Real-world example](https://refactoring.guru/design-patterns/factory-method/php/example#example-1) ![Prototype](https://refactoring.guru/images/patterns/cards/prototype-mini-3x.png) #### Prototype Lets you copy existing objects without making your code dependent on their classes. [Main article](https://refactoring.guru/design-patterns/prototype) [Usage in PHP](https://refactoring.guru/design-patterns/prototype/php/example#lang-features) [Conceptual example](https://refactoring.guru/design-patterns/prototype/php/example#example-0) [Real-world example](https://refactoring.guru/design-patterns/prototype/php/example#example-1) ![Singleton](https://refactoring.guru/images/patterns/cards/singleton-mini-3x.png) #### Singleton Lets you ensure that a class has only one instance, while providing a global access point to this instance. [Main article](https://refactoring.guru/design-patterns/singleton) [Usage in PHP](https://refactoring.guru/design-patterns/singleton/php/example#lang-features) [Naïve Singleton](https://refactoring.guru/design-patterns/singleton/php/example#example-0) [Thread-safe Singleton](https://refactoring.guru/design-patterns/singleton/php/example#example-1) #### Structural Patterns ![Adapter](https://refactoring.guru/images/patterns/cards/adapter-mini-3x.png) #### Adapter Allows objects with incompatible interfaces to collaborate. [Main article](https://refactoring.guru/design-patterns/adapter) [Usage in PHP](https://refactoring.guru/design-patterns/adapter/php/example#lang-features) [Conceptual example](https://refactoring.guru/design-patterns/adapter/php/example#example-0) [Real-world example](https://refactoring.guru/design-patterns/adapter/php/example#example-1) ![Bridge](https://refactoring.guru/images/patterns/cards/bridge-mini-3x.png) #### Bridge Lets you split a large class or a set of closely related classes into two separate hierarchies—abstraction and implementation—which can be developed independently of each other. [Main article](https://refactoring.guru/design-patterns/bridge) [Usage in PHP](https://refactoring.guru/design-patterns/bridge/php/example#lang-features) [Conceptual example](https://refactoring.guru/design-patterns/bridge/php/example#example-0) [Real-world example](https://refactoring.guru/design-patterns/bridge/php/example#example-1) ![Composite](https://refactoring.guru/images/patterns/cards/composite-mini-3x.png) #### Composite Lets you compose objects into tree structures and then work with these structures as if they were individual objects. [Main article](https://refactoring.guru/design-patterns/composite) [Usage in PHP](https://refactoring.guru/design-patterns/composite/php/example#lang-features) [Conceptual example](https://refactoring.guru/design-patterns/composite/php/example#example-0) [Real-world example](https://refactoring.guru/design-patterns/composite/php/example#example-1) ![Decorator](https://refactoring.guru/images/patterns/cards/decorator-mini-3x.png) #### Decorator Lets you attach new behaviors to objects by placing these objects inside special wrapper objects that contain the behaviors. [Main article](https://refactoring.guru/design-patterns/decorator) [Usage in PHP](https://refactoring.guru/design-patterns/decorator/php/example#lang-features) [Conceptual example](https://refactoring.guru/design-patterns/decorator/php/example#example-0) [Real-world example](https://refactoring.guru/design-patterns/decorator/php/example#example-1) ![Facade](https://refactoring.guru/images/patterns/cards/facade-mini-3x.png) #### Facade Provides a simplified interface to a library, a framework, or any other complex set of classes. [Main article](https://refactoring.guru/design-patterns/facade) [Usage in PHP](https://refactoring.guru/design-patterns/facade/php/example#lang-features) [Conceptual example](https://refactoring.guru/design-patterns/facade/php/example#example-0) [Real-world example](https://refactoring.guru/design-patterns/facade/php/example#example-1) ![Flyweight](https://refactoring.guru/images/patterns/cards/flyweight-mini-3x.png) #### Flyweight Lets you fit more objects into the available amount of RAM by sharing common parts of state between multiple objects instead of keeping all of the data in each object. [Main article](https://refactoring.guru/design-patterns/flyweight) [Usage in PHP](https://refactoring.guru/design-patterns/flyweight/php/example#lang-features) [Conceptual example](https://refactoring.guru/design-patterns/flyweight/php/example#example-0) [Real-world example](https://refactoring.guru/design-patterns/flyweight/php/example#example-1) ![Proxy](https://refactoring.guru/images/patterns/cards/proxy-mini-3x.png) #### Proxy Lets you provide a substitute or placeholder for another object. A proxy controls access to the original object, allowing you to perform something either before or after the request gets through to the original object. [Main article](https://refactoring.guru/design-patterns/proxy) [Usage in PHP](https://refactoring.guru/design-patterns/proxy/php/example#lang-features) [Conceptual example](https://refactoring.guru/design-patterns/proxy/php/example#example-0) [Real-world example](https://refactoring.guru/design-patterns/proxy/php/example#example-1) #### Behavioral Patterns ![Chain of Responsibility](https://refactoring.guru/images/patterns/cards/chain-of-responsibility-mini-3x.png) #### Chain of Responsibility Lets you pass requests along a chain of handlers. Upon receiving a request, each handler decides either to process the request or to pass it to the next handler in the chain. [Main article](https://refactoring.guru/design-patterns/chain-of-responsibility) [Usage in PHP](https://refactoring.guru/design-patterns/chain-of-responsibility/php/example#lang-features) [Conceptual example](https://refactoring.guru/design-patterns/chain-of-responsibility/php/example#example-0) [Real-world example](https://refactoring.guru/design-patterns/chain-of-responsibility/php/example#example-1) ![Command](https://refactoring.guru/images/patterns/cards/command-mini-3x.png) #### Command Turns a request into a stand-alone object that contains all information about the request. This transformation lets you pass requests as a method arguments, delay or queue a request's execution, and support undoable operations. [Main article](https://refactoring.guru/design-patterns/command) [Usage in PHP](https://refactoring.guru/design-patterns/command/php/example#lang-features) [Conceptual example](https://refactoring.guru/design-patterns/command/php/example#example-0) [Real-world example](https://refactoring.guru/design-patterns/command/php/example#example-1) ![Iterator](https://refactoring.guru/images/patterns/cards/iterator-mini-3x.png) #### Iterator Lets you traverse elements of a collection without exposing its underlying representation (list, stack, tree, etc.). [Main article](https://refactoring.guru/design-patterns/iterator) [Usage in PHP](https://refactoring.guru/design-patterns/iterator/php/example#lang-features) [Conceptual example](https://refactoring.guru/design-patterns/iterator/php/example#example-0) [Real-world example](https://refactoring.guru/design-patterns/iterator/php/example#example-1) ![Mediator](https://refactoring.guru/images/patterns/cards/mediator-mini-3x.png) #### Mediator Lets you reduce chaotic dependencies between objects. The pattern restricts direct communications between the objects and forces them to collaborate only via a mediator object. [Main article](https://refactoring.guru/design-patterns/mediator) [Usage in PHP](https://refactoring.guru/design-patterns/mediator/php/example#lang-features) [Conceptual example](https://refactoring.guru/design-patterns/mediator/php/example#example-0) [Real-world example](https://refactoring.guru/design-patterns/mediator/php/example#example-1) ![Memento](https://refactoring.guru/images/patterns/cards/memento-mini-3x.png) #### Memento Lets you save and restore the previous state of an object without revealing the details of its implementation. [Main article](https://refactoring.guru/design-patterns/memento) [Usage in PHP](https://refactoring.guru/design-patterns/memento/php/example#lang-features) [Conceptual example](https://refactoring.guru/design-patterns/memento/php/example#example-0) [Real-world example](https://refactoring.guru/design-patterns/memento/php/example#example-1) ![Observer](https://refactoring.guru/images/patterns/cards/observer-mini-3x.png) #### Observer Lets you define a subscription mechanism to notify multiple objects about any events that happen to the object they're observing. [Main article](https://refactoring.guru/design-patterns/observer) [Usage in PHP](https://refactoring.guru/design-patterns/observer/php/example#lang-features) [Conceptual example](https://refactoring.guru/design-patterns/observer/php/example#example-0) [Real-world example](https://refactoring.guru/design-patterns/observer/php/example#example-1) ![State](https://refactoring.guru/images/patterns/cards/state-mini-3x.png) #### State Lets an object alter its behavior when its internal state changes. It appears as if the object changed its class. [Main article](https://refactoring.guru/design-patterns/state) [Usage in PHP](https://refactoring.guru/design-patterns/state/php/example#lang-features) [Conceptual example](https://refactoring.guru/design-patterns/state/php/example#example-0) [Real-world example](https://refactoring.guru/design-patterns/state/php/example#example-1) ![Strategy](https://refactoring.guru/images/patterns/cards/strategy-mini-3x.png) #### Strategy Lets you define a family of algorithms, put each of them into a separate class, and make their objects interchangeable. [Main article](https://refactoring.guru/design-patterns/strategy) [Usage in PHP](https://refactoring.guru/design-patterns/strategy/php/example#lang-features) [Conceptual example](https://refactoring.guru/design-patterns/strategy/php/example#example-0) [Real-world example](https://refactoring.guru/design-patterns/strategy/php/example#example-1) ![Template Method](https://refactoring.guru/images/patterns/cards/template-method-mini-3x.png) #### Template Method Defines the skeleton of an algorithm in the superclass but lets subclasses override specific steps of the algorithm without changing its structure. [Main article](https://refactoring.guru/design-patterns/template-method) [Usage in PHP](https://refactoring.guru/design-patterns/template-method/php/example#lang-features) [Conceptual example](https://refactoring.guru/design-patterns/template-method/php/example#example-0) [Real-world example](https://refactoring.guru/design-patterns/template-method/php/example#example-1) ![Visitor](https://refactoring.guru/images/patterns/cards/visitor-mini-3x.png) #### Visitor Lets you separate algorithms from the objects on which they operate. [Main article](https://refactoring.guru/design-patterns/visitor) [Usage in PHP](https://refactoring.guru/design-patterns/visitor/php/example#lang-features) [Conceptual example](https://refactoring.guru/design-patterns/visitor/php/example#example-0) [Real-world example](https://refactoring.guru/design-patterns/visitor/php/example#example-1) --- # Design Patterns in Python [There are patterns of patterns now! \ My friend's project: MetaPatterns.io](https://metapatterns.io/)  [](https://refactoring.guru/design-patterns/python#checkout) [](https://refactoring.guru/design-patterns/python#checkout) ![Design Patterns in Python](https://refactoring.guru/images/patterns/languages/python-3x.png) ![Design Patterns in Python](https://refactoring.guru/images/patterns/languages/mini/python-3x.png) Design Patterns in Python ========================= The Catalog of **Python** Examples ---------------------------------- #### Creational Patterns ![Abstract Factory](https://refactoring.guru/images/patterns/cards/abstract-factory-mini-3x.png) #### Abstract Factory Lets you produce families of related objects without specifying their concrete classes. [Main article](https://refactoring.guru/design-patterns/abstract-factory) [Usage in Python](https://refactoring.guru/design-patterns/abstract-factory/python/example#lang-features) [Code example](https://refactoring.guru/design-patterns/abstract-factory/python/example#example-0) ![Builder](https://refactoring.guru/images/patterns/cards/builder-mini-3x.png) #### Builder Lets you construct complex objects step by step. The pattern allows you to produce different types and representations of an object using the same construction code. [Main article](https://refactoring.guru/design-patterns/builder) [Usage in Python](https://refactoring.guru/design-patterns/builder/python/example#lang-features) [Code example](https://refactoring.guru/design-patterns/builder/python/example#example-0) ![Factory Method](https://refactoring.guru/images/patterns/cards/factory-method-mini-3x.png) #### Factory Method Provides an interface for creating objects in a superclass, but allows subclasses to alter the type of objects that will be created. [Main article](https://refactoring.guru/design-patterns/factory-method) [Usage in Python](https://refactoring.guru/design-patterns/factory-method/python/example#lang-features) [Code example](https://refactoring.guru/design-patterns/factory-method/python/example#example-0) ![Prototype](https://refactoring.guru/images/patterns/cards/prototype-mini-3x.png) #### Prototype Lets you copy existing objects without making your code dependent on their classes. [Main article](https://refactoring.guru/design-patterns/prototype) [Usage in Python](https://refactoring.guru/design-patterns/prototype/python/example#lang-features) [Code example](https://refactoring.guru/design-patterns/prototype/python/example#example-0) ![Singleton](https://refactoring.guru/images/patterns/cards/singleton-mini-3x.png) #### Singleton Lets you ensure that a class has only one instance, while providing a global access point to this instance. [Main article](https://refactoring.guru/design-patterns/singleton) [Usage in Python](https://refactoring.guru/design-patterns/singleton/python/example#lang-features) [Naïve Singleton](https://refactoring.guru/design-patterns/singleton/python/example#example-0) [Thread-safe Singleton](https://refactoring.guru/design-patterns/singleton/python/example#example-1) #### Structural Patterns ![Adapter](https://refactoring.guru/images/patterns/cards/adapter-mini-3x.png) #### Adapter Allows objects with incompatible interfaces to collaborate. [Main article](https://refactoring.guru/design-patterns/adapter) [Usage in Python](https://refactoring.guru/design-patterns/adapter/python/example#lang-features) [Code example](https://refactoring.guru/design-patterns/adapter/python/example#example-0) ![Bridge](https://refactoring.guru/images/patterns/cards/bridge-mini-3x.png) #### Bridge Lets you split a large class or a set of closely related classes into two separate hierarchies—abstraction and implementation—which can be developed independently of each other. [Main article](https://refactoring.guru/design-patterns/bridge) [Usage in Python](https://refactoring.guru/design-patterns/bridge/python/example#lang-features) [Code example](https://refactoring.guru/design-patterns/bridge/python/example#example-0) ![Composite](https://refactoring.guru/images/patterns/cards/composite-mini-3x.png) #### Composite Lets you compose objects into tree structures and then work with these structures as if they were individual objects. [Main article](https://refactoring.guru/design-patterns/composite) [Usage in Python](https://refactoring.guru/design-patterns/composite/python/example#lang-features) [Code example](https://refactoring.guru/design-patterns/composite/python/example#example-0) ![Decorator](https://refactoring.guru/images/patterns/cards/decorator-mini-3x.png) #### Decorator Lets you attach new behaviors to objects by placing these objects inside special wrapper objects that contain the behaviors. [Main article](https://refactoring.guru/design-patterns/decorator) [Usage in Python](https://refactoring.guru/design-patterns/decorator/python/example#lang-features) [Code example](https://refactoring.guru/design-patterns/decorator/python/example#example-0) ![Facade](https://refactoring.guru/images/patterns/cards/facade-mini-3x.png) #### Facade Provides a simplified interface to a library, a framework, or any other complex set of classes. [Main article](https://refactoring.guru/design-patterns/facade) [Usage in Python](https://refactoring.guru/design-patterns/facade/python/example#lang-features) [Code example](https://refactoring.guru/design-patterns/facade/python/example#example-0) ![Flyweight](https://refactoring.guru/images/patterns/cards/flyweight-mini-3x.png) #### Flyweight Lets you fit more objects into the available amount of RAM by sharing common parts of state between multiple objects instead of keeping all of the data in each object. [Main article](https://refactoring.guru/design-patterns/flyweight) [Usage in Python](https://refactoring.guru/design-patterns/flyweight/python/example#lang-features) [Code example](https://refactoring.guru/design-patterns/flyweight/python/example#example-0) ![Proxy](https://refactoring.guru/images/patterns/cards/proxy-mini-3x.png) #### Proxy Lets you provide a substitute or placeholder for another object. A proxy controls access to the original object, allowing you to perform something either before or after the request gets through to the original object. [Main article](https://refactoring.guru/design-patterns/proxy) [Usage in Python](https://refactoring.guru/design-patterns/proxy/python/example#lang-features) [Code example](https://refactoring.guru/design-patterns/proxy/python/example#example-0) #### Behavioral Patterns ![Chain of Responsibility](https://refactoring.guru/images/patterns/cards/chain-of-responsibility-mini-3x.png) #### Chain of Responsibility Lets you pass requests along a chain of handlers. Upon receiving a request, each handler decides either to process the request or to pass it to the next handler in the chain. [Main article](https://refactoring.guru/design-patterns/chain-of-responsibility) [Usage in Python](https://refactoring.guru/design-patterns/chain-of-responsibility/python/example#lang-features) [Code example](https://refactoring.guru/design-patterns/chain-of-responsibility/python/example#example-0) ![Command](https://refactoring.guru/images/patterns/cards/command-mini-3x.png) #### Command Turns a request into a stand-alone object that contains all information about the request. This transformation lets you pass requests as a method arguments, delay or queue a request's execution, and support undoable operations. [Main article](https://refactoring.guru/design-patterns/command) [Usage in Python](https://refactoring.guru/design-patterns/command/python/example#lang-features) [Code example](https://refactoring.guru/design-patterns/command/python/example#example-0) ![Iterator](https://refactoring.guru/images/patterns/cards/iterator-mini-3x.png) #### Iterator Lets you traverse elements of a collection without exposing its underlying representation (list, stack, tree, etc.). [Main article](https://refactoring.guru/design-patterns/iterator) [Usage in Python](https://refactoring.guru/design-patterns/iterator/python/example#lang-features) [Code example](https://refactoring.guru/design-patterns/iterator/python/example#example-0) ![Mediator](https://refactoring.guru/images/patterns/cards/mediator-mini-3x.png) #### Mediator Lets you reduce chaotic dependencies between objects. The pattern restricts direct communications between the objects and forces them to collaborate only via a mediator object. [Main article](https://refactoring.guru/design-patterns/mediator) [Usage in Python](https://refactoring.guru/design-patterns/mediator/python/example#lang-features) [Code example](https://refactoring.guru/design-patterns/mediator/python/example#example-0) ![Memento](https://refactoring.guru/images/patterns/cards/memento-mini-3x.png) #### Memento Lets you save and restore the previous state of an object without revealing the details of its implementation. [Main article](https://refactoring.guru/design-patterns/memento) [Usage in Python](https://refactoring.guru/design-patterns/memento/python/example#lang-features) [Code example](https://refactoring.guru/design-patterns/memento/python/example#example-0) ![Observer](https://refactoring.guru/images/patterns/cards/observer-mini-3x.png) #### Observer Lets you define a subscription mechanism to notify multiple objects about any events that happen to the object they're observing. [Main article](https://refactoring.guru/design-patterns/observer) [Usage in Python](https://refactoring.guru/design-patterns/observer/python/example#lang-features) [Code example](https://refactoring.guru/design-patterns/observer/python/example#example-0) ![State](https://refactoring.guru/images/patterns/cards/state-mini-3x.png) #### State Lets an object alter its behavior when its internal state changes. It appears as if the object changed its class. [Main article](https://refactoring.guru/design-patterns/state) [Usage in Python](https://refactoring.guru/design-patterns/state/python/example#lang-features) [Code example](https://refactoring.guru/design-patterns/state/python/example#example-0) ![Strategy](https://refactoring.guru/images/patterns/cards/strategy-mini-3x.png) #### Strategy Lets you define a family of algorithms, put each of them into a separate class, and make their objects interchangeable. [Main article](https://refactoring.guru/design-patterns/strategy) [Usage in Python](https://refactoring.guru/design-patterns/strategy/python/example#lang-features) [Code example](https://refactoring.guru/design-patterns/strategy/python/example#example-0) ![Template Method](https://refactoring.guru/images/patterns/cards/template-method-mini-3x.png) #### Template Method Defines the skeleton of an algorithm in the superclass but lets subclasses override specific steps of the algorithm without changing its structure. [Main article](https://refactoring.guru/design-patterns/template-method) [Usage in Python](https://refactoring.guru/design-patterns/template-method/python/example#lang-features) [Code example](https://refactoring.guru/design-patterns/template-method/python/example#example-0) ![Visitor](https://refactoring.guru/images/patterns/cards/visitor-mini-3x.png) #### Visitor Lets you separate algorithms from the objects on which they operate. [Main article](https://refactoring.guru/design-patterns/visitor) [Usage in Python](https://refactoring.guru/design-patterns/visitor/python/example#lang-features) [Code example](https://refactoring.guru/design-patterns/visitor/python/example#example-0) --- # Design Patterns in Ruby [There are patterns of patterns now! \ My friend's project: MetaPatterns.io](https://metapatterns.io/)  [](https://refactoring.guru/design-patterns/ruby#checkout) [](https://refactoring.guru/design-patterns/ruby#checkout) ![Design Patterns in Ruby](https://refactoring.guru/images/patterns/languages/ruby-3x.png) ![Design Patterns in Ruby](https://refactoring.guru/images/patterns/languages/mini/ruby-3x.png) Design Patterns in Ruby ======================= The Catalog of **Ruby** Examples -------------------------------- #### Creational Patterns ![Abstract Factory](https://refactoring.guru/images/patterns/cards/abstract-factory-mini-3x.png) #### Abstract Factory Lets you produce families of related objects without specifying their concrete classes. [Main article](https://refactoring.guru/design-patterns/abstract-factory) [Usage in Ruby](https://refactoring.guru/design-patterns/abstract-factory/ruby/example#lang-features) [Code example](https://refactoring.guru/design-patterns/abstract-factory/ruby/example#example-0) ![Builder](https://refactoring.guru/images/patterns/cards/builder-mini-3x.png) #### Builder Lets you construct complex objects step by step. The pattern allows you to produce different types and representations of an object using the same construction code. [Main article](https://refactoring.guru/design-patterns/builder) [Usage in Ruby](https://refactoring.guru/design-patterns/builder/ruby/example#lang-features) [Code example](https://refactoring.guru/design-patterns/builder/ruby/example#example-0) ![Factory Method](https://refactoring.guru/images/patterns/cards/factory-method-mini-3x.png) #### Factory Method Provides an interface for creating objects in a superclass, but allows subclasses to alter the type of objects that will be created. [Main article](https://refactoring.guru/design-patterns/factory-method) [Usage in Ruby](https://refactoring.guru/design-patterns/factory-method/ruby/example#lang-features) [Code example](https://refactoring.guru/design-patterns/factory-method/ruby/example#example-0) ![Prototype](https://refactoring.guru/images/patterns/cards/prototype-mini-3x.png) #### Prototype Lets you copy existing objects without making your code dependent on their classes. [Main article](https://refactoring.guru/design-patterns/prototype) [Usage in Ruby](https://refactoring.guru/design-patterns/prototype/ruby/example#lang-features) [Code example](https://refactoring.guru/design-patterns/prototype/ruby/example#example-0) ![Singleton](https://refactoring.guru/images/patterns/cards/singleton-mini-3x.png) #### Singleton Lets you ensure that a class has only one instance, while providing a global access point to this instance. [Main article](https://refactoring.guru/design-patterns/singleton) [Usage in Ruby](https://refactoring.guru/design-patterns/singleton/ruby/example#lang-features) [Naïve Singleton](https://refactoring.guru/design-patterns/singleton/ruby/example#example-0) [Thread-safe Singleton](https://refactoring.guru/design-patterns/singleton/ruby/example#example-1) #### Structural Patterns ![Adapter](https://refactoring.guru/images/patterns/cards/adapter-mini-3x.png) #### Adapter Allows objects with incompatible interfaces to collaborate. [Main article](https://refactoring.guru/design-patterns/adapter) [Usage in Ruby](https://refactoring.guru/design-patterns/adapter/ruby/example#lang-features) [Code example](https://refactoring.guru/design-patterns/adapter/ruby/example#example-0) ![Bridge](https://refactoring.guru/images/patterns/cards/bridge-mini-3x.png) #### Bridge Lets you split a large class or a set of closely related classes into two separate hierarchies—abstraction and implementation—which can be developed independently of each other. [Main article](https://refactoring.guru/design-patterns/bridge) [Usage in Ruby](https://refactoring.guru/design-patterns/bridge/ruby/example#lang-features) [Code example](https://refactoring.guru/design-patterns/bridge/ruby/example#example-0) ![Composite](https://refactoring.guru/images/patterns/cards/composite-mini-3x.png) #### Composite Lets you compose objects into tree structures and then work with these structures as if they were individual objects. [Main article](https://refactoring.guru/design-patterns/composite) [Usage in Ruby](https://refactoring.guru/design-patterns/composite/ruby/example#lang-features) [Code example](https://refactoring.guru/design-patterns/composite/ruby/example#example-0) ![Decorator](https://refactoring.guru/images/patterns/cards/decorator-mini-3x.png) #### Decorator Lets you attach new behaviors to objects by placing these objects inside special wrapper objects that contain the behaviors. [Main article](https://refactoring.guru/design-patterns/decorator) [Usage in Ruby](https://refactoring.guru/design-patterns/decorator/ruby/example#lang-features) [Code example](https://refactoring.guru/design-patterns/decorator/ruby/example#example-0) ![Facade](https://refactoring.guru/images/patterns/cards/facade-mini-3x.png) #### Facade Provides a simplified interface to a library, a framework, or any other complex set of classes. [Main article](https://refactoring.guru/design-patterns/facade) [Usage in Ruby](https://refactoring.guru/design-patterns/facade/ruby/example#lang-features) [Code example](https://refactoring.guru/design-patterns/facade/ruby/example#example-0) ![Flyweight](https://refactoring.guru/images/patterns/cards/flyweight-mini-3x.png) #### Flyweight Lets you fit more objects into the available amount of RAM by sharing common parts of state between multiple objects instead of keeping all of the data in each object. [Main article](https://refactoring.guru/design-patterns/flyweight) [Usage in Ruby](https://refactoring.guru/design-patterns/flyweight/ruby/example#lang-features) [Code example](https://refactoring.guru/design-patterns/flyweight/ruby/example#example-0) ![Proxy](https://refactoring.guru/images/patterns/cards/proxy-mini-3x.png) #### Proxy Lets you provide a substitute or placeholder for another object. A proxy controls access to the original object, allowing you to perform something either before or after the request gets through to the original object. [Main article](https://refactoring.guru/design-patterns/proxy) [Usage in Ruby](https://refactoring.guru/design-patterns/proxy/ruby/example#lang-features) [Code example](https://refactoring.guru/design-patterns/proxy/ruby/example#example-0) #### Behavioral Patterns ![Chain of Responsibility](https://refactoring.guru/images/patterns/cards/chain-of-responsibility-mini-3x.png) #### Chain of Responsibility Lets you pass requests along a chain of handlers. Upon receiving a request, each handler decides either to process the request or to pass it to the next handler in the chain. [Main article](https://refactoring.guru/design-patterns/chain-of-responsibility) [Usage in Ruby](https://refactoring.guru/design-patterns/chain-of-responsibility/ruby/example#lang-features) [Code example](https://refactoring.guru/design-patterns/chain-of-responsibility/ruby/example#example-0) ![Command](https://refactoring.guru/images/patterns/cards/command-mini-3x.png) #### Command Turns a request into a stand-alone object that contains all information about the request. This transformation lets you pass requests as a method arguments, delay or queue a request's execution, and support undoable operations. [Main article](https://refactoring.guru/design-patterns/command) [Usage in Ruby](https://refactoring.guru/design-patterns/command/ruby/example#lang-features) [Code example](https://refactoring.guru/design-patterns/command/ruby/example#example-0) ![Iterator](https://refactoring.guru/images/patterns/cards/iterator-mini-3x.png) #### Iterator Lets you traverse elements of a collection without exposing its underlying representation (list, stack, tree, etc.). [Main article](https://refactoring.guru/design-patterns/iterator) [Usage in Ruby](https://refactoring.guru/design-patterns/iterator/ruby/example#lang-features) [Code example](https://refactoring.guru/design-patterns/iterator/ruby/example#example-0) ![Mediator](https://refactoring.guru/images/patterns/cards/mediator-mini-3x.png) #### Mediator Lets you reduce chaotic dependencies between objects. The pattern restricts direct communications between the objects and forces them to collaborate only via a mediator object. [Main article](https://refactoring.guru/design-patterns/mediator) [Usage in Ruby](https://refactoring.guru/design-patterns/mediator/ruby/example#lang-features) [Code example](https://refactoring.guru/design-patterns/mediator/ruby/example#example-0) ![Memento](https://refactoring.guru/images/patterns/cards/memento-mini-3x.png) #### Memento Lets you save and restore the previous state of an object without revealing the details of its implementation. [Main article](https://refactoring.guru/design-patterns/memento) [Usage in Ruby](https://refactoring.guru/design-patterns/memento/ruby/example#lang-features) [Code example](https://refactoring.guru/design-patterns/memento/ruby/example#example-0) ![Observer](https://refactoring.guru/images/patterns/cards/observer-mini-3x.png) #### Observer Lets you define a subscription mechanism to notify multiple objects about any events that happen to the object they're observing. [Main article](https://refactoring.guru/design-patterns/observer) [Usage in Ruby](https://refactoring.guru/design-patterns/observer/ruby/example#lang-features) [Code example](https://refactoring.guru/design-patterns/observer/ruby/example#example-0) ![State](https://refactoring.guru/images/patterns/cards/state-mini-3x.png) #### State Lets an object alter its behavior when its internal state changes. It appears as if the object changed its class. [Main article](https://refactoring.guru/design-patterns/state) [Usage in Ruby](https://refactoring.guru/design-patterns/state/ruby/example#lang-features) [Code example](https://refactoring.guru/design-patterns/state/ruby/example#example-0) ![Strategy](https://refactoring.guru/images/patterns/cards/strategy-mini-3x.png) #### Strategy Lets you define a family of algorithms, put each of them into a separate class, and make their objects interchangeable. [Main article](https://refactoring.guru/design-patterns/strategy) [Usage in Ruby](https://refactoring.guru/design-patterns/strategy/ruby/example#lang-features) [Code example](https://refactoring.guru/design-patterns/strategy/ruby/example#example-0) ![Template Method](https://refactoring.guru/images/patterns/cards/template-method-mini-3x.png) #### Template Method Defines the skeleton of an algorithm in the superclass but lets subclasses override specific steps of the algorithm without changing its structure. [Main article](https://refactoring.guru/design-patterns/template-method) [Usage in Ruby](https://refactoring.guru/design-patterns/template-method/ruby/example#lang-features) [Code example](https://refactoring.guru/design-patterns/template-method/ruby/example#example-0) ![Visitor](https://refactoring.guru/images/patterns/cards/visitor-mini-3x.png) #### Visitor Lets you separate algorithms from the objects on which they operate. [Main article](https://refactoring.guru/design-patterns/visitor) [Usage in Ruby](https://refactoring.guru/design-patterns/visitor/ruby/example#lang-features) [Code example](https://refactoring.guru/design-patterns/visitor/ruby/example#example-0) --- # Design Patterns in Rust [There are patterns of patterns now! \ My friend's project: MetaPatterns.io](https://metapatterns.io/)  [](https://refactoring.guru/design-patterns/rust#checkout) [](https://refactoring.guru/design-patterns/rust#checkout) Design Patterns in Rust ======================= The Catalog of **Rust** Examples -------------------------------- #### Creational Patterns ![Abstract Factory](https://refactoring.guru/images/patterns/cards/abstract-factory-mini-3x.png) #### Abstract Factory Lets you produce families of related objects without specifying their concrete classes. [Main article](https://refactoring.guru/design-patterns/abstract-factory) [Code example](https://refactoring.guru/design-patterns/abstract-factory/rust/example#example-0) ![Builder](https://refactoring.guru/images/patterns/cards/builder-mini-3x.png) #### Builder Lets you construct complex objects step by step. The pattern allows you to produce different types and representations of an object using the same construction code. [Main article](https://refactoring.guru/design-patterns/builder) [Code example](https://refactoring.guru/design-patterns/builder/rust/example#example-0) ![Factory Method](https://refactoring.guru/images/patterns/cards/factory-method-mini-3x.png) #### Factory Method Provides an interface for creating objects in a superclass, but allows subclasses to alter the type of objects that will be created. [Main article](https://refactoring.guru/design-patterns/factory-method) [Code example 1](https://refactoring.guru/design-patterns/factory-method/rust/example#example-0) [Code example 2](https://refactoring.guru/design-patterns/factory-method/rust/example#example-1) ![Prototype](https://refactoring.guru/images/patterns/cards/prototype-mini-3x.png) #### Prototype Lets you copy existing objects without making your code dependent on their classes. [Main article](https://refactoring.guru/design-patterns/prototype) [Code example](https://refactoring.guru/design-patterns/prototype/rust/example#example-0) ![Singleton](https://refactoring.guru/images/patterns/cards/singleton-mini-3x.png) #### Singleton Lets you ensure that a class has only one instance, while providing a global access point to this instance. [Main article](https://refactoring.guru/design-patterns/singleton) [Code example](https://refactoring.guru/design-patterns/singleton/rust/example#example-0) #### Structural Patterns ![Adapter](https://refactoring.guru/images/patterns/cards/adapter-mini-3x.png) #### Adapter Allows objects with incompatible interfaces to collaborate. [Main article](https://refactoring.guru/design-patterns/adapter) [Code example](https://refactoring.guru/design-patterns/adapter/rust/example#example-0) ![Bridge](https://refactoring.guru/images/patterns/cards/bridge-mini-3x.png) #### Bridge Lets you split a large class or a set of closely related classes into two separate hierarchies—abstraction and implementation—which can be developed independently of each other. [Main article](https://refactoring.guru/design-patterns/bridge) [Code example](https://refactoring.guru/design-patterns/bridge/rust/example#example-0) ![Composite](https://refactoring.guru/images/patterns/cards/composite-mini-3x.png) #### Composite Lets you compose objects into tree structures and then work with these structures as if they were individual objects. [Main article](https://refactoring.guru/design-patterns/composite) [Code example](https://refactoring.guru/design-patterns/composite/rust/example#example-0) ![Decorator](https://refactoring.guru/images/patterns/cards/decorator-mini-3x.png) #### Decorator Lets you attach new behaviors to objects by placing these objects inside special wrapper objects that contain the behaviors. [Main article](https://refactoring.guru/design-patterns/decorator) [Code example](https://refactoring.guru/design-patterns/decorator/rust/example#example-0) ![Facade](https://refactoring.guru/images/patterns/cards/facade-mini-3x.png) #### Facade Provides a simplified interface to a library, a framework, or any other complex set of classes. [Main article](https://refactoring.guru/design-patterns/facade) [Code example](https://refactoring.guru/design-patterns/facade/rust/example#example-0) ![Flyweight](https://refactoring.guru/images/patterns/cards/flyweight-mini-3x.png) #### Flyweight Lets you fit more objects into the available amount of RAM by sharing common parts of state between multiple objects instead of keeping all of the data in each object. [Main article](https://refactoring.guru/design-patterns/flyweight) [Code example](https://refactoring.guru/design-patterns/flyweight/rust/example#example-0) ![Proxy](https://refactoring.guru/images/patterns/cards/proxy-mini-3x.png) #### Proxy Lets you provide a substitute or placeholder for another object. A proxy controls access to the original object, allowing you to perform something either before or after the request gets through to the original object. [Main article](https://refactoring.guru/design-patterns/proxy) [Code example](https://refactoring.guru/design-patterns/proxy/rust/example#example-0) #### Behavioral Patterns ![Chain of Responsibility](https://refactoring.guru/images/patterns/cards/chain-of-responsibility-mini-3x.png) #### Chain of Responsibility Lets you pass requests along a chain of handlers. Upon receiving a request, each handler decides either to process the request or to pass it to the next handler in the chain. [Main article](https://refactoring.guru/design-patterns/chain-of-responsibility) [Code example](https://refactoring.guru/design-patterns/chain-of-responsibility/rust/example#example-0) ![Command](https://refactoring.guru/images/patterns/cards/command-mini-3x.png) #### Command Turns a request into a stand-alone object that contains all information about the request. This transformation lets you pass requests as a method arguments, delay or queue a request's execution, and support undoable operations. [Main article](https://refactoring.guru/design-patterns/command) [Code example](https://refactoring.guru/design-patterns/command/rust/example#example-0) ![Iterator](https://refactoring.guru/images/patterns/cards/iterator-mini-3x.png) #### Iterator Lets you traverse elements of a collection without exposing its underlying representation (list, stack, tree, etc.). [Main article](https://refactoring.guru/design-patterns/iterator) [Code example](https://refactoring.guru/design-patterns/iterator/rust/example#example-0) ![Mediator](https://refactoring.guru/images/patterns/cards/mediator-mini-3x.png) #### Mediator Lets you reduce chaotic dependencies between objects. The pattern restricts direct communications between the objects and forces them to collaborate only via a mediator object. [Main article](https://refactoring.guru/design-patterns/mediator) [Code example](https://refactoring.guru/design-patterns/mediator/rust/example#example-0) ![Memento](https://refactoring.guru/images/patterns/cards/memento-mini-3x.png) #### Memento Lets you save and restore the previous state of an object without revealing the details of its implementation. [Main article](https://refactoring.guru/design-patterns/memento) [Code example](https://refactoring.guru/design-patterns/memento/rust/example#example-0) ![Observer](https://refactoring.guru/images/patterns/cards/observer-mini-3x.png) #### Observer Lets you define a subscription mechanism to notify multiple objects about any events that happen to the object they're observing. [Main article](https://refactoring.guru/design-patterns/observer) [Code example](https://refactoring.guru/design-patterns/observer/rust/example#example-0) ![State](https://refactoring.guru/images/patterns/cards/state-mini-3x.png) #### State Lets an object alter its behavior when its internal state changes. It appears as if the object changed its class. [Main article](https://refactoring.guru/design-patterns/state) [Code example](https://refactoring.guru/design-patterns/state/rust/example#example-0) ![Strategy](https://refactoring.guru/images/patterns/cards/strategy-mini-3x.png) #### Strategy Lets you define a family of algorithms, put each of them into a separate class, and make their objects interchangeable. [Main article](https://refactoring.guru/design-patterns/strategy) [Code example](https://refactoring.guru/design-patterns/strategy/rust/example#example-0) ![Template Method](https://refactoring.guru/images/patterns/cards/template-method-mini-3x.png) #### Template Method Defines the skeleton of an algorithm in the superclass but lets subclasses override specific steps of the algorithm without changing its structure. [Main article](https://refactoring.guru/design-patterns/template-method) [Code example](https://refactoring.guru/design-patterns/template-method/rust/example#example-0) ![Visitor](https://refactoring.guru/images/patterns/cards/visitor-mini-3x.png) #### Visitor Lets you separate algorithms from the objects on which they operate. [Main article](https://refactoring.guru/design-patterns/visitor) [Code example](https://refactoring.guru/design-patterns/visitor/rust/example#example-0) --- # Patrones de diseño / Design patterns [There are patterns of patterns now! \ My friend's project: MetaPatterns.io](https://metapatterns.io/)  [](https://refactoring.guru/es/design-patterns#checkout) [](https://refactoring.guru/es/design-patterns#checkout) ![](https://refactoring.guru/images/patterns/content/index/full/patterns-01-2x.png?id=3c9d28bb5e9f11205b3878c6b9fcf566) ![](https://refactoring.guru/images/patterns/content/index/full/patterns-02-2x.png?id=cf09c144c61a2e0f178c2bea34806f48) ![](https://refactoring.guru/images/patterns/content/index/full/patterns-03-2x.png?id=34a621d1e23d676c86eb33d8008c1d3d) ![](https://refactoring.guru/images/patterns/content/index/full/patterns-04-2x.png?id=31b2315c8c58c7db9b68ce228f03ecb7) ![](https://refactoring.guru/images/patterns/content/index/full/patterns-05-2x.png?id=ef1937518b72b7cb4afe2674b4806790) ![](https://refactoring.guru/images/patterns/content/index/full/patterns-06-2x.png?id=b4ffdc5d1e46dddf925fe0ab5534d6f9) ![](https://refactoring.guru/images/patterns/content/index/full/patterns-07-2x.png?id=cd9158569a4aedec02096f52057656de) Patrones de diseño ================== [![Patrones de diseño](https://refactoring.guru/images/patterns/content/index/patterns-i1-3x.png)](https://refactoring.guru/es/design-patterns/what-is-pattern "Intro to design patterns") Los **patrones de diseño** (design patterns) son soluciones habituales a problemas comunes en el diseño de software. Cada patrón es como un plano que se puede personalizar para resolver un problema de diseño particular de tu código. [¿Qué es un patrón de diseño?](https://refactoring.guru/es/design-patterns/what-is-pattern) ### Catálogo de patrones [![Catalog of patterns](https://refactoring.guru/images/patterns/content/index/patterns-i2-3x.png)](https://refactoring.guru/es/design-patterns/catalog "Catalog of patterns") Lista de 22 patrones de diseño clásicos, agrupados con base en su propósito. [Consulta el catálogo »](https://refactoring.guru/es/design-patterns/catalog) ### Ventajas de los patrones [![Ventajas de los patrones](https://refactoring.guru/images/patterns/content/index/patterns-i3-3x.png)](https://refactoring.guru/es/design-patterns/why-learn-patterns "Benefits of patterns") Los patrones son un juego de herramientas que brindan soluciones a problemas habituales en el diseño de software. Definen un lenguaje común que ayuda a tu equipo a comunicarse con más eficiencia. [Más sobre las ventajas »](https://refactoring.guru/es/design-patterns/why-learn-patterns) ### Clasificación [![Classification of patterns](https://refactoring.guru/images/patterns/content/index/patterns-i4-3x.png)](https://refactoring.guru/es/design-patterns/classification "Clasificación de patrones") Los patrones de diseño varían en su complejidad, nivel de detalle y escala de aplicabilidad. Además, pueden clasificarse por su propósito y dividirse en tres grupos. [Más sobre categorías »](https://refactoring.guru/es/design-patterns/classification) ### Historia de los patrones [![History of patterns](https://refactoring.guru/images/patterns/content/index/patterns-i5-3x.png)](https://refactoring.guru/es/design-patterns/history "History of patterns") ¿Quién inventó los patrones y cuándo? ¿Se pueden utilizar los patrones fuera del desarrollo de software? ¿Cómo se hace? [Más sobre la historia »](https://refactoring.guru/es/design-patterns/history) ### Crítica de los patrones [![Criticism of patterns](https://refactoring.guru/images/patterns/content/index/patterns-i6-3x.png)](https://refactoring.guru/es/design-patterns/criticism "Criticism of patterns") ¿Son tan buenos los patrones como se dice? ¿Es siempre posible utilizarlos? ¿Pueden los patrones ser dañinos en alguna ocasión? [Más sobre la crítica »](https://refactoring.guru/es/design-patterns/criticism) ### Sumérgete en los PATRONES DE DISEÑO [![Design patterns book](https://refactoring.guru/images/patterns/banners/patterns-book-banner-3-3x.png)](https://refactoring.guru/es/design-patterns/book "Design patterns book: Dive Into Design Patterns") Consulta nuestro ebook sobre patrones y principios de diseño. Está disponible en formatos PDF/ePUB/MOBI e incluye el archivo con ejemplos de código en Java, C#, C++, PHP, Python, Go, Ruby, TypeScript y Swift. [Saber más sobre el libro](https://refactoring.guru/es/design-patterns/book) [](https://refactoring.guru/es/design-patterns/book) --- # Design Patterns in Swift [There are patterns of patterns now! \ My friend's project: MetaPatterns.io](https://metapatterns.io/)  [](https://refactoring.guru/design-patterns/swift#checkout) [](https://refactoring.guru/design-patterns/swift#checkout) ![Design Patterns in Swift](https://refactoring.guru/images/patterns/languages/swift-3x.png) ![Design Patterns in Swift](https://refactoring.guru/images/patterns/languages/mini/swift-3x.png) Design Patterns in Swift ======================== The Catalog of **Swift** Examples --------------------------------- #### Creational Patterns ![Abstract Factory](https://refactoring.guru/images/patterns/cards/abstract-factory-mini-3x.png) #### Abstract Factory Lets you produce families of related objects without specifying their concrete classes. [Main article](https://refactoring.guru/design-patterns/abstract-factory) [Usage in Swift](https://refactoring.guru/design-patterns/abstract-factory/swift/example#lang-features) [Conceptual example](https://refactoring.guru/design-patterns/abstract-factory/swift/example#example-0) [Real-world example](https://refactoring.guru/design-patterns/abstract-factory/swift/example#example-1) ![Builder](https://refactoring.guru/images/patterns/cards/builder-mini-3x.png) #### Builder Lets you construct complex objects step by step. The pattern allows you to produce different types and representations of an object using the same construction code. [Main article](https://refactoring.guru/design-patterns/builder) [Usage in Swift](https://refactoring.guru/design-patterns/builder/swift/example#lang-features) [Conceptual example](https://refactoring.guru/design-patterns/builder/swift/example#example-0) [Real-world example](https://refactoring.guru/design-patterns/builder/swift/example#example-1) ![Factory Method](https://refactoring.guru/images/patterns/cards/factory-method-mini-3x.png) #### Factory Method Provides an interface for creating objects in a superclass, but allows subclasses to alter the type of objects that will be created. [Main article](https://refactoring.guru/design-patterns/factory-method) [Usage in Swift](https://refactoring.guru/design-patterns/factory-method/swift/example#lang-features) [Conceptual example](https://refactoring.guru/design-patterns/factory-method/swift/example#example-0) [Real-world example](https://refactoring.guru/design-patterns/factory-method/swift/example#example-1) ![Prototype](https://refactoring.guru/images/patterns/cards/prototype-mini-3x.png) #### Prototype Lets you copy existing objects without making your code dependent on their classes. [Main article](https://refactoring.guru/design-patterns/prototype) [Usage in Swift](https://refactoring.guru/design-patterns/prototype/swift/example#lang-features) [Conceptual example](https://refactoring.guru/design-patterns/prototype/swift/example#example-0) [Real-world example](https://refactoring.guru/design-patterns/prototype/swift/example#example-1) ![Singleton](https://refactoring.guru/images/patterns/cards/singleton-mini-3x.png) #### Singleton Lets you ensure that a class has only one instance, while providing a global access point to this instance. [Main article](https://refactoring.guru/design-patterns/singleton) [Usage in Swift](https://refactoring.guru/design-patterns/singleton/swift/example#lang-features) [Conceptual example](https://refactoring.guru/design-patterns/singleton/swift/example#example-0) [Real-world example](https://refactoring.guru/design-patterns/singleton/swift/example#example-1) #### Structural Patterns ![Adapter](https://refactoring.guru/images/patterns/cards/adapter-mini-3x.png) #### Adapter Allows objects with incompatible interfaces to collaborate. [Main article](https://refactoring.guru/design-patterns/adapter) [Usage in Swift](https://refactoring.guru/design-patterns/adapter/swift/example#lang-features) [Conceptual example](https://refactoring.guru/design-patterns/adapter/swift/example#example-0) [Real-world example](https://refactoring.guru/design-patterns/adapter/swift/example#example-1) ![Bridge](https://refactoring.guru/images/patterns/cards/bridge-mini-3x.png) #### Bridge Lets you split a large class or a set of closely related classes into two separate hierarchies—abstraction and implementation—which can be developed independently of each other. [Main article](https://refactoring.guru/design-patterns/bridge) [Usage in Swift](https://refactoring.guru/design-patterns/bridge/swift/example#lang-features) [Conceptual example](https://refactoring.guru/design-patterns/bridge/swift/example#example-0) [Real-world example](https://refactoring.guru/design-patterns/bridge/swift/example#example-1) ![Composite](https://refactoring.guru/images/patterns/cards/composite-mini-3x.png) #### Composite Lets you compose objects into tree structures and then work with these structures as if they were individual objects. [Main article](https://refactoring.guru/design-patterns/composite) [Usage in Swift](https://refactoring.guru/design-patterns/composite/swift/example#lang-features) [Conceptual example](https://refactoring.guru/design-patterns/composite/swift/example#example-0) [Real-world example](https://refactoring.guru/design-patterns/composite/swift/example#example-1) ![Decorator](https://refactoring.guru/images/patterns/cards/decorator-mini-3x.png) #### Decorator Lets you attach new behaviors to objects by placing these objects inside special wrapper objects that contain the behaviors. [Main article](https://refactoring.guru/design-patterns/decorator) [Usage in Swift](https://refactoring.guru/design-patterns/decorator/swift/example#lang-features) [Conceptual example](https://refactoring.guru/design-patterns/decorator/swift/example#example-0) [Real-world example](https://refactoring.guru/design-patterns/decorator/swift/example#example-1) ![Facade](https://refactoring.guru/images/patterns/cards/facade-mini-3x.png) #### Facade Provides a simplified interface to a library, a framework, or any other complex set of classes. [Main article](https://refactoring.guru/design-patterns/facade) [Usage in Swift](https://refactoring.guru/design-patterns/facade/swift/example#lang-features) [Conceptual example](https://refactoring.guru/design-patterns/facade/swift/example#example-0) [Real-world example](https://refactoring.guru/design-patterns/facade/swift/example#example-1) ![Flyweight](https://refactoring.guru/images/patterns/cards/flyweight-mini-3x.png) #### Flyweight Lets you fit more objects into the available amount of RAM by sharing common parts of state between multiple objects instead of keeping all of the data in each object. [Main article](https://refactoring.guru/design-patterns/flyweight) [Usage in Swift](https://refactoring.guru/design-patterns/flyweight/swift/example#lang-features) [Conceptual example](https://refactoring.guru/design-patterns/flyweight/swift/example#example-0) [Real-world example](https://refactoring.guru/design-patterns/flyweight/swift/example#example-1) ![Proxy](https://refactoring.guru/images/patterns/cards/proxy-mini-3x.png) #### Proxy Lets you provide a substitute or placeholder for another object. A proxy controls access to the original object, allowing you to perform something either before or after the request gets through to the original object. [Main article](https://refactoring.guru/design-patterns/proxy) [Usage in Swift](https://refactoring.guru/design-patterns/proxy/swift/example#lang-features) [Conceptual example](https://refactoring.guru/design-patterns/proxy/swift/example#example-0) [Real-world example](https://refactoring.guru/design-patterns/proxy/swift/example#example-1) #### Behavioral Patterns ![Chain of Responsibility](https://refactoring.guru/images/patterns/cards/chain-of-responsibility-mini-3x.png) #### Chain of Responsibility Lets you pass requests along a chain of handlers. Upon receiving a request, each handler decides either to process the request or to pass it to the next handler in the chain. [Main article](https://refactoring.guru/design-patterns/chain-of-responsibility) [Usage in Swift](https://refactoring.guru/design-patterns/chain-of-responsibility/swift/example#lang-features) [Conceptual example](https://refactoring.guru/design-patterns/chain-of-responsibility/swift/example#example-0) [Real-world example](https://refactoring.guru/design-patterns/chain-of-responsibility/swift/example#example-1) ![Command](https://refactoring.guru/images/patterns/cards/command-mini-3x.png) #### Command Turns a request into a stand-alone object that contains all information about the request. This transformation lets you pass requests as a method arguments, delay or queue a request's execution, and support undoable operations. [Main article](https://refactoring.guru/design-patterns/command) [Usage in Swift](https://refactoring.guru/design-patterns/command/swift/example#lang-features) [Conceptual example](https://refactoring.guru/design-patterns/command/swift/example#example-0) [Real-world example](https://refactoring.guru/design-patterns/command/swift/example#example-1) ![Iterator](https://refactoring.guru/images/patterns/cards/iterator-mini-3x.png) #### Iterator Lets you traverse elements of a collection without exposing its underlying representation (list, stack, tree, etc.). [Main article](https://refactoring.guru/design-patterns/iterator) [Usage in Swift](https://refactoring.guru/design-patterns/iterator/swift/example#lang-features) [Conceptual example](https://refactoring.guru/design-patterns/iterator/swift/example#example-0) [Real-world example](https://refactoring.guru/design-patterns/iterator/swift/example#example-1) ![Mediator](https://refactoring.guru/images/patterns/cards/mediator-mini-3x.png) #### Mediator Lets you reduce chaotic dependencies between objects. The pattern restricts direct communications between the objects and forces them to collaborate only via a mediator object. [Main article](https://refactoring.guru/design-patterns/mediator) [Usage in Swift](https://refactoring.guru/design-patterns/mediator/swift/example#lang-features) [Conceptual example](https://refactoring.guru/design-patterns/mediator/swift/example#example-0) [Real-world example](https://refactoring.guru/design-patterns/mediator/swift/example#example-1) ![Memento](https://refactoring.guru/images/patterns/cards/memento-mini-3x.png) #### Memento Lets you save and restore the previous state of an object without revealing the details of its implementation. [Main article](https://refactoring.guru/design-patterns/memento) [Usage in Swift](https://refactoring.guru/design-patterns/memento/swift/example#lang-features) [Conceptual example](https://refactoring.guru/design-patterns/memento/swift/example#example-0) [Real-world example](https://refactoring.guru/design-patterns/memento/swift/example#example-1) ![Observer](https://refactoring.guru/images/patterns/cards/observer-mini-3x.png) #### Observer Lets you define a subscription mechanism to notify multiple objects about any events that happen to the object they're observing. [Main article](https://refactoring.guru/design-patterns/observer) [Usage in Swift](https://refactoring.guru/design-patterns/observer/swift/example#lang-features) [Conceptual example](https://refactoring.guru/design-patterns/observer/swift/example#example-0) [Real-world example](https://refactoring.guru/design-patterns/observer/swift/example#example-1) ![State](https://refactoring.guru/images/patterns/cards/state-mini-3x.png) #### State Lets an object alter its behavior when its internal state changes. It appears as if the object changed its class. [Main article](https://refactoring.guru/design-patterns/state) [Usage in Swift](https://refactoring.guru/design-patterns/state/swift/example#lang-features) [Conceptual example](https://refactoring.guru/design-patterns/state/swift/example#example-0) [Real-world example](https://refactoring.guru/design-patterns/state/swift/example#example-1) ![Strategy](https://refactoring.guru/images/patterns/cards/strategy-mini-3x.png) #### Strategy Lets you define a family of algorithms, put each of them into a separate class, and make their objects interchangeable. [Main article](https://refactoring.guru/design-patterns/strategy) [Usage in Swift](https://refactoring.guru/design-patterns/strategy/swift/example#lang-features) [Conceptual example](https://refactoring.guru/design-patterns/strategy/swift/example#example-0) [Real-world example](https://refactoring.guru/design-patterns/strategy/swift/example#example-1) ![Template Method](https://refactoring.guru/images/patterns/cards/template-method-mini-3x.png) #### Template Method Defines the skeleton of an algorithm in the superclass but lets subclasses override specific steps of the algorithm without changing its structure. [Main article](https://refactoring.guru/design-patterns/template-method) [Usage in Swift](https://refactoring.guru/design-patterns/template-method/swift/example#lang-features) [Conceptual example](https://refactoring.guru/design-patterns/template-method/swift/example#example-0) [Real-world example](https://refactoring.guru/design-patterns/template-method/swift/example#example-1) ![Visitor](https://refactoring.guru/images/patterns/cards/visitor-mini-3x.png) #### Visitor Lets you separate algorithms from the objects on which they operate. [Main article](https://refactoring.guru/design-patterns/visitor) [Usage in Swift](https://refactoring.guru/design-patterns/visitor/swift/example#lang-features) [Conceptual example](https://refactoring.guru/design-patterns/visitor/swift/example#example-0) [Real-world example](https://refactoring.guru/design-patterns/visitor/swift/example#example-1) --- # Patrons de conception / Design patterns [There are patterns of patterns now! \ My friend's project: MetaPatterns.io](https://metapatterns.io/)  [](https://refactoring.guru/fr/design-patterns#checkout) [](https://refactoring.guru/fr/design-patterns#checkout) ![](https://refactoring.guru/images/patterns/content/index/full/patterns-01-2x.png?id=3c9d28bb5e9f11205b3878c6b9fcf566) ![](https://refactoring.guru/images/patterns/content/index/full/patterns-02-2x.png?id=cf09c144c61a2e0f178c2bea34806f48) ![](https://refactoring.guru/images/patterns/content/index/full/patterns-03-2x.png?id=34a621d1e23d676c86eb33d8008c1d3d) ![](https://refactoring.guru/images/patterns/content/index/full/patterns-04-2x.png?id=31b2315c8c58c7db9b68ce228f03ecb7) ![](https://refactoring.guru/images/patterns/content/index/full/patterns-05-2x.png?id=ef1937518b72b7cb4afe2674b4806790) ![](https://refactoring.guru/images/patterns/content/index/full/patterns-06-2x.png?id=b4ffdc5d1e46dddf925fe0ab5534d6f9) ![](https://refactoring.guru/images/patterns/content/index/full/patterns-07-2x.png?id=cd9158569a4aedec02096f52057656de) Patrons de conception ===================== [![Design Patterns](https://refactoring.guru/images/patterns/content/index/patterns-i1-3x.png)](https://refactoring.guru/fr/design-patterns/what-is-pattern "Introduction aux patrons de conception") Les **patrons de conception** (design patterns) sont des solutions classiques à des problèmes récurrents de la conception de logiciels. Chaque patron est une sorte de plan ou de schéma que vous pouvez personnaliser afin de résoudre un problème récurrent dans votre code. [Qu’est-ce qu’un patron de conception ?](https://refactoring.guru/fr/design-patterns/what-is-pattern) ### Catalogue de patrons de conception [![Catalog of patterns](https://refactoring.guru/images/patterns/content/index/patterns-i2-3x.png)](https://refactoring.guru/fr/design-patterns/catalog "Catalogue de patrons de conception") Liste de 22 patrons de conception classiques, groupés par intention. [Feuilleter le catalogue »](https://refactoring.guru/fr/design-patterns/catalog) ### Les bénéfices des patrons [![Les bénéfices apportés par les patrons de conception](https://refactoring.guru/images/patterns/content/index/patterns-i3-3x.png)](https://refactoring.guru/fr/design-patterns/why-learn-patterns "Les bénéfices apportés par les patrons de conception") Les patrons de conception sont une boîte à outils permettant de résoudre des problèmes classi- ques de la conception de logiciels. Ils défi- nissent un langage commun pour aider votre équipe à commu- niquer plus efficacement. [Plus d’informations sur leurs avantages »](https://refactoring.guru/fr/design-patterns/why-learn-patterns) ### Classification [![Classification](https://refactoring.guru/images/patterns/content/index/patterns-i4-3x.png)](https://refactoring.guru/fr/design-patterns/classification "Classification") Les patrons de conception diffèrent par leur complexité, leur niveau de détails et l’échelle à laquelle ils peuvent être mis en œuvre. Ils sont rangés dans trois catégories selon leur intention. [Plus d'informations sur ces catégories »](https://refactoring.guru/fr/design-patterns/classification) ### Histoire des patrons [![Histoire des patrons de conception](https://refactoring.guru/images/patterns/content/index/patterns-i5-3x.png)](https://refactoring.guru/fr/design-patterns/history "Histoire des patrons de conception") Qui a inventé les patrons et quand ? Peut-on utiliser les patrons de conception en dehors du développement de logiciels ? Comment faire ? [Plus d’informations sur leur histoire »](https://refactoring.guru/fr/design-patterns/history) ### Critique des patrons [![Critique des patrons de conception](https://refactoring.guru/images/patterns/content/index/patterns-i6-3x.png)](https://refactoring.guru/fr/design-patterns/criticism "Critique des patrons de conception") Les patrons sont-ils si efficaces que cela ? Peut-on les utiliser en permanence ? Les patrons causent-ils parfois plus de mal que de bien ? [Plus d’informations sur les critiques »](https://refactoring.guru/fr/design-patterns/criticism) ### Plongée au cœur des patrons de conception [![Design patterns book](https://refactoring.guru/images/patterns/banners/patterns-book-banner-3-3x.png)](https://refactoring.guru/fr/design-patterns/book "Design patterns book: Dive Into Design Patterns") Jetez un œil à notre livre sur les patrons de conception et certains principes. Il est disponible aux formats PDF/EPUB/MOBI/KFX et contient une archive avec des exemples de code en Java, C#, C++, Go, PHP, Python, Ruby, Swift et TypeScript. [Plus d'informations \ sur le livre](https://refactoring.guru/fr/design-patterns/book) [](https://refactoring.guru/fr/design-patterns/book) --- # 디자인 패턴들 [There are patterns of patterns now! \ My friend's project: MetaPatterns.io](https://metapatterns.io/)  [](https://refactoring.guru/ko/design-patterns#checkout) [](https://refactoring.guru/ko/design-patterns#checkout) ![](https://refactoring.guru/images/patterns/content/index/full/patterns-01-2x.png?id=3c9d28bb5e9f11205b3878c6b9fcf566) ![](https://refactoring.guru/images/patterns/content/index/full/patterns-02-2x.png?id=cf09c144c61a2e0f178c2bea34806f48) ![](https://refactoring.guru/images/patterns/content/index/full/patterns-03-2x.png?id=34a621d1e23d676c86eb33d8008c1d3d) ![](https://refactoring.guru/images/patterns/content/index/full/patterns-04-2x.png?id=31b2315c8c58c7db9b68ce228f03ecb7) ![](https://refactoring.guru/images/patterns/content/index/full/patterns-05-2x.png?id=ef1937518b72b7cb4afe2674b4806790) ![](https://refactoring.guru/images/patterns/content/index/full/patterns-06-2x.png?id=b4ffdc5d1e46dddf925fe0ab5534d6f9) ![](https://refactoring.guru/images/patterns/content/index/full/patterns-07-2x.png?id=cd9158569a4aedec02096f52057656de) 디자인패턴들 ====== [![디자인 패턴들](https://refactoring.guru/images/patterns/content/index/patterns-i1-3x.png)](https://refactoring.guru/ko/design-patterns/what-is-pattern "디자인 패턴 소개") **디자인 패턴**들은 소프트웨어 디자인 과정에서 자주 발생하는 문제들에 대한 일반적인 해결책들입니다. 이는 당신의 코드에서 반복적으로 되풀이되는 디자인 문제들을 해결하기 위하여 맞춤화할 수 있는 청사진들을 미리 만들어 놓은 것과 같습니다. [디자인 패턴이란?](https://refactoring.guru/ko/design-patterns/what-is-pattern) ### 패턴 목록 [![패턴 목록](https://refactoring.guru/images/patterns/content/index/patterns-i2-3x.png)](https://refactoring.guru/ko/design-patterns/catalog "Catalog of patterns") 의도별로 분류된 22개의 클래식 디자인 패턴 목록. [목록 살펴보기 »](https://refactoring.guru/ko/design-patterns/catalog) ### 패턴의 이점 [![패턴의 이점](https://refactoring.guru/images/patterns/content/index/patterns-i3-3x.png)](https://refactoring.guru/ko/design-patterns/why-learn-patterns "Benefits of patterns") 이곳에 소개된 패턴들은 소프트웨어 디자인의 일반적인 문제들에 대한 해결책을 모은 것으로, 당신과 당신의 팀원들이 더 효율적으로 의사소통하는 데 사용할 수 있는 공통적인 언어를 정의합니다. [패턴의 이점 더 알아보기 »](https://refactoring.guru/ko/design-patterns/why-learn-patterns) ### 분류 [![패턴의 분류](https://refactoring.guru/images/patterns/content/index/patterns-i4-3x.png)](https://refactoring.guru/ko/design-patterns/classification "Classification of patterns") 디자인 패턴은 복잡성, 상세도와 설계 중인 전체 시스템에 대한 적용 범위에 따라 분류되며, 또 의도에 따라 세분될 수도 있습니다. [패턴의 분류 더 알아보기 »](https://refactoring.guru/ko/design-patterns/classification) ### 패턴의 역사 [![패턴의 역사](https://refactoring.guru/images/patterns/content/index/patterns-i5-3x.png)](https://refactoring.guru/ko/design-patterns/history "History of patterns") 누가 언제 패턴을 발명했으며 프로그래밍 외의 분야에서 패턴을 사용할 수 있나요? [패턴의 역사 더 알아보기 »](https://refactoring.guru/ko/design-patterns/history) ### 비판 [![비판](https://refactoring.guru/images/patterns/content/index/patterns-i6-3x.png)](https://refactoring.guru/ko/design-patterns/criticism "Criticism of patterns") 패턴은 언제 유용하며 언제 적용할 수 없나요? 아니면 항상 패턴을 사용할 수 있나요? [패턴에 대한 비판 더 알아보기 »](https://refactoring.guru/ko/design-patterns/criticism) ### 디자인패턴에뛰어들기 [![디자인 패턴 책](https://refactoring.guru/images/patterns/banners/patterns-book-banner-3-3x.png)](https://refactoring.guru/ko/design-patterns/book "디자인 패턴 책: 디자인 패턴에 뛰어들기") 저희 eBook을 살펴보세요. 디자인 패턴 및 원칙들에 관한 책이며 PDF/ePUB/MOBI 형식으로 제공됩니다. 또 자바, C#, C++, PHP, 파이썬, 루비, Go, 스위프트 및 타입스크립트의 코드 예시를 별도의 보관소에 포함하여 제공합니다. [책에 대해 더 알아보세요](https://refactoring.guru/ko/design-patterns/book) [](https://refactoring.guru/ko/design-patterns/book) --- # デザインパターン [There are patterns of patterns now! \ My friend's project: MetaPatterns.io](https://metapatterns.io/)  [](https://refactoring.guru/ja/design-patterns#checkout) [](https://refactoring.guru/ja/design-patterns#checkout) ![](https://refactoring.guru/images/patterns/content/index/full/patterns-01-2x.png?id=3c9d28bb5e9f11205b3878c6b9fcf566) ![](https://refactoring.guru/images/patterns/content/index/full/patterns-02-2x.png?id=cf09c144c61a2e0f178c2bea34806f48) ![](https://refactoring.guru/images/patterns/content/index/full/patterns-03-2x.png?id=34a621d1e23d676c86eb33d8008c1d3d) ![](https://refactoring.guru/images/patterns/content/index/full/patterns-04-2x.png?id=31b2315c8c58c7db9b68ce228f03ecb7) ![](https://refactoring.guru/images/patterns/content/index/full/patterns-05-2x.png?id=ef1937518b72b7cb4afe2674b4806790) ![](https://refactoring.guru/images/patterns/content/index/full/patterns-06-2x.png?id=b4ffdc5d1e46dddf925fe0ab5534d6f9) ![](https://refactoring.guru/images/patterns/content/index/full/patterns-07-2x.png?id=cd9158569a4aedec02096f52057656de) デザイン パターン ========= [![デザインパターン](https://refactoring.guru/images/patterns/content/index/patterns-i1-3x.png)](https://refactoring.guru/ja/design-patterns/what-is-pattern "デザインパターン入門") **デザインパターン**は、 ソフトウェアの設計でよく 起きる問題に対する典型的な解決方法です。 パターンの一つ一つは、 自分のコードの設計 の一つ一つは、 自分のコードの設計上の問題に 合わせて調整可能な設計図のようなものです。 [デザインパターンとは? ​](https://refactoring.guru/ja/design-patterns/what-is-pattern) ### パターンのカタログ [![パターンのカタログ](https://refactoring.guru/images/patterns/content/index/patterns-i2-3x.png)](https://refactoring.guru/ja/design-patterns/catalog "Catalog of patterns") よく知られた 22 のデザイン パターンをその意図で分類。 [カタログ内を覗いてみる »](https://refactoring.guru/ja/design-patterns/catalog) ### パターンの利点 [![パターンの利点](https://refactoring.guru/images/patterns/content/index/patterns-i3-3x.png)](https://refactoring.guru/ja/design-patterns/why-learn-patterns "Benefits of patterns") パターンは、 ソフトウェア設計でよく 遭遇する問題の解決方法の道具箱です。 明確に定義された用語で、 チーム内の コミュニケーションを円滑にします。 [利点についてもう少し »](https://refactoring.guru/ja/design-patterns/why-learn-patterns) ### 分類 [![パターンの分類](https://refactoring.guru/images/patterns/content/index/patterns-i4-3x.png)](https://refactoring.guru/ja/design-patterns/classification "Classification of patterns") デザインパターンは、 複雑さ、 詳細度、 適用範囲の広さがいろいろ異なります。 さらに、 その意図により、 大きく三つ のグループに分けられます。 [分類についてさらに詳しく »](https://refactoring.guru/ja/design-patterns/classification) ### パターンの歴史 [![パターンの歴史](https://refactoring.guru/images/patterns/content/index/patterns-i5-3x.png)](https://refactoring.guru/ja/design-patterns/history "History of patterns") パターンは誰がいつ発明しましたか? ソフトウェア開発以外で使えますか? どうやって? [歴史についてもう少し »](https://refactoring.guru/ja/design-patterns/history) ### パターンの批判 [![パターンの批判](https://refactoring.guru/images/patterns/content/index/patterns-i6-3x.png)](https://refactoring.guru/ja/design-patterns/criticism "Criticism of patterns") パターンは宣伝文句と同じくらい良いですか? いつでも使うことができますか? 害になることはありませんか? [批判についてもう少し »](https://refactoring.guru/ja/design-patterns/criticism) ### 直撃!デザインパターン [![デザインパターンの本](https://refactoring.guru/images/patterns/banners/patterns-book-banner-3-3x.png)](https://refactoring.guru/ja/design-patterns/book "デザインパターンの本:直撃!デザインパターン") デザインパターンと設計原則 に関する電子書籍をご覧ください。 PDF、 ePUB、 MOBI の形式で入手可能で Java、 C#、 C++、 PHP、 Python、 Ruby、 Go、 Swift、 TypeScript のコード例も収録。 [本についてもっと知る](https://refactoring.guru/ja/design-patterns/book) [](https://refactoring.guru/ja/design-patterns/book) --- # Wzorce projektowe / Design patterns [There are patterns of patterns now! \ My friend's project: MetaPatterns.io](https://metapatterns.io/)  [](https://refactoring.guru/pl/design-patterns#checkout) [](https://refactoring.guru/pl/design-patterns#checkout) ![](https://refactoring.guru/images/patterns/content/index/full/patterns-01-2x.png?id=3c9d28bb5e9f11205b3878c6b9fcf566) ![](https://refactoring.guru/images/patterns/content/index/full/patterns-02-2x.png?id=cf09c144c61a2e0f178c2bea34806f48) ![](https://refactoring.guru/images/patterns/content/index/full/patterns-03-2x.png?id=34a621d1e23d676c86eb33d8008c1d3d) ![](https://refactoring.guru/images/patterns/content/index/full/patterns-04-2x.png?id=31b2315c8c58c7db9b68ce228f03ecb7) ![](https://refactoring.guru/images/patterns/content/index/full/patterns-05-2x.png?id=ef1937518b72b7cb4afe2674b4806790) ![](https://refactoring.guru/images/patterns/content/index/full/patterns-06-2x.png?id=b4ffdc5d1e46dddf925fe0ab5534d6f9) ![](https://refactoring.guru/images/patterns/content/index/full/patterns-07-2x.png?id=cd9158569a4aedec02096f52057656de) Wzorce Projektowe ================= [![Wzorce projektowe](https://refactoring.guru/images/patterns/content/index/patterns-i1-3x.png)](https://refactoring.guru/pl/design-patterns/what-is-pattern "Intro to design patterns") **Wzorce projektowe** (design patterns) to typowe rozwiązania problemów często napotykanych podczas projektowania oprogramowania. Każdy z nich stanowi plan, który po odpowiednim dostosowaniu pomaga poradzić sobie z konkretnym problemem w projekcie twojego kodu. [Czym jest wzorzec projektowy?](https://refactoring.guru/pl/design-patterns/what-is-pattern) ### Katalog wzorców [![Katalog wzorców](https://refactoring.guru/images/patterns/content/index/patterns-i2-3x.png)](https://refactoring.guru/pl/design-patterns/catalog "Katalog wzorców") Lista 22 klasycznych wzorców projektowych, podzielona ze względu na ich przeznaczenie. [Zajrzyj do katalogu wzorców »](https://refactoring.guru/pl/design-patterns/catalog) ### Zalety wzorców [![Zalety wzorców](https://refactoring.guru/images/patterns/content/index/patterns-i3-3x.png)](https://refactoring.guru/pl/design-patterns/why-learn-patterns "Zalety wzorców") Ponieważ wzorce są zestawem rozwiązań typowych problemów przy projektowaniu oprogramowania, definiują wspólny język pozwalający efektywniej współ- działać zespołowo. [Więcej o zaletach »](https://refactoring.guru/pl/design-patterns/why-learn-patterns) ### Klasyfikacja wzorców [![Klasyfikacja wzorców](https://refactoring.guru/images/patterns/content/index/patterns-i4-3x.png)](https://refactoring.guru/pl/design-patterns/classification "Klasyfikacja wzorców") Wzorce projektowe różnią się poziomem skompliko- wania, szczegółowością oraz skalą w jakiej można je zastosować. Ponadto można je podzielić na trzy kategorie — według ich przeznaczenia. [Więcej o kategoriach wzorców »](https://refactoring.guru/pl/design-patterns/classification) ### Historia wzorców [![Historia wzorców](https://refactoring.guru/images/patterns/content/index/patterns-i5-3x.png)](https://refactoring.guru/pl/design-patterns/history "Historia wzorców") Kto i kiedy wynalazł wzorce? Czy można ich używać poza sferą projektowania oprogramowania? Jeśli tak, to jak? [Więcej o historii wzorców »](https://refactoring.guru/pl/design-patterns/history) ### Krytyka wzorców [![Krytyka wzorców](https://refactoring.guru/images/patterns/content/index/patterns-i6-3x.png)](https://refactoring.guru/pl/design-patterns/criticism "Krytyka wzorców") Czy wzorce są naprawdę aż tak dobre? Czy zawsze można się nimi posłużyć? Czy wzorce mogą być szkodliwe? [Więcej o krytyce »](https://refactoring.guru/pl/design-patterns/criticism) ### WZORCE PROJEKTOWE Nowoczesny podręcznik [![Design patterns book](https://refactoring.guru/images/patterns/banners/patterns-book-banner-3-3x.png)](https://refactoring.guru/pl/design-patterns/book " 26/5000 Książka o wzorach projektowych: Wzorce projektowe. Nowoczesny podręcznik") Rzuć okiem na nasz eBook o wzorcach projektowych i zasadach programowania. Jest on dostępny w formatach PDF/ePUB/MOBI i zawiera archiwum przykładowego kodu w językach Java, C#, C++, PHP, Python, TypeScript, Go, Ruby i Swift. [Dowiedz się więcej o książce](https://refactoring.guru/pl/design-patterns/book) [](https://refactoring.guru/pl/design-patterns/book) --- # Патерни/шаблони проектування [There are patterns of patterns now! \ My friend's project: MetaPatterns.io](https://metapatterns.io/)  [](https://refactoring.guru/uk/design-patterns#checkout) [](https://refactoring.guru/uk/design-patterns#checkout) ![](https://refactoring.guru/images/patterns/content/index/full/patterns-01-2x.png?id=3c9d28bb5e9f11205b3878c6b9fcf566) ![](https://refactoring.guru/images/patterns/content/index/full/patterns-02-2x.png?id=cf09c144c61a2e0f178c2bea34806f48) ![](https://refactoring.guru/images/patterns/content/index/full/patterns-03-2x.png?id=34a621d1e23d676c86eb33d8008c1d3d) ![](https://refactoring.guru/images/patterns/content/index/full/patterns-04-2x.png?id=31b2315c8c58c7db9b68ce228f03ecb7) ![](https://refactoring.guru/images/patterns/content/index/full/patterns-05-2x.png?id=ef1937518b72b7cb4afe2674b4806790) ![](https://refactoring.guru/images/patterns/content/index/full/patterns-06-2x.png?id=b4ffdc5d1e46dddf925fe0ab5534d6f9) ![](https://refactoring.guru/images/patterns/content/index/full/patterns-07-2x.png?id=cd9158569a4aedec02096f52057656de) Патерни проектування ==================== [![Патерни проектування](https://refactoring.guru/images/patterns/content/index/patterns-i1-3x.png)](https://refactoring.guru/uk/design-patterns/what-is-pattern "Вступ до патернів проектування") Патерни (або шаблони) проектування описують типові способи вирішення поширених проблем при проектуванні програм. [Що таке патерн?](https://refactoring.guru/uk/design-patterns/what-is-pattern) ### Каталог патернів [![Каталог патернів](https://refactoring.guru/images/patterns/content/index/patterns-i2-3x.png)](https://refactoring.guru/uk/design-patterns/catalog "Каталог патернів") Список з 22-х класичних патернів, згрупованих за призначенням. [Зазирнути у каталог](https://refactoring.guru/uk/design-patterns/catalog) ### Користь патернів [![Користь патернів](https://refactoring.guru/images/patterns/content/index/patterns-i3-3x.png)](https://refactoring.guru/uk/design-patterns/why-learn-patterns "Користь патернів") Хоча ви можете цілком успішно працювати, не знаючи жодного патерна, опанувавши їх ви отримаєте ще один потужний інстру- мент в свій набір професіонала. [Докладніше про користь](https://refactoring.guru/uk/design-patterns/why-learn-patterns) ### Класифікація [![Класифікація патернів](https://refactoring.guru/images/patterns/content/index/patterns-i4-3x.png)](https://refactoring.guru/uk/design-patterns/classification "Класифікація патернів") Патерни відрізняються за рівнем складності, охоп- лення і деталізації проектованої системи. На додачу, їх можна поділити на три групи, щодо розв'язуваних проблем. [Докладніше про групи](https://refactoring.guru/uk/design-patterns/classification) ### Історія патернів [![Історія патернів](https://refactoring.guru/images/patterns/content/index/patterns-i5-3x.png)](https://refactoring.guru/uk/design-patterns/history "Історія патернів") Хто і коли придумав патерни та чи можна використовувати мову патернів поза розробкою програмного забезпечення? [Докладніше про історію](https://refactoring.guru/uk/design-patterns/history) ### Критика патернів [![Критика патернів](https://refactoring.guru/images/patterns/content/index/patterns-i6-3x.png)](https://refactoring.guru/uk/design-patterns/criticism "Критика патернів") Чи насправді патерни такі корисні, як про них пишуть? Чи можна всюди їх використовувати? І чому, іноді, патерни бувають шкідливими? [Докладніше про критику](https://refactoring.guru/uk/design-patterns/criticism) ### Занурення в Патерни [![Книжка про патерни: Занурення в Патерни Проектування](https://refactoring.guru/images/patterns/banners/patterns-book-banner-3-3x.png)](https://refactoring.guru/uk/design-patterns/book "Книжка про патерни: Занурення в Патерни Проектування") Електронна книжка про патерни та принципи проектування. Доступна у форматах PDF/EPUB/MOBI. Містить архів з прикладами на 9 мовах програмування. [Дізнатися більше про Книжку](https://refactoring.guru/uk/design-patterns/book) [](https://refactoring.guru/uk/design-patterns/book) --- # Padrões de Projeto [There are patterns of patterns now! \ My friend's project: MetaPatterns.io](https://metapatterns.io/)  [](https://refactoring.guru/pt-br/design-patterns#checkout) [](https://refactoring.guru/pt-br/design-patterns#checkout) ![](https://refactoring.guru/images/patterns/content/index/full/patterns-01-2x.png?id=3c9d28bb5e9f11205b3878c6b9fcf566) ![](https://refactoring.guru/images/patterns/content/index/full/patterns-02-2x.png?id=cf09c144c61a2e0f178c2bea34806f48) ![](https://refactoring.guru/images/patterns/content/index/full/patterns-03-2x.png?id=34a621d1e23d676c86eb33d8008c1d3d) ![](https://refactoring.guru/images/patterns/content/index/full/patterns-04-2x.png?id=31b2315c8c58c7db9b68ce228f03ecb7) ![](https://refactoring.guru/images/patterns/content/index/full/patterns-05-2x.png?id=ef1937518b72b7cb4afe2674b4806790) ![](https://refactoring.guru/images/patterns/content/index/full/patterns-06-2x.png?id=b4ffdc5d1e46dddf925fe0ab5534d6f9) ![](https://refactoring.guru/images/patterns/content/index/full/patterns-07-2x.png?id=cd9158569a4aedec02096f52057656de) Padrões de Projeto ================== [![Padrões de Projeto](https://refactoring.guru/images/patterns/content/index/patterns-i1-3x.png)](https://refactoring.guru/pt-br/design-patterns/what-is-pattern "Introdução aos padrões de design") **Padrões de projeto** (design patterns) são soluções típicas para problemas comuns em projeto de software. Cada padrão é como uma planta de construção que você pode customizar para resolver um problema de projeto particular em seu código. [O que é um padrão de projeto?](https://refactoring.guru/pt-br/design-patterns/what-is-pattern) ### Catálogo de padrões [![Catálogo de padrões](https://refactoring.guru/images/patterns/content/index/patterns-i2-3x.png)](https://refactoring.guru/pt-br/design-patterns/catalog "Catalog of patterns") Lista de 22 padrões de projeto clássicos, agrupados por seu propósito. [Dê uma olhada no catálogo »](https://refactoring.guru/pt-br/design-patterns/catalog) ### Benefícios dos padrões [![Benefícios dos padrões](https://refactoring.guru/images/patterns/content/index/patterns-i3-3x.png)](https://refactoring.guru/pt-br/design-patterns/why-learn-patterns "Benefits of patterns") Padrões são um conjunto de ferramentas para soluções de problemas comuns em design de software. Eles definem uma linguagem comum que ajuda sua equipe a se comunicar mais eficientemente. [Mais sobre os benefícios »](https://refactoring.guru/pt-br/design-patterns/why-learn-patterns) ### Classificação [![Classificação de padrões](https://refactoring.guru/images/patterns/content/index/patterns-i4-3x.png)](https://refactoring.guru/pt-br/design-patterns/classification "Classification of patterns") Padrões de projeto diferem por sua complexidade, nível de detalhamento e grau de aplicabilidade. Além disso, eles podem ser categorizados por seu propósito e divididos em três grupos. [Mais sobre as categorias »](https://refactoring.guru/pt-br/design-patterns/classification) ### História dos padrões [![História dos padrões](https://refactoring.guru/images/patterns/content/index/patterns-i5-3x.png)](https://refactoring.guru/pt-br/design-patterns/history "History of patterns") Quem inventou os padrões e quando? Você pode usar os padrões fora do desenvolvimento de software? Como fazer isso? [Mais sobre a história »](https://refactoring.guru/pt-br/design-patterns/history) ### Críticas aos padrões [![Críticas aos padrões](https://refactoring.guru/images/patterns/content/index/patterns-i6-3x.png)](https://refactoring.guru/pt-br/design-patterns/criticism "Criticism of patterns") Os padrões são realmente tão bons quanto dizem? É sempre possível usá-los? Os padrões podem ser prejudiciais às vezes? [Mais sobre as críticas »](https://refactoring.guru/pt-br/design-patterns/criticism) ### Mergulho nos Padrões de Projeto [![Design patterns book](https://refactoring.guru/images/patterns/banners/patterns-book-banner-3-3x.png)](https://refactoring.guru/pt-br/design-patterns/book "Design patterns book: Dive Into Design Patterns") Dê uma olhada no nosso ebook sobre princípios e padrões de projeto. Ele está disponível nos formatos PDF/ePUB/MOBI e inclui o arquivo com exemplos de código em Java, C#, C++, PHP, Python, Ruby, Go, Swift e TypeScript. [Saiba mais sobre o livro](https://refactoring.guru/pt-br/design-patterns/book) [](https://refactoring.guru/pt-br/design-patterns/book) --- # Паттерны/шаблоны проектирования [There are patterns of patterns now! \ My friend's project: MetaPatterns.io](https://metapatterns.io/)  [](https://refactoring.guru/ru/design-patterns#checkout) [](https://refactoring.guru/ru/design-patterns#checkout) ![](https://refactoring.guru/images/patterns/content/index/full/patterns-01-2x.png?id=3c9d28bb5e9f11205b3878c6b9fcf566) ![](https://refactoring.guru/images/patterns/content/index/full/patterns-02-2x.png?id=cf09c144c61a2e0f178c2bea34806f48) ![](https://refactoring.guru/images/patterns/content/index/full/patterns-03-2x.png?id=34a621d1e23d676c86eb33d8008c1d3d) ![](https://refactoring.guru/images/patterns/content/index/full/patterns-04-2x.png?id=31b2315c8c58c7db9b68ce228f03ecb7) ![](https://refactoring.guru/images/patterns/content/index/full/patterns-05-2x.png?id=ef1937518b72b7cb4afe2674b4806790) ![](https://refactoring.guru/images/patterns/content/index/full/patterns-06-2x.png?id=b4ffdc5d1e46dddf925fe0ab5534d6f9) ![](https://refactoring.guru/images/patterns/content/index/full/patterns-07-2x.png?id=cd9158569a4aedec02096f52057656de) Паттерны проектирования ======================= [![Паттерны проектирования](https://refactoring.guru/images/patterns/content/index/patterns-i1-3x.png)](https://refactoring.guru/ru/design-patterns/what-is-pattern "Вступление в паттерны проектирования") Паттерны (или шаблоны) проектирования описывают типичные способы решения часто встречающихся проблем при проектировании программ. [Что такое паттерн?](https://refactoring.guru/ru/design-patterns/what-is-pattern) ### Каталог паттернов [![Каталог паттернов](https://refactoring.guru/images/patterns/content/index/patterns-i2-3x.png)](https://refactoring.guru/ru/design-patterns/catalog "Каталог паттернов") Список из 22-х классических паттернов, сгруппированых по предназначению. [Заглянуть в каталог](https://refactoring.guru/ru/design-patterns/catalog) ### Польза паттернов [![Польза паттернов](https://refactoring.guru/images/patterns/content/index/patterns-i3-3x.png)](https://refactoring.guru/ru/design-patterns/why-learn-patterns "Польза паттернов") Вы можете вполне успешно работать, не зная ни одного паттерна. Но зная паттерны, вы получаете ещё один инструмент в свой личный набор профессионала. [Подробнее о пользе](https://refactoring.guru/ru/design-patterns/why-learn-patterns) ### Классификация [![Классификация паттернов](https://refactoring.guru/images/patterns/content/index/patterns-i4-3x.png)](https://refactoring.guru/ru/design-patterns/classification "Классификация паттернов") Паттерны отличаются по уровню сложности, охвата и детализации проектируемой системы. Кроме этого, их можно поделить на три группы, относительно решаемых проблем. [Подробнее о группах](https://refactoring.guru/ru/design-patterns/classification) ### История паттернов [![История паттернов](https://refactoring.guru/images/patterns/content/index/patterns-i5-3x.png)](https://refactoring.guru/ru/design-patterns/history "История паттернов") Кто и когда придумал паттерны? Можно ли использовать язык паттернов вне разработки программного обеспечения? [Подробнее об истории](https://refactoring.guru/ru/design-patterns/history) ### Критика паттернов [![Критика паттернов](https://refactoring.guru/images/patterns/content/index/patterns-i6-3x.png)](https://refactoring.guru/ru/design-patterns/criticism "Критика паттернов") Так ли паттерны хороши на самом деле? Всегда ли можно их использовать? Почему, иногда, паттерны бывают вредными? [Подробнее о критике](https://refactoring.guru/ru/design-patterns/criticism) ### Погружение в Паттерны [![Книга о паттернах: Погружение в Паттерны Проектирования](https://refactoring.guru/images/patterns/banners/patterns-book-banner-3-3x.png)](https://refactoring.guru/ru/design-patterns/book "Книга о паттернах: Погружение в Паттерны Проектирования") Электронная книга о паттернах и принципах проектирования. Доступна в PDF/EPUB/MOBI. Включает в себя архив с примерами на 9 языках программирования. [Узнать больше о Книге](https://refactoring.guru/ru/design-patterns/book) [](https://refactoring.guru/ru/design-patterns/book) --- # Qu’est-ce qu’un patron de conception ? [There are patterns of patterns now! \ My friend's project: MetaPatterns.io](https://metapatterns.io/)  [](https://refactoring.guru/fr/design-patterns/what-is-pattern#checkout) [](https://refactoring.guru/fr/design-patterns/what-is-pattern#checkout) [](https://refactoring.guru/) / [Patrons de conception](https://refactoring.guru/fr/design-patterns) Qu’est-ce qu’un patron de conception ? ====================================== Les **patrons de conception** sont des solutions classiques à des problèmes récurrents de la conception de logiciels. Ce sont des sortes de plans ou de schémas que l’on peut personnaliser afin de résoudre un problème récurrent dans notre code. Vous ne pouvez pas vous contenter de trouver un patron et de le recopier dans votre programme comme vous le feriez avec des fonctions ou des librairies prêtes à l’emploi. Un patron, ce n’est pas un bout de code spécifique, mais plutôt un concept général pour résoudre un problème précis. Vous pouvez suivre le principe du patron et implémenter une solution qui convient à votre propre programme. Les patrons sont souvent confondus avec les algorithmes, car ils décrivent tous deux des solutions classiques à des problèmes connus. Un algorithme définit toujours clairement un ensemble d’actions qui va vous mener vers un objectif, alors qu’un patron, c’est la description d’une solution à un plus haut niveau. Le code utilisé pour implémenter un même patron peut être complètement différent s’il est appliqué à deux programmes distincts. Un algorithme c’est un peu comme une recette de cuisine, ses étapes sont claires et vous guident vers un objectif précis. Un patron, c’est plutôt comme un plan : vous pouvez voir ses fonctionnalités et les résultats obtenus, mais la manière de l’implémenter vous revient. Que trouve-t-on dans un patron de conception ? ---------------------------------------------- La majorité des patrons sont présentés de façon très générale, afin qu’ils soient reproductibles dans tous les contextes. Voici les différentes sections que vous retrouverez habituellement dans la description d’un patron : * L’**Intention** du patron permet de décrire brièvement le problème et la solution. * La **Motivation** explique en détail la problématique et la solution offerte par le patron. * La **Structure** des classes montre les différentes parties du patron et leurs relations. * L’**Exemple de code** écrit dans un des langages de programmation les plus populaires facilite la compréhension générale de l’idée derrière le patron. Vous retrouverez dans certains catalogues de patrons, toute une liste de détails pratiques : des cas d’utilisation, les étapes de l’implémentation et les liens avec d’autres patrons. --- # ¿Qué es un patrón de diseño? [There are patterns of patterns now! \ My friend's project: MetaPatterns.io](https://metapatterns.io/)  [](https://refactoring.guru/es/design-patterns/what-is-pattern#checkout) [](https://refactoring.guru/es/design-patterns/what-is-pattern#checkout) [](https://refactoring.guru/) / [Patrones de diseño](https://refactoring.guru/es/design-patterns) ¿Qué es un patrón de diseño? ============================ Los **patrones de diseño** son soluciones habituales a problemas que ocurren con frecuencia en el diseño de software. Son como planos prefabricados que se pueden personalizar para resolver un problema de diseño recurrente en tu código. No se puede elegir un patrón y copiarlo en el programa como si se tratara de funciones o bibliotecas ya preparadas. El patrón no es una porción específica de código, sino un concepto general para resolver un problema particular. Puedes seguir los detalles del patrón e implementar una solución que encaje con las realidades de tu propio programa. A menudo los patrones se confunden con algoritmos porque ambos conceptos describen soluciones típicas a problemas conocidos. Mientras que un algoritmo siempre define un grupo claro de acciones para lograr un objetivo, un patrón es una descripción de más alto nivel de una solución. El código del mismo patrón aplicado a dos programas distintos puede ser diferente. Una analogía de un algoritmo sería una receta de cocina: ambos cuentan con pasos claros para alcanzar una meta. Por su parte, un patrón es más similar a un plano, ya que puedes observar cómo son su resultado y sus funciones, pero el orden exacto de la implementación depende de ti. ¿En qué consiste el patrón? --------------------------- La mayoría de los patrones se describe con mucha formalidad para que la gente pueda reproducirlos en muchos contextos. Aquí tienes las secciones que suelen estar presentes en la descripción de un patrón: * El **propósito** del patrón explica brevemente el problema y la solución. * La **motivación** explica en más detalle el problema y la solución que brinda el patrón. * La **estructura** de las clases muestra cada una de las partes del patrón y el modo en que se relacionan. * El **ejemplo de código** en uno de los lenguajes de programación populares facilita la asimilación de la idea que se esconde tras el patrón. Algunos catálogos de patrones enumeran otros detalles útiles, como la aplicabilidad del patrón, los pasos de implementación y las relaciones con otros patrones. --- # デザインパターンとは? [There are patterns of patterns now! \ My friend's project: MetaPatterns.io](https://metapatterns.io/)  [](https://refactoring.guru/ja/design-patterns/what-is-pattern#checkout) [](https://refactoring.guru/ja/design-patterns/what-is-pattern#checkout) [](https://refactoring.guru/) / [デザインパターン](https://refactoring.guru/ja/design-patterns) デザインパターンとは? =========== **デザインパターン**は、 ソフトウェア設計でよく起きる問題に対する典型的な解決方法です。 これらは、 事前に用意された、 問題解決のための設計図で、 自分の開発しているコードで繰り返し起きる設計上の問題の解決に適用できます。 デザインパターンは、 それを見つけてプログラムにコピーすればいい、 というものではありません。 既製の関数やライブラリーとは違います。 パターンは特定のコードではなく、 特定の問題を解決するための一般的な概念です。 パターンの詳細に従い、 自分のプログラムの現実に合うように解決策を実装することができます。 パターンは、 しばしばアルゴリズムと混同されます。 なぜなら、 どちらの概念も、 いくつかの既知の問題を解決するための典型的な方法を記述しているからです。 アルゴリズムは、 目標を達成するための明確な一連の行動を常に定義しますが、 パターンは解法に関するもっと高度なレベルの説明をします。 同じパターンを二つの異なるプログラムに適用すると、 そのコードは異なるかもしれません。 アルゴリズムは、 言ってみれば料理のレシピです。 どちらも目標を達成するための明確なステップがあります。 一方、 パターンは設計図のようなものです。 結果とその特徴を見ることができます。 しかし厳密な実装の順番は、 あなた次第です。 パターンは何でできていますか? --------------- ほとんどのパターンは、 様々な状況下で再現できるよう、 公式に記述されています。 通常、 パターンの記述には、 以下の部分が含まれています: * パターンの**意図**は、 問題と解決策の両方を簡単に説明。 * **動機**は、 問題とパターンが達成する解決策をさらに説明。 * クラスの**構造**は、 パターンの各部分と部分間の関係を説明。 * 普及しているプログラミング言語の一つによる**コード例**により、 パターンの背後にあるアイディアの理解を容易にする。 パターン・カタログによっては、 パターンの適応性、 実装手順、 他のパターンとの関係など、 他の役立つ詳細情報も掲載されています。 --- # 디자인 패턴이란? [There are patterns of patterns now! \ My friend's project: MetaPatterns.io](https://metapatterns.io/)  [](https://refactoring.guru/ko/design-patterns/what-is-pattern#checkout) [](https://refactoring.guru/ko/design-patterns/what-is-pattern#checkout) [](https://refactoring.guru/) / [디자인 패턴들](https://refactoring.guru/ko/design-patterns) 디자인 패턴이란? ========= **디자인 패턴**은 소프트웨어 디자인 과정에서 자주 발생하는 문제들에 대한 전형적인 해결책입니다. 이는 코드에서 반복되는 디자인 문제들을 해결하기 위해 맞춤화할 수 있는 미리 만들어진 청사진과 비슷합니다. 표준화된 라이브러리들이나 함수들을 코드에 복사해 사용하는 것처럼 패턴들을 붙여넣기식으로 사용할 수 없습니다. 패턴은 재사용할 수 있는 코드 조각이 아니라 특정 문제를 해결하는 방식을 알려주는 일반적인 개념입니다. 당신은 패턴의 세부 개념들을 적용하여 당신의 프로그램에 맞는 해결책을 구현할 수 있습니다. 패턴은 알고리즘과 자주 혼동됩니다. 왜냐하면 두 개념 모두 알려진 문제에 대한 일반적인 해결책을 설명하기 때문입니다. 알고리즘은 어떤 목표를 달성하기 위해 따라야 할 명확한 일련의 절차를 정의하지만, 패턴은 해결책에 대한 더 상위 수준의 설명입니다. 예를 들어 같은 패턴을 두 개의 다른 프로그램에 적용하면 두 프로그램의 코드는 다를 것입니다. 알고리즘은 요리법에 비유할 수 있지만 패턴은 요리법이 아닌 청사진에 더 가깝습니다. 알고리즘과 요리법 둘 다 목표를 달성하기 위한 명확한 단계들이 제시되어 있습니다. 반면에 청사진은 결과와 기능들은 제시하나 구현 단계 및 순서는 사용자가 결정합니다. 패턴은 무엇으로 구성되어 있나요? ------------------ 많은 상황에서 독자들이 패턴을 재현할 수 있도록 대부분의 패턴을 매우 형식적으로 설명했습니다. 패턴 설명에 일반적으로 표시되는 섹션들은 다음과 같습니다. * 패턴의 **의도** 섹션에서는 문제와 해결책을 간략하게 설명했습니다. * **동기** 섹션에서는 문제와 패턴이 가능하게 하는 해결책을 추가 설명했습니다. * 클래스의 **구조** 섹션에서는 패턴의 각 부분과 이러한 부분들이 어떻게 연관되어 있는지를 보여주었습니다. * **코드 예시** 섹션에서는 여러 인기 있는 프로그래밍 언어들로 된 코드 예시를 제공하여 독자들이 패턴 뒤의 아이디어를 이해하기 쉽도록 했습니다. 일부 패턴 섹션에서는 패턴의 적용, 구현 단계 및 다른 패턴과의 관계와 같은 유용한 세부 정보들도 설명했습니다. --- # Czym jest wzorzec projektowy? [There are patterns of patterns now! \ My friend's project: MetaPatterns.io](https://metapatterns.io/)  [](https://refactoring.guru/pl/design-patterns/what-is-pattern#checkout) [](https://refactoring.guru/pl/design-patterns/what-is-pattern#checkout) [](https://refactoring.guru/) / [Wzorce projektowe](https://refactoring.guru/pl/design-patterns) Czym jest wzorzec projektowy? ============================= **Wzorce projektowe** to typowe rozwiązania problemów często napotykanych przy projektowaniu oprogramowania. Stanowią coś na kształt gotowych planów które można dostosować, aby rozwiązać powtarzający się problem w kodzie. Nie można jednak wybrać wzorca i po prostu skopiować go do programu, jak bibliotekę czy funkcję zewnętrznego dostawcy. Wzorzec nie jest konkretnym fragmentem kodu, ale ogólną koncepcją pozwalającą rozwiązać dany problem. Postępując według wzorca możesz zaimplementować rozwiązanie które będzie pasować do realiów twojego programu. Wzorce często myli się z algorytmami, ponieważ obie koncepcje opisują typowe rozwiązanie jakiegoś znanego problemu. Algorytm jednak zawsze definiuje wyraźny zestaw czynności które prowadzą do celu, zaś wzorzec to wysokopoziomowy opis rozwiązania. Kod powstały na podstawie jednego wzorca może wyglądać zupełnie inaczej w różnych programach. Algorytm jest jak przepis kulinarny: oba mają wyraźnie określone etapy które trzeba wykonać w określonej kolejności by osiągnąć cel. Wzorzec bardziej przypomina strategię: znany jest wynik i założenia, ale dokładna kolejność implementacji należy do ciebie. Co składa się na wzorzec? ------------------------- Większość wzorców posiada formalny opis, dzięki czemu każdy może odtworzyć ich ideę w różnych kontekstach. Oto sekcje na które zwykle dzieli się opis wzorca: * **Cel** pobieżnie opisuje zarówno problem, jak i rozwiązanie. * **Motywacja** rozszerza opis problemu i rozwiązania jakie umożliwia dany wzorzec. * **Struktura** klas ukazuje poszczególne części wzorca i jak są ze sobą powiązane. * **Przykład kodu** w którymś z popularnych języków programowania pomaga zrozumieć ideę wzorca. Niektóre katalogi wzorców wymieniają inne użyteczne szczegóły, jak typowe zastosowanie wzorca, etapy implementacji i powiązania z innymi wzorcami. --- # O que é um padrão de projeto? [There are patterns of patterns now! \ My friend's project: MetaPatterns.io](https://metapatterns.io/)  [](https://refactoring.guru/pt-br/design-patterns/what-is-pattern#checkout) [](https://refactoring.guru/pt-br/design-patterns/what-is-pattern#checkout) [](https://refactoring.guru/) / [Padrões de Projeto](https://refactoring.guru/pt-br/design-patterns) O que é um padrão de projeto? ============================= **Padrões de projeto** são soluções típicas para problemas comuns em projeto de software. Eles são como plantas de obra pré fabricadas que você pode customizar para resolver um problema de projeto recorrente em seu código. Você não pode apenas encontrar um padrão e copiá-lo para dentro do seu programa, como você faz com funções e bibliotecas que encontra por aí. O padrão não é um pedaço de código específico, mas um conceito geral para resolver um problema em particular. Você pode seguir os detalhes do padrão e implementar uma solução que se adeque às realidades do seu próprio programa. Os padrões são frequentemente confundidos com algoritmos, porque ambos os conceitos descrevem soluções típicas para alguns problemas conhecidos. Enquanto um algoritmo sempre define um conjunto claro de ações para atingir uma meta, um padrão é mais uma descrição de alto nível de uma solução. O código do mesmo padrão aplicado para dois programas distintos pode ser bem diferente. Uma analogia a um algoritmo é que ele seria uma receita de comida: ambos têm etapas claras para chegar a um objetivo. Por outro lado, um padrão é mais como uma planta de obras: você pode ver o resultado e suas funcionalidades, mas a ordem exata de implementação depende de você. Do que consiste um padrão? -------------------------- A maioria dos padrões são descritos formalmente para que as pessoas possam reproduzi-los em diferentes contextos. Aqui estão algumas seções que são geralmente presentes em uma descrição de um padrão: * O **Propósito** do padrão descreve brevemente o problema e a solução. * A **Motivação** explica a fundo o problema e a solução que o padrão torna possível. * As **Estruturas** de classes mostram cada parte do padrão e como se relacionam. * **Exemplos de código** em uma das linguagens de programação populares tornam mais fácil compreender a ideia por trás do padrão. Alguns catálogos de padrão listam outros detalhes úteis, tais como a aplicabilidade do padrão, etapas de implementação, e relações com outros padrões. --- # Design Patterns in TypeScript [There are patterns of patterns now! \ My friend's project: MetaPatterns.io](https://metapatterns.io/)  [](https://refactoring.guru/design-patterns/typescript#checkout) [](https://refactoring.guru/design-patterns/typescript#checkout) ![Design Patterns in TypeScript](https://refactoring.guru/images/patterns/languages/typescript-3x.png) ![Design Patterns in TypeScript](https://refactoring.guru/images/patterns/languages/mini/typescript-3x.png) Design Patterns in TypeScript ============================= The Catalog of **TypeScript** Examples -------------------------------------- #### Creational Patterns ![Abstract Factory](https://refactoring.guru/images/patterns/cards/abstract-factory-mini-3x.png) #### Abstract Factory Lets you produce families of related objects without specifying their concrete classes. [Main article](https://refactoring.guru/design-patterns/abstract-factory) [Usage in TypeScript](https://refactoring.guru/design-patterns/abstract-factory/typescript/example#lang-features) [Code example](https://refactoring.guru/design-patterns/abstract-factory/typescript/example#example-0) ![Builder](https://refactoring.guru/images/patterns/cards/builder-mini-3x.png) #### Builder Lets you construct complex objects step by step. The pattern allows you to produce different types and representations of an object using the same construction code. [Main article](https://refactoring.guru/design-patterns/builder) [Usage in TypeScript](https://refactoring.guru/design-patterns/builder/typescript/example#lang-features) [Code example](https://refactoring.guru/design-patterns/builder/typescript/example#example-0) ![Factory Method](https://refactoring.guru/images/patterns/cards/factory-method-mini-3x.png) #### Factory Method Provides an interface for creating objects in a superclass, but allows subclasses to alter the type of objects that will be created. [Main article](https://refactoring.guru/design-patterns/factory-method) [Usage in TypeScript](https://refactoring.guru/design-patterns/factory-method/typescript/example#lang-features) [Code example](https://refactoring.guru/design-patterns/factory-method/typescript/example#example-0) ![Prototype](https://refactoring.guru/images/patterns/cards/prototype-mini-3x.png) #### Prototype Lets you copy existing objects without making your code dependent on their classes. [Main article](https://refactoring.guru/design-patterns/prototype) [Usage in TypeScript](https://refactoring.guru/design-patterns/prototype/typescript/example#lang-features) [Code example](https://refactoring.guru/design-patterns/prototype/typescript/example#example-0) ![Singleton](https://refactoring.guru/images/patterns/cards/singleton-mini-3x.png) #### Singleton Lets you ensure that a class has only one instance, while providing a global access point to this instance. [Main article](https://refactoring.guru/design-patterns/singleton) [Usage in TypeScript](https://refactoring.guru/design-patterns/singleton/typescript/example#lang-features) [Code example](https://refactoring.guru/design-patterns/singleton/typescript/example#example-0) #### Structural Patterns ![Adapter](https://refactoring.guru/images/patterns/cards/adapter-mini-3x.png) #### Adapter Allows objects with incompatible interfaces to collaborate. [Main article](https://refactoring.guru/design-patterns/adapter) [Usage in TypeScript](https://refactoring.guru/design-patterns/adapter/typescript/example#lang-features) [Code example](https://refactoring.guru/design-patterns/adapter/typescript/example#example-0) ![Bridge](https://refactoring.guru/images/patterns/cards/bridge-mini-3x.png) #### Bridge Lets you split a large class or a set of closely related classes into two separate hierarchies—abstraction and implementation—which can be developed independently of each other. [Main article](https://refactoring.guru/design-patterns/bridge) [Usage in TypeScript](https://refactoring.guru/design-patterns/bridge/typescript/example#lang-features) [Code example](https://refactoring.guru/design-patterns/bridge/typescript/example#example-0) ![Composite](https://refactoring.guru/images/patterns/cards/composite-mini-3x.png) #### Composite Lets you compose objects into tree structures and then work with these structures as if they were individual objects. [Main article](https://refactoring.guru/design-patterns/composite) [Usage in TypeScript](https://refactoring.guru/design-patterns/composite/typescript/example#lang-features) [Code example](https://refactoring.guru/design-patterns/composite/typescript/example#example-0) ![Decorator](https://refactoring.guru/images/patterns/cards/decorator-mini-3x.png) #### Decorator Lets you attach new behaviors to objects by placing these objects inside special wrapper objects that contain the behaviors. [Main article](https://refactoring.guru/design-patterns/decorator) [Usage in TypeScript](https://refactoring.guru/design-patterns/decorator/typescript/example#lang-features) [Code example](https://refactoring.guru/design-patterns/decorator/typescript/example#example-0) ![Facade](https://refactoring.guru/images/patterns/cards/facade-mini-3x.png) #### Facade Provides a simplified interface to a library, a framework, or any other complex set of classes. [Main article](https://refactoring.guru/design-patterns/facade) [Usage in TypeScript](https://refactoring.guru/design-patterns/facade/typescript/example#lang-features) [Code example](https://refactoring.guru/design-patterns/facade/typescript/example#example-0) ![Flyweight](https://refactoring.guru/images/patterns/cards/flyweight-mini-3x.png) #### Flyweight Lets you fit more objects into the available amount of RAM by sharing common parts of state between multiple objects instead of keeping all of the data in each object. [Main article](https://refactoring.guru/design-patterns/flyweight) [Usage in TypeScript](https://refactoring.guru/design-patterns/flyweight/typescript/example#lang-features) [Code example](https://refactoring.guru/design-patterns/flyweight/typescript/example#example-0) ![Proxy](https://refactoring.guru/images/patterns/cards/proxy-mini-3x.png) #### Proxy Lets you provide a substitute or placeholder for another object. A proxy controls access to the original object, allowing you to perform something either before or after the request gets through to the original object. [Main article](https://refactoring.guru/design-patterns/proxy) [Usage in TypeScript](https://refactoring.guru/design-patterns/proxy/typescript/example#lang-features) [Code example](https://refactoring.guru/design-patterns/proxy/typescript/example#example-0) #### Behavioral Patterns ![Chain of Responsibility](https://refactoring.guru/images/patterns/cards/chain-of-responsibility-mini-3x.png) #### Chain of Responsibility Lets you pass requests along a chain of handlers. Upon receiving a request, each handler decides either to process the request or to pass it to the next handler in the chain. [Main article](https://refactoring.guru/design-patterns/chain-of-responsibility) [Usage in TypeScript](https://refactoring.guru/design-patterns/chain-of-responsibility/typescript/example#lang-features) [Code example](https://refactoring.guru/design-patterns/chain-of-responsibility/typescript/example#example-0) ![Command](https://refactoring.guru/images/patterns/cards/command-mini-3x.png) #### Command Turns a request into a stand-alone object that contains all information about the request. This transformation lets you pass requests as a method arguments, delay or queue a request's execution, and support undoable operations. [Main article](https://refactoring.guru/design-patterns/command) [Usage in TypeScript](https://refactoring.guru/design-patterns/command/typescript/example#lang-features) [Code example](https://refactoring.guru/design-patterns/command/typescript/example#example-0) ![Iterator](https://refactoring.guru/images/patterns/cards/iterator-mini-3x.png) #### Iterator Lets you traverse elements of a collection without exposing its underlying representation (list, stack, tree, etc.). [Main article](https://refactoring.guru/design-patterns/iterator) [Usage in TypeScript](https://refactoring.guru/design-patterns/iterator/typescript/example#lang-features) [Code example](https://refactoring.guru/design-patterns/iterator/typescript/example#example-0) ![Mediator](https://refactoring.guru/images/patterns/cards/mediator-mini-3x.png) #### Mediator Lets you reduce chaotic dependencies between objects. The pattern restricts direct communications between the objects and forces them to collaborate only via a mediator object. [Main article](https://refactoring.guru/design-patterns/mediator) [Usage in TypeScript](https://refactoring.guru/design-patterns/mediator/typescript/example#lang-features) [Code example](https://refactoring.guru/design-patterns/mediator/typescript/example#example-0) ![Memento](https://refactoring.guru/images/patterns/cards/memento-mini-3x.png) #### Memento Lets you save and restore the previous state of an object without revealing the details of its implementation. [Main article](https://refactoring.guru/design-patterns/memento) [Usage in TypeScript](https://refactoring.guru/design-patterns/memento/typescript/example#lang-features) [Code example](https://refactoring.guru/design-patterns/memento/typescript/example#example-0) ![Observer](https://refactoring.guru/images/patterns/cards/observer-mini-3x.png) #### Observer Lets you define a subscription mechanism to notify multiple objects about any events that happen to the object they're observing. [Main article](https://refactoring.guru/design-patterns/observer) [Usage in TypeScript](https://refactoring.guru/design-patterns/observer/typescript/example#lang-features) [Code example](https://refactoring.guru/design-patterns/observer/typescript/example#example-0) ![State](https://refactoring.guru/images/patterns/cards/state-mini-3x.png) #### State Lets an object alter its behavior when its internal state changes. It appears as if the object changed its class. [Main article](https://refactoring.guru/design-patterns/state) [Usage in TypeScript](https://refactoring.guru/design-patterns/state/typescript/example#lang-features) [Code example](https://refactoring.guru/design-patterns/state/typescript/example#example-0) ![Strategy](https://refactoring.guru/images/patterns/cards/strategy-mini-3x.png) #### Strategy Lets you define a family of algorithms, put each of them into a separate class, and make their objects interchangeable. [Main article](https://refactoring.guru/design-patterns/strategy) [Usage in TypeScript](https://refactoring.guru/design-patterns/strategy/typescript/example#lang-features) [Code example](https://refactoring.guru/design-patterns/strategy/typescript/example#example-0) ![Template Method](https://refactoring.guru/images/patterns/cards/template-method-mini-3x.png) #### Template Method Defines the skeleton of an algorithm in the superclass but lets subclasses override specific steps of the algorithm without changing its structure. [Main article](https://refactoring.guru/design-patterns/template-method) [Usage in TypeScript](https://refactoring.guru/design-patterns/template-method/typescript/example#lang-features) [Code example](https://refactoring.guru/design-patterns/template-method/typescript/example#example-0) ![Visitor](https://refactoring.guru/images/patterns/cards/visitor-mini-3x.png) #### Visitor Lets you separate algorithms from the objects on which they operate. [Main article](https://refactoring.guru/design-patterns/visitor) [Usage in TypeScript](https://refactoring.guru/design-patterns/visitor/typescript/example#lang-features) [Code example](https://refactoring.guru/design-patterns/visitor/typescript/example#example-0) --- # Abstract Factory in C++ / Design Patterns [There are patterns of patterns now! \ My friend's project: MetaPatterns.io](https://metapatterns.io/)  [](https://refactoring.guru/design-patterns/abstract-factory/cpp/example#checkout) [](https://refactoring.guru/design-patterns/abstract-factory/cpp/example#checkout) [](https://refactoring.guru/) / [Design Patterns](https://refactoring.guru/design-patterns) / [Abstract Factory](https://refactoring.guru/design-patterns/abstract-factory) / [C++](https://refactoring.guru/design-patterns/cpp) ![Abstract Factory](https://refactoring.guru/images/patterns/cards/abstract-factory-mini-2x.png?id=22236aaa65ff52cbde1c713216d52c1f) **Abstract Factory** in C++ =========================== **Abstract Factory** is a creational design pattern, which solves the problem of creating entire product families without specifying their concrete classes. Abstract Factory defines an interface for creating all distinct products but leaves the actual product creation to concrete factory classes. Each factory type corresponds to a certain product variety. The client code calls the creation methods of a factory object instead of creating products directly with a constructor call (`new` operator). Since a factory corresponds to a single product variant, all its products will be compatible. Client code works with factories and products only through their abstract interfaces. This lets the client code work with any product variants, created by the factory object. You just create a new concrete factory class and pass it to the client code. > If you can’t figure out the difference between various factory patterns and concepts, then read our [Factory Comparison](https://refactoring.guru/design-patterns/factory-comparison) > . [Learn more about Abstract Factory](https://refactoring.guru/design-patterns/abstract-factory) Navigation  [Intro](https://refactoring.guru/design-patterns/abstract-factory/cpp/example#)  [Conceptual Example](https://refactoring.guru/design-patterns/abstract-factory/cpp/example#example-0)  [main](https://refactoring.guru/design-patterns/abstract-factory/cpp/example#example-0--main-cc)  [Output](https://refactoring.guru/design-patterns/abstract-factory/cpp/example#example-0--Output-txt) **Complexity:** **Popularity:** **Usage examples:** The Abstract Factory pattern is pretty common in C++ code. Many frameworks and libraries use it to provide a way to extend and customize their standard components. **Identification:** The pattern is easy to recognize by methods, which return a factory object. Then, the factory is used for creating specific sub-components. Conceptual Example ------------------ This example illustrates the structure of the **Abstract Factory** design pattern. It focuses on answering these questions: * What classes does it consist of? * What roles do these classes play? * In what way the elements of the pattern are related? #### **main.cc:** Conceptual example /\*\* \* Each distinct product of a product family should have a base interface. All \* variants of the product must implement this interface. \*/ class AbstractProductA { public: virtual ~AbstractProductA(){}; virtual std::string UsefulFunctionA() const = 0; }; /\*\* \* Concrete Products are created by corresponding Concrete Factories. \*/ class ConcreteProductA1 : public AbstractProductA { public: std::string UsefulFunctionA() const override { return "The result of the product A1."; } }; class ConcreteProductA2 : public AbstractProductA { std::string UsefulFunctionA() const override { return "The result of the product A2."; } }; /\*\* \* Here's the the base interface of another product. All products can interact \* with each other, but proper interaction is possible only between products of \* the same concrete variant. \*/ class AbstractProductB { /\*\* \* Product B is able to do its own thing... \*/ public: virtual ~AbstractProductB(){}; virtual std::string UsefulFunctionB() const = 0; /\*\* \* ...but it also can collaborate with the ProductA. \* \* The Abstract Factory makes sure that all products it creates are of the \* same variant and thus, compatible. \*/ virtual std::string AnotherUsefulFunctionB(const AbstractProductA &collaborator) const = 0; }; /\*\* \* Concrete Products are created by corresponding Concrete Factories. \*/ class ConcreteProductB1 : public AbstractProductB { public: std::string UsefulFunctionB() const override { return "The result of the product B1."; } /\*\* \* The variant, Product B1, is only able to work correctly with the variant, \* Product A1. Nevertheless, it accepts any instance of AbstractProductA as an \* argument. \*/ std::string AnotherUsefulFunctionB(const AbstractProductA &collaborator) const override { const std::string result = collaborator.UsefulFunctionA(); return "The result of the B1 collaborating with ( " + result + " )"; } }; class ConcreteProductB2 : public AbstractProductB { public: std::string UsefulFunctionB() const override { return "The result of the product B2."; } /\*\* \* The variant, Product B2, is only able to work correctly with the variant, \* Product A2. Nevertheless, it accepts any instance of AbstractProductA as an \* argument. \*/ std::string AnotherUsefulFunctionB(const AbstractProductA &collaborator) const override { const std::string result = collaborator.UsefulFunctionA(); return "The result of the B2 collaborating with ( " + result + " )"; } }; /\*\* \* The Abstract Factory interface declares a set of methods that return \* different abstract products. These products are called a family and are \* related by a high-level theme or concept. Products of one family are usually \* able to collaborate among themselves. A family of products may have several \* variants, but the products of one variant are incompatible with products of \* another. \*/ class AbstractFactory { public: virtual ~AbstractFactory(){}; virtual AbstractProductA \*CreateProductA() const = 0; virtual AbstractProductB \*CreateProductB() const = 0; }; /\*\* \* Concrete Factories produce a family of products that belong to a single \* variant. The factory guarantees that resulting products are compatible. Note \* that signatures of the Concrete Factory's methods return an abstract product, \* while inside the method a concrete product is instantiated. \*/ class ConcreteFactory1 : public AbstractFactory { public: AbstractProductA \*CreateProductA() const override { return new ConcreteProductA1(); } AbstractProductB \*CreateProductB() const override { return new ConcreteProductB1(); } }; /\*\* \* Each Concrete Factory has a corresponding product variant. \*/ class ConcreteFactory2 : public AbstractFactory { public: AbstractProductA \*CreateProductA() const override { return new ConcreteProductA2(); } AbstractProductB \*CreateProductB() const override { return new ConcreteProductB2(); } }; /\*\* \* The client code works with factories and products only through abstract \* types: AbstractFactory and AbstractProduct. This lets you pass any factory or \* product subclass to the client code without breaking it. \*/ void ClientCode(const AbstractFactory &factory) { const AbstractProductA \*product\_a = factory.CreateProductA(); const AbstractProductB \*product\_b = factory.CreateProductB(); std::cout << product\_b->UsefulFunctionB() << "\\n"; std::cout << product\_b->AnotherUsefulFunctionB(\*product\_a) << "\\n"; delete product\_a; delete product\_b; } int main() { std::cout << "Client: Testing client code with the first factory type:\\n"; ConcreteFactory1 \*f1 = new ConcreteFactory1(); ClientCode(\*f1); delete f1; std::cout << std::endl; std::cout << "Client: Testing the same client code with the second factory type:\\n"; ConcreteFactory2 \*f2 = new ConcreteFactory2(); ClientCode(\*f2); delete f2; return 0; } #### **Output.txt:** Execution result Client: Testing client code with the first factory type: The result of the product B1. The result of the B1 collaborating with the (The result of the product A1.) Client: Testing the same client code with the second factory type: The result of the product B2. The result of the B2 collaborating with the (The result of the product A2.) **Abstract Factory** in Other Languages --------------------------------------- [![Abstract Factory in C#](https://refactoring.guru/images/patterns/icons/csharp.svg?id=da64592defc6e86d57c39c66e9de3e58)](https://refactoring.guru/design-patterns/abstract-factory/csharp/example "Abstract Factory in C#") [![Abstract Factory in Go](https://refactoring.guru/images/patterns/icons/go.svg?id=1a89927eb99b1ea3fde7701d97970aca)](https://refactoring.guru/design-patterns/abstract-factory/go/example "Abstract Factory in Go") [![Abstract Factory in Java](https://refactoring.guru/images/patterns/icons/java.svg?id=e6d87e2dca08c953fe3acd1275ed4f4e)](https://refactoring.guru/design-patterns/abstract-factory/java/example "Abstract Factory in Java") [![Abstract Factory in PHP](https://refactoring.guru/images/patterns/icons/php.svg?id=be1906eb26b71ec1d3b93720d6156618)](https://refactoring.guru/design-patterns/abstract-factory/php/example "Abstract Factory in PHP") [![Abstract Factory in Python](https://refactoring.guru/images/patterns/icons/python.svg?id=6d815d43c0f7050a1151b43e51569c9f)](https://refactoring.guru/design-patterns/abstract-factory/python/example "Abstract Factory in Python") [![Abstract Factory in Ruby](https://refactoring.guru/images/patterns/icons/ruby.svg?id=b065b718c914bf8e960ef731600be1eb)](https://refactoring.guru/design-patterns/abstract-factory/ruby/example "Abstract Factory in Ruby") [![Abstract Factory in Rust](https://refactoring.guru/images/patterns/icons/rust.svg?id=1f5698a4b5ae23fe79413511747e4a87)](https://refactoring.guru/design-patterns/abstract-factory/rust/example "Abstract Factory in Rust") [![Abstract Factory in Swift](https://refactoring.guru/images/patterns/icons/swift.svg?id=0b716c2d52ec3a48fbe91ac031070c1d)](https://refactoring.guru/design-patterns/abstract-factory/swift/example "Abstract Factory in Swift") [![Abstract Factory in TypeScript](https://refactoring.guru/images/patterns/icons/typescript.svg?id=2239d0f16cb703540c205dd8cb0c0cb7)](https://refactoring.guru/design-patterns/abstract-factory/typescript/example "Abstract Factory in TypeScript") --- # Abstract Factory in Go / Design Patterns [There are patterns of patterns now! \ My friend's project: MetaPatterns.io](https://metapatterns.io/)  [](https://refactoring.guru/design-patterns/abstract-factory/go/example#checkout) [](https://refactoring.guru/design-patterns/abstract-factory/go/example#checkout) [](https://refactoring.guru/) / [Design Patterns](https://refactoring.guru/design-patterns) / [Abstract Factory](https://refactoring.guru/design-patterns/abstract-factory) / [Go](https://refactoring.guru/design-patterns/go) ![Abstract Factory](https://refactoring.guru/images/patterns/cards/abstract-factory-mini-2x.png?id=22236aaa65ff52cbde1c713216d52c1f) **Abstract Factory** in Go ========================== **Abstract Factory** is a creational design pattern, which solves the problem of creating entire product families without specifying their concrete classes. Abstract Factory defines an interface for creating all distinct products but leaves the actual product creation to concrete factory classes. Each factory type corresponds to a certain product variety. The client code calls the creation methods of a factory object instead of creating products directly with a constructor call (`new` operator). Since a factory corresponds to a single product variant, all its products will be compatible. Client code works with factories and products only through their abstract interfaces. This lets the client code work with any product variants, created by the factory object. You just create a new concrete factory class and pass it to the client code. > If you can’t figure out the difference between various factory patterns and concepts, then read our [Factory Comparison](https://refactoring.guru/design-patterns/factory-comparison) > . [Learn more about Abstract Factory](https://refactoring.guru/design-patterns/abstract-factory) Navigation  [Intro](https://refactoring.guru/design-patterns/abstract-factory/go/example#)  [Conceptual Example](https://refactoring.guru/design-patterns/abstract-factory/go/example#example-0)  [i­Sports­Factory](https://refactoring.guru/design-patterns/abstract-factory/go/example#example-0--iSportsFactory-go)  [adidas](https://refactoring.guru/design-patterns/abstract-factory/go/example#example-0--adidas-go)  [nike](https://refactoring.guru/design-patterns/abstract-factory/go/example#example-0--nike-go)  [i­Shoe](https://refactoring.guru/design-patterns/abstract-factory/go/example#example-0--iShoe-go)  [adidas­Shoe](https://refactoring.guru/design-patterns/abstract-factory/go/example#example-0--adidasShoe-go)  [nike­Shoe](https://refactoring.guru/design-patterns/abstract-factory/go/example#example-0--nikeShoe-go)  [i­Shirt](https://refactoring.guru/design-patterns/abstract-factory/go/example#example-0--iShirt-go)  [adidas­Shirt](https://refactoring.guru/design-patterns/abstract-factory/go/example#example-0--adidasShirt-go)  [nike­Shirt](https://refactoring.guru/design-patterns/abstract-factory/go/example#example-0--nikeShirt-go)  [main](https://refactoring.guru/design-patterns/abstract-factory/go/example#example-0--main-go)  [output](https://refactoring.guru/design-patterns/abstract-factory/go/example#example-0--output-txt) Conceptual Example ------------------ Say, you need to buy a sports kit, a set of two different products: a pair of shoes and a shirt. You would want to buy a full sports kit of the same brand to match all the items. If we try to turn this into code, the abstract factory will help us create sets of products so that they would always match each other. #### **iSportsFactory.go:** Abstract factory interface package main import "fmt" type ISportsFactory interface { makeShoe() IShoe makeShirt() IShirt } func GetSportsFactory(brand string) (ISportsFactory, error) { if brand == "adidas" { return &Adidas{}, nil } if brand == "nike" { return &Nike{}, nil } return nil, fmt.Errorf("Wrong brand type passed") } #### **adidas.go:** Concrete factory package main type Adidas struct { } func (a \*Adidas) makeShoe() IShoe { return &AdidasShoe{ Shoe: Shoe{ logo: "adidas", size: 14, }, } } func (a \*Adidas) makeShirt() IShirt { return &AdidasShirt{ Shirt: Shirt{ logo: "adidas", size: 14, }, } } #### **nike.go:** Concrete factory package main type Nike struct { } func (n \*Nike) makeShoe() IShoe { return &NikeShoe{ Shoe: Shoe{ logo: "nike", size: 14, }, } } func (n \*Nike) makeShirt() IShirt { return &NikeShirt{ Shirt: Shirt{ logo: "nike", size: 14, }, } } #### **iShoe.go:** Abstract product package main type IShoe interface { setLogo(logo string) setSize(size int) getLogo() string getSize() int } type Shoe struct { logo string size int } func (s \*Shoe) setLogo(logo string) { s.logo = logo } func (s \*Shoe) getLogo() string { return s.logo } func (s \*Shoe) setSize(size int) { s.size = size } func (s \*Shoe) getSize() int { return s.size } #### **adidasShoe.go:** Concrete product package main type AdidasShoe struct { Shoe } #### **nikeShoe.go:** Concrete product package main type NikeShoe struct { Shoe } #### **iShirt.go:** Abstract product package main type IShirt interface { setLogo(logo string) setSize(size int) getLogo() string getSize() int } type Shirt struct { logo string size int } func (s \*Shirt) setLogo(logo string) { s.logo = logo } func (s \*Shirt) getLogo() string { return s.logo } func (s \*Shirt) setSize(size int) { s.size = size } func (s \*Shirt) getSize() int { return s.size } #### **adidasShirt.go:** Concrete product package main type AdidasShirt struct { Shirt } #### **nikeShirt.go:** Concrete product package main type NikeShirt struct { Shirt } #### **main.go:** Client code package main import "fmt" func main() { adidasFactory, \_ := GetSportsFactory("adidas") nikeFactory, \_ := GetSportsFactory("nike") nikeShoe := nikeFactory.makeShoe() nikeShirt := nikeFactory.makeShirt() adidasShoe := adidasFactory.makeShoe() adidasShirt := adidasFactory.makeShirt() printShoeDetails(nikeShoe) printShirtDetails(nikeShirt) printShoeDetails(adidasShoe) printShirtDetails(adidasShirt) } func printShoeDetails(s IShoe) { fmt.Printf("Logo: %s", s.getLogo()) fmt.Println() fmt.Printf("Size: %d", s.getSize()) fmt.Println() } func printShirtDetails(s IShirt) { fmt.Printf("Logo: %s", s.getLogo()) fmt.Println() fmt.Printf("Size: %d", s.getSize()) fmt.Println() } #### **output.txt:** Execution result Logo: nike Size: 14 Logo: nike Size: 14 Logo: adidas Size: 14 Logo: adidas Size: 14 **Abstract Factory** in Other Languages --------------------------------------- [![Abstract Factory in C#](https://refactoring.guru/images/patterns/icons/csharp.svg?id=da64592defc6e86d57c39c66e9de3e58)](https://refactoring.guru/design-patterns/abstract-factory/csharp/example "Abstract Factory in C#") [![Abstract Factory in C++](https://refactoring.guru/images/patterns/icons/cpp.svg?id=f7782ed8b8666246bfcc3f8fefc3b858)](https://refactoring.guru/design-patterns/abstract-factory/cpp/example "Abstract Factory in C++") [![Abstract Factory in Java](https://refactoring.guru/images/patterns/icons/java.svg?id=e6d87e2dca08c953fe3acd1275ed4f4e)](https://refactoring.guru/design-patterns/abstract-factory/java/example "Abstract Factory in Java") [![Abstract Factory in PHP](https://refactoring.guru/images/patterns/icons/php.svg?id=be1906eb26b71ec1d3b93720d6156618)](https://refactoring.guru/design-patterns/abstract-factory/php/example "Abstract Factory in PHP") [![Abstract Factory in Python](https://refactoring.guru/images/patterns/icons/python.svg?id=6d815d43c0f7050a1151b43e51569c9f)](https://refactoring.guru/design-patterns/abstract-factory/python/example "Abstract Factory in Python") [![Abstract Factory in Ruby](https://refactoring.guru/images/patterns/icons/ruby.svg?id=b065b718c914bf8e960ef731600be1eb)](https://refactoring.guru/design-patterns/abstract-factory/ruby/example "Abstract Factory in Ruby") [![Abstract Factory in Rust](https://refactoring.guru/images/patterns/icons/rust.svg?id=1f5698a4b5ae23fe79413511747e4a87)](https://refactoring.guru/design-patterns/abstract-factory/rust/example "Abstract Factory in Rust") [![Abstract Factory in Swift](https://refactoring.guru/images/patterns/icons/swift.svg?id=0b716c2d52ec3a48fbe91ac031070c1d)](https://refactoring.guru/design-patterns/abstract-factory/swift/example "Abstract Factory in Swift") [![Abstract Factory in TypeScript](https://refactoring.guru/images/patterns/icons/typescript.svg?id=2239d0f16cb703540c205dd8cb0c0cb7)](https://refactoring.guru/design-patterns/abstract-factory/typescript/example "Abstract Factory in TypeScript") --- # Abstract Factory in C# / Design Patterns [There are patterns of patterns now! \ My friend's project: MetaPatterns.io](https://metapatterns.io/)  [](https://refactoring.guru/design-patterns/abstract-factory/csharp/example#checkout) [](https://refactoring.guru/design-patterns/abstract-factory/csharp/example#checkout) [](https://refactoring.guru/) / [Design Patterns](https://refactoring.guru/design-patterns) / [Abstract Factory](https://refactoring.guru/design-patterns/abstract-factory) / [C#](https://refactoring.guru/design-patterns/csharp) ![Abstract Factory](https://refactoring.guru/images/patterns/cards/abstract-factory-mini-2x.png?id=22236aaa65ff52cbde1c713216d52c1f) **Abstract Factory** in C# ========================== **Abstract Factory** is a creational design pattern, which solves the problem of creating entire product families without specifying their concrete classes. Abstract Factory defines an interface for creating all distinct products but leaves the actual product creation to concrete factory classes. Each factory type corresponds to a certain product variety. The client code calls the creation methods of a factory object instead of creating products directly with a constructor call (`new` operator). Since a factory corresponds to a single product variant, all its products will be compatible. Client code works with factories and products only through their abstract interfaces. This lets the client code work with any product variants, created by the factory object. You just create a new concrete factory class and pass it to the client code. > If you can’t figure out the difference between various factory patterns and concepts, then read our [Factory Comparison](https://refactoring.guru/design-patterns/factory-comparison) > . [Learn more about Abstract Factory](https://refactoring.guru/design-patterns/abstract-factory) Navigation  [Intro](https://refactoring.guru/design-patterns/abstract-factory/csharp/example#)  [Conceptual Example](https://refactoring.guru/design-patterns/abstract-factory/csharp/example#example-0)  [Program](https://refactoring.guru/design-patterns/abstract-factory/csharp/example#example-0--Program-cs)  [Output](https://refactoring.guru/design-patterns/abstract-factory/csharp/example#example-0--Output-txt) **Complexity:** **Popularity:** **Usage examples:** The Abstract Factory pattern is pretty common in C# code. Many frameworks and libraries use it to provide a way to extend and customize their standard components. **Identification:** The pattern is easy to recognize by methods, which return a factory object. Then, the factory is used for creating specific sub-components. Conceptual Example ------------------ This example illustrates the structure of the **Abstract Factory** design pattern. It focuses on answering these questions: * What classes does it consist of? * What roles do these classes play? * In what way the elements of the pattern are related? #### **Program.cs:** Conceptual example using System; namespace RefactoringGuru.DesignPatterns.AbstractFactory.Conceptual { // The Abstract Factory interface declares a set of methods that return // different abstract products. These products are called a family and are // related by a high-level theme or concept. Products of one family are // usually able to collaborate among themselves. A family of products may // have several variants, but the products of one variant are incompatible // with products of another. public interface IAbstractFactory { IAbstractProductA CreateProductA(); IAbstractProductB CreateProductB(); } // Concrete Factories produce a family of products that belong to a single // variant. The factory guarantees that resulting products are compatible. // Note that signatures of the Concrete Factory's methods return an abstract // product, while inside the method a concrete product is instantiated. class ConcreteFactory1 : IAbstractFactory { public IAbstractProductA CreateProductA() { return new ConcreteProductA1(); } public IAbstractProductB CreateProductB() { return new ConcreteProductB1(); } } // Each Concrete Factory has a corresponding product variant. class ConcreteFactory2 : IAbstractFactory { public IAbstractProductA CreateProductA() { return new ConcreteProductA2(); } public IAbstractProductB CreateProductB() { return new ConcreteProductB2(); } } // Each distinct product of a product family should have a base interface. // All variants of the product must implement this interface. public interface IAbstractProductA { string UsefulFunctionA(); } // Concrete Products are created by corresponding Concrete Factories. class ConcreteProductA1 : IAbstractProductA { public string UsefulFunctionA() { return "The result of the product A1."; } } class ConcreteProductA2 : IAbstractProductA { public string UsefulFunctionA() { return "The result of the product A2."; } } // Here's the the base interface of another product. All products can // interact with each other, but proper interaction is possible only between // products of the same concrete variant. public interface IAbstractProductB { // Product B is able to do its own thing... string UsefulFunctionB(); // ...but it also can collaborate with the ProductA. // // The Abstract Factory makes sure that all products it creates are of // the same variant and thus, compatible. string AnotherUsefulFunctionB(IAbstractProductA collaborator); } // Concrete Products are created by corresponding Concrete Factories. class ConcreteProductB1 : IAbstractProductB { public string UsefulFunctionB() { return "The result of the product B1."; } // The variant, Product B1, is only able to work correctly with the // variant, Product A1. Nevertheless, it accepts any instance of // AbstractProductA as an argument. public string AnotherUsefulFunctionB(IAbstractProductA collaborator) { var result = collaborator.UsefulFunctionA(); return $"The result of the B1 collaborating with the ({result})"; } } class ConcreteProductB2 : IAbstractProductB { public string UsefulFunctionB() { return "The result of the product B2."; } // The variant, Product B2, is only able to work correctly with the // variant, Product A2. Nevertheless, it accepts any instance of // AbstractProductA as an argument. public string AnotherUsefulFunctionB(IAbstractProductA collaborator) { var result = collaborator.UsefulFunctionA(); return $"The result of the B2 collaborating with the ({result})"; } } // The client code works with factories and products only through abstract // types: AbstractFactory and AbstractProduct. This lets you pass any // factory or product subclass to the client code without breaking it. class Client { public void Main() { // The client code can work with any concrete factory class. Console.WriteLine("Client: Testing client code with the first factory type..."); ClientMethod(new ConcreteFactory1()); Console.WriteLine(); Console.WriteLine("Client: Testing the same client code with the second factory type..."); ClientMethod(new ConcreteFactory2()); } public void ClientMethod(IAbstractFactory factory) { var productA = factory.CreateProductA(); var productB = factory.CreateProductB(); Console.WriteLine(productB.UsefulFunctionB()); Console.WriteLine(productB.AnotherUsefulFunctionB(productA)); } } class Program { static void Main(string\[\] args) { new Client().Main(); } } } #### **Output.txt:** Execution result Client: Testing client code with the first factory type... The result of the product B1. The result of the B1 collaborating with the (The result of the product A1.) Client: Testing the same client code with the second factory type... The result of the product B2. The result of the B2 collaborating with the (The result of the product A2.) **Abstract Factory** in Other Languages --------------------------------------- [![Abstract Factory in C++](https://refactoring.guru/images/patterns/icons/cpp.svg?id=f7782ed8b8666246bfcc3f8fefc3b858)](https://refactoring.guru/design-patterns/abstract-factory/cpp/example "Abstract Factory in C++") [![Abstract Factory in Go](https://refactoring.guru/images/patterns/icons/go.svg?id=1a89927eb99b1ea3fde7701d97970aca)](https://refactoring.guru/design-patterns/abstract-factory/go/example "Abstract Factory in Go") [![Abstract Factory in Java](https://refactoring.guru/images/patterns/icons/java.svg?id=e6d87e2dca08c953fe3acd1275ed4f4e)](https://refactoring.guru/design-patterns/abstract-factory/java/example "Abstract Factory in Java") [![Abstract Factory in PHP](https://refactoring.guru/images/patterns/icons/php.svg?id=be1906eb26b71ec1d3b93720d6156618)](https://refactoring.guru/design-patterns/abstract-factory/php/example "Abstract Factory in PHP") [![Abstract Factory in Python](https://refactoring.guru/images/patterns/icons/python.svg?id=6d815d43c0f7050a1151b43e51569c9f)](https://refactoring.guru/design-patterns/abstract-factory/python/example "Abstract Factory in Python") [![Abstract Factory in Ruby](https://refactoring.guru/images/patterns/icons/ruby.svg?id=b065b718c914bf8e960ef731600be1eb)](https://refactoring.guru/design-patterns/abstract-factory/ruby/example "Abstract Factory in Ruby") [![Abstract Factory in Rust](https://refactoring.guru/images/patterns/icons/rust.svg?id=1f5698a4b5ae23fe79413511747e4a87)](https://refactoring.guru/design-patterns/abstract-factory/rust/example "Abstract Factory in Rust") [![Abstract Factory in Swift](https://refactoring.guru/images/patterns/icons/swift.svg?id=0b716c2d52ec3a48fbe91ac031070c1d)](https://refactoring.guru/design-patterns/abstract-factory/swift/example "Abstract Factory in Swift") [![Abstract Factory in TypeScript](https://refactoring.guru/images/patterns/icons/typescript.svg?id=2239d0f16cb703540c205dd8cb0c0cb7)](https://refactoring.guru/design-patterns/abstract-factory/typescript/example "Abstract Factory in TypeScript") --- # Abstract Factory in Ruby / Design Patterns [There are patterns of patterns now! \ My friend's project: MetaPatterns.io](https://metapatterns.io/)  [](https://refactoring.guru/design-patterns/abstract-factory/ruby/example#checkout) [](https://refactoring.guru/design-patterns/abstract-factory/ruby/example#checkout) [](https://refactoring.guru/) / [Design Patterns](https://refactoring.guru/design-patterns) / [Abstract Factory](https://refactoring.guru/design-patterns/abstract-factory) / [Ruby](https://refactoring.guru/design-patterns/ruby) ![Abstract Factory](https://refactoring.guru/images/patterns/cards/abstract-factory-mini-2x.png?id=22236aaa65ff52cbde1c713216d52c1f) **Abstract Factory** in Ruby ============================ **Abstract Factory** is a creational design pattern, which solves the problem of creating entire product families without specifying their concrete classes. Abstract Factory defines an interface for creating all distinct products but leaves the actual product creation to concrete factory classes. Each factory type corresponds to a certain product variety. The client code calls the creation methods of a factory object instead of creating products directly with a constructor call (`new` operator). Since a factory corresponds to a single product variant, all its products will be compatible. Client code works with factories and products only through their abstract interfaces. This lets the client code work with any product variants, created by the factory object. You just create a new concrete factory class and pass it to the client code. > If you can’t figure out the difference between various factory patterns and concepts, then read our [Factory Comparison](https://refactoring.guru/design-patterns/factory-comparison) > . [Learn more about Abstract Factory](https://refactoring.guru/design-patterns/abstract-factory) Navigation  [Intro](https://refactoring.guru/design-patterns/abstract-factory/ruby/example#)  [Conceptual Example](https://refactoring.guru/design-patterns/abstract-factory/ruby/example#example-0)  [main](https://refactoring.guru/design-patterns/abstract-factory/ruby/example#example-0--main-rb)  [output](https://refactoring.guru/design-patterns/abstract-factory/ruby/example#example-0--output-txt) **Complexity:** **Popularity:** **Usage examples:** The Abstract Factory pattern is pretty common in Ruby code. Many frameworks and libraries use it to provide a way to extend and customize their standard components. **Identification:** The pattern is easy to recognize by methods, which return a factory object. Then, the factory is used for creating specific sub-components. Conceptual Example ------------------ This example illustrates the structure of the **Abstract Factory** design pattern. It focuses on answering these questions: * What classes does it consist of? * What roles do these classes play? * In what way the elements of the pattern are related? #### **main.rb:** Conceptual example \# The Abstract Factory interface declares a set of methods that return different # abstract products. These products are called a family and are related by a # high-level theme or concept. Products of one family are usually able to # collaborate among themselves. A family of products may have several variants, # but the products of one variant are incompatible with products of another. class AbstractFactory # @abstract def create\_product\_a raise NotImplementedError, "#{self.class} has not implemented method '#{\_\_method\_\_}'" end # @abstract def create\_product\_b raise NotImplementedError, "#{self.class} has not implemented method '#{\_\_method\_\_}'" end end # Concrete Factories produce a family of products that belong to a single # variant. The factory guarantees that resulting products are compatible. Note # that signatures of the Concrete Factory's methods return an abstract product, # while inside the method a concrete product is instantiated. class ConcreteFactory1 < AbstractFactory def create\_product\_a ConcreteProductA1.new end def create\_product\_b ConcreteProductB1.new end end # Each Concrete Factory has a corresponding product variant. class ConcreteFactory2 < AbstractFactory def create\_product\_a ConcreteProductA2.new end def create\_product\_b ConcreteProductB2.new end end # Each distinct product of a product family should have a base interface. All # variants of the product must implement this interface. class AbstractProductA # @abstract # # @return \[String\] def useful\_function\_a raise NotImplementedError, "#{self.class} has not implemented method '#{\_\_method\_\_}'" end end # Concrete Products are created by corresponding Concrete Factories. class ConcreteProductA1 < AbstractProductA def useful\_function\_a 'The result of the product A1.' end end class ConcreteProductA2 < AbstractProductA def useful\_function\_a 'The result of the product A2.' end end # Here's the the base interface of another product. All products can interact # with each other, but proper interaction is possible only between products of # the same concrete variant. class AbstractProductB # Product B is able to do its own thing... def useful\_function\_b raise NotImplementedError, "#{self.class} has not implemented method '#{\_\_method\_\_}'" end # ...but it also can collaborate with the ProductA. # # The Abstract Factory makes sure that all products it creates are of the same # variant and thus, compatible. def another\_useful\_function\_b(\_collaborator) raise NotImplementedError, "#{self.class} has not implemented method '#{\_\_method\_\_}'" end end # Concrete Products are created by corresponding Concrete Factories. class ConcreteProductB1 < AbstractProductB # @return \[String\] def useful\_function\_b 'The result of the product B1.' end # The variant, Product B1, is only able to work correctly with the variant, # Product A1. Nevertheless, it accepts any instance of AbstractProductA as an # argument. def another\_useful\_function\_b(collaborator) result = collaborator.useful\_function\_a "The result of the B1 collaborating with the (#{result})" end end class ConcreteProductB2 < AbstractProductB # @return \[String\] def useful\_function\_b 'The result of the product B2.' end # The variant, Product B2, is only able to work correctly with the variant, # Product A2. Nevertheless, it accepts any instance of AbstractProductA as an # argument. def another\_useful\_function\_b(collaborator) result = collaborator.useful\_function\_a "The result of the B2 collaborating with the (#{result})" end end # The client code works with factories and products only through abstract types: # AbstractFactory and AbstractProduct. This lets you pass any factory or product # subclass to the client code without breaking it. def client\_code(factory) product\_a = factory.create\_product\_a product\_b = factory.create\_product\_b puts product\_b.useful\_function\_b puts product\_b.another\_useful\_function\_b(product\_a) end # The client code can work with any concrete factory class. puts 'Client: Testing client code with the first factory type:' client\_code(ConcreteFactory1.new) puts "\\n" puts 'Client: Testing the same client code with the second factory type:' client\_code(ConcreteFactory2.new) #### **output.txt:** Execution result Client: Testing client code with the first factory type: The result of the product B1. The result of the B1 collaborating with the (The result of the product A1.) Client: Testing the same client code with the second factory type: The result of the product B2. The result of the B2 collaborating with the (The result of the product A2.) **Abstract Factory** in Other Languages --------------------------------------- [![Abstract Factory in C#](https://refactoring.guru/images/patterns/icons/csharp.svg?id=da64592defc6e86d57c39c66e9de3e58)](https://refactoring.guru/design-patterns/abstract-factory/csharp/example "Abstract Factory in C#") [![Abstract Factory in C++](https://refactoring.guru/images/patterns/icons/cpp.svg?id=f7782ed8b8666246bfcc3f8fefc3b858)](https://refactoring.guru/design-patterns/abstract-factory/cpp/example "Abstract Factory in C++") [![Abstract Factory in Go](https://refactoring.guru/images/patterns/icons/go.svg?id=1a89927eb99b1ea3fde7701d97970aca)](https://refactoring.guru/design-patterns/abstract-factory/go/example "Abstract Factory in Go") [![Abstract Factory in Java](https://refactoring.guru/images/patterns/icons/java.svg?id=e6d87e2dca08c953fe3acd1275ed4f4e)](https://refactoring.guru/design-patterns/abstract-factory/java/example "Abstract Factory in Java") [![Abstract Factory in PHP](https://refactoring.guru/images/patterns/icons/php.svg?id=be1906eb26b71ec1d3b93720d6156618)](https://refactoring.guru/design-patterns/abstract-factory/php/example "Abstract Factory in PHP") [![Abstract Factory in Python](https://refactoring.guru/images/patterns/icons/python.svg?id=6d815d43c0f7050a1151b43e51569c9f)](https://refactoring.guru/design-patterns/abstract-factory/python/example "Abstract Factory in Python") [![Abstract Factory in Rust](https://refactoring.guru/images/patterns/icons/rust.svg?id=1f5698a4b5ae23fe79413511747e4a87)](https://refactoring.guru/design-patterns/abstract-factory/rust/example "Abstract Factory in Rust") [![Abstract Factory in Swift](https://refactoring.guru/images/patterns/icons/swift.svg?id=0b716c2d52ec3a48fbe91ac031070c1d)](https://refactoring.guru/design-patterns/abstract-factory/swift/example "Abstract Factory in Swift") [![Abstract Factory in TypeScript](https://refactoring.guru/images/patterns/icons/typescript.svg?id=2239d0f16cb703540c205dd8cb0c0cb7)](https://refactoring.guru/design-patterns/abstract-factory/typescript/example "Abstract Factory in TypeScript") --- # Abstract Factory in PHP / Design Patterns [There are patterns of patterns now! \ My friend's project: MetaPatterns.io](https://metapatterns.io/)  [](https://refactoring.guru/design-patterns/abstract-factory/php/example#checkout) [](https://refactoring.guru/design-patterns/abstract-factory/php/example#checkout) [](https://refactoring.guru/) / [Design Patterns](https://refactoring.guru/design-patterns) / [Abstract Factory](https://refactoring.guru/design-patterns/abstract-factory) / [PHP](https://refactoring.guru/design-patterns/php) ![Abstract Factory](https://refactoring.guru/images/patterns/cards/abstract-factory-mini-2x.png?id=22236aaa65ff52cbde1c713216d52c1f) **Abstract Factory** in PHP =========================== **Abstract Factory** is a creational design pattern, which solves the problem of creating entire product families without specifying their concrete classes. Abstract Factory defines an interface for creating all distinct products but leaves the actual product creation to concrete factory classes. Each factory type corresponds to a certain product variety. The client code calls the creation methods of a factory object instead of creating products directly with a constructor call (`new` operator). Since a factory corresponds to a single product variant, all its products will be compatible. Client code works with factories and products only through their abstract interfaces. This lets the client code work with any product variants, created by the factory object. You just create a new concrete factory class and pass it to the client code. > If you can’t figure out the difference between various factory patterns and concepts, then read our [Factory Comparison](https://refactoring.guru/design-patterns/factory-comparison) > . [Learn more about Abstract Factory](https://refactoring.guru/design-patterns/abstract-factory) Navigation  [Intro](https://refactoring.guru/design-patterns/abstract-factory/php/example#)  [Conceptual Example](https://refactoring.guru/design-patterns/abstract-factory/php/example#example-0)  [index](https://refactoring.guru/design-patterns/abstract-factory/php/example#example-0--index-php)  [Output](https://refactoring.guru/design-patterns/abstract-factory/php/example#example-0--Output-txt)  [Real World Example](https://refactoring.guru/design-patterns/abstract-factory/php/example#example-1)  [index](https://refactoring.guru/design-patterns/abstract-factory/php/example#example-1--index-php)  [Output](https://refactoring.guru/design-patterns/abstract-factory/php/example#example-1--Output-txt) **Complexity:** **Popularity:** **Usage examples:** The Abstract Factory pattern is pretty common in PHP code. Many frameworks and libraries use it to provide a way to extend and customize their standard components. **Identification:** The pattern is easy to recognize by methods, which return a factory object. Then, the factory is used for creating specific sub-components. Conceptual Example ------------------ This example illustrates the structure of the **Abstract Factory** design pattern. It focuses on answering these questions: * What classes does it consist of? * What roles do these classes play? * In what way the elements of the pattern are related? After learning about the pattern’s structure it’ll be easier for you to grasp the following example, based on a real-world PHP use case. #### **index.php:** Conceptual example usefulFunctionA(); return "The result of the B1 collaborating with the ({$result})"; } } class ConcreteProductB2 implements AbstractProductB { public function usefulFunctionB(): string { return "The result of the product B2."; } /\*\* \* The variant, Product B2, is only able to work correctly with the variant, \* Product A2. Nevertheless, it accepts any instance of AbstractProductA as \* an argument. \*/ public function anotherUsefulFunctionB(AbstractProductA $collaborator): string { $result = $collaborator->usefulFunctionA(); return "The result of the B2 collaborating with the ({$result})"; } } /\*\* \* The client code works with factories and products only through abstract \* types: AbstractFactory and AbstractProduct. This lets you pass any factory or \* product subclass to the client code without breaking it. \*/ function clientCode(AbstractFactory $factory) { $productA = $factory->createProductA(); $productB = $factory->createProductB(); echo $productB->usefulFunctionB() . "\\n"; echo $productB->anotherUsefulFunctionB($productA) . "\\n"; } /\*\* \* The client code can work with any concrete factory class. \*/ echo "Client: Testing client code with the first factory type:\\n"; clientCode(new ConcreteFactory1()); echo "\\n"; echo "Client: Testing the same client code with the second factory type:\\n"; clientCode(new ConcreteFactory2()); #### **Output.txt:** Execution result Client: Testing client code with the first factory type: The result of the product B1. The result of the B1 collaborating with the (The result of the product A1.) Client: Testing the same client code with the second factory type: The result of the product B2. The result of the B2 collaborating with the (The result of the product A2.) Real World Example ------------------ In this example, the **Abstract Factory** pattern provides an infrastructure for creating various types of templates for different elements of a web page. A web application can support different rendering engines at the same time, but only if its classes are independent of the concrete classes of rendering engines. Hence, the application’s objects must communicate with template objects only via their abstract interfaces. Your code shouldn’t create the template objects directly, but delegate their creation to special factory objects. Finally, your code shouldn’t depend on the factory objects either but, instead, should work with them via the abstract factory interface. As a result, you will be able to provide the app with the factory object that corresponds to one of the rendering engines. All templates, created in the app, will be created by that factory and their type will match the type of the factory. If you decide to change the rendering engine, you’ll be able to pass a new factory to the client code, without breaking any existing code. #### **index.php:** Real world example createTitleTemplate()); } public function getRenderer(): TemplateRenderer { return new TwigRenderer(); } } /\*\* \* And this Concrete Factory creates PHPTemplate templates. \*/ class PHPTemplateFactory implements TemplateFactory { public function createTitleTemplate(): TitleTemplate { return new PHPTemplateTitleTemplate(); } public function createPageTemplate(): PageTemplate { return new PHPTemplatePageTemplate($this->createTitleTemplate()); } public function getRenderer(): TemplateRenderer { return new PHPTemplateRenderer(); } } /\*\* \* Each distinct product type should have a separate interface. All variants of \* the product must follow the same interface. \* \* For instance, this Abstract Product interface describes the behavior of page \* title templates. \*/ interface TitleTemplate { public function getTemplateString(): string; } /\*\* \* This Concrete Product provides Twig page title templates. \*/ class TwigTitleTemplate implements TitleTemplate { public function getTemplateString(): string { return "
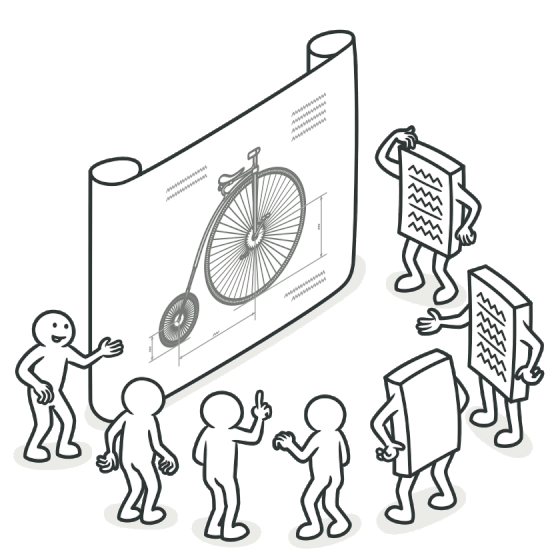
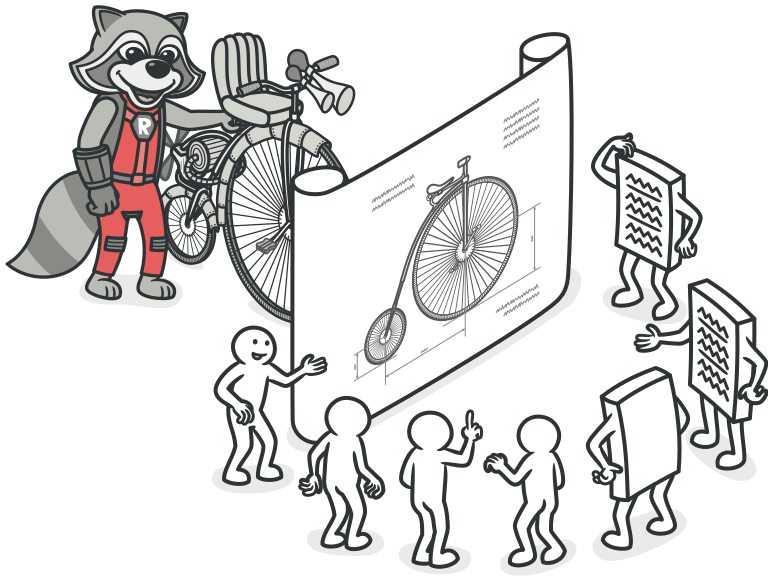





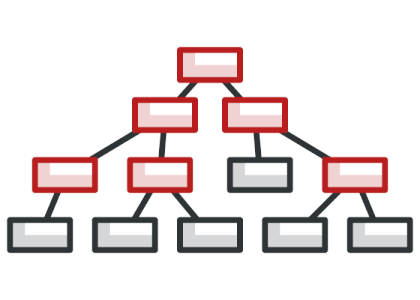

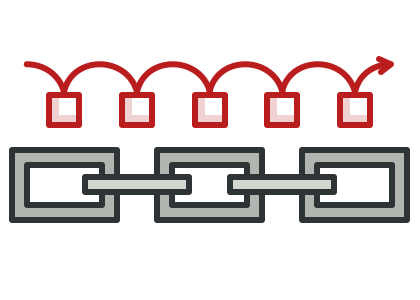
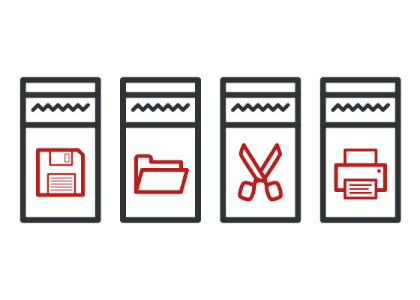
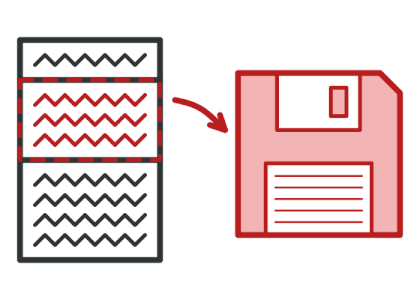

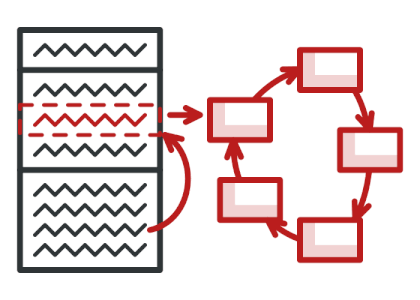
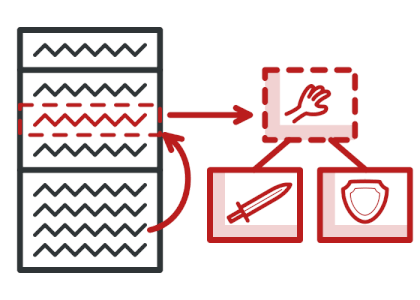
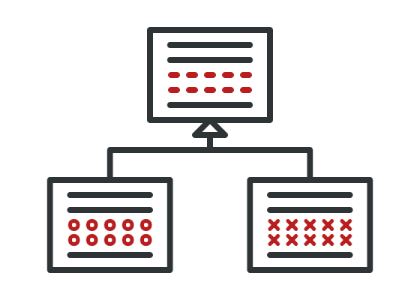
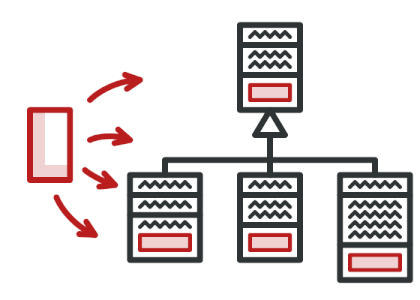












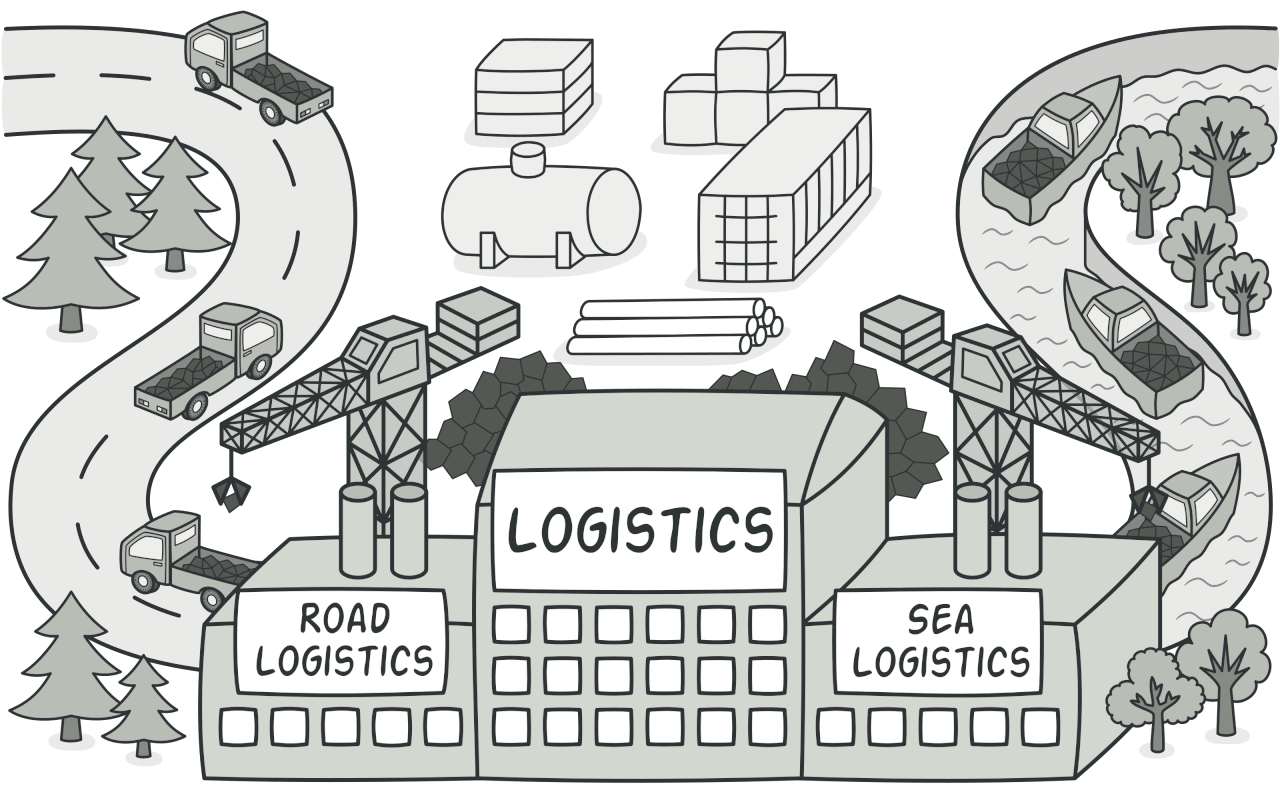
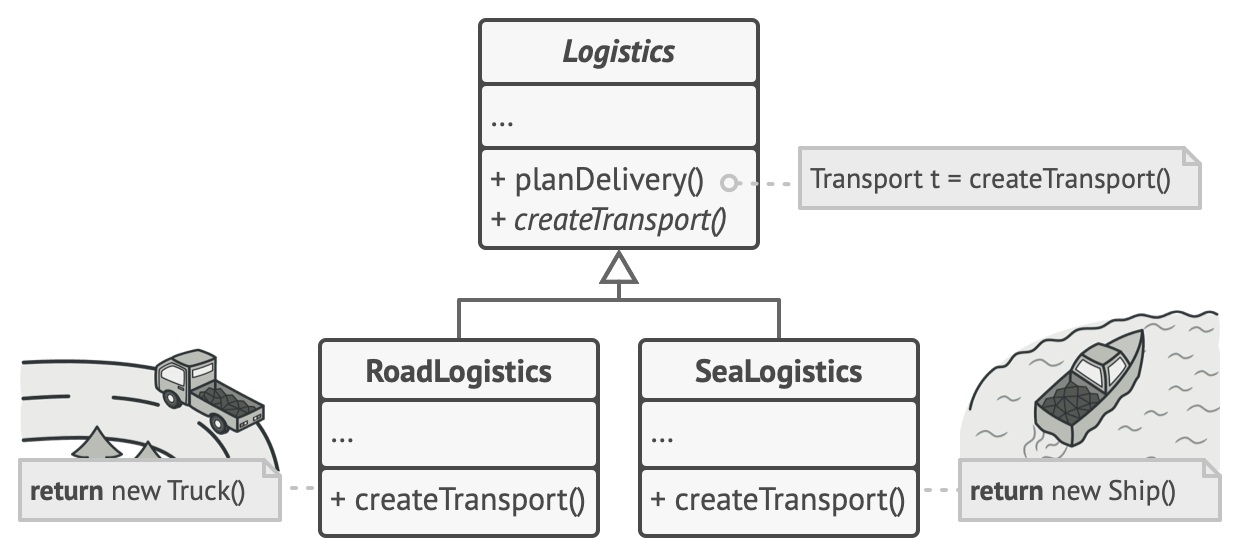
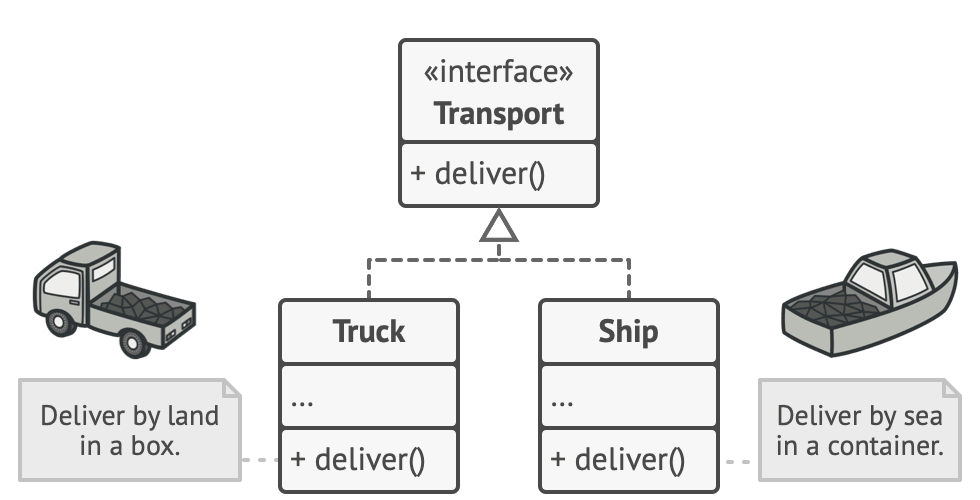
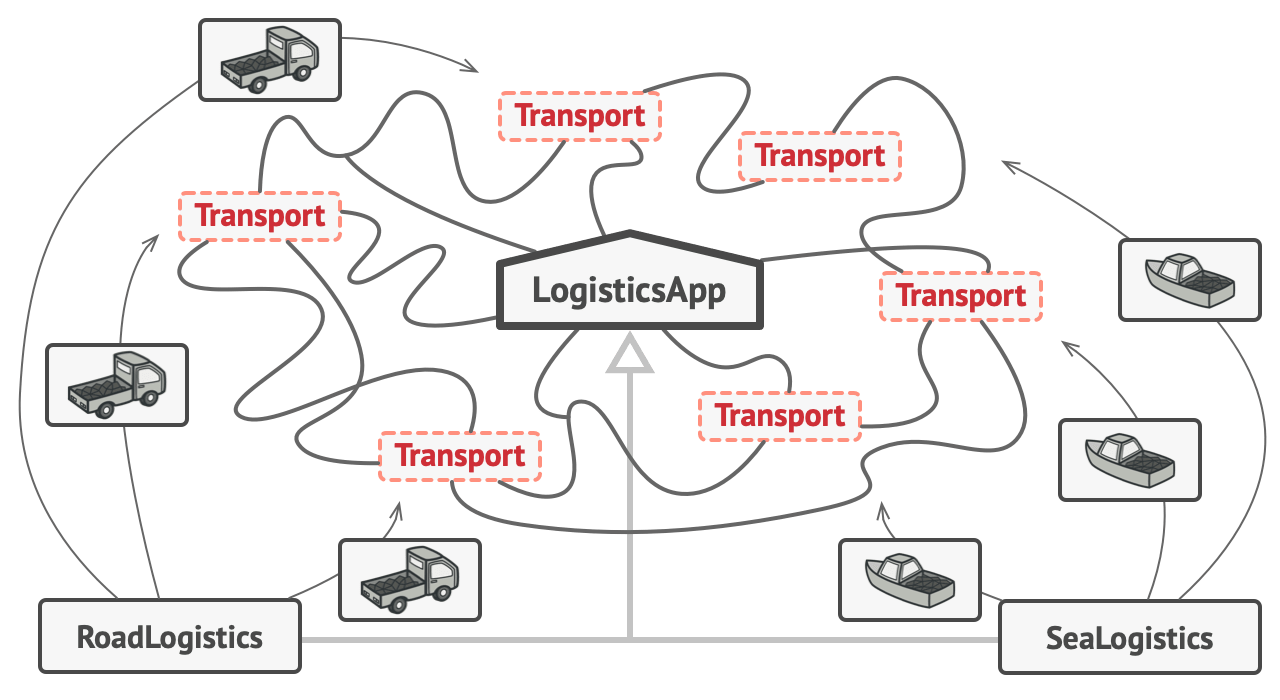
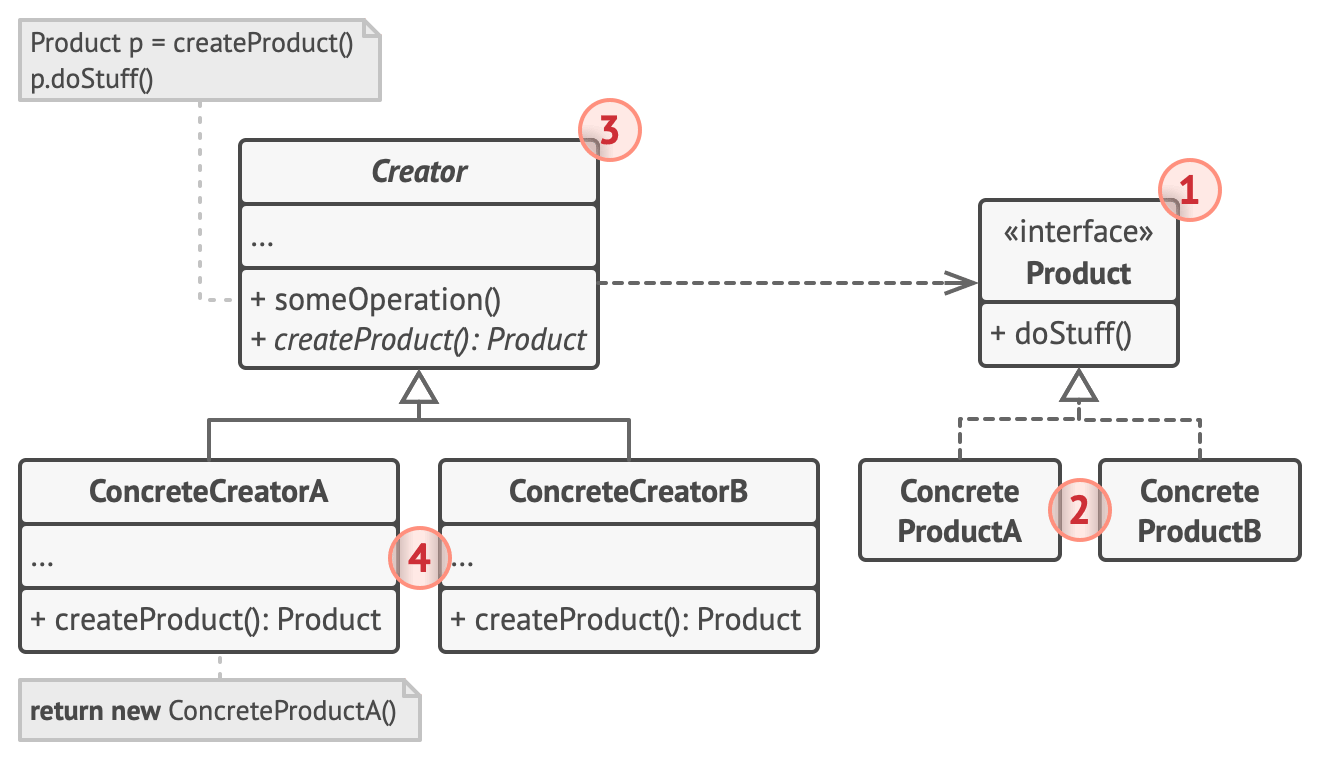
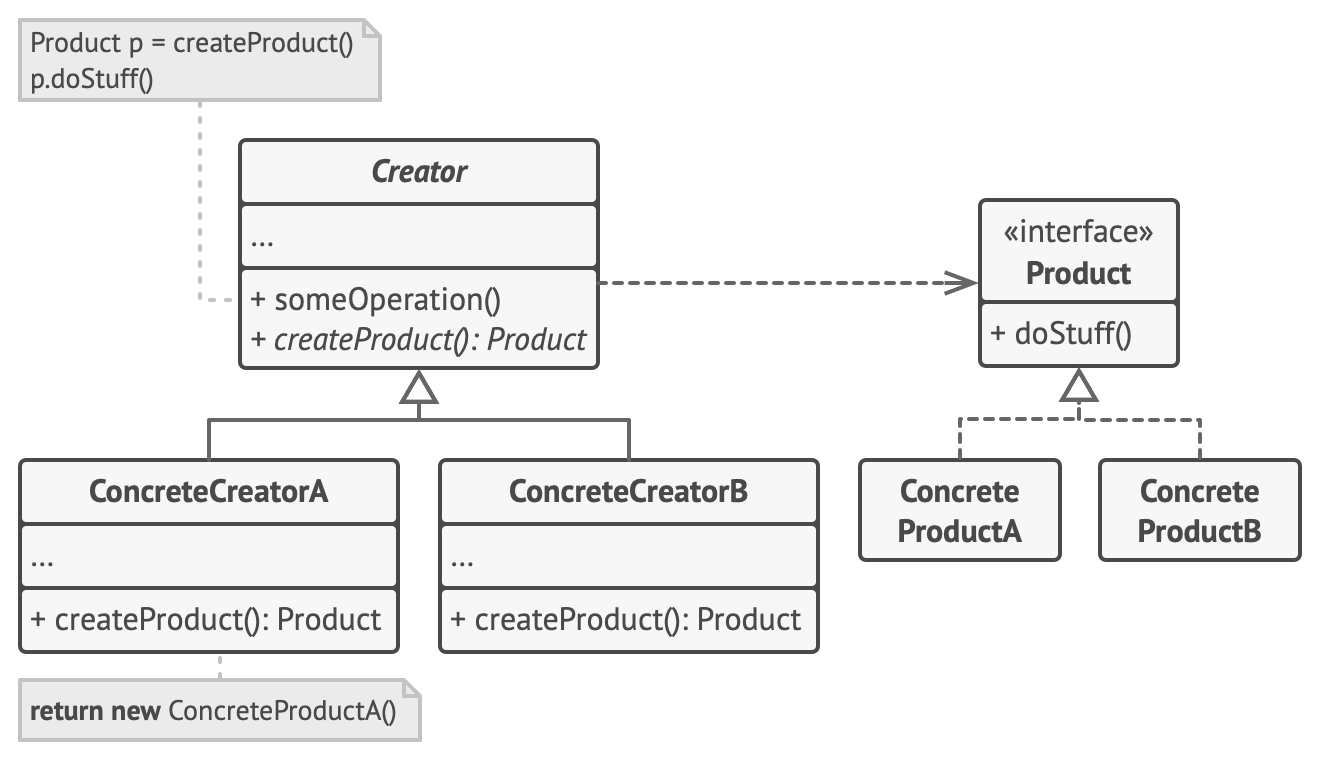
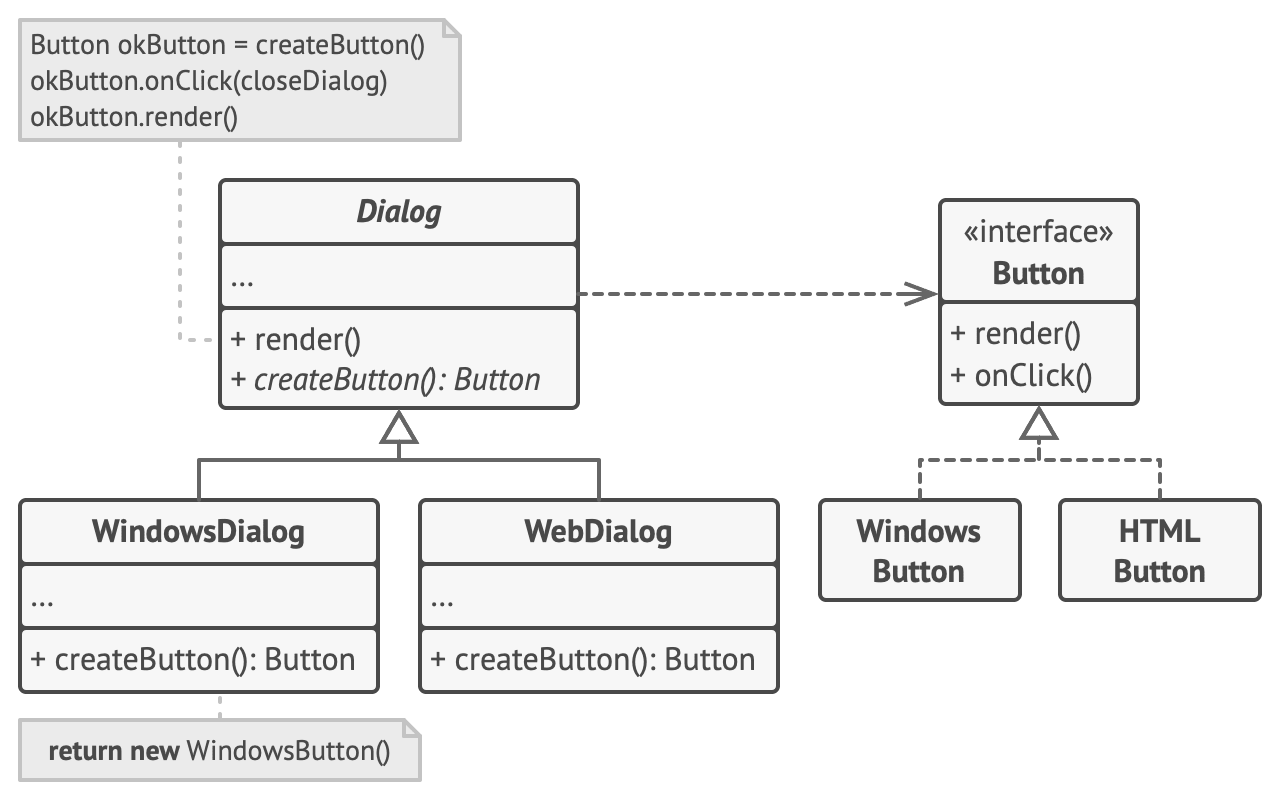









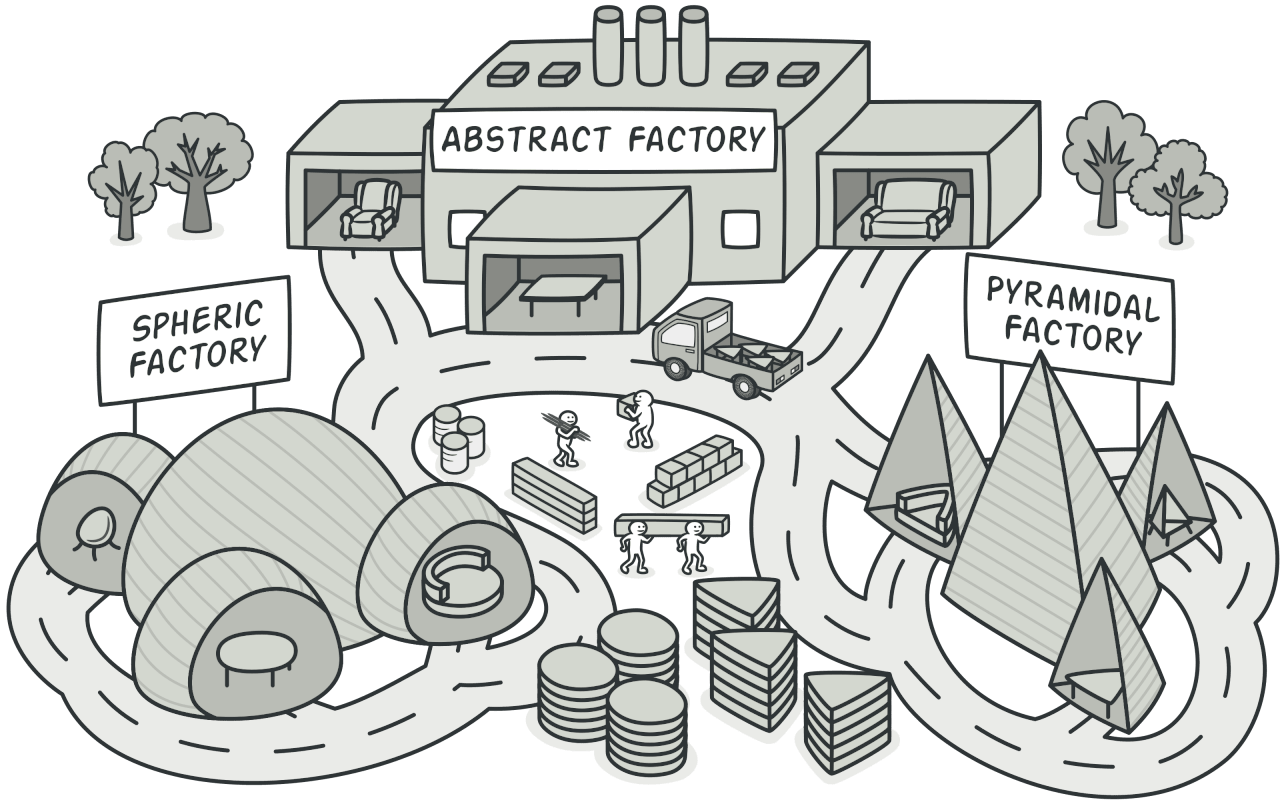
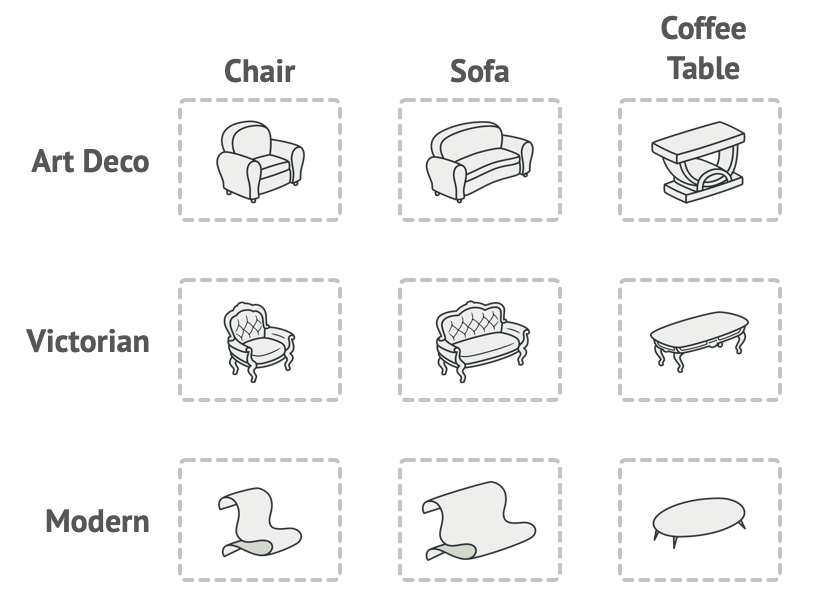

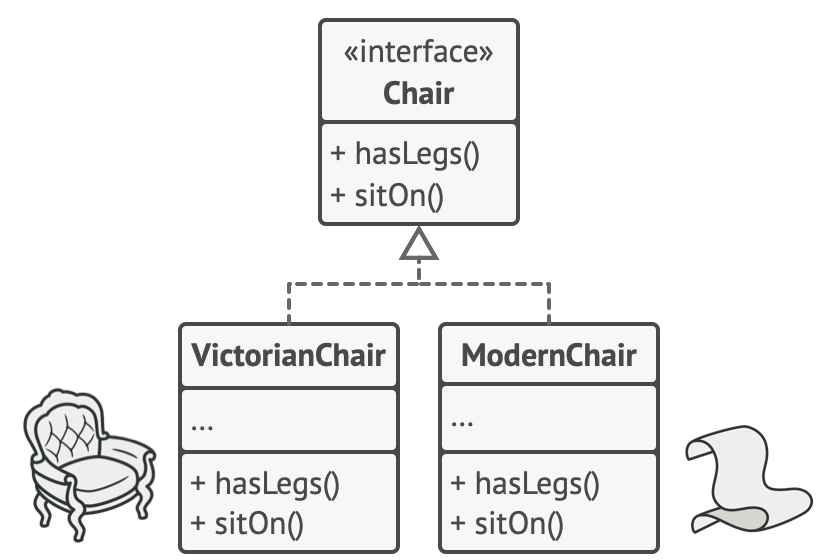
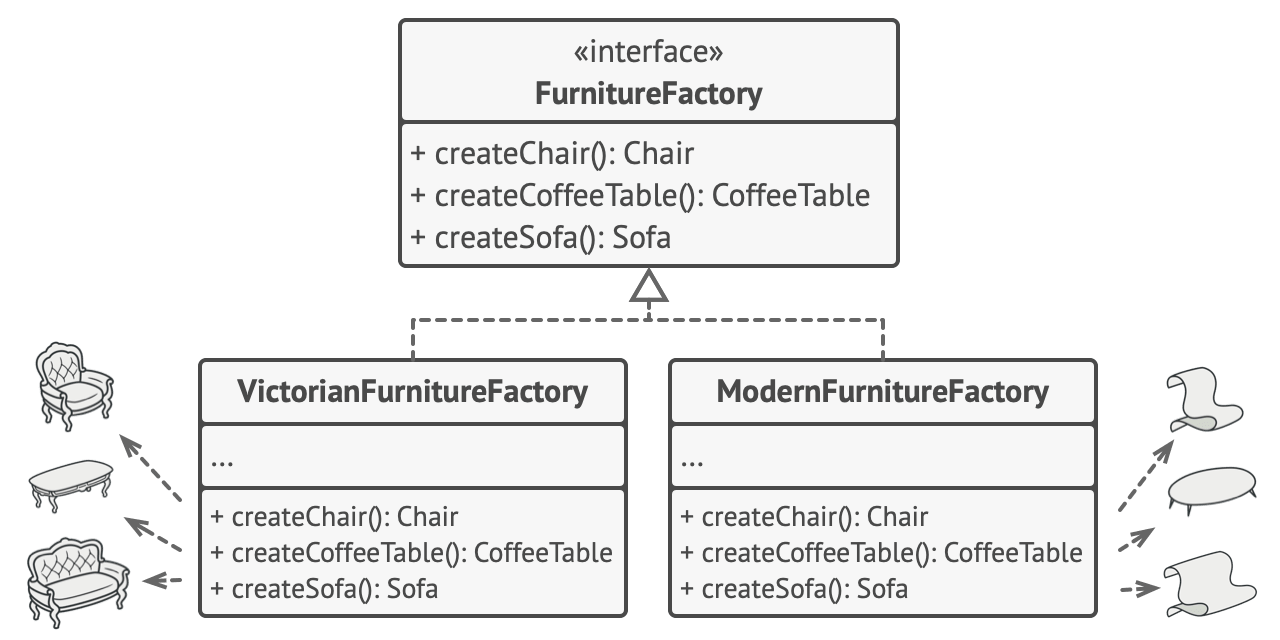

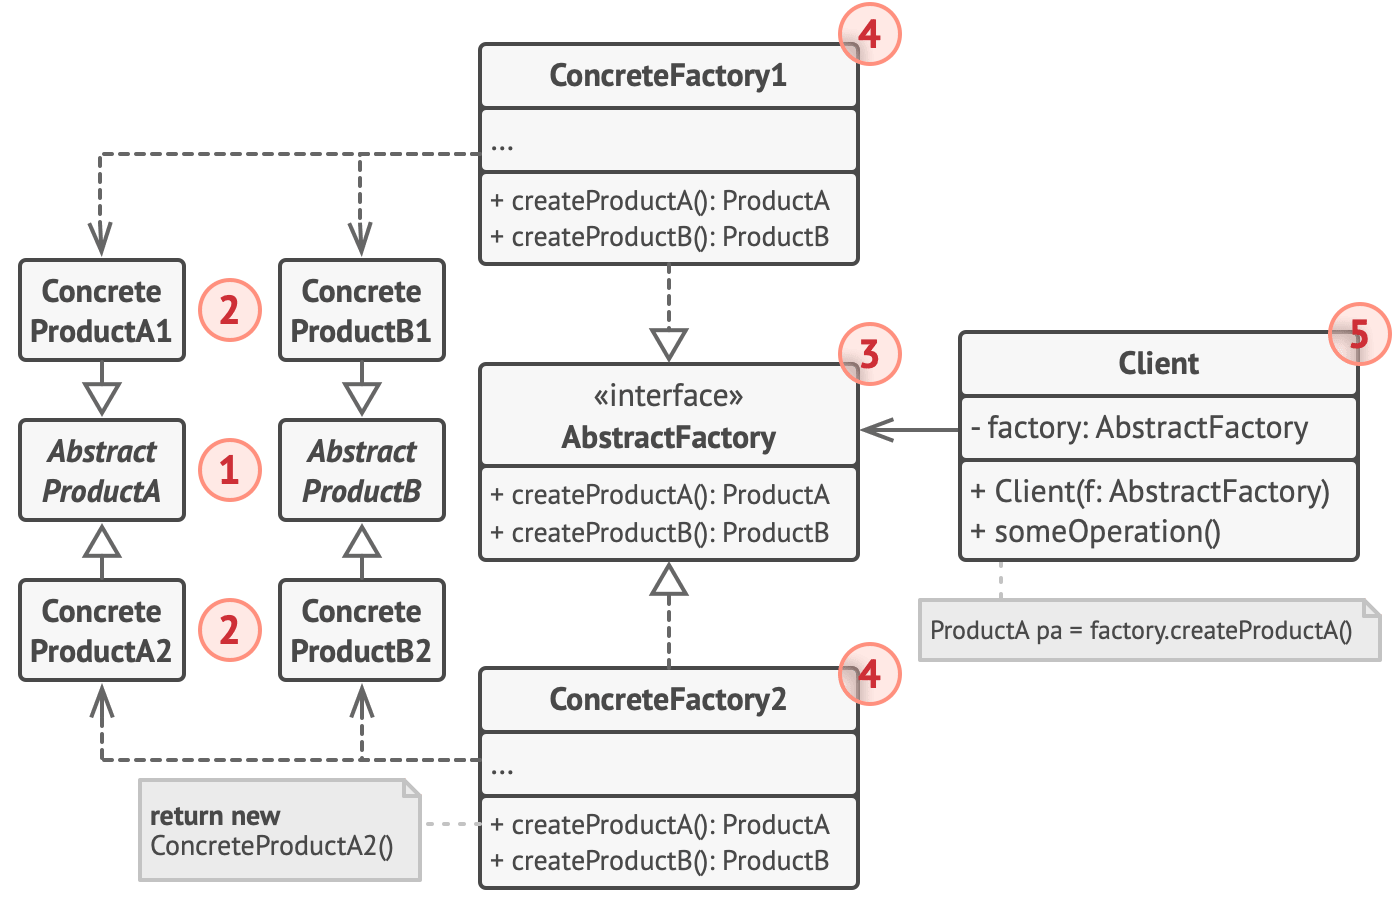
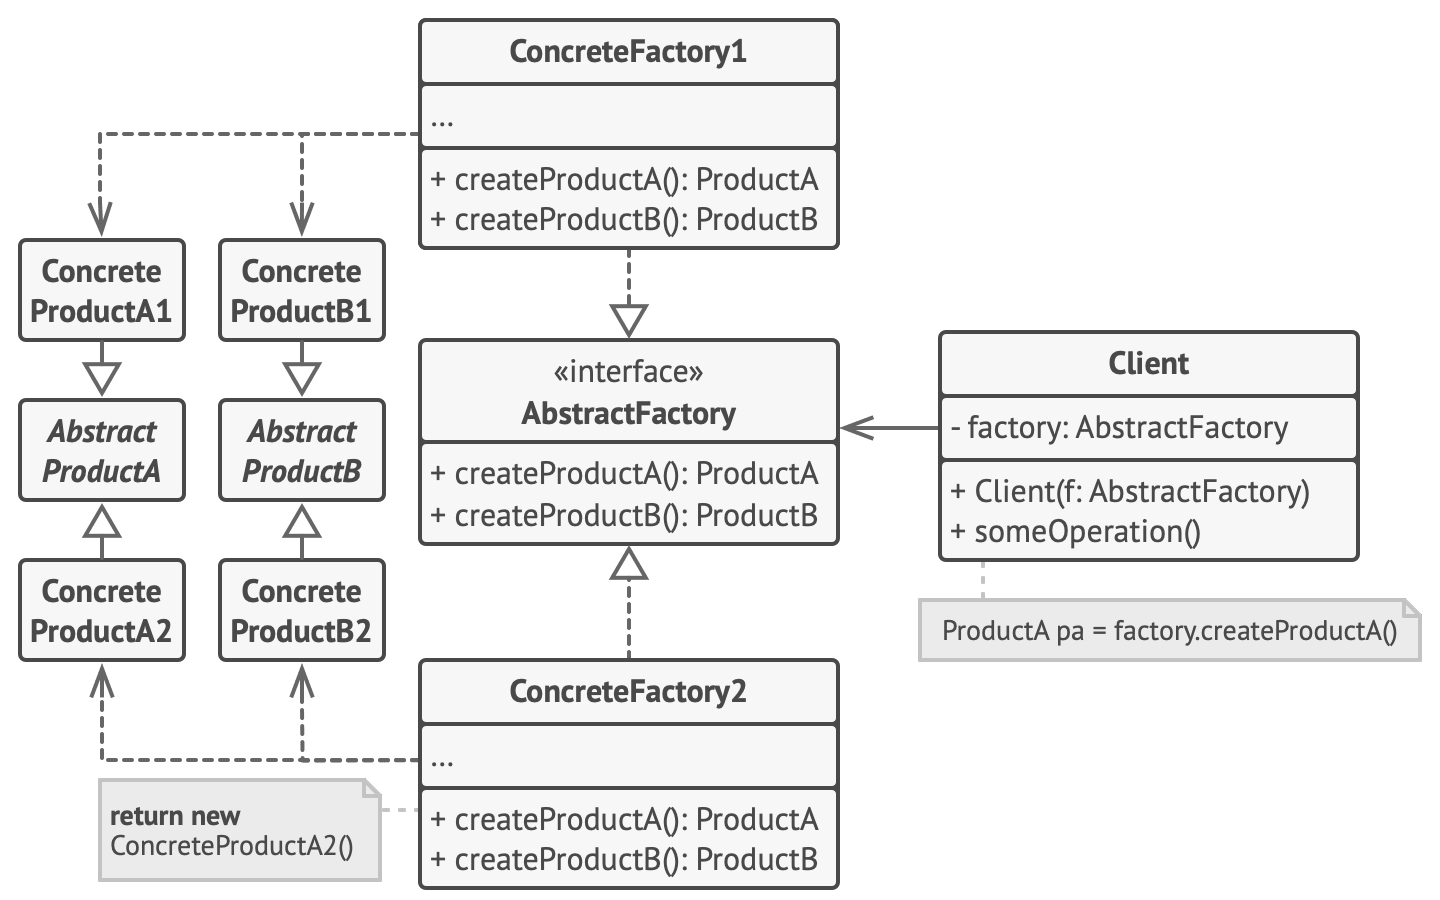
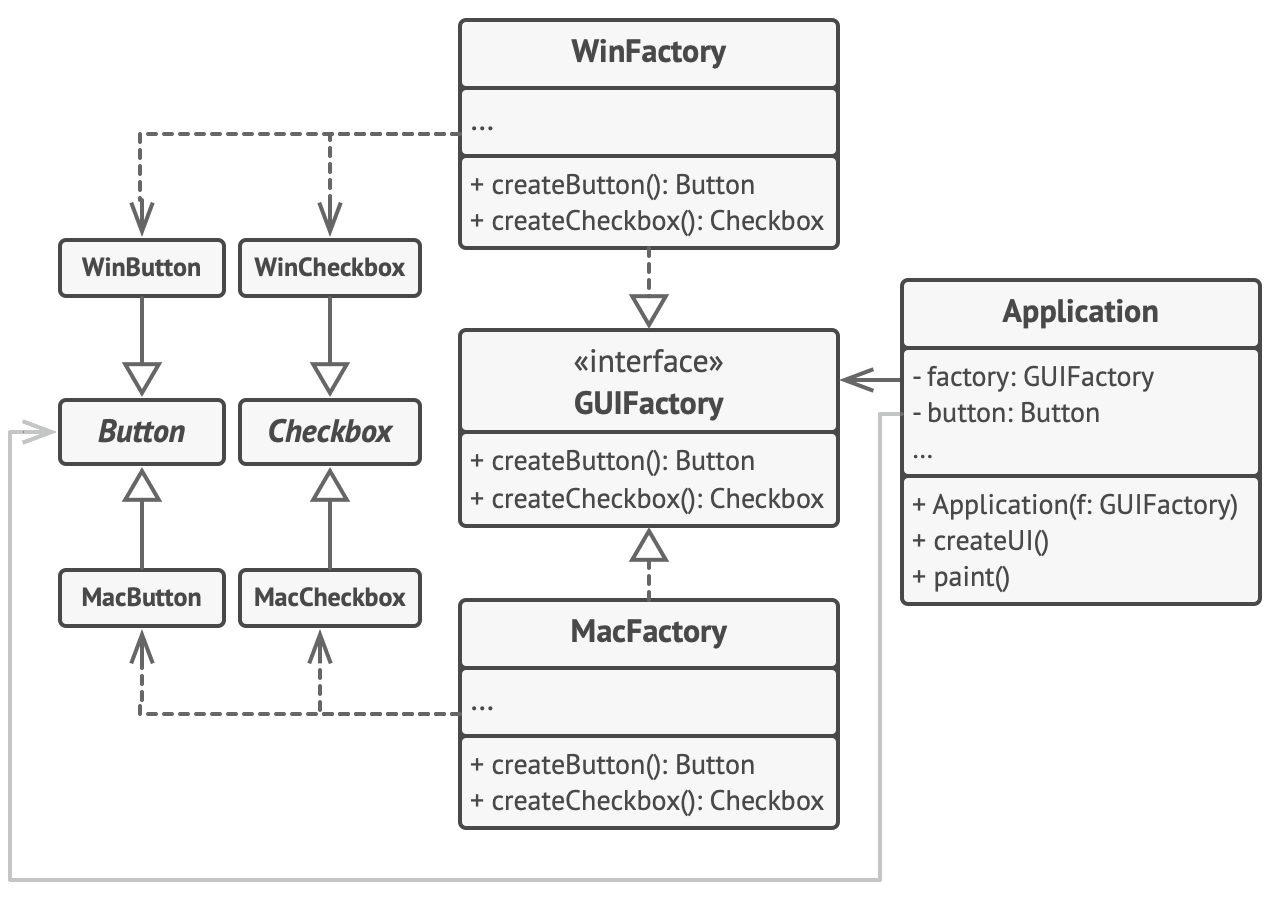










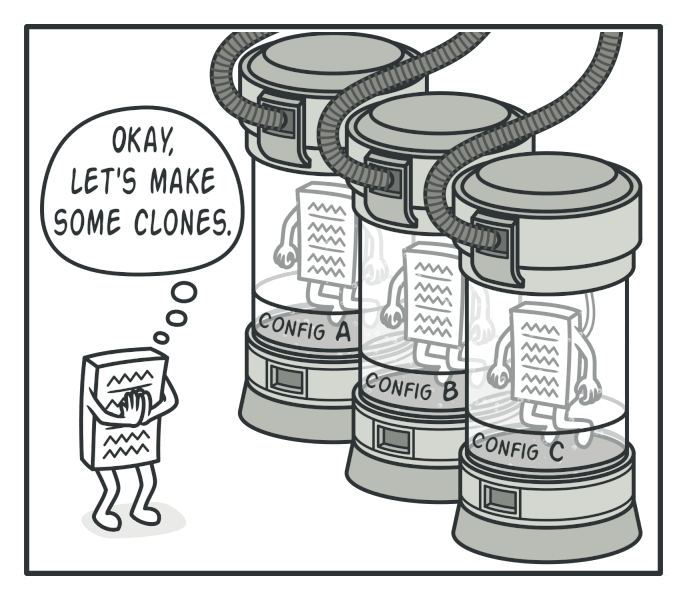
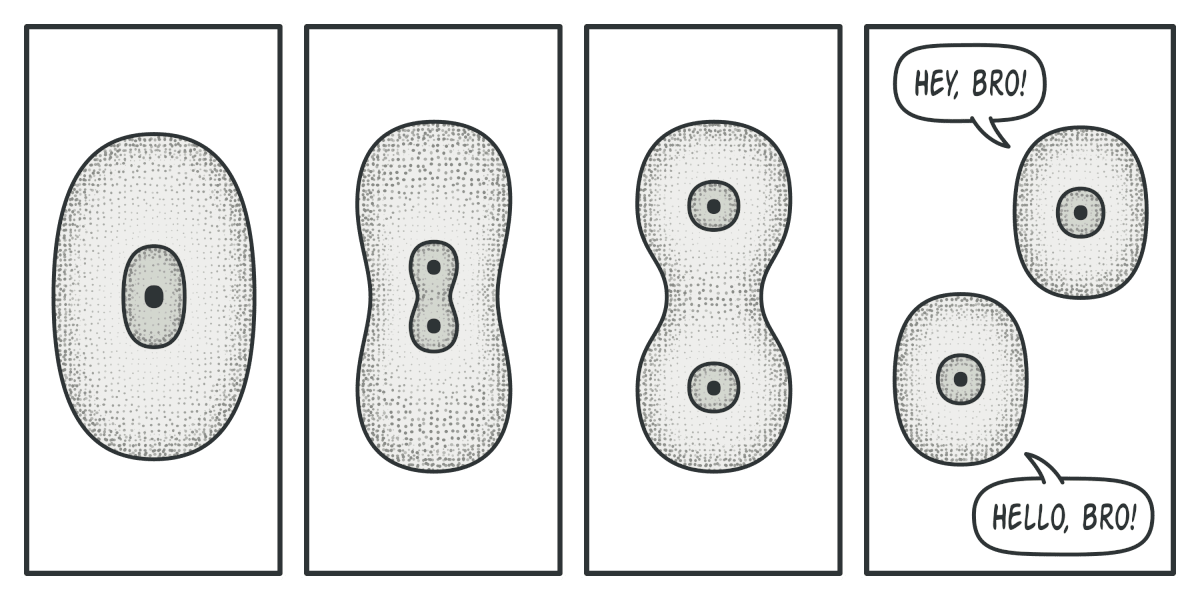
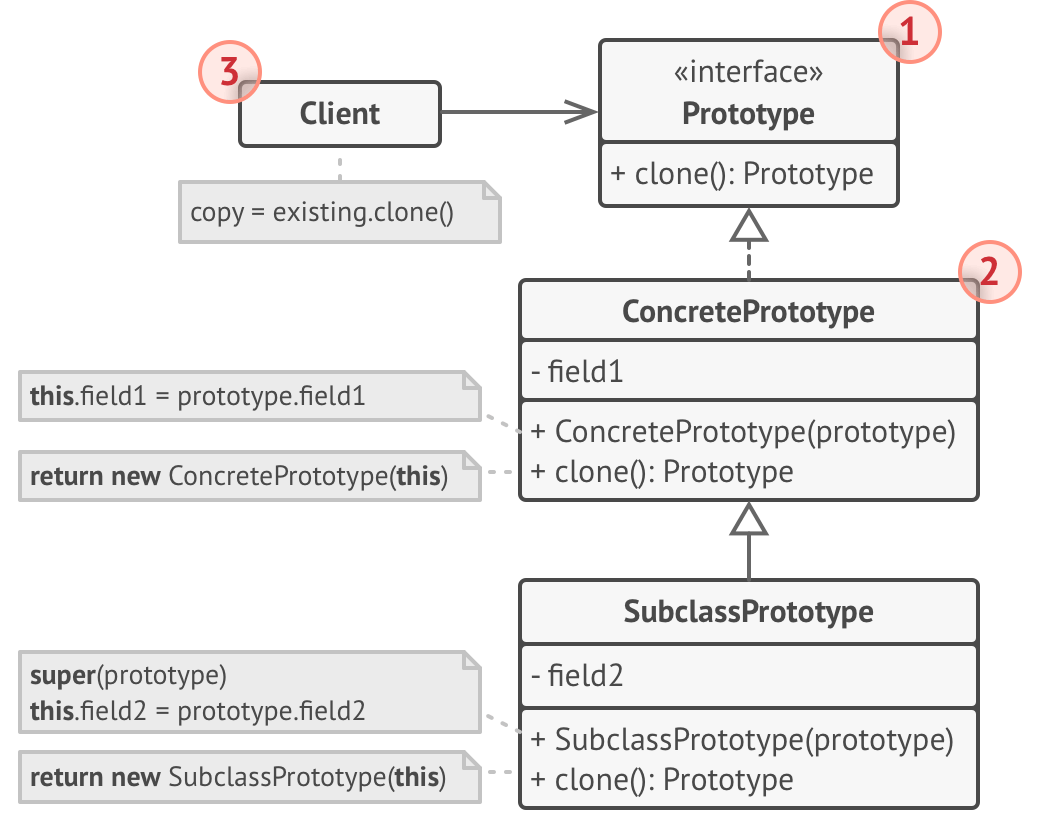
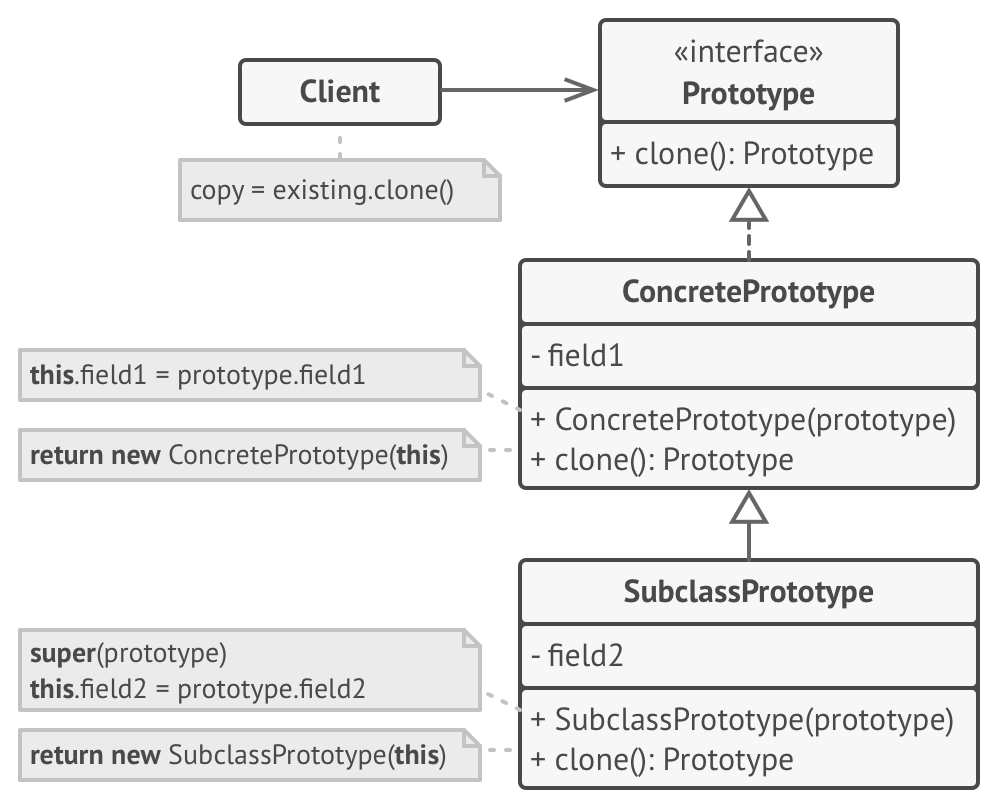
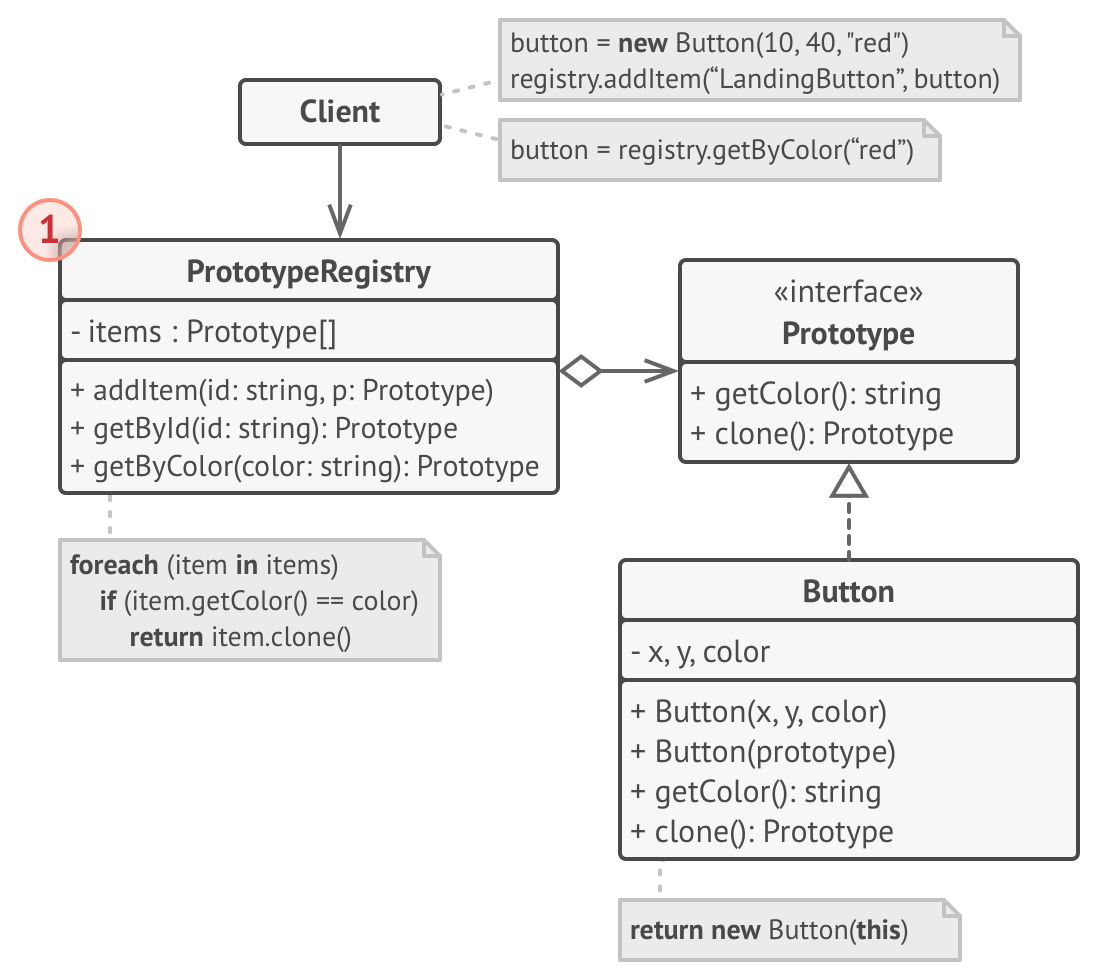
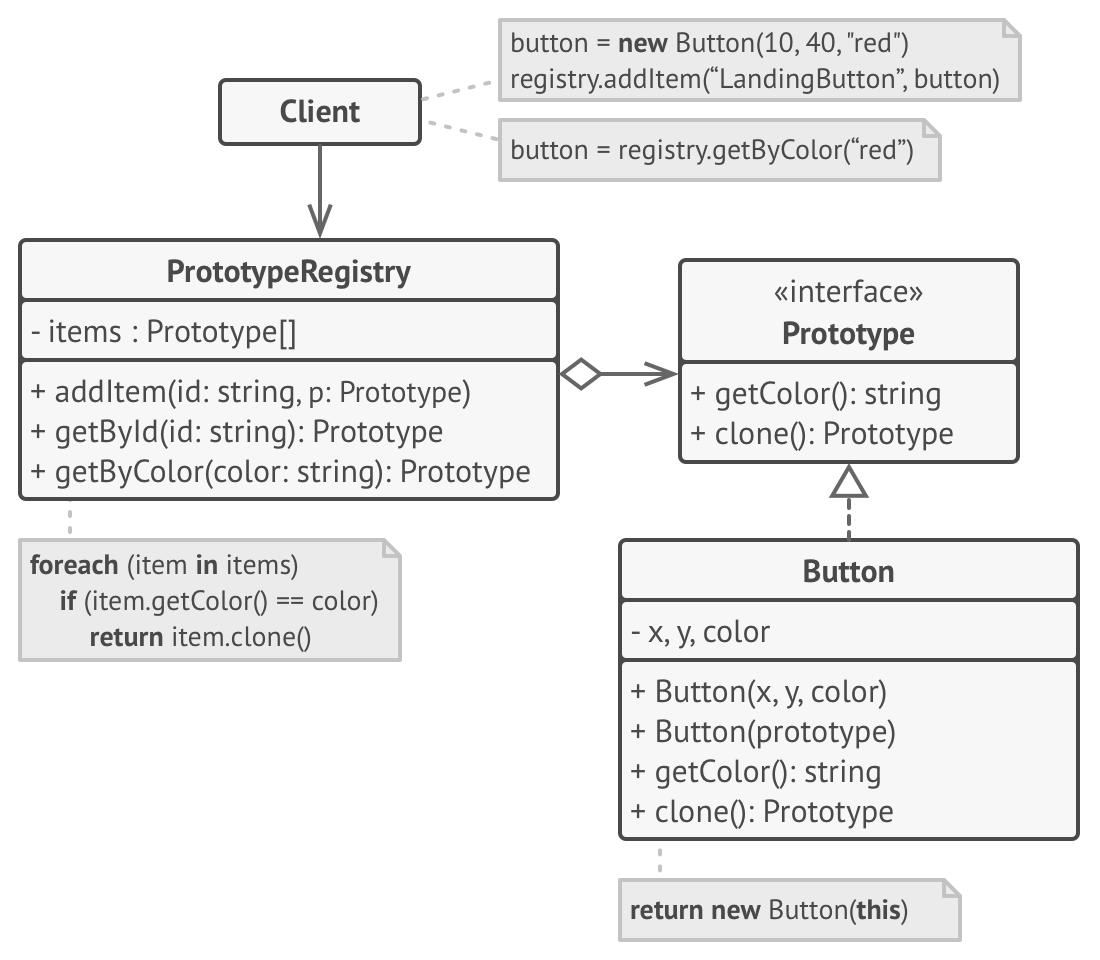
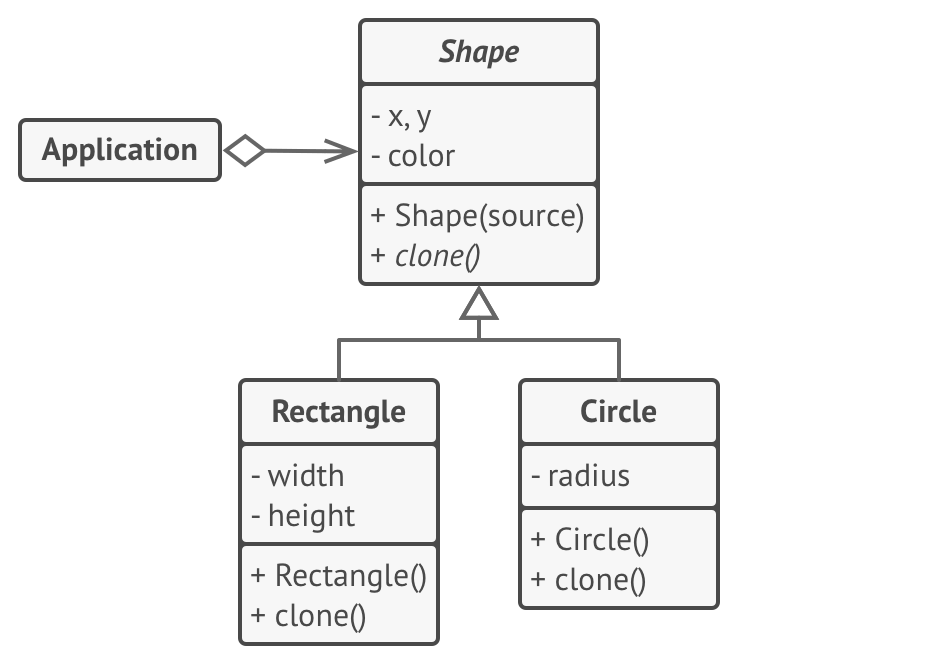











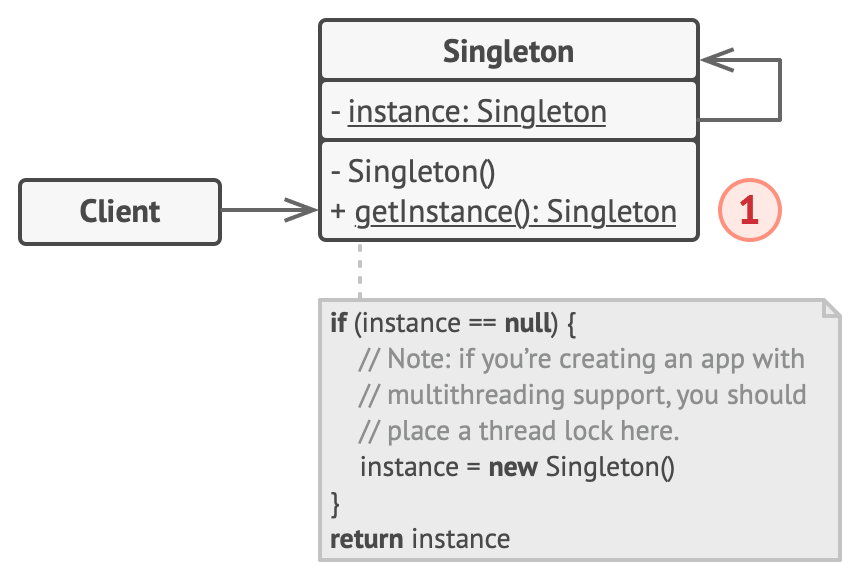
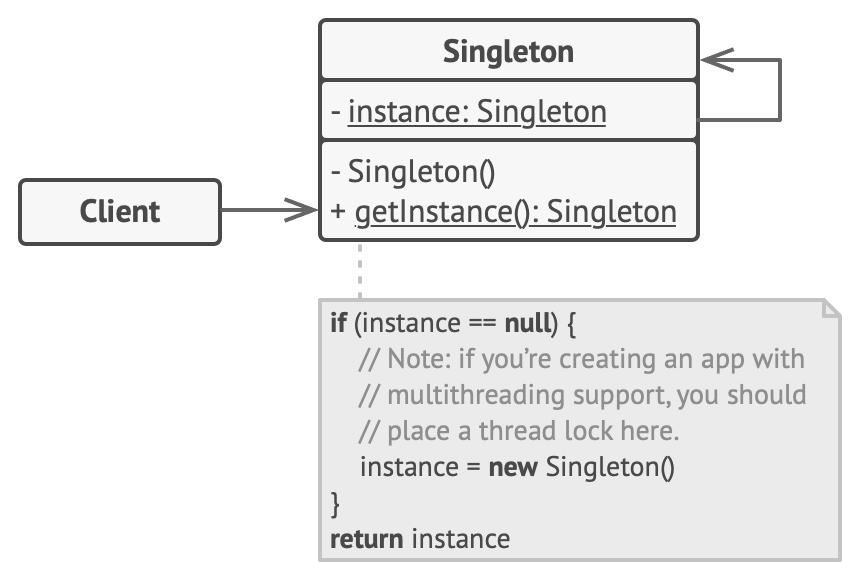









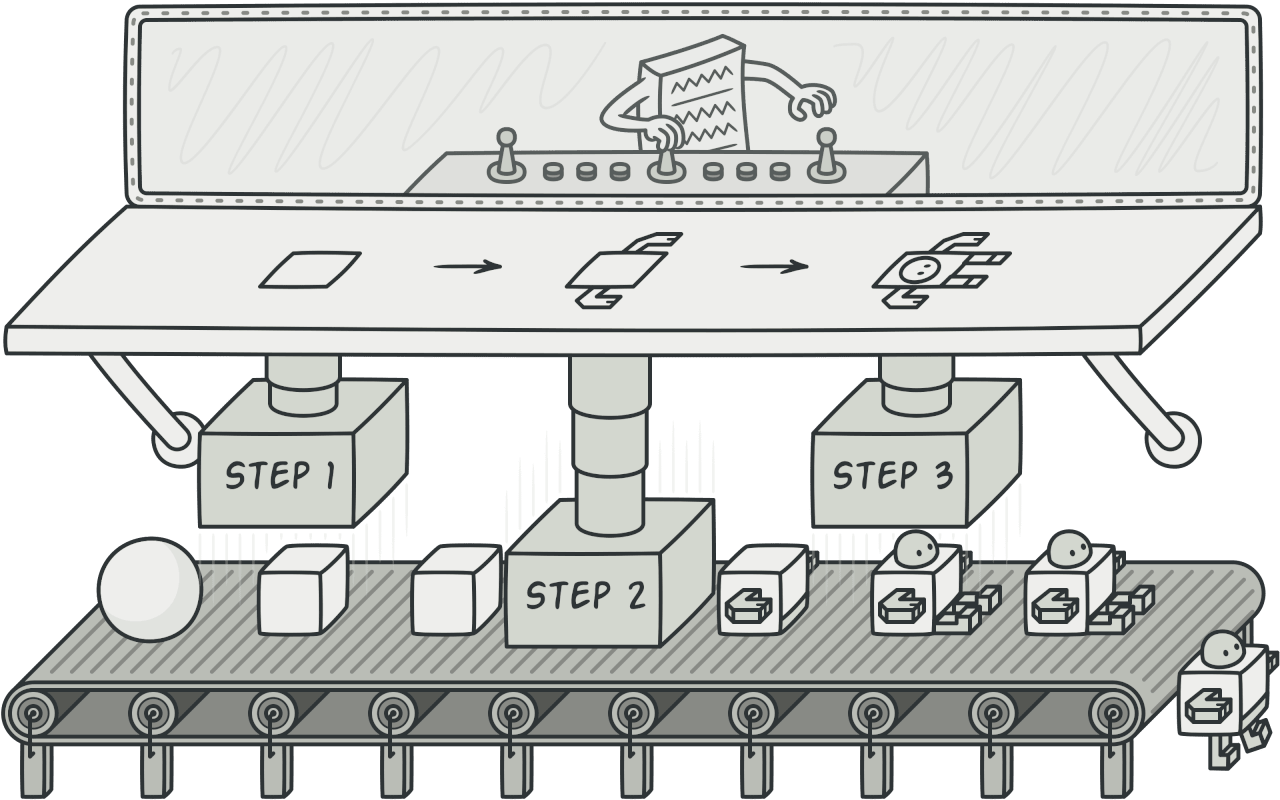
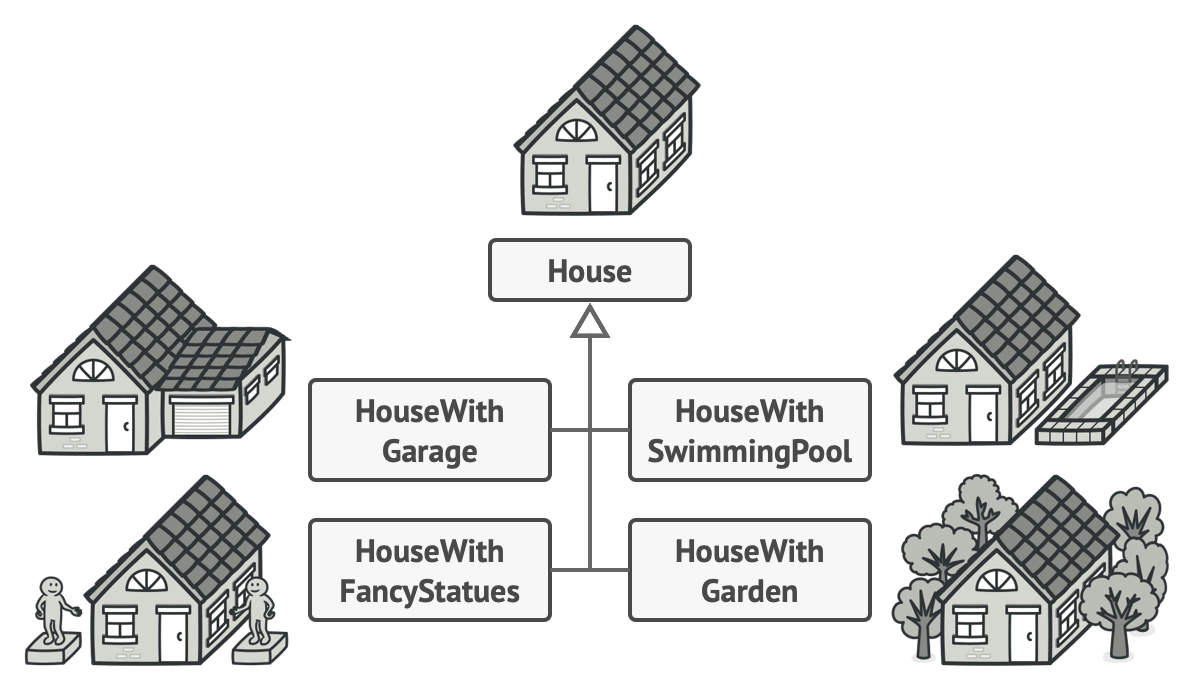
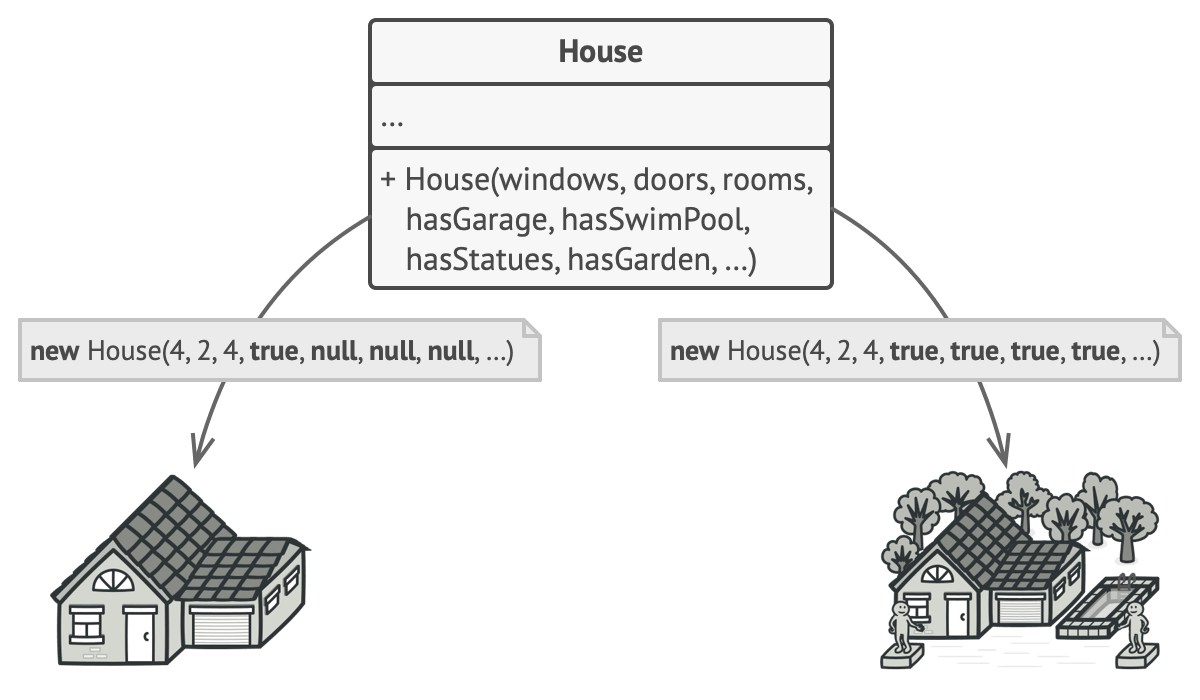
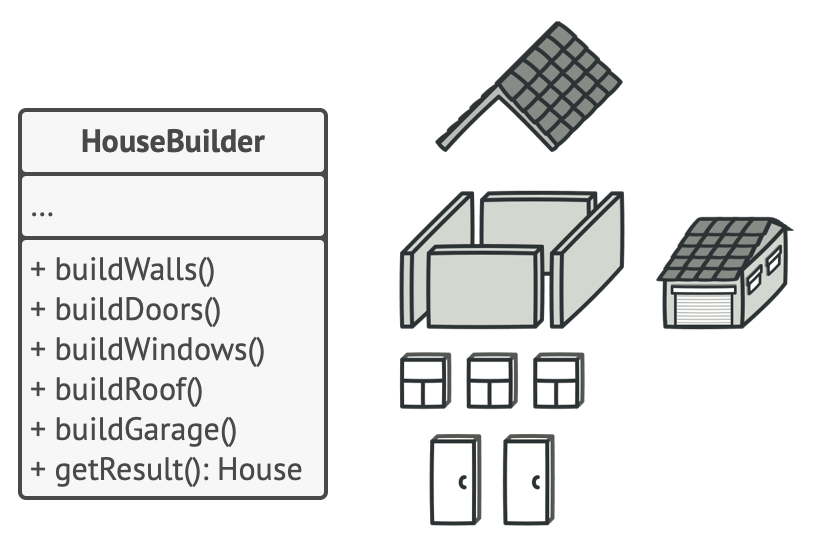
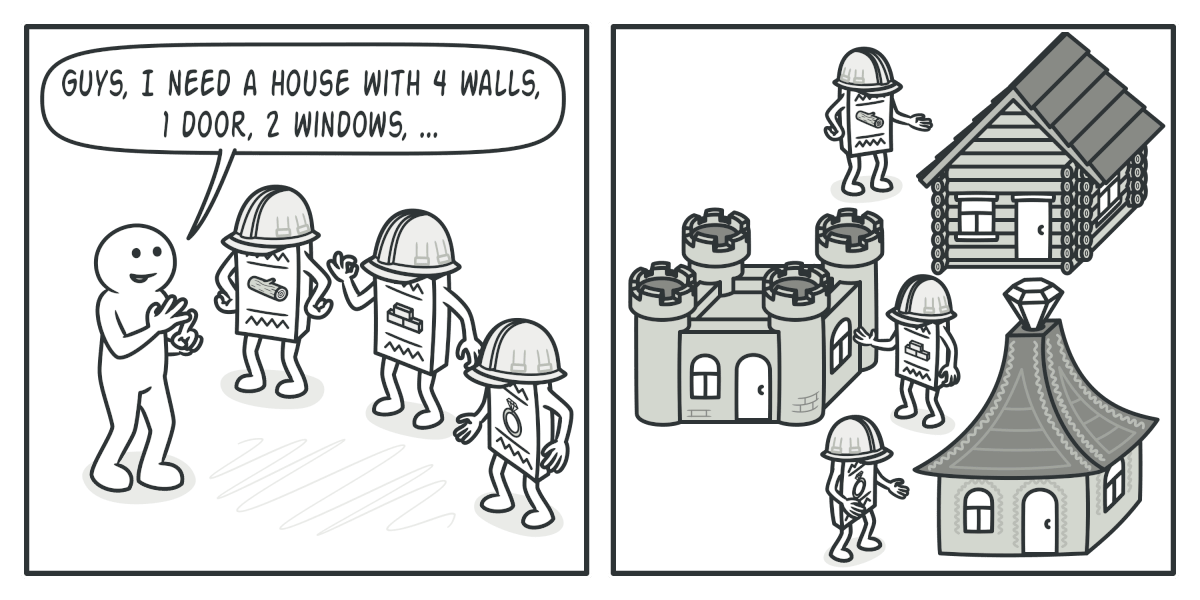
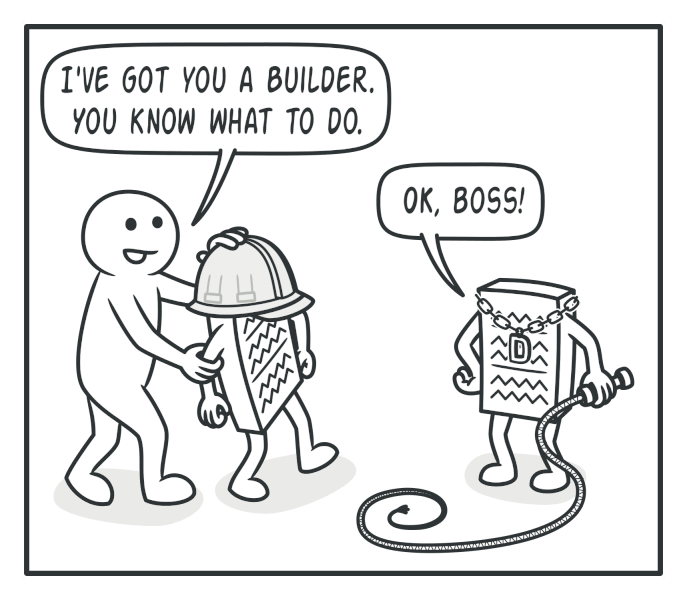
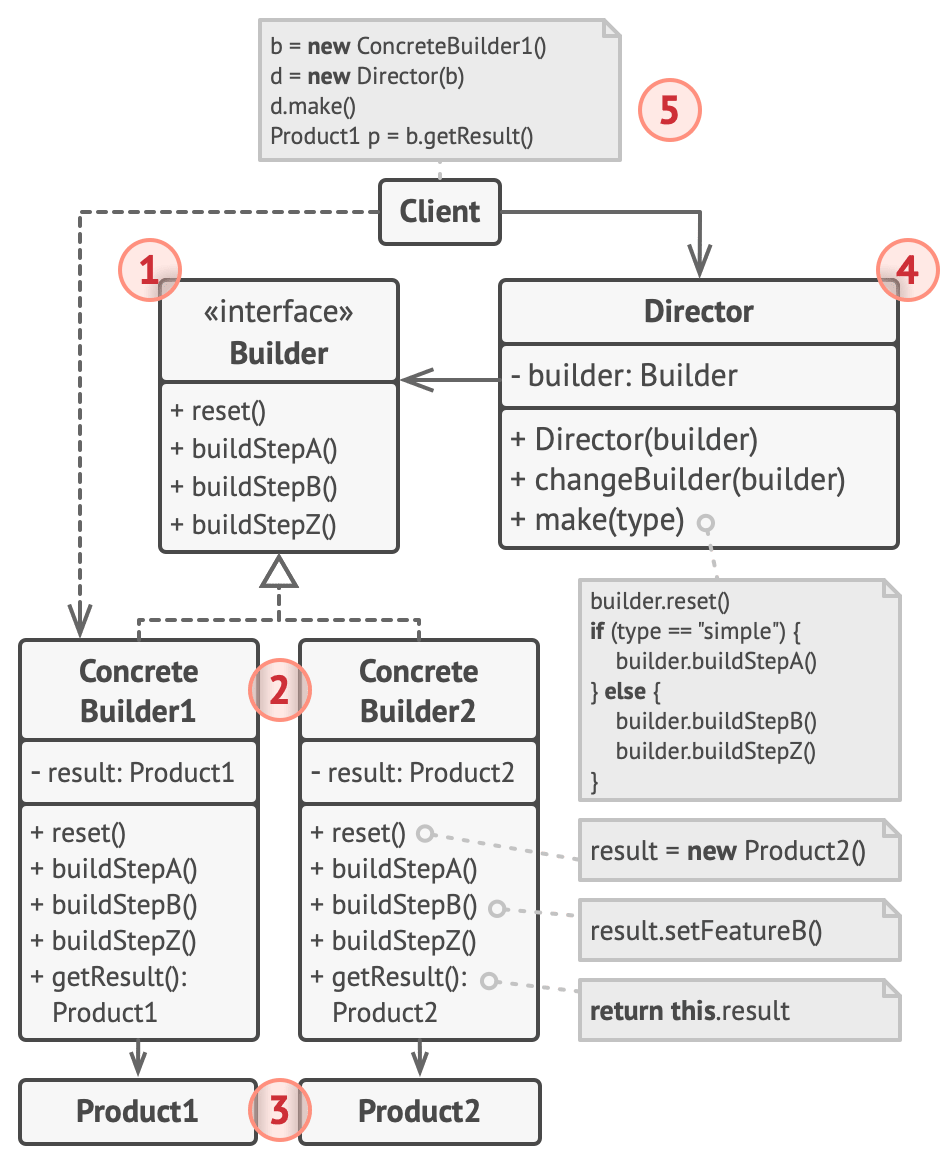
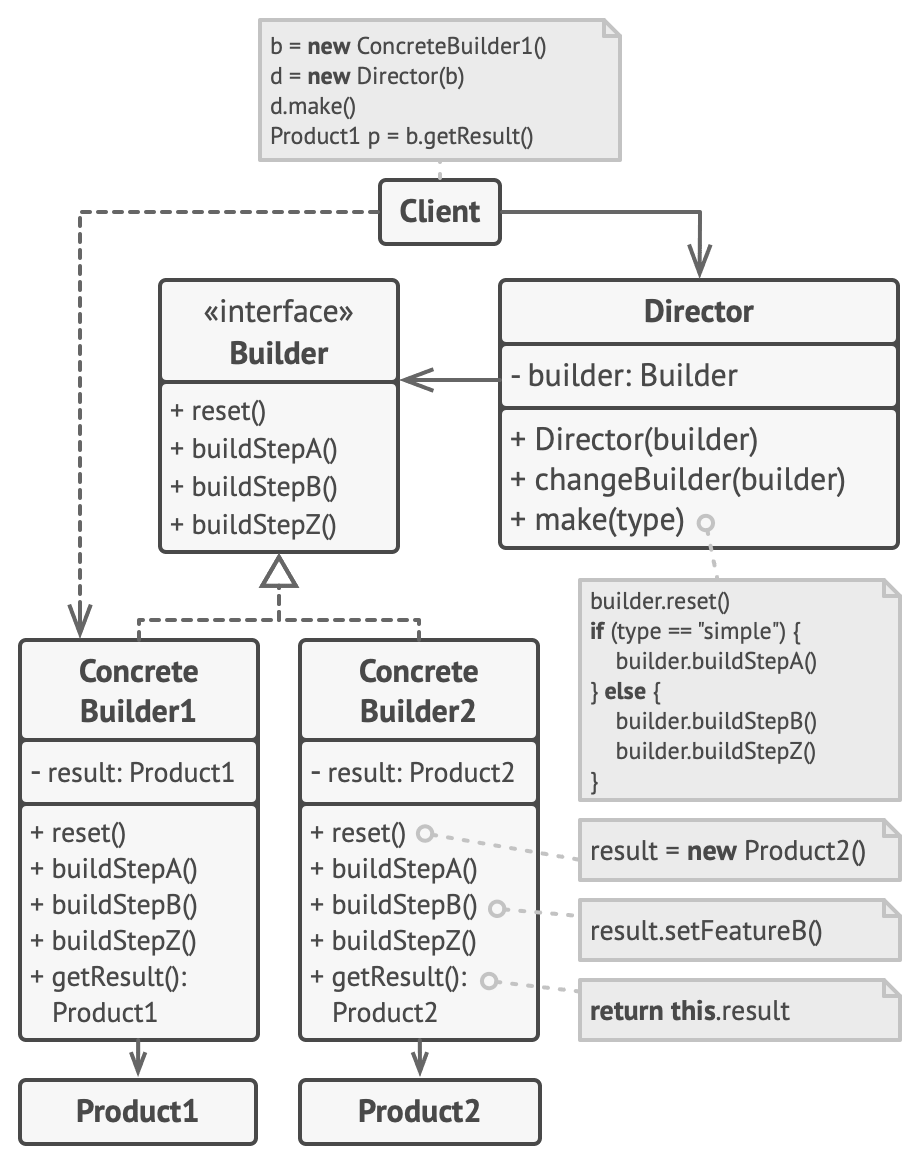
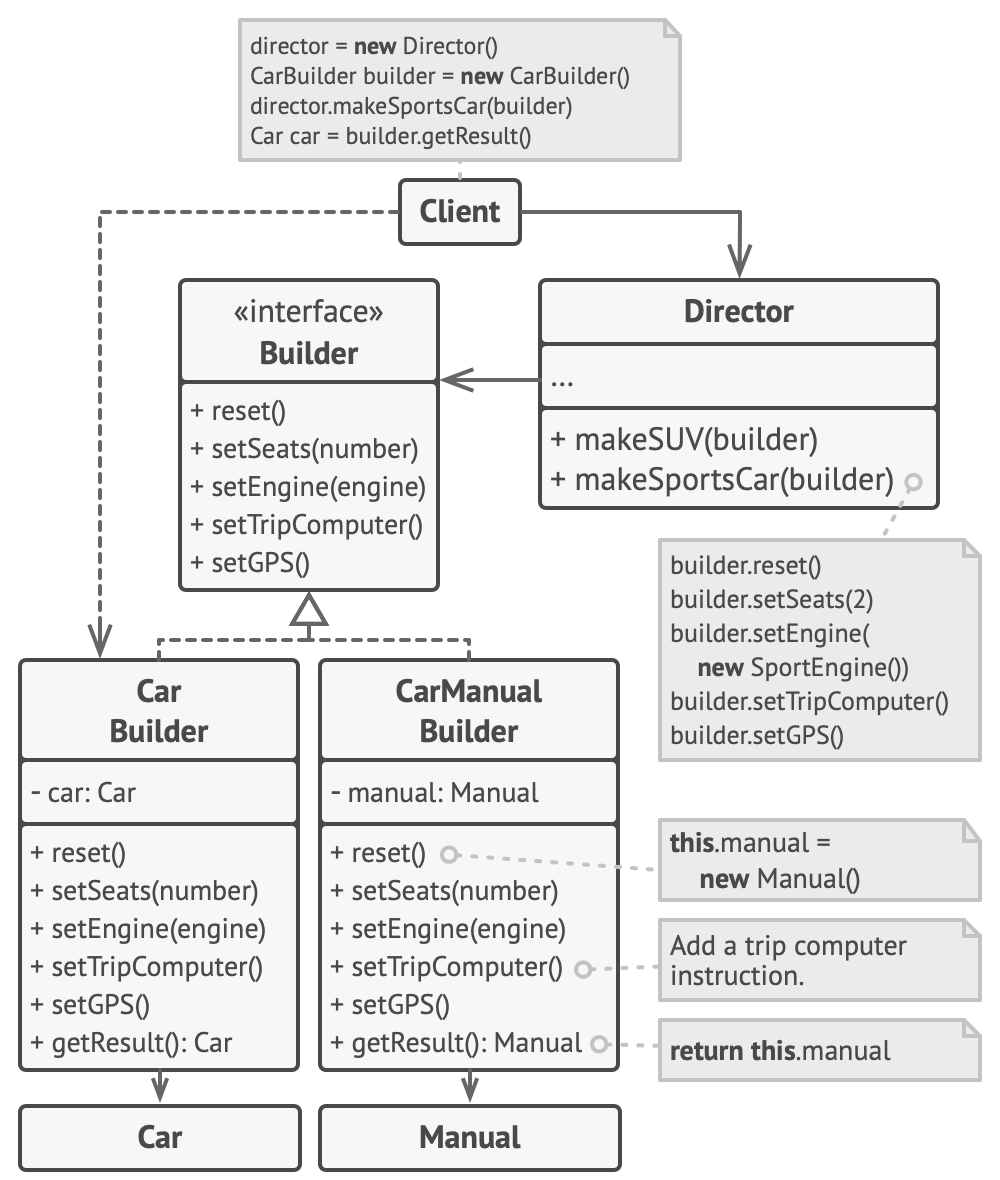

















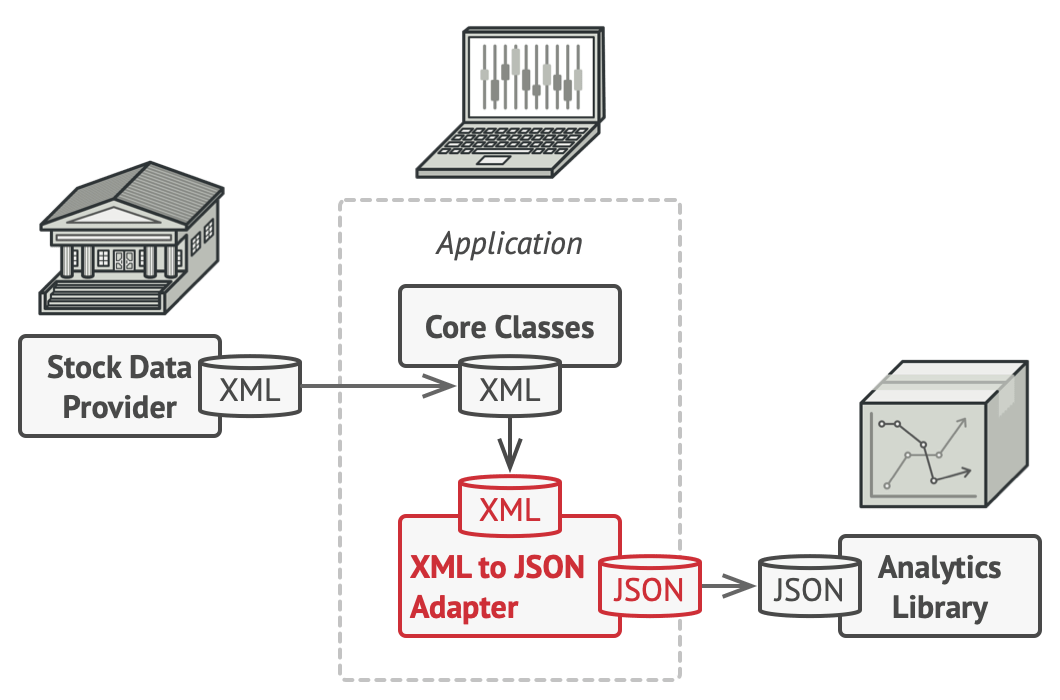
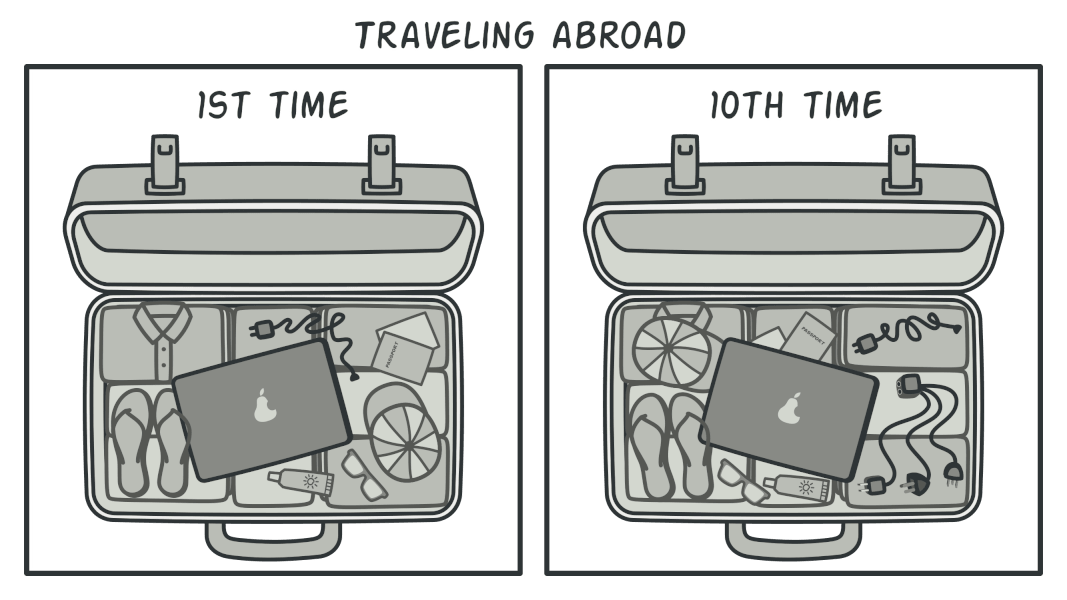
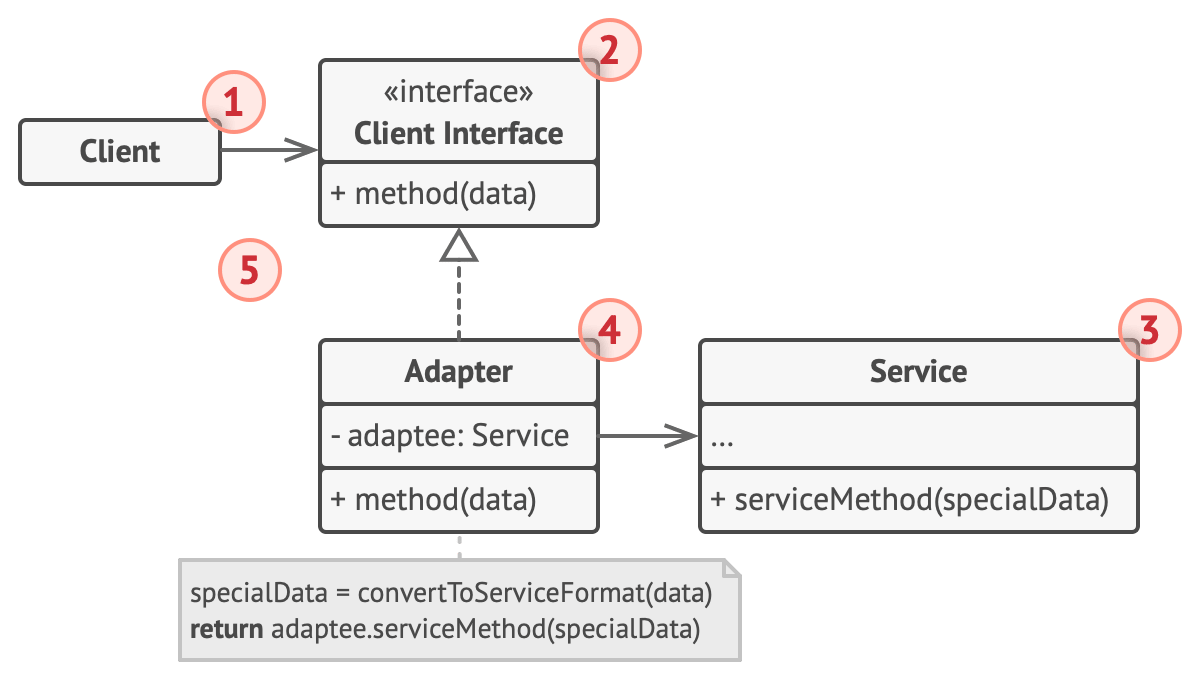
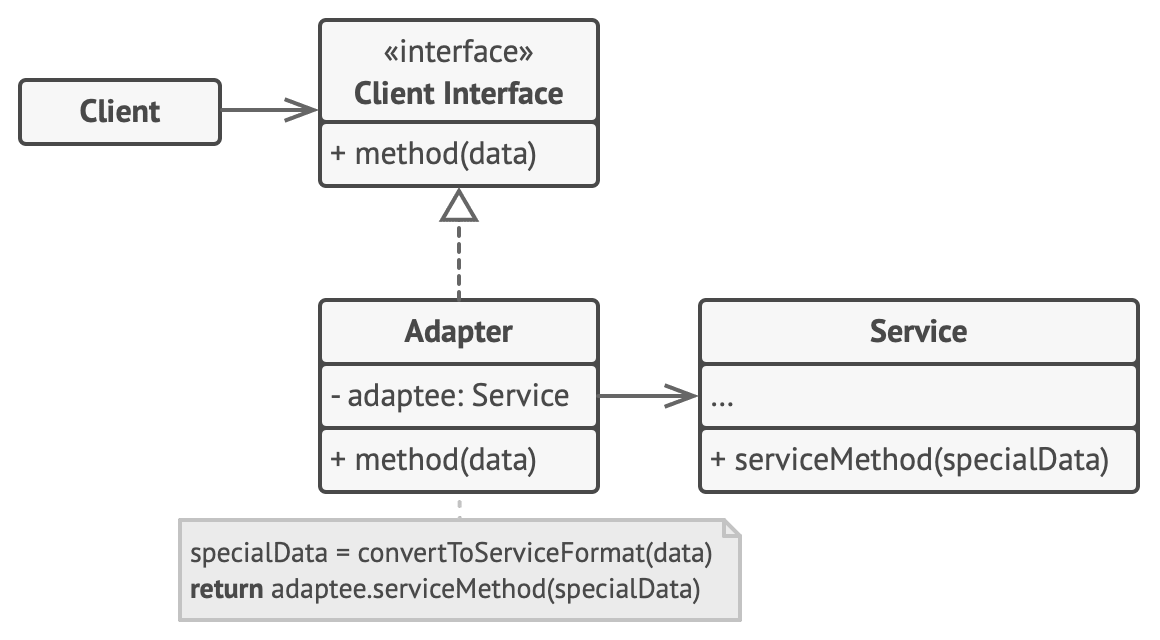
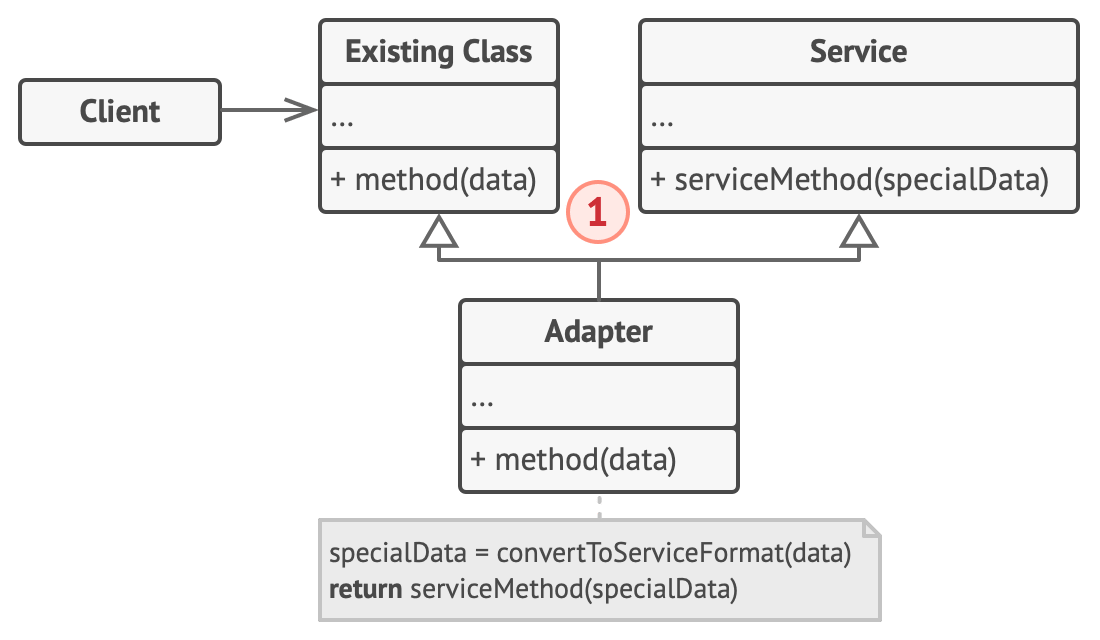









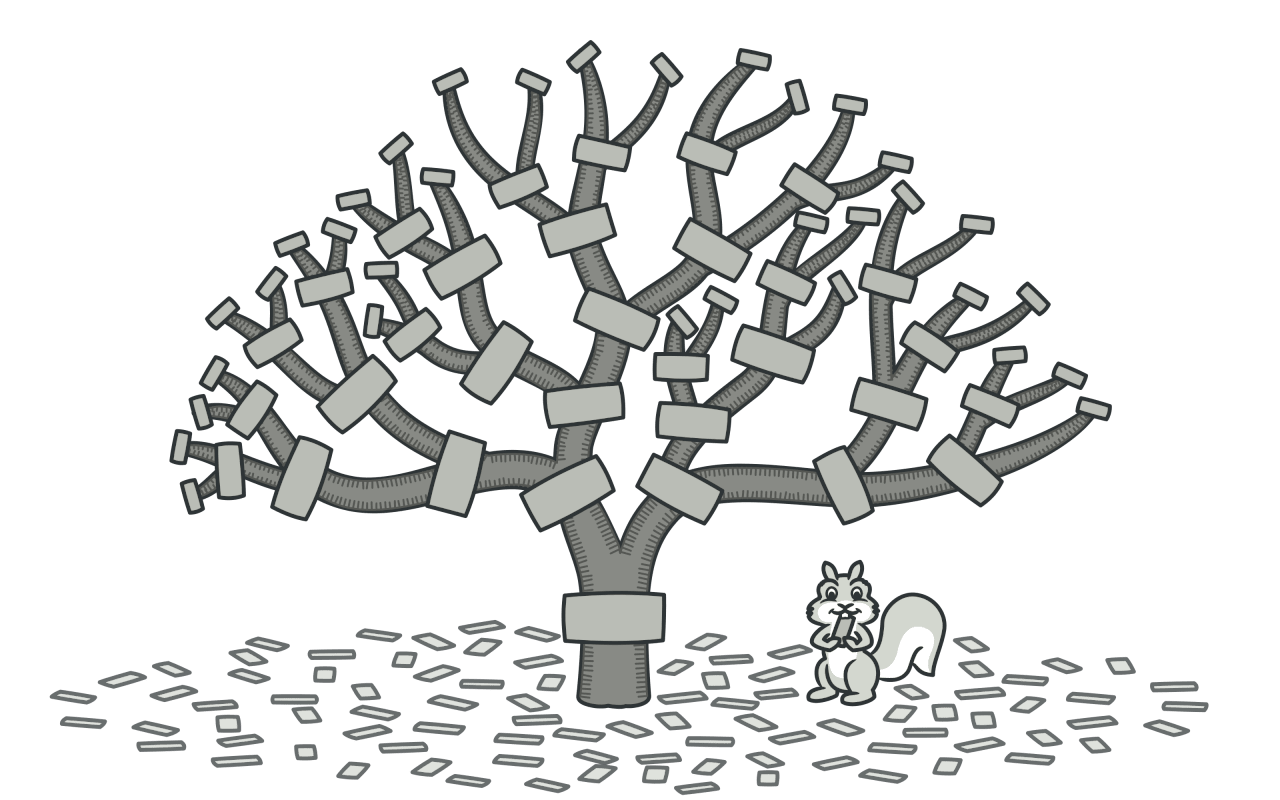
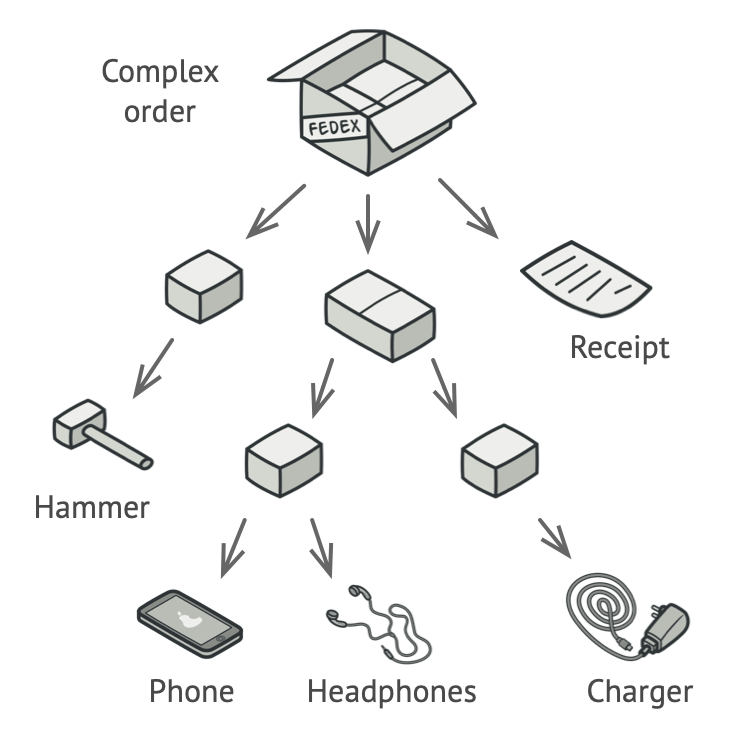

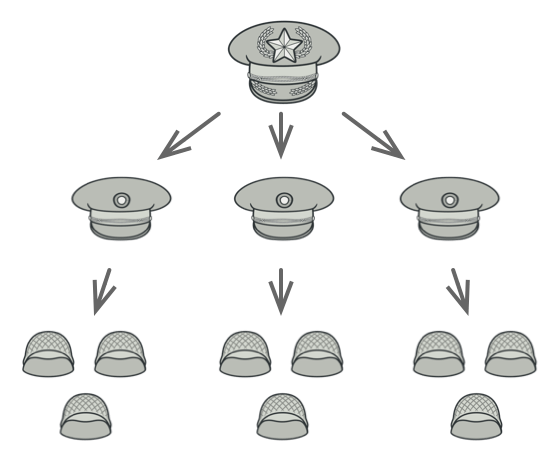
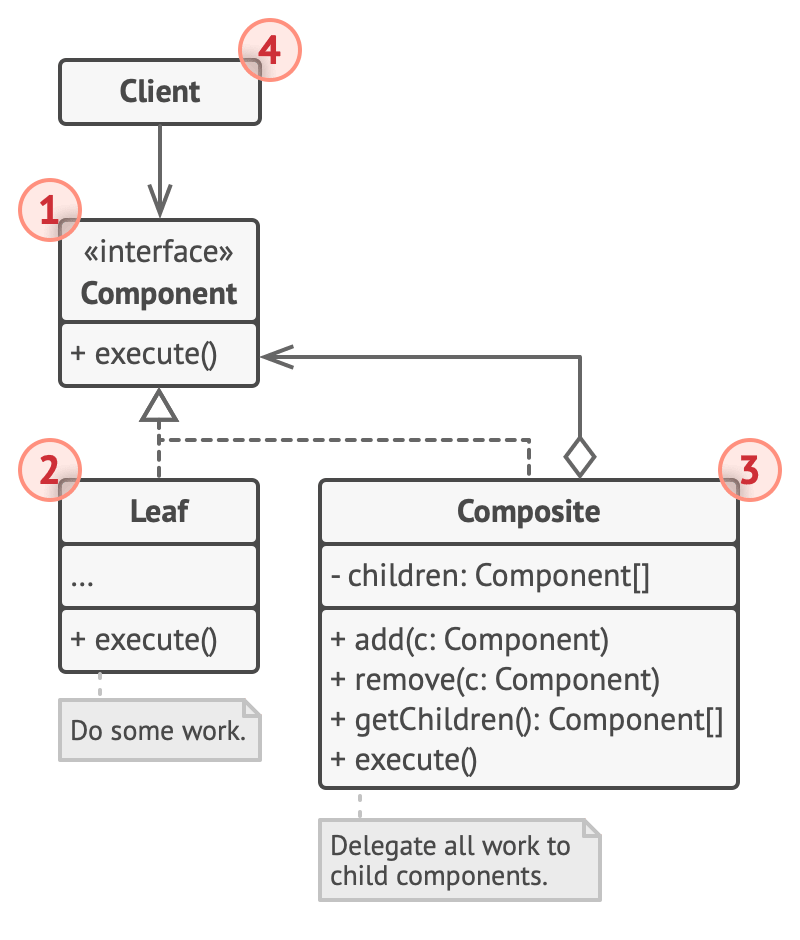
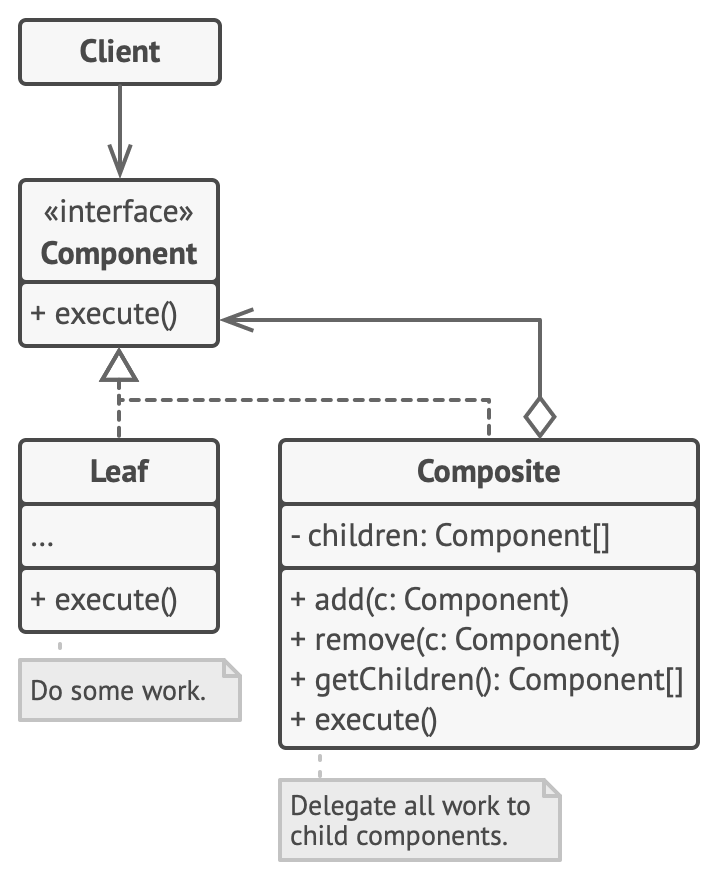
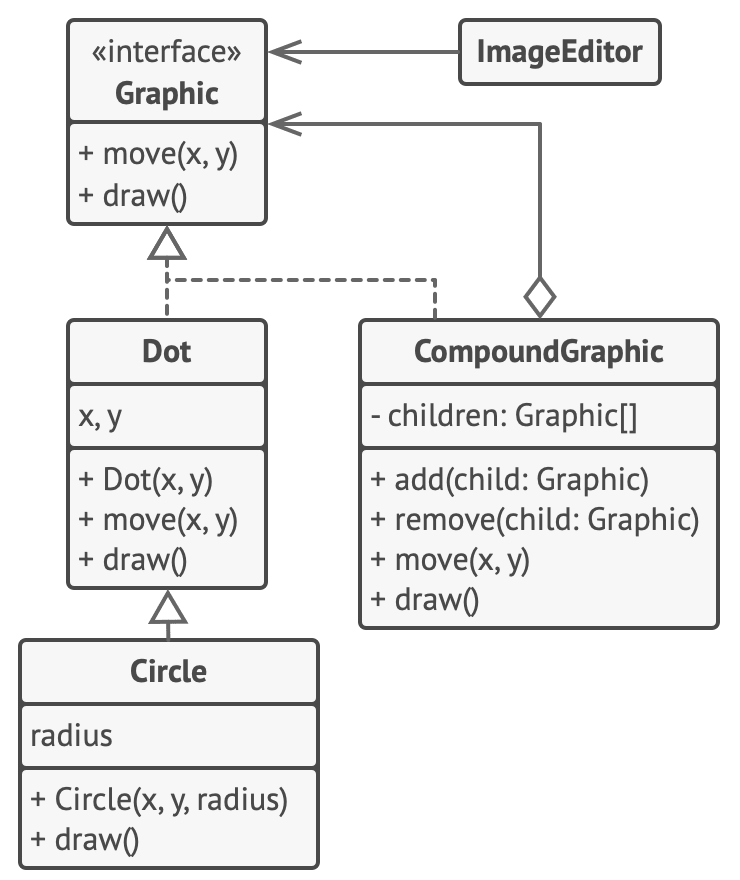









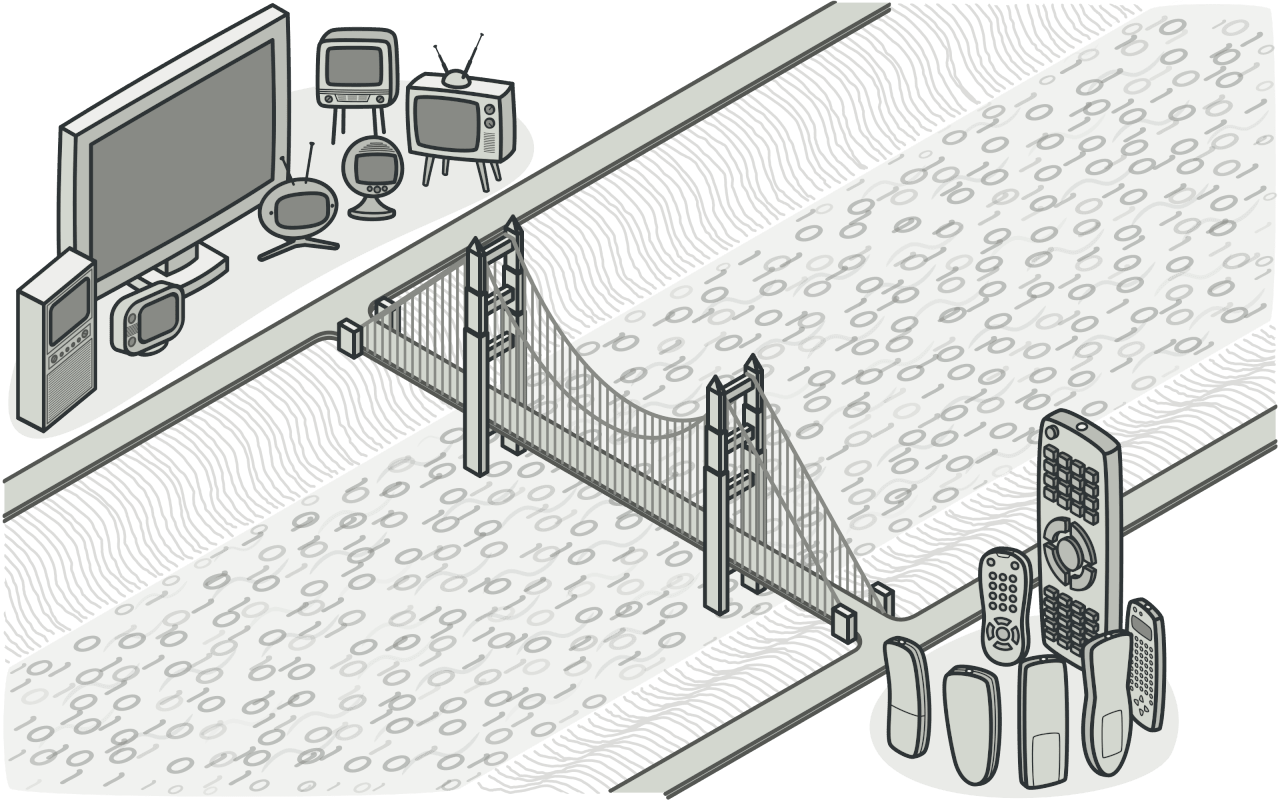
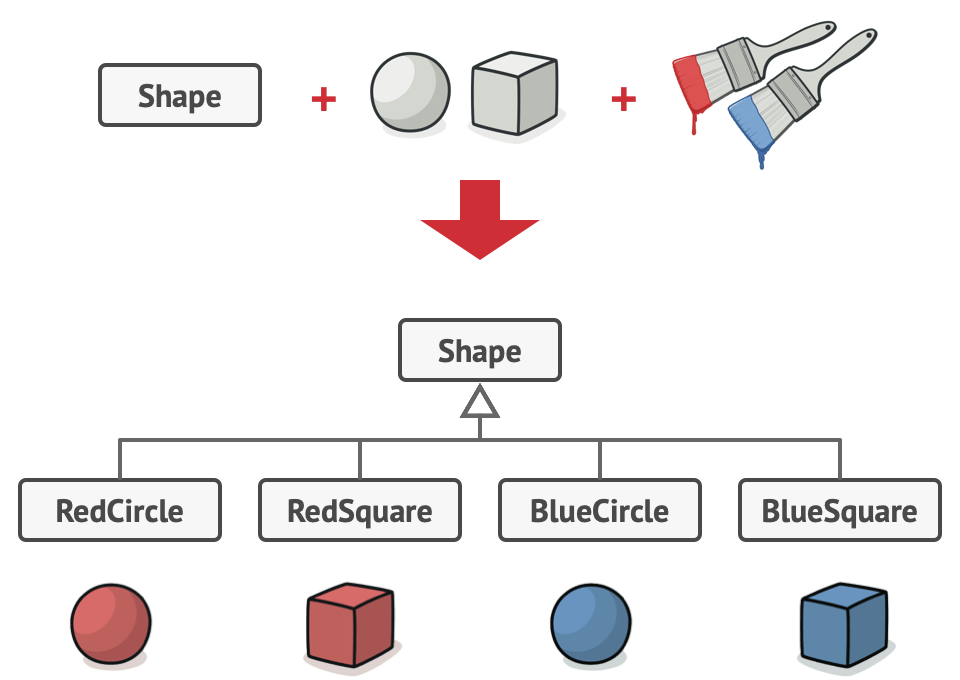
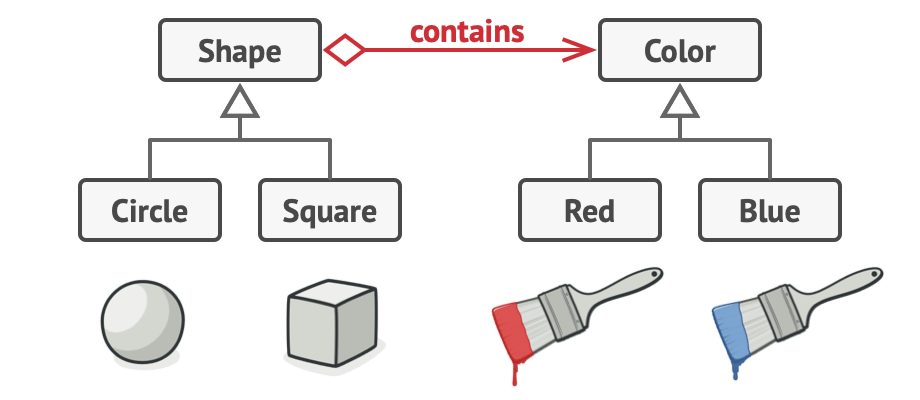
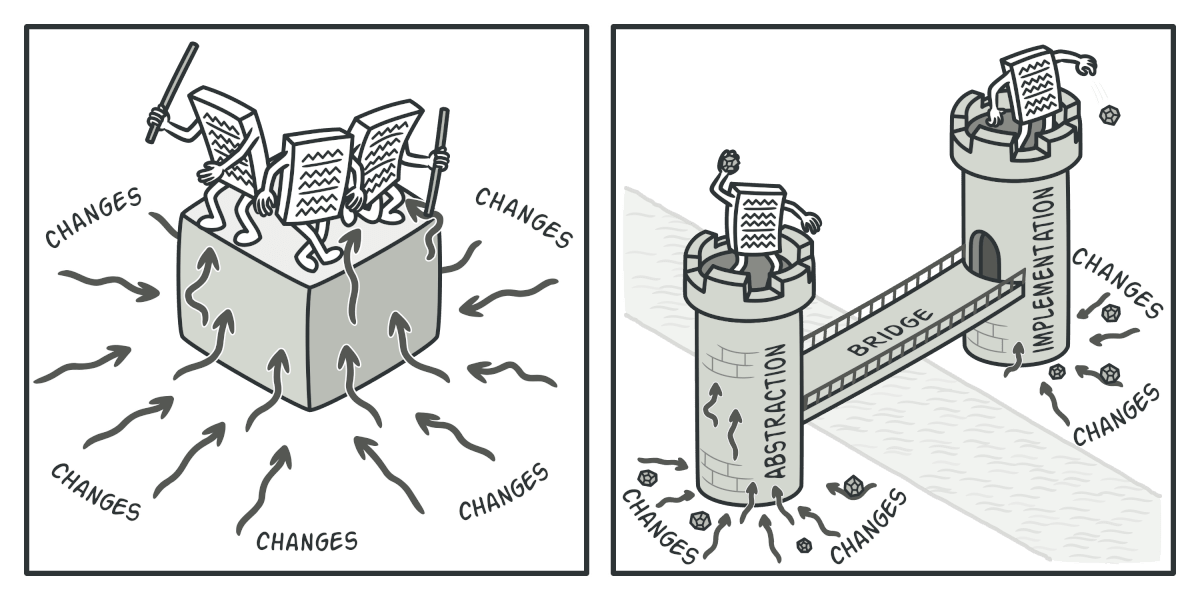
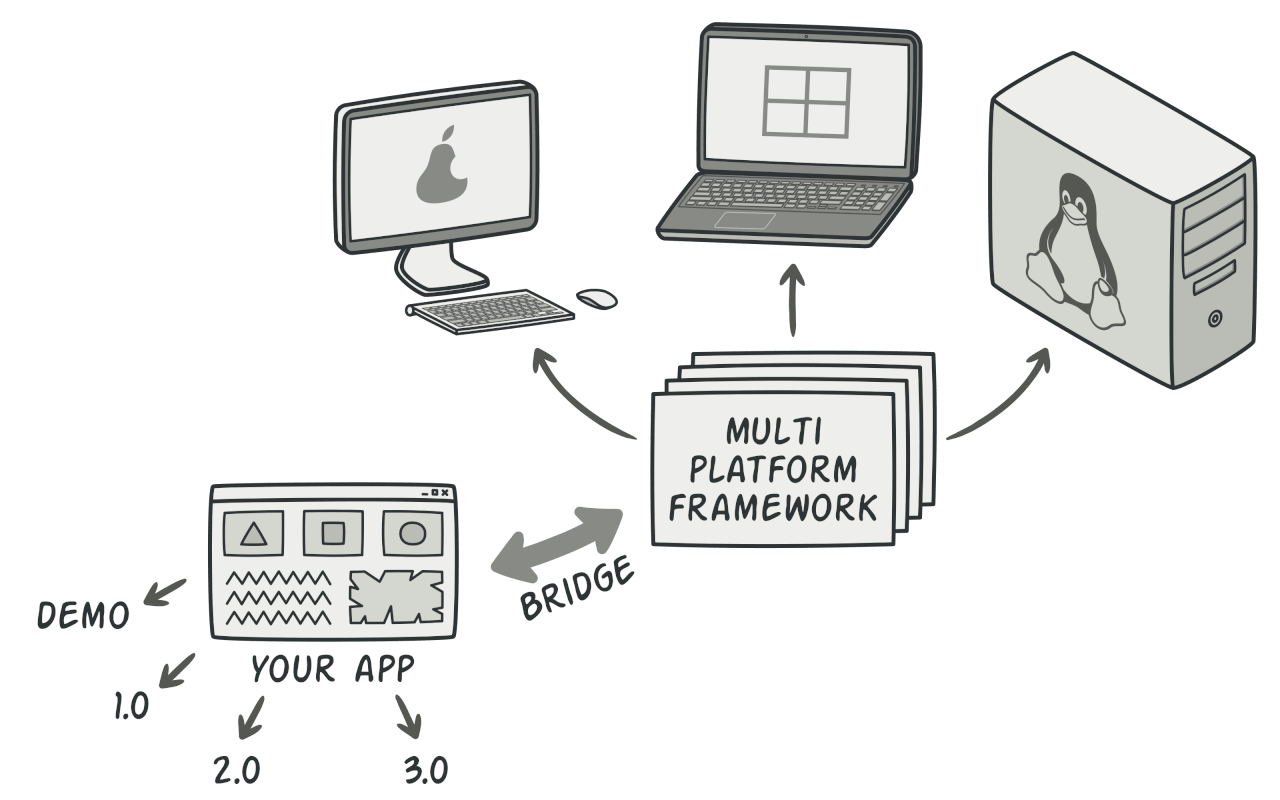
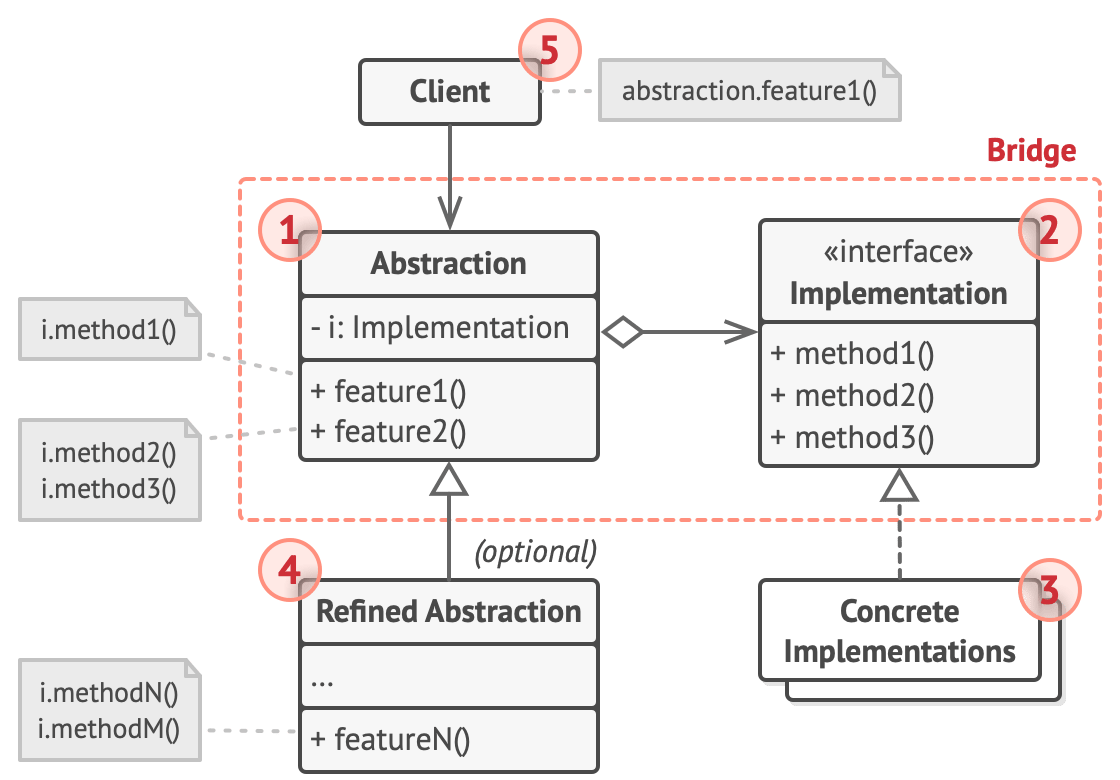
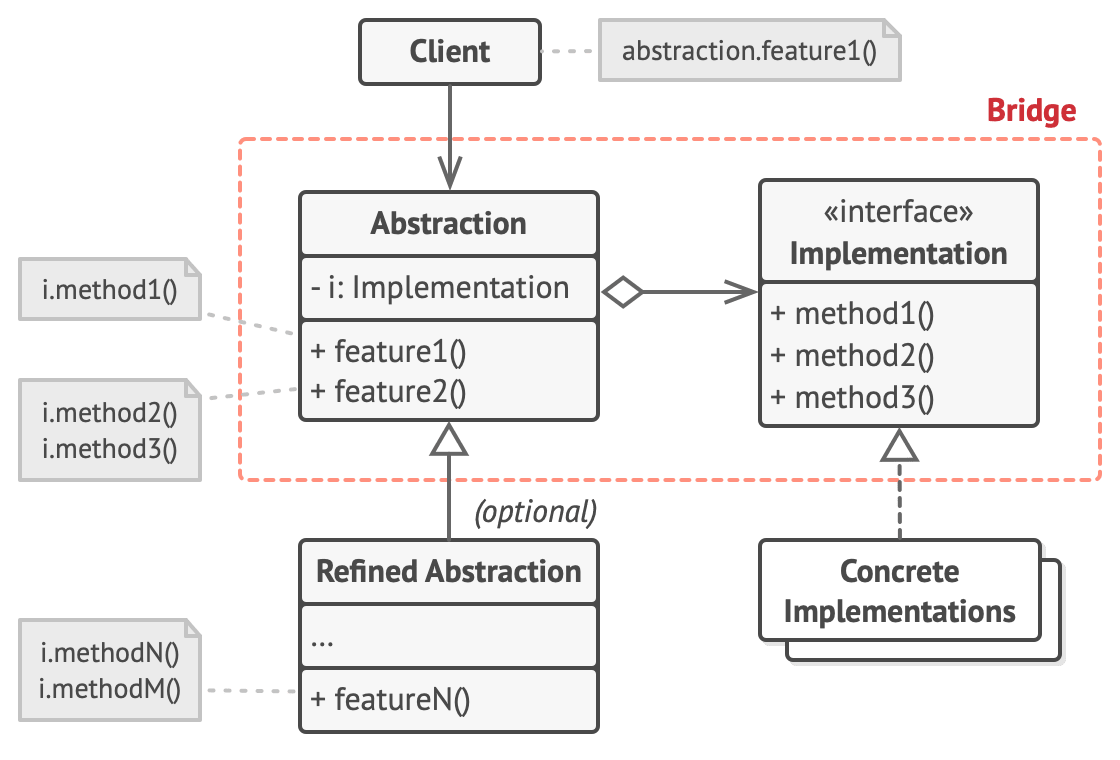
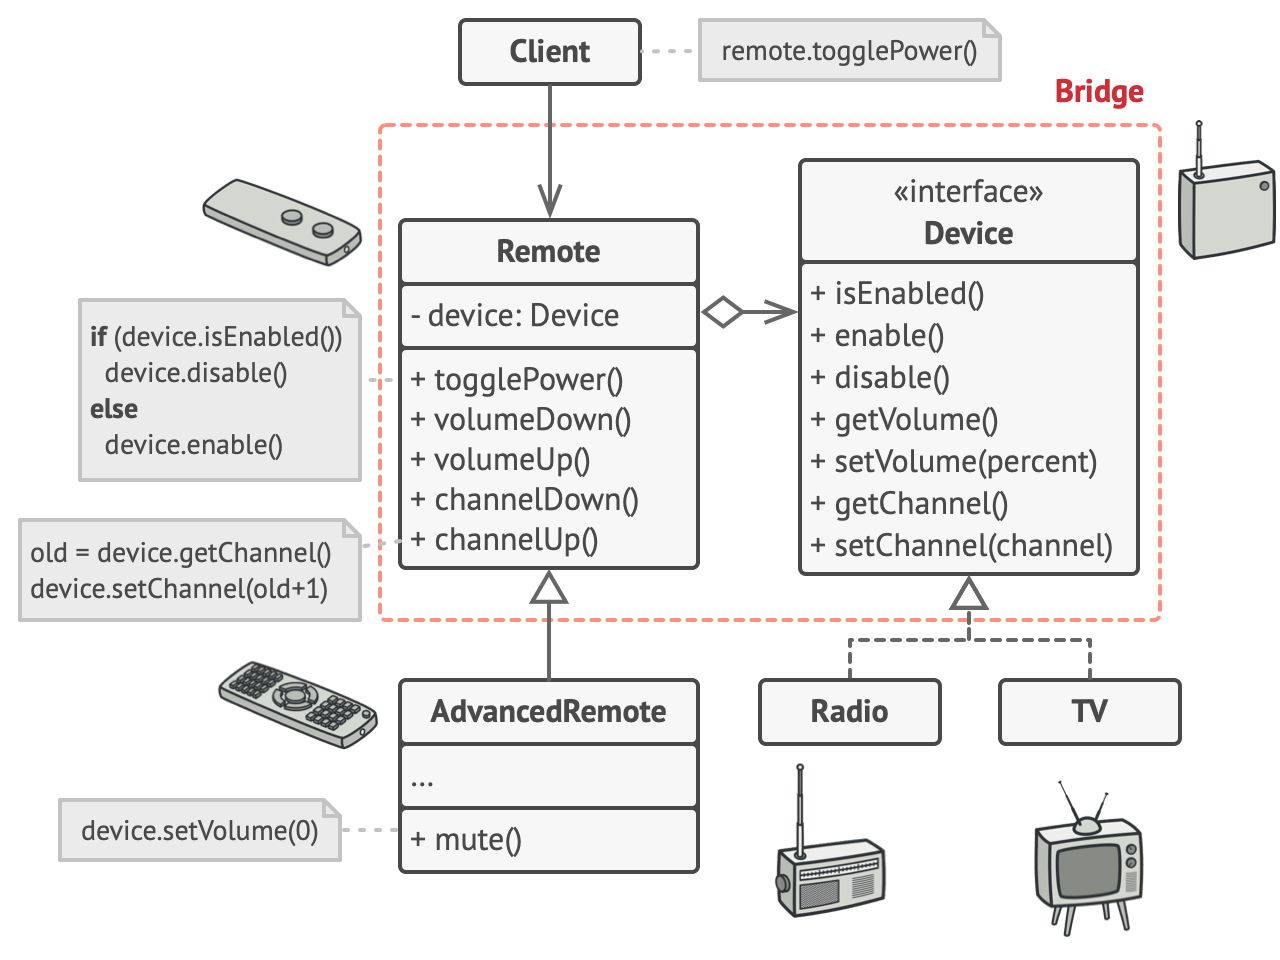









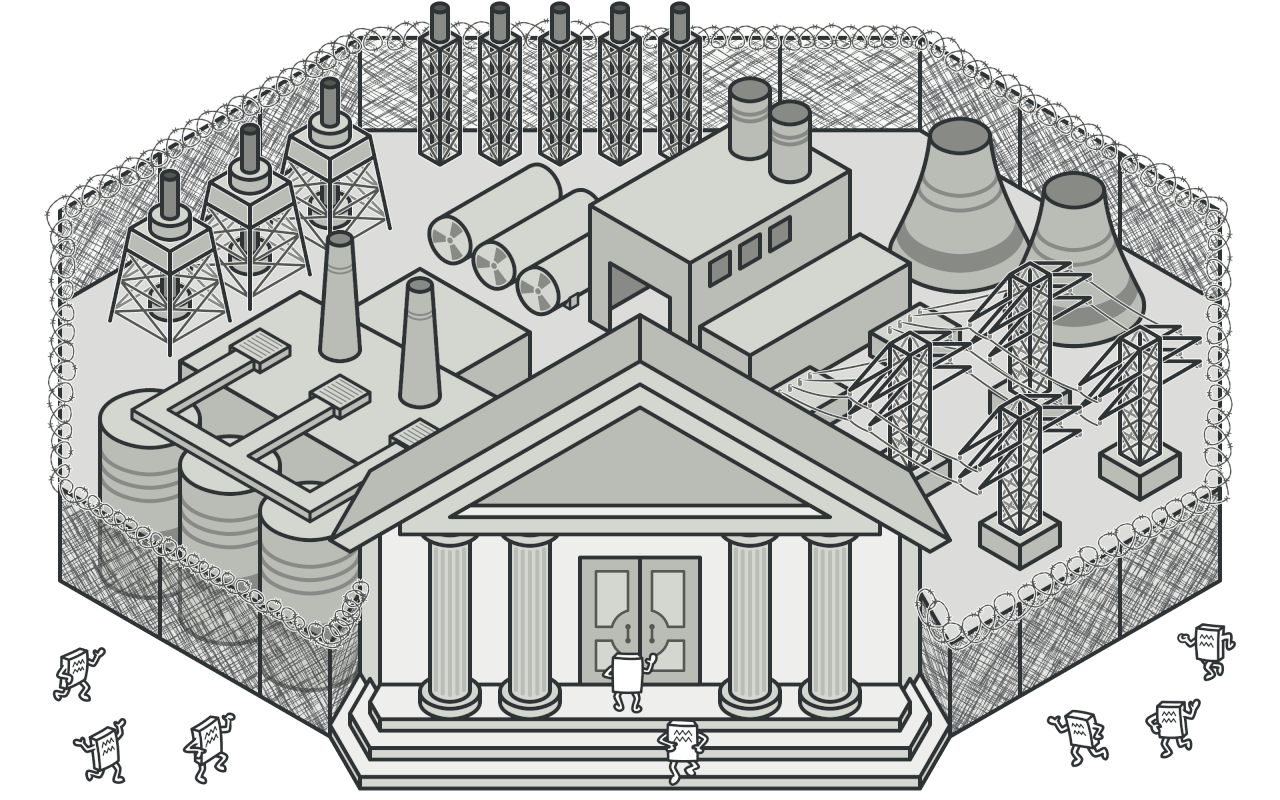
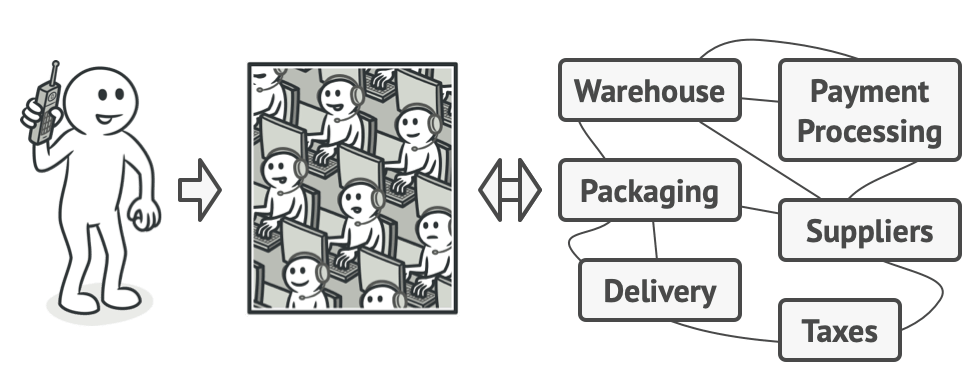
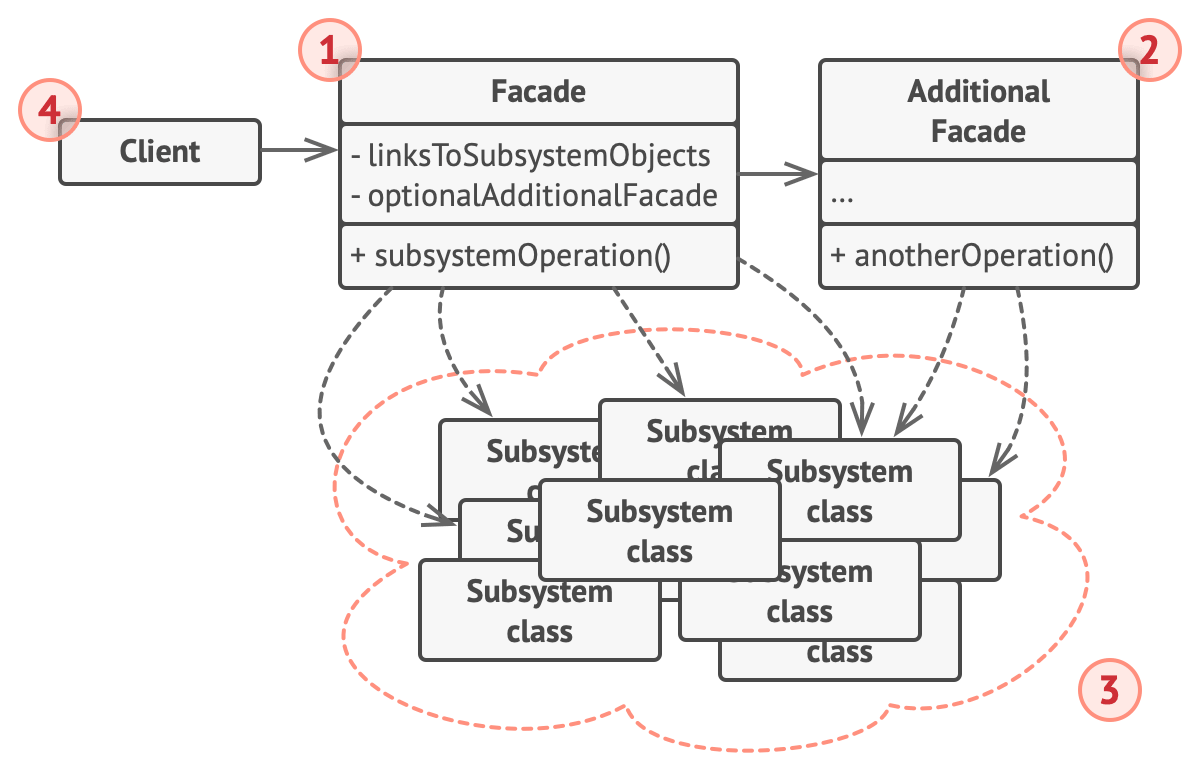
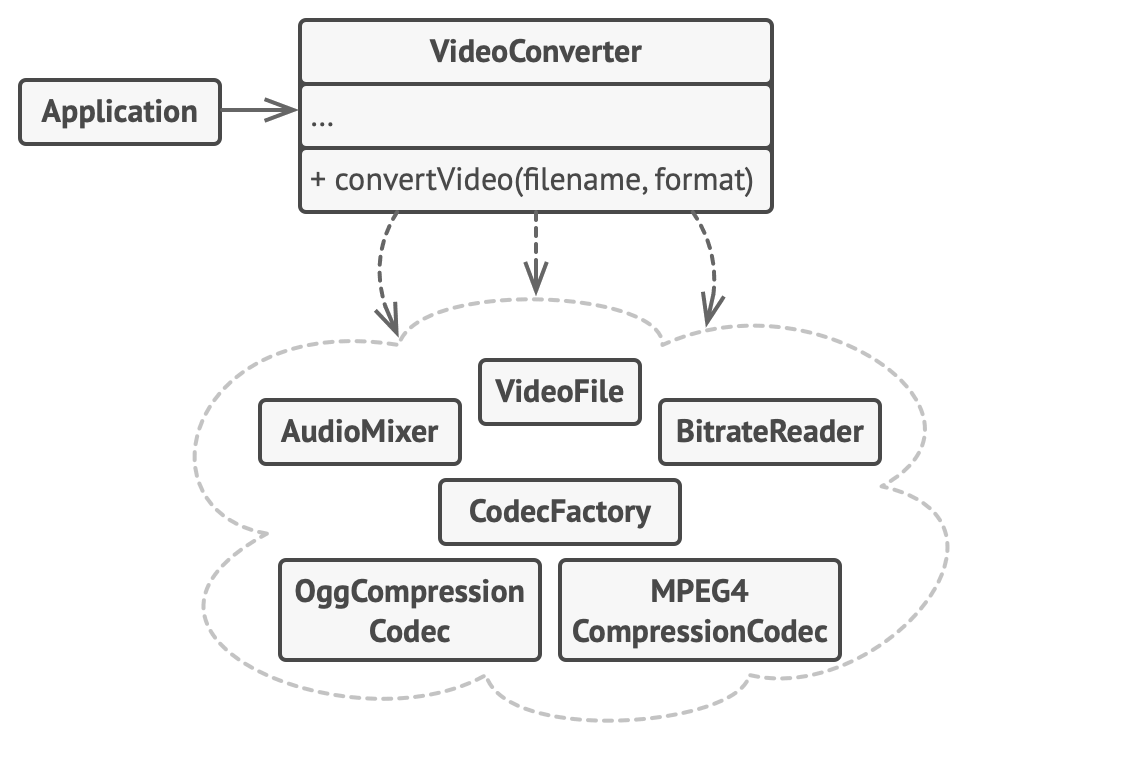









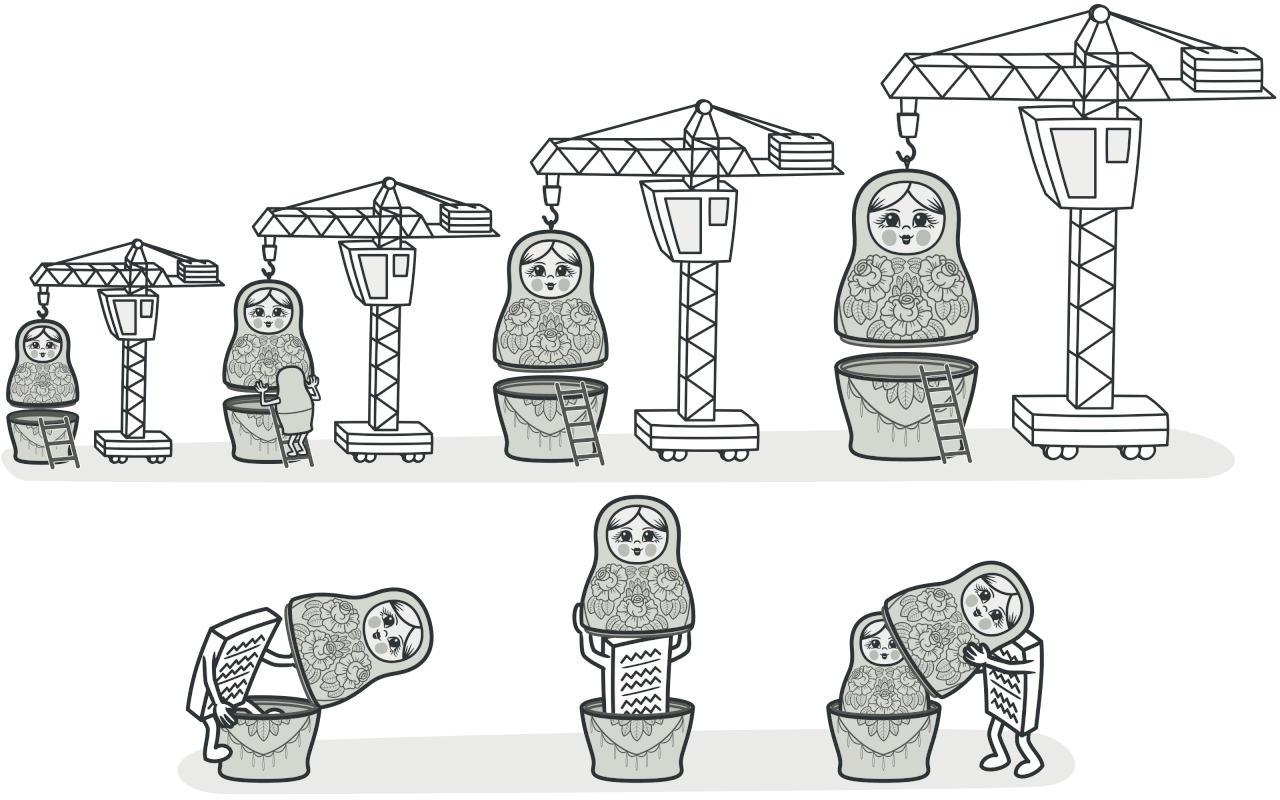
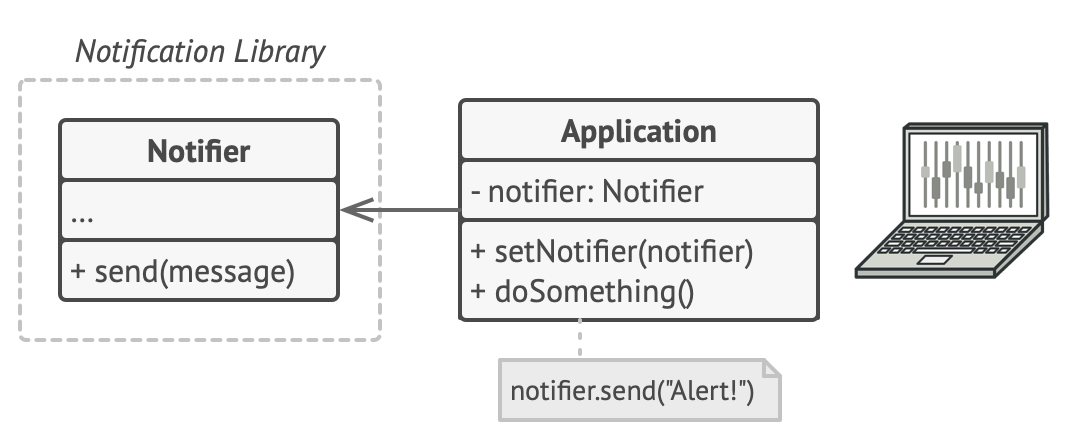
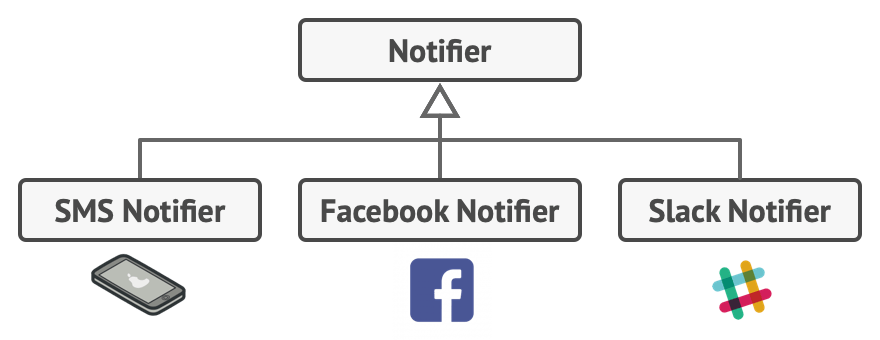
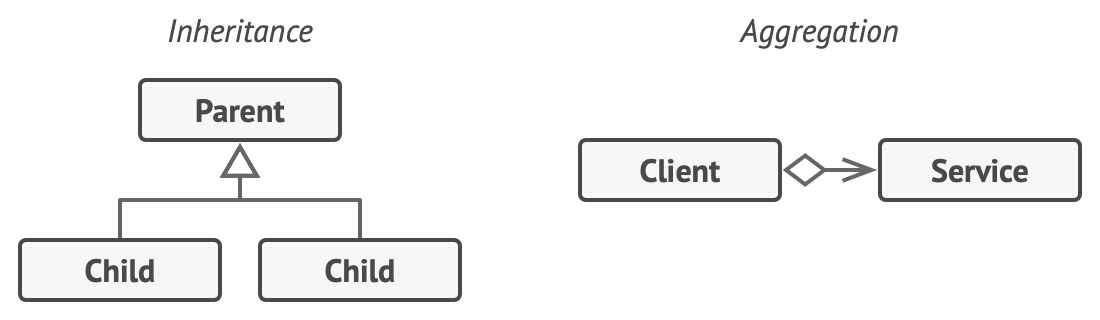
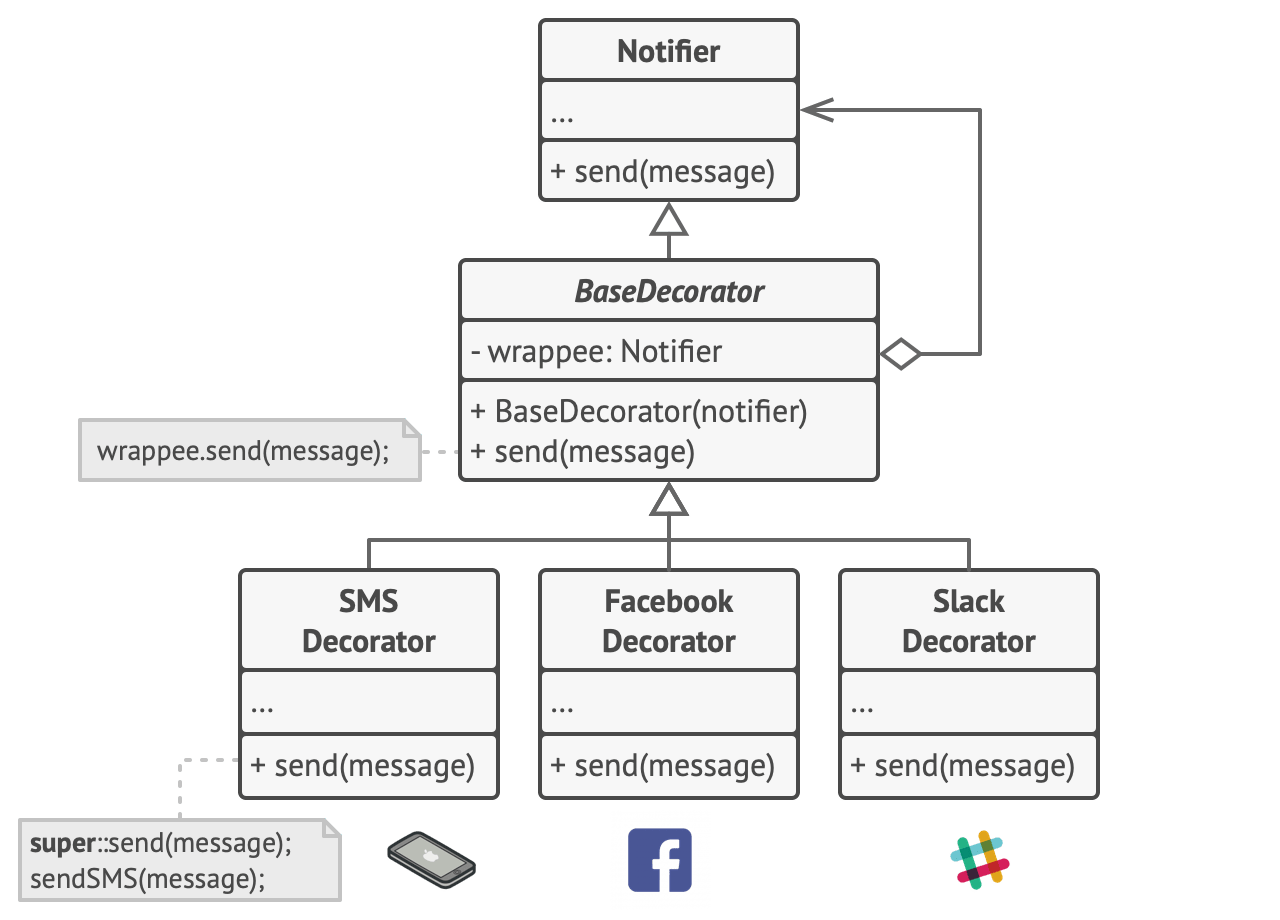
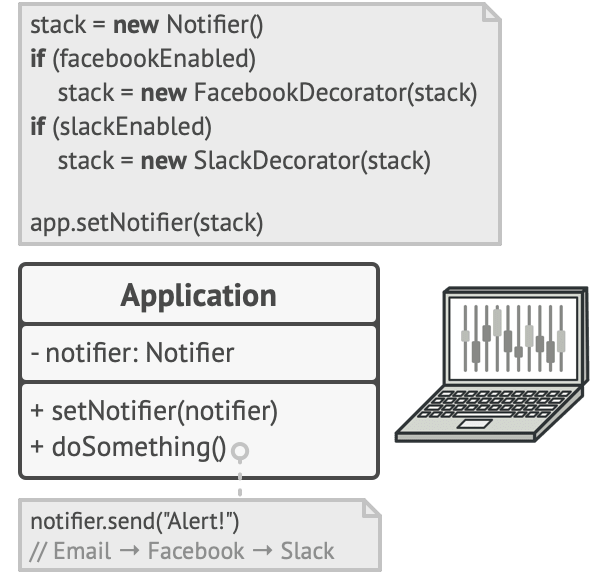

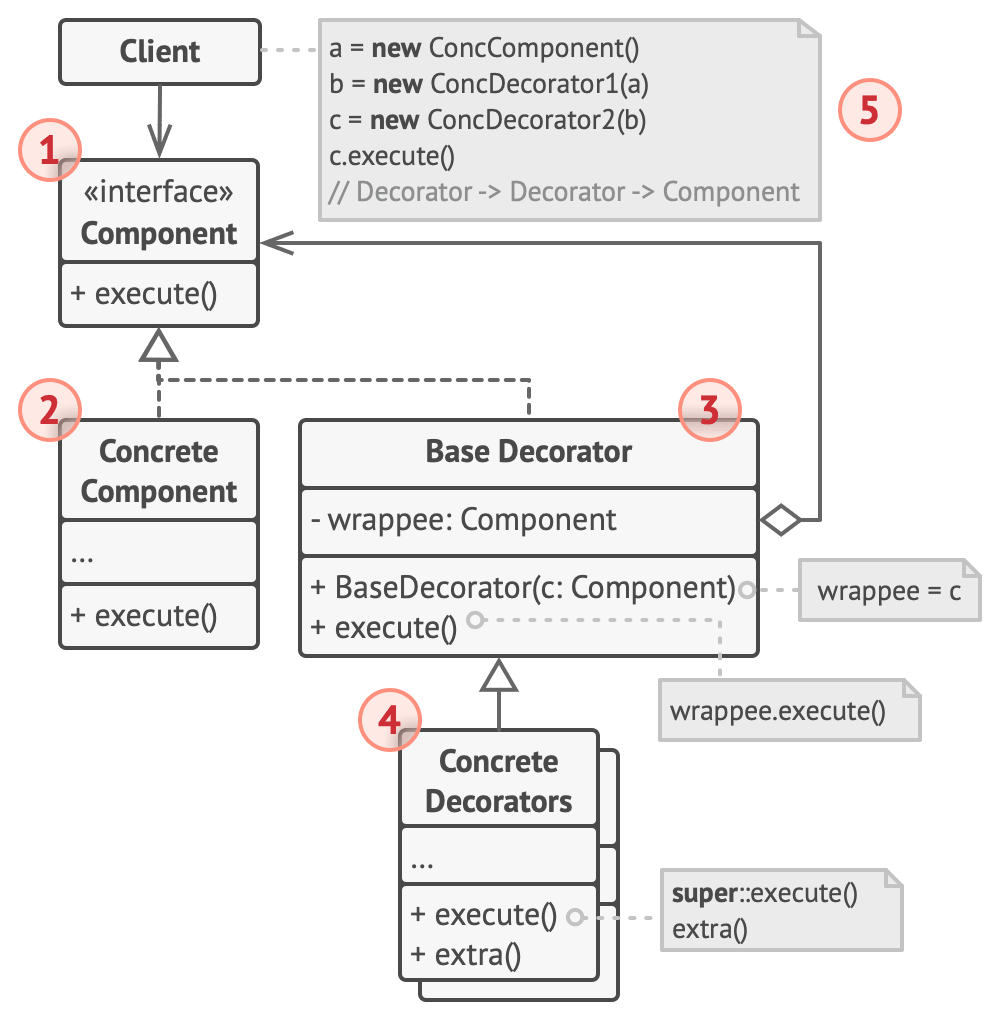
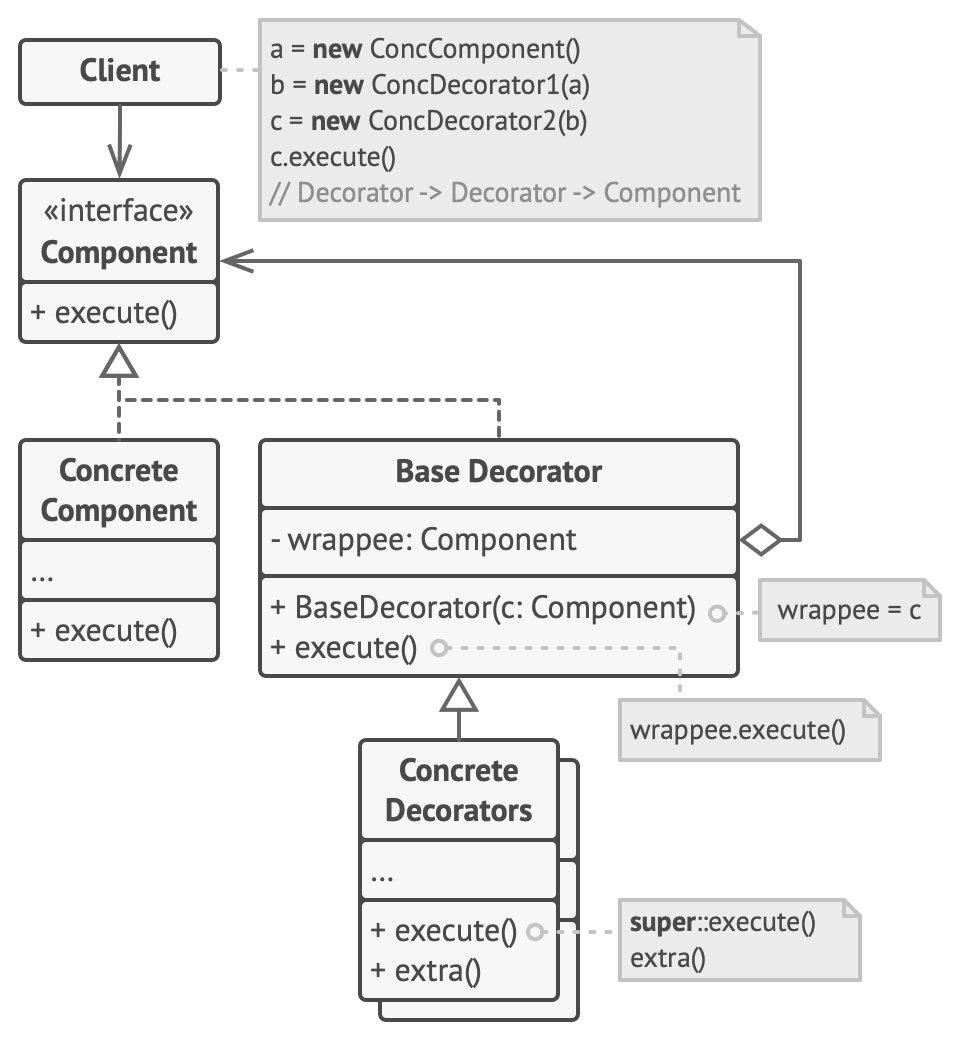
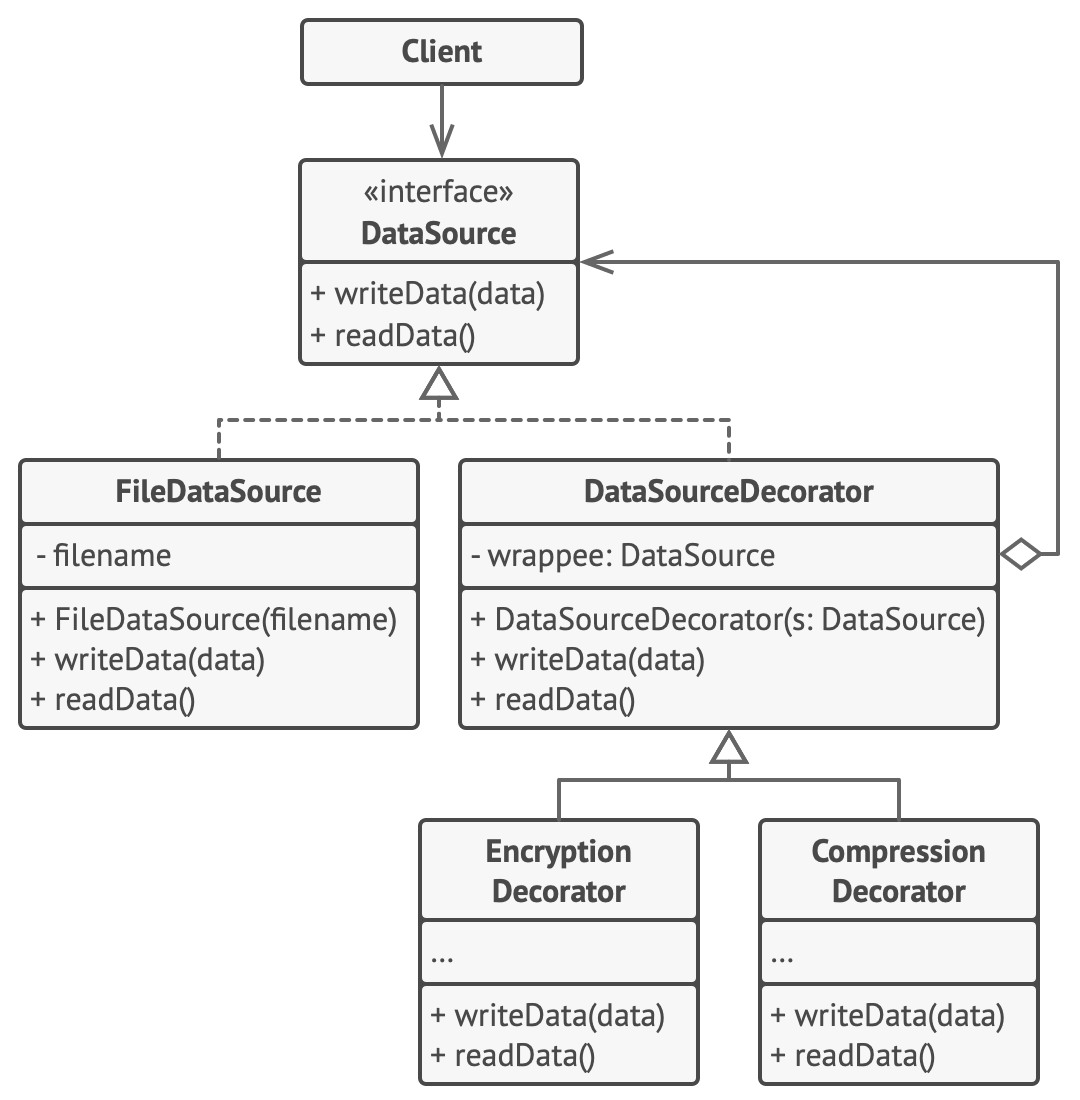









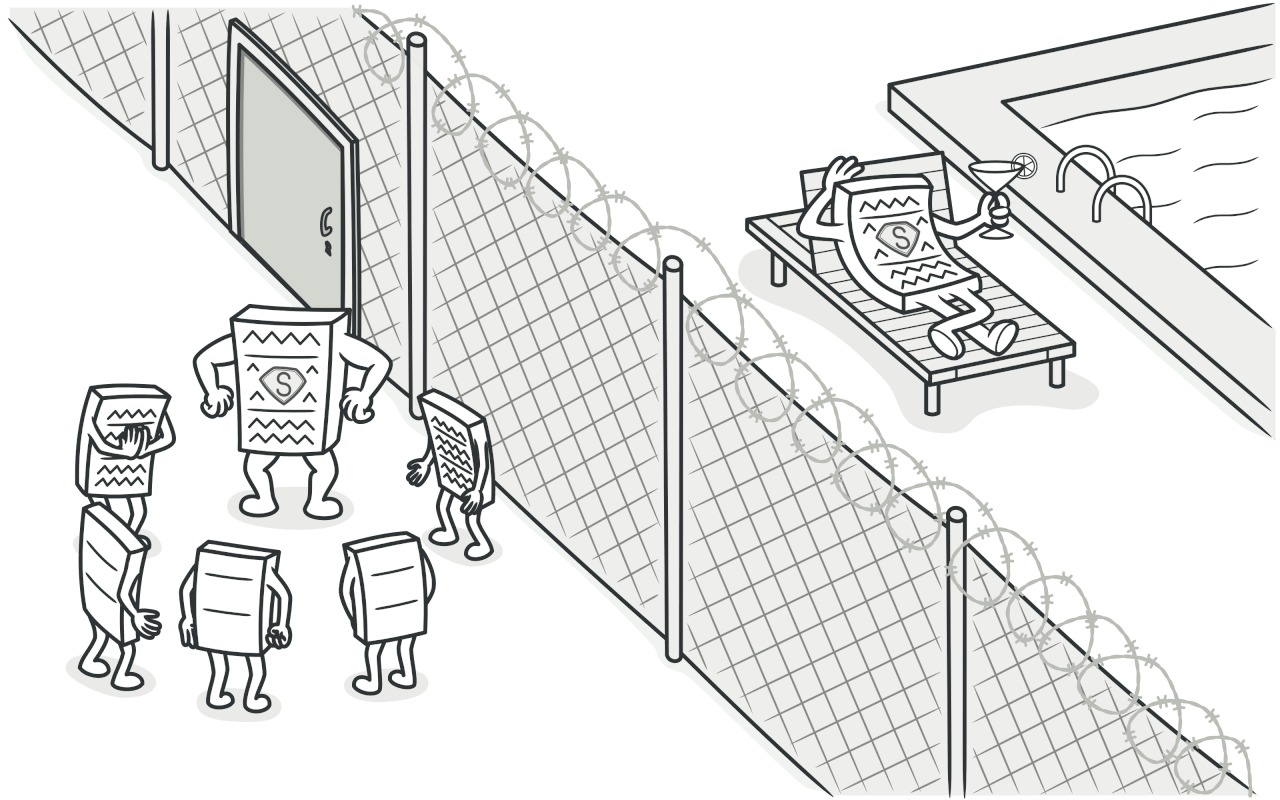
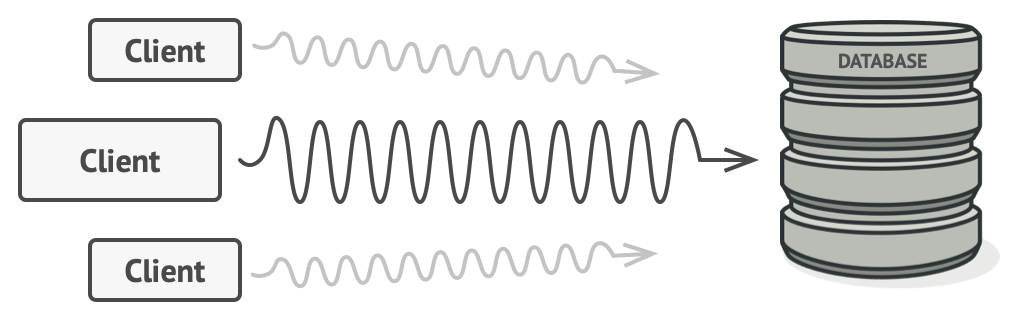
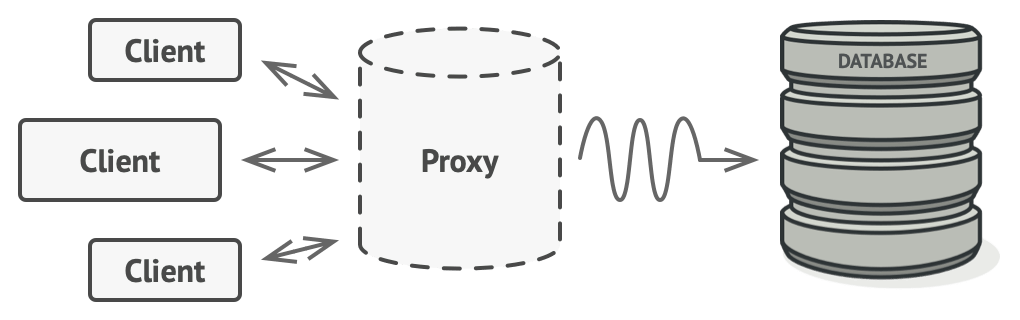
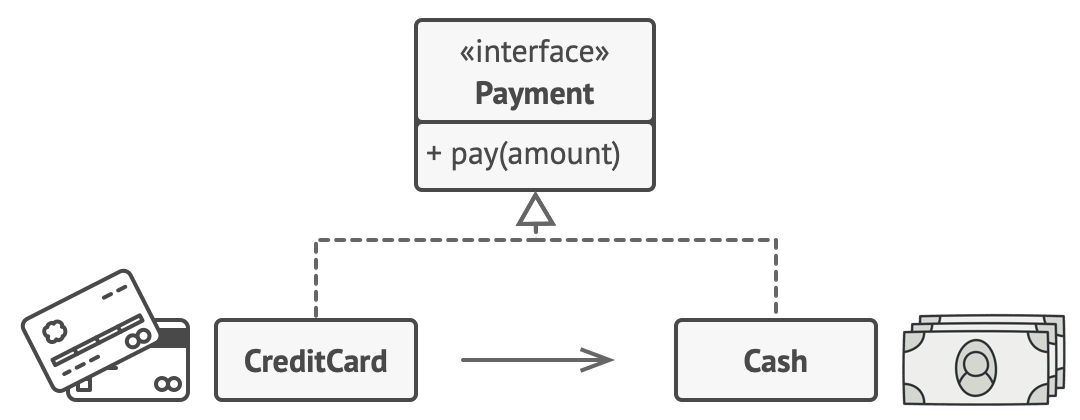
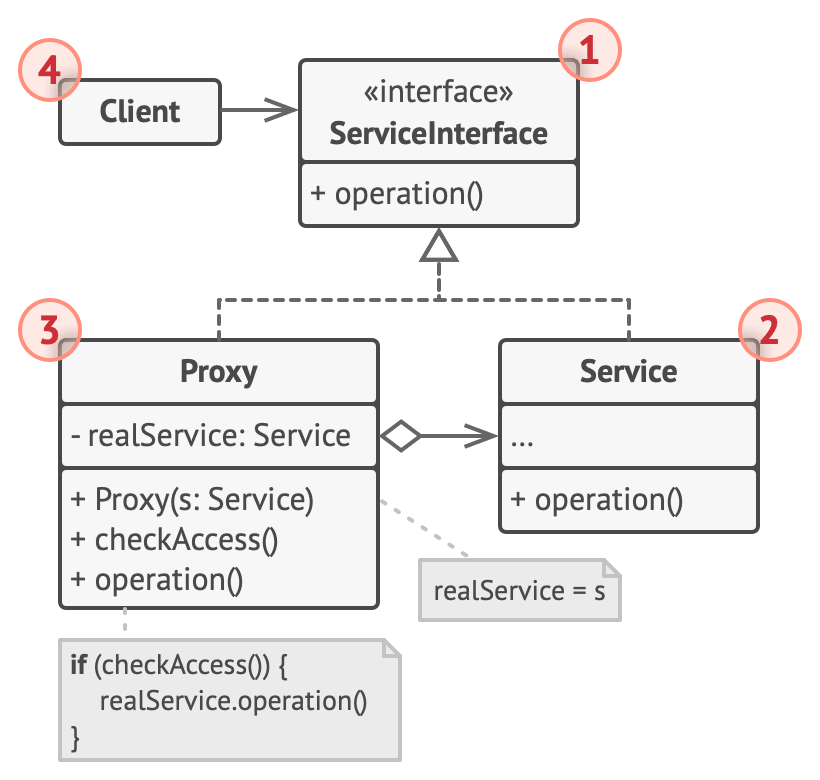
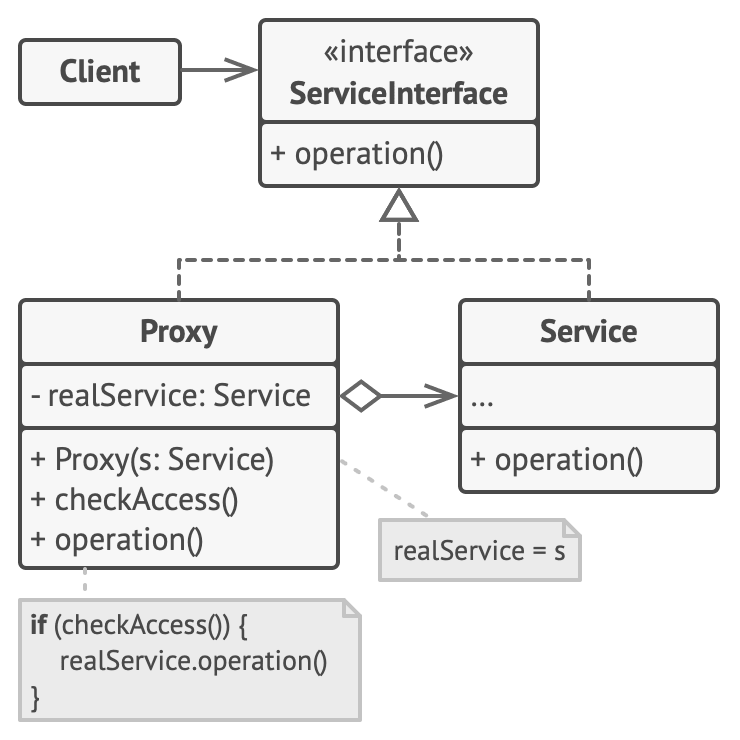
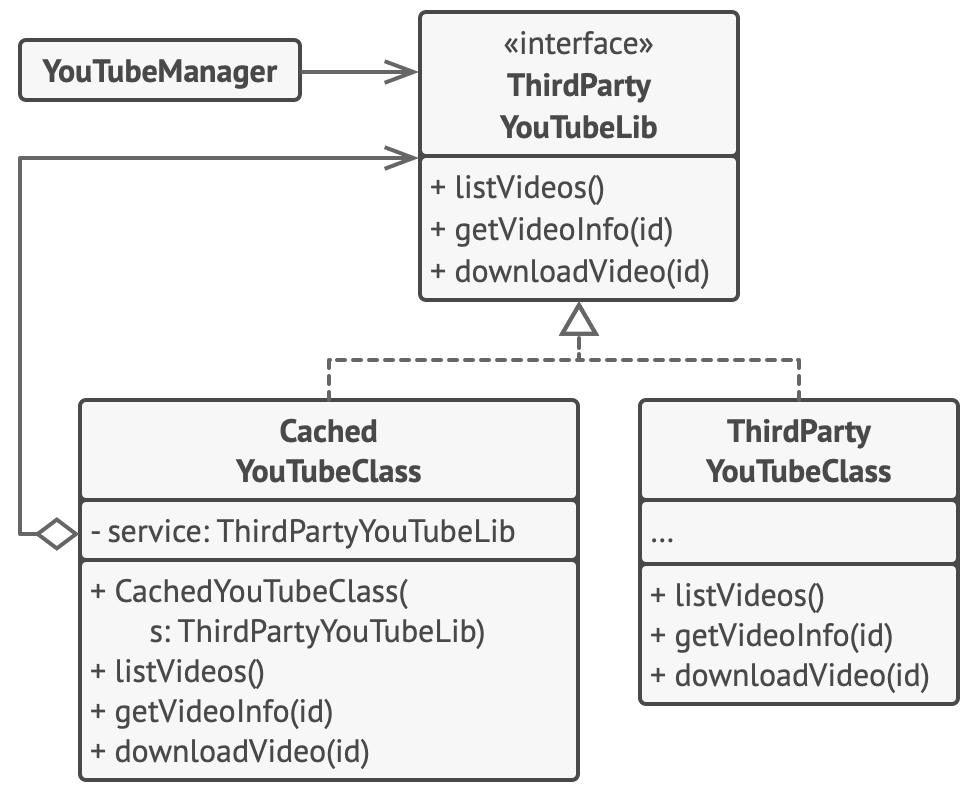









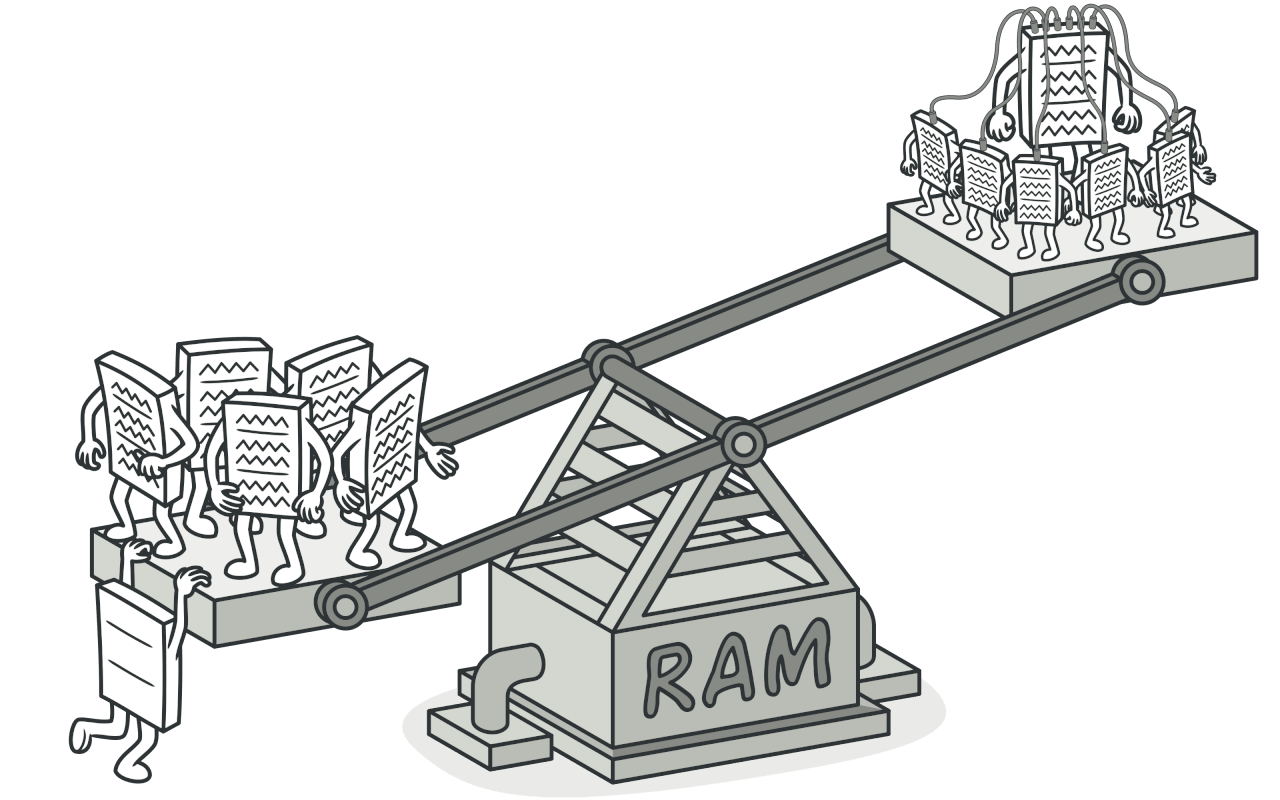
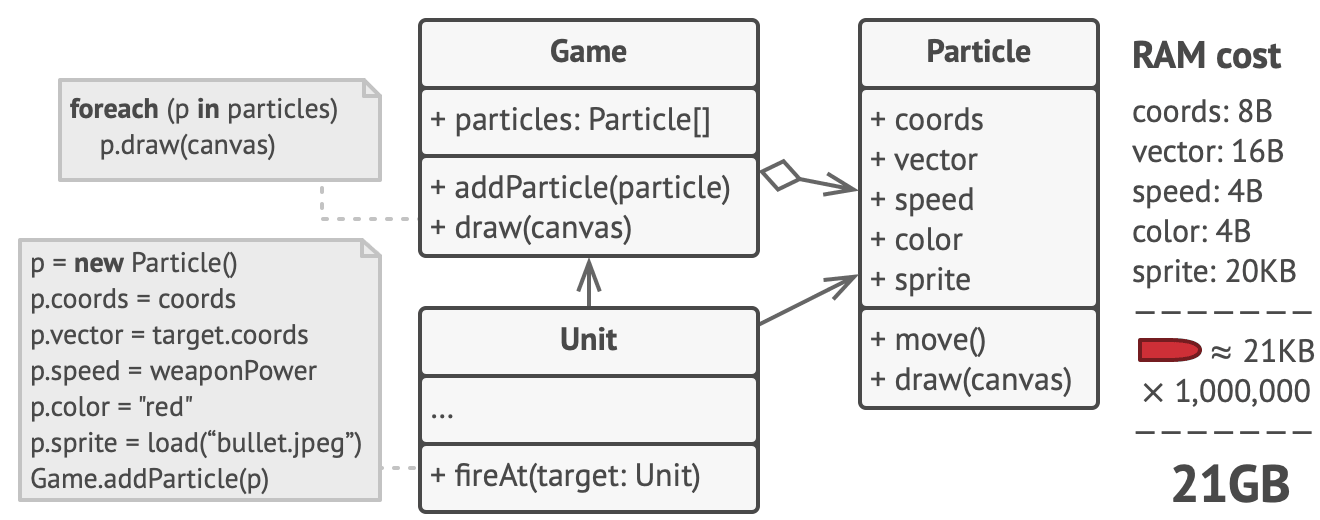
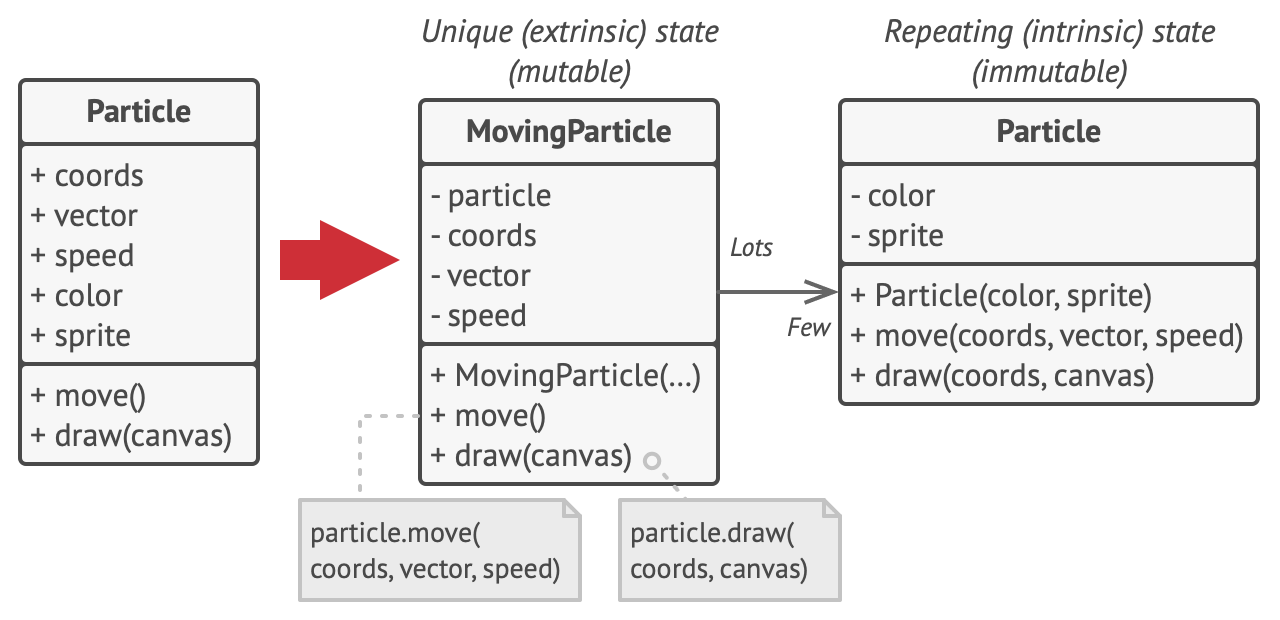
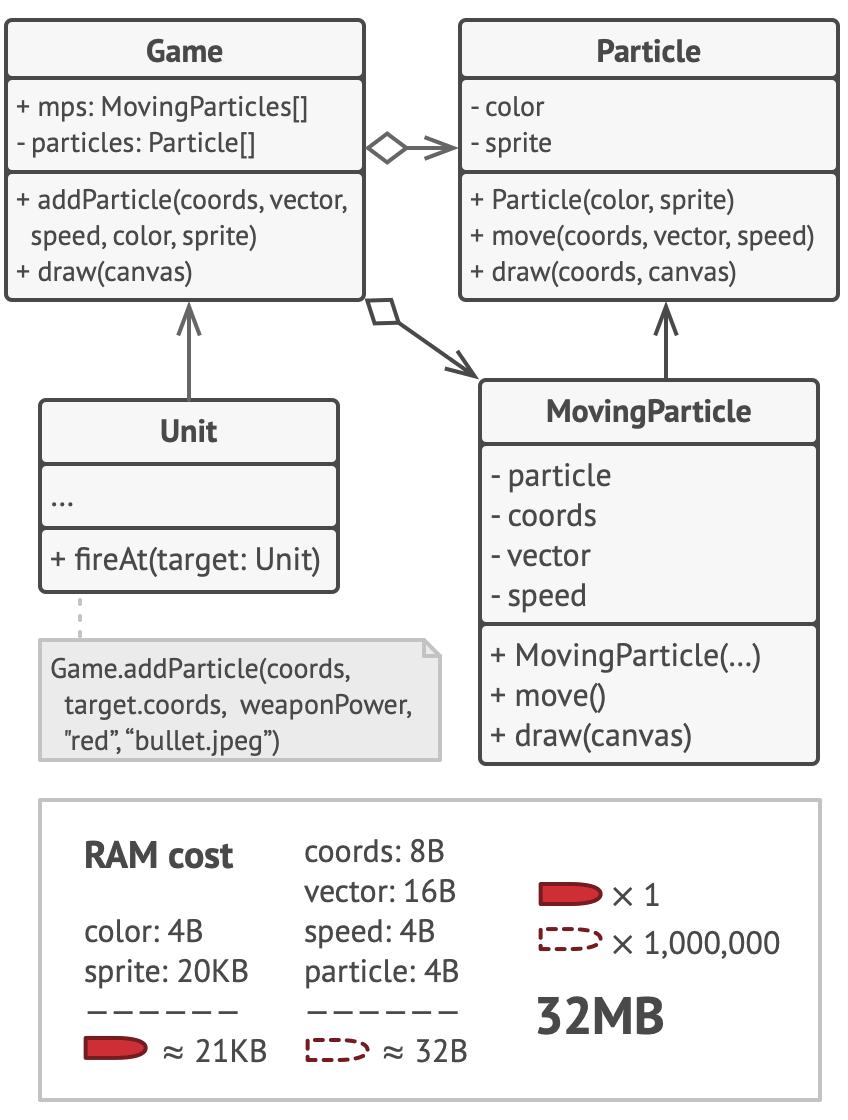
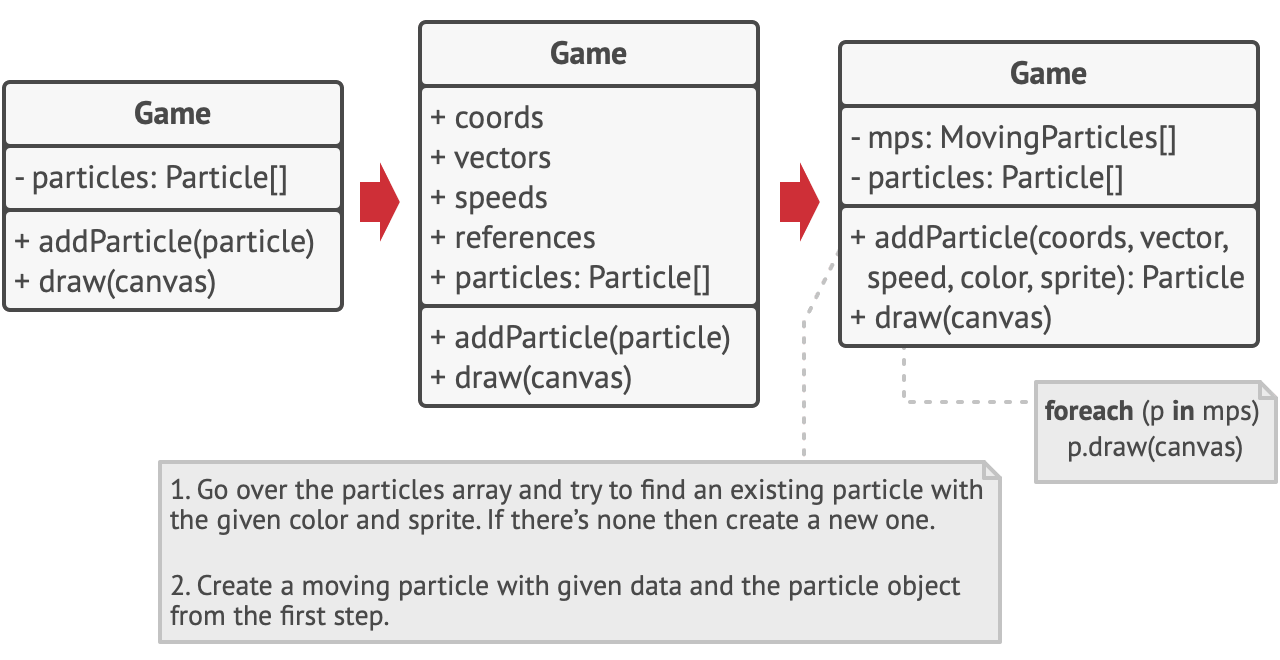
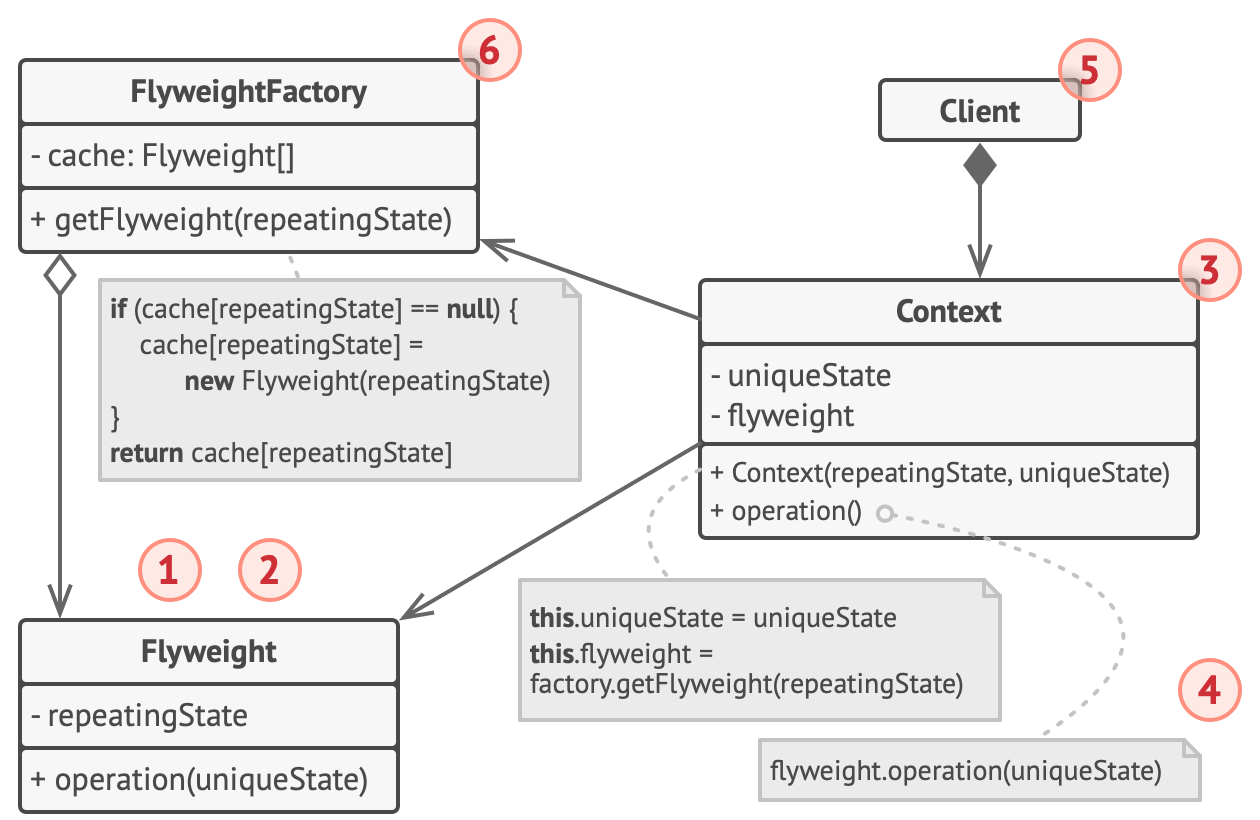
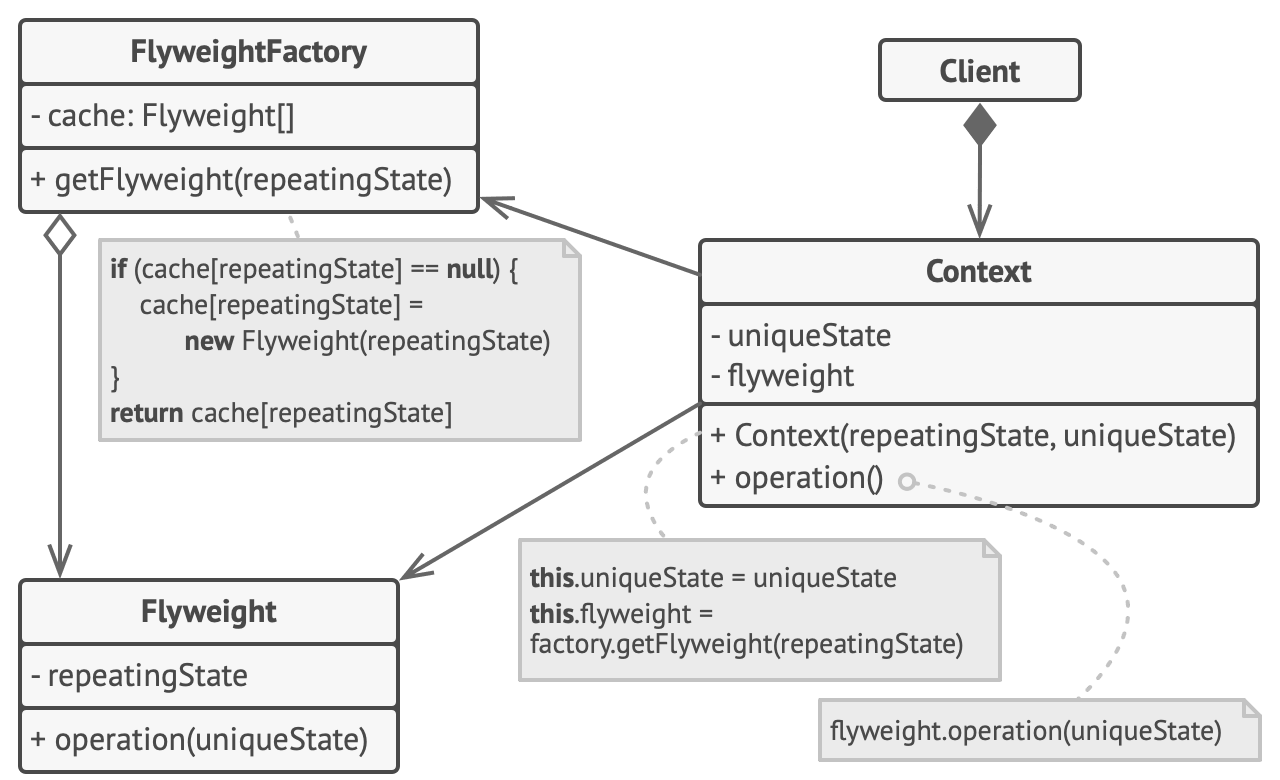
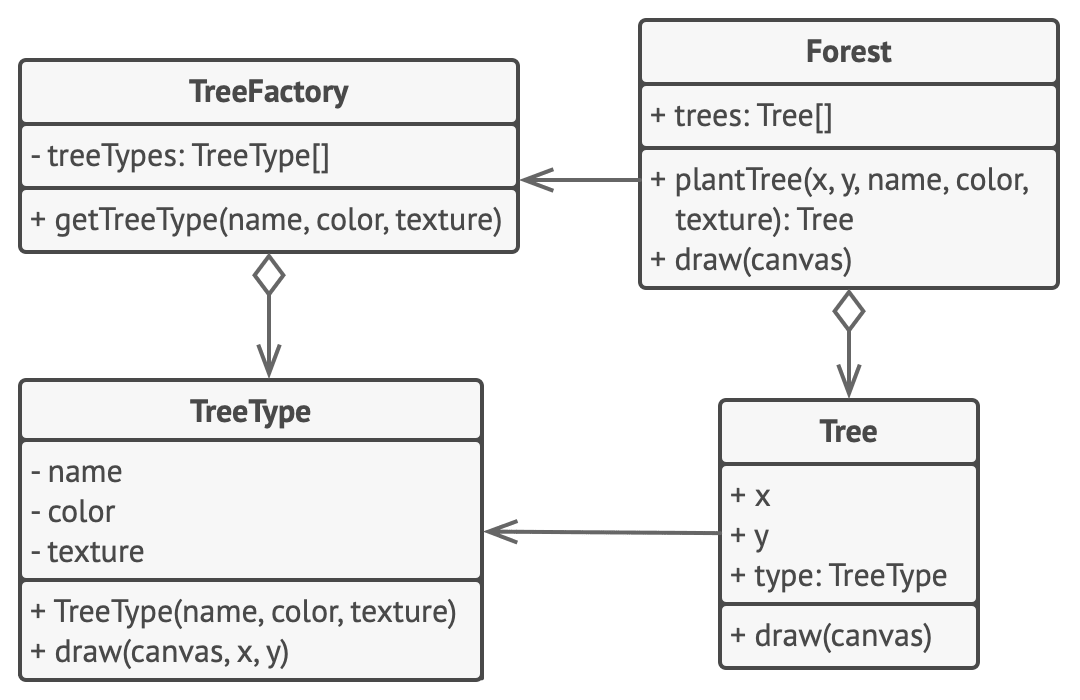









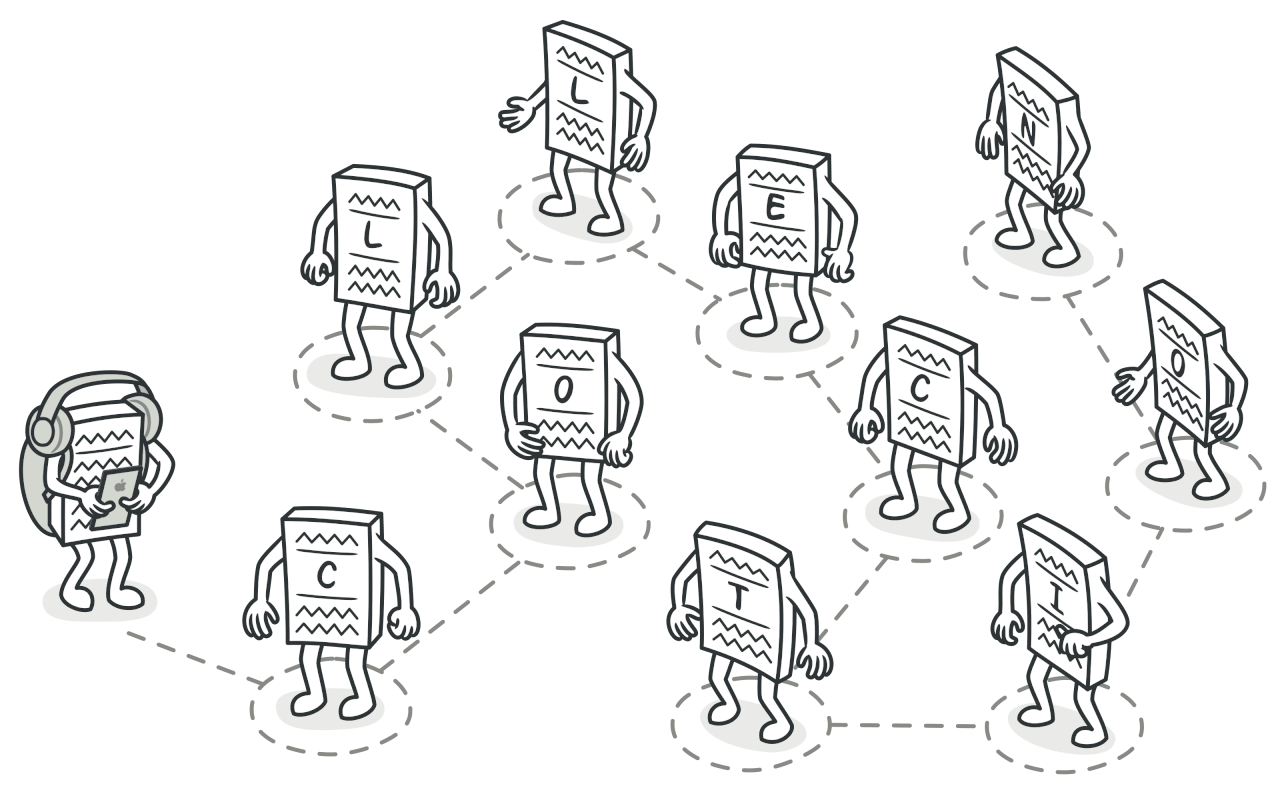
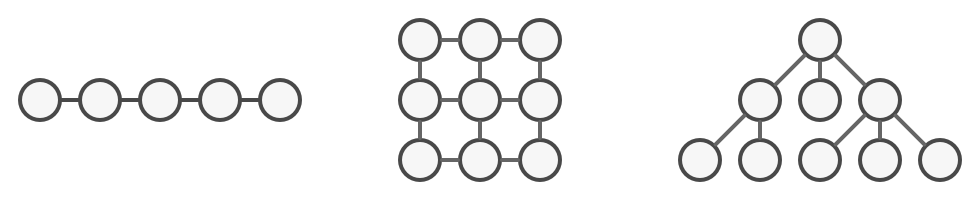
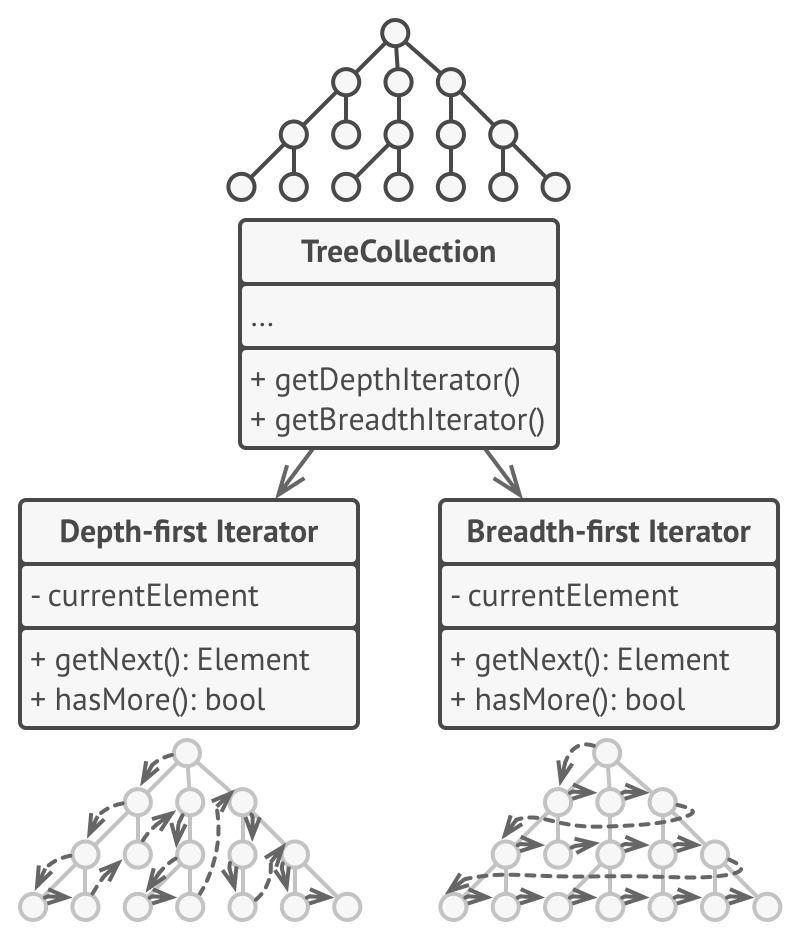
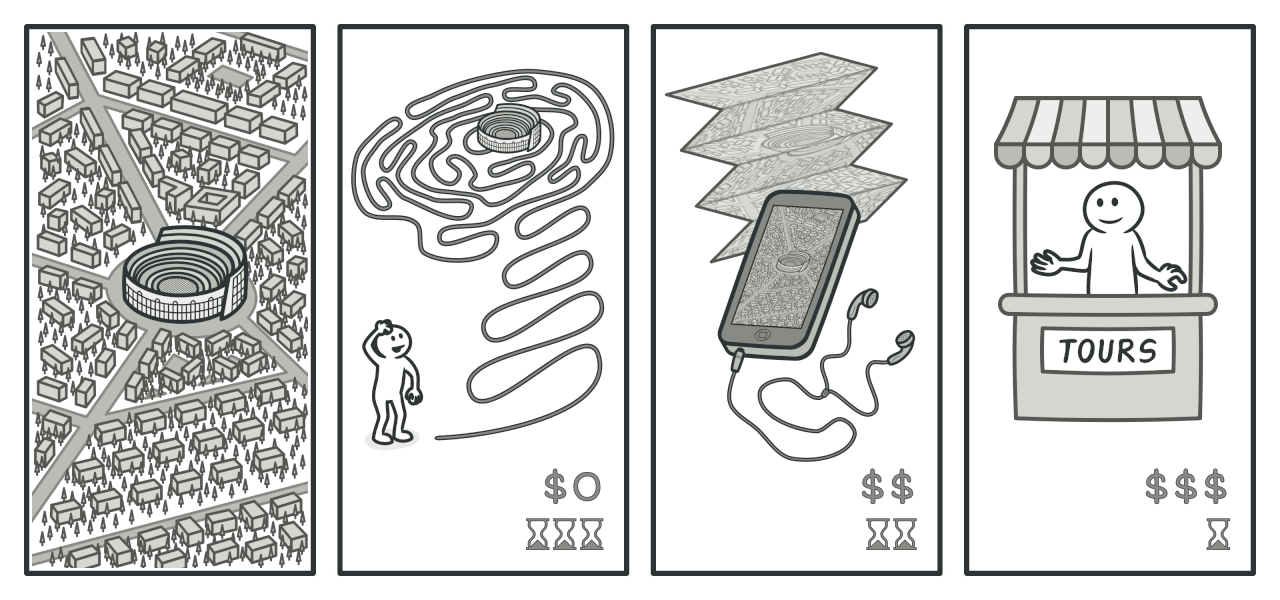
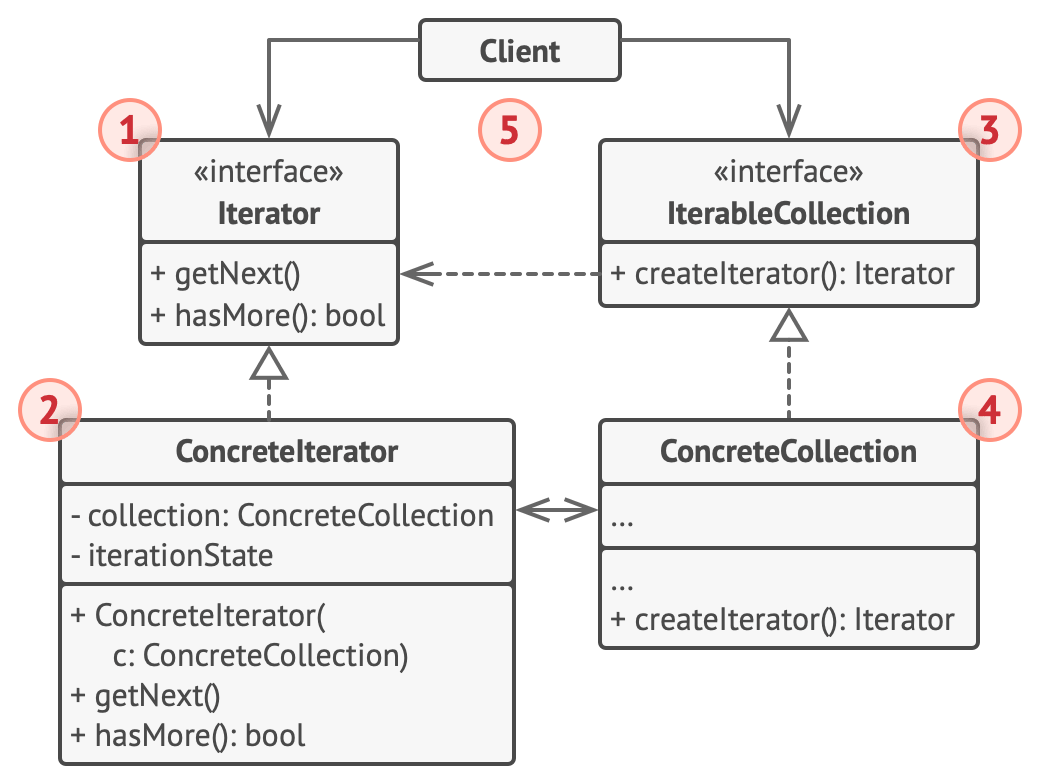
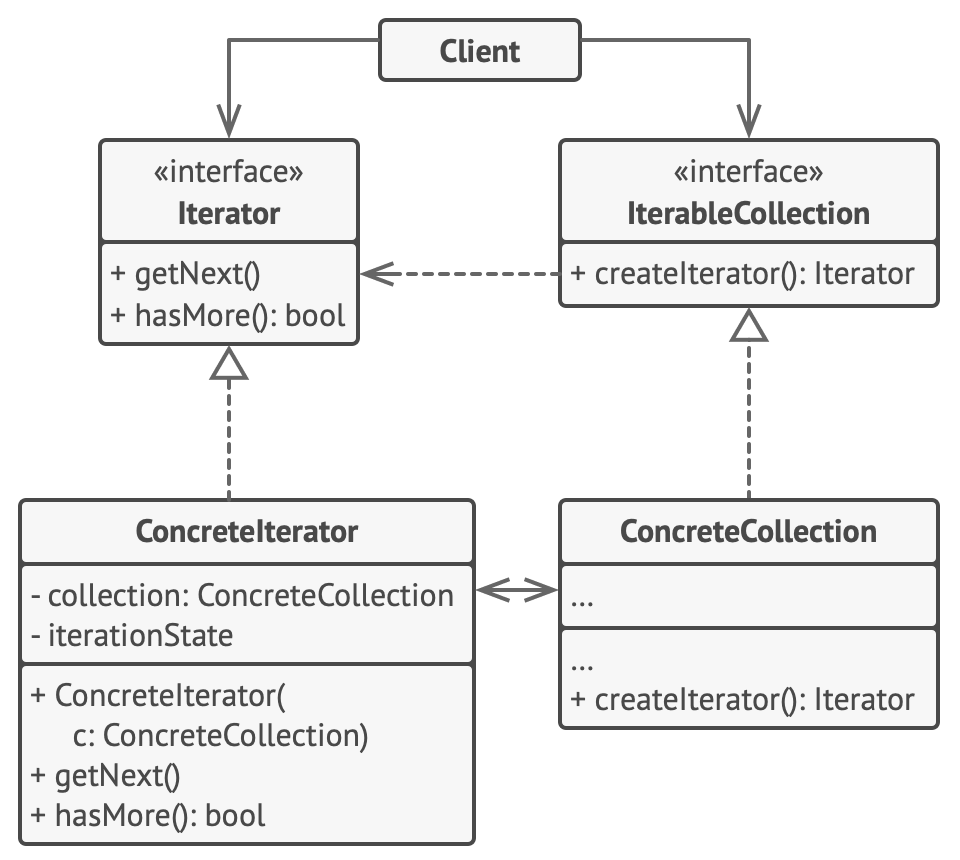
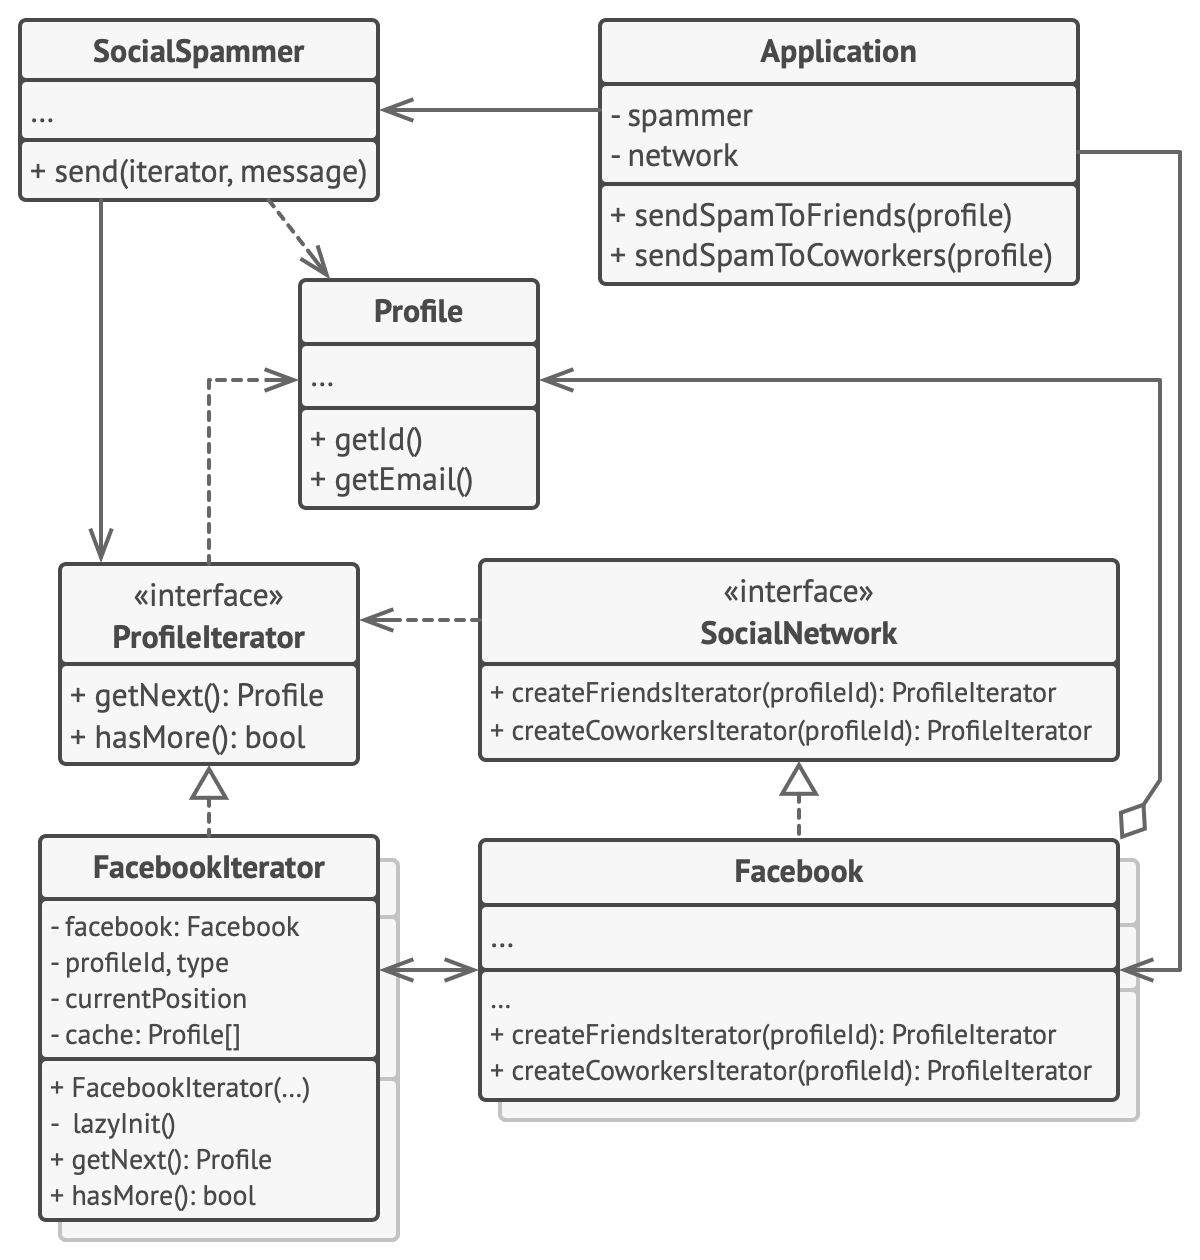










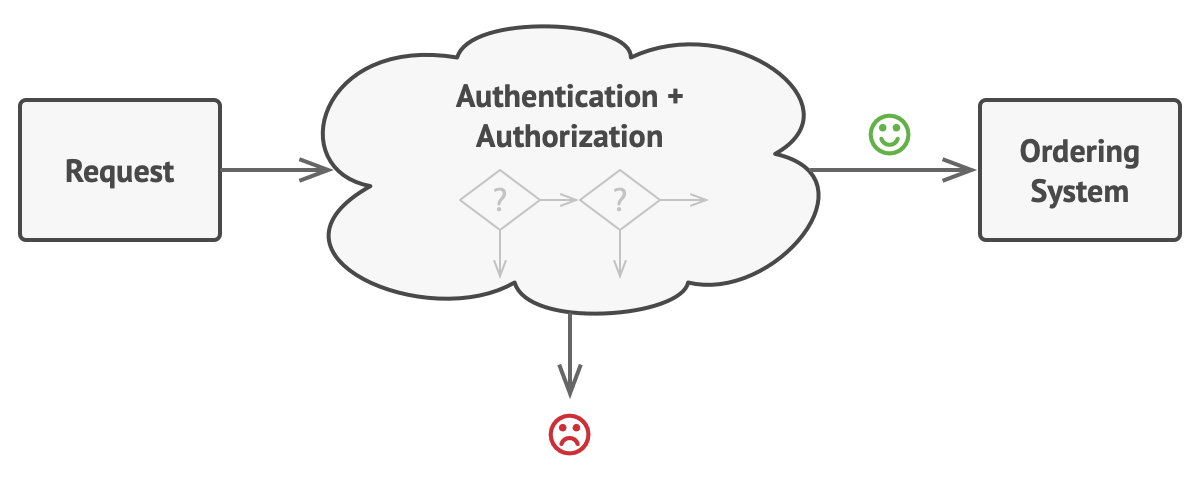
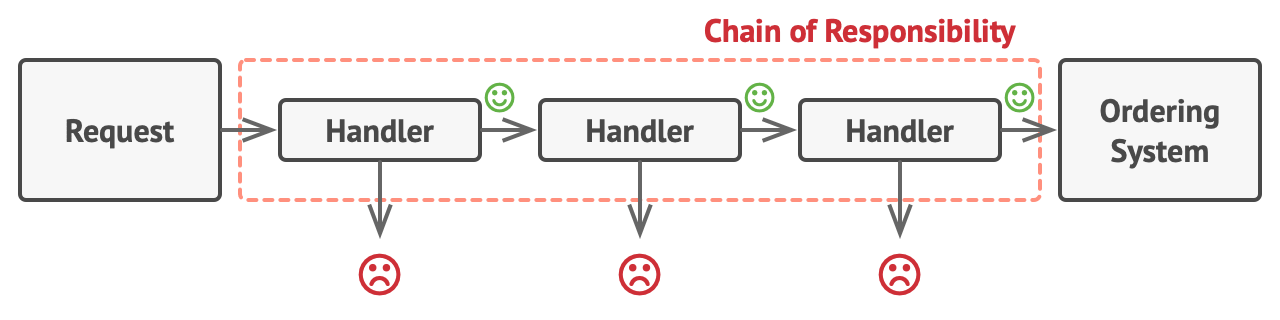
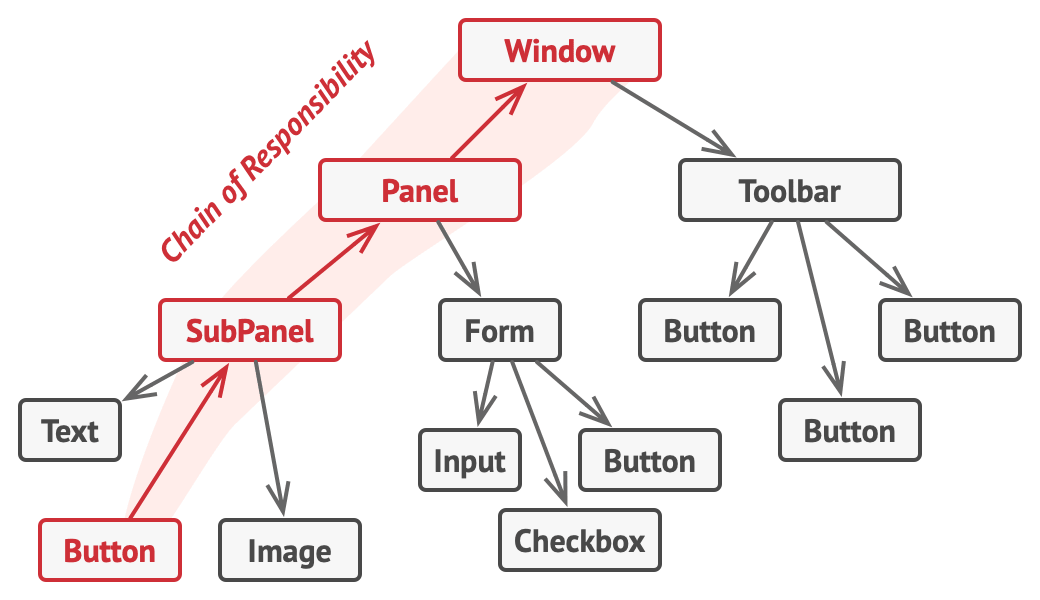
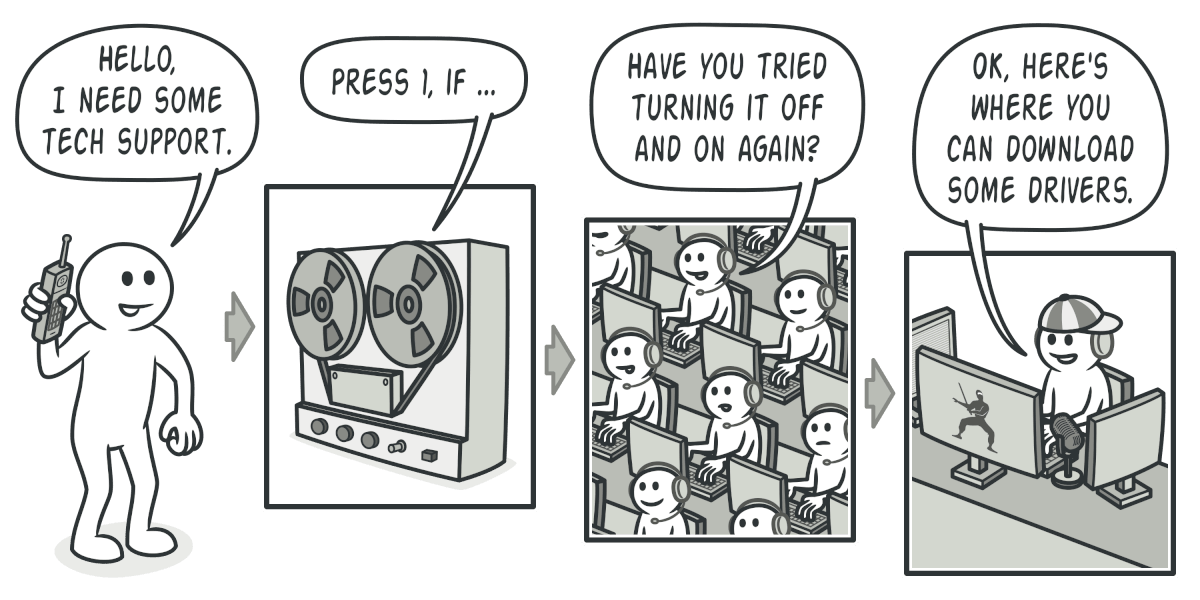
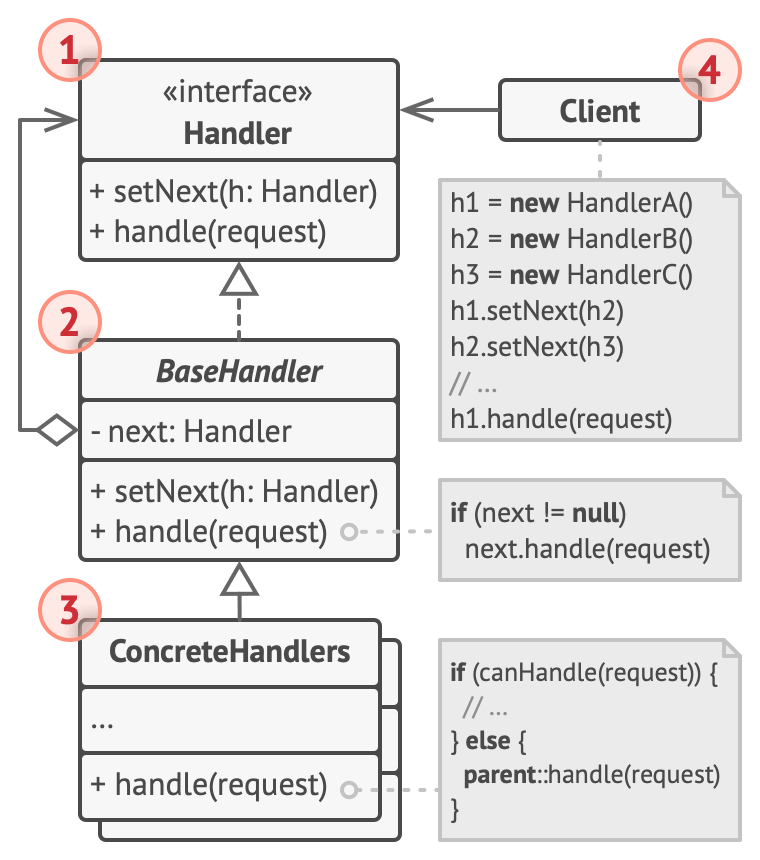
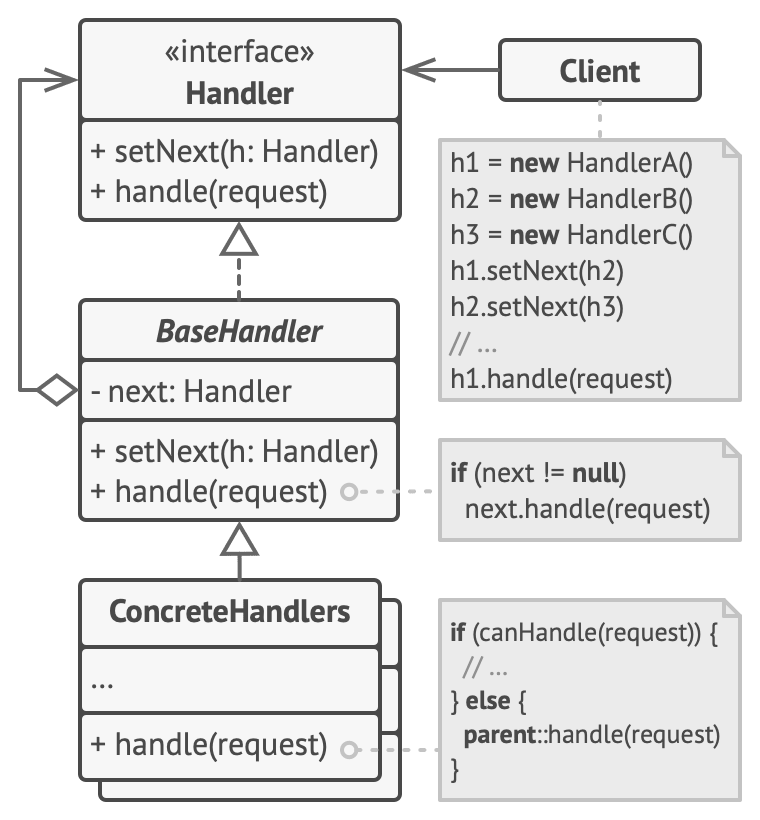
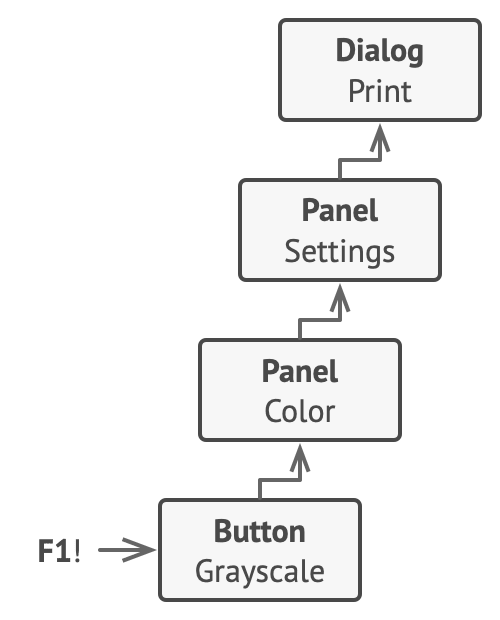









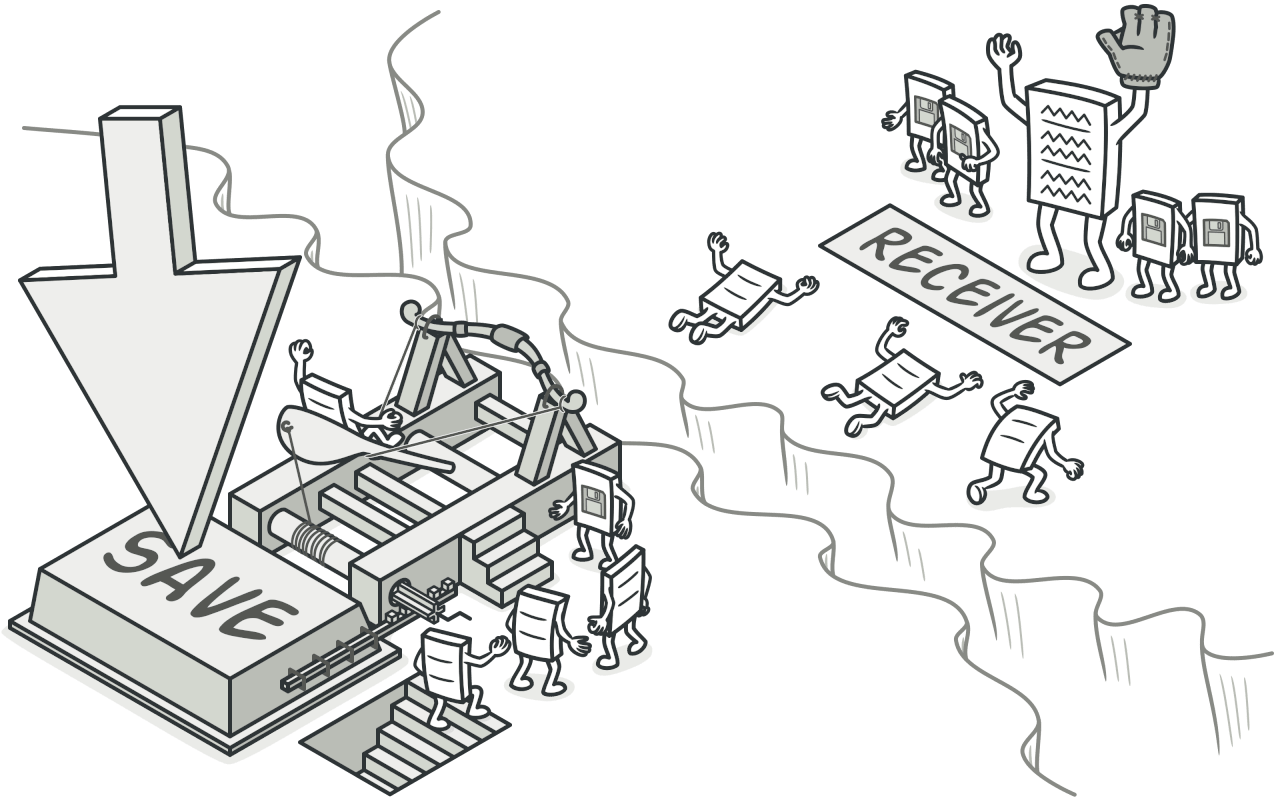
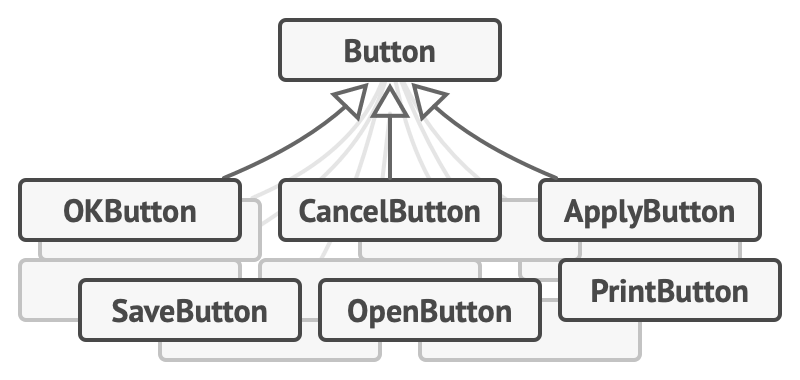
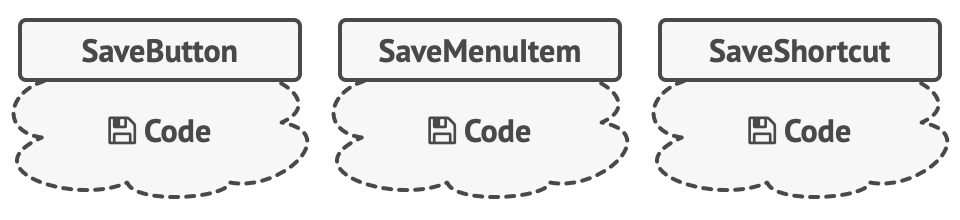
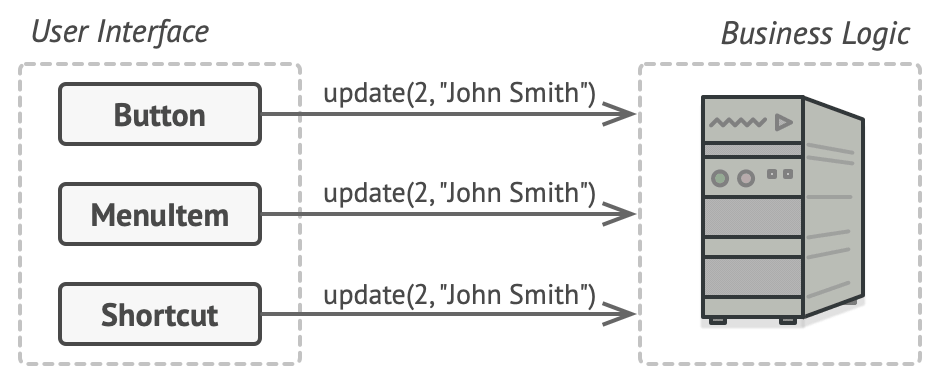
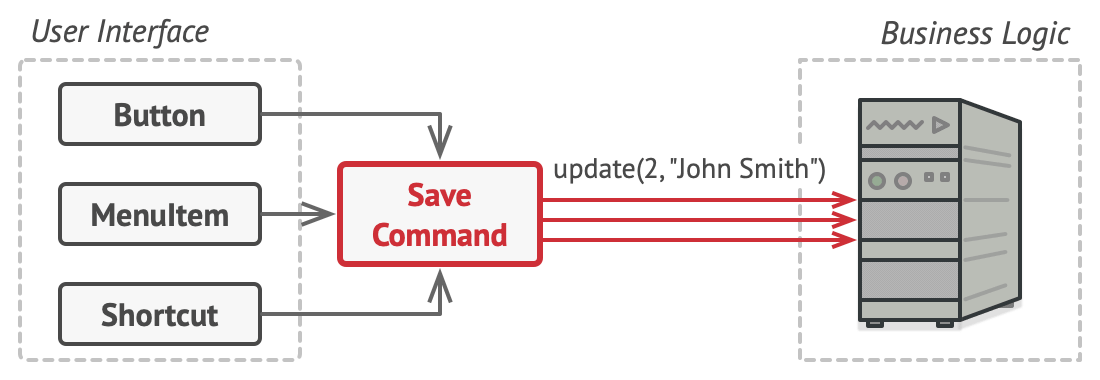
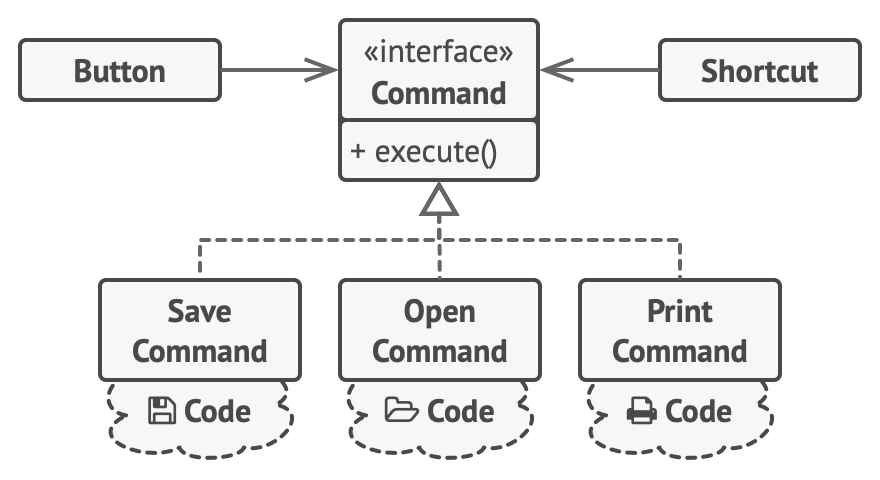
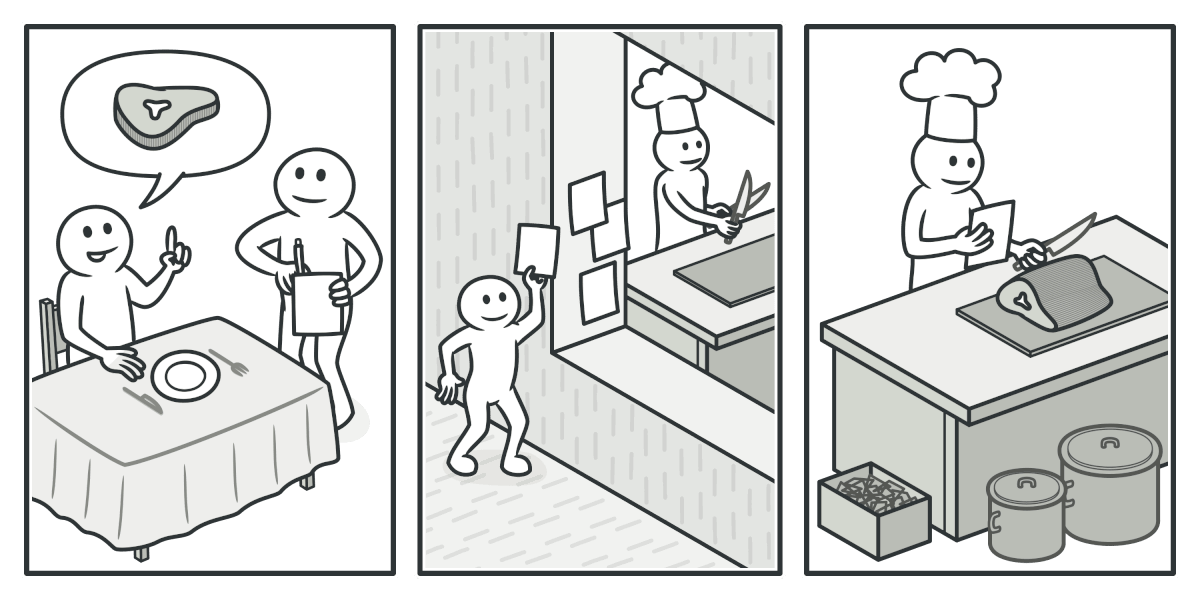
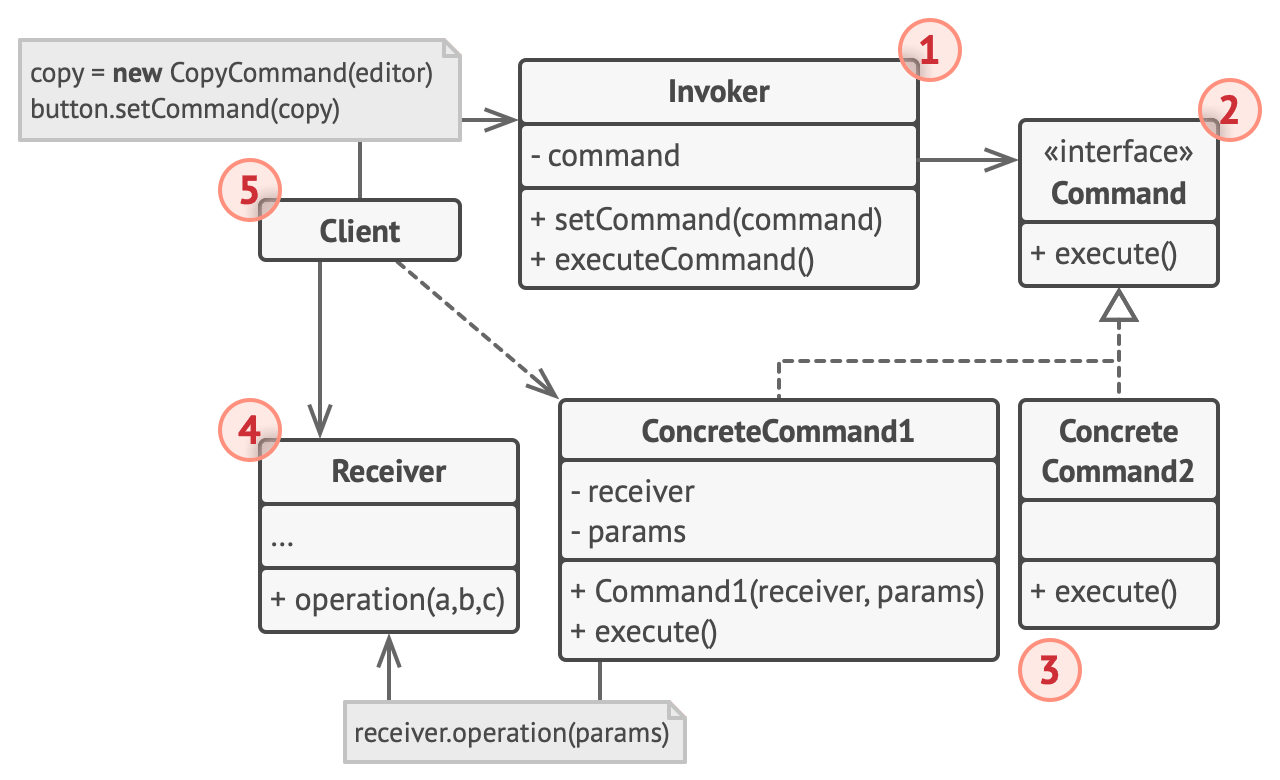
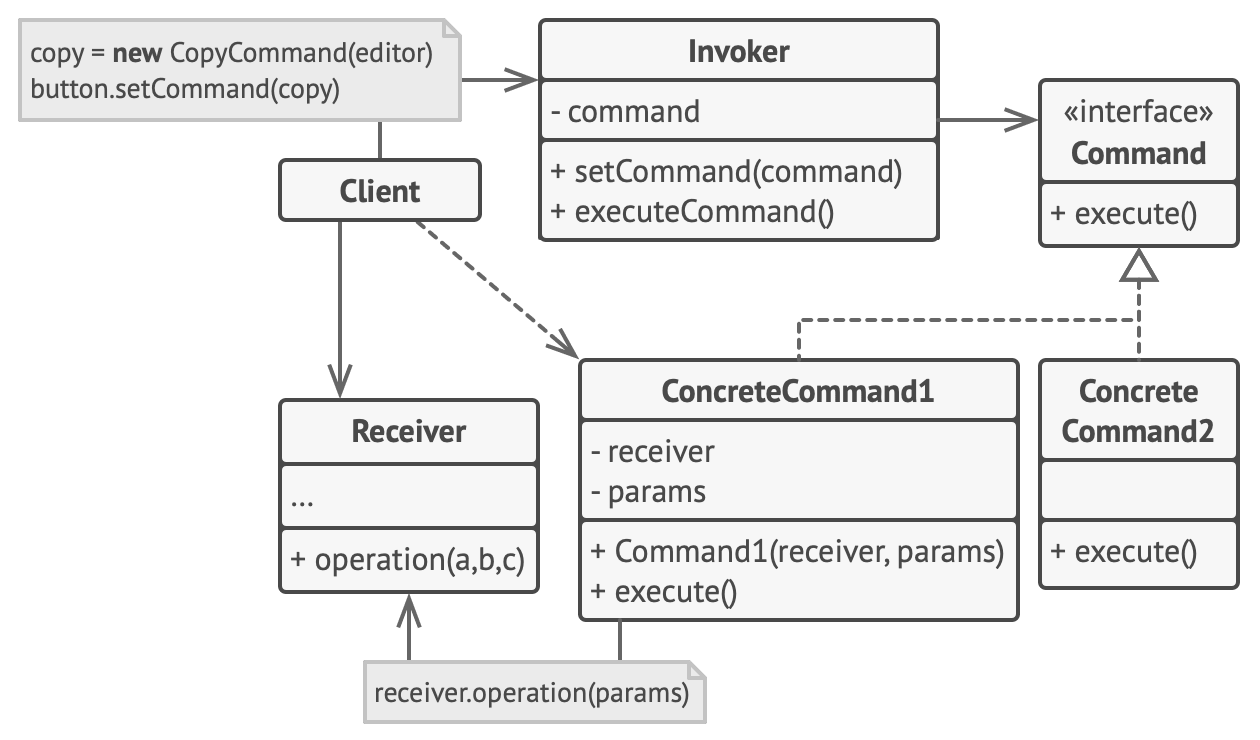
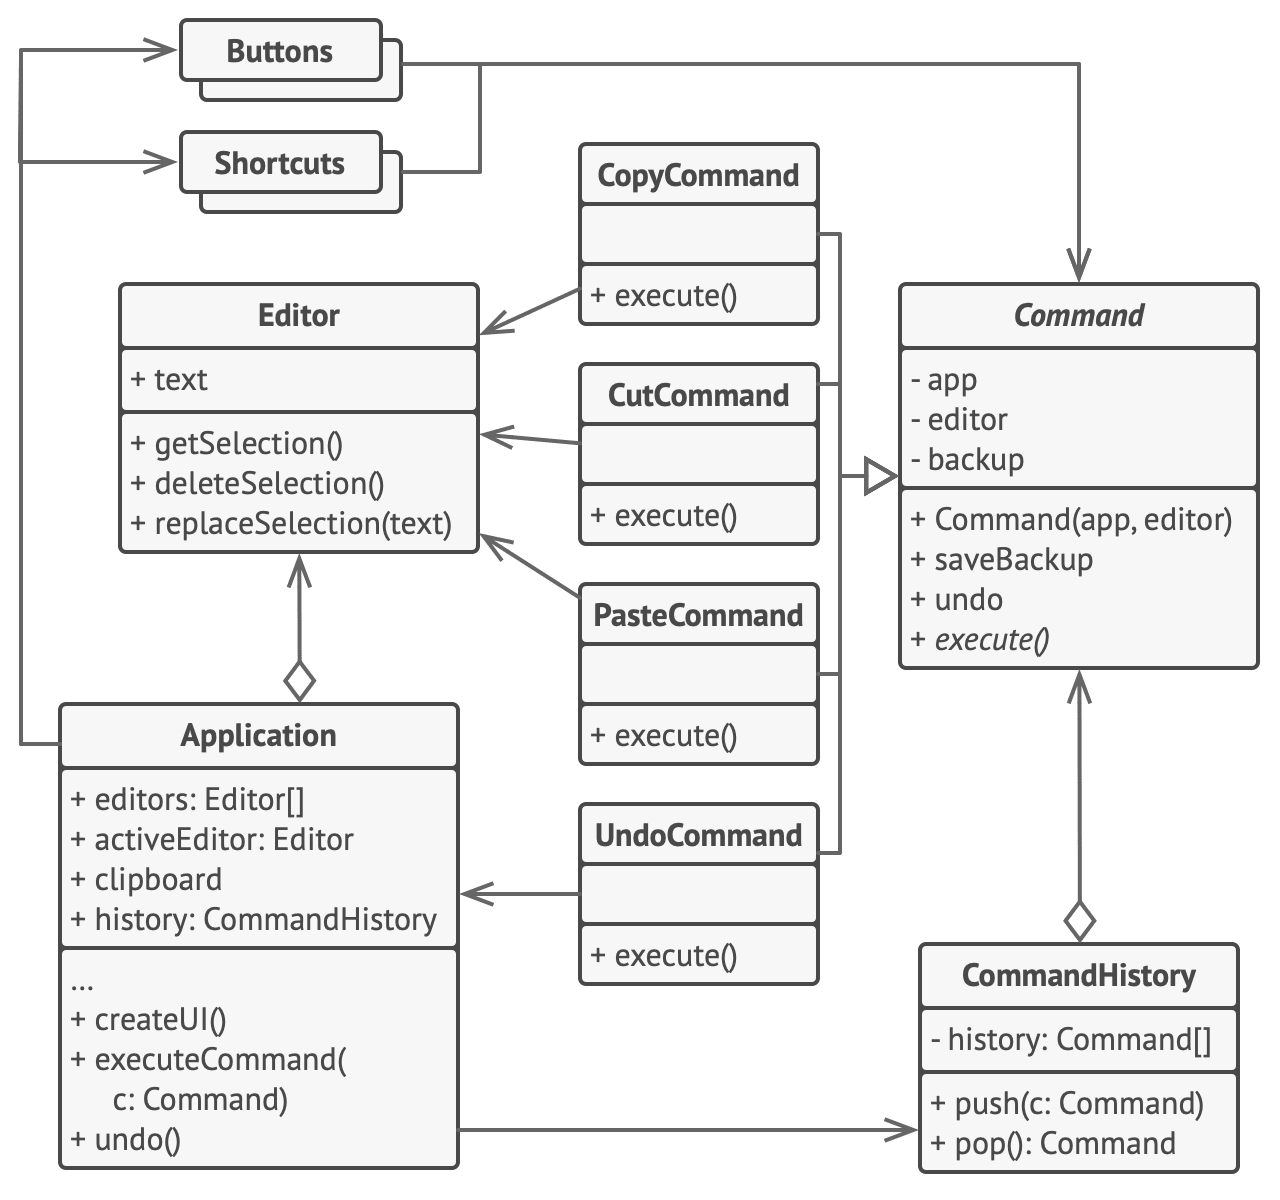


























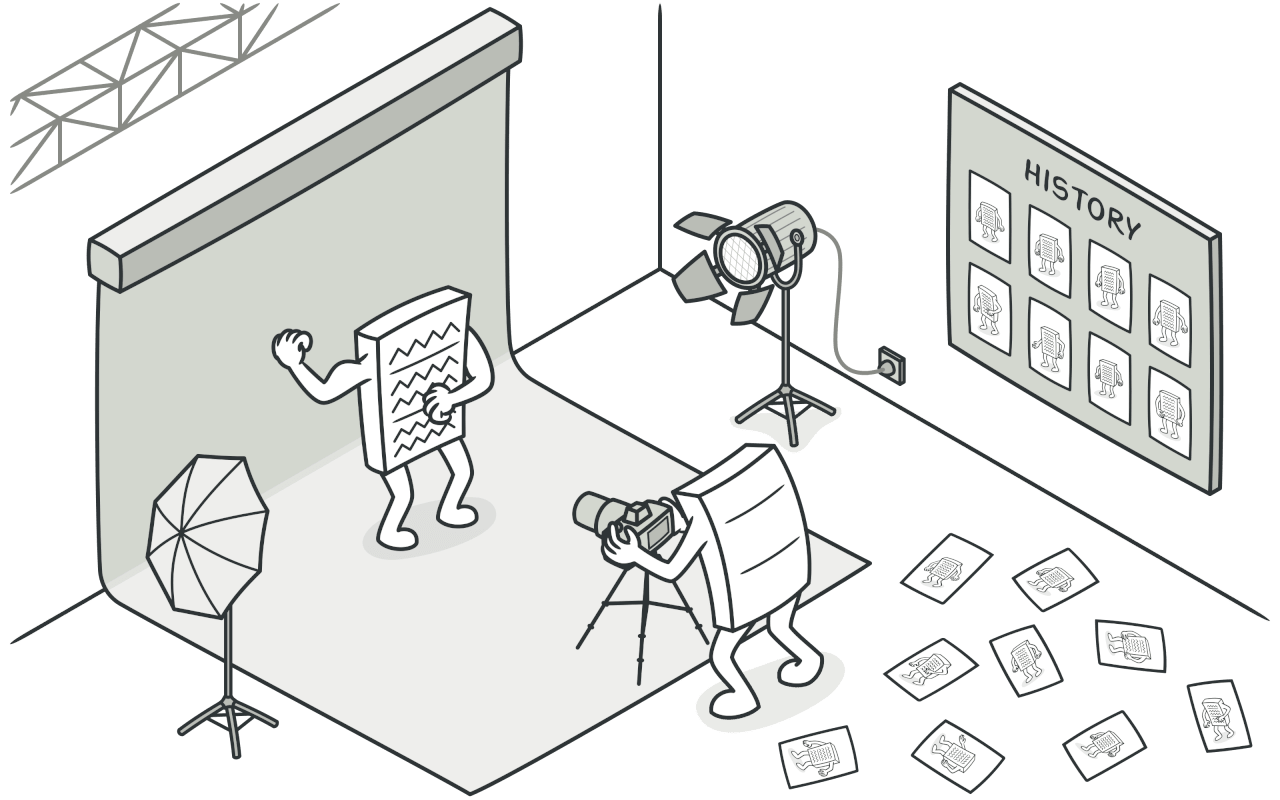
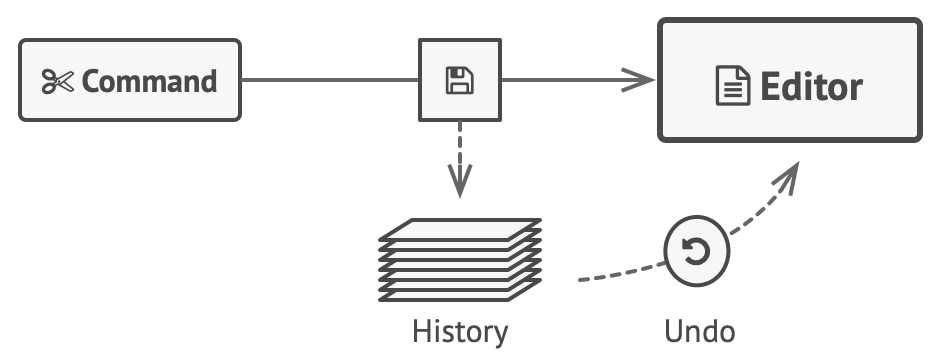
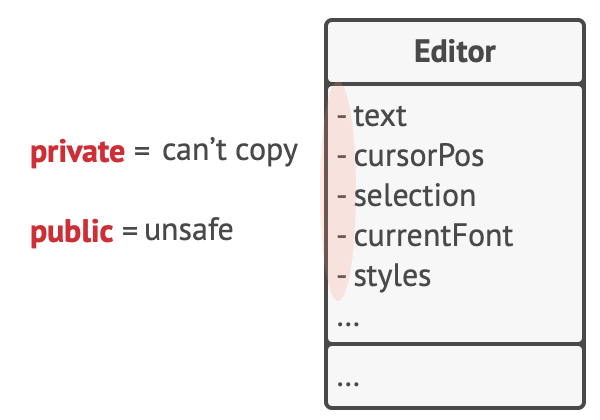
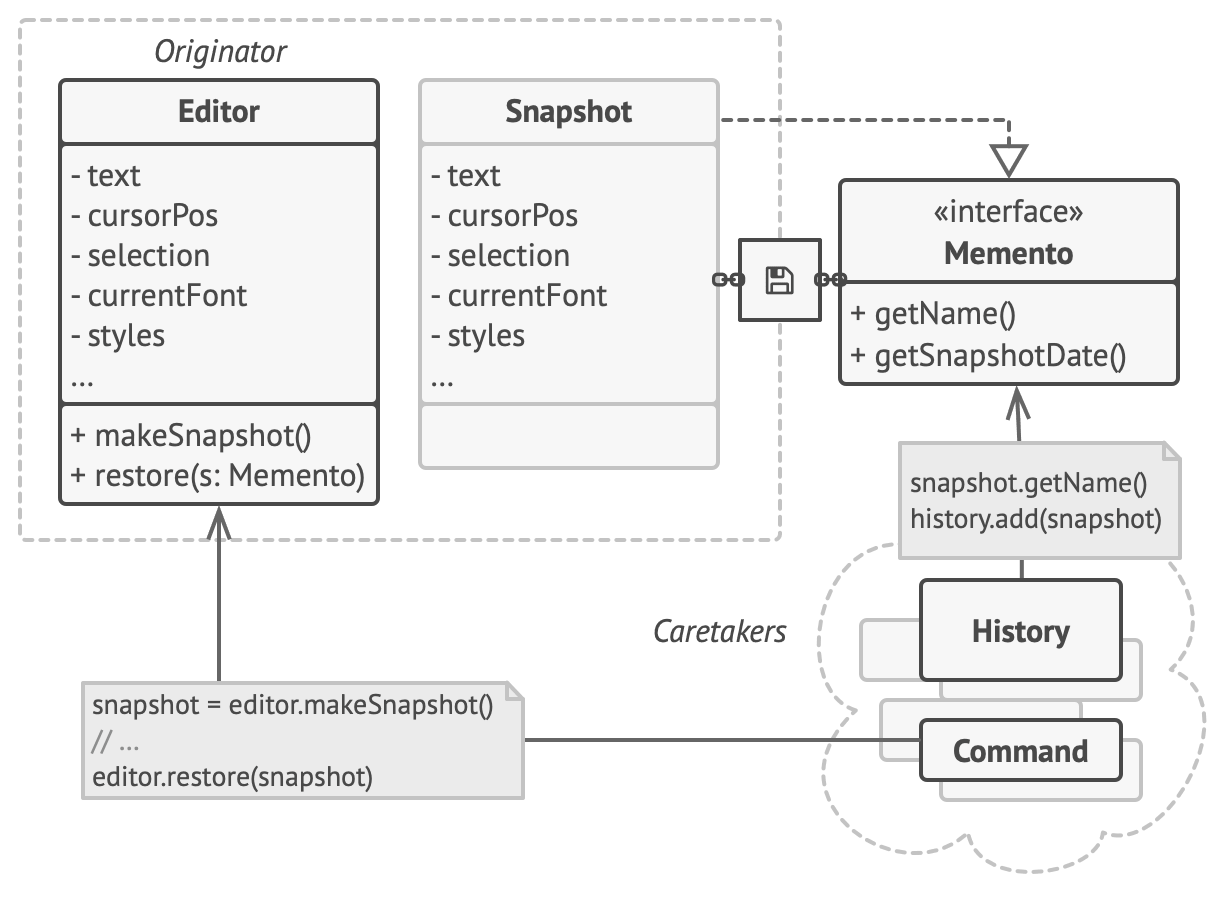
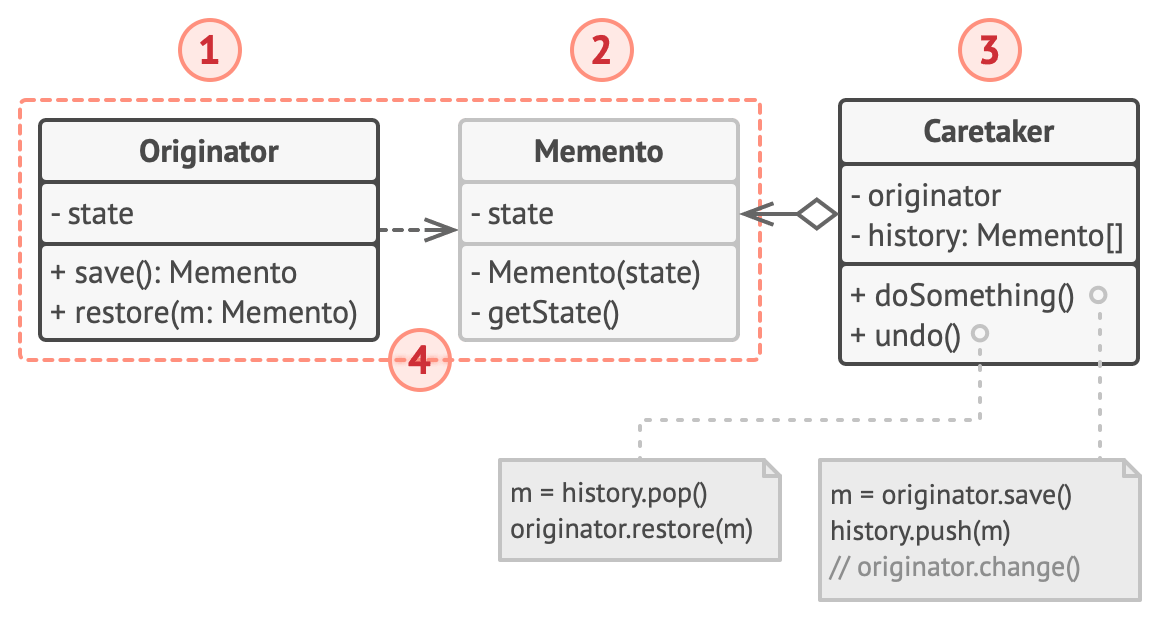
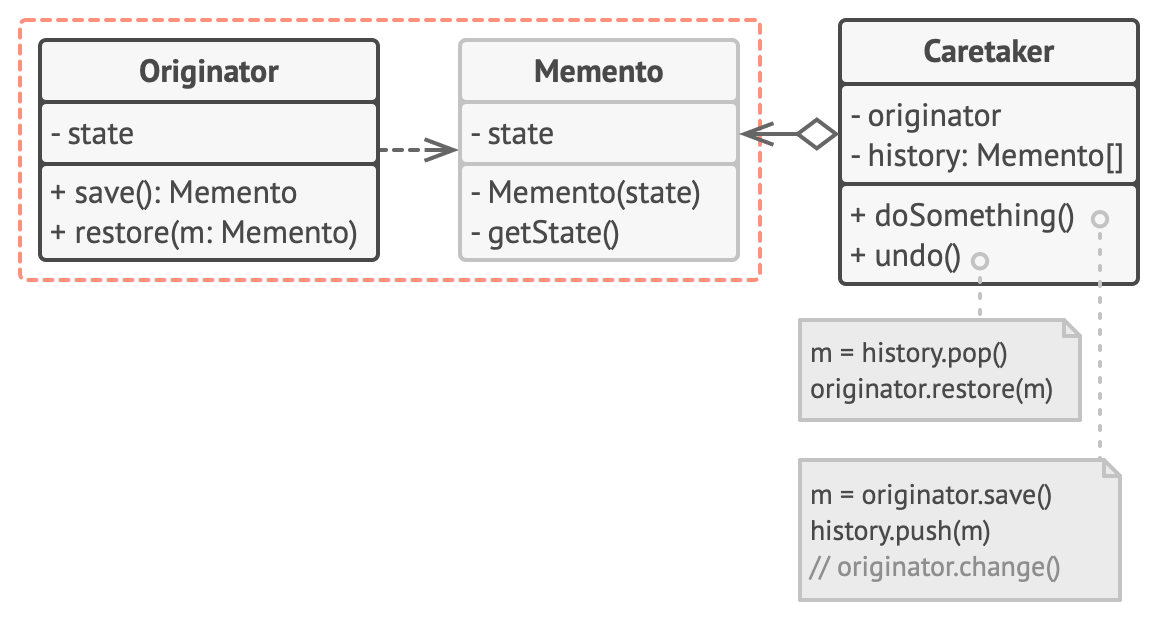
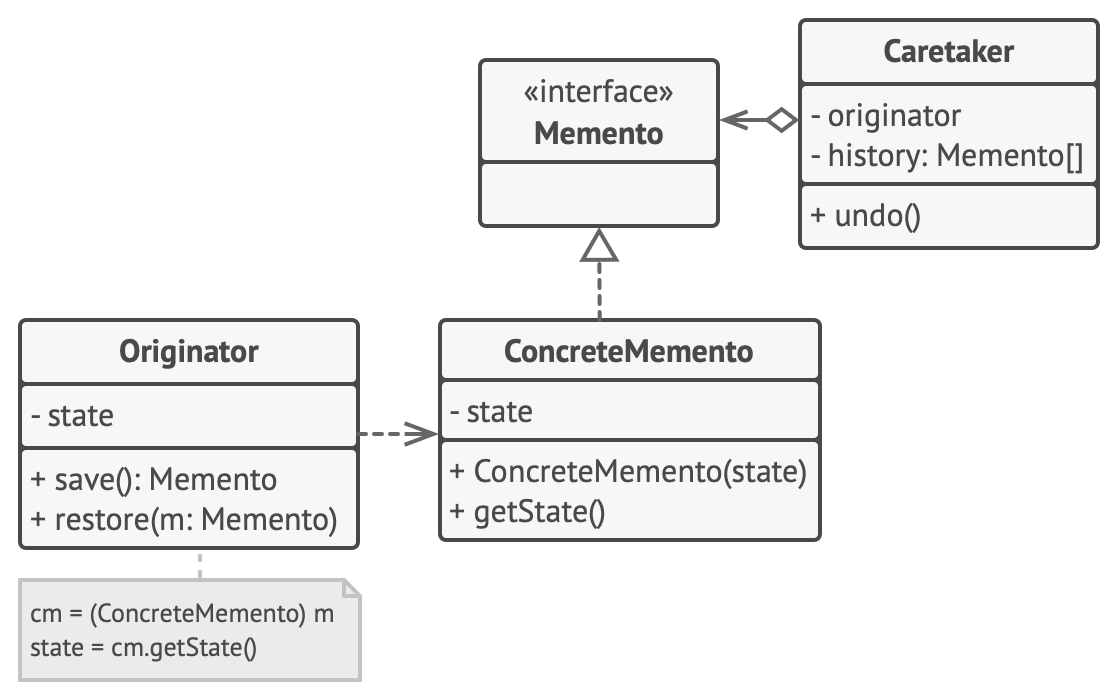
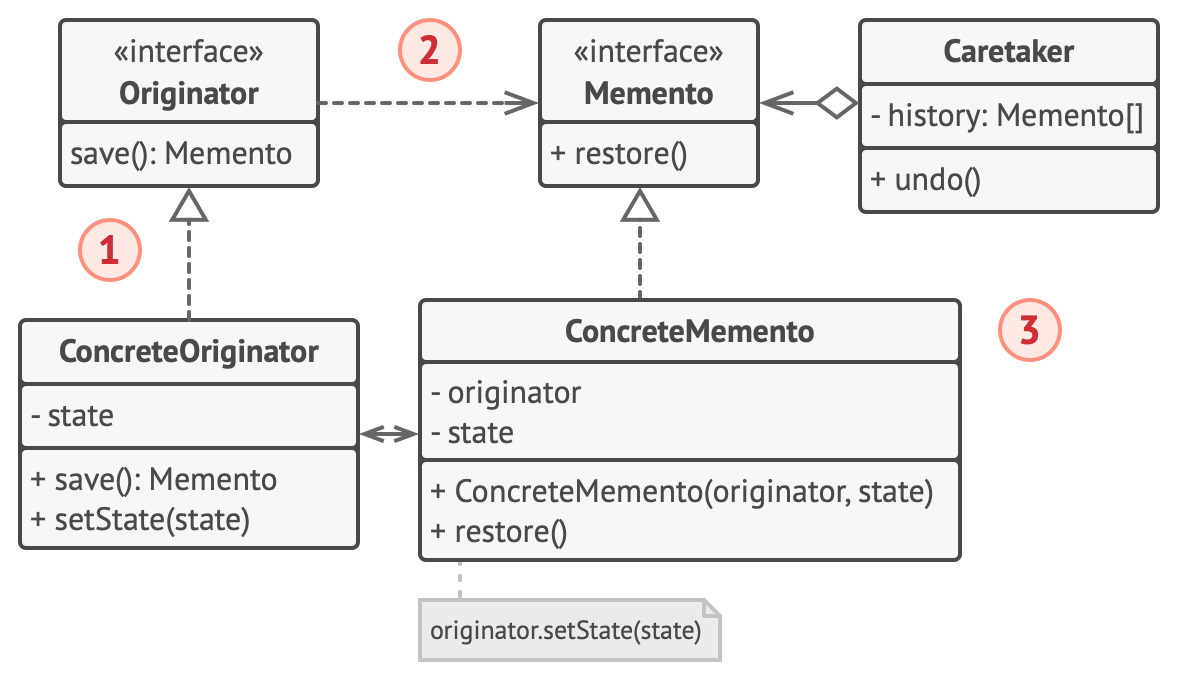
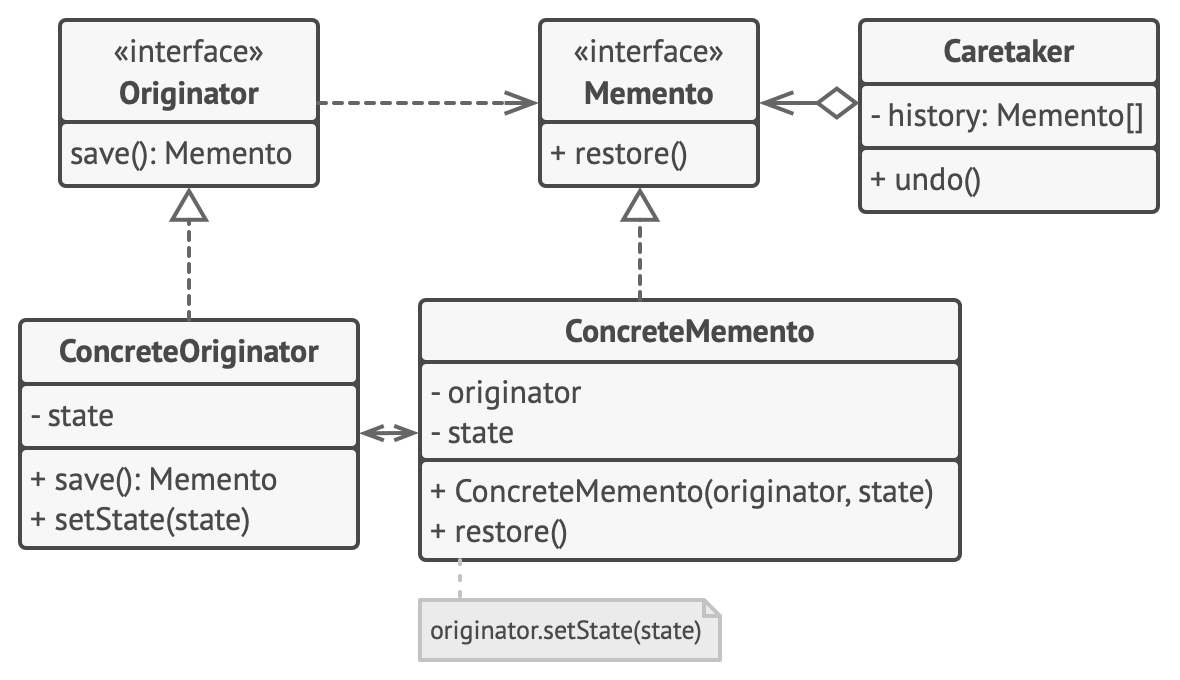
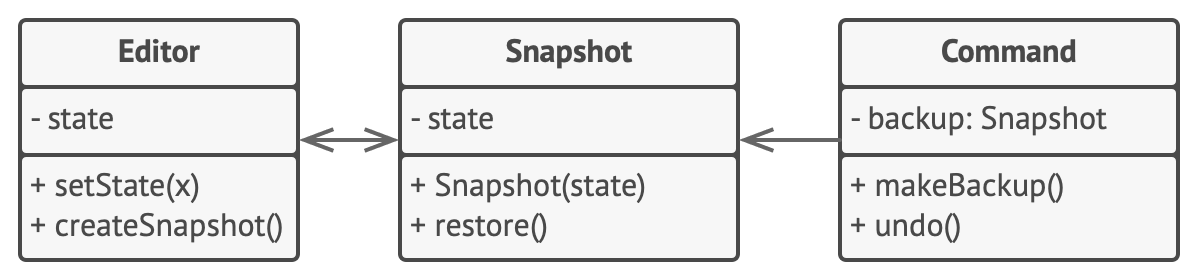









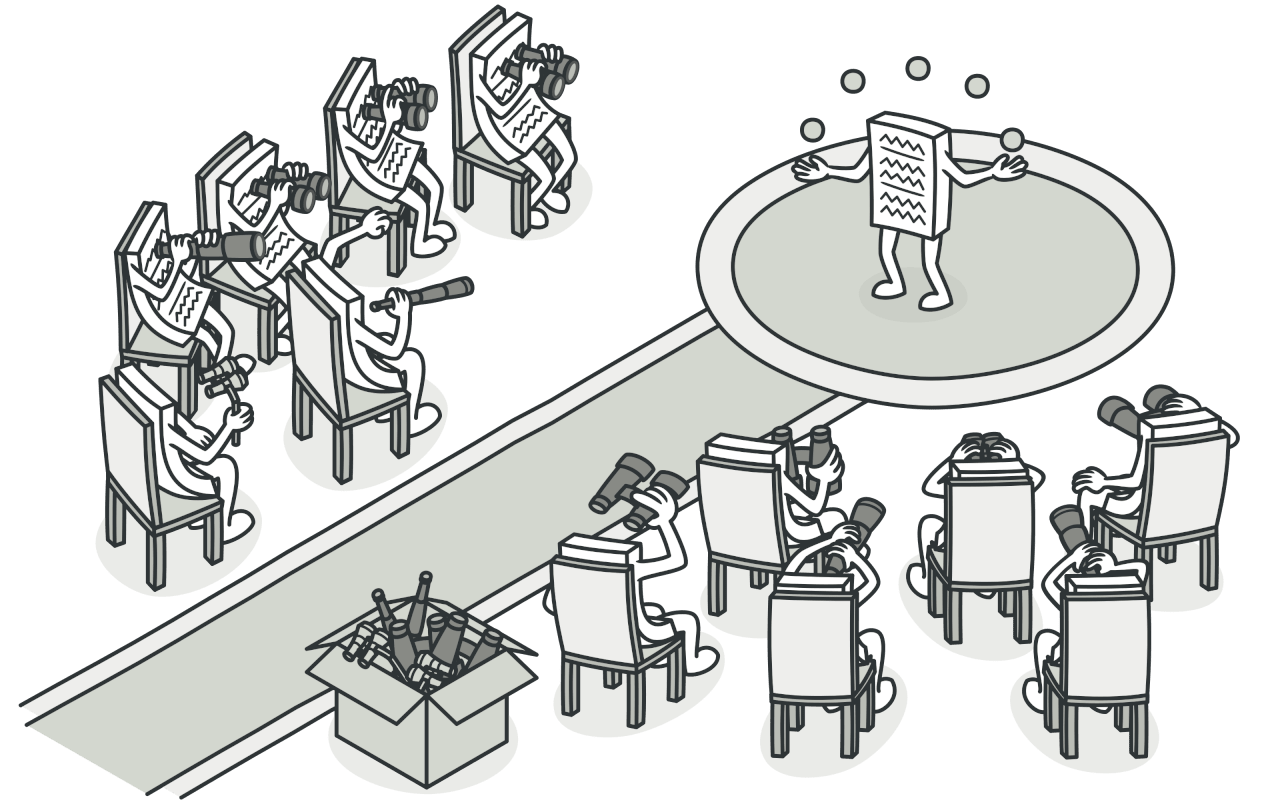
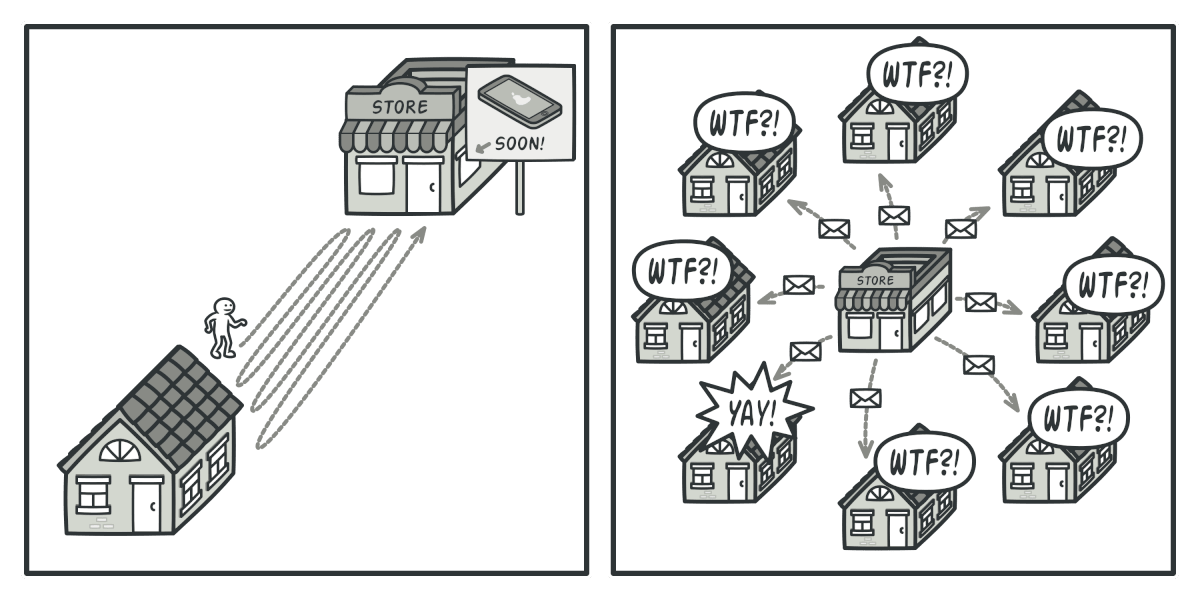
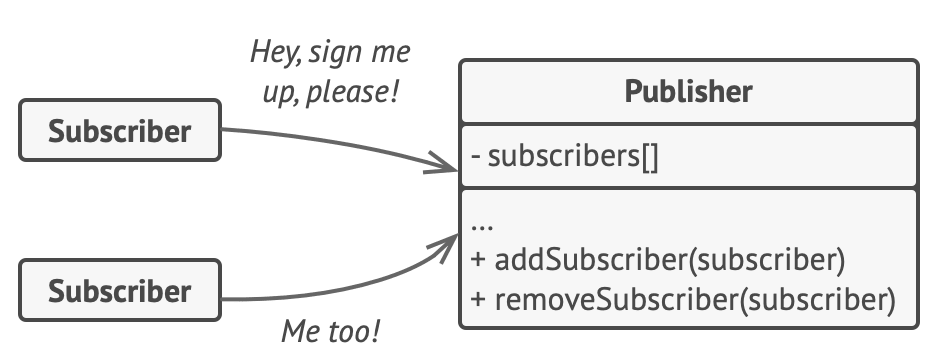

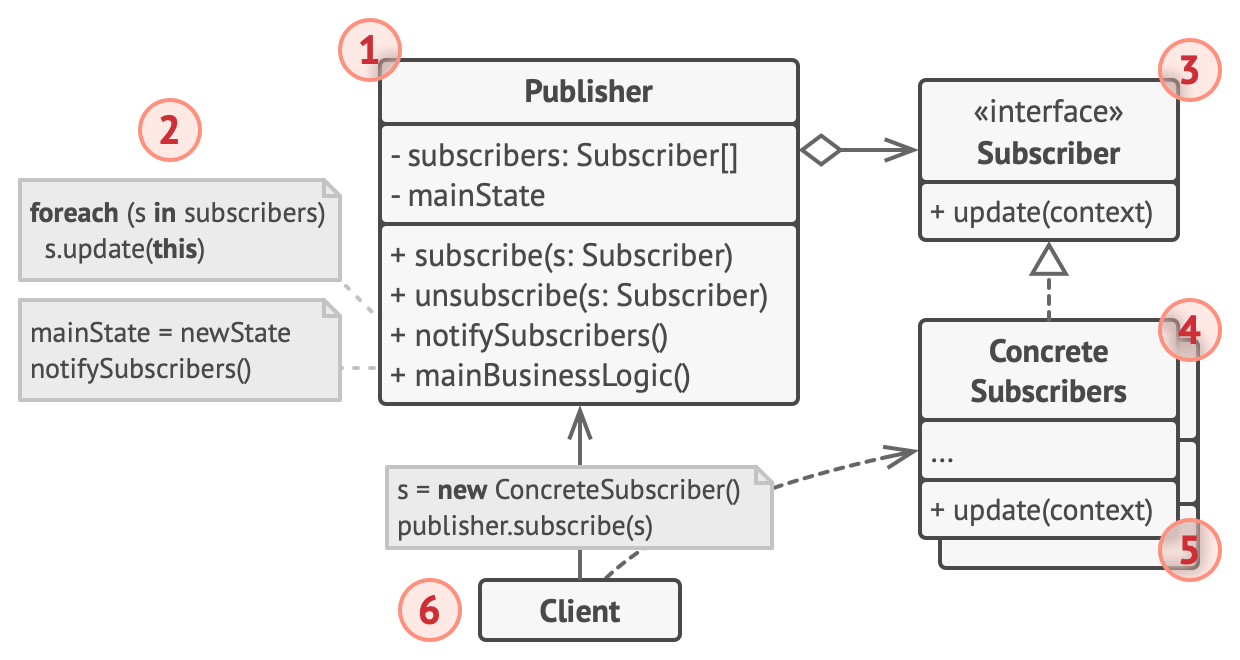
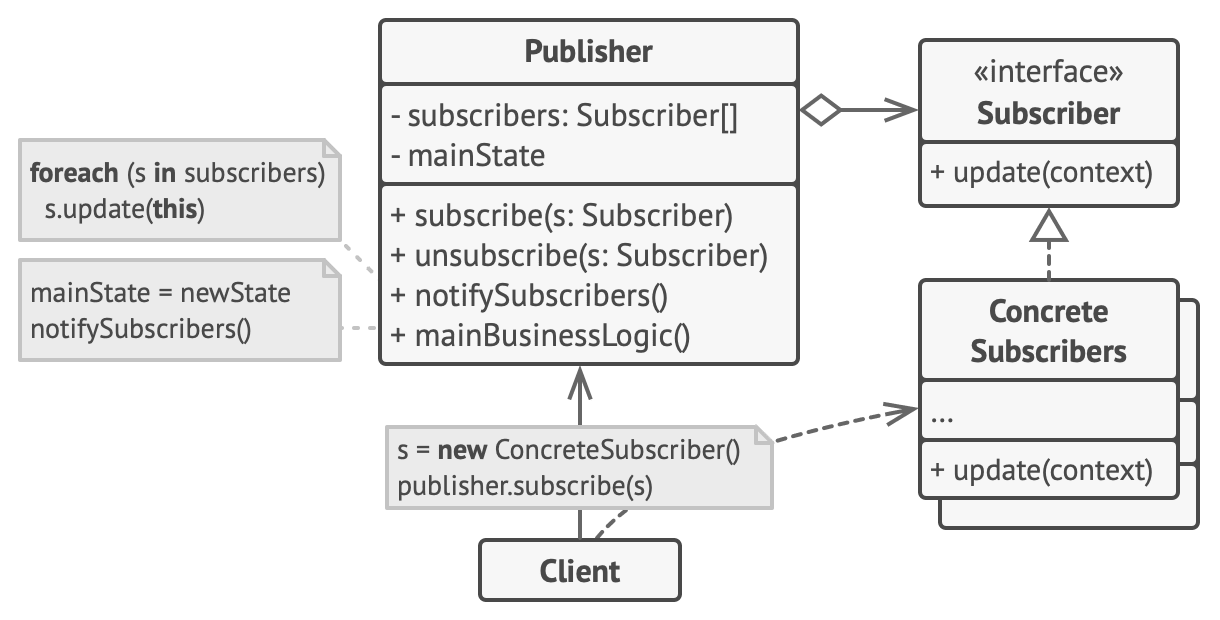
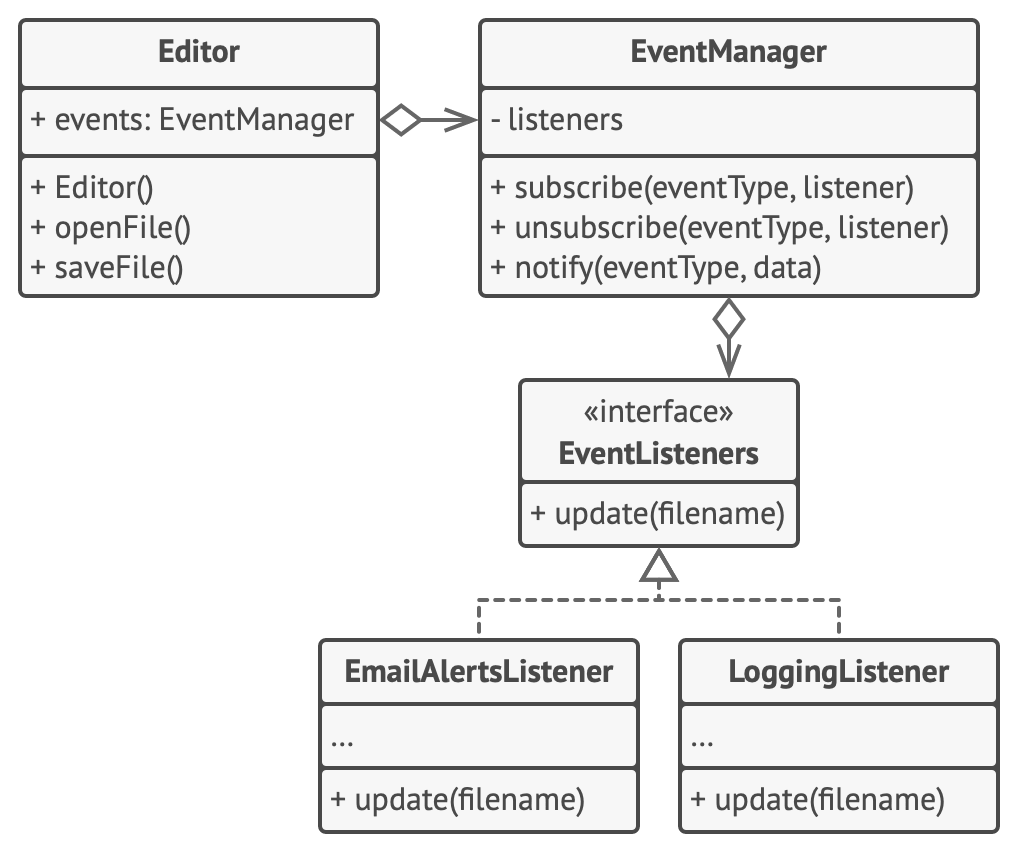









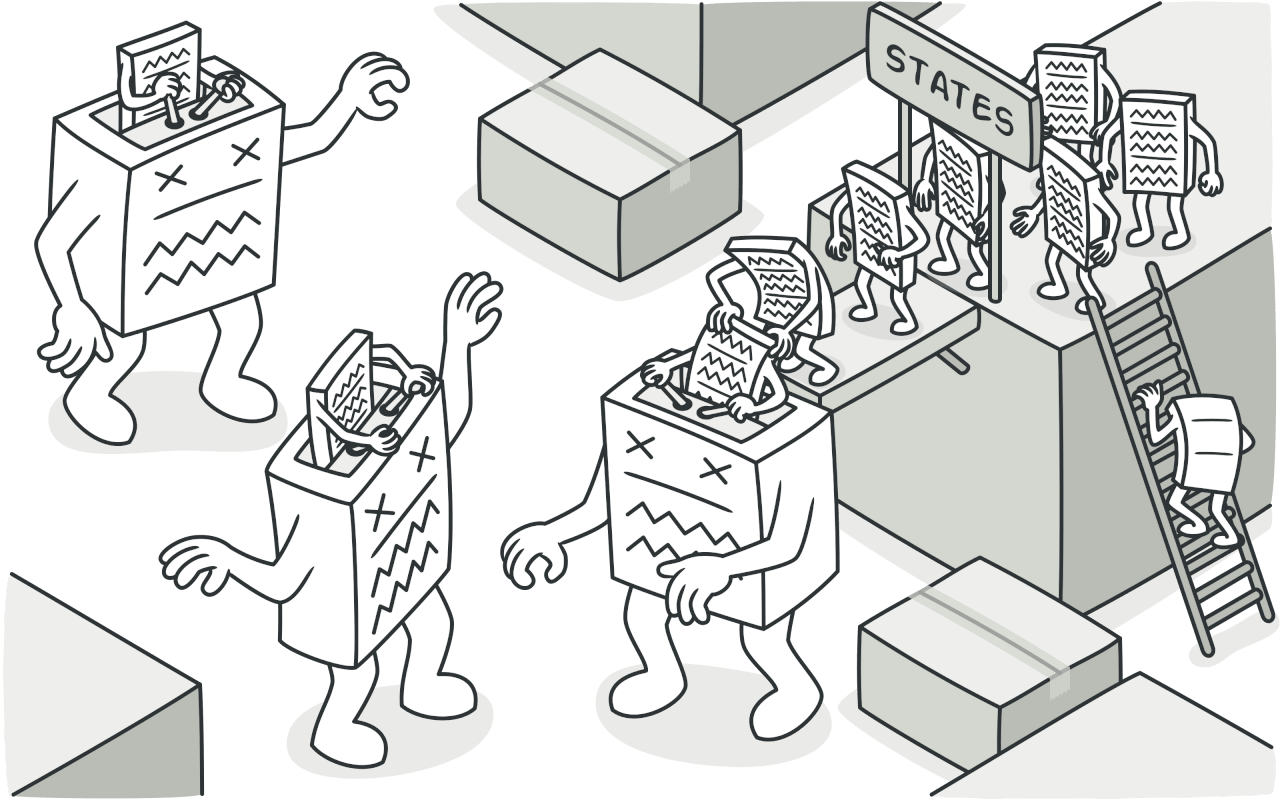
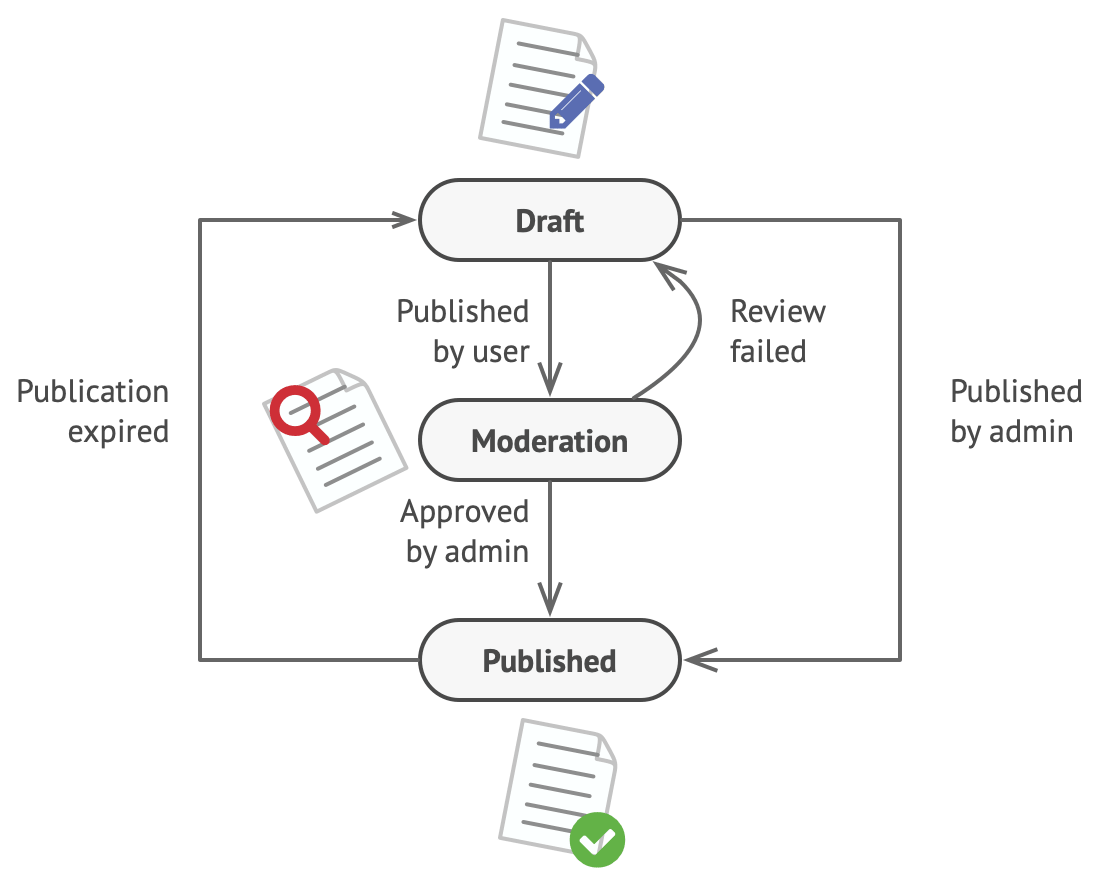
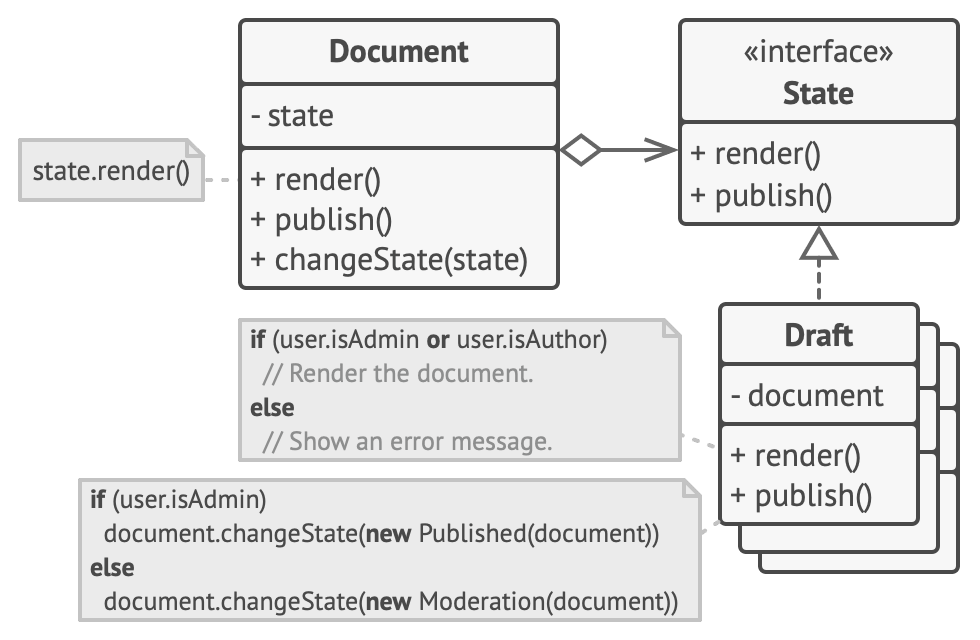
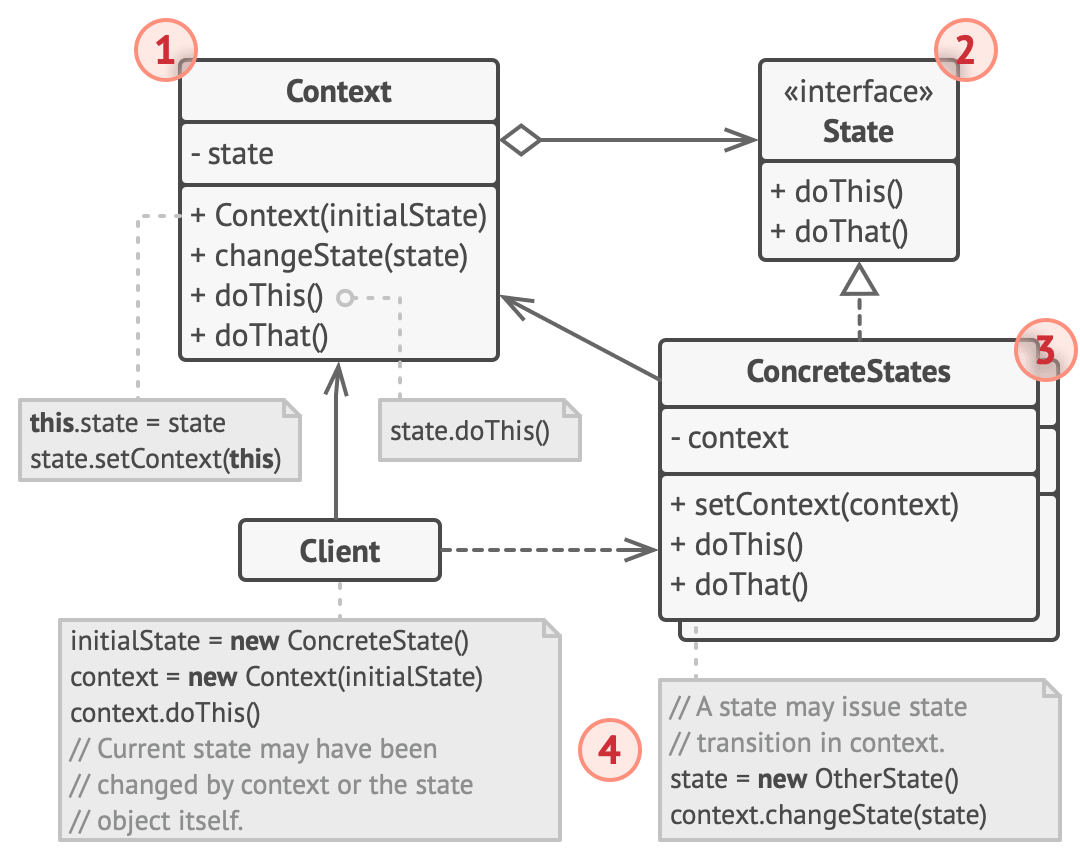
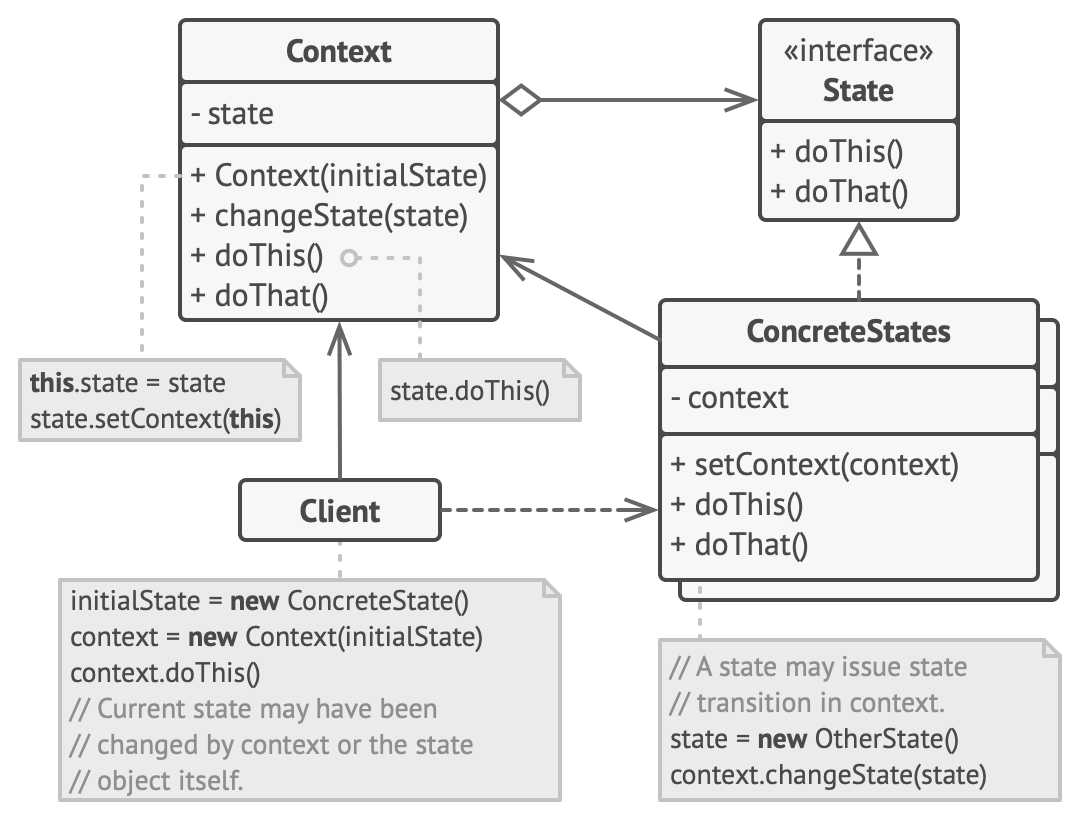
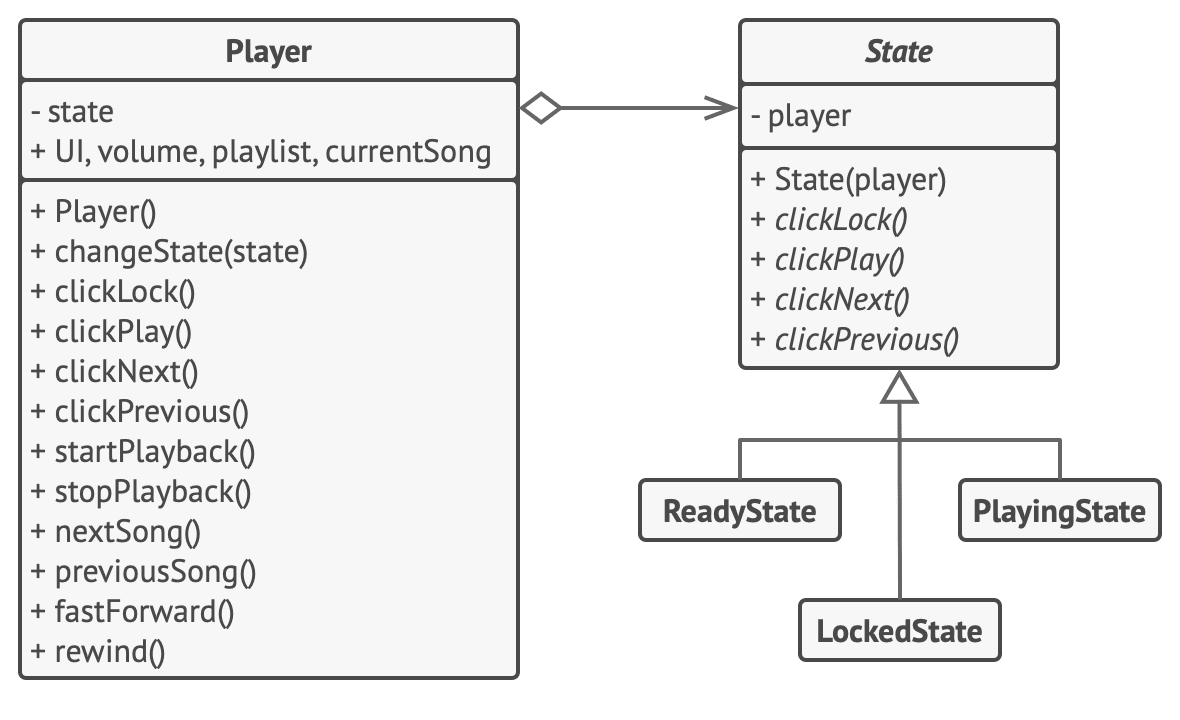










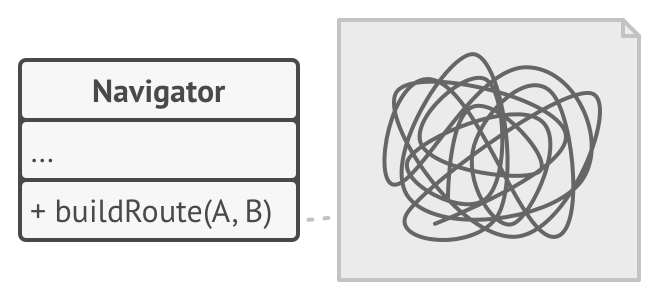
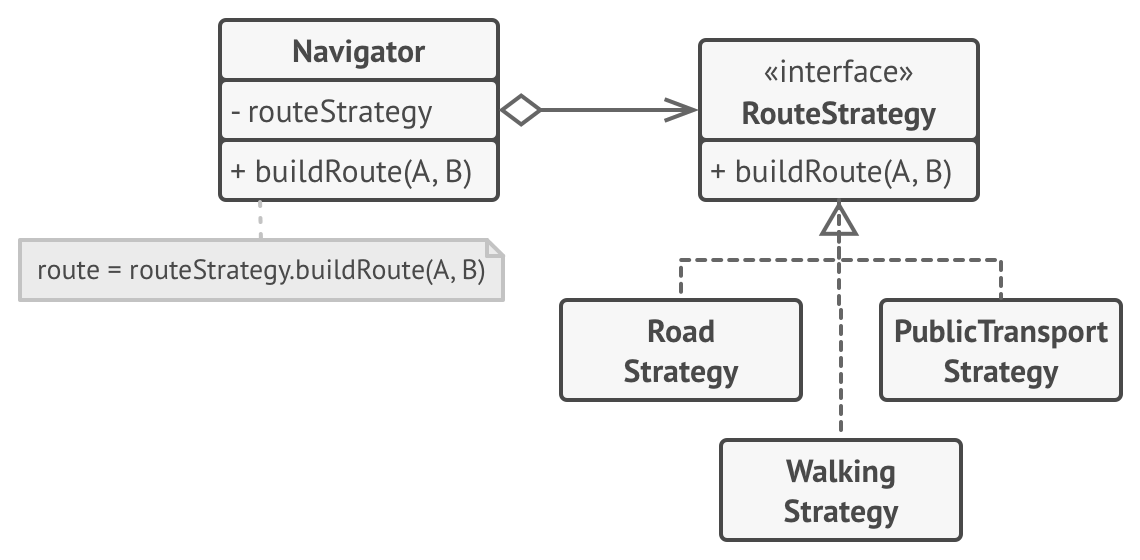
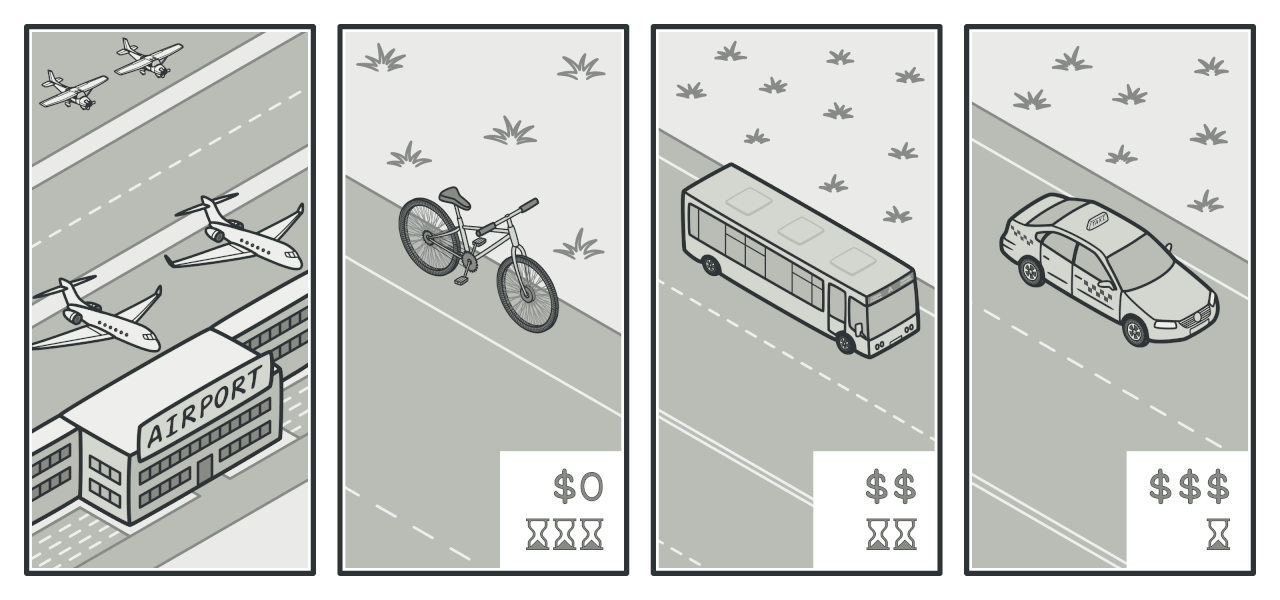
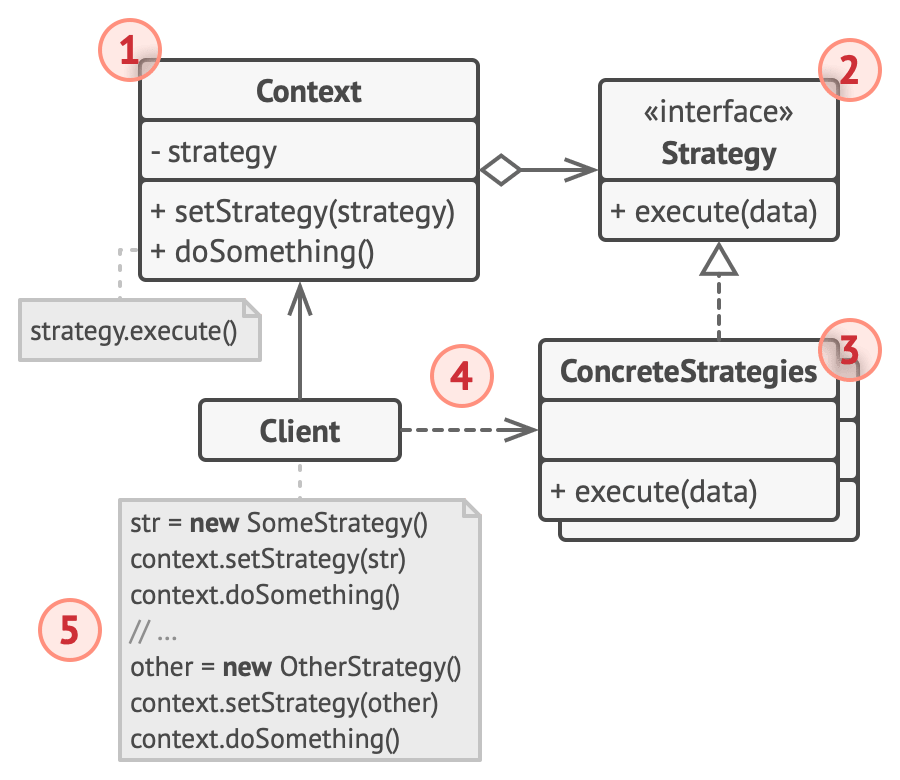
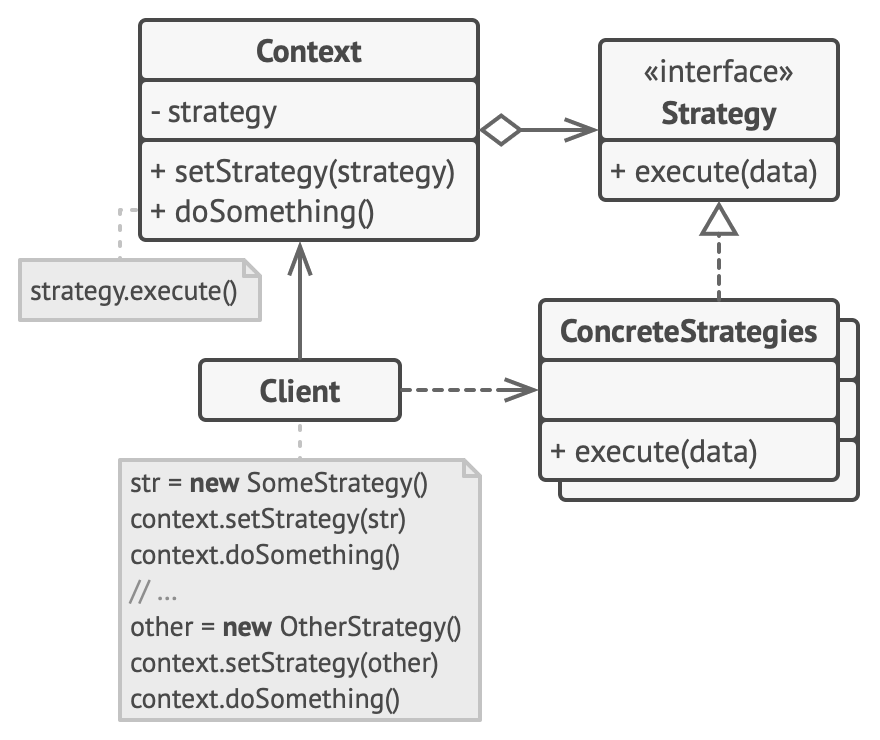









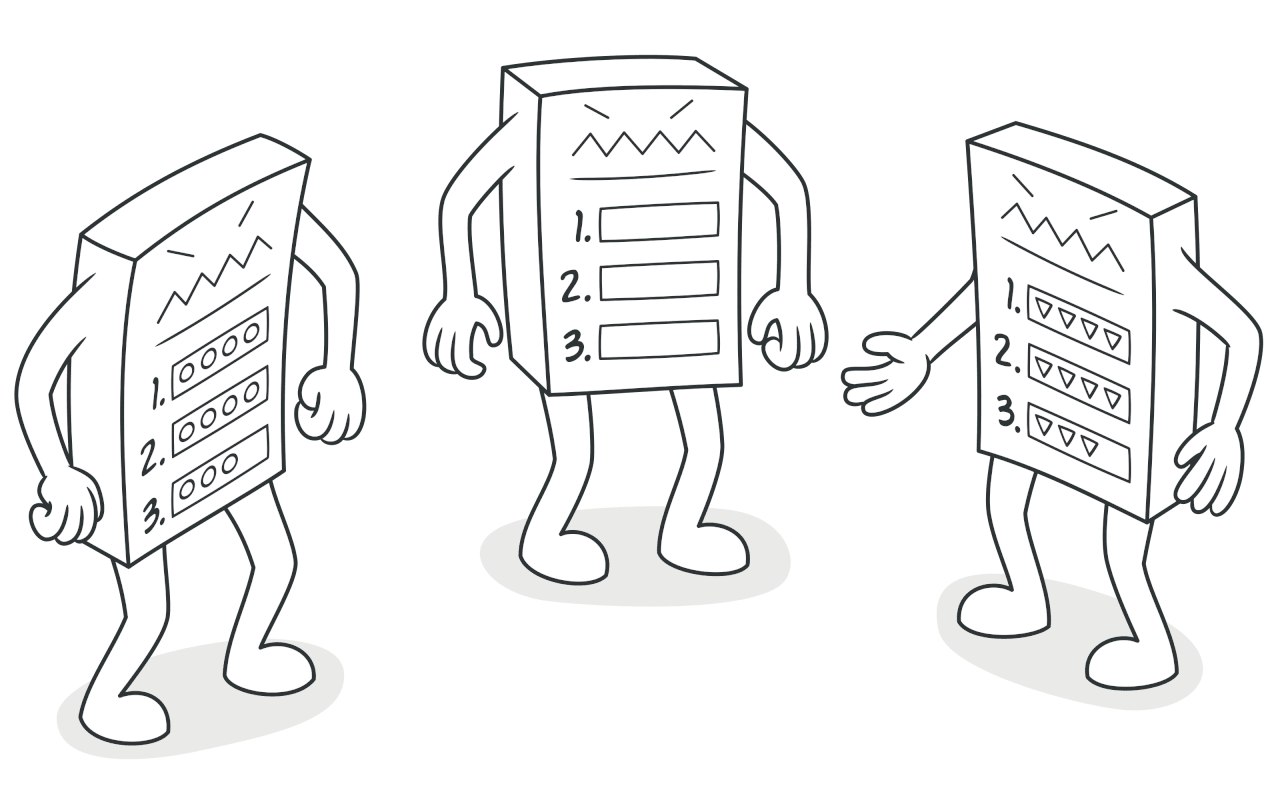
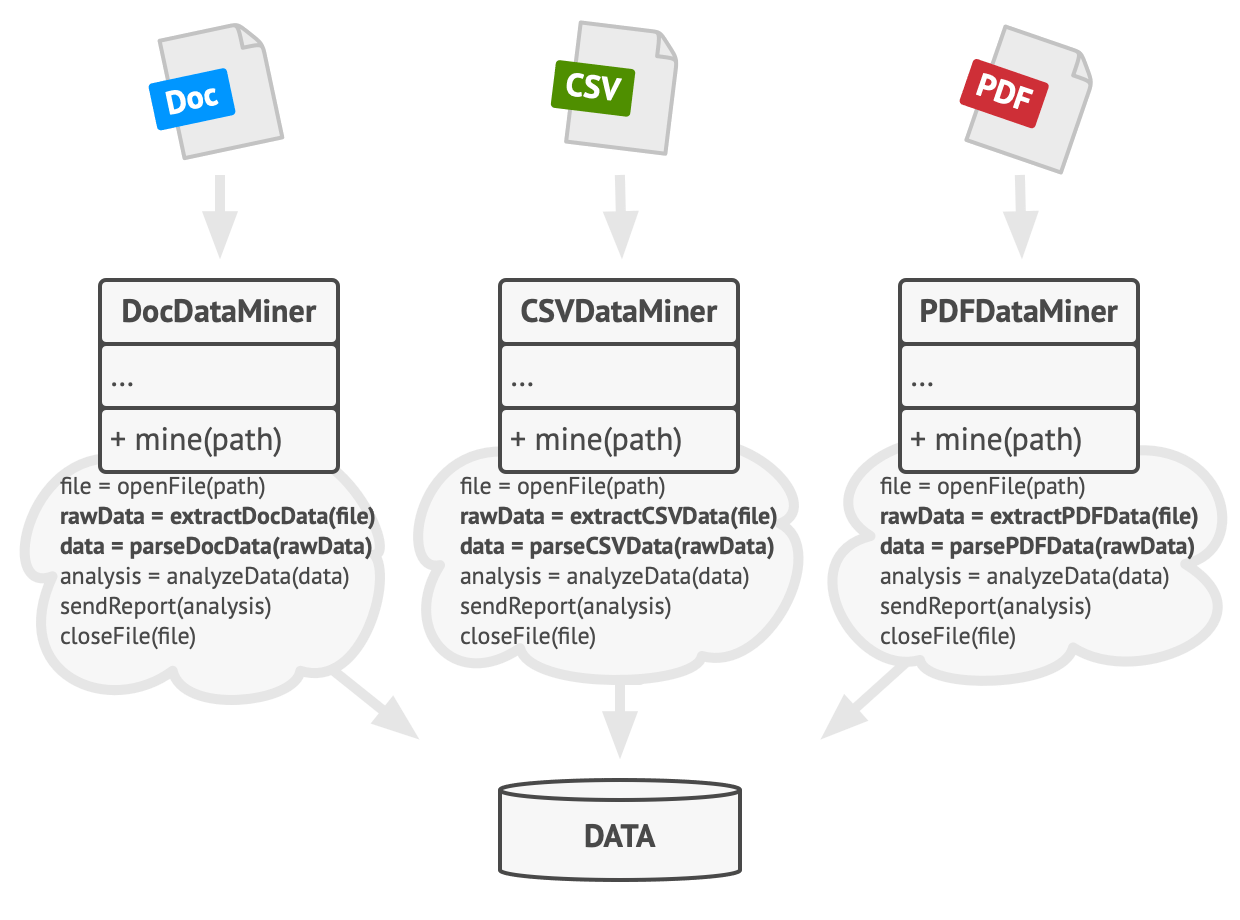
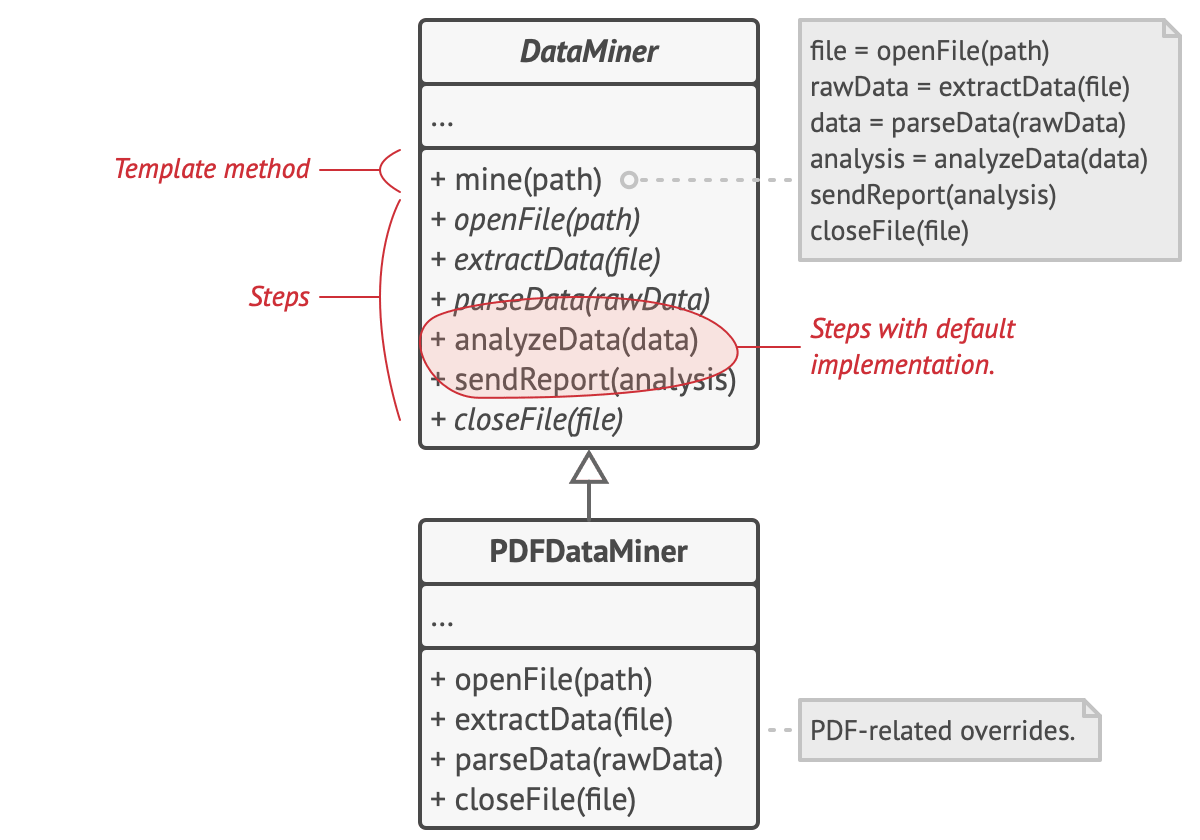
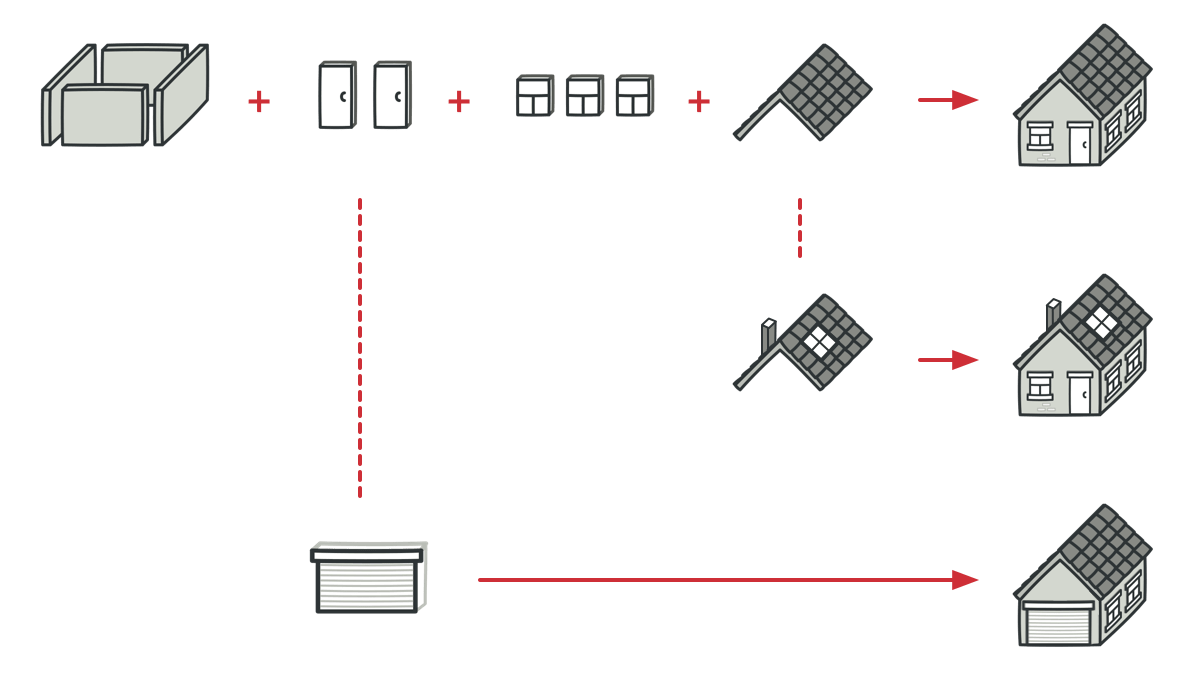
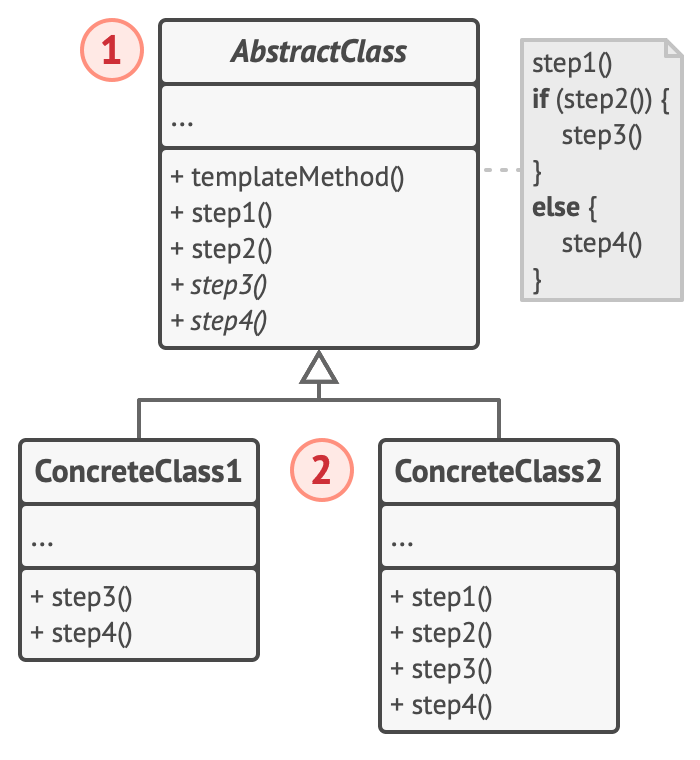
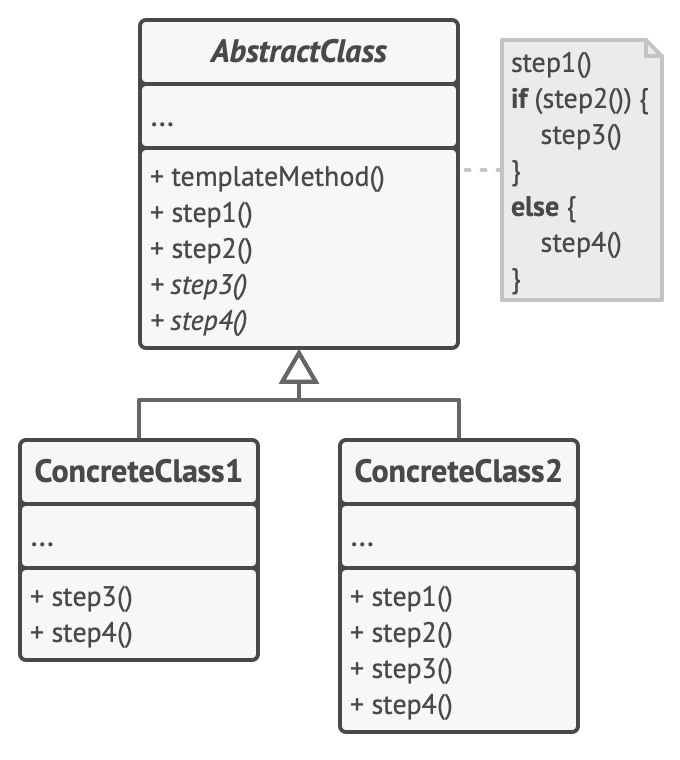
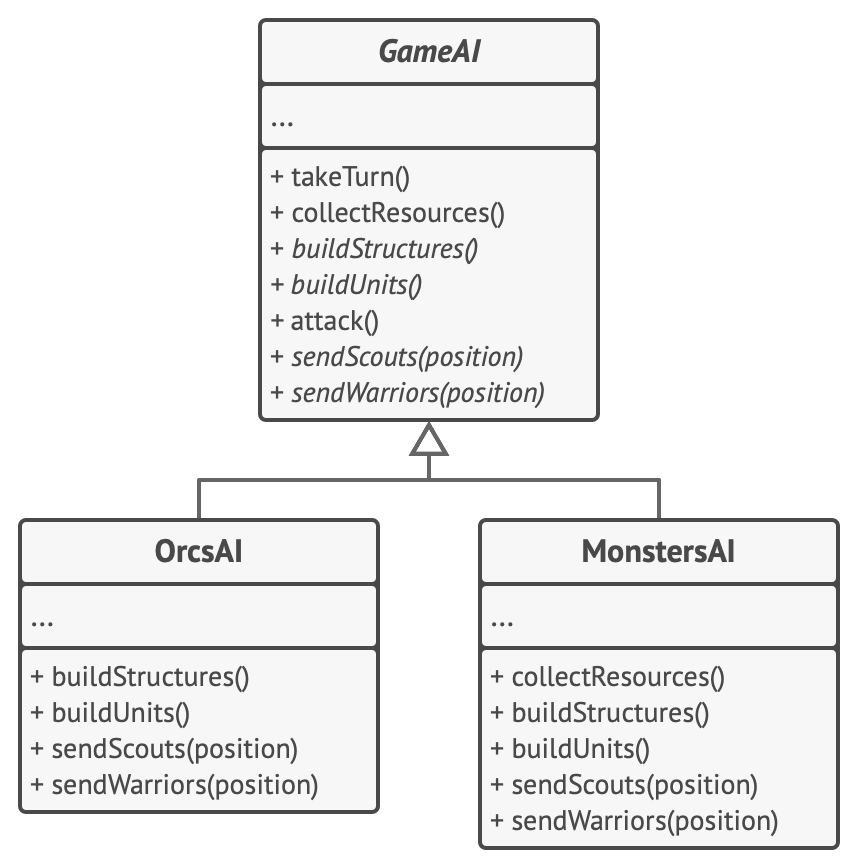

















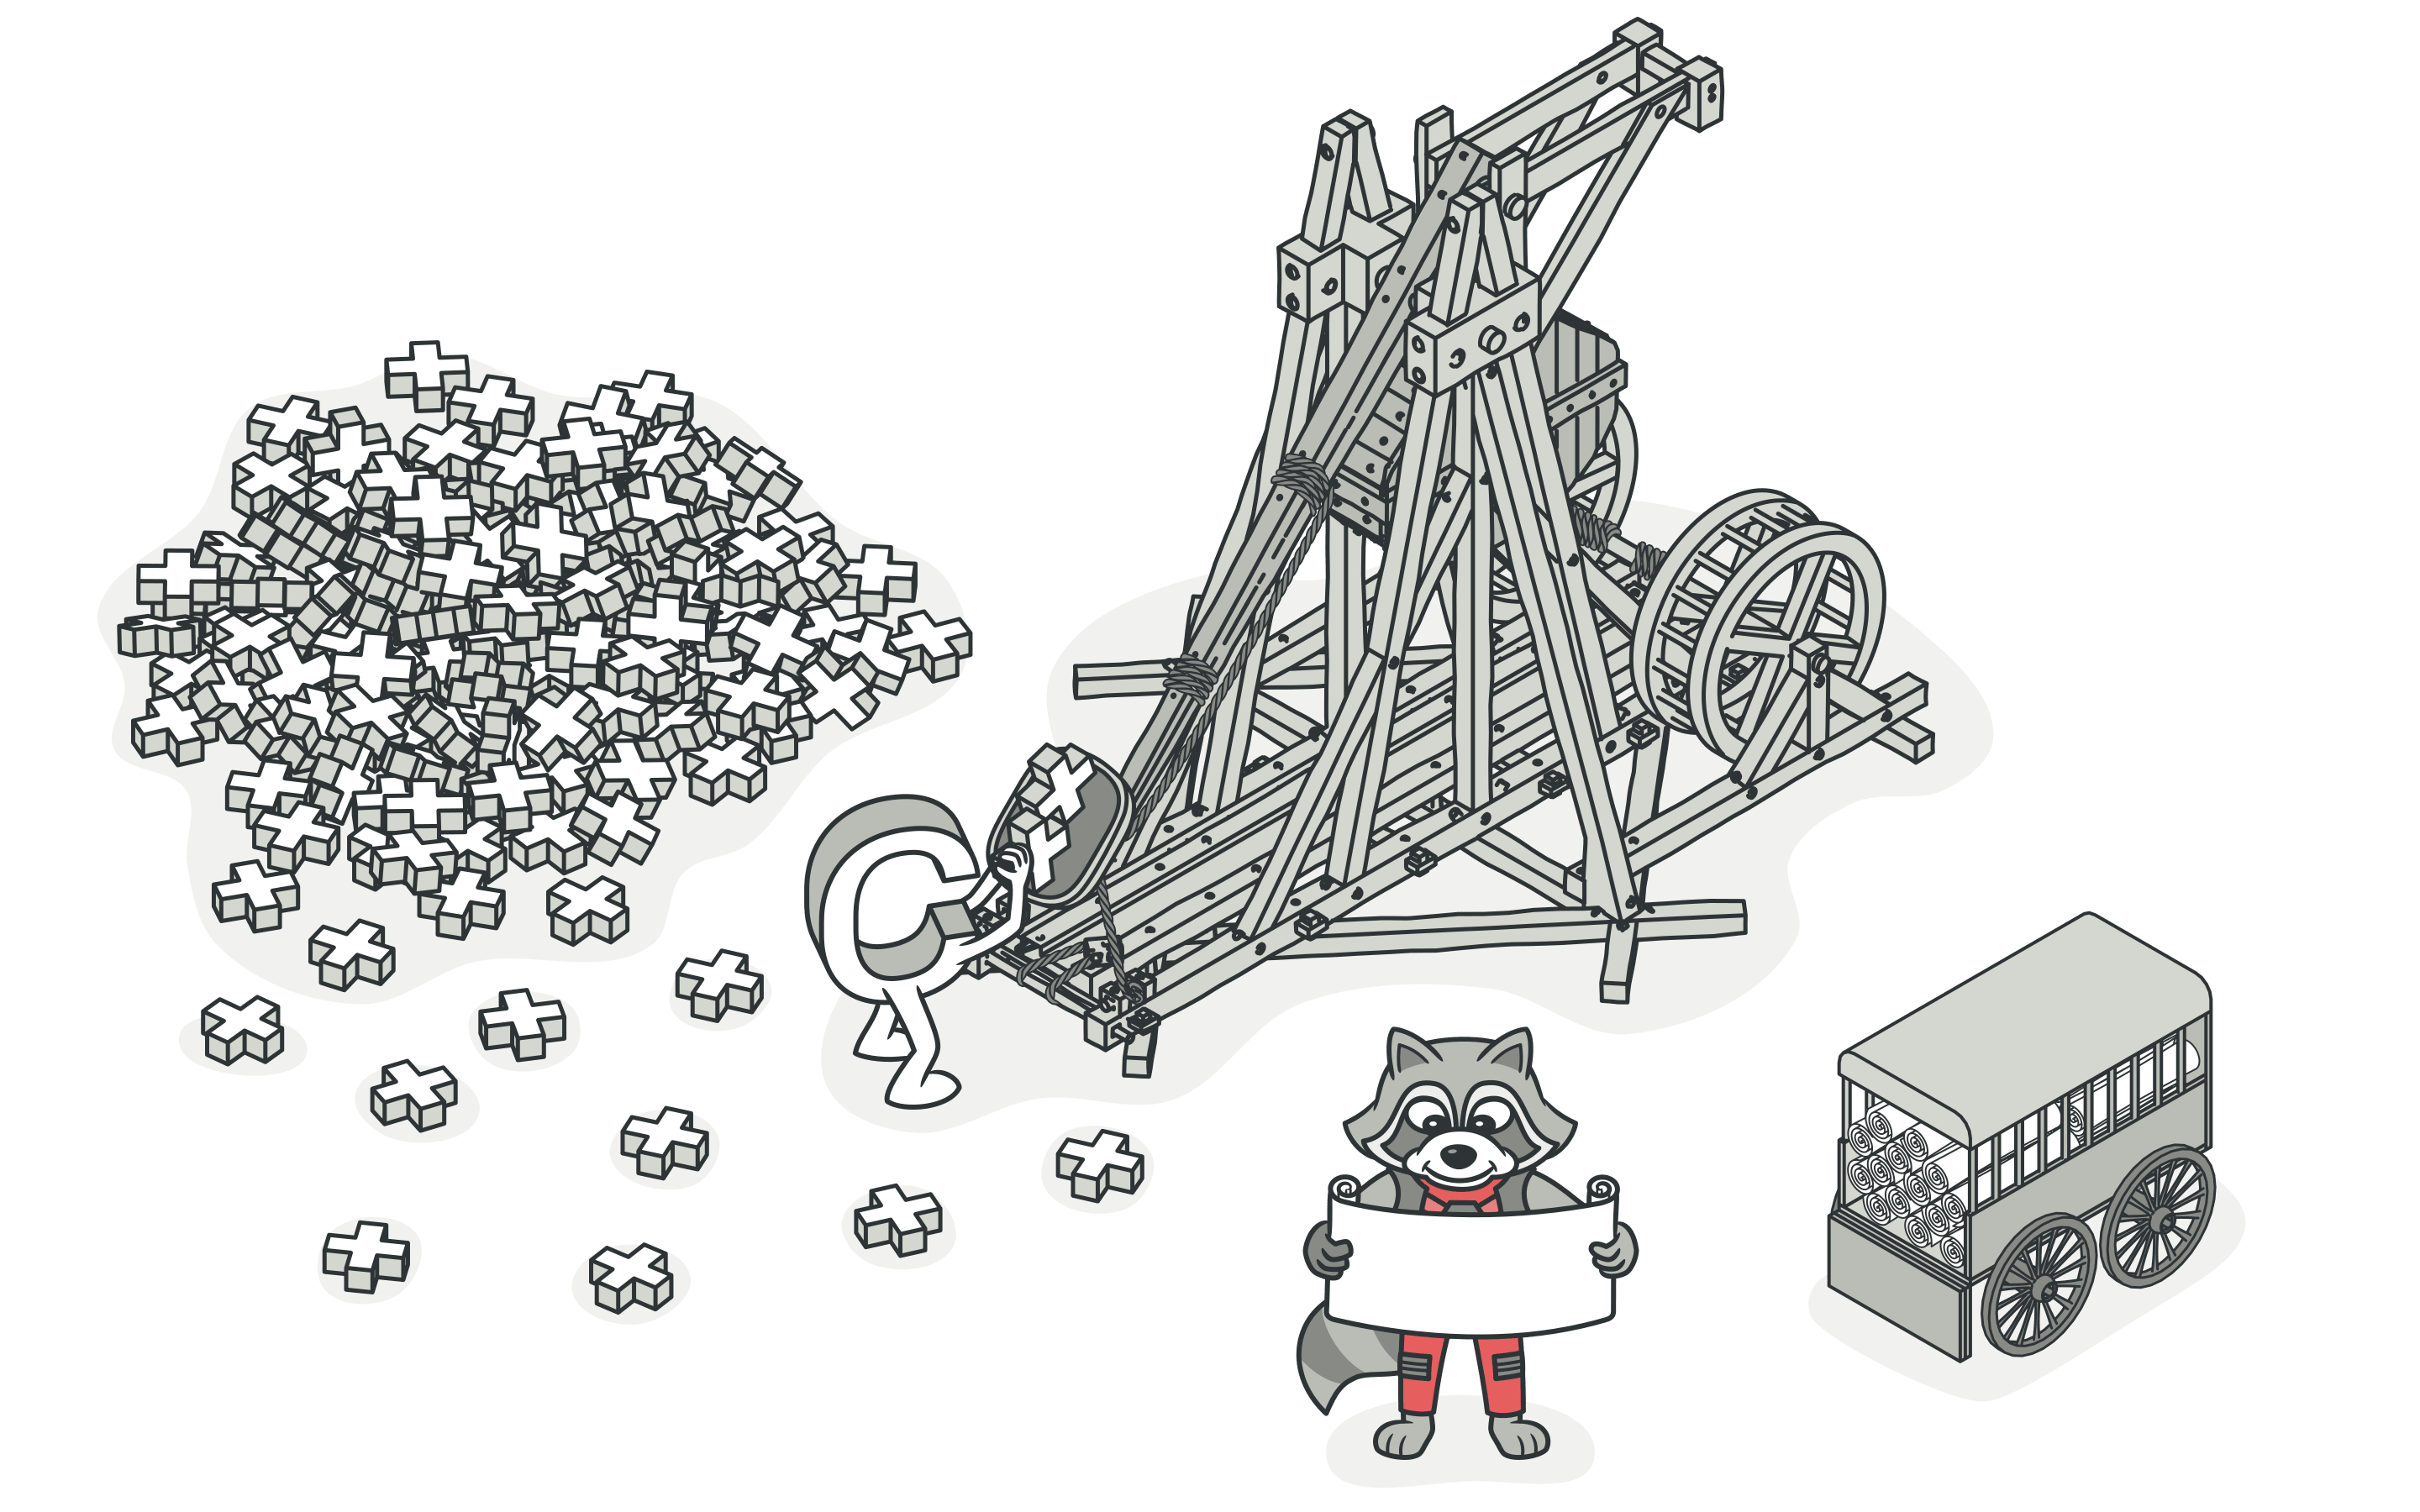




















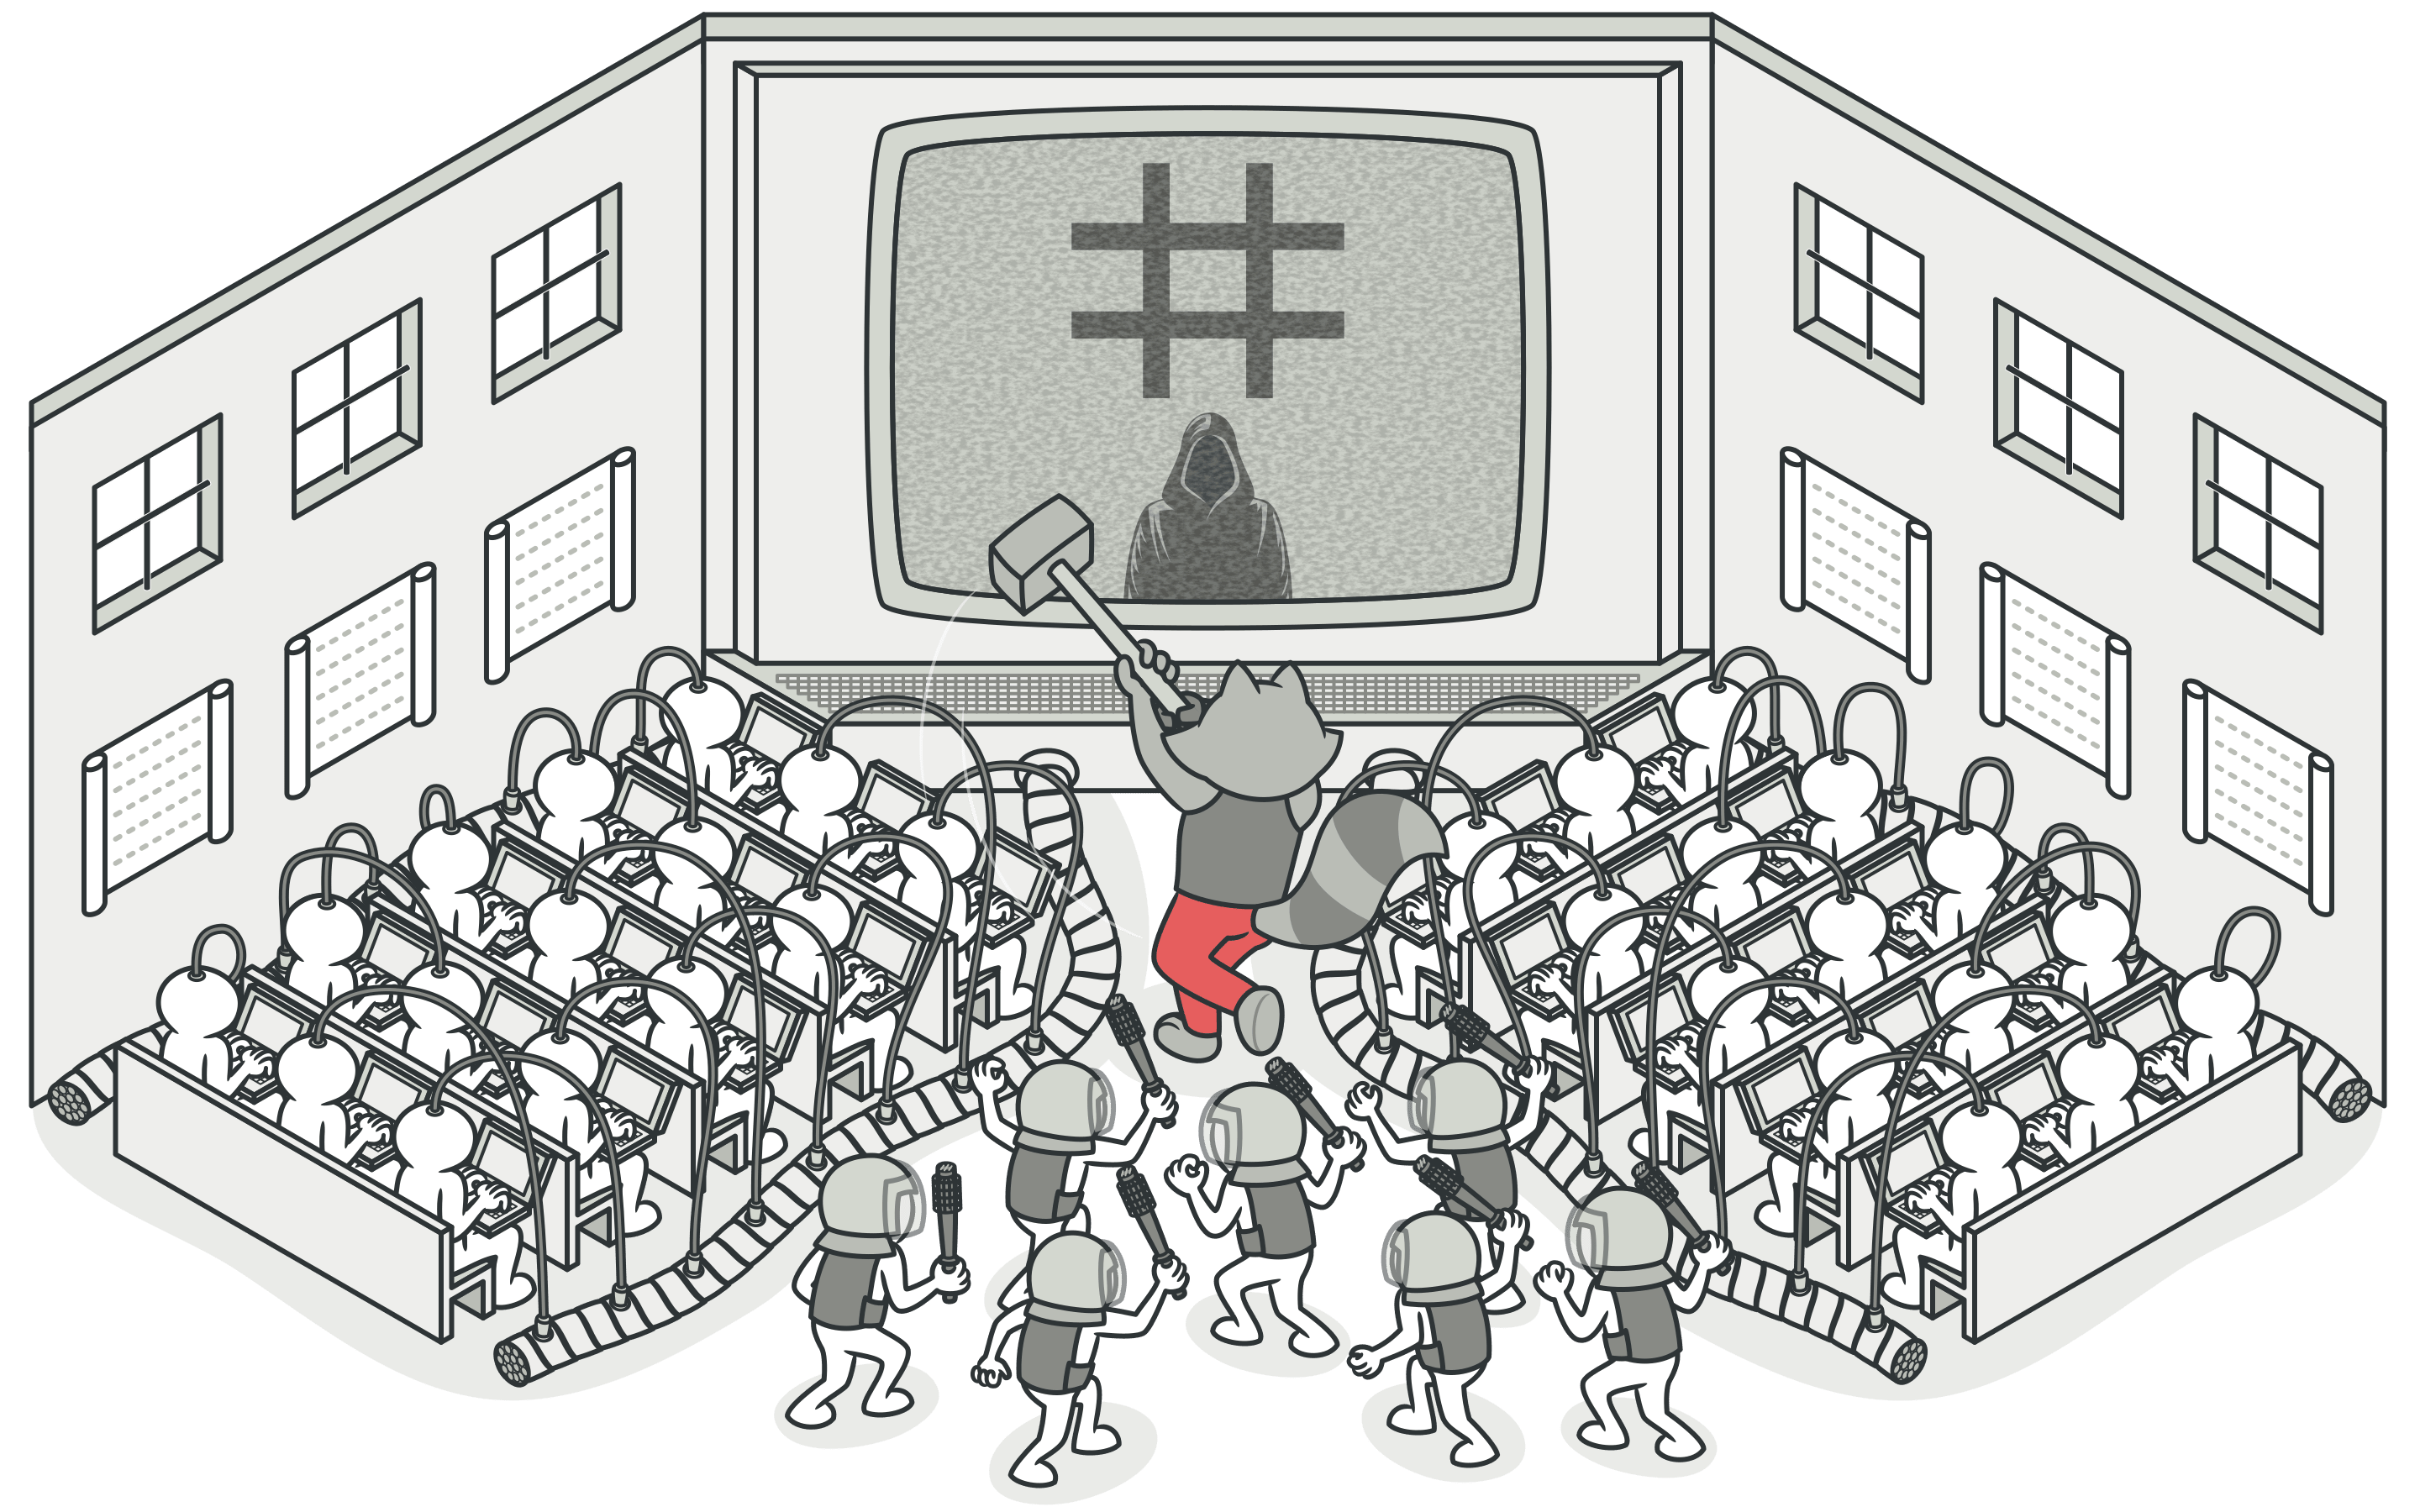




















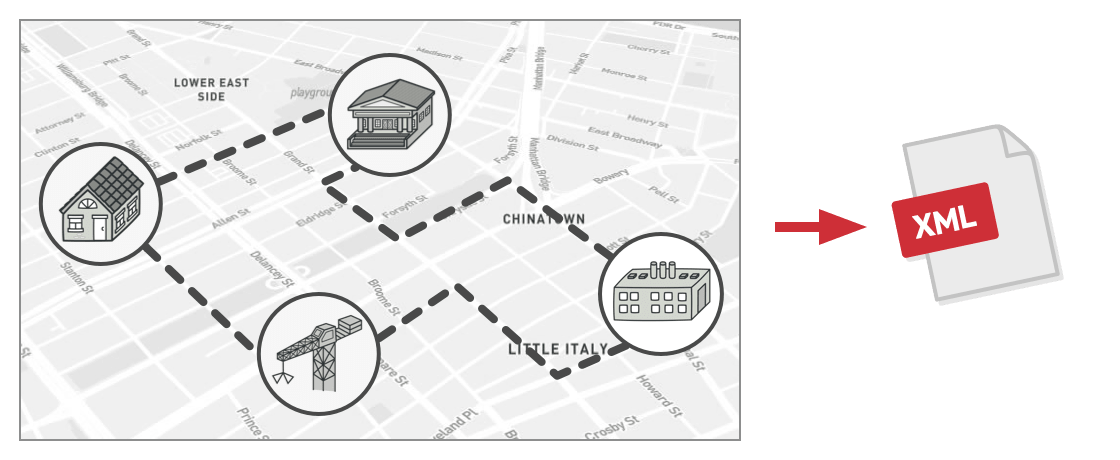
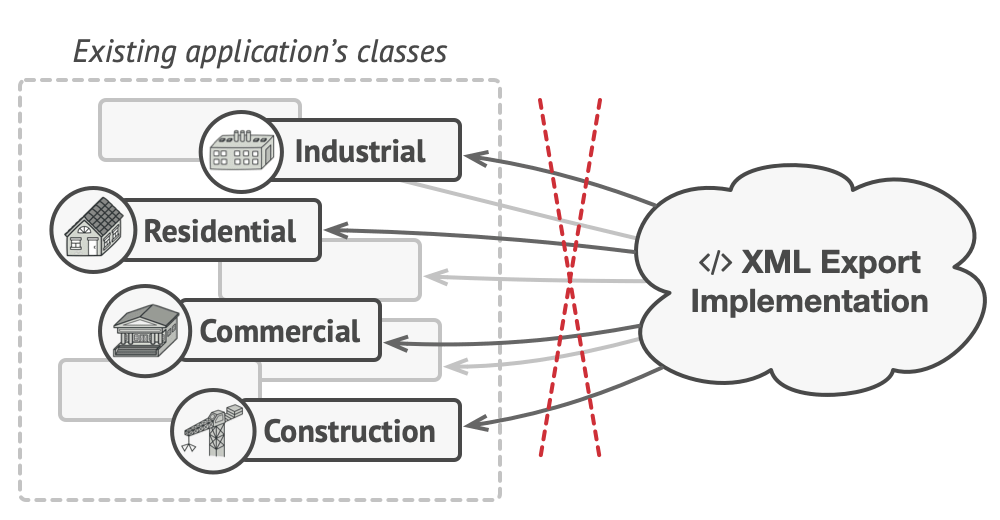
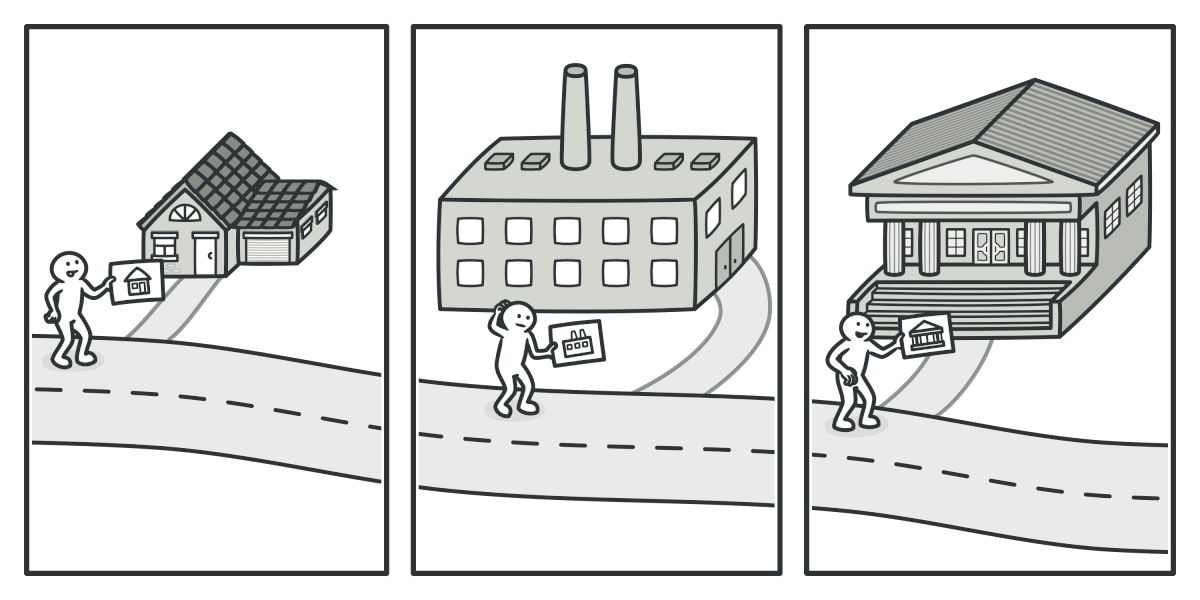
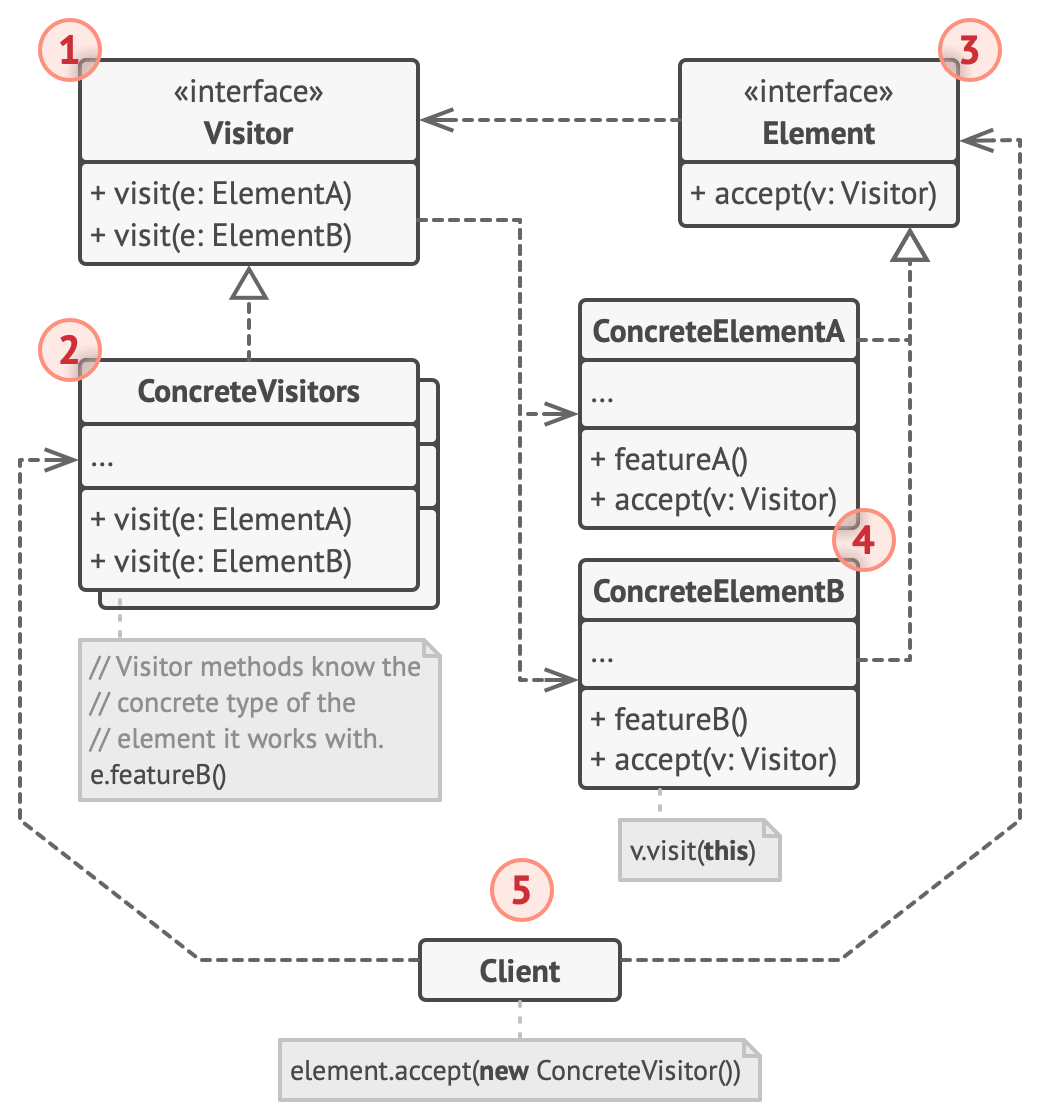
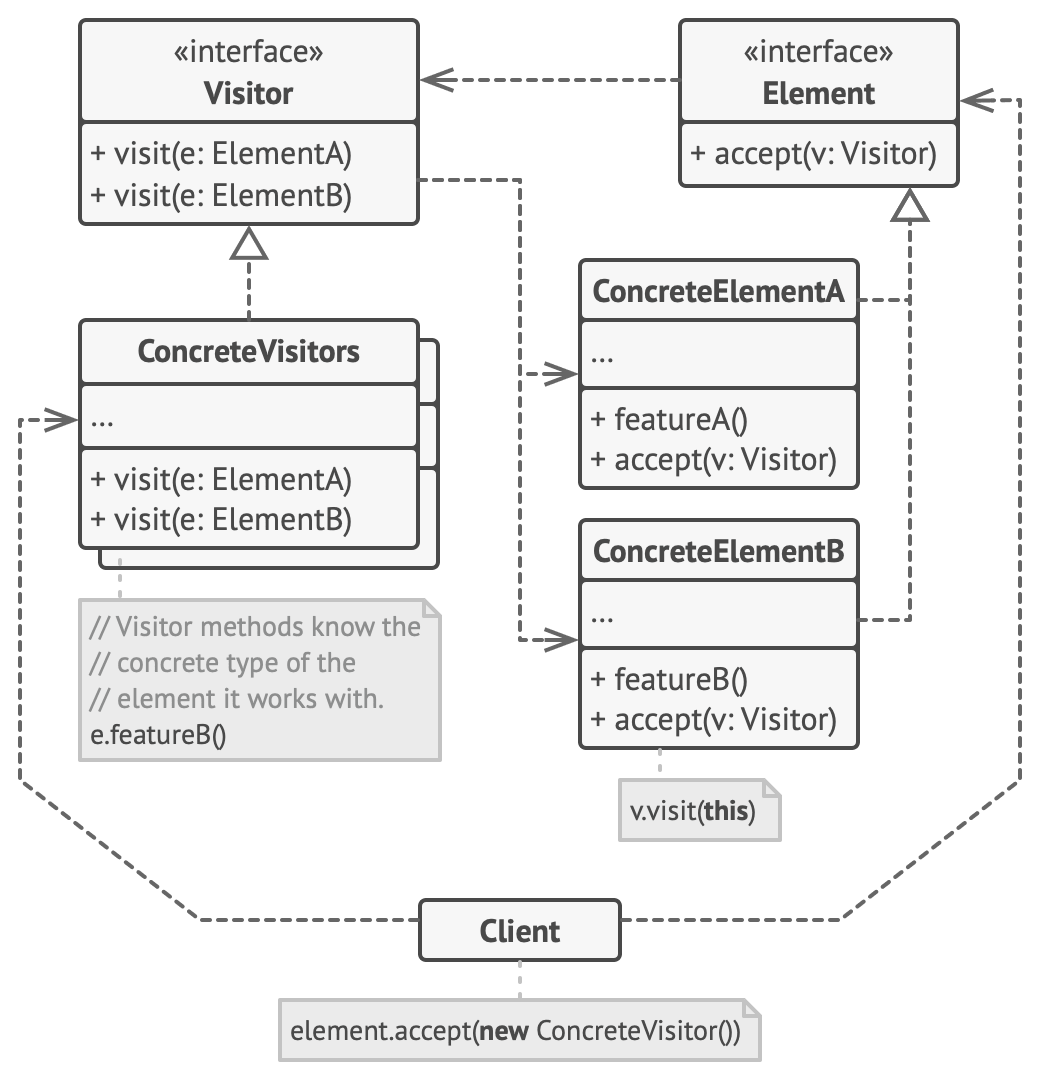
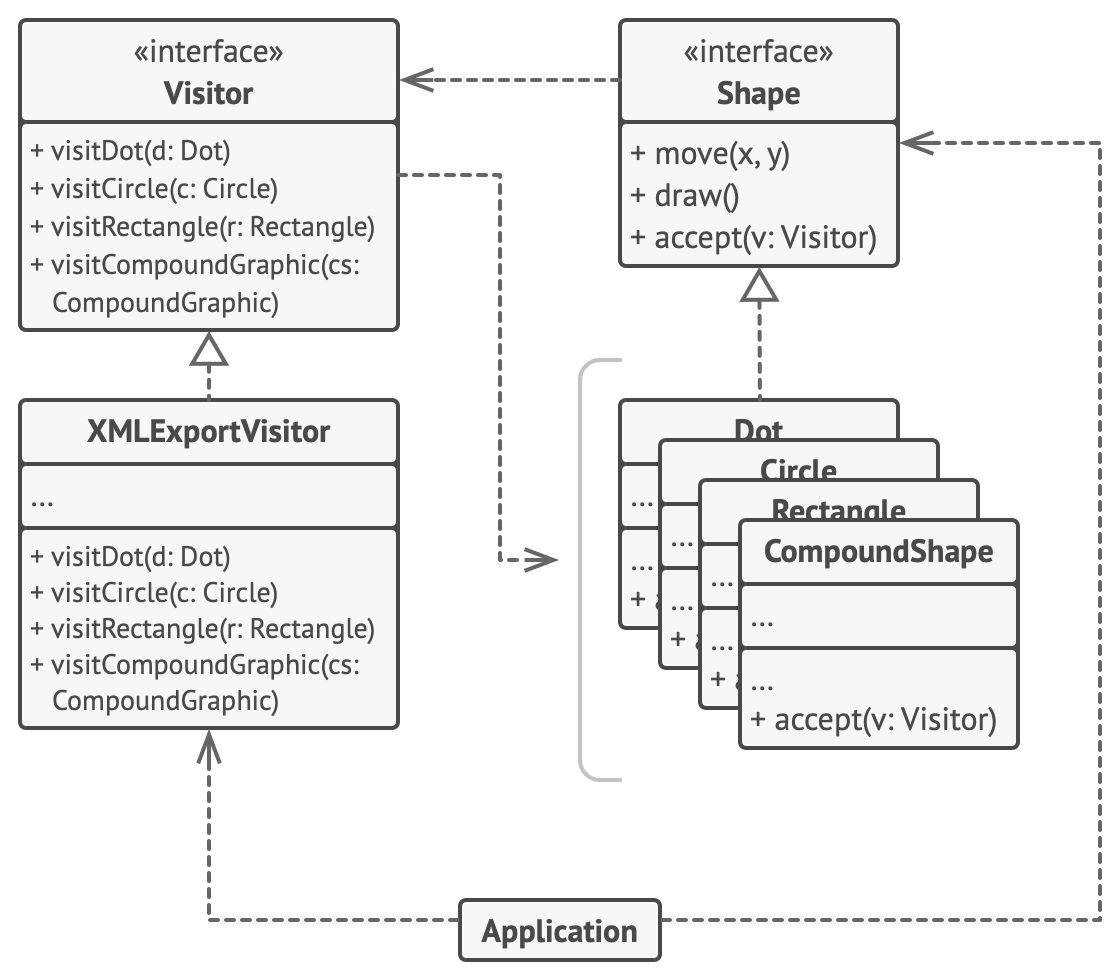







































































































































































































































































{{ title }}

"; } } /\*\* \* And this Concrete Product provides PHPTemplate page title templates. \*/ class PHPTemplateTitleTemplate implements TitleTemplate { public function getTemplateString(): string { return "

"; } } /\*\* \* This is another Abstract Product type, which describes whole page templates. \*/ interface PageTemplate { public function getTemplateString(): string; } /\*\* \* The page template uses the title sub-template, so we have to provide the way \* to set it in the sub-template object. The abstract factory will link the page \* template with a title template of the same variant. \*/ abstract class BasePageTemplate implements PageTemplate { protected $titleTemplate; public function \_\_construct(TitleTemplate $titleTemplate) { $this->titleTemplate = $titleTemplate; } } /\*\* \* The Twig variant of the whole page templates. \*/ class TwigPageTemplate extends BasePageTemplate { public function getTemplateString(): string { $renderedTitle = $this->titleTemplate->getTemplateString(); return << $renderedTitle
{{ content }}
HTML; } } /\*\* \* The PHPTemplate variant of the whole page templates. \*/ class PHPTemplatePageTemplate extends BasePageTemplate { public function getTemplateString(): string { $renderedTitle = $this->titleTemplate->getTemplateString(); return << $renderedTitle
HTML; } } /\*\* \* The renderer is responsible for converting a template string into the actual \* HTML code. Each renderer behaves differently and expects its own type of \* template strings passed to it. Baking templates with the factory let you pass \* proper types of templates to proper renders. \*/ interface TemplateRenderer { public function render(string $templateString, array $arguments = \[\]): string; } /\*\* \* The renderer for Twig templates. \*/ class TwigRenderer implements TemplateRenderer { public function render(string $templateString, array $arguments = \[\]): string { return \\Twig::render($templateString, $arguments); } } /\*\* \* The renderer for PHPTemplate templates. Note that this implementation is very \* basic, if not crude. Using the \`eval\` function has many security \* implications, so use it with caution in real projects. \*/ class PHPTemplateRenderer implements TemplateRenderer { public function render(string $templateString, array $arguments = \[\]): string { extract($arguments); ob\_start(); eval(' ?>' . $templateString . 'title = $title; $this->content = $content; } // Here's how would you use the template further in real life. Note that the // page class does not depend on any concrete template classes. public function render(TemplateFactory $factory): string { $pageTemplate = $factory->createPageTemplate(); $renderer = $factory->getRenderer(); return $renderer->render($pageTemplate->getTemplateString(), \[\ 'title' => $this->title,\ 'content' => $this->content\ \]); } } /\*\* \* Now, in other parts of the app, the client code can accept factory objects of \* any type. \*/ $page = new Page('Sample page', 'This is the body.'); echo "Testing actual rendering with the PHPTemplate factory:\\n"; echo $page->render(new PHPTemplateFactory()); // Uncomment the following if you have Twig installed. // echo "Testing rendering with the Twig factory:\\n"; echo $page->render(new // TwigTemplateFactory()); #### **Output.txt:** Execution result Testing actual rendering with the PHPTemplate factory:

Sample page

This it the body.
**Abstract Factory** in Other Languages --------------------------------------- [![Abstract Factory in C#](https://refactoring.guru/images/patterns/icons/csharp.svg?id=da64592defc6e86d57c39c66e9de3e58)](https://refactoring.guru/design-patterns/abstract-factory/csharp/example "Abstract Factory in C#") [![Abstract Factory in C++](https://refactoring.guru/images/patterns/icons/cpp.svg?id=f7782ed8b8666246bfcc3f8fefc3b858)](https://refactoring.guru/design-patterns/abstract-factory/cpp/example "Abstract Factory in C++") [![Abstract Factory in Go](https://refactoring.guru/images/patterns/icons/go.svg?id=1a89927eb99b1ea3fde7701d97970aca)](https://refactoring.guru/design-patterns/abstract-factory/go/example "Abstract Factory in Go") [![Abstract Factory in Java](https://refactoring.guru/images/patterns/icons/java.svg?id=e6d87e2dca08c953fe3acd1275ed4f4e)](https://refactoring.guru/design-patterns/abstract-factory/java/example "Abstract Factory in Java") [![Abstract Factory in Python](https://refactoring.guru/images/patterns/icons/python.svg?id=6d815d43c0f7050a1151b43e51569c9f)](https://refactoring.guru/design-patterns/abstract-factory/python/example "Abstract Factory in Python") [![Abstract Factory in Ruby](https://refactoring.guru/images/patterns/icons/ruby.svg?id=b065b718c914bf8e960ef731600be1eb)](https://refactoring.guru/design-patterns/abstract-factory/ruby/example "Abstract Factory in Ruby") [![Abstract Factory in Rust](https://refactoring.guru/images/patterns/icons/rust.svg?id=1f5698a4b5ae23fe79413511747e4a87)](https://refactoring.guru/design-patterns/abstract-factory/rust/example "Abstract Factory in Rust") [![Abstract Factory in Swift](https://refactoring.guru/images/patterns/icons/swift.svg?id=0b716c2d52ec3a48fbe91ac031070c1d)](https://refactoring.guru/design-patterns/abstract-factory/swift/example "Abstract Factory in Swift") [![Abstract Factory in TypeScript](https://refactoring.guru/images/patterns/icons/typescript.svg?id=2239d0f16cb703540c205dd8cb0c0cb7)](https://refactoring.guru/design-patterns/abstract-factory/typescript/example "Abstract Factory in TypeScript") --- # Abstract Factory in Python / Design Patterns [There are patterns of patterns now! \ My friend's project: MetaPatterns.io](https://metapatterns.io/)  [](https://refactoring.guru/design-patterns/abstract-factory/python/example#checkout) [](https://refactoring.guru/design-patterns/abstract-factory/python/example#checkout) [](https://refactoring.guru/) / [Design Patterns](https://refactoring.guru/design-patterns) / [Abstract Factory](https://refactoring.guru/design-patterns/abstract-factory) / [Python](https://refactoring.guru/design-patterns/python) ![Abstract Factory](https://refactoring.guru/images/patterns/cards/abstract-factory-mini-2x.png?id=22236aaa65ff52cbde1c713216d52c1f) **Abstract Factory** in Python ============================== **Abstract Factory** is a creational design pattern, which solves the problem of creating entire product families without specifying their concrete classes. Abstract Factory defines an interface for creating all distinct products but leaves the actual product creation to concrete factory classes. Each factory type corresponds to a certain product variety. The client code calls the creation methods of a factory object instead of creating products directly with a constructor call (`new` operator). Since a factory corresponds to a single product variant, all its products will be compatible. Client code works with factories and products only through their abstract interfaces. This lets the client code work with any product variants, created by the factory object. You just create a new concrete factory class and pass it to the client code. > If you can’t figure out the difference between various factory patterns and concepts, then read our [Factory Comparison](https://refactoring.guru/design-patterns/factory-comparison) > . [Learn more about Abstract Factory](https://refactoring.guru/design-patterns/abstract-factory) Navigation  [Intro](https://refactoring.guru/design-patterns/abstract-factory/python/example#)  [Conceptual Example](https://refactoring.guru/design-patterns/abstract-factory/python/example#example-0)  [main](https://refactoring.guru/design-patterns/abstract-factory/python/example#example-0--main-py)  [Output](https://refactoring.guru/design-patterns/abstract-factory/python/example#example-0--Output-txt) **Complexity:** **Popularity:** **Usage examples:** The Abstract Factory pattern is pretty common in Python code. Many frameworks and libraries use it to provide a way to extend and customize their standard components. **Identification:** The pattern is easy to recognize by methods, which return a factory object. Then, the factory is used for creating specific sub-components. Conceptual Example ------------------ This example illustrates the structure of the **Abstract Factory** design pattern. It focuses on answering these questions: * What classes does it consist of? * What roles do these classes play? * In what way the elements of the pattern are related? #### **main.py:** Conceptual example from \_\_future\_\_ import annotations from abc import ABC, abstractmethod class AbstractFactory(ABC): """ The Abstract Factory interface declares a set of methods that return different abstract products. These products are called a family and are related by a high-level theme or concept. Products of one family are usually able to collaborate among themselves. A family of products may have several variants, but the products of one variant are incompatible with products of another. """ @abstractmethod def create\_product\_a(self) -> AbstractProductA: pass @abstractmethod def create\_product\_b(self) -> AbstractProductB: pass class ConcreteFactory1(AbstractFactory): """ Concrete Factories produce a family of products that belong to a single variant. The factory guarantees that resulting products are compatible. Note that signatures of the Concrete Factory's methods return an abstract product, while inside the method a concrete product is instantiated. """ def create\_product\_a(self) -> AbstractProductA: return ConcreteProductA1() def create\_product\_b(self) -> AbstractProductB: return ConcreteProductB1() class ConcreteFactory2(AbstractFactory): """ Each Concrete Factory has a corresponding product variant. """ def create\_product\_a(self) -> AbstractProductA: return ConcreteProductA2() def create\_product\_b(self) -> AbstractProductB: return ConcreteProductB2() class AbstractProductA(ABC): """ Each distinct product of a product family should have a base interface. All variants of the product must implement this interface. """ @abstractmethod def useful\_function\_a(self) -> str: pass """ Concrete Products are created by corresponding Concrete Factories. """ class ConcreteProductA1(AbstractProductA): def useful\_function\_a(self) -> str: return "The result of the product A1." class ConcreteProductA2(AbstractProductA): def useful\_function\_a(self) -> str: return "The result of the product A2." class AbstractProductB(ABC): """ Here's the the base interface of another product. All products can interact with each other, but proper interaction is possible only between products of the same concrete variant. """ @abstractmethod def useful\_function\_b(self) -> None: """ Product B is able to do its own thing... """ pass @abstractmethod def another\_useful\_function\_b(self, collaborator: AbstractProductA) -> None: """ ...but it also can collaborate with the ProductA. The Abstract Factory makes sure that all products it creates are of the same variant and thus, compatible. """ pass """ Concrete Products are created by corresponding Concrete Factories. """ class ConcreteProductB1(AbstractProductB): def useful\_function\_b(self) -> str: return "The result of the product B1." """ The variant, Product B1, is only able to work correctly with the variant, Product A1. Nevertheless, it accepts any instance of AbstractProductA as an argument. """ def another\_useful\_function\_b(self, collaborator: AbstractProductA) -> str: result = collaborator.useful\_function\_a() return f"The result of the B1 collaborating with the ({result})" class ConcreteProductB2(AbstractProductB): def useful\_function\_b(self) -> str: return "The result of the product B2." def another\_useful\_function\_b(self, collaborator: AbstractProductA): """ The variant, Product B2, is only able to work correctly with the variant, Product A2. Nevertheless, it accepts any instance of AbstractProductA as an argument. """ result = collaborator.useful\_function\_a() return f"The result of the B2 collaborating with the ({result})" def client\_code(factory: AbstractFactory) -> None: """ The client code works with factories and products only through abstract types: AbstractFactory and AbstractProduct. This lets you pass any factory or product subclass to the client code without breaking it. """ product\_a = factory.create\_product\_a() product\_b = factory.create\_product\_b() print(f"{product\_b.useful\_function\_b()}") print(f"{product\_b.another\_useful\_function\_b(product\_a)}", end="") if \_\_name\_\_ == "\_\_main\_\_": """ The client code can work with any concrete factory class. """ print("Client: Testing client code with the first factory type:") client\_code(ConcreteFactory1()) print("\\n") print("Client: Testing the same client code with the second factory type:") client\_code(ConcreteFactory2()) #### **Output.txt:** Execution result Client: Testing client code with the first factory type: The result of the product B1. The result of the B1 collaborating with the (The result of the product A1.) Client: Testing the same client code with the second factory type: The result of the product B2. The result of the B2 collaborating with the (The result of the product A2.) **Abstract Factory** in Other Languages --------------------------------------- [![Abstract Factory in C#](https://refactoring.guru/images/patterns/icons/csharp.svg?id=da64592defc6e86d57c39c66e9de3e58)](https://refactoring.guru/design-patterns/abstract-factory/csharp/example "Abstract Factory in C#") [![Abstract Factory in C++](https://refactoring.guru/images/patterns/icons/cpp.svg?id=f7782ed8b8666246bfcc3f8fefc3b858)](https://refactoring.guru/design-patterns/abstract-factory/cpp/example "Abstract Factory in C++") [![Abstract Factory in Go](https://refactoring.guru/images/patterns/icons/go.svg?id=1a89927eb99b1ea3fde7701d97970aca)](https://refactoring.guru/design-patterns/abstract-factory/go/example "Abstract Factory in Go") [![Abstract Factory in Java](https://refactoring.guru/images/patterns/icons/java.svg?id=e6d87e2dca08c953fe3acd1275ed4f4e)](https://refactoring.guru/design-patterns/abstract-factory/java/example "Abstract Factory in Java") [![Abstract Factory in PHP](https://refactoring.guru/images/patterns/icons/php.svg?id=be1906eb26b71ec1d3b93720d6156618)](https://refactoring.guru/design-patterns/abstract-factory/php/example "Abstract Factory in PHP") [![Abstract Factory in Ruby](https://refactoring.guru/images/patterns/icons/ruby.svg?id=b065b718c914bf8e960ef731600be1eb)](https://refactoring.guru/design-patterns/abstract-factory/ruby/example "Abstract Factory in Ruby") [![Abstract Factory in Rust](https://refactoring.guru/images/patterns/icons/rust.svg?id=1f5698a4b5ae23fe79413511747e4a87)](https://refactoring.guru/design-patterns/abstract-factory/rust/example "Abstract Factory in Rust") [![Abstract Factory in Swift](https://refactoring.guru/images/patterns/icons/swift.svg?id=0b716c2d52ec3a48fbe91ac031070c1d)](https://refactoring.guru/design-patterns/abstract-factory/swift/example "Abstract Factory in Swift") [![Abstract Factory in TypeScript](https://refactoring.guru/images/patterns/icons/typescript.svg?id=2239d0f16cb703540c205dd8cb0c0cb7)](https://refactoring.guru/design-patterns/abstract-factory/typescript/example "Abstract Factory in TypeScript") --- # Abstract Factory in Rust / Design Patterns [There are patterns of patterns now! \ My friend's project: MetaPatterns.io](https://metapatterns.io/)  [](https://refactoring.guru/design-patterns/abstract-factory/rust/example#checkout) [](https://refactoring.guru/design-patterns/abstract-factory/rust/example#checkout) [](https://refactoring.guru/) / [Design Patterns](https://refactoring.guru/design-patterns) / [Abstract Factory](https://refactoring.guru/design-patterns/abstract-factory) / [Rust](https://refactoring.guru/design-patterns/rust) ![Abstract Factory](https://refactoring.guru/images/patterns/cards/abstract-factory-mini-2x.png?id=22236aaa65ff52cbde1c713216d52c1f) **Abstract Factory** in Rust ============================ **Abstract Factory** is a creational design pattern, which solves the problem of creating entire product families without specifying their concrete classes. Abstract Factory defines an interface for creating all distinct products but leaves the actual product creation to concrete factory classes. Each factory type corresponds to a certain product variety. The client code calls the creation methods of a factory object instead of creating products directly with a constructor call (`new` operator). Since a factory corresponds to a single product variant, all its products will be compatible. Client code works with factories and products only through their abstract interfaces. This lets the client code work with any product variants, created by the factory object. You just create a new concrete factory class and pass it to the client code. > If you can’t figure out the difference between various factory patterns and concepts, then read our [Factory Comparison](https://refactoring.guru/design-patterns/factory-comparison) > . [Learn more about Abstract Factory](https://refactoring.guru/design-patterns/abstract-factory) Navigation  [Intro](https://refactoring.guru/design-patterns/abstract-factory/rust/example#)  [GUI Elements Factory](https://refactoring.guru/design-patterns/abstract-factory/rust/example#example-0)  gui   [lib](https://refactoring.guru/design-patterns/abstract-factory/rust/example#example-0--gui-lib-rs)  macos-gui   [lib](https://refactoring.guru/design-patterns/abstract-factory/rust/example#example-0--macos-gui-lib-rs)  windows-gui   [lib](https://refactoring.guru/design-patterns/abstract-factory/rust/example#example-0--windows-gui-lib-rs)  app   [main](https://refactoring.guru/design-patterns/abstract-factory/rust/example#example-0--app-main-rs)   [render](https://refactoring.guru/design-patterns/abstract-factory/rust/example#example-0--app-render-rs)  app-dyn   [main](https://refactoring.guru/design-patterns/abstract-factory/rust/example#example-0--app-dyn-main-rs)   [render](https://refactoring.guru/design-patterns/abstract-factory/rust/example#example-0--app-dyn-render-rs) GUI Elements Factory -------------------- This example illustrates how a GUI framework can organize its classes into independent libraries: 1. The `gui` library defines interfaces for all the components. It has no external dependencies. 2. The `windows-gui` library provides Windows implementation of the base GUI. Depends on `gui`. 3. The `macos-gui` library provides Mac OS implementation of the base GUI. Depends on `gui`. The `app` is a client application that can use several implementations of the GUI framework, depending on the current environment or configuration. However, most of the `app` code _doesn’t depend on specific types of GUI elements_. All the client code works with GUI elements through abstract interfaces (traits) defined by the `gui` lib. There are two approaches to implementing abstract factories in Rust: * using generics (_static dispatch_) * using dynamic allocation (_dynamic dispatch_) When you’re given a choice between static and dynamic dispatch, there is rarely a clear-cut correct answer. You’ll want to use static dispatch in your libraries and dynamic dispatch in your binaries. In a library, you want to allow your users to decide what kind of dispatch is best for them since you don’t know what their needs are. If you use dynamic dispatch, they’re forced to do the same, whereas if you use static dispatch, they can choose whether to use dynamic dispatch or not. ### **gui:** Abstract Factory and Abstract Products #### **gui/lib.rs** pub trait Button { fn press(&self); } pub trait Checkbox { fn switch(&self); } /// Abstract Factory defined using generics. pub trait GuiFactory { type B: Button; type C: Checkbox; fn create\_button(&self) -> Self::B; fn create\_checkbox(&self) -> Self::C; } /// Abstract Factory defined using Box pointer. pub trait GuiFactoryDynamic { fn create\_button(&self) -> Box; fn create\_checkbox(&self) -> Box; } ### **macos-gui:** One family of products #### **macos-gui/lib.rs** pub mod button; pub mod checkbox; pub mod factory; ### **windows-gui:** Another family of products #### **windows-gui/lib.rs** pub mod button; pub mod checkbox; pub mod factory; #### Static dispatch Here, the abstract factory is implemented via **generics** which lets the compiler create a code that does NOT require dynamic dispatch in runtime. ### **app:** Client code with static dispatch #### **app/main.rs** mod render; use render::render; use macos\_gui::factory::MacFactory; use windows\_gui::factory::WindowsFactory; fn main() { let windows = true; if windows { render(WindowsFactory); } else { render(MacFactory); } } #### **app/render.rs** //! The code demonstrates that it doesn't depend on a concrete //! factory implementation. use gui::GuiFactory; // Renders GUI. Factory object must be passed as a parameter to such the // generic function with factory invocation to utilize static dispatch. pub fn render(factory: impl GuiFactory) { let button1 = factory.create\_button(); let button2 = factory.create\_button(); let checkbox1 = factory.create\_checkbox(); let checkbox2 = factory.create\_checkbox(); use gui::{Button, Checkbox}; button1.press(); button2.press(); checkbox1.switch(); checkbox2.switch(); } #### Dynamic dispatch If a concrete type of abstract factory is not known at the compilation time, then is should be implemented using `Box` pointers. ### **app-dyn:** Client code with dynamic dispatch #### **app-dyn/main.rs** mod render; use render::render; use gui::GuiFactoryDynamic; use macos\_gui::factory::MacFactory; use windows\_gui::factory::WindowsFactory; fn main() { let windows = false; // Allocate a factory object in runtime depending on unpredictable input. let factory: &dyn GuiFactoryDynamic = if windows { &WindowsFactory } else { &MacFactory }; // Factory invocation can be inlined right here. let button = factory.create\_button(); button.press(); // Factory object can be passed to a function as a parameter. render(factory); } #### **app-dyn/render.rs** //! The code demonstrates that it doesn't depend on a concrete //! factory implementation. use gui::GuiFactoryDynamic; /// Renders GUI. pub fn render(factory: &dyn GuiFactoryDynamic) { let button1 = factory.create\_button(); let button2 = factory.create\_button(); let checkbox1 = factory.create\_checkbox(); let checkbox2 = factory.create\_checkbox(); button1.press(); button2.press(); checkbox1.switch(); checkbox2.switch(); } ### Output Windows button has pressed Windows button has pressed Windows checkbox has switched Windows checkbox has switched **Abstract Factory** in Other Languages --------------------------------------- [![Abstract Factory in C#](https://refactoring.guru/images/patterns/icons/csharp.svg?id=da64592defc6e86d57c39c66e9de3e58)](https://refactoring.guru/design-patterns/abstract-factory/csharp/example "Abstract Factory in C#") [![Abstract Factory in C++](https://refactoring.guru/images/patterns/icons/cpp.svg?id=f7782ed8b8666246bfcc3f8fefc3b858)](https://refactoring.guru/design-patterns/abstract-factory/cpp/example "Abstract Factory in C++") [![Abstract Factory in Go](https://refactoring.guru/images/patterns/icons/go.svg?id=1a89927eb99b1ea3fde7701d97970aca)](https://refactoring.guru/design-patterns/abstract-factory/go/example "Abstract Factory in Go") [![Abstract Factory in Java](https://refactoring.guru/images/patterns/icons/java.svg?id=e6d87e2dca08c953fe3acd1275ed4f4e)](https://refactoring.guru/design-patterns/abstract-factory/java/example "Abstract Factory in Java") [![Abstract Factory in PHP](https://refactoring.guru/images/patterns/icons/php.svg?id=be1906eb26b71ec1d3b93720d6156618)](https://refactoring.guru/design-patterns/abstract-factory/php/example "Abstract Factory in PHP") [![Abstract Factory in Python](https://refactoring.guru/images/patterns/icons/python.svg?id=6d815d43c0f7050a1151b43e51569c9f)](https://refactoring.guru/design-patterns/abstract-factory/python/example "Abstract Factory in Python") [![Abstract Factory in Ruby](https://refactoring.guru/images/patterns/icons/ruby.svg?id=b065b718c914bf8e960ef731600be1eb)](https://refactoring.guru/design-patterns/abstract-factory/ruby/example "Abstract Factory in Ruby") [![Abstract Factory in Swift](https://refactoring.guru/images/patterns/icons/swift.svg?id=0b716c2d52ec3a48fbe91ac031070c1d)](https://refactoring.guru/design-patterns/abstract-factory/swift/example "Abstract Factory in Swift") [![Abstract Factory in TypeScript](https://refactoring.guru/images/patterns/icons/typescript.svg?id=2239d0f16cb703540c205dd8cb0c0cb7)](https://refactoring.guru/design-patterns/abstract-factory/typescript/example "Abstract Factory in TypeScript") --- # Abstract Factory in Java / Design Patterns [There are patterns of patterns now! \ My friend's project: MetaPatterns.io](https://metapatterns.io/)  [](https://refactoring.guru/design-patterns/abstract-factory/java/example#checkout) [](https://refactoring.guru/design-patterns/abstract-factory/java/example#checkout) [](https://refactoring.guru/) / [Design Patterns](https://refactoring.guru/design-patterns) / [Abstract Factory](https://refactoring.guru/design-patterns/abstract-factory) / [Java](https://refactoring.guru/design-patterns/java) ![Abstract Factory](https://refactoring.guru/images/patterns/cards/abstract-factory-mini-2x.png?id=22236aaa65ff52cbde1c713216d52c1f) **Abstract Factory** in Java ============================ **Abstract Factory** is a creational design pattern, which solves the problem of creating entire product families without specifying their concrete classes. Abstract Factory defines an interface for creating all distinct products but leaves the actual product creation to concrete factory classes. Each factory type corresponds to a certain product variety. The client code calls the creation methods of a factory object instead of creating products directly with a constructor call (`new` operator). Since a factory corresponds to a single product variant, all its products will be compatible. Client code works with factories and products only through their abstract interfaces. This lets the client code work with any product variants, created by the factory object. You just create a new concrete factory class and pass it to the client code. > If you can’t figure out the difference between various factory patterns and concepts, then read our [Factory Comparison](https://refactoring.guru/design-patterns/factory-comparison) > . [Learn more about Abstract Factory](https://refactoring.guru/design-patterns/abstract-factory) Navigation  [Intro](https://refactoring.guru/design-patterns/abstract-factory/java/example#)  [Families of cross-platform GUI components and their production](https://refactoring.guru/design-patterns/abstract-factory/java/example#example-0)  buttons   [Button](https://refactoring.guru/design-patterns/abstract-factory/java/example#example-0--buttons-Button-java)   [Mac­OSButton](https://refactoring.guru/design-patterns/abstract-factory/java/example#example-0--buttons-MacOSButton-java)   [Windows­Button](https://refactoring.guru/design-patterns/abstract-factory/java/example#example-0--buttons-WindowsButton-java)  checkboxes   [Checkbox](https://refactoring.guru/design-patterns/abstract-factory/java/example#example-0--checkboxes-Checkbox-java)   [Mac­OSCheckbox](https://refactoring.guru/design-patterns/abstract-factory/java/example#example-0--checkboxes-MacOSCheckbox-java)   [Windows­Checkbox](https://refactoring.guru/design-patterns/abstract-factory/java/example#example-0--checkboxes-WindowsCheckbox-java)  factories   [GUIFactory](https://refactoring.guru/design-patterns/abstract-factory/java/example#example-0--factories-GUIFactory-java)   [Mac­OSFactory](https://refactoring.guru/design-patterns/abstract-factory/java/example#example-0--factories-MacOSFactory-java)   [Windows­Factory](https://refactoring.guru/design-patterns/abstract-factory/java/example#example-0--factories-WindowsFactory-java)  app   [Application](https://refactoring.guru/design-patterns/abstract-factory/java/example#example-0--app-Application-java)  [Demo](https://refactoring.guru/design-patterns/abstract-factory/java/example#example-0--Demo-java)  [Output­Demo](https://refactoring.guru/design-patterns/abstract-factory/java/example#example-0--OutputDemo-txt) **Complexity:** **Popularity:** **Usage examples:** The Abstract Factory pattern is pretty common in Java code. Many frameworks and libraries use it to provide a way to extend and customize their standard components. Here are some examples from core Java libraries: * [`javax.xml.parsers.DocumentBuilderFactory#newInstance()`](http://docs.oracle.com/javase/8/docs/api/javax/xml/parsers/DocumentBuilderFactory.html#newInstance--) * [`javax.xml.transform.TransformerFactory#newInstance()`](http://docs.oracle.com/javase/8/docs/api/javax/xml/transform/TransformerFactory.html#newInstance--) * [`javax.xml.xpath.XPathFactory#newInstance()`](http://docs.oracle.com/javase/8/docs/api/javax/xml/xpath/XPathFactory.html#newInstance--) **Identification:** The pattern is easy to recognize by methods, which return a factory object. Then, the factory is used for creating specific sub-components. Families of cross-platform GUI components and their production -------------------------------------------------------------- In this example, buttons and checkboxes will act as products. They have two variants: macOS and Windows. The abstract factory defines an interface for creating buttons and checkboxes. There are two concrete factories, which return both products in a single variant. Client code works with factories and products using abstract interfaces. It makes the same client code working with many product variants, depending on the type of factory object. ### **buttons:** First product hierarchy #### **buttons/Button.java** package refactoring\_guru.abstract\_factory.example.buttons; /\*\* \* Abstract Factory assumes that you have several families of products, \* structured into separate class hierarchies (Button/Checkbox). All products of \* the same family have the common interface. \* \* This is the common interface for buttons family. \*/ public interface Button { void paint(); } #### **buttons/MacOSButton.java** package refactoring\_guru.abstract\_factory.example.buttons; /\*\* \* All products families have the same varieties (MacOS/Windows). \* \* This is a MacOS variant of a button. \*/ public class MacOSButton implements Button { @Override public void paint() { System.out.println("You have created MacOSButton."); } } #### **buttons/WindowsButton.java** package refactoring\_guru.abstract\_factory.example.buttons; /\*\* \* All products families have the same varieties (MacOS/Windows). \* \* This is another variant of a button. \*/ public class WindowsButton implements Button { @Override public void paint() { System.out.println("You have created WindowsButton."); } } ### **checkboxes:** Second product hierarchy #### **checkboxes/Checkbox.java** package refactoring\_guru.abstract\_factory.example.checkboxes; /\*\* \* Checkboxes is the second product family. It has the same variants as buttons. \*/ public interface Checkbox { void paint(); } #### **checkboxes/MacOSCheckbox.java** package refactoring\_guru.abstract\_factory.example.checkboxes; /\*\* \* All products families have the same varieties (MacOS/Windows). \* \* This is a variant of a checkbox. \*/ public class MacOSCheckbox implements Checkbox { @Override public void paint() { System.out.println("You have created MacOSCheckbox."); } } #### **checkboxes/WindowsCheckbox.java** package refactoring\_guru.abstract\_factory.example.checkboxes; /\*\* \* All products families have the same varieties (MacOS/Windows). \* \* This is another variant of a checkbox. \*/ public class WindowsCheckbox implements Checkbox { @Override public void paint() { System.out.println("You have created WindowsCheckbox."); } } ### **factories** #### **factories/GUIFactory.java:** Abstract factory package refactoring\_guru.abstract\_factory.example.factories; import refactoring\_guru.abstract\_factory.example.buttons.Button; import refactoring\_guru.abstract\_factory.example.checkboxes.Checkbox; /\*\* \* Abstract factory knows about all (abstract) product types. \*/ public interface GUIFactory { Button createButton(); Checkbox createCheckbox(); } #### **factories/MacOSFactory.java:** Concrete factory (macOS) package refactoring\_guru.abstract\_factory.example.factories; import refactoring\_guru.abstract\_factory.example.buttons.Button; import refactoring\_guru.abstract\_factory.example.buttons.MacOSButton; import refactoring\_guru.abstract\_factory.example.checkboxes.Checkbox; import refactoring\_guru.abstract\_factory.example.checkboxes.MacOSCheckbox; /\*\* \* Each concrete factory extends basic factory and responsible for creating \* products of a single variety. \*/ public class MacOSFactory implements GUIFactory { @Override public Button createButton() { return new MacOSButton(); } @Override public Checkbox createCheckbox() { return new MacOSCheckbox(); } } #### **factories/WindowsFactory.java:** Concrete factory (Windows) package refactoring\_guru.abstract\_factory.example.factories; import refactoring\_guru.abstract\_factory.example.buttons.Button; import refactoring\_guru.abstract\_factory.example.buttons.WindowsButton; import refactoring\_guru.abstract\_factory.example.checkboxes.Checkbox; import refactoring\_guru.abstract\_factory.example.checkboxes.WindowsCheckbox; /\*\* \* Each concrete factory extends basic factory and responsible for creating \* products of a single variety. \*/ public class WindowsFactory implements GUIFactory { @Override public Button createButton() { return new WindowsButton(); } @Override public Checkbox createCheckbox() { return new WindowsCheckbox(); } } ### **app** #### **app/Application.java:** Client code package refactoring\_guru.abstract\_factory.example.app; import refactoring\_guru.abstract\_factory.example.buttons.Button; import refactoring\_guru.abstract\_factory.example.checkboxes.Checkbox; import refactoring\_guru.abstract\_factory.example.factories.GUIFactory; /\*\* \* Factory users don't care which concrete factory they use since they work with \* factories and products through abstract interfaces. \*/ public class Application { private Button button; private Checkbox checkbox; public Application(GUIFactory factory) { button = factory.createButton(); checkbox = factory.createCheckbox(); } public void paint() { button.paint(); checkbox.paint(); } } #### **Demo.java:** App configuration package refactoring\_guru.abstract\_factory.example; import refactoring\_guru.abstract\_factory.example.app.Application; import refactoring\_guru.abstract\_factory.example.factories.GUIFactory; import refactoring\_guru.abstract\_factory.example.factories.MacOSFactory; import refactoring\_guru.abstract\_factory.example.factories.WindowsFactory; /\*\* \* Demo class. Everything comes together here. \*/ public class Demo { /\*\* \* Application picks the factory type and creates it in run time (usually at \* initialization stage), depending on the configuration or environment \* variables. \*/ private static Application configureApplication() { Application app; GUIFactory factory; String osName = System.getProperty("os.name").toLowerCase(); if (osName.contains("mac")) { factory = new MacOSFactory(); } else { factory = new WindowsFactory(); } app = new Application(factory); return app; } public static void main(String\[\] args) { Application app = configureApplication(); app.paint(); } } #### **OutputDemo.txt:** Execution result You create WindowsButton. You created WindowsCheckbox. **Abstract Factory** in Other Languages --------------------------------------- [![Abstract Factory in C#](https://refactoring.guru/images/patterns/icons/csharp.svg?id=da64592defc6e86d57c39c66e9de3e58)](https://refactoring.guru/design-patterns/abstract-factory/csharp/example "Abstract Factory in C#") [![Abstract Factory in C++](https://refactoring.guru/images/patterns/icons/cpp.svg?id=f7782ed8b8666246bfcc3f8fefc3b858)](https://refactoring.guru/design-patterns/abstract-factory/cpp/example "Abstract Factory in C++") [![Abstract Factory in Go](https://refactoring.guru/images/patterns/icons/go.svg?id=1a89927eb99b1ea3fde7701d97970aca)](https://refactoring.guru/design-patterns/abstract-factory/go/example "Abstract Factory in Go") [![Abstract Factory in PHP](https://refactoring.guru/images/patterns/icons/php.svg?id=be1906eb26b71ec1d3b93720d6156618)](https://refactoring.guru/design-patterns/abstract-factory/php/example "Abstract Factory in PHP") [![Abstract Factory in Python](https://refactoring.guru/images/patterns/icons/python.svg?id=6d815d43c0f7050a1151b43e51569c9f)](https://refactoring.guru/design-patterns/abstract-factory/python/example "Abstract Factory in Python") [![Abstract Factory in Ruby](https://refactoring.guru/images/patterns/icons/ruby.svg?id=b065b718c914bf8e960ef731600be1eb)](https://refactoring.guru/design-patterns/abstract-factory/ruby/example "Abstract Factory in Ruby") [![Abstract Factory in Rust](https://refactoring.guru/images/patterns/icons/rust.svg?id=1f5698a4b5ae23fe79413511747e4a87)](https://refactoring.guru/design-patterns/abstract-factory/rust/example "Abstract Factory in Rust") [![Abstract Factory in Swift](https://refactoring.guru/images/patterns/icons/swift.svg?id=0b716c2d52ec3a48fbe91ac031070c1d)](https://refactoring.guru/design-patterns/abstract-factory/swift/example "Abstract Factory in Swift") [![Abstract Factory in TypeScript](https://refactoring.guru/images/patterns/icons/typescript.svg?id=2239d0f16cb703540c205dd8cb0c0cb7)](https://refactoring.guru/design-patterns/abstract-factory/typescript/example "Abstract Factory in TypeScript") --- # Abstract Factory in TypeScript / Design Patterns [There are patterns of patterns now! \ My friend's project: MetaPatterns.io](https://metapatterns.io/)  [](https://refactoring.guru/design-patterns/abstract-factory/typescript/example#checkout) [](https://refactoring.guru/design-patterns/abstract-factory/typescript/example#checkout) [](https://refactoring.guru/) / [Design Patterns](https://refactoring.guru/design-patterns) / [Abstract Factory](https://refactoring.guru/design-patterns/abstract-factory) / [TypeScript](https://refactoring.guru/design-patterns/typescript) ![Abstract Factory](https://refactoring.guru/images/patterns/cards/abstract-factory-mini-2x.png?id=22236aaa65ff52cbde1c713216d52c1f) **Abstract Factory** in TypeScript ================================== **Abstract Factory** is a creational design pattern, which solves the problem of creating entire product families without specifying their concrete classes. Abstract Factory defines an interface for creating all distinct products but leaves the actual product creation to concrete factory classes. Each factory type corresponds to a certain product variety. The client code calls the creation methods of a factory object instead of creating products directly with a constructor call (`new` operator). Since a factory corresponds to a single product variant, all its products will be compatible. Client code works with factories and products only through their abstract interfaces. This lets the client code work with any product variants, created by the factory object. You just create a new concrete factory class and pass it to the client code. > If you can’t figure out the difference between various factory patterns and concepts, then read our [Factory Comparison](https://refactoring.guru/design-patterns/factory-comparison) > . [Learn more about Abstract Factory](https://refactoring.guru/design-patterns/abstract-factory) Navigation  [Intro](https://refactoring.guru/design-patterns/abstract-factory/typescript/example#)  [Conceptual Example](https://refactoring.guru/design-patterns/abstract-factory/typescript/example#example-0)  [index](https://refactoring.guru/design-patterns/abstract-factory/typescript/example#example-0--index-ts)  [Output](https://refactoring.guru/design-patterns/abstract-factory/typescript/example#example-0--Output-txt) **Complexity:** **Popularity:** **Usage examples:** The Abstract Factory pattern is pretty common in TypeScript code. Many frameworks and libraries use it to provide a way to extend and customize their standard components. **Identification:** The pattern is easy to recognize by methods, which return a factory object. Then, the factory is used for creating specific sub-components. Conceptual Example ------------------ This example illustrates the structure of the **Abstract Factory** design pattern. It focuses on answering these questions: * What classes does it consist of? * What roles do these classes play? * In what way the elements of the pattern are related? #### **index.ts:** Conceptual example /\*\* \* The Abstract Factory interface declares a set of methods that return \* different abstract products. These products are called a family and are \* related by a high-level theme or concept. Products of one family are usually \* able to collaborate among themselves. A family of products may have several \* variants, but the products of one variant are incompatible with products of \* another. \*/ interface AbstractFactory { createProductA(): AbstractProductA; createProductB(): AbstractProductB; } /\*\* \* Concrete Factories produce a family of products that belong to a single \* variant. The factory guarantees that resulting products are compatible. Note \* that signatures of the Concrete Factory's methods return an abstract product, \* while inside the method a concrete product is instantiated. \*/ class ConcreteFactory1 implements AbstractFactory { public createProductA(): AbstractProductA { return new ConcreteProductA1(); } public createProductB(): AbstractProductB { return new ConcreteProductB1(); } } /\*\* \* Each Concrete Factory has a corresponding product variant. \*/ class ConcreteFactory2 implements AbstractFactory { public createProductA(): AbstractProductA { return new ConcreteProductA2(); } public createProductB(): AbstractProductB { return new ConcreteProductB2(); } } /\*\* \* Each distinct product of a product family should have a base interface. All \* variants of the product must implement this interface. \*/ interface AbstractProductA { usefulFunctionA(): string; } /\*\* \* These Concrete Products are created by corresponding Concrete Factories. \*/ class ConcreteProductA1 implements AbstractProductA { public usefulFunctionA(): string { return 'The result of the product A1.'; } } class ConcreteProductA2 implements AbstractProductA { public usefulFunctionA(): string { return 'The result of the product A2.'; } } /\*\* \* Here's the the base interface of another product. All products can interact \* with each other, but proper interaction is possible only between products of \* the same concrete variant. \*/ interface AbstractProductB { /\*\* \* Product B is able to do its own thing... \*/ usefulFunctionB(): string; /\*\* \* ...but it also can collaborate with the ProductA. \* \* The Abstract Factory makes sure that all products it creates are of the \* same variant and thus, compatible. \*/ anotherUsefulFunctionB(collaborator: AbstractProductA): string; } /\*\* \* These Concrete Products are created by corresponding Concrete Factories. \*/ class ConcreteProductB1 implements AbstractProductB { public usefulFunctionB(): string { return 'The result of the product B1.'; } /\*\* \* The variant, Product B1, is only able to work correctly with the variant, \* Product A1. Nevertheless, it accepts any instance of AbstractProductA as \* an argument. \*/ public anotherUsefulFunctionB(collaborator: AbstractProductA): string { const result = collaborator.usefulFunctionA(); return \`The result of the B1 collaborating with the (${result})\`; } } class ConcreteProductB2 implements AbstractProductB { public usefulFunctionB(): string { return 'The result of the product B2.'; } /\*\* \* The variant, Product B2, is only able to work correctly with the variant, \* Product A2. Nevertheless, it accepts any instance of AbstractProductA as \* an argument. \*/ public anotherUsefulFunctionB(collaborator: AbstractProductA): string { const result = collaborator.usefulFunctionA(); return \`The result of the B2 collaborating with the (${result})\`; } } /\*\* \* The client code works with factories and products only through abstract \* types: AbstractFactory and AbstractProduct. This lets you pass any factory or \* product subclass to the client code without breaking it. \*/ function clientCode(factory: AbstractFactory) { const productA = factory.createProductA(); const productB = factory.createProductB(); console.log(productB.usefulFunctionB()); console.log(productB.anotherUsefulFunctionB(productA)); } /\*\* \* The client code can work with any concrete factory class. \*/ console.log('Client: Testing client code with the first factory type...'); clientCode(new ConcreteFactory1()); console.log(''); console.log('Client: Testing the same client code with the second factory type...'); clientCode(new ConcreteFactory2()); #### **Output.txt:** Execution result Client: Testing client code with the first factory type... The result of the product B1. The result of the B1 collaborating with the (The result of the product A1.) Client: Testing the same client code with the second factory type... The result of the product B2. The result of the B2 collaborating with the (The result of the product A2.) **Abstract Factory** in Other Languages --------------------------------------- [![Abstract Factory in C#](https://refactoring.guru/images/patterns/icons/csharp.svg?id=da64592defc6e86d57c39c66e9de3e58)](https://refactoring.guru/design-patterns/abstract-factory/csharp/example "Abstract Factory in C#") [![Abstract Factory in C++](https://refactoring.guru/images/patterns/icons/cpp.svg?id=f7782ed8b8666246bfcc3f8fefc3b858)](https://refactoring.guru/design-patterns/abstract-factory/cpp/example "Abstract Factory in C++") [![Abstract Factory in Go](https://refactoring.guru/images/patterns/icons/go.svg?id=1a89927eb99b1ea3fde7701d97970aca)](https://refactoring.guru/design-patterns/abstract-factory/go/example "Abstract Factory in Go") [![Abstract Factory in Java](https://refactoring.guru/images/patterns/icons/java.svg?id=e6d87e2dca08c953fe3acd1275ed4f4e)](https://refactoring.guru/design-patterns/abstract-factory/java/example "Abstract Factory in Java") [![Abstract Factory in PHP](https://refactoring.guru/images/patterns/icons/php.svg?id=be1906eb26b71ec1d3b93720d6156618)](https://refactoring.guru/design-patterns/abstract-factory/php/example "Abstract Factory in PHP") [![Abstract Factory in Python](https://refactoring.guru/images/patterns/icons/python.svg?id=6d815d43c0f7050a1151b43e51569c9f)](https://refactoring.guru/design-patterns/abstract-factory/python/example "Abstract Factory in Python") [![Abstract Factory in Ruby](https://refactoring.guru/images/patterns/icons/ruby.svg?id=b065b718c914bf8e960ef731600be1eb)](https://refactoring.guru/design-patterns/abstract-factory/ruby/example "Abstract Factory in Ruby") [![Abstract Factory in Rust](https://refactoring.guru/images/patterns/icons/rust.svg?id=1f5698a4b5ae23fe79413511747e4a87)](https://refactoring.guru/design-patterns/abstract-factory/rust/example "Abstract Factory in Rust") [![Abstract Factory in Swift](https://refactoring.guru/images/patterns/icons/swift.svg?id=0b716c2d52ec3a48fbe91ac031070c1d)](https://refactoring.guru/design-patterns/abstract-factory/swift/example "Abstract Factory in Swift") --- # Adapter in C# / Design Patterns [There are patterns of patterns now! \ My friend's project: MetaPatterns.io](https://metapatterns.io/)  [](https://refactoring.guru/design-patterns/adapter/csharp/example#checkout) [](https://refactoring.guru/design-patterns/adapter/csharp/example#checkout) [](https://refactoring.guru/) / [Design Patterns](https://refactoring.guru/design-patterns) / [Adapter](https://refactoring.guru/design-patterns/adapter) / [C#](https://refactoring.guru/design-patterns/csharp) ![Adapter](https://refactoring.guru/images/patterns/cards/adapter-mini-2x.png?id=8274d99afbbe9c63bfbfd0d68ceeffc7) **Adapter** in C# ================= **Adapter** is a structural design pattern, which allows incompatible objects to collaborate. The Adapter acts as a wrapper between two objects. It catches calls for one object and transforms them to format and interface recognizable by the second object. [Learn more about Adapter](https://refactoring.guru/design-patterns/adapter) Navigation  [Intro](https://refactoring.guru/design-patterns/adapter/csharp/example#)  [Conceptual Example](https://refactoring.guru/design-patterns/adapter/csharp/example#example-0)  [Program](https://refactoring.guru/design-patterns/adapter/csharp/example#example-0--Program-cs)  [Output](https://refactoring.guru/design-patterns/adapter/csharp/example#example-0--Output-txt) **Complexity:** **Popularity:** **Usage examples:** The Adapter pattern is pretty common in C# code. It’s very often used in systems based on some legacy code. In such cases, Adapters make legacy code work with modern classes. **Identification:** Adapter is recognizable by a constructor which takes an instance of a different abstract/interface type. When the adapter receives a call to any of its methods, it translates parameters to the appropriate format and then directs the call to one or several methods of the wrapped object. Conceptual Example ------------------ This example illustrates the structure of the **Adapter** design pattern. It focuses on answering these questions: * What classes does it consist of? * What roles do these classes play? * In what way the elements of the pattern are related? #### **Program.cs:** Conceptual example using System; namespace RefactoringGuru.DesignPatterns.Adapter.Conceptual { // The Target defines the domain-specific interface used by the client code. public interface ITarget { string GetRequest(); } // The Adaptee contains some useful behavior, but its interface is // incompatible with the existing client code. The Adaptee needs some // adaptation before the client code can use it. class Adaptee { public string GetSpecificRequest() { return "Specific request."; } } // The Adapter makes the Adaptee's interface compatible with the Target's // interface. class Adapter : ITarget { private readonly Adaptee \_adaptee; public Adapter(Adaptee adaptee) { this.\_adaptee = adaptee; } public string GetRequest() { return $"This is '{this.\_adaptee.GetSpecificRequest()}'"; } } class Program { static void Main(string\[\] args) { Adaptee adaptee = new Adaptee(); ITarget target = new Adapter(adaptee); Console.WriteLine("Adaptee interface is incompatible with the client."); Console.WriteLine("But with adapter client can call it's method."); Console.WriteLine(target.GetRequest()); } } } #### **Output.txt:** Execution result Adaptee interface is incompatible with the client. But with adapter client can call it's method. This is 'Specific request.' **Adapter** in Other Languages ------------------------------ [![Adapter in C++](https://refactoring.guru/images/patterns/icons/cpp.svg?id=f7782ed8b8666246bfcc3f8fefc3b858)](https://refactoring.guru/design-patterns/adapter/cpp/example "Adapter in C++") [![Adapter in Go](https://refactoring.guru/images/patterns/icons/go.svg?id=1a89927eb99b1ea3fde7701d97970aca)](https://refactoring.guru/design-patterns/adapter/go/example "Adapter in Go") [![Adapter in Java](https://refactoring.guru/images/patterns/icons/java.svg?id=e6d87e2dca08c953fe3acd1275ed4f4e)](https://refactoring.guru/design-patterns/adapter/java/example "Adapter in Java") [![Adapter in PHP](https://refactoring.guru/images/patterns/icons/php.svg?id=be1906eb26b71ec1d3b93720d6156618)](https://refactoring.guru/design-patterns/adapter/php/example "Adapter in PHP") [![Adapter in Python](https://refactoring.guru/images/patterns/icons/python.svg?id=6d815d43c0f7050a1151b43e51569c9f)](https://refactoring.guru/design-patterns/adapter/python/example "Adapter in Python") [![Adapter in Ruby](https://refactoring.guru/images/patterns/icons/ruby.svg?id=b065b718c914bf8e960ef731600be1eb)](https://refactoring.guru/design-patterns/adapter/ruby/example "Adapter in Ruby") [![Adapter in Rust](https://refactoring.guru/images/patterns/icons/rust.svg?id=1f5698a4b5ae23fe79413511747e4a87)](https://refactoring.guru/design-patterns/adapter/rust/example "Adapter in Rust") [![Adapter in Swift](https://refactoring.guru/images/patterns/icons/swift.svg?id=0b716c2d52ec3a48fbe91ac031070c1d)](https://refactoring.guru/design-patterns/adapter/swift/example "Adapter in Swift") [![Adapter in TypeScript](https://refactoring.guru/images/patterns/icons/typescript.svg?id=2239d0f16cb703540c205dd8cb0c0cb7)](https://refactoring.guru/design-patterns/adapter/typescript/example "Adapter in TypeScript") --- # Adapter in Go / Design Patterns [There are patterns of patterns now! \ My friend's project: MetaPatterns.io](https://metapatterns.io/)  [](https://refactoring.guru/design-patterns/adapter/go/example#checkout) [](https://refactoring.guru/design-patterns/adapter/go/example#checkout) [](https://refactoring.guru/) / [Design Patterns](https://refactoring.guru/design-patterns) / [Adapter](https://refactoring.guru/design-patterns/adapter) / [Go](https://refactoring.guru/design-patterns/go) ![Adapter](https://refactoring.guru/images/patterns/cards/adapter-mini-2x.png?id=8274d99afbbe9c63bfbfd0d68ceeffc7) **Adapter** in Go ================= **Adapter** is a structural design pattern, which allows incompatible objects to collaborate. The Adapter acts as a wrapper between two objects. It catches calls for one object and transforms them to format and interface recognizable by the second object. [Learn more about Adapter](https://refactoring.guru/design-patterns/adapter) Navigation  [Intro](https://refactoring.guru/design-patterns/adapter/go/example#)  [Conceptual Example](https://refactoring.guru/design-patterns/adapter/go/example#example-0)  [client](https://refactoring.guru/design-patterns/adapter/go/example#example-0--client-go)  [computer](https://refactoring.guru/design-patterns/adapter/go/example#example-0--computer-go)  [mac](https://refactoring.guru/design-patterns/adapter/go/example#example-0--mac-go)  [windows](https://refactoring.guru/design-patterns/adapter/go/example#example-0--windows-go)  [windows­Adapter](https://refactoring.guru/design-patterns/adapter/go/example#example-0--windowsAdapter-go)  [main](https://refactoring.guru/design-patterns/adapter/go/example#example-0--main-go)  [output](https://refactoring.guru/design-patterns/adapter/go/example#example-0--output-txt) Conceptual Example ------------------ We have a client code that expects some features of an object (Lightning port), but we have another object called _adaptee_ (Windows laptop) which offers the same functionality but through a different interface (USB port) This is where the Adapter pattern comes into the picture. We create a struct type known as _adapter_ that will: * Adhere to the same interface which the client expects (Lightning port). * Translate the request from the client to the adaptee in the form that the adaptee expects. The adapter accepts a Lightning connector and then translates its signals into a USB format and passes them to the USB port in windows laptop. #### **client.go:** Client code package main import "fmt" type Client struct { } func (c \*Client) InsertLightningConnectorIntoComputer(com Computer) { fmt.Println("Client inserts Lightning connector into computer.") com.InsertIntoLightningPort() } #### **computer.go:** Client interface package main type Computer interface { InsertIntoLightningPort() } #### **mac.go:** Service package main import "fmt" type Mac struct { } func (m \*Mac) InsertIntoLightningPort() { fmt.Println("Lightning connector is plugged into mac machine.") } #### **windows.go:** Unknown service package main import "fmt" type Windows struct{} func (w \*Windows) insertIntoUSBPort() { fmt.Println("USB connector is plugged into windows machine.") } #### **windowsAdapter.go:** Adapter package main import "fmt" type WindowsAdapter struct { windowMachine \*Windows } func (w \*WindowsAdapter) InsertIntoLightningPort() { fmt.Println("Adapter converts Lightning signal to USB.") w.windowMachine.insertIntoUSBPort() } #### **main.go** package main func main() { client := &Client{} mac := &Mac{} client.InsertLightningConnectorIntoComputer(mac) windowsMachine := &Windows{} windowsMachineAdapter := &WindowsAdapter{ windowMachine: windowsMachine, } client.InsertLightningConnectorIntoComputer(windowsMachineAdapter) } #### **output.txt:** Execution result Client inserts Lightning connector into computer. Lightning connector is plugged into mac machine. Client inserts Lightning connector into computer. Adapter converts Lightning signal to USB. USB connector is plugged into windows machine. **Adapter** in Other Languages ------------------------------ [![Adapter in C#](https://refactoring.guru/images/patterns/icons/csharp.svg?id=da64592defc6e86d57c39c66e9de3e58)](https://refactoring.guru/design-patterns/adapter/csharp/example "Adapter in C#") [![Adapter in C++](https://refactoring.guru/images/patterns/icons/cpp.svg?id=f7782ed8b8666246bfcc3f8fefc3b858)](https://refactoring.guru/design-patterns/adapter/cpp/example "Adapter in C++") [![Adapter in Java](https://refactoring.guru/images/patterns/icons/java.svg?id=e6d87e2dca08c953fe3acd1275ed4f4e)](https://refactoring.guru/design-patterns/adapter/java/example "Adapter in Java") [![Adapter in PHP](https://refactoring.guru/images/patterns/icons/php.svg?id=be1906eb26b71ec1d3b93720d6156618)](https://refactoring.guru/design-patterns/adapter/php/example "Adapter in PHP") [![Adapter in Python](https://refactoring.guru/images/patterns/icons/python.svg?id=6d815d43c0f7050a1151b43e51569c9f)](https://refactoring.guru/design-patterns/adapter/python/example "Adapter in Python") [![Adapter in Ruby](https://refactoring.guru/images/patterns/icons/ruby.svg?id=b065b718c914bf8e960ef731600be1eb)](https://refactoring.guru/design-patterns/adapter/ruby/example "Adapter in Ruby") [![Adapter in Rust](https://refactoring.guru/images/patterns/icons/rust.svg?id=1f5698a4b5ae23fe79413511747e4a87)](https://refactoring.guru/design-patterns/adapter/rust/example "Adapter in Rust") [![Adapter in Swift](https://refactoring.guru/images/patterns/icons/swift.svg?id=0b716c2d52ec3a48fbe91ac031070c1d)](https://refactoring.guru/design-patterns/adapter/swift/example "Adapter in Swift") [![Adapter in TypeScript](https://refactoring.guru/images/patterns/icons/typescript.svg?id=2239d0f16cb703540c205dd8cb0c0cb7)](https://refactoring.guru/design-patterns/adapter/typescript/example "Adapter in TypeScript") --- # Abstract Factory in Swift / Design Patterns [There are patterns of patterns now! \ My friend's project: MetaPatterns.io](https://metapatterns.io/)  [](https://refactoring.guru/design-patterns/abstract-factory/swift/example#checkout) [](https://refactoring.guru/design-patterns/abstract-factory/swift/example#checkout) [](https://refactoring.guru/) / [Design Patterns](https://refactoring.guru/design-patterns) / [Abstract Factory](https://refactoring.guru/design-patterns/abstract-factory) / [Swift](https://refactoring.guru/design-patterns/swift) ![Abstract Factory](https://refactoring.guru/images/patterns/cards/abstract-factory-mini-2x.png?id=22236aaa65ff52cbde1c713216d52c1f) **Abstract Factory** in Swift ============================= **Abstract Factory** is a creational design pattern, which solves the problem of creating entire product families without specifying their concrete classes. Abstract Factory defines an interface for creating all distinct products but leaves the actual product creation to concrete factory classes. Each factory type corresponds to a certain product variety. The client code calls the creation methods of a factory object instead of creating products directly with a constructor call (`new` operator). Since a factory corresponds to a single product variant, all its products will be compatible. Client code works with factories and products only through their abstract interfaces. This lets the client code work with any product variants, created by the factory object. You just create a new concrete factory class and pass it to the client code. > If you can’t figure out the difference between various factory patterns and concepts, then read our [Factory Comparison](https://refactoring.guru/design-patterns/factory-comparison) > . [Learn more about Abstract Factory](https://refactoring.guru/design-patterns/abstract-factory) Navigation  [Intro](https://refactoring.guru/design-patterns/abstract-factory/swift/example#)  [Conceptual Example](https://refactoring.guru/design-patterns/abstract-factory/swift/example#example-0)  [Example](https://refactoring.guru/design-patterns/abstract-factory/swift/example#example-0--Example-swift)  [Output](https://refactoring.guru/design-patterns/abstract-factory/swift/example#example-0--Output-txt)  [Real World Example](https://refactoring.guru/design-patterns/abstract-factory/swift/example#example-1)  [Example](https://refactoring.guru/design-patterns/abstract-factory/swift/example#example-1--Example-swift)  [Output](https://refactoring.guru/design-patterns/abstract-factory/swift/example#example-1--Output-txt) **Complexity:** **Popularity:** **Usage examples:** The Abstract Factory pattern is pretty common in Swift code. Many frameworks and libraries use it to provide a way to extend and customize their standard components. **Identification:** The pattern is easy to recognize by methods, which return a factory object. Then, the factory is used for creating specific sub-components. The following examples are available on [Swift Playgrounds](https://www.alemohamad.com/playgrounds) . Kudos to [Alejandro Mohamad](https://www.alemohamad.com/) for creating the Playground version. Conceptual Example ------------------ This example illustrates the structure of the **Abstract Factory** design pattern. It focuses on answering these questions: * What classes does it consist of? * What roles do these classes play? * In what way the elements of the pattern are related? After learning about the pattern’s structure it’ll be easier for you to grasp the following example, based on a real-world Swift use case. #### **Example.swift:** Conceptual example import XCTest /// The Abstract Factory protocol declares a set of methods that return /// different abstract products. These products are called a family and are /// related by a high-level theme or concept. Products of one family are usually /// able to collaborate among themselves. A family of products may have several /// variants, but the products of one variant are incompatible with products of /// another. protocol AbstractFactory { func createProductA() -> AbstractProductA func createProductB() -> AbstractProductB } /// Concrete Factories produce a family of products that belong to a single /// variant. The factory guarantees that resulting products are compatible. Note /// that signatures of the Concrete Factory's methods return an abstract /// product, while inside the method a concrete product is instantiated. class ConcreteFactory1: AbstractFactory { func createProductA() -> AbstractProductA { return ConcreteProductA1() } func createProductB() -> AbstractProductB { return ConcreteProductB1() } } /// Each Concrete Factory has a corresponding product variant. class ConcreteFactory2: AbstractFactory { func createProductA() -> AbstractProductA { return ConcreteProductA2() } func createProductB() -> AbstractProductB { return ConcreteProductB2() } } /// Each distinct product of a product family should have a base protocol. All /// variants of the product must implement this protocol. protocol AbstractProductA { func usefulFunctionA() -> String } /// Concrete Products are created by corresponding Concrete Factories. class ConcreteProductA1: AbstractProductA { func usefulFunctionA() -> String { return "The result of the product A1." } } class ConcreteProductA2: AbstractProductA { func usefulFunctionA() -> String { return "The result of the product A2." } } /// The base protocol of another product. All products can interact with each /// other, but proper interaction is possible only between products of the same /// concrete variant. protocol AbstractProductB { /// Product B is able to do its own thing... func usefulFunctionB() -> String /// ...but it also can collaborate with the ProductA. /// /// The Abstract Factory makes sure that all products it creates are of the /// same variant and thus, compatible. func anotherUsefulFunctionB(collaborator: AbstractProductA) -> String } /// Concrete Products are created by corresponding Concrete Factories. class ConcreteProductB1: AbstractProductB { func usefulFunctionB() -> String { return "The result of the product B1." } /// This variant, Product B1, is only able to work correctly with the /// variant, Product A1. Nevertheless, it accepts any instance of /// AbstractProductA as an argument. func anotherUsefulFunctionB(collaborator: AbstractProductA) -> String { let result = collaborator.usefulFunctionA() return "The result of the B1 collaborating with the (\\(result))" } } class ConcreteProductB2: AbstractProductB { func usefulFunctionB() -> String { return "The result of the product B2." } /// This variant, Product B2, is only able to work correctly with the /// variant, Product A2. Nevertheless, it accepts any instance of /// AbstractProductA as an argument. func anotherUsefulFunctionB(collaborator: AbstractProductA) -> String { let result = collaborator.usefulFunctionA() return "The result of the B2 collaborating with the (\\(result))" } } /// The client code works with factories and products only through abstract /// types: AbstractFactory and AbstractProduct. This lets you pass any factory /// or product subclass to the client code without breaking it. class Client { // ... static func someClientCode(factory: AbstractFactory) { let productA = factory.createProductA() let productB = factory.createProductB() print(productB.usefulFunctionB()) print(productB.anotherUsefulFunctionB(collaborator: productA)) } // ... } /// Let's see how it all works together. class AbstractFactoryConceptual: XCTestCase { func testAbstractFactoryConceptual() { /// The client code can work with any concrete factory class. print("Client: Testing client code with the first factory type:") Client.someClientCode(factory: ConcreteFactory1()) print("Client: Testing the same client code with the second factory type:") Client.someClientCode(factory: ConcreteFactory2()) } } #### **Output.txt:** Execution result Client: Testing client code with the first factory type: The result of the product B1. The result of the B1 collaborating with the (The result of the product A1.) Client: Testing the same client code with the second factory type: The result of the product B2. The result of the B2 collaborating with the (The result of the product A2.) Real World Example ------------------ #### **Example.swift:** Real world example import Foundation import UIKit import XCTest enum AuthType { case login case signUp } protocol AuthViewFactory { static func authView(for type: AuthType) -> AuthView static func authController(for type: AuthType) -> AuthViewController } class StudentAuthViewFactory: AuthViewFactory { static func authView(for type: AuthType) -> AuthView { print("Student View has been created") switch type { case .login: return StudentLoginView() case .signUp: return StudentSignUpView() } } static func authController(for type: AuthType) -> AuthViewController { let controller = StudentAuthViewController(contentView: authView(for: type)) print("Student View Controller has been created") return controller } } class TeacherAuthViewFactory: AuthViewFactory { static func authView(for type: AuthType) -> AuthView { print("Teacher View has been created") switch type { case .login: return TeacherLoginView() case .signUp: return TeacherSignUpView() } } static func authController(for type: AuthType) -> AuthViewController { let controller = TeacherAuthViewController(contentView: authView(for: type)) print("Teacher View Controller has been created") return controller } } protocol AuthView { typealias AuthAction = (AuthType) -> () var contentView: UIView { get } var authHandler: AuthAction? { get set } var description: String { get } } class StudentSignUpView: UIView, AuthView { private class StudentSignUpContentView: UIView { /// This view contains a number of features available only during a /// STUDENT authorization. } var contentView: UIView = StudentSignUpContentView() /// The handler will be connected for actions of buttons of this view. var authHandler: AuthView.AuthAction? override var description: String { return "Student-SignUp-View" } } class StudentLoginView: UIView, AuthView { private let emailField = UITextField() private let passwordField = UITextField() private let signUpButton = UIButton() var contentView: UIView { return self } /// The handler will be connected for actions of buttons of this view. var authHandler: AuthView.AuthAction? override var description: String { return "Student-Login-View" } } class TeacherSignUpView: UIView, AuthView { class TeacherSignUpContentView: UIView { /// This view contains a number of features available only during a /// TEACHER authorization. } var contentView: UIView = TeacherSignUpContentView() /// The handler will be connected for actions of buttons of this view. var authHandler: AuthView.AuthAction? override var description: String { return "Teacher-SignUp-View" } } class TeacherLoginView: UIView, AuthView { private let emailField = UITextField() private let passwordField = UITextField() private let loginButton = UIButton() private let forgotPasswordButton = UIButton() var contentView: UIView { return self } /// The handler will be connected for actions of buttons of this view. var authHandler: AuthView.AuthAction? override var description: String { return "Teacher-Login-View" } } class AuthViewController: UIViewController { fileprivate var contentView: AuthView init(contentView: AuthView) { self.contentView = contentView super.init(nibName: nil, bundle: nil) } required convenience init?(coder aDecoder: NSCoder) { return nil } } class StudentAuthViewController: AuthViewController { /// Student-oriented features } class TeacherAuthViewController: AuthViewController { /// Teacher-oriented features } private class ClientCode { private var currentController: AuthViewController? private lazy var navigationController: UINavigationController = { guard let vc = currentController else { return UINavigationController() } return UINavigationController(rootViewController: vc) }() private let factoryType: AuthViewFactory.Type init(factoryType: AuthViewFactory.Type) { self.factoryType = factoryType } /// MARK: - Presentation func presentLogin() { let controller = factoryType.authController(for: .login) navigationController.pushViewController(controller, animated: true) } func presentSignUp() { let controller = factoryType.authController(for: .signUp) navigationController.pushViewController(controller, animated: true) } /// Other methods... } class AbstractFactoryRealWorld: XCTestCase { func testFactoryMethodRealWorld() { #if teacherMode let clientCode = ClientCode(factoryType: TeacherAuthViewFactory.self) #else let clientCode = ClientCode(factoryType: StudentAuthViewFactory.self) #endif /// Present LogIn flow clientCode.presentLogin() print("Login screen has been presented") /// Present SignUp flow clientCode.presentSignUp() print("Sign up screen has been presented") } } #### **Output.txt:** Execution result Teacher View has been created Teacher View Controller has been created Login screen has been presented Teacher View has been created Teacher View Controller has been created Sign up screen has been presented **Abstract Factory** in Other Languages --------------------------------------- [![Abstract Factory in C#](https://refactoring.guru/images/patterns/icons/csharp.svg?id=da64592defc6e86d57c39c66e9de3e58)](https://refactoring.guru/design-patterns/abstract-factory/csharp/example "Abstract Factory in C#") [![Abstract Factory in C++](https://refactoring.guru/images/patterns/icons/cpp.svg?id=f7782ed8b8666246bfcc3f8fefc3b858)](https://refactoring.guru/design-patterns/abstract-factory/cpp/example "Abstract Factory in C++") [![Abstract Factory in Go](https://refactoring.guru/images/patterns/icons/go.svg?id=1a89927eb99b1ea3fde7701d97970aca)](https://refactoring.guru/design-patterns/abstract-factory/go/example "Abstract Factory in Go") [![Abstract Factory in Java](https://refactoring.guru/images/patterns/icons/java.svg?id=e6d87e2dca08c953fe3acd1275ed4f4e)](https://refactoring.guru/design-patterns/abstract-factory/java/example "Abstract Factory in Java") [![Abstract Factory in PHP](https://refactoring.guru/images/patterns/icons/php.svg?id=be1906eb26b71ec1d3b93720d6156618)](https://refactoring.guru/design-patterns/abstract-factory/php/example "Abstract Factory in PHP") [![Abstract Factory in Python](https://refactoring.guru/images/patterns/icons/python.svg?id=6d815d43c0f7050a1151b43e51569c9f)](https://refactoring.guru/design-patterns/abstract-factory/python/example "Abstract Factory in Python") [![Abstract Factory in Ruby](https://refactoring.guru/images/patterns/icons/ruby.svg?id=b065b718c914bf8e960ef731600be1eb)](https://refactoring.guru/design-patterns/abstract-factory/ruby/example "Abstract Factory in Ruby") [![Abstract Factory in Rust](https://refactoring.guru/images/patterns/icons/rust.svg?id=1f5698a4b5ae23fe79413511747e4a87)](https://refactoring.guru/design-patterns/abstract-factory/rust/example "Abstract Factory in Rust") [![Abstract Factory in TypeScript](https://refactoring.guru/images/patterns/icons/typescript.svg?id=2239d0f16cb703540c205dd8cb0c0cb7)](https://refactoring.guru/design-patterns/abstract-factory/typescript/example "Abstract Factory in TypeScript") --- # Adapter in Ruby / Design Patterns [There are patterns of patterns now! \ My friend's project: MetaPatterns.io](https://metapatterns.io/)  [](https://refactoring.guru/design-patterns/adapter/ruby/example#checkout) [](https://refactoring.guru/design-patterns/adapter/ruby/example#checkout) [](https://refactoring.guru/) / [Design Patterns](https://refactoring.guru/design-patterns) / [Adapter](https://refactoring.guru/design-patterns/adapter) / [Ruby](https://refactoring.guru/design-patterns/ruby) ![Adapter](https://refactoring.guru/images/patterns/cards/adapter-mini-2x.png?id=8274d99afbbe9c63bfbfd0d68ceeffc7) **Adapter** in Ruby =================== **Adapter** is a structural design pattern, which allows incompatible objects to collaborate. The Adapter acts as a wrapper between two objects. It catches calls for one object and transforms them to format and interface recognizable by the second object. [Learn more about Adapter](https://refactoring.guru/design-patterns/adapter) Navigation  [Intro](https://refactoring.guru/design-patterns/adapter/ruby/example#)  [Conceptual Example](https://refactoring.guru/design-patterns/adapter/ruby/example#example-0)  [main](https://refactoring.guru/design-patterns/adapter/ruby/example#example-0--main-rb)  [output](https://refactoring.guru/design-patterns/adapter/ruby/example#example-0--output-txt) **Complexity:** **Popularity:** **Usage examples:** The Adapter pattern is pretty common in Ruby code. It’s very often used in systems based on some legacy code. In such cases, Adapters make legacy code work with modern classes. **Identification:** Adapter is recognizable by a constructor which takes an instance of a different abstract/interface type. When the adapter receives a call to any of its methods, it translates parameters to the appropriate format and then directs the call to one or several methods of the wrapped object. Conceptual Example ------------------ This example illustrates the structure of the **Adapter** design pattern. It focuses on answering these questions: * What classes does it consist of? * What roles do these classes play? * In what way the elements of the pattern are related? #### **main.rb:** Conceptual example \# The Target defines the domain-specific interface used by the client code. class Target # @return \[String\] def request 'Target: The default target\\'s behavior.' end end # The Adaptee contains some useful behavior, but its interface is incompatible # with the existing client code. The Adaptee needs some adaptation before the # client code can use it. class Adaptee # @return \[String\] def specific\_request '.eetpadA eht fo roivaheb laicepS' end end # The Adapter makes the Adaptee's interface compatible with the Target's # interface. class Adapter < Target # @param \[Adaptee\] adaptee def initialize(adaptee) @adaptee = adaptee end def request "Adapter: (TRANSLATED) #{@adaptee.specific\_request.reverse!}" end end # The client code supports all classes that follow the Target interface. def client\_code(target) print target.request end puts 'Client: I can work just fine with the Target objects:' target = Target.new client\_code(target) puts "\\n\\n" adaptee = Adaptee.new puts 'Client: The Adaptee class has a weird interface. See, I don\\'t understand it:' puts "Adaptee: #{adaptee.specific\_request}" puts "\\n" puts 'Client: But I can work with it via the Adapter:' adapter = Adapter.new(adaptee) client\_code(adapter) #### **output.txt:** Execution result Client: I can work just fine with the Target objects: Target: The default target's behavior. Client: The Adaptee class has a weird interface. See, I don't understand it: Adaptee: .eetpadA eht fo roivaheb laicepS Client: But I can work with it via the Adapter: Adapter: (TRANSLATED) Special behavior of the Adaptee. **Adapter** in Other Languages ------------------------------ [![Adapter in C#](https://refactoring.guru/images/patterns/icons/csharp.svg?id=da64592defc6e86d57c39c66e9de3e58)](https://refactoring.guru/design-patterns/adapter/csharp/example "Adapter in C#") [![Adapter in C++](https://refactoring.guru/images/patterns/icons/cpp.svg?id=f7782ed8b8666246bfcc3f8fefc3b858)](https://refactoring.guru/design-patterns/adapter/cpp/example "Adapter in C++") [![Adapter in Go](https://refactoring.guru/images/patterns/icons/go.svg?id=1a89927eb99b1ea3fde7701d97970aca)](https://refactoring.guru/design-patterns/adapter/go/example "Adapter in Go") [![Adapter in Java](https://refactoring.guru/images/patterns/icons/java.svg?id=e6d87e2dca08c953fe3acd1275ed4f4e)](https://refactoring.guru/design-patterns/adapter/java/example "Adapter in Java") [![Adapter in PHP](https://refactoring.guru/images/patterns/icons/php.svg?id=be1906eb26b71ec1d3b93720d6156618)](https://refactoring.guru/design-patterns/adapter/php/example "Adapter in PHP") [![Adapter in Python](https://refactoring.guru/images/patterns/icons/python.svg?id=6d815d43c0f7050a1151b43e51569c9f)](https://refactoring.guru/design-patterns/adapter/python/example "Adapter in Python") [![Adapter in Rust](https://refactoring.guru/images/patterns/icons/rust.svg?id=1f5698a4b5ae23fe79413511747e4a87)](https://refactoring.guru/design-patterns/adapter/rust/example "Adapter in Rust") [![Adapter in Swift](https://refactoring.guru/images/patterns/icons/swift.svg?id=0b716c2d52ec3a48fbe91ac031070c1d)](https://refactoring.guru/design-patterns/adapter/swift/example "Adapter in Swift") [![Adapter in TypeScript](https://refactoring.guru/images/patterns/icons/typescript.svg?id=2239d0f16cb703540c205dd8cb0c0cb7)](https://refactoring.guru/design-patterns/adapter/typescript/example "Adapter in TypeScript") --- # Adapter in Rust / Design Patterns [There are patterns of patterns now! \ My friend's project: MetaPatterns.io](https://metapatterns.io/)  [](https://refactoring.guru/design-patterns/adapter/rust/example#checkout) [](https://refactoring.guru/design-patterns/adapter/rust/example#checkout) [](https://refactoring.guru/) / [Design Patterns](https://refactoring.guru/design-patterns) / [Adapter](https://refactoring.guru/design-patterns/adapter) / [Rust](https://refactoring.guru/design-patterns/rust) ![Adapter](https://refactoring.guru/images/patterns/cards/adapter-mini-2x.png?id=8274d99afbbe9c63bfbfd0d68ceeffc7) **Adapter** in Rust =================== **Adapter** is a structural design pattern, which allows incompatible objects to collaborate. The Adapter acts as a wrapper between two objects. It catches calls for one object and transforms them to format and interface recognizable by the second object. [Learn more about Adapter](https://refactoring.guru/design-patterns/adapter) Navigation  [Intro](https://refactoring.guru/design-patterns/adapter/rust/example#)  [Adapter in Rust](https://refactoring.guru/design-patterns/adapter/rust/example#example-0)  [adapter](https://refactoring.guru/design-patterns/adapter/rust/example#example-0--adapter-rs)  [adaptee](https://refactoring.guru/design-patterns/adapter/rust/example#example-0--adaptee-rs)  [target](https://refactoring.guru/design-patterns/adapter/rust/example#example-0--target-rs)  [main](https://refactoring.guru/design-patterns/adapter/rust/example#example-0--main-rs) Adapter in Rust --------------- In this example, the `trait SpecificTarget` is incompatible with a `call` function which accepts `trait Target` only. fn call(target: impl Target); The adapter helps to pass the incompatible interface to the `call` function. let target = TargetAdapter::new(specific\_target); call(target); #### **adapter.rs** use crate::{adaptee::SpecificTarget, Target}; /// Converts adaptee's specific interface to a compatible \`Target\` output. pub struct TargetAdapter { adaptee: SpecificTarget, } impl TargetAdapter { pub fn new(adaptee: SpecificTarget) -> Self { Self { adaptee } } } impl Target for TargetAdapter { fn request(&self) -> String { // Here's the "adaptation" of a specific output to a compatible output. self.adaptee.specific\_request().chars().rev().collect() } } #### **adaptee.rs** pub struct SpecificTarget; impl SpecificTarget { pub fn specific\_request(&self) -> String { ".tseuqer cificepS".into() } } #### **target.rs** pub trait Target { fn request(&self) -> String; } pub struct OrdinaryTarget; impl Target for OrdinaryTarget { fn request(&self) -> String { "Ordinary request.".into() } } #### **main.rs** mod adaptee; mod adapter; mod target; use adaptee::SpecificTarget; use adapter::TargetAdapter; use target::{OrdinaryTarget, Target}; /// Calls any object of a \`Target\` trait. /// /// To understand the Adapter pattern better, imagine that this is /// a client code, which can operate over a specific interface only /// (\`Target\` trait only). It means that an incompatible interface cannot be /// passed here without an adapter. fn call(target: impl Target) { println!("'{}'", target.request()); } fn main() { let target = OrdinaryTarget; print!("A compatible target can be directly called: "); call(target); let adaptee = SpecificTarget; println!( "Adaptee is incompatible with client: '{}'", adaptee.specific\_request() ); let adapter = TargetAdapter::new(adaptee); print!("But with adapter client can call its method: "); call(adapter); } ### Output A compatible target can be directly called: 'Ordinary request.' Adaptee is incompatible with client: '.tseuqer cificepS' But with adapter client can call its method: 'Specific request.' **Adapter** in Other Languages ------------------------------ [![Adapter in C#](https://refactoring.guru/images/patterns/icons/csharp.svg?id=da64592defc6e86d57c39c66e9de3e58)](https://refactoring.guru/design-patterns/adapter/csharp/example "Adapter in C#") [![Adapter in C++](https://refactoring.guru/images/patterns/icons/cpp.svg?id=f7782ed8b8666246bfcc3f8fefc3b858)](https://refactoring.guru/design-patterns/adapter/cpp/example "Adapter in C++") [![Adapter in Go](https://refactoring.guru/images/patterns/icons/go.svg?id=1a89927eb99b1ea3fde7701d97970aca)](https://refactoring.guru/design-patterns/adapter/go/example "Adapter in Go") [![Adapter in Java](https://refactoring.guru/images/patterns/icons/java.svg?id=e6d87e2dca08c953fe3acd1275ed4f4e)](https://refactoring.guru/design-patterns/adapter/java/example "Adapter in Java") [![Adapter in PHP](https://refactoring.guru/images/patterns/icons/php.svg?id=be1906eb26b71ec1d3b93720d6156618)](https://refactoring.guru/design-patterns/adapter/php/example "Adapter in PHP") [![Adapter in Python](https://refactoring.guru/images/patterns/icons/python.svg?id=6d815d43c0f7050a1151b43e51569c9f)](https://refactoring.guru/design-patterns/adapter/python/example "Adapter in Python") [![Adapter in Ruby](https://refactoring.guru/images/patterns/icons/ruby.svg?id=b065b718c914bf8e960ef731600be1eb)](https://refactoring.guru/design-patterns/adapter/ruby/example "Adapter in Ruby") [![Adapter in Swift](https://refactoring.guru/images/patterns/icons/swift.svg?id=0b716c2d52ec3a48fbe91ac031070c1d)](https://refactoring.guru/design-patterns/adapter/swift/example "Adapter in Swift") [![Adapter in TypeScript](https://refactoring.guru/images/patterns/icons/typescript.svg?id=2239d0f16cb703540c205dd8cb0c0cb7)](https://refactoring.guru/design-patterns/adapter/typescript/example "Adapter in TypeScript") --- # Adapter in PHP / Design Patterns [There are patterns of patterns now! \ My friend's project: MetaPatterns.io](https://metapatterns.io/)  [](https://refactoring.guru/design-patterns/adapter/php/example#checkout) [](https://refactoring.guru/design-patterns/adapter/php/example#checkout) [](https://refactoring.guru/) / [Design Patterns](https://refactoring.guru/design-patterns) / [Adapter](https://refactoring.guru/design-patterns/adapter) / [PHP](https://refactoring.guru/design-patterns/php) ![Adapter](https://refactoring.guru/images/patterns/cards/adapter-mini-2x.png?id=8274d99afbbe9c63bfbfd0d68ceeffc7) **Adapter** in PHP ================== **Adapter** is a structural design pattern, which allows incompatible objects to collaborate. The Adapter acts as a wrapper between two objects. It catches calls for one object and transforms them to format and interface recognizable by the second object. [Learn more about Adapter](https://refactoring.guru/design-patterns/adapter) Navigation  [Intro](https://refactoring.guru/design-patterns/adapter/php/example#)  [Conceptual Example](https://refactoring.guru/design-patterns/adapter/php/example#example-0)  [index](https://refactoring.guru/design-patterns/adapter/php/example#example-0--index-php)  [Output](https://refactoring.guru/design-patterns/adapter/php/example#example-0--Output-txt)  [Real World Example](https://refactoring.guru/design-patterns/adapter/php/example#example-1)  [index](https://refactoring.guru/design-patterns/adapter/php/example#example-1--index-php)  [Output](https://refactoring.guru/design-patterns/adapter/php/example#example-1--Output-txt) **Complexity:** **Popularity:** **Usage examples:** The Adapter pattern is pretty common in PHP code. It’s very often used in systems based on some legacy code. In such cases, Adapters make legacy code work with modern classes. **Identification:** Adapter is recognizable by a constructor which takes an instance of a different abstract/interface type. When the adapter receives a call to any of its methods, it translates parameters to the appropriate format and then directs the call to one or several methods of the wrapped object. Conceptual Example ------------------ This example illustrates the structure of the **Adapter** design pattern and focuses on the following questions: * What classes does it consist of? * What roles do these classes play? * In what way the elements of the pattern are related? After learning about the pattern’s structure it’ll be easier for you to grasp the following example, based on a real-world PHP use case. #### **index.php:** Conceptual example adaptee = $adaptee; } public function request(): string { return "Adapter: (TRANSLATED) " . strrev($this->adaptee->specificRequest()); } } /\*\* \* The client code supports all classes that follow the Target interface. \*/ function clientCode(Target $target) { echo $target->request(); } echo "Client: I can work just fine with the Target objects:\\n"; $target = new Target(); clientCode($target); echo "\\n\\n"; $adaptee = new Adaptee(); echo "Client: The Adaptee class has a weird interface. See, I don't understand it:\\n"; echo "Adaptee: " . $adaptee->specificRequest(); echo "\\n\\n"; echo "Client: But I can work with it via the Adapter:\\n"; $adapter = new Adapter($adaptee); clientCode($adapter); #### **Output.txt:** Execution result Client: I can work just fine with the Target objects: Target: The default target's behavior. Client: The Adaptee class has a weird interface. See, I don't understand it: Adaptee: .eetpadA eht fo roivaheb laicepS Client: But I can work with it via the Adapter: Adapter: (TRANSLATED) Special behavior of the Adaptee. Real World Example ------------------ The **Adapter** pattern allows you to use 3rd-party or legacy classes even if they’re incompatible with the bulk of your code. For example, instead of rewriting the notification interface of your app to support each 3rd-party service such as Slack, Facebook, SMS or (you-name-it), you can create a set of special wrappers that adapt calls from your app to an interface and format required by each 3rd-party class. #### **index.php:** Real world example adminEmail = $adminEmail; } public function send(string $title, string $message): void { mail($this->adminEmail, $title, $message); echo "Sent email with title '$title' to '{$this->adminEmail}' that says '$message'."; } } /\*\* \* The Adaptee is some useful class, incompatible with the Target interface. You \* can't just go in and change the code of the class to follow the Target \* interface, since the code might be provided by a 3rd-party library. \*/ class SlackApi { private $login; private $apiKey; public function \_\_construct(string $login, string $apiKey) { $this->login = $login; $this->apiKey = $apiKey; } public function logIn(): void { // Send authentication request to Slack web service. echo "Logged in to a slack account '{$this->login}'.\\n"; } public function sendMessage(string $chatId, string $message): void { // Send message post request to Slack web service. echo "Posted following message into the '$chatId' chat: '$message'.\\n"; } } /\*\* \* The Adapter is a class that links the Target interface and the Adaptee class. \* In this case, it allows the application to send notifications using Slack \* API. \*/ class SlackNotification implements Notification { private $slack; private $chatId; public function \_\_construct(SlackApi $slack, string $chatId) { $this->slack = $slack; $this->chatId = $chatId; } /\*\* \* An Adapter is not only capable of adapting interfaces, but it can also \* convert incoming data to the format required by the Adaptee. \*/ public function send(string $title, string $message): void { $slackMessage = "#" . $title . "# " . strip\_tags($message); $this->slack->logIn(); $this->slack->sendMessage($this->chatId, $slackMessage); } } /\*\* \* The client code can work with any class that follows the Target interface. \*/ function clientCode(Notification $notification) { // ... echo $notification->send( "Website is down!", "Alert! " . "Our website is not responding. Call admins and bring it up!" ); // ... } echo "Client code is designed correctly and works with email notifications:\\n"; $notification = new EmailNotification("developers@example.com"); clientCode($notification); echo "\\n\\n"; echo "The same client code can work with other classes via adapter:\\n"; $slackApi = new SlackApi("example.com", "XXXXXXXX"); $notification = new SlackNotification($slackApi, "Example.com Developers"); clientCode($notification); #### **Output.txt:** Execution result Client code is designed correctly and works with email notifications: Sent email with title 'Website is down!' to 'developers@example.com' that says 'Alert! Our website is not responding. Call admins and bring it up!'. The same client code can work with other classes via adapter: Logged in to a slack account 'example.com'. Posted following message into the 'Example.com Developers' chat: '#Website is down!# Alert! Our website is not responding. Call admins and bring it up!'. **Adapter** in Other Languages ------------------------------ [![Adapter in C#](https://refactoring.guru/images/patterns/icons/csharp.svg?id=da64592defc6e86d57c39c66e9de3e58)](https://refactoring.guru/design-patterns/adapter/csharp/example "Adapter in C#") [![Adapter in C++](https://refactoring.guru/images/patterns/icons/cpp.svg?id=f7782ed8b8666246bfcc3f8fefc3b858)](https://refactoring.guru/design-patterns/adapter/cpp/example "Adapter in C++") [![Adapter in Go](https://refactoring.guru/images/patterns/icons/go.svg?id=1a89927eb99b1ea3fde7701d97970aca)](https://refactoring.guru/design-patterns/adapter/go/example "Adapter in Go") [![Adapter in Java](https://refactoring.guru/images/patterns/icons/java.svg?id=e6d87e2dca08c953fe3acd1275ed4f4e)](https://refactoring.guru/design-patterns/adapter/java/example "Adapter in Java") [![Adapter in Python](https://refactoring.guru/images/patterns/icons/python.svg?id=6d815d43c0f7050a1151b43e51569c9f)](https://refactoring.guru/design-patterns/adapter/python/example "Adapter in Python") [![Adapter in Ruby](https://refactoring.guru/images/patterns/icons/ruby.svg?id=b065b718c914bf8e960ef731600be1eb)](https://refactoring.guru/design-patterns/adapter/ruby/example "Adapter in Ruby") [![Adapter in Rust](https://refactoring.guru/images/patterns/icons/rust.svg?id=1f5698a4b5ae23fe79413511747e4a87)](https://refactoring.guru/design-patterns/adapter/rust/example "Adapter in Rust") [![Adapter in Swift](https://refactoring.guru/images/patterns/icons/swift.svg?id=0b716c2d52ec3a48fbe91ac031070c1d)](https://refactoring.guru/design-patterns/adapter/swift/example "Adapter in Swift") [![Adapter in TypeScript](https://refactoring.guru/images/patterns/icons/typescript.svg?id=2239d0f16cb703540c205dd8cb0c0cb7)](https://refactoring.guru/design-patterns/adapter/typescript/example "Adapter in TypeScript") --- # Adapter in Python / Design Patterns [There are patterns of patterns now! \ My friend's project: MetaPatterns.io](https://metapatterns.io/)  [](https://refactoring.guru/design-patterns/adapter/python/example#checkout) [](https://refactoring.guru/design-patterns/adapter/python/example#checkout) [](https://refactoring.guru/) / [Design Patterns](https://refactoring.guru/design-patterns) / [Adapter](https://refactoring.guru/design-patterns/adapter) / [Python](https://refactoring.guru/design-patterns/python) ![Adapter](https://refactoring.guru/images/patterns/cards/adapter-mini-2x.png?id=8274d99afbbe9c63bfbfd0d68ceeffc7) **Adapter** in Python ===================== **Adapter** is a structural design pattern, which allows incompatible objects to collaborate. The Adapter acts as a wrapper between two objects. It catches calls for one object and transforms them to format and interface recognizable by the second object. [Learn more about Adapter](https://refactoring.guru/design-patterns/adapter) Navigation  [Intro](https://refactoring.guru/design-patterns/adapter/python/example#)  [Conceptual Example (via inheritance)](https://refactoring.guru/design-patterns/adapter/python/example#example-0)  [main](https://refactoring.guru/design-patterns/adapter/python/example#example-0--main-py)  [Output](https://refactoring.guru/design-patterns/adapter/python/example#example-0--Output-txt)  [Conceptual Example (via object composition)](https://refactoring.guru/design-patterns/adapter/python/example#example-1)  [main](https://refactoring.guru/design-patterns/adapter/python/example#example-1--main-py)  [Output](https://refactoring.guru/design-patterns/adapter/python/example#example-1--Output-txt) **Complexity:** **Popularity:** **Usage examples:** The Adapter pattern is pretty common in Python code. It’s very often used in systems based on some legacy code. In such cases, Adapters make legacy code work with modern classes. **Identification:** Adapter is recognizable by a constructor which takes an instance of a different abstract/interface type. When the adapter receives a call to any of its methods, it translates parameters to the appropriate format and then directs the call to one or several methods of the wrapped object. Conceptual Example (via inheritance) ------------------------------------ This example illustrates the structure of the **Adapter** design pattern. It focuses on answering these questions: * What classes does it consist of? * What roles do these classes play? * In what way the elements of the pattern are related? #### **main.py:** Conceptual example class Target: """ The Target defines the domain-specific interface used by the client code. """ def request(self) -> str: return "Target: The default target's behavior." class Adaptee: """ The Adaptee contains some useful behavior, but its interface is incompatible with the existing client code. The Adaptee needs some adaptation before the client code can use it. """ def specific\_request(self) -> str: return ".eetpadA eht fo roivaheb laicepS" class Adapter(Target, Adaptee): """ The Adapter makes the Adaptee's interface compatible with the Target's interface via multiple inheritance. """ def request(self) -> str: return f"Adapter: (TRANSLATED) {self.specific\_request()\[::-1\]}" def client\_code(target: "Target") -> None: """ The client code supports all classes that follow the Target interface. """ print(target.request(), end="") if \_\_name\_\_ == "\_\_main\_\_": print("Client: I can work just fine with the Target objects:") target = Target() client\_code(target) print("\\n") adaptee = Adaptee() print("Client: The Adaptee class has a weird interface. " "See, I don't understand it:") print(f"Adaptee: {adaptee.specific\_request()}", end="\\n\\n") print("Client: But I can work with it via the Adapter:") adapter = Adapter() client\_code(adapter) #### **Output.txt:** Execution result Client: I can work just fine with the Target objects: Target: The default target's behavior. Client: The Adaptee class has a weird interface. See, I don't understand it: Adaptee: .eetpadA eht fo roivaheb laicepS Client: But I can work with it via the Adapter: Adapter: (TRANSLATED) Special behavior of the Adaptee. Conceptual Example (via object composition) ------------------------------------------- This example illustrates the structure of the **Adapter** design pattern. It focuses on answering these questions: * What classes does it consist of? * What roles do these classes play? * In what way the elements of the pattern are related? #### **main.py:** Conceptual example class Target: """ The Target defines the domain-specific interface used by the client code. """ def request(self) -> str: return "Target: The default target's behavior." class Adaptee: """ The Adaptee contains some useful behavior, but its interface is incompatible with the existing client code. The Adaptee needs some adaptation before the client code can use it. """ def specific\_request(self) -> str: return ".eetpadA eht fo roivaheb laicepS" class Adapter(Target): """ The Adapter makes the Adaptee's interface compatible with the Target's interface via composition. """ def \_\_init\_\_(self, adaptee: Adaptee) -> None: self.adaptee = adaptee def request(self) -> str: return f"Adapter: (TRANSLATED) {self.adaptee.specific\_request()\[::-1\]}" def client\_code(target: Target) -> None: """ The client code supports all classes that follow the Target interface. """ print(target.request(), end="") if \_\_name\_\_ == "\_\_main\_\_": print("Client: I can work just fine with the Target objects:") target = Target() client\_code(target) print("\\n") adaptee = Adaptee() print("Client: The Adaptee class has a weird interface. " "See, I don't understand it:") print(f"Adaptee: {adaptee.specific\_request()}", end="\\n\\n") print("Client: But I can work with it via the Adapter:") adapter = Adapter(adaptee) client\_code(adapter) #### **Output.txt:** Execution result Client: I can work just fine with the Target objects: Target: The default target's behavior. Client: The Adaptee class has a weird interface. See, I don't understand it: Adaptee: .eetpadA eht fo roivaheb laicepS Client: But I can work with it via the Adapter: Adapter: (TRANSLATED) Special behavior of the Adaptee. **Adapter** in Other Languages ------------------------------ [![Adapter in C#](https://refactoring.guru/images/patterns/icons/csharp.svg?id=da64592defc6e86d57c39c66e9de3e58)](https://refactoring.guru/design-patterns/adapter/csharp/example "Adapter in C#") [![Adapter in C++](https://refactoring.guru/images/patterns/icons/cpp.svg?id=f7782ed8b8666246bfcc3f8fefc3b858)](https://refactoring.guru/design-patterns/adapter/cpp/example "Adapter in C++") [![Adapter in Go](https://refactoring.guru/images/patterns/icons/go.svg?id=1a89927eb99b1ea3fde7701d97970aca)](https://refactoring.guru/design-patterns/adapter/go/example "Adapter in Go") [![Adapter in Java](https://refactoring.guru/images/patterns/icons/java.svg?id=e6d87e2dca08c953fe3acd1275ed4f4e)](https://refactoring.guru/design-patterns/adapter/java/example "Adapter in Java") [![Adapter in PHP](https://refactoring.guru/images/patterns/icons/php.svg?id=be1906eb26b71ec1d3b93720d6156618)](https://refactoring.guru/design-patterns/adapter/php/example "Adapter in PHP") [![Adapter in Ruby](https://refactoring.guru/images/patterns/icons/ruby.svg?id=b065b718c914bf8e960ef731600be1eb)](https://refactoring.guru/design-patterns/adapter/ruby/example "Adapter in Ruby") [![Adapter in Rust](https://refactoring.guru/images/patterns/icons/rust.svg?id=1f5698a4b5ae23fe79413511747e4a87)](https://refactoring.guru/design-patterns/adapter/rust/example "Adapter in Rust") [![Adapter in Swift](https://refactoring.guru/images/patterns/icons/swift.svg?id=0b716c2d52ec3a48fbe91ac031070c1d)](https://refactoring.guru/design-patterns/adapter/swift/example "Adapter in Swift") [![Adapter in TypeScript](https://refactoring.guru/images/patterns/icons/typescript.svg?id=2239d0f16cb703540c205dd8cb0c0cb7)](https://refactoring.guru/design-patterns/adapter/typescript/example "Adapter in TypeScript") --- # Adapter in C++ / Design Patterns [There are patterns of patterns now! \ My friend's project: MetaPatterns.io](https://metapatterns.io/)  [](https://refactoring.guru/design-patterns/adapter/cpp/example#checkout) [](https://refactoring.guru/design-patterns/adapter/cpp/example#checkout) [](https://refactoring.guru/) / [Design Patterns](https://refactoring.guru/design-patterns) / [Adapter](https://refactoring.guru/design-patterns/adapter) / [C++](https://refactoring.guru/design-patterns/cpp) ![Adapter](https://refactoring.guru/images/patterns/cards/adapter-mini-2x.png?id=8274d99afbbe9c63bfbfd0d68ceeffc7) **Adapter** in C++ ================== **Adapter** is a structural design pattern, which allows incompatible objects to collaborate. The Adapter acts as a wrapper between two objects. It catches calls for one object and transforms them to format and interface recognizable by the second object. [Learn more about Adapter](https://refactoring.guru/design-patterns/adapter) Navigation  [Intro](https://refactoring.guru/design-patterns/adapter/cpp/example#)  [Conceptual Example](https://refactoring.guru/design-patterns/adapter/cpp/example#example-0)  [main](https://refactoring.guru/design-patterns/adapter/cpp/example#example-0--main-cc)  [Output](https://refactoring.guru/design-patterns/adapter/cpp/example#example-0--Output-txt)  [Multiple Inheritance](https://refactoring.guru/design-patterns/adapter/cpp/example#example-1)  [main](https://refactoring.guru/design-patterns/adapter/cpp/example#example-1--main-cc)  [Output](https://refactoring.guru/design-patterns/adapter/cpp/example#example-1--Output-txt) **Complexity:** **Popularity:** **Usage examples:** The Adapter pattern is pretty common in C++ code. It’s very often used in systems based on some legacy code. In such cases, Adapters make legacy code work with modern classes. **Identification:** Adapter is recognizable by a constructor which takes an instance of a different abstract/interface type. When the adapter receives a call to any of its methods, it translates parameters to the appropriate format and then directs the call to one or several methods of the wrapped object. Conceptual Example ------------------ This example illustrates the structure of the **Adapter** design pattern. It focuses on answering these questions: * What classes does it consist of? * What roles do these classes play? * In what way the elements of the pattern are related? #### **main.cc:** Conceptual example /\*\* \* The Target defines the domain-specific interface used by the client code. \*/ class Target { public: virtual ~Target() = default; virtual std::string Request() const { return "Target: The default target's behavior."; } }; /\*\* \* The Adaptee contains some useful behavior, but its interface is incompatible \* with the existing client code. The Adaptee needs some adaptation before the \* client code can use it. \*/ class Adaptee { public: std::string SpecificRequest() const { return ".eetpadA eht fo roivaheb laicepS"; } }; /\*\* \* The Adapter makes the Adaptee's interface compatible with the Target's \* interface. \*/ class Adapter : public Target { private: Adaptee \*adaptee\_; public: Adapter(Adaptee \*adaptee) : adaptee\_(adaptee) {} std::string Request() const override { std::string to\_reverse = this->adaptee\_->SpecificRequest(); std::reverse(to\_reverse.begin(), to\_reverse.end()); return "Adapter: (TRANSLATED) " + to\_reverse; } }; /\*\* \* The client code supports all classes that follow the Target interface. \*/ void ClientCode(const Target \*target) { std::cout << target->Request(); } int main() { std::cout << "Client: I can work just fine with the Target objects:\\n"; Target \*target = new Target; ClientCode(target); std::cout << "\\n\\n"; Adaptee \*adaptee = new Adaptee; std::cout << "Client: The Adaptee class has a weird interface. See, I don't understand it:\\n"; std::cout << "Adaptee: " << adaptee->SpecificRequest(); std::cout << "\\n\\n"; std::cout << "Client: But I can work with it via the Adapter:\\n"; Adapter \*adapter = new Adapter(adaptee); ClientCode(adapter); std::cout << "\\n"; delete target; delete adaptee; delete adapter; return 0; } #### **Output.txt:** Execution result Client: I can work just fine with the Target objects: Target: The default target's behavior. Client: The Adaptee class has a weird interface. See, I don't understand it: Adaptee: .eetpadA eht fo roivaheb laicepS Client: But I can work with it via the Adapter: Adapter: (TRANSLATED) Special behavior of the Adaptee. Multiple Inheritance -------------------- In C++ the **Adapter** pattern can be implemented using multiple inheritance. #### **main.cc:** Multiple Inheritance /\*\* \* The Target defines the domain-specific interface used by the client code. \*/ class Target { public: virtual ~Target() = default; virtual std::string Request() const { return "Target: The default target's behavior."; } }; /\*\* \* The Adaptee contains some useful behavior, but its interface is incompatible \* with the existing client code. The Adaptee needs some adaptation before the \* client code can use it. \*/ class Adaptee { public: std::string SpecificRequest() const { return ".eetpadA eht fo roivaheb laicepS"; } }; /\*\* \* The Adapter makes the Adaptee's interface compatible with the Target's \* interface using multiple inheritance. \*/ class Adapter : public Target, public Adaptee { public: Adapter() {} std::string Request() const override { std::string to\_reverse = SpecificRequest(); std::reverse(to\_reverse.begin(), to\_reverse.end()); return "Adapter: (TRANSLATED) " + to\_reverse; } }; /\*\* \* The client code supports all classes that follow the Target interface. \*/ void ClientCode(const Target \*target) { std::cout << target->Request(); } int main() { std::cout << "Client: I can work just fine with the Target objects:\\n"; Target \*target = new Target; ClientCode(target); std::cout << "\\n\\n"; Adaptee \*adaptee = new Adaptee; std::cout << "Client: The Adaptee class has a weird interface. See, I don't understand it:\\n"; std::cout << "Adaptee: " << adaptee->SpecificRequest(); std::cout << "\\n\\n"; std::cout << "Client: But I can work with it via the Adapter:\\n"; Adapter \*adapter = new Adapter; ClientCode(adapter); std::cout << "\\n"; delete target; delete adaptee; delete adapter; return 0; } #### **Output.txt:** Execution result Client: I can work just fine with the Target objects: Target: The default target's behavior. Client: The Adaptee class has a weird interface. See, I don't understand it: Adaptee: .eetpadA eht fo roivaheb laicepS Client: But I can work with it via the Adapter: Adapter: (TRANSLATED) Special behavior of the Adaptee. **Adapter** in Other Languages ------------------------------ [![Adapter in C#](https://refactoring.guru/images/patterns/icons/csharp.svg?id=da64592defc6e86d57c39c66e9de3e58)](https://refactoring.guru/design-patterns/adapter/csharp/example "Adapter in C#") [![Adapter in Go](https://refactoring.guru/images/patterns/icons/go.svg?id=1a89927eb99b1ea3fde7701d97970aca)](https://refactoring.guru/design-patterns/adapter/go/example "Adapter in Go") [![Adapter in Java](https://refactoring.guru/images/patterns/icons/java.svg?id=e6d87e2dca08c953fe3acd1275ed4f4e)](https://refactoring.guru/design-patterns/adapter/java/example "Adapter in Java") [![Adapter in PHP](https://refactoring.guru/images/patterns/icons/php.svg?id=be1906eb26b71ec1d3b93720d6156618)](https://refactoring.guru/design-patterns/adapter/php/example "Adapter in PHP") [![Adapter in Python](https://refactoring.guru/images/patterns/icons/python.svg?id=6d815d43c0f7050a1151b43e51569c9f)](https://refactoring.guru/design-patterns/adapter/python/example "Adapter in Python") [![Adapter in Ruby](https://refactoring.guru/images/patterns/icons/ruby.svg?id=b065b718c914bf8e960ef731600be1eb)](https://refactoring.guru/design-patterns/adapter/ruby/example "Adapter in Ruby") [![Adapter in Rust](https://refactoring.guru/images/patterns/icons/rust.svg?id=1f5698a4b5ae23fe79413511747e4a87)](https://refactoring.guru/design-patterns/adapter/rust/example "Adapter in Rust") [![Adapter in Swift](https://refactoring.guru/images/patterns/icons/swift.svg?id=0b716c2d52ec3a48fbe91ac031070c1d)](https://refactoring.guru/design-patterns/adapter/swift/example "Adapter in Swift") [![Adapter in TypeScript](https://refactoring.guru/images/patterns/icons/typescript.svg?id=2239d0f16cb703540c205dd8cb0c0cb7)](https://refactoring.guru/design-patterns/adapter/typescript/example "Adapter in TypeScript") --- # Adapter in TypeScript / Design Patterns [There are patterns of patterns now! \ My friend's project: MetaPatterns.io](https://metapatterns.io/)  [](https://refactoring.guru/design-patterns/adapter/typescript/example#checkout) [](https://refactoring.guru/design-patterns/adapter/typescript/example#checkout) [](https://refactoring.guru/) / [Design Patterns](https://refactoring.guru/design-patterns) / [Adapter](https://refactoring.guru/design-patterns/adapter) / [TypeScript](https://refactoring.guru/design-patterns/typescript) ![Adapter](https://refactoring.guru/images/patterns/cards/adapter-mini-2x.png?id=8274d99afbbe9c63bfbfd0d68ceeffc7) **Adapter** in TypeScript ========================= **Adapter** is a structural design pattern, which allows incompatible objects to collaborate. The Adapter acts as a wrapper between two objects. It catches calls for one object and transforms them to format and interface recognizable by the second object. [Learn more about Adapter](https://refactoring.guru/design-patterns/adapter) Navigation  [Intro](https://refactoring.guru/design-patterns/adapter/typescript/example#)  [Conceptual Example](https://refactoring.guru/design-patterns/adapter/typescript/example#example-0)  [index](https://refactoring.guru/design-patterns/adapter/typescript/example#example-0--index-ts)  [Output](https://refactoring.guru/design-patterns/adapter/typescript/example#example-0--Output-txt) **Complexity:** **Popularity:** **Usage examples:** The Adapter pattern is pretty common in TypeScript code. It’s very often used in systems based on some legacy code. In such cases, Adapters make legacy code work with modern classes. **Identification:** Adapter is recognizable by a constructor which takes an instance of a different abstract/interface type. When the adapter receives a call to any of its methods, it translates parameters to the appropriate format and then directs the call to one or several methods of the wrapped object. Conceptual Example ------------------ This example illustrates the structure of the **Adapter** design pattern and focuses on the following questions: * What classes does it consist of? * What roles do these classes play? * In what way the elements of the pattern are related? #### **index.ts:** Conceptual example /\*\* \* The Target defines the domain-specific interface used by the client code. \*/ class Target { public request(): string { return 'Target: The default target\\'s behavior.'; } } /\*\* \* The Adaptee contains some useful behavior, but its interface is incompatible \* with the existing client code. The Adaptee needs some adaptation before the \* client code can use it. \*/ class Adaptee { public specificRequest(): string { return '.eetpadA eht fo roivaheb laicepS'; } } /\*\* \* The Adapter makes the Adaptee's interface compatible with the Target's \* interface. \*/ class Adapter extends Target { private adaptee: Adaptee; constructor(adaptee: Adaptee) { super(); this.adaptee = adaptee; } public request(): string { const result = this.adaptee.specificRequest().split('').reverse().join(''); return \`Adapter: (TRANSLATED) ${result}\`; } } /\*\* \* The client code supports all classes that follow the Target interface. \*/ function clientCode(target: Target) { console.log(target.request()); } console.log('Client: I can work just fine with the Target objects:'); const target = new Target(); clientCode(target); console.log(''); const adaptee = new Adaptee(); console.log('Client: The Adaptee class has a weird interface. See, I don\\'t understand it:'); console.log(\`Adaptee: ${adaptee.specificRequest()}\`); console.log(''); console.log('Client: But I can work with it via the Adapter:'); const adapter = new Adapter(adaptee); clientCode(adapter); #### **Output.txt:** Execution result Client: I can work just fine with the Target objects: Target: The default target's behavior. Client: The Adaptee class has a weird interface. See, I don't understand it: Adaptee: .eetpadA eht fo roivaheb laicepS Client: But I can work with it via the Adapter: Adapter: (TRANSLATED) Special behavior of the Adaptee. **Adapter** in Other Languages ------------------------------ [![Adapter in C#](https://refactoring.guru/images/patterns/icons/csharp.svg?id=da64592defc6e86d57c39c66e9de3e58)](https://refactoring.guru/design-patterns/adapter/csharp/example "Adapter in C#") [![Adapter in C++](https://refactoring.guru/images/patterns/icons/cpp.svg?id=f7782ed8b8666246bfcc3f8fefc3b858)](https://refactoring.guru/design-patterns/adapter/cpp/example "Adapter in C++") [![Adapter in Go](https://refactoring.guru/images/patterns/icons/go.svg?id=1a89927eb99b1ea3fde7701d97970aca)](https://refactoring.guru/design-patterns/adapter/go/example "Adapter in Go") [![Adapter in Java](https://refactoring.guru/images/patterns/icons/java.svg?id=e6d87e2dca08c953fe3acd1275ed4f4e)](https://refactoring.guru/design-patterns/adapter/java/example "Adapter in Java") [![Adapter in PHP](https://refactoring.guru/images/patterns/icons/php.svg?id=be1906eb26b71ec1d3b93720d6156618)](https://refactoring.guru/design-patterns/adapter/php/example "Adapter in PHP") [![Adapter in Python](https://refactoring.guru/images/patterns/icons/python.svg?id=6d815d43c0f7050a1151b43e51569c9f)](https://refactoring.guru/design-patterns/adapter/python/example "Adapter in Python") [![Adapter in Ruby](https://refactoring.guru/images/patterns/icons/ruby.svg?id=b065b718c914bf8e960ef731600be1eb)](https://refactoring.guru/design-patterns/adapter/ruby/example "Adapter in Ruby") [![Adapter in Rust](https://refactoring.guru/images/patterns/icons/rust.svg?id=1f5698a4b5ae23fe79413511747e4a87)](https://refactoring.guru/design-patterns/adapter/rust/example "Adapter in Rust") [![Adapter in Swift](https://refactoring.guru/images/patterns/icons/swift.svg?id=0b716c2d52ec3a48fbe91ac031070c1d)](https://refactoring.guru/design-patterns/adapter/swift/example "Adapter in Swift") --- # Adapter in Swift / Design Patterns [There are patterns of patterns now! \ My friend's project: MetaPatterns.io](https://metapatterns.io/)  [](https://refactoring.guru/design-patterns/adapter/swift/example#checkout) [](https://refactoring.guru/design-patterns/adapter/swift/example#checkout) [](https://refactoring.guru/) / [Design Patterns](https://refactoring.guru/design-patterns) / [Adapter](https://refactoring.guru/design-patterns/adapter) / [Swift](https://refactoring.guru/design-patterns/swift) ![Adapter](https://refactoring.guru/images/patterns/cards/adapter-mini-2x.png?id=8274d99afbbe9c63bfbfd0d68ceeffc7) **Adapter** in Swift ==================== **Adapter** is a structural design pattern, which allows incompatible objects to collaborate. The Adapter acts as a wrapper between two objects. It catches calls for one object and transforms them to format and interface recognizable by the second object. [Learn more about Adapter](https://refactoring.guru/design-patterns/adapter) Navigation  [Intro](https://refactoring.guru/design-patterns/adapter/swift/example#)  [Conceptual Example](https://refactoring.guru/design-patterns/adapter/swift/example#example-0)  [Example](https://refactoring.guru/design-patterns/adapter/swift/example#example-0--Example-swift)  [Output](https://refactoring.guru/design-patterns/adapter/swift/example#example-0--Output-txt)  [Real World Example](https://refactoring.guru/design-patterns/adapter/swift/example#example-1)  [Example](https://refactoring.guru/design-patterns/adapter/swift/example#example-1--Example-swift)  [Output](https://refactoring.guru/design-patterns/adapter/swift/example#example-1--Output-txt) **Complexity:** **Popularity:** **Usage examples:** The Adapter pattern is pretty common in Swift code. It’s very often used in systems based on some legacy code. In such cases, Adapters make legacy code work with modern classes. **Identification:** Adapter is recognizable by a constructor which takes an instance of a different abstract/interface type. When adapter receives a call to any of its methods, it translates parameters to appropriate format and then directs the call to one or several methods of the wrapped object. The following examples are available on [Swift Playgrounds](https://www.alemohamad.com/playgrounds) . Kudos to [Alejandro Mohamad](https://www.alemohamad.com/) for creating the Playground version. Conceptual Example ------------------ This example illustrates the structure of the **Adapter** design pattern and focuses on the following questions: * What classes does it consist of? * What roles do these classes play? * In what way the elements of the pattern are related? After learning about the pattern’s structure it’ll be easier for you to grasp the following example, based on a real-world Swift use case. #### **Example.swift:** Conceptual example import XCTest /// The Target defines the domain-specific interface used by the client code. class Target { func request() -> String { return "Target: The default target's behavior." } } /// The Adaptee contains some useful behavior, but its interface is incompatible /// with the existing client code. The Adaptee needs some adaptation before the /// client code can use it. class Adaptee { public func specificRequest() -> String { return ".eetpadA eht fo roivaheb laicepS" } } /// The Adapter makes the Adaptee's interface compatible with the Target's /// interface. class Adapter: Target { private var adaptee: Adaptee init(\_ adaptee: Adaptee) { self.adaptee = adaptee } override func request() -> String { return "Adapter: (TRANSLATED) " + adaptee.specificRequest().reversed() } } /// The client code supports all classes that follow the Target interface. class Client { // ... static func someClientCode(target: Target) { print(target.request()) } // ... } /// Let's see how it all works together. class AdapterConceptual: XCTestCase { func testAdapterConceptual() { print("Client: I can work just fine with the Target objects:") Client.someClientCode(target: Target()) let adaptee = Adaptee() print("Client: The Adaptee class has a weird interface. See, I don't understand it:") print("Adaptee: " + adaptee.specificRequest()) print("Client: But I can work with it via the Adapter:") Client.someClientCode(target: Adapter(adaptee)) } } #### **Output.txt:** Execution result Client: I can work just fine with the Target objects: Target: The default target's behavior. Client: The Adaptee class has a weird interface. See, I don't understand it: Adaptee: .eetpadA eht fo roivaheb laicepS Client: But I can work with it via the Adapter: Adapter: (TRANSLATED) Special behavior of the Adaptee. Real World Example ------------------ #### **Example.swift:** Real world example import XCTest import UIKit /// Adapter Design Pattern /// /// Intent: Convert the interface of a class into the interface clients expect. /// Adapter lets classes work together that couldn't work otherwise because of /// incompatible interfaces. class AdapterRealWorld: XCTestCase { /// Example. Let's assume that our app perfectly works with Facebook /// authorization. However, users ask you to add sign in via Twitter. /// /// Unfortunately, Twitter SDK has a different authorization method. /// /// Firstly, you have to create the new protocol 'AuthService' and insert /// the authorization method of Facebook SDK. /// /// Secondly, write an extension for Twitter SDK and implement methods of /// AuthService protocol, just a simple redirect. /// /// Thirdly, write an extension for Facebook SDK. You should not write any /// code at this point as methods already implemented by Facebook SDK. /// /// It just tells a compiler that both SDKs have the same interface. func testAdapterRealWorld() { print("Starting an authorization via Facebook") startAuthorization(with: FacebookAuthSDK()) print("Starting an authorization via Twitter.") startAuthorization(with: TwitterAuthSDK()) } func startAuthorization(with service: AuthService) { /// The current top view controller of the app let topViewController = UIViewController() service.presentAuthFlow(from: topViewController) } } protocol AuthService { func presentAuthFlow(from viewController: UIViewController) } class FacebookAuthSDK { func presentAuthFlow(from viewController: UIViewController) { /// Call SDK methods and pass a view controller print("Facebook WebView has been shown.") } } class TwitterAuthSDK { func startAuthorization(with viewController: UIViewController) { /// Call SDK methods and pass a view controller print("Twitter WebView has been shown. Users will be happy :)") } } extension TwitterAuthSDK: AuthService { /// This is an adapter /// /// Yeah, we are able to not create another class and just extend an /// existing one func presentAuthFlow(from viewController: UIViewController) { print("The Adapter is called! Redirecting to the original method...") self.startAuthorization(with: viewController) } } extension FacebookAuthSDK: AuthService { /// This extension just tells a compiler that both SDKs have the same /// interface. } #### **Output.txt:** Execution result Starting an authorization via Facebook Facebook WebView has been shown /// Starting an authorization via Twitter The Adapter is called! Redirecting to the original method... Twitter WebView has been shown. Users will be happy :) **Adapter** in Other Languages ------------------------------ [![Adapter in C#](https://refactoring.guru/images/patterns/icons/csharp.svg?id=da64592defc6e86d57c39c66e9de3e58)](https://refactoring.guru/design-patterns/adapter/csharp/example "Adapter in C#") [![Adapter in C++](https://refactoring.guru/images/patterns/icons/cpp.svg?id=f7782ed8b8666246bfcc3f8fefc3b858)](https://refactoring.guru/design-patterns/adapter/cpp/example "Adapter in C++") [![Adapter in Go](https://refactoring.guru/images/patterns/icons/go.svg?id=1a89927eb99b1ea3fde7701d97970aca)](https://refactoring.guru/design-patterns/adapter/go/example "Adapter in Go") [![Adapter in Java](https://refactoring.guru/images/patterns/icons/java.svg?id=e6d87e2dca08c953fe3acd1275ed4f4e)](https://refactoring.guru/design-patterns/adapter/java/example "Adapter in Java") [![Adapter in PHP](https://refactoring.guru/images/patterns/icons/php.svg?id=be1906eb26b71ec1d3b93720d6156618)](https://refactoring.guru/design-patterns/adapter/php/example "Adapter in PHP") [![Adapter in Python](https://refactoring.guru/images/patterns/icons/python.svg?id=6d815d43c0f7050a1151b43e51569c9f)](https://refactoring.guru/design-patterns/adapter/python/example "Adapter in Python") [![Adapter in Ruby](https://refactoring.guru/images/patterns/icons/ruby.svg?id=b065b718c914bf8e960ef731600be1eb)](https://refactoring.guru/design-patterns/adapter/ruby/example "Adapter in Ruby") [![Adapter in Rust](https://refactoring.guru/images/patterns/icons/rust.svg?id=1f5698a4b5ae23fe79413511747e4a87)](https://refactoring.guru/design-patterns/adapter/rust/example "Adapter in Rust") [![Adapter in TypeScript](https://refactoring.guru/images/patterns/icons/typescript.svg?id=2239d0f16cb703540c205dd8cb0c0cb7)](https://refactoring.guru/design-patterns/adapter/typescript/example "Adapter in TypeScript") --- # Adapter in Java / Design Patterns [There are patterns of patterns now! \ My friend's project: MetaPatterns.io](https://metapatterns.io/)  [](https://refactoring.guru/design-patterns/adapter/java/example#checkout) [](https://refactoring.guru/design-patterns/adapter/java/example#checkout) [](https://refactoring.guru/) / [Design Patterns](https://refactoring.guru/design-patterns) / [Adapter](https://refactoring.guru/design-patterns/adapter) / [Java](https://refactoring.guru/design-patterns/java) ![Adapter](https://refactoring.guru/images/patterns/cards/adapter-mini-2x.png?id=8274d99afbbe9c63bfbfd0d68ceeffc7) **Adapter** in Java =================== **Adapter** is a structural design pattern, which allows incompatible objects to collaborate. The Adapter acts as a wrapper between two objects. It catches calls for one object and transforms them to format and interface recognizable by the second object. [Learn more about Adapter](https://refactoring.guru/design-patterns/adapter) Navigation  [Intro](https://refactoring.guru/design-patterns/adapter/java/example#)  [Fitting square pegs into round holes](https://refactoring.guru/design-patterns/adapter/java/example#example-0)  round   [Round­Hole](https://refactoring.guru/design-patterns/adapter/java/example#example-0--round-RoundHole-java)   [Round­Peg](https://refactoring.guru/design-patterns/adapter/java/example#example-0--round-RoundPeg-java)  square   [Square­Peg](https://refactoring.guru/design-patterns/adapter/java/example#example-0--square-SquarePeg-java)  adapters   [Square­Peg­Adapter](https://refactoring.guru/design-patterns/adapter/java/example#example-0--adapters-SquarePegAdapter-java)  [Demo](https://refactoring.guru/design-patterns/adapter/java/example#example-0--Demo-java)  [Output­Demo](https://refactoring.guru/design-patterns/adapter/java/example#example-0--OutputDemo-txt) **Complexity:** **Popularity:** **Usage examples:** The Adapter pattern is pretty common in Java code. It’s very often used in systems based on some legacy code. In such cases, Adapters make legacy code work with modern classes. There are some standard Adapters in Java core libraries: * [`java.util.Arrays#asList()`](https://docs.oracle.com/javase/8/docs/api/java/util/Arrays.html#asList-T...-) * [`java.util.Collections#list()`](https://docs.oracle.com/javase/8/docs/api/java/util/Collections.html#list-java.util.Enumeration-) * [`java.util.Collections#enumeration()`](https://docs.oracle.com/javase/8/docs/api/java/util/Collections.html#enumeration-java.util.Collection-) * [`java.io.InputStreamReader(InputStream)`](https://docs.oracle.com/javase/8/docs/api/java/io/InputStreamReader.html#InputStreamReader-java.io.InputStream-) (returns a `Reader` object) * [`java.io.OutputStreamWriter(OutputStream)`](https://docs.oracle.com/javase/8/docs/api/java/io/OutputStreamWriter.html#OutputStreamWriter-java.io.OutputStream-) (returns a `Writer` object) * [`javax.xml.bind.annotation.adapters.XmlAdapter#marshal()`](https://docs.oracle.com/javase/8/docs/api/javax/xml/bind/annotation/adapters/XmlAdapter.html#marshal-BoundType-) and `#unmarshal()` **Identification:** Adapter is recognizable by a constructor which takes an instance of a different abstract/interface type. When the adapter receives a call to any of its methods, it translates parameters to the appropriate format and then directs the call to one or several methods of the wrapped object. Fitting square pegs into round holes ------------------------------------ This simple example shows how an Adapter can make incompatible objects work together. ### **round** #### **round/RoundHole.java:** Round holes package refactoring\_guru.adapter.example.round; /\*\* \* RoundHoles are compatible with RoundPegs. \*/ public class RoundHole { private double radius; public RoundHole(double radius) { this.radius = radius; } public double getRadius() { return radius; } public boolean fits(RoundPeg peg) { boolean result; result = (this.getRadius() >= peg.getRadius()); return result; } } #### **round/RoundPeg.java:** Round pegs package refactoring\_guru.adapter.example.round; /\*\* \* RoundPegs are compatible with RoundHoles. \*/ public class RoundPeg { private double radius; public RoundPeg() {} public RoundPeg(double radius) { this.radius = radius; } public double getRadius() { return radius; } } ### **square** #### **square/SquarePeg.java:** Square pegs package refactoring\_guru.adapter.example.square; /\*\* \* SquarePegs are not compatible with RoundHoles (they were implemented by \* previous development team). But we have to integrate them into our program. \*/ public class SquarePeg { private double width; public SquarePeg(double width) { this.width = width; } public double getWidth() { return width; } public double getSquare() { double result; result = Math.pow(this.width, 2); return result; } } ### **adapters** #### **adapters/SquarePegAdapter.java:** Adapter of square pegs to round holes package refactoring\_guru.adapter.example.adapters; import refactoring\_guru.adapter.example.round.RoundPeg; import refactoring\_guru.adapter.example.square.SquarePeg; /\*\* \* Adapter allows fitting square pegs into round holes. \*/ public class SquarePegAdapter extends RoundPeg { private SquarePeg peg; public SquarePegAdapter(SquarePeg peg) { this.peg = peg; } @Override public double getRadius() { double result; // Calculate a minimum circle radius, which can fit this peg. result = (Math.sqrt(Math.pow((peg.getWidth() / 2), 2) \* 2)); return result; } } #### **Demo.java:** Client code package refactoring\_guru.adapter.example; import refactoring\_guru.adapter.example.adapters.SquarePegAdapter; import refactoring\_guru.adapter.example.round.RoundHole; import refactoring\_guru.adapter.example.round.RoundPeg; import refactoring\_guru.adapter.example.square.SquarePeg; /\*\* \* Somewhere in client code... \*/ public class Demo { public static void main(String\[\] args) { // Round fits round, no surprise. RoundHole hole = new RoundHole(5); RoundPeg rpeg = new RoundPeg(5); if (hole.fits(rpeg)) { System.out.println("Round peg r5 fits round hole r5."); } SquarePeg smallSqPeg = new SquarePeg(2); SquarePeg largeSqPeg = new SquarePeg(20); // hole.fits(smallSqPeg); // Won't compile. // Adapter solves the problem. SquarePegAdapter smallSqPegAdapter = new SquarePegAdapter(smallSqPeg); SquarePegAdapter largeSqPegAdapter = new SquarePegAdapter(largeSqPeg); if (hole.fits(smallSqPegAdapter)) { System.out.println("Square peg w2 fits round hole r5."); } if (!hole.fits(largeSqPegAdapter)) { System.out.println("Square peg w20 does not fit into round hole r5."); } } } #### **OutputDemo.txt:** Execution result Round peg r5 fits round hole r5. Square peg w2 fits round hole r5. Square peg w20 does not fit into round hole r5. **Adapter** in Other Languages ------------------------------ [![Adapter in C#](https://refactoring.guru/images/patterns/icons/csharp.svg?id=da64592defc6e86d57c39c66e9de3e58)](https://refactoring.guru/design-patterns/adapter/csharp/example "Adapter in C#") [![Adapter in C++](https://refactoring.guru/images/patterns/icons/cpp.svg?id=f7782ed8b8666246bfcc3f8fefc3b858)](https://refactoring.guru/design-patterns/adapter/cpp/example "Adapter in C++") [![Adapter in Go](https://refactoring.guru/images/patterns/icons/go.svg?id=1a89927eb99b1ea3fde7701d97970aca)](https://refactoring.guru/design-patterns/adapter/go/example "Adapter in Go") [![Adapter in PHP](https://refactoring.guru/images/patterns/icons/php.svg?id=be1906eb26b71ec1d3b93720d6156618)](https://refactoring.guru/design-patterns/adapter/php/example "Adapter in PHP") [![Adapter in Python](https://refactoring.guru/images/patterns/icons/python.svg?id=6d815d43c0f7050a1151b43e51569c9f)](https://refactoring.guru/design-patterns/adapter/python/example "Adapter in Python") [![Adapter in Ruby](https://refactoring.guru/images/patterns/icons/ruby.svg?id=b065b718c914bf8e960ef731600be1eb)](https://refactoring.guru/design-patterns/adapter/ruby/example "Adapter in Ruby") [![Adapter in Rust](https://refactoring.guru/images/patterns/icons/rust.svg?id=1f5698a4b5ae23fe79413511747e4a87)](https://refactoring.guru/design-patterns/adapter/rust/example "Adapter in Rust") [![Adapter in Swift](https://refactoring.guru/images/patterns/icons/swift.svg?id=0b716c2d52ec3a48fbe91ac031070c1d)](https://refactoring.guru/design-patterns/adapter/swift/example "Adapter in Swift") [![Adapter in TypeScript](https://refactoring.guru/images/patterns/icons/typescript.svg?id=2239d0f16cb703540c205dd8cb0c0cb7)](https://refactoring.guru/design-patterns/adapter/typescript/example "Adapter in TypeScript") --- # Bridge in C# / Design Patterns [There are patterns of patterns now! \ My friend's project: MetaPatterns.io](https://metapatterns.io/)  [](https://refactoring.guru/design-patterns/bridge/csharp/example#checkout) [](https://refactoring.guru/design-patterns/bridge/csharp/example#checkout) [](https://refactoring.guru/) / [Design Patterns](https://refactoring.guru/design-patterns) / [Bridge](https://refactoring.guru/design-patterns/bridge) / [C#](https://refactoring.guru/design-patterns/csharp) ![Bridge](https://refactoring.guru/images/patterns/cards/bridge-mini-2x.png?id=2622384cf623ed150ee9c21a0812dd87) **Bridge** in C# ================ **Bridge** is a structural design pattern that divides business logic or huge class into separate class hierarchies that can be developed independently. One of these hierarchies (often called the Abstraction) will get a reference to an object of the second hierarchy (Implementation). The abstraction will be able to delegate some (sometimes, most) of its calls to the implementations object. Since all implementations will have a common interface, they’d be interchangeable inside the abstraction. [Learn more about Bridge](https://refactoring.guru/design-patterns/bridge) Navigation  [Intro](https://refactoring.guru/design-patterns/bridge/csharp/example#)  [Conceptual Example](https://refactoring.guru/design-patterns/bridge/csharp/example#example-0)  [Program](https://refactoring.guru/design-patterns/bridge/csharp/example#example-0--Program-cs)  [Output](https://refactoring.guru/design-patterns/bridge/csharp/example#example-0--Output-txt) **Complexity:** **Popularity:** **Usage examples:** The Bridge pattern is especially useful when dealing with cross-platform apps, supporting multiple types of database servers or working with several API providers of a certain kind (for example, cloud platforms, social networks, etc.) **Identification:** Bridge can be recognized by a clear distinction between some controlling entity and several different platforms that it relies on. Conceptual Example ------------------ This example illustrates the structure of the **Bridge** design pattern. It focuses on answering these questions: * What classes does it consist of? * What roles do these classes play? * In what way the elements of the pattern are related? #### **Program.cs:** Conceptual example using System; namespace RefactoringGuru.DesignPatterns.Bridge.Conceptual { // The Abstraction defines the interface for the "control" part of the two // class hierarchies. It maintains a reference to an object of the // Implementation hierarchy and delegates all of the real work to this // object. class Abstraction { protected IImplementation \_implementation; public Abstraction(IImplementation implementation) { this.\_implementation = implementation; } public virtual string Operation() { return "Abstract: Base operation with:\\n" + \_implementation.OperationImplementation(); } } // You can extend the Abstraction without changing the Implementation // classes. class ExtendedAbstraction : Abstraction { public ExtendedAbstraction(IImplementation implementation) : base(implementation) { } public override string Operation() { return "ExtendedAbstraction: Extended operation with:\\n" + base.\_implementation.OperationImplementation(); } } // The Implementation defines the interface for all implementation classes. // It doesn't have to match the Abstraction's interface. In fact, the two // interfaces can be entirely different. Typically the Implementation // interface provides only primitive operations, while the Abstraction // defines higher- level operations based on those primitives. public interface IImplementation { string OperationImplementation(); } // Each Concrete Implementation corresponds to a specific platform and // implements the Implementation interface using that platform's API. class ConcreteImplementationA : IImplementation { public string OperationImplementation() { return "ConcreteImplementationA: The result in platform A.\\n"; } } class ConcreteImplementationB : IImplementation { public string OperationImplementation() { return "ConcreteImplementationB: The result in platform B.\\n"; } } class Client { // Except for the initialization phase, where an Abstraction object gets // linked with a specific Implementation object, the client code should // only depend on the Abstraction class. This way the client code can // support any abstraction-implementation combination. public void ClientCode(Abstraction abstraction) { Console.Write(abstraction.Operation()); } } class Program { static void Main(string\[\] args) { Client client = new Client(); Abstraction abstraction; // The client code should be able to work with any pre-configured // abstraction-implementation combination. abstraction = new Abstraction(new ConcreteImplementationA()); client.ClientCode(abstraction); Console.WriteLine(); abstraction = new ExtendedAbstraction(new ConcreteImplementationB()); client.ClientCode(abstraction); } } } #### **Output.txt:** Execution result Abstract: Base operation with: ConcreteImplementationA: The result in platform A. ExtendedAbstraction: Extended operation with: ConcreteImplementationA: The result in platform B. **Bridge** in Other Languages ----------------------------- [![Bridge in C++](https://refactoring.guru/images/patterns/icons/cpp.svg?id=f7782ed8b8666246bfcc3f8fefc3b858)](https://refactoring.guru/design-patterns/bridge/cpp/example "Bridge in C++") [![Bridge in Go](https://refactoring.guru/images/patterns/icons/go.svg?id=1a89927eb99b1ea3fde7701d97970aca)](https://refactoring.guru/design-patterns/bridge/go/example "Bridge in Go") [![Bridge in Java](https://refactoring.guru/images/patterns/icons/java.svg?id=e6d87e2dca08c953fe3acd1275ed4f4e)](https://refactoring.guru/design-patterns/bridge/java/example "Bridge in Java") [![Bridge in PHP](https://refactoring.guru/images/patterns/icons/php.svg?id=be1906eb26b71ec1d3b93720d6156618)](https://refactoring.guru/design-patterns/bridge/php/example "Bridge in PHP") [![Bridge in Python](https://refactoring.guru/images/patterns/icons/python.svg?id=6d815d43c0f7050a1151b43e51569c9f)](https://refactoring.guru/design-patterns/bridge/python/example "Bridge in Python") [![Bridge in Ruby](https://refactoring.guru/images/patterns/icons/ruby.svg?id=b065b718c914bf8e960ef731600be1eb)](https://refactoring.guru/design-patterns/bridge/ruby/example "Bridge in Ruby") [![Bridge in Rust](https://refactoring.guru/images/patterns/icons/rust.svg?id=1f5698a4b5ae23fe79413511747e4a87)](https://refactoring.guru/design-patterns/bridge/rust/example "Bridge in Rust") [![Bridge in Swift](https://refactoring.guru/images/patterns/icons/swift.svg?id=0b716c2d52ec3a48fbe91ac031070c1d)](https://refactoring.guru/design-patterns/bridge/swift/example "Bridge in Swift") [![Bridge in TypeScript](https://refactoring.guru/images/patterns/icons/typescript.svg?id=2239d0f16cb703540c205dd8cb0c0cb7)](https://refactoring.guru/design-patterns/bridge/typescript/example "Bridge in TypeScript") --- # Bridge in C++ / Design Patterns [There are patterns of patterns now! \ My friend's project: MetaPatterns.io](https://metapatterns.io/)  [](https://refactoring.guru/design-patterns/bridge/cpp/example#checkout) [](https://refactoring.guru/design-patterns/bridge/cpp/example#checkout) [](https://refactoring.guru/) / [Design Patterns](https://refactoring.guru/design-patterns) / [Bridge](https://refactoring.guru/design-patterns/bridge) / [C++](https://refactoring.guru/design-patterns/cpp) ![Bridge](https://refactoring.guru/images/patterns/cards/bridge-mini-2x.png?id=2622384cf623ed150ee9c21a0812dd87) **Bridge** in C++ ================= **Bridge** is a structural design pattern that divides business logic or huge class into separate class hierarchies that can be developed independently. One of these hierarchies (often called the Abstraction) will get a reference to an object of the second hierarchy (Implementation). The abstraction will be able to delegate some (sometimes, most) of its calls to the implementations object. Since all implementations will have a common interface, they’d be interchangeable inside the abstraction. [Learn more about Bridge](https://refactoring.guru/design-patterns/bridge) Navigation  [Intro](https://refactoring.guru/design-patterns/bridge/cpp/example#)  [Conceptual Example](https://refactoring.guru/design-patterns/bridge/cpp/example#example-0)  [main](https://refactoring.guru/design-patterns/bridge/cpp/example#example-0--main-cc)  [Output](https://refactoring.guru/design-patterns/bridge/cpp/example#example-0--Output-txt) **Complexity:** **Popularity:** **Usage examples:** The Bridge pattern is especially useful when dealing with cross-platform apps, supporting multiple types of database servers or working with several API providers of a certain kind (for example, cloud platforms, social networks, etc.) **Identification:** Bridge can be recognized by a clear distinction between some controlling entity and several different platforms that it relies on. Conceptual Example ------------------ This example illustrates the structure of the **Bridge** design pattern. It focuses on answering these questions: * What classes does it consist of? * What roles do these classes play? * In what way the elements of the pattern are related? #### **main.cc:** Conceptual example /\*\* \* The Implementation defines the interface for all implementation classes. It \* doesn't have to match the Abstraction's interface. In fact, the two \* interfaces can be entirely different. Typically the Implementation interface \* provides only primitive operations, while the Abstraction defines higher- \* level operations based on those primitives. \*/ class Implementation { public: virtual ~Implementation() {} virtual std::string OperationImplementation() const = 0; }; /\*\* \* Each Concrete Implementation corresponds to a specific platform and \* implements the Implementation interface using that platform's API. \*/ class ConcreteImplementationA : public Implementation { public: std::string OperationImplementation() const override { return "ConcreteImplementationA: Here's the result on the platform A.\\n"; } }; class ConcreteImplementationB : public Implementation { public: std::string OperationImplementation() const override { return "ConcreteImplementationB: Here's the result on the platform B.\\n"; } }; /\*\* \* The Abstraction defines the interface for the "control" part of the two class \* hierarchies. It maintains a reference to an object of the Implementation \* hierarchy and delegates all of the real work to this object. \*/ class Abstraction { /\*\* \* @var Implementation \*/ protected: Implementation\* implementation\_; public: Abstraction(Implementation\* implementation) : implementation\_(implementation) { } virtual ~Abstraction() { } virtual std::string Operation() const { return "Abstraction: Base operation with:\\n" + this->implementation\_->OperationImplementation(); } }; /\*\* \* You can extend the Abstraction without changing the Implementation classes. \*/ class ExtendedAbstraction : public Abstraction { public: ExtendedAbstraction(Implementation\* implementation) : Abstraction(implementation) { } std::string Operation() const override { return "ExtendedAbstraction: Extended operation with:\\n" + this->implementation\_->OperationImplementation(); } }; /\*\* \* Except for the initialization phase, where an Abstraction object gets linked \* with a specific Implementation object, the client code should only depend on \* the Abstraction class. This way the client code can support any abstraction- \* implementation combination. \*/ void ClientCode(const Abstraction& abstraction) { // ... std::cout << abstraction.Operation(); // ... } /\*\* \* The client code should be able to work with any pre-configured abstraction- \* implementation combination. \*/ int main() { Implementation\* implementation = new ConcreteImplementationA; Abstraction\* abstraction = new Abstraction(implementation); ClientCode(\*abstraction); std::cout << std::endl; delete implementation; delete abstraction; implementation = new ConcreteImplementationB; abstraction = new ExtendedAbstraction(implementation); ClientCode(\*abstraction); delete implementation; delete abstraction; return 0; } #### **Output.txt:** Execution result Abstraction: Base operation with: ConcreteImplementationA: Here's the result on the platform A. ExtendedAbstraction: Extended operation with: ConcreteImplementationB: Here's the result on the platform B. **Bridge** in Other Languages ----------------------------- [![Bridge in C#](https://refactoring.guru/images/patterns/icons/csharp.svg?id=da64592defc6e86d57c39c66e9de3e58)](https://refactoring.guru/design-patterns/bridge/csharp/example "Bridge in C#") [![Bridge in Go](https://refactoring.guru/images/patterns/icons/go.svg?id=1a89927eb99b1ea3fde7701d97970aca)](https://refactoring.guru/design-patterns/bridge/go/example "Bridge in Go") [![Bridge in Java](https://refactoring.guru/images/patterns/icons/java.svg?id=e6d87e2dca08c953fe3acd1275ed4f4e)](https://refactoring.guru/design-patterns/bridge/java/example "Bridge in Java") [![Bridge in PHP](https://refactoring.guru/images/patterns/icons/php.svg?id=be1906eb26b71ec1d3b93720d6156618)](https://refactoring.guru/design-patterns/bridge/php/example "Bridge in PHP") [![Bridge in Python](https://refactoring.guru/images/patterns/icons/python.svg?id=6d815d43c0f7050a1151b43e51569c9f)](https://refactoring.guru/design-patterns/bridge/python/example "Bridge in Python") [![Bridge in Ruby](https://refactoring.guru/images/patterns/icons/ruby.svg?id=b065b718c914bf8e960ef731600be1eb)](https://refactoring.guru/design-patterns/bridge/ruby/example "Bridge in Ruby") [![Bridge in Rust](https://refactoring.guru/images/patterns/icons/rust.svg?id=1f5698a4b5ae23fe79413511747e4a87)](https://refactoring.guru/design-patterns/bridge/rust/example "Bridge in Rust") [![Bridge in Swift](https://refactoring.guru/images/patterns/icons/swift.svg?id=0b716c2d52ec3a48fbe91ac031070c1d)](https://refactoring.guru/design-patterns/bridge/swift/example "Bridge in Swift") [![Bridge in TypeScript](https://refactoring.guru/images/patterns/icons/typescript.svg?id=2239d0f16cb703540c205dd8cb0c0cb7)](https://refactoring.guru/design-patterns/bridge/typescript/example "Bridge in TypeScript") --- # Bridge in Go / Design Patterns [There are patterns of patterns now! \ My friend's project: MetaPatterns.io](https://metapatterns.io/)  [](https://refactoring.guru/design-patterns/bridge/go/example#checkout) [](https://refactoring.guru/design-patterns/bridge/go/example#checkout) [](https://refactoring.guru/) / [Design Patterns](https://refactoring.guru/design-patterns) / [Bridge](https://refactoring.guru/design-patterns/bridge) / [Go](https://refactoring.guru/design-patterns/go) ![Bridge](https://refactoring.guru/images/patterns/cards/bridge-mini-2x.png?id=2622384cf623ed150ee9c21a0812dd87) **Bridge** in Go ================ **Bridge** is a structural design pattern that divides business logic or huge class into separate class hierarchies that can be developed independently. One of these hierarchies (often called the Abstraction) will get a reference to an object of the second hierarchy (Implementation). The abstraction will be able to delegate some (sometimes, most) of its calls to the implementations object. Since all implementations will have a common interface, they’d be interchangeable inside the abstraction. [Learn more about Bridge](https://refactoring.guru/design-patterns/bridge) Navigation  [Intro](https://refactoring.guru/design-patterns/bridge/go/example#)  [Conceptual Example](https://refactoring.guru/design-patterns/bridge/go/example#example-0)  [computer](https://refactoring.guru/design-patterns/bridge/go/example#example-0--computer-go)  [mac](https://refactoring.guru/design-patterns/bridge/go/example#example-0--mac-go)  [windows](https://refactoring.guru/design-patterns/bridge/go/example#example-0--windows-go)  [printer](https://refactoring.guru/design-patterns/bridge/go/example#example-0--printer-go)  [epson](https://refactoring.guru/design-patterns/bridge/go/example#example-0--epson-go)  [hp](https://refactoring.guru/design-patterns/bridge/go/example#example-0--hp-go)  [main](https://refactoring.guru/design-patterns/bridge/go/example#example-0--main-go)  [output](https://refactoring.guru/design-patterns/bridge/go/example#example-0--output-txt) Conceptual Example ------------------ Say, you have two types of computers: Mac and Windows. Also, two types of printers: Epson and HP. Both computers and printers need to work with each other in any combination. The client doesn’t want to worry about the details of connecting printers to computers. If we introduce new printers, we don’t want our code to grow exponentially. Instead of creating four structs for the 2\*2 combination, we create two hierarchies: * Abstraction hierarchy: this will be our computers * Implementation hierarchy: this will be our printers These two hierarchies communicate with each other via a Bridge, where the Abstraction (computer) contains a reference to the Implementation (printer). Both the abstraction and implementation can be developed independently without affecting each other. #### **computer.go:** Abstraction package main type Computer interface { Print() SetPrinter(Printer) } #### **mac.go:** Refined abstraction package main import "fmt" type Mac struct { printer Printer } func (m \*Mac) Print() { fmt.Println("Print request for mac") m.printer.PrintFile() } func (m \*Mac) SetPrinter(p Printer) { m.printer = p } #### **windows.go:** Refined abstraction package main import "fmt" type Windows struct { printer Printer } func (w \*Windows) Print() { fmt.Println("Print request for windows") w.printer.PrintFile() } func (w \*Windows) SetPrinter(p Printer) { w.printer = p } #### **printer.go:** Implementation package main type Printer interface { PrintFile() } #### **epson.go:** Concrete implementation package main import "fmt" type Epson struct { } func (p \*Epson) PrintFile() { fmt.Println("Printing by a EPSON Printer") } #### **hp.go:** Concrete implementation package main import "fmt" type Hp struct { } func (p \*Hp) PrintFile() { fmt.Println("Printing by a HP Printer") } #### **main.go:** Client code package main import "fmt" func main() { hpPrinter := &Hp{} epsonPrinter := &Epson{} macComputer := &Mac{} macComputer.SetPrinter(hpPrinter) macComputer.Print() fmt.Println() macComputer.SetPrinter(epsonPrinter) macComputer.Print() fmt.Println() winComputer := &Windows{} winComputer.SetPrinter(hpPrinter) winComputer.Print() fmt.Println() winComputer.SetPrinter(epsonPrinter) winComputer.Print() fmt.Println() } #### **output.txt:** Execution result Print request for mac Printing by a HP Printer Print request for mac Printing by a EPSON Printer Print request for windows Printing by a HP Printer Print request for windows **Bridge** in Other Languages ----------------------------- [![Bridge in C#](https://refactoring.guru/images/patterns/icons/csharp.svg?id=da64592defc6e86d57c39c66e9de3e58)](https://refactoring.guru/design-patterns/bridge/csharp/example "Bridge in C#") [![Bridge in C++](https://refactoring.guru/images/patterns/icons/cpp.svg?id=f7782ed8b8666246bfcc3f8fefc3b858)](https://refactoring.guru/design-patterns/bridge/cpp/example "Bridge in C++") [![Bridge in Java](https://refactoring.guru/images/patterns/icons/java.svg?id=e6d87e2dca08c953fe3acd1275ed4f4e)](https://refactoring.guru/design-patterns/bridge/java/example "Bridge in Java") [![Bridge in PHP](https://refactoring.guru/images/patterns/icons/php.svg?id=be1906eb26b71ec1d3b93720d6156618)](https://refactoring.guru/design-patterns/bridge/php/example "Bridge in PHP") [![Bridge in Python](https://refactoring.guru/images/patterns/icons/python.svg?id=6d815d43c0f7050a1151b43e51569c9f)](https://refactoring.guru/design-patterns/bridge/python/example "Bridge in Python") [![Bridge in Ruby](https://refactoring.guru/images/patterns/icons/ruby.svg?id=b065b718c914bf8e960ef731600be1eb)](https://refactoring.guru/design-patterns/bridge/ruby/example "Bridge in Ruby") [![Bridge in Rust](https://refactoring.guru/images/patterns/icons/rust.svg?id=1f5698a4b5ae23fe79413511747e4a87)](https://refactoring.guru/design-patterns/bridge/rust/example "Bridge in Rust") [![Bridge in Swift](https://refactoring.guru/images/patterns/icons/swift.svg?id=0b716c2d52ec3a48fbe91ac031070c1d)](https://refactoring.guru/design-patterns/bridge/swift/example "Bridge in Swift") [![Bridge in TypeScript](https://refactoring.guru/images/patterns/icons/typescript.svg?id=2239d0f16cb703540c205dd8cb0c0cb7)](https://refactoring.guru/design-patterns/bridge/typescript/example "Bridge in TypeScript") --- # Bridge in Ruby / Design Patterns [There are patterns of patterns now! \ My friend's project: MetaPatterns.io](https://metapatterns.io/)  [](https://refactoring.guru/design-patterns/bridge/ruby/example#checkout) [](https://refactoring.guru/design-patterns/bridge/ruby/example#checkout) [](https://refactoring.guru/) / [Design Patterns](https://refactoring.guru/design-patterns) / [Bridge](https://refactoring.guru/design-patterns/bridge) / [Ruby](https://refactoring.guru/design-patterns/ruby) ![Bridge](https://refactoring.guru/images/patterns/cards/bridge-mini-2x.png?id=2622384cf623ed150ee9c21a0812dd87) **Bridge** in Ruby ================== **Bridge** is a structural design pattern that divides business logic or huge class into separate class hierarchies that can be developed independently. One of these hierarchies (often called the Abstraction) will get a reference to an object of the second hierarchy (Implementation). The abstraction will be able to delegate some (sometimes, most) of its calls to the implementations object. Since all implementations will have a common interface, they’d be interchangeable inside the abstraction. [Learn more about Bridge](https://refactoring.guru/design-patterns/bridge) Navigation  [Intro](https://refactoring.guru/design-patterns/bridge/ruby/example#)  [Conceptual Example](https://refactoring.guru/design-patterns/bridge/ruby/example#example-0)  [main](https://refactoring.guru/design-patterns/bridge/ruby/example#example-0--main-rb)  [output](https://refactoring.guru/design-patterns/bridge/ruby/example#example-0--output-txt) **Complexity:** **Popularity:** **Usage examples:** The Bridge pattern is especially useful when dealing with cross-platform apps, supporting multiple types of database servers or working with several API providers of a certain kind (for example, cloud platforms, social networks, etc.) **Identification:** Bridge can be recognized by a clear distinction between some controlling entity and several different platforms that it relies on. Conceptual Example ------------------ This example illustrates the structure of the **Bridge** design pattern. It focuses on answering these questions: * What classes does it consist of? * What roles do these classes play? * In what way the elements of the pattern are related? #### **main.rb:** Conceptual example \# The Abstraction defines the interface for the "control" part of the two class # hierarchies. It maintains a reference to an object of the Implementation # hierarchy and delegates all of the real work to this object. class Abstraction # @param \[Implementation\] implementation def initialize(implementation) @implementation = implementation end # @return \[String\] def operation "Abstraction: Base operation with:\\n"\\ "#{@implementation.operation\_implementation}" end end # You can extend the Abstraction without changing the Implementation classes. class ExtendedAbstraction < Abstraction # @return \[String\] def operation "ExtendedAbstraction: Extended operation with:\\n"\\ "#{@implementation.operation\_implementation}" end end # The Implementation defines the interface for all implementation classes. It # doesn't have to match the Abstraction's interface. In fact, the two interfaces # can be entirely different. Typically the Implementation interface provides # only primitive operations, while the Abstraction defines higher-level # operations based on those primitives. class Implementation # @abstract # # @return \[String\] def operation\_implementation raise NotImplementedError, "#{self.class} has not implemented method '#{\_\_method\_\_}'" end end # Each Concrete Implementation corresponds to a specific platform and implements # the Implementation interface using that platform's API. class ConcreteImplementationA < Implementation # @return \[String\] def operation\_implementation 'ConcreteImplementationA: Here\\'s the result on the platform A.' end end class ConcreteImplementationB < Implementation # @return \[String\] def operation\_implementation 'ConcreteImplementationB: Here\\'s the result on the platform B.' end end # Except for the initialization phase, where an Abstraction object gets linked # with a specific Implementation object, the client code should only depend on # the Abstraction class. This way the client code can support any abstraction- # implementation combination. def client\_code(abstraction) # ... print abstraction.operation # ... end # The client code should be able to work with any pre-configured abstraction- # implementation combination. implementation = ConcreteImplementationA.new abstraction = Abstraction.new(implementation) client\_code(abstraction) puts "\\n\\n" implementation = ConcreteImplementationB.new abstraction = ExtendedAbstraction.new(implementation) client\_code(abstraction) #### **output.txt:** Execution result Abstraction: Base operation with: ConcreteImplementationA: Here's the result on the platform A. ExtendedAbstraction: Extended operation with: ConcreteImplementationB: Here's the result on the platform B. **Bridge** in Other Languages ----------------------------- [![Bridge in C#](https://refactoring.guru/images/patterns/icons/csharp.svg?id=da64592defc6e86d57c39c66e9de3e58)](https://refactoring.guru/design-patterns/bridge/csharp/example "Bridge in C#") [![Bridge in C++](https://refactoring.guru/images/patterns/icons/cpp.svg?id=f7782ed8b8666246bfcc3f8fefc3b858)](https://refactoring.guru/design-patterns/bridge/cpp/example "Bridge in C++") [![Bridge in Go](https://refactoring.guru/images/patterns/icons/go.svg?id=1a89927eb99b1ea3fde7701d97970aca)](https://refactoring.guru/design-patterns/bridge/go/example "Bridge in Go") [![Bridge in Java](https://refactoring.guru/images/patterns/icons/java.svg?id=e6d87e2dca08c953fe3acd1275ed4f4e)](https://refactoring.guru/design-patterns/bridge/java/example "Bridge in Java") [![Bridge in PHP](https://refactoring.guru/images/patterns/icons/php.svg?id=be1906eb26b71ec1d3b93720d6156618)](https://refactoring.guru/design-patterns/bridge/php/example "Bridge in PHP") [![Bridge in Python](https://refactoring.guru/images/patterns/icons/python.svg?id=6d815d43c0f7050a1151b43e51569c9f)](https://refactoring.guru/design-patterns/bridge/python/example "Bridge in Python") [![Bridge in Rust](https://refactoring.guru/images/patterns/icons/rust.svg?id=1f5698a4b5ae23fe79413511747e4a87)](https://refactoring.guru/design-patterns/bridge/rust/example "Bridge in Rust") [![Bridge in Swift](https://refactoring.guru/images/patterns/icons/swift.svg?id=0b716c2d52ec3a48fbe91ac031070c1d)](https://refactoring.guru/design-patterns/bridge/swift/example "Bridge in Swift") [![Bridge in TypeScript](https://refactoring.guru/images/patterns/icons/typescript.svg?id=2239d0f16cb703540c205dd8cb0c0cb7)](https://refactoring.guru/design-patterns/bridge/typescript/example "Bridge in TypeScript") --- # Bridge in Java / Design Patterns [There are patterns of patterns now! \ My friend's project: MetaPatterns.io](https://metapatterns.io/)  [](https://refactoring.guru/design-patterns/bridge/java/example#checkout) [](https://refactoring.guru/design-patterns/bridge/java/example#checkout) [](https://refactoring.guru/) / [Design Patterns](https://refactoring.guru/design-patterns) / [Bridge](https://refactoring.guru/design-patterns/bridge) / [Java](https://refactoring.guru/design-patterns/java) ![Bridge](https://refactoring.guru/images/patterns/cards/bridge-mini-2x.png?id=2622384cf623ed150ee9c21a0812dd87) **Bridge** in Java ================== **Bridge** is a structural design pattern that divides business logic or huge class into separate class hierarchies that can be developed independently. One of these hierarchies (often called the Abstraction) will get a reference to an object of the second hierarchy (Implementation). The abstraction will be able to delegate some (sometimes, most) of its calls to the implementations object. Since all implementations will have a common interface, they’d be interchangeable inside the abstraction. [Learn more about Bridge](https://refactoring.guru/design-patterns/bridge) Navigation  [Intro](https://refactoring.guru/design-patterns/bridge/java/example#)  [Bridge between devices and remote controls](https://refactoring.guru/design-patterns/bridge/java/example#example-0)  devices   [Device](https://refactoring.guru/design-patterns/bridge/java/example#example-0--devices-Device-java)   [Radio](https://refactoring.guru/design-patterns/bridge/java/example#example-0--devices-Radio-java)   [Tv](https://refactoring.guru/design-patterns/bridge/java/example#example-0--devices-Tv-java)  remotes   [Remote](https://refactoring.guru/design-patterns/bridge/java/example#example-0--remotes-Remote-java)   [Basic­Remote](https://refactoring.guru/design-patterns/bridge/java/example#example-0--remotes-BasicRemote-java)   [Advanced­Remote](https://refactoring.guru/design-patterns/bridge/java/example#example-0--remotes-AdvancedRemote-java)  [Demo](https://refactoring.guru/design-patterns/bridge/java/example#example-0--Demo-java)  [Output­Demo](https://refactoring.guru/design-patterns/bridge/java/example#example-0--OutputDemo-txt) **Complexity:** **Popularity:** **Usage examples:** The Bridge pattern is especially useful when dealing with cross-platform apps, supporting multiple types of database servers or working with several API providers of a certain kind (for example, cloud platforms, social networks, etc.) **Identification:** Bridge can be recognized by a clear distinction between some controlling entity and several different platforms that it relies on. Bridge between devices and remote controls ------------------------------------------ This example shows separation between the classes of remotes and devices that they control. Remotes act as abstractions, and devices are their implementations. Thanks to the common interfaces, the same remotes can work with different devices and vice versa. The Bridge pattern allows changing or even creating new classes without touching the code of the opposite hierarchy. ### **devices** #### **devices/Device.java:** Common interface of all devices package refactoring\_guru.bridge.example.devices; public interface Device { boolean isEnabled(); void enable(); void disable(); int getVolume(); void setVolume(int percent); int getChannel(); void setChannel(int channel); void printStatus(); } #### **devices/Radio.java:** Radio package refactoring\_guru.bridge.example.devices; public class Radio implements Device { private boolean on = false; private int volume = 30; private int channel = 1; @Override public boolean isEnabled() { return on; } @Override public void enable() { on = true; } @Override public void disable() { on = false; } @Override public int getVolume() { return volume; } @Override public void setVolume(int volume) { if (volume > 100) { this.volume = 100; } else if (volume < 0) { this.volume = 0; } else { this.volume = volume; } } @Override public int getChannel() { return channel; } @Override public void setChannel(int channel) { this.channel = channel; } @Override public void printStatus() { System.out.println("------------------------------------"); System.out.println("| I'm radio."); System.out.println("| I'm " + (on ? "enabled" : "disabled")); System.out.println("| Current volume is " + volume + "%"); System.out.println("| Current channel is " + channel); System.out.println("------------------------------------\\n"); } } #### **devices/Tv.java:** TV package refactoring\_guru.bridge.example.devices; public class Tv implements Device { private boolean on = false; private int volume = 30; private int channel = 1; @Override public boolean isEnabled() { return on; } @Override public void enable() { on = true; } @Override public void disable() { on = false; } @Override public int getVolume() { return volume; } @Override public void setVolume(int volume) { if (volume > 100) { this.volume = 100; } else if (volume < 0) { this.volume = 0; } else { this.volume = volume; } } @Override public int getChannel() { return channel; } @Override public void setChannel(int channel) { this.channel = channel; } @Override public void printStatus() { System.out.println("------------------------------------"); System.out.println("| I'm TV set."); System.out.println("| I'm " + (on ? "enabled" : "disabled")); System.out.println("| Current volume is " + volume + "%"); System.out.println("| Current channel is " + channel); System.out.println("------------------------------------\\n"); } } ### **remotes** #### **remotes/Remote.java:** Common interface for all remotes package refactoring\_guru.bridge.example.remotes; public interface Remote { void power(); void volumeDown(); void volumeUp(); void channelDown(); void channelUp(); } #### **remotes/BasicRemote.java:** Basic remote control package refactoring\_guru.bridge.example.remotes; import refactoring\_guru.bridge.example.devices.Device; public class BasicRemote implements Remote { protected Device device; public BasicRemote() {} public BasicRemote(Device device) { this.device = device; } @Override public void power() { System.out.println("Remote: power toggle"); if (device.isEnabled()) { device.disable(); } else { device.enable(); } } @Override public void volumeDown() { System.out.println("Remote: volume down"); device.setVolume(device.getVolume() - 10); } @Override public void volumeUp() { System.out.println("Remote: volume up"); device.setVolume(device.getVolume() + 10); } @Override public void channelDown() { System.out.println("Remote: channel down"); device.setChannel(device.getChannel() - 1); } @Override public void channelUp() { System.out.println("Remote: channel up"); device.setChannel(device.getChannel() + 1); } } #### **remotes/AdvancedRemote.java:** Advanced remote control package refactoring\_guru.bridge.example.remotes; import refactoring\_guru.bridge.example.devices.Device; public class AdvancedRemote extends BasicRemote { public AdvancedRemote(Device device) { super.device = device; } public void mute() { System.out.println("Remote: mute"); device.setVolume(0); } } #### **Demo.java:** Client code package refactoring\_guru.bridge.example; import refactoring\_guru.bridge.example.devices.Device; import refactoring\_guru.bridge.example.devices.Radio; import refactoring\_guru.bridge.example.devices.Tv; import refactoring\_guru.bridge.example.remotes.AdvancedRemote; import refactoring\_guru.bridge.example.remotes.BasicRemote; public class Demo { public static void main(String\[\] args) { testDevice(new Tv()); testDevice(new Radio()); } public static void testDevice(Device device) { System.out.println("Tests with basic remote."); BasicRemote basicRemote = new BasicRemote(device); basicRemote.power(); device.printStatus(); System.out.println("Tests with advanced remote."); AdvancedRemote advancedRemote = new AdvancedRemote(device); advancedRemote.power(); advancedRemote.mute(); device.printStatus(); } } #### **OutputDemo.txt:** Execution result Tests with basic remote. Remote: power toggle ------------------------------------ | I'm TV set. | I'm enabled | Current volume is 30% | Current channel is 1 ------------------------------------ Tests with advanced remote. Remote: power toggle Remote: mute ------------------------------------ | I'm TV set. | I'm disabled | Current volume is 0% | Current channel is 1 ------------------------------------ Tests with basic remote. Remote: power toggle ------------------------------------ | I'm radio. | I'm enabled | Current volume is 30% | Current channel is 1 ------------------------------------ Tests with advanced remote. Remote: power toggle Remote: mute ------------------------------------ | I'm radio. | I'm disabled | Current volume is 0% | Current channel is 1 ------------------------------------ **Bridge** in Other Languages ----------------------------- [![Bridge in C#](https://refactoring.guru/images/patterns/icons/csharp.svg?id=da64592defc6e86d57c39c66e9de3e58)](https://refactoring.guru/design-patterns/bridge/csharp/example "Bridge in C#") [![Bridge in C++](https://refactoring.guru/images/patterns/icons/cpp.svg?id=f7782ed8b8666246bfcc3f8fefc3b858)](https://refactoring.guru/design-patterns/bridge/cpp/example "Bridge in C++") [![Bridge in Go](https://refactoring.guru/images/patterns/icons/go.svg?id=1a89927eb99b1ea3fde7701d97970aca)](https://refactoring.guru/design-patterns/bridge/go/example "Bridge in Go") [![Bridge in PHP](https://refactoring.guru/images/patterns/icons/php.svg?id=be1906eb26b71ec1d3b93720d6156618)](https://refactoring.guru/design-patterns/bridge/php/example "Bridge in PHP") [![Bridge in Python](https://refactoring.guru/images/patterns/icons/python.svg?id=6d815d43c0f7050a1151b43e51569c9f)](https://refactoring.guru/design-patterns/bridge/python/example "Bridge in Python") [![Bridge in Ruby](https://refactoring.guru/images/patterns/icons/ruby.svg?id=b065b718c914bf8e960ef731600be1eb)](https://refactoring.guru/design-patterns/bridge/ruby/example "Bridge in Ruby") [![Bridge in Rust](https://refactoring.guru/images/patterns/icons/rust.svg?id=1f5698a4b5ae23fe79413511747e4a87)](https://refactoring.guru/design-patterns/bridge/rust/example "Bridge in Rust") [![Bridge in Swift](https://refactoring.guru/images/patterns/icons/swift.svg?id=0b716c2d52ec3a48fbe91ac031070c1d)](https://refactoring.guru/design-patterns/bridge/swift/example "Bridge in Swift") [![Bridge in TypeScript](https://refactoring.guru/images/patterns/icons/typescript.svg?id=2239d0f16cb703540c205dd8cb0c0cb7)](https://refactoring.guru/design-patterns/bridge/typescript/example "Bridge in TypeScript") --- # Bridge in Python / Design Patterns [There are patterns of patterns now! \ My friend's project: MetaPatterns.io](https://metapatterns.io/)  [](https://refactoring.guru/design-patterns/bridge/python/example#checkout) [](https://refactoring.guru/design-patterns/bridge/python/example#checkout) [](https://refactoring.guru/) / [Design Patterns](https://refactoring.guru/design-patterns) / [Bridge](https://refactoring.guru/design-patterns/bridge) / [Python](https://refactoring.guru/design-patterns/python) ![Bridge](https://refactoring.guru/images/patterns/cards/bridge-mini-2x.png?id=2622384cf623ed150ee9c21a0812dd87) **Bridge** in Python ==================== **Bridge** is a structural design pattern that divides business logic or huge class into separate class hierarchies that can be developed independently. One of these hierarchies (often called the Abstraction) will get a reference to an object of the second hierarchy (Implementation). The abstraction will be able to delegate some (sometimes, most) of its calls to the implementations object. Since all implementations will have a common interface, they’d be interchangeable inside the abstraction. [Learn more about Bridge](https://refactoring.guru/design-patterns/bridge) Navigation  [Intro](https://refactoring.guru/design-patterns/bridge/python/example#)  [Conceptual Example](https://refactoring.guru/design-patterns/bridge/python/example#example-0)  [main](https://refactoring.guru/design-patterns/bridge/python/example#example-0--main-py)  [Output](https://refactoring.guru/design-patterns/bridge/python/example#example-0--Output-txt) **Complexity:** **Popularity:** **Usage examples:** The Bridge pattern is especially useful when dealing with cross-platform apps, supporting multiple types of database servers or working with several API providers of a certain kind (for example, cloud platforms, social networks, etc.) **Identification:** Bridge can be recognized by a clear distinction between some controlling entity and several different platforms that it relies on. Conceptual Example ------------------ This example illustrates the structure of the **Bridge** design pattern. It focuses on answering these questions: * What classes does it consist of? * What roles do these classes play? * In what way the elements of the pattern are related? #### **main.py:** Conceptual example from \_\_future\_\_ import annotations from abc import ABC, abstractmethod class Abstraction: """ The Abstraction defines the interface for the "control" part of the two class hierarchies. It maintains a reference to an object of the Implementation hierarchy and delegates all of the real work to this object. """ def \_\_init\_\_(self, implementation: Implementation) -> None: self.implementation = implementation def operation(self) -> str: return (f"Abstraction: Base operation with:\\n" f"{self.implementation.operation\_implementation()}") class ExtendedAbstraction(Abstraction): """ You can extend the Abstraction without changing the Implementation classes. """ def operation(self) -> str: return (f"ExtendedAbstraction: Extended operation with:\\n" f"{self.implementation.operation\_implementation()}") class Implementation(ABC): """ The Implementation defines the interface for all implementation classes. It doesn't have to match the Abstraction's interface. In fact, the two interfaces can be entirely different. Typically the Implementation interface provides only primitive operations, while the Abstraction defines higher- level operations based on those primitives. """ @abstractmethod def operation\_implementation(self) -> str: pass """ Each Concrete Implementation corresponds to a specific platform and implements the Implementation interface using that platform's API. """ class ConcreteImplementationA(Implementation): def operation\_implementation(self) -> str: return "ConcreteImplementationA: Here's the result on the platform A." class ConcreteImplementationB(Implementation): def operation\_implementation(self) -> str: return "ConcreteImplementationB: Here's the result on the platform B." def client\_code(abstraction: Abstraction) -> None: """ Except for the initialization phase, where an Abstraction object gets linked with a specific Implementation object, the client code should only depend on the Abstraction class. This way the client code can support any abstraction- implementation combination. """ # ... print(abstraction.operation(), end="") # ... if \_\_name\_\_ == "\_\_main\_\_": """ The client code should be able to work with any pre-configured abstraction- implementation combination. """ implementation = ConcreteImplementationA() abstraction = Abstraction(implementation) client\_code(abstraction) print("\\n") implementation = ConcreteImplementationB() abstraction = ExtendedAbstraction(implementation) client\_code(abstraction) #### **Output.txt:** Execution result Abstraction: Base operation with: ConcreteImplementationA: Here's the result on the platform A. ExtendedAbstraction: Extended operation with: ConcreteImplementationB: Here's the result on the platform B. **Bridge** in Other Languages ----------------------------- [![Bridge in C#](https://refactoring.guru/images/patterns/icons/csharp.svg?id=da64592defc6e86d57c39c66e9de3e58)](https://refactoring.guru/design-patterns/bridge/csharp/example "Bridge in C#") [![Bridge in C++](https://refactoring.guru/images/patterns/icons/cpp.svg?id=f7782ed8b8666246bfcc3f8fefc3b858)](https://refactoring.guru/design-patterns/bridge/cpp/example "Bridge in C++") [![Bridge in Go](https://refactoring.guru/images/patterns/icons/go.svg?id=1a89927eb99b1ea3fde7701d97970aca)](https://refactoring.guru/design-patterns/bridge/go/example "Bridge in Go") [![Bridge in Java](https://refactoring.guru/images/patterns/icons/java.svg?id=e6d87e2dca08c953fe3acd1275ed4f4e)](https://refactoring.guru/design-patterns/bridge/java/example "Bridge in Java") [![Bridge in PHP](https://refactoring.guru/images/patterns/icons/php.svg?id=be1906eb26b71ec1d3b93720d6156618)](https://refactoring.guru/design-patterns/bridge/php/example "Bridge in PHP") [![Bridge in Ruby](https://refactoring.guru/images/patterns/icons/ruby.svg?id=b065b718c914bf8e960ef731600be1eb)](https://refactoring.guru/design-patterns/bridge/ruby/example "Bridge in Ruby") [![Bridge in Rust](https://refactoring.guru/images/patterns/icons/rust.svg?id=1f5698a4b5ae23fe79413511747e4a87)](https://refactoring.guru/design-patterns/bridge/rust/example "Bridge in Rust") [![Bridge in Swift](https://refactoring.guru/images/patterns/icons/swift.svg?id=0b716c2d52ec3a48fbe91ac031070c1d)](https://refactoring.guru/design-patterns/bridge/swift/example "Bridge in Swift") [![Bridge in TypeScript](https://refactoring.guru/images/patterns/icons/typescript.svg?id=2239d0f16cb703540c205dd8cb0c0cb7)](https://refactoring.guru/design-patterns/bridge/typescript/example "Bridge in TypeScript") --- # Bridge in TypeScript / Design Patterns [There are patterns of patterns now! \ My friend's project: MetaPatterns.io](https://metapatterns.io/)  [](https://refactoring.guru/design-patterns/bridge/typescript/example#checkout) [](https://refactoring.guru/design-patterns/bridge/typescript/example#checkout) [](https://refactoring.guru/) / [Design Patterns](https://refactoring.guru/design-patterns) / [Bridge](https://refactoring.guru/design-patterns/bridge) / [TypeScript](https://refactoring.guru/design-patterns/typescript) ![Bridge](https://refactoring.guru/images/patterns/cards/bridge-mini-2x.png?id=2622384cf623ed150ee9c21a0812dd87) **Bridge** in TypeScript ======================== **Bridge** is a structural design pattern that divides business logic or huge class into separate class hierarchies that can be developed independently. One of these hierarchies (often called the Abstraction) will get a reference to an object of the second hierarchy (Implementation). The abstraction will be able to delegate some (sometimes, most) of its calls to the implementations object. Since all implementations will have a common interface, they’d be interchangeable inside the abstraction. [Learn more about Bridge](https://refactoring.guru/design-patterns/bridge) Navigation  [Intro](https://refactoring.guru/design-patterns/bridge/typescript/example#)  [Conceptual Example](https://refactoring.guru/design-patterns/bridge/typescript/example#example-0)  [index](https://refactoring.guru/design-patterns/bridge/typescript/example#example-0--index-ts)  [Output](https://refactoring.guru/design-patterns/bridge/typescript/example#example-0--Output-txt) **Complexity:** **Popularity:** **Usage examples:** The Bridge pattern is especially useful when dealing with cross-platform apps, supporting multiple types of database servers or working with several API providers of a certain kind (for example, cloud platforms, social networks, etc.) **Identification:** Bridge can be recognized by a clear distinction between some controlling entity and several different platforms that it relies on. Conceptual Example ------------------ This example illustrates the structure of the **Bridge** design pattern and focuses on the following questions: * What classes does it consist of? * What roles do these classes play? * In what way the elements of the pattern are related? #### **index.ts:** Conceptual example /\*\* \* The Abstraction defines the interface for the "control" part of the two class \* hierarchies. It maintains a reference to an object of the Implementation \* hierarchy and delegates all of the real work to this object. \*/ class Abstraction { protected implementation: Implementation; constructor(implementation: Implementation) { this.implementation = implementation; } public operation(): string { const result = this.implementation.operationImplementation(); return \`Abstraction: Base operation with:\\n${result}\`; } } /\*\* \* You can extend the Abstraction without changing the Implementation classes. \*/ class ExtendedAbstraction extends Abstraction { public operation(): string { const result = this.implementation.operationImplementation(); return \`ExtendedAbstraction: Extended operation with:\\n${result}\`; } } /\*\* \* The Implementation defines the interface for all implementation classes. It \* doesn't have to match the Abstraction's interface. In fact, the two \* interfaces can be entirely different. Typically the Implementation interface \* provides only primitive operations, while the Abstraction defines higher- \* level operations based on those primitives. \*/ interface Implementation { operationImplementation(): string; } /\*\* \* Each Concrete Implementation corresponds to a specific platform and \* implements the Implementation interface using that platform's API. \*/ class ConcreteImplementationA implements Implementation { public operationImplementation(): string { return 'ConcreteImplementationA: Here\\'s the result on the platform A.'; } } class ConcreteImplementationB implements Implementation { public operationImplementation(): string { return 'ConcreteImplementationB: Here\\'s the result on the platform B.'; } } /\*\* \* Except for the initialization phase, where an Abstraction object gets linked \* with a specific Implementation object, the client code should only depend on \* the Abstraction class. This way the client code can support any abstraction- \* implementation combination. \*/ function clientCode(abstraction: Abstraction) { // .. console.log(abstraction.operation()); // .. } /\*\* \* The client code should be able to work with any pre-configured abstraction- \* implementation combination. \*/ let implementation = new ConcreteImplementationA(); let abstraction = new Abstraction(implementation); clientCode(abstraction); console.log(''); implementation = new ConcreteImplementationB(); abstraction = new ExtendedAbstraction(implementation); clientCode(abstraction); #### **Output.txt:** Execution result Abstraction: Base operation with: ConcreteImplementationA: Here's the result on the platform A. ExtendedAbstraction: Extended operation with: ConcreteImplementationB: Here's the result on the platform B. **Bridge** in Other Languages ----------------------------- [![Bridge in C#](https://refactoring.guru/images/patterns/icons/csharp.svg?id=da64592defc6e86d57c39c66e9de3e58)](https://refactoring.guru/design-patterns/bridge/csharp/example "Bridge in C#") [![Bridge in C++](https://refactoring.guru/images/patterns/icons/cpp.svg?id=f7782ed8b8666246bfcc3f8fefc3b858)](https://refactoring.guru/design-patterns/bridge/cpp/example "Bridge in C++") [![Bridge in Go](https://refactoring.guru/images/patterns/icons/go.svg?id=1a89927eb99b1ea3fde7701d97970aca)](https://refactoring.guru/design-patterns/bridge/go/example "Bridge in Go") [![Bridge in Java](https://refactoring.guru/images/patterns/icons/java.svg?id=e6d87e2dca08c953fe3acd1275ed4f4e)](https://refactoring.guru/design-patterns/bridge/java/example "Bridge in Java") [![Bridge in PHP](https://refactoring.guru/images/patterns/icons/php.svg?id=be1906eb26b71ec1d3b93720d6156618)](https://refactoring.guru/design-patterns/bridge/php/example "Bridge in PHP") [![Bridge in Python](https://refactoring.guru/images/patterns/icons/python.svg?id=6d815d43c0f7050a1151b43e51569c9f)](https://refactoring.guru/design-patterns/bridge/python/example "Bridge in Python") [![Bridge in Ruby](https://refactoring.guru/images/patterns/icons/ruby.svg?id=b065b718c914bf8e960ef731600be1eb)](https://refactoring.guru/design-patterns/bridge/ruby/example "Bridge in Ruby") [![Bridge in Rust](https://refactoring.guru/images/patterns/icons/rust.svg?id=1f5698a4b5ae23fe79413511747e4a87)](https://refactoring.guru/design-patterns/bridge/rust/example "Bridge in Rust") [![Bridge in Swift](https://refactoring.guru/images/patterns/icons/swift.svg?id=0b716c2d52ec3a48fbe91ac031070c1d)](https://refactoring.guru/design-patterns/bridge/swift/example "Bridge in Swift") --- # Builder in C++ / Design Patterns [There are patterns of patterns now! \ My friend's project: MetaPatterns.io](https://metapatterns.io/)  [](https://refactoring.guru/design-patterns/builder/cpp/example#checkout) [](https://refactoring.guru/design-patterns/builder/cpp/example#checkout) [](https://refactoring.guru/) / [Design Patterns](https://refactoring.guru/design-patterns) / [Builder](https://refactoring.guru/design-patterns/builder) / [C++](https://refactoring.guru/design-patterns/cpp) ![Builder](https://refactoring.guru/images/patterns/cards/builder-mini-2x.png?id=de6d0938678b86903a1426dddfdd13bf) **Builder** in C++ ================== **Builder** is a creational design pattern, which allows constructing complex objects step by step. Unlike other creational patterns, Builder doesn’t require products to have a common interface. That makes it possible to produce different products using the same construction process. [Learn more about Builder](https://refactoring.guru/design-patterns/builder) Navigation  [Intro](https://refactoring.guru/design-patterns/builder/cpp/example#)  [Conceptual Example](https://refactoring.guru/design-patterns/builder/cpp/example#example-0)  [main](https://refactoring.guru/design-patterns/builder/cpp/example#example-0--main-cc)  [Output](https://refactoring.guru/design-patterns/builder/cpp/example#example-0--Output-txt) **Complexity:** **Popularity:** **Usage examples:** The Builder pattern is a well-known pattern in C++ world. It’s especially useful when you need to create an object with lots of possible configuration options. **Identification:** The Builder pattern can be recognized in a class, which has a single creation method and several methods to configure the resulting object. Builder methods often support chaining (for example, `someBuilder->setValueA(1)->setValueB(2)->create()`). Conceptual Example ------------------ This example illustrates the structure of the **Builder** design pattern. It focuses on answering these questions: * What classes does it consist of? * What roles do these classes play? * In what way the elements of the pattern are related? #### **main.cc:** Conceptual example /\*\* \* It makes sense to use the Builder pattern only when your products are quite \* complex and require extensive configuration. \* \* Unlike in other creational patterns, different concrete builders can produce \* unrelated products. In other words, results of various builders may not \* always follow the same interface. \*/ class Product1{ public: std::vector parts\_; void ListParts()const{ std::cout << "Product parts: "; for (size\_t i=0;iReset(); } ~ConcreteBuilder1(){ delete product; } void Reset(){ this->product= new Product1(); } /\*\* \* All production steps work with the same product instance. \*/ void ProducePartA()const override{ this->product->parts\_.push\_back("PartA1"); } void ProducePartB()const override{ this->product->parts\_.push\_back("PartB1"); } void ProducePartC()const override{ this->product->parts\_.push\_back("PartC1"); } /\*\* \* Concrete Builders are supposed to provide their own methods for \* retrieving results. That's because various types of builders may create \* entirely different products that don't follow the same interface. \* Therefore, such methods cannot be declared in the base Builder interface \* (at least in a statically typed programming language). Note that PHP is a \* dynamically typed language and this method CAN be in the base interface. \* However, we won't declare it there for the sake of clarity. \* \* Usually, after returning the end result to the client, a builder instance \* is expected to be ready to start producing another product. That's why \* it's a usual practice to call the reset method at the end of the \* \`getProduct\` method body. However, this behavior is not mandatory, and \* you can make your builders wait for an explicit reset call from the \* client code before disposing of the previous result. \*/ /\*\* \* Please be careful here with the memory ownership. Once you call \* GetProduct the user of this function is responsable to release this \* memory. Here could be a better option to use smart pointers to avoid \* memory leaks \*/ Product1\* GetProduct() { Product1\* result= this->product; this->Reset(); return result; } }; /\*\* \* The Director is only responsible for executing the building steps in a \* particular sequence. It is helpful when producing products according to a \* specific order or configuration. Strictly speaking, the Director class is \* optional, since the client can control builders directly. \*/ class Director{ /\*\* \* @var Builder \*/ private: Builder\* builder; /\*\* \* The Director works with any builder instance that the client code passes \* to it. This way, the client code may alter the final type of the newly \* assembled product. \*/ public: void set\_builder(Builder\* builder){ this->builder=builder; } /\*\* \* The Director can construct several product variations using the same \* building steps. \*/ void BuildMinimalViableProduct(){ this->builder->ProducePartA(); } void BuildFullFeaturedProduct(){ this->builder->ProducePartA(); this->builder->ProducePartB(); this->builder->ProducePartC(); } }; /\*\* \* The client code creates a builder object, passes it to the director and then \* initiates the construction process. The end result is retrieved from the \* builder object. \*/ /\*\* \* I used raw pointers for simplicity however you may prefer to use smart \* pointers here \*/ void ClientCode(Director& director) { ConcreteBuilder1\* builder = new ConcreteBuilder1(); director.set\_builder(builder); std::cout << "Standard basic product:\\n"; director.BuildMinimalViableProduct(); Product1\* p= builder->GetProduct(); p->ListParts(); delete p; std::cout << "Standard full featured product:\\n"; director.BuildFullFeaturedProduct(); p= builder->GetProduct(); p->ListParts(); delete p; // Remember, the Builder pattern can be used without a Director class. std::cout << "Custom product:\\n"; builder->ProducePartA(); builder->ProducePartC(); p=builder->GetProduct(); p->ListParts(); delete p; delete builder; } int main(){ Director\* director= new Director(); ClientCode(\*director); delete director; return 0; } #### **Output.txt:** Execution result Standard basic product: Product parts: PartA1 Standard full featured product: Product parts: PartA1, PartB1, PartC1 Custom product: Product parts: PartA1, PartC1 **Builder** in Other Languages ------------------------------ [![Builder in C#](https://refactoring.guru/images/patterns/icons/csharp.svg?id=da64592defc6e86d57c39c66e9de3e58)](https://refactoring.guru/design-patterns/builder/csharp/example "Builder in C#") [![Builder in Go](https://refactoring.guru/images/patterns/icons/go.svg?id=1a89927eb99b1ea3fde7701d97970aca)](https://refactoring.guru/design-patterns/builder/go/example "Builder in Go") [![Builder in Java](https://refactoring.guru/images/patterns/icons/java.svg?id=e6d87e2dca08c953fe3acd1275ed4f4e)](https://refactoring.guru/design-patterns/builder/java/example "Builder in Java") [![Builder in PHP](https://refactoring.guru/images/patterns/icons/php.svg?id=be1906eb26b71ec1d3b93720d6156618)](https://refactoring.guru/design-patterns/builder/php/example "Builder in PHP") [![Builder in Python](https://refactoring.guru/images/patterns/icons/python.svg?id=6d815d43c0f7050a1151b43e51569c9f)](https://refactoring.guru/design-patterns/builder/python/example "Builder in Python") [![Builder in Ruby](https://refactoring.guru/images/patterns/icons/ruby.svg?id=b065b718c914bf8e960ef731600be1eb)](https://refactoring.guru/design-patterns/builder/ruby/example "Builder in Ruby") [![Builder in Rust](https://refactoring.guru/images/patterns/icons/rust.svg?id=1f5698a4b5ae23fe79413511747e4a87)](https://refactoring.guru/design-patterns/builder/rust/example "Builder in Rust") [![Builder in Swift](https://refactoring.guru/images/patterns/icons/swift.svg?id=0b716c2d52ec3a48fbe91ac031070c1d)](https://refactoring.guru/design-patterns/builder/swift/example "Builder in Swift") [![Builder in TypeScript](https://refactoring.guru/images/patterns/icons/typescript.svg?id=2239d0f16cb703540c205dd8cb0c0cb7)](https://refactoring.guru/design-patterns/builder/typescript/example "Builder in TypeScript") --- # Bridge in Swift / Design Patterns [There are patterns of patterns now! \ My friend's project: MetaPatterns.io](https://metapatterns.io/)  [](https://refactoring.guru/design-patterns/bridge/swift/example#checkout) [](https://refactoring.guru/design-patterns/bridge/swift/example#checkout) [](https://refactoring.guru/) / [Design Patterns](https://refactoring.guru/design-patterns) / [Bridge](https://refactoring.guru/design-patterns/bridge) / [Swift](https://refactoring.guru/design-patterns/swift) ![Bridge](https://refactoring.guru/images/patterns/cards/bridge-mini-2x.png?id=2622384cf623ed150ee9c21a0812dd87) **Bridge** in Swift =================== **Bridge** is a structural design pattern that divides business logic or huge class into separate class hierarchies that can be developed independently. One of these hierarchies (often called the Abstraction) will get a reference to an object of the second hierarchy (Implementation). The abstraction will be able to delegate some (sometimes, most) of its calls to the implementations object. Since all implementations will have a common interface, they’d be interchangeable inside the abstraction. [Learn more about Bridge](https://refactoring.guru/design-patterns/bridge) Navigation  [Intro](https://refactoring.guru/design-patterns/bridge/swift/example#)  [Conceptual Example](https://refactoring.guru/design-patterns/bridge/swift/example#example-0)  [Example](https://refactoring.guru/design-patterns/bridge/swift/example#example-0--Example-swift)  [Output](https://refactoring.guru/design-patterns/bridge/swift/example#example-0--Output-txt)  [Real World Example](https://refactoring.guru/design-patterns/bridge/swift/example#example-1)  [Example](https://refactoring.guru/design-patterns/bridge/swift/example#example-1--Example-swift)  [Output](https://refactoring.guru/design-patterns/bridge/swift/example#example-1--Output-txt) **Complexity:** **Popularity:** **Usage examples:** The Bridge pattern is especially useful when dealing with cross-platform apps, supporting multiple types of database servers or working with several API providers of a certain kind (for example, cloud platforms, social networks, etc.) **Identification:** Bridge can be recognized by a clear distinction between some controlling entity and several different platforms that it relies on. The following examples are available on [Swift Playgrounds](https://www.alemohamad.com/playgrounds) . Kudos to [Alejandro Mohamad](https://www.alemohamad.com/) for creating the Playground version. Conceptual Example ------------------ This example illustrates the structure of the **Bridge** design pattern and focuses on the following questions: * What classes does it consist of? * What roles do these classes play? * In what way the elements of the pattern are related? After learning about the pattern’s structure it’ll be easier for you to grasp the following example, based on a real-world Swift use case. #### **Example.swift:** Conceptual example import XCTest /// The Abstraction defines the interface for the "control" part of the two /// class hierarchies. It holds a reference to an object from the Implementation /// hierarchy and delegates all of the real work to this object. class Abstraction { fileprivate var implementation: Implementation init(\_ implementation: Implementation) { self.implementation = implementation } func operation() -> String { let operation = implementation.operationImplementation() return "Abstraction: Base operation with:\\n" + operation } } /// You can extend the Abstraction without changing the Implementation classes. class ExtendedAbstraction: Abstraction { override func operation() -> String { let operation = implementation.operationImplementation() return "ExtendedAbstraction: Extended operation with:\\n" + operation } } /// The Implementation defines the interface for all implementation classes. It /// doesn't have to match the Abstraction's interface. In fact, the two /// interfaces can be entirely different. Typically the Implementation interface /// provides only primitive operations, while the Abstraction defines higher- /// level operations based on those primitives. protocol Implementation { func operationImplementation() -> String } /// Each Concrete Implementation corresponds to a specific platform and /// implements the Implementation interface using that platform's API. class ConcreteImplementationA: Implementation { func operationImplementation() -> String { return "ConcreteImplementationA: Here's the result on the platform A.\\n" } } class ConcreteImplementationB: Implementation { func operationImplementation() -> String { return "ConcreteImplementationB: Here's the result on the platform B\\n" } } /// Except for the initialization phase, where an Abstraction object gets linked /// with a specific Implementation object, the client code should only depend on /// the Abstraction class. This way the client code can support any abstraction- /// implementation combination. class Client { // ... static func someClientCode(abstraction: Abstraction) { print(abstraction.operation()) } // ... } /// Let's see how it all works together. class BridgeConceptual: XCTestCase { func testBridgeConceptual() { // The client code should be able to work with any pre-configured // abstraction-implementation combination. let implementation = ConcreteImplementationA() Client.someClientCode(abstraction: Abstraction(implementation)) let concreteImplementation = ConcreteImplementationB() Client.someClientCode(abstraction: ExtendedAbstraction(concreteImplementation)) } } #### **Output.txt:** Execution result Abstraction: Base operation with: ConcreteImplementationA: Here's the result on the platform A ExtendedAbstraction: Extended operation with: ConcreteImplementationB: Here's the result on the platform B Real World Example ------------------ #### **Example.swift:** Real world example import XCTest private class BridgeRealWorld: XCTestCase { func testBridgeRealWorld() { print("Client: Pushing Photo View Controller...") push(PhotoViewController()) print() print("Client: Pushing Feed View Controller...") push(FeedViewController()) } func push(\_ container: SharingSupportable) { let instagram = InstagramSharingService() let facebook = FaceBookSharingService() container.accept(service: instagram) container.update(content: foodModel) container.accept(service: facebook) container.update(content: foodModel) } var foodModel: Content { return FoodDomainModel(title: "This food is so various and delicious!", images: \[UIImage(), UIImage()\], calories: 47) } } private protocol SharingSupportable { /// Abstraction func accept(service: SharingService) func update(content: Content) } class BaseViewController: UIViewController, SharingSupportable { fileprivate var shareService: SharingService? func update(content: Content) { /// ...updating UI and showing a content... /// ... /// ... then, a user will choose a content and trigger an event print("\\(description): User selected a \\(content) to share") /// ... shareService?.share(content: content) } func accept(service: SharingService) { shareService = service } } class PhotoViewController: BaseViewController { /// Custom UI and features override var description: String { return "PhotoViewController" } } class FeedViewController: BaseViewController { /// Custom UI and features override var description: String { return "FeedViewController" } } protocol SharingService { /// Implementation func share(content: Content) } class FaceBookSharingService: SharingService { func share(content: Content) { /// Use FaceBook API to share a content print("Service: \\(content) was posted to the Facebook") } } class InstagramSharingService: SharingService { func share(content: Content) { /// Use Instagram API to share a content print("Service: \\(content) was posted to the Instagram", terminator: "\\n\\n") } } protocol Content: CustomStringConvertible { var title: String { get } var images: \[UIImage\] { get } } struct FoodDomainModel: Content { var title: String var images: \[UIImage\] var calories: Int var description: String { return "Food Model" } } #### **Output.txt:** Execution result Client: Pushing Photo View Controller... PhotoViewController: User selected a Food Model to share Service: Food Model was posted to the Instagram PhotoViewController: User selected a Food Model to share Service: Food Model was posted to the Facebook Client: Pushing Feed View Controller... FeedViewController: User selected a Food Model to share Service: Food Model was posted to the Instagram FeedViewController: User selected a Food Model to share Service: Food Model was posted to the Facebook **Bridge** in Other Languages ----------------------------- [![Bridge in C#](https://refactoring.guru/images/patterns/icons/csharp.svg?id=da64592defc6e86d57c39c66e9de3e58)](https://refactoring.guru/design-patterns/bridge/csharp/example "Bridge in C#") [![Bridge in C++](https://refactoring.guru/images/patterns/icons/cpp.svg?id=f7782ed8b8666246bfcc3f8fefc3b858)](https://refactoring.guru/design-patterns/bridge/cpp/example "Bridge in C++") [![Bridge in Go](https://refactoring.guru/images/patterns/icons/go.svg?id=1a89927eb99b1ea3fde7701d97970aca)](https://refactoring.guru/design-patterns/bridge/go/example "Bridge in Go") [![Bridge in Java](https://refactoring.guru/images/patterns/icons/java.svg?id=e6d87e2dca08c953fe3acd1275ed4f4e)](https://refactoring.guru/design-patterns/bridge/java/example "Bridge in Java") [![Bridge in PHP](https://refactoring.guru/images/patterns/icons/php.svg?id=be1906eb26b71ec1d3b93720d6156618)](https://refactoring.guru/design-patterns/bridge/php/example "Bridge in PHP") [![Bridge in Python](https://refactoring.guru/images/patterns/icons/python.svg?id=6d815d43c0f7050a1151b43e51569c9f)](https://refactoring.guru/design-patterns/bridge/python/example "Bridge in Python") [![Bridge in Ruby](https://refactoring.guru/images/patterns/icons/ruby.svg?id=b065b718c914bf8e960ef731600be1eb)](https://refactoring.guru/design-patterns/bridge/ruby/example "Bridge in Ruby") [![Bridge in Rust](https://refactoring.guru/images/patterns/icons/rust.svg?id=1f5698a4b5ae23fe79413511747e4a87)](https://refactoring.guru/design-patterns/bridge/rust/example "Bridge in Rust") [![Bridge in TypeScript](https://refactoring.guru/images/patterns/icons/typescript.svg?id=2239d0f16cb703540c205dd8cb0c0cb7)](https://refactoring.guru/design-patterns/bridge/typescript/example "Bridge in TypeScript") --- # Bridge in Rust / Design Patterns [There are patterns of patterns now! \ My friend's project: MetaPatterns.io](https://metapatterns.io/)  [](https://refactoring.guru/design-patterns/bridge/rust/example#checkout) [](https://refactoring.guru/design-patterns/bridge/rust/example#checkout) [](https://refactoring.guru/) / [Design Patterns](https://refactoring.guru/design-patterns) / [Bridge](https://refactoring.guru/design-patterns/bridge) / [Rust](https://refactoring.guru/design-patterns/rust) ![Bridge](https://refactoring.guru/images/patterns/cards/bridge-mini-2x.png?id=2622384cf623ed150ee9c21a0812dd87) **Bridge** in Rust ================== **Bridge** is a structural design pattern that divides business logic or huge class into separate class hierarchies that can be developed independently. One of these hierarchies (often called the Abstraction) will get a reference to an object of the second hierarchy (Implementation). The abstraction will be able to delegate some (sometimes, most) of its calls to the implementations object. Since all implementations will have a common interface, they’d be interchangeable inside the abstraction. [Learn more about Bridge](https://refactoring.guru/design-patterns/bridge) Navigation  [Intro](https://refactoring.guru/design-patterns/bridge/rust/example#)  [Devices and Remotes](https://refactoring.guru/design-patterns/bridge/rust/example#example-0)   [mod](https://refactoring.guru/design-patterns/bridge/rust/example#example-0--remotes-mod-rs)   [basic](https://refactoring.guru/design-patterns/bridge/rust/example#example-0--remotes-basic-rs)   [advanced](https://refactoring.guru/design-patterns/bridge/rust/example#example-0--remotes-advanced-rs)   [mod](https://refactoring.guru/design-patterns/bridge/rust/example#example-0--device-mod-rs)   [radio](https://refactoring.guru/design-patterns/bridge/rust/example#example-0--device-radio-rs)   [tv](https://refactoring.guru/design-patterns/bridge/rust/example#example-0--device-tv-rs)  [main](https://refactoring.guru/design-patterns/bridge/rust/example#example-0--main-rs) Devices and Remotes ------------------- This example illustrates how the Bridge pattern can help divide the monolithic code of an app that manages devices and their remote controls. The Device classes act as the implementation, whereas the Remotes act as the abstraction. #### **remotes/mod.rs** mod advanced; mod basic; pub use advanced::AdvancedRemote; pub use basic::BasicRemote; use crate::device::Device; pub trait HasMutableDevice { fn device(&mut self) -> &mut D; } pub trait Remote: HasMutableDevice { fn power(&mut self) { println!("Remote: power toggle"); if self.device().is\_enabled() { self.device().disable(); } else { self.device().enable(); } } fn volume\_down(&mut self) { println!("Remote: volume down"); let volume = self.device().volume(); self.device().set\_volume(volume - 10); } fn volume\_up(&mut self) { println!("Remote: volume up"); let volume = self.device().volume(); self.device().set\_volume(volume + 10); } fn channel\_down(&mut self) { println!("Remote: channel down"); let channel = self.device().channel(); self.device().set\_channel(channel - 1); } fn channel\_up(&mut self) { println!("Remote: channel up"); let channel = self.device().channel(); self.device().set\_channel(channel + 1); } } #### **remotes/basic.rs** use crate::device::Device; use super::{HasMutableDevice, Remote}; pub struct BasicRemote { device: D, } impl BasicRemote { pub fn new(device: D) -> Self { Self { device } } } impl HasMutableDevice for BasicRemote { fn device(&mut self) -> &mut D { &mut self.device } } impl Remote for BasicRemote {} #### **remotes/advanced.rs** use crate::device::Device; use super::{HasMutableDevice, Remote}; pub struct AdvancedRemote { device: D, } impl AdvancedRemote { pub fn new(device: D) -> Self { Self { device } } pub fn mute(&mut self) { println!("Remote: mute"); self.device.set\_volume(0); } } impl HasMutableDevice for AdvancedRemote { fn device(&mut self) -> &mut D { &mut self.device } } impl Remote for AdvancedRemote {} #### **device/mod.rs** mod radio; mod tv; pub use radio::Radio; pub use tv::Tv; pub trait Device { fn is\_enabled(&self) -> bool; fn enable(&mut self); fn disable(&mut self); fn volume(&self) -> u8; fn set\_volume(&mut self, percent: u8); fn channel(&self) -> u16; fn set\_channel(&mut self, channel: u16); fn print\_status(&self); } #### **device/radio.rs** use super::Device; #\[derive(Clone)\] pub struct Radio { on: bool, volume: u8, channel: u16, } impl Default for Radio { fn default() -> Self { Self { on: false, volume: 30, channel: 1, } } } impl Device for Radio { fn is\_enabled(&self) -> bool { self.on } fn enable(&mut self) { self.on = true; } fn disable(&mut self) { self.on = false; } fn volume(&self) -> u8 { self.volume } fn set\_volume(&mut self, percent: u8) { self.volume = std::cmp::min(percent, 100); } fn channel(&self) -> u16 { self.channel } fn set\_channel(&mut self, channel: u16) { self.channel = channel; } fn print\_status(&self) { println!("------------------------------------"); println!("| I'm radio."); println!("| I'm {}", if self.on { "enabled" } else { "disabled" }); println!("| Current volume is {}%", self.volume); println!("| Current channel is {}", self.channel); println!("------------------------------------\\n"); } } #### **device/tv.rs** use super::Device; #\[derive(Clone)\] pub struct Tv { on: bool, volume: u8, channel: u16, } impl Default for Tv { fn default() -> Self { Self { on: false, volume: 30, channel: 1, } } } impl Device for Tv { fn is\_enabled(&self) -> bool { self.on } fn enable(&mut self) { self.on = true; } fn disable(&mut self) { self.on = false; } fn volume(&self) -> u8 { self.volume } fn set\_volume(&mut self, percent: u8) { self.volume = std::cmp::min(percent, 100); } fn channel(&self) -> u16 { self.channel } fn set\_channel(&mut self, channel: u16) { self.channel = channel; } fn print\_status(&self) { println!("------------------------------------"); println!("| I'm TV set."); println!("| I'm {}", if self.on { "enabled" } else { "disabled" }); println!("| Current volume is {}%", self.volume); println!("| Current channel is {}", self.channel); println!("------------------------------------\\n"); } } #### **main.rs** mod device; mod remotes; use device::{Device, Radio, Tv}; use remotes::{AdvancedRemote, BasicRemote, HasMutableDevice, Remote}; fn main() { test\_device(Tv::default()); test\_device(Radio::default()); } fn test\_device(device: impl Device + Clone) { println!("Tests with basic remote."); let mut basic\_remote = BasicRemote::new(device.clone()); basic\_remote.power(); basic\_remote.device().print\_status(); println!("Tests with advanced remote."); let mut advanced\_remote = AdvancedRemote::new(device); advanced\_remote.power(); advanced\_remote.mute(); advanced\_remote.device().print\_status(); } ### Output Tests with basic remote. Remote: power toggle ------------------------------------ | I'm TV set. | I'm enabled | Current volume is 30% | Current channel is 1 ------------------------------------ Tests with advanced remote. Remote: power toggle Remote: mute ------------------------------------ | I'm TV set. | I'm enabled | Current volume is 0% | Current channel is 1 ------------------------------------ Tests with basic remote. Remote: power toggle ------------------------------------ | I'm radio. | I'm enabled | Current volume is 30% | Current channel is 1 ------------------------------------ Tests with advanced remote. Remote: power toggle Remote: mute ------------------------------------ | I'm radio. | I'm enabled | Current volume is 0% | Current channel is 1 ------------------------------------\`\`\` **Bridge** in Other Languages ----------------------------- [![Bridge in C#](https://refactoring.guru/images/patterns/icons/csharp.svg?id=da64592defc6e86d57c39c66e9de3e58)](https://refactoring.guru/design-patterns/bridge/csharp/example "Bridge in C#") [![Bridge in C++](https://refactoring.guru/images/patterns/icons/cpp.svg?id=f7782ed8b8666246bfcc3f8fefc3b858)](https://refactoring.guru/design-patterns/bridge/cpp/example "Bridge in C++") [![Bridge in Go](https://refactoring.guru/images/patterns/icons/go.svg?id=1a89927eb99b1ea3fde7701d97970aca)](https://refactoring.guru/design-patterns/bridge/go/example "Bridge in Go") [![Bridge in Java](https://refactoring.guru/images/patterns/icons/java.svg?id=e6d87e2dca08c953fe3acd1275ed4f4e)](https://refactoring.guru/design-patterns/bridge/java/example "Bridge in Java") [![Bridge in PHP](https://refactoring.guru/images/patterns/icons/php.svg?id=be1906eb26b71ec1d3b93720d6156618)](https://refactoring.guru/design-patterns/bridge/php/example "Bridge in PHP") [![Bridge in Python](https://refactoring.guru/images/patterns/icons/python.svg?id=6d815d43c0f7050a1151b43e51569c9f)](https://refactoring.guru/design-patterns/bridge/python/example "Bridge in Python") [![Bridge in Ruby](https://refactoring.guru/images/patterns/icons/ruby.svg?id=b065b718c914bf8e960ef731600be1eb)](https://refactoring.guru/design-patterns/bridge/ruby/example "Bridge in Ruby") [![Bridge in Swift](https://refactoring.guru/images/patterns/icons/swift.svg?id=0b716c2d52ec3a48fbe91ac031070c1d)](https://refactoring.guru/design-patterns/bridge/swift/example "Bridge in Swift") [![Bridge in TypeScript](https://refactoring.guru/images/patterns/icons/typescript.svg?id=2239d0f16cb703540c205dd8cb0c0cb7)](https://refactoring.guru/design-patterns/bridge/typescript/example "Bridge in TypeScript") --- # Builder in C# / Design Patterns [There are patterns of patterns now! \ My friend's project: MetaPatterns.io](https://metapatterns.io/)  [](https://refactoring.guru/design-patterns/builder/csharp/example#checkout) [](https://refactoring.guru/design-patterns/builder/csharp/example#checkout) [](https://refactoring.guru/) / [Design Patterns](https://refactoring.guru/design-patterns) / [Builder](https://refactoring.guru/design-patterns/builder) / [C#](https://refactoring.guru/design-patterns/csharp) ![Builder](https://refactoring.guru/images/patterns/cards/builder-mini-2x.png?id=de6d0938678b86903a1426dddfdd13bf) **Builder** in C# ================= **Builder** is a creational design pattern, which allows constructing complex objects step by step. Unlike other creational patterns, Builder doesn’t require products to have a common interface. That makes it possible to produce different products using the same construction process. [Learn more about Builder](https://refactoring.guru/design-patterns/builder) Navigation  [Intro](https://refactoring.guru/design-patterns/builder/csharp/example#)  [Conceptual Example](https://refactoring.guru/design-patterns/builder/csharp/example#example-0)  [Program](https://refactoring.guru/design-patterns/builder/csharp/example#example-0--Program-cs)  [Output](https://refactoring.guru/design-patterns/builder/csharp/example#example-0--Output-txt) **Complexity:** **Popularity:** **Usage examples:** The Builder pattern is a well-known pattern in C# world. It’s especially useful when you need to create an object with lots of possible configuration options. **Identification:** The Builder pattern can be recognized in a class, which has a single creation method and several methods to configure the resulting object. Builder methods often support chaining (for example, `someBuilder.setValueA(1).setValueB(2).create()`). Conceptual Example ------------------ This example illustrates the structure of the **Builder** design pattern. It focuses on answering these questions: * What classes does it consist of? * What roles do these classes play? * In what way the elements of the pattern are related? #### **Program.cs:** Conceptual example using System; using System.Collections.Generic; namespace RefactoringGuru.DesignPatterns.Builder.Conceptual { // The Builder interface specifies methods for creating the different parts // of the Product objects. public interface IBuilder { void BuildPartA(); void BuildPartB(); void BuildPartC(); } // The Concrete Builder classes follow the Builder interface and provide // specific implementations of the building steps. Your program may have // several variations of Builders, implemented differently. public class ConcreteBuilder : IBuilder { private Product \_product = new Product(); // A fresh builder instance should contain a blank product object, which // is used in further assembly. public ConcreteBuilder() { this.Reset(); } public void Reset() { this.\_product = new Product(); } // All production steps work with the same product instance. public void BuildPartA() { this.\_product.Add("PartA1"); } public void BuildPartB() { this.\_product.Add("PartB1"); } public void BuildPartC() { this.\_product.Add("PartC1"); } // Concrete Builders are supposed to provide their own methods for // retrieving results. That's because various types of builders may // create entirely different products that don't follow the same // interface. Therefore, such methods cannot be declared in the base // Builder interface (at least in a statically typed programming // language). // // Usually, after returning the end result to the client, a builder // instance is expected to be ready to start producing another product. // That's why it's a usual practice to call the reset method at the end // of the \`GetProduct\` method body. However, this behavior is not // mandatory, and you can make your builders wait for an explicit reset // call from the client code before disposing of the previous result. public Product GetProduct() { Product result = this.\_product; this.Reset(); return result; } } // It makes sense to use the Builder pattern only when your products are // quite complex and require extensive configuration. // // Unlike in other creational patterns, different concrete builders can // produce unrelated products. In other words, results of various builders // may not always follow the same interface. public class Product { private List \_parts = new List(); public void Add(string part) { this.\_parts.Add(part); } public string ListParts() { string str = string.Empty; for (int i = 0; i < this.\_parts.Count; i++) { str += this.\_parts\[i\] + ", "; } str = str.Remove(str.Length - 2); // removing last ",c" return "Product parts: " + str + "\\n"; } } // The Director is only responsible for executing the building steps in a // particular sequence. It is helpful when producing products according to a // specific order or configuration. Strictly speaking, the Director class is // optional, since the client can control builders directly. public class Director { private IBuilder \_builder; public IBuilder Builder { set { \_builder = value; } } // The Director can construct several product variations using the same // building steps. public void BuildMinimalViableProduct() { this.\_builder.BuildPartA(); } public void BuildFullFeaturedProduct() { this.\_builder.BuildPartA(); this.\_builder.BuildPartB(); this.\_builder.BuildPartC(); } } class Program { static void Main(string\[\] args) { // The client code creates a builder object, passes it to the // director and then initiates the construction process. The end // result is retrieved from the builder object. var director = new Director(); var builder = new ConcreteBuilder(); director.Builder = builder; Console.WriteLine("Standard basic product:"); director.BuildMinimalViableProduct(); Console.WriteLine(builder.GetProduct().ListParts()); Console.WriteLine("Standard full featured product:"); director.BuildFullFeaturedProduct(); Console.WriteLine(builder.GetProduct().ListParts()); // Remember, the Builder pattern can be used without a Director // class. Console.WriteLine("Custom product:"); builder.BuildPartA(); builder.BuildPartC(); Console.Write(builder.GetProduct().ListParts()); } } } #### **Output.txt:** Execution result Standard basic product: Product parts: PartA1 Standard full featured product: Product parts: PartA1, PartB1, PartC1 Custom product: Product parts: PartA1, PartC1 **Builder** in Other Languages ------------------------------ [![Builder in C++](https://refactoring.guru/images/patterns/icons/cpp.svg?id=f7782ed8b8666246bfcc3f8fefc3b858)](https://refactoring.guru/design-patterns/builder/cpp/example "Builder in C++") [![Builder in Go](https://refactoring.guru/images/patterns/icons/go.svg?id=1a89927eb99b1ea3fde7701d97970aca)](https://refactoring.guru/design-patterns/builder/go/example "Builder in Go") [![Builder in Java](https://refactoring.guru/images/patterns/icons/java.svg?id=e6d87e2dca08c953fe3acd1275ed4f4e)](https://refactoring.guru/design-patterns/builder/java/example "Builder in Java") [![Builder in PHP](https://refactoring.guru/images/patterns/icons/php.svg?id=be1906eb26b71ec1d3b93720d6156618)](https://refactoring.guru/design-patterns/builder/php/example "Builder in PHP") [![Builder in Python](https://refactoring.guru/images/patterns/icons/python.svg?id=6d815d43c0f7050a1151b43e51569c9f)](https://refactoring.guru/design-patterns/builder/python/example "Builder in Python") [![Builder in Ruby](https://refactoring.guru/images/patterns/icons/ruby.svg?id=b065b718c914bf8e960ef731600be1eb)](https://refactoring.guru/design-patterns/builder/ruby/example "Builder in Ruby") [![Builder in Rust](https://refactoring.guru/images/patterns/icons/rust.svg?id=1f5698a4b5ae23fe79413511747e4a87)](https://refactoring.guru/design-patterns/builder/rust/example "Builder in Rust") [![Builder in Swift](https://refactoring.guru/images/patterns/icons/swift.svg?id=0b716c2d52ec3a48fbe91ac031070c1d)](https://refactoring.guru/design-patterns/builder/swift/example "Builder in Swift") [![Builder in TypeScript](https://refactoring.guru/images/patterns/icons/typescript.svg?id=2239d0f16cb703540c205dd8cb0c0cb7)](https://refactoring.guru/design-patterns/builder/typescript/example "Builder in TypeScript") --- # Builder in Go / Design Patterns [There are patterns of patterns now! \ My friend's project: MetaPatterns.io](https://metapatterns.io/)  [](https://refactoring.guru/design-patterns/builder/go/example#checkout) [](https://refactoring.guru/design-patterns/builder/go/example#checkout) [](https://refactoring.guru/) / [Design Patterns](https://refactoring.guru/design-patterns) / [Builder](https://refactoring.guru/design-patterns/builder) / [Go](https://refactoring.guru/design-patterns/go) ![Builder](https://refactoring.guru/images/patterns/cards/builder-mini-2x.png?id=de6d0938678b86903a1426dddfdd13bf) **Builder** in Go ================= **Builder** is a creational design pattern, which allows constructing complex objects step by step. Unlike other creational patterns, Builder doesn’t require products to have a common interface. That makes it possible to produce different products using the same construction process. [Learn more about Builder](https://refactoring.guru/design-patterns/builder) Navigation  [Intro](https://refactoring.guru/design-patterns/builder/go/example#)  [Conceptual Example](https://refactoring.guru/design-patterns/builder/go/example#example-0)  [i­Builder](https://refactoring.guru/design-patterns/builder/go/example#example-0--iBuilder-go)  [normal­Builder](https://refactoring.guru/design-patterns/builder/go/example#example-0--normalBuilder-go)  [igloo­Builder](https://refactoring.guru/design-patterns/builder/go/example#example-0--iglooBuilder-go)  [house](https://refactoring.guru/design-patterns/builder/go/example#example-0--house-go)  [director](https://refactoring.guru/design-patterns/builder/go/example#example-0--director-go)  [main](https://refactoring.guru/design-patterns/builder/go/example#example-0--main-go)  [output](https://refactoring.guru/design-patterns/builder/go/example#example-0--output-txt) Conceptual Example ------------------ The Builder pattern is used when the desired product is complex and requires multiple steps to complete. In this case, several construction methods would be simpler than a single monstrous constructor. The potential problem with the multistage building process is that a partially built and unstable product may be exposed to the client. The Builder pattern keeps the product private until it’s fully built. In the below code, we see different types of houses (`igloo` and `normalHouse`) being constructed by `iglooBuilder` and `normalBuilder`. Each house type has the same construction steps. The optional director struct helps to organize the building process. #### **iBuilder.go:** Builder interface package main type IBuilder interface { setWindowType() setDoorType() setNumFloor() getHouse() House } func getBuilder(builderType string) IBuilder { if builderType == "normal" { return newNormalBuilder() } if builderType == "igloo" { return newIglooBuilder() } return nil } #### **normalBuilder.go:** Concrete builder package main type NormalBuilder struct { windowType string doorType string floor int } func newNormalBuilder() \*NormalBuilder { return &NormalBuilder{} } func (b \*NormalBuilder) setWindowType() { b.windowType = "Wooden Window" } func (b \*NormalBuilder) setDoorType() { b.doorType = "Wooden Door" } func (b \*NormalBuilder) setNumFloor() { b.floor = 2 } func (b \*NormalBuilder) getHouse() House { return House{ doorType: b.doorType, windowType: b.windowType, floor: b.floor, } } #### **iglooBuilder.go:** Concrete builder package main type IglooBuilder struct { windowType string doorType string floor int } func newIglooBuilder() \*IglooBuilder { return &IglooBuilder{} } func (b \*IglooBuilder) setWindowType() { b.windowType = "Snow Window" } func (b \*IglooBuilder) setDoorType() { b.doorType = "Snow Door" } func (b \*IglooBuilder) setNumFloor() { b.floor = 1 } func (b \*IglooBuilder) getHouse() House { return House{ doorType: b.doorType, windowType: b.windowType, floor: b.floor, } } #### **house.go:** Product package main type House struct { windowType string doorType string floor int } #### **director.go:** Director package main type Director struct { builder IBuilder } func newDirector(b IBuilder) \*Director { return &Director{ builder: b, } } func (d \*Director) setBuilder(b IBuilder) { d.builder = b } func (d \*Director) buildHouse() House { d.builder.setDoorType() d.builder.setWindowType() d.builder.setNumFloor() return d.builder.getHouse() } #### **main.go:** Client code package main import "fmt" func main() { normalBuilder := getBuilder("normal") iglooBuilder := getBuilder("igloo") director := newDirector(normalBuilder) normalHouse := director.buildHouse() fmt.Printf("Normal House Door Type: %s\\n", normalHouse.doorType) fmt.Printf("Normal House Window Type: %s\\n", normalHouse.windowType) fmt.Printf("Normal House Num Floor: %d\\n", normalHouse.floor) director.setBuilder(iglooBuilder) iglooHouse := director.buildHouse() fmt.Printf("\\nIgloo House Door Type: %s\\n", iglooHouse.doorType) fmt.Printf("Igloo House Window Type: %s\\n", iglooHouse.windowType) fmt.Printf("Igloo House Num Floor: %d\\n", iglooHouse.floor) } #### **output.txt:** Execution result Normal House Door Type: Wooden Door Normal House Window Type: Wooden Window Normal House Num Floor: 2 Igloo House Door Type: Snow Door Igloo House Window Type: Snow Window Igloo House Num Floor: 1 **Builder** in Other Languages ------------------------------ [![Builder in C#](https://refactoring.guru/images/patterns/icons/csharp.svg?id=da64592defc6e86d57c39c66e9de3e58)](https://refactoring.guru/design-patterns/builder/csharp/example "Builder in C#") [![Builder in C++](https://refactoring.guru/images/patterns/icons/cpp.svg?id=f7782ed8b8666246bfcc3f8fefc3b858)](https://refactoring.guru/design-patterns/builder/cpp/example "Builder in C++") [![Builder in Java](https://refactoring.guru/images/patterns/icons/java.svg?id=e6d87e2dca08c953fe3acd1275ed4f4e)](https://refactoring.guru/design-patterns/builder/java/example "Builder in Java") [![Builder in PHP](https://refactoring.guru/images/patterns/icons/php.svg?id=be1906eb26b71ec1d3b93720d6156618)](https://refactoring.guru/design-patterns/builder/php/example "Builder in PHP") [![Builder in Python](https://refactoring.guru/images/patterns/icons/python.svg?id=6d815d43c0f7050a1151b43e51569c9f)](https://refactoring.guru/design-patterns/builder/python/example "Builder in Python") [![Builder in Ruby](https://refactoring.guru/images/patterns/icons/ruby.svg?id=b065b718c914bf8e960ef731600be1eb)](https://refactoring.guru/design-patterns/builder/ruby/example "Builder in Ruby") [![Builder in Rust](https://refactoring.guru/images/patterns/icons/rust.svg?id=1f5698a4b5ae23fe79413511747e4a87)](https://refactoring.guru/design-patterns/builder/rust/example "Builder in Rust") [![Builder in Swift](https://refactoring.guru/images/patterns/icons/swift.svg?id=0b716c2d52ec3a48fbe91ac031070c1d)](https://refactoring.guru/design-patterns/builder/swift/example "Builder in Swift") [![Builder in TypeScript](https://refactoring.guru/images/patterns/icons/typescript.svg?id=2239d0f16cb703540c205dd8cb0c0cb7)](https://refactoring.guru/design-patterns/builder/typescript/example "Builder in TypeScript") --- # Builder in Ruby / Design Patterns [There are patterns of patterns now! \ My friend's project: MetaPatterns.io](https://metapatterns.io/)  [](https://refactoring.guru/design-patterns/builder/ruby/example#checkout) [](https://refactoring.guru/design-patterns/builder/ruby/example#checkout) [](https://refactoring.guru/) / [Design Patterns](https://refactoring.guru/design-patterns) / [Builder](https://refactoring.guru/design-patterns/builder) / [Ruby](https://refactoring.guru/design-patterns/ruby) ![Builder](https://refactoring.guru/images/patterns/cards/builder-mini-2x.png?id=de6d0938678b86903a1426dddfdd13bf) **Builder** in Ruby =================== **Builder** is a creational design pattern, which allows constructing complex objects step by step. Unlike other creational patterns, Builder doesn’t require products to have a common interface. That makes it possible to produce different products using the same construction process. [Learn more about Builder](https://refactoring.guru/design-patterns/builder) Navigation  [Intro](https://refactoring.guru/design-patterns/builder/ruby/example#)  [Conceptual Example](https://refactoring.guru/design-patterns/builder/ruby/example#example-0)  [main](https://refactoring.guru/design-patterns/builder/ruby/example#example-0--main-rb)  [output](https://refactoring.guru/design-patterns/builder/ruby/example#example-0--output-txt) **Complexity:** **Popularity:** **Usage examples:** The Builder pattern is a well-known pattern in Ruby world. It’s especially useful when you need to create an object with lots of possible configuration options. **Identification:** The Builder pattern can be recognized in a class, which has a single creation method and several methods to configure the resulting object. Builder methods often support chaining (for example, `someBuilder.setValueA(1).setValueB(2).create()`). Conceptual Example ------------------ This example illustrates the structure of the **Builder** design pattern. It focuses on answering these questions: * What classes does it consist of? * What roles do these classes play? * In what way the elements of the pattern are related? #### **main.rb:** Conceptual example \# The Builder interface specifies methods for creating the different parts of # the Product objects. class Builder # @abstract def produce\_part\_a raise NotImplementedError, "#{self.class} has not implemented method '#{\_\_method\_\_}'" end # @abstract def produce\_part\_b raise NotImplementedError, "#{self.class} has not implemented method '#{\_\_method\_\_}'" end # @abstract def produce\_part\_c raise NotImplementedError, "#{self.class} has not implemented method '#{\_\_method\_\_}'" end end # The Concrete Builder classes follow the Builder interface and provide specific # implementations of the building steps. Your program may have several # variations of Builders, implemented differently. class ConcreteBuilder1 < Builder # A fresh builder instance should contain a blank product object, which is # used in further assembly. def initialize reset end def reset @product = Product1.new end # Concrete Builders are supposed to provide their own methods for retrieving # results. That's because various types of builders may create entirely # different products that don't follow the same interface. Therefore, such # methods cannot be declared in the base Builder interface (at least in a # statically typed programming language). # # Usually, after returning the end result to the client, a builder instance is # expected to be ready to start producing another product. That's why it's a # usual practice to call the reset method at the end of the \`getProduct\` # method body. However, this behavior is not mandatory, and you can make your # builders wait for an explicit reset call from the client code before # disposing of the previous result. def product product = @product reset product end def produce\_part\_a @product.add('PartA1') end def produce\_part\_b @product.add('PartB1') end def produce\_part\_c @product.add('PartC1') end end # It makes sense to use the Builder pattern only when your products are quite # complex and require extensive configuration. # # Unlike in other creational patterns, different concrete builders can produce # unrelated products. In other words, results of various builders may not always # follow the same interface. class Product1 def initialize @parts = \[\] end # @param \[String\] part def add(part) @parts << part end def list\_parts print "Product parts: #{@parts.join(', ')}" end end # The Director is only responsible for executing the building steps in a # particular sequence. It is helpful when producing products according to a # specific order or configuration. Strictly speaking, the Director class is # optional, since the client can control builders directly. class Director # @return \[Builder\] attr\_accessor :builder def initialize @builder = nil end # The Director works with any builder instance that the client code passes to # it. This way, the client code may alter the final type of the newly # assembled product. def builder=(builder) @builder = builder end # The Director can construct several product variations using the same # building steps. def build\_minimal\_viable\_product @builder.produce\_part\_a end def build\_full\_featured\_product @builder.produce\_part\_a @builder.produce\_part\_b @builder.produce\_part\_c end end # The client code creates a builder object, passes it to the director and then # initiates the construction process. The end result is retrieved from the # builder object. director = Director.new builder = ConcreteBuilder1.new director.builder = builder puts 'Standard basic product: ' director.build\_minimal\_viable\_product builder.product.list\_parts puts "\\n\\n" puts 'Standard full featured product: ' director.build\_full\_featured\_product builder.product.list\_parts puts "\\n\\n" # Remember, the Builder pattern can be used without a Director class. puts 'Custom product: ' builder.produce\_part\_a builder.produce\_part\_b builder.product.list\_parts #### **output.txt:** Execution result Standard basic product: Product parts: PartA1 Standard full featured product: Product parts: PartA1, PartB1, PartC1 Custom product: Product parts: PartA1, PartB1 **Builder** in Other Languages ------------------------------ [![Builder in C#](https://refactoring.guru/images/patterns/icons/csharp.svg?id=da64592defc6e86d57c39c66e9de3e58)](https://refactoring.guru/design-patterns/builder/csharp/example "Builder in C#") [![Builder in C++](https://refactoring.guru/images/patterns/icons/cpp.svg?id=f7782ed8b8666246bfcc3f8fefc3b858)](https://refactoring.guru/design-patterns/builder/cpp/example "Builder in C++") [![Builder in Go](https://refactoring.guru/images/patterns/icons/go.svg?id=1a89927eb99b1ea3fde7701d97970aca)](https://refactoring.guru/design-patterns/builder/go/example "Builder in Go") [![Builder in Java](https://refactoring.guru/images/patterns/icons/java.svg?id=e6d87e2dca08c953fe3acd1275ed4f4e)](https://refactoring.guru/design-patterns/builder/java/example "Builder in Java") [![Builder in PHP](https://refactoring.guru/images/patterns/icons/php.svg?id=be1906eb26b71ec1d3b93720d6156618)](https://refactoring.guru/design-patterns/builder/php/example "Builder in PHP") [![Builder in Python](https://refactoring.guru/images/patterns/icons/python.svg?id=6d815d43c0f7050a1151b43e51569c9f)](https://refactoring.guru/design-patterns/builder/python/example "Builder in Python") [![Builder in Rust](https://refactoring.guru/images/patterns/icons/rust.svg?id=1f5698a4b5ae23fe79413511747e4a87)](https://refactoring.guru/design-patterns/builder/rust/example "Builder in Rust") [![Builder in Swift](https://refactoring.guru/images/patterns/icons/swift.svg?id=0b716c2d52ec3a48fbe91ac031070c1d)](https://refactoring.guru/design-patterns/builder/swift/example "Builder in Swift") [![Builder in TypeScript](https://refactoring.guru/images/patterns/icons/typescript.svg?id=2239d0f16cb703540c205dd8cb0c0cb7)](https://refactoring.guru/design-patterns/builder/typescript/example "Builder in TypeScript") --- # Ejemplos de código de patrones de diseño [There are patterns of patterns now! \ My friend's project: MetaPatterns.io](https://metapatterns.io/)  [](https://refactoring.guru/es/design-patterns/examples#checkout) [](https://refactoring.guru/es/design-patterns/examples#checkout) PATRONES de DISEÑO en **distintos** lenguajes de programación ============================================================= [![Patrones de diseño en C#](https://refactoring.guru/images/patterns/icons/csharp.svg?id=da64592defc6e86d57c39c66e9de3e58)](https://refactoring.guru/es/design-patterns/csharp "Patrones de diseño en C#") [![Patrones de diseño en C++](https://refactoring.guru/images/patterns/icons/cpp.svg?id=f7782ed8b8666246bfcc3f8fefc3b858)](https://refactoring.guru/es/design-patterns/cpp "Patrones de diseño en C++") [![Patrones de diseño en Go](https://refactoring.guru/images/patterns/icons/go.svg?id=1a89927eb99b1ea3fde7701d97970aca)](https://refactoring.guru/es/design-patterns/go "Patrones de diseño en Go") [![Patrones de diseño en Java](https://refactoring.guru/images/patterns/icons/java.svg?id=e6d87e2dca08c953fe3acd1275ed4f4e)](https://refactoring.guru/es/design-patterns/java "Patrones de diseño en Java") [![Patrones de diseño en PHP](https://refactoring.guru/images/patterns/icons/php.svg?id=be1906eb26b71ec1d3b93720d6156618)](https://refactoring.guru/es/design-patterns/php "Patrones de diseño en PHP") [![Patrones de diseño en Python](https://refactoring.guru/images/patterns/icons/python.svg?id=6d815d43c0f7050a1151b43e51569c9f)](https://refactoring.guru/es/design-patterns/python "Patrones de diseño en Python") [![Patrones de diseño en Ruby](https://refactoring.guru/images/patterns/icons/ruby.svg?id=b065b718c914bf8e960ef731600be1eb)](https://refactoring.guru/es/design-patterns/ruby "Patrones de diseño en Ruby") [![Patrones de diseño en Rust](https://refactoring.guru/images/patterns/icons/rust.svg?id=1f5698a4b5ae23fe79413511747e4a87)](https://refactoring.guru/es/design-patterns/rust "Patrones de diseño en Rust") [![Patrones de diseño en Swift](https://refactoring.guru/images/patterns/icons/swift.svg?id=0b716c2d52ec3a48fbe91ac031070c1d)](https://refactoring.guru/es/design-patterns/swift "Patrones de diseño en Swift") [![Patrones de diseño en TypeScript](https://refactoring.guru/images/patterns/icons/typescript.svg?id=2239d0f16cb703540c205dd8cb0c0cb7)](https://refactoring.guru/es/design-patterns/typescript "Patrones de diseño en TypeScript") --- # Patrones creacionales [There are patterns of patterns now! \ My friend's project: MetaPatterns.io](https://metapatterns.io/)  [](https://refactoring.guru/es/design-patterns/creational-patterns#checkout) [](https://refactoring.guru/es/design-patterns/creational-patterns#checkout) [](https://refactoring.guru/) / [Patrones de diseño](https://refactoring.guru/es/design-patterns) / [Catálogo](https://refactoring.guru/es/design-patterns/catalog) Patrones creacionales ===================== Los patrones creacionales proporcionan varios mecanismos de creación de objetos que incrementan la flexibilidad y la reutilización del código existente. [![Factory Method](https://refactoring.guru/images/patterns/cards/factory-method-mini-3x.png) Factory Method\ \ Proporciona una interfaz para la creación de objetos en una superclase, mientras permite a las subclases alterar el tipo de objetos que se crearán.](https://refactoring.guru/es/design-patterns/factory-method) [![Abstract Factory](https://refactoring.guru/images/patterns/cards/abstract-factory-mini-3x.png) Abstract Factory\ \ Permite producir familias de objetos relacionados sin especificar sus clases concretas.](https://refactoring.guru/es/design-patterns/abstract-factory) [![Builder](https://refactoring.guru/images/patterns/cards/builder-mini-3x.png) Builder\ \ Permite construir objetos complejos paso a paso. Este patrón nos permite producir distintos tipos y representaciones de un objeto empleando el mismo código de construcción.](https://refactoring.guru/es/design-patterns/builder) [![Prototype](https://refactoring.guru/images/patterns/cards/prototype-mini-3x.png) Prototype\ \ Permite copiar objetos existentes sin que el código dependa de sus clases.](https://refactoring.guru/es/design-patterns/prototype) [![Singleton](https://refactoring.guru/images/patterns/cards/singleton-mini-3x.png) Singleton\ \ Permite asegurarnos de que una clase tenga una única instancia, a la vez que proporciona un punto de acceso global a dicha instancia.](https://refactoring.guru/es/design-patterns/singleton) --- # Adapter en C++ / Patrones de diseño [There are patterns of patterns now! \ My friend's project: MetaPatterns.io](https://metapatterns.io/)  [](https://refactoring.guru/es/design-patterns/adapter/cpp/example#checkout) [](https://refactoring.guru/es/design-patterns/adapter/cpp/example#checkout) [](https://refactoring.guru/) / [Patrones de diseño](https://refactoring.guru/es/design-patterns) / [Adapter](https://refactoring.guru/es/design-patterns/adapter) / [C++](https://refactoring.guru/es/design-patterns/cpp) ![Adapter](https://refactoring.guru/images/patterns/cards/adapter-mini-2x.png?id=8274d99afbbe9c63bfbfd0d68ceeffc7) **Adapter** en C++ ================== **Adapter** es un patrón de diseño estructural que permite colaborar a objetos incompatibles. El patrón Adapter actúa como envoltorio entre dos objetos. Atrapa las llamadas a un objeto y las transforma a un formato y una interfaz reconocible para el segundo objeto. [Aprende más sobre el patrón Adapter](https://refactoring.guru/es/design-patterns/adapter) Navegación  [Intro](https://refactoring.guru/es/design-patterns/adapter/cpp/example#)  [Ejemplo conceptual](https://refactoring.guru/es/design-patterns/adapter/cpp/example#example-0)  [main](https://refactoring.guru/es/design-patterns/adapter/cpp/example#example-0--main-cc)  [Output](https://refactoring.guru/es/design-patterns/adapter/cpp/example#example-0--Output-txt)  [Herencia múltiple](https://refactoring.guru/es/design-patterns/adapter/cpp/example#example-1)  [main](https://refactoring.guru/es/design-patterns/adapter/cpp/example#example-1--main-cc)  [Output](https://refactoring.guru/es/design-patterns/adapter/cpp/example#example-1--Output-txt) **Complejidad:** **Popularidad:** **Ejemplos de uso:** El patrón Adapter es muy común en el código C++. Se utiliza muy a menudo en sistemas basados en algún código heredado. En estos casos, los adaptadores crean código heredado con clases modernas. **Identificación:** Adapter es reconocible por un constructor que toma una instancia de distinto tipo de clase abstracta/interfaz. Cuando el adaptador recibe una llamada a uno de sus métodos, convierte los parámetros al formato adecuado y después dirige la llamada a uno o varios métodos del objeto envuelto. Ejemplo conceptual ------------------ Este ejemplo ilustra la estructura del patrón de diseño **Adapter**. Se centra en responder las siguientes preguntas: * ¿De qué clases se compone? * ¿Qué papeles juegan esas clases? * ¿De qué forma se relacionan los elementos del patrón? #### **main.cc:** Ejemplo conceptual /\*\* \* The Target defines the domain-specific interface used by the client code. \*/ class Target { public: virtual ~Target() = default; virtual std::string Request() const { return "Target: The default target's behavior."; } }; /\*\* \* The Adaptee contains some useful behavior, but its interface is incompatible \* with the existing client code. The Adaptee needs some adaptation before the \* client code can use it. \*/ class Adaptee { public: std::string SpecificRequest() const { return ".eetpadA eht fo roivaheb laicepS"; } }; /\*\* \* The Adapter makes the Adaptee's interface compatible with the Target's \* interface. \*/ class Adapter : public Target { private: Adaptee \*adaptee\_; public: Adapter(Adaptee \*adaptee) : adaptee\_(adaptee) {} std::string Request() const override { std::string to\_reverse = this->adaptee\_->SpecificRequest(); std::reverse(to\_reverse.begin(), to\_reverse.end()); return "Adapter: (TRANSLATED) " + to\_reverse; } }; /\*\* \* The client code supports all classes that follow the Target interface. \*/ void ClientCode(const Target \*target) { std::cout << target->Request(); } int main() { std::cout << "Client: I can work just fine with the Target objects:\\n"; Target \*target = new Target; ClientCode(target); std::cout << "\\n\\n"; Adaptee \*adaptee = new Adaptee; std::cout << "Client: The Adaptee class has a weird interface. See, I don't understand it:\\n"; std::cout << "Adaptee: " << adaptee->SpecificRequest(); std::cout << "\\n\\n"; std::cout << "Client: But I can work with it via the Adapter:\\n"; Adapter \*adapter = new Adapter(adaptee); ClientCode(adapter); std::cout << "\\n"; delete target; delete adaptee; delete adapter; return 0; } #### **Output.txt:** Resultado de la ejecución Client: I can work just fine with the Target objects: Target: The default target's behavior. Client: The Adaptee class has a weird interface. See, I don't understand it: Adaptee: .eetpadA eht fo roivaheb laicepS Client: But I can work with it via the Adapter: Adapter: (TRANSLATED) Special behavior of the Adaptee. Herencia múltiple ----------------- En C++, el patrón **Adapter** puede implementarse utilizando la herencia múltiple. #### **main.cc:** Herencia múltiple /\*\* \* The Target defines the domain-specific interface used by the client code. \*/ class Target { public: virtual ~Target() = default; virtual std::string Request() const { return "Target: The default target's behavior."; } }; /\*\* \* The Adaptee contains some useful behavior, but its interface is incompatible \* with the existing client code. The Adaptee needs some adaptation before the \* client code can use it. \*/ class Adaptee { public: std::string SpecificRequest() const { return ".eetpadA eht fo roivaheb laicepS"; } }; /\*\* \* The Adapter makes the Adaptee's interface compatible with the Target's \* interface using multiple inheritance. \*/ class Adapter : public Target, public Adaptee { public: Adapter() {} std::string Request() const override { std::string to\_reverse = SpecificRequest(); std::reverse(to\_reverse.begin(), to\_reverse.end()); return "Adapter: (TRANSLATED) " + to\_reverse; } }; /\*\* \* The client code supports all classes that follow the Target interface. \*/ void ClientCode(const Target \*target) { std::cout << target->Request(); } int main() { std::cout << "Client: I can work just fine with the Target objects:\\n"; Target \*target = new Target; ClientCode(target); std::cout << "\\n\\n"; Adaptee \*adaptee = new Adaptee; std::cout << "Client: The Adaptee class has a weird interface. See, I don't understand it:\\n"; std::cout << "Adaptee: " << adaptee->SpecificRequest(); std::cout << "\\n\\n"; std::cout << "Client: But I can work with it via the Adapter:\\n"; Adapter \*adapter = new Adapter; ClientCode(adapter); std::cout << "\\n"; delete target; delete adaptee; delete adapter; return 0; } #### **Output.txt:** Resultado de la ejecución Client: I can work just fine with the Target objects: Target: The default target's behavior. Client: The Adaptee class has a weird interface. See, I don't understand it: Adaptee: .eetpadA eht fo roivaheb laicepS Client: But I can work with it via the Adapter: Adapter: (TRANSLATED) Special behavior of the Adaptee. **Adapter** en otros lenguajes ------------------------------ [![Adapter en C#](https://refactoring.guru/images/patterns/icons/csharp.svg?id=da64592defc6e86d57c39c66e9de3e58)](https://refactoring.guru/es/design-patterns/adapter/csharp/example "Adapter en C#") [![Adapter en Go](https://refactoring.guru/images/patterns/icons/go.svg?id=1a89927eb99b1ea3fde7701d97970aca)](https://refactoring.guru/es/design-patterns/adapter/go/example "Adapter en Go") [![Adapter en Java](https://refactoring.guru/images/patterns/icons/java.svg?id=e6d87e2dca08c953fe3acd1275ed4f4e)](https://refactoring.guru/es/design-patterns/adapter/java/example "Adapter en Java") [![Adapter en PHP](https://refactoring.guru/images/patterns/icons/php.svg?id=be1906eb26b71ec1d3b93720d6156618)](https://refactoring.guru/es/design-patterns/adapter/php/example "Adapter en PHP") [![Adapter en Python](https://refactoring.guru/images/patterns/icons/python.svg?id=6d815d43c0f7050a1151b43e51569c9f)](https://refactoring.guru/es/design-patterns/adapter/python/example "Adapter en Python") [![Adapter en Ruby](https://refactoring.guru/images/patterns/icons/ruby.svg?id=b065b718c914bf8e960ef731600be1eb)](https://refactoring.guru/es/design-patterns/adapter/ruby/example "Adapter en Ruby") [![Adapter en Rust](https://refactoring.guru/images/patterns/icons/rust.svg?id=1f5698a4b5ae23fe79413511747e4a87)](https://refactoring.guru/es/design-patterns/adapter/rust/example "Adapter en Rust") [![Adapter en Swift](https://refactoring.guru/images/patterns/icons/swift.svg?id=0b716c2d52ec3a48fbe91ac031070c1d)](https://refactoring.guru/es/design-patterns/adapter/swift/example "Adapter en Swift") [![Adapter en TypeScript](https://refactoring.guru/images/patterns/icons/typescript.svg?id=2239d0f16cb703540c205dd8cb0c0cb7)](https://refactoring.guru/es/design-patterns/adapter/typescript/example "Adapter en TypeScript") --- # Bridge en Python / Patrones de diseño [There are patterns of patterns now! \ My friend's project: MetaPatterns.io](https://metapatterns.io/)  [](https://refactoring.guru/es/design-patterns/bridge/python/example#checkout) [](https://refactoring.guru/es/design-patterns/bridge/python/example#checkout) [](https://refactoring.guru/) / [Patrones de diseño](https://refactoring.guru/es/design-patterns) / [Bridge](https://refactoring.guru/es/design-patterns/bridge) / [Python](https://refactoring.guru/es/design-patterns/python) ![Bridge](https://refactoring.guru/images/patterns/cards/bridge-mini-2x.png?id=2622384cf623ed150ee9c21a0812dd87) **Bridge** en Python ==================== **Bridge** es un patrón de diseño estructural que divide la lógica de negocio o una clase muy grande en jerarquías de clases separadas que se pueden desarrollar independientemente. Una de estas jerarquías (a menudo denominada Abstracción) obtendrá una referencia a un objeto de la segunda jerarquía (Implementación). La abstracción podrá delegar algunas (en ocasiones, la mayoría) de sus llamadas al objeto de las implementaciones. Como todas las implementaciones tendrán una interfaz común, serán intercambiables dentro de la abstracción. [Aprende más sobre el patrón Bridge](https://refactoring.guru/es/design-patterns/bridge) Navegación  [Intro](https://refactoring.guru/es/design-patterns/bridge/python/example#)  [Ejemplo conceptual](https://refactoring.guru/es/design-patterns/bridge/python/example#example-0)  [main](https://refactoring.guru/es/design-patterns/bridge/python/example#example-0--main-py)  [Output](https://refactoring.guru/es/design-patterns/bridge/python/example#example-0--Output-txt) **Complejidad:** **Popularidad:** **Ejemplos de uso:** El patrón Bridge es de especial utilidad a la hora de tratar con aplicaciones multiplataforma, soportar varios tipos de servidores de bases de datos, o trabajar con varios proveedores de API de un cierto tipo (por ejemplo, plataformas en la nube, redes sociales, etc.). **Identificación:** El patrón Bridge se puede reconocer por una distinción clara entre alguna entidad controladora y varias plataformas diferentes en las que se basa. Ejemplo conceptual ------------------ Este ejemplo ilustra la estructura del patrón de diseño **Bridge**. Se centra en responder las siguientes preguntas: * ¿De qué clases se compone? * ¿Qué papeles juegan esas clases? * ¿De qué forma se relacionan los elementos del patrón? #### **main.py:** Ejemplo conceptual from \_\_future\_\_ import annotations from abc import ABC, abstractmethod class Abstraction: """ The Abstraction defines the interface for the "control" part of the two class hierarchies. It maintains a reference to an object of the Implementation hierarchy and delegates all of the real work to this object. """ def \_\_init\_\_(self, implementation: Implementation) -> None: self.implementation = implementation def operation(self) -> str: return (f"Abstraction: Base operation with:\\n" f"{self.implementation.operation\_implementation()}") class ExtendedAbstraction(Abstraction): """ You can extend the Abstraction without changing the Implementation classes. """ def operation(self) -> str: return (f"ExtendedAbstraction: Extended operation with:\\n" f"{self.implementation.operation\_implementation()}") class Implementation(ABC): """ The Implementation defines the interface for all implementation classes. It doesn't have to match the Abstraction's interface. In fact, the two interfaces can be entirely different. Typically the Implementation interface provides only primitive operations, while the Abstraction defines higher- level operations based on those primitives. """ @abstractmethod def operation\_implementation(self) -> str: pass """ Each Concrete Implementation corresponds to a specific platform and implements the Implementation interface using that platform's API. """ class ConcreteImplementationA(Implementation): def operation\_implementation(self) -> str: return "ConcreteImplementationA: Here's the result on the platform A." class ConcreteImplementationB(Implementation): def operation\_implementation(self) -> str: return "ConcreteImplementationB: Here's the result on the platform B." def client\_code(abstraction: Abstraction) -> None: """ Except for the initialization phase, where an Abstraction object gets linked with a specific Implementation object, the client code should only depend on the Abstraction class. This way the client code can support any abstraction- implementation combination. """ # ... print(abstraction.operation(), end="") # ... if \_\_name\_\_ == "\_\_main\_\_": """ The client code should be able to work with any pre-configured abstraction- implementation combination. """ implementation = ConcreteImplementationA() abstraction = Abstraction(implementation) client\_code(abstraction) print("\\n") implementation = ConcreteImplementationB() abstraction = ExtendedAbstraction(implementation) client\_code(abstraction) #### **Output.txt:** Resultado de la ejecución Abstraction: Base operation with: ConcreteImplementationA: Here's the result on the platform A. ExtendedAbstraction: Extended operation with: ConcreteImplementationB: Here's the result on the platform B. **Bridge** en otros lenguajes ----------------------------- [![Bridge en C#](https://refactoring.guru/images/patterns/icons/csharp.svg?id=da64592defc6e86d57c39c66e9de3e58)](https://refactoring.guru/es/design-patterns/bridge/csharp/example "Bridge en C#") [![Bridge en C++](https://refactoring.guru/images/patterns/icons/cpp.svg?id=f7782ed8b8666246bfcc3f8fefc3b858)](https://refactoring.guru/es/design-patterns/bridge/cpp/example "Bridge en C++") [![Bridge en Go](https://refactoring.guru/images/patterns/icons/go.svg?id=1a89927eb99b1ea3fde7701d97970aca)](https://refactoring.guru/es/design-patterns/bridge/go/example "Bridge en Go") [![Bridge en Java](https://refactoring.guru/images/patterns/icons/java.svg?id=e6d87e2dca08c953fe3acd1275ed4f4e)](https://refactoring.guru/es/design-patterns/bridge/java/example "Bridge en Java") [![Bridge en PHP](https://refactoring.guru/images/patterns/icons/php.svg?id=be1906eb26b71ec1d3b93720d6156618)](https://refactoring.guru/es/design-patterns/bridge/php/example "Bridge en PHP") [![Bridge en Ruby](https://refactoring.guru/images/patterns/icons/ruby.svg?id=b065b718c914bf8e960ef731600be1eb)](https://refactoring.guru/es/design-patterns/bridge/ruby/example "Bridge en Ruby") [![Bridge en Rust](https://refactoring.guru/images/patterns/icons/rust.svg?id=1f5698a4b5ae23fe79413511747e4a87)](https://refactoring.guru/es/design-patterns/bridge/rust/example "Bridge en Rust") [![Bridge en Swift](https://refactoring.guru/images/patterns/icons/swift.svg?id=0b716c2d52ec3a48fbe91ac031070c1d)](https://refactoring.guru/es/design-patterns/bridge/swift/example "Bridge en Swift") [![Bridge en TypeScript](https://refactoring.guru/images/patterns/icons/typescript.svg?id=2239d0f16cb703540c205dd8cb0c0cb7)](https://refactoring.guru/es/design-patterns/bridge/typescript/example "Bridge en TypeScript") --- # Bridge en C# / Patrones de diseño [There are patterns of patterns now! \ My friend's project: MetaPatterns.io](https://metapatterns.io/)  [](https://refactoring.guru/es/design-patterns/bridge/csharp/example#checkout) [](https://refactoring.guru/es/design-patterns/bridge/csharp/example#checkout) [](https://refactoring.guru/) / [Patrones de diseño](https://refactoring.guru/es/design-patterns) / [Bridge](https://refactoring.guru/es/design-patterns/bridge) / [C#](https://refactoring.guru/es/design-patterns/csharp) ![Bridge](https://refactoring.guru/images/patterns/cards/bridge-mini-2x.png?id=2622384cf623ed150ee9c21a0812dd87) **Bridge** en C# ================ **Bridge** es un patrón de diseño estructural que divide la lógica de negocio o una clase muy grande en jerarquías de clases separadas que se pueden desarrollar independientemente. Una de estas jerarquías (a menudo denominada Abstracción) obtendrá una referencia a un objeto de la segunda jerarquía (Implementación). La abstracción podrá delegar algunas (en ocasiones, la mayoría) de sus llamadas al objeto de las implementaciones. Como todas las implementaciones tendrán una interfaz común, serán intercambiables dentro de la abstracción. [Aprende más sobre el patrón Bridge](https://refactoring.guru/es/design-patterns/bridge) Navegación  [Intro](https://refactoring.guru/es/design-patterns/bridge/csharp/example#)  [Ejemplo conceptual](https://refactoring.guru/es/design-patterns/bridge/csharp/example#example-0)  [Program](https://refactoring.guru/es/design-patterns/bridge/csharp/example#example-0--Program-cs)  [Output](https://refactoring.guru/es/design-patterns/bridge/csharp/example#example-0--Output-txt) **Complejidad:** **Popularidad:** **Ejemplos de uso:** El patrón Bridge es de especial utilidad a la hora de tratar con aplicaciones multiplataforma, soportar varios tipos de servidores de bases de datos, o trabajar con varios proveedores de API de un cierto tipo (por ejemplo, plataformas en la nube, redes sociales, etc.). **Identificación:** El patrón Bridge se puede reconocer por una distinción clara entre alguna entidad controladora y varias plataformas diferentes en las que se basa. Ejemplo conceptual ------------------ Este ejemplo ilustra la estructura del patrón de diseño **Bridge**. Se centra en responder las siguientes preguntas: * ¿De qué clases se compone? * ¿Qué papeles juegan esas clases? * ¿De qué forma se relacionan los elementos del patrón? #### **Program.cs:** Ejemplo conceptual using System; namespace RefactoringGuru.DesignPatterns.Bridge.Conceptual { // The Abstraction defines the interface for the "control" part of the two // class hierarchies. It maintains a reference to an object of the // Implementation hierarchy and delegates all of the real work to this // object. class Abstraction { protected IImplementation \_implementation; public Abstraction(IImplementation implementation) { this.\_implementation = implementation; } public virtual string Operation() { return "Abstract: Base operation with:\\n" + \_implementation.OperationImplementation(); } } // You can extend the Abstraction without changing the Implementation // classes. class ExtendedAbstraction : Abstraction { public ExtendedAbstraction(IImplementation implementation) : base(implementation) { } public override string Operation() { return "ExtendedAbstraction: Extended operation with:\\n" + base.\_implementation.OperationImplementation(); } } // The Implementation defines the interface for all implementation classes. // It doesn't have to match the Abstraction's interface. In fact, the two // interfaces can be entirely different. Typically the Implementation // interface provides only primitive operations, while the Abstraction // defines higher- level operations based on those primitives. public interface IImplementation { string OperationImplementation(); } // Each Concrete Implementation corresponds to a specific platform and // implements the Implementation interface using that platform's API. class ConcreteImplementationA : IImplementation { public string OperationImplementation() { return "ConcreteImplementationA: The result in platform A.\\n"; } } class ConcreteImplementationB : IImplementation { public string OperationImplementation() { return "ConcreteImplementationB: The result in platform B.\\n"; } } class Client { // Except for the initialization phase, where an Abstraction object gets // linked with a specific Implementation object, the client code should // only depend on the Abstraction class. This way the client code can // support any abstraction-implementation combination. public void ClientCode(Abstraction abstraction) { Console.Write(abstraction.Operation()); } } class Program { static void Main(string\[\] args) { Client client = new Client(); Abstraction abstraction; // The client code should be able to work with any pre-configured // abstraction-implementation combination. abstraction = new Abstraction(new ConcreteImplementationA()); client.ClientCode(abstraction); Console.WriteLine(); abstraction = new ExtendedAbstraction(new ConcreteImplementationB()); client.ClientCode(abstraction); } } } #### **Output.txt:** Resultado de la ejecución Abstract: Base operation with: ConcreteImplementationA: The result in platform A. ExtendedAbstraction: Extended operation with: ConcreteImplementationA: The result in platform B. **Bridge** en otros lenguajes ----------------------------- [![Bridge en C++](https://refactoring.guru/images/patterns/icons/cpp.svg?id=f7782ed8b8666246bfcc3f8fefc3b858)](https://refactoring.guru/es/design-patterns/bridge/cpp/example "Bridge en C++") [![Bridge en Go](https://refactoring.guru/images/patterns/icons/go.svg?id=1a89927eb99b1ea3fde7701d97970aca)](https://refactoring.guru/es/design-patterns/bridge/go/example "Bridge en Go") [![Bridge en Java](https://refactoring.guru/images/patterns/icons/java.svg?id=e6d87e2dca08c953fe3acd1275ed4f4e)](https://refactoring.guru/es/design-patterns/bridge/java/example "Bridge en Java") [![Bridge en PHP](https://refactoring.guru/images/patterns/icons/php.svg?id=be1906eb26b71ec1d3b93720d6156618)](https://refactoring.guru/es/design-patterns/bridge/php/example "Bridge en PHP") [![Bridge en Python](https://refactoring.guru/images/patterns/icons/python.svg?id=6d815d43c0f7050a1151b43e51569c9f)](https://refactoring.guru/es/design-patterns/bridge/python/example "Bridge en Python") [![Bridge en Ruby](https://refactoring.guru/images/patterns/icons/ruby.svg?id=b065b718c914bf8e960ef731600be1eb)](https://refactoring.guru/es/design-patterns/bridge/ruby/example "Bridge en Ruby") [![Bridge en Rust](https://refactoring.guru/images/patterns/icons/rust.svg?id=1f5698a4b5ae23fe79413511747e4a87)](https://refactoring.guru/es/design-patterns/bridge/rust/example "Bridge en Rust") [![Bridge en Swift](https://refactoring.guru/images/patterns/icons/swift.svg?id=0b716c2d52ec3a48fbe91ac031070c1d)](https://refactoring.guru/es/design-patterns/bridge/swift/example "Bridge en Swift") [![Bridge en TypeScript](https://refactoring.guru/images/patterns/icons/typescript.svg?id=2239d0f16cb703540c205dd8cb0c0cb7)](https://refactoring.guru/es/design-patterns/bridge/typescript/example "Bridge en TypeScript") --- # Bridge en Rust / Patrones de diseño [There are patterns of patterns now! \ My friend's project: MetaPatterns.io](https://metapatterns.io/)  [](https://refactoring.guru/es/design-patterns/bridge/rust/example#checkout) [](https://refactoring.guru/es/design-patterns/bridge/rust/example#checkout) [](https://refactoring.guru/) / [Patrones de diseño](https://refactoring.guru/es/design-patterns) / [Bridge](https://refactoring.guru/es/design-patterns/bridge) / [Rust](https://refactoring.guru/es/design-patterns/rust) ![Bridge](https://refactoring.guru/images/patterns/cards/bridge-mini-2x.png?id=2622384cf623ed150ee9c21a0812dd87) **Bridge** en Rust ================== **Bridge** es un patrón de diseño estructural que divide la lógica de negocio o una clase muy grande en jerarquías de clases separadas que se pueden desarrollar independientemente. Una de estas jerarquías (a menudo denominada Abstracción) obtendrá una referencia a un objeto de la segunda jerarquía (Implementación). La abstracción podrá delegar algunas (en ocasiones, la mayoría) de sus llamadas al objeto de las implementaciones. Como todas las implementaciones tendrán una interfaz común, serán intercambiables dentro de la abstracción. [Aprende más sobre el patrón Bridge](https://refactoring.guru/es/design-patterns/bridge) Navegación  [Intro](https://refactoring.guru/es/design-patterns/bridge/rust/example#)  [Devices and Remotes](https://refactoring.guru/es/design-patterns/bridge/rust/example#example-0)   [mod](https://refactoring.guru/es/design-patterns/bridge/rust/example#example-0--remotes-mod-rs)   [basic](https://refactoring.guru/es/design-patterns/bridge/rust/example#example-0--remotes-basic-rs)   [advanced](https://refactoring.guru/es/design-patterns/bridge/rust/example#example-0--remotes-advanced-rs)   [mod](https://refactoring.guru/es/design-patterns/bridge/rust/example#example-0--device-mod-rs)   [radio](https://refactoring.guru/es/design-patterns/bridge/rust/example#example-0--device-radio-rs)   [tv](https://refactoring.guru/es/design-patterns/bridge/rust/example#example-0--device-tv-rs)  [main](https://refactoring.guru/es/design-patterns/bridge/rust/example#example-0--main-rs) Devices and Remotes ------------------- This example illustrates how the Bridge pattern can help divide the monolithic code of an app that manages devices and their remote controls. The Device classes act as the implementation, whereas the Remotes act as the abstraction. #### **remotes/mod.rs** mod advanced; mod basic; pub use advanced::AdvancedRemote; pub use basic::BasicRemote; use crate::device::Device; pub trait HasMutableDevice { fn device(&mut self) -> &mut D; } pub trait Remote: HasMutableDevice { fn power(&mut self) { println!("Remote: power toggle"); if self.device().is\_enabled() { self.device().disable(); } else { self.device().enable(); } } fn volume\_down(&mut self) { println!("Remote: volume down"); let volume = self.device().volume(); self.device().set\_volume(volume - 10); } fn volume\_up(&mut self) { println!("Remote: volume up"); let volume = self.device().volume(); self.device().set\_volume(volume + 10); } fn channel\_down(&mut self) { println!("Remote: channel down"); let channel = self.device().channel(); self.device().set\_channel(channel - 1); } fn channel\_up(&mut self) { println!("Remote: channel up"); let channel = self.device().channel(); self.device().set\_channel(channel + 1); } } #### **remotes/basic.rs** use crate::device::Device; use super::{HasMutableDevice, Remote}; pub struct BasicRemote { device: D, } impl BasicRemote { pub fn new(device: D) -> Self { Self { device } } } impl HasMutableDevice for BasicRemote { fn device(&mut self) -> &mut D { &mut self.device } } impl Remote for BasicRemote {} #### **remotes/advanced.rs** use crate::device::Device; use super::{HasMutableDevice, Remote}; pub struct AdvancedRemote { device: D, } impl AdvancedRemote { pub fn new(device: D) -> Self { Self { device } } pub fn mute(&mut self) { println!("Remote: mute"); self.device.set\_volume(0); } } impl HasMutableDevice for AdvancedRemote { fn device(&mut self) -> &mut D { &mut self.device } } impl Remote for AdvancedRemote {} #### **device/mod.rs** mod radio; mod tv; pub use radio::Radio; pub use tv::Tv; pub trait Device { fn is\_enabled(&self) -> bool; fn enable(&mut self); fn disable(&mut self); fn volume(&self) -> u8; fn set\_volume(&mut self, percent: u8); fn channel(&self) -> u16; fn set\_channel(&mut self, channel: u16); fn print\_status(&self); } #### **device/radio.rs** use super::Device; #\[derive(Clone)\] pub struct Radio { on: bool, volume: u8, channel: u16, } impl Default for Radio { fn default() -> Self { Self { on: false, volume: 30, channel: 1, } } } impl Device for Radio { fn is\_enabled(&self) -> bool { self.on } fn enable(&mut self) { self.on = true; } fn disable(&mut self) { self.on = false; } fn volume(&self) -> u8 { self.volume } fn set\_volume(&mut self, percent: u8) { self.volume = std::cmp::min(percent, 100); } fn channel(&self) -> u16 { self.channel } fn set\_channel(&mut self, channel: u16) { self.channel = channel; } fn print\_status(&self) { println!("------------------------------------"); println!("| I'm radio."); println!("| I'm {}", if self.on { "enabled" } else { "disabled" }); println!("| Current volume is {}%", self.volume); println!("| Current channel is {}", self.channel); println!("------------------------------------\\n"); } } #### **device/tv.rs** use super::Device; #\[derive(Clone)\] pub struct Tv { on: bool, volume: u8, channel: u16, } impl Default for Tv { fn default() -> Self { Self { on: false, volume: 30, channel: 1, } } } impl Device for Tv { fn is\_enabled(&self) -> bool { self.on } fn enable(&mut self) { self.on = true; } fn disable(&mut self) { self.on = false; } fn volume(&self) -> u8 { self.volume } fn set\_volume(&mut self, percent: u8) { self.volume = std::cmp::min(percent, 100); } fn channel(&self) -> u16 { self.channel } fn set\_channel(&mut self, channel: u16) { self.channel = channel; } fn print\_status(&self) { println!("------------------------------------"); println!("| I'm TV set."); println!("| I'm {}", if self.on { "enabled" } else { "disabled" }); println!("| Current volume is {}%", self.volume); println!("| Current channel is {}", self.channel); println!("------------------------------------\\n"); } } #### **main.rs** mod device; mod remotes; use device::{Device, Radio, Tv}; use remotes::{AdvancedRemote, BasicRemote, HasMutableDevice, Remote}; fn main() { test\_device(Tv::default()); test\_device(Radio::default()); } fn test\_device(device: impl Device + Clone) { println!("Tests with basic remote."); let mut basic\_remote = BasicRemote::new(device.clone()); basic\_remote.power(); basic\_remote.device().print\_status(); println!("Tests with advanced remote."); let mut advanced\_remote = AdvancedRemote::new(device); advanced\_remote.power(); advanced\_remote.mute(); advanced\_remote.device().print\_status(); } ### Output Tests with basic remote. Remote: power toggle ------------------------------------ | I'm TV set. | I'm enabled | Current volume is 30% | Current channel is 1 ------------------------------------ Tests with advanced remote. Remote: power toggle Remote: mute ------------------------------------ | I'm TV set. | I'm enabled | Current volume is 0% | Current channel is 1 ------------------------------------ Tests with basic remote. Remote: power toggle ------------------------------------ | I'm radio. | I'm enabled | Current volume is 30% | Current channel is 1 ------------------------------------ Tests with advanced remote. Remote: power toggle Remote: mute ------------------------------------ | I'm radio. | I'm enabled | Current volume is 0% | Current channel is 1 ------------------------------------\`\`\` **Bridge** en otros lenguajes ----------------------------- [![Bridge en C#](https://refactoring.guru/images/patterns/icons/csharp.svg?id=da64592defc6e86d57c39c66e9de3e58)](https://refactoring.guru/es/design-patterns/bridge/csharp/example "Bridge en C#") [![Bridge en C++](https://refactoring.guru/images/patterns/icons/cpp.svg?id=f7782ed8b8666246bfcc3f8fefc3b858)](https://refactoring.guru/es/design-patterns/bridge/cpp/example "Bridge en C++") [![Bridge en Go](https://refactoring.guru/images/patterns/icons/go.svg?id=1a89927eb99b1ea3fde7701d97970aca)](https://refactoring.guru/es/design-patterns/bridge/go/example "Bridge en Go") [![Bridge en Java](https://refactoring.guru/images/patterns/icons/java.svg?id=e6d87e2dca08c953fe3acd1275ed4f4e)](https://refactoring.guru/es/design-patterns/bridge/java/example "Bridge en Java") [![Bridge en PHP](https://refactoring.guru/images/patterns/icons/php.svg?id=be1906eb26b71ec1d3b93720d6156618)](https://refactoring.guru/es/design-patterns/bridge/php/example "Bridge en PHP") [![Bridge en Python](https://refactoring.guru/images/patterns/icons/python.svg?id=6d815d43c0f7050a1151b43e51569c9f)](https://refactoring.guru/es/design-patterns/bridge/python/example "Bridge en Python") [![Bridge en Ruby](https://refactoring.guru/images/patterns/icons/ruby.svg?id=b065b718c914bf8e960ef731600be1eb)](https://refactoring.guru/es/design-patterns/bridge/ruby/example "Bridge en Ruby") [![Bridge en Swift](https://refactoring.guru/images/patterns/icons/swift.svg?id=0b716c2d52ec3a48fbe91ac031070c1d)](https://refactoring.guru/es/design-patterns/bridge/swift/example "Bridge en Swift") [![Bridge en TypeScript](https://refactoring.guru/images/patterns/icons/typescript.svg?id=2239d0f16cb703540c205dd8cb0c0cb7)](https://refactoring.guru/es/design-patterns/bridge/typescript/example "Bridge en TypeScript") --- # Bridge [There are patterns of patterns now! \ My friend's project: MetaPatterns.io](https://metapatterns.io/)  [](https://refactoring.guru/es/design-patterns/bridge#checkout) [](https://refactoring.guru/es/design-patterns/bridge#checkout) [](https://refactoring.guru/) / [Patrones de diseño](https://refactoring.guru/es/design-patterns) / [Patrones estructurales](https://refactoring.guru/es/design-patterns/structural-patterns) Bridge ====== También llamado: Puente Propósito --------- **Bridge** es un patrón de diseño estructural que te permite dividir una clase grande, o un grupo de clases estrechamente relacionadas, en dos jerarquías separadas (abstracción e implementación) que pueden desarrollarse independientemente la una de la otra. ![Patrón de diseño Bridge](https://refactoring.guru/images/patterns/content/bridge/bridge-2x.png?id=1e905ae5742e5cd10a7eb0e3175ef00d) Problema -------- ¿_Abstracción?_ ¿_Implementación_? ¿Asusta? Mantengamos la calma y veamos un ejemplo sencillo. Digamos que tienes una clase geométrica `Forma` con un par de subclases: `Círculo` y `Cuadrado`. Deseas extender esta jerarquía de clase para que incorpore colores, por lo que planeas crear las subclases de forma `Rojo` y `Azul`. Sin embargo, como ya tienes dos subclases, tienes que crear cuatro combinaciones de clase, como `CírculoAzul` y `CuadradoRojo`. ![Problema del patrón Bridge](https://refactoring.guru/images/patterns/diagrams/bridge/problem-es-2x.png?id=8f3101d70657909039a68d5693bd56a8) El número de combinaciones de clase crece en progresión geométrica. Añadir nuevos tipos de forma y color a la jerarquía hará que ésta crezca exponencialmente. Por ejemplo, para añadir una forma de triángulo deberás introducir dos subclases, una para cada color. Y, después, para añadir un nuevo color habrá que crear tres subclases, una para cada tipo de forma. Cuanto más avancemos, peor será. Solución -------- Este problema se presenta porque intentamos extender las clases de forma en dos dimensiones independientes: por forma y por color. Es un problema muy habitual en la herencia de clases. El patrón Bridge intenta resolver este problema pasando de la herencia a la composición del objeto. Esto quiere decir que se extrae una de las dimensiones a una jerarquía de clases separada, de modo que las clases originales referencian un objeto de la nueva jerarquía, en lugar de tener todo su estado y sus funcionalidades dentro de una clase. ![Solución sugerida por el patrón Bridge](https://refactoring.guru/images/patterns/diagrams/bridge/solution-es-2x.png?id=44e038fd90cd45eb6b9474d3798ecfd0) Puedes evitar la explosión de una jerarquía de clase transformándola en varias jerarquías relacionadas. Con esta solución, podemos extraer el código relacionado con el color y colocarlo dentro de su propia clase, con dos subclases: `Rojo` y `Azul`. La clase `Forma` obtiene entonces un campo de referencia que apunta a uno de los objetos de color. Ahora la forma puede delegar cualquier trabajo relacionado con el color al objeto de color vinculado. Esa referencia actuará como un puente entre las clases `Forma` y `Color`. En adelante, añadir nuevos colores no exigirá cambiar la jerarquía de forma y viceversa. #### Abstracción e implementación El libro de la GoF “Gang of Four” (banda de los cuatro) es el sobrenombre de los cuatro autores del primer libro sobre patrones de diseño: _Patrones de diseño_ [https://refactoring.guru/es/gof-book](https://refactoring.guru/es/gof-book) . introduce los términos _Abstracción_ e _Implementación_ como parte de la definición del patrón Bridge. En mi opinión, los términos suenan demasiado académicos y provocan que el patrón parezca más complicado de lo que es en realidad. Una vez leído el sencillo ejemplo con las formas y los colores, vamos a descifrar el significado que esconden las temibles palabras del libro de esta banda de cuatro. La _Abstracción_ (también llamada _interfaz_) es una capa de control de alto nivel para una entidad. Esta capa no tiene que hacer ningún trabajo real por su cuenta, sino que debe delegar el trabajo a la capa de _implementación_ (también llamada _plataforma_). Ten en cuenta que no estamos hablando de las _interfaces_ o las _clases abstractas_ de tu lenguaje de programación. Son cosas diferentes. Cuando hablamos de aplicación reales, la abstracción puede representarse por una interfaz gráfica de usuario (GUI), y la implementación puede ser el código del sistema operativo subyacente (API) a la que la capa GUI llama en respuesta a las interacciones del usuario. En términos generales, puedes extender esa aplicación en dos direcciones independientes: * Tener varias GUI diferentes (por ejemplo, personalizadas para clientes regulares o administradores). * Soportar varias API diferentes (por ejemplo, para poder lanzar la aplicación con Windows, Linux y macOS). En el peor de los casos, esta aplicación podría asemejarse a un plato gigante de espagueti, en el que cientos de condicionales conectan distintos tipos de GUI con varias API por todo el código. ![Es mucho más sencillo gestionar cambios en código modular](https://refactoring.guru/images/patterns/content/bridge/bridge-3-es-2x.png?id=51c0396446b451fd772a56421d7c071d) Realizar incluso un cambio sencillo en una base de código monolítica es bastante difícil porque debes comprender _todo el asunto_ muy bien. Es mucho más sencillo realizar cambios en módulos más pequeños y bien definidos. Puedes poner orden en este caos metiendo el código relacionado con combinaciones específicas interfaz-plataforma dentro de clases independientes. Sin embargo, pronto descubrirás que hay _muchas_ de estas clases. La jerarquía de clase crecerá exponencialmente porque añadir una nueva GUI o soportar una API diferente exigirá que se creen más y más clases. Intentemos resolver este problema con el patrón Bridge, que nos sugiere que dividamos las clases en dos jerarquías: * Abstracción: la capa GUI de la aplicación. * Implementación: las API de los sistemas operativos. ![Arquitectura multiplataforma](https://refactoring.guru/images/patterns/content/bridge/bridge-2-es-2x.png?id=549b6e0899b90e12dd20ecf764af1e91) Una de las formas de estructurar una aplicación multiplataforma. El objeto de la abstracción controla la apariencia de la aplicación, delegando el trabajo real al objeto de la implementación vinculado. Las distintas implementaciones son intercambiables siempre y cuando sigan una interfaz común, permitiendo a la misma GUI funcionar con Windows y Linux. En consecuencia, puedes cambiar las clases de la GUI sin tocar las clases relacionadas con la API. Además, añadir soporte para otro sistema operativo sólo requiere crear una subclase en la jerarquía de implementación. Estructura ---------- ![Patrón de diseño Bridge](https://refactoring.guru/images/patterns/diagrams/bridge/structure-es-2x.png?id=fc28523953d3d8bf0f9c807df2c0dd7d)![Patrón de diseño Bridge](https://refactoring.guru/images/patterns/diagrams/bridge/structure-es-indexed-2x.png?id=adcb081baa92ed45668a801c25833107) 1. La **Abstracción** ofrece lógica de control de alto nivel. Depende de que el objeto de la implementación haga el trabajo de bajo nivel. 2. La **Implementación** declara la interfaz común a todas las implementaciones concretas. Una abstracción sólo se puede comunicar con un objeto de implementación a través de los métodos que se declaren aquí. La abstracción puede enumerar los mismos métodos que la implementación, pero normalmente la abstracción declara funcionalidades complejas que dependen de una amplia variedad de operaciones primitivas declaradas por la implementación. 3. Las **Implementaciones Concretas** contienen código específico de plataforma. 4. Las **Abstracciones Refinadas** proporcionan variantes de lógica de control. Como sus padres, trabajan con distintas implementaciones a través de la interfaz general de implementación. 5. Normalmente, el **Cliente** sólo está interesado en trabajar con la abstracción. No obstante, el cliente tiene que vincular el objeto de la abstracción con uno de los objetos de la implementación. Pseudocódigo ------------ Este ejemplo ilustra cómo puede ayudar el patrón **Bridge** a dividir el código monolítico de una aplicación que gestiona dispositivos y sus controles remotos. Las clases `Dispositivo` actúan como implementación, mientras que las clases `Remoto` actúan como abstracción. ![Ejemplo de estructura del patrón Bridge](https://refactoring.guru/images/patterns/diagrams/bridge/example-es-2x.png?id=19bb8272b4082c5f47c4d047e6cb9967) La jerarquía de clase original se divide en dos partes: dispositivos y controles remotos. La clase base de control remoto declara un campo de referencia que la vincula con un objeto de dispositivo. Todos los controles remotos funcionan con los dispositivos a través de la interfaz general de dispositivos, que permite al mismo remoto soportar varios tipos de dispositivos. Puedes desarrollar las clases de control remoto independientemente de las clases de dispositivo. Lo único necesario es crear una nueva subclase de control remoto. Por ejemplo, puede ser que un control remoto básico cuente tan solo con dos botones, pero puedes extenderlo añadiéndole funciones, como una batería adicional o pantalla táctil. El código cliente vincula el tipo deseado de control remoto con un objeto específico de dispositivo a través del constructor del control remoto. // La "abstracción" define la interfaz para la parte de // "control" de las dos jerarquías de clase. Mantiene una // referencia a un objeto de la jerarquía de "implementación" y // delega todo el trabajo real a este objeto. class RemoteControl is protected field device: Device constructor RemoteControl(device: Device) is this.device = device method togglePower() is if (device.isEnabled()) then device.disable() else device.enable() method volumeDown() is device.setVolume(device.getVolume() - 10) method volumeUp() is device.setVolume(device.getVolume() + 10) method channelDown() is device.setChannel(device.getChannel() - 1) method channelUp() is device.setChannel(device.getChannel() + 1) // Puedes extender clases de la jerarquía de abstracción // independientemente de las clases de dispositivo. class AdvancedRemoteControl extends RemoteControl is method mute() is device.setVolume(0) // La interfaz de "implementación" declara métodos comunes a // todas las clases concretas de implementación. No tiene por // qué coincidir con la interfaz de la abstracción. De hecho, // las dos interfaces pueden ser completamente diferentes. // Normalmente, la interfaz de implementación únicamente // proporciona operaciones primitivas, mientras que la // abstracción define operaciones de más alto nivel con base en // las primitivas. interface Device is method isEnabled() method enable() method disable() method getVolume() method setVolume(percent) method getChannel() method setChannel(channel) // Todos los dispositivos siguen la misma interfaz. class Tv implements Device is // ... class Radio implements Device is // ... // En algún lugar del código cliente. tv = new Tv() remote = new RemoteControl(tv) remote.togglePower() radio = new Radio() remote = new AdvancedRemoteControl(radio) Aplicabilidad ------------- Utiliza el patrón Bridge cuando quieras dividir y organizar una clase monolítica que tenga muchas variantes de una sola funcionalidad (por ejemplo, si la clase puede trabajar con diversos servidores de bases de datos). Conforme más crece una clase, más difícil resulta entender cómo funciona y más tiempo se tarda en realizar un cambio. Cambiar una de las variaciones de funcionalidad puede exigir realizar muchos cambios a toda la clase, lo que a menudo provoca que se cometan errores o no se aborden algunos de los efectos colaterales críticos. El patrón Bridge te permite dividir la clase monolítica en varias jerarquías de clase. Después, puedes cambiar las clases de cada jerarquía independientemente de las clases de las otras. Esta solución simplifica el mantenimiento del código y minimiza el riesgo de descomponer el código existente. Utiliza el patrón cuando necesites extender una clase en varias dimensiones ortogonales (independientes). El patrón Bridge sugiere que extraigas una jerarquía de clase separada para cada una de las dimensiones. La clase original delega el trabajo relacionado a los objetos pertenecientes a dichas jerarquías, en lugar de hacerlo todo por su cuenta. Utiliza el patrón Bridge cuando necesites poder cambiar implementaciones durante el tiempo de ejecución. Aunque es opcional, el patrón Bridge te permite sustituir el objeto de implementación dentro de la abstracción. Es tan sencillo como asignar un nuevo valor a un campo. _Por cierto, este último punto es la razón principal por la que tanta gente confunde el patrón Bridge con el patrón [Strategy](https://refactoring.guru/es/design-patterns/strategy) . Recuerda que un patrón es algo más que un cierto modo de estructurar tus clases. También puede comunicar intención y el tipo de problema que se está abordando._ Cómo implementarlo ------------------ 1. Identifica las dimensiones ortogonales de tus clases. Estos conceptos independientes pueden ser: abstracción/plataforma, dominio/infraestructura, _front end_/_back end_, o interfaz/implementación. 2. Comprueba qué operaciones necesita el cliente y defínelas en la clase base de abstracción. 3. Determina las operaciones disponibles en todas las plataformas. Declara aquellas que necesite la abstracción en la interfaz general de implementación. 4. Crea clases concretas de implementación para todas las plataformas de tu dominio, pero asegúrate de que todas sigan la interfaz de implementación. 5. Dentro de la clase de abstracción añade un campo de referencia para el tipo de implementación. La abstracción delega la mayor parte del trabajo al objeto de la implementación referenciado en ese campo. 6. Si tienes muchas variantes de lógica de alto nivel, crea abstracciones refinadas para cada variante extendiendo la clase base de abstracción. 7. El código cliente debe pasar un objeto de implementación al constructor de la abstracción para asociar el uno con el otro. Después, el cliente puede ignorar la implementación y trabajar solo con el objeto de la abstracción. Pros y contras -------------- * Puedes crear clases y aplicaciones independientes de plataforma. * El código cliente funciona con abstracciones de alto nivel. No está expuesto a los detalles de la plataforma. * _Principio de abierto/cerrado_. Puedes introducir nuevas abstracciones e implementaciones independientes entre sí. * _Principio de responsabilidad única_. Puedes centrarte en la lógica de alto nivel en la abstracción y en detalles de la plataforma en la implementación. * Puede ser que el código se complique si aplicas el patrón a una clase muy cohesionada. Relaciones con otros patrones ----------------------------- * [Bridge](https://refactoring.guru/es/design-patterns/bridge) suele diseñarse por anticipado, lo que te permite desarrollar partes de una aplicación de forma independiente entre sí. Por otro lado, [Adapter](https://refactoring.guru/es/design-patterns/adapter) se utiliza habitualmente con una aplicación existente para hacer que unas clases que de otro modo serían incompatibles, trabajen juntas sin problemas. * [Bridge](https://refactoring.guru/es/design-patterns/bridge) , [State](https://refactoring.guru/es/design-patterns/state) , [Strategy](https://refactoring.guru/es/design-patterns/strategy) (y, hasta cierto punto, [Adapter](https://refactoring.guru/es/design-patterns/adapter) ) tienen estructuras muy similares. De hecho, todos estos patrones se basan en la composición, que consiste en delegar trabajo a otros objetos. Sin embargo, todos ellos solucionan problemas diferentes. Un patrón no es simplemente una receta para estructurar tu código de una forma específica. También puede comunicar a otros desarrolladores el problema que resuelve. * Puedes utilizar [Abstract Factory](https://refactoring.guru/es/design-patterns/abstract-factory) junto a [Bridge](https://refactoring.guru/es/design-patterns/bridge) . Este emparejamiento resulta útil cuando algunas abstracciones definidas por _Bridge_ sólo pueden funcionar con implementaciones específicas. En este caso, _Abstract Factory_ puede encapsular estas relaciones y esconder la complejidad al código cliente. * Puedes combinar [Builder](https://refactoring.guru/es/design-patterns/builder) con [Bridge](https://refactoring.guru/es/design-patterns/bridge) : la clase _directora_ juega el papel de la abstracción, mientras que diferentes _constructoras_ actúan como _implementaciones_. Ejemplos de código ------------------ [![Bridge en C#](https://refactoring.guru/images/patterns/icons/csharp.svg?id=da64592defc6e86d57c39c66e9de3e58)](https://refactoring.guru/es/design-patterns/bridge/csharp/example "Bridge en C#") [![Bridge en C++](https://refactoring.guru/images/patterns/icons/cpp.svg?id=f7782ed8b8666246bfcc3f8fefc3b858)](https://refactoring.guru/es/design-patterns/bridge/cpp/example "Bridge en C++") [![Bridge en Go](https://refactoring.guru/images/patterns/icons/go.svg?id=1a89927eb99b1ea3fde7701d97970aca)](https://refactoring.guru/es/design-patterns/bridge/go/example "Bridge en Go") [![Bridge en Java](https://refactoring.guru/images/patterns/icons/java.svg?id=e6d87e2dca08c953fe3acd1275ed4f4e)](https://refactoring.guru/es/design-patterns/bridge/java/example "Bridge en Java") [![Bridge en PHP](https://refactoring.guru/images/patterns/icons/php.svg?id=be1906eb26b71ec1d3b93720d6156618)](https://refactoring.guru/es/design-patterns/bridge/php/example "Bridge en PHP") [![Bridge en Python](https://refactoring.guru/images/patterns/icons/python.svg?id=6d815d43c0f7050a1151b43e51569c9f)](https://refactoring.guru/es/design-patterns/bridge/python/example "Bridge en Python") [![Bridge en Ruby](https://refactoring.guru/images/patterns/icons/ruby.svg?id=b065b718c914bf8e960ef731600be1eb)](https://refactoring.guru/es/design-patterns/bridge/ruby/example "Bridge en Ruby") [![Bridge en Rust](https://refactoring.guru/images/patterns/icons/rust.svg?id=1f5698a4b5ae23fe79413511747e4a87)](https://refactoring.guru/es/design-patterns/bridge/rust/example "Bridge en Rust") [![Bridge en Swift](https://refactoring.guru/images/patterns/icons/swift.svg?id=0b716c2d52ec3a48fbe91ac031070c1d)](https://refactoring.guru/es/design-patterns/bridge/swift/example "Bridge en Swift") [![Bridge en TypeScript](https://refactoring.guru/images/patterns/icons/typescript.svg?id=2239d0f16cb703540c205dd8cb0c0cb7)](https://refactoring.guru/es/design-patterns/bridge/typescript/example "Bridge en TypeScript") [![](https://refactoring.guru/images/patterns/banners/patterns-book-banner-3-2x.png?id=0cc3f77ab421d1a5c02ee46488231c3a)](https://refactoring.guru/es/design-patterns/book) ### ¡Apoya nuestro sitio web gratuito y compra el libro! * 22 patrones de diseño y 8 principios explicados en profundidad * 436 páginas bien estructuradas, fáciles de leer y libres de tecnicismos * 225 ilustraciones y diagramas claros y útiles * Un archivo con ejemplos de código en 11 lenguajes * Todos los dispositivos soportados: Formatos PDF/EPUB/MOBI/KFX [Saber más…](https://refactoring.guru/es/design-patterns/book) --- # Adapter [There are patterns of patterns now! \ My friend's project: MetaPatterns.io](https://metapatterns.io/)  [](https://refactoring.guru/es/design-patterns/adapter#checkout) [](https://refactoring.guru/es/design-patterns/adapter#checkout) [](https://refactoring.guru/) / [Patrones de diseño](https://refactoring.guru/es/design-patterns) / [Patrones estructurales](https://refactoring.guru/es/design-patterns/structural-patterns) Adapter ======= También llamado: Adaptador, Envoltorio, Wrapper Propósito --------- **Adapter** es un patrón de diseño estructural que permite la colaboración entre objetos con interfaces incompatibles. ![Patrón de diseño Adapter](https://refactoring.guru/images/patterns/content/adapter/adapter-es-2x.png?id=0627cb0c14b241c13833dc6d96b0df5c) Problema -------- Imagina que estás creando una aplicación de monitoreo del mercado de valores. La aplicación descarga la información de bolsa desde varias fuentes en formato XML para presentarla al usuario con bonitos gráficos y diagramas. En cierto momento, decides mejorar la aplicación integrando una inteligente biblioteca de análisis de una tercera persona. Pero hay una trampa: la biblioteca de análisis solo funciona con datos en formato JSON. ![La estructura de la aplicación antes de la integración con la biblioteca de análisis](https://refactoring.guru/images/patterns/diagrams/adapter/problem-es-2x.png?id=0375841dd491633a0e02a67332ed4247) No puedes utilizar la biblioteca de análisis “tal cual” porque ésta espera los datos en un formato que es incompatible con tu aplicación. Podrías cambiar la biblioteca para que funcione con XML. Sin embargo, esto podría descomponer parte del código existente que depende de la biblioteca. Y, lo que es peor, podrías no tener siquiera acceso al código fuente de la biblioteca, lo que hace imposible esta solución. Solución -------- Puedes crear un _adaptador_. Se trata de un objeto especial que convierte la interfaz de un objeto, de forma que otro objeto pueda comprenderla. Un adaptador envuelve uno de los objetos para esconder la complejidad de la conversión que tiene lugar tras bambalinas. El objeto envuelto ni siquiera es consciente de la existencia del adaptador. Por ejemplo, puedes envolver un objeto que opera con metros y kilómetros con un adaptador que convierte todos los datos al sistema anglosajón, es decir, pies y millas. Los adaptadores no solo convierten datos a varios formatos, sino que también ayudan a objetos con distintas interfaces a colaborar. Funciona así: 1. El adaptador obtiene una interfaz compatible con uno de los objetos existentes. 2. Utilizando esta interfaz, el objeto existente puede invocar con seguridad los métodos del adaptador. 3. Al recibir una llamada, el adaptador pasa la solicitud al segundo objeto, pero en un formato y orden que ese segundo objeto espera. En ocasiones se puede incluso crear un adaptador de dos direcciones que pueda convertir las llamadas en ambos sentidos. ![Solución del patrón Adapter](https://refactoring.guru/images/patterns/diagrams/adapter/solution-es-2x.png?id=ee482c83d2aeab7ccd3158ffc3970f7f) Regresemos a nuestra aplicación del mercado de valores. Para resolver el dilema de los formatos incompatibles, puedes crear adaptadores de XML a JSON para cada clase de la biblioteca de análisis con la que trabaje tu código directamente. Después ajustas tu código para que se comunique con la biblioteca únicamente a través de estos adaptadores. Cuando un adaptador recibe una llamada, traduce los datos XML entrantes a una estructura JSON y pasa la llamada a los métodos adecuados de un objeto de análisis envuelto. Analogía en el mundo real ------------------------- ![Ejemplo del patrón Adapter](https://refactoring.guru/images/patterns/content/adapter/adapter-comic-1-es-2x.png?id=6c3831488916aa7b4ea632659be8a368) Una maleta antes y después de un viaje al extranjero. Cuando viajas de Europa a Estados Unidos por primera vez, puede ser que te lleves una sorpresa cuanto intentes cargar tu computadora portátil. Los tipos de enchufe son diferentes en cada país, por lo que un enchufe español no sirve en Estados Unidos. El problema puede solucionarse utilizando un adaptador que incluya el enchufe americano y el europeo. Estructura ---------- #### Adaptador de objetos Esta implementación utiliza el principio de composición de objetos: el adaptador implementa la interfaz de un objeto y envuelve el otro. Puede implementarse en todos los lenguajes de programación populares. ![Estructura del patrón de diseño Adapter (el adaptador de objetos)](https://refactoring.guru/images/patterns/diagrams/adapter/structure-object-adapter-2x.png?id=03e8052e168c962d6bc369bbb13b0945)![Estructura del patrón de diseño Adapter (el adaptador de objetos)](https://refactoring.guru/images/patterns/diagrams/adapter/structure-object-adapter-indexed-2x.png?id=759771515f08d74d53cf4fe500f814a3) 1. La clase **Cliente** contiene la lógica de negocio existente del programa. 2. La **Interfaz con el Cliente** describe un protocolo que otras clases deben seguir para poder colaborar con el código cliente. 3. **Servicio** es alguna clase útil (normalmente de una tercera parte o heredada). El cliente no puede utilizar directamente esta clase porque tiene una interfaz incompatible. 4. La clase **Adaptadora** es capaz de trabajar tanto con la clase cliente como con la clase de servicio: implementa la interfaz con el cliente, mientras envuelve el objeto de la clase de servicio. La clase adaptadora recibe llamadas del cliente a través de la interfaz de cliente y las traduce en llamadas al objeto envuelto de la clase de servicio, pero en un formato que pueda comprender. 5. El código cliente no se acopla a la clase adaptadora concreta siempre y cuando funcione con la clase adaptadora a través de la interfaz con el cliente. Gracias a esto, puedes introducir nuevos tipos de adaptadores en el programa sin descomponer el código cliente existente. Esto puede resultar útil cuando la interfaz de la clase de servicio se cambia o sustituye, ya que puedes crear una nueva clase adaptadora sin cambiar el código cliente. #### Clase adaptadora Esta implementación utiliza la herencia, porque la clase adaptadora hereda interfaces de ambos objetos al mismo tiempo. Ten en cuenta que esta opción sólo puede implementarse en lenguajes de programación que soporten la herencia múltiple, como C++. ![Patrón de diseño Adapter (clase adaptadora)](https://refactoring.guru/images/patterns/diagrams/adapter/structure-class-adapter-2x.png?id=ddca3e3e4d972b7c58207daba8d24866)![Patrón de diseño Adapter (clase adaptadora)](https://refactoring.guru/images/patterns/diagrams/adapter/structure-class-adapter-indexed-2x.png?id=9ae1182ef2a34d2ea65f4b4f94a4019e) 1. La **Clase adaptadora** no necesita envolver objetos porque hereda comportamientos tanto de la clase cliente como de la clase de servicio. La adaptación tiene lugar dentro de los métodos sobrescritos. La clase adaptadora resultante puede utilizarse en lugar de una clase cliente existente. Pseudocódigo ------------ Este ejemplo del patrón **Adapter** se basa en el clásico conflicto entre piezas cuadradas y agujeros redondos. ![Ejemplo de estructura del patrón Adapter](https://refactoring.guru/images/patterns/diagrams/adapter/example-2x.png?id=0ac62d1bc151e8ce6abad8e8502756cf) Adaptando piezas cuadradas a agujeros redondos. El patrón Adapter finge ser una pieza redonda con un radio igual a la mitad del diámetro del cuadrado (en otras palabras, el radio del círculo más pequeño en el que quepa la pieza cuadrada). // Digamos que tienes dos clases con interfaces compatibles: // RoundHole (HoyoRedondo) y RoundPeg (PiezaRedonda). class RoundHole is constructor RoundHole(radius) { ... } method getRadius() is // Devuelve el radio del agujero. method fits(peg: RoundPeg) is return this.getRadius() >= peg.getRadius() class RoundPeg is constructor RoundPeg(radius) { ... } method getRadius() is // Devuelve el radio de la pieza. // Pero hay una clase incompatible: SquarePeg (PiezaCuadrada). class SquarePeg is constructor SquarePeg(width) { ... } method getWidth() is // Devuelve la anchura de la pieza cuadrada. // Una clase adaptadora te permite encajar piezas cuadradas en // hoyos redondos. Extiende la clase RoundPeg para permitir a // los objetos adaptadores actuar como piezas redondas. class SquarePegAdapter extends RoundPeg is // En realidad, el adaptador contiene una instancia de la // clase SquarePeg. private field peg: SquarePeg constructor SquarePegAdapter(peg: SquarePeg) is this.peg = peg method getRadius() is // El adaptador simula que es una pieza redonda con un // radio que pueda albergar la pieza cuadrada que el // adaptador envuelve. return peg.getWidth() \* Math.sqrt(2) / 2 // En algún punto del código cliente. hole = new RoundHole(5) rpeg = new RoundPeg(5) hole.fits(rpeg) // verdadero small\_sqpeg = new SquarePeg(5) large\_sqpeg = new SquarePeg(10) hole.fits(small\_sqpeg) // esto no compila (tipos incompatibles) small\_sqpeg\_adapter = new SquarePegAdapter(small\_sqpeg) large\_sqpeg\_adapter = new SquarePegAdapter(large\_sqpeg) hole.fits(small\_sqpeg\_adapter) // verdadero hole.fits(large\_sqpeg\_adapter) // falso Aplicabilidad ------------- Utiliza la clase adaptadora cuando quieras usar una clase existente, pero cuya interfaz no sea compatible con el resto del código. El patrón Adapter te permite crear una clase intermedia que sirva como traductora entre tu código y una clase heredada, una clase de un tercero o cualquier otra clase con una interfaz extraña. Utiliza el patrón cuando quieras reutilizar varias subclases existentes que carezcan de alguna funcionalidad común que no pueda añadirse a la superclase. Puedes extender cada subclase y colocar la funcionalidad que falta, dentro de las nuevas clases hijas. No obstante, deberás duplicar el código en todas estas nuevas clases, lo cual [huele muy mal](https://refactoring.guru/es/smells/duplicate-code) . Una solución mucho más elegante sería colocar la funcionalidad que falta dentro de una clase adaptadora. Después puedes envolver objetos a los que les falten funciones, dentro de la clase adaptadora, obteniendo esas funciones necesarias de un modo dinámico. Para que esto funcione, las clases en cuestión deben tener una interfaz común y el campo de la clase adaptadora debe seguir dicha interfaz. Este procedimiento es muy similar al del patrón [Decorator](https://refactoring.guru/es/design-patterns/decorator) . Cómo implementarlo ------------------ 1. Asegúrate de que tienes al menos dos clases con interfaces incompatibles: * Una útil clase _servicio_ que no puedes cambiar (a menudo de un tercero, heredada o con muchas dependencias existentes). * Una o varias clases _cliente_ que se beneficiarían de contar con una clase de servicio. 2. Declara la interfaz con el cliente y describe el modo en que las clases cliente se comunican con la clase de servicio. 3. Crea la clase adaptadora y haz que siga la interfaz con el cliente. Deja todos los métodos vacíos por ahora. 4. Añade un campo a la clase adaptadora para almacenar una referencia al objeto de servicio. La práctica común es inicializar este campo a través del constructor, pero en ocasiones es adecuado pasarlo al adaptador cuando se invocan sus métodos. 5. Uno por uno, implementa todos los métodos de la interfaz con el cliente en la clase adaptadora. La clase adaptadora deberá delegar la mayor parte del trabajo real al objeto de servicio, gestionando tan solo la interfaz o la conversión de formato de los datos. 6. Las clases cliente deberán utilizar la clase adaptadora a través de la interfaz con el cliente. Esto te permitirá cambiar o extender las clases adaptadoras sin afectar al código cliente. Pros y contras -------------- * _Principio de responsabilidad única_. Puedes separar la interfaz o el código de conversión de datos de la lógica de negocio primaria del programa. * _Principio de abierto/cerrado_. Puedes introducir nuevos tipos de adaptadores al programa sin descomponer el código cliente existente, siempre y cuando trabajen con los adaptadores a través de la interfaz con el cliente. * La complejidad general del código aumenta, ya que debes introducir un grupo de nuevas interfaces y clases. En ocasiones resulta más sencillo cambiar la clase de servicio de modo que coincida con el resto de tu código. Relaciones con otros patrones ----------------------------- * [Bridge](https://refactoring.guru/es/design-patterns/bridge) suele diseñarse por anticipado, lo que te permite desarrollar partes de una aplicación de forma independiente entre sí. Por otro lado, [Adapter](https://refactoring.guru/es/design-patterns/adapter) se utiliza habitualmente con una aplicación existente para hacer que unas clases que de otro modo serían incompatibles, trabajen juntas sin problemas. * [Adapter](https://refactoring.guru/es/design-patterns/adapter) proporciona una interfaz completamente diferente para acceder a un objeto existente. Por otro lado, con el patrón [Decorator](https://refactoring.guru/es/design-patterns/decorator) la interfaz permanece igual o se amplía. Además, _Decorator_ admite la composición recursiva, que no es posible cuando se utiliza _Adapter_. * Con [Adapter](https://refactoring.guru/es/design-patterns/adapter) se accede a un objeto existente a través de una interfaz diferente. Con [Proxy](https://refactoring.guru/es/design-patterns/proxy) , la interfaz sigue siendo la misma. Con [Decorator](https://refactoring.guru/es/design-patterns/decorator) se accede al objeto a través de una interfaz mejorada. * [Facade](https://refactoring.guru/es/design-patterns/facade) define una nueva interfaz para objetos existentes, mientras que [Adapter](https://refactoring.guru/es/design-patterns/adapter) intenta hacer que la interfaz existente sea utilizable. Normalmente _Adapter_ sólo envuelve un objeto, mientras que _Facade_ trabaja con todo un subsistema de objetos. * [Bridge](https://refactoring.guru/es/design-patterns/bridge) , [State](https://refactoring.guru/es/design-patterns/state) , [Strategy](https://refactoring.guru/es/design-patterns/strategy) (y, hasta cierto punto, [Adapter](https://refactoring.guru/es/design-patterns/adapter) ) tienen estructuras muy similares. De hecho, todos estos patrones se basan en la composición, que consiste en delegar trabajo a otros objetos. Sin embargo, todos ellos solucionan problemas diferentes. Un patrón no es simplemente una receta para estructurar tu código de una forma específica. También puede comunicar a otros desarrolladores el problema que resuelve. Ejemplos de código ------------------ [![Adapter en C#](https://refactoring.guru/images/patterns/icons/csharp.svg?id=da64592defc6e86d57c39c66e9de3e58)](https://refactoring.guru/es/design-patterns/adapter/csharp/example "Adapter en C#") [![Adapter en C++](https://refactoring.guru/images/patterns/icons/cpp.svg?id=f7782ed8b8666246bfcc3f8fefc3b858)](https://refactoring.guru/es/design-patterns/adapter/cpp/example "Adapter en C++") [![Adapter en Go](https://refactoring.guru/images/patterns/icons/go.svg?id=1a89927eb99b1ea3fde7701d97970aca)](https://refactoring.guru/es/design-patterns/adapter/go/example "Adapter en Go") [![Adapter en Java](https://refactoring.guru/images/patterns/icons/java.svg?id=e6d87e2dca08c953fe3acd1275ed4f4e)](https://refactoring.guru/es/design-patterns/adapter/java/example "Adapter en Java") [![Adapter en PHP](https://refactoring.guru/images/patterns/icons/php.svg?id=be1906eb26b71ec1d3b93720d6156618)](https://refactoring.guru/es/design-patterns/adapter/php/example "Adapter en PHP") [![Adapter en Python](https://refactoring.guru/images/patterns/icons/python.svg?id=6d815d43c0f7050a1151b43e51569c9f)](https://refactoring.guru/es/design-patterns/adapter/python/example "Adapter en Python") [![Adapter en Ruby](https://refactoring.guru/images/patterns/icons/ruby.svg?id=b065b718c914bf8e960ef731600be1eb)](https://refactoring.guru/es/design-patterns/adapter/ruby/example "Adapter en Ruby") [![Adapter en Rust](https://refactoring.guru/images/patterns/icons/rust.svg?id=1f5698a4b5ae23fe79413511747e4a87)](https://refactoring.guru/es/design-patterns/adapter/rust/example "Adapter en Rust") [![Adapter en Swift](https://refactoring.guru/images/patterns/icons/swift.svg?id=0b716c2d52ec3a48fbe91ac031070c1d)](https://refactoring.guru/es/design-patterns/adapter/swift/example "Adapter en Swift") [![Adapter en TypeScript](https://refactoring.guru/images/patterns/icons/typescript.svg?id=2239d0f16cb703540c205dd8cb0c0cb7)](https://refactoring.guru/es/design-patterns/adapter/typescript/example "Adapter en TypeScript") [![](https://refactoring.guru/images/patterns/banners/patterns-book-banner-3-2x.png?id=0cc3f77ab421d1a5c02ee46488231c3a)](https://refactoring.guru/es/design-patterns/book) ### ¡Apoya nuestro sitio web gratuito y compra el libro! * 22 patrones de diseño y 8 principios explicados en profundidad * 436 páginas bien estructuradas, fáciles de leer y libres de tecnicismos * 225 ilustraciones y diagramas claros y útiles * Un archivo con ejemplos de código en 11 lenguajes * Todos los dispositivos soportados: Formatos PDF/EPUB/MOBI/KFX [Saber más…](https://refactoring.guru/es/design-patterns/book) --- # Bridge en Java / Patrones de diseño [There are patterns of patterns now! \ My friend's project: MetaPatterns.io](https://metapatterns.io/)  [](https://refactoring.guru/es/design-patterns/bridge/java/example#checkout) [](https://refactoring.guru/es/design-patterns/bridge/java/example#checkout) [](https://refactoring.guru/) / [Patrones de diseño](https://refactoring.guru/es/design-patterns) / [Bridge](https://refactoring.guru/es/design-patterns/bridge) / [Java](https://refactoring.guru/es/design-patterns/java) ![Bridge](https://refactoring.guru/images/patterns/cards/bridge-mini-2x.png?id=2622384cf623ed150ee9c21a0812dd87) **Bridge** en Java ================== **Bridge** es un patrón de diseño estructural que divide la lógica de negocio o una clase muy grande en jerarquías de clases separadas que se pueden desarrollar independientemente. Una de estas jerarquías (a menudo denominada Abstracción) obtendrá una referencia a un objeto de la segunda jerarquía (Implementación). La abstracción podrá delegar algunas (en ocasiones, la mayoría) de sus llamadas al objeto de las implementaciones. Como todas las implementaciones tendrán una interfaz común, serán intercambiables dentro de la abstracción. [Aprende más sobre el patrón Bridge](https://refactoring.guru/es/design-patterns/bridge) Navegación  [Intro](https://refactoring.guru/es/design-patterns/bridge/java/example#)  [Bridge (puente) entre dispositivos y controles remotos](https://refactoring.guru/es/design-patterns/bridge/java/example#example-0)  devices   [Device](https://refactoring.guru/es/design-patterns/bridge/java/example#example-0--devices-Device-java)   [Radio](https://refactoring.guru/es/design-patterns/bridge/java/example#example-0--devices-Radio-java)   [Tv](https://refactoring.guru/es/design-patterns/bridge/java/example#example-0--devices-Tv-java)  remotes   [Remote](https://refactoring.guru/es/design-patterns/bridge/java/example#example-0--remotes-Remote-java)   [Basic­Remote](https://refactoring.guru/es/design-patterns/bridge/java/example#example-0--remotes-BasicRemote-java)   [Advanced­Remote](https://refactoring.guru/es/design-patterns/bridge/java/example#example-0--remotes-AdvancedRemote-java)  [Demo](https://refactoring.guru/es/design-patterns/bridge/java/example#example-0--Demo-java)  [Output­Demo](https://refactoring.guru/es/design-patterns/bridge/java/example#example-0--OutputDemo-txt) **Complejidad:** **Popularidad:** **Ejemplos de uso:** El patrón Bridge es de especial utilidad a la hora de tratar con aplicaciones multiplataforma, soportar varios tipos de servidores de bases de datos, o trabajar con varios proveedores de API de un cierto tipo (por ejemplo, plataformas en la nube, redes sociales, etc.). **Identificación:** El patrón Bridge se puede reconocer por una distinción clara entre alguna entidad controladora y varias plataformas diferentes de las que depende. Bridge (puente) entre dispositivos y controles remotos ------------------------------------------------------ Este ejemplo muestra la separación entre las clases de los remotos y los dispositivos que controlan. Los remotos actúan como abstracciones, y los dispositivos son sus implementaciones. Gracias a las interfaces comunes, los mismos remotos pueden funcionar con distintos dispositivos y viceversa. El patrón Bridge permite cambiar o incluso crear nuevas clases sin tocar el código de la jerarquía opuesta. ### **devices** #### **devices/Device.java:** Interfaz común de todos los dispositivos package refactoring\_guru.bridge.example.devices; public interface Device { boolean isEnabled(); void enable(); void disable(); int getVolume(); void setVolume(int percent); int getChannel(); void setChannel(int channel); void printStatus(); } #### **devices/Radio.java:** Radio package refactoring\_guru.bridge.example.devices; public class Radio implements Device { private boolean on = false; private int volume = 30; private int channel = 1; @Override public boolean isEnabled() { return on; } @Override public void enable() { on = true; } @Override public void disable() { on = false; } @Override public int getVolume() { return volume; } @Override public void setVolume(int volume) { if (volume > 100) { this.volume = 100; } else if (volume < 0) { this.volume = 0; } else { this.volume = volume; } } @Override public int getChannel() { return channel; } @Override public void setChannel(int channel) { this.channel = channel; } @Override public void printStatus() { System.out.println("------------------------------------"); System.out.println("| I'm radio."); System.out.println("| I'm " + (on ? "enabled" : "disabled")); System.out.println("| Current volume is " + volume + "%"); System.out.println("| Current channel is " + channel); System.out.println("------------------------------------\\n"); } } #### **devices/Tv.java:** TV package refactoring\_guru.bridge.example.devices; public class Tv implements Device { private boolean on = false; private int volume = 30; private int channel = 1; @Override public boolean isEnabled() { return on; } @Override public void enable() { on = true; } @Override public void disable() { on = false; } @Override public int getVolume() { return volume; } @Override public void setVolume(int volume) { if (volume > 100) { this.volume = 100; } else if (volume < 0) { this.volume = 0; } else { this.volume = volume; } } @Override public int getChannel() { return channel; } @Override public void setChannel(int channel) { this.channel = channel; } @Override public void printStatus() { System.out.println("------------------------------------"); System.out.println("| I'm TV set."); System.out.println("| I'm " + (on ? "enabled" : "disabled")); System.out.println("| Current volume is " + volume + "%"); System.out.println("| Current channel is " + channel); System.out.println("------------------------------------\\n"); } } ### **remotes** #### **remotes/Remote.java:** Interfaz común de todos los remotos package refactoring\_guru.bridge.example.remotes; public interface Remote { void power(); void volumeDown(); void volumeUp(); void channelDown(); void channelUp(); } #### **remotes/BasicRemote.java:** Control remoto básico package refactoring\_guru.bridge.example.remotes; import refactoring\_guru.bridge.example.devices.Device; public class BasicRemote implements Remote { protected Device device; public BasicRemote() {} public BasicRemote(Device device) { this.device = device; } @Override public void power() { System.out.println("Remote: power toggle"); if (device.isEnabled()) { device.disable(); } else { device.enable(); } } @Override public void volumeDown() { System.out.println("Remote: volume down"); device.setVolume(device.getVolume() - 10); } @Override public void volumeUp() { System.out.println("Remote: volume up"); device.setVolume(device.getVolume() + 10); } @Override public void channelDown() { System.out.println("Remote: channel down"); device.setChannel(device.getChannel() - 1); } @Override public void channelUp() { System.out.println("Remote: channel up"); device.setChannel(device.getChannel() + 1); } } #### **remotes/AdvancedRemote.java:** Control remoto avanzado package refactoring\_guru.bridge.example.remotes; import refactoring\_guru.bridge.example.devices.Device; public class AdvancedRemote extends BasicRemote { public AdvancedRemote(Device device) { super.device = device; } public void mute() { System.out.println("Remote: mute"); device.setVolume(0); } } #### **Demo.java:** Código cliente package refactoring\_guru.bridge.example; import refactoring\_guru.bridge.example.devices.Device; import refactoring\_guru.bridge.example.devices.Radio; import refactoring\_guru.bridge.example.devices.Tv; import refactoring\_guru.bridge.example.remotes.AdvancedRemote; import refactoring\_guru.bridge.example.remotes.BasicRemote; public class Demo { public static void main(String\[\] args) { testDevice(new Tv()); testDevice(new Radio()); } public static void testDevice(Device device) { System.out.println("Tests with basic remote."); BasicRemote basicRemote = new BasicRemote(device); basicRemote.power(); device.printStatus(); System.out.println("Tests with advanced remote."); AdvancedRemote advancedRemote = new AdvancedRemote(device); advancedRemote.power(); advancedRemote.mute(); device.printStatus(); } } #### **OutputDemo.txt:** Resultado de la ejecución Tests with basic remote. Remote: power toggle ------------------------------------ | I'm TV set. | I'm enabled | Current volume is 30% | Current channel is 1 ------------------------------------ Tests with advanced remote. Remote: power toggle Remote: mute ------------------------------------ | I'm TV set. | I'm disabled | Current volume is 0% | Current channel is 1 ------------------------------------ Tests with basic remote. Remote: power toggle ------------------------------------ | I'm radio. | I'm enabled | Current volume is 30% | Current channel is 1 ------------------------------------ Tests with advanced remote. Remote: power toggle Remote: mute ------------------------------------ | I'm radio. | I'm disabled | Current volume is 0% | Current channel is 1 ------------------------------------ **Bridge** en otros lenguajes ----------------------------- [![Bridge en C#](https://refactoring.guru/images/patterns/icons/csharp.svg?id=da64592defc6e86d57c39c66e9de3e58)](https://refactoring.guru/es/design-patterns/bridge/csharp/example "Bridge en C#") [![Bridge en C++](https://refactoring.guru/images/patterns/icons/cpp.svg?id=f7782ed8b8666246bfcc3f8fefc3b858)](https://refactoring.guru/es/design-patterns/bridge/cpp/example "Bridge en C++") [![Bridge en Go](https://refactoring.guru/images/patterns/icons/go.svg?id=1a89927eb99b1ea3fde7701d97970aca)](https://refactoring.guru/es/design-patterns/bridge/go/example "Bridge en Go") [![Bridge en PHP](https://refactoring.guru/images/patterns/icons/php.svg?id=be1906eb26b71ec1d3b93720d6156618)](https://refactoring.guru/es/design-patterns/bridge/php/example "Bridge en PHP") [![Bridge en Python](https://refactoring.guru/images/patterns/icons/python.svg?id=6d815d43c0f7050a1151b43e51569c9f)](https://refactoring.guru/es/design-patterns/bridge/python/example "Bridge en Python") [![Bridge en Ruby](https://refactoring.guru/images/patterns/icons/ruby.svg?id=b065b718c914bf8e960ef731600be1eb)](https://refactoring.guru/es/design-patterns/bridge/ruby/example "Bridge en Ruby") [![Bridge en Rust](https://refactoring.guru/images/patterns/icons/rust.svg?id=1f5698a4b5ae23fe79413511747e4a87)](https://refactoring.guru/es/design-patterns/bridge/rust/example "Bridge en Rust") [![Bridge en Swift](https://refactoring.guru/images/patterns/icons/swift.svg?id=0b716c2d52ec3a48fbe91ac031070c1d)](https://refactoring.guru/es/design-patterns/bridge/swift/example "Bridge en Swift") [![Bridge en TypeScript](https://refactoring.guru/images/patterns/icons/typescript.svg?id=2239d0f16cb703540c205dd8cb0c0cb7)](https://refactoring.guru/es/design-patterns/bridge/typescript/example "Bridge en TypeScript") --- # Bridge en PHP / Patrones de diseño [There are patterns of patterns now! \ My friend's project: MetaPatterns.io](https://metapatterns.io/)  [](https://refactoring.guru/es/design-patterns/bridge/php/example#checkout) [](https://refactoring.guru/es/design-patterns/bridge/php/example#checkout) [](https://refactoring.guru/) / [Patrones de diseño](https://refactoring.guru/es/design-patterns) / [Bridge](https://refactoring.guru/es/design-patterns/bridge) / [PHP](https://refactoring.guru/es/design-patterns/php) ![Bridge](https://refactoring.guru/images/patterns/cards/bridge-mini-2x.png?id=2622384cf623ed150ee9c21a0812dd87) **Bridge** en PHP ================= **Bridge** es un patrón de diseño estructural que divide la lógica de negocio o una clase muy grande en jerarquías de clases separadas que se pueden desarrollar independientemente. Una de estas jerarquías (a menudo denominada Abstracción) obtendrá una referencia a un objeto de la segunda jerarquía (Implementación). La abstracción podrá delegar algunas (en ocasiones, la mayoría) de sus llamadas al objeto de las implementaciones. Como todas las implementaciones tendrán una interfaz común, serán intercambiables dentro de la abstracción. [Aprende más sobre el patrón Bridge](https://refactoring.guru/es/design-patterns/bridge) Navegación  [Intro](https://refactoring.guru/es/design-patterns/bridge/php/example#)  [Ejemplo conceptual](https://refactoring.guru/es/design-patterns/bridge/php/example#example-0)  [index](https://refactoring.guru/es/design-patterns/bridge/php/example#example-0--index-php)  [Output](https://refactoring.guru/es/design-patterns/bridge/php/example#example-0--Output-txt)  [Ejemplo del mundo real](https://refactoring.guru/es/design-patterns/bridge/php/example#example-1)  [index](https://refactoring.guru/es/design-patterns/bridge/php/example#example-1--index-php)  [Output](https://refactoring.guru/es/design-patterns/bridge/php/example#example-1--Output-txt) **Complejidad:** **Popularidad:** **Ejemplos de uso:** El patrón Bridge es de especial utilidad para soportar varios tipos de servidores de bases de datos o trabajar con varios proveedores de API de cierto tipo (por ejemplo, plataformas en la nube, redes sociales, etc.). **Identificación:** El patrón Bridge se puede reconocer por una distinción clara entre alguna entidad controladora y varias plataformas diferentes en las que se basa. Ejemplo conceptual ------------------ Este ejemplo ilustra la estructura del patrón de diseño **Bridge** y se centra en las siguientes preguntas: * ¿De qué clases se compone? * ¿Qué papeles juegan esas clases? * ¿De qué forma se relacionan los elementos del patrón? Después de conocer la estructura del patrón, será más fácil comprender el siguiente ejemplo basado en un caso de uso real de PHP. #### **index.php:** Ejemplo conceptual implementation = $implementation; } public function operation(): string { return "Abstraction: Base operation with:\\n" . $this->implementation->operationImplementation(); } } /\*\* \* You can extend the Abstraction without changing the Implementation classes. \*/ class ExtendedAbstraction extends Abstraction { public function operation(): string { return "ExtendedAbstraction: Extended operation with:\\n" . $this->implementation->operationImplementation(); } } /\*\* \* The Implementation defines the interface for all implementation classes. It \* doesn't have to match the Abstraction's interface. In fact, the two \* interfaces can be entirely different. Typically the Implementation interface \* provides only primitive operations, while the Abstraction defines higher- \* level operations based on those primitives. \*/ interface Implementation { public function operationImplementation(): string; } /\*\* \* Each Concrete Implementation corresponds to a specific platform and \* implements the Implementation interface using that platform's API. \*/ class ConcreteImplementationA implements Implementation { public function operationImplementation(): string { return "ConcreteImplementationA: Here's the result on the platform A.\\n"; } } class ConcreteImplementationB implements Implementation { public function operationImplementation(): string { return "ConcreteImplementationB: Here's the result on the platform B.\\n"; } } /\*\* \* Except for the initialization phase, where an Abstraction object gets linked \* with a specific Implementation object, the client code should only depend on \* the Abstraction class. This way the client code can support any abstraction- \* implementation combination. \*/ function clientCode(Abstraction $abstraction) { // ... echo $abstraction->operation(); // ... } /\*\* \* The client code should be able to work with any pre-configured abstraction- \* implementation combination. \*/ $implementation = new ConcreteImplementationA(); $abstraction = new Abstraction($implementation); clientCode($abstraction); echo "\\n"; $implementation = new ConcreteImplementationB(); $abstraction = new ExtendedAbstraction($implementation); clientCode($abstraction); #### **Output.txt:** Resultado de la ejecución Abstraction: Base operation with: ConcreteImplementationA: Here's the result on the platform A. ExtendedAbstraction: Extended operation with: ConcreteImplementationB: Here's the result on the platform B. Ejemplo del mundo real ---------------------- En este ejemplo, la jerarquía `Página` actúa como **Abstracción**, y la jerarquía `Procesador` actúa como **Implementación**. Los objetos de la clase `Página` pueden ensamblar páginas web de un tipo particular utilizando elementos básicos proporcionados por un objeto `Procesador` adjunto a esa página. Al estar ambas jerarquías de clases separadas, puedes añadir una nueva clase `Procesador` sin cambiar ninguna de las clases `Página` y viceversa. #### **index.php:** Ejemplo del mundo real renderer = $renderer; } /\*\* \* The Bridge pattern allows replacing the attached Implementation object \* dynamically. \*/ public function changeRenderer(Renderer $renderer): void { $this->renderer = $renderer; } /\*\* \* The "view" behavior stays abstract since it can only be provided by \* Concrete Abstraction classes. \*/ abstract public function view(): string; } /\*\* \* This Concrete Abstraction represents a simple page. \*/ class SimplePage extends Page { protected $title; protected $content; public function \_\_construct(Renderer $renderer, string $title, string $content) { parent::\_\_construct($renderer); $this->title = $title; $this->content = $content; } public function view(): string { return $this->renderer->renderParts(\[\ $this->renderer->renderHeader(),\ $this->renderer->renderTitle($this->title),\ $this->renderer->renderTextBlock($this->content),\ $this->renderer->renderFooter()\ \]); } } /\*\* \* This Concrete Abstraction represents a more complex page. \*/ class ProductPage extends Page { protected $product; public function \_\_construct(Renderer $renderer, Product $product) { parent::\_\_construct($renderer); $this->product = $product; } public function view(): string { return $this->renderer->renderParts(\[\ $this->renderer->renderHeader(),\ $this->renderer->renderTitle($this->product->getTitle()),\ $this->renderer->renderTextBlock($this->product->getDescription()),\ $this->renderer->renderImage($this->product->getImage()),\ $this->renderer->renderTextBlock('$' . number\_format($this->product->getPrice(), 2)),\ $this->renderer->renderLink("/cart/add/" . $this->product->getId(), "Add to cart"),\ $this->renderer->renderFooter()\ \]); } } /\*\* \* A helper class for the ProductPage class. \*/ class Product { private $id, $title, $description, $image, $price; public function \_\_construct( string $id, string $title, string $description, string $image, float $price ) { $this->id = $id; $this->title = $title; $this->description = $description; $this->image = $image; $this->price = $price; } public function getId(): string { return $this->id; } public function getTitle(): string { return $this->title; } public function getDescription(): string { return $this->description; } public function getImage(): string { return $this->image; } public function getPrice(): float { return $this->price; } } /\*\* \* The Implementation declares a set of "real", "under-the-hood", "platform" \* methods. \* \* In this case, the Implementation lists rendering methods that can be used to \* compose any web page. Different Abstractions may use different methods of the \* Implementation. \*/ interface Renderer { public function renderTitle(string $title): string; public function renderTextBlock(string $text): string; public function renderImage(string $url): string; public function renderLink(string $url, string $title): string; public function renderHeader(): string; public function renderFooter(): string; public function renderParts(array $parts): string; } /\*\* \* This Concrete Implementation renders a web page as HTML. \*/ class HTMLRenderer implements Renderer { public function renderTitle(string $title): string { return "




















































































































































































































$title

"; } public function renderTextBlock(string $text): string { return "
$text
"; } public function renderImage(string $url): string { return ""; } public function renderLink(string $url, string $title): string { return "$title"; } public function renderHeader(): string { return ""; } public function renderFooter(): string { return ""; } public function renderParts(array $parts): string { return implode("\\n", $parts); } } /\*\* \* This Concrete Implementation renders a web page as JSON strings. \*/ class JsonRenderer implements Renderer { public function renderTitle(string $title): string { return '"title": "' . $title . '"'; } public function renderTextBlock(string $text): string { return '"text": "' . $text . '"'; } public function renderImage(string $url): string { return '"img": "' . $url . '"'; } public function renderLink(string $url, string $title): string { return '"link": {"href": "' . $url . '", "title": "' . $title . '"}'; } public function renderHeader(): string { return ''; } public function renderFooter(): string { return ''; } public function renderParts(array $parts): string { return "{\\n" . implode(",\\n", array\_filter($parts)) . "\\n}"; } } /\*\* \* The client code usually deals only with the Abstraction objects. \*/ function clientCode(Page $page) { // ... echo $page->view(); // ... } /\*\* \* The client code can be executed with any pre-configured combination of the \* Abstraction+Implementation. \*/ $HTMLRenderer = new HTMLRenderer(); $JSONRenderer = new JsonRenderer(); $page = new SimplePage($HTMLRenderer, "Home", "Welcome to our website!"); echo "HTML view of a simple content page:\\n"; clientCode($page); echo "\\n\\n"; /\*\* \* The Abstraction can change the linked Implementation at runtime if needed. \*/ $page->changeRenderer($JSONRenderer); echo "JSON view of a simple content page, rendered with the same client code:\\n"; clientCode($page); echo "\\n\\n"; $product = new Product( "123", "Star Wars, episode1", "A long time ago in a galaxy far, far away...", "/images/star-wars.jpeg", 39.95 ); $page = new ProductPage($HTMLRenderer, $product); echo "HTML view of a product page, same client code:\\n"; clientCode($page); echo "\\n\\n"; $page->changeRenderer($JSONRenderer); echo "JSON view of a simple content page, with the same client code:\\n"; clientCode($page); #### **Output.txt:** Resultado de la ejecución HTML view of a simple content page:

Home

Welcome to our website!
JSON view of a simple content page, rendered with the same client code: { "title": "Home", "text": "Welcome to our website!" } HTML view of a product page, same client code:

Star Wars, episode1

A long time ago in a galaxy far, far away...
Add to cart JSON view of a simple content page, with the same client code: { "title": "Star Wars, episode1", "text": "A long time ago in a galaxy far, far away...", "img": "/images/star-wars.jpeg", "link": {"href": "/cart/add/123", "title": "Add to cart"} } **Bridge** en otros lenguajes ----------------------------- [![Bridge en C#](https://refactoring.guru/images/patterns/icons/csharp.svg?id=da64592defc6e86d57c39c66e9de3e58)](https://refactoring.guru/es/design-patterns/bridge/csharp/example "Bridge en C#") [![Bridge en C++](https://refactoring.guru/images/patterns/icons/cpp.svg?id=f7782ed8b8666246bfcc3f8fefc3b858)](https://refactoring.guru/es/design-patterns/bridge/cpp/example "Bridge en C++") [![Bridge en Go](https://refactoring.guru/images/patterns/icons/go.svg?id=1a89927eb99b1ea3fde7701d97970aca)](https://refactoring.guru/es/design-patterns/bridge/go/example "Bridge en Go") [![Bridge en Java](https://refactoring.guru/images/patterns/icons/java.svg?id=e6d87e2dca08c953fe3acd1275ed4f4e)](https://refactoring.guru/es/design-patterns/bridge/java/example "Bridge en Java") [![Bridge en Python](https://refactoring.guru/images/patterns/icons/python.svg?id=6d815d43c0f7050a1151b43e51569c9f)](https://refactoring.guru/es/design-patterns/bridge/python/example "Bridge en Python") [![Bridge en Ruby](https://refactoring.guru/images/patterns/icons/ruby.svg?id=b065b718c914bf8e960ef731600be1eb)](https://refactoring.guru/es/design-patterns/bridge/ruby/example "Bridge en Ruby") [![Bridge en Rust](https://refactoring.guru/images/patterns/icons/rust.svg?id=1f5698a4b5ae23fe79413511747e4a87)](https://refactoring.guru/es/design-patterns/bridge/rust/example "Bridge en Rust") [![Bridge en Swift](https://refactoring.guru/images/patterns/icons/swift.svg?id=0b716c2d52ec3a48fbe91ac031070c1d)](https://refactoring.guru/es/design-patterns/bridge/swift/example "Bridge en Swift") [![Bridge en TypeScript](https://refactoring.guru/images/patterns/icons/typescript.svg?id=2239d0f16cb703540c205dd8cb0c0cb7)](https://refactoring.guru/es/design-patterns/bridge/typescript/example "Bridge en TypeScript") --- # Bridge en TypeScript / Patrones de diseño [There are patterns of patterns now! \ My friend's project: MetaPatterns.io](https://metapatterns.io/)  [](https://refactoring.guru/es/design-patterns/bridge/typescript/example#checkout) [](https://refactoring.guru/es/design-patterns/bridge/typescript/example#checkout) [](https://refactoring.guru/) / [Patrones de diseño](https://refactoring.guru/es/design-patterns) / [Bridge](https://refactoring.guru/es/design-patterns/bridge) / [TypeScript](https://refactoring.guru/es/design-patterns/typescript) ![Bridge](https://refactoring.guru/images/patterns/cards/bridge-mini-2x.png?id=2622384cf623ed150ee9c21a0812dd87) **Bridge** en TypeScript ======================== **Bridge** es un patrón de diseño estructural que divide la lógica de negocio o una clase muy grande en jerarquías de clases separadas que se pueden desarrollar independientemente. Una de estas jerarquías (a menudo denominada Abstracción) obtendrá una referencia a un objeto de la segunda jerarquía (Implementación). La abstracción podrá delegar algunas (en ocasiones, la mayoría) de sus llamadas al objeto de las implementaciones. Como todas las implementaciones tendrán una interfaz común, serán intercambiables dentro de la abstracción. [Aprende más sobre el patrón Bridge](https://refactoring.guru/es/design-patterns/bridge) Navegación  [Intro](https://refactoring.guru/es/design-patterns/bridge/typescript/example#)  [Ejemplo conceptual](https://refactoring.guru/es/design-patterns/bridge/typescript/example#example-0)  [index](https://refactoring.guru/es/design-patterns/bridge/typescript/example#example-0--index-ts)  [Output](https://refactoring.guru/es/design-patterns/bridge/typescript/example#example-0--Output-txt) **Complejidad:** **Popularidad:** **Ejemplos de uso:** El patrón Bridge es de especial utilidad a la hora de tratar con aplicaciones multiplataforma, soportar varios tipos de servidores de bases de datos, o trabajar con varios proveedores de API de un cierto tipo (por ejemplo, plataformas en la nube, redes sociales, etc.). **Identificación:** El patrón Bridge se puede reconocer por una distinción clara entre alguna entidad controladora y varias plataformas diferentes en las que se basa. Ejemplo conceptual ------------------ Este ejemplo ilustra la estructura del patrón de diseño **Bridge** y se centra en las siguientes preguntas: * ¿De qué clases se compone? * ¿Qué papeles juegan esas clases? * ¿De qué forma se relacionan los elementos del patrón? #### **index.ts:** Ejemplo conceptual /\*\* \* The Abstraction defines the interface for the "control" part of the two class \* hierarchies. It maintains a reference to an object of the Implementation \* hierarchy and delegates all of the real work to this object. \*/ class Abstraction { protected implementation: Implementation; constructor(implementation: Implementation) { this.implementation = implementation; } public operation(): string { const result = this.implementation.operationImplementation(); return \`Abstraction: Base operation with:\\n${result}\`; } } /\*\* \* You can extend the Abstraction without changing the Implementation classes. \*/ class ExtendedAbstraction extends Abstraction { public operation(): string { const result = this.implementation.operationImplementation(); return \`ExtendedAbstraction: Extended operation with:\\n${result}\`; } } /\*\* \* The Implementation defines the interface for all implementation classes. It \* doesn't have to match the Abstraction's interface. In fact, the two \* interfaces can be entirely different. Typically the Implementation interface \* provides only primitive operations, while the Abstraction defines higher- \* level operations based on those primitives. \*/ interface Implementation { operationImplementation(): string; } /\*\* \* Each Concrete Implementation corresponds to a specific platform and \* implements the Implementation interface using that platform's API. \*/ class ConcreteImplementationA implements Implementation { public operationImplementation(): string { return 'ConcreteImplementationA: Here\\'s the result on the platform A.'; } } class ConcreteImplementationB implements Implementation { public operationImplementation(): string { return 'ConcreteImplementationB: Here\\'s the result on the platform B.'; } } /\*\* \* Except for the initialization phase, where an Abstraction object gets linked \* with a specific Implementation object, the client code should only depend on \* the Abstraction class. This way the client code can support any abstraction- \* implementation combination. \*/ function clientCode(abstraction: Abstraction) { // .. console.log(abstraction.operation()); // .. } /\*\* \* The client code should be able to work with any pre-configured abstraction- \* implementation combination. \*/ let implementation = new ConcreteImplementationA(); let abstraction = new Abstraction(implementation); clientCode(abstraction); console.log(''); implementation = new ConcreteImplementationB(); abstraction = new ExtendedAbstraction(implementation); clientCode(abstraction); #### **Output.txt:** Resultado de la ejecución Abstraction: Base operation with: ConcreteImplementationA: Here's the result on the platform A. ExtendedAbstraction: Extended operation with: ConcreteImplementationB: Here's the result on the platform B. **Bridge** en otros lenguajes ----------------------------- [![Bridge en C#](https://refactoring.guru/images/patterns/icons/csharp.svg?id=da64592defc6e86d57c39c66e9de3e58)](https://refactoring.guru/es/design-patterns/bridge/csharp/example "Bridge en C#") [![Bridge en C++](https://refactoring.guru/images/patterns/icons/cpp.svg?id=f7782ed8b8666246bfcc3f8fefc3b858)](https://refactoring.guru/es/design-patterns/bridge/cpp/example "Bridge en C++") [![Bridge en Go](https://refactoring.guru/images/patterns/icons/go.svg?id=1a89927eb99b1ea3fde7701d97970aca)](https://refactoring.guru/es/design-patterns/bridge/go/example "Bridge en Go") [![Bridge en Java](https://refactoring.guru/images/patterns/icons/java.svg?id=e6d87e2dca08c953fe3acd1275ed4f4e)](https://refactoring.guru/es/design-patterns/bridge/java/example "Bridge en Java") [![Bridge en PHP](https://refactoring.guru/images/patterns/icons/php.svg?id=be1906eb26b71ec1d3b93720d6156618)](https://refactoring.guru/es/design-patterns/bridge/php/example "Bridge en PHP") [![Bridge en Python](https://refactoring.guru/images/patterns/icons/python.svg?id=6d815d43c0f7050a1151b43e51569c9f)](https://refactoring.guru/es/design-patterns/bridge/python/example "Bridge en Python") [![Bridge en Ruby](https://refactoring.guru/images/patterns/icons/ruby.svg?id=b065b718c914bf8e960ef731600be1eb)](https://refactoring.guru/es/design-patterns/bridge/ruby/example "Bridge en Ruby") [![Bridge en Rust](https://refactoring.guru/images/patterns/icons/rust.svg?id=1f5698a4b5ae23fe79413511747e4a87)](https://refactoring.guru/es/design-patterns/bridge/rust/example "Bridge en Rust") [![Bridge en Swift](https://refactoring.guru/images/patterns/icons/swift.svg?id=0b716c2d52ec3a48fbe91ac031070c1d)](https://refactoring.guru/es/design-patterns/bridge/swift/example "Bridge en Swift") --- # Bridge en Go / Patrones de diseño [There are patterns of patterns now! \ My friend's project: MetaPatterns.io](https://metapatterns.io/)  [](https://refactoring.guru/es/design-patterns/bridge/go/example#checkout) [](https://refactoring.guru/es/design-patterns/bridge/go/example#checkout) [](https://refactoring.guru/) / [Patrones de diseño](https://refactoring.guru/es/design-patterns) / [Bridge](https://refactoring.guru/es/design-patterns/bridge) / [Go](https://refactoring.guru/es/design-patterns/go) ![Bridge](https://refactoring.guru/images/patterns/cards/bridge-mini-2x.png?id=2622384cf623ed150ee9c21a0812dd87) **Bridge** en Go ================ **Bridge** es un patrón de diseño estructural que divide la lógica de negocio o una clase muy grande en jerarquías de clases separadas que se pueden desarrollar independientemente. Una de estas jerarquías (a menudo denominada Abstracción) obtendrá una referencia a un objeto de la segunda jerarquía (Implementación). La abstracción podrá delegar algunas (en ocasiones, la mayoría) de sus llamadas al objeto de las implementaciones. Como todas las implementaciones tendrán una interfaz común, serán intercambiables dentro de la abstracción. [Aprende más sobre el patrón Bridge](https://refactoring.guru/es/design-patterns/bridge) Navegación  [Intro](https://refactoring.guru/es/design-patterns/bridge/go/example#)  [Ejemplo conceptual](https://refactoring.guru/es/design-patterns/bridge/go/example#example-0)  [computer](https://refactoring.guru/es/design-patterns/bridge/go/example#example-0--computer-go)  [mac](https://refactoring.guru/es/design-patterns/bridge/go/example#example-0--mac-go)  [windows](https://refactoring.guru/es/design-patterns/bridge/go/example#example-0--windows-go)  [printer](https://refactoring.guru/es/design-patterns/bridge/go/example#example-0--printer-go)  [epson](https://refactoring.guru/es/design-patterns/bridge/go/example#example-0--epson-go)  [hp](https://refactoring.guru/es/design-patterns/bridge/go/example#example-0--hp-go)  [main](https://refactoring.guru/es/design-patterns/bridge/go/example#example-0--main-go)  [output](https://refactoring.guru/es/design-patterns/bridge/go/example#example-0--output-txt) Ejemplo conceptual ------------------ Digamos que tienes dos tipos de computadora: Mac y Windows. También, dos tipos de impresora: Epson y HP. Todas las computadoras e impresoras deben funcionar unas con otras en cualquier combinación. El cliente no quiere preocuparse de los detalles de conectar impresoras a computadoras. Si introducimos nuevas impresoras, no queremos que nuestro código crezca exponencialmente. En lugar de crear cuatro estructuras para la combinación 2\*2, creamos dos jerarquías: * Jerarquía de abstracción: éstas serán nuestras computadoras. * Jerarquía de implementación: éstas serán nuestras impresoras. Estas dos jerarquías se comunican entre sí a través de un Bridge, donde la Abstracción (computadora) contiene una referencia a la Implementación (impresora). Tanto la abstracción como la implementación pueden desarrollarse independientemente sin afectar la una a la otra. #### **computer.go:** Abstracción package main type Computer interface { Print() SetPrinter(Printer) } #### **mac.go:** Abstracción refinada package main import "fmt" type Mac struct { printer Printer } func (m \*Mac) Print() { fmt.Println("Print request for mac") m.printer.PrintFile() } func (m \*Mac) SetPrinter(p Printer) { m.printer = p } #### **windows.go:** Abstracción refinada package main import "fmt" type Windows struct { printer Printer } func (w \*Windows) Print() { fmt.Println("Print request for windows") w.printer.PrintFile() } func (w \*Windows) SetPrinter(p Printer) { w.printer = p } #### **printer.go:** Implementación package main type Printer interface { PrintFile() } #### **epson.go:** Implementación concreta package main import "fmt" type Epson struct { } func (p \*Epson) PrintFile() { fmt.Println("Printing by a EPSON Printer") } #### **hp.go:** Implementación concreta package main import "fmt" type Hp struct { } func (p \*Hp) PrintFile() { fmt.Println("Printing by a HP Printer") } #### **main.go:** Código cliente package main import "fmt" func main() { hpPrinter := &Hp{} epsonPrinter := &Epson{} macComputer := &Mac{} macComputer.SetPrinter(hpPrinter) macComputer.Print() fmt.Println() macComputer.SetPrinter(epsonPrinter) macComputer.Print() fmt.Println() winComputer := &Windows{} winComputer.SetPrinter(hpPrinter) winComputer.Print() fmt.Println() winComputer.SetPrinter(epsonPrinter) winComputer.Print() fmt.Println() } #### **output.txt:** Resultado de la ejecución Print request for mac Printing by a HP Printer Print request for mac Printing by a EPSON Printer Print request for windows Printing by a HP Printer Print request for windows **Bridge** en otros lenguajes ----------------------------- [![Bridge en C#](https://refactoring.guru/images/patterns/icons/csharp.svg?id=da64592defc6e86d57c39c66e9de3e58)](https://refactoring.guru/es/design-patterns/bridge/csharp/example "Bridge en C#") [![Bridge en C++](https://refactoring.guru/images/patterns/icons/cpp.svg?id=f7782ed8b8666246bfcc3f8fefc3b858)](https://refactoring.guru/es/design-patterns/bridge/cpp/example "Bridge en C++") [![Bridge en Java](https://refactoring.guru/images/patterns/icons/java.svg?id=e6d87e2dca08c953fe3acd1275ed4f4e)](https://refactoring.guru/es/design-patterns/bridge/java/example "Bridge en Java") [![Bridge en PHP](https://refactoring.guru/images/patterns/icons/php.svg?id=be1906eb26b71ec1d3b93720d6156618)](https://refactoring.guru/es/design-patterns/bridge/php/example "Bridge en PHP") [![Bridge en Python](https://refactoring.guru/images/patterns/icons/python.svg?id=6d815d43c0f7050a1151b43e51569c9f)](https://refactoring.guru/es/design-patterns/bridge/python/example "Bridge en Python") [![Bridge en Ruby](https://refactoring.guru/images/patterns/icons/ruby.svg?id=b065b718c914bf8e960ef731600be1eb)](https://refactoring.guru/es/design-patterns/bridge/ruby/example "Bridge en Ruby") [![Bridge en Rust](https://refactoring.guru/images/patterns/icons/rust.svg?id=1f5698a4b5ae23fe79413511747e4a87)](https://refactoring.guru/es/design-patterns/bridge/rust/example "Bridge en Rust") [![Bridge en Swift](https://refactoring.guru/images/patterns/icons/swift.svg?id=0b716c2d52ec3a48fbe91ac031070c1d)](https://refactoring.guru/es/design-patterns/bridge/swift/example "Bridge en Swift") [![Bridge en TypeScript](https://refactoring.guru/images/patterns/icons/typescript.svg?id=2239d0f16cb703540c205dd8cb0c0cb7)](https://refactoring.guru/es/design-patterns/bridge/typescript/example "Bridge en TypeScript") --- # Builder en Go / Patrones de diseño [There are patterns of patterns now! \ My friend's project: MetaPatterns.io](https://metapatterns.io/)  [](https://refactoring.guru/es/design-patterns/builder/go/example#checkout) [](https://refactoring.guru/es/design-patterns/builder/go/example#checkout) [](https://refactoring.guru/) / [Patrones de diseño](https://refactoring.guru/es/design-patterns) / [Builder](https://refactoring.guru/es/design-patterns/builder) / [Go](https://refactoring.guru/es/design-patterns/go) ![Builder](https://refactoring.guru/images/patterns/cards/builder-mini-2x.png?id=de6d0938678b86903a1426dddfdd13bf) **Builder** en Go ================= **Builder** es un patrón de diseño creacional que permite construir objetos complejos paso a paso. Al contrario que otros patrones creacionales, Builder no necesita que los productos tengan una interfaz común. Esto hace posible crear distintos productos utilizando el mismo proceso de construcción. [Aprende más sobre el patrón Builder](https://refactoring.guru/es/design-patterns/builder) Navegación  [Intro](https://refactoring.guru/es/design-patterns/builder/go/example#)  [Ejemplo conceptual](https://refactoring.guru/es/design-patterns/builder/go/example#example-0)  [i­Builder](https://refactoring.guru/es/design-patterns/builder/go/example#example-0--iBuilder-go)  [normal­Builder](https://refactoring.guru/es/design-patterns/builder/go/example#example-0--normalBuilder-go)  [igloo­Builder](https://refactoring.guru/es/design-patterns/builder/go/example#example-0--iglooBuilder-go)  [house](https://refactoring.guru/es/design-patterns/builder/go/example#example-0--house-go)  [director](https://refactoring.guru/es/design-patterns/builder/go/example#example-0--director-go)  [main](https://refactoring.guru/es/design-patterns/builder/go/example#example-0--main-go)  [output](https://refactoring.guru/es/design-patterns/builder/go/example#example-0--output-txt) Ejemplo conceptual ------------------ El patrón Builder también se utiliza cuando el producto deseado es complejo y se requieren varios pasos para completarlo. En este caso, será más sencillo emplear varios métodos de construcción que un único constructor enorme. El problema potencial con el proceso de creación de varias etapas es que un producto parcialmente creado e inestable puede quedar expuesto al cliente. El patrón Builder mantiene privado el producto hasta que esté totalmente creado. En el siguiente código, vemos distintos tipos de casas (`igloo` y `normalHouse`) que son construidos por `iglooBuilder` y `normalBuilder`. Cada tipo de casa tiene los mismos pasos de construcción. La estructura directora opcional ayuda a organizar el proceso de creación. #### **iBuilder.go:** Interfaz builder package main type IBuilder interface { setWindowType() setDoorType() setNumFloor() getHouse() House } func getBuilder(builderType string) IBuilder { if builderType == "normal" { return newNormalBuilder() } if builderType == "igloo" { return newIglooBuilder() } return nil } #### **normalBuilder.go:** Builder concreto package main type NormalBuilder struct { windowType string doorType string floor int } func newNormalBuilder() \*NormalBuilder { return &NormalBuilder{} } func (b \*NormalBuilder) setWindowType() { b.windowType = "Wooden Window" } func (b \*NormalBuilder) setDoorType() { b.doorType = "Wooden Door" } func (b \*NormalBuilder) setNumFloor() { b.floor = 2 } func (b \*NormalBuilder) getHouse() House { return House{ doorType: b.doorType, windowType: b.windowType, floor: b.floor, } } #### **iglooBuilder.go:** Builder concreto package main type IglooBuilder struct { windowType string doorType string floor int } func newIglooBuilder() \*IglooBuilder { return &IglooBuilder{} } func (b \*IglooBuilder) setWindowType() { b.windowType = "Snow Window" } func (b \*IglooBuilder) setDoorType() { b.doorType = "Snow Door" } func (b \*IglooBuilder) setNumFloor() { b.floor = 1 } func (b \*IglooBuilder) getHouse() House { return House{ doorType: b.doorType, windowType: b.windowType, floor: b.floor, } } #### **house.go:** Producto package main type House struct { windowType string doorType string floor int } #### **director.go:** Director package main type Director struct { builder IBuilder } func newDirector(b IBuilder) \*Director { return &Director{ builder: b, } } func (d \*Director) setBuilder(b IBuilder) { d.builder = b } func (d \*Director) buildHouse() House { d.builder.setDoorType() d.builder.setWindowType() d.builder.setNumFloor() return d.builder.getHouse() } #### **main.go:** Código cliente package main import "fmt" func main() { normalBuilder := getBuilder("normal") iglooBuilder := getBuilder("igloo") director := newDirector(normalBuilder) normalHouse := director.buildHouse() fmt.Printf("Normal House Door Type: %s\\n", normalHouse.doorType) fmt.Printf("Normal House Window Type: %s\\n", normalHouse.windowType) fmt.Printf("Normal House Num Floor: %d\\n", normalHouse.floor) director.setBuilder(iglooBuilder) iglooHouse := director.buildHouse() fmt.Printf("\\nIgloo House Door Type: %s\\n", iglooHouse.doorType) fmt.Printf("Igloo House Window Type: %s\\n", iglooHouse.windowType) fmt.Printf("Igloo House Num Floor: %d\\n", iglooHouse.floor) } #### **output.txt:** Resultado de la ejecución Normal House Door Type: Wooden Door Normal House Window Type: Wooden Window Normal House Num Floor: 2 Igloo House Door Type: Snow Door Igloo House Window Type: Snow Window Igloo House Num Floor: 1 **Builder** en otros lenguajes ------------------------------ [![Builder en C#](https://refactoring.guru/images/patterns/icons/csharp.svg?id=da64592defc6e86d57c39c66e9de3e58)](https://refactoring.guru/es/design-patterns/builder/csharp/example "Builder en C#") [![Builder en C++](https://refactoring.guru/images/patterns/icons/cpp.svg?id=f7782ed8b8666246bfcc3f8fefc3b858)](https://refactoring.guru/es/design-patterns/builder/cpp/example "Builder en C++") [![Builder en Java](https://refactoring.guru/images/patterns/icons/java.svg?id=e6d87e2dca08c953fe3acd1275ed4f4e)](https://refactoring.guru/es/design-patterns/builder/java/example "Builder en Java") [![Builder en PHP](https://refactoring.guru/images/patterns/icons/php.svg?id=be1906eb26b71ec1d3b93720d6156618)](https://refactoring.guru/es/design-patterns/builder/php/example "Builder en PHP") [![Builder en Python](https://refactoring.guru/images/patterns/icons/python.svg?id=6d815d43c0f7050a1151b43e51569c9f)](https://refactoring.guru/es/design-patterns/builder/python/example "Builder en Python") [![Builder en Ruby](https://refactoring.guru/images/patterns/icons/ruby.svg?id=b065b718c914bf8e960ef731600be1eb)](https://refactoring.guru/es/design-patterns/builder/ruby/example "Builder en Ruby") [![Builder en Rust](https://refactoring.guru/images/patterns/icons/rust.svg?id=1f5698a4b5ae23fe79413511747e4a87)](https://refactoring.guru/es/design-patterns/builder/rust/example "Builder en Rust") [![Builder en Swift](https://refactoring.guru/images/patterns/icons/swift.svg?id=0b716c2d52ec3a48fbe91ac031070c1d)](https://refactoring.guru/es/design-patterns/builder/swift/example "Builder en Swift") [![Builder en TypeScript](https://refactoring.guru/images/patterns/icons/typescript.svg?id=2239d0f16cb703540c205dd8cb0c0cb7)](https://refactoring.guru/es/design-patterns/builder/typescript/example "Builder en TypeScript") --- # Builder en Ruby / Patrones de diseño [There are patterns of patterns now! \ My friend's project: MetaPatterns.io](https://metapatterns.io/)  [](https://refactoring.guru/es/design-patterns/builder/ruby/example#checkout) [](https://refactoring.guru/es/design-patterns/builder/ruby/example#checkout) [](https://refactoring.guru/) / [Patrones de diseño](https://refactoring.guru/es/design-patterns) / [Builder](https://refactoring.guru/es/design-patterns/builder) / [Ruby](https://refactoring.guru/es/design-patterns/ruby) ![Builder](https://refactoring.guru/images/patterns/cards/builder-mini-2x.png?id=de6d0938678b86903a1426dddfdd13bf) **Builder** en Ruby =================== **Builder** es un patrón de diseño creacional que permite construir objetos complejos paso a paso. Al contrario que otros patrones creacionales, Builder no necesita que los productos tengan una interfaz común. Esto hace posible crear distintos productos utilizando el mismo proceso de construcción. [Aprende más sobre el patrón Builder](https://refactoring.guru/es/design-patterns/builder) Navegación  [Intro](https://refactoring.guru/es/design-patterns/builder/ruby/example#)  [Ejemplo conceptual](https://refactoring.guru/es/design-patterns/builder/ruby/example#example-0)  [main](https://refactoring.guru/es/design-patterns/builder/ruby/example#example-0--main-rb)  [output](https://refactoring.guru/es/design-patterns/builder/ruby/example#example-0--output-txt) **Complejidad:** **Popularidad:** **Ejemplos de uso:** El patrón Builder es muy conocido en el mundo Ruby. Resulta especialmente útil cuando debes crear un objeto con muchas opciones posibles de configuración. **Identificación:** El patrón Builder se puede reconocer por la clase, que tiene un único método de creación y varios métodos para configurar el objeto resultante. A menudo, los métodos del Builder soportan el encadenamiento (por ejemplo, `someBuilder.setValueA(1).setValueB(2).create()`). Ejemplo conceptual ------------------ Este ejemplo ilustra la estructura del patrón de diseño **Builder**. Se centra en responder las siguientes preguntas: * ¿De qué clases se compone? * ¿Qué papeles juegan esas clases? * ¿De qué forma se relacionan los elementos del patrón? #### **main.rb:** Ejemplo conceptual \# The Builder interface specifies methods for creating the different parts of # the Product objects. class Builder # @abstract def produce\_part\_a raise NotImplementedError, "#{self.class} has not implemented method '#{\_\_method\_\_}'" end # @abstract def produce\_part\_b raise NotImplementedError, "#{self.class} has not implemented method '#{\_\_method\_\_}'" end # @abstract def produce\_part\_c raise NotImplementedError, "#{self.class} has not implemented method '#{\_\_method\_\_}'" end end # The Concrete Builder classes follow the Builder interface and provide specific # implementations of the building steps. Your program may have several # variations of Builders, implemented differently. class ConcreteBuilder1 < Builder # A fresh builder instance should contain a blank product object, which is # used in further assembly. def initialize reset end def reset @product = Product1.new end # Concrete Builders are supposed to provide their own methods for retrieving # results. That's because various types of builders may create entirely # different products that don't follow the same interface. Therefore, such # methods cannot be declared in the base Builder interface (at least in a # statically typed programming language). # # Usually, after returning the end result to the client, a builder instance is # expected to be ready to start producing another product. That's why it's a # usual practice to call the reset method at the end of the \`getProduct\` # method body. However, this behavior is not mandatory, and you can make your # builders wait for an explicit reset call from the client code before # disposing of the previous result. def product product = @product reset product end def produce\_part\_a @product.add('PartA1') end def produce\_part\_b @product.add('PartB1') end def produce\_part\_c @product.add('PartC1') end end # It makes sense to use the Builder pattern only when your products are quite # complex and require extensive configuration. # # Unlike in other creational patterns, different concrete builders can produce # unrelated products. In other words, results of various builders may not always # follow the same interface. class Product1 def initialize @parts = \[\] end # @param \[String\] part def add(part) @parts << part end def list\_parts print "Product parts: #{@parts.join(', ')}" end end # The Director is only responsible for executing the building steps in a # particular sequence. It is helpful when producing products according to a # specific order or configuration. Strictly speaking, the Director class is # optional, since the client can control builders directly. class Director # @return \[Builder\] attr\_accessor :builder def initialize @builder = nil end # The Director works with any builder instance that the client code passes to # it. This way, the client code may alter the final type of the newly # assembled product. def builder=(builder) @builder = builder end # The Director can construct several product variations using the same # building steps. def build\_minimal\_viable\_product @builder.produce\_part\_a end def build\_full\_featured\_product @builder.produce\_part\_a @builder.produce\_part\_b @builder.produce\_part\_c end end # The client code creates a builder object, passes it to the director and then # initiates the construction process. The end result is retrieved from the # builder object. director = Director.new builder = ConcreteBuilder1.new director.builder = builder puts 'Standard basic product: ' director.build\_minimal\_viable\_product builder.product.list\_parts puts "\\n\\n" puts 'Standard full featured product: ' director.build\_full\_featured\_product builder.product.list\_parts puts "\\n\\n" # Remember, the Builder pattern can be used without a Director class. puts 'Custom product: ' builder.produce\_part\_a builder.produce\_part\_b builder.product.list\_parts #### **output.txt:** Resultado de la ejecución Standard basic product: Product parts: PartA1 Standard full featured product: Product parts: PartA1, PartB1, PartC1 Custom product: Product parts: PartA1, PartB1 **Builder** en otros lenguajes ------------------------------ [![Builder en C#](https://refactoring.guru/images/patterns/icons/csharp.svg?id=da64592defc6e86d57c39c66e9de3e58)](https://refactoring.guru/es/design-patterns/builder/csharp/example "Builder en C#") [![Builder en C++](https://refactoring.guru/images/patterns/icons/cpp.svg?id=f7782ed8b8666246bfcc3f8fefc3b858)](https://refactoring.guru/es/design-patterns/builder/cpp/example "Builder en C++") [![Builder en Go](https://refactoring.guru/images/patterns/icons/go.svg?id=1a89927eb99b1ea3fde7701d97970aca)](https://refactoring.guru/es/design-patterns/builder/go/example "Builder en Go") [![Builder en Java](https://refactoring.guru/images/patterns/icons/java.svg?id=e6d87e2dca08c953fe3acd1275ed4f4e)](https://refactoring.guru/es/design-patterns/builder/java/example "Builder en Java") [![Builder en PHP](https://refactoring.guru/images/patterns/icons/php.svg?id=be1906eb26b71ec1d3b93720d6156618)](https://refactoring.guru/es/design-patterns/builder/php/example "Builder en PHP") [![Builder en Python](https://refactoring.guru/images/patterns/icons/python.svg?id=6d815d43c0f7050a1151b43e51569c9f)](https://refactoring.guru/es/design-patterns/builder/python/example "Builder en Python") [![Builder en Rust](https://refactoring.guru/images/patterns/icons/rust.svg?id=1f5698a4b5ae23fe79413511747e4a87)](https://refactoring.guru/es/design-patterns/builder/rust/example "Builder en Rust") [![Builder en Swift](https://refactoring.guru/images/patterns/icons/swift.svg?id=0b716c2d52ec3a48fbe91ac031070c1d)](https://refactoring.guru/es/design-patterns/builder/swift/example "Builder en Swift") [![Builder en TypeScript](https://refactoring.guru/images/patterns/icons/typescript.svg?id=2239d0f16cb703540c205dd8cb0c0cb7)](https://refactoring.guru/es/design-patterns/builder/typescript/example "Builder en TypeScript") --- # Bridge en Swift / Patrones de diseño [There are patterns of patterns now! \ My friend's project: MetaPatterns.io](https://metapatterns.io/)  [](https://refactoring.guru/es/design-patterns/bridge/swift/example#checkout) [](https://refactoring.guru/es/design-patterns/bridge/swift/example#checkout) [](https://refactoring.guru/) / [Patrones de diseño](https://refactoring.guru/es/design-patterns) / [Bridge](https://refactoring.guru/es/design-patterns/bridge) / [Swift](https://refactoring.guru/es/design-patterns/swift) ![Bridge](https://refactoring.guru/images/patterns/cards/bridge-mini-2x.png?id=2622384cf623ed150ee9c21a0812dd87) **Bridge** en Swift =================== **Bridge** es un patrón de diseño estructural que divide la lógica de negocio o una clase muy grande en jerarquías de clases separadas que se pueden desarrollar independientemente. Una de estas jerarquías (a menudo denominada Abstracción) obtendrá una referencia a un objeto de la segunda jerarquía (Implementación). La abstracción podrá delegar algunas (en ocasiones, la mayoría) de sus llamadas al objeto de las implementaciones. Como todas las implementaciones tendrán una interfaz común, serán intercambiables dentro de la abstracción. [Aprende más sobre el patrón Bridge](https://refactoring.guru/es/design-patterns/bridge) Navegación  [Intro](https://refactoring.guru/es/design-patterns/bridge/swift/example#)  [Ejemplo conceptual](https://refactoring.guru/es/design-patterns/bridge/swift/example#example-0)  [Example](https://refactoring.guru/es/design-patterns/bridge/swift/example#example-0--Example-swift)  [Output](https://refactoring.guru/es/design-patterns/bridge/swift/example#example-0--Output-txt)  [Ejemplo del mundo real](https://refactoring.guru/es/design-patterns/bridge/swift/example#example-1)  [Example](https://refactoring.guru/es/design-patterns/bridge/swift/example#example-1--Example-swift)  [Output](https://refactoring.guru/es/design-patterns/bridge/swift/example#example-1--Output-txt) **Complejidad:** **Popularidad:** **Ejemplos de uso:** El patrón Bridge es de especial utilidad a la hora de tratar con aplicaciones multiplataforma, soportar varios tipos de servidores de bases de datos, o trabajar con varios proveedores de API de un cierto tipo (por ejemplo, plataformas en la nube, redes sociales, etc.). **Identificación:** El patrón Bridge se puede reconocer por una distinción clara entre alguna entidad controladora y varias plataformas diferentes en las que se basa. Los siguientes ejemplos están disponibles en [Swift Playgrounds](https://www.alemohamad.com/playgrounds) . Kudos a [Alejandro Mohamad](https://www.alemohamad.com/) por crear la versión de Playground. Ejemplo conceptual ------------------ Este ejemplo ilustra la estructura del patrón de diseño **Bridge** y se centra en las siguientes preguntas: * ¿De qué clases se compone? * ¿Qué papeles juegan esas clases? * ¿De qué forma se relacionan los elementos del patrón? Después de conocer la estructura del patrón, será más fácil comprender el siguiente ejemplo basado en un caso de uso real de Swift. #### **Example.swift:** Ejemplo conceptual import XCTest /// The Abstraction defines the interface for the "control" part of the two /// class hierarchies. It holds a reference to an object from the Implementation /// hierarchy and delegates all of the real work to this object. class Abstraction { fileprivate var implementation: Implementation init(\_ implementation: Implementation) { self.implementation = implementation } func operation() -> String { let operation = implementation.operationImplementation() return "Abstraction: Base operation with:\\n" + operation } } /// You can extend the Abstraction without changing the Implementation classes. class ExtendedAbstraction: Abstraction { override func operation() -> String { let operation = implementation.operationImplementation() return "ExtendedAbstraction: Extended operation with:\\n" + operation } } /// The Implementation defines the interface for all implementation classes. It /// doesn't have to match the Abstraction's interface. In fact, the two /// interfaces can be entirely different. Typically the Implementation interface /// provides only primitive operations, while the Abstraction defines higher- /// level operations based on those primitives. protocol Implementation { func operationImplementation() -> String } /// Each Concrete Implementation corresponds to a specific platform and /// implements the Implementation interface using that platform's API. class ConcreteImplementationA: Implementation { func operationImplementation() -> String { return "ConcreteImplementationA: Here's the result on the platform A.\\n" } } class ConcreteImplementationB: Implementation { func operationImplementation() -> String { return "ConcreteImplementationB: Here's the result on the platform B\\n" } } /// Except for the initialization phase, where an Abstraction object gets linked /// with a specific Implementation object, the client code should only depend on /// the Abstraction class. This way the client code can support any abstraction- /// implementation combination. class Client { // ... static func someClientCode(abstraction: Abstraction) { print(abstraction.operation()) } // ... } /// Let's see how it all works together. class BridgeConceptual: XCTestCase { func testBridgeConceptual() { // The client code should be able to work with any pre-configured // abstraction-implementation combination. let implementation = ConcreteImplementationA() Client.someClientCode(abstraction: Abstraction(implementation)) let concreteImplementation = ConcreteImplementationB() Client.someClientCode(abstraction: ExtendedAbstraction(concreteImplementation)) } } #### **Output.txt:** Resultado de la ejecución Abstraction: Base operation with: ConcreteImplementationA: Here's the result on the platform A ExtendedAbstraction: Extended operation with: ConcreteImplementationB: Here's the result on the platform B Ejemplo del mundo real ---------------------- #### **Example.swift:** Ejemplo del mundo real import XCTest private class BridgeRealWorld: XCTestCase { func testBridgeRealWorld() { print("Client: Pushing Photo View Controller...") push(PhotoViewController()) print() print("Client: Pushing Feed View Controller...") push(FeedViewController()) } func push(\_ container: SharingSupportable) { let instagram = InstagramSharingService() let facebook = FaceBookSharingService() container.accept(service: instagram) container.update(content: foodModel) container.accept(service: facebook) container.update(content: foodModel) } var foodModel: Content { return FoodDomainModel(title: "This food is so various and delicious!", images: \[UIImage(), UIImage()\], calories: 47) } } private protocol SharingSupportable { /// Abstraction func accept(service: SharingService) func update(content: Content) } class BaseViewController: UIViewController, SharingSupportable { fileprivate var shareService: SharingService? func update(content: Content) { /// ...updating UI and showing a content... /// ... /// ... then, a user will choose a content and trigger an event print("\\(description): User selected a \\(content) to share") /// ... shareService?.share(content: content) } func accept(service: SharingService) { shareService = service } } class PhotoViewController: BaseViewController { /// Custom UI and features override var description: String { return "PhotoViewController" } } class FeedViewController: BaseViewController { /// Custom UI and features override var description: String { return "FeedViewController" } } protocol SharingService { /// Implementation func share(content: Content) } class FaceBookSharingService: SharingService { func share(content: Content) { /// Use FaceBook API to share a content print("Service: \\(content) was posted to the Facebook") } } class InstagramSharingService: SharingService { func share(content: Content) { /// Use Instagram API to share a content print("Service: \\(content) was posted to the Instagram", terminator: "\\n\\n") } } protocol Content: CustomStringConvertible { var title: String { get } var images: \[UIImage\] { get } } struct FoodDomainModel: Content { var title: String var images: \[UIImage\] var calories: Int var description: String { return "Food Model" } } #### **Output.txt:** Resultado de la ejecución Client: Pushing Photo View Controller... PhotoViewController: User selected a Food Model to share Service: Food Model was posted to the Instagram PhotoViewController: User selected a Food Model to share Service: Food Model was posted to the Facebook Client: Pushing Feed View Controller... FeedViewController: User selected a Food Model to share Service: Food Model was posted to the Instagram FeedViewController: User selected a Food Model to share Service: Food Model was posted to the Facebook **Bridge** en otros lenguajes ----------------------------- [![Bridge en C#](https://refactoring.guru/images/patterns/icons/csharp.svg?id=da64592defc6e86d57c39c66e9de3e58)](https://refactoring.guru/es/design-patterns/bridge/csharp/example "Bridge en C#") [![Bridge en C++](https://refactoring.guru/images/patterns/icons/cpp.svg?id=f7782ed8b8666246bfcc3f8fefc3b858)](https://refactoring.guru/es/design-patterns/bridge/cpp/example "Bridge en C++") [![Bridge en Go](https://refactoring.guru/images/patterns/icons/go.svg?id=1a89927eb99b1ea3fde7701d97970aca)](https://refactoring.guru/es/design-patterns/bridge/go/example "Bridge en Go") [![Bridge en Java](https://refactoring.guru/images/patterns/icons/java.svg?id=e6d87e2dca08c953fe3acd1275ed4f4e)](https://refactoring.guru/es/design-patterns/bridge/java/example "Bridge en Java") [![Bridge en PHP](https://refactoring.guru/images/patterns/icons/php.svg?id=be1906eb26b71ec1d3b93720d6156618)](https://refactoring.guru/es/design-patterns/bridge/php/example "Bridge en PHP") [![Bridge en Python](https://refactoring.guru/images/patterns/icons/python.svg?id=6d815d43c0f7050a1151b43e51569c9f)](https://refactoring.guru/es/design-patterns/bridge/python/example "Bridge en Python") [![Bridge en Ruby](https://refactoring.guru/images/patterns/icons/ruby.svg?id=b065b718c914bf8e960ef731600be1eb)](https://refactoring.guru/es/design-patterns/bridge/ruby/example "Bridge en Ruby") [![Bridge en Rust](https://refactoring.guru/images/patterns/icons/rust.svg?id=1f5698a4b5ae23fe79413511747e4a87)](https://refactoring.guru/es/design-patterns/bridge/rust/example "Bridge en Rust") [![Bridge en TypeScript](https://refactoring.guru/images/patterns/icons/typescript.svg?id=2239d0f16cb703540c205dd8cb0c0cb7)](https://refactoring.guru/es/design-patterns/bridge/typescript/example "Bridge en TypeScript") --- # Builder en Python / Patrones de diseño [There are patterns of patterns now! \ My friend's project: MetaPatterns.io](https://metapatterns.io/)  [](https://refactoring.guru/es/design-patterns/builder/python/example#checkout) [](https://refactoring.guru/es/design-patterns/builder/python/example#checkout) [](https://refactoring.guru/) / [Patrones de diseño](https://refactoring.guru/es/design-patterns) / [Builder](https://refactoring.guru/es/design-patterns/builder) / [Python](https://refactoring.guru/es/design-patterns/python) ![Builder](https://refactoring.guru/images/patterns/cards/builder-mini-2x.png?id=de6d0938678b86903a1426dddfdd13bf) **Builder** en Python ===================== **Builder** es un patrón de diseño creacional que permite construir objetos complejos paso a paso. Al contrario que otros patrones creacionales, Builder no necesita que los productos tengan una interfaz común. Esto hace posible crear distintos productos utilizando el mismo proceso de construcción. [Aprende más sobre el patrón Builder](https://refactoring.guru/es/design-patterns/builder) Navegación  [Intro](https://refactoring.guru/es/design-patterns/builder/python/example#)  [Ejemplo conceptual](https://refactoring.guru/es/design-patterns/builder/python/example#example-0)  [main](https://refactoring.guru/es/design-patterns/builder/python/example#example-0--main-py)  [Output](https://refactoring.guru/es/design-patterns/builder/python/example#example-0--Output-txt) **Complejidad:** **Popularidad:** **Ejemplos de uso:** El patrón Builder es muy conocido en el mundo Python. Resulta especialmente útil cuando debes crear un objeto con muchas opciones posibles de configuración. **Identificación:** El patrón Builder se puede reconocer por la clase, que tiene un único método de creación y varios métodos para configurar el objeto resultante. A menudo, los métodos del Builder soportan el encadenamiento (por ejemplo, `algúnBuilder.establecerValorA(1).establecerValorB(2).crear()`). Ejemplo conceptual ------------------ Este ejemplo ilustra la estructura del patrón de diseño **Builder**. Se centra en responder las siguientes preguntas: * ¿De qué clases se compone? * ¿Qué papeles juegan esas clases? * ¿De qué forma se relacionan los elementos del patrón? #### **main.py:** Ejemplo conceptual from \_\_future\_\_ import annotations from abc import ABC, abstractmethod from typing import Any class Builder(ABC): """ The Builder interface specifies methods for creating the different parts of the Product objects. """ @property @abstractmethod def product(self) -> None: pass @abstractmethod def produce\_part\_a(self) -> None: pass @abstractmethod def produce\_part\_b(self) -> None: pass @abstractmethod def produce\_part\_c(self) -> None: pass class ConcreteBuilder1(Builder): """ The Concrete Builder classes follow the Builder interface and provide specific implementations of the building steps. Your program may have several variations of Builders, implemented differently. """ def \_\_init\_\_(self) -> None: """ A fresh builder instance should contain a blank product object, which is used in further assembly. """ self.reset() def reset(self) -> None: self.\_product = Product1() @property def product(self) -> Product1: """ Concrete Builders are supposed to provide their own methods for retrieving results. That's because various types of builders may create entirely different products that don't follow the same interface. Therefore, such methods cannot be declared in the base Builder interface (at least in a statically typed programming language). Usually, after returning the end result to the client, a builder instance is expected to be ready to start producing another product. That's why it's a usual practice to call the reset method at the end of the \`getProduct\` method body. However, this behavior is not mandatory, and you can make your builders wait for an explicit reset call from the client code before disposing of the previous result. """ product = self.\_product self.reset() return product def produce\_part\_a(self) -> None: self.\_product.add("PartA1") def produce\_part\_b(self) -> None: self.\_product.add("PartB1") def produce\_part\_c(self) -> None: self.\_product.add("PartC1") class Product1(): """ It makes sense to use the Builder pattern only when your products are quite complex and require extensive configuration. Unlike in other creational patterns, different concrete builders can produce unrelated products. In other words, results of various builders may not always follow the same interface. """ def \_\_init\_\_(self) -> None: self.parts = \[\] def add(self, part: Any) -> None: self.parts.append(part) def list\_parts(self) -> None: print(f"Product parts: {', '.join(self.parts)}", end="") class Director: """ The Director is only responsible for executing the building steps in a particular sequence. It is helpful when producing products according to a specific order or configuration. Strictly speaking, the Director class is optional, since the client can control builders directly. """ def \_\_init\_\_(self) -> None: self.\_builder = None @property def builder(self) -> Builder: return self.\_builder @builder.setter def builder(self, builder: Builder) -> None: """ The Director works with any builder instance that the client code passes to it. This way, the client code may alter the final type of the newly assembled product. """ self.\_builder = builder """ The Director can construct several product variations using the same building steps. """ def build\_minimal\_viable\_product(self) -> None: self.builder.produce\_part\_a() def build\_full\_featured\_product(self) -> None: self.builder.produce\_part\_a() self.builder.produce\_part\_b() self.builder.produce\_part\_c() if \_\_name\_\_ == "\_\_main\_\_": """ The client code creates a builder object, passes it to the director and then initiates the construction process. The end result is retrieved from the builder object. """ director = Director() builder = ConcreteBuilder1() director.builder = builder print("Standard basic product: ") director.build\_minimal\_viable\_product() builder.product.list\_parts() print("\\n") print("Standard full featured product: ") director.build\_full\_featured\_product() builder.product.list\_parts() print("\\n") # Remember, the Builder pattern can be used without a Director class. print("Custom product: ") builder.produce\_part\_a() builder.produce\_part\_b() builder.product.list\_parts() #### **Output.txt:** Resultado de la ejecución Standard basic product: Product parts: PartA1 Standard full featured product: Product parts: PartA1, PartB1, PartC1 Custom product: Product parts: PartA1, PartB1 **Builder** en otros lenguajes ------------------------------ [![Builder en C#](https://refactoring.guru/images/patterns/icons/csharp.svg?id=da64592defc6e86d57c39c66e9de3e58)](https://refactoring.guru/es/design-patterns/builder/csharp/example "Builder en C#") [![Builder en C++](https://refactoring.guru/images/patterns/icons/cpp.svg?id=f7782ed8b8666246bfcc3f8fefc3b858)](https://refactoring.guru/es/design-patterns/builder/cpp/example "Builder en C++") [![Builder en Go](https://refactoring.guru/images/patterns/icons/go.svg?id=1a89927eb99b1ea3fde7701d97970aca)](https://refactoring.guru/es/design-patterns/builder/go/example "Builder en Go") [![Builder en Java](https://refactoring.guru/images/patterns/icons/java.svg?id=e6d87e2dca08c953fe3acd1275ed4f4e)](https://refactoring.guru/es/design-patterns/builder/java/example "Builder en Java") [![Builder en PHP](https://refactoring.guru/images/patterns/icons/php.svg?id=be1906eb26b71ec1d3b93720d6156618)](https://refactoring.guru/es/design-patterns/builder/php/example "Builder en PHP") [![Builder en Ruby](https://refactoring.guru/images/patterns/icons/ruby.svg?id=b065b718c914bf8e960ef731600be1eb)](https://refactoring.guru/es/design-patterns/builder/ruby/example "Builder en Ruby") [![Builder en Rust](https://refactoring.guru/images/patterns/icons/rust.svg?id=1f5698a4b5ae23fe79413511747e4a87)](https://refactoring.guru/es/design-patterns/builder/rust/example "Builder en Rust") [![Builder en Swift](https://refactoring.guru/images/patterns/icons/swift.svg?id=0b716c2d52ec3a48fbe91ac031070c1d)](https://refactoring.guru/es/design-patterns/builder/swift/example "Builder en Swift") [![Builder en TypeScript](https://refactoring.guru/images/patterns/icons/typescript.svg?id=2239d0f16cb703540c205dd8cb0c0cb7)](https://refactoring.guru/es/design-patterns/builder/typescript/example "Builder en TypeScript") --- # Builder en C# / Patrones de diseño [There are patterns of patterns now! \ My friend's project: MetaPatterns.io](https://metapatterns.io/)  [](https://refactoring.guru/es/design-patterns/builder/csharp/example#checkout) [](https://refactoring.guru/es/design-patterns/builder/csharp/example#checkout) [](https://refactoring.guru/) / [Patrones de diseño](https://refactoring.guru/es/design-patterns) / [Builder](https://refactoring.guru/es/design-patterns/builder) / [C#](https://refactoring.guru/es/design-patterns/csharp) ![Builder](https://refactoring.guru/images/patterns/cards/builder-mini-2x.png?id=de6d0938678b86903a1426dddfdd13bf) **Builder** en C# ================= **Builder** es un patrón de diseño creacional que permite construir objetos complejos paso a paso. Al contrario que otros patrones creacionales, Builder no necesita que los productos tengan una interfaz común. Esto hace posible crear distintos productos utilizando el mismo proceso de construcción. [Aprende más sobre el patrón Builder](https://refactoring.guru/es/design-patterns/builder) Navegación  [Intro](https://refactoring.guru/es/design-patterns/builder/csharp/example#)  [Ejemplo conceptual](https://refactoring.guru/es/design-patterns/builder/csharp/example#example-0)  [Program](https://refactoring.guru/es/design-patterns/builder/csharp/example#example-0--Program-cs)  [Output](https://refactoring.guru/es/design-patterns/builder/csharp/example#example-0--Output-txt) **Complejidad:** **Popularidad:** **Ejemplos de uso:** El patrón Builder es muy conocido en el mundo C#. Resulta especialmente útil cuando debes crear un objeto con muchas opciones posibles de configuración. **Identificación:** El patrón Builder se puede reconocer por la clase, que tiene un único método de creación y varios métodos para configurar el objeto resultante. A menudo, los métodos del Builder soportan el encadenamiento (por ejemplo, `algúnBuilder.establecerValorA(1).establecerValorB(2).crear()`). Ejemplo conceptual ------------------ Este ejemplo ilustra la estructura del patrón de diseño **Builder**. Se centra en responder las siguientes preguntas: * ¿De qué clases se compone? * ¿Qué papeles juegan esas clases? * ¿De qué forma se relacionan los elementos del patrón? #### **Program.cs:** Ejemplo conceptual using System; using System.Collections.Generic; namespace RefactoringGuru.DesignPatterns.Builder.Conceptual { // The Builder interface specifies methods for creating the different parts // of the Product objects. public interface IBuilder { void BuildPartA(); void BuildPartB(); void BuildPartC(); } // The Concrete Builder classes follow the Builder interface and provide // specific implementations of the building steps. Your program may have // several variations of Builders, implemented differently. public class ConcreteBuilder : IBuilder { private Product \_product = new Product(); // A fresh builder instance should contain a blank product object, which // is used in further assembly. public ConcreteBuilder() { this.Reset(); } public void Reset() { this.\_product = new Product(); } // All production steps work with the same product instance. public void BuildPartA() { this.\_product.Add("PartA1"); } public void BuildPartB() { this.\_product.Add("PartB1"); } public void BuildPartC() { this.\_product.Add("PartC1"); } // Concrete Builders are supposed to provide their own methods for // retrieving results. That's because various types of builders may // create entirely different products that don't follow the same // interface. Therefore, such methods cannot be declared in the base // Builder interface (at least in a statically typed programming // language). // // Usually, after returning the end result to the client, a builder // instance is expected to be ready to start producing another product. // That's why it's a usual practice to call the reset method at the end // of the \`GetProduct\` method body. However, this behavior is not // mandatory, and you can make your builders wait for an explicit reset // call from the client code before disposing of the previous result. public Product GetProduct() { Product result = this.\_product; this.Reset(); return result; } } // It makes sense to use the Builder pattern only when your products are // quite complex and require extensive configuration. // // Unlike in other creational patterns, different concrete builders can // produce unrelated products. In other words, results of various builders // may not always follow the same interface. public class Product { private List \_parts = new List(); public void Add(string part) { this.\_parts.Add(part); } public string ListParts() { string str = string.Empty; for (int i = 0; i < this.\_parts.Count; i++) { str += this.\_parts\[i\] + ", "; } str = str.Remove(str.Length - 2); // removing last ",c" return "Product parts: " + str + "\\n"; } } // The Director is only responsible for executing the building steps in a // particular sequence. It is helpful when producing products according to a // specific order or configuration. Strictly speaking, the Director class is // optional, since the client can control builders directly. public class Director { private IBuilder \_builder; public IBuilder Builder { set { \_builder = value; } } // The Director can construct several product variations using the same // building steps. public void BuildMinimalViableProduct() { this.\_builder.BuildPartA(); } public void BuildFullFeaturedProduct() { this.\_builder.BuildPartA(); this.\_builder.BuildPartB(); this.\_builder.BuildPartC(); } } class Program { static void Main(string\[\] args) { // The client code creates a builder object, passes it to the // director and then initiates the construction process. The end // result is retrieved from the builder object. var director = new Director(); var builder = new ConcreteBuilder(); director.Builder = builder; Console.WriteLine("Standard basic product:"); director.BuildMinimalViableProduct(); Console.WriteLine(builder.GetProduct().ListParts()); Console.WriteLine("Standard full featured product:"); director.BuildFullFeaturedProduct(); Console.WriteLine(builder.GetProduct().ListParts()); // Remember, the Builder pattern can be used without a Director // class. Console.WriteLine("Custom product:"); builder.BuildPartA(); builder.BuildPartC(); Console.Write(builder.GetProduct().ListParts()); } } } #### **Output.txt:** Resultado de la ejecución Standard basic product: Product parts: PartA1 Standard full featured product: Product parts: PartA1, PartB1, PartC1 Custom product: Product parts: PartA1, PartC1 **Builder** en otros lenguajes ------------------------------ [![Builder en C++](https://refactoring.guru/images/patterns/icons/cpp.svg?id=f7782ed8b8666246bfcc3f8fefc3b858)](https://refactoring.guru/es/design-patterns/builder/cpp/example "Builder en C++") [![Builder en Go](https://refactoring.guru/images/patterns/icons/go.svg?id=1a89927eb99b1ea3fde7701d97970aca)](https://refactoring.guru/es/design-patterns/builder/go/example "Builder en Go") [![Builder en Java](https://refactoring.guru/images/patterns/icons/java.svg?id=e6d87e2dca08c953fe3acd1275ed4f4e)](https://refactoring.guru/es/design-patterns/builder/java/example "Builder en Java") [![Builder en PHP](https://refactoring.guru/images/patterns/icons/php.svg?id=be1906eb26b71ec1d3b93720d6156618)](https://refactoring.guru/es/design-patterns/builder/php/example "Builder en PHP") [![Builder en Python](https://refactoring.guru/images/patterns/icons/python.svg?id=6d815d43c0f7050a1151b43e51569c9f)](https://refactoring.guru/es/design-patterns/builder/python/example "Builder en Python") [![Builder en Ruby](https://refactoring.guru/images/patterns/icons/ruby.svg?id=b065b718c914bf8e960ef731600be1eb)](https://refactoring.guru/es/design-patterns/builder/ruby/example "Builder en Ruby") [![Builder en Rust](https://refactoring.guru/images/patterns/icons/rust.svg?id=1f5698a4b5ae23fe79413511747e4a87)](https://refactoring.guru/es/design-patterns/builder/rust/example "Builder en Rust") [![Builder en Swift](https://refactoring.guru/images/patterns/icons/swift.svg?id=0b716c2d52ec3a48fbe91ac031070c1d)](https://refactoring.guru/es/design-patterns/builder/swift/example "Builder en Swift") [![Builder en TypeScript](https://refactoring.guru/images/patterns/icons/typescript.svg?id=2239d0f16cb703540c205dd8cb0c0cb7)](https://refactoring.guru/es/design-patterns/builder/typescript/example "Builder en TypeScript") --- # Builder [There are patterns of patterns now! \ My friend's project: MetaPatterns.io](https://metapatterns.io/)  [](https://refactoring.guru/es/design-patterns/builder#checkout) [](https://refactoring.guru/es/design-patterns/builder#checkout) [](https://refactoring.guru/) / [Patrones de diseño](https://refactoring.guru/es/design-patterns) / [Patrones creacionales](https://refactoring.guru/es/design-patterns/creational-patterns) Builder ======= También llamado: Constructor Propósito --------- **Builder** es un patrón de diseño creacional que nos permite construir objetos complejos paso a paso. El patrón nos permite producir distintos tipos y representaciones de un objeto empleando el mismo código de construcción. ![Patrón de diseño Builder](https://refactoring.guru/images/patterns/content/builder/builder-es-2x.png?id=23aa59f21675a8694523a6d03c00a8ff) Problema -------- Imagina un objeto complejo que requiere una inicialización laboriosa, paso a paso, de muchos campos y objetos anidados. Normalmente, este código de inicialización está sepultado dentro de un monstruoso constructor con una gran cantidad de parámetros. O, peor aún: disperso por todo el código cliente. ![Una gran cantidad de subclases genera otro problema](https://refactoring.guru/images/patterns/diagrams/builder/problem1-2x.png?id=02ffbd7ad294600e42aa78989d441b4d) Crear una subclase por cada configuración posible de un objeto puede complicar demasiado el programa. Por ejemplo, pensemos en cómo crear un objeto `Casa`. Para construir una casa sencilla, debemos construir cuatro paredes y un piso, así como instalar una puerta, colocar un par de ventanas y ponerle un tejado. Pero ¿qué pasa si quieres una casa más grande y luminosa, con un jardín y otros extras (como sistema de calefacción, instalación de fontanería y cableado eléctrico)? La solución más sencilla es extender la clase base `Casa` y crear un grupo de subclases que cubran todas las combinaciones posibles de los parámetros. Pero, en cualquier caso, acabarás con una cantidad considerable de subclases. Cualquier parámetro nuevo, como el estilo del porche, exigirá que incrementes esta jerarquía aún más. Existe otra posibilidad que no implica generar subclases. Puedes crear un enorme constructor dentro de la clase base `Casa` con todos los parámetros posibles para controlar el objeto casa. Aunque es cierto que esta solución elimina la necesidad de las subclases, genera otro problema. ![El constructor telescópico](https://refactoring.guru/images/patterns/diagrams/builder/problem2-2x.png?id=5e7975a91c0e4f4ba960f908cc9c2ea2) Un constructor con un montón de parámetros tiene su inconveniente: no todos los parámetros son necesarios todo el tiempo. En la mayoría de los casos, gran parte de los parámetros no se utilizará, lo que provocará que [las llamadas al constructor sean bastante feas](https://refactoring.guru/es/smells/long-parameter-list) . Por ejemplo, solo una pequeña parte de las casas tiene piscina, por lo que los parámetros relacionados con piscinas serán inútiles en nueve de cada diez casos. Solución -------- El patrón Builder sugiere que saques el código de construcción del objeto de su propia clase y lo coloques dentro de objetos independientes llamados _constructores_. ![Aplicación del patrón Builder](https://refactoring.guru/images/patterns/diagrams/builder/solution1-2x.png?id=a9c2ab02f0b2aca1a7512022194dd113) El patrón Builder te permite construir objetos complejos paso a paso. El patrón Builder no permite a otros objetos acceder al producto mientras se construye. El patrón organiza la construcción de objetos en una serie de pasos (`construirParedes`, `construirPuerta`, etc.). Para crear un objeto, se ejecuta una serie de estos pasos en un objeto constructor. Lo importante es que no necesitas invocar todos los pasos. Puedes invocar sólo aquellos que sean necesarios para producir una configuración particular de un objeto. Puede ser que algunos pasos de la construcción necesiten una implementación diferente cuando tengamos que construir distintas representaciones del producto. Por ejemplo, las paredes de una cabaña pueden ser de madera, pero las paredes de un castillo tienen que ser de piedra. En este caso, podemos crear varias clases constructoras distintas que implementen la misma serie de pasos de construcción, pero de forma diferente. Entonces podemos utilizar estos constructores en el proceso de construcción (por ejemplo, una serie ordenada de llamadas a los pasos de construcción) para producir distintos tipos de objetos. ![](https://refactoring.guru/images/patterns/content/builder/builder-comic-1-es-2x.png?id=a9f38324cd69f3b232b36d63c50e60ab) Los distintos constructores ejecutan la misma tarea de formas distintas. Por ejemplo, imagina un constructor que construye todo de madera y vidrio, otro que construye todo con piedra y hierro y un tercero que utiliza oro y diamantes. Al invocar la misma serie de pasos, obtenemos una casa normal del primer constructor, un pequeño castillo del segundo y un palacio del tercero. Sin embargo, esto sólo funcionaría si el código cliente que invoca los pasos de construcción es capaz de interactuar con los constructores mediante una interfaz común. #### Clase directora Puedes ir más lejos y extraer una serie de llamadas a los pasos del constructor que utilizas para construir un producto y ponerlas en una clase independiente llamada _directora_. La clase directora define el orden en el que se deben ejecutar los pasos de construcción, mientras que el constructor proporciona la implementación de dichos pasos. ![](https://refactoring.guru/images/patterns/content/builder/builder-comic-2-es-2x.png?id=55601a71e3c066fe003b3ebadfd0fa71) La clase directora sabe qué pasos de construcción ejecutar para lograr un producto que funcione. No es estrictamente necesario tener una clase directora en el programa, ya que se pueden invocar los pasos de construcción en un orden específico directamente desde el código cliente. No obstante, la clase directora puede ser un buen lugar donde colocar distintas rutinas de construcción para poder reutilizarlas a lo largo del programa. Además, la clase directora esconde por completo los detalles de la construcción del producto al código cliente. El cliente sólo necesita asociar un objeto constructor con una clase directora, utilizarla para iniciar la construcción, y obtener el resultado del objeto constructor. Estructura ---------- ![Estructura del patrón de diseño Builder](https://refactoring.guru/images/patterns/diagrams/builder/structure-2x.png?id=dca1b1508e23c266cbedc80ffb84311a)![Estructura del patrón de diseño Builder](https://refactoring.guru/images/patterns/diagrams/builder/structure-indexed-2x.png?id=153eed9a51784cbe00d0ca8b3d6b268d) 1. La interfaz **Constructora** declara pasos de construcción de producto que todos los tipos de objetos constructores tienen en común. 2. Los **Constructores Concretos** ofrecen distintas implementaciones de los pasos de construcción. Los constructores concretos pueden crear productos que no siguen la interfaz común. 3. Los **Productos** son los objetos resultantes. Los productos construidos por distintos objetos constructores no tienen que pertenecer a la misma jerarquía de clases o interfaz. 4. La clase **Directora** define el orden en el que se invocarán los pasos de construcción, por lo que puedes crear y reutilizar configuraciones específicas de los productos. 5. El **Cliente** debe asociar uno de los objetos constructores con la clase directora. Normalmente, se hace una sola vez mediante los parámetros del constructor de la clase directora, que utiliza el objeto constructor para el resto de la construcción. No obstante, existe una solución alternativa para cuando el cliente pasa el objeto constructor al método de producción de la clase directora. En este caso, puedes utilizar un constructor diferente cada vez que produzcas algo con la clase directora. Pseudocódigo ------------ Este ejemplo del patrón **Builder** ilustra cómo se puede reutilizar el mismo código de construcción de objetos a la hora de construir distintos tipos de productos, como automóviles, y crear los correspondientes manuales para esos automóviles. ![Ejemplo de la estructura del patrón Builder](https://refactoring.guru/images/patterns/diagrams/builder/example-es-2x.png?id=dcace51331439c48a6cd9fc6f4f930f7) Ejemplo de una construcción paso a paso de automóviles y de los manuales de usuario para esos modelos de automóvil. Un automóvil es un objeto complejo que puede construirse de mil maneras diferentes. En lugar de saturar la clase `Automóvil` con un constructor enorme, extrajimos el código de ensamblaje del automóvil y lo pusimos en una clase constructora de automóviles independiente. Esta clase tiene un grupo de métodos para configurar las distintas partes de un automóvil. Si el código cliente necesita ensamblar un modelo de automóvil con ajustes especiales, puede trabajar directamente con el objeto constructor. Por otro lado, el cliente puede delegar el ensamblaje a la clase directora, que sabe cómo utilizar un objeto constructor para construir varios de los modelos más populares de automóviles. Puede que te sorprenda, pero todo automóvil necesita un manual (en serio, ¿quién se los lee?). El manual explica cada característica del automóvil, de modo que los detalles del manual varían de un modelo a otro. Por eso tiene lógica reutilizar un proceso de construcción existente para automóviles reales y sus respectivos manuales. Por supuesto, elaborar un manual no es lo mismo que fabricar un automóvil, por lo que debemos incluir otra clase constructora especializada en elaborar manuales. Esta clase implementa los mismos métodos de construcción que su hermana constructora de automóviles , pero, en lugar de fabricar piezas del automóvil, las describe. Al pasar estos constructores al mismo objeto director, podemos construir tanto un automóvil como un manual. La última parte consiste en buscar el objeto resultante. Un automóvil de metal y un manual de papel, aunque estén relacionados, son objetos muy diferentes. No podemos colocar un método para buscar resultados en la clase directora sin acoplarla a clases de productos concretos. Por lo tanto, obtenemos el resultado de la construcción del constructor que realizó el trabajo. // El uso del patrón Builder sólo tiene sentido cuando tus // productos son bastante complejos y requieren una // configuración extensiva. Los dos siguientes productos están // relacionados, aunque no tienen una interfaz común. class Car is // Un coche puede tener un GPS, una computadora de // navegación y cierto número de asientos. Los distintos // modelos de coches (deportivo, SUV, descapotable) pueden // tener distintas características instaladas o habilitadas. class Manual is // Cada coche debe contar con un manual de usuario que se // corresponda con la configuración del coche y explique // todas sus características. // La interfaz constructora especifica métodos para crear las // distintas partes de los objetos del producto. interface Builder is method reset() method setSeats(...) method setEngine(...) method setTripComputer(...) method setGPS(...) // Las clases constructoras concretas siguen la interfaz // constructora y proporcionan implementaciones específicas de // los pasos de construcción. Tu programa puede tener multitud // de variaciones de objetos constructores, cada una de ellas // implementada de forma diferente. class CarBuilder implements Builder is private field car:Car // Una nueva instancia de la clase constructora debe // contener un objeto de producto en blanco que utiliza en // el montaje posterior. constructor CarBuilder() is this.reset() // El método reset despeja el objeto en construcción. method reset() is this.car = new Car() // Todos los pasos de producción funcionan con la misma // instancia de producto. method setSeats(...) is // Establece la cantidad de asientos del coche. method setEngine(...) is // Instala un motor específico. method setTripComputer(...) is // Instala una computadora de navegación. method setGPS(...) is // Instala un GPS. // Los constructores concretos deben proporcionar sus // propios métodos para obtener resultados. Esto se debe a // que varios tipos de objetos constructores pueden crear // productos completamente diferentes de los cuales no todos // siguen la misma interfaz. Por lo tanto, dichos métodos no // pueden declararse en la interfaz constructora (al menos // no en un lenguaje de programación de tipado estático). // // Normalmente, tras devolver el resultado final al cliente, // una instancia constructora debe estar lista para empezar // a generar otro producto. Ese es el motivo por el que es // práctica común invocar el método reset al final del // cuerpo del método \`getProduct\`. Sin embargo, este // comportamiento no es obligatorio y puedes hacer que tu // objeto constructor espere una llamada reset explícita del // código cliente antes de desechar el resultado anterior. method getProduct():Car is product = this.car this.reset() return product // Al contrario que otros patrones creacionales, Builder te // permite construir productos que no siguen una interfaz común. class CarManualBuilder implements Builder is private field manual:Manual constructor CarManualBuilder() is this.reset() method reset() is this.manual = new Manual() method setSeats(...) is // Documenta las características del asiento del coche. method setEngine(...) is // Añade instrucciones del motor. method setTripComputer(...) is // Añade instrucciones de la computadora de navegación. method setGPS(...) is // Añade instrucciones del GPS. method getProduct():Manual is // Devuelve el manual y rearma el constructor. // El director sólo es responsable de ejecutar los pasos de // construcción en una secuencia particular. Resulta útil cuando // se crean productos de acuerdo con un orden o configuración // específicos. En sentido estricto, la clase directora es // opcional, ya que el cliente puede controlar directamente los // objetos constructores. class Director is // El director funciona con cualquier instancia de // constructor que le pase el código cliente. De esta forma, // el código cliente puede alterar el tipo final del // producto recién montado. El director puede construir // multitud de variaciones de producto utilizando los mismos // pasos de construcción. method constructSportsCar(builder: Builder) is builder.reset() builder.setSeats(2) builder.setEngine(new SportEngine()) builder.setTripComputer(true) builder.setGPS(true) method constructSUV(builder: Builder) is // ... // El código cliente crea un objeto constructor, lo pasa al // director y después inicia el proceso de construcción. El // resultado final se extrae del objeto constructor. class Application is method makeCar() is director = new Director() CarBuilder builder = new CarBuilder() director.constructSportsCar(builder) Car car = builder.getProduct() CarManualBuilder builder = new CarManualBuilder() director.constructSportsCar(builder) // El producto final a menudo se extrae de un objeto // constructor, ya que el director no conoce y no // depende de constructores y productos concretos. Manual manual = builder.getProduct() Aplicabilidad ------------- Utiliza el patrón Builder para evitar un “constructor telescópico”. Digamos que tenemos un constructor con diez parámetros opcionales. Invocar a semejante bestia es poco práctico, por lo que sobrecargamos el constructor y creamos varias versiones más cortas con menos parámetros. Estos constructores siguen recurriendo al principal, pasando algunos valores por defecto a cualquier parámetro omitido. class Pizza { Pizza(int size) { ... } Pizza(int size, boolean cheese) { ... } Pizza(int size, boolean cheese, boolean pepperoni) { ... } // ... Crear un monstruo semejante sólo es posible en lenguajes que soportan la sobrecarga de métodos, como C# o Java. El patrón Builder permite construir objetos paso a paso, utilizando tan solo aquellos pasos que realmente necesitamos. Una vez implementado el patrón, ya no hará falta apiñar decenas de parámetros dentro de los constructores. Utiliza el patrón Builder cuando quieras que el código sea capaz de crear distintas representaciones de ciertos productos (por ejemplo, casas de piedra y madera). El patrón Builder se puede aplicar cuando la construcción de varias representaciones de un producto requiera de pasos similares que sólo varían en los detalles. La interfaz constructora base define todos los pasos de construcción posibles, mientras que los constructores concretos implementan estos pasos para construir representaciones particulares del producto. Entre tanto, la clase directora guía el orden de la construcción. Utiliza el patrón Builder para construir árboles con el patrón [Composite](https://refactoring.guru/es/design-patterns/composite) u otros objetos complejos. El patrón Builder te permite construir productos paso a paso. Podrás aplazar la ejecución de ciertos pasos sin descomponer el producto final. Puedes incluso invocar pasos de forma recursiva, lo cual resulta útil cuando necesitas construir un árbol de objetos. Un constructor no expone el producto incompleto mientras ejecuta los pasos de construcción. Esto evita que el código cliente extraiga un resultado incompleto. Cómo implementarlo ------------------ 1. Asegúrate de poder definir claramente los pasos comunes de construcción para todas las representaciones disponibles del producto. De lo contrario, no podrás proceder a implementar el patrón. 2. Declara estos pasos en la interfaz constructora base. 3. Crea una clase constructora concreta para cada una de las representaciones de producto e implementa sus pasos de construcción. No olvides implementar un método para extraer el resultado de la construcción. La razón por la que este método no se puede declarar dentro de la interfaz constructora es que varios constructores pueden construir productos sin una interfaz común. Por lo tanto, no sabemos cuál será el tipo de retorno para un método como éste. No obstante, si trabajas con productos de una única jerarquía, el método de extracción puede añadirse sin problemas a la interfaz base. 4. Piensa en crear una clase directora. Puede encapsular varias formas de construir un producto utilizando el mismo objeto constructor. 5. El código cliente crea tanto el objeto constructor como el director. Antes de que empiece la construcción, el cliente debe pasar un objeto constructor al director. Normalmente, el cliente hace esto sólo una vez, mediante los parámetros del constructor del director. El director utiliza el objeto constructor para el resto de la construcción. Existe una manera alternativa, en la que el objeto constructor se pasa directamente al método de construcción del director. 6. El resultado de la construcción tan solo se puede obtener directamente del director si todos los productos siguen la misma interfaz. De lo contrario, el cliente deberá extraer el resultado del constructor. Pros y contras -------------- * Puedes construir objetos paso a paso, aplazar pasos de la construcción o ejecutar pasos de forma recursiva. * Puedes reutilizar el mismo código de construcción al construir varias representaciones de productos. * _Principio de responsabilidad única_. Puedes aislar un código de construcción complejo de la lógica de negocio del producto. * La complejidad general del código aumenta, ya que el patrón exige la creación de varias clases nuevas. Relaciones con otros patrones ----------------------------- * Muchos diseños empiezan utilizando el [Factory Method](https://refactoring.guru/es/design-patterns/factory-method) (menos complicado y más personalizable mediante las subclases) y evolucionan hacia [Abstract Factory](https://refactoring.guru/es/design-patterns/abstract-factory) , [Prototype](https://refactoring.guru/es/design-patterns/prototype) , o [Builder](https://refactoring.guru/es/design-patterns/builder) (más flexibles, pero más complicados). * [Builder](https://refactoring.guru/es/design-patterns/builder) se enfoca en construir objetos complejos, paso a paso. [Abstract Factory](https://refactoring.guru/es/design-patterns/abstract-factory) se especializa en crear familias de objetos relacionados. _Abstract Factory_ devuelve el producto inmediatamente, mientras que _Builder_ te permite ejecutar algunos pasos adicionales de construcción antes de extraer el producto. * Puedes utilizar [Builder](https://refactoring.guru/es/design-patterns/builder) al crear árboles [Composite](https://refactoring.guru/es/design-patterns/composite) complejos porque puedes programar sus pasos de construcción para que funcionen de forma recursiva. * Puedes combinar [Builder](https://refactoring.guru/es/design-patterns/builder) con [Bridge](https://refactoring.guru/es/design-patterns/bridge) : la clase _directora_ juega el papel de la abstracción, mientras que diferentes _constructoras_ actúan como _implementaciones_. * Los patrones [Abstract Factory](https://refactoring.guru/es/design-patterns/abstract-factory) , [Builder](https://refactoring.guru/es/design-patterns/builder) y [Prototype](https://refactoring.guru/es/design-patterns/prototype) pueden todos ellos implementarse como [Singletons](https://refactoring.guru/es/design-patterns/singleton) . Ejemplos de código ------------------ [![Builder en C#](https://refactoring.guru/images/patterns/icons/csharp.svg?id=da64592defc6e86d57c39c66e9de3e58)](https://refactoring.guru/es/design-patterns/builder/csharp/example "Builder en C#") [![Builder en C++](https://refactoring.guru/images/patterns/icons/cpp.svg?id=f7782ed8b8666246bfcc3f8fefc3b858)](https://refactoring.guru/es/design-patterns/builder/cpp/example "Builder en C++") [![Builder en Go](https://refactoring.guru/images/patterns/icons/go.svg?id=1a89927eb99b1ea3fde7701d97970aca)](https://refactoring.guru/es/design-patterns/builder/go/example "Builder en Go") [![Builder en Java](https://refactoring.guru/images/patterns/icons/java.svg?id=e6d87e2dca08c953fe3acd1275ed4f4e)](https://refactoring.guru/es/design-patterns/builder/java/example "Builder en Java") [![Builder en PHP](https://refactoring.guru/images/patterns/icons/php.svg?id=be1906eb26b71ec1d3b93720d6156618)](https://refactoring.guru/es/design-patterns/builder/php/example "Builder en PHP") [![Builder en Python](https://refactoring.guru/images/patterns/icons/python.svg?id=6d815d43c0f7050a1151b43e51569c9f)](https://refactoring.guru/es/design-patterns/builder/python/example "Builder en Python") [![Builder en Ruby](https://refactoring.guru/images/patterns/icons/ruby.svg?id=b065b718c914bf8e960ef731600be1eb)](https://refactoring.guru/es/design-patterns/builder/ruby/example "Builder en Ruby") [![Builder en Rust](https://refactoring.guru/images/patterns/icons/rust.svg?id=1f5698a4b5ae23fe79413511747e4a87)](https://refactoring.guru/es/design-patterns/builder/rust/example "Builder en Rust") [![Builder en Swift](https://refactoring.guru/images/patterns/icons/swift.svg?id=0b716c2d52ec3a48fbe91ac031070c1d)](https://refactoring.guru/es/design-patterns/builder/swift/example "Builder en Swift") [![Builder en TypeScript](https://refactoring.guru/images/patterns/icons/typescript.svg?id=2239d0f16cb703540c205dd8cb0c0cb7)](https://refactoring.guru/es/design-patterns/builder/typescript/example "Builder en TypeScript") [![](https://refactoring.guru/images/patterns/banners/patterns-book-banner-3-2x.png?id=0cc3f77ab421d1a5c02ee46488231c3a)](https://refactoring.guru/es/design-patterns/book) ### ¡Apoya nuestro sitio web gratuito y compra el libro! * 22 patrones de diseño y 8 principios explicados en profundidad * 436 páginas bien estructuradas, fáciles de leer y libres de tecnicismos * 225 ilustraciones y diagramas claros y útiles * Un archivo con ejemplos de código en 11 lenguajes * Todos los dispositivos soportados: Formatos PDF/EPUB/MOBI/KFX [Saber más…](https://refactoring.guru/es/design-patterns/book) --- # Libro moderno sobre patrones de diseño: Sumérgete en los patrones de diseño [There are patterns of patterns now! \ My friend's project: MetaPatterns.io](https://metapatterns.io/)  [](https://refactoring.guru/es/design-patterns/book#checkout) [](https://refactoring.guru/es/design-patterns/book#checkout) Sumérgete en los **PATRONES de DISEÑO** ======================================= Un eBook sobre patrones y los principios en los que se basan. [![Sumérgete en los patrones de diseño](https://refactoring.guru/images/patterns/book/web-cover-es-3x.png)](https://refactoring.guru/es/design-patterns/book#buy-now) REBAJA de invierno $40.00 $24.95 más impuestos locales impuestos locales incluidos [Comprar ya](https://refactoring.guru/es/design-patterns/book#buy-now) [Comprar como regalo](https://refactoring.guru/es/design-patterns/book#buy-now) [Comprar para mi equipo](https://refactoring.guru/es/design-patterns/book#buy-team) Los **patrones de diseño** te ayudan a resolver problemas que ocurren con frecuencia en el diseño de software. Pero no se puede elegir un patrón y copiarlo en el programa como si se tratara de funciones o bibliotecas ya existentes. Un patrón no es una porción específica de código, sino un concepto general para resolver un problema particular. Son como planos prefabricados que se pueden personalizar para resolver un problema de diseño recurrente en tu código. El libro _Sumérgete en los patrones de diseño_ ilustra 22 patrones de diseño clásicos y 8 principios de diseño en los que se basan estos patrones. * Cada capítulo empieza con un _problema_ de diseño de software del mundo real, que después se resuelve utilizando uno de los patrones. * Después nos sumergimos en una revisión detallada de la _estructura_ del patrón y sus variaciones, seguido de un _ejemplo de código_. * Después el libro muestra varias _aplicaciones_ del patrón y enseña cómo implementar el patrón _paso a paso_, incluso en un programa existente. * Cada capítulo concluye con una discusión de los _pros y contras_ del patrón y explora sus _relaciones, similitudes y diferencias_ con otros patrones. > ¿Por qué tienes que conocer los patrones? > ----------------------------------------- > > **Brilla en entrevistas y revisiones.** Prácticamente en todas las entrevistas de empleo de programación y todas las revisiones de rendimiento surgen preguntas sobre los patrones. Consigue más trabajos y logra ese aumento y promoción que tanto mereces. > > **Amplía tu arsenal de programación.** Los patrones te permiten personalizar soluciones ya conocidas en lugar de tener que reinventar la rueda. Tu código tiene menos errores porque utilizas una solución probada y estandarizada que cubre todos los problemas ocultos. > > **Comunícate mejor con los colegas.** Indica el nombre del patrón en lugar de perder una hora explicando a otros programadores los detalles de tu estupendo diseño y sus clases. Consigue la gloria sin el sudor. ¿Para quién es este libro? -------------------------- **Principiantes con los patrones.** Si nunca has estudiado patrones, el libro explica los principios básicos de la programación orientada a objetos con ejemplos del mundo real. Antes de sumergirte en los patrones, observamos los valores y principios de diseño sobre los que se construyen. **Quienes quieren actualizarse con los patrones.** Si estudiaste los patrones hace tiempo pero ya olvidaste cómo aplicarlos, este libro electrónico puede refrescarte la memoria y servirte como útil referencia. Encuentra rápidamente las secciones de tu interés sin tener que leerlo de principio a fin. **Quienes cambian de lenguaje.** Si estás cambiando a unos de los lenguajes de POO (C#, C++, Go, Java, PHP, Python, Ruby, Rust, Swift o TypeScript), captarás fácilmente la esencia del texto gracias a los muchos ejemplos y analogías del mundo real, apoyadas por útiles ilustraciones y diagramas. > Demostración gratuita > --------------------- > > [Abrir en el navegador](https://refactoring.guru/files/design-patterns-es-demo.pdf) > [Descargar PDF](https://refactoring.guru/files/design-patterns-es-demo.pdf) > > Comprueba por ti mismo la calidad del libro. La demo incluye el índice de contenidos, varios capítulos introductorios, tres principios de diseño y el patrón de diseño Factory Method. ![Sumérgete en los patrones de diseño](https://refactoring.guru/images/content-public/landings/100-satisfaction-es-3x.png) Satisfacción garantizada ------------------------ No arriesgas nada comprando ahora. Si después de un mes desde tu compra decides que el libro no te ayuda, te devolveremos todo el dinero. Sin hacer preguntas. REBAJA de invierno $40.00 $24.95 más impuestos locales impuestos locales incluidos [Comprar ya \ (¡Será más costoso más adelante!)](https://refactoring.guru/es/design-patterns/book#buy-now) * Tu copia personalizada de **Sumérgete en los patrones de diseño** * 436 páginas de gran escritura técnica * 225 (!) ilustraciones y diagramas * Archivo con ricos ejemplos de código (C#, C++, Go, Java, PHP, Python, Ruby, Rust, Swift, TypeScript) * Garantía de reembolso de 30 días ¿Qué dicen otros? ----------------- [![](https://refactoring.guru/images/content-public/landings/goodreads-badge-read-reviews.png)](https://www.goodreads.com/book/show/43125355-dive-into-design-patterns) Facebook [Añadir una opinión](https://refactoring.guru/login?destination=https%3A%2F%2Ffeedback.refactoring.guru%3Flang%3Dru%26show_feedback_form_private%3Dtrue) Me ha encantado la forma de explicar y de ejemplificar los distintos patrones. Además, la mención a la programación orientada a objetos y los principios SOLID me ha parecido excelente. Realmente lo han redactado de una forma sencilla de leer y atrapante, dos características difíciles de encontrar en un libro teórico. Lo recomiendo! Facundo Rodríguez Argentina Todo está bien explicado y me gusta el modo en que se presentan todos los fundamentos por primera vez (UML, SOLID) para luego poder pasar a cada patrón de diseño y jugar con él. La única mejora que se me ocurre es lanzar versiones impresas (prefiero el papel al pdf) y quizá en otros idiomas. Mickaël Andrieu France Your book is great. I am junior level developer and certainly happy with the purchase! I like the structure of how each pattern is presented, and the UML and examples really clarify things. I also like the "vibe", which keeps it fun yet on-point. I can't think of a con. Thanks for this! Leon Wong Canada The book is awesome, easy-understanding and well-written. Just have a little suggestion to organize the content not in alphabetical order but by categories would be better. And also put some code in it \[rather than having it in separate archive\] so that it would be easier to read on an iPad when travel. Zhang Lingkang Canada I read it the same day I got it, I mostly use it as a refresher on on when I dont see the woods for the trees. I think it's fine the way it is. Christopher Lousberg Czech Republic I have been really busy with work recently. The info you have on design patterns has been a huge help and an excellent reference! I think what you have currently is well done and the organization is superb! Pamela Wheeler USA I only had time to glance at the book but it seems really amazing. I hope to have time since next month to read it. About the things that made me to buy it are the cartoons and UML diagrams that simplifies the understanding of each pattern. I really like them! I would like to suggest you to do something similar (including cartoons) with the most famous programming antipatterns. Alvaro Prieto Spain I have just read the book and I think it is amazing. I have bought both of your patterns books and refactoring course and if you need me to buy from you again I will :) Toni Dezman Slovenia So far I find this book very interesting and useful in terms of examples/diagrams and ideas. I wish you could have the code written in Java. Ion Apostol Romania I am loving the book so far. I'm currently reading it on my Kindle. I'll use it to make dojos with some friends of mine so that we practice the principles of the book. As for suggestions, maybe it's a bit too soon to say since I'm still at the beginning and I'm a slow reader, but maybe exercises? I don't even know if the book presents exercises. Maybe it does and I didn't get there yet. Vinícius Guerra Cardoso Brazil The book is great and makes all the patterns more easier to understand than the books or examples i found on the internet. I like your style of writting, it\`s easy to understand. You are going from the problem to the solution and that process give me the best understanding about pattern. Comparations betweem patterns are helpful alot. Maybe the UML diagrams should have cardinality and the role that a class plays in the relationship because it's difficult for the first reading for every problem follow all properties from the code or from the text. Maybe for some patters you should use the same problem, saving time to understand the new problem but to concentrate just on pattern, and make good comparision of new pattern with the old one. Well it's good to have more different problems for diversity but it's more time consuming and little blury the pattern. Nikola Pajić Serbia I have already started reading the book, though I'm not quite half way yet. My impressions so far is that I like it! I enjoy the UML diagrams high diagrams explaining the connections and the coding examples. I also appreciate the explanation on when to use a particular pattern and what are it's strengths and weaknesses. There is a lot of good information and I have been re-reading sections to make sure I have a firm understanding as to why a particular pattern is beneficial and how to properly implement it before moving on. Akin Delamarre Canada The book is great! I discovered your site a few months ago in my ongoing quest to design better code. I bought the book because it has information on SOLID design principles, and I like that I can read it on a Kindle. I'm a big fan of the illustrations - they're funny and do a good job of illustrating the concepts. Brian Dumez USA I'm a long-term user of your website refactoring.guru from as early as my undergrad era. I have to say the website (refactor.guru and design patterns) are great! It's the 101 for me to learn how to improve my code in a higher level than just learning grammars and best practices of programming languages. To me, the e-book is a modernized Design Patterns: Elements of Reusable Object-Oriented Software. Although I've purchased the old Design Patterns book long before and put it on my bookshelf, I seldom read it. Your book changed this awkward situation, because it has a much better look and more readable contents. It also have updated understandings of trade-off, nice illustrations and better summaries for each of the design patterns. Much more attractive to me. And the book is well organized by chapters, letting me to read it through many times on my phone during leisure time. Sincerely, it's perfect as an e-book to me as a guidebook to improve my skills as a software developer and I have recommended the book to all of my friends. Yet I'm wondering if there is a further plan to make a more "advanced" version. What I mean is that a version with more detailed explanation with the theories behind these design patterns, probably citing some academic researches of software engineering, some industry cases, etc. This advanced book will be the best choice for people who want to dive even deeper into the story behind the scene. Its form might be somehow like that of Peopleware and Pragmatic Programmer where the author introduced the experiences by telling stories or some industry cases they know. Another advice is that it might be a good business decision to make a paper-based version of the e-book. I believe almost every programmer will be willing to put one on his/her shelf. I noticed the e-book has some hyperlinks as part of the organization. But I believe it's possible to make some arrangement to minimize the jumps and make it highly sequentially readable. Again, thank you so much for creating the awesome website and book. It's a huge help to me. The thing is that I found trade-offs in software engineering cannot be taught easily in universities. So in the past a newgrad have to spend several years to learn these experiences by working in a big company for years. However, this might not be everyone's ideal career path. Your website and book made it all flatten and now a newgrad or student can learn very quickly by using your website. It enabled an agile career path directly from a startup (or even "non-profit" career path by simply start to working on open-source projects). Zhaoxiong Cui USA I did read your book. Twice. It is a very comprehensive book and a joy to read and to walk through. It serves great as a reference and I probably won't need another reference book for patterns. I like your writing. No lengthy fluff, no excessive jargon, no just dry code. To the point. Also I like the way you explain the design and SOLID principles. Thank you very much. What I would like to see more in the book is a reference to typical, real life use cases of each pattern. For example, I have heard the command pattern can be used to radio groups or for writing wizards. How is this done? Are there any examples of real life code using the visitor pattern? Are there any simple examples we can study? No need for extra book pages, just a link to a online repo with code examples probably would do. Maybe more examples would help the stick better to the memory. Yes, it is up to me to come up with good use cases for each pattern but as a newbie I find it difficult to remember what each pattern does and what it is good for. Some, like the singleton, the facade, the observer etc. are obvious and easy to remember their purpose and general functionality, others not so much. Also it would be great if there was an option for a dead tree version of the book. I want to keep it as reference. I will feed the PDF to my laser printer but I would like to have it printed and bound looking like a real book. All and all I give your book a solid 5 stars. Thank you very much. Alkis Tsamis Grece I've read a considerable part of the book already. I loved what I read! You explain the concepts in such an easy way. I wish I had the opportunity to read it when I was in college. I don't have, currently, any suggestions to improve it. But it would be great if it were available in more languages. Since I'm from Brazil, I'm not gonna lie, it would be great to have it in Portuguese (so I could tell my non-English speaking friends to get it as well, 'cause they really need some of the knowledge in the book). I stumbled across your website when searching "why refactoring is important" if I'm not mistaken. I immediately saved it to my bookmarks that day and shared it with some of my colleagues. Thank you for the book. Renato Oliveira Brazil I like your book, it is easy to understand even if I'm not good in English and really really beginner, of course the illustrate each pattern make me smile, real world example and class diagram help me better understanding, relation between pattern really help me to understand when and why pattern exist. I hope you can write code in JavaScript, because sometime I convert the code into Typescript/ES7 **Note:** since March, 2019, the book comes with TypeScript examples. Rozaliyana Aushuria Indonesia I am half way through the design patterns book and I must say I am more than 100% happy that I purchased the books. I must say you have a knack of telling the things in the right way. I am really enjoying the book and I am very sure even the refactoring book would be great as well. I like the way topics are presented and the examples. That helped be get the context and better understand them. This way, I will not forget the concepts over a period of time. I wish the SOLID principles content should be expanded a little more by taking a real world complete use case and applying step by step like before and after. I know this kind of thing may be tricky to make, but, it would help. Moreover, I would suggest breaking the design pattern book in to design patterns and also OOAD book. The OOAD book can focus on SOLID principles, OOP in general and how OOAD can be done. The design patterns then can augment the same. I am glad to have purchased the books and they will definitely help me in understanding and applying them at my work. Keep up the good work. I will be watching out for any new content that you put out. Vamsikrishna Koundinya India I like the way you have explained each of design patterns although I have the original GoF books but it's really hard to understand. No suggestion as of now I am still in between and I am happy with my purchase. Thanks! Majed Samyal India The Design Patterns are something I was not very familiar with. I already learned a lot from your book and I hope I will be able soon to get a new role in my career and maybe to teach other people about the patterns. Everything is explained very well, the introductory part includes SOLID and fundamentals of OOP which is very good. I would do more examples if I could. What I would put here is a brief of symptoms of a bad design like rigidity, fragility, imobility and viscosity. But for me, it's exactly what I was looking for - design patterns with explanations and concrete examples in one place. And to be honest it was at the best price - personally I wouldn't do it for this amount. Thank you again and congratulations for your work. I would be glad to share you my pieces of code in the future if you want. Good luck! Daniel Belu Romania This is a very good book you have. This is well explained at the level of the principles and through examples. My only concern is my level of English which is very low and it takes me a lot of time to understand the quite complex designs. I am a symfony developer and currently I am in the process of deciding the use of these patterns at the framwork level. The use of SOLID is quite understandable and I think it is the basis, so I did not have the same problems for the factory. It's the others that I'm investing more. I found, for example, that symfony formlaries are rich enough to find use cases (factoryMethod, builder, composite). This will interest me a lot if you can help me find the use of the symfony designs. Setra Ratefiniaina France I'm still reading the book, but so far I really like it! It has been a helpful refresher to me on OOP principles. I liked the explanation of UML diagram symbols. I'm relatively new to design patterns, but you explain them in a very clear manner which is easy to understand. I enjoy the illustrations and the real-world examples. Other material I had previously read on design patterns was pretty abstract without saying how it would be helpful in real life. But your book makes it all very clear! Edward Gulbransen USA The book is really awesome and explains the concepts in great detail. I read the book completely and I think its the fastest I completed any book.I am also considering to buy the other book on code refactoring. The improvements I would like to see in the book is to add some more design patterns. I guess some design patterns from the Gang of Four missing and also some patterns outside GoF which we use most often. Some information on Anti patterns & code smells and also examples of how multiple patterns can be used together within applications would be great. Raghavendra Somannavar USA I would like to thank you for your excellent book. It's one of the best purchases I have recently made and has helped me a ton with work. I've read the book as soon as I got it after I had read through the examples available on your website, because it convinced me that the information in it would be very useful to me. Since I have got your book, I have kept it open at work on one of the displays as a reference and guidelines for my designs and whenever I extend the functionality of my software I always follow the design patterns presented in the book. What I love about the book is that it is a recent and modern document about design patterns, which is in my experience the bread and butter of object oriented software design. It is very concise, provides many examples and very concrete applications, and actual implementations in all the programming languages I use at work. While the information in the unavoidable "Gang of Four" design patterns book is very good on its own and a great text, I was looking for a book in the same scope, but a recent one to keep up with the new designs, technology and concepts that come and your book is a perfect candidate for that. The text itself is pretty, with very nice diagrams and images, great formatting and typesetting. While these are details, they make the information much more readable and enhances the whole experience. And the cover art is very nice ! I honestly have no idea on how to improve the book. It has been a pleasure to read, and has become a very important tool at work and one of my "definite references", so it's difficult to improve something you are already very satisfied with ! So, thank you again, props to you for making this great text. The first recommendation for books about design patterns and object oriented software design that I would give would be definitely yours, hands down. Julien Belmon France I’m very happy with the book. It’s easier to read than a GoF book. \- I can’t say anything bad. \- Complex structures are explained in an easy to understand way. \- I believe it would be great if a few chapters on anti-patterns were added. Overall, thank you very much for the high-quality material. Evgeny Stelmashok Russia I liked everything, I read it only once for now. And I have not yet found anything that could be improved. I keep it in my favorites as a reference book. Vladislav Karpenko Russia I use your website, and bought the book to support the project! I like everything very much. Simple and user-friendly! Keep it up! Maksim Berezin Russia To my surprise, the book is very well suited for different levels of specialists. That’s why we even added a link to your website as a recommendation. I enjoyed the illustrations and the method of presenting the material. Thank you for popularizing useful educational materials. Andrej Grekov Russia I believe the presentation is ideal: brief, without unnecessary discussion. A clear description of the problem, a way to solve it, a pseudocode: all you need is there. Illustrations also help a lot. If I need to remember why one or another pattern is needed, I just look at the picture and I remember everything. This is what could be improved, in my opinion. Maybe a few more examples of the practical application of a particular pattern. Without a code. Just a description of the situation and its solution using a pattern. I.e. real-life examples. I am, of course, more interested in Web development. Andrej Senichev Russia I'm reading the book right now. The website has almost everything that is written in the book, so technically I could have just read about it on the website. As to what could be improved, it is difficult to say. Sometimes you write about the same thing over and over 10 times, but many of us (including myself) need it for initial understanding. I would love to see more examples, maybe even without code. For example - you can talk with developers from different industries and ask around, where and how they apply this or that pattern. I’m an Android developer and some of your patterns are stacked on commonly occurring screens. Maybe you should add some links to designs of other guys as an example. But overall the book is quite good. The pictures are cool. Sometimes it's hard to figure out what's what, but what can you do? We must persevere. Read again, try again. It would be great to see the version for Kotlin. I actually rewrite your examples in order to learn the language. Dmitry Mitroshin Russia I started reading the book, and I'm very pleased with it. Great, high-quality examples and schemes. Taras Savranskij Russia My first impression is a positive one, the author should continue writing. I'd like to buy the book for a friend. I understand that the only option is to register under a new account. Denis Zaharov Belarus I previously studied these patterns in the book titled “The Gang of Four”. I liked the simplicity of descriptions in your book, as well as the excellent usage examples. I use your book as a reference guide in order to refresh my knowledge about a particular template or to search for a template I may need at the moment. I can't say anything about how the book can be improved, because I haven't even thought about it. The author did a great job creating this book) Dmitry Borodin Russia Thanks for the great material! I'm reading the book in sections, I really like how the material is presented, user-friendly presentation on several levels, interesting examples, clear illustrations. I can't help but compare it to Freeman's “Design Patterns”, and the presentation in your book is more informative in my opinion. It is convenient not only to read the book in a sequential order, but to also use it as a reference guide. I plan to use the materials you have collected to put together training materials, reports inside and outside my company, in the context of front-end development. Andrej Alekseev Russia Truth be told, I bought the book to give back for the work the authors did when creating the website, it helped me and continues to help + I was interested to see how SOLID will be outlined. I think it would be cool for newbies if there were c# examples as well, although everything is quite clear anyway. Since I have a stable Internet connection, I use the website as a reference guide instead of the book. **Note:** the book is supplied with C# examples since spring, 2018. Pavel Bobrovskij Russia I'm reading the book, it's interesting, not boring, and it offers quite an exciting and fresh perspective. I would love to see it a paperback edition as well. Dmitry Udovenko Russia Thank you for the book. The material is presented beautifully and in a user-friendly manner. The examples are clear, the diagrams are accurate, the illustrations are interesting. It works as a reference book, as well as an introductory guide for the topic. I use it for both purposes. Vladimir Lebed Kazakhstan I work as a C# developer. I had read an article online that included many references to patterns. I went to Google and found your website, where I read about the pattern that was of interest to me. Your information is very well structured, but what I liked the most was the style of illustrations. There is something home-like about them)) As a beginner, I really liked the fact that the patterns are described from the point of view of the issues that they solve, and not from the standpoint of the description of the pattern itself. After reading the entire section on patterns on the website, I realized that I wanted to buy the book to thank you for the work you have done collecting and structuring the information. I would like to comment only on one section - “Relationships with other patterns”. Despite the fact that I read about all the patterns, I still don't understand what this section is about. Maybe you could add illustrations there, or even remove this section altogether and add a chapter about using combined patterns? Daniil Doniy Russia The project as a whole, and the book in particular, make an excellent impression. It would seem that there are quite a lot of books written on this topic, but you have structured everything and made it rather fun) Wonderful illustrations that help readers memorize everything in a fun way. I started reading the book right after I purchased it. I've already learned how to apply a couple of the described patterns quite confidently in practice. The book can be improved by publishing it on paper. That way you can give it as a gift, for example. I would like to see examples for PHP and Python, but as I understand, you are already working on it. Thank you for your work, and good luck in your endeavors! **Note:** the book is now supplied with PHP and Python examples. Vasily Jurlov Russia I am completely satisfied with the purchase, I have already read the book from cover to cover. I think that this is the most user-friendly book on patterns I have ever read. I was really happy that I could read it on my iPhone. Thank you for the great book! Alexey Bezruchenkov Ukraine Excellent book, everything is explained in detail and presented in a user-friendly manner. Special thanks for supporting multiple formats and providing the readers with the ability to read the book on the go. Alex Chugaev Ukraine I liked the book; from time to time I apply the solutions from the book in my work. I'm pleased with the book and very thankful for your work. Dmitry Grusheckij Russia I would like to note right away that the book is beautifully illustrated) The information about SOLID, and in particular, about the principle of Barbara Liskov, is presented very well and in a user-friendly manner. I found some new information for myself about the private members of the base classes and the fact that you explicitly separate the restrictions on preconditions by type and attribute values. It is really easier to figure everything out this way. It seemed strange that the book is over 30mb, though Dmitry Bezik Russia The book is great. Excellent illustrations and examples. I am now preparing a report on Design Patterns at work. What can be added: examples with Anti-Patterns, what not to do. Alexandre Fiveg Munich, Germany I do really enjoy your book. And would like to buy printed version to have it on my work place. Sergii Aleksieiev Київ, Україна Everything that is explained using cats is always clear, and the more allegories the better. I haven't finished the book yet, but the first impression is rather good, thank you! Andrej Zemskov Russia I confirm that I bought this book, and am satisfied with the purchase, otherwise I would not have bought it :) I was looking to find some information on the most widely used patterns (builder and factory), and I ended up finding the materials on the website. And everything after that is history - I really liked the design of the website and its structure; other similar resources usually just have a description of random ~5 patterns, and the rest are “coming soon...”. Your website is by far the BEST of all that I have come across on this topic, and that's why I bookmarked it and added the PDF version to the offline library on my tablet. Although I am an experienced “pirate”, I am always happy to pay an ADEQUATE price for the product that I use for my professional activity. Denis Zaharov Russia I almost finished reading the book. I will say right away that I liked it; the book offers real-life examples, the descriptions and the pseudocode are good. Albert Gizetdinov Russia The material is interesting, even though it was a bit unusual to learn on examples with pseudocode. For pros, this approach is, of course, quite acceptable. In general, the book is definitely worth its price. NeonDT Russia [Mostrar opinión siguiente](https://refactoring.guru/es/design-patterns/book#) ¿Qué obtienes con la compra? ---------------------------- **Un eBook multilingüe en 4 formatos** * Formatos: PDF, EPUB, MOBI, KFX * Idiomas: español, inglés, portugués, francés, chino, japonés, coreano, polaco, ruso, ucraniano * Volumen: 436 páginas * Gráficos: 225 ilustraciones y diagramas * Actualizaciones y arreglos: totalmente gratuitos **Un archivo con ejemplos de código** * Los ejemplos están en C#, C++, Go, Java, PHP, Python, Ruby, Rust, Swift y TypeScript ![](https://refactoring.guru/images/patterns/banners/patterns-book-banner-5-en-3x.png) **Un libro electrónico en un lenguaje humano y natural.** Escrito con los mínimos tecnicismos y jerga, y el máximo número de ejemplos de código e ilustraciones. ![](https://refactoring.guru/images/patterns/banners/patterns-book-banner-6-3x.png) **No vinculado a un lenguaje de programación específico.** Los ejemplos de código están en pseudocódigo y son aplicables a la mayoría de lenguajes de POO modernos. ![](https://refactoring.guru/images/patterns/banners/patterns-book-banner-3-3x.png) **Puede leerse en cualquier dispositivo.** El libro electrónico está disponible en cuatro formatos: * **EPUB** para leerlo en teléfonos y tabletas * **MOBI** y **KFX** para lectores de Amazon Kindle * **PDF** para leerlo en cualquier parte o imprimirlo ![](https://refactoring.guru/images/patterns/banners/patterns-book-banner-2-2x.png) **Siempre práctico y consultable.** El libro electrónico es una cómoda guía de referencia. Al contrario que el libro en papel, puedes buscar en él y es imposible perderlo en alguna parte. Siempre estará disponible en tu smartphone, tableta, portátil o computadora de mesa. ![](https://refactoring.guru/images/patterns/banners/patterns-book-banner-1-a-3x.png) **Una lectura agradable de camino al trabajo o en ratos libres.** ¿En qué otro momento puedes aprender en paz hoy en día, si no es durante un vuelo o en el autobús o el metro? Bueno, quizá en la cama... ![](https://refactoring.guru/images/patterns/banners/patterns-book-banner-4-3x.png) **Fácil lectura, por el día o la noche.** ¡Buenas noticias para los trasnochadores! El libro electrónico se lee genial con un fondo claro por el día o uno oscuro para leerlo por la noche. Preguntas frecuentes -------------------- ¿Qué métodos de pago se aceptan? Puedes pagar con tarjetas de crédito/débito (Visa, MasterCard, AmEx, Discover, JCB, Elo, Hipercard y más), PayPal, Apple Pay, Google Pay, iDeal, NetBanking, WeChat Pay y Alipay. También puede pagar con criptomoneda. ¿Cómo se mantienen seguros mis datos? Tu información de pago está encriptada y se envía directamente a la pasarela de pago. Nunca se almacena en nuestro servidor. He intentado hacer el pedido, pero mi pago me da error cada vez que lo intento. ¿Qué puedo hacer? Asegúrese de que su tarjeta está habilitada para realizar transacciones en línea y que no haya alcanzado su límite de gasto en línea. Luego, vuelva a intentar hacer el pedido. Si aun así sigue sin poder realizar el pago, [envíenos un mensaje](https://refactoring.userecho.com/?show_feedback_form=true) e intentaremos ofrecerle opciones de pago alternativas. ¿Puedo obtener un reembolso si no quedo satisfecho? ¡Sí! Si nuestro libro no te ayuda, envía un mensaje a support@refactoring.guru con tu recibo. Te reembolsaremos la compra en su totalidad, sin hacer preguntas. ¿Puedo solicitar una factura después de hacer mi compra? ¡Sí! Puede descargar la factura después de hacer su compra. ¿Puedo comprar una versión en papel del libro? Lo sentimos, pero por el momento el libro sólo está disponible como libro electrónico. ¿Puedo comprar el libro en Amazon? Lamentablemente, no. El libro sólo se puede comprar en Refactoring.Guru. Vender el libro desde nuestro propio sitio web nos permite evitar los enormes recortes impuestos por las plataformas de terceros y encontrar un punto de equilibrio al mismo tiempo que ofrecemos un precio asequible. Si está interesado en consultar o escribir reseñas, puede visitar la página del libro en [Goodreads](https://www.goodreads.com/book/show/43125355-dive-into-design-patterns) . ¿Recibiré las versiones en todos los idiomas después de la compra? (Inglés, español, etc.) ¡Sí! Tendrá acceso a todas las versiones actuales y futuras del ebook. ¿Tienes más preguntas? ---------------------- [Envía un mensaje a través del foro](https://refactoring.userecho.com/?show_feedback_form=true) o mediante un correo a [support@refactoring.guru](mailto:support@refactoring.guru) . Normalmente respondemos en cuestión de horas. ### Dive Into **DESIGN PATTERNS** REBAJA de invierno $40.00 $24.95 más impuestos locales impuestos locales incluidos [Comprar ya](https://refactoring.guru/es/design-patterns/book#buy-now) **PDF, EPUB, MOBI, KFX + ejemplos de código** / Actualizaciones gratuitas / **Devolución garantizada en 30 días** [![](https://refactoring.guru/images/patterns/book/web-cover-es-3x.png)](https://refactoring.guru/es/design-patterns/book#buy-now) REBAJA de invierno $40.00 $24.95 más impuestos locales impuestos locales incluidos [Comprar ya](https://refactoring.guru/es/design-patterns/book#buy-now) [Comprar como regalo](https://refactoring.guru/es/design-patterns/book#buy-now) [Comprar para mi equipo](https://refactoring.guru/es/design-patterns/book#buy-team) ![](https://refactoring.guru/images/content-public/landings/ipadiphone.png) PDF, EPUB, MOBI, KFX \+ ejemplos de código ![](https://refactoring.guru/images/content-public/landings/satisf.gif) Devolución garantizada en 30 días --- # Comparación de fábricas [There are patterns of patterns now! \ My friend's project: MetaPatterns.io](https://metapatterns.io/)  [](https://refactoring.guru/es/design-patterns/factory-comparison#checkout) [](https://refactoring.guru/es/design-patterns/factory-comparison#checkout) [](https://refactoring.guru/) / [Patrones de diseño](https://refactoring.guru/es/design-patterns) / [Patrones creacionales](https://refactoring.guru/es/design-patterns/creational-patterns) Comparación de fábricas ======================= Este artículo muestra la diferencia entre: 1. Fábrica (“factory”, en inglés) 2. Método de creación 3. Método de creación estática 4. Patrón _Simple Factory_ 5. Patrón [Factory Method](https://refactoring.guru/es/design-patterns/factory-method) 6. Patrón [Abstract Factory](https://refactoring.guru/es/design-patterns/abstract-factory) Puedes encontrar referencias a estos términos por toda la web y, aunque pueden parecer similares, todos tienen significados diferentes. Mucha gente no se da cuenta de ello, lo que provoca malos entendidos y confusión. Vamos a intentar establecer las diferencias y resolver este problema de una vez por todas. 1\. Fábrica o Factory --------------------- **Fábrica** es un término ambiguo que se refiere a una función, método o clase que debe producir algo. Normalmente las fábricas producen objetos, pero también pueden producir archivos, registros en bases de datos, etc. Por ejemplo, alguien podría referirse a cualquiera de estas cosas como una “fábrica”: * una función o un método que crea la GUI de un programa; * una clase que crea usuarios; * un método estático que invoca una clase constructora de cierta manera; * uno de los patrones de diseño creacionales. Normalmente, cuando alguien emplea la palabra “fábrica”, el significado exacto debe quedar claro por el contexto. Pero si tienes dudas, pregunta. Es posible que el autor lo ignore. 2\. Método de creación ---------------------- El método de creación se define en el libro [Refactoring To Patterns](https://refactoring.guru/es/ref-to-patterns-book) como “un método que crea objetos”. Esto significa que todo resultado de un patrón Factory Method es un “método de creación” pero no necesariamente a la inversa. También significa que puedes sustituir el término “método de creación” allá donde Martin Fowler utiliza el término “método fábrica” en [Refactoring](https://refactoring.guru/es/ref-book) y allá donde Joshua Bloch utiliza el término “método fábrica estático” en [Effective Java](https://refactoring.guru/es/effective-java-book) . En realidad, el método de creación simplemente es un envoltorio alrededor de una llamada al constructor. Puede tener un nombre que exprese mejor tus intenciones. Por otro lado, puede ayudar a aislar tu código de cambios en el constructor. Puede incluso contener una lógica particular que devuelva objetos existentes en lugar de crear unos nuevos. Muchas personas llamarían a tales métodos “métodos fábrica” sencillamente porque producen nuevos objetos. La lógica es sencilla: el método crea objetos y, como todas las _fábricas_ crean objetos, este método claramente debe ser un _método fábrica_. Naturalmente, hay mucha confusión en lo que se refiere al verdadero patrón [Factory Method](https://refactoring.guru/es/design-patterns/factory-method) . En el siguiente ejemplo, `next` es un método de creación: class Number { private $value; public function \_\_construct($value) { $this->value = $value; } public function next() { return new Number ($this->value + 1); } } 3\. Método de creación estático ------------------------------- El **método de creación estático** es un método de creación declarado como `estático`. En otras palabras, puede invocarse en una clase y no necesita un objeto para ser creado. No te confundas cuando alguien llame a un método como éste un “método fábrica estático”. Es una mala costumbre. El [Factory Method](https://refactoring.guru/es/design-patterns/factory-method) es un patrón de diseño que se basa en la herencia. Si lo haces `estático`, ya no podrás extenderlo en subclases, lo cual contradice el propósito del patrón. Cuando un método de creación estático devuelve nuevos objetos se convierte en un constructor alternativo. Puede ser de utilidad cuando: * Necesitas varios constructores diferentes con distintos propósitos pero cuyas firmas coinciden. Por ejemplo, tener `Random(int max)` y `Random(int min)` es imposible en Java, C++, C# y muchos otros lenguajes. La solución más popular es crear varios métodos estáticos que invoquen el constructor por defecto y establezcan después los valores adecuados. * Quieras reutilizar objetos existentes, en lugar de instanciar unos nuevos (véase el patrón [Singleton](https://refactoring.guru/es/design-patterns/singleton) ). En la mayoría de los lenguajes de programación, los constructores deben devolver nuevas instancias de clase. El método de creación estático es una solución a esta limitación. Dentro de un método estático, tu código puede decidir si crear una nueva instancia invocando al constructor, o devolver un objeto existente a partir de una memoria caché. En el siguiente ejemplo, el método `load` es un método de creación estático. Ofrece un modo conveniente de recuperar usuarios de una base de datos. class User { private $id, $name, $email, $phone; public function \_\_construct($id, $name, $email, $phone) { $this->id = $id; $this->name = $name; $this->email = $email; $this->phone = $phone; } public static function load($id) { list($id, $name, $email, $phone) = DB::load\_data('users', 'id', 'name', 'email', 'phone'); $user = new User($id, $name, $email, $phone); return $user; } } 4\. Patrón _Simple Factory_ --------------------------- El patrón **Simple Factory** (fábrica simple) Definido en el libro [Head First Design Patterns](https://refactoring.guru/es/head-first-book) . describe una clase que tiene un método de creación con un gran condicional que, basándose en los parámetros del método, elige la clase de producto que instanciar y devolver. La gente suele confundir las _fábricas simples_ con _fábricas_ en general, o con uno de los patrones de diseño creacionales. En la mayoría de los casos, una fábrica simple es un paso intermedio para introducir los patrones [Factory method](https://refactoring.guru/es/design-patterns/factory-method) o [Abstract factory](https://refactoring.guru/es/design-patterns/abstract-factory) . Las fábricas simples no suelen tener subclases. Pero, después de extraer subclases de una fábrica simple, empiezan a parecerse a un patrón _factory method_ clásico. Por cierto, si declaras una fábrica simple como `abstracta`, no se convierte en el patrón _abstract factory_ por arte de magia. Aquí tienes un ejemplo de _fábrica simple_: class UserFactory { public static function create($type) { switch ($type) { case 'user': return new User(); case 'customer': return new Customer(); case 'admin': return new Admin(); default: throw new Exception('Wrong user type passed.'); } } } 5\. Patrón _Factory Method_ --------------------------- El patrón **Factory Method** Definido en el libro de la GoF [Patrones de diseño](https://refactoring.guru/es/gof-book) . es un patrón de diseño creacional que proporciona una interfaz para crear objetos pero permite a las subclases alterar el tipo de objetos que se crearán. Si tienes un método de creación en la clase base y subclases que lo extienden, puede que se trate del método fábrica. abstract class Department { public abstract function createEmployee($id); public function fire($id) { $employee = $this->createEmployee($id); $employee->paySalary(); $employee->dismiss(); } } class ITDepartment extends Department { public function createEmployee($id) { return new Programmer($id); } } class AccountingDepartment extends Department { public function createEmployee($id) { return new Accountant($id); } } 6\. Patrón _Abstract Factory_ ----------------------------- El patrón **Abstract Factory** También explicado en el [libro de la GoF](https://refactoring.guru/es/gof-book) . es un patrón de diseño creacional que permite la producción de familias de objetos relacionados o dependientes, sin especificar sus clases concretas. ¿Qué son las "familias de objetos"? Por ejemplo, tomemos este grupo de clases: `Transporte` + `Motor` + `Controles`. Puede haber diversas variantes de ellas: 1. `Coche` + `MotordeCombustión` + `Volante` 2. `Avión` + `Reactor` + `Horquilla` Si tu programa no funciona con familias de productos, entonces no necesitas una fábrica abstracta. Y, de nuevo, mucha gente confunde el patrón _abstract factory_ con una simple clase fábrica declarada como `abstracta`. ¡No hagas tú lo mismo! ### Epílogo Ahora que conoces las diferencias, repasa los patrones de diseño: * [Factory Method](https://refactoring.guru/es/design-patterns/factory-method) * [Abstract Factory](https://refactoring.guru/es/design-patterns/abstract-factory) --- # Builder en Rust / Patrones de diseño [There are patterns of patterns now! \ My friend's project: MetaPatterns.io](https://metapatterns.io/)  [](https://refactoring.guru/es/design-patterns/builder/rust/example#checkout) [](https://refactoring.guru/es/design-patterns/builder/rust/example#checkout) [](https://refactoring.guru/) / [Patrones de diseño](https://refactoring.guru/es/design-patterns) / [Builder](https://refactoring.guru/es/design-patterns/builder) / [Rust](https://refactoring.guru/es/design-patterns/rust) ![Builder](https://refactoring.guru/images/patterns/cards/builder-mini-2x.png?id=de6d0938678b86903a1426dddfdd13bf) **Builder** en Rust =================== **Builder** es un patrón de diseño creacional que permite construir objetos complejos paso a paso. Al contrario que otros patrones creacionales, Builder no necesita que los productos tengan una interfaz común. Esto hace posible crear distintos productos utilizando el mismo proceso de construcción. [Aprende más sobre el patrón Builder](https://refactoring.guru/es/design-patterns/builder) Navegación  [Intro](https://refactoring.guru/es/design-patterns/builder/rust/example#)  [Car & car manual builders](https://refactoring.guru/es/design-patterns/builder/rust/example#example-0)  builders   [mod](https://refactoring.guru/es/design-patterns/builder/rust/example#example-0--builders-mod-rs)   [car](https://refactoring.guru/es/design-patterns/builder/rust/example#example-0--builders-car-rs)   [car\_manual](https://refactoring.guru/es/design-patterns/builder/rust/example#example-0--builders-car_manual-rs)  cars   [mod](https://refactoring.guru/es/design-patterns/builder/rust/example#example-0--cars-mod-rs)   [car](https://refactoring.guru/es/design-patterns/builder/rust/example#example-0--cars-car-rs)   [manual](https://refactoring.guru/es/design-patterns/builder/rust/example#example-0--cars-manual-rs)  [components](https://refactoring.guru/es/design-patterns/builder/rust/example#example-0--components-rs)  [director](https://refactoring.guru/es/design-patterns/builder/rust/example#example-0--director-rs)  [main](https://refactoring.guru/es/design-patterns/builder/rust/example#example-0--main-rs) Car & car manual builders ------------------------- This slightly synthetic example illustrates how you can use the Builder pattern to construct totally different products using the same building process. For example, the trait `Builder` declares steps for assembling a car. However, depending on the builder implementation, a constructed object can be something different, for example, a car manual. The resulting manual will contain instructions from each building step, making it accurate and up-to-date. The **Builder** design pattern is not the same as the **Fluent Interface** idiom (that relies on _method chaining_), although Rust developers sometimes use those terms interchangeably. 1. **Fluent Interface** is a way to chain methods for constructing or modifying an object using the following approach: let car = Car::default().places(5).gas(30) It’s pretty elegant way to construct an object. Still, such a code may not be an instance of the Builder pattern. 2. While the **Builder** pattern also suggests constructing object step by step, it also lets you build different types of products using the same construction process. ### **builders:** Builders #### **builders/mod.rs** mod car; mod car\_manual; use crate::components::{CarType, Engine, GpsNavigator, Transmission}; /// Builder defines how to assemble a car. pub trait Builder { type OutputType; fn set\_car\_type(&mut self, car\_type: CarType); fn set\_seats(&mut self, seats: u16); fn set\_engine(&mut self, engine: Engine); fn set\_transmission(&mut self, transmission: Transmission); fn set\_gps\_navigator(&mut self, gps\_navigator: GpsNavigator); fn build(self) -> Self::OutputType; } pub use car::CarBuilder; pub use car\_manual::CarManualBuilder; #### **builders/car.rs** use crate::{ cars::Car, components::{CarType, Engine, GpsNavigator, Transmission}, }; use super::Builder; pub const DEFAULT\_FUEL: f64 = 5f64; #\[derive(Default)\] pub struct CarBuilder { car\_type: Option, engine: Option, gps\_navigator: Option, seats: Option, transmission: Option, } impl Builder for CarBuilder { type OutputType = Car; fn set\_car\_type(&mut self, car\_type: CarType) { self.car\_type = Some(car\_type); } fn set\_engine(&mut self, engine: Engine) { self.engine = Some(engine); } fn set\_gps\_navigator(&mut self, gps\_navigator: GpsNavigator) { self.gps\_navigator = Some(gps\_navigator); } fn set\_seats(&mut self, seats: u16) { self.seats = Some(seats); } fn set\_transmission(&mut self, transmission: Transmission) { self.transmission = Some(transmission); } fn build(self) -> Car { Car::new( self.car\_type.expect("Please, set a car type"), self.seats.expect("Please, set a number of seats"), self.engine.expect("Please, set an engine configuration"), self.transmission.expect("Please, set up transmission"), self.gps\_navigator, DEFAULT\_FUEL, ) } } #### **builders/car\_manual.rs** use crate::{ cars::Manual, components::{CarType, Engine, GpsNavigator, Transmission}, }; use super::Builder; #\[derive(Default)\] pub struct CarManualBuilder { car\_type: Option, engine: Option, gps\_navigator: Option, seats: Option, transmission: Option, } /// Builds a car manual instead of an actual car. impl Builder for CarManualBuilder { type OutputType = Manual; fn set\_car\_type(&mut self, car\_type: CarType) { self.car\_type = Some(car\_type); } fn set\_engine(&mut self, engine: Engine) { self.engine = Some(engine); } fn set\_gps\_navigator(&mut self, gps\_navigator: GpsNavigator) { self.gps\_navigator = Some(gps\_navigator); } fn set\_seats(&mut self, seats: u16) { self.seats = Some(seats); } fn set\_transmission(&mut self, transmission: Transmission) { self.transmission = Some(transmission); } fn build(self) -> Manual { Manual::new( self.car\_type.expect("Please, set a car type"), self.seats.expect("Please, set a number of seats"), self.engine.expect("Please, set an engine configuration"), self.transmission.expect("Please, set up transmission"), self.gps\_navigator, ) } } ### **cars:** Products #### **cars/mod.rs** mod car; mod manual; pub use car::Car; pub use manual::Manual; #### **cars/car.rs** use crate::components::{CarType, Engine, GpsNavigator, Transmission}; pub struct Car { car\_type: CarType, seats: u16, engine: Engine, transmission: Transmission, gps\_navigator: Option, fuel: f64, } impl Car { pub fn new( car\_type: CarType, seats: u16, engine: Engine, transmission: Transmission, gps\_navigator: Option, fuel: f64, ) -> Self { Self { car\_type, seats, engine, transmission, gps\_navigator, fuel, } } pub fn car\_type(&self) -> CarType { self.car\_type } pub fn fuel(&self) -> f64 { self.fuel } pub fn set\_fuel(&mut self, fuel: f64) { self.fuel = fuel; } pub fn seats(&self) -> u16 { self.seats } pub fn engine(&self) -> &Engine { &self.engine } pub fn transmission(&self) -> &Transmission { &self.transmission } pub fn gps\_navigator(&self) -> &Option { &self.gps\_navigator } } #### **cars/manual.rs** use crate::components::{CarType, Engine, GpsNavigator, Transmission}; pub struct Manual { car\_type: CarType, seats: u16, engine: Engine, transmission: Transmission, gps\_navigator: Option, } impl Manual { pub fn new( car\_type: CarType, seats: u16, engine: Engine, transmission: Transmission, gps\_navigator: Option, ) -> Self { Self { car\_type, seats, engine, transmission, gps\_navigator, } } } impl std::fmt::Display for Manual { fn fmt(&self, f: &mut std::fmt::Formatter<'\_>) -> std::fmt::Result { writeln!(f, "Type of car: {:?}", self.car\_type)?; writeln!(f, "Count of seats: {}", self.seats)?; writeln!( f, "Engine: volume - {}; mileage - {}", self.engine.volume(), self.engine.mileage() )?; writeln!(f, "Transmission: {:?}", self.transmission)?; match self.gps\_navigator { Some(\_) => writeln!(f, "GPS Navigator: Functional")?, None => writeln!(f, "GPS Navigator: N/A")?, }; Ok(()) } } #### **components.rs:** Product components #\[derive(Copy, Clone, Debug)\] pub enum CarType { CityCar, SportsCar, Suv, } #\[derive(Debug)\] pub enum Transmission { SingleSpeed, Manual, Automatic, SemiAutomatic, } pub struct Engine { volume: f64, mileage: f64, started: bool, } impl Engine { pub fn new(volume: f64, mileage: f64) -> Self { Self { volume, mileage, started: false, } } pub fn on(&mut self) { self.started = true; } pub fn off(&mut self) { self.started = false; } pub fn started(&self) -> bool { self.started } pub fn volume(&self) -> f64 { self.volume } pub fn mileage(&self) -> f64 { self.mileage } pub fn go(&mut self, mileage: f64) { if self.started() { self.mileage += mileage; } else { println!("Cannot go(), you must start engine first!"); } } } pub struct GpsNavigator { route: String, } impl GpsNavigator { pub fn new() -> Self { Self::from\_route( "221b, Baker Street, London to Scotland Yard, 8-10 Broadway, London".into(), ) } pub fn from\_route(route: String) -> Self { Self { route } } pub fn route(&self) -> &String { &self.route } } #### **director.rs:** Directors use crate::{ builders::Builder, components::{CarType, Engine, GpsNavigator, Transmission}, }; /// Director knows how to build a car. /// /// However, a builder can build a car manual instead of an actual car, /// everything depends on the concrete builder. pub struct Director; impl Director { pub fn construct\_sports\_car(builder: &mut impl Builder) { builder.set\_car\_type(CarType::SportsCar); builder.set\_seats(2); builder.set\_engine(Engine::new(3.0, 0.0)); builder.set\_transmission(Transmission::SemiAutomatic); builder.set\_gps\_navigator(GpsNavigator::new()); } pub fn construct\_city\_car(builder: &mut impl Builder) { builder.set\_car\_type(CarType::CityCar); builder.set\_seats(2); builder.set\_engine(Engine::new(1.2, 0.0)); builder.set\_transmission(Transmission::Automatic); builder.set\_gps\_navigator(GpsNavigator::new()); } pub fn construct\_suv(builder: &mut impl Builder) { builder.set\_car\_type(CarType::Suv); builder.set\_seats(4); builder.set\_engine(Engine::new(2.5, 0.0)); builder.set\_transmission(Transmission::Manual); builder.set\_gps\_navigator(GpsNavigator::new()); } } #### **main.rs:** Client code #!\[allow(unused)\] mod builders; mod cars; mod components; mod director; use builders::{Builder, CarBuilder, CarManualBuilder}; use cars::{Car, Manual}; use director::Director; fn main() { let mut car\_builder = CarBuilder::default(); // Director gets the concrete builder object from the client // (application code). That's because application knows better which // builder to use to get a specific product. Director::construct\_sports\_car(&mut car\_builder); // The final product is often retrieved from a builder object, since // Director is not aware and not dependent on concrete builders and // products. let car: Car = car\_builder.build(); println!("Car built: {:?}\\n", car.car\_type()); let mut manual\_builder = CarManualBuilder::default(); // Director may know several building recipes. Director::construct\_city\_car(&mut manual\_builder); // The final car manual. let manual: Manual = manual\_builder.build(); println!("Car manual built:\\n{}", manual); } ### Output Car built: SportsCar Car manual built: Type of car: CityCar Count of seats: 2 Engine: volume - 1.2; mileage - 0 Transmission: Automatic GPS Navigator: Functional **Builder** en otros lenguajes ------------------------------ [![Builder en C#](https://refactoring.guru/images/patterns/icons/csharp.svg?id=da64592defc6e86d57c39c66e9de3e58)](https://refactoring.guru/es/design-patterns/builder/csharp/example "Builder en C#") [![Builder en C++](https://refactoring.guru/images/patterns/icons/cpp.svg?id=f7782ed8b8666246bfcc3f8fefc3b858)](https://refactoring.guru/es/design-patterns/builder/cpp/example "Builder en C++") [![Builder en Go](https://refactoring.guru/images/patterns/icons/go.svg?id=1a89927eb99b1ea3fde7701d97970aca)](https://refactoring.guru/es/design-patterns/builder/go/example "Builder en Go") [![Builder en Java](https://refactoring.guru/images/patterns/icons/java.svg?id=e6d87e2dca08c953fe3acd1275ed4f4e)](https://refactoring.guru/es/design-patterns/builder/java/example "Builder en Java") [![Builder en PHP](https://refactoring.guru/images/patterns/icons/php.svg?id=be1906eb26b71ec1d3b93720d6156618)](https://refactoring.guru/es/design-patterns/builder/php/example "Builder en PHP") [![Builder en Python](https://refactoring.guru/images/patterns/icons/python.svg?id=6d815d43c0f7050a1151b43e51569c9f)](https://refactoring.guru/es/design-patterns/builder/python/example "Builder en Python") [![Builder en Ruby](https://refactoring.guru/images/patterns/icons/ruby.svg?id=b065b718c914bf8e960ef731600be1eb)](https://refactoring.guru/es/design-patterns/builder/ruby/example "Builder en Ruby") [![Builder en Swift](https://refactoring.guru/images/patterns/icons/swift.svg?id=0b716c2d52ec3a48fbe91ac031070c1d)](https://refactoring.guru/es/design-patterns/builder/swift/example "Builder en Swift") [![Builder en TypeScript](https://refactoring.guru/images/patterns/icons/typescript.svg?id=2239d0f16cb703540c205dd8cb0c0cb7)](https://refactoring.guru/es/design-patterns/builder/typescript/example "Builder en TypeScript") --- # Clasificación de los patrones [There are patterns of patterns now! \ My friend's project: MetaPatterns.io](https://metapatterns.io/)  [](https://refactoring.guru/es/design-patterns/classification#checkout) [](https://refactoring.guru/es/design-patterns/classification#checkout) [](https://refactoring.guru/) / [Patrones de diseño](https://refactoring.guru/es/design-patterns) Clasificación de los patrones ============================= Los patrones de diseño varían en su complejidad, nivel de detalle y escala de aplicabilidad al sistema completo que se diseña. Me gusta la analogía de la construcción de carreteras: puedes hacer más segura una intersección instalando semáforos o construyendo un intercambiador completo de varios niveles con pasajes subterráneos para peatones. Los patrones más básicos y de más bajo nivel suelen llamarse _idioms_. Normalmente se aplican a un único lenguaje de programación. Los patrones más universales y de más alto nivel son los _patrones de arquitectura_. Los desarrolladores pueden implementar estos patrones prácticamente en cualquier lenguaje. Al contrario que otros patrones, pueden utilizarse para diseñar la arquitectura de una aplicación completa. Además, todos los patrones pueden clasificarse por su _propósito_. Este libro cubre tres grupos generales de patrones: * Los **patrones creacionales** proporcionan mecanismos de creación de objetos que incrementan la flexibilidad y la reutilización de código existente. * Los **patrones estructurales** explican cómo ensamblar objetos y clases en estructuras más grandes a la vez que se mantiene la flexibilidad y eficiencia de la estructura. * Los **patrones de comportamiento** se encargan de una comunicación efectiva y la asignación de responsabilidades entre objetos. --- # Abstract Factory en TypeScript / Patrones de diseño [There are patterns of patterns now! \ My friend's project: MetaPatterns.io](https://metapatterns.io/)  [](https://refactoring.guru/es/design-patterns/abstract-factory/typescript/example#checkout) [](https://refactoring.guru/es/design-patterns/abstract-factory/typescript/example#checkout) [](https://refactoring.guru/) / [Patrones de diseño](https://refactoring.guru/es/design-patterns) / [Abstract Factory](https://refactoring.guru/es/design-patterns/abstract-factory) / [TypeScript](https://refactoring.guru/es/design-patterns/typescript) ![Abstract Factory](https://refactoring.guru/images/patterns/cards/abstract-factory-mini-2x.png?id=22236aaa65ff52cbde1c713216d52c1f) **Abstract Factory** en TypeScript ================================== **Abstract Factory** es un patrón de diseño creacional que resuelve el problema de crear familias enteras de productos sin especificar sus clases concretas. El patrón Abstract Factory define una interfaz para crear todos los productos, pero deja la propia creación de productos para las clases de fábrica concretas. Cada tipo de fábrica se corresponde con cierta variedad de producto. El código cliente invoca los métodos de creación de un objeto de fábrica en lugar de crear los productos directamente con una llamada al constructor (operador `new`). Como una fábrica se corresponde con una única variante de producto, todos sus productos serán compatibles. El código cliente trabaja con fábricas y productos únicamente a través de sus interfaces abstractas. Esto permite al mismo código cliente trabajar con productos diferentes. Simplemente, creas una nueva clase fábrica concreta y la pasas al código cliente. > Si no sabes la diferencia entre los distintos patrones de fábrica y sus conceptos, lee nuestra [Comparación de fábricas](https://refactoring.guru/es/design-patterns/factory-comparison) > . [Aprende más sobre el patrón Abstract Factory](https://refactoring.guru/es/design-patterns/abstract-factory) Navegación  [Intro](https://refactoring.guru/es/design-patterns/abstract-factory/typescript/example#)  [Ejemplo conceptual](https://refactoring.guru/es/design-patterns/abstract-factory/typescript/example#example-0)  [index](https://refactoring.guru/es/design-patterns/abstract-factory/typescript/example#example-0--index-ts)  [Output](https://refactoring.guru/es/design-patterns/abstract-factory/typescript/example#example-0--Output-txt) **Complejidad:** **Popularidad:** **Ejemplos de uso:** El patrón Abstract Factory es muy común en el código TypeScript. Muchos _frameworks_ y bibliotecas lo utilizan para proporcionar una forma de extender y personalizar sus componentes estándar. **Identificación:** El patrón es fácil de reconocer por los métodos, que devuelven un objeto de fábrica. Después, la fábrica se utiliza para crear subcomponentes específicos. Ejemplo conceptual ------------------ Este ejemplo ilustra la estructura del patrón de diseño **Abstract Factory**, centrándose en responder las siguientes preguntas: * ¿De qué clases se compone? * ¿Qué papeles juegan esas clases? * ¿De qué forma se relacionan los elementos del patrón? #### **index.ts:** Ejemplo conceptual /\*\* \* The Abstract Factory interface declares a set of methods that return \* different abstract products. These products are called a family and are \* related by a high-level theme or concept. Products of one family are usually \* able to collaborate among themselves. A family of products may have several \* variants, but the products of one variant are incompatible with products of \* another. \*/ interface AbstractFactory { createProductA(): AbstractProductA; createProductB(): AbstractProductB; } /\*\* \* Concrete Factories produce a family of products that belong to a single \* variant. The factory guarantees that resulting products are compatible. Note \* that signatures of the Concrete Factory's methods return an abstract product, \* while inside the method a concrete product is instantiated. \*/ class ConcreteFactory1 implements AbstractFactory { public createProductA(): AbstractProductA { return new ConcreteProductA1(); } public createProductB(): AbstractProductB { return new ConcreteProductB1(); } } /\*\* \* Each Concrete Factory has a corresponding product variant. \*/ class ConcreteFactory2 implements AbstractFactory { public createProductA(): AbstractProductA { return new ConcreteProductA2(); } public createProductB(): AbstractProductB { return new ConcreteProductB2(); } } /\*\* \* Each distinct product of a product family should have a base interface. All \* variants of the product must implement this interface. \*/ interface AbstractProductA { usefulFunctionA(): string; } /\*\* \* These Concrete Products are created by corresponding Concrete Factories. \*/ class ConcreteProductA1 implements AbstractProductA { public usefulFunctionA(): string { return 'The result of the product A1.'; } } class ConcreteProductA2 implements AbstractProductA { public usefulFunctionA(): string { return 'The result of the product A2.'; } } /\*\* \* Here's the the base interface of another product. All products can interact \* with each other, but proper interaction is possible only between products of \* the same concrete variant. \*/ interface AbstractProductB { /\*\* \* Product B is able to do its own thing... \*/ usefulFunctionB(): string; /\*\* \* ...but it also can collaborate with the ProductA. \* \* The Abstract Factory makes sure that all products it creates are of the \* same variant and thus, compatible. \*/ anotherUsefulFunctionB(collaborator: AbstractProductA): string; } /\*\* \* These Concrete Products are created by corresponding Concrete Factories. \*/ class ConcreteProductB1 implements AbstractProductB { public usefulFunctionB(): string { return 'The result of the product B1.'; } /\*\* \* The variant, Product B1, is only able to work correctly with the variant, \* Product A1. Nevertheless, it accepts any instance of AbstractProductA as \* an argument. \*/ public anotherUsefulFunctionB(collaborator: AbstractProductA): string { const result = collaborator.usefulFunctionA(); return \`The result of the B1 collaborating with the (${result})\`; } } class ConcreteProductB2 implements AbstractProductB { public usefulFunctionB(): string { return 'The result of the product B2.'; } /\*\* \* The variant, Product B2, is only able to work correctly with the variant, \* Product A2. Nevertheless, it accepts any instance of AbstractProductA as \* an argument. \*/ public anotherUsefulFunctionB(collaborator: AbstractProductA): string { const result = collaborator.usefulFunctionA(); return \`The result of the B2 collaborating with the (${result})\`; } } /\*\* \* The client code works with factories and products only through abstract \* types: AbstractFactory and AbstractProduct. This lets you pass any factory or \* product subclass to the client code without breaking it. \*/ function clientCode(factory: AbstractFactory) { const productA = factory.createProductA(); const productB = factory.createProductB(); console.log(productB.usefulFunctionB()); console.log(productB.anotherUsefulFunctionB(productA)); } /\*\* \* The client code can work with any concrete factory class. \*/ console.log('Client: Testing client code with the first factory type...'); clientCode(new ConcreteFactory1()); console.log(''); console.log('Client: Testing the same client code with the second factory type...'); clientCode(new ConcreteFactory2()); #### **Output.txt:** Resultado de la ejecución Client: Testing client code with the first factory type... The result of the product B1. The result of the B1 collaborating with the (The result of the product A1.) Client: Testing the same client code with the second factory type... The result of the product B2. The result of the B2 collaborating with the (The result of the product A2.) **Abstract Factory** en otros lenguajes --------------------------------------- [![Abstract Factory en C#](https://refactoring.guru/images/patterns/icons/csharp.svg?id=da64592defc6e86d57c39c66e9de3e58)](https://refactoring.guru/es/design-patterns/abstract-factory/csharp/example "Abstract Factory en C#") [![Abstract Factory en C++](https://refactoring.guru/images/patterns/icons/cpp.svg?id=f7782ed8b8666246bfcc3f8fefc3b858)](https://refactoring.guru/es/design-patterns/abstract-factory/cpp/example "Abstract Factory en C++") [![Abstract Factory en Go](https://refactoring.guru/images/patterns/icons/go.svg?id=1a89927eb99b1ea3fde7701d97970aca)](https://refactoring.guru/es/design-patterns/abstract-factory/go/example "Abstract Factory en Go") [![Abstract Factory en Java](https://refactoring.guru/images/patterns/icons/java.svg?id=e6d87e2dca08c953fe3acd1275ed4f4e)](https://refactoring.guru/es/design-patterns/abstract-factory/java/example "Abstract Factory en Java") [![Abstract Factory en PHP](https://refactoring.guru/images/patterns/icons/php.svg?id=be1906eb26b71ec1d3b93720d6156618)](https://refactoring.guru/es/design-patterns/abstract-factory/php/example "Abstract Factory en PHP") [![Abstract Factory en Python](https://refactoring.guru/images/patterns/icons/python.svg?id=6d815d43c0f7050a1151b43e51569c9f)](https://refactoring.guru/es/design-patterns/abstract-factory/python/example "Abstract Factory en Python") [![Abstract Factory en Ruby](https://refactoring.guru/images/patterns/icons/ruby.svg?id=b065b718c914bf8e960ef731600be1eb)](https://refactoring.guru/es/design-patterns/abstract-factory/ruby/example "Abstract Factory en Ruby") [![Abstract Factory en Rust](https://refactoring.guru/images/patterns/icons/rust.svg?id=1f5698a4b5ae23fe79413511747e4a87)](https://refactoring.guru/es/design-patterns/abstract-factory/rust/example "Abstract Factory en Rust") [![Abstract Factory en Swift](https://refactoring.guru/images/patterns/icons/swift.svg?id=0b716c2d52ec3a48fbe91ac031070c1d)](https://refactoring.guru/es/design-patterns/abstract-factory/swift/example "Abstract Factory en Swift") --- # Chain of Responsibility en Python / Patrones de diseño [There are patterns of patterns now! \ My friend's project: MetaPatterns.io](https://metapatterns.io/)  [](https://refactoring.guru/es/design-patterns/chain-of-responsibility/python/example#checkout) [](https://refactoring.guru/es/design-patterns/chain-of-responsibility/python/example#checkout) [](https://refactoring.guru/) / [Patrones de diseño](https://refactoring.guru/es/design-patterns) / [Chain of Responsibility](https://refactoring.guru/es/design-patterns/chain-of-responsibility) / [Python](https://refactoring.guru/es/design-patterns/python) ![Chain of Responsibility](https://refactoring.guru/images/patterns/cards/chain-of-responsibility-mini-2x.png?id=8c81f7069e51259b2443801b91135f7f) **Chain of Responsibility** en Python ===================================== **Chain of Responsibility** es un patrón de diseño de comportamiento que permite pasar solicitudes a lo largo de la cadena de manejadores potenciales hasta que uno de ellos gestiona la solicitud. El patrón permite que varios objetos gestionen la solicitud sin acoplar la clase emisora a las clases concretas de los receptores. La cadena puede componerse dinámicamente durante el tiempo de ejecución con cualquier manejador que siga una interfaz manejadora estándar. [Aprende más sobre el patrón Chain of Responsibility](https://refactoring.guru/es/design-patterns/chain-of-responsibility) Navegación  [Intro](https://refactoring.guru/es/design-patterns/chain-of-responsibility/python/example#)  [Ejemplo conceptual](https://refactoring.guru/es/design-patterns/chain-of-responsibility/python/example#example-0)  [main](https://refactoring.guru/es/design-patterns/chain-of-responsibility/python/example#example-0--main-py)  [Output](https://refactoring.guru/es/design-patterns/chain-of-responsibility/python/example#example-0--Output-txt) **Complejidad:** **Popularidad:** **Ejemplos de uso:** El patrón Chain of Responsibility no es un invitado habitual en el programa Python, ya que tan solo es relevante cuando el código opera con cadenas de objetos. **Identificación:** El patrón es reconocible porque los métodos de comportamiento de un grupo de objetos invocan indirectamente los mismos métodos en otros objetos, mientras que todos los objetos siguen la interfaz común. Ejemplo conceptual ------------------ Este ejemplo ilustra la estructura del patrón de diseño **Chain of Responsibility**. Se centra en responder las siguientes preguntas: * ¿De qué clases se compone? * ¿Qué papeles juegan esas clases? * ¿De qué forma se relacionan los elementos del patrón? #### **main.py:** Ejemplo conceptual from \_\_future\_\_ import annotations from abc import ABC, abstractmethod from typing import Any, Optional class Handler(ABC): """ The Handler interface declares a method for building the chain of handlers. It also declares a method for executing a request. """ @abstractmethod def set\_next(self, handler: Handler) -> Handler: pass @abstractmethod def handle(self, request) -> Optional\[str\]: pass class AbstractHandler(Handler): """ The default chaining behavior can be implemented inside a base handler class. """ \_next\_handler: Handler = None def set\_next(self, handler: Handler) -> Handler: self.\_next\_handler = handler # Returning a handler from here will let us link handlers in a # convenient way like this: # monkey.set\_next(squirrel).set\_next(dog) return handler @abstractmethod def handle(self, request: Any) -> str: if self.\_next\_handler: return self.\_next\_handler.handle(request) return None """ All Concrete Handlers either handle a request or pass it to the next handler in the chain. """ class MonkeyHandler(AbstractHandler): def handle(self, request: Any) -> str: if request == "Banana": return f"Monkey: I'll eat the {request}" else: return super().handle(request) class SquirrelHandler(AbstractHandler): def handle(self, request: Any) -> str: if request == "Nut": return f"Squirrel: I'll eat the {request}" else: return super().handle(request) class DogHandler(AbstractHandler): def handle(self, request: Any) -> str: if request == "MeatBall": return f"Dog: I'll eat the {request}" else: return super().handle(request) def client\_code(handler: Handler) -> None: """ The client code is usually suited to work with a single handler. In most cases, it is not even aware that the handler is part of a chain. """ for food in \["Nut", "Banana", "Cup of coffee"\]: print(f"\\nClient: Who wants a {food}?") result = handler.handle(food) if result: print(f" {result}", end="") else: print(f" {food} was left untouched.", end="") if \_\_name\_\_ == "\_\_main\_\_": monkey = MonkeyHandler() squirrel = SquirrelHandler() dog = DogHandler() monkey.set\_next(squirrel).set\_next(dog) # The client should be able to send a request to any handler, not just the # first one in the chain. print("Chain: Monkey > Squirrel > Dog") client\_code(monkey) print("\\n") print("Subchain: Squirrel > Dog") client\_code(squirrel) #### **Output.txt:** Resultado de la ejecución Chain: Monkey > Squirrel > Dog Client: Who wants a Nut? Squirrel: I'll eat the Nut Client: Who wants a Banana? Monkey: I'll eat the Banana Client: Who wants a Cup of coffee? Cup of coffee was left untouched. Subchain: Squirrel > Dog Client: Who wants a Nut? Squirrel: I'll eat the Nut Client: Who wants a Banana? Banana was left untouched. Client: Who wants a Cup of coffee? Cup of coffee was left untouched. **Chain of Responsibility** en otros lenguajes ---------------------------------------------- [![Chain of Responsibility en C#](https://refactoring.guru/images/patterns/icons/csharp.svg?id=da64592defc6e86d57c39c66e9de3e58)](https://refactoring.guru/es/design-patterns/chain-of-responsibility/csharp/example "Chain of Responsibility en C#") [![Chain of Responsibility en C++](https://refactoring.guru/images/patterns/icons/cpp.svg?id=f7782ed8b8666246bfcc3f8fefc3b858)](https://refactoring.guru/es/design-patterns/chain-of-responsibility/cpp/example "Chain of Responsibility en C++") [![Chain of Responsibility en Go](https://refactoring.guru/images/patterns/icons/go.svg?id=1a89927eb99b1ea3fde7701d97970aca)](https://refactoring.guru/es/design-patterns/chain-of-responsibility/go/example "Chain of Responsibility en Go") [![Chain of Responsibility en Java](https://refactoring.guru/images/patterns/icons/java.svg?id=e6d87e2dca08c953fe3acd1275ed4f4e)](https://refactoring.guru/es/design-patterns/chain-of-responsibility/java/example "Chain of Responsibility en Java") [![Chain of Responsibility en PHP](https://refactoring.guru/images/patterns/icons/php.svg?id=be1906eb26b71ec1d3b93720d6156618)](https://refactoring.guru/es/design-patterns/chain-of-responsibility/php/example "Chain of Responsibility en PHP") [![Chain of Responsibility en Ruby](https://refactoring.guru/images/patterns/icons/ruby.svg?id=b065b718c914bf8e960ef731600be1eb)](https://refactoring.guru/es/design-patterns/chain-of-responsibility/ruby/example "Chain of Responsibility en Ruby") [![Chain of Responsibility en Rust](https://refactoring.guru/images/patterns/icons/rust.svg?id=1f5698a4b5ae23fe79413511747e4a87)](https://refactoring.guru/es/design-patterns/chain-of-responsibility/rust/example "Chain of Responsibility en Rust") [![Chain of Responsibility en Swift](https://refactoring.guru/images/patterns/icons/swift.svg?id=0b716c2d52ec3a48fbe91ac031070c1d)](https://refactoring.guru/es/design-patterns/chain-of-responsibility/swift/example "Chain of Responsibility en Swift") [![Chain of Responsibility en TypeScript](https://refactoring.guru/images/patterns/icons/typescript.svg?id=2239d0f16cb703540c205dd8cb0c0cb7)](https://refactoring.guru/es/design-patterns/chain-of-responsibility/typescript/example "Chain of Responsibility en TypeScript") --- # Command en C++ / Patrones de diseño [There are patterns of patterns now! \ My friend's project: MetaPatterns.io](https://metapatterns.io/)  [](https://refactoring.guru/es/design-patterns/command/cpp/example#checkout) [](https://refactoring.guru/es/design-patterns/command/cpp/example#checkout) [](https://refactoring.guru/) / [Patrones de diseño](https://refactoring.guru/es/design-patterns) / [Command](https://refactoring.guru/es/design-patterns/command) / [C++](https://refactoring.guru/es/design-patterns/cpp) ![Command](https://refactoring.guru/images/patterns/cards/command-mini-2x.png?id=e5f6332e057f6d352a209da963a8fc54) **Command** en C++ ================== **Command** es un patrón de diseño de comportamiento que convierte solicitudes u operaciones simples en objetos. La conversión permite la ejecución diferida de comandos, el almacenamiento del historial de comandos, etc. [Aprende más sobre el patrón Command](https://refactoring.guru/es/design-patterns/command) Navegación  [Intro](https://refactoring.guru/es/design-patterns/command/cpp/example#)  [Ejemplo conceptual](https://refactoring.guru/es/design-patterns/command/cpp/example#example-0)  [main](https://refactoring.guru/es/design-patterns/command/cpp/example#example-0--main-cc)  [Output](https://refactoring.guru/es/design-patterns/command/cpp/example#example-0--Output-txt) **Complejidad:** **Popularidad:** **Ejemplos de uso:** El patrón Command es muy común en el código C++. La mayoría de las veces se utiliza como alternativa a las retrollamadas (_callbacks_) para parametrizar elementos UI con acciones. También se utiliza para poner tareas en cola, realizar el seguimiento del historial de operaciones, etc. **Identificación:** El patrón Command es reconocible por los métodos de comportamiento en un tipo de clase abstracta/interfaz (emisora) que invoca un método en una implementación de un tipo de clase abstracta/interfaz diferente (receptora) que la implementación del comando ha implementado durante su creación. Las clases de comando se limitan normalmente a acciones específicas. Ejemplo conceptual ------------------ Este ejemplo ilustra la estructura del patrón de diseño **Command**. Se centra en responder las siguientes preguntas: * ¿De qué clases se compone? * ¿Qué papeles juegan esas clases? * ¿De qué forma se relacionan los elementos del patrón? #### **main.cc:** Ejemplo conceptual /\*\* \* The Command interface declares a method for executing a command. \*/ class Command { public: virtual ~Command() { } virtual void Execute() const = 0; }; /\*\* \* Some commands can implement simple operations on their own. \*/ class SimpleCommand : public Command { private: std::string pay\_load\_; public: explicit SimpleCommand(std::string pay\_load) : pay\_load\_(pay\_load) { } void Execute() const override { std::cout << "SimpleCommand: See, I can do simple things like printing (" << this->pay\_load\_ << ")\\n"; } }; /\*\* \* The Receiver classes contain some important business logic. They know how to \* perform all kinds of operations, associated with carrying out a request. In \* fact, any class may serve as a Receiver. \*/ class Receiver { public: void DoSomething(const std::string &a) { std::cout << "Receiver: Working on (" << a << ".)\\n"; } void DoSomethingElse(const std::string &b) { std::cout << "Receiver: Also working on (" << b << ".)\\n"; } }; /\*\* \* However, some commands can delegate more complex operations to other objects, \* called "receivers." \*/ class ComplexCommand : public Command { /\*\* \* @var Receiver \*/ private: Receiver \*receiver\_; /\*\* \* Context data, required for launching the receiver's methods. \*/ std::string a\_; std::string b\_; /\*\* \* Complex commands can accept one or several receiver objects along with any \* context data via the constructor. \*/ public: ComplexCommand(Receiver \*receiver, std::string a, std::string b) : receiver\_(receiver), a\_(a), b\_(b) { } /\*\* \* Commands can delegate to any methods of a receiver. \*/ void Execute() const override { std::cout << "ComplexCommand: Complex stuff should be done by a receiver object.\\n"; this->receiver\_->DoSomething(this->a\_); this->receiver\_->DoSomethingElse(this->b\_); } }; /\*\* \* The Invoker is associated with one or several commands. It sends a request to \* the command. \*/ class Invoker { /\*\* \* @var Command \*/ private: Command \*on\_start\_; /\*\* \* @var Command \*/ Command \*on\_finish\_; /\*\* \* Initialize commands. \*/ public: ~Invoker() { delete on\_start\_; delete on\_finish\_; } void SetOnStart(Command \*command) { this->on\_start\_ = command; } void SetOnFinish(Command \*command) { this->on\_finish\_ = command; } /\*\* \* The Invoker does not depend on concrete command or receiver classes. The \* Invoker passes a request to a receiver indirectly, by executing a command. \*/ void DoSomethingImportant() { std::cout << "Invoker: Does anybody want something done before I begin?\\n"; if (this->on\_start\_) { this->on\_start\_->Execute(); } std::cout << "Invoker: ...doing something really important...\\n"; std::cout << "Invoker: Does anybody want something done after I finish?\\n"; if (this->on\_finish\_) { this->on\_finish\_->Execute(); } } }; /\*\* \* The client code can parameterize an invoker with any commands. \*/ int main() { Invoker \*invoker = new Invoker; invoker->SetOnStart(new SimpleCommand("Say Hi!")); Receiver \*receiver = new Receiver; invoker->SetOnFinish(new ComplexCommand(receiver, "Send email", "Save report")); invoker->DoSomethingImportant(); delete invoker; delete receiver; return 0; } #### **Output.txt:** Resultado de la ejecución Invoker: Does anybody want something done before I begin? SimpleCommand: See, I can do simple things like printing (Say Hi!) Invoker: ...doing something really important... Invoker: Does anybody want something done after I finish? ComplexCommand: Complex stuff should be done by a receiver object. Receiver: Working on (Send email.) Receiver: Also working on (Save report.) **Command** en otros lenguajes ------------------------------ [![Command en C#](https://refactoring.guru/images/patterns/icons/csharp.svg?id=da64592defc6e86d57c39c66e9de3e58)](https://refactoring.guru/es/design-patterns/command/csharp/example "Command en C#") [![Command en Go](https://refactoring.guru/images/patterns/icons/go.svg?id=1a89927eb99b1ea3fde7701d97970aca)](https://refactoring.guru/es/design-patterns/command/go/example "Command en Go") [![Command en Java](https://refactoring.guru/images/patterns/icons/java.svg?id=e6d87e2dca08c953fe3acd1275ed4f4e)](https://refactoring.guru/es/design-patterns/command/java/example "Command en Java") [![Command en PHP](https://refactoring.guru/images/patterns/icons/php.svg?id=be1906eb26b71ec1d3b93720d6156618)](https://refactoring.guru/es/design-patterns/command/php/example "Command en PHP") [![Command en Python](https://refactoring.guru/images/patterns/icons/python.svg?id=6d815d43c0f7050a1151b43e51569c9f)](https://refactoring.guru/es/design-patterns/command/python/example "Command en Python") [![Command en Ruby](https://refactoring.guru/images/patterns/icons/ruby.svg?id=b065b718c914bf8e960ef731600be1eb)](https://refactoring.guru/es/design-patterns/command/ruby/example "Command en Ruby") [![Command en Rust](https://refactoring.guru/images/patterns/icons/rust.svg?id=1f5698a4b5ae23fe79413511747e4a87)](https://refactoring.guru/es/design-patterns/command/rust/example "Command en Rust") [![Command en Swift](https://refactoring.guru/images/patterns/icons/swift.svg?id=0b716c2d52ec3a48fbe91ac031070c1d)](https://refactoring.guru/es/design-patterns/command/swift/example "Command en Swift") [![Command en TypeScript](https://refactoring.guru/images/patterns/icons/typescript.svg?id=2239d0f16cb703540c205dd8cb0c0cb7)](https://refactoring.guru/es/design-patterns/command/typescript/example "Command en TypeScript") --- # Builder en Java / Patrones de diseño [There are patterns of patterns now! \ My friend's project: MetaPatterns.io](https://metapatterns.io/)  [](https://refactoring.guru/es/design-patterns/builder/java/example#checkout) [](https://refactoring.guru/es/design-patterns/builder/java/example#checkout) [](https://refactoring.guru/) / [Patrones de diseño](https://refactoring.guru/es/design-patterns) / [Builder](https://refactoring.guru/es/design-patterns/builder) / [Java](https://refactoring.guru/es/design-patterns/java) ![Builder](https://refactoring.guru/images/patterns/cards/builder-mini-2x.png?id=de6d0938678b86903a1426dddfdd13bf) **Builder** en Java =================== **Builder** es un patrón de diseño creacional que permite construir objetos complejos paso a paso. Al contrario que otros patrones creacionales, Builder no necesita que los productos tengan una interfaz común. Esto hace posible crear distintos productos utilizando el mismo proceso de construcción. [Aprende más sobre el patrón Builder](https://refactoring.guru/es/design-patterns/builder) Navegación  [Intro](https://refactoring.guru/es/design-patterns/builder/java/example#)  [Fabricación de autos paso a paso](https://refactoring.guru/es/design-patterns/builder/java/example#example-0)  builders   [Builder](https://refactoring.guru/es/design-patterns/builder/java/example#example-0--builders-Builder-java)   [Car­Builder](https://refactoring.guru/es/design-patterns/builder/java/example#example-0--builders-CarBuilder-java)   [Car­Manual­Builder](https://refactoring.guru/es/design-patterns/builder/java/example#example-0--builders-CarManualBuilder-java)  cars   [Car](https://refactoring.guru/es/design-patterns/builder/java/example#example-0--cars-Car-java)   [Manual](https://refactoring.guru/es/design-patterns/builder/java/example#example-0--cars-Manual-java)   [Car­Type](https://refactoring.guru/es/design-patterns/builder/java/example#example-0--cars-CarType-java)  components   [Engine](https://refactoring.guru/es/design-patterns/builder/java/example#example-0--components-Engine-java)   [GPSNavigator](https://refactoring.guru/es/design-patterns/builder/java/example#example-0--components-GPSNavigator-java)   [Transmission](https://refactoring.guru/es/design-patterns/builder/java/example#example-0--components-Transmission-java)   [Trip­Computer](https://refactoring.guru/es/design-patterns/builder/java/example#example-0--components-TripComputer-java)  director   [Director](https://refactoring.guru/es/design-patterns/builder/java/example#example-0--director-Director-java)  [Demo](https://refactoring.guru/es/design-patterns/builder/java/example#example-0--Demo-java)  [Output­Demo](https://refactoring.guru/es/design-patterns/builder/java/example#example-0--OutputDemo-txt) **Complejidad:** **Popularidad:** **Ejemplos de uso:** El patrón Builder es muy conocido en el mundo de Java. Resulta especialmente útil cuando debes crear un objeto con muchas opciones posibles de configuración. El uso del patrón Builder está muy extendido en las principales bibliotecas Java: * [`java.lang.StringBuilder#append()`](http://docs.oracle.com/javase/8/docs/api/java/lang/StringBuilder.html#append-boolean-) (`unsynchronized`) * [`java.lang.StringBuffer#append()`](http://docs.oracle.com/javase/8/docs/api/java/lang/StringBuffer.html#append-boolean-) (`synchronized`) * [`java.nio.ByteBuffer#put()`](http://docs.oracle.com/javase/8/docs/api/java/nio/ByteBuffer.html#put-byte-) (también en [`CharBuffer`](http://docs.oracle.com/javase/8/docs/api/java/nio/CharBuffer.html#put-char-) , [`ShortBuffer`](http://docs.oracle.com/javase/8/docs/api/java/nio/ShortBuffer.html#put-short-) , [`IntBuffer`](http://docs.oracle.com/javase/8/docs/api/java/nio/IntBuffer.html#put-int-) , [`LongBuffer`](http://docs.oracle.com/javase/8/docs/api/java/nio/LongBuffer.html#put-long-) , [`FloatBuffer`](http://docs.oracle.com/javase/8/docs/api/java/nio/FloatBuffer.html#put-float-) y [`DoubleBuffer`](http://docs.oracle.com/javase/8/docs/api/java/nio/DoubleBuffer.html#put-double-) ) * [`javax.swing.GroupLayout.Group#addComponent()`](http://docs.oracle.com/javase/8/docs/api/javax/swing/GroupLayout.Group.html#addComponent-java.awt.Component-) * Todas las implementaciones [`java.lang.Appendable`](http://docs.oracle.com/javase/8/docs/api/java/lang/Appendable.html) **Identificación:** El patrón Builder se puede reconocer por una clase, que tiene un único método de creación y varios métodos para configurar el objeto resultante. A menudo, los métodos del Builder soportan el encadenamiento (por ejemplo, `algúnBuilder->establecerValorA(1)->establecerValorB(2)->crear()`). Fabricación de autos paso a paso -------------------------------- En este ejemplo, el patrón Builder permite la construcción paso a paso de distintos modelos de auto. El ejemplo muestra también cómo el patrón Builder crea productos de distinto tipo (manual del auto) utilizando los mismos pasos de construcción. El Director controla el orden de construcción. Sabe qué pasos de construcción invocar para producir éste o aquel modelo de auto. Trabaja con los constructores únicamente a través de su interfaz común. Esto permite pasar distintos tipos de constructores al director. El resultado final se extrae del objeto constructor porque el director no puede saber el tipo de producto resultante. Sólo el objeto del constructor sabe exactamente lo que construye. ### **builders** #### **builders/Builder.java:** Interfaz común del constructor package refactoring\_guru.builder.example.builders; import refactoring\_guru.builder.example.cars.CarType; import refactoring\_guru.builder.example.components.Engine; import refactoring\_guru.builder.example.components.GPSNavigator; import refactoring\_guru.builder.example.components.Transmission; import refactoring\_guru.builder.example.components.TripComputer; /\*\* \* Builder interface defines all possible ways to configure a product. \*/ public interface Builder { void setCarType(CarType type); void setSeats(int seats); void setEngine(Engine engine); void setTransmission(Transmission transmission); void setTripComputer(TripComputer tripComputer); void setGPSNavigator(GPSNavigator gpsNavigator); } #### **builders/CarBuilder.java:** Constructor de auto package refactoring\_guru.builder.example.builders; import refactoring\_guru.builder.example.cars.Car; import refactoring\_guru.builder.example.cars.CarType; import refactoring\_guru.builder.example.components.Engine; import refactoring\_guru.builder.example.components.GPSNavigator; import refactoring\_guru.builder.example.components.Transmission; import refactoring\_guru.builder.example.components.TripComputer; /\*\* \* Concrete builders implement steps defined in the common interface. \*/ public class CarBuilder implements Builder { private CarType type; private int seats; private Engine engine; private Transmission transmission; private TripComputer tripComputer; private GPSNavigator gpsNavigator; public void setCarType(CarType type) { this.type = type; } @Override public void setSeats(int seats) { this.seats = seats; } @Override public void setEngine(Engine engine) { this.engine = engine; } @Override public void setTransmission(Transmission transmission) { this.transmission = transmission; } @Override public void setTripComputer(TripComputer tripComputer) { this.tripComputer = tripComputer; } @Override public void setGPSNavigator(GPSNavigator gpsNavigator) { this.gpsNavigator = gpsNavigator; } public Car getResult() { return new Car(type, seats, engine, transmission, tripComputer, gpsNavigator); } } #### **builders/CarManualBuilder.java:** Constructor de manual de auto package refactoring\_guru.builder.example.builders; import refactoring\_guru.builder.example.cars.Manual; import refactoring\_guru.builder.example.cars.CarType; import refactoring\_guru.builder.example.components.Engine; import refactoring\_guru.builder.example.components.GPSNavigator; import refactoring\_guru.builder.example.components.Transmission; import refactoring\_guru.builder.example.components.TripComputer; /\*\* \* Unlike other creational patterns, Builder can construct unrelated products, \* which don't have the common interface. \* \* In this case we build a user manual for a car, using the same steps as we \* built a car. This allows to produce manuals for specific car models, \* configured with different features. \*/ public class CarManualBuilder implements Builder{ private CarType type; private int seats; private Engine engine; private Transmission transmission; private TripComputer tripComputer; private GPSNavigator gpsNavigator; @Override public void setCarType(CarType type) { this.type = type; } @Override public void setSeats(int seats) { this.seats = seats; } @Override public void setEngine(Engine engine) { this.engine = engine; } @Override public void setTransmission(Transmission transmission) { this.transmission = transmission; } @Override public void setTripComputer(TripComputer tripComputer) { this.tripComputer = tripComputer; } @Override public void setGPSNavigator(GPSNavigator gpsNavigator) { this.gpsNavigator = gpsNavigator; } public Manual getResult() { return new Manual(type, seats, engine, transmission, tripComputer, gpsNavigator); } } ### **cars** #### **cars/Car.java:** Producto auto package refactoring\_guru.builder.example.cars; import refactoring\_guru.builder.example.components.Engine; import refactoring\_guru.builder.example.components.GPSNavigator; import refactoring\_guru.builder.example.components.Transmission; import refactoring\_guru.builder.example.components.TripComputer; /\*\* \* Car is a product class. \*/ public class Car { private final CarType carType; private final int seats; private final Engine engine; private final Transmission transmission; private final TripComputer tripComputer; private final GPSNavigator gpsNavigator; private double fuel = 0; public Car(CarType carType, int seats, Engine engine, Transmission transmission, TripComputer tripComputer, GPSNavigator gpsNavigator) { this.carType = carType; this.seats = seats; this.engine = engine; this.transmission = transmission; this.tripComputer = tripComputer; if (this.tripComputer != null) { this.tripComputer.setCar(this); } this.gpsNavigator = gpsNavigator; } public CarType getCarType() { return carType; } public double getFuel() { return fuel; } public void setFuel(double fuel) { this.fuel = fuel; } public int getSeats() { return seats; } public Engine getEngine() { return engine; } public Transmission getTransmission() { return transmission; } public TripComputer getTripComputer() { return tripComputer; } public GPSNavigator getGpsNavigator() { return gpsNavigator; } } #### **cars/Manual.java:** Producto manual package refactoring\_guru.builder.example.cars; import refactoring\_guru.builder.example.components.Engine; import refactoring\_guru.builder.example.components.GPSNavigator; import refactoring\_guru.builder.example.components.Transmission; import refactoring\_guru.builder.example.components.TripComputer; /\*\* \* Car manual is another product. Note that it does not have the same ancestor \* as a Car. They are not related. \*/ public class Manual { private final CarType carType; private final int seats; private final Engine engine; private final Transmission transmission; private final TripComputer tripComputer; private final GPSNavigator gpsNavigator; public Manual(CarType carType, int seats, Engine engine, Transmission transmission, TripComputer tripComputer, GPSNavigator gpsNavigator) { this.carType = carType; this.seats = seats; this.engine = engine; this.transmission = transmission; this.tripComputer = tripComputer; this.gpsNavigator = gpsNavigator; } public String print() { String info = ""; info += "Type of car: " + carType + "\\n"; info += "Count of seats: " + seats + "\\n"; info += "Engine: volume - " + engine.getVolume() + "; mileage - " + engine.getMileage() + "\\n"; info += "Transmission: " + transmission + "\\n"; if (this.tripComputer != null) { info += "Trip Computer: Functional" + "\\n"; } else { info += "Trip Computer: N/A" + "\\n"; } if (this.gpsNavigator != null) { info += "GPS Navigator: Functional" + "\\n"; } else { info += "GPS Navigator: N/A" + "\\n"; } return info; } } #### **cars/CarType.java** package refactoring\_guru.builder.example.cars; public enum CarType { CITY\_CAR, SPORTS\_CAR, SUV } ### **components** #### **components/Engine.java:** Característica de producto 1 package refactoring\_guru.builder.example.components; /\*\* \* Just another feature of a car. \*/ public class Engine { private final double volume; private double mileage; private boolean started; public Engine(double volume, double mileage) { this.volume = volume; this.mileage = mileage; } public void on() { started = true; } public void off() { started = false; } public boolean isStarted() { return started; } public void go(double mileage) { if (started) { this.mileage += mileage; } else { System.err.println("Cannot go(), you must start engine first!"); } } public double getVolume() { return volume; } public double getMileage() { return mileage; } } #### **components/GPSNavigator.java:** Característica de producto 2 package refactoring\_guru.builder.example.components; /\*\* \* Just another feature of a car. \*/ public class GPSNavigator { private String route; public GPSNavigator() { this.route = "221b, Baker Street, London to Scotland Yard, 8-10 Broadway, London"; } public GPSNavigator(String manualRoute) { this.route = manualRoute; } public String getRoute() { return route; } } #### **components/Transmission.java:** Característica de producto 3 package refactoring\_guru.builder.example.components; /\*\* \* Just another feature of a car. \*/ public enum Transmission { SINGLE\_SPEED, MANUAL, AUTOMATIC, SEMI\_AUTOMATIC } #### **components/TripComputer.java:** Característica de producto 4 package refactoring\_guru.builder.example.components; import refactoring\_guru.builder.example.cars.Car; /\*\* \* Just another feature of a car. \*/ public class TripComputer { private Car car; public void setCar(Car car) { this.car = car; } public void showFuelLevel() { System.out.println("Fuel level: " + car.getFuel()); } public void showStatus() { if (this.car.getEngine().isStarted()) { System.out.println("Car is started"); } else { System.out.println("Car isn't started"); } } } ### **director** #### **director/Director.java:** El director controla los constructores package refactoring\_guru.builder.example.director; import refactoring\_guru.builder.example.builders.Builder; import refactoring\_guru.builder.example.cars.CarType; import refactoring\_guru.builder.example.components.Engine; import refactoring\_guru.builder.example.components.GPSNavigator; import refactoring\_guru.builder.example.components.Transmission; import refactoring\_guru.builder.example.components.TripComputer; /\*\* \* Director defines the order of building steps. It works with a builder object \* through common Builder interface. Therefore it may not know what product is \* being built. \*/ public class Director { public void constructSportsCar(Builder builder) { builder.setCarType(CarType.SPORTS\_CAR); builder.setSeats(2); builder.setEngine(new Engine(3.0, 0)); builder.setTransmission(Transmission.SEMI\_AUTOMATIC); builder.setTripComputer(new TripComputer()); builder.setGPSNavigator(new GPSNavigator()); } public void constructCityCar(Builder builder) { builder.setCarType(CarType.CITY\_CAR); builder.setSeats(2); builder.setEngine(new Engine(1.2, 0)); builder.setTransmission(Transmission.AUTOMATIC); builder.setTripComputer(new TripComputer()); builder.setGPSNavigator(new GPSNavigator()); } public void constructSUV(Builder builder) { builder.setCarType(CarType.SUV); builder.setSeats(4); builder.setEngine(new Engine(2.5, 0)); builder.setTransmission(Transmission.MANUAL); builder.setGPSNavigator(new GPSNavigator()); } } #### **Demo.java:** Código cliente package refactoring\_guru.builder.example; import refactoring\_guru.builder.example.builders.CarBuilder; import refactoring\_guru.builder.example.builders.CarManualBuilder; import refactoring\_guru.builder.example.cars.Car; import refactoring\_guru.builder.example.cars.Manual; import refactoring\_guru.builder.example.director.Director; /\*\* \* Demo class. Everything comes together here. \*/ public class Demo { public static void main(String\[\] args) { Director director = new Director(); // Director gets the concrete builder object from the client // (application code). That's because application knows better which // builder to use to get a specific product. CarBuilder builder = new CarBuilder(); director.constructSportsCar(builder); // The final product is often retrieved from a builder object, since // Director is not aware and not dependent on concrete builders and // products. Car car = builder.getResult(); System.out.println("Car built:\\n" + car.getCarType()); CarManualBuilder manualBuilder = new CarManualBuilder(); // Director may know several building recipes. director.constructSportsCar(manualBuilder); Manual carManual = manualBuilder.getResult(); System.out.println("\\nCar manual built:\\n" + carManual.print()); } } #### **OutputDemo.txt:** Resultados de la ejecución Car built: SPORTS\_CAR Car manual built: Type of car: SPORTS\_CAR Count of seats: 2 Engine: volume - 3.0; mileage - 0.0 Transmission: SEMI\_AUTOMATIC Trip Computer: Functional GPS Navigator: Functional **Builder** en otros lenguajes ------------------------------ [![Builder en C#](https://refactoring.guru/images/patterns/icons/csharp.svg?id=da64592defc6e86d57c39c66e9de3e58)](https://refactoring.guru/es/design-patterns/builder/csharp/example "Builder en C#") [![Builder en C++](https://refactoring.guru/images/patterns/icons/cpp.svg?id=f7782ed8b8666246bfcc3f8fefc3b858)](https://refactoring.guru/es/design-patterns/builder/cpp/example "Builder en C++") [![Builder en Go](https://refactoring.guru/images/patterns/icons/go.svg?id=1a89927eb99b1ea3fde7701d97970aca)](https://refactoring.guru/es/design-patterns/builder/go/example "Builder en Go") [![Builder en PHP](https://refactoring.guru/images/patterns/icons/php.svg?id=be1906eb26b71ec1d3b93720d6156618)](https://refactoring.guru/es/design-patterns/builder/php/example "Builder en PHP") [![Builder en Python](https://refactoring.guru/images/patterns/icons/python.svg?id=6d815d43c0f7050a1151b43e51569c9f)](https://refactoring.guru/es/design-patterns/builder/python/example "Builder en Python") [![Builder en Ruby](https://refactoring.guru/images/patterns/icons/ruby.svg?id=b065b718c914bf8e960ef731600be1eb)](https://refactoring.guru/es/design-patterns/builder/ruby/example "Builder en Ruby") [![Builder en Rust](https://refactoring.guru/images/patterns/icons/rust.svg?id=1f5698a4b5ae23fe79413511747e4a87)](https://refactoring.guru/es/design-patterns/builder/rust/example "Builder en Rust") [![Builder en Swift](https://refactoring.guru/images/patterns/icons/swift.svg?id=0b716c2d52ec3a48fbe91ac031070c1d)](https://refactoring.guru/es/design-patterns/builder/swift/example "Builder en Swift") [![Builder en TypeScript](https://refactoring.guru/images/patterns/icons/typescript.svg?id=2239d0f16cb703540c205dd8cb0c0cb7)](https://refactoring.guru/es/design-patterns/builder/typescript/example "Builder en TypeScript") --- # Chain of Responsibility en C# / Patrones de diseño [There are patterns of patterns now! \ My friend's project: MetaPatterns.io](https://metapatterns.io/)  [](https://refactoring.guru/es/design-patterns/chain-of-responsibility/csharp/example#checkout) [](https://refactoring.guru/es/design-patterns/chain-of-responsibility/csharp/example#checkout) [](https://refactoring.guru/) / [Patrones de diseño](https://refactoring.guru/es/design-patterns) / [Chain of Responsibility](https://refactoring.guru/es/design-patterns/chain-of-responsibility) / [C#](https://refactoring.guru/es/design-patterns/csharp) ![Chain of Responsibility](https://refactoring.guru/images/patterns/cards/chain-of-responsibility-mini-2x.png?id=8c81f7069e51259b2443801b91135f7f) **Chain of Responsibility** en C# ================================= **Chain of Responsibility** es un patrón de diseño de comportamiento que permite pasar solicitudes a lo largo de la cadena de manejadores potenciales hasta que uno de ellos gestiona la solicitud. El patrón permite que varios objetos gestionen la solicitud sin acoplar la clase emisora a las clases concretas de los receptores. La cadena puede componerse dinámicamente durante el tiempo de ejecución con cualquier manejador que siga una interfaz manejadora estándar. [Aprende más sobre el patrón Chain of Responsibility](https://refactoring.guru/es/design-patterns/chain-of-responsibility) Navegación  [Intro](https://refactoring.guru/es/design-patterns/chain-of-responsibility/csharp/example#)  [Ejemplo conceptual](https://refactoring.guru/es/design-patterns/chain-of-responsibility/csharp/example#example-0)  [Program](https://refactoring.guru/es/design-patterns/chain-of-responsibility/csharp/example#example-0--Program-cs)  [Output](https://refactoring.guru/es/design-patterns/chain-of-responsibility/csharp/example#example-0--Output-txt) **Complejidad:** **Popularidad:** **Ejemplos de uso:** El patrón Chain of Responsibility no es un invitado habitual en el programa C#, ya que tan solo es relevante cuando el código opera con cadenas de objetos. **Identificación:** El patrón es reconocible porque los métodos de comportamiento de un grupo de objetos invocan indirectamente los mismos métodos en otros objetos, mientras que todos los objetos siguen la interfaz común. Ejemplo conceptual ------------------ Este ejemplo ilustra la estructura del patrón de diseño **Chain of Responsibility**. Se centra en responder las siguientes preguntas: * ¿De qué clases se compone? * ¿Qué papeles juegan esas clases? * ¿De qué forma se relacionan los elementos del patrón? #### **Program.cs:** Ejemplo conceptual using System; using System.Collections.Generic; namespace RefactoringGuru.DesignPatterns.ChainOfResponsibility.Conceptual { // The Handler interface declares a method for building the chain of // handlers. It also declares a method for executing a request. public interface IHandler { IHandler SetNext(IHandler handler); object Handle(object request); } // The default chaining behavior can be implemented inside a base handler // class. abstract class AbstractHandler : IHandler { private IHandler \_nextHandler; public IHandler SetNext(IHandler handler) { this.\_nextHandler = handler; // Returning a handler from here will let us link handlers in a // convenient way like this: // monkey.SetNext(squirrel).SetNext(dog); return handler; } public virtual object Handle(object request) { if (this.\_nextHandler != null) { return this.\_nextHandler.Handle(request); } else { return null; } } } class MonkeyHandler : AbstractHandler { public override object Handle(object request) { if ((request as string) == "Banana") { return $"Monkey: I'll eat the {request.ToString()}.\\n"; } else { return base.Handle(request); } } } class SquirrelHandler : AbstractHandler { public override object Handle(object request) { if (request.ToString() == "Nut") { return $"Squirrel: I'll eat the {request.ToString()}.\\n"; } else { return base.Handle(request); } } } class DogHandler : AbstractHandler { public override object Handle(object request) { if (request.ToString() == "MeatBall") { return $"Dog: I'll eat the {request.ToString()}.\\n"; } else { return base.Handle(request); } } } class Client { // The client code is usually suited to work with a single handler. In // most cases, it is not even aware that the handler is part of a chain. public static void ClientCode(AbstractHandler handler) { foreach (var food in new List { "Nut", "Banana", "Cup of coffee" }) { Console.WriteLine($"Client: Who wants a {food}?"); var result = handler.Handle(food); if (result != null) { Console.Write($" {result}"); } else { Console.WriteLine($" {food} was left untouched."); } } } } class Program { static void Main(string\[\] args) { // The other part of the client code constructs the actual chain. var monkey = new MonkeyHandler(); var squirrel = new SquirrelHandler(); var dog = new DogHandler(); monkey.SetNext(squirrel).SetNext(dog); // The client should be able to send a request to any handler, not // just the first one in the chain. Console.WriteLine("Chain: Monkey > Squirrel > Dog\\n"); Client.ClientCode(monkey); Console.WriteLine(); Console.WriteLine("Subchain: Squirrel > Dog\\n"); Client.ClientCode(squirrel); } } } #### **Output.txt:** Resultado de la ejecución Chain: Monkey > Squirrel > Dog Client: Who wants a Nut? Squirrel: I'll eat the Nut. Client: Who wants a Banana? Monkey: I'll eat the Banana. Client: Who wants a Cup of coffee? Cup of coffee was left untouched. Subchain: Squirrel > Dog Client: Who wants a Nut? Squirrel: I'll eat the Nut. Client: Who wants a Banana? Banana was left untouched. Client: Who wants a Cup of coffee? Cup of coffee was left untouched. **Chain of Responsibility** en otros lenguajes ---------------------------------------------- [![Chain of Responsibility en C++](https://refactoring.guru/images/patterns/icons/cpp.svg?id=f7782ed8b8666246bfcc3f8fefc3b858)](https://refactoring.guru/es/design-patterns/chain-of-responsibility/cpp/example "Chain of Responsibility en C++") [![Chain of Responsibility en Go](https://refactoring.guru/images/patterns/icons/go.svg?id=1a89927eb99b1ea3fde7701d97970aca)](https://refactoring.guru/es/design-patterns/chain-of-responsibility/go/example "Chain of Responsibility en Go") [![Chain of Responsibility en Java](https://refactoring.guru/images/patterns/icons/java.svg?id=e6d87e2dca08c953fe3acd1275ed4f4e)](https://refactoring.guru/es/design-patterns/chain-of-responsibility/java/example "Chain of Responsibility en Java") [![Chain of Responsibility en PHP](https://refactoring.guru/images/patterns/icons/php.svg?id=be1906eb26b71ec1d3b93720d6156618)](https://refactoring.guru/es/design-patterns/chain-of-responsibility/php/example "Chain of Responsibility en PHP") [![Chain of Responsibility en Python](https://refactoring.guru/images/patterns/icons/python.svg?id=6d815d43c0f7050a1151b43e51569c9f)](https://refactoring.guru/es/design-patterns/chain-of-responsibility/python/example "Chain of Responsibility en Python") [![Chain of Responsibility en Ruby](https://refactoring.guru/images/patterns/icons/ruby.svg?id=b065b718c914bf8e960ef731600be1eb)](https://refactoring.guru/es/design-patterns/chain-of-responsibility/ruby/example "Chain of Responsibility en Ruby") [![Chain of Responsibility en Rust](https://refactoring.guru/images/patterns/icons/rust.svg?id=1f5698a4b5ae23fe79413511747e4a87)](https://refactoring.guru/es/design-patterns/chain-of-responsibility/rust/example "Chain of Responsibility en Rust") [![Chain of Responsibility en Swift](https://refactoring.guru/images/patterns/icons/swift.svg?id=0b716c2d52ec3a48fbe91ac031070c1d)](https://refactoring.guru/es/design-patterns/chain-of-responsibility/swift/example "Chain of Responsibility en Swift") [![Chain of Responsibility en TypeScript](https://refactoring.guru/images/patterns/icons/typescript.svg?id=2239d0f16cb703540c205dd8cb0c0cb7)](https://refactoring.guru/es/design-patterns/chain-of-responsibility/typescript/example "Chain of Responsibility en TypeScript") --- # Command en Ruby / Patrones de diseño [There are patterns of patterns now! \ My friend's project: MetaPatterns.io](https://metapatterns.io/)  [](https://refactoring.guru/es/design-patterns/command/ruby/example#checkout) [](https://refactoring.guru/es/design-patterns/command/ruby/example#checkout) [](https://refactoring.guru/) / [Patrones de diseño](https://refactoring.guru/es/design-patterns) / [Command](https://refactoring.guru/es/design-patterns/command) / [Ruby](https://refactoring.guru/es/design-patterns/ruby) ![Command](https://refactoring.guru/images/patterns/cards/command-mini-2x.png?id=e5f6332e057f6d352a209da963a8fc54) **Command** en Ruby =================== **Command** es un patrón de diseño de comportamiento que convierte solicitudes u operaciones simples en objetos. La conversión permite la ejecución diferida de comandos, el almacenamiento del historial de comandos, etc. [Aprende más sobre el patrón Command](https://refactoring.guru/es/design-patterns/command) Navegación  [Intro](https://refactoring.guru/es/design-patterns/command/ruby/example#)  [Ejemplo conceptual](https://refactoring.guru/es/design-patterns/command/ruby/example#example-0)  [main](https://refactoring.guru/es/design-patterns/command/ruby/example#example-0--main-rb)  [output](https://refactoring.guru/es/design-patterns/command/ruby/example#example-0--output-txt) **Complejidad:** **Popularidad:** **Ejemplos de uso:** El patrón Command es muy común en el código Ruby. La mayoría de las veces se utiliza como alternativa a las retrollamadas (_callbacks_) para parametrizar elementos UI con acciones. También se utiliza para poner tareas en cola, realizar el seguimiento del historial de operaciones, etc. **Identificación:** El patrón Command es reconocible por los métodos de comportamiento en un tipo de clase abstracta/interfaz (emisora) que invoca un método en una implementación de un tipo de clase abstracta/interfaz diferente (receptora) que la implementación del comando ha implementado durante su creación. Las clases de comando se limitan normalmente a acciones específicas. Ejemplo conceptual ------------------ Este ejemplo ilustra la estructura del patrón de diseño **Command**. Se centra en responder las siguientes preguntas: * ¿De qué clases se compone? * ¿Qué papeles juegan esas clases? * ¿De qué forma se relacionan los elementos del patrón? #### **main.rb:** Ejemplo conceptual \# The Command interface declares a method for executing a command. class Command # @abstract def execute raise NotImplementedError, "#{self.class} has not implemented method '#{\_\_method\_\_}'" end end # Some commands can implement simple operations on their own. class SimpleCommand < Command # @param \[String\] payload def initialize(payload) @payload = payload end def execute puts "SimpleCommand: See, I can do simple things like printing (#{@payload})" end end # However, some commands can delegate more complex operations to other objects, # called "receivers". class ComplexCommand < Command # Complex commands can accept one or several receiver objects along with any # context data via the constructor. def initialize(receiver, a, b) @receiver = receiver @a = a @b = b end # Commands can delegate to any methods of a receiver. def execute print 'ComplexCommand: Complex stuff should be done by a receiver object' @receiver.do\_something(@a) @receiver.do\_something\_else(@b) end end # The Receiver classes contain some important business logic. They know how to # perform all kinds of operations, associated with carrying out a request. In # fact, any class may serve as a Receiver. class Receiver # @param \[String\] a def do\_something(a) print "\\nReceiver: Working on (#{a}.)" end # @param \[String\] b def do\_something\_else(b) print "\\nReceiver: Also working on (#{b}.)" end end # The Invoker is associated with one or several commands. It sends a request to # the command. class Invoker # Initialize commands. # @param \[Command\] command def on\_start=(command) @on\_start = command end # @param \[Command\] command def on\_finish=(command) @on\_finish = command end # The Invoker does not depend on concrete command or receiver classes. The # Invoker passes a request to a receiver indirectly, by executing a command. def do\_something\_important puts 'Invoker: Does anybody want something done before I begin?' @on\_start.execute if @on\_start.is\_a? Command puts 'Invoker: ...doing something really important...' puts 'Invoker: Does anybody want something done after I finish?' @on\_finish.execute if @on\_finish.is\_a? Command end end # The client code can parameterize an invoker with any commands. invoker = Invoker.new invoker.on\_start = SimpleCommand.new('Say Hi!') receiver = Receiver.new invoker.on\_finish = ComplexCommand.new(receiver, 'Send email', 'Save report') invoker.do\_something\_important #### **output.txt:** Resultado de la ejecución Invoker: Does anybody want something done before I begin? SimpleCommand: See, I can do simple things like printing (Say Hi!) Invoker: ...doing something really important... Invoker: Does anybody want something done after I finish? ComplexCommand: Complex stuff should be done by a receiver object Receiver: Working on (Send email.) Receiver: Also working on (Save report.) **Command** en otros lenguajes ------------------------------ [![Command en C#](https://refactoring.guru/images/patterns/icons/csharp.svg?id=da64592defc6e86d57c39c66e9de3e58)](https://refactoring.guru/es/design-patterns/command/csharp/example "Command en C#") [![Command en C++](https://refactoring.guru/images/patterns/icons/cpp.svg?id=f7782ed8b8666246bfcc3f8fefc3b858)](https://refactoring.guru/es/design-patterns/command/cpp/example "Command en C++") [![Command en Go](https://refactoring.guru/images/patterns/icons/go.svg?id=1a89927eb99b1ea3fde7701d97970aca)](https://refactoring.guru/es/design-patterns/command/go/example "Command en Go") [![Command en Java](https://refactoring.guru/images/patterns/icons/java.svg?id=e6d87e2dca08c953fe3acd1275ed4f4e)](https://refactoring.guru/es/design-patterns/command/java/example "Command en Java") [![Command en PHP](https://refactoring.guru/images/patterns/icons/php.svg?id=be1906eb26b71ec1d3b93720d6156618)](https://refactoring.guru/es/design-patterns/command/php/example "Command en PHP") [![Command en Python](https://refactoring.guru/images/patterns/icons/python.svg?id=6d815d43c0f7050a1151b43e51569c9f)](https://refactoring.guru/es/design-patterns/command/python/example "Command en Python") [![Command en Rust](https://refactoring.guru/images/patterns/icons/rust.svg?id=1f5698a4b5ae23fe79413511747e4a87)](https://refactoring.guru/es/design-patterns/command/rust/example "Command en Rust") [![Command en Swift](https://refactoring.guru/images/patterns/icons/swift.svg?id=0b716c2d52ec3a48fbe91ac031070c1d)](https://refactoring.guru/es/design-patterns/command/swift/example "Command en Swift") [![Command en TypeScript](https://refactoring.guru/images/patterns/icons/typescript.svg?id=2239d0f16cb703540c205dd8cb0c0cb7)](https://refactoring.guru/es/design-patterns/command/typescript/example "Command en TypeScript") --- # Chain of Responsibility en Ruby / Patrones de diseño [There are patterns of patterns now! \ My friend's project: MetaPatterns.io](https://metapatterns.io/)  [](https://refactoring.guru/es/design-patterns/chain-of-responsibility/ruby/example#checkout) [](https://refactoring.guru/es/design-patterns/chain-of-responsibility/ruby/example#checkout) [](https://refactoring.guru/) / [Patrones de diseño](https://refactoring.guru/es/design-patterns) / [Chain of Responsibility](https://refactoring.guru/es/design-patterns/chain-of-responsibility) / [Ruby](https://refactoring.guru/es/design-patterns/ruby) ![Chain of Responsibility](https://refactoring.guru/images/patterns/cards/chain-of-responsibility-mini-2x.png?id=8c81f7069e51259b2443801b91135f7f) **Chain of Responsibility** en Ruby =================================== **Chain of Responsibility** es un patrón de diseño de comportamiento que permite pasar solicitudes a lo largo de la cadena de manejadores potenciales hasta que uno de ellos gestiona la solicitud. El patrón permite que varios objetos gestionen la solicitud sin acoplar la clase emisora a las clases concretas de los receptores. La cadena puede componerse dinámicamente durante el tiempo de ejecución con cualquier manejador que siga una interfaz manejadora estándar. [Aprende más sobre el patrón Chain of Responsibility](https://refactoring.guru/es/design-patterns/chain-of-responsibility) Navegación  [Intro](https://refactoring.guru/es/design-patterns/chain-of-responsibility/ruby/example#)  [Ejemplo conceptual](https://refactoring.guru/es/design-patterns/chain-of-responsibility/ruby/example#example-0)  [main](https://refactoring.guru/es/design-patterns/chain-of-responsibility/ruby/example#example-0--main-rb)  [output](https://refactoring.guru/es/design-patterns/chain-of-responsibility/ruby/example#example-0--output-txt) **Complejidad:** **Popularidad:** **Ejemplos de uso:** El patrón Chain of Responsibility no es un invitado habitual en el programa Ruby, ya que tan solo es relevante cuando el código opera con cadenas de objetos. **Identificación:** El patrón es reconocible porque los métodos de comportamiento de un grupo de objetos invocan indirectamente los mismos métodos en otros objetos, mientras que todos los objetos siguen la interfaz común. Ejemplo conceptual ------------------ Este ejemplo ilustra la estructura del patrón de diseño **Chain of Responsibility**. Se centra en responder las siguientes preguntas: * ¿De qué clases se compone? * ¿Qué papeles juegan esas clases? * ¿De qué forma se relacionan los elementos del patrón? #### **main.rb:** Ejemplo conceptual \# The Handler interface declares a method for building the chain of handlers. It # also declares a method for executing a request. class Handler # @abstract # # @param \[Handler\] handler def next\_handler=(handler) raise NotImplementedError, "#{self.class} has not implemented method '#{\_\_method\_\_}'" end # @abstract # # @param \[String\] request # # @return \[String, nil\] def handle(request) raise NotImplementedError, "#{self.class} has not implemented method '#{\_\_method\_\_}'" end end # The default chaining behavior can be implemented inside a base handler class. class AbstractHandler < Handler # @return \[Handler\] attr\_writer :next\_handler # @param \[Handler\] handler # # @return \[Handler\] def next\_handler(handler) @next\_handler = handler # Returning a handler from here will let us link handlers in a convenient # way like this: # monkey.next\_handler(squirrel).next\_handler(dog) handler end # @abstract # # @param \[String\] request # # @return \[String, nil\] def handle(request) return @next\_handler.handle(request) if @next\_handler nil end end # All Concrete Handlers either handle a request or pass it to the next handler # in the chain. class MonkeyHandler < AbstractHandler # @param \[String\] request # # @return \[String, nil\] def handle(request) if request == 'Banana' "Monkey: I'll eat the #{request}" else super(request) end end end class SquirrelHandler < AbstractHandler # @param \[String\] request # # @return \[String, nil\] def handle(request) if request == 'Nut' "Squirrel: I'll eat the #{request}" else super(request) end end end class DogHandler < AbstractHandler # @param \[String\] request # # @return \[String, nil\] def handle(request) if request == 'MeatBall' "Dog: I'll eat the #{request}" else super(request) end end end # The client code is usually suited to work with a single handler. In most # cases, it is not even aware that the handler is part of a chain. def client\_code(handler) \['Nut', 'Banana', 'Cup of coffee'\].each do |food| puts "\\nClient: Who wants a #{food}?" result = handler.handle(food) if result print " #{result}" else print " #{food} was left untouched." end end end monkey = MonkeyHandler.new squirrel = SquirrelHandler.new dog = DogHandler.new monkey.next\_handler(squirrel).next\_handler(dog) # The client should be able to send a request to any handler, not just the first # one in the chain. puts 'Chain: Monkey > Squirrel > Dog' client\_code(monkey) puts "\\n\\n" puts 'Subchain: Squirrel > Dog' client\_code(squirrel) #### **output.txt:** Resultado de la ejecución Chain: Monkey > Squirrel > Dog Client: Who wants a Nut? Squirrel: I'll eat the Nut Client: Who wants a Banana? Monkey: I'll eat the Banana Client: Who wants a Cup of coffee? Cup of coffee was left untouched. Subchain: Squirrel > Dog Client: Who wants a Nut? Squirrel: I'll eat the Nut Client: Who wants a Banana? Banana was left untouched. Client: Who wants a Cup of coffee? Cup of coffee was left untouched. **Chain of Responsibility** en otros lenguajes ---------------------------------------------- [![Chain of Responsibility en C#](https://refactoring.guru/images/patterns/icons/csharp.svg?id=da64592defc6e86d57c39c66e9de3e58)](https://refactoring.guru/es/design-patterns/chain-of-responsibility/csharp/example "Chain of Responsibility en C#") [![Chain of Responsibility en C++](https://refactoring.guru/images/patterns/icons/cpp.svg?id=f7782ed8b8666246bfcc3f8fefc3b858)](https://refactoring.guru/es/design-patterns/chain-of-responsibility/cpp/example "Chain of Responsibility en C++") [![Chain of Responsibility en Go](https://refactoring.guru/images/patterns/icons/go.svg?id=1a89927eb99b1ea3fde7701d97970aca)](https://refactoring.guru/es/design-patterns/chain-of-responsibility/go/example "Chain of Responsibility en Go") [![Chain of Responsibility en Java](https://refactoring.guru/images/patterns/icons/java.svg?id=e6d87e2dca08c953fe3acd1275ed4f4e)](https://refactoring.guru/es/design-patterns/chain-of-responsibility/java/example "Chain of Responsibility en Java") [![Chain of Responsibility en PHP](https://refactoring.guru/images/patterns/icons/php.svg?id=be1906eb26b71ec1d3b93720d6156618)](https://refactoring.guru/es/design-patterns/chain-of-responsibility/php/example "Chain of Responsibility en PHP") [![Chain of Responsibility en Python](https://refactoring.guru/images/patterns/icons/python.svg?id=6d815d43c0f7050a1151b43e51569c9f)](https://refactoring.guru/es/design-patterns/chain-of-responsibility/python/example "Chain of Responsibility en Python") [![Chain of Responsibility en Rust](https://refactoring.guru/images/patterns/icons/rust.svg?id=1f5698a4b5ae23fe79413511747e4a87)](https://refactoring.guru/es/design-patterns/chain-of-responsibility/rust/example "Chain of Responsibility en Rust") [![Chain of Responsibility en Swift](https://refactoring.guru/images/patterns/icons/swift.svg?id=0b716c2d52ec3a48fbe91ac031070c1d)](https://refactoring.guru/es/design-patterns/chain-of-responsibility/swift/example "Chain of Responsibility en Swift") [![Chain of Responsibility en TypeScript](https://refactoring.guru/images/patterns/icons/typescript.svg?id=2239d0f16cb703540c205dd8cb0c0cb7)](https://refactoring.guru/es/design-patterns/chain-of-responsibility/typescript/example "Chain of Responsibility en TypeScript") --- # Command en C# / Patrones de diseño [There are patterns of patterns now! \ My friend's project: MetaPatterns.io](https://metapatterns.io/)  [](https://refactoring.guru/es/design-patterns/command/csharp/example#checkout) [](https://refactoring.guru/es/design-patterns/command/csharp/example#checkout) [](https://refactoring.guru/) / [Patrones de diseño](https://refactoring.guru/es/design-patterns) / [Command](https://refactoring.guru/es/design-patterns/command) / [C#](https://refactoring.guru/es/design-patterns/csharp) ![Command](https://refactoring.guru/images/patterns/cards/command-mini-2x.png?id=e5f6332e057f6d352a209da963a8fc54) **Command** en C# ================= **Command** es un patrón de diseño de comportamiento que convierte solicitudes u operaciones simples en objetos. La conversión permite la ejecución diferida de comandos, el almacenamiento del historial de comandos, etc. [Aprende más sobre el patrón Command](https://refactoring.guru/es/design-patterns/command) Navegación  [Intro](https://refactoring.guru/es/design-patterns/command/csharp/example#)  [Ejemplo conceptual](https://refactoring.guru/es/design-patterns/command/csharp/example#example-0)  [Program](https://refactoring.guru/es/design-patterns/command/csharp/example#example-0--Program-cs)  [Output](https://refactoring.guru/es/design-patterns/command/csharp/example#example-0--Output-txt) **Complejidad:** **Popularidad:** **Ejemplos de uso:** El patrón Command es muy común en el código C#. La mayoría de las veces se utiliza como alternativa a las retrollamadas (_callbacks_) para parametrizar elementos UI con acciones. También se utiliza para poner tareas en cola, realizar el seguimiento del historial de operaciones, etc. **Identificación:** El patrón Command es reconocible por los métodos de comportamiento en un tipo de clase abstracta/interfaz (emisora) que invoca un método en una implementación de un tipo de clase abstracta/interfaz diferente (receptora) que la implementación del comando ha implementado durante su creación. Las clases de comando se limitan normalmente a acciones específicas. Ejemplo conceptual ------------------ Este ejemplo ilustra la estructura del patrón de diseño **Command**. Se centra en responder las siguientes preguntas: * ¿De qué clases se compone? * ¿Qué papeles juegan esas clases? * ¿De qué forma se relacionan los elementos del patrón? #### **Program.cs:** Ejemplo conceptual using System; namespace RefactoringGuru.DesignPatterns.Command.Conceptual { // The Command interface declares a method for executing a command. public interface ICommand { void Execute(); } // Some commands can implement simple operations on their own. class SimpleCommand : ICommand { private string \_payload = string.Empty; public SimpleCommand(string payload) { this.\_payload = payload; } public void Execute() { Console.WriteLine($"SimpleCommand: See, I can do simple things like printing ({this.\_payload})"); } } // However, some commands can delegate more complex operations to other // objects, called "receivers." class ComplexCommand : ICommand { private Receiver \_receiver; // Context data, required for launching the receiver's methods. private string \_a; private string \_b; // Complex commands can accept one or several receiver objects along // with any context data via the constructor. public ComplexCommand(Receiver receiver, string a, string b) { this.\_receiver = receiver; this.\_a = a; this.\_b = b; } // Commands can delegate to any methods of a receiver. public void Execute() { Console.WriteLine("ComplexCommand: Complex stuff should be done by a receiver object."); this.\_receiver.DoSomething(this.\_a); this.\_receiver.DoSomethingElse(this.\_b); } } // The Receiver classes contain some important business logic. They know how // to perform all kinds of operations, associated with carrying out a // request. In fact, any class may serve as a Receiver. class Receiver { public void DoSomething(string a) { Console.WriteLine($"Receiver: Working on ({a}.)"); } public void DoSomethingElse(string b) { Console.WriteLine($"Receiver: Also working on ({b}.)"); } } // The Invoker is associated with one or several commands. It sends a // request to the command. class Invoker { private ICommand \_onStart; private ICommand \_onFinish; // Initialize commands. public void SetOnStart(ICommand command) { this.\_onStart = command; } public void SetOnFinish(ICommand command) { this.\_onFinish = command; } // The Invoker does not depend on concrete command or receiver classes. // The Invoker passes a request to a receiver indirectly, by executing a // command. public void DoSomethingImportant() { Console.WriteLine("Invoker: Does anybody want something done before I begin?"); if (this.\_onStart is ICommand) { this.\_onStart.Execute(); } Console.WriteLine("Invoker: ...doing something really important..."); Console.WriteLine("Invoker: Does anybody want something done after I finish?"); if (this.\_onFinish is ICommand) { this.\_onFinish.Execute(); } } } class Program { static void Main(string\[\] args) { // The client code can parameterize an invoker with any commands. Invoker invoker = new Invoker(); invoker.SetOnStart(new SimpleCommand("Say Hi!")); Receiver receiver = new Receiver(); invoker.SetOnFinish(new ComplexCommand(receiver, "Send email", "Save report")); invoker.DoSomethingImportant(); } } } #### **Output.txt:** Resultado de la ejecución Invoker: Does anybody want something done before I begin? SimpleCommand: See, I can do simple things like printing (Say Hi!) Invoker: ...doing something really important... Invoker: Does anybody want something done after I finish? ComplexCommand: Complex stuff should be done by a receiver object. Receiver: Working on (Send email.) Receiver: Also working on (Save report.) **Command** en otros lenguajes ------------------------------ [![Command en C++](https://refactoring.guru/images/patterns/icons/cpp.svg?id=f7782ed8b8666246bfcc3f8fefc3b858)](https://refactoring.guru/es/design-patterns/command/cpp/example "Command en C++") [![Command en Go](https://refactoring.guru/images/patterns/icons/go.svg?id=1a89927eb99b1ea3fde7701d97970aca)](https://refactoring.guru/es/design-patterns/command/go/example "Command en Go") [![Command en Java](https://refactoring.guru/images/patterns/icons/java.svg?id=e6d87e2dca08c953fe3acd1275ed4f4e)](https://refactoring.guru/es/design-patterns/command/java/example "Command en Java") [![Command en PHP](https://refactoring.guru/images/patterns/icons/php.svg?id=be1906eb26b71ec1d3b93720d6156618)](https://refactoring.guru/es/design-patterns/command/php/example "Command en PHP") [![Command en Python](https://refactoring.guru/images/patterns/icons/python.svg?id=6d815d43c0f7050a1151b43e51569c9f)](https://refactoring.guru/es/design-patterns/command/python/example "Command en Python") [![Command en Ruby](https://refactoring.guru/images/patterns/icons/ruby.svg?id=b065b718c914bf8e960ef731600be1eb)](https://refactoring.guru/es/design-patterns/command/ruby/example "Command en Ruby") [![Command en Rust](https://refactoring.guru/images/patterns/icons/rust.svg?id=1f5698a4b5ae23fe79413511747e4a87)](https://refactoring.guru/es/design-patterns/command/rust/example "Command en Rust") [![Command en Swift](https://refactoring.guru/images/patterns/icons/swift.svg?id=0b716c2d52ec3a48fbe91ac031070c1d)](https://refactoring.guru/es/design-patterns/command/swift/example "Command en Swift") [![Command en TypeScript](https://refactoring.guru/images/patterns/icons/typescript.svg?id=2239d0f16cb703540c205dd8cb0c0cb7)](https://refactoring.guru/es/design-patterns/command/typescript/example "Command en TypeScript") --- # Builder en Swift / Patrones de diseño [There are patterns of patterns now! \ My friend's project: MetaPatterns.io](https://metapatterns.io/)  [](https://refactoring.guru/es/design-patterns/builder/swift/example#checkout) [](https://refactoring.guru/es/design-patterns/builder/swift/example#checkout) [](https://refactoring.guru/) / [Patrones de diseño](https://refactoring.guru/es/design-patterns) / [Builder](https://refactoring.guru/es/design-patterns/builder) / [Swift](https://refactoring.guru/es/design-patterns/swift) ![Builder](https://refactoring.guru/images/patterns/cards/builder-mini-2x.png?id=de6d0938678b86903a1426dddfdd13bf) **Builder** en Swift ==================== **Builder** es un patrón de diseño creacional que permite construir objetos complejos paso a paso. Al contrario que otros patrones creacionales, Builder no necesita que los productos tengan una interfaz común. Esto hace posible crear distintos productos utilizando el mismo proceso de construcción. [Aprende más sobre el patrón Builder](https://refactoring.guru/es/design-patterns/builder) Navegación  [Intro](https://refactoring.guru/es/design-patterns/builder/swift/example#)  [Ejemplo conceptual](https://refactoring.guru/es/design-patterns/builder/swift/example#example-0)  [Example](https://refactoring.guru/es/design-patterns/builder/swift/example#example-0--Example-swift)  [Output](https://refactoring.guru/es/design-patterns/builder/swift/example#example-0--Output-txt)  [Ejemplo del mundo real](https://refactoring.guru/es/design-patterns/builder/swift/example#example-1)  [Example](https://refactoring.guru/es/design-patterns/builder/swift/example#example-1--Example-swift)  [Output](https://refactoring.guru/es/design-patterns/builder/swift/example#example-1--Output-txt) **Complejidad:** **Popularidad:** **Ejemplos de uso:** El patrón Builder es muy conocido en el mundo Swift. Resulta especialmente útil cuando debes crear un objeto con muchas opciones posibles de configuración. **Identificación:** El patrón Builder se puede reconocer por la clase, que tiene un único método de creación y varios métodos para configurar el objeto resultante. A menudo, los métodos del Builder soportan el encadenamiento (por ejemplo, `someBuilder.setValueA(1).setValueB(2).create()`). Los siguientes ejemplos están disponibles en [Swift Playgrounds](https://www.alemohamad.com/playgrounds) . Kudos a [Alejandro Mohamad](https://www.alemohamad.com/) por crear la versión de Playground. Ejemplo conceptual ------------------ Este ejemplo ilustra la estructura del patrón de diseño **Builder** y se centra en las siguientes preguntas: * ¿De qué clases se compone? * ¿Qué papeles juegan esas clases? * ¿De qué forma se relacionan los elementos del patrón? Después de conocer la estructura del patrón, será más fácil comprender el siguiente ejemplo basado en un caso de uso real de Swift. #### **Example.swift:** Ejemplo conceptual import XCTest /// The Builder interface specifies methods for creating the different parts of /// the Product objects. protocol Builder { func producePartA() func producePartB() func producePartC() } /// The Concrete Builder classes follow the Builder interface and provide /// specific implementations of the building steps. Your program may have /// several variations of Builders, implemented differently. class ConcreteBuilder1: Builder { /// A fresh builder instance should contain a blank product object, which is /// used in further assembly. private var product = Product1() func reset() { product = Product1() } /// All production steps work with the same product instance. func producePartA() { product.add(part: "PartA1") } func producePartB() { product.add(part: "PartB1") } func producePartC() { product.add(part: "PartC1") } /// Concrete Builders are supposed to provide their own methods for /// retrieving results. That's because various types of builders may create /// entirely different products that don't follow the same interface. /// Therefore, such methods cannot be declared in the base Builder interface /// (at least in a statically typed programming language). /// /// Usually, after returning the end result to the client, a builder /// instance is expected to be ready to start producing another product. /// That's why it's a usual practice to call the reset method at the end of /// the \`getProduct\` method body. However, this behavior is not mandatory, /// and you can make your builders wait for an explicit reset call from the /// client code before disposing of the previous result. func retrieveProduct() -> Product1 { let result = self.product reset() return result } } /// The Director is only responsible for executing the building steps in a /// particular sequence. It is helpful when producing products according to a /// specific order or configuration. Strictly speaking, the Director class is /// optional, since the client can control builders directly. class Director { private var builder: Builder? /// The Director works with any builder instance that the client code passes /// to it. This way, the client code may alter the final type of the newly /// assembled product. func update(builder: Builder) { self.builder = builder } /// The Director can construct several product variations using the same /// building steps. func buildMinimalViableProduct() { builder?.producePartA() } func buildFullFeaturedProduct() { builder?.producePartA() builder?.producePartB() builder?.producePartC() } } /// It makes sense to use the Builder pattern only when your products are quite /// complex and require extensive configuration. /// /// Unlike in other creational patterns, different concrete builders can produce /// unrelated products. In other words, results of various builders may not /// always follow the same interface. class Product1 { private var parts = \[String\]() func add(part: String) { self.parts.append(part) } func listParts() -> String { return "Product parts: " + parts.joined(separator: ", ") + "\\n" } } /// The client code creates a builder object, passes it to the director and then /// initiates the construction process. The end result is retrieved from the /// builder object. class Client { // ... static func someClientCode(director: Director) { let builder = ConcreteBuilder1() director.update(builder: builder) print("Standard basic product:") director.buildMinimalViableProduct() print(builder.retrieveProduct().listParts()) print("Standard full featured product:") director.buildFullFeaturedProduct() print(builder.retrieveProduct().listParts()) // Remember, the Builder pattern can be used without a Director class. print("Custom product:") builder.producePartA() builder.producePartC() print(builder.retrieveProduct().listParts()) } // ... } /// Let's see how it all comes together. class BuilderConceptual: XCTestCase { func testBuilderConceptual() { let director = Director() Client.someClientCode(director: director) } } #### **Output.txt:** Resultado de la ejecución Standard basic product: Product parts: PartA1 Standard full featured product: Product parts: PartA1, PartB1, PartC1 Custom product: Product parts: PartA1, PartC1 Ejemplo del mundo real ---------------------- #### **Example.swift:** Ejemplo del mundo real import Foundation import XCTest class BaseQueryBuilder { typealias Predicate = (Model) -> (Bool) func limit(\_ limit: Int) -> BaseQueryBuilder { return self } func filter(\_ predicate: @escaping Predicate) -> BaseQueryBuilder { return self } func fetch() -> \[Model\] { preconditionFailure("Should be overridden in subclasses.") } } class RealmQueryBuilder: BaseQueryBuilder { enum Query { case filter(Predicate) case limit(Int) /// ... } fileprivate var operations = \[Query\]() @discardableResult override func limit(\_ limit: Int) -> RealmQueryBuilder { operations.append(Query.limit(limit)) return self } @discardableResult override func filter(\_ predicate: @escaping Predicate) -> RealmQueryBuilder { operations.append(Query.filter(predicate)) return self } override func fetch() -> \[Model\] { print("RealmQueryBuilder: Initializing RealmDataProvider with \\(operations.count) operations:") return RealmProvider().fetch(operations) } } class CoreDataQueryBuilder: BaseQueryBuilder { enum Query { case filter(Predicate) case limit(Int) case includesPropertyValues(Bool) /// ... } fileprivate var operations = \[Query\]() override func limit(\_ limit: Int) -> CoreDataQueryBuilder { operations.append(Query.limit(limit)) return self } override func filter(\_ predicate: @escaping Predicate) -> CoreDataQueryBuilder { operations.append(Query.filter(predicate)) return self } func includesPropertyValues(\_ toggle: Bool) -> CoreDataQueryBuilder { operations.append(Query.includesPropertyValues(toggle)) return self } override func fetch() -> \[Model\] { print("CoreDataQueryBuilder: Initializing CoreDataProvider with \\(operations.count) operations.") return CoreDataProvider().fetch(operations) } } /// Data Providers contain a logic how to fetch models. Builders accumulate /// operations and then update providers to fetch the data. class RealmProvider { func fetch(\_ operations: \[RealmQueryBuilder.Query\]) -> \[Model\] { print("RealmProvider: Retrieving data from Realm...") for item in operations { switch item { case .filter(\_): print("RealmProvider: executing the 'filter' operation.") /// Use Realm instance to filter results. break case .limit(\_): print("RealmProvider: executing the 'limit' operation.") /// Use Realm instance to limit results. break } } /// Return results from Realm return \[\] } } class CoreDataProvider { func fetch(\_ operations: \[CoreDataQueryBuilder.Query\]) -> \[Model\] { /// Create a NSFetchRequest print("CoreDataProvider: Retrieving data from CoreData...") for item in operations { switch item { case .filter(\_): print("CoreDataProvider: executing the 'filter' operation.") /// Set a 'predicate' for a NSFetchRequest. break case .limit(\_): print("CoreDataProvider: executing the 'limit' operation.") /// Set a 'fetchLimit' for a NSFetchRequest. break case .includesPropertyValues(\_): print("CoreDataProvider: executing the 'includesPropertyValues' operation.") /// Set an 'includesPropertyValues' for a NSFetchRequest. break } } /// Execute a NSFetchRequest and return results. return \[\] } } protocol DomainModel { /// The protocol groups domain models to the common interface } private struct User: DomainModel { let id: Int let age: Int let email: String } class BuilderRealWorld: XCTestCase { func testBuilderRealWorld() { print("Client: Start fetching data from Realm") clientCode(builder: RealmQueryBuilder()) print() print("Client: Start fetching data from CoreData") clientCode(builder: CoreDataQueryBuilder()) } fileprivate func clientCode(builder: BaseQueryBuilder) { let results = builder.filter({ $0.age < 20 }) .limit(1) .fetch() print("Client: I have fetched: " + String(results.count) + " records.") } } #### **Output.txt:** Resultado de la ejecución Client: Start fetching data from Realm RealmQueryBuilder: Initializing RealmDataProvider with 2 operations: RealmProvider: Retrieving data from Realm... RealmProvider: executing the 'filter' operation. RealmProvider: executing the 'limit' operation. Client: I have fetched: 0 records. Client: Start fetching data from CoreData CoreDataQueryBuilder: Initializing CoreDataProvider with 2 operations. CoreDataProvider: Retrieving data from CoreData... CoreDataProvider: executing the 'filter' operation. CoreDataProvider: executing the 'limit' operation. Client: I have fetched: 0 records. **Builder** en otros lenguajes ------------------------------ [![Builder en C#](https://refactoring.guru/images/patterns/icons/csharp.svg?id=da64592defc6e86d57c39c66e9de3e58)](https://refactoring.guru/es/design-patterns/builder/csharp/example "Builder en C#") [![Builder en C++](https://refactoring.guru/images/patterns/icons/cpp.svg?id=f7782ed8b8666246bfcc3f8fefc3b858)](https://refactoring.guru/es/design-patterns/builder/cpp/example "Builder en C++") [![Builder en Go](https://refactoring.guru/images/patterns/icons/go.svg?id=1a89927eb99b1ea3fde7701d97970aca)](https://refactoring.guru/es/design-patterns/builder/go/example "Builder en Go") [![Builder en Java](https://refactoring.guru/images/patterns/icons/java.svg?id=e6d87e2dca08c953fe3acd1275ed4f4e)](https://refactoring.guru/es/design-patterns/builder/java/example "Builder en Java") [![Builder en PHP](https://refactoring.guru/images/patterns/icons/php.svg?id=be1906eb26b71ec1d3b93720d6156618)](https://refactoring.guru/es/design-patterns/builder/php/example "Builder en PHP") [![Builder en Python](https://refactoring.guru/images/patterns/icons/python.svg?id=6d815d43c0f7050a1151b43e51569c9f)](https://refactoring.guru/es/design-patterns/builder/python/example "Builder en Python") [![Builder en Ruby](https://refactoring.guru/images/patterns/icons/ruby.svg?id=b065b718c914bf8e960ef731600be1eb)](https://refactoring.guru/es/design-patterns/builder/ruby/example "Builder en Ruby") [![Builder en Rust](https://refactoring.guru/images/patterns/icons/rust.svg?id=1f5698a4b5ae23fe79413511747e4a87)](https://refactoring.guru/es/design-patterns/builder/rust/example "Builder en Rust") [![Builder en TypeScript](https://refactoring.guru/images/patterns/icons/typescript.svg?id=2239d0f16cb703540c205dd8cb0c0cb7)](https://refactoring.guru/es/design-patterns/builder/typescript/example "Builder en TypeScript") --- # Composite en C++ / Patrones de diseño [There are patterns of patterns now! \ My friend's project: MetaPatterns.io](https://metapatterns.io/)  [](https://refactoring.guru/es/design-patterns/composite/cpp/example#checkout) [](https://refactoring.guru/es/design-patterns/composite/cpp/example#checkout) [](https://refactoring.guru/) / [Patrones de diseño](https://refactoring.guru/es/design-patterns) / [Composite](https://refactoring.guru/es/design-patterns/composite) / [C++](https://refactoring.guru/es/design-patterns/cpp) ![Composite](https://refactoring.guru/images/patterns/cards/composite-mini-2x.png?id=3f7f811fefeb0b64f6774746eb42af09) **Composite** en C++ ==================== **Composite** es un patrón de diseño estructural que permite componer objetos en una estructura en forma de árbol y trabajar con ella como si fuera un objeto único. El patrón Composite se convirtió en una solución muy popular para la mayoría de problemas que requieren la creación de una estructura de árbol. La gran característica del Composite es la capacidad para ejecutar métodos de forma recursiva por toda la estructura de árbol y recapitular los resultados. [Aprende más sobre el patrón Composite](https://refactoring.guru/es/design-patterns/composite) Navegación  [Intro](https://refactoring.guru/es/design-patterns/composite/cpp/example#)  [Ejemplo conceptual](https://refactoring.guru/es/design-patterns/composite/cpp/example#example-0)  [main](https://refactoring.guru/es/design-patterns/composite/cpp/example#example-0--main-cc)  [Output](https://refactoring.guru/es/design-patterns/composite/cpp/example#example-0--Output-txt) **Complejidad:** **Popularidad:** **Ejemplos de uso:** El patrón Composite es muy común en el código C++. Se utiliza a menudo para representar jerarquías de componentes de interfaz de usuario o el código que trabaja con gráficos. **Identificación:** El Composite es fácil de reconocer por los métodos de comportamiento que toman una instancia del mismo tipo abstracto/interfaz y lo hacen una estructura de árbol. Ejemplo conceptual ------------------ Este ejemplo ilustra la estructura del patrón de diseño **Composite**. Se centra en responder las siguientes preguntas: * ¿De qué clases se compone? * ¿Qué papeles juegan esas clases? * ¿De qué forma se relacionan los elementos del patrón? #### **main.cc:** Ejemplo conceptual #include #include #include #include /\*\* \* The base Component class declares common operations for both simple and \* complex objects of a composition. \*/ class Component { /\*\* \* @var Component \*/ protected: Component \*parent\_; /\*\* \* Optionally, the base Component can declare an interface for setting and \* accessing a parent of the component in a tree structure. It can also \* provide some default implementation for these methods. \*/ public: virtual ~Component() {} void SetParent(Component \*parent) { this->parent\_ = parent; } Component \*GetParent() const { return this->parent\_; } /\*\* \* In some cases, it would be beneficial to define the child-management \* operations right in the base Component class. This way, you won't need to \* expose any concrete component classes to the client code, even during the \* object tree assembly. The downside is that these methods will be empty for \* the leaf-level components. \*/ virtual void Add(Component \*component) {} virtual void Remove(Component \*component) {} /\*\* \* You can provide a method that lets the client code figure out whether a \* component can bear children. \*/ virtual bool IsComposite() const { return false; } /\*\* \* The base Component may implement some default behavior or leave it to \* concrete classes (by declaring the method containing the behavior as \* "abstract"). \*/ virtual std::string Operation() const = 0; }; /\*\* \* The Leaf class represents the end objects of a composition. A leaf can't have \* any children. \* \* Usually, it's the Leaf objects that do the actual work, whereas Composite \* objects only delegate to their sub-components. \*/ class Leaf : public Component { public: std::string Operation() const override { return "Leaf"; } }; /\*\* \* The Composite class represents the complex components that may have children. \* Usually, the Composite objects delegate the actual work to their children and \* then "sum-up" the result. \*/ class Composite : public Component { /\*\* \* @var \\SplObjectStorage \*/ protected: std::list children\_; public: /\*\* \* A composite object can add or remove other components (both simple or \* complex) to or from its child list. \*/ void Add(Component \*component) override { this->children\_.push\_back(component); component->SetParent(this); } /\*\* \* Have in mind that this method removes the pointer to the list but doesn't \* frees the \* memory, you should do it manually or better use smart pointers. \*/ void Remove(Component \*component) override { children\_.remove(component); component->SetParent(nullptr); } bool IsComposite() const override { return true; } /\*\* \* The Composite executes its primary logic in a particular way. It traverses \* recursively through all its children, collecting and summing their results. \* Since the composite's children pass these calls to their children and so \* forth, the whole object tree is traversed as a result. \*/ std::string Operation() const override { std::string result; for (const Component \*c : children\_) { if (c == children\_.back()) { result += c->Operation(); } else { result += c->Operation() + "+"; } } return "Branch(" + result + ")"; } }; /\*\* \* The client code works with all of the components via the base interface. \*/ void ClientCode(Component \*component) { // ... std::cout << "RESULT: " << component->Operation(); // ... } /\*\* \* Thanks to the fact that the child-management operations are declared in the \* base Component class, the client code can work with any component, simple or \* complex, without depending on their concrete classes. \*/ void ClientCode2(Component \*component1, Component \*component2) { // ... if (component1->IsComposite()) { component1->Add(component2); } std::cout << "RESULT: " << component1->Operation(); // ... } /\*\* \* This way the client code can support the simple leaf components... \*/ int main() { Component \*simple = new Leaf; std::cout << "Client: I've got a simple component:\\n"; ClientCode(simple); std::cout << "\\n\\n"; /\*\* \* ...as well as the complex composites. \*/ Component \*tree = new Composite; Component \*branch1 = new Composite; Component \*leaf\_1 = new Leaf; Component \*leaf\_2 = new Leaf; Component \*leaf\_3 = new Leaf; branch1->Add(leaf\_1); branch1->Add(leaf\_2); Component \*branch2 = new Composite; branch2->Add(leaf\_3); tree->Add(branch1); tree->Add(branch2); std::cout << "Client: Now I've got a composite tree:\\n"; ClientCode(tree); std::cout << "\\n\\n"; std::cout << "Client: I don't need to check the components classes even when managing the tree:\\n"; ClientCode2(tree, simple); std::cout << "\\n"; delete simple; delete tree; delete branch1; delete branch2; delete leaf\_1; delete leaf\_2; delete leaf\_3; return 0; } #### **Output.txt:** Resultado de la ejecución Client: I've got a simple component: RESULT: Leaf Client: Now I've got a composite tree: RESULT: Branch(Branch(Leaf+Leaf)+Branch(Leaf)) Client: I don't need to check the components classes even when managing the tree: RESULT: Branch(Branch(Leaf+Leaf)+Branch(Leaf)+Leaf) **Composite** en otros lenguajes -------------------------------- [![Composite en C#](https://refactoring.guru/images/patterns/icons/csharp.svg?id=da64592defc6e86d57c39c66e9de3e58)](https://refactoring.guru/es/design-patterns/composite/csharp/example "Composite en C#") [![Composite en Go](https://refactoring.guru/images/patterns/icons/go.svg?id=1a89927eb99b1ea3fde7701d97970aca)](https://refactoring.guru/es/design-patterns/composite/go/example "Composite en Go") [![Composite en Java](https://refactoring.guru/images/patterns/icons/java.svg?id=e6d87e2dca08c953fe3acd1275ed4f4e)](https://refactoring.guru/es/design-patterns/composite/java/example "Composite en Java") [![Composite en PHP](https://refactoring.guru/images/patterns/icons/php.svg?id=be1906eb26b71ec1d3b93720d6156618)](https://refactoring.guru/es/design-patterns/composite/php/example "Composite en PHP") [![Composite en Python](https://refactoring.guru/images/patterns/icons/python.svg?id=6d815d43c0f7050a1151b43e51569c9f)](https://refactoring.guru/es/design-patterns/composite/python/example "Composite en Python") [![Composite en Ruby](https://refactoring.guru/images/patterns/icons/ruby.svg?id=b065b718c914bf8e960ef731600be1eb)](https://refactoring.guru/es/design-patterns/composite/ruby/example "Composite en Ruby") [![Composite en Rust](https://refactoring.guru/images/patterns/icons/rust.svg?id=1f5698a4b5ae23fe79413511747e4a87)](https://refactoring.guru/es/design-patterns/composite/rust/example "Composite en Rust") [![Composite en Swift](https://refactoring.guru/images/patterns/icons/swift.svg?id=0b716c2d52ec3a48fbe91ac031070c1d)](https://refactoring.guru/es/design-patterns/composite/swift/example "Composite en Swift") [![Composite en TypeScript](https://refactoring.guru/images/patterns/icons/typescript.svg?id=2239d0f16cb703540c205dd8cb0c0cb7)](https://refactoring.guru/es/design-patterns/composite/typescript/example "Composite en TypeScript") --- # Builder en PHP / Patrones de diseño [There are patterns of patterns now! \ My friend's project: MetaPatterns.io](https://metapatterns.io/)  [](https://refactoring.guru/es/design-patterns/builder/php/example#checkout) [](https://refactoring.guru/es/design-patterns/builder/php/example#checkout) [](https://refactoring.guru/) / [Patrones de diseño](https://refactoring.guru/es/design-patterns) / [Builder](https://refactoring.guru/es/design-patterns/builder) / [PHP](https://refactoring.guru/es/design-patterns/php) ![Builder](https://refactoring.guru/images/patterns/cards/builder-mini-2x.png?id=de6d0938678b86903a1426dddfdd13bf) **Builder** en PHP ================== **Builder** es un patrón de diseño creacional que permite construir objetos complejos paso a paso. Al contrario que otros patrones creacionales, Builder no necesita que los productos tengan una interfaz común. Esto hace posible crear distintos productos utilizando el mismo proceso de construcción. [Aprende más sobre el patrón Builder](https://refactoring.guru/es/design-patterns/builder) Navegación  [Intro](https://refactoring.guru/es/design-patterns/builder/php/example#)  [Ejemplo conceptual](https://refactoring.guru/es/design-patterns/builder/php/example#example-0)  [index](https://refactoring.guru/es/design-patterns/builder/php/example#example-0--index-php)  [Output](https://refactoring.guru/es/design-patterns/builder/php/example#example-0--Output-txt)  [Ejemplo del mundo real](https://refactoring.guru/es/design-patterns/builder/php/example#example-1)  [index](https://refactoring.guru/es/design-patterns/builder/php/example#example-1--index-php)  [Output](https://refactoring.guru/es/design-patterns/builder/php/example#example-1--Output-txt) **Complejidad:** **Popularidad:** **Ejemplos de uso:** El patrón Builder es muy conocido en el mundo PHP. Resulta especialmente útil cuando debes crear un objeto con muchas opciones posibles de configuración. **Identificación:** El patrón Builder se puede reconocer por una clase, que tiene un único método de creación y varios métodos para configurar el objeto resultante. A menudo, los métodos del Builder soportan el encadenamiento (por ejemplo, `algúnBuilder->establecerValorA(1)->establecerValorB(2)->crear()`). Ejemplo conceptual ------------------ Este ejemplo ilustra la estructura del patrón de diseño **Builder** y se centra en las siguientes preguntas: * ¿De qué clases se compone? * ¿Qué papeles juegan esas clases? * ¿De qué forma se relacionan los elementos del patrón? Después de conocer la estructura del patrón, será más fácil comprender el siguiente ejemplo basado en un caso de uso real de PHP. #### **index.php:** Ejemplo conceptual reset(); } public function reset(): void { $this->product = new Product1(); } /\*\* \* All production steps work with the same product instance. \*/ public function producePartA(): void { $this->product->parts\[\] = "PartA1"; } public function producePartB(): void { $this->product->parts\[\] = "PartB1"; } public function producePartC(): void { $this->product->parts\[\] = "PartC1"; } /\*\* \* Concrete Builders are supposed to provide their own methods for \* retrieving results. That's because various types of builders may create \* entirely different products that don't follow the same interface. \* Therefore, such methods cannot be declared in the base Builder interface \* (at least in a statically typed programming language). Note that PHP is a \* dynamically typed language and this method CAN be in the base interface. \* However, we won't declare it there for the sake of clarity. \* \* Usually, after returning the end result to the client, a builder instance \* is expected to be ready to start producing another product. That's why \* it's a usual practice to call the reset method at the end of the \* \`getProduct\` method body. However, this behavior is not mandatory, and \* you can make your builders wait for an explicit reset call from the \* client code before disposing of the previous result. \*/ public function getProduct(): Product1 { $result = $this->product; $this->reset(); return $result; } } /\*\* \* It makes sense to use the Builder pattern only when your products are quite \* complex and require extensive configuration. \* \* Unlike in other creational patterns, different concrete builders can produce \* unrelated products. In other words, results of various builders may not \* always follow the same interface. \*/ class Product1 { public $parts = \[\]; public function listParts(): void { echo "Product parts: " . implode(', ', $this->parts) . "\\n\\n"; } } /\*\* \* The Director is only responsible for executing the building steps in a \* particular sequence. It is helpful when producing products according to a \* specific order or configuration. Strictly speaking, the Director class is \* optional, since the client can control builders directly. \*/ class Director { /\*\* \* @var Builder \*/ private $builder; /\*\* \* The Director works with any builder instance that the client code passes \* to it. This way, the client code may alter the final type of the newly \* assembled product. \*/ public function setBuilder(Builder $builder): void { $this->builder = $builder; } /\*\* \* The Director can construct several product variations using the same \* building steps. \*/ public function buildMinimalViableProduct(): void { $this->builder->producePartA(); } public function buildFullFeaturedProduct(): void { $this->builder->producePartA(); $this->builder->producePartB(); $this->builder->producePartC(); } } /\*\* \* The client code creates a builder object, passes it to the director and then \* initiates the construction process. The end result is retrieved from the \* builder object. \*/ function clientCode(Director $director) { $builder = new ConcreteBuilder1(); $director->setBuilder($builder); echo "Standard basic product:\\n"; $director->buildMinimalViableProduct(); $builder->getProduct()->listParts(); echo "Standard full featured product:\\n"; $director->buildFullFeaturedProduct(); $builder->getProduct()->listParts(); // Remember, the Builder pattern can be used without a Director class. echo "Custom product:\\n"; $builder->producePartA(); $builder->producePartC(); $builder->getProduct()->listParts(); } $director = new Director(); clientCode($director); #### **Output.txt:** Resultado de la ejecución Standard basic product: Product parts: PartA1 Standard full featured product: Product parts: PartA1, PartB1, PartC1 Custom product: Product parts: PartA1, PartC1 Ejemplo del mundo real ---------------------- Una de las mejores aplicaciones del patrón **Builder** es un constructor de una consulta SQL. La interfaz del constructor define los pasos comunes necesarios para construir una consulta SQL genérica. Por otro lado, los constructores concretos, que se corresponden con distintos dialectos SQL, implementan estos pasos devolviendo partes de consultas SQL que se pueden ejecutar en un motor de base de datos particular. #### **index.php:** Ejemplo del mundo real select(...)->where(...) \*/ interface SQLQueryBuilder { public function select(string $table, array $fields): SQLQueryBuilder; public function where(string $field, string $value, string $operator = '='): SQLQueryBuilder; public function limit(int $start, int $offset): SQLQueryBuilder; // +100 other SQL syntax methods... public function getSQL(): string; } /\*\* \* Each Concrete Builder corresponds to a specific SQL dialect and may implement \* the builder steps a little bit differently from the others. \* \* This Concrete Builder can build SQL queries compatible with MySQL. \*/ class MysqlQueryBuilder implements SQLQueryBuilder { protected $query; protected function reset(): void { $this->query = new \\stdClass(); } /\*\* \* Build a base SELECT query. \*/ public function select(string $table, array $fields): SQLQueryBuilder { $this->reset(); $this->query->base = "SELECT " . implode(", ", $fields) . " FROM " . $table; $this->query->type = 'select'; return $this; } /\*\* \* Add a WHERE condition. \*/ public function where(string $field, string $value, string $operator = '='): SQLQueryBuilder { if (!in\_array($this->query->type, \['select', 'update', 'delete'\])) { throw new \\Exception("WHERE can only be added to SELECT, UPDATE OR DELETE"); } $this->query->where\[\] = "$field $operator '$value'"; return $this; } /\*\* \* Add a LIMIT constraint. \*/ public function limit(int $start, int $offset): SQLQueryBuilder { if (!in\_array($this->query->type, \['select'\])) { throw new \\Exception("LIMIT can only be added to SELECT"); } $this->query->limit = " LIMIT " . $start . ", " . $offset; return $this; } /\*\* \* Get the final query string. \*/ public function getSQL(): string { $query = $this->query; $sql = $query->base; if (!empty($query->where)) { $sql .= " WHERE " . implode(' AND ', $query->where); } if (isset($query->limit)) { $sql .= $query->limit; } $sql .= ";"; return $sql; } } /\*\* \* This Concrete Builder is compatible with PostgreSQL. While Postgres is very \* similar to Mysql, it still has several differences. To reuse the common code, \* we extend it from the MySQL builder, while overriding some of the building \* steps. \*/ class PostgresQueryBuilder extends MysqlQueryBuilder { /\*\* \* Among other things, PostgreSQL has slightly different LIMIT syntax. \*/ public function limit(int $start, int $offset): SQLQueryBuilder { parent::limit($start, $offset); $this->query->limit = " LIMIT " . $start . " OFFSET " . $offset; return $this; } // + tons of other overrides... } /\*\* \* Note that the client code uses the builder object directly. A designated \* Director class is not necessary in this case, because the client code needs \* different queries almost every time, so the sequence of the construction \* steps cannot be easily reused. \* \* Since all our query builders create products of the same type (which is a \* string), we can interact with all builders using their common interface. \* Later, if we implement a new Builder class, we will be able to pass its \* instance to the existing client code without breaking it thanks to the \* SQLQueryBuilder interface. \*/ function clientCode(SQLQueryBuilder $queryBuilder) { // ... $query = $queryBuilder ->select("users", \["name", "email", "password"\]) ->where("age", 18, ">") ->where("age", 30, "<") ->limit(10, 20) ->getSQL(); echo $query; // ... } /\*\* \* The application selects the proper query builder type depending on a current \* configuration or the environment settings. \*/ // if ($\_ENV\['database\_type'\] == 'postgres') { // $builder = new PostgresQueryBuilder(); } else { // $builder = new MysqlQueryBuilder(); } // // clientCode($builder); echo "Testing MySQL query builder:\\n"; clientCode(new MysqlQueryBuilder()); echo "\\n\\n"; echo "Testing PostgresSQL query builder:\\n"; clientCode(new PostgresQueryBuilder()); #### **Output.txt:** Resultado de la ejecución Testing MySQL query builder: SELECT name, email, password FROM users WHERE age > '18' AND age < '30' LIMIT 10, 20; Testing PostgresSQL query builder: SELECT name, email, password FROM users WHERE age > '18' AND age < '30' LIMIT 10 OFFSET 20; **Builder** en otros lenguajes ------------------------------ [![Builder en C#](https://refactoring.guru/images/patterns/icons/csharp.svg?id=da64592defc6e86d57c39c66e9de3e58)](https://refactoring.guru/es/design-patterns/builder/csharp/example "Builder en C#") [![Builder en C++](https://refactoring.guru/images/patterns/icons/cpp.svg?id=f7782ed8b8666246bfcc3f8fefc3b858)](https://refactoring.guru/es/design-patterns/builder/cpp/example "Builder en C++") [![Builder en Go](https://refactoring.guru/images/patterns/icons/go.svg?id=1a89927eb99b1ea3fde7701d97970aca)](https://refactoring.guru/es/design-patterns/builder/go/example "Builder en Go") [![Builder en Java](https://refactoring.guru/images/patterns/icons/java.svg?id=e6d87e2dca08c953fe3acd1275ed4f4e)](https://refactoring.guru/es/design-patterns/builder/java/example "Builder en Java") [![Builder en Python](https://refactoring.guru/images/patterns/icons/python.svg?id=6d815d43c0f7050a1151b43e51569c9f)](https://refactoring.guru/es/design-patterns/builder/python/example "Builder en Python") [![Builder en Ruby](https://refactoring.guru/images/patterns/icons/ruby.svg?id=b065b718c914bf8e960ef731600be1eb)](https://refactoring.guru/es/design-patterns/builder/ruby/example "Builder en Ruby") [![Builder en Rust](https://refactoring.guru/images/patterns/icons/rust.svg?id=1f5698a4b5ae23fe79413511747e4a87)](https://refactoring.guru/es/design-patterns/builder/rust/example "Builder en Rust") [![Builder en Swift](https://refactoring.guru/images/patterns/icons/swift.svg?id=0b716c2d52ec3a48fbe91ac031070c1d)](https://refactoring.guru/es/design-patterns/builder/swift/example "Builder en Swift") [![Builder en TypeScript](https://refactoring.guru/images/patterns/icons/typescript.svg?id=2239d0f16cb703540c205dd8cb0c0cb7)](https://refactoring.guru/es/design-patterns/builder/typescript/example "Builder en TypeScript") --- # Command en Go / Patrones de diseño [There are patterns of patterns now! \ My friend's project: MetaPatterns.io](https://metapatterns.io/)  [](https://refactoring.guru/es/design-patterns/command/go/example#checkout) [](https://refactoring.guru/es/design-patterns/command/go/example#checkout) [](https://refactoring.guru/) / [Patrones de diseño](https://refactoring.guru/es/design-patterns) / [Command](https://refactoring.guru/es/design-patterns/command) / [Go](https://refactoring.guru/es/design-patterns/go) ![Command](https://refactoring.guru/images/patterns/cards/command-mini-2x.png?id=e5f6332e057f6d352a209da963a8fc54) **Command** en Go ================= **Command** es un patrón de diseño de comportamiento que convierte solicitudes u operaciones simples en objetos. La conversión permite la ejecución diferida de comandos, el almacenamiento del historial de comandos, etc. [Aprende más sobre el patrón Command](https://refactoring.guru/es/design-patterns/command) Navegación  [Intro](https://refactoring.guru/es/design-patterns/command/go/example#)  [Ejemplo conceptual](https://refactoring.guru/es/design-patterns/command/go/example#example-0)  [button](https://refactoring.guru/es/design-patterns/command/go/example#example-0--button-go)  [command](https://refactoring.guru/es/design-patterns/command/go/example#example-0--command-go)  [on­Command](https://refactoring.guru/es/design-patterns/command/go/example#example-0--onCommand-go)  [off­Command](https://refactoring.guru/es/design-patterns/command/go/example#example-0--offCommand-go)  [device](https://refactoring.guru/es/design-patterns/command/go/example#example-0--device-go)  [tv](https://refactoring.guru/es/design-patterns/command/go/example#example-0--tv-go)  [main](https://refactoring.guru/es/design-patterns/command/go/example#example-0--main-go)  [output](https://refactoring.guru/es/design-patterns/command/go/example#example-0--output-txt) Ejemplo conceptual ------------------ Veamos el patrón Command con el caso de un televisor. Un televisor puede encenderse de dos maneras: * Con el botón ON del mando; * Con el botón ON del propio televisor. Podemos comenzar implementando el objeto comando ON con el televisor como receptor. Cuando se invoca el método `execute` en este comando, éste, por su parte, invoca la función `TV.on`. La última parte consiste en definir un invocador. Tendremos dos invocadores: el mando y el propio televisor. Ambos integrarán el objeto comando ON. Observa cómo hemos envuelto la misma solicitud en varios invocadores. Podemos hacer lo mismo con otros comandos. La ventaja de crear un objeto comando separado es que desacoplamos la lógica UI de la lógica de negocio subyacente. No es necesario desarrollar distintos manejadores para cada uno de los invocadores. El objeto comando contiene toda la información que necesita ejecutar. Por lo tanto, también puede utilizarse para una ejecución retardada. #### **button.go:** Invocador package main type Button struct { command Command } func (b \*Button) press() { b.command.execute() } #### **command.go:** Interfaz comando package main type Command interface { execute() } #### **onCommand.go:** Comando concreto package main type OnCommand struct { device Device } func (c \*OnCommand) execute() { c.device.on() } #### **offCommand.go:** Comando concreto package main type OffCommand struct { device Device } func (c \*OffCommand) execute() { c.device.off() } #### **device.go:** Interfaz receptora package main type Device interface { on() off() } #### **tv.go:** Receptor concreto package main import "fmt" type Tv struct { isRunning bool } func (t \*Tv) on() { t.isRunning = true fmt.Println("Turning tv on") } func (t \*Tv) off() { t.isRunning = false fmt.Println("Turning tv off") } #### **main.go:** Código cliente package main func main() { tv := &Tv{} onCommand := &OnCommand{ device: tv, } offCommand := &OffCommand{ device: tv, } onButton := &Button{ command: onCommand, } onButton.press() offButton := &Button{ command: offCommand, } offButton.press() } #### **output.txt:** Resultado de la ejecución Turning tv on Turning tv off **Command** en otros lenguajes ------------------------------ [![Command en C#](https://refactoring.guru/images/patterns/icons/csharp.svg?id=da64592defc6e86d57c39c66e9de3e58)](https://refactoring.guru/es/design-patterns/command/csharp/example "Command en C#") [![Command en C++](https://refactoring.guru/images/patterns/icons/cpp.svg?id=f7782ed8b8666246bfcc3f8fefc3b858)](https://refactoring.guru/es/design-patterns/command/cpp/example "Command en C++") [![Command en Java](https://refactoring.guru/images/patterns/icons/java.svg?id=e6d87e2dca08c953fe3acd1275ed4f4e)](https://refactoring.guru/es/design-patterns/command/java/example "Command en Java") [![Command en PHP](https://refactoring.guru/images/patterns/icons/php.svg?id=be1906eb26b71ec1d3b93720d6156618)](https://refactoring.guru/es/design-patterns/command/php/example "Command en PHP") [![Command en Python](https://refactoring.guru/images/patterns/icons/python.svg?id=6d815d43c0f7050a1151b43e51569c9f)](https://refactoring.guru/es/design-patterns/command/python/example "Command en Python") [![Command en Ruby](https://refactoring.guru/images/patterns/icons/ruby.svg?id=b065b718c914bf8e960ef731600be1eb)](https://refactoring.guru/es/design-patterns/command/ruby/example "Command en Ruby") [![Command en Rust](https://refactoring.guru/images/patterns/icons/rust.svg?id=1f5698a4b5ae23fe79413511747e4a87)](https://refactoring.guru/es/design-patterns/command/rust/example "Command en Rust") [![Command en Swift](https://refactoring.guru/images/patterns/icons/swift.svg?id=0b716c2d52ec3a48fbe91ac031070c1d)](https://refactoring.guru/es/design-patterns/command/swift/example "Command en Swift") [![Command en TypeScript](https://refactoring.guru/images/patterns/icons/typescript.svg?id=2239d0f16cb703540c205dd8cb0c0cb7)](https://refactoring.guru/es/design-patterns/command/typescript/example "Command en TypeScript") --- # Builder en TypeScript / Patrones de diseño [There are patterns of patterns now! \ My friend's project: MetaPatterns.io](https://metapatterns.io/)  [](https://refactoring.guru/es/design-patterns/builder/typescript/example#checkout) [](https://refactoring.guru/es/design-patterns/builder/typescript/example#checkout) [](https://refactoring.guru/) / [Patrones de diseño](https://refactoring.guru/es/design-patterns) / [Builder](https://refactoring.guru/es/design-patterns/builder) / [TypeScript](https://refactoring.guru/es/design-patterns/typescript) ![Builder](https://refactoring.guru/images/patterns/cards/builder-mini-2x.png?id=de6d0938678b86903a1426dddfdd13bf) **Builder** en TypeScript ========================= **Builder** es un patrón de diseño creacional que permite construir objetos complejos paso a paso. Al contrario que otros patrones creacionales, Builder no necesita que los productos tengan una interfaz común. Esto hace posible crear distintos productos utilizando el mismo proceso de construcción. [Aprende más sobre el patrón Builder](https://refactoring.guru/es/design-patterns/builder) Navegación  [Intro](https://refactoring.guru/es/design-patterns/builder/typescript/example#)  [Ejemplo conceptual](https://refactoring.guru/es/design-patterns/builder/typescript/example#example-0)  [index](https://refactoring.guru/es/design-patterns/builder/typescript/example#example-0--index-ts)  [Output](https://refactoring.guru/es/design-patterns/builder/typescript/example#example-0--Output-txt) **Complejidad:** **Popularidad:** **Ejemplos de uso:** El patrón Builder es muy conocido en el mundo TypeScript. Resulta especialmente útil cuando debes crear un objeto con muchas opciones posibles de configuración. **Identificación:** El patrón Builder se puede reconocer por la clase, que tiene un único método de creación y varios métodos para configurar el objeto resultante. A menudo, los métodos del Builder soportan el encadenamiento (por ejemplo, `someBuilder.setValueA(1).setValueB(2).create()`). Ejemplo conceptual ------------------ Este ejemplo ilustra la estructura del patrón de diseño **Builder** y se centra en las siguientes preguntas: * ¿De qué clases se compone? * ¿Qué papeles juegan esas clases? * ¿De qué forma se relacionan los elementos del patrón? #### **index.ts:** Ejemplo conceptual /\*\* \* The Builder interface specifies methods for creating the different parts of \* the Product objects. \*/ interface Builder { producePartA(): void; producePartB(): void; producePartC(): void; } /\*\* \* The Concrete Builder classes follow the Builder interface and provide \* specific implementations of the building steps. Your program may have several \* variations of Builders, implemented differently. \*/ class ConcreteBuilder1 implements Builder { private product: Product1; /\*\* \* A fresh builder instance should contain a blank product object, which is \* used in further assembly. \*/ constructor() { this.reset(); } public reset(): void { this.product = new Product1(); } /\*\* \* All production steps work with the same product instance. \*/ public producePartA(): void { this.product.parts.push('PartA1'); } public producePartB(): void { this.product.parts.push('PartB1'); } public producePartC(): void { this.product.parts.push('PartC1'); } /\*\* \* Concrete Builders are supposed to provide their own methods for \* retrieving results. That's because various types of builders may create \* entirely different products that don't follow the same interface. \* Therefore, such methods cannot be declared in the base Builder interface \* (at least in a statically typed programming language). \* \* Usually, after returning the end result to the client, a builder instance \* is expected to be ready to start producing another product. That's why \* it's a usual practice to call the reset method at the end of the \* \`getProduct\` method body. However, this behavior is not mandatory, and \* you can make your builders wait for an explicit reset call from the \* client code before disposing of the previous result. \*/ public getProduct(): Product1 { const result = this.product; this.reset(); return result; } } /\*\* \* It makes sense to use the Builder pattern only when your products are quite \* complex and require extensive configuration. \* \* Unlike in other creational patterns, different concrete builders can produce \* unrelated products. In other words, results of various builders may not \* always follow the same interface. \*/ class Product1 { public parts: string\[\] = \[\]; public listParts(): void { console.log(\`Product parts: ${this.parts.join(', ')}\\n\`); } } /\*\* \* The Director is only responsible for executing the building steps in a \* particular sequence. It is helpful when producing products according to a \* specific order or configuration. Strictly speaking, the Director class is \* optional, since the client can control builders directly. \*/ class Director { private builder: Builder; /\*\* \* The Director works with any builder instance that the client code passes \* to it. This way, the client code may alter the final type of the newly \* assembled product. \*/ public setBuilder(builder: Builder): void { this.builder = builder; } /\*\* \* The Director can construct several product variations using the same \* building steps. \*/ public buildMinimalViableProduct(): void { this.builder.producePartA(); } public buildFullFeaturedProduct(): void { this.builder.producePartA(); this.builder.producePartB(); this.builder.producePartC(); } } /\*\* \* The client code creates a builder object, passes it to the director and then \* initiates the construction process. The end result is retrieved from the \* builder object. \*/ function clientCode(director: Director) { const builder = new ConcreteBuilder1(); director.setBuilder(builder); console.log('Standard basic product:'); director.buildMinimalViableProduct(); builder.getProduct().listParts(); console.log('Standard full featured product:'); director.buildFullFeaturedProduct(); builder.getProduct().listParts(); // Remember, the Builder pattern can be used without a Director class. console.log('Custom product:'); builder.producePartA(); builder.producePartC(); builder.getProduct().listParts(); } const director = new Director(); clientCode(director); #### **Output.txt:** Resultado de la ejecución Standard basic product: Product parts: PartA1 Standard full featured product: Product parts: PartA1, PartB1, PartC1 Custom product: Product parts: PartA1, PartC1 **Builder** en otros lenguajes ------------------------------ [![Builder en C#](https://refactoring.guru/images/patterns/icons/csharp.svg?id=da64592defc6e86d57c39c66e9de3e58)](https://refactoring.guru/es/design-patterns/builder/csharp/example "Builder en C#") [![Builder en C++](https://refactoring.guru/images/patterns/icons/cpp.svg?id=f7782ed8b8666246bfcc3f8fefc3b858)](https://refactoring.guru/es/design-patterns/builder/cpp/example "Builder en C++") [![Builder en Go](https://refactoring.guru/images/patterns/icons/go.svg?id=1a89927eb99b1ea3fde7701d97970aca)](https://refactoring.guru/es/design-patterns/builder/go/example "Builder en Go") [![Builder en Java](https://refactoring.guru/images/patterns/icons/java.svg?id=e6d87e2dca08c953fe3acd1275ed4f4e)](https://refactoring.guru/es/design-patterns/builder/java/example "Builder en Java") [![Builder en PHP](https://refactoring.guru/images/patterns/icons/php.svg?id=be1906eb26b71ec1d3b93720d6156618)](https://refactoring.guru/es/design-patterns/builder/php/example "Builder en PHP") [![Builder en Python](https://refactoring.guru/images/patterns/icons/python.svg?id=6d815d43c0f7050a1151b43e51569c9f)](https://refactoring.guru/es/design-patterns/builder/python/example "Builder en Python") [![Builder en Ruby](https://refactoring.guru/images/patterns/icons/ruby.svg?id=b065b718c914bf8e960ef731600be1eb)](https://refactoring.guru/es/design-patterns/builder/ruby/example "Builder en Ruby") [![Builder en Rust](https://refactoring.guru/images/patterns/icons/rust.svg?id=1f5698a4b5ae23fe79413511747e4a87)](https://refactoring.guru/es/design-patterns/builder/rust/example "Builder en Rust") [![Builder en Swift](https://refactoring.guru/images/patterns/icons/swift.svg?id=0b716c2d52ec3a48fbe91ac031070c1d)](https://refactoring.guru/es/design-patterns/builder/swift/example "Builder en Swift") --- # Chain of Responsibility en C++ / Patrones de diseño [There are patterns of patterns now! \ My friend's project: MetaPatterns.io](https://metapatterns.io/)  [](https://refactoring.guru/es/design-patterns/chain-of-responsibility/cpp/example#checkout) [](https://refactoring.guru/es/design-patterns/chain-of-responsibility/cpp/example#checkout) [](https://refactoring.guru/) / [Patrones de diseño](https://refactoring.guru/es/design-patterns) / [Chain of Responsibility](https://refactoring.guru/es/design-patterns/chain-of-responsibility) / [C++](https://refactoring.guru/es/design-patterns/cpp) ![Chain of Responsibility](https://refactoring.guru/images/patterns/cards/chain-of-responsibility-mini-2x.png?id=8c81f7069e51259b2443801b91135f7f) **Chain of Responsibility** en C++ ================================== **Chain of Responsibility** es un patrón de diseño de comportamiento que permite pasar solicitudes a lo largo de la cadena de manejadores potenciales hasta que uno de ellos gestiona la solicitud. El patrón permite que varios objetos gestionen la solicitud sin acoplar la clase emisora a las clases concretas de los receptores. La cadena puede componerse dinámicamente durante el tiempo de ejecución con cualquier manejador que siga una interfaz manejadora estándar. [Aprende más sobre el patrón Chain of Responsibility](https://refactoring.guru/es/design-patterns/chain-of-responsibility) Navegación  [Intro](https://refactoring.guru/es/design-patterns/chain-of-responsibility/cpp/example#)  [Ejemplo conceptual](https://refactoring.guru/es/design-patterns/chain-of-responsibility/cpp/example#example-0)  [main](https://refactoring.guru/es/design-patterns/chain-of-responsibility/cpp/example#example-0--main-cc)  [Output](https://refactoring.guru/es/design-patterns/chain-of-responsibility/cpp/example#example-0--Output-txt) **Complejidad:** **Popularidad:** **Ejemplos de uso:** El patrón Chain of Responsibility no es un invitado habitual en el programa C++, ya que tan solo es relevante cuando el código opera con cadenas de objetos. **Identificación:** El patrón es reconocible porque los métodos de comportamiento de un grupo de objetos invocan indirectamente los mismos métodos en otros objetos, mientras que todos los objetos siguen la interfaz común. Ejemplo conceptual ------------------ Este ejemplo ilustra la estructura del patrón de diseño **Chain of Responsibility**. Se centra en responder las siguientes preguntas: * ¿De qué clases se compone? * ¿Qué papeles juegan esas clases? * ¿De qué forma se relacionan los elementos del patrón? #### **main.cc:** Ejemplo conceptual /\*\* \* The Handler interface declares a method for building the chain of handlers. \* It also declares a method for executing a request. \*/ class Handler { public: virtual Handler \*SetNext(Handler \*handler) = 0; virtual std::string Handle(std::string request) = 0; }; /\*\* \* The default chaining behavior can be implemented inside a base handler class. \*/ class AbstractHandler : public Handler { /\*\* \* @var Handler \*/ private: Handler \*next\_handler\_; public: AbstractHandler() : next\_handler\_(nullptr) { } Handler \*SetNext(Handler \*handler) override { this->next\_handler\_ = handler; // Returning a handler from here will let us link handlers in a convenient // way like this: // $monkey->setNext($squirrel)->setNext($dog); return handler; } std::string Handle(std::string request) override { if (this->next\_handler\_) { return this->next\_handler\_->Handle(request); } return {}; } }; /\*\* \* All Concrete Handlers either handle a request or pass it to the next handler \* in the chain. \*/ class MonkeyHandler : public AbstractHandler { public: std::string Handle(std::string request) override { if (request == "Banana") { return "Monkey: I'll eat the " + request + ".\\n"; } else { return AbstractHandler::Handle(request); } } }; class SquirrelHandler : public AbstractHandler { public: std::string Handle(std::string request) override { if (request == "Nut") { return "Squirrel: I'll eat the " + request + ".\\n"; } else { return AbstractHandler::Handle(request); } } }; class DogHandler : public AbstractHandler { public: std::string Handle(std::string request) override { if (request == "MeatBall") { return "Dog: I'll eat the " + request + ".\\n"; } else { return AbstractHandler::Handle(request); } } }; /\*\* \* The client code is usually suited to work with a single handler. In most \* cases, it is not even aware that the handler is part of a chain. \*/ void ClientCode(Handler &handler) { std::vector food = {"Nut", "Banana", "Cup of coffee"}; for (const std::string &f : food) { std::cout << "Client: Who wants a " << f << "?\\n"; const std::string result = handler.Handle(f); if (!result.empty()) { std::cout << " " << result; } else { std::cout << " " << f << " was left untouched.\\n"; } } } /\*\* \* The other part of the client code constructs the actual chain. \*/ int main() { MonkeyHandler \*monkey = new MonkeyHandler; SquirrelHandler \*squirrel = new SquirrelHandler; DogHandler \*dog = new DogHandler; monkey->SetNext(squirrel)->SetNext(dog); /\*\* \* The client should be able to send a request to any handler, not just the \* first one in the chain. \*/ std::cout << "Chain: Monkey > Squirrel > Dog\\n\\n"; ClientCode(\*monkey); std::cout << "\\n"; std::cout << "Subchain: Squirrel > Dog\\n\\n"; ClientCode(\*squirrel); delete monkey; delete squirrel; delete dog; return 0; } #### **Output.txt:** Resultado de la ejecución Chain: Monkey > Squirrel > Dog Client: Who wants a Nut? Squirrel: I'll eat the Nut. Client: Who wants a Banana? Monkey: I'll eat the Banana. Client: Who wants a Cup of coffee? Cup of coffee was left untouched. Subchain: Squirrel > Dog Client: Who wants a Nut? Squirrel: I'll eat the Nut. Client: Who wants a Banana? Banana was left untouched. Client: Who wants a Cup of coffee? Cup of coffee was left untouched. **Chain of Responsibility** en otros lenguajes ---------------------------------------------- [![Chain of Responsibility en C#](https://refactoring.guru/images/patterns/icons/csharp.svg?id=da64592defc6e86d57c39c66e9de3e58)](https://refactoring.guru/es/design-patterns/chain-of-responsibility/csharp/example "Chain of Responsibility en C#") [![Chain of Responsibility en Go](https://refactoring.guru/images/patterns/icons/go.svg?id=1a89927eb99b1ea3fde7701d97970aca)](https://refactoring.guru/es/design-patterns/chain-of-responsibility/go/example "Chain of Responsibility en Go") [![Chain of Responsibility en Java](https://refactoring.guru/images/patterns/icons/java.svg?id=e6d87e2dca08c953fe3acd1275ed4f4e)](https://refactoring.guru/es/design-patterns/chain-of-responsibility/java/example "Chain of Responsibility en Java") [![Chain of Responsibility en PHP](https://refactoring.guru/images/patterns/icons/php.svg?id=be1906eb26b71ec1d3b93720d6156618)](https://refactoring.guru/es/design-patterns/chain-of-responsibility/php/example "Chain of Responsibility en PHP") [![Chain of Responsibility en Python](https://refactoring.guru/images/patterns/icons/python.svg?id=6d815d43c0f7050a1151b43e51569c9f)](https://refactoring.guru/es/design-patterns/chain-of-responsibility/python/example "Chain of Responsibility en Python") [![Chain of Responsibility en Ruby](https://refactoring.guru/images/patterns/icons/ruby.svg?id=b065b718c914bf8e960ef731600be1eb)](https://refactoring.guru/es/design-patterns/chain-of-responsibility/ruby/example "Chain of Responsibility en Ruby") [![Chain of Responsibility en Rust](https://refactoring.guru/images/patterns/icons/rust.svg?id=1f5698a4b5ae23fe79413511747e4a87)](https://refactoring.guru/es/design-patterns/chain-of-responsibility/rust/example "Chain of Responsibility en Rust") [![Chain of Responsibility en Swift](https://refactoring.guru/images/patterns/icons/swift.svg?id=0b716c2d52ec3a48fbe91ac031070c1d)](https://refactoring.guru/es/design-patterns/chain-of-responsibility/swift/example "Chain of Responsibility en Swift") [![Chain of Responsibility en TypeScript](https://refactoring.guru/images/patterns/icons/typescript.svg?id=2239d0f16cb703540c205dd8cb0c0cb7)](https://refactoring.guru/es/design-patterns/chain-of-responsibility/typescript/example "Chain of Responsibility en TypeScript") --- # Chain of Responsibility en Go / Patrones de diseño [There are patterns of patterns now! \ My friend's project: MetaPatterns.io](https://metapatterns.io/)  [](https://refactoring.guru/es/design-patterns/chain-of-responsibility/go/example#checkout) [](https://refactoring.guru/es/design-patterns/chain-of-responsibility/go/example#checkout) [](https://refactoring.guru/) / [Patrones de diseño](https://refactoring.guru/es/design-patterns) / [Chain of Responsibility](https://refactoring.guru/es/design-patterns/chain-of-responsibility) / [Go](https://refactoring.guru/es/design-patterns/go) ![Chain of Responsibility](https://refactoring.guru/images/patterns/cards/chain-of-responsibility-mini-2x.png?id=8c81f7069e51259b2443801b91135f7f) **Chain of Responsibility** en Go ================================= **Chain of Responsibility** es un patrón de diseño de comportamiento que permite pasar solicitudes a lo largo de la cadena de manejadores potenciales hasta que uno de ellos gestiona la solicitud. El patrón permite que varios objetos gestionen la solicitud sin acoplar la clase emisora a las clases concretas de los receptores. La cadena puede componerse dinámicamente durante el tiempo de ejecución con cualquier manejador que siga una interfaz manejadora estándar. [Aprende más sobre el patrón Chain of Responsibility](https://refactoring.guru/es/design-patterns/chain-of-responsibility) Navegación  [Intro](https://refactoring.guru/es/design-patterns/chain-of-responsibility/go/example#)  [Ejemplo conceptual](https://refactoring.guru/es/design-patterns/chain-of-responsibility/go/example#example-0)  [department](https://refactoring.guru/es/design-patterns/chain-of-responsibility/go/example#example-0--department-go)  [reception](https://refactoring.guru/es/design-patterns/chain-of-responsibility/go/example#example-0--reception-go)  [doctor](https://refactoring.guru/es/design-patterns/chain-of-responsibility/go/example#example-0--doctor-go)  [medical](https://refactoring.guru/es/design-patterns/chain-of-responsibility/go/example#example-0--medical-go)  [cashier](https://refactoring.guru/es/design-patterns/chain-of-responsibility/go/example#example-0--cashier-go)  [patient](https://refactoring.guru/es/design-patterns/chain-of-responsibility/go/example#example-0--patient-go)  [main](https://refactoring.guru/es/design-patterns/chain-of-responsibility/go/example#example-0--main-go)  [output](https://refactoring.guru/es/design-patterns/chain-of-responsibility/go/example#example-0--output-txt) Ejemplo conceptual ------------------ Veamos el patrón Chain of Responsibility con el caso de una aplicación de hospital. Un hospital puede tener varios departamentos, como: * Recepción * Consulta * Sala de curas * Caja Cuando llega un paciente, primero pasa por recepción, después por la consulta del médico y después por la sala de curas, y por último por la caja (etcétera). El paciente pasa por una cadena de departamentos y cada uno de ellos envía al paciente un poco más allá en la cadena, una vez que se complete su función. El patrón se aplica cuando hay varios candidatos para procesar la misma solicitud. Cuando no quieres que el cliente elija el receptor ya que varios objetos pueden gestionar la solicitud. Además, quieres desacoplar el cliente de los receptores. El cliente solo necesita conocer el primer elemento de la cadena. Al igual que en el ejemplo del hospital, el paciente pasa primero por la recepción. Después, en base al estado del paciente, desde recepción lo envían al siguiente manejador de la cadena. #### **department.go:** Interfaz manejador package main type Department interface { execute(\*Patient) setNext(Department) } #### **reception.go:** Manipulador concreto package main import "fmt" type Reception struct { next Department } func (r \*Reception) execute(p \*Patient) { if p.registrationDone { fmt.Println("Patient registration already done") r.next.execute(p) return } fmt.Println("Reception registering patient") p.registrationDone = true r.next.execute(p) } func (r \*Reception) setNext(next Department) { r.next = next } #### **doctor.go:** Manipulador concreto package main import "fmt" type Doctor struct { next Department } func (d \*Doctor) execute(p \*Patient) { if p.doctorCheckUpDone { fmt.Println("Doctor checkup already done") d.next.execute(p) return } fmt.Println("Doctor checking patient") p.doctorCheckUpDone = true d.next.execute(p) } func (d \*Doctor) setNext(next Department) { d.next = next } #### **medical.go:** Manipulador concreto package main import "fmt" type Medical struct { next Department } func (m \*Medical) execute(p \*Patient) { if p.medicineDone { fmt.Println("Medicine already given to patient") m.next.execute(p) return } fmt.Println("Medical giving medicine to patient") p.medicineDone = true m.next.execute(p) } func (m \*Medical) setNext(next Department) { m.next = next } #### **cashier.go:** Manipulador concreto package main import "fmt" type Cashier struct { next Department } func (c \*Cashier) execute(p \*Patient) { if p.paymentDone { fmt.Println("Payment Done") } fmt.Println("Cashier getting money from patient patient") } func (c \*Cashier) setNext(next Department) { c.next = next } #### **patient.go** package main type Patient struct { name string registrationDone bool doctorCheckUpDone bool medicineDone bool paymentDone bool } #### **main.go:** Código cliente package main func main() { cashier := &Cashier{} //Set next for medical department medical := &Medical{} medical.setNext(cashier) //Set next for doctor department doctor := &Doctor{} doctor.setNext(medical) //Set next for reception department reception := &Reception{} reception.setNext(doctor) patient := &Patient{name: "abc"} //Patient visiting reception.execute(patient) } #### **output.txt:** Resultado de la ejecución Reception registering patient Doctor checking patient Medical giving medicine to patient Cashier getting money from patient patient **Chain of Responsibility** en otros lenguajes ---------------------------------------------- [![Chain of Responsibility en C#](https://refactoring.guru/images/patterns/icons/csharp.svg?id=da64592defc6e86d57c39c66e9de3e58)](https://refactoring.guru/es/design-patterns/chain-of-responsibility/csharp/example "Chain of Responsibility en C#") [![Chain of Responsibility en C++](https://refactoring.guru/images/patterns/icons/cpp.svg?id=f7782ed8b8666246bfcc3f8fefc3b858)](https://refactoring.guru/es/design-patterns/chain-of-responsibility/cpp/example "Chain of Responsibility en C++") [![Chain of Responsibility en Java](https://refactoring.guru/images/patterns/icons/java.svg?id=e6d87e2dca08c953fe3acd1275ed4f4e)](https://refactoring.guru/es/design-patterns/chain-of-responsibility/java/example "Chain of Responsibility en Java") [![Chain of Responsibility en PHP](https://refactoring.guru/images/patterns/icons/php.svg?id=be1906eb26b71ec1d3b93720d6156618)](https://refactoring.guru/es/design-patterns/chain-of-responsibility/php/example "Chain of Responsibility en PHP") [![Chain of Responsibility en Python](https://refactoring.guru/images/patterns/icons/python.svg?id=6d815d43c0f7050a1151b43e51569c9f)](https://refactoring.guru/es/design-patterns/chain-of-responsibility/python/example "Chain of Responsibility en Python") [![Chain of Responsibility en Ruby](https://refactoring.guru/images/patterns/icons/ruby.svg?id=b065b718c914bf8e960ef731600be1eb)](https://refactoring.guru/es/design-patterns/chain-of-responsibility/ruby/example "Chain of Responsibility en Ruby") [![Chain of Responsibility en Rust](https://refactoring.guru/images/patterns/icons/rust.svg?id=1f5698a4b5ae23fe79413511747e4a87)](https://refactoring.guru/es/design-patterns/chain-of-responsibility/rust/example "Chain of Responsibility en Rust") [![Chain of Responsibility en Swift](https://refactoring.guru/images/patterns/icons/swift.svg?id=0b716c2d52ec3a48fbe91ac031070c1d)](https://refactoring.guru/es/design-patterns/chain-of-responsibility/swift/example "Chain of Responsibility en Swift") [![Chain of Responsibility en TypeScript](https://refactoring.guru/images/patterns/icons/typescript.svg?id=2239d0f16cb703540c205dd8cb0c0cb7)](https://refactoring.guru/es/design-patterns/chain-of-responsibility/typescript/example "Chain of Responsibility en TypeScript") --- # Chain of Responsibility en Java / Patrones de diseño [There are patterns of patterns now! \ My friend's project: MetaPatterns.io](https://metapatterns.io/)  [](https://refactoring.guru/es/design-patterns/chain-of-responsibility/java/example#checkout) [](https://refactoring.guru/es/design-patterns/chain-of-responsibility/java/example#checkout) [](https://refactoring.guru/) / [Patrones de diseño](https://refactoring.guru/es/design-patterns) / [Chain of Responsibility](https://refactoring.guru/es/design-patterns/chain-of-responsibility) / [Java](https://refactoring.guru/es/design-patterns/java) ![Chain of Responsibility](https://refactoring.guru/images/patterns/cards/chain-of-responsibility-mini-2x.png?id=8c81f7069e51259b2443801b91135f7f) **Chain of Responsibility** en Java =================================== **Chain of Responsibility** es un patrón de diseño de comportamiento que permite pasar solicitudes a lo largo de la cadena de manejadores potenciales hasta que uno de ellos gestiona la solicitud. El patrón permite que varios objetos gestionen la solicitud sin acoplar la clase emisora a las clases concretas de los receptores. La cadena puede componerse dinámicamente durante el tiempo de ejecución con cualquier manejador que siga una interfaz manejadora estándar. [Aprende más sobre el patrón Chain of Responsibility](https://refactoring.guru/es/design-patterns/chain-of-responsibility) Navegación  [Intro](https://refactoring.guru/es/design-patterns/chain-of-responsibility/java/example#)  [Acceso filtrado](https://refactoring.guru/es/design-patterns/chain-of-responsibility/java/example#example-0)  middleware   [Middleware](https://refactoring.guru/es/design-patterns/chain-of-responsibility/java/example#example-0--middleware-Middleware-java)   [Throttling­Middleware](https://refactoring.guru/es/design-patterns/chain-of-responsibility/java/example#example-0--middleware-ThrottlingMiddleware-java)   [User­Exists­Middleware](https://refactoring.guru/es/design-patterns/chain-of-responsibility/java/example#example-0--middleware-UserExistsMiddleware-java)   [Role­Check­Middleware](https://refactoring.guru/es/design-patterns/chain-of-responsibility/java/example#example-0--middleware-RoleCheckMiddleware-java)  server   [Server](https://refactoring.guru/es/design-patterns/chain-of-responsibility/java/example#example-0--server-Server-java)  [Demo](https://refactoring.guru/es/design-patterns/chain-of-responsibility/java/example#example-0--Demo-java)  [Output­Demo](https://refactoring.guru/es/design-patterns/chain-of-responsibility/java/example#example-0--OutputDemo-txt) **Complejidad:** **Popularidad:** **Ejemplos de uso:** El patrón Chain of Responsibility no es un invitado habitual en el programa Java, ya que tan solo es relevante cuando el código opera con cadenas de objetos. Uno de los casos de uso más populares para el patrón es la propagación de eventos a los componentes padre (_bubbling_) de las clases GUI. Otro caso de uso notable son los filtros de acceso secuencial. Aquí tienes algunos ejemplos del patrón en las principales bibliotecas Java: * [`javax.servlet.Filter#doFilter()`](http://docs.oracle.com/javaee/7/api/javax/servlet/Filter.html#doFilter-javax.servlet.ServletRequest-javax.servlet.ServletResponse-javax.servlet.FilterChain-) * [`java.util.logging.Logger#log()`](http://docs.oracle.com/javase/8/docs/api/java/util/logging/Logger.html#log-java.util.logging.Level-java.lang.String-) **Identificación:** El patrón es reconocible porque los métodos de comportamiento de un grupo de objetos invocan indirectamente los mismos métodos en otros objetos, mientras que todos los objetos siguen la interfaz común. Acceso filtrado --------------- Este ejemplo muestra cómo una solicitud que contiene información de usuario pasa una cadena secuencial de manejadores que realizan varias acciones, como la autenticación, autorización y validación. Este ejemplo es un poco diferente de la versión estándar del patrón establecida por varios autores. La mayoría de ejemplos del patrón se basan en la noción de buscar el manejador adecuado, lanzarlo y salir de la cadena a continuación. Pero aquí ejecutamos todos los manejadores hasta que hay uno que **no puede gestionar** una solicitud. Ten en cuenta que éste sigue siendo el patrón Chain of Responsibility, aunque el flujo es un poco distinto. ### **middleware** #### **middleware/Middleware.java:** Interfaz de validación básica package refactoring\_guru.chain\_of\_responsibility.example.middleware; /\*\* \* Base middleware class. \*/ public abstract class Middleware { private Middleware next; /\*\* \* Builds chains of middleware objects. \*/ public static Middleware link(Middleware first, Middleware... chain) { Middleware head = first; for (Middleware nextInChain: chain) { head.next = nextInChain; head = nextInChain; } return first; } /\*\* \* Subclasses will implement this method with concrete checks. \*/ public abstract boolean check(String email, String password); /\*\* \* Runs check on the next object in chain or ends traversing if we're in \* last object in chain. \*/ protected boolean checkNext(String email, String password) { if (next == null) { return true; } return next.check(email, password); } } #### **middleware/ThrottlingMiddleware.java:** Comprueba el límite de cantidad de solicitudes package refactoring\_guru.chain\_of\_responsibility.example.middleware; /\*\* \* ConcreteHandler. Checks whether there are too many failed login requests. \*/ public class ThrottlingMiddleware extends Middleware { private int requestPerMinute; private int request; private long currentTime; public ThrottlingMiddleware(int requestPerMinute) { this.requestPerMinute = requestPerMinute; this.currentTime = System.currentTimeMillis(); } /\*\* \* Please, not that checkNext() call can be inserted both in the beginning \* of this method and in the end. \* \* This gives much more flexibility than a simple loop over all middleware \* objects. For instance, an element of a chain can change the order of \* checks by running its check after all other checks. \*/ public boolean check(String email, String password) { if (System.currentTimeMillis() > currentTime + 60\_000) { request = 0; currentTime = System.currentTimeMillis(); } request++; if (request > requestPerMinute) { System.out.println("Request limit exceeded!"); Thread.currentThread().stop(); } return checkNext(email, password); } } #### **middleware/UserExistsMiddleware.java:** Comprueba las credenciales del usuario package refactoring\_guru.chain\_of\_responsibility.example.middleware; import refactoring\_guru.chain\_of\_responsibility.example.server.Server; /\*\* \* ConcreteHandler. Checks whether a user with the given credentials exists. \*/ public class UserExistsMiddleware extends Middleware { private Server server; public UserExistsMiddleware(Server server) { this.server = server; } public boolean check(String email, String password) { if (!server.hasEmail(email)) { System.out.println("This email is not registered!"); return false; } if (!server.isValidPassword(email, password)) { System.out.println("Wrong password!"); return false; } return checkNext(email, password); } } #### **middleware/RoleCheckMiddleware.java:** Comprueba el papel del usuario package refactoring\_guru.chain\_of\_responsibility.example.middleware; /\*\* \* ConcreteHandler. Checks a user's role. \*/ public class RoleCheckMiddleware extends Middleware { public boolean check(String email, String password) { if (email.equals("admin@example.com")) { System.out.println("Hello, admin!"); return true; } System.out.println("Hello, user!"); return checkNext(email, password); } } ### **server** #### **server/Server.java:** Objetivo de la autorización package refactoring\_guru.chain\_of\_responsibility.example.server; import refactoring\_guru.chain\_of\_responsibility.example.middleware.Middleware; import java.util.HashMap; import java.util.Map; /\*\* \* Server class. \*/ public class Server { private Map users = new HashMap<>(); private Middleware middleware; /\*\* \* Client passes a chain of object to server. This improves flexibility and \* makes testing the server class easier. \*/ public void setMiddleware(Middleware middleware) { this.middleware = middleware; } /\*\* \* Server gets email and password from client and sends the authorization \* request to the chain. \*/ public boolean logIn(String email, String password) { if (middleware.check(email, password)) { System.out.println("Authorization have been successful!"); // Do something useful here for authorized users. return true; } return false; } public void register(String email, String password) { users.put(email, password); } public boolean hasEmail(String email) { return users.containsKey(email); } public boolean isValidPassword(String email, String password) { return users.get(email).equals(password); } } #### **Demo.java:** Código cliente package refactoring\_guru.chain\_of\_responsibility.example; import refactoring\_guru.chain\_of\_responsibility.example.middleware.Middleware; import refactoring\_guru.chain\_of\_responsibility.example.middleware.RoleCheckMiddleware; import refactoring\_guru.chain\_of\_responsibility.example.middleware.ThrottlingMiddleware; import refactoring\_guru.chain\_of\_responsibility.example.middleware.UserExistsMiddleware; import refactoring\_guru.chain\_of\_responsibility.example.server.Server; import java.io.BufferedReader; import java.io.IOException; import java.io.InputStreamReader; /\*\* \* Demo class. Everything comes together here. \*/ public class Demo { private static BufferedReader reader = new BufferedReader(new InputStreamReader(System.in)); private static Server server; private static void init() { server = new Server(); server.register("admin@example.com", "admin\_pass"); server.register("user@example.com", "user\_pass"); // All checks are linked. Client can build various chains using the same // components. Middleware middleware = Middleware.link( new ThrottlingMiddleware(2), new UserExistsMiddleware(server), new RoleCheckMiddleware() ); // Server gets a chain from client code. server.setMiddleware(middleware); } public static void main(String\[\] args) throws IOException { init(); boolean success; do { System.out.print("Enter email: "); String email = reader.readLine(); System.out.print("Input password: "); String password = reader.readLine(); success = server.logIn(email, password); } while (!success); } } #### **OutputDemo.txt:** Resultado de la ejecución Enter email: admin@example.com Input password: admin\_pass Hello, admin! Authorization have been successful! Enter email: wrong@example.com Input password: wrong\_pass This email is not registered! Enter email: wrong@example.com Input password: wrong\_pass This email is not registered! Enter email: wrong@example.com Input password: wrong\_pass Request limit exceeded! **Chain of Responsibility** en otros lenguajes ---------------------------------------------- [![Chain of Responsibility en C#](https://refactoring.guru/images/patterns/icons/csharp.svg?id=da64592defc6e86d57c39c66e9de3e58)](https://refactoring.guru/es/design-patterns/chain-of-responsibility/csharp/example "Chain of Responsibility en C#") [![Chain of Responsibility en C++](https://refactoring.guru/images/patterns/icons/cpp.svg?id=f7782ed8b8666246bfcc3f8fefc3b858)](https://refactoring.guru/es/design-patterns/chain-of-responsibility/cpp/example "Chain of Responsibility en C++") [![Chain of Responsibility en Go](https://refactoring.guru/images/patterns/icons/go.svg?id=1a89927eb99b1ea3fde7701d97970aca)](https://refactoring.guru/es/design-patterns/chain-of-responsibility/go/example "Chain of Responsibility en Go") [![Chain of Responsibility en PHP](https://refactoring.guru/images/patterns/icons/php.svg?id=be1906eb26b71ec1d3b93720d6156618)](https://refactoring.guru/es/design-patterns/chain-of-responsibility/php/example "Chain of Responsibility en PHP") [![Chain of Responsibility en Python](https://refactoring.guru/images/patterns/icons/python.svg?id=6d815d43c0f7050a1151b43e51569c9f)](https://refactoring.guru/es/design-patterns/chain-of-responsibility/python/example "Chain of Responsibility en Python") [![Chain of Responsibility en Ruby](https://refactoring.guru/images/patterns/icons/ruby.svg?id=b065b718c914bf8e960ef731600be1eb)](https://refactoring.guru/es/design-patterns/chain-of-responsibility/ruby/example "Chain of Responsibility en Ruby") [![Chain of Responsibility en Rust](https://refactoring.guru/images/patterns/icons/rust.svg?id=1f5698a4b5ae23fe79413511747e4a87)](https://refactoring.guru/es/design-patterns/chain-of-responsibility/rust/example "Chain of Responsibility en Rust") [![Chain of Responsibility en Swift](https://refactoring.guru/images/patterns/icons/swift.svg?id=0b716c2d52ec3a48fbe91ac031070c1d)](https://refactoring.guru/es/design-patterns/chain-of-responsibility/swift/example "Chain of Responsibility en Swift") [![Chain of Responsibility en TypeScript](https://refactoring.guru/images/patterns/icons/typescript.svg?id=2239d0f16cb703540c205dd8cb0c0cb7)](https://refactoring.guru/es/design-patterns/chain-of-responsibility/typescript/example "Chain of Responsibility en TypeScript") --- # El catálogo de patrones de diseño [There are patterns of patterns now! \ My friend's project: MetaPatterns.io](https://metapatterns.io/)  [](https://refactoring.guru/es/design-patterns/catalog#checkout) [](https://refactoring.guru/es/design-patterns/catalog#checkout) El catálogo de patrones de diseño ================================= ### Patrones creacionales Estos patrones proporcionan mecanismos de creación de objetos que incrementan la flexibilidad y la reutilización del código existente. [![Factory Method](https://refactoring.guru/images/patterns/cards/factory-method-mini-3x.png) Factory Method](https://refactoring.guru/es/design-patterns/factory-method) [![Abstract Factory](https://refactoring.guru/images/patterns/cards/abstract-factory-mini-3x.png) Abstract Factory](https://refactoring.guru/es/design-patterns/abstract-factory) [![Builder](https://refactoring.guru/images/patterns/cards/builder-mini-3x.png) Builder](https://refactoring.guru/es/design-patterns/builder) [![Prototype](https://refactoring.guru/images/patterns/cards/prototype-mini-3x.png) Prototype](https://refactoring.guru/es/design-patterns/prototype) [![Singleton](https://refactoring.guru/images/patterns/cards/singleton-mini-3x.png) Singleton](https://refactoring.guru/es/design-patterns/singleton) ### Patrones estructurales Estos patrones explican cómo ensamblar objetos y clases en estructuras más grandes, mientras se mantiene la flexibilidad y eficiencia de la estructura. [![Adapter](https://refactoring.guru/images/patterns/cards/adapter-mini-3x.png) Adapter](https://refactoring.guru/es/design-patterns/adapter) [![Bridge](https://refactoring.guru/images/patterns/cards/bridge-mini-3x.png) Bridge](https://refactoring.guru/es/design-patterns/bridge) [![Composite](https://refactoring.guru/images/patterns/cards/composite-mini-3x.png) Composite](https://refactoring.guru/es/design-patterns/composite) [![Decorator](https://refactoring.guru/images/patterns/cards/decorator-mini-3x.png) Decorator](https://refactoring.guru/es/design-patterns/decorator) [![Facade](https://refactoring.guru/images/patterns/cards/facade-mini-3x.png) Facade](https://refactoring.guru/es/design-patterns/facade) [![Flyweight](https://refactoring.guru/images/patterns/cards/flyweight-mini-3x.png) Flyweight](https://refactoring.guru/es/design-patterns/flyweight) [![Proxy](https://refactoring.guru/images/patterns/cards/proxy-mini-3x.png) Proxy](https://refactoring.guru/es/design-patterns/proxy) ### Patrones de comportamiento Estos patrones tratan con algoritmos y la asignación de responsabilidades entre objetos. [![Chain of Responsibility](https://refactoring.guru/images/patterns/cards/chain-of-responsibility-mini-3x.png) Chain of Responsibility](https://refactoring.guru/es/design-patterns/chain-of-responsibility) [![Command](https://refactoring.guru/images/patterns/cards/command-mini-3x.png) Command](https://refactoring.guru/es/design-patterns/command) [![Iterator](https://refactoring.guru/images/patterns/cards/iterator-mini-3x.png) Iterator](https://refactoring.guru/es/design-patterns/iterator) [![Mediator](https://refactoring.guru/images/patterns/cards/mediator-mini-3x.png) Mediator](https://refactoring.guru/es/design-patterns/mediator) [![Memento](https://refactoring.guru/images/patterns/cards/memento-mini-3x.png) Memento](https://refactoring.guru/es/design-patterns/memento) [![Observer](https://refactoring.guru/images/patterns/cards/observer-mini-3x.png) Observer](https://refactoring.guru/es/design-patterns/observer) [![State](https://refactoring.guru/images/patterns/cards/state-mini-3x.png) State](https://refactoring.guru/es/design-patterns/state) [![Strategy](https://refactoring.guru/images/patterns/cards/strategy-mini-3x.png) Strategy](https://refactoring.guru/es/design-patterns/strategy) [![Template Method](https://refactoring.guru/images/patterns/cards/template-method-mini-3x.png) Template Method](https://refactoring.guru/es/design-patterns/template-method) [![Visitor](https://refactoring.guru/images/patterns/cards/visitor-mini-3x.png) Visitor](https://refactoring.guru/es/design-patterns/visitor) --- # Composite en Ruby / Patrones de diseño [There are patterns of patterns now! \ My friend's project: MetaPatterns.io](https://metapatterns.io/)  [](https://refactoring.guru/es/design-patterns/composite/ruby/example#checkout) [](https://refactoring.guru/es/design-patterns/composite/ruby/example#checkout) [](https://refactoring.guru/) / [Patrones de diseño](https://refactoring.guru/es/design-patterns) / [Composite](https://refactoring.guru/es/design-patterns/composite) / [Ruby](https://refactoring.guru/es/design-patterns/ruby) ![Composite](https://refactoring.guru/images/patterns/cards/composite-mini-2x.png?id=3f7f811fefeb0b64f6774746eb42af09) **Composite** en Ruby ===================== **Composite** es un patrón de diseño estructural que permite componer objetos en una estructura en forma de árbol y trabajar con ella como si fuera un objeto único. El patrón Composite se convirtió en una solución muy popular para la mayoría de problemas que requieren la creación de una estructura de árbol. La gran característica del Composite es la capacidad para ejecutar métodos de forma recursiva por toda la estructura de árbol y recapitular los resultados. [Aprende más sobre el patrón Composite](https://refactoring.guru/es/design-patterns/composite) Navegación  [Intro](https://refactoring.guru/es/design-patterns/composite/ruby/example#)  [Ejemplo conceptual](https://refactoring.guru/es/design-patterns/composite/ruby/example#example-0)  [main](https://refactoring.guru/es/design-patterns/composite/ruby/example#example-0--main-rb)  [output](https://refactoring.guru/es/design-patterns/composite/ruby/example#example-0--output-txt) **Complejidad:** **Popularidad:** **Ejemplos de uso:** El patrón Composite es muy común en el código Ruby. Se utiliza a menudo para representar jerarquías de componentes de interfaz de usuario o el código que trabaja con gráficos. **Identificación:** El Composite es fácil de reconocer por los métodos de comportamiento que toman una instancia del mismo tipo abstracto/interfaz y lo hacen una estructura de árbol. Ejemplo conceptual ------------------ Este ejemplo ilustra la estructura del patrón de diseño **Composite**. Se centra en responder las siguientes preguntas: * ¿De qué clases se compone? * ¿Qué papeles juegan esas clases? * ¿De qué forma se relacionan los elementos del patrón? #### **main.rb:** Ejemplo conceptual \# The base Component class declares common operations for both simple and # complex objects of a composition. class Component # @return \[Component\] def parent @parent end # Optionally, the base Component can declare an interface for setting and # accessing a parent of the component in a tree structure. It can also provide # some default implementation for these methods. def parent=(parent) @parent = parent end # In some cases, it would be beneficial to define the child-management # operations right in the base Component class. This way, you won't need to # expose any concrete component classes to the client code, even during the # object tree assembly. The downside is that these methods will be empty for # the leaf-level components. def add(component) raise NotImplementedError, "#{self.class} has not implemented method '#{\_\_method\_\_}'" end # @abstract # # @param \[Component\] component def remove(component) raise NotImplementedError, "#{self.class} has not implemented method '#{\_\_method\_\_}'" end # You can provide a method that lets the client code figure out whether a # component can bear children. def composite? false end # The base Component may implement some default behavior or leave it to # concrete classes (by declaring the method containing the behavior as # "abstract"). def operation raise NotImplementedError, "#{self.class} has not implemented method '#{\_\_method\_\_}'" end end # The Leaf class represents the end objects of a composition. A leaf can't have # any children. # # Usually, it's the Leaf objects that do the actual work, whereas Composite # objects only delegate to their sub-components. class Leaf < Component # return \[String\] def operation 'Leaf' end end # The Composite class represents the complex components that may have children. # Usually, the Composite objects delegate the actual work to their children and # then "sum-up" the result. class Composite < Component def initialize @children = \[\] end # A composite object can add or remove other components (both simple or # complex) to or from its child list. # @param \[Component\] component def add(component) @children.append(component) component.parent = self end # @param \[Component\] component def remove(component) @children.remove(component) component.parent = nil end # @return \[Boolean\] def composite? true end # The Composite executes its primary logic in a particular way. It traverses # recursively through all its children, collecting and summing their results. # Since the composite's children pass these calls to their children and so # forth, the whole object tree is traversed as a result. def operation results = \[\] @children.each { |child| results.append(child.operation) } "Branch(#{results.join('+')})" end end # The client code works with all of the components via the base interface. def client\_code(component) puts "RESULT: #{component.operation}" end # Thanks to the fact that the child-management operations are declared in the # base Component class, the client code can work with any component, simple or # complex, without depending on their concrete classes. def client\_code2(component1, component2) component1.add(component2) if component1.composite? print "RESULT: #{component1.operation}" end # This way the client code can support the simple leaf components... simple = Leaf.new puts 'Client: I\\'ve got a simple component:' client\_code(simple) puts "\\n" # ...as well as the complex composites. tree = Composite.new branch1 = Composite.new branch1.add(Leaf.new) branch1.add(Leaf.new) branch2 = Composite.new branch2.add(Leaf.new) tree.add(branch1) tree.add(branch2) puts 'Client: Now I\\'ve got a composite tree:' client\_code(tree) puts "\\n" puts 'Client: I don\\'t need to check the components classes even when managing the tree:' client\_code2(tree, simple) #### **output.txt:** Resultado de la ejecución Client: I've got a simple component: RESULT: Leaf Client: Now I've got a composite tree: RESULT: Branch(Branch(Leaf+Leaf)+Branch(Leaf)) Client: I don't need to check the components classes even when managing the tree: RESULT: Branch(Branch(Leaf+Leaf)+Branch(Leaf)+Leaf) **Composite** en otros lenguajes -------------------------------- [![Composite en C#](https://refactoring.guru/images/patterns/icons/csharp.svg?id=da64592defc6e86d57c39c66e9de3e58)](https://refactoring.guru/es/design-patterns/composite/csharp/example "Composite en C#") [![Composite en C++](https://refactoring.guru/images/patterns/icons/cpp.svg?id=f7782ed8b8666246bfcc3f8fefc3b858)](https://refactoring.guru/es/design-patterns/composite/cpp/example "Composite en C++") [![Composite en Go](https://refactoring.guru/images/patterns/icons/go.svg?id=1a89927eb99b1ea3fde7701d97970aca)](https://refactoring.guru/es/design-patterns/composite/go/example "Composite en Go") [![Composite en Java](https://refactoring.guru/images/patterns/icons/java.svg?id=e6d87e2dca08c953fe3acd1275ed4f4e)](https://refactoring.guru/es/design-patterns/composite/java/example "Composite en Java") [![Composite en PHP](https://refactoring.guru/images/patterns/icons/php.svg?id=be1906eb26b71ec1d3b93720d6156618)](https://refactoring.guru/es/design-patterns/composite/php/example "Composite en PHP") [![Composite en Python](https://refactoring.guru/images/patterns/icons/python.svg?id=6d815d43c0f7050a1151b43e51569c9f)](https://refactoring.guru/es/design-patterns/composite/python/example "Composite en Python") [![Composite en Rust](https://refactoring.guru/images/patterns/icons/rust.svg?id=1f5698a4b5ae23fe79413511747e4a87)](https://refactoring.guru/es/design-patterns/composite/rust/example "Composite en Rust") [![Composite en Swift](https://refactoring.guru/images/patterns/icons/swift.svg?id=0b716c2d52ec3a48fbe91ac031070c1d)](https://refactoring.guru/es/design-patterns/composite/swift/example "Composite en Swift") [![Composite en TypeScript](https://refactoring.guru/images/patterns/icons/typescript.svg?id=2239d0f16cb703540c205dd8cb0c0cb7)](https://refactoring.guru/es/design-patterns/composite/typescript/example "Composite en TypeScript") --- # Crítica de los patrones [There are patterns of patterns now! \ My friend's project: MetaPatterns.io](https://metapatterns.io/)  [](https://refactoring.guru/es/design-patterns/criticism#checkout) [](https://refactoring.guru/es/design-patterns/criticism#checkout) [](https://refactoring.guru/) / [Patrones de diseño](https://refactoring.guru/es/design-patterns) Crítica de los patrones ======================= Da la sensación de que todos los holgazanes han criticado ya los patrones de diseño. Veamos los argumentos más habituales contra el uso de los patrones. #### Chapuzas para un lenguaje de programación débil Este punto de vista fue expresado por primera vez por Paul Graham en el ensayo [Revenge of the Nerds (la venganza de los cerebritos)](http://www.paulgraham.com/icad.html) . Lee más sobre esto en esta [página Wiki (en inglés)](http://wiki.c2.com/?AreDesignPatternsMissingLanguageFeatures) . Normalmente, la necesidad por los patrones surge cuando la gente elige un lenguaje de programación o una tecnología que carece del nivel necesario de abstracción. En este caso, los patrones se convierten en una chapuza que otorga al lenguaje unas súper habilidades muy necesitadas. Por ejemplo, el patrón [Strategy](https://refactoring.guru/es/design-patterns/strategy) puede implementarse con una simple función anónima (lambda) en la mayoría de lenguajes de programación modernos. #### Soluciones ineficientes Los patrones intentan sistematizar soluciones cuyo uso ya es generalizado. Esta unificación es vista por muchos como un dogma, e implementan los patrones “al pie de la letra”, sin adaptarlos al contexto del proyecto particular. #### Uso injustificado > Si lo único que tienes es un martillo, todo te parecerá un clavo. Este es el problema que persigue a muchos principiantes que acaban de familiarizarse con los patrones. Una vez que aprenden sobre patrones, intentan aplicarlos en todas partes, incluso en situaciones en las que un código más simple funcionaría perfectamente bien. --- # Adapter en Python / Patrones de diseño [There are patterns of patterns now! \ My friend's project: MetaPatterns.io](https://metapatterns.io/)  [](https://refactoring.guru/es/design-patterns/adapter/python/example#checkout) [](https://refactoring.guru/es/design-patterns/adapter/python/example#checkout) [](https://refactoring.guru/) / [Patrones de diseño](https://refactoring.guru/es/design-patterns) / [Adapter](https://refactoring.guru/es/design-patterns/adapter) / [Python](https://refactoring.guru/es/design-patterns/python) ![Adapter](https://refactoring.guru/images/patterns/cards/adapter-mini-2x.png?id=8274d99afbbe9c63bfbfd0d68ceeffc7) **Adapter** en Python ===================== **Adapter** es un patrón de diseño estructural que permite colaborar a objetos incompatibles. El patrón Adapter actúa como envoltorio entre dos objetos. Atrapa las llamadas a un objeto y las transforma a un formato y una interfaz reconocible para el segundo objeto. [Aprende más sobre el patrón Adapter](https://refactoring.guru/es/design-patterns/adapter) Navegación  [Intro](https://refactoring.guru/es/design-patterns/adapter/python/example#)  [Ejemplo conceptual](https://refactoring.guru/es/design-patterns/adapter/python/example#example-0)  [main](https://refactoring.guru/es/design-patterns/adapter/python/example#example-0--main-py)  [Output](https://refactoring.guru/es/design-patterns/adapter/python/example#example-0--Output-txt) **Complejidad:** **Popularidad:** **Ejemplos de uso:** El patrón Adapter es muy común en el código Python. Se utiliza muy a menudo en sistemas basados en algún código heredado. En estos casos, los adaptadores crean código heredado con clases modernas. **Identificación:** Adapter es reconocible por un constructor que toma una instancia de distinto tipo de clase abstracta/interfaz. Cuando el adaptador recibe una llamada a uno de sus métodos, convierte los parámetros al formato adecuado y después dirige la llamada a uno o varios métodos del objeto envuelto. Ejemplo conceptual ------------------ Este ejemplo ilustra la estructura del patrón de diseño **Adapter**. Se centra en responder las siguientes preguntas: * ¿De qué clases se compone? * ¿Qué papeles juegan esas clases? * ¿De qué forma se relacionan los elementos del patrón? #### **main.py:** Ejemplo conceptual class Target: """ The Target defines the domain-specific interface used by the client code. """ def request(self) -> str: return "Target: The default target's behavior." class Adaptee: """ The Adaptee contains some useful behavior, but its interface is incompatible with the existing client code. The Adaptee needs some adaptation before the client code can use it. """ def specific\_request(self) -> str: return ".eetpadA eht fo roivaheb laicepS" class Adapter(Target, Adaptee): """ The Adapter makes the Adaptee's interface compatible with the Target's interface via multiple inheritance. """ def request(self) -> str: return f"Adapter: (TRANSLATED) {self.specific\_request()\[::-1\]}" def client\_code(target: "Target") -> None: """ The client code supports all classes that follow the Target interface. """ print(target.request(), end="") if \_\_name\_\_ == "\_\_main\_\_": print("Client: I can work just fine with the Target objects:") target = Target() client\_code(target) print("\\n") adaptee = Adaptee() print("Client: The Adaptee class has a weird interface. " "See, I don't understand it:") print(f"Adaptee: {adaptee.specific\_request()}", end="\\n\\n") print("Client: But I can work with it via the Adapter:") adapter = Adapter() client\_code(adapter) #### **Output.txt:** Resultado de la ejecución Client: I can work just fine with the Target objects: Target: The default target's behavior. Client: The Adaptee class has a weird interface. See, I don't understand it: Adaptee: .eetpadA eht fo roivaheb laicepS Client: But I can work with it via the Adapter: Adapter: (TRANSLATED) Special behavior of the Adaptee. **Adapter** en otros lenguajes ------------------------------ [![Adapter en C#](https://refactoring.guru/images/patterns/icons/csharp.svg?id=da64592defc6e86d57c39c66e9de3e58)](https://refactoring.guru/es/design-patterns/adapter/csharp/example "Adapter en C#") [![Adapter en C++](https://refactoring.guru/images/patterns/icons/cpp.svg?id=f7782ed8b8666246bfcc3f8fefc3b858)](https://refactoring.guru/es/design-patterns/adapter/cpp/example "Adapter en C++") [![Adapter en Go](https://refactoring.guru/images/patterns/icons/go.svg?id=1a89927eb99b1ea3fde7701d97970aca)](https://refactoring.guru/es/design-patterns/adapter/go/example "Adapter en Go") [![Adapter en Java](https://refactoring.guru/images/patterns/icons/java.svg?id=e6d87e2dca08c953fe3acd1275ed4f4e)](https://refactoring.guru/es/design-patterns/adapter/java/example "Adapter en Java") [![Adapter en PHP](https://refactoring.guru/images/patterns/icons/php.svg?id=be1906eb26b71ec1d3b93720d6156618)](https://refactoring.guru/es/design-patterns/adapter/php/example "Adapter en PHP") [![Adapter en Ruby](https://refactoring.guru/images/patterns/icons/ruby.svg?id=b065b718c914bf8e960ef731600be1eb)](https://refactoring.guru/es/design-patterns/adapter/ruby/example "Adapter en Ruby") [![Adapter en Rust](https://refactoring.guru/images/patterns/icons/rust.svg?id=1f5698a4b5ae23fe79413511747e4a87)](https://refactoring.guru/es/design-patterns/adapter/rust/example "Adapter en Rust") [![Adapter en Swift](https://refactoring.guru/images/patterns/icons/swift.svg?id=0b716c2d52ec3a48fbe91ac031070c1d)](https://refactoring.guru/es/design-patterns/adapter/swift/example "Adapter en Swift") [![Adapter en TypeScript](https://refactoring.guru/images/patterns/icons/typescript.svg?id=2239d0f16cb703540c205dd8cb0c0cb7)](https://refactoring.guru/es/design-patterns/adapter/typescript/example "Adapter en TypeScript") --- # Abstract Factory en Ruby / Patrones de diseño [There are patterns of patterns now! \ My friend's project: MetaPatterns.io](https://metapatterns.io/)  [](https://refactoring.guru/es/design-patterns/abstract-factory/ruby/example#checkout) [](https://refactoring.guru/es/design-patterns/abstract-factory/ruby/example#checkout) [](https://refactoring.guru/) / [Patrones de diseño](https://refactoring.guru/es/design-patterns) / [Abstract Factory](https://refactoring.guru/es/design-patterns/abstract-factory) / [Ruby](https://refactoring.guru/es/design-patterns/ruby) ![Abstract Factory](https://refactoring.guru/images/patterns/cards/abstract-factory-mini-2x.png?id=22236aaa65ff52cbde1c713216d52c1f) **Abstract Factory** en Ruby ============================ **Abstract Factory** es un patrón de diseño creacional que resuelve el problema de crear familias enteras de productos sin especificar sus clases concretas. El patrón Abstract Factory define una interfaz para crear todos los productos, pero deja la propia creación de productos para las clases de fábrica concretas. Cada tipo de fábrica se corresponde con cierta variedad de producto. El código cliente invoca los métodos de creación de un objeto de fábrica en lugar de crear los productos directamente con una llamada al constructor (operador `new`). Como una fábrica se corresponde con una única variante de producto, todos sus productos serán compatibles. El código cliente trabaja con fábricas y productos únicamente a través de sus interfaces abstractas. Esto permite al mismo código cliente trabajar con productos diferentes. Simplemente, creas una nueva clase fábrica concreta y la pasas al código cliente. > Si no sabes la diferencia entre los distintos patrones de fábrica y sus conceptos, lee nuestra [Comparación de fábricas](https://refactoring.guru/es/design-patterns/factory-comparison) > . [Aprende más sobre el patrón Abstract Factory](https://refactoring.guru/es/design-patterns/abstract-factory) Navegación  [Intro](https://refactoring.guru/es/design-patterns/abstract-factory/ruby/example#)  [Ejemplo conceptual](https://refactoring.guru/es/design-patterns/abstract-factory/ruby/example#example-0)  [main](https://refactoring.guru/es/design-patterns/abstract-factory/ruby/example#example-0--main-rb)  [output](https://refactoring.guru/es/design-patterns/abstract-factory/ruby/example#example-0--output-txt) **Complejidad:** **Popularidad:** **Ejemplos de uso:** El patrón Abstract Factory es muy común en el código Ruby. Muchos _frameworks_ y bibliotecas lo utilizan para proporcionar una forma de extender y personalizar sus componentes estándar. **Identificación:** El patrón es fácil de reconocer por los métodos, que devuelven un objeto de fábrica. Después, la fábrica se utiliza para crear subcomponentes específicos. Ejemplo conceptual ------------------ Este ejemplo ilustra la estructura del patrón de diseño **Abstract Factory**. Se centra en responder las siguientes preguntas: * ¿De qué clases se compone? * ¿Qué papeles juegan esas clases? * ¿De qué forma se relacionan los elementos del patrón? #### **main.rb:** Ejemplo conceptual \# The Abstract Factory interface declares a set of methods that return different # abstract products. These products are called a family and are related by a # high-level theme or concept. Products of one family are usually able to # collaborate among themselves. A family of products may have several variants, # but the products of one variant are incompatible with products of another. class AbstractFactory # @abstract def create\_product\_a raise NotImplementedError, "#{self.class} has not implemented method '#{\_\_method\_\_}'" end # @abstract def create\_product\_b raise NotImplementedError, "#{self.class} has not implemented method '#{\_\_method\_\_}'" end end # Concrete Factories produce a family of products that belong to a single # variant. The factory guarantees that resulting products are compatible. Note # that signatures of the Concrete Factory's methods return an abstract product, # while inside the method a concrete product is instantiated. class ConcreteFactory1 < AbstractFactory def create\_product\_a ConcreteProductA1.new end def create\_product\_b ConcreteProductB1.new end end # Each Concrete Factory has a corresponding product variant. class ConcreteFactory2 < AbstractFactory def create\_product\_a ConcreteProductA2.new end def create\_product\_b ConcreteProductB2.new end end # Each distinct product of a product family should have a base interface. All # variants of the product must implement this interface. class AbstractProductA # @abstract # # @return \[String\] def useful\_function\_a raise NotImplementedError, "#{self.class} has not implemented method '#{\_\_method\_\_}'" end end # Concrete Products are created by corresponding Concrete Factories. class ConcreteProductA1 < AbstractProductA def useful\_function\_a 'The result of the product A1.' end end class ConcreteProductA2 < AbstractProductA def useful\_function\_a 'The result of the product A2.' end end # Here's the the base interface of another product. All products can interact # with each other, but proper interaction is possible only between products of # the same concrete variant. class AbstractProductB # Product B is able to do its own thing... def useful\_function\_b raise NotImplementedError, "#{self.class} has not implemented method '#{\_\_method\_\_}'" end # ...but it also can collaborate with the ProductA. # # The Abstract Factory makes sure that all products it creates are of the same # variant and thus, compatible. def another\_useful\_function\_b(\_collaborator) raise NotImplementedError, "#{self.class} has not implemented method '#{\_\_method\_\_}'" end end # Concrete Products are created by corresponding Concrete Factories. class ConcreteProductB1 < AbstractProductB # @return \[String\] def useful\_function\_b 'The result of the product B1.' end # The variant, Product B1, is only able to work correctly with the variant, # Product A1. Nevertheless, it accepts any instance of AbstractProductA as an # argument. def another\_useful\_function\_b(collaborator) result = collaborator.useful\_function\_a "The result of the B1 collaborating with the (#{result})" end end class ConcreteProductB2 < AbstractProductB # @return \[String\] def useful\_function\_b 'The result of the product B2.' end # The variant, Product B2, is only able to work correctly with the variant, # Product A2. Nevertheless, it accepts any instance of AbstractProductA as an # argument. def another\_useful\_function\_b(collaborator) result = collaborator.useful\_function\_a "The result of the B2 collaborating with the (#{result})" end end # The client code works with factories and products only through abstract types: # AbstractFactory and AbstractProduct. This lets you pass any factory or product # subclass to the client code without breaking it. def client\_code(factory) product\_a = factory.create\_product\_a product\_b = factory.create\_product\_b puts product\_b.useful\_function\_b puts product\_b.another\_useful\_function\_b(product\_a) end # The client code can work with any concrete factory class. puts 'Client: Testing client code with the first factory type:' client\_code(ConcreteFactory1.new) puts "\\n" puts 'Client: Testing the same client code with the second factory type:' client\_code(ConcreteFactory2.new) #### **output.txt:** Resultado de la ejecución Client: Testing client code with the first factory type: The result of the product B1. The result of the B1 collaborating with the (The result of the product A1.) Client: Testing the same client code with the second factory type: The result of the product B2. The result of the B2 collaborating with the (The result of the product A2.) **Abstract Factory** en otros lenguajes --------------------------------------- [![Abstract Factory en C#](https://refactoring.guru/images/patterns/icons/csharp.svg?id=da64592defc6e86d57c39c66e9de3e58)](https://refactoring.guru/es/design-patterns/abstract-factory/csharp/example "Abstract Factory en C#") [![Abstract Factory en C++](https://refactoring.guru/images/patterns/icons/cpp.svg?id=f7782ed8b8666246bfcc3f8fefc3b858)](https://refactoring.guru/es/design-patterns/abstract-factory/cpp/example "Abstract Factory en C++") [![Abstract Factory en Go](https://refactoring.guru/images/patterns/icons/go.svg?id=1a89927eb99b1ea3fde7701d97970aca)](https://refactoring.guru/es/design-patterns/abstract-factory/go/example "Abstract Factory en Go") [![Abstract Factory en Java](https://refactoring.guru/images/patterns/icons/java.svg?id=e6d87e2dca08c953fe3acd1275ed4f4e)](https://refactoring.guru/es/design-patterns/abstract-factory/java/example "Abstract Factory en Java") [![Abstract Factory en PHP](https://refactoring.guru/images/patterns/icons/php.svg?id=be1906eb26b71ec1d3b93720d6156618)](https://refactoring.guru/es/design-patterns/abstract-factory/php/example "Abstract Factory en PHP") [![Abstract Factory en Python](https://refactoring.guru/images/patterns/icons/python.svg?id=6d815d43c0f7050a1151b43e51569c9f)](https://refactoring.guru/es/design-patterns/abstract-factory/python/example "Abstract Factory en Python") [![Abstract Factory en Rust](https://refactoring.guru/images/patterns/icons/rust.svg?id=1f5698a4b5ae23fe79413511747e4a87)](https://refactoring.guru/es/design-patterns/abstract-factory/rust/example "Abstract Factory en Rust") [![Abstract Factory en Swift](https://refactoring.guru/images/patterns/icons/swift.svg?id=0b716c2d52ec3a48fbe91ac031070c1d)](https://refactoring.guru/es/design-patterns/abstract-factory/swift/example "Abstract Factory en Swift") [![Abstract Factory en TypeScript](https://refactoring.guru/images/patterns/icons/typescript.svg?id=2239d0f16cb703540c205dd8cb0c0cb7)](https://refactoring.guru/es/design-patterns/abstract-factory/typescript/example "Abstract Factory en TypeScript") --- # Adapter en Rust / Patrones de diseño [There are patterns of patterns now! \ My friend's project: MetaPatterns.io](https://metapatterns.io/)  [](https://refactoring.guru/es/design-patterns/adapter/rust/example#checkout) [](https://refactoring.guru/es/design-patterns/adapter/rust/example#checkout) [](https://refactoring.guru/) / [Patrones de diseño](https://refactoring.guru/es/design-patterns) / [Adapter](https://refactoring.guru/es/design-patterns/adapter) / [Rust](https://refactoring.guru/es/design-patterns/rust) ![Adapter](https://refactoring.guru/images/patterns/cards/adapter-mini-2x.png?id=8274d99afbbe9c63bfbfd0d68ceeffc7) **Adapter** en Rust =================== **Adapter** es un patrón de diseño estructural que permite colaborar a objetos incompatibles. El patrón Adapter actúa como envoltorio entre dos objetos. Atrapa las llamadas a un objeto y las transforma a un formato y una interfaz reconocible para el segundo objeto. [Aprende más sobre el patrón Adapter](https://refactoring.guru/es/design-patterns/adapter) Navegación  [Intro](https://refactoring.guru/es/design-patterns/adapter/rust/example#)  [Adapter in Rust](https://refactoring.guru/es/design-patterns/adapter/rust/example#example-0)  [adapter](https://refactoring.guru/es/design-patterns/adapter/rust/example#example-0--adapter-rs)  [adaptee](https://refactoring.guru/es/design-patterns/adapter/rust/example#example-0--adaptee-rs)  [target](https://refactoring.guru/es/design-patterns/adapter/rust/example#example-0--target-rs)  [main](https://refactoring.guru/es/design-patterns/adapter/rust/example#example-0--main-rs) Adapter in Rust --------------- In this example, the `trait SpecificTarget` is incompatible with a `call` function which accepts `trait Target` only. fn call(target: impl Target); The adapter helps to pass the incompatible interface to the `call` function. let target = TargetAdapter::new(specific\_target); call(target); #### **adapter.rs** use crate::{adaptee::SpecificTarget, Target}; /// Converts adaptee's specific interface to a compatible \`Target\` output. pub struct TargetAdapter { adaptee: SpecificTarget, } impl TargetAdapter { pub fn new(adaptee: SpecificTarget) -> Self { Self { adaptee } } } impl Target for TargetAdapter { fn request(&self) -> String { // Here's the "adaptation" of a specific output to a compatible output. self.adaptee.specific\_request().chars().rev().collect() } } #### **adaptee.rs** pub struct SpecificTarget; impl SpecificTarget { pub fn specific\_request(&self) -> String { ".tseuqer cificepS".into() } } #### **target.rs** pub trait Target { fn request(&self) -> String; } pub struct OrdinaryTarget; impl Target for OrdinaryTarget { fn request(&self) -> String { "Ordinary request.".into() } } #### **main.rs** mod adaptee; mod adapter; mod target; use adaptee::SpecificTarget; use adapter::TargetAdapter; use target::{OrdinaryTarget, Target}; /// Calls any object of a \`Target\` trait. /// /// To understand the Adapter pattern better, imagine that this is /// a client code, which can operate over a specific interface only /// (\`Target\` trait only). It means that an incompatible interface cannot be /// passed here without an adapter. fn call(target: impl Target) { println!("'{}'", target.request()); } fn main() { let target = OrdinaryTarget; print!("A compatible target can be directly called: "); call(target); let adaptee = SpecificTarget; println!( "Adaptee is incompatible with client: '{}'", adaptee.specific\_request() ); let adapter = TargetAdapter::new(adaptee); print!("But with adapter client can call its method: "); call(adapter); } ### Output A compatible target can be directly called: 'Ordinary request.' Adaptee is incompatible with client: '.tseuqer cificepS' But with adapter client can call its method: 'Specific request.' **Adapter** en otros lenguajes ------------------------------ [![Adapter en C#](https://refactoring.guru/images/patterns/icons/csharp.svg?id=da64592defc6e86d57c39c66e9de3e58)](https://refactoring.guru/es/design-patterns/adapter/csharp/example "Adapter en C#") [![Adapter en C++](https://refactoring.guru/images/patterns/icons/cpp.svg?id=f7782ed8b8666246bfcc3f8fefc3b858)](https://refactoring.guru/es/design-patterns/adapter/cpp/example "Adapter en C++") [![Adapter en Go](https://refactoring.guru/images/patterns/icons/go.svg?id=1a89927eb99b1ea3fde7701d97970aca)](https://refactoring.guru/es/design-patterns/adapter/go/example "Adapter en Go") [![Adapter en Java](https://refactoring.guru/images/patterns/icons/java.svg?id=e6d87e2dca08c953fe3acd1275ed4f4e)](https://refactoring.guru/es/design-patterns/adapter/java/example "Adapter en Java") [![Adapter en PHP](https://refactoring.guru/images/patterns/icons/php.svg?id=be1906eb26b71ec1d3b93720d6156618)](https://refactoring.guru/es/design-patterns/adapter/php/example "Adapter en PHP") [![Adapter en Python](https://refactoring.guru/images/patterns/icons/python.svg?id=6d815d43c0f7050a1151b43e51569c9f)](https://refactoring.guru/es/design-patterns/adapter/python/example "Adapter en Python") [![Adapter en Ruby](https://refactoring.guru/images/patterns/icons/ruby.svg?id=b065b718c914bf8e960ef731600be1eb)](https://refactoring.guru/es/design-patterns/adapter/ruby/example "Adapter en Ruby") [![Adapter en Swift](https://refactoring.guru/images/patterns/icons/swift.svg?id=0b716c2d52ec3a48fbe91ac031070c1d)](https://refactoring.guru/es/design-patterns/adapter/swift/example "Adapter en Swift") [![Adapter en TypeScript](https://refactoring.guru/images/patterns/icons/typescript.svg?id=2239d0f16cb703540c205dd8cb0c0cb7)](https://refactoring.guru/es/design-patterns/adapter/typescript/example "Adapter en TypeScript") --- # Composite en Python / Patrones de diseño [There are patterns of patterns now! \ My friend's project: MetaPatterns.io](https://metapatterns.io/)  [](https://refactoring.guru/es/design-patterns/composite/python/example#checkout) [](https://refactoring.guru/es/design-patterns/composite/python/example#checkout) [](https://refactoring.guru/) / [Patrones de diseño](https://refactoring.guru/es/design-patterns) / [Composite](https://refactoring.guru/es/design-patterns/composite) / [Python](https://refactoring.guru/es/design-patterns/python) ![Composite](https://refactoring.guru/images/patterns/cards/composite-mini-2x.png?id=3f7f811fefeb0b64f6774746eb42af09) **Composite** en Python ======================= **Composite** es un patrón de diseño estructural que permite componer objetos en una estructura en forma de árbol y trabajar con ella como si fuera un objeto único. El patrón Composite se convirtió en una solución muy popular para la mayoría de problemas que requieren la creación de una estructura de árbol. La gran característica del Composite es la capacidad para ejecutar métodos de forma recursiva por toda la estructura de árbol y recapitular los resultados. [Aprende más sobre el patrón Composite](https://refactoring.guru/es/design-patterns/composite) Navegación  [Intro](https://refactoring.guru/es/design-patterns/composite/python/example#)  [Ejemplo conceptual](https://refactoring.guru/es/design-patterns/composite/python/example#example-0)  [main](https://refactoring.guru/es/design-patterns/composite/python/example#example-0--main-py)  [Output](https://refactoring.guru/es/design-patterns/composite/python/example#example-0--Output-txt) **Complejidad:** **Popularidad:** **Ejemplos de uso:** El patrón Composite es muy común en el código Python. Se utiliza a menudo para representar jerarquías de componentes de interfaz de usuario o el código que trabaja con gráficos. **Identificación:** El Composite es fácil de reconocer por los métodos de comportamiento que toman una instancia del mismo tipo abstracto/interfaz y lo hacen una estructura de árbol. Ejemplo conceptual ------------------ Este ejemplo ilustra la estructura del patrón de diseño **Composite**. Se centra en responder las siguientes preguntas: * ¿De qué clases se compone? * ¿Qué papeles juegan esas clases? * ¿De qué forma se relacionan los elementos del patrón? #### **main.py:** Ejemplo conceptual from \_\_future\_\_ import annotations from abc import ABC, abstractmethod from typing import List class Component(ABC): """ The base Component class declares common operations for both simple and complex objects of a composition. """ @property def parent(self) -> Component: return self.\_parent @parent.setter def parent(self, parent: Component): """ Optionally, the base Component can declare an interface for setting and accessing a parent of the component in a tree structure. It can also provide some default implementation for these methods. """ self.\_parent = parent """ In some cases, it would be beneficial to define the child-management operations right in the base Component class. This way, you won't need to expose any concrete component classes to the client code, even during the object tree assembly. The downside is that these methods will be empty for the leaf-level components. """ def add(self, component: Component) -> None: pass def remove(self, component: Component) -> None: pass def is\_composite(self) -> bool: """ You can provide a method that lets the client code figure out whether a component can bear children. """ return False @abstractmethod def operation(self) -> str: """ The base Component may implement some default behavior or leave it to concrete classes (by declaring the method containing the behavior as "abstract"). """ pass class Leaf(Component): """ The Leaf class represents the end objects of a composition. A leaf can't have any children. Usually, it's the Leaf objects that do the actual work, whereas Composite objects only delegate to their sub-components. """ def operation(self) -> str: return "Leaf" class Composite(Component): """ The Composite class represents the complex components that may have children. Usually, the Composite objects delegate the actual work to their children and then "sum-up" the result. """ def \_\_init\_\_(self) -> None: self.\_children: List\[Component\] = \[\] """ A composite object can add or remove other components (both simple or complex) to or from its child list. """ def add(self, component: Component) -> None: self.\_children.append(component) component.parent = self def remove(self, component: Component) -> None: self.\_children.remove(component) component.parent = None def is\_composite(self) -> bool: return True def operation(self) -> str: """ The Composite executes its primary logic in a particular way. It traverses recursively through all its children, collecting and summing their results. Since the composite's children pass these calls to their children and so forth, the whole object tree is traversed as a result. """ results = \[\] for child in self.\_children: results.append(child.operation()) return f"Branch({'+'.join(results)})" def client\_code(component: Component) -> None: """ The client code works with all of the components via the base interface. """ print(f"RESULT: {component.operation()}", end="") def client\_code2(component1: Component, component2: Component) -> None: """ Thanks to the fact that the child-management operations are declared in the base Component class, the client code can work with any component, simple or complex, without depending on their concrete classes. """ if component1.is\_composite(): component1.add(component2) print(f"RESULT: {component1.operation()}", end="") if \_\_name\_\_ == "\_\_main\_\_": # This way the client code can support the simple leaf components... simple = Leaf() print("Client: I've got a simple component:") client\_code(simple) print("\\n") # ...as well as the complex composites. tree = Composite() branch1 = Composite() branch1.add(Leaf()) branch1.add(Leaf()) branch2 = Composite() branch2.add(Leaf()) tree.add(branch1) tree.add(branch2) print("Client: Now I've got a composite tree:") client\_code(tree) print("\\n") print("Client: I don't need to check the components classes even when managing the tree:") client\_code2(tree, simple) #### **Output.txt:** Resultado de la ejecución Client: I've got a simple component: RESULT: Leaf Client: Now I've got a composite tree: RESULT: Branch(Branch(Leaf+Leaf)+Branch(Leaf)) Client: I don't need to check the components classes even when managing the tree: RESULT: Branch(Branch(Leaf+Leaf)+Branch(Leaf)+Leaf) **Composite** en otros lenguajes -------------------------------- [![Composite en C#](https://refactoring.guru/images/patterns/icons/csharp.svg?id=da64592defc6e86d57c39c66e9de3e58)](https://refactoring.guru/es/design-patterns/composite/csharp/example "Composite en C#") [![Composite en C++](https://refactoring.guru/images/patterns/icons/cpp.svg?id=f7782ed8b8666246bfcc3f8fefc3b858)](https://refactoring.guru/es/design-patterns/composite/cpp/example "Composite en C++") [![Composite en Go](https://refactoring.guru/images/patterns/icons/go.svg?id=1a89927eb99b1ea3fde7701d97970aca)](https://refactoring.guru/es/design-patterns/composite/go/example "Composite en Go") [![Composite en Java](https://refactoring.guru/images/patterns/icons/java.svg?id=e6d87e2dca08c953fe3acd1275ed4f4e)](https://refactoring.guru/es/design-patterns/composite/java/example "Composite en Java") [![Composite en PHP](https://refactoring.guru/images/patterns/icons/php.svg?id=be1906eb26b71ec1d3b93720d6156618)](https://refactoring.guru/es/design-patterns/composite/php/example "Composite en PHP") [![Composite en Ruby](https://refactoring.guru/images/patterns/icons/ruby.svg?id=b065b718c914bf8e960ef731600be1eb)](https://refactoring.guru/es/design-patterns/composite/ruby/example "Composite en Ruby") [![Composite en Rust](https://refactoring.guru/images/patterns/icons/rust.svg?id=1f5698a4b5ae23fe79413511747e4a87)](https://refactoring.guru/es/design-patterns/composite/rust/example "Composite en Rust") [![Composite en Swift](https://refactoring.guru/images/patterns/icons/swift.svg?id=0b716c2d52ec3a48fbe91ac031070c1d)](https://refactoring.guru/es/design-patterns/composite/swift/example "Composite en Swift") [![Composite en TypeScript](https://refactoring.guru/images/patterns/icons/typescript.svg?id=2239d0f16cb703540c205dd8cb0c0cb7)](https://refactoring.guru/es/design-patterns/composite/typescript/example "Composite en TypeScript") --- # Command en Python / Patrones de diseño [There are patterns of patterns now! \ My friend's project: MetaPatterns.io](https://metapatterns.io/)  [](https://refactoring.guru/es/design-patterns/command/python/example#checkout) [](https://refactoring.guru/es/design-patterns/command/python/example#checkout) [](https://refactoring.guru/) / [Patrones de diseño](https://refactoring.guru/es/design-patterns) / [Command](https://refactoring.guru/es/design-patterns/command) / [Python](https://refactoring.guru/es/design-patterns/python) ![Command](https://refactoring.guru/images/patterns/cards/command-mini-2x.png?id=e5f6332e057f6d352a209da963a8fc54) **Command** en Python ===================== **Command** es un patrón de diseño de comportamiento que convierte solicitudes u operaciones simples en objetos. La conversión permite la ejecución diferida de comandos, el almacenamiento del historial de comandos, etc. [Aprende más sobre el patrón Command](https://refactoring.guru/es/design-patterns/command) Navegación  [Intro](https://refactoring.guru/es/design-patterns/command/python/example#)  [Ejemplo conceptual](https://refactoring.guru/es/design-patterns/command/python/example#example-0)  [main](https://refactoring.guru/es/design-patterns/command/python/example#example-0--main-py)  [Output](https://refactoring.guru/es/design-patterns/command/python/example#example-0--Output-txt) **Complejidad:** **Popularidad:** **Ejemplos de uso:** El patrón Command es muy común en el código Python. La mayoría de las veces se utiliza como alternativa a las retrollamadas (_callbacks_) para parametrizar elementos UI con acciones. También se utiliza para poner tareas en cola, realizar el seguimiento del historial de operaciones, etc. **Identificación:** El patrón Command es reconocible por los métodos de comportamiento en un tipo de clase abstracta/interfaz (emisora) que invoca un método en una implementación de un tipo de clase abstracta/interfaz diferente (receptora) que la implementación del comando ha implementado durante su creación. Las clases de comando se limitan normalmente a acciones específicas. Ejemplo conceptual ------------------ Este ejemplo ilustra la estructura del patrón de diseño **Command**. Se centra en responder las siguientes preguntas: * ¿De qué clases se compone? * ¿Qué papeles juegan esas clases? * ¿De qué forma se relacionan los elementos del patrón? #### **main.py:** Ejemplo conceptual from \_\_future\_\_ import annotations from abc import ABC, abstractmethod class Command(ABC): """ The Command interface declares a method for executing a command. """ @abstractmethod def execute(self) -> None: pass class SimpleCommand(Command): """ Some commands can implement simple operations on their own. """ def \_\_init\_\_(self, payload: str) -> None: self.\_payload = payload def execute(self) -> None: print(f"SimpleCommand: See, I can do simple things like printing" f"({self.\_payload})") class ComplexCommand(Command): """ However, some commands can delegate more complex operations to other objects, called "receivers." """ def \_\_init\_\_(self, receiver: Receiver, a: str, b: str) -> None: """ Complex commands can accept one or several receiver objects along with any context data via the constructor. """ self.\_receiver = receiver self.\_a = a self.\_b = b def execute(self) -> None: """ Commands can delegate to any methods of a receiver. """ print("ComplexCommand: Complex stuff should be done by a receiver object", end="") self.\_receiver.do\_something(self.\_a) self.\_receiver.do\_something\_else(self.\_b) class Receiver: """ The Receiver classes contain some important business logic. They know how to perform all kinds of operations, associated with carrying out a request. In fact, any class may serve as a Receiver. """ def do\_something(self, a: str) -> None: print(f"\\nReceiver: Working on ({a}.)", end="") def do\_something\_else(self, b: str) -> None: print(f"\\nReceiver: Also working on ({b}.)", end="") class Invoker: """ The Invoker is associated with one or several commands. It sends a request to the command. """ \_on\_start = None \_on\_finish = None """ Initialize commands. """ def set\_on\_start(self, command: Command): self.\_on\_start = command def set\_on\_finish(self, command: Command): self.\_on\_finish = command def do\_something\_important(self) -> None: """ The Invoker does not depend on concrete command or receiver classes. The Invoker passes a request to a receiver indirectly, by executing a command. """ print("Invoker: Does anybody want something done before I begin?") if isinstance(self.\_on\_start, Command): self.\_on\_start.execute() print("Invoker: ...doing something really important...") print("Invoker: Does anybody want something done after I finish?") if isinstance(self.\_on\_finish, Command): self.\_on\_finish.execute() if \_\_name\_\_ == "\_\_main\_\_": """ The client code can parameterize an invoker with any commands. """ invoker = Invoker() invoker.set\_on\_start(SimpleCommand("Say Hi!")) receiver = Receiver() invoker.set\_on\_finish(ComplexCommand( receiver, "Send email", "Save report")) invoker.do\_something\_important() #### **Output.txt:** Resultado de la ejecución Invoker: Does anybody want something done before I begin? SimpleCommand: See, I can do simple things like printing (Say Hi!) Invoker: ...doing something really important... Invoker: Does anybody want something done after I finish? ComplexCommand: Complex stuff should be done by a receiver object Receiver: Working on (Send email.) Receiver: Also working on (Save report.) **Command** en otros lenguajes ------------------------------ [![Command en C#](https://refactoring.guru/images/patterns/icons/csharp.svg?id=da64592defc6e86d57c39c66e9de3e58)](https://refactoring.guru/es/design-patterns/command/csharp/example "Command en C#") [![Command en C++](https://refactoring.guru/images/patterns/icons/cpp.svg?id=f7782ed8b8666246bfcc3f8fefc3b858)](https://refactoring.guru/es/design-patterns/command/cpp/example "Command en C++") [![Command en Go](https://refactoring.guru/images/patterns/icons/go.svg?id=1a89927eb99b1ea3fde7701d97970aca)](https://refactoring.guru/es/design-patterns/command/go/example "Command en Go") [![Command en Java](https://refactoring.guru/images/patterns/icons/java.svg?id=e6d87e2dca08c953fe3acd1275ed4f4e)](https://refactoring.guru/es/design-patterns/command/java/example "Command en Java") [![Command en PHP](https://refactoring.guru/images/patterns/icons/php.svg?id=be1906eb26b71ec1d3b93720d6156618)](https://refactoring.guru/es/design-patterns/command/php/example "Command en PHP") [![Command en Ruby](https://refactoring.guru/images/patterns/icons/ruby.svg?id=b065b718c914bf8e960ef731600be1eb)](https://refactoring.guru/es/design-patterns/command/ruby/example "Command en Ruby") [![Command en Rust](https://refactoring.guru/images/patterns/icons/rust.svg?id=1f5698a4b5ae23fe79413511747e4a87)](https://refactoring.guru/es/design-patterns/command/rust/example "Command en Rust") [![Command en Swift](https://refactoring.guru/images/patterns/icons/swift.svg?id=0b716c2d52ec3a48fbe91ac031070c1d)](https://refactoring.guru/es/design-patterns/command/swift/example "Command en Swift") [![Command en TypeScript](https://refactoring.guru/images/patterns/icons/typescript.svg?id=2239d0f16cb703540c205dd8cb0c0cb7)](https://refactoring.guru/es/design-patterns/command/typescript/example "Command en TypeScript") --- # Chain of Responsibility en TypeScript / Patrones de diseño [There are patterns of patterns now! \ My friend's project: MetaPatterns.io](https://metapatterns.io/)  [](https://refactoring.guru/es/design-patterns/chain-of-responsibility/typescript/example#checkout) [](https://refactoring.guru/es/design-patterns/chain-of-responsibility/typescript/example#checkout) [](https://refactoring.guru/) / [Patrones de diseño](https://refactoring.guru/es/design-patterns) / [Chain of Responsibility](https://refactoring.guru/es/design-patterns/chain-of-responsibility) / [TypeScript](https://refactoring.guru/es/design-patterns/typescript) ![Chain of Responsibility](https://refactoring.guru/images/patterns/cards/chain-of-responsibility-mini-2x.png?id=8c81f7069e51259b2443801b91135f7f) **Chain of Responsibility** en TypeScript ========================================= **Chain of Responsibility** es un patrón de diseño de comportamiento que permite pasar solicitudes a lo largo de la cadena de manejadores potenciales hasta que uno de ellos gestiona la solicitud. El patrón permite que varios objetos gestionen la solicitud sin acoplar la clase emisora a las clases concretas de los receptores. La cadena puede componerse dinámicamente durante el tiempo de ejecución con cualquier manejador que siga una interfaz manejadora estándar. [Aprende más sobre el patrón Chain of Responsibility](https://refactoring.guru/es/design-patterns/chain-of-responsibility) Navegación  [Intro](https://refactoring.guru/es/design-patterns/chain-of-responsibility/typescript/example#)  [Ejemplo conceptual](https://refactoring.guru/es/design-patterns/chain-of-responsibility/typescript/example#example-0)  [index](https://refactoring.guru/es/design-patterns/chain-of-responsibility/typescript/example#example-0--index-ts)  [Output](https://refactoring.guru/es/design-patterns/chain-of-responsibility/typescript/example#example-0--Output-txt) **Complejidad:** **Popularidad:** **Ejemplos de uso:** El patrón Chain of Responsibility no es un invitado habitual en el programa TypeScript, ya que tan solo es relevante cuando el código opera con cadenas de objetos. **Identificación:** El patrón es reconocible porque los métodos de comportamiento de un grupo de objetos invocan indirectamente los mismos métodos en otros objetos, mientras que todos los objetos siguen la interfaz común. Ejemplo conceptual ------------------ Este ejemplo ilustra la estructura del patrón de diseño **Chain of Responsibility** y se centra en las siguientes preguntas: * ¿De qué clases se compone? * ¿Qué papeles juegan esas clases? * ¿De qué forma se relacionan los elementos del patrón? #### **index.ts:** Ejemplo conceptual /\*\* \* The Handler interface declares a method for building the chain of handlers. \* It also declares a method for executing a request. \*/ interface Handler { setNext(handler: Handler): Handler; handle(request: Request): Result; } /\*\* \* The default chaining behavior can be implemented inside a base handler class. \*/ abstract class AbstractHandler implements Handler { private nextHandler: Handler; public setNext(handler: Handler): Handler { this.nextHandler = handler; // Returning a handler from here will let us link handlers in a // convenient way like this: // monkey.setNext(squirrel).setNext(dog); return handler; } public handle(request: string): string { if (this.nextHandler) { return this.nextHandler.handle(request); } return null; } } /\*\* \* All Concrete Handlers either handle a request or pass it to the next handler \* in the chain. \*/ class MonkeyHandler extends AbstractHandler { public handle(request: string): string { if (request === 'Banana') { return \`Monkey: I'll eat the ${request}.\`; } return super.handle(request); } } class SquirrelHandler extends AbstractHandler { public handle(request: string): string { if (request === 'Nut') { return \`Squirrel: I'll eat the ${request}.\`; } return super.handle(request); } } class DogHandler extends AbstractHandler { public handle(request: string): string { if (request === 'MeatBall') { return \`Dog: I'll eat the ${request}.\`; } return super.handle(request); } } /\*\* \* The client code is usually suited to work with a single handler. In most \* cases, it is not even aware that the handler is part of a chain. \*/ function clientCode(handler: Handler) { const foods = \['Nut', 'Banana', 'Cup of coffee'\]; for (const food of foods) { console.log(\`Client: Who wants a ${food}?\`); const result = handler.handle(food); if (result) { console.log(\` ${result}\`); } else { console.log(\` ${food} was left untouched.\`); } } } /\*\* \* The other part of the client code constructs the actual chain. \*/ const monkey = new MonkeyHandler(); const squirrel = new SquirrelHandler(); const dog = new DogHandler(); monkey.setNext(squirrel).setNext(dog); /\*\* \* The client should be able to send a request to any handler, not just the \* first one in the chain. \*/ console.log('Chain: Monkey > Squirrel > Dog\\n'); clientCode(monkey); console.log(''); console.log('Subchain: Squirrel > Dog\\n'); clientCode(squirrel); #### **Output.txt:** Resultado de la ejecución Chain: Monkey > Squirrel > Dog Client: Who wants a Nut? Squirrel: I'll eat the Nut. Client: Who wants a Banana? Monkey: I'll eat the Banana. Client: Who wants a Cup of coffee? Cup of coffee was left untouched. Subchain: Squirrel > Dog Client: Who wants a Nut? Squirrel: I'll eat the Nut. Client: Who wants a Banana? Banana was left untouched. Client: Who wants a Cup of coffee? Cup of coffee was left untouched. **Chain of Responsibility** en otros lenguajes ---------------------------------------------- [![Chain of Responsibility en C#](https://refactoring.guru/images/patterns/icons/csharp.svg?id=da64592defc6e86d57c39c66e9de3e58)](https://refactoring.guru/es/design-patterns/chain-of-responsibility/csharp/example "Chain of Responsibility en C#") [![Chain of Responsibility en C++](https://refactoring.guru/images/patterns/icons/cpp.svg?id=f7782ed8b8666246bfcc3f8fefc3b858)](https://refactoring.guru/es/design-patterns/chain-of-responsibility/cpp/example "Chain of Responsibility en C++") [![Chain of Responsibility en Go](https://refactoring.guru/images/patterns/icons/go.svg?id=1a89927eb99b1ea3fde7701d97970aca)](https://refactoring.guru/es/design-patterns/chain-of-responsibility/go/example "Chain of Responsibility en Go") [![Chain of Responsibility en Java](https://refactoring.guru/images/patterns/icons/java.svg?id=e6d87e2dca08c953fe3acd1275ed4f4e)](https://refactoring.guru/es/design-patterns/chain-of-responsibility/java/example "Chain of Responsibility en Java") [![Chain of Responsibility en PHP](https://refactoring.guru/images/patterns/icons/php.svg?id=be1906eb26b71ec1d3b93720d6156618)](https://refactoring.guru/es/design-patterns/chain-of-responsibility/php/example "Chain of Responsibility en PHP") [![Chain of Responsibility en Python](https://refactoring.guru/images/patterns/icons/python.svg?id=6d815d43c0f7050a1151b43e51569c9f)](https://refactoring.guru/es/design-patterns/chain-of-responsibility/python/example "Chain of Responsibility en Python") [![Chain of Responsibility en Ruby](https://refactoring.guru/images/patterns/icons/ruby.svg?id=b065b718c914bf8e960ef731600be1eb)](https://refactoring.guru/es/design-patterns/chain-of-responsibility/ruby/example "Chain of Responsibility en Ruby") [![Chain of Responsibility en Rust](https://refactoring.guru/images/patterns/icons/rust.svg?id=1f5698a4b5ae23fe79413511747e4a87)](https://refactoring.guru/es/design-patterns/chain-of-responsibility/rust/example "Chain of Responsibility en Rust") [![Chain of Responsibility en Swift](https://refactoring.guru/images/patterns/icons/swift.svg?id=0b716c2d52ec3a48fbe91ac031070c1d)](https://refactoring.guru/es/design-patterns/chain-of-responsibility/swift/example "Chain of Responsibility en Swift") --- # Composite en Go / Patrones de diseño [There are patterns of patterns now! \ My friend's project: MetaPatterns.io](https://metapatterns.io/)  [](https://refactoring.guru/es/design-patterns/composite/go/example#checkout) [](https://refactoring.guru/es/design-patterns/composite/go/example#checkout) [](https://refactoring.guru/) / [Patrones de diseño](https://refactoring.guru/es/design-patterns) / [Composite](https://refactoring.guru/es/design-patterns/composite) / [Go](https://refactoring.guru/es/design-patterns/go) ![Composite](https://refactoring.guru/images/patterns/cards/composite-mini-2x.png?id=3f7f811fefeb0b64f6774746eb42af09) **Composite** en Go =================== **Composite** es un patrón de diseño estructural que permite componer objetos en una estructura en forma de árbol y trabajar con ella como si fuera un objeto único. El patrón Composite se convirtió en una solución muy popular para la mayoría de problemas que requieren la creación de una estructura de árbol. La gran característica del Composite es la capacidad para ejecutar métodos de forma recursiva por toda la estructura de árbol y recapitular los resultados. [Aprende más sobre el patrón Composite](https://refactoring.guru/es/design-patterns/composite) Navegación  [Intro](https://refactoring.guru/es/design-patterns/composite/go/example#)  [Ejemplo conceptual](https://refactoring.guru/es/design-patterns/composite/go/example#example-0)  [component](https://refactoring.guru/es/design-patterns/composite/go/example#example-0--component-go)  [folder](https://refactoring.guru/es/design-patterns/composite/go/example#example-0--folder-go)  [file](https://refactoring.guru/es/design-patterns/composite/go/example#example-0--file-go)  [main](https://refactoring.guru/es/design-patterns/composite/go/example#example-0--main-go)  [output](https://refactoring.guru/es/design-patterns/composite/go/example#example-0--output-txt) Ejemplo conceptual ------------------ Vamos a intentar imaginar el patrón Composite con un ejemplo de un sistema de archivos del sistema operativo. En el sistema de archivos hay dos tipos de objetos: archivos y carpetas. Hay casos en los que archivos y carpetas deben tratarse de la misma manera. Aquí es donde el patrón Composite resulta de utilidad. Imagina que tienes que realizar una búsqueda de una palabra clave particular en tu sistema de archivos. Esta operación de búsqueda se aplica tanto a archivos como a carpetas. Para un archivo, buscará en los contenidos del archivo; para una carpeta, recorrerá todos los archivos de la carpeta para encontrar la palabra clave. #### **component.go:** Interfaz componente package main type Component interface { search(string) } #### **folder.go:** Compuesto package main import "fmt" type Folder struct { components \[\]Component name string } func (f \*Folder) search(keyword string) { fmt.Printf("Serching recursively for keyword %s in folder %s\\n", keyword, f.name) for \_, composite := range f.components { composite.search(keyword) } } func (f \*Folder) add(c Component) { f.components = append(f.components, c) } #### **file.go:** Hoja package main import "fmt" type File struct { name string } func (f \*File) search(keyword string) { fmt.Printf("Searching for keyword %s in file %s\\n", keyword, f.name) } func (f \*File) getName() string { return f.name } #### **main.go:** Código cliente package main func main() { file1 := &File{name: "File1"} file2 := &File{name: "File2"} file3 := &File{name: "File3"} folder1 := &Folder{ name: "Folder1", } folder1.add(file1) folder2 := &Folder{ name: "Folder2", } folder2.add(file2) folder2.add(file3) folder2.add(folder1) folder2.search("rose") } #### **output.txt:** Resultado de la ejecución Serching recursively for keyword rose in folder Folder2 Searching for keyword rose in file File2 Searching for keyword rose in file File3 Serching recursively for keyword rose in folder Folder1 Searching for keyword rose in file File1 **Composite** en otros lenguajes -------------------------------- [![Composite en C#](https://refactoring.guru/images/patterns/icons/csharp.svg?id=da64592defc6e86d57c39c66e9de3e58)](https://refactoring.guru/es/design-patterns/composite/csharp/example "Composite en C#") [![Composite en C++](https://refactoring.guru/images/patterns/icons/cpp.svg?id=f7782ed8b8666246bfcc3f8fefc3b858)](https://refactoring.guru/es/design-patterns/composite/cpp/example "Composite en C++") [![Composite en Java](https://refactoring.guru/images/patterns/icons/java.svg?id=e6d87e2dca08c953fe3acd1275ed4f4e)](https://refactoring.guru/es/design-patterns/composite/java/example "Composite en Java") [![Composite en PHP](https://refactoring.guru/images/patterns/icons/php.svg?id=be1906eb26b71ec1d3b93720d6156618)](https://refactoring.guru/es/design-patterns/composite/php/example "Composite en PHP") [![Composite en Python](https://refactoring.guru/images/patterns/icons/python.svg?id=6d815d43c0f7050a1151b43e51569c9f)](https://refactoring.guru/es/design-patterns/composite/python/example "Composite en Python") [![Composite en Ruby](https://refactoring.guru/images/patterns/icons/ruby.svg?id=b065b718c914bf8e960ef731600be1eb)](https://refactoring.guru/es/design-patterns/composite/ruby/example "Composite en Ruby") [![Composite en Rust](https://refactoring.guru/images/patterns/icons/rust.svg?id=1f5698a4b5ae23fe79413511747e4a87)](https://refactoring.guru/es/design-patterns/composite/rust/example "Composite en Rust") [![Composite en Swift](https://refactoring.guru/images/patterns/icons/swift.svg?id=0b716c2d52ec3a48fbe91ac031070c1d)](https://refactoring.guru/es/design-patterns/composite/swift/example "Composite en Swift") [![Composite en TypeScript](https://refactoring.guru/images/patterns/icons/typescript.svg?id=2239d0f16cb703540c205dd8cb0c0cb7)](https://refactoring.guru/es/design-patterns/composite/typescript/example "Composite en TypeScript") --- # Command en Java / Patrones de diseño [There are patterns of patterns now! \ My friend's project: MetaPatterns.io](https://metapatterns.io/)  [](https://refactoring.guru/es/design-patterns/command/java/example#checkout) [](https://refactoring.guru/es/design-patterns/command/java/example#checkout) [](https://refactoring.guru/) / [Patrones de diseño](https://refactoring.guru/es/design-patterns) / [Command](https://refactoring.guru/es/design-patterns/command) / [Java](https://refactoring.guru/es/design-patterns/java) ![Command](https://refactoring.guru/images/patterns/cards/command-mini-2x.png?id=e5f6332e057f6d352a209da963a8fc54) **Command** en Java =================== **Command** es un patrón de diseño de comportamiento que convierte solicitudes u operaciones simples en objetos. La conversión permite la ejecución diferida de comandos, el almacenamiento del historial de comandos, etc. [Aprende más sobre el patrón Command](https://refactoring.guru/es/design-patterns/command) Navegación  [Intro](https://refactoring.guru/es/design-patterns/command/java/example#)  [Comandos de editor de texto y deshacer](https://refactoring.guru/es/design-patterns/command/java/example#example-0)  commands   [Command](https://refactoring.guru/es/design-patterns/command/java/example#example-0--commands-Command-java)   [Copy­Command](https://refactoring.guru/es/design-patterns/command/java/example#example-0--commands-CopyCommand-java)   [Paste­Command](https://refactoring.guru/es/design-patterns/command/java/example#example-0--commands-PasteCommand-java)   [Cut­Command](https://refactoring.guru/es/design-patterns/command/java/example#example-0--commands-CutCommand-java)   [Command­History](https://refactoring.guru/es/design-patterns/command/java/example#example-0--commands-CommandHistory-java)  editor   [Editor](https://refactoring.guru/es/design-patterns/command/java/example#example-0--editor-Editor-java)  [Demo](https://refactoring.guru/es/design-patterns/command/java/example#example-0--Demo-java)  [Output­Demo](https://refactoring.guru/es/design-patterns/command/java/example#example-0--OutputDemo-png) **Complejidad:** **Popularidad:** **Ejemplos de uso:** El patrón Command es muy común en el código Java. La mayoría de las veces se utiliza como alternativa a las retrollamadas (_callbacks_) para parametrizar elementos UI con acciones. También se utiliza para poner tareas en cola, realizar el seguimiento del historial de operaciones, etc. Aquí tienes algunos ejemplos del patrón Command en las principales bibliotecas Java: * Todas las implementaciones de [`java.lang.Runnable`](http://docs.oracle.com/javase/8/docs/api/java/lang/Runnable.html) * Todas las implementaciones de [`javax.swing.Action`](http://docs.oracle.com/javase/8/docs/api/javax/swing/Action.html) **Identificación:** Si ves un grupo de clases relacionadas que representan acciones específicas (como “Copiar”, “Cortar”, “Enviar”, “Imprimir”, etc.), puede que se trate de un patrón Command. Estas clases deben implementar la misma interfaz/clase abstracta. Los comandos pueden implementar las acciones relevantes por su cuenta, o delegar el trabajo a objetos separados, que serían los receptores. La última pieza del rompecabezas es identificar una invocadora: busca una clase que acepte los objetos de comando de los parámetros de sus métodos o constructor. Comandos de editor de texto y deshacer -------------------------------------- El editor de texto de este ejemplo crea nuevos objetos de comando cada vez que un usuario interactúa con él. Tras ejecutar sus acciones, un comando es empujado a la pila del historial. Ahora, para realizar la operación deshacer (undo), la aplicación toma el último comando ejecutado del historial y, o bien realiza una acción inversa, o bien restaura el pasado estado del editor guardado por ese comando. ### **commands** #### **commands/Command.java:** Comando base abstracto package refactoring\_guru.command.example.commands; import refactoring\_guru.command.example.editor.Editor; public abstract class Command { public Editor editor; private String backup; Command(Editor editor) { this.editor = editor; } void backup() { backup = editor.textField.getText(); } public void undo() { editor.textField.setText(backup); } public abstract boolean execute(); } #### **commands/CopyCommand.java:** Copiar el texto seleccionado en el portapapeles package refactoring\_guru.command.example.commands; import refactoring\_guru.command.example.editor.Editor; public class CopyCommand extends Command { public CopyCommand(Editor editor) { super(editor); } @Override public boolean execute() { editor.clipboard = editor.textField.getSelectedText(); return false; } } #### **commands/PasteCommand.java:** Pegar texto desde el portapapeles package refactoring\_guru.command.example.commands; import refactoring\_guru.command.example.editor.Editor; public class PasteCommand extends Command { public PasteCommand(Editor editor) { super(editor); } @Override public boolean execute() { if (editor.clipboard == null || editor.clipboard.isEmpty()) return false; backup(); editor.textField.insert(editor.clipboard, editor.textField.getCaretPosition()); return true; } } #### **commands/CutCommand.java:** Cortar texto al portapapeles package refactoring\_guru.command.example.commands; import refactoring\_guru.command.example.editor.Editor; public class CutCommand extends Command { public CutCommand(Editor editor) { super(editor); } @Override public boolean execute() { if (editor.textField.getSelectedText().isEmpty()) return false; backup(); String source = editor.textField.getText(); editor.clipboard = editor.textField.getSelectedText(); editor.textField.setText(cutString(source)); return true; } private String cutString(String source) { String start = source.substring(0, editor.textField.getSelectionStart()); String end = source.substring(editor.textField.getSelectionEnd()); return start + end; } } #### **commands/CommandHistory.java:** historial del comando package refactoring\_guru.command.example.commands; import java.util.Stack; public class CommandHistory { private Stack history = new Stack<>(); public void push(Command c) { history.push(c); } public Command pop() { return history.pop(); } public boolean isEmpty() { return history.isEmpty(); } } ### **editor** #### **editor/Editor.java:** GUI del editor de texto package refactoring\_guru.command.example.editor; import refactoring\_guru.command.example.commands.\*; import javax.swing.\*; import java.awt.\*; import java.awt.event.ActionEvent; import java.awt.event.ActionListener; public class Editor { public JTextArea textField; public String clipboard; private CommandHistory history = new CommandHistory(); public void init() { JFrame frame = new JFrame("Text editor (type & use buttons, Luke!)"); JPanel content = new JPanel(); frame.setContentPane(content); frame.setDefaultCloseOperation(WindowConstants.EXIT\_ON\_CLOSE); content.setLayout(new BoxLayout(content, BoxLayout.Y\_AXIS)); textField = new JTextArea(); textField.setLineWrap(true); content.add(textField); JPanel buttons = new JPanel(new FlowLayout(FlowLayout.CENTER)); JButton ctrlC = new JButton("Ctrl+C"); JButton ctrlX = new JButton("Ctrl+X"); JButton ctrlV = new JButton("Ctrl+V"); JButton ctrlZ = new JButton("Ctrl+Z"); Editor editor = this; ctrlC.addActionListener(new ActionListener() { @Override public void actionPerformed(ActionEvent e) { executeCommand(new CopyCommand(editor)); } }); ctrlX.addActionListener(new ActionListener() { @Override public void actionPerformed(ActionEvent e) { executeCommand(new CutCommand(editor)); } }); ctrlV.addActionListener(new ActionListener() { @Override public void actionPerformed(ActionEvent e) { executeCommand(new PasteCommand(editor)); } }); ctrlZ.addActionListener(new ActionListener() { @Override public void actionPerformed(ActionEvent e) { undo(); } }); buttons.add(ctrlC); buttons.add(ctrlX); buttons.add(ctrlV); buttons.add(ctrlZ); content.add(buttons); frame.setSize(450, 200); frame.setLocationRelativeTo(null); frame.setVisible(true); } private void executeCommand(Command command) { if (command.execute()) { history.push(command); } } private void undo() { if (history.isEmpty()) return; Command command = history.pop(); if (command != null) { command.undo(); } } } #### **Demo.java:** Código cliente package refactoring\_guru.command.example; import refactoring\_guru.command.example.editor.Editor; public class Demo { public static void main(String\[\] args) { Editor editor = new Editor(); editor.init(); } } #### **OutputDemo.png:** Resultado de la ejecución ![](https://refactoring.guru/images/patterns/examples/java/command/OutputDemo.png?id=f20c0baa8286ed8d9eff64c17ae9e18d) **Command** en otros lenguajes ------------------------------ [![Command en C#](https://refactoring.guru/images/patterns/icons/csharp.svg?id=da64592defc6e86d57c39c66e9de3e58)](https://refactoring.guru/es/design-patterns/command/csharp/example "Command en C#") [![Command en C++](https://refactoring.guru/images/patterns/icons/cpp.svg?id=f7782ed8b8666246bfcc3f8fefc3b858)](https://refactoring.guru/es/design-patterns/command/cpp/example "Command en C++") [![Command en Go](https://refactoring.guru/images/patterns/icons/go.svg?id=1a89927eb99b1ea3fde7701d97970aca)](https://refactoring.guru/es/design-patterns/command/go/example "Command en Go") [![Command en PHP](https://refactoring.guru/images/patterns/icons/php.svg?id=be1906eb26b71ec1d3b93720d6156618)](https://refactoring.guru/es/design-patterns/command/php/example "Command en PHP") [![Command en Python](https://refactoring.guru/images/patterns/icons/python.svg?id=6d815d43c0f7050a1151b43e51569c9f)](https://refactoring.guru/es/design-patterns/command/python/example "Command en Python") [![Command en Ruby](https://refactoring.guru/images/patterns/icons/ruby.svg?id=b065b718c914bf8e960ef731600be1eb)](https://refactoring.guru/es/design-patterns/command/ruby/example "Command en Ruby") [![Command en Rust](https://refactoring.guru/images/patterns/icons/rust.svg?id=1f5698a4b5ae23fe79413511747e4a87)](https://refactoring.guru/es/design-patterns/command/rust/example "Command en Rust") [![Command en Swift](https://refactoring.guru/images/patterns/icons/swift.svg?id=0b716c2d52ec3a48fbe91ac031070c1d)](https://refactoring.guru/es/design-patterns/command/swift/example "Command en Swift") [![Command en TypeScript](https://refactoring.guru/images/patterns/icons/typescript.svg?id=2239d0f16cb703540c205dd8cb0c0cb7)](https://refactoring.guru/es/design-patterns/command/typescript/example "Command en TypeScript") --- # Chain of Responsibility en PHP / Patrones de diseño [There are patterns of patterns now! \ My friend's project: MetaPatterns.io](https://metapatterns.io/)  [](https://refactoring.guru/es/design-patterns/chain-of-responsibility/php/example#checkout) [](https://refactoring.guru/es/design-patterns/chain-of-responsibility/php/example#checkout) [](https://refactoring.guru/) / [Patrones de diseño](https://refactoring.guru/es/design-patterns) / [Chain of Responsibility](https://refactoring.guru/es/design-patterns/chain-of-responsibility) / [PHP](https://refactoring.guru/es/design-patterns/php) ![Chain of Responsibility](https://refactoring.guru/images/patterns/cards/chain-of-responsibility-mini-2x.png?id=8c81f7069e51259b2443801b91135f7f) **Chain of Responsibility** en PHP ================================== **Chain of Responsibility** es un patrón de diseño de comportamiento que permite pasar solicitudes a lo largo de la cadena de manejadores potenciales hasta que uno de ellos gestiona la solicitud. El patrón permite que varios objetos gestionen la solicitud sin acoplar la clase emisora a las clases concretas de los receptores. La cadena puede componerse dinámicamente durante el tiempo de ejecución con cualquier manejador que siga una interfaz manejadora estándar. [Aprende más sobre el patrón Chain of Responsibility](https://refactoring.guru/es/design-patterns/chain-of-responsibility) Navegación  [Intro](https://refactoring.guru/es/design-patterns/chain-of-responsibility/php/example#)  [Ejemplo conceptual](https://refactoring.guru/es/design-patterns/chain-of-responsibility/php/example#example-0)  [index](https://refactoring.guru/es/design-patterns/chain-of-responsibility/php/example#example-0--index-php)  [Output](https://refactoring.guru/es/design-patterns/chain-of-responsibility/php/example#example-0--Output-txt)  [Ejemplo del mundo real](https://refactoring.guru/es/design-patterns/chain-of-responsibility/php/example#example-1)  [index](https://refactoring.guru/es/design-patterns/chain-of-responsibility/php/example#example-1--index-php)  [Output](https://refactoring.guru/es/design-patterns/chain-of-responsibility/php/example#example-1--Output-txt) **Complejidad:** **Popularidad:** **Ejemplos de uso:** El patrón Chain of Responsibility no es muy común en PHP porque requiere que el programa tenga cadenas de objetos. Posiblemente uno de los ejemplos más famosos del uso de este patrón en PHP es el [_middleware_ de solicitud HTTP](https://www.php-fig.org/psr/psr-15/) descrito en PSR-15. **Identificación:** El patrón es reconocible porque los métodos de comportamiento de un grupo de objetos invocan indirectamente los mismos métodos en otros objetos, mientras que todos los objetos siguen la interfaz común. Ejemplo conceptual ------------------ Este ejemplo ilustra la estructura del patrón de diseño **Chain of Responsibility** y se centra en las siguientes preguntas: * ¿De qué clases se compone? * ¿Qué papeles juegan esas clases? * ¿De qué forma se relacionan los elementos del patrón? Después de conocer la estructura del patrón, será más fácil comprender el siguiente ejemplo basado en un caso de uso real de PHP. #### **index.php:** Ejemplo conceptual nextHandler = $handler; // Returning a handler from here will let us link handlers in a // convenient way like this: // $monkey->setNext($squirrel)->setNext($dog); return $handler; } public function handle(string $request): ?string { if ($this->nextHandler) { return $this->nextHandler->handle($request); } return null; } } /\*\* \* All Concrete Handlers either handle a request or pass it to the next handler \* in the chain. \*/ class MonkeyHandler extends AbstractHandler { public function handle(string $request): ?string { if ($request === "Banana") { return "Monkey: I'll eat the " . $request . ".\\n"; } else { return parent::handle($request); } } } class SquirrelHandler extends AbstractHandler { public function handle(string $request): ?string { if ($request === "Nut") { return "Squirrel: I'll eat the " . $request . ".\\n"; } else { return parent::handle($request); } } } class DogHandler extends AbstractHandler { public function handle(string $request): ?string { if ($request === "MeatBall") { return "Dog: I'll eat the " . $request . ".\\n"; } else { return parent::handle($request); } } } /\*\* \* The client code is usually suited to work with a single handler. In most \* cases, it is not even aware that the handler is part of a chain. \*/ function clientCode(Handler $handler) { foreach (\["Nut", "Banana", "Cup of coffee"\] as $food) { echo "Client: Who wants a " . $food . "?\\n"; $result = $handler->handle($food); if ($result) { echo " " . $result; } else { echo " " . $food . " was left untouched.\\n"; } } } /\*\* \* The other part of the client code constructs the actual chain. \*/ $monkey = new MonkeyHandler(); $squirrel = new SquirrelHandler(); $dog = new DogHandler(); $monkey->setNext($squirrel)->setNext($dog); /\*\* \* The client should be able to send a request to any handler, not just the \* first one in the chain. \*/ echo "Chain: Monkey > Squirrel > Dog\\n\\n"; clientCode($monkey); echo "\\n"; echo "Subchain: Squirrel > Dog\\n\\n"; clientCode($squirrel); #### **Output.txt:** Resultado de la ejecución Chain: Monkey > Squirrel > Dog Client: Who wants a Nut? Squirrel: I'll eat the Nut. Client: Who wants a Banana? Monkey: I'll eat the Banana. Client: Who wants a Cup of coffee? Cup of coffee was left untouched. Subchain: Squirrel > Dog Client: Who wants a Nut? Squirrel: I'll eat the Nut. Client: Who wants a Banana? Banana was left untouched. Client: Who wants a Cup of coffee? Cup of coffee was left untouched. Ejemplo del mundo real ---------------------- El uso más conocido del patrón **Chain of Responsibility** (CoR) en el mundo PHP se encuentra en el _middleware_ de solicitud HTTP. Se implementan con los _frameworks_ PHP más populares y se estandarizan como parte de PSR-15. Funciona así: una solicitud HTTP debe pasar por una pila de objetos de _middleware_ para ser gestionada por la aplicación. Cada _middleware_ puede rechazar el procesamiento posterior de la solicitud o pasarla al siguiente _middleware_. Una vez que la solicitud pasa con éxito todo el _middleware_, el manejador principal de la aplicación pueden por fin gestionarla. Puede que hayas observado que este proceso es el contrario al propósito original del patrón. De hecho, en la implementación típica, una solicitud sólo se pasa por la cadena si un manejador actual no puede procesarla, mientras que un _middleware_ pasa la solicitud por la cadena cuando cree que la aplicación PUEDE gestionar la solicitud. No obstante, como los objetos de _middleware_ están encadenados, el concepto sigue considerándose un ejemplo del patrón CoR. #### **index.php:** Ejemplo del mundo real next = $next; return $next; } /\*\* \* Subclasses must override this method to provide their own checks. A \* subclass can fall back to the parent implementation if it can't process a \* request. \*/ public function check(string $email, string $password): bool { if (!$this->next) { return true; } return $this->next->check($email, $password); } } /\*\* \* This Concrete Middleware checks whether a user with given credentials exists. \*/ class UserExistsMiddleware extends Middleware { private $server; public function \_\_construct(Server $server) { $this->server = $server; } public function check(string $email, string $password): bool { if (!$this->server->hasEmail($email)) { echo "UserExistsMiddleware: This email is not registered!\\n"; return false; } if (!$this->server->isValidPassword($email, $password)) { echo "UserExistsMiddleware: Wrong password!\\n"; return false; } return parent::check($email, $password); } } /\*\* \* This Concrete Middleware checks whether a user associated with the request \* has sufficient permissions. \*/ class RoleCheckMiddleware extends Middleware { public function check(string $email, string $password): bool { if ($email === "admin@example.com") { echo "RoleCheckMiddleware: Hello, admin!\\n"; return true; } echo "RoleCheckMiddleware: Hello, user!\\n"; return parent::check($email, $password); } } /\*\* \* This Concrete Middleware checks whether there are too many failed login \* requests. \*/ class ThrottlingMiddleware extends Middleware { private $requestPerMinute; private $request; private $currentTime; public function \_\_construct(int $requestPerMinute) { $this->requestPerMinute = $requestPerMinute; $this->currentTime = time(); } /\*\* \* Please, note that the parent::check call can be inserted both at the \* beginning of this method and at the end. \* \* This gives much more flexibility than a simple loop over all middleware \* objects. For instance, a middleware can change the order of checks by \* running its check after all the others. \*/ public function check(string $email, string $password): bool { if (time() > $this->currentTime + 60) { $this->request = 0; $this->currentTime = time(); } $this->request++; if ($this->request > $this->requestPerMinute) { echo "ThrottlingMiddleware: Request limit exceeded!\\n"; die(); } return parent::check($email, $password); } } /\*\* \* This is an application's class that acts as a real handler. The Server class \* uses the CoR pattern to execute a set of various authentication middleware \* before launching some business logic associated with a request. \*/ class Server { private $users = \[\]; /\*\* \* @var Middleware \*/ private $middleware; /\*\* \* The client can configure the server with a chain of middleware objects. \*/ public function setMiddleware(Middleware $middleware): void { $this->middleware = $middleware; } /\*\* \* The server gets the email and password from the client and sends the \* authorization request to the middleware. \*/ public function logIn(string $email, string $password): bool { if ($this->middleware->check($email, $password)) { echo "Server: Authorization has been successful!\\n"; // Do something useful for authorized users. return true; } return false; } public function register(string $email, string $password): void { $this->users\[$email\] = $password; } public function hasEmail(string $email): bool { return isset($this->users\[$email\]); } public function isValidPassword(string $email, string $password): bool { return $this->users\[$email\] === $password; } } /\*\* \* The client code. \*/ $server = new Server(); $server->register("admin@example.com", "admin\_pass"); $server->register("user@example.com", "user\_pass"); // All middleware are chained. The client can build various configurations of // chains depending on its needs. $middleware = new ThrottlingMiddleware(2); $middleware ->linkWith(new UserExistsMiddleware($server)) ->linkWith(new RoleCheckMiddleware()); // The server gets a chain from the client code. $server->setMiddleware($middleware); // ... do { echo "\\nEnter your email:\\n"; $email = readline(); echo "Enter your password:\\n"; $password = readline(); $success = $server->logIn($email, $password); } while (!$success); #### **Output.txt:** Resultado de la ejecución Enter your email: asd Enter your password: 123 UserExistsMiddleware: This email is not registered! Enter your email: admin@example.com Enter your password: wrong UserExistsMiddleware: Wrong password! Enter your email: admin@example.com Enter your password: letmein ThrottlingMiddleware: Request limit exceeded! Enter your email: admin@example.com Enter your password: admin\_pass RoleCheckMiddleware: Hello, admin! Server: Authorization has been successful! **Chain of Responsibility** en otros lenguajes ---------------------------------------------- [![Chain of Responsibility en C#](https://refactoring.guru/images/patterns/icons/csharp.svg?id=da64592defc6e86d57c39c66e9de3e58)](https://refactoring.guru/es/design-patterns/chain-of-responsibility/csharp/example "Chain of Responsibility en C#") [![Chain of Responsibility en C++](https://refactoring.guru/images/patterns/icons/cpp.svg?id=f7782ed8b8666246bfcc3f8fefc3b858)](https://refactoring.guru/es/design-patterns/chain-of-responsibility/cpp/example "Chain of Responsibility en C++") [![Chain of Responsibility en Go](https://refactoring.guru/images/patterns/icons/go.svg?id=1a89927eb99b1ea3fde7701d97970aca)](https://refactoring.guru/es/design-patterns/chain-of-responsibility/go/example "Chain of Responsibility en Go") [![Chain of Responsibility en Java](https://refactoring.guru/images/patterns/icons/java.svg?id=e6d87e2dca08c953fe3acd1275ed4f4e)](https://refactoring.guru/es/design-patterns/chain-of-responsibility/java/example "Chain of Responsibility en Java") [![Chain of Responsibility en Python](https://refactoring.guru/images/patterns/icons/python.svg?id=6d815d43c0f7050a1151b43e51569c9f)](https://refactoring.guru/es/design-patterns/chain-of-responsibility/python/example "Chain of Responsibility en Python") [![Chain of Responsibility en Ruby](https://refactoring.guru/images/patterns/icons/ruby.svg?id=b065b718c914bf8e960ef731600be1eb)](https://refactoring.guru/es/design-patterns/chain-of-responsibility/ruby/example "Chain of Responsibility en Ruby") [![Chain of Responsibility en Rust](https://refactoring.guru/images/patterns/icons/rust.svg?id=1f5698a4b5ae23fe79413511747e4a87)](https://refactoring.guru/es/design-patterns/chain-of-responsibility/rust/example "Chain of Responsibility en Rust") [![Chain of Responsibility en Swift](https://refactoring.guru/images/patterns/icons/swift.svg?id=0b716c2d52ec3a48fbe91ac031070c1d)](https://refactoring.guru/es/design-patterns/chain-of-responsibility/swift/example "Chain of Responsibility en Swift") [![Chain of Responsibility en TypeScript](https://refactoring.guru/images/patterns/icons/typescript.svg?id=2239d0f16cb703540c205dd8cb0c0cb7)](https://refactoring.guru/es/design-patterns/chain-of-responsibility/typescript/example "Chain of Responsibility en TypeScript") --- # Chain of Responsibility en Rust / Patrones de diseño [There are patterns of patterns now! \ My friend's project: MetaPatterns.io](https://metapatterns.io/)  [](https://refactoring.guru/es/design-patterns/chain-of-responsibility/rust/example#checkout) [](https://refactoring.guru/es/design-patterns/chain-of-responsibility/rust/example#checkout) [](https://refactoring.guru/) / [Patrones de diseño](https://refactoring.guru/es/design-patterns) / [Chain of Responsibility](https://refactoring.guru/es/design-patterns/chain-of-responsibility) / [Rust](https://refactoring.guru/es/design-patterns/rust) ![Chain of Responsibility](https://refactoring.guru/images/patterns/cards/chain-of-responsibility-mini-2x.png?id=8c81f7069e51259b2443801b91135f7f) **Chain of Responsibility** en Rust =================================== **Chain of Responsibility** es un patrón de diseño de comportamiento que permite pasar solicitudes a lo largo de la cadena de manejadores potenciales hasta que uno de ellos gestiona la solicitud. El patrón permite que varios objetos gestionen la solicitud sin acoplar la clase emisora a las clases concretas de los receptores. La cadena puede componerse dinámicamente durante el tiempo de ejecución con cualquier manejador que siga una interfaz manejadora estándar. [Aprende más sobre el patrón Chain of Responsibility](https://refactoring.guru/es/design-patterns/chain-of-responsibility) Navegación  [Intro](https://refactoring.guru/es/design-patterns/chain-of-responsibility/rust/example#)  [Conceptual Example](https://refactoring.guru/es/design-patterns/chain-of-responsibility/rust/example#example-0)  [patient](https://refactoring.guru/es/design-patterns/chain-of-responsibility/rust/example#example-0--patient-rs)  [department](https://refactoring.guru/es/design-patterns/chain-of-responsibility/rust/example#example-0--department-rs)   [cashier](https://refactoring.guru/es/design-patterns/chain-of-responsibility/rust/example#example-0--department-cashier-rs)   [doctor](https://refactoring.guru/es/design-patterns/chain-of-responsibility/rust/example#example-0--department-doctor-rs)   [medical](https://refactoring.guru/es/design-patterns/chain-of-responsibility/rust/example#example-0--department-medical-rs)   [reception](https://refactoring.guru/es/design-patterns/chain-of-responsibility/rust/example#example-0--department-reception-rs)  [main](https://refactoring.guru/es/design-patterns/chain-of-responsibility/rust/example#example-0--main-rs) Conceptual Example ------------------ The example demonstrates processing a patient through a chain of departments. The chain of responsibility is constructed as follows: Patient -> Reception -> Doctor -> Medical -> Cashier The chain is constructed using `Box` pointers, which means dynamic dispatch in runtime. Why? It seems quite difficult to narrow down implementation to a strict compile-time typing using generics: in order to construct a type of a full chain Rust needs full knowledge of the “next of the next” link in the chain. Thus, it would look like this: let mut reception = Reception::>>::new(doctor); // 😱 Instead, `Box` allows chaining in any combination: let mut reception = Reception::new(doctor); // 👍 let mut reception = Reception::new(cashier); // 🕵️‍♀️ #### **patient.rs:** Request #\[derive(Default)\] pub struct Patient { pub name: String, pub registration\_done: bool, pub doctor\_check\_up\_done: bool, pub medicine\_done: bool, pub payment\_done: bool, } #### **department.rs:** Handlers mod cashier; mod doctor; mod medical; mod reception; pub use cashier::Cashier; pub use doctor::Doctor; pub use medical::Medical; pub use reception::Reception; use crate::patient::Patient; /// A single role of objects that make up a chain. /// A typical trait implementation must have \`handle\` and \`next\` methods, /// while \`execute\` is implemented by default and contains a proper chaining /// logic. pub trait Department { fn execute(&mut self, patient: &mut Patient) { self.handle(patient); if let Some(next) = &mut self.next() { next.execute(patient); } } fn handle(&mut self, patient: &mut Patient); fn next(&mut self) -> &mut Option>; } /// Helps to wrap an object into a boxed type. pub fn into\_next(department: impl Department + Sized + 'static) -> Option> { Some(Box::new(department)) } #### **department/cashier.rs** use super::{Department, Patient}; #\[derive(Default)\] pub struct Cashier { next: Option>, } impl Department for Cashier { fn handle(&mut self, patient: &mut Patient) { if patient.payment\_done { println!("Payment done"); } else { println!("Cashier getting money from a patient {}", patient.name); patient.payment\_done = true; } } fn next(&mut self) -> &mut Option> { &mut self.next } } #### **department/doctor.rs** use super::{into\_next, Department, Patient}; pub struct Doctor { next: Option>, } impl Doctor { pub fn new(next: impl Department + 'static) -> Self { Self { next: into\_next(next), } } } impl Department for Doctor { fn handle(&mut self, patient: &mut Patient) { if patient.doctor\_check\_up\_done { println!("A doctor checkup is already done"); } else { println!("Doctor checking a patient {}", patient.name); patient.doctor\_check\_up\_done = true; } } fn next(&mut self) -> &mut Option> { &mut self.next } } #### **department/medical.rs** use super::{into\_next, Department, Patient}; pub struct Medical { next: Option>, } impl Medical { pub fn new(next: impl Department + 'static) -> Self { Self { next: into\_next(next), } } } impl Department for Medical { fn handle(&mut self, patient: &mut Patient) { if patient.medicine\_done { println!("Medicine is already given to a patient"); } else { println!("Medical giving medicine to a patient {}", patient.name); patient.medicine\_done = true; } } fn next(&mut self) -> &mut Option> { &mut self.next } } #### **department/reception.rs** use super::{into\_next, Department, Patient}; #\[derive(Default)\] pub struct Reception { next: Option>, } impl Reception { pub fn new(next: impl Department + 'static) -> Self { Self { next: into\_next(next), } } } impl Department for Reception { fn handle(&mut self, patient: &mut Patient) { if patient.registration\_done { println!("Patient registration is already done"); } else { println!("Reception registering a patient {}", patient.name); patient.registration\_done = true; } } fn next(&mut self) -> &mut Option> { &mut self.next } } #### **main.rs:** Client code mod department; mod patient; use department::{Cashier, Department, Doctor, Medical, Reception}; use patient::Patient; fn main() { let cashier = Cashier::default(); let medical = Medical::new(cashier); let doctor = Doctor::new(medical); let mut reception = Reception::new(doctor); let mut patient = Patient { name: "John".into(), ..Patient::default() }; // Reception handles a patient passing him to the next link in the chain. // Reception -> Doctor -> Medical -> Cashier. reception.execute(&mut patient); println!("\\nThe patient has been already handled:\\n"); reception.execute(&mut patient); } ### Output Reception registering a patient John Doctor checking a patient John Medical giving medicine to a patient John Cashier getting money from a patient John The patient has been already handled: Patient registration is already done A doctor checkup is already done Medicine is already given to a patient Payment done **Chain of Responsibility** en otros lenguajes ---------------------------------------------- [![Chain of Responsibility en C#](https://refactoring.guru/images/patterns/icons/csharp.svg?id=da64592defc6e86d57c39c66e9de3e58)](https://refactoring.guru/es/design-patterns/chain-of-responsibility/csharp/example "Chain of Responsibility en C#") [![Chain of Responsibility en C++](https://refactoring.guru/images/patterns/icons/cpp.svg?id=f7782ed8b8666246bfcc3f8fefc3b858)](https://refactoring.guru/es/design-patterns/chain-of-responsibility/cpp/example "Chain of Responsibility en C++") [![Chain of Responsibility en Go](https://refactoring.guru/images/patterns/icons/go.svg?id=1a89927eb99b1ea3fde7701d97970aca)](https://refactoring.guru/es/design-patterns/chain-of-responsibility/go/example "Chain of Responsibility en Go") [![Chain of Responsibility en Java](https://refactoring.guru/images/patterns/icons/java.svg?id=e6d87e2dca08c953fe3acd1275ed4f4e)](https://refactoring.guru/es/design-patterns/chain-of-responsibility/java/example "Chain of Responsibility en Java") [![Chain of Responsibility en PHP](https://refactoring.guru/images/patterns/icons/php.svg?id=be1906eb26b71ec1d3b93720d6156618)](https://refactoring.guru/es/design-patterns/chain-of-responsibility/php/example "Chain of Responsibility en PHP") [![Chain of Responsibility en Python](https://refactoring.guru/images/patterns/icons/python.svg?id=6d815d43c0f7050a1151b43e51569c9f)](https://refactoring.guru/es/design-patterns/chain-of-responsibility/python/example "Chain of Responsibility en Python") [![Chain of Responsibility en Ruby](https://refactoring.guru/images/patterns/icons/ruby.svg?id=b065b718c914bf8e960ef731600be1eb)](https://refactoring.guru/es/design-patterns/chain-of-responsibility/ruby/example "Chain of Responsibility en Ruby") [![Chain of Responsibility en Swift](https://refactoring.guru/images/patterns/icons/swift.svg?id=0b716c2d52ec3a48fbe91ac031070c1d)](https://refactoring.guru/es/design-patterns/chain-of-responsibility/swift/example "Chain of Responsibility en Swift") [![Chain of Responsibility en TypeScript](https://refactoring.guru/images/patterns/icons/typescript.svg?id=2239d0f16cb703540c205dd8cb0c0cb7)](https://refactoring.guru/es/design-patterns/chain-of-responsibility/typescript/example "Chain of Responsibility en TypeScript") --- # Composite en TypeScript / Patrones de diseño [There are patterns of patterns now! \ My friend's project: MetaPatterns.io](https://metapatterns.io/)  [](https://refactoring.guru/es/design-patterns/composite/typescript/example#checkout) [](https://refactoring.guru/es/design-patterns/composite/typescript/example#checkout) [](https://refactoring.guru/) / [Patrones de diseño](https://refactoring.guru/es/design-patterns) / [Composite](https://refactoring.guru/es/design-patterns/composite) / [TypeScript](https://refactoring.guru/es/design-patterns/typescript) ![Composite](https://refactoring.guru/images/patterns/cards/composite-mini-2x.png?id=3f7f811fefeb0b64f6774746eb42af09) **Composite** en TypeScript =========================== **Composite** es un patrón de diseño estructural que permite componer objetos en una estructura en forma de árbol y trabajar con ella como si fuera un objeto único. El patrón Composite se convirtió en una solución muy popular para la mayoría de problemas que requieren la creación de una estructura de árbol. La gran característica del Composite es la capacidad para ejecutar métodos de forma recursiva por toda la estructura de árbol y recapitular los resultados. [Aprende más sobre el patrón Composite](https://refactoring.guru/es/design-patterns/composite) Navegación  [Intro](https://refactoring.guru/es/design-patterns/composite/typescript/example#)  [Ejemplo conceptual](https://refactoring.guru/es/design-patterns/composite/typescript/example#example-0)  [index](https://refactoring.guru/es/design-patterns/composite/typescript/example#example-0--index-ts)  [Output](https://refactoring.guru/es/design-patterns/composite/typescript/example#example-0--Output-txt) **Complejidad:** **Popularidad:** **Ejemplos de uso:** El patrón Composite es muy común en el código TypeScript. Se utiliza a menudo para representar jerarquías de componentes de interfaz de usuario o el código que trabaja con gráficos. **Identificación:** El Composite es fácil de reconocer por los métodos de comportamiento que toman una instancia del mismo tipo abstracto/interfaz y lo hacen una estructura de árbol. Ejemplo conceptual ------------------ Este ejemplo ilustra la estructura del patrón de diseño **Composite** y se centra en las siguientes preguntas: * ¿De qué clases se compone? * ¿Qué papeles juegan esas clases? * ¿De qué forma se relacionan los elementos del patrón? #### **index.ts:** Ejemplo conceptual /\*\* \* The base Component class declares common operations for both simple and \* complex objects of a composition. \*/ abstract class Component { protected parent!: Component | null; /\*\* \* Optionally, the base Component can declare an interface for setting and \* accessing a parent of the component in a tree structure. It can also \* provide some default implementation for these methods. \*/ public setParent(parent: Component | null) { this.parent = parent; } public getParent(): Component | null { return this.parent; } /\*\* \* In some cases, it would be beneficial to define the child-management \* operations right in the base Component class. This way, you won't need to \* expose any concrete component classes to the client code, even during the \* object tree assembly. The downside is that these methods will be empty \* for the leaf-level components. \*/ public add(component: Component): void { } public remove(component: Component): void { } /\*\* \* You can provide a method that lets the client code figure out whether a \* component can bear children. \*/ public isComposite(): boolean { return false; } /\*\* \* The base Component may implement some default behavior or leave it to \* concrete classes (by declaring the method containing the behavior as \* "abstract"). \*/ public abstract operation(): string; } /\*\* \* The Leaf class represents the end objects of a composition. A leaf can't have \* any children. \* \* Usually, it's the Leaf objects that do the actual work, whereas Composite \* objects only delegate to their sub-components. \*/ class Leaf extends Component { public operation(): string { return 'Leaf'; } } /\*\* \* The Composite class represents the complex components that may have children. \* Usually, the Composite objects delegate the actual work to their children and \* then "sum-up" the result. \*/ class Composite extends Component { protected children: Component\[\] = \[\]; /\*\* \* A composite object can add or remove other components (both simple or \* complex) to or from its child list. \*/ public add(component: Component): void { this.children.push(component); component.setParent(this); } public remove(component: Component): void { const componentIndex = this.children.indexOf(component); this.children.splice(componentIndex, 1); component.setParent(null); } public isComposite(): boolean { return true; } /\*\* \* The Composite executes its primary logic in a particular way. It \* traverses recursively through all its children, collecting and summing \* their results. Since the composite's children pass these calls to their \* children and so forth, the whole object tree is traversed as a result. \*/ public operation(): string { const results = \[\]; for (const child of this.children) { results.push(child.operation()); } return \`Branch(${results.join('+')})\`; } } /\*\* \* The client code works with all of the components via the base interface. \*/ function clientCode(component: Component) { // ... console.log(\`RESULT: ${component.operation()}\`); // ... } /\*\* \* This way the client code can support the simple leaf components... \*/ const simple = new Leaf(); console.log('Client: I\\'ve got a simple component:'); clientCode(simple); console.log(''); /\*\* \* ...as well as the complex composites. \*/ const tree = new Composite(); const branch1 = new Composite(); branch1.add(new Leaf()); branch1.add(new Leaf()); const branch2 = new Composite(); branch2.add(new Leaf()); tree.add(branch1); tree.add(branch2); console.log('Client: Now I\\'ve got a composite tree:'); clientCode(tree); console.log(''); /\*\* \* Thanks to the fact that the child-management operations are declared in the \* base Component class, the client code can work with any component, simple or \* complex, without depending on their concrete classes. \*/ function clientCode2(component1: Component, component2: Component) { // ... if (component1.isComposite()) { component1.add(component2); } console.log(\`RESULT: ${component1.operation()}\`); // ... } console.log('Client: I don\\'t need to check the components classes even when managing the tree:'); clientCode2(tree, simple); #### **Output.txt:** Resultado de la ejecución Client: I've got a simple component: RESULT: Leaf Client: Now I've got a composite tree: RESULT: Branch(Branch(Leaf+Leaf)+Branch(Leaf)) Client: I don't need to check the components classes even when managing the tree: RESULT: Branch(Branch(Leaf+Leaf)+Branch(Leaf)+Leaf) **Composite** en otros lenguajes -------------------------------- [![Composite en C#](https://refactoring.guru/images/patterns/icons/csharp.svg?id=da64592defc6e86d57c39c66e9de3e58)](https://refactoring.guru/es/design-patterns/composite/csharp/example "Composite en C#") [![Composite en C++](https://refactoring.guru/images/patterns/icons/cpp.svg?id=f7782ed8b8666246bfcc3f8fefc3b858)](https://refactoring.guru/es/design-patterns/composite/cpp/example "Composite en C++") [![Composite en Go](https://refactoring.guru/images/patterns/icons/go.svg?id=1a89927eb99b1ea3fde7701d97970aca)](https://refactoring.guru/es/design-patterns/composite/go/example "Composite en Go") [![Composite en Java](https://refactoring.guru/images/patterns/icons/java.svg?id=e6d87e2dca08c953fe3acd1275ed4f4e)](https://refactoring.guru/es/design-patterns/composite/java/example "Composite en Java") [![Composite en PHP](https://refactoring.guru/images/patterns/icons/php.svg?id=be1906eb26b71ec1d3b93720d6156618)](https://refactoring.guru/es/design-patterns/composite/php/example "Composite en PHP") [![Composite en Python](https://refactoring.guru/images/patterns/icons/python.svg?id=6d815d43c0f7050a1151b43e51569c9f)](https://refactoring.guru/es/design-patterns/composite/python/example "Composite en Python") [![Composite en Ruby](https://refactoring.guru/images/patterns/icons/ruby.svg?id=b065b718c914bf8e960ef731600be1eb)](https://refactoring.guru/es/design-patterns/composite/ruby/example "Composite en Ruby") [![Composite en Rust](https://refactoring.guru/images/patterns/icons/rust.svg?id=1f5698a4b5ae23fe79413511747e4a87)](https://refactoring.guru/es/design-patterns/composite/rust/example "Composite en Rust") [![Composite en Swift](https://refactoring.guru/images/patterns/icons/swift.svg?id=0b716c2d52ec3a48fbe91ac031070c1d)](https://refactoring.guru/es/design-patterns/composite/swift/example "Composite en Swift") --- # Composite en Rust / Patrones de diseño [There are patterns of patterns now! \ My friend's project: MetaPatterns.io](https://metapatterns.io/)  [](https://refactoring.guru/es/design-patterns/composite/rust/example#checkout) [](https://refactoring.guru/es/design-patterns/composite/rust/example#checkout) [](https://refactoring.guru/) / [Patrones de diseño](https://refactoring.guru/es/design-patterns) / [Composite](https://refactoring.guru/es/design-patterns/composite) / [Rust](https://refactoring.guru/es/design-patterns/rust) ![Composite](https://refactoring.guru/images/patterns/cards/composite-mini-2x.png?id=3f7f811fefeb0b64f6774746eb42af09) **Composite** en Rust ===================== **Composite** es un patrón de diseño estructural que permite componer objetos en una estructura en forma de árbol y trabajar con ella como si fuera un objeto único. El patrón Composite se convirtió en una solución muy popular para la mayoría de problemas que requieren la creación de una estructura de árbol. La gran característica del Composite es la capacidad para ejecutar métodos de forma recursiva por toda la estructura de árbol y recapitular los resultados. [Aprende más sobre el patrón Composite](https://refactoring.guru/es/design-patterns/composite) Navegación  [Intro](https://refactoring.guru/es/design-patterns/composite/rust/example#)  [Files and Folders](https://refactoring.guru/es/design-patterns/composite/rust/example#example-0)   [mod](https://refactoring.guru/es/design-patterns/composite/rust/example#example-0--fs-mod-rs)   [file](https://refactoring.guru/es/design-patterns/composite/rust/example#example-0--fs-file-rs)   [folder](https://refactoring.guru/es/design-patterns/composite/rust/example#example-0--fs-folder-rs)  [main](https://refactoring.guru/es/design-patterns/composite/rust/example#example-0--main-rs) Files and Folders ----------------- Let’s try to understand the Composite pattern with an example of an operating system’s file system. In the file system, there are two types of objects: files and folders. There are cases when files and folders should be treated to be the same way. This is where the Composite pattern comes in handy. `File` and `Directory` are both of the `trait Component` with a single `search` method. For a file, it will just look into the contents of the file; for a folder, it will go through all files of that folder to find that keyword. #### **fs/mod.rs** mod file; mod folder; pub use file::File; pub use folder::Folder; pub trait Component { fn search(&self, keyword: &str); } #### **fs/file.rs** use super::Component; pub struct File { name: &'static str, } impl File { pub fn new(name: &'static str) -> Self { Self { name } } } impl Component for File { fn search(&self, keyword: &str) { println!("Searching for keyword {} in file {}", keyword, self.name); } } #### **fs/folder.rs** use super::Component; pub struct Folder { name: &'static str, components: Vec>, } impl Folder { pub fn new(name: &'static str) -> Self { Self { name, components: vec!\[\], } } pub fn add(&mut self, component: impl Component + 'static) { self.components.push(Box::new(component)); } } impl Component for Folder { fn search(&self, keyword: &str) { println!( "Searching recursively for keyword {} in folder {}", keyword, self.name ); for component in self.components.iter() { component.search(keyword); } } } #### **main.rs** mod fs; use fs::{Component, File, Folder}; fn main() { let file1 = File::new("File 1"); let file2 = File::new("File 2"); let file3 = File::new("File 3"); let mut folder1 = Folder::new("Folder 1"); folder1.add(file1); let mut folder2 = Folder::new("Folder 2"); folder2.add(file2); folder2.add(file3); folder2.add(folder1); folder2.search("rose"); } ### Output Searching recursively for keyword rose in folder Folder 2 Searching for keyword rose in file File 2 Searching for keyword rose in file File 3 Searching recursively for keyword rose in folder Folder 1 Searching for keyword rose in file File 1 ------------------------------------ **Composite** en otros lenguajes -------------------------------- [![Composite en C#](https://refactoring.guru/images/patterns/icons/csharp.svg?id=da64592defc6e86d57c39c66e9de3e58)](https://refactoring.guru/es/design-patterns/composite/csharp/example "Composite en C#") [![Composite en C++](https://refactoring.guru/images/patterns/icons/cpp.svg?id=f7782ed8b8666246bfcc3f8fefc3b858)](https://refactoring.guru/es/design-patterns/composite/cpp/example "Composite en C++") [![Composite en Go](https://refactoring.guru/images/patterns/icons/go.svg?id=1a89927eb99b1ea3fde7701d97970aca)](https://refactoring.guru/es/design-patterns/composite/go/example "Composite en Go") [![Composite en Java](https://refactoring.guru/images/patterns/icons/java.svg?id=e6d87e2dca08c953fe3acd1275ed4f4e)](https://refactoring.guru/es/design-patterns/composite/java/example "Composite en Java") [![Composite en PHP](https://refactoring.guru/images/patterns/icons/php.svg?id=be1906eb26b71ec1d3b93720d6156618)](https://refactoring.guru/es/design-patterns/composite/php/example "Composite en PHP") [![Composite en Python](https://refactoring.guru/images/patterns/icons/python.svg?id=6d815d43c0f7050a1151b43e51569c9f)](https://refactoring.guru/es/design-patterns/composite/python/example "Composite en Python") [![Composite en Ruby](https://refactoring.guru/images/patterns/icons/ruby.svg?id=b065b718c914bf8e960ef731600be1eb)](https://refactoring.guru/es/design-patterns/composite/ruby/example "Composite en Ruby") [![Composite en Swift](https://refactoring.guru/images/patterns/icons/swift.svg?id=0b716c2d52ec3a48fbe91ac031070c1d)](https://refactoring.guru/es/design-patterns/composite/swift/example "Composite en Swift") [![Composite en TypeScript](https://refactoring.guru/images/patterns/icons/typescript.svg?id=2239d0f16cb703540c205dd8cb0c0cb7)](https://refactoring.guru/es/design-patterns/composite/typescript/example "Composite en TypeScript") --- # Decorator en Go / Patrones de diseño [There are patterns of patterns now! \ My friend's project: MetaPatterns.io](https://metapatterns.io/)  [](https://refactoring.guru/es/design-patterns/decorator/go/example#checkout) [](https://refactoring.guru/es/design-patterns/decorator/go/example#checkout) [](https://refactoring.guru/) / [Patrones de diseño](https://refactoring.guru/es/design-patterns) / [Decorator](https://refactoring.guru/es/design-patterns/decorator) / [Go](https://refactoring.guru/es/design-patterns/go) ![Decorator](https://refactoring.guru/images/patterns/cards/decorator-mini-2x.png?id=3b58e540d7d28523080cad341ed9b2e9) **Decorator** en Go =================== **Decorator** es un patrón de diseño estructural que permite añadir dinámicamente nuevos comportamientos a objetos colocándolos dentro de objetos especiales que los envuelven (\_wrappers\_). Utilizando decoradores puedes envolver objetos innumerables veces, ya que los objetos objetivo y los decoradores siguen la misma interfaz. El objeto resultante obtendrá un comportamiento de apilado de todos los _wrappers_. [Aprende más sobre el patrón Decorator](https://refactoring.guru/es/design-patterns/decorator) Navegación  [Intro](https://refactoring.guru/es/design-patterns/decorator/go/example#)  [Ejemplo conceptual](https://refactoring.guru/es/design-patterns/decorator/go/example#example-0)  [pizza](https://refactoring.guru/es/design-patterns/decorator/go/example#example-0--pizza-go)  [veggie­Mania](https://refactoring.guru/es/design-patterns/decorator/go/example#example-0--veggieMania-go)  [tomato­Topping](https://refactoring.guru/es/design-patterns/decorator/go/example#example-0--tomatoTopping-go)  [cheese­Topping](https://refactoring.guru/es/design-patterns/decorator/go/example#example-0--cheeseTopping-go)  [main](https://refactoring.guru/es/design-patterns/decorator/go/example#example-0--main-go)  [output](https://refactoring.guru/es/design-patterns/decorator/go/example#example-0--output-txt) Ejemplo conceptual ------------------ #### **pizza.go:** Interfaz componente package main type IPizza interface { getPrice() int } #### **veggieMania.go:** Componente concreto package main type VeggieMania struct { } func (p \*VeggieMania) getPrice() int { return 15 } #### **tomatoTopping.go:** Decorador concreto package main type TomatoTopping struct { pizza IPizza } func (c \*TomatoTopping) getPrice() int { pizzaPrice := c.pizza.getPrice() return pizzaPrice + 7 } #### **cheeseTopping.go:** Decorador concreto package main type CheeseTopping struct { pizza IPizza } func (c \*CheeseTopping) getPrice() int { pizzaPrice := c.pizza.getPrice() return pizzaPrice + 10 } #### **main.go:** Código cliente package main import "fmt" func main() { pizza := &VeggieMania{} //Add cheese topping pizzaWithCheese := &CheeseTopping{ pizza: pizza, } //Add tomato topping pizzaWithCheeseAndTomato := &TomatoTopping{ pizza: pizzaWithCheese, } fmt.Printf("Price of veggeMania with tomato and cheese topping is %d\\n", pizzaWithCheeseAndTomato.getPrice()) } #### **output.txt:** Resultado de la ejecución Price of veggeMania with tomato and cheese topping is 32 **Decorator** en otros lenguajes -------------------------------- [![Decorator en C#](https://refactoring.guru/images/patterns/icons/csharp.svg?id=da64592defc6e86d57c39c66e9de3e58)](https://refactoring.guru/es/design-patterns/decorator/csharp/example "Decorator en C#") [![Decorator en C++](https://refactoring.guru/images/patterns/icons/cpp.svg?id=f7782ed8b8666246bfcc3f8fefc3b858)](https://refactoring.guru/es/design-patterns/decorator/cpp/example "Decorator en C++") [![Decorator en Java](https://refactoring.guru/images/patterns/icons/java.svg?id=e6d87e2dca08c953fe3acd1275ed4f4e)](https://refactoring.guru/es/design-patterns/decorator/java/example "Decorator en Java") [![Decorator en PHP](https://refactoring.guru/images/patterns/icons/php.svg?id=be1906eb26b71ec1d3b93720d6156618)](https://refactoring.guru/es/design-patterns/decorator/php/example "Decorator en PHP") [![Decorator en Python](https://refactoring.guru/images/patterns/icons/python.svg?id=6d815d43c0f7050a1151b43e51569c9f)](https://refactoring.guru/es/design-patterns/decorator/python/example "Decorator en Python") [![Decorator en Ruby](https://refactoring.guru/images/patterns/icons/ruby.svg?id=b065b718c914bf8e960ef731600be1eb)](https://refactoring.guru/es/design-patterns/decorator/ruby/example "Decorator en Ruby") [![Decorator en Rust](https://refactoring.guru/images/patterns/icons/rust.svg?id=1f5698a4b5ae23fe79413511747e4a87)](https://refactoring.guru/es/design-patterns/decorator/rust/example "Decorator en Rust") [![Decorator en Swift](https://refactoring.guru/images/patterns/icons/swift.svg?id=0b716c2d52ec3a48fbe91ac031070c1d)](https://refactoring.guru/es/design-patterns/decorator/swift/example "Decorator en Swift") [![Decorator en TypeScript](https://refactoring.guru/images/patterns/icons/typescript.svg?id=2239d0f16cb703540c205dd8cb0c0cb7)](https://refactoring.guru/es/design-patterns/decorator/typescript/example "Decorator en TypeScript") --- # Composite en C# / Patrones de diseño [There are patterns of patterns now! \ My friend's project: MetaPatterns.io](https://metapatterns.io/)  [](https://refactoring.guru/es/design-patterns/composite/csharp/example#checkout) [](https://refactoring.guru/es/design-patterns/composite/csharp/example#checkout) [](https://refactoring.guru/) / [Patrones de diseño](https://refactoring.guru/es/design-patterns) / [Composite](https://refactoring.guru/es/design-patterns/composite) / [C#](https://refactoring.guru/es/design-patterns/csharp) ![Composite](https://refactoring.guru/images/patterns/cards/composite-mini-2x.png?id=3f7f811fefeb0b64f6774746eb42af09) **Composite** en C# =================== **Composite** es un patrón de diseño estructural que permite componer objetos en una estructura en forma de árbol y trabajar con ella como si fuera un objeto único. El patrón Composite se convirtió en una solución muy popular para la mayoría de problemas que requieren la creación de una estructura de árbol. La gran característica del Composite es la capacidad para ejecutar métodos de forma recursiva por toda la estructura de árbol y recapitular los resultados. [Aprende más sobre el patrón Composite](https://refactoring.guru/es/design-patterns/composite) Navegación  [Intro](https://refactoring.guru/es/design-patterns/composite/csharp/example#)  [Ejemplo conceptual](https://refactoring.guru/es/design-patterns/composite/csharp/example#example-0)  [Program](https://refactoring.guru/es/design-patterns/composite/csharp/example#example-0--Program-cs)  [Output](https://refactoring.guru/es/design-patterns/composite/csharp/example#example-0--Output-txt) **Complejidad:** **Popularidad:** **Ejemplos de uso:** El patrón Composite es muy común en el código C#. Se utiliza a menudo para representar jerarquías de componentes de interfaz de usuario o el código que trabaja con gráficos. **Identificación:** El Composite es fácil de reconocer por los métodos de comportamiento que toman una instancia del mismo tipo abstracto/interfaz y lo hacen una estructura de árbol. Ejemplo conceptual ------------------ Este ejemplo ilustra la estructura del patrón de diseño **Composite**. Se centra en responder las siguientes preguntas: * ¿De qué clases se compone? * ¿Qué papeles juegan esas clases? * ¿De qué forma se relacionan los elementos del patrón? #### **Program.cs:** Ejemplo conceptual using System; using System.Collections.Generic; namespace RefactoringGuru.DesignPatterns.Composite.Conceptual { // The base Component class declares common operations for both simple and // complex objects of a composition. abstract class Component { public Component() { } // The base Component may implement some default behavior or leave it to // concrete classes (by declaring the method containing the behavior as // "abstract"). public abstract string Operation(); // In some cases, it would be beneficial to define the child-management // operations right in the base Component class. This way, you won't // need to expose any concrete component classes to the client code, // even during the object tree assembly. The downside is that these // methods will be empty for the leaf-level components. public virtual void Add(Component component) { throw new NotImplementedException(); } public virtual void Remove(Component component) { throw new NotImplementedException(); } // You can provide a method that lets the client code figure out whether // a component can bear children. public virtual bool IsComposite() { return true; } } // The Leaf class represents the end objects of a composition. A leaf can't // have any children. // // Usually, it's the Leaf objects that do the actual work, whereas Composite // objects only delegate to their sub-components. class Leaf : Component { public override string Operation() { return "Leaf"; } public override bool IsComposite() { return false; } } // The Composite class represents the complex components that may have // children. Usually, the Composite objects delegate the actual work to // their children and then "sum-up" the result. class Composite : Component { protected List \_children = new List(); public override void Add(Component component) { this.\_children.Add(component); } public override void Remove(Component component) { this.\_children.Remove(component); } // The Composite executes its primary logic in a particular way. It // traverses recursively through all its children, collecting and // summing their results. Since the composite's children pass these // calls to their children and so forth, the whole object tree is // traversed as a result. public override string Operation() { int i = 0; string result = "Branch("; foreach (Component component in this.\_children) { result += component.Operation(); if (i != this.\_children.Count - 1) { result += "+"; } i++; } return result + ")"; } } class Client { // The client code works with all of the components via the base // interface. public void ClientCode(Component leaf) { Console.WriteLine($"RESULT: {leaf.Operation()}\\n"); } // Thanks to the fact that the child-management operations are declared // in the base Component class, the client code can work with any // component, simple or complex, without depending on their concrete // classes. public void ClientCode2(Component component1, Component component2) { if (component1.IsComposite()) { component1.Add(component2); } Console.WriteLine($"RESULT: {component1.Operation()}"); } } class Program { static void Main(string\[\] args) { Client client = new Client(); // This way the client code can support the simple leaf // components... Leaf leaf = new Leaf(); Console.WriteLine("Client: I get a simple component:"); client.ClientCode(leaf); // ...as well as the complex composites. Composite tree = new Composite(); Composite branch1 = new Composite(); branch1.Add(new Leaf()); branch1.Add(new Leaf()); Composite branch2 = new Composite(); branch2.Add(new Leaf()); tree.Add(branch1); tree.Add(branch2); Console.WriteLine("Client: Now I've got a composite tree:"); client.ClientCode(tree); Console.Write("Client: I don't need to check the components classes even when managing the tree:\\n"); client.ClientCode2(tree, leaf); } } } #### **Output.txt:** Resultado de la ejecución Client: I get a simple component: RESULT: Leaf Client: Now I've got a composite tree: RESULT: Branch(Branch(Leaf+Leaf)+Branch(Leaf)) Client: I don't need to check the components classes even when managing the tree: RESULT: Branch(Branch(Leaf+Leaf)+Branch(Leaf)+Leaf) **Composite** en otros lenguajes -------------------------------- [![Composite en C++](https://refactoring.guru/images/patterns/icons/cpp.svg?id=f7782ed8b8666246bfcc3f8fefc3b858)](https://refactoring.guru/es/design-patterns/composite/cpp/example "Composite en C++") [![Composite en Go](https://refactoring.guru/images/patterns/icons/go.svg?id=1a89927eb99b1ea3fde7701d97970aca)](https://refactoring.guru/es/design-patterns/composite/go/example "Composite en Go") [![Composite en Java](https://refactoring.guru/images/patterns/icons/java.svg?id=e6d87e2dca08c953fe3acd1275ed4f4e)](https://refactoring.guru/es/design-patterns/composite/java/example "Composite en Java") [![Composite en PHP](https://refactoring.guru/images/patterns/icons/php.svg?id=be1906eb26b71ec1d3b93720d6156618)](https://refactoring.guru/es/design-patterns/composite/php/example "Composite en PHP") [![Composite en Python](https://refactoring.guru/images/patterns/icons/python.svg?id=6d815d43c0f7050a1151b43e51569c9f)](https://refactoring.guru/es/design-patterns/composite/python/example "Composite en Python") [![Composite en Ruby](https://refactoring.guru/images/patterns/icons/ruby.svg?id=b065b718c914bf8e960ef731600be1eb)](https://refactoring.guru/es/design-patterns/composite/ruby/example "Composite en Ruby") [![Composite en Rust](https://refactoring.guru/images/patterns/icons/rust.svg?id=1f5698a4b5ae23fe79413511747e4a87)](https://refactoring.guru/es/design-patterns/composite/rust/example "Composite en Rust") [![Composite en Swift](https://refactoring.guru/images/patterns/icons/swift.svg?id=0b716c2d52ec3a48fbe91ac031070c1d)](https://refactoring.guru/es/design-patterns/composite/swift/example "Composite en Swift") [![Composite en TypeScript](https://refactoring.guru/images/patterns/icons/typescript.svg?id=2239d0f16cb703540c205dd8cb0c0cb7)](https://refactoring.guru/es/design-patterns/composite/typescript/example "Composite en TypeScript") --- # Command en TypeScript / Patrones de diseño [There are patterns of patterns now! \ My friend's project: MetaPatterns.io](https://metapatterns.io/)  [](https://refactoring.guru/es/design-patterns/command/typescript/example#checkout) [](https://refactoring.guru/es/design-patterns/command/typescript/example#checkout) [](https://refactoring.guru/) / [Patrones de diseño](https://refactoring.guru/es/design-patterns) / [Command](https://refactoring.guru/es/design-patterns/command) / [TypeScript](https://refactoring.guru/es/design-patterns/typescript) ![Command](https://refactoring.guru/images/patterns/cards/command-mini-2x.png?id=e5f6332e057f6d352a209da963a8fc54) **Command** en TypeScript ========================= **Command** es un patrón de diseño de comportamiento que convierte solicitudes u operaciones simples en objetos. La conversión permite la ejecución diferida de comandos, el almacenamiento del historial de comandos, etc. [Aprende más sobre el patrón Command](https://refactoring.guru/es/design-patterns/command) Navegación  [Intro](https://refactoring.guru/es/design-patterns/command/typescript/example#)  [Ejemplo conceptual](https://refactoring.guru/es/design-patterns/command/typescript/example#example-0)  [index](https://refactoring.guru/es/design-patterns/command/typescript/example#example-0--index-ts)  [Output](https://refactoring.guru/es/design-patterns/command/typescript/example#example-0--Output-txt) **Complejidad:** **Popularidad:** **Ejemplos de uso:** El patrón Command es muy común en el código TypeScript. La mayoría de las veces se utiliza como alternativa a las retrollamadas (_callbacks_) para parametrizar elementos UI con acciones. También se utiliza para poner tareas en cola, realizar el seguimiento del historial de operaciones, etc. **Identificación:** El patrón Command es reconocible por los métodos de comportamiento en un tipo de clase abstracta/interfaz (emisora) que invoca un método en una implementación de un tipo de clase abstracta/interfaz diferente (receptora) que la implementación del comando ha implementado durante su creación. Las clases de comando se limitan normalmente a acciones específicas. Ejemplo conceptual ------------------ Este ejemplo ilustra la estructura del patrón de diseño **Command** y se centra en las siguientes preguntas: * ¿De qué clases se compone? * ¿Qué papeles juegan esas clases? * ¿De qué forma se relacionan los elementos del patrón? #### **index.ts:** Ejemplo conceptual /\*\* \* The Command interface declares a method for executing a command. \*/ interface Command { execute(): void; } /\*\* \* Some commands can implement simple operations on their own. \*/ class SimpleCommand implements Command { private payload: string; constructor(payload: string) { this.payload = payload; } public execute(): void { console.log(\`SimpleCommand: See, I can do simple things like printing (${this.payload})\`); } } /\*\* \* However, some commands can delegate more complex operations to other objects, \* called "receivers." \*/ class ComplexCommand implements Command { private receiver: Receiver; /\*\* \* Context data, required for launching the receiver's methods. \*/ private a: string; private b: string; /\*\* \* Complex commands can accept one or several receiver objects along with \* any context data via the constructor. \*/ constructor(receiver: Receiver, a: string, b: string) { this.receiver = receiver; this.a = a; this.b = b; } /\*\* \* Commands can delegate to any methods of a receiver. \*/ public execute(): void { console.log('ComplexCommand: Complex stuff should be done by a receiver object.'); this.receiver.doSomething(this.a); this.receiver.doSomethingElse(this.b); } } /\*\* \* The Receiver classes contain some important business logic. They know how to \* perform all kinds of operations, associated with carrying out a request. In \* fact, any class may serve as a Receiver. \*/ class Receiver { public doSomething(a: string): void { console.log(\`Receiver: Working on (${a}.)\`); } public doSomethingElse(b: string): void { console.log(\`Receiver: Also working on (${b}.)\`); } } /\*\* \* The Invoker is associated with one or several commands. It sends a request to \* the command. \*/ class Invoker { private onStart: Command; private onFinish: Command; /\*\* \* Initialize commands. \*/ public setOnStart(command: Command): void { this.onStart = command; } public setOnFinish(command: Command): void { this.onFinish = command; } /\*\* \* The Invoker does not depend on concrete command or receiver classes. The \* Invoker passes a request to a receiver indirectly, by executing a \* command. \*/ public doSomethingImportant(): void { console.log('Invoker: Does anybody want something done before I begin?'); if (this.isCommand(this.onStart)) { this.onStart.execute(); } console.log('Invoker: ...doing something really important...'); console.log('Invoker: Does anybody want something done after I finish?'); if (this.isCommand(this.onFinish)) { this.onFinish.execute(); } } private isCommand(object): object is Command { return object.execute !== undefined; } } /\*\* \* The client code can parameterize an invoker with any commands. \*/ const invoker = new Invoker(); invoker.setOnStart(new SimpleCommand('Say Hi!')); const receiver = new Receiver(); invoker.setOnFinish(new ComplexCommand(receiver, 'Send email', 'Save report')); invoker.doSomethingImportant(); #### **Output.txt:** Resultado de la ejecución Invoker: Does anybody want something done before I begin? SimpleCommand: See, I can do simple things like printing (Say Hi!) Invoker: ...doing something really important... Invoker: Does anybody want something done after I finish? ComplexCommand: Complex stuff should be done by a receiver object. Receiver: Working on (Send email.) Receiver: Also working on (Save report.) **Command** en otros lenguajes ------------------------------ [![Command en C#](https://refactoring.guru/images/patterns/icons/csharp.svg?id=da64592defc6e86d57c39c66e9de3e58)](https://refactoring.guru/es/design-patterns/command/csharp/example "Command en C#") [![Command en C++](https://refactoring.guru/images/patterns/icons/cpp.svg?id=f7782ed8b8666246bfcc3f8fefc3b858)](https://refactoring.guru/es/design-patterns/command/cpp/example "Command en C++") [![Command en Go](https://refactoring.guru/images/patterns/icons/go.svg?id=1a89927eb99b1ea3fde7701d97970aca)](https://refactoring.guru/es/design-patterns/command/go/example "Command en Go") [![Command en Java](https://refactoring.guru/images/patterns/icons/java.svg?id=e6d87e2dca08c953fe3acd1275ed4f4e)](https://refactoring.guru/es/design-patterns/command/java/example "Command en Java") [![Command en PHP](https://refactoring.guru/images/patterns/icons/php.svg?id=be1906eb26b71ec1d3b93720d6156618)](https://refactoring.guru/es/design-patterns/command/php/example "Command en PHP") [![Command en Python](https://refactoring.guru/images/patterns/icons/python.svg?id=6d815d43c0f7050a1151b43e51569c9f)](https://refactoring.guru/es/design-patterns/command/python/example "Command en Python") [![Command en Ruby](https://refactoring.guru/images/patterns/icons/ruby.svg?id=b065b718c914bf8e960ef731600be1eb)](https://refactoring.guru/es/design-patterns/command/ruby/example "Command en Ruby") [![Command en Rust](https://refactoring.guru/images/patterns/icons/rust.svg?id=1f5698a4b5ae23fe79413511747e4a87)](https://refactoring.guru/es/design-patterns/command/rust/example "Command en Rust") [![Command en Swift](https://refactoring.guru/images/patterns/icons/swift.svg?id=0b716c2d52ec3a48fbe91ac031070c1d)](https://refactoring.guru/es/design-patterns/command/swift/example "Command en Swift") --- # Decorator en C# / Patrones de diseño [There are patterns of patterns now! \ My friend's project: MetaPatterns.io](https://metapatterns.io/)  [](https://refactoring.guru/es/design-patterns/decorator/csharp/example#checkout) [](https://refactoring.guru/es/design-patterns/decorator/csharp/example#checkout) [](https://refactoring.guru/) / [Patrones de diseño](https://refactoring.guru/es/design-patterns) / [Decorator](https://refactoring.guru/es/design-patterns/decorator) / [C#](https://refactoring.guru/es/design-patterns/csharp) ![Decorator](https://refactoring.guru/images/patterns/cards/decorator-mini-2x.png?id=3b58e540d7d28523080cad341ed9b2e9) **Decorator** en C# =================== **Decorator** es un patrón de diseño estructural que permite añadir dinámicamente nuevos comportamientos a objetos colocándolos dentro de objetos especiales que los envuelven (\_wrappers\_). Utilizando decoradores puedes envolver objetos innumerables veces, ya que los objetos objetivo y los decoradores siguen la misma interfaz. El objeto resultante obtendrá un comportamiento de apilado de todos los _wrappers_. [Aprende más sobre el patrón Decorator](https://refactoring.guru/es/design-patterns/decorator) Navegación  [Intro](https://refactoring.guru/es/design-patterns/decorator/csharp/example#)  [Ejemplo conceptual](https://refactoring.guru/es/design-patterns/decorator/csharp/example#example-0)  [Program](https://refactoring.guru/es/design-patterns/decorator/csharp/example#example-0--Program-cs)  [Output](https://refactoring.guru/es/design-patterns/decorator/csharp/example#example-0--Output-txt) **Complejidad:** **Popularidad:** **Ejemplos de uso:** El patrón Decorator es bastante común en el código C#, especialmente en el código relacionado con los flujos (streams). **Identificación:** El patrón Decorator puede ser reconocido por métodos de creación o el constructor que acepta objetos de la misma clase o interfaz que la clase actual. Ejemplo conceptual ------------------ Este ejemplo ilustra la estructura del patrón de diseño **Decorator**. Se centra en responder las siguientes preguntas: * ¿De qué clases se compone? * ¿Qué papeles juegan esas clases? * ¿De qué forma se relacionan los elementos del patrón? #### **Program.cs:** Ejemplo conceptual using System; namespace RefactoringGuru.DesignPatterns.Composite.Conceptual { // The base Component interface defines operations that can be altered by // decorators. public abstract class Component { public abstract string Operation(); } // Concrete Components provide default implementations of the operations. // There might be several variations of these classes. class ConcreteComponent : Component { public override string Operation() { return "ConcreteComponent"; } } // The base Decorator class follows the same interface as the other // components. The primary purpose of this class is to define the wrapping // interface for all concrete decorators. The default implementation of the // wrapping code might include a field for storing a wrapped component and // the means to initialize it. abstract class Decorator : Component { protected Component \_component; public Decorator(Component component) { this.\_component = component; } public void SetComponent(Component component) { this.\_component = component; } // The Decorator delegates all work to the wrapped component. public override string Operation() { if (this.\_component != null) { return this.\_component.Operation(); } else { return string.Empty; } } } // Concrete Decorators call the wrapped object and alter its result in some // way. class ConcreteDecoratorA : Decorator { public ConcreteDecoratorA(Component comp) : base(comp) { } // Decorators may call parent implementation of the operation, instead // of calling the wrapped object directly. This approach simplifies // extension of decorator classes. public override string Operation() { return $"ConcreteDecoratorA({base.Operation()})"; } } // Decorators can execute their behavior either before or after the call to // a wrapped object. class ConcreteDecoratorB : Decorator { public ConcreteDecoratorB(Component comp) : base(comp) { } public override string Operation() { return $"ConcreteDecoratorB({base.Operation()})"; } } public class Client { // The client code works with all objects using the Component interface. // This way it can stay independent of the concrete classes of // components it works with. public void ClientCode(Component component) { Console.WriteLine("RESULT: " + component.Operation()); } } class Program { static void Main(string\[\] args) { Client client = new Client(); var simple = new ConcreteComponent(); Console.WriteLine("Client: I get a simple component:"); client.ClientCode(simple); Console.WriteLine(); // ...as well as decorated ones. // // Note how decorators can wrap not only simple components but the // other decorators as well. ConcreteDecoratorA decorator1 = new ConcreteDecoratorA(simple); ConcreteDecoratorB decorator2 = new ConcreteDecoratorB(decorator1); Console.WriteLine("Client: Now I've got a decorated component:"); client.ClientCode(decorator2); } } } #### **Output.txt:** Resultado de la ejecución Client: I get a simple component: RESULT: ConcreteComponent Client: Now I've got a decorated component: RESULT: ConcreteDecoratorB(ConcreteDecoratorA(ConcreteComponent)) **Decorator** en otros lenguajes -------------------------------- [![Decorator en C++](https://refactoring.guru/images/patterns/icons/cpp.svg?id=f7782ed8b8666246bfcc3f8fefc3b858)](https://refactoring.guru/es/design-patterns/decorator/cpp/example "Decorator en C++") [![Decorator en Go](https://refactoring.guru/images/patterns/icons/go.svg?id=1a89927eb99b1ea3fde7701d97970aca)](https://refactoring.guru/es/design-patterns/decorator/go/example "Decorator en Go") [![Decorator en Java](https://refactoring.guru/images/patterns/icons/java.svg?id=e6d87e2dca08c953fe3acd1275ed4f4e)](https://refactoring.guru/es/design-patterns/decorator/java/example "Decorator en Java") [![Decorator en PHP](https://refactoring.guru/images/patterns/icons/php.svg?id=be1906eb26b71ec1d3b93720d6156618)](https://refactoring.guru/es/design-patterns/decorator/php/example "Decorator en PHP") [![Decorator en Python](https://refactoring.guru/images/patterns/icons/python.svg?id=6d815d43c0f7050a1151b43e51569c9f)](https://refactoring.guru/es/design-patterns/decorator/python/example "Decorator en Python") [![Decorator en Ruby](https://refactoring.guru/images/patterns/icons/ruby.svg?id=b065b718c914bf8e960ef731600be1eb)](https://refactoring.guru/es/design-patterns/decorator/ruby/example "Decorator en Ruby") [![Decorator en Rust](https://refactoring.guru/images/patterns/icons/rust.svg?id=1f5698a4b5ae23fe79413511747e4a87)](https://refactoring.guru/es/design-patterns/decorator/rust/example "Decorator en Rust") [![Decorator en Swift](https://refactoring.guru/images/patterns/icons/swift.svg?id=0b716c2d52ec3a48fbe91ac031070c1d)](https://refactoring.guru/es/design-patterns/decorator/swift/example "Decorator en Swift") [![Decorator en TypeScript](https://refactoring.guru/images/patterns/icons/typescript.svg?id=2239d0f16cb703540c205dd8cb0c0cb7)](https://refactoring.guru/es/design-patterns/decorator/typescript/example "Decorator en TypeScript") --- # Decorator en Ruby / Patrones de diseño [There are patterns of patterns now! \ My friend's project: MetaPatterns.io](https://metapatterns.io/)  [](https://refactoring.guru/es/design-patterns/decorator/ruby/example#checkout) [](https://refactoring.guru/es/design-patterns/decorator/ruby/example#checkout) [](https://refactoring.guru/) / [Patrones de diseño](https://refactoring.guru/es/design-patterns) / [Decorator](https://refactoring.guru/es/design-patterns/decorator) / [Ruby](https://refactoring.guru/es/design-patterns/ruby) ![Decorator](https://refactoring.guru/images/patterns/cards/decorator-mini-2x.png?id=3b58e540d7d28523080cad341ed9b2e9) **Decorator** en Ruby ===================== **Decorator** es un patrón de diseño estructural que permite añadir dinámicamente nuevos comportamientos a objetos colocándolos dentro de objetos especiales que los envuelven (\_wrappers\_). Utilizando decoradores puedes envolver objetos innumerables veces, ya que los objetos objetivo y los decoradores siguen la misma interfaz. El objeto resultante obtendrá un comportamiento de apilado de todos los _wrappers_. [Aprende más sobre el patrón Decorator](https://refactoring.guru/es/design-patterns/decorator) Navegación  [Intro](https://refactoring.guru/es/design-patterns/decorator/ruby/example#)  [Ejemplo conceptual](https://refactoring.guru/es/design-patterns/decorator/ruby/example#example-0)  [main](https://refactoring.guru/es/design-patterns/decorator/ruby/example#example-0--main-rb)  [output](https://refactoring.guru/es/design-patterns/decorator/ruby/example#example-0--output-txt) **Complejidad:** **Popularidad:** **Ejemplos de uso:** El patrón Decorator es bastante común en el código Ruby, especialmente en el código relacionado con los flujos (streams). **Identificación:** El patrón Decorator puede ser reconocido por métodos de creación o el constructor que acepta objetos de la misma clase o interfaz que la clase actual. Ejemplo conceptual ------------------ Este ejemplo ilustra la estructura del patrón de diseño **Decorator**. Se centra en responder las siguientes preguntas: * ¿De qué clases se compone? * ¿Qué papeles juegan esas clases? * ¿De qué forma se relacionan los elementos del patrón? #### **main.rb:** Ejemplo conceptual \# The base Component interface defines operations that can be altered by # decorators. class Component # @return \[String\] def operation raise NotImplementedError, "#{self.class} has not implemented method '#{\_\_method\_\_}'" end end # Concrete Components provide default implementations of the operations. There # might be several variations of these classes. class ConcreteComponent < Component # @return \[String\] def operation 'ConcreteComponent' end end # The base Decorator class follows the same interface as the other components. # The primary purpose of this class is to define the wrapping interface for all # concrete decorators. The default implementation of the wrapping code might # include a field for storing a wrapped component and the means to initialize # it. class Decorator < Component attr\_accessor :component # @param \[Component\] component def initialize(component) @component = component end # The Decorator delegates all work to the wrapped component. def operation @component.operation end end # Concrete Decorators call the wrapped object and alter its result in some way. class ConcreteDecoratorA < Decorator # Decorators may call parent implementation of the operation, instead of # calling the wrapped object directly. This approach simplifies extension of # decorator classes. def operation "ConcreteDecoratorA(#{@component.operation})" end end # Decorators can execute their behavior either before or after the call to a # wrapped object. class ConcreteDecoratorB < Decorator # @return \[String\] def operation "ConcreteDecoratorB(#{@component.operation})" end end # The client code works with all objects using the Component interface. This way # it can stay independent of the concrete classes of components it works with. def client\_code(component) # ... print "RESULT: #{component.operation}" # ... end # This way the client code can support both simple components... simple = ConcreteComponent.new puts 'Client: I\\'ve got a simple component:' client\_code(simple) puts "\\n\\n" # ...as well as decorated ones. # # Note how decorators can wrap not only simple components but the other # decorators as well. decorator1 = ConcreteDecoratorA.new(simple) decorator2 = ConcreteDecoratorB.new(decorator1) puts 'Client: Now I\\'ve got a decorated component:' client\_code(decorator2) #### **output.txt:** Resultado de la ejecución Client: I've got a simple component: RESULT: ConcreteComponent Client: Now I've got a decorated component: RESULT: ConcreteDecoratorB(ConcreteDecoratorA(ConcreteComponent)) **Decorator** en otros lenguajes -------------------------------- [![Decorator en C#](https://refactoring.guru/images/patterns/icons/csharp.svg?id=da64592defc6e86d57c39c66e9de3e58)](https://refactoring.guru/es/design-patterns/decorator/csharp/example "Decorator en C#") [![Decorator en C++](https://refactoring.guru/images/patterns/icons/cpp.svg?id=f7782ed8b8666246bfcc3f8fefc3b858)](https://refactoring.guru/es/design-patterns/decorator/cpp/example "Decorator en C++") [![Decorator en Go](https://refactoring.guru/images/patterns/icons/go.svg?id=1a89927eb99b1ea3fde7701d97970aca)](https://refactoring.guru/es/design-patterns/decorator/go/example "Decorator en Go") [![Decorator en Java](https://refactoring.guru/images/patterns/icons/java.svg?id=e6d87e2dca08c953fe3acd1275ed4f4e)](https://refactoring.guru/es/design-patterns/decorator/java/example "Decorator en Java") [![Decorator en PHP](https://refactoring.guru/images/patterns/icons/php.svg?id=be1906eb26b71ec1d3b93720d6156618)](https://refactoring.guru/es/design-patterns/decorator/php/example "Decorator en PHP") [![Decorator en Python](https://refactoring.guru/images/patterns/icons/python.svg?id=6d815d43c0f7050a1151b43e51569c9f)](https://refactoring.guru/es/design-patterns/decorator/python/example "Decorator en Python") [![Decorator en Rust](https://refactoring.guru/images/patterns/icons/rust.svg?id=1f5698a4b5ae23fe79413511747e4a87)](https://refactoring.guru/es/design-patterns/decorator/rust/example "Decorator en Rust") [![Decorator en Swift](https://refactoring.guru/images/patterns/icons/swift.svg?id=0b716c2d52ec3a48fbe91ac031070c1d)](https://refactoring.guru/es/design-patterns/decorator/swift/example "Decorator en Swift") [![Decorator en TypeScript](https://refactoring.guru/images/patterns/icons/typescript.svg?id=2239d0f16cb703540c205dd8cb0c0cb7)](https://refactoring.guru/es/design-patterns/decorator/typescript/example "Decorator en TypeScript") --- # Adapter en Java / Patrones de diseño [There are patterns of patterns now! \ My friend's project: MetaPatterns.io](https://metapatterns.io/)  [](https://refactoring.guru/es/design-patterns/adapter/java/example#checkout) [](https://refactoring.guru/es/design-patterns/adapter/java/example#checkout) [](https://refactoring.guru/) / [Patrones de diseño](https://refactoring.guru/es/design-patterns) / [Adapter](https://refactoring.guru/es/design-patterns/adapter) / [Java](https://refactoring.guru/es/design-patterns/java) ![Adapter](https://refactoring.guru/images/patterns/cards/adapter-mini-2x.png?id=8274d99afbbe9c63bfbfd0d68ceeffc7) **Adapter** en Java =================== **Adapter** es un patrón de diseño estructural que permite colaborar a objetos incompatibles. El patrón Adapter actúa como envoltorio entre dos objetos. Atrapa las llamadas a un objeto y las transforma a un formato y una interfaz reconocible para el segundo objeto. [Aprende más sobre el patrón Adapter](https://refactoring.guru/es/design-patterns/adapter) Navegación  [Intro](https://refactoring.guru/es/design-patterns/adapter/java/example#)  [Encajar piezas cuadradas en agujeros redondos](https://refactoring.guru/es/design-patterns/adapter/java/example#example-0)  round   [Round­Hole](https://refactoring.guru/es/design-patterns/adapter/java/example#example-0--round-RoundHole-java)   [Round­Peg](https://refactoring.guru/es/design-patterns/adapter/java/example#example-0--round-RoundPeg-java)  square   [Square­Peg](https://refactoring.guru/es/design-patterns/adapter/java/example#example-0--square-SquarePeg-java)  adapters   [Square­Peg­Adapter](https://refactoring.guru/es/design-patterns/adapter/java/example#example-0--adapters-SquarePegAdapter-java)  [Demo](https://refactoring.guru/es/design-patterns/adapter/java/example#example-0--Demo-java)  [Output­Demo](https://refactoring.guru/es/design-patterns/adapter/java/example#example-0--OutputDemo-txt) **Complejidad:** **Popularidad:** **Ejemplos de uso:** El patrón Adapter es muy común en el código Java. Se utiliza muy a menudo en sistemas basados en algún código heredado (_legacy_). En estos casos, los adaptadores crean código heredado con clases modernas. Hay algunos adaptadores estándar en las principales bibliotecas de Java: * [`java.util.Arrays#asList()`](https://docs.oracle.com/javase/8/docs/api/java/util/Arrays.html#asList-T...-) * [`java.util.Collections#list()`](https://docs.oracle.com/javase/8/docs/api/java/util/Collections.html#list-java.util.Enumeration-) * [`java.util.Collections#enumeration()`](https://docs.oracle.com/javase/8/docs/api/java/util/Collections.html#enumeration-java.util.Collection-) * [`java.io.InputStreamReader(InputStream)`](https://docs.oracle.com/javase/8/docs/api/java/io/InputStreamReader.html#InputStreamReader-java.io.InputStream-) (devuelve un objeto `Reader`) * [`java.io.OutputStreamWriter(OutputStream)`](https://docs.oracle.com/javase/8/docs/api/java/io/OutputStreamWriter.html#OutputStreamWriter-java.io.OutputStream-) (devuelve un objeto `Writer`) * [`javax.xml.bind.annotation.adapters.XmlAdapter#marshal()`](https://docs.oracle.com/javase/8/docs/api/javax/xml/bind/annotation/adapters/XmlAdapter.html#marshal-BoundType-) y `#unmarshal()` **Identificación:** Adapter es reconocible por un constructor que toma una instancia de distinto tipo de clase abstracta/interfaz. Cuando el adaptador recibe una llamada a uno de sus métodos, convierte los parámetros al formato adecuado y después dirige la llamada a uno o varios métodos del objeto envuelto. Encajar piezas cuadradas en agujeros redondos --------------------------------------------- Este sencillo ejemplo muestra el modo en que un Adapter puede hacer que objetos incompatibles trabajen juntos. ### **round** #### **round/RoundHole.java:** Agujeros redondos package refactoring\_guru.adapter.example.round; /\*\* \* RoundHoles are compatible with RoundPegs. \*/ public class RoundHole { private double radius; public RoundHole(double radius) { this.radius = radius; } public double getRadius() { return radius; } public boolean fits(RoundPeg peg) { boolean result; result = (this.getRadius() >= peg.getRadius()); return result; } } #### **round/RoundPeg.java:** Piezas redondas package refactoring\_guru.adapter.example.round; /\*\* \* RoundPegs are compatible with RoundHoles. \*/ public class RoundPeg { private double radius; public RoundPeg() {} public RoundPeg(double radius) { this.radius = radius; } public double getRadius() { return radius; } } ### **square** #### **square/SquarePeg.java:** Piezas cuadradas package refactoring\_guru.adapter.example.square; /\*\* \* SquarePegs are not compatible with RoundHoles (they were implemented by \* previous development team). But we have to integrate them into our program. \*/ public class SquarePeg { private double width; public SquarePeg(double width) { this.width = width; } public double getWidth() { return width; } public double getSquare() { double result; result = Math.pow(this.width, 2); return result; } } ### **adapters** #### **adapters/SquarePegAdapter.java:** Adaptador de piezas cuadradas para agujeros redondos package refactoring\_guru.adapter.example.adapters; import refactoring\_guru.adapter.example.round.RoundPeg; import refactoring\_guru.adapter.example.square.SquarePeg; /\*\* \* Adapter allows fitting square pegs into round holes. \*/ public class SquarePegAdapter extends RoundPeg { private SquarePeg peg; public SquarePegAdapter(SquarePeg peg) { this.peg = peg; } @Override public double getRadius() { double result; // Calculate a minimum circle radius, which can fit this peg. result = (Math.sqrt(Math.pow((peg.getWidth() / 2), 2) \* 2)); return result; } } #### **Demo.java:** Código cliente package refactoring\_guru.adapter.example; import refactoring\_guru.adapter.example.adapters.SquarePegAdapter; import refactoring\_guru.adapter.example.round.RoundHole; import refactoring\_guru.adapter.example.round.RoundPeg; import refactoring\_guru.adapter.example.square.SquarePeg; /\*\* \* Somewhere in client code... \*/ public class Demo { public static void main(String\[\] args) { // Round fits round, no surprise. RoundHole hole = new RoundHole(5); RoundPeg rpeg = new RoundPeg(5); if (hole.fits(rpeg)) { System.out.println("Round peg r5 fits round hole r5."); } SquarePeg smallSqPeg = new SquarePeg(2); SquarePeg largeSqPeg = new SquarePeg(20); // hole.fits(smallSqPeg); // Won't compile. // Adapter solves the problem. SquarePegAdapter smallSqPegAdapter = new SquarePegAdapter(smallSqPeg); SquarePegAdapter largeSqPegAdapter = new SquarePegAdapter(largeSqPeg); if (hole.fits(smallSqPegAdapter)) { System.out.println("Square peg w2 fits round hole r5."); } if (!hole.fits(largeSqPegAdapter)) { System.out.println("Square peg w20 does not fit into round hole r5."); } } } #### **OutputDemo.txt:** Resultado de la ejecución Round peg r5 fits round hole r5. Square peg w2 fits round hole r5. Square peg w20 does not fit into round hole r5. **Adapter** en otros lenguajes ------------------------------ [![Adapter en C#](https://refactoring.guru/images/patterns/icons/csharp.svg?id=da64592defc6e86d57c39c66e9de3e58)](https://refactoring.guru/es/design-patterns/adapter/csharp/example "Adapter en C#") [![Adapter en C++](https://refactoring.guru/images/patterns/icons/cpp.svg?id=f7782ed8b8666246bfcc3f8fefc3b858)](https://refactoring.guru/es/design-patterns/adapter/cpp/example "Adapter en C++") [![Adapter en Go](https://refactoring.guru/images/patterns/icons/go.svg?id=1a89927eb99b1ea3fde7701d97970aca)](https://refactoring.guru/es/design-patterns/adapter/go/example "Adapter en Go") [![Adapter en PHP](https://refactoring.guru/images/patterns/icons/php.svg?id=be1906eb26b71ec1d3b93720d6156618)](https://refactoring.guru/es/design-patterns/adapter/php/example "Adapter en PHP") [![Adapter en Python](https://refactoring.guru/images/patterns/icons/python.svg?id=6d815d43c0f7050a1151b43e51569c9f)](https://refactoring.guru/es/design-patterns/adapter/python/example "Adapter en Python") [![Adapter en Ruby](https://refactoring.guru/images/patterns/icons/ruby.svg?id=b065b718c914bf8e960ef731600be1eb)](https://refactoring.guru/es/design-patterns/adapter/ruby/example "Adapter en Ruby") [![Adapter en Rust](https://refactoring.guru/images/patterns/icons/rust.svg?id=1f5698a4b5ae23fe79413511747e4a87)](https://refactoring.guru/es/design-patterns/adapter/rust/example "Adapter en Rust") [![Adapter en Swift](https://refactoring.guru/images/patterns/icons/swift.svg?id=0b716c2d52ec3a48fbe91ac031070c1d)](https://refactoring.guru/es/design-patterns/adapter/swift/example "Adapter en Swift") [![Adapter en TypeScript](https://refactoring.guru/images/patterns/icons/typescript.svg?id=2239d0f16cb703540c205dd8cb0c0cb7)](https://refactoring.guru/es/design-patterns/adapter/typescript/example "Adapter en TypeScript") --- # Adapter en C# / Patrones de diseño [There are patterns of patterns now! \ My friend's project: MetaPatterns.io](https://metapatterns.io/)  [](https://refactoring.guru/es/design-patterns/adapter/csharp/example#checkout) [](https://refactoring.guru/es/design-patterns/adapter/csharp/example#checkout) [](https://refactoring.guru/) / [Patrones de diseño](https://refactoring.guru/es/design-patterns) / [Adapter](https://refactoring.guru/es/design-patterns/adapter) / [C#](https://refactoring.guru/es/design-patterns/csharp) ![Adapter](https://refactoring.guru/images/patterns/cards/adapter-mini-2x.png?id=8274d99afbbe9c63bfbfd0d68ceeffc7) **Adapter** en C# ================= **Adapter** es un patrón de diseño estructural que permite colaborar a objetos incompatibles. El patrón Adapter actúa como envoltorio entre dos objetos. Atrapa las llamadas a un objeto y las transforma a un formato y una interfaz reconocible para el segundo objeto. [Aprende más sobre el patrón Adapter](https://refactoring.guru/es/design-patterns/adapter) Navegación  [Intro](https://refactoring.guru/es/design-patterns/adapter/csharp/example#)  [Ejemplo conceptual](https://refactoring.guru/es/design-patterns/adapter/csharp/example#example-0)  [Program](https://refactoring.guru/es/design-patterns/adapter/csharp/example#example-0--Program-cs)  [Output](https://refactoring.guru/es/design-patterns/adapter/csharp/example#example-0--Output-txt) **Complejidad:** **Popularidad:** **Ejemplos de uso:** El patrón Adapter es muy común en el código C#. Se utiliza muy a menudo en sistemas basados en algún código heredado. En estos casos, los adaptadores crean código heredado con clases modernas. **Identificación:** Adapter es reconocible por un constructor que toma una instancia de distinto tipo de clase abstracta/interfaz. Cuando el adaptador recibe una llamada a uno de sus métodos, convierte los parámetros al formato adecuado y después dirige la llamada a uno o varios métodos del objeto envuelto. Ejemplo conceptual ------------------ Este ejemplo ilustra la estructura del patrón de diseño **Adapter**. Se centra en responder las siguientes preguntas: * ¿De qué clases se compone? * ¿Qué papeles juegan esas clases? * ¿De qué forma se relacionan los elementos del patrón? #### **Program.cs:** Ejemplo conceptual using System; namespace RefactoringGuru.DesignPatterns.Adapter.Conceptual { // The Target defines the domain-specific interface used by the client code. public interface ITarget { string GetRequest(); } // The Adaptee contains some useful behavior, but its interface is // incompatible with the existing client code. The Adaptee needs some // adaptation before the client code can use it. class Adaptee { public string GetSpecificRequest() { return "Specific request."; } } // The Adapter makes the Adaptee's interface compatible with the Target's // interface. class Adapter : ITarget { private readonly Adaptee \_adaptee; public Adapter(Adaptee adaptee) { this.\_adaptee = adaptee; } public string GetRequest() { return $"This is '{this.\_adaptee.GetSpecificRequest()}'"; } } class Program { static void Main(string\[\] args) { Adaptee adaptee = new Adaptee(); ITarget target = new Adapter(adaptee); Console.WriteLine("Adaptee interface is incompatible with the client."); Console.WriteLine("But with adapter client can call it's method."); Console.WriteLine(target.GetRequest()); } } } #### **Output.txt:** Resultado de la ejecución Adaptee interface is incompatible with the client. But with adapter client can call it's method. This is 'Specific request.' **Adapter** en otros lenguajes ------------------------------ [![Adapter en C++](https://refactoring.guru/images/patterns/icons/cpp.svg?id=f7782ed8b8666246bfcc3f8fefc3b858)](https://refactoring.guru/es/design-patterns/adapter/cpp/example "Adapter en C++") [![Adapter en Go](https://refactoring.guru/images/patterns/icons/go.svg?id=1a89927eb99b1ea3fde7701d97970aca)](https://refactoring.guru/es/design-patterns/adapter/go/example "Adapter en Go") [![Adapter en Java](https://refactoring.guru/images/patterns/icons/java.svg?id=e6d87e2dca08c953fe3acd1275ed4f4e)](https://refactoring.guru/es/design-patterns/adapter/java/example "Adapter en Java") [![Adapter en PHP](https://refactoring.guru/images/patterns/icons/php.svg?id=be1906eb26b71ec1d3b93720d6156618)](https://refactoring.guru/es/design-patterns/adapter/php/example "Adapter en PHP") [![Adapter en Python](https://refactoring.guru/images/patterns/icons/python.svg?id=6d815d43c0f7050a1151b43e51569c9f)](https://refactoring.guru/es/design-patterns/adapter/python/example "Adapter en Python") [![Adapter en Ruby](https://refactoring.guru/images/patterns/icons/ruby.svg?id=b065b718c914bf8e960ef731600be1eb)](https://refactoring.guru/es/design-patterns/adapter/ruby/example "Adapter en Ruby") [![Adapter en Rust](https://refactoring.guru/images/patterns/icons/rust.svg?id=1f5698a4b5ae23fe79413511747e4a87)](https://refactoring.guru/es/design-patterns/adapter/rust/example "Adapter en Rust") [![Adapter en Swift](https://refactoring.guru/images/patterns/icons/swift.svg?id=0b716c2d52ec3a48fbe91ac031070c1d)](https://refactoring.guru/es/design-patterns/adapter/swift/example "Adapter en Swift") [![Adapter en TypeScript](https://refactoring.guru/images/patterns/icons/typescript.svg?id=2239d0f16cb703540c205dd8cb0c0cb7)](https://refactoring.guru/es/design-patterns/adapter/typescript/example "Adapter en TypeScript") --- # Abstract Factory en Python / Patrones de diseño [There are patterns of patterns now! \ My friend's project: MetaPatterns.io](https://metapatterns.io/)  [](https://refactoring.guru/es/design-patterns/abstract-factory/python/example#checkout) [](https://refactoring.guru/es/design-patterns/abstract-factory/python/example#checkout) [](https://refactoring.guru/) / [Patrones de diseño](https://refactoring.guru/es/design-patterns) / [Abstract Factory](https://refactoring.guru/es/design-patterns/abstract-factory) / [Python](https://refactoring.guru/es/design-patterns/python) ![Abstract Factory](https://refactoring.guru/images/patterns/cards/abstract-factory-mini-2x.png?id=22236aaa65ff52cbde1c713216d52c1f) **Abstract Factory** en Python ============================== **Abstract Factory** es un patrón de diseño creacional que resuelve el problema de crear familias enteras de productos sin especificar sus clases concretas. El patrón Abstract Factory define una interfaz para crear todos los productos, pero deja la propia creación de productos para las clases de fábrica concretas. Cada tipo de fábrica se corresponde con cierta variedad de producto. El código cliente invoca los métodos de creación de un objeto de fábrica en lugar de crear los productos directamente con una llamada al constructor (operador `new`). Como una fábrica se corresponde con una única variante de producto, todos sus productos serán compatibles. El código cliente trabaja con fábricas y productos únicamente a través de sus interfaces abstractas. Esto permite al mismo código cliente trabajar con productos diferentes. Simplemente, creas una nueva clase fábrica concreta y la pasas al código cliente. > Si no sabes la diferencia entre los distintos patrones de fábrica y sus conceptos, lee nuestra [Comparación de fábricas](https://refactoring.guru/es/design-patterns/factory-comparison) > . [Aprende más sobre el patrón Abstract Factory](https://refactoring.guru/es/design-patterns/abstract-factory) Navegación  [Intro](https://refactoring.guru/es/design-patterns/abstract-factory/python/example#)  [Ejemplo conceptual](https://refactoring.guru/es/design-patterns/abstract-factory/python/example#example-0)  [main](https://refactoring.guru/es/design-patterns/abstract-factory/python/example#example-0--main-py)  [Output](https://refactoring.guru/es/design-patterns/abstract-factory/python/example#example-0--Output-txt) **Complejidad:** **Popularidad:** **Ejemplos de uso:** El patrón Abstract Factory es muy común en el código Python. Muchos _frameworks_ y bibliotecas lo utilizan para proporcionar una forma de extender y personalizar sus componentes estándar. **Identificación:** El patrón es fácil de reconocer por los métodos, que devuelven un objeto de fábrica. Después, la fábrica se utiliza para crear subcomponentes específicos. Ejemplo conceptual ------------------ Este ejemplo ilustra la estructura del patrón de diseño **Abstract Factory**. Se centra en responder las siguientes preguntas: * ¿De qué clases se compone? * ¿Qué papeles juegan esas clases? * ¿De qué forma se relacionan los elementos del patrón? #### **main.py:** Ejemplo conceptual from \_\_future\_\_ import annotations from abc import ABC, abstractmethod class AbstractFactory(ABC): """ The Abstract Factory interface declares a set of methods that return different abstract products. These products are called a family and are related by a high-level theme or concept. Products of one family are usually able to collaborate among themselves. A family of products may have several variants, but the products of one variant are incompatible with products of another. """ @abstractmethod def create\_product\_a(self) -> AbstractProductA: pass @abstractmethod def create\_product\_b(self) -> AbstractProductB: pass class ConcreteFactory1(AbstractFactory): """ Concrete Factories produce a family of products that belong to a single variant. The factory guarantees that resulting products are compatible. Note that signatures of the Concrete Factory's methods return an abstract product, while inside the method a concrete product is instantiated. """ def create\_product\_a(self) -> AbstractProductA: return ConcreteProductA1() def create\_product\_b(self) -> AbstractProductB: return ConcreteProductB1() class ConcreteFactory2(AbstractFactory): """ Each Concrete Factory has a corresponding product variant. """ def create\_product\_a(self) -> AbstractProductA: return ConcreteProductA2() def create\_product\_b(self) -> AbstractProductB: return ConcreteProductB2() class AbstractProductA(ABC): """ Each distinct product of a product family should have a base interface. All variants of the product must implement this interface. """ @abstractmethod def useful\_function\_a(self) -> str: pass """ Concrete Products are created by corresponding Concrete Factories. """ class ConcreteProductA1(AbstractProductA): def useful\_function\_a(self) -> str: return "The result of the product A1." class ConcreteProductA2(AbstractProductA): def useful\_function\_a(self) -> str: return "The result of the product A2." class AbstractProductB(ABC): """ Here's the the base interface of another product. All products can interact with each other, but proper interaction is possible only between products of the same concrete variant. """ @abstractmethod def useful\_function\_b(self) -> None: """ Product B is able to do its own thing... """ pass @abstractmethod def another\_useful\_function\_b(self, collaborator: AbstractProductA) -> None: """ ...but it also can collaborate with the ProductA. The Abstract Factory makes sure that all products it creates are of the same variant and thus, compatible. """ pass """ Concrete Products are created by corresponding Concrete Factories. """ class ConcreteProductB1(AbstractProductB): def useful\_function\_b(self) -> str: return "The result of the product B1." """ The variant, Product B1, is only able to work correctly with the variant, Product A1. Nevertheless, it accepts any instance of AbstractProductA as an argument. """ def another\_useful\_function\_b(self, collaborator: AbstractProductA) -> str: result = collaborator.useful\_function\_a() return f"The result of the B1 collaborating with the ({result})" class ConcreteProductB2(AbstractProductB): def useful\_function\_b(self) -> str: return "The result of the product B2." def another\_useful\_function\_b(self, collaborator: AbstractProductA): """ The variant, Product B2, is only able to work correctly with the variant, Product A2. Nevertheless, it accepts any instance of AbstractProductA as an argument. """ result = collaborator.useful\_function\_a() return f"The result of the B2 collaborating with the ({result})" def client\_code(factory: AbstractFactory) -> None: """ The client code works with factories and products only through abstract types: AbstractFactory and AbstractProduct. This lets you pass any factory or product subclass to the client code without breaking it. """ product\_a = factory.create\_product\_a() product\_b = factory.create\_product\_b() print(f"{product\_b.useful\_function\_b()}") print(f"{product\_b.another\_useful\_function\_b(product\_a)}", end="") if \_\_name\_\_ == "\_\_main\_\_": """ The client code can work with any concrete factory class. """ print("Client: Testing client code with the first factory type:") client\_code(ConcreteFactory1()) print("\\n") print("Client: Testing the same client code with the second factory type:") client\_code(ConcreteFactory2()) #### **Output.txt:** Resultado de la ejecución Client: Testing client code with the first factory type: The result of the product B1. The result of the B1 collaborating with the (The result of the product A1.) Client: Testing the same client code with the second factory type: The result of the product B2. The result of the B2 collaborating with the (The result of the product A2.) **Abstract Factory** en otros lenguajes --------------------------------------- [![Abstract Factory en C#](https://refactoring.guru/images/patterns/icons/csharp.svg?id=da64592defc6e86d57c39c66e9de3e58)](https://refactoring.guru/es/design-patterns/abstract-factory/csharp/example "Abstract Factory en C#") [![Abstract Factory en C++](https://refactoring.guru/images/patterns/icons/cpp.svg?id=f7782ed8b8666246bfcc3f8fefc3b858)](https://refactoring.guru/es/design-patterns/abstract-factory/cpp/example "Abstract Factory en C++") [![Abstract Factory en Go](https://refactoring.guru/images/patterns/icons/go.svg?id=1a89927eb99b1ea3fde7701d97970aca)](https://refactoring.guru/es/design-patterns/abstract-factory/go/example "Abstract Factory en Go") [![Abstract Factory en Java](https://refactoring.guru/images/patterns/icons/java.svg?id=e6d87e2dca08c953fe3acd1275ed4f4e)](https://refactoring.guru/es/design-patterns/abstract-factory/java/example "Abstract Factory en Java") [![Abstract Factory en PHP](https://refactoring.guru/images/patterns/icons/php.svg?id=be1906eb26b71ec1d3b93720d6156618)](https://refactoring.guru/es/design-patterns/abstract-factory/php/example "Abstract Factory en PHP") [![Abstract Factory en Ruby](https://refactoring.guru/images/patterns/icons/ruby.svg?id=b065b718c914bf8e960ef731600be1eb)](https://refactoring.guru/es/design-patterns/abstract-factory/ruby/example "Abstract Factory en Ruby") [![Abstract Factory en Rust](https://refactoring.guru/images/patterns/icons/rust.svg?id=1f5698a4b5ae23fe79413511747e4a87)](https://refactoring.guru/es/design-patterns/abstract-factory/rust/example "Abstract Factory en Rust") [![Abstract Factory en Swift](https://refactoring.guru/images/patterns/icons/swift.svg?id=0b716c2d52ec3a48fbe91ac031070c1d)](https://refactoring.guru/es/design-patterns/abstract-factory/swift/example "Abstract Factory en Swift") [![Abstract Factory en TypeScript](https://refactoring.guru/images/patterns/icons/typescript.svg?id=2239d0f16cb703540c205dd8cb0c0cb7)](https://refactoring.guru/es/design-patterns/abstract-factory/typescript/example "Abstract Factory en TypeScript") --- # Bridge en C++ / Patrones de diseño [There are patterns of patterns now! \ My friend's project: MetaPatterns.io](https://metapatterns.io/)  [](https://refactoring.guru/es/design-patterns/bridge/cpp/example#checkout) [](https://refactoring.guru/es/design-patterns/bridge/cpp/example#checkout) [](https://refactoring.guru/) / [Patrones de diseño](https://refactoring.guru/es/design-patterns) / [Bridge](https://refactoring.guru/es/design-patterns/bridge) / [C++](https://refactoring.guru/es/design-patterns/cpp) ![Bridge](https://refactoring.guru/images/patterns/cards/bridge-mini-2x.png?id=2622384cf623ed150ee9c21a0812dd87) **Bridge** en C++ ================= **Bridge** es un patrón de diseño estructural que divide la lógica de negocio o una clase muy grande en jerarquías de clases separadas que se pueden desarrollar independientemente. Una de estas jerarquías (a menudo denominada Abstracción) obtendrá una referencia a un objeto de la segunda jerarquía (Implementación). La abstracción podrá delegar algunas (en ocasiones, la mayoría) de sus llamadas al objeto de las implementaciones. Como todas las implementaciones tendrán una interfaz común, serán intercambiables dentro de la abstracción. [Aprende más sobre el patrón Bridge](https://refactoring.guru/es/design-patterns/bridge) Navegación  [Intro](https://refactoring.guru/es/design-patterns/bridge/cpp/example#)  [Ejemplo conceptual](https://refactoring.guru/es/design-patterns/bridge/cpp/example#example-0)  [main](https://refactoring.guru/es/design-patterns/bridge/cpp/example#example-0--main-cc)  [Output](https://refactoring.guru/es/design-patterns/bridge/cpp/example#example-0--Output-txt) **Complejidad:** **Popularidad:** **Ejemplos de uso:** El patrón Bridge es de especial utilidad a la hora de tratar con aplicaciones multiplataforma, soportar varios tipos de servidores de bases de datos, o trabajar con varios proveedores de API de un cierto tipo (por ejemplo, plataformas en la nube, redes sociales, etc.). **Identificación:** El patrón Bridge se puede reconocer por una distinción clara entre alguna entidad controladora y varias plataformas diferentes en las que se basa. Ejemplo conceptual ------------------ Este ejemplo ilustra la estructura del patrón de diseño **Bridge**. Se centra en responder las siguientes preguntas: * ¿De qué clases se compone? * ¿Qué papeles juegan esas clases? * ¿De qué forma se relacionan los elementos del patrón? #### **main.cc:** Ejemplo conceptual /\*\* \* The Implementation defines the interface for all implementation classes. It \* doesn't have to match the Abstraction's interface. In fact, the two \* interfaces can be entirely different. Typically the Implementation interface \* provides only primitive operations, while the Abstraction defines higher- \* level operations based on those primitives. \*/ class Implementation { public: virtual ~Implementation() {} virtual std::string OperationImplementation() const = 0; }; /\*\* \* Each Concrete Implementation corresponds to a specific platform and \* implements the Implementation interface using that platform's API. \*/ class ConcreteImplementationA : public Implementation { public: std::string OperationImplementation() const override { return "ConcreteImplementationA: Here's the result on the platform A.\\n"; } }; class ConcreteImplementationB : public Implementation { public: std::string OperationImplementation() const override { return "ConcreteImplementationB: Here's the result on the platform B.\\n"; } }; /\*\* \* The Abstraction defines the interface for the "control" part of the two class \* hierarchies. It maintains a reference to an object of the Implementation \* hierarchy and delegates all of the real work to this object. \*/ class Abstraction { /\*\* \* @var Implementation \*/ protected: Implementation\* implementation\_; public: Abstraction(Implementation\* implementation) : implementation\_(implementation) { } virtual ~Abstraction() { } virtual std::string Operation() const { return "Abstraction: Base operation with:\\n" + this->implementation\_->OperationImplementation(); } }; /\*\* \* You can extend the Abstraction without changing the Implementation classes. \*/ class ExtendedAbstraction : public Abstraction { public: ExtendedAbstraction(Implementation\* implementation) : Abstraction(implementation) { } std::string Operation() const override { return "ExtendedAbstraction: Extended operation with:\\n" + this->implementation\_->OperationImplementation(); } }; /\*\* \* Except for the initialization phase, where an Abstraction object gets linked \* with a specific Implementation object, the client code should only depend on \* the Abstraction class. This way the client code can support any abstraction- \* implementation combination. \*/ void ClientCode(const Abstraction& abstraction) { // ... std::cout << abstraction.Operation(); // ... } /\*\* \* The client code should be able to work with any pre-configured abstraction- \* implementation combination. \*/ int main() { Implementation\* implementation = new ConcreteImplementationA; Abstraction\* abstraction = new Abstraction(implementation); ClientCode(\*abstraction); std::cout << std::endl; delete implementation; delete abstraction; implementation = new ConcreteImplementationB; abstraction = new ExtendedAbstraction(implementation); ClientCode(\*abstraction); delete implementation; delete abstraction; return 0; } #### **Output.txt:** Resultado de la ejecución Abstraction: Base operation with: ConcreteImplementationA: Here's the result on the platform A. ExtendedAbstraction: Extended operation with: ConcreteImplementationB: Here's the result on the platform B. **Bridge** en otros lenguajes ----------------------------- [![Bridge en C#](https://refactoring.guru/images/patterns/icons/csharp.svg?id=da64592defc6e86d57c39c66e9de3e58)](https://refactoring.guru/es/design-patterns/bridge/csharp/example "Bridge en C#") [![Bridge en Go](https://refactoring.guru/images/patterns/icons/go.svg?id=1a89927eb99b1ea3fde7701d97970aca)](https://refactoring.guru/es/design-patterns/bridge/go/example "Bridge en Go") [![Bridge en Java](https://refactoring.guru/images/patterns/icons/java.svg?id=e6d87e2dca08c953fe3acd1275ed4f4e)](https://refactoring.guru/es/design-patterns/bridge/java/example "Bridge en Java") [![Bridge en PHP](https://refactoring.guru/images/patterns/icons/php.svg?id=be1906eb26b71ec1d3b93720d6156618)](https://refactoring.guru/es/design-patterns/bridge/php/example "Bridge en PHP") [![Bridge en Python](https://refactoring.guru/images/patterns/icons/python.svg?id=6d815d43c0f7050a1151b43e51569c9f)](https://refactoring.guru/es/design-patterns/bridge/python/example "Bridge en Python") [![Bridge en Ruby](https://refactoring.guru/images/patterns/icons/ruby.svg?id=b065b718c914bf8e960ef731600be1eb)](https://refactoring.guru/es/design-patterns/bridge/ruby/example "Bridge en Ruby") [![Bridge en Rust](https://refactoring.guru/images/patterns/icons/rust.svg?id=1f5698a4b5ae23fe79413511747e4a87)](https://refactoring.guru/es/design-patterns/bridge/rust/example "Bridge en Rust") [![Bridge en Swift](https://refactoring.guru/images/patterns/icons/swift.svg?id=0b716c2d52ec3a48fbe91ac031070c1d)](https://refactoring.guru/es/design-patterns/bridge/swift/example "Bridge en Swift") [![Bridge en TypeScript](https://refactoring.guru/images/patterns/icons/typescript.svg?id=2239d0f16cb703540c205dd8cb0c0cb7)](https://refactoring.guru/es/design-patterns/bridge/typescript/example "Bridge en TypeScript") --- # Abstract Factory en Rust / Patrones de diseño [There are patterns of patterns now! \ My friend's project: MetaPatterns.io](https://metapatterns.io/)  [](https://refactoring.guru/es/design-patterns/abstract-factory/rust/example#checkout) [](https://refactoring.guru/es/design-patterns/abstract-factory/rust/example#checkout) [](https://refactoring.guru/) / [Patrones de diseño](https://refactoring.guru/es/design-patterns) / [Abstract Factory](https://refactoring.guru/es/design-patterns/abstract-factory) / [Rust](https://refactoring.guru/es/design-patterns/rust) ![Abstract Factory](https://refactoring.guru/images/patterns/cards/abstract-factory-mini-2x.png?id=22236aaa65ff52cbde1c713216d52c1f) **Abstract Factory** en Rust ============================ **Abstract Factory** es un patrón de diseño creacional que resuelve el problema de crear familias enteras de productos sin especificar sus clases concretas. El patrón Abstract Factory define una interfaz para crear todos los productos, pero deja la propia creación de productos para las clases de fábrica concretas. Cada tipo de fábrica se corresponde con cierta variedad de producto. El código cliente invoca los métodos de creación de un objeto de fábrica en lugar de crear los productos directamente con una llamada al constructor (operador `new`). Como una fábrica se corresponde con una única variante de producto, todos sus productos serán compatibles. El código cliente trabaja con fábricas y productos únicamente a través de sus interfaces abstractas. Esto permite al mismo código cliente trabajar con productos diferentes. Simplemente, creas una nueva clase fábrica concreta y la pasas al código cliente. > Si no sabes la diferencia entre los distintos patrones de fábrica y sus conceptos, lee nuestra [Comparación de fábricas](https://refactoring.guru/es/design-patterns/factory-comparison) > . [Aprende más sobre el patrón Abstract Factory](https://refactoring.guru/es/design-patterns/abstract-factory) Navegación  [Intro](https://refactoring.guru/es/design-patterns/abstract-factory/rust/example#)  [GUI Elements Factory](https://refactoring.guru/es/design-patterns/abstract-factory/rust/example#example-0)  gui   [lib](https://refactoring.guru/es/design-patterns/abstract-factory/rust/example#example-0--gui-lib-rs)  macos-gui   [lib](https://refactoring.guru/es/design-patterns/abstract-factory/rust/example#example-0--macos-gui-lib-rs)  windows-gui   [lib](https://refactoring.guru/es/design-patterns/abstract-factory/rust/example#example-0--windows-gui-lib-rs)  app   [main](https://refactoring.guru/es/design-patterns/abstract-factory/rust/example#example-0--app-main-rs)   [render](https://refactoring.guru/es/design-patterns/abstract-factory/rust/example#example-0--app-render-rs)  app-dyn   [main](https://refactoring.guru/es/design-patterns/abstract-factory/rust/example#example-0--app-dyn-main-rs)   [render](https://refactoring.guru/es/design-patterns/abstract-factory/rust/example#example-0--app-dyn-render-rs) GUI Elements Factory -------------------- This example illustrates how a GUI framework can organize its classes into independent libraries: 1. The `gui` library defines interfaces for all the components. It has no external dependencies. 2. The `windows-gui` library provides Windows implementation of the base GUI. Depends on `gui`. 3. The `macos-gui` library provides Mac OS implementation of the base GUI. Depends on `gui`. The `app` is a client application that can use several implementations of the GUI framework, depending on the current environment or configuration. However, most of the `app` code _doesn’t depend on specific types of GUI elements_. All the client code works with GUI elements through abstract interfaces (traits) defined by the `gui` lib. There are two approaches to implementing abstract factories in Rust: * using generics (_static dispatch_) * using dynamic allocation (_dynamic dispatch_) When you’re given a choice between static and dynamic dispatch, there is rarely a clear-cut correct answer. You’ll want to use static dispatch in your libraries and dynamic dispatch in your binaries. In a library, you want to allow your users to decide what kind of dispatch is best for them since you don’t know what their needs are. If you use dynamic dispatch, they’re forced to do the same, whereas if you use static dispatch, they can choose whether to use dynamic dispatch or not. ### **gui:** Abstract Factory and Abstract Products #### **gui/lib.rs** pub trait Button { fn press(&self); } pub trait Checkbox { fn switch(&self); } /// Abstract Factory defined using generics. pub trait GuiFactory { type B: Button; type C: Checkbox; fn create\_button(&self) -> Self::B; fn create\_checkbox(&self) -> Self::C; } /// Abstract Factory defined using Box pointer. pub trait GuiFactoryDynamic { fn create\_button(&self) -> Box; fn create\_checkbox(&self) -> Box; } ### **macos-gui:** One family of products #### **macos-gui/lib.rs** pub mod button; pub mod checkbox; pub mod factory; ### **windows-gui:** Another family of products #### **windows-gui/lib.rs** pub mod button; pub mod checkbox; pub mod factory; #### Static dispatch Here, the abstract factory is implemented via **generics** which lets the compiler create a code that does NOT require dynamic dispatch in runtime. ### **app:** Client code with static dispatch #### **app/main.rs** mod render; use render::render; use macos\_gui::factory::MacFactory; use windows\_gui::factory::WindowsFactory; fn main() { let windows = true; if windows { render(WindowsFactory); } else { render(MacFactory); } } #### **app/render.rs** //! The code demonstrates that it doesn't depend on a concrete //! factory implementation. use gui::GuiFactory; // Renders GUI. Factory object must be passed as a parameter to such the // generic function with factory invocation to utilize static dispatch. pub fn render(factory: impl GuiFactory) { let button1 = factory.create\_button(); let button2 = factory.create\_button(); let checkbox1 = factory.create\_checkbox(); let checkbox2 = factory.create\_checkbox(); use gui::{Button, Checkbox}; button1.press(); button2.press(); checkbox1.switch(); checkbox2.switch(); } #### Dynamic dispatch If a concrete type of abstract factory is not known at the compilation time, then is should be implemented using `Box` pointers. ### **app-dyn:** Client code with dynamic dispatch #### **app-dyn/main.rs** mod render; use render::render; use gui::GuiFactoryDynamic; use macos\_gui::factory::MacFactory; use windows\_gui::factory::WindowsFactory; fn main() { let windows = false; // Allocate a factory object in runtime depending on unpredictable input. let factory: &dyn GuiFactoryDynamic = if windows { &WindowsFactory } else { &MacFactory }; // Factory invocation can be inlined right here. let button = factory.create\_button(); button.press(); // Factory object can be passed to a function as a parameter. render(factory); } #### **app-dyn/render.rs** //! The code demonstrates that it doesn't depend on a concrete //! factory implementation. use gui::GuiFactoryDynamic; /// Renders GUI. pub fn render(factory: &dyn GuiFactoryDynamic) { let button1 = factory.create\_button(); let button2 = factory.create\_button(); let checkbox1 = factory.create\_checkbox(); let checkbox2 = factory.create\_checkbox(); button1.press(); button2.press(); checkbox1.switch(); checkbox2.switch(); } ### Output Windows button has pressed Windows button has pressed Windows checkbox has switched Windows checkbox has switched **Abstract Factory** en otros lenguajes --------------------------------------- [![Abstract Factory en C#](https://refactoring.guru/images/patterns/icons/csharp.svg?id=da64592defc6e86d57c39c66e9de3e58)](https://refactoring.guru/es/design-patterns/abstract-factory/csharp/example "Abstract Factory en C#") [![Abstract Factory en C++](https://refactoring.guru/images/patterns/icons/cpp.svg?id=f7782ed8b8666246bfcc3f8fefc3b858)](https://refactoring.guru/es/design-patterns/abstract-factory/cpp/example "Abstract Factory en C++") [![Abstract Factory en Go](https://refactoring.guru/images/patterns/icons/go.svg?id=1a89927eb99b1ea3fde7701d97970aca)](https://refactoring.guru/es/design-patterns/abstract-factory/go/example "Abstract Factory en Go") [![Abstract Factory en Java](https://refactoring.guru/images/patterns/icons/java.svg?id=e6d87e2dca08c953fe3acd1275ed4f4e)](https://refactoring.guru/es/design-patterns/abstract-factory/java/example "Abstract Factory en Java") [![Abstract Factory en PHP](https://refactoring.guru/images/patterns/icons/php.svg?id=be1906eb26b71ec1d3b93720d6156618)](https://refactoring.guru/es/design-patterns/abstract-factory/php/example "Abstract Factory en PHP") [![Abstract Factory en Python](https://refactoring.guru/images/patterns/icons/python.svg?id=6d815d43c0f7050a1151b43e51569c9f)](https://refactoring.guru/es/design-patterns/abstract-factory/python/example "Abstract Factory en Python") [![Abstract Factory en Ruby](https://refactoring.guru/images/patterns/icons/ruby.svg?id=b065b718c914bf8e960ef731600be1eb)](https://refactoring.guru/es/design-patterns/abstract-factory/ruby/example "Abstract Factory en Ruby") [![Abstract Factory en Swift](https://refactoring.guru/images/patterns/icons/swift.svg?id=0b716c2d52ec3a48fbe91ac031070c1d)](https://refactoring.guru/es/design-patterns/abstract-factory/swift/example "Abstract Factory en Swift") [![Abstract Factory en TypeScript](https://refactoring.guru/images/patterns/icons/typescript.svg?id=2239d0f16cb703540c205dd8cb0c0cb7)](https://refactoring.guru/es/design-patterns/abstract-factory/typescript/example "Abstract Factory en TypeScript") --- # Composite en Swift / Patrones de diseño [There are patterns of patterns now! \ My friend's project: MetaPatterns.io](https://metapatterns.io/)  [](https://refactoring.guru/es/design-patterns/composite/swift/example#checkout) [](https://refactoring.guru/es/design-patterns/composite/swift/example#checkout) [](https://refactoring.guru/) / [Patrones de diseño](https://refactoring.guru/es/design-patterns) / [Composite](https://refactoring.guru/es/design-patterns/composite) / [Swift](https://refactoring.guru/es/design-patterns/swift) ![Composite](https://refactoring.guru/images/patterns/cards/composite-mini-2x.png?id=3f7f811fefeb0b64f6774746eb42af09) **Composite** en Swift ====================== **Composite** es un patrón de diseño estructural que permite componer objetos en una estructura en forma de árbol y trabajar con ella como si fuera un objeto único. El patrón Composite se convirtió en una solución muy popular para la mayoría de problemas que requieren la creación de una estructura de árbol. La gran característica del Composite es la capacidad para ejecutar métodos de forma recursiva por toda la estructura de árbol y recapitular los resultados. [Aprende más sobre el patrón Composite](https://refactoring.guru/es/design-patterns/composite) Navegación  [Intro](https://refactoring.guru/es/design-patterns/composite/swift/example#)  [Ejemplo conceptual](https://refactoring.guru/es/design-patterns/composite/swift/example#example-0)  [Example](https://refactoring.guru/es/design-patterns/composite/swift/example#example-0--Example-swift)  [Output](https://refactoring.guru/es/design-patterns/composite/swift/example#example-0--Output-txt)  [Ejemplo del mundo real](https://refactoring.guru/es/design-patterns/composite/swift/example#example-1)  [Example](https://refactoring.guru/es/design-patterns/composite/swift/example#example-1--Example-swift)  [Output](https://refactoring.guru/es/design-patterns/composite/swift/example#example-1--Output-txt) **Complejidad:** **Popularidad:** **Ejemplos de uso:** El patrón Composite es muy común en el código Swift. Se utiliza a menudo para representar jerarquías de componentes de interfaz de usuario o el código que trabaja con gráficos. **Identificación:** El Composite es fácil de reconocer por los métodos de comportamiento que toman una instancia del mismo tipo abstracto/interfaz y lo hacen una estructura de árbol. Los siguientes ejemplos están disponibles en [Swift Playgrounds](https://www.alemohamad.com/playgrounds) . Kudos a [Alejandro Mohamad](https://www.alemohamad.com/) por crear la versión de Playground. Ejemplo conceptual ------------------ Este ejemplo ilustra la estructura del patrón de diseño **Composite** y se centra en las siguientes preguntas: * ¿De qué clases se compone? * ¿Qué papeles juegan esas clases? * ¿De qué forma se relacionan los elementos del patrón? Después de conocer la estructura del patrón, será más fácil comprender el siguiente ejemplo basado en un caso de uso real de Swift. #### **Example.swift:** Ejemplo conceptual import XCTest /// The base Component class declares common operations for both simple and /// complex objects of a composition. protocol Component { /// The base Component may optionally declare methods for setting and /// accessing a parent of the component in a tree structure. It can also /// provide some default implementation for these methods. var parent: Component? { get set } /// In some cases, it would be beneficial to define the child-management /// operations right in the base Component class. This way, you won't need /// to expose any concrete component classes to the client code, even during /// the object tree assembly. The downside is that these methods will be /// empty for the leaf-level components. func add(component: Component) func remove(component: Component) /// You can provide a method that lets the client code figure out whether a /// component can bear children. func isComposite() -> Bool /// The base Component may implement some default behavior or leave it to /// concrete classes. func operation() -> String } extension Component { func add(component: Component) {} func remove(component: Component) {} func isComposite() -> Bool { return false } } /// The Leaf class represents the end objects of a composition. A leaf can't /// have any children. /// /// Usually, it's the Leaf objects that do the actual work, whereas Composite /// objects only delegate to their sub-components. class Leaf: Component { var parent: Component? func operation() -> String { return "Leaf" } } /// The Composite class represents the complex components that may have /// children. Usually, the Composite objects delegate the actual work to their /// children and then "sum-up" the result. class Composite: Component { var parent: Component? /// This fields contains the conponent subtree. private var children = \[Component\]() /// A composite object can add or remove other components (both simple or /// complex) to or from its child list. func add(component: Component) { var item = component item.parent = self children.append(item) } func remove(component: Component) { // ... } func isComposite() -> Bool { return true } /// The Composite executes its primary logic in a particular way. It /// traverses recursively through all its children, collecting and summing /// their results. Since the composite's children pass these calls to their /// children and so forth, the whole object tree is traversed as a result. func operation() -> String { let result = children.map({ $0.operation() }) return "Branch(" + result.joined(separator: " ") + ")" } } class Client { /// The client code works with all of the components via the base interface. static func someClientCode(component: Component) { print("Result: " + component.operation()) } /// Thanks to the fact that the child-management operations are also /// declared in the base Component class, the client code can work with both /// simple or complex components. static func moreComplexClientCode(leftComponent: Component, rightComponent: Component) { if leftComponent.isComposite() { leftComponent.add(component: rightComponent) } print("Result: " + leftComponent.operation()) } } /// Let's see how it all comes together. class CompositeConceptual: XCTestCase { func testCompositeConceptual() { /// This way the client code can support the simple leaf components... print("Client: I've got a simple component:") Client.someClientCode(component: Leaf()) /// ...as well as the complex composites. let tree = Composite() let branch1 = Composite() branch1.add(component: Leaf()) branch1.add(component: Leaf()) let branch2 = Composite() branch2.add(component: Leaf()) branch2.add(component: Leaf()) tree.add(component: branch1) tree.add(component: branch2) print("\\nClient: Now I've got a composite tree:") Client.someClientCode(component: tree) print("\\nClient: I don't need to check the components classes even when managing the tree:") Client.moreComplexClientCode(leftComponent: tree, rightComponent: Leaf()) } } #### **Output.txt:** Resultado de la ejecución Client: I've got a simple component: Result: Leaf Client: Now I've got a composite tree: Result: Branch(Branch(Leaf Leaf) Branch(Leaf Leaf)) Client: I don't need to check the components classes even when managing the tree: Result: Branch(Branch(Leaf Leaf) Branch(Leaf Leaf) Leaf) Ejemplo del mundo real ---------------------- #### **Example.swift:** Ejemplo del mundo real import UIKit import XCTest protocol Component { func accept(theme: T) } extension Component where Self: UIViewController { func accept(theme: T) { view.accept(theme: theme) view.subviews.forEach({ $0.accept(theme: theme) }) } } extension UIView: Component {} extension UIViewController: Component {} extension Component where Self: UIView { func accept(theme: T) { print("\\t\\(description): has applied \\(theme.description)") backgroundColor = theme.backgroundColor } } extension Component where Self: UILabel { func accept(theme: T) { print("\\t\\(description): has applied \\(theme.description)") backgroundColor = theme.backgroundColor textColor = theme.textColor } } extension Component where Self: UIButton { func accept(theme: T) { print("\\t\\(description): has applied \\(theme.description)") backgroundColor = theme.backgroundColor setTitleColor(theme.textColor, for: .normal) setTitleColor(theme.highlightedColor, for: .highlighted) } } protocol Theme: CustomStringConvertible { var backgroundColor: UIColor { get } } protocol ButtonTheme: Theme { var textColor: UIColor { get } var highlightedColor: UIColor { get } /// other properties } protocol LabelTheme: Theme { var textColor: UIColor { get } /// other properties } /// Button Themes struct DefaultButtonTheme: ButtonTheme { var textColor = UIColor.red var highlightedColor = UIColor.white var backgroundColor = UIColor.orange var description: String { return "Default Buttom Theme" } } struct NightButtonTheme: ButtonTheme { var textColor = UIColor.white var highlightedColor = UIColor.red var backgroundColor = UIColor.black var description: String { return "Night Buttom Theme" } } /// Label Themes struct DefaultLabelTheme: LabelTheme { var textColor = UIColor.red var backgroundColor = UIColor.black var description: String { return "Default Label Theme" } } struct NightLabelTheme: LabelTheme { var textColor = UIColor.white var backgroundColor = UIColor.black var description: String { return "Night Label Theme" } } class CompositeRealWorld: XCTestCase { func testCompositeRealWorld() { print("\\nClient: Applying 'default' theme for 'UIButton'") apply(theme: DefaultButtonTheme(), for: UIButton()) print("\\nClient: Applying 'night' theme for 'UIButton'") apply(theme: NightButtonTheme(), for: UIButton()) print("\\nClient: Let's use View Controller as a composite!") /// Night theme print("\\nClient: Applying 'night button' theme for 'WelcomeViewController'...") apply(theme: NightButtonTheme(), for: WelcomeViewController()) print() print("\\nClient: Applying 'night label' theme for 'WelcomeViewController'...") apply(theme: NightLabelTheme(), for: WelcomeViewController()) print() /// Default Theme print("\\nClient: Applying 'default button' theme for 'WelcomeViewController'...") apply(theme: DefaultButtonTheme(), for: WelcomeViewController()) print() print("\\nClient: Applying 'default label' theme for 'WelcomeViewController'...") apply(theme: DefaultLabelTheme(), for: WelcomeViewController()) print() } func apply(theme: T, for component: Component) { component.accept(theme: theme) } } class WelcomeViewController: UIViewController { class ContentView: UIView { var titleLabel = UILabel() var actionButton = UIButton() override init(frame: CGRect) { super.init(frame: frame) setup() } required init?(coder decoder: NSCoder) { super.init(coder: decoder) setup() } func setup() { addSubview(titleLabel) addSubview(actionButton) } } override func loadView() { view = ContentView() } } /// Let's override a description property for the better output extension WelcomeViewController { open override var description: String { return "WelcomeViewController" } } extension WelcomeViewController.ContentView { override var description: String { return "ContentView" } } extension UIButton { open override var description: String { return "UIButton" } } extension UILabel { open override var description: String { return "UILabel" } } #### **Output.txt:** Resultado de la ejecución Client: Applying 'default' theme for 'UIButton' UIButton: has applied Default Buttom Theme Client: Applying 'night' theme for 'UIButton' UIButton: has applied Night Buttom Theme Client: Let's use View Controller as a composite! Client: Applying 'night button' theme for 'WelcomeViewController'... ContentView: has applied Night Buttom Theme UILabel: has applied Night Buttom Theme UIButton: has applied Night Buttom Theme **Composite** en otros lenguajes -------------------------------- [![Composite en C#](https://refactoring.guru/images/patterns/icons/csharp.svg?id=da64592defc6e86d57c39c66e9de3e58)](https://refactoring.guru/es/design-patterns/composite/csharp/example "Composite en C#") [![Composite en C++](https://refactoring.guru/images/patterns/icons/cpp.svg?id=f7782ed8b8666246bfcc3f8fefc3b858)](https://refactoring.guru/es/design-patterns/composite/cpp/example "Composite en C++") [![Composite en Go](https://refactoring.guru/images/patterns/icons/go.svg?id=1a89927eb99b1ea3fde7701d97970aca)](https://refactoring.guru/es/design-patterns/composite/go/example "Composite en Go") [![Composite en Java](https://refactoring.guru/images/patterns/icons/java.svg?id=e6d87e2dca08c953fe3acd1275ed4f4e)](https://refactoring.guru/es/design-patterns/composite/java/example "Composite en Java") [![Composite en PHP](https://refactoring.guru/images/patterns/icons/php.svg?id=be1906eb26b71ec1d3b93720d6156618)](https://refactoring.guru/es/design-patterns/composite/php/example "Composite en PHP") [![Composite en Python](https://refactoring.guru/images/patterns/icons/python.svg?id=6d815d43c0f7050a1151b43e51569c9f)](https://refactoring.guru/es/design-patterns/composite/python/example "Composite en Python") [![Composite en Ruby](https://refactoring.guru/images/patterns/icons/ruby.svg?id=b065b718c914bf8e960ef731600be1eb)](https://refactoring.guru/es/design-patterns/composite/ruby/example "Composite en Ruby") [![Composite en Rust](https://refactoring.guru/images/patterns/icons/rust.svg?id=1f5698a4b5ae23fe79413511747e4a87)](https://refactoring.guru/es/design-patterns/composite/rust/example "Composite en Rust") [![Composite en TypeScript](https://refactoring.guru/images/patterns/icons/typescript.svg?id=2239d0f16cb703540c205dd8cb0c0cb7)](https://refactoring.guru/es/design-patterns/composite/typescript/example "Composite en TypeScript") --- # Chain of Responsibility en Swift / Patrones de diseño [There are patterns of patterns now! \ My friend's project: MetaPatterns.io](https://metapatterns.io/)  [](https://refactoring.guru/es/design-patterns/chain-of-responsibility/swift/example#checkout) [](https://refactoring.guru/es/design-patterns/chain-of-responsibility/swift/example#checkout) [](https://refactoring.guru/) / [Patrones de diseño](https://refactoring.guru/es/design-patterns) / [Chain of Responsibility](https://refactoring.guru/es/design-patterns/chain-of-responsibility) / [Swift](https://refactoring.guru/es/design-patterns/swift) ![Chain of Responsibility](https://refactoring.guru/images/patterns/cards/chain-of-responsibility-mini-2x.png?id=8c81f7069e51259b2443801b91135f7f) **Chain of Responsibility** en Swift ==================================== **Chain of Responsibility** es un patrón de diseño de comportamiento que permite pasar solicitudes a lo largo de la cadena de manejadores potenciales hasta que uno de ellos gestiona la solicitud. El patrón permite que varios objetos gestionen la solicitud sin acoplar la clase emisora a las clases concretas de los receptores. La cadena puede componerse dinámicamente durante el tiempo de ejecución con cualquier manejador que siga una interfaz manejadora estándar. [Aprende más sobre el patrón Chain of Responsibility](https://refactoring.guru/es/design-patterns/chain-of-responsibility) Navegación  [Intro](https://refactoring.guru/es/design-patterns/chain-of-responsibility/swift/example#)  [Ejemplo conceptual](https://refactoring.guru/es/design-patterns/chain-of-responsibility/swift/example#example-0)  [Example](https://refactoring.guru/es/design-patterns/chain-of-responsibility/swift/example#example-0--Example-swift)  [Output](https://refactoring.guru/es/design-patterns/chain-of-responsibility/swift/example#example-0--Output-txt)  [Ejemplo del mundo real](https://refactoring.guru/es/design-patterns/chain-of-responsibility/swift/example#example-1)  [Example](https://refactoring.guru/es/design-patterns/chain-of-responsibility/swift/example#example-1--Example-swift)  [Output](https://refactoring.guru/es/design-patterns/chain-of-responsibility/swift/example#example-1--Output-txt) **Complejidad:** **Popularidad:** **Ejemplos de uso:** El patrón Chain of Responsibility no es un invitado habitual en el programa Swift, ya que tan solo es relevante cuando el código opera con cadenas de objetos. **Identificación:** El patrón es reconocible porque los métodos de comportamiento de un grupo de objetos invocan indirectamente los mismos métodos en otros objetos, mientras que todos los objetos siguen la interfaz común. Los siguientes ejemplos están disponibles en [Swift Playgrounds](https://www.alemohamad.com/playgrounds) . Kudos a [Alejandro Mohamad](https://www.alemohamad.com/) por crear la versión de Playground. Ejemplo conceptual ------------------ Este ejemplo ilustra la estructura del patrón de diseño **Chain of Responsibility** y se centra en las siguientes preguntas: * ¿De qué clases se compone? * ¿Qué papeles juegan esas clases? * ¿De qué forma se relacionan los elementos del patrón? Después de conocer la estructura del patrón, será más fácil comprender el siguiente ejemplo basado en un caso de uso real de Swift. #### **Example.swift:** Ejemplo conceptual import XCTest /// The Handler interface declares a method for building the chain of handlers. /// It also declares a method for executing a request. protocol Handler: AnyObject { @discardableResult func setNext(handler: Handler) -> Handler func handle(request: String) -> String? var nextHandler: Handler? { get set } } extension Handler { func setNext(handler: Handler) -> Handler { self.nextHandler = handler /// Returning a handler from here will let us link handlers in a /// convenient way like this: /// monkey.setNext(handler: squirrel).setNext(handler: dog) return handler } func handle(request: String) -> String? { return nextHandler?.handle(request: request) } } /// All Concrete Handlers either handle a request or pass it to the next handler /// in the chain. class MonkeyHandler: Handler { var nextHandler: Handler? func handle(request: String) -> String? { if (request == "Banana") { return "Monkey: I'll eat the " + request + ".\\n" } else { return nextHandler?.handle(request: request) } } } class SquirrelHandler: Handler { var nextHandler: Handler? func handle(request: String) -> String? { if (request == "Nut") { return "Squirrel: I'll eat the " + request + ".\\n" } else { return nextHandler?.handle(request: request) } } } class DogHandler: Handler { var nextHandler: Handler? func handle(request: String) -> String? { if (request == "MeatBall") { return "Dog: I'll eat the " + request + ".\\n" } else { return nextHandler?.handle(request: request) } } } /// The client code is usually suited to work with a single handler. In most /// cases, it is not even aware that the handler is part of a chain. class Client { // ... static func someClientCode(handler: Handler) { let food = \["Nut", "Banana", "Cup of coffee"\] for item in food { print("Client: Who wants a " + item + "?\\n") guard let result = handler.handle(request: item) else { print(" " + item + " was left untouched.\\n") return } print(" " + result) } } // ... } /// Let's see how it all works together. class ChainOfResponsibilityConceptual: XCTestCase { func test() { /// The other part of the client code constructs the actual chain. let monkey = MonkeyHandler() let squirrel = SquirrelHandler() let dog = DogHandler() monkey.setNext(handler: squirrel).setNext(handler: dog) /// The client should be able to send a request to any handler, not just /// the first one in the chain. print("Chain: Monkey > Squirrel > Dog\\n\\n") Client.someClientCode(handler: monkey) print() print("Subchain: Squirrel > Dog\\n\\n") Client.someClientCode(handler: squirrel) } } #### **Output.txt:** Resultado de la ejecución Chain: Monkey > Squirrel > Dog Client: Who wants a Nut? Squirrel: I'll eat the Nut. Client: Who wants a Banana? Monkey: I'll eat the Banana. Client: Who wants a Cup of coffee? Cup of coffee was left untouched. Subchain: Squirrel > Dog Client: Who wants a Nut? Squirrel: I'll eat the Nut. Client: Who wants a Banana? Banana was left untouched. Ejemplo del mundo real ---------------------- #### **Example.swift:** Ejemplo del mundo real import Foundation import UIKit import XCTest protocol Handler { var next: Handler? { get } func handle(\_ request: Request) -> LocalizedError? } class BaseHandler: Handler { var next: Handler? init(with handler: Handler? = nil) { self.next = handler } func handle(\_ request: Request) -> LocalizedError? { return next?.handle(request) } } class LoginHandler: BaseHandler { override func handle(\_ request: Request) -> LocalizedError? { guard request.email?.isEmpty == false else { return AuthError.emptyEmail } guard request.password?.isEmpty == false else { return AuthError.emptyPassword } return next?.handle(request) } } class SignUpHandler: BaseHandler { private struct Limit { static let passwordLength = 8 } override func handle(\_ request: Request) -> LocalizedError? { guard request.email?.contains("@") == true else { return AuthError.invalidEmail } guard (request.password?.count ?? 0) >= Limit.passwordLength else { return AuthError.invalidPassword } guard request.password == request.repeatedPassword else { return AuthError.differentPasswords } return next?.handle(request) } } class LocationHandler: BaseHandler { override func handle(\_ request: Request) -> LocalizedError? { guard isLocationEnabled() else { return AuthError.locationDisabled } return next?.handle(request) } func isLocationEnabled() -> Bool { return true /// Calls special method } } class NotificationHandler: BaseHandler { override func handle(\_ request: Request) -> LocalizedError? { guard isNotificationsEnabled() else { return AuthError.notificationsDisabled } return next?.handle(request) } func isNotificationsEnabled() -> Bool { return false /// Calls special method } } enum AuthError: LocalizedError { case emptyFirstName case emptyLastName case emptyEmail case emptyPassword case invalidEmail case invalidPassword case differentPasswords case locationDisabled case notificationsDisabled var errorDescription: String? { switch self { case .emptyFirstName: return "First name is empty" case .emptyLastName: return "Last name is empty" case .emptyEmail: return "Email is empty" case .emptyPassword: return "Password is empty" case .invalidEmail: return "Email is invalid" case .invalidPassword: return "Password is invalid" case .differentPasswords: return "Password and repeated password should be equal" case .locationDisabled: return "Please turn location services on" case .notificationsDisabled: return "Please turn notifications on" } } } protocol Request { var firstName: String? { get } var lastName: String? { get } var email: String? { get } var password: String? { get } var repeatedPassword: String? { get } } extension Request { /// Default implementations var firstName: String? { return nil } var lastName: String? { return nil } var email: String? { return nil } var password: String? { return nil } var repeatedPassword: String? { return nil } } struct SignUpRequest: Request { var firstName: String? var lastName: String? var email: String? var password: String? var repeatedPassword: String? } struct LoginRequest: Request { var email: String? var password: String? } protocol AuthHandlerSupportable: AnyObject { var handler: Handler? { get set } } class BaseAuthViewController: UIViewController, AuthHandlerSupportable { /// Base class or extensions can be used to implement a base behavior var handler: Handler? init(handler: Handler) { self.handler = handler super.init(nibName: nil, bundle: nil) } required init?(coder aDecoder: NSCoder) { super.init(coder: aDecoder) } } class LoginViewController: BaseAuthViewController { func loginButtonSelected() { print("Login View Controller: User selected Login button") let request = LoginRequest(email: "smth@gmail.com", password: "123HardPass") if let error = handler?.handle(request) { print("Login View Controller: something went wrong") print("Login View Controller: Error -> " + (error.errorDescription ?? "")) } else { print("Login View Controller: Preconditions are successfully validated") } } } class SignUpViewController: BaseAuthViewController { func signUpButtonSelected() { print("SignUp View Controller: User selected SignUp button") let request = SignUpRequest(firstName: "Vasya", lastName: "Pupkin", email: "vasya.pupkin@gmail.com", password: "123HardPass", repeatedPassword: "123HardPass") if let error = handler?.handle(request) { print("SignUp View Controller: something went wrong") print("SignUp View Controller: Error -> " + (error.errorDescription ?? "")) } else { print("SignUp View Controller: Preconditions are successfully validated") } } } class ChainOfResponsibilityRealWorld: XCTestCase { func testChainOfResponsibilityRealWorld() { print("Client: Let's test Login flow!") let loginHandler = LoginHandler(with: LocationHandler()) let loginController = LoginViewController(handler: loginHandler) loginController.loginButtonSelected() print("\\nClient: Let's test SignUp flow!") let signUpHandler = SignUpHandler(with: LocationHandler(with: NotificationHandler())) let signUpController = SignUpViewController(handler: signUpHandler) signUpController.signUpButtonSelected() } } #### **Output.txt:** Resultado de la ejecución Client: Let's test Login flow! Login View Controller: User selected Login button Login View Controller: Preconditions are successfully validated Client: Let's test SignUp flow! SignUp View Controller: User selected SignUp button SignUp View Controller: something went wrong SignUp View Controller: Error -> Please turn notifications on **Chain of Responsibility** en otros lenguajes ---------------------------------------------- [![Chain of Responsibility en C#](https://refactoring.guru/images/patterns/icons/csharp.svg?id=da64592defc6e86d57c39c66e9de3e58)](https://refactoring.guru/es/design-patterns/chain-of-responsibility/csharp/example "Chain of Responsibility en C#") [![Chain of Responsibility en C++](https://refactoring.guru/images/patterns/icons/cpp.svg?id=f7782ed8b8666246bfcc3f8fefc3b858)](https://refactoring.guru/es/design-patterns/chain-of-responsibility/cpp/example "Chain of Responsibility en C++") [![Chain of Responsibility en Go](https://refactoring.guru/images/patterns/icons/go.svg?id=1a89927eb99b1ea3fde7701d97970aca)](https://refactoring.guru/es/design-patterns/chain-of-responsibility/go/example "Chain of Responsibility en Go") [![Chain of Responsibility en Java](https://refactoring.guru/images/patterns/icons/java.svg?id=e6d87e2dca08c953fe3acd1275ed4f4e)](https://refactoring.guru/es/design-patterns/chain-of-responsibility/java/example "Chain of Responsibility en Java") [![Chain of Responsibility en PHP](https://refactoring.guru/images/patterns/icons/php.svg?id=be1906eb26b71ec1d3b93720d6156618)](https://refactoring.guru/es/design-patterns/chain-of-responsibility/php/example "Chain of Responsibility en PHP") [![Chain of Responsibility en Python](https://refactoring.guru/images/patterns/icons/python.svg?id=6d815d43c0f7050a1151b43e51569c9f)](https://refactoring.guru/es/design-patterns/chain-of-responsibility/python/example "Chain of Responsibility en Python") [![Chain of Responsibility en Ruby](https://refactoring.guru/images/patterns/icons/ruby.svg?id=b065b718c914bf8e960ef731600be1eb)](https://refactoring.guru/es/design-patterns/chain-of-responsibility/ruby/example "Chain of Responsibility en Ruby") [![Chain of Responsibility en Rust](https://refactoring.guru/images/patterns/icons/rust.svg?id=1f5698a4b5ae23fe79413511747e4a87)](https://refactoring.guru/es/design-patterns/chain-of-responsibility/rust/example "Chain of Responsibility en Rust") [![Chain of Responsibility en TypeScript](https://refactoring.guru/images/patterns/icons/typescript.svg?id=2239d0f16cb703540c205dd8cb0c0cb7)](https://refactoring.guru/es/design-patterns/chain-of-responsibility/typescript/example "Chain of Responsibility en TypeScript") --- # Composite en Java / Patrones de diseño [There are patterns of patterns now! \ My friend's project: MetaPatterns.io](https://metapatterns.io/)  [](https://refactoring.guru/es/design-patterns/composite/java/example#checkout) [](https://refactoring.guru/es/design-patterns/composite/java/example#checkout) [](https://refactoring.guru/) / [Patrones de diseño](https://refactoring.guru/es/design-patterns) / [Composite](https://refactoring.guru/es/design-patterns/composite) / [Java](https://refactoring.guru/es/design-patterns/java) ![Composite](https://refactoring.guru/images/patterns/cards/composite-mini-2x.png?id=3f7f811fefeb0b64f6774746eb42af09) **Composite** en Java ===================== **Composite** es un patrón de diseño estructural que permite componer objetos en una estructura en forma de árbol y trabajar con ella como si fuera un objeto único. El patrón Composite se convirtió en una solución muy popular para la mayoría de problemas que requieren la creación de una estructura de árbol. La gran característica del Composite es la capacidad para ejecutar métodos de forma recursiva por toda la estructura de árbol y recapitular los resultados. [Aprende más sobre el patrón Composite](https://refactoring.guru/es/design-patterns/composite) Navegación  [Intro](https://refactoring.guru/es/design-patterns/composite/java/example#)  [Formas gráficas simples y compuestas](https://refactoring.guru/es/design-patterns/composite/java/example#example-0)  shapes   [Shape](https://refactoring.guru/es/design-patterns/composite/java/example#example-0--shapes-Shape-java)   [Base­Shape](https://refactoring.guru/es/design-patterns/composite/java/example#example-0--shapes-BaseShape-java)   [Dot](https://refactoring.guru/es/design-patterns/composite/java/example#example-0--shapes-Dot-java)   [Circle](https://refactoring.guru/es/design-patterns/composite/java/example#example-0--shapes-Circle-java)   [Rectangle](https://refactoring.guru/es/design-patterns/composite/java/example#example-0--shapes-Rectangle-java)   [Compound­Shape](https://refactoring.guru/es/design-patterns/composite/java/example#example-0--shapes-CompoundShape-java)  editor   [Image­Editor](https://refactoring.guru/es/design-patterns/composite/java/example#example-0--editor-ImageEditor-java)  [Demo](https://refactoring.guru/es/design-patterns/composite/java/example#example-0--Demo-java)  [Output­Demo](https://refactoring.guru/es/design-patterns/composite/java/example#example-0--OutputDemo-png) **Complejidad:** **Popularidad:** **Ejemplos de uso:** El patrón Composite es muy común en el código Java. Se utiliza a menudo para representar jerarquías de componentes de interfaz de usuario o el código que trabaja con gráficos. Aquí tienes algunos ejemplos del patrón Composite en las principales bibliotecas de Java: * [`java.awt.Container#add(Component)`](http://docs.oracle.com/javase/8/docs/api/java/awt/Container.html#add-java.awt.Component-) (prácticamente por todos los componentes Swing) * [`javax.faces.component.UIComponent#getChildren()`](http://docs.oracle.com/javaee/7/api/javax/faces/component/UIComponent.html#getChildren--) (prácticamente por todos los componentes JSF UI) **Identificación:** Si tienes un árbol de objetos y cada objeto de un árbol es parte de la misma jerarquía de clases, lo más probable es que se trate de un compuesto (composite). Si los métodos de estas clases delegan el trabajo de objetos hijos del árbol y lo hacen a través de la clase base/interfaz de la jerarquía, sin duda, se trata de un compuesto. Formas gráficas simples y compuestas ------------------------------------ Este ejemplo muestra cómo crear formas gráficas complejas compuestas por formas simples, y cómo tratarlas a ambas de manera uniforme. ### **shapes** #### **shapes/Shape.java:** Interfaz común de las formas package refactoring\_guru.composite.example.shapes; import java.awt.\*; public interface Shape { int getX(); int getY(); int getWidth(); int getHeight(); void move(int x, int y); boolean isInsideBounds(int x, int y); void select(); void unSelect(); boolean isSelected(); void paint(Graphics graphics); } #### **shapes/BaseShape.java:** Forma abstracta con funcionalidad básica package refactoring\_guru.composite.example.shapes; import java.awt.\*; abstract class BaseShape implements Shape { public int x; public int y; public Color color; private boolean selected = false; BaseShape(int x, int y, Color color) { this.x = x; this.y = y; this.color = color; } @Override public int getX() { return x; } @Override public int getY() { return y; } @Override public int getWidth() { return 0; } @Override public int getHeight() { return 0; } @Override public void move(int x, int y) { this.x += x; this.y += y; } @Override public boolean isInsideBounds(int x, int y) { return x > getX() && x < (getX() + getWidth()) && y > getY() && y < (getY() + getHeight()); } @Override public void select() { selected = true; } @Override public void unSelect() { selected = false; } @Override public boolean isSelected() { return selected; } void enableSelectionStyle(Graphics graphics) { graphics.setColor(Color.LIGHT\_GRAY); Graphics2D g2 = (Graphics2D) graphics; float\[\] dash1 = {2.0f}; g2.setStroke(new BasicStroke(1.0f, BasicStroke.CAP\_BUTT, BasicStroke.JOIN\_MITER, 2.0f, dash1, 0.0f)); } void disableSelectionStyle(Graphics graphics) { graphics.setColor(color); Graphics2D g2 = (Graphics2D) graphics; g2.setStroke(new BasicStroke()); } @Override public void paint(Graphics graphics) { if (isSelected()) { enableSelectionStyle(graphics); } else { disableSelectionStyle(graphics); } // ... } } #### **shapes/Dot.java:** Un punto package refactoring\_guru.composite.example.shapes; import java.awt.\*; public class Dot extends BaseShape { private final int DOT\_SIZE = 3; public Dot(int x, int y, Color color) { super(x, y, color); } @Override public int getWidth() { return DOT\_SIZE; } @Override public int getHeight() { return DOT\_SIZE; } @Override public void paint(Graphics graphics) { super.paint(graphics); graphics.fillRect(x - 1, y - 1, getWidth(), getHeight()); } } #### **shapes/Circle.java:** Un círculo package refactoring\_guru.composite.example.shapes; import java.awt.\*; public class Circle extends BaseShape { public int radius; public Circle(int x, int y, int radius, Color color) { super(x, y, color); this.radius = radius; } @Override public int getWidth() { return radius \* 2; } @Override public int getHeight() { return radius \* 2; } @Override public void paint(Graphics graphics) { super.paint(graphics); graphics.drawOval(x, y, getWidth() - 1, getHeight() - 1); } } #### **shapes/Rectangle.java:** Un rectángulo package refactoring\_guru.composite.example.shapes; import java.awt.\*; public class Rectangle extends BaseShape { public int width; public int height; public Rectangle(int x, int y, int width, int height, Color color) { super(x, y, color); this.width = width; this.height = height; } @Override public int getWidth() { return width; } @Override public int getHeight() { return height; } @Override public void paint(Graphics graphics) { super.paint(graphics); graphics.drawRect(x, y, getWidth() - 1, getHeight() - 1); } } #### **shapes/CompoundShape.java:** Forma compuesta, que consiste en otros objetos de forma package refactoring\_guru.composite.example.shapes; import java.awt.\*; import java.util.ArrayList; import java.util.Arrays; import java.util.List; public class CompoundShape extends BaseShape { protected List children = new ArrayList<>(); public CompoundShape(Shape... components) { super(0, 0, Color.BLACK); add(components); } public void add(Shape component) { children.add(component); } public void add(Shape... components) { children.addAll(Arrays.asList(components)); } public void remove(Shape child) { children.remove(child); } public void remove(Shape... components) { children.removeAll(Arrays.asList(components)); } public void clear() { children.clear(); } @Override public int getX() { if (children.size() == 0) { return 0; } int x = children.get(0).getX(); for (Shape child : children) { if (child.getX() < x) { x = child.getX(); } } return x; } @Override public int getY() { if (children.size() == 0) { return 0; } int y = children.get(0).getY(); for (Shape child : children) { if (child.getY() < y) { y = child.getY(); } } return y; } @Override public int getWidth() { int maxWidth = 0; int x = getX(); for (Shape child : children) { int childsRelativeX = child.getX() - x; int childWidth = childsRelativeX + child.getWidth(); if (childWidth > maxWidth) { maxWidth = childWidth; } } return maxWidth; } @Override public int getHeight() { int maxHeight = 0; int y = getY(); for (Shape child : children) { int childsRelativeY = child.getY() - y; int childHeight = childsRelativeY + child.getHeight(); if (childHeight > maxHeight) { maxHeight = childHeight; } } return maxHeight; } @Override public void move(int x, int y) { for (Shape child : children) { child.move(x, y); } } @Override public boolean isInsideBounds(int x, int y) { for (Shape child : children) { if (child.isInsideBounds(x, y)) { return true; } } return false; } @Override public void unSelect() { super.unSelect(); for (Shape child : children) { child.unSelect(); } } public boolean selectChildAt(int x, int y) { for (Shape child : children) { if (child.isInsideBounds(x, y)) { child.select(); return true; } } return false; } @Override public void paint(Graphics graphics) { if (isSelected()) { enableSelectionStyle(graphics); graphics.drawRect(getX() - 1, getY() - 1, getWidth() + 1, getHeight() + 1); disableSelectionStyle(graphics); } for (Shape child : children) { child.paint(graphics); } } } ### **editor** #### **editor/ImageEditor.java:** Editor de forma package refactoring\_guru.composite.example.editor; import refactoring\_guru.composite.example.shapes.CompoundShape; import refactoring\_guru.composite.example.shapes.Shape; import javax.swing.\*; import javax.swing.border.Border; import java.awt.\*; import java.awt.event.MouseAdapter; import java.awt.event.MouseEvent; public class ImageEditor { private EditorCanvas canvas; private CompoundShape allShapes = new CompoundShape(); public ImageEditor() { canvas = new EditorCanvas(); } public void loadShapes(Shape... shapes) { allShapes.clear(); allShapes.add(shapes); canvas.refresh(); } private class EditorCanvas extends Canvas { JFrame frame; private static final int PADDING = 10; EditorCanvas() { createFrame(); refresh(); addMouseListener(new MouseAdapter() { @Override public void mousePressed(MouseEvent e) { allShapes.unSelect(); allShapes.selectChildAt(e.getX(), e.getY()); e.getComponent().repaint(); } }); } void createFrame() { frame = new JFrame(); frame.setDefaultCloseOperation(WindowConstants.EXIT\_ON\_CLOSE); frame.setLocationRelativeTo(null); JPanel contentPanel = new JPanel(); Border padding = BorderFactory.createEmptyBorder(PADDING, PADDING, PADDING, PADDING); contentPanel.setBorder(padding); frame.setContentPane(contentPanel); frame.add(this); frame.setVisible(true); frame.getContentPane().setBackground(Color.LIGHT\_GRAY); } public int getWidth() { return allShapes.getX() + allShapes.getWidth() + PADDING; } public int getHeight() { return allShapes.getY() + allShapes.getHeight() + PADDING; } void refresh() { this.setSize(getWidth(), getHeight()); frame.pack(); } public void paint(Graphics graphics) { allShapes.paint(graphics); } } } #### **Demo.java:** Código cliente package refactoring\_guru.composite.example; import refactoring\_guru.composite.example.editor.ImageEditor; import refactoring\_guru.composite.example.shapes.Circle; import refactoring\_guru.composite.example.shapes.CompoundShape; import refactoring\_guru.composite.example.shapes.Dot; import refactoring\_guru.composite.example.shapes.Rectangle; import java.awt.\*; public class Demo { public static void main(String\[\] args) { ImageEditor editor = new ImageEditor(); editor.loadShapes( new Circle(10, 10, 10, Color.BLUE), new CompoundShape( new Circle(110, 110, 50, Color.RED), new Dot(160, 160, Color.RED) ), new CompoundShape( new Rectangle(250, 250, 100, 100, Color.GREEN), new Dot(240, 240, Color.GREEN), new Dot(240, 360, Color.GREEN), new Dot(360, 360, Color.GREEN), new Dot(360, 240, Color.GREEN) ) ); } } #### **OutputDemo.png:** Resultado de la ejecución ![](https://refactoring.guru/images/patterns/examples/java/composite/OutputDemo.png?id=261f3b34b99f9e2ee0f9012d5b1ed734) **Composite** en otros lenguajes -------------------------------- [![Composite en C#](https://refactoring.guru/images/patterns/icons/csharp.svg?id=da64592defc6e86d57c39c66e9de3e58)](https://refactoring.guru/es/design-patterns/composite/csharp/example "Composite en C#") [![Composite en C++](https://refactoring.guru/images/patterns/icons/cpp.svg?id=f7782ed8b8666246bfcc3f8fefc3b858)](https://refactoring.guru/es/design-patterns/composite/cpp/example "Composite en C++") [![Composite en Go](https://refactoring.guru/images/patterns/icons/go.svg?id=1a89927eb99b1ea3fde7701d97970aca)](https://refactoring.guru/es/design-patterns/composite/go/example "Composite en Go") [![Composite en PHP](https://refactoring.guru/images/patterns/icons/php.svg?id=be1906eb26b71ec1d3b93720d6156618)](https://refactoring.guru/es/design-patterns/composite/php/example "Composite en PHP") [![Composite en Python](https://refactoring.guru/images/patterns/icons/python.svg?id=6d815d43c0f7050a1151b43e51569c9f)](https://refactoring.guru/es/design-patterns/composite/python/example "Composite en Python") [![Composite en Ruby](https://refactoring.guru/images/patterns/icons/ruby.svg?id=b065b718c914bf8e960ef731600be1eb)](https://refactoring.guru/es/design-patterns/composite/ruby/example "Composite en Ruby") [![Composite en Rust](https://refactoring.guru/images/patterns/icons/rust.svg?id=1f5698a4b5ae23fe79413511747e4a87)](https://refactoring.guru/es/design-patterns/composite/rust/example "Composite en Rust") [![Composite en Swift](https://refactoring.guru/images/patterns/icons/swift.svg?id=0b716c2d52ec3a48fbe91ac031070c1d)](https://refactoring.guru/es/design-patterns/composite/swift/example "Composite en Swift") [![Composite en TypeScript](https://refactoring.guru/images/patterns/icons/typescript.svg?id=2239d0f16cb703540c205dd8cb0c0cb7)](https://refactoring.guru/es/design-patterns/composite/typescript/example "Composite en TypeScript") --- # Command en Swift / Patrones de diseño [There are patterns of patterns now! \ My friend's project: MetaPatterns.io](https://metapatterns.io/)  [](https://refactoring.guru/es/design-patterns/command/swift/example#checkout) [](https://refactoring.guru/es/design-patterns/command/swift/example#checkout) [](https://refactoring.guru/) / [Patrones de diseño](https://refactoring.guru/es/design-patterns) / [Command](https://refactoring.guru/es/design-patterns/command) / [Swift](https://refactoring.guru/es/design-patterns/swift) ![Command](https://refactoring.guru/images/patterns/cards/command-mini-2x.png?id=e5f6332e057f6d352a209da963a8fc54) **Command** en Swift ==================== **Command** es un patrón de diseño de comportamiento que convierte solicitudes u operaciones simples en objetos. La conversión permite la ejecución diferida de comandos, el almacenamiento del historial de comandos, etc. [Aprende más sobre el patrón Command](https://refactoring.guru/es/design-patterns/command) Navegación  [Intro](https://refactoring.guru/es/design-patterns/command/swift/example#)  [Ejemplo conceptual](https://refactoring.guru/es/design-patterns/command/swift/example#example-0)  [Example](https://refactoring.guru/es/design-patterns/command/swift/example#example-0--Example-swift)  [Output](https://refactoring.guru/es/design-patterns/command/swift/example#example-0--Output-txt)  [Ejemplo del mundo real](https://refactoring.guru/es/design-patterns/command/swift/example#example-1)  [Example](https://refactoring.guru/es/design-patterns/command/swift/example#example-1--Example-swift)  [Output](https://refactoring.guru/es/design-patterns/command/swift/example#example-1--Output-txt) **Complejidad:** **Popularidad:** **Ejemplos de uso:** El patrón Command es muy común en el código Swift. La mayoría de las veces se utiliza como alternativa a las retrollamadas (_callbacks_) para parametrizar elementos UI con acciones. También se utiliza para poner tareas en cola, realizar el seguimiento del historial de operaciones, etc. **Identificación:** El patrón Command es reconocible por los métodos de comportamiento en un tipo de clase abstracta/interfaz (emisora) que invoca un método en una implementación de un tipo de clase abstracta/interfaz diferente (receptora) que la implementación del comando ha implementado durante su creación. Las clases de comando se limitan normalmente a acciones específicas. Los siguientes ejemplos están disponibles en [Swift Playgrounds](https://www.alemohamad.com/playgrounds) . Kudos a [Alejandro Mohamad](https://www.alemohamad.com/) por crear la versión de Playground. Ejemplo conceptual ------------------ Este ejemplo ilustra la estructura del patrón de diseño **Command** y se centra en las siguientes preguntas: * ¿De qué clases se compone? * ¿Qué papeles juegan esas clases? * ¿De qué forma se relacionan los elementos del patrón? Después de conocer la estructura del patrón, será más fácil comprender el siguiente ejemplo basado en un caso de uso real de Swift. #### **Example.swift:** Ejemplo conceptual import XCTest /// The Command interface declares a method for executing a command. protocol Command { func execute() } /// Some commands can implement simple operations on their own. class SimpleCommand: Command { private var payload: String init(\_ payload: String) { self.payload = payload } func execute() { print("SimpleCommand: See, I can do simple things like printing (" + payload + ")") } } /// However, some commands can delegate more complex operations to other /// objects, called "receivers." class ComplexCommand: Command { private var receiver: Receiver /// Context data, required for launching the receiver's methods. private var a: String private var b: String /// Complex commands can accept one or several receiver objects along with /// any context data via the constructor. init(\_ receiver: Receiver, \_ a: String, \_ b: String) { self.receiver = receiver self.a = a self.b = b } /// Commands can delegate to any methods of a receiver. func execute() { print("ComplexCommand: Complex stuff should be done by a receiver object.\\n") receiver.doSomething(a) receiver.doSomethingElse(b) } } /// The Receiver classes contain some important business logic. They know how to /// perform all kinds of operations, associated with carrying out a request. In /// fact, any class may serve as a Receiver. class Receiver { func doSomething(\_ a: String) { print("Receiver: Working on (" + a + ")\\n") } func doSomethingElse(\_ b: String) { print("Receiver: Also working on (" + b + ")\\n") } } /// The Invoker is associated with one or several commands. It sends a request /// to the command. class Invoker { private var onStart: Command? private var onFinish: Command? /// Initialize commands. func setOnStart(\_ command: Command) { onStart = command } func setOnFinish(\_ command: Command) { onFinish = command } /// The Invoker does not depend on concrete command or receiver classes. The /// Invoker passes a request to a receiver indirectly, by executing a /// command. func doSomethingImportant() { print("Invoker: Does anybody want something done before I begin?") onStart?.execute() print("Invoker: ...doing something really important...") print("Invoker: Does anybody want something done after I finish?") onFinish?.execute() } } /// Let's see how it all comes together. class CommandConceptual: XCTestCase { func test() { /// The client code can parameterize an invoker with any commands. let invoker = Invoker() invoker.setOnStart(SimpleCommand("Say Hi!")) let receiver = Receiver() invoker.setOnFinish(ComplexCommand(receiver, "Send email", "Save report")) invoker.doSomethingImportant() } } #### **Output.txt:** Resultado de la ejecución Invoker: Does anybody want something done before I begin? SimpleCommand: See, I can do simple things like printing (Say Hi!) Invoker: ...doing something really important... Invoker: Does anybody want something done after I finish? ComplexCommand: Complex stuff should be done by a receiver object. Receiver: Working on (Send email) Receiver: Also working on (Save report) Ejemplo del mundo real ---------------------- #### **Example.swift:** Ejemplo del mundo real import Foundation import XCTest class DelayedOperation: Operation, @unchecked Sendable { private var delay: TimeInterval init(\_ delay: TimeInterval = 0) { self.delay = delay } override var isExecuting : Bool { get { return \_executing } set { willChangeValue(forKey: "isExecuting") \_executing = newValue didChangeValue(forKey: "isExecuting") } } private var \_executing : Bool = false override var isFinished : Bool { get { return \_finished } set { willChangeValue(forKey: "isFinished") \_finished = newValue didChangeValue(forKey: "isFinished") } } private var \_finished : Bool = false override func start() { guard delay > 0 else { \_start() return } let deadline = DispatchTime.now() + delay DispatchQueue(label: "").asyncAfter(deadline: deadline) { self.\_start() } } private func \_start() { guard !self.isCancelled else { print("\\(self): operation is canceled") self.isFinished = true return } self.isExecuting = true self.main() self.isExecuting = false self.isFinished = true } } class WindowOperation: DelayedOperation, @unchecked Sendable { override func main() { print("\\(self): Windows are closed via HomeKit.") } override var description: String { return "WindowOperation" } } class DoorOperation: DelayedOperation, @unchecked Sendable { override func main() { print("\\(self): Doors are closed via HomeKit.") } override var description: String { return "DoorOperation" } } class TaxiOperation: DelayedOperation, @unchecked Sendable { override func main() { print("\\(self): Taxi is ordered via Uber") } override var description: String { return "TaxiOperation" } } class CommandRealWorld: XCTestCase { func testCommandRealWorld() { prepareTestEnvironment { let siri = SiriShortcuts.shared print("User: Hey Siri, I am leaving my home") siri.perform(.leaveHome) print("User: Hey Siri, I am leaving my work in 3 minutes") siri.perform(.leaveWork, delay: 3) /// for simplicity, we use seconds print("User: Hey Siri, I am still working") siri.cancel(.leaveWork) } } } extension CommandRealWorld { struct ExecutionTime { static let max: TimeInterval = 5 static let waiting: TimeInterval = 4 } func prepareTestEnvironment(\_ execution: () -> ()) { /// This method tells Xcode to wait for async operations. Otherwise the /// main test is done immediately. let expectation = self.expectation(description: "Expectation for async operations") let deadline = DispatchTime.now() + ExecutionTime.waiting DispatchQueue.main.asyncAfter(deadline: deadline) { expectation.fulfill() } execution() wait(for: \[expectation\], timeout: ExecutionTime.max) } } class SiriShortcuts { static let shared = SiriShortcuts() private lazy var queue = OperationQueue() private init() {} enum Action: String { case leaveHome case leaveWork } func perform(\_ action: Action, delay: TimeInterval = 0) { print("Siri: performing \\(action)-action\\n") switch action { case .leaveHome: add(operation: WindowOperation(delay)) add(operation: DoorOperation(delay)) case .leaveWork: add(operation: TaxiOperation(delay)) } } func cancel(\_ action: Action) { print("Siri: canceling \\(action)-action\\n") switch action { case .leaveHome: cancelOperation(with: WindowOperation.self) cancelOperation(with: DoorOperation.self) case .leaveWork: cancelOperation(with: TaxiOperation.self) } } private func cancelOperation(with operationType: Operation.Type) { queue.operations.filter { operation in return type(of: operation) == operationType }.forEach({ $0.cancel() }) } private func add(operation: Operation) { queue.addOperation(operation) } } #### **Output.txt:** Resultado de la ejecución User: Hey Siri, I am leaving my home Siri: performing leaveHome-action User: Hey Siri, I am leaving my work in 3 minutes Siri: performing leaveWork-action User: Hey Siri, I am still working Siri: canceling leaveWork-action DoorOperation: Doors are closed via HomeKit. WindowOperation: Windows are closed via HomeKit. TaxiOperation: operation is canceled **Command** en otros lenguajes ------------------------------ [![Command en C#](https://refactoring.guru/images/patterns/icons/csharp.svg?id=da64592defc6e86d57c39c66e9de3e58)](https://refactoring.guru/es/design-patterns/command/csharp/example "Command en C#") [![Command en C++](https://refactoring.guru/images/patterns/icons/cpp.svg?id=f7782ed8b8666246bfcc3f8fefc3b858)](https://refactoring.guru/es/design-patterns/command/cpp/example "Command en C++") [![Command en Go](https://refactoring.guru/images/patterns/icons/go.svg?id=1a89927eb99b1ea3fde7701d97970aca)](https://refactoring.guru/es/design-patterns/command/go/example "Command en Go") [![Command en Java](https://refactoring.guru/images/patterns/icons/java.svg?id=e6d87e2dca08c953fe3acd1275ed4f4e)](https://refactoring.guru/es/design-patterns/command/java/example "Command en Java") [![Command en PHP](https://refactoring.guru/images/patterns/icons/php.svg?id=be1906eb26b71ec1d3b93720d6156618)](https://refactoring.guru/es/design-patterns/command/php/example "Command en PHP") [![Command en Python](https://refactoring.guru/images/patterns/icons/python.svg?id=6d815d43c0f7050a1151b43e51569c9f)](https://refactoring.guru/es/design-patterns/command/python/example "Command en Python") [![Command en Ruby](https://refactoring.guru/images/patterns/icons/ruby.svg?id=b065b718c914bf8e960ef731600be1eb)](https://refactoring.guru/es/design-patterns/command/ruby/example "Command en Ruby") [![Command en Rust](https://refactoring.guru/images/patterns/icons/rust.svg?id=1f5698a4b5ae23fe79413511747e4a87)](https://refactoring.guru/es/design-patterns/command/rust/example "Command en Rust") [![Command en TypeScript](https://refactoring.guru/images/patterns/icons/typescript.svg?id=2239d0f16cb703540c205dd8cb0c0cb7)](https://refactoring.guru/es/design-patterns/command/typescript/example "Command en TypeScript") --- # Chain of Responsibility [There are patterns of patterns now! \ My friend's project: MetaPatterns.io](https://metapatterns.io/)  [](https://refactoring.guru/es/design-patterns/chain-of-responsibility#checkout) [](https://refactoring.guru/es/design-patterns/chain-of-responsibility#checkout) [](https://refactoring.guru/) / [Patrones de diseño](https://refactoring.guru/es/design-patterns) / [Patrones de comportamiento](https://refactoring.guru/es/design-patterns/behavioral-patterns) Chain of Responsibility ======================= También llamado: Cadena de responsabilidad, CoR, Chain of Command Propósito --------- **Chain of Responsibility** es un patrón de diseño de comportamiento que te permite pasar solicitudes a lo largo de una cadena de manejadores. Al recibir una solicitud, cada manejador decide si la procesa o si la pasa al siguiente manejador de la cadena. ![Patrón de diseño Chain of Responsibility](https://refactoring.guru/images/patterns/content/chain-of-responsibility/chain-of-responsibility-2x.png?id=cc104b0a00a410f37fb39da80f392b88) Problema -------- Imagina que estás trabajando en un sistema de pedidos online. Quieres restringir el acceso al sistema de forma que únicamente los usuarios autenticados puedan generar pedidos. Además, los usuarios que tengan permisos administrativos deben tener pleno acceso a todos los pedidos. Tras planificar un poco, te das cuenta de que estas comprobaciones deben realizarse secuencialmente. La aplicación puede intentar autenticar a un usuario en el sistema cuando reciba una solicitud que contenga las credenciales del usuario. Sin embargo, si esas credenciales no son correctas y la autenticación falla, no hay razón para proceder con otras comprobaciones. ![Problema solucionado por el patrón Chain of Responsibility](https://refactoring.guru/images/patterns/diagrams/chain-of-responsibility/problem1-es-2x.png?id=f8f78a1bc776618bf423e1f5989822d4) La solicitud debe pasar una serie de comprobaciones antes de que el propio sistema de pedidos pueda gestionarla. Durante los meses siguientes, implementas varias de esas comprobaciones secuenciales. * Uno de tus colegas sugiere que no es seguro pasar datos sin procesar directamente al sistema de pedidos. De modo que añades un paso adicional de validación para sanear los datos de una solicitud. * Más tarde, alguien se da cuenta de que el sistema es vulnerable al desciframiento de contraseñas por la fuerza. Para evitarlo, añades rápidamente una comprobación que filtra las solicitudes fallidas repetidas que vengan de la misma dirección IP. * Otra persona sugiere que podrías acelerar el sistema devolviendo los resultados en caché en solicitudes repetidas que contengan los mismos datos, de modo que añades otra comprobación que permite a la solicitud pasar por el sistema únicamente cuando no hay una respuesta adecuada en caché. ![Con cada nueva comprobación el código crece, se complica y se afea](https://refactoring.guru/images/patterns/diagrams/chain-of-responsibility/problem2-es-2x.png?id=550bd802c700050a6932eb58d6346eb9) Cuanto más crece el código, más se complica. El código de las comprobaciones, que ya se veía desordenado, se vuelve más y más abotargado cada vez que añades una nueva función. En ocasiones, un cambio en una comprobación afecta a las demás. Y lo peor de todo es que, cuando intentas reutilizar las comprobaciones para proteger otros componentes del sistema, tienes que duplicar parte del código, ya que esos componentes necesitan parte de las comprobaciones, pero no todas ellas. El sistema se vuelve muy difícil de comprender y costoso de mantener. Luchas con el código durante un tiempo hasta que un día decides refactorizarlo todo. Solución -------- Al igual que muchos otros patrones de diseño de comportamiento, el **Chain of Responsibility** se basa en transformar comportamientos particulares en objetos autónomos llamados _manejadores_. En nuestro caso, cada comprobación debe ponerse dentro de su propia clase con un único método que realice la comprobación. La solicitud, junto con su información, se pasa a este método como argumento. El patrón sugiere que vincules esos manejadores en una cadena. Cada manejador vinculado tiene un campo para almacenar una referencia al siguiente manejador de la cadena. Además de procesar una solicitud, los manejadores la pasan a lo largo de la cadena. La solicitud viaja por la cadena hasta que todos los manejadores han tenido la oportunidad de procesarla. Y ésta es la mejor parte: un manejador puede decidir no pasar la solicitud más allá por la cadena y detener con ello el procesamiento. En nuestro ejemplo de los sistemas de pedidos, un manejador realiza el procesamiento y después decide si pasa la solicitud al siguiente eslabón de la cadena. Asumiendo que la solicitud contiene la información correcta, todos los manejadores pueden ejecutar su comportamiento principal, ya sean comprobaciones de autenticación o almacenamiento en la memoria caché. ![Los manejadores se alinean uno tras otro, formando una cadena](https://refactoring.guru/images/patterns/diagrams/chain-of-responsibility/solution1-es-2x.png?id=3689c7f432e4ac52adca66105f885ae3) Los manejadores se alinean uno tras otro, formando una cadena. No obstante, hay una solución ligeramente diferente (y un poco más estandarizada) en la que, al recibir una solicitud, un manejador decide si puede procesarla. Si puede, no pasa la solicitud más allá. De modo que un único manejador procesa la solicitud o no lo hace ninguno en absoluto. Esta solución es muy habitual cuando tratamos con eventos en pilas de elementos dentro de una interfaz gráfica de usuario (GUI). Por ejemplo, cuando un usuario hace clic en un botón, el evento se propaga por la cadena de elementos GUI que comienza en el botón, recorre sus contenedores (como formularios o paneles) y acaba en la ventana principal de la aplicación. El evento es procesado por el primer elemento de la cadena que es capaz de gestionarlo. Este ejemplo también es destacable porque muestra que siempre se puede extraer una cadena de un árbol de objetos. ![Una cadena puede formarse a partir de una rama de un árbol de objetos](https://refactoring.guru/images/patterns/diagrams/chain-of-responsibility/solution2-es-2x.png?id=dae29aba464b4baa61eae7e806bdf0d5) Una cadena puede formarse a partir de una rama de un árbol de objetos. Es fundamental que todas las clases manejadoras implementen la misma interfaz. Cada manejadora concreta solo debe preocuparse por la siguiente que cuente con el método `ejecutar`. De esta forma puedes componer cadenas durante el tiempo de ejecución, utilizando varios manejadores sin acoplar tu código a sus clases concretas. Analogía en el mundo real ------------------------- ![Hablar con soporte técnico a veces es difícil](https://refactoring.guru/images/patterns/content/chain-of-responsibility/chain-of-responsibility-comic-1-es-2x.png?id=e3bef85a490debda074d2f11dc0f1520) Una llamada al soporte técnico puede pasar por muchos operadores. Acabas de comprar e instalar una nueva pieza de hardware en tu computadora. Como eres un fanático de la informática, la computadora tiene varios sistemas operativos instalados. Intentas arrancarlos todos para ver si soportan el hardware. Windows detecta y habilita el hardware automáticamente. Sin embargo, tu querido Linux se niega a funcionar con el nuevo hardware. Ligeramente esperanzado, decides llamar al número de teléfono de soporte técnico escrito en la caja. Lo primero que oyes es la voz robótica del contestador automático. Te sugiere nueve soluciones populares a varios problemas, pero ninguna de ellas es relevante a tu caso. Después de un rato, el robot te conecta con un operador humano. Por desgracia, el operador tampoco consigue sugerirte nada específico. Se dedica a recitar largos pasajes del manual, negándose a escuchar tus comentarios. Cuando escuchas por enésima vez la frase “¿has intentado apagar y encender la computadora?”, exiges que te pasen con un ingeniero de verdad. Por fin, el operador pasa tu llamada a unos de los ingenieros, que probablemente ansiaba una conversación humana desde hacía tiempo, sentado en la solitaria sala del servidor del oscuro sótano de un edificio de oficinas. El ingeniero te indica dónde descargar los drivers adecuados para tu nuevo hardware y cómo instalarlos en Linux. Por fin, ¡la solución! Acabas la llamada dando saltos de alegría. Estructura ---------- ![Estructura del patrón de diseño Chain Of Responsibility](https://refactoring.guru/images/patterns/diagrams/chain-of-responsibility/structure-2x.png?id=bb837faaac88e7f2a16f751d0beaa201)![Estructura del patrón de diseño Chain Of Responsibility](https://refactoring.guru/images/patterns/diagrams/chain-of-responsibility/structure-indexed-2x.png?id=4f27e2c48e635f45a78472d707a8df3c) 1. La clase **Manejadora** declara la interfaz común a todos los manejadores concretos. Normalmente contiene un único método para manejar solicitudes, pero en ocasiones también puede contar con otro método para establecer el siguiente manejador de la cadena. 2. La clase **Manejadora Base** es opcional y es donde puedes colocar el código boilerplate (segmentos de código que suelen no alterarse) común para todas las clases manejadoras. Normalmente, esta clase define un campo para almacenar una referencia al siguiente manejador. Los clientes pueden crear una cadena pasando un manejador al constructor o modificador (_setter_) del manejador previo. La clase también puede implementar el comportamiento de gestión por defecto: puede pasar la ejecución al siguiente manejador después de comprobar su existencia. 3. Los **Manejadores Concretos** contienen el código para procesar las solicitudes. Al recibir una solicitud, cada manejador debe decidir si procesarla y, además, si la pasa a lo largo de la cadena. Habitualmente los manejadores son autónomos e inmutables, y aceptan toda la información necesaria únicamente a través del constructor. 4. El **Cliente** puede componer cadenas una sola vez o componerlas dinámicamente, dependiendo de la lógica de la aplicación. Observa que se puede enviar una solicitud a cualquier manejador de la cadena; no tiene por qué ser al primero. Pseudocódigo ------------ En este ejemplo, el patrón **Chain of Responsibility** es responsable de mostrar información de ayuda contextual para elementos GUI activos. ![Ejemplo de estructura del patrón Chain of Responsibility](https://refactoring.guru/images/patterns/diagrams/chain-of-responsibility/example-es-2x.png?id=708c56c5f322b8c4ae38367386f1021d) Las clases GUI se crean con el patrón Composite. Cada elemento se vincula a su elemento contenedor. En cualquier momento puedes crear una cadena de elementos que comience con el propio elemento y recorra todos los elementos contenedores. La GUI de la aplicación se estructura normalmente como un árbol de objetos. Por ejemplo, la clase `Diálogo`, que representa la ventana principal de la aplicación, es la raíz del árbol de objetos. La clase diálogo contiene `Paneles`, que pueden contener otros paneles o simples elementos de bajo nivel, como `Botones` y `CamposdeTexto`. Un simple componente puede mostrar breves pistas contextuales, siempre y cuando el componente tenga asignado cierto texto de ayuda. Pero los componentes más complejos definen su propia forma de mostrar ayuda contextual, por ejemplo, mostrando un extracto del manual o abriendo una página en un navegador. ![Ejemplo de estructura del patrón Chain of Responsibility](https://refactoring.guru/images/patterns/diagrams/chain-of-responsibility/example2-es-2x.png?id=fdd402509cd4b6d21bbd6bc45c20c7cd) Ésta es la forma en la que las solicitudes de ayuda recorren objetos GUI. Cuando un usuario apunta el cursor del ratón a un elemento y pulsa la tecla `F1`, la aplicación detecta el componente bajo el puntero y le envía una solicitud de ayuda. La solicitud emerge por todos los contenedores del elemento hasta que llega al elemento capaz de mostrar la información de ayuda. // La interfaz manejadora declara un método para ejecutar una // solicitud. interface ComponentWithContextualHelp is method showHelp() // La clase base para componentes simples. abstract class Component implements ComponentWithContextualHelp is field tooltipText: string // El contenedor del componente actúa como el siguiente // eslabón de la cadena de manejadores. protected field container: Container // El componente muestra una pista si tiene un texto de // ayuda asignado. De lo contrario, reenvía la llamada al // contenedor, si es que existe. method showHelp() is if (tooltipText != null) // Muestra la pista. else container.showHelp() // Los contenedores pueden contener componentes simples y otros // contenedores como hijos. Las relaciones de la cadena se // establecen aquí. La clase hereda el comportamiento showHelp // (mostrarAyuda) de su padre. abstract class Container extends Component is protected field children: array of Component method add(child) is children.add(child) child.container = this // Los componentes primitivos pueden estar bien con la // implementación de la ayuda por defecto... class Button extends Component is // ... // Pero los componentes complejos pueden sobrescribir la // implementación por defecto. Si no puede proporcionarse el // texto de ayuda de una nueva forma, el componente siempre // puede invocar la implementación base (véase la clase // Componente). class Panel extends Container is field modalHelpText: string method showHelp() is if (modalHelpText != null) // Muestra una ventana modal con el texto de ayuda. else super.showHelp() // ...igual que arriba... class Dialog extends Container is field wikiPageURL: string method showHelp() is if (wikiPageURL != null) // Abre la página de ayuda wiki. else super.showHelp() // Código cliente. class Application is // Cada aplicación configura la cadena de forma diferente. method createUI() is dialog = new Dialog("Budget Reports") dialog.wikiPageURL = "http://..." panel = new Panel(0, 0, 400, 800) panel.modalHelpText = "This panel does..." ok = new Button(250, 760, 50, 20, "OK") ok.tooltipText = "This is an OK button that..." cancel = new Button(320, 760, 50, 20, "Cancel") // ... panel.add(ok) panel.add(cancel) dialog.add(panel) // Imagina lo que pasa aquí. method onF1KeyPress() is component = this.getComponentAtMouseCoords() component.showHelp() Aplicabilidad ------------- Utiliza el patrón Chain of Responsibility cuando tu programa deba procesar distintos tipos de solicitudes de varias maneras, pero los tipos exactos de solicitudes y sus secuencias no se conozcan de antemano. El patrón te permite encadenar varios manejadores y, al recibir una solicitud, “preguntar” a cada manejador si puede procesarla. De esta forma todos los manejadores tienen la oportunidad de procesar la solicitud. Utiliza el patrón cuando sea fundamental ejecutar varios manejadores en un orden específico. Ya que puedes vincular los manejadores de la cadena en cualquier orden, todas las solicitudes recorrerán la cadena exactamente como planees. Utiliza el patrón Chain of Responsibility cuando el grupo de manejadores y su orden deban cambiar durante el tiempo de ejecución. Si aportas modificadores (_setters_) para un campo de referencia dentro de las clases manejadoras, podrás insertar, eliminar o reordenar los manejadores dinámicamente. Cómo implementarlo ------------------ 1. Declara la interfaz manejadora y describe la firma de un método para manejar solicitudes. Decide cómo pasará el cliente la información de la solicitud dentro del método. La forma más flexible consiste en convertir la solicitud en un objeto y pasarlo al método de gestión como argumento. 2. Para eliminar código boilerplate duplicado en manejadores concretos, puede merecer la pena crear una clase manejadora abstracta base, derivada de la interfaz manejadora. Esta clase debe tener un campo para almacenar una referencia al siguiente manejador de la cadena. Considera hacer la clase inmutable. No obstante, si planeas modificar las cadenas durante el tiempo de ejecución, deberás definir un modificador (_setter_) para alterar el valor del campo de referencia. También puedes implementar el comportamiento por defecto conveniente para el método de control, que consiste en reenviar la solicitud al siguiente objeto, a no ser que no quede ninguno. Los manejadores concretos podrán utilizar este comportamiento invocando al método padre. 3. Una a una, crea subclases manejadoras concretas e implementa los métodos de control. Cada manejador debe tomar dos decisiones cuando recibe una solicitud: * Si procesa la solicitud. * Si pasa la solicitud al siguiente eslabón de la cadena. 4. El cliente puede ensamblar cadenas por su cuenta o recibir cadenas prefabricadas de otros objetos. En el último caso, debes implementar algunas clases fábrica para crear cadenas de acuerdo con los ajustes de configuración o de entorno. 5. El cliente puede activar cualquier manejador de la cadena, no solo el primero. La solicitud se pasará a lo largo de la cadena hasta que algún manejador se rehúse a pasarlo o hasta que llegue al final de la cadena. 6. Debido a la naturaleza dinámica de la cadena, el cliente debe estar listo para gestionar los siguientes escenarios: * La cadena puede consistir en un único vínculo. * Algunas solicitudes pueden no llegar al final de la cadena. * Otras pueden llegar hasta el final de la cadena sin ser gestionadas. Pros y contras -------------- * Puedes controlar el orden de control de solicitudes. * _Principio de responsabilidad única_. Puedes desacoplar las clases que invoquen operaciones de las que realicen operaciones. * _Principio de abierto/cerrado_. Puedes introducir nuevos manejadores en la aplicación sin descomponer el código cliente existente. * Algunas solicitudes pueden acabar sin ser gestionadas. Relaciones con otros patrones ----------------------------- * [Chain of Responsibility](https://refactoring.guru/es/design-patterns/chain-of-responsibility) , [Command](https://refactoring.guru/es/design-patterns/command) , [Mediator](https://refactoring.guru/es/design-patterns/mediator) y [Observer](https://refactoring.guru/es/design-patterns/observer) abordan distintas formas de conectar emisores y receptores de solicitudes: * _Chain of Responsibility_ pasa una solicitud secuencialmente a lo largo de una cadena dinámica de receptores potenciales hasta que uno de ellos la gestiona. * _Command_ establece conexiones unidireccionales entre emisores y receptores. * _Mediator_ elimina las conexiones directas entre emisores y receptores, forzándolos a comunicarse indirectamente a través de un objeto mediador. * _Observer_ permite a los receptores suscribirse o darse de baja dinámicamente a la recepción de solicitudes. * [Chain of Responsibility](https://refactoring.guru/es/design-patterns/chain-of-responsibility) se utiliza a menudo junto a [Composite](https://refactoring.guru/es/design-patterns/composite) . En este caso, cuando un componente hoja recibe una solicitud, puede pasarla a lo largo de la cadena de todos los componentes padre hasta la raíz del árbol de objetos. * Los manejadores del [Chain of Responsibility](https://refactoring.guru/es/design-patterns/chain-of-responsibility) se pueden implementar como [Comandos](https://refactoring.guru/es/design-patterns/command) . En este caso, puedes ejecutar muchas operaciones diferentes sobre el mismo objeto de contexto, representado por una solicitud. Sin embargo, hay otra solución en la que la propia solicitud es un objeto _Comando_. En este caso, puedes ejecutar la misma operación en una serie de contextos diferentes vinculados en una cadena. * [Chain of Responsibility](https://refactoring.guru/es/design-patterns/chain-of-responsibility) y [Decorator](https://refactoring.guru/es/design-patterns/decorator) tienen estructuras de clase muy similares. Ambos patrones se basan en la composición recursiva para pasar la ejecución a través de una serie de objetos. Sin embargo, existen varias diferencias fundamentales: Los manejadores de _CoR_ pueden ejecutar operaciones arbitrarias con independencia entre sí. También pueden dejar de pasar la solicitud en cualquier momento. Por otro lado, varios _decoradores_ pueden extender el comportamiento del objeto manteniendo su consistencia con la interfaz base. Además, los decoradores no pueden romper el flujo de la solicitud. Ejemplos de código ------------------ [![Chain of Responsibility en C#](https://refactoring.guru/images/patterns/icons/csharp.svg?id=da64592defc6e86d57c39c66e9de3e58)](https://refactoring.guru/es/design-patterns/chain-of-responsibility/csharp/example "Chain of Responsibility en C#") [![Chain of Responsibility en C++](https://refactoring.guru/images/patterns/icons/cpp.svg?id=f7782ed8b8666246bfcc3f8fefc3b858)](https://refactoring.guru/es/design-patterns/chain-of-responsibility/cpp/example "Chain of Responsibility en C++") [![Chain of Responsibility en Go](https://refactoring.guru/images/patterns/icons/go.svg?id=1a89927eb99b1ea3fde7701d97970aca)](https://refactoring.guru/es/design-patterns/chain-of-responsibility/go/example "Chain of Responsibility en Go") [![Chain of Responsibility en Java](https://refactoring.guru/images/patterns/icons/java.svg?id=e6d87e2dca08c953fe3acd1275ed4f4e)](https://refactoring.guru/es/design-patterns/chain-of-responsibility/java/example "Chain of Responsibility en Java") [![Chain of Responsibility en PHP](https://refactoring.guru/images/patterns/icons/php.svg?id=be1906eb26b71ec1d3b93720d6156618)](https://refactoring.guru/es/design-patterns/chain-of-responsibility/php/example "Chain of Responsibility en PHP") [![Chain of Responsibility en Python](https://refactoring.guru/images/patterns/icons/python.svg?id=6d815d43c0f7050a1151b43e51569c9f)](https://refactoring.guru/es/design-patterns/chain-of-responsibility/python/example "Chain of Responsibility en Python") [![Chain of Responsibility en Ruby](https://refactoring.guru/images/patterns/icons/ruby.svg?id=b065b718c914bf8e960ef731600be1eb)](https://refactoring.guru/es/design-patterns/chain-of-responsibility/ruby/example "Chain of Responsibility en Ruby") [![Chain of Responsibility en Rust](https://refactoring.guru/images/patterns/icons/rust.svg?id=1f5698a4b5ae23fe79413511747e4a87)](https://refactoring.guru/es/design-patterns/chain-of-responsibility/rust/example "Chain of Responsibility en Rust") [![Chain of Responsibility en Swift](https://refactoring.guru/images/patterns/icons/swift.svg?id=0b716c2d52ec3a48fbe91ac031070c1d)](https://refactoring.guru/es/design-patterns/chain-of-responsibility/swift/example "Chain of Responsibility en Swift") [![Chain of Responsibility en TypeScript](https://refactoring.guru/images/patterns/icons/typescript.svg?id=2239d0f16cb703540c205dd8cb0c0cb7)](https://refactoring.guru/es/design-patterns/chain-of-responsibility/typescript/example "Chain of Responsibility en TypeScript") [![](https://refactoring.guru/images/patterns/banners/patterns-book-banner-3-2x.png?id=0cc3f77ab421d1a5c02ee46488231c3a)](https://refactoring.guru/es/design-patterns/book) ### ¡Apoya nuestro sitio web gratuito y compra el libro! * 22 patrones de diseño y 8 principios explicados en profundidad * 436 páginas bien estructuradas, fáciles de leer y libres de tecnicismos * 225 ilustraciones y diagramas claros y útiles * Un archivo con ejemplos de código en 11 lenguajes * Todos los dispositivos soportados: Formatos PDF/EPUB/MOBI/KFX [Saber más…](https://refactoring.guru/es/design-patterns/book) --- # Composite [There are patterns of patterns now! \ My friend's project: MetaPatterns.io](https://metapatterns.io/)  [](https://refactoring.guru/es/design-patterns/composite#checkout) [](https://refactoring.guru/es/design-patterns/composite#checkout) [](https://refactoring.guru/) / [Patrones de diseño](https://refactoring.guru/es/design-patterns) / [Patrones estructurales](https://refactoring.guru/es/design-patterns/structural-patterns) Composite ========= También llamado: Objeto compuesto, Object Tree Propósito --------- **Composite** es un patrón de diseño estructural que te permite componer objetos en estructuras de árbol y trabajar con esas estructuras como si fueran objetos individuales. ![Patrón de diseño Composite](https://refactoring.guru/images/patterns/content/composite/composite-2x.png?id=8847e6f8e2cb892ed2229faba83bd1b7) Problema -------- El uso del patrón Composite sólo tiene sentido cuando el modelo central de tu aplicación puede representarse en forma de árbol. Por ejemplo, imagina que tienes dos tipos de objetos: `Productos` y `Cajas`. Una `Caja` puede contener varios `Productos` así como cierto número de `Cajas` más pequeñas. Estas `Cajas` pequeñas también pueden contener algunos `Productos` o incluso `Cajas` más pequeñas, y así sucesivamente. Digamos que decides crear un sistema de pedidos que utiliza estas clases. Los pedidos pueden contener productos sencillos sin envolver, así como cajas llenas de productos... y otras cajas. ¿Cómo determinarás el precio total de ese pedido? ![Estructura de un pedido complejo](https://refactoring.guru/images/patterns/diagrams/composite/problem-es-2x.png?id=36dce86ec18de08f859c8f1a7342e9ca) Un pedido puede incluir varios productos empaquetados en cajas, que a su vez están empaquetados en cajas más grandes y así sucesivamente. La estructura se asemeja a un árbol boca abajo. Puedes intentar la solución directa: desenvolver todas las cajas, repasar todos los productos y calcular el total. Esto sería viable en el mundo real; pero en un programa no es tan fácil como ejecutar un bucle. Tienes que conocer de antemano las clases de `Productos` y `Cajas` a iterar, el nivel de anidación de las cajas y otros detalles desagradables. Todo esto provoca que la solución directa sea demasiado complicada, o incluso imposible. Solución -------- El patrón Composite sugiere que trabajes con `Productos` y `Cajas` a través de una interfaz común que declara un método para calcular el precio total. ¿Cómo funcionaría este método? Para un producto, sencillamente devuelve el precio del producto. Para una caja, recorre cada artículo que contiene la caja, pregunta su precio y devuelve un total por la caja. Si uno de esos artículos fuera una caja más pequeña, esa caja también comenzaría a repasar su contenido y así sucesivamente, hasta que se calcule el precio de todos los componentes internos. Una caja podría incluso añadir costos adicionales al precio final, como costos de empaquetado. ![Solution sugerida por el patrón Composite](https://refactoring.guru/images/patterns/content/composite/composite-comic-1-es-2x.png?id=4f48f8d11fd2082b3f60fbc4d5d2fc16) El patrón Composite te permite ejecutar un comportamiento de forma recursiva sobre todos los componentes de un árbol de objetos. La gran ventaja de esta solución es que no tienes que preocuparte por las clases concretas de los objetos que componen el árbol. No tienes que saber si un objeto es un producto simple o una sofisticada caja. Puedes tratarlos a todos por igual a través de la interfaz común. Cuando invocas un método, los propios objetos pasan la solicitud a lo largo del árbol. Analogía en el mundo real ------------------------- ![Un ejemplo de estructura militar](https://refactoring.guru/images/patterns/diagrams/composite/live-example-2x.png?id=b555458f20fc30425ae6dada5da492af) Un ejemplo de estructura militar. Los ejércitos de la mayoría de países se estructuran como jerarquías. Un ejército está formado por varias divisiones; una división es un grupo de brigadas y una brigada está formada por pelotones, que pueden dividirse en escuadrones. Por último, un escuadrón es un pequeño grupo de soldados reales. Las órdenes se dan en la parte superior de la jerarquía y se pasan hacia abajo por cada nivel hasta que todos los soldados saben lo que hay que hacer. Estructura ---------- ![Estructura del patrón de diseño Composite](https://refactoring.guru/images/patterns/diagrams/composite/structure-es-2x.png?id=ecfb776298ef331f15c33a6979f5a9b8)![Estructura del patrón de diseño Composite](https://refactoring.guru/images/patterns/diagrams/composite/structure-es-indexed-2x.png?id=5a3681df3cabc9cde45de0bfd07b166d) 1. La interfaz **Componente** describe operaciones que son comunes a elementos simples y complejos del árbol. 2. La **Hoja** es un elemento básico de un árbol que no tiene subelementos. Normalmente, los componentes de la hoja acaban realizando la mayoría del trabajo real, ya que no tienen a nadie a quien delegarle el trabajo. 3. El **Contenedor** (también llamado _compuesto_) es un elemento que tiene subelementos: hojas u otros contenedores. Un contenedor no conoce las clases concretas de sus hijos. Funciona con todos los subelementos únicamente a través de la interfaz componente. Al recibir una solicitud, un contenedor delega el trabajo a sus subelementos, procesa los resultados intermedios y devuelve el resultado final al cliente. 4. El **Cliente** funciona con todos los elementos a través de la interfaz componente. Como resultado, el cliente puede funcionar de la misma manera tanto con elementos simples como complejos del árbol. Pseudocódigo ------------ En este ejemplo, el patrón **Composite** te permite implementar el apilamiento (_stacking_) de formas geométricas en un editor gráfico. ![Ejemplo de estructura del patrón Composite](https://refactoring.guru/images/patterns/diagrams/composite/example-2x.png?id=d21edef39d3792e8a4c6736727ac7305) Ejemplo del editor de formas geométricas. La clase `GráficoCompuesto` es un contenedor que puede incluir cualquier cantidad de subformas, incluyendo otras formas compuestas. Una forma compuesta tiene los mismos métodos que una forma simple. Sin embargo, en lugar de hacer algo por su cuenta, una forma compuesta pasa la solicitud de forma recursiva a todos sus hijos y “suma” el resultado. El código cliente trabaja con todas las formas a través de la interfaz común a todas las clases de forma. De este modo, el cliente no sabe si está trabajando con una forma simple o una compuesta. El cliente puede trabajar con estructuras de objetos muy complejas sin acoplarse a las clases concretas que forman esa estructura. // La interfaz componente declara operaciones comunes para // objetos simples y complejos de una composición. interface Graphic is method move(x, y) method draw() // La clase hoja representa objetos finales de una composición. // Un objeto hoja no puede tener ningún subobjeto. Normalmente, // son los objetos hoja los que hacen el trabajo real, mientras // que los objetos compuestos se limitan a delegar a sus // subcomponentes. class Dot implements Graphic is field x, y constructor Dot(x, y) { ... } method move(x, y) is this.x += x, this.y += y method draw() is // Dibuja un punto en X e Y. // Todas las clases de componente pueden extender otros // componentes. class Circle extends Dot is field radius constructor Circle(x, y, radius) { ... } method draw() is // Dibuja un círculo en X y Y con radio R. // La clase compuesta representa componentes complejos que // pueden tener hijos. Normalmente los objetos compuestos // delegan el trabajo real a sus hijos y después "recapitulan" // el resultado. class CompoundGraphic implements Graphic is field children: array of Graphic // Un objeto compuesto puede añadir o eliminar otros // componentes (tanto simples como complejos) a o desde su // lista hija. method add(child: Graphic) is // Añade un hijo a la matriz de hijos. method remove(child: Graphic) is // Elimina un hijo de la matriz de hijos. method move(x, y) is foreach (child in children) do child.move(x, y) // Un compuesto ejecuta su lógica primaria de una forma // particular. Recorre recursivamente todos sus hijos, // recopilando y recapitulando sus resultados. Debido a que // los hijos del compuesto pasan esas llamadas a sus propios // hijos y así sucesivamente, se recorre todo el árbol de // objetos como resultado. method draw() is // 1. Para cada componente hijo: // - Dibuja el componente. // - Actualiza el rectángulo delimitador. // 2. Dibuja un rectángulo de línea punteada utilizando // las coordenadas de delimitación. // El código cliente trabaja con todos los componentes a través // de su interfaz base. De esta forma el código cliente puede // soportar componentes de hoja simples así como compuestos // complejos. class ImageEditor is field all: CompoundGraphic method load() is all = new CompoundGraphic() all.add(new Dot(1, 2)) all.add(new Circle(5, 3, 10)) // ... // Combina componentes seleccionados para formar un // componente compuesto complejo. method groupSelected(components: array of Graphic) is group = new CompoundGraphic() foreach (component in components) do group.add(component) all.remove(component) all.add(group) // Se dibujarán todos los componentes. all.draw() Aplicabilidad ------------- Utiliza el patrón Composite cuando tengas que implementar una estructura de objetos con forma de árbol. El patrón Composite te proporciona dos tipos de elementos básicos que comparten una interfaz común: hojas simples y contenedores complejos. Un contenedor puede estar compuesto por hojas y por otros contenedores. Esto te permite construir una estructura de objetos recursivos anidados parecida a un árbol. Utiliza el patrón cuando quieras que el código cliente trate elementos simples y complejos de la misma forma. Todos los elementos definidos por el patrón Composite comparten una interfaz común. Utilizando esta interfaz, el cliente no tiene que preocuparse por la clase concreta de los objetos con los que funciona. Cómo implementarlo ------------------ 1. Asegúrate de que el modelo central de tu aplicación pueda representarse como una estructura de árbol. Intenta dividirlo en elementos simples y contenedores. Recuerda que los contenedores deben ser capaces de contener tanto elementos simples como otros contenedores. 2. Declara la interfaz componente con una lista de métodos que tengan sentido para componentes simples y complejos. 3. Crea una clase hoja para representar elementos simples. Un programa puede tener varias clases hoja diferentes. 4. Crea una clase contenedora para representar elementos complejos. Incluye un campo matriz en esta clase para almacenar referencias a subelementos. La matriz debe poder almacenar hojas y contenedores, así que asegúrate de declararla con el tipo de la interfaz componente. Al implementar los métodos de la interfaz componente, recuerda que un contenedor debe delegar la mayor parte del trabajo a los subelementos. 5. Por último, define los métodos para añadir y eliminar elementos hijos dentro del contenedor. Ten en cuenta que estas operaciones se pueden declarar en la interfaz componente. Esto violaría el _Principio de segregación de la interfaz_ porque los métodos de la clase hoja estarían vacíos. No obstante, el cliente podrá tratar a todos los elementos de la misma manera, incluso al componer el árbol. Pros y contras -------------- * Puedes trabajar con estructuras de árbol complejas con mayor comodidad: utiliza el polimorfismo y la recursión en tu favor. * _Principio de abierto/cerrado_. Puedes introducir nuevos tipos de elemento en la aplicación sin descomponer el código existente, que ahora funciona con el árbol de objetos. * Puede resultar difícil proporcionar una interfaz común para clases cuya funcionalidad difiere demasiado. En algunos casos, tendrás que generalizar en exceso la interfaz componente, provocando que sea más difícil de comprender. Relaciones con otros patrones ----------------------------- * Puedes utilizar [Builder](https://refactoring.guru/es/design-patterns/builder) al crear árboles [Composite](https://refactoring.guru/es/design-patterns/composite) complejos porque puedes programar sus pasos de construcción para que funcionen de forma recursiva. * [Chain of Responsibility](https://refactoring.guru/es/design-patterns/chain-of-responsibility) se utiliza a menudo junto a [Composite](https://refactoring.guru/es/design-patterns/composite) . En este caso, cuando un componente hoja recibe una solicitud, puede pasarla a lo largo de la cadena de todos los componentes padre hasta la raíz del árbol de objetos. * Puedes utilizar [Iteradores](https://refactoring.guru/es/design-patterns/iterator) para recorrer árboles [Composite](https://refactoring.guru/es/design-patterns/composite) . * Puedes utilizar el patrón [Visitor](https://refactoring.guru/es/design-patterns/visitor) para ejecutar una operación sobre un árbol [Composite](https://refactoring.guru/es/design-patterns/composite) entero. * Puedes implementar nodos de hoja compartidos del árbol [Composite](https://refactoring.guru/es/design-patterns/composite) como [Flyweights](https://refactoring.guru/es/design-patterns/flyweight) para ahorrar memoria RAM. * [Composite](https://refactoring.guru/es/design-patterns/composite) y [Decorator](https://refactoring.guru/es/design-patterns/decorator) tienen diagramas de estructura similares ya que ambos se basan en la composición recursiva para organizar un número indefinido de objetos. Un _Decorator_ es como un _Composite_ pero sólo tiene un componente hijo. Hay otra diferencia importante: _Decorator_ añade responsabilidades adicionales al objeto envuelto, mientras que _Composite_ se limita a “recapitular” los resultados de sus hijos. No obstante, los patrones también pueden colaborar: puedes utilizar el _Decorator_ para extender el comportamiento de un objeto específico del árbol _Composite_. * Los diseños que hacen un uso amplio de [Composite](https://refactoring.guru/es/design-patterns/composite) y [Decorator](https://refactoring.guru/es/design-patterns/decorator) a menudo pueden beneficiarse del uso del [Prototype](https://refactoring.guru/es/design-patterns/prototype) . Aplicar el patrón te permite clonar estructuras complejas en lugar de reconstruirlas desde cero. Ejemplos de código ------------------ [![Composite en C#](https://refactoring.guru/images/patterns/icons/csharp.svg?id=da64592defc6e86d57c39c66e9de3e58)](https://refactoring.guru/es/design-patterns/composite/csharp/example "Composite en C#") [![Composite en C++](https://refactoring.guru/images/patterns/icons/cpp.svg?id=f7782ed8b8666246bfcc3f8fefc3b858)](https://refactoring.guru/es/design-patterns/composite/cpp/example "Composite en C++") [![Composite en Go](https://refactoring.guru/images/patterns/icons/go.svg?id=1a89927eb99b1ea3fde7701d97970aca)](https://refactoring.guru/es/design-patterns/composite/go/example "Composite en Go") [![Composite en Java](https://refactoring.guru/images/patterns/icons/java.svg?id=e6d87e2dca08c953fe3acd1275ed4f4e)](https://refactoring.guru/es/design-patterns/composite/java/example "Composite en Java") [![Composite en PHP](https://refactoring.guru/images/patterns/icons/php.svg?id=be1906eb26b71ec1d3b93720d6156618)](https://refactoring.guru/es/design-patterns/composite/php/example "Composite en PHP") [![Composite en Python](https://refactoring.guru/images/patterns/icons/python.svg?id=6d815d43c0f7050a1151b43e51569c9f)](https://refactoring.guru/es/design-patterns/composite/python/example "Composite en Python") [![Composite en Ruby](https://refactoring.guru/images/patterns/icons/ruby.svg?id=b065b718c914bf8e960ef731600be1eb)](https://refactoring.guru/es/design-patterns/composite/ruby/example "Composite en Ruby") [![Composite en Rust](https://refactoring.guru/images/patterns/icons/rust.svg?id=1f5698a4b5ae23fe79413511747e4a87)](https://refactoring.guru/es/design-patterns/composite/rust/example "Composite en Rust") [![Composite en Swift](https://refactoring.guru/images/patterns/icons/swift.svg?id=0b716c2d52ec3a48fbe91ac031070c1d)](https://refactoring.guru/es/design-patterns/composite/swift/example "Composite en Swift") [![Composite en TypeScript](https://refactoring.guru/images/patterns/icons/typescript.svg?id=2239d0f16cb703540c205dd8cb0c0cb7)](https://refactoring.guru/es/design-patterns/composite/typescript/example "Composite en TypeScript") [![](https://refactoring.guru/images/patterns/banners/patterns-book-banner-3-2x.png?id=0cc3f77ab421d1a5c02ee46488231c3a)](https://refactoring.guru/es/design-patterns/book) ### ¡Apoya nuestro sitio web gratuito y compra el libro! * 22 patrones de diseño y 8 principios explicados en profundidad * 436 páginas bien estructuradas, fáciles de leer y libres de tecnicismos * 225 ilustraciones y diagramas claros y útiles * Un archivo con ejemplos de código en 11 lenguajes * Todos los dispositivos soportados: Formatos PDF/EPUB/MOBI/KFX [Saber más…](https://refactoring.guru/es/design-patterns/book) --- # Adapter en Ruby / Patrones de diseño [There are patterns of patterns now! \ My friend's project: MetaPatterns.io](https://metapatterns.io/)  [](https://refactoring.guru/es/design-patterns/adapter/ruby/example#checkout) [](https://refactoring.guru/es/design-patterns/adapter/ruby/example#checkout) [](https://refactoring.guru/) / [Patrones de diseño](https://refactoring.guru/es/design-patterns) / [Adapter](https://refactoring.guru/es/design-patterns/adapter) / [Ruby](https://refactoring.guru/es/design-patterns/ruby) ![Adapter](https://refactoring.guru/images/patterns/cards/adapter-mini-2x.png?id=8274d99afbbe9c63bfbfd0d68ceeffc7) **Adapter** en Ruby =================== **Adapter** es un patrón de diseño estructural que permite colaborar a objetos incompatibles. El patrón Adapter actúa como envoltorio entre dos objetos. Atrapa las llamadas a un objeto y las transforma a un formato y una interfaz reconocible para el segundo objeto. [Aprende más sobre el patrón Adapter](https://refactoring.guru/es/design-patterns/adapter) Navegación  [Intro](https://refactoring.guru/es/design-patterns/adapter/ruby/example#)  [Ejemplo conceptual](https://refactoring.guru/es/design-patterns/adapter/ruby/example#example-0)  [main](https://refactoring.guru/es/design-patterns/adapter/ruby/example#example-0--main-rb)  [output](https://refactoring.guru/es/design-patterns/adapter/ruby/example#example-0--output-txt) **Complejidad:** **Popularidad:** **Ejemplos de uso:** El patrón Adapter es muy común en el código Ruby. Se utiliza muy a menudo en sistemas basados en algún código heredado. En estos casos, los adaptadores crean código heredado con clases modernas. **Identificación:** Adapter es reconocible por un constructor que toma una instancia de distinto tipo de clase abstracta/interfaz. Cuando el adaptador recibe una llamada a uno de sus métodos, convierte los parámetros al formato adecuado y después dirige la llamada a uno o varios métodos del objeto envuelto. Ejemplo conceptual ------------------ Este ejemplo ilustra la estructura del patrón de diseño **Adapter**. Se centra en responder las siguientes preguntas: * ¿De qué clases se compone? * ¿Qué papeles juegan esas clases? * ¿De qué forma se relacionan los elementos del patrón? #### **main.rb:** Ejemplo conceptual \# The Target defines the domain-specific interface used by the client code. class Target # @return \[String\] def request 'Target: The default target\\'s behavior.' end end # The Adaptee contains some useful behavior, but its interface is incompatible # with the existing client code. The Adaptee needs some adaptation before the # client code can use it. class Adaptee # @return \[String\] def specific\_request '.eetpadA eht fo roivaheb laicepS' end end # The Adapter makes the Adaptee's interface compatible with the Target's # interface. class Adapter < Target # @param \[Adaptee\] adaptee def initialize(adaptee) @adaptee = adaptee end def request "Adapter: (TRANSLATED) #{@adaptee.specific\_request.reverse!}" end end # The client code supports all classes that follow the Target interface. def client\_code(target) print target.request end puts 'Client: I can work just fine with the Target objects:' target = Target.new client\_code(target) puts "\\n\\n" adaptee = Adaptee.new puts 'Client: The Adaptee class has a weird interface. See, I don\\'t understand it:' puts "Adaptee: #{adaptee.specific\_request}" puts "\\n" puts 'Client: But I can work with it via the Adapter:' adapter = Adapter.new(adaptee) client\_code(adapter) #### **output.txt:** Resultado de la ejecución Client: I can work just fine with the Target objects: Target: The default target's behavior. Client: The Adaptee class has a weird interface. See, I don't understand it: Adaptee: .eetpadA eht fo roivaheb laicepS Client: But I can work with it via the Adapter: Adapter: (TRANSLATED) Special behavior of the Adaptee. **Adapter** en otros lenguajes ------------------------------ [![Adapter en C#](https://refactoring.guru/images/patterns/icons/csharp.svg?id=da64592defc6e86d57c39c66e9de3e58)](https://refactoring.guru/es/design-patterns/adapter/csharp/example "Adapter en C#") [![Adapter en C++](https://refactoring.guru/images/patterns/icons/cpp.svg?id=f7782ed8b8666246bfcc3f8fefc3b858)](https://refactoring.guru/es/design-patterns/adapter/cpp/example "Adapter en C++") [![Adapter en Go](https://refactoring.guru/images/patterns/icons/go.svg?id=1a89927eb99b1ea3fde7701d97970aca)](https://refactoring.guru/es/design-patterns/adapter/go/example "Adapter en Go") [![Adapter en Java](https://refactoring.guru/images/patterns/icons/java.svg?id=e6d87e2dca08c953fe3acd1275ed4f4e)](https://refactoring.guru/es/design-patterns/adapter/java/example "Adapter en Java") [![Adapter en PHP](https://refactoring.guru/images/patterns/icons/php.svg?id=be1906eb26b71ec1d3b93720d6156618)](https://refactoring.guru/es/design-patterns/adapter/php/example "Adapter en PHP") [![Adapter en Python](https://refactoring.guru/images/patterns/icons/python.svg?id=6d815d43c0f7050a1151b43e51569c9f)](https://refactoring.guru/es/design-patterns/adapter/python/example "Adapter en Python") [![Adapter en Rust](https://refactoring.guru/images/patterns/icons/rust.svg?id=1f5698a4b5ae23fe79413511747e4a87)](https://refactoring.guru/es/design-patterns/adapter/rust/example "Adapter en Rust") [![Adapter en Swift](https://refactoring.guru/images/patterns/icons/swift.svg?id=0b716c2d52ec3a48fbe91ac031070c1d)](https://refactoring.guru/es/design-patterns/adapter/swift/example "Adapter en Swift") [![Adapter en TypeScript](https://refactoring.guru/images/patterns/icons/typescript.svg?id=2239d0f16cb703540c205dd8cb0c0cb7)](https://refactoring.guru/es/design-patterns/adapter/typescript/example "Adapter en TypeScript") --- # Facade en Python / Patrones de diseño [There are patterns of patterns now! \ My friend's project: MetaPatterns.io](https://metapatterns.io/)  [](https://refactoring.guru/es/design-patterns/facade/python/example#checkout) [](https://refactoring.guru/es/design-patterns/facade/python/example#checkout) [](https://refactoring.guru/) / [Patrones de diseño](https://refactoring.guru/es/design-patterns) / [Facade](https://refactoring.guru/es/design-patterns/facade) / [Python](https://refactoring.guru/es/design-patterns/python) ![Facade](https://refactoring.guru/images/patterns/cards/facade-mini-2x.png?id=d4cc6a5d81a31143cc665f7ac1481ac8) **Facade** en Python ==================== **Facade** es un patrón de diseño estructural que proporciona una interfaz simplificada (pero limitada) a un sistema complejo de clases, bibliotecas o \_frameworks\_. El patrón Facade disminuye la complejidad general de la aplicación, al mismo tiempo que ayuda a mover dependencias no deseadas a un solo lugar. [Aprende más sobre el patrón Facade](https://refactoring.guru/es/design-patterns/facade) Navegación  [Intro](https://refactoring.guru/es/design-patterns/facade/python/example#)  [Ejemplo conceptual](https://refactoring.guru/es/design-patterns/facade/python/example#example-0)  [main](https://refactoring.guru/es/design-patterns/facade/python/example#example-0--main-py)  [Output](https://refactoring.guru/es/design-patterns/facade/python/example#example-0--Output-txt) **Complejidad:** **Popularidad:** **Ejemplos de uso:** El patrón Facade se utiliza habitualmente en aplicaciones escritas en Python. Es de especial utilidad al trabajar con bibliotecas y API complejas. **Identificación:** El patrón Facade se puede reconocer en una clase con una interfaz simple, pero que delega la mayor parte del trabajo a otras clases. Normalmente, las fachadas gestionan todo el ciclo de vida de los objetos que utilizan. Ejemplo conceptual ------------------ Este ejemplo ilustra la estructura del patrón de diseño **Facade**. Se centra en responder las siguientes preguntas: * ¿De qué clases se compone? * ¿Qué papeles juegan esas clases? * ¿De qué forma se relacionan los elementos del patrón? #### **main.py:** Ejemplo conceptual from \_\_future\_\_ import annotations class Facade: """ The Facade class provides a simple interface to the complex logic of one or several subsystems. The Facade delegates the client requests to the appropriate objects within the subsystem. The Facade is also responsible for managing their lifecycle. All of this shields the client from the undesired complexity of the subsystem. """ def \_\_init\_\_(self, subsystem1: Subsystem1, subsystem2: Subsystem2) -> None: """ Depending on your application's needs, you can provide the Facade with existing subsystem objects or force the Facade to create them on its own. """ self.\_subsystem1 = subsystem1 or Subsystem1() self.\_subsystem2 = subsystem2 or Subsystem2() def operation(self) -> str: """ The Facade's methods are convenient shortcuts to the sophisticated functionality of the subsystems. However, clients get only to a fraction of a subsystem's capabilities. """ results = \[\] results.append("Facade initializes subsystems:") results.append(self.\_subsystem1.operation1()) results.append(self.\_subsystem2.operation1()) results.append("Facade orders subsystems to perform the action:") results.append(self.\_subsystem1.operation\_n()) results.append(self.\_subsystem2.operation\_z()) return "\\n".join(results) class Subsystem1: """ The Subsystem can accept requests either from the facade or client directly. In any case, to the Subsystem, the Facade is yet another client, and it's not a part of the Subsystem. """ def operation1(self) -> str: return "Subsystem1: Ready!" # ... def operation\_n(self) -> str: return "Subsystem1: Go!" class Subsystem2: """ Some facades can work with multiple subsystems at the same time. """ def operation1(self) -> str: return "Subsystem2: Get ready!" # ... def operation\_z(self) -> str: return "Subsystem2: Fire!" def client\_code(facade: Facade) -> None: """ The client code works with complex subsystems through a simple interface provided by the Facade. When a facade manages the lifecycle of the subsystem, the client might not even know about the existence of the subsystem. This approach lets you keep the complexity under control. """ print(facade.operation(), end="") if \_\_name\_\_ == "\_\_main\_\_": # The client code may have some of the subsystem's objects already created. # In this case, it might be worthwhile to initialize the Facade with these # objects instead of letting the Facade create new instances. subsystem1 = Subsystem1() subsystem2 = Subsystem2() facade = Facade(subsystem1, subsystem2) client\_code(facade) #### **Output.txt:** Resultado de la ejecución Facade initializes subsystems: Subsystem1: Ready! Subsystem2: Get ready! Facade orders subsystems to perform the action: Subsystem1: Go! Subsystem2: Fire! **Facade** en otros lenguajes ----------------------------- [![Facade en C#](https://refactoring.guru/images/patterns/icons/csharp.svg?id=da64592defc6e86d57c39c66e9de3e58)](https://refactoring.guru/es/design-patterns/facade/csharp/example "Facade en C#") [![Facade en C++](https://refactoring.guru/images/patterns/icons/cpp.svg?id=f7782ed8b8666246bfcc3f8fefc3b858)](https://refactoring.guru/es/design-patterns/facade/cpp/example "Facade en C++") [![Facade en Go](https://refactoring.guru/images/patterns/icons/go.svg?id=1a89927eb99b1ea3fde7701d97970aca)](https://refactoring.guru/es/design-patterns/facade/go/example "Facade en Go") [![Facade en Java](https://refactoring.guru/images/patterns/icons/java.svg?id=e6d87e2dca08c953fe3acd1275ed4f4e)](https://refactoring.guru/es/design-patterns/facade/java/example "Facade en Java") [![Facade en PHP](https://refactoring.guru/images/patterns/icons/php.svg?id=be1906eb26b71ec1d3b93720d6156618)](https://refactoring.guru/es/design-patterns/facade/php/example "Facade en PHP") [![Facade en Ruby](https://refactoring.guru/images/patterns/icons/ruby.svg?id=b065b718c914bf8e960ef731600be1eb)](https://refactoring.guru/es/design-patterns/facade/ruby/example "Facade en Ruby") [![Facade en Rust](https://refactoring.guru/images/patterns/icons/rust.svg?id=1f5698a4b5ae23fe79413511747e4a87)](https://refactoring.guru/es/design-patterns/facade/rust/example "Facade en Rust") [![Facade en Swift](https://refactoring.guru/images/patterns/icons/swift.svg?id=0b716c2d52ec3a48fbe91ac031070c1d)](https://refactoring.guru/es/design-patterns/facade/swift/example "Facade en Swift") [![Facade en TypeScript](https://refactoring.guru/images/patterns/icons/typescript.svg?id=2239d0f16cb703540c205dd8cb0c0cb7)](https://refactoring.guru/es/design-patterns/facade/typescript/example "Facade en TypeScript") --- # Decorator en C++ / Patrones de diseño [There are patterns of patterns now! \ My friend's project: MetaPatterns.io](https://metapatterns.io/)  [](https://refactoring.guru/es/design-patterns/decorator/cpp/example#checkout) [](https://refactoring.guru/es/design-patterns/decorator/cpp/example#checkout) [](https://refactoring.guru/) / [Patrones de diseño](https://refactoring.guru/es/design-patterns) / [Decorator](https://refactoring.guru/es/design-patterns/decorator) / [C++](https://refactoring.guru/es/design-patterns/cpp) ![Decorator](https://refactoring.guru/images/patterns/cards/decorator-mini-2x.png?id=3b58e540d7d28523080cad341ed9b2e9) **Decorator** en C++ ==================== **Decorator** es un patrón de diseño estructural que permite añadir dinámicamente nuevos comportamientos a objetos colocándolos dentro de objetos especiales que los envuelven (\_wrappers\_). Utilizando decoradores puedes envolver objetos innumerables veces, ya que los objetos objetivo y los decoradores siguen la misma interfaz. El objeto resultante obtendrá un comportamiento de apilado de todos los _wrappers_. [Aprende más sobre el patrón Decorator](https://refactoring.guru/es/design-patterns/decorator) Navegación  [Intro](https://refactoring.guru/es/design-patterns/decorator/cpp/example#)  [Ejemplo conceptual](https://refactoring.guru/es/design-patterns/decorator/cpp/example#example-0)  [main](https://refactoring.guru/es/design-patterns/decorator/cpp/example#example-0--main-cc)  [Output](https://refactoring.guru/es/design-patterns/decorator/cpp/example#example-0--Output-txt) **Complejidad:** **Popularidad:** **Ejemplos de uso:** El patrón Decorator es bastante común en el código C++, especialmente en el código relacionado con los flujos (streams). **Identificación:** El patrón Decorator puede ser reconocido por métodos de creación o el constructor que acepta objetos de la misma clase o interfaz que la clase actual. Ejemplo conceptual ------------------ Este ejemplo ilustra la estructura del patrón de diseño **Decorator**. Se centra en responder las siguientes preguntas: * ¿De qué clases se compone? * ¿Qué papeles juegan esas clases? * ¿De qué forma se relacionan los elementos del patrón? #### **main.cc:** Ejemplo conceptual /\*\* \* The base Component interface defines operations that can be altered by \* decorators. \*/ class Component { public: virtual ~Component() {} virtual std::string Operation() const = 0; }; /\*\* \* Concrete Components provide default implementations of the operations. There \* might be several variations of these classes. \*/ class ConcreteComponent : public Component { public: std::string Operation() const override { return "ConcreteComponent"; } }; /\*\* \* The base Decorator class follows the same interface as the other components. \* The primary purpose of this class is to define the wrapping interface for all \* concrete decorators. The default implementation of the wrapping code might \* include a field for storing a wrapped component and the means to initialize \* it. \*/ class Decorator : public Component { /\*\* \* @var Component \*/ protected: Component\* component\_; public: Decorator(Component\* component) : component\_(component) { } /\*\* \* The Decorator delegates all work to the wrapped component. \*/ std::string Operation() const override { return this->component\_->Operation(); } }; /\*\* \* Concrete Decorators call the wrapped object and alter its result in some way. \*/ class ConcreteDecoratorA : public Decorator { /\*\* \* Decorators may call parent implementation of the operation, instead of \* calling the wrapped object directly. This approach simplifies extension of \* decorator classes. \*/ public: ConcreteDecoratorA(Component\* component) : Decorator(component) { } std::string Operation() const override { return "ConcreteDecoratorA(" + Decorator::Operation() + ")"; } }; /\*\* \* Decorators can execute their behavior either before or after the call to a \* wrapped object. \*/ class ConcreteDecoratorB : public Decorator { public: ConcreteDecoratorB(Component\* component) : Decorator(component) { } std::string Operation() const override { return "ConcreteDecoratorB(" + Decorator::Operation() + ")"; } }; /\*\* \* The client code works with all objects using the Component interface. This \* way it can stay independent of the concrete classes of components it works \* with. \*/ void ClientCode(Component\* component) { // ... std::cout << "RESULT: " << component->Operation(); // ... } int main() { /\*\* \* This way the client code can support both simple components... \*/ Component\* simple = new ConcreteComponent; std::cout << "Client: I've got a simple component:\\n"; ClientCode(simple); std::cout << "\\n\\n"; /\*\* \* ...as well as decorated ones. \* \* Note how decorators can wrap not only simple components but the other \* decorators as well. \*/ Component\* decorator1 = new ConcreteDecoratorA(simple); Component\* decorator2 = new ConcreteDecoratorB(decorator1); std::cout << "Client: Now I've got a decorated component:\\n"; ClientCode(decorator2); std::cout << "\\n"; delete simple; delete decorator1; delete decorator2; return 0; } #### **Output.txt:** Resultado de la ejecución Client: I've got a simple component: RESULT: ConcreteComponent Client: Now I've got a decorated component: RESULT: ConcreteDecoratorB(ConcreteDecoratorA(ConcreteComponent)) **Decorator** en otros lenguajes -------------------------------- [![Decorator en C#](https://refactoring.guru/images/patterns/icons/csharp.svg?id=da64592defc6e86d57c39c66e9de3e58)](https://refactoring.guru/es/design-patterns/decorator/csharp/example "Decorator en C#") [![Decorator en Go](https://refactoring.guru/images/patterns/icons/go.svg?id=1a89927eb99b1ea3fde7701d97970aca)](https://refactoring.guru/es/design-patterns/decorator/go/example "Decorator en Go") [![Decorator en Java](https://refactoring.guru/images/patterns/icons/java.svg?id=e6d87e2dca08c953fe3acd1275ed4f4e)](https://refactoring.guru/es/design-patterns/decorator/java/example "Decorator en Java") [![Decorator en PHP](https://refactoring.guru/images/patterns/icons/php.svg?id=be1906eb26b71ec1d3b93720d6156618)](https://refactoring.guru/es/design-patterns/decorator/php/example "Decorator en PHP") [![Decorator en Python](https://refactoring.guru/images/patterns/icons/python.svg?id=6d815d43c0f7050a1151b43e51569c9f)](https://refactoring.guru/es/design-patterns/decorator/python/example "Decorator en Python") [![Decorator en Ruby](https://refactoring.guru/images/patterns/icons/ruby.svg?id=b065b718c914bf8e960ef731600be1eb)](https://refactoring.guru/es/design-patterns/decorator/ruby/example "Decorator en Ruby") [![Decorator en Rust](https://refactoring.guru/images/patterns/icons/rust.svg?id=1f5698a4b5ae23fe79413511747e4a87)](https://refactoring.guru/es/design-patterns/decorator/rust/example "Decorator en Rust") [![Decorator en Swift](https://refactoring.guru/images/patterns/icons/swift.svg?id=0b716c2d52ec3a48fbe91ac031070c1d)](https://refactoring.guru/es/design-patterns/decorator/swift/example "Decorator en Swift") [![Decorator en TypeScript](https://refactoring.guru/images/patterns/icons/typescript.svg?id=2239d0f16cb703540c205dd8cb0c0cb7)](https://refactoring.guru/es/design-patterns/decorator/typescript/example "Decorator en TypeScript") --- # Decorator en TypeScript / Patrones de diseño [There are patterns of patterns now! \ My friend's project: MetaPatterns.io](https://metapatterns.io/)  [](https://refactoring.guru/es/design-patterns/decorator/typescript/example#checkout) [](https://refactoring.guru/es/design-patterns/decorator/typescript/example#checkout) [](https://refactoring.guru/) / [Patrones de diseño](https://refactoring.guru/es/design-patterns) / [Decorator](https://refactoring.guru/es/design-patterns/decorator) / [TypeScript](https://refactoring.guru/es/design-patterns/typescript) ![Decorator](https://refactoring.guru/images/patterns/cards/decorator-mini-2x.png?id=3b58e540d7d28523080cad341ed9b2e9) **Decorator** en TypeScript =========================== **Decorator** es un patrón de diseño estructural que permite añadir dinámicamente nuevos comportamientos a objetos colocándolos dentro de objetos especiales que los envuelven (\_wrappers\_). Utilizando decoradores puedes envolver objetos innumerables veces, ya que los objetos objetivo y los decoradores siguen la misma interfaz. El objeto resultante obtendrá un comportamiento de apilado de todos los _wrappers_. [Aprende más sobre el patrón Decorator](https://refactoring.guru/es/design-patterns/decorator) Navegación  [Intro](https://refactoring.guru/es/design-patterns/decorator/typescript/example#)  [Ejemplo conceptual](https://refactoring.guru/es/design-patterns/decorator/typescript/example#example-0)  [index](https://refactoring.guru/es/design-patterns/decorator/typescript/example#example-0--index-ts)  [Output](https://refactoring.guru/es/design-patterns/decorator/typescript/example#example-0--Output-txt) **Complejidad:** **Popularidad:** **Ejemplos de uso:** El patrón Decorator es bastante común en el código TypeScript, especialmente en el código relacionado con los flujos (streams). **Identificación:** El patrón Decorator puede ser reconocido por métodos de creación o el constructor que acepta objetos de la misma clase o interfaz que la clase actual. Ejemplo conceptual ------------------ Este ejemplo ilustra la estructura del patrón de diseño **Decorator** y se centra en las siguientes preguntas: * ¿De qué clases se compone? * ¿Qué papeles juegan esas clases? * ¿De qué forma se relacionan los elementos del patrón? #### **index.ts:** Ejemplo conceptual /\*\* \* The base Component interface defines operations that can be altered by \* decorators. \*/ interface Component { operation(): string; } /\*\* \* Concrete Components provide default implementations of the operations. There \* might be several variations of these classes. \*/ class ConcreteComponent implements Component { public operation(): string { return 'ConcreteComponent'; } } /\*\* \* The base Decorator class follows the same interface as the other components. \* The primary purpose of this class is to define the wrapping interface for all \* concrete decorators. The default implementation of the wrapping code might \* include a field for storing a wrapped component and the means to initialize \* it. \*/ class Decorator implements Component { protected component: Component; constructor(component: Component) { this.component = component; } /\*\* \* The Decorator delegates all work to the wrapped component. \*/ public operation(): string { return this.component.operation(); } } /\*\* \* Concrete Decorators call the wrapped object and alter its result in some way. \*/ class ConcreteDecoratorA extends Decorator { /\*\* \* Decorators may call parent implementation of the operation, instead of \* calling the wrapped object directly. This approach simplifies extension \* of decorator classes. \*/ public operation(): string { return \`ConcreteDecoratorA(${super.operation()})\`; } } /\*\* \* Decorators can execute their behavior either before or after the call to a \* wrapped object. \*/ class ConcreteDecoratorB extends Decorator { public operation(): string { return \`ConcreteDecoratorB(${super.operation()})\`; } } /\*\* \* The client code works with all objects using the Component interface. This \* way it can stay independent of the concrete classes of components it works \* with. \*/ function clientCode(component: Component) { // ... console.log(\`RESULT: ${component.operation()}\`); // ... } /\*\* \* This way the client code can support both simple components... \*/ const simple = new ConcreteComponent(); console.log('Client: I\\'ve got a simple component:'); clientCode(simple); console.log(''); /\*\* \* ...as well as decorated ones. \* \* Note how decorators can wrap not only simple components but the other \* decorators as well. \*/ const decorator1 = new ConcreteDecoratorA(simple); const decorator2 = new ConcreteDecoratorB(decorator1); console.log('Client: Now I\\'ve got a decorated component:'); clientCode(decorator2); #### **Output.txt:** Resultado de la ejecución Client: I've got a simple component: RESULT: ConcreteComponent Client: Now I've got a decorated component: RESULT: ConcreteDecoratorB(ConcreteDecoratorA(ConcreteComponent)) **Decorator** en otros lenguajes -------------------------------- [![Decorator en C#](https://refactoring.guru/images/patterns/icons/csharp.svg?id=da64592defc6e86d57c39c66e9de3e58)](https://refactoring.guru/es/design-patterns/decorator/csharp/example "Decorator en C#") [![Decorator en C++](https://refactoring.guru/images/patterns/icons/cpp.svg?id=f7782ed8b8666246bfcc3f8fefc3b858)](https://refactoring.guru/es/design-patterns/decorator/cpp/example "Decorator en C++") [![Decorator en Go](https://refactoring.guru/images/patterns/icons/go.svg?id=1a89927eb99b1ea3fde7701d97970aca)](https://refactoring.guru/es/design-patterns/decorator/go/example "Decorator en Go") [![Decorator en Java](https://refactoring.guru/images/patterns/icons/java.svg?id=e6d87e2dca08c953fe3acd1275ed4f4e)](https://refactoring.guru/es/design-patterns/decorator/java/example "Decorator en Java") [![Decorator en PHP](https://refactoring.guru/images/patterns/icons/php.svg?id=be1906eb26b71ec1d3b93720d6156618)](https://refactoring.guru/es/design-patterns/decorator/php/example "Decorator en PHP") [![Decorator en Python](https://refactoring.guru/images/patterns/icons/python.svg?id=6d815d43c0f7050a1151b43e51569c9f)](https://refactoring.guru/es/design-patterns/decorator/python/example "Decorator en Python") [![Decorator en Ruby](https://refactoring.guru/images/patterns/icons/ruby.svg?id=b065b718c914bf8e960ef731600be1eb)](https://refactoring.guru/es/design-patterns/decorator/ruby/example "Decorator en Ruby") [![Decorator en Rust](https://refactoring.guru/images/patterns/icons/rust.svg?id=1f5698a4b5ae23fe79413511747e4a87)](https://refactoring.guru/es/design-patterns/decorator/rust/example "Decorator en Rust") [![Decorator en Swift](https://refactoring.guru/images/patterns/icons/swift.svg?id=0b716c2d52ec3a48fbe91ac031070c1d)](https://refactoring.guru/es/design-patterns/decorator/swift/example "Decorator en Swift") --- # Adapter en PHP / Patrones de diseño [There are patterns of patterns now! \ My friend's project: MetaPatterns.io](https://metapatterns.io/)  [](https://refactoring.guru/es/design-patterns/adapter/php/example#checkout) [](https://refactoring.guru/es/design-patterns/adapter/php/example#checkout) [](https://refactoring.guru/) / [Patrones de diseño](https://refactoring.guru/es/design-patterns) / [Adapter](https://refactoring.guru/es/design-patterns/adapter) / [PHP](https://refactoring.guru/es/design-patterns/php) ![Adapter](https://refactoring.guru/images/patterns/cards/adapter-mini-2x.png?id=8274d99afbbe9c63bfbfd0d68ceeffc7) **Adapter** en PHP ================== **Adapter** es un patrón de diseño estructural que permite colaborar a objetos incompatibles. El patrón Adapter actúa como envoltorio entre dos objetos. Atrapa las llamadas a un objeto y las transforma a un formato y una interfaz reconocible para el segundo objeto. [Aprende más sobre el patrón Adapter](https://refactoring.guru/es/design-patterns/adapter) Navegación  [Intro](https://refactoring.guru/es/design-patterns/adapter/php/example#)  [Ejemplo conceptual](https://refactoring.guru/es/design-patterns/adapter/php/example#example-0)  [index](https://refactoring.guru/es/design-patterns/adapter/php/example#example-0--index-php)  [Output](https://refactoring.guru/es/design-patterns/adapter/php/example#example-0--Output-txt)  [Ejemplo del mundo real](https://refactoring.guru/es/design-patterns/adapter/php/example#example-1)  [index](https://refactoring.guru/es/design-patterns/adapter/php/example#example-1--index-php)  [Output](https://refactoring.guru/es/design-patterns/adapter/php/example#example-1--Output-txt) **Complejidad:** **Popularidad:** **Ejemplos de uso:** El patrón Adapter es muy común en el código PHP. Se utiliza muy a menudo en sistemas basados en algún código heredado. En estos casos, los adaptadores crean código heredado con clases modernas. **Identificación:** Adapter es reconocible por un constructor que toma una instancia de distinto tipo de clase abstracta/interfaz. Cuando el adaptador recibe una llamada a uno de sus métodos, convierte los parámetros al formato adecuado y después dirige la llamada a uno o varios métodos del objeto envuelto. Ejemplo conceptual ------------------ Este ejemplo ilustra la estructura del patrón de diseño **Adapter** y se centra en las siguientes preguntas: * ¿De qué clases se compone? * ¿Qué papeles juegan esas clases? * ¿De qué forma se relacionan los elementos del patrón? Después de conocer la estructura del patrón, será más fácil comprender el siguiente ejemplo basado en un caso de uso real de PHP. #### **index.php:** Ejemplo conceptual adaptee = $adaptee; } public function request(): string { return "Adapter: (TRANSLATED) " . strrev($this->adaptee->specificRequest()); } } /\*\* \* The client code supports all classes that follow the Target interface. \*/ function clientCode(Target $target) { echo $target->request(); } echo "Client: I can work just fine with the Target objects:\\n"; $target = new Target(); clientCode($target); echo "\\n\\n"; $adaptee = new Adaptee(); echo "Client: The Adaptee class has a weird interface. See, I don't understand it:\\n"; echo "Adaptee: " . $adaptee->specificRequest(); echo "\\n\\n"; echo "Client: But I can work with it via the Adapter:\\n"; $adapter = new Adapter($adaptee); clientCode($adapter); #### **Output.txt:** Resultado de la ejecución Client: I can work just fine with the Target objects: Target: The default target's behavior. Client: The Adaptee class has a weird interface. See, I don't understand it: Adaptee: .eetpadA eht fo roivaheb laicepS Client: But I can work with it via the Adapter: Adapter: (TRANSLATED) Special behavior of the Adaptee. Ejemplo del mundo real ---------------------- El patrón **Adapter** te permite utilizar clases de terceros o heredadas incluso aunque sean incompatibles con el grueso de tu código. Por ejemplo, en lugar de reescribir la interfaz de notificación de tu aplicación para que soporte todos los servicios de terceros, como Slack, Facebook, SMS u otros, puedes crear un grupo de envoltorios especiales que adaptan las llamadas desde tu aplicación a una interfaz y formato requerido por cada una de las clases de terceros. #### **index.php:** Ejemplo del mundo real adminEmail = $adminEmail; } public function send(string $title, string $message): void { mail($this->adminEmail, $title, $message); echo "Sent email with title '$title' to '{$this->adminEmail}' that says '$message'."; } } /\*\* \* The Adaptee is some useful class, incompatible with the Target interface. You \* can't just go in and change the code of the class to follow the Target \* interface, since the code might be provided by a 3rd-party library. \*/ class SlackApi { private $login; private $apiKey; public function \_\_construct(string $login, string $apiKey) { $this->login = $login; $this->apiKey = $apiKey; } public function logIn(): void { // Send authentication request to Slack web service. echo "Logged in to a slack account '{$this->login}'.\\n"; } public function sendMessage(string $chatId, string $message): void { // Send message post request to Slack web service. echo "Posted following message into the '$chatId' chat: '$message'.\\n"; } } /\*\* \* The Adapter is a class that links the Target interface and the Adaptee class. \* In this case, it allows the application to send notifications using Slack \* API. \*/ class SlackNotification implements Notification { private $slack; private $chatId; public function \_\_construct(SlackApi $slack, string $chatId) { $this->slack = $slack; $this->chatId = $chatId; } /\*\* \* An Adapter is not only capable of adapting interfaces, but it can also \* convert incoming data to the format required by the Adaptee. \*/ public function send(string $title, string $message): void { $slackMessage = "#" . $title . "# " . strip\_tags($message); $this->slack->logIn(); $this->slack->sendMessage($this->chatId, $slackMessage); } } /\*\* \* The client code can work with any class that follows the Target interface. \*/ function clientCode(Notification $notification) { // ... echo $notification->send( "Website is down!", "Alert! " . "Our website is not responding. Call admins and bring it up!" ); // ... } echo "Client code is designed correctly and works with email notifications:\\n"; $notification = new EmailNotification("developers@example.com"); clientCode($notification); echo "\\n\\n"; echo "The same client code can work with other classes via adapter:\\n"; $slackApi = new SlackApi("example.com", "XXXXXXXX"); $notification = new SlackNotification($slackApi, "Example.com Developers"); clientCode($notification); #### **Output.txt:** Resultado de la ejecución Client code is designed correctly and works with email notifications: Sent email with title 'Website is down!' to 'developers@example.com' that says 'Alert! Our website is not responding. Call admins and bring it up!'. The same client code can work with other classes via adapter: Logged in to a slack account 'example.com'. Posted following message into the 'Example.com Developers' chat: '#Website is down!# Alert! Our website is not responding. Call admins and bring it up!'. **Adapter** en otros lenguajes ------------------------------ [![Adapter en C#](https://refactoring.guru/images/patterns/icons/csharp.svg?id=da64592defc6e86d57c39c66e9de3e58)](https://refactoring.guru/es/design-patterns/adapter/csharp/example "Adapter en C#") [![Adapter en C++](https://refactoring.guru/images/patterns/icons/cpp.svg?id=f7782ed8b8666246bfcc3f8fefc3b858)](https://refactoring.guru/es/design-patterns/adapter/cpp/example "Adapter en C++") [![Adapter en Go](https://refactoring.guru/images/patterns/icons/go.svg?id=1a89927eb99b1ea3fde7701d97970aca)](https://refactoring.guru/es/design-patterns/adapter/go/example "Adapter en Go") [![Adapter en Java](https://refactoring.guru/images/patterns/icons/java.svg?id=e6d87e2dca08c953fe3acd1275ed4f4e)](https://refactoring.guru/es/design-patterns/adapter/java/example "Adapter en Java") [![Adapter en Python](https://refactoring.guru/images/patterns/icons/python.svg?id=6d815d43c0f7050a1151b43e51569c9f)](https://refactoring.guru/es/design-patterns/adapter/python/example "Adapter en Python") [![Adapter en Ruby](https://refactoring.guru/images/patterns/icons/ruby.svg?id=b065b718c914bf8e960ef731600be1eb)](https://refactoring.guru/es/design-patterns/adapter/ruby/example "Adapter en Ruby") [![Adapter en Rust](https://refactoring.guru/images/patterns/icons/rust.svg?id=1f5698a4b5ae23fe79413511747e4a87)](https://refactoring.guru/es/design-patterns/adapter/rust/example "Adapter en Rust") [![Adapter en Swift](https://refactoring.guru/images/patterns/icons/swift.svg?id=0b716c2d52ec3a48fbe91ac031070c1d)](https://refactoring.guru/es/design-patterns/adapter/swift/example "Adapter en Swift") [![Adapter en TypeScript](https://refactoring.guru/images/patterns/icons/typescript.svg?id=2239d0f16cb703540c205dd8cb0c0cb7)](https://refactoring.guru/es/design-patterns/adapter/typescript/example "Adapter en TypeScript") --- # Adapter en Go / Patrones de diseño [There are patterns of patterns now! \ My friend's project: MetaPatterns.io](https://metapatterns.io/)  [](https://refactoring.guru/es/design-patterns/adapter/go/example#checkout) [](https://refactoring.guru/es/design-patterns/adapter/go/example#checkout) [](https://refactoring.guru/) / [Patrones de diseño](https://refactoring.guru/es/design-patterns) / [Adapter](https://refactoring.guru/es/design-patterns/adapter) / [Go](https://refactoring.guru/es/design-patterns/go) ![Adapter](https://refactoring.guru/images/patterns/cards/adapter-mini-2x.png?id=8274d99afbbe9c63bfbfd0d68ceeffc7) **Adapter** en Go ================= **Adapter** es un patrón de diseño estructural que permite colaborar a objetos incompatibles. El patrón Adapter actúa como envoltorio entre dos objetos. Atrapa las llamadas a un objeto y las transforma a un formato y una interfaz reconocible para el segundo objeto. [Aprende más sobre el patrón Adapter](https://refactoring.guru/es/design-patterns/adapter) Navegación  [Intro](https://refactoring.guru/es/design-patterns/adapter/go/example#)  [Ejemplo conceptual](https://refactoring.guru/es/design-patterns/adapter/go/example#example-0)  [client](https://refactoring.guru/es/design-patterns/adapter/go/example#example-0--client-go)  [computer](https://refactoring.guru/es/design-patterns/adapter/go/example#example-0--computer-go)  [mac](https://refactoring.guru/es/design-patterns/adapter/go/example#example-0--mac-go)  [windows](https://refactoring.guru/es/design-patterns/adapter/go/example#example-0--windows-go)  [windows­Adapter](https://refactoring.guru/es/design-patterns/adapter/go/example#example-0--windowsAdapter-go)  [main](https://refactoring.guru/es/design-patterns/adapter/go/example#example-0--main-go)  [output](https://refactoring.guru/es/design-patterns/adapter/go/example#example-0--output-txt) Ejemplo conceptual ------------------ Tenemos un código cliente que espera ciertas funciones de un objeto (puerto Lightning), pero tenemos otro objeto llamado _adaptee_ (portátil Windows), que ofrece la misma funcionalidad pero a través de una interfaz diferente (puerto USB). Aquí es donde el patrón Adapter entra en escena. Creamos un tipo de estructura conocido como _adapter_ que: * Se adherirá a la misma interfaz que espera el cliente (puerto Lightning). * Traducirá la solicitud del cliente al objeto adaptado en la forma que éste espera. El adaptador acepta un conector Lightning y después traduce sus señales a un formato USB y las pasa al puerto USB en el portátil Windows. #### **client.go:** Código cliente package main import "fmt" type Client struct { } func (c \*Client) InsertLightningConnectorIntoComputer(com Computer) { fmt.Println("Client inserts Lightning connector into computer.") com.InsertIntoLightningPort() } #### **computer.go:** Interfaz de cliente package main type Computer interface { InsertIntoLightningPort() } #### **mac.go:** Servicio package main import "fmt" type Mac struct { } func (m \*Mac) InsertIntoLightningPort() { fmt.Println("Lightning connector is plugged into mac machine.") } #### **windows.go:** Servicio desconocido package main import "fmt" type Windows struct{} func (w \*Windows) insertIntoUSBPort() { fmt.Println("USB connector is plugged into windows machine.") } #### **windowsAdapter.go:** Adaptador package main import "fmt" type WindowsAdapter struct { windowMachine \*Windows } func (w \*WindowsAdapter) InsertIntoLightningPort() { fmt.Println("Adapter converts Lightning signal to USB.") w.windowMachine.insertIntoUSBPort() } #### **main.go** package main func main() { client := &Client{} mac := &Mac{} client.InsertLightningConnectorIntoComputer(mac) windowsMachine := &Windows{} windowsMachineAdapter := &WindowsAdapter{ windowMachine: windowsMachine, } client.InsertLightningConnectorIntoComputer(windowsMachineAdapter) } #### **output.txt:** Resultado de la ejecución Client inserts Lightning connector into computer. Lightning connector is plugged into mac machine. Client inserts Lightning connector into computer. Adapter converts Lightning signal to USB. USB connector is plugged into windows machine. **Adapter** en otros lenguajes ------------------------------ [![Adapter en C#](https://refactoring.guru/images/patterns/icons/csharp.svg?id=da64592defc6e86d57c39c66e9de3e58)](https://refactoring.guru/es/design-patterns/adapter/csharp/example "Adapter en C#") [![Adapter en C++](https://refactoring.guru/images/patterns/icons/cpp.svg?id=f7782ed8b8666246bfcc3f8fefc3b858)](https://refactoring.guru/es/design-patterns/adapter/cpp/example "Adapter en C++") [![Adapter en Java](https://refactoring.guru/images/patterns/icons/java.svg?id=e6d87e2dca08c953fe3acd1275ed4f4e)](https://refactoring.guru/es/design-patterns/adapter/java/example "Adapter en Java") [![Adapter en PHP](https://refactoring.guru/images/patterns/icons/php.svg?id=be1906eb26b71ec1d3b93720d6156618)](https://refactoring.guru/es/design-patterns/adapter/php/example "Adapter en PHP") [![Adapter en Python](https://refactoring.guru/images/patterns/icons/python.svg?id=6d815d43c0f7050a1151b43e51569c9f)](https://refactoring.guru/es/design-patterns/adapter/python/example "Adapter en Python") [![Adapter en Ruby](https://refactoring.guru/images/patterns/icons/ruby.svg?id=b065b718c914bf8e960ef731600be1eb)](https://refactoring.guru/es/design-patterns/adapter/ruby/example "Adapter en Ruby") [![Adapter en Rust](https://refactoring.guru/images/patterns/icons/rust.svg?id=1f5698a4b5ae23fe79413511747e4a87)](https://refactoring.guru/es/design-patterns/adapter/rust/example "Adapter en Rust") [![Adapter en Swift](https://refactoring.guru/images/patterns/icons/swift.svg?id=0b716c2d52ec3a48fbe91ac031070c1d)](https://refactoring.guru/es/design-patterns/adapter/swift/example "Adapter en Swift") [![Adapter en TypeScript](https://refactoring.guru/images/patterns/icons/typescript.svg?id=2239d0f16cb703540c205dd8cb0c0cb7)](https://refactoring.guru/es/design-patterns/adapter/typescript/example "Adapter en TypeScript") --- # Decorator en Rust / Patrones de diseño [There are patterns of patterns now! \ My friend's project: MetaPatterns.io](https://metapatterns.io/)  [](https://refactoring.guru/es/design-patterns/decorator/rust/example#checkout) [](https://refactoring.guru/es/design-patterns/decorator/rust/example#checkout) [](https://refactoring.guru/) / [Patrones de diseño](https://refactoring.guru/es/design-patterns) / [Decorator](https://refactoring.guru/es/design-patterns/decorator) / [Rust](https://refactoring.guru/es/design-patterns/rust) ![Decorator](https://refactoring.guru/images/patterns/cards/decorator-mini-2x.png?id=3b58e540d7d28523080cad341ed9b2e9) **Decorator** en Rust ===================== **Decorator** es un patrón de diseño estructural que permite añadir dinámicamente nuevos comportamientos a objetos colocándolos dentro de objetos especiales que los envuelven (\_wrappers\_). Utilizando decoradores puedes envolver objetos innumerables veces, ya que los objetos objetivo y los decoradores siguen la misma interfaz. El objeto resultante obtendrá un comportamiento de apilado de todos los _wrappers_. [Aprende más sobre el patrón Decorator](https://refactoring.guru/es/design-patterns/decorator) Navegación  [Intro](https://refactoring.guru/es/design-patterns/decorator/rust/example#)  [Input streams decoration](https://refactoring.guru/es/design-patterns/decorator/rust/example#example-0)  [main](https://refactoring.guru/es/design-patterns/decorator/rust/example#example-0--main-rs) Input streams decoration ------------------------ There is a **_practical example_** in Rust’s standard library for input/output operations. A buffered reader decorates a vector reader adding buffered behavior. let mut input = BufReader::new(Cursor::new("Input data")); input.read(&mut buf).ok(); #### **main.rs** use std::io::{BufReader, Cursor, Read}; fn main() { let mut buf = \[0u8; 10\]; // A buffered reader decorates a vector reader which wraps input data. let mut input = BufReader::new(Cursor::new("Input data")); input.read(&mut buf).ok(); print!("Read from a buffered reader: "); for byte in buf { print!("{}", char::from(byte)); } println!(); } ### Output Read from a buffered reader: Input data **Decorator** en otros lenguajes -------------------------------- [![Decorator en C#](https://refactoring.guru/images/patterns/icons/csharp.svg?id=da64592defc6e86d57c39c66e9de3e58)](https://refactoring.guru/es/design-patterns/decorator/csharp/example "Decorator en C#") [![Decorator en C++](https://refactoring.guru/images/patterns/icons/cpp.svg?id=f7782ed8b8666246bfcc3f8fefc3b858)](https://refactoring.guru/es/design-patterns/decorator/cpp/example "Decorator en C++") [![Decorator en Go](https://refactoring.guru/images/patterns/icons/go.svg?id=1a89927eb99b1ea3fde7701d97970aca)](https://refactoring.guru/es/design-patterns/decorator/go/example "Decorator en Go") [![Decorator en Java](https://refactoring.guru/images/patterns/icons/java.svg?id=e6d87e2dca08c953fe3acd1275ed4f4e)](https://refactoring.guru/es/design-patterns/decorator/java/example "Decorator en Java") [![Decorator en PHP](https://refactoring.guru/images/patterns/icons/php.svg?id=be1906eb26b71ec1d3b93720d6156618)](https://refactoring.guru/es/design-patterns/decorator/php/example "Decorator en PHP") [![Decorator en Python](https://refactoring.guru/images/patterns/icons/python.svg?id=6d815d43c0f7050a1151b43e51569c9f)](https://refactoring.guru/es/design-patterns/decorator/python/example "Decorator en Python") [![Decorator en Ruby](https://refactoring.guru/images/patterns/icons/ruby.svg?id=b065b718c914bf8e960ef731600be1eb)](https://refactoring.guru/es/design-patterns/decorator/ruby/example "Decorator en Ruby") [![Decorator en Swift](https://refactoring.guru/images/patterns/icons/swift.svg?id=0b716c2d52ec3a48fbe91ac031070c1d)](https://refactoring.guru/es/design-patterns/decorator/swift/example "Decorator en Swift") [![Decorator en TypeScript](https://refactoring.guru/images/patterns/icons/typescript.svg?id=2239d0f16cb703540c205dd8cb0c0cb7)](https://refactoring.guru/es/design-patterns/decorator/typescript/example "Decorator en TypeScript") --- # Command en PHP / Patrones de diseño [There are patterns of patterns now! \ My friend's project: MetaPatterns.io](https://metapatterns.io/)  [](https://refactoring.guru/es/design-patterns/command/php/example#checkout) [](https://refactoring.guru/es/design-patterns/command/php/example#checkout) [](https://refactoring.guru/) / [Patrones de diseño](https://refactoring.guru/es/design-patterns) / [Command](https://refactoring.guru/es/design-patterns/command) / [PHP](https://refactoring.guru/es/design-patterns/php) ![Command](https://refactoring.guru/images/patterns/cards/command-mini-2x.png?id=e5f6332e057f6d352a209da963a8fc54) **Command** en PHP ================== **Command** es un patrón de diseño de comportamiento que convierte solicitudes u operaciones simples en objetos. La conversión permite la ejecución diferida de comandos, el almacenamiento del historial de comandos, etc. [Aprende más sobre el patrón Command](https://refactoring.guru/es/design-patterns/command) Navegación  [Intro](https://refactoring.guru/es/design-patterns/command/php/example#)  [Ejemplo conceptual](https://refactoring.guru/es/design-patterns/command/php/example#example-0)  [index](https://refactoring.guru/es/design-patterns/command/php/example#example-0--index-php)  [Output](https://refactoring.guru/es/design-patterns/command/php/example#example-0--Output-txt)  [Ejemplo del mundo real](https://refactoring.guru/es/design-patterns/command/php/example#example-1)  [index](https://refactoring.guru/es/design-patterns/command/php/example#example-1--index-php)  [Output](https://refactoring.guru/es/design-patterns/command/php/example#example-1--Output-txt) **Complejidad:** **Popularidad:** **Ejemplos de uso:** El patrón Command es muy común en el código PHP. Se utiliza para poner tareas en cola, realizar el seguimiento de tareas ejecutadas y llevar a cabo la operación “deshacer”. **Identificación:** Si ves un grupo de clases relacionadas que representan acciones específicas (como “Copiar”, “Cortar”, “Enviar”, “Imprimir”, etc.), puede que se trate de un patrón Command. Estas clases deben implementar la misma interfaz/clase abstracta. Los comandos pueden implementar las acciones relevantes por su cuenta, o delegar el trabajo a objetos separados, que serían los receptores. La última pieza del rompecabezas es identificar una invocadora: busca una clase que acepte los objetos de comando de los parámetros de sus métodos o constructor. Ejemplo conceptual ------------------ Este ejemplo ilustra la estructura del patrón de diseño **Command** y se centra en las siguientes preguntas: * ¿De qué clases se compone? * ¿Qué papeles juegan esas clases? * ¿De qué forma se relacionan los elementos del patrón? Después de conocer la estructura del patrón, será más fácil comprender el siguiente ejemplo basado en un caso de uso real de PHP. #### **index.php:** Ejemplo conceptual payload = $payload; } public function execute(): void { echo "SimpleCommand: See, I can do simple things like printing (" . $this->payload . ")\\n"; } } /\*\* \* However, some commands can delegate more complex operations to other objects, \* called "receivers." \*/ class ComplexCommand implements Command { /\*\* \* @var Receiver \*/ private $receiver; /\*\* \* Context data, required for launching the receiver's methods. \*/ private $a; private $b; /\*\* \* Complex commands can accept one or several receiver objects along with \* any context data via the constructor. \*/ public function \_\_construct(Receiver $receiver, string $a, string $b) { $this->receiver = $receiver; $this->a = $a; $this->b = $b; } /\*\* \* Commands can delegate to any methods of a receiver. \*/ public function execute(): void { echo "ComplexCommand: Complex stuff should be done by a receiver object.\\n"; $this->receiver->doSomething($this->a); $this->receiver->doSomethingElse($this->b); } } /\*\* \* The Receiver classes contain some important business logic. They know how to \* perform all kinds of operations, associated with carrying out a request. In \* fact, any class may serve as a Receiver. \*/ class Receiver { public function doSomething(string $a): void { echo "Receiver: Working on (" . $a . ".)\\n"; } public function doSomethingElse(string $b): void { echo "Receiver: Also working on (" . $b . ".)\\n"; } } /\*\* \* The Invoker is associated with one or several commands. It sends a request to \* the command. \*/ class Invoker { /\*\* \* @var Command \*/ private $onStart; /\*\* \* @var Command \*/ private $onFinish; /\*\* \* Initialize commands. \*/ public function setOnStart(Command $command): void { $this->onStart = $command; } public function setOnFinish(Command $command): void { $this->onFinish = $command; } /\*\* \* The Invoker does not depend on concrete command or receiver classes. The \* Invoker passes a request to a receiver indirectly, by executing a \* command. \*/ public function doSomethingImportant(): void { echo "Invoker: Does anybody want something done before I begin?\\n"; if ($this->onStart instanceof Command) { $this->onStart->execute(); } echo "Invoker: ...doing something really important...\\n"; echo "Invoker: Does anybody want something done after I finish?\\n"; if ($this->onFinish instanceof Command) { $this->onFinish->execute(); } } } /\*\* \* The client code can parameterize an invoker with any commands. \*/ $invoker = new Invoker(); $invoker->setOnStart(new SimpleCommand("Say Hi!")); $receiver = new Receiver(); $invoker->setOnFinish(new ComplexCommand($receiver, "Send email", "Save report")); $invoker->doSomethingImportant(); #### **Output.txt:** Resultado de la ejecución Invoker: Does anybody want something done before I begin? SimpleCommand: See, I can do simple things like printing (Say Hi!) Invoker: ...doing something really important... Invoker: Does anybody want something done after I finish? ComplexCommand: Complex stuff should be done by a receiver object. Receiver: Working on (Send email.) Receiver: Also working on (Save report.) Ejemplo del mundo real ---------------------- En este ejemplo, el patrón **Command** se utiliza para poner en cola llamadas de _web scraping_ al sitio web de IMDB y ejecutarlas una a una. La propia cola se mantiene en una base de datos para ayudar a preservar los comandos entre lanzamientos del _script_. #### **index.php:** Ejemplo del mundo real url = $url; } public function getId(): int { return $this->id; } public function getStatus(): int { return $this->status; } public function getURL(): string { return $this->url; } /\*\* \* Since the execution methods for all web scraping commands are very \* similar, we can provide a default implementation and let subclasses \* override them if needed. \* \* Psst! An observant reader may spot another behavioral pattern in action \* here. \*/ public function execute(): void { $html = $this->download(); $this->parse($html); $this->complete(); } public function download(): string { $html = file\_get\_contents($this->getURL()); echo "WebScrapingCommand: Downloaded {$this->url}\\n"; return $html; } abstract public function parse(string $html): void; public function complete(): void { $this->status = 1; Queue::get()->completeCommand($this); } } /\*\* \* The Concrete Command for scraping the list of movie genres. \*/ class IMDBGenresScrapingCommand extends WebScrapingCommand { public function \_\_construct() { $this->url = "https://www.imdb.com/feature/genre/"; } /\*\* \* Extract all genres and their search URLs from the page: \* https://www.imdb.com/feature/genre/ \*/ public function parse($html): void { preg\_match\_all("|href=\\"(https://www.imdb.com/search/title\\?genres=.\*?)\\"|", $html, $matches); echo "IMDBGenresScrapingCommand: Discovered " . count($matches\[1\]) . " genres.\\n"; foreach ($matches\[1\] as $genre) { Queue::get()->add(new IMDBGenrePageScrapingCommand($genre)); } } } /\*\* \* The Concrete Command for scraping the list of movies in a specific genre. \*/ class IMDBGenrePageScrapingCommand extends WebScrapingCommand { private $page; public function \_\_construct(string $url, int $page = 1) { parent::\_\_construct($url); $this->page = $page; } public function getURL(): string { return $this->url . '?page=' . $this->page; } /\*\* \* Extract all movies from a page like this: \* https://www.imdb.com/search/title?genres=sci-fi&explore=title\_type,genres \*/ public function parse(string $html): void { preg\_match\_all("|href=\\"(/title/.\*?/)\\?ref\_=adv\_li\_tt\\"|", $html, $matches); echo "IMDBGenrePageScrapingCommand: Discovered " . count($matches\[1\]) . " movies.\\n"; foreach ($matches\[1\] as $moviePath) { $url = "https://www.imdb.com" . $moviePath; Queue::get()->add(new IMDBMovieScrapingCommand($url)); } // Parse the next page URL. if (preg\_match("|Next »|", $html)) { Queue::get()->add(new IMDBGenrePageScrapingCommand($this->url, $this->page + 1)); } } } /\*\* \* The Concrete Command for scraping the movie details. \*/ class IMDBMovieScrapingCommand extends WebScrapingCommand { /\*\* \* Get the movie info from a page like this: \* https://www.imdb.com/title/tt4154756/ \*/ public function parse(string $html): void { if (preg\_match("|

(.\*?)

|", $html, $matches)) { $title = $matches\[1\]; } echo "IMDBMovieScrapingCommand: Parsed movie $title.\\n"; } } /\*\* \* The Queue class acts as an Invoker. It stacks the command objects and \* executes them one by one. If the script execution is suddenly terminated, the \* queue and all its commands can easily be restored, and you won't need to \* repeat all of the executed commands. \* \* Note that this is a very primitive implementation of the command queue, which \* stores commands in a local SQLite database. There are dozens of robust queue \* solution available for use in real apps. \*/ class Queue { private $db; public function \_\_construct() { $this->db = new \\SQLite3( \_\_DIR\_\_ . '/commands.sqlite', SQLITE3\_OPEN\_CREATE | SQLITE3\_OPEN\_READWRITE ); $this->db->query('CREATE TABLE IF NOT EXISTS "commands" ( "id" INTEGER PRIMARY KEY AUTO\_INCREMENT NOT NULL, "command" TEXT, "status" INTEGER )'); } public function isEmpty(): bool { $query = 'SELECT COUNT("id") FROM "commands" WHERE status = 0'; return $this->db->querySingle($query) === 0; } public function add(Command $command): void { $query = 'INSERT INTO commands (command, status) VALUES (:command, :status)'; $statement = $this->db->prepare($query); $statement->bindValue(':command', base64\_encode(serialize($command))); $statement->bindValue(':status', $command->getStatus()); $statement->execute(); } public function getCommand(): Command { $query = 'SELECT \* FROM "commands" WHERE "status" = 0 LIMIT 1'; $record = $this->db->querySingle($query, true); $command = unserialize(base64\_decode($record\["command"\])); $command->id = $record\['id'\]; return $command; } public function completeCommand(Command $command): void { $query = 'UPDATE commands SET status = :status WHERE id = :id'; $statement = $this->db->prepare($query); $statement->bindValue(':status', $command->getStatus()); $statement->bindValue(':id', $command->getId()); $statement->execute(); } public function work(): void { while (!$this->isEmpty()) { $command = $this->getCommand(); $command->execute(); } } /\*\* \* For our convenience, the Queue object is a Singleton. \*/ public static function get(): Queue { static $instance; if (!$instance) { $instance = new Queue(); } return $instance; } } /\*\* \* The client code. \*/ $queue = Queue::get(); if ($queue->isEmpty()) { $queue->add(new IMDBGenresScrapingCommand()); } $queue->work(); #### **Output.txt:** Resultado de la ejecución WebScrapingCommand: Downloaded https://www.imdb.com/feature/genre/ IMDBGenresScrapingCommand: Discovered 14 genres. WebScrapingCommand: Downloaded https://www.imdb.com/search/title?genres=comedy IMDBGenrePageScrapingCommand: Discovered 50 movies. WebScrapingCommand: Downloaded https://www.imdb.com/search/title?genres=sci-fi IMDBGenrePageScrapingCommand: Discovered 50 movies. WebScrapingCommand: Downloaded https://www.imdb.com/search/title?genres=horror IMDBGenrePageScrapingCommand: Discovered 50 movies. WebScrapingCommand: Downloaded https://www.imdb.com/search/title?genres=romance IMDBGenrePageScrapingCommand: Discovered 50 movies. ... **Command** en otros lenguajes ------------------------------ [![Command en C#](https://refactoring.guru/images/patterns/icons/csharp.svg?id=da64592defc6e86d57c39c66e9de3e58)](https://refactoring.guru/es/design-patterns/command/csharp/example "Command en C#") [![Command en C++](https://refactoring.guru/images/patterns/icons/cpp.svg?id=f7782ed8b8666246bfcc3f8fefc3b858)](https://refactoring.guru/es/design-patterns/command/cpp/example "Command en C++") [![Command en Go](https://refactoring.guru/images/patterns/icons/go.svg?id=1a89927eb99b1ea3fde7701d97970aca)](https://refactoring.guru/es/design-patterns/command/go/example "Command en Go") [![Command en Java](https://refactoring.guru/images/patterns/icons/java.svg?id=e6d87e2dca08c953fe3acd1275ed4f4e)](https://refactoring.guru/es/design-patterns/command/java/example "Command en Java") [![Command en Python](https://refactoring.guru/images/patterns/icons/python.svg?id=6d815d43c0f7050a1151b43e51569c9f)](https://refactoring.guru/es/design-patterns/command/python/example "Command en Python") [![Command en Ruby](https://refactoring.guru/images/patterns/icons/ruby.svg?id=b065b718c914bf8e960ef731600be1eb)](https://refactoring.guru/es/design-patterns/command/ruby/example "Command en Ruby") [![Command en Rust](https://refactoring.guru/images/patterns/icons/rust.svg?id=1f5698a4b5ae23fe79413511747e4a87)](https://refactoring.guru/es/design-patterns/command/rust/example "Command en Rust") [![Command en Swift](https://refactoring.guru/images/patterns/icons/swift.svg?id=0b716c2d52ec3a48fbe91ac031070c1d)](https://refactoring.guru/es/design-patterns/command/swift/example "Command en Swift") [![Command en TypeScript](https://refactoring.guru/images/patterns/icons/typescript.svg?id=2239d0f16cb703540c205dd8cb0c0cb7)](https://refactoring.guru/es/design-patterns/command/typescript/example "Command en TypeScript") --- # Facade en Ruby / Patrones de diseño [There are patterns of patterns now! \ My friend's project: MetaPatterns.io](https://metapatterns.io/)  [](https://refactoring.guru/es/design-patterns/facade/ruby/example#checkout) [](https://refactoring.guru/es/design-patterns/facade/ruby/example#checkout) [](https://refactoring.guru/) / [Patrones de diseño](https://refactoring.guru/es/design-patterns) / [Facade](https://refactoring.guru/es/design-patterns/facade) / [Ruby](https://refactoring.guru/es/design-patterns/ruby) ![Facade](https://refactoring.guru/images/patterns/cards/facade-mini-2x.png?id=d4cc6a5d81a31143cc665f7ac1481ac8) **Facade** en Ruby ================== **Facade** es un patrón de diseño estructural que proporciona una interfaz simplificada (pero limitada) a un sistema complejo de clases, bibliotecas o \_frameworks\_. El patrón Facade disminuye la complejidad general de la aplicación, al mismo tiempo que ayuda a mover dependencias no deseadas a un solo lugar. [Aprende más sobre el patrón Facade](https://refactoring.guru/es/design-patterns/facade) Navegación  [Intro](https://refactoring.guru/es/design-patterns/facade/ruby/example#)  [Ejemplo conceptual](https://refactoring.guru/es/design-patterns/facade/ruby/example#example-0)  [main](https://refactoring.guru/es/design-patterns/facade/ruby/example#example-0--main-rb)  [output](https://refactoring.guru/es/design-patterns/facade/ruby/example#example-0--output-txt) **Complejidad:** **Popularidad:** **Ejemplos de uso:** El patrón Facade se utiliza habitualmente en aplicaciones escritas en Ruby. Es de especial utilidad al trabajar con bibliotecas y API complejas. **Identificación:** El patrón Facade se puede reconocer en una clase con una interfaz simple, pero que delega la mayor parte del trabajo a otras clases. Normalmente, las fachadas gestionan todo el ciclo de vida de los objetos que utilizan. Ejemplo conceptual ------------------ Este ejemplo ilustra la estructura del patrón de diseño **Facade**. Se centra en responder las siguientes preguntas: * ¿De qué clases se compone? * ¿Qué papeles juegan esas clases? * ¿De qué forma se relacionan los elementos del patrón? #### **main.rb:** Ejemplo conceptual \# The Facade class provides a simple interface to the complex logic of one or # several subsystems. The Facade delegates the client requests to the # appropriate objects within the subsystem. The Facade is also responsible for # managing their lifecycle. All of this shields the client from the undesired # complexity of the subsystem. class Facade # Depending on your application's needs, you can provide the Facade with # existing subsystem objects or force the Facade to create them on its own. def initialize(subsystem1, subsystem2) @subsystem1 = subsystem1 || Subsystem1.new @subsystem2 = subsystem2 || Subsystem2.new end # The Facade's methods are convenient shortcuts to the sophisticated # functionality of the subsystems. However, clients get only to a fraction of # a subsystem's capabilities. def operation results = \[\] results.append('Facade initializes subsystems:') results.append(@subsystem1.operation1) results.append(@subsystem2.operation1) results.append('Facade orders subsystems to perform the action:') results.append(@subsystem1.operation\_n) results.append(@subsystem2.operation\_z) results.join("\\n") end end # The Subsystem can accept requests either from the facade or client directly. # In any case, to the Subsystem, the Facade is yet another client, and it's not # a part of the Subsystem. class Subsystem1 # @return \[String\] def operation1 'Subsystem1: Ready!' end # ... # @return \[String\] def operation\_n 'Subsystem1: Go!' end end # Some facades can work with multiple subsystems at the same time. class Subsystem2 # @return \[String\] def operation1 'Subsystem2: Get ready!' end # ... # @return \[String\] def operation\_z 'Subsystem2: Fire!' end end # The client code works with complex subsystems through a simple interface # provided by the Facade. When a facade manages the lifecycle of the subsystem, # the client might not even know about the existence of the subsystem. This # approach lets you keep the complexity under control. def client\_code(facade) print facade.operation end # The client code may have some of the subsystem's objects already created. In # this case, it might be worthwhile to initialize the Facade with these objects # instead of letting the Facade create new instances. subsystem1 = Subsystem1.new subsystem2 = Subsystem2.new facade = Facade.new(subsystem1, subsystem2) client\_code(facade) #### **output.txt:** Resultado de la ejecución Facade initializes subsystems: Subsystem1: Ready! Subsystem2: Get ready! Facade orders subsystems to perform the action: Subsystem1: Go! Subsystem2: Fire! **Facade** en otros lenguajes ----------------------------- [![Facade en C#](https://refactoring.guru/images/patterns/icons/csharp.svg?id=da64592defc6e86d57c39c66e9de3e58)](https://refactoring.guru/es/design-patterns/facade/csharp/example "Facade en C#") [![Facade en C++](https://refactoring.guru/images/patterns/icons/cpp.svg?id=f7782ed8b8666246bfcc3f8fefc3b858)](https://refactoring.guru/es/design-patterns/facade/cpp/example "Facade en C++") [![Facade en Go](https://refactoring.guru/images/patterns/icons/go.svg?id=1a89927eb99b1ea3fde7701d97970aca)](https://refactoring.guru/es/design-patterns/facade/go/example "Facade en Go") [![Facade en Java](https://refactoring.guru/images/patterns/icons/java.svg?id=e6d87e2dca08c953fe3acd1275ed4f4e)](https://refactoring.guru/es/design-patterns/facade/java/example "Facade en Java") [![Facade en PHP](https://refactoring.guru/images/patterns/icons/php.svg?id=be1906eb26b71ec1d3b93720d6156618)](https://refactoring.guru/es/design-patterns/facade/php/example "Facade en PHP") [![Facade en Python](https://refactoring.guru/images/patterns/icons/python.svg?id=6d815d43c0f7050a1151b43e51569c9f)](https://refactoring.guru/es/design-patterns/facade/python/example "Facade en Python") [![Facade en Rust](https://refactoring.guru/images/patterns/icons/rust.svg?id=1f5698a4b5ae23fe79413511747e4a87)](https://refactoring.guru/es/design-patterns/facade/rust/example "Facade en Rust") [![Facade en Swift](https://refactoring.guru/images/patterns/icons/swift.svg?id=0b716c2d52ec3a48fbe91ac031070c1d)](https://refactoring.guru/es/design-patterns/facade/swift/example "Facade en Swift") [![Facade en TypeScript](https://refactoring.guru/images/patterns/icons/typescript.svg?id=2239d0f16cb703540c205dd8cb0c0cb7)](https://refactoring.guru/es/design-patterns/facade/typescript/example "Facade en TypeScript") --- # Facade en Rust / Patrones de diseño [There are patterns of patterns now! \ My friend's project: MetaPatterns.io](https://metapatterns.io/)  [](https://refactoring.guru/es/design-patterns/facade/rust/example#checkout) [](https://refactoring.guru/es/design-patterns/facade/rust/example#checkout) [](https://refactoring.guru/) / [Patrones de diseño](https://refactoring.guru/es/design-patterns) / [Facade](https://refactoring.guru/es/design-patterns/facade) / [Rust](https://refactoring.guru/es/design-patterns/rust) ![Facade](https://refactoring.guru/images/patterns/cards/facade-mini-2x.png?id=d4cc6a5d81a31143cc665f7ac1481ac8) **Facade** en Rust ================== **Facade** es un patrón de diseño estructural que proporciona una interfaz simplificada (pero limitada) a un sistema complejo de clases, bibliotecas o \_frameworks\_. El patrón Facade disminuye la complejidad general de la aplicación, al mismo tiempo que ayuda a mover dependencias no deseadas a un solo lugar. [Aprende más sobre el patrón Facade](https://refactoring.guru/es/design-patterns/facade) Navegación  [Intro](https://refactoring.guru/es/design-patterns/facade/rust/example#)  [Conceptual Example](https://refactoring.guru/es/design-patterns/facade/rust/example#example-0)  [wallet\_facade](https://refactoring.guru/es/design-patterns/facade/rust/example#example-0--wallet_facade-rs)  [wallet](https://refactoring.guru/es/design-patterns/facade/rust/example#example-0--wallet-rs)  [account](https://refactoring.guru/es/design-patterns/facade/rust/example#example-0--account-rs)  [ledger](https://refactoring.guru/es/design-patterns/facade/rust/example#example-0--ledger-rs)  [notification](https://refactoring.guru/es/design-patterns/facade/rust/example#example-0--notification-rs)  [security\_code](https://refactoring.guru/es/design-patterns/facade/rust/example#example-0--security_code-rs)  [main](https://refactoring.guru/es/design-patterns/facade/rust/example#example-0--main-rs) Conceptual Example ------------------ `pub struct WalletFacade` hides a complex logic behind its API. A single method `add_money_to_wallet` interacts with the account, code, wallet, notification and ledger behind the scenes. #### **wallet\_facade.rs** use crate::{ account::Account, ledger::Ledger, notification::Notification, security\_code::SecurityCode, wallet::Wallet, }; /// Facade hides a complex logic behind the API. pub struct WalletFacade { account: Account, wallet: Wallet, code: SecurityCode, notification: Notification, ledger: Ledger, } impl WalletFacade { pub fn new(account\_id: String, code: u32) -> Self { println!("Starting create account"); let this = Self { account: Account::new(account\_id), wallet: Wallet::new(), code: SecurityCode::new(code), notification: Notification, ledger: Ledger, }; println!("Account created"); this } pub fn add\_money\_to\_wallet( &mut self, account\_id: &String, security\_code: u32, amount: u32, ) -> Result<(), String> { println!("Starting add money to wallet"); self.account.check(account\_id)?; self.code.check(security\_code)?; self.wallet.credit\_balance(amount); self.notification.send\_wallet\_credit\_notification(); self.ledger.make\_entry(account\_id, "credit".into(), amount); Ok(()) } pub fn deduct\_money\_from\_wallet( &mut self, account\_id: &String, security\_code: u32, amount: u32, ) -> Result<(), String> { println!("Starting debit money from wallet"); self.account.check(account\_id)?; self.code.check(security\_code)?; self.wallet.debit\_balance(amount); self.notification.send\_wallet\_debit\_notification(); self.ledger.make\_entry(account\_id, "debit".into(), amount); Ok(()) } } #### **wallet.rs** pub struct Wallet { balance: u32, } impl Wallet { pub fn new() -> Self { Self { balance: 0 } } pub fn credit\_balance(&mut self, amount: u32) { self.balance += amount; } pub fn debit\_balance(&mut self, amount: u32) { self.balance .checked\_sub(amount) .expect("Balance is not sufficient"); } } #### **account.rs** pub struct Account { name: String, } impl Account { pub fn new(name: String) -> Self { Self { name } } pub fn check(&self, name: &String) -> Result<(), String> { if &self.name != name { return Err("Account name is incorrect".into()); } println!("Account verified"); Ok(()) } } #### **ledger.rs** pub struct Ledger; impl Ledger { pub fn make\_entry(&mut self, account\_id: &String, txn\_type: String, amount: u32) { println!( "Make ledger entry for accountId {} with transaction type {} for amount {}", account\_id, txn\_type, amount ); } } #### **notification.rs** pub struct Notification; impl Notification { pub fn send\_wallet\_credit\_notification(&self) { println!("Sending wallet credit notification"); } pub fn send\_wallet\_debit\_notification(&self) { println!("Sending wallet debit notification"); } } #### **security\_code.rs** pub struct SecurityCode { code: u32, } impl SecurityCode { pub fn new(code: u32) -> Self { Self { code } } pub fn check(&self, code: u32) -> Result<(), String> { if self.code != code { return Err("Security code is incorrect".into()); } println!("Security code verified"); Ok(()) } } #### **main.rs** mod account; mod ledger; mod notification; mod security\_code; mod wallet; mod wallet\_facade; use wallet\_facade::WalletFacade; fn main() -> Result<(), String> { let mut wallet = WalletFacade::new("abc".into(), 1234); println!(); // Wallet Facade interacts with the account, code, wallet, notification and // ledger behind the scenes. wallet.add\_money\_to\_wallet(&"abc".into(), 1234, 10)?; println!(); wallet.deduct\_money\_from\_wallet(&"abc".into(), 1234, 5) } ### Output Starting create account Account created Starting add money to wallet Account verified Security code verified Sending wallet credit notification Make ledger entry for accountId abc with transaction type credit for amount 10 Starting debit money from wallet Account verified Security code verified Sending wallet debit notification Make ledger entry for accountId abc with transaction type debit for amount 5 **Facade** en otros lenguajes ----------------------------- [![Facade en C#](https://refactoring.guru/images/patterns/icons/csharp.svg?id=da64592defc6e86d57c39c66e9de3e58)](https://refactoring.guru/es/design-patterns/facade/csharp/example "Facade en C#") [![Facade en C++](https://refactoring.guru/images/patterns/icons/cpp.svg?id=f7782ed8b8666246bfcc3f8fefc3b858)](https://refactoring.guru/es/design-patterns/facade/cpp/example "Facade en C++") [![Facade en Go](https://refactoring.guru/images/patterns/icons/go.svg?id=1a89927eb99b1ea3fde7701d97970aca)](https://refactoring.guru/es/design-patterns/facade/go/example "Facade en Go") [![Facade en Java](https://refactoring.guru/images/patterns/icons/java.svg?id=e6d87e2dca08c953fe3acd1275ed4f4e)](https://refactoring.guru/es/design-patterns/facade/java/example "Facade en Java") [![Facade en PHP](https://refactoring.guru/images/patterns/icons/php.svg?id=be1906eb26b71ec1d3b93720d6156618)](https://refactoring.guru/es/design-patterns/facade/php/example "Facade en PHP") [![Facade en Python](https://refactoring.guru/images/patterns/icons/python.svg?id=6d815d43c0f7050a1151b43e51569c9f)](https://refactoring.guru/es/design-patterns/facade/python/example "Facade en Python") [![Facade en Ruby](https://refactoring.guru/images/patterns/icons/ruby.svg?id=b065b718c914bf8e960ef731600be1eb)](https://refactoring.guru/es/design-patterns/facade/ruby/example "Facade en Ruby") [![Facade en Swift](https://refactoring.guru/images/patterns/icons/swift.svg?id=0b716c2d52ec3a48fbe91ac031070c1d)](https://refactoring.guru/es/design-patterns/facade/swift/example "Facade en Swift") [![Facade en TypeScript](https://refactoring.guru/images/patterns/icons/typescript.svg?id=2239d0f16cb703540c205dd8cb0c0cb7)](https://refactoring.guru/es/design-patterns/facade/typescript/example "Facade en TypeScript") --- # Decorator en Python / Patrones de diseño [There are patterns of patterns now! \ My friend's project: MetaPatterns.io](https://metapatterns.io/)  [](https://refactoring.guru/es/design-patterns/decorator/python/example#checkout) [](https://refactoring.guru/es/design-patterns/decorator/python/example#checkout) [](https://refactoring.guru/) / [Patrones de diseño](https://refactoring.guru/es/design-patterns) / [Decorator](https://refactoring.guru/es/design-patterns/decorator) / [Python](https://refactoring.guru/es/design-patterns/python) ![Decorator](https://refactoring.guru/images/patterns/cards/decorator-mini-2x.png?id=3b58e540d7d28523080cad341ed9b2e9) **Decorator** en Python ======================= **Decorator** es un patrón de diseño estructural que permite añadir dinámicamente nuevos comportamientos a objetos colocándolos dentro de objetos especiales que los envuelven (\_wrappers\_). Utilizando decoradores puedes envolver objetos innumerables veces, ya que los objetos objetivo y los decoradores siguen la misma interfaz. El objeto resultante obtendrá un comportamiento de apilado de todos los _wrappers_. [Aprende más sobre el patrón Decorator](https://refactoring.guru/es/design-patterns/decorator) Navegación  [Intro](https://refactoring.guru/es/design-patterns/decorator/python/example#)  [Ejemplo conceptual](https://refactoring.guru/es/design-patterns/decorator/python/example#example-0)  [main](https://refactoring.guru/es/design-patterns/decorator/python/example#example-0--main-py)  [Output](https://refactoring.guru/es/design-patterns/decorator/python/example#example-0--Output-txt) **Complejidad:** **Popularidad:** **Ejemplos de uso:** El patrón Decorator es bastante común en el código Python, especialmente en el código relacionado con los flujos (streams). **Identificación:** El patrón Decorator puede ser reconocido por métodos de creación o el constructor que acepta objetos de la misma clase o interfaz que la clase actual. Ejemplo conceptual ------------------ Este ejemplo ilustra la estructura del patrón de diseño **Decorator**. Se centra en responder las siguientes preguntas: * ¿De qué clases se compone? * ¿Qué papeles juegan esas clases? * ¿De qué forma se relacionan los elementos del patrón? #### **main.py:** Ejemplo conceptual class Component(): """ The base Component interface defines operations that can be altered by decorators. """ def operation(self) -> str: pass class ConcreteComponent(Component): """ Concrete Components provide default implementations of the operations. There might be several variations of these classes. """ def operation(self) -> str: return "ConcreteComponent" class Decorator(Component): """ The base Decorator class follows the same interface as the other components. The primary purpose of this class is to define the wrapping interface for all concrete decorators. The default implementation of the wrapping code might include a field for storing a wrapped component and the means to initialize it. """ \_component: Component = None def \_\_init\_\_(self, component: Component) -> None: self.\_component = component @property def component(self) -> Component: """ The Decorator delegates all work to the wrapped component. """ return self.\_component def operation(self) -> str: return self.\_component.operation() class ConcreteDecoratorA(Decorator): """ Concrete Decorators call the wrapped object and alter its result in some way. """ def operation(self) -> str: """ Decorators may call parent implementation of the operation, instead of calling the wrapped object directly. This approach simplifies extension of decorator classes. """ return f"ConcreteDecoratorA({self.component.operation()})" class ConcreteDecoratorB(Decorator): """ Decorators can execute their behavior either before or after the call to a wrapped object. """ def operation(self) -> str: return f"ConcreteDecoratorB({self.component.operation()})" def client\_code(component: Component) -> None: """ The client code works with all objects using the Component interface. This way it can stay independent of the concrete classes of components it works with. """ # ... print(f"RESULT: {component.operation()}", end="") # ... if \_\_name\_\_ == "\_\_main\_\_": # This way the client code can support both simple components... simple = ConcreteComponent() print("Client: I've got a simple component:") client\_code(simple) print("\\n") # ...as well as decorated ones. # # Note how decorators can wrap not only simple components but the other # decorators as well. decorator1 = ConcreteDecoratorA(simple) decorator2 = ConcreteDecoratorB(decorator1) print("Client: Now I've got a decorated component:") client\_code(decorator2) #### **Output.txt:** Resultado de la ejecución Client: I've got a simple component: RESULT: ConcreteComponent Client: Now I've got a decorated component: RESULT: ConcreteDecoratorB(ConcreteDecoratorA(ConcreteComponent)) **Decorator** en otros lenguajes -------------------------------- [![Decorator en C#](https://refactoring.guru/images/patterns/icons/csharp.svg?id=da64592defc6e86d57c39c66e9de3e58)](https://refactoring.guru/es/design-patterns/decorator/csharp/example "Decorator en C#") [![Decorator en C++](https://refactoring.guru/images/patterns/icons/cpp.svg?id=f7782ed8b8666246bfcc3f8fefc3b858)](https://refactoring.guru/es/design-patterns/decorator/cpp/example "Decorator en C++") [![Decorator en Go](https://refactoring.guru/images/patterns/icons/go.svg?id=1a89927eb99b1ea3fde7701d97970aca)](https://refactoring.guru/es/design-patterns/decorator/go/example "Decorator en Go") [![Decorator en Java](https://refactoring.guru/images/patterns/icons/java.svg?id=e6d87e2dca08c953fe3acd1275ed4f4e)](https://refactoring.guru/es/design-patterns/decorator/java/example "Decorator en Java") [![Decorator en PHP](https://refactoring.guru/images/patterns/icons/php.svg?id=be1906eb26b71ec1d3b93720d6156618)](https://refactoring.guru/es/design-patterns/decorator/php/example "Decorator en PHP") [![Decorator en Ruby](https://refactoring.guru/images/patterns/icons/ruby.svg?id=b065b718c914bf8e960ef731600be1eb)](https://refactoring.guru/es/design-patterns/decorator/ruby/example "Decorator en Ruby") [![Decorator en Rust](https://refactoring.guru/images/patterns/icons/rust.svg?id=1f5698a4b5ae23fe79413511747e4a87)](https://refactoring.guru/es/design-patterns/decorator/rust/example "Decorator en Rust") [![Decorator en Swift](https://refactoring.guru/images/patterns/icons/swift.svg?id=0b716c2d52ec3a48fbe91ac031070c1d)](https://refactoring.guru/es/design-patterns/decorator/swift/example "Decorator en Swift") [![Decorator en TypeScript](https://refactoring.guru/images/patterns/icons/typescript.svg?id=2239d0f16cb703540c205dd8cb0c0cb7)](https://refactoring.guru/es/design-patterns/decorator/typescript/example "Decorator en TypeScript") --- # Facade en TypeScript / Patrones de diseño [There are patterns of patterns now! \ My friend's project: MetaPatterns.io](https://metapatterns.io/)  [](https://refactoring.guru/es/design-patterns/facade/typescript/example#checkout) [](https://refactoring.guru/es/design-patterns/facade/typescript/example#checkout) [](https://refactoring.guru/) / [Patrones de diseño](https://refactoring.guru/es/design-patterns) / [Facade](https://refactoring.guru/es/design-patterns/facade) / [TypeScript](https://refactoring.guru/es/design-patterns/typescript) ![Facade](https://refactoring.guru/images/patterns/cards/facade-mini-2x.png?id=d4cc6a5d81a31143cc665f7ac1481ac8) **Facade** en TypeScript ======================== **Facade** es un patrón de diseño estructural que proporciona una interfaz simplificada (pero limitada) a un sistema complejo de clases, bibliotecas o \_frameworks\_. El patrón Facade disminuye la complejidad general de la aplicación, al mismo tiempo que ayuda a mover dependencias no deseadas a un solo lugar. [Aprende más sobre el patrón Facade](https://refactoring.guru/es/design-patterns/facade) Navegación  [Intro](https://refactoring.guru/es/design-patterns/facade/typescript/example#)  [Ejemplo conceptual](https://refactoring.guru/es/design-patterns/facade/typescript/example#example-0)  [index](https://refactoring.guru/es/design-patterns/facade/typescript/example#example-0--index-ts)  [Output](https://refactoring.guru/es/design-patterns/facade/typescript/example#example-0--Output-txt) **Complejidad:** **Popularidad:** **Ejemplos de uso:** El patrón Facade se utiliza habitualmente en aplicaciones escritas en TypeScript. Es de especial utilidad al trabajar con bibliotecas y API complejas. **Identificación:** El patrón Facade se puede reconocer en una clase con una interfaz simple, pero que delega la mayor parte del trabajo a otras clases. Normalmente, las fachadas gestionan todo el ciclo de vida de los objetos que utilizan. Ejemplo conceptual ------------------ Este ejemplo ilustra la estructura del patrón de diseño **Facade** y se centra en las siguientes preguntas: * ¿De qué clases se compone? * ¿Qué papeles juegan esas clases? * ¿De qué forma se relacionan los elementos del patrón? #### **index.ts:** Ejemplo conceptual /\*\* \* The Facade class provides a simple interface to the complex logic of one or \* several subsystems. The Facade delegates the client requests to the \* appropriate objects within the subsystem. The Facade is also responsible for \* managing their lifecycle. All of this shields the client from the undesired \* complexity of the subsystem. \*/ class Facade { protected subsystem1: Subsystem1; protected subsystem2: Subsystem2; /\*\* \* Depending on your application's needs, you can provide the Facade with \* existing subsystem objects or force the Facade to create them on its own. \*/ constructor(subsystem1?: Subsystem1, subsystem2?: Subsystem2) { this.subsystem1 = subsystem1 || new Subsystem1(); this.subsystem2 = subsystem2 || new Subsystem2(); } /\*\* \* The Facade's methods are convenient shortcuts to the sophisticated \* functionality of the subsystems. However, clients get only to a fraction \* of a subsystem's capabilities. \*/ public operation(): string { let result = 'Facade initializes subsystems:\\n'; result += this.subsystem1.operation1(); result += this.subsystem2.operation1(); result += 'Facade orders subsystems to perform the action:\\n'; result += this.subsystem1.operationN(); result += this.subsystem2.operationZ(); return result; } } /\*\* \* The Subsystem can accept requests either from the facade or client directly. \* In any case, to the Subsystem, the Facade is yet another client, and it's not \* a part of the Subsystem. \*/ class Subsystem1 { public operation1(): string { return 'Subsystem1: Ready!\\n'; } // ... public operationN(): string { return 'Subsystem1: Go!\\n'; } } /\*\* \* Some facades can work with multiple subsystems at the same time. \*/ class Subsystem2 { public operation1(): string { return 'Subsystem2: Get ready!\\n'; } // ... public operationZ(): string { return 'Subsystem2: Fire!'; } } /\*\* \* The client code works with complex subsystems through a simple interface \* provided by the Facade. When a facade manages the lifecycle of the subsystem, \* the client might not even know about the existence of the subsystem. This \* approach lets you keep the complexity under control. \*/ function clientCode(facade: Facade) { // ... console.log(facade.operation()); // ... } /\*\* \* The client code may have some of the subsystem's objects already created. In \* this case, it might be worthwhile to initialize the Facade with these objects \* instead of letting the Facade create new instances. \*/ const subsystem1 = new Subsystem1(); const subsystem2 = new Subsystem2(); const facade = new Facade(subsystem1, subsystem2); clientCode(facade); #### **Output.txt:** Resultado de la ejecución Facade initializes subsystems: Subsystem1: Ready! Subsystem2: Get ready! Facade orders subsystems to perform the action: Subsystem1: Go! Subsystem2: Fire! **Facade** en otros lenguajes ----------------------------- [![Facade en C#](https://refactoring.guru/images/patterns/icons/csharp.svg?id=da64592defc6e86d57c39c66e9de3e58)](https://refactoring.guru/es/design-patterns/facade/csharp/example "Facade en C#") [![Facade en C++](https://refactoring.guru/images/patterns/icons/cpp.svg?id=f7782ed8b8666246bfcc3f8fefc3b858)](https://refactoring.guru/es/design-patterns/facade/cpp/example "Facade en C++") [![Facade en Go](https://refactoring.guru/images/patterns/icons/go.svg?id=1a89927eb99b1ea3fde7701d97970aca)](https://refactoring.guru/es/design-patterns/facade/go/example "Facade en Go") [![Facade en Java](https://refactoring.guru/images/patterns/icons/java.svg?id=e6d87e2dca08c953fe3acd1275ed4f4e)](https://refactoring.guru/es/design-patterns/facade/java/example "Facade en Java") [![Facade en PHP](https://refactoring.guru/images/patterns/icons/php.svg?id=be1906eb26b71ec1d3b93720d6156618)](https://refactoring.guru/es/design-patterns/facade/php/example "Facade en PHP") [![Facade en Python](https://refactoring.guru/images/patterns/icons/python.svg?id=6d815d43c0f7050a1151b43e51569c9f)](https://refactoring.guru/es/design-patterns/facade/python/example "Facade en Python") [![Facade en Ruby](https://refactoring.guru/images/patterns/icons/ruby.svg?id=b065b718c914bf8e960ef731600be1eb)](https://refactoring.guru/es/design-patterns/facade/ruby/example "Facade en Ruby") [![Facade en Rust](https://refactoring.guru/images/patterns/icons/rust.svg?id=1f5698a4b5ae23fe79413511747e4a87)](https://refactoring.guru/es/design-patterns/facade/rust/example "Facade en Rust") [![Facade en Swift](https://refactoring.guru/images/patterns/icons/swift.svg?id=0b716c2d52ec3a48fbe91ac031070c1d)](https://refactoring.guru/es/design-patterns/facade/swift/example "Facade en Swift") --- # Facade en C++ / Patrones de diseño [There are patterns of patterns now! \ My friend's project: MetaPatterns.io](https://metapatterns.io/)  [](https://refactoring.guru/es/design-patterns/facade/cpp/example#checkout) [](https://refactoring.guru/es/design-patterns/facade/cpp/example#checkout) [](https://refactoring.guru/) / [Patrones de diseño](https://refactoring.guru/es/design-patterns) / [Facade](https://refactoring.guru/es/design-patterns/facade) / [C++](https://refactoring.guru/es/design-patterns/cpp) ![Facade](https://refactoring.guru/images/patterns/cards/facade-mini-2x.png?id=d4cc6a5d81a31143cc665f7ac1481ac8) **Facade** en C++ ================= **Facade** es un patrón de diseño estructural que proporciona una interfaz simplificada (pero limitada) a un sistema complejo de clases, bibliotecas o \_frameworks\_. El patrón Facade disminuye la complejidad general de la aplicación, al mismo tiempo que ayuda a mover dependencias no deseadas a un solo lugar. [Aprende más sobre el patrón Facade](https://refactoring.guru/es/design-patterns/facade) Navegación  [Intro](https://refactoring.guru/es/design-patterns/facade/cpp/example#)  [Ejemplo conceptual](https://refactoring.guru/es/design-patterns/facade/cpp/example#example-0)  [main](https://refactoring.guru/es/design-patterns/facade/cpp/example#example-0--main-cc)  [Output](https://refactoring.guru/es/design-patterns/facade/cpp/example#example-0--Output-txt) **Complejidad:** **Popularidad:** **Ejemplos de uso:** El patrón Facade se utiliza habitualmente en aplicaciones escritas en C++. Es de especial utilidad al trabajar con bibliotecas y API complejas. **Identificación:** El patrón Facade se puede reconocer en una clase con una interfaz simple, pero que delega la mayor parte del trabajo a otras clases. Normalmente, las fachadas gestionan todo el ciclo de vida de los objetos que utilizan. Ejemplo conceptual ------------------ Este ejemplo ilustra la estructura del patrón de diseño **Facade**. Se centra en responder las siguientes preguntas: * ¿De qué clases se compone? * ¿Qué papeles juegan esas clases? * ¿De qué forma se relacionan los elementos del patrón? #### **main.cc:** Ejemplo conceptual /\*\* \* The Subsystem can accept requests either from the facade or client directly. \* In any case, to the Subsystem, the Facade is yet another client, and it's not \* a part of the Subsystem. \*/ class Subsystem1 { public: std::string Operation1() const { return "Subsystem1: Ready!\\n"; } // ... std::string OperationN() const { return "Subsystem1: Go!\\n"; } }; /\*\* \* Some facades can work with multiple subsystems at the same time. \*/ class Subsystem2 { public: std::string Operation1() const { return "Subsystem2: Get ready!\\n"; } // ... std::string OperationZ() const { return "Subsystem2: Fire!\\n"; } }; /\*\* \* The Facade class provides a simple interface to the complex logic of one or \* several subsystems. The Facade delegates the client requests to the \* appropriate objects within the subsystem. The Facade is also responsible for \* managing their lifecycle. All of this shields the client from the undesired \* complexity of the subsystem. \*/ class Facade { protected: Subsystem1 \*subsystem1\_; Subsystem2 \*subsystem2\_; /\*\* \* Depending on your application's needs, you can provide the Facade with \* existing subsystem objects or force the Facade to create them on its own. \*/ public: /\*\* \* In this case we will delegate the memory ownership to Facade Class \*/ Facade( Subsystem1 \*subsystem1 = nullptr, Subsystem2 \*subsystem2 = nullptr) { this->subsystem1\_ = subsystem1 ?: new Subsystem1; this->subsystem2\_ = subsystem2 ?: new Subsystem2; } ~Facade() { delete subsystem1\_; delete subsystem2\_; } /\*\* \* The Facade's methods are convenient shortcuts to the sophisticated \* functionality of the subsystems. However, clients get only to a fraction of \* a subsystem's capabilities. \*/ std::string Operation() { std::string result = "Facade initializes subsystems:\\n"; result += this->subsystem1\_->Operation1(); result += this->subsystem2\_->Operation1(); result += "Facade orders subsystems to perform the action:\\n"; result += this->subsystem1\_->OperationN(); result += this->subsystem2\_->OperationZ(); return result; } }; /\*\* \* The client code works with complex subsystems through a simple interface \* provided by the Facade. When a facade manages the lifecycle of the subsystem, \* the client might not even know about the existence of the subsystem. This \* approach lets you keep the complexity under control. \*/ void ClientCode(Facade \*facade) { // ... std::cout << facade->Operation(); // ... } /\*\* \* The client code may have some of the subsystem's objects already created. In \* this case, it might be worthwhile to initialize the Facade with these objects \* instead of letting the Facade create new instances. \*/ int main() { Subsystem1 \*subsystem1 = new Subsystem1; Subsystem2 \*subsystem2 = new Subsystem2; Facade \*facade = new Facade(subsystem1, subsystem2); ClientCode(facade); delete facade; return 0; } #### **Output.txt:** Resultado de la ejecución Facade initializes subsystems: Subsystem1: Ready! Subsystem2: Get ready! Facade orders subsystems to perform the action: Subsystem1: Go! Subsystem2: Fire! **Facade** en otros lenguajes ----------------------------- [![Facade en C#](https://refactoring.guru/images/patterns/icons/csharp.svg?id=da64592defc6e86d57c39c66e9de3e58)](https://refactoring.guru/es/design-patterns/facade/csharp/example "Facade en C#") [![Facade en Go](https://refactoring.guru/images/patterns/icons/go.svg?id=1a89927eb99b1ea3fde7701d97970aca)](https://refactoring.guru/es/design-patterns/facade/go/example "Facade en Go") [![Facade en Java](https://refactoring.guru/images/patterns/icons/java.svg?id=e6d87e2dca08c953fe3acd1275ed4f4e)](https://refactoring.guru/es/design-patterns/facade/java/example "Facade en Java") [![Facade en PHP](https://refactoring.guru/images/patterns/icons/php.svg?id=be1906eb26b71ec1d3b93720d6156618)](https://refactoring.guru/es/design-patterns/facade/php/example "Facade en PHP") [![Facade en Python](https://refactoring.guru/images/patterns/icons/python.svg?id=6d815d43c0f7050a1151b43e51569c9f)](https://refactoring.guru/es/design-patterns/facade/python/example "Facade en Python") [![Facade en Ruby](https://refactoring.guru/images/patterns/icons/ruby.svg?id=b065b718c914bf8e960ef731600be1eb)](https://refactoring.guru/es/design-patterns/facade/ruby/example "Facade en Ruby") [![Facade en Rust](https://refactoring.guru/images/patterns/icons/rust.svg?id=1f5698a4b5ae23fe79413511747e4a87)](https://refactoring.guru/es/design-patterns/facade/rust/example "Facade en Rust") [![Facade en Swift](https://refactoring.guru/images/patterns/icons/swift.svg?id=0b716c2d52ec3a48fbe91ac031070c1d)](https://refactoring.guru/es/design-patterns/facade/swift/example "Facade en Swift") [![Facade en TypeScript](https://refactoring.guru/images/patterns/icons/typescript.svg?id=2239d0f16cb703540c205dd8cb0c0cb7)](https://refactoring.guru/es/design-patterns/facade/typescript/example "Facade en TypeScript") --- # Composite en PHP / Patrones de diseño [There are patterns of patterns now! \ My friend's project: MetaPatterns.io](https://metapatterns.io/)  [](https://refactoring.guru/es/design-patterns/composite/php/example#checkout) [](https://refactoring.guru/es/design-patterns/composite/php/example#checkout) [](https://refactoring.guru/) / [Patrones de diseño](https://refactoring.guru/es/design-patterns) / [Composite](https://refactoring.guru/es/design-patterns/composite) / [PHP](https://refactoring.guru/es/design-patterns/php) ![Composite](https://refactoring.guru/images/patterns/cards/composite-mini-2x.png?id=3f7f811fefeb0b64f6774746eb42af09) **Composite** en PHP ==================== **Composite** es un patrón de diseño estructural que permite componer objetos en una estructura en forma de árbol y trabajar con ella como si fuera un objeto único. El patrón Composite se convirtió en una solución muy popular para la mayoría de problemas que requieren la creación de una estructura de árbol. La gran característica del Composite es la capacidad para ejecutar métodos de forma recursiva por toda la estructura de árbol y recapitular los resultados. [Aprende más sobre el patrón Composite](https://refactoring.guru/es/design-patterns/composite) Navegación  [Intro](https://refactoring.guru/es/design-patterns/composite/php/example#)  [Ejemplo conceptual](https://refactoring.guru/es/design-patterns/composite/php/example#example-0)  [index](https://refactoring.guru/es/design-patterns/composite/php/example#example-0--index-php)  [Output](https://refactoring.guru/es/design-patterns/composite/php/example#example-0--Output-txt)  [Ejemplo del mundo real](https://refactoring.guru/es/design-patterns/composite/php/example#example-1)  [index](https://refactoring.guru/es/design-patterns/composite/php/example#example-1--index-php)  [Output](https://refactoring.guru/es/design-patterns/composite/php/example#example-1--Output-txt) **Complejidad:** **Popularidad:** **Ejemplos de uso:** El patrón Composite se utiliza habitualmente al trabajar con árboles de objetos. El ejemplo más sencillo sería aplicar el patrón a elementos del árbol DOM, trabajando con elementos compuestos y simples del árbol de la misma manera. **Identificación:** El Composite es fácil de reconocer por los métodos de comportamiento que toman una instancia del mismo tipo abstracto/interfaz y lo hacen una estructura de árbol. Ejemplo conceptual ------------------ Este ejemplo ilustra la estructura del patrón de diseño **Composite** y se centra en las siguientes preguntas: * ¿De qué clases se compone? * ¿Qué papeles juegan esas clases? * ¿De qué forma se relacionan los elementos del patrón? Después de conocer la estructura del patrón, será más fácil comprender el siguiente ejemplo basado en un caso de uso real de PHP. #### **index.php:** Ejemplo conceptual parent = $parent; } public function getParent(): Component { return $this->parent; } /\*\* \* In some cases, it would be beneficial to define the child-management \* operations right in the base Component class. This way, you won't need to \* expose any concrete component classes to the client code, even during the \* object tree assembly. The downside is that these methods will be empty \* for the leaf-level components. \*/ public function add(Component $component): void { } public function remove(Component $component): void { } /\*\* \* You can provide a method that lets the client code figure out whether a \* component can bear children. \*/ public function isComposite(): bool { return false; } /\*\* \* The base Component may implement some default behavior or leave it to \* concrete classes (by declaring the method containing the behavior as \* "abstract"). \*/ abstract public function operation(): string; } /\*\* \* The Leaf class represents the end objects of a composition. A leaf can't have \* any children. \* \* Usually, it's the Leaf objects that do the actual work, whereas Composite \* objects only delegate to their sub-components. \*/ class Leaf extends Component { public function operation(): string { return "Leaf"; } } /\*\* \* The Composite class represents the complex components that may have children. \* Usually, the Composite objects delegate the actual work to their children and \* then "sum-up" the result. \*/ class Composite extends Component { /\*\* \* @var \\SplObjectStorage \*/ protected $children; public function \_\_construct() { $this->children = new \\SplObjectStorage(); } /\*\* \* A composite object can add or remove other components (both simple or \* complex) to or from its child list. \*/ public function add(Component $component): void { $this->children->attach($component); $component->setParent($this); } public function remove(Component $component): void { $this->children->detach($component); $component->setParent(null); } public function isComposite(): bool { return true; } /\*\* \* The Composite executes its primary logic in a particular way. It \* traverses recursively through all its children, collecting and summing \* their results. Since the composite's children pass these calls to their \* children and so forth, the whole object tree is traversed as a result. \*/ public function operation(): string { $results = \[\]; foreach ($this->children as $child) { $results\[\] = $child->operation(); } return "Branch(" . implode("+", $results) . ")"; } } /\*\* \* The client code works with all of the components via the base interface. \*/ function clientCode(Component $component) { // ... echo "RESULT: " . $component->operation(); // ... } /\*\* \* This way the client code can support the simple leaf components... \*/ $simple = new Leaf(); echo "Client: I've got a simple component:\\n"; clientCode($simple); echo "\\n\\n"; /\*\* \* ...as well as the complex composites. \*/ $tree = new Composite(); $branch1 = new Composite(); $branch1->add(new Leaf()); $branch1->add(new Leaf()); $branch2 = new Composite(); $branch2->add(new Leaf()); $tree->add($branch1); $tree->add($branch2); echo "Client: Now I've got a composite tree:\\n"; clientCode($tree); echo "\\n\\n"; /\*\* \* Thanks to the fact that the child-management operations are declared in the \* base Component class, the client code can work with any component, simple or \* complex, without depending on their concrete classes. \*/ function clientCode2(Component $component1, Component $component2) { // ... if ($component1->isComposite()) { $component1->add($component2); } echo "RESULT: " . $component1->operation(); // ... } echo "Client: I don't need to check the components classes even when managing the tree:\\n"; clientCode2($tree, $simple); #### **Output.txt:** Resultado de la ejecución Client: I get a simple component: RESULT: Leaf Client: Now I get a composite tree: RESULT: Branch(Branch(Leaf+Leaf)+Branch(Leaf)) Client: I don't need to check the components classes even when managing the tree:: RESULT: Branch(Branch(Leaf+Leaf)+Branch(Leaf)+Leaf) Ejemplo del mundo real ---------------------- El patrón **Composite** puede agilizar el trabajo con cualquier estructura recursiva con forma de árbol. El árbol DOM HTML es un ejemplo de dicha estructura. Por ejemplo, mientras varios elementos de entrada pueden actuar como hojas, los elementos complejos como formas y grupos de campo (fieldsets) juegan el papel de compuestos. Con esto en mente, puedes utilizar el patrón Composite para aplicar varios comportamientos a todo el árbol HTML, del mismo modo que a sus elementos internos, sin acoplar tu código a clases concretas del árbol DOM. Ejemplos de estos comportamientos serían representar los elementos DOM, exportarlos a varios formatos, validar sus partes, etc. Con el patrón Composite, no tienes que comprobar si se trata del tipo de elemento simple o complejo antes de ejecutar el comportamiento. Dependiendo del tipo de elemento, se ejecuta directamente o se pasa a todos los hijos del elemento. #### **index.php:** Ejemplo del mundo real name = $name; $this->title = $title; } public function getName(): string { return $this->name; } public function setData($data): void { $this->data = $data; } public function getData(): array { return $this->data; } /\*\* \* Each concrete DOM element must provide its rendering implementation, but \* we can safely assume that all of them are returning strings. \*/ abstract public function render(): string; } /\*\* \* This is a Leaf component. Like all the Leaves, it can't have any children. \*/ class Input extends FormElement { private $type; public function \_\_construct(string $name, string $title, string $type) { parent::\_\_construct($name, $title); $this->type = $type; } /\*\* \* Since Leaf components don't have any children that may handle the bulk of \* the work for them, usually it is the Leaves who do the most of the heavy- \* lifting within the Composite pattern. \*/ public function render(): string { return "\\n" . "name}\\" type=\\"{$this->type}\\" value=\\"{$this->data}\\">\\n"; } } /\*\* \* The base Composite class implements the infrastructure for managing child \* objects, reused by all Concrete Composites. \*/ abstract class FieldComposite extends FormElement { /\*\* \* @var FormElement\[\] \*/ protected $fields = \[\]; /\*\* \* The methods for adding/removing sub-objects. \*/ public function add(FormElement $field): void { $name = $field->getName(); $this->fields\[$name\] = $field; } public function remove(FormElement $component): void { $this->fields = array\_filter($this->fields, function ($child) use ($component) { return $child != $component; }); } /\*\* \* Whereas a Leaf's method just does the job, the Composite's method almost \* always has to take its sub-objects into account. \* \* In this case, the composite can accept structured data. \* \* @param array $data \*/ public function setData($data): void { foreach ($this->fields as $name => $field) { if (isset($data\[$name\])) { $field->setData($data\[$name\]); } } } /\*\* \* The same logic applies to the getter. It returns the structured data of \* the composite itself (if any) and all the children data. \*/ public function getData(): array { $data = \[\]; foreach ($this->fields as $name => $field) { $data\[$name\] = $field->getData(); } return $data; } /\*\* \* The base implementation of the Composite's rendering simply combines \* results of all children. Concrete Composites will be able to reuse this \* implementation in their real rendering implementations. \*/ public function render(): string { $output = ""; foreach ($this->fields as $name => $field) { $output .= $field->render(); } return $output; } } /\*\* \* The fieldset element is a Concrete Composite. \*/ class Fieldset extends FieldComposite { public function render(): string { // Note how the combined rendering result of children is incorporated // into the fieldset tag. $output = parent::render(); return "
{$this->title}\\n$output
\\n"; } } /\*\* \* And so is the form element. \*/ class Form extends FieldComposite { protected $url; public function \_\_construct(string $name, string $title, string $url) { parent::\_\_construct($name, $title); $this->url = $url; } public function render(): string { $output = parent::render(); return "
url}\\">\\n

{$this->title}

\\n$output
\\n"; } } /\*\* \* The client code gets a convenient interface for building complex tree \* structures. \*/ function getProductForm(): FormElement { $form = new Form('product', "Add product", "/product/add"); $form->add(new Input('name', "Name", 'text')); $form->add(new Input('description', "Description", 'text')); $picture = new Fieldset('photo', "Product photo"); $picture->add(new Input('caption', "Caption", 'text')); $picture->add(new Input('image', "Image", 'file')); $form->add($picture); return $form; } /\*\* \* The form structure can be filled with data from various sources. The Client \* doesn't have to traverse through all form fields to assign data to various \* fields since the form itself can handle that. \*/ function loadProductData(FormElement $form) { $data = \[\ 'name' => 'Apple MacBook',\ 'description' => 'A decent laptop.',\ 'photo' => \[\ 'caption' => 'Front photo.',\ 'image' => 'photo1.png',\ \],\ \]; $form->setData($data); } /\*\* \* The client code can work with form elements using the abstract interface. \* This way, it doesn't matter whether the client works with a simple component \* or a complex composite tree. \*/ function renderProduct(FormElement $form) { // .. echo $form->render(); // .. } $form = getProductForm(); loadProductData($form); renderProduct($form); #### **Output.txt:** Resultado de la ejecución

Add product

Product photo
**Composite** en otros lenguajes -------------------------------- [![Composite en C#](https://refactoring.guru/images/patterns/icons/csharp.svg?id=da64592defc6e86d57c39c66e9de3e58)](https://refactoring.guru/es/design-patterns/composite/csharp/example "Composite en C#") [![Composite en C++](https://refactoring.guru/images/patterns/icons/cpp.svg?id=f7782ed8b8666246bfcc3f8fefc3b858)](https://refactoring.guru/es/design-patterns/composite/cpp/example "Composite en C++") [![Composite en Go](https://refactoring.guru/images/patterns/icons/go.svg?id=1a89927eb99b1ea3fde7701d97970aca)](https://refactoring.guru/es/design-patterns/composite/go/example "Composite en Go") [![Composite en Java](https://refactoring.guru/images/patterns/icons/java.svg?id=e6d87e2dca08c953fe3acd1275ed4f4e)](https://refactoring.guru/es/design-patterns/composite/java/example "Composite en Java") [![Composite en Python](https://refactoring.guru/images/patterns/icons/python.svg?id=6d815d43c0f7050a1151b43e51569c9f)](https://refactoring.guru/es/design-patterns/composite/python/example "Composite en Python") [![Composite en Ruby](https://refactoring.guru/images/patterns/icons/ruby.svg?id=b065b718c914bf8e960ef731600be1eb)](https://refactoring.guru/es/design-patterns/composite/ruby/example "Composite en Ruby") [![Composite en Rust](https://refactoring.guru/images/patterns/icons/rust.svg?id=1f5698a4b5ae23fe79413511747e4a87)](https://refactoring.guru/es/design-patterns/composite/rust/example "Composite en Rust") [![Composite en Swift](https://refactoring.guru/images/patterns/icons/swift.svg?id=0b716c2d52ec3a48fbe91ac031070c1d)](https://refactoring.guru/es/design-patterns/composite/swift/example "Composite en Swift") [![Composite en TypeScript](https://refactoring.guru/images/patterns/icons/typescript.svg?id=2239d0f16cb703540c205dd8cb0c0cb7)](https://refactoring.guru/es/design-patterns/composite/typescript/example "Composite en TypeScript") --- # Bridge en Ruby / Patrones de diseño [There are patterns of patterns now! \ My friend's project: MetaPatterns.io](https://metapatterns.io/)  [](https://refactoring.guru/es/design-patterns/bridge/ruby/example#checkout) [](https://refactoring.guru/es/design-patterns/bridge/ruby/example#checkout) [](https://refactoring.guru/) / [Patrones de diseño](https://refactoring.guru/es/design-patterns) / [Bridge](https://refactoring.guru/es/design-patterns/bridge) / [Ruby](https://refactoring.guru/es/design-patterns/ruby) ![Bridge](https://refactoring.guru/images/patterns/cards/bridge-mini-2x.png?id=2622384cf623ed150ee9c21a0812dd87) **Bridge** en Ruby ================== **Bridge** es un patrón de diseño estructural que divide la lógica de negocio o una clase muy grande en jerarquías de clases separadas que se pueden desarrollar independientemente. Una de estas jerarquías (a menudo denominada Abstracción) obtendrá una referencia a un objeto de la segunda jerarquía (Implementación). La abstracción podrá delegar algunas (en ocasiones, la mayoría) de sus llamadas al objeto de las implementaciones. Como todas las implementaciones tendrán una interfaz común, serán intercambiables dentro de la abstracción. [Aprende más sobre el patrón Bridge](https://refactoring.guru/es/design-patterns/bridge) Navegación  [Intro](https://refactoring.guru/es/design-patterns/bridge/ruby/example#)  [Ejemplo conceptual](https://refactoring.guru/es/design-patterns/bridge/ruby/example#example-0)  [main](https://refactoring.guru/es/design-patterns/bridge/ruby/example#example-0--main-rb)  [output](https://refactoring.guru/es/design-patterns/bridge/ruby/example#example-0--output-txt) **Complejidad:** **Popularidad:** **Ejemplos de uso:** El patrón Bridge es de especial utilidad a la hora de tratar con aplicaciones multiplataforma, soportar varios tipos de servidores de bases de datos, o trabajar con varios proveedores de API de un cierto tipo (por ejemplo, plataformas en la nube, redes sociales, etc.). **Identificación:** El patrón Bridge se puede reconocer por una distinción clara entre alguna entidad controladora y varias plataformas diferentes en las que se basa. Ejemplo conceptual ------------------ Este ejemplo ilustra la estructura del patrón de diseño **Bridge**. Se centra en responder las siguientes preguntas: * ¿De qué clases se compone? * ¿Qué papeles juegan esas clases? * ¿De qué forma se relacionan los elementos del patrón? #### **main.rb:** Ejemplo conceptual \# The Abstraction defines the interface for the "control" part of the two class # hierarchies. It maintains a reference to an object of the Implementation # hierarchy and delegates all of the real work to this object. class Abstraction # @param \[Implementation\] implementation def initialize(implementation) @implementation = implementation end # @return \[String\] def operation "Abstraction: Base operation with:\\n"\\ "#{@implementation.operation\_implementation}" end end # You can extend the Abstraction without changing the Implementation classes. class ExtendedAbstraction < Abstraction # @return \[String\] def operation "ExtendedAbstraction: Extended operation with:\\n"\\ "#{@implementation.operation\_implementation}" end end # The Implementation defines the interface for all implementation classes. It # doesn't have to match the Abstraction's interface. In fact, the two interfaces # can be entirely different. Typically the Implementation interface provides # only primitive operations, while the Abstraction defines higher-level # operations based on those primitives. class Implementation # @abstract # # @return \[String\] def operation\_implementation raise NotImplementedError, "#{self.class} has not implemented method '#{\_\_method\_\_}'" end end # Each Concrete Implementation corresponds to a specific platform and implements # the Implementation interface using that platform's API. class ConcreteImplementationA < Implementation # @return \[String\] def operation\_implementation 'ConcreteImplementationA: Here\\'s the result on the platform A.' end end class ConcreteImplementationB < Implementation # @return \[String\] def operation\_implementation 'ConcreteImplementationB: Here\\'s the result on the platform B.' end end # Except for the initialization phase, where an Abstraction object gets linked # with a specific Implementation object, the client code should only depend on # the Abstraction class. This way the client code can support any abstraction- # implementation combination. def client\_code(abstraction) # ... print abstraction.operation # ... end # The client code should be able to work with any pre-configured abstraction- # implementation combination. implementation = ConcreteImplementationA.new abstraction = Abstraction.new(implementation) client\_code(abstraction) puts "\\n\\n" implementation = ConcreteImplementationB.new abstraction = ExtendedAbstraction.new(implementation) client\_code(abstraction) #### **output.txt:** Resultado de la ejecución Abstraction: Base operation with: ConcreteImplementationA: Here's the result on the platform A. ExtendedAbstraction: Extended operation with: ConcreteImplementationB: Here's the result on the platform B. **Bridge** en otros lenguajes ----------------------------- [![Bridge en C#](https://refactoring.guru/images/patterns/icons/csharp.svg?id=da64592defc6e86d57c39c66e9de3e58)](https://refactoring.guru/es/design-patterns/bridge/csharp/example "Bridge en C#") [![Bridge en C++](https://refactoring.guru/images/patterns/icons/cpp.svg?id=f7782ed8b8666246bfcc3f8fefc3b858)](https://refactoring.guru/es/design-patterns/bridge/cpp/example "Bridge en C++") [![Bridge en Go](https://refactoring.guru/images/patterns/icons/go.svg?id=1a89927eb99b1ea3fde7701d97970aca)](https://refactoring.guru/es/design-patterns/bridge/go/example "Bridge en Go") [![Bridge en Java](https://refactoring.guru/images/patterns/icons/java.svg?id=e6d87e2dca08c953fe3acd1275ed4f4e)](https://refactoring.guru/es/design-patterns/bridge/java/example "Bridge en Java") [![Bridge en PHP](https://refactoring.guru/images/patterns/icons/php.svg?id=be1906eb26b71ec1d3b93720d6156618)](https://refactoring.guru/es/design-patterns/bridge/php/example "Bridge en PHP") [![Bridge en Python](https://refactoring.guru/images/patterns/icons/python.svg?id=6d815d43c0f7050a1151b43e51569c9f)](https://refactoring.guru/es/design-patterns/bridge/python/example "Bridge en Python") [![Bridge en Rust](https://refactoring.guru/images/patterns/icons/rust.svg?id=1f5698a4b5ae23fe79413511747e4a87)](https://refactoring.guru/es/design-patterns/bridge/rust/example "Bridge en Rust") [![Bridge en Swift](https://refactoring.guru/images/patterns/icons/swift.svg?id=0b716c2d52ec3a48fbe91ac031070c1d)](https://refactoring.guru/es/design-patterns/bridge/swift/example "Bridge en Swift") [![Bridge en TypeScript](https://refactoring.guru/images/patterns/icons/typescript.svg?id=2239d0f16cb703540c205dd8cb0c0cb7)](https://refactoring.guru/es/design-patterns/bridge/typescript/example "Bridge en TypeScript") --- # Facade en PHP / Patrones de diseño [There are patterns of patterns now! \ My friend's project: MetaPatterns.io](https://metapatterns.io/)  [](https://refactoring.guru/es/design-patterns/facade/php/example#checkout) [](https://refactoring.guru/es/design-patterns/facade/php/example#checkout) [](https://refactoring.guru/) / [Patrones de diseño](https://refactoring.guru/es/design-patterns) / [Facade](https://refactoring.guru/es/design-patterns/facade) / [PHP](https://refactoring.guru/es/design-patterns/php) ![Facade](https://refactoring.guru/images/patterns/cards/facade-mini-2x.png?id=d4cc6a5d81a31143cc665f7ac1481ac8) **Facade** en PHP ================= **Facade** es un patrón de diseño estructural que proporciona una interfaz simplificada (pero limitada) a un sistema complejo de clases, bibliotecas o \_frameworks\_. El patrón Facade disminuye la complejidad general de la aplicación, al mismo tiempo que ayuda a mover dependencias no deseadas a un solo lugar. [Aprende más sobre el patrón Facade](https://refactoring.guru/es/design-patterns/facade) Navegación  [Intro](https://refactoring.guru/es/design-patterns/facade/php/example#)  [Ejemplo conceptual](https://refactoring.guru/es/design-patterns/facade/php/example#example-0)  [index](https://refactoring.guru/es/design-patterns/facade/php/example#example-0--index-php)  [Output](https://refactoring.guru/es/design-patterns/facade/php/example#example-0--Output-txt)  [Ejemplo del mundo real](https://refactoring.guru/es/design-patterns/facade/php/example#example-1)  [index](https://refactoring.guru/es/design-patterns/facade/php/example#example-1--index-php)  [Output](https://refactoring.guru/es/design-patterns/facade/php/example#example-1--Output-txt) **Complejidad:** **Popularidad:** **Ejemplos de uso:** El patrón Facade se utiliza habitualmente en aplicaciones PHP, donde las clases fachada simplifican el trabajo con bibliotecas o API complejas. **Identificación:** El patrón Facade se puede reconocer en una clase con una interfaz simple, pero que delega la mayor parte del trabajo a otras clases. Normalmente, las fachadas gestionan todo el ciclo de vida de los objetos que utilizan. Ejemplo conceptual ------------------ Este ejemplo ilustra la estructura del patrón de diseño **Facade** y se centra en las siguientes preguntas: * ¿De qué clases se compone? * ¿Qué papeles juegan esas clases? * ¿De qué forma se relacionan los elementos del patrón? Después de conocer la estructura del patrón, será más fácil comprender el siguiente ejemplo basado en un caso de uso real de PHP. #### **index.php:** Ejemplo conceptual subsystem1 = $subsystem1 ?: new Subsystem1(); $this->subsystem2 = $subsystem2 ?: new Subsystem2(); } /\*\* \* The Facade's methods are convenient shortcuts to the sophisticated \* functionality of the subsystems. However, clients get only to a fraction \* of a subsystem's capabilities. \*/ public function operation(): string { $result = "Facade initializes subsystems:\\n"; $result .= $this->subsystem1->operation1(); $result .= $this->subsystem2->operation1(); $result .= "Facade orders subsystems to perform the action:\\n"; $result .= $this->subsystem1->operationN(); $result .= $this->subsystem2->operationZ(); return $result; } } /\*\* \* The Subsystem can accept requests either from the facade or client directly. \* In any case, to the Subsystem, the Facade is yet another client, and it's not \* a part of the Subsystem. \*/ class Subsystem1 { public function operation1(): string { return "Subsystem1: Ready!\\n"; } // ... public function operationN(): string { return "Subsystem1: Go!\\n"; } } /\*\* \* Some facades can work with multiple subsystems at the same time. \*/ class Subsystem2 { public function operation1(): string { return "Subsystem2: Get ready!\\n"; } // ... public function operationZ(): string { return "Subsystem2: Fire!\\n"; } } /\*\* \* The client code works with complex subsystems through a simple interface \* provided by the Facade. When a facade manages the lifecycle of the subsystem, \* the client might not even know about the existence of the subsystem. This \* approach lets you keep the complexity under control. \*/ function clientCode(Facade $facade) { // ... echo $facade->operation(); // ... } /\*\* \* The client code may have some of the subsystem's objects already created. In \* this case, it might be worthwhile to initialize the Facade with these objects \* instead of letting the Facade create new instances. \*/ $subsystem1 = new Subsystem1(); $subsystem2 = new Subsystem2(); $facade = new Facade($subsystem1, $subsystem2); clientCode($facade); #### **Output.txt:** Resultado de la ejecución Facade initializes subsystems: Subsystem1: Ready! Subsystem2: Get ready! Facade orders subsystems to perform the action: Subsystem1: Go! Subsystem2: Fire! Ejemplo del mundo real ---------------------- Piensa en el patrón **Facade** como un adaptador de simplicidad para algunos subsistemas complejos. El patrón Facade aísla la complejidad dentro de una única clase y permite al código de otras aplicaciones utilizar la interfaz directa. En este ejemplo, el patrón Facade esconde al código cliente la complejidad de la API de YouTube y la biblioteca de FFmpeg. En lugar de trabajar con decenas de clases, el cliente utiliza un método simple en la fachada. #### **index.php:** Ejemplo del mundo real youtube = new YouTube($youtubeApiKey); $this->ffmpeg = new FFMpeg(); } /\*\* \* The Facade provides a simple method for downloading video and encoding it \* to a target format (for the sake of simplicity, the real-world code is \* commented-out). \*/ public function downloadVideo(string $url): void { echo "Fetching video metadata from youtube...\\n"; // $title = $this->youtube->fetchVideo($url)->getTitle(); echo "Saving video file to a temporary file...\\n"; // $this->youtube->saveAs($url, "video.mpg"); echo "Processing source video...\\n"; // $video = $this->ffmpeg->open('video.mpg'); echo "Normalizing and resizing the video to smaller dimensions...\\n"; // $video // ->filters() // ->resize(new FFMpeg\\Coordinate\\Dimension(320, 240)) // ->synchronize(); echo "Capturing preview image...\\n"; // $video // ->frame(FFMpeg\\Coordinate\\TimeCode::fromSeconds(10)) // ->save($title . 'frame.jpg'); echo "Saving video in target formats...\\n"; // $video // ->save(new FFMpeg\\Format\\Video\\X264(), $title . '.mp4') // ->save(new FFMpeg\\Format\\Video\\WMV(), $title . '.wmv') // ->save(new FFMpeg\\Format\\Video\\WebM(), $title . '.webm'); echo "Done!\\n"; } } /\*\* \* The YouTube API subsystem. \*/ class YouTube { public function fetchVideo(): string { /\* ... \*/ } public function saveAs(string $path): void { /\* ... \*/ } // ...more methods and classes... } /\*\* \* The FFmpeg subsystem (a complex video/audio conversion library). \*/ class FFMpeg { public static function create(): FFMpeg { /\* ... \*/ } public function open(string $video): void { /\* ... \*/ } // ...more methods and classes... RU: ...дополнительные методы и классы... } class FFMpegVideo { public function filters(): self { /\* ... \*/ } public function resize(): self { /\* ... \*/ } public function synchronize(): self { /\* ... \*/ } public function frame(): self { /\* ... \*/ } public function save(string $path): self { /\* ... \*/ } // ...more methods and classes... RU: ...дополнительные методы и классы... } /\*\* \* The client code does not depend on any subsystem's classes. Any changes \* inside the subsystem's code won't affect the client code. You will only need \* to update the Facade. \*/ function clientCode(YouTubeDownloader $facade) { // ... $facade->downloadVideo("https://www.youtube.com/watch?v=QH2-TGUlwu4"); // ... } $facade = new YouTubeDownloader("APIKEY-XXXXXXXXX"); clientCode($facade); #### **Output.txt:** Resultado de la ejecución Fetching video metadata from youtube... Saving video file to a temporary file... Processing source video... Normalizing and resizing the video to smaller dimensions... Capturing preview image... Saving video in target formats... Done! **Facade** en otros lenguajes ----------------------------- [![Facade en C#](https://refactoring.guru/images/patterns/icons/csharp.svg?id=da64592defc6e86d57c39c66e9de3e58)](https://refactoring.guru/es/design-patterns/facade/csharp/example "Facade en C#") [![Facade en C++](https://refactoring.guru/images/patterns/icons/cpp.svg?id=f7782ed8b8666246bfcc3f8fefc3b858)](https://refactoring.guru/es/design-patterns/facade/cpp/example "Facade en C++") [![Facade en Go](https://refactoring.guru/images/patterns/icons/go.svg?id=1a89927eb99b1ea3fde7701d97970aca)](https://refactoring.guru/es/design-patterns/facade/go/example "Facade en Go") [![Facade en Java](https://refactoring.guru/images/patterns/icons/java.svg?id=e6d87e2dca08c953fe3acd1275ed4f4e)](https://refactoring.guru/es/design-patterns/facade/java/example "Facade en Java") [![Facade en Python](https://refactoring.guru/images/patterns/icons/python.svg?id=6d815d43c0f7050a1151b43e51569c9f)](https://refactoring.guru/es/design-patterns/facade/python/example "Facade en Python") [![Facade en Ruby](https://refactoring.guru/images/patterns/icons/ruby.svg?id=b065b718c914bf8e960ef731600be1eb)](https://refactoring.guru/es/design-patterns/facade/ruby/example "Facade en Ruby") [![Facade en Rust](https://refactoring.guru/images/patterns/icons/rust.svg?id=1f5698a4b5ae23fe79413511747e4a87)](https://refactoring.guru/es/design-patterns/facade/rust/example "Facade en Rust") [![Facade en Swift](https://refactoring.guru/images/patterns/icons/swift.svg?id=0b716c2d52ec3a48fbe91ac031070c1d)](https://refactoring.guru/es/design-patterns/facade/swift/example "Facade en Swift") [![Facade en TypeScript](https://refactoring.guru/images/patterns/icons/typescript.svg?id=2239d0f16cb703540c205dd8cb0c0cb7)](https://refactoring.guru/es/design-patterns/facade/typescript/example "Facade en TypeScript") --- # Decorator [There are patterns of patterns now! \ My friend's project: MetaPatterns.io](https://metapatterns.io/)  [](https://refactoring.guru/es/design-patterns/decorator#checkout) [](https://refactoring.guru/es/design-patterns/decorator#checkout) [](https://refactoring.guru/) / [Patrones de diseño](https://refactoring.guru/es/design-patterns) / [Patrones estructurales](https://refactoring.guru/es/design-patterns/structural-patterns) Decorator ========= También llamado: Decorador, Envoltorio, Wrapper Propósito --------- **Decorator** es un patrón de diseño estructural que te permite añadir funcionalidades a objetos colocando estos objetos dentro de objetos encapsuladores especiales que contienen estas funcionalidades. ![Patrón de diseño Decorator](https://refactoring.guru/images/patterns/content/decorator/decorator-2x.png?id=736ab07b1d8920ab2c7a70c9cb1305cc) Problema -------- Imagina que estás trabajando en una biblioteca de notificaciones que permite a otros programas notificar a sus usuarios acerca de eventos importantes. La versión inicial de la biblioteca se basaba en la clase `Notificador` que solo contaba con unos cuantos campos, un constructor y un único método `send`. El método podía aceptar un argumento de mensaje de un cliente y enviar el mensaje a una lista de correos electrónicos que se pasaban a la clase notificadora a través de su constructor. Una aplicación de un tercero que actuaba como cliente debía crear y configurar el objeto notificador una vez y después utilizarlo cada vez que sucediera algo importante. ![Estructura de la biblioteca antes de aplicar el patrón Decorator](https://refactoring.guru/images/patterns/diagrams/decorator/problem1-es-2x.png?id=5aa03215663b9baf22350d6fb4d8ea3d) Un programa puede utilizar la clase notificadora para enviar notificaciones sobre eventos importantes a un grupo predefinido de correos electrónicos. En cierto momento te das cuenta de que los usuarios de la biblioteca esperan algo más que unas simples notificaciones por correo. A muchos de ellos les gustaría recibir mensajes SMS sobre asuntos importantes. Otros querrían recibir las notificaciones por Facebook y, por supuesto, a los usuarios corporativos les encantaría recibir notificaciones por Slack. ![Estructura de la biblioteca después de implementar otros tipos de notificaciones](https://refactoring.guru/images/patterns/diagrams/decorator/problem2-2x.png?id=28b2c8509b4e78c031d728424b876ebc) Cada tipo de notificación se implementa como una subclase de la clase notificadora. No puede ser muy complicado ¿verdad? Extendiste la clase `Notificador` y metiste los métodos adicionales de notificación dentro de nuevas subclases. Ahora el cliente debería instanciar la clase notificadora deseada y utilizarla para el resto de notificaciones. Pero entonces alguien te hace una pregunta razonable: “¿Por qué no se pueden utilizar varios tipos de notificación al mismo tiempo? Si tu casa está en llamas, probablemente quieras que te informen a través de todos los canales”. Intentaste solucionar ese problema creando subclases especiales que combinaban varios métodos de notificación dentro de una clase. Sin embargo, enseguida resultó evidente que esta solución inflaría el código en gran medida, no sólo el de la biblioteca, sino también el código cliente. ![Estructura de la biblioteca tras crear combinaciones de clases](https://refactoring.guru/images/patterns/diagrams/decorator/problem3-2x.png?id=abb7a87b521ce97d7661dd9c0b988cc3) Explosión combinatoria de subclases. Debes encontrar alguna otra forma de estructurar las clases de las notificaciones para no alcanzar cifras que rompan accidentalmente un récord Guinness. Solución -------- Cuando tenemos que alterar la funcionalidad de un objeto, lo primero que se viene a la mente es extender una clase. No obstante, la herencia tiene varias limitaciones importantes de las que debes ser consciente. * La herencia es estática. No se puede alterar la funcionalidad de un objeto existente durante el tiempo de ejecución. Sólo se puede sustituir el objeto completo por otro creado a partir de una subclase diferente. * Las subclases sólo pueden tener una clase padre. En la mayoría de lenguajes, la herencia no permite a una clase heredar comportamientos de varias clases al mismo tiempo. Una de las formas de superar estas limitaciones es empleando la _Agregación_ o la _Composición_ _Agregación_: el objeto A contiene objetos B; B puede existir sin A. _Composición_: el objeto A está compuesto de objetos B; A gestiona el ciclo vital de B; B no puede existir sin A. en lugar de la _Herencia_. Ambas alternativas funcionan prácticamente del mismo modo: un objeto _tiene una_ referencia a otro y le delega parte del trabajo, mientras que con la herencia, el propio objeto _puede_ realizar ese trabajo, heredando el comportamiento de su superclase. Con esta nueva solución puedes sustituir fácilmente el objeto “ayudante” vinculado por otro, cambiando el comportamiento del contenedor durante el tiempo de ejecución. Un objeto puede utilizar el comportamiento de varias clases con referencias a varios objetos, delegándoles todo tipo de tareas. La agregación/composición es el principio clave que se esconde tras muchos patrones de diseño, incluyendo el Decorator. A propósito, regresemos a la discusión sobre el patrón. ![Herencia vs. Agregación](https://refactoring.guru/images/patterns/diagrams/decorator/solution1-es-2x.png?id=32193cacb5b8cdee7f2a2b33721cd01d) Herencia vs. Agregación “Wrapper” (envoltorio, en inglés) es el sobrenombre alternativo del patrón Decorator, que expresa claramente su idea principal. Un _wrapper_ es un objeto que puede vincularse con un objeto _objetivo_. El wrapper contiene el mismo grupo de métodos que el objetivo y le delega todas las solicitudes que recibe. No obstante, el wrapper puede alterar el resultado haciendo algo antes o después de pasar la solicitud al objetivo. ¿Cuándo se convierte un simple wrapper en el verdadero decorador? Como he mencionado, el wrapper implementa la misma interfaz que el objeto envuelto. Éste es el motivo por el que, desde la perspectiva del cliente, estos objetos son idénticos. Haz que el campo de referencia del wrapper acepte cualquier objeto que siga esa interfaz. Esto te permitirá _envolver_ un objeto en varios wrappers, añadiéndole el comportamiento combinado de todos ellos. En nuestro ejemplo de las notificaciones, dejemos la sencilla funcionalidad de las notificaciones por correo electrónico dentro de la clase base `Notificador`, pero convirtamos el resto de los métodos de notificación en decoradores. ![La solución con el patrón Decorator](https://refactoring.guru/images/patterns/diagrams/decorator/solution2-2x.png?id=7775f76b94dbd5cd25f711ce81f59262) Varios métodos de notificación se convierten en decoradores. El código cliente debe envolver un objeto notificador básico dentro de un grupo de decoradores que satisfagan las preferencias del cliente. Los objetos resultantes se estructurarán como una pila. ![Las aplicaciones pueden configurar pilas complejas de decoradores de notificación](https://refactoring.guru/images/patterns/diagrams/decorator/solution3-es-2x.png?id=1058bedcc9530b2f7ad3d3cfd3deee24) Las aplicaciones pueden configurar pilas complejas de decoradores de notificación. El último decorador de la pila será el objeto con el que el cliente trabaja. Debido a que todos los decoradores implementan la misma interfaz que la notificadora base, al resto del código cliente no le importa si está trabajando con el objeto notificador “puro” o con el decorado. Podemos aplicar la misma solución a otras funcionalidades, como el formateo de mensajes o la composición de una lista de destinatarios. El cliente puede decorar el objeto con los decoradores personalizados que desee, siempre y cuando sigan la misma interfaz que los demás. Analogía en el mundo real ------------------------- ![Ejemplo del patrón Decorator](https://refactoring.guru/images/patterns/content/decorator/decorator-comic-1-2x.png?id=ba869f621b6e0ea173fdc2b535fc7eed) Obtienes un efecto combinado vistiendo varias prendas de ropa. Vestir ropa es un ejemplo del uso de decoradores. Cuando tienes frío, te cubres con un suéter. Si sigues teniendo frío a pesar del suéter, puedes ponerte una chaqueta encima. Si está lloviendo, puedes ponerte un impermeable. Todas estas prendas “extienden” tu comportamiento básico pero no son parte de ti, y puedes quitarte fácilmente cualquier prenda cuando lo desees. Estructura ---------- ![Estructura del patrón de diseño Decorator](https://refactoring.guru/images/patterns/diagrams/decorator/structure-2x.png?id=3cfa1f10417a4ef0c12580bc4a63b80d)![Estructura del patrón de diseño Decorator](https://refactoring.guru/images/patterns/diagrams/decorator/structure-indexed-2x.png?id=2733e7d0e322bfb2f150ccf8a878dbf6) 1. El **Componente** declara la interfaz común tanto para wrappers como para objetos envueltos. 2. **Componente Concreto** es una clase de objetos envueltos. Define el comportamiento básico, que los decoradores pueden alterar. 3. La clase **Decoradora Base** tiene un campo para referenciar un objeto envuelto. El tipo del campo debe declararse como la interfaz del componente para que pueda contener tanto los componentes concretos como los decoradores. La clase decoradora base delega todas las operaciones al objeto envuelto. 4. Los **Decoradores Concretos** definen funcionalidades adicionales que se pueden añadir dinámicamente a los componentes. Los decoradores concretos sobrescriben métodos de la clase decoradora base y ejecutan su comportamiento, ya sea antes o después de invocar al método padre. 5. El **Cliente** puede envolver componentes en varias capas de decoradores, siempre y cuando trabajen con todos los objetos a través de la interfaz del componente. Pseudocódigo ------------ En este ejemplo, el patrón **Decorator** te permite comprimir y encriptar información delicada independientemente del código que utiliza esos datos. ![Ejemplo de estructura del patrón Decorator](https://refactoring.guru/images/patterns/diagrams/decorator/example-2x.png?id=4891323a27d5601a174eec366187d833) Ejemplo de la encriptación y compresión de decoradores. La aplicación envuelve el objeto de la fuente de datos con un par de decoradores. Ambos wrappers cambian el modo en que los datos se escriben y se leen en el disco: * Justo antes de que los datos se **escriban en el disco**, los decoradores los encriptan y comprimen. La clase original escribe en el archivo los datos encriptados y protegidos, sin conocer el cambio. * Después de que los datos son **leídos del disco**, pasan por los mismos decoradores, que los descomprimen y decodifican. Los decoradores y la clase fuente de datos implementan la misma interfaz, lo que los hace intercambiables en el código cliente. // La interfaz de componente define operaciones que los // decoradores pueden alterar. interface DataSource is method writeData(data) method readData():data // Los componentes concretos proporcionan implementaciones por // defecto para las operaciones. En un programa puede haber // muchas variaciones de estas clases. class FileDataSource implements DataSource is constructor FileDataSource(filename) { ... } method writeData(data) is // Escribe datos en el archivo. method readData():data is // Lee datos del archivo. // La clase decoradora base sigue la misma interfaz que los // demás componentes. El principal propósito de esta clase es // definir la interfaz de encapsulación para todos los // decoradores concretos. La implementación por defecto del // código de encapsulación puede incluir un campo para almacenar // un componente envuelto y los medios para inicializarlo. class DataSourceDecorator implements DataSource is protected field wrappee: DataSource constructor DataSourceDecorator(source: DataSource) is wrappee = source // La decoradora base simplemente delega todo el trabajo al // componente envuelto. En los decoradores concretos se // pueden añadir comportamientos adicionales. method writeData(data) is wrappee.writeData(data) // Los decoradores concretos pueden invocar la // implementación padre de la operación en lugar de invocar // directamente al objeto envuelto. Esta solución simplifica // la extensión de las clases decoradoras. method readData():data is return wrappee.readData() // Los decoradores concretos deben invocar métodos en el objeto // envuelto, pero pueden añadir algo de su parte al resultado. // Los decoradores pueden ejecutar el comportamiento añadido // antes o después de la llamada a un objeto envuelto. class EncryptionDecorator extends DataSourceDecorator is method writeData(data) is // 1. Encripta los datos pasados. // 2. Pasa los datos encriptados al método writeData // (escribirDatos) del objeto envuelto. method readData():data is // 1. Obtiene datos del método readData (leerDatos) del // objeto envuelto. // 2. Intenta descifrarlo si está encriptado. // 3. Devuelve el resultado. // Puedes envolver objetos en varias capas de decoradores. class CompressionDecorator extends DataSourceDecorator is method writeData(data) is // 1. Comprime los datos pasados. // 2. Pasa los datos comprimidos al método writeData del // objeto envuelto. method readData():data is // 1. Obtiene datos del método readData del objeto // envuelto. // 2. Intenta descomprimirlo si está comprimido. // 3. Devuelve el resultado. // Opción 1. Un ejemplo sencillo del montaje de un decorador. class Application is method dumbUsageExample() is source = new FileDataSource("somefile.dat") source.writeData(salaryRecords) // El archivo objetivo se ha escrito con datos sin // formato. source = new CompressionDecorator(source) source.writeData(salaryRecords) // El archivo objetivo se ha escrito con datos // comprimidos. source = new EncryptionDecorator(source) // La variable fuente ahora contiene esto: // Cifrado > Compresión > FileDataSource source.writeData(salaryRecords) // El archivo se ha escrito con datos comprimidos y // encriptados. // Opción 2. El código cliente que utiliza una fuente externa de // datos. Los objetos SalaryManager no conocen ni se preocupan // por las especificaciones del almacenamiento de datos. // Trabajan con una fuente de datos preconfigurada recibida del // configurador de la aplicación. class SalaryManager is field source: DataSource constructor SalaryManager(source: DataSource) { ... } method load() is return source.readData() method save() is source.writeData(salaryRecords) // ...Otros métodos útiles... // La aplicación puede montar distintas pilas de decoradores // durante el tiempo de ejecución, dependiendo de la // configuración o el entorno. class ApplicationConfigurator is method configurationExample() is source = new FileDataSource("salary.dat") if (enabledEncryption) source = new EncryptionDecorator(source) if (enabledCompression) source = new CompressionDecorator(source) logger = new SalaryManager(source) salary = logger.load() // ... Aplicabilidad ------------- Utiliza el patrón Decorator cuando necesites asignar funcionalidades adicionales a objetos durante el tiempo de ejecución sin descomponer el código que utiliza esos objetos. El patrón Decorator te permite estructurar tu lógica de negocio en capas, crear un decorador para cada capa y componer objetos con varias combinaciones de esta lógica, durante el tiempo de ejecución. El código cliente puede tratar a todos estos objetos de la misma forma, ya que todos siguen una interfaz común. Utiliza el patrón cuando resulte extraño o no sea posible extender el comportamiento de un objeto utilizando la herencia. Muchos lenguajes de programación cuentan con la palabra clave `final` que puede utilizarse para evitar que una clase siga extendiéndose. Para una clase final, la única forma de reutilizar el comportamiento existente será envolver la clase con tu propio wrapper, utilizando el patrón Decorator. Cómo implementarlo ------------------ 1. Asegúrate de que tu dominio de negocio puede representarse como un componente primario con varias capas opcionales encima. 2. Decide qué métodos son comunes al componente primario y las capas opcionales. Crea una interfaz de componente y declara esos métodos en ella. 3. Crea una clase concreta de componente y define en ella el comportamiento base. 4. Crea una clase base decoradora. Debe tener un campo para almacenar una referencia a un objeto envuelto. El campo debe declararse con el tipo de interfaz de componente para permitir la vinculación a componentes concretos, así como a decoradores. La clase decoradora base debe delegar todas las operaciones al objeto envuelto. 5. Asegúrate de que todas las clases implementan la interfaz de componente. 6. Crea decoradores concretos extendiéndolos a partir de la decoradora base. Un decorador concreto debe ejecutar su comportamiento antes o después de la llamada al método padre (que siempre delega al objeto envuelto). 7. El código cliente debe ser responsable de crear decoradores y componerlos del modo que el cliente necesite. Pros y contras -------------- * Puedes extender el comportamiento de un objeto sin crear una nueva subclase. * Puedes añadir o eliminar responsabilidades de un objeto durante el tiempo de ejecución. * Puedes combinar varios comportamientos envolviendo un objeto con varios decoradores. * _Principio de responsabilidad única_. Puedes dividir una clase monolítica que implementa muchas variantes posibles de comportamiento, en varias clases más pequeñas. * Resulta difícil eliminar un wrapper específico de la pila de wrappers. * Es difícil implementar un decorador de tal forma que su comportamiento no dependa del orden en la pila de decoradores. * El código de configuración inicial de las capas pueden tener un aspecto desagradable. Relaciones con otros patrones ----------------------------- * [Adapter](https://refactoring.guru/es/design-patterns/adapter) proporciona una interfaz completamente diferente para acceder a un objeto existente. Por otro lado, con el patrón [Decorator](https://refactoring.guru/es/design-patterns/decorator) la interfaz permanece igual o se amplía. Además, _Decorator_ admite la composición recursiva, que no es posible cuando se utiliza _Adapter_. * Con [Adapter](https://refactoring.guru/es/design-patterns/adapter) se accede a un objeto existente a través de una interfaz diferente. Con [Proxy](https://refactoring.guru/es/design-patterns/proxy) , la interfaz sigue siendo la misma. Con [Decorator](https://refactoring.guru/es/design-patterns/decorator) se accede al objeto a través de una interfaz mejorada. * [Chain of Responsibility](https://refactoring.guru/es/design-patterns/chain-of-responsibility) y [Decorator](https://refactoring.guru/es/design-patterns/decorator) tienen estructuras de clase muy similares. Ambos patrones se basan en la composición recursiva para pasar la ejecución a través de una serie de objetos. Sin embargo, existen varias diferencias fundamentales: Los manejadores de _CoR_ pueden ejecutar operaciones arbitrarias con independencia entre sí. También pueden dejar de pasar la solicitud en cualquier momento. Por otro lado, varios _decoradores_ pueden extender el comportamiento del objeto manteniendo su consistencia con la interfaz base. Además, los decoradores no pueden romper el flujo de la solicitud. * [Composite](https://refactoring.guru/es/design-patterns/composite) y [Decorator](https://refactoring.guru/es/design-patterns/decorator) tienen diagramas de estructura similares ya que ambos se basan en la composición recursiva para organizar un número indefinido de objetos. Un _Decorator_ es como un _Composite_ pero sólo tiene un componente hijo. Hay otra diferencia importante: _Decorator_ añade responsabilidades adicionales al objeto envuelto, mientras que _Composite_ se limita a “recapitular” los resultados de sus hijos. No obstante, los patrones también pueden colaborar: puedes utilizar el _Decorator_ para extender el comportamiento de un objeto específico del árbol _Composite_. * Los diseños que hacen un uso amplio de [Composite](https://refactoring.guru/es/design-patterns/composite) y [Decorator](https://refactoring.guru/es/design-patterns/decorator) a menudo pueden beneficiarse del uso del [Prototype](https://refactoring.guru/es/design-patterns/prototype) . Aplicar el patrón te permite clonar estructuras complejas en lugar de reconstruirlas desde cero. * [Decorator](https://refactoring.guru/es/design-patterns/decorator) te permite cambiar la piel de un objeto, mientras que [Strategy](https://refactoring.guru/es/design-patterns/strategy) te permite cambiar sus entrañas. * [Decorator](https://refactoring.guru/es/design-patterns/decorator) y [Proxy](https://refactoring.guru/es/design-patterns/proxy) tienen estructuras similares, pero propósitos muy distintos. Ambos patrones se basan en el principio de composición, por el que un objeto debe delegar parte del trabajo a otro. La diferencia es que, normalmente, un _Proxy_ gestiona el ciclo de vida de su objeto de servicio por su cuenta, mientras que la composición de los _Decoradores_ siempre está controlada por el cliente. Ejemplos de código ------------------ [![Decorator en C#](https://refactoring.guru/images/patterns/icons/csharp.svg?id=da64592defc6e86d57c39c66e9de3e58)](https://refactoring.guru/es/design-patterns/decorator/csharp/example "Decorator en C#") [![Decorator en C++](https://refactoring.guru/images/patterns/icons/cpp.svg?id=f7782ed8b8666246bfcc3f8fefc3b858)](https://refactoring.guru/es/design-patterns/decorator/cpp/example "Decorator en C++") [![Decorator en Go](https://refactoring.guru/images/patterns/icons/go.svg?id=1a89927eb99b1ea3fde7701d97970aca)](https://refactoring.guru/es/design-patterns/decorator/go/example "Decorator en Go") [![Decorator en Java](https://refactoring.guru/images/patterns/icons/java.svg?id=e6d87e2dca08c953fe3acd1275ed4f4e)](https://refactoring.guru/es/design-patterns/decorator/java/example "Decorator en Java") [![Decorator en PHP](https://refactoring.guru/images/patterns/icons/php.svg?id=be1906eb26b71ec1d3b93720d6156618)](https://refactoring.guru/es/design-patterns/decorator/php/example "Decorator en PHP") [![Decorator en Python](https://refactoring.guru/images/patterns/icons/python.svg?id=6d815d43c0f7050a1151b43e51569c9f)](https://refactoring.guru/es/design-patterns/decorator/python/example "Decorator en Python") [![Decorator en Ruby](https://refactoring.guru/images/patterns/icons/ruby.svg?id=b065b718c914bf8e960ef731600be1eb)](https://refactoring.guru/es/design-patterns/decorator/ruby/example "Decorator en Ruby") [![Decorator en Rust](https://refactoring.guru/images/patterns/icons/rust.svg?id=1f5698a4b5ae23fe79413511747e4a87)](https://refactoring.guru/es/design-patterns/decorator/rust/example "Decorator en Rust") [![Decorator en Swift](https://refactoring.guru/images/patterns/icons/swift.svg?id=0b716c2d52ec3a48fbe91ac031070c1d)](https://refactoring.guru/es/design-patterns/decorator/swift/example "Decorator en Swift") [![Decorator en TypeScript](https://refactoring.guru/images/patterns/icons/typescript.svg?id=2239d0f16cb703540c205dd8cb0c0cb7)](https://refactoring.guru/es/design-patterns/decorator/typescript/example "Decorator en TypeScript") [![](https://refactoring.guru/images/patterns/banners/patterns-book-banner-3-2x.png?id=0cc3f77ab421d1a5c02ee46488231c3a)](https://refactoring.guru/es/design-patterns/book) ### ¡Apoya nuestro sitio web gratuito y compra el libro! * 22 patrones de diseño y 8 principios explicados en profundidad * 436 páginas bien estructuradas, fáciles de leer y libres de tecnicismos * 225 ilustraciones y diagramas claros y útiles * Un archivo con ejemplos de código en 11 lenguajes * Todos los dispositivos soportados: Formatos PDF/EPUB/MOBI/KFX [Saber más…](https://refactoring.guru/es/design-patterns/book) --- # Decorator en PHP / Patrones de diseño [There are patterns of patterns now! \ My friend's project: MetaPatterns.io](https://metapatterns.io/)  [](https://refactoring.guru/es/design-patterns/decorator/php/example#checkout) [](https://refactoring.guru/es/design-patterns/decorator/php/example#checkout) [](https://refactoring.guru/) / [Patrones de diseño](https://refactoring.guru/es/design-patterns) / [Decorator](https://refactoring.guru/es/design-patterns/decorator) / [PHP](https://refactoring.guru/es/design-patterns/php) ![Decorator](https://refactoring.guru/images/patterns/cards/decorator-mini-2x.png?id=3b58e540d7d28523080cad341ed9b2e9) **Decorator** en PHP ==================== **Decorator** es un patrón de diseño estructural que permite añadir dinámicamente nuevos comportamientos a objetos colocándolos dentro de objetos especiales que los envuelven (\_wrappers\_). Utilizando decoradores puedes envolver objetos innumerables veces, ya que los objetos objetivo y los decoradores siguen la misma interfaz. El objeto resultante obtendrá un comportamiento de apilado de todos los _wrappers_. [Aprende más sobre el patrón Decorator](https://refactoring.guru/es/design-patterns/decorator) Navegación  [Intro](https://refactoring.guru/es/design-patterns/decorator/php/example#)  [Ejemplo conceptual](https://refactoring.guru/es/design-patterns/decorator/php/example#example-0)  [index](https://refactoring.guru/es/design-patterns/decorator/php/example#example-0--index-php)  [Output](https://refactoring.guru/es/design-patterns/decorator/php/example#example-0--Output-txt)  [Ejemplo del mundo real](https://refactoring.guru/es/design-patterns/decorator/php/example#example-1)  [index](https://refactoring.guru/es/design-patterns/decorator/php/example#example-1--index-php)  [Output](https://refactoring.guru/es/design-patterns/decorator/php/example#example-1--Output-txt) **Complejidad:** **Popularidad:** **Ejemplos de uso:** El patrón Decorator es bastante común en el código PHP, especialmente en el código relacionado con los flujos (streams). **Identificación:** El patrón Decorator puede ser reconocido por métodos de creación o el constructor que acepta objetos de la misma clase o interfaz que la clase actual. Ejemplo conceptual ------------------ Este ejemplo ilustra la estructura del patrón de diseño **Decorator** y se centra en las siguientes preguntas: * ¿De qué clases se compone? * ¿Qué papeles juegan esas clases? * ¿De qué forma se relacionan los elementos del patrón? Después de conocer la estructura del patrón, será más fácil comprender el siguiente ejemplo basado en un caso de uso real de PHP. #### **index.php:** Ejemplo conceptual component = $component; } /\*\* \* The Decorator delegates all work to the wrapped component. \*/ public function operation(): string { return $this->component->operation(); } } /\*\* \* Concrete Decorators call the wrapped object and alter its result in some way. \*/ class ConcreteDecoratorA extends Decorator { /\*\* \* Decorators may call parent implementation of the operation, instead of \* calling the wrapped object directly. This approach simplifies extension \* of decorator classes. \*/ public function operation(): string { return "ConcreteDecoratorA(" . parent::operation() . ")"; } } /\*\* \* Decorators can execute their behavior either before or after the call to a \* wrapped object. \*/ class ConcreteDecoratorB extends Decorator { public function operation(): string { return "ConcreteDecoratorB(" . parent::operation() . ")"; } } /\*\* \* The client code works with all objects using the Component interface. This \* way it can stay independent of the concrete classes of components it works \* with. \*/ function clientCode(Component $component) { // ... echo "RESULT: " . $component->operation(); // ... } /\*\* \* This way the client code can support both simple components... \*/ $simple = new ConcreteComponent(); echo "Client: I've got a simple component:\\n"; clientCode($simple); echo "\\n\\n"; /\*\* \* ...as well as decorated ones. \* \* Note how decorators can wrap not only simple components but the other \* decorators as well. \*/ $decorator1 = new ConcreteDecoratorA($simple); $decorator2 = new ConcreteDecoratorB($decorator1); echo "Client: Now I've got a decorated component:\\n"; clientCode($decorator2); #### **Output.txt:** Resultado de la ejecución Client: I've got a simple component: RESULT: ConcreteComponent Client: Now I've got a decorated component: RESULT: ConcreteDecoratorB(ConcreteDecoratorA(ConcreteComponent)) Ejemplo del mundo real ---------------------- En este ejemplo, el patrón **Decorator** te ayuda a construir reglas complejas de filtrado de texto para limpiar el contenido antes de representarlo en una página web. Los distintos tipos de contenido, como comentarios, publicaciones en foros, o mensajes privados, requieren distintos grupos de filtros. Por ejemplo, aunque quieras eliminar todo el HTML de los comentarios, quizá desees mantener algunas etiquetas HTML básicas en publicaciones en el foro. Además, puede que quieras permitir publicar en formato Markdown, que debe procesarse antes de que se realice el filtrado HTML. Todas estas reglas de filtrado pueden representarse como clases decoradoras separadas, que se pueden apilar de otra forma, dependiendo de la naturaleza del contenido que tengas. #### **index.php:** Ejemplo del mundo real inputFormat = $inputFormat; } /\*\* \* Decorator delegates all work to a wrapped component. \*/ public function formatText(string $text): string { return $this->inputFormat->formatText($text); } } /\*\* \* This Concrete Decorator strips out all HTML tags from the given text. \*/ class PlainTextFilter extends TextFormat { public function formatText(string $text): string { $text = parent::formatText($text); return strip\_tags($text); } } /\*\* \* This Concrete Decorator strips only dangerous HTML tags and attributes that \* may lead to an XSS vulnerability. \*/ class DangerousHTMLTagsFilter extends TextFormat { private $dangerousTagPatterns = \[\ "|(\[\\s\\S\]\*)?|i", // ...\ \]; private $dangerousAttributes = \[\ "onclick", "onkeypress", // ...\ \]; public function formatText(string $text): string { $text = parent::formatText($text); foreach ($this->dangerousTagPatterns as $pattern) { $text = preg\_replace($pattern, '', $text); } foreach ($this->dangerousAttributes as $attribute) { $text = preg\_replace\_callback('|<(.\*?)>|', function ($matches) use ($attribute) { $result = preg\_replace("|$attribute=|i", '', $matches\[1\]); return "<" . $result . ">"; }, $text); } return $text; } } /\*\* \* This Concrete Decorator provides a rudimentary Markdown → HTML conversion. \*/ class MarkdownFormat extends TextFormat { public function formatText(string $text): string { $text = parent::formatText($text); // Format block elements. $chunks = preg\_split('|\\n\\n|', $text); foreach ($chunks as &$chunk) { // Format headers. if (preg\_match('|^#+|', $chunk)) { $chunk = preg\_replace\_callback('|^(#+)(.\*?)$|', function ($matches) { $h = strlen($matches\[1\]); return "" . trim($matches\[2\]) . ""; }, $chunk); } // Format paragraphs. else { $chunk = "

$chunk

"; } } $text = implode("\\n\\n", $chunks); // Format inline elements. $text = preg\_replace("|\_\_(.\*?)\_\_|", '$1', $text); $text = preg\_replace("|\\\*\\\*(.\*?)\\\*\\\*|", '$1', $text); $text = preg\_replace("|\_(.\*?)\_|", '$1', $text); $text = preg\_replace("|\\\*(.\*?)\\\*|", '$1', $text); return $text; } } /\*\* \* The client code might be a part of a real website, which renders user- \* generated content. Since it works with formatters through the Component \* interface, it doesn't care whether it gets a simple component object or a \* decorated one. \*/ function displayCommentAsAWebsite(InputFormat $format, string $text) { // .. echo $format->formatText($text); // .. } /\*\* \* Input formatters are very handy when dealing with user-generated content. \* Displaying such content "as is" could be very dangerous, especially when \* anonymous users can generate it (e.g. comments). Your website is not only \* risking getting tons of spammy links but may also be exposed to XSS attacks. \*/ $dangerousComment = <<homepage. HERE; /\*\* \* Naive comment rendering (unsafe). \*/ $naiveInput = new TextInput(); echo "Website renders comments without filtering (unsafe):\\n"; displayCommentAsAWebsite($naiveInput, $dangerousComment); echo "\\n\\n\\n"; /\*\* \* Filtered comment rendering (safe). \*/ $filteredInput = new PlainTextFilter($naiveInput); echo "Website renders comments after stripping all tags (safe):\\n"; displayCommentAsAWebsite($filteredInput, $dangerousComment); echo "\\n\\n\\n"; /\*\* \* Decorator allows stacking multiple input formats to get fine-grained control \* over the rendered content. \*/ $dangerousForumPost = << performXSSAttack(); HERE; /\*\* \* Naive post rendering (unsafe, no formatting). \*/ $naiveInput = new TextInput(); echo "Website renders a forum post without filtering and formatting (unsafe, ugly):\\n"; displayCommentAsAWebsite($naiveInput, $dangerousForumPost); echo "\\n\\n\\n"; /\*\* \* Markdown formatter + filtering dangerous tags (safe, pretty). \*/ $text = new TextInput(); $markdown = new MarkdownFormat($text); $filteredInput = new DangerousHTMLTagsFilter($markdown); echo "Website renders a forum post after translating markdown markup" . " and filtering some dangerous HTML tags and attributes (safe, pretty):\\n"; displayCommentAsAWebsite($filteredInput, $dangerousForumPost); echo "\\n\\n\\n"; #### **Output.txt:** Resultado de la ejecución Website renders comments without filtering (unsafe): Hello! Nice blog post! Please visit my homepage. Website renders comments after stripping all tags (safe): Hello! Nice blog post! Please visit my homepage. performXSSAttack(); Website renders a forum post without filtering and formatting (unsafe, ugly): # Welcome This is my first post on this \*\*gorgeous\*\* forum. Website renders a forum post after translating markdown markupand filtering some dangerous HTML tags and attributes (safe, pretty):

Welcome

This is my first post on this gorgeous forum.

**Decorator** en otros lenguajes -------------------------------- [![Decorator en C#](https://refactoring.guru/images/patterns/icons/csharp.svg?id=da64592defc6e86d57c39c66e9de3e58)](https://refactoring.guru/es/design-patterns/decorator/csharp/example "Decorator en C#") [![Decorator en C++](https://refactoring.guru/images/patterns/icons/cpp.svg?id=f7782ed8b8666246bfcc3f8fefc3b858)](https://refactoring.guru/es/design-patterns/decorator/cpp/example "Decorator en C++") [![Decorator en Go](https://refactoring.guru/images/patterns/icons/go.svg?id=1a89927eb99b1ea3fde7701d97970aca)](https://refactoring.guru/es/design-patterns/decorator/go/example "Decorator en Go") [![Decorator en Java](https://refactoring.guru/images/patterns/icons/java.svg?id=e6d87e2dca08c953fe3acd1275ed4f4e)](https://refactoring.guru/es/design-patterns/decorator/java/example "Decorator en Java") [![Decorator en Python](https://refactoring.guru/images/patterns/icons/python.svg?id=6d815d43c0f7050a1151b43e51569c9f)](https://refactoring.guru/es/design-patterns/decorator/python/example "Decorator en Python") [![Decorator en Ruby](https://refactoring.guru/images/patterns/icons/ruby.svg?id=b065b718c914bf8e960ef731600be1eb)](https://refactoring.guru/es/design-patterns/decorator/ruby/example "Decorator en Ruby") [![Decorator en Rust](https://refactoring.guru/images/patterns/icons/rust.svg?id=1f5698a4b5ae23fe79413511747e4a87)](https://refactoring.guru/es/design-patterns/decorator/rust/example "Decorator en Rust") [![Decorator en Swift](https://refactoring.guru/images/patterns/icons/swift.svg?id=0b716c2d52ec3a48fbe91ac031070c1d)](https://refactoring.guru/es/design-patterns/decorator/swift/example "Decorator en Swift") [![Decorator en TypeScript](https://refactoring.guru/images/patterns/icons/typescript.svg?id=2239d0f16cb703540c205dd8cb0c0cb7)](https://refactoring.guru/es/design-patterns/decorator/typescript/example "Decorator en TypeScript") --- # Facade [There are patterns of patterns now! \ My friend's project: MetaPatterns.io](https://metapatterns.io/)  [](https://refactoring.guru/es/design-patterns/facade#checkout) [](https://refactoring.guru/es/design-patterns/facade#checkout) [](https://refactoring.guru/) / [Patrones de diseño](https://refactoring.guru/es/design-patterns) / [Patrones estructurales](https://refactoring.guru/es/design-patterns/structural-patterns) Facade ====== También llamado: Fachada Propósito --------- **Facade** es un patrón de diseño estructural que proporciona una interfaz simplificada a una biblioteca, un framework o cualquier otro grupo complejo de clases. ![Patrón de diseño Facade](https://refactoring.guru/images/patterns/content/facade/facade-2x.png?id=b69fce5943703f5f07c0ba38e3baaed0) Problema -------- Imagina que debes lograr que tu código trabaje con un amplio grupo de objetos que pertenecen a una sofisticada biblioteca o _framework_. Normalmente, debes inicializar todos esos objetos, llevar un registro de las dependencias, ejecutar los métodos en el orden correcto y así sucesivamente. Como resultado, la lógica de negocio de tus clases se vería estrechamente acoplada a los detalles de implementación de las clases de terceros, haciéndola difícil de comprender y mantener. Solución -------- Una fachada es una clase que proporciona una interfaz simple a un subsistema complejo que contiene muchas partes móviles. Una fachada puede proporcionar una funcionalidad limitada en comparación con trabajar directamente con el subsistema. Sin embargo, tan solo incluye las funciones realmente importantes para los clientes. Tener una fachada resulta útil cuando tienes que integrar tu aplicación con una biblioteca sofisticada con decenas de funciones, de la cual sólo necesitas una pequeña parte. Por ejemplo, una aplicación que sube breves vídeos divertidos de gatos a las redes sociales, podría potencialmente utilizar una biblioteca de conversión de vídeo profesional. Sin embargo, lo único que necesita en realidad es una clase con el método simple `codificar(nombreDelArchivo, formato)`. Una vez que crees dicha clase y la conectes con la biblioteca de conversión de vídeo, tendrás tu primera fachada. Analogía en el mundo real ------------------------- ![Un ejemplo de recepción de un pedido por teléfono](https://refactoring.guru/images/patterns/diagrams/facade/live-example-es-2x.png?id=d4aa87ddee92e7c4b570b8ece7c9c319) Haciendo pedidos por teléfono. Cuando llamas a una tienda para hacer un pedido por teléfono, un operador es tu fachada a todos los servicios y departamentos de la tienda. El operador te proporciona una sencilla interfaz de voz al sistema de pedidos, pasarelas de pago y varios servicios de entrega. Estructura ---------- ![Estructura del patrón de diseño Facade](https://refactoring.guru/images/patterns/diagrams/facade/structure-2x.png?id=528ca429555bce293b7c3bd90954e097)![Estructura del patrón de diseño Facade](https://refactoring.guru/images/patterns/diagrams/facade/structure-indexed-2x.png?id=4d181bcf1df5d58c533e6c92461e9571) 1. El patrón **Facade** proporciona un práctico acceso a una parte específica de la funcionalidad del subsistema. Sabe a dónde dirigir la petición del cliente y cómo operar todas las partes móviles. 2. Puede crearse una clase **Fachada Adicional** para evitar contaminar una única fachada con funciones no relacionadas que podrían convertirla en otra estructura compleja. Las fachadas adicionales pueden utilizarse por clientes y por otras fachadas. 3. El **Subsistema Complejo** consiste en decenas de objetos diversos. Para lograr que todos hagan algo significativo, debes profundizar en los detalles de implementación del subsistema, que pueden incluir inicializar objetos en el orden correcto y suministrarles datos en el formato adecuado. Las clases del subsistema no conocen la existencia de la fachada. Operan dentro del sistema y trabajan entre sí directamente. 4. El **Cliente** utiliza la fachada en lugar de invocar directamente los objetos del subsistema. Pseudocódigo ------------ En este ejemplo, el patrón **Facade** simplifica la interacción con un framework complejo de conversión de vídeo. ![Ejemplo de la estructura del patrón Facade](https://refactoring.guru/images/patterns/diagrams/facade/example-2x.png?id=f2c846d74041626c923ff3e8919b68a9) Un ejemplo de aislamiento de múltiples dependencias dentro de una única clase fachada. En lugar de hacer que tu código trabaje con decenas de las clases del framework directamente, creas una clase fachada que encapsula esa funcionalidad y la esconde del resto del código. Esta estructura también te ayuda a minimizar el esfuerzo de actualizar a futuras versiones del framework o de sustituirlo por otro. Lo único que tendrías que cambiar en la aplicación es la implementación de los métodos de la fachada. // Estas son algunas de las clases de un framework de conversión // de video de un tercero. No controlamos ese código, por lo que // no podemos simplificarlo. class VideoFile // ... class OggCompressionCodec // ... class MPEG4CompressionCodec // ... class CodecFactory // ... class BitrateReader // ... class AudioMixer // ... // Creamos una clase fachada para esconder la complejidad del // framework tras una interfaz simple. Es una solución de // equilibrio entre funcionalidad y simplicidad. class VideoConverter is method convert(filename, format):File is file = new VideoFile(filename) sourceCodec = (new CodecFactory).extract(file) if (format == "mp4") destinationCodec = new MPEG4CompressionCodec() else destinationCodec = new OggCompressionCodec() buffer = BitrateReader.read(filename, sourceCodec) result = BitrateReader.convert(buffer, destinationCodec) result = (new AudioMixer()).fix(result) return new File(result) // Las clases Application no dependen de un millón de clases // proporcionadas por el complejo framework. Además, si decides // cambiar los frameworks, sólo tendrás de volver a escribir la // clase fachada. class Application is method main() is convertor = new VideoConverter() mp4 = convertor.convert("funny-cats-video.ogg", "mp4") mp4.save() Aplicabilidad ------------- Utiliza el patrón Facade cuando necesites una interfaz limitada pero directa a un subsistema complejo. A menudo los subsistemas se vuelven más complejos con el tiempo. Incluso la aplicación de patrones de diseño suele conducir a la creación de un mayor número de clases. Un subsistema puede hacerse más flexible y más fácil de reutilizar en varios contextos, pero la cantidad de código de configuración que exige de un cliente, crece aún más. El patrón Facade intenta solucionar este problema proporcionando un atajo a las funciones más utilizadas del subsistema que mejor encajan con los requisitos del cliente. Utiliza el patrón Facade cuando quieras estructurar un subsistema en capas. Crea fachadas para definir puntos de entrada a cada nivel de un subsistema. Puedes reducir el acoplamiento entre varios subsistemas exigiéndoles que se comuniquen únicamente mediante fachadas. Por ejemplo, regresemos a nuestro framework de conversión de vídeo. Puede dividirse en dos capas: la relacionada con el vídeo y la relacionada con el audio. Puedes crear una fachada para cada capa y hacer que las clases de cada una de ellas se comuniquen entre sí a través de esas fachadas. Este procedimiento es bastante similar al patrón [Mediator](https://refactoring.guru/es/design-patterns/mediator) . Cómo implementarlo ------------------ 1. Comprueba si es posible proporcionar una interfaz más simple que la que está proporcionando un subsistema existente. Estás bien encaminado si esta interfaz hace que el código cliente sea independiente de muchas de las clases del subsistema. 2. Declara e implementa esta interfaz en una nueva clase fachada. La fachada deberá redireccionar las llamadas desde el código cliente a los objetos adecuados del subsistema. La fachada deberá ser responsable de inicializar el subsistema y gestionar su ciclo de vida, a no ser que el código cliente ya lo haga. 3. Para aprovechar el patrón al máximo, haz que todo el código cliente se comunique con el subsistema únicamente a través de la fachada. Ahora el código cliente está protegido de cualquier cambio en el código del subsistema. Por ejemplo, cuando se actualice un subsistema a una nueva versión, sólo tendrás que modificar el código de la fachada. 4. Si la fachada se vuelve [demasiado grande](https://refactoring.guru/es/smells/large-class) , piensa en extraer parte de su comportamiento y colocarlo dentro de una nueva clase fachada refinada. Pros y contras -------------- * Puedes aislar tu código de la complejidad de un subsistema. * Una fachada puede convertirse en [un objeto todopoderoso](https://refactoring.guru/es/antipatterns/god-object) acoplado a todas las clases de una aplicación. Relaciones con otros patrones ----------------------------- * [Facade](https://refactoring.guru/es/design-patterns/facade) define una nueva interfaz para objetos existentes, mientras que [Adapter](https://refactoring.guru/es/design-patterns/adapter) intenta hacer que la interfaz existente sea utilizable. Normalmente _Adapter_ sólo envuelve un objeto, mientras que _Facade_ trabaja con todo un subsistema de objetos. * [Abstract Factory](https://refactoring.guru/es/design-patterns/abstract-factory) puede servir como alternativa a [Facade](https://refactoring.guru/es/design-patterns/facade) cuando tan solo deseas esconder la forma en que se crean los objetos del subsistema a partir del código cliente. * [Flyweight](https://refactoring.guru/es/design-patterns/flyweight) muestra cómo crear muchos pequeños objetos, mientras que [Facade](https://refactoring.guru/es/design-patterns/facade) muestra cómo crear un único objeto que represente un subsistema completo. * [Facade](https://refactoring.guru/es/design-patterns/facade) y [Mediator](https://refactoring.guru/es/design-patterns/mediator) tienen trabajos similares: ambos intentan organizar la colaboración entre muchas clases estrechamente acopladas. * _Facade_ define una interfaz simplificada a un subsistema de objetos, pero no introduce ninguna nueva funcionalidad. El propio subsistema no conoce la fachada. Los objetos del subsistema pueden comunicarse directamente. * _Mediator_ centraliza la comunicación entre componentes del sistema. Los componentes conocen únicamente el objeto mediador y no se comunican directamente. * Una clase [fachada](https://refactoring.guru/es/design-patterns/facade) a menudo puede transformarse en una [Singleton](https://refactoring.guru/es/design-patterns/singleton) , ya que un único objeto fachada es suficiente en la mayoría de los casos. * [Facade](https://refactoring.guru/es/design-patterns/facade) es similar a [Proxy](https://refactoring.guru/es/design-patterns/proxy) en el sentido de que ambos pueden almacenar temporalmente una entidad compleja e inicializarla por su cuenta. Al contrario que _Facade_, _Proxy_ tiene la misma interfaz que su objeto de servicio, lo que hace que sean intercambiables. Ejemplos de código ------------------ [![Facade en C#](https://refactoring.guru/images/patterns/icons/csharp.svg?id=da64592defc6e86d57c39c66e9de3e58)](https://refactoring.guru/es/design-patterns/facade/csharp/example "Facade en C#") [![Facade en C++](https://refactoring.guru/images/patterns/icons/cpp.svg?id=f7782ed8b8666246bfcc3f8fefc3b858)](https://refactoring.guru/es/design-patterns/facade/cpp/example "Facade en C++") [![Facade en Go](https://refactoring.guru/images/patterns/icons/go.svg?id=1a89927eb99b1ea3fde7701d97970aca)](https://refactoring.guru/es/design-patterns/facade/go/example "Facade en Go") [![Facade en Java](https://refactoring.guru/images/patterns/icons/java.svg?id=e6d87e2dca08c953fe3acd1275ed4f4e)](https://refactoring.guru/es/design-patterns/facade/java/example "Facade en Java") [![Facade en PHP](https://refactoring.guru/images/patterns/icons/php.svg?id=be1906eb26b71ec1d3b93720d6156618)](https://refactoring.guru/es/design-patterns/facade/php/example "Facade en PHP") [![Facade en Python](https://refactoring.guru/images/patterns/icons/python.svg?id=6d815d43c0f7050a1151b43e51569c9f)](https://refactoring.guru/es/design-patterns/facade/python/example "Facade en Python") [![Facade en Ruby](https://refactoring.guru/images/patterns/icons/ruby.svg?id=b065b718c914bf8e960ef731600be1eb)](https://refactoring.guru/es/design-patterns/facade/ruby/example "Facade en Ruby") [![Facade en Rust](https://refactoring.guru/images/patterns/icons/rust.svg?id=1f5698a4b5ae23fe79413511747e4a87)](https://refactoring.guru/es/design-patterns/facade/rust/example "Facade en Rust") [![Facade en Swift](https://refactoring.guru/images/patterns/icons/swift.svg?id=0b716c2d52ec3a48fbe91ac031070c1d)](https://refactoring.guru/es/design-patterns/facade/swift/example "Facade en Swift") [![Facade en TypeScript](https://refactoring.guru/images/patterns/icons/typescript.svg?id=2239d0f16cb703540c205dd8cb0c0cb7)](https://refactoring.guru/es/design-patterns/facade/typescript/example "Facade en TypeScript") [![](https://refactoring.guru/images/patterns/banners/patterns-book-banner-3-2x.png?id=0cc3f77ab421d1a5c02ee46488231c3a)](https://refactoring.guru/es/design-patterns/book) ### ¡Apoya nuestro sitio web gratuito y compra el libro! * 22 patrones de diseño y 8 principios explicados en profundidad * 436 páginas bien estructuradas, fáciles de leer y libres de tecnicismos * 225 ilustraciones y diagramas claros y útiles * Un archivo con ejemplos de código en 11 lenguajes * Todos los dispositivos soportados: Formatos PDF/EPUB/MOBI/KFX [Saber más…](https://refactoring.guru/es/design-patterns/book) --- # Factory Method en Rust / Patrones de diseño [There are patterns of patterns now! \ My friend's project: MetaPatterns.io](https://metapatterns.io/)  [](https://refactoring.guru/es/design-patterns/factory-method/rust/example#checkout) [](https://refactoring.guru/es/design-patterns/factory-method/rust/example#checkout) [](https://refactoring.guru/) / [Patrones de diseño](https://refactoring.guru/es/design-patterns) / [Factory Method](https://refactoring.guru/es/design-patterns/factory-method) / [Rust](https://refactoring.guru/es/design-patterns/rust) ![Factory Method](https://refactoring.guru/images/patterns/cards/factory-method-mini-2x.png?id=fa9d4a8d61a67cc3822e52b9daf69dad) **Factory Method** en Rust ========================== **Factory method** es un patrón de diseño creacional que resuelve el problema de crear objetos de producto sin especificar sus clases concretas. El patrón Factory Method define un método que debe utilizarse para crear objetos, en lugar de una llamada directa al constructor (operador `new`). Las subclases pueden sobrescribir este método para cambiar las clases de los objetos que se crearán. > Si no sabes la diferencia entre varios patrones y conceptos de la fábrica, lee nuestra [Comparación de fábricas](https://refactoring.guru/es/design-patterns/factory-comparison) > . [Aprende más sobre el patrón Factory Method](https://refactoring.guru/es/design-patterns/factory-method) Navegación  [Intro](https://refactoring.guru/es/design-patterns/factory-method/rust/example#)  [Dialog Rendering](https://refactoring.guru/es/design-patterns/factory-method/rust/example#example-0)  [gui](https://refactoring.guru/es/design-patterns/factory-method/rust/example#example-0--gui-rs)  [html\_gui](https://refactoring.guru/es/design-patterns/factory-method/rust/example#example-0--html_gui-rs)  [windows\_gui](https://refactoring.guru/es/design-patterns/factory-method/rust/example#example-0--windows_gui-rs)  [init](https://refactoring.guru/es/design-patterns/factory-method/rust/example#example-0--init-rs)  [main](https://refactoring.guru/es/design-patterns/factory-method/rust/example#example-0--main-rs)  [Maze Game](https://refactoring.guru/es/design-patterns/factory-method/rust/example#example-1)  [game](https://refactoring.guru/es/design-patterns/factory-method/rust/example#example-1--game-rs)  [magic\_maze](https://refactoring.guru/es/design-patterns/factory-method/rust/example#example-1--magic_maze-rs)  [ordinary\_maze](https://refactoring.guru/es/design-patterns/factory-method/rust/example#example-1--ordinary_maze-rs)  [main](https://refactoring.guru/es/design-patterns/factory-method/rust/example#example-1--main-rs) Dialog Rendering ---------------- This example illustrates how to organize a GUI framework into independent modules using **dynamic dispatch**: 1. The `gui` module defines interfaces for all the components. It has no external dependencies. 2. The `html_gui` module provides HTML implementation of the base GUI. Depends on `gui`. 3. The `windows_gui` module provides Windows implementation of the base GUI. Depends on `gui`. The `app` is a client application that can use several implementations of the GUI framework, depending on the current environment or configuration. However, most of the app code doesn’t depend on specific types of GUI elements. All client code works with GUI elements through abstract interfaces defined by the `gui` module. The [Abstract Factory example](https://refactoring.guru/design-patterns/abstract-factory/rust/example) demonstrates an even greater separation of a factory interface and its implementations. #### **gui.rs:** Product & Creator pub trait Button { fn render(&self); fn on\_click(&self); } /// Dialog has a factory method \`create\_button\`. /// /// It creates different buttons depending on a factory implementation. pub trait Dialog { /// The factory method. It must be overridden with a concrete implementation. fn create\_button(&self) -> Box; fn render(&self) { let button = self.create\_button(); button.render(); } fn refresh(&self) { println!("Dialog - Refresh"); } } #### **html\_gui.rs:** Concrete creator use crate::gui::{Button, Dialog}; pub struct HtmlButton; impl Button for HtmlButton { fn render(&self) { println!(""); self.on\_click(); } fn on\_click(&self) { println!("Click! Button says - 'Hello World!'"); } } pub struct HtmlDialog; impl Dialog for HtmlDialog { /// Creates an HTML button. fn create\_button(&self) -> Box { Box::new(HtmlButton) } } #### **windows\_gui.rs:** Another concrete creator use crate::gui::{Button, Dialog}; pub struct WindowsButton; impl Button for WindowsButton { fn render(&self) { println!("Drawing a Windows button"); self.on\_click(); } fn on\_click(&self) { println!("Click! Hello, Windows!"); } } pub struct WindowsDialog; impl Dialog for WindowsDialog { /// Creates a Windows button. fn create\_button(&self) -> Box { Box::new(WindowsButton) } } #### **init.rs:** Initialization code use crate::gui::Dialog; use crate::html\_gui::HtmlDialog; use crate::windows\_gui::WindowsDialog; pub fn initialize() -> &'static dyn Dialog { // The dialog type is selected depending on the environment settings or configuration. if cfg!(windows) { println!("-- Windows detected, creating Windows GUI --"); &WindowsDialog } else { println!("-- No OS detected, creating the HTML GUI --"); &HtmlDialog } } #### **main.rs:** Client code mod gui; mod html\_gui; mod init; mod windows\_gui; use init::initialize; fn main() { // The rest of the code doesn't depend on specific dialog types, because // it works with all dialog objects via the abstract \`Dialog\` trait // which is defined in the \`gui\` module. let dialog = initialize(); dialog.render(); dialog.refresh(); } ### Output Click! Button says - 'Hello World!' Dialog - Refresh Maze Game --------- This example illustrates how to implement the Factory Method pattern using **static dispatch** (generics). _Inspired by the Factory Method [example from the GoF book](https://en.wikipedia.org/wiki/Factory_method_pattern) ._ #### **game.rs** /// Maze room that is going to be instantiated with a factory method. pub trait Room { fn render(&self); } /// Maze game has a factory method producing different rooms. pub trait MazeGame { type RoomImpl: Room; /// A factory method. fn rooms(&self) -> Vec; fn play(&self) { for room in self.rooms() { room.render(); } } } /// The client code initializes resources and does other preparations /// then it uses a factory to construct and run the game. pub fn run(maze\_game: impl MazeGame) { println!("Loading resources..."); println!("Starting the game..."); maze\_game.play(); } #### **magic\_maze.rs** use super::game::{MazeGame, Room}; #\[derive(Clone)\] pub struct MagicRoom { title: String, } impl MagicRoom { pub fn new(title: String) -> Self { Self { title } } } impl Room for MagicRoom { fn render(&self) { println!("Magic Room: {}", self.title); } } pub struct MagicMaze { rooms: Vec, } impl MagicMaze { pub fn new() -> Self { Self { rooms: vec!\[\ MagicRoom::new("Infinite Room".into()),\ MagicRoom::new("Red Room".into()),\ \], } } } impl MazeGame for MagicMaze { type RoomImpl = MagicRoom; fn rooms(&self) -> Vec { self.rooms.clone() } } #### **ordinary\_maze.rs** use super::game::{MazeGame, Room}; #\[derive(Clone)\] pub struct OrdinaryRoom { id: u32, } impl OrdinaryRoom { pub fn new(id: u32) -> Self { Self { id } } } impl Room for OrdinaryRoom { fn render(&self) { println!("Ordinary Room: #{}", self.id); } } pub struct OrdinaryMaze { rooms: Vec, } impl OrdinaryMaze { pub fn new() -> Self { Self { rooms: vec!\[OrdinaryRoom::new(1), OrdinaryRoom::new(2)\], } } } impl MazeGame for OrdinaryMaze { type RoomImpl = OrdinaryRoom; fn rooms(&self) -> Vec { let mut rooms = self.rooms.clone(); rooms.reverse(); rooms } } #### **main.rs:** Client code mod game; mod magic\_maze; mod ordinary\_maze; use magic\_maze::MagicMaze; use ordinary\_maze::OrdinaryMaze; /// The game runs with different mazes depending on the concrete factory type: /// it's either an ordinary maze or a magic maze. /// /// For demonstration purposes, both mazes are used to construct the game. fn main() { // Option 1: The game starts with an ordinary maze. let ordinary\_maze = OrdinaryMaze::new(); game::run(ordinary\_maze); // Option 2: The game starts with a magic maze. let magic\_maze = MagicMaze::new(); game::run(magic\_maze); } ### Output Loading resources... Starting the game... Magic Room: Infinite Room Magic Room: Red Room Loading resources... Starting the game... Ordinary Room: #2 Ordinary Room: #1 **Factory Method** en otros lenguajes ------------------------------------- [![Factory Method en C#](https://refactoring.guru/images/patterns/icons/csharp.svg?id=da64592defc6e86d57c39c66e9de3e58)](https://refactoring.guru/es/design-patterns/factory-method/csharp/example "Factory Method en C#") [![Factory Method en C++](https://refactoring.guru/images/patterns/icons/cpp.svg?id=f7782ed8b8666246bfcc3f8fefc3b858)](https://refactoring.guru/es/design-patterns/factory-method/cpp/example "Factory Method en C++") [![Factory Method en Go](https://refactoring.guru/images/patterns/icons/go.svg?id=1a89927eb99b1ea3fde7701d97970aca)](https://refactoring.guru/es/design-patterns/factory-method/go/example "Factory Method en Go") [![Factory Method en Java](https://refactoring.guru/images/patterns/icons/java.svg?id=e6d87e2dca08c953fe3acd1275ed4f4e)](https://refactoring.guru/es/design-patterns/factory-method/java/example "Factory Method en Java") [![Factory Method en PHP](https://refactoring.guru/images/patterns/icons/php.svg?id=be1906eb26b71ec1d3b93720d6156618)](https://refactoring.guru/es/design-patterns/factory-method/php/example "Factory Method en PHP") [![Factory Method en Python](https://refactoring.guru/images/patterns/icons/python.svg?id=6d815d43c0f7050a1151b43e51569c9f)](https://refactoring.guru/es/design-patterns/factory-method/python/example "Factory Method en Python") [![Factory Method en Ruby](https://refactoring.guru/images/patterns/icons/ruby.svg?id=b065b718c914bf8e960ef731600be1eb)](https://refactoring.guru/es/design-patterns/factory-method/ruby/example "Factory Method en Ruby") [![Factory Method en Swift](https://refactoring.guru/images/patterns/icons/swift.svg?id=0b716c2d52ec3a48fbe91ac031070c1d)](https://refactoring.guru/es/design-patterns/factory-method/swift/example "Factory Method en Swift") [![Factory Method en TypeScript](https://refactoring.guru/images/patterns/icons/typescript.svg?id=2239d0f16cb703540c205dd8cb0c0cb7)](https://refactoring.guru/es/design-patterns/factory-method/typescript/example "Factory Method en TypeScript") --- # Patrones de comportamiento [There are patterns of patterns now! \ My friend's project: MetaPatterns.io](https://metapatterns.io/)  [](https://refactoring.guru/es/design-patterns/behavioral-patterns#checkout) [](https://refactoring.guru/es/design-patterns/behavioral-patterns#checkout) [](https://refactoring.guru/) / [Patrones de diseño](https://refactoring.guru/es/design-patterns) / [Catálogo](https://refactoring.guru/es/design-patterns/catalog) Patrones de comportamiento ========================== Los patrones de comportamiento tratan con algoritmos y la asignación de responsabilidades entre objetos. [![Chain of Responsibility](https://refactoring.guru/images/patterns/cards/chain-of-responsibility-mini-3x.png) Chain of Responsibility\ \ Permite pasar solicitudes a lo largo de una cadena de manejadores. Al recibir una solicitud, cada manejador decide si la procesa o si la pasa al siguiente manejador de la cadena.](https://refactoring.guru/es/design-patterns/chain-of-responsibility) [![Command](https://refactoring.guru/images/patterns/cards/command-mini-3x.png) Command\ \ Convierte una solicitud en un objeto independiente que contiene toda la información sobre la solicitud. Esta transformación te permite parametrizar los métodos con diferentes solicitudes, retrasar o poner en cola la ejecución de una solicitud y soportar operaciones que no se pueden realizar.](https://refactoring.guru/es/design-patterns/command) [![Iterator](https://refactoring.guru/images/patterns/cards/iterator-mini-3x.png) Iterator\ \ Permite recorrer elementos de una colección sin exponer su representación subyacente (lista, pila, árbol, etc.).](https://refactoring.guru/es/design-patterns/iterator) [![Mediator](https://refactoring.guru/images/patterns/cards/mediator-mini-3x.png) Mediator\ \ Permite reducir las dependencias caóticas entre objetos. El patrón restringe las comunicaciones directas entre los objetos, forzándolos a colaborar únicamente a través de un objeto mediador.](https://refactoring.guru/es/design-patterns/mediator) [![Memento](https://refactoring.guru/images/patterns/cards/memento-mini-3x.png) Memento\ \ Permite guardar y restaurar el estado previo de un objeto sin revelar los detalles de su implementación.](https://refactoring.guru/es/design-patterns/memento) [![Observer](https://refactoring.guru/images/patterns/cards/observer-mini-3x.png) Observer\ \ Permite definir un mecanismo de suscripción para notificar a varios objetos sobre cualquier evento que le suceda al objeto que están observando.](https://refactoring.guru/es/design-patterns/observer) [![State](https://refactoring.guru/images/patterns/cards/state-mini-3x.png) State\ \ Permite a un objeto alterar su comportamiento cuando su estado interno cambia. Parece como si el objeto cambiara su clase.](https://refactoring.guru/es/design-patterns/state) [![Strategy](https://refactoring.guru/images/patterns/cards/strategy-mini-3x.png) Strategy\ \ Permite definir una familia de algoritmos, colocar cada uno de ellos en una clase separada y hacer sus objetos intercambiables.](https://refactoring.guru/es/design-patterns/strategy) [![Template Method](https://refactoring.guru/images/patterns/cards/template-method-mini-3x.png) Template Method\ \ Define el esqueleto de un algoritmo en la superclase pero permite que las subclases sobrescriban pasos del algoritmo sin cambiar su estructura.](https://refactoring.guru/es/design-patterns/template-method) [![Visitor](https://refactoring.guru/images/patterns/cards/visitor-mini-3x.png) Visitor\ \ Permite separar algoritmos de los objetos sobre los que operan.](https://refactoring.guru/es/design-patterns/visitor) --- # Factory Method en Ruby / Patrones de diseño [There are patterns of patterns now! \ My friend's project: MetaPatterns.io](https://metapatterns.io/)  [](https://refactoring.guru/es/design-patterns/factory-method/ruby/example#checkout) [](https://refactoring.guru/es/design-patterns/factory-method/ruby/example#checkout) [](https://refactoring.guru/) / [Patrones de diseño](https://refactoring.guru/es/design-patterns) / [Factory Method](https://refactoring.guru/es/design-patterns/factory-method) / [Ruby](https://refactoring.guru/es/design-patterns/ruby) ![Factory Method](https://refactoring.guru/images/patterns/cards/factory-method-mini-2x.png?id=fa9d4a8d61a67cc3822e52b9daf69dad) **Factory Method** en Ruby ========================== **Factory method** es un patrón de diseño creacional que resuelve el problema de crear objetos de producto sin especificar sus clases concretas. El patrón Factory Method define un método que debe utilizarse para crear objetos, en lugar de una llamada directa al constructor (operador `new`). Las subclases pueden sobrescribir este método para cambiar las clases de los objetos que se crearán. > Si no sabes la diferencia entre varios patrones y conceptos de la fábrica, lee nuestra [Comparación de fábricas](https://refactoring.guru/es/design-patterns/factory-comparison) > . [Aprende más sobre el patrón Factory Method](https://refactoring.guru/es/design-patterns/factory-method) Navegación  [Intro](https://refactoring.guru/es/design-patterns/factory-method/ruby/example#)  [Ejemplo conceptual](https://refactoring.guru/es/design-patterns/factory-method/ruby/example#example-0)  [main](https://refactoring.guru/es/design-patterns/factory-method/ruby/example#example-0--main-rb)  [output](https://refactoring.guru/es/design-patterns/factory-method/ruby/example#example-0--output-txt) **Complejidad:** **Popularidad:** **Ejemplos de uso:** El patrón Factory Method se utiliza mucho en el código Ruby. Resulta muy útil cuando necesitas proporcionar un alto nivel de flexibilidad a tu código. **Identificación:** Los métodos fábrica pueden ser reconocidos por métodos de creación, que crean objetos de clases concretas, pero los devuelven como objetos del tipo abstracto o interfaz. Ejemplo conceptual ------------------ Este ejemplo ilustra la estructura del patrón de diseño **Factory Method**. Se centra en responder las siguientes preguntas: * ¿De qué clases se compone? * ¿Qué papeles juegan esas clases? * ¿De qué forma se relacionan los elementos del patrón? #### **main.rb:** Ejemplo conceptual \# The Creator class declares the factory method that is supposed to return an # object of a Product class. The Creator's subclasses usually provide the # implementation of this method. class Creator # Note that the Creator may also provide some default implementation of the # factory method. def factory\_method raise NotImplementedError, "#{self.class} has not implemented method '#{\_\_method\_\_}'" end # Also note that, despite its name, the Creator's primary responsibility is # not creating products. Usually, it contains some core business logic that # relies on Product objects, returned by the factory method. Subclasses can # indirectly change that business logic by overriding the factory method and # returning a different type of product from it. def some\_operation # Call the factory method to create a Product object. product = factory\_method # Now, use the product. "Creator: The same creator's code has just worked with #{product.operation}" end end # Concrete Creators override the factory method in order to change the resulting # product's type. class ConcreteCreator1 < Creator # Note that the signature of the method still uses the abstract product type, # even though the concrete product is actually returned from the method. This # way the Creator can stay independent of concrete product classes. def factory\_method ConcreteProduct1.new end end class ConcreteCreator2 < Creator # @return \[ConcreteProduct2\] def factory\_method ConcreteProduct2.new end end # The Product interface declares the operations that all concrete products must # implement. class Product # return \[String\] def operation raise NotImplementedError, "#{self.class} has not implemented method '#{\_\_method\_\_}'" end end # Concrete Products provide various implementations of the Product interface. class ConcreteProduct1 < Product # @return \[String\] def operation '{Result of the ConcreteProduct1}' end end class ConcreteProduct2 < Product # @return \[String\] def operation '{Result of the ConcreteProduct2}' end end # The client code works with an instance of a concrete creator, albeit through # its base interface. As long as the client keeps working with the creator via # the base interface, you can pass it any creator's subclass. def client\_code(creator) print "Client: I'm not aware of the creator's class, but it still works.\\n"\\ "#{creator.some\_operation}" end puts 'App: Launched with the ConcreteCreator1.' client\_code(ConcreteCreator1.new) puts "\\n\\n" puts 'App: Launched with the ConcreteCreator2.' client\_code(ConcreteCreator2.new) #### **output.txt:** Resultado de la ejecución App: Launched with the ConcreteCreator1. Client: I'm not aware of the creator's class, but it still works. Creator: The same creator's code has just worked with {Result of the ConcreteProduct1} App: Launched with the ConcreteCreator2. Client: I'm not aware of the creator's class, but it still works. Creator: The same creator's code has just worked with {Result of the ConcreteProduct2} **Factory Method** en otros lenguajes ------------------------------------- [![Factory Method en C#](https://refactoring.guru/images/patterns/icons/csharp.svg?id=da64592defc6e86d57c39c66e9de3e58)](https://refactoring.guru/es/design-patterns/factory-method/csharp/example "Factory Method en C#") [![Factory Method en C++](https://refactoring.guru/images/patterns/icons/cpp.svg?id=f7782ed8b8666246bfcc3f8fefc3b858)](https://refactoring.guru/es/design-patterns/factory-method/cpp/example "Factory Method en C++") [![Factory Method en Go](https://refactoring.guru/images/patterns/icons/go.svg?id=1a89927eb99b1ea3fde7701d97970aca)](https://refactoring.guru/es/design-patterns/factory-method/go/example "Factory Method en Go") [![Factory Method en Java](https://refactoring.guru/images/patterns/icons/java.svg?id=e6d87e2dca08c953fe3acd1275ed4f4e)](https://refactoring.guru/es/design-patterns/factory-method/java/example "Factory Method en Java") [![Factory Method en PHP](https://refactoring.guru/images/patterns/icons/php.svg?id=be1906eb26b71ec1d3b93720d6156618)](https://refactoring.guru/es/design-patterns/factory-method/php/example "Factory Method en PHP") [![Factory Method en Python](https://refactoring.guru/images/patterns/icons/python.svg?id=6d815d43c0f7050a1151b43e51569c9f)](https://refactoring.guru/es/design-patterns/factory-method/python/example "Factory Method en Python") [![Factory Method en Rust](https://refactoring.guru/images/patterns/icons/rust.svg?id=1f5698a4b5ae23fe79413511747e4a87)](https://refactoring.guru/es/design-patterns/factory-method/rust/example "Factory Method en Rust") [![Factory Method en Swift](https://refactoring.guru/images/patterns/icons/swift.svg?id=0b716c2d52ec3a48fbe91ac031070c1d)](https://refactoring.guru/es/design-patterns/factory-method/swift/example "Factory Method en Swift") [![Factory Method en TypeScript](https://refactoring.guru/images/patterns/icons/typescript.svg?id=2239d0f16cb703540c205dd8cb0c0cb7)](https://refactoring.guru/es/design-patterns/factory-method/typescript/example "Factory Method en TypeScript") --- # Factory Method en C# / Patrones de diseño [There are patterns of patterns now! \ My friend's project: MetaPatterns.io](https://metapatterns.io/)  [](https://refactoring.guru/es/design-patterns/factory-method/csharp/example#checkout) [](https://refactoring.guru/es/design-patterns/factory-method/csharp/example#checkout) [](https://refactoring.guru/) / [Patrones de diseño](https://refactoring.guru/es/design-patterns) / [Factory Method](https://refactoring.guru/es/design-patterns/factory-method) / [C#](https://refactoring.guru/es/design-patterns/csharp) ![Factory Method](https://refactoring.guru/images/patterns/cards/factory-method-mini-2x.png?id=fa9d4a8d61a67cc3822e52b9daf69dad) **Factory Method** en C# ======================== **Factory method** es un patrón de diseño creacional que resuelve el problema de crear objetos de producto sin especificar sus clases concretas. El patrón Factory Method define un método que debe utilizarse para crear objetos, en lugar de una llamada directa al constructor (operador `new`). Las subclases pueden sobrescribir este método para cambiar las clases de los objetos que se crearán. > Si no sabes la diferencia entre varios patrones y conceptos de la fábrica, lee nuestra [Comparación de fábricas](https://refactoring.guru/es/design-patterns/factory-comparison) > . [Aprende más sobre el patrón Factory Method](https://refactoring.guru/es/design-patterns/factory-method) Navegación  [Intro](https://refactoring.guru/es/design-patterns/factory-method/csharp/example#)  [Ejemplo conceptual](https://refactoring.guru/es/design-patterns/factory-method/csharp/example#example-0)  [Program](https://refactoring.guru/es/design-patterns/factory-method/csharp/example#example-0--Program-cs)  [Output](https://refactoring.guru/es/design-patterns/factory-method/csharp/example#example-0--Output-txt) **Complejidad:** **Popularidad:** **Ejemplos de uso:** El patrón Factory Method se utiliza mucho en el código C#. Resulta muy útil cuando necesitas proporcionar un alto nivel de flexibilidad a tu código. **Identificación:** Los métodos fábrica pueden ser reconocidos por métodos de creación, que crean objetos de clases concretas, pero los devuelven como objetos del tipo abstracto o interfaz. Ejemplo conceptual ------------------ Este ejemplo ilustra la estructura del patrón de diseño **Factory Method**. Se centra en responder las siguientes preguntas: * ¿De qué clases se compone? * ¿Qué papeles juegan esas clases? * ¿De qué forma se relacionan los elementos del patrón? #### **Program.cs:** Ejemplo conceptual using System; namespace RefactoringGuru.DesignPatterns.FactoryMethod.Conceptual { // The Creator class declares the factory method that is supposed to return // an object of a Product class. The Creator's subclasses usually provide // the implementation of this method. abstract class Creator { // Note that the Creator may also provide some default implementation of // the factory method. public abstract IProduct FactoryMethod(); // Also note that, despite its name, the Creator's primary // responsibility is not creating products. Usually, it contains some // core business logic that relies on Product objects, returned by the // factory method. Subclasses can indirectly change that business logic // by overriding the factory method and returning a different type of // product from it. public string SomeOperation() { // Call the factory method to create a Product object. var product = FactoryMethod(); // Now, use the product. var result = "Creator: The same creator's code has just worked with " + product.Operation(); return result; } } // Concrete Creators override the factory method in order to change the // resulting product's type. class ConcreteCreator1 : Creator { // Note that the signature of the method still uses the abstract product // type, even though the concrete product is actually returned from the // method. This way the Creator can stay independent of concrete product // classes. public override IProduct FactoryMethod() { return new ConcreteProduct1(); } } class ConcreteCreator2 : Creator { public override IProduct FactoryMethod() { return new ConcreteProduct2(); } } // The Product interface declares the operations that all concrete products // must implement. public interface IProduct { string Operation(); } // Concrete Products provide various implementations of the Product // interface. class ConcreteProduct1 : IProduct { public string Operation() { return "{Result of ConcreteProduct1}"; } } class ConcreteProduct2 : IProduct { public string Operation() { return "{Result of ConcreteProduct2}"; } } class Client { public void Main() { Console.WriteLine("App: Launched with the ConcreteCreator1."); ClientCode(new ConcreteCreator1()); Console.WriteLine(""); Console.WriteLine("App: Launched with the ConcreteCreator2."); ClientCode(new ConcreteCreator2()); } // The client code works with an instance of a concrete creator, albeit // through its base interface. As long as the client keeps working with // the creator via the base interface, you can pass it any creator's // subclass. public void ClientCode(Creator creator) { // ... Console.WriteLine("Client: I'm not aware of the creator's class," + "but it still works.\\n" + creator.SomeOperation()); // ... } } class Program { static void Main(string\[\] args) { new Client().Main(); } } } #### **Output.txt:** Resultado de la ejecución App: Launched with the ConcreteCreator1. Client: I'm not aware of the creator's class, but it still works. Creator: The same creator's code has just worked with {Result of ConcreteProduct1} App: Launched with the ConcreteCreator2. Client: I'm not aware of the creator's class, but it still works. Creator: The same creator's code has just worked with {Result of ConcreteProduct2} **Factory Method** en otros lenguajes ------------------------------------- [![Factory Method en C++](https://refactoring.guru/images/patterns/icons/cpp.svg?id=f7782ed8b8666246bfcc3f8fefc3b858)](https://refactoring.guru/es/design-patterns/factory-method/cpp/example "Factory Method en C++") [![Factory Method en Go](https://refactoring.guru/images/patterns/icons/go.svg?id=1a89927eb99b1ea3fde7701d97970aca)](https://refactoring.guru/es/design-patterns/factory-method/go/example "Factory Method en Go") [![Factory Method en Java](https://refactoring.guru/images/patterns/icons/java.svg?id=e6d87e2dca08c953fe3acd1275ed4f4e)](https://refactoring.guru/es/design-patterns/factory-method/java/example "Factory Method en Java") [![Factory Method en PHP](https://refactoring.guru/images/patterns/icons/php.svg?id=be1906eb26b71ec1d3b93720d6156618)](https://refactoring.guru/es/design-patterns/factory-method/php/example "Factory Method en PHP") [![Factory Method en Python](https://refactoring.guru/images/patterns/icons/python.svg?id=6d815d43c0f7050a1151b43e51569c9f)](https://refactoring.guru/es/design-patterns/factory-method/python/example "Factory Method en Python") [![Factory Method en Ruby](https://refactoring.guru/images/patterns/icons/ruby.svg?id=b065b718c914bf8e960ef731600be1eb)](https://refactoring.guru/es/design-patterns/factory-method/ruby/example "Factory Method en Ruby") [![Factory Method en Rust](https://refactoring.guru/images/patterns/icons/rust.svg?id=1f5698a4b5ae23fe79413511747e4a87)](https://refactoring.guru/es/design-patterns/factory-method/rust/example "Factory Method en Rust") [![Factory Method en Swift](https://refactoring.guru/images/patterns/icons/swift.svg?id=0b716c2d52ec3a48fbe91ac031070c1d)](https://refactoring.guru/es/design-patterns/factory-method/swift/example "Factory Method en Swift") [![Factory Method en TypeScript](https://refactoring.guru/images/patterns/icons/typescript.svg?id=2239d0f16cb703540c205dd8cb0c0cb7)](https://refactoring.guru/es/design-patterns/factory-method/typescript/example "Factory Method en TypeScript") --- # Facade en Go / Patrones de diseño [There are patterns of patterns now! \ My friend's project: MetaPatterns.io](https://metapatterns.io/)  [](https://refactoring.guru/es/design-patterns/facade/go/example#checkout) [](https://refactoring.guru/es/design-patterns/facade/go/example#checkout) [](https://refactoring.guru/) / [Patrones de diseño](https://refactoring.guru/es/design-patterns) / [Facade](https://refactoring.guru/es/design-patterns/facade) / [Go](https://refactoring.guru/es/design-patterns/go) ![Facade](https://refactoring.guru/images/patterns/cards/facade-mini-2x.png?id=d4cc6a5d81a31143cc665f7ac1481ac8) **Facade** en Go ================ **Facade** es un patrón de diseño estructural que proporciona una interfaz simplificada (pero limitada) a un sistema complejo de clases, bibliotecas o \_frameworks\_. El patrón Facade disminuye la complejidad general de la aplicación, al mismo tiempo que ayuda a mover dependencias no deseadas a un solo lugar. [Aprende más sobre el patrón Facade](https://refactoring.guru/es/design-patterns/facade) Navegación  [Intro](https://refactoring.guru/es/design-patterns/facade/go/example#)  [Ejemplo conceptual](https://refactoring.guru/es/design-patterns/facade/go/example#example-0)  [wallet­Facade](https://refactoring.guru/es/design-patterns/facade/go/example#example-0--walletFacade-go)  [account](https://refactoring.guru/es/design-patterns/facade/go/example#example-0--account-go)  [security­Code](https://refactoring.guru/es/design-patterns/facade/go/example#example-0--securityCode-go)  [wallet](https://refactoring.guru/es/design-patterns/facade/go/example#example-0--wallet-go)  [ledger](https://refactoring.guru/es/design-patterns/facade/go/example#example-0--ledger-go)  [notification](https://refactoring.guru/es/design-patterns/facade/go/example#example-0--notification-go)  [main](https://refactoring.guru/es/design-patterns/facade/go/example#example-0--main-go)  [output](https://refactoring.guru/es/design-patterns/facade/go/example#example-0--output-txt) Ejemplo conceptual ------------------ Resulta sencillo subestimar las complejidades que tienen lugar tras bambalinas cuando pides una pizza con tu tarjeta de crédito. Decenas de subsistemas actúan en este proceso. Aquí tienes una pequeña muestra de ellos: * Comprobar la cuenta * Comprobar el PIN de seguridad * Balance de crédito/débito * Realizar la entrada del movimiento * Enviar la notificación En un sistema complejo como éste, es fácil perderse y es fácil descomponer algo si se hacen las cosas mal. Por eso existe el concepto del patrón Facade: algo que permite al cliente trabajar con decenas de componentes utilizando una interfaz simple. El cliente solo tiene que introducir los datos de la tarjeta, el pin de seguridad, la cantidad a pagar y el tipo de operación. El patrón Facade dirige las comunicaciones con varios componentes sin exponer al cliente a las complejidades internas. #### **walletFacade.go:** Fachada package main import "fmt" type WalletFacade struct { account \*Account wallet \*Wallet securityCode \*SecurityCode notification \*Notification ledger \*Ledger } func newWalletFacade(accountID string, code int) \*WalletFacade { fmt.Println("Starting create account") walletFacacde := &WalletFacade{ account: newAccount(accountID), securityCode: newSecurityCode(code), wallet: newWallet(), notification: &Notification{}, ledger: &Ledger{}, } fmt.Println("Account created") return walletFacacde } func (w \*WalletFacade) addMoneyToWallet(accountID string, securityCode int, amount int) error { fmt.Println("Starting add money to wallet") err := w.account.checkAccount(accountID) if err != nil { return err } err = w.securityCode.checkCode(securityCode) if err != nil { return err } w.wallet.creditBalance(amount) w.notification.sendWalletCreditNotification() w.ledger.makeEntry(accountID, "credit", amount) return nil } func (w \*WalletFacade) deductMoneyFromWallet(accountID string, securityCode int, amount int) error { fmt.Println("Starting debit money from wallet") err := w.account.checkAccount(accountID) if err != nil { return err } err = w.securityCode.checkCode(securityCode) if err != nil { return err } err = w.wallet.debitBalance(amount) if err != nil { return err } w.notification.sendWalletDebitNotification() w.ledger.makeEntry(accountID, "debit", amount) return nil } #### **account.go:** Partes del subsistema complejo package main import "fmt" type Account struct { name string } func newAccount(accountName string) \*Account { return &Account{ name: accountName, } } func (a \*Account) checkAccount(accountName string) error { if a.name != accountName { return fmt.Errorf("Account Name is incorrect") } fmt.Println("Account Verified") return nil } #### **securityCode.go:** Partes del subsistema complejo package main import "fmt" type SecurityCode struct { code int } func newSecurityCode(code int) \*SecurityCode { return &SecurityCode{ code: code, } } func (s \*SecurityCode) checkCode(incomingCode int) error { if s.code != incomingCode { return fmt.Errorf("Security Code is incorrect") } fmt.Println("SecurityCode Verified") return nil } #### **wallet.go:** Partes del subsistema complejo package main import "fmt" type Wallet struct { balance int } func newWallet() \*Wallet { return &Wallet{ balance: 0, } } func (w \*Wallet) creditBalance(amount int) { w.balance += amount fmt.Println("Wallet balance added successfully") return } func (w \*Wallet) debitBalance(amount int) error { if w.balance < amount { return fmt.Errorf("Balance is not sufficient") } fmt.Println("Wallet balance is Sufficient") w.balance = w.balance - amount return nil } #### **ledger.go:** Partes del subsistema complejo package main import "fmt" type Ledger struct { } func (s \*Ledger) makeEntry(accountID, txnType string, amount int) { fmt.Printf("Make ledger entry for accountId %s with txnType %s for amount %d\\n", accountID, txnType, amount) return } #### **notification.go:** Partes del subsistema complejo package main import "fmt" type Notification struct { } func (n \*Notification) sendWalletCreditNotification() { fmt.Println("Sending wallet credit notification") } func (n \*Notification) sendWalletDebitNotification() { fmt.Println("Sending wallet debit notification") } #### **main.go:** Código cliente package main import ( "fmt" "log" ) func main() { fmt.Println() walletFacade := newWalletFacade("abc", 1234) fmt.Println() err := walletFacade.addMoneyToWallet("abc", 1234, 10) if err != nil { log.Fatalf("Error: %s\\n", err.Error()) } fmt.Println() err = walletFacade.deductMoneyFromWallet("abc", 1234, 5) if err != nil { log.Fatalf("Error: %s\\n", err.Error()) } } #### **output.txt:** Resultado de la ejecución Starting create account Account created Starting add money to wallet Account Verified SecurityCode Verified Wallet balance added successfully Sending wallet credit notification Make ledger entry for accountId abc with txnType credit for amount 10 Starting debit money from wallet Account Verified SecurityCode Verified Wallet balance is Sufficient Sending wallet debit notification Make ledger entry for accountId abc with txnType debit for amount 5 **Facade** en otros lenguajes ----------------------------- [![Facade en C#](https://refactoring.guru/images/patterns/icons/csharp.svg?id=da64592defc6e86d57c39c66e9de3e58)](https://refactoring.guru/es/design-patterns/facade/csharp/example "Facade en C#") [![Facade en C++](https://refactoring.guru/images/patterns/icons/cpp.svg?id=f7782ed8b8666246bfcc3f8fefc3b858)](https://refactoring.guru/es/design-patterns/facade/cpp/example "Facade en C++") [![Facade en Java](https://refactoring.guru/images/patterns/icons/java.svg?id=e6d87e2dca08c953fe3acd1275ed4f4e)](https://refactoring.guru/es/design-patterns/facade/java/example "Facade en Java") [![Facade en PHP](https://refactoring.guru/images/patterns/icons/php.svg?id=be1906eb26b71ec1d3b93720d6156618)](https://refactoring.guru/es/design-patterns/facade/php/example "Facade en PHP") [![Facade en Python](https://refactoring.guru/images/patterns/icons/python.svg?id=6d815d43c0f7050a1151b43e51569c9f)](https://refactoring.guru/es/design-patterns/facade/python/example "Facade en Python") [![Facade en Ruby](https://refactoring.guru/images/patterns/icons/ruby.svg?id=b065b718c914bf8e960ef731600be1eb)](https://refactoring.guru/es/design-patterns/facade/ruby/example "Facade en Ruby") [![Facade en Rust](https://refactoring.guru/images/patterns/icons/rust.svg?id=1f5698a4b5ae23fe79413511747e4a87)](https://refactoring.guru/es/design-patterns/facade/rust/example "Facade en Rust") [![Facade en Swift](https://refactoring.guru/images/patterns/icons/swift.svg?id=0b716c2d52ec3a48fbe91ac031070c1d)](https://refactoring.guru/es/design-patterns/facade/swift/example "Facade en Swift") [![Facade en TypeScript](https://refactoring.guru/images/patterns/icons/typescript.svg?id=2239d0f16cb703540c205dd8cb0c0cb7)](https://refactoring.guru/es/design-patterns/facade/typescript/example "Facade en TypeScript") --- # Decorator en Java / Patrones de diseño [There are patterns of patterns now! \ My friend's project: MetaPatterns.io](https://metapatterns.io/)  [](https://refactoring.guru/es/design-patterns/decorator/java/example#checkout) [](https://refactoring.guru/es/design-patterns/decorator/java/example#checkout) [](https://refactoring.guru/) / [Patrones de diseño](https://refactoring.guru/es/design-patterns) / [Decorator](https://refactoring.guru/es/design-patterns/decorator) / [Java](https://refactoring.guru/es/design-patterns/java) ![Decorator](https://refactoring.guru/images/patterns/cards/decorator-mini-2x.png?id=3b58e540d7d28523080cad341ed9b2e9) **Decorator** en Java ===================== **Decorator** es un patrón de diseño estructural que permite añadir dinámicamente nuevos comportamientos a objetos colocándolos dentro de objetos especiales que los envuelven (\_wrappers\_). Utilizando decoradores puedes envolver objetos innumerables veces, ya que los objetos objetivo y los decoradores siguen la misma interfaz. El objeto resultante obtendrá un comportamiento de apilado de todos los _wrappers_. [Aprende más sobre el patrón Decorator](https://refactoring.guru/es/design-patterns/decorator) Navegación  [Intro](https://refactoring.guru/es/design-patterns/decorator/java/example#)  [Decoradores de codificación y compresión](https://refactoring.guru/es/design-patterns/decorator/java/example#example-0)  decorators   [Data­Source](https://refactoring.guru/es/design-patterns/decorator/java/example#example-0--decorators-DataSource-java)   [File­Data­Source](https://refactoring.guru/es/design-patterns/decorator/java/example#example-0--decorators-FileDataSource-java)   [Data­Source­Decorator](https://refactoring.guru/es/design-patterns/decorator/java/example#example-0--decorators-DataSourceDecorator-java)   [Encryption­Decorator](https://refactoring.guru/es/design-patterns/decorator/java/example#example-0--decorators-EncryptionDecorator-java)   [Compression­Decorator](https://refactoring.guru/es/design-patterns/decorator/java/example#example-0--decorators-CompressionDecorator-java)  [Demo](https://refactoring.guru/es/design-patterns/decorator/java/example#example-0--Demo-java)  [Output­Demo](https://refactoring.guru/es/design-patterns/decorator/java/example#example-0--OutputDemo-txt) **Complejidad:** **Popularidad:** **Ejemplos de uso:** El patrón Decorator es bastante común en el código Java, especialmente en el código relacionado con los flujos (streams). Aquí tienes algunos ejemplos del patrón Decorator en las principales bibliotecas Java: * Todas las subclases de [`java.io.InputStream`](http://docs.oracle.com/javase/8/docs/api/java/io/InputStream.html) , [`OutputStream`](http://docs.oracle.com/javase/8/docs/api/java/io/OutputStream.html) , [`Reader`](http://docs.oracle.com/javase/8/docs/api/java/io/Reader.html) y [`Writer`](http://docs.oracle.com/javase/8/docs/api/java/io/Writer.html) tienen constructores que aceptan objetos de su propio tipo. * [`java.util.Collections`](http://docs.oracle.com/javase/8/docs/api/java/util/Collections.html) , los métodos [`checkedXXX()`](http://docs.oracle.com/javase/8/docs/api/java/util/Collections.html#checkedCollection-java.util.Collection-java.lang.Class-) , [`synchronizedXXX()`](http://docs.oracle.com/javase/8/docs/api/java/util/Collections.html#synchronizedCollection-java.util.Collection-) y [`unmodifiableXXX()`](http://docs.oracle.com/javase/8/docs/api/java/util/Collections.html#unmodifiableCollection-java.util.Collection-) . * [`javax.servlet.http.HttpServletRequestWrapper`](http://docs.oracle.com/javaee/7/api/javax/servlet/http/HttpServletRequestWrapper.html) y [`HttpServletResponseWrapper`](http://docs.oracle.com/javaee/7/api/javax/servlet/http/HttpServletResponseWrapper.html) **Identificación:** El patrón Decorator puede ser reconocido por métodos de creación o el constructor que acepta objetos de la misma clase o interfaz que la clase actual. Decoradores de codificación y compresión ---------------------------------------- Este ejemplo muestra cómo puedes ajustar el comportamiento de un objeto sin cambiar su código. Inicialmente, la clase de la lógica de negocio sólo podía leer y escribir datos en texto sin formato. Después creamos varias pequeñas clases envoltorio que añaden un nuevo comportamiento tras ejecutar operaciones estándar en un objeto envuelto. El primer _wrapper_ codifica y decodifica información, y el segundo comprime y extrae datos. Puedes incluso combinar estos _wrappers_ envolviendo un decorador con otro. ### **decorators** #### **decorators/DataSource.java:** Una interfaz común de datos que define operaciones de leer y escribir package refactoring\_guru.decorator.example.decorators; public interface DataSource { void writeData(String data); String readData(); } #### **decorators/FileDataSource.java:** Escritor-lector de datos simple package refactoring\_guru.decorator.example.decorators; import java.io.\*; public class FileDataSource implements DataSource { private String name; public FileDataSource(String name) { this.name = name; } @Override public void writeData(String data) { File file = new File(name); try (OutputStream fos = new FileOutputStream(file)) { fos.write(data.getBytes(), 0, data.length()); } catch (IOException ex) { System.out.println(ex.getMessage()); } } @Override public String readData() { char\[\] buffer = null; File file = new File(name); try (FileReader reader = new FileReader(file)) { buffer = new char\[(int) file.length()\]; reader.read(buffer); } catch (IOException ex) { System.out.println(ex.getMessage()); } return new String(buffer); } } #### **decorators/DataSourceDecorator.java:** Decorador abstracto base package refactoring\_guru.decorator.example.decorators; public abstract class DataSourceDecorator implements DataSource { private DataSource wrappee; DataSourceDecorator(DataSource source) { this.wrappee = source; } @Override public void writeData(String data) { wrappee.writeData(data); } @Override public String readData() { return wrappee.readData(); } } #### **decorators/EncryptionDecorator.java:** Decorador de codificación package refactoring\_guru.decorator.example.decorators; import java.util.Base64; public class EncryptionDecorator extends DataSourceDecorator { public EncryptionDecorator(DataSource source) { super(source); } @Override public void writeData(String data) { super.writeData(encode(data)); } @Override public String readData() { return decode(super.readData()); } private String encode(String data) { byte\[\] result = data.getBytes(); for (int i = 0; i < result.length; i++) { result\[i\] += (byte) 1; } return Base64.getEncoder().encodeToString(result); } private String decode(String data) { byte\[\] result = Base64.getDecoder().decode(data); for (int i = 0; i < result.length; i++) { result\[i\] -= (byte) 1; } return new String(result); } } #### **decorators/CompressionDecorator.java:** Decorador de compresión package refactoring\_guru.decorator.example.decorators; import java.io.ByteArrayInputStream; import java.io.ByteArrayOutputStream; import java.io.IOException; import java.io.InputStream; import java.util.Base64; import java.util.zip.Deflater; import java.util.zip.DeflaterOutputStream; import java.util.zip.InflaterInputStream; public class CompressionDecorator extends DataSourceDecorator { private int compLevel = 6; public CompressionDecorator(DataSource source) { super(source); } public int getCompressionLevel() { return compLevel; } public void setCompressionLevel(int value) { compLevel = value; } @Override public void writeData(String data) { super.writeData(compress(data)); } @Override public String readData() { return decompress(super.readData()); } private String compress(String stringData) { byte\[\] data = stringData.getBytes(); try { ByteArrayOutputStream bout = new ByteArrayOutputStream(512); DeflaterOutputStream dos = new DeflaterOutputStream(bout, new Deflater(compLevel)); dos.write(data); dos.close(); bout.close(); return Base64.getEncoder().encodeToString(bout.toByteArray()); } catch (IOException ex) { return null; } } private String decompress(String stringData) { byte\[\] data = Base64.getDecoder().decode(stringData); try { InputStream in = new ByteArrayInputStream(data); InflaterInputStream iin = new InflaterInputStream(in); ByteArrayOutputStream bout = new ByteArrayOutputStream(512); int b; while ((b = iin.read()) != -1) { bout.write(b); } in.close(); iin.close(); bout.close(); return new String(bout.toByteArray()); } catch (IOException ex) { return null; } } } #### **Demo.java:** Código cliente package refactoring\_guru.decorator.example; import refactoring\_guru.decorator.example.decorators.\*; public class Demo { public static void main(String\[\] args) { String salaryRecords = "Name,Salary\\nJohn Smith,100000\\nSteven Jobs,912000"; DataSourceDecorator encoded = new CompressionDecorator( new EncryptionDecorator( new FileDataSource("out/OutputDemo.txt"))); encoded.writeData(salaryRecords); DataSource plain = new FileDataSource("out/OutputDemo.txt"); System.out.println("- Input ----------------"); System.out.println(salaryRecords); System.out.println("- Encoded --------------"); System.out.println(plain.readData()); System.out.println("- Decoded --------------"); System.out.println(encoded.readData()); } } #### **OutputDemo.txt:** Resultado de la ejecución \- Input ---------------- Name,Salary John Smith,100000 Steven Jobs,912000 - Encoded -------------- Zkt7e1Q5eU8yUm1Qe0ZsdHJ2VXp6dDBKVnhrUHtUe0sxRUYxQkJIdjVLTVZ0dVI5Q2IwOXFISmVUMU5rcENCQmdxRlByaD4+ - Decoded -------------- Name,Salary John Smith,100000 Steven Jobs,912000 **Decorator** en otros lenguajes -------------------------------- [![Decorator en C#](https://refactoring.guru/images/patterns/icons/csharp.svg?id=da64592defc6e86d57c39c66e9de3e58)](https://refactoring.guru/es/design-patterns/decorator/csharp/example "Decorator en C#") [![Decorator en C++](https://refactoring.guru/images/patterns/icons/cpp.svg?id=f7782ed8b8666246bfcc3f8fefc3b858)](https://refactoring.guru/es/design-patterns/decorator/cpp/example "Decorator en C++") [![Decorator en Go](https://refactoring.guru/images/patterns/icons/go.svg?id=1a89927eb99b1ea3fde7701d97970aca)](https://refactoring.guru/es/design-patterns/decorator/go/example "Decorator en Go") [![Decorator en PHP](https://refactoring.guru/images/patterns/icons/php.svg?id=be1906eb26b71ec1d3b93720d6156618)](https://refactoring.guru/es/design-patterns/decorator/php/example "Decorator en PHP") [![Decorator en Python](https://refactoring.guru/images/patterns/icons/python.svg?id=6d815d43c0f7050a1151b43e51569c9f)](https://refactoring.guru/es/design-patterns/decorator/python/example "Decorator en Python") [![Decorator en Ruby](https://refactoring.guru/images/patterns/icons/ruby.svg?id=b065b718c914bf8e960ef731600be1eb)](https://refactoring.guru/es/design-patterns/decorator/ruby/example "Decorator en Ruby") [![Decorator en Rust](https://refactoring.guru/images/patterns/icons/rust.svg?id=1f5698a4b5ae23fe79413511747e4a87)](https://refactoring.guru/es/design-patterns/decorator/rust/example "Decorator en Rust") [![Decorator en Swift](https://refactoring.guru/images/patterns/icons/swift.svg?id=0b716c2d52ec3a48fbe91ac031070c1d)](https://refactoring.guru/es/design-patterns/decorator/swift/example "Decorator en Swift") [![Decorator en TypeScript](https://refactoring.guru/images/patterns/icons/typescript.svg?id=2239d0f16cb703540c205dd8cb0c0cb7)](https://refactoring.guru/es/design-patterns/decorator/typescript/example "Decorator en TypeScript") --- # Factory Method en Python / Patrones de diseño [There are patterns of patterns now! \ My friend's project: MetaPatterns.io](https://metapatterns.io/)  [](https://refactoring.guru/es/design-patterns/factory-method/python/example#checkout) [](https://refactoring.guru/es/design-patterns/factory-method/python/example#checkout) [](https://refactoring.guru/) / [Patrones de diseño](https://refactoring.guru/es/design-patterns) / [Factory Method](https://refactoring.guru/es/design-patterns/factory-method) / [Python](https://refactoring.guru/es/design-patterns/python) ![Factory Method](https://refactoring.guru/images/patterns/cards/factory-method-mini-2x.png?id=fa9d4a8d61a67cc3822e52b9daf69dad) **Factory Method** en Python ============================ **Factory method** es un patrón de diseño creacional que resuelve el problema de crear objetos de producto sin especificar sus clases concretas. El patrón Factory Method define un método que debe utilizarse para crear objetos, en lugar de una llamada directa al constructor (operador `new`). Las subclases pueden sobrescribir este método para cambiar las clases de los objetos que se crearán. > Si no sabes la diferencia entre varios patrones y conceptos de la fábrica, lee nuestra [Comparación de fábricas](https://refactoring.guru/es/design-patterns/factory-comparison) > . [Aprende más sobre el patrón Factory Method](https://refactoring.guru/es/design-patterns/factory-method) Navegación  [Intro](https://refactoring.guru/es/design-patterns/factory-method/python/example#)  [Ejemplo conceptual](https://refactoring.guru/es/design-patterns/factory-method/python/example#example-0)  [main](https://refactoring.guru/es/design-patterns/factory-method/python/example#example-0--main-py)  [Output](https://refactoring.guru/es/design-patterns/factory-method/python/example#example-0--Output-txt) **Complejidad:** **Popularidad:** **Ejemplos de uso:** El patrón Factory Method se utiliza mucho en el código Python. Resulta muy útil cuando necesitas proporcionar un alto nivel de flexibilidad a tu código. **Identificación:** Los métodos fábrica pueden ser reconocidos por métodos de creación, que crean objetos de clases concretas, pero los devuelven como objetos del tipo abstracto o interfaz. Ejemplo conceptual ------------------ Este ejemplo ilustra la estructura del patrón de diseño **Factory Method**. Se centra en responder las siguientes preguntas: * ¿De qué clases se compone? * ¿Qué papeles juegan esas clases? * ¿De qué forma se relacionan los elementos del patrón? #### **main.py:** Ejemplo conceptual from \_\_future\_\_ import annotations from abc import ABC, abstractmethod class Creator(ABC): """ The Creator class declares the factory method that is supposed to return an object of a Product class. The Creator's subclasses usually provide the implementation of this method. """ @abstractmethod def factory\_method(self): """ Note that the Creator may also provide some default implementation of the factory method. """ pass def some\_operation(self) -> str: """ Also note that, despite its name, the Creator's primary responsibility is not creating products. Usually, it contains some core business logic that relies on Product objects, returned by the factory method. Subclasses can indirectly change that business logic by overriding the factory method and returning a different type of product from it. """ # Call the factory method to create a Product object. product = self.factory\_method() # Now, use the product. result = f"Creator: The same creator's code has just worked with {product.operation()}" return result """ Concrete Creators override the factory method in order to change the resulting product's type. """ class ConcreteCreator1(Creator): """ Note that the signature of the method still uses the abstract product type, even though the concrete product is actually returned from the method. This way the Creator can stay independent of concrete product classes. """ def factory\_method(self) -> Product: return ConcreteProduct1() class ConcreteCreator2(Creator): def factory\_method(self) -> Product: return ConcreteProduct2() class Product(ABC): """ The Product interface declares the operations that all concrete products must implement. """ @abstractmethod def operation(self) -> str: pass """ Concrete Products provide various implementations of the Product interface. """ class ConcreteProduct1(Product): def operation(self) -> str: return "{Result of the ConcreteProduct1}" class ConcreteProduct2(Product): def operation(self) -> str: return "{Result of the ConcreteProduct2}" def client\_code(creator: Creator) -> None: """ The client code works with an instance of a concrete creator, albeit through its base interface. As long as the client keeps working with the creator via the base interface, you can pass it any creator's subclass. """ print(f"Client: I'm not aware of the creator's class, but it still works.\\n" f"{creator.some\_operation()}", end="") if \_\_name\_\_ == "\_\_main\_\_": print("App: Launched with the ConcreteCreator1.") client\_code(ConcreteCreator1()) print("\\n") print("App: Launched with the ConcreteCreator2.") client\_code(ConcreteCreator2()) #### **Output.txt:** Resultado de la ejecución App: Launched with the ConcreteCreator1. Client: I'm not aware of the creator's class, but it still works. Creator: The same creator's code has just worked with {Result of the ConcreteProduct1} App: Launched with the ConcreteCreator2. Client: I'm not aware of the creator's class, but it still works. Creator: The same creator's code has just worked with {Result of the ConcreteProduct2} **Factory Method** en otros lenguajes ------------------------------------- [![Factory Method en C#](https://refactoring.guru/images/patterns/icons/csharp.svg?id=da64592defc6e86d57c39c66e9de3e58)](https://refactoring.guru/es/design-patterns/factory-method/csharp/example "Factory Method en C#") [![Factory Method en C++](https://refactoring.guru/images/patterns/icons/cpp.svg?id=f7782ed8b8666246bfcc3f8fefc3b858)](https://refactoring.guru/es/design-patterns/factory-method/cpp/example "Factory Method en C++") [![Factory Method en Go](https://refactoring.guru/images/patterns/icons/go.svg?id=1a89927eb99b1ea3fde7701d97970aca)](https://refactoring.guru/es/design-patterns/factory-method/go/example "Factory Method en Go") [![Factory Method en Java](https://refactoring.guru/images/patterns/icons/java.svg?id=e6d87e2dca08c953fe3acd1275ed4f4e)](https://refactoring.guru/es/design-patterns/factory-method/java/example "Factory Method en Java") [![Factory Method en PHP](https://refactoring.guru/images/patterns/icons/php.svg?id=be1906eb26b71ec1d3b93720d6156618)](https://refactoring.guru/es/design-patterns/factory-method/php/example "Factory Method en PHP") [![Factory Method en Ruby](https://refactoring.guru/images/patterns/icons/ruby.svg?id=b065b718c914bf8e960ef731600be1eb)](https://refactoring.guru/es/design-patterns/factory-method/ruby/example "Factory Method en Ruby") [![Factory Method en Rust](https://refactoring.guru/images/patterns/icons/rust.svg?id=1f5698a4b5ae23fe79413511747e4a87)](https://refactoring.guru/es/design-patterns/factory-method/rust/example "Factory Method en Rust") [![Factory Method en Swift](https://refactoring.guru/images/patterns/icons/swift.svg?id=0b716c2d52ec3a48fbe91ac031070c1d)](https://refactoring.guru/es/design-patterns/factory-method/swift/example "Factory Method en Swift") [![Factory Method en TypeScript](https://refactoring.guru/images/patterns/icons/typescript.svg?id=2239d0f16cb703540c205dd8cb0c0cb7)](https://refactoring.guru/es/design-patterns/factory-method/typescript/example "Factory Method en TypeScript") --- # Adapter en Swift / Patrones de diseño [There are patterns of patterns now! \ My friend's project: MetaPatterns.io](https://metapatterns.io/)  [](https://refactoring.guru/es/design-patterns/adapter/swift/example#checkout) [](https://refactoring.guru/es/design-patterns/adapter/swift/example#checkout) [](https://refactoring.guru/) / [Patrones de diseño](https://refactoring.guru/es/design-patterns) / [Adapter](https://refactoring.guru/es/design-patterns/adapter) / [Swift](https://refactoring.guru/es/design-patterns/swift) ![Adapter](https://refactoring.guru/images/patterns/cards/adapter-mini-2x.png?id=8274d99afbbe9c63bfbfd0d68ceeffc7) **Adapter** en Swift ==================== **Adapter** es un patrón de diseño estructural que permite colaborar a objetos incompatibles. El patrón Adapter actúa como envoltorio entre dos objetos. Atrapa las llamadas a un objeto y las transforma a un formato y una interfaz reconocible para el segundo objeto. [Aprende más sobre el patrón Adapter](https://refactoring.guru/es/design-patterns/adapter) Navegación  [Intro](https://refactoring.guru/es/design-patterns/adapter/swift/example#)  [Ejemplo conceptual](https://refactoring.guru/es/design-patterns/adapter/swift/example#example-0)  [Example](https://refactoring.guru/es/design-patterns/adapter/swift/example#example-0--Example-swift)  [Output](https://refactoring.guru/es/design-patterns/adapter/swift/example#example-0--Output-txt)  [Ejemplo del mundo real](https://refactoring.guru/es/design-patterns/adapter/swift/example#example-1)  [Example](https://refactoring.guru/es/design-patterns/adapter/swift/example#example-1--Example-swift)  [Output](https://refactoring.guru/es/design-patterns/adapter/swift/example#example-1--Output-txt) **Complejidad:** **Popularidad:** **Ejemplos de uso:** El patrón Adapter es muy común en el código Swift. Se utiliza muy a menudo en sistemas basados en algún código heredado. En estos casos, los adaptadores crean código heredado con clases modernas. **Identificación:** Adapter es reconocible por un constructor que toma una instancia de distinto tipo de clase abstracta/interfaz. Cuando el adaptador recibe una llamada a uno de sus métodos, convierte los parámetros al formato adecuado y después dirige la llamada a uno o varios métodos del objeto envuelto. Los siguientes ejemplos están disponibles en [Swift Playgrounds](https://www.alemohamad.com/playgrounds) . Kudos a [Alejandro Mohamad](https://www.alemohamad.com/) por crear la versión de Playground. Ejemplo conceptual ------------------ Este ejemplo ilustra la estructura del patrón de diseño **Adapter** y se centra en las siguientes preguntas: * ¿De qué clases se compone? * ¿Qué papeles juegan esas clases? * ¿De qué forma se relacionan los elementos del patrón? Después de conocer la estructura del patrón, será más fácil comprender el siguiente ejemplo basado en un caso de uso real de Swift. #### **Example.swift:** Ejemplo conceptual import XCTest /// The Target defines the domain-specific interface used by the client code. class Target { func request() -> String { return "Target: The default target's behavior." } } /// The Adaptee contains some useful behavior, but its interface is incompatible /// with the existing client code. The Adaptee needs some adaptation before the /// client code can use it. class Adaptee { public func specificRequest() -> String { return ".eetpadA eht fo roivaheb laicepS" } } /// The Adapter makes the Adaptee's interface compatible with the Target's /// interface. class Adapter: Target { private var adaptee: Adaptee init(\_ adaptee: Adaptee) { self.adaptee = adaptee } override func request() -> String { return "Adapter: (TRANSLATED) " + adaptee.specificRequest().reversed() } } /// The client code supports all classes that follow the Target interface. class Client { // ... static func someClientCode(target: Target) { print(target.request()) } // ... } /// Let's see how it all works together. class AdapterConceptual: XCTestCase { func testAdapterConceptual() { print("Client: I can work just fine with the Target objects:") Client.someClientCode(target: Target()) let adaptee = Adaptee() print("Client: The Adaptee class has a weird interface. See, I don't understand it:") print("Adaptee: " + adaptee.specificRequest()) print("Client: But I can work with it via the Adapter:") Client.someClientCode(target: Adapter(adaptee)) } } #### **Output.txt:** Resultado de la ejecución Client: I can work just fine with the Target objects: Target: The default target's behavior. Client: The Adaptee class has a weird interface. See, I don't understand it: Adaptee: .eetpadA eht fo roivaheb laicepS Client: But I can work with it via the Adapter: Adapter: (TRANSLATED) Special behavior of the Adaptee. Ejemplo del mundo real ---------------------- #### **Example.swift:** Ejemplo del mundo real import XCTest import UIKit /// Adapter Design Pattern /// /// Intent: Convert the interface of a class into the interface clients expect. /// Adapter lets classes work together that couldn't work otherwise because of /// incompatible interfaces. class AdapterRealWorld: XCTestCase { /// Example. Let's assume that our app perfectly works with Facebook /// authorization. However, users ask you to add sign in via Twitter. /// /// Unfortunately, Twitter SDK has a different authorization method. /// /// Firstly, you have to create the new protocol 'AuthService' and insert /// the authorization method of Facebook SDK. /// /// Secondly, write an extension for Twitter SDK and implement methods of /// AuthService protocol, just a simple redirect. /// /// Thirdly, write an extension for Facebook SDK. You should not write any /// code at this point as methods already implemented by Facebook SDK. /// /// It just tells a compiler that both SDKs have the same interface. func testAdapterRealWorld() { print("Starting an authorization via Facebook") startAuthorization(with: FacebookAuthSDK()) print("Starting an authorization via Twitter.") startAuthorization(with: TwitterAuthSDK()) } func startAuthorization(with service: AuthService) { /// The current top view controller of the app let topViewController = UIViewController() service.presentAuthFlow(from: topViewController) } } protocol AuthService { func presentAuthFlow(from viewController: UIViewController) } class FacebookAuthSDK { func presentAuthFlow(from viewController: UIViewController) { /// Call SDK methods and pass a view controller print("Facebook WebView has been shown.") } } class TwitterAuthSDK { func startAuthorization(with viewController: UIViewController) { /// Call SDK methods and pass a view controller print("Twitter WebView has been shown. Users will be happy :)") } } extension TwitterAuthSDK: AuthService { /// This is an adapter /// /// Yeah, we are able to not create another class and just extend an /// existing one func presentAuthFlow(from viewController: UIViewController) { print("The Adapter is called! Redirecting to the original method...") self.startAuthorization(with: viewController) } } extension FacebookAuthSDK: AuthService { /// This extension just tells a compiler that both SDKs have the same /// interface. } #### **Output.txt:** Resultado de la ejecución Starting an authorization via Facebook Facebook WebView has been shown /// Starting an authorization via Twitter The Adapter is called! Redirecting to the original method... Twitter WebView has been shown. Users will be happy :) **Adapter** en otros lenguajes ------------------------------ [![Adapter en C#](https://refactoring.guru/images/patterns/icons/csharp.svg?id=da64592defc6e86d57c39c66e9de3e58)](https://refactoring.guru/es/design-patterns/adapter/csharp/example "Adapter en C#") [![Adapter en C++](https://refactoring.guru/images/patterns/icons/cpp.svg?id=f7782ed8b8666246bfcc3f8fefc3b858)](https://refactoring.guru/es/design-patterns/adapter/cpp/example "Adapter en C++") [![Adapter en Go](https://refactoring.guru/images/patterns/icons/go.svg?id=1a89927eb99b1ea3fde7701d97970aca)](https://refactoring.guru/es/design-patterns/adapter/go/example "Adapter en Go") [![Adapter en Java](https://refactoring.guru/images/patterns/icons/java.svg?id=e6d87e2dca08c953fe3acd1275ed4f4e)](https://refactoring.guru/es/design-patterns/adapter/java/example "Adapter en Java") [![Adapter en PHP](https://refactoring.guru/images/patterns/icons/php.svg?id=be1906eb26b71ec1d3b93720d6156618)](https://refactoring.guru/es/design-patterns/adapter/php/example "Adapter en PHP") [![Adapter en Python](https://refactoring.guru/images/patterns/icons/python.svg?id=6d815d43c0f7050a1151b43e51569c9f)](https://refactoring.guru/es/design-patterns/adapter/python/example "Adapter en Python") [![Adapter en Ruby](https://refactoring.guru/images/patterns/icons/ruby.svg?id=b065b718c914bf8e960ef731600be1eb)](https://refactoring.guru/es/design-patterns/adapter/ruby/example "Adapter en Ruby") [![Adapter en Rust](https://refactoring.guru/images/patterns/icons/rust.svg?id=1f5698a4b5ae23fe79413511747e4a87)](https://refactoring.guru/es/design-patterns/adapter/rust/example "Adapter en Rust") [![Adapter en TypeScript](https://refactoring.guru/images/patterns/icons/typescript.svg?id=2239d0f16cb703540c205dd8cb0c0cb7)](https://refactoring.guru/es/design-patterns/adapter/typescript/example "Adapter en TypeScript") --- # Builder en C++ / Patrones de diseño [There are patterns of patterns now! \ My friend's project: MetaPatterns.io](https://metapatterns.io/)  [](https://refactoring.guru/es/design-patterns/builder/cpp/example#checkout) [](https://refactoring.guru/es/design-patterns/builder/cpp/example#checkout) [](https://refactoring.guru/) / [Patrones de diseño](https://refactoring.guru/es/design-patterns) / [Builder](https://refactoring.guru/es/design-patterns/builder) / [C++](https://refactoring.guru/es/design-patterns/cpp) ![Builder](https://refactoring.guru/images/patterns/cards/builder-mini-2x.png?id=de6d0938678b86903a1426dddfdd13bf) **Builder** en C++ ================== **Builder** es un patrón de diseño creacional que permite construir objetos complejos paso a paso. Al contrario que otros patrones creacionales, Builder no necesita que los productos tengan una interfaz común. Esto hace posible crear distintos productos utilizando el mismo proceso de construcción. [Aprende más sobre el patrón Builder](https://refactoring.guru/es/design-patterns/builder) Navegación  [Intro](https://refactoring.guru/es/design-patterns/builder/cpp/example#)  [Ejemplo conceptual](https://refactoring.guru/es/design-patterns/builder/cpp/example#example-0)  [main](https://refactoring.guru/es/design-patterns/builder/cpp/example#example-0--main-cc)  [Output](https://refactoring.guru/es/design-patterns/builder/cpp/example#example-0--Output-txt) **Complejidad:** **Popularidad:** **Ejemplos de uso:** El patrón Builder es muy conocido en el mundo C++. Resulta especialmente útil cuando debes crear un objeto con muchas opciones posibles de configuración. **Identificación:** El patrón Builder se puede reconocer por la clase, que tiene un único método de creación y varios métodos para configurar el objeto resultante. A menudo, los métodos del Builder soportan el encadenamiento (por ejemplo, `algúnBuilder->establecerValorA(1)->establecerValorB(2)->crear()`). Ejemplo conceptual ------------------ Este ejemplo ilustra la estructura del patrón de diseño **Builder**. Se centra en responder las siguientes preguntas: * ¿De qué clases se compone? * ¿Qué papeles juegan esas clases? * ¿De qué forma se relacionan los elementos del patrón? #### **main.cc:** Ejemplo conceptual /\*\* \* It makes sense to use the Builder pattern only when your products are quite \* complex and require extensive configuration. \* \* Unlike in other creational patterns, different concrete builders can produce \* unrelated products. In other words, results of various builders may not \* always follow the same interface. \*/ class Product1{ public: std::vector parts\_; void ListParts()const{ std::cout << "Product parts: "; for (size\_t i=0;iReset(); } ~ConcreteBuilder1(){ delete product; } void Reset(){ this->product= new Product1(); } /\*\* \* All production steps work with the same product instance. \*/ void ProducePartA()const override{ this->product->parts\_.push\_back("PartA1"); } void ProducePartB()const override{ this->product->parts\_.push\_back("PartB1"); } void ProducePartC()const override{ this->product->parts\_.push\_back("PartC1"); } /\*\* \* Concrete Builders are supposed to provide their own methods for \* retrieving results. That's because various types of builders may create \* entirely different products that don't follow the same interface. \* Therefore, such methods cannot be declared in the base Builder interface \* (at least in a statically typed programming language). Note that PHP is a \* dynamically typed language and this method CAN be in the base interface. \* However, we won't declare it there for the sake of clarity. \* \* Usually, after returning the end result to the client, a builder instance \* is expected to be ready to start producing another product. That's why \* it's a usual practice to call the reset method at the end of the \* \`getProduct\` method body. However, this behavior is not mandatory, and \* you can make your builders wait for an explicit reset call from the \* client code before disposing of the previous result. \*/ /\*\* \* Please be careful here with the memory ownership. Once you call \* GetProduct the user of this function is responsable to release this \* memory. Here could be a better option to use smart pointers to avoid \* memory leaks \*/ Product1\* GetProduct() { Product1\* result= this->product; this->Reset(); return result; } }; /\*\* \* The Director is only responsible for executing the building steps in a \* particular sequence. It is helpful when producing products according to a \* specific order or configuration. Strictly speaking, the Director class is \* optional, since the client can control builders directly. \*/ class Director{ /\*\* \* @var Builder \*/ private: Builder\* builder; /\*\* \* The Director works with any builder instance that the client code passes \* to it. This way, the client code may alter the final type of the newly \* assembled product. \*/ public: void set\_builder(Builder\* builder){ this->builder=builder; } /\*\* \* The Director can construct several product variations using the same \* building steps. \*/ void BuildMinimalViableProduct(){ this->builder->ProducePartA(); } void BuildFullFeaturedProduct(){ this->builder->ProducePartA(); this->builder->ProducePartB(); this->builder->ProducePartC(); } }; /\*\* \* The client code creates a builder object, passes it to the director and then \* initiates the construction process. The end result is retrieved from the \* builder object. \*/ /\*\* \* I used raw pointers for simplicity however you may prefer to use smart \* pointers here \*/ void ClientCode(Director& director) { ConcreteBuilder1\* builder = new ConcreteBuilder1(); director.set\_builder(builder); std::cout << "Standard basic product:\\n"; director.BuildMinimalViableProduct(); Product1\* p= builder->GetProduct(); p->ListParts(); delete p; std::cout << "Standard full featured product:\\n"; director.BuildFullFeaturedProduct(); p= builder->GetProduct(); p->ListParts(); delete p; // Remember, the Builder pattern can be used without a Director class. std::cout << "Custom product:\\n"; builder->ProducePartA(); builder->ProducePartC(); p=builder->GetProduct(); p->ListParts(); delete p; delete builder; } int main(){ Director\* director= new Director(); ClientCode(\*director); delete director; return 0; } #### **Output.txt:** Resultado de la ejecución Standard basic product: Product parts: PartA1 Standard full featured product: Product parts: PartA1, PartB1, PartC1 Custom product: Product parts: PartA1, PartC1 **Builder** en otros lenguajes ------------------------------ [![Builder en C#](https://refactoring.guru/images/patterns/icons/csharp.svg?id=da64592defc6e86d57c39c66e9de3e58)](https://refactoring.guru/es/design-patterns/builder/csharp/example "Builder en C#") [![Builder en Go](https://refactoring.guru/images/patterns/icons/go.svg?id=1a89927eb99b1ea3fde7701d97970aca)](https://refactoring.guru/es/design-patterns/builder/go/example "Builder en Go") [![Builder en Java](https://refactoring.guru/images/patterns/icons/java.svg?id=e6d87e2dca08c953fe3acd1275ed4f4e)](https://refactoring.guru/es/design-patterns/builder/java/example "Builder en Java") [![Builder en PHP](https://refactoring.guru/images/patterns/icons/php.svg?id=be1906eb26b71ec1d3b93720d6156618)](https://refactoring.guru/es/design-patterns/builder/php/example "Builder en PHP") [![Builder en Python](https://refactoring.guru/images/patterns/icons/python.svg?id=6d815d43c0f7050a1151b43e51569c9f)](https://refactoring.guru/es/design-patterns/builder/python/example "Builder en Python") [![Builder en Ruby](https://refactoring.guru/images/patterns/icons/ruby.svg?id=b065b718c914bf8e960ef731600be1eb)](https://refactoring.guru/es/design-patterns/builder/ruby/example "Builder en Ruby") [![Builder en Rust](https://refactoring.guru/images/patterns/icons/rust.svg?id=1f5698a4b5ae23fe79413511747e4a87)](https://refactoring.guru/es/design-patterns/builder/rust/example "Builder en Rust") [![Builder en Swift](https://refactoring.guru/images/patterns/icons/swift.svg?id=0b716c2d52ec3a48fbe91ac031070c1d)](https://refactoring.guru/es/design-patterns/builder/swift/example "Builder en Swift") [![Builder en TypeScript](https://refactoring.guru/images/patterns/icons/typescript.svg?id=2239d0f16cb703540c205dd8cb0c0cb7)](https://refactoring.guru/es/design-patterns/builder/typescript/example "Builder en TypeScript") --- # Facade en C# / Patrones de diseño [There are patterns of patterns now! \ My friend's project: MetaPatterns.io](https://metapatterns.io/)  [](https://refactoring.guru/es/design-patterns/facade/csharp/example#checkout) [](https://refactoring.guru/es/design-patterns/facade/csharp/example#checkout) [](https://refactoring.guru/) / [Patrones de diseño](https://refactoring.guru/es/design-patterns) / [Facade](https://refactoring.guru/es/design-patterns/facade) / [C#](https://refactoring.guru/es/design-patterns/csharp) ![Facade](https://refactoring.guru/images/patterns/cards/facade-mini-2x.png?id=d4cc6a5d81a31143cc665f7ac1481ac8) **Facade** en C# ================ **Facade** es un patrón de diseño estructural que proporciona una interfaz simplificada (pero limitada) a un sistema complejo de clases, bibliotecas o \_frameworks\_. El patrón Facade disminuye la complejidad general de la aplicación, al mismo tiempo que ayuda a mover dependencias no deseadas a un solo lugar. [Aprende más sobre el patrón Facade](https://refactoring.guru/es/design-patterns/facade) Navegación  [Intro](https://refactoring.guru/es/design-patterns/facade/csharp/example#)  [Ejemplo conceptual](https://refactoring.guru/es/design-patterns/facade/csharp/example#example-0)  [Program](https://refactoring.guru/es/design-patterns/facade/csharp/example#example-0--Program-cs)  [Output](https://refactoring.guru/es/design-patterns/facade/csharp/example#example-0--Output-txt) **Complejidad:** **Popularidad:** **Ejemplos de uso:** El patrón Facade se utiliza habitualmente en aplicaciones escritas en C#. Es de especial utilidad al trabajar con bibliotecas y API complejas. **Identificación:** El patrón Facade se puede reconocer en una clase con una interfaz simple, pero que delega la mayor parte del trabajo a otras clases. Normalmente, las fachadas gestionan todo el ciclo de vida de los objetos que utilizan. Ejemplo conceptual ------------------ Este ejemplo ilustra la estructura del patrón de diseño **Facade**. Se centra en responder las siguientes preguntas: * ¿De qué clases se compone? * ¿Qué papeles juegan esas clases? * ¿De qué forma se relacionan los elementos del patrón? #### **Program.cs:** Ejemplo conceptual using System; namespace RefactoringGuru.DesignPatterns.Facade.Conceptual { // The Facade class provides a simple interface to the complex logic of one // or several subsystems. The Facade delegates the client requests to the // appropriate objects within the subsystem. The Facade is also responsible // for managing their lifecycle. All of this shields the client from the // undesired complexity of the subsystem. public class Facade { protected Subsystem1 \_subsystem1; protected Subsystem2 \_subsystem2; public Facade(Subsystem1 subsystem1, Subsystem2 subsystem2) { this.\_subsystem1 = subsystem1; this.\_subsystem2 = subsystem2; } // The Facade's methods are convenient shortcuts to the sophisticated // functionality of the subsystems. However, clients get only to a // fraction of a subsystem's capabilities. public string Operation() { string result = "Facade initializes subsystems:\\n"; result += this.\_subsystem1.operation1(); result += this.\_subsystem2.operation1(); result += "Facade orders subsystems to perform the action:\\n"; result += this.\_subsystem1.operationN(); result += this.\_subsystem2.operationZ(); return result; } } // The Subsystem can accept requests either from the facade or client // directly. In any case, to the Subsystem, the Facade is yet another // client, and it's not a part of the Subsystem. public class Subsystem1 { public string operation1() { return "Subsystem1: Ready!\\n"; } public string operationN() { return "Subsystem1: Go!\\n"; } } // Some facades can work with multiple subsystems at the same time. public class Subsystem2 { public string operation1() { return "Subsystem2: Get ready!\\n"; } public string operationZ() { return "Subsystem2: Fire!\\n"; } } class Client { // The client code works with complex subsystems through a simple // interface provided by the Facade. When a facade manages the lifecycle // of the subsystem, the client might not even know about the existence // of the subsystem. This approach lets you keep the complexity under // control. public static void ClientCode(Facade facade) { Console.Write(facade.Operation()); } } class Program { static void Main(string\[\] args) { // The client code may have some of the subsystem's objects already // created. In this case, it might be worthwhile to initialize the // Facade with these objects instead of letting the Facade create // new instances. Subsystem1 subsystem1 = new Subsystem1(); Subsystem2 subsystem2 = new Subsystem2(); Facade facade = new Facade(subsystem1, subsystem2); Client.ClientCode(facade); } } } #### **Output.txt:** Resultado de la ejecución Facade initializes subsystems: Subsystem1: Ready! Subsystem2: Get ready! Facade orders subsystems to perform the action: Subsystem1: Go! Subsystem2: Fire! **Facade** en otros lenguajes ----------------------------- [![Facade en C++](https://refactoring.guru/images/patterns/icons/cpp.svg?id=f7782ed8b8666246bfcc3f8fefc3b858)](https://refactoring.guru/es/design-patterns/facade/cpp/example "Facade en C++") [![Facade en Go](https://refactoring.guru/images/patterns/icons/go.svg?id=1a89927eb99b1ea3fde7701d97970aca)](https://refactoring.guru/es/design-patterns/facade/go/example "Facade en Go") [![Facade en Java](https://refactoring.guru/images/patterns/icons/java.svg?id=e6d87e2dca08c953fe3acd1275ed4f4e)](https://refactoring.guru/es/design-patterns/facade/java/example "Facade en Java") [![Facade en PHP](https://refactoring.guru/images/patterns/icons/php.svg?id=be1906eb26b71ec1d3b93720d6156618)](https://refactoring.guru/es/design-patterns/facade/php/example "Facade en PHP") [![Facade en Python](https://refactoring.guru/images/patterns/icons/python.svg?id=6d815d43c0f7050a1151b43e51569c9f)](https://refactoring.guru/es/design-patterns/facade/python/example "Facade en Python") [![Facade en Ruby](https://refactoring.guru/images/patterns/icons/ruby.svg?id=b065b718c914bf8e960ef731600be1eb)](https://refactoring.guru/es/design-patterns/facade/ruby/example "Facade en Ruby") [![Facade en Rust](https://refactoring.guru/images/patterns/icons/rust.svg?id=1f5698a4b5ae23fe79413511747e4a87)](https://refactoring.guru/es/design-patterns/facade/rust/example "Facade en Rust") [![Facade en Swift](https://refactoring.guru/images/patterns/icons/swift.svg?id=0b716c2d52ec3a48fbe91ac031070c1d)](https://refactoring.guru/es/design-patterns/facade/swift/example "Facade en Swift") [![Facade en TypeScript](https://refactoring.guru/images/patterns/icons/typescript.svg?id=2239d0f16cb703540c205dd8cb0c0cb7)](https://refactoring.guru/es/design-patterns/facade/typescript/example "Facade en TypeScript") --- # Decorator en Swift / Patrones de diseño [There are patterns of patterns now! \ My friend's project: MetaPatterns.io](https://metapatterns.io/)  [](https://refactoring.guru/es/design-patterns/decorator/swift/example#checkout) [](https://refactoring.guru/es/design-patterns/decorator/swift/example#checkout) [](https://refactoring.guru/) / [Patrones de diseño](https://refactoring.guru/es/design-patterns) / [Decorator](https://refactoring.guru/es/design-patterns/decorator) / [Swift](https://refactoring.guru/es/design-patterns/swift) ![Decorator](https://refactoring.guru/images/patterns/cards/decorator-mini-2x.png?id=3b58e540d7d28523080cad341ed9b2e9) **Decorator** en Swift ====================== **Decorator** es un patrón de diseño estructural que permite añadir dinámicamente nuevos comportamientos a objetos colocándolos dentro de objetos especiales que los envuelven (\_wrappers\_). Utilizando decoradores puedes envolver objetos innumerables veces, ya que los objetos objetivo y los decoradores siguen la misma interfaz. El objeto resultante obtendrá un comportamiento de apilado de todos los _wrappers_. [Aprende más sobre el patrón Decorator](https://refactoring.guru/es/design-patterns/decorator) Navegación  [Intro](https://refactoring.guru/es/design-patterns/decorator/swift/example#)  [Ejemplo conceptual](https://refactoring.guru/es/design-patterns/decorator/swift/example#example-0)  [Example](https://refactoring.guru/es/design-patterns/decorator/swift/example#example-0--Example-swift)  [Output](https://refactoring.guru/es/design-patterns/decorator/swift/example#example-0--Output-txt)  [Ejemplo del mundo real](https://refactoring.guru/es/design-patterns/decorator/swift/example#example-1)  [Example](https://refactoring.guru/es/design-patterns/decorator/swift/example#example-1--Example-swift)  [Output](https://refactoring.guru/es/design-patterns/decorator/swift/example#example-1--Output-txt) **Complejidad:** **Popularidad:** **Ejemplos de uso:** El patrón Decorator es bastante común en el código Swift, especialmente en el código relacionado con los flujos (streams). **Identificación:** El patrón Decorator puede ser reconocido por métodos de creación o el constructor que acepta objetos de la misma clase o interfaz que la clase actual. Los siguientes ejemplos están disponibles en [Swift Playgrounds](https://www.alemohamad.com/playgrounds) . Kudos a [Alejandro Mohamad](https://www.alemohamad.com/) por crear la versión de Playground. Ejemplo conceptual ------------------ Este ejemplo ilustra la estructura del patrón de diseño **Decorator** y se centra en las siguientes preguntas: * ¿De qué clases se compone? * ¿Qué papeles juegan esas clases? * ¿De qué forma se relacionan los elementos del patrón? Después de conocer la estructura del patrón, será más fácil comprender el siguiente ejemplo basado en un caso de uso real de Swift. #### **Example.swift:** Ejemplo conceptual import XCTest /// The base Component interface defines operations that can be altered by /// decorators. protocol Component { func operation() -> String } /// Concrete Components provide default implementations of the operations. There /// might be several variations of these classes. class ConcreteComponent: Component { func operation() -> String { return "ConcreteComponent" } } /// The base Decorator class follows the same interface as the other components. /// The primary purpose of this class is to define the wrapping interface for /// all concrete decorators. The default implementation of the wrapping code /// might include a field for storing a wrapped component and the means to /// initialize it. class Decorator: Component { private var component: Component init(\_ component: Component) { self.component = component } /// The Decorator delegates all work to the wrapped component. func operation() -> String { return component.operation() } } /// Concrete Decorators call the wrapped object and alter its result in some /// way. class ConcreteDecoratorA: Decorator { /// Decorators may call parent implementation of the operation, instead of /// calling the wrapped object directly. This approach simplifies extension /// of decorator classes. override func operation() -> String { return "ConcreteDecoratorA(" + super.operation() + ")" } } /// Decorators can execute their behavior either before or after the call to a /// wrapped object. class ConcreteDecoratorB: Decorator { override func operation() -> String { return "ConcreteDecoratorB(" + super.operation() + ")" } } /// The client code works with all objects using the Component interface. This /// way it can stay independent of the concrete classes of components it works /// with. class Client { // ... static func someClientCode(component: Component) { print("Result: " + component.operation()) } // ... } /// Let's see how it all works together. class DecoratorConceptual: XCTestCase { func testDecoratorConceptual() { // This way the client code can support both simple components... print("Client: I've got a simple component") let simple = ConcreteComponent() Client.someClientCode(component: simple) // ...as well as decorated ones. // // Note how decorators can wrap not only simple components but the other // decorators as well. let decorator1 = ConcreteDecoratorA(simple) let decorator2 = ConcreteDecoratorB(decorator1) print("\\nClient: Now I've got a decorated component") Client.someClientCode(component: decorator2) } } #### **Output.txt:** Resultado de la ejecución Client: I've got a simple component Result: ConcreteComponent Client: Now I've got a decorated component Result: ConcreteDecoratorB(ConcreteDecoratorA(ConcreteComponent)) Ejemplo del mundo real ---------------------- #### **Example.swift:** Ejemplo del mundo real import UIKit import XCTest protocol ImageEditor: CustomStringConvertible { func apply() -> UIImage } class ImageDecorator: ImageEditor { private var editor: ImageEditor required init(\_ editor: ImageEditor) { self.editor = editor } func apply() -> UIImage { print(editor.description + " applies changes") return editor.apply() } var description: String { return "ImageDecorator" } } extension UIImage: ImageEditor { func apply() -> UIImage { return self } open override var description: String { return "Image" } } class BaseFilter: ImageDecorator { fileprivate var filter: CIFilter? init(editor: ImageEditor, filterName: String) { self.filter = CIFilter(name: filterName) super.init(editor) } required init(\_ editor: ImageEditor) { super.init(editor) } override func apply() -> UIImage { let image = super.apply() let context = CIContext(options: nil) filter?.setValue(CIImage(image: image), forKey: kCIInputImageKey) guard let output = filter?.outputImage else { return image } guard let coreImage = context.createCGImage(output, from: output.extent) else { return image } return UIImage(cgImage: coreImage) } override var description: String { return "BaseFilter" } } class BlurFilter: BaseFilter { required init(\_ editor: ImageEditor) { super.init(editor: editor, filterName: "CIGaussianBlur") } func update(radius: Double) { filter?.setValue(radius, forKey: "inputRadius") } override var description: String { return "BlurFilter" } } class ColorFilter: BaseFilter { required init(\_ editor: ImageEditor) { super.init(editor: editor, filterName: "CIColorControls") } func update(saturation: Double) { filter?.setValue(saturation, forKey: "inputSaturation") } func update(brightness: Double) { filter?.setValue(brightness, forKey: "inputBrightness") } func update(contrast: Double) { filter?.setValue(contrast, forKey: "inputContrast") } override var description: String { return "ColorFilter" } } class Resizer: ImageDecorator { private var xScale: CGFloat = 0 private var yScale: CGFloat = 0 private var hasAlpha = false convenience init(\_ editor: ImageEditor, xScale: CGFloat = 0, yScale: CGFloat = 0, hasAlpha: Bool = false) { self.init(editor) self.xScale = xScale self.yScale = yScale self.hasAlpha = hasAlpha } required init(\_ editor: ImageEditor) { super.init(editor) } override func apply() -> UIImage { let image = super.apply() let size = image.size.applying(CGAffineTransform(scaleX: xScale, y: yScale)) UIGraphicsBeginImageContextWithOptions(size, !hasAlpha, UIScreen.main.scale) image.draw(in: CGRect(origin: .zero, size: size)) let scaledImage = UIGraphicsGetImageFromCurrentImageContext() UIGraphicsEndImageContext() return scaledImage ?? image } override var description: String { return "Resizer" } } class DecoratorRealWorld: XCTestCase { func testDecoratorRealWorld() { let image = loadImage() print("Client: set up an editors stack") let resizer = Resizer(image, xScale: 0.2, yScale: 0.2) let blurFilter = BlurFilter(resizer) blurFilter.update(radius: 2) let colorFilter = ColorFilter(blurFilter) colorFilter.update(contrast: 0.53) colorFilter.update(brightness: 0.12) colorFilter.update(saturation: 4) clientCode(editor: colorFilter) } func clientCode(editor: ImageEditor) { let image = editor.apply() /// Note. You can stop an execution in Xcode to see an image preview. print("Client: all changes have been applied for \\(image)") } } private extension DecoratorRealWorld { func loadImage() -> UIImage { let urlString = "https:// refactoring.guru/images/content-public/logos/logo-new-3x.png" /// Note: /// Do not download images the following way in a production code. guard let url = URL(string: urlString) else { fatalError("Please enter a valid URL") } guard let data = try? Data(contentsOf: url) else { fatalError("Cannot load an image") } guard let image = UIImage(data: data) else { fatalError("Cannot create an image from data") } return image } } #### **Output.txt:** Resultado de la ejecución Client: set up an editors stack BlurFilter applies changes Resizer applies changes Image applies changes Client: all changes have been applied for Image **Decorator** en otros lenguajes -------------------------------- [![Decorator en C#](https://refactoring.guru/images/patterns/icons/csharp.svg?id=da64592defc6e86d57c39c66e9de3e58)](https://refactoring.guru/es/design-patterns/decorator/csharp/example "Decorator en C#") [![Decorator en C++](https://refactoring.guru/images/patterns/icons/cpp.svg?id=f7782ed8b8666246bfcc3f8fefc3b858)](https://refactoring.guru/es/design-patterns/decorator/cpp/example "Decorator en C++") [![Decorator en Go](https://refactoring.guru/images/patterns/icons/go.svg?id=1a89927eb99b1ea3fde7701d97970aca)](https://refactoring.guru/es/design-patterns/decorator/go/example "Decorator en Go") [![Decorator en Java](https://refactoring.guru/images/patterns/icons/java.svg?id=e6d87e2dca08c953fe3acd1275ed4f4e)](https://refactoring.guru/es/design-patterns/decorator/java/example "Decorator en Java") [![Decorator en PHP](https://refactoring.guru/images/patterns/icons/php.svg?id=be1906eb26b71ec1d3b93720d6156618)](https://refactoring.guru/es/design-patterns/decorator/php/example "Decorator en PHP") [![Decorator en Python](https://refactoring.guru/images/patterns/icons/python.svg?id=6d815d43c0f7050a1151b43e51569c9f)](https://refactoring.guru/es/design-patterns/decorator/python/example "Decorator en Python") [![Decorator en Ruby](https://refactoring.guru/images/patterns/icons/ruby.svg?id=b065b718c914bf8e960ef731600be1eb)](https://refactoring.guru/es/design-patterns/decorator/ruby/example "Decorator en Ruby") [![Decorator en Rust](https://refactoring.guru/images/patterns/icons/rust.svg?id=1f5698a4b5ae23fe79413511747e4a87)](https://refactoring.guru/es/design-patterns/decorator/rust/example "Decorator en Rust") [![Decorator en TypeScript](https://refactoring.guru/images/patterns/icons/typescript.svg?id=2239d0f16cb703540c205dd8cb0c0cb7)](https://refactoring.guru/es/design-patterns/decorator/typescript/example "Decorator en TypeScript") --- # Facade en Java / Patrones de diseño [There are patterns of patterns now! \ My friend's project: MetaPatterns.io](https://metapatterns.io/)  [](https://refactoring.guru/es/design-patterns/facade/java/example#checkout) [](https://refactoring.guru/es/design-patterns/facade/java/example#checkout) [](https://refactoring.guru/) / [Patrones de diseño](https://refactoring.guru/es/design-patterns) / [Facade](https://refactoring.guru/es/design-patterns/facade) / [Java](https://refactoring.guru/es/design-patterns/java) ![Facade](https://refactoring.guru/images/patterns/cards/facade-mini-2x.png?id=d4cc6a5d81a31143cc665f7ac1481ac8) **Facade** en Java ================== **Facade** es un patrón de diseño estructural que proporciona una interfaz simplificada (pero limitada) a un sistema complejo de clases, bibliotecas o \_frameworks\_. El patrón Facade disminuye la complejidad general de la aplicación, al mismo tiempo que ayuda a mover dependencias no deseadas a un solo lugar. [Aprende más sobre el patrón Facade](https://refactoring.guru/es/design-patterns/facade) Navegación  [Intro](https://refactoring.guru/es/design-patterns/facade/java/example#)  [Interfaz simple para una biblioteca compleja de conversión de video](https://refactoring.guru/es/design-patterns/facade/java/example#example-0)  some\_complex\_media\_library   [Video­File](https://refactoring.guru/es/design-patterns/facade/java/example#example-0--some_complex_media_library-VideoFile-java)   [Codec](https://refactoring.guru/es/design-patterns/facade/java/example#example-0--some_complex_media_library-Codec-java)   [MPEG4Compression­Codec](https://refactoring.guru/es/design-patterns/facade/java/example#example-0--some_complex_media_library-MPEG4CompressionCodec-java)   [Ogg­Compression­Codec](https://refactoring.guru/es/design-patterns/facade/java/example#example-0--some_complex_media_library-OggCompressionCodec-java)   [Codec­Factory](https://refactoring.guru/es/design-patterns/facade/java/example#example-0--some_complex_media_library-CodecFactory-java)   [Bitrate­Reader](https://refactoring.guru/es/design-patterns/facade/java/example#example-0--some_complex_media_library-BitrateReader-java)   [Audio­Mixer](https://refactoring.guru/es/design-patterns/facade/java/example#example-0--some_complex_media_library-AudioMixer-java)  facade   [Video­Conversion­Facade](https://refactoring.guru/es/design-patterns/facade/java/example#example-0--facade-VideoConversionFacade-java)  [Demo](https://refactoring.guru/es/design-patterns/facade/java/example#example-0--Demo-java)  [Output­Demo](https://refactoring.guru/es/design-patterns/facade/java/example#example-0--OutputDemo-txt) **Complejidad:** **Popularidad:** **Ejemplos de uso:** El patrón Facade se utiliza habitualmente en aplicaciones escritas en Java. Es de especial utilidad al trabajar con bibliotecas y API complejas. Aquí tienes algunos ejemplos del patrón Facade en las principales bibliotecas de Java: * [`javax.faces.context.FacesContext`](http://docs.oracle.com/javaee/7/api/javax/faces/context/FacesContext.html) utiliza las clases [`LifeCycle`](http://docs.oracle.com/javaee/7/api/javax/faces/lifecycle/Lifecycle.html) , [`ViewHandler`](http://docs.oracle.com/javaee/7/api/javax/faces/application/ViewHandler.html) , [`NavigationHandler`](http://docs.oracle.com/javaee/7/api/javax/faces/application/NavigationHandler.html) a nivel interno, pero la mayoría de clientes no lo sabe. * [`javax.faces.context.ExternalContext`](http://docs.oracle.com/javaee/7/api/javax/faces/context/ExternalContext.html) utiliza [`ServletContext`](http://docs.oracle.com/javaee/7/api/javax/servlet/ServletContext.html) , [`HttpSession`](http://docs.oracle.com/javaee/7/api/javax/servlet/http/HttpSession.html) , [`HttpServletRequest`](http://docs.oracle.com/javaee/7/api/javax/servlet/http/HttpServletRequest.html) , [`HttpServletResponse`](http://docs.oracle.com/javaee/7/api/javax/servlet/http/HttpServletResponse.html) y otras dentro. **Identificación:** El patrón Facade se puede reconocer en una clase con una interfaz simple, pero que delega la mayor parte del trabajo a otras clases. Normalmente, las fachadas gestionan todo el ciclo de vida de los objetos que utilizan. Interfaz simple para una biblioteca compleja de conversión de video ------------------------------------------------------------------- En este ejemplo, el patrón Facade simplifica la comunicación con un _framework_ complejo de conversión de video. El patrón Facade proporciona una única clase con un único método que gestiona toda la complejidad de configurar las clases correctas del _framework_ y recuperar el resultado en el formato correcto. ### **some\_complex\_media\_library:** Biblioteca compleja de conversión de video #### **some\_complex\_media\_library/VideoFile.java** package refactoring\_guru.facade.example.some\_complex\_media\_library; public class VideoFile { private String name; private String codecType; public VideoFile(String name) { this.name = name; this.codecType = name.substring(name.indexOf(".") + 1); } public String getCodecType() { return codecType; } public String getName() { return name; } } #### **some\_complex\_media\_library/Codec.java** package refactoring\_guru.facade.example.some\_complex\_media\_library; public interface Codec { } #### **some\_complex\_media\_library/MPEG4CompressionCodec.java** package refactoring\_guru.facade.example.some\_complex\_media\_library; public class MPEG4CompressionCodec implements Codec { public String type = "mp4"; } #### **some\_complex\_media\_library/OggCompressionCodec.java** package refactoring\_guru.facade.example.some\_complex\_media\_library; public class OggCompressionCodec implements Codec { public String type = "ogg"; } #### **some\_complex\_media\_library/CodecFactory.java** package refactoring\_guru.facade.example.some\_complex\_media\_library; public class CodecFactory { public static Codec extract(VideoFile file) { String type = file.getCodecType(); if (type.equals("mp4")) { System.out.println("CodecFactory: extracting mpeg audio..."); return new MPEG4CompressionCodec(); } else { System.out.println("CodecFactory: extracting ogg audio..."); return new OggCompressionCodec(); } } } #### **some\_complex\_media\_library/BitrateReader.java** package refactoring\_guru.facade.example.some\_complex\_media\_library; public class BitrateReader { public static VideoFile read(VideoFile file, Codec codec) { System.out.println("BitrateReader: reading file..."); return file; } public static VideoFile convert(VideoFile buffer, Codec codec) { System.out.println("BitrateReader: writing file..."); return buffer; } } #### **some\_complex\_media\_library/AudioMixer.java** package refactoring\_guru.facade.example.some\_complex\_media\_library; import java.io.File; public class AudioMixer { public File fix(VideoFile result){ System.out.println("AudioMixer: fixing audio..."); return new File("tmp"); } } ### **facade** #### **facade/VideoConversionFacade.java:** Facade proporciona una interfaz simple de conversión de video package refactoring\_guru.facade.example.facade; import refactoring\_guru.facade.example.some\_complex\_media\_library.\*; import java.io.File; public class VideoConversionFacade { public File convertVideo(String fileName, String format) { System.out.println("VideoConversionFacade: conversion started."); VideoFile file = new VideoFile(fileName); Codec sourceCodec = CodecFactory.extract(file); Codec destinationCodec; if (format.equals("mp4")) { destinationCodec = new MPEG4CompressionCodec(); } else { destinationCodec = new OggCompressionCodec(); } VideoFile buffer = BitrateReader.read(file, sourceCodec); VideoFile intermediateResult = BitrateReader.convert(buffer, destinationCodec); File result = (new AudioMixer()).fix(intermediateResult); System.out.println("VideoConversionFacade: conversion completed."); return result; } } #### **Demo.java:** Código cliente package refactoring\_guru.facade.example; import refactoring\_guru.facade.example.facade.VideoConversionFacade; import java.io.File; public class Demo { public static void main(String\[\] args) { VideoConversionFacade converter = new VideoConversionFacade(); File mp4Video = converter.convertVideo("youtubevideo.ogg", "mp4"); // ... } } #### **OutputDemo.txt:** Resultado de la ejecución VideoConversionFacade: conversion started. CodecFactory: extracting ogg audio... BitrateReader: reading file... BitrateReader: writing file... AudioMixer: fixing audio... VideoConversionFacade: conversion completed. **Facade** en otros lenguajes ----------------------------- [![Facade en C#](https://refactoring.guru/images/patterns/icons/csharp.svg?id=da64592defc6e86d57c39c66e9de3e58)](https://refactoring.guru/es/design-patterns/facade/csharp/example "Facade en C#") [![Facade en C++](https://refactoring.guru/images/patterns/icons/cpp.svg?id=f7782ed8b8666246bfcc3f8fefc3b858)](https://refactoring.guru/es/design-patterns/facade/cpp/example "Facade en C++") [![Facade en Go](https://refactoring.guru/images/patterns/icons/go.svg?id=1a89927eb99b1ea3fde7701d97970aca)](https://refactoring.guru/es/design-patterns/facade/go/example "Facade en Go") [![Facade en PHP](https://refactoring.guru/images/patterns/icons/php.svg?id=be1906eb26b71ec1d3b93720d6156618)](https://refactoring.guru/es/design-patterns/facade/php/example "Facade en PHP") [![Facade en Python](https://refactoring.guru/images/patterns/icons/python.svg?id=6d815d43c0f7050a1151b43e51569c9f)](https://refactoring.guru/es/design-patterns/facade/python/example "Facade en Python") [![Facade en Ruby](https://refactoring.guru/images/patterns/icons/ruby.svg?id=b065b718c914bf8e960ef731600be1eb)](https://refactoring.guru/es/design-patterns/facade/ruby/example "Facade en Ruby") [![Facade en Rust](https://refactoring.guru/images/patterns/icons/rust.svg?id=1f5698a4b5ae23fe79413511747e4a87)](https://refactoring.guru/es/design-patterns/facade/rust/example "Facade en Rust") [![Facade en Swift](https://refactoring.guru/images/patterns/icons/swift.svg?id=0b716c2d52ec3a48fbe91ac031070c1d)](https://refactoring.guru/es/design-patterns/facade/swift/example "Facade en Swift") [![Facade en TypeScript](https://refactoring.guru/images/patterns/icons/typescript.svg?id=2239d0f16cb703540c205dd8cb0c0cb7)](https://refactoring.guru/es/design-patterns/facade/typescript/example "Facade en TypeScript") --- # Patrones de diseño en C# [There are patterns of patterns now! \ My friend's project: MetaPatterns.io](https://metapatterns.io/)  [](https://refactoring.guru/es/design-patterns/csharp#checkout) [](https://refactoring.guru/es/design-patterns/csharp#checkout) ![Patrones de diseño en C#](https://refactoring.guru/images/patterns/languages/csharp-3x.png) ![Patrones de diseño en C#](https://refactoring.guru/images/patterns/languages/mini/csharp-3x.png) PATRONES de DISEÑO en C# ======================== El catálogo de ejemplos en **C#** --------------------------------- #### Patrones creacionales ![Abstract Factory](https://refactoring.guru/images/patterns/cards/abstract-factory-mini-3x.png) #### Abstract Factory Permite producir familias de objetos relacionados sin especificar sus clases concretas. [Artículo principal](https://refactoring.guru/es/design-patterns/abstract-factory) [Uso en C#](https://refactoring.guru/es/design-patterns/abstract-factory/csharp/example#lang-features) [Ejemplo de código](https://refactoring.guru/es/design-patterns/abstract-factory/csharp/example#example-0) ![Builder](https://refactoring.guru/images/patterns/cards/builder-mini-3x.png) #### Builder Permite construir objetos complejos paso a paso. Este patrón nos permite producir distintos tipos y representaciones de un objeto empleando el mismo código de construcción. [Artículo principal](https://refactoring.guru/es/design-patterns/builder) [Uso en C#](https://refactoring.guru/es/design-patterns/builder/csharp/example#lang-features) [Ejemplo de código](https://refactoring.guru/es/design-patterns/builder/csharp/example#example-0) ![Factory Method](https://refactoring.guru/images/patterns/cards/factory-method-mini-3x.png) #### Factory Method Proporciona una interfaz para la creación de objetos en una superclase, mientras permite a las subclases alterar el tipo de objetos que se crearán. [Artículo principal](https://refactoring.guru/es/design-patterns/factory-method) [Uso en C#](https://refactoring.guru/es/design-patterns/factory-method/csharp/example#lang-features) [Ejemplo de código](https://refactoring.guru/es/design-patterns/factory-method/csharp/example#example-0) ![Prototype](https://refactoring.guru/images/patterns/cards/prototype-mini-3x.png) #### Prototype Permite copiar objetos existentes sin que el código dependa de sus clases. [Artículo principal](https://refactoring.guru/es/design-patterns/prototype) [Uso en C#](https://refactoring.guru/es/design-patterns/prototype/csharp/example#lang-features) [Ejemplo de código](https://refactoring.guru/es/design-patterns/prototype/csharp/example#example-0) ![Singleton](https://refactoring.guru/images/patterns/cards/singleton-mini-3x.png) #### Singleton Permite asegurarnos de que una clase tenga una única instancia, a la vez que proporciona un punto de acceso global a dicha instancia. [Artículo principal](https://refactoring.guru/es/design-patterns/singleton) [Uso en C#](https://refactoring.guru/es/design-patterns/singleton/csharp/example#lang-features) [Naïve Singleton](https://refactoring.guru/es/design-patterns/singleton/csharp/example#example-0) [Thread-safe Singleton](https://refactoring.guru/es/design-patterns/singleton/csharp/example#example-1) #### Patrones estructurales ![Adapter](https://refactoring.guru/images/patterns/cards/adapter-mini-3x.png) #### Adapter Permite la colaboración entre objetos con interfaces incompatibles. [Artículo principal](https://refactoring.guru/es/design-patterns/adapter) [Uso en C#](https://refactoring.guru/es/design-patterns/adapter/csharp/example#lang-features) [Ejemplo de código](https://refactoring.guru/es/design-patterns/adapter/csharp/example#example-0) ![Bridge](https://refactoring.guru/images/patterns/cards/bridge-mini-3x.png) #### Bridge Permite dividir una clase grande o un grupo de clases estrechamente relacionadas, en dos jerarquías separadas (abstracción e implementación) que pueden desarrollarse independientemente la una de la otra. [Artículo principal](https://refactoring.guru/es/design-patterns/bridge) [Uso en C#](https://refactoring.guru/es/design-patterns/bridge/csharp/example#lang-features) [Ejemplo de código](https://refactoring.guru/es/design-patterns/bridge/csharp/example#example-0) ![Composite](https://refactoring.guru/images/patterns/cards/composite-mini-3x.png) #### Composite Permite componer objetos en estructuras de árbol y trabajar con esas estructuras como si fueran objetos individuales. [Artículo principal](https://refactoring.guru/es/design-patterns/composite) [Uso en C#](https://refactoring.guru/es/design-patterns/composite/csharp/example#lang-features) [Ejemplo de código](https://refactoring.guru/es/design-patterns/composite/csharp/example#example-0) ![Decorator](https://refactoring.guru/images/patterns/cards/decorator-mini-3x.png) #### Decorator Permite añadir funcionalidades a objetos colocando estos objetos dentro de objetos encapsuladores especiales que contienen estas funcionalidades. [Artículo principal](https://refactoring.guru/es/design-patterns/decorator) [Uso en C#](https://refactoring.guru/es/design-patterns/decorator/csharp/example#lang-features) [Ejemplo de código](https://refactoring.guru/es/design-patterns/decorator/csharp/example#example-0) ![Facade](https://refactoring.guru/images/patterns/cards/facade-mini-3x.png) #### Facade Proporciona una interfaz simplificada a una biblioteca, un framework o cualquier otro grupo complejo de clases. [Artículo principal](https://refactoring.guru/es/design-patterns/facade) [Uso en C#](https://refactoring.guru/es/design-patterns/facade/csharp/example#lang-features) [Ejemplo de código](https://refactoring.guru/es/design-patterns/facade/csharp/example#example-0) ![Flyweight](https://refactoring.guru/images/patterns/cards/flyweight-mini-3x.png) #### Flyweight Permite mantener más objetos dentro de la cantidad disponible de memoria RAM compartiendo las partes comunes del estado entre varios objetos en lugar de mantener toda la información en cada objeto. [Artículo principal](https://refactoring.guru/es/design-patterns/flyweight) [Uso en C#](https://refactoring.guru/es/design-patterns/flyweight/csharp/example#lang-features) [Ejemplo de código](https://refactoring.guru/es/design-patterns/flyweight/csharp/example#example-0) ![Proxy](https://refactoring.guru/images/patterns/cards/proxy-mini-3x.png) #### Proxy Permite proporcionar un sustituto o marcador de posición para otro objeto. Un proxy controla el acceso al objeto original, permitiéndote hacer algo antes o después de que la solicitud llegue al objeto original. [Artículo principal](https://refactoring.guru/es/design-patterns/proxy) [Uso en C#](https://refactoring.guru/es/design-patterns/proxy/csharp/example#lang-features) [Ejemplo de código](https://refactoring.guru/es/design-patterns/proxy/csharp/example#example-0) #### Patrones de comportamiento ![Chain of Responsibility](https://refactoring.guru/images/patterns/cards/chain-of-responsibility-mini-3x.png) #### Chain of Responsibility Permite pasar solicitudes a lo largo de una cadena de manejadores. Al recibir una solicitud, cada manejador decide si la procesa o si la pasa al siguiente manejador de la cadena. [Artículo principal](https://refactoring.guru/es/design-patterns/chain-of-responsibility) [Uso en C#](https://refactoring.guru/es/design-patterns/chain-of-responsibility/csharp/example#lang-features) [Ejemplo de código](https://refactoring.guru/es/design-patterns/chain-of-responsibility/csharp/example#example-0) ![Command](https://refactoring.guru/images/patterns/cards/command-mini-3x.png) #### Command Convierte una solicitud en un objeto independiente que contiene toda la información sobre la solicitud. Esta transformación te permite parametrizar los métodos con diferentes solicitudes, retrasar o poner en cola la ejecución de una solicitud y soportar operaciones que no se pueden realizar. [Artículo principal](https://refactoring.guru/es/design-patterns/command) [Uso en C#](https://refactoring.guru/es/design-patterns/command/csharp/example#lang-features) [Ejemplo de código](https://refactoring.guru/es/design-patterns/command/csharp/example#example-0) ![Iterator](https://refactoring.guru/images/patterns/cards/iterator-mini-3x.png) #### Iterator Permite recorrer elementos de una colección sin exponer su representación subyacente (lista, pila, árbol, etc.). [Artículo principal](https://refactoring.guru/es/design-patterns/iterator) [Uso en C#](https://refactoring.guru/es/design-patterns/iterator/csharp/example#lang-features) [Ejemplo de código](https://refactoring.guru/es/design-patterns/iterator/csharp/example#example-0) ![Mediator](https://refactoring.guru/images/patterns/cards/mediator-mini-3x.png) #### Mediator Permite reducir las dependencias caóticas entre objetos. El patrón restringe las comunicaciones directas entre los objetos, forzándolos a colaborar únicamente a través de un objeto mediador. [Artículo principal](https://refactoring.guru/es/design-patterns/mediator) [Uso en C#](https://refactoring.guru/es/design-patterns/mediator/csharp/example#lang-features) [Ejemplo de código](https://refactoring.guru/es/design-patterns/mediator/csharp/example#example-0) ![Memento](https://refactoring.guru/images/patterns/cards/memento-mini-3x.png) #### Memento Permite guardar y restaurar el estado previo de un objeto sin revelar los detalles de su implementación. [Artículo principal](https://refactoring.guru/es/design-patterns/memento) [Uso en C#](https://refactoring.guru/es/design-patterns/memento/csharp/example#lang-features) [Ejemplo de código](https://refactoring.guru/es/design-patterns/memento/csharp/example#example-0) ![Observer](https://refactoring.guru/images/patterns/cards/observer-mini-3x.png) #### Observer Permite definir un mecanismo de suscripción para notificar a varios objetos sobre cualquier evento que le suceda al objeto que están observando. [Artículo principal](https://refactoring.guru/es/design-patterns/observer) [Uso en C#](https://refactoring.guru/es/design-patterns/observer/csharp/example#lang-features) [Ejemplo de código](https://refactoring.guru/es/design-patterns/observer/csharp/example#example-0) ![State](https://refactoring.guru/images/patterns/cards/state-mini-3x.png) #### State Permite a un objeto alterar su comportamiento cuando su estado interno cambia. Parece como si el objeto cambiara su clase. [Artículo principal](https://refactoring.guru/es/design-patterns/state) [Uso en C#](https://refactoring.guru/es/design-patterns/state/csharp/example#lang-features) [Ejemplo de código](https://refactoring.guru/es/design-patterns/state/csharp/example#example-0) ![Strategy](https://refactoring.guru/images/patterns/cards/strategy-mini-3x.png) #### Strategy Permite definir una familia de algoritmos, colocar cada uno de ellos en una clase separada y hacer sus objetos intercambiables. [Artículo principal](https://refactoring.guru/es/design-patterns/strategy) [Uso en C#](https://refactoring.guru/es/design-patterns/strategy/csharp/example#lang-features) [Ejemplo de código](https://refactoring.guru/es/design-patterns/strategy/csharp/example#example-0) ![Template Method](https://refactoring.guru/images/patterns/cards/template-method-mini-3x.png) #### Template Method Define el esqueleto de un algoritmo en la superclase pero permite que las subclases sobrescriban pasos del algoritmo sin cambiar su estructura. [Artículo principal](https://refactoring.guru/es/design-patterns/template-method) [Uso en C#](https://refactoring.guru/es/design-patterns/template-method/csharp/example#lang-features) [Ejemplo de código](https://refactoring.guru/es/design-patterns/template-method/csharp/example#example-0) ![Visitor](https://refactoring.guru/images/patterns/cards/visitor-mini-3x.png) #### Visitor Permite separar algoritmos de los objetos sobre los que operan. [Artículo principal](https://refactoring.guru/es/design-patterns/visitor) [Uso en C#](https://refactoring.guru/es/design-patterns/visitor/csharp/example#lang-features) [Ejemplo de código](https://refactoring.guru/es/design-patterns/visitor/csharp/example#example-0) --- # Command [There are patterns of patterns now! \ My friend's project: MetaPatterns.io](https://metapatterns.io/)  [](https://refactoring.guru/es/design-patterns/command#checkout) [](https://refactoring.guru/es/design-patterns/command#checkout) [](https://refactoring.guru/) / [Patrones de diseño](https://refactoring.guru/es/design-patterns) / [Patrones de comportamiento](https://refactoring.guru/es/design-patterns/behavioral-patterns) Command ======= También llamado: Comando, Orden, Action, Transaction Propósito --------- **Command** es un patrón de diseño de comportamiento que convierte una solicitud en un objeto independiente que contiene toda la información sobre la solicitud. Esta transformación te permite parametrizar los métodos con diferentes solicitudes, retrasar o poner en cola la ejecución de una solicitud y soportar operaciones que no se pueden realizar. ![Patrón de diseño Command](https://refactoring.guru/images/patterns/content/command/command-es-2x.png?id=bdc52551c69cb9558d3459dd025b7812) Problema -------- Imagina que estás trabajando en una nueva aplicación de edición de texto. Tu tarea actual consiste en crear una barra de herramientas con unos cuantos botones para varias operaciones del editor. Creaste una clase `Botón` muy limpia que puede utilizarse para los botones de la barra de herramientas y también para botones genéricos en diversos diálogos. ![Problema resuelto por el patrón Command](https://refactoring.guru/images/patterns/diagrams/command/problem1-2x.png?id=af4c4e9c1d1b4fa2c4104c5f6bb18719) Todos los botones de la aplicación provienen de la misma clase. Aunque todos estos botones se parecen, se supone que hacen cosas diferentes. ¿Dónde pondrías el código para los varios gestores de clics de estos botones? La solución más simple consiste en crear cientos de subclases para cada lugar donde se utilice el botón. Estas subclases contendrán el código que deberá ejecutarse con el clic en un botón. ![Muchas subclases de botón](https://refactoring.guru/images/patterns/diagrams/command/problem2-2x.png?id=5eea7d0f6247da011150bb63e423f405) Muchas subclases de botón. ¿Qué puede salir mal? Pronto te das cuenta de que esta solución es muy deficiente. En primer lugar, tienes una enorme cantidad de subclases, lo cual no supondría un problema si no corrieras el riesgo de descomponer el código de esas subclases cada vez que modifiques la clase base `Botón`. Dicho de forma sencilla, tu código GUI depende torpemente del volátil código de la lógica de negocio. ![Varias clases implementan la misma funcionalidad](https://refactoring.guru/images/patterns/diagrams/command/problem3-es-2x.png?id=f91f74e46951797c12cc37f61eb27d46) Varias clases implementan la misma funcionalidad. Y aquí está la parte más desagradable. Algunas operaciones, como copiar/pegar texto, deben ser invocadas desde varios lugares. Por ejemplo, un usuario podría hacer clic en un pequeño botón “Copiar” de la barra de herramientas, o copiar algo a través del menú contextual, o pulsar `Ctrl+C` en el teclado. Inicialmente, cuando tu aplicación solo tenía la barra de herramientas, no había problema en colocar la implementación de varias operaciones dentro de las subclases de botón. En otras palabras, tener el código para copiar texto dentro de la subclase `BotónCopiar` estaba bien. Sin embargo, cuando implementas menús contextuales, atajos y otros elementos, debes duplicar el código de la operación en muchas clases, o bien hacer menús dependientes de los botones, lo cual es una opción aún peor. Solución -------- El buen diseño de software a menudo se basa en el principio de separación de responsabilidades, lo que suele tener como resultado la división de la aplicación en capas. El ejemplo más habitual es tener una capa para la interfaz gráfica de usuario (GUI) y otra capa para la lógica de negocio. La capa GUI es responsable de representar una bonita imagen en pantalla, capturar entradas y mostrar resultados de lo que el usuario y la aplicación están haciendo. Sin embargo, cuando se trata de hacer algo importante, como calcular la trayectoria de la luna o componer un informe anual, la capa GUI delega el trabajo a la capa subyacente de la lógica de negocio. El código puede tener este aspecto: un objeto GUI invoca a un método de un objeto de la lógica de negocio, pasándole algunos argumentos. Este proceso se describe habitualmente como un objeto que envía a otro una _solicitud_. ![La capa GUI puede acceder a la capa de la lógica de negocio directamente](https://refactoring.guru/images/patterns/diagrams/command/solution1-es-2x.png?id=1c3ee25e79a26ed5f6f2a1c7fc1d2cd0) Los objetos GUI pueden acceder directamente a los objetos de la lógica de negocio. El patrón Command sugiere que los objetos GUI no envíen estas solicitudes directamente. En lugar de ello, debes extraer todos los detalles de la solicitud, como el objeto que está siendo invocado, el nombre del método y la lista de argumentos, y ponerlos dentro de una clase _comando_ separada con un único método que activa esta solicitud. Los objetos de comando sirven como vínculo entre varios objetos GUI y de lógica de negocio. De ahora en adelante, el objeto GUI no tiene que conocer qué objeto de la lógica de negocio recibirá la solicitud y cómo la procesará. El objeto GUI activa el comando, que gestiona todos los detalles. ![Acceso a la capa de lógica de negocio a través de un comando.](https://refactoring.guru/images/patterns/diagrams/command/solution2-es-2x.png?id=307e12ad0a938dded9be6665a9619236) Acceso a la capa de lógica de negocio a través de un comando. El siguiente paso es hacer que tus comandos implementen la misma interfaz. Normalmente tiene un único método de ejecución que no acepta parámetros. Esta interfaz te permite utilizar varios comandos con el mismo emisor de la solicitud, sin acoplarla a clases concretas de comandos. Adicionalmente, ahora puedes cambiar objetos de comando vinculados al emisor, cambiando efectivamente el comportamiento del emisor durante el tiempo de ejecución. Puede que hayas observado que falta una pieza del rompecabezas, que son los parámetros de la solicitud. Un objeto GUI puede haber proporcionado al objeto de la capa de negocio algunos parámetros. Ya que el método de ejecución del comando no tiene parámetros, ¿cómo pasaremos los detalles de la solicitud al receptor? Resulta que el comando debe estar preconfigurado con esta información o ser capaz de conseguirla por su cuenta. ![Los objetos GUI delegan el trabajo a los comandos](https://refactoring.guru/images/patterns/diagrams/command/solution3-es-2x.png?id=b398836186fcdea28e04b915b85f8695) Los objetos GUI delegan el trabajo a los comandos. Regresemos a nuestro editor de textos. Tras aplicar el patrón Command, ya no necesitamos todas esas subclases de botón para implementar varios comportamientos de clic. Basta con colocar un único campo dentro de la clase base `Botón` que almacene una referencia a un objeto de comando y haga que el botón ejecute ese comando en un clic. Implementarás un puñado de clases de comando para toda operación posible y las vincularás con botones particulares, dependiendo del comportamiento pretendido de los botones. Otros elementos GUI, como menús, atajos o diálogos enteros, se pueden implementar del mismo modo. Se vincularán a un comando que se ejecuta cuando un usuario interactúa con el elemento GUI. Como probablemente ya habrás adivinado, los elementos relacionados con las mismas operaciones se vincularán a los mismos comandos, evitando cualquier duplicación de código. Como resultado, los comandos se convierten en una conveniente capa intermedia que reduce el acoplamiento entre las capas de la GUI y la lógica de negocio. ¡Y esto es tan solo una fracción de las ventajas que ofrece el patrón Command! Analogía en el mundo real ------------------------- ![Realizando un pedido en un restaurante](https://refactoring.guru/images/patterns/content/command/command-comic-1-2x.png?id=47b3c00b2cfbda7157a1ed9da6ce2948) Realizando un pedido en un restaurante. Tras un largo paseo por la ciudad, entras en un buen restaurante y te sientas a una mesa junto a la ventana. Un amable camarero se acerca y toma tu pedido rápidamente, apuntándolo en un papel. El camarero se va a la cocina y pega el pedido a la pared. Al cabo de un rato, el pedido llega al chef, que lo lee y prepara la comida. El cocinero coloca la comida en una bandeja junto al pedido. El camarero descubre la bandeja, comprueba el pedido para asegurarse de que todo está como lo querías, y lo lleva todo a tu mesa. El pedido en papel hace la función de un comando. Permanece en una cola hasta que el chef está listo para servirlo. Este pedido contiene toda la información relevante necesaria para preparar la comida. Permite al chef empezar a cocinar de inmediato, en lugar de tener que correr de un lado a otro aclarando los detalles del pedido directamente contigo. Estructura ---------- ![Estructura del patrón de diseño Command](https://refactoring.guru/images/patterns/diagrams/command/structure-2x.png?id=1dfaa84354ffe49ef7ad46ce069482d2)![Estructura del patrón de diseño Command](https://refactoring.guru/images/patterns/diagrams/command/structure-indexed-2x.png?id=e4cc286a44768c7d060af33497da7df6) 1. La clase **Emisora** (o _invocadora_) es responsable de inicializar las solicitudes. Esta clase debe tener un campo para almacenar una referencia a un objeto de comando. El emisor activa este comando en lugar de enviar la solicitud directamente al receptor. Ten en cuenta que el emisor no es responsable de crear el objeto de comando. Normalmente, obtiene un comando precreado de parte del cliente a través del constructor. 2. La interfaz **Comando** normalmente declara un único método para ejecutar el comando. 3. Los **Comandos Concretos** implementan varios tipos de solicitudes. Un comando concreto no se supone que tenga que realizar el trabajo por su cuenta, sino pasar la llamada a uno de los objetos de la lógica de negocio. Sin embargo, para lograr simplificar el código, estas clases se pueden fusionar. Los parámetros necesarios para ejecutar un método en un objeto receptor pueden declararse como campos en el comando concreto. Puedes hacer inmutables los objetos de comando permitiendo la inicialización de estos campos únicamente a través del constructor. 4. La clase **Receptora** contiene cierta lógica de negocio. Casi cualquier objeto puede actuar como receptor. La mayoría de los comandos solo gestiona los detalles sobre cómo se pasa una solicitud al receptor, mientras que el propio receptor hace el trabajo real. 5. El **Cliente** crea y configura los objetos de comando concretos. El cliente debe pasar todos los parámetros de la solicitud, incluyendo una instancia del receptor, dentro del constructor del comando. Después de eso, el comando resultante puede asociarse con uno o varios emisores. Pseudocódigo ------------ En este ejemplo, el patrón **Command** ayuda a rastrear el historial de operaciones ejecutadas y hace posible revertir una operación si es necesario. ![Ejemplo de estructura del patrón Command](https://refactoring.guru/images/patterns/diagrams/command/example-2x.png?id=ed44dfd9b02eccf1ae7e2714d018ed36) Operaciones que no se pueden realizar en un editor de texto. Los comandos que resultan en cambiar el estado del editor (por ejemplo, cortar y pegar) realizan una copia de seguridad del estado del editor antes de ejecutar una operación asociada con el comando. Una vez que un comando es ejecutado, se coloca en el historial del comando (una pila de objetos de comando) junto a la copia de seguridad del estado del editor en ese momento. Más tarde, si el usuario necesita revertir la operación, la aplicación puede tomar el comando más reciente del historial, leer la copia asociada del estado del editor, y restaurarla. El código cliente (elementos GUI, historial de comando, etc.) no se acopla a clases concretas de comando porque trabaja con los comandos a través de la interfaz de comando. Esta solución te permite introducir nuevos comandos en la aplicación sin descomponer el código existente. // La clase base comando define la interfaz común a todos los // comandos concretos. abstract class Command is protected field app: Application protected field editor: Editor protected field backup: text constructor Command(app: Application, editor: Editor) is this.app = app this.editor = editor // Realiza una copia de seguridad del estado del editor. method saveBackup() is backup = editor.text // Restaura el estado del editor. method undo() is editor.text = backup // El método de ejecución se declara abstracto para forzar a // todos los comandos concretos a proporcionar sus propias // implementaciones. El método debe devolver verdadero o // falso dependiendo de si el comando cambia el estado del // editor. abstract method execute() // Los comandos concretos van aquí. class CopyCommand extends Command is // El comando copiar no se guarda en el historial ya que no // cambia el estado del editor. method execute() is app.clipboard = editor.getSelection() return false class CutCommand extends Command is // El comando cortar no cambia el estado del editor, por lo // que debe guardarse en el historial. Y se guardará siempre // y cuando el método devuelva verdadero. method execute() is saveBackup() app.clipboard = editor.getSelection() editor.deleteSelection() return true class PasteCommand extends Command is method execute() is saveBackup() editor.replaceSelection(app.clipboard) return true // La operación deshacer también es un comando. class UndoCommand extends Command is method execute() is app.undo() return false // El historial global de comandos tan solo es una pila. class CommandHistory is private field history: array of Command // El último dentro... method push(c: Command) is // Empuja el comando al final de la matriz del // historial. // ...el primero fuera. method pop():Command is // Obtiene el comando más reciente del historial. // La clase editora tiene operaciones reales de edición de // texto. Juega el papel de un receptor: todos los comandos // acaban delegando la ejecución a los métodos del editor. class Editor is field text: string method getSelection() is // Devuelve el texto seleccionado. method deleteSelection() is // Borra el texto seleccionado. method replaceSelection(text) is // Inserta los contenidos del portapapeles en la // posición actual. // La clase Aplicación establece relaciones entre objetos. Actúa // como un emisor: cuando algo debe hacerse, crea un objeto de // comando y lo ejecuta. class Application is field clipboard: string field editors: array of Editors field activeEditor: Editor field history: CommandHistory // El código que asigna comandos a objetos UI puede tener // este aspecto. method createUI() is // ... copy = function() { executeCommand( new CopyCommand(this, activeEditor)) } copyButton.setCommand(copy) shortcuts.onKeyPress("Ctrl+C", copy) cut = function() { executeCommand( new CutCommand(this, activeEditor)) } cutButton.setCommand(cut) shortcuts.onKeyPress("Ctrl+X", cut) paste = function() { executeCommand( new PasteCommand(this, activeEditor)) } pasteButton.setCommand(paste) shortcuts.onKeyPress("Ctrl+V", paste) undo = function() { executeCommand( new UndoCommand(this, activeEditor)) } undoButton.setCommand(undo) shortcuts.onKeyPress("Ctrl+Z", undo) // Ejecuta un comando y comprueba si debe añadirse al // historial. method executeCommand(command) is if (command.execute()) history.push(command) // Toma el comando más reciente del historial y ejecuta su // método deshacer. Observa que no conocemos la clase de ese // comando. Pero no tenemos por qué, ya que el comando sabe // cómo deshacer su propia acción. method undo() is command = history.pop() if (command != null) command.undo() Aplicabilidad ------------- Utiliza el patrón Command cuando quieras parametrizar objetos con operaciones. El patrón Command puede convertir una llamada a un método específico en un objeto autónomo. Este cambio abre la puerta a muchos usos interesantes: puedes pasar comandos como argumentos de método, almacenarlos dentro de otros objetos, cambiar comandos vinculados durante el tiempo de ejecución, etc. Aquí tienes un ejemplo: estás desarrollando un componente GUI, como un menú contextual, y quieres que los usuarios puedan configurar opciones del menú que activen operaciones cuando un usuario final haga clic sobre ellos. Utiliza el patrón Command cuando quieras poner operaciones en cola, programar su ejecución, o ejecutarlas de forma remota. Como pasa con cualquier otro objeto, un comando se pueden serializar, lo cual implica convertirlo en una cadena que pueda escribirse fácilmente a un archivo o una base de datos. Más tarde, la cadena puede restaurarse como el objeto de comando inicial. De este modo, puedes retardar y programar la ejecución del comando. ¡Pero aún hay más! Del mismo modo, puedes poner comandos en cola, así como registrarlos o enviarlos por la red. Utiliza el patrón Command cuando quieras implementar operaciones reversibles. Aunque hay muchas formas de implementar deshacer/rehacer, el patrón Command es quizá la más popular de todas. Para poder revertir operaciones, debes implementar el historial de las operaciones realizadas. El historial de comando es una pila que contiene todos los objetos de comando ejecutados junto a copias de seguridad relacionadas del estado de la aplicación. Este método tiene dos desventajas. Primero, no es tan fácil guardar el estado de una aplicación, porque parte de ella puede ser privada. Este problema puede mitigarse con el patrón [Memento](https://refactoring.guru/es/design-patterns/memento) . Segundo, las copias de seguridad de estado pueden consumir mucha memoria RAM. Por lo tanto, en ocasiones puedes recurrir a una implementación alternativa: en lugar de restaurar el estado pasado, el comando realiza la operación inversa, aunque ésta también tiene un precio, ya que puede resultar difícil o incluso imposible de implementar. Cómo implementarlo ------------------ 1. Declara la interfaz de comando con un único método de ejecución. 2. Empieza extrayendo solicitudes y poniéndolas dentro de clases concretas de comando que implementen la interfaz de comando. Cada clase debe contar con un grupo de campos para almacenar los argumentos de las solicitudes junto con referencias al objeto receptor. Todos estos valores deben inicializarse a través del constructor del comando. 3. Identifica clases que actúen como _emisoras_. Añade los campos para almacenar comandos dentro de estas clases. Las emisoras deberán comunicarse con sus comandos tan solo a través de la interfaz de comando. Normalmente las emisoras no crean objetos de comando por su cuenta, sino que los obtienen del código cliente. 4. Cambia las emisoras de forma que ejecuten el comando en lugar de enviar directamente una solicitud al receptor. 5. El cliente debe inicializar objetos en el siguiente orden: * Crear receptores. * Crear comandos y asociarlos con receptores si es necesario. * Crear emisores y asociarlos con comandos específicos. Pros y contras -------------- * _Principio de responsabilidad única_. Puedes desacoplar las clases que invocan operaciones de las que realizan esas operaciones. * _Principio de abierto/cerrado_. Puedes introducir nuevos comandos en la aplicación sin descomponer el código cliente existente. * Puedes implementar deshacer/rehacer. * Puedes implementar la ejecución diferida de operaciones. * Puedes ensamblar un grupo de comandos simples para crear uno complejo. * El código puede complicarse, ya que estás introduciendo una nueva capa entre emisores y receptores. Relaciones con otros patrones ----------------------------- * [Chain of Responsibility](https://refactoring.guru/es/design-patterns/chain-of-responsibility) , [Command](https://refactoring.guru/es/design-patterns/command) , [Mediator](https://refactoring.guru/es/design-patterns/mediator) y [Observer](https://refactoring.guru/es/design-patterns/observer) abordan distintas formas de conectar emisores y receptores de solicitudes: * _Chain of Responsibility_ pasa una solicitud secuencialmente a lo largo de una cadena dinámica de receptores potenciales hasta que uno de ellos la gestiona. * _Command_ establece conexiones unidireccionales entre emisores y receptores. * _Mediator_ elimina las conexiones directas entre emisores y receptores, forzándolos a comunicarse indirectamente a través de un objeto mediador. * _Observer_ permite a los receptores suscribirse o darse de baja dinámicamente a la recepción de solicitudes. * Los manejadores del [Chain of Responsibility](https://refactoring.guru/es/design-patterns/chain-of-responsibility) se pueden implementar como [Comandos](https://refactoring.guru/es/design-patterns/command) . En este caso, puedes ejecutar muchas operaciones diferentes sobre el mismo objeto de contexto, representado por una solicitud. Sin embargo, hay otra solución en la que la propia solicitud es un objeto _Comando_. En este caso, puedes ejecutar la misma operación en una serie de contextos diferentes vinculados en una cadena. * Puedes utilizar [Command](https://refactoring.guru/es/design-patterns/command) y [Memento](https://refactoring.guru/es/design-patterns/memento) juntos cuando implementes “deshacer”. En este caso, los comandos son responsables de realizar varias operaciones sobre un objeto destino, mientras que los mementos guardan el estado de ese objeto justo antes de que se ejecute el comando. * [Command](https://refactoring.guru/es/design-patterns/command) y [Strategy](https://refactoring.guru/es/design-patterns/strategy) pueden resultar similares porque puedes usar ambos para parametrizar un objeto con cierta acción. No obstante, tienen propósitos muy diferentes. * Puedes utilizar _Command_ para convertir cualquier operación en un objeto. Los parámetros de la operación se convierten en campos de ese objeto. La conversión te permite aplazar la ejecución de la operación, ponerla en cola, almacenar el historial de comandos, enviar comandos a servicios remotos, etc. * Por su parte, _Strategy_ normalmente describe distintas formas de hacer lo mismo, permitiéndote intercambiar estos algoritmos dentro de una única clase contexto. * [Prototype](https://refactoring.guru/es/design-patterns/prototype) puede ayudar a cuando necesitas guardar copias de [Comandos](https://refactoring.guru/es/design-patterns/command) en un historial. * Puedes tratar a [Visitor](https://refactoring.guru/es/design-patterns/visitor) como una versión potente del patrón [Command](https://refactoring.guru/es/design-patterns/command) . Sus objetos pueden ejecutar operaciones sobre varios objetos de distintas clases. Ejemplos de código ------------------ [![Command en C#](https://refactoring.guru/images/patterns/icons/csharp.svg?id=da64592defc6e86d57c39c66e9de3e58)](https://refactoring.guru/es/design-patterns/command/csharp/example "Command en C#") [![Command en C++](https://refactoring.guru/images/patterns/icons/cpp.svg?id=f7782ed8b8666246bfcc3f8fefc3b858)](https://refactoring.guru/es/design-patterns/command/cpp/example "Command en C++") [![Command en Go](https://refactoring.guru/images/patterns/icons/go.svg?id=1a89927eb99b1ea3fde7701d97970aca)](https://refactoring.guru/es/design-patterns/command/go/example "Command en Go") [![Command en Java](https://refactoring.guru/images/patterns/icons/java.svg?id=e6d87e2dca08c953fe3acd1275ed4f4e)](https://refactoring.guru/es/design-patterns/command/java/example "Command en Java") [![Command en PHP](https://refactoring.guru/images/patterns/icons/php.svg?id=be1906eb26b71ec1d3b93720d6156618)](https://refactoring.guru/es/design-patterns/command/php/example "Command en PHP") [![Command en Python](https://refactoring.guru/images/patterns/icons/python.svg?id=6d815d43c0f7050a1151b43e51569c9f)](https://refactoring.guru/es/design-patterns/command/python/example "Command en Python") [![Command en Ruby](https://refactoring.guru/images/patterns/icons/ruby.svg?id=b065b718c914bf8e960ef731600be1eb)](https://refactoring.guru/es/design-patterns/command/ruby/example "Command en Ruby") [![Command en Rust](https://refactoring.guru/images/patterns/icons/rust.svg?id=1f5698a4b5ae23fe79413511747e4a87)](https://refactoring.guru/es/design-patterns/command/rust/example "Command en Rust") [![Command en Swift](https://refactoring.guru/images/patterns/icons/swift.svg?id=0b716c2d52ec3a48fbe91ac031070c1d)](https://refactoring.guru/es/design-patterns/command/swift/example "Command en Swift") [![Command en TypeScript](https://refactoring.guru/images/patterns/icons/typescript.svg?id=2239d0f16cb703540c205dd8cb0c0cb7)](https://refactoring.guru/es/design-patterns/command/typescript/example "Command en TypeScript") [![](https://refactoring.guru/images/patterns/banners/patterns-book-banner-3-2x.png?id=0cc3f77ab421d1a5c02ee46488231c3a)](https://refactoring.guru/es/design-patterns/book) ### ¡Apoya nuestro sitio web gratuito y compra el libro! * 22 patrones de diseño y 8 principios explicados en profundidad * 436 páginas bien estructuradas, fáciles de leer y libres de tecnicismos * 225 ilustraciones y diagramas claros y útiles * Un archivo con ejemplos de código en 11 lenguajes * Todos los dispositivos soportados: Formatos PDF/EPUB/MOBI/KFX [Saber más…](https://refactoring.guru/es/design-patterns/book) --- # Factory Method en Go / Patrones de diseño [There are patterns of patterns now! \ My friend's project: MetaPatterns.io](https://metapatterns.io/)  [](https://refactoring.guru/es/design-patterns/factory-method/go/example#checkout) [](https://refactoring.guru/es/design-patterns/factory-method/go/example#checkout) [](https://refactoring.guru/) / [Patrones de diseño](https://refactoring.guru/es/design-patterns) / [Factory Method](https://refactoring.guru/es/design-patterns/factory-method) / [Go](https://refactoring.guru/es/design-patterns/go) ![Factory Method](https://refactoring.guru/images/patterns/cards/factory-method-mini-2x.png?id=fa9d4a8d61a67cc3822e52b9daf69dad) **Factory Method** en Go ======================== **Factory method** es un patrón de diseño creacional que resuelve el problema de crear objetos de producto sin especificar sus clases concretas. El patrón Factory Method define un método que debe utilizarse para crear objetos, en lugar de una llamada directa al constructor (operador `new`). Las subclases pueden sobrescribir este método para cambiar las clases de los objetos que se crearán. > Si no sabes la diferencia entre varios patrones y conceptos de la fábrica, lee nuestra [Comparación de fábricas](https://refactoring.guru/es/design-patterns/factory-comparison) > . [Aprende más sobre el patrón Factory Method](https://refactoring.guru/es/design-patterns/factory-method) Navegación  [Intro](https://refactoring.guru/es/design-patterns/factory-method/go/example#)  [Ejemplo conceptual](https://refactoring.guru/es/design-patterns/factory-method/go/example#example-0)  [i­Gun](https://refactoring.guru/es/design-patterns/factory-method/go/example#example-0--iGun-go)  [gun](https://refactoring.guru/es/design-patterns/factory-method/go/example#example-0--gun-go)  [ak47](https://refactoring.guru/es/design-patterns/factory-method/go/example#example-0--ak47-go)  [musket](https://refactoring.guru/es/design-patterns/factory-method/go/example#example-0--musket-go)  [gun­Factory](https://refactoring.guru/es/design-patterns/factory-method/go/example#example-0--gunFactory-go)  [main](https://refactoring.guru/es/design-patterns/factory-method/go/example#example-0--main-go)  [output](https://refactoring.guru/es/design-patterns/factory-method/go/example#example-0--output-txt) Ejemplo conceptual ------------------ Resulta imposible implementar el clásico patrón Factory Method en Go debido a la falta de funciones POO, como las clases y la herencia. Sin embargo, podemos implementar la versión básica del patrón, el Simple Factory. En este ejemplo, vamos a crear varios tipos de armas utilizando una estructura de fábrica. Primero, creamos la interfaz `iGun`, que define todos los métodos con los que debería contar un arma. Hay un tipo de estructura `gun` que implementa la interfaz iGun. Dos armas concretas (`ak47` y `musket`), ambas integran la estructura del arma e, indirectamente, implementan todos los métodos `iGun`. La estructura `gunFactory` sirve como fábrica, que crea armas del tipo deseado en base a un argumento entrante. _main.go_ actúa como cliente. En lugar de interactuar directamente con `ak47` o `musket`, se basa en `gunFactory` para crear instancias de varias armas, utilizando únicamente parámetros de cadenas para controlar la producción. #### **iGun.go:** Interfaz de producto package main type IGun interface { setName(name string) setPower(power int) getName() string getPower() int } #### **gun.go:** Producto concreto package main type Gun struct { name string power int } func (g \*Gun) setName(name string) { g.name = name } func (g \*Gun) getName() string { return g.name } func (g \*Gun) setPower(power int) { g.power = power } func (g \*Gun) getPower() int { return g.power } #### **ak47.go:** Producto concreto package main type Ak47 struct { Gun } func newAk47() IGun { return &Ak47{ Gun: Gun{ name: "AK47 gun", power: 4, }, } } #### **musket.go:** Producto concreto package main type musket struct { Gun } func newMusket() IGun { return &musket{ Gun: Gun{ name: "Musket gun", power: 1, }, } } #### **gunFactory.go:** Fábrica package main import "fmt" func getGun(gunType string) (IGun, error) { if gunType == "ak47" { return newAk47(), nil } if gunType == "musket" { return newMusket(), nil } return nil, fmt.Errorf("Wrong gun type passed") } #### **main.go:** Código cliente package main import "fmt" func main() { ak47, \_ := getGun("ak47") musket, \_ := getGun("musket") printDetails(ak47) printDetails(musket) } func printDetails(g IGun) { fmt.Printf("Gun: %s", g.getName()) fmt.Println() fmt.Printf("Power: %d", g.getPower()) fmt.Println() } #### **output.txt:** Resultado de la ejecución Gun: AK47 gun Power: 4 Gun: Musket gun Power: 1 **Factory Method** en otros lenguajes ------------------------------------- [![Factory Method en C#](https://refactoring.guru/images/patterns/icons/csharp.svg?id=da64592defc6e86d57c39c66e9de3e58)](https://refactoring.guru/es/design-patterns/factory-method/csharp/example "Factory Method en C#") [![Factory Method en C++](https://refactoring.guru/images/patterns/icons/cpp.svg?id=f7782ed8b8666246bfcc3f8fefc3b858)](https://refactoring.guru/es/design-patterns/factory-method/cpp/example "Factory Method en C++") [![Factory Method en Java](https://refactoring.guru/images/patterns/icons/java.svg?id=e6d87e2dca08c953fe3acd1275ed4f4e)](https://refactoring.guru/es/design-patterns/factory-method/java/example "Factory Method en Java") [![Factory Method en PHP](https://refactoring.guru/images/patterns/icons/php.svg?id=be1906eb26b71ec1d3b93720d6156618)](https://refactoring.guru/es/design-patterns/factory-method/php/example "Factory Method en PHP") [![Factory Method en Python](https://refactoring.guru/images/patterns/icons/python.svg?id=6d815d43c0f7050a1151b43e51569c9f)](https://refactoring.guru/es/design-patterns/factory-method/python/example "Factory Method en Python") [![Factory Method en Ruby](https://refactoring.guru/images/patterns/icons/ruby.svg?id=b065b718c914bf8e960ef731600be1eb)](https://refactoring.guru/es/design-patterns/factory-method/ruby/example "Factory Method en Ruby") [![Factory Method en Rust](https://refactoring.guru/images/patterns/icons/rust.svg?id=1f5698a4b5ae23fe79413511747e4a87)](https://refactoring.guru/es/design-patterns/factory-method/rust/example "Factory Method en Rust") [![Factory Method en Swift](https://refactoring.guru/images/patterns/icons/swift.svg?id=0b716c2d52ec3a48fbe91ac031070c1d)](https://refactoring.guru/es/design-patterns/factory-method/swift/example "Factory Method en Swift") [![Factory Method en TypeScript](https://refactoring.guru/images/patterns/icons/typescript.svg?id=2239d0f16cb703540c205dd8cb0c0cb7)](https://refactoring.guru/es/design-patterns/factory-method/typescript/example "Factory Method en TypeScript") --- # Factory Method en C++ / Patrones de diseño [There are patterns of patterns now! \ My friend's project: MetaPatterns.io](https://metapatterns.io/)  [](https://refactoring.guru/es/design-patterns/factory-method/cpp/example#checkout) [](https://refactoring.guru/es/design-patterns/factory-method/cpp/example#checkout) [](https://refactoring.guru/) / [Patrones de diseño](https://refactoring.guru/es/design-patterns) / [Factory Method](https://refactoring.guru/es/design-patterns/factory-method) / [C++](https://refactoring.guru/es/design-patterns/cpp) ![Factory Method](https://refactoring.guru/images/patterns/cards/factory-method-mini-2x.png?id=fa9d4a8d61a67cc3822e52b9daf69dad) **Factory Method** en C++ ========================= **Factory method** es un patrón de diseño creacional que resuelve el problema de crear objetos de producto sin especificar sus clases concretas. El patrón Factory Method define un método que debe utilizarse para crear objetos, en lugar de una llamada directa al constructor (operador `new`). Las subclases pueden sobrescribir este método para cambiar las clases de los objetos que se crearán. > Si no sabes la diferencia entre varios patrones y conceptos de la fábrica, lee nuestra [Comparación de fábricas](https://refactoring.guru/es/design-patterns/factory-comparison) > . [Aprende más sobre el patrón Factory Method](https://refactoring.guru/es/design-patterns/factory-method) Navegación  [Intro](https://refactoring.guru/es/design-patterns/factory-method/cpp/example#)  [Ejemplo conceptual](https://refactoring.guru/es/design-patterns/factory-method/cpp/example#example-0)  [main](https://refactoring.guru/es/design-patterns/factory-method/cpp/example#example-0--main-cc)  [Output](https://refactoring.guru/es/design-patterns/factory-method/cpp/example#example-0--Output-txt) **Complejidad:** **Popularidad:** **Ejemplos de uso:** El patrón Factory Method se utiliza mucho en el código C++. Resulta muy útil cuando necesitas proporcionar un alto nivel de flexibilidad a tu código. **Identificación:** Los métodos fábrica pueden ser reconocidos por métodos de creación, que crean objetos de clases concretas, pero los devuelven como objetos del tipo abstracto o interfaz. Ejemplo conceptual ------------------ Este ejemplo ilustra la estructura del patrón de diseño **Factory Method**. Se centra en responder las siguientes preguntas: * ¿De qué clases se compone? * ¿Qué papeles juegan esas clases? * ¿De qué forma se relacionan los elementos del patrón? #### **main.cc:** Ejemplo conceptual /\*\* \* The Product interface declares the operations that all concrete products must \* implement. \*/ class Product { public: virtual ~Product() {} virtual std::string Operation() const = 0; }; /\*\* \* Concrete Products provide various implementations of the Product interface. \*/ class ConcreteProduct1 : public Product { public: std::string Operation() const override { return "{Result of the ConcreteProduct1}"; } }; class ConcreteProduct2 : public Product { public: std::string Operation() const override { return "{Result of the ConcreteProduct2}"; } }; /\*\* \* The Creator class declares the factory method that is supposed to return an \* object of a Product class. The Creator's subclasses usually provide the \* implementation of this method. \*/ class Creator { /\*\* \* Note that the Creator may also provide some default implementation of the \* factory method. \*/ public: virtual ~Creator(){}; virtual Product\* FactoryMethod() const = 0; /\*\* \* Also note that, despite its name, the Creator's primary responsibility is \* not creating products. Usually, it contains some core business logic that \* relies on Product objects, returned by the factory method. Subclasses can \* indirectly change that business logic by overriding the factory method and \* returning a different type of product from it. \*/ std::string SomeOperation() const { // Call the factory method to create a Product object. Product\* product = this->FactoryMethod(); // Now, use the product. std::string result = "Creator: The same creator's code has just worked with " + product->Operation(); delete product; return result; } }; /\*\* \* Concrete Creators override the factory method in order to change the \* resulting product's type. \*/ class ConcreteCreator1 : public Creator { /\*\* \* Note that the signature of the method still uses the abstract product type, \* even though the concrete product is actually returned from the method. This \* way the Creator can stay independent of concrete product classes. \*/ public: Product\* FactoryMethod() const override { return new ConcreteProduct1(); } }; class ConcreteCreator2 : public Creator { public: Product\* FactoryMethod() const override { return new ConcreteProduct2(); } }; /\*\* \* The client code works with an instance of a concrete creator, albeit through \* its base interface. As long as the client keeps working with the creator via \* the base interface, you can pass it any creator's subclass. \*/ void ClientCode(const Creator& creator) { // ... std::cout << "Client: I'm not aware of the creator's class, but it still works.\\n" << creator.SomeOperation() << std::endl; // ... } /\*\* \* The Application picks a creator's type depending on the configuration or \* environment. \*/ int main() { std::cout << "App: Launched with the ConcreteCreator1.\\n"; Creator\* creator = new ConcreteCreator1(); ClientCode(\*creator); std::cout << std::endl; std::cout << "App: Launched with the ConcreteCreator2.\\n"; Creator\* creator2 = new ConcreteCreator2(); ClientCode(\*creator2); delete creator; delete creator2; return 0; } #### **Output.txt:** Resultado de la ejecución App: Launched with the ConcreteCreator1. Client: I'm not aware of the creator's class, but it still works. Creator: The same creator's code has just worked with {Result of the ConcreteProduct1} App: Launched with the ConcreteCreator2. Client: I'm not aware of the creator's class, but it still works. Creator: The same creator's code has just worked with {Result of the ConcreteProduct2} **Factory Method** en otros lenguajes ------------------------------------- [![Factory Method en C#](https://refactoring.guru/images/patterns/icons/csharp.svg?id=da64592defc6e86d57c39c66e9de3e58)](https://refactoring.guru/es/design-patterns/factory-method/csharp/example "Factory Method en C#") [![Factory Method en Go](https://refactoring.guru/images/patterns/icons/go.svg?id=1a89927eb99b1ea3fde7701d97970aca)](https://refactoring.guru/es/design-patterns/factory-method/go/example "Factory Method en Go") [![Factory Method en Java](https://refactoring.guru/images/patterns/icons/java.svg?id=e6d87e2dca08c953fe3acd1275ed4f4e)](https://refactoring.guru/es/design-patterns/factory-method/java/example "Factory Method en Java") [![Factory Method en PHP](https://refactoring.guru/images/patterns/icons/php.svg?id=be1906eb26b71ec1d3b93720d6156618)](https://refactoring.guru/es/design-patterns/factory-method/php/example "Factory Method en PHP") [![Factory Method en Python](https://refactoring.guru/images/patterns/icons/python.svg?id=6d815d43c0f7050a1151b43e51569c9f)](https://refactoring.guru/es/design-patterns/factory-method/python/example "Factory Method en Python") [![Factory Method en Ruby](https://refactoring.guru/images/patterns/icons/ruby.svg?id=b065b718c914bf8e960ef731600be1eb)](https://refactoring.guru/es/design-patterns/factory-method/ruby/example "Factory Method en Ruby") [![Factory Method en Rust](https://refactoring.guru/images/patterns/icons/rust.svg?id=1f5698a4b5ae23fe79413511747e4a87)](https://refactoring.guru/es/design-patterns/factory-method/rust/example "Factory Method en Rust") [![Factory Method en Swift](https://refactoring.guru/images/patterns/icons/swift.svg?id=0b716c2d52ec3a48fbe91ac031070c1d)](https://refactoring.guru/es/design-patterns/factory-method/swift/example "Factory Method en Swift") [![Factory Method en TypeScript](https://refactoring.guru/images/patterns/icons/typescript.svg?id=2239d0f16cb703540c205dd8cb0c0cb7)](https://refactoring.guru/es/design-patterns/factory-method/typescript/example "Factory Method en TypeScript") --- # Facade en Swift / Patrones de diseño [There are patterns of patterns now! \ My friend's project: MetaPatterns.io](https://metapatterns.io/)  [](https://refactoring.guru/es/design-patterns/facade/swift/example#checkout) [](https://refactoring.guru/es/design-patterns/facade/swift/example#checkout) [](https://refactoring.guru/) / [Patrones de diseño](https://refactoring.guru/es/design-patterns) / [Facade](https://refactoring.guru/es/design-patterns/facade) / [Swift](https://refactoring.guru/es/design-patterns/swift) ![Facade](https://refactoring.guru/images/patterns/cards/facade-mini-2x.png?id=d4cc6a5d81a31143cc665f7ac1481ac8) **Facade** en Swift =================== **Facade** es un patrón de diseño estructural que proporciona una interfaz simplificada (pero limitada) a un sistema complejo de clases, bibliotecas o \_frameworks\_. El patrón Facade disminuye la complejidad general de la aplicación, al mismo tiempo que ayuda a mover dependencias no deseadas a un solo lugar. [Aprende más sobre el patrón Facade](https://refactoring.guru/es/design-patterns/facade) Navegación  [Intro](https://refactoring.guru/es/design-patterns/facade/swift/example#)  [Ejemplo conceptual](https://refactoring.guru/es/design-patterns/facade/swift/example#example-0)  [Example](https://refactoring.guru/es/design-patterns/facade/swift/example#example-0--Example-swift)  [Output](https://refactoring.guru/es/design-patterns/facade/swift/example#example-0--Output-txt)  [Ejemplo del mundo real](https://refactoring.guru/es/design-patterns/facade/swift/example#example-1)  [Example](https://refactoring.guru/es/design-patterns/facade/swift/example#example-1--Example-swift)  [Output](https://refactoring.guru/es/design-patterns/facade/swift/example#example-1--Output-txt) **Complejidad:** **Popularidad:** **Ejemplos de uso:** El patrón Facade se utiliza habitualmente en aplicaciones escritas en Swift. Es de especial utilidad al trabajar con bibliotecas y API complejas. **Identificación:** El patrón Facade se puede reconocer en una clase con una interfaz simple, pero que delega la mayor parte del trabajo a otras clases. Normalmente, las fachadas gestionan todo el ciclo de vida de los objetos que utilizan. Los siguientes ejemplos están disponibles en [Swift Playgrounds](https://www.alemohamad.com/playgrounds) . Kudos a [Alejandro Mohamad](https://www.alemohamad.com/) por crear la versión de Playground. Ejemplo conceptual ------------------ Este ejemplo ilustra la estructura del patrón de diseño **Facade** y se centra en las siguientes preguntas: * ¿De qué clases se compone? * ¿Qué papeles juegan esas clases? * ¿De qué forma se relacionan los elementos del patrón? Después de conocer la estructura del patrón, será más fácil comprender el siguiente ejemplo basado en un caso de uso real de Swift. #### **Example.swift:** Ejemplo conceptual import XCTest /// The Facade class provides a simple interface to the complex logic of one or /// several subsystems. The Facade delegates the client requests to the /// appropriate objects within the subsystem. The Facade is also responsible for /// managing their lifecycle. All of this shields the client from the undesired /// complexity of the subsystem. class Facade { private var subsystem1: Subsystem1 private var subsystem2: Subsystem2 /// Depending on your application's needs, you can provide the Facade with /// existing subsystem objects or force the Facade to create them on its /// own. init(subsystem1: Subsystem1 = Subsystem1(), subsystem2: Subsystem2 = Subsystem2()) { self.subsystem1 = subsystem1 self.subsystem2 = subsystem2 } /// The Facade's methods are convenient shortcuts to the sophisticated /// functionality of the subsystems. However, clients get only to a fraction /// of a subsystem's capabilities. func operation() -> String { var result = "Facade initializes subsystems:" result += " " + subsystem1.operation1() result += " " + subsystem2.operation1() result += "\\n" + "Facade orders subsystems to perform the action:\\n" result += " " + subsystem1.operationN() result += " " + subsystem2.operationZ() return result } } /// The Subsystem can accept requests either from the facade or client directly. /// In any case, to the Subsystem, the Facade is yet another client, and it's /// not a part of the Subsystem. class Subsystem1 { func operation1() -> String { return "Subsystem1: Ready!\\n" } // ... func operationN() -> String { return "Subsystem1: Go!\\n" } } /// Some facades can work with multiple subsystems at the same time. class Subsystem2 { func operation1() -> String { return "Subsystem2: Get ready!\\n" } // ... func operationZ() -> String { return "Subsystem2: Fire!\\n" } } /// The client code works with complex subsystems through a simple interface /// provided by the Facade. When a facade manages the lifecycle of the /// subsystem, the client might not even know about the existence of the /// subsystem. This approach lets you keep the complexity under control. class Client { // ... static func clientCode(facade: Facade) { print(facade.operation()) } // ... } /// Let's see how it all works together. class FacadeConceptual: XCTestCase { func testFacadeConceptual() { /// The client code may have some of the subsystem's objects already /// created. In this case, it might be worthwhile to initialize the /// Facade with these objects instead of letting the Facade create new /// instances. let subsystem1 = Subsystem1() let subsystem2 = Subsystem2() let facade = Facade(subsystem1: subsystem1, subsystem2: subsystem2) Client.clientCode(facade: facade) } } #### **Output.txt:** Resultado de la ejecución Facade initializes subsystems: Sybsystem1: Ready! Sybsystem2: Get ready! Facade orders subsystems to perform the action: Sybsystem1: Go! Sybsystem2: Fire! Ejemplo del mundo real ---------------------- #### **Example.swift:** Ejemplo del mundo real import XCTest /// Facade Design Pattern /// /// Intent: Provides a simplified interface to a library, a framework, or any /// other complex set of classes. class FacadeRealWorld: XCTestCase { /// In the real project, you probably will use third-party libraries. For /// instance, to download images. /// /// Therefore, facade and wrapping it is a good way to use a third-party API /// in the client code. Even if it is your own library that is connected to /// a project. /// /// The benefits here are: /// /// 1) If you need to change a current image downloader it should be done /// only in the one place of a project. A number of lines of the client code /// will stay work. /// /// 2) The facade provides an access to a fraction of a functionality that /// fits most client needs. Moreover, it can set frequently used or default /// parameters. func testFacadeRealWorld() { let imageView = UIImageView() print("Let's set an image for the image view") clientCode(imageView) print("Image has been set") XCTAssert(imageView.image != nil) } fileprivate func clientCode(\_ imageView: UIImageView) { let url = URL(string: "www.example.com/logo") imageView.downloadImage(at: url) } } private extension UIImageView { /// This extension plays a facade role. func downloadImage(at url: URL?) { print("Start downloading...") let placeholder = UIImage(named: "placeholder") ImageDownloader().loadImage(at: url, placeholder: placeholder, completion: { image, error in print("Handle an image...") /// Crop, cache, apply filters, whatever... self.image = image }) } } private class ImageDownloader { /// Third-party library or your own solution (subsystem) typealias Completion = (UIImage, Error?) -> () typealias Progress = (Int, Int) -> () func loadImage(at url: URL?, placeholder: UIImage? = nil, progress: Progress? = nil, completion: Completion) { /// ... Set up a network stack /// ... Downloading an image /// ... completion(UIImage(), nil) } } #### **Output.txt:** Resultado de la ejecución Let's set an image for the image view Start downloading... Handle an image... Image has been set **Facade** en otros lenguajes ----------------------------- [![Facade en C#](https://refactoring.guru/images/patterns/icons/csharp.svg?id=da64592defc6e86d57c39c66e9de3e58)](https://refactoring.guru/es/design-patterns/facade/csharp/example "Facade en C#") [![Facade en C++](https://refactoring.guru/images/patterns/icons/cpp.svg?id=f7782ed8b8666246bfcc3f8fefc3b858)](https://refactoring.guru/es/design-patterns/facade/cpp/example "Facade en C++") [![Facade en Go](https://refactoring.guru/images/patterns/icons/go.svg?id=1a89927eb99b1ea3fde7701d97970aca)](https://refactoring.guru/es/design-patterns/facade/go/example "Facade en Go") [![Facade en Java](https://refactoring.guru/images/patterns/icons/java.svg?id=e6d87e2dca08c953fe3acd1275ed4f4e)](https://refactoring.guru/es/design-patterns/facade/java/example "Facade en Java") [![Facade en PHP](https://refactoring.guru/images/patterns/icons/php.svg?id=be1906eb26b71ec1d3b93720d6156618)](https://refactoring.guru/es/design-patterns/facade/php/example "Facade en PHP") [![Facade en Python](https://refactoring.guru/images/patterns/icons/python.svg?id=6d815d43c0f7050a1151b43e51569c9f)](https://refactoring.guru/es/design-patterns/facade/python/example "Facade en Python") [![Facade en Ruby](https://refactoring.guru/images/patterns/icons/ruby.svg?id=b065b718c914bf8e960ef731600be1eb)](https://refactoring.guru/es/design-patterns/facade/ruby/example "Facade en Ruby") [![Facade en Rust](https://refactoring.guru/images/patterns/icons/rust.svg?id=1f5698a4b5ae23fe79413511747e4a87)](https://refactoring.guru/es/design-patterns/facade/rust/example "Facade en Rust") [![Facade en TypeScript](https://refactoring.guru/images/patterns/icons/typescript.svg?id=2239d0f16cb703540c205dd8cb0c0cb7)](https://refactoring.guru/es/design-patterns/facade/typescript/example "Facade en TypeScript") --- # Command en Rust / Patrones de diseño [There are patterns of patterns now! \ My friend's project: MetaPatterns.io](https://metapatterns.io/)  [](https://refactoring.guru/es/design-patterns/command/rust/example#checkout) [](https://refactoring.guru/es/design-patterns/command/rust/example#checkout) [](https://refactoring.guru/) / [Patrones de diseño](https://refactoring.guru/es/design-patterns) / [Command](https://refactoring.guru/es/design-patterns/command) / [Rust](https://refactoring.guru/es/design-patterns/rust) ![Command](https://refactoring.guru/images/patterns/cards/command-mini-2x.png?id=e5f6332e057f6d352a209da963a8fc54) **Command** en Rust =================== **Command** es un patrón de diseño de comportamiento que convierte solicitudes u operaciones simples en objetos. La conversión permite la ejecución diferida de comandos, el almacenamiento del historial de comandos, etc. [Aprende más sobre el patrón Command](https://refactoring.guru/es/design-patterns/command) Navegación  [Intro](https://refactoring.guru/es/design-patterns/command/rust/example#)  [Text Editor: Commands and Undo](https://refactoring.guru/es/design-patterns/command/rust/example#example-0)  [command](https://refactoring.guru/es/design-patterns/command/rust/example#example-0--command-rs)   [copy](https://refactoring.guru/es/design-patterns/command/rust/example#example-0--command-copy-rs)   [cut](https://refactoring.guru/es/design-patterns/command/rust/example#example-0--command-cut-rs)   [paste](https://refactoring.guru/es/design-patterns/command/rust/example#example-0--command-paste-rs)  [main](https://refactoring.guru/es/design-patterns/command/rust/example#example-0--main-rs) In Rust, a command instance should _NOT hold a permanent reference to global context_, instead the latter should be passed _from top to down as a mutable parameter_ of the “`execute`” method: fn execute(&mut self, app: &mut cursive::Cursive) -> bool; Text Editor: Commands and Undo ------------------------------ Key points: * Each button runs a separate command. * Because a command is represented as an object, it can be pushed into a `history` array in order to be undone later. * TUI is created with `cursive` crate. #### **command.rs:** Command Inteface mod copy; mod cut; mod paste; pub use copy::CopyCommand; pub use cut::CutCommand; pub use paste::PasteCommand; /// Declares a method for executing (and undoing) a command. /// /// Each command receives an application context to access /// visual components (e.g. edit view) and a clipboard. pub trait Command { fn execute(&mut self, app: &mut cursive::Cursive) -> bool; fn undo(&mut self, app: &mut cursive::Cursive); } #### **command/copy.rs:** Copy Command use cursive::{views::EditView, Cursive}; use super::Command; use crate::AppContext; #\[derive(Default)\] pub struct CopyCommand; impl Command for CopyCommand { fn execute(&mut self, app: &mut Cursive) -> bool { let editor = app.find\_name::("Editor").unwrap(); let mut context = app.take\_user\_data::().unwrap(); context.clipboard = editor.get\_content().to\_string(); app.set\_user\_data(context); false } fn undo(&mut self, \_: &mut Cursive) {} } #### **command/cut.rs:** Cut Command use cursive::{views::EditView, Cursive}; use super::Command; use crate::AppContext; #\[derive(Default)\] pub struct CutCommand { backup: String, } impl Command for CutCommand { fn execute(&mut self, app: &mut Cursive) -> bool { let mut editor = app.find\_name::("Editor").unwrap(); app.with\_user\_data(|context: &mut AppContext| { self.backup = editor.get\_content().to\_string(); context.clipboard = self.backup.clone(); editor.set\_content("".to\_string()); }); true } fn undo(&mut self, app: &mut Cursive) { let mut editor = app.find\_name::("Editor").unwrap(); editor.set\_content(&self.backup); } } #### **command/paste.rs:** Paste Command use cursive::{views::EditView, Cursive}; use super::Command; use crate::AppContext; #\[derive(Default)\] pub struct PasteCommand { backup: String, } impl Command for PasteCommand { fn execute(&mut self, app: &mut Cursive) -> bool { let mut editor = app.find\_name::("Editor").unwrap(); app.with\_user\_data(|context: &mut AppContext| { self.backup = editor.get\_content().to\_string(); editor.set\_content(context.clipboard.clone()); }); true } fn undo(&mut self, app: &mut Cursive) { let mut editor = app.find\_name::("Editor").unwrap(); editor.set\_content(&self.backup); } } #### **main.rs:** Client code mod command; use cursive::{ traits::Nameable, views::{Dialog, EditView}, Cursive, }; use command::{Command, CopyCommand, CutCommand, PasteCommand}; /// An application context to be passed into visual component callbacks. /// It contains a clipboard and a history of commands to be undone. #\[derive(Default)\] struct AppContext { clipboard: String, history: Vec>, } fn main() { let mut app = cursive::default(); app.set\_user\_data(AppContext::default()); app.add\_layer( Dialog::around(EditView::default().with\_name("Editor")) .title("Type and use buttons") .button("Copy", |s| execute(s, CopyCommand)) .button("Cut", |s| execute(s, CutCommand::default())) .button("Paste", |s| execute(s, PasteCommand::default())) .button("Undo", undo) .button("Quit", |s| s.quit()), ); app.run(); } /// Executes a command and then pushes it to a history array. fn execute(app: &mut Cursive, mut command: impl Command + 'static) { if command.execute(app) { app.with\_user\_data(|context: &mut AppContext| { context.history.push(Box::new(command)); }); } } /// Pops the last command and executes an undo action. fn undo(app: &mut Cursive) { let mut context = app.take\_user\_data::().unwrap(); if let Some(mut command) = context.history.pop() { command.undo(app) } app.set\_user\_data(context); } Output ====== ![Text Editor screenshot](data:image/png;base64,iVBORw0KGgoAAAANSUhEUgAAA8AAAAJKCAYAAADjiiyRAAAAAXNSR0IArs4c6QAAAARnQU1BAACxjwv8YQUAAAAJcEhZcwAAFiUAABYlAUlSJPAAADfASURBVHhe7d0PnFV1nfj/N4qDKaLyR/lnBKICuWCoiKZUK2Wh9QP3m9KWYClsKm3+qU10NzVL3FotE7QVNdG2oD9i35T0F9QKVghCQCojKIjyV4Y/4kjMSPi9M3MGZoaZYWZghsHP8/l4XDnnzJnx3M+9c+e+7jn33BYz7i56NwAAAOA97qDsXwAAAHhPE8AAAAAkQQADAACQBAEMAABAEgQwAAAASRDAAAAAJEEAAwAAkAQBDAAAQBIEMAAAAEkQwAAAACRBAAMAAJAEAQwAAEASBDAAAABJEMAAAAAkQQADAACQBAEMAABAEgQwAAAASRDAAAAAJEEAAwAAkAQBDAAAQBIEMAAAAEkQwAAAACRBAAMAAJAEAQwAAEASBDAAAABJEMAAAAAkQQADAACQBAEMAABAEgQwAAAASRDAAAAAJEEAAwAAkAQBDAAAQBIEMAAAAEkQwAAAACRBAAMAAJAEAQwAAEASBDAAAABJEMAAAAAkQQADAACQBAEMAABAEgQwAAAASRDAAAAAJEEAAwAAkAQBDAAAQBIEMAAAAEkQwAAAACRBAAMAAJAEAQwAAEASBDAAAABJEMAAAAAkQQADAACQBAEMAABAEgQwAAAASRDAAAAAJEEAAwAAkAQBDAAAQBIEMAAAAEkQwAAAACRBAAMAAJAEAQwAAEASBDAAAABJEMAAAAAkQQADAACQBAEMAABAEgQwAAAASRDAAAAAJEEAAwAAkAQBDAAAQBIEMAAAAEkQwAAAACRBAAMAAJAEAQwAAEASBDAAAABJEMAAAAAkQQADAACQBAEMAABAEgQwAAAASRDAAAAAJEEAAwAAkAQBDAAAQBIEMAAAAEkQwAAAACRBAAMAAJAEAQwAAEASBDAAAABJEMAAAAAkQQADAACQBAEMAABAEgQwAAAASRDAAAAAJEEAAwAAkAQBDAAAQBIEMAAAAEkQwAAAACRBAAMAAJAEAQwAAEASBDAAAABJEMAAAAAkQQADAACQBAEMAABAEgQwAAAASRDAAAAAJEEAAwAAkAQBDAAAQBIEMAAAAEkQwAAAACRBAAMAAJAEAQwAAEASBDAAAABJEMAAAAAkQQADAACQBAEMAABAEgQwAAAASRDAAAAAJEEAAwAAkAQBDAAAQBIEMAAAAEkQwAAAACRBAAMAAJAEAQwAAEASBDAAAABJEMAAAAAkQQADAACQBAEMAABAEgQwAAAASRDAAAAAJEEAAwAAkAQBDAAAQBIEMAAAAEkQwAAAACRBAAMAAJAEAQwAAEASBDAAAABJEMAAAAAkQQADAACQBAEMAABAEgQwAAAASRDAAAAAJEEAAwAAkAQBDAAAQBIEMAAAAEkQwAAAACRBAAMAAJAEAQwAAEASBDAAAABJEMAAAAAkQQADAACQBAEMAABAEgQwAAAASRDAAAAAJEEAAwAAkAQBDAAAQBIEMAAAAEkQwAAAACRBAAMAAJAEAQwAAEASBDAAAABJEMAAAAAkQQADAACQBAEMAABAEgQwAAAASRDAAAAAJEEAAwAAkAQBDAAAQBIEMAAAAEkQwAAAACRBAAMAAJAEAQwAAEASBDAAAABJEMAAAAAkQQADAACQBAEMAABAEgQwAAAASRDAAAAAJEEAAwAAkAQBDAAAQBIEMAAAAEkQwAAAACRBAAMAAJAEAQwAAEASBDAAAABJEMAAAAAkQQADAACQBAEMAABAEgQwAAAASRDAAAAAJEEAAwAAkAQBDAAAQBIEMAAAAEkQwAAAACRBAAMAAJAEAQwAAEASBDAAAABJEMAAAAAkQQADAACQBAEMAABAEgQwAAAASRDAAAAAJEEAAwAAkAQBDAAAQBIEMAAAAEkQwAAAACRBAAMAAJAEAQwAAEASBDAAAABJEMAAAAAkQQADAACQBAEMAABAEgQwAAAASRDAAAAAJEEAAwAAkAQBDAAAQBIEMAAAAEkQwAAAACRBAAMAAJAEAQwAAEASBDAAAABJEMAAAAAkQQADAACQBAEMAABAElrMuLvo3Wwa2I8+PKoom6KxzJkzP0ZeOiYmPTQ+Bgzony0FqD+PJ03njxNbZVMAe88eYAAAAJIggAEAAEiCAAYAACAJAhgAAIAkCGAAAACSIIABOCBsfuo/4umx02NzNp+eTfHi2PPjT09tyuYbUfG6WLnw9SjMZveovusDwH4igAEaJD8WfXlMPFPp8vl4+uNDY+Zuyx+L1dl3wQGh8K/x2td+Gxuz2T2q7/oAsJ8IYIAG6RV9fzQ+zq54ue2LcUj8Q7S/rcryHw2Nztl3AQCw/whgAAAAktBixt1F72bTwH704VFF2RSNZc6c+THy0jEx6aHxMWBA/2zpPrRxevzp4qfjqCm3Rp+22bIKCv/4nzFv8j/EB+8eEu2zZZUVRv5NF8fmj06JgR9rnZsvec/nF2LbiCei1yFPx5Ipv44trxfHQcXvxI6je8RRI0bHyf2OrvaVzM0LH4slD0+PbW/nZnLrx3GnxjGX/HOc2LP1Xr/yub3w9Xj1f38dBY/nR3HJgo2bInp/JI657NLo9f680nXK7Nr+/se/Hvn3PxRvLFqX+/9vir9vPDYOv2xM9DmvRxyWrV1uR+Gy3Lb/T7zx3Mo4KPfjdhR3jdaXfD46F/84Xvrfj0S/cYPjqGzdetnD7fPaPefH8rgjPnJlr2xJma0vPx35j/wiclc7256IvL652/DCQdHj/dWPZ+OMf9l4bv7og3HK8fl7vj/U9/q+/Fg881/Ty6aL34i/565vi+OP2W1723x1fPTtnZuo7/qZnbdv6X0hNx+t49BP5Mbmwr5VbteG3X8acns1RKM/nrDTHye2yqYA9p4AhmZCADe+/R3AEctiwRdujbj5x3FKz2xRRSXf/4X86PjYmOhR2pFlAbCx8KTYkXdmdL3xs9Ej+7lbX54WC/71oWh544Mx4MMlsVyuOBc2X4nliwfGcbd8scr6v45D77g7+veuGKn1szkX8Qu/tymOvPGq6Hn6cbl0KbN14X3x3NfmRZt7/7vCdSvb/q0f/bfY/sCvI+/G/4i+uUBrmfvKjsJFue0ZG1svfDDOvuDYstVzdqx9OuZ8eULE5bdH3wvK46YwVj91X7z8XzPi3dOuadIA3vHyL+KZf10U7X/0H6VxXx5PhS9Pjxdz8df65tujT8dsYanGHP+y8SxY1zXi6MF7vj80MPhLLb4vnv7XiO6/Gx3vzxbVqo7r71g7PWZ/6RfR8uv/Hqd87LgoG4lNsez+W+P1P/WK7j/Kff/O4WnA/afet1fDCeCmI4CBfUkAQzNRXQBv2bIl8vNfyeYqa9Eim6Ba775b8tBWeZDy85fGuNt/sB8DOKLg8WvjhZc/H2dcfWocmi0rV/K1FwvHxNnDe2RP3LPgOfZbcUpu/Taly3bZNnd8PHtTXnSftis6SvcyP3B0lZAosy0XqXO+d3T0/Mln9+I9ycWxLZctVbe9xOrJX4ylr4yOU288Mwvjsu1fv7B/dHgwNyZVwqM4t/1/vuvYOGHn9rwez3/ly7H5vB/FWRcct9ueuoLHr48X/ji4SQN45f1D45Xib8U5V/at057Dxh3/et4fml0AL4sFX/pKbL34wRh43rFVxrPkhYN/ieWb9ub+U//ba2+UB/DY66+OXr1OyJaW8fhcu+oen8v16nV8tGlT+d4tgIF9SQBDM1FdAJc/wWLf2p8BHMWL4rmhD8WhD94ZJ1d6Ql+yd/jOaHnb+Dh5Z0GUBcDmj/4kzjrv6GxZBcXzYs75t0bLHz4W/UsPMX09Fn3py7Htiqkx4PTq9jLuYQ/0XtqRC7xZYw+J46d9MbqWLinf/gdz279rL91Oa3PjdcnT0TY3Xr1y47UjF1GzriuO43buAa+s5GOQFjbxIdClL1g8NShOunto7HnHYWOPfz3vD80sgMtu39w6FV6wqWS37a3f/adE/W6vvePxuXFU9/gsgIF9SQBDM1FbAF9//Vej9257GOxiqE3ZHobKFucvjdtvv2v/BnDO6sn/Ei/HNyrs6c21y8Lx8ef7e1R5f/AegifWxYvXfSk2X5D7+sdyX9/4dO7/PzvaT/1GnFjxqOidiuPlHwyLN/pl6++lHcWFsfG1ZbExf15sfe2N2PrcvHjn9cEVImgP219lvN54fEwsfvmLcebVp2aHxla2PwK4ZIyXfO/WWDP36Djiss9G19N7Rdu2eaWH4e6m0ce/vveHhlzfTCMEcOkRAmvH1Hj7lh4B8OUvx9bLyl9AqN/9p0w9bq+95PG54er7+CyAgX1JAEMzUVsAN1qwJabRx7OOARyFT8fsi2ZH25+Xh1LVk1+V21PwVPl6aYRMr/ZEROV2rF0eLa+o6efVzdaS91Pe9Vhs63hqtP3ER+KY3sdE69at49DdIqh+AVNrkOXsnwAuU3Lir9f+OC82/ml6bF24KQ46/bPR8ZLBlU+q1OjjX8/7QzML4D3dvrtfv/rdfyqq0+21lzw+71u1jacABvalffV3AIC6an1mHPOJP8cb/7uubL5wXmye+6k4ptLJrOpiUxS/HtGy7eFls4ccHS1icHyg0mcQV74MeuyJBsZXmY25CJ37QHF0HZf7eTd+Mfqc3iPal8Rv9vW90bLtMRHFb0fpmaWbmZatj4se5w2N024pGcMfR58L82LjzV+IP03OzoRdognGv3ZV7g/NzJ5v38LYsSn3xKT1Idl8w9Xp9gIgSQIYoMnlRY/hoyMmz4zVubmC//11FI8YEh+o/rjQmq3Nj8J1/aP18dk3vr9HLkT/HBtfLpvd54oXxbK7NkW7K4ZEx/q2eh20Oa5XxHPLoiCb3/dKwuqdkiOR91JetO09JE67+dKIB34drxZmixt7/Pek6v1hr65vfSN0z+t37HdmxP8/L9Zm87vZ+FJseaV/tOm9r+9cNdxeACRJAAPsDx0HxTG9/yde+8O8WDk5ou1Hd70feDfvFMeObHKX4njt0V/E3z86JN5ffvhn3qnR9bK8ePOB6bExW7RPFW6K4ndal3626u4KY+3i17Pphmndb1C02jgtVi+srtg2RcHildl0A7U9Lg479q9R+PruP3/ba9Ni5ePZzE7FsXHtpmrGvsxBVd/J2tjjX67G+8OvK98f6n19KziuV7SK16OwrlekDusf1HtwHNkx9/99al312z/5F/FOxe2vt3reXgAkSQAD7Beto+fFn4/i274Zbx7//8UHajll7Tt3fSVmT14UG3d2TC42H781lj93ahz31fKPjCnTefi34ti8++L5702P1ZX2dOXiYPG0eO470xu+h7Vt32h7Wn4UTJ4Xm7NFJYrXLooF110Xy15pHQdnyxqk9Zlx4le7xttjb43nXy7cGTLbC/Nj0XW3xtrqPxGsHnpE1+Enxd/ufSheqzA2mxf+OJ67bWUcdXmV93EWr4vV3xsTf/peLtrWVo7OHYXL4vl774sdF+duuwo3QKOOf+ade66t4f7wD1XuD/W8vhW1PjXan//XKHj4z5Vu6x25MSnIjcVu6rR+j+h78+jYcdc3Y/7cdbkRKVcYq6vd/npqwO0FQHqcBAuaCSfBanzN5iRYO5V9bM7WS6qe/Kpc+UmA7o4eedPj1SmLyqIh95+80z4bHxjxkRoORS6MgrnTY9nk38a2TYeU7rHdkcuKQ0/7VC6IPhKd9yYAcpHx8qP3xepH83NBfHTpq6gt+w7N/dzB0TVKrv+y6NrAk2CVKz3J1r2/iK2v57Y9t/yg4wZHxyuGRtu5e3kSrFK5WHzqoXj5gT/Hjtz2l8j76OjoNbxvRMlJtl75/G4naSp8+elY9vjM2JJftuey5DrvOPy4aHPBZ+PEj/WIw0rXqqixxr9sPLcNnxKdN/501/0hJ69vTfeH+l/fXTblrsP4WFnhti653kddflX0rfYw5bqtXxKjSx7+n3jjuZW5sTkkF8l5cegFl8aJF/atcrs27P5T/9urYTw+71tOggU0FQEMzYQAbnzNbjzXTotnvrQsOtfwubd7DABgv/H4vG8JYKCplLwwCkCTK3sP746GnPwKAIAGEcAA+0HBU/8Zy587Mz5wYS0nvwIAYJ/yvAugiWxfeF/M/NKY3OVfIn/xmXHSj0bH++39BQBoMgIYoIm07Dc6Bj04Pnf57zj76sHRcY/xe3T0GfeE9/8CAOwjAhgAAIAkOAs0NBPVnQV67ty/xIiRV8XDkybE6ad/KFvaMM6iCUBjqO7vV33V9veud5+zsqm6uf+aedkUwO7sAYZm7N3s5anyfwHgvcjfO6CpCGAAAACSIIABAABIggAGAAAgCQIYAACAJAhgYN/ZOjN+PvWr8cPyyy8vjVsfeDBezb68m/quT+328XhuXnJT3Prk9Nicze9m+/p4dc2KKMxmAQCaOwEMKdk6PR584KaYtzWbr+qNB/cuQA8bFBcNuyv+tfwyaFD2hRrUd/1mpGDxV+PW2Quzudq9PPvz8cPFq7O5RtTU41m8MH4/bUYUZLMAAM2dAAZogKOO6BmxYXXNe0d3Wh9v5lZqf9iR2TwAAPuLAAZogJbvOyparV1Rh72f62PtqsOiXevDs3kAAPYXAQzUyeY1k+OnT5S/t/TK+OHvfhQLN7ydfbWJFa2IhbO/veu9rlPHxk+fX1iHvbH7UOue0TVWxIa3svkSGx6J7z5waTzxRjZfYuvqWBe5dVtn8yXquf2vzv583Dr7xdLpbZv/HDP+MDb7vivjuz8dG8/u7RXPtufOkts19zPv/OW349evrIht2ZcBAN4rBDCwB2/nAuzKuGfu1hjwsey9pf/nnhjdv3PM+83Xc7HXxBH81vR48Gf/GS91+FJcufP9rtfGgL9Njnt++WC8uj1br7G1ah/tWr8WBX/L5nMK3nguiuKdeGHN0mxJTuFrsbZ15ziyVTbf4O1/Jza/kovmmYuj2xnjsu+7J/7tolvi1KOyVRoitz0P//ymWHjkJXFl7nYt+ZnX/p8xcerffxU/nfVythIAwHuDAAZqVbhifPx05Wnxz0O+FD0PyxbmHNruM/HP5/WNF/7waKzMljW+pfHUUz+OOOuWuOj4ztEyWxrRIXqe/u9xUdc/56Ltz010VuLO0fWYiHWb12fzb8e6tQXRp9fAKFq2eOeh0YVvrYi/H9kpyhp1L7Z/5X/Hw0sHxujPVL4domVehZ9TX6vjj3/4cRSedluM6N0tDs2WRm5ru554bYw46/3ZPADAe4MAhuSsiBlPlR96W+Uyc2a2TrkV8ezcRdFz4MXxgWoq69BO50a/mBkvbMgWNLY3ZsW8wnPjH0/skC2o6PDo2ffi6LjsyXipprNc71OHx5FtD4tVG7MA3r448pf1jV59T4vjN86LFdk2bC5cHQe36xylR0DvzfYX9o5PDB6chfQ+8saT8fTGgfGPJ3TOFlTW8uC8bAoA4L1BAENyusW555UfelvlUvVjc7YujRVv9o0PdqjpBE7dolvXrbFqc9O8+3blmj/H30/oG12z+d0c1idOavtyvLqxOFvQuNof1TNXuNmZoDcuipc69o0uR+TGJLcNL60vOTT87Xhz49bo2LYsMPdq+3udG70avqu3WgUbFua258zo2dCfe1iHaNexfO82AEDzJ4CBmhW+FqticTw1rZq9xaWXr8e0Zbn1/v5O2fqNbPvftkYcfFgth/weEoe+L+LNrW9m843r0Pd1iINXvVYawCVx27Jrz1wMdo5uPQ6LV9aUvH/2zdi8+ZA49oiyRGxu21/4ZsEetmdPDomWBx+STQMANH8CGKhZLm5axcD4THV7i7PLtZf8T3yp2kN6972W7zssF9tbo+bzXL0T2/6WC9NWFd8k24havz86lpwJeuvqWLHsnfhgpxNKF3ftdGYcvGJRrIz1UbCxW3TMzgDd3LZ/z9uzJ33ivI8NsgcYADhgCGCgZkf2juNjXrzSVO/x3YPSsFxaEpY12PpivLSxZ5xU4yHb+9hhnePYg1dHwfqS/++pcXzbbHnbvnFS4XOxYuX62BDdol3Ws81t+0sP4V65ONZm8w3RspX3CQMABw4BDNSs5WlxxmmHxLy50xv2Gbule5CL676HcU/rH3NOnNp6Zvx+SfmZlyt6O15d9Gis7fHJOKmmHahFq+PVNQtj5T47SVbn6Nhxa7y5YlGs6tI7OpYfS9yyd/TqURArli2KtV3ev2sP6d5uf33tYTwP7Tgojv/bzJi3prqPstocq9avzqart23D9Hhi7uTIr/hZyAAAzZgABmrVtd8tcd7BP4kHZ06PlUXZwlLFsfmN38av/jB950f+7KbdwOjXenbMrBh8uQgtqPRzKtjj+ifEeYMvjO1/uil+tXJ9hbDbHCsXfzd+urJ3XHjWmWVnXN7N5pj3h6/HI9O+Gz/+zSP76KObjop27Q6Jl5bOiyO79alwKPDhcWzH9vFKbvnfj+pcYfnebH8D7Gk8W50ZQ87qHC889d3444YKEVz0Ysx44tu5Zdl8tXLr/ObHMX/Rb+IXf5zeRB89BQCwdwQwsAcd4tSPT4gRPQpi5vQr485flp8A66aYtuLwOOOswdE+W3N3ueAb8qU4Mv+G+G7J9/0y9/3TH4lXCms6S3Md1j/qMzH6c9+Iniv/u/TrJdty5y+/HTP/fmFc+X++Er1aZevt5rBo16lTtDo4N1n4cqzbR3uB27ftlvvvIXF8u8ofJdT+mNOiZFO6tK3y/ugGb39D7Hk8jzrxlrj20+fE2tlfj+/+tOy2ve9Pi6Lbx/4rLupV/ccjlekZH/xQ+zg4d927ndBv30U7AEAjajHj7qJ3s2lgP/rwqN13i86Z85cYeelVMemhCTFgwIeypQ3zx4n7tKwOXJv/b/zwVyviEyNzsdnw0x8DkKnu71d91fb3rnefs7Kpurn/mnnZFMDu7AEGkrL5jXnx5vv7RVfxCwCQHHuAoZmwB7gJvDU9HvzVo9Hl0/fEee2yZTSaV2d/Ph55IZupzQdvjP8Y2Mf6NbF+7axfuyZY/8kHjs9mGs4eYKCpCGBoJgRwYyqOzWt+Ej+fvjC6DL4tzu/URB+TBJAAh0ADBxKHQAMJyIvWrT8ZF33uLvELAJAwAQzNWIsWlf+l4Voe0TmO8r5fgGbJ3zugqTgEGpqJ6g4hmzv3LzFi5FXx8KQJcfrpe3cINAA0V7X9vXMINLAv2QMMzdi72ctT5f8CwHuRv3dAUxHAAAAAJEEAAwAAkAQBDAAAQBIEMAAAAEkQwAAAACRBAAMAAJAEAQwAAEASBDAAAABJEMAAAAAkQQADAACQBAEMAABAEgQwAAAASRDAAAAAJEEAAwAAkAQBDAAAQBIEMAAAAEkQwAAAACRBAAMAAJAEAQwAAEASBDAAAABJEMAAAAAkQQADAACQBAEMAABAEgQwAAAASRDA0Iy1aFH5XwB4L/L3DmgqLWbcXfRuNg3sRx8eVZRN7TJ37l9ixMir4uFJE+L00z+ULW2YVpdclk1RnaJHHsimAGhqtf29693nrGyqbu6/Zl42BbA7e4ChGXs3e3mq/F8AeC/y9w5oKgIYAACAJAhgAAAAkiCAAQAASIIABgAAIAkCGOC9qGhNLJizIrZks+wl49no1k+9JnqPfiLWZ/PU3/pp34gBfT4RY6ZtyJbUwP0ZSJgABuqmeHP86pWXYtSiRaWXkQsWxI2vF8RL27OvUz/r58fkm78Rwy4cWXoZcv7wGDPud7F4Xz0j3TI/Jlw6NZZlsweK0gg65YKd41J6yY3NsJHfjDumLdl/T9gP0PGsl/VPxKg+18TUmgq09Os/iAXZLHW1Jmbd+c0YXnI/Lv1dHxXX3jk7VmVf3beKo6j0sgcp3J8BaiCAgV12bI0Zm7dlM7us27g0F7yrY1O77jGhb9+YmLtMOqVv/Ovhb8V/zX8pZjTjCF65uSCW7chmmlrRipg2a002s8uqGd+OIRc8EG8NuTomPzoppuYu056YFGPPfiFu+Pg3Y3oT7gJbNet3sWyPz5YbSQ3jEwOuiPuycSm9PDE5pt79hegybUycM/p376k9hM1y/A9gzW48i56Pced/Lh7u8oW4r+R+XPq7fmeMOOKBXAj/IBbs423tMOT7sfDF/42JQ9plS/bOfh1PgEYigIFShYVr4urnlsSzOyo/LBQXvh7/tmR7fK5vn7j8qLzIy5aXPHwc27Z7TDzthDi3ZbaoGTpkx6a45bkXY1Jh01b6loVTYsSgb8Ss4l0jVqJo4T0x6roNMerRCTFqQKdolS2P3FSXc66OqTNvjMEdskVNIK/42Rgz6KqYtPCtbEnTqGl8atTmxBh+x7diyDP3xmOLs2XvAQfM+B8gmtd4vhXTbxgTs84eH+MvPjHaZEsjjohTRo2PSWfPjpE3zGzWhyHvr/EEaEwtZtxd5CPHoRn48KjdX2afM+cvMfLS3JOPhybEgAEfypY2TKtLLsumqtoe81/Pj9s2HR5f7dU9zqn0fHh7zHjpz/Gro06Pe449NFtWB9u3xow1r8fkTeXXqWV06dA5ruh0VBybLSlTHE+++Gws63pOjGhZEJNXrY1n/7YjYseOKM47PP6xa/cY2WZXXW/auDRGrW4TPzj52OiaLausbHt/3+7M+E77ClVevDHuyn85lh/dK246rk0cnS2uqOiRB7KpvbUh5tx5fYx55oNxx39fHedUitm3YtqY8+Lhc34Vky/ulC2rRckhpx+ZHkOe/n4MqyaKF4w7Kz4X98XisSeXLVg8JYbfOK3s8MeiNZG/PKJ7r4qRXWboTZNiZL9spsT62THuX74ZC8++Pe6+tn80bn/XNj5lh0AP+u3gmHnf+dVsx4aYOvrTMe1Tv4mJwyrs4dqyImb9dkpMmfJC2WGlBRuiqO/gGHPtFTGkR9Vrn1t98e9iwoSfxKzc+LTKfbkoN2A9Th8aF48YHOf0OCJbK6eh45mzfs6UGDdhWiwv6YaS/0H3gTHqqstiSO8KP79ccxn/Pdzfyr6+NK568eo4pXRB2e2Rf9WfYmyvFTHtznti4ty1pctXFXSKIdd8Pa4dVjH8MluWxLQJD8T4Z1Zk498tzsmNzdCie+PC6m77bP2yn12idXQfelmMHVHDWDWX8Vw2NYZdMDtGzf7PGLLbIORs+V2MGfiTOPvxSTG8R26+vr/v8XxMuvB78Vg2V6YoVuW/FsN+lrtNqtwnm/vjQ21/73r3OSubqpv7r5mXTQHszh5gSNm2grht0YJ4+KD3x8S+VeM3p3hTPPlGu/jM0fWI323r4+sle5Lf123n4dIT+/aMz2xfGVcteD3+Ws3hyM+/9nyMfrUo+nc7uWz9U06JCR9oE8+/OD9u27hrz+3RbTvFJ4tXxZOF2YKqSrZ3U9f4dNsqu6Tz2sZX+/aPEQfltmHRKzFj96O8941Vv4uxF46M8UdcEU88unvcxfqZMfX3Z8TF/1iH+G2I3hfvPKR66m1DcguGxG3l8xUuVWMtOgyMsY/+LK494oG48MJvx7TGeXPinsdnj4pLnt+X7Czfaf2Mb8aAj3838jtfvOu6znw8Jo+IGH/ByJhYdW/x4kdi+OemRa9r7ys97Lxk/ZJ/b7s4L6Z97fqYWvG6N2g8i3KhMjwG37khhv9Xts4Tk2PSVd1i6udGxbiFpflR2QEz/jVYlgu5j387Fp/7b9mYPB5zHr8iWt1/aYyeUuWQ4Nw2jPn4mJjW47KYXHpI8OTc+P97Ln5/Htfd+Gy2UgWrclE46Jsxq9+Vu26LR78VwwvujcE1HULcTMZz2dzHIv9T58fZ1cVviTYDY+inlsaUuSuyBfV1cozcOSbll3+PYdlXd9PcHx8AmogAhiTtiGXrl8bI/E3Rv+cp8YMu1e8VjW2FseTwI6N7nY+SLIz78/Mjju8VN7Q/tMLh0nnR/7g+ccOR6+OWVzbGpmxpuc3v6xwT+nSJ/hX+P60POzZu6tUu5i9ZE3/NlpXs+flkl7x4ct3m3P9pdys3rYtVx3WIgdU+srWM/l36xH0928Sz+QvitvVbq/0ZDVMUy6Z+O4aMfjYGfOdn8fCoGvaSLF8az3TuH732VXjsU+1iwKgJ8cR3PhSzRg+PsVNXlO0p2ifqOD57suX5mDH3g3Fuv117fzuce2PMenZCjDqnW6U9jW0GXB13XFMcd95f+RDTBb99IJZffEkMq7JnuE3v82PcoxNiWJdsQQNtmfGdGPnMwJg06coYUOFKtuk9LMbfNzCmX/fzqP4I7gNg/Gvw8C3T4tyfTYzrBlTYK9+mf1x7/dBYOHF6heu7IiZfd1MUXDtxt0OCew/795h4U9WjXJbExNHfibjp+zFuSLcKr3vkxura8THx7Jm1HEK8/8ezYNnS6DWg8v2ysiOix4ATIn/ZHs7Y3Cw05ngCNC0BDKnZURiTXpwf47YcHd855YT45GE1v4F3XdHfIg7Ni6Oy+T3asime3PaBGNGhuj3GB+UC9LjovnZtPFucLcp0adO62gBv3aZdnPHOqphVoVS7dugaZ6xfGb/fbS9uYTy5akf8U7vW2Xz1Wh/WIW44pVecseXlGP3imnhpb0+QVbQkJo38p7hu7hkx8Yl/j2HVHeKaWb9qRUSPttE+m2+OSkPwie/HOXO/GYNHTonFe/sstx7jU5uiVfPjjlwMLbvkq1UitdVuh3CW691vUMSM5yud6bZDlxMiFi5tpLPfroipd06PIddfEadUs1GtBgyJ4TE1nqnlPczNdfxrc/pN/1btCwetenwwTl89P5aXn7Vs4dQYlz80rh3aLVtQWV5elVfaFk6L8asuiquGVXfERKsYcPllMeC3U2NGLWdF23/juSFWLY9on1f749EReW0jlq85YE7sts/HE2A/EMCQmm1v5eLxyPh0p6NqeB9tw7301vp4p8MRcVI2v5u8I2LgkRvir1vrWJ0HHRontXsnlm+rUMwHHRWfOW57TN5Qef9t8eb18WTesXFGnY7WPjTO6NQpTty2Lmbv7eHQq/4SU1b1jxGXDIy93HnYjHSKsy+5KE5fNTXm7O3hjg0Znzn3xugLd30M0pBBF8TwGx6L9tf+KqaNPbnG4I2it2LV4vkxbco9cce4b8aIW6bl7hiVX23pcvG34u4e02L4oGti3NT5sWz9PnwGv35JPLN8cJzbr6Yt7Ba9zl4bc5bvaY/ffh7/empV4ViPSnKLS0aifISX5f8liocOihqHp4rFc2bm1h8YvbP53XQ4Oc7t9WwszN/TbXhgjWfztw/HE2A/EMCQmsM6xaST28XylxfE1WsKaz0M+NhW78sFc3Fszub3pHjH27knvQfV9HQ456A4vGXEG+/U9YzM2c+qcqq+k47tGt1fXxOzdv6Y7TFr3co4qWO7OkT99vjrmhdj9MuFce7Jp8TIw7LFDdXj4pj2syGRf+PnYsTDz9d6RtcOXbrlKmBjFGTzzdNbseDhq+L8G5fGsJ9NjpElJ+fZG/UYn52qfAzStJmPx9RJ34qRFQ+xrWDL4ifi5uEjc5H8SMwpaB39PnVJjBn7rXi49H2OVXWKwbdNijmPXx3nxtJ4+JbRcc4ZucC+bkrMWraXZ7pd/UI8E7PjzksrfIZxpcvoGPfb3Hq19lozGP9GsmXZ0lwRt675BYwqigrW7mH93Nfa55q0oLZHsf01nu2iS/fcr3tB7S92FBSsiOjeqdFOLLXv7ePxBNgPBDCkqPSkUKfEiO2vxqWLlsesKock73Ro6zjx7TdjeU1fryLvoMNLKrjkVEU12BFv56L18IPr+tBTHCu3RRxzSJXDtFu2jU8fuyF+tiHbfbt9c/y+upNfVVVyNuhF8+OB7V1jQnUn/Wqo0pPETIoxBXfF4At/ELNqOp6x+wlx9ur5kd9cj3csOdvrhf8UtxdcFo/uy5Mk1XV8GmDV1Gti8PeL4+L7JsXkO66MYeecGF3aHLHnyGrTLQYMuzhuHj8pZj37q7hjRF5M+8qnY9jE5xv+3sa8dtE5hsTNFeK96mXas3+qfAbrivb7+O/hFyL3i11U9TDlemjVvmPuBxTWeXz3vH7uawURR7SpYZv283h26fWhWD13aS2HN2+I/Llr4+xe1R8S3uw01ngCNDEBDMlqGf2POzke6nlYPLmghpNC5R0dnzxmQ/zfTXU7TvikIzrEIevfipey+d0UvxWz32wXA1vvIVTLbXs75r/dLv7hsKoPVQfFwE7dc/WzofT/tXLD2lhe48mvSmQn/VqwPrr37B8/qOGjkPZOyYl5Jsb073SLKRfUcJKYDoNi2D8+G1N+X9ezvpY8sc9VRx1fgKis4mc270l2Up8Lpkb37/wqJjfKR53UYXzqq2h+TLxlY1x7/bDoXfOZhuqgVXTpNyzG3X1FxPd/HrOq3a1Xh/HscUKcEzNjYb0/p7iZjH+HTtEr79nSj8epTtGyF2LugBMafOhvlx4nRzxT9/df9x4wKPIem13DScNy1j8fM/LPiHP6Vn0fbvMYzy4DBke/Z2bG3Jp2E2+ZHzOe+WCcu/PIhr35fa+v5vb4ANB0BDAkruRsy9857cTov3lJXPrimvhrpaOTW8Y5XT4Qby9fHk/W1MDbt8ay8u9pkwvmQ1fFw+urW3lH/HXdqljesWOcUeWZ1zs7qntP8I6Yv2ZVvFHN+qUObRefO+L1eLhgYzy5KmJ4TSe/2l5y0q/n4pbNR8VNp50Un6nlpF/7QunZfmf+ZwyY+404Z+SUWFDpye8Rce6oL8SWcT+o/HE7Fa1fEovLdxl16BYDOv8lFi7bPRWLlk2NCVOymep0PznOjRW7TkBUky3Px6SRn44xcz9Uut3DG+EkSRXVPj71tGVDrCpuXfpZsrt7KxYvrPpCQ1GsWlXbIam1JEFdxrPVwLj4mrwY//0nyj6PuC6a1fjnAn5oXkyeNnv3OM4tmTNjWvQ79+QGx0+b0wfHpwqmxmNzqnvpY0PkV729+g2JMV0eiwlTq3yUUqmiWHD/IzHnU8Pi3Iob1JzGs8uQuOqiZ+OOCfOrH88J98asiy7bdQKxvfl9r69m+vgA0BQEMJB7JDgsPnnCKTGh47b44ZrKRZLX+rj4bs+D4v5FL8akLRXreEes2/x6XP3cknhy50mtWsflJ3aPd17Jj+9tLK6wI2N7vLTupbhlwxHxte5td9v7unzJorh61eZYt7ODt8ey3Pq3vXlkteuXycV5p+Ni+eIX4jeHd4xzajj51V/XLIvNHU+JSSd0iB5N9YjXqlsMu21yPHH5mrjl/uezhWVa9bsyJt6WF+MuvComLaz4ntNcnM25J4Z//Jvx2OryJ8AnxpBRH4wpt98bcyrcLOtz64382ooYcu0Z2ZJqtDkjhl30lxg/YWblQzCL1sSyVbueYC+4/3ux+vKfxbTbzo8qnwzUeGoZn3rp0D+Gnf1CTJw4u9J1LDlj9MSRo2Jc/hHRK1tWqmhtzLphZAy7YWosqDAGpbYsicm33xVFl18U51S3N7mO49l71PdjXN5dMeqGJ2JxpV+l3O27cGrcfF3lOG5e498qBlx1Ywx47PoYM2VJhfe3vhWLp+SWzR0a1w/di8+wbjMorrupW0wefX1MXlzhvl8aWdfHhPxsfqcTY9TdX423brkmbp61JjeC5cq2Z+Qz/WP8TYMqfcxQcxvPc8aOj8HPXBsjJ1Z8v/BbsWDimBj1zKCYNHZghcP19+L3vb6a8+MDQCNrMePuoiqnlwH2hw+PqvKEPGfOnL/EyEtzofTQhBgwoOpnZNZPq0suy6YaqHhzTFqxOn7/dnHkHVRWksccfmz803HHVvr83lLbt8aMNa/Hwxv+Vrpu8Y6DovuxXeOKTkfFsdkqZYrjyRefjRkdTo0rWmyIB1ZvijdKluZCuGu7znFZp/bRo9Ydtltj0oJ5saTrmfGd9nu3Z7fokQeyqSayfn5Muv2BmJK/IVpluzC79B0aI64aVunzY0uf7E+9N275/szY0r5d6ZPlLp/6atw0qn/E1GtiUP5lsXjsyWWr7mZDzJn43bj5kReiVe57Sx3RLYZe+/UY2a957slZX3Kdfjs4Zt53ft32NOaesM96+AdxZ+46FpWPz+kXxeWXnx+nxBMx6iNL46oXr85N77Jl8e9i6pTp8diitdmSnNy4nH3xF2LUkIqfT1tVXcfzrVg2a1qMv39q5Be0yvZQt47uZw+NUZd/fC8P124C65+PyRPujYd/v6L0ehYUFEW/T10WV11Vdds3xNTRn45pn/pN9e9rXl8y/tNjyNPfj2EVbsySk5bdefsjMWN5q2jfPjeE3YfEmOsvju7P1HDbb1kS0yY8EOOfyW1PbjCLivKi18VXxNgRB8ihuNl9dFx2vynKPdT3GFqy/QOjy25RuTe/7yWej3F9Rkf87E8xtl+2qEbN6/Ghtr93vfuclU3Vzf3XzMumAHYngKGZaPYB3CjKA/iM+F6Hur8jbadt6+LKBVtjxIDutbz/t26aPICBxCyJiYMvjYXXPhXjhziUuCoBDDQVh0ADB6iy9wi/XevJrwCaixNjxB0XxbIbvln5EHAAmpSnjcABaeX6pXHbmx3ia51qOPkVQDPTqt/VMflnQ2L5hDEx5PySz4YeHsMfrutZ4QHYFwQwcMAo3rI8/nnBohhV8rFNW9rGd/seF//gUQw4gLTp/fEYO35STHui5LOhJ8fkEQfI5wADvEd46gjsR3nxyT7n1Pn9v3ltusdPT+kbE085Je45vgnP6gwAwHuCp4/QjLVoUflfAHgv8vcOaCrOAg3NRPVngZ4fIy8dE5MeGh8DBvTPlgLAe0ttf++cBRrYl+wBBgAAIAkCGAAAgCQIYAAAAJIggAEAAEiCAAYAACAJAhgAAIAkCGAAAACSIIABAABIggAGAAAgCQIYAACAJAhgAAAAktBixt1F72bTwH704VFF2dQuc+bMj5GXjomx118dvXqdkC0t06JFNgEAB5B33y156ln5j1h+/tIYd/sPYtJD42PAgP7Z0jK9+5yVTdXN/dfMy6YAdieAoZmoLYABIAUCGGhsAhiaieoCeMuWLZGf/3I2V1kLu4ABOACV7QGuXq9ePaNNmzbZXBkBDOxLAhiaieoCGABSJ4CBfclJsAAAAEiCAAYAACAJAhgAAIAkCGAAAACSIIABAABIggAGAAAgCQIYAACAJAhgAAAAkiCAAQAASIIABgAAIAkCGAAAgCS0mHF30bvZNHAAufz7p2ZTAEC5+6+Zl00B7M4eYAAAAJIggAEAAEiCAAYAACAJAhgAAIAkCGAAAACSIIABAABIggAGAAAgCQIYAACAJAhgAAAAkiCAAQAASIIABgAAIAkCGAAAgCQIYAAAAJIggAEAAEiCAAYAACAJAhgAAIAkCGAAAACSIIABAABIggAGAAAgCQIYAACAJAhgAAAAkiCAAQAASIIABgAAIAkCGAAAgCQIYAAAAJIggAEAAEhCixl3F72bTQMAAMB7lj3AAAAAJEEAAwAAkAQBDAAAQBIEMAAAAEkQwAAAACRBAAMAAJAEAQwAAEASBDAAAABJEMAAAAAkQQADAACQBAEMAABAEgQwAAAASRDAAAAAJEEAAwAAkAQBDAAAQBIEMAAAAEkQwAAAACRBAAMAAJAEAQwAAEASBDAAAABJEMAAAAAkQQADAACQBAEMAABAEgQwAAAASRDAAAAAJEEAAwAAkAQBDAAAQBIEMAAAAEkQwAAAACRBAAMAAJAEAQwAAEASBDAAAABJEMAAAAAkQQADAACQBAEMAABAEgQwAAAASRDAAAAAJEEAAwAAkAQBDAAAQBIEMAAAAEkQwAAAACRBAAMAAJAEAQwAAEASBDAAAABJEMAAAAAkQQADAACQBAEMAABAEgQwAAAASRDAAAAAJEEAAwAAkAQBDAAAQBIEMAAAAEkQwAAAACRBAAMAAJAEAQwAAEASBDAAAABJEMAAAAAkQQADAACQBAEMAABAEgQwAAAASRDAAAAAJEEAAwAAkAQBDAAAQBIEMAAAAEkQwAAAACRBAAMAAJAEAQwAAEASBDAAAABJEMAAAAAkQQADAACQBAEMAABAEgQwAAAASRDAAAAAJEEAAwAAkAQBDAAAQBIEMAAAAEkQwAAAACRBAAMAAJAEAQwAAEASBDAAAABJEMAAAAAkQQADAACQBAEMAABAEgQwAAAASRDAAAAAJEEAAwAAkAQBDAAAQBIEMAAAAEkQwAAAACRBAAMAAJAEAQwAAEASBDAAAABJEMAAAAAkQQADAACQBAEMAABAEgQwAAAASRDAAAAAJEEAAwAAkAQBDAAAQBIEMAAAAEkQwAAAACRBAAMAAJAEAQwAAEASBDAAAABJEMAAAAAkQQADAACQBAEMAABAEgQwAAAASRDAAAAAJEEAAwAAkAQBDAAAQBIEMAAAAEkQwAAAACRBAAMAAJAEAQwAAEASBDAAAABJEMAAAAAkQQADAACQBAEMAABAEgQwAAAASRDAAAAAJEEAAwAAkAQBDAAAQBIEMAAAAEkQwAAAACRBAAMAAJAEAQwAAEASBDAAAABJEMAAAAAkQQADAACQBAEMAABAEgQwAAAASRDAAAAAJEEAAwAAkAQBDAAAQBIEMAAAAEkQwAAAACRBAAMAAJAEAQwAAEASBDAAAABJEMAAAAAkQQADAACQBAEMAABAEgQwAAAASRDAAAAAJEEAAwAAkAQBDAAAQBIEMAAAAEkQwAAAACRBAAMAAJAEAQwAAEASBDAAAABJEMAAAAAkQQADAACQBAEMAABAEgQwAAAASRDAAAAAJEEAAwAAkAQBDAAAQBIEMAAAAEkQwAAAACRBAAMAAJAEAQwAAEASBDAAAABJEMAAAAAkQQADAACQBAEMAABAEgQwAAAASRDAAAAAJEEAAwAAkAQBDAAAQBIEMAAAAEkQwAAAACRBAAMAAJAEAQwAAEASBDAAAABJEMAAAAAkQQADAACQBAEMAABAEgQwAAAASRDAAAAAJEEAAwAAkAQBDAAAQBIEMAAAAEkQwAAAACRBAAMAAJAEAQwAAEASBDAAAABJEMAAAAAkQQADAACQBAEMAABAEgQwAAAASRDAAAAAJEEAAwAAkAQBDAAAQBIEMAAAAEkQwAAAACRBAAMAAJAEAQwAAEASBDAAAABJEMAAAAAkQQADAACQgIj/Bwiv3SlPndWAAAAAAElFTkSuQmCC) **Command** en otros lenguajes ------------------------------ [![Command en C#](https://refactoring.guru/images/patterns/icons/csharp.svg?id=da64592defc6e86d57c39c66e9de3e58)](https://refactoring.guru/es/design-patterns/command/csharp/example "Command en C#") [![Command en C++](https://refactoring.guru/images/patterns/icons/cpp.svg?id=f7782ed8b8666246bfcc3f8fefc3b858)](https://refactoring.guru/es/design-patterns/command/cpp/example "Command en C++") [![Command en Go](https://refactoring.guru/images/patterns/icons/go.svg?id=1a89927eb99b1ea3fde7701d97970aca)](https://refactoring.guru/es/design-patterns/command/go/example "Command en Go") [![Command en Java](https://refactoring.guru/images/patterns/icons/java.svg?id=e6d87e2dca08c953fe3acd1275ed4f4e)](https://refactoring.guru/es/design-patterns/command/java/example "Command en Java") [![Command en PHP](https://refactoring.guru/images/patterns/icons/php.svg?id=be1906eb26b71ec1d3b93720d6156618)](https://refactoring.guru/es/design-patterns/command/php/example "Command en PHP") [![Command en Python](https://refactoring.guru/images/patterns/icons/python.svg?id=6d815d43c0f7050a1151b43e51569c9f)](https://refactoring.guru/es/design-patterns/command/python/example "Command en Python") [![Command en Ruby](https://refactoring.guru/images/patterns/icons/ruby.svg?id=b065b718c914bf8e960ef731600be1eb)](https://refactoring.guru/es/design-patterns/command/ruby/example "Command en Ruby") [![Command en Swift](https://refactoring.guru/images/patterns/icons/swift.svg?id=0b716c2d52ec3a48fbe91ac031070c1d)](https://refactoring.guru/es/design-patterns/command/swift/example "Command en Swift") [![Command en TypeScript](https://refactoring.guru/images/patterns/icons/typescript.svg?id=2239d0f16cb703540c205dd8cb0c0cb7)](https://refactoring.guru/es/design-patterns/command/typescript/example "Command en TypeScript") --- # Factory Method [There are patterns of patterns now! \ My friend's project: MetaPatterns.io](https://metapatterns.io/)  [](https://refactoring.guru/es/design-patterns/factory-method#checkout) [](https://refactoring.guru/es/design-patterns/factory-method#checkout) [](https://refactoring.guru/) / [Patrones de diseño](https://refactoring.guru/es/design-patterns) / [Patrones creacionales](https://refactoring.guru/es/design-patterns/creational-patterns) Factory Method ============== También llamado: Método fábrica, Constructor virtual Propósito --------- **Factory Method** es un patrón de diseño creacional que proporciona una interfaz para crear objetos en una superclase, mientras permite a las subclases alterar el tipo de objetos que se crearán. ![Patrón Factory Method](https://refactoring.guru/images/patterns/content/factory-method/factory-method-es-2x.png?id=4d995e1b565cbd4bc4a0647274bcdceb) Problema -------- Imagina que estás creando una aplicación de gestión logística. La primera versión de tu aplicación sólo es capaz de manejar el transporte en camión, por lo que la mayor parte de tu código se encuentra dentro de la clase `Camión`. Al cabo de un tiempo, tu aplicación se vuelve bastante popular. Cada día recibes decenas de peticiones de empresas de transporte marítimo para que incorpores la logística por mar a la aplicación. ![Añadir una nueva clase de transporte al programa provoca un problema](https://refactoring.guru/images/patterns/diagrams/factory-method/problem1-es-2x.png?id=43a57d1fe740ed44ac77a879fe778236) Añadir una nueva clase al programa no es tan sencillo si el resto del código ya está acoplado a clases existentes. Estupendo, ¿verdad? Pero, ¿qué pasa con el código? En este momento, la mayor parte de tu código está acoplado a la clase `Camión`. Para añadir barcos a la aplicación habría que hacer cambios en toda la base del código. Además, si más tarde decides añadir otro tipo de transporte a la aplicación, probablemente tendrás que volver a hacer todos estos cambios. Al final acabarás con un código bastante sucio, plagado de condicionales que cambian el comportamiento de la aplicación dependiendo de la clase de los objetos de transporte. Solución -------- El patrón Factory Method sugiere que, en lugar de llamar al operador `new` para construir objetos directamente, se invoque a un método _fábrica_ especial. No te preocupes: los objetos se siguen creando a través del operador `new`, pero se invocan desde el método fábrica. Los objetos devueltos por el método fábrica a menudo se denominan _productos_. ![La estructura de las clases creadoras](https://refactoring.guru/images/patterns/diagrams/factory-method/solution1-2x.png?id=c482b3cd7a4d8dd73b4c8c12dfcaa03c) Las subclases pueden alterar la clase de los objetos devueltos por el método fábrica. A simple vista, puede parecer que este cambio no tiene sentido, ya que tan solo hemos cambiado el lugar desde donde invocamos al constructor. Sin embargo, piensa en esto: ahora puedes sobrescribir el método fábrica en una subclase y cambiar la clase de los productos creados por el método. No obstante, hay una pequeña limitación: las subclases sólo pueden devolver productos de distintos tipos si dichos productos tienen una clase base o interfaz común. Además, el método fábrica en la clase base debe tener su tipo de retorno declarado como dicha interfaz. ![La estructura de la jerarquía de productos](https://refactoring.guru/images/patterns/diagrams/factory-method/solution2-es-2x.png?id=6b9634803fb095534f3240b7a7f08b8c) Todos los productos deben seguir la misma interfaz. Por ejemplo, tanto la clase `Camión` como la clase `Barco` deben implementar la interfaz `Transporte`, que declara un método llamado `entrega`. Cada clase implementa este método de forma diferente: los camiones entregan su carga por tierra, mientras que los barcos lo hacen por mar. El método fábrica dentro de la clase `LogísticaTerrestre` devuelve objetos de tipo camión, mientras que el método fábrica de la clase `LogísticaMarítima` devuelve barcos. ![La estructura del código tras aplicar el patrón Factory Method](https://refactoring.guru/images/patterns/diagrams/factory-method/solution3-es-2x.png?id=4bd2eb285b3906b813bfa93ab10cf6aa) Siempre y cuando todas las clases de producto implementen una interfaz común, podrás pasar sus objetos al código cliente sin descomponerlo. El código que utiliza el método fábrica (a menudo denominado código _cliente_) no encuentra diferencias entre los productos devueltos por varias subclases, y trata a todos los productos como la clase abstracta `Transporte`. El cliente sabe que todos los objetos de transporte deben tener el método `entrega`, pero no necesita saber cómo funciona exactamente. Estructura ---------- ![La estructura del patrón Factory Method](https://refactoring.guru/images/patterns/diagrams/factory-method/structure-2x.png?id=9ea3aa8a47f8be22e12e523c15b448fd)![La estructura del patrón Factory Method](https://refactoring.guru/images/patterns/diagrams/factory-method/structure-indexed-2x.png?id=c794e4f2d05013fb176464a1d1a5d7ab) 1. El **Producto** declara la interfaz, que es común a todos los objetos que puede producir la clase creadora y sus subclases. 2. Los **Productos Concretos** son distintas implementaciones de la interfaz de producto. 3. La clase **Creadora** declara el método fábrica que devuelve nuevos objetos de producto. Es importante que el tipo de retorno de este método coincida con la interfaz de producto. Puedes declarar el patrón Factory Method como abstracto para forzar a todas las subclases a implementar sus propias versiones del método. Como alternativa, el método fábrica base puede devolver algún tipo de producto por defecto. Observa que, a pesar de su nombre, la creación de producto **no** es la principal responsabilidad de la clase creadora. Normalmente, esta clase cuenta con alguna lógica de negocios central relacionada con los productos. El patrón Factory Method ayuda a desacoplar esta lógica de las clases concretas de producto. Aquí tienes una analogía: una gran empresa de desarrollo de software puede contar con un departamento de formación de programadores. Sin embargo, la principal función de la empresa sigue siendo escribir código, no preparar programadores. 4. Los **Creadores Concretos** sobrescriben el Factory Method base, de modo que devuelva un tipo diferente de producto. Observa que el método fábrica no tiene que **crear** nuevas instancias todo el tiempo. También puede devolver objetos existentes de una memoria caché, una agrupación de objetos, u otra fuente. Pseudocódigo ------------ Este ejemplo ilustra cómo puede utilizarse el patrón **Factory Method** para crear elementos de interfaz de usuario (UI) multiplataforma sin acoplar el código cliente a clases UI concretas. ![Ejemplo de la estructura del patrón Factory Method](https://refactoring.guru/images/patterns/diagrams/factory-method/example-2x.png?id=a2470830778e318263155000dbdc5870) Ejemplo del diálogo multiplataforma. La clase base de diálogo utiliza distintos elementos UI para representar su ventana. En varios sistemas operativos, estos elementos pueden tener aspectos diferentes, pero su comportamiento debe ser consistente. Un botón en Windows sigue siendo un botón en Linux. Cuando entra en juego el patrón Factory Method no hace falta reescribir la lógica del diálogo para cada sistema operativo. Si declaramos un patrón Factory Method que produce botones dentro de la clase base de diálogo, más tarde podremos crear una subclase de diálogo que devuelva botones al estilo de Windows desde el Factory Method. Entonces la subclase hereda la mayor parte del código del diálogo de la clase base, pero, gracias al Factory Method, puede representar botones al estilo de Windows en pantalla. Para que este patrón funcione, la clase base de diálogo debe funcionar con botones abstractos, es decir, una clase base o una interfaz que sigan todos los botones concretos. De este modo, el código sigue siendo funcional, independientemente del tipo de botones con el que trabaje. Por supuesto, también se puede aplicar este sistema a otros elementos UI. Sin embargo, con cada nuevo método de fábrica que añadas al diálogo, más te acercarás al patrón [Abstract Factory](https://refactoring.guru/es/design-patterns/abstract-factory) . No temas, más adelante hablaremos sobre este patrón. // La clase creadora declara el método fábrica que debe devolver // un objeto de una clase de producto. Normalmente, las // subclases de la creadora proporcionan la implementación de // este método. class Dialog is // La creadora también puede proporcionar cierta // implementación por defecto del método fábrica. abstract method createButton():Button // Observa que, a pesar de su nombre, la principal // responsabilidad de la creadora no es crear productos. // Normalmente contiene cierta lógica de negocio que depende // de los objetos de producto devueltos por el método // fábrica. Las subclases pueden cambiar indirectamente esa // lógica de negocio sobrescribiendo el método fábrica y // devolviendo desde él un tipo diferente de producto. method render() is // Invoca el método fábrica para crear un objeto de // producto. Button okButton = createButton() // Ahora utiliza el producto. okButton.onClick(closeDialog) okButton.render() // Los creadores concretos sobrescriben el método fábrica para // cambiar el tipo de producto resultante. class WindowsDialog extends Dialog is method createButton():Button is return new WindowsButton() class WebDialog extends Dialog is method createButton():Button is return new HTMLButton() // La interfaz de producto declara las operaciones que todos los // productos concretos deben implementar. interface Button is method render() method onClick(f) // Los productos concretos proporcionan varias implementaciones // de la interfaz de producto. class WindowsButton implements Button is method render(a, b) is // Representa un botón en estilo Windows. method onClick(f) is // Vincula un evento clic de OS nativo. class HTMLButton implements Button is method render(a, b) is // Devuelve una representación HTML de un botón. method onClick(f) is // Vincula un evento clic de navegador web. class Application is field dialog: Dialog // La aplicación elige un tipo de creador dependiendo de la // configuración actual o los ajustes del entorno. method initialize() is config = readApplicationConfigFile() if (config.OS == "Windows") then dialog = new WindowsDialog() else if (config.OS == "Web") then dialog = new WebDialog() else throw new Exception("Error! Unknown operating system.") // El código cliente funciona con una instancia de un // creador concreto, aunque a través de su interfaz base. // Siempre y cuando el cliente siga funcionando con el // creador a través de la interfaz base, puedes pasarle // cualquier subclase del creador. method main() is this.initialize() dialog.render() Aplicabilidad ------------- Utiliza el Método Fábrica cuando no conozcas de antemano las dependencias y los tipos exactos de los objetos con los que deba funcionar tu código. El patrón Factory Method separa el código de construcción de producto del código que hace uso del producto. Por ello, es más fácil extender el código de construcción de producto de forma independiente al resto del código. Por ejemplo, para añadir un nuevo tipo de producto a la aplicación, sólo tendrás que crear una nueva subclase creadora y sobrescribir el Factory Method que contiene. Utiliza el Factory Method cuando quieras ofrecer a los usuarios de tu biblioteca o framework, una forma de extender sus componentes internos. La herencia es probablemente la forma más sencilla de extender el comportamiento por defecto de una biblioteca o un framework. Pero, ¿cómo reconoce el framework si debe utilizar tu subclase en lugar de un componente estándar? La solución es reducir el código que construye componentes en todo el framework a un único patrón Factory Method y permitir que cualquiera sobrescriba este método además de extender el propio componente. Veamos cómo funcionaría. Imagina que escribes una aplicación utilizando un framework de UI de código abierto. Tu aplicación debe tener botones redondos, pero el framework sólo proporciona botones cuadrados. Extiendes la clase estándar `Botón` con una maravillosa subclase `BotónRedondo`, pero ahora tienes que decirle a la clase principal `FrameworkUI` que utilice la nueva subclase de botón en lugar de la clase por defecto. Para conseguirlo, creamos una subclase `UIConBotonesRedondos` a partir de una clase base del framework y sobrescribimos su método `crearBotón`. Si bien este método devuelve objetos `Botón` en la clase base, haces que tu subclase devuelva objetos `BotónRedondo`. Ahora, utiliza la clase `UIConBotonesRedondos` en lugar de `FrameworkUI`. ¡Eso es todo! Utiliza el Factory Method cuando quieras ahorrar recursos del sistema mediante la reutilización de objetos existentes en lugar de reconstruirlos cada vez. A menudo experimentas esta necesidad cuando trabajas con objetos grandes y que consumen muchos recursos, como conexiones de bases de datos, sistemas de archivos y recursos de red. Pensemos en lo que hay que hacer para reutilizar un objeto existente: 1. Primero, debemos crear un almacenamiento para llevar un registro de todos los objetos creados. 2. Cuando alguien necesite un objeto, el programa deberá buscar un objeto disponible dentro de ese agrupamiento. 3. … y devolverlo al código cliente. 4. Si no hay objetos disponibles, el programa deberá crear uno nuevo (y añadirlo al agrupamiento). ¡Eso es mucho código! Y hay que ponerlo todo en un mismo sitio para no contaminar el programa con código duplicado. Es probable que el lugar más evidente y cómodo para colocar este código sea el constructor de la clase cuyos objetos intentamos reutilizar. Sin embargo, un constructor siempre debe devolver **nuevos objetos** por definición. No puede devolver instancias existentes. Por lo tanto, necesitas un método regular capaz de crear nuevos objetos, además de reutilizar los existentes. Eso suena bastante a lo que hace un patrón Factory Method. Cómo implementarlo ------------------ 1. Haz que todos los productos sigan la misma interfaz. Esta interfaz deberá declarar métodos que tengan sentido en todos los productos. 2. Añade un patrón Factory Method vacío dentro de la clase creadora. El tipo de retorno del método deberá coincidir con la interfaz común de los productos. 3. Encuentra todas las referencias a constructores de producto en el código de la clase creadora. Una a una, sustitúyelas por invocaciones al Factory Method, mientras extraes el código de creación de productos para colocarlo dentro del Factory Method. Puede ser que tengas que añadir un parámetro temporal al Factory Method para controlar el tipo de producto devuelto. A estas alturas, es posible que el aspecto del código del Factory Method luzca bastante desagradable. Puede ser que tenga un operador `switch` largo que elige qué clase de producto instanciar. Pero, no te preocupes, lo arreglaremos enseguida. 4. Ahora, crea un grupo de subclases creadoras para cada tipo de producto enumerado en el Factory Method. Sobrescribe el Factory Method en las subclases y extrae las partes adecuadas de código constructor del método base. 5. Si hay demasiados tipos de producto y no tiene sentido crear subclases para todos ellos, puedes reutilizar el parámetro de control de la clase base en las subclases. Por ejemplo, imagina que tienes la siguiente jerarquía de clases: la clase base `Correo` con las subclases `CorreoAéreo` y `CorreoTerrestre` y la clase `Transporte` con `Avión`, `Camión` y `Tren`. La clase `CorreoAéreo` sólo utiliza objetos `Avión`, pero `CorreoTerrestre` puede funcionar tanto con objetos `Camión`, como con objetos `Tren`. Puedes crear una nueva subclase (digamos, `CorreoFerroviario`) que gestione ambos casos, pero hay otra opción. El código cliente puede pasar un argumento al Factory Method de la clase `CorreoTerrestre` para controlar el producto que quiere recibir. 6. Si, tras todas las extracciones, el Factory Method base queda vacío, puedes hacerlo abstracto. Si queda algo dentro, puedes convertirlo en un comportamiento por defecto del método. Pros y contras -------------- * Evitas un acoplamiento fuerte entre el creador y los productos concretos. * _Principio de responsabilidad única_. Puedes mover el código de creación de producto a un lugar del programa, haciendo que el código sea más fácil de mantener. * _Principio de abierto/cerrado_. Puedes incorporar nuevos tipos de productos en el programa sin descomponer el código cliente existente. * Puede ser que el código se complique, ya que debes incorporar una multitud de nuevas subclases para implementar el patrón. La situación ideal sería introducir el patrón en una jerarquía existente de clases creadoras. Relaciones con otros patrones ----------------------------- * Muchos diseños empiezan utilizando el [Factory Method](https://refactoring.guru/es/design-patterns/factory-method) (menos complicado y más personalizable mediante las subclases) y evolucionan hacia [Abstract Factory](https://refactoring.guru/es/design-patterns/abstract-factory) , [Prototype](https://refactoring.guru/es/design-patterns/prototype) , o [Builder](https://refactoring.guru/es/design-patterns/builder) (más flexibles, pero más complicados). * Las clases del [Abstract Factory](https://refactoring.guru/es/design-patterns/abstract-factory) a menudo se basan en un grupo de [métodos de fábrica](https://refactoring.guru/es/design-patterns/factory-method) , pero también puedes utilizar [Prototype](https://refactoring.guru/es/design-patterns/prototype) para escribir los métodos de estas clases. * Puedes utilizar el patrón [Factory Method](https://refactoring.guru/es/design-patterns/factory-method) junto con el [Iterator](https://refactoring.guru/es/design-patterns/iterator) para permitir que las subclases de la colección devuelvan distintos tipos de iteradores que sean compatibles con las colecciones. * [Prototype](https://refactoring.guru/es/design-patterns/prototype) no se basa en la herencia, por lo que no presenta sus inconvenientes. No obstante, _Prototype_ requiere de una inicialización complicada del objeto clonado. [Factory Method](https://refactoring.guru/es/design-patterns/factory-method) se basa en la herencia, pero no requiere de un paso de inicialización. * [Factory Method](https://refactoring.guru/es/design-patterns/factory-method) es una especialización del [Template Method](https://refactoring.guru/es/design-patterns/template-method) . Al mismo tiempo, un _Factory Method_ puede servir como paso de un gran _Template Method_. Ejemplos de código ------------------ [![Factory Method en C#](https://refactoring.guru/images/patterns/icons/csharp.svg?id=da64592defc6e86d57c39c66e9de3e58)](https://refactoring.guru/es/design-patterns/factory-method/csharp/example "Factory Method en C#") [![Factory Method en C++](https://refactoring.guru/images/patterns/icons/cpp.svg?id=f7782ed8b8666246bfcc3f8fefc3b858)](https://refactoring.guru/es/design-patterns/factory-method/cpp/example "Factory Method en C++") [![Factory Method en Go](https://refactoring.guru/images/patterns/icons/go.svg?id=1a89927eb99b1ea3fde7701d97970aca)](https://refactoring.guru/es/design-patterns/factory-method/go/example "Factory Method en Go") [![Factory Method en Java](https://refactoring.guru/images/patterns/icons/java.svg?id=e6d87e2dca08c953fe3acd1275ed4f4e)](https://refactoring.guru/es/design-patterns/factory-method/java/example "Factory Method en Java") [![Factory Method en PHP](https://refactoring.guru/images/patterns/icons/php.svg?id=be1906eb26b71ec1d3b93720d6156618)](https://refactoring.guru/es/design-patterns/factory-method/php/example "Factory Method en PHP") [![Factory Method en Python](https://refactoring.guru/images/patterns/icons/python.svg?id=6d815d43c0f7050a1151b43e51569c9f)](https://refactoring.guru/es/design-patterns/factory-method/python/example "Factory Method en Python") [![Factory Method en Ruby](https://refactoring.guru/images/patterns/icons/ruby.svg?id=b065b718c914bf8e960ef731600be1eb)](https://refactoring.guru/es/design-patterns/factory-method/ruby/example "Factory Method en Ruby") [![Factory Method en Rust](https://refactoring.guru/images/patterns/icons/rust.svg?id=1f5698a4b5ae23fe79413511747e4a87)](https://refactoring.guru/es/design-patterns/factory-method/rust/example "Factory Method en Rust") [![Factory Method en Swift](https://refactoring.guru/images/patterns/icons/swift.svg?id=0b716c2d52ec3a48fbe91ac031070c1d)](https://refactoring.guru/es/design-patterns/factory-method/swift/example "Factory Method en Swift") [![Factory Method en TypeScript](https://refactoring.guru/images/patterns/icons/typescript.svg?id=2239d0f16cb703540c205dd8cb0c0cb7)](https://refactoring.guru/es/design-patterns/factory-method/typescript/example "Factory Method en TypeScript") Contenido adicional ------------------- * Consulta nuestra [Comparación de fábricas](https://refactoring.guru/es/design-patterns/factory-comparison) si aún no te queda clara la diferencia entre los varios patrones y conceptos de la fábrica. [![](https://refactoring.guru/images/patterns/banners/patterns-book-banner-3-2x.png?id=0cc3f77ab421d1a5c02ee46488231c3a)](https://refactoring.guru/es/design-patterns/book) ### ¡Apoya nuestro sitio web gratuito y compra el libro! * 22 patrones de diseño y 8 principios explicados en profundidad * 436 páginas bien estructuradas, fáciles de leer y libres de tecnicismos * 225 ilustraciones y diagramas claros y útiles * Un archivo con ejemplos de código en 11 lenguajes * Todos los dispositivos soportados: Formatos PDF/EPUB/MOBI/KFX [Saber más…](https://refactoring.guru/es/design-patterns/book) --- # Patrones de diseño en C++ [There are patterns of patterns now! \ My friend's project: MetaPatterns.io](https://metapatterns.io/)  [](https://refactoring.guru/es/design-patterns/cpp#checkout) [](https://refactoring.guru/es/design-patterns/cpp#checkout) ![Patrones de diseño en C++](https://refactoring.guru/images/patterns/languages/cpp-3x.png) ![Patrones de diseño en C++](https://refactoring.guru/images/patterns/languages/mini/cpp-3x.png) PATRONES de DISEÑO en C++ ========================= El catálogo de ejemplos en **C++** ---------------------------------- #### Patrones creacionales ![Abstract Factory](https://refactoring.guru/images/patterns/cards/abstract-factory-mini-3x.png) #### Abstract Factory Permite producir familias de objetos relacionados sin especificar sus clases concretas. [Artículo principal](https://refactoring.guru/es/design-patterns/abstract-factory) [Uso en C++](https://refactoring.guru/es/design-patterns/abstract-factory/cpp/example#lang-features) [Ejemplo de código](https://refactoring.guru/es/design-patterns/abstract-factory/cpp/example#example-0) ![Builder](https://refactoring.guru/images/patterns/cards/builder-mini-3x.png) #### Builder Permite construir objetos complejos paso a paso. Este patrón nos permite producir distintos tipos y representaciones de un objeto empleando el mismo código de construcción. [Artículo principal](https://refactoring.guru/es/design-patterns/builder) [Uso en C++](https://refactoring.guru/es/design-patterns/builder/cpp/example#lang-features) [Ejemplo de código](https://refactoring.guru/es/design-patterns/builder/cpp/example#example-0) ![Factory Method](https://refactoring.guru/images/patterns/cards/factory-method-mini-3x.png) #### Factory Method Proporciona una interfaz para la creación de objetos en una superclase, mientras permite a las subclases alterar el tipo de objetos que se crearán. [Artículo principal](https://refactoring.guru/es/design-patterns/factory-method) [Uso en C++](https://refactoring.guru/es/design-patterns/factory-method/cpp/example#lang-features) [Ejemplo de código](https://refactoring.guru/es/design-patterns/factory-method/cpp/example#example-0) ![Prototype](https://refactoring.guru/images/patterns/cards/prototype-mini-3x.png) #### Prototype Permite copiar objetos existentes sin que el código dependa de sus clases. [Artículo principal](https://refactoring.guru/es/design-patterns/prototype) [Uso en C++](https://refactoring.guru/es/design-patterns/prototype/cpp/example#lang-features) [Ejemplo de código](https://refactoring.guru/es/design-patterns/prototype/cpp/example#example-0) ![Singleton](https://refactoring.guru/images/patterns/cards/singleton-mini-3x.png) #### Singleton Permite asegurarnos de que una clase tenga una única instancia, a la vez que proporciona un punto de acceso global a dicha instancia. [Artículo principal](https://refactoring.guru/es/design-patterns/singleton) [Uso en C++](https://refactoring.guru/es/design-patterns/singleton/cpp/example#lang-features) [Naïve Singleton](https://refactoring.guru/es/design-patterns/singleton/cpp/example#example-0) [Thread-safe Singleton](https://refactoring.guru/es/design-patterns/singleton/cpp/example#example-1) #### Patrones estructurales ![Adapter](https://refactoring.guru/images/patterns/cards/adapter-mini-3x.png) #### Adapter Permite la colaboración entre objetos con interfaces incompatibles. [Artículo principal](https://refactoring.guru/es/design-patterns/adapter) [Uso en C++](https://refactoring.guru/es/design-patterns/adapter/cpp/example#lang-features) [Ejemplo conceptual](https://refactoring.guru/es/design-patterns/adapter/cpp/example#example-0) [Multiple inheritance](https://refactoring.guru/es/design-patterns/adapter/cpp/example#example-1) ![Bridge](https://refactoring.guru/images/patterns/cards/bridge-mini-3x.png) #### Bridge Permite dividir una clase grande o un grupo de clases estrechamente relacionadas, en dos jerarquías separadas (abstracción e implementación) que pueden desarrollarse independientemente la una de la otra. [Artículo principal](https://refactoring.guru/es/design-patterns/bridge) [Uso en C++](https://refactoring.guru/es/design-patterns/bridge/cpp/example#lang-features) [Ejemplo de código](https://refactoring.guru/es/design-patterns/bridge/cpp/example#example-0) ![Composite](https://refactoring.guru/images/patterns/cards/composite-mini-3x.png) #### Composite Permite componer objetos en estructuras de árbol y trabajar con esas estructuras como si fueran objetos individuales. [Artículo principal](https://refactoring.guru/es/design-patterns/composite) [Uso en C++](https://refactoring.guru/es/design-patterns/composite/cpp/example#lang-features) [Ejemplo de código](https://refactoring.guru/es/design-patterns/composite/cpp/example#example-0) ![Decorator](https://refactoring.guru/images/patterns/cards/decorator-mini-3x.png) #### Decorator Permite añadir funcionalidades a objetos colocando estos objetos dentro de objetos encapsuladores especiales que contienen estas funcionalidades. [Artículo principal](https://refactoring.guru/es/design-patterns/decorator) [Uso en C++](https://refactoring.guru/es/design-patterns/decorator/cpp/example#lang-features) [Ejemplo de código](https://refactoring.guru/es/design-patterns/decorator/cpp/example#example-0) ![Facade](https://refactoring.guru/images/patterns/cards/facade-mini-3x.png) #### Facade Proporciona una interfaz simplificada a una biblioteca, un framework o cualquier otro grupo complejo de clases. [Artículo principal](https://refactoring.guru/es/design-patterns/facade) [Uso en C++](https://refactoring.guru/es/design-patterns/facade/cpp/example#lang-features) [Ejemplo de código](https://refactoring.guru/es/design-patterns/facade/cpp/example#example-0) ![Flyweight](https://refactoring.guru/images/patterns/cards/flyweight-mini-3x.png) #### Flyweight Permite mantener más objetos dentro de la cantidad disponible de memoria RAM compartiendo las partes comunes del estado entre varios objetos en lugar de mantener toda la información en cada objeto. [Artículo principal](https://refactoring.guru/es/design-patterns/flyweight) [Uso en C++](https://refactoring.guru/es/design-patterns/flyweight/cpp/example#lang-features) [Ejemplo de código](https://refactoring.guru/es/design-patterns/flyweight/cpp/example#example-0) ![Proxy](https://refactoring.guru/images/patterns/cards/proxy-mini-3x.png) #### Proxy Permite proporcionar un sustituto o marcador de posición para otro objeto. Un proxy controla el acceso al objeto original, permitiéndote hacer algo antes o después de que la solicitud llegue al objeto original. [Artículo principal](https://refactoring.guru/es/design-patterns/proxy) [Uso en C++](https://refactoring.guru/es/design-patterns/proxy/cpp/example#lang-features) [Ejemplo de código](https://refactoring.guru/es/design-patterns/proxy/cpp/example#example-0) #### Patrones de comportamiento ![Chain of Responsibility](https://refactoring.guru/images/patterns/cards/chain-of-responsibility-mini-3x.png) #### Chain of Responsibility Permite pasar solicitudes a lo largo de una cadena de manejadores. Al recibir una solicitud, cada manejador decide si la procesa o si la pasa al siguiente manejador de la cadena. [Artículo principal](https://refactoring.guru/es/design-patterns/chain-of-responsibility) [Uso en C++](https://refactoring.guru/es/design-patterns/chain-of-responsibility/cpp/example#lang-features) [Ejemplo de código](https://refactoring.guru/es/design-patterns/chain-of-responsibility/cpp/example#example-0) ![Command](https://refactoring.guru/images/patterns/cards/command-mini-3x.png) #### Command Convierte una solicitud en un objeto independiente que contiene toda la información sobre la solicitud. Esta transformación te permite parametrizar los métodos con diferentes solicitudes, retrasar o poner en cola la ejecución de una solicitud y soportar operaciones que no se pueden realizar. [Artículo principal](https://refactoring.guru/es/design-patterns/command) [Uso en C++](https://refactoring.guru/es/design-patterns/command/cpp/example#lang-features) [Ejemplo de código](https://refactoring.guru/es/design-patterns/command/cpp/example#example-0) ![Iterator](https://refactoring.guru/images/patterns/cards/iterator-mini-3x.png) #### Iterator Permite recorrer elementos de una colección sin exponer su representación subyacente (lista, pila, árbol, etc.). [Artículo principal](https://refactoring.guru/es/design-patterns/iterator) [Uso en C++](https://refactoring.guru/es/design-patterns/iterator/cpp/example#lang-features) [Ejemplo de código](https://refactoring.guru/es/design-patterns/iterator/cpp/example#example-0) ![Mediator](https://refactoring.guru/images/patterns/cards/mediator-mini-3x.png) #### Mediator Permite reducir las dependencias caóticas entre objetos. El patrón restringe las comunicaciones directas entre los objetos, forzándolos a colaborar únicamente a través de un objeto mediador. [Artículo principal](https://refactoring.guru/es/design-patterns/mediator) [Uso en C++](https://refactoring.guru/es/design-patterns/mediator/cpp/example#lang-features) [Ejemplo de código](https://refactoring.guru/es/design-patterns/mediator/cpp/example#example-0) ![Memento](https://refactoring.guru/images/patterns/cards/memento-mini-3x.png) #### Memento Permite guardar y restaurar el estado previo de un objeto sin revelar los detalles de su implementación. [Artículo principal](https://refactoring.guru/es/design-patterns/memento) [Uso en C++](https://refactoring.guru/es/design-patterns/memento/cpp/example#lang-features) [Ejemplo de código](https://refactoring.guru/es/design-patterns/memento/cpp/example#example-0) ![Observer](https://refactoring.guru/images/patterns/cards/observer-mini-3x.png) #### Observer Permite definir un mecanismo de suscripción para notificar a varios objetos sobre cualquier evento que le suceda al objeto que están observando. [Artículo principal](https://refactoring.guru/es/design-patterns/observer) [Uso en C++](https://refactoring.guru/es/design-patterns/observer/cpp/example#lang-features) [Ejemplo de código](https://refactoring.guru/es/design-patterns/observer/cpp/example#example-0) ![State](https://refactoring.guru/images/patterns/cards/state-mini-3x.png) #### State Permite a un objeto alterar su comportamiento cuando su estado interno cambia. Parece como si el objeto cambiara su clase. [Artículo principal](https://refactoring.guru/es/design-patterns/state) [Uso en C++](https://refactoring.guru/es/design-patterns/state/cpp/example#lang-features) [Ejemplo de código](https://refactoring.guru/es/design-patterns/state/cpp/example#example-0) ![Strategy](https://refactoring.guru/images/patterns/cards/strategy-mini-3x.png) #### Strategy Permite definir una familia de algoritmos, colocar cada uno de ellos en una clase separada y hacer sus objetos intercambiables. [Artículo principal](https://refactoring.guru/es/design-patterns/strategy) [Uso en C++](https://refactoring.guru/es/design-patterns/strategy/cpp/example#lang-features) [Ejemplo de código](https://refactoring.guru/es/design-patterns/strategy/cpp/example#example-0) ![Template Method](https://refactoring.guru/images/patterns/cards/template-method-mini-3x.png) #### Template Method Define el esqueleto de un algoritmo en la superclase pero permite que las subclases sobrescriban pasos del algoritmo sin cambiar su estructura. [Artículo principal](https://refactoring.guru/es/design-patterns/template-method) [Uso en C++](https://refactoring.guru/es/design-patterns/template-method/cpp/example#lang-features) [Ejemplo de código](https://refactoring.guru/es/design-patterns/template-method/cpp/example#example-0) ![Visitor](https://refactoring.guru/images/patterns/cards/visitor-mini-3x.png) #### Visitor Permite separar algoritmos de los objetos sobre los que operan. [Artículo principal](https://refactoring.guru/es/design-patterns/visitor) [Uso en C++](https://refactoring.guru/es/design-patterns/visitor/cpp/example#lang-features) [Ejemplo de código](https://refactoring.guru/es/design-patterns/visitor/cpp/example#example-0) --- # Factory Method en Java / Patrones de diseño [There are patterns of patterns now! \ My friend's project: MetaPatterns.io](https://metapatterns.io/)  [](https://refactoring.guru/es/design-patterns/factory-method/java/example#checkout) [](https://refactoring.guru/es/design-patterns/factory-method/java/example#checkout) [](https://refactoring.guru/) / [Patrones de diseño](https://refactoring.guru/es/design-patterns) / [Factory Method](https://refactoring.guru/es/design-patterns/factory-method) / [Java](https://refactoring.guru/es/design-patterns/java) ![Factory Method](https://refactoring.guru/images/patterns/cards/factory-method-mini-2x.png?id=fa9d4a8d61a67cc3822e52b9daf69dad) **Factory Method** en Java ========================== **Factory method** es un patrón de diseño creacional que resuelve el problema de crear objetos de producto sin especificar sus clases concretas. El patrón Factory Method define un método que debe utilizarse para crear objetos, en lugar de una llamada directa al constructor (operador `new`). Las subclases pueden sobrescribir este método para cambiar las clases de los objetos que se crearán. > Si no sabes la diferencia entre varios patrones y conceptos de la fábrica, lee nuestra [Comparación de fábricas](https://refactoring.guru/es/design-patterns/factory-comparison) > . [Aprende más sobre el patrón Factory Method](https://refactoring.guru/es/design-patterns/factory-method) Navegación  [Intro](https://refactoring.guru/es/design-patterns/factory-method/java/example#)  [Producción de elementos GUI multiplataforma](https://refactoring.guru/es/design-patterns/factory-method/java/example#example-0)  buttons   [Button](https://refactoring.guru/es/design-patterns/factory-method/java/example#example-0--buttons-Button-java)   [Html­Button](https://refactoring.guru/es/design-patterns/factory-method/java/example#example-0--buttons-HtmlButton-java)   [Windows­Button](https://refactoring.guru/es/design-patterns/factory-method/java/example#example-0--buttons-WindowsButton-java)  factory   [Dialog](https://refactoring.guru/es/design-patterns/factory-method/java/example#example-0--factory-Dialog-java)   [Html­Dialog](https://refactoring.guru/es/design-patterns/factory-method/java/example#example-0--factory-HtmlDialog-java)   [Windows­Dialog](https://refactoring.guru/es/design-patterns/factory-method/java/example#example-0--factory-WindowsDialog-java)  [Demo](https://refactoring.guru/es/design-patterns/factory-method/java/example#example-0--Demo-java)  [Output­Demo](https://refactoring.guru/es/design-patterns/factory-method/java/example#example-0--OutputDemo-txt)  [Output­Demo](https://refactoring.guru/es/design-patterns/factory-method/java/example#example-0--OutputDemo-png) **Complejidad:** **Popularidad:** **Ejemplos de uso:** El patrón Factory Method se utiliza mucho en el código Java. Resulta muy útil cuando necesitas proporcionar un alto nivel de flexibilidad a tu código. El patrón está presente en las principales bibliotecas de Java: * [`java.util.Calendar#getInstance()`](http://docs.oracle.com/javase/8/docs/api/java/util/Calendar.html#getInstance--) * [`java.util.ResourceBundle#getBundle()`](http://docs.oracle.com/javase/8/docs/api/java/util/ResourceBundle.html#getBundle-java.lang.String-) * [`java.text.NumberFormat#getInstance()`](http://docs.oracle.com/javase/8/docs/api/java/text/NumberFormat.html#getInstance--) * [`java.nio.charset.Charset#forName()`](http://docs.oracle.com/javase/8/docs/api/java/nio/charset/Charset.html#forName-java.lang.String-) * [`java.net.URLStreamHandlerFactory#createURLStreamHandler(String)`](http://docs.oracle.com/javase/8/docs/api/java/net/URLStreamHandlerFactory.html) (Devuelve distintos objetos singleton, dependiendo de un protocolo). * [`java.util.EnumSet#of()`](https://docs.oracle.com/javase/8/docs/api/java/util/EnumSet.html#of(E)) * [`javax.xml.bind.JAXBContext#createMarshaller()`](https://docs.oracle.com/javase/8/docs/api/javax/xml/bind/JAXBContext.html#createMarshaller--) y otros métodos similares. **Identificación:** Los métodos fábrica pueden ser reconocidos por métodos de creación, que crean objetos a partir de clases concretas, pero los devuelven como objetos del tipo abstracto o interfaz. Producción de elementos GUI multiplataforma ------------------------------------------- En este ejemplo, Buttons (Botones) juega el papel de producto y los diálogos actúan como creadores. Los distintos tipos de diálogos requieren sus propios tipos de elementos. Por eso creamos una subclase para cada tipo de diálogo y sobrescribimos sus métodos fábrica. Ahora, cada tipo de diálogo instanciará clases de botón. El diálogo base trabaja con productos utilizando su interfaz común, por eso su código sigue siendo funcional tras todos los cambios. ### **buttons** #### **buttons/Button.java:** Interfaz común de producto package refactoring\_guru.factory\_method.example.buttons; /\*\* \* Common interface for all buttons. \*/ public interface Button { void render(); void onClick(); } #### **buttons/HtmlButton.java:** Producto concreto package refactoring\_guru.factory\_method.example.buttons; /\*\* \* HTML button implementation. \*/ public class HtmlButton implements Button { public void render() { System.out.println(""); onClick(); } public void onClick() { System.out.println("Click! Button says - 'Hello World!'"); } } #### **buttons/WindowsButton.java:** Otro producto concreto package refactoring\_guru.factory\_method.example.buttons; import javax.swing.\*; import java.awt.\*; import java.awt.event.ActionEvent; import java.awt.event.ActionListener; /\*\* \* Windows button implementation. \*/ public class WindowsButton implements Button { JPanel panel = new JPanel(); JFrame frame = new JFrame(); JButton button; public void render() { frame.setDefaultCloseOperation(JFrame.EXIT\_ON\_CLOSE); JLabel label = new JLabel("Hello World!"); label.setOpaque(true); label.setBackground(new Color(235, 233, 126)); label.setFont(new Font("Dialog", Font.BOLD, 44)); label.setHorizontalAlignment(SwingConstants.CENTER); panel.setLayout(new FlowLayout(FlowLayout.CENTER)); frame.getContentPane().add(panel); panel.add(label); onClick(); panel.add(button); frame.setSize(320, 200); frame.setVisible(true); onClick(); } public void onClick() { button = new JButton("Exit"); button.addActionListener(new ActionListener() { public void actionPerformed(ActionEvent e) { frame.setVisible(false); System.exit(0); } }); } } ### **factory** #### **factory/Dialog.java:** Creador base package refactoring\_guru.factory\_method.example.factory; import refactoring\_guru.factory\_method.example.buttons.Button; /\*\* \* Base factory class. Note that "factory" is merely a role for the class. It \* should have some core business logic which needs different products to be \* created. \*/ public abstract class Dialog { public void renderWindow() { // ... other code ... Button okButton = createButton(); okButton.render(); } /\*\* \* Subclasses will override this method in order to create specific button \* objects. \*/ public abstract Button createButton(); } #### **factory/HtmlDialog.java:** Creador concreto package refactoring\_guru.factory\_method.example.factory; import refactoring\_guru.factory\_method.example.buttons.Button; import refactoring\_guru.factory\_method.example.buttons.HtmlButton; /\*\* \* HTML Dialog will produce HTML buttons. \*/ public class HtmlDialog extends Dialog { @Override public Button createButton() { return new HtmlButton(); } } #### **factory/WindowsDialog.java:** Otro creador concreto package refactoring\_guru.factory\_method.example.factory; import refactoring\_guru.factory\_method.example.buttons.Button; import refactoring\_guru.factory\_method.example.buttons.WindowsButton; /\*\* \* Windows Dialog will produce Windows buttons. \*/ public class WindowsDialog extends Dialog { @Override public Button createButton() { return new WindowsButton(); } } #### **Demo.java:** Código cliente package refactoring\_guru.factory\_method.example; import refactoring\_guru.factory\_method.example.factory.Dialog; import refactoring\_guru.factory\_method.example.factory.HtmlDialog; import refactoring\_guru.factory\_method.example.factory.WindowsDialog; /\*\* \* Demo class. Everything comes together here. \*/ public class Demo { private static Dialog dialog; public static void main(String\[\] args) { configure(); runBusinessLogic(); } /\*\* \* The concrete factory is usually chosen depending on configuration or \* environment options. \*/ static void configure() { if (System.getProperty("os.name").equals("Windows 10")) { dialog = new WindowsDialog(); } else { dialog = new HtmlDialog(); } } /\*\* \* All of the client code should work with factories and products through \* abstract interfaces. This way it does not care which factory it works \* with and what kind of product it returns. \*/ static void runBusinessLogic() { dialog.renderWindow(); } } #### **OutputDemo.txt:** Resultados de la ejecución (HtmlDialog) Click! Button says - 'Hello World!' #### **OutputDemo.png:** Resultados de la ejecución (WindowsDialog) ![](https://refactoring.guru/images/patterns/examples/java/factory-method/OutputDemo.png?id=36afce413161f6650321896d3023fb65) **Factory Method** en otros lenguajes ------------------------------------- [![Factory Method en C#](https://refactoring.guru/images/patterns/icons/csharp.svg?id=da64592defc6e86d57c39c66e9de3e58)](https://refactoring.guru/es/design-patterns/factory-method/csharp/example "Factory Method en C#") [![Factory Method en C++](https://refactoring.guru/images/patterns/icons/cpp.svg?id=f7782ed8b8666246bfcc3f8fefc3b858)](https://refactoring.guru/es/design-patterns/factory-method/cpp/example "Factory Method en C++") [![Factory Method en Go](https://refactoring.guru/images/patterns/icons/go.svg?id=1a89927eb99b1ea3fde7701d97970aca)](https://refactoring.guru/es/design-patterns/factory-method/go/example "Factory Method en Go") [![Factory Method en PHP](https://refactoring.guru/images/patterns/icons/php.svg?id=be1906eb26b71ec1d3b93720d6156618)](https://refactoring.guru/es/design-patterns/factory-method/php/example "Factory Method en PHP") [![Factory Method en Python](https://refactoring.guru/images/patterns/icons/python.svg?id=6d815d43c0f7050a1151b43e51569c9f)](https://refactoring.guru/es/design-patterns/factory-method/python/example "Factory Method en Python") [![Factory Method en Ruby](https://refactoring.guru/images/patterns/icons/ruby.svg?id=b065b718c914bf8e960ef731600be1eb)](https://refactoring.guru/es/design-patterns/factory-method/ruby/example "Factory Method en Ruby") [![Factory Method en Rust](https://refactoring.guru/images/patterns/icons/rust.svg?id=1f5698a4b5ae23fe79413511747e4a87)](https://refactoring.guru/es/design-patterns/factory-method/rust/example "Factory Method en Rust") [![Factory Method en Swift](https://refactoring.guru/images/patterns/icons/swift.svg?id=0b716c2d52ec3a48fbe91ac031070c1d)](https://refactoring.guru/es/design-patterns/factory-method/swift/example "Factory Method en Swift") [![Factory Method en TypeScript](https://refactoring.guru/images/patterns/icons/typescript.svg?id=2239d0f16cb703540c205dd8cb0c0cb7)](https://refactoring.guru/es/design-patterns/factory-method/typescript/example "Factory Method en TypeScript") --- # Factory Method en PHP / Patrones de diseño [There are patterns of patterns now! \ My friend's project: MetaPatterns.io](https://metapatterns.io/)  [](https://refactoring.guru/es/design-patterns/factory-method/php/example#checkout) [](https://refactoring.guru/es/design-patterns/factory-method/php/example#checkout) [](https://refactoring.guru/) / [Patrones de diseño](https://refactoring.guru/es/design-patterns) / [Factory Method](https://refactoring.guru/es/design-patterns/factory-method) / [PHP](https://refactoring.guru/es/design-patterns/php) ![Factory Method](https://refactoring.guru/images/patterns/cards/factory-method-mini-2x.png?id=fa9d4a8d61a67cc3822e52b9daf69dad) **Factory Method** en PHP ========================= **Factory method** es un patrón de diseño creacional que resuelve el problema de crear objetos de producto sin especificar sus clases concretas. El patrón Factory Method define un método que debe utilizarse para crear objetos, en lugar de una llamada directa al constructor (operador `new`). Las subclases pueden sobrescribir este método para cambiar las clases de los objetos que se crearán. > Si no sabes la diferencia entre varios patrones y conceptos de la fábrica, lee nuestra [Comparación de fábricas](https://refactoring.guru/es/design-patterns/factory-comparison) > . [Aprende más sobre el patrón Factory Method](https://refactoring.guru/es/design-patterns/factory-method) Navegación  [Intro](https://refactoring.guru/es/design-patterns/factory-method/php/example#)  [Ejemplo conceptual](https://refactoring.guru/es/design-patterns/factory-method/php/example#example-0)  [index](https://refactoring.guru/es/design-patterns/factory-method/php/example#example-0--index-php)  [Output](https://refactoring.guru/es/design-patterns/factory-method/php/example#example-0--Output-txt)  [Ejemplo del mundo real](https://refactoring.guru/es/design-patterns/factory-method/php/example#example-1)  [index](https://refactoring.guru/es/design-patterns/factory-method/php/example#example-1--index-php)  [Output](https://refactoring.guru/es/design-patterns/factory-method/php/example#example-1--Output-txt) **Complejidad:** **Popularidad:** **Ejemplos de uso:** El patrón Factory Method se utiliza mucho en el código PHP. Resulta muy útil cuando necesitas proporcionar un alto nivel de flexibilidad a tu código. **Identificación:** Los métodos fábrica pueden ser reconocidos por métodos de creación, que crean objetos de clases concretas, pero los devuelven como objetos del tipo abstracto o interfaz. Ejemplo conceptual ------------------ Este ejemplo ilustra la estructura del patrón de diseño **Factory Method** y se centra en las siguientes preguntas: * ¿De qué clases se compone? * ¿Qué papeles juegan esas clases? * ¿De qué forma se relacionan los elementos del patrón? Después de conocer la estructura del patrón, será más fácil comprender el siguiente ejemplo basado en un caso de uso real de PHP. #### **index.php:** Ejemplo conceptual factoryMethod(); // Now, use the product. $result = "Creator: The same creator's code has just worked with " . $product->operation(); return $result; } } /\*\* \* Concrete Creators override the factory method in order to change the \* resulting product's type. \*/ class ConcreteCreator1 extends Creator { /\*\* \* Note that the signature of the method still uses the abstract product \* type, even though the concrete product is actually returned from the \* method. This way the Creator can stay independent of concrete product \* classes. \*/ public function factoryMethod(): Product { return new ConcreteProduct1(); } } class ConcreteCreator2 extends Creator { public function factoryMethod(): Product { return new ConcreteProduct2(); } } /\*\* \* The Product interface declares the operations that all concrete products must \* implement. \*/ interface Product { public function operation(): string; } /\*\* \* Concrete Products provide various implementations of the Product interface. \*/ class ConcreteProduct1 implements Product { public function operation(): string { return "{Result of the ConcreteProduct1}"; } } class ConcreteProduct2 implements Product { public function operation(): string { return "{Result of the ConcreteProduct2}"; } } /\*\* \* The client code works with an instance of a concrete creator, albeit through \* its base interface. As long as the client keeps working with the creator via \* the base interface, you can pass it any creator's subclass. \*/ function clientCode(Creator $creator) { // ... echo "Client: I'm not aware of the creator's class, but it still works.\\n" . $creator->someOperation(); // ... } /\*\* \* The Application picks a creator's type depending on the configuration or \* environment. \*/ echo "App: Launched with the ConcreteCreator1.\\n"; clientCode(new ConcreteCreator1()); echo "\\n\\n"; echo "App: Launched with the ConcreteCreator2.\\n"; clientCode(new ConcreteCreator2()); #### **Output.txt:** Resultado de la ejecución App: Launched with the ConcreteCreator1. Client: I'm not aware of the creator's class, but it still works. Creator: The same creator's code has just worked with {Result of the ConcreteProduct1} App: Launched with the ConcreteCreator2. Client: I'm not aware of the creator's class, but it still works. Creator: The same creator's code has just worked with {Result of the ConcreteProduct2} Ejemplo del mundo real ---------------------- En este ejemplo, el patrón **Factory Method** proporciona una interfaz para crear conectores en redes sociales, que pueden utilizarse para iniciar sesión en la red, crear publicaciones y, potencialmente, realizar otras actividades; y todo ello sin acoplar el código cliente a clases específicas de la red social particular. #### **index.php:** Ejemplo del mundo real getSocialNetwork; \* \* This allows changing the type of the product being created by \* SocialNetworkPoster's subclasses. \*/ abstract class SocialNetworkPoster { /\*\* \* The actual factory method. Note that it returns the abstract connector. \* This lets subclasses return any concrete connectors without breaking the \* superclass' contract. \*/ abstract public function getSocialNetwork(): SocialNetworkConnector; /\*\* \* When the factory method is used inside the Creator's business logic, the \* subclasses may alter the logic indirectly by returning different types of \* the connector from the factory method. \*/ public function post($content): void { // Call the factory method to create a Product object... $network = $this->getSocialNetwork(); // ...then use it as you will. $network->logIn(); $network->createPost($content); $network->logout(); } } /\*\* \* This Concrete Creator supports Facebook. Remember that this class also \* inherits the 'post' method from the parent class. Concrete Creators are the \* classes that the Client actually uses. \*/ class FacebookPoster extends SocialNetworkPoster { private $login, $password; public function \_\_construct(string $login, string $password) { $this->login = $login; $this->password = $password; } public function getSocialNetwork(): SocialNetworkConnector { return new FacebookConnector($this->login, $this->password); } } /\*\* \* This Concrete Creator supports LinkedIn. \*/ class LinkedInPoster extends SocialNetworkPoster { private $email, $password; public function \_\_construct(string $email, string $password) { $this->email = $email; $this->password = $password; } public function getSocialNetwork(): SocialNetworkConnector { return new LinkedInConnector($this->email, $this->password); } } /\*\* \* The Product interface declares behaviors of various types of products. \*/ interface SocialNetworkConnector { public function logIn(): void; public function logOut(): void; public function createPost($content): void; } /\*\* \* This Concrete Product implements the Facebook API. \*/ class FacebookConnector implements SocialNetworkConnector { private $login, $password; public function \_\_construct(string $login, string $password) { $this->login = $login; $this->password = $password; } public function logIn(): void { echo "Send HTTP API request to log in user $this->login with " . "password $this->password\\n"; } public function logOut(): void { echo "Send HTTP API request to log out user $this->login\\n"; } public function createPost($content): void { echo "Send HTTP API requests to create a post in Facebook timeline.\\n"; } } /\*\* \* This Concrete Product implements the LinkedIn API. \*/ class LinkedInConnector implements SocialNetworkConnector { private $email, $password; public function \_\_construct(string $email, string $password) { $this->email = $email; $this->password = $password; } public function logIn(): void { echo "Send HTTP API request to log in user $this->email with " . "password $this->password\\n"; } public function logOut(): void { echo "Send HTTP API request to log out user $this->email\\n"; } public function createPost($content): void { echo "Send HTTP API requests to create a post in LinkedIn timeline.\\n"; } } /\*\* \* The client code can work with any subclass of SocialNetworkPoster since it \* doesn't depend on concrete classes. \*/ function clientCode(SocialNetworkPoster $creator) { // ... $creator->post("Hello world!"); $creator->post("I had a large hamburger this morning!"); // ... } /\*\* \* During the initialization phase, the app can decide which social network it \* wants to work with, create an object of the proper subclass, and pass it to \* the client code. \*/ echo "Testing ConcreteCreator1:\\n"; clientCode(new FacebookPoster("john\_smith", "\*\*\*\*\*\*")); echo "\\n\\n"; echo "Testing ConcreteCreator2:\\n"; clientCode(new LinkedInPoster("john\_smith@example.com", "\*\*\*\*\*\*")); #### **Output.txt:** Resultado de la ejecución Testing ConcreteCreator1: Send HTTP API request to log in user john\_smith with password \*\*\*\*\*\* Send HTTP API requests to create a post in Facebook timeline. Send HTTP API request to log out user john\_smith Send HTTP API request to log in user john\_smith with password \*\*\*\*\*\* Send HTTP API requests to create a post in Facebook timeline. Send HTTP API request to log out user john\_smith Testing ConcreteCreator2: Send HTTP API request to log in user john\_smith@example.com with password \*\*\*\*\*\* Send HTTP API requests to create a post in LinkedIn timeline. Send HTTP API request to log out user john\_smith@example.com Send HTTP API request to log in user john\_smith@example.com with password \*\*\*\*\*\* Send HTTP API requests to create a post in LinkedIn timeline. Send HTTP API request to log out user john\_smith@example.com **Factory Method** en otros lenguajes ------------------------------------- [![Factory Method en C#](https://refactoring.guru/images/patterns/icons/csharp.svg?id=da64592defc6e86d57c39c66e9de3e58)](https://refactoring.guru/es/design-patterns/factory-method/csharp/example "Factory Method en C#") [![Factory Method en C++](https://refactoring.guru/images/patterns/icons/cpp.svg?id=f7782ed8b8666246bfcc3f8fefc3b858)](https://refactoring.guru/es/design-patterns/factory-method/cpp/example "Factory Method en C++") [![Factory Method en Go](https://refactoring.guru/images/patterns/icons/go.svg?id=1a89927eb99b1ea3fde7701d97970aca)](https://refactoring.guru/es/design-patterns/factory-method/go/example "Factory Method en Go") [![Factory Method en Java](https://refactoring.guru/images/patterns/icons/java.svg?id=e6d87e2dca08c953fe3acd1275ed4f4e)](https://refactoring.guru/es/design-patterns/factory-method/java/example "Factory Method en Java") [![Factory Method en Python](https://refactoring.guru/images/patterns/icons/python.svg?id=6d815d43c0f7050a1151b43e51569c9f)](https://refactoring.guru/es/design-patterns/factory-method/python/example "Factory Method en Python") [![Factory Method en Ruby](https://refactoring.guru/images/patterns/icons/ruby.svg?id=b065b718c914bf8e960ef731600be1eb)](https://refactoring.guru/es/design-patterns/factory-method/ruby/example "Factory Method en Ruby") [![Factory Method en Rust](https://refactoring.guru/images/patterns/icons/rust.svg?id=1f5698a4b5ae23fe79413511747e4a87)](https://refactoring.guru/es/design-patterns/factory-method/rust/example "Factory Method en Rust") [![Factory Method en Swift](https://refactoring.guru/images/patterns/icons/swift.svg?id=0b716c2d52ec3a48fbe91ac031070c1d)](https://refactoring.guru/es/design-patterns/factory-method/swift/example "Factory Method en Swift") [![Factory Method en TypeScript](https://refactoring.guru/images/patterns/icons/typescript.svg?id=2239d0f16cb703540c205dd8cb0c0cb7)](https://refactoring.guru/es/design-patterns/factory-method/typescript/example "Factory Method en TypeScript") --- # Adapter en TypeScript / Patrones de diseño [There are patterns of patterns now! \ My friend's project: MetaPatterns.io](https://metapatterns.io/)  [](https://refactoring.guru/es/design-patterns/adapter/typescript/example#checkout) [](https://refactoring.guru/es/design-patterns/adapter/typescript/example#checkout) [](https://refactoring.guru/) / [Patrones de diseño](https://refactoring.guru/es/design-patterns) / [Adapter](https://refactoring.guru/es/design-patterns/adapter) / [TypeScript](https://refactoring.guru/es/design-patterns/typescript) ![Adapter](https://refactoring.guru/images/patterns/cards/adapter-mini-2x.png?id=8274d99afbbe9c63bfbfd0d68ceeffc7) **Adapter** en TypeScript ========================= **Adapter** es un patrón de diseño estructural que permite colaborar a objetos incompatibles. El patrón Adapter actúa como envoltorio entre dos objetos. Atrapa las llamadas a un objeto y las transforma a un formato y una interfaz reconocible para el segundo objeto. [Aprende más sobre el patrón Adapter](https://refactoring.guru/es/design-patterns/adapter) Navegación  [Intro](https://refactoring.guru/es/design-patterns/adapter/typescript/example#)  [Ejemplo conceptual](https://refactoring.guru/es/design-patterns/adapter/typescript/example#example-0)  [index](https://refactoring.guru/es/design-patterns/adapter/typescript/example#example-0--index-ts)  [Output](https://refactoring.guru/es/design-patterns/adapter/typescript/example#example-0--Output-txt) **Complejidad:** **Popularidad:** **Ejemplos de uso:** El patrón Adapter es muy común en el código TypeScript. Se utiliza muy a menudo en sistemas basados en algún código heredado. En estos casos, los adaptadores crean código heredado con clases modernas. **Identificación:** Adapter es reconocible por un constructor que toma una instancia de distinto tipo de clase abstracta/interfaz. Cuando el adaptador recibe una llamada a uno de sus métodos, convierte los parámetros al formato adecuado y después dirige la llamada a uno o varios métodos del objeto envuelto. Ejemplo conceptual ------------------ Este ejemplo ilustra la estructura del patrón de diseño **Adapter** y se centra en las siguientes preguntas: * ¿De qué clases se compone? * ¿Qué papeles juegan esas clases? * ¿De qué forma se relacionan los elementos del patrón? #### **index.ts:** Ejemplo conceptual /\*\* \* The Target defines the domain-specific interface used by the client code. \*/ class Target { public request(): string { return 'Target: The default target\\'s behavior.'; } } /\*\* \* The Adaptee contains some useful behavior, but its interface is incompatible \* with the existing client code. The Adaptee needs some adaptation before the \* client code can use it. \*/ class Adaptee { public specificRequest(): string { return '.eetpadA eht fo roivaheb laicepS'; } } /\*\* \* The Adapter makes the Adaptee's interface compatible with the Target's \* interface. \*/ class Adapter extends Target { private adaptee: Adaptee; constructor(adaptee: Adaptee) { super(); this.adaptee = adaptee; } public request(): string { const result = this.adaptee.specificRequest().split('').reverse().join(''); return \`Adapter: (TRANSLATED) ${result}\`; } } /\*\* \* The client code supports all classes that follow the Target interface. \*/ function clientCode(target: Target) { console.log(target.request()); } console.log('Client: I can work just fine with the Target objects:'); const target = new Target(); clientCode(target); console.log(''); const adaptee = new Adaptee(); console.log('Client: The Adaptee class has a weird interface. See, I don\\'t understand it:'); console.log(\`Adaptee: ${adaptee.specificRequest()}\`); console.log(''); console.log('Client: But I can work with it via the Adapter:'); const adapter = new Adapter(adaptee); clientCode(adapter); #### **Output.txt:** Resultado de la ejecución Client: I can work just fine with the Target objects: Target: The default target's behavior. Client: The Adaptee class has a weird interface. See, I don't understand it: Adaptee: .eetpadA eht fo roivaheb laicepS Client: But I can work with it via the Adapter: Adapter: (TRANSLATED) Special behavior of the Adaptee. **Adapter** en otros lenguajes ------------------------------ [![Adapter en C#](https://refactoring.guru/images/patterns/icons/csharp.svg?id=da64592defc6e86d57c39c66e9de3e58)](https://refactoring.guru/es/design-patterns/adapter/csharp/example "Adapter en C#") [![Adapter en C++](https://refactoring.guru/images/patterns/icons/cpp.svg?id=f7782ed8b8666246bfcc3f8fefc3b858)](https://refactoring.guru/es/design-patterns/adapter/cpp/example "Adapter en C++") [![Adapter en Go](https://refactoring.guru/images/patterns/icons/go.svg?id=1a89927eb99b1ea3fde7701d97970aca)](https://refactoring.guru/es/design-patterns/adapter/go/example "Adapter en Go") [![Adapter en Java](https://refactoring.guru/images/patterns/icons/java.svg?id=e6d87e2dca08c953fe3acd1275ed4f4e)](https://refactoring.guru/es/design-patterns/adapter/java/example "Adapter en Java") [![Adapter en PHP](https://refactoring.guru/images/patterns/icons/php.svg?id=be1906eb26b71ec1d3b93720d6156618)](https://refactoring.guru/es/design-patterns/adapter/php/example "Adapter en PHP") [![Adapter en Python](https://refactoring.guru/images/patterns/icons/python.svg?id=6d815d43c0f7050a1151b43e51569c9f)](https://refactoring.guru/es/design-patterns/adapter/python/example "Adapter en Python") [![Adapter en Ruby](https://refactoring.guru/images/patterns/icons/ruby.svg?id=b065b718c914bf8e960ef731600be1eb)](https://refactoring.guru/es/design-patterns/adapter/ruby/example "Adapter en Ruby") [![Adapter en Rust](https://refactoring.guru/images/patterns/icons/rust.svg?id=1f5698a4b5ae23fe79413511747e4a87)](https://refactoring.guru/es/design-patterns/adapter/rust/example "Adapter en Rust") [![Adapter en Swift](https://refactoring.guru/images/patterns/icons/swift.svg?id=0b716c2d52ec3a48fbe91ac031070c1d)](https://refactoring.guru/es/design-patterns/adapter/swift/example "Adapter en Swift") --- # Что такое Паттерн? [There are patterns of patterns now! \ My friend's project: MetaPatterns.io](https://metapatterns.io/)  [](https://refactoring.guru/ru/design-patterns/what-is-pattern#checkout) [](https://refactoring.guru/ru/design-patterns/what-is-pattern#checkout) [](https://refactoring.guru/) / [Паттерны проектирования](https://refactoring.guru/ru/design-patterns) Что такое Паттерн? ================== **Паттерн проектирования** — это часто встречающееся решение определённой проблемы при проектировании архитектуры программ. В отличие от готовых функций или библиотек, паттерн нельзя просто взять и скопировать в программу. Паттерн представляет собой не какой-то конкретный код, а общую концепцию решения той или иной проблемы, которую нужно будет ещё подстроить под нужды вашей программы. Паттерны часто путают с алгоритмами, ведь оба понятия описывают типовые решения каких-то известных проблем. Но если алгоритм — это чёткий набор действий, то паттерн — это высокоуровневое описание решения, реализация которого может отличаться в двух разных программах. Если привести аналогии, то алгоритм — это кулинарный рецепт с чёткими шагами, а паттерн — инженерный чертёж, на котором нарисовано решение, но не конкретные шаги его реализации. Из чего состоит паттерн? ------------------------ Описания паттернов обычно очень формальны и чаще всего состоят из таких пунктов: * проблема, которую решает паттерн; * мотивации к решению проблемы способом, который предлагает паттерн; * структуры классов, составляющих решение; * примера на одном из языков программирования; * особенностей реализации в различных контекстах; * связей с другими паттернами. Такой формализм в описании позволил создать обширный каталог паттернов, проверив каждый из них на состоятельность. --- # Що таке Патерн? [There are patterns of patterns now! \ My friend's project: MetaPatterns.io](https://metapatterns.io/)  [](https://refactoring.guru/uk/design-patterns/what-is-pattern#checkout) [](https://refactoring.guru/uk/design-patterns/what-is-pattern#checkout) [](https://refactoring.guru/) / [Патерни проектування](https://refactoring.guru/uk/design-patterns) Що таке Патерн? =============== **Патерн проектування** — це типовий спосіб вирішення певної проблеми, що часто зустрічається при проектуванні архітектури програм. На відміну від готових функцій чи бібліотек, патерн не можна просто взяти й скопіювати в програму. Патерн являє собою не якийсь конкретний код, а загальний принцип вирішення певної проблеми, який майже завжди треба підлаштовувати для потреб тієї чи іншої програми. Патерни часто плутають з алгоритмами, адже обидва поняття описують типові рішення відомих проблем. Але якщо алгоритм — це чіткий набір дій, то патерн — це високорівневий опис рішення, реалізація якого може відрізнятися у двох різних програмах. Якщо провести аналогії, то алгоритм — це кулінарний рецепт з чіткими кроками, а патерн — інженерне креслення, на якому намальовано рішення без конкретних кроків його отримання. З чого складається патерн? -------------------------- Описи патернів зазвичай дуже формальні й найчастіше складаються з таких пунктів: * проблема, яку вирішує патерн; * мотивація щодо вирішення проблеми способом, який пропонує патерн; * структура класів, складових рішення; * приклад однією з мов програмування; * особливості реалізації в різних контекстах; * зв’язки з іншими патернами. Такий формалізм опису дозволив зібрати великий каталог патернів, додатково перевіривши кожен патерн на дієвість. --- # Patrones de diseño en Ruby [There are patterns of patterns now! \ My friend's project: MetaPatterns.io](https://metapatterns.io/)  [](https://refactoring.guru/es/design-patterns/ruby#checkout) [](https://refactoring.guru/es/design-patterns/ruby#checkout) ![Patrones de diseño en Ruby](https://refactoring.guru/images/patterns/languages/ruby-3x.png) ![Patrones de diseño en Ruby](https://refactoring.guru/images/patterns/languages/mini/ruby-3x.png) PATRONES de DISEÑO en Ruby ========================== El catálogo de ejemplos en **Ruby** ----------------------------------- #### Patrones creacionales ![Abstract Factory](https://refactoring.guru/images/patterns/cards/abstract-factory-mini-3x.png) #### Abstract Factory Permite producir familias de objetos relacionados sin especificar sus clases concretas. [Artículo principal](https://refactoring.guru/es/design-patterns/abstract-factory) [Uso en Ruby](https://refactoring.guru/es/design-patterns/abstract-factory/ruby/example#lang-features) [Ejemplo de código](https://refactoring.guru/es/design-patterns/abstract-factory/ruby/example#example-0) ![Builder](https://refactoring.guru/images/patterns/cards/builder-mini-3x.png) #### Builder Permite construir objetos complejos paso a paso. Este patrón nos permite producir distintos tipos y representaciones de un objeto empleando el mismo código de construcción. [Artículo principal](https://refactoring.guru/es/design-patterns/builder) [Uso en Ruby](https://refactoring.guru/es/design-patterns/builder/ruby/example#lang-features) [Ejemplo de código](https://refactoring.guru/es/design-patterns/builder/ruby/example#example-0) ![Factory Method](https://refactoring.guru/images/patterns/cards/factory-method-mini-3x.png) #### Factory Method Proporciona una interfaz para la creación de objetos en una superclase, mientras permite a las subclases alterar el tipo de objetos que se crearán. [Artículo principal](https://refactoring.guru/es/design-patterns/factory-method) [Uso en Ruby](https://refactoring.guru/es/design-patterns/factory-method/ruby/example#lang-features) [Ejemplo de código](https://refactoring.guru/es/design-patterns/factory-method/ruby/example#example-0) ![Prototype](https://refactoring.guru/images/patterns/cards/prototype-mini-3x.png) #### Prototype Permite copiar objetos existentes sin que el código dependa de sus clases. [Artículo principal](https://refactoring.guru/es/design-patterns/prototype) [Uso en Ruby](https://refactoring.guru/es/design-patterns/prototype/ruby/example#lang-features) [Ejemplo de código](https://refactoring.guru/es/design-patterns/prototype/ruby/example#example-0) ![Singleton](https://refactoring.guru/images/patterns/cards/singleton-mini-3x.png) #### Singleton Permite asegurarnos de que una clase tenga una única instancia, a la vez que proporciona un punto de acceso global a dicha instancia. [Artículo principal](https://refactoring.guru/es/design-patterns/singleton) [Uso en Ruby](https://refactoring.guru/es/design-patterns/singleton/ruby/example#lang-features) [Naïve Singleton](https://refactoring.guru/es/design-patterns/singleton/ruby/example#example-0) [Thread-safe Singleton](https://refactoring.guru/es/design-patterns/singleton/ruby/example#example-1) #### Patrones estructurales ![Adapter](https://refactoring.guru/images/patterns/cards/adapter-mini-3x.png) #### Adapter Permite la colaboración entre objetos con interfaces incompatibles. [Artículo principal](https://refactoring.guru/es/design-patterns/adapter) [Uso en Ruby](https://refactoring.guru/es/design-patterns/adapter/ruby/example#lang-features) [Ejemplo de código](https://refactoring.guru/es/design-patterns/adapter/ruby/example#example-0) ![Bridge](https://refactoring.guru/images/patterns/cards/bridge-mini-3x.png) #### Bridge Permite dividir una clase grande o un grupo de clases estrechamente relacionadas, en dos jerarquías separadas (abstracción e implementación) que pueden desarrollarse independientemente la una de la otra. [Artículo principal](https://refactoring.guru/es/design-patterns/bridge) [Uso en Ruby](https://refactoring.guru/es/design-patterns/bridge/ruby/example#lang-features) [Ejemplo de código](https://refactoring.guru/es/design-patterns/bridge/ruby/example#example-0) ![Composite](https://refactoring.guru/images/patterns/cards/composite-mini-3x.png) #### Composite Permite componer objetos en estructuras de árbol y trabajar con esas estructuras como si fueran objetos individuales. [Artículo principal](https://refactoring.guru/es/design-patterns/composite) [Uso en Ruby](https://refactoring.guru/es/design-patterns/composite/ruby/example#lang-features) [Ejemplo de código](https://refactoring.guru/es/design-patterns/composite/ruby/example#example-0) ![Decorator](https://refactoring.guru/images/patterns/cards/decorator-mini-3x.png) #### Decorator Permite añadir funcionalidades a objetos colocando estos objetos dentro de objetos encapsuladores especiales que contienen estas funcionalidades. [Artículo principal](https://refactoring.guru/es/design-patterns/decorator) [Uso en Ruby](https://refactoring.guru/es/design-patterns/decorator/ruby/example#lang-features) [Ejemplo de código](https://refactoring.guru/es/design-patterns/decorator/ruby/example#example-0) ![Facade](https://refactoring.guru/images/patterns/cards/facade-mini-3x.png) #### Facade Proporciona una interfaz simplificada a una biblioteca, un framework o cualquier otro grupo complejo de clases. [Artículo principal](https://refactoring.guru/es/design-patterns/facade) [Uso en Ruby](https://refactoring.guru/es/design-patterns/facade/ruby/example#lang-features) [Ejemplo de código](https://refactoring.guru/es/design-patterns/facade/ruby/example#example-0) ![Flyweight](https://refactoring.guru/images/patterns/cards/flyweight-mini-3x.png) #### Flyweight Permite mantener más objetos dentro de la cantidad disponible de memoria RAM compartiendo las partes comunes del estado entre varios objetos en lugar de mantener toda la información en cada objeto. [Artículo principal](https://refactoring.guru/es/design-patterns/flyweight) [Uso en Ruby](https://refactoring.guru/es/design-patterns/flyweight/ruby/example#lang-features) [Ejemplo de código](https://refactoring.guru/es/design-patterns/flyweight/ruby/example#example-0) ![Proxy](https://refactoring.guru/images/patterns/cards/proxy-mini-3x.png) #### Proxy Permite proporcionar un sustituto o marcador de posición para otro objeto. Un proxy controla el acceso al objeto original, permitiéndote hacer algo antes o después de que la solicitud llegue al objeto original. [Artículo principal](https://refactoring.guru/es/design-patterns/proxy) [Uso en Ruby](https://refactoring.guru/es/design-patterns/proxy/ruby/example#lang-features) [Ejemplo de código](https://refactoring.guru/es/design-patterns/proxy/ruby/example#example-0) #### Patrones de comportamiento ![Chain of Responsibility](https://refactoring.guru/images/patterns/cards/chain-of-responsibility-mini-3x.png) #### Chain of Responsibility Permite pasar solicitudes a lo largo de una cadena de manejadores. Al recibir una solicitud, cada manejador decide si la procesa o si la pasa al siguiente manejador de la cadena. [Artículo principal](https://refactoring.guru/es/design-patterns/chain-of-responsibility) [Uso en Ruby](https://refactoring.guru/es/design-patterns/chain-of-responsibility/ruby/example#lang-features) [Ejemplo de código](https://refactoring.guru/es/design-patterns/chain-of-responsibility/ruby/example#example-0) ![Command](https://refactoring.guru/images/patterns/cards/command-mini-3x.png) #### Command Convierte una solicitud en un objeto independiente que contiene toda la información sobre la solicitud. Esta transformación te permite parametrizar los métodos con diferentes solicitudes, retrasar o poner en cola la ejecución de una solicitud y soportar operaciones que no se pueden realizar. [Artículo principal](https://refactoring.guru/es/design-patterns/command) [Uso en Ruby](https://refactoring.guru/es/design-patterns/command/ruby/example#lang-features) [Ejemplo de código](https://refactoring.guru/es/design-patterns/command/ruby/example#example-0) ![Iterator](https://refactoring.guru/images/patterns/cards/iterator-mini-3x.png) #### Iterator Permite recorrer elementos de una colección sin exponer su representación subyacente (lista, pila, árbol, etc.). [Artículo principal](https://refactoring.guru/es/design-patterns/iterator) [Uso en Ruby](https://refactoring.guru/es/design-patterns/iterator/ruby/example#lang-features) [Ejemplo de código](https://refactoring.guru/es/design-patterns/iterator/ruby/example#example-0) ![Mediator](https://refactoring.guru/images/patterns/cards/mediator-mini-3x.png) #### Mediator Permite reducir las dependencias caóticas entre objetos. El patrón restringe las comunicaciones directas entre los objetos, forzándolos a colaborar únicamente a través de un objeto mediador. [Artículo principal](https://refactoring.guru/es/design-patterns/mediator) [Uso en Ruby](https://refactoring.guru/es/design-patterns/mediator/ruby/example#lang-features) [Ejemplo de código](https://refactoring.guru/es/design-patterns/mediator/ruby/example#example-0) ![Memento](https://refactoring.guru/images/patterns/cards/memento-mini-3x.png) #### Memento Permite guardar y restaurar el estado previo de un objeto sin revelar los detalles de su implementación. [Artículo principal](https://refactoring.guru/es/design-patterns/memento) [Uso en Ruby](https://refactoring.guru/es/design-patterns/memento/ruby/example#lang-features) [Ejemplo de código](https://refactoring.guru/es/design-patterns/memento/ruby/example#example-0) ![Observer](https://refactoring.guru/images/patterns/cards/observer-mini-3x.png) #### Observer Permite definir un mecanismo de suscripción para notificar a varios objetos sobre cualquier evento que le suceda al objeto que están observando. [Artículo principal](https://refactoring.guru/es/design-patterns/observer) [Uso en Ruby](https://refactoring.guru/es/design-patterns/observer/ruby/example#lang-features) [Ejemplo de código](https://refactoring.guru/es/design-patterns/observer/ruby/example#example-0) ![State](https://refactoring.guru/images/patterns/cards/state-mini-3x.png) #### State Permite a un objeto alterar su comportamiento cuando su estado interno cambia. Parece como si el objeto cambiara su clase. [Artículo principal](https://refactoring.guru/es/design-patterns/state) [Uso en Ruby](https://refactoring.guru/es/design-patterns/state/ruby/example#lang-features) [Ejemplo de código](https://refactoring.guru/es/design-patterns/state/ruby/example#example-0) ![Strategy](https://refactoring.guru/images/patterns/cards/strategy-mini-3x.png) #### Strategy Permite definir una familia de algoritmos, colocar cada uno de ellos en una clase separada y hacer sus objetos intercambiables. [Artículo principal](https://refactoring.guru/es/design-patterns/strategy) [Uso en Ruby](https://refactoring.guru/es/design-patterns/strategy/ruby/example#lang-features) [Ejemplo de código](https://refactoring.guru/es/design-patterns/strategy/ruby/example#example-0) ![Template Method](https://refactoring.guru/images/patterns/cards/template-method-mini-3x.png) #### Template Method Define el esqueleto de un algoritmo en la superclase pero permite que las subclases sobrescriban pasos del algoritmo sin cambiar su estructura. [Artículo principal](https://refactoring.guru/es/design-patterns/template-method) [Uso en Ruby](https://refactoring.guru/es/design-patterns/template-method/ruby/example#lang-features) [Ejemplo de código](https://refactoring.guru/es/design-patterns/template-method/ruby/example#example-0) ![Visitor](https://refactoring.guru/images/patterns/cards/visitor-mini-3x.png) #### Visitor Permite separar algoritmos de los objetos sobre los que operan. [Artículo principal](https://refactoring.guru/es/design-patterns/visitor) [Uso en Ruby](https://refactoring.guru/es/design-patterns/visitor/ruby/example#lang-features) [Ejemplo de código](https://refactoring.guru/es/design-patterns/visitor/ruby/example#example-0) --- # Patrones de diseño en Swift [There are patterns of patterns now! \ My friend's project: MetaPatterns.io](https://metapatterns.io/)  [](https://refactoring.guru/es/design-patterns/swift#checkout) [](https://refactoring.guru/es/design-patterns/swift#checkout) ![Patrones de diseño en Swift](https://refactoring.guru/images/patterns/languages/swift-3x.png) ![Patrones de diseño en Swift](https://refactoring.guru/images/patterns/languages/mini/swift-3x.png) PATRONES de DISEÑO en Swift =========================== El catálogo de ejemplos en **Swift** ------------------------------------ #### Patrones creacionales ![Abstract Factory](https://refactoring.guru/images/patterns/cards/abstract-factory-mini-3x.png) #### Abstract Factory Permite producir familias de objetos relacionados sin especificar sus clases concretas. [Artículo principal](https://refactoring.guru/es/design-patterns/abstract-factory) [Uso en Swift](https://refactoring.guru/es/design-patterns/abstract-factory/swift/example#lang-features) [Ejemplo conceptual](https://refactoring.guru/es/design-patterns/abstract-factory/swift/example#example-0) [Ejemplo del mundo real](https://refactoring.guru/es/design-patterns/abstract-factory/swift/example#example-1) ![Builder](https://refactoring.guru/images/patterns/cards/builder-mini-3x.png) #### Builder Permite construir objetos complejos paso a paso. Este patrón nos permite producir distintos tipos y representaciones de un objeto empleando el mismo código de construcción. [Artículo principal](https://refactoring.guru/es/design-patterns/builder) [Uso en Swift](https://refactoring.guru/es/design-patterns/builder/swift/example#lang-features) [Ejemplo conceptual](https://refactoring.guru/es/design-patterns/builder/swift/example#example-0) [Ejemplo del mundo real](https://refactoring.guru/es/design-patterns/builder/swift/example#example-1) ![Factory Method](https://refactoring.guru/images/patterns/cards/factory-method-mini-3x.png) #### Factory Method Proporciona una interfaz para la creación de objetos en una superclase, mientras permite a las subclases alterar el tipo de objetos que se crearán. [Artículo principal](https://refactoring.guru/es/design-patterns/factory-method) [Uso en Swift](https://refactoring.guru/es/design-patterns/factory-method/swift/example#lang-features) [Ejemplo conceptual](https://refactoring.guru/es/design-patterns/factory-method/swift/example#example-0) [Ejemplo del mundo real](https://refactoring.guru/es/design-patterns/factory-method/swift/example#example-1) ![Prototype](https://refactoring.guru/images/patterns/cards/prototype-mini-3x.png) #### Prototype Permite copiar objetos existentes sin que el código dependa de sus clases. [Artículo principal](https://refactoring.guru/es/design-patterns/prototype) [Uso en Swift](https://refactoring.guru/es/design-patterns/prototype/swift/example#lang-features) [Ejemplo conceptual](https://refactoring.guru/es/design-patterns/prototype/swift/example#example-0) [Ejemplo del mundo real](https://refactoring.guru/es/design-patterns/prototype/swift/example#example-1) ![Singleton](https://refactoring.guru/images/patterns/cards/singleton-mini-3x.png) #### Singleton Permite asegurarnos de que una clase tenga una única instancia, a la vez que proporciona un punto de acceso global a dicha instancia. [Artículo principal](https://refactoring.guru/es/design-patterns/singleton) [Uso en Swift](https://refactoring.guru/es/design-patterns/singleton/swift/example#lang-features) [Ejemplo conceptual](https://refactoring.guru/es/design-patterns/singleton/swift/example#example-0) [Ejemplo del mundo real](https://refactoring.guru/es/design-patterns/singleton/swift/example#example-1) #### Patrones estructurales ![Adapter](https://refactoring.guru/images/patterns/cards/adapter-mini-3x.png) #### Adapter Permite la colaboración entre objetos con interfaces incompatibles. [Artículo principal](https://refactoring.guru/es/design-patterns/adapter) [Uso en Swift](https://refactoring.guru/es/design-patterns/adapter/swift/example#lang-features) [Ejemplo conceptual](https://refactoring.guru/es/design-patterns/adapter/swift/example#example-0) [Ejemplo del mundo real](https://refactoring.guru/es/design-patterns/adapter/swift/example#example-1) ![Bridge](https://refactoring.guru/images/patterns/cards/bridge-mini-3x.png) #### Bridge Permite dividir una clase grande o un grupo de clases estrechamente relacionadas, en dos jerarquías separadas (abstracción e implementación) que pueden desarrollarse independientemente la una de la otra. [Artículo principal](https://refactoring.guru/es/design-patterns/bridge) [Uso en Swift](https://refactoring.guru/es/design-patterns/bridge/swift/example#lang-features) [Ejemplo conceptual](https://refactoring.guru/es/design-patterns/bridge/swift/example#example-0) [Ejemplo del mundo real](https://refactoring.guru/es/design-patterns/bridge/swift/example#example-1) ![Composite](https://refactoring.guru/images/patterns/cards/composite-mini-3x.png) #### Composite Permite componer objetos en estructuras de árbol y trabajar con esas estructuras como si fueran objetos individuales. [Artículo principal](https://refactoring.guru/es/design-patterns/composite) [Uso en Swift](https://refactoring.guru/es/design-patterns/composite/swift/example#lang-features) [Ejemplo conceptual](https://refactoring.guru/es/design-patterns/composite/swift/example#example-0) [Ejemplo del mundo real](https://refactoring.guru/es/design-patterns/composite/swift/example#example-1) ![Decorator](https://refactoring.guru/images/patterns/cards/decorator-mini-3x.png) #### Decorator Permite añadir funcionalidades a objetos colocando estos objetos dentro de objetos encapsuladores especiales que contienen estas funcionalidades. [Artículo principal](https://refactoring.guru/es/design-patterns/decorator) [Uso en Swift](https://refactoring.guru/es/design-patterns/decorator/swift/example#lang-features) [Ejemplo conceptual](https://refactoring.guru/es/design-patterns/decorator/swift/example#example-0) [Ejemplo del mundo real](https://refactoring.guru/es/design-patterns/decorator/swift/example#example-1) ![Facade](https://refactoring.guru/images/patterns/cards/facade-mini-3x.png) #### Facade Proporciona una interfaz simplificada a una biblioteca, un framework o cualquier otro grupo complejo de clases. [Artículo principal](https://refactoring.guru/es/design-patterns/facade) [Uso en Swift](https://refactoring.guru/es/design-patterns/facade/swift/example#lang-features) [Ejemplo conceptual](https://refactoring.guru/es/design-patterns/facade/swift/example#example-0) [Ejemplo del mundo real](https://refactoring.guru/es/design-patterns/facade/swift/example#example-1) ![Flyweight](https://refactoring.guru/images/patterns/cards/flyweight-mini-3x.png) #### Flyweight Permite mantener más objetos dentro de la cantidad disponible de memoria RAM compartiendo las partes comunes del estado entre varios objetos en lugar de mantener toda la información en cada objeto. [Artículo principal](https://refactoring.guru/es/design-patterns/flyweight) [Uso en Swift](https://refactoring.guru/es/design-patterns/flyweight/swift/example#lang-features) [Ejemplo conceptual](https://refactoring.guru/es/design-patterns/flyweight/swift/example#example-0) [Ejemplo del mundo real](https://refactoring.guru/es/design-patterns/flyweight/swift/example#example-1) ![Proxy](https://refactoring.guru/images/patterns/cards/proxy-mini-3x.png) #### Proxy Permite proporcionar un sustituto o marcador de posición para otro objeto. Un proxy controla el acceso al objeto original, permitiéndote hacer algo antes o después de que la solicitud llegue al objeto original. [Artículo principal](https://refactoring.guru/es/design-patterns/proxy) [Uso en Swift](https://refactoring.guru/es/design-patterns/proxy/swift/example#lang-features) [Ejemplo conceptual](https://refactoring.guru/es/design-patterns/proxy/swift/example#example-0) [Ejemplo del mundo real](https://refactoring.guru/es/design-patterns/proxy/swift/example#example-1) #### Patrones de comportamiento ![Chain of Responsibility](https://refactoring.guru/images/patterns/cards/chain-of-responsibility-mini-3x.png) #### Chain of Responsibility Permite pasar solicitudes a lo largo de una cadena de manejadores. Al recibir una solicitud, cada manejador decide si la procesa o si la pasa al siguiente manejador de la cadena. [Artículo principal](https://refactoring.guru/es/design-patterns/chain-of-responsibility) [Uso en Swift](https://refactoring.guru/es/design-patterns/chain-of-responsibility/swift/example#lang-features) [Ejemplo conceptual](https://refactoring.guru/es/design-patterns/chain-of-responsibility/swift/example#example-0) [Ejemplo del mundo real](https://refactoring.guru/es/design-patterns/chain-of-responsibility/swift/example#example-1) ![Command](https://refactoring.guru/images/patterns/cards/command-mini-3x.png) #### Command Convierte una solicitud en un objeto independiente que contiene toda la información sobre la solicitud. Esta transformación te permite parametrizar los métodos con diferentes solicitudes, retrasar o poner en cola la ejecución de una solicitud y soportar operaciones que no se pueden realizar. [Artículo principal](https://refactoring.guru/es/design-patterns/command) [Uso en Swift](https://refactoring.guru/es/design-patterns/command/swift/example#lang-features) [Ejemplo conceptual](https://refactoring.guru/es/design-patterns/command/swift/example#example-0) [Ejemplo del mundo real](https://refactoring.guru/es/design-patterns/command/swift/example#example-1) ![Iterator](https://refactoring.guru/images/patterns/cards/iterator-mini-3x.png) #### Iterator Permite recorrer elementos de una colección sin exponer su representación subyacente (lista, pila, árbol, etc.). [Artículo principal](https://refactoring.guru/es/design-patterns/iterator) [Uso en Swift](https://refactoring.guru/es/design-patterns/iterator/swift/example#lang-features) [Ejemplo conceptual](https://refactoring.guru/es/design-patterns/iterator/swift/example#example-0) [Ejemplo del mundo real](https://refactoring.guru/es/design-patterns/iterator/swift/example#example-1) ![Mediator](https://refactoring.guru/images/patterns/cards/mediator-mini-3x.png) #### Mediator Permite reducir las dependencias caóticas entre objetos. El patrón restringe las comunicaciones directas entre los objetos, forzándolos a colaborar únicamente a través de un objeto mediador. [Artículo principal](https://refactoring.guru/es/design-patterns/mediator) [Uso en Swift](https://refactoring.guru/es/design-patterns/mediator/swift/example#lang-features) [Ejemplo conceptual](https://refactoring.guru/es/design-patterns/mediator/swift/example#example-0) [Ejemplo del mundo real](https://refactoring.guru/es/design-patterns/mediator/swift/example#example-1) ![Memento](https://refactoring.guru/images/patterns/cards/memento-mini-3x.png) #### Memento Permite guardar y restaurar el estado previo de un objeto sin revelar los detalles de su implementación. [Artículo principal](https://refactoring.guru/es/design-patterns/memento) [Uso en Swift](https://refactoring.guru/es/design-patterns/memento/swift/example#lang-features) [Ejemplo conceptual](https://refactoring.guru/es/design-patterns/memento/swift/example#example-0) [Ejemplo del mundo real](https://refactoring.guru/es/design-patterns/memento/swift/example#example-1) ![Observer](https://refactoring.guru/images/patterns/cards/observer-mini-3x.png) #### Observer Permite definir un mecanismo de suscripción para notificar a varios objetos sobre cualquier evento que le suceda al objeto que están observando. [Artículo principal](https://refactoring.guru/es/design-patterns/observer) [Uso en Swift](https://refactoring.guru/es/design-patterns/observer/swift/example#lang-features) [Ejemplo conceptual](https://refactoring.guru/es/design-patterns/observer/swift/example#example-0) [Ejemplo del mundo real](https://refactoring.guru/es/design-patterns/observer/swift/example#example-1) ![State](https://refactoring.guru/images/patterns/cards/state-mini-3x.png) #### State Permite a un objeto alterar su comportamiento cuando su estado interno cambia. Parece como si el objeto cambiara su clase. [Artículo principal](https://refactoring.guru/es/design-patterns/state) [Uso en Swift](https://refactoring.guru/es/design-patterns/state/swift/example#lang-features) [Ejemplo conceptual](https://refactoring.guru/es/design-patterns/state/swift/example#example-0) [Ejemplo del mundo real](https://refactoring.guru/es/design-patterns/state/swift/example#example-1) ![Strategy](https://refactoring.guru/images/patterns/cards/strategy-mini-3x.png) #### Strategy Permite definir una familia de algoritmos, colocar cada uno de ellos en una clase separada y hacer sus objetos intercambiables. [Artículo principal](https://refactoring.guru/es/design-patterns/strategy) [Uso en Swift](https://refactoring.guru/es/design-patterns/strategy/swift/example#lang-features) [Ejemplo conceptual](https://refactoring.guru/es/design-patterns/strategy/swift/example#example-0) [Ejemplo del mundo real](https://refactoring.guru/es/design-patterns/strategy/swift/example#example-1) ![Template Method](https://refactoring.guru/images/patterns/cards/template-method-mini-3x.png) #### Template Method Define el esqueleto de un algoritmo en la superclase pero permite que las subclases sobrescriban pasos del algoritmo sin cambiar su estructura. [Artículo principal](https://refactoring.guru/es/design-patterns/template-method) [Uso en Swift](https://refactoring.guru/es/design-patterns/template-method/swift/example#lang-features) [Ejemplo conceptual](https://refactoring.guru/es/design-patterns/template-method/swift/example#example-0) [Ejemplo del mundo real](https://refactoring.guru/es/design-patterns/template-method/swift/example#example-1) ![Visitor](https://refactoring.guru/images/patterns/cards/visitor-mini-3x.png) #### Visitor Permite separar algoritmos de los objetos sobre los que operan. [Artículo principal](https://refactoring.guru/es/design-patterns/visitor) [Uso en Swift](https://refactoring.guru/es/design-patterns/visitor/swift/example#lang-features) [Ejemplo conceptual](https://refactoring.guru/es/design-patterns/visitor/swift/example#example-0) [Ejemplo del mundo real](https://refactoring.guru/es/design-patterns/visitor/swift/example#example-1) --- # Patrones de diseño en Go [There are patterns of patterns now! \ My friend's project: MetaPatterns.io](https://metapatterns.io/)  [](https://refactoring.guru/es/design-patterns/go#checkout) [](https://refactoring.guru/es/design-patterns/go#checkout) ![Patrones de diseño en Go](https://refactoring.guru/images/patterns/languages/go-3x.png) ![Design Patterns in Go](https://refactoring.guru/images/patterns/languages/mini/go-3x.png) PATRONES de DISEÑO en Go ======================== El catálogo de ejemplos en **Go** --------------------------------- #### Patrones creacionales ![Abstract Factory](https://refactoring.guru/images/patterns/cards/abstract-factory-mini-3x.png) #### Abstract Factory Permite producir familias de objetos relacionados sin especificar sus clases concretas. [Artículo principal](https://refactoring.guru/es/design-patterns/abstract-factory) [Ejemplo de código](https://refactoring.guru/es/design-patterns/abstract-factory/go/example#example-0) ![Builder](https://refactoring.guru/images/patterns/cards/builder-mini-3x.png) #### Builder Permite construir objetos complejos paso a paso. Este patrón nos permite producir distintos tipos y representaciones de un objeto empleando el mismo código de construcción. [Artículo principal](https://refactoring.guru/es/design-patterns/builder) [Ejemplo de código](https://refactoring.guru/es/design-patterns/builder/go/example#example-0) ![Factory Method](https://refactoring.guru/images/patterns/cards/factory-method-mini-3x.png) #### Factory Method Proporciona una interfaz para la creación de objetos en una superclase, mientras permite a las subclases alterar el tipo de objetos que se crearán. [Artículo principal](https://refactoring.guru/es/design-patterns/factory-method) [Ejemplo de código](https://refactoring.guru/es/design-patterns/factory-method/go/example#example-0) ![Prototype](https://refactoring.guru/images/patterns/cards/prototype-mini-3x.png) #### Prototype Permite copiar objetos existentes sin que el código dependa de sus clases. [Artículo principal](https://refactoring.guru/es/design-patterns/prototype) [Ejemplo de código](https://refactoring.guru/es/design-patterns/prototype/go/example#example-0) ![Singleton](https://refactoring.guru/images/patterns/cards/singleton-mini-3x.png) #### Singleton Permite asegurarnos de que una clase tenga una única instancia, a la vez que proporciona un punto de acceso global a dicha instancia. [Artículo principal](https://refactoring.guru/es/design-patterns/singleton) [Naïve Singleton](https://refactoring.guru/es/design-patterns/singleton/go/example#example-0) [Thread-safe Singleton](https://refactoring.guru/es/design-patterns/singleton/go/example#example-1) #### Patrones estructurales ![Adapter](https://refactoring.guru/images/patterns/cards/adapter-mini-3x.png) #### Adapter Permite la colaboración entre objetos con interfaces incompatibles. [Artículo principal](https://refactoring.guru/es/design-patterns/adapter) [Ejemplo de código](https://refactoring.guru/es/design-patterns/adapter/go/example#example-0) ![Bridge](https://refactoring.guru/images/patterns/cards/bridge-mini-3x.png) #### Bridge Permite dividir una clase grande o un grupo de clases estrechamente relacionadas, en dos jerarquías separadas (abstracción e implementación) que pueden desarrollarse independientemente la una de la otra. [Artículo principal](https://refactoring.guru/es/design-patterns/bridge) [Ejemplo de código](https://refactoring.guru/es/design-patterns/bridge/go/example#example-0) ![Composite](https://refactoring.guru/images/patterns/cards/composite-mini-3x.png) #### Composite Permite componer objetos en estructuras de árbol y trabajar con esas estructuras como si fueran objetos individuales. [Artículo principal](https://refactoring.guru/es/design-patterns/composite) [Ejemplo de código](https://refactoring.guru/es/design-patterns/composite/go/example#example-0) ![Decorator](https://refactoring.guru/images/patterns/cards/decorator-mini-3x.png) #### Decorator Permite añadir funcionalidades a objetos colocando estos objetos dentro de objetos encapsuladores especiales que contienen estas funcionalidades. [Artículo principal](https://refactoring.guru/es/design-patterns/decorator) [Ejemplo de código](https://refactoring.guru/es/design-patterns/decorator/go/example#example-0) ![Facade](https://refactoring.guru/images/patterns/cards/facade-mini-3x.png) #### Facade Proporciona una interfaz simplificada a una biblioteca, un framework o cualquier otro grupo complejo de clases. [Artículo principal](https://refactoring.guru/es/design-patterns/facade) [Ejemplo de código](https://refactoring.guru/es/design-patterns/facade/go/example#example-0) ![Flyweight](https://refactoring.guru/images/patterns/cards/flyweight-mini-3x.png) #### Flyweight Permite mantener más objetos dentro de la cantidad disponible de memoria RAM compartiendo las partes comunes del estado entre varios objetos en lugar de mantener toda la información en cada objeto. [Artículo principal](https://refactoring.guru/es/design-patterns/flyweight) [Ejemplo de código](https://refactoring.guru/es/design-patterns/flyweight/go/example#example-0) ![Proxy](https://refactoring.guru/images/patterns/cards/proxy-mini-3x.png) #### Proxy Permite proporcionar un sustituto o marcador de posición para otro objeto. Un proxy controla el acceso al objeto original, permitiéndote hacer algo antes o después de que la solicitud llegue al objeto original. [Artículo principal](https://refactoring.guru/es/design-patterns/proxy) [Ejemplo de código](https://refactoring.guru/es/design-patterns/proxy/go/example#example-0) #### Patrones de comportamiento ![Chain of Responsibility](https://refactoring.guru/images/patterns/cards/chain-of-responsibility-mini-3x.png) #### Chain of Responsibility Permite pasar solicitudes a lo largo de una cadena de manejadores. Al recibir una solicitud, cada manejador decide si la procesa o si la pasa al siguiente manejador de la cadena. [Artículo principal](https://refactoring.guru/es/design-patterns/chain-of-responsibility) [Ejemplo de código](https://refactoring.guru/es/design-patterns/chain-of-responsibility/go/example#example-0) ![Command](https://refactoring.guru/images/patterns/cards/command-mini-3x.png) #### Command Convierte una solicitud en un objeto independiente que contiene toda la información sobre la solicitud. Esta transformación te permite parametrizar los métodos con diferentes solicitudes, retrasar o poner en cola la ejecución de una solicitud y soportar operaciones que no se pueden realizar. [Artículo principal](https://refactoring.guru/es/design-patterns/command) [Ejemplo de código](https://refactoring.guru/es/design-patterns/command/go/example#example-0) ![Iterator](https://refactoring.guru/images/patterns/cards/iterator-mini-3x.png) #### Iterator Permite recorrer elementos de una colección sin exponer su representación subyacente (lista, pila, árbol, etc.). [Artículo principal](https://refactoring.guru/es/design-patterns/iterator) [Ejemplo de código](https://refactoring.guru/es/design-patterns/iterator/go/example#example-0) ![Mediator](https://refactoring.guru/images/patterns/cards/mediator-mini-3x.png) #### Mediator Permite reducir las dependencias caóticas entre objetos. El patrón restringe las comunicaciones directas entre los objetos, forzándolos a colaborar únicamente a través de un objeto mediador. [Artículo principal](https://refactoring.guru/es/design-patterns/mediator) [Ejemplo de código](https://refactoring.guru/es/design-patterns/mediator/go/example#example-0) ![Memento](https://refactoring.guru/images/patterns/cards/memento-mini-3x.png) #### Memento Permite guardar y restaurar el estado previo de un objeto sin revelar los detalles de su implementación. [Artículo principal](https://refactoring.guru/es/design-patterns/memento) [Ejemplo de código](https://refactoring.guru/es/design-patterns/memento/go/example#example-0) ![Observer](https://refactoring.guru/images/patterns/cards/observer-mini-3x.png) #### Observer Permite definir un mecanismo de suscripción para notificar a varios objetos sobre cualquier evento que le suceda al objeto que están observando. [Artículo principal](https://refactoring.guru/es/design-patterns/observer) [Ejemplo de código](https://refactoring.guru/es/design-patterns/observer/go/example#example-0) ![State](https://refactoring.guru/images/patterns/cards/state-mini-3x.png) #### State Permite a un objeto alterar su comportamiento cuando su estado interno cambia. Parece como si el objeto cambiara su clase. [Artículo principal](https://refactoring.guru/es/design-patterns/state) [Ejemplo de código](https://refactoring.guru/es/design-patterns/state/go/example#example-0) ![Strategy](https://refactoring.guru/images/patterns/cards/strategy-mini-3x.png) #### Strategy Permite definir una familia de algoritmos, colocar cada uno de ellos en una clase separada y hacer sus objetos intercambiables. [Artículo principal](https://refactoring.guru/es/design-patterns/strategy) [Ejemplo de código](https://refactoring.guru/es/design-patterns/strategy/go/example#example-0) ![Template Method](https://refactoring.guru/images/patterns/cards/template-method-mini-3x.png) #### Template Method Define el esqueleto de un algoritmo en la superclase pero permite que las subclases sobrescriban pasos del algoritmo sin cambiar su estructura. [Artículo principal](https://refactoring.guru/es/design-patterns/template-method) [Ejemplo de código](https://refactoring.guru/es/design-patterns/template-method/go/example#example-0) ![Visitor](https://refactoring.guru/images/patterns/cards/visitor-mini-3x.png) #### Visitor Permite separar algoritmos de los objetos sobre los que operan. [Artículo principal](https://refactoring.guru/es/design-patterns/visitor) [Ejemplo de código](https://refactoring.guru/es/design-patterns/visitor/go/example#example-0) --- # Ланцюжок обов'язків на Java [There are patterns of patterns now! \ My friend's project: MetaPatterns.io](https://metapatterns.io/)  [](https://refactoring.guru/uk/design-patterns/chain-of-responsibility/java/example#checkout) [](https://refactoring.guru/uk/design-patterns/chain-of-responsibility/java/example#checkout) [](https://refactoring.guru/) / [Патерни проектування](https://refactoring.guru/uk/design-patterns) / [Ланцюжок обов'язків](https://refactoring.guru/uk/design-patterns/chain-of-responsibility) / [Java](https://refactoring.guru/uk/design-patterns/java) ![Ланцюжок обов'язків](https://refactoring.guru/images/patterns/cards/chain-of-responsibility-mini-2x.png?id=8c81f7069e51259b2443801b91135f7f) **Ланцюжок обов'язків** на Java =============================== **Ланцюжок обов’язків** — це поведінковий патерн, що дозволяє передавати запит ланцюжком потенційних обробників до тих пір, поки один з них не обробить його. Позбавляє від жорсткої прив’язки відправника запиту до одержувача, дозволяючи динамічно вибудовувати ланцюг з різних обробників. [Детальніше про Ланцюжок обов'язків](https://refactoring.guru/uk/design-patterns/chain-of-responsibility) Навігація  [Інтро](https://refactoring.guru/uk/design-patterns/chain-of-responsibility/java/example#)  [Шари авторизації та аутентифікації користувачів](https://refactoring.guru/uk/design-patterns/chain-of-responsibility/java/example#example-0)  middleware   [Middleware](https://refactoring.guru/uk/design-patterns/chain-of-responsibility/java/example#example-0--middleware-Middleware-java)   [Throttling­Middleware](https://refactoring.guru/uk/design-patterns/chain-of-responsibility/java/example#example-0--middleware-ThrottlingMiddleware-java)   [User­Exists­Middleware](https://refactoring.guru/uk/design-patterns/chain-of-responsibility/java/example#example-0--middleware-UserExistsMiddleware-java)   [Role­Check­Middleware](https://refactoring.guru/uk/design-patterns/chain-of-responsibility/java/example#example-0--middleware-RoleCheckMiddleware-java)  server   [Server](https://refactoring.guru/uk/design-patterns/chain-of-responsibility/java/example#example-0--server-Server-java)  [Demo](https://refactoring.guru/uk/design-patterns/chain-of-responsibility/java/example#example-0--Demo-java)  [Output­Demo](https://refactoring.guru/uk/design-patterns/chain-of-responsibility/java/example#example-0--OutputDemo-txt) **Складність:** **Популярність:** **Застосування:** Патерн зустрічається в Java не так вже й часто, оскільки для його застосування потрібен ланцюг об’єктів, наприклад, зв’язаний список. Сфера застосування ланцюжка обов’язків — різноманітні обробники подій, послідовні перевірки доступу та інше. Приклади Ланцюжка обов’язків в стандартних бібліотеках Java: * [`java.util.logging.Logger#log()`](http://docs.oracle.com/javase/8/docs/api/java/util/logging/Logger.html#log-java.util.logging.Level-java.lang.String-) * [`javax.servlet.Filter#doFilter()`](http://docs.oracle.com/javaee/7/api/javax/servlet/Filter.html#doFilter-javax.servlet.ServletRequest-javax.servlet.ServletResponse-javax.servlet.FilterChain-) **Ознаки застосування патерна:** Ланцюжок обов’язків можна визначити за списками обробників або перевірок, через які пропускаються запити. Особливо, якщо порядок проходження обробників є важливим. Шари авторизації та аутентифікації користувачів ----------------------------------------------- Цей приклад показує як дані користувача проходять послідовну аутентифікацію через багато обробників, зв’язаних в один ланцюг. Цей приклад відрізняється від канонічної версії тим, що перевірка припиняється, якщо черговий обробник **не може** обробити запит. В класичному варіанті проходження ланцюжком закінчується відразу, як тільки знаходиться елемент ланцюга, що **може** обробити запит. Просто знайте, що Концептуальний приклад від цього не змінюється, а код відрізняється тільки умовою виходу з ланцюга. ### **middleware** #### **middleware/Middleware.java:** Базовий клас перевірок package refactoring\_guru.chain\_of\_responsibility.example.middleware; /\*\* \* Base middleware class. \*/ public abstract class Middleware { private Middleware next; /\*\* \* Builds chains of middleware objects. \*/ public static Middleware link(Middleware first, Middleware... chain) { Middleware head = first; for (Middleware nextInChain: chain) { head.next = nextInChain; head = nextInChain; } return first; } /\*\* \* Subclasses will implement this method with concrete checks. \*/ public abstract boolean check(String email, String password); /\*\* \* Runs check on the next object in chain or ends traversing if we're in \* last object in chain. \*/ protected boolean checkNext(String email, String password) { if (next == null) { return true; } return next.check(email, password); } } #### **middleware/ThrottlingMiddleware.java:** Перевірка на ліміт запитів package refactoring\_guru.chain\_of\_responsibility.example.middleware; /\*\* \* ConcreteHandler. Checks whether there are too many failed login requests. \*/ public class ThrottlingMiddleware extends Middleware { private int requestPerMinute; private int request; private long currentTime; public ThrottlingMiddleware(int requestPerMinute) { this.requestPerMinute = requestPerMinute; this.currentTime = System.currentTimeMillis(); } /\*\* \* Please, not that checkNext() call can be inserted both in the beginning \* of this method and in the end. \* \* This gives much more flexibility than a simple loop over all middleware \* objects. For instance, an element of a chain can change the order of \* checks by running its check after all other checks. \*/ public boolean check(String email, String password) { if (System.currentTimeMillis() > currentTime + 60\_000) { request = 0; currentTime = System.currentTimeMillis(); } request++; if (request > requestPerMinute) { System.out.println("Request limit exceeded!"); Thread.currentThread().stop(); } return checkNext(email, password); } } #### **middleware/UserExistsMiddleware.java:** Перевірка пароля package refactoring\_guru.chain\_of\_responsibility.example.middleware; import refactoring\_guru.chain\_of\_responsibility.example.server.Server; /\*\* \* ConcreteHandler. Checks whether a user with the given credentials exists. \*/ public class UserExistsMiddleware extends Middleware { private Server server; public UserExistsMiddleware(Server server) { this.server = server; } public boolean check(String email, String password) { if (!server.hasEmail(email)) { System.out.println("This email is not registered!"); return false; } if (!server.isValidPassword(email, password)) { System.out.println("Wrong password!"); return false; } return checkNext(email, password); } } #### **middleware/RoleCheckMiddleware.java:** Перевірка ролі package refactoring\_guru.chain\_of\_responsibility.example.middleware; /\*\* \* ConcreteHandler. Checks a user's role. \*/ public class RoleCheckMiddleware extends Middleware { public boolean check(String email, String password) { if (email.equals("admin@example.com")) { System.out.println("Hello, admin!"); return true; } System.out.println("Hello, user!"); return checkNext(email, password); } } ### **server** #### **server/Server.java:** Сервер, на який заходимо package refactoring\_guru.chain\_of\_responsibility.example.server; import refactoring\_guru.chain\_of\_responsibility.example.middleware.Middleware; import java.util.HashMap; import java.util.Map; /\*\* \* Server class. \*/ public class Server { private Map users = new HashMap<>(); private Middleware middleware; /\*\* \* Client passes a chain of object to server. This improves flexibility and \* makes testing the server class easier. \*/ public void setMiddleware(Middleware middleware) { this.middleware = middleware; } /\*\* \* Server gets email and password from client and sends the authorization \* request to the chain. \*/ public boolean logIn(String email, String password) { if (middleware.check(email, password)) { System.out.println("Authorization have been successful!"); // Do something useful here for authorized users. return true; } return false; } public void register(String email, String password) { users.put(email, password); } public boolean hasEmail(String email) { return users.containsKey(email); } public boolean isValidPassword(String email, String password) { return users.get(email).equals(password); } } #### **Demo.java:** Клієнтський код package refactoring\_guru.chain\_of\_responsibility.example; import refactoring\_guru.chain\_of\_responsibility.example.middleware.Middleware; import refactoring\_guru.chain\_of\_responsibility.example.middleware.RoleCheckMiddleware; import refactoring\_guru.chain\_of\_responsibility.example.middleware.ThrottlingMiddleware; import refactoring\_guru.chain\_of\_responsibility.example.middleware.UserExistsMiddleware; import refactoring\_guru.chain\_of\_responsibility.example.server.Server; import java.io.BufferedReader; import java.io.IOException; import java.io.InputStreamReader; /\*\* \* Demo class. Everything comes together here. \*/ public class Demo { private static BufferedReader reader = new BufferedReader(new InputStreamReader(System.in)); private static Server server; private static void init() { server = new Server(); server.register("admin@example.com", "admin\_pass"); server.register("user@example.com", "user\_pass"); // All checks are linked. Client can build various chains using the same // components. Middleware middleware = Middleware.link( new ThrottlingMiddleware(2), new UserExistsMiddleware(server), new RoleCheckMiddleware() ); // Server gets a chain from client code. server.setMiddleware(middleware); } public static void main(String\[\] args) throws IOException { init(); boolean success; do { System.out.print("Enter email: "); String email = reader.readLine(); System.out.print("Input password: "); String password = reader.readLine(); success = server.logIn(email, password); } while (!success); } } #### **OutputDemo.txt:** Результат виконання Enter email: admin@example.com Input password: admin\_pass Hello, admin! Authorization have been successful! Enter email: wrong@example.com Input password: wrong\_pass This email is not registered! Enter email: wrong@example.com Input password: wrong\_pass This email is not registered! Enter email: wrong@example.com Input password: wrong\_pass Request limit exceeded! **Ланцюжок обов'язків** іншими мовами програмування --------------------------------------------------- [![Ланцюжок обов'язків на C#](https://refactoring.guru/images/patterns/icons/csharp.svg?id=da64592defc6e86d57c39c66e9de3e58)](https://refactoring.guru/uk/design-patterns/chain-of-responsibility/csharp/example "Ланцюжок обов'язків на C#") [![Ланцюжок обов'язків на C++](https://refactoring.guru/images/patterns/icons/cpp.svg?id=f7782ed8b8666246bfcc3f8fefc3b858)](https://refactoring.guru/uk/design-patterns/chain-of-responsibility/cpp/example "Ланцюжок обов'язків на C++") [![Ланцюжок обов'язків на Go](https://refactoring.guru/images/patterns/icons/go.svg?id=1a89927eb99b1ea3fde7701d97970aca)](https://refactoring.guru/uk/design-patterns/chain-of-responsibility/go/example "Ланцюжок обов'язків на Go") [![Ланцюжок обов'язків на PHP](https://refactoring.guru/images/patterns/icons/php.svg?id=be1906eb26b71ec1d3b93720d6156618)](https://refactoring.guru/uk/design-patterns/chain-of-responsibility/php/example "Ланцюжок обов'язків на PHP") [![Ланцюжок обов'язків на Python](https://refactoring.guru/images/patterns/icons/python.svg?id=6d815d43c0f7050a1151b43e51569c9f)](https://refactoring.guru/uk/design-patterns/chain-of-responsibility/python/example "Ланцюжок обов'язків на Python") [![Ланцюжок обов'язків на Ruby](https://refactoring.guru/images/patterns/icons/ruby.svg?id=b065b718c914bf8e960ef731600be1eb)](https://refactoring.guru/uk/design-patterns/chain-of-responsibility/ruby/example "Ланцюжок обов'язків на Ruby") [![Ланцюжок обов'язків на Rust](https://refactoring.guru/images/patterns/icons/rust.svg?id=1f5698a4b5ae23fe79413511747e4a87)](https://refactoring.guru/uk/design-patterns/chain-of-responsibility/rust/example "Ланцюжок обов'язків на Rust") [![Ланцюжок обов'язків на Swift](https://refactoring.guru/images/patterns/icons/swift.svg?id=0b716c2d52ec3a48fbe91ac031070c1d)](https://refactoring.guru/uk/design-patterns/chain-of-responsibility/swift/example "Ланцюжок обов'язків на Swift") [![Ланцюжок обов'язків на TypeScript](https://refactoring.guru/images/patterns/icons/typescript.svg?id=2239d0f16cb703540c205dd8cb0c0cb7)](https://refactoring.guru/uk/design-patterns/chain-of-responsibility/typescript/example "Ланцюжок обов'язків на TypeScript") --- # Patrones de diseño en Python [There are patterns of patterns now! \ My friend's project: MetaPatterns.io](https://metapatterns.io/)  [](https://refactoring.guru/es/design-patterns/python#checkout) [](https://refactoring.guru/es/design-patterns/python#checkout) ![Patrones de diseño en Python](https://refactoring.guru/images/patterns/languages/python-3x.png) ![Patrones de diseño en Python](https://refactoring.guru/images/patterns/languages/mini/python-3x.png) PATRONES de DISEÑO en Python ============================ El catálogo de ejemplos en **Python** ------------------------------------- #### Patrones creacionales ![Abstract Factory](https://refactoring.guru/images/patterns/cards/abstract-factory-mini-3x.png) #### Abstract Factory Permite producir familias de objetos relacionados sin especificar sus clases concretas. [Artículo principal](https://refactoring.guru/es/design-patterns/abstract-factory) [Uso en Python](https://refactoring.guru/es/design-patterns/abstract-factory/python/example#lang-features) [Ejemplo de código](https://refactoring.guru/es/design-patterns/abstract-factory/python/example#example-0) ![Builder](https://refactoring.guru/images/patterns/cards/builder-mini-3x.png) #### Builder Permite construir objetos complejos paso a paso. Este patrón nos permite producir distintos tipos y representaciones de un objeto empleando el mismo código de construcción. [Artículo principal](https://refactoring.guru/es/design-patterns/builder) [Uso en Python](https://refactoring.guru/es/design-patterns/builder/python/example#lang-features) [Ejemplo de código](https://refactoring.guru/es/design-patterns/builder/python/example#example-0) ![Factory Method](https://refactoring.guru/images/patterns/cards/factory-method-mini-3x.png) #### Factory Method Proporciona una interfaz para la creación de objetos en una superclase, mientras permite a las subclases alterar el tipo de objetos que se crearán. [Artículo principal](https://refactoring.guru/es/design-patterns/factory-method) [Uso en Python](https://refactoring.guru/es/design-patterns/factory-method/python/example#lang-features) [Ejemplo de código](https://refactoring.guru/es/design-patterns/factory-method/python/example#example-0) ![Prototype](https://refactoring.guru/images/patterns/cards/prototype-mini-3x.png) #### Prototype Permite copiar objetos existentes sin que el código dependa de sus clases. [Artículo principal](https://refactoring.guru/es/design-patterns/prototype) [Uso en Python](https://refactoring.guru/es/design-patterns/prototype/python/example#lang-features) [Ejemplo de código](https://refactoring.guru/es/design-patterns/prototype/python/example#example-0) ![Singleton](https://refactoring.guru/images/patterns/cards/singleton-mini-3x.png) #### Singleton Permite asegurarnos de que una clase tenga una única instancia, a la vez que proporciona un punto de acceso global a dicha instancia. [Artículo principal](https://refactoring.guru/es/design-patterns/singleton) [Uso en Python](https://refactoring.guru/es/design-patterns/singleton/python/example#lang-features) [Naïve Singleton](https://refactoring.guru/es/design-patterns/singleton/python/example#example-0) [Thread-safe Singleton](https://refactoring.guru/es/design-patterns/singleton/python/example#example-1) #### Patrones estructurales ![Adapter](https://refactoring.guru/images/patterns/cards/adapter-mini-3x.png) #### Adapter Permite la colaboración entre objetos con interfaces incompatibles. [Artículo principal](https://refactoring.guru/es/design-patterns/adapter) [Uso en Python](https://refactoring.guru/es/design-patterns/adapter/python/example#lang-features) [Ejemplo de código](https://refactoring.guru/es/design-patterns/adapter/python/example#example-0) ![Bridge](https://refactoring.guru/images/patterns/cards/bridge-mini-3x.png) #### Bridge Permite dividir una clase grande o un grupo de clases estrechamente relacionadas, en dos jerarquías separadas (abstracción e implementación) que pueden desarrollarse independientemente la una de la otra. [Artículo principal](https://refactoring.guru/es/design-patterns/bridge) [Uso en Python](https://refactoring.guru/es/design-patterns/bridge/python/example#lang-features) [Ejemplo de código](https://refactoring.guru/es/design-patterns/bridge/python/example#example-0) ![Composite](https://refactoring.guru/images/patterns/cards/composite-mini-3x.png) #### Composite Permite componer objetos en estructuras de árbol y trabajar con esas estructuras como si fueran objetos individuales. [Artículo principal](https://refactoring.guru/es/design-patterns/composite) [Uso en Python](https://refactoring.guru/es/design-patterns/composite/python/example#lang-features) [Ejemplo de código](https://refactoring.guru/es/design-patterns/composite/python/example#example-0) ![Decorator](https://refactoring.guru/images/patterns/cards/decorator-mini-3x.png) #### Decorator Permite añadir funcionalidades a objetos colocando estos objetos dentro de objetos encapsuladores especiales que contienen estas funcionalidades. [Artículo principal](https://refactoring.guru/es/design-patterns/decorator) [Uso en Python](https://refactoring.guru/es/design-patterns/decorator/python/example#lang-features) [Ejemplo de código](https://refactoring.guru/es/design-patterns/decorator/python/example#example-0) ![Facade](https://refactoring.guru/images/patterns/cards/facade-mini-3x.png) #### Facade Proporciona una interfaz simplificada a una biblioteca, un framework o cualquier otro grupo complejo de clases. [Artículo principal](https://refactoring.guru/es/design-patterns/facade) [Uso en Python](https://refactoring.guru/es/design-patterns/facade/python/example#lang-features) [Ejemplo de código](https://refactoring.guru/es/design-patterns/facade/python/example#example-0) ![Flyweight](https://refactoring.guru/images/patterns/cards/flyweight-mini-3x.png) #### Flyweight Permite mantener más objetos dentro de la cantidad disponible de memoria RAM compartiendo las partes comunes del estado entre varios objetos en lugar de mantener toda la información en cada objeto. [Artículo principal](https://refactoring.guru/es/design-patterns/flyweight) [Uso en Python](https://refactoring.guru/es/design-patterns/flyweight/python/example#lang-features) [Ejemplo de código](https://refactoring.guru/es/design-patterns/flyweight/python/example#example-0) ![Proxy](https://refactoring.guru/images/patterns/cards/proxy-mini-3x.png) #### Proxy Permite proporcionar un sustituto o marcador de posición para otro objeto. Un proxy controla el acceso al objeto original, permitiéndote hacer algo antes o después de que la solicitud llegue al objeto original. [Artículo principal](https://refactoring.guru/es/design-patterns/proxy) [Uso en Python](https://refactoring.guru/es/design-patterns/proxy/python/example#lang-features) [Ejemplo de código](https://refactoring.guru/es/design-patterns/proxy/python/example#example-0) #### Patrones de comportamiento ![Chain of Responsibility](https://refactoring.guru/images/patterns/cards/chain-of-responsibility-mini-3x.png) #### Chain of Responsibility Permite pasar solicitudes a lo largo de una cadena de manejadores. Al recibir una solicitud, cada manejador decide si la procesa o si la pasa al siguiente manejador de la cadena. [Artículo principal](https://refactoring.guru/es/design-patterns/chain-of-responsibility) [Uso en Python](https://refactoring.guru/es/design-patterns/chain-of-responsibility/python/example#lang-features) [Ejemplo de código](https://refactoring.guru/es/design-patterns/chain-of-responsibility/python/example#example-0) ![Command](https://refactoring.guru/images/patterns/cards/command-mini-3x.png) #### Command Convierte una solicitud en un objeto independiente que contiene toda la información sobre la solicitud. Esta transformación te permite parametrizar los métodos con diferentes solicitudes, retrasar o poner en cola la ejecución de una solicitud y soportar operaciones que no se pueden realizar. [Artículo principal](https://refactoring.guru/es/design-patterns/command) [Uso en Python](https://refactoring.guru/es/design-patterns/command/python/example#lang-features) [Ejemplo de código](https://refactoring.guru/es/design-patterns/command/python/example#example-0) ![Iterator](https://refactoring.guru/images/patterns/cards/iterator-mini-3x.png) #### Iterator Permite recorrer elementos de una colección sin exponer su representación subyacente (lista, pila, árbol, etc.). [Artículo principal](https://refactoring.guru/es/design-patterns/iterator) [Uso en Python](https://refactoring.guru/es/design-patterns/iterator/python/example#lang-features) [Ejemplo de código](https://refactoring.guru/es/design-patterns/iterator/python/example#example-0) ![Mediator](https://refactoring.guru/images/patterns/cards/mediator-mini-3x.png) #### Mediator Permite reducir las dependencias caóticas entre objetos. El patrón restringe las comunicaciones directas entre los objetos, forzándolos a colaborar únicamente a través de un objeto mediador. [Artículo principal](https://refactoring.guru/es/design-patterns/mediator) [Uso en Python](https://refactoring.guru/es/design-patterns/mediator/python/example#lang-features) [Ejemplo de código](https://refactoring.guru/es/design-patterns/mediator/python/example#example-0) ![Memento](https://refactoring.guru/images/patterns/cards/memento-mini-3x.png) #### Memento Permite guardar y restaurar el estado previo de un objeto sin revelar los detalles de su implementación. [Artículo principal](https://refactoring.guru/es/design-patterns/memento) [Uso en Python](https://refactoring.guru/es/design-patterns/memento/python/example#lang-features) [Ejemplo de código](https://refactoring.guru/es/design-patterns/memento/python/example#example-0) ![Observer](https://refactoring.guru/images/patterns/cards/observer-mini-3x.png) #### Observer Permite definir un mecanismo de suscripción para notificar a varios objetos sobre cualquier evento que le suceda al objeto que están observando. [Artículo principal](https://refactoring.guru/es/design-patterns/observer) [Uso en Python](https://refactoring.guru/es/design-patterns/observer/python/example#lang-features) [Ejemplo de código](https://refactoring.guru/es/design-patterns/observer/python/example#example-0) ![State](https://refactoring.guru/images/patterns/cards/state-mini-3x.png) #### State Permite a un objeto alterar su comportamiento cuando su estado interno cambia. Parece como si el objeto cambiara su clase. [Artículo principal](https://refactoring.guru/es/design-patterns/state) [Uso en Python](https://refactoring.guru/es/design-patterns/state/python/example#lang-features) [Ejemplo de código](https://refactoring.guru/es/design-patterns/state/python/example#example-0) ![Strategy](https://refactoring.guru/images/patterns/cards/strategy-mini-3x.png) #### Strategy Permite definir una familia de algoritmos, colocar cada uno de ellos en una clase separada y hacer sus objetos intercambiables. [Artículo principal](https://refactoring.guru/es/design-patterns/strategy) [Uso en Python](https://refactoring.guru/es/design-patterns/strategy/python/example#lang-features) [Ejemplo de código](https://refactoring.guru/es/design-patterns/strategy/python/example#example-0) ![Template Method](https://refactoring.guru/images/patterns/cards/template-method-mini-3x.png) #### Template Method Define el esqueleto de un algoritmo en la superclase pero permite que las subclases sobrescriban pasos del algoritmo sin cambiar su estructura. [Artículo principal](https://refactoring.guru/es/design-patterns/template-method) [Uso en Python](https://refactoring.guru/es/design-patterns/template-method/python/example#lang-features) [Ejemplo de código](https://refactoring.guru/es/design-patterns/template-method/python/example#example-0) ![Visitor](https://refactoring.guru/images/patterns/cards/visitor-mini-3x.png) #### Visitor Permite separar algoritmos de los objetos sobre los que operan. [Artículo principal](https://refactoring.guru/es/design-patterns/visitor) [Uso en Python](https://refactoring.guru/es/design-patterns/visitor/python/example#lang-features) [Ejemplo de código](https://refactoring.guru/es/design-patterns/visitor/python/example#example-0) --- # Мост на PHP [There are patterns of patterns now! \ My friend's project: MetaPatterns.io](https://metapatterns.io/)  [](https://refactoring.guru/ru/design-patterns/bridge/php/example#checkout) [](https://refactoring.guru/ru/design-patterns/bridge/php/example#checkout) [](https://refactoring.guru/) / [Паттерны проектирования](https://refactoring.guru/ru/design-patterns) / [Мост](https://refactoring.guru/ru/design-patterns/bridge) / [PHP](https://refactoring.guru/ru/design-patterns/php) ![Мост](https://refactoring.guru/images/patterns/cards/bridge-mini-2x.png?id=2622384cf623ed150ee9c21a0812dd87) **Мост** на PHP =============== **Мост** — это структурный паттерн, который разделяет бизнес-логику или большой класс на несколько отдельных иерархий, которые потом можно развивать отдельно друг от друга. Одна из этих иерархий (абстракция) получит ссылку на объекты другой иерархии (реализация) и будет делегировать им основную работу. Благодаря тому, что все реализации будут следовать общему интерфейсу, их можно будет взаимозаменять внутри абстракции. [Подробней о паттерне Мост](https://refactoring.guru/ru/design-patterns/bridge) Навигация  [Интро](https://refactoring.guru/ru/design-patterns/bridge/php/example#)  [Концептуальный пример](https://refactoring.guru/ru/design-patterns/bridge/php/example#example-0)  [index](https://refactoring.guru/ru/design-patterns/bridge/php/example#example-0--index-php)  [Output](https://refactoring.guru/ru/design-patterns/bridge/php/example#example-0--Output-txt)  [Пример из реальной жизни](https://refactoring.guru/ru/design-patterns/bridge/php/example#example-1)  [index](https://refactoring.guru/ru/design-patterns/bridge/php/example#example-1--index-php)  [Output](https://refactoring.guru/ru/design-patterns/bridge/php/example#example-1--Output-txt) **Сложность:** **Популярность:** **Применимость:** Паттерн Мост особенно полезен когда вам приходится поддерживать несколько типов баз данных или работать с разными поставщиками похожего API (например, cloud-сервисы, социальные сети и т. д.) **Признаки применения паттерна:** Если в программе чётко выделены классы «управления» и несколько видов классов «платформ», причём управляющие объекты делегируют выполнение платформам, то можно сказать, что у вас используется Мост. Концептуальный пример --------------------- Этот пример показывает структуру паттерна **Мост**, а именно — из каких классов он состоит, какие роли эти классы выполняют и как они взаимодействуют друг с другом. После ознакомления со структурой, вам будет легче воспринимать второй пример, который рассматривает реальный случай использования паттерна в мире PHP. #### **index.php:** Пример структуры паттерна implementation = $implementation; } public function operation(): string { return "Abstraction: Base operation with:\\n" . $this->implementation->operationImplementation(); } } /\*\* \* Можно расширить Абстракцию без изменения классов Реализации. \*/ class ExtendedAbstraction extends Abstraction { public function operation(): string { return "ExtendedAbstraction: Extended operation with:\\n" . $this->implementation->operationImplementation(); } } /\*\* \* Реализация устанавливает интерфейс для всех классов реализации. Он не должен \* соответствовать интерфейсу Абстракции. На практике оба интерфейса могут быть \* совершенно разными. Как правило, интерфейс Реализации предоставляет только \* примитивные операции, в то время как Абстракция определяет операции более \* высокого уровня, основанные на этих примитивах. \*/ interface Implementation { public function operationImplementation(): string; } /\*\* \* Каждая Конкретная Реализация соответствует определённой платформе и реализует \* интерфейс Реализации с использованием API этой платформы. \*/ class ConcreteImplementationA implements Implementation { public function operationImplementation(): string { return "ConcreteImplementationA: Here's the result on the platform A.\\n"; } } class ConcreteImplementationB implements Implementation { public function operationImplementation(): string { return "ConcreteImplementationB: Here's the result on the platform B.\\n"; } } /\*\* \* За исключением этапа инициализации, когда объект Абстракции связывается с \* определённым объектом Реализации, клиентский код должен зависеть только от \* класса Абстракции. Таким образом, клиентский код может поддерживать любую \* комбинацию абстракции и реализации. \*/ function clientCode(Abstraction $abstraction) { // ... echo $abstraction->operation(); // ... } /\*\* \* Клиентский код должен работать с любой предварительно сконфигурированной \* комбинацией абстракции и реализации. \*/ $implementation = new ConcreteImplementationA(); $abstraction = new Abstraction($implementation); clientCode($abstraction); echo "\\n"; $implementation = new ConcreteImplementationB(); $abstraction = new ExtendedAbstraction($implementation); clientCode($abstraction); #### **Output.txt:** Результат выполнения Abstraction: Base operation with: ConcreteImplementationA: Here's the result on the platform A. ExtendedAbstraction: Extended operation with: ConcreteImplementationB: Here's the result on the platform B. Пример из реальной жизни ------------------------ В этом примере иерархия Страницы выступает как Абстракция, а иерархия Рендера как Реализация. Объекты класса Страница монтируют веб-страницы определённого типа, используя базовые элементы, которые предоставляются объектом Рендер, прикреплённым к этой странице. Обе иерархии классов разделены, поэтому можно добавить новый класс Рендер без изменения классов страниц и наоборот. #### **index.php:** Пример из реальной жизни renderer = $renderer; } /\*\* \* Паттерн Мост позволяет динамически заменять присоединённый объект \* Реализации. \*/ public function changeRenderer(Renderer $renderer): void { $this->renderer = $renderer; } /\*\* \* Поведение «вида» остаётся абстрактным, так как оно предоставляется только \* классами Конкретной Абстракции. \*/ abstract public function view(): string; } /\*\* \* Эта Конкретная Абстракция создаёт простую страницу. \*/ class SimplePage extends Page { protected $title; protected $content; public function \_\_construct(Renderer $renderer, string $title, string $content) { parent::\_\_construct($renderer); $this->title = $title; $this->content = $content; } public function view(): string { return $this->renderer->renderParts(\[\ $this->renderer->renderHeader(),\ $this->renderer->renderTitle($this->title),\ $this->renderer->renderTextBlock($this->content),\ $this->renderer->renderFooter()\ \]); } } /\*\* \* Эта Конкретная Абстракция создаёт более сложную страницу. \*/ class ProductPage extends Page { protected $product; public function \_\_construct(Renderer $renderer, Product $product) { parent::\_\_construct($renderer); $this->product = $product; } public function view(): string { return $this->renderer->renderParts(\[\ $this->renderer->renderHeader(),\ $this->renderer->renderTitle($this->product->getTitle()),\ $this->renderer->renderTextBlock($this->product->getDescription()),\ $this->renderer->renderImage($this->product->getImage()),\ $this->renderer->renderTextBlock('$' . number\_format($this->product->getPrice(), 2)),\ $this->renderer->renderLink("/cart/add/" . $this->product->getId(), "Add to cart"),\ $this->renderer->renderFooter()\ \]); } } /\*\* \* Вспомогательный класс для класса ProductPage. \*/ class Product { private $id, $title, $description, $image, $price; public function \_\_construct( string $id, string $title, string $description, string $image, float $price ) { $this->id = $id; $this->title = $title; $this->description = $description; $this->image = $image; $this->price = $price; } public function getId(): string { return $this->id; } public function getTitle(): string { return $this->title; } public function getDescription(): string { return $this->description; } public function getImage(): string { return $this->image; } public function getPrice(): float { return $this->price; } } /\*\* \* Реализация объявляет набор «реальных», «под капотом», «платформенных» \* методов. \* \* В этом случае Реализация перечисляет методы рендеринга, которые используются \* для создания веб-страниц. Разные Абстракции могут использовать разные методы \* Реализации. \*/ interface Renderer { public function renderTitle(string $title): string; public function renderTextBlock(string $text): string; public function renderImage(string $url): string; public function renderLink(string $url, string $title): string; public function renderHeader(): string; public function renderFooter(): string; public function renderParts(array $parts): string; } /\*\* \* Эта Конкретная Реализация отображает веб-страницу в виде HTML. \*/ class HTMLRenderer implements Renderer { public function renderTitle(string $title): string { return "

$title

"; } public function renderTextBlock(string $text): string { return "
$text
"; } public function renderImage(string $url): string { return ""; } public function renderLink(string $url, string $title): string { return "$title"; } public function renderHeader(): string { return ""; } public function renderFooter(): string { return ""; } public function renderParts(array $parts): string { return implode("\\n", $parts); } } /\*\* \* Эта Конкретная Реализация отображает веб-страницу в виде строк JSON. \*/ class JsonRenderer implements Renderer { public function renderTitle(string $title): string { return '"title": "' . $title . '"'; } public function renderTextBlock(string $text): string { return '"text": "' . $text . '"'; } public function renderImage(string $url): string { return '"img": "' . $url . '"'; } public function renderLink(string $url, string $title): string { return '"link": {"href": "' . $url . '", "title": "' . $title . '"}'; } public function renderHeader(): string { return ''; } public function renderFooter(): string { return ''; } public function renderParts(array $parts): string { return "{\\n" . implode(",\\n", array\_filter($parts)) . "\\n}"; } } /\*\* \* Клиентский код имеет дело только с объектами Абстракции. \*/ function clientCode(Page $page) { // ... echo $page->view(); // ... } /\*\* \* Клиентский код может выполняться с любой предварительно сконфигурированной \* комбинацией Абстракция+Реализация. \*/ $HTMLRenderer = new HTMLRenderer(); $JSONRenderer = new JsonRenderer(); $page = new SimplePage($HTMLRenderer, "Home", "Welcome to our website!"); echo "HTML view of a simple content page:\\n"; clientCode($page); echo "\\n\\n"; /\*\* \* При необходимости Абстракция может заменить связанную Реализацию во время \* выполнения. \*/ $page->changeRenderer($JSONRenderer); echo "JSON view of a simple content page, rendered with the same client code:\\n"; clientCode($page); echo "\\n\\n"; $product = new Product( "123", "Star Wars, episode1", "A long time ago in a galaxy far, far away...", "/images/star-wars.jpeg", 39.95 ); $page = new ProductPage($HTMLRenderer, $product); echo "HTML view of a product page, same client code:\\n"; clientCode($page); echo "\\n\\n"; $page->changeRenderer($JSONRenderer); echo "JSON view of a simple content page, with the same client code:\\n"; clientCode($page); #### **Output.txt:** Результат выполнения HTML view of a simple content page:

Home

Welcome to our website!
JSON view of a simple content page, rendered with the same client code: { "title": "Home", "text": "Welcome to our website!" } HTML view of a product page, same client code:

Star Wars, episode1

A long time ago in a galaxy far, far away...
Add to cart JSON view of a simple content page, with the same client code: { "title": "Star Wars, episode1", "text": "A long time ago in a galaxy far, far away...", "img": "/images/star-wars.jpeg", "link": {"href": "/cart/add/123", "title": "Add to cart"} } **Мост** на других языках программирования ------------------------------------------ [![Мост на C#](https://refactoring.guru/images/patterns/icons/csharp.svg?id=da64592defc6e86d57c39c66e9de3e58)](https://refactoring.guru/ru/design-patterns/bridge/csharp/example "Мост на C#") [![Мост на C++](https://refactoring.guru/images/patterns/icons/cpp.svg?id=f7782ed8b8666246bfcc3f8fefc3b858)](https://refactoring.guru/ru/design-patterns/bridge/cpp/example "Мост на C++") [![Мост на Go](https://refactoring.guru/images/patterns/icons/go.svg?id=1a89927eb99b1ea3fde7701d97970aca)](https://refactoring.guru/ru/design-patterns/bridge/go/example "Мост на Go") [![Мост на Java](https://refactoring.guru/images/patterns/icons/java.svg?id=e6d87e2dca08c953fe3acd1275ed4f4e)](https://refactoring.guru/ru/design-patterns/bridge/java/example "Мост на Java") [![Мост на Python](https://refactoring.guru/images/patterns/icons/python.svg?id=6d815d43c0f7050a1151b43e51569c9f)](https://refactoring.guru/ru/design-patterns/bridge/python/example "Мост на Python") [![Мост на Ruby](https://refactoring.guru/images/patterns/icons/ruby.svg?id=b065b718c914bf8e960ef731600be1eb)](https://refactoring.guru/ru/design-patterns/bridge/ruby/example "Мост на Ruby") [![Мост на Rust](https://refactoring.guru/images/patterns/icons/rust.svg?id=1f5698a4b5ae23fe79413511747e4a87)](https://refactoring.guru/ru/design-patterns/bridge/rust/example "Мост на Rust") [![Мост на Swift](https://refactoring.guru/images/patterns/icons/swift.svg?id=0b716c2d52ec3a48fbe91ac031070c1d)](https://refactoring.guru/ru/design-patterns/bridge/swift/example "Мост на Swift") [![Мост на TypeScript](https://refactoring.guru/images/patterns/icons/typescript.svg?id=2239d0f16cb703540c205dd8cb0c0cb7)](https://refactoring.guru/ru/design-patterns/bridge/typescript/example "Мост на TypeScript") --- # Proxy [There are patterns of patterns now! \ My friend's project: MetaPatterns.io](https://metapatterns.io/)  [](https://refactoring.guru/es/design-patterns/proxy#checkout) [](https://refactoring.guru/es/design-patterns/proxy#checkout) [](https://refactoring.guru/) / [Patrones de diseño](https://refactoring.guru/es/design-patterns) / [Patrones estructurales](https://refactoring.guru/es/design-patterns/structural-patterns) Proxy ===== Propósito --------- **Proxy** es un patrón de diseño estructural que te permite proporcionar un sustituto o marcador de posición para otro objeto. Un proxy controla el acceso al objeto original, permitiéndote hacer algo antes o después de que la solicitud llegue al objeto original. ![Patrón de diseño Proxy](https://refactoring.guru/images/patterns/content/proxy/proxy-2x.png?id=fb3d14e21c210a758d4777f4d93dce09) Problema -------- ¿Por qué querrías controlar el acceso a un objeto? Imagina que tienes un objeto enorme que consume una gran cantidad de recursos del sistema. Lo necesitas de vez en cuando, pero no siempre. ![Problema resuelto por el patrón Proxy](https://refactoring.guru/images/patterns/diagrams/proxy/problem-es-2x.png?id=68c95ce54805b94b831673444c0f3e23) Las consultas a las bases de datos pueden ser muy lentas. Puedes llevar a cabo una implementación diferida, es decir, crear este objeto sólo cuando sea realmente necesario. Todos los clientes del objeto tendrán que ejecutar algún código de inicialización diferida. Lamentablemente, esto seguramente generará una gran cantidad de código duplicado. En un mundo ideal, querríamos meter este código directamente dentro de la clase de nuestro objeto, pero eso no siempre es posible. Por ejemplo, la clase puede ser parte de una biblioteca cerrada de un tercero. Solución -------- El patrón Proxy sugiere que crees una nueva clase proxy con la misma interfaz que un objeto de servicio original. Después actualizas tu aplicación para que pase el objeto proxy a todos los clientes del objeto original. Al recibir una solicitud de un cliente, el proxy crea un objeto de servicio real y le delega todo el trabajo. ![Solución con el patrón Proxy](https://refactoring.guru/images/patterns/diagrams/proxy/solution-es-2x.png?id=6fb4b08230496c1eb957ecb83887279e) El proxy se camufla como objeto de la base de datos. Puede gestionar la inicialización diferida y el caché de resultados sin que el cliente o el objeto real de la base de datos lo sepan. Pero, ¿cuál es la ventaja? Si necesitas ejecutar algo antes o después de la lógica primaria de la clase, el proxy te permite hacerlo sin cambiar esa clase. Ya que el proxy implementa la misma interfaz que la clase original, puede pasarse a cualquier cliente que espere un objeto de servicio real. Analogía en el mundo real ------------------------- ![Una tarjeta de crédito es un proxy de un manojo de billetes](https://refactoring.guru/images/patterns/diagrams/proxy/live-example-2x.png?id=8b8083fa1954d2d92ca84a5a5636ead7) Las tarjetas de crédito pueden utilizarse para realizar pagos tanto como el efectivo. Una tarjeta de crédito es un proxy de una cuenta bancaria, que, a su vez, es un proxy de un manojo de billetes. Ambos implementan la misma interfaz, por lo que pueden utilizarse para realizar un pago. El consumidor se siente genial porque no necesita llevar un montón de efectivo encima. El dueño de la tienda también está contento porque los ingresos de la transacción se añaden electrónicamente a la cuenta bancaria de la tienda sin el riesgo de perder el depósito o sufrir un robo de camino al banco. Estructura ---------- ![Estructura del patrón de diseño Proxy](https://refactoring.guru/images/patterns/diagrams/proxy/structure-2x.png?id=3d54eeca9af4aa373e989a73463539b5)![Estructura del patrón de diseño Proxy](https://refactoring.guru/images/patterns/diagrams/proxy/structure-indexed-2x.png?id=ddf2b3b4807e52330c456c59fc52d504) 1. La **Interfaz de Servicio** declara la interfaz del Servicio. El proxy debe seguir esta interfaz para poder camuflarse como objeto de servicio. 2. **Servicio** es una clase que proporciona una lógica de negocio útil. 3. La clase **Proxy** tiene un campo de referencia que apunta a un objeto de servicio. Cuando el proxy finaliza su procesamiento (por ejemplo, inicialización diferida, registro, control de acceso, almacenamiento en caché, etc.), pasa la solicitud al objeto de servicio. Normalmente los proxies gestionan el ciclo de vida completo de sus objetos de servicio. 4. El **Cliente** debe funcionar con servicios y proxies a través de la misma interfaz. De este modo puedes pasar un proxy a cualquier código que espere un objeto de servicio. Pseudocódigo ------------ Este ejemplo ilustra cómo el patrón **Proxy** puede ayudar a introducir la inicialización diferida y el almacenamiento en caché a una biblioteca de integración de YouTube de un tercero. ![Ejemplo de estructura del patrón Proxy](https://refactoring.guru/images/patterns/diagrams/proxy/example-2x.png?id=40f22d12d183b9285a380e4a072efb16) Resultados del almacenamiento en caché de un servicio con un proxy. La biblioteca nos proporciona la clase de descarga de videos. Sin embargo, es muy ineficiente. Si la aplicación cliente solicita el mismo video muchas veces, la biblioteca lo descarga una y otra vez, en lugar de guardarlo en caché y reutilizar el primer archivo descargado. La clase proxy implementa la misma interfaz que el descargador original y le delega todo el trabajo. No obstante, mantiene un seguimiento de los archivos descargados y devuelve los resultados en caché cuando la aplicación solicita el mismo video varias veces. // La interfaz de un servicio remoto. interface ThirdPartyYouTubeLib is method listVideos() method getVideoInfo(id) method downloadVideo(id) // La implementación concreta de un conector de servicio. Los // métodos de esta clase pueden solicitar información a YouTube. // La velocidad de la solicitud depende de la conexión a // internet del usuario y de YouTube. La aplicación se // ralentizará si se lanzan muchas solicitudes al mismo tiempo, // incluso aunque todas soliciten la misma información. class ThirdPartyYouTubeClass implements ThirdPartyYouTubeLib is method listVideos() is // Envía una solicitud API a YouTube. method getVideoInfo(id) is // Obtiene metadatos de algún video. method downloadVideo(id) is // Descarga un archivo de video de YouTube. // Para ahorrar ancho de banda, podemos guardar en caché // resultados de la solicitud durante algún tiempo, pero se // puede colocar este código directamente dentro de la clase de // servicio. Por ejemplo, puede haberse proporcionado como parte // de la biblioteca de un tercero y/o definido como \`final\`. Por // eso colocamos el código de almacenamiento en caché dentro de // una nueva clase proxy que implementa la misma interfaz que la // clase servicio. Delega al objeto de servicio únicamente // cuando deben enviarse las solicitudes reales. class CachedYouTubeClass implements ThirdPartyYouTubeLib is private field service: ThirdPartyYouTubeLib private field listCache, videoCache field needReset constructor CachedYouTubeClass(service: ThirdPartyYouTubeLib) is this.service = service method listVideos() is if (listCache == null || needReset) listCache = service.listVideos() return listCache method getVideoInfo(id) is if (videoCache == null || needReset) videoCache = service.getVideoInfo(id) return videoCache method downloadVideo(id) is if (!downloadExists(id) || needReset) service.downloadVideo(id) // La clase GUI, que solía trabajar directamente con un objeto // de servicio, permanece sin cambios siempre y cuando trabaje // con el objeto de servicio a través de una interfaz. Podemos // pasar sin riesgo un objeto proxy en lugar de un objeto de // servicio real, ya que ambos implementan la misma interfaz. class YouTubeManager is protected field service: ThirdPartyYouTubeLib constructor YouTubeManager(service: ThirdPartyYouTubeLib) is this.service = service method renderVideoPage(id) is info = service.getVideoInfo(id) // Representa la página del video. method renderListPanel() is list = service.listVideos() // Representa la lista de miniaturas de los videos. method reactOnUserInput() is renderVideoPage() renderListPanel() // La aplicación puede configurar proxies sobre la marcha. class Application is method init() is aYouTubeService = new ThirdPartyYouTubeClass() aYouTubeProxy = new CachedYouTubeClass(aYouTubeService) manager = new YouTubeManager(aYouTubeProxy) manager.reactOnUserInput() Aplicabilidad ------------- Hay decenas de formas de utilizar el patrón Proxy. Repasemos los usos más populares. Inicialización diferida (proxy virtual). Es cuando tienes un objeto de servicio muy pesado que utiliza muchos recursos del sistema al estar siempre funcionando, aunque solo lo necesites de vez en cuando. En lugar de crear el objeto cuando se lanza la aplicación, puedes retrasar la inicialización del objeto a un momento en que sea realmente necesario. Control de acceso (proxy de protección). Es cuando quieres que únicamente clientes específicos sean capaces de utilizar el objeto de servicio, por ejemplo, cuando tus objetos son partes fundamentales de un sistema operativo y los clientes son varias aplicaciones lanzadas (incluyendo maliciosas). El proxy puede pasar la solicitud al objeto de servicio tan sólo si las credenciales del cliente cumplen ciertos criterios. Ejecución local de un servicio remoto (proxy remoto). Es cuando el objeto de servicio se ubica en un servidor remoto. En este caso, el proxy pasa la solicitud del cliente por la red, gestionando todos los detalles desagradables de trabajar con la red. Solicitudes de registro (proxy de registro). Es cuando quieres mantener un historial de solicitudes al objeto de servicio. El proxy puede registrar cada solicitud antes de pasarla al servicio. Resultados de solicitudes en caché (proxy de caché). Es cuando necesitas guardar en caché resultados de solicitudes de clientes y gestionar el ciclo de vida de ese caché, especialmente si los resultados son muchos. El proxy puede implementar el caché para solicitudes recurrentes que siempre dan los mismos resultados. El proxy puede utilizar los parámetros de las solicitudes como claves de caché. Referencia inteligente. Es cuando debes ser capaz de desechar un objeto pesado una vez que no haya clientes que lo utilicen. El proxy puede rastrear los clientes que obtuvieron una referencia del objeto de servicio o sus resultados. De vez en cuando, el proxy puede recorrer los clientes y comprobar si siguen activos. Si la lista del cliente se vacía, el proxy puede desechar el objeto de servicio y liberar los recursos subyacentes del sistema. El proxy también puede rastrear si el cliente ha modificado el objeto de servicio. Después, los objetos sin cambios pueden ser reutilizados por otros clientes. Cómo implementarlo ------------------ 1. Si no hay una interfaz de servicio preexistente, crea una para que los objetos de proxy y de servicio sean intercambiables. No siempre resulta posible extraer la interfaz de la clase servicio, porque tienes que cambiar todos los clientes del servicio para utilizar esa interfaz. El plan B consiste en convertir el proxy en una subclase de la clase servicio, de forma que herede la interfaz del servicio. 2. Crea la clase proxy. Debe tener un campo para almacenar una referencia al servicio. Normalmente los proxies crean y gestionan el ciclo de vida completo de sus servicios. En raras ocasiones, el cliente pasa un servicio al proxy a través de un constructor. 3. Implementa los métodos del proxy según sus propósitos. En la mayoría de los casos, después de hacer cierta labor, el proxy debería delegar el trabajo a un objeto de servicio. 4. Considera introducir un método de creación que decida si el cliente obtiene un proxy o un servicio real. Puede tratarse de un simple método estático en la clase proxy o de todo un método de fábrica. 5. Considera implementar la inicialización diferida para el objeto de servicio. Pros y contras -------------- * Puedes controlar el objeto de servicio sin que los clientes lo sepan. * Puedes gestionar el ciclo de vida del objeto de servicio cuando a los clientes no les importa. * El proxy funciona incluso si el objeto de servicio no está listo o no está disponible. * _Principio de abierto/cerrado_. Puedes introducir nuevos proxies sin cambiar el servicio o los clientes. * El código puede complicarse ya que debes introducir gran cantidad de clases nuevas. * La respuesta del servicio puede retrasarse. Relaciones con otros patrones ----------------------------- * Con [Adapter](https://refactoring.guru/es/design-patterns/adapter) se accede a un objeto existente a través de una interfaz diferente. Con [Proxy](https://refactoring.guru/es/design-patterns/proxy) , la interfaz sigue siendo la misma. Con [Decorator](https://refactoring.guru/es/design-patterns/decorator) se accede al objeto a través de una interfaz mejorada. * [Facade](https://refactoring.guru/es/design-patterns/facade) es similar a [Proxy](https://refactoring.guru/es/design-patterns/proxy) en el sentido de que ambos pueden almacenar temporalmente una entidad compleja e inicializarla por su cuenta. Al contrario que _Facade_, _Proxy_ tiene la misma interfaz que su objeto de servicio, lo que hace que sean intercambiables. * [Decorator](https://refactoring.guru/es/design-patterns/decorator) y [Proxy](https://refactoring.guru/es/design-patterns/proxy) tienen estructuras similares, pero propósitos muy distintos. Ambos patrones se basan en el principio de composición, por el que un objeto debe delegar parte del trabajo a otro. La diferencia es que, normalmente, un _Proxy_ gestiona el ciclo de vida de su objeto de servicio por su cuenta, mientras que la composición de los _Decoradores_ siempre está controlada por el cliente. Ejemplos de código ------------------ [![Proxy en C#](https://refactoring.guru/images/patterns/icons/csharp.svg?id=da64592defc6e86d57c39c66e9de3e58)](https://refactoring.guru/es/design-patterns/proxy/csharp/example "Proxy en C#") [![Proxy en C++](https://refactoring.guru/images/patterns/icons/cpp.svg?id=f7782ed8b8666246bfcc3f8fefc3b858)](https://refactoring.guru/es/design-patterns/proxy/cpp/example "Proxy en C++") [![Proxy en Go](https://refactoring.guru/images/patterns/icons/go.svg?id=1a89927eb99b1ea3fde7701d97970aca)](https://refactoring.guru/es/design-patterns/proxy/go/example "Proxy en Go") [![Proxy en Java](https://refactoring.guru/images/patterns/icons/java.svg?id=e6d87e2dca08c953fe3acd1275ed4f4e)](https://refactoring.guru/es/design-patterns/proxy/java/example "Proxy en Java") [![Proxy en PHP](https://refactoring.guru/images/patterns/icons/php.svg?id=be1906eb26b71ec1d3b93720d6156618)](https://refactoring.guru/es/design-patterns/proxy/php/example "Proxy en PHP") [![Proxy en Python](https://refactoring.guru/images/patterns/icons/python.svg?id=6d815d43c0f7050a1151b43e51569c9f)](https://refactoring.guru/es/design-patterns/proxy/python/example "Proxy en Python") [![Proxy en Ruby](https://refactoring.guru/images/patterns/icons/ruby.svg?id=b065b718c914bf8e960ef731600be1eb)](https://refactoring.guru/es/design-patterns/proxy/ruby/example "Proxy en Ruby") [![Proxy en Rust](https://refactoring.guru/images/patterns/icons/rust.svg?id=1f5698a4b5ae23fe79413511747e4a87)](https://refactoring.guru/es/design-patterns/proxy/rust/example "Proxy en Rust") [![Proxy en Swift](https://refactoring.guru/images/patterns/icons/swift.svg?id=0b716c2d52ec3a48fbe91ac031070c1d)](https://refactoring.guru/es/design-patterns/proxy/swift/example "Proxy en Swift") [![Proxy en TypeScript](https://refactoring.guru/images/patterns/icons/typescript.svg?id=2239d0f16cb703540c205dd8cb0c0cb7)](https://refactoring.guru/es/design-patterns/proxy/typescript/example "Proxy en TypeScript") [![](https://refactoring.guru/images/patterns/banners/patterns-book-banner-3-2x.png?id=0cc3f77ab421d1a5c02ee46488231c3a)](https://refactoring.guru/es/design-patterns/book) ### ¡Apoya nuestro sitio web gratuito y compra el libro! * 22 patrones de diseño y 8 principios explicados en profundidad * 436 páginas bien estructuradas, fáciles de leer y libres de tecnicismos * 225 ilustraciones y diagramas claros y útiles * Un archivo con ejemplos de código en 11 lenguajes * Todos los dispositivos soportados: Formatos PDF/EPUB/MOBI/KFX [Saber más…](https://refactoring.guru/es/design-patterns/book) --- # Каталог патернів проектування [There are patterns of patterns now! \ My friend's project: MetaPatterns.io](https://metapatterns.io/)  [](https://refactoring.guru/uk/design-patterns/catalog#checkout) [](https://refactoring.guru/uk/design-patterns/catalog#checkout) Каталог патернів проектування ============================= ### Породжувальні Відповідають за зручне та безпечне створення нових об'єктів або навіть цілих сімейств об'єктів. [![Фабричний метод](https://refactoring.guru/images/patterns/cards/factory-method-mini-3x.png) Фабричний метод Factory Method](https://refactoring.guru/uk/design-patterns/factory-method) [![Абстрактна фабрика](https://refactoring.guru/images/patterns/cards/abstract-factory-mini-3x.png) Абстрактна фабрика Abstract Factory](https://refactoring.guru/uk/design-patterns/abstract-factory) [![Будівельник](https://refactoring.guru/images/patterns/cards/builder-mini-3x.png) Будівельник Builder](https://refactoring.guru/uk/design-patterns/builder) [![Прототип](https://refactoring.guru/images/patterns/cards/prototype-mini-3x.png) Прототип Prototype](https://refactoring.guru/uk/design-patterns/prototype) [![Одинак](https://refactoring.guru/images/patterns/cards/singleton-mini-3x.png) Одинак Singleton](https://refactoring.guru/uk/design-patterns/singleton) ### Структурні Відповідають за побудову зручних в підтримці ієрархій класів. [![Адаптер](https://refactoring.guru/images/patterns/cards/adapter-mini-3x.png) Адаптер Adapter](https://refactoring.guru/uk/design-patterns/adapter) [![Міст](https://refactoring.guru/images/patterns/cards/bridge-mini-3x.png) Міст Bridge](https://refactoring.guru/uk/design-patterns/bridge) [![Компонувальник](https://refactoring.guru/images/patterns/cards/composite-mini-3x.png) Компонувальник Composite](https://refactoring.guru/uk/design-patterns/composite) [![Декоратор](https://refactoring.guru/images/patterns/cards/decorator-mini-3x.png) Декоратор Decorator](https://refactoring.guru/uk/design-patterns/decorator) [![Фасад](https://refactoring.guru/images/patterns/cards/facade-mini-3x.png) Фасад Facade](https://refactoring.guru/uk/design-patterns/facade) [![Легковаговик](https://refactoring.guru/images/patterns/cards/flyweight-mini-3x.png) Легковаговик Flyweight](https://refactoring.guru/uk/design-patterns/flyweight) [![Замісник](https://refactoring.guru/images/patterns/cards/proxy-mini-3x.png) Замісник Proxy](https://refactoring.guru/uk/design-patterns/proxy) ### Поведінкові Вирішують завдання ефективної та безпечної взаємодії між об'єктами програми. [![Ланцюжок обов'язків](https://refactoring.guru/images/patterns/cards/chain-of-responsibility-mini-3x.png) Ланцюжок обов'язків Chain of Responsibility](https://refactoring.guru/uk/design-patterns/chain-of-responsibility) [![Команда](https://refactoring.guru/images/patterns/cards/command-mini-3x.png) Команда Command](https://refactoring.guru/uk/design-patterns/command) [![Ітератор](https://refactoring.guru/images/patterns/cards/iterator-mini-3x.png) Ітератор Iterator](https://refactoring.guru/uk/design-patterns/iterator) [![Посередник](https://refactoring.guru/images/patterns/cards/mediator-mini-3x.png) Посередник Mediator](https://refactoring.guru/uk/design-patterns/mediator) [![Знімок](https://refactoring.guru/images/patterns/cards/memento-mini-3x.png) Знімок Memento](https://refactoring.guru/uk/design-patterns/memento) [![Спостерігач](https://refactoring.guru/images/patterns/cards/observer-mini-3x.png) Спостерігач Observer](https://refactoring.guru/uk/design-patterns/observer) [![Стан](https://refactoring.guru/images/patterns/cards/state-mini-3x.png) Стан State](https://refactoring.guru/uk/design-patterns/state) [![Стратегія](https://refactoring.guru/images/patterns/cards/strategy-mini-3x.png) Стратегія Strategy](https://refactoring.guru/uk/design-patterns/strategy) [![Шаблонний метод](https://refactoring.guru/images/patterns/cards/template-method-mini-3x.png) Шаблонний метод Template Method](https://refactoring.guru/uk/design-patterns/template-method) [![Відвідувач](https://refactoring.guru/images/patterns/cards/visitor-mini-3x.png) Відвідувач Visitor](https://refactoring.guru/uk/design-patterns/visitor) --- # Легковес [There are patterns of patterns now! \ My friend's project: MetaPatterns.io](https://metapatterns.io/)  [](https://refactoring.guru/ru/design-patterns/flyweight#checkout) [](https://refactoring.guru/ru/design-patterns/flyweight#checkout) [](https://refactoring.guru/) / [Паттерны проектирования](https://refactoring.guru/ru/design-patterns) / [Структурные паттерны](https://refactoring.guru/ru/design-patterns/structural-patterns) Легковес ======== Также известен как: Приспособленец, Кэш, Flyweight Суть паттерна ------------- **Легковес** — это структурный паттерн проектирования, который позволяет вместить бóльшее количество объектов в отведённую оперативную память. Легковес экономит память, разделяя общее состояние объектов между собой, вместо хранения одинаковых данных в каждом объекте. ![Паттерн Легковес](https://refactoring.guru/images/patterns/content/flyweight/flyweight-2x.png?id=6a8f17d9550c75c3d648a605c4d31b45) Проблема -------- На досуге вы решили написать небольшую игру, в которой игроки перемещаются по карте и стреляют друг в друга. Фишкой игры должна была стать реалистичная система частиц. Пули, снаряды, осколки от взрывов — всё это должно красиво летать и радовать взгляд. Игра отлично работала на вашем мощном компьютере. Однако ваш друг сообщил, что игра начинает тормозить и вылетает через несколько минут после запуска. Покопавшись в логах, вы обнаружили, что игра вылетает из-за недостатка оперативной памяти. У вашего друга компьютер значительно менее «прокачанный», поэтому проблема у него и проявляется так быстро. И действительно, каждая частица представлена собственным объектом, имеющим множество данных. В определённый момент, когда побоище на экране достигает кульминации, новые объекты частиц уже не вмещаются в оперативную память компьютера, и программа вылетает. ![Проблема паттерна Легковес](https://refactoring.guru/images/patterns/diagrams/flyweight/problem-ru-2x.png?id=2394105b6f4b0b461623d2fa7c09b6ff) Решение ------- Если внимательно посмотреть на класс частиц, то можно заметить, что цвет и спрайт занимают больше всего памяти. Более того, они хранятся в каждом объекте, хотя фактически их значения одинаковы для большинства частиц. ![Решение паттерна Легковес](https://refactoring.guru/images/patterns/diagrams/flyweight/solution1-ru-2x.png?id=79f38dbfec2259507c5e06d0354b4af3) Остальное состояние объектов — координаты, вектор движения и скорость — отличаются для всех частиц. Таким образом, эти поля можно рассматривать как контекст, в котором частица используется. А цвет и спрайт — это данные, не изменяющиеся во времени. Неизменяемые данные объекта принято называть «внутренним состоянием». Все остальные данные — это «внешнее состояние». Паттерн Легковес предлагает не хранить в классе внешнее состояние, а передавать его в те или иные методы через параметры. Таким образом, одни и те же объекты можно будет повторно использовать в различных контекстах. Но главное — понадобится гораздо меньше объектов, ведь теперь они будут отличаться только внутренним состоянием, а оно имеет не так много вариаций. ![Решение паттерна Легковес](https://refactoring.guru/images/patterns/diagrams/flyweight/solution3-ru-2x.png?id=9bfaf275f5fcf3f74fbeb036e4c64c40) В нашем примере с частицами достаточно будет оставить всего три объекта с отличающимися спрайтами и цветом — для пуль, снарядов и осколков. Несложно догадаться, что такие облегчённые объекты называют _легковéсами_ Название пришло из бокса и означает весовую категорию до 50 кг.. #### Хранилище внешнего состояния Но куда переедет внешнее состояние? Ведь кто-то должен его хранить. Чаще всего, его перемещают в контейнер, который управлял объектами до применения паттерна. В нашем случае это был главный объект игры. Вы могли бы добавить в его класс поля-массивы для хранения координат, векторов и скоростей частиц. Кроме этого, понадобится ещё один массив для хранения ссылок на объекты-легковесы, соответствующие той или иной частице. ![Решение паттерна Легковес](https://refactoring.guru/images/patterns/diagrams/flyweight/solution2-ru-2x.png?id=7316d6a2f29997d4a25d23b56991607c) Но более элегантным решением было бы создать дополнительный класс-контекст, который бы связывал внешнее состояние с тем или иным легковесом. Это позволит обойтись только одним полем-массивом в классе контейнера. «Но погодите-ка, нам потребуется столько же этих объектов, сколько было в самом начале!», — скажете вы и будете правы! Но дело в том, что объекты-контексты занимают намного меньше места, чем первоначальные. Ведь самые тяжёлые поля остались в легковесах (простите за каламбур), и сейчас мы будем ссылаться на эти объекты из контекстов, вместо того, чтобы повторно хранить дублирующееся состояние. #### Неизменяемость Легковесов Так как объекты легковесов будут использованы в разных контекстах, вы должны быть уверены в том, что их состояние невозможно изменить после создания. Всё внутреннее состояние легковес должен получать через параметры конструктора. Он не должен иметь сеттеров и публичных полей. #### Фабрика Легковесов Для удобства работы с легковесами и контекстами можно создать фабричный метод, принимающий в параметрах всё внутреннее (а иногда и внешнее) состояние желаемого объекта. Главная польза от этого метода в том, чтобы искать уже созданные легковесы с таким же внутренним состоянием, что и требуемое. Если легковес находится, его можно повторно использовать. Если нет — просто создаём новый. Обычно этот метод добавляют в контейнер легковесов либо создают отдельный класс-фабрику. Его даже можно сделать статическим и поместить в класс легковесов. Структура --------- ![Паттерн Легковес (Приспособленец)](https://refactoring.guru/images/patterns/diagrams/flyweight/structure-2x.png?id=a7c8347421bde16435fc90a706f5dd34)![Паттерн Легковес (Приспособленец)](https://refactoring.guru/images/patterns/diagrams/flyweight/structure-indexed-2x.png?id=205e2f7d08b4ac0695f445a9db8989c4) 1. Вы всегда должны помнить о том, что Легковес применяется в программе, имеющей громадное количество одинаковых объектов. Этих объектов должно быть так много, чтобы они не помещались в доступную оперативную память без ухищрений. Паттерн разделяет данные этих объектов на две части — легковесы и контексты. 2. **Легковес** содержит состояние, которое повторялось во множестве первоначальных объектов. Один и тот же легковес можно использовать в связке со множеством контекстов. Состояние, которое хранится здесь, называется _внутренним_, а то, которое он получает извне — _внешним_. 3. **Контекст** содержит «внешнюю» часть состояния, уникальную для каждого объекта. Контекст связан с одним из объектов-легковесов, хранящих оставшееся состояние. 4. Поведение оригинального объекта чаще всего оставляют в Легковесе, передавая значения контекста через параметры методов. Тем не менее, поведение можно поместить и в контекст, используя легковес как объект данных. 5. **Клиент** вычисляет или хранит контекст, то есть внешнее состояние легковесов. Для клиента легковесы выглядят как шаблонные объекты, которые можно настроить во время использования, передав контекст через параметры. 6. **Фабрика легковесов** управляет созданием и повторным использованием легковесов. Фабрика получает запросы, в которых указано желаемое состояние легковеса. Если легковес с таким состоянием уже создан, фабрика сразу его возвращает, а если нет — создаёт новый объект. Псевдокод --------- В этом примере **Легковес** помогает сэкономить оперативную память при отрисовке на экране миллионов объектов-деревьев. ![Структура классов примера паттерна Легковес](https://refactoring.guru/images/patterns/diagrams/flyweight/example-2x.png?id=9423640fe3688a64201389b6e7aa1f48) Легковес выделяет повторяющуюся часть состояния из основного класса `Tree` и помещает его в дополнительный класс `TreeType`. Теперь, вместо хранения повторяющихся данных во всех объектах, отдельные деревья будут ссылаться на несколько общих объектов, хранящих эти данные. Клиент работает с деревьями через фабрику деревьев, которая скрывает от него сложность кеширования общих данных деревьев. Таким образом, программа будет использовать намного меньше оперативной памяти, что позволит отрисовать больше деревьев на экране на том же железе. // Этот класс-легковес содержит часть полей, которые описывают // деревья. Эти поля не уникальны для каждого дерева, в отличие, // например, от координат: несколько деревьев могут иметь ту же // текстуру. // // Поэтому мы переносим повторяющиеся данные в один-единственный // объект и ссылаемся на него из множества отдельных деревьев. class TreeType is field name field color field texture constructor TreeType(name, color, texture) { ... } method draw(canvas, x, y) is // 1. Создать картинку данного типа, цвета и текстуры. // 2. Нарисовать картинку на холсте в позиции X, Y. // Фабрика легковесов решает, когда нужно создать новый // легковес, а когда можно обойтись существующим. class TreeFactory is static field treeTypes: collection of tree types static method getTreeType(name, color, texture) is type = treeTypes.find(name, color, texture) if (type == null) type = new TreeType(name, color, texture) treeTypes.add(type) return type // Контекстный объект, из которого мы выделили легковес // TreeType. В программе могут быть тысячи объектов Tree, так // как накладные расходы на их хранение совсем небольшие — в // памяти нужно держать всего три целых числа (две координаты и // ссылка). class Tree is field x,y field type: TreeType constructor Tree(x, y, type) { ... } method draw(canvas) is type.draw(canvas, this.x, this.y) // Классы Tree и Forest являются клиентами Легковеса. При // желании их можно слить в один класс, если вам не нужно // расширять класс деревьев далее. class Forest is field trees: collection of Trees method plantTree(x, y, name, color, texture) is type = TreeFactory.getTreeType(name, color, texture) tree = new Tree(x, y, type) trees.add(tree) method draw(canvas) is foreach (tree in trees) do tree.draw(canvas) Применимость ------------ Когда не хватает оперативной памяти для поддержки всех нужных объектов. Эффективность паттерна **Легковес** во многом зависит от того, как и где он используется. Применяйте этот паттерн, когда выполнены все перечисленные условия: * в приложении используется большое число объектов; * из-за этого высоки расходы оперативной памяти; * большую часть состояния объектов можно вынести за пределы их классов; * большие группы объектов можно заменить относительно небольшим количеством разделяемых объектов, поскольку внешнее состояние вынесено. Шаги реализации --------------- 1. Разделите поля класса, который станет легковесом, на две части: * внутреннее состояние: значения этих полей одинаковы для большого числа объектов; * внешнее состояние (контекст): значения полей уникальны для каждого объекта. 2. Оставьте поля внутреннего состояния в классе, но убедитесь, что их значения неизменяемы. Эти поля должны инициализироваться только через конструктор. 3. Превратите поля внешнего состояния в параметры методов, где эти поля использовались. Затем удалите поля из класса. 4. Создайте фабрику, которая будет кешировать и повторно отдавать уже созданные объекты. Клиент должен запрашивать из этой фабрики легковеса с определённым внутренним состоянием, а не создавать его напрямую. 5. Клиент должен хранить или вычислять значения внешнего состояния (контекст) и передавать его в методы объекта легковеса. Преимущества и недостатки ------------------------- * Экономит оперативную память. * Расходует процессорное время на поиск/вычисление контекста. * Усложняет код программы из-за введения множества дополнительных классов. Отношения с другими паттернами ------------------------------ * [Компоновщик](https://refactoring.guru/ru/design-patterns/composite) часто совмещают с [Легковесом](https://refactoring.guru/ru/design-patterns/flyweight) , чтобы реализовать общие ветки дерева и сэкономить при этом память. * [Легковес](https://refactoring.guru/ru/design-patterns/flyweight) показывает, как создавать много мелких объектов, а [Фасад](https://refactoring.guru/ru/design-patterns/facade) показывает, как создать один объект, который отображает целую подсистему. * Паттерн [Легковес](https://refactoring.guru/ru/design-patterns/flyweight) может напоминать [Одиночку](https://refactoring.guru/ru/design-patterns/singleton) , если для конкретной задачи у вас получилось свести количество объектов к одному. Но помните, что между паттернами есть два кардинальных отличия: 1. В отличие от _Одиночки_, вы можете иметь множество объектов-легковесов. 2. Объекты-легковесы должны быть неизменяемыми, тогда как объект-одиночка допускает изменение своего состояния. Примеры реализации паттерна --------------------------- [![Легковес на C#](https://refactoring.guru/images/patterns/icons/csharp.svg?id=da64592defc6e86d57c39c66e9de3e58)](https://refactoring.guru/ru/design-patterns/flyweight/csharp/example "Легковес на C#") [![Легковес на C++](https://refactoring.guru/images/patterns/icons/cpp.svg?id=f7782ed8b8666246bfcc3f8fefc3b858)](https://refactoring.guru/ru/design-patterns/flyweight/cpp/example "Легковес на C++") [![Легковес на Go](https://refactoring.guru/images/patterns/icons/go.svg?id=1a89927eb99b1ea3fde7701d97970aca)](https://refactoring.guru/ru/design-patterns/flyweight/go/example "Легковес на Go") [![Легковес на Java](https://refactoring.guru/images/patterns/icons/java.svg?id=e6d87e2dca08c953fe3acd1275ed4f4e)](https://refactoring.guru/ru/design-patterns/flyweight/java/example "Легковес на Java") [![Легковес на PHP](https://refactoring.guru/images/patterns/icons/php.svg?id=be1906eb26b71ec1d3b93720d6156618)](https://refactoring.guru/ru/design-patterns/flyweight/php/example "Легковес на PHP") [![Легковес на Python](https://refactoring.guru/images/patterns/icons/python.svg?id=6d815d43c0f7050a1151b43e51569c9f)](https://refactoring.guru/ru/design-patterns/flyweight/python/example "Легковес на Python") [![Легковес на Ruby](https://refactoring.guru/images/patterns/icons/ruby.svg?id=b065b718c914bf8e960ef731600be1eb)](https://refactoring.guru/ru/design-patterns/flyweight/ruby/example "Легковес на Ruby") [![Легковес на Rust](https://refactoring.guru/images/patterns/icons/rust.svg?id=1f5698a4b5ae23fe79413511747e4a87)](https://refactoring.guru/ru/design-patterns/flyweight/rust/example "Легковес на Rust") [![Легковес на Swift](https://refactoring.guru/images/patterns/icons/swift.svg?id=0b716c2d52ec3a48fbe91ac031070c1d)](https://refactoring.guru/ru/design-patterns/flyweight/swift/example "Легковес на Swift") [![Легковес на TypeScript](https://refactoring.guru/images/patterns/icons/typescript.svg?id=2239d0f16cb703540c205dd8cb0c0cb7)](https://refactoring.guru/ru/design-patterns/flyweight/typescript/example "Легковес на TypeScript") [![](https://refactoring.guru/images/patterns/banners/patterns-book-banner-1-b-2x.png?id=5572aa55e5b09e59780aca9e0ea8e44b)](https://refactoring.guru/ru/design-patterns/book) ### Не втыкай в транспорте Лучше почитай нашу книгу о паттернах проектирования. Теперь это удобно делать даже во время поездок в общественном транспорте. [Узнать больше…](https://refactoring.guru/ru/design-patterns/book) --- # Критика патернів [There are patterns of patterns now! \ My friend's project: MetaPatterns.io](https://metapatterns.io/)  [](https://refactoring.guru/uk/design-patterns/criticism#checkout) [](https://refactoring.guru/uk/design-patterns/criticism#checkout) [](https://refactoring.guru/) / [Патерни проектування](https://refactoring.guru/uk/design-patterns) Критика патернів ================ Патерни були описані більше 20-ти років тому, тому тільки ледачий не встиг кинути в них камінь. Давайте розглянемо найпопулярнішу критику. #### Розпорки для слабкої мови програмування  Вперше цю точку зору висловив Пол Грем в есе «[Помста Ботанів](https://habrahabr.ru/post/267865/) ». Докладніше про цю точку зору — [Wiki](http://wiki.c2.com/?AreDesignPatternsMissingLanguageFeatures) . Потреба в патернах з’являється тоді, коли люди вибирають для свого проекту мову програмування з недостатнім рівнем абстракції. В цьому випадку, патерни — це розпорки, які надають цій мові суперздібності. Наприклад, патерн [Стратегія](https://refactoring.guru/uk/design-patterns/strategy) в сучасних мовах можна реалізувати простою анонімною (лямбда) функцією. #### Неефективні рішення Патерни намагаються стандартизувати підходи, які й так вже широко використовуються. Така стандартизація здається деяким людям догмою і вони починають усюди реалізовувати патерни «як в книжці», не пристосовуючи їх до реалій проекту. #### Невиправдане застосування > Якщо у тебе в руках молоток, то всі предмети навколо починають нагадувати цвяхи. Схожа проблема виникає у новачків, які тільки-но познайомилися з патернами. Вникнувши в патерни, людина намагається застосувати свої знання всюди. Навіть там, де можна було б обійтися більш простим кодом. --- # Міст [There are patterns of patterns now! \ My friend's project: MetaPatterns.io](https://metapatterns.io/)  [](https://refactoring.guru/uk/design-patterns/bridge#checkout) [](https://refactoring.guru/uk/design-patterns/bridge#checkout) [](https://refactoring.guru/) / [Патерни проектування](https://refactoring.guru/uk/design-patterns) / [Структурні патерни](https://refactoring.guru/uk/design-patterns/structural-patterns) Міст ==== Також відомий як: Bridge Суть патерна ------------ **Міст** — це структурний патерн проектування, який розділяє один або кілька класів на дві окремі ієрархії — абстракцію та реалізацію, дозволяючи змінювати код в одній гілці класів, незалежно від іншої. ![Патерн Міст](https://refactoring.guru/images/patterns/content/bridge/bridge-2x.png?id=1e905ae5742e5cd10a7eb0e3175ef00d) Проблема -------- _Абстракція?_ _Реалізація?!_ Звучить страхітливо! Розгляньмо простенький приклад, щоб зрозуміти про що йде мова. У вас є клас геометричних `Фігур`, який має підкласи `Круг` та `Квадрат`. Ви хочете розширити ієрархію фігур за кольором, тобто мати `Червоні` та `Сині` фігури. Але для того, щоб все це об’єднати, доведеться створити 4 комбінації підкласів на зразок `СиніКруги` та `ЧервоніКвадрати`. ![Проблема патерна Міст](https://refactoring.guru/images/patterns/diagrams/bridge/problem-uk-2x.png?id=889c5b2ac48e841a9a6c808ac255d089) Кількість підкласів зростає в геометричній прогресії. При додаванні нових видів фігур і кольорів кількість комбінацій зростатиме в геометричній прогресії. Наприклад, щоб ввести в програму фігури трикутників, доведеться створити відразу два нових класи трикутників, по одному для кожного кольору. Після цього введення нового кольору вимагатиме створення вже трьох класів, по одному для кожного виду фігур. Чим далі, тим гірше. Рішення ------- Корінь проблеми полягає в тому, що ми намагаємося розширити класи фігур одразу в двох незалежних площинах — за видом та кольором. Саме це призводить до розростання дерева класів. Патерн Міст пропонує замінити спадкування на делегування. Для цього потрібно виділити одну з таких «площин» в окрему ієрархію і посилатися на об’єкт цієї ієрархії, замість зберігання його стану та поведінки всередині одного класу. ![Рішення патерна Міст](https://refactoring.guru/images/patterns/diagrams/bridge/solution-uk-2x.png?id=2c8bc596bcf03ee2807a92498bd76708) Розмноження підкласів можна зупинити, розбивши класи на кілька ієрархій. Таким чином, ми можемо зробити `Колір` окремим класом з підкласами `Червоний` та `Синій`. Клас `Фігур` отримає посилання на об’єкт `Кольору` і зможе делегувати йому роботу, якщо виникне така необхідність. Такий зв’язок і стане мостом між `Фігурами` та `Кольором`. При додаванні нових класів кольорів не потрібно буде звертатись до класів фігур і навпаки. #### Абстракція і Реалізація Ці терміни було введено в книзі GoF Gang of Four / «Банда чотирьох». Автори книги _Design Patterns: Elements of Reusable Object-Oriented Software_ [https://refactoring.guru/uk/gof-book](https://refactoring.guru/uk/gof-book) . при описі Мосту. На мій погляд, вони виглядають занадто академічними та показують патерн складнішим, ніж він є насправді. Пам’ятаючи про приклад з фігурами й кольорами, давайте все ж таки розберемося, що мали на увазі автори патерна. Отже, _абстракція_ (або _інтерфейс_) — це уявний рівень керування чим-небудь, що не виконує роботу самостійно, а делегує її рівню _реалізації_ (який зветься _платформою_). > Тільки не плутайте ці терміни з _інтерфейсами_ або _абстрактними класами_ вашої мови програмування — це не одне і те ж саме. Якщо говорити про реальні програми, то абстракцією може виступати графічний інтерфейс програми (GUI), а реалізацією — низькорівневий код операційної системи (API), до якого графічний інтерфейс звертається, реагуючи на дії користувача. Ви можете розвивати програму у двох різних напрямках: * мати кілька різних GUI (наприклад, для звичайних користувачів та адміністраторів). * підтримувати багато видів API (наприклад, працювати під Windows, Linux і macOS). Така програма може виглядати як один великий клубок коду, в якому змішано умовні оператори рівнів GUI та API. ![Захист від змін](https://refactoring.guru/images/patterns/content/bridge/bridge-3-uk-2x.png?id=68160642232950f6356eeccf601cf7ed) Коли зміни беруть проект в «осаду», вам легше відбиватися, якщо розділити монолітний код на частини. Ви можете спробувати структурувати цей хаос, створивши для кожної з варіацій інтерфейсу-платформи свої підкласи. Але такий підхід призведе до зростання класів комбінацій, і з кожною новою платформою їх буде все більше й більше. Ми можемо вирішити цю проблему, застосувавши Міст. Патерн пропонує розплутати цей код, розділивши його на дві частини: * Абстракцію: рівень графічного інтерфейсу програми. * Реалізацію: рівень взаємодії з операційною системою. ![Варіант крос-платформової архітектури](https://refactoring.guru/images/patterns/content/bridge/bridge-2-uk-2x.png?id=77694eee4cae9188d9828ed2f623c5ad) Один з варіантів крос-платформової архітектури. Абстракція делегуватиме роботу одному з об’єктів реалізації. Причому, реалізації можна буде взаємозаміняти, але тільки за умови, що всі вони слідуватимуть єдиному інтерфейсу. Таким чином, ви зможете змінювати графічний інтерфейс програми, не чіпаючи низькорівневий код роботи з операційною системою. І навпаки, ви зможете додавати підтримку нових операційних систем, створюючи нові підкласи реалізації, без необхідності правити код у класах графічного інтерфейсу. Структура --------- ![Структура класів патерна Міст](https://refactoring.guru/images/patterns/diagrams/bridge/structure-uk-2x.png?id=f893df875d884d8c52c320ee2d02f6ca)![Структура класів патерна Міст](https://refactoring.guru/images/patterns/diagrams/bridge/structure-uk-indexed-2x.png?id=1706b9ebfddb89023919222e568d771a) 1. **Абстракція** містить керуючу логіку. Код абстракції делегує реальну роботу пов’язаному об’єктові реалізації. 2. **Реалізація** описує загальний інтерфейс для всіх реалізацій. Всі методи, які тут описані, будуть доступні з класу абстракції та його підкласів. Інтерфейси абстракції та реалізації можуть або збігатися, або бути абсолютно різними. Проте, зазвичай в реалізації живуть базові операції, на яких будуються складні операції абстракції. 3. **Конкретні реалізації** містять платформо-залежний код. 4. **Розширені абстракції** містять різні варіації керуючої логіки. Як і батьківский клас, працює з реалізаціями тільки через загальний інтерфейс реалізацій. 5. **Клієнт** працює тільки з об’єктами абстракції. Не рахуючи початкового зв’язування абстракції з однією із реалізацій, клієнтський код не має прямого доступу до об’єктів реалізації. Псевдокод --------- У цьому прикладі **Міст** ділить монолітний код приладів та пультів на дві частини: прилади (виступають реалізацією) і пульти керування ними (виступають абстракцією). ![Структура класів прикладу патерна Міст](https://refactoring.guru/images/patterns/diagrams/bridge/example-uk-2x.png?id=6ae1d0674cd9403dee2bb2005aade4a5) Приклад поділу двох ієрархій класів — приладів та пультів керування. Клас пульта має посилання на об’єкт приладу, яким він керує. Пульти працюють з приладами через загальний інтерфейс. Це дає можливість зв’язати пульти з різними приладами. Пульти можна розвивати незалежно від приладів. Для цього достатньо створити новий підклас абстракції. Ви можете створити як простий пульт з двома кнопками, так і більш складний пульт з тач-інтерфейсом. Клієнтському коду залишається вибрати версію абстракції та реалізації, з якими він хоче працювати, та зв’язати їх між собою. // Клас пультів має посилання на пристрій, яким керує. Методи // цього класу делегують роботу методам пов'язаного пристрою. class Remote is protected field device: Device constructor Remote(device: Device) is this.device = device method togglePower() is if (device.isEnabled()) then device.disable() else device.enable() method volumeDown() is device.setVolume(device.getVolume() - 10) method volumeUp() is device.setVolume(device.getVolume() + 10) method channelDown() is device.setChannel(device.getChannel() - 1) method channelUp() is device.setChannel(device.getChannel() + 1) // Ви можете розширювати клас пультів, не чіпаючи код пристроїв. class AdvancedRemote extends Remote is method mute() is device.setVolume(0) // Всі пристрої мають спільний інтерфейс, тому з ними може // працювати будь-який пульт. interface Device is method isEnabled() method enable() method disable() method getVolume() method setVolume(percent) method getChannel() method setChannel(channel) // Разом з цим, кожен пристрій має особливу реалізацію. class Tv implements Device is // ... class Radio implements Device is // ... // Десь у клієнтському програмному коді. tv = new Tv() remote = new Remote(tv) remote.togglePower() radio = new Radio() remote = new AdvancedRemote(radio) Застосування ------------ Якщо ви хочете розділити монолітний клас, який містить кілька різних реалізацій якої-небудь функціональності (наприклад, якщо клас може працювати з різними системами баз даних). Чим більший клас, тим важче розібратись у його коді, і тим більше це розтягує час розробки. Крім того, зміни, що вносяться в одну з реалізацій, призводять до редагування всього класу, що може викликати появу несподіваних помилок у коді. Міст дозволяє розділити монолітний клас на кілька окремих ієрархій. Після цього ви можете змінювати код в одній гілці класів незалежно від іншої. Це спрощує роботу над кодом і зменшує ймовірність внесення помилок. Якщо клас потрібно розширювати в двох незалежних площинах. Міст пропонує виділити одну з таких площин в окрему ієрархію класів, зберігаючи посилання на один з її об’єктів у початковому класі. Якщо ви хочете мати можливість змінювати реалізацію під час виконання програми. Міст дозволяє замінювати реалізацію навіть під час виконання програми, оскільки конкретна реалізація не «зашита» в клас абстракції. _До речі, через цей пункт Міст часто плутають із [Стратегією](https://refactoring.guru/uk/design-patterns/strategy) . Зверніть увагу, що у Моста цей пункт займає останнє місце за значущістю, оскільки його головна задача — структурна._ Кроки реалізації ---------------- 1. Визначте, чи існують у ваших класах два непересічних виміри. Це може бути функціональність/платформа, предметна область/інфраструктура, фронт-енд/бек-енд або інтерфейс/реалізація. 2. Продумайте, які операції будуть потрібні клієнтам, і опишіть їх у базовому класі _абстракції_. 3. Визначте поведінки, які доступні на всіх платформах, та виберіть з них ту частину, яка буде потрібна для абстракції. На підставі цього опишіть загальний інтерфейс _реалізації_. 4. Для кожної платформи створіть власний клас конкретної реалізації. Всі вони повинні дотримуватися загального інтерфейсу, який ми виділили перед цим. 5. Додайте до класу абстракції посилання на об’єкт реалізації. Реалізуйте методи абстракції, делегуючи основну роботу пов’язаному об’єкту реалізації. 6. Якщо у вас є кілька варіацій абстракції, створіть для кожної з них власний підклас. 7. Клієнт повинен подати об’єкт реалізації до конструктора абстракції, щоб зв’язати їх разом. Після цього він може вільно використовувати об’єкт абстракції, забувши про реалізацію. Переваги та недоліки -------------------- * Дозволяє будувати платформо-незалежні програми. * Приховує зайві або небезпечні деталі реалізації від клієнтського коду. * Реалізує _принцип відкритості/закритості_. * Ускладнює код програми внаслідок введення додаткових класів. Відносини з іншими патернами ---------------------------- * [Міст](https://refactoring.guru/uk/design-patterns/bridge) проектують заздалегідь, щоб розвивати великі частини програми окремо одну від одної. [Адаптер](https://refactoring.guru/uk/design-patterns/adapter) застосовується постфактум, щоб змусити несумісні класи працювати разом. * [Міст](https://refactoring.guru/uk/design-patterns/bridge) , [Стратегія](https://refactoring.guru/uk/design-patterns/strategy) та [Стан](https://refactoring.guru/uk/design-patterns/state) (а також трохи і [Адаптер](https://refactoring.guru/uk/design-patterns/adapter) ) мають схожі структури класів — усі вони побудовані за принципом «композиції», тобто делегування роботи іншим об’єктам. Проте вони відрізняються тим, що вирішують різні проблеми. Пам’ятайте, що патерни — це не тільки рецепт побудови коду певним чином, але й описування проблем, які призвели до такого рішення. * [Абстрактна фабрика](https://refactoring.guru/uk/design-patterns/abstract-factory) може працювати спільно з [Мостом](https://refactoring.guru/uk/design-patterns/bridge) . Це особливо корисно, якщо у вас є абстракції, які можуть працювати тільки з деякими реалізаціями. В цьому випадку фабрика визначатиме типи створюваних абстракцій та реалізацій. * Патерн [Будівельник](https://refactoring.guru/uk/design-patterns/builder) може бути побудований у вигляді [Мосту](https://refactoring.guru/uk/design-patterns/bridge) : _директор_ гратиме роль абстракції, а _будівельники_ — реалізації. Приклади реалізації патерна --------------------------- [![Міст на C#](https://refactoring.guru/images/patterns/icons/csharp.svg?id=da64592defc6e86d57c39c66e9de3e58)](https://refactoring.guru/uk/design-patterns/bridge/csharp/example "Міст на C#") [![Міст на C++](https://refactoring.guru/images/patterns/icons/cpp.svg?id=f7782ed8b8666246bfcc3f8fefc3b858)](https://refactoring.guru/uk/design-patterns/bridge/cpp/example "Міст на C++") [![Міст на Go](https://refactoring.guru/images/patterns/icons/go.svg?id=1a89927eb99b1ea3fde7701d97970aca)](https://refactoring.guru/uk/design-patterns/bridge/go/example "Міст на Go") [![Міст на Java](https://refactoring.guru/images/patterns/icons/java.svg?id=e6d87e2dca08c953fe3acd1275ed4f4e)](https://refactoring.guru/uk/design-patterns/bridge/java/example "Міст на Java") [![Міст на PHP](https://refactoring.guru/images/patterns/icons/php.svg?id=be1906eb26b71ec1d3b93720d6156618)](https://refactoring.guru/uk/design-patterns/bridge/php/example "Міст на PHP") [![Міст на Python](https://refactoring.guru/images/patterns/icons/python.svg?id=6d815d43c0f7050a1151b43e51569c9f)](https://refactoring.guru/uk/design-patterns/bridge/python/example "Міст на Python") [![Міст на Ruby](https://refactoring.guru/images/patterns/icons/ruby.svg?id=b065b718c914bf8e960ef731600be1eb)](https://refactoring.guru/uk/design-patterns/bridge/ruby/example "Міст на Ruby") [![Міст на Rust](https://refactoring.guru/images/patterns/icons/rust.svg?id=1f5698a4b5ae23fe79413511747e4a87)](https://refactoring.guru/uk/design-patterns/bridge/rust/example "Міст на Rust") [![Міст на Swift](https://refactoring.guru/images/patterns/icons/swift.svg?id=0b716c2d52ec3a48fbe91ac031070c1d)](https://refactoring.guru/uk/design-patterns/bridge/swift/example "Міст на Swift") [![Міст на TypeScript](https://refactoring.guru/images/patterns/icons/typescript.svg?id=2239d0f16cb703540c205dd8cb0c0cb7)](https://refactoring.guru/uk/design-patterns/bridge/typescript/example "Міст на TypeScript") [![](https://refactoring.guru/images/patterns/banners/patterns-book-banner-1-b-2x.png?id=5572aa55e5b09e59780aca9e0ea8e44b)](https://refactoring.guru/uk/design-patterns/book) ### Не нудьгуй в транспорті Краще почитай нашу книжку про патерни проектування. Тепер це зручно робити навіть під час поїздок в громадському транспорті. [Дізнатися більше…](https://refactoring.guru/uk/design-patterns/book) --- # Состояние [There are patterns of patterns now! \ My friend's project: MetaPatterns.io](https://metapatterns.io/)  [](https://refactoring.guru/ru/design-patterns/state#checkout) [](https://refactoring.guru/ru/design-patterns/state#checkout) [](https://refactoring.guru/) / [Паттерны проектирования](https://refactoring.guru/ru/design-patterns) / [Поведенческие паттерны](https://refactoring.guru/ru/design-patterns/behavioral-patterns) Состояние ========= Также известен как: State Суть паттерна ------------- **Состояние** — это поведенческий паттерн проектирования, который позволяет объектам менять поведение в зависимости от своего состояния. Извне создаётся впечатление, что изменился класс объекта. ![Паттерн Состояние](https://refactoring.guru/images/patterns/content/state/state-ru-2x.png?id=dc0c78340356c82d013200759f16c822) Проблема -------- Паттерн Состояние невозможно рассматривать в отрыве от концепции _машины состояний_, также известной как _стейт-машина_ или _конечный автомат_ Конечный автомат: [https://refactoring.guru/ru/fsm](https://refactoring.guru/ru/fsm) . ![Конечный автомат](https://refactoring.guru/images/patterns/diagrams/state/problem1-2x.png?id=ae03c2233939eace11d44925ddeb912d) Конечный автомат. Основная идея в том, что программа может находиться в одном из нескольких состояний, которые всё время сменяют друг друга. Набор этих состояний, а также переходов между ними, предопределён и _конечен_. Находясь в разных состояниях, программа может по-разному реагировать на одни и те же события, которые происходят с ней. Такой подход можно применить и к отдельным объектам. Например, объект `Документ` может принимать три состояния: `Черновик`, `Модерация` или `Опубликован`. В каждом из этих состоянии метод `опубликовать` будет работать по-разному: * Из черновика он отправит документ на модерацию. * Из модерации — в публикацию, но при условии, что это сделал администратор. * В опубликованном состоянии метод не будет делать ничего. ![Возможные состояния документа и переходы между ними](https://refactoring.guru/images/patterns/diagrams/state/problem2-ru-2x.png?id=f89d1a206d2b551efdc0f81541c16b09) Возможные состояния документа и переходы между ними. Машину состояний чаще всего реализуют с помощью множества условных операторов, `if` либо `switch`, которые проверяют текущее состояние объекта и выполняют соответствующее поведение. Наверняка вы уже реализовали хотя бы одну машину состояний в своей жизни, даже не зная об этом. Как насчёт вот такого кода, выглядит знакомо? class Document is field state: string // ... method publish() is switch (state) "draft": state = "moderation" break "moderation": if (currentUser.role == "admin") state = "published" break "published": // Do nothing. break // ... Основная проблема такой машины состояний проявится в том случае, если в `Документ` добавить ещё десяток состояний. Каждый метод будет состоять из увесистого условного оператора, перебирающего доступные состояния. Такой код крайне сложно поддерживать. Малейшее изменение логики переходов заставит вас перепроверять работу всех методов, которые содержат условные операторы машины состояний. Путаница и нагромождение условий особенно сильно проявляется в старых проектах. Набор возможных состояний бывает трудно предопределить заранее, поэтому они всё время добавляются в процессе эволюции программы. Из-за этого решение, которое выглядело простым и эффективным в самом начале разработки, может впоследствии стать проекцией большого макаронного монстра. Решение ------- Паттерн Состояние предлагает создать отдельные классы для каждого состояния, в котором может пребывать объект, а затем вынести туда поведения, соответствующие этим состояниям. Вместо того, чтобы хранить код всех состояний, первоначальный объект, называемый _контекстом_, будет содержать ссылку на один из объектов-состояний и делегировать ему работу, зависящую от состояния. ![Документ делегирует работу своему активному объекту-состоянию](https://refactoring.guru/images/patterns/diagrams/state/solution-ru-2x.png?id=455d71443da13fc9cc3d4bc84da6e276) Документ делегирует работу своему активному объекту-состоянию. Благодаря тому, что объекты состояний будут иметь общий интерфейс, контекст сможет делегировать работу состоянию, не привязываясь к его классу. Поведение контекста можно будет изменить в любой момент, подключив к нему другой объект-состояние. Очень важным нюансом, отличающим этот паттерн от [Стратегии](https://refactoring.guru/ru/design-patterns/strategy) , является то, что и контекст, и сами конкретные состояния могут знать друг о друге и инициировать переходы от одного состояния к другому. Аналогия из жизни ----------------- Ваш смартфон ведёт себя по-разному, в зависимости от текущего состояния: * Когда телефон разблокирован, нажатие кнопок телефона приводит к каким-то действиям. * Когда телефон заблокирован, нажатие кнопок приводит к экрану разблокировки. * Когда телефон разряжен, нажатие кнопок приводит к экрану зарядки. Структура --------- ![Структура классов паттерна Состояние](https://refactoring.guru/images/patterns/diagrams/state/structure-ru-2x.png?id=af0dedbd5a7b509161ea4151c6f8fe3a)![Структура классов паттерна Состояние](https://refactoring.guru/images/patterns/diagrams/state/structure-ru-indexed-2x.png?id=f97a92d19f87903e6649ef51c87530a3) 1. **Контекст** хранит ссылку на объект состояния и делегирует ему часть работы, зависящей от состояний. Контекст работает с этим объектом через общий интерфейс состояний. Контекст должен иметь метод для присваивания ему нового объекта-состояния. 2. **Состояние** описывает общий интерфейс для всех конкретных состояний. 3. **Конкретные состояния** реализуют поведения, связанные с определённым состоянием контекста. Иногда приходится создавать целые иерархии классов состояний, чтобы обобщить дублирующий код. Состояние может иметь обратную ссылку на объект контекста. Через неё не только удобно получать из контекста нужную информацию, но и осуществлять смену его состояния. 4. И контекст, и объекты конкретных состояний могут решать, когда и какое следующее состояние будет выбрано. Чтобы переключить состояние, нужно подать другой объект-состояние в контекст. Псевдокод --------- В этом примере паттерн **Состояние** изменяет функциональность одних и тех же элементов управления музыкальным проигрывателем, в зависимости от того, в каком состоянии находится сейчас проигрыватель. ![Структура классов примера паттерна Состояние](https://refactoring.guru/images/patterns/diagrams/state/example-2x.png?id=cd81e3ffb8aba5883983a59c111b805f) Пример изменение поведения проигрывателя с помощью состояний. Объект проигрывателя содержит объект-состояние, которому и делегирует основную работу. Изменяя состояния, можно менять то, как ведут себя элементы управления проигрывателя. // Общий интерфейс всех состояний. abstract class State is protected field player: AudioPlayer // Контекст передаёт себя в конструктор состояния, чтобы // состояние могло обращаться к его данным и методам в // будущем, если потребуется. constructor State(player) is this.player = player abstract method clickLock() abstract method clickPlay() abstract method clickNext() abstract method clickPrevious() // Конкретные состояния реализуют методы абстрактного состояния // по-своему. class LockedState extends State is // При разблокировке проигрователя с заблокированными // клавишами он может принять одно из двух состояний. method clickLock() is if (player.playing) player.changeState(new PlayingState(player)) else player.changeState(new ReadyState(player)) method clickPlay() is // Ничего не делать. method clickNext() is // Ничего не делать. method clickPrevious() is // Ничего не делать. // Конкретные состояния сами могут переводить контекст в другое // состояние. class ReadyState extends State is method clickLock() is player.changeState(new LockedState(player)) method clickPlay() is player.startPlayback() player.changeState(new PlayingState(player)) method clickNext() is player.nextSong() method clickPrevious() is player.previousSong() class PlayingState extends State is method clickLock() is player.changeState(new LockedState(player)) method clickPlay() is player.stopPlayback() player.changeState(new ReadyState(player)) method clickNext() is if (event.doubleclick) player.nextSong() else player.fastForward(5) method clickPrevious() is if (event.doubleclick) player.previous() else player.rewind(5) // Проигрыватель выступает в роли контекста. class AudioPlayer is field state: State field UI, volume, playlist, currentSong constructor AudioPlayer() is this.state = new ReadyState(this) // Контекст заставляет состояние реагировать на // пользовательский ввод вместо себя. Реакция может быть // разной, в зависимости от того, какое состояние сейчас // активно. UI = new UserInterface() UI.lockButton.onClick(this.clickLock) UI.playButton.onClick(this.clickPlay) UI.nextButton.onClick(this.clickNext) UI.prevButton.onClick(this.clickPrevious) // Другие объекты тоже должны иметь возможность заменять // состояние проигрывателя. method changeState(state: State) is this.state = state // Методы UI будут делегировать работу активному состоянию. method clickLock() is state.clickLock() method clickPlay() is state.clickPlay() method clickNext() is state.clickNext() method clickPrevious() is state.clickPrevious() // Сервисные методы контекста, вызываемые состояниями. method startPlayback() is // ... method stopPlayback() is // ... method nextSong() is // ... method previousSong() is // ... method fastForward(time) is // ... method rewind(time) is // ... Применимость ------------ Когда у вас есть объект, поведение которого кардинально меняется в зависимости от внутреннего состояния, причём типов состояний много, и их код часто меняется. Паттерн предлагает выделить в собственные классы все поля и методы, связанные с определёнными состояниями. Первоначальный объект будет постоянно ссылаться на один из объектов-состояний, делегируя ему часть своей работы. Для изменения состояния в контекст достаточно будет подставить другой объект-состояние. Когда код класса содержит множество больших, похожих друг на друга, условных операторов, которые выбирают поведения в зависимости от текущих значений полей класса. Паттерн предлагает переместить каждую ветку такого условного оператора в собственный класс. Тут же можно поселить и все поля, связанные с данным состоянием. Когда вы сознательно используете табличную машину состояний, построенную на условных операторах, но вынуждены мириться с дублированием кода для похожих состояний и переходов. Паттерн Состояние позволяет реализовать иерархическую машину состояний, базирующуюся на наследовании. Вы можете отнаследовать похожие состояния от одного родительского класса и вынести туда весь дублирующий код. Шаги реализации --------------- 1. Определитесь с классом, который будет играть роль контекста. Это может быть как существующий класс, в котором уже есть зависимость от состояния, так и новый класс, если код состояний размазан по нескольким классам. 2. Создайте общий интерфейс состояний. Он должен описывать методы, общие для всех состояний, обнаруженных в контексте. Заметьте, что не всё поведение контекста нужно переносить в состояние, а только то, которое зависит от состояний. 3. Для каждого фактического состояния создайте класс, реализующий интерфейс состояния. Переместите код, связанный с конкретными состояниями в нужные классы. В конце концов, все методы интерфейса состояния должны быть реализованы во всех классах состояний. При переносе поведения из контекста вы можете столкнуться с тем, что это поведение зависит от приватных полей или методов контекста, к которым нет доступа из объекта состояния. Существует парочка способов обойти эту проблему. Самый простой — оставить поведение внутри контекста, вызывая его из объекта состояния. С другой стороны, вы можете сделать классы состояний вложенными в класс контекста, и тогда они получат доступ ко всем приватным частям контекста. Но последний способ доступен только в некоторых языках программирования (например, Java, C#). 4. Создайте в контексте поле для хранения объектов-состояний, а также публичный метод для изменения значения этого поля. 5. Старые методы контекста, в которых находился зависимый от состояния код, замените на вызовы соответствующих методов объекта-состояния. 6. В зависимости от бизнес-логики, разместите код, который переключает состояние контекста либо внутри контекста, либо внутри классов конкретных состояний. Преимущества и недостатки ------------------------- * Избавляет от множества больших условных операторов машины состояний. * Концентрирует в одном месте код, связанный с определённым состоянием. * Упрощает код контекста. * Может неоправданно усложнить код, если состояний мало и они редко меняются. Отношения с другими паттернами ------------------------------ * [Мост](https://refactoring.guru/ru/design-patterns/bridge) , [Стратегия](https://refactoring.guru/ru/design-patterns/strategy) и [Состояние](https://refactoring.guru/ru/design-patterns/state) (а также слегка и [Адаптер](https://refactoring.guru/ru/design-patterns/adapter) ) имеют схожие структуры классов — все они построены на принципе «композиции», то есть делегирования работы другим объектам. Тем не менее, они отличаются тем, что решают разные проблемы. Помните, что паттерны — это не только рецепт построения кода определённым образом, но и описание проблем, которые привели к данному решению. * [Состояние](https://refactoring.guru/ru/design-patterns/state) можно рассматривать как надстройку над [Стратегией](https://refactoring.guru/ru/design-patterns/strategy) . Оба паттерна используют композицию, чтобы менять поведение основного объекта, делегируя работу вложенным объектам-помощникам. Однако в _Стратегии_ эти объекты не знают друг о друге и никак не связаны. В _Состоянии_ сами конкретные состояния могут переключать контекст. Примеры реализации паттерна --------------------------- [![Состояние на C#](https://refactoring.guru/images/patterns/icons/csharp.svg?id=da64592defc6e86d57c39c66e9de3e58)](https://refactoring.guru/ru/design-patterns/state/csharp/example "Состояние на C#") [![Состояние на C++](https://refactoring.guru/images/patterns/icons/cpp.svg?id=f7782ed8b8666246bfcc3f8fefc3b858)](https://refactoring.guru/ru/design-patterns/state/cpp/example "Состояние на C++") [![Состояние на Go](https://refactoring.guru/images/patterns/icons/go.svg?id=1a89927eb99b1ea3fde7701d97970aca)](https://refactoring.guru/ru/design-patterns/state/go/example "Состояние на Go") [![Состояние на Java](https://refactoring.guru/images/patterns/icons/java.svg?id=e6d87e2dca08c953fe3acd1275ed4f4e)](https://refactoring.guru/ru/design-patterns/state/java/example "Состояние на Java") [![Состояние на PHP](https://refactoring.guru/images/patterns/icons/php.svg?id=be1906eb26b71ec1d3b93720d6156618)](https://refactoring.guru/ru/design-patterns/state/php/example "Состояние на PHP") [![Состояние на Python](https://refactoring.guru/images/patterns/icons/python.svg?id=6d815d43c0f7050a1151b43e51569c9f)](https://refactoring.guru/ru/design-patterns/state/python/example "Состояние на Python") [![Состояние на Ruby](https://refactoring.guru/images/patterns/icons/ruby.svg?id=b065b718c914bf8e960ef731600be1eb)](https://refactoring.guru/ru/design-patterns/state/ruby/example "Состояние на Ruby") [![Состояние на Rust](https://refactoring.guru/images/patterns/icons/rust.svg?id=1f5698a4b5ae23fe79413511747e4a87)](https://refactoring.guru/ru/design-patterns/state/rust/example "Состояние на Rust") [![Состояние на Swift](https://refactoring.guru/images/patterns/icons/swift.svg?id=0b716c2d52ec3a48fbe91ac031070c1d)](https://refactoring.guru/ru/design-patterns/state/swift/example "Состояние на Swift") [![Состояние на TypeScript](https://refactoring.guru/images/patterns/icons/typescript.svg?id=2239d0f16cb703540c205dd8cb0c0cb7)](https://refactoring.guru/ru/design-patterns/state/typescript/example "Состояние на TypeScript") [![](https://refactoring.guru/images/patterns/banners/patterns-book-banner-1-b-2x.png?id=5572aa55e5b09e59780aca9e0ea8e44b)](https://refactoring.guru/ru/design-patterns/book) ### Не втыкай в транспорте Лучше почитай нашу книгу о паттернах проектирования. Теперь это удобно делать даже во время поездок в общественном транспорте. [Узнать больше…](https://refactoring.guru/ru/design-patterns/book) --- # Спостерігач на Python [There are patterns of patterns now! \ My friend's project: MetaPatterns.io](https://metapatterns.io/)  [](https://refactoring.guru/uk/design-patterns/observer/python/example#checkout) [](https://refactoring.guru/uk/design-patterns/observer/python/example#checkout) [](https://refactoring.guru/) / [Патерни проектування](https://refactoring.guru/uk/design-patterns) / [Спостерігач](https://refactoring.guru/uk/design-patterns/observer) / [Python](https://refactoring.guru/uk/design-patterns/python) ![Спостерігач](https://refactoring.guru/images/patterns/cards/observer-mini-2x.png?id=f205b0655572ac8e4636691c0e0debfd) **Спостерігач** на Python ========================= **Спостерігач** — це поведінковий патерн, який дозволяє об’єктам повідомляти інші об’єкти про зміни свого стану. При цьому спостерігачі можуть вільно підписуватися і відписуватись від цих повідомлень. [Детальніше про Спостерігач](https://refactoring.guru/uk/design-patterns/observer) Навігація  [Інтро](https://refactoring.guru/uk/design-patterns/observer/python/example#)  [Концептуальний приклад](https://refactoring.guru/uk/design-patterns/observer/python/example#example-0)  [main](https://refactoring.guru/uk/design-patterns/observer/python/example#example-0--main-py)  [Output](https://refactoring.guru/uk/design-patterns/observer/python/example#example-0--Output-txt) **Складність:** **Популярність:** **Застосування:** Спостерігач часто зустрічається в коді Python, особливо там, де до відносин між компонентами застосовується модель подій. Спостерігач дозволяє окремим компонентам реагувати на події, які відбуваються в інших компонентах. **Ознаки застосування патерна:** Спостерігач визначається за механізмом підписки та методами повідомлення, які викликають компоненти програми. Концептуальний приклад ---------------------- Цей приклад показує структуру патерна **Спостерігач**, а саме — з яких класів він складається, які ролі ці класи виконують і як вони взаємодіють один з одним. #### **main.py:** Приклад структури патерна from \_\_future\_\_ import annotations from abc import ABC, abstractmethod from random import randrange from typing import List class Subject(ABC): """ The Subject interface declares a set of methods for managing subscribers. """ @abstractmethod def attach(self, observer: Observer) -> None: """ Attach an observer to the subject. """ pass @abstractmethod def detach(self, observer: Observer) -> None: """ Detach an observer from the subject. """ pass @abstractmethod def notify(self) -> None: """ Notify all observers about an event. """ pass class ConcreteSubject(Subject): """ The Subject owns some important state and notifies observers when the state changes. """ \_state: int = None """ For the sake of simplicity, the Subject's state, essential to all subscribers, is stored in this variable. """ \_observers: List\[Observer\] = \[\] """ List of subscribers. In real life, the list of subscribers can be stored more comprehensively (categorized by event type, etc.). """ def attach(self, observer: Observer) -> None: print("Subject: Attached an observer.") self.\_observers.append(observer) def detach(self, observer: Observer) -> None: self.\_observers.remove(observer) """ The subscription management methods. """ def notify(self) -> None: """ Trigger an update in each subscriber. """ print("Subject: Notifying observers...") for observer in self.\_observers: observer.update(self) def some\_business\_logic(self) -> None: """ Usually, the subscription logic is only a fraction of what a Subject can really do. Subjects commonly hold some important business logic, that triggers a notification method whenever something important is about to happen (or after it). """ print("\\nSubject: I'm doing something important.") self.\_state = randrange(0, 10) print(f"Subject: My state has just changed to: {self.\_state}") self.notify() class Observer(ABC): """ The Observer interface declares the update method, used by subjects. """ @abstractmethod def update(self, subject: Subject) -> None: """ Receive update from subject. """ pass """ Concrete Observers react to the updates issued by the Subject they had been attached to. """ class ConcreteObserverA(Observer): def update(self, subject: Subject) -> None: if subject.\_state < 3: print("ConcreteObserverA: Reacted to the event") class ConcreteObserverB(Observer): def update(self, subject: Subject) -> None: if subject.\_state == 0 or subject.\_state >= 2: print("ConcreteObserverB: Reacted to the event") if \_\_name\_\_ == "\_\_main\_\_": # The client code. subject = ConcreteSubject() observer\_a = ConcreteObserverA() subject.attach(observer\_a) observer\_b = ConcreteObserverB() subject.attach(observer\_b) subject.some\_business\_logic() subject.some\_business\_logic() subject.detach(observer\_a) subject.some\_business\_logic() #### **Output.txt:** Результат виконання Subject: Attached an observer. Subject: Attached an observer. Subject: I'm doing something important. Subject: My state has just changed to: 0 Subject: Notifying observers... ConcreteObserverA: Reacted to the event ConcreteObserverB: Reacted to the event Subject: I'm doing something important. Subject: My state has just changed to: 5 Subject: Notifying observers... ConcreteObserverB: Reacted to the event Subject: I'm doing something important. Subject: My state has just changed to: 0 Subject: Notifying observers... ConcreteObserverB: Reacted to the event **Спостерігач** іншими мовами програмування ------------------------------------------- [![Спостерігач на C#](https://refactoring.guru/images/patterns/icons/csharp.svg?id=da64592defc6e86d57c39c66e9de3e58)](https://refactoring.guru/uk/design-patterns/observer/csharp/example "Спостерігач на C#") [![Спостерігач на C++](https://refactoring.guru/images/patterns/icons/cpp.svg?id=f7782ed8b8666246bfcc3f8fefc3b858)](https://refactoring.guru/uk/design-patterns/observer/cpp/example "Спостерігач на C++") [![Спостерігач на Go](https://refactoring.guru/images/patterns/icons/go.svg?id=1a89927eb99b1ea3fde7701d97970aca)](https://refactoring.guru/uk/design-patterns/observer/go/example "Спостерігач на Go") [![Спостерігач на Java](https://refactoring.guru/images/patterns/icons/java.svg?id=e6d87e2dca08c953fe3acd1275ed4f4e)](https://refactoring.guru/uk/design-patterns/observer/java/example "Спостерігач на Java") [![Спостерігач на PHP](https://refactoring.guru/images/patterns/icons/php.svg?id=be1906eb26b71ec1d3b93720d6156618)](https://refactoring.guru/uk/design-patterns/observer/php/example "Спостерігач на PHP") [![Спостерігач на Ruby](https://refactoring.guru/images/patterns/icons/ruby.svg?id=b065b718c914bf8e960ef731600be1eb)](https://refactoring.guru/uk/design-patterns/observer/ruby/example "Спостерігач на Ruby") [![Спостерігач на Rust](https://refactoring.guru/images/patterns/icons/rust.svg?id=1f5698a4b5ae23fe79413511747e4a87)](https://refactoring.guru/uk/design-patterns/observer/rust/example "Спостерігач на Rust") [![Спостерігач на Swift](https://refactoring.guru/images/patterns/icons/swift.svg?id=0b716c2d52ec3a48fbe91ac031070c1d)](https://refactoring.guru/uk/design-patterns/observer/swift/example "Спостерігач на Swift") [![Спостерігач на TypeScript](https://refactoring.guru/images/patterns/icons/typescript.svg?id=2239d0f16cb703540c205dd8cb0c0cb7)](https://refactoring.guru/uk/design-patterns/observer/typescript/example "Спостерігач на TypeScript") --- # Паттерны проектирования на C# [There are patterns of patterns now! \ My friend's project: MetaPatterns.io](https://metapatterns.io/)  [](https://refactoring.guru/ru/design-patterns/csharp#checkout) [](https://refactoring.guru/ru/design-patterns/csharp#checkout) ![Паттерны проектирования на C#](https://refactoring.guru/images/patterns/languages/csharp-3x.png) ![Паттерны проектирования на C#](https://refactoring.guru/images/patterns/languages/mini/csharp-3x.png) ПАТТЕРНЫ ПРОЕКТИРОВАНИЯ на C# ============================= Каталог **C#**\-примеров ------------------------ #### Порождающие паттерны ![Абстрактная фабрика](https://refactoring.guru/images/patterns/cards/abstract-factory-mini-3x.png) #### Абстрактная фабрика Abstract Factory Позволяет создавать семейства связанных объектов, не привязываясь к конкретным классам создаваемых объектов. [Главный раздел](https://refactoring.guru/ru/design-patterns/abstract-factory) [Паттерн на C#](https://refactoring.guru/ru/design-patterns/abstract-factory/csharp/example#lang-features) [Пример кода](https://refactoring.guru/ru/design-patterns/abstract-factory/csharp/example#example-0) ![Строитель](https://refactoring.guru/images/patterns/cards/builder-mini-3x.png) #### Строитель Builder Позволяет создавать сложные объекты пошагово. Строитель даёт возможность использовать один и тот же код строительства для получения разных представлений объектов. [Главный раздел](https://refactoring.guru/ru/design-patterns/builder) [Паттерн на C#](https://refactoring.guru/ru/design-patterns/builder/csharp/example#lang-features) [Пример кода](https://refactoring.guru/ru/design-patterns/builder/csharp/example#example-0) ![Фабричный метод](https://refactoring.guru/images/patterns/cards/factory-method-mini-3x.png) #### Фабричный метод Factory Method Определяет общий интерфейс для создания объектов в суперклассе, позволяя подклассам изменять тип создаваемых объектов. [Главный раздел](https://refactoring.guru/ru/design-patterns/factory-method) [Паттерн на C#](https://refactoring.guru/ru/design-patterns/factory-method/csharp/example#lang-features) [Пример кода](https://refactoring.guru/ru/design-patterns/factory-method/csharp/example#example-0) ![Прототип](https://refactoring.guru/images/patterns/cards/prototype-mini-3x.png) #### Прототип Prototype Позволяет копировать объекты, не вдаваясь в подробности их реализации. [Главный раздел](https://refactoring.guru/ru/design-patterns/prototype) [Паттерн на C#](https://refactoring.guru/ru/design-patterns/prototype/csharp/example#lang-features) [Пример кода](https://refactoring.guru/ru/design-patterns/prototype/csharp/example#example-0) ![Одиночка](https://refactoring.guru/images/patterns/cards/singleton-mini-3x.png) #### Одиночка Singleton Гарантирует, что у класса есть только один экземпляр, и предоставляет к нему глобальную точку доступа. [Главный раздел](https://refactoring.guru/ru/design-patterns/singleton) [Паттерн на C#](https://refactoring.guru/ru/design-patterns/singleton/csharp/example#lang-features) [Наивный Одиночка](https://refactoring.guru/ru/design-patterns/singleton/csharp/example#example-0) [Многопоточный Одиночка](https://refactoring.guru/ru/design-patterns/singleton/csharp/example#example-1) #### Структурные паттерны ![Адаптер](https://refactoring.guru/images/patterns/cards/adapter-mini-3x.png) #### Адаптер Adapter Позволяет объектам с несовместимыми интерфейсами работать вместе. [Главный раздел](https://refactoring.guru/ru/design-patterns/adapter) [Паттерн на C#](https://refactoring.guru/ru/design-patterns/adapter/csharp/example#lang-features) [Пример кода](https://refactoring.guru/ru/design-patterns/adapter/csharp/example#example-0) ![Мост](https://refactoring.guru/images/patterns/cards/bridge-mini-3x.png) #### Мост Bridge Разделяет один или несколько классов на две отдельные иерархии — абстракцию и реализацию, позволяя изменять их независимо друг от друга. [Главный раздел](https://refactoring.guru/ru/design-patterns/bridge) [Паттерн на C#](https://refactoring.guru/ru/design-patterns/bridge/csharp/example#lang-features) [Пример кода](https://refactoring.guru/ru/design-patterns/bridge/csharp/example#example-0) ![Компоновщик](https://refactoring.guru/images/patterns/cards/composite-mini-3x.png) #### Компоновщик Composite Позволяет сгруппировать объекты в древовидную структуру, а затем работать с ними так, как будто это единичный объект. [Главный раздел](https://refactoring.guru/ru/design-patterns/composite) [Паттерн на C#](https://refactoring.guru/ru/design-patterns/composite/csharp/example#lang-features) [Пример кода](https://refactoring.guru/ru/design-patterns/composite/csharp/example#example-0) ![Декоратор](https://refactoring.guru/images/patterns/cards/decorator-mini-3x.png) #### Декоратор Decorator Позволяет динамически добавлять объектам новую функциональность, оборачивая их в полезные «обёртки». [Главный раздел](https://refactoring.guru/ru/design-patterns/decorator) [Паттерн на C#](https://refactoring.guru/ru/design-patterns/decorator/csharp/example#lang-features) [Пример кода](https://refactoring.guru/ru/design-patterns/decorator/csharp/example#example-0) ![Фасад](https://refactoring.guru/images/patterns/cards/facade-mini-3x.png) #### Фасад Facade Предоставляет простой интерфейс к сложной системе классов, библиотеке или фреймворку. [Главный раздел](https://refactoring.guru/ru/design-patterns/facade) [Паттерн на C#](https://refactoring.guru/ru/design-patterns/facade/csharp/example#lang-features) [Пример кода](https://refactoring.guru/ru/design-patterns/facade/csharp/example#example-0) ![Легковес](https://refactoring.guru/images/patterns/cards/flyweight-mini-3x.png) #### Легковес Flyweight Позволяет вместить бóльшее количество объектов в отведённую оперативную память. Легковес экономит память, разделяя общее состояние объектов между собой, вместо хранения одинаковых данных в каждом объекте. [Главный раздел](https://refactoring.guru/ru/design-patterns/flyweight) [Паттерн на C#](https://refactoring.guru/ru/design-patterns/flyweight/csharp/example#lang-features) [Пример кода](https://refactoring.guru/ru/design-patterns/flyweight/csharp/example#example-0) ![Заместитель](https://refactoring.guru/images/patterns/cards/proxy-mini-3x.png) #### Заместитель Proxy Позволяет подставлять вместо реальных объектов специальные объекты-заменители. Эти объекты перехватывают вызовы к оригинальному объекту, позволяя сделать что-то до или после передачи вызова оригиналу. [Главный раздел](https://refactoring.guru/ru/design-patterns/proxy) [Паттерн на C#](https://refactoring.guru/ru/design-patterns/proxy/csharp/example#lang-features) [Пример кода](https://refactoring.guru/ru/design-patterns/proxy/csharp/example#example-0) #### Поведенческие паттерны ![Цепочка обязанностей](https://refactoring.guru/images/patterns/cards/chain-of-responsibility-mini-3x.png) #### Цепочка обязанностей Chain of Responsibility Позволяет передавать запросы последовательно по цепочке обработчиков. Каждый последующий обработчик решает, может ли он обработать запрос сам и стоит ли передавать запрос дальше по цепи. [Главный раздел](https://refactoring.guru/ru/design-patterns/chain-of-responsibility) [Паттерн на C#](https://refactoring.guru/ru/design-patterns/chain-of-responsibility/csharp/example#lang-features) [Пример кода](https://refactoring.guru/ru/design-patterns/chain-of-responsibility/csharp/example#example-0) ![Команда](https://refactoring.guru/images/patterns/cards/command-mini-3x.png) #### Команда Command Превращает запросы в объекты, позволяя передавать их как аргументы при вызове методов, ставить запросы в очередь, логировать их, а также поддерживать отмену операций. [Главный раздел](https://refactoring.guru/ru/design-patterns/command) [Паттерн на C#](https://refactoring.guru/ru/design-patterns/command/csharp/example#lang-features) [Пример кода](https://refactoring.guru/ru/design-patterns/command/csharp/example#example-0) ![Итератор](https://refactoring.guru/images/patterns/cards/iterator-mini-3x.png) #### Итератор Iterator Даёт возможность последовательно обходить элементы составных объектов, не раскрывая их внутреннего представления. [Главный раздел](https://refactoring.guru/ru/design-patterns/iterator) [Паттерн на C#](https://refactoring.guru/ru/design-patterns/iterator/csharp/example#lang-features) [Пример кода](https://refactoring.guru/ru/design-patterns/iterator/csharp/example#example-0) ![Посредник](https://refactoring.guru/images/patterns/cards/mediator-mini-3x.png) #### Посредник Mediator Позволяет уменьшить связанность множества классов между собой, благодаря перемещению этих связей в один класс-посредник. [Главный раздел](https://refactoring.guru/ru/design-patterns/mediator) [Паттерн на C#](https://refactoring.guru/ru/design-patterns/mediator/csharp/example#lang-features) [Пример кода](https://refactoring.guru/ru/design-patterns/mediator/csharp/example#example-0) ![Снимок](https://refactoring.guru/images/patterns/cards/memento-mini-3x.png) #### Снимок Memento Позволяет делать снимки состояния объектов, не раскрывая подробностей их реализации. Затем снимки можно использовать, чтобы восстановить прошлое состояние объектов. [Главный раздел](https://refactoring.guru/ru/design-patterns/memento) [Паттерн на C#](https://refactoring.guru/ru/design-patterns/memento/csharp/example#lang-features) [Пример кода](https://refactoring.guru/ru/design-patterns/memento/csharp/example#example-0) ![Наблюдатель](https://refactoring.guru/images/patterns/cards/observer-mini-3x.png) #### Наблюдатель Observer Создаёт механизм подписки, позволяющий одним объектам следить и реагировать на события, происходящие в других объектах. [Главный раздел](https://refactoring.guru/ru/design-patterns/observer) [Паттерн на C#](https://refactoring.guru/ru/design-patterns/observer/csharp/example#lang-features) [Пример кода](https://refactoring.guru/ru/design-patterns/observer/csharp/example#example-0) ![Состояние](https://refactoring.guru/images/patterns/cards/state-mini-3x.png) #### Состояние State Позволяет объектам менять поведение в зависимости от своего состояния. Извне создаётся впечатление, что изменился класс объекта. [Главный раздел](https://refactoring.guru/ru/design-patterns/state) [Паттерн на C#](https://refactoring.guru/ru/design-patterns/state/csharp/example#lang-features) [Пример кода](https://refactoring.guru/ru/design-patterns/state/csharp/example#example-0) ![Стратегия](https://refactoring.guru/images/patterns/cards/strategy-mini-3x.png) #### Стратегия Strategy Определяет семейство схожих алгоритмов и помещает каждый из них в собственный класс, после чего алгоритмы можно взаимозаменять прямо во время исполнения программы. [Главный раздел](https://refactoring.guru/ru/design-patterns/strategy) [Паттерн на C#](https://refactoring.guru/ru/design-patterns/strategy/csharp/example#lang-features) [Пример кода](https://refactoring.guru/ru/design-patterns/strategy/csharp/example#example-0) ![Шаблонный метод](https://refactoring.guru/images/patterns/cards/template-method-mini-3x.png) #### Шаблонный метод Template Method Определяет скелет алгоритма, перекладывая ответственность за некоторые его шаги на подклассы. Паттерн позволяет подклассам переопределять шаги алгоритма, не меняя его общей структуры. [Главный раздел](https://refactoring.guru/ru/design-patterns/template-method) [Паттерн на C#](https://refactoring.guru/ru/design-patterns/template-method/csharp/example#lang-features) [Пример кода](https://refactoring.guru/ru/design-patterns/template-method/csharp/example#example-0) ![Посетитель](https://refactoring.guru/images/patterns/cards/visitor-mini-3x.png) #### Посетитель Visitor Позволяет создавать новые операции, не меняя классы объектов, над которыми эти операции могут выполняться. [Главный раздел](https://refactoring.guru/ru/design-patterns/visitor) [Паттерн на C#](https://refactoring.guru/ru/design-patterns/visitor/csharp/example#lang-features) [Пример кода](https://refactoring.guru/ru/design-patterns/visitor/csharp/example#example-0) --- # C++로 작성된 디자인 패턴들 [There are patterns of patterns now! \ My friend's project: MetaPatterns.io](https://metapatterns.io/)  [](https://refactoring.guru/ko/design-patterns/cpp#checkout) [](https://refactoring.guru/ko/design-patterns/cpp#checkout) ![C++로 작성된 디자인 패턴들](https://refactoring.guru/images/patterns/languages/cpp-3x.png) ![C++로 작성된 디자인 패턴들](https://refactoring.guru/images/patterns/languages/mini/cpp-3x.png) C++로 된 디자인 패턴 ============= **C++** 예시의 카탈로그 ---------------- #### 생성 패턴 ![추상 팩토리](https://refactoring.guru/images/patterns/cards/abstract-factory-mini-3x.png) #### 추상 팩토리 관련 객체들의 구상 클래스들을 지정하지 않고도 그들의 패밀리들을 생성할 수 있습니다. [주 기사](https://refactoring.guru/ko/design-patterns/abstract-factory) [C++에서의 사용예시](https://refactoring.guru/ko/design-patterns/abstract-factory/cpp/example#lang-features) [코드 예시](https://refactoring.guru/ko/design-patterns/abstract-factory/cpp/example#example-0) ![빌더](https://refactoring.guru/images/patterns/cards/builder-mini-3x.png) #### 빌더 복잡한 객체들을 단계별로 생성할 수 있도록 합니다. 이 패턴은 같은 생성코드를 사용하여 객체의 다양한 유형들과 표현을 생성할 수 있습니다. [주 기사](https://refactoring.guru/ko/design-patterns/builder) [C++에서의 사용예시](https://refactoring.guru/ko/design-patterns/builder/cpp/example#lang-features) [코드 예시](https://refactoring.guru/ko/design-patterns/builder/cpp/example#example-0) ![팩토리 메서드](https://refactoring.guru/images/patterns/cards/factory-method-mini-3x.png) #### 팩토리 메서드 부모 클래스에서 객체를 생성할 수 있는 인터페이스를 제공하지만, 자식 클래스들이 생성될 객체의 유형을 변경할 수 있도록 합니다. [주 기사](https://refactoring.guru/ko/design-patterns/factory-method) [C++에서의 사용예시](https://refactoring.guru/ko/design-patterns/factory-method/cpp/example#lang-features) [코드 예시](https://refactoring.guru/ko/design-patterns/factory-method/cpp/example#example-0) ![프로토타입](https://refactoring.guru/images/patterns/cards/prototype-mini-3x.png) #### 프로토타입 코드를 그들의 클래스들에 의존시키지 않고 기존 객체들을 복사할 수 있도록 합니다. [주 기사](https://refactoring.guru/ko/design-patterns/prototype) [C++에서의 사용예시](https://refactoring.guru/ko/design-patterns/prototype/cpp/example#lang-features) [코드 예시](https://refactoring.guru/ko/design-patterns/prototype/cpp/example#example-0) ![싱글턴](https://refactoring.guru/images/patterns/cards/singleton-mini-3x.png) #### 싱글턴 클래스에 인스턴스가 하나만 있도록 하면서 이 인스턴스에 대한 전역 접근​(액세스) 지점을 제공합니다. [주 기사](https://refactoring.guru/ko/design-patterns/singleton) [C++에서의 사용예시](https://refactoring.guru/ko/design-patterns/singleton/cpp/example#lang-features) [기본 싱글턴](https://refactoring.guru/ko/design-patterns/singleton/cpp/example#example-0) [스레드로부터 안전한 싱글턴](https://refactoring.guru/ko/design-patterns/singleton/cpp/example#example-1) #### 구조 패턴 ![어댑터](https://refactoring.guru/images/patterns/cards/adapter-mini-3x.png) #### 어댑터 호환되지 않는 인터페이스를 가진 객체들이 협업할 수 있도록 합니다. [주 기사](https://refactoring.guru/ko/design-patterns/adapter) [C++에서의 사용예시](https://refactoring.guru/ko/design-patterns/adapter/cpp/example#lang-features) [개념적인 예시](https://refactoring.guru/ko/design-patterns/adapter/cpp/example#example-0) [다중 상속](https://refactoring.guru/ko/design-patterns/adapter/cpp/example#example-1) ![브리지](https://refactoring.guru/images/patterns/cards/bridge-mini-3x.png) #### 브리지 큰 클래스 또는 밀접하게 관련된 클래스들의 집합을 두 개의 개별 계층구조​(추상화 및 구현)​로 나눈 후 각각 독립적으로 개발할 수 있도록 합니다. [주 기사](https://refactoring.guru/ko/design-patterns/bridge) [C++에서의 사용예시](https://refactoring.guru/ko/design-patterns/bridge/cpp/example#lang-features) [코드 예시](https://refactoring.guru/ko/design-patterns/bridge/cpp/example#example-0) ![복합체](https://refactoring.guru/images/patterns/cards/composite-mini-3x.png) #### 복합체 객체들을 트리 구조들로 구성한 후, 이러한 트리 구조들이 개별 객체들인 것처럼 작업할 수 있도록 하는 디자인 패턴입니다 [주 기사](https://refactoring.guru/ko/design-patterns/composite) [C++에서의 사용예시](https://refactoring.guru/ko/design-patterns/composite/cpp/example#lang-features) [코드 예시](https://refactoring.guru/ko/design-patterns/composite/cpp/example#example-0) ![데코레이터](https://refactoring.guru/images/patterns/cards/decorator-mini-3x.png) #### 데코레이터 객체들을 새로운 행동들을 포함한 특수 래퍼 객체들 내에 넣어서 위 행동들을 해당 객체들에 연결시킵니다. [주 기사](https://refactoring.guru/ko/design-patterns/decorator) [C++에서의 사용예시](https://refactoring.guru/ko/design-patterns/decorator/cpp/example#lang-features) [코드 예시](https://refactoring.guru/ko/design-patterns/decorator/cpp/example#example-0) ![퍼사드](https://refactoring.guru/images/patterns/cards/facade-mini-3x.png) #### 퍼사드 라이브러리에 대한, 프레임워크에 대한 또는 다른 클래스들의 복잡한 집합에 대한 단순화된 인터페이스를 제공합니다. [주 기사](https://refactoring.guru/ko/design-patterns/facade) [C++에서의 사용예시](https://refactoring.guru/ko/design-patterns/facade/cpp/example#lang-features) [코드 예시](https://refactoring.guru/ko/design-patterns/facade/cpp/example#example-0) ![플라이웨이트](https://refactoring.guru/images/patterns/cards/flyweight-mini-3x.png) #### 플라이웨이트 각 객체에 모든 데이터를 유지하는 대신 여러 객체 간에 상태의 공통 부분들을 공유하여 사용할 수 있는 RAM에 더 많은 객체를 포함할 수 있도록 합니다. [주 기사](https://refactoring.guru/ko/design-patterns/flyweight) [C++에서의 사용예시](https://refactoring.guru/ko/design-patterns/flyweight/cpp/example#lang-features) [코드 예시](https://refactoring.guru/ko/design-patterns/flyweight/cpp/example#example-0) ![프록시](https://refactoring.guru/images/patterns/cards/proxy-mini-3x.png) #### 프록시 다른 객체에 대한 대체 또는 자리표시자를 제공할 수 있습니다. 프록시는 원래 객체에 대한 접근을 제어하므로, 당신의 요청이 원래 객체에 전달되기 전 또는 후에 무언가를 수행할 수 있도록 합니다. [주 기사](https://refactoring.guru/ko/design-patterns/proxy) [C++에서의 사용예시](https://refactoring.guru/ko/design-patterns/proxy/cpp/example#lang-features) [코드 예시](https://refactoring.guru/ko/design-patterns/proxy/cpp/example#example-0) #### 행동 패턴 ![책임 연쇄](https://refactoring.guru/images/patterns/cards/chain-of-responsibility-mini-3x.png) #### 책임 연쇄 일련의 핸들러들의 사슬을 따라 요청을 전달할 수 있게 해주는 행동 디자인 패턴입니다. 각 핸들러는 요청을 받으면 요청을 처리할지 아니면 체인의 다음 핸들러로 전달할지를 결정합니다. [주 기사](https://refactoring.guru/ko/design-patterns/chain-of-responsibility) [C++에서의 사용예시](https://refactoring.guru/ko/design-patterns/chain-of-responsibility/cpp/example#lang-features) [코드 예시](https://refactoring.guru/ko/design-patterns/chain-of-responsibility/cpp/example#example-0) ![커맨드](https://refactoring.guru/images/patterns/cards/command-mini-3x.png) #### 커맨드 요청을 요청에 대한 모든 정보가 포함된 독립 실행형 객체로 변환합니다. 이 변환은 다양한 요청들이 있는 메서드들을 인수화할 수 있도록 하며, 요청의 실행을 지연 또는 대기열에 넣을 수 있도록 하고, 또 실행 취소할 수 있는 작업을 지원할 수 있도록 합니다. [주 기사](https://refactoring.guru/ko/design-patterns/command) [C++에서의 사용예시](https://refactoring.guru/ko/design-patterns/command/cpp/example#lang-features) [코드 예시](https://refactoring.guru/ko/design-patterns/command/cpp/example#example-0) ![반복자](https://refactoring.guru/images/patterns/cards/iterator-mini-3x.png) #### 반복자 컬렉션의 요소들의 기본 표현​(리스트, 스택, 트리 등)​을 노출하지 않고 그들을 하나씩 순회할 수 있도록 합니다. [주 기사](https://refactoring.guru/ko/design-patterns/iterator) [C++에서의 사용예시](https://refactoring.guru/ko/design-patterns/iterator/cpp/example#lang-features) [코드 예시](https://refactoring.guru/ko/design-patterns/iterator/cpp/example#example-0) ![중재자](https://refactoring.guru/images/patterns/cards/mediator-mini-3x.png) #### 중재자 객체 간의 혼란스러운 의존 관계들을 줄일 수 있습니다. 이 패턴은 객체 간의 직접 통신을 제한하고 중재자 객체를 통해서만 협력하도록 합니다. [주 기사](https://refactoring.guru/ko/design-patterns/mediator) [C++에서의 사용예시](https://refactoring.guru/ko/design-patterns/mediator/cpp/example#lang-features) [코드 예시](https://refactoring.guru/ko/design-patterns/mediator/cpp/example#example-0) ![메멘토](https://refactoring.guru/images/patterns/cards/memento-mini-3x.png) #### 메멘토 객체의 구현 세부 사항을 공개하지 않으면서 해당 객체의 이전 상태를 저장하고 복원할 수 있게 해줍니다. [주 기사](https://refactoring.guru/ko/design-patterns/memento) [C++에서의 사용예시](https://refactoring.guru/ko/design-patterns/memento/cpp/example#lang-features) [코드 예시](https://refactoring.guru/ko/design-patterns/memento/cpp/example#example-0) ![옵서버](https://refactoring.guru/images/patterns/cards/observer-mini-3x.png) #### 옵서버 여러 객체에 자신이 관찰 중인 객체에 발생하는 모든 이벤트에 대하여 알리는 구독 메커니즘을 정의할 수 있도록 합니다. [주 기사](https://refactoring.guru/ko/design-patterns/observer) [C++에서의 사용예시](https://refactoring.guru/ko/design-patterns/observer/cpp/example#lang-features) [코드 예시](https://refactoring.guru/ko/design-patterns/observer/cpp/example#example-0) ![상태](https://refactoring.guru/images/patterns/cards/state-mini-3x.png) #### 상태 객체의 내부 상태가 변경될 때 해당 객체가 그의 행동을 변경할 수 있도록 합니다. 객체가 행동을 변경할 때 객체가 클래스를 변경한 것처럼 보일 수 있습니다. [주 기사](https://refactoring.guru/ko/design-patterns/state) [C++에서의 사용예시](https://refactoring.guru/ko/design-patterns/state/cpp/example#lang-features) [코드 예시](https://refactoring.guru/ko/design-patterns/state/cpp/example#example-0) ![전략](https://refactoring.guru/images/patterns/cards/strategy-mini-3x.png) #### 전략 알고리즘들의 패밀리를 정의하고, 각 패밀리를 별도의 클래스들에 넣은 후 그들의 객체들을 상호교환할 수 있도록 합니다. [주 기사](https://refactoring.guru/ko/design-patterns/strategy) [C++에서의 사용예시](https://refactoring.guru/ko/design-patterns/strategy/cpp/example#lang-features) [코드 예시](https://refactoring.guru/ko/design-patterns/strategy/cpp/example#example-0) ![템플릿 메서드](https://refactoring.guru/images/patterns/cards/template-method-mini-3x.png) #### 템플릿 메서드 부모 클래스에서 알고리즘의 골격을 정의하지만, 해당 알고리즘의 구조를 변경하지 않고 자식 클래스들이 알고리즘의 특정 단계들을 오버라이드​(재정의)​할 수 있도록 합니다. [주 기사](https://refactoring.guru/ko/design-patterns/template-method) [C++에서의 사용예시](https://refactoring.guru/ko/design-patterns/template-method/cpp/example#lang-features) [코드 예시](https://refactoring.guru/ko/design-patterns/template-method/cpp/example#example-0) ![비지터](https://refactoring.guru/images/patterns/cards/visitor-mini-3x.png) #### 비지터 알고리즘들을 그들이 작동하는 객체들로부터 분리할 수 있습니다. [주 기사](https://refactoring.guru/ko/design-patterns/visitor) [C++에서의 사용예시](https://refactoring.guru/ko/design-patterns/visitor/cpp/example#lang-features) [코드 예시](https://refactoring.guru/ko/design-patterns/visitor/cpp/example#example-0) --- # Factory Method を PHP で / デザインパターン [There are patterns of patterns now! \ My friend's project: MetaPatterns.io](https://metapatterns.io/)  [](https://refactoring.guru/ja/design-patterns/factory-method/php/example#checkout) [](https://refactoring.guru/ja/design-patterns/factory-method/php/example#checkout) [](https://refactoring.guru/) / [デザインパターン](https://refactoring.guru/ja/design-patterns) / [Factory Method](https://refactoring.guru/ja/design-patterns/factory-method) / [PHP](https://refactoring.guru/ja/design-patterns/php) ![Factory Method](https://refactoring.guru/images/patterns/cards/factory-method-mini-2x.png?id=fa9d4a8d61a67cc3822e52b9daf69dad) **Factory Method** を PHP で ========================== **Factory Method** は、 生成に関するデザインパターンの一つで、 具象クラスを指定することなく、 プロダクト (訳注: 本パターンでは、 生成されるモノのことを一般にプロダクトと呼びます) のオブジェクトを生成することを可能とします。 Factory Method では、 オブジェクトの生成において、 直接のコンストラクター呼び出し (`new` 演算子) 代わりに使用すべきメソッドを定義します。 サブクラスにおいてこのメソッドを上書きすることにより、 生成されるオブジェクトのクラスを変更します。 > もし各種ファクトリー系のパターンやコンセプトの違いで迷った場合は、 [ファクトリーの比較](https://refactoring.guru/ja/design-patterns/factory-comparison) > をご覧ください。 [Factory Method の詳細](https://refactoring.guru/ja/design-patterns/factory-method) ナビゲーション  [はじめに](https://refactoring.guru/ja/design-patterns/factory-method/php/example#)  [概念的な例](https://refactoring.guru/ja/design-patterns/factory-method/php/example#example-0)  [index](https://refactoring.guru/ja/design-patterns/factory-method/php/example#example-0--index-php)  [Output](https://refactoring.guru/ja/design-patterns/factory-method/php/example#example-0--Output-txt)  [現実的な例](https://refactoring.guru/ja/design-patterns/factory-method/php/example#example-1)  [index](https://refactoring.guru/ja/design-patterns/factory-method/php/example#example-1--index-php)  [Output](https://refactoring.guru/ja/design-patterns/factory-method/php/example#example-1--Output-txt) **複雑度:** **人気度:** **使用例:** Factory Method パターンは、 PHP コードでは広く使われます。 コードに高度の柔軟性を持たせたい時にとても役に立ちます。 **見つけ方:** 具象クラスで具象オブジェクトを作成し、 それを抽象型またはインターフェースのオブジェクトとして返すような生成メソッドの存在により、 Factory Method を識別できます。 概念的な例 ----- この例は、 **Factory Method** デザインパターンの構造を説明するためのものです。 以下の質問に答えることを目的としています: * どういうクラスからできているか? * それぞれのクラスの役割は? * パターンの要素同士はどう関係しているのか? ここでパターンの構造を学んだ後だと、 これに続く、 現実世界の PHP でのユースケースが理解しやすくなります。 #### **index.php:** 概念的な例 factoryMethod(); // Now, use the product. $result = "Creator: The same creator's code has just worked with " . $product->operation(); return $result; } } /\*\* \* Concrete Creators override the factory method in order to change the \* resulting product's type. \*/ class ConcreteCreator1 extends Creator { /\*\* \* Note that the signature of the method still uses the abstract product \* type, even though the concrete product is actually returned from the \* method. This way the Creator can stay independent of concrete product \* classes. \*/ public function factoryMethod(): Product { return new ConcreteProduct1(); } } class ConcreteCreator2 extends Creator { public function factoryMethod(): Product { return new ConcreteProduct2(); } } /\*\* \* The Product interface declares the operations that all concrete products must \* implement. \*/ interface Product { public function operation(): string; } /\*\* \* Concrete Products provide various implementations of the Product interface. \*/ class ConcreteProduct1 implements Product { public function operation(): string { return "{Result of the ConcreteProduct1}"; } } class ConcreteProduct2 implements Product { public function operation(): string { return "{Result of the ConcreteProduct2}"; } } /\*\* \* The client code works with an instance of a concrete creator, albeit through \* its base interface. As long as the client keeps working with the creator via \* the base interface, you can pass it any creator's subclass. \*/ function clientCode(Creator $creator) { // ... echo "Client: I'm not aware of the creator's class, but it still works.\\n" . $creator->someOperation(); // ... } /\*\* \* The Application picks a creator's type depending on the configuration or \* environment. \*/ echo "App: Launched with the ConcreteCreator1.\\n"; clientCode(new ConcreteCreator1()); echo "\\n\\n"; echo "App: Launched with the ConcreteCreator2.\\n"; clientCode(new ConcreteCreator2()); #### **Output.txt:** 実行結果 App: Launched with the ConcreteCreator1. Client: I'm not aware of the creator's class, but it still works. Creator: The same creator's code has just worked with {Result of the ConcreteProduct1} App: Launched with the ConcreteCreator2. Client: I'm not aware of the creator's class, but it still works. Creator: The same creator's code has just worked with {Result of the ConcreteProduct2} 現実的な例 ----- この例では、 **Factory Method** パターンを使い、 ソーシャル・ネットワークのコネクターを作成するためのインターフェースが宣言されています。 クライアント・コードを特定のソーシャル・ネットワーク用の特別なクラスに結合することなく、 ネットワークへのログイン、 投稿の作成、 その他の作業を行えます。 #### **index.php:** 現実的な例 getSocialNetwork; \* \* This allows changing the type of the product being created by \* SocialNetworkPoster's subclasses. \*/ abstract class SocialNetworkPoster { /\*\* \* The actual factory method. Note that it returns the abstract connector. \* This lets subclasses return any concrete connectors without breaking the \* superclass' contract. \*/ abstract public function getSocialNetwork(): SocialNetworkConnector; /\*\* \* When the factory method is used inside the Creator's business logic, the \* subclasses may alter the logic indirectly by returning different types of \* the connector from the factory method. \*/ public function post($content): void { // Call the factory method to create a Product object... $network = $this->getSocialNetwork(); // ...then use it as you will. $network->logIn(); $network->createPost($content); $network->logout(); } } /\*\* \* This Concrete Creator supports Facebook. Remember that this class also \* inherits the 'post' method from the parent class. Concrete Creators are the \* classes that the Client actually uses. \*/ class FacebookPoster extends SocialNetworkPoster { private $login, $password; public function \_\_construct(string $login, string $password) { $this->login = $login; $this->password = $password; } public function getSocialNetwork(): SocialNetworkConnector { return new FacebookConnector($this->login, $this->password); } } /\*\* \* This Concrete Creator supports LinkedIn. \*/ class LinkedInPoster extends SocialNetworkPoster { private $email, $password; public function \_\_construct(string $email, string $password) { $this->email = $email; $this->password = $password; } public function getSocialNetwork(): SocialNetworkConnector { return new LinkedInConnector($this->email, $this->password); } } /\*\* \* The Product interface declares behaviors of various types of products. \*/ interface SocialNetworkConnector { public function logIn(): void; public function logOut(): void; public function createPost($content): void; } /\*\* \* This Concrete Product implements the Facebook API. \*/ class FacebookConnector implements SocialNetworkConnector { private $login, $password; public function \_\_construct(string $login, string $password) { $this->login = $login; $this->password = $password; } public function logIn(): void { echo "Send HTTP API request to log in user $this->login with " . "password $this->password\\n"; } public function logOut(): void { echo "Send HTTP API request to log out user $this->login\\n"; } public function createPost($content): void { echo "Send HTTP API requests to create a post in Facebook timeline.\\n"; } } /\*\* \* This Concrete Product implements the LinkedIn API. \*/ class LinkedInConnector implements SocialNetworkConnector { private $email, $password; public function \_\_construct(string $email, string $password) { $this->email = $email; $this->password = $password; } public function logIn(): void { echo "Send HTTP API request to log in user $this->email with " . "password $this->password\\n"; } public function logOut(): void { echo "Send HTTP API request to log out user $this->email\\n"; } public function createPost($content): void { echo "Send HTTP API requests to create a post in LinkedIn timeline.\\n"; } } /\*\* \* The client code can work with any subclass of SocialNetworkPoster since it \* doesn't depend on concrete classes. \*/ function clientCode(SocialNetworkPoster $creator) { // ... $creator->post("Hello world!"); $creator->post("I had a large hamburger this morning!"); // ... } /\*\* \* During the initialization phase, the app can decide which social network it \* wants to work with, create an object of the proper subclass, and pass it to \* the client code. \*/ echo "Testing ConcreteCreator1:\\n"; clientCode(new FacebookPoster("john\_smith", "\*\*\*\*\*\*")); echo "\\n\\n"; echo "Testing ConcreteCreator2:\\n"; clientCode(new LinkedInPoster("john\_smith@example.com", "\*\*\*\*\*\*")); #### **Output.txt:** 実行結果 Testing ConcreteCreator1: Send HTTP API request to log in user john\_smith with password \*\*\*\*\*\* Send HTTP API requests to create a post in Facebook timeline. Send HTTP API request to log out user john\_smith Send HTTP API request to log in user john\_smith with password \*\*\*\*\*\* Send HTTP API requests to create a post in Facebook timeline. Send HTTP API request to log out user john\_smith Testing ConcreteCreator2: Send HTTP API request to log in user john\_smith@example.com with password \*\*\*\*\*\* Send HTTP API requests to create a post in LinkedIn timeline. Send HTTP API request to log out user john\_smith@example.com Send HTTP API request to log in user john\_smith@example.com with password \*\*\*\*\*\* Send HTTP API requests to create a post in LinkedIn timeline. Send HTTP API request to log out user john\_smith@example.com 他言語での **Factory Method** ------------------------ [![Factory Method を C# で](https://refactoring.guru/images/patterns/icons/csharp.svg?id=da64592defc6e86d57c39c66e9de3e58)](https://refactoring.guru/ja/design-patterns/factory-method/csharp/example "Factory Method を C# で") [![Factory Method を C++ で](https://refactoring.guru/images/patterns/icons/cpp.svg?id=f7782ed8b8666246bfcc3f8fefc3b858)](https://refactoring.guru/ja/design-patterns/factory-method/cpp/example "Factory Method を C++ で") [![Factory Method を Go で](https://refactoring.guru/images/patterns/icons/go.svg?id=1a89927eb99b1ea3fde7701d97970aca)](https://refactoring.guru/ja/design-patterns/factory-method/go/example "Factory Method を Go で") [![Factory Method を Java で](https://refactoring.guru/images/patterns/icons/java.svg?id=e6d87e2dca08c953fe3acd1275ed4f4e)](https://refactoring.guru/ja/design-patterns/factory-method/java/example "Factory Method を Java で") [![Factory Method を Python で](https://refactoring.guru/images/patterns/icons/python.svg?id=6d815d43c0f7050a1151b43e51569c9f)](https://refactoring.guru/ja/design-patterns/factory-method/python/example "Factory Method を Python で") [![Factory Method を Ruby で](https://refactoring.guru/images/patterns/icons/ruby.svg?id=b065b718c914bf8e960ef731600be1eb)](https://refactoring.guru/ja/design-patterns/factory-method/ruby/example "Factory Method を Ruby で") [![Factory Method を Rust で](https://refactoring.guru/images/patterns/icons/rust.svg?id=1f5698a4b5ae23fe79413511747e4a87)](https://refactoring.guru/ja/design-patterns/factory-method/rust/example "Factory Method を Rust で") [![Factory Method を Swift で](https://refactoring.guru/images/patterns/icons/swift.svg?id=0b716c2d52ec3a48fbe91ac031070c1d)](https://refactoring.guru/ja/design-patterns/factory-method/swift/example "Factory Method を Swift で") [![Factory Method を TypeScript で](https://refactoring.guru/images/patterns/icons/typescript.svg?id=2239d0f16cb703540c205dd8cb0c0cb7)](https://refactoring.guru/ja/design-patterns/factory-method/typescript/example "Factory Method を TypeScript で") --- # Polecenie w języku Rust / Wzorce projektowe [There are patterns of patterns now! \ My friend's project: MetaPatterns.io](https://metapatterns.io/)  [](https://refactoring.guru/pl/design-patterns/command/rust/example#checkout) [](https://refactoring.guru/pl/design-patterns/command/rust/example#checkout) [](https://refactoring.guru/) / [Wzorce projektowe](https://refactoring.guru/pl/design-patterns) / [Polecenie](https://refactoring.guru/pl/design-patterns/command) / [Rust](https://refactoring.guru/pl/design-patterns/rust) ![Polecenie](https://refactoring.guru/images/patterns/cards/command-mini-2x.png?id=e5f6332e057f6d352a209da963a8fc54) **Polecenie** w języku Rust =========================== **Polecenie** to behawioralny wzorzec projektowy według którego żądania lub proste działania są konwertowane na obiekty. Wyżej wymieniona konwersja pozwala odkładać zadania w czasie, uruchamiać je zdalnie, przechowywać ich historię, itp. [Dowiedz się więcej o Polecenie](https://refactoring.guru/pl/design-patterns/command) Nawigacja  [Intro](https://refactoring.guru/pl/design-patterns/command/rust/example#)  [Text Editor: Commands and Undo](https://refactoring.guru/pl/design-patterns/command/rust/example#example-0)  [command](https://refactoring.guru/pl/design-patterns/command/rust/example#example-0--command-rs)   [copy](https://refactoring.guru/pl/design-patterns/command/rust/example#example-0--command-copy-rs)   [cut](https://refactoring.guru/pl/design-patterns/command/rust/example#example-0--command-cut-rs)   [paste](https://refactoring.guru/pl/design-patterns/command/rust/example#example-0--command-paste-rs)  [main](https://refactoring.guru/pl/design-patterns/command/rust/example#example-0--main-rs) In Rust, a command instance should _NOT hold a permanent reference to global context_, instead the latter should be passed _from top to down as a mutable parameter_ of the “`execute`” method: fn execute(&mut self, app: &mut cursive::Cursive) -> bool; Text Editor: Commands and Undo ------------------------------ Key points: * Each button runs a separate command. * Because a command is represented as an object, it can be pushed into a `history` array in order to be undone later. * TUI is created with `cursive` crate. #### **command.rs:** Command Inteface mod copy; mod cut; mod paste; pub use copy::CopyCommand; pub use cut::CutCommand; pub use paste::PasteCommand; /// Declares a method for executing (and undoing) a command. /// /// Each command receives an application context to access /// visual components (e.g. edit view) and a clipboard. pub trait Command { fn execute(&mut self, app: &mut cursive::Cursive) -> bool; fn undo(&mut self, app: &mut cursive::Cursive); } #### **command/copy.rs:** Copy Command use cursive::{views::EditView, Cursive}; use super::Command; use crate::AppContext; #\[derive(Default)\] pub struct CopyCommand; impl Command for CopyCommand { fn execute(&mut self, app: &mut Cursive) -> bool { let editor = app.find\_name::("Editor").unwrap(); let mut context = app.take\_user\_data::().unwrap(); context.clipboard = editor.get\_content().to\_string(); app.set\_user\_data(context); false } fn undo(&mut self, \_: &mut Cursive) {} } #### **command/cut.rs:** Cut Command use cursive::{views::EditView, Cursive}; use super::Command; use crate::AppContext; #\[derive(Default)\] pub struct CutCommand { backup: String, } impl Command for CutCommand { fn execute(&mut self, app: &mut Cursive) -> bool { let mut editor = app.find\_name::("Editor").unwrap(); app.with\_user\_data(|context: &mut AppContext| { self.backup = editor.get\_content().to\_string(); context.clipboard = self.backup.clone(); editor.set\_content("".to\_string()); }); true } fn undo(&mut self, app: &mut Cursive) { let mut editor = app.find\_name::("Editor").unwrap(); editor.set\_content(&self.backup); } } #### **command/paste.rs:** Paste Command use cursive::{views::EditView, Cursive}; use super::Command; use crate::AppContext; #\[derive(Default)\] pub struct PasteCommand { backup: String, } impl Command for PasteCommand { fn execute(&mut self, app: &mut Cursive) -> bool { let mut editor = app.find\_name::("Editor").unwrap(); app.with\_user\_data(|context: &mut AppContext| { self.backup = editor.get\_content().to\_string(); editor.set\_content(context.clipboard.clone()); }); true } fn undo(&mut self, app: &mut Cursive) { let mut editor = app.find\_name::("Editor").unwrap(); editor.set\_content(&self.backup); } } #### **main.rs:** Client code mod command; use cursive::{ traits::Nameable, views::{Dialog, EditView}, Cursive, }; use command::{Command, CopyCommand, CutCommand, PasteCommand}; /// An application context to be passed into visual component callbacks. /// It contains a clipboard and a history of commands to be undone. #\[derive(Default)\] struct AppContext { clipboard: String, history: Vec>, } fn main() { let mut app = cursive::default(); app.set\_user\_data(AppContext::default()); app.add\_layer( Dialog::around(EditView::default().with\_name("Editor")) .title("Type and use buttons") .button("Copy", |s| execute(s, CopyCommand)) .button("Cut", |s| execute(s, CutCommand::default())) .button("Paste", |s| execute(s, PasteCommand::default())) .button("Undo", undo) .button("Quit", |s| s.quit()), ); app.run(); } /// Executes a command and then pushes it to a history array. fn execute(app: &mut Cursive, mut command: impl Command + 'static) { if command.execute(app) { app.with\_user\_data(|context: &mut AppContext| { context.history.push(Box::new(command)); }); } } /// Pops the last command and executes an undo action. fn undo(app: &mut Cursive) { let mut context = app.take\_user\_data::().unwrap(); if let Some(mut command) = context.history.pop() { command.undo(app) } app.set\_user\_data(context); } Output ====== ![Text Editor screenshot](data:image/png;base64,iVBORw0KGgoAAAANSUhEUgAAA8AAAAJKCAYAAADjiiyRAAAAAXNSR0IArs4c6QAAAARnQU1BAACxjwv8YQUAAAAJcEhZcwAAFiUAABYlAUlSJPAAADfASURBVHhe7d0PnFV1nfj/N4qDKaLyR/lnBKICuWCoiKZUK2Wh9QP3m9KWYClsKm3+qU10NzVL3FotE7QVNdG2oD9i35T0F9QKVghCQCojKIjyV4Y/4kjMSPi9M3MGZoaZYWZghsHP8/l4XDnnzJnx3M+9c+e+7jn33BYz7i56NwAAAOA97qDsXwAAAHhPE8AAAAAkQQADAACQBAEMAABAEgQwAAAASRDAAAAAJEEAAwAAkAQBDAAAQBIEMAAAAEkQwAAAACRBAAMAAJAEAQwAAEASBDAAAABJEMAAAAAkQQADAACQBAEMAABAEgQwAAAASRDAAAAAJEEAAwAAkAQBDAAAQBIEMAAAAEkQwAAAACRBAAMAAJAEAQwAAEASBDAAAABJEMAAAAAkQQADAACQBAEMAABAEgQwAAAASRDAAAAAJEEAAwAAkAQBDAAAQBIEMAAAAEkQwAAAACRBAAMAAJAEAQwAAEASBDAAAABJEMAAAAAkQQADAACQBAEMAABAEgQwAAAASRDAAAAAJEEAAwAAkAQBDAAAQBIEMAAAAEkQwAAAACRBAAMAAJAEAQwAAEASBDAAAABJEMAAAAAkQQADAACQBAEMAABAEgQwAAAASRDAAAAAJEEAAwAAkAQBDAAAQBIEMAAAAEkQwAAAACRBAAMAAJAEAQwAAEASBDAAAABJEMAAAAAkQQADAACQBAEMAABAEgQwAAAASRDAAAAAJEEAAwAAkAQBDAAAQBIEMAAAAEkQwAAAACRBAAMAAJAEAQwAAEASBDAAAABJEMAAAAAkQQADAACQBAEMAABAEgQwAAAASRDAAAAAJEEAAwAAkAQBDAAAQBIEMAAAAEkQwAAAACRBAAMAAJAEAQwAAEASBDAAAABJEMAAAAAkQQADAACQBAEMAABAEgQwAAAASRDAAAAAJEEAAwAAkAQBDAAAQBIEMAAAAEkQwAAAACRBAAMAAJAEAQwAAEASBDAAAABJEMAAAAAkQQADAACQBAEMAABAEgQwAAAASRDAAAAAJEEAAwAAkAQBDAAAQBIEMAAAAEkQwAAAACRBAAMAAJAEAQwAAEASBDAAAABJEMAAAAAkQQADAACQBAEMAABAEgQwAAAASRDAAAAAJEEAAwAAkAQBDAAAQBIEMAAAAEkQwAAAACRBAAMAAJAEAQwAAEASBDAAAABJEMAAAAAkQQADAACQBAEMAABAEgQwAAAASRDAAAAAJEEAAwAAkAQBDAAAQBIEMAAAAEkQwAAAACRBAAMAAJAEAQwAAEASBDAAAABJEMAAAAAkQQADAACQBAEMAABAEgQwAAAASRDAAAAAJEEAAwAAkAQBDAAAQBIEMAAAAEkQwAAAACRBAAMAAJAEAQwAAEASBDAAAABJEMAAAAAkQQADAACQBAEMAABAEgQwAAAASRDAAAAAJEEAAwAAkAQBDAAAQBIEMAAAAEkQwAAAACRBAAMAAJAEAQwAAEASBDAAAABJEMAAAAAkQQADAACQBAEMAABAEgQwAAAASRDAAAAAJEEAAwAAkAQBDAAAQBIEMAAAAEkQwAAAACRBAAMAAJAEAQwAAEASBDAAAABJEMAAAAAkQQADAACQBAEMAABAEgQwAAAASRDAAAAAJEEAAwAAkAQBDAAAQBIEMAAAAEkQwAAAACRBAAMAAJAEAQwAAEASBDAAAABJEMAAAAAkQQADAACQBAEMAABAEgQwAAAASRDAAAAAJEEAAwAAkAQBDAAAQBIEMAAAAEkQwAAAACRBAAMAAJAEAQwAAEASBDAAAABJEMAAAAAkQQADAACQBAEMAABAEgQwAAAASRDAAAAAJEEAAwAAkAQBDAAAQBIEMAAAAEkQwAAAACRBAAMAAJAEAQwAAEASBDAAAABJEMAAAAAkQQADAACQBAEMAABAEgQwAAAASRDAAAAAJEEAAwAAkAQBDAAAQBIEMAAAAEkQwAAAACRBAAMAAJAEAQwAAEASBDAAAABJEMAAAAAkQQADAACQBAEMAABAElrMuLvo3Wwa2I8+PKoom6KxzJkzP0ZeOiYmPTQ+Bgzony0FqD+PJ03njxNbZVMAe88eYAAAAJIggAEAAEiCAAYAACAJAhgAAIAkCGAAAACSIIABOCBsfuo/4umx02NzNp+eTfHi2PPjT09tyuYbUfG6WLnw9SjMZveovusDwH4igAEaJD8WfXlMPFPp8vl4+uNDY+Zuyx+L1dl3wQGh8K/x2td+Gxuz2T2q7/oAsJ8IYIAG6RV9fzQ+zq54ue2LcUj8Q7S/rcryHw2Nztl3AQCw/whgAAAAktBixt1F72bTwH704VFF2RSNZc6c+THy0jEx6aHxMWBA/2zpPrRxevzp4qfjqCm3Rp+22bIKCv/4nzFv8j/EB+8eEu2zZZUVRv5NF8fmj06JgR9rnZsvec/nF2LbiCei1yFPx5Ipv44trxfHQcXvxI6je8RRI0bHyf2OrvaVzM0LH4slD0+PbW/nZnLrx3GnxjGX/HOc2LP1Xr/yub3w9Xj1f38dBY/nR3HJgo2bInp/JI657NLo9f680nXK7Nr+/se/Hvn3PxRvLFqX+/9vir9vPDYOv2xM9DmvRxyWrV1uR+Gy3Lb/T7zx3Mo4KPfjdhR3jdaXfD46F/84Xvrfj0S/cYPjqGzdetnD7fPaPefH8rgjPnJlr2xJma0vPx35j/wiclc7256IvL652/DCQdHj/dWPZ+OMf9l4bv7og3HK8fl7vj/U9/q+/Fg881/Ty6aL34i/565vi+OP2W1723x1fPTtnZuo7/qZnbdv6X0hNx+t49BP5Mbmwr5VbteG3X8acns1RKM/nrDTHye2yqYA9p4AhmZCADe+/R3AEctiwRdujbj5x3FKz2xRRSXf/4X86PjYmOhR2pFlAbCx8KTYkXdmdL3xs9Ej+7lbX54WC/71oWh544Mx4MMlsVyuOBc2X4nliwfGcbd8scr6v45D77g7+veuGKn1szkX8Qu/tymOvPGq6Hn6cbl0KbN14X3x3NfmRZt7/7vCdSvb/q0f/bfY/sCvI+/G/4i+uUBrmfvKjsJFue0ZG1svfDDOvuDYstVzdqx9OuZ8eULE5bdH3wvK46YwVj91X7z8XzPi3dOuadIA3vHyL+KZf10U7X/0H6VxXx5PhS9Pjxdz8df65tujT8dsYanGHP+y8SxY1zXi6MF7vj80MPhLLb4vnv7XiO6/Gx3vzxbVqo7r71g7PWZ/6RfR8uv/Hqd87LgoG4lNsez+W+P1P/WK7j/Kff/O4WnA/afet1fDCeCmI4CBfUkAQzNRXQBv2bIl8vNfyeYqa9Eim6Ba775b8tBWeZDy85fGuNt/sB8DOKLg8WvjhZc/H2dcfWocmi0rV/K1FwvHxNnDe2RP3LPgOfZbcUpu/Taly3bZNnd8PHtTXnSftis6SvcyP3B0lZAosy0XqXO+d3T0/Mln9+I9ycWxLZctVbe9xOrJX4ylr4yOU288Mwvjsu1fv7B/dHgwNyZVwqM4t/1/vuvYOGHn9rwez3/ly7H5vB/FWRcct9ueuoLHr48X/ji4SQN45f1D45Xib8U5V/at057Dxh3/et4fml0AL4sFX/pKbL34wRh43rFVxrPkhYN/ieWb9ub+U//ba2+UB/DY66+OXr1OyJaW8fhcu+oen8v16nV8tGlT+d4tgIF9SQBDM1FdAJc/wWLf2p8BHMWL4rmhD8WhD94ZJ1d6Ql+yd/jOaHnb+Dh5Z0GUBcDmj/4kzjrv6GxZBcXzYs75t0bLHz4W/UsPMX09Fn3py7Htiqkx4PTq9jLuYQ/0XtqRC7xZYw+J46d9MbqWLinf/gdz279rL91Oa3PjdcnT0TY3Xr1y47UjF1GzriuO43buAa+s5GOQFjbxIdClL1g8NShOunto7HnHYWOPfz3vD80sgMtu39w6FV6wqWS37a3f/adE/W6vvePxuXFU9/gsgIF9SQBDM1FbAF9//Vej9257GOxiqE3ZHobKFucvjdtvv2v/BnDO6sn/Ei/HNyrs6c21y8Lx8ef7e1R5f/AegifWxYvXfSk2X5D7+sdyX9/4dO7/PzvaT/1GnFjxqOidiuPlHwyLN/pl6++lHcWFsfG1ZbExf15sfe2N2PrcvHjn9cEVImgP219lvN54fEwsfvmLcebVp2aHxla2PwK4ZIyXfO/WWDP36Djiss9G19N7Rdu2eaWH4e6m0ce/vveHhlzfTCMEcOkRAmvH1Hj7lh4B8OUvx9bLyl9AqN/9p0w9bq+95PG54er7+CyAgX1JAEMzUVsAN1qwJabRx7OOARyFT8fsi2ZH25+Xh1LVk1+V21PwVPl6aYRMr/ZEROV2rF0eLa+o6efVzdaS91Pe9Vhs63hqtP3ER+KY3sdE69at49DdIqh+AVNrkOXsnwAuU3Lir9f+OC82/ml6bF24KQ46/bPR8ZLBlU+q1OjjX8/7QzML4D3dvrtfv/rdfyqq0+21lzw+71u1jacABvalffV3AIC6an1mHPOJP8cb/7uubL5wXmye+6k4ptLJrOpiUxS/HtGy7eFls4ccHS1icHyg0mcQV74MeuyJBsZXmY25CJ37QHF0HZf7eTd+Mfqc3iPal8Rv9vW90bLtMRHFb0fpmaWbmZatj4se5w2N024pGcMfR58L82LjzV+IP03OzoRdognGv3ZV7g/NzJ5v38LYsSn3xKT1Idl8w9Xp9gIgSQIYoMnlRY/hoyMmz4zVubmC//11FI8YEh+o/rjQmq3Nj8J1/aP18dk3vr9HLkT/HBtfLpvd54oXxbK7NkW7K4ZEx/q2eh20Oa5XxHPLoiCb3/dKwuqdkiOR91JetO09JE67+dKIB34drxZmixt7/Pek6v1hr65vfSN0z+t37HdmxP8/L9Zm87vZ+FJseaV/tOm9r+9cNdxeACRJAAPsDx0HxTG9/yde+8O8WDk5ou1Hd70feDfvFMeObHKX4njt0V/E3z86JN5ffvhn3qnR9bK8ePOB6bExW7RPFW6K4ndal3626u4KY+3i17Pphmndb1C02jgtVi+srtg2RcHildl0A7U9Lg479q9R+PruP3/ba9Ni5ePZzE7FsXHtpmrGvsxBVd/J2tjjX67G+8OvK98f6n19KziuV7SK16OwrlekDusf1HtwHNkx9/99al312z/5F/FOxe2vt3reXgAkSQAD7Beto+fFn4/i274Zbx7//8UHajll7Tt3fSVmT14UG3d2TC42H781lj93ahz31fKPjCnTefi34ti8++L5702P1ZX2dOXiYPG0eO470xu+h7Vt32h7Wn4UTJ4Xm7NFJYrXLooF110Xy15pHQdnyxqk9Zlx4le7xttjb43nXy7cGTLbC/Nj0XW3xtrqPxGsHnpE1+Enxd/ufSheqzA2mxf+OJ67bWUcdXmV93EWr4vV3xsTf/peLtrWVo7OHYXL4vl774sdF+duuwo3QKOOf+ade66t4f7wD1XuD/W8vhW1PjXan//XKHj4z5Vu6x25MSnIjcVu6rR+j+h78+jYcdc3Y/7cdbkRKVcYq6vd/npqwO0FQHqcBAuaCSfBanzN5iRYO5V9bM7WS6qe/Kpc+UmA7o4eedPj1SmLyqIh95+80z4bHxjxkRoORS6MgrnTY9nk38a2TYeU7rHdkcuKQ0/7VC6IPhKd9yYAcpHx8qP3xepH83NBfHTpq6gt+w7N/dzB0TVKrv+y6NrAk2CVKz3J1r2/iK2v57Y9t/yg4wZHxyuGRtu5e3kSrFK5WHzqoXj5gT/Hjtz2l8j76OjoNbxvRMlJtl75/G4naSp8+elY9vjM2JJftuey5DrvOPy4aHPBZ+PEj/WIw0rXqqixxr9sPLcNnxKdN/501/0hJ69vTfeH+l/fXTblrsP4WFnhti653kddflX0rfYw5bqtXxKjSx7+n3jjuZW5sTkkF8l5cegFl8aJF/atcrs27P5T/9urYTw+71tOggU0FQEMzYQAbnzNbjzXTotnvrQsOtfwubd7DABgv/H4vG8JYKCplLwwCkCTK3sP746GnPwKAIAGEcAA+0HBU/8Zy587Mz5wYS0nvwIAYJ/yvAugiWxfeF/M/NKY3OVfIn/xmXHSj0bH++39BQBoMgIYoIm07Dc6Bj04Pnf57zj76sHRcY/xe3T0GfeE9/8CAOwjAhgAAIAkOAs0NBPVnQV67ty/xIiRV8XDkybE6ad/KFvaMM6iCUBjqO7vV33V9veud5+zsqm6uf+aedkUwO7sAYZm7N3s5anyfwHgvcjfO6CpCGAAAACSIIABAABIggAGAAAgCQIYAACAJAhgYN/ZOjN+PvWr8cPyyy8vjVsfeDBezb68m/quT+328XhuXnJT3Prk9Nicze9m+/p4dc2KKMxmAQCaOwEMKdk6PR584KaYtzWbr+qNB/cuQA8bFBcNuyv+tfwyaFD2hRrUd/1mpGDxV+PW2Quzudq9PPvz8cPFq7O5RtTU41m8MH4/bUYUZLMAAM2dAAZogKOO6BmxYXXNe0d3Wh9v5lZqf9iR2TwAAPuLAAZogJbvOyparV1Rh72f62PtqsOiXevDs3kAAPYXAQzUyeY1k+OnT5S/t/TK+OHvfhQLN7ydfbWJFa2IhbO/veu9rlPHxk+fX1iHvbH7UOue0TVWxIa3svkSGx6J7z5waTzxRjZfYuvqWBe5dVtn8yXquf2vzv583Dr7xdLpbZv/HDP+MDb7vivjuz8dG8/u7RXPtufOkts19zPv/OW349evrIht2ZcBAN4rBDCwB2/nAuzKuGfu1hjwsey9pf/nnhjdv3PM+83Xc7HXxBH81vR48Gf/GS91+FJcufP9rtfGgL9Njnt++WC8uj1br7G1ah/tWr8WBX/L5nMK3nguiuKdeGHN0mxJTuFrsbZ15ziyVTbf4O1/Jza/kovmmYuj2xnjsu+7J/7tolvi1KOyVRoitz0P//ymWHjkJXFl7nYt+ZnX/p8xcerffxU/nfVythIAwHuDAAZqVbhifPx05Wnxz0O+FD0PyxbmHNruM/HP5/WNF/7waKzMljW+pfHUUz+OOOuWuOj4ztEyWxrRIXqe/u9xUdc/56Ltz010VuLO0fWYiHWb12fzb8e6tQXRp9fAKFq2eOeh0YVvrYi/H9kpyhp1L7Z/5X/Hw0sHxujPVL4domVehZ9TX6vjj3/4cRSedluM6N0tDs2WRm5ru554bYw46/3ZPADAe4MAhuSsiBlPlR96W+Uyc2a2TrkV8ezcRdFz4MXxgWoq69BO50a/mBkvbMgWNLY3ZsW8wnPjH0/skC2o6PDo2ffi6LjsyXipprNc71OHx5FtD4tVG7MA3r448pf1jV59T4vjN86LFdk2bC5cHQe36xylR0DvzfYX9o5PDB6chfQ+8saT8fTGgfGPJ3TOFlTW8uC8bAoA4L1BAENyusW555UfelvlUvVjc7YujRVv9o0PdqjpBE7dolvXrbFqc9O8+3blmj/H30/oG12z+d0c1idOavtyvLqxOFvQuNof1TNXuNmZoDcuipc69o0uR+TGJLcNL60vOTT87Xhz49bo2LYsMPdq+3udG70avqu3WgUbFua258zo2dCfe1iHaNexfO82AEDzJ4CBmhW+FqticTw1rZq9xaWXr8e0Zbn1/v5O2fqNbPvftkYcfFgth/weEoe+L+LNrW9m843r0Pd1iINXvVYawCVx27Jrz1wMdo5uPQ6LV9aUvH/2zdi8+ZA49oiyRGxu21/4ZsEetmdPDomWBx+STQMANH8CGKhZLm5axcD4THV7i7PLtZf8T3yp2kN6972W7zssF9tbo+bzXL0T2/6WC9NWFd8k24havz86lpwJeuvqWLHsnfhgpxNKF3ftdGYcvGJRrIz1UbCxW3TMzgDd3LZ/z9uzJ33ivI8NsgcYADhgCGCgZkf2juNjXrzSVO/x3YPSsFxaEpY12PpivLSxZ5xU4yHb+9hhnePYg1dHwfqS/++pcXzbbHnbvnFS4XOxYuX62BDdol3Ws81t+0sP4V65ONZm8w3RspX3CQMABw4BDNSs5WlxxmmHxLy50xv2Gbule5CL676HcU/rH3NOnNp6Zvx+SfmZlyt6O15d9Gis7fHJOKmmHahFq+PVNQtj5T47SVbn6Nhxa7y5YlGs6tI7OpYfS9yyd/TqURArli2KtV3ev2sP6d5uf33tYTwP7Tgojv/bzJi3prqPstocq9avzqart23D9Hhi7uTIr/hZyAAAzZgABmrVtd8tcd7BP4kHZ06PlUXZwlLFsfmN38av/jB950f+7KbdwOjXenbMrBh8uQgtqPRzKtjj+ifEeYMvjO1/uil+tXJ9hbDbHCsXfzd+urJ3XHjWmWVnXN7N5pj3h6/HI9O+Gz/+zSP76KObjop27Q6Jl5bOiyO79alwKPDhcWzH9vFKbvnfj+pcYfnebH8D7Gk8W50ZQ87qHC889d3444YKEVz0Ysx44tu5Zdl8tXLr/ObHMX/Rb+IXf5zeRB89BQCwdwQwsAcd4tSPT4gRPQpi5vQr485flp8A66aYtuLwOOOswdE+W3N3ueAb8qU4Mv+G+G7J9/0y9/3TH4lXCms6S3Md1j/qMzH6c9+Iniv/u/TrJdty5y+/HTP/fmFc+X++Er1aZevt5rBo16lTtDo4N1n4cqzbR3uB27ftlvvvIXF8u8ofJdT+mNOiZFO6tK3y/ugGb39D7Hk8jzrxlrj20+fE2tlfj+/+tOy2ve9Pi6Lbx/4rLupV/ccjlekZH/xQ+zg4d927ndBv30U7AEAjajHj7qJ3s2lgP/rwqN13i86Z85cYeelVMemhCTFgwIeypQ3zx4n7tKwOXJv/b/zwVyviEyNzsdnw0x8DkKnu71d91fb3rnefs7Kpurn/mnnZFMDu7AEGkrL5jXnx5vv7RVfxCwCQHHuAoZmwB7gJvDU9HvzVo9Hl0/fEee2yZTSaV2d/Ph55IZupzQdvjP8Y2Mf6NbF+7axfuyZY/8kHjs9mGs4eYKCpCGBoJgRwYyqOzWt+Ej+fvjC6DL4tzu/URB+TBJAAh0ADBxKHQAMJyIvWrT8ZF33uLvELAJAwAQzNWIsWlf+l4Voe0TmO8r5fgGbJ3zugqTgEGpqJ6g4hmzv3LzFi5FXx8KQJcfrpe3cINAA0V7X9vXMINLAv2QMMzdi72ctT5f8CwHuRv3dAUxHAAAAAJEEAAwAAkAQBDAAAQBIEMAAAAEkQwAAAACRBAAMAAJAEAQwAAEASBDAAAABJEMAAAAAkQQADAACQBAEMAABAEgQwAAAASRDAAAAAJEEAAwAAkAQBDAAAQBIEMAAAAEkQwAAAACRBAAMAAJAEAQwAAEASBDAAAABJEMAAAAAkQQADAACQBAEMAABAEgQwAAAASRDA0Iy1aFH5XwB4L/L3DmgqLWbcXfRuNg3sRx8eVZRN7TJ37l9ixMir4uFJE+L00z+ULW2YVpdclk1RnaJHHsimAGhqtf29693nrGyqbu6/Zl42BbA7e4ChGXs3e3mq/F8AeC/y9w5oKgIYAACAJAhgAAAAkiCAAQAASIIABgAAIAkCGOC9qGhNLJizIrZks+wl49no1k+9JnqPfiLWZ/PU3/pp34gBfT4RY6ZtyJbUwP0ZSJgABuqmeHP86pWXYtSiRaWXkQsWxI2vF8RL27OvUz/r58fkm78Rwy4cWXoZcv7wGDPud7F4Xz0j3TI/Jlw6NZZlsweK0gg65YKd41J6yY3NsJHfjDumLdl/T9gP0PGsl/VPxKg+18TUmgq09Os/iAXZLHW1Jmbd+c0YXnI/Lv1dHxXX3jk7VmVf3beKo6j0sgcp3J8BaiCAgV12bI0Zm7dlM7us27g0F7yrY1O77jGhb9+YmLtMOqVv/Ovhb8V/zX8pZjTjCF65uSCW7chmmlrRipg2a002s8uqGd+OIRc8EG8NuTomPzoppuYu056YFGPPfiFu+Pg3Y3oT7gJbNet3sWyPz5YbSQ3jEwOuiPuycSm9PDE5pt79hegybUycM/p376k9hM1y/A9gzW48i56Pced/Lh7u8oW4r+R+XPq7fmeMOOKBXAj/IBbs423tMOT7sfDF/42JQ9plS/bOfh1PgEYigIFShYVr4urnlsSzOyo/LBQXvh7/tmR7fK5vn7j8qLzIy5aXPHwc27Z7TDzthDi3ZbaoGTpkx6a45bkXY1Jh01b6loVTYsSgb8Ss4l0jVqJo4T0x6roNMerRCTFqQKdolS2P3FSXc66OqTNvjMEdskVNIK/42Rgz6KqYtPCtbEnTqGl8atTmxBh+x7diyDP3xmOLs2XvAQfM+B8gmtd4vhXTbxgTs84eH+MvPjHaZEsjjohTRo2PSWfPjpE3zGzWhyHvr/EEaEwtZtxd5CPHoRn48KjdX2afM+cvMfLS3JOPhybEgAEfypY2TKtLLsumqtoe81/Pj9s2HR5f7dU9zqn0fHh7zHjpz/Gro06Pe449NFtWB9u3xow1r8fkTeXXqWV06dA5ruh0VBybLSlTHE+++Gws63pOjGhZEJNXrY1n/7YjYseOKM47PP6xa/cY2WZXXW/auDRGrW4TPzj52OiaLausbHt/3+7M+E77ClVevDHuyn85lh/dK246rk0cnS2uqOiRB7KpvbUh5tx5fYx55oNxx39fHedUitm3YtqY8+Lhc34Vky/ulC2rRckhpx+ZHkOe/n4MqyaKF4w7Kz4X98XisSeXLVg8JYbfOK3s8MeiNZG/PKJ7r4qRXWboTZNiZL9spsT62THuX74ZC8++Pe6+tn80bn/XNj5lh0AP+u3gmHnf+dVsx4aYOvrTMe1Tv4mJwyrs4dqyImb9dkpMmfJC2WGlBRuiqO/gGHPtFTGkR9Vrn1t98e9iwoSfxKzc+LTKfbkoN2A9Th8aF48YHOf0OCJbK6eh45mzfs6UGDdhWiwv6YaS/0H3gTHqqstiSO8KP79ccxn/Pdzfyr6+NK568eo4pXRB2e2Rf9WfYmyvFTHtznti4ty1pctXFXSKIdd8Pa4dVjH8MluWxLQJD8T4Z1Zk498tzsmNzdCie+PC6m77bP2yn12idXQfelmMHVHDWDWX8Vw2NYZdMDtGzf7PGLLbIORs+V2MGfiTOPvxSTG8R26+vr/v8XxMuvB78Vg2V6YoVuW/FsN+lrtNqtwnm/vjQ21/73r3OSubqpv7r5mXTQHszh5gSNm2grht0YJ4+KD3x8S+VeM3p3hTPPlGu/jM0fWI323r4+sle5Lf123n4dIT+/aMz2xfGVcteD3+Ws3hyM+/9nyMfrUo+nc7uWz9U06JCR9oE8+/OD9u27hrz+3RbTvFJ4tXxZOF2YKqSrZ3U9f4dNsqu6Tz2sZX+/aPEQfltmHRKzFj96O8941Vv4uxF46M8UdcEU88unvcxfqZMfX3Z8TF/1iH+G2I3hfvPKR66m1DcguGxG3l8xUuVWMtOgyMsY/+LK494oG48MJvx7TGeXPinsdnj4pLnt+X7Czfaf2Mb8aAj3838jtfvOu6znw8Jo+IGH/ByJhYdW/x4kdi+OemRa9r7ys97Lxk/ZJ/b7s4L6Z97fqYWvG6N2g8i3KhMjwG37khhv9Xts4Tk2PSVd1i6udGxbiFpflR2QEz/jVYlgu5j387Fp/7b9mYPB5zHr8iWt1/aYyeUuWQ4Nw2jPn4mJjW47KYXHpI8OTc+P97Ln5/Htfd+Gy2UgWrclE46Jsxq9+Vu26LR78VwwvujcE1HULcTMZz2dzHIv9T58fZ1cVviTYDY+inlsaUuSuyBfV1cozcOSbll3+PYdlXd9PcHx8AmogAhiTtiGXrl8bI/E3Rv+cp8YMu1e8VjW2FseTwI6N7nY+SLIz78/Mjju8VN7Q/tMLh0nnR/7g+ccOR6+OWVzbGpmxpuc3v6xwT+nSJ/hX+P60POzZu6tUu5i9ZE3/NlpXs+flkl7x4ct3m3P9pdys3rYtVx3WIgdU+srWM/l36xH0928Sz+QvitvVbq/0ZDVMUy6Z+O4aMfjYGfOdn8fCoGvaSLF8az3TuH732VXjsU+1iwKgJ8cR3PhSzRg+PsVNXlO0p2ifqOD57suX5mDH3g3Fuv117fzuce2PMenZCjDqnW6U9jW0GXB13XFMcd95f+RDTBb99IJZffEkMq7JnuE3v82PcoxNiWJdsQQNtmfGdGPnMwJg06coYUOFKtuk9LMbfNzCmX/fzqP4I7gNg/Gvw8C3T4tyfTYzrBlTYK9+mf1x7/dBYOHF6heu7IiZfd1MUXDtxt0OCew/795h4U9WjXJbExNHfibjp+zFuSLcKr3vkxura8THx7Jm1HEK8/8ezYNnS6DWg8v2ysiOix4ATIn/ZHs7Y3Cw05ngCNC0BDKnZURiTXpwf47YcHd855YT45GE1v4F3XdHfIg7Ni6Oy+T3asime3PaBGNGhuj3GB+UC9LjovnZtPFucLcp0adO62gBv3aZdnPHOqphVoVS7dugaZ6xfGb/fbS9uYTy5akf8U7vW2Xz1Wh/WIW44pVecseXlGP3imnhpb0+QVbQkJo38p7hu7hkx8Yl/j2HVHeKaWb9qRUSPttE+m2+OSkPwie/HOXO/GYNHTonFe/sstx7jU5uiVfPjjlwMLbvkq1UitdVuh3CW691vUMSM5yud6bZDlxMiFi5tpLPfroipd06PIddfEadUs1GtBgyJ4TE1nqnlPczNdfxrc/pN/1btCwetenwwTl89P5aXn7Vs4dQYlz80rh3aLVtQWV5elVfaFk6L8asuiquGVXfERKsYcPllMeC3U2NGLWdF23/juSFWLY9on1f749EReW0jlq85YE7sts/HE2A/EMCQmm1v5eLxyPh0p6NqeB9tw7301vp4p8MRcVI2v5u8I2LgkRvir1vrWJ0HHRontXsnlm+rUMwHHRWfOW57TN5Qef9t8eb18WTesXFGnY7WPjTO6NQpTty2Lmbv7eHQq/4SU1b1jxGXDIy93HnYjHSKsy+5KE5fNTXm7O3hjg0Znzn3xugLd30M0pBBF8TwGx6L9tf+KqaNPbnG4I2it2LV4vkxbco9cce4b8aIW6bl7hiVX23pcvG34u4e02L4oGti3NT5sWz9PnwGv35JPLN8cJzbr6Yt7Ba9zl4bc5bvaY/ffh7/empV4ViPSnKLS0aifISX5f8liocOihqHp4rFc2bm1h8YvbP53XQ4Oc7t9WwszN/TbXhgjWfztw/HE2A/EMCQmsM6xaST28XylxfE1WsKaz0M+NhW78sFc3Fszub3pHjH27knvQfV9HQ456A4vGXEG+/U9YzM2c+qcqq+k47tGt1fXxOzdv6Y7TFr3co4qWO7OkT99vjrmhdj9MuFce7Jp8TIw7LFDdXj4pj2syGRf+PnYsTDz9d6RtcOXbrlKmBjFGTzzdNbseDhq+L8G5fGsJ9NjpElJ+fZG/UYn52qfAzStJmPx9RJ34qRFQ+xrWDL4ifi5uEjc5H8SMwpaB39PnVJjBn7rXi49H2OVXWKwbdNijmPXx3nxtJ4+JbRcc4ZucC+bkrMWraXZ7pd/UI8E7PjzksrfIZxpcvoGPfb3Hq19lozGP9GsmXZ0lwRt675BYwqigrW7mH93Nfa55q0oLZHsf01nu2iS/fcr3tB7S92FBSsiOjeqdFOLLXv7ePxBNgPBDCkqPSkUKfEiO2vxqWLlsesKock73Ro6zjx7TdjeU1fryLvoMNLKrjkVEU12BFv56L18IPr+tBTHCu3RRxzSJXDtFu2jU8fuyF+tiHbfbt9c/y+upNfVVVyNuhF8+OB7V1jQnUn/Wqo0pPETIoxBXfF4At/ELNqOp6x+wlx9ur5kd9cj3csOdvrhf8UtxdcFo/uy5Mk1XV8GmDV1Gti8PeL4+L7JsXkO66MYeecGF3aHLHnyGrTLQYMuzhuHj8pZj37q7hjRF5M+8qnY9jE5xv+3sa8dtE5hsTNFeK96mXas3+qfAbrivb7+O/hFyL3i11U9TDlemjVvmPuBxTWeXz3vH7uawURR7SpYZv283h26fWhWD13aS2HN2+I/Llr4+xe1R8S3uw01ngCNDEBDMlqGf2POzke6nlYPLmghpNC5R0dnzxmQ/zfTXU7TvikIzrEIevfipey+d0UvxWz32wXA1vvIVTLbXs75r/dLv7hsKoPVQfFwE7dc/WzofT/tXLD2lhe48mvSmQn/VqwPrr37B8/qOGjkPZOyYl5Jsb073SLKRfUcJKYDoNi2D8+G1N+X9ezvpY8sc9VRx1fgKis4mc270l2Up8Lpkb37/wqJjfKR53UYXzqq2h+TLxlY1x7/bDoXfOZhuqgVXTpNyzG3X1FxPd/HrOq3a1Xh/HscUKcEzNjYb0/p7iZjH+HTtEr79nSj8epTtGyF2LugBMafOhvlx4nRzxT9/df9x4wKPIem13DScNy1j8fM/LPiHP6Vn0fbvMYzy4DBke/Z2bG3Jp2E2+ZHzOe+WCcu/PIhr35fa+v5vb4ANB0BDAkruRsy9857cTov3lJXPrimvhrpaOTW8Y5XT4Qby9fHk/W1MDbt8ay8u9pkwvmQ1fFw+urW3lH/HXdqljesWOcUeWZ1zs7qntP8I6Yv2ZVvFHN+qUObRefO+L1eLhgYzy5KmJ4TSe/2l5y0q/n4pbNR8VNp50Un6nlpF/7QunZfmf+ZwyY+404Z+SUWFDpye8Rce6oL8SWcT+o/HE7Fa1fEovLdxl16BYDOv8lFi7bPRWLlk2NCVOymep0PznOjRW7TkBUky3Px6SRn44xcz9Uut3DG+EkSRXVPj71tGVDrCpuXfpZsrt7KxYvrPpCQ1GsWlXbIam1JEFdxrPVwLj4mrwY//0nyj6PuC6a1fjnAn5oXkyeNnv3OM4tmTNjWvQ79+QGx0+b0wfHpwqmxmNzqnvpY0PkV729+g2JMV0eiwlTq3yUUqmiWHD/IzHnU8Pi3Iob1JzGs8uQuOqiZ+OOCfOrH88J98asiy7bdQKxvfl9r69m+vgA0BQEMJB7JDgsPnnCKTGh47b44ZrKRZLX+rj4bs+D4v5FL8akLRXreEes2/x6XP3cknhy50mtWsflJ3aPd17Jj+9tLK6wI2N7vLTupbhlwxHxte5td9v7unzJorh61eZYt7ODt8ey3Pq3vXlkteuXycV5p+Ni+eIX4jeHd4xzajj51V/XLIvNHU+JSSd0iB5N9YjXqlsMu21yPHH5mrjl/uezhWVa9bsyJt6WF+MuvComLaz4ntNcnM25J4Z//Jvx2OryJ8AnxpBRH4wpt98bcyrcLOtz64382ooYcu0Z2ZJqtDkjhl30lxg/YWblQzCL1sSyVbueYC+4/3ux+vKfxbTbzo8qnwzUeGoZn3rp0D+Gnf1CTJw4u9J1LDlj9MSRo2Jc/hHRK1tWqmhtzLphZAy7YWosqDAGpbYsicm33xVFl18U51S3N7mO49l71PdjXN5dMeqGJ2JxpV+l3O27cGrcfF3lOG5e498qBlx1Ywx47PoYM2VJhfe3vhWLp+SWzR0a1w/di8+wbjMorrupW0wefX1MXlzhvl8aWdfHhPxsfqcTY9TdX423brkmbp61JjeC5cq2Z+Qz/WP8TYMqfcxQcxvPc8aOj8HPXBsjJ1Z8v/BbsWDimBj1zKCYNHZghcP19+L3vb6a8+MDQCNrMePuoiqnlwH2hw+PqvKEPGfOnL/EyEtzofTQhBgwoOpnZNZPq0suy6YaqHhzTFqxOn7/dnHkHVRWksccfmz803HHVvr83lLbt8aMNa/Hwxv+Vrpu8Y6DovuxXeOKTkfFsdkqZYrjyRefjRkdTo0rWmyIB1ZvijdKluZCuGu7znFZp/bRo9Ydtltj0oJ5saTrmfGd9nu3Z7fokQeyqSayfn5Muv2BmJK/IVpluzC79B0aI64aVunzY0uf7E+9N275/szY0r5d6ZPlLp/6atw0qn/E1GtiUP5lsXjsyWWr7mZDzJn43bj5kReiVe57Sx3RLYZe+/UY2a957slZX3Kdfjs4Zt53ft32NOaesM96+AdxZ+46FpWPz+kXxeWXnx+nxBMx6iNL46oXr85N77Jl8e9i6pTp8diitdmSnNy4nH3xF2LUkIqfT1tVXcfzrVg2a1qMv39q5Be0yvZQt47uZw+NUZd/fC8P124C65+PyRPujYd/v6L0ehYUFEW/T10WV11Vdds3xNTRn45pn/pN9e9rXl8y/tNjyNPfj2EVbsySk5bdefsjMWN5q2jfPjeE3YfEmOsvju7P1HDbb1kS0yY8EOOfyW1PbjCLivKi18VXxNgRB8ihuNl9dFx2vynKPdT3GFqy/QOjy25RuTe/7yWej3F9Rkf87E8xtl+2qEbN6/Ghtr93vfuclU3Vzf3XzMumAHYngKGZaPYB3CjKA/iM+F6Hur8jbadt6+LKBVtjxIDutbz/t26aPICBxCyJiYMvjYXXPhXjhziUuCoBDDQVh0ADB6iy9wi/XevJrwCaixNjxB0XxbIbvln5EHAAmpSnjcABaeX6pXHbmx3ia51qOPkVQDPTqt/VMflnQ2L5hDEx5PySz4YeHsMfrutZ4QHYFwQwcMAo3rI8/nnBohhV8rFNW9rGd/seF//gUQw4gLTp/fEYO35STHui5LOhJ8fkEQfI5wADvEd46gjsR3nxyT7n1Pn9v3ltusdPT+kbE085Je45vgnP6gwAwHuCp4/QjLVoUflfAHgv8vcOaCrOAg3NRPVngZ4fIy8dE5MeGh8DBvTPlgLAe0ttf++cBRrYl+wBBgAAIAkCGAAAgCQIYAAAAJIggAEAAEiCAAYAACAJAhgAAIAkCGAAAACSIIABAABIggAGAAAgCQIYAACAJAhgAAAAktBixt1F72bTwH704VFF2dQuc+bMj5GXjomx118dvXqdkC0t06JFNgEAB5B33y156ln5j1h+/tIYd/sPYtJD42PAgP7Z0jK9+5yVTdXN/dfMy6YAdieAoZmoLYABIAUCGGhsAhiaieoCeMuWLZGf/3I2V1kLu4ABOACV7QGuXq9ePaNNmzbZXBkBDOxLAhiaieoCGABSJ4CBfclJsAAAAEiCAAYAACAJAhgAAIAkCGAAAACSIIABAABIggAGAAAgCQIYAACAJAhgAAAAkiCAAQAASIIABgAAIAkCGAAAgCS0mHF30bvZNHAAufz7p2ZTAEC5+6+Zl00B7M4eYAAAAJIggAEAAEiCAAYAACAJAhgAAIAkCGAAAACSIIABAABIggAGAAAgCQIYAACAJAhgAAAAkiCAAQAASIIABgAAIAkCGAAAgCQIYAAAAJIggAEAAEiCAAYAACAJAhgAAIAkCGAAAACSIIABAABIggAGAAAgCQIYAACAJAhgAAAAkiCAAQAASIIABgAAIAkCGAAAgCQIYAAAAJIggAEAAEhCixl3F72bTQMAAMB7lj3AAAAAJEEAAwAAkAQBDAAAQBIEMAAAAEkQwAAAACRBAAMAAJAEAQwAAEASBDAAAABJEMAAAAAkQQADAACQBAEMAABAEgQwAAAASRDAAAAAJEEAAwAAkAQBDAAAQBIEMAAAAEkQwAAAACRBAAMAAJAEAQwAAEASBDAAAABJEMAAAAAkQQADAACQBAEMAABAEgQwAAAASRDAAAAAJEEAAwAAkAQBDAAAQBIEMAAAAEkQwAAAACRBAAMAAJAEAQwAAEASBDAAAABJEMAAAAAkQQADAACQBAEMAABAEgQwAAAASRDAAAAAJEEAAwAAkAQBDAAAQBIEMAAAAEkQwAAAACRBAAMAAJAEAQwAAEASBDAAAABJEMAAAAAkQQADAACQBAEMAABAEgQwAAAASRDAAAAAJEEAAwAAkAQBDAAAQBIEMAAAAEkQwAAAACRBAAMAAJAEAQwAAEASBDAAAABJEMAAAAAkQQADAACQBAEMAABAEgQwAAAASRDAAAAAJEEAAwAAkAQBDAAAQBIEMAAAAEkQwAAAACRBAAMAAJAEAQwAAEASBDAAAABJEMAAAAAkQQADAACQBAEMAABAEgQwAAAASRDAAAAAJEEAAwAAkAQBDAAAQBIEMAAAAEkQwAAAACRBAAMAAJAEAQwAAEASBDAAAABJEMAAAAAkQQADAACQBAEMAABAEgQwAAAASRDAAAAAJEEAAwAAkAQBDAAAQBIEMAAAAEkQwAAAACRBAAMAAJAEAQwAAEASBDAAAABJEMAAAAAkQQADAACQBAEMAABAEgQwAAAASRDAAAAAJEEAAwAAkAQBDAAAQBIEMAAAAEkQwAAAACRBAAMAAJAEAQwAAEASBDAAAABJEMAAAAAkQQADAACQBAEMAABAEgQwAAAASRDAAAAAJEEAAwAAkAQBDAAAQBIEMAAAAEkQwAAAACRBAAMAAJAEAQwAAEASBDAAAABJEMAAAAAkQQADAACQBAEMAABAEgQwAAAASRDAAAAAJEEAAwAAkAQBDAAAQBIEMAAAAEkQwAAAACRBAAMAAJAEAQwAAEASBDAAAABJEMAAAAAkQQADAACQBAEMAABAEgQwAAAASRDAAAAAJEEAAwAAkAQBDAAAQBIEMAAAAEkQwAAAACRBAAMAAJAEAQwAAEASBDAAAABJEMAAAAAkQQADAACQBAEMAABAEgQwAAAASRDAAAAAJEEAAwAAkAQBDAAAQBIEMAAAAEkQwAAAACRBAAMAAJAEAQwAAEASBDAAAABJEMAAAAAkQQADAACQBAEMAABAEgQwAAAASRDAAAAAJEEAAwAAkAQBDAAAQBIEMAAAAEkQwAAAACRBAAMAAJAEAQwAAEASBDAAAABJEMAAAAAkQQADAACQBAEMAABAEgQwAAAASRDAAAAAJEEAAwAAkAQBDAAAQBIEMAAAAEkQwAAAACRBAAMAAJAEAQwAAEASBDAAAABJEMAAAAAkQQADAACQBAEMAABAEgQwAAAASRDAAAAAJEEAAwAAkAQBDAAAQBIEMAAAAEkQwAAAACRBAAMAAJAEAQwAAEASBDAAAABJEMAAAAAkQQADAACQBAEMAABAEgQwAAAASRDAAAAAJEEAAwAAkAQBDAAAQBIEMAAAAEkQwAAAACRBAAMAAJAEAQwAAEASBDAAAABJEMAAAAAkQQADAACQgIj/Bwiv3SlPndWAAAAAAElFTkSuQmCC) **Polecenie** w innych językach ------------------------------- [![Polecenie w języku C#](https://refactoring.guru/images/patterns/icons/csharp.svg?id=da64592defc6e86d57c39c66e9de3e58)](https://refactoring.guru/pl/design-patterns/command/csharp/example "Polecenie w języku C#") [![Polecenie w języku C++](https://refactoring.guru/images/patterns/icons/cpp.svg?id=f7782ed8b8666246bfcc3f8fefc3b858)](https://refactoring.guru/pl/design-patterns/command/cpp/example "Polecenie w języku C++") [![Polecenie w języku Go](https://refactoring.guru/images/patterns/icons/go.svg?id=1a89927eb99b1ea3fde7701d97970aca)](https://refactoring.guru/pl/design-patterns/command/go/example "Polecenie w języku Go") [![Polecenie w języku Java](https://refactoring.guru/images/patterns/icons/java.svg?id=e6d87e2dca08c953fe3acd1275ed4f4e)](https://refactoring.guru/pl/design-patterns/command/java/example "Polecenie w języku Java") [![Polecenie w języku PHP](https://refactoring.guru/images/patterns/icons/php.svg?id=be1906eb26b71ec1d3b93720d6156618)](https://refactoring.guru/pl/design-patterns/command/php/example "Polecenie w języku PHP") [![Polecenie w języku Python](https://refactoring.guru/images/patterns/icons/python.svg?id=6d815d43c0f7050a1151b43e51569c9f)](https://refactoring.guru/pl/design-patterns/command/python/example "Polecenie w języku Python") [![Polecenie w języku Ruby](https://refactoring.guru/images/patterns/icons/ruby.svg?id=b065b718c914bf8e960ef731600be1eb)](https://refactoring.guru/pl/design-patterns/command/ruby/example "Polecenie w języku Ruby") [![Polecenie w języku Swift](https://refactoring.guru/images/patterns/icons/swift.svg?id=0b716c2d52ec3a48fbe91ac031070c1d)](https://refactoring.guru/pl/design-patterns/command/swift/example "Polecenie w języku Swift") [![Polecenie w języku TypeScript](https://refactoring.guru/images/patterns/icons/typescript.svg?id=2239d0f16cb703540c205dd8cb0c0cb7)](https://refactoring.guru/pl/design-patterns/command/typescript/example "Polecenie w języku TypeScript") --- # Команда [There are patterns of patterns now! \ My friend's project: MetaPatterns.io](https://metapatterns.io/)  [](https://refactoring.guru/ru/design-patterns/command#checkout) [](https://refactoring.guru/ru/design-patterns/command#checkout) [](https://refactoring.guru/) / [Паттерны проектирования](https://refactoring.guru/ru/design-patterns) / [Поведенческие паттерны](https://refactoring.guru/ru/design-patterns/behavioral-patterns) Команда ======= Также известен как: Действие, Транзакция, Action, Command Суть паттерна ------------- **Команда** — это поведенческий паттерн проектирования, который превращает запросы в объекты, позволяя передавать их как аргументы при вызове методов, ставить запросы в очередь, логировать их, а также поддерживать отмену операций. ![Паттерн Команда](https://refactoring.guru/images/patterns/content/command/command-en-2x.png?id=6149af804cbbbd5cb18595c30b856d89) Проблема -------- Представьте, что вы работаете над программой текстового редактора. Дело как раз подошло к разработке панели управления. Вы создали класс красивых `Кнопок` и хотите использовать его для всех кнопок приложения, начиная от панели управления, заканчивая простыми кнопками в диалогах. ![Проблема, которую решает Команда](https://refactoring.guru/images/patterns/diagrams/command/problem1-2x.png?id=af4c4e9c1d1b4fa2c4104c5f6bb18719) Все кнопки приложения унаследованы от одного класса. Все эти кнопки, хоть и выглядят схоже, но делают разные вещи. Поэтому возникает вопрос: куда поместить код обработчиков кликов по этим кнопкам? Самым простым решением было бы создать подклассы для каждой кнопки и переопределить в них метод действия под разные задачи. ![Множество подклассов кнопок](https://refactoring.guru/images/patterns/diagrams/command/problem2-2x.png?id=5eea7d0f6247da011150bb63e423f405) Множество подклассов кнопок. Но скоро стало понятно, что такой подход никуда не годится. Во-первых, получается очень много подклассов. Во-вторых, код кнопок, относящийся к графическому интерфейсу, начинает зависеть от классов бизнес-логики, которая довольно часто меняется. ![Несколько классов дублируют одну и ту же функциональность](https://refactoring.guru/images/patterns/diagrams/command/problem3-en-2x.png?id=e06878f7cfbe4131980c68db2904878e) Несколько классов дублируют одну и ту же функциональность. Но самое обидное ещё впереди. Ведь некоторые операции, например, «сохранить», можно вызывать из нескольких мест: нажав кнопку на панели управления, вызвав контекстное меню или просто нажав клавиши `Ctrl+S`. Когда в программе были только кнопки, код сохранения имелся только в подклассе `SaveButton`. Но теперь его придётся продублировать ещё в два класса. Решение ------- Хорошие программы обычно структурированы в виде слоёв. Самый распространённый пример — слои пользовательского интерфейса и бизнес-логики. Первый всего лишь рисует красивую картинку для пользователя. Но когда нужно сделать что-то важное, интерфейс «просит» слой бизнес-логики заняться этим. В реальности это выглядит так: один из объектов интерфейса напрямую вызывает метод одного из объектов бизнес-логики, передавая в него какие-то параметры. ![Прямой доступ из UI в бизнес-логику](https://refactoring.guru/images/patterns/diagrams/command/solution1-ru-2x.png?id=d1987064fb2c02212cd6c407937bc295) Прямой доступ из UI в бизнес-логику. Паттерн Команда предлагает больше не отправлять такие вызовы напрямую. Вместо этого каждый вызов, отличающийся от других, следует завернуть в собственный класс с единственным методом, который и будет осуществлять вызов. Такие объекты называют _командами_. К объекту интерфейса можно будет привязать объект команды, который знает, кому и в каком виде следует отправлять запросы. Когда объект интерфейса будет готов передать запрос, он вызовет метод команды, а та — позаботится обо всём остальном. ![Доступ из UI в бизнес-логику через команду](https://refactoring.guru/images/patterns/diagrams/command/solution2-ru-2x.png?id=f824bb61256b3afaa6fcab1f2647c436) Доступ из UI в бизнес-логику через команду. Классы команд можно объединить под общим интерфейсом c единственным методом запуска. После этого одни и те же отправители смогут работать с различными командами, не привязываясь к их классам. Даже больше: команды можно будет взаимозаменять на лету, изменяя итоговое поведение отправителей. Параметры, с которыми должен быть вызван метод объекта получателя, можно загодя сохранить в полях объекта-команды. Благодаря этому, объекты, отправляющие запросы, могут не беспокоиться о том, чтобы собрать необходимые для получателя данные. Более того, они теперь вообще не знают, кто будет получателем запроса. Вся эта информация скрыта внутри команды. ![Классы UI делегируют работу командам](https://refactoring.guru/images/patterns/diagrams/command/solution3-en-2x.png?id=c12bb9971d1ba4f8a3d3717bbced2859) Классы UI делегируют работу командам. После применения Команды в нашем примере с текстовым редактором вам больше не потребуется создавать уйму подклассов кнопок под разные действия. Будет достаточно единственного класса с полем для хранения объекта команды. Используя общий интерфейс команд, объекты кнопок будут ссылаться на объекты команд различных типов. При нажатии кнопки будут делегировать работу связанным командам, а команды — перенаправлять вызовы тем или иным объектам бизнес-логики. Так же можно поступить и с контекстным меню, и с горячими клавишами. Они будут привязаны к тем же объектам команд, что и кнопки, избавляя классы от дублирования. Таким образом, команды станут гибкой прослойкой между пользовательским интерфейсом и бизнес-логикой. И это лишь малая доля пользы, которую может принести паттерн Команда! Аналогия из жизни ----------------- ![Пример заказа в ресторане](https://refactoring.guru/images/patterns/content/command/command-comic-1-2x.png?id=47b3c00b2cfbda7157a1ed9da6ce2948) Пример заказа в ресторане. Вы заходите в ресторан и садитесь у окна. К вам подходит вежливый официант и принимает заказ, записывая все пожелания в блокнот. Откланявшись, он уходит на кухню, где вырывает лист из блокнота и клеит на стену. Далее лист оказывается в руках повара, который читает содержание заказа и готовит заказанные блюда. В этом примере вы являетесь _отправителем_, официант с блокнотом — _командой_, а повар — _получателем_. Как и в паттерне, вы не соприкасаетесь напрямую с поваром. Вместо этого вы отправляете заказ с официантом, который самостоятельно «настраивает» повара на работу. С другой стороны, повар не знает, кто конкретно послал ему заказ. Но это ему безразлично, так как вся необходимая информация есть в листе заказа. Структура --------- ![Структура классов паттерна Команда](https://refactoring.guru/images/patterns/diagrams/command/structure-2x.png?id=1dfaa84354ffe49ef7ad46ce069482d2)![Структура классов паттерна Команда](https://refactoring.guru/images/patterns/diagrams/command/structure-indexed-2x.png?id=e4cc286a44768c7d060af33497da7df6) 1. **Отправитель** хранит ссылку на объект команды и обращается к нему, когда нужно выполнить какое-то действие. Отправитель работает с командами только через их общий интерфейс. Он не знает, какую конкретно команду использует, так как получает готовый объект команды от клиента. 2. **Команда** описывает общий для всех конкретных команд интерфейс. Обычно здесь описан всего один метод для запуска команды. 3. **Конкретные команды** реализуют различные запросы, следуя общему интерфейсу команд. Обычно команда не делает всю работу самостоятельно, а лишь передаёт вызов получателю, которым является один из объектов бизнес-логики. Параметры, с которыми команда обращается к получателю, следует хранить в виде полей. В большинстве случаев объекты команд можно сделать неизменяемыми, передавая в них все необходимые параметры только через конструктор. 4. **Получатель** содержит бизнес-логику программы. В этой роли может выступать практически любой объект. Обычно команды перенаправляют вызовы получателям. Но иногда, чтобы упростить программу, вы можете избавиться от получателей, «слив» их код в классы команд. 5. **Клиент** создаёт объекты конкретных команд, передавая в них все необходимые параметры, среди которых могут быть и ссылки на объекты получателей. После этого клиент связывает объекты отправителей с созданными командами. Псевдокод --------- В этом примере паттерн **Команда** служит для ведения истории выполненных операций, позволяя отменять их, если потребуется. ![Структура классов примера паттерна Команда](https://refactoring.guru/images/patterns/diagrams/command/example-2x.png?id=ed44dfd9b02eccf1ae7e2714d018ed36) Пример реализации отмены в текстовом редакторе. Команды, которые меняют состояние редактора (например, команда вставки текста из буфера обмена), сохраняют копию состояния редактора перед выполнением действия. Копии выполненных команд помещаются в историю команд, откуда они могут быть получены, если нужно будет сделать отмену операции. Классы элементов интерфейса, истории команд и прочие не зависят от конкретных классов команд, так как работают с ними через общий интерфейс. Это позволяет добавлять в приложение новые команды, не изменяя существующий код. // Абстрактная команда задаёт общий интерфейс для конкретных // классов команд и содержит базовое поведение отмены операции. abstract class Command is protected field app: Application protected field editor: Editor protected field backup: text constructor Command(app: Application, editor: Editor) is this.app = app this.editor = editor // Сохраняем состояние редактора. method saveBackup() is backup = editor.text // Восстанавливаем состояние редактора. method undo() is editor.text = backup // Главный метод команды остаётся абстрактным, чтобы каждая // конкретная команда определила его по-своему. Метод должен // возвратить true или false в зависимости о того, изменила // ли команда состояние редактора, а значит, нужно ли её // сохранить в истории. abstract method execute() // Конкретные команды. class CopyCommand extends Command is // Команда копирования не записывается в историю, так как // она не меняет состояние редактора. method execute() is app.clipboard = editor.getSelection() return false class CutCommand extends Command is // Команды, меняющие состояние редактора, сохраняют // состояние редактора перед своим действием и сигнализируют // об изменении, возвращая true. method execute() is saveBackup() app.clipboard = editor.getSelection() editor.deleteSelection() return true class PasteCommand extends Command is method execute() is saveBackup() editor.replaceSelection(app.clipboard) return true // Отмена — это тоже команда. class UndoCommand extends Command is method execute() is app.undo() return false // Глобальная история команд — это стек. class CommandHistory is private field history: array of Command // Последний зашедший... method push(c: Command) is // Добавить команду в конец массива-истории. // ...выходит первым. method pop():Command is // Достать последнюю команду из массива-истории. // Класс редактора содержит непосредственные операции над // текстом. Он отыгрывает роль получателя — команды делегируют // ему свои действия. class Editor is field text: string method getSelection() is // Вернуть выбранный текст. method deleteSelection() is // Удалить выбранный текст. method replaceSelection(text) is // Вставить текст из буфера обмена в текущей позиции. // Класс приложения настраивает объекты для совместной работы. // Он выступает в роли отправителя — создаёт команды, чтобы // выполнить какие-то действия. class Application is field clipboard: string field editors: array of Editors field activeEditor: Editor field history: CommandHistory // Код, привязывающий команды к элементам интерфейса, может // выглядеть примерно так. method createUI() is // ... copy = function() {executeCommand( new CopyCommand(this, activeEditor)) } copyButton.setCommand(copy) shortcuts.onKeyPress("Ctrl+C", copy) cut = function() { executeCommand( new CutCommand(this, activeEditor)) } cutButton.setCommand(cut) shortcuts.onKeyPress("Ctrl+X", cut) paste = function() { executeCommand( new PasteCommand(this, activeEditor)) } pasteButton.setCommand(paste) shortcuts.onKeyPress("Ctrl+V", paste) undo = function() { executeCommand( new UndoCommand(this, activeEditor)) } undoButton.setCommand(undo) shortcuts.onKeyPress("Ctrl+Z", undo) // Запускаем команду и проверяем, надо ли добавить её в // историю. method executeCommand(command) is if (command.execute()) history.push(command) // Берём последнюю команду из истории и заставляем её все // отменить. Мы не знаем конкретный тип команды, но это и не // важно, так как каждая команда знает, как отменить своё // действие. method undo() is command = history.pop() if (command != null) command.undo() Применимость ------------ Когда вы хотите параметризовать объекты выполняемым действием. Команда превращает операции в объекты. А объекты можно передавать, хранить и взаимозаменять внутри других объектов. Скажем, вы разрабатываете библиотеку графического меню и хотите, чтобы пользователи могли использовать меню в разных приложениях, не меняя каждый раз код ваших классов. Применив паттерн, пользователям не придётся изменять классы меню, вместо этого они будут конфигурировать объекты меню различными командами. Когда вы хотите ставить операции в очередь, выполнять их по расписанию или передавать по сети. Как и любые другие объекты, команды можно сериализовать, то есть превратить в строку, чтобы потом сохранить в файл или базу данных. Затем в любой удобный момент её можно достать обратно, снова превратить в объект команды и выполнить. Таким же образом команды можно передавать по сети, логировать или выполнять на удалённом сервере. Когда вам нужна операция отмены. Главная вещь, которая вам нужна, чтобы иметь возможность отмены операций, — это хранение истории. Среди многих способов, которыми можно это сделать, паттерн Команда является, пожалуй, самым популярным. История команд выглядит как стек, в который попадают все выполненные объекты команд. Каждая команда перед выполнением операции сохраняет текущее состояние объекта, с которым она будет работать. После выполнения операции копия команды попадает в стек истории, все ещё неся в себе сохранённое состояние объекта. Если потребуется отмена, программа возьмёт последнюю команду из истории и возобновит сохранённое в ней состояние. Этот способ имеет две особенности. Во-первых, точное состояние объектов не так-то просто сохранить, ведь часть его может быть приватным. Но с этим может помочь справиться паттерн [Снимок](https://refactoring.guru/ru/design-patterns/memento) . Во-вторых, копии состояния могут занимать довольно много оперативной памяти. Поэтому иногда можно прибегнуть к альтернативной реализации, когда вместо восстановления старого состояния команда выполняет обратное действие. Недостаток этого способа в сложности (а иногда и невозможности) реализации обратного действия. Шаги реализации --------------- 1. Создайте общий интерфейс команд и определите в нём метод запуска. 2. Один за другим создайте классы конкретных команд. В каждом классе должно быть поле для хранения ссылки на один или несколько объектов-получателей, которым команда будет перенаправлять основную работу. Кроме этого, команда должна иметь поля для хранения параметров, которые нужны при вызове методов получателя. Значения всех этих полей команда должна получать через конструктор. И, наконец, реализуйте основной метод команды, вызывая в нём те или иные методы получателя. 3. Добавьте в классы отправителей поля для хранения команд. Обычно объекты-отправители принимают готовые объекты команд извне — через конструктор либо через сеттер поля команды. 4. Измените основной код отправителей так, чтобы они делегировали выполнение действия команде. 5. Порядок инициализации объектов должен выглядеть так: * Создаём объекты получателей. * Создаём объекты команд, связав их с получателями. * Создаём объекты отправителей, связав их с командами. Преимущества и недостатки ------------------------- * Убирает прямую зависимость между объектами, вызывающими операции, и объектами, которые их непосредственно выполняют. * Позволяет реализовать простую отмену и повтор операций. * Позволяет реализовать отложенный запуск операций. * Позволяет собирать сложные команды из простых. * Реализует _принцип открытости/закрытости_. * Усложняет код программы из-за введения множества дополнительных классов. Отношения с другими паттернами ------------------------------ * [Цепочка обязанностей](https://refactoring.guru/ru/design-patterns/chain-of-responsibility) , [Команда](https://refactoring.guru/ru/design-patterns/command) , [Посредник](https://refactoring.guru/ru/design-patterns/mediator) и [Наблюдатель](https://refactoring.guru/ru/design-patterns/observer) показывают различные способы работы отправителей запросов с их получателями: * _Цепочка обязанностей_ передаёт запрос последовательно через цепочку потенциальных получателей, ожидая, что какой-то из них обработает запрос. * _Команда_ устанавливает косвенную одностороннюю связь от отправителей к получателям. * _Посредник_ убирает прямую связь между отправителями и получателями, заставляя их общаться опосредованно, через себя. * _Наблюдатель_ передаёт запрос одновременно всем заинтересованным получателям, но позволяет им динамически подписываться или отписываться от таких оповещений. * Обработчики в [Цепочке обязанностей](https://refactoring.guru/ru/design-patterns/chain-of-responsibility) могут быть выполнены в виде [Команд](https://refactoring.guru/ru/design-patterns/command) . В этом случае множество разных операций может быть выполнено над одним и тем же контекстом, коим является запрос. Но есть и другой подход, в котором сам запрос является _Командой_, посланной по цепочке объектов. В этом случае одна и та же операция может быть выполнена над множеством разных контекстов, представленных в виде цепочки. * [Команду](https://refactoring.guru/ru/design-patterns/command) и [Снимок](https://refactoring.guru/ru/design-patterns/memento) можно использовать сообща для реализации отмены операций. В этом случае объекты команд будут отвечать за выполнение действия над объектом, а снимки будут хранить резервную копию состояния этого объекта, сделанную перед самым запуском команды. * [Команда](https://refactoring.guru/ru/design-patterns/command) и [Стратегия](https://refactoring.guru/ru/design-patterns/strategy) похожи по духу, но отличаются масштабом и применением: * _Команду_ используют, чтобы превратить любые разнородные действия в объекты. Параметры операции превращаются в поля объекта. Этот объект теперь можно логировать, хранить в истории для отмены, передавать во внешние сервисы и так далее. * С другой стороны, _Стратегия_ описывает разные способы произвести одно и то же действие, позволяя взаимозаменять эти способы в каком-то объекте контекста. * Если [Команду](https://refactoring.guru/ru/design-patterns/command) нужно копировать перед вставкой в историю выполненных команд, вам может помочь [Прототип](https://refactoring.guru/ru/design-patterns/prototype) . * [Посетитель](https://refactoring.guru/ru/design-patterns/visitor) можно рассматривать как расширенный аналог [Команды](https://refactoring.guru/ru/design-patterns/command) , который способен работать сразу с несколькими видами получателей. Примеры реализации паттерна --------------------------- [![Команда на C#](https://refactoring.guru/images/patterns/icons/csharp.svg?id=da64592defc6e86d57c39c66e9de3e58)](https://refactoring.guru/ru/design-patterns/command/csharp/example "Команда на C#") [![Команда на C++](https://refactoring.guru/images/patterns/icons/cpp.svg?id=f7782ed8b8666246bfcc3f8fefc3b858)](https://refactoring.guru/ru/design-patterns/command/cpp/example "Команда на C++") [![Команда на Go](https://refactoring.guru/images/patterns/icons/go.svg?id=1a89927eb99b1ea3fde7701d97970aca)](https://refactoring.guru/ru/design-patterns/command/go/example "Команда на Go") [![Команда на Java](https://refactoring.guru/images/patterns/icons/java.svg?id=e6d87e2dca08c953fe3acd1275ed4f4e)](https://refactoring.guru/ru/design-patterns/command/java/example "Команда на Java") [![Команда на PHP](https://refactoring.guru/images/patterns/icons/php.svg?id=be1906eb26b71ec1d3b93720d6156618)](https://refactoring.guru/ru/design-patterns/command/php/example "Команда на PHP") [![Команда на Python](https://refactoring.guru/images/patterns/icons/python.svg?id=6d815d43c0f7050a1151b43e51569c9f)](https://refactoring.guru/ru/design-patterns/command/python/example "Команда на Python") [![Команда на Ruby](https://refactoring.guru/images/patterns/icons/ruby.svg?id=b065b718c914bf8e960ef731600be1eb)](https://refactoring.guru/ru/design-patterns/command/ruby/example "Команда на Ruby") [![Команда на Rust](https://refactoring.guru/images/patterns/icons/rust.svg?id=1f5698a4b5ae23fe79413511747e4a87)](https://refactoring.guru/ru/design-patterns/command/rust/example "Команда на Rust") [![Команда на Swift](https://refactoring.guru/images/patterns/icons/swift.svg?id=0b716c2d52ec3a48fbe91ac031070c1d)](https://refactoring.guru/ru/design-patterns/command/swift/example "Команда на Swift") [![Команда на TypeScript](https://refactoring.guru/images/patterns/icons/typescript.svg?id=2239d0f16cb703540c205dd8cb0c0cb7)](https://refactoring.guru/ru/design-patterns/command/typescript/example "Команда на TypeScript") [![](https://refactoring.guru/images/patterns/banners/patterns-book-banner-1-b-2x.png?id=5572aa55e5b09e59780aca9e0ea8e44b)](https://refactoring.guru/ru/design-patterns/book) ### Не втыкай в транспорте Лучше почитай нашу книгу о паттернах проектирования. Теперь это удобно делать даже во время поездок в общественном транспорте. [Узнать больше…](https://refactoring.guru/ru/design-patterns/book) --- # Fabrique en Rust / Patrons de conception [There are patterns of patterns now! \ My friend's project: MetaPatterns.io](https://metapatterns.io/)  [](https://refactoring.guru/fr/design-patterns/factory-method/rust/example#checkout) [](https://refactoring.guru/fr/design-patterns/factory-method/rust/example#checkout) [](https://refactoring.guru/) / [Patrons de conception](https://refactoring.guru/fr/design-patterns) / [Fabrique](https://refactoring.guru/fr/design-patterns/factory-method) / [Rust](https://refactoring.guru/fr/design-patterns/rust) ![Fabrique](https://refactoring.guru/images/patterns/cards/factory-method-mini-2x.png?id=fa9d4a8d61a67cc3822e52b9daf69dad) **Fabrique** en Rust ==================== La **Fabrique** est un patron de conception de création qui permet de créer des produits sans avoir à préciser leurs classes concrètes. La fabrique définit une méthode qui doit être utilisée pour créer des objets à la place de l’appel au constructeur (opérateur `new`). Les sous-classes peuvent redéfinir cette méthode pour modifier la classe des objets qui seront créés. > Lisez notre [Comparaison des fabriques](https://refactoring.guru/fr/design-patterns/factory-comparison) > si vous avez du mal à saisir la différence entre les divers concepts et patrons. [En savoir plus sur la patron Fabrique](https://refactoring.guru/fr/design-patterns/factory-method) Navigation  [Intro](https://refactoring.guru/fr/design-patterns/factory-method/rust/example#)  [Dialog Rendering](https://refactoring.guru/fr/design-patterns/factory-method/rust/example#example-0)  [gui](https://refactoring.guru/fr/design-patterns/factory-method/rust/example#example-0--gui-rs)  [html\_gui](https://refactoring.guru/fr/design-patterns/factory-method/rust/example#example-0--html_gui-rs)  [windows\_gui](https://refactoring.guru/fr/design-patterns/factory-method/rust/example#example-0--windows_gui-rs)  [init](https://refactoring.guru/fr/design-patterns/factory-method/rust/example#example-0--init-rs)  [main](https://refactoring.guru/fr/design-patterns/factory-method/rust/example#example-0--main-rs)  [Maze Game](https://refactoring.guru/fr/design-patterns/factory-method/rust/example#example-1)  [game](https://refactoring.guru/fr/design-patterns/factory-method/rust/example#example-1--game-rs)  [magic\_maze](https://refactoring.guru/fr/design-patterns/factory-method/rust/example#example-1--magic_maze-rs)  [ordinary\_maze](https://refactoring.guru/fr/design-patterns/factory-method/rust/example#example-1--ordinary_maze-rs)  [main](https://refactoring.guru/fr/design-patterns/factory-method/rust/example#example-1--main-rs) Dialog Rendering ---------------- This example illustrates how to organize a GUI framework into independent modules using **dynamic dispatch**: 1. The `gui` module defines interfaces for all the components. It has no external dependencies. 2. The `html_gui` module provides HTML implementation of the base GUI. Depends on `gui`. 3. The `windows_gui` module provides Windows implementation of the base GUI. Depends on `gui`. The `app` is a client application that can use several implementations of the GUI framework, depending on the current environment or configuration. However, most of the app code doesn’t depend on specific types of GUI elements. All client code works with GUI elements through abstract interfaces defined by the `gui` module. The [Abstract Factory example](https://refactoring.guru/design-patterns/abstract-factory/rust/example) demonstrates an even greater separation of a factory interface and its implementations. #### **gui.rs:** Product & Creator pub trait Button { fn render(&self); fn on\_click(&self); } /// Dialog has a factory method \`create\_button\`. /// /// It creates different buttons depending on a factory implementation. pub trait Dialog { /// The factory method. It must be overridden with a concrete implementation. fn create\_button(&self) -> Box; fn render(&self) { let button = self.create\_button(); button.render(); } fn refresh(&self) { println!("Dialog - Refresh"); } } #### **html\_gui.rs:** Concrete creator use crate::gui::{Button, Dialog}; pub struct HtmlButton; impl Button for HtmlButton { fn render(&self) { println!(""); self.on\_click(); } fn on\_click(&self) { println!("Click! Button says - 'Hello World!'"); } } pub struct HtmlDialog; impl Dialog for HtmlDialog { /// Creates an HTML button. fn create\_button(&self) -> Box { Box::new(HtmlButton) } } #### **windows\_gui.rs:** Another concrete creator use crate::gui::{Button, Dialog}; pub struct WindowsButton; impl Button for WindowsButton { fn render(&self) { println!("Drawing a Windows button"); self.on\_click(); } fn on\_click(&self) { println!("Click! Hello, Windows!"); } } pub struct WindowsDialog; impl Dialog for WindowsDialog { /// Creates a Windows button. fn create\_button(&self) -> Box { Box::new(WindowsButton) } } #### **init.rs:** Initialization code use crate::gui::Dialog; use crate::html\_gui::HtmlDialog; use crate::windows\_gui::WindowsDialog; pub fn initialize() -> &'static dyn Dialog { // The dialog type is selected depending on the environment settings or configuration. if cfg!(windows) { println!("-- Windows detected, creating Windows GUI --"); &WindowsDialog } else { println!("-- No OS detected, creating the HTML GUI --"); &HtmlDialog } } #### **main.rs:** Client code mod gui; mod html\_gui; mod init; mod windows\_gui; use init::initialize; fn main() { // The rest of the code doesn't depend on specific dialog types, because // it works with all dialog objects via the abstract \`Dialog\` trait // which is defined in the \`gui\` module. let dialog = initialize(); dialog.render(); dialog.refresh(); } ### Output Click! Button says - 'Hello World!' Dialog - Refresh Maze Game --------- This example illustrates how to implement the Factory Method pattern using **static dispatch** (generics). _Inspired by the Factory Method [example from the GoF book](https://en.wikipedia.org/wiki/Factory_method_pattern) ._ #### **game.rs** /// Maze room that is going to be instantiated with a factory method. pub trait Room { fn render(&self); } /// Maze game has a factory method producing different rooms. pub trait MazeGame { type RoomImpl: Room; /// A factory method. fn rooms(&self) -> Vec; fn play(&self) { for room in self.rooms() { room.render(); } } } /// The client code initializes resources and does other preparations /// then it uses a factory to construct and run the game. pub fn run(maze\_game: impl MazeGame) { println!("Loading resources..."); println!("Starting the game..."); maze\_game.play(); } #### **magic\_maze.rs** use super::game::{MazeGame, Room}; #\[derive(Clone)\] pub struct MagicRoom { title: String, } impl MagicRoom { pub fn new(title: String) -> Self { Self { title } } } impl Room for MagicRoom { fn render(&self) { println!("Magic Room: {}", self.title); } } pub struct MagicMaze { rooms: Vec, } impl MagicMaze { pub fn new() -> Self { Self { rooms: vec!\[\ MagicRoom::new("Infinite Room".into()),\ MagicRoom::new("Red Room".into()),\ \], } } } impl MazeGame for MagicMaze { type RoomImpl = MagicRoom; fn rooms(&self) -> Vec { self.rooms.clone() } } #### **ordinary\_maze.rs** use super::game::{MazeGame, Room}; #\[derive(Clone)\] pub struct OrdinaryRoom { id: u32, } impl OrdinaryRoom { pub fn new(id: u32) -> Self { Self { id } } } impl Room for OrdinaryRoom { fn render(&self) { println!("Ordinary Room: #{}", self.id); } } pub struct OrdinaryMaze { rooms: Vec, } impl OrdinaryMaze { pub fn new() -> Self { Self { rooms: vec!\[OrdinaryRoom::new(1), OrdinaryRoom::new(2)\], } } } impl MazeGame for OrdinaryMaze { type RoomImpl = OrdinaryRoom; fn rooms(&self) -> Vec { let mut rooms = self.rooms.clone(); rooms.reverse(); rooms } } #### **main.rs:** Client code mod game; mod magic\_maze; mod ordinary\_maze; use magic\_maze::MagicMaze; use ordinary\_maze::OrdinaryMaze; /// The game runs with different mazes depending on the concrete factory type: /// it's either an ordinary maze or a magic maze. /// /// For demonstration purposes, both mazes are used to construct the game. fn main() { // Option 1: The game starts with an ordinary maze. let ordinary\_maze = OrdinaryMaze::new(); game::run(ordinary\_maze); // Option 2: The game starts with a magic maze. let magic\_maze = MagicMaze::new(); game::run(magic\_maze); } ### Output Loading resources... Starting the game... Magic Room: Infinite Room Magic Room: Red Room Loading resources... Starting the game... Ordinary Room: #2 Ordinary Room: #1 **Fabrique** dans les autres langues ------------------------------------ [![Fabrique en C#](https://refactoring.guru/images/patterns/icons/csharp.svg?id=da64592defc6e86d57c39c66e9de3e58)](https://refactoring.guru/fr/design-patterns/factory-method/csharp/example "Fabrique en C#") [![Fabrique en C++](https://refactoring.guru/images/patterns/icons/cpp.svg?id=f7782ed8b8666246bfcc3f8fefc3b858)](https://refactoring.guru/fr/design-patterns/factory-method/cpp/example "Fabrique en C++") [![Fabrique en Go](https://refactoring.guru/images/patterns/icons/go.svg?id=1a89927eb99b1ea3fde7701d97970aca)](https://refactoring.guru/fr/design-patterns/factory-method/go/example "Fabrique en Go") [![Fabrique en Java](https://refactoring.guru/images/patterns/icons/java.svg?id=e6d87e2dca08c953fe3acd1275ed4f4e)](https://refactoring.guru/fr/design-patterns/factory-method/java/example "Fabrique en Java") [![Fabrique en PHP](https://refactoring.guru/images/patterns/icons/php.svg?id=be1906eb26b71ec1d3b93720d6156618)](https://refactoring.guru/fr/design-patterns/factory-method/php/example "Fabrique en PHP") [![Fabrique en Python](https://refactoring.guru/images/patterns/icons/python.svg?id=6d815d43c0f7050a1151b43e51569c9f)](https://refactoring.guru/fr/design-patterns/factory-method/python/example "Fabrique en Python") [![Fabrique en Ruby](https://refactoring.guru/images/patterns/icons/ruby.svg?id=b065b718c914bf8e960ef731600be1eb)](https://refactoring.guru/fr/design-patterns/factory-method/ruby/example "Fabrique en Ruby") [![Fabrique en Swift](https://refactoring.guru/images/patterns/icons/swift.svg?id=0b716c2d52ec3a48fbe91ac031070c1d)](https://refactoring.guru/fr/design-patterns/factory-method/swift/example "Fabrique en Swift") [![Fabrique en TypeScript](https://refactoring.guru/images/patterns/icons/typescript.svg?id=2239d0f16cb703540c205dd8cb0c0cb7)](https://refactoring.guru/fr/design-patterns/factory-method/typescript/example "Fabrique en TypeScript") --- # Adaptateur en TypeScript / Patrons de conception [There are patterns of patterns now! \ My friend's project: MetaPatterns.io](https://metapatterns.io/)  [](https://refactoring.guru/fr/design-patterns/adapter/typescript/example#checkout) [](https://refactoring.guru/fr/design-patterns/adapter/typescript/example#checkout) [](https://refactoring.guru/) / [Patrons de conception](https://refactoring.guru/fr/design-patterns) / [Adaptateur](https://refactoring.guru/fr/design-patterns/adapter) / [TypeScript](https://refactoring.guru/fr/design-patterns/typescript) ![Adaptateur](https://refactoring.guru/images/patterns/cards/adapter-mini-2x.png?id=8274d99afbbe9c63bfbfd0d68ceeffc7) **Adaptateur** en TypeScript ============================ L’**Adaptateur** est un patron de conception structurel qui permet à des objets incompatibles de collaborer. L’adaptateur fait office d’emballeur entre les deux objets. Il récupère les appels à un objet et les met dans un format et une interface reconnaissables par le second objet. [En savoir plus sur la patron Adaptateur](https://refactoring.guru/fr/design-patterns/adapter) Navigation  [Intro](https://refactoring.guru/fr/design-patterns/adapter/typescript/example#)  [Exemple conceptuel](https://refactoring.guru/fr/design-patterns/adapter/typescript/example#example-0)  [index](https://refactoring.guru/fr/design-patterns/adapter/typescript/example#example-0--index-ts)  [Output](https://refactoring.guru/fr/design-patterns/adapter/typescript/example#example-0--Output-txt) **Complexité :** **Popularité :** **Exemples d’utilisation :** L’adaptateur est très répandu en TypeScript. On le retrouve souvent dans des systèmes basés sur du code hérité, dans lesquels l’adaptateur fait fonctionner du code hérité avec des classes modernes. **Identification :** L’adaptateur peut être identifié grâce à son constructeur qui prend une instance d’un type abstrait différent ou d’une interface différente. Lorsque l’une des méthodes de l’adaptateur est appelée, il traduit les paramètres dans un format approprié et redirige l’appel vers une ou plusieurs méthodes de l’objet emballé. Exemple conceptuel ------------------ Dans cet exemple, nous allons voir la structure de l’**Adaptateur** et répondre aux questions suivantes : * Que contiennent les classes ? * Quels rôles jouent-elles ? * Comment les éléments du patron sont-ils reliés ? #### **index.ts:** Exemple conceptuel /\*\* \* The Target defines the domain-specific interface used by the client code. \*/ class Target { public request(): string { return 'Target: The default target\\'s behavior.'; } } /\*\* \* The Adaptee contains some useful behavior, but its interface is incompatible \* with the existing client code. The Adaptee needs some adaptation before the \* client code can use it. \*/ class Adaptee { public specificRequest(): string { return '.eetpadA eht fo roivaheb laicepS'; } } /\*\* \* The Adapter makes the Adaptee's interface compatible with the Target's \* interface. \*/ class Adapter extends Target { private adaptee: Adaptee; constructor(adaptee: Adaptee) { super(); this.adaptee = adaptee; } public request(): string { const result = this.adaptee.specificRequest().split('').reverse().join(''); return \`Adapter: (TRANSLATED) ${result}\`; } } /\*\* \* The client code supports all classes that follow the Target interface. \*/ function clientCode(target: Target) { console.log(target.request()); } console.log('Client: I can work just fine with the Target objects:'); const target = new Target(); clientCode(target); console.log(''); const adaptee = new Adaptee(); console.log('Client: The Adaptee class has a weird interface. See, I don\\'t understand it:'); console.log(\`Adaptee: ${adaptee.specificRequest()}\`); console.log(''); console.log('Client: But I can work with it via the Adapter:'); const adapter = new Adapter(adaptee); clientCode(adapter); #### **Output.txt:** Résultat de l’exécution Client: I can work just fine with the Target objects: Target: The default target's behavior. Client: The Adaptee class has a weird interface. See, I don't understand it: Adaptee: .eetpadA eht fo roivaheb laicepS Client: But I can work with it via the Adapter: Adapter: (TRANSLATED) Special behavior of the Adaptee. **Adaptateur** dans les autres langues -------------------------------------- [![Adaptateur en C#](https://refactoring.guru/images/patterns/icons/csharp.svg?id=da64592defc6e86d57c39c66e9de3e58)](https://refactoring.guru/fr/design-patterns/adapter/csharp/example "Adaptateur en C#") [![Adaptateur en C++](https://refactoring.guru/images/patterns/icons/cpp.svg?id=f7782ed8b8666246bfcc3f8fefc3b858)](https://refactoring.guru/fr/design-patterns/adapter/cpp/example "Adaptateur en C++") [![Adaptateur en Go](https://refactoring.guru/images/patterns/icons/go.svg?id=1a89927eb99b1ea3fde7701d97970aca)](https://refactoring.guru/fr/design-patterns/adapter/go/example "Adaptateur en Go") [![Adaptateur en Java](https://refactoring.guru/images/patterns/icons/java.svg?id=e6d87e2dca08c953fe3acd1275ed4f4e)](https://refactoring.guru/fr/design-patterns/adapter/java/example "Adaptateur en Java") [![Adaptateur en PHP](https://refactoring.guru/images/patterns/icons/php.svg?id=be1906eb26b71ec1d3b93720d6156618)](https://refactoring.guru/fr/design-patterns/adapter/php/example "Adaptateur en PHP") [![Adaptateur en Python](https://refactoring.guru/images/patterns/icons/python.svg?id=6d815d43c0f7050a1151b43e51569c9f)](https://refactoring.guru/fr/design-patterns/adapter/python/example "Adaptateur en Python") [![Adaptateur en Ruby](https://refactoring.guru/images/patterns/icons/ruby.svg?id=b065b718c914bf8e960ef731600be1eb)](https://refactoring.guru/fr/design-patterns/adapter/ruby/example "Adaptateur en Ruby") [![Adaptateur en Rust](https://refactoring.guru/images/patterns/icons/rust.svg?id=1f5698a4b5ae23fe79413511747e4a87)](https://refactoring.guru/fr/design-patterns/adapter/rust/example "Adaptateur en Rust") [![Adaptateur en Swift](https://refactoring.guru/images/patterns/icons/swift.svg?id=0b716c2d52ec3a48fbe91ac031070c1d)](https://refactoring.guru/fr/design-patterns/adapter/swift/example "Adaptateur en Swift") --- # Фабричный метод на Go [There are patterns of patterns now! \ My friend's project: MetaPatterns.io](https://metapatterns.io/)  [](https://refactoring.guru/ru/design-patterns/factory-method/go/example#checkout) [](https://refactoring.guru/ru/design-patterns/factory-method/go/example#checkout) [](https://refactoring.guru/) / [Паттерны проектирования](https://refactoring.guru/ru/design-patterns) / [Фабричный метод](https://refactoring.guru/ru/design-patterns/factory-method) / [Go](https://refactoring.guru/ru/design-patterns/go) ![Фабричный метод](https://refactoring.guru/images/patterns/cards/factory-method-mini-2x.png?id=fa9d4a8d61a67cc3822e52b9daf69dad) **Фабричный метод** на Go ========================= **Фабричный метод** — это порождающий паттерн проектирования, который решает проблему создания различных продуктов, без указания конкретных классов продуктов. Фабричный метод задаёт метод, который следует использовать вместо вызова оператора `new` для создания объектов-продуктов. Подклассы могут переопределить этот метод, чтобы изменять тип создаваемых продуктов. [Подробней о паттерне Фабричный метод](https://refactoring.guru/ru/design-patterns/factory-method) Навигация  [Интро](https://refactoring.guru/ru/design-patterns/factory-method/go/example#)  [Концептуальный пример](https://refactoring.guru/ru/design-patterns/factory-method/go/example#example-0)  [i­Gun](https://refactoring.guru/ru/design-patterns/factory-method/go/example#example-0--iGun-go)  [gun](https://refactoring.guru/ru/design-patterns/factory-method/go/example#example-0--gun-go)  [ak47](https://refactoring.guru/ru/design-patterns/factory-method/go/example#example-0--ak47-go)  [musket](https://refactoring.guru/ru/design-patterns/factory-method/go/example#example-0--musket-go)  [gun­Factory](https://refactoring.guru/ru/design-patterns/factory-method/go/example#example-0--gunFactory-go)  [main](https://refactoring.guru/ru/design-patterns/factory-method/go/example#example-0--main-go)  [output](https://refactoring.guru/ru/design-patterns/factory-method/go/example#example-0--output-txt) Концептуальный пример --------------------- В Go невозможно реализовать классический вариант паттерна Фабричный метод, поскольу в языке отсутствуют возможности ООП, в том числе классы и наследственность. Несмотря на это, мы все же можем реализовать базовую версию этого паттерна — Простая фабрика. В этом примере мы будем создавать разные типы оружия при помощи структуры фабрики. Сперва, мы создадим интерфейс `iGun`, который определяет все методы будущих пушек. Также имеем структуру `gun` (пушка), которая применяет интерфейс `iGun`. Две конкретных пушки — `ak47` и `musket` — обе включают в себя структуру gun и не напрямую реализуют все методы от iGun. `gunFactory` служит фабрикой, которая создает пушку нужного типа в зависимости от аргумента на входе. Клиентом служит _main.go_ . Вместо прямого взаимодействия с объектами `ak47` или `musket`, он создает экземпляры различного оружия при помощи `gunFactory`, используя для контроля изготовления только параметры в виде строк. #### **iGun.go:** Интерфейс продукта package main type IGun interface { setName(name string) setPower(power int) getName() string getPower() int } #### **gun.go:** Конкретный продукт package main type Gun struct { name string power int } func (g \*Gun) setName(name string) { g.name = name } func (g \*Gun) getName() string { return g.name } func (g \*Gun) setPower(power int) { g.power = power } func (g \*Gun) getPower() int { return g.power } #### **ak47.go:** Конкретный продукт package main type Ak47 struct { Gun } func newAk47() IGun { return &Ak47{ Gun: Gun{ name: "AK47 gun", power: 4, }, } } #### **musket.go:** Конкретный продукт package main type musket struct { Gun } func newMusket() IGun { return &musket{ Gun: Gun{ name: "Musket gun", power: 1, }, } } #### **gunFactory.go:** Фабрика package main import "fmt" func getGun(gunType string) (IGun, error) { if gunType == "ak47" { return newAk47(), nil } if gunType == "musket" { return newMusket(), nil } return nil, fmt.Errorf("Wrong gun type passed") } #### **main.go:** Клиентский код package main import "fmt" func main() { ak47, \_ := getGun("ak47") musket, \_ := getGun("musket") printDetails(ak47) printDetails(musket) } func printDetails(g IGun) { fmt.Printf("Gun: %s", g.getName()) fmt.Println() fmt.Printf("Power: %d", g.getPower()) fmt.Println() } #### **output.txt:** Результат выполнения Gun: AK47 gun Power: 4 Gun: Musket gun Power: 1 **Фабричный метод** на других языках программирования ----------------------------------------------------- [![Фабричный метод на C#](https://refactoring.guru/images/patterns/icons/csharp.svg?id=da64592defc6e86d57c39c66e9de3e58)](https://refactoring.guru/ru/design-patterns/factory-method/csharp/example "Фабричный метод на C#") [![Фабричный метод на C++](https://refactoring.guru/images/patterns/icons/cpp.svg?id=f7782ed8b8666246bfcc3f8fefc3b858)](https://refactoring.guru/ru/design-patterns/factory-method/cpp/example "Фабричный метод на C++") [![Фабричный метод на Java](https://refactoring.guru/images/patterns/icons/java.svg?id=e6d87e2dca08c953fe3acd1275ed4f4e)](https://refactoring.guru/ru/design-patterns/factory-method/java/example "Фабричный метод на Java") [![Фабричный метод на PHP](https://refactoring.guru/images/patterns/icons/php.svg?id=be1906eb26b71ec1d3b93720d6156618)](https://refactoring.guru/ru/design-patterns/factory-method/php/example "Фабричный метод на PHP") [![Фабричный метод на Python](https://refactoring.guru/images/patterns/icons/python.svg?id=6d815d43c0f7050a1151b43e51569c9f)](https://refactoring.guru/ru/design-patterns/factory-method/python/example "Фабричный метод на Python") [![Фабричный метод на Ruby](https://refactoring.guru/images/patterns/icons/ruby.svg?id=b065b718c914bf8e960ef731600be1eb)](https://refactoring.guru/ru/design-patterns/factory-method/ruby/example "Фабричный метод на Ruby") [![Фабричный метод на Rust](https://refactoring.guru/images/patterns/icons/rust.svg?id=1f5698a4b5ae23fe79413511747e4a87)](https://refactoring.guru/ru/design-patterns/factory-method/rust/example "Фабричный метод на Rust") [![Фабричный метод на Swift](https://refactoring.guru/images/patterns/icons/swift.svg?id=0b716c2d52ec3a48fbe91ac031070c1d)](https://refactoring.guru/ru/design-patterns/factory-method/swift/example "Фабричный метод на Swift") [![Фабричный метод на TypeScript](https://refactoring.guru/images/patterns/icons/typescript.svg?id=2239d0f16cb703540c205dd8cb0c0cb7)](https://refactoring.guru/ru/design-patterns/factory-method/typescript/example "Фабричный метод на TypeScript") --- # Адаптер на Swift [There are patterns of patterns now! \ My friend's project: MetaPatterns.io](https://metapatterns.io/)  [](https://refactoring.guru/uk/design-patterns/adapter/swift/example#checkout) [](https://refactoring.guru/uk/design-patterns/adapter/swift/example#checkout) [](https://refactoring.guru/) / [Патерни проектування](https://refactoring.guru/uk/design-patterns) / [Адаптер](https://refactoring.guru/uk/design-patterns/adapter) / [Swift](https://refactoring.guru/uk/design-patterns/swift) ![Адаптер](https://refactoring.guru/images/patterns/cards/adapter-mini-2x.png?id=8274d99afbbe9c63bfbfd0d68ceeffc7) **Адаптер** на Swift ==================== **Адаптер** — це структурний патерн, який дозволяє подружити несумісні об’єкти. Адаптер виступає прошарком між двома об’єктами, перетворюючи виклики одного у виклики, що зрозумілі іншому. [Детальніше про Адаптер](https://refactoring.guru/uk/design-patterns/adapter) Навігація  [Інтро](https://refactoring.guru/uk/design-patterns/adapter/swift/example#)  [Концептуальний приклад](https://refactoring.guru/uk/design-patterns/adapter/swift/example#example-0)  [Example](https://refactoring.guru/uk/design-patterns/adapter/swift/example#example-0--Example-swift)  [Output](https://refactoring.guru/uk/design-patterns/adapter/swift/example#example-0--Output-txt)  [Життєвий приклад](https://refactoring.guru/uk/design-patterns/adapter/swift/example#example-1)  [Example](https://refactoring.guru/uk/design-patterns/adapter/swift/example#example-1--Example-swift)  [Output](https://refactoring.guru/uk/design-patterns/adapter/swift/example#example-1--Output-txt) **Складність:** **Популярність:** **Застосування:** Патерн можна часто зустріти в Swift-коді, особливо там, де потрібна конвертація різних типів даних або спільна робота класів з різними інтерфейсами. **Ознаки застосування патерна:** Адаптер отримує конвертований об’єкт у конструкторі або через параметри своїх методів. Методи Адаптера, зазвичай, сумісні з інтерфейсом одного об’єкта. Вони делегують виклики вкладеному об’єктові, перетворивши перед цим параметри виклику у формат, підтримуваний вкладеним об’єктом. Наступні приклади доступні на [Swift Playgrounds](https://www.alemohamad.com/playgrounds) . Вдячність [Alejandro Mohamad](https://www.alemohamad.com/) за створення версії Playground. Концептуальний приклад ---------------------- Цей приклад показує структуру патерна **Адаптер**, а саме — з яких класів він складається, які ролі ці класи виконують і як вони взаємодіють один з одним. Після ознайомлення зі структурою, вам буде легше сприймати наступний приклад, що розглядає реальний випадок використання патерна в світі Swift. #### **Example.swift:** Приклад структури патерна import XCTest /// The Target defines the domain-specific interface used by the client code. class Target { func request() -> String { return "Target: The default target's behavior." } } /// The Adaptee contains some useful behavior, but its interface is incompatible /// with the existing client code. The Adaptee needs some adaptation before the /// client code can use it. class Adaptee { public func specificRequest() -> String { return ".eetpadA eht fo roivaheb laicepS" } } /// The Adapter makes the Adaptee's interface compatible with the Target's /// interface. class Adapter: Target { private var adaptee: Adaptee init(\_ adaptee: Adaptee) { self.adaptee = adaptee } override func request() -> String { return "Adapter: (TRANSLATED) " + adaptee.specificRequest().reversed() } } /// The client code supports all classes that follow the Target interface. class Client { // ... static func someClientCode(target: Target) { print(target.request()) } // ... } /// Let's see how it all works together. class AdapterConceptual: XCTestCase { func testAdapterConceptual() { print("Client: I can work just fine with the Target objects:") Client.someClientCode(target: Target()) let adaptee = Adaptee() print("Client: The Adaptee class has a weird interface. See, I don't understand it:") print("Adaptee: " + adaptee.specificRequest()) print("Client: But I can work with it via the Adapter:") Client.someClientCode(target: Adapter(adaptee)) } } #### **Output.txt:** Результат виконання Client: I can work just fine with the Target objects: Target: The default target's behavior. Client: The Adaptee class has a weird interface. See, I don't understand it: Adaptee: .eetpadA eht fo roivaheb laicepS Client: But I can work with it via the Adapter: Adapter: (TRANSLATED) Special behavior of the Adaptee. Життєвий приклад ---------------- #### **Example.swift:** Життєвий приклад import XCTest import UIKit /// Adapter Design Pattern /// /// Intent: Convert the interface of a class into the interface clients expect. /// Adapter lets classes work together that couldn't work otherwise because of /// incompatible interfaces. class AdapterRealWorld: XCTestCase { /// Example. Let's assume that our app perfectly works with Facebook /// authorization. However, users ask you to add sign in via Twitter. /// /// Unfortunately, Twitter SDK has a different authorization method. /// /// Firstly, you have to create the new protocol 'AuthService' and insert /// the authorization method of Facebook SDK. /// /// Secondly, write an extension for Twitter SDK and implement methods of /// AuthService protocol, just a simple redirect. /// /// Thirdly, write an extension for Facebook SDK. You should not write any /// code at this point as methods already implemented by Facebook SDK. /// /// It just tells a compiler that both SDKs have the same interface. func testAdapterRealWorld() { print("Starting an authorization via Facebook") startAuthorization(with: FacebookAuthSDK()) print("Starting an authorization via Twitter.") startAuthorization(with: TwitterAuthSDK()) } func startAuthorization(with service: AuthService) { /// The current top view controller of the app let topViewController = UIViewController() service.presentAuthFlow(from: topViewController) } } protocol AuthService { func presentAuthFlow(from viewController: UIViewController) } class FacebookAuthSDK { func presentAuthFlow(from viewController: UIViewController) { /// Call SDK methods and pass a view controller print("Facebook WebView has been shown.") } } class TwitterAuthSDK { func startAuthorization(with viewController: UIViewController) { /// Call SDK methods and pass a view controller print("Twitter WebView has been shown. Users will be happy :)") } } extension TwitterAuthSDK: AuthService { /// This is an adapter /// /// Yeah, we are able to not create another class and just extend an /// existing one func presentAuthFlow(from viewController: UIViewController) { print("The Adapter is called! Redirecting to the original method...") self.startAuthorization(with: viewController) } } extension FacebookAuthSDK: AuthService { /// This extension just tells a compiler that both SDKs have the same /// interface. } #### **Output.txt:** Результат виконання Starting an authorization via Facebook Facebook WebView has been shown /// Starting an authorization via Twitter The Adapter is called! Redirecting to the original method... Twitter WebView has been shown. Users will be happy :) **Адаптер** іншими мовами програмування --------------------------------------- [![Адаптер на C#](https://refactoring.guru/images/patterns/icons/csharp.svg?id=da64592defc6e86d57c39c66e9de3e58)](https://refactoring.guru/uk/design-patterns/adapter/csharp/example "Адаптер на C#") [![Адаптер на C++](https://refactoring.guru/images/patterns/icons/cpp.svg?id=f7782ed8b8666246bfcc3f8fefc3b858)](https://refactoring.guru/uk/design-patterns/adapter/cpp/example "Адаптер на C++") [![Адаптер на Go](https://refactoring.guru/images/patterns/icons/go.svg?id=1a89927eb99b1ea3fde7701d97970aca)](https://refactoring.guru/uk/design-patterns/adapter/go/example "Адаптер на Go") [![Адаптер на Java](https://refactoring.guru/images/patterns/icons/java.svg?id=e6d87e2dca08c953fe3acd1275ed4f4e)](https://refactoring.guru/uk/design-patterns/adapter/java/example "Адаптер на Java") [![Адаптер на PHP](https://refactoring.guru/images/patterns/icons/php.svg?id=be1906eb26b71ec1d3b93720d6156618)](https://refactoring.guru/uk/design-patterns/adapter/php/example "Адаптер на PHP") [![Адаптер на Python](https://refactoring.guru/images/patterns/icons/python.svg?id=6d815d43c0f7050a1151b43e51569c9f)](https://refactoring.guru/uk/design-patterns/adapter/python/example "Адаптер на Python") [![Адаптер на Ruby](https://refactoring.guru/images/patterns/icons/ruby.svg?id=b065b718c914bf8e960ef731600be1eb)](https://refactoring.guru/uk/design-patterns/adapter/ruby/example "Адаптер на Ruby") [![Адаптер на Rust](https://refactoring.guru/images/patterns/icons/rust.svg?id=1f5698a4b5ae23fe79413511747e4a87)](https://refactoring.guru/uk/design-patterns/adapter/rust/example "Адаптер на Rust") [![Адаптер на TypeScript](https://refactoring.guru/images/patterns/icons/typescript.svg?id=2239d0f16cb703540c205dd8cb0c0cb7)](https://refactoring.guru/uk/design-patterns/adapter/typescript/example "Адаптер на TypeScript") --- # Padrões de Projeto em C# [There are patterns of patterns now! \ My friend's project: MetaPatterns.io](https://metapatterns.io/)  [](https://refactoring.guru/pt-br/design-patterns/csharp#checkout) [](https://refactoring.guru/pt-br/design-patterns/csharp#checkout) ![Padrões de Projeto em C#](https://refactoring.guru/images/patterns/languages/csharp-3x.png) ![Padrões de Projeto em C#](https://refactoring.guru/images/patterns/languages/mini/csharp-3x.png) Padrões de Projeto em C# ======================== O catálogo dos exemplos **C#** ------------------------------ #### Padrões criacionais ![Abstract Factory](https://refactoring.guru/images/patterns/cards/abstract-factory-mini-3x.png) #### Abstract Factory Permite que você produza famílias de objetos relacionados sem ter que especificar suas classes concretas. [Artigo principal](https://refactoring.guru/pt-br/design-patterns/abstract-factory) [Uso em C#](https://refactoring.guru/pt-br/design-patterns/abstract-factory/csharp/example#lang-features) [Exemplo de código](https://refactoring.guru/pt-br/design-patterns/abstract-factory/csharp/example#example-0) ![Builder](https://refactoring.guru/images/patterns/cards/builder-mini-3x.png) #### Builder Permite construir objetos complexos passo a passo. O padrão permite produzir diferentes tipos e representações de um objeto usando o mesmo código de construção. [Artigo principal](https://refactoring.guru/pt-br/design-patterns/builder) [Uso em C#](https://refactoring.guru/pt-br/design-patterns/builder/csharp/example#lang-features) [Exemplo de código](https://refactoring.guru/pt-br/design-patterns/builder/csharp/example#example-0) ![Factory Method](https://refactoring.guru/images/patterns/cards/factory-method-mini-3x.png) #### Factory Method Fornece uma interface para criar objetos em uma superclasse, mas permite que as subclasses alterem o tipo de objetos que serão criados. [Artigo principal](https://refactoring.guru/pt-br/design-patterns/factory-method) [Uso em C#](https://refactoring.guru/pt-br/design-patterns/factory-method/csharp/example#lang-features) [Exemplo de código](https://refactoring.guru/pt-br/design-patterns/factory-method/csharp/example#example-0) ![Prototype](https://refactoring.guru/images/patterns/cards/prototype-mini-3x.png) #### Prototype Permite que você copie objetos existentes sem fazer seu código ficar dependente de suas classes. [Artigo principal](https://refactoring.guru/pt-br/design-patterns/prototype) [Uso em C#](https://refactoring.guru/pt-br/design-patterns/prototype/csharp/example#lang-features) [Exemplo de código](https://refactoring.guru/pt-br/design-patterns/prototype/csharp/example#example-0) ![Singleton](https://refactoring.guru/images/patterns/cards/singleton-mini-3x.png) #### Singleton Permite a você garantir que uma classe tem apenas uma instância, enquanto provê um ponto de acesso global para esta instância. [Artigo principal](https://refactoring.guru/pt-br/design-patterns/singleton) [Uso em C#](https://refactoring.guru/pt-br/design-patterns/singleton/csharp/example#lang-features) [Singleton ingênuo](https://refactoring.guru/pt-br/design-patterns/singleton/csharp/example#example-0) [Singleton seguro para threads](https://refactoring.guru/pt-br/design-patterns/singleton/csharp/example#example-1) #### Padrões estruturais ![Adapter](https://refactoring.guru/images/patterns/cards/adapter-mini-3x.png) #### Adapter Permite a colaboração de objetos de interfaces incompatíveis. [Artigo principal](https://refactoring.guru/pt-br/design-patterns/adapter) [Uso em C#](https://refactoring.guru/pt-br/design-patterns/adapter/csharp/example#lang-features) [Exemplo de código](https://refactoring.guru/pt-br/design-patterns/adapter/csharp/example#example-0) ![Bridge](https://refactoring.guru/images/patterns/cards/bridge-mini-3x.png) #### Bridge Permite que você divida uma classe grande ou um conjunto de classes intimamente ligadas em duas hierarquias separadas—abstração e implementação—que podem ser desenvolvidas independentemente umas das outras. [Artigo principal](https://refactoring.guru/pt-br/design-patterns/bridge) [Uso em C#](https://refactoring.guru/pt-br/design-patterns/bridge/csharp/example#lang-features) [Exemplo de código](https://refactoring.guru/pt-br/design-patterns/bridge/csharp/example#example-0) ![Composite](https://refactoring.guru/images/patterns/cards/composite-mini-3x.png) #### Composite Permite que você componha objetos em estrutura de árvores e então trabalhe com essas estruturas como se fossem objetos individuais. [Artigo principal](https://refactoring.guru/pt-br/design-patterns/composite) [Uso em C#](https://refactoring.guru/pt-br/design-patterns/composite/csharp/example#lang-features) [Exemplo de código](https://refactoring.guru/pt-br/design-patterns/composite/csharp/example#example-0) ![Decorator](https://refactoring.guru/images/patterns/cards/decorator-mini-3x.png) #### Decorator Permite que você adicione novos comportamentos a objetos colocando eles dentro de um envoltório (wrapper) de objetos que contém os comportamentos. [Artigo principal](https://refactoring.guru/pt-br/design-patterns/decorator) [Uso em C#](https://refactoring.guru/pt-br/design-patterns/decorator/csharp/example#lang-features) [Exemplo de código](https://refactoring.guru/pt-br/design-patterns/decorator/csharp/example#example-0) ![Facade](https://refactoring.guru/images/patterns/cards/facade-mini-3x.png) #### Facade Fornece uma interface simplificada para uma biblioteca, um framework, ou qualquer outro conjunto complexo de classes. [Artigo principal](https://refactoring.guru/pt-br/design-patterns/facade) [Uso em C#](https://refactoring.guru/pt-br/design-patterns/facade/csharp/example#lang-features) [Exemplo de código](https://refactoring.guru/pt-br/design-patterns/facade/csharp/example#example-0) ![Flyweight](https://refactoring.guru/images/patterns/cards/flyweight-mini-3x.png) #### Flyweight Permite que você coloque mais objetos na quantidade disponível de RAM ao compartilhar partes do estado entre múltiplos objetos ao invés de manter todos os dados em cada objeto. [Artigo principal](https://refactoring.guru/pt-br/design-patterns/flyweight) [Uso em C#](https://refactoring.guru/pt-br/design-patterns/flyweight/csharp/example#lang-features) [Exemplo de código](https://refactoring.guru/pt-br/design-patterns/flyweight/csharp/example#example-0) ![Proxy](https://refactoring.guru/images/patterns/cards/proxy-mini-3x.png) #### Proxy Permite que você forneça um substituto ou um espaço reservado para outro objeto. Um proxy controla o acesso ao objeto original, permitindo que você faça algo ou antes ou depois do pedido chegar ao objeto original. [Artigo principal](https://refactoring.guru/pt-br/design-patterns/proxy) [Uso em C#](https://refactoring.guru/pt-br/design-patterns/proxy/csharp/example#lang-features) [Exemplo de código](https://refactoring.guru/pt-br/design-patterns/proxy/csharp/example#example-0) #### Padrões comportamentais ![Chain of Responsibility](https://refactoring.guru/images/patterns/cards/chain-of-responsibility-mini-3x.png) #### Chain of Responsibility Permite que você passe pedidos por uma corrente de handlers. Ao receber um pedido, cada handler decide se processa o pedido ou passa para o próximo handler da corrente. [Artigo principal](https://refactoring.guru/pt-br/design-patterns/chain-of-responsibility) [Uso em C#](https://refactoring.guru/pt-br/design-patterns/chain-of-responsibility/csharp/example#lang-features) [Exemplo de código](https://refactoring.guru/pt-br/design-patterns/chain-of-responsibility/csharp/example#example-0) ![Command](https://refactoring.guru/images/patterns/cards/command-mini-3x.png) #### Command Transforma o pedido em um objeto independente que contém toda a informação sobre o pedido. Essa Transformação permite que você parameterize métodos com diferentes pedidos, atrase ou coloque a execução do pedido em uma fila, e suporte operações que não podem ser feitas. [Artigo principal](https://refactoring.guru/pt-br/design-patterns/command) [Uso em C#](https://refactoring.guru/pt-br/design-patterns/command/csharp/example#lang-features) [Exemplo de código](https://refactoring.guru/pt-br/design-patterns/command/csharp/example#example-0) ![Iterator](https://refactoring.guru/images/patterns/cards/iterator-mini-3x.png) #### Iterator Permite que você percorra elementos de uma coleção sem expor as representações estruturais deles (lista, pilha, árvore, etc.) [Artigo principal](https://refactoring.guru/pt-br/design-patterns/iterator) [Uso em C#](https://refactoring.guru/pt-br/design-patterns/iterator/csharp/example#lang-features) [Exemplo de código](https://refactoring.guru/pt-br/design-patterns/iterator/csharp/example#example-0) ![Mediator](https://refactoring.guru/images/patterns/cards/mediator-mini-3x.png) #### Mediator Permite que você reduza as dependências caóticas entre objetos. O padrão restringe comunicações diretas entre objetos e os força a colaborar apenas através do objeto mediador. [Artigo principal](https://refactoring.guru/pt-br/design-patterns/mediator) [Uso em C#](https://refactoring.guru/pt-br/design-patterns/mediator/csharp/example#lang-features) [Exemplo de código](https://refactoring.guru/pt-br/design-patterns/mediator/csharp/example#example-0) ![Memento](https://refactoring.guru/images/patterns/cards/memento-mini-3x.png) #### Memento Permite que você salve e restaure o estado anterior de um objeto sem revelar os detalhes de sua implementação. [Artigo principal](https://refactoring.guru/pt-br/design-patterns/memento) [Uso em C#](https://refactoring.guru/pt-br/design-patterns/memento/csharp/example#lang-features) [Exemplo de código](https://refactoring.guru/pt-br/design-patterns/memento/csharp/example#example-0) ![Observer](https://refactoring.guru/images/patterns/cards/observer-mini-3x.png) #### Observer Permite que você defina um mecanismo de assinatura para notificar múltiplos objetos sobre quaisquer eventos que aconteçam com o objeto que eles estão observando. [Artigo principal](https://refactoring.guru/pt-br/design-patterns/observer) [Uso em C#](https://refactoring.guru/pt-br/design-patterns/observer/csharp/example#lang-features) [Exemplo de código](https://refactoring.guru/pt-br/design-patterns/observer/csharp/example#example-0) ![State](https://refactoring.guru/images/patterns/cards/state-mini-3x.png) #### State Permite que um objeto altere seu comportamento quando seu estado interno muda. Parece como se o objeto mudasse de classe. [Artigo principal](https://refactoring.guru/pt-br/design-patterns/state) [Uso em C#](https://refactoring.guru/pt-br/design-patterns/state/csharp/example#lang-features) [Exemplo de código](https://refactoring.guru/pt-br/design-patterns/state/csharp/example#example-0) ![Strategy](https://refactoring.guru/images/patterns/cards/strategy-mini-3x.png) #### Strategy Permite que você defina uma família de algoritmos, coloque-os em classes separadas, e faça os objetos deles intercambiáveis. [Artigo principal](https://refactoring.guru/pt-br/design-patterns/strategy) [Uso em C#](https://refactoring.guru/pt-br/design-patterns/strategy/csharp/example#lang-features) [Exemplo de código](https://refactoring.guru/pt-br/design-patterns/strategy/csharp/example#example-0) ![Template Method](https://refactoring.guru/images/patterns/cards/template-method-mini-3x.png) #### Template Method Define o esqueleto de um algoritmo na superclasse mas deixa as subclasses sobrescreverem etapas específicas do algoritmo sem modificar sua estrutura. [Artigo principal](https://refactoring.guru/pt-br/design-patterns/template-method) [Uso em C#](https://refactoring.guru/pt-br/design-patterns/template-method/csharp/example#lang-features) [Exemplo de código](https://refactoring.guru/pt-br/design-patterns/template-method/csharp/example#example-0) ![Visitor](https://refactoring.guru/images/patterns/cards/visitor-mini-3x.png) #### Visitor Permite que você separe algoritmos dos objetos nos quais eles operam. [Artigo principal](https://refactoring.guru/pt-br/design-patterns/visitor) [Uso em C#](https://refactoring.guru/pt-br/design-patterns/visitor/csharp/example#lang-features) [Exemplo de código](https://refactoring.guru/pt-br/design-patterns/visitor/csharp/example#example-0) --- # デザインパターンを C++ で [There are patterns of patterns now! \ My friend's project: MetaPatterns.io](https://metapatterns.io/)  [](https://refactoring.guru/ja/design-patterns/cpp#checkout) [](https://refactoring.guru/ja/design-patterns/cpp#checkout) ![デザインパターンを C++ で](https://refactoring.guru/images/patterns/languages/cpp-3x.png) ![デザインパターンを C++ で](https://refactoring.guru/images/patterns/languages/mini/cpp-3x.png) デザインパターンを C++ で =============== **C++** で書かれた例題コードのカタログ ----------------------- #### 生成に関するパターン ![Abstract Factory](https://refactoring.guru/images/patterns/cards/abstract-factory-mini-3x.png) #### Abstract Factory 関連したオブジェクトの集りを、 具象クラスを指定することなく生成することを可能にします。 [主要記事](https://refactoring.guru/ja/design-patterns/abstract-factory) [C++ での使用法](https://refactoring.guru/ja/design-patterns/abstract-factory/cpp/example#lang-features) [コード例](https://refactoring.guru/ja/design-patterns/abstract-factory/cpp/example#example-0) ![Builder](https://refactoring.guru/images/patterns/cards/builder-mini-3x.png) #### Builder 複雑なオブジェクトを段階的に構築できます。 このパターンを使用すると、 同じ構築コードを使用して異なる型と表現のオブジェクトを生成することが可能です。 [主要記事](https://refactoring.guru/ja/design-patterns/builder) [C++ での使用法](https://refactoring.guru/ja/design-patterns/builder/cpp/example#lang-features) [コード例](https://refactoring.guru/ja/design-patterns/builder/cpp/example#example-0) ![Factory Method](https://refactoring.guru/images/patterns/cards/factory-method-mini-3x.png) #### Factory Method スーパークラス内でオブジェクトを作成するためのインターフェースを提供しますが、 サブクラスでは作成されるオブジェクトの型を変更することができます。 [主要記事](https://refactoring.guru/ja/design-patterns/factory-method) [C++ での使用法](https://refactoring.guru/ja/design-patterns/factory-method/cpp/example#lang-features) [コード例](https://refactoring.guru/ja/design-patterns/factory-method/cpp/example#example-0) ![Prototype](https://refactoring.guru/images/patterns/cards/prototype-mini-3x.png) #### Prototype 既存オブジェクトのコピーをそのクラスに依存することなく可能とします。 [主要記事](https://refactoring.guru/ja/design-patterns/prototype) [C++ での使用法](https://refactoring.guru/ja/design-patterns/prototype/cpp/example#lang-features) [コード例](https://refactoring.guru/ja/design-patterns/prototype/cpp/example#example-0) ![Singleton](https://refactoring.guru/images/patterns/cards/singleton-mini-3x.png) #### Singleton クラスが一つのインスタンスのみを持つことを保証するとともに、 このインスタンスへの大域アクセス・ポイントを提供します。 [主要記事](https://refactoring.guru/ja/design-patterns/singleton) [C++ での使用法](https://refactoring.guru/ja/design-patterns/singleton/cpp/example#lang-features) [素朴なシングルトン](https://refactoring.guru/ja/design-patterns/singleton/cpp/example#example-0) [スレッド・セーフなシングルトン](https://refactoring.guru/ja/design-patterns/singleton/cpp/example#example-1) #### 構造に関するパターン ![Adapter](https://refactoring.guru/images/patterns/cards/adapter-mini-3x.png) #### Adapter 非互換なインターフェースのオブジェクト同士の協働を可能とします。 [主要記事](https://refactoring.guru/ja/design-patterns/adapter) [C++ での使用法](https://refactoring.guru/ja/design-patterns/adapter/cpp/example#lang-features) [概念的な例](https://refactoring.guru/ja/design-patterns/adapter/cpp/example#example-0) [多重継承](https://refactoring.guru/ja/design-patterns/adapter/cpp/example#example-1) ![Bridge](https://refactoring.guru/images/patterns/cards/bridge-mini-3x.png) #### Bridge 巨大なクラスや密接に関連したクラスの集まりを、 抽象部分と実装部分の二つの階層に分離し、 それぞれが独立して開発できるようにします。 [主要記事](https://refactoring.guru/ja/design-patterns/bridge) [C++ での使用法](https://refactoring.guru/ja/design-patterns/bridge/cpp/example#lang-features) [コード例](https://refactoring.guru/ja/design-patterns/bridge/cpp/example#example-0) ![Composite](https://refactoring.guru/images/patterns/cards/composite-mini-3x.png) #### Composite オブジェクトからツリー構造を組み立て、 その木構造がまるで独立したオブジェクトであるかのように扱えるようにします。 [主要記事](https://refactoring.guru/ja/design-patterns/composite) [C++ での使用法](https://refactoring.guru/ja/design-patterns/composite/cpp/example#lang-features) [コード例](https://refactoring.guru/ja/design-patterns/composite/cpp/example#example-0) ![Decorator](https://refactoring.guru/images/patterns/cards/decorator-mini-3x.png) #### Decorator ある振る舞いを含む特別なラッパー・オブジェクトの中にオブジェクトを配置することで、 それらのオブジェクトに新しい振る舞いを付け加えます。 [主要記事](https://refactoring.guru/ja/design-patterns/decorator) [C++ での使用法](https://refactoring.guru/ja/design-patterns/decorator/cpp/example#lang-features) [コード例](https://refactoring.guru/ja/design-patterns/decorator/cpp/example#example-0) ![Facade](https://refactoring.guru/images/patterns/cards/facade-mini-3x.png) #### Facade ライブラリー、 フレームワーク、 その他のクラスの複雑な組み合わせに対し、 簡素化されたインターフェースを提供します。 [主要記事](https://refactoring.guru/ja/design-patterns/facade) [C++ での使用法](https://refactoring.guru/ja/design-patterns/facade/cpp/example#lang-features) [コード例](https://refactoring.guru/ja/design-patterns/facade/cpp/example#example-0) ![Flyweight](https://refactoring.guru/images/patterns/cards/flyweight-mini-3x.png) #### Flyweight 複数のオブジェクト間で共通する部分を各自で持つ代わりに共有することによって、 利用可能な RAM により多くのオブジェクトを収められるようにします。 [主要記事](https://refactoring.guru/ja/design-patterns/flyweight) [C++ での使用法](https://refactoring.guru/ja/design-patterns/flyweight/cpp/example#lang-features) [コード例](https://refactoring.guru/ja/design-patterns/flyweight/cpp/example#example-0) ![Proxy](https://refactoring.guru/images/patterns/cards/proxy-mini-3x.png) #### Proxy 他のオブジェクトの代理、 代用を提供します。 プロキシーは、 元のオブジェクトへのアクセスを制御し、 元のオブジェクトへリクエストが行く前か後に別の何かを行うようにすることができます。 [主要記事](https://refactoring.guru/ja/design-patterns/proxy) [C++ での使用法](https://refactoring.guru/ja/design-patterns/proxy/cpp/example#lang-features) [コード例](https://refactoring.guru/ja/design-patterns/proxy/cpp/example#example-0) #### 振る舞いに関するパターン ![Chain of Responsibility](https://refactoring.guru/images/patterns/cards/chain-of-responsibility-mini-3x.png) #### Chain of Responsibility ハンドラーの連鎖に沿ってリクエストを渡すことができます。 各ハンドラーは、 リクエストを受け取ると、 リクエストを処理するか、 連鎖内の次のハンドラーに渡すかを決めます。 [主要記事](https://refactoring.guru/ja/design-patterns/chain-of-responsibility) [C++ での使用法](https://refactoring.guru/ja/design-patterns/chain-of-responsibility/cpp/example#lang-features) [コード例](https://refactoring.guru/ja/design-patterns/chain-of-responsibility/cpp/example#example-0) ![Command](https://refactoring.guru/images/patterns/cards/command-mini-3x.png) #### Command リクエストを、 それに関するすべての情報を含む独立したオブジェクトに転換します。 この転換により、 リクエストをメソッドの引数として渡したり、 リクエストの実行を遅らせたり、 待ち行列に入れたり、 取り消し操作を行なうことが可能になります。 [主要記事](https://refactoring.guru/ja/design-patterns/command) [C++ での使用法](https://refactoring.guru/ja/design-patterns/command/cpp/example#lang-features) [コード例](https://refactoring.guru/ja/design-patterns/command/cpp/example#example-0) ![Iterator](https://refactoring.guru/images/patterns/cards/iterator-mini-3x.png) #### Iterator リスト、 スタック、 ツリーなどの実際のデータ表現を表に出さずにコレクションの要素を探索することができます。 [主要記事](https://refactoring.guru/ja/design-patterns/iterator) [C++ での使用法](https://refactoring.guru/ja/design-patterns/iterator/cpp/example#lang-features) [コード例](https://refactoring.guru/ja/design-patterns/iterator/cpp/example#example-0) ![Mediator](https://refactoring.guru/images/patterns/cards/mediator-mini-3x.png) #### Mediator オブジェクト間の混沌とした依存性を削減します。 パターンは、 オブジェクト間の直接の通信を制限し、 メディエーター・オブジェクトを介してのみの共同作業を強制します。 [主要記事](https://refactoring.guru/ja/design-patterns/mediator) [C++ での使用法](https://refactoring.guru/ja/design-patterns/mediator/cpp/example#lang-features) [コード例](https://refactoring.guru/ja/design-patterns/mediator/cpp/example#example-0) ![Memento](https://refactoring.guru/images/patterns/cards/memento-mini-3x.png) #### Memento オブジェクトの以前の状態を保存し復元することを、 実装の詳細を明かさずに行います。 [主要記事](https://refactoring.guru/ja/design-patterns/memento) [C++ での使用法](https://refactoring.guru/ja/design-patterns/memento/cpp/example#lang-features) [コード例](https://refactoring.guru/ja/design-patterns/memento/cpp/example#example-0) ![Observer](https://refactoring.guru/images/patterns/cards/observer-mini-3x.png) #### Observer 複数のオブジェクトが観察しているオブジェクトに何かイベントが発生した時にそのイベントについて観察しているオブジェクトへ通知を行うサブスクリプションの仕組みを定義することができます。 [主要記事](https://refactoring.guru/ja/design-patterns/observer) [C++ での使用法](https://refactoring.guru/ja/design-patterns/observer/cpp/example#lang-features) [コード例](https://refactoring.guru/ja/design-patterns/observer/cpp/example#example-0) ![State](https://refactoring.guru/images/patterns/cards/state-mini-3x.png) #### State オブジェクトの内部状態が変化した時に、 その挙動を変化させます。 それは、 あたかもそのオブジェクトのクラスが変わったかのように見えます。 [主要記事](https://refactoring.guru/ja/design-patterns/state) [C++ での使用法](https://refactoring.guru/ja/design-patterns/state/cpp/example#lang-features) [コード例](https://refactoring.guru/ja/design-patterns/state/cpp/example#example-0) ![Strategy](https://refactoring.guru/images/patterns/cards/strategy-mini-3x.png) #### Strategy アルゴリズムのファミリーを定義し、 それぞれのアルゴリズムを別個のクラスとし、 それらのオブジェクトを交換可能にします。 [主要記事](https://refactoring.guru/ja/design-patterns/strategy) [C++ での使用法](https://refactoring.guru/ja/design-patterns/strategy/cpp/example#lang-features) [コード例](https://refactoring.guru/ja/design-patterns/strategy/cpp/example#example-0) ![Template Method](https://refactoring.guru/images/patterns/cards/template-method-mini-3x.png) #### Template Method スーパークラス内でアルゴリズムの骨格を定義しておき、 サブクラスは構造を変えることなくアルゴリズムの特定のステップを上書きします。 [主要記事](https://refactoring.guru/ja/design-patterns/template-method) [C++ での使用法](https://refactoring.guru/ja/design-patterns/template-method/cpp/example#lang-features) [コード例](https://refactoring.guru/ja/design-patterns/template-method/cpp/example#example-0) ![Visitor](https://refactoring.guru/images/patterns/cards/visitor-mini-3x.png) #### Visitor アルゴリズムをその動作対象となるオブジェクトから切り離します。 [主要記事](https://refactoring.guru/ja/design-patterns/visitor) [C++ での使用法](https://refactoring.guru/ja/design-patterns/visitor/cpp/example#lang-features) [コード例](https://refactoring.guru/ja/design-patterns/visitor/cpp/example#example-0) --- # Адаптер [There are patterns of patterns now! \ My friend's project: MetaPatterns.io](https://metapatterns.io/)  [](https://refactoring.guru/uk/design-patterns/adapter#checkout) [](https://refactoring.guru/uk/design-patterns/adapter#checkout) [](https://refactoring.guru/) / [Патерни проектування](https://refactoring.guru/uk/design-patterns) / [Структурні патерни](https://refactoring.guru/uk/design-patterns/structural-patterns) Адаптер ======= Також відомий як: Wrapper, Обгортка, Adapter Суть патерна ------------ **Адаптер** — це структурний патерн проектування, що дає змогу об’єктам із несумісними інтерфейсами працювати разом. ![Патерн Адаптер](https://refactoring.guru/images/patterns/content/adapter/adapter-en-2x.png?id=e0ab0f6103b0b7b0648a8fda592ffab8) Проблема -------- Уявіть, що ви пишете програму для торгівлі на біржі. Ваша програма спочатку завантажує біржові котирування з декількох джерел в XML, а потім малює гарні графіки. У якийсь момент ви вирішуєте покращити програму, застосувавши сторонню бібліотеку аналітики. Але от біда — бібліотека підтримує тільки формат даних JSON, несумісний із вашим додатком. ![Структура програми до підключення сторонньої бібліотеки](https://refactoring.guru/images/patterns/diagrams/adapter/problem-en-2x.png?id=f6f4bfbd2d6136a5ae4fb8c899e9854e) Під’єднати сторонню бібліотеку неможливо через несумісність форматів даних. Ви могли б переписати цю бібліотеку, щоб вона підтримувала формат XML, але, по-перше, це може порушити роботу наявного коду, який уже залежить від бібліотеки, по-друге, у вас може просто не бути доступу до її вихідного коду. Рішення ------- Ви можете створити _адаптер_. Це об’єкт-перекладач, який трансформує інтерфейс або дані одного об’єкта таким чином, щоб він став зрозумілим іншому об’єкту. Адаптер загортає один з об’єктів так, що інший об’єкт навіть не підозрює про існування першого. Наприклад, об’єкт, що працює в метричній системі вимірювання, можна «обгорнути» адаптером, який буде конвертувати дані у фути. Адаптери можуть не тільки конвертувати дані з одного формату в інший, але й допомагати об’єктам із різними інтерфейсами працювати разом. Це виглядає так: 1. Адаптер має інтерфейс, сумісний з одним із об’єктів. 2. Тому цей об’єкт може вільно викликати методи адаптера. 3. Адаптер отримує ці виклики та перенаправляє їх іншому об’єкту, але вже в тому форматі та послідовності, які є зрозумілими для цього об’єкта. Іноді вдається створити навіть _двосторонній адаптер_, який може працювати в обох напрямках. ![Структура програми після застосування адаптера](https://refactoring.guru/images/patterns/diagrams/adapter/solution-en-2x.png?id=5846ed9b88cad0220993f79bdfe817a8) Програма може працювати зі сторонньою бібліотекою через адаптер. Таким чином, для програми біржових котирувань ви могли б створити клас `XML_To_JSON_Adapter`, який би обгортав об’єкт того чи іншого класу бібліотеки аналітики. Ваш код посилав би адаптеру запити у форматі XML, а адаптер спочатку б транслював вхідні дані у формат JSON, а потім передавав їх методам загорнутого об’єкта аналітики. Аналогія з життя ---------------- ![Приклад патерна Адаптер](https://refactoring.guru/images/patterns/content/adapter/adapter-comic-1-uk-2x.png?id=bcd1d0b2238b98ad2c9e60f1ed3be5b0) Вміст валіз до й після поїздки за кордон. Під час вашої першої подорожі за кордон спроба зарядити ноутбук може стати неприємним сюрпризом, тому що стандарти розеток у багатьох країнах різняться. Ваша європейська зарядка стане непотрібом у США без спеціального адаптера, що дозволяє під’єднуватися до розетки іншого типу. Структура --------- #### Адаптер об’єктів Ця реалізація використовує агрегацію: об’єкт адаптера «загортає», тобто містить посилання на службовий об’єкт. Такий підхід працює в усіх мовах програмування. ![Структура класів патерна Адаптер (адаптер об’єктів)](https://refactoring.guru/images/patterns/diagrams/adapter/structure-object-adapter-2x.png?id=03e8052e168c962d6bc369bbb13b0945)![Структура класів патерна Адаптер (адаптер об’єктів)](https://refactoring.guru/images/patterns/diagrams/adapter/structure-object-adapter-indexed-2x.png?id=759771515f08d74d53cf4fe500f814a3) 1. **Клієнт** — це клас, який містить існуючу бізнес-логіку програми. 2. **Клієнтський інтерфейс** описує протокол, через який клієнт може працювати з іншими класами. 3. **Сервіс** — це який-небудь корисний клас, зазвичай сторонній. Клієнт не може використовувати цей клас безпосередньо, оскільки сервіс має незрозумілий йому інтерфейс. 4. **Адаптер** — це клас, який може одночасно працювати і з клієнтом, і з сервісом. Він реалізує клієнтський інтерфейс і містить посилання на об’єкт сервісу. Адаптер отримує виклики від клієнта через методи клієнтського інтерфейсу, а потім конвертує їх у виклики методів загорнутого об’єкта в потрібному форматі. 5. Працюючи з адаптером через інтерфейс, клієнт не прив’язується до конкретного класу адаптера. Завдяки цьому ви можете додавати до програми нові види адаптерів, незалежно від клієнтського коду. Це може стати в нагоді, якщо інтерфейс сервісу раптом зміниться, наприклад, після виходу нової версії сторонньої бібліотеки. #### Адаптер класів Ця реалізація базується на спадкуванні: адаптер успадковує обидва інтерфейси одночасно. Такий підхід можливий тільки в мовах, які підтримують множинне спадкування, наприклад у C++. ![Структура класів патерна Адаптер (адаптер класів)](https://refactoring.guru/images/patterns/diagrams/adapter/structure-class-adapter-2x.png?id=ddca3e3e4d972b7c58207daba8d24866)![Структура класів патерна Адаптер (адаптер класів)](https://refactoring.guru/images/patterns/diagrams/adapter/structure-class-adapter-indexed-2x.png?id=9ae1182ef2a34d2ea65f4b4f94a4019e) 1. **Адаптер класів** не потребує вкладеного об’єкта, тому що він може одночасно успадкувати й частину існуючого класу, й частину класу сервісу. Псевдокод --------- У цьому жартівливому прикладі **Адаптер** перетворює один інтерфейс на інший, дозволяючи поєднувати квадратні кілочки та круглі отвори. ![Структура класів прикладу патерна Адаптер](https://refactoring.guru/images/patterns/diagrams/adapter/example-2x.png?id=0ac62d1bc151e8ce6abad8e8502756cf) Приклад адаптації квадратних кілочків та круглих отворів. Адаптер обчислює найменший радіус кола, у яке можна вписати квадратний кілочок, і подає його як круглий кілочок із цим радіусом. // Класи з сумісними інтерфейсами: КруглийОтвір та // КруглийКілочок. class RoundHole is constructor RoundHole(radius) { ... } method getRadius() is // Повернути радіус отвору. method fits(peg: RoundPeg) is return this.getRadius() >= peg.getRadius() class RoundPeg is constructor RoundPeg(radius) { ... } method getRadius() is // Повернути радіус круглого кілочка. // Застарілий несумісний клас: КвадратнийКілочок. class SquarePeg is constructor SquarePeg(width) { ... } method getWidth() is // Повернути ширину квадратного кілочка. // Адаптер дозволяє використовувати квадратні кілочки й круглі // отвори разом. class SquarePegAdapter extends RoundPeg is private field peg: SquarePeg constructor SquarePegAdapter(peg: SquarePeg) is this.peg = peg method getRadius() is // Обчислити половину діагоналі квадратного кілочка за // теоремою Піфагора. return peg.getWidth() \* Math.sqrt(2) / 2 // Десь у клієнтському програмному коді. hole = new RoundHole(5) rpeg = new RoundPeg(5) hole.fits(rpeg) // TRUE small\_sqpeg = new SquarePeg(5) large\_sqpeg = new SquarePeg(10) hole.fits(small\_sqpeg) // Помилка компіляції, несумісні типи. small\_sqpeg\_adapter = new SquarePegAdapter(small\_sqpeg) large\_sqpeg\_adapter = new SquarePegAdapter(large\_sqpeg) hole.fits(small\_sqpeg\_adapter) // TRUE hole.fits(large\_sqpeg\_adapter) // FALSE Застосування ------------ Якщо ви хочете використати сторонній клас, але його інтерфейс не відповідає решті кодів програми. Адаптер дозволяє створити об’єкт-прокладку, який перетворюватиме виклики програми у формат, зрозумілий сторонньому класу. Якщо вам потрібно використати декілька існуючих підкласів, але в них не вистачає якої-небудь спільної функціональності, а розширити суперклас ви не можете. Ви могли б створити ще один рівень підкласів та додати до них забраклу функціональність. Але при цьому доведеться дублювати один і той самий код в обох гілках підкласів. Більш елегантним рішенням було б розмістити відсутню функціональність в адаптері й пристосувати його для роботи із суперкласом. Такий адаптер зможе працювати з усіма підкласами ієрархії. Це рішення сильно нагадуватиме патерн [Декоратор](https://refactoring.guru/uk/design-patterns/decorator) . Кроки реалізації ---------------- 1. Переконайтеся, що у вас є два класи з незручними інтерфейсами: * корисний _сервіс_ — службовий клас, який ви не можете змінювати (він або сторонній, або від нього залежить інший код); * один або декілька _клієнтів_ — існуючих класів програми, які не можуть використовувати сервіс через несумісний із ним інтерфейс. 2. Опишіть клієнтський інтерфейс, через який класи програм могли б використовувати клас сервісу. 3. Створіть клас адаптера, реалізувавши цей інтерфейс. 4. Розмістіть в адаптері поле, що міститиме посилання на об’єкт сервісу. Зазвичай це поле заповнюють об’єктом, переданим у конструктор адаптера. Але цей об’єкт можна передавати й безпосередньо до методів адаптера. 5. Реалізуйте всі методи клієнтського інтерфейсу в адаптері. Адаптер повинен делегувати основну роботу сервісу. 6. Програма повинна використовувати адаптер тільки через клієнтський інтерфейс. Це дозволить легко змінювати та додавати адаптери в майбутньому. Переваги та недоліки -------------------- * Відокремлює та приховує від клієнта подробиці перетворення різних інтерфейсів. * Ускладнює код програми внаслідок введення додаткових класів. Відносини з іншими патернами ---------------------------- * [Міст](https://refactoring.guru/uk/design-patterns/bridge) проектують заздалегідь, щоб розвивати великі частини програми окремо одну від одної. [Адаптер](https://refactoring.guru/uk/design-patterns/adapter) застосовується постфактум, щоб змусити несумісні класи працювати разом. * [Адаптер](https://refactoring.guru/uk/design-patterns/adapter) надає зовсім інший інтерфейс для доступу до існуючого об’єкта. З іншого боку, з [Декоратором](https://refactoring.guru/uk/design-patterns/decorator) інтерфейс або залишається тим самим, або розширюється. Крім того _Декоратор_ підтримує рекурсивну вкладуваність, на відміну від _Адаптеру_. * З [Адаптером](https://refactoring.guru/uk/design-patterns/adapter) ви отримуєте доступ до існуючого об’єкта через інший інтерфейс. Використовуючи [Замісник](https://refactoring.guru/uk/design-patterns/proxy) , інтерфейс залишається незмінним. Використовуючи [Декоратор](https://refactoring.guru/uk/design-patterns/decorator) , ви отримуєте доступ до об’єкта через розширений інтерфейс. * [Фасад](https://refactoring.guru/uk/design-patterns/facade) задає новий інтерфейс, тоді як [Адаптер](https://refactoring.guru/uk/design-patterns/adapter) повторно використовує старий. _Адаптер_ обгортає тільки один клас, а _Фасад_ обгортає цілу підсистему. Крім того, _Адаптер_ дозволяє двом існуючим інтерфейсам працювати спільно, замість того, щоб визначити повністю новий. * [Міст](https://refactoring.guru/uk/design-patterns/bridge) , [Стратегія](https://refactoring.guru/uk/design-patterns/strategy) та [Стан](https://refactoring.guru/uk/design-patterns/state) (а також трохи і [Адаптер](https://refactoring.guru/uk/design-patterns/adapter) ) мають схожі структури класів — усі вони побудовані за принципом «композиції», тобто делегування роботи іншим об’єктам. Проте вони відрізняються тим, що вирішують різні проблеми. Пам’ятайте, що патерни — це не тільки рецепт побудови коду певним чином, але й описування проблем, які призвели до такого рішення. Приклади реалізації патерна --------------------------- [![Адаптер на C#](https://refactoring.guru/images/patterns/icons/csharp.svg?id=da64592defc6e86d57c39c66e9de3e58)](https://refactoring.guru/uk/design-patterns/adapter/csharp/example "Адаптер на C#") [![Адаптер на C++](https://refactoring.guru/images/patterns/icons/cpp.svg?id=f7782ed8b8666246bfcc3f8fefc3b858)](https://refactoring.guru/uk/design-patterns/adapter/cpp/example "Адаптер на C++") [![Адаптер на Go](https://refactoring.guru/images/patterns/icons/go.svg?id=1a89927eb99b1ea3fde7701d97970aca)](https://refactoring.guru/uk/design-patterns/adapter/go/example "Адаптер на Go") [![Адаптер на Java](https://refactoring.guru/images/patterns/icons/java.svg?id=e6d87e2dca08c953fe3acd1275ed4f4e)](https://refactoring.guru/uk/design-patterns/adapter/java/example "Адаптер на Java") [![Адаптер на PHP](https://refactoring.guru/images/patterns/icons/php.svg?id=be1906eb26b71ec1d3b93720d6156618)](https://refactoring.guru/uk/design-patterns/adapter/php/example "Адаптер на PHP") [![Адаптер на Python](https://refactoring.guru/images/patterns/icons/python.svg?id=6d815d43c0f7050a1151b43e51569c9f)](https://refactoring.guru/uk/design-patterns/adapter/python/example "Адаптер на Python") [![Адаптер на Ruby](https://refactoring.guru/images/patterns/icons/ruby.svg?id=b065b718c914bf8e960ef731600be1eb)](https://refactoring.guru/uk/design-patterns/adapter/ruby/example "Адаптер на Ruby") [![Адаптер на Rust](https://refactoring.guru/images/patterns/icons/rust.svg?id=1f5698a4b5ae23fe79413511747e4a87)](https://refactoring.guru/uk/design-patterns/adapter/rust/example "Адаптер на Rust") [![Адаптер на Swift](https://refactoring.guru/images/patterns/icons/swift.svg?id=0b716c2d52ec3a48fbe91ac031070c1d)](https://refactoring.guru/uk/design-patterns/adapter/swift/example "Адаптер на Swift") [![Адаптер на TypeScript](https://refactoring.guru/images/patterns/icons/typescript.svg?id=2239d0f16cb703540c205dd8cb0c0cb7)](https://refactoring.guru/uk/design-patterns/adapter/typescript/example "Адаптер на TypeScript") [![](https://refactoring.guru/images/patterns/banners/patterns-book-banner-1-b-2x.png?id=5572aa55e5b09e59780aca9e0ea8e44b)](https://refactoring.guru/uk/design-patterns/book) ### Не нудьгуй в транспорті Краще почитай нашу книжку про патерни проектування. Тепер це зручно робити навіть під час поїздок в громадському транспорті. [Дізнатися більше…](https://refactoring.guru/uk/design-patterns/book) --- # Facade em Swift / Padrões de Projeto [There are patterns of patterns now! \ My friend's project: MetaPatterns.io](https://metapatterns.io/)  [](https://refactoring.guru/pt-br/design-patterns/facade/swift/example#checkout) [](https://refactoring.guru/pt-br/design-patterns/facade/swift/example#checkout) [](https://refactoring.guru/) / [Padrões de Projeto](https://refactoring.guru/pt-br/design-patterns) / [Facade](https://refactoring.guru/pt-br/design-patterns/facade) / [Swift](https://refactoring.guru/pt-br/design-patterns/swift) ![Facade](https://refactoring.guru/images/patterns/cards/facade-mini-2x.png?id=d4cc6a5d81a31143cc665f7ac1481ac8) **Facade** em Swift =================== O **Facade** é um padrão de projeto estrutural que fornece uma interface simplificada (mas limitada) para um sistema complexo de classes, biblioteca, ou framework. Embora o Facade diminua a complexidade geral do aplicativo, também ajuda a mover dependências indesejadas para um só local. [Saiba mais sobre o Facade](https://refactoring.guru/pt-br/design-patterns/facade) Navegação  [Introdução](https://refactoring.guru/pt-br/design-patterns/facade/swift/example#)  [Exemplo conceitual](https://refactoring.guru/pt-br/design-patterns/facade/swift/example#example-0)  [Example](https://refactoring.guru/pt-br/design-patterns/facade/swift/example#example-0--Example-swift)  [Output](https://refactoring.guru/pt-br/design-patterns/facade/swift/example#example-0--Output-txt)  [Exemplo do mundo real](https://refactoring.guru/pt-br/design-patterns/facade/swift/example#example-1)  [Example](https://refactoring.guru/pt-br/design-patterns/facade/swift/example#example-1--Example-swift)  [Output](https://refactoring.guru/pt-br/design-patterns/facade/swift/example#example-1--Output-txt) **Complexidade:** **Popularidade:** **Exemplos de uso:** O padrão Facade é comumente usado em aplicações escritas em Swift. É especialmente útil ao trabalhar com bibliotecas e APIs complexas. **Identificação:** O Facade pode ser reconhecido em uma classe que possui uma interface simples, mas delega a maior parte do trabalho para outras classes. Geralmente, as fachadas gerenciam o ciclo de vida completo dos objetos que usam. The following examples are available on [Swift Playgrounds](https://www.alemohamad.com/playgrounds) . Kudos to [Alejandro Mohamad](https://www.alemohamad.com/) for creating the Playground version. Exemplo conceitual ------------------ Este exemplo ilustra a estrutura do padrão de projeto **Facade**. Ele se concentra em responder a estas perguntas: * De quais classes ele consiste? * Quais papéis essas classes desempenham? * De que maneira os elementos do padrão estão relacionados? Depois de aprender sobre a estrutura do padrão, será mais fácil entender o exemplo a seguir, com base em um caso de uso Swift do mundo real. #### **Example.swift:** Exemplo conceitual import XCTest /// The Facade class provides a simple interface to the complex logic of one or /// several subsystems. The Facade delegates the client requests to the /// appropriate objects within the subsystem. The Facade is also responsible for /// managing their lifecycle. All of this shields the client from the undesired /// complexity of the subsystem. class Facade { private var subsystem1: Subsystem1 private var subsystem2: Subsystem2 /// Depending on your application's needs, you can provide the Facade with /// existing subsystem objects or force the Facade to create them on its /// own. init(subsystem1: Subsystem1 = Subsystem1(), subsystem2: Subsystem2 = Subsystem2()) { self.subsystem1 = subsystem1 self.subsystem2 = subsystem2 } /// The Facade's methods are convenient shortcuts to the sophisticated /// functionality of the subsystems. However, clients get only to a fraction /// of a subsystem's capabilities. func operation() -> String { var result = "Facade initializes subsystems:" result += " " + subsystem1.operation1() result += " " + subsystem2.operation1() result += "\\n" + "Facade orders subsystems to perform the action:\\n" result += " " + subsystem1.operationN() result += " " + subsystem2.operationZ() return result } } /// The Subsystem can accept requests either from the facade or client directly. /// In any case, to the Subsystem, the Facade is yet another client, and it's /// not a part of the Subsystem. class Subsystem1 { func operation1() -> String { return "Subsystem1: Ready!\\n" } // ... func operationN() -> String { return "Subsystem1: Go!\\n" } } /// Some facades can work with multiple subsystems at the same time. class Subsystem2 { func operation1() -> String { return "Subsystem2: Get ready!\\n" } // ... func operationZ() -> String { return "Subsystem2: Fire!\\n" } } /// The client code works with complex subsystems through a simple interface /// provided by the Facade. When a facade manages the lifecycle of the /// subsystem, the client might not even know about the existence of the /// subsystem. This approach lets you keep the complexity under control. class Client { // ... static func clientCode(facade: Facade) { print(facade.operation()) } // ... } /// Let's see how it all works together. class FacadeConceptual: XCTestCase { func testFacadeConceptual() { /// The client code may have some of the subsystem's objects already /// created. In this case, it might be worthwhile to initialize the /// Facade with these objects instead of letting the Facade create new /// instances. let subsystem1 = Subsystem1() let subsystem2 = Subsystem2() let facade = Facade(subsystem1: subsystem1, subsystem2: subsystem2) Client.clientCode(facade: facade) } } #### **Output.txt:** Resultados da execução Facade initializes subsystems: Sybsystem1: Ready! Sybsystem2: Get ready! Facade orders subsystems to perform the action: Sybsystem1: Go! Sybsystem2: Fire! Exemplo do mundo real --------------------- #### **Example.swift:** Exemplo do mundo real import XCTest /// Facade Design Pattern /// /// Intent: Provides a simplified interface to a library, a framework, or any /// other complex set of classes. class FacadeRealWorld: XCTestCase { /// In the real project, you probably will use third-party libraries. For /// instance, to download images. /// /// Therefore, facade and wrapping it is a good way to use a third-party API /// in the client code. Even if it is your own library that is connected to /// a project. /// /// The benefits here are: /// /// 1) If you need to change a current image downloader it should be done /// only in the one place of a project. A number of lines of the client code /// will stay work. /// /// 2) The facade provides an access to a fraction of a functionality that /// fits most client needs. Moreover, it can set frequently used or default /// parameters. func testFacadeRealWorld() { let imageView = UIImageView() print("Let's set an image for the image view") clientCode(imageView) print("Image has been set") XCTAssert(imageView.image != nil) } fileprivate func clientCode(\_ imageView: UIImageView) { let url = URL(string: "www.example.com/logo") imageView.downloadImage(at: url) } } private extension UIImageView { /// This extension plays a facade role. func downloadImage(at url: URL?) { print("Start downloading...") let placeholder = UIImage(named: "placeholder") ImageDownloader().loadImage(at: url, placeholder: placeholder, completion: { image, error in print("Handle an image...") /// Crop, cache, apply filters, whatever... self.image = image }) } } private class ImageDownloader { /// Third-party library or your own solution (subsystem) typealias Completion = (UIImage, Error?) -> () typealias Progress = (Int, Int) -> () func loadImage(at url: URL?, placeholder: UIImage? = nil, progress: Progress? = nil, completion: Completion) { /// ... Set up a network stack /// ... Downloading an image /// ... completion(UIImage(), nil) } } #### **Output.txt:** Resultados da execução Let's set an image for the image view Start downloading... Handle an image... Image has been set **Facade** em outras linguagens ------------------------------- [![Facade em C#](https://refactoring.guru/images/patterns/icons/csharp.svg?id=da64592defc6e86d57c39c66e9de3e58)](https://refactoring.guru/pt-br/design-patterns/facade/csharp/example "Facade em C#") [![Facade em C++](https://refactoring.guru/images/patterns/icons/cpp.svg?id=f7782ed8b8666246bfcc3f8fefc3b858)](https://refactoring.guru/pt-br/design-patterns/facade/cpp/example "Facade em C++") [![Facade em Go](https://refactoring.guru/images/patterns/icons/go.svg?id=1a89927eb99b1ea3fde7701d97970aca)](https://refactoring.guru/pt-br/design-patterns/facade/go/example "Facade em Go") [![Facade em Java](https://refactoring.guru/images/patterns/icons/java.svg?id=e6d87e2dca08c953fe3acd1275ed4f4e)](https://refactoring.guru/pt-br/design-patterns/facade/java/example "Facade em Java") [![Facade em PHP](https://refactoring.guru/images/patterns/icons/php.svg?id=be1906eb26b71ec1d3b93720d6156618)](https://refactoring.guru/pt-br/design-patterns/facade/php/example "Facade em PHP") [![Facade em Python](https://refactoring.guru/images/patterns/icons/python.svg?id=6d815d43c0f7050a1151b43e51569c9f)](https://refactoring.guru/pt-br/design-patterns/facade/python/example "Facade em Python") [![Facade em Ruby](https://refactoring.guru/images/patterns/icons/ruby.svg?id=b065b718c914bf8e960ef731600be1eb)](https://refactoring.guru/pt-br/design-patterns/facade/ruby/example "Facade em Ruby") [![Facade em Rust](https://refactoring.guru/images/patterns/icons/rust.svg?id=1f5698a4b5ae23fe79413511747e4a87)](https://refactoring.guru/pt-br/design-patterns/facade/rust/example "Facade em Rust") [![Facade em TypeScript](https://refactoring.guru/images/patterns/icons/typescript.svg?id=2239d0f16cb703540c205dd8cb0c0cb7)](https://refactoring.guru/pt-br/design-patterns/facade/typescript/example "Facade em TypeScript") --- # Фабричный метод на C++ [There are patterns of patterns now! \ My friend's project: MetaPatterns.io](https://metapatterns.io/)  [](https://refactoring.guru/ru/design-patterns/factory-method/cpp/example#checkout) [](https://refactoring.guru/ru/design-patterns/factory-method/cpp/example#checkout) [](https://refactoring.guru/) / [Паттерны проектирования](https://refactoring.guru/ru/design-patterns) / [Фабричный метод](https://refactoring.guru/ru/design-patterns/factory-method) / [C++](https://refactoring.guru/ru/design-patterns/cpp) ![Фабричный метод](https://refactoring.guru/images/patterns/cards/factory-method-mini-2x.png?id=fa9d4a8d61a67cc3822e52b9daf69dad) **Фабричный метод** на C++ ========================== **Фабричный метод** — это порождающий паттерн проектирования, который решает проблему создания различных продуктов, без указания конкретных классов продуктов. Фабричный метод задаёт метод, который следует использовать вместо вызова оператора `new` для создания объектов-продуктов. Подклассы могут переопределить этот метод, чтобы изменять тип создаваемых продуктов. [Подробней о паттерне Фабричный метод](https://refactoring.guru/ru/design-patterns/factory-method) Навигация  [Интро](https://refactoring.guru/ru/design-patterns/factory-method/cpp/example#)  [Концептуальный пример](https://refactoring.guru/ru/design-patterns/factory-method/cpp/example#example-0)  [main](https://refactoring.guru/ru/design-patterns/factory-method/cpp/example#example-0--main-cc)  [Output](https://refactoring.guru/ru/design-patterns/factory-method/cpp/example#example-0--Output-txt) **Сложность:** **Популярность:** **Применимость:** Паттерн можно часто встретить в любом C++ коде, где требуется гибкость при создании продуктов. **Признаки применения паттерна:** Фабричный метод можно определить по создающим методам, которые возвращают объекты продуктов через абстрактные типы или интерфейсы. Это позволяет переопределять типы создаваемых продуктов в подклассах. Концептуальный пример --------------------- Этот пример показывает структуру паттерна **Фабричный метод**, а именно — из каких классов он состоит, какие роли эти классы выполняют и как они взаимодействуют друг с другом. #### **main.cc:** Пример структуры паттерна /\*\* \* Интерфейс Продукта объявляет операции, которые должны выполнять все \* конкретные продукты. \*/ class Product { public: virtual ~Product() {} virtual std::string Operation() const = 0; }; /\*\* \* Конкретные Продукты предоставляют различные реализации интерфейса Продукта. \*/ class ConcreteProduct1 : public Product { public: std::string Operation() const override { return "{Result of the ConcreteProduct1}"; } }; class ConcreteProduct2 : public Product { public: std::string Operation() const override { return "{Result of the ConcreteProduct2}"; } }; /\*\* \* Класс Создатель объявляет фабричный метод, который должен возвращать объект \* класса Продукт. Подклассы Создателя обычно предоставляют реализацию этого \* метода. \*/ class Creator { /\*\* \* Обратите внимание, что Создатель может также обеспечить реализацию \* фабричного метода по умолчанию. \*/ public: virtual ~Creator(){}; virtual Product\* FactoryMethod() const = 0; /\*\* \* Также заметьте, что, несмотря на название, основная обязанность Создателя \* не заключается в создании продуктов. Обычно он содержит некоторую базовую \* бизнес-логику, которая основана на объектах Продуктов, возвращаемых \* фабричным методом. Подклассы могут косвенно изменять эту бизнес-логику, \* переопределяя фабричный метод и возвращая из него другой тип продукта. \*/ std::string SomeOperation() const { // Вызываем фабричный метод, чтобы получить объект-продукт. Product\* product = this->FactoryMethod(); // Далее, работаем с этим продуктом. std::string result = "Creator: The same creator's code has just worked with " + product->Operation(); delete product; return result; } }; /\*\* \* Конкретные Создатели переопределяют фабричный метод для того, чтобы изменить \* тип результирующего продукта. \*/ class ConcreteCreator1 : public Creator { /\*\* \* Обратите внимание, что сигнатура метода по-прежнему использует тип \* абстрактного продукта, хотя фактически из метода возвращается конкретный \* продукт. Таким образом, Создатель может оставаться независимым от \* конкретных классов продуктов. \*/ public: Product\* FactoryMethod() const override { return new ConcreteProduct1(); } }; class ConcreteCreator2 : public Creator { public: Product\* FactoryMethod() const override { return new ConcreteProduct2(); } }; /\*\* \* Клиентский код работает с экземпляром конкретного создателя, хотя и через его \* базовый интерфейс. Пока клиент продолжает работать с создателем через базовый \* интерфейс, вы можете передать ему любой подкласс создателя. \*/ void ClientCode(const Creator& creator) { // ... std::cout << "Client: I'm not aware of the creator's class, but it still works.\\n" << creator.SomeOperation() << std::endl; // ... } /\*\* \* Приложение выбирает тип создателя в зависимости от конфигурации или среды. \*/ int main() { std::cout << "App: Launched with the ConcreteCreator1.\\n"; Creator\* creator = new ConcreteCreator1(); ClientCode(\*creator); std::cout << std::endl; std::cout << "App: Launched with the ConcreteCreator2.\\n"; Creator\* creator2 = new ConcreteCreator2(); ClientCode(\*creator2); delete creator; delete creator2; return 0; } #### **Output.txt:** Результат выполнения App: Launched with the ConcreteCreator1. Client: I'm not aware of the creator's class, but it still works. Creator: The same creator's code has just worked with {Result of the ConcreteProduct1} App: Launched with the ConcreteCreator2. Client: I'm not aware of the creator's class, but it still works. Creator: The same creator's code has just worked with {Result of the ConcreteProduct2} **Фабричный метод** на других языках программирования ----------------------------------------------------- [![Фабричный метод на C#](https://refactoring.guru/images/patterns/icons/csharp.svg?id=da64592defc6e86d57c39c66e9de3e58)](https://refactoring.guru/ru/design-patterns/factory-method/csharp/example "Фабричный метод на C#") [![Фабричный метод на Go](https://refactoring.guru/images/patterns/icons/go.svg?id=1a89927eb99b1ea3fde7701d97970aca)](https://refactoring.guru/ru/design-patterns/factory-method/go/example "Фабричный метод на Go") [![Фабричный метод на Java](https://refactoring.guru/images/patterns/icons/java.svg?id=e6d87e2dca08c953fe3acd1275ed4f4e)](https://refactoring.guru/ru/design-patterns/factory-method/java/example "Фабричный метод на Java") [![Фабричный метод на PHP](https://refactoring.guru/images/patterns/icons/php.svg?id=be1906eb26b71ec1d3b93720d6156618)](https://refactoring.guru/ru/design-patterns/factory-method/php/example "Фабричный метод на PHP") [![Фабричный метод на Python](https://refactoring.guru/images/patterns/icons/python.svg?id=6d815d43c0f7050a1151b43e51569c9f)](https://refactoring.guru/ru/design-patterns/factory-method/python/example "Фабричный метод на Python") [![Фабричный метод на Ruby](https://refactoring.guru/images/patterns/icons/ruby.svg?id=b065b718c914bf8e960ef731600be1eb)](https://refactoring.guru/ru/design-patterns/factory-method/ruby/example "Фабричный метод на Ruby") [![Фабричный метод на Rust](https://refactoring.guru/images/patterns/icons/rust.svg?id=1f5698a4b5ae23fe79413511747e4a87)](https://refactoring.guru/ru/design-patterns/factory-method/rust/example "Фабричный метод на Rust") [![Фабричный метод на Swift](https://refactoring.guru/images/patterns/icons/swift.svg?id=0b716c2d52ec3a48fbe91ac031070c1d)](https://refactoring.guru/ru/design-patterns/factory-method/swift/example "Фабричный метод на Swift") [![Фабричный метод на TypeScript](https://refactoring.guru/images/patterns/icons/typescript.svg?id=2239d0f16cb703540c205dd8cb0c0cb7)](https://refactoring.guru/ru/design-patterns/factory-method/typescript/example "Фабричный метод на TypeScript") --- # Fabrique abstraite en Swift / Patrons de conception [There are patterns of patterns now! \ My friend's project: MetaPatterns.io](https://metapatterns.io/)  [](https://refactoring.guru/fr/design-patterns/abstract-factory/swift/example#checkout) [](https://refactoring.guru/fr/design-patterns/abstract-factory/swift/example#checkout) [](https://refactoring.guru/) / [Patrons de conception](https://refactoring.guru/fr/design-patterns) / [Fabrique abstraite](https://refactoring.guru/fr/design-patterns/abstract-factory) / [Swift](https://refactoring.guru/fr/design-patterns/swift) ![Fabrique abstraite](https://refactoring.guru/images/patterns/cards/abstract-factory-mini-2x.png?id=22236aaa65ff52cbde1c713216d52c1f) **Fabrique abstraite** en Swift =============================== La **Fabrique abstraite** est un patron de conception de création qui permet de créer des familles de produits complètes sans avoir à préciser leurs classes concrètes. La fabrique abstraite définit une interface pour la création de chaque produit, mais délègue la véritable création des produits aux classes concrètes de la fabrique. Chaque type de fabrique correspond à une certaine variété de produits. Le code client appelle les méthodes de création d’un objet Fabrique plutôt que de créer directement les produits à l’aide d’un constructeur (opérateur `new`). Comme chaque fabrique possède sa propre variante de produit, tous ses produits seront compatibles. Le code client manipule les fabriques et les produits uniquement via leurs interfaces abstraites, ce qui lui permet de travailler avec n’importe quelle variante de produit créée par un objet Fabrique. Créez juste une nouvelle classe concrète Fabrique et passez-la au code client. > Lisez notre [Comparaison des fabriques](https://refactoring.guru/fr/design-patterns/factory-comparison) > si vous avez du mal à comprendre la différence entre les divers concepts et patrons. [En savoir plus sur la patron Fabrique abstraite](https://refactoring.guru/fr/design-patterns/abstract-factory) Navigation  [Intro](https://refactoring.guru/fr/design-patterns/abstract-factory/swift/example#)  [Exemple conceptuel](https://refactoring.guru/fr/design-patterns/abstract-factory/swift/example#example-0)  [Example](https://refactoring.guru/fr/design-patterns/abstract-factory/swift/example#example-0--Example-swift)  [Output](https://refactoring.guru/fr/design-patterns/abstract-factory/swift/example#example-0--Output-txt)  [Analogie du monde réel](https://refactoring.guru/fr/design-patterns/abstract-factory/swift/example#example-1)  [Example](https://refactoring.guru/fr/design-patterns/abstract-factory/swift/example#example-1--Example-swift)  [Output](https://refactoring.guru/fr/design-patterns/abstract-factory/swift/example#example-1--Output-txt) **Complexité :** **Popularité :** **Exemples d’utilisation :** Le patron fabrique abstraite est très répandu en Swift. Il est utilisé par de nombreux frameworks et bibliothèques afin d’étendre et de personnaliser leurs composants standards. **Identification :** Le patron est facile à identifier, car ses méthodes renvoient un objet Fabrique. La fabrique est utilisée pour créer des sous-composants spécifiques. Les exemples suivants sont disponibles sur le site de [Swift Playgrounds](https://www.alemohamad.com/playgrounds) . Félicitations à [Alejandro Mohamad](https://www.alemohamad.com/) pour avoir créé la version du Playground. Exemple conceptuel ------------------ Dans cet exemple, nous allons voir la structure du patron de conception **Fabrique abstraite**. Il va répondre aux questions suivantes : * Que contiennent les classes ? * Quels rôles jouent-elles ? * Comment les éléments du patron sont-ils reliés ? Après avoir étudié la structure du patron, vous pourrez plus facilement comprendre l’exemple suivant qui est basé sur un cas réel d’utilisation en Swift. #### **Example.swift:** Exemple conceptuel import XCTest /// The Abstract Factory protocol declares a set of methods that return /// different abstract products. These products are called a family and are /// related by a high-level theme or concept. Products of one family are usually /// able to collaborate among themselves. A family of products may have several /// variants, but the products of one variant are incompatible with products of /// another. protocol AbstractFactory { func createProductA() -> AbstractProductA func createProductB() -> AbstractProductB } /// Concrete Factories produce a family of products that belong to a single /// variant. The factory guarantees that resulting products are compatible. Note /// that signatures of the Concrete Factory's methods return an abstract /// product, while inside the method a concrete product is instantiated. class ConcreteFactory1: AbstractFactory { func createProductA() -> AbstractProductA { return ConcreteProductA1() } func createProductB() -> AbstractProductB { return ConcreteProductB1() } } /// Each Concrete Factory has a corresponding product variant. class ConcreteFactory2: AbstractFactory { func createProductA() -> AbstractProductA { return ConcreteProductA2() } func createProductB() -> AbstractProductB { return ConcreteProductB2() } } /// Each distinct product of a product family should have a base protocol. All /// variants of the product must implement this protocol. protocol AbstractProductA { func usefulFunctionA() -> String } /// Concrete Products are created by corresponding Concrete Factories. class ConcreteProductA1: AbstractProductA { func usefulFunctionA() -> String { return "The result of the product A1." } } class ConcreteProductA2: AbstractProductA { func usefulFunctionA() -> String { return "The result of the product A2." } } /// The base protocol of another product. All products can interact with each /// other, but proper interaction is possible only between products of the same /// concrete variant. protocol AbstractProductB { /// Product B is able to do its own thing... func usefulFunctionB() -> String /// ...but it also can collaborate with the ProductA. /// /// The Abstract Factory makes sure that all products it creates are of the /// same variant and thus, compatible. func anotherUsefulFunctionB(collaborator: AbstractProductA) -> String } /// Concrete Products are created by corresponding Concrete Factories. class ConcreteProductB1: AbstractProductB { func usefulFunctionB() -> String { return "The result of the product B1." } /// This variant, Product B1, is only able to work correctly with the /// variant, Product A1. Nevertheless, it accepts any instance of /// AbstractProductA as an argument. func anotherUsefulFunctionB(collaborator: AbstractProductA) -> String { let result = collaborator.usefulFunctionA() return "The result of the B1 collaborating with the (\\(result))" } } class ConcreteProductB2: AbstractProductB { func usefulFunctionB() -> String { return "The result of the product B2." } /// This variant, Product B2, is only able to work correctly with the /// variant, Product A2. Nevertheless, it accepts any instance of /// AbstractProductA as an argument. func anotherUsefulFunctionB(collaborator: AbstractProductA) -> String { let result = collaborator.usefulFunctionA() return "The result of the B2 collaborating with the (\\(result))" } } /// The client code works with factories and products only through abstract /// types: AbstractFactory and AbstractProduct. This lets you pass any factory /// or product subclass to the client code without breaking it. class Client { // ... static func someClientCode(factory: AbstractFactory) { let productA = factory.createProductA() let productB = factory.createProductB() print(productB.usefulFunctionB()) print(productB.anotherUsefulFunctionB(collaborator: productA)) } // ... } /// Let's see how it all works together. class AbstractFactoryConceptual: XCTestCase { func testAbstractFactoryConceptual() { /// The client code can work with any concrete factory class. print("Client: Testing client code with the first factory type:") Client.someClientCode(factory: ConcreteFactory1()) print("Client: Testing the same client code with the second factory type:") Client.someClientCode(factory: ConcreteFactory2()) } } #### **Output.txt:** Résultat de l’exécution Client: Testing client code with the first factory type: The result of the product B1. The result of the B1 collaborating with the (The result of the product A1.) Client: Testing the same client code with the second factory type: The result of the product B2. The result of the B2 collaborating with the (The result of the product A2.) Analogie du monde réel ---------------------- #### **Example.swift:** Analogie du monde réel import Foundation import UIKit import XCTest enum AuthType { case login case signUp } protocol AuthViewFactory { static func authView(for type: AuthType) -> AuthView static func authController(for type: AuthType) -> AuthViewController } class StudentAuthViewFactory: AuthViewFactory { static func authView(for type: AuthType) -> AuthView { print("Student View has been created") switch type { case .login: return StudentLoginView() case .signUp: return StudentSignUpView() } } static func authController(for type: AuthType) -> AuthViewController { let controller = StudentAuthViewController(contentView: authView(for: type)) print("Student View Controller has been created") return controller } } class TeacherAuthViewFactory: AuthViewFactory { static func authView(for type: AuthType) -> AuthView { print("Teacher View has been created") switch type { case .login: return TeacherLoginView() case .signUp: return TeacherSignUpView() } } static func authController(for type: AuthType) -> AuthViewController { let controller = TeacherAuthViewController(contentView: authView(for: type)) print("Teacher View Controller has been created") return controller } } protocol AuthView { typealias AuthAction = (AuthType) -> () var contentView: UIView { get } var authHandler: AuthAction? { get set } var description: String { get } } class StudentSignUpView: UIView, AuthView { private class StudentSignUpContentView: UIView { /// This view contains a number of features available only during a /// STUDENT authorization. } var contentView: UIView = StudentSignUpContentView() /// The handler will be connected for actions of buttons of this view. var authHandler: AuthView.AuthAction? override var description: String { return "Student-SignUp-View" } } class StudentLoginView: UIView, AuthView { private let emailField = UITextField() private let passwordField = UITextField() private let signUpButton = UIButton() var contentView: UIView { return self } /// The handler will be connected for actions of buttons of this view. var authHandler: AuthView.AuthAction? override var description: String { return "Student-Login-View" } } class TeacherSignUpView: UIView, AuthView { class TeacherSignUpContentView: UIView { /// This view contains a number of features available only during a /// TEACHER authorization. } var contentView: UIView = TeacherSignUpContentView() /// The handler will be connected for actions of buttons of this view. var authHandler: AuthView.AuthAction? override var description: String { return "Teacher-SignUp-View" } } class TeacherLoginView: UIView, AuthView { private let emailField = UITextField() private let passwordField = UITextField() private let loginButton = UIButton() private let forgotPasswordButton = UIButton() var contentView: UIView { return self } /// The handler will be connected for actions of buttons of this view. var authHandler: AuthView.AuthAction? override var description: String { return "Teacher-Login-View" } } class AuthViewController: UIViewController { fileprivate var contentView: AuthView init(contentView: AuthView) { self.contentView = contentView super.init(nibName: nil, bundle: nil) } required convenience init?(coder aDecoder: NSCoder) { return nil } } class StudentAuthViewController: AuthViewController { /// Student-oriented features } class TeacherAuthViewController: AuthViewController { /// Teacher-oriented features } private class ClientCode { private var currentController: AuthViewController? private lazy var navigationController: UINavigationController = { guard let vc = currentController else { return UINavigationController() } return UINavigationController(rootViewController: vc) }() private let factoryType: AuthViewFactory.Type init(factoryType: AuthViewFactory.Type) { self.factoryType = factoryType } /// MARK: - Presentation func presentLogin() { let controller = factoryType.authController(for: .login) navigationController.pushViewController(controller, animated: true) } func presentSignUp() { let controller = factoryType.authController(for: .signUp) navigationController.pushViewController(controller, animated: true) } /// Other methods... } class AbstractFactoryRealWorld: XCTestCase { func testFactoryMethodRealWorld() { #if teacherMode let clientCode = ClientCode(factoryType: TeacherAuthViewFactory.self) #else let clientCode = ClientCode(factoryType: StudentAuthViewFactory.self) #endif /// Present LogIn flow clientCode.presentLogin() print("Login screen has been presented") /// Present SignUp flow clientCode.presentSignUp() print("Sign up screen has been presented") } } #### **Output.txt:** Résultat de l’exécution Teacher View has been created Teacher View Controller has been created Login screen has been presented Teacher View has been created Teacher View Controller has been created Sign up screen has been presented **Fabrique abstraite** dans les autres langues ---------------------------------------------- [![Fabrique abstraite en C#](https://refactoring.guru/images/patterns/icons/csharp.svg?id=da64592defc6e86d57c39c66e9de3e58)](https://refactoring.guru/fr/design-patterns/abstract-factory/csharp/example "Fabrique abstraite en C#") [![Fabrique abstraite en C++](https://refactoring.guru/images/patterns/icons/cpp.svg?id=f7782ed8b8666246bfcc3f8fefc3b858)](https://refactoring.guru/fr/design-patterns/abstract-factory/cpp/example "Fabrique abstraite en C++") [![Fabrique abstraite en Go](https://refactoring.guru/images/patterns/icons/go.svg?id=1a89927eb99b1ea3fde7701d97970aca)](https://refactoring.guru/fr/design-patterns/abstract-factory/go/example "Fabrique abstraite en Go") [![Fabrique abstraite en Java](https://refactoring.guru/images/patterns/icons/java.svg?id=e6d87e2dca08c953fe3acd1275ed4f4e)](https://refactoring.guru/fr/design-patterns/abstract-factory/java/example "Fabrique abstraite en Java") [![Fabrique abstraite en PHP](https://refactoring.guru/images/patterns/icons/php.svg?id=be1906eb26b71ec1d3b93720d6156618)](https://refactoring.guru/fr/design-patterns/abstract-factory/php/example "Fabrique abstraite en PHP") [![Fabrique abstraite en Python](https://refactoring.guru/images/patterns/icons/python.svg?id=6d815d43c0f7050a1151b43e51569c9f)](https://refactoring.guru/fr/design-patterns/abstract-factory/python/example "Fabrique abstraite en Python") [![Fabrique abstraite en Ruby](https://refactoring.guru/images/patterns/icons/ruby.svg?id=b065b718c914bf8e960ef731600be1eb)](https://refactoring.guru/fr/design-patterns/abstract-factory/ruby/example "Fabrique abstraite en Ruby") [![Fabrique abstraite en Rust](https://refactoring.guru/images/patterns/icons/rust.svg?id=1f5698a4b5ae23fe79413511747e4a87)](https://refactoring.guru/fr/design-patterns/abstract-factory/rust/example "Fabrique abstraite en Rust") [![Fabrique abstraite en TypeScript](https://refactoring.guru/images/patterns/icons/typescript.svg?id=2239d0f16cb703540c205dd8cb0c0cb7)](https://refactoring.guru/fr/design-patterns/abstract-factory/typescript/example "Fabrique abstraite en TypeScript") --- # Будівельник на C++ [There are patterns of patterns now! \ My friend's project: MetaPatterns.io](https://metapatterns.io/)  [](https://refactoring.guru/uk/design-patterns/builder/cpp/example#checkout) [](https://refactoring.guru/uk/design-patterns/builder/cpp/example#checkout) [](https://refactoring.guru/) / [Патерни проектування](https://refactoring.guru/uk/design-patterns) / [Будівельник](https://refactoring.guru/uk/design-patterns/builder) / [C++](https://refactoring.guru/uk/design-patterns/cpp) ![Будівельник](https://refactoring.guru/images/patterns/cards/builder-mini-2x.png?id=de6d0938678b86903a1426dddfdd13bf) **Будівельник** на C++ ====================== **Будівельник** — це породжуючий патерн проектування, який дозволяє створювати об’єкти покроково. На відміну від інших породжуючих патернів, Будівельник дозволяє виготовляти різні продукти, використовуючи один і той же процес будівництва. [Детальніше про Будівельник](https://refactoring.guru/uk/design-patterns/builder) Навігація  [Інтро](https://refactoring.guru/uk/design-patterns/builder/cpp/example#)  [Концептуальний приклад](https://refactoring.guru/uk/design-patterns/builder/cpp/example#example-0)  [main](https://refactoring.guru/uk/design-patterns/builder/cpp/example#example-0--main-cc)  [Output](https://refactoring.guru/uk/design-patterns/builder/cpp/example#example-0--Output-txt) **Складність:** **Популярність:** **Застосування:** Патерн можна часто зустріти в C++ коді, особливо там, де необхідним є покрокове створення продуктів або конфігурація складних об’єктів. **Ознаки застосування патерна:** Будівельника можна визначити у класі, який має один створюючий метод та декілька методів налаштування створюваного продукту. Зазвичай, для зручності, методи налаштувань викликають ланцюжком (наприклад, `someBuilder->setValueA(1)->setValueB(2)->create()`). Концептуальний приклад ---------------------- Цей приклад показує структуру патерна **Будівельник**, а саме — з яких класів він складається, які ролі ці класи виконують і як вони взаємодіють один з одним. #### **main.cc:** Приклад структури патерна /\*\* \* It makes sense to use the Builder pattern only when your products are quite \* complex and require extensive configuration. \* \* Unlike in other creational patterns, different concrete builders can produce \* unrelated products. In other words, results of various builders may not \* always follow the same interface. \*/ class Product1{ public: std::vector parts\_; void ListParts()const{ std::cout << "Product parts: "; for (size\_t i=0;iReset(); } ~ConcreteBuilder1(){ delete product; } void Reset(){ this->product= new Product1(); } /\*\* \* All production steps work with the same product instance. \*/ void ProducePartA()const override{ this->product->parts\_.push\_back("PartA1"); } void ProducePartB()const override{ this->product->parts\_.push\_back("PartB1"); } void ProducePartC()const override{ this->product->parts\_.push\_back("PartC1"); } /\*\* \* Concrete Builders are supposed to provide their own methods for \* retrieving results. That's because various types of builders may create \* entirely different products that don't follow the same interface. \* Therefore, such methods cannot be declared in the base Builder interface \* (at least in a statically typed programming language). Note that PHP is a \* dynamically typed language and this method CAN be in the base interface. \* However, we won't declare it there for the sake of clarity. \* \* Usually, after returning the end result to the client, a builder instance \* is expected to be ready to start producing another product. That's why \* it's a usual practice to call the reset method at the end of the \* \`getProduct\` method body. However, this behavior is not mandatory, and \* you can make your builders wait for an explicit reset call from the \* client code before disposing of the previous result. \*/ /\*\* \* Please be careful here with the memory ownership. Once you call \* GetProduct the user of this function is responsable to release this \* memory. Here could be a better option to use smart pointers to avoid \* memory leaks \*/ Product1\* GetProduct() { Product1\* result= this->product; this->Reset(); return result; } }; /\*\* \* The Director is only responsible for executing the building steps in a \* particular sequence. It is helpful when producing products according to a \* specific order or configuration. Strictly speaking, the Director class is \* optional, since the client can control builders directly. \*/ class Director{ /\*\* \* @var Builder \*/ private: Builder\* builder; /\*\* \* The Director works with any builder instance that the client code passes \* to it. This way, the client code may alter the final type of the newly \* assembled product. \*/ public: void set\_builder(Builder\* builder){ this->builder=builder; } /\*\* \* The Director can construct several product variations using the same \* building steps. \*/ void BuildMinimalViableProduct(){ this->builder->ProducePartA(); } void BuildFullFeaturedProduct(){ this->builder->ProducePartA(); this->builder->ProducePartB(); this->builder->ProducePartC(); } }; /\*\* \* The client code creates a builder object, passes it to the director and then \* initiates the construction process. The end result is retrieved from the \* builder object. \*/ /\*\* \* I used raw pointers for simplicity however you may prefer to use smart \* pointers here \*/ void ClientCode(Director& director) { ConcreteBuilder1\* builder = new ConcreteBuilder1(); director.set\_builder(builder); std::cout << "Standard basic product:\\n"; director.BuildMinimalViableProduct(); Product1\* p= builder->GetProduct(); p->ListParts(); delete p; std::cout << "Standard full featured product:\\n"; director.BuildFullFeaturedProduct(); p= builder->GetProduct(); p->ListParts(); delete p; // Remember, the Builder pattern can be used without a Director class. std::cout << "Custom product:\\n"; builder->ProducePartA(); builder->ProducePartC(); p=builder->GetProduct(); p->ListParts(); delete p; delete builder; } int main(){ Director\* director= new Director(); ClientCode(\*director); delete director; return 0; } #### **Output.txt:** Результат виконання Standard basic product: Product parts: PartA1 Standard full featured product: Product parts: PartA1, PartB1, PartC1 Custom product: Product parts: PartA1, PartC1 **Будівельник** іншими мовами програмування ------------------------------------------- [![Будівельник на C#](https://refactoring.guru/images/patterns/icons/csharp.svg?id=da64592defc6e86d57c39c66e9de3e58)](https://refactoring.guru/uk/design-patterns/builder/csharp/example "Будівельник на C#") [![Будівельник на Go](https://refactoring.guru/images/patterns/icons/go.svg?id=1a89927eb99b1ea3fde7701d97970aca)](https://refactoring.guru/uk/design-patterns/builder/go/example "Будівельник на Go") [![Будівельник на Java](https://refactoring.guru/images/patterns/icons/java.svg?id=e6d87e2dca08c953fe3acd1275ed4f4e)](https://refactoring.guru/uk/design-patterns/builder/java/example "Будівельник на Java") [![Будівельник на PHP](https://refactoring.guru/images/patterns/icons/php.svg?id=be1906eb26b71ec1d3b93720d6156618)](https://refactoring.guru/uk/design-patterns/builder/php/example "Будівельник на PHP") [![Будівельник на Python](https://refactoring.guru/images/patterns/icons/python.svg?id=6d815d43c0f7050a1151b43e51569c9f)](https://refactoring.guru/uk/design-patterns/builder/python/example "Будівельник на Python") [![Будівельник на Ruby](https://refactoring.guru/images/patterns/icons/ruby.svg?id=b065b718c914bf8e960ef731600be1eb)](https://refactoring.guru/uk/design-patterns/builder/ruby/example "Будівельник на Ruby") [![Будівельник на Rust](https://refactoring.guru/images/patterns/icons/rust.svg?id=1f5698a4b5ae23fe79413511747e4a87)](https://refactoring.guru/uk/design-patterns/builder/rust/example "Будівельник на Rust") [![Будівельник на Swift](https://refactoring.guru/images/patterns/icons/swift.svg?id=0b716c2d52ec3a48fbe91ac031070c1d)](https://refactoring.guru/uk/design-patterns/builder/swift/example "Будівельник на Swift") [![Будівельник на TypeScript](https://refactoring.guru/images/patterns/icons/typescript.svg?id=2239d0f16cb703540c205dd8cb0c0cb7)](https://refactoring.guru/uk/design-patterns/builder/typescript/example "Будівельник на TypeScript") --- # Наблюдатель [There are patterns of patterns now! \ My friend's project: MetaPatterns.io](https://metapatterns.io/)  [](https://refactoring.guru/ru/design-patterns/observer#checkout) [](https://refactoring.guru/ru/design-patterns/observer#checkout) [](https://refactoring.guru/) / [Паттерны проектирования](https://refactoring.guru/ru/design-patterns) / [Поведенческие паттерны](https://refactoring.guru/ru/design-patterns/behavioral-patterns) Наблюдатель =========== Также известен как: Издатель-Подписчик, Слушатель, Observer Суть паттерна ------------- **Наблюдатель** — это поведенческий паттерн проектирования, который создаёт механизм подписки, позволяющий одним объектам следить и реагировать на события, происходящие в других объектах. ![Паттерн Наблюдатель](https://refactoring.guru/images/patterns/content/observer/observer-2x.png?id=d5a83e115528e9fd633f04ad2650f1db) Проблема -------- Представьте, что вы имеете два объекта: `Покупатель` и `Магазин`. В магазин вот-вот должны завезти новый товар, который интересен покупателю. Покупатель может каждый день ходить в магазин, чтобы проверить наличие товара. Но при этом он будет злиться, без толку тратя своё драгоценное время. ![Постоянное посещение магазина или спам?](https://refactoring.guru/images/patterns/content/observer/observer-comic-1-ru-2x.png?id=608c47f7f40a853486127037cfde85ff) Постоянное посещение магазина или спам? С другой стороны, магазин может разослать спам каждому своему покупателю. Многих это расстроит, так как товар специфический, и не всем он нужен. Получается конфликт: либо покупатель тратит время на периодические проверки, либо магазин тратит ресурсы на бесполезные оповещения. Решение ------- Давайте называть `Издателями` те объекты, которые содержат важное или интересное для других состояние. Остальные объекты, которые хотят отслеживать изменения этого состояния, назовём `Подписчиками`. Паттерн Наблюдатель предлагает хранить внутри объекта издателя список ссылок на объекты подписчиков, причём издатель не должен вести список подписки самостоятельно. Он предоставит методы, с помощью которых подписчики могли бы добавлять или убирать себя из списка. ![Подписка на события](https://refactoring.guru/images/patterns/diagrams/observer/solution1-ru-2x.png?id=3f0603674586f4cfb5718b883a34a863) Подписка на события. Теперь самое интересное. Когда в издателе будет происходить важное событие, он будет проходиться по списку подписчиков и оповещать их об этом, вызывая определённый метод объектов-подписчиков. Издателю безразлично, какой класс будет иметь тот или иной подписчик, так как все они должны следовать общему интерфейсу и иметь единый метод оповещения. ![Оповещения о событиях](https://refactoring.guru/images/patterns/diagrams/observer/solution2-ru-2x.png?id=dd7295d8ca6b22e43fb53fe6d8565ca2) Оповещения о событиях. Увидев, как складно всё работает, вы можете выделить общий интерфейс, описывающий методы подписки и отписки, и для всех издателей. После этого подписчики смогут работать с разными типами издателей, а также получать оповещения от них через один и тот же метод. Аналогия из жизни ----------------- ![Подписка на газеты и их доставка.](https://refactoring.guru/images/patterns/content/observer/observer-comic-2-ru-2x.png?id=75926144c7ac8af556c956a044121bed) Подписка на газеты и их доставка. После того как вы оформили подписку на газету или журнал, вам больше не нужно ездить в супермаркет и проверять, не вышел ли очередной номер. Вместо этого издательство будет присылать новые номера по почте прямо к вам домой сразу после их выхода. Издательство ведёт список подписчиков и знает, кому какой журнал высылать. Вы можете в любой момент отказаться от подписки, и журнал перестанет вам приходить. Структура --------- ![Структура классов паттерна Наблюдатель](https://refactoring.guru/images/patterns/diagrams/observer/structure-2x.png?id=228af9bded4d6ee6daf43a0e23cca9ff)![Структура классов паттерна Наблюдатель](https://refactoring.guru/images/patterns/diagrams/observer/structure-indexed-2x.png?id=910eec855bc41f05199e510494078926) 1. **Издатель** владеет внутренним состоянием, изменение которого интересно отслеживать подписчикам. Издатель содержит механизм подписки: список подписчиков и методы подписки/отписки. 2. Когда внутреннее состояние издателя меняется, он оповещает своих подписчиков. Для этого издатель проходит по списку подписчиков и вызывает их метод оповещения, заданный в общем интерфейсе подписчиков. 3. **Подписчик** определяет интерфейс, которым пользуется издатель для отправки оповещения. В большинстве случаев для этого достаточно единственного метода. 4. **Конкретные подписчики** выполняют что-то в ответ на оповещение, пришедшее от издателя. Эти классы должны следовать общему интерфейсу подписчиков, чтобы издатель не зависел от конкретных классов подписчиков. 5. По приходу оповещения подписчику нужно получить обновлённое состояние издателя. Издатель может передать это состояние через параметры метода оповещения. Более гибкий вариант — передавать через параметры весь объект издателя, чтобы подписчик мог сам получить требуемые данные. Как вариант, подписчик может постоянно хранить ссылку на объект издателя, переданный ему в конструкторе. 6. **Клиент** создаёт объекты издателей и подписчиков, а затем регистрирует подписчиков на обновления в издателях. Псевдокод --------- В этом примере **Наблюдатель** позволяет объекту текстового редактора оповещать другие объекты об изменениях своего состояния. ![Структура классов примера паттерна Наблюдатель](https://refactoring.guru/images/patterns/diagrams/observer/example-2x.png?id=e2838e1562325e485fc7c2828a8ca445) Пример оповещения объектов о событиях в других объектах. Список подписчиков составляется динамически, объекты могут как подписываться на определённые события, так и отписываться от них прямо во время выполнения программы. В этой реализации редактор не ведёт список подписчиков самостоятельно, а делегирует это вложенному объекту. Это даёт возможность использовать механизм подписки не только в классе редактора, но и в других классах программы. Для добавления в программу новых подписчиков не нужно менять классы издателей, пока они работают с подписчиками через общий интерфейс. // Базовый класс-издатель. Содержит код управления подписчиками // и их оповещения. class EventManager is private field listeners: hash map of event types and listeners method subscribe(eventType, listener) is listeners.add(eventType, listener) method unsubscribe(eventType, listener) is listeners.remove(eventType, listener) method notify(eventType, data) is foreach (listener in listeners.of(eventType)) do listener.update(data) // Конкретный класс-издатель, содержащий интересную для других // компонентов бизнес-логику. Мы могли бы сделать его прямым // потомком EventManager, но в реальной жизни это не всегда // возможно (например, если у класса уже есть родитель). Поэтому // здесь мы подключаем механизм подписки при помощи композиции. class Editor is public field events: EventManager private field file: File constructor Editor() is events = new EventManager() // Методы бизнес-логики, которые оповещают подписчиков об // изменениях. method openFile(path) is this.file = new File(path) events.notify("open", file.name) method saveFile() is file.write() events.notify("save", file.name) // ... // Общий интерфейс подписчиков. Во многих языках, поддерживающих // функциональные типы, можно обойтись без этого интерфейса и // конкретных классов, заменив объекты подписчиков функциями. interface EventListener is method update(filename) // Набор конкретных подписчиков. Они реализуют добавочную // функциональность, реагируя на извещения от издателя. class LoggingListener implements EventListener is private field log: File private field message: string constructor LoggingListener(log\_filename, message) is this.log = new File(log\_filename) this.message = message method update(filename) is log.write(replace('%s',filename,message)) class EmailAlertsListener implements EventListener is private field email: string private field message: string constructor EmailAlertsListener(email, message) is this.email = email this.message = message method update(filename) is system.email(email, replace('%s',filename,message)) // Приложение может сконфигурировать издателей и подписчиков как // угодно, в зависимости от целей и окружения. class Application is method config() is editor = new Editor() logger = new LoggingListener( "/path/to/log.txt", "Someone has opened file: %s"); editor.events.subscribe("open", logger) emailAlerts = new EmailAlertsListener( "admin@example.com", "Someone has changed the file: %s") editor.events.subscribe("save", emailAlerts) Применимость ------------ Когда после изменения состояния одного объекта требуется что-то сделать в других, но вы не знаете наперёд, какие именно объекты должны отреагировать. Описанная проблема может возникнуть при разработке библиотек пользовательского интерфейса, когда вам надо дать возможность сторонним классам реагировать на клики по кнопкам. Паттерн Наблюдатель позволяет любому объекту с интерфейсом подписчика зарегистрироваться на получение оповещений о событиях, происходящих в объектах-издателях. Когда одни объекты должны наблюдать за другими, но только в определённых случаях. Издатели ведут динамические списки. Все наблюдатели могут подписываться или отписываться от получения оповещений прямо во время выполнения программы. Шаги реализации --------------- 1. Разбейте вашу функциональность на две части: независимое ядро и опциональные зависимые части. Независимое ядро станет издателем. Зависимые части станут подписчиками. 2. Создайте интерфейс подписчиков. Обычно в нём достаточно определить единственный метод оповещения. 3. Создайте интерфейс издателей и опишите в нём операции управления подпиской. Помните, что издатель должен работать только с общим интерфейсом подписчиков. 4. Вам нужно решить, куда поместить код ведения подписки, ведь он обычно бывает одинаков для всех типов издателей. Самый очевидный способ — вынести этот код в промежуточный абстрактный класс, от которого будут наследоваться все издатели. Но если вы интегрируете паттерн в существующие классы, то создать новый базовый класс может быть затруднительно. В этом случае вы можете поместить логику подписки во вспомогательный объект и делегировать ему работу из издателей. 5. Создайте классы конкретных издателей. Реализуйте их так, чтобы после каждого изменения состояния они отправляли оповещения всем своим подписчикам. 6. Реализуйте метод оповещения в конкретных подписчиках. Не забудьте предусмотреть параметры, через которые издатель мог бы отправлять какие-то данные, связанные с происшедшим событием. Возможен и другой вариант, когда подписчик, получив оповещение, сам возьмёт из объекта издателя нужные данные. Но в этом случае вы будете вынуждены привязать класс подписчика к конкретному классу издателя. 7. Клиент должен создавать необходимое количество объектов подписчиков и подписывать их у издателей. Преимущества и недостатки ------------------------- * Издатели не зависят от конкретных классов подписчиков и наоборот. * Вы можете подписывать и отписывать получателей на лету. * Реализует _принцип открытости/закрытости_. * Подписчики оповещаются в случайном порядке. Отношения с другими паттернами ------------------------------ * [Цепочка обязанностей](https://refactoring.guru/ru/design-patterns/chain-of-responsibility) , [Команда](https://refactoring.guru/ru/design-patterns/command) , [Посредник](https://refactoring.guru/ru/design-patterns/mediator) и [Наблюдатель](https://refactoring.guru/ru/design-patterns/observer) показывают различные способы работы отправителей запросов с их получателями: * _Цепочка обязанностей_ передаёт запрос последовательно через цепочку потенциальных получателей, ожидая, что какой-то из них обработает запрос. * _Команда_ устанавливает косвенную одностороннюю связь от отправителей к получателям. * _Посредник_ убирает прямую связь между отправителями и получателями, заставляя их общаться опосредованно, через себя. * _Наблюдатель_ передаёт запрос одновременно всем заинтересованным получателям, но позволяет им динамически подписываться или отписываться от таких оповещений. * Разница между [Посредником](https://refactoring.guru/ru/design-patterns/mediator) и [Наблюдателем](https://refactoring.guru/ru/design-patterns/observer) не всегда очевидна. Чаще всего они выступают как конкуренты, но иногда могут работать вместе. Цель _Посредника_ — убрать обоюдные зависимости между компонентами системы. Вместо этого они становятся зависимыми от самого посредника. С другой стороны, цель _Наблюдателя_ — обеспечить динамическую одностороннюю связь, в которой одни объекты косвенно зависят от других. Довольно популярна реализация _Посредника_ при помощи _Наблюдателя_. При этом объект посредника будет выступать издателем, а все остальные компоненты станут подписчиками и смогут динамически следить за событиями, происходящими в посреднике. В этом случае трудно понять, чем же отличаются оба паттерна. Но _Посредник_ имеет и другие реализации, когда отдельные компоненты жёстко привязаны к объекту посредника. Такой код вряд ли будет напоминать _Наблюдателя_, но всё же останется _Посредником_. Напротив, в случае реализации посредника с помощью _Наблюдателя_ представим такую программу, в которой каждый компонент системы становится издателем. Компоненты могут подписываться друг на друга, в то же время не привязываясь к конкретным классам. Программа будет состоять из целой сети _Наблюдателей_, не имея центрального объекта-_Посредника_. Примеры реализации паттерна --------------------------- [![Наблюдатель на C#](https://refactoring.guru/images/patterns/icons/csharp.svg?id=da64592defc6e86d57c39c66e9de3e58)](https://refactoring.guru/ru/design-patterns/observer/csharp/example "Наблюдатель на C#") [![Наблюдатель на C++](https://refactoring.guru/images/patterns/icons/cpp.svg?id=f7782ed8b8666246bfcc3f8fefc3b858)](https://refactoring.guru/ru/design-patterns/observer/cpp/example "Наблюдатель на C++") [![Наблюдатель на Go](https://refactoring.guru/images/patterns/icons/go.svg?id=1a89927eb99b1ea3fde7701d97970aca)](https://refactoring.guru/ru/design-patterns/observer/go/example "Наблюдатель на Go") [![Наблюдатель на Java](https://refactoring.guru/images/patterns/icons/java.svg?id=e6d87e2dca08c953fe3acd1275ed4f4e)](https://refactoring.guru/ru/design-patterns/observer/java/example "Наблюдатель на Java") [![Наблюдатель на PHP](https://refactoring.guru/images/patterns/icons/php.svg?id=be1906eb26b71ec1d3b93720d6156618)](https://refactoring.guru/ru/design-patterns/observer/php/example "Наблюдатель на PHP") [![Наблюдатель на Python](https://refactoring.guru/images/patterns/icons/python.svg?id=6d815d43c0f7050a1151b43e51569c9f)](https://refactoring.guru/ru/design-patterns/observer/python/example "Наблюдатель на Python") [![Наблюдатель на Ruby](https://refactoring.guru/images/patterns/icons/ruby.svg?id=b065b718c914bf8e960ef731600be1eb)](https://refactoring.guru/ru/design-patterns/observer/ruby/example "Наблюдатель на Ruby") [![Наблюдатель на Rust](https://refactoring.guru/images/patterns/icons/rust.svg?id=1f5698a4b5ae23fe79413511747e4a87)](https://refactoring.guru/ru/design-patterns/observer/rust/example "Наблюдатель на Rust") [![Наблюдатель на Swift](https://refactoring.guru/images/patterns/icons/swift.svg?id=0b716c2d52ec3a48fbe91ac031070c1d)](https://refactoring.guru/ru/design-patterns/observer/swift/example "Наблюдатель на Swift") [![Наблюдатель на TypeScript](https://refactoring.guru/images/patterns/icons/typescript.svg?id=2239d0f16cb703540c205dd8cb0c0cb7)](https://refactoring.guru/ru/design-patterns/observer/typescript/example "Наблюдатель на TypeScript") [![](https://refactoring.guru/images/patterns/banners/patterns-book-banner-1-b-2x.png?id=5572aa55e5b09e59780aca9e0ea8e44b)](https://refactoring.guru/ru/design-patterns/book) ### Не втыкай в транспорте Лучше почитай нашу книгу о паттернах проектирования. Теперь это удобно делать даже во время поездок в общественном транспорте. [Узнать больше…](https://refactoring.guru/ru/design-patterns/book) --- # Фасад на C# [There are patterns of patterns now! \ My friend's project: MetaPatterns.io](https://metapatterns.io/)  [](https://refactoring.guru/uk/design-patterns/facade/csharp/example#checkout) [](https://refactoring.guru/uk/design-patterns/facade/csharp/example#checkout) [](https://refactoring.guru/) / [Патерни проектування](https://refactoring.guru/uk/design-patterns) / [Фасад](https://refactoring.guru/uk/design-patterns/facade) / [C#](https://refactoring.guru/uk/design-patterns/csharp) ![Фасад](https://refactoring.guru/images/patterns/cards/facade-mini-2x.png?id=d4cc6a5d81a31143cc665f7ac1481ac8) **Фасад** на C# =============== **Фасад** — це структурний патерн, який надає простий (але урізаний) інтерфейс до складної системи об’єктів, бібліотеки або фреймворку. Крім того, що Фасад дозволяє знизити загальну складність програми, він також допомагає винести код, який залежить від зовнішньої системи, в одне місце. [Детальніше про Фасад](https://refactoring.guru/uk/design-patterns/facade) Навігація  [Інтро](https://refactoring.guru/uk/design-patterns/facade/csharp/example#)  [Концептуальний приклад](https://refactoring.guru/uk/design-patterns/facade/csharp/example#example-0)  [Program](https://refactoring.guru/uk/design-patterns/facade/csharp/example#example-0--Program-cs)  [Output](https://refactoring.guru/uk/design-patterns/facade/csharp/example#example-0--Output-txt) **Складність:** **Популярність:** **Застосування:** Патерн часто зустрічається в клієнтських додатках, написаних на C#, які використовують складні бібліотеки або API. **Ознаки застосування патерна:** Фасад впізнається у класі, який має простий інтерфейс, але делегує основну частину роботи іншим класам. Найчастіше, фасади самі стежать за життєвим циклом об’єктів складної системи. Концептуальний приклад ---------------------- Цей приклад показує структуру патерна **Фасад**, а саме — з яких класів він складається, які ролі ці класи виконують і як вони взаємодіють один з одним. #### **Program.cs:** Приклад структури патерна using System; namespace RefactoringGuru.DesignPatterns.Facade.Conceptual { // The Facade class provides a simple interface to the complex logic of one // or several subsystems. The Facade delegates the client requests to the // appropriate objects within the subsystem. The Facade is also responsible // for managing their lifecycle. All of this shields the client from the // undesired complexity of the subsystem. public class Facade { protected Subsystem1 \_subsystem1; protected Subsystem2 \_subsystem2; public Facade(Subsystem1 subsystem1, Subsystem2 subsystem2) { this.\_subsystem1 = subsystem1; this.\_subsystem2 = subsystem2; } // The Facade's methods are convenient shortcuts to the sophisticated // functionality of the subsystems. However, clients get only to a // fraction of a subsystem's capabilities. public string Operation() { string result = "Facade initializes subsystems:\\n"; result += this.\_subsystem1.operation1(); result += this.\_subsystem2.operation1(); result += "Facade orders subsystems to perform the action:\\n"; result += this.\_subsystem1.operationN(); result += this.\_subsystem2.operationZ(); return result; } } // The Subsystem can accept requests either from the facade or client // directly. In any case, to the Subsystem, the Facade is yet another // client, and it's not a part of the Subsystem. public class Subsystem1 { public string operation1() { return "Subsystem1: Ready!\\n"; } public string operationN() { return "Subsystem1: Go!\\n"; } } // Some facades can work with multiple subsystems at the same time. public class Subsystem2 { public string operation1() { return "Subsystem2: Get ready!\\n"; } public string operationZ() { return "Subsystem2: Fire!\\n"; } } class Client { // The client code works with complex subsystems through a simple // interface provided by the Facade. When a facade manages the lifecycle // of the subsystem, the client might not even know about the existence // of the subsystem. This approach lets you keep the complexity under // control. public static void ClientCode(Facade facade) { Console.Write(facade.Operation()); } } class Program { static void Main(string\[\] args) { // The client code may have some of the subsystem's objects already // created. In this case, it might be worthwhile to initialize the // Facade with these objects instead of letting the Facade create // new instances. Subsystem1 subsystem1 = new Subsystem1(); Subsystem2 subsystem2 = new Subsystem2(); Facade facade = new Facade(subsystem1, subsystem2); Client.ClientCode(facade); } } } #### **Output.txt:** Результат виконання Facade initializes subsystems: Subsystem1: Ready! Subsystem2: Get ready! Facade orders subsystems to perform the action: Subsystem1: Go! Subsystem2: Fire! **Фасад** іншими мовами програмування ------------------------------------- [![Фасад на C++](https://refactoring.guru/images/patterns/icons/cpp.svg?id=f7782ed8b8666246bfcc3f8fefc3b858)](https://refactoring.guru/uk/design-patterns/facade/cpp/example "Фасад на C++") [![Фасад на Go](https://refactoring.guru/images/patterns/icons/go.svg?id=1a89927eb99b1ea3fde7701d97970aca)](https://refactoring.guru/uk/design-patterns/facade/go/example "Фасад на Go") [![Фасад на Java](https://refactoring.guru/images/patterns/icons/java.svg?id=e6d87e2dca08c953fe3acd1275ed4f4e)](https://refactoring.guru/uk/design-patterns/facade/java/example "Фасад на Java") [![Фасад на PHP](https://refactoring.guru/images/patterns/icons/php.svg?id=be1906eb26b71ec1d3b93720d6156618)](https://refactoring.guru/uk/design-patterns/facade/php/example "Фасад на PHP") [![Фасад на Python](https://refactoring.guru/images/patterns/icons/python.svg?id=6d815d43c0f7050a1151b43e51569c9f)](https://refactoring.guru/uk/design-patterns/facade/python/example "Фасад на Python") [![Фасад на Ruby](https://refactoring.guru/images/patterns/icons/ruby.svg?id=b065b718c914bf8e960ef731600be1eb)](https://refactoring.guru/uk/design-patterns/facade/ruby/example "Фасад на Ruby") [![Фасад на Rust](https://refactoring.guru/images/patterns/icons/rust.svg?id=1f5698a4b5ae23fe79413511747e4a87)](https://refactoring.guru/uk/design-patterns/facade/rust/example "Фасад на Rust") [![Фасад на Swift](https://refactoring.guru/images/patterns/icons/swift.svg?id=0b716c2d52ec3a48fbe91ac031070c1d)](https://refactoring.guru/uk/design-patterns/facade/swift/example "Фасад на Swift") [![Фасад на TypeScript](https://refactoring.guru/images/patterns/icons/typescript.svg?id=2239d0f16cb703540c205dd8cb0c0cb7)](https://refactoring.guru/uk/design-patterns/facade/typescript/example "Фасад на TypeScript") --- # Fasada w języku Swift / Wzorce projektowe [There are patterns of patterns now! \ My friend's project: MetaPatterns.io](https://metapatterns.io/)  [](https://refactoring.guru/pl/design-patterns/facade/swift/example#checkout) [](https://refactoring.guru/pl/design-patterns/facade/swift/example#checkout) [](https://refactoring.guru/) / [Wzorce projektowe](https://refactoring.guru/pl/design-patterns) / [Fasada](https://refactoring.guru/pl/design-patterns/facade) / [Swift](https://refactoring.guru/pl/design-patterns/swift) ![Fasada](https://refactoring.guru/images/patterns/cards/facade-mini-2x.png?id=d4cc6a5d81a31143cc665f7ac1481ac8) **Fasada** w języku Swift ========================= **Fasada** to strukturalny wzorzec projektowy wyposażający złożony system klas, bibliotekę lub framework w uproszczony interfejs. Fasada zmniejsza ogólną złożoność aplikacji oraz pomaga przenieść niechciane zależności w jedno miejsce w programie. [Dowiedz się więcej o Fasada](https://refactoring.guru/pl/design-patterns/facade) Nawigacja  [Intro](https://refactoring.guru/pl/design-patterns/facade/swift/example#)  [Przykład koncepcyjny](https://refactoring.guru/pl/design-patterns/facade/swift/example#example-0)  [Example](https://refactoring.guru/pl/design-patterns/facade/swift/example#example-0--Example-swift)  [Output](https://refactoring.guru/pl/design-patterns/facade/swift/example#example-0--Output-txt)  [Przykład z prawdziwego życia](https://refactoring.guru/pl/design-patterns/facade/swift/example#example-1)  [Example](https://refactoring.guru/pl/design-patterns/facade/swift/example#example-1--Example-swift)  [Output](https://refactoring.guru/pl/design-patterns/facade/swift/example#example-1--Output-txt) **Złożoność:** **Popularność:** **Przykłady użycia:** Wzorzec Fasada jest często używany w aplikacjach pisanych w Swift, gdzie przydaje się w pracy ze złożonymi bibliotekami i API. **Identyfikacja:** Użycie Fasady można stwierdzić po istnieniu klasy o uproszczonym interfejsie, która deleguje większość swoich zadań innym klasom. Zazwyczaj fasady zarządzają całym cyklem życia używanych przez siebie obiektów. Następujące przykłady są dostępne na [Swift Playgrounds](https://www.alemohamad.com/playgrounds) . Gratulacje dla [Alejandro Mohamad](https://www.alemohamad.com/) za stworzenie wersji Playground. Przykład koncepcyjny -------------------- Poniższy przykład ilustruje strukturę wzorca **Fasada** ze szczególnym naciskiem na następujące kwestie: * Z jakich składa się klas? * Jakie role pełnią te klasy? * W jaki sposób elementy wzorca są ze sobą powiązane? Poznawszy strukturę wzorca będzie ci łatwiej zrozumieć następujący przykład, oparty na prawdziwym przypadku użycia Swift. #### **Example.swift:** Przykład koncepcyjny import XCTest /// The Facade class provides a simple interface to the complex logic of one or /// several subsystems. The Facade delegates the client requests to the /// appropriate objects within the subsystem. The Facade is also responsible for /// managing their lifecycle. All of this shields the client from the undesired /// complexity of the subsystem. class Facade { private var subsystem1: Subsystem1 private var subsystem2: Subsystem2 /// Depending on your application's needs, you can provide the Facade with /// existing subsystem objects or force the Facade to create them on its /// own. init(subsystem1: Subsystem1 = Subsystem1(), subsystem2: Subsystem2 = Subsystem2()) { self.subsystem1 = subsystem1 self.subsystem2 = subsystem2 } /// The Facade's methods are convenient shortcuts to the sophisticated /// functionality of the subsystems. However, clients get only to a fraction /// of a subsystem's capabilities. func operation() -> String { var result = "Facade initializes subsystems:" result += " " + subsystem1.operation1() result += " " + subsystem2.operation1() result += "\\n" + "Facade orders subsystems to perform the action:\\n" result += " " + subsystem1.operationN() result += " " + subsystem2.operationZ() return result } } /// The Subsystem can accept requests either from the facade or client directly. /// In any case, to the Subsystem, the Facade is yet another client, and it's /// not a part of the Subsystem. class Subsystem1 { func operation1() -> String { return "Subsystem1: Ready!\\n" } // ... func operationN() -> String { return "Subsystem1: Go!\\n" } } /// Some facades can work with multiple subsystems at the same time. class Subsystem2 { func operation1() -> String { return "Subsystem2: Get ready!\\n" } // ... func operationZ() -> String { return "Subsystem2: Fire!\\n" } } /// The client code works with complex subsystems through a simple interface /// provided by the Facade. When a facade manages the lifecycle of the /// subsystem, the client might not even know about the existence of the /// subsystem. This approach lets you keep the complexity under control. class Client { // ... static func clientCode(facade: Facade) { print(facade.operation()) } // ... } /// Let's see how it all works together. class FacadeConceptual: XCTestCase { func testFacadeConceptual() { /// The client code may have some of the subsystem's objects already /// created. In this case, it might be worthwhile to initialize the /// Facade with these objects instead of letting the Facade create new /// instances. let subsystem1 = Subsystem1() let subsystem2 = Subsystem2() let facade = Facade(subsystem1: subsystem1, subsystem2: subsystem2) Client.clientCode(facade: facade) } } #### **Output.txt:** Wynik działania Facade initializes subsystems: Sybsystem1: Ready! Sybsystem2: Get ready! Facade orders subsystems to perform the action: Sybsystem1: Go! Sybsystem2: Fire! Przykład z prawdziwego życia ---------------------------- #### **Example.swift:** Przykład z prawdziwego życia import XCTest /// Facade Design Pattern /// /// Intent: Provides a simplified interface to a library, a framework, or any /// other complex set of classes. class FacadeRealWorld: XCTestCase { /// In the real project, you probably will use third-party libraries. For /// instance, to download images. /// /// Therefore, facade and wrapping it is a good way to use a third-party API /// in the client code. Even if it is your own library that is connected to /// a project. /// /// The benefits here are: /// /// 1) If you need to change a current image downloader it should be done /// only in the one place of a project. A number of lines of the client code /// will stay work. /// /// 2) The facade provides an access to a fraction of a functionality that /// fits most client needs. Moreover, it can set frequently used or default /// parameters. func testFacadeRealWorld() { let imageView = UIImageView() print("Let's set an image for the image view") clientCode(imageView) print("Image has been set") XCTAssert(imageView.image != nil) } fileprivate func clientCode(\_ imageView: UIImageView) { let url = URL(string: "www.example.com/logo") imageView.downloadImage(at: url) } } private extension UIImageView { /// This extension plays a facade role. func downloadImage(at url: URL?) { print("Start downloading...") let placeholder = UIImage(named: "placeholder") ImageDownloader().loadImage(at: url, placeholder: placeholder, completion: { image, error in print("Handle an image...") /// Crop, cache, apply filters, whatever... self.image = image }) } } private class ImageDownloader { /// Third-party library or your own solution (subsystem) typealias Completion = (UIImage, Error?) -> () typealias Progress = (Int, Int) -> () func loadImage(at url: URL?, placeholder: UIImage? = nil, progress: Progress? = nil, completion: Completion) { /// ... Set up a network stack /// ... Downloading an image /// ... completion(UIImage(), nil) } } #### **Output.txt:** Wynik działania Let's set an image for the image view Start downloading... Handle an image... Image has been set **Fasada** w innych językach ---------------------------- [![Fasada w języku C#](https://refactoring.guru/images/patterns/icons/csharp.svg?id=da64592defc6e86d57c39c66e9de3e58)](https://refactoring.guru/pl/design-patterns/facade/csharp/example "Fasada w języku C#") [![Fasada w języku C++](https://refactoring.guru/images/patterns/icons/cpp.svg?id=f7782ed8b8666246bfcc3f8fefc3b858)](https://refactoring.guru/pl/design-patterns/facade/cpp/example "Fasada w języku C++") [![Fasada w języku Go](https://refactoring.guru/images/patterns/icons/go.svg?id=1a89927eb99b1ea3fde7701d97970aca)](https://refactoring.guru/pl/design-patterns/facade/go/example "Fasada w języku Go") [![Fasada w języku Java](https://refactoring.guru/images/patterns/icons/java.svg?id=e6d87e2dca08c953fe3acd1275ed4f4e)](https://refactoring.guru/pl/design-patterns/facade/java/example "Fasada w języku Java") [![Fasada w języku PHP](https://refactoring.guru/images/patterns/icons/php.svg?id=be1906eb26b71ec1d3b93720d6156618)](https://refactoring.guru/pl/design-patterns/facade/php/example "Fasada w języku PHP") [![Fasada w języku Python](https://refactoring.guru/images/patterns/icons/python.svg?id=6d815d43c0f7050a1151b43e51569c9f)](https://refactoring.guru/pl/design-patterns/facade/python/example "Fasada w języku Python") [![Fasada w języku Ruby](https://refactoring.guru/images/patterns/icons/ruby.svg?id=b065b718c914bf8e960ef731600be1eb)](https://refactoring.guru/pl/design-patterns/facade/ruby/example "Fasada w języku Ruby") [![Fasada w języku Rust](https://refactoring.guru/images/patterns/icons/rust.svg?id=1f5698a4b5ae23fe79413511747e4a87)](https://refactoring.guru/pl/design-patterns/facade/rust/example "Fasada w języku Rust") [![Fasada w języku TypeScript](https://refactoring.guru/images/patterns/icons/typescript.svg?id=2239d0f16cb703540c205dd8cb0c0cb7)](https://refactoring.guru/pl/design-patterns/facade/typescript/example "Fasada w języku TypeScript") --- # 자바로 작성된 팩토리 메서드 / 디자인 패턴들 [There are patterns of patterns now! \ My friend's project: MetaPatterns.io](https://metapatterns.io/)  [](https://refactoring.guru/ko/design-patterns/factory-method/java/example#checkout) [](https://refactoring.guru/ko/design-patterns/factory-method/java/example#checkout) [](https://refactoring.guru/) / [디자인 패턴들](https://refactoring.guru/ko/design-patterns) / [팩토리 메서드](https://refactoring.guru/ko/design-patterns/factory-method) / [자바](https://refactoring.guru/ko/design-patterns/java) ![팩토리 메서드](https://refactoring.guru/images/patterns/cards/factory-method-mini-2x.png?id=fa9d4a8d61a67cc3822e52b9daf69dad) 자바로 작성된 **팩토리 메서드** =================== **팩토리 메서드**는 제품 객체들의 구상 클래스들을 지정하지 않고 해당 제품 객체들을 생성할 수 있도록 하는 생성 디자인 패턴입니다. 팩토리 메서드는 메서드를 정의하며, 이 메서드는 직접 생성자 호출​(`new` 연산자)​을 사용하여 객체를 생성하는 대신 객체 생성에 사용되여야 합니다. 자식 클래스들은 이 메서드를 오버라이드하여 생성될 객체들의 클래스를 변경할 수 있습니다. > 다양한 팩토리 패턴들과 개념들의 차이점을 이해하지 못하셨다면 [팩토리 비교](https://refactoring.guru/ko/design-patterns/factory-comparison) > 를 읽어보세요. [팩토리 메서드에 대하여 더 자세히 알아보세요](https://refactoring.guru/ko/design-patterns/factory-method) 내비게이션  [소개](https://refactoring.guru/ko/design-patterns/factory-method/java/example#)  [크로스 플랫폼 그래픽 사용자 요소들의 생성](https://refactoring.guru/ko/design-patterns/factory-method/java/example#example-0)  buttons   [Button](https://refactoring.guru/ko/design-patterns/factory-method/java/example#example-0--buttons-Button-java)   [Html­Button](https://refactoring.guru/ko/design-patterns/factory-method/java/example#example-0--buttons-HtmlButton-java)   [Windows­Button](https://refactoring.guru/ko/design-patterns/factory-method/java/example#example-0--buttons-WindowsButton-java)  factory   [Dialog](https://refactoring.guru/ko/design-patterns/factory-method/java/example#example-0--factory-Dialog-java)   [Html­Dialog](https://refactoring.guru/ko/design-patterns/factory-method/java/example#example-0--factory-HtmlDialog-java)   [Windows­Dialog](https://refactoring.guru/ko/design-patterns/factory-method/java/example#example-0--factory-WindowsDialog-java)  [Demo](https://refactoring.guru/ko/design-patterns/factory-method/java/example#example-0--Demo-java)  [Output­Demo](https://refactoring.guru/ko/design-patterns/factory-method/java/example#example-0--OutputDemo-txt)  [Output­Demo](https://refactoring.guru/ko/design-patterns/factory-method/java/example#example-0--OutputDemo-png) **복잡도:** **인기도:** **사용 사례들:** 팩토리 메서드 패턴은 자바 코드에서 널리 사용되며 코드에 높은 수준의 유연성을 제공해야 할 때 매우 유용합니다. 이 패턴은 핵심 자바 라이브러리에 등장합니다: * [`java.util.Calendar#getInstance()`](http://docs.oracle.com/javase/8/docs/api/java/util/Calendar.html#getInstance--) * [`java.util.ResourceBundle#getBundle()`](http://docs.oracle.com/javase/8/docs/api/java/util/ResourceBundle.html#getBundle-java.lang.String-) * [`java.text.NumberFormat#getInstance()`](http://docs.oracle.com/javase/8/docs/api/java/text/NumberFormat.html#getInstance--) * [`java.nio.charset.Charset#forName()`](http://docs.oracle.com/javase/8/docs/api/java/nio/charset/Charset.html#forName-java.lang.String-) * [`java.net.URLStreamHandlerFactory#createURLStreamHandler(String)`](http://docs.oracle.com/javase/8/docs/api/java/net/URLStreamHandlerFactory.html) (프로토콜에 따라 다른 싱글턴 객체를 반환합니다.) * [`java.util.EnumSet#of()`](https://docs.oracle.com/javase/8/docs/api/java/util/EnumSet.html#of(E)) * [`javax.xml.bind.JAXBContext#createMarshaller()`](https://docs.oracle.com/javase/8/docs/api/javax/xml/bind/JAXBContext.html#createMarshaller--) 와 다른 유사한 메서드들. **식별:** 팩토리 메서드는 구상 클래스들로부터 객체들을 생성하는 생성 메서드들로 인식될 수 있습니다. 구상 클래스들은 객체 생성 중에 사용되지만 팩토리 메서드들의 반환 유형은 일반적으로 추상 클래스 또는 인터페이스로 선언됩니다. 크로스 플랫폼 그래픽 사용자 요소들의 생성 ----------------------- 이 예시에서는 버튼들은 제품의 역할을 하고 다이얼로그들은 크리에이터의 역할을 합니다. 각 다른 다이얼로그 유형은 그의 고유한 요소 유형들이 필요합니다. 그러므로 각 다이얼로그 유형에 대한 자식 클래스를 만들고 해당 팩토리 메서드들을 오버라이드합니다. 이제 각 다이얼로그 유형은 적절한 버튼 클래스들을 인스턴스화할 것입니다. 기초 다이얼로그는 공통 인터페이스를 사용하는 제품과 함께 작동하므로 모든 변경 후에도 해당 기초 다이얼로그의 코드가 계속 작동할 것입니다. ### **buttons** #### **buttons/Button.java:** 공통 제품 인터페이스 package refactoring\_guru.factory\_method.example.buttons; /\*\* \* Common interface for all buttons. \*/ public interface Button { void render(); void onClick(); } #### **buttons/HtmlButton.java:** 구상 제품 package refactoring\_guru.factory\_method.example.buttons; /\*\* \* HTML button implementation. \*/ public class HtmlButton implements Button { public void render() { System.out.println(""); onClick(); } public void onClick() { System.out.println("Click! Button says - 'Hello World!'"); } } #### **buttons/WindowsButton.java:** 또 하나의 구상 제품 package refactoring\_guru.factory\_method.example.buttons; import javax.swing.\*; import java.awt.\*; import java.awt.event.ActionEvent; import java.awt.event.ActionListener; /\*\* \* Windows button implementation. \*/ public class WindowsButton implements Button { JPanel panel = new JPanel(); JFrame frame = new JFrame(); JButton button; public void render() { frame.setDefaultCloseOperation(JFrame.EXIT\_ON\_CLOSE); JLabel label = new JLabel("Hello World!"); label.setOpaque(true); label.setBackground(new Color(235, 233, 126)); label.setFont(new Font("Dialog", Font.BOLD, 44)); label.setHorizontalAlignment(SwingConstants.CENTER); panel.setLayout(new FlowLayout(FlowLayout.CENTER)); frame.getContentPane().add(panel); panel.add(label); onClick(); panel.add(button); frame.setSize(320, 200); frame.setVisible(true); onClick(); } public void onClick() { button = new JButton("Exit"); button.addActionListener(new ActionListener() { public void actionPerformed(ActionEvent e) { frame.setVisible(false); System.exit(0); } }); } } ### **factory** #### **factory/Dialog.java:** 기초 크리에이터 package refactoring\_guru.factory\_method.example.factory; import refactoring\_guru.factory\_method.example.buttons.Button; /\*\* \* Base factory class. Note that "factory" is merely a role for the class. It \* should have some core business logic which needs different products to be \* created. \*/ public abstract class Dialog { public void renderWindow() { // ... other code ... Button okButton = createButton(); okButton.render(); } /\*\* \* Subclasses will override this method in order to create specific button \* objects. \*/ public abstract Button createButton(); } #### **factory/HtmlDialog.java:** 구상 크리에이터 package refactoring\_guru.factory\_method.example.factory; import refactoring\_guru.factory\_method.example.buttons.Button; import refactoring\_guru.factory\_method.example.buttons.HtmlButton; /\*\* \* HTML Dialog will produce HTML buttons. \*/ public class HtmlDialog extends Dialog { @Override public Button createButton() { return new HtmlButton(); } } #### **factory/WindowsDialog.java:** 또 하나의 구상 크리에이터 package refactoring\_guru.factory\_method.example.factory; import refactoring\_guru.factory\_method.example.buttons.Button; import refactoring\_guru.factory\_method.example.buttons.WindowsButton; /\*\* \* Windows Dialog will produce Windows buttons. \*/ public class WindowsDialog extends Dialog { @Override public Button createButton() { return new WindowsButton(); } } #### **Demo.java:** 클라이언트 코드 package refactoring\_guru.factory\_method.example; import refactoring\_guru.factory\_method.example.factory.Dialog; import refactoring\_guru.factory\_method.example.factory.HtmlDialog; import refactoring\_guru.factory\_method.example.factory.WindowsDialog; /\*\* \* Demo class. Everything comes together here. \*/ public class Demo { private static Dialog dialog; public static void main(String\[\] args) { configure(); runBusinessLogic(); } /\*\* \* The concrete factory is usually chosen depending on configuration or \* environment options. \*/ static void configure() { if (System.getProperty("os.name").equals("Windows 10")) { dialog = new WindowsDialog(); } else { dialog = new HtmlDialog(); } } /\*\* \* All of the client code should work with factories and products through \* abstract interfaces. This way it does not care which factory it works \* with and what kind of product it returns. \*/ static void runBusinessLogic() { dialog.renderWindow(); } } #### **OutputDemo.txt:** 실행 결과 (HtmlDialog) Click! Button says - 'Hello World!' #### **OutputDemo.png:** 실행 결과 (WindowsDialog) ![](https://refactoring.guru/images/patterns/examples/java/factory-method/OutputDemo.png?id=36afce413161f6650321896d3023fb65) 다른 언어로 작성된 **팩토리 메서드** ---------------------- [![C#으로 작성된 팩토리 메서드](https://refactoring.guru/images/patterns/icons/csharp.svg?id=da64592defc6e86d57c39c66e9de3e58)](https://refactoring.guru/ko/design-patterns/factory-method/csharp/example "C#으로 작성된 팩토리 메서드") [![C++로 작성된 팩토리 메서드](https://refactoring.guru/images/patterns/icons/cpp.svg?id=f7782ed8b8666246bfcc3f8fefc3b858)](https://refactoring.guru/ko/design-patterns/factory-method/cpp/example "C++로 작성된 팩토리 메서드") [![Go로 작성된 팩토리 메서드](https://refactoring.guru/images/patterns/icons/go.svg?id=1a89927eb99b1ea3fde7701d97970aca)](https://refactoring.guru/ko/design-patterns/factory-method/go/example "Go로 작성된 팩토리 메서드") [![PHP로 작성된 팩토리 메서드](https://refactoring.guru/images/patterns/icons/php.svg?id=be1906eb26b71ec1d3b93720d6156618)](https://refactoring.guru/ko/design-patterns/factory-method/php/example "PHP로 작성된 팩토리 메서드") [![파이썬으로 작성된 팩토리 메서드](https://refactoring.guru/images/patterns/icons/python.svg?id=6d815d43c0f7050a1151b43e51569c9f)](https://refactoring.guru/ko/design-patterns/factory-method/python/example "파이썬으로 작성된 팩토리 메서드") [![루비로 작성된 팩토리 메서드](https://refactoring.guru/images/patterns/icons/ruby.svg?id=b065b718c914bf8e960ef731600be1eb)](https://refactoring.guru/ko/design-patterns/factory-method/ruby/example "루비로 작성된 팩토리 메서드") [![러스트로 작성된 팩토리 메서드](https://refactoring.guru/images/patterns/icons/rust.svg?id=1f5698a4b5ae23fe79413511747e4a87)](https://refactoring.guru/ko/design-patterns/factory-method/rust/example "러스트로 작성된 팩토리 메서드") [![스위프트로 작성된 팩토리 메서드](https://refactoring.guru/images/patterns/icons/swift.svg?id=0b716c2d52ec3a48fbe91ac031070c1d)](https://refactoring.guru/ko/design-patterns/factory-method/swift/example "스위프트로 작성된 팩토리 메서드") [![타입스크립트로 작성된 팩토리 메서드](https://refactoring.guru/images/patterns/icons/typescript.svg?id=2239d0f16cb703540c205dd8cb0c0cb7)](https://refactoring.guru/ko/design-patterns/factory-method/typescript/example "타입스크립트로 작성된 팩토리 메서드") --- # Фасад на PHP [There are patterns of patterns now! \ My friend's project: MetaPatterns.io](https://metapatterns.io/)  [](https://refactoring.guru/uk/design-patterns/facade/php/example#checkout) [](https://refactoring.guru/uk/design-patterns/facade/php/example#checkout) [](https://refactoring.guru/) / [Патерни проектування](https://refactoring.guru/uk/design-patterns) / [Фасад](https://refactoring.guru/uk/design-patterns/facade) / [PHP](https://refactoring.guru/uk/design-patterns/php) ![Фасад](https://refactoring.guru/images/patterns/cards/facade-mini-2x.png?id=d4cc6a5d81a31143cc665f7ac1481ac8) **Фасад** на PHP ================ **Фасад** — це структурний патерн, який надає простий (але урізаний) інтерфейс до складної системи об’єктів, бібліотеки або фреймворку. Крім того, що Фасад дозволяє знизити загальну складність програми, він також допомагає винести код, який залежить від зовнішньої системи, в одне місце. [Детальніше про Фасад](https://refactoring.guru/uk/design-patterns/facade) Навігація  [Інтро](https://refactoring.guru/uk/design-patterns/facade/php/example#)  [Концептуальний приклад](https://refactoring.guru/uk/design-patterns/facade/php/example#example-0)  [index](https://refactoring.guru/uk/design-patterns/facade/php/example#example-0--index-php)  [Output](https://refactoring.guru/uk/design-patterns/facade/php/example#example-0--Output-txt)  [Життєвий приклад](https://refactoring.guru/uk/design-patterns/facade/php/example#example-1)  [index](https://refactoring.guru/uk/design-patterns/facade/php/example#example-1--index-php)  [Output](https://refactoring.guru/uk/design-patterns/facade/php/example#example-1--Output-txt) **Складність:** **Популярність:** **Застосування:** Патерн часто використовують у звичайних PHP-програмах для спрощення роботи зі складними бібліотеки або API. **Ознаки застосування патерна:** Фасад впізнається у класі, який має простий інтерфейс, але делегує основну частину роботи іншим класам. Найчастіше, фасади самі стежать за життєвим циклом об’єктів складної системи. Концептуальний приклад ---------------------- Цей приклад показує структуру патерна **Фасад**, а саме — з яких класів він складається, які ролі ці класи виконують і як вони взаємодіють один з одним. Після ознайомлення зі структурою, вам буде легше сприймати наступний приклад, що розглядає реальний випадок використання патерна в світі PHP. #### **index.php:** Приклад структури патерна subsystem1 = $subsystem1 ?: new Subsystem1(); $this->subsystem2 = $subsystem2 ?: new Subsystem2(); } /\*\* \* The Facade's methods are convenient shortcuts to the sophisticated \* functionality of the subsystems. However, clients get only to a fraction \* of a subsystem's capabilities. \*/ public function operation(): string { $result = "Facade initializes subsystems:\\n"; $result .= $this->subsystem1->operation1(); $result .= $this->subsystem2->operation1(); $result .= "Facade orders subsystems to perform the action:\\n"; $result .= $this->subsystem1->operationN(); $result .= $this->subsystem2->operationZ(); return $result; } } /\*\* \* The Subsystem can accept requests either from the facade or client directly. \* In any case, to the Subsystem, the Facade is yet another client, and it's not \* a part of the Subsystem. \*/ class Subsystem1 { public function operation1(): string { return "Subsystem1: Ready!\\n"; } // ... public function operationN(): string { return "Subsystem1: Go!\\n"; } } /\*\* \* Some facades can work with multiple subsystems at the same time. \*/ class Subsystem2 { public function operation1(): string { return "Subsystem2: Get ready!\\n"; } // ... public function operationZ(): string { return "Subsystem2: Fire!\\n"; } } /\*\* \* The client code works with complex subsystems through a simple interface \* provided by the Facade. When a facade manages the lifecycle of the subsystem, \* the client might not even know about the existence of the subsystem. This \* approach lets you keep the complexity under control. \*/ function clientCode(Facade $facade) { // ... echo $facade->operation(); // ... } /\*\* \* The client code may have some of the subsystem's objects already created. In \* this case, it might be worthwhile to initialize the Facade with these objects \* instead of letting the Facade create new instances. \*/ $subsystem1 = new Subsystem1(); $subsystem2 = new Subsystem2(); $facade = new Facade($subsystem1, $subsystem2); clientCode($facade); #### **Output.txt:** Результат виконання Facade initializes subsystems: Subsystem1: Ready! Subsystem2: Get ready! Facade orders subsystems to perform the action: Subsystem1: Go! Subsystem2: Fire! Життєвий приклад ---------------- #### **index.php:** Приклад з реального світу youtube = new YouTube($youtubeApiKey); $this->ffmpeg = new FFMpeg(); } /\*\* \* The Facade provides a simple method for downloading video and encoding it \* to a target format (for the sake of simplicity, the real-world code is \* commented-out). \*/ public function downloadVideo(string $url): void { echo "Fetching video metadata from youtube...\\n"; // $title = $this->youtube->fetchVideo($url)->getTitle(); echo "Saving video file to a temporary file...\\n"; // $this->youtube->saveAs($url, "video.mpg"); echo "Processing source video...\\n"; // $video = $this->ffmpeg->open('video.mpg'); echo "Normalizing and resizing the video to smaller dimensions...\\n"; // $video // ->filters() // ->resize(new FFMpeg\\Coordinate\\Dimension(320, 240)) // ->synchronize(); echo "Capturing preview image...\\n"; // $video // ->frame(FFMpeg\\Coordinate\\TimeCode::fromSeconds(10)) // ->save($title . 'frame.jpg'); echo "Saving video in target formats...\\n"; // $video // ->save(new FFMpeg\\Format\\Video\\X264(), $title . '.mp4') // ->save(new FFMpeg\\Format\\Video\\WMV(), $title . '.wmv') // ->save(new FFMpeg\\Format\\Video\\WebM(), $title . '.webm'); echo "Done!\\n"; } } /\*\* \* The YouTube API subsystem. \*/ class YouTube { public function fetchVideo(): string { /\* ... \*/ } public function saveAs(string $path): void { /\* ... \*/ } // ...more methods and classes... } /\*\* \* The FFmpeg subsystem (a complex video/audio conversion library). \*/ class FFMpeg { public static function create(): FFMpeg { /\* ... \*/ } public function open(string $video): void { /\* ... \*/ } // ...more methods and classes... RU: ...дополнительные методы и классы... } class FFMpegVideo { public function filters(): self { /\* ... \*/ } public function resize(): self { /\* ... \*/ } public function synchronize(): self { /\* ... \*/ } public function frame(): self { /\* ... \*/ } public function save(string $path): self { /\* ... \*/ } // ...more methods and classes... RU: ...дополнительные методы и классы... } /\*\* \* The client code does not depend on any subsystem's classes. Any changes \* inside the subsystem's code won't affect the client code. You will only need \* to update the Facade. \*/ function clientCode(YouTubeDownloader $facade) { // ... $facade->downloadVideo("https://www.youtube.com/watch?v=QH2-TGUlwu4"); // ... } $facade = new YouTubeDownloader("APIKEY-XXXXXXXXX"); clientCode($facade); #### **Output.txt:** Результат виконання Fetching video metadata from youtube... Saving video file to a temporary file... Processing source video... Normalizing and resizing the video to smaller dimensions... Capturing preview image... Saving video in target formats... Done! **Фасад** іншими мовами програмування ------------------------------------- [![Фасад на C#](https://refactoring.guru/images/patterns/icons/csharp.svg?id=da64592defc6e86d57c39c66e9de3e58)](https://refactoring.guru/uk/design-patterns/facade/csharp/example "Фасад на C#") [![Фасад на C++](https://refactoring.guru/images/patterns/icons/cpp.svg?id=f7782ed8b8666246bfcc3f8fefc3b858)](https://refactoring.guru/uk/design-patterns/facade/cpp/example "Фасад на C++") [![Фасад на Go](https://refactoring.guru/images/patterns/icons/go.svg?id=1a89927eb99b1ea3fde7701d97970aca)](https://refactoring.guru/uk/design-patterns/facade/go/example "Фасад на Go") [![Фасад на Java](https://refactoring.guru/images/patterns/icons/java.svg?id=e6d87e2dca08c953fe3acd1275ed4f4e)](https://refactoring.guru/uk/design-patterns/facade/java/example "Фасад на Java") [![Фасад на Python](https://refactoring.guru/images/patterns/icons/python.svg?id=6d815d43c0f7050a1151b43e51569c9f)](https://refactoring.guru/uk/design-patterns/facade/python/example "Фасад на Python") [![Фасад на Ruby](https://refactoring.guru/images/patterns/icons/ruby.svg?id=b065b718c914bf8e960ef731600be1eb)](https://refactoring.guru/uk/design-patterns/facade/ruby/example "Фасад на Ruby") [![Фасад на Rust](https://refactoring.guru/images/patterns/icons/rust.svg?id=1f5698a4b5ae23fe79413511747e4a87)](https://refactoring.guru/uk/design-patterns/facade/rust/example "Фасад на Rust") [![Фасад на Swift](https://refactoring.guru/images/patterns/icons/swift.svg?id=0b716c2d52ec3a48fbe91ac031070c1d)](https://refactoring.guru/uk/design-patterns/facade/swift/example "Фасад на Swift") [![Фасад на TypeScript](https://refactoring.guru/images/patterns/icons/typescript.svg?id=2239d0f16cb703540c205dd8cb0c0cb7)](https://refactoring.guru/uk/design-patterns/facade/typescript/example "Фасад на TypeScript") --- # Фасад на Java [There are patterns of patterns now! \ My friend's project: MetaPatterns.io](https://metapatterns.io/)  [](https://refactoring.guru/uk/design-patterns/facade/java/example#checkout) [](https://refactoring.guru/uk/design-patterns/facade/java/example#checkout) [](https://refactoring.guru/) / [Патерни проектування](https://refactoring.guru/uk/design-patterns) / [Фасад](https://refactoring.guru/uk/design-patterns/facade) / [Java](https://refactoring.guru/uk/design-patterns/java) ![Фасад](https://refactoring.guru/images/patterns/cards/facade-mini-2x.png?id=d4cc6a5d81a31143cc665f7ac1481ac8) **Фасад** на Java ================= **Фасад** — це структурний патерн, який надає простий (але урізаний) інтерфейс до складної системи об’єктів, бібліотеки або фреймворку. Крім того, що Фасад дозволяє знизити загальну складність програми, він також допомагає винести код, який залежить від зовнішньої системи, в одне місце. [Детальніше про Фасад](https://refactoring.guru/uk/design-patterns/facade) Навігація  [Інтро](https://refactoring.guru/uk/design-patterns/facade/java/example#)  [Простий інтерфейс до складної бібліотеки відеоконвертації](https://refactoring.guru/uk/design-patterns/facade/java/example#example-0)  some\_complex\_media\_library   [Video­File](https://refactoring.guru/uk/design-patterns/facade/java/example#example-0--some_complex_media_library-VideoFile-java)   [Codec](https://refactoring.guru/uk/design-patterns/facade/java/example#example-0--some_complex_media_library-Codec-java)   [MPEG4Compression­Codec](https://refactoring.guru/uk/design-patterns/facade/java/example#example-0--some_complex_media_library-MPEG4CompressionCodec-java)   [Ogg­Compression­Codec](https://refactoring.guru/uk/design-patterns/facade/java/example#example-0--some_complex_media_library-OggCompressionCodec-java)   [Codec­Factory](https://refactoring.guru/uk/design-patterns/facade/java/example#example-0--some_complex_media_library-CodecFactory-java)   [Bitrate­Reader](https://refactoring.guru/uk/design-patterns/facade/java/example#example-0--some_complex_media_library-BitrateReader-java)   [Audio­Mixer](https://refactoring.guru/uk/design-patterns/facade/java/example#example-0--some_complex_media_library-AudioMixer-java)  facade   [Video­Conversion­Facade](https://refactoring.guru/uk/design-patterns/facade/java/example#example-0--facade-VideoConversionFacade-java)  [Demo](https://refactoring.guru/uk/design-patterns/facade/java/example#example-0--Demo-java)  [Output­Demo](https://refactoring.guru/uk/design-patterns/facade/java/example#example-0--OutputDemo-txt) **Складність:** **Популярність:** **Застосування:** Патерн часто зустрічається в клієнтських додатках, написаних на Java, які використовують складні бібліотеки або API. Приклади Фасадів в стандартних бібліотеках Java: * [`javax.faces.context.FacesContext`](http://docs.oracle.com/javaee/7/api/javax/faces/context/FacesContext.html) використовує «під капотом» класи [`LifeCycle`](http://docs.oracle.com/javaee/7/api/javax/faces/lifecycle/Lifecycle.html) , [`ViewHandler`](http://docs.oracle.com/javaee/7/api/javax/faces/application/ViewHandler.html) , [`NavigationHandler`](http://docs.oracle.com/javaee/7/api/javax/faces/application/NavigationHandler.html) і багато інших, але клієнти про це навіть не знають (що не заважає замінити ці класи іншими за допомогою ін’єкцій). * [`javax.faces.context.ExternalContext`](http://docs.oracle.com/javaee/7/api/javax/faces/context/ExternalContext.html) використовує всередині класи [`ServletContext`](http://docs.oracle.com/javaee/7/api/javax/servlet/ServletContext.html) , [`HttpSession`](http://docs.oracle.com/javaee/7/api/javax/servlet/http/HttpSession.html) , [`HttpServletRequest`](http://docs.oracle.com/javaee/7/api/javax/servlet/http/HttpServletRequest.html) , [`HttpServletResponse`](http://docs.oracle.com/javaee/7/api/javax/servlet/http/HttpServletResponse.html) і так далі. **Ознаки застосування патерна:** Фасад впізнається у класі, який має простий інтерфейс, але делегує основну частину роботи іншим класам. Найчастіше, фасади самі стежать за життєвим циклом об’єктів складної системи. Простий інтерфейс до складної бібліотеки відеоконвертації --------------------------------------------------------- У цьому прикладі Фасад спрощує роботу клієнта зі складною бібліотекою відеоконвертації. Фасад надає користувачеві лише один простий метод, приховуючи за собою цілу систему з відеокодеками, аудіомікшерами та іншими, не менш складними об’єктами. ### **some\_complex\_media\_library:** Складна бібліотека відеоконвертації #### **some\_complex\_media\_library/VideoFile.java:** Клас відеофайлу package refactoring\_guru.facade.example.some\_complex\_media\_library; public class VideoFile { private String name; private String codecType; public VideoFile(String name) { this.name = name; this.codecType = name.substring(name.indexOf(".") + 1); } public String getCodecType() { return codecType; } public String getName() { return name; } } #### **some\_complex\_media\_library/Codec.java:** Інтерфейс кодека package refactoring\_guru.facade.example.some\_complex\_media\_library; public interface Codec { } #### **some\_complex\_media\_library/MPEG4CompressionCodec.java:** Кодек MPEG4 package refactoring\_guru.facade.example.some\_complex\_media\_library; public class MPEG4CompressionCodec implements Codec { public String type = "mp4"; } #### **some\_complex\_media\_library/OggCompressionCodec.java:** Ogg Кодек package refactoring\_guru.facade.example.some\_complex\_media\_library; public class OggCompressionCodec implements Codec { public String type = "ogg"; } #### **some\_complex\_media\_library/CodecFactory.java:** Фабрика відеокодеків package refactoring\_guru.facade.example.some\_complex\_media\_library; public class CodecFactory { public static Codec extract(VideoFile file) { String type = file.getCodecType(); if (type.equals("mp4")) { System.out.println("CodecFactory: extracting mpeg audio..."); return new MPEG4CompressionCodec(); } else { System.out.println("CodecFactory: extracting ogg audio..."); return new OggCompressionCodec(); } } } #### **some\_complex\_media\_library/BitrateReader.java:** Bitrate-конвертер package refactoring\_guru.facade.example.some\_complex\_media\_library; public class BitrateReader { public static VideoFile read(VideoFile file, Codec codec) { System.out.println("BitrateReader: reading file..."); return file; } public static VideoFile convert(VideoFile buffer, Codec codec) { System.out.println("BitrateReader: writing file..."); return buffer; } } #### **some\_complex\_media\_library/AudioMixer.java:** Мікшування аудіо package refactoring\_guru.facade.example.some\_complex\_media\_library; import java.io.File; public class AudioMixer { public File fix(VideoFile result){ System.out.println("AudioMixer: fixing audio..."); return new File("tmp"); } } ### **facade** #### **facade/VideoConversionFacade.java:** Фасад бібліотеки роботи з відео package refactoring\_guru.facade.example.facade; import refactoring\_guru.facade.example.some\_complex\_media\_library.\*; import java.io.File; public class VideoConversionFacade { public File convertVideo(String fileName, String format) { System.out.println("VideoConversionFacade: conversion started."); VideoFile file = new VideoFile(fileName); Codec sourceCodec = CodecFactory.extract(file); Codec destinationCodec; if (format.equals("mp4")) { destinationCodec = new MPEG4CompressionCodec(); } else { destinationCodec = new OggCompressionCodec(); } VideoFile buffer = BitrateReader.read(file, sourceCodec); VideoFile intermediateResult = BitrateReader.convert(buffer, destinationCodec); File result = (new AudioMixer()).fix(intermediateResult); System.out.println("VideoConversionFacade: conversion completed."); return result; } } #### **Demo.java:** Клієнтський код package refactoring\_guru.facade.example; import refactoring\_guru.facade.example.facade.VideoConversionFacade; import java.io.File; public class Demo { public static void main(String\[\] args) { VideoConversionFacade converter = new VideoConversionFacade(); File mp4Video = converter.convertVideo("youtubevideo.ogg", "mp4"); // ... } } #### **OutputDemo.txt:** Результат виконання VideoConversionFacade: conversion started. CodecFactory: extracting ogg audio... BitrateReader: reading file... BitrateReader: writing file... AudioMixer: fixing audio... VideoConversionFacade: conversion completed. **Фасад** іншими мовами програмування ------------------------------------- [![Фасад на C#](https://refactoring.guru/images/patterns/icons/csharp.svg?id=da64592defc6e86d57c39c66e9de3e58)](https://refactoring.guru/uk/design-patterns/facade/csharp/example "Фасад на C#") [![Фасад на C++](https://refactoring.guru/images/patterns/icons/cpp.svg?id=f7782ed8b8666246bfcc3f8fefc3b858)](https://refactoring.guru/uk/design-patterns/facade/cpp/example "Фасад на C++") [![Фасад на Go](https://refactoring.guru/images/patterns/icons/go.svg?id=1a89927eb99b1ea3fde7701d97970aca)](https://refactoring.guru/uk/design-patterns/facade/go/example "Фасад на Go") [![Фасад на PHP](https://refactoring.guru/images/patterns/icons/php.svg?id=be1906eb26b71ec1d3b93720d6156618)](https://refactoring.guru/uk/design-patterns/facade/php/example "Фасад на PHP") [![Фасад на Python](https://refactoring.guru/images/patterns/icons/python.svg?id=6d815d43c0f7050a1151b43e51569c9f)](https://refactoring.guru/uk/design-patterns/facade/python/example "Фасад на Python") [![Фасад на Ruby](https://refactoring.guru/images/patterns/icons/ruby.svg?id=b065b718c914bf8e960ef731600be1eb)](https://refactoring.guru/uk/design-patterns/facade/ruby/example "Фасад на Ruby") [![Фасад на Rust](https://refactoring.guru/images/patterns/icons/rust.svg?id=1f5698a4b5ae23fe79413511747e4a87)](https://refactoring.guru/uk/design-patterns/facade/rust/example "Фасад на Rust") [![Фасад на Swift](https://refactoring.guru/images/patterns/icons/swift.svg?id=0b716c2d52ec3a48fbe91ac031070c1d)](https://refactoring.guru/uk/design-patterns/facade/swift/example "Фасад на Swift") [![Фасад на TypeScript](https://refactoring.guru/images/patterns/icons/typescript.svg?id=2239d0f16cb703540c205dd8cb0c0cb7)](https://refactoring.guru/uk/design-patterns/facade/typescript/example "Фасад на TypeScript") --- # Декоратор на Swift [There are patterns of patterns now! \ My friend's project: MetaPatterns.io](https://metapatterns.io/)  [](https://refactoring.guru/uk/design-patterns/decorator/swift/example#checkout) [](https://refactoring.guru/uk/design-patterns/decorator/swift/example#checkout) [](https://refactoring.guru/) / [Патерни проектування](https://refactoring.guru/uk/design-patterns) / [Декоратор](https://refactoring.guru/uk/design-patterns/decorator) / [Swift](https://refactoring.guru/uk/design-patterns/swift) ![Декоратор](https://refactoring.guru/images/patterns/cards/decorator-mini-2x.png?id=3b58e540d7d28523080cad341ed9b2e9) **Декоратор** на Swift ====================== **Декоратор** — це структурний патерн, який дозволяє додавати «на льоту» нові поведінки об’єктам, розміщаючи їх в об’єктах-обгортках. Декоратор дозволяє загортати об’єкти безліч разів завдяки тому, що і обгортки, і реальні об’єкти, що загортаються, мають спільний інтерфейс. [Детальніше про Декоратор](https://refactoring.guru/uk/design-patterns/decorator) Навігація  [Інтро](https://refactoring.guru/uk/design-patterns/decorator/swift/example#)  [Концептуальний приклад](https://refactoring.guru/uk/design-patterns/decorator/swift/example#example-0)  [Example](https://refactoring.guru/uk/design-patterns/decorator/swift/example#example-0--Example-swift)  [Output](https://refactoring.guru/uk/design-patterns/decorator/swift/example#example-0--Output-txt)  [Життєвий приклад](https://refactoring.guru/uk/design-patterns/decorator/swift/example#example-1)  [Example](https://refactoring.guru/uk/design-patterns/decorator/swift/example#example-1--Example-swift)  [Output](https://refactoring.guru/uk/design-patterns/decorator/swift/example#example-1--Output-txt) **Складність:** **Популярність:** **Застосування:** Патерн можна часто зустріти в Swift-коді, особливо якщо код створено для роботи з потоками даних. **Ознаки застосування патерна:** Декоратор можна розпізнати за створенними методами, які приймають в параметрах об’єкти того ж абстрактного типу чи інтерфейсу, що і поточний клас. Наступні приклади доступні на [Swift Playgrounds](https://www.alemohamad.com/playgrounds) . Вдячність [Alejandro Mohamad](https://www.alemohamad.com/) за створення версії Playground. Концептуальний приклад ---------------------- Цей приклад показує структуру патерна **Декоратор**, а саме — з яких класів він складається, які ролі ці класи виконують і як вони взаємодіють один з одним. Після ознайомлення зі структурою, вам буде легше сприймати наступний приклад, що розглядає реальний випадок використання патерна в світі Swift. #### **Example.swift:** Приклад структури патерна import XCTest /// The base Component interface defines operations that can be altered by /// decorators. protocol Component { func operation() -> String } /// Concrete Components provide default implementations of the operations. There /// might be several variations of these classes. class ConcreteComponent: Component { func operation() -> String { return "ConcreteComponent" } } /// The base Decorator class follows the same interface as the other components. /// The primary purpose of this class is to define the wrapping interface for /// all concrete decorators. The default implementation of the wrapping code /// might include a field for storing a wrapped component and the means to /// initialize it. class Decorator: Component { private var component: Component init(\_ component: Component) { self.component = component } /// The Decorator delegates all work to the wrapped component. func operation() -> String { return component.operation() } } /// Concrete Decorators call the wrapped object and alter its result in some /// way. class ConcreteDecoratorA: Decorator { /// Decorators may call parent implementation of the operation, instead of /// calling the wrapped object directly. This approach simplifies extension /// of decorator classes. override func operation() -> String { return "ConcreteDecoratorA(" + super.operation() + ")" } } /// Decorators can execute their behavior either before or after the call to a /// wrapped object. class ConcreteDecoratorB: Decorator { override func operation() -> String { return "ConcreteDecoratorB(" + super.operation() + ")" } } /// The client code works with all objects using the Component interface. This /// way it can stay independent of the concrete classes of components it works /// with. class Client { // ... static func someClientCode(component: Component) { print("Result: " + component.operation()) } // ... } /// Let's see how it all works together. class DecoratorConceptual: XCTestCase { func testDecoratorConceptual() { // This way the client code can support both simple components... print("Client: I've got a simple component") let simple = ConcreteComponent() Client.someClientCode(component: simple) // ...as well as decorated ones. // // Note how decorators can wrap not only simple components but the other // decorators as well. let decorator1 = ConcreteDecoratorA(simple) let decorator2 = ConcreteDecoratorB(decorator1) print("\\nClient: Now I've got a decorated component") Client.someClientCode(component: decorator2) } } #### **Output.txt:** Результат виконання Client: I've got a simple component Result: ConcreteComponent Client: Now I've got a decorated component Result: ConcreteDecoratorB(ConcreteDecoratorA(ConcreteComponent)) Життєвий приклад ---------------- #### **Example.swift:** Життєвий приклад import UIKit import XCTest protocol ImageEditor: CustomStringConvertible { func apply() -> UIImage } class ImageDecorator: ImageEditor { private var editor: ImageEditor required init(\_ editor: ImageEditor) { self.editor = editor } func apply() -> UIImage { print(editor.description + " applies changes") return editor.apply() } var description: String { return "ImageDecorator" } } extension UIImage: ImageEditor { func apply() -> UIImage { return self } open override var description: String { return "Image" } } class BaseFilter: ImageDecorator { fileprivate var filter: CIFilter? init(editor: ImageEditor, filterName: String) { self.filter = CIFilter(name: filterName) super.init(editor) } required init(\_ editor: ImageEditor) { super.init(editor) } override func apply() -> UIImage { let image = super.apply() let context = CIContext(options: nil) filter?.setValue(CIImage(image: image), forKey: kCIInputImageKey) guard let output = filter?.outputImage else { return image } guard let coreImage = context.createCGImage(output, from: output.extent) else { return image } return UIImage(cgImage: coreImage) } override var description: String { return "BaseFilter" } } class BlurFilter: BaseFilter { required init(\_ editor: ImageEditor) { super.init(editor: editor, filterName: "CIGaussianBlur") } func update(radius: Double) { filter?.setValue(radius, forKey: "inputRadius") } override var description: String { return "BlurFilter" } } class ColorFilter: BaseFilter { required init(\_ editor: ImageEditor) { super.init(editor: editor, filterName: "CIColorControls") } func update(saturation: Double) { filter?.setValue(saturation, forKey: "inputSaturation") } func update(brightness: Double) { filter?.setValue(brightness, forKey: "inputBrightness") } func update(contrast: Double) { filter?.setValue(contrast, forKey: "inputContrast") } override var description: String { return "ColorFilter" } } class Resizer: ImageDecorator { private var xScale: CGFloat = 0 private var yScale: CGFloat = 0 private var hasAlpha = false convenience init(\_ editor: ImageEditor, xScale: CGFloat = 0, yScale: CGFloat = 0, hasAlpha: Bool = false) { self.init(editor) self.xScale = xScale self.yScale = yScale self.hasAlpha = hasAlpha } required init(\_ editor: ImageEditor) { super.init(editor) } override func apply() -> UIImage { let image = super.apply() let size = image.size.applying(CGAffineTransform(scaleX: xScale, y: yScale)) UIGraphicsBeginImageContextWithOptions(size, !hasAlpha, UIScreen.main.scale) image.draw(in: CGRect(origin: .zero, size: size)) let scaledImage = UIGraphicsGetImageFromCurrentImageContext() UIGraphicsEndImageContext() return scaledImage ?? image } override var description: String { return "Resizer" } } class DecoratorRealWorld: XCTestCase { func testDecoratorRealWorld() { let image = loadImage() print("Client: set up an editors stack") let resizer = Resizer(image, xScale: 0.2, yScale: 0.2) let blurFilter = BlurFilter(resizer) blurFilter.update(radius: 2) let colorFilter = ColorFilter(blurFilter) colorFilter.update(contrast: 0.53) colorFilter.update(brightness: 0.12) colorFilter.update(saturation: 4) clientCode(editor: colorFilter) } func clientCode(editor: ImageEditor) { let image = editor.apply() /// Note. You can stop an execution in Xcode to see an image preview. print("Client: all changes have been applied for \\(image)") } } private extension DecoratorRealWorld { func loadImage() -> UIImage { let urlString = "https:// refactoring.guru/images/content-public/logos/logo-new-3x.png" /// Note: /// Do not download images the following way in a production code. guard let url = URL(string: urlString) else { fatalError("Please enter a valid URL") } guard let data = try? Data(contentsOf: url) else { fatalError("Cannot load an image") } guard let image = UIImage(data: data) else { fatalError("Cannot create an image from data") } return image } } #### **Output.txt:** Результат виконання Client: set up an editors stack BlurFilter applies changes Resizer applies changes Image applies changes Client: all changes have been applied for Image **Декоратор** іншими мовами програмування ----------------------------------------- [![Декоратор на C#](https://refactoring.guru/images/patterns/icons/csharp.svg?id=da64592defc6e86d57c39c66e9de3e58)](https://refactoring.guru/uk/design-patterns/decorator/csharp/example "Декоратор на C#") [![Декоратор на C++](https://refactoring.guru/images/patterns/icons/cpp.svg?id=f7782ed8b8666246bfcc3f8fefc3b858)](https://refactoring.guru/uk/design-patterns/decorator/cpp/example "Декоратор на C++") [![Декоратор на Go](https://refactoring.guru/images/patterns/icons/go.svg?id=1a89927eb99b1ea3fde7701d97970aca)](https://refactoring.guru/uk/design-patterns/decorator/go/example "Декоратор на Go") [![Декоратор на Java](https://refactoring.guru/images/patterns/icons/java.svg?id=e6d87e2dca08c953fe3acd1275ed4f4e)](https://refactoring.guru/uk/design-patterns/decorator/java/example "Декоратор на Java") [![Декоратор на PHP](https://refactoring.guru/images/patterns/icons/php.svg?id=be1906eb26b71ec1d3b93720d6156618)](https://refactoring.guru/uk/design-patterns/decorator/php/example "Декоратор на PHP") [![Декоратор на Python](https://refactoring.guru/images/patterns/icons/python.svg?id=6d815d43c0f7050a1151b43e51569c9f)](https://refactoring.guru/uk/design-patterns/decorator/python/example "Декоратор на Python") [![Декоратор на Ruby](https://refactoring.guru/images/patterns/icons/ruby.svg?id=b065b718c914bf8e960ef731600be1eb)](https://refactoring.guru/uk/design-patterns/decorator/ruby/example "Декоратор на Ruby") [![Декоратор на Rust](https://refactoring.guru/images/patterns/icons/rust.svg?id=1f5698a4b5ae23fe79413511747e4a87)](https://refactoring.guru/uk/design-patterns/decorator/rust/example "Декоратор на Rust") [![Декоратор на TypeScript](https://refactoring.guru/images/patterns/icons/typescript.svg?id=2239d0f16cb703540c205dd8cb0c0cb7)](https://refactoring.guru/uk/design-patterns/decorator/typescript/example "Декоратор на TypeScript") --- # Строитель на C++ [There are patterns of patterns now! \ My friend's project: MetaPatterns.io](https://metapatterns.io/)  [](https://refactoring.guru/ru/design-patterns/builder/cpp/example#checkout) [](https://refactoring.guru/ru/design-patterns/builder/cpp/example#checkout) [](https://refactoring.guru/) / [Паттерны проектирования](https://refactoring.guru/ru/design-patterns) / [Строитель](https://refactoring.guru/ru/design-patterns/builder) / [C++](https://refactoring.guru/ru/design-patterns/cpp) ![Строитель](https://refactoring.guru/images/patterns/cards/builder-mini-2x.png?id=de6d0938678b86903a1426dddfdd13bf) **Строитель** на C++ ==================== **Строитель** — это порождающий паттерн проектирования, который позволяет создавать объекты пошагово. В отличие от других порождающих паттернов, Строитель позволяет производить различные продукты, используя один и тот же процесс строительства. [Подробней о паттерне Строитель](https://refactoring.guru/ru/design-patterns/builder) Навигация  [Интро](https://refactoring.guru/ru/design-patterns/builder/cpp/example#)  [Концептуальный пример](https://refactoring.guru/ru/design-patterns/builder/cpp/example#example-0)  [main](https://refactoring.guru/ru/design-patterns/builder/cpp/example#example-0--main-cc)  [Output](https://refactoring.guru/ru/design-patterns/builder/cpp/example#example-0--Output-txt) **Сложность:** **Популярность:** **Применимость:** Паттерн можно часто встретить в C++ коде, особенно там, где требуется пошаговое создание продуктов или конфигурация сложных объектов. **Признаки применения паттерна:** Строителя можно узнать в классе, который имеет один создающий метод и несколько методов настройки создаваемого продукта. Обычно, методы настройки вызывают для удобства цепочкой (например, `someBuilder->setValueA(1)->setValueB(2)->create()`). Концептуальный пример --------------------- Этот пример показывает структуру паттерна **Строитель**, а именно — из каких классов он состоит, какие роли эти классы выполняют и как они взаимодействуют друг с другом. #### **main.cc:** Пример структуры паттерна /\*\* \* Имеет смысл использовать паттерн Строитель только тогда, когда ваши продукты \* достаточно сложны и требуют обширной конфигурации. \* \* В отличие от других порождающих паттернов, различные конкретные строители \* могут производить несвязанные продукты. Другими словами, результаты различных \* строителей могут не всегда следовать одному и тому же интерфейсу. \*/ class Product1{ public: std::vector parts\_; void ListParts()const{ std::cout << "Product parts: "; for (size\_t i=0;iReset(); } ~ConcreteBuilder1(){ delete product; } void Reset(){ this->product= new Product1(); } /\*\* \* Все этапы производства работают с одним и тем же экземпляром продукта. \*/ void ProducePartA()const override{ this->product->parts\_.push\_back("PartA1"); } void ProducePartB()const override{ this->product->parts\_.push\_back("PartB1"); } void ProducePartC()const override{ this->product->parts\_.push\_back("PartC1"); } /\*\* \* Конкретные Строители должны предоставить свои собственные методы \* получения результатов. Это связано с тем, что различные типы строителей \* могут создавать совершенно разные продукты с разными интерфейсами. \* Поэтому такие методы не могут быть объявлены в базовом интерфейсе \* Строителя (по крайней мере, в статически типизированном языке \* программирования). Обратите внимание, что PHP является динамически \* типизированным языком, и этот метод может быть в базовом интерфейсе. \* Однако мы не будем объявлять его здесь для ясности. \* \* Как правило, после возвращения конечного результата клиенту, экземпляр \* строителя должен быть готов к началу производства следующего продукта. \* Поэтому обычной практикой является вызов метода сброса в конце тела \* метода getProduct. Однако такое поведение не является обязательным, вы \* можете заставить своих строителей ждать явного запроса на сброс из кода \* клиента, прежде чем избавиться от предыдущего результата. \*/ /\*\* \* Please be careful here with the memory ownership. Once you call \* GetProduct the user of this function is responsable to release this \* memory. Here could be a better option to use smart pointers to avoid \* memory leaks \*/ Product1\* GetProduct() { Product1\* result= this->product; this->Reset(); return result; } }; /\*\* \* Директор отвечает только за выполнение шагов построения в определённой \* последовательности. Это полезно при производстве продуктов в определённом \* порядке или особой конфигурации. Строго говоря, класс Директор необязателен, \* так как клиент может напрямую управлять строителями. \*/ class Director{ /\*\* \* @var Builder \*/ private: Builder\* builder; /\*\* \* Директор работает с любым экземпляром строителя, который передаётся ему \* клиентским кодом. Таким образом, клиентский код может изменить конечный \* тип вновь собираемого продукта. \*/ public: void set\_builder(Builder\* builder){ this->builder=builder; } /\*\* \* Директор может строить несколько вариаций продукта, используя одинаковые \* шаги построения. \*/ void BuildMinimalViableProduct(){ this->builder->ProducePartA(); } void BuildFullFeaturedProduct(){ this->builder->ProducePartA(); this->builder->ProducePartB(); this->builder->ProducePartC(); } }; /\*\* \* Клиентский код создаёт объект-строитель, передаёт его директору, а затем \* инициирует процесс построения. Конечный результат извлекается из объекта- \* строителя. \*/ /\*\* \* I used raw pointers for simplicity however you may prefer to use smart \* pointers here \*/ void ClientCode(Director& director) { ConcreteBuilder1\* builder = new ConcreteBuilder1(); director.set\_builder(builder); std::cout << "Standard basic product:\\n"; director.BuildMinimalViableProduct(); Product1\* p= builder->GetProduct(); p->ListParts(); delete p; std::cout << "Standard full featured product:\\n"; director.BuildFullFeaturedProduct(); p= builder->GetProduct(); p->ListParts(); delete p; // Помните, что паттерн Строитель можно использовать без класса Директор. std::cout << "Custom product:\\n"; builder->ProducePartA(); builder->ProducePartC(); p=builder->GetProduct(); p->ListParts(); delete p; delete builder; } int main(){ Director\* director= new Director(); ClientCode(\*director); delete director; return 0; } #### **Output.txt:** Результат выполнения Standard basic product: Product parts: PartA1 Standard full featured product: Product parts: PartA1, PartB1, PartC1 Custom product: Product parts: PartA1, PartC1 **Строитель** на других языках программирования ----------------------------------------------- [![Строитель на C#](https://refactoring.guru/images/patterns/icons/csharp.svg?id=da64592defc6e86d57c39c66e9de3e58)](https://refactoring.guru/ru/design-patterns/builder/csharp/example "Строитель на C#") [![Строитель на Go](https://refactoring.guru/images/patterns/icons/go.svg?id=1a89927eb99b1ea3fde7701d97970aca)](https://refactoring.guru/ru/design-patterns/builder/go/example "Строитель на Go") [![Строитель на Java](https://refactoring.guru/images/patterns/icons/java.svg?id=e6d87e2dca08c953fe3acd1275ed4f4e)](https://refactoring.guru/ru/design-patterns/builder/java/example "Строитель на Java") [![Строитель на PHP](https://refactoring.guru/images/patterns/icons/php.svg?id=be1906eb26b71ec1d3b93720d6156618)](https://refactoring.guru/ru/design-patterns/builder/php/example "Строитель на PHP") [![Строитель на Python](https://refactoring.guru/images/patterns/icons/python.svg?id=6d815d43c0f7050a1151b43e51569c9f)](https://refactoring.guru/ru/design-patterns/builder/python/example "Строитель на Python") [![Строитель на Ruby](https://refactoring.guru/images/patterns/icons/ruby.svg?id=b065b718c914bf8e960ef731600be1eb)](https://refactoring.guru/ru/design-patterns/builder/ruby/example "Строитель на Ruby") [![Строитель на Rust](https://refactoring.guru/images/patterns/icons/rust.svg?id=1f5698a4b5ae23fe79413511747e4a87)](https://refactoring.guru/ru/design-patterns/builder/rust/example "Строитель на Rust") [![Строитель на Swift](https://refactoring.guru/images/patterns/icons/swift.svg?id=0b716c2d52ec3a48fbe91ac031070c1d)](https://refactoring.guru/ru/design-patterns/builder/swift/example "Строитель на Swift") [![Строитель на TypeScript](https://refactoring.guru/images/patterns/icons/typescript.svg?id=2239d0f16cb703540c205dd8cb0c0cb7)](https://refactoring.guru/ru/design-patterns/builder/typescript/example "Строитель на TypeScript") --- # Fabrique en PHP / Patrons de conception [There are patterns of patterns now! \ My friend's project: MetaPatterns.io](https://metapatterns.io/)  [](https://refactoring.guru/fr/design-patterns/factory-method/php/example#checkout) [](https://refactoring.guru/fr/design-patterns/factory-method/php/example#checkout) [](https://refactoring.guru/) / [Patrons de conception](https://refactoring.guru/fr/design-patterns) / [Fabrique](https://refactoring.guru/fr/design-patterns/factory-method) / [PHP](https://refactoring.guru/fr/design-patterns/php) ![Fabrique](https://refactoring.guru/images/patterns/cards/factory-method-mini-2x.png?id=fa9d4a8d61a67cc3822e52b9daf69dad) **Fabrique** en PHP =================== La **Fabrique** est un patron de conception de création qui permet de créer des produits sans avoir à préciser leurs classes concrètes. La fabrique définit une méthode qui doit être utilisée pour créer des objets à la place de l’appel au constructeur (opérateur `new`). Les sous-classes peuvent redéfinir cette méthode pour modifier la classe des objets qui seront créés. > Lisez notre [Comparaison des fabriques](https://refactoring.guru/fr/design-patterns/factory-comparison) > si vous avez du mal à saisir la différence entre les divers concepts et patrons. [En savoir plus sur la patron Fabrique](https://refactoring.guru/fr/design-patterns/factory-method) Navigation  [Intro](https://refactoring.guru/fr/design-patterns/factory-method/php/example#)  [Exemple conceptuel](https://refactoring.guru/fr/design-patterns/factory-method/php/example#example-0)  [index](https://refactoring.guru/fr/design-patterns/factory-method/php/example#example-0--index-php)  [Output](https://refactoring.guru/fr/design-patterns/factory-method/php/example#example-0--Output-txt)  [Analogie du monde réel](https://refactoring.guru/fr/design-patterns/factory-method/php/example#example-1)  [index](https://refactoring.guru/fr/design-patterns/factory-method/php/example#example-1--index-php)  [Output](https://refactoring.guru/fr/design-patterns/factory-method/php/example#example-1--Output-txt) **Complexité :** **Popularité :** **Exemples d’utilisation :** La fabrique est très largement utilisée en PHP. Elle est très utile lorsque vous avez besoin de flexibilité dans votre code. **Identification :** La fabrique peut être reconnue grâce à ses méthodes de création qui produisent des objets depuis les classes concrètes, mais les retournent en tant qu’objets d’interface ou de type abstrait. Exemple conceptuel ------------------ Dans cet exemple, nous allons voir la structure de la **Fabrique** et répondre aux questions suivantes : * Que contiennent les classes ? * Quels rôles jouent-elles ? * Comment les éléments du patron sont-ils reliés ? Après avoir étudié la structure du patron, vous pourrez plus facilement comprendre l’exemple suivant qui est basé sur un cas d’utilisation réel en PHP. #### **index.php:** Exemple conceptuel factoryMethod(); // Now, use the product. $result = "Creator: The same creator's code has just worked with " . $product->operation(); return $result; } } /\*\* \* Concrete Creators override the factory method in order to change the \* resulting product's type. \*/ class ConcreteCreator1 extends Creator { /\*\* \* Note that the signature of the method still uses the abstract product \* type, even though the concrete product is actually returned from the \* method. This way the Creator can stay independent of concrete product \* classes. \*/ public function factoryMethod(): Product { return new ConcreteProduct1(); } } class ConcreteCreator2 extends Creator { public function factoryMethod(): Product { return new ConcreteProduct2(); } } /\*\* \* The Product interface declares the operations that all concrete products must \* implement. \*/ interface Product { public function operation(): string; } /\*\* \* Concrete Products provide various implementations of the Product interface. \*/ class ConcreteProduct1 implements Product { public function operation(): string { return "{Result of the ConcreteProduct1}"; } } class ConcreteProduct2 implements Product { public function operation(): string { return "{Result of the ConcreteProduct2}"; } } /\*\* \* The client code works with an instance of a concrete creator, albeit through \* its base interface. As long as the client keeps working with the creator via \* the base interface, you can pass it any creator's subclass. \*/ function clientCode(Creator $creator) { // ... echo "Client: I'm not aware of the creator's class, but it still works.\\n" . $creator->someOperation(); // ... } /\*\* \* The Application picks a creator's type depending on the configuration or \* environment. \*/ echo "App: Launched with the ConcreteCreator1.\\n"; clientCode(new ConcreteCreator1()); echo "\\n\\n"; echo "App: Launched with the ConcreteCreator2.\\n"; clientCode(new ConcreteCreator2()); #### **Output.txt:** Résultat de l’exécution App: Launched with the ConcreteCreator1. Client: I'm not aware of the creator's class, but it still works. Creator: The same creator's code has just worked with {Result of the ConcreteProduct1} App: Launched with the ConcreteCreator2. Client: I'm not aware of the creator's class, but it still works. Creator: The same creator's code has just worked with {Result of the ConcreteProduct2} Analogie du monde réel ---------------------- Dans cet exemple, la **Fabrique** fournit une interface pour créer des connecteurs pour les réseaux sociaux. Elle va pouvoir être utilisée pour se connecter au réseau, poster des messages et effectuer d’autres activités potentielles - et tout ceci sans coupler le code client aux classes concernant les réseaux sociaux. #### **index.php:** Exemple du monde réel getSocialNetwork; \* \* This allows changing the type of the product being created by \* SocialNetworkPoster's subclasses. \*/ abstract class SocialNetworkPoster { /\*\* \* The actual factory method. Note that it returns the abstract connector. \* This lets subclasses return any concrete connectors without breaking the \* superclass' contract. \*/ abstract public function getSocialNetwork(): SocialNetworkConnector; /\*\* \* When the factory method is used inside the Creator's business logic, the \* subclasses may alter the logic indirectly by returning different types of \* the connector from the factory method. \*/ public function post($content): void { // Call the factory method to create a Product object... $network = $this->getSocialNetwork(); // ...then use it as you will. $network->logIn(); $network->createPost($content); $network->logout(); } } /\*\* \* This Concrete Creator supports Facebook. Remember that this class also \* inherits the 'post' method from the parent class. Concrete Creators are the \* classes that the Client actually uses. \*/ class FacebookPoster extends SocialNetworkPoster { private $login, $password; public function \_\_construct(string $login, string $password) { $this->login = $login; $this->password = $password; } public function getSocialNetwork(): SocialNetworkConnector { return new FacebookConnector($this->login, $this->password); } } /\*\* \* This Concrete Creator supports LinkedIn. \*/ class LinkedInPoster extends SocialNetworkPoster { private $email, $password; public function \_\_construct(string $email, string $password) { $this->email = $email; $this->password = $password; } public function getSocialNetwork(): SocialNetworkConnector { return new LinkedInConnector($this->email, $this->password); } } /\*\* \* The Product interface declares behaviors of various types of products. \*/ interface SocialNetworkConnector { public function logIn(): void; public function logOut(): void; public function createPost($content): void; } /\*\* \* This Concrete Product implements the Facebook API. \*/ class FacebookConnector implements SocialNetworkConnector { private $login, $password; public function \_\_construct(string $login, string $password) { $this->login = $login; $this->password = $password; } public function logIn(): void { echo "Send HTTP API request to log in user $this->login with " . "password $this->password\\n"; } public function logOut(): void { echo "Send HTTP API request to log out user $this->login\\n"; } public function createPost($content): void { echo "Send HTTP API requests to create a post in Facebook timeline.\\n"; } } /\*\* \* This Concrete Product implements the LinkedIn API. \*/ class LinkedInConnector implements SocialNetworkConnector { private $email, $password; public function \_\_construct(string $email, string $password) { $this->email = $email; $this->password = $password; } public function logIn(): void { echo "Send HTTP API request to log in user $this->email with " . "password $this->password\\n"; } public function logOut(): void { echo "Send HTTP API request to log out user $this->email\\n"; } public function createPost($content): void { echo "Send HTTP API requests to create a post in LinkedIn timeline.\\n"; } } /\*\* \* The client code can work with any subclass of SocialNetworkPoster since it \* doesn't depend on concrete classes. \*/ function clientCode(SocialNetworkPoster $creator) { // ... $creator->post("Hello world!"); $creator->post("I had a large hamburger this morning!"); // ... } /\*\* \* During the initialization phase, the app can decide which social network it \* wants to work with, create an object of the proper subclass, and pass it to \* the client code. \*/ echo "Testing ConcreteCreator1:\\n"; clientCode(new FacebookPoster("john\_smith", "\*\*\*\*\*\*")); echo "\\n\\n"; echo "Testing ConcreteCreator2:\\n"; clientCode(new LinkedInPoster("john\_smith@example.com", "\*\*\*\*\*\*")); #### **Output.txt:** Résultat de l’exécution Testing ConcreteCreator1: Send HTTP API request to log in user john\_smith with password \*\*\*\*\*\* Send HTTP API requests to create a post in Facebook timeline. Send HTTP API request to log out user john\_smith Send HTTP API request to log in user john\_smith with password \*\*\*\*\*\* Send HTTP API requests to create a post in Facebook timeline. Send HTTP API request to log out user john\_smith Testing ConcreteCreator2: Send HTTP API request to log in user john\_smith@example.com with password \*\*\*\*\*\* Send HTTP API requests to create a post in LinkedIn timeline. Send HTTP API request to log out user john\_smith@example.com Send HTTP API request to log in user john\_smith@example.com with password \*\*\*\*\*\* Send HTTP API requests to create a post in LinkedIn timeline. Send HTTP API request to log out user john\_smith@example.com **Fabrique** dans les autres langues ------------------------------------ [![Fabrique en C#](https://refactoring.guru/images/patterns/icons/csharp.svg?id=da64592defc6e86d57c39c66e9de3e58)](https://refactoring.guru/fr/design-patterns/factory-method/csharp/example "Fabrique en C#") [![Fabrique en C++](https://refactoring.guru/images/patterns/icons/cpp.svg?id=f7782ed8b8666246bfcc3f8fefc3b858)](https://refactoring.guru/fr/design-patterns/factory-method/cpp/example "Fabrique en C++") [![Fabrique en Go](https://refactoring.guru/images/patterns/icons/go.svg?id=1a89927eb99b1ea3fde7701d97970aca)](https://refactoring.guru/fr/design-patterns/factory-method/go/example "Fabrique en Go") [![Fabrique en Java](https://refactoring.guru/images/patterns/icons/java.svg?id=e6d87e2dca08c953fe3acd1275ed4f4e)](https://refactoring.guru/fr/design-patterns/factory-method/java/example "Fabrique en Java") [![Fabrique en Python](https://refactoring.guru/images/patterns/icons/python.svg?id=6d815d43c0f7050a1151b43e51569c9f)](https://refactoring.guru/fr/design-patterns/factory-method/python/example "Fabrique en Python") [![Fabrique en Ruby](https://refactoring.guru/images/patterns/icons/ruby.svg?id=b065b718c914bf8e960ef731600be1eb)](https://refactoring.guru/fr/design-patterns/factory-method/ruby/example "Fabrique en Ruby") [![Fabrique en Rust](https://refactoring.guru/images/patterns/icons/rust.svg?id=1f5698a4b5ae23fe79413511747e4a87)](https://refactoring.guru/fr/design-patterns/factory-method/rust/example "Fabrique en Rust") [![Fabrique en Swift](https://refactoring.guru/images/patterns/icons/swift.svg?id=0b716c2d52ec3a48fbe91ac031070c1d)](https://refactoring.guru/fr/design-patterns/factory-method/swift/example "Fabrique en Swift") [![Fabrique en TypeScript](https://refactoring.guru/images/patterns/icons/typescript.svg?id=2239d0f16cb703540c205dd8cb0c0cb7)](https://refactoring.guru/fr/design-patterns/factory-method/typescript/example "Fabrique en TypeScript") --- # Фасад на TypeScript [There are patterns of patterns now! \ My friend's project: MetaPatterns.io](https://metapatterns.io/)  [](https://refactoring.guru/uk/design-patterns/facade/typescript/example#checkout) [](https://refactoring.guru/uk/design-patterns/facade/typescript/example#checkout) [](https://refactoring.guru/) / [Патерни проектування](https://refactoring.guru/uk/design-patterns) / [Фасад](https://refactoring.guru/uk/design-patterns/facade) / [TypeScript](https://refactoring.guru/uk/design-patterns/typescript) ![Фасад](https://refactoring.guru/images/patterns/cards/facade-mini-2x.png?id=d4cc6a5d81a31143cc665f7ac1481ac8) **Фасад** на TypeScript ======================= **Фасад** — це структурний патерн, який надає простий (але урізаний) інтерфейс до складної системи об’єктів, бібліотеки або фреймворку. Крім того, що Фасад дозволяє знизити загальну складність програми, він також допомагає винести код, який залежить від зовнішньої системи, в одне місце. [Детальніше про Фасад](https://refactoring.guru/uk/design-patterns/facade) Навігація  [Інтро](https://refactoring.guru/uk/design-patterns/facade/typescript/example#)  [Концептуальний приклад](https://refactoring.guru/uk/design-patterns/facade/typescript/example#example-0)  [index](https://refactoring.guru/uk/design-patterns/facade/typescript/example#example-0--index-ts)  [Output](https://refactoring.guru/uk/design-patterns/facade/typescript/example#example-0--Output-txt) **Складність:** **Популярність:** **Застосування:** Патерн часто зустрічається в клієнтських додатках, написаних на TypeScript, які використовують складні бібліотеки або API. **Ознаки застосування патерна:** Фасад впізнається у класі, який має простий інтерфейс, але делегує основну частину роботи іншим класам. Найчастіше, фасади самі стежать за життєвим циклом об’єктів складної системи. Концептуальний приклад ---------------------- Цей приклад показує структуру патерна **Фасад**, а саме — з яких класів він складається, які ролі ці класи виконують і як вони взаємодіють один з одним. #### **index.ts:** Приклад структури патерна /\*\* \* The Facade class provides a simple interface to the complex logic of one or \* several subsystems. The Facade delegates the client requests to the \* appropriate objects within the subsystem. The Facade is also responsible for \* managing their lifecycle. All of this shields the client from the undesired \* complexity of the subsystem. \*/ class Facade { protected subsystem1: Subsystem1; protected subsystem2: Subsystem2; /\*\* \* Depending on your application's needs, you can provide the Facade with \* existing subsystem objects or force the Facade to create them on its own. \*/ constructor(subsystem1?: Subsystem1, subsystem2?: Subsystem2) { this.subsystem1 = subsystem1 || new Subsystem1(); this.subsystem2 = subsystem2 || new Subsystem2(); } /\*\* \* The Facade's methods are convenient shortcuts to the sophisticated \* functionality of the subsystems. However, clients get only to a fraction \* of a subsystem's capabilities. \*/ public operation(): string { let result = 'Facade initializes subsystems:\\n'; result += this.subsystem1.operation1(); result += this.subsystem2.operation1(); result += 'Facade orders subsystems to perform the action:\\n'; result += this.subsystem1.operationN(); result += this.subsystem2.operationZ(); return result; } } /\*\* \* The Subsystem can accept requests either from the facade or client directly. \* In any case, to the Subsystem, the Facade is yet another client, and it's not \* a part of the Subsystem. \*/ class Subsystem1 { public operation1(): string { return 'Subsystem1: Ready!\\n'; } // ... public operationN(): string { return 'Subsystem1: Go!\\n'; } } /\*\* \* Some facades can work with multiple subsystems at the same time. \*/ class Subsystem2 { public operation1(): string { return 'Subsystem2: Get ready!\\n'; } // ... public operationZ(): string { return 'Subsystem2: Fire!'; } } /\*\* \* The client code works with complex subsystems through a simple interface \* provided by the Facade. When a facade manages the lifecycle of the subsystem, \* the client might not even know about the existence of the subsystem. This \* approach lets you keep the complexity under control. \*/ function clientCode(facade: Facade) { // ... console.log(facade.operation()); // ... } /\*\* \* The client code may have some of the subsystem's objects already created. In \* this case, it might be worthwhile to initialize the Facade with these objects \* instead of letting the Facade create new instances. \*/ const subsystem1 = new Subsystem1(); const subsystem2 = new Subsystem2(); const facade = new Facade(subsystem1, subsystem2); clientCode(facade); #### **Output.txt:** Результат виконання Facade initializes subsystems: Subsystem1: Ready! Subsystem2: Get ready! Facade orders subsystems to perform the action: Subsystem1: Go! Subsystem2: Fire! **Фасад** іншими мовами програмування ------------------------------------- [![Фасад на C#](https://refactoring.guru/images/patterns/icons/csharp.svg?id=da64592defc6e86d57c39c66e9de3e58)](https://refactoring.guru/uk/design-patterns/facade/csharp/example "Фасад на C#") [![Фасад на C++](https://refactoring.guru/images/patterns/icons/cpp.svg?id=f7782ed8b8666246bfcc3f8fefc3b858)](https://refactoring.guru/uk/design-patterns/facade/cpp/example "Фасад на C++") [![Фасад на Go](https://refactoring.guru/images/patterns/icons/go.svg?id=1a89927eb99b1ea3fde7701d97970aca)](https://refactoring.guru/uk/design-patterns/facade/go/example "Фасад на Go") [![Фасад на Java](https://refactoring.guru/images/patterns/icons/java.svg?id=e6d87e2dca08c953fe3acd1275ed4f4e)](https://refactoring.guru/uk/design-patterns/facade/java/example "Фасад на Java") [![Фасад на PHP](https://refactoring.guru/images/patterns/icons/php.svg?id=be1906eb26b71ec1d3b93720d6156618)](https://refactoring.guru/uk/design-patterns/facade/php/example "Фасад на PHP") [![Фасад на Python](https://refactoring.guru/images/patterns/icons/python.svg?id=6d815d43c0f7050a1151b43e51569c9f)](https://refactoring.guru/uk/design-patterns/facade/python/example "Фасад на Python") [![Фасад на Ruby](https://refactoring.guru/images/patterns/icons/ruby.svg?id=b065b718c914bf8e960ef731600be1eb)](https://refactoring.guru/uk/design-patterns/facade/ruby/example "Фасад на Ruby") [![Фасад на Rust](https://refactoring.guru/images/patterns/icons/rust.svg?id=1f5698a4b5ae23fe79413511747e4a87)](https://refactoring.guru/uk/design-patterns/facade/rust/example "Фасад на Rust") [![Фасад на Swift](https://refactoring.guru/images/patterns/icons/swift.svg?id=0b716c2d52ec3a48fbe91ac031070c1d)](https://refactoring.guru/uk/design-patterns/facade/swift/example "Фасад на Swift") --- # Фасад на C++ [There are patterns of patterns now! \ My friend's project: MetaPatterns.io](https://metapatterns.io/)  [](https://refactoring.guru/uk/design-patterns/facade/cpp/example#checkout) [](https://refactoring.guru/uk/design-patterns/facade/cpp/example#checkout) [](https://refactoring.guru/) / [Патерни проектування](https://refactoring.guru/uk/design-patterns) / [Фасад](https://refactoring.guru/uk/design-patterns/facade) / [C++](https://refactoring.guru/uk/design-patterns/cpp) ![Фасад](https://refactoring.guru/images/patterns/cards/facade-mini-2x.png?id=d4cc6a5d81a31143cc665f7ac1481ac8) **Фасад** на C++ ================ **Фасад** — це структурний патерн, який надає простий (але урізаний) інтерфейс до складної системи об’єктів, бібліотеки або фреймворку. Крім того, що Фасад дозволяє знизити загальну складність програми, він також допомагає винести код, який залежить від зовнішньої системи, в одне місце. [Детальніше про Фасад](https://refactoring.guru/uk/design-patterns/facade) Навігація  [Інтро](https://refactoring.guru/uk/design-patterns/facade/cpp/example#)  [Концептуальний приклад](https://refactoring.guru/uk/design-patterns/facade/cpp/example#example-0)  [main](https://refactoring.guru/uk/design-patterns/facade/cpp/example#example-0--main-cc)  [Output](https://refactoring.guru/uk/design-patterns/facade/cpp/example#example-0--Output-txt) **Складність:** **Популярність:** **Застосування:** Патерн часто зустрічається в клієнтських додатках, написаних на C++, які використовують складні бібліотеки або API. **Ознаки застосування патерна:** Фасад впізнається у класі, який має простий інтерфейс, але делегує основну частину роботи іншим класам. Найчастіше, фасади самі стежать за життєвим циклом об’єктів складної системи. Концептуальний приклад ---------------------- Цей приклад показує структуру патерна **Фасад**, а саме — з яких класів він складається, які ролі ці класи виконують і як вони взаємодіють один з одним. #### **main.cc:** Приклад структури патерна /\*\* \* The Subsystem can accept requests either from the facade or client directly. \* In any case, to the Subsystem, the Facade is yet another client, and it's not \* a part of the Subsystem. \*/ class Subsystem1 { public: std::string Operation1() const { return "Subsystem1: Ready!\\n"; } // ... std::string OperationN() const { return "Subsystem1: Go!\\n"; } }; /\*\* \* Some facades can work with multiple subsystems at the same time. \*/ class Subsystem2 { public: std::string Operation1() const { return "Subsystem2: Get ready!\\n"; } // ... std::string OperationZ() const { return "Subsystem2: Fire!\\n"; } }; /\*\* \* The Facade class provides a simple interface to the complex logic of one or \* several subsystems. The Facade delegates the client requests to the \* appropriate objects within the subsystem. The Facade is also responsible for \* managing their lifecycle. All of this shields the client from the undesired \* complexity of the subsystem. \*/ class Facade { protected: Subsystem1 \*subsystem1\_; Subsystem2 \*subsystem2\_; /\*\* \* Depending on your application's needs, you can provide the Facade with \* existing subsystem objects or force the Facade to create them on its own. \*/ public: /\*\* \* In this case we will delegate the memory ownership to Facade Class \*/ Facade( Subsystem1 \*subsystem1 = nullptr, Subsystem2 \*subsystem2 = nullptr) { this->subsystem1\_ = subsystem1 ?: new Subsystem1; this->subsystem2\_ = subsystem2 ?: new Subsystem2; } ~Facade() { delete subsystem1\_; delete subsystem2\_; } /\*\* \* The Facade's methods are convenient shortcuts to the sophisticated \* functionality of the subsystems. However, clients get only to a fraction of \* a subsystem's capabilities. \*/ std::string Operation() { std::string result = "Facade initializes subsystems:\\n"; result += this->subsystem1\_->Operation1(); result += this->subsystem2\_->Operation1(); result += "Facade orders subsystems to perform the action:\\n"; result += this->subsystem1\_->OperationN(); result += this->subsystem2\_->OperationZ(); return result; } }; /\*\* \* The client code works with complex subsystems through a simple interface \* provided by the Facade. When a facade manages the lifecycle of the subsystem, \* the client might not even know about the existence of the subsystem. This \* approach lets you keep the complexity under control. \*/ void ClientCode(Facade \*facade) { // ... std::cout << facade->Operation(); // ... } /\*\* \* The client code may have some of the subsystem's objects already created. In \* this case, it might be worthwhile to initialize the Facade with these objects \* instead of letting the Facade create new instances. \*/ int main() { Subsystem1 \*subsystem1 = new Subsystem1; Subsystem2 \*subsystem2 = new Subsystem2; Facade \*facade = new Facade(subsystem1, subsystem2); ClientCode(facade); delete facade; return 0; } #### **Output.txt:** Результат виконання Facade initializes subsystems: Subsystem1: Ready! Subsystem2: Get ready! Facade orders subsystems to perform the action: Subsystem1: Go! Subsystem2: Fire! **Фасад** іншими мовами програмування ------------------------------------- [![Фасад на C#](https://refactoring.guru/images/patterns/icons/csharp.svg?id=da64592defc6e86d57c39c66e9de3e58)](https://refactoring.guru/uk/design-patterns/facade/csharp/example "Фасад на C#") [![Фасад на Go](https://refactoring.guru/images/patterns/icons/go.svg?id=1a89927eb99b1ea3fde7701d97970aca)](https://refactoring.guru/uk/design-patterns/facade/go/example "Фасад на Go") [![Фасад на Java](https://refactoring.guru/images/patterns/icons/java.svg?id=e6d87e2dca08c953fe3acd1275ed4f4e)](https://refactoring.guru/uk/design-patterns/facade/java/example "Фасад на Java") [![Фасад на PHP](https://refactoring.guru/images/patterns/icons/php.svg?id=be1906eb26b71ec1d3b93720d6156618)](https://refactoring.guru/uk/design-patterns/facade/php/example "Фасад на PHP") [![Фасад на Python](https://refactoring.guru/images/patterns/icons/python.svg?id=6d815d43c0f7050a1151b43e51569c9f)](https://refactoring.guru/uk/design-patterns/facade/python/example "Фасад на Python") [![Фасад на Ruby](https://refactoring.guru/images/patterns/icons/ruby.svg?id=b065b718c914bf8e960ef731600be1eb)](https://refactoring.guru/uk/design-patterns/facade/ruby/example "Фасад на Ruby") [![Фасад на Rust](https://refactoring.guru/images/patterns/icons/rust.svg?id=1f5698a4b5ae23fe79413511747e4a87)](https://refactoring.guru/uk/design-patterns/facade/rust/example "Фасад на Rust") [![Фасад на Swift](https://refactoring.guru/images/patterns/icons/swift.svg?id=0b716c2d52ec3a48fbe91ac031070c1d)](https://refactoring.guru/uk/design-patterns/facade/swift/example "Фасад на Swift") [![Фасад на TypeScript](https://refactoring.guru/images/patterns/icons/typescript.svg?id=2239d0f16cb703540c205dd8cb0c0cb7)](https://refactoring.guru/uk/design-patterns/facade/typescript/example "Фасад на TypeScript") --- # Factory Method em C++ / Padrões de Projeto [There are patterns of patterns now! \ My friend's project: MetaPatterns.io](https://metapatterns.io/)  [](https://refactoring.guru/pt-br/design-patterns/factory-method/cpp/example#checkout) [](https://refactoring.guru/pt-br/design-patterns/factory-method/cpp/example#checkout) [](https://refactoring.guru/) / [Padrões de Projeto](https://refactoring.guru/pt-br/design-patterns) / [Factory Method](https://refactoring.guru/pt-br/design-patterns/factory-method) / [C++](https://refactoring.guru/pt-br/design-patterns/cpp) ![Factory Method](https://refactoring.guru/images/patterns/cards/factory-method-mini-2x.png?id=fa9d4a8d61a67cc3822e52b9daf69dad) **Factory Method** em C++ ========================= O **Factory method** é um padrão de projeto criacional, que resolve o problema de criar objetos de produtos sem especificar suas classes concretas. O Factory Method define um método, que deve ser usado para criar objetos em vez da chamada direta ao construtor (operador `new`). As subclasses podem substituir esse método para alterar a classe de objetos que serão criados. > Se você não conseguir descobrir a diferença entre os padrões **Factory**, **Factory Method** e **Abstract Factory**, leia nossa [Comparação Factory](https://refactoring.guru/pt-br/design-patterns/factory-comparison) > . [Saiba mais sobre o Factory Method](https://refactoring.guru/pt-br/design-patterns/factory-method) Navegação  [Introdução](https://refactoring.guru/pt-br/design-patterns/factory-method/cpp/example#)  [Exemplo conceitual](https://refactoring.guru/pt-br/design-patterns/factory-method/cpp/example#example-0)  [main](https://refactoring.guru/pt-br/design-patterns/factory-method/cpp/example#example-0--main-cc)  [Output](https://refactoring.guru/pt-br/design-patterns/factory-method/cpp/example#example-0--Output-txt) **Complexidade:** **Popularidade:** **Exemplos de uso:** O padrão Factory Method é amplamente utilizado no código C++. É muito útil quando você precisa fornecer um alto nível de flexibilidade para seu código. **Identificação:** Os métodos fábrica podem ser reconhecidos por métodos de criação, que criam objetos de classes concretas, mas os retornam como objetos de tipo ou interface abstrata. Exemplo conceitual ------------------ Este exemplo ilustra a estrutura do padrão de projeto **Factory Method**. Ele se concentra em responder a estas perguntas: * De quais classes ele consiste? * Quais papéis essas classes desempenham? * De que maneira os elementos do padrão estão relacionados? #### **main.cc:** Exemplo conceitual /\*\* \* The Product interface declares the operations that all concrete products must \* implement. \*/ class Product { public: virtual ~Product() {} virtual std::string Operation() const = 0; }; /\*\* \* Concrete Products provide various implementations of the Product interface. \*/ class ConcreteProduct1 : public Product { public: std::string Operation() const override { return "{Result of the ConcreteProduct1}"; } }; class ConcreteProduct2 : public Product { public: std::string Operation() const override { return "{Result of the ConcreteProduct2}"; } }; /\*\* \* The Creator class declares the factory method that is supposed to return an \* object of a Product class. The Creator's subclasses usually provide the \* implementation of this method. \*/ class Creator { /\*\* \* Note that the Creator may also provide some default implementation of the \* factory method. \*/ public: virtual ~Creator(){}; virtual Product\* FactoryMethod() const = 0; /\*\* \* Also note that, despite its name, the Creator's primary responsibility is \* not creating products. Usually, it contains some core business logic that \* relies on Product objects, returned by the factory method. Subclasses can \* indirectly change that business logic by overriding the factory method and \* returning a different type of product from it. \*/ std::string SomeOperation() const { // Call the factory method to create a Product object. Product\* product = this->FactoryMethod(); // Now, use the product. std::string result = "Creator: The same creator's code has just worked with " + product->Operation(); delete product; return result; } }; /\*\* \* Concrete Creators override the factory method in order to change the \* resulting product's type. \*/ class ConcreteCreator1 : public Creator { /\*\* \* Note that the signature of the method still uses the abstract product type, \* even though the concrete product is actually returned from the method. This \* way the Creator can stay independent of concrete product classes. \*/ public: Product\* FactoryMethod() const override { return new ConcreteProduct1(); } }; class ConcreteCreator2 : public Creator { public: Product\* FactoryMethod() const override { return new ConcreteProduct2(); } }; /\*\* \* The client code works with an instance of a concrete creator, albeit through \* its base interface. As long as the client keeps working with the creator via \* the base interface, you can pass it any creator's subclass. \*/ void ClientCode(const Creator& creator) { // ... std::cout << "Client: I'm not aware of the creator's class, but it still works.\\n" << creator.SomeOperation() << std::endl; // ... } /\*\* \* The Application picks a creator's type depending on the configuration or \* environment. \*/ int main() { std::cout << "App: Launched with the ConcreteCreator1.\\n"; Creator\* creator = new ConcreteCreator1(); ClientCode(\*creator); std::cout << std::endl; std::cout << "App: Launched with the ConcreteCreator2.\\n"; Creator\* creator2 = new ConcreteCreator2(); ClientCode(\*creator2); delete creator; delete creator2; return 0; } #### **Output.txt:** Resultados da execução App: Launched with the ConcreteCreator1. Client: I'm not aware of the creator's class, but it still works. Creator: The same creator's code has just worked with {Result of the ConcreteProduct1} App: Launched with the ConcreteCreator2. Client: I'm not aware of the creator's class, but it still works. Creator: The same creator's code has just worked with {Result of the ConcreteProduct2} **Factory Method** em outras linguagens --------------------------------------- [![Factory Method em C#](https://refactoring.guru/images/patterns/icons/csharp.svg?id=da64592defc6e86d57c39c66e9de3e58)](https://refactoring.guru/pt-br/design-patterns/factory-method/csharp/example "Factory Method em C#") [![Factory Method em Go](https://refactoring.guru/images/patterns/icons/go.svg?id=1a89927eb99b1ea3fde7701d97970aca)](https://refactoring.guru/pt-br/design-patterns/factory-method/go/example "Factory Method em Go") [![Factory Method em Java](https://refactoring.guru/images/patterns/icons/java.svg?id=e6d87e2dca08c953fe3acd1275ed4f4e)](https://refactoring.guru/pt-br/design-patterns/factory-method/java/example "Factory Method em Java") [![Factory Method em PHP](https://refactoring.guru/images/patterns/icons/php.svg?id=be1906eb26b71ec1d3b93720d6156618)](https://refactoring.guru/pt-br/design-patterns/factory-method/php/example "Factory Method em PHP") [![Factory Method em Python](https://refactoring.guru/images/patterns/icons/python.svg?id=6d815d43c0f7050a1151b43e51569c9f)](https://refactoring.guru/pt-br/design-patterns/factory-method/python/example "Factory Method em Python") [![Factory Method em Ruby](https://refactoring.guru/images/patterns/icons/ruby.svg?id=b065b718c914bf8e960ef731600be1eb)](https://refactoring.guru/pt-br/design-patterns/factory-method/ruby/example "Factory Method em Ruby") [![Factory Method em Rust](https://refactoring.guru/images/patterns/icons/rust.svg?id=1f5698a4b5ae23fe79413511747e4a87)](https://refactoring.guru/pt-br/design-patterns/factory-method/rust/example "Factory Method em Rust") [![Factory Method em Swift](https://refactoring.guru/images/patterns/icons/swift.svg?id=0b716c2d52ec3a48fbe91ac031070c1d)](https://refactoring.guru/pt-br/design-patterns/factory-method/swift/example "Factory Method em Swift") [![Factory Method em TypeScript](https://refactoring.guru/images/patterns/icons/typescript.svg?id=2239d0f16cb703540c205dd8cb0c0cb7)](https://refactoring.guru/pt-br/design-patterns/factory-method/typescript/example "Factory Method em TypeScript") --- # Factory Method を Java で / デザインパターン [There are patterns of patterns now! \ My friend's project: MetaPatterns.io](https://metapatterns.io/)  [](https://refactoring.guru/ja/design-patterns/factory-method/java/example#checkout) [](https://refactoring.guru/ja/design-patterns/factory-method/java/example#checkout) [](https://refactoring.guru/) / [デザインパターン](https://refactoring.guru/ja/design-patterns) / [Factory Method](https://refactoring.guru/ja/design-patterns/factory-method) / [Java](https://refactoring.guru/ja/design-patterns/java) ![Factory Method](https://refactoring.guru/images/patterns/cards/factory-method-mini-2x.png?id=fa9d4a8d61a67cc3822e52b9daf69dad) **Factory Method** を Java で =========================== **Factory Method** は、 生成に関するデザインパターンの一つで、 具象クラスを指定することなく、 プロダクト (訳注: 本パターンでは、 生成されるモノのことを一般にプロダクトと呼びます) のオブジェクトを生成することを可能とします。 Factory Method では、 オブジェクトの生成において、 直接のコンストラクター呼び出し (`new` 演算子) 代わりに使用すべきメソッドを定義します。 サブクラスにおいてこのメソッドを上書きすることにより、 生成されるオブジェクトのクラスを変更します。 > もし各種ファクトリー系のパターンやコンセプトの違いで迷った場合は、 [ファクトリーの比較](https://refactoring.guru/ja/design-patterns/factory-comparison) > をご覧ください。 [Factory Method の詳細](https://refactoring.guru/ja/design-patterns/factory-method) ナビゲーション  [はじめに](https://refactoring.guru/ja/design-patterns/factory-method/java/example#)  [クロス・プラットフォーム GUI 要素の作成](https://refactoring.guru/ja/design-patterns/factory-method/java/example#example-0)  buttons   [Button](https://refactoring.guru/ja/design-patterns/factory-method/java/example#example-0--buttons-Button-java)   [Html­Button](https://refactoring.guru/ja/design-patterns/factory-method/java/example#example-0--buttons-HtmlButton-java)   [Windows­Button](https://refactoring.guru/ja/design-patterns/factory-method/java/example#example-0--buttons-WindowsButton-java)  factory   [Dialog](https://refactoring.guru/ja/design-patterns/factory-method/java/example#example-0--factory-Dialog-java)   [Html­Dialog](https://refactoring.guru/ja/design-patterns/factory-method/java/example#example-0--factory-HtmlDialog-java)   [Windows­Dialog](https://refactoring.guru/ja/design-patterns/factory-method/java/example#example-0--factory-WindowsDialog-java)  [Demo](https://refactoring.guru/ja/design-patterns/factory-method/java/example#example-0--Demo-java)  [Output­Demo](https://refactoring.guru/ja/design-patterns/factory-method/java/example#example-0--OutputDemo-txt)  [Output­Demo](https://refactoring.guru/ja/design-patterns/factory-method/java/example#example-0--OutputDemo-png) **複雑度:** **人気度:** **使用例:** Factory Method パターンは、 Java コードでは広く使われます。 コードに高度の柔軟性を持たせたい時にとても役に立ちます。 このパターンは、 以下の Java コア・ライブラリーで使われています: * [`java.util.Calendar#getInstance()`](http://docs.oracle.com/javase/8/docs/api/java/util/Calendar.html#getInstance--) * [`java.util.ResourceBundle#getBundle()`](http://docs.oracle.com/javase/8/docs/api/java/util/ResourceBundle.html#getBundle-java.lang.String-) * [`java.text.NumberFormat#getInstance()`](http://docs.oracle.com/javase/8/docs/api/java/text/NumberFormat.html#getInstance--) * [`java.nio.charset.Charset#forName()`](http://docs.oracle.com/javase/8/docs/api/java/nio/charset/Charset.html#forName-java.lang.String-) * [`java.net.URLStreamHandlerFactory#createURLStreamHandler(String)`](http://docs.oracle.com/javase/8/docs/api/java/net/URLStreamHandlerFactory.html) (プロトコルに応じて異なるシングルトン・オブジェクトを返却) * [`java.util.EnumSet#of()`](https://docs.oracle.com/javase/8/docs/api/java/util/EnumSet.html#of(E)) * [`javax.xml.bind.JAXBContext#createMarshaller()`](https://docs.oracle.com/javase/8/docs/api/javax/xml/bind/JAXBContext.html#createMarshaller--) および他の類似メソッド。 **見つけ方:** 具象クラスで具象オブジェクトを作成し、 それを抽象型またはインターフェースのオブジェクトとして返すような生成メソッドの存在により、 Factory Method を識別できます。 クロス・プラットフォーム GUI 要素の作成 ---------------------- この例では、 Button はプロダクト、 ダイアログはクリエーターとして機能します。 ダイアログは、 種類によって、 それ独自の要素を必要とします。 ダイアログの種類に応じてサブクラスを作成し、 ファクトリー・メソッドを上書きするのはこのためです。 これで、 ダイアログの種類に応じて適切なボタンのクラスのインスタンスが生成されます。 基底ダイアログは、 共通のインターフェースを使ってプロダクトと連携するため、 多くの変更にもかかわらずコードは動作し続けます。 ### **buttons** #### **buttons/Button.java:** 共通プロダクト・インターフェース package refactoring\_guru.factory\_method.example.buttons; /\*\* \* Common interface for all buttons. \*/ public interface Button { void render(); void onClick(); } #### **buttons/HtmlButton.java:** 具象プロダクト package refactoring\_guru.factory\_method.example.buttons; /\*\* \* HTML button implementation. \*/ public class HtmlButton implements Button { public void render() { System.out.println(""); onClick(); } public void onClick() { System.out.println("Click! Button says - 'Hello World!'"); } } #### **buttons/WindowsButton.java:** もう一つの具象プロダクト package refactoring\_guru.factory\_method.example.buttons; import javax.swing.\*; import java.awt.\*; import java.awt.event.ActionEvent; import java.awt.event.ActionListener; /\*\* \* Windows button implementation. \*/ public class WindowsButton implements Button { JPanel panel = new JPanel(); JFrame frame = new JFrame(); JButton button; public void render() { frame.setDefaultCloseOperation(JFrame.EXIT\_ON\_CLOSE); JLabel label = new JLabel("Hello World!"); label.setOpaque(true); label.setBackground(new Color(235, 233, 126)); label.setFont(new Font("Dialog", Font.BOLD, 44)); label.setHorizontalAlignment(SwingConstants.CENTER); panel.setLayout(new FlowLayout(FlowLayout.CENTER)); frame.getContentPane().add(panel); panel.add(label); onClick(); panel.add(button); frame.setSize(320, 200); frame.setVisible(true); onClick(); } public void onClick() { button = new JButton("Exit"); button.addActionListener(new ActionListener() { public void actionPerformed(ActionEvent e) { frame.setVisible(false); System.exit(0); } }); } } ### **factory** #### **factory/Dialog.java:** 基底クリエーター package refactoring\_guru.factory\_method.example.factory; import refactoring\_guru.factory\_method.example.buttons.Button; /\*\* \* Base factory class. Note that "factory" is merely a role for the class. It \* should have some core business logic which needs different products to be \* created. \*/ public abstract class Dialog { public void renderWindow() { // ... other code ... Button okButton = createButton(); okButton.render(); } /\*\* \* Subclasses will override this method in order to create specific button \* objects. \*/ public abstract Button createButton(); } #### **factory/HtmlDialog.java:** 具象クリエーター package refactoring\_guru.factory\_method.example.factory; import refactoring\_guru.factory\_method.example.buttons.Button; import refactoring\_guru.factory\_method.example.buttons.HtmlButton; /\*\* \* HTML Dialog will produce HTML buttons. \*/ public class HtmlDialog extends Dialog { @Override public Button createButton() { return new HtmlButton(); } } #### **factory/WindowsDialog.java:** もう一つの具象クリエーター package refactoring\_guru.factory\_method.example.factory; import refactoring\_guru.factory\_method.example.buttons.Button; import refactoring\_guru.factory\_method.example.buttons.WindowsButton; /\*\* \* Windows Dialog will produce Windows buttons. \*/ public class WindowsDialog extends Dialog { @Override public Button createButton() { return new WindowsButton(); } } #### **Demo.java:** クライアント・コード package refactoring\_guru.factory\_method.example; import refactoring\_guru.factory\_method.example.factory.Dialog; import refactoring\_guru.factory\_method.example.factory.HtmlDialog; import refactoring\_guru.factory\_method.example.factory.WindowsDialog; /\*\* \* Demo class. Everything comes together here. \*/ public class Demo { private static Dialog dialog; public static void main(String\[\] args) { configure(); runBusinessLogic(); } /\*\* \* The concrete factory is usually chosen depending on configuration or \* environment options. \*/ static void configure() { if (System.getProperty("os.name").equals("Windows 10")) { dialog = new WindowsDialog(); } else { dialog = new HtmlDialog(); } } /\*\* \* All of the client code should work with factories and products through \* abstract interfaces. This way it does not care which factory it works \* with and what kind of product it returns. \*/ static void runBusinessLogic() { dialog.renderWindow(); } } #### **OutputDemo.txt:** 実行結果 (Html­Dialog) Click! Button says - 'Hello World!' #### **OutputDemo.png:** 実行結果 (Windows­Dialog) ![](https://refactoring.guru/images/patterns/examples/java/factory-method/OutputDemo.png?id=36afce413161f6650321896d3023fb65) 他言語での **Factory Method** ------------------------ [![Factory Method を C# で](https://refactoring.guru/images/patterns/icons/csharp.svg?id=da64592defc6e86d57c39c66e9de3e58)](https://refactoring.guru/ja/design-patterns/factory-method/csharp/example "Factory Method を C# で") [![Factory Method を C++ で](https://refactoring.guru/images/patterns/icons/cpp.svg?id=f7782ed8b8666246bfcc3f8fefc3b858)](https://refactoring.guru/ja/design-patterns/factory-method/cpp/example "Factory Method を C++ で") [![Factory Method を Go で](https://refactoring.guru/images/patterns/icons/go.svg?id=1a89927eb99b1ea3fde7701d97970aca)](https://refactoring.guru/ja/design-patterns/factory-method/go/example "Factory Method を Go で") [![Factory Method を PHP で](https://refactoring.guru/images/patterns/icons/php.svg?id=be1906eb26b71ec1d3b93720d6156618)](https://refactoring.guru/ja/design-patterns/factory-method/php/example "Factory Method を PHP で") [![Factory Method を Python で](https://refactoring.guru/images/patterns/icons/python.svg?id=6d815d43c0f7050a1151b43e51569c9f)](https://refactoring.guru/ja/design-patterns/factory-method/python/example "Factory Method を Python で") [![Factory Method を Ruby で](https://refactoring.guru/images/patterns/icons/ruby.svg?id=b065b718c914bf8e960ef731600be1eb)](https://refactoring.guru/ja/design-patterns/factory-method/ruby/example "Factory Method を Ruby で") [![Factory Method を Rust で](https://refactoring.guru/images/patterns/icons/rust.svg?id=1f5698a4b5ae23fe79413511747e4a87)](https://refactoring.guru/ja/design-patterns/factory-method/rust/example "Factory Method を Rust で") [![Factory Method を Swift で](https://refactoring.guru/images/patterns/icons/swift.svg?id=0b716c2d52ec3a48fbe91ac031070c1d)](https://refactoring.guru/ja/design-patterns/factory-method/swift/example "Factory Method を Swift で") [![Factory Method を TypeScript で](https://refactoring.guru/images/patterns/icons/typescript.svg?id=2239d0f16cb703540c205dd8cb0c0cb7)](https://refactoring.guru/ja/design-patterns/factory-method/typescript/example "Factory Method を TypeScript で") --- # Адаптер на Swift [There are patterns of patterns now! \ My friend's project: MetaPatterns.io](https://metapatterns.io/)  [](https://refactoring.guru/ru/design-patterns/adapter/swift/example#checkout) [](https://refactoring.guru/ru/design-patterns/adapter/swift/example#checkout) [](https://refactoring.guru/) / [Паттерны проектирования](https://refactoring.guru/ru/design-patterns) / [Адаптер](https://refactoring.guru/ru/design-patterns/adapter) / [Swift](https://refactoring.guru/ru/design-patterns/swift) ![Адаптер](https://refactoring.guru/images/patterns/cards/adapter-mini-2x.png?id=8274d99afbbe9c63bfbfd0d68ceeffc7) **Адаптер** на Swift ==================== **Адаптер** — это структурный паттерн, который позволяет подружить несовместимые объекты. Адаптер выступает прослойкой между двумя объектами, превращая вызовы одного в вызовы понятные другому. [Подробней о паттерне Адаптер](https://refactoring.guru/ru/design-patterns/adapter) Навигация  [Интро](https://refactoring.guru/ru/design-patterns/adapter/swift/example#)  [Концептуальный пример](https://refactoring.guru/ru/design-patterns/adapter/swift/example#example-0)  [Example](https://refactoring.guru/ru/design-patterns/adapter/swift/example#example-0--Example-swift)  [Output](https://refactoring.guru/ru/design-patterns/adapter/swift/example#example-0--Output-txt)  [Пример из реальной жизни](https://refactoring.guru/ru/design-patterns/adapter/swift/example#example-1)  [Example](https://refactoring.guru/ru/design-patterns/adapter/swift/example#example-1--Example-swift)  [Output](https://refactoring.guru/ru/design-patterns/adapter/swift/example#example-1--Output-txt) **Сложность:** **Популярность:** **Применимость:** Паттерн можно часто встретить в Swift-коде, особенно там, где требуется конвертация разных типов данных или совместная работа классов с разными интерфейсами. **Признаки применения паттерна:** Адаптер получает конвертируемый объект в конструкторе или через параметры своих методов. Методы Адаптера обычно совместимы с интерфейсом одного объекта. Они делегируют вызовы вложенному объекту, превратив перед этим параметры вызова в формат, поддерживаемый вложенным объектом. Следующие примеры доступны на [Swift Playgrounds](https://www.alemohamad.com/playgrounds) . Благодарность [Alejandro Mohamad](https://www.alemohamad.com/) за создание версии Playground. Концептуальный пример --------------------- Этот пример показывает структуру паттерна **Адаптер**, а именно — из каких классов он состоит, какие роли эти классы выполняют и как они взаимодействуют друг с другом. После ознакомления со структурой, вам будет легче воспринимать второй пример, который рассматривает реальный случай использования паттерна в мире Swift. #### **Example.swift:** Пример структуры паттерна import XCTest /// Целевой класс объявляет интерфейс, с которым может работать клиентский код. class Target { func request() -> String { return "Target: The default target's behavior." } } /// Адаптируемый класс содержит некоторое полезное поведение, но его интерфейс /// несовместим с существующим клиентским кодом. Адаптируемый класс нуждается в /// некоторой доработке, прежде чем клиентский код сможет его использовать. class Adaptee { public func specificRequest() -> String { return ".eetpadA eht fo roivaheb laicepS" } } /// Адаптер делает интерфейс Адаптируемого класса совместимым с целевым /// интерфейсом. class Adapter: Target { private var adaptee: Adaptee init(\_ adaptee: Adaptee) { self.adaptee = adaptee } override func request() -> String { return "Adapter: (TRANSLATED) " + adaptee.specificRequest().reversed() } } /// Клиентский код поддерживает все классы, использующие целевой интерфейс. class Client { // ... static func someClientCode(target: Target) { print(target.request()) } // ... } /// Давайте посмотрим как всё это будет работать. class AdapterConceptual: XCTestCase { func testAdapterConceptual() { print("Client: I can work just fine with the Target objects:") Client.someClientCode(target: Target()) let adaptee = Adaptee() print("Client: The Adaptee class has a weird interface. See, I don't understand it:") print("Adaptee: " + adaptee.specificRequest()) print("Client: But I can work with it via the Adapter:") Client.someClientCode(target: Adapter(adaptee)) } } #### **Output.txt:** Результат выполнения Client: I can work just fine with the Target objects: Target: The default target's behavior. Client: The Adaptee class has a weird interface. See, I don't understand it: Adaptee: .eetpadA eht fo roivaheb laicepS Client: But I can work with it via the Adapter: Adapter: (TRANSLATED) Special behavior of the Adaptee. Пример из реальной жизни ------------------------ #### **Example.swift:** Пример из реальной жизни import XCTest import UIKit /// Adapter Design Pattern /// /// Intent: Convert the interface of a class into the interface clients expect. /// Adapter lets classes work together that couldn't work otherwise because of /// incompatible interfaces. class AdapterRealWorld: XCTestCase { /// Example. Let's assume that our app perfectly works with Facebook /// authorization. However, users ask you to add sign in via Twitter. /// /// Unfortunately, Twitter SDK has a different authorization method. /// /// Firstly, you have to create the new protocol 'AuthService' and insert /// the authorization method of Facebook SDK. /// /// Secondly, write an extension for Twitter SDK and implement methods of /// AuthService protocol, just a simple redirect. /// /// Thirdly, write an extension for Facebook SDK. You should not write any /// code at this point as methods already implemented by Facebook SDK. /// /// It just tells a compiler that both SDKs have the same interface. func testAdapterRealWorld() { print("Starting an authorization via Facebook") startAuthorization(with: FacebookAuthSDK()) print("Starting an authorization via Twitter.") startAuthorization(with: TwitterAuthSDK()) } func startAuthorization(with service: AuthService) { /// The current top view controller of the app let topViewController = UIViewController() service.presentAuthFlow(from: topViewController) } } protocol AuthService { func presentAuthFlow(from viewController: UIViewController) } class FacebookAuthSDK { func presentAuthFlow(from viewController: UIViewController) { /// Call SDK methods and pass a view controller print("Facebook WebView has been shown.") } } class TwitterAuthSDK { func startAuthorization(with viewController: UIViewController) { /// Call SDK methods and pass a view controller print("Twitter WebView has been shown. Users will be happy :)") } } extension TwitterAuthSDK: AuthService { /// This is an adapter /// /// Yeah, we are able to not create another class and just extend an /// existing one func presentAuthFlow(from viewController: UIViewController) { print("The Adapter is called! Redirecting to the original method...") self.startAuthorization(with: viewController) } } extension FacebookAuthSDK: AuthService { /// This extension just tells a compiler that both SDKs have the same /// interface. } #### **Output.txt:** Результат выполнения Starting an authorization via Facebook Facebook WebView has been shown /// Starting an authorization via Twitter The Adapter is called! Redirecting to the original method... Twitter WebView has been shown. Users will be happy :) **Адаптер** на других языках программирования --------------------------------------------- [![Адаптер на C#](https://refactoring.guru/images/patterns/icons/csharp.svg?id=da64592defc6e86d57c39c66e9de3e58)](https://refactoring.guru/ru/design-patterns/adapter/csharp/example "Адаптер на C#") [![Адаптер на C++](https://refactoring.guru/images/patterns/icons/cpp.svg?id=f7782ed8b8666246bfcc3f8fefc3b858)](https://refactoring.guru/ru/design-patterns/adapter/cpp/example "Адаптер на C++") [![Адаптер на Go](https://refactoring.guru/images/patterns/icons/go.svg?id=1a89927eb99b1ea3fde7701d97970aca)](https://refactoring.guru/ru/design-patterns/adapter/go/example "Адаптер на Go") [![Адаптер на Java](https://refactoring.guru/images/patterns/icons/java.svg?id=e6d87e2dca08c953fe3acd1275ed4f4e)](https://refactoring.guru/ru/design-patterns/adapter/java/example "Адаптер на Java") [![Адаптер на PHP](https://refactoring.guru/images/patterns/icons/php.svg?id=be1906eb26b71ec1d3b93720d6156618)](https://refactoring.guru/ru/design-patterns/adapter/php/example "Адаптер на PHP") [![Адаптер на Python](https://refactoring.guru/images/patterns/icons/python.svg?id=6d815d43c0f7050a1151b43e51569c9f)](https://refactoring.guru/ru/design-patterns/adapter/python/example "Адаптер на Python") [![Адаптер на Ruby](https://refactoring.guru/images/patterns/icons/ruby.svg?id=b065b718c914bf8e960ef731600be1eb)](https://refactoring.guru/ru/design-patterns/adapter/ruby/example "Адаптер на Ruby") [![Адаптер на Rust](https://refactoring.guru/images/patterns/icons/rust.svg?id=1f5698a4b5ae23fe79413511747e4a87)](https://refactoring.guru/ru/design-patterns/adapter/rust/example "Адаптер на Rust") [![Адаптер на TypeScript](https://refactoring.guru/images/patterns/icons/typescript.svg?id=2239d0f16cb703540c205dd8cb0c0cb7)](https://refactoring.guru/ru/design-patterns/adapter/typescript/example "Адаптер на TypeScript") --- # Фасад на Java [There are patterns of patterns now! \ My friend's project: MetaPatterns.io](https://metapatterns.io/)  [](https://refactoring.guru/ru/design-patterns/facade/java/example#checkout) [](https://refactoring.guru/ru/design-patterns/facade/java/example#checkout) [](https://refactoring.guru/) / [Паттерны проектирования](https://refactoring.guru/ru/design-patterns) / [Фасад](https://refactoring.guru/ru/design-patterns/facade) / [Java](https://refactoring.guru/ru/design-patterns/java) ![Фасад](https://refactoring.guru/images/patterns/cards/facade-mini-2x.png?id=d4cc6a5d81a31143cc665f7ac1481ac8) **Фасад** на Java ================= **Фасад** — это структурный паттерн, который предоставляет простой (но урезанный) интерфейс к сложной системе объектов, библиотеке или фреймворку. Кроме того, что Фасад позволяет снизить общую сложность программы, он также помогает вынести код, зависимый от внешней системы в единственное место. [Подробней о паттерне Фасад](https://refactoring.guru/ru/design-patterns/facade) Навигация  [Интро](https://refactoring.guru/ru/design-patterns/facade/java/example#)  [Простой интерфейс к сложной библиотеке видеоконвертации](https://refactoring.guru/ru/design-patterns/facade/java/example#example-0)  some\_complex\_media\_library   [Video­File](https://refactoring.guru/ru/design-patterns/facade/java/example#example-0--some_complex_media_library-VideoFile-java)   [Codec](https://refactoring.guru/ru/design-patterns/facade/java/example#example-0--some_complex_media_library-Codec-java)   [MPEG4Compression­Codec](https://refactoring.guru/ru/design-patterns/facade/java/example#example-0--some_complex_media_library-MPEG4CompressionCodec-java)   [Ogg­Compression­Codec](https://refactoring.guru/ru/design-patterns/facade/java/example#example-0--some_complex_media_library-OggCompressionCodec-java)   [Codec­Factory](https://refactoring.guru/ru/design-patterns/facade/java/example#example-0--some_complex_media_library-CodecFactory-java)   [Bitrate­Reader](https://refactoring.guru/ru/design-patterns/facade/java/example#example-0--some_complex_media_library-BitrateReader-java)   [Audio­Mixer](https://refactoring.guru/ru/design-patterns/facade/java/example#example-0--some_complex_media_library-AudioMixer-java)  facade   [Video­Conversion­Facade](https://refactoring.guru/ru/design-patterns/facade/java/example#example-0--facade-VideoConversionFacade-java)  [Demo](https://refactoring.guru/ru/design-patterns/facade/java/example#example-0--Demo-java)  [Output­Demo](https://refactoring.guru/ru/design-patterns/facade/java/example#example-0--OutputDemo-txt) **Сложность:** **Популярность:** **Применимость:** Паттерн часто встречается в клиентских приложениях, написанных на Java, которые используют классы-фасады для упрощения работы со сложными библиотеки или API. Примеры Фасадов в стандартных библиотеках Java: * [`javax.faces.context.FacesContext`](http://docs.oracle.com/javaee/7/api/javax/faces/context/FacesContext.html) использует «под капотом» классы [`LifeCycle`](http://docs.oracle.com/javaee/7/api/javax/faces/lifecycle/Lifecycle.html) , [`ViewHandler`](http://docs.oracle.com/javaee/7/api/javax/faces/application/ViewHandler.html) , [`NavigationHandler`](http://docs.oracle.com/javaee/7/api/javax/faces/application/NavigationHandler.html) и многие другие, но клиенты об этом даже не знают (что не мешает заменить эти классы другими с помощью инъекций). * [`javax.faces.context.ExternalContext`](http://docs.oracle.com/javaee/7/api/javax/faces/context/ExternalContext.html) использует внутри классы [`ServletContext`](http://docs.oracle.com/javaee/7/api/javax/servlet/ServletContext.html) , [`HttpSession`](http://docs.oracle.com/javaee/7/api/javax/servlet/http/HttpSession.html) , [`HttpServletRequest`](http://docs.oracle.com/javaee/7/api/javax/servlet/http/HttpServletRequest.html) , [`HttpServletResponse`](http://docs.oracle.com/javaee/7/api/javax/servlet/http/HttpServletResponse.html) , и так далее. **Признаки применения паттерна:** Фасад угадывается в классе, который имеет простой интерфейс, но делегирует основную часть работы другим классам. Чаще всего, фасады сами следят за жизненным циклом объектов сложной системы. Простой интерфейс к сложной библиотеке видеоконвертации ------------------------------------------------------- В этом примере Фасад упрощает работу клиента со сложной библиотекой видеоконвертации. Фасад предоставляет пользователю лишь один простой метод, скрывая за собой целую систему с видеокодеками, аудиомикшерами и другими не менее сложными объектами. ### **some\_complex\_media\_library:** Сложная библиотека видеоконвертации #### **some\_complex\_media\_library/VideoFile.java:** Класс видеофайла package refactoring\_guru.facade.example.some\_complex\_media\_library; public class VideoFile { private String name; private String codecType; public VideoFile(String name) { this.name = name; this.codecType = name.substring(name.indexOf(".") + 1); } public String getCodecType() { return codecType; } public String getName() { return name; } } #### **some\_complex\_media\_library/Codec.java:** Интерфейс кодека package refactoring\_guru.facade.example.some\_complex\_media\_library; public interface Codec { } #### **some\_complex\_media\_library/MPEG4CompressionCodec.java:** Кодек MPEG4 package refactoring\_guru.facade.example.some\_complex\_media\_library; public class MPEG4CompressionCodec implements Codec { public String type = "mp4"; } #### **some\_complex\_media\_library/OggCompressionCodec.java:** Кодек Ogg package refactoring\_guru.facade.example.some\_complex\_media\_library; public class OggCompressionCodec implements Codec { public String type = "ogg"; } #### **some\_complex\_media\_library/CodecFactory.java:** Фабрика видеокодеков кодеков package refactoring\_guru.facade.example.some\_complex\_media\_library; public class CodecFactory { public static Codec extract(VideoFile file) { String type = file.getCodecType(); if (type.equals("mp4")) { System.out.println("CodecFactory: extracting mpeg audio..."); return new MPEG4CompressionCodec(); } else { System.out.println("CodecFactory: extracting ogg audio..."); return new OggCompressionCodec(); } } } #### **some\_complex\_media\_library/BitrateReader.java:** Bitrate-конвертер package refactoring\_guru.facade.example.some\_complex\_media\_library; public class BitrateReader { public static VideoFile read(VideoFile file, Codec codec) { System.out.println("BitrateReader: reading file..."); return file; } public static VideoFile convert(VideoFile buffer, Codec codec) { System.out.println("BitrateReader: writing file..."); return buffer; } } #### **some\_complex\_media\_library/AudioMixer.java:** Микширование аудио package refactoring\_guru.facade.example.some\_complex\_media\_library; import java.io.File; public class AudioMixer { public File fix(VideoFile result){ System.out.println("AudioMixer: fixing audio..."); return new File("tmp"); } } ### **facade** #### **facade/VideoConversionFacade.java:** Фасад библиотеки работы с видео package refactoring\_guru.facade.example.facade; import refactoring\_guru.facade.example.some\_complex\_media\_library.\*; import java.io.File; public class VideoConversionFacade { public File convertVideo(String fileName, String format) { System.out.println("VideoConversionFacade: conversion started."); VideoFile file = new VideoFile(fileName); Codec sourceCodec = CodecFactory.extract(file); Codec destinationCodec; if (format.equals("mp4")) { destinationCodec = new MPEG4CompressionCodec(); } else { destinationCodec = new OggCompressionCodec(); } VideoFile buffer = BitrateReader.read(file, sourceCodec); VideoFile intermediateResult = BitrateReader.convert(buffer, destinationCodec); File result = (new AudioMixer()).fix(intermediateResult); System.out.println("VideoConversionFacade: conversion completed."); return result; } } #### **Demo.java:** Клиентский код package refactoring\_guru.facade.example; import refactoring\_guru.facade.example.facade.VideoConversionFacade; import java.io.File; public class Demo { public static void main(String\[\] args) { VideoConversionFacade converter = new VideoConversionFacade(); File mp4Video = converter.convertVideo("youtubevideo.ogg", "mp4"); // ... } } #### **OutputDemo.txt:** Результат выполнения VideoConversionFacade: conversion started. CodecFactory: extracting ogg audio... BitrateReader: reading file... BitrateReader: writing file... AudioMixer: fixing audio... VideoConversionFacade: conversion completed. **Фасад** на других языках программирования ------------------------------------------- [![Фасад на C#](https://refactoring.guru/images/patterns/icons/csharp.svg?id=da64592defc6e86d57c39c66e9de3e58)](https://refactoring.guru/ru/design-patterns/facade/csharp/example "Фасад на C#") [![Фасад на C++](https://refactoring.guru/images/patterns/icons/cpp.svg?id=f7782ed8b8666246bfcc3f8fefc3b858)](https://refactoring.guru/ru/design-patterns/facade/cpp/example "Фасад на C++") [![Фасад на Go](https://refactoring.guru/images/patterns/icons/go.svg?id=1a89927eb99b1ea3fde7701d97970aca)](https://refactoring.guru/ru/design-patterns/facade/go/example "Фасад на Go") [![Фасад на PHP](https://refactoring.guru/images/patterns/icons/php.svg?id=be1906eb26b71ec1d3b93720d6156618)](https://refactoring.guru/ru/design-patterns/facade/php/example "Фасад на PHP") [![Фасад на Python](https://refactoring.guru/images/patterns/icons/python.svg?id=6d815d43c0f7050a1151b43e51569c9f)](https://refactoring.guru/ru/design-patterns/facade/python/example "Фасад на Python") [![Фасад на Ruby](https://refactoring.guru/images/patterns/icons/ruby.svg?id=b065b718c914bf8e960ef731600be1eb)](https://refactoring.guru/ru/design-patterns/facade/ruby/example "Фасад на Ruby") [![Фасад на Rust](https://refactoring.guru/images/patterns/icons/rust.svg?id=1f5698a4b5ae23fe79413511747e4a87)](https://refactoring.guru/ru/design-patterns/facade/rust/example "Фасад на Rust") [![Фасад на Swift](https://refactoring.guru/images/patterns/icons/swift.svg?id=0b716c2d52ec3a48fbe91ac031070c1d)](https://refactoring.guru/ru/design-patterns/facade/swift/example "Фасад на Swift") [![Фасад на TypeScript](https://refactoring.guru/images/patterns/icons/typescript.svg?id=2239d0f16cb703540c205dd8cb0c0cb7)](https://refactoring.guru/ru/design-patterns/facade/typescript/example "Фасад на TypeScript") --- # Decorator [There are patterns of patterns now! \ My friend's project: MetaPatterns.io](https://metapatterns.io/)  [](https://refactoring.guru/pt-br/design-patterns/decorator#checkout) [](https://refactoring.guru/pt-br/design-patterns/decorator#checkout) [](https://refactoring.guru/) / [Padrões de Projeto](https://refactoring.guru/pt-br/design-patterns) / [Padrões estruturais](https://refactoring.guru/pt-br/design-patterns/structural-patterns) Decorator ========= Também conhecido como: Decorador, Envoltório, Wrapper Propósito --------- O **Decorator** é um padrão de projeto estrutural que permite que você acople novos comportamentos para objetos ao colocá-los dentro de invólucros de objetos que contém os comportamentos. ![Padrão de projeto Decorator](https://refactoring.guru/images/patterns/content/decorator/decorator-2x.png?id=736ab07b1d8920ab2c7a70c9cb1305cc) Problema -------- Imagine que você está trabalhando em um biblioteca de notificação que permite que outros programas notifiquem seus usuários sobre eventos importantes. A versão inicial da biblioteca foi baseada na classe `Notificador` que tinha apenas alguns poucos campos, um construtor, e um único método `enviar`. O método podia aceitar um argumento de mensagem de um cliente e enviar a mensagem para uma lista de emails que eram passadas para o notificador através de seu construtor. Uma aplicação de terceiros que agia como cliente deveria criar e configurar o objeto notificador uma vez, e então usá-lo a cada vez que algo importante acontecesse. ![Estrutura da biblioteca antes de aplicar o padrão Decorator](https://refactoring.guru/images/patterns/diagrams/decorator/problem1-pt-br-2x.png?id=f3f8ce46f9ae80241cb41ace3340b51c) Um programa poderia usar a classe notificador para enviar notificações sobre eventos importantes para um conjunto predefinido de emails. Em algum momento você se dá conta que os usuários da biblioteca esperam mais que apenas notificações por email. Muitos deles gostariam de receber um SMS acerca de problemas críticos. Outros gostariam de ser notificados no Facebook, e, é claro, os usuários corporativos adorariam receber notificações do Slack. ![Estrutura da biblioteca após implementar outros tipos de notificação](https://refactoring.guru/images/patterns/diagrams/decorator/problem2-2x.png?id=28b2c8509b4e78c031d728424b876ebc) Cada tipo de notificação é implementada em uma subclasse do notificador. Quão difícil isso seria? Você estende a classe `Notificador` e coloca os métodos de notificação adicionais nas novas subclasses. Agora o cliente deve ser instanciado à classe de notificação que deseja e usar ela para todas as futura notificações. Mas então alguém, com razão, pergunta a você, “Por que você não usa diversos tipos de notificação de uma só vez? Se a sua casa pegar fogo, você provavelmente vai querer ser notificado por todos os canais.” Você tenta resolver esse problema criando subclasses especiais que combinam diversos tipos de métodos de notificação dentro de uma classe. Contudo, rapidamente você nota que isso irá inflar o código imensamente, e não só da biblioteca, o código cliente também. ![Estrutura da biblioteca após criar combinações de classes](https://refactoring.guru/images/patterns/diagrams/decorator/problem3-2x.png?id=abb7a87b521ce97d7661dd9c0b988cc3) Combinação explosiva de subclasses. Você precisa encontrar outra maneira de estruturar classes de notificação para que o número delas não quebre um recorde do Guinness acidentalmente. Solução ------- Estender uma classe é a primeira coisa que vem à mente quando você precisa alterar o comportamento de um objeto. Contudo, a herança vem com algumas ressalvas sérias que você precisa estar ciente. * A herança é estática. Você não pode alterar o comportamento de um objeto existente durante o tempo de execução. Você só pode substituir todo o objeto por outro que foi criado de uma subclasse diferente. * As subclasses só podem ter uma classe pai. Na maioria das linguagens, a herança não permite que uma classe herde comportamentos de múltiplas classes ao mesmo tempo. Uma das maneiras de superar essas ressalvas é usando _Agregação_ ou _Composição_ _Agregação_: objeto A contém objetos B; B pode viver sem A. _Composição_: objeto A consiste de objetos B; A gerencia o ciclo de vida de B; B não pode viver sem A. ao invés de _Herança_. Ambas alternativas funcionam quase da mesma maneira: um objeto _tem uma_ referência com outro e delega alguma funcionalidade, enquanto que na herança, o próprio objeto _é_ capaz de fazer a função, herdando o comportamento da sua superclasse. Com essa nova abordagem você pode facilmente substituir o objeto “auxiliador” por outros, mudando o comportamento do contêiner durante o tempo de execução. Um objeto pode usar o comportamento de várias classes, ter referências a múltiplos objetos, e delegar qualquer tipo de trabalho a eles. A agregação/composição é o princípio chave por trás de muitos padrões de projeto, incluindo o Decorator. Falando nisso, vamos voltar à discussão desse padrão. ![Herança vs. Agregação](https://refactoring.guru/images/patterns/diagrams/decorator/solution1-pt-br-2x.png?id=82b00a77a649c8ad5ff2e3867d45771a) Herança vs. Agregação “Envoltório” (ing. “wrapper”) é o apelido alternativo para o padrão Decorator que expressa claramente a ideia principal dele. Um _envoltório_ é um objeto que pode ser ligado com outro objeto _alvo_. O envoltório contém o mesmo conjunto de métodos que o alvo e delega a ele todos os pedidos que recebe. Contudo, o envoltório pode alterar o resultado fazendo alguma coisa ou antes ou depois de passar o pedido para o alvo. Quando um simples envoltório se torna um verdadeiro decorador? Como mencionei, o envoltório implementa a mesma interface que o objeto envolvido. É por isso que da perspectiva do cliente esses objetos são idênticos. Faça o campo de referência do envoltório aceitar qualquer objeto que segue aquela interface. Isso lhe permitirá cobrir um objeto em múltiplos envoltórios, adicionando o comportamento combinado de todos os envoltórios a ele. No nosso exemplo de notificações vamos deixar o simples comportamento de notificação por email dentro da classe `Notificador` base, mas transformar todos os métodos de notificação em decoradores. ![A solução com o padrão Decorator](https://refactoring.guru/images/patterns/diagrams/decorator/solution2-2x.png?id=7775f76b94dbd5cd25f711ce81f59262) Vários métodos de notificação se tornam decoradores. O código cliente vai precisar envolver um objeto notificador básico em um conjunto de decoradores que coincidem com as preferências do cliente. Os objetos resultantes serão estruturados como uma pilha. ![As aplicações pode configurar pilhas complexas de notificações decorators](https://refactoring.guru/images/patterns/diagrams/decorator/solution3-pt-br-2x.png?id=4b4f3cb97b49a58cf62a3f8b7d9ca39c) As aplicações pode configurar pilhas complexas de notificações decoradores O último decorador na pilha seria o objeto que o cliente realmente trabalha. Como todos os decoradores implementam a mesma interface que o notificador base, o resto do código cliente não quer saber se ele funciona com o objeto “puro” do notificador ou do decorador. Podemos utilizar a mesma abordagem para vários comportamentos tais como formatação de mensagens ou compor uma lista de recipientes. O cliente pode decorar o objeto com quaisquer decoradores customizados, desde que sigam a mesma interface que os demais. Analogia com o mundo real ------------------------- ![Exemplo do padrão Decorator](https://refactoring.guru/images/patterns/content/decorator/decorator-comic-1-2x.png?id=ba869f621b6e0ea173fdc2b535fc7eed) Você tem um efeito combinado de usar múltiplas peças de roupa. Vestir roupas é um exemplo de usar decoradores. Quando você está com frio, você se envolve com um suéter. Se você ainda sente frio com um suéter, você pode vestir um casaco por cima. Se está chovendo, você pode colocar uma capa de chuva. Todas essas vestimentas “estendem” seu comportamento básico mas não são parte de você, e você pode facilmente remover uma peça de roupa sempre que não precisar mais dela. Estrutura --------- ![Estrutura do padrão de projeto Decorator](https://refactoring.guru/images/patterns/diagrams/decorator/structure-2x.png?id=3cfa1f10417a4ef0c12580bc4a63b80d)![Estrutura do padrão de projeto Decorator](https://refactoring.guru/images/patterns/diagrams/decorator/structure-indexed-2x.png?id=2733e7d0e322bfb2f150ccf8a878dbf6) 1. O **Componente** declara a interface comum tanto para os envoltórios como para os objetos envolvidos. 2. O **Componente Concreto** é uma classe de objetos sendo envolvidos. Ela define o comportamento básico, que pode ser alterado por decoradores. 3. A classe **Decorador Base** tem um campo para referenciar um objeto envolvido. O tipo do campo deve ser declarado assim como a interface do componente para que possa conter ambos os componentes concretos e os decoradores. O decorador base delega todas as operações para o objeto envolvido. 4. Os **Decoradores Concretos** definem os comportamentos adicionais que podem ser adicionados aos componentes dinamicamente. Os decoradores concretos sobrescrevem métodos do decorador base e executam seus comportamentos tanto antes como depois de chamarem o método pai. 5. O **Cliente** pode envolver componentes em múltiplas camadas de decoradors, desde que trabalhe com todos os objetos através da interface do componente. Pseudocódigo ------------ Neste exemplo, o padrão **Decorator** lhe permite comprimir e encriptar dados sensíveis independentemente do código que verdadeiramente usa esses dados. ![Exemplo de estrutura do padrão Decorator](https://refactoring.guru/images/patterns/diagrams/decorator/example-2x.png?id=4891323a27d5601a174eec366187d833) Exemplo da encriptação e compressão com decoradores. A aplicação envolve o objeto da fonte de dados com um par de decoradores. Ambos invólucros mudam a maneira que os dados são escritos e lidos no disco: * Antes dos dados serem **escritos no disco**, os decoradores encriptam e comprimem eles. A classe original escreve os dados protegidos e encriptados para o arquivo sem saber da mudança. * Logo antes dos dados serem **lidos do disco**, ele passa pelos mesmos decoradores que descomprimem e decodificam eles. Os decoradores e a classe da fonte de dados implementam a mesma interface, que os torna intercomunicáveis dentro do código cliente. // A interface componente define operações que podem ser // alteradas por decoradores. interface DataSource is method writeData(data) method readData():data // Componentes concretos fornecem uma implementação padrão para // as operações. Pode haver diversas variações dessas classes em // um programa. class FileDataSource implements DataSource is constructor FileDataSource(filename) { ... } method writeData(data) is // Escreve dados no arquivo. method readData():data is // Lê dados de um arquivo. // A classe decorador base segue a mesma interface que os outros // componentes. O propósito primário dessa classe é definir a // interface que envolve todos os decoradores concretos. A // implementação padrão do código de envolvimento pode também // incluir um campo para armazenar um componente envolvido e os // meios para inicializá-lo. class DataSourceDecorator implements DataSource is protected field wrappee: DataSource constructor DataSourceDecorator(source: DataSource) is wrappee = source // O decorador base simplesmente delega todo o trabalho para // o componente envolvido. Comportamentos extra podem ser // adicionados em decoradores concretos. method writeData(data) is wrappee.writeData(data) // Decoradores concretos podem chamar a implementação pai da // operação ao invés de chamar o objeto envolvido // diretamente. Essa abordagem simplifica a extensão de // classes decorador. method readData():data is return wrappee.readData() // Decoradores concretos devem chamar métodos no objeto // envolvido, mas podem adicionar algo próprio para o resultado. // Os decoradores podem executar o comportamento adicional tanto // antes como depois da chamada ao objeto envolvido. class EncryptionDecorator extends DataSourceDecorator is method writeData(data) is // 1. Encriptar os dados passados. // 2. Passar dados encriptados para o método writeData // do objeto envolvido. method readData():data is // 1. Obter os dados do método readData do objeto // envolvido. // 2. Tentar decifrá-lo se for encriptado. // 3. Retornar o resultado. // Você pode envolver objetos em diversas camadas de // decoradores. class CompressionDecorator extends DataSourceDecorator is method writeData(data) is // 1. Comprimir os dados passados. // 2. Passar os dados comprimidos para o método // writeData do objeto envolvido. method readData():data is // 1. Obter dados do método readData do objeto // envolvido. // 2. Tentar descomprimi-lo se for comprimido. // 3. Retornar o resultado. // Opção 1. Um exemplo simples de uma montagem decorador. class Application is method dumbUsageExample() is source = new FileDataSource("somefile.dat") source.writeData(salaryRecords) // O arquivo alvo foi escrito com dados simples. source = new CompressionDecorator(source) source.writeData(salaryRecords) // O arquivo alvo foi escrito com dados comprimidos. source = new EncryptionDecorator(source) // A variável fonte agora contém isso: // Encryption > Compression > FileDataSource source.writeData(salaryRecords) // O arquivo foi escrito com dados comprimidos e // encriptados. // Opção 2. Código cliente que usa uma fonte de dados externa. // Objetos SalaryManager não sabem e nem se importam sobre as // especificações de armazenamento de dados. Eles trabalham com // uma fonte de dados pré configurada recebida pelo configurador // da aplicação. class SalaryManager is field source: DataSource constructor SalaryManager(source: DataSource) { ... } method load() is return source.readData() method save() is source.writeData(salaryRecords) // ...Outros métodos úteis... // A aplicação pode montar diferentes pilhas de decoradores no // tempo de execução, dependendo da configuração ou ambiente. class ApplicationConfigurator is method configurationExample() is source = new FileDataSource("salary.dat") if (enabledEncryption) source = new EncryptionDecorator(source) if (enabledCompression) source = new CompressionDecorator(source) logger = new SalaryManager(source) salary = logger.load() // ... Aplicabilidade -------------- Utilize o padrão Decorator quando você precisa ser capaz de projetar comportamentos adicionais para objetos em tempo de execução sem quebrar o código que usa esses objetos. O Decorator lhe permite estruturar sua lógica de negócio em camadas, criar um decorador para cada camada, e compor objetos com várias combinações dessa lógica durante a execução. O código cliente pode tratar de todos esses objetos da mesma forma, como todos seguem a mesma interface comum. Utilize o padrão quando é complicado ou impossível estender o comportamento de um objeto usando herança. Muitas linguagens de programação tem a palavra chave `final` que pode ser usada para prevenir a extensão de uma classe. Para uma classe final, a única maneira de reutilizar seu comportamento existente seria envolver a classe com seu próprio invólucro usando o padrão Decorator. Como implementar ---------------- 1. Certifique-se que seu domínio de negócio pode ser representado como um componente primário com múltiplas camadas opcionais sobre ele. 2. Descubra quais métodos são comuns tanto para o componente primário e para as camadas opcionais. Crie uma interface componente e declare aqueles métodos ali. 3. Crie uma classe componente concreta e defina o comportamento base nela. 4. Crie uma classe decorador base. Ela deve ter um campo para armazenar uma referência ao objeto envolvido. O campo deve ser declarado com o tipo da interface componente para permitir uma ligação entre os componentes concretos e decoradores. O decorador base deve delegar todo o trabalho para o objeto envolvido. 5. Certifique-se que todas as classes implementam a interface componente. 6. Crie decoradores concretos estendendo-os a partir do decorador base. Um decorador concreto deve executar seu comportamento antes ou depois da chamada para o método pai (que sempre delega para o objeto envolvido). 7. O código cliente deve ser responsável por criar decoradores e compô-los do jeito que o cliente precisa. Prós e contras -------------- * Você pode estender o comportamento de um objeto sem fazer um nova subclasse. * Você pode adicionar ou remover responsabilidades de um objeto no momento da execução. * Você pode combinar diversos comportamentos ao envolver o objeto com múltiplos decoradores. * _Princípio de responsabilidade única_. Você pode dividir uma classe monolítica que implementa muitas possíveis variantes de um comportamento em diversas classes menores. * É difícil remover um invólucro de uma pilha de invólucros. * É difícil implementar um decorador de tal maneira que seu comportamento não dependa da ordem do pilha de decoradores. * A configuração inicial do código de camadas pode ficar bastante feia. Relações com outros padrões --------------------------- * O [Adapter](https://refactoring.guru/pt-br/design-patterns/adapter) fornece uma interface completamente diferente para acessar um objeto existente. Por outro lado, com o padrão [Decorator](https://refactoring.guru/pt-br/design-patterns/decorator) , a interface permanece a mesma ou é estendida. Além disso, o _Decorator_ oferece suporte à composição recursiva, o que não é possível quando você usa o _Adapter_. * Com [Adapter](https://refactoring.guru/pt-br/design-patterns/adapter) , você acessa um objeto existente por meio de uma interface diferente. Com [Proxy](https://refactoring.guru/pt-br/design-patterns/proxy) , a interface permanece a mesma. Com [Decorator](https://refactoring.guru/pt-br/design-patterns/decorator) , você acessa o objeto por meio de uma interface aprimorada. * O [Chain of Responsibility](https://refactoring.guru/pt-br/design-patterns/chain-of-responsibility) e o [Decorator](https://refactoring.guru/pt-br/design-patterns/decorator) têm estruturas de classe muito parecidas. Ambos padrões dependem de composição recursiva para passar a execução através de uma série de objetos. Contudo, há algumas diferenças cruciais. Os handlers do _CoR_ podem executar operações arbitrárias independentemente uma das outras. Eles também podem parar o pedido de ser passado adiante em qualquer ponto. Por outro lado, vários _decoradores_ podem estender o comportamento do objeto enquanto mantém ele consistente com a interface base. Além disso, os decoradores não tem permissão para quebrar o fluxo do pedido. * O [Composite](https://refactoring.guru/pt-br/design-patterns/composite) e o [Decorator](https://refactoring.guru/pt-br/design-patterns/decorator) tem diagramas estruturais parecidos já que ambos dependem de composição recursiva para organizar um número indefinido de objetos. Um _Decorador_ é como um _Composite_ mas tem apenas um componente filho. Há outra diferença significativa: o _Decorador_ adiciona responsabilidades adicionais ao objeto envolvido, enquanto que o _Composite_ apenas “soma” o resultado de seus filhos. Contudo, os padrões também podem cooperar: você pode usar o _Decorador_ para estender o comportamento de um objeto específico na árvore [Composite](https://refactoring.guru/pt-br/design-patterns/composite) * Projetos que fazem um uso pesado de [Composite](https://refactoring.guru/pt-br/design-patterns/composite) e do [Decorator](https://refactoring.guru/pt-br/design-patterns/decorator) podem se beneficiar com frequência do uso do [Prototype](https://refactoring.guru/pt-br/design-patterns/prototype) . Aplicando o padrão permite que você clone estruturas complexas ao invés de reconstruí-las do zero. * O [Decorator](https://refactoring.guru/pt-br/design-patterns/decorator) permite que você mude a pele de um objeto, enquanto o [Strategy](https://refactoring.guru/pt-br/design-patterns/strategy) permite que você mude suas entranhas. * O [Decorator](https://refactoring.guru/pt-br/design-patterns/decorator) e o [Proxy](https://refactoring.guru/pt-br/design-patterns/proxy) têm estruturas semelhantes, mas propósitos muito diferentes. Alguns padrões são construídos no princípio de composição, onde um objeto deve delegar parte do trabalho para outro. A diferença é que o _Proxy_ geralmente gerencia o ciclo de vida de seu objeto serviço por conta própria, enquanto que a composição do _decoradores_ é sempre controlada pelo cliente. Exemplos de código ------------------ [![Decorator em C#](https://refactoring.guru/images/patterns/icons/csharp.svg?id=da64592defc6e86d57c39c66e9de3e58)](https://refactoring.guru/pt-br/design-patterns/decorator/csharp/example "Decorator em C#") [![Decorator em C++](https://refactoring.guru/images/patterns/icons/cpp.svg?id=f7782ed8b8666246bfcc3f8fefc3b858)](https://refactoring.guru/pt-br/design-patterns/decorator/cpp/example "Decorator em C++") [![Decorator em Go](https://refactoring.guru/images/patterns/icons/go.svg?id=1a89927eb99b1ea3fde7701d97970aca)](https://refactoring.guru/pt-br/design-patterns/decorator/go/example "Decorator em Go") [![Decorator em Java](https://refactoring.guru/images/patterns/icons/java.svg?id=e6d87e2dca08c953fe3acd1275ed4f4e)](https://refactoring.guru/pt-br/design-patterns/decorator/java/example "Decorator em Java") [![Decorator em PHP](https://refactoring.guru/images/patterns/icons/php.svg?id=be1906eb26b71ec1d3b93720d6156618)](https://refactoring.guru/pt-br/design-patterns/decorator/php/example "Decorator em PHP") [![Decorator em Python](https://refactoring.guru/images/patterns/icons/python.svg?id=6d815d43c0f7050a1151b43e51569c9f)](https://refactoring.guru/pt-br/design-patterns/decorator/python/example "Decorator em Python") [![Decorator em Ruby](https://refactoring.guru/images/patterns/icons/ruby.svg?id=b065b718c914bf8e960ef731600be1eb)](https://refactoring.guru/pt-br/design-patterns/decorator/ruby/example "Decorator em Ruby") [![Decorator em Rust](https://refactoring.guru/images/patterns/icons/rust.svg?id=1f5698a4b5ae23fe79413511747e4a87)](https://refactoring.guru/pt-br/design-patterns/decorator/rust/example "Decorator em Rust") [![Decorator em Swift](https://refactoring.guru/images/patterns/icons/swift.svg?id=0b716c2d52ec3a48fbe91ac031070c1d)](https://refactoring.guru/pt-br/design-patterns/decorator/swift/example "Decorator em Swift") [![Decorator em TypeScript](https://refactoring.guru/images/patterns/icons/typescript.svg?id=2239d0f16cb703540c205dd8cb0c0cb7)](https://refactoring.guru/pt-br/design-patterns/decorator/typescript/example "Decorator em TypeScript") [![](https://refactoring.guru/images/patterns/banners/patterns-book-banner-3-2x.png?id=0cc3f77ab421d1a5c02ee46488231c3a)](https://refactoring.guru/pt-br/design-patterns/book) ### Apoie nosso website gratuito e ganhe o eBook! * 22 padrões de projeto e 8 princípios explicados a fundo. * 439 páginas bem estruturadas, fáceis de se ler e livres de jargões. * 225 diagramas e ilustrações claras e úteis. * Um arquivo com exemplos de código em 11 línguas. * Suportado por todos os dispositivos: formatos PDF/EPUB/MOBI/KFX. [Saiba mais…](https://refactoring.guru/pt-br/design-patterns/book) --- # Міст на Ruby [There are patterns of patterns now! \ My friend's project: MetaPatterns.io](https://metapatterns.io/)  [](https://refactoring.guru/uk/design-patterns/bridge/ruby/example#checkout) [](https://refactoring.guru/uk/design-patterns/bridge/ruby/example#checkout) [](https://refactoring.guru/) / [Патерни проектування](https://refactoring.guru/uk/design-patterns) / [Міст](https://refactoring.guru/uk/design-patterns/bridge) / [Ruby](https://refactoring.guru/uk/design-patterns/ruby) ![Міст](https://refactoring.guru/images/patterns/cards/bridge-mini-2x.png?id=2622384cf623ed150ee9c21a0812dd87) **Міст** на Ruby ================ **Міст** — це структурний патерн, який розділяє бізнес-логіку або великий клас на кілька окремих ієрархій, які можна розвивати далі окремо одну від одної. Одна з цих ієрархій (абстракція) отримає посилання на об’єкти іншої ієрархії (реалізація) і буде делегувати їм основну роботу. Завдяки тому, що всі реалізації будуть дотримуватись спільного інтерфейсу, їх можна буде взаємозамінювати всередині абстракції. [Детальніше про Міст](https://refactoring.guru/uk/design-patterns/bridge) Навігація  [Інтро](https://refactoring.guru/uk/design-patterns/bridge/ruby/example#)  [Концептуальний приклад](https://refactoring.guru/uk/design-patterns/bridge/ruby/example#example-0)  [main](https://refactoring.guru/uk/design-patterns/bridge/ruby/example#example-0--main-rb)  [output](https://refactoring.guru/uk/design-patterns/bridge/ruby/example#example-0--output-txt) **Складність:** **Популярність:** **Застосування:** Патерн Міст особливо корисний, якщо вам доводиться робити крос-платформні додатки, підтримувати кілька типів баз даних або працювати з різними постачальниками схожого API (наприклад, cloud-сервіси, соціальні мережі і т. д.) **Ознаки застосування патерна:** Якщо в програмі чітко виділено класи «керування» та кілька видів класів «платформ», а керуючі об’єкти делегують виконання платформам, тоді можна сказати, що ви застосовуєте Міст. Концептуальний приклад ---------------------- Цей приклад показує структуру патерна **Міст**, а саме — з яких класів він складається, які ролі ці класи виконують і як вони взаємодіють один з одним. #### **main.rb:** Приклад структури патерна \# The Abstraction defines the interface for the "control" part of the two class # hierarchies. It maintains a reference to an object of the Implementation # hierarchy and delegates all of the real work to this object. class Abstraction # @param \[Implementation\] implementation def initialize(implementation) @implementation = implementation end # @return \[String\] def operation "Abstraction: Base operation with:\\n"\\ "#{@implementation.operation\_implementation}" end end # You can extend the Abstraction without changing the Implementation classes. class ExtendedAbstraction < Abstraction # @return \[String\] def operation "ExtendedAbstraction: Extended operation with:\\n"\\ "#{@implementation.operation\_implementation}" end end # The Implementation defines the interface for all implementation classes. It # doesn't have to match the Abstraction's interface. In fact, the two interfaces # can be entirely different. Typically the Implementation interface provides # only primitive operations, while the Abstraction defines higher-level # operations based on those primitives. class Implementation # @abstract # # @return \[String\] def operation\_implementation raise NotImplementedError, "#{self.class} has not implemented method '#{\_\_method\_\_}'" end end # Each Concrete Implementation corresponds to a specific platform and implements # the Implementation interface using that platform's API. class ConcreteImplementationA < Implementation # @return \[String\] def operation\_implementation 'ConcreteImplementationA: Here\\'s the result on the platform A.' end end class ConcreteImplementationB < Implementation # @return \[String\] def operation\_implementation 'ConcreteImplementationB: Here\\'s the result on the platform B.' end end # Except for the initialization phase, where an Abstraction object gets linked # with a specific Implementation object, the client code should only depend on # the Abstraction class. This way the client code can support any abstraction- # implementation combination. def client\_code(abstraction) # ... print abstraction.operation # ... end # The client code should be able to work with any pre-configured abstraction- # implementation combination. implementation = ConcreteImplementationA.new abstraction = Abstraction.new(implementation) client\_code(abstraction) puts "\\n\\n" implementation = ConcreteImplementationB.new abstraction = ExtendedAbstraction.new(implementation) client\_code(abstraction) #### **output.txt:** Результат виконання Abstraction: Base operation with: ConcreteImplementationA: Here's the result on the platform A. ExtendedAbstraction: Extended operation with: ConcreteImplementationB: Here's the result on the platform B. **Міст** іншими мовами програмування ------------------------------------ [![Міст на C#](https://refactoring.guru/images/patterns/icons/csharp.svg?id=da64592defc6e86d57c39c66e9de3e58)](https://refactoring.guru/uk/design-patterns/bridge/csharp/example "Міст на C#") [![Міст на C++](https://refactoring.guru/images/patterns/icons/cpp.svg?id=f7782ed8b8666246bfcc3f8fefc3b858)](https://refactoring.guru/uk/design-patterns/bridge/cpp/example "Міст на C++") [![Міст на Go](https://refactoring.guru/images/patterns/icons/go.svg?id=1a89927eb99b1ea3fde7701d97970aca)](https://refactoring.guru/uk/design-patterns/bridge/go/example "Міст на Go") [![Міст на Java](https://refactoring.guru/images/patterns/icons/java.svg?id=e6d87e2dca08c953fe3acd1275ed4f4e)](https://refactoring.guru/uk/design-patterns/bridge/java/example "Міст на Java") [![Міст на PHP](https://refactoring.guru/images/patterns/icons/php.svg?id=be1906eb26b71ec1d3b93720d6156618)](https://refactoring.guru/uk/design-patterns/bridge/php/example "Міст на PHP") [![Міст на Python](https://refactoring.guru/images/patterns/icons/python.svg?id=6d815d43c0f7050a1151b43e51569c9f)](https://refactoring.guru/uk/design-patterns/bridge/python/example "Міст на Python") [![Міст на Rust](https://refactoring.guru/images/patterns/icons/rust.svg?id=1f5698a4b5ae23fe79413511747e4a87)](https://refactoring.guru/uk/design-patterns/bridge/rust/example "Міст на Rust") [![Міст на Swift](https://refactoring.guru/images/patterns/icons/swift.svg?id=0b716c2d52ec3a48fbe91ac031070c1d)](https://refactoring.guru/uk/design-patterns/bridge/swift/example "Міст на Swift") [![Міст на TypeScript](https://refactoring.guru/images/patterns/icons/typescript.svg?id=2239d0f16cb703540c205dd8cb0c0cb7)](https://refactoring.guru/uk/design-patterns/bridge/typescript/example "Міст на TypeScript") --- # Компонувальник на PHP [There are patterns of patterns now! \ My friend's project: MetaPatterns.io](https://metapatterns.io/)  [](https://refactoring.guru/uk/design-patterns/composite/php/example#checkout) [](https://refactoring.guru/uk/design-patterns/composite/php/example#checkout) [](https://refactoring.guru/) / [Патерни проектування](https://refactoring.guru/uk/design-patterns) / [Компонувальник](https://refactoring.guru/uk/design-patterns/composite) / [PHP](https://refactoring.guru/uk/design-patterns/php) ![Компонувальник](https://refactoring.guru/images/patterns/cards/composite-mini-2x.png?id=3f7f811fefeb0b64f6774746eb42af09) **Компонувальник** на PHP ========================= **Компонувальник** — це структурний патерн, який дозволяє створювати дерево об’єктів та працювати з ним так само, як і з одиничним об’єктом. Компонувальник давно став синонімом всіх завдань, пов’язаних з побудовою дерева об’єктів. Всі операції компонувальника базуються на рекурсії та «підсумовуванні» результатів на гілках дерева. [Детальніше про Компонувальник](https://refactoring.guru/uk/design-patterns/composite) Навігація  [Інтро](https://refactoring.guru/uk/design-patterns/composite/php/example#)  [Концептуальний приклад](https://refactoring.guru/uk/design-patterns/composite/php/example#example-0)  [index](https://refactoring.guru/uk/design-patterns/composite/php/example#example-0--index-php)  [Output](https://refactoring.guru/uk/design-patterns/composite/php/example#example-0--Output-txt)  [Життєвий приклад](https://refactoring.guru/uk/design-patterns/composite/php/example#example-1)  [index](https://refactoring.guru/uk/design-patterns/composite/php/example#example-1--index-php)  [Output](https://refactoring.guru/uk/design-patterns/composite/php/example#example-1--Output-txt) **Складність:** **Популярність:** **Застосування:** Патерн Компонувальник зустрічається при вирішенні будь-яких завданнь, пов’язаних з побудовою дерева об’єктів. Найпростіший приклад — складові елементи DOM-дерева, які в свою чергу теж можна розглядати як піддерева. **Ознаки застосування патерна:** Якщо з об’єктів будується деревовидна структура та з усіма об’єктами дерева, як і з самим деревом, працюють через загальний інтерфейс. Концептуальний приклад ---------------------- Цей приклад показує структуру патерна **Компонувальник**, а саме — з яких класів він складається, які ролі ці класи виконують і як вони взаємодіють один з одним. Після ознайомлення зі структурою, вам буде легше сприймати наступний приклад, що розглядає реальний випадок використання патерна в світі PHP. #### **index.php:** Приклад структури патерна parent = $parent; } public function getParent(): Component { return $this->parent; } /\*\* \* In some cases, it would be beneficial to define the child-management \* operations right in the base Component class. This way, you won't need to \* expose any concrete component classes to the client code, even during the \* object tree assembly. The downside is that these methods will be empty \* for the leaf-level components. \*/ public function add(Component $component): void { } public function remove(Component $component): void { } /\*\* \* You can provide a method that lets the client code figure out whether a \* component can bear children. \*/ public function isComposite(): bool { return false; } /\*\* \* The base Component may implement some default behavior or leave it to \* concrete classes (by declaring the method containing the behavior as \* "abstract"). \*/ abstract public function operation(): string; } /\*\* \* The Leaf class represents the end objects of a composition. A leaf can't have \* any children. \* \* Usually, it's the Leaf objects that do the actual work, whereas Composite \* objects only delegate to their sub-components. \*/ class Leaf extends Component { public function operation(): string { return "Leaf"; } } /\*\* \* The Composite class represents the complex components that may have children. \* Usually, the Composite objects delegate the actual work to their children and \* then "sum-up" the result. \*/ class Composite extends Component { /\*\* \* @var \\SplObjectStorage \*/ protected $children; public function \_\_construct() { $this->children = new \\SplObjectStorage(); } /\*\* \* A composite object can add or remove other components (both simple or \* complex) to or from its child list. \*/ public function add(Component $component): void { $this->children->attach($component); $component->setParent($this); } public function remove(Component $component): void { $this->children->detach($component); $component->setParent(null); } public function isComposite(): bool { return true; } /\*\* \* The Composite executes its primary logic in a particular way. It \* traverses recursively through all its children, collecting and summing \* their results. Since the composite's children pass these calls to their \* children and so forth, the whole object tree is traversed as a result. \*/ public function operation(): string { $results = \[\]; foreach ($this->children as $child) { $results\[\] = $child->operation(); } return "Branch(" . implode("+", $results) . ")"; } } /\*\* \* The client code works with all of the components via the base interface. \*/ function clientCode(Component $component) { // ... echo "RESULT: " . $component->operation(); // ... } /\*\* \* This way the client code can support the simple leaf components... \*/ $simple = new Leaf(); echo "Client: I've got a simple component:\\n"; clientCode($simple); echo "\\n\\n"; /\*\* \* ...as well as the complex composites. \*/ $tree = new Composite(); $branch1 = new Composite(); $branch1->add(new Leaf()); $branch1->add(new Leaf()); $branch2 = new Composite(); $branch2->add(new Leaf()); $tree->add($branch1); $tree->add($branch2); echo "Client: Now I've got a composite tree:\\n"; clientCode($tree); echo "\\n\\n"; /\*\* \* Thanks to the fact that the child-management operations are declared in the \* base Component class, the client code can work with any component, simple or \* complex, without depending on their concrete classes. \*/ function clientCode2(Component $component1, Component $component2) { // ... if ($component1->isComposite()) { $component1->add($component2); } echo "RESULT: " . $component1->operation(); // ... } echo "Client: I don't need to check the components classes even when managing the tree:\\n"; clientCode2($tree, $simple); #### **Output.txt:** Результат виконання Client: I get a simple component: RESULT: Leaf Client: Now I get a composite tree: RESULT: Branch(Branch(Leaf+Leaf)+Branch(Leaf)) Client: I don't need to check the components classes even when managing the tree:: RESULT: Branch(Branch(Leaf+Leaf)+Branch(Leaf)+Leaf) Життєвий приклад ---------------- #### **index.php:** Приклад з реального світу name = $name; $this->title = $title; } public function getName(): string { return $this->name; } public function setData($data): void { $this->data = $data; } public function getData(): array { return $this->data; } /\*\* \* Each concrete DOM element must provide its rendering implementation, but \* we can safely assume that all of them are returning strings. \*/ abstract public function render(): string; } /\*\* \* This is a Leaf component. Like all the Leaves, it can't have any children. \*/ class Input extends FormElement { private $type; public function \_\_construct(string $name, string $title, string $type) { parent::\_\_construct($name, $title); $this->type = $type; } /\*\* \* Since Leaf components don't have any children that may handle the bulk of \* the work for them, usually it is the Leaves who do the most of the heavy- \* lifting within the Composite pattern. \*/ public function render(): string { return "\\n" . "name}\\" type=\\"{$this->type}\\" value=\\"{$this->data}\\">\\n"; } } /\*\* \* The base Composite class implements the infrastructure for managing child \* objects, reused by all Concrete Composites. \*/ abstract class FieldComposite extends FormElement { /\*\* \* @var FormElement\[\] \*/ protected $fields = \[\]; /\*\* \* The methods for adding/removing sub-objects. \*/ public function add(FormElement $field): void { $name = $field->getName(); $this->fields\[$name\] = $field; } public function remove(FormElement $component): void { $this->fields = array\_filter($this->fields, function ($child) use ($component) { return $child != $component; }); } /\*\* \* Whereas a Leaf's method just does the job, the Composite's method almost \* always has to take its sub-objects into account. \* \* In this case, the composite can accept structured data. \* \* @param array $data \*/ public function setData($data): void { foreach ($this->fields as $name => $field) { if (isset($data\[$name\])) { $field->setData($data\[$name\]); } } } /\*\* \* The same logic applies to the getter. It returns the structured data of \* the composite itself (if any) and all the children data. \*/ public function getData(): array { $data = \[\]; foreach ($this->fields as $name => $field) { $data\[$name\] = $field->getData(); } return $data; } /\*\* \* The base implementation of the Composite's rendering simply combines \* results of all children. Concrete Composites will be able to reuse this \* implementation in their real rendering implementations. \*/ public function render(): string { $output = ""; foreach ($this->fields as $name => $field) { $output .= $field->render(); } return $output; } } /\*\* \* The fieldset element is a Concrete Composite. \*/ class Fieldset extends FieldComposite { public function render(): string { // Note how the combined rendering result of children is incorporated // into the fieldset tag. $output = parent::render(); return "
{$this->title}\\n$output
\\n"; } } /\*\* \* And so is the form element. \*/ class Form extends FieldComposite { protected $url; public function \_\_construct(string $name, string $title, string $url) { parent::\_\_construct($name, $title); $this->url = $url; } public function render(): string { $output = parent::render(); return "
url}\\">\\n

{$this->title}

\\n$output
\\n"; } } /\*\* \* The client code gets a convenient interface for building complex tree \* structures. \*/ function getProductForm(): FormElement { $form = new Form('product', "Add product", "/product/add"); $form->add(new Input('name', "Name", 'text')); $form->add(new Input('description', "Description", 'text')); $picture = new Fieldset('photo', "Product photo"); $picture->add(new Input('caption', "Caption", 'text')); $picture->add(new Input('image', "Image", 'file')); $form->add($picture); return $form; } /\*\* \* The form structure can be filled with data from various sources. The Client \* doesn't have to traverse through all form fields to assign data to various \* fields since the form itself can handle that. \*/ function loadProductData(FormElement $form) { $data = \[\ 'name' => 'Apple MacBook',\ 'description' => 'A decent laptop.',\ 'photo' => \[\ 'caption' => 'Front photo.',\ 'image' => 'photo1.png',\ \],\ \]; $form->setData($data); } /\*\* \* The client code can work with form elements using the abstract interface. \* This way, it doesn't matter whether the client works with a simple component \* or a complex composite tree. \*/ function renderProduct(FormElement $form) { // .. echo $form->render(); // .. } $form = getProductForm(); loadProductData($form); renderProduct($form); #### **Output.txt:** Результат виконання

Add product

Product photo
**Компонувальник** іншими мовами програмування ---------------------------------------------- [![Компонувальник на C#](https://refactoring.guru/images/patterns/icons/csharp.svg?id=da64592defc6e86d57c39c66e9de3e58)](https://refactoring.guru/uk/design-patterns/composite/csharp/example "Компонувальник на C#") [![Компонувальник на C++](https://refactoring.guru/images/patterns/icons/cpp.svg?id=f7782ed8b8666246bfcc3f8fefc3b858)](https://refactoring.guru/uk/design-patterns/composite/cpp/example "Компонувальник на C++") [![Компонувальник на Go](https://refactoring.guru/images/patterns/icons/go.svg?id=1a89927eb99b1ea3fde7701d97970aca)](https://refactoring.guru/uk/design-patterns/composite/go/example "Компонувальник на Go") [![Компонувальник на Java](https://refactoring.guru/images/patterns/icons/java.svg?id=e6d87e2dca08c953fe3acd1275ed4f4e)](https://refactoring.guru/uk/design-patterns/composite/java/example "Компонувальник на Java") [![Компонувальник на Python](https://refactoring.guru/images/patterns/icons/python.svg?id=6d815d43c0f7050a1151b43e51569c9f)](https://refactoring.guru/uk/design-patterns/composite/python/example "Компонувальник на Python") [![Компонувальник на Ruby](https://refactoring.guru/images/patterns/icons/ruby.svg?id=b065b718c914bf8e960ef731600be1eb)](https://refactoring.guru/uk/design-patterns/composite/ruby/example "Компонувальник на Ruby") [![Компонувальник на Rust](https://refactoring.guru/images/patterns/icons/rust.svg?id=1f5698a4b5ae23fe79413511747e4a87)](https://refactoring.guru/uk/design-patterns/composite/rust/example "Компонувальник на Rust") [![Компонувальник на Swift](https://refactoring.guru/images/patterns/icons/swift.svg?id=0b716c2d52ec3a48fbe91ac031070c1d)](https://refactoring.guru/uk/design-patterns/composite/swift/example "Компонувальник на Swift") [![Компонувальник на TypeScript](https://refactoring.guru/images/patterns/icons/typescript.svg?id=2239d0f16cb703540c205dd8cb0c0cb7)](https://refactoring.guru/uk/design-patterns/composite/typescript/example "Компонувальник на TypeScript") --- # Фасад на C# [There are patterns of patterns now! \ My friend's project: MetaPatterns.io](https://metapatterns.io/)  [](https://refactoring.guru/ru/design-patterns/facade/csharp/example#checkout) [](https://refactoring.guru/ru/design-patterns/facade/csharp/example#checkout) [](https://refactoring.guru/) / [Паттерны проектирования](https://refactoring.guru/ru/design-patterns) / [Фасад](https://refactoring.guru/ru/design-patterns/facade) / [C#](https://refactoring.guru/ru/design-patterns/csharp) ![Фасад](https://refactoring.guru/images/patterns/cards/facade-mini-2x.png?id=d4cc6a5d81a31143cc665f7ac1481ac8) **Фасад** на C# =============== **Фасад** — это структурный паттерн, который предоставляет простой (но урезанный) интерфейс к сложной системе объектов, библиотеке или фреймворку. Кроме того, что Фасад позволяет снизить общую сложность программы, он также помогает вынести код, зависимый от внешней системы в единственное место. [Подробней о паттерне Фасад](https://refactoring.guru/ru/design-patterns/facade) Навигация  [Интро](https://refactoring.guru/ru/design-patterns/facade/csharp/example#)  [Концептуальный пример](https://refactoring.guru/ru/design-patterns/facade/csharp/example#example-0)  [Program](https://refactoring.guru/ru/design-patterns/facade/csharp/example#example-0--Program-cs)  [Output](https://refactoring.guru/ru/design-patterns/facade/csharp/example#example-0--Output-txt) **Сложность:** **Популярность:** **Применимость:** Паттерн часто встречается в клиентских приложениях, написанных на C#, которые используют классы-фасады для упрощения работы со сложными библиотеки или API. **Признаки применения паттерна:** Фасад угадывается в классе, который имеет простой интерфейс, но делегирует основную часть работы другим классам. Чаще всего, фасады сами следят за жизненным циклом объектов сложной системы. Концептуальный пример --------------------- Этот пример показывает структуру паттерна **Фасад**, а именно — из каких классов он состоит, какие роли эти классы выполняют и как они взаимодействуют друг с другом. #### **Program.cs:** Пример структуры паттерна using System; namespace RefactoringGuru.DesignPatterns.Facade.Conceptual { // Класс Фасада предоставляет простой интерфейс для сложной логики одной или // нескольких подсистем. Фасад делегирует запросы клиентов соответствующим // объектам внутри подсистемы. Фасад также отвечает за управление их // жизненным циклом. Все это защищает клиента от нежелательной сложности // подсистемы. public class Facade { protected Subsystem1 \_subsystem1; protected Subsystem2 \_subsystem2; public Facade(Subsystem1 subsystem1, Subsystem2 subsystem2) { this.\_subsystem1 = subsystem1; this.\_subsystem2 = subsystem2; } // Методы Фасада удобны для быстрого доступа к сложной функциональности // подсистем. Однако клиенты получают только часть возможностей // подсистемы. public string Operation() { string result = "Facade initializes subsystems:\\n"; result += this.\_subsystem1.operation1(); result += this.\_subsystem2.operation1(); result += "Facade orders subsystems to perform the action:\\n"; result += this.\_subsystem1.operationN(); result += this.\_subsystem2.operationZ(); return result; } } // Подсистема может принимать запросы либо от фасада, либо от клиента // напрямую. В любом случае, для Подсистемы Фасад – это еще один клиент, и // он не является частью Подсистемы. public class Subsystem1 { public string operation1() { return "Subsystem1: Ready!\\n"; } public string operationN() { return "Subsystem1: Go!\\n"; } } // Некоторые фасады могут работать с разными подсистемами одновременно. public class Subsystem2 { public string operation1() { return "Subsystem2: Get ready!\\n"; } public string operationZ() { return "Subsystem2: Fire!\\n"; } } class Client { // Клиентский код работает со сложными подсистемами через простой // интерфейс, предоставляемый Фасадом. Когда фасад управляет жизненным // циклом подсистемы, клиент может даже не знать о существовании // подсистемы. Такой подход позволяет держать сложность под контролем. public static void ClientCode(Facade facade) { Console.Write(facade.Operation()); } } class Program { static void Main(string\[\] args) { // В клиентском коде могут быть уже созданы некоторые объекты // подсистемы. В этом случае может оказаться целесообразным // инициализировать Фасад с этими объектами вместо того, чтобы // позволить Фасаду создавать новые экземпляры. Subsystem1 subsystem1 = new Subsystem1(); Subsystem2 subsystem2 = new Subsystem2(); Facade facade = new Facade(subsystem1, subsystem2); Client.ClientCode(facade); } } } #### **Output.txt:** Результат выполнения Facade initializes subsystems: Subsystem1: Ready! Subsystem2: Get ready! Facade orders subsystems to perform the action: Subsystem1: Go! Subsystem2: Fire! **Фасад** на других языках программирования ------------------------------------------- [![Фасад на C++](https://refactoring.guru/images/patterns/icons/cpp.svg?id=f7782ed8b8666246bfcc3f8fefc3b858)](https://refactoring.guru/ru/design-patterns/facade/cpp/example "Фасад на C++") [![Фасад на Go](https://refactoring.guru/images/patterns/icons/go.svg?id=1a89927eb99b1ea3fde7701d97970aca)](https://refactoring.guru/ru/design-patterns/facade/go/example "Фасад на Go") [![Фасад на Java](https://refactoring.guru/images/patterns/icons/java.svg?id=e6d87e2dca08c953fe3acd1275ed4f4e)](https://refactoring.guru/ru/design-patterns/facade/java/example "Фасад на Java") [![Фасад на PHP](https://refactoring.guru/images/patterns/icons/php.svg?id=be1906eb26b71ec1d3b93720d6156618)](https://refactoring.guru/ru/design-patterns/facade/php/example "Фасад на PHP") [![Фасад на Python](https://refactoring.guru/images/patterns/icons/python.svg?id=6d815d43c0f7050a1151b43e51569c9f)](https://refactoring.guru/ru/design-patterns/facade/python/example "Фасад на Python") [![Фасад на Ruby](https://refactoring.guru/images/patterns/icons/ruby.svg?id=b065b718c914bf8e960ef731600be1eb)](https://refactoring.guru/ru/design-patterns/facade/ruby/example "Фасад на Ruby") [![Фасад на Rust](https://refactoring.guru/images/patterns/icons/rust.svg?id=1f5698a4b5ae23fe79413511747e4a87)](https://refactoring.guru/ru/design-patterns/facade/rust/example "Фасад на Rust") [![Фасад на Swift](https://refactoring.guru/images/patterns/icons/swift.svg?id=0b716c2d52ec3a48fbe91ac031070c1d)](https://refactoring.guru/ru/design-patterns/facade/swift/example "Фасад на Swift") [![Фасад на TypeScript](https://refactoring.guru/images/patterns/icons/typescript.svg?id=2239d0f16cb703540c205dd8cb0c0cb7)](https://refactoring.guru/ru/design-patterns/facade/typescript/example "Фасад на TypeScript") --- # Factory Method em Go / Padrões de Projeto [There are patterns of patterns now! \ My friend's project: MetaPatterns.io](https://metapatterns.io/)  [](https://refactoring.guru/pt-br/design-patterns/factory-method/go/example#checkout) [](https://refactoring.guru/pt-br/design-patterns/factory-method/go/example#checkout) [](https://refactoring.guru/) / [Padrões de Projeto](https://refactoring.guru/pt-br/design-patterns) / [Factory Method](https://refactoring.guru/pt-br/design-patterns/factory-method) / [Go](https://refactoring.guru/pt-br/design-patterns/go) ![Factory Method](https://refactoring.guru/images/patterns/cards/factory-method-mini-2x.png?id=fa9d4a8d61a67cc3822e52b9daf69dad) **Factory Method** em Go ======================== O **Factory method** é um padrão de projeto criacional, que resolve o problema de criar objetos de produtos sem especificar suas classes concretas. O Factory Method define um método, que deve ser usado para criar objetos em vez da chamada direta ao construtor (operador `new`). As subclasses podem substituir esse método para alterar a classe de objetos que serão criados. > Se você não conseguir descobrir a diferença entre os padrões **Factory**, **Factory Method** e **Abstract Factory**, leia nossa [Comparação Factory](https://refactoring.guru/pt-br/design-patterns/factory-comparison) > . [Saiba mais sobre o Factory Method](https://refactoring.guru/pt-br/design-patterns/factory-method) Navegação  [Introdução](https://refactoring.guru/pt-br/design-patterns/factory-method/go/example#)  [Exemplo conceitual](https://refactoring.guru/pt-br/design-patterns/factory-method/go/example#example-0)  [i­Gun](https://refactoring.guru/pt-br/design-patterns/factory-method/go/example#example-0--iGun-go)  [gun](https://refactoring.guru/pt-br/design-patterns/factory-method/go/example#example-0--gun-go)  [ak47](https://refactoring.guru/pt-br/design-patterns/factory-method/go/example#example-0--ak47-go)  [musket](https://refactoring.guru/pt-br/design-patterns/factory-method/go/example#example-0--musket-go)  [gun­Factory](https://refactoring.guru/pt-br/design-patterns/factory-method/go/example#example-0--gunFactory-go)  [main](https://refactoring.guru/pt-br/design-patterns/factory-method/go/example#example-0--main-go)  [output](https://refactoring.guru/pt-br/design-patterns/factory-method/go/example#example-0--output-txt) Exemplo conceitual ------------------ É impossível implementar o padrão Factory Method clássico no Go devido à falta de recursos OOP, como classes e herança. No entanto, ainda podemos implementar a versão básica do padrão, o Factory Simples. Neste exemplo, vamos construir vários tipos de armas usando uma struct factory. Primeiro, criamos a interface `iGun`, que define todos os métodos que uma arma deve ter. Existe um tipo de struct `gun` que implementa a interface iGun. Duas armas concretas — `ak47` e `musket` — ambas incorporam a struct da arma e indiretamente implementam todos os métodos `iGun`. A struct `gunFactory` serve como um factory, que cria armas do tipo desejado com base em um argumento de entrada. O _main.go_ atua como o cliente. Em vez de interagir diretamente com o `ak47` ou `musket`, ele conta com o `gunFactory` para criar instâncias de várias armas, usando apenas parâmetros de tipo string para controlar a produção. #### **iGun.go:** Interface do produto package main type IGun interface { setName(name string) setPower(power int) getName() string getPower() int } #### **gun.go:** Produto concreto package main type Gun struct { name string power int } func (g \*Gun) setName(name string) { g.name = name } func (g \*Gun) getName() string { return g.name } func (g \*Gun) setPower(power int) { g.power = power } func (g \*Gun) getPower() int { return g.power } #### **ak47.go:** Produto concreto package main type Ak47 struct { Gun } func newAk47() IGun { return &Ak47{ Gun: Gun{ name: "AK47 gun", power: 4, }, } } #### **musket.go:** Produto concreto package main type musket struct { Gun } func newMusket() IGun { return &musket{ Gun: Gun{ name: "Musket gun", power: 1, }, } } #### **gunFactory.go:** Factory package main import "fmt" func getGun(gunType string) (IGun, error) { if gunType == "ak47" { return newAk47(), nil } if gunType == "musket" { return newMusket(), nil } return nil, fmt.Errorf("Wrong gun type passed") } #### **main.go:** Código cliente package main import "fmt" func main() { ak47, \_ := getGun("ak47") musket, \_ := getGun("musket") printDetails(ak47) printDetails(musket) } func printDetails(g IGun) { fmt.Printf("Gun: %s", g.getName()) fmt.Println() fmt.Printf("Power: %d", g.getPower()) fmt.Println() } #### **output.txt:** Resultados da execução Gun: AK47 gun Power: 4 Gun: Musket gun Power: 1 **Factory Method** em outras linguagens --------------------------------------- [![Factory Method em C#](https://refactoring.guru/images/patterns/icons/csharp.svg?id=da64592defc6e86d57c39c66e9de3e58)](https://refactoring.guru/pt-br/design-patterns/factory-method/csharp/example "Factory Method em C#") [![Factory Method em C++](https://refactoring.guru/images/patterns/icons/cpp.svg?id=f7782ed8b8666246bfcc3f8fefc3b858)](https://refactoring.guru/pt-br/design-patterns/factory-method/cpp/example "Factory Method em C++") [![Factory Method em Java](https://refactoring.guru/images/patterns/icons/java.svg?id=e6d87e2dca08c953fe3acd1275ed4f4e)](https://refactoring.guru/pt-br/design-patterns/factory-method/java/example "Factory Method em Java") [![Factory Method em PHP](https://refactoring.guru/images/patterns/icons/php.svg?id=be1906eb26b71ec1d3b93720d6156618)](https://refactoring.guru/pt-br/design-patterns/factory-method/php/example "Factory Method em PHP") [![Factory Method em Python](https://refactoring.guru/images/patterns/icons/python.svg?id=6d815d43c0f7050a1151b43e51569c9f)](https://refactoring.guru/pt-br/design-patterns/factory-method/python/example "Factory Method em Python") [![Factory Method em Ruby](https://refactoring.guru/images/patterns/icons/ruby.svg?id=b065b718c914bf8e960ef731600be1eb)](https://refactoring.guru/pt-br/design-patterns/factory-method/ruby/example "Factory Method em Ruby") [![Factory Method em Rust](https://refactoring.guru/images/patterns/icons/rust.svg?id=1f5698a4b5ae23fe79413511747e4a87)](https://refactoring.guru/pt-br/design-patterns/factory-method/rust/example "Factory Method em Rust") [![Factory Method em Swift](https://refactoring.guru/images/patterns/icons/swift.svg?id=0b716c2d52ec3a48fbe91ac031070c1d)](https://refactoring.guru/pt-br/design-patterns/factory-method/swift/example "Factory Method em Swift") [![Factory Method em TypeScript](https://refactoring.guru/images/patterns/icons/typescript.svg?id=2239d0f16cb703540c205dd8cb0c0cb7)](https://refactoring.guru/pt-br/design-patterns/factory-method/typescript/example "Factory Method em TypeScript") --- # Спостерігач на C# [There are patterns of patterns now! \ My friend's project: MetaPatterns.io](https://metapatterns.io/)  [](https://refactoring.guru/uk/design-patterns/observer/csharp/example#checkout) [](https://refactoring.guru/uk/design-patterns/observer/csharp/example#checkout) [](https://refactoring.guru/) / [Патерни проектування](https://refactoring.guru/uk/design-patterns) / [Спостерігач](https://refactoring.guru/uk/design-patterns/observer) / [C#](https://refactoring.guru/uk/design-patterns/csharp) ![Спостерігач](https://refactoring.guru/images/patterns/cards/observer-mini-2x.png?id=f205b0655572ac8e4636691c0e0debfd) **Спостерігач** на C# ===================== **Спостерігач** — це поведінковий патерн, який дозволяє об’єктам повідомляти інші об’єкти про зміни свого стану. При цьому спостерігачі можуть вільно підписуватися і відписуватись від цих повідомлень. [Детальніше про Спостерігач](https://refactoring.guru/uk/design-patterns/observer) Навігація  [Інтро](https://refactoring.guru/uk/design-patterns/observer/csharp/example#)  [Концептуальний приклад](https://refactoring.guru/uk/design-patterns/observer/csharp/example#example-0)  [Program](https://refactoring.guru/uk/design-patterns/observer/csharp/example#example-0--Program-cs)  [Output](https://refactoring.guru/uk/design-patterns/observer/csharp/example#example-0--Output-txt) **Складність:** **Популярність:** **Застосування:** Спостерігач часто зустрічається в коді C#, особливо там, де до відносин між компонентами застосовується модель подій. Спостерігач дозволяє окремим компонентам реагувати на події, які відбуваються в інших компонентах. **Ознаки застосування патерна:** Спостерігач визначається за механізмом підписки та методами повідомлення, які викликають компоненти програми. Концептуальний приклад ---------------------- Цей приклад показує структуру патерна **Спостерігач**, а саме — з яких класів він складається, які ролі ці класи виконують і як вони взаємодіють один з одним. #### **Program.cs:** Приклад структури патерна using System; using System.Collections.Generic; using System.Threading; namespace RefactoringGuru.DesignPatterns.Observer.Conceptual { public interface IObserver { // Receive update from subject void Update(ISubject subject); } public interface ISubject { // Attach an observer to the subject. void Attach(IObserver observer); // Detach an observer from the subject. void Detach(IObserver observer); // Notify all observers about an event. void Notify(); } // The Subject owns some important state and notifies observers when the // state changes. public class Subject : ISubject { // For the sake of simplicity, the Subject's state, essential to all // subscribers, is stored in this variable. public int State { get; set; } = -0; // List of subscribers. In real life, the list of subscribers can be // stored more comprehensively (categorized by event type, etc.). private List \_observers = new List(); // The subscription management methods. public void Attach(IObserver observer) { Console.WriteLine("Subject: Attached an observer."); this.\_observers.Add(observer); } public void Detach(IObserver observer) { this.\_observers.Remove(observer); Console.WriteLine("Subject: Detached an observer."); } // Trigger an update in each subscriber. public void Notify() { Console.WriteLine("Subject: Notifying observers..."); foreach (var observer in \_observers) { observer.Update(this); } } // Usually, the subscription logic is only a fraction of what a Subject // can really do. Subjects commonly hold some important business logic, // that triggers a notification method whenever something important is // about to happen (or after it). public void SomeBusinessLogic() { Console.WriteLine("\\nSubject: I'm doing something important."); this.State = new Random().Next(0, 10); Thread.Sleep(15); Console.WriteLine("Subject: My state has just changed to: " + this.State); this.Notify(); } } // Concrete Observers react to the updates issued by the Subject they had // been attached to. class ConcreteObserverA : IObserver { public void Update(ISubject subject) { if ((subject as Subject).State < 3) { Console.WriteLine("ConcreteObserverA: Reacted to the event."); } } } class ConcreteObserverB : IObserver { public void Update(ISubject subject) { if ((subject as Subject).State == 0 || (subject as Subject).State >= 2) { Console.WriteLine("ConcreteObserverB: Reacted to the event."); } } } class Program { static void Main(string\[\] args) { // The client code. var subject = new Subject(); var observerA = new ConcreteObserverA(); subject.Attach(observerA); var observerB = new ConcreteObserverB(); subject.Attach(observerB); subject.SomeBusinessLogic(); subject.SomeBusinessLogic(); subject.Detach(observerB); subject.SomeBusinessLogic(); } } } #### **Output.txt:** Результат виконання Subject: Attached an observer. Subject: Attached an observer. Subject: I'm doing something important. Subject: My state has just changed to: 2 Subject: Notifying observers... ConcreteObserverA: Reacted to the event. ConcreteObserverB: Reacted to the event. Subject: I'm doing something important. Subject: My state has just changed to: 1 Subject: Notifying observers... ConcreteObserverA: Reacted to the event. Subject: Detached an observer. Subject: I'm doing something important. Subject: My state has just changed to: 5 Subject: Notifying observers... **Спостерігач** іншими мовами програмування ------------------------------------------- [![Спостерігач на C++](https://refactoring.guru/images/patterns/icons/cpp.svg?id=f7782ed8b8666246bfcc3f8fefc3b858)](https://refactoring.guru/uk/design-patterns/observer/cpp/example "Спостерігач на C++") [![Спостерігач на Go](https://refactoring.guru/images/patterns/icons/go.svg?id=1a89927eb99b1ea3fde7701d97970aca)](https://refactoring.guru/uk/design-patterns/observer/go/example "Спостерігач на Go") [![Спостерігач на Java](https://refactoring.guru/images/patterns/icons/java.svg?id=e6d87e2dca08c953fe3acd1275ed4f4e)](https://refactoring.guru/uk/design-patterns/observer/java/example "Спостерігач на Java") [![Спостерігач на PHP](https://refactoring.guru/images/patterns/icons/php.svg?id=be1906eb26b71ec1d3b93720d6156618)](https://refactoring.guru/uk/design-patterns/observer/php/example "Спостерігач на PHP") [![Спостерігач на Python](https://refactoring.guru/images/patterns/icons/python.svg?id=6d815d43c0f7050a1151b43e51569c9f)](https://refactoring.guru/uk/design-patterns/observer/python/example "Спостерігач на Python") [![Спостерігач на Ruby](https://refactoring.guru/images/patterns/icons/ruby.svg?id=b065b718c914bf8e960ef731600be1eb)](https://refactoring.guru/uk/design-patterns/observer/ruby/example "Спостерігач на Ruby") [![Спостерігач на Rust](https://refactoring.guru/images/patterns/icons/rust.svg?id=1f5698a4b5ae23fe79413511747e4a87)](https://refactoring.guru/uk/design-patterns/observer/rust/example "Спостерігач на Rust") [![Спостерігач на Swift](https://refactoring.guru/images/patterns/icons/swift.svg?id=0b716c2d52ec3a48fbe91ac031070c1d)](https://refactoring.guru/uk/design-patterns/observer/swift/example "Спостерігач на Swift") [![Спостерігач на TypeScript](https://refactoring.guru/images/patterns/icons/typescript.svg?id=2239d0f16cb703540c205dd8cb0c0cb7)](https://refactoring.guru/uk/design-patterns/observer/typescript/example "Спостерігач на TypeScript") --- # Наблюдатель на TypeScript [There are patterns of patterns now! \ My friend's project: MetaPatterns.io](https://metapatterns.io/)  [](https://refactoring.guru/ru/design-patterns/observer/typescript/example#checkout) [](https://refactoring.guru/ru/design-patterns/observer/typescript/example#checkout) [](https://refactoring.guru/) / [Паттерны проектирования](https://refactoring.guru/ru/design-patterns) / [Наблюдатель](https://refactoring.guru/ru/design-patterns/observer) / [TypeScript](https://refactoring.guru/ru/design-patterns/typescript) ![Наблюдатель](https://refactoring.guru/images/patterns/cards/observer-mini-2x.png?id=f205b0655572ac8e4636691c0e0debfd) **Наблюдатель** на TypeScript ============================= **Наблюдатель** — это поведенческий паттерн, который позволяет объектам оповещать другие объекты об изменениях своего состояния. При этом наблюдатели могут свободно подписываться и отписываться от этих оповещений. [Подробней о паттерне Наблюдатель](https://refactoring.guru/ru/design-patterns/observer) Навигация  [Интро](https://refactoring.guru/ru/design-patterns/observer/typescript/example#)  [Концептуальный пример](https://refactoring.guru/ru/design-patterns/observer/typescript/example#example-0)  [index](https://refactoring.guru/ru/design-patterns/observer/typescript/example#example-0--index-ts)  [Output](https://refactoring.guru/ru/design-patterns/observer/typescript/example#example-0--Output-txt) **Сложность:** **Популярность:** **Применимость:** Наблюдатель можно часто встретить в TypeScript коде, особенно там, где применяется событийная модель отношений между компонентами. Наблюдатель позволяет отдельным компонентам реагировать на события, происходящие в других компонентах. **Признаки применения паттерна:** Наблюдатель можно определить по механизму подписки и методам оповещения, которые вызывают компоненты программы. Концептуальный пример --------------------- Этот пример показывает структуру паттерна **Наблюдатель**, а именно — из каких классов он состоит, какие роли эти классы выполняют и как они взаимодействуют друг с другом. #### **index.ts:** Пример структуры паттерна /\*\* \* Интерфейс издателя объявляет набор методов для управлениями подписчиками. \*/ interface Subject { // Присоединяет наблюдателя к издателю. attach(observer: Observer): void; // Отсоединяет наблюдателя от издателя. detach(observer: Observer): void; // Уведомляет всех наблюдателей о событии. notify(): void; } /\*\* \* Издатель владеет некоторым важным состоянием и оповещает наблюдателей о его \* изменениях. \*/ class ConcreteSubject implements Subject { /\*\* \* @type {number} Для удобства в этой переменной хранится состояние \* Издателя, необходимое всем подписчикам. \*/ public state: number; /\*\* \* @type {Observer\[\]} Список подписчиков. В реальной жизни список \* подписчиков может храниться в более подробном виде (классифицируется по \* типу события и т.д.) \*/ private observers: Observer\[\] = \[\]; /\*\* \* Методы управления подпиской. \*/ public attach(observer: Observer): void { const isExist = this.observers.includes(observer); if (isExist) { return console.log('Subject: Observer has been attached already.'); } console.log('Subject: Attached an observer.'); this.observers.push(observer); } public detach(observer: Observer): void { const observerIndex = this.observers.indexOf(observer); if (observerIndex === -1) { return console.log('Subject: Nonexistent observer.'); } this.observers.splice(observerIndex, 1); console.log('Subject: Detached an observer.'); } /\*\* \* Запуск обновления в каждом подписчике. \*/ public notify(): void { console.log('Subject: Notifying observers...'); for (const observer of this.observers) { observer.update(this); } } /\*\* \* Обычно логика подписки – только часть того, что делает Издатель. Издатели \* часто содержат некоторую важную бизнес-логику, которая запускает метод \* уведомления всякий раз, когда должно произойти что-то важное (или после \* этого). \*/ public someBusinessLogic(): void { console.log('\\nSubject: I\\'m doing something important.'); this.state = Math.floor(Math.random() \* (10 + 1)); console.log(\`Subject: My state has just changed to: ${this.state}\`); this.notify(); } } /\*\* \* Интерфейс Наблюдателя объявляет метод уведомления, который издатели \* используют для оповещения своих подписчиков. \*/ interface Observer { // Получить обновление от субъекта. update(subject: Subject): void; } /\*\* \* Конкретные Наблюдатели реагируют на обновления, выпущенные Издателем, к \* которому они прикреплены. \*/ class ConcreteObserverA implements Observer { public update(subject: Subject): void { if (subject instanceof ConcreteSubject && subject.state < 3) { console.log('ConcreteObserverA: Reacted to the event.'); } } } class ConcreteObserverB implements Observer { public update(subject: Subject): void { if (subject instanceof ConcreteSubject && (subject.state === 0 || subject.state >= 2)) { console.log('ConcreteObserverB: Reacted to the event.'); } } } /\*\* \* Клиентский код. \*/ const subject = new ConcreteSubject(); const observer1 = new ConcreteObserverA(); subject.attach(observer1); const observer2 = new ConcreteObserverB(); subject.attach(observer2); subject.someBusinessLogic(); subject.someBusinessLogic(); subject.detach(observer2); subject.someBusinessLogic(); #### **Output.txt:** Результат выполнения Subject: Attached an observer. Subject: Attached an observer. Subject: I'm doing something important. Subject: My state has just changed to: 6 Subject: Notifying observers... ConcreteObserverB: Reacted to the event. Subject: I'm doing something important. Subject: My state has just changed to: 1 Subject: Notifying observers... ConcreteObserverA: Reacted to the event. Subject: Detached an observer. Subject: I'm doing something important. Subject: My state has just changed to: 5 Subject: Notifying observers... **Наблюдатель** на других языках программирования ------------------------------------------------- [![Наблюдатель на C#](https://refactoring.guru/images/patterns/icons/csharp.svg?id=da64592defc6e86d57c39c66e9de3e58)](https://refactoring.guru/ru/design-patterns/observer/csharp/example "Наблюдатель на C#") [![Наблюдатель на C++](https://refactoring.guru/images/patterns/icons/cpp.svg?id=f7782ed8b8666246bfcc3f8fefc3b858)](https://refactoring.guru/ru/design-patterns/observer/cpp/example "Наблюдатель на C++") [![Наблюдатель на Go](https://refactoring.guru/images/patterns/icons/go.svg?id=1a89927eb99b1ea3fde7701d97970aca)](https://refactoring.guru/ru/design-patterns/observer/go/example "Наблюдатель на Go") [![Наблюдатель на Java](https://refactoring.guru/images/patterns/icons/java.svg?id=e6d87e2dca08c953fe3acd1275ed4f4e)](https://refactoring.guru/ru/design-patterns/observer/java/example "Наблюдатель на Java") [![Наблюдатель на PHP](https://refactoring.guru/images/patterns/icons/php.svg?id=be1906eb26b71ec1d3b93720d6156618)](https://refactoring.guru/ru/design-patterns/observer/php/example "Наблюдатель на PHP") [![Наблюдатель на Python](https://refactoring.guru/images/patterns/icons/python.svg?id=6d815d43c0f7050a1151b43e51569c9f)](https://refactoring.guru/ru/design-patterns/observer/python/example "Наблюдатель на Python") [![Наблюдатель на Ruby](https://refactoring.guru/images/patterns/icons/ruby.svg?id=b065b718c914bf8e960ef731600be1eb)](https://refactoring.guru/ru/design-patterns/observer/ruby/example "Наблюдатель на Ruby") [![Наблюдатель на Rust](https://refactoring.guru/images/patterns/icons/rust.svg?id=1f5698a4b5ae23fe79413511747e4a87)](https://refactoring.guru/ru/design-patterns/observer/rust/example "Наблюдатель на Rust") [![Наблюдатель на Swift](https://refactoring.guru/images/patterns/icons/swift.svg?id=0b716c2d52ec3a48fbe91ac031070c1d)](https://refactoring.guru/ru/design-patterns/observer/swift/example "Наблюдатель на Swift") --- # 러스트로 작성된 커맨드 / 디자인 패턴들 [There are patterns of patterns now! \ My friend's project: MetaPatterns.io](https://metapatterns.io/)  [](https://refactoring.guru/ko/design-patterns/command/rust/example#checkout) [](https://refactoring.guru/ko/design-patterns/command/rust/example#checkout) [](https://refactoring.guru/) / [디자인 패턴들](https://refactoring.guru/ko/design-patterns) / [커맨드](https://refactoring.guru/ko/design-patterns/command) / [러스트](https://refactoring.guru/ko/design-patterns/rust) ![커맨드](https://refactoring.guru/images/patterns/cards/command-mini-2x.png?id=e5f6332e057f6d352a209da963a8fc54) 러스트로 작성된 **커맨드** ================ **커맨드**는 요청 또는 간단한 작업을 객체로 변환하는 행동 디자인 패턴입니다. 이러한 변환은 명령의 지연 또는 원격 실행, 명령 기록 저장 등을 허용합니다. [커맨드에 대하여 더 자세히 알아보세요](https://refactoring.guru/ko/design-patterns/command) 내비게이션  [소개](https://refactoring.guru/ko/design-patterns/command/rust/example#)  [Text Editor: Commands and Undo](https://refactoring.guru/ko/design-patterns/command/rust/example#example-0)  [command](https://refactoring.guru/ko/design-patterns/command/rust/example#example-0--command-rs)   [copy](https://refactoring.guru/ko/design-patterns/command/rust/example#example-0--command-copy-rs)   [cut](https://refactoring.guru/ko/design-patterns/command/rust/example#example-0--command-cut-rs)   [paste](https://refactoring.guru/ko/design-patterns/command/rust/example#example-0--command-paste-rs)  [main](https://refactoring.guru/ko/design-patterns/command/rust/example#example-0--main-rs) In Rust, a command instance should _NOT hold a permanent reference to global context_, instead the latter should be passed _from top to down as a mutable parameter_ of the "`execute`" method: fn execute(&mut self, app: &mut cursive::Cursive) -> bool; Text Editor: Commands and Undo ------------------------------ Key points: * Each button runs a separate command. * Because a command is represented as an object, it can be pushed into a `history` array in order to be undone later. * TUI is created with `cursive` crate. #### **command.rs:** Command Inteface mod copy; mod cut; mod paste; pub use copy::CopyCommand; pub use cut::CutCommand; pub use paste::PasteCommand; /// Declares a method for executing (and undoing) a command. /// /// Each command receives an application context to access /// visual components (e.g. edit view) and a clipboard. pub trait Command { fn execute(&mut self, app: &mut cursive::Cursive) -> bool; fn undo(&mut self, app: &mut cursive::Cursive); } #### **command/copy.rs:** Copy Command use cursive::{views::EditView, Cursive}; use super::Command; use crate::AppContext; #\[derive(Default)\] pub struct CopyCommand; impl Command for CopyCommand { fn execute(&mut self, app: &mut Cursive) -> bool { let editor = app.find\_name::("Editor").unwrap(); let mut context = app.take\_user\_data::().unwrap(); context.clipboard = editor.get\_content().to\_string(); app.set\_user\_data(context); false } fn undo(&mut self, \_: &mut Cursive) {} } #### **command/cut.rs:** Cut Command use cursive::{views::EditView, Cursive}; use super::Command; use crate::AppContext; #\[derive(Default)\] pub struct CutCommand { backup: String, } impl Command for CutCommand { fn execute(&mut self, app: &mut Cursive) -> bool { let mut editor = app.find\_name::("Editor").unwrap(); app.with\_user\_data(|context: &mut AppContext| { self.backup = editor.get\_content().to\_string(); context.clipboard = self.backup.clone(); editor.set\_content("".to\_string()); }); true } fn undo(&mut self, app: &mut Cursive) { let mut editor = app.find\_name::("Editor").unwrap(); editor.set\_content(&self.backup); } } #### **command/paste.rs:** Paste Command use cursive::{views::EditView, Cursive}; use super::Command; use crate::AppContext; #\[derive(Default)\] pub struct PasteCommand { backup: String, } impl Command for PasteCommand { fn execute(&mut self, app: &mut Cursive) -> bool { let mut editor = app.find\_name::("Editor").unwrap(); app.with\_user\_data(|context: &mut AppContext| { self.backup = editor.get\_content().to\_string(); editor.set\_content(context.clipboard.clone()); }); true } fn undo(&mut self, app: &mut Cursive) { let mut editor = app.find\_name::("Editor").unwrap(); editor.set\_content(&self.backup); } } #### **main.rs:** Client code mod command; use cursive::{ traits::Nameable, views::{Dialog, EditView}, Cursive, }; use command::{Command, CopyCommand, CutCommand, PasteCommand}; /// An application context to be passed into visual component callbacks. /// It contains a clipboard and a history of commands to be undone. #\[derive(Default)\] struct AppContext { clipboard: String, history: Vec>, } fn main() { let mut app = cursive::default(); app.set\_user\_data(AppContext::default()); app.add\_layer( Dialog::around(EditView::default().with\_name("Editor")) .title("Type and use buttons") .button("Copy", |s| execute(s, CopyCommand)) .button("Cut", |s| execute(s, CutCommand::default())) .button("Paste", |s| execute(s, PasteCommand::default())) .button("Undo", undo) .button("Quit", |s| s.quit()), ); app.run(); } /// Executes a command and then pushes it to a history array. fn execute(app: &mut Cursive, mut command: impl Command + 'static) { if command.execute(app) { app.with\_user\_data(|context: &mut AppContext| { context.history.push(Box::new(command)); }); } } /// Pops the last command and executes an undo action. fn undo(app: &mut Cursive) { let mut context = app.take\_user\_data::().unwrap(); if let Some(mut command) = context.history.pop() { command.undo(app) } app.set\_user\_data(context); } Output ====== ![Text Editor screenshot](data:image/png;base64,iVBORw0KGgoAAAANSUhEUgAAA8AAAAJKCAYAAADjiiyRAAAAAXNSR0IArs4c6QAAAARnQU1BAACxjwv8YQUAAAAJcEhZcwAAFiUAABYlAUlSJPAAADfASURBVHhe7d0PnFV1nfj/N4qDKaLyR/lnBKICuWCoiKZUK2Wh9QP3m9KWYClsKm3+qU10NzVL3FotE7QVNdG2oD9i35T0F9QKVghCQCojKIjyV4Y/4kjMSPi9M3MGZoaZYWZghsHP8/l4XDnnzJnx3M+9c+e+7jn33BYz7i56NwAAAOA97qDsXwAAAHhPE8AAAAAkQQADAACQBAEMAABAEgQwAAAASRDAAAAAJEEAAwAAkAQBDAAAQBIEMAAAAEkQwAAAACRBAAMAAJAEAQwAAEASBDAAAABJEMAAAAAkQQADAACQBAEMAABAEgQwAAAASRDAAAAAJEEAAwAAkAQBDAAAQBIEMAAAAEkQwAAAACRBAAMAAJAEAQwAAEASBDAAAABJEMAAAAAkQQADAACQBAEMAABAEgQwAAAASRDAAAAAJEEAAwAAkAQBDAAAQBIEMAAAAEkQwAAAACRBAAMAAJAEAQwAAEASBDAAAABJEMAAAAAkQQADAACQBAEMAABAEgQwAAAASRDAAAAAJEEAAwAAkAQBDAAAQBIEMAAAAEkQwAAAACRBAAMAAJAEAQwAAEASBDAAAABJEMAAAAAkQQADAACQBAEMAABAEgQwAAAASRDAAAAAJEEAAwAAkAQBDAAAQBIEMAAAAEkQwAAAACRBAAMAAJAEAQwAAEASBDAAAABJEMAAAAAkQQADAACQBAEMAABAEgQwAAAASRDAAAAAJEEAAwAAkAQBDAAAQBIEMAAAAEkQwAAAACRBAAMAAJAEAQwAAEASBDAAAABJEMAAAAAkQQADAACQBAEMAABAEgQwAAAASRDAAAAAJEEAAwAAkAQBDAAAQBIEMAAAAEkQwAAAACRBAAMAAJAEAQwAAEASBDAAAABJEMAAAAAkQQADAACQBAEMAABAEgQwAAAASRDAAAAAJEEAAwAAkAQBDAAAQBIEMAAAAEkQwAAAACRBAAMAAJAEAQwAAEASBDAAAABJEMAAAAAkQQADAACQBAEMAABAEgQwAAAASRDAAAAAJEEAAwAAkAQBDAAAQBIEMAAAAEkQwAAAACRBAAMAAJAEAQwAAEASBDAAAABJEMAAAAAkQQADAACQBAEMAABAEgQwAAAASRDAAAAAJEEAAwAAkAQBDAAAQBIEMAAAAEkQwAAAACRBAAMAAJAEAQwAAEASBDAAAABJEMAAAAAkQQADAACQBAEMAABAEgQwAAAASRDAAAAAJEEAAwAAkAQBDAAAQBIEMAAAAEkQwAAAACRBAAMAAJAEAQwAAEASBDAAAABJEMAAAAAkQQADAACQBAEMAABAEgQwAAAASRDAAAAAJEEAAwAAkAQBDAAAQBIEMAAAAEkQwAAAACRBAAMAAJAEAQwAAEASBDAAAABJEMAAAAAkQQADAACQBAEMAABAEgQwAAAASRDAAAAAJEEAAwAAkAQBDAAAQBIEMAAAAEkQwAAAACRBAAMAAJAEAQwAAEASBDAAAABJEMAAAAAkQQADAACQBAEMAABAEgQwAAAASRDAAAAAJEEAAwAAkAQBDAAAQBIEMAAAAEkQwAAAACRBAAMAAJAEAQwAAEASBDAAAABJEMAAAAAkQQADAACQBAEMAABAEgQwAAAASRDAAAAAJEEAAwAAkAQBDAAAQBIEMAAAAEkQwAAAACRBAAMAAJAEAQwAAEASBDAAAABJEMAAAAAkQQADAACQBAEMAABAEgQwAAAASRDAAAAAJEEAAwAAkAQBDAAAQBIEMAAAAEkQwAAAACRBAAMAAJAEAQwAAEASBDAAAABJEMAAAAAkQQADAACQBAEMAABAEgQwAAAASRDAAAAAJEEAAwAAkAQBDAAAQBIEMAAAAEkQwAAAACRBAAMAAJAEAQwAAEASBDAAAABJEMAAAAAkQQADAACQBAEMAABAEgQwAAAASRDAAAAAJEEAAwAAkAQBDAAAQBIEMAAAAEkQwAAAACRBAAMAAJAEAQwAAEASBDAAAABJEMAAAAAkQQADAACQBAEMAABAElrMuLvo3Wwa2I8+PKoom6KxzJkzP0ZeOiYmPTQ+Bgzony0FqD+PJ03njxNbZVMAe88eYAAAAJIggAEAAEiCAAYAACAJAhgAAIAkCGAAAACSIIABOCBsfuo/4umx02NzNp+eTfHi2PPjT09tyuYbUfG6WLnw9SjMZveovusDwH4igAEaJD8WfXlMPFPp8vl4+uNDY+Zuyx+L1dl3wQGh8K/x2td+Gxuz2T2q7/oAsJ8IYIAG6RV9fzQ+zq54ue2LcUj8Q7S/rcryHw2Nztl3AQCw/whgAAAAktBixt1F72bTwH704VFF2RSNZc6c+THy0jEx6aHxMWBA/2zpPrRxevzp4qfjqCm3Rp+22bIKCv/4nzFv8j/EB+8eEu2zZZUVRv5NF8fmj06JgR9rnZsvec/nF2LbiCei1yFPx5Ipv44trxfHQcXvxI6je8RRI0bHyf2OrvaVzM0LH4slD0+PbW/nZnLrx3GnxjGX/HOc2LP1Xr/yub3w9Xj1f38dBY/nR3HJgo2bInp/JI657NLo9f680nXK7Nr+/se/Hvn3PxRvLFqX+/9vir9vPDYOv2xM9DmvRxyWrV1uR+Gy3Lb/T7zx3Mo4KPfjdhR3jdaXfD46F/84Xvrfj0S/cYPjqGzdetnD7fPaPefH8rgjPnJlr2xJma0vPx35j/wiclc7256IvL652/DCQdHj/dWPZ+OMf9l4bv7og3HK8fl7vj/U9/q+/Fg881/Ty6aL34i/565vi+OP2W1723x1fPTtnZuo7/qZnbdv6X0hNx+t49BP5Mbmwr5VbteG3X8acns1RKM/nrDTHye2yqYA9p4AhmZCADe+/R3AEctiwRdujbj5x3FKz2xRRSXf/4X86PjYmOhR2pFlAbCx8KTYkXdmdL3xs9Ej+7lbX54WC/71oWh544Mx4MMlsVyuOBc2X4nliwfGcbd8scr6v45D77g7+veuGKn1szkX8Qu/tymOvPGq6Hn6cbl0KbN14X3x3NfmRZt7/7vCdSvb/q0f/bfY/sCvI+/G/4i+uUBrmfvKjsJFue0ZG1svfDDOvuDYstVzdqx9OuZ8eULE5bdH3wvK46YwVj91X7z8XzPi3dOuadIA3vHyL+KZf10U7X/0H6VxXx5PhS9Pjxdz8df65tujT8dsYanGHP+y8SxY1zXi6MF7vj80MPhLLb4vnv7XiO6/Gx3vzxbVqo7r71g7PWZ/6RfR8uv/Hqd87LgoG4lNsez+W+P1P/WK7j/Kff/O4WnA/afet1fDCeCmI4CBfUkAQzNRXQBv2bIl8vNfyeYqa9Eim6Ba775b8tBWeZDy85fGuNt/sB8DOKLg8WvjhZc/H2dcfWocmi0rV/K1FwvHxNnDe2RP3LPgOfZbcUpu/Taly3bZNnd8PHtTXnSftis6SvcyP3B0lZAosy0XqXO+d3T0/Mln9+I9ycWxLZctVbe9xOrJX4ylr4yOU288Mwvjsu1fv7B/dHgwNyZVwqM4t/1/vuvYOGHn9rwez3/ly7H5vB/FWRcct9ueuoLHr48X/ji4SQN45f1D45Xib8U5V/at057Dxh3/et4fml0AL4sFX/pKbL34wRh43rFVxrPkhYN/ieWb9ub+U//ba2+UB/DY66+OXr1OyJaW8fhcu+oen8v16nV8tGlT+d4tgIF9SQBDM1FdAJc/wWLf2p8BHMWL4rmhD8WhD94ZJ1d6Ql+yd/jOaHnb+Dh5Z0GUBcDmj/4kzjrv6GxZBcXzYs75t0bLHz4W/UsPMX09Fn3py7Htiqkx4PTq9jLuYQ/0XtqRC7xZYw+J46d9MbqWLinf/gdz279rL91Oa3PjdcnT0TY3Xr1y47UjF1GzriuO43buAa+s5GOQFjbxIdClL1g8NShOunto7HnHYWOPfz3vD80sgMtu39w6FV6wqWS37a3f/adE/W6vvePxuXFU9/gsgIF9SQBDM1FbAF9//Vej9257GOxiqE3ZHobKFucvjdtvv2v/BnDO6sn/Ei/HNyrs6c21y8Lx8ef7e1R5f/AegifWxYvXfSk2X5D7+sdyX9/4dO7/PzvaT/1GnFjxqOidiuPlHwyLN/pl6++lHcWFsfG1ZbExf15sfe2N2PrcvHjn9cEVImgP219lvN54fEwsfvmLcebVp2aHxla2PwK4ZIyXfO/WWDP36Djiss9G19N7Rdu2eaWH4e6m0ce/vveHhlzfTCMEcOkRAmvH1Hj7lh4B8OUvx9bLyl9AqN/9p0w9bq+95PG54er7+CyAgX1JAEMzUVsAN1qwJabRx7OOARyFT8fsi2ZH25+Xh1LVk1+V21PwVPl6aYRMr/ZEROV2rF0eLa+o6efVzdaS91Pe9Vhs63hqtP3ER+KY3sdE69at49DdIqh+AVNrkOXsnwAuU3Lir9f+OC82/ml6bF24KQ46/bPR8ZLBlU+q1OjjX8/7QzML4D3dvrtfv/rdfyqq0+21lzw+71u1jacABvalffV3AIC6an1mHPOJP8cb/7uubL5wXmye+6k4ptLJrOpiUxS/HtGy7eFls4ccHS1icHyg0mcQV74MeuyJBsZXmY25CJ37QHF0HZf7eTd+Mfqc3iPal8Rv9vW90bLtMRHFb0fpmaWbmZatj4se5w2N024pGcMfR58L82LjzV+IP03OzoRdognGv3ZV7g/NzJ5v38LYsSn3xKT1Idl8w9Xp9gIgSQIYoMnlRY/hoyMmz4zVubmC//11FI8YEh+o/rjQmq3Nj8J1/aP18dk3vr9HLkT/HBtfLpvd54oXxbK7NkW7K4ZEx/q2eh20Oa5XxHPLoiCb3/dKwuqdkiOR91JetO09JE67+dKIB34drxZmixt7/Pek6v1hr65vfSN0z+t37HdmxP8/L9Zm87vZ+FJseaV/tOm9r+9cNdxeACRJAAPsDx0HxTG9/yde+8O8WDk5ou1Hd70feDfvFMeObHKX4njt0V/E3z86JN5ffvhn3qnR9bK8ePOB6bExW7RPFW6K4ndal3626u4KY+3i17Pphmndb1C02jgtVi+srtg2RcHildl0A7U9Lg479q9R+PruP3/ba9Ni5ePZzE7FsXHtpmrGvsxBVd/J2tjjX67G+8OvK98f6n19KziuV7SK16OwrlekDusf1HtwHNkx9/99al312z/5F/FOxe2vt3reXgAkSQAD7Beto+fFn4/i274Zbx7//8UHajll7Tt3fSVmT14UG3d2TC42H781lj93ahz31fKPjCnTefi34ti8++L5702P1ZX2dOXiYPG0eO470xu+h7Vt32h7Wn4UTJ4Xm7NFJYrXLooF110Xy15pHQdnyxqk9Zlx4le7xttjb43nXy7cGTLbC/Nj0XW3xtrqPxGsHnpE1+Enxd/ufSheqzA2mxf+OJ67bWUcdXmV93EWr4vV3xsTf/peLtrWVo7OHYXL4vl774sdF+duuwo3QKOOf+ade66t4f7wD1XuD/W8vhW1PjXan//XKHj4z5Vu6x25MSnIjcVu6rR+j+h78+jYcdc3Y/7cdbkRKVcYq6vd/npqwO0FQHqcBAuaCSfBanzN5iRYO5V9bM7WS6qe/Kpc+UmA7o4eedPj1SmLyqIh95+80z4bHxjxkRoORS6MgrnTY9nk38a2TYeU7rHdkcuKQ0/7VC6IPhKd9yYAcpHx8qP3xepH83NBfHTpq6gt+w7N/dzB0TVKrv+y6NrAk2CVKz3J1r2/iK2v57Y9t/yg4wZHxyuGRtu5e3kSrFK5WHzqoXj5gT/Hjtz2l8j76OjoNbxvRMlJtl75/G4naSp8+elY9vjM2JJftuey5DrvOPy4aHPBZ+PEj/WIw0rXqqixxr9sPLcNnxKdN/501/0hJ69vTfeH+l/fXTblrsP4WFnhti653kddflX0rfYw5bqtXxKjSx7+n3jjuZW5sTkkF8l5cegFl8aJF/atcrs27P5T/9urYTw+71tOggU0FQEMzYQAbnzNbjzXTotnvrQsOtfwubd7DABgv/H4vG8JYKCplLwwCkCTK3sP746GnPwKAIAGEcAA+0HBU/8Zy587Mz5wYS0nvwIAYJ/yvAugiWxfeF/M/NKY3OVfIn/xmXHSj0bH++39BQBoMgIYoIm07Dc6Bj04Pnf57zj76sHRcY/xe3T0GfeE9/8CAOwjAhgAAIAkOAs0NBPVnQV67ty/xIiRV8XDkybE6ad/KFvaMM6iCUBjqO7vV33V9veud5+zsqm6uf+aedkUwO7sAYZm7N3s5anyfwHgvcjfO6CpCGAAAACSIIABAABIggAGAAAgCQIYAACAJAhgYN/ZOjN+PvWr8cPyyy8vjVsfeDBezb68m/quT+328XhuXnJT3Prk9Nicze9m+/p4dc2KKMxmAQCaOwEMKdk6PR584KaYtzWbr+qNB/cuQA8bFBcNuyv+tfwyaFD2hRrUd/1mpGDxV+PW2Quzudq9PPvz8cPFq7O5RtTU41m8MH4/bUYUZLMAAM2dAAZogKOO6BmxYXXNe0d3Wh9v5lZqf9iR2TwAAPuLAAZogJbvOyparV1Rh72f62PtqsOiXevDs3kAAPYXAQzUyeY1k+OnT5S/t/TK+OHvfhQLN7ydfbWJFa2IhbO/veu9rlPHxk+fX1iHvbH7UOue0TVWxIa3svkSGx6J7z5waTzxRjZfYuvqWBe5dVtn8yXquf2vzv583Dr7xdLpbZv/HDP+MDb7vivjuz8dG8/u7RXPtufOkts19zPv/OW349evrIht2ZcBAN4rBDCwB2/nAuzKuGfu1hjwsey9pf/nnhjdv3PM+83Xc7HXxBH81vR48Gf/GS91+FJcufP9rtfGgL9Njnt++WC8uj1br7G1ah/tWr8WBX/L5nMK3nguiuKdeGHN0mxJTuFrsbZ15ziyVTbf4O1/Jza/kovmmYuj2xnjsu+7J/7tolvi1KOyVRoitz0P//ymWHjkJXFl7nYt+ZnX/p8xcerffxU/nfVythIAwHuDAAZqVbhifPx05Wnxz0O+FD0PyxbmHNruM/HP5/WNF/7waKzMljW+pfHUUz+OOOuWuOj4ztEyWxrRIXqe/u9xUdc/56Ltz010VuLO0fWYiHWb12fzb8e6tQXRp9fAKFq2eOeh0YVvrYi/H9kpyhp1L7Z/5X/Hw0sHxujPVL4domVehZ9TX6vjj3/4cRSedluM6N0tDs2WRm5ru554bYw46/3ZPADAe4MAhuSsiBlPlR96W+Uyc2a2TrkV8ezcRdFz4MXxgWoq69BO50a/mBkvbMgWNLY3ZsW8wnPjH0/skC2o6PDo2ffi6LjsyXipprNc71OHx5FtD4tVG7MA3r448pf1jV59T4vjN86LFdk2bC5cHQe36xylR0DvzfYX9o5PDB6chfQ+8saT8fTGgfGPJ3TOFlTW8uC8bAoA4L1BAENyusW555UfelvlUvVjc7YujRVv9o0PdqjpBE7dolvXrbFqc9O8+3blmj/H30/oG12z+d0c1idOavtyvLqxOFvQuNof1TNXuNmZoDcuipc69o0uR+TGJLcNL60vOTT87Xhz49bo2LYsMPdq+3udG70avqu3WgUbFua258zo2dCfe1iHaNexfO82AEDzJ4CBmhW+FqticTw1rZq9xaWXr8e0Zbn1/v5O2fqNbPvftkYcfFgth/weEoe+L+LNrW9m843r0Pd1iINXvVYawCVx27Jrz1wMdo5uPQ6LV9aUvH/2zdi8+ZA49oiyRGxu21/4ZsEetmdPDomWBx+STQMANH8CGKhZLm5axcD4THV7i7PLtZf8T3yp2kN6972W7zssF9tbo+bzXL0T2/6WC9NWFd8k24havz86lpwJeuvqWLHsnfhgpxNKF3ftdGYcvGJRrIz1UbCxW3TMzgDd3LZ/z9uzJ33ivI8NsgcYADhgCGCgZkf2juNjXrzSVO/x3YPSsFxaEpY12PpivLSxZ5xU4yHb+9hhnePYg1dHwfqS/++pcXzbbHnbvnFS4XOxYuX62BDdol3Ws81t+0sP4V65ONZm8w3RspX3CQMABw4BDNSs5WlxxmmHxLy50xv2Gbule5CL676HcU/rH3NOnNp6Zvx+SfmZlyt6O15d9Gis7fHJOKmmHahFq+PVNQtj5T47SVbn6Nhxa7y5YlGs6tI7OpYfS9yyd/TqURArli2KtV3ev2sP6d5uf33tYTwP7Tgojv/bzJi3prqPstocq9avzqart23D9Hhi7uTIr/hZyAAAzZgABmrVtd8tcd7BP4kHZ06PlUXZwlLFsfmN38av/jB950f+7KbdwOjXenbMrBh8uQgtqPRzKtjj+ifEeYMvjO1/uil+tXJ9hbDbHCsXfzd+urJ3XHjWmWVnXN7N5pj3h6/HI9O+Gz/+zSP76KObjop27Q6Jl5bOiyO79alwKPDhcWzH9vFKbvnfj+pcYfnebH8D7Gk8W50ZQ87qHC889d3444YKEVz0Ysx44tu5Zdl8tXLr/ObHMX/Rb+IXf5zeRB89BQCwdwQwsAcd4tSPT4gRPQpi5vQr485flp8A66aYtuLwOOOswdE+W3N3ueAb8qU4Mv+G+G7J9/0y9/3TH4lXCms6S3Md1j/qMzH6c9+Iniv/u/TrJdty5y+/HTP/fmFc+X++Er1aZevt5rBo16lTtDo4N1n4cqzbR3uB27ftlvvvIXF8u8ofJdT+mNOiZFO6tK3y/ugGb39D7Hk8jzrxlrj20+fE2tlfj+/+tOy2ve9Pi6Lbx/4rLupV/ccjlekZH/xQ+zg4d927ndBv30U7AEAjajHj7qJ3s2lgP/rwqN13i86Z85cYeelVMemhCTFgwIeypQ3zx4n7tKwOXJv/b/zwVyviEyNzsdnw0x8DkKnu71d91fb3rnefs7Kpurn/mnnZFMDu7AEGkrL5jXnx5vv7RVfxCwCQHHuAoZmwB7gJvDU9HvzVo9Hl0/fEee2yZTSaV2d/Ph55IZupzQdvjP8Y2Mf6NbF+7axfuyZY/8kHjs9mGs4eYKCpCGBoJgRwYyqOzWt+Ej+fvjC6DL4tzu/URB+TBJAAh0ADBxKHQAMJyIvWrT8ZF33uLvELAJAwAQzNWIsWlf+l4Voe0TmO8r5fgGbJ3zugqTgEGpqJ6g4hmzv3LzFi5FXx8KQJcfrpe3cINAA0V7X9vXMINLAv2QMMzdi72ctT5f8CwHuRv3dAUxHAAAAAJEEAAwAAkAQBDAAAQBIEMAAAAEkQwAAAACRBAAMAAJAEAQwAAEASBDAAAABJEMAAAAAkQQADAACQBAEMAABAEgQwAAAASRDAAAAAJEEAAwAAkAQBDAAAQBIEMAAAAEkQwAAAACRBAAMAAJAEAQwAAEASBDAAAABJEMAAAAAkQQADAACQBAEMAABAEgQwAAAASRDA0Iy1aFH5XwB4L/L3DmgqLWbcXfRuNg3sRx8eVZRN7TJ37l9ixMir4uFJE+L00z+ULW2YVpdclk1RnaJHHsimAGhqtf29693nrGyqbu6/Zl42BbA7e4ChGXs3e3mq/F8AeC/y9w5oKgIYAACAJAhgAAAAkiCAAQAASIIABgAAIAkCGOC9qGhNLJizIrZks+wl49no1k+9JnqPfiLWZ/PU3/pp34gBfT4RY6ZtyJbUwP0ZSJgABuqmeHP86pWXYtSiRaWXkQsWxI2vF8RL27OvUz/r58fkm78Rwy4cWXoZcv7wGDPud7F4Xz0j3TI/Jlw6NZZlsweK0gg65YKd41J6yY3NsJHfjDumLdl/T9gP0PGsl/VPxKg+18TUmgq09Os/iAXZLHW1Jmbd+c0YXnI/Lv1dHxXX3jk7VmVf3beKo6j0sgcp3J8BaiCAgV12bI0Zm7dlM7us27g0F7yrY1O77jGhb9+YmLtMOqVv/Ovhb8V/zX8pZjTjCF65uSCW7chmmlrRipg2a002s8uqGd+OIRc8EG8NuTomPzoppuYu056YFGPPfiFu+Pg3Y3oT7gJbNet3sWyPz5YbSQ3jEwOuiPuycSm9PDE5pt79hegybUycM/p376k9hM1y/A9gzW48i56Pced/Lh7u8oW4r+R+XPq7fmeMOOKBXAj/IBbs423tMOT7sfDF/42JQ9plS/bOfh1PgEYigIFShYVr4urnlsSzOyo/LBQXvh7/tmR7fK5vn7j8qLzIy5aXPHwc27Z7TDzthDi3ZbaoGTpkx6a45bkXY1Jh01b6loVTYsSgb8Ss4l0jVqJo4T0x6roNMerRCTFqQKdolS2P3FSXc66OqTNvjMEdskVNIK/42Rgz6KqYtPCtbEnTqGl8atTmxBh+x7diyDP3xmOLs2XvAQfM+B8gmtd4vhXTbxgTs84eH+MvPjHaZEsjjohTRo2PSWfPjpE3zGzWhyHvr/EEaEwtZtxd5CPHoRn48KjdX2afM+cvMfLS3JOPhybEgAEfypY2TKtLLsumqtoe81/Pj9s2HR5f7dU9zqn0fHh7zHjpz/Gro06Pe449NFtWB9u3xow1r8fkTeXXqWV06dA5ruh0VBybLSlTHE+++Gws63pOjGhZEJNXrY1n/7YjYseOKM47PP6xa/cY2WZXXW/auDRGrW4TPzj52OiaLausbHt/3+7M+E77ClVevDHuyn85lh/dK246rk0cnS2uqOiRB7KpvbUh5tx5fYx55oNxx39fHedUitm3YtqY8+Lhc34Vky/ulC2rRckhpx+ZHkOe/n4MqyaKF4w7Kz4X98XisSeXLVg8JYbfOK3s8MeiNZG/PKJ7r4qRXWboTZNiZL9spsT62THuX74ZC8++Pe6+tn80bn/XNj5lh0AP+u3gmHnf+dVsx4aYOvrTMe1Tv4mJwyrs4dqyImb9dkpMmfJC2WGlBRuiqO/gGHPtFTGkR9Vrn1t98e9iwoSfxKzc+LTKfbkoN2A9Th8aF48YHOf0OCJbK6eh45mzfs6UGDdhWiwv6YaS/0H3gTHqqstiSO8KP79ccxn/Pdzfyr6+NK568eo4pXRB2e2Rf9WfYmyvFTHtznti4ty1pctXFXSKIdd8Pa4dVjH8MluWxLQJD8T4Z1Zk498tzsmNzdCie+PC6m77bP2yn12idXQfelmMHVHDWDWX8Vw2NYZdMDtGzf7PGLLbIORs+V2MGfiTOPvxSTG8R26+vr/v8XxMuvB78Vg2V6YoVuW/FsN+lrtNqtwnm/vjQ21/73r3OSubqpv7r5mXTQHszh5gSNm2grht0YJ4+KD3x8S+VeM3p3hTPPlGu/jM0fWI323r4+sle5Lf123n4dIT+/aMz2xfGVcteD3+Ws3hyM+/9nyMfrUo+nc7uWz9U06JCR9oE8+/OD9u27hrz+3RbTvFJ4tXxZOF2YKqSrZ3U9f4dNsqu6Tz2sZX+/aPEQfltmHRKzFj96O8941Vv4uxF46M8UdcEU88unvcxfqZMfX3Z8TF/1iH+G2I3hfvPKR66m1DcguGxG3l8xUuVWMtOgyMsY/+LK494oG48MJvx7TGeXPinsdnj4pLnt+X7Czfaf2Mb8aAj3838jtfvOu6znw8Jo+IGH/ByJhYdW/x4kdi+OemRa9r7ys97Lxk/ZJ/b7s4L6Z97fqYWvG6N2g8i3KhMjwG37khhv9Xts4Tk2PSVd1i6udGxbiFpflR2QEz/jVYlgu5j387Fp/7b9mYPB5zHr8iWt1/aYyeUuWQ4Nw2jPn4mJjW47KYXHpI8OTc+P97Ln5/Htfd+Gy2UgWrclE46Jsxq9+Vu26LR78VwwvujcE1HULcTMZz2dzHIv9T58fZ1cVviTYDY+inlsaUuSuyBfV1cozcOSbll3+PYdlXd9PcHx8AmogAhiTtiGXrl8bI/E3Rv+cp8YMu1e8VjW2FseTwI6N7nY+SLIz78/Mjju8VN7Q/tMLh0nnR/7g+ccOR6+OWVzbGpmxpuc3v6xwT+nSJ/hX+P60POzZu6tUu5i9ZE3/NlpXs+flkl7x4ct3m3P9pdys3rYtVx3WIgdU+srWM/l36xH0928Sz+QvitvVbq/0ZDVMUy6Z+O4aMfjYGfOdn8fCoGvaSLF8az3TuH732VXjsU+1iwKgJ8cR3PhSzRg+PsVNXlO0p2ifqOD57suX5mDH3g3Fuv117fzuce2PMenZCjDqnW6U9jW0GXB13XFMcd95f+RDTBb99IJZffEkMq7JnuE3v82PcoxNiWJdsQQNtmfGdGPnMwJg06coYUOFKtuk9LMbfNzCmX/fzqP4I7gNg/Gvw8C3T4tyfTYzrBlTYK9+mf1x7/dBYOHF6heu7IiZfd1MUXDtxt0OCew/795h4U9WjXJbExNHfibjp+zFuSLcKr3vkxura8THx7Jm1HEK8/8ezYNnS6DWg8v2ysiOix4ATIn/ZHs7Y3Cw05ngCNC0BDKnZURiTXpwf47YcHd855YT45GE1v4F3XdHfIg7Ni6Oy+T3asime3PaBGNGhuj3GB+UC9LjovnZtPFucLcp0adO62gBv3aZdnPHOqphVoVS7dugaZ6xfGb/fbS9uYTy5akf8U7vW2Xz1Wh/WIW44pVecseXlGP3imnhpb0+QVbQkJo38p7hu7hkx8Yl/j2HVHeKaWb9qRUSPttE+m2+OSkPwie/HOXO/GYNHTonFe/sstx7jU5uiVfPjjlwMLbvkq1UitdVuh3CW691vUMSM5yud6bZDlxMiFi5tpLPfroipd06PIddfEadUs1GtBgyJ4TE1nqnlPczNdfxrc/pN/1btCwetenwwTl89P5aXn7Vs4dQYlz80rh3aLVtQWV5elVfaFk6L8asuiquGVXfERKsYcPllMeC3U2NGLWdF23/juSFWLY9on1f749EReW0jlq85YE7sts/HE2A/EMCQmm1v5eLxyPh0p6NqeB9tw7301vp4p8MRcVI2v5u8I2LgkRvir1vrWJ0HHRontXsnlm+rUMwHHRWfOW57TN5Qef9t8eb18WTesXFGnY7WPjTO6NQpTty2Lmbv7eHQq/4SU1b1jxGXDIy93HnYjHSKsy+5KE5fNTXm7O3hjg0Znzn3xugLd30M0pBBF8TwGx6L9tf+KqaNPbnG4I2it2LV4vkxbco9cce4b8aIW6bl7hiVX23pcvG34u4e02L4oGti3NT5sWz9PnwGv35JPLN8cJzbr6Yt7Ba9zl4bc5bvaY/ffh7/empV4ViPSnKLS0aifISX5f8liocOihqHp4rFc2bm1h8YvbP53XQ4Oc7t9WwszN/TbXhgjWfztw/HE2A/EMCQmsM6xaST28XylxfE1WsKaz0M+NhW78sFc3Fszub3pHjH27knvQfV9HQ456A4vGXEG+/U9YzM2c+qcqq+k47tGt1fXxOzdv6Y7TFr3co4qWO7OkT99vjrmhdj9MuFce7Jp8TIw7LFDdXj4pj2syGRf+PnYsTDz9d6RtcOXbrlKmBjFGTzzdNbseDhq+L8G5fGsJ9NjpElJ+fZG/UYn52qfAzStJmPx9RJ34qRFQ+xrWDL4ifi5uEjc5H8SMwpaB39PnVJjBn7rXi49H2OVXWKwbdNijmPXx3nxtJ4+JbRcc4ZucC+bkrMWraXZ7pd/UI8E7PjzksrfIZxpcvoGPfb3Hq19lozGP9GsmXZ0lwRt675BYwqigrW7mH93Nfa55q0oLZHsf01nu2iS/fcr3tB7S92FBSsiOjeqdFOLLXv7ePxBNgPBDCkqPSkUKfEiO2vxqWLlsesKock73Ro6zjx7TdjeU1fryLvoMNLKrjkVEU12BFv56L18IPr+tBTHCu3RRxzSJXDtFu2jU8fuyF+tiHbfbt9c/y+upNfVVVyNuhF8+OB7V1jQnUn/Wqo0pPETIoxBXfF4At/ELNqOp6x+wlx9ur5kd9cj3csOdvrhf8UtxdcFo/uy5Mk1XV8GmDV1Gti8PeL4+L7JsXkO66MYeecGF3aHLHnyGrTLQYMuzhuHj8pZj37q7hjRF5M+8qnY9jE5xv+3sa8dtE5hsTNFeK96mXas3+qfAbrivb7+O/hFyL3i11U9TDlemjVvmPuBxTWeXz3vH7uawURR7SpYZv283h26fWhWD13aS2HN2+I/Llr4+xe1R8S3uw01ngCNDEBDMlqGf2POzke6nlYPLmghpNC5R0dnzxmQ/zfTXU7TvikIzrEIevfipey+d0UvxWz32wXA1vvIVTLbXs75r/dLv7hsKoPVQfFwE7dc/WzofT/tXLD2lhe48mvSmQn/VqwPrr37B8/qOGjkPZOyYl5Jsb073SLKRfUcJKYDoNi2D8+G1N+X9ezvpY8sc9VRx1fgKis4mc270l2Up8Lpkb37/wqJjfKR53UYXzqq2h+TLxlY1x7/bDoXfOZhuqgVXTpNyzG3X1FxPd/HrOq3a1Xh/HscUKcEzNjYb0/p7iZjH+HTtEr79nSj8epTtGyF2LugBMafOhvlx4nRzxT9/df9x4wKPIem13DScNy1j8fM/LPiHP6Vn0fbvMYzy4DBke/Z2bG3Jp2E2+ZHzOe+WCcu/PIhr35fa+v5vb4ANB0BDAkruRsy9857cTov3lJXPrimvhrpaOTW8Y5XT4Qby9fHk/W1MDbt8ay8u9pkwvmQ1fFw+urW3lH/HXdqljesWOcUeWZ1zs7qntP8I6Yv2ZVvFHN+qUObRefO+L1eLhgYzy5KmJ4TSe/2l5y0q/n4pbNR8VNp50Un6nlpF/7QunZfmf+ZwyY+404Z+SUWFDpye8Rce6oL8SWcT+o/HE7Fa1fEovLdxl16BYDOv8lFi7bPRWLlk2NCVOymep0PznOjRW7TkBUky3Px6SRn44xcz9Uut3DG+EkSRXVPj71tGVDrCpuXfpZsrt7KxYvrPpCQ1GsWlXbIam1JEFdxrPVwLj4mrwY//0nyj6PuC6a1fjnAn5oXkyeNnv3OM4tmTNjWvQ79+QGx0+b0wfHpwqmxmNzqnvpY0PkV729+g2JMV0eiwlTq3yUUqmiWHD/IzHnU8Pi3Iob1JzGs8uQuOqiZ+OOCfOrH88J98asiy7bdQKxvfl9r69m+vgA0BQEMJB7JDgsPnnCKTGh47b44ZrKRZLX+rj4bs+D4v5FL8akLRXreEes2/x6XP3cknhy50mtWsflJ3aPd17Jj+9tLK6wI2N7vLTupbhlwxHxte5td9v7unzJorh61eZYt7ODt8ey3Pq3vXlkteuXycV5p+Ni+eIX4jeHd4xzajj51V/XLIvNHU+JSSd0iB5N9YjXqlsMu21yPHH5mrjl/uezhWVa9bsyJt6WF+MuvComLaz4ntNcnM25J4Z//Jvx2OryJ8AnxpBRH4wpt98bcyrcLOtz64382ooYcu0Z2ZJqtDkjhl30lxg/YWblQzCL1sSyVbueYC+4/3ux+vKfxbTbzo8qnwzUeGoZn3rp0D+Gnf1CTJw4u9J1LDlj9MSRo2Jc/hHRK1tWqmhtzLphZAy7YWosqDAGpbYsicm33xVFl18U51S3N7mO49l71PdjXN5dMeqGJ2JxpV+l3O27cGrcfF3lOG5e498qBlx1Ywx47PoYM2VJhfe3vhWLp+SWzR0a1w/di8+wbjMorrupW0wefX1MXlzhvl8aWdfHhPxsfqcTY9TdX423brkmbp61JjeC5cq2Z+Qz/WP8TYMqfcxQcxvPc8aOj8HPXBsjJ1Z8v/BbsWDimBj1zKCYNHZghcP19+L3vb6a8+MDQCNrMePuoiqnlwH2hw+PqvKEPGfOnL/EyEtzofTQhBgwoOpnZNZPq0suy6YaqHhzTFqxOn7/dnHkHVRWksccfmz803HHVvr83lLbt8aMNa/Hwxv+Vrpu8Y6DovuxXeOKTkfFsdkqZYrjyRefjRkdTo0rWmyIB1ZvijdKluZCuGu7znFZp/bRo9Ydtltj0oJ5saTrmfGd9nu3Z7fokQeyqSayfn5Muv2BmJK/IVpluzC79B0aI64aVunzY0uf7E+9N275/szY0r5d6ZPlLp/6atw0qn/E1GtiUP5lsXjsyWWr7mZDzJn43bj5kReiVe57Sx3RLYZe+/UY2a957slZX3Kdfjs4Zt53ft32NOaesM96+AdxZ+46FpWPz+kXxeWXnx+nxBMx6iNL46oXr85N77Jl8e9i6pTp8diitdmSnNy4nH3xF2LUkIqfT1tVXcfzrVg2a1qMv39q5Be0yvZQt47uZw+NUZd/fC8P124C65+PyRPujYd/v6L0ehYUFEW/T10WV11Vdds3xNTRn45pn/pN9e9rXl8y/tNjyNPfj2EVbsySk5bdefsjMWN5q2jfPjeE3YfEmOsvju7P1HDbb1kS0yY8EOOfyW1PbjCLivKi18VXxNgRB8ihuNl9dFx2vynKPdT3GFqy/QOjy25RuTe/7yWej3F9Rkf87E8xtl+2qEbN6/Ghtr93vfuclU3Vzf3XzMumAHYngKGZaPYB3CjKA/iM+F6Hur8jbadt6+LKBVtjxIDutbz/t26aPICBxCyJiYMvjYXXPhXjhziUuCoBDDQVh0ADB6iy9wi/XevJrwCaixNjxB0XxbIbvln5EHAAmpSnjcABaeX6pXHbmx3ia51qOPkVQDPTqt/VMflnQ2L5hDEx5PySz4YeHsMfrutZ4QHYFwQwcMAo3rI8/nnBohhV8rFNW9rGd/seF//gUQw4gLTp/fEYO35STHui5LOhJ8fkEQfI5wADvEd46gjsR3nxyT7n1Pn9v3ltusdPT+kbE085Je45vgnP6gwAwHuCp4/QjLVoUflfAHgv8vcOaCrOAg3NRPVngZ4fIy8dE5MeGh8DBvTPlgLAe0ttf++cBRrYl+wBBgAAIAkCGAAAgCQIYAAAAJIggAEAAEiCAAYAACAJAhgAAIAkCGAAAACSIIABAABIggAGAAAgCQIYAACAJAhgAAAAktBixt1F72bTwH704VFF2dQuc+bMj5GXjomx118dvXqdkC0t06JFNgEAB5B33y156ln5j1h+/tIYd/sPYtJD42PAgP7Z0jK9+5yVTdXN/dfMy6YAdieAoZmoLYABIAUCGGhsAhiaieoCeMuWLZGf/3I2V1kLu4ABOACV7QGuXq9ePaNNmzbZXBkBDOxLAhiaieoCGABSJ4CBfclJsAAAAEiCAAYAACAJAhgAAIAkCGAAAACSIIABAABIggAGAAAgCQIYAACAJAhgAAAAkiCAAQAASIIABgAAIAkCGAAAgCS0mHF30bvZNHAAufz7p2ZTAEC5+6+Zl00B7M4eYAAAAJIggAEAAEiCAAYAACAJAhgAAIAkCGAAAACSIIABAABIggAGAAAgCQIYAACAJAhgAAAAkiCAAQAASIIABgAAIAkCGAAAgCQIYAAAAJIggAEAAEiCAAYAACAJAhgAAIAkCGAAAACSIIABAABIggAGAAAgCQIYAACAJAhgAAAAkiCAAQAASIIABgAAIAkCGAAAgCQIYAAAAJIggAEAAEhCixl3F72bTQMAAMB7lj3AAAAAJEEAAwAAkAQBDAAAQBIEMAAAAEkQwAAAACRBAAMAAJAEAQwAAEASBDAAAABJEMAAAAAkQQADAACQBAEMAABAEgQwAAAASRDAAAAAJEEAAwAAkAQBDAAAQBIEMAAAAEkQwAAAACRBAAMAAJAEAQwAAEASBDAAAABJEMAAAAAkQQADAACQBAEMAABAEgQwAAAASRDAAAAAJEEAAwAAkAQBDAAAQBIEMAAAAEkQwAAAACRBAAMAAJAEAQwAAEASBDAAAABJEMAAAAAkQQADAACQBAEMAABAEgQwAAAASRDAAAAAJEEAAwAAkAQBDAAAQBIEMAAAAEkQwAAAACRBAAMAAJAEAQwAAEASBDAAAABJEMAAAAAkQQADAACQBAEMAABAEgQwAAAASRDAAAAAJEEAAwAAkAQBDAAAQBIEMAAAAEkQwAAAACRBAAMAAJAEAQwAAEASBDAAAABJEMAAAAAkQQADAACQBAEMAABAEgQwAAAASRDAAAAAJEEAAwAAkAQBDAAAQBIEMAAAAEkQwAAAACRBAAMAAJAEAQwAAEASBDAAAABJEMAAAAAkQQADAACQBAEMAABAEgQwAAAASRDAAAAAJEEAAwAAkAQBDAAAQBIEMAAAAEkQwAAAACRBAAMAAJAEAQwAAEASBDAAAABJEMAAAAAkQQADAACQBAEMAABAEgQwAAAASRDAAAAAJEEAAwAAkAQBDAAAQBIEMAAAAEkQwAAAACRBAAMAAJAEAQwAAEASBDAAAABJEMAAAAAkQQADAACQBAEMAABAEgQwAAAASRDAAAAAJEEAAwAAkAQBDAAAQBIEMAAAAEkQwAAAACRBAAMAAJAEAQwAAEASBDAAAABJEMAAAAAkQQADAACQBAEMAABAEgQwAAAASRDAAAAAJEEAAwAAkAQBDAAAQBIEMAAAAEkQwAAAACRBAAMAAJAEAQwAAEASBDAAAABJEMAAAAAkQQADAACQBAEMAABAEgQwAAAASRDAAAAAJEEAAwAAkAQBDAAAQBIEMAAAAEkQwAAAACRBAAMAAJAEAQwAAEASBDAAAABJEMAAAAAkQQADAACQBAEMAABAEgQwAAAASRDAAAAAJEEAAwAAkAQBDAAAQBIEMAAAAEkQwAAAACRBAAMAAJAEAQwAAEASBDAAAABJEMAAAAAkQQADAACQBAEMAABAEgQwAAAASRDAAAAAJEEAAwAAkAQBDAAAQBIEMAAAAEkQwAAAACRBAAMAAJAEAQwAAEASBDAAAABJEMAAAAAkQQADAACQBAEMAABAEgQwAAAASRDAAAAAJEEAAwAAkAQBDAAAQBIEMAAAAEkQwAAAACRBAAMAAJAEAQwAAEASBDAAAABJEMAAAAAkQQADAACQBAEMAABAEgQwAAAASRDAAAAAJEEAAwAAkAQBDAAAQBIEMAAAAEkQwAAAACRBAAMAAJAEAQwAAEASBDAAAABJEMAAAAAkQQADAACQBAEMAABAEgQwAAAASRDAAAAAJEEAAwAAkAQBDAAAQBIEMAAAAEkQwAAAACRBAAMAAJAEAQwAAEASBDAAAABJEMAAAAAkQQADAACQBAEMAABAEgQwAAAASRDAAAAAJEEAAwAAkAQBDAAAQBIEMAAAAEkQwAAAACRBAAMAAJAEAQwAAEASBDAAAABJEMAAAAAkQQADAACQgIj/Bwiv3SlPndWAAAAAAElFTkSuQmCC) 다른 언어로 작성된 **커맨드** ------------------ [![C#으로 작성된 커맨드](https://refactoring.guru/images/patterns/icons/csharp.svg?id=da64592defc6e86d57c39c66e9de3e58)](https://refactoring.guru/ko/design-patterns/command/csharp/example "C#으로 작성된 커맨드") [![C++로 작성된 커맨드](https://refactoring.guru/images/patterns/icons/cpp.svg?id=f7782ed8b8666246bfcc3f8fefc3b858)](https://refactoring.guru/ko/design-patterns/command/cpp/example "C++로 작성된 커맨드") [![Go로 작성된 커맨드](https://refactoring.guru/images/patterns/icons/go.svg?id=1a89927eb99b1ea3fde7701d97970aca)](https://refactoring.guru/ko/design-patterns/command/go/example "Go로 작성된 커맨드") [![자바로 작성된 커맨드](https://refactoring.guru/images/patterns/icons/java.svg?id=e6d87e2dca08c953fe3acd1275ed4f4e)](https://refactoring.guru/ko/design-patterns/command/java/example "자바로 작성된 커맨드") [![PHP로 작성된 커맨드](https://refactoring.guru/images/patterns/icons/php.svg?id=be1906eb26b71ec1d3b93720d6156618)](https://refactoring.guru/ko/design-patterns/command/php/example "PHP로 작성된 커맨드") [![파이썬으로 작성된 커맨드](https://refactoring.guru/images/patterns/icons/python.svg?id=6d815d43c0f7050a1151b43e51569c9f)](https://refactoring.guru/ko/design-patterns/command/python/example "파이썬으로 작성된 커맨드") [![루비로 작성된 커맨드](https://refactoring.guru/images/patterns/icons/ruby.svg?id=b065b718c914bf8e960ef731600be1eb)](https://refactoring.guru/ko/design-patterns/command/ruby/example "루비로 작성된 커맨드") [![스위프트로 작성된 커맨드](https://refactoring.guru/images/patterns/icons/swift.svg?id=0b716c2d52ec3a48fbe91ac031070c1d)](https://refactoring.guru/ko/design-patterns/command/swift/example "스위프트로 작성된 커맨드") [![타입스크립트로 작성된 커맨드](https://refactoring.guru/images/patterns/icons/typescript.svg?id=2239d0f16cb703540c205dd8cb0c0cb7)](https://refactoring.guru/ko/design-patterns/command/typescript/example "타입스크립트로 작성된 커맨드") --- # Command [There are patterns of patterns now! \ My friend's project: MetaPatterns.io](https://metapatterns.io/)  [](https://refactoring.guru/pt-br/design-patterns/command#checkout) [](https://refactoring.guru/pt-br/design-patterns/command#checkout) [](https://refactoring.guru/) / [Padrões de Projeto](https://refactoring.guru/pt-br/design-patterns) / [Padrões comportamentais](https://refactoring.guru/pt-br/design-patterns/behavioral-patterns) Command ======= Também conhecido como: Comando, Ação, Action, Transação, Transaction Propósito --------- O **Command** é um padrão de projeto comportamental que transforma um pedido em um objeto independente que contém toda a informação sobre o pedido. Essa transformação permite que você parameterize métodos com diferentes pedidos, atrase ou coloque a execução do pedido em uma fila, e suporte operações que não podem ser feitas. ![Padrão de projeto Command](https://refactoring.guru/images/patterns/content/command/command-pt-br-2x.png?id=51156130ac5860b2b9146f63e872cce3) Problema -------- Imagine que você está trabalhando em uma nova aplicação de editor de texto. Sua tarefa atual é criar uma barra de tarefas com vários botões para várias operações do editor. Você criou uma classe `Botão` muito bacana que pode ser usada para botões na barra de tarefas, bem como para botões genéricos de diversas caixas de diálogo. ![Problema resolvido pelo padrão Command](https://refactoring.guru/images/patterns/diagrams/command/problem1-2x.png?id=af4c4e9c1d1b4fa2c4104c5f6bb18719) Todos os botões de uma aplicação são derivadas de uma mesma classe. Embora todos esses botões pareçam similares, eles todos devem fazer coisas diferentes. Aonde você deveria colocar o código para os vários handlers de cliques desses botões? A solução mais simples é criar um monte de subclasses para cada local que o botão for usado. Essas subclasses conteriam o código que teria que ser executado em um clique de botão. ![Várias subclasses de botões](https://refactoring.guru/images/patterns/diagrams/command/problem2-2x.png?id=5eea7d0f6247da011150bb63e423f405) Várias subclasses de botões. O que pode dar errado? Não demora muito e você percebe que essa abordagem é falha. Primeiro você tem um enorme número de subclasses, e isso seria okay se você não arriscasse quebrar o código dentro dessas subclasses cada vez que você modificar a classe base `Botão`. Colocando em miúdos: seu código GUI se torna absurdamente dependente de um código volátil da lógica do negócio. ![Várias classes implementam a mesma funcionalidade](https://refactoring.guru/images/patterns/diagrams/command/problem3-pt-br-2x.png?id=f91f74e46951797c12cc37f61eb27d46) Várias classes implementam a mesma funcionalidade. E aqui está a parte mais feia. Algumas operações, tais como copiar/colar texto, precisariam ser invocadas de diversos lugares. Por exemplo, um usuário poderia criar um pequeno botão “Copiar” na barra de ferramentas, ou copiar alguma coisa através do menu de contexto, ou apenas apertando `Crtl+C` no teclado. Inicialmente, quando sua aplicação só tinha a barra de ferramentas, tudo bem colocar a implementação de várias operações dentro das subclasses do botão. Em outras palavras, ter o código de cópia de texto dentro da subclasse `BotãoCópia` parecia certo. Mas então, quando você implementou menus de contexto, atalhos, e outras coisas, você teve que ou duplicar o código da operação em muitas classes ou fazer menus dependentes de botões, o que é uma opção ainda pior. Solução ------- Um bom projeto de software quase sempre se baseia no princípio da separação de interesses, o que geralmente resulta em dividir a aplicação em camadas. O exemplo mais comum: uma camada para a interface gráfica do usuário e outra camada para a lógica do negócio. A camada GUI é responsável por renderizar uma bonita imagem na tela, capturando quaisquer dados e mostrando resultados do que o usuário e a aplicação estão fazendo. Contudo, quando se trata de fazer algo importante, como calcular a trajetória da lua ou compor um relatório anual, a camada GUI delega o trabalho para a camada inferior da lógica do negócio. Dentro do código pode parecer assim: um objeto GUI chama um método da lógica do negócio, passando alguns argumentos. Este processo é geralmente descrito como um objeto mandando um _pedido_ para outro. ![A camada GUI pode acessar a camada da lógica do negócio diretamente](https://refactoring.guru/images/patterns/diagrams/command/solution1-pt-br-2x.png?id=7409772f1849947aeaf868bcd0129fe0) Os objetos GUI podem acessar os objetos da lógica do negócio diretamente. O padrão Command sugere que os objetos GUI não enviem esses pedidos diretamente. Ao invés disso, você deve extrair todos os detalhes do pedido, tais como o objeto a ser chamado, o nome do método, e a lista de argumentos em uma classe _comando_ separada que tem apenas um método que aciona esse pedido. Objetos comando servem como links entre vários objetos GUI e de lógica de negócio. De agora em diante, o objeto GUI não precisa saber qual objeto de lógica do negócio irá receber o pedido e como ele vai ser processado. O objeto GUI deve acionar o comando, que irá lidar com todos os detalhes. ![Acessando a lógica de negócio através do comando.](https://refactoring.guru/images/patterns/diagrams/command/solution2-pt-br-2x.png?id=1fe72ad5955eca0af48cca23e6997134) Acessando a lógica do negócio através do comando. O próximo passo é fazer seus comandos implementarem a mesma interface. Geralmente é apenas um método de execução que não pega parâmetros. Essa interface permite que você use vários comandos com o mesmo remetente do pedido, sem acoplá-lo com as classes concretas dos comandos. Como um bônus, agora você pode trocar os objetos comando ligados ao remetente, efetivamente mudando o comportamento do remetente no momento da execução. Você pode ter notado uma peça faltante nesse quebra cabeças, que são os parâmetros do pedido. Um objeto GUI pode ter fornecido ao objeto da camada de negócio com alguns parâmetros, como deveremos passar os detalhes do pedido para o destinatário? Parece que o comando deve ser ou pré configurado com esses dados, ou ser capaz de obtê-los por conta própria. ![Os objetos GUI delegam o trabalho aos comandos](https://refactoring.guru/images/patterns/diagrams/command/solution3-pt-br-2x.png?id=b398836186fcdea28e04b915b85f8695) Os objetos GUI delegam o trabalho aos comandos. Vamos voltar ao nosso editor de texto. Após aplicarmos o padrão Command, nós não mais precisamos de todas aquelas subclasses de botões para implementar vários comportamentos de cliques. É suficiente colocar apenas um campo na classe `Botão` base que armazena a referência para um objeto comando e faz o botão executar aquele comando com um clique. Você vai implementar um monte de classes comando para cada possível operação e ligá-los aos seus botões em particular, dependendo do comportamento desejado para os botões. Outros elementos GUI, tais como menus, atalhos, ou caixas de diálogo inteiras, podem ser implementados da mesma maneira. Eles serão ligados a um comando que será executado quando um usuário interage com um elemento GUI. Como você provavelmente adivinhou, os elementos relacionados a mesma operação serão ligados aos mesmos comandos, prevenindo a duplicação de código. Como resultado, os comandos se tornam uma camada intermédia conveniente que reduz o acoplamento entre as camadas GUI e de lógica do negócio. E isso é apenas uma fração dos benefícios que o padrão Command pode oferecer. Analogia com o mundo real ------------------------- ![Fazendo um pedido em um restaurante](https://refactoring.guru/images/patterns/content/command/command-comic-1-2x.png?id=47b3c00b2cfbda7157a1ed9da6ce2948) Fazendo um pedido em um restaurante. Após uma longa caminhada pela cidade, você chega a um restaurante bacana e senta numa mesa perto da janela. Um garçom amigável se aproxima e rapidamente recebe seu pedido, escrevendo-o em um pedaço de papel. O garçom vai até a cozinha e prende o pedido em uma parede. Após algum tempo, o pedido chega até o chef, que o lê e cozinha a refeição de acordo. O cozinheiro coloca a refeição em uma bandeja junto com o pedido. O garçom acha a bandeja, verifica o pedido para garantir que é aquilo que você queria, e o traz para sua mesa. O pedido no papel serve como um comando. Ele permanece em uma fila até que o chef esteja pronto para serví-lo. O pedido contém todas as informações relevantes necessárias para cozinhar a refeição. Ele permite ao chef começar a cozinhar imediatamente ao invés de ter que ir até você para clarificar os detalhes do pedido pessoalmente. Estrutura --------- ![Estrutura do padrão de projeto Command](https://refactoring.guru/images/patterns/diagrams/command/structure-2x.png?id=1dfaa84354ffe49ef7ad46ce069482d2)![Estrutura do padrão de projeto Command](https://refactoring.guru/images/patterns/diagrams/command/structure-indexed-2x.png?id=e4cc286a44768c7d060af33497da7df6) 1. A classe **Remetente** (também conhecida como _invocadora_) é responsável por iniciar os pedidos. Essa classe deve ter um campo para armazenar a referência para um objeto comando. O remetente aciona aquele comando ao invés de enviar o pedido diretamente para o destinatário. Observe que o remetente não é responsável por criar o objeto comando. Geralmente ele é pré criado através de um construtor do cliente. 2. A interface **Comando** geralmente declara apenas um único método para executar o comando. 3. **Comandos Concretos** implementam vários tipos de pedidos. Um comando concreto não deve realizar o trabalho por conta própria, mas passar a chamada para um dos objetos da lógica do negócio. Contudo, para simplificar o código, essas classes podem ser fundidas. Os parâmetros necessários para executar um método em um objeto destinatário podem ser declarados como campos no comando concreto. Você pode tornar os objetos comando imutáveis ao permitir que apenas inicializem esses campos através do construtor. 4. A classe **Destinatária** contém a lógica do negócio. Quase qualquer objeto pode servir como um destinatário. A maioria dos comandos apenas lida com os detalhes de como um pedido é passado para o destinatário, enquanto que o destinatário em si executa o verdadeiro trabalho. 5. O **Cliente** cria e configura objetos comando concretos. O cliente deve passar todos os parâmetros do pedido, incluindo uma instância do destinatário, para o construtor do comando. Após isso, o comando resultante pode ser associado com um ou múltiplos destinatários. Pseudocódigo ------------ Neste exemplo, o padrão **Command** ajuda a manter um registro da história de operações executadas e torna possível reverter uma operação se necessário. ![Exemplo de estrutura do padrão Command](https://refactoring.guru/images/patterns/diagrams/command/example-2x.png?id=ed44dfd9b02eccf1ae7e2714d018ed36) Operações não executáveis em um editor de texto. Os comandos que resultam de mudanças de estado do editor (por exemplo, cortando e colando) fazem uma cópia de backup do estado do editor antes de executarem uma operação associada com o comando. Após o comando ser executado, ele é colocado em um histórico de comando (uma pilha de objetos comando) junto com a cópia de backup do estado do editor naquele momento. Mais tarde, se o usuário precisa reverter uma operação, a aplicação pode pegar o comando mais recente do histórico, ler o backup associado ao estado do editor, e restaurá-lo. O código cliente (elementos GUI, histórico de comandos, etc.) não é acoplado às classes comando concretas porque ele trabalha com comandos através da interface comando. Essa abordagem permite que você introduza novos comandos na aplicação sem quebrar o código existente. // A classe comando base define a interface comum para todos // comandos concretos. abstract class Command is protected field app: Application protected field editor: Editor protected field backup: text constructor Command(app: Application, editor: Editor) is this.app = app this.editor = editor // Faz um backup do estado do editor. method saveBackup() is backup = editor.text // Restaura o estado do editor. method undo() is editor.text = backup // O método de execução é declarado abstrato para forçar // todos os comandos concretos a fornecer suas próprias // implementações. O método deve retornar verdadeiro ou // falso dependendo se o comando muda o estado do editor. abstract method execute() // Comandos concretos vêm aqui. class CopyCommand extends Command is // O comando copy (copiar) não é salvo no histórico já que // não muda o estado do editor. method execute() is app.clipboard = editor.getSelection() return false class CutCommand extends Command is // O comando cut (cortar) muda o estado do editor, portanto // deve ser salvo no histórico. E ele será salvo desde que o // método retorne verdadeiro. method execute() is saveBackup() app.clipboard = editor.getSelection() editor.deleteSelection() return true class PasteCommand extends Command is method execute() is saveBackup() editor.replaceSelection(app.clipboard) return true // A operação undo (desfazer) também é um comando. class UndoCommand extends Command is method execute() is app.undo() return false // O comando global history (histórico) é apenas uma pilha. class CommandHistory is private field history: array of Command // Último a entrar... method push(c: Command) is // Empurra o comando para o fim do vetor do histórico. // ...primeiro a sair. method pop():Command is // Obter o comando mais recente do histórico. // A classe do editor tem verdadeiras operações de edição de // texto. Ela faz o papel de destinatária: todos os comandos // acabam delegando a execução para os métodos do editor. class Editor is field text: string method getSelection() is // Retorna o texto selecionado. method deleteSelection() is // Deleta o texto selecionado. method replaceSelection(text) is // Insere os conteúdos da área de transferência na // posição atual. // A classe da aplicação define as relações de objeto. Ela age // como uma remetente: quando alguma coisa precisa ser feita, // ela cria um objeto comando e executa ele. class Application is field clipboard: string field editors: array of Editors field activeEditor: Editor field history: CommandHistory // O código que assinala comandos para objetos UI pode se // parecer como este. method createUI() is // ... copy = function() { executeCommand( new CopyCommand(this, activeEditor)) } copyButton.setCommand(copy) shortcuts.onKeyPress("Ctrl+C", copy) cut = function() { executeCommand( new CutCommand(this, activeEditor)) } cutButton.setCommand(cut) shortcuts.onKeyPress("Ctrl+X", cut) paste = function() { executeCommand( new PasteCommand(this, activeEditor)) } pasteButton.setCommand(paste) shortcuts.onKeyPress("Ctrl+V", paste) undo = function() { executeCommand( new UndoCommand(this, activeEditor)) } undoButton.setCommand(undo) shortcuts.onKeyPress("Ctrl+Z", undo) // Executa um comando e verifica se ele foi adicionado ao // histórico. method executeCommand(command) is if (command.execute()) history.push(command) // Pega o comando mais recente do histórico e executa seu // método undo(desfazer). Observe que nós não sabemos a // classe desse comando. Mas nós não precisamos saber, já // que o comando sabe como desfazer sua própria ação. method undo() is command = history.pop() if (command != null) command.undo() Aplicabilidade -------------- Utilize o padrão Command quando você quer parametrizar objetos com operações. O padrão Command podem tornar uma chamada específica para um método em um objeto separado. Essa mudança abre várias possibilidades de usos interessantes: você pode passar comandos como argumentos do método, armazená-los dentro de outros objetos, trocar comandos ligados no momento de execução, etc. Aqui está um exemplo: você está desenvolvendo um componente GUI como um menu de contexto, e você quer que os usuários sejam capazes de configurar os items do menu que aciona as operações quando um usuário clica em um item. Utilize o padrão Command quando você quer colocar operações em fila, agendar sua execução, ou executá-las remotamente. Como qualquer outro objeto, um comando pode ser serializado, o que significa convertê-lo em uma string que pode ser facilmente escrita em um arquivo ou base de dados. Mais tarde a string pode ser restaurada no objeto comando inicial. Dessa forma você pode adiar e agendar execuções do comando. Mas isso não é tudo! Da mesma forma, você pode colocar em fila, fazer registro de log ou enviar comandos por uma rede. Utilize o padrão Command quando você quer implementar operações reversíveis. Embora haja muitas formas de implementar o desfazer/refazer, o padrão Command é talvez a mais popular de todas. Para ser capaz de reverter operações, você precisa implementar o histórico de operações realizadas. O histórico do comando é uma pilha que contém todos os objetos comando executados junto com seus backups do estado da aplicação relacionados. Esse método tem duas desvantagens. Primeiro, se não for fácil salvar o estado da aplicação por parte dela ser privada. Esse problema pode ser facilmente mitigado com o padrão [Memento](https://refactoring.guru/pt-br/design-patterns/memento) . Segundo, os backups de estado podem consumir uma considerável quantidade de RAM. Portanto, algumas vezes você pode recorrer a uma implementação alternativa: ao invés de restaurar a um estado passado, o comando faz a operação inversa. A operação reversa também cobra um preço: ela pode ter sua implementação difícil ou até impossível. Como implementar ---------------- 1. Declare a interface comando com um único método de execução. 2. Comece extraindo pedidos para dentro de classes concretas comando que implementam a interface comando. Cada classe deve ter um conjunto de campos para armazenar os argumentos dos pedidos junto com uma referência ao objeto destinatário real. Todos esses valores devem ser inicializados através do construtor do comando. 3. Identifique classes que vão agir como _remetentes_. Adicione os campos para armazenar comandos nessas classes. Remetentes devem sempre comunicar-se com seus comandos através da interface comando. Remetentes geralmente não criam objetos comando por conta própria, mas devem obtê-los do código cliente. 4. Mude os remetentes para que executem o comando ao invés de enviar o pedido para o destinatário diretamente. 5. O cliente deve inicializar objetos na seguinte ordem: * Crie os destinatários. * Crie os comandos, e os associe com os destinatários se necessário. * Crie os remetentes, e os associe com os comandos específicos. Prós e contras -------------- * _Princípio de responsabilidade única_. Você pode desacoplar classes que invocam operações de classes que fazem essas operações. * _Princípio aberto/fechado_. Você pode introduzir novos comandos na aplicação sem quebrar o código cliente existente. * Você pode implementar desfazer/refazer. * Você pode implementar a execução adiada de operações. * Você pode montar um conjunto de comandos simples em um complexo. * O código pode ficar mais complicado uma vez que você está introduzindo uma nova camada entre remetentes e destinatários. Relações com outros padrões --------------------------- * O [Chain of Responsibility](https://refactoring.guru/pt-br/design-patterns/chain-of-responsibility) , [Command](https://refactoring.guru/pt-br/design-patterns/command) , [Mediator](https://refactoring.guru/pt-br/design-patterns/mediator) e [Observer](https://refactoring.guru/pt-br/design-patterns/observer) abrangem várias maneiras de se conectar remetentes e destinatários de pedidos: * O _Chain of Responsibility_ passa um pedido sequencialmente ao longo de um corrente dinâmica de potenciais destinatários até que um deles atua no pedido. * O _Command_ estabelece conexões unidirecionais entre remetentes e destinatários. * O _Mediator_ elimina as conexões diretas entre remetentes e destinatários, forçando-os a se comunicar indiretamente através de um objeto mediador. * O _Observer_ permite que destinatários inscrevam-se ou cancelem sua inscrição dinamicamente para receber pedidos. * Handlers em uma [Chain of Responsibility](https://refactoring.guru/pt-br/design-patterns/chain-of-responsibility) podem ser implementados como [comandos](https://refactoring.guru/pt-br/design-patterns/command) . Neste caso, você pode executar várias operações diferentes sobre o mesmo objeto contexto, representado por um pedido. Contudo, há outra abordagem, onde o próprio pedido é um objeto _comando_. Neste caso, você pode executar a mesma operação em uma série de diferentes contextos ligados em uma corrente. * Você pode usar o [Command](https://refactoring.guru/pt-br/design-patterns/command) e o [Memento](https://refactoring.guru/pt-br/design-patterns/memento) juntos quando implementando um “desfazer”. Neste caso, os comandos são responsáveis pela realização de várias operações sobre um objeto alvo, enquanto que os mementos salvam o estado daquele objeto momentos antes de um comando ser executado. * O [Command](https://refactoring.guru/pt-br/design-patterns/command) e o [Strategy](https://refactoring.guru/pt-br/design-patterns/strategy) podem ser parecidos porque você pode usar ambos para parametrizar um objeto com alguma ação. Contudo, eles têm propósitos bem diferentes. * Você pode usar o _Command_ para converter qualquer operação em um objeto. Os parâmetros da operação se transformam em campos daquele objeto. A conversão permite que você atrase a execução de uma operação, transforme-a em uma fila, armazene o histórico de comandos, envie comandos para serviços remotos, etc. * Por outro lado, o _Strategy_ geralmente descreve diferentes maneiras de fazer a mesma coisa, permitindo que você troque esses algoritmos dentro de uma única classe contexto. * O [Prototype](https://refactoring.guru/pt-br/design-patterns/prototype) pode ajudar quando você precisa salvar cópias de [comandos](https://refactoring.guru/pt-br/design-patterns/command) no histórico. * Você pode tratar um [Visitor](https://refactoring.guru/pt-br/design-patterns/visitor) como uma poderosa versão do padrão [Command](https://refactoring.guru/pt-br/design-patterns/command) . Seus objetos podem executar operações sobre vários objetos de diferentes classes. Exemplos de código ------------------ [![Command em C#](https://refactoring.guru/images/patterns/icons/csharp.svg?id=da64592defc6e86d57c39c66e9de3e58)](https://refactoring.guru/pt-br/design-patterns/command/csharp/example "Command em C#") [![Command em C++](https://refactoring.guru/images/patterns/icons/cpp.svg?id=f7782ed8b8666246bfcc3f8fefc3b858)](https://refactoring.guru/pt-br/design-patterns/command/cpp/example "Command em C++") [![Command em Go](https://refactoring.guru/images/patterns/icons/go.svg?id=1a89927eb99b1ea3fde7701d97970aca)](https://refactoring.guru/pt-br/design-patterns/command/go/example "Command em Go") [![Command em Java](https://refactoring.guru/images/patterns/icons/java.svg?id=e6d87e2dca08c953fe3acd1275ed4f4e)](https://refactoring.guru/pt-br/design-patterns/command/java/example "Command em Java") [![Command em PHP](https://refactoring.guru/images/patterns/icons/php.svg?id=be1906eb26b71ec1d3b93720d6156618)](https://refactoring.guru/pt-br/design-patterns/command/php/example "Command em PHP") [![Command em Python](https://refactoring.guru/images/patterns/icons/python.svg?id=6d815d43c0f7050a1151b43e51569c9f)](https://refactoring.guru/pt-br/design-patterns/command/python/example "Command em Python") [![Command em Ruby](https://refactoring.guru/images/patterns/icons/ruby.svg?id=b065b718c914bf8e960ef731600be1eb)](https://refactoring.guru/pt-br/design-patterns/command/ruby/example "Command em Ruby") [![Command em Rust](https://refactoring.guru/images/patterns/icons/rust.svg?id=1f5698a4b5ae23fe79413511747e4a87)](https://refactoring.guru/pt-br/design-patterns/command/rust/example "Command em Rust") [![Command em Swift](https://refactoring.guru/images/patterns/icons/swift.svg?id=0b716c2d52ec3a48fbe91ac031070c1d)](https://refactoring.guru/pt-br/design-patterns/command/swift/example "Command em Swift") [![Command em TypeScript](https://refactoring.guru/images/patterns/icons/typescript.svg?id=2239d0f16cb703540c205dd8cb0c0cb7)](https://refactoring.guru/pt-br/design-patterns/command/typescript/example "Command em TypeScript") [![](https://refactoring.guru/images/patterns/banners/patterns-book-banner-3-2x.png?id=0cc3f77ab421d1a5c02ee46488231c3a)](https://refactoring.guru/pt-br/design-patterns/book) ### Apoie nosso website gratuito e ganhe o eBook! * 22 padrões de projeto e 8 princípios explicados a fundo. * 439 páginas bem estruturadas, fáceis de se ler e livres de jargões. * 225 diagramas e ilustrações claras e úteis. * Um arquivo com exemplos de código em 11 línguas. * Suportado por todos os dispositivos: formatos PDF/EPUB/MOBI/KFX. [Saiba mais…](https://refactoring.guru/pt-br/design-patterns/book) --- # Снимок на Ruby [There are patterns of patterns now! \ My friend's project: MetaPatterns.io](https://metapatterns.io/)  [](https://refactoring.guru/ru/design-patterns/memento/ruby/example#checkout) [](https://refactoring.guru/ru/design-patterns/memento/ruby/example#checkout) [](https://refactoring.guru/) / [Паттерны проектирования](https://refactoring.guru/ru/design-patterns) / [Снимок](https://refactoring.guru/ru/design-patterns/memento) / [Ruby](https://refactoring.guru/ru/design-patterns/ruby) ![Снимок](https://refactoring.guru/images/patterns/cards/memento-mini-2x.png?id=1d7cba189261dd84b11369a6838b1055) **Снимок** на Ruby ================== **Снимок** — это поведенческий паттерн, позволяющий делать снимки внутреннего состояния объектов, а затем восстанавливать их. При этом Снимок не раскрывает подробностей реализации объектов, и клиент не имеет доступа к защищённой информации объекта. [Подробней о паттерне Снимок](https://refactoring.guru/ru/design-patterns/memento) Навигация  [Интро](https://refactoring.guru/ru/design-patterns/memento/ruby/example#)  [Концептуальный пример](https://refactoring.guru/ru/design-patterns/memento/ruby/example#example-0)  [main](https://refactoring.guru/ru/design-patterns/memento/ruby/example#example-0--main-rb)  [output](https://refactoring.guru/ru/design-patterns/memento/ruby/example#example-0--output-txt) **Сложность:** **Популярность:** **Применимость:** Снимок на Ruby чаще всего реализуют с помощью сериализации. Но это не единственный, да и не самый эффективный метод сохранения состояния объектов во время выполнения программы. Концептуальный пример --------------------- Этот пример показывает структуру паттерна **Снимок**, а именно — из каких классов он состоит, какие роли эти классы выполняют и как они взаимодействуют друг с другом. #### **main.rb:** Пример структуры паттерна \# Создатель содержит некоторое важное состояние, которое может со временем # меняться. Он также объявляет метод сохранения состояния внутри снимка и метод # восстановления состояния из него. class Originator # Для удобства состояние создателя хранится внутри одной переменной. attr\_accessor :state private :state # @param \[String\] state def initialize(state) @state = state puts "Originator: My initial state is: #{@state}" end # Бизнес-логика Создателя может повлиять на его внутреннее состояние. Поэтому # клиент должен выполнить резервное копирование состояния с помощью метода # save перед запуском методов бизнес-логики. def do\_something puts 'Originator: I\\'m doing something important.' @state = generate\_random\_string(30) puts "Originator: and my state has changed to: #{@state}" end private def generate\_random\_string(length = 10) ascii\_letters = \[\*'a'..'z', \*'A'..'Z'\] (0...length).map { ascii\_letters.sample }.join end # Сохраняет текущее состояние внутри снимка. # # @return \[Memento\] def save ConcreteMemento.new(@state) end # Восстанавливает состояние Создателя из объекта снимка. # # @param \[Memento\] memento def restore(memento) @state = memento.state puts "Originator: My state has changed to: #{@state}" end end # Интерфейс Снимка предоставляет способ извлечения метаданных снимка, таких как # дата создания или название. Однако он не раскрывает состояние Создателя. # # @abstract class Memento # @abstract # # @return \[String\] def name raise NotImplementedError, "#{self.class} has not implemented method '#{\_\_method\_\_}'" end # @abstract # # @return \[String\] def date raise NotImplementedError, "#{self.class} has not implemented method '#{\_\_method\_\_}'" end end class ConcreteMemento < Memento # @param \[String\] state def initialize(state) @state = state @date = Time.now.strftime('%F %T') end # Создатель использует этот метод, когда восстанавливает своё состояние. # # @return \[String\] attr\_reader :state # Остальные методы используются Опекуном для отображения метаданных. # # @return \[String\] def name "#{@date} / (#{@state\[0, 9\]}...)" end # @return \[String\] attr\_reader :date end # Опекун не зависит от класса Конкретного Снимка. Таким образом, он не имеет # доступа к состоянию создателя, хранящемуся внутри снимка. Он работает со всеми # снимками через базовый интерфейс Снимка. class Caretaker # @param \[Originator\] originator def initialize(originator) @mementos = \[\] @originator = originator end def backup puts "\\nCaretaker: Saving Originator's state..." @mementos << @originator.save end def undo return if @mementos.empty? memento = @mementos.pop puts "Caretaker: Restoring state to: #{memento.name}" begin @originator.restore(memento) rescue StandardError undo end end def show\_history puts 'Caretaker: Here\\'s the list of mementos:' @mementos.each { |memento| puts memento.name } end end originator = Originator.new('Super-duper-super-puper-super.') caretaker = Caretaker.new(originator) caretaker.backup originator.do\_something caretaker.backup originator.do\_something caretaker.backup originator.do\_something puts "\\n" caretaker.show\_history puts "\\nClient: Now, let's rollback!\\n" caretaker.undo puts "\\nClient: Once more!\\n" caretaker.undo #### **output.txt:** Результат выполнения Originator: My initial state is: Super-duper-super-puper-super. Caretaker: Saving Originator's state... Originator: I'm doing something important. Originator: and my state has changed to: CHYzYSIWbqvWkCzIHOqTyEJWfQlFMn Caretaker: Saving Originator's state... Originator: I'm doing something important. Originator: and my state has changed to: vbkhwCeAEQBpLwQLlhmpcvUnwzxVnT Caretaker: Saving Originator's state... Originator: I'm doing something important. Originator: and my state has changed to: SBWlQnAEPLsitiOQAZbGlXHZAeWBoW Caretaker: Here's the list of mementos: 2023-08-11 15:02:35 / (Super-dup...) 2023-08-11 15:02:35 / (CHYzYSIWb...) 2023-08-11 15:02:35 / (vbkhwCeAE...) Client: Now, let's rollback! Caretaker: Restoring state to: 2023-08-11 15:02:35 / (vbkhwCeAE...) Originator: My state has changed to: vbkhwCeAEQBpLwQLlhmpcvUnwzxVnT Client: Once more! Caretaker: Restoring state to: 2023-08-11 15:02:35 / (CHYzYSIWb...) Originator: My state has changed to: CHYzYSIWbqvWkCzIHOqTyEJWfQlFMn **Снимок** на других языках программирования -------------------------------------------- [![Снимок на C#](https://refactoring.guru/images/patterns/icons/csharp.svg?id=da64592defc6e86d57c39c66e9de3e58)](https://refactoring.guru/ru/design-patterns/memento/csharp/example "Снимок на C#") [![Снимок на C++](https://refactoring.guru/images/patterns/icons/cpp.svg?id=f7782ed8b8666246bfcc3f8fefc3b858)](https://refactoring.guru/ru/design-patterns/memento/cpp/example "Снимок на C++") [![Снимок на Go](https://refactoring.guru/images/patterns/icons/go.svg?id=1a89927eb99b1ea3fde7701d97970aca)](https://refactoring.guru/ru/design-patterns/memento/go/example "Снимок на Go") [![Снимок на Java](https://refactoring.guru/images/patterns/icons/java.svg?id=e6d87e2dca08c953fe3acd1275ed4f4e)](https://refactoring.guru/ru/design-patterns/memento/java/example "Снимок на Java") [![Снимок на PHP](https://refactoring.guru/images/patterns/icons/php.svg?id=be1906eb26b71ec1d3b93720d6156618)](https://refactoring.guru/ru/design-patterns/memento/php/example "Снимок на PHP") [![Снимок на Python](https://refactoring.guru/images/patterns/icons/python.svg?id=6d815d43c0f7050a1151b43e51569c9f)](https://refactoring.guru/ru/design-patterns/memento/python/example "Снимок на Python") [![Снимок на Rust](https://refactoring.guru/images/patterns/icons/rust.svg?id=1f5698a4b5ae23fe79413511747e4a87)](https://refactoring.guru/ru/design-patterns/memento/rust/example "Снимок на Rust") [![Снимок на Swift](https://refactoring.guru/images/patterns/icons/swift.svg?id=0b716c2d52ec3a48fbe91ac031070c1d)](https://refactoring.guru/ru/design-patterns/memento/swift/example "Снимок на Swift") [![Снимок на TypeScript](https://refactoring.guru/images/patterns/icons/typescript.svg?id=2239d0f16cb703540c205dd8cb0c0cb7)](https://refactoring.guru/ru/design-patterns/memento/typescript/example "Снимок на TypeScript") --- # ビジターと二重ディスパッチ [There are patterns of patterns now! \ My friend's project: MetaPatterns.io](https://metapatterns.io/)  [](https://refactoring.guru/ja/design-patterns/visitor-double-dispatch#checkout) [](https://refactoring.guru/ja/design-patterns/visitor-double-dispatch#checkout) [](https://refactoring.guru/) / [デザインパターン](https://refactoring.guru/ja/design-patterns) / [振る舞いに関するパターン](https://refactoring.guru/ja/design-patterns/behavioral-patterns) / [Visitor](https://refactoring.guru/ja/design-patterns/visitor) ビジターと二重ディスパッチ ============= 以下の幾何学形状のクラス階層を眺めてみてください (注: 疑似コードです): interface Graphic is method draw() class Shape implements Graphic is field id method draw() // …… class Dot extends Shape is field x, y method draw() // …… class Circle extends Dot is field radius method draw() // …… class Rectangle extends Shape is field width, height method draw() // …… class CompoundGraphic implements Graphic is field children: array of Graphic method draw() // …… コードは正常に動作し、 アプリは本番稼働しています。 しかし、 ある日、 エクスポート機能を追加することにしました。 エクスポートのコードをこれらのクラス中に置くのは、 ちょっと変です。 エクスポート機能をこの階層のクラスに追加する代わりに、 このクラス階層からは独立した新規クラスを一つ作り、 そこにエクスポートに関する全てのロジックを入れることにしました。 そのクラスには、 各オブジェクトの公開状態を XML の文字列としてエクスポートするための複数のメソッドが入ります。 class Exporter is method export(s: Shape) is print("Exporting shape") method export(d: Dot) print("Exporting dot") method export(c: Circle) print("Exporting circle") method export(r: Rectangle) print("Exporting rectangle") method export(cs: CompoundGraphic) print("Exporting compound") コードは良さそうに見えます。 試してみましょう。 class App() is method export(shape: Shape) is Exporter exporter = new Exporter() exporter.export(shape); app.export(new Circle()); // 残念ながら、"Exporting shape" が出力されます。 ちょと待って! どうして? コンパイラーの立場で考える ------------- 注: 以下の情報は、 近代的なオブジェクト指向プログラミング言語のほとんど (Java、 C#、 PHP など) に当てはまります。 ### 遅延・動的バインディング 自分がコンパイラーになったと思ってください。 以下のコードをどうコンパイルすればいいか決めるところです: method drawShape(shape: Shape) is shape.draw(); えっと、 `draw` メソッドは、 `Shape` クラスで定義されています。 あ、 ちょっと待って、 四つのサブクラスでこのメソッドを上書きしています。 どの実装がここで呼ばれるのか、 安全に決定できるかな? そうは見えない。 確実な唯一の方法は、 プログラムを走らせて、 メソッドに渡されたオブジェクトのクラスを調べること。 確実にわかっていることは、 オブジェクトが `draw` メソッドの実装を**行う予定**ということだけ。 なので、 結果の機械語は、 `shape` パラメーターに渡されたオブジェクトのクラスを調べて、 適切なクラスの `draw` メソッドの実装を選ぶことをします。 このような動的な型のチェックは、 遅延 (または動的) バインディングと呼ばれます。 * **遅延**は、 コンパイル後、 実行時にオブジェクトと実装をリンクするため。 * **動的**は、 どの新規オブジェクトも、 異なる実装にリンクする必要があるかもしれないから。 ### 早期・静的バインディング では、 以下のコードを 「コンパイル」 してみましょう: method exportShape(shape: Shape) is Exporter exporter = new Exporter() exporter.export(shape); すべてのことは 2 行目で明らかです。 `Exporter` クラスは、 独自定義のコンストラクターがないので、 オブジェクトのインスタンスを一つ作るだけです。 `export` の呼び出しはどうでしょうか? `Exporter` には、 名前が同じでパラメーター型が異なる五つのメソッドがあります。 どれを呼べばいいでしょうか? どうやら、 ここでも動的バインディングが必要そうです。 もう一つ問題点があります。 適切な `export` メソッドが `Exporter` クラス中にない新たな形状クラスにはどう対応しますか? たとえば、 `Ellipse` (楕円) オブジェクトとかです。 コンパイラーは、 適切な多重定義 (= overload。 上書き= overwrite とは異なる) されたメソッドが存在することは保証できません。 このようなあいまいな状況は、 コンパイラーの許容範囲外です。 そのため、 コンパイラー開発者は安全性を優先し、 多重定義されたメソッドには早期 (または静的) バインディングを使用します: * **早期**は、 プログラム開始時より前のコンパイル時に行われるから。 * **静的**は、 実行時の変更ができないから。 最初の例に戻りましょう。 渡される引数が、 `Shape` 階層のものであることはわかっています。 `Shape` クラスか、 そのサブクラスのうちの一つです。 それと、 `Exporter` クラスには、 `Shape` クラスのエクスポートをサポートする基本的な実装、 `export(s: Shape)` があることがわかっています。 あいまいな状況になることなく与えられたコードに安全にリンクできる唯一の実装は、 そうなります。 `Rectangle` オブジェクトを `export­Shape` に渡しても `Exporter` が `export(s: Shape)` メソッドを呼び続けるのは、 そういう理由によります。 二重ディスパッチ -------- **二重ディスパッチ**は、 多重定義メソッドとともに動的バインディングを使用することを可能にする技法です。 このように行われます: class Visitor is method visit(s: Shape) is print("Visited shape") method visit(d: Dot) print("Visited dot") interface Graphic is method accept(v: Visitor) class Shape implements Graphic is method accept(v: Visitor) // コンパイラーは、\`this\` が確実に \`Shape\` であることを知っている。 // そのため、\`visit(s: Shape)\` を安全に呼び出し可能。 v.visit(this) class Dot extends Shape is method accept(v: Visitor) // コンパイラーは、\`this\` が \`Dot\` であることを知っている。 // そのため、\`visit(s: Dot)\` を安全に呼び出し可能。 v.visit(this) Visitor v = new Visitor(); Graphic g = new Dot(); // \`accept\` は、(多重定義ではなく)上書きされている。コンパイラー // は、それを動的にバインディング。従って、\`accept\` は、メソッド // を呼び出すオブジェクトに対応したクラス(この場合 \`Dot\`)上で実行 // される。 g.accept(v); // 「Visited dot」を表示。 ### 後書き [Visitor](https://refactoring.guru/ja/design-patterns/visitor) パターンは二重ディスパッチの原則に基づいていますが、 それが主目的ではありません。 Visitor を使うと、 クラス階層中のクラスの既存コードを変更せずに、 ​ 「外的」 操作をクラス階層全体に追加できます。 --- # Посредник на Rust [There are patterns of patterns now! \ My friend's project: MetaPatterns.io](https://metapatterns.io/)  [](https://refactoring.guru/ru/design-patterns/mediator/rust/example#checkout) [](https://refactoring.guru/ru/design-patterns/mediator/rust/example#checkout) [](https://refactoring.guru/) / [Паттерны проектирования](https://refactoring.guru/ru/design-patterns) / [Посредник](https://refactoring.guru/ru/design-patterns/mediator) / [Rust](https://refactoring.guru/ru/design-patterns/rust) ![Посредник](https://refactoring.guru/images/patterns/cards/mediator-mini-2x.png?id=d288d7c73f5581ae09701d61200ae09e) **Посредник** на Rust ===================== **Посредник** — это поведенческий паттерн, который упрощает коммуникацию между компонентами системы. Посредник убирает прямые связи между отдельными компонентами, заставляя их общаться друг с другом через себя. [Подробней о паттерне Посредник](https://refactoring.guru/ru/design-patterns/mediator) Навигация  [Интро](https://refactoring.guru/ru/design-patterns/mediator/rust/example#)  [Top-Down Ownership](https://refactoring.guru/ru/design-patterns/mediator/rust/example#example-0)  [train\_station](https://refactoring.guru/ru/design-patterns/mediator/rust/example#example-0--train_station-rs)   [mod](https://refactoring.guru/ru/design-patterns/mediator/rust/example#example-0--trains-mod-rs)   [freight\_train](https://refactoring.guru/ru/design-patterns/mediator/rust/example#example-0--trains-freight_train-rs)   [passenger\_train](https://refactoring.guru/ru/design-patterns/mediator/rust/example#example-0--trains-passenger_train-rs)  [main](https://refactoring.guru/ru/design-patterns/mediator/rust/example#example-0--main-rs) Top-Down Ownership ------------------ Top-Down Ownership approach allows to apply Mediator in Rust as it is a suitable for Rust's ownership model with strict borrow checker rules. It's not the only way to implement Mediator, but it's a fundamental one. The key point is thinking in terms of OWNERSHIP. 1. A mediator takes ownership of all components. 2. A component doesn't preserve a reference to a mediator. Instead, it gets the reference via a method call. // A train gets a mediator object by reference. pub trait Train { fn name(&self) -> &String; fn arrive(&mut self, mediator: &mut dyn Mediator); fn depart(&mut self, mediator: &mut dyn Mediator); } // Mediator has notification methods. pub trait Mediator { fn notify\_about\_arrival(&mut self, train\_name: &str) -> bool; fn notify\_about\_departure(&mut self, train\_name: &str); } 3. Control flow starts from `fn main()` where the mediator receives external events/commands. 4. `Mediator` trait for the interaction between components (`notify_about_arrival`, `notify_about_departure`) is not the same as its external API for receiving external events (`accept`, `depart` commands from the main loop). let train1 = PassengerTrain::new("Train 1"); let train2 = FreightTrain::new("Train 2"); // Station has \`accept\` and \`depart\` methods, // but it also implements \`Mediator\`. let mut station = TrainStation::default(); // Station is taking ownership of the trains. station.accept(train1); station.accept(train2); // \`train1\` and \`train2\` have been moved inside, // but we can use train names to depart them. station.depart("Train 1"); station.depart("Train 2"); station.depart("Train 3"); ![Top-Down Ownership](https://github.com/fadeevab/mediator-pattern-rust/raw/main/images/mediator-rust-approach.jpg) #### Extra info There is a research and discussion of the Mediator pattern in Rust: [https://github.com/fadeevab/mediator-pattern-rust](https://github.com/fadeevab/mediator-pattern-rust) #### **train\_station.rs** use std::collections::{HashMap, VecDeque}; use crate::trains::Train; // Mediator has notification methods. pub trait Mediator { fn notify\_about\_arrival(&mut self, train\_name: &str) -> bool; fn notify\_about\_departure(&mut self, train\_name: &str); } #\[derive(Default)\] pub struct TrainStation { trains: HashMap>, train\_queue: VecDeque, train\_on\_platform: Option, } impl Mediator for TrainStation { fn notify\_about\_arrival(&mut self, train\_name: &str) -> bool { if self.train\_on\_platform.is\_some() { self.train\_queue.push\_back(train\_name.into()); false } else { self.train\_on\_platform.replace(train\_name.into()); true } } fn notify\_about\_departure(&mut self, train\_name: &str) { if Some(train\_name.into()) == self.train\_on\_platform { self.train\_on\_platform = None; if let Some(next\_train\_name) = self.train\_queue.pop\_front() { let mut next\_train = self.trains.remove(&next\_train\_name).unwrap(); next\_train.arrive(self); self.trains.insert(next\_train\_name.clone(), next\_train); self.train\_on\_platform = Some(next\_train\_name); } } } } impl TrainStation { pub fn accept(&mut self, mut train: impl Train + 'static) { if self.trains.contains\_key(train.name()) { println!("{} has already arrived", train.name()); return; } train.arrive(self); self.trains.insert(train.name().clone(), Box::new(train)); } pub fn depart(&mut self, name: &'static str) { let train = self.trains.remove(name); if let Some(mut train) = train { train.depart(self); } else { println!("'{}' is not on the station!", name); } } } #### **trains/mod.rs** mod freight\_train; mod passenger\_train; pub use freight\_train::FreightTrain; pub use passenger\_train::PassengerTrain; use crate::train\_station::Mediator; // A train gets a mediator object by reference. pub trait Train { fn name(&self) -> &String; fn arrive(&mut self, mediator: &mut dyn Mediator); fn depart(&mut self, mediator: &mut dyn Mediator); } #### **trains/freight\_train.rs** use super::Train; use crate::train\_station::Mediator; pub struct FreightTrain { name: String, } impl FreightTrain { pub fn new(name: &'static str) -> Self { Self { name: name.into() } } } impl Train for FreightTrain { fn name(&self) -> &String { &self.name } fn arrive(&mut self, mediator: &mut dyn Mediator) { if !mediator.notify\_about\_arrival(&self.name) { println!("Freight train {}: Arrival blocked, waiting", self.name); return; } println!("Freight train {}: Arrived", self.name); } fn depart(&mut self, mediator: &mut dyn Mediator) { println!("Freight train {}: Leaving", self.name); mediator.notify\_about\_departure(&self.name); } } #### **trains/passenger\_train.rs** use super::Train; use crate::train\_station::Mediator; pub struct PassengerTrain { name: String, } impl PassengerTrain { pub fn new(name: &'static str) -> Self { Self { name: name.into() } } } impl Train for PassengerTrain { fn name(&self) -> &String { &self.name } fn arrive(&mut self, mediator: &mut dyn Mediator) { if !mediator.notify\_about\_arrival(&self.name) { println!("Passenger train {}: Arrival blocked, waiting", self.name); return; } println!("Passenger train {}: Arrived", self.name); } fn depart(&mut self, mediator: &mut dyn Mediator) { println!("Passenger train {}: Leaving", self.name); mediator.notify\_about\_departure(&self.name); } } #### **main.rs:** Client code mod train\_station; mod trains; use train\_station::TrainStation; use trains::{FreightTrain, PassengerTrain}; fn main() { let train1 = PassengerTrain::new("Train 1"); let train2 = FreightTrain::new("Train 2"); // Station has \`accept\` and \`depart\` methods, // but it also implements \`Mediator\`. let mut station = TrainStation::default(); // Station is taking ownership of the trains. station.accept(train1); station.accept(train2); // \`train1\` and \`train2\` have been moved inside, // but we can use train names to depart them. station.depart("Train 1"); station.depart("Train 2"); station.depart("Train 3"); } ### Output Passenger train Train 1: Arrived Freight train Train 2: Arrival blocked, waiting Passenger train Train 1: Leaving Freight train Train 2: Arrived Freight train Train 2: Leaving 'Train 3' is not on the station! **Посредник** на других языках программирования ----------------------------------------------- [![Посредник на C#](https://refactoring.guru/images/patterns/icons/csharp.svg?id=da64592defc6e86d57c39c66e9de3e58)](https://refactoring.guru/ru/design-patterns/mediator/csharp/example "Посредник на C#") [![Посредник на C++](https://refactoring.guru/images/patterns/icons/cpp.svg?id=f7782ed8b8666246bfcc3f8fefc3b858)](https://refactoring.guru/ru/design-patterns/mediator/cpp/example "Посредник на C++") [![Посредник на Go](https://refactoring.guru/images/patterns/icons/go.svg?id=1a89927eb99b1ea3fde7701d97970aca)](https://refactoring.guru/ru/design-patterns/mediator/go/example "Посредник на Go") [![Посредник на Java](https://refactoring.guru/images/patterns/icons/java.svg?id=e6d87e2dca08c953fe3acd1275ed4f4e)](https://refactoring.guru/ru/design-patterns/mediator/java/example "Посредник на Java") [![Посредник на PHP](https://refactoring.guru/images/patterns/icons/php.svg?id=be1906eb26b71ec1d3b93720d6156618)](https://refactoring.guru/ru/design-patterns/mediator/php/example "Посредник на PHP") [![Посредник на Python](https://refactoring.guru/images/patterns/icons/python.svg?id=6d815d43c0f7050a1151b43e51569c9f)](https://refactoring.guru/ru/design-patterns/mediator/python/example "Посредник на Python") [![Посредник на Ruby](https://refactoring.guru/images/patterns/icons/ruby.svg?id=b065b718c914bf8e960ef731600be1eb)](https://refactoring.guru/ru/design-patterns/mediator/ruby/example "Посредник на Ruby") [![Посредник на Swift](https://refactoring.guru/images/patterns/icons/swift.svg?id=0b716c2d52ec3a48fbe91ac031070c1d)](https://refactoring.guru/ru/design-patterns/mediator/swift/example "Посредник на Swift") [![Посредник на TypeScript](https://refactoring.guru/images/patterns/icons/typescript.svg?id=2239d0f16cb703540c205dd8cb0c0cb7)](https://refactoring.guru/ru/design-patterns/mediator/typescript/example "Посредник на TypeScript") --- # Dekorator w języku PHP / Wzorce projektowe [There are patterns of patterns now! \ My friend's project: MetaPatterns.io](https://metapatterns.io/)  [](https://refactoring.guru/pl/design-patterns/decorator/php/example#checkout) [](https://refactoring.guru/pl/design-patterns/decorator/php/example#checkout) [](https://refactoring.guru/) / [Wzorce projektowe](https://refactoring.guru/pl/design-patterns) / [Dekorator](https://refactoring.guru/pl/design-patterns/decorator) / [PHP](https://refactoring.guru/pl/design-patterns/php) ![Dekorator](https://refactoring.guru/images/patterns/cards/decorator-mini-2x.png?id=3b58e540d7d28523080cad341ed9b2e9) **Dekorator** w języku PHP ========================== **Dekorator** to strukturalny wzorzec pozwalający na dodawanie obiektom nowych obowiązków w sposób dynamiczny — poprzez “opakowywanie” ich w specjalne obiekty posiadające potrzebną funkcjonalność. Stosując dekoratory można opakowywać obiekty wielokrotnie, gdyż zarówno obiekt docelowy jak i dekoratory są zgodne pod względem interfejsu. Wynikowy obiekt będzie posiadał ułożoną w formie stosu połączoną funkcjonalność wszystkich “opakowań”. [Dowiedz się więcej o Dekorator](https://refactoring.guru/pl/design-patterns/decorator) Nawigacja  [Intro](https://refactoring.guru/pl/design-patterns/decorator/php/example#)  [Przykład koncepcyjny](https://refactoring.guru/pl/design-patterns/decorator/php/example#example-0)  [index](https://refactoring.guru/pl/design-patterns/decorator/php/example#example-0--index-php)  [Output](https://refactoring.guru/pl/design-patterns/decorator/php/example#example-0--Output-txt)  [Przykład z prawdziwego życia](https://refactoring.guru/pl/design-patterns/decorator/php/example#example-1)  [index](https://refactoring.guru/pl/design-patterns/decorator/php/example#example-1--index-php)  [Output](https://refactoring.guru/pl/design-patterns/decorator/php/example#example-1--Output-txt) **Złożoność:** **Popularność:** **Przykłady użycia:** Dekorator jest dość typowy w kodzie PHP, szczególnie tym związanym ze strumieniami. **Identyfikacja:** Dekorator można poznać po metodach kreacyjnych lub konstruktorach przyjmujących obiekty tej samej klasy lub interfejsu jako bieżącą klasę. Przykład koncepcyjny -------------------- Poniższy przykład ilustruje strukturę wzorca **Dekorator** ze szczególnym naciskiem na następujące kwestie: * Z jakich składa się klas? * Jakie role pełnią te klasy? * W jaki sposób elementy wzorca są ze sobą powiązane? Poznawszy strukturę wzorca będzie ci łatwiej zrozumieć następujący przykład, oparty na prawdziwym przypadku użycia PHP. #### **index.php:** Przykład koncepcyjny component = $component; } /\*\* \* The Decorator delegates all work to the wrapped component. \*/ public function operation(): string { return $this->component->operation(); } } /\*\* \* Concrete Decorators call the wrapped object and alter its result in some way. \*/ class ConcreteDecoratorA extends Decorator { /\*\* \* Decorators may call parent implementation of the operation, instead of \* calling the wrapped object directly. This approach simplifies extension \* of decorator classes. \*/ public function operation(): string { return "ConcreteDecoratorA(" . parent::operation() . ")"; } } /\*\* \* Decorators can execute their behavior either before or after the call to a \* wrapped object. \*/ class ConcreteDecoratorB extends Decorator { public function operation(): string { return "ConcreteDecoratorB(" . parent::operation() . ")"; } } /\*\* \* The client code works with all objects using the Component interface. This \* way it can stay independent of the concrete classes of components it works \* with. \*/ function clientCode(Component $component) { // ... echo "RESULT: " . $component->operation(); // ... } /\*\* \* This way the client code can support both simple components... \*/ $simple = new ConcreteComponent(); echo "Client: I've got a simple component:\\n"; clientCode($simple); echo "\\n\\n"; /\*\* \* ...as well as decorated ones. \* \* Note how decorators can wrap not only simple components but the other \* decorators as well. \*/ $decorator1 = new ConcreteDecoratorA($simple); $decorator2 = new ConcreteDecoratorB($decorator1); echo "Client: Now I've got a decorated component:\\n"; clientCode($decorator2); #### **Output.txt:** Wynik działania Client: I've got a simple component: RESULT: ConcreteComponent Client: Now I've got a decorated component: RESULT: ConcreteDecoratorB(ConcreteDecoratorA(ConcreteComponent)) Przykład z prawdziwego życia ---------------------------- W tym przykładzie wzorzec **Dekorator** pomaga skonstruować złożone reguły filtrowania tekstu który ma być wyświetlony na stronie internetowej. Różne rodzaje treści, jak komentarze, wpisy na forum, czy prywatne wiadomości wymagają odmiennych zestawów filtrów. Przykładowo, chcielibyśmy wyciąć HTML z treści publikowanych komentarzy oprócz kilku podstawowych tagów. Chcemy umożliwić też publikowanie w formacie Markdown, który zostanie przetworzony jeszcze przed filtrowaniem HTML. Wszystkie powyższe reguły filtrowania można przedstawić w formie osobnych klas-dekoratorów, które można układać w stos na różne sposoby, zależnie od treści z jaką pracujemy. #### **index.php:** Przykład z prawdziwego życia inputFormat = $inputFormat; } /\*\* \* Decorator delegates all work to a wrapped component. \*/ public function formatText(string $text): string { return $this->inputFormat->formatText($text); } } /\*\* \* This Concrete Decorator strips out all HTML tags from the given text. \*/ class PlainTextFilter extends TextFormat { public function formatText(string $text): string { $text = parent::formatText($text); return strip\_tags($text); } } /\*\* \* This Concrete Decorator strips only dangerous HTML tags and attributes that \* may lead to an XSS vulnerability. \*/ class DangerousHTMLTagsFilter extends TextFormat { private $dangerousTagPatterns = \[\ "|(\[\\s\\S\]\*)?|i", // ...\ \]; private $dangerousAttributes = \[\ "onclick", "onkeypress", // ...\ \]; public function formatText(string $text): string { $text = parent::formatText($text); foreach ($this->dangerousTagPatterns as $pattern) { $text = preg\_replace($pattern, '', $text); } foreach ($this->dangerousAttributes as $attribute) { $text = preg\_replace\_callback('|<(.\*?)>|', function ($matches) use ($attribute) { $result = preg\_replace("|$attribute=|i", '', $matches\[1\]); return "<" . $result . ">"; }, $text); } return $text; } } /\*\* \* This Concrete Decorator provides a rudimentary Markdown → HTML conversion. \*/ class MarkdownFormat extends TextFormat { public function formatText(string $text): string { $text = parent::formatText($text); // Format block elements. $chunks = preg\_split('|\\n\\n|', $text); foreach ($chunks as &$chunk) { // Format headers. if (preg\_match('|^#+|', $chunk)) { $chunk = preg\_replace\_callback('|^(#+)(.\*?)$|', function ($matches) { $h = strlen($matches\[1\]); return "" . trim($matches\[2\]) . ""; }, $chunk); } // Format paragraphs. else { $chunk = "

$chunk

"; } } $text = implode("\\n\\n", $chunks); // Format inline elements. $text = preg\_replace("|\_\_(.\*?)\_\_|", '$1', $text); $text = preg\_replace("|\\\*\\\*(.\*?)\\\*\\\*|", '$1', $text); $text = preg\_replace("|\_(.\*?)\_|", '$1', $text); $text = preg\_replace("|\\\*(.\*?)\\\*|", '$1', $text); return $text; } } /\*\* \* The client code might be a part of a real website, which renders user- \* generated content. Since it works with formatters through the Component \* interface, it doesn't care whether it gets a simple component object or a \* decorated one. \*/ function displayCommentAsAWebsite(InputFormat $format, string $text) { // .. echo $format->formatText($text); // .. } /\*\* \* Input formatters are very handy when dealing with user-generated content. \* Displaying such content "as is" could be very dangerous, especially when \* anonymous users can generate it (e.g. comments). Your website is not only \* risking getting tons of spammy links but may also be exposed to XSS attacks. \*/ $dangerousComment = <<homepage. HERE; /\*\* \* Naive comment rendering (unsafe). \*/ $naiveInput = new TextInput(); echo "Website renders comments without filtering (unsafe):\\n"; displayCommentAsAWebsite($naiveInput, $dangerousComment); echo "\\n\\n\\n"; /\*\* \* Filtered comment rendering (safe). \*/ $filteredInput = new PlainTextFilter($naiveInput); echo "Website renders comments after stripping all tags (safe):\\n"; displayCommentAsAWebsite($filteredInput, $dangerousComment); echo "\\n\\n\\n"; /\*\* \* Decorator allows stacking multiple input formats to get fine-grained control \* over the rendered content. \*/ $dangerousForumPost = << performXSSAttack(); HERE; /\*\* \* Naive post rendering (unsafe, no formatting). \*/ $naiveInput = new TextInput(); echo "Website renders a forum post without filtering and formatting (unsafe, ugly):\\n"; displayCommentAsAWebsite($naiveInput, $dangerousForumPost); echo "\\n\\n\\n"; /\*\* \* Markdown formatter + filtering dangerous tags (safe, pretty). \*/ $text = new TextInput(); $markdown = new MarkdownFormat($text); $filteredInput = new DangerousHTMLTagsFilter($markdown); echo "Website renders a forum post after translating markdown markup" . " and filtering some dangerous HTML tags and attributes (safe, pretty):\\n"; displayCommentAsAWebsite($filteredInput, $dangerousForumPost); echo "\\n\\n\\n"; #### **Output.txt:** Wynik działania Website renders comments without filtering (unsafe): Hello! Nice blog post! Please visit my homepage. Website renders comments after stripping all tags (safe): Hello! Nice blog post! Please visit my homepage. performXSSAttack(); Website renders a forum post without filtering and formatting (unsafe, ugly): # Welcome This is my first post on this \*\*gorgeous\*\* forum. Website renders a forum post after translating markdown markupand filtering some dangerous HTML tags and attributes (safe, pretty):

Welcome

This is my first post on this gorgeous forum.

**Dekorator** w innych językach ------------------------------- [![Dekorator w języku C#](https://refactoring.guru/images/patterns/icons/csharp.svg?id=da64592defc6e86d57c39c66e9de3e58)](https://refactoring.guru/pl/design-patterns/decorator/csharp/example "Dekorator w języku C#") [![Dekorator w języku C++](https://refactoring.guru/images/patterns/icons/cpp.svg?id=f7782ed8b8666246bfcc3f8fefc3b858)](https://refactoring.guru/pl/design-patterns/decorator/cpp/example "Dekorator w języku C++") [![Dekorator w języku Go](https://refactoring.guru/images/patterns/icons/go.svg?id=1a89927eb99b1ea3fde7701d97970aca)](https://refactoring.guru/pl/design-patterns/decorator/go/example "Dekorator w języku Go") [![Dekorator w języku Java](https://refactoring.guru/images/patterns/icons/java.svg?id=e6d87e2dca08c953fe3acd1275ed4f4e)](https://refactoring.guru/pl/design-patterns/decorator/java/example "Dekorator w języku Java") [![Dekorator w języku Python](https://refactoring.guru/images/patterns/icons/python.svg?id=6d815d43c0f7050a1151b43e51569c9f)](https://refactoring.guru/pl/design-patterns/decorator/python/example "Dekorator w języku Python") [![Dekorator w języku Ruby](https://refactoring.guru/images/patterns/icons/ruby.svg?id=b065b718c914bf8e960ef731600be1eb)](https://refactoring.guru/pl/design-patterns/decorator/ruby/example "Dekorator w języku Ruby") [![Dekorator w języku Rust](https://refactoring.guru/images/patterns/icons/rust.svg?id=1f5698a4b5ae23fe79413511747e4a87)](https://refactoring.guru/pl/design-patterns/decorator/rust/example "Dekorator w języku Rust") [![Dekorator w języku Swift](https://refactoring.guru/images/patterns/icons/swift.svg?id=0b716c2d52ec3a48fbe91ac031070c1d)](https://refactoring.guru/pl/design-patterns/decorator/swift/example "Dekorator w języku Swift") [![Dekorator w języku TypeScript](https://refactoring.guru/images/patterns/icons/typescript.svg?id=2239d0f16cb703540c205dd8cb0c0cb7)](https://refactoring.guru/pl/design-patterns/decorator/typescript/example "Dekorator w języku TypeScript") --- # Прототип на C++ [There are patterns of patterns now! \ My friend's project: MetaPatterns.io](https://metapatterns.io/)  [](https://refactoring.guru/ru/design-patterns/prototype/cpp/example#checkout) [](https://refactoring.guru/ru/design-patterns/prototype/cpp/example#checkout) [](https://refactoring.guru/) / [Паттерны проектирования](https://refactoring.guru/ru/design-patterns) / [Прототип](https://refactoring.guru/ru/design-patterns/prototype) / [C++](https://refactoring.guru/ru/design-patterns/cpp) ![Прототип](https://refactoring.guru/images/patterns/cards/prototype-mini-2x.png?id=b871f789a736e7efbb1cd082d2de6398) **Прототип** на C++ =================== **Прототип** — это порождающий паттерн, который позволяет копировать объекты любой сложности без привязки к их конкретным классам. Все классы—Прототипы имеют общий интерфейс. Поэтому вы можете копировать объекты, не обращая внимания на их конкретные типы и всегда быть уверены, что получите точную копию. Клонирование совершается самим объектом-прототипом, что позволяет ему скопировать значения всех полей, даже приватных. [Подробней о паттерне Прототип](https://refactoring.guru/ru/design-patterns/prototype) Навигация  [Интро](https://refactoring.guru/ru/design-patterns/prototype/cpp/example#)  [Концептуальный пример](https://refactoring.guru/ru/design-patterns/prototype/cpp/example#example-0)  [main](https://refactoring.guru/ru/design-patterns/prototype/cpp/example#example-0--main-cc)  [Output](https://refactoring.guru/ru/design-patterns/prototype/cpp/example#example-0--Output-txt) **Сложность:** **Популярность:** **Признаки применения паттерна:** Прототип легко определяется в коде по наличию методов `clone`, `copy` и прочих. Концептуальный пример --------------------- Этот пример показывает структуру паттерна **Прототип**, а именно — из каких классов он состоит, какие роли эти классы выполняют и как они взаимодействуют друг с другом. #### **main.cc:** Пример структуры паттерна using std::string; // Паттерн Прототип // // Назначение: Позволяет копировать объекты, не вдаваясь в подробности их // реализации. enum Type { PROTOTYPE\_1 = 0, PROTOTYPE\_2 }; /\*\* \* Пример класса, имеющего возможность клонирования. Мы посмотрим как происходит \* клонирование значений полей разных типов. \*/ class Prototype { protected: string prototype\_name\_; float prototype\_field\_; public: Prototype() {} Prototype(string prototype\_name) : prototype\_name\_(prototype\_name) { } virtual ~Prototype() {} virtual Prototype \*Clone() const = 0; virtual void Method(float prototype\_field) { this->prototype\_field\_ = prototype\_field; std::cout << "Call Method from " << prototype\_name\_ << " with field : " << prototype\_field << std::endl; } }; /\*\* \* ConcretePrototype1 is a Sub-Class of Prototype and implement the Clone Method \* In this example all data members of Prototype Class are in the Stack. If you \* have pointers in your properties for ex: String\* name\_ ,you will need to \* implement the Copy-Constructor to make sure you have a deep copy from the \* clone method \*/ class ConcretePrototype1 : public Prototype { private: float concrete\_prototype\_field1\_; public: ConcretePrototype1(string prototype\_name, float concrete\_prototype\_field) : Prototype(prototype\_name), concrete\_prototype\_field1\_(concrete\_prototype\_field) { } /\*\* \* Notice that Clone method return a Pointer to a new ConcretePrototype1 \* replica. so, the client (who call the clone method) has the responsability \* to free that memory. If you have smart pointer knowledge you may prefer to \* use unique\_pointer here. \*/ Prototype \*Clone() const override { return new ConcretePrototype1(\*this); } }; class ConcretePrototype2 : public Prototype { private: float concrete\_prototype\_field2\_; public: ConcretePrototype2(string prototype\_name, float concrete\_prototype\_field) : Prototype(prototype\_name), concrete\_prototype\_field2\_(concrete\_prototype\_field) { } Prototype \*Clone() const override { return new ConcretePrototype2(\*this); } }; /\*\* \* In PrototypeFactory you have two concrete prototypes, one for each concrete \* prototype class, so each time you want to create a bullet , you can use the \* existing ones and clone those. \*/ class PrototypeFactory { private: std::unordered\_map> prototypes\_; public: PrototypeFactory() { prototypes\_\[Type::PROTOTYPE\_1\] = new ConcretePrototype1("PROTOTYPE\_1 ", 50.f); prototypes\_\[Type::PROTOTYPE\_2\] = new ConcretePrototype2("PROTOTYPE\_2 ", 60.f); } /\*\* \* Be carefull of free all memory allocated. Again, if you have smart pointers \* knowelege will be better to use it here. \*/ ~PrototypeFactory() { delete prototypes\_\[Type::PROTOTYPE\_1\]; delete prototypes\_\[Type::PROTOTYPE\_2\]; } /\*\* \* Notice here that you just need to specify the type of the prototype you \* want and the method will create from the object with this type. \*/ Prototype \*CreatePrototype(Type type) { return prototypes\_\[type\]->Clone(); } }; void Client(PrototypeFactory &prototype\_factory) { std::cout << "Let's create a Prototype 1\\n"; Prototype \*prototype = prototype\_factory.CreatePrototype(Type::PROTOTYPE\_1); prototype->Method(90); delete prototype; std::cout << "\\n"; std::cout << "Let's create a Prototype 2 \\n"; prototype = prototype\_factory.CreatePrototype(Type::PROTOTYPE\_2); prototype->Method(10); delete prototype; } int main() { PrototypeFactory \*prototype\_factory = new PrototypeFactory(); Client(\*prototype\_factory); delete prototype\_factory; return 0; } #### **Output.txt:** Результат выполнения Let's create a Prototype 1 Call Method from PROTOTYPE\_1 with field : 90 Let's create a Prototype 2 Call Method from PROTOTYPE\_2 with field : 10 **Прототип** на других языках программирования ---------------------------------------------- [![Прототип на C#](https://refactoring.guru/images/patterns/icons/csharp.svg?id=da64592defc6e86d57c39c66e9de3e58)](https://refactoring.guru/ru/design-patterns/prototype/csharp/example "Прототип на C#") [![Прототип на Go](https://refactoring.guru/images/patterns/icons/go.svg?id=1a89927eb99b1ea3fde7701d97970aca)](https://refactoring.guru/ru/design-patterns/prototype/go/example "Прототип на Go") [![Прототип на Java](https://refactoring.guru/images/patterns/icons/java.svg?id=e6d87e2dca08c953fe3acd1275ed4f4e)](https://refactoring.guru/ru/design-patterns/prototype/java/example "Прототип на Java") [![Прототип на PHP](https://refactoring.guru/images/patterns/icons/php.svg?id=be1906eb26b71ec1d3b93720d6156618)](https://refactoring.guru/ru/design-patterns/prototype/php/example "Прототип на PHP") [![Прототип на Python](https://refactoring.guru/images/patterns/icons/python.svg?id=6d815d43c0f7050a1151b43e51569c9f)](https://refactoring.guru/ru/design-patterns/prototype/python/example "Прототип на Python") [![Прототип на Ruby](https://refactoring.guru/images/patterns/icons/ruby.svg?id=b065b718c914bf8e960ef731600be1eb)](https://refactoring.guru/ru/design-patterns/prototype/ruby/example "Прототип на Ruby") [![Прототип на Rust](https://refactoring.guru/images/patterns/icons/rust.svg?id=1f5698a4b5ae23fe79413511747e4a87)](https://refactoring.guru/ru/design-patterns/prototype/rust/example "Прототип на Rust") [![Прототип на Swift](https://refactoring.guru/images/patterns/icons/swift.svg?id=0b716c2d52ec3a48fbe91ac031070c1d)](https://refactoring.guru/ru/design-patterns/prototype/swift/example "Прототип на Swift") [![Прототип на TypeScript](https://refactoring.guru/images/patterns/icons/typescript.svg?id=2239d0f16cb703540c205dd8cb0c0cb7)](https://refactoring.guru/ru/design-patterns/prototype/typescript/example "Прототип на TypeScript") --- # Patrones de diseño en TypeScript [There are patterns of patterns now! \ My friend's project: MetaPatterns.io](https://metapatterns.io/)  [](https://refactoring.guru/es/design-patterns/typescript#checkout) [](https://refactoring.guru/es/design-patterns/typescript#checkout) ![Patrones de diseño en TypeScript](https://refactoring.guru/images/patterns/languages/typescript-3x.png) ![Patrones de diseño en TypeScript](https://refactoring.guru/images/patterns/languages/mini/typescript-3x.png) PATRONES de DISEÑO en TypeScript ================================ El catálogo de ejemplos en **TypeScript** ----------------------------------------- #### Patrones creacionales ![Abstract Factory](https://refactoring.guru/images/patterns/cards/abstract-factory-mini-3x.png) #### Abstract Factory Permite producir familias de objetos relacionados sin especificar sus clases concretas. [Artículo principal](https://refactoring.guru/es/design-patterns/abstract-factory) [Uso en TypeScript](https://refactoring.guru/es/design-patterns/abstract-factory/typescript/example#lang-features) [Ejemplo de código](https://refactoring.guru/es/design-patterns/abstract-factory/typescript/example#example-0) ![Builder](https://refactoring.guru/images/patterns/cards/builder-mini-3x.png) #### Builder Permite construir objetos complejos paso a paso. Este patrón nos permite producir distintos tipos y representaciones de un objeto empleando el mismo código de construcción. [Artículo principal](https://refactoring.guru/es/design-patterns/builder) [Uso en TypeScript](https://refactoring.guru/es/design-patterns/builder/typescript/example#lang-features) [Ejemplo de código](https://refactoring.guru/es/design-patterns/builder/typescript/example#example-0) ![Factory Method](https://refactoring.guru/images/patterns/cards/factory-method-mini-3x.png) #### Factory Method Proporciona una interfaz para la creación de objetos en una superclase, mientras permite a las subclases alterar el tipo de objetos que se crearán. [Artículo principal](https://refactoring.guru/es/design-patterns/factory-method) [Uso en TypeScript](https://refactoring.guru/es/design-patterns/factory-method/typescript/example#lang-features) [Ejemplo de código](https://refactoring.guru/es/design-patterns/factory-method/typescript/example#example-0) ![Prototype](https://refactoring.guru/images/patterns/cards/prototype-mini-3x.png) #### Prototype Permite copiar objetos existentes sin que el código dependa de sus clases. [Artículo principal](https://refactoring.guru/es/design-patterns/prototype) [Uso en TypeScript](https://refactoring.guru/es/design-patterns/prototype/typescript/example#lang-features) [Ejemplo de código](https://refactoring.guru/es/design-patterns/prototype/typescript/example#example-0) ![Singleton](https://refactoring.guru/images/patterns/cards/singleton-mini-3x.png) #### Singleton Permite asegurarnos de que una clase tenga una única instancia, a la vez que proporciona un punto de acceso global a dicha instancia. [Artículo principal](https://refactoring.guru/es/design-patterns/singleton) [Uso en TypeScript](https://refactoring.guru/es/design-patterns/singleton/typescript/example#lang-features) [Ejemplo de código](https://refactoring.guru/es/design-patterns/singleton/typescript/example#example-0) #### Patrones estructurales ![Adapter](https://refactoring.guru/images/patterns/cards/adapter-mini-3x.png) #### Adapter Permite la colaboración entre objetos con interfaces incompatibles. [Artículo principal](https://refactoring.guru/es/design-patterns/adapter) [Uso en TypeScript](https://refactoring.guru/es/design-patterns/adapter/typescript/example#lang-features) [Ejemplo de código](https://refactoring.guru/es/design-patterns/adapter/typescript/example#example-0) ![Bridge](https://refactoring.guru/images/patterns/cards/bridge-mini-3x.png) #### Bridge Permite dividir una clase grande o un grupo de clases estrechamente relacionadas, en dos jerarquías separadas (abstracción e implementación) que pueden desarrollarse independientemente la una de la otra. [Artículo principal](https://refactoring.guru/es/design-patterns/bridge) [Uso en TypeScript](https://refactoring.guru/es/design-patterns/bridge/typescript/example#lang-features) [Ejemplo de código](https://refactoring.guru/es/design-patterns/bridge/typescript/example#example-0) ![Composite](https://refactoring.guru/images/patterns/cards/composite-mini-3x.png) #### Composite Permite componer objetos en estructuras de árbol y trabajar con esas estructuras como si fueran objetos individuales. [Artículo principal](https://refactoring.guru/es/design-patterns/composite) [Uso en TypeScript](https://refactoring.guru/es/design-patterns/composite/typescript/example#lang-features) [Ejemplo de código](https://refactoring.guru/es/design-patterns/composite/typescript/example#example-0) ![Decorator](https://refactoring.guru/images/patterns/cards/decorator-mini-3x.png) #### Decorator Permite añadir funcionalidades a objetos colocando estos objetos dentro de objetos encapsuladores especiales que contienen estas funcionalidades. [Artículo principal](https://refactoring.guru/es/design-patterns/decorator) [Uso en TypeScript](https://refactoring.guru/es/design-patterns/decorator/typescript/example#lang-features) [Ejemplo de código](https://refactoring.guru/es/design-patterns/decorator/typescript/example#example-0) ![Facade](https://refactoring.guru/images/patterns/cards/facade-mini-3x.png) #### Facade Proporciona una interfaz simplificada a una biblioteca, un framework o cualquier otro grupo complejo de clases. [Artículo principal](https://refactoring.guru/es/design-patterns/facade) [Uso en TypeScript](https://refactoring.guru/es/design-patterns/facade/typescript/example#lang-features) [Ejemplo de código](https://refactoring.guru/es/design-patterns/facade/typescript/example#example-0) ![Flyweight](https://refactoring.guru/images/patterns/cards/flyweight-mini-3x.png) #### Flyweight Permite mantener más objetos dentro de la cantidad disponible de memoria RAM compartiendo las partes comunes del estado entre varios objetos en lugar de mantener toda la información en cada objeto. [Artículo principal](https://refactoring.guru/es/design-patterns/flyweight) [Uso en TypeScript](https://refactoring.guru/es/design-patterns/flyweight/typescript/example#lang-features) [Ejemplo de código](https://refactoring.guru/es/design-patterns/flyweight/typescript/example#example-0) ![Proxy](https://refactoring.guru/images/patterns/cards/proxy-mini-3x.png) #### Proxy Permite proporcionar un sustituto o marcador de posición para otro objeto. Un proxy controla el acceso al objeto original, permitiéndote hacer algo antes o después de que la solicitud llegue al objeto original. [Artículo principal](https://refactoring.guru/es/design-patterns/proxy) [Uso en TypeScript](https://refactoring.guru/es/design-patterns/proxy/typescript/example#lang-features) [Ejemplo de código](https://refactoring.guru/es/design-patterns/proxy/typescript/example#example-0) #### Patrones de comportamiento ![Chain of Responsibility](https://refactoring.guru/images/patterns/cards/chain-of-responsibility-mini-3x.png) #### Chain of Responsibility Permite pasar solicitudes a lo largo de una cadena de manejadores. Al recibir una solicitud, cada manejador decide si la procesa o si la pasa al siguiente manejador de la cadena. [Artículo principal](https://refactoring.guru/es/design-patterns/chain-of-responsibility) [Uso en TypeScript](https://refactoring.guru/es/design-patterns/chain-of-responsibility/typescript/example#lang-features) [Ejemplo de código](https://refactoring.guru/es/design-patterns/chain-of-responsibility/typescript/example#example-0) ![Command](https://refactoring.guru/images/patterns/cards/command-mini-3x.png) #### Command Convierte una solicitud en un objeto independiente que contiene toda la información sobre la solicitud. Esta transformación te permite parametrizar los métodos con diferentes solicitudes, retrasar o poner en cola la ejecución de una solicitud y soportar operaciones que no se pueden realizar. [Artículo principal](https://refactoring.guru/es/design-patterns/command) [Uso en TypeScript](https://refactoring.guru/es/design-patterns/command/typescript/example#lang-features) [Ejemplo de código](https://refactoring.guru/es/design-patterns/command/typescript/example#example-0) ![Iterator](https://refactoring.guru/images/patterns/cards/iterator-mini-3x.png) #### Iterator Permite recorrer elementos de una colección sin exponer su representación subyacente (lista, pila, árbol, etc.). [Artículo principal](https://refactoring.guru/es/design-patterns/iterator) [Uso en TypeScript](https://refactoring.guru/es/design-patterns/iterator/typescript/example#lang-features) [Ejemplo de código](https://refactoring.guru/es/design-patterns/iterator/typescript/example#example-0) ![Mediator](https://refactoring.guru/images/patterns/cards/mediator-mini-3x.png) #### Mediator Permite reducir las dependencias caóticas entre objetos. El patrón restringe las comunicaciones directas entre los objetos, forzándolos a colaborar únicamente a través de un objeto mediador. [Artículo principal](https://refactoring.guru/es/design-patterns/mediator) [Uso en TypeScript](https://refactoring.guru/es/design-patterns/mediator/typescript/example#lang-features) [Ejemplo de código](https://refactoring.guru/es/design-patterns/mediator/typescript/example#example-0) ![Memento](https://refactoring.guru/images/patterns/cards/memento-mini-3x.png) #### Memento Permite guardar y restaurar el estado previo de un objeto sin revelar los detalles de su implementación. [Artículo principal](https://refactoring.guru/es/design-patterns/memento) [Uso en TypeScript](https://refactoring.guru/es/design-patterns/memento/typescript/example#lang-features) [Ejemplo de código](https://refactoring.guru/es/design-patterns/memento/typescript/example#example-0) ![Observer](https://refactoring.guru/images/patterns/cards/observer-mini-3x.png) #### Observer Permite definir un mecanismo de suscripción para notificar a varios objetos sobre cualquier evento que le suceda al objeto que están observando. [Artículo principal](https://refactoring.guru/es/design-patterns/observer) [Uso en TypeScript](https://refactoring.guru/es/design-patterns/observer/typescript/example#lang-features) [Ejemplo de código](https://refactoring.guru/es/design-patterns/observer/typescript/example#example-0) ![State](https://refactoring.guru/images/patterns/cards/state-mini-3x.png) #### State Permite a un objeto alterar su comportamiento cuando su estado interno cambia. Parece como si el objeto cambiara su clase. [Artículo principal](https://refactoring.guru/es/design-patterns/state) [Uso en TypeScript](https://refactoring.guru/es/design-patterns/state/typescript/example#lang-features) [Ejemplo de código](https://refactoring.guru/es/design-patterns/state/typescript/example#example-0) ![Strategy](https://refactoring.guru/images/patterns/cards/strategy-mini-3x.png) #### Strategy Permite definir una familia de algoritmos, colocar cada uno de ellos en una clase separada y hacer sus objetos intercambiables. [Artículo principal](https://refactoring.guru/es/design-patterns/strategy) [Uso en TypeScript](https://refactoring.guru/es/design-patterns/strategy/typescript/example#lang-features) [Ejemplo de código](https://refactoring.guru/es/design-patterns/strategy/typescript/example#example-0) ![Template Method](https://refactoring.guru/images/patterns/cards/template-method-mini-3x.png) #### Template Method Define el esqueleto de un algoritmo en la superclase pero permite que las subclases sobrescriban pasos del algoritmo sin cambiar su estructura. [Artículo principal](https://refactoring.guru/es/design-patterns/template-method) [Uso en TypeScript](https://refactoring.guru/es/design-patterns/template-method/typescript/example#lang-features) [Ejemplo de código](https://refactoring.guru/es/design-patterns/template-method/typescript/example#example-0) ![Visitor](https://refactoring.guru/images/patterns/cards/visitor-mini-3x.png) #### Visitor Permite separar algoritmos de los objetos sobre los que operan. [Artículo principal](https://refactoring.guru/es/design-patterns/visitor) [Uso en TypeScript](https://refactoring.guru/es/design-patterns/visitor/typescript/example#lang-features) [Ejemplo de código](https://refactoring.guru/es/design-patterns/visitor/typescript/example#example-0) --- # Prototype em C# / Padrões de Projeto [There are patterns of patterns now! \ My friend's project: MetaPatterns.io](https://metapatterns.io/)  [](https://refactoring.guru/pt-br/design-patterns/prototype/csharp/example#checkout) [](https://refactoring.guru/pt-br/design-patterns/prototype/csharp/example#checkout) [](https://refactoring.guru/) / [Padrões de Projeto](https://refactoring.guru/pt-br/design-patterns) / [Prototype](https://refactoring.guru/pt-br/design-patterns/prototype) / [C#](https://refactoring.guru/pt-br/design-patterns/csharp) ![Prototype](https://refactoring.guru/images/patterns/cards/prototype-mini-2x.png?id=b871f789a736e7efbb1cd082d2de6398) **Prototype** em C# =================== O **Prototype** é um padrão de projeto criacional que permite a clonagem de objetos, mesmo complexos, sem acoplamento à suas classes específicas. Todas as classes de prototypes(protótipos) devem ter uma interface comum que permita copiar objetos, mesmo que suas classes concretas sejam desconhecidas. Objetos protótipos podem produzir cópias completas, pois objetos da mesma classe podem acessar os campos privados um do outro. [Saiba mais sobre o Prototype](https://refactoring.guru/pt-br/design-patterns/prototype) Navegação  [Introdução](https://refactoring.guru/pt-br/design-patterns/prototype/csharp/example#)  [Exemplo conceitual](https://refactoring.guru/pt-br/design-patterns/prototype/csharp/example#example-0)  [Program](https://refactoring.guru/pt-br/design-patterns/prototype/csharp/example#example-0--Program-cs)  [Output](https://refactoring.guru/pt-br/design-patterns/prototype/csharp/example#example-0--Output-txt) **Complexidade:** **Popularidade:** **Exemplos de uso:** O padrão Prototype está disponível e pronto para uso em C# com a interface `ICloneable`. **Identificação:** O prototype pode ser facilmente reconhecido pelos métodos `clone` ou `copy`, etc. Exemplo conceitual ------------------ Este exemplo ilustra a estrutura do padrão de projeto **Prototype**. Ele se concentra em responder a estas perguntas: * De quais classes ele consiste? * Quais papéis essas classes desempenham? * De que maneira os elementos do padrão estão relacionados? #### **Program.cs:** Exemplo conceitual using System; namespace RefactoringGuru.DesignPatterns.Prototype.Conceptual { public class Person { public int Age; public DateTime BirthDate; public string Name; public IdInfo IdInfo; public Person ShallowCopy() { return (Person) this.MemberwiseClone(); } public Person DeepCopy() { Person clone = (Person) this.MemberwiseClone(); clone.IdInfo = new IdInfo(IdInfo.IdNumber); clone.Name = String.Copy(Name); return clone; } } public class IdInfo { public int IdNumber; public IdInfo(int idNumber) { this.IdNumber = idNumber; } } class Program { static void Main(string\[\] args) { Person p1 = new Person(); p1.Age = 42; p1.BirthDate = Convert.ToDateTime("1977-01-01"); p1.Name = "Jack Daniels"; p1.IdInfo = new IdInfo(666); // Perform a shallow copy of p1 and assign it to p2. Person p2 = p1.ShallowCopy(); // Make a deep copy of p1 and assign it to p3. Person p3 = p1.DeepCopy(); // Display values of p1, p2 and p3. Console.WriteLine("Original values of p1, p2, p3:"); Console.WriteLine(" p1 instance values: "); DisplayValues(p1); Console.WriteLine(" p2 instance values:"); DisplayValues(p2); Console.WriteLine(" p3 instance values:"); DisplayValues(p3); // Change the value of p1 properties and display the values of p1, // p2 and p3. p1.Age = 32; p1.BirthDate = Convert.ToDateTime("1900-01-01"); p1.Name = "Frank"; p1.IdInfo.IdNumber = 7878; Console.WriteLine("\\nValues of p1, p2 and p3 after changes to p1:"); Console.WriteLine(" p1 instance values: "); DisplayValues(p1); Console.WriteLine(" p2 instance values (reference values have changed):"); DisplayValues(p2); Console.WriteLine(" p3 instance values (everything was kept the same):"); DisplayValues(p3); } public static void DisplayValues(Person p) { Console.WriteLine(" Name: {0:s}, Age: {1:d}, BirthDate: {2:MM/dd/yy}", p.Name, p.Age, p.BirthDate); Console.WriteLine(" ID#: {0:d}", p.IdInfo.IdNumber); } } } #### **Output.txt:** Resultados da execução Original values of p1, p2, p3: p1 instance values: Name: Jack Daniels, Age: 42, BirthDate: 01/01/77 ID#: 666 p2 instance values: Name: Jack Daniels, Age: 42, BirthDate: 01/01/77 ID#: 666 p3 instance values: Name: Jack Daniels, Age: 42, BirthDate: 01/01/77 ID#: 666 Values of p1, p2 and p3 after changes to p1: p1 instance values: Name: Frank, Age: 32, BirthDate: 01/01/00 ID#: 7878 p2 instance values (reference values have changed): Name: Jack Daniels, Age: 42, BirthDate: 01/01/77 ID#: 7878 p3 instance values (everything was kept the same): Name: Jack Daniels, Age: 42, BirthDate: 01/01/77 ID#: 666 **Prototype** em outras linguagens ---------------------------------- [![Prototype em C++](https://refactoring.guru/images/patterns/icons/cpp.svg?id=f7782ed8b8666246bfcc3f8fefc3b858)](https://refactoring.guru/pt-br/design-patterns/prototype/cpp/example "Prototype em C++") [![Prototype em Go](https://refactoring.guru/images/patterns/icons/go.svg?id=1a89927eb99b1ea3fde7701d97970aca)](https://refactoring.guru/pt-br/design-patterns/prototype/go/example "Prototype em Go") [![Prototype em Java](https://refactoring.guru/images/patterns/icons/java.svg?id=e6d87e2dca08c953fe3acd1275ed4f4e)](https://refactoring.guru/pt-br/design-patterns/prototype/java/example "Prototype em Java") [![Prototype em PHP](https://refactoring.guru/images/patterns/icons/php.svg?id=be1906eb26b71ec1d3b93720d6156618)](https://refactoring.guru/pt-br/design-patterns/prototype/php/example "Prototype em PHP") [![Prototype em Python](https://refactoring.guru/images/patterns/icons/python.svg?id=6d815d43c0f7050a1151b43e51569c9f)](https://refactoring.guru/pt-br/design-patterns/prototype/python/example "Prototype em Python") [![Prototype em Ruby](https://refactoring.guru/images/patterns/icons/ruby.svg?id=b065b718c914bf8e960ef731600be1eb)](https://refactoring.guru/pt-br/design-patterns/prototype/ruby/example "Prototype em Ruby") [![Prototype em Rust](https://refactoring.guru/images/patterns/icons/rust.svg?id=1f5698a4b5ae23fe79413511747e4a87)](https://refactoring.guru/pt-br/design-patterns/prototype/rust/example "Prototype em Rust") [![Prototype em Swift](https://refactoring.guru/images/patterns/icons/swift.svg?id=0b716c2d52ec3a48fbe91ac031070c1d)](https://refactoring.guru/pt-br/design-patterns/prototype/swift/example "Prototype em Swift") [![Prototype em TypeScript](https://refactoring.guru/images/patterns/icons/typescript.svg?id=2239d0f16cb703540c205dd8cb0c0cb7)](https://refactoring.guru/pt-br/design-patterns/prototype/typescript/example "Prototype em TypeScript") --- # C#으로 작성된 프록시 / 디자인 패턴들 [There are patterns of patterns now! \ My friend's project: MetaPatterns.io](https://metapatterns.io/)  [](https://refactoring.guru/ko/design-patterns/proxy/csharp/example#checkout) [](https://refactoring.guru/ko/design-patterns/proxy/csharp/example#checkout) [](https://refactoring.guru/) / [디자인 패턴들](https://refactoring.guru/ko/design-patterns) / [프록시](https://refactoring.guru/ko/design-patterns/proxy) / [C#](https://refactoring.guru/ko/design-patterns/csharp) ![프록시](https://refactoring.guru/images/patterns/cards/proxy-mini-2x.png?id=8638fac9dc08c992852492f9cb29d9c6) C#으로 작성된 **프록시** ================ **프록시**는 클라이언트가 사용하는 실제 서비스 객체를 대신하는 객체를 제공하는 구조 디자인 패턴입니다. 프록시는 클라이언트 요청을 수신하고, 일부 작업​(접근 제어, 캐싱 등)​을 수행한 다음 요청을 서비스 객체에 전달합니다. 프록시 객체는 서비스 객체와 같은 인터페이스를 가지기 때문에 클라이언트에 전달되면 실제 객체와 상호교환이 가능합니다. [프록시에 대하여 더 자세히 알아보세요](https://refactoring.guru/ko/design-patterns/proxy) 내비게이션  [소개](https://refactoring.guru/ko/design-patterns/proxy/csharp/example#)  [개념적인 예시](https://refactoring.guru/ko/design-patterns/proxy/csharp/example#example-0)  [Program](https://refactoring.guru/ko/design-patterns/proxy/csharp/example#example-0--Program-cs)  [Output](https://refactoring.guru/ko/design-patterns/proxy/csharp/example#example-0--Output-txt) **복잡도:** **인기도:** **사용 사례들:** 프록시 패턴은 대부분의 C# 앱에서 일반적으로 발견되지 않습니다. 그러나 일부 특별한 경우에는 여전히 매우 유용할 수 있습니다. 클라이언트 코드를 변경하지 않고 기존 클래스의 객체에 몇 가지 추가 행동들을 추가해야 할 때 매우 유용합니다. **식별:** 프록시들은 모든 실제 작업을 다른 객체에 위임합니다. 각 프록시 메서드는 프록시가 서비스 객체의 자식 클래스가 아닌 이상 최종적으로 서비스 객체를 참조해야 합니다. 개념적인 예시 ------- 이 예시는 **프록시** 디자인 패턴의 구조를 보여주고 다음 질문에 중점을 둡니다: * 패턴은 어떤 클래스들로 구성되어 있나요? * 이 클래스들은 어떤 역할을 하나요? * 패턴의 요소들은 어떻게 서로 연관되어 있나요? #### **Program.cs:** 개념적인 예시 using System; namespace RefactoringGuru.DesignPatterns.Proxy.Conceptual { // The Subject interface declares common operations for both RealSubject and // the Proxy. As long as the client works with RealSubject using this // interface, you'll be able to pass it a proxy instead of a real subject. public interface ISubject { void Request(); } // The RealSubject contains some core business logic. Usually, RealSubjects // are capable of doing some useful work which may also be very slow or // sensitive - e.g. correcting input data. A Proxy can solve these issues // without any changes to the RealSubject's code. class RealSubject : ISubject { public void Request() { Console.WriteLine("RealSubject: Handling Request."); } } // The Proxy has an interface identical to the RealSubject. class Proxy : ISubject { private RealSubject \_realSubject; public Proxy(RealSubject realSubject) { this.\_realSubject = realSubject; } // The most common applications of the Proxy pattern are lazy loading, // caching, controlling the access, logging, etc. A Proxy can perform // one of these things and then, depending on the result, pass the // execution to the same method in a linked RealSubject object. public void Request() { if (this.CheckAccess()) { this.\_realSubject.Request(); this.LogAccess(); } } public bool CheckAccess() { // Some real checks should go here. Console.WriteLine("Proxy: Checking access prior to firing a real request."); return true; } public void LogAccess() { Console.WriteLine("Proxy: Logging the time of request."); } } public class Client { // The client code is supposed to work with all objects (both subjects // and proxies) via the Subject interface in order to support both real // subjects and proxies. In real life, however, clients mostly work with // their real subjects directly. In this case, to implement the pattern // more easily, you can extend your proxy from the real subject's class. public void ClientCode(ISubject subject) { // ... subject.Request(); // ... } } class Program { static void Main(string\[\] args) { Client client = new Client(); Console.WriteLine("Client: Executing the client code with a real subject:"); RealSubject realSubject = new RealSubject(); client.ClientCode(realSubject); Console.WriteLine(); Console.WriteLine("Client: Executing the same client code with a proxy:"); Proxy proxy = new Proxy(realSubject); client.ClientCode(proxy); } } } #### **Output.txt:** 실행 결과 Client: Executing the client code with a real subject: RealSubject: Handling Request. Client: Executing the same client code with a proxy: Proxy: Checking access prior to firing a real request. RealSubject: Handling Request. Proxy: Logging the time of request. 다른 언어로 작성된 **프록시** ------------------ [![C++로 작성된 프록시](https://refactoring.guru/images/patterns/icons/cpp.svg?id=f7782ed8b8666246bfcc3f8fefc3b858)](https://refactoring.guru/ko/design-patterns/proxy/cpp/example "C++로 작성된 프록시") [![Go로 작성된 프록시](https://refactoring.guru/images/patterns/icons/go.svg?id=1a89927eb99b1ea3fde7701d97970aca)](https://refactoring.guru/ko/design-patterns/proxy/go/example "Go로 작성된 프록시") [![자바로 작성된 프록시](https://refactoring.guru/images/patterns/icons/java.svg?id=e6d87e2dca08c953fe3acd1275ed4f4e)](https://refactoring.guru/ko/design-patterns/proxy/java/example "자바로 작성된 프록시") [![PHP로 작성된 프록시](https://refactoring.guru/images/patterns/icons/php.svg?id=be1906eb26b71ec1d3b93720d6156618)](https://refactoring.guru/ko/design-patterns/proxy/php/example "PHP로 작성된 프록시") [![파이썬으로 작성된 프록시](https://refactoring.guru/images/patterns/icons/python.svg?id=6d815d43c0f7050a1151b43e51569c9f)](https://refactoring.guru/ko/design-patterns/proxy/python/example "파이썬으로 작성된 프록시") [![루비로 작성된 프록시](https://refactoring.guru/images/patterns/icons/ruby.svg?id=b065b718c914bf8e960ef731600be1eb)](https://refactoring.guru/ko/design-patterns/proxy/ruby/example "루비로 작성된 프록시") [![러스트로 작성된 프록시](https://refactoring.guru/images/patterns/icons/rust.svg?id=1f5698a4b5ae23fe79413511747e4a87)](https://refactoring.guru/ko/design-patterns/proxy/rust/example "러스트로 작성된 프록시") [![스위프트로 작성된 프록시](https://refactoring.guru/images/patterns/icons/swift.svg?id=0b716c2d52ec3a48fbe91ac031070c1d)](https://refactoring.guru/ko/design-patterns/proxy/swift/example "스위프트로 작성된 프록시") [![타입스크립트로 작성된 프록시](https://refactoring.guru/images/patterns/icons/typescript.svg?id=2239d0f16cb703540c205dd8cb0c0cb7)](https://refactoring.guru/ko/design-patterns/proxy/typescript/example "타입스크립트로 작성된 프록시") --- # 파이썬으로 작성된 프로토타입 / 디자인 패턴들 [There are patterns of patterns now! \ My friend's project: MetaPatterns.io](https://metapatterns.io/)  [](https://refactoring.guru/ko/design-patterns/prototype/python/example#checkout) [](https://refactoring.guru/ko/design-patterns/prototype/python/example#checkout) [](https://refactoring.guru/) / [디자인 패턴들](https://refactoring.guru/ko/design-patterns) / [프로토타입](https://refactoring.guru/ko/design-patterns/prototype) / [파이썬](https://refactoring.guru/ko/design-patterns/python) ![프로토타입](https://refactoring.guru/images/patterns/cards/prototype-mini-2x.png?id=b871f789a736e7efbb1cd082d2de6398) 파이썬으로 작성된 **프로토타입** =================== **프로토타입**은 객체들​(복잡한 객체 포함)​을 그의 특정 클래스들에 결합하지 않고 복제할 수 있도록 하는 생성 디자인 패턴입니다. 모든 프로토타입 클래스들은 객체들의 구상 클래스들을 알 수 없는 경우에도 해당 객체들을 복사할 수 있도록 하는 공통 인터페이스가 있어야 합니다. 프로토타입 객체들은 전체 복사본들을 생성할 수 있습니다. 왜냐하면 같은 클래스의 객체들은 서로의 비공개 필드들에 접근할 수 있기 때문입니다. [프로토타입에 대하여 더 자세히 알아보세요](https://refactoring.guru/ko/design-patterns/prototype) 내비게이션  [소개](https://refactoring.guru/ko/design-patterns/prototype/python/example#)  [개념적인 예시](https://refactoring.guru/ko/design-patterns/prototype/python/example#example-0)  [main](https://refactoring.guru/ko/design-patterns/prototype/python/example#example-0--main-py)  [Output](https://refactoring.guru/ko/design-patterns/prototype/python/example#example-0--Output-txt) **복잡도:** **인기도:** **사용 사례들:** 프로토타입 패턴은 `copy` 모듈을 통해 파이썬에서 바로 사용할 수 있습니다. **식별:** 프로토타입은 `clone` 또는 `copy` 등의 메서드들의 유무로 식별할 수 있습니다. 개념적인 예시 ------- 이 예시는 **프로토타입** 패턴의 구조를 보여주고 다음 질문에 중점을 둡니다: * 패턴은 어떤 클래스들로 구성되어 있나요? * 이 클래스들은 어떤 역할을 하나요? * 패턴의 요소들은 어떻게 서로 연관되어 있나요? #### **main.py:** 개념적인 예시 import copy class SelfReferencingEntity: def \_\_init\_\_(self): self.parent = None def set\_parent(self, parent): self.parent = parent class SomeComponent: """ Python provides its own interface of Prototype via \`copy.copy\` and \`copy.deepcopy\` functions. And any class that wants to implement custom implementations have to override \`\_\_copy\_\_\` and \`\_\_deepcopy\_\_\` member functions. """ def \_\_init\_\_(self, some\_int, some\_list\_of\_objects, some\_circular\_ref): self.some\_int = some\_int self.some\_list\_of\_objects = some\_list\_of\_objects self.some\_circular\_ref = some\_circular\_ref def \_\_copy\_\_(self): """ Create a shallow copy. This method will be called whenever someone calls \`copy.copy\` with this object and the returned value is returned as the new shallow copy. """ # First, let's create copies of the nested objects. some\_list\_of\_objects = copy.copy(self.some\_list\_of\_objects) some\_circular\_ref = copy.copy(self.some\_circular\_ref) # Then, let's clone the object itself, using the prepared clones of the # nested objects. new = self.\_\_class\_\_( self.some\_int, some\_list\_of\_objects, some\_circular\_ref ) new.\_\_dict\_\_.update(self.\_\_dict\_\_) return new def \_\_deepcopy\_\_(self, memo=None): """ Create a deep copy. This method will be called whenever someone calls \`copy.deepcopy\` with this object and the returned value is returned as the new deep copy. What is the use of the argument \`memo\`? Memo is the dictionary that is used by the \`deepcopy\` library to prevent infinite recursive copies in instances of circular references. Pass it to all the \`deepcopy\` calls you make in the \`\_\_deepcopy\_\_\` implementation to prevent infinite recursions. """ if memo is None: memo = {} # First, let's create copies of the nested objects. some\_list\_of\_objects = copy.deepcopy(self.some\_list\_of\_objects, memo) some\_circular\_ref = copy.deepcopy(self.some\_circular\_ref, memo) # Then, let's clone the object itself, using the prepared clones of the # nested objects. new = self.\_\_class\_\_( self.some\_int, some\_list\_of\_objects, some\_circular\_ref ) new.\_\_dict\_\_ = copy.deepcopy(self.\_\_dict\_\_, memo) return new if \_\_name\_\_ == "\_\_main\_\_": list\_of\_objects = \[1, {1, 2, 3}, \[1, 2, 3\]\] circular\_ref = SelfReferencingEntity() component = SomeComponent(23, list\_of\_objects, circular\_ref) circular\_ref.set\_parent(component) shallow\_copied\_component = copy.copy(component) # Let's change the list in shallow\_copied\_component and see if it changes in # component. shallow\_copied\_component.some\_list\_of\_objects.append("another object") if component.some\_list\_of\_objects\[-1\] == "another object": print( "Adding elements to \`shallow\_copied\_component\`'s " "some\_list\_of\_objects adds it to \`component\`'s " "some\_list\_of\_objects." ) else: print( "Adding elements to \`shallow\_copied\_component\`'s " "some\_list\_of\_objects doesn't add it to \`component\`'s " "some\_list\_of\_objects." ) # Let's change the set in the list of objects. component.some\_list\_of\_objects\[1\].add(4) if 4 in shallow\_copied\_component.some\_list\_of\_objects\[1\]: print( "Changing objects in the \`component\`'s some\_list\_of\_objects " "changes that object in \`shallow\_copied\_component\`'s " "some\_list\_of\_objects." ) else: print( "Changing objects in the \`component\`'s some\_list\_of\_objects " "doesn't change that object in \`shallow\_copied\_component\`'s " "some\_list\_of\_objects." ) deep\_copied\_component = copy.deepcopy(component) # Let's change the list in deep\_copied\_component and see if it changes in # component. deep\_copied\_component.some\_list\_of\_objects.append("one more object") if component.some\_list\_of\_objects\[-1\] == "one more object": print( "Adding elements to \`deep\_copied\_component\`'s " "some\_list\_of\_objects adds it to \`component\`'s " "some\_list\_of\_objects." ) else: print( "Adding elements to \`deep\_copied\_component\`'s " "some\_list\_of\_objects doesn't add it to \`component\`'s " "some\_list\_of\_objects." ) # Let's change the set in the list of objects. component.some\_list\_of\_objects\[1\].add(10) if 10 in deep\_copied\_component.some\_list\_of\_objects\[1\]: print( "Changing objects in the \`component\`'s some\_list\_of\_objects " "changes that object in \`deep\_copied\_component\`'s " "some\_list\_of\_objects." ) else: print( "Changing objects in the \`component\`'s some\_list\_of\_objects " "doesn't change that object in \`deep\_copied\_component\`'s " "some\_list\_of\_objects." ) print( f"id(deep\_copied\_component.some\_circular\_ref.parent): " f"{id(deep\_copied\_component.some\_circular\_ref.parent)}" ) print( f"id(deep\_copied\_component.some\_circular\_ref.parent.some\_circular\_ref.parent): " f"{id(deep\_copied\_component.some\_circular\_ref.parent.some\_circular\_ref.parent)}" ) print( "^^ This shows that deepcopied objects contain same reference, they " "are not cloned repeatedly." ) #### **Output.txt:** 실행 결과 Adding elements to \`shallow\_copied\_component\`'s some\_list\_of\_objects adds it to \`component\`'s some\_list\_of\_objects. Changing objects in the \`component\`'s some\_list\_of\_objects changes that object in \`shallow\_copied\_component\`'s some\_list\_of\_objects. Adding elements to \`deep\_copied\_component\`'s some\_list\_of\_objects doesn't add it to \`component\`'s some\_list\_of\_objects. Changing objects in the \`component\`'s some\_list\_of\_objects doesn't change that object in \`deep\_copied\_component\`'s some\_list\_of\_objects. id(deep\_copied\_component.some\_circular\_ref.parent): 4429472784 id(deep\_copied\_component.some\_circular\_ref.parent.some\_circular\_ref.parent): 4429472784 ^^ This shows that deepcopied objects contain same reference, they are not cloned repeatedly. 다른 언어로 작성된 **프로토타입** -------------------- [![C#으로 작성된 프로토타입](https://refactoring.guru/images/patterns/icons/csharp.svg?id=da64592defc6e86d57c39c66e9de3e58)](https://refactoring.guru/ko/design-patterns/prototype/csharp/example "C#으로 작성된 프로토타입") [![C++로 작성된 프로토타입](https://refactoring.guru/images/patterns/icons/cpp.svg?id=f7782ed8b8666246bfcc3f8fefc3b858)](https://refactoring.guru/ko/design-patterns/prototype/cpp/example "C++로 작성된 프로토타입") [![Go로 작성된 프로토타입](https://refactoring.guru/images/patterns/icons/go.svg?id=1a89927eb99b1ea3fde7701d97970aca)](https://refactoring.guru/ko/design-patterns/prototype/go/example "Go로 작성된 프로토타입") [![자바로 작성된 프로토타입](https://refactoring.guru/images/patterns/icons/java.svg?id=e6d87e2dca08c953fe3acd1275ed4f4e)](https://refactoring.guru/ko/design-patterns/prototype/java/example "자바로 작성된 프로토타입") [![PHP로 작성된 프로토타입](https://refactoring.guru/images/patterns/icons/php.svg?id=be1906eb26b71ec1d3b93720d6156618)](https://refactoring.guru/ko/design-patterns/prototype/php/example "PHP로 작성된 프로토타입") [![루비로 작성된 프로토타입](https://refactoring.guru/images/patterns/icons/ruby.svg?id=b065b718c914bf8e960ef731600be1eb)](https://refactoring.guru/ko/design-patterns/prototype/ruby/example "루비로 작성된 프로토타입") [![러스트로 작성된 프로토타입](https://refactoring.guru/images/patterns/icons/rust.svg?id=1f5698a4b5ae23fe79413511747e4a87)](https://refactoring.guru/ko/design-patterns/prototype/rust/example "러스트로 작성된 프로토타입") [![스위프트로 작성된 프로토타입](https://refactoring.guru/images/patterns/icons/swift.svg?id=0b716c2d52ec3a48fbe91ac031070c1d)](https://refactoring.guru/ko/design-patterns/prototype/swift/example "스위프트로 작성된 프로토타입") [![타입스크립트로 작성된 프로토타입](https://refactoring.guru/images/patterns/icons/typescript.svg?id=2239d0f16cb703540c205dd8cb0c0cb7)](https://refactoring.guru/ko/design-patterns/prototype/typescript/example "타입스크립트로 작성된 프로토타입") --- # 패턴에 대한 비판 [There are patterns of patterns now! \ My friend's project: MetaPatterns.io](https://metapatterns.io/)  [](https://refactoring.guru/ko/design-patterns/criticism#checkout) [](https://refactoring.guru/ko/design-patterns/criticism#checkout) [](https://refactoring.guru/) / [디자인 패턴들](https://refactoring.guru/ko/design-patterns) 패턴에 대한 비판 ========= 많은 분이 디자인 패턴에 대해 비판했습니다. 이분들이 주장하는 패턴을 사용하지 말아야 할 보편적인 이유에 대하여 알아봅시다. #### 약한 프로그래밍 언어를 위한 클루지로 작동합니다. 이 관점은 폴 그레이엄이 [Revenge of the Nerds(괴짜들의 복수)](http://www.paulgraham.com/icad.html) 에세이에서 처음으로 표현했습니다. 이 [위키 페이지](http://wiki.c2.com/?AreDesignPatternsMissingLanguageFeatures) \]\]에서 더 자세한 내용을 읽어보세요. 일반적으로 패턴의 필요성은 개발자가 추상화 수준이 부족한 프로그래밍 언어나 기술을 선택했을 때 발생합니다. 이 경우 패턴은 약한 프로그래밍 언어에 필요한 초능력을 부여하는 클루지​(문제의 어지럽고 임시변통의 그러나 효과적인 해결책)​로 작동합니다. 예를 들어 [Strategy](https://refactoring.guru/ko/design-patterns/strategy) 패턴은 대부분의 최신 프로그래밍 언어에서 간단한 익명​(람다) 함수로 구현할 수 있습니다. #### 비효율적인 해결책 패턴은 이미 널리 사용되는 문제 해결 방식의 체계화를 시도합니다. 많은 사람이 이렇게 통합된 패턴들을 도그마처럼 신봉하여 패턴을 프로젝트의 맥락에 따라 적용하지 않고 '문자 그대로' 구현합니다. #### 부당한 사용 > 망치만 있으면 모든 것이 못처럼 보입니다. 많은 초보자는 패턴을 갓 배운 후, 더 간단한 코드로도 문제 해결이 되는 상황에도 모든 곳에 패턴을 적용하려고 합니다. 이것은 최근에 패턴에 익숙해진 많은 초보자를 괴롭히는 문제입니다. --- # Спостерігач на Go [There are patterns of patterns now! \ My friend's project: MetaPatterns.io](https://metapatterns.io/)  [](https://refactoring.guru/uk/design-patterns/observer/go/example#checkout) [](https://refactoring.guru/uk/design-patterns/observer/go/example#checkout) [](https://refactoring.guru/) / [Патерни проектування](https://refactoring.guru/uk/design-patterns) / [Спостерігач](https://refactoring.guru/uk/design-patterns/observer) / [Go](https://refactoring.guru/uk/design-patterns/go) ![Спостерігач](https://refactoring.guru/images/patterns/cards/observer-mini-2x.png?id=f205b0655572ac8e4636691c0e0debfd) **Спостерігач** на Go ===================== **Спостерігач** — це поведінковий патерн, який дозволяє об’єктам повідомляти інші об’єкти про зміни свого стану. При цьому спостерігачі можуть вільно підписуватися і відписуватись від цих повідомлень. [Детальніше про Спостерігач](https://refactoring.guru/uk/design-patterns/observer) Навігація  [Інтро](https://refactoring.guru/uk/design-patterns/observer/go/example#)  [Концептуальний приклад](https://refactoring.guru/uk/design-patterns/observer/go/example#example-0)  [subject](https://refactoring.guru/uk/design-patterns/observer/go/example#example-0--subject-go)  [item](https://refactoring.guru/uk/design-patterns/observer/go/example#example-0--item-go)  [observer](https://refactoring.guru/uk/design-patterns/observer/go/example#example-0--observer-go)  [customer](https://refactoring.guru/uk/design-patterns/observer/go/example#example-0--customer-go)  [main](https://refactoring.guru/uk/design-patterns/observer/go/example#example-0--main-go)  [output](https://refactoring.guru/uk/design-patterns/observer/go/example#example-0--output-txt) Концептуальний приклад ---------------------- На сайті інтернет-магазину періодично може закінчуватися певний товар. Водночас деякі користувачі можуть бути зацікавлені у цьому предметі, якого поки що немає у наявності. У цієї проблеми може бути 3 варіанти вирішення: 1. Покупець самостійно періодично перевіряє наявність товару. 2. Інтернет-магазин завалює користувачів сповіщеннями про надходження всіх нових товарів. 3. Користувач підписується лише на той конкретний предмет, який його цікавить, і одержує сповіщення про його повернення на полиці магазину. Також, на один і той же продукт можуть підписатися декілька покупців. Варіант 3 звучить найбільш ефективно, і фактично це і є суть патерна Спостерігач. Головні елементи цього патерна проектування наступні: * Видавець — публікує подію, коли щось відбувається. * Спостерігач — підписується на події суб’єкта і одержує сповіщення в разі їх виникнення. #### **subject.go:** Видавець package main type Subject interface { register(observer Observer) deregister(observer Observer) notifyAll() } #### **item.go:** Конкретний видавець package main import "fmt" type Item struct { observerList \[\]Observer name string inStock bool } func newItem(name string) \*Item { return &Item{ name: name, } } func (i \*Item) updateAvailability() { fmt.Printf("Item %s is now in stock\\n", i.name) i.inStock = true i.notifyAll() } func (i \*Item) register(o Observer) { i.observerList = append(i.observerList, o) } func (i \*Item) deregister(o Observer) { i.observerList = removeFromslice(i.observerList, o) } func (i \*Item) notifyAll() { for \_, observer := range i.observerList { observer.update(i.name) } } func removeFromslice(observerList \[\]Observer, observerToRemove Observer) \[\]Observer { observerListLength := len(observerList) for i, observer := range observerList { if observerToRemove.getID() == observer.getID() { observerList\[observerListLength-1\], observerList\[i\] = observerList\[i\], observerList\[observerListLength-1\] return observerList\[:observerListLength-1\] } } return observerList } #### **observer.go:** Спостерігач package main type Observer interface { update(string) getID() string } #### **customer.go:** Конкретний спостерігач package main import "fmt" type Customer struct { id string } func (c \*Customer) update(itemName string) { fmt.Printf("Sending email to customer %s for item %s\\n", c.id, itemName) } func (c \*Customer) getID() string { return c.id } #### **main.go:** Клієнтський код package main func main() { shirtItem := newItem("Nike Shirt") observerFirst := &Customer{id: "abc@gmail.com"} observerSecond := &Customer{id: "xyz@gmail.com"} shirtItem.register(observerFirst) shirtItem.register(observerSecond) shirtItem.updateAvailability() } #### **output.txt:** Результат виконання Item Nike Shirt is now in stock Sending email to customer abc@gmail.com for item Nike Shirt Sending email to customer xyz@gmail.com for item Nike Shirt **Спостерігач** іншими мовами програмування ------------------------------------------- [![Спостерігач на C#](https://refactoring.guru/images/patterns/icons/csharp.svg?id=da64592defc6e86d57c39c66e9de3e58)](https://refactoring.guru/uk/design-patterns/observer/csharp/example "Спостерігач на C#") [![Спостерігач на C++](https://refactoring.guru/images/patterns/icons/cpp.svg?id=f7782ed8b8666246bfcc3f8fefc3b858)](https://refactoring.guru/uk/design-patterns/observer/cpp/example "Спостерігач на C++") [![Спостерігач на Java](https://refactoring.guru/images/patterns/icons/java.svg?id=e6d87e2dca08c953fe3acd1275ed4f4e)](https://refactoring.guru/uk/design-patterns/observer/java/example "Спостерігач на Java") [![Спостерігач на PHP](https://refactoring.guru/images/patterns/icons/php.svg?id=be1906eb26b71ec1d3b93720d6156618)](https://refactoring.guru/uk/design-patterns/observer/php/example "Спостерігач на PHP") [![Спостерігач на Python](https://refactoring.guru/images/patterns/icons/python.svg?id=6d815d43c0f7050a1151b43e51569c9f)](https://refactoring.guru/uk/design-patterns/observer/python/example "Спостерігач на Python") [![Спостерігач на Ruby](https://refactoring.guru/images/patterns/icons/ruby.svg?id=b065b718c914bf8e960ef731600be1eb)](https://refactoring.guru/uk/design-patterns/observer/ruby/example "Спостерігач на Ruby") [![Спостерігач на Rust](https://refactoring.guru/images/patterns/icons/rust.svg?id=1f5698a4b5ae23fe79413511747e4a87)](https://refactoring.guru/uk/design-patterns/observer/rust/example "Спостерігач на Rust") [![Спостерігач на Swift](https://refactoring.guru/images/patterns/icons/swift.svg?id=0b716c2d52ec3a48fbe91ac031070c1d)](https://refactoring.guru/uk/design-patterns/observer/swift/example "Спостерігач на Swift") [![Спостерігач на TypeScript](https://refactoring.guru/images/patterns/icons/typescript.svg?id=2239d0f16cb703540c205dd8cb0c0cb7)](https://refactoring.guru/uk/design-patterns/observer/typescript/example "Спостерігач на TypeScript") --- # Спостерігач на Rust [There are patterns of patterns now! \ My friend's project: MetaPatterns.io](https://metapatterns.io/)  [](https://refactoring.guru/uk/design-patterns/observer/rust/example#checkout) [](https://refactoring.guru/uk/design-patterns/observer/rust/example#checkout) [](https://refactoring.guru/) / [Патерни проектування](https://refactoring.guru/uk/design-patterns) / [Спостерігач](https://refactoring.guru/uk/design-patterns/observer) / [Rust](https://refactoring.guru/uk/design-patterns/rust) ![Спостерігач](https://refactoring.guru/images/patterns/cards/observer-mini-2x.png?id=f205b0655572ac8e4636691c0e0debfd) **Спостерігач** на Rust ======================= **Спостерігач** — це поведінковий патерн, який дозволяє об’єктам повідомляти інші об’єкти про зміни свого стану. При цьому спостерігачі можуть вільно підписуватися і відписуватись від цих повідомлень. [Детальніше про Спостерігач](https://refactoring.guru/uk/design-patterns/observer) Навігація  [Інтро](https://refactoring.guru/uk/design-patterns/observer/rust/example#)  [Conceptual example](https://refactoring.guru/uk/design-patterns/observer/rust/example#example-0)  [editor](https://refactoring.guru/uk/design-patterns/observer/rust/example#example-0--editor-rs)  [observer](https://refactoring.guru/uk/design-patterns/observer/rust/example#example-0--observer-rs)  [main](https://refactoring.guru/uk/design-patterns/observer/rust/example#example-0--main-rs) Conceptual example ------------------ In Rust, a convenient way to define a subscriber is to have a function as a callable object with complex logic passing it to a event publisher. In this Observer example, Subscribers are either _a lambda function_ or _an explicit function_ subscribed to the event. Explicit function objects could be also unsubscribed (although, there could be limitations for some function types). #### **editor.rs** use crate::observer::{Event, Publisher}; /// Editor has its own logic and it utilizes a publisher /// to operate with subscribers and events. #\[derive(Default)\] pub struct Editor { publisher: Publisher, file\_path: String, } impl Editor { pub fn events(&mut self) -> &mut Publisher { &mut self.publisher } pub fn load(&mut self, path: String) { self.file\_path = path.clone(); self.publisher.notify(Event::Load, path); } pub fn save(&self) { self.publisher.notify(Event::Save, self.file\_path.clone()); } } #### **observer.rs** use std::collections::HashMap; /// An event type. #\[derive(PartialEq, Eq, Hash, Clone)\] pub enum Event { Load, Save, } /// A subscriber (listener) has type of a callable function. pub type Subscriber = fn(file\_path: String); /// Publisher sends events to subscribers (listeners). #\[derive(Default)\] pub struct Publisher { events: HashMap>, } impl Publisher { pub fn subscribe(&mut self, event\_type: Event, listener: Subscriber) { self.events.entry(event\_type.clone()).or\_default(); self.events.get\_mut(&event\_type).unwrap().push(listener); } pub fn unsubscribe(&mut self, event\_type: Event, listener: Subscriber) { self.events .get\_mut(&event\_type) .unwrap() .retain(|&x| x != listener); } pub fn notify(&self, event\_type: Event, file\_path: String) { let listeners = self.events.get(&event\_type).unwrap(); for listener in listeners { listener(file\_path.clone()); } } } #### **main.rs** use editor::Editor; use observer::Event; mod editor; mod observer; fn main() { let mut editor = Editor::default(); editor.events().subscribe(Event::Load, |file\_path| { let log = "/path/to/log/file.txt".to\_string(); println!("Save log to {}: Load file {}", log, file\_path); }); editor.events().subscribe(Event::Save, save\_listener); editor.load("test1.txt".into()); editor.load("test2.txt".into()); editor.save(); editor.events().unsubscribe(Event::Save, save\_listener); editor.save(); } fn save\_listener(file\_path: String) { let email = "admin@example.com".to\_string(); println!("Email to {}: Save file {}", email, file\_path); } ### Output Save log to /path/to/log/file.txt: Load file test1.txt Save log to /path/to/log/file.txt: Load file test2.txt Email to admin@example.com: Save file test2.txt **Спостерігач** іншими мовами програмування ------------------------------------------- [![Спостерігач на C#](https://refactoring.guru/images/patterns/icons/csharp.svg?id=da64592defc6e86d57c39c66e9de3e58)](https://refactoring.guru/uk/design-patterns/observer/csharp/example "Спостерігач на C#") [![Спостерігач на C++](https://refactoring.guru/images/patterns/icons/cpp.svg?id=f7782ed8b8666246bfcc3f8fefc3b858)](https://refactoring.guru/uk/design-patterns/observer/cpp/example "Спостерігач на C++") [![Спостерігач на Go](https://refactoring.guru/images/patterns/icons/go.svg?id=1a89927eb99b1ea3fde7701d97970aca)](https://refactoring.guru/uk/design-patterns/observer/go/example "Спостерігач на Go") [![Спостерігач на Java](https://refactoring.guru/images/patterns/icons/java.svg?id=e6d87e2dca08c953fe3acd1275ed4f4e)](https://refactoring.guru/uk/design-patterns/observer/java/example "Спостерігач на Java") [![Спостерігач на PHP](https://refactoring.guru/images/patterns/icons/php.svg?id=be1906eb26b71ec1d3b93720d6156618)](https://refactoring.guru/uk/design-patterns/observer/php/example "Спостерігач на PHP") [![Спостерігач на Python](https://refactoring.guru/images/patterns/icons/python.svg?id=6d815d43c0f7050a1151b43e51569c9f)](https://refactoring.guru/uk/design-patterns/observer/python/example "Спостерігач на Python") [![Спостерігач на Ruby](https://refactoring.guru/images/patterns/icons/ruby.svg?id=b065b718c914bf8e960ef731600be1eb)](https://refactoring.guru/uk/design-patterns/observer/ruby/example "Спостерігач на Ruby") [![Спостерігач на Swift](https://refactoring.guru/images/patterns/icons/swift.svg?id=0b716c2d52ec3a48fbe91ac031070c1d)](https://refactoring.guru/uk/design-patterns/observer/swift/example "Спостерігач на Swift") [![Спостерігач на TypeScript](https://refactoring.guru/images/patterns/icons/typescript.svg?id=2239d0f16cb703540c205dd8cb0c0cb7)](https://refactoring.guru/uk/design-patterns/observer/typescript/example "Спостерігач на TypeScript") --- # Patrones de diseño en Rust [There are patterns of patterns now! \ My friend's project: MetaPatterns.io](https://metapatterns.io/)  [](https://refactoring.guru/es/design-patterns/rust#checkout) [](https://refactoring.guru/es/design-patterns/rust#checkout) PATRONES de DISEÑO en Rust ========================== El catálogo de ejemplos en **Rust** ----------------------------------- #### Patrones creacionales ![Abstract Factory](https://refactoring.guru/images/patterns/cards/abstract-factory-mini-3x.png) #### Abstract Factory Permite producir familias de objetos relacionados sin especificar sus clases concretas. [Artículo principal](https://refactoring.guru/es/design-patterns/abstract-factory) [Ejemplo de código](https://refactoring.guru/es/design-patterns/abstract-factory/rust/example#example-0) ![Builder](https://refactoring.guru/images/patterns/cards/builder-mini-3x.png) #### Builder Permite construir objetos complejos paso a paso. Este patrón nos permite producir distintos tipos y representaciones de un objeto empleando el mismo código de construcción. [Artículo principal](https://refactoring.guru/es/design-patterns/builder) [Ejemplo de código](https://refactoring.guru/es/design-patterns/builder/rust/example#example-0) ![Factory Method](https://refactoring.guru/images/patterns/cards/factory-method-mini-3x.png) #### Factory Method Proporciona una interfaz para la creación de objetos en una superclase, mientras permite a las subclases alterar el tipo de objetos que se crearán. [Artículo principal](https://refactoring.guru/es/design-patterns/factory-method) [Ejemplo de código 1](https://refactoring.guru/es/design-patterns/factory-method/rust/example#example-0) [Ejemplo de código 2](https://refactoring.guru/es/design-patterns/factory-method/rust/example#example-1) ![Prototype](https://refactoring.guru/images/patterns/cards/prototype-mini-3x.png) #### Prototype Permite copiar objetos existentes sin que el código dependa de sus clases. [Artículo principal](https://refactoring.guru/es/design-patterns/prototype) [Ejemplo de código](https://refactoring.guru/es/design-patterns/prototype/rust/example#example-0) ![Singleton](https://refactoring.guru/images/patterns/cards/singleton-mini-3x.png) #### Singleton Permite asegurarnos de que una clase tenga una única instancia, a la vez que proporciona un punto de acceso global a dicha instancia. [Artículo principal](https://refactoring.guru/es/design-patterns/singleton) [Ejemplo de código](https://refactoring.guru/es/design-patterns/singleton/rust/example#example-0) #### Patrones estructurales ![Adapter](https://refactoring.guru/images/patterns/cards/adapter-mini-3x.png) #### Adapter Permite la colaboración entre objetos con interfaces incompatibles. [Artículo principal](https://refactoring.guru/es/design-patterns/adapter) [Ejemplo de código](https://refactoring.guru/es/design-patterns/adapter/rust/example#example-0) ![Bridge](https://refactoring.guru/images/patterns/cards/bridge-mini-3x.png) #### Bridge Permite dividir una clase grande o un grupo de clases estrechamente relacionadas, en dos jerarquías separadas (abstracción e implementación) que pueden desarrollarse independientemente la una de la otra. [Artículo principal](https://refactoring.guru/es/design-patterns/bridge) [Ejemplo de código](https://refactoring.guru/es/design-patterns/bridge/rust/example#example-0) ![Composite](https://refactoring.guru/images/patterns/cards/composite-mini-3x.png) #### Composite Permite componer objetos en estructuras de árbol y trabajar con esas estructuras como si fueran objetos individuales. [Artículo principal](https://refactoring.guru/es/design-patterns/composite) [Ejemplo de código](https://refactoring.guru/es/design-patterns/composite/rust/example#example-0) ![Decorator](https://refactoring.guru/images/patterns/cards/decorator-mini-3x.png) #### Decorator Permite añadir funcionalidades a objetos colocando estos objetos dentro de objetos encapsuladores especiales que contienen estas funcionalidades. [Artículo principal](https://refactoring.guru/es/design-patterns/decorator) [Ejemplo de código](https://refactoring.guru/es/design-patterns/decorator/rust/example#example-0) ![Facade](https://refactoring.guru/images/patterns/cards/facade-mini-3x.png) #### Facade Proporciona una interfaz simplificada a una biblioteca, un framework o cualquier otro grupo complejo de clases. [Artículo principal](https://refactoring.guru/es/design-patterns/facade) [Ejemplo de código](https://refactoring.guru/es/design-patterns/facade/rust/example#example-0) ![Flyweight](https://refactoring.guru/images/patterns/cards/flyweight-mini-3x.png) #### Flyweight Permite mantener más objetos dentro de la cantidad disponible de memoria RAM compartiendo las partes comunes del estado entre varios objetos en lugar de mantener toda la información en cada objeto. [Artículo principal](https://refactoring.guru/es/design-patterns/flyweight) [Ejemplo de código](https://refactoring.guru/es/design-patterns/flyweight/rust/example#example-0) ![Proxy](https://refactoring.guru/images/patterns/cards/proxy-mini-3x.png) #### Proxy Permite proporcionar un sustituto o marcador de posición para otro objeto. Un proxy controla el acceso al objeto original, permitiéndote hacer algo antes o después de que la solicitud llegue al objeto original. [Artículo principal](https://refactoring.guru/es/design-patterns/proxy) [Ejemplo de código](https://refactoring.guru/es/design-patterns/proxy/rust/example#example-0) #### Patrones de comportamiento ![Chain of Responsibility](https://refactoring.guru/images/patterns/cards/chain-of-responsibility-mini-3x.png) #### Chain of Responsibility Permite pasar solicitudes a lo largo de una cadena de manejadores. Al recibir una solicitud, cada manejador decide si la procesa o si la pasa al siguiente manejador de la cadena. [Artículo principal](https://refactoring.guru/es/design-patterns/chain-of-responsibility) [Ejemplo de código](https://refactoring.guru/es/design-patterns/chain-of-responsibility/rust/example#example-0) ![Command](https://refactoring.guru/images/patterns/cards/command-mini-3x.png) #### Command Convierte una solicitud en un objeto independiente que contiene toda la información sobre la solicitud. Esta transformación te permite parametrizar los métodos con diferentes solicitudes, retrasar o poner en cola la ejecución de una solicitud y soportar operaciones que no se pueden realizar. [Artículo principal](https://refactoring.guru/es/design-patterns/command) [Ejemplo de código](https://refactoring.guru/es/design-patterns/command/rust/example#example-0) ![Iterator](https://refactoring.guru/images/patterns/cards/iterator-mini-3x.png) #### Iterator Permite recorrer elementos de una colección sin exponer su representación subyacente (lista, pila, árbol, etc.). [Artículo principal](https://refactoring.guru/es/design-patterns/iterator) [Ejemplo de código](https://refactoring.guru/es/design-patterns/iterator/rust/example#example-0) ![Mediator](https://refactoring.guru/images/patterns/cards/mediator-mini-3x.png) #### Mediator Permite reducir las dependencias caóticas entre objetos. El patrón restringe las comunicaciones directas entre los objetos, forzándolos a colaborar únicamente a través de un objeto mediador. [Artículo principal](https://refactoring.guru/es/design-patterns/mediator) [Ejemplo de código](https://refactoring.guru/es/design-patterns/mediator/rust/example#example-0) ![Memento](https://refactoring.guru/images/patterns/cards/memento-mini-3x.png) #### Memento Permite guardar y restaurar el estado previo de un objeto sin revelar los detalles de su implementación. [Artículo principal](https://refactoring.guru/es/design-patterns/memento) [Ejemplo de código](https://refactoring.guru/es/design-patterns/memento/rust/example#example-0) ![Observer](https://refactoring.guru/images/patterns/cards/observer-mini-3x.png) #### Observer Permite definir un mecanismo de suscripción para notificar a varios objetos sobre cualquier evento que le suceda al objeto que están observando. [Artículo principal](https://refactoring.guru/es/design-patterns/observer) [Ejemplo de código](https://refactoring.guru/es/design-patterns/observer/rust/example#example-0) ![State](https://refactoring.guru/images/patterns/cards/state-mini-3x.png) #### State Permite a un objeto alterar su comportamiento cuando su estado interno cambia. Parece como si el objeto cambiara su clase. [Artículo principal](https://refactoring.guru/es/design-patterns/state) [Ejemplo de código](https://refactoring.guru/es/design-patterns/state/rust/example#example-0) ![Strategy](https://refactoring.guru/images/patterns/cards/strategy-mini-3x.png) #### Strategy Permite definir una familia de algoritmos, colocar cada uno de ellos en una clase separada y hacer sus objetos intercambiables. [Artículo principal](https://refactoring.guru/es/design-patterns/strategy) [Ejemplo de código](https://refactoring.guru/es/design-patterns/strategy/rust/example#example-0) ![Template Method](https://refactoring.guru/images/patterns/cards/template-method-mini-3x.png) #### Template Method Define el esqueleto de un algoritmo en la superclase pero permite que las subclases sobrescriban pasos del algoritmo sin cambiar su estructura. [Artículo principal](https://refactoring.guru/es/design-patterns/template-method) [Ejemplo de código](https://refactoring.guru/es/design-patterns/template-method/rust/example#example-0) ![Visitor](https://refactoring.guru/images/patterns/cards/visitor-mini-3x.png) #### Visitor Permite separar algoritmos de los objetos sobre los que operan. [Artículo principal](https://refactoring.guru/es/design-patterns/visitor) [Ejemplo de código](https://refactoring.guru/es/design-patterns/visitor/rust/example#example-0) --- # Prototype em Rust / Padrões de Projeto [There are patterns of patterns now! \ My friend's project: MetaPatterns.io](https://metapatterns.io/)  [](https://refactoring.guru/pt-br/design-patterns/prototype/rust/example#checkout) [](https://refactoring.guru/pt-br/design-patterns/prototype/rust/example#checkout) [](https://refactoring.guru/) / [Padrões de Projeto](https://refactoring.guru/pt-br/design-patterns) / [Prototype](https://refactoring.guru/pt-br/design-patterns/prototype) / [Rust](https://refactoring.guru/pt-br/design-patterns/rust) ![Prototype](https://refactoring.guru/images/patterns/cards/prototype-mini-2x.png?id=b871f789a736e7efbb1cd082d2de6398) **Prototype** em Rust ===================== O **Prototype** é um padrão de projeto criacional que permite a clonagem de objetos, mesmo complexos, sem acoplamento à suas classes específicas. Todas as classes de prototypes(protótipos) devem ter uma interface comum que permita copiar objetos, mesmo que suas classes concretas sejam desconhecidas. Objetos protótipos podem produzir cópias completas, pois objetos da mesma classe podem acessar os campos privados um do outro. [Saiba mais sobre o Prototype](https://refactoring.guru/pt-br/design-patterns/prototype) Navegação  [Introdução](https://refactoring.guru/pt-br/design-patterns/prototype/rust/example#)  [Built-in _Clone_ trait](https://refactoring.guru/pt-br/design-patterns/prototype/rust/example#example-0)  [main](https://refactoring.guru/pt-br/design-patterns/prototype/rust/example#example-0--main-rs) Built-in _Clone_ trait ---------------------- Rust has a built-in `std::clone::Clone` trait with many implementations for various types (via `#[derive(Clone)]`). Thus, the Prototype pattern is ready to use out of the box. #### **main.rs** #\[derive(Clone)\] struct Circle { pub x: u32, pub y: u32, pub radius: u32, } fn main() { let circle1 = Circle { x: 10, y: 15, radius: 10, }; // Prototype in action. let mut circle2 = circle1.clone(); circle2.radius = 77; println!("Circle 1: {}, {}, {}", circle1.x, circle1.y, circle1.radius); println!("Circle 2: {}, {}, {}", circle2.x, circle2.y, circle2.radius); } ### Output Circle 1: 10, 15, 10 Circle 2: 10, 15, 77 **Prototype** em outras linguagens ---------------------------------- [![Prototype em C#](https://refactoring.guru/images/patterns/icons/csharp.svg?id=da64592defc6e86d57c39c66e9de3e58)](https://refactoring.guru/pt-br/design-patterns/prototype/csharp/example "Prototype em C#") [![Prototype em C++](https://refactoring.guru/images/patterns/icons/cpp.svg?id=f7782ed8b8666246bfcc3f8fefc3b858)](https://refactoring.guru/pt-br/design-patterns/prototype/cpp/example "Prototype em C++") [![Prototype em Go](https://refactoring.guru/images/patterns/icons/go.svg?id=1a89927eb99b1ea3fde7701d97970aca)](https://refactoring.guru/pt-br/design-patterns/prototype/go/example "Prototype em Go") [![Prototype em Java](https://refactoring.guru/images/patterns/icons/java.svg?id=e6d87e2dca08c953fe3acd1275ed4f4e)](https://refactoring.guru/pt-br/design-patterns/prototype/java/example "Prototype em Java") [![Prototype em PHP](https://refactoring.guru/images/patterns/icons/php.svg?id=be1906eb26b71ec1d3b93720d6156618)](https://refactoring.guru/pt-br/design-patterns/prototype/php/example "Prototype em PHP") [![Prototype em Python](https://refactoring.guru/images/patterns/icons/python.svg?id=6d815d43c0f7050a1151b43e51569c9f)](https://refactoring.guru/pt-br/design-patterns/prototype/python/example "Prototype em Python") [![Prototype em Ruby](https://refactoring.guru/images/patterns/icons/ruby.svg?id=b065b718c914bf8e960ef731600be1eb)](https://refactoring.guru/pt-br/design-patterns/prototype/ruby/example "Prototype em Ruby") [![Prototype em Swift](https://refactoring.guru/images/patterns/icons/swift.svg?id=0b716c2d52ec3a48fbe91ac031070c1d)](https://refactoring.guru/pt-br/design-patterns/prototype/swift/example "Prototype em Swift") [![Prototype em TypeScript](https://refactoring.guru/images/patterns/icons/typescript.svg?id=2239d0f16cb703540c205dd8cb0c0cb7)](https://refactoring.guru/pt-br/design-patterns/prototype/typescript/example "Prototype em TypeScript") --- # Спостерігач на C++ [There are patterns of patterns now! \ My friend's project: MetaPatterns.io](https://metapatterns.io/)  [](https://refactoring.guru/uk/design-patterns/observer/cpp/example#checkout) [](https://refactoring.guru/uk/design-patterns/observer/cpp/example#checkout) [](https://refactoring.guru/) / [Патерни проектування](https://refactoring.guru/uk/design-patterns) / [Спостерігач](https://refactoring.guru/uk/design-patterns/observer) / [C++](https://refactoring.guru/uk/design-patterns/cpp) ![Спостерігач](https://refactoring.guru/images/patterns/cards/observer-mini-2x.png?id=f205b0655572ac8e4636691c0e0debfd) **Спостерігач** на C++ ====================== **Спостерігач** — це поведінковий патерн, який дозволяє об’єктам повідомляти інші об’єкти про зміни свого стану. При цьому спостерігачі можуть вільно підписуватися і відписуватись від цих повідомлень. [Детальніше про Спостерігач](https://refactoring.guru/uk/design-patterns/observer) Навігація  [Інтро](https://refactoring.guru/uk/design-patterns/observer/cpp/example#)  [Концептуальний приклад](https://refactoring.guru/uk/design-patterns/observer/cpp/example#example-0)  [main](https://refactoring.guru/uk/design-patterns/observer/cpp/example#example-0--main-cc)  [Output](https://refactoring.guru/uk/design-patterns/observer/cpp/example#example-0--Output-txt) **Складність:** **Популярність:** **Застосування:** Спостерігач часто зустрічається в коді C++, особливо там, де до відносин між компонентами застосовується модель подій. Спостерігач дозволяє окремим компонентам реагувати на події, які відбуваються в інших компонентах. **Ознаки застосування патерна:** Спостерігач визначається за механізмом підписки та методами повідомлення, які викликають компоненти програми. Концептуальний приклад ---------------------- Цей приклад показує структуру патерна **Спостерігач**, а саме — з яких класів він складається, які ролі ці класи виконують і як вони взаємодіють один з одним. #### **main.cc:** Приклад структури патерна /\*\* \* Observer Design Pattern \* \* Intent: Lets you define a subscription mechanism to notify multiple objects \* about any events that happen to the object they're observing. \* \* Note that there's a lot of different terms with similar meaning associated \* with this pattern. Just remember that the Subject is also called the \* Publisher and the Observer is often called the Subscriber and vice versa. \* Also the verbs "observe", "listen" or "track" usually mean the same thing. \*/ #include #include #include class IObserver { public: virtual ~IObserver(){}; virtual void Update(const std::string &message\_from\_subject) = 0; }; class ISubject { public: virtual ~ISubject(){}; virtual void Attach(IObserver \*observer) = 0; virtual void Detach(IObserver \*observer) = 0; virtual void Notify() = 0; }; /\*\* \* The Subject owns some important state and notifies observers when the state \* changes. \*/ class Subject : public ISubject { public: virtual ~Subject() { std::cout << "Goodbye, I was the Subject.\\n"; } /\*\* \* The subscription management methods. \*/ void Attach(IObserver \*observer) override { list\_observer\_.push\_back(observer); } void Detach(IObserver \*observer) override { list\_observer\_.remove(observer); } void Notify() override { std::list::iterator iterator = list\_observer\_.begin(); HowManyObserver(); while (iterator != list\_observer\_.end()) { (\*iterator)->Update(message\_); ++iterator; } } void CreateMessage(std::string message = "Empty") { this->message\_ = message; Notify(); } void HowManyObserver() { std::cout << "There are " << list\_observer\_.size() << " observers in the list.\\n"; } /\*\* \* Usually, the subscription logic is only a fraction of what a Subject can \* really do. Subjects commonly hold some important business logic, that \* triggers a notification method whenever something important is about to \* happen (or after it). \*/ void SomeBusinessLogic() { this->message\_ = "change message message"; Notify(); std::cout << "I'm about to do some thing important\\n"; } private: std::list list\_observer\_; std::string message\_; }; class Observer : public IObserver { public: Observer(Subject &subject) : subject\_(subject) { this->subject\_.Attach(this); std::cout << "Hi, I'm the Observer \\"" << ++Observer::static\_number\_ << "\\".\\n"; this->number\_ = Observer::static\_number\_; } virtual ~Observer() { std::cout << "Goodbye, I was the Observer \\"" << this->number\_ << "\\".\\n"; } void Update(const std::string &message\_from\_subject) override { message\_from\_subject\_ = message\_from\_subject; PrintInfo(); } void RemoveMeFromTheList() { subject\_.Detach(this); std::cout << "Observer \\"" << number\_ << "\\" removed from the list.\\n"; } void PrintInfo() { std::cout << "Observer \\"" << this->number\_ << "\\": a new message is available --> " << this->message\_from\_subject\_ << "\\n"; } private: std::string message\_from\_subject\_; Subject &subject\_; static int static\_number\_; int number\_; }; int Observer::static\_number\_ = 0; void ClientCode() { Subject \*subject = new Subject; Observer \*observer1 = new Observer(\*subject); Observer \*observer2 = new Observer(\*subject); Observer \*observer3 = new Observer(\*subject); Observer \*observer4; Observer \*observer5; subject->CreateMessage("Hello World! :D"); observer3->RemoveMeFromTheList(); subject->CreateMessage("The weather is hot today! :p"); observer4 = new Observer(\*subject); observer2->RemoveMeFromTheList(); observer5 = new Observer(\*subject); subject->CreateMessage("My new car is great! ;)"); observer5->RemoveMeFromTheList(); observer4->RemoveMeFromTheList(); observer1->RemoveMeFromTheList(); delete observer5; delete observer4; delete observer3; delete observer2; delete observer1; delete subject; } int main() { ClientCode(); return 0; } #### **Output.txt:** Результат виконання Hi, I'm the Observer "1". Hi, I'm the Observer "2". Hi, I'm the Observer "3". There are 3 observers in the list. Observer "1": a new message is available --> Hello World! :D Observer "2": a new message is available --> Hello World! :D Observer "3": a new message is available --> Hello World! :D Observer "3" removed from the list. There are 2 observers in the list. Observer "1": a new message is available --> The weather is hot today! :p Observer "2": a new message is available --> The weather is hot today! :p Hi, I'm the Observer "4". Observer "2" removed from the list. Hi, I'm the Observer "5". There are 3 observers in the list. Observer "1": a new message is available --> My new car is great! ;) Observer "4": a new message is available --> My new car is great! ;) Observer "5": a new message is available --> My new car is great! ;) Observer "5" removed from the list. Observer "4" removed from the list. Observer "1" removed from the list. Goodbye, I was the Observer "5". Goodbye, I was the Observer "4". Goodbye, I was the Observer "3". Goodbye, I was the Observer "2". Goodbye, I was the Observer "1". Goodbye, I was the Subject. **Спостерігач** іншими мовами програмування ------------------------------------------- [![Спостерігач на C#](https://refactoring.guru/images/patterns/icons/csharp.svg?id=da64592defc6e86d57c39c66e9de3e58)](https://refactoring.guru/uk/design-patterns/observer/csharp/example "Спостерігач на C#") [![Спостерігач на Go](https://refactoring.guru/images/patterns/icons/go.svg?id=1a89927eb99b1ea3fde7701d97970aca)](https://refactoring.guru/uk/design-patterns/observer/go/example "Спостерігач на Go") [![Спостерігач на Java](https://refactoring.guru/images/patterns/icons/java.svg?id=e6d87e2dca08c953fe3acd1275ed4f4e)](https://refactoring.guru/uk/design-patterns/observer/java/example "Спостерігач на Java") [![Спостерігач на PHP](https://refactoring.guru/images/patterns/icons/php.svg?id=be1906eb26b71ec1d3b93720d6156618)](https://refactoring.guru/uk/design-patterns/observer/php/example "Спостерігач на PHP") [![Спостерігач на Python](https://refactoring.guru/images/patterns/icons/python.svg?id=6d815d43c0f7050a1151b43e51569c9f)](https://refactoring.guru/uk/design-patterns/observer/python/example "Спостерігач на Python") [![Спостерігач на Ruby](https://refactoring.guru/images/patterns/icons/ruby.svg?id=b065b718c914bf8e960ef731600be1eb)](https://refactoring.guru/uk/design-patterns/observer/ruby/example "Спостерігач на Ruby") [![Спостерігач на Rust](https://refactoring.guru/images/patterns/icons/rust.svg?id=1f5698a4b5ae23fe79413511747e4a87)](https://refactoring.guru/uk/design-patterns/observer/rust/example "Спостерігач на Rust") [![Спостерігач на Swift](https://refactoring.guru/images/patterns/icons/swift.svg?id=0b716c2d52ec3a48fbe91ac031070c1d)](https://refactoring.guru/uk/design-patterns/observer/swift/example "Спостерігач на Swift") [![Спостерігач на TypeScript](https://refactoring.guru/images/patterns/icons/typescript.svg?id=2239d0f16cb703540c205dd8cb0c0cb7)](https://refactoring.guru/uk/design-patterns/observer/typescript/example "Спостерігач на TypeScript") --- # Pamiątka w języku TypeScript / Wzorce projektowe [There are patterns of patterns now! \ My friend's project: MetaPatterns.io](https://metapatterns.io/)  [](https://refactoring.guru/pl/design-patterns/memento/typescript/example#checkout) [](https://refactoring.guru/pl/design-patterns/memento/typescript/example#checkout) [](https://refactoring.guru/) / [Wzorce projektowe](https://refactoring.guru/pl/design-patterns) / [Pamiątka](https://refactoring.guru/pl/design-patterns/memento) / [TypeScript](https://refactoring.guru/pl/design-patterns/typescript) ![Pamiątka](https://refactoring.guru/images/patterns/cards/memento-mini-2x.png?id=1d7cba189261dd84b11369a6838b1055) **Pamiątka** w języku TypeScript ================================ **Pamiątka** to behawioralny wzorzec projektowy umożliwiający zapisywanie “migawek” stanu obiektu i późniejsze jego przywracanie. Wzorzec Pamiątka nie wpływa na wewnętrzną strukturę obiektu z którym współpracuje, ani na dane przechowywane w migawkach. [Dowiedz się więcej o Pamiątka](https://refactoring.guru/pl/design-patterns/memento) Nawigacja  [Intro](https://refactoring.guru/pl/design-patterns/memento/typescript/example#)  [Przykład koncepcyjny](https://refactoring.guru/pl/design-patterns/memento/typescript/example#example-0)  [index](https://refactoring.guru/pl/design-patterns/memento/typescript/example#example-0--index-ts)  [Output](https://refactoring.guru/pl/design-patterns/memento/typescript/example#example-0--Output-txt) **Złożoność:** **Popularność:** **Przykłady użycia:** Zasada działania Pamiątki opiera się na serializacji, która jest dość powszechnie stosowana w TypeScript. Nie jest to jedyny, czy najefektywniejszy sposób zapisywania migawki stanu obiektu, ale pozwala na przechowywanie kopii zapasowych, chroniąc jednocześnie strukturę obiektu źródłowego przed innymi obiektami. Przykład koncepcyjny -------------------- Poniższy przykład ilustruje strukturę wzorca **Pamiątka** ze szczególnym naciskiem na następujące kwestie: * Z jakich składa się klas? * Jakie role pełnią te klasy? * W jaki sposób elementy wzorca są ze sobą powiązane? #### **index.ts:** Przykład koncepcyjny /\*\* \* The Originator holds some important state that may change over time. It also \* defines a method for saving the state inside a memento and another method for \* restoring the state from it. \*/ class Originator { /\*\* \* For the sake of simplicity, the originator's state is stored inside a \* single variable. \*/ private state: string; constructor(state: string) { this.state = state; console.log(\`Originator: My initial state is: ${state}\`); } /\*\* \* The Originator's business logic may affect its internal state. Therefore, \* the client should backup the state before launching methods of the \* business logic via the save() method. \*/ public doSomething(): void { console.log('Originator: I\\'m doing something important.'); this.state = this.generateRandomString(30); console.log(\`Originator: and my state has changed to: ${this.state}\`); } private generateRandomString(length: number = 10): string { const charSet = 'abcdefghijklmnopqrstuvwxyzABCDEFGHIJKLMNOPQRSTUVWXYZ'; return Array .apply(null, { length }) .map(() => charSet.charAt(Math.floor(Math.random() \* charSet.length))) .join(''); } /\*\* \* Saves the current state inside a memento. \*/ public save(): Memento { return new ConcreteMemento(this.state); } /\*\* \* Restores the Originator's state from a memento object. \*/ public restore(memento: Memento): void { this.state = memento.getState(); console.log(\`Originator: My state has changed to: ${this.state}\`); } } /\*\* \* The Memento interface provides a way to retrieve the memento's metadata, such \* as creation date or name. However, it doesn't expose the Originator's state. \*/ interface Memento { getState(): string; getName(): string; getDate(): string; } /\*\* \* The Concrete Memento contains the infrastructure for storing the Originator's \* state. \*/ class ConcreteMemento implements Memento { private state: string; private date: string; constructor(state: string) { this.state = state; this.date = new Date().toISOString().slice(0, 19).replace('T', ' '); } /\*\* \* The Originator uses this method when restoring its state. \*/ public getState(): string { return this.state; } /\*\* \* The rest of the methods are used by the Caretaker to display metadata. \*/ public getName(): string { return \`${this.date} / (${this.state.substr(0, 9)}...)\`; } public getDate(): string { return this.date; } } /\*\* \* The Caretaker doesn't depend on the Concrete Memento class. Therefore, it \* doesn't have access to the originator's state, stored inside the memento. It \* works with all mementos via the base Memento interface. \*/ class Caretaker { private mementos: Memento\[\] = \[\]; private originator: Originator; constructor(originator: Originator) { this.originator = originator; } public backup(): void { console.log('\\nCaretaker: Saving Originator\\'s state...'); this.mementos.push(this.originator.save()); } public undo(): void { if (!this.mementos.length) { return; } const memento = this.mementos.pop(); console.log(\`Caretaker: Restoring state to: ${memento.getName()}\`); this.originator.restore(memento); } public showHistory(): void { console.log('Caretaker: Here\\'s the list of mementos:'); for (const memento of this.mementos) { console.log(memento.getName()); } } } /\*\* \* Client code. \*/ const originator = new Originator('Super-duper-super-puper-super.'); const caretaker = new Caretaker(originator); caretaker.backup(); originator.doSomething(); caretaker.backup(); originator.doSomething(); caretaker.backup(); originator.doSomething(); console.log(''); caretaker.showHistory(); console.log('\\nClient: Now, let\\'s rollback!\\n'); caretaker.undo(); console.log('\\nClient: Once more!\\n'); caretaker.undo(); #### **Output.txt:** Wynik działania Originator: My initial state is: Super-duper-super-puper-super. Caretaker: Saving Originator's state... Originator: I'm doing something important. Originator: and my state has changed to: qXqxgTcLSCeLYdcgElOghOFhPGfMxo Caretaker: Saving Originator's state... Originator: I'm doing something important. Originator: and my state has changed to: iaVCJVryJwWwbipieensfodeMSWvUY Caretaker: Saving Originator's state... Originator: I'm doing something important. Originator: and my state has changed to: oSUxsOCiZEnohBMQEjwnPWJLGnwGmy Caretaker: Here's the list of mementos: 2019-02-17 15:14:05 / (Super-dup...) 2019-02-17 15:14:05 / (qXqxgTcLS...) 2019-02-17 15:14:05 / (iaVCJVryJ...) Client: Now, let's rollback! Caretaker: Restoring state to: 2019-02-17 15:14:05 / (iaVCJVryJ...) Originator: My state has changed to: iaVCJVryJwWwbipieensfodeMSWvUY Client: Once more! Caretaker: Restoring state to: 2019-02-17 15:14:05 / (qXqxgTcLS...) Originator: My state has changed to: qXqxgTcLSCeLYdcgElOghOFhPGfMxo **Pamiątka** w innych językach ------------------------------ [![Pamiątka w języku C#](https://refactoring.guru/images/patterns/icons/csharp.svg?id=da64592defc6e86d57c39c66e9de3e58)](https://refactoring.guru/pl/design-patterns/memento/csharp/example "Pamiątka w języku C#") [![Pamiątka w języku C++](https://refactoring.guru/images/patterns/icons/cpp.svg?id=f7782ed8b8666246bfcc3f8fefc3b858)](https://refactoring.guru/pl/design-patterns/memento/cpp/example "Pamiątka w języku C++") [![Pamiątka w języku Go](https://refactoring.guru/images/patterns/icons/go.svg?id=1a89927eb99b1ea3fde7701d97970aca)](https://refactoring.guru/pl/design-patterns/memento/go/example "Pamiątka w języku Go") [![Pamiątka w języku Java](https://refactoring.guru/images/patterns/icons/java.svg?id=e6d87e2dca08c953fe3acd1275ed4f4e)](https://refactoring.guru/pl/design-patterns/memento/java/example "Pamiątka w języku Java") [![Pamiątka w języku PHP](https://refactoring.guru/images/patterns/icons/php.svg?id=be1906eb26b71ec1d3b93720d6156618)](https://refactoring.guru/pl/design-patterns/memento/php/example "Pamiątka w języku PHP") [![Pamiątka w języku Python](https://refactoring.guru/images/patterns/icons/python.svg?id=6d815d43c0f7050a1151b43e51569c9f)](https://refactoring.guru/pl/design-patterns/memento/python/example "Pamiątka w języku Python") [![Pamiątka w języku Ruby](https://refactoring.guru/images/patterns/icons/ruby.svg?id=b065b718c914bf8e960ef731600be1eb)](https://refactoring.guru/pl/design-patterns/memento/ruby/example "Pamiątka w języku Ruby") [![Pamiątka w języku Rust](https://refactoring.guru/images/patterns/icons/rust.svg?id=1f5698a4b5ae23fe79413511747e4a87)](https://refactoring.guru/pl/design-patterns/memento/rust/example "Pamiątka w języku Rust") [![Pamiątka w języku Swift](https://refactoring.guru/images/patterns/icons/swift.svg?id=0b716c2d52ec3a48fbe91ac031070c1d)](https://refactoring.guru/pl/design-patterns/memento/swift/example "Pamiątka w języku Swift") --- # Декоратор на Swift [There are patterns of patterns now! \ My friend's project: MetaPatterns.io](https://metapatterns.io/)  [](https://refactoring.guru/ru/design-patterns/decorator/swift/example#checkout) [](https://refactoring.guru/ru/design-patterns/decorator/swift/example#checkout) [](https://refactoring.guru/) / [Паттерны проектирования](https://refactoring.guru/ru/design-patterns) / [Декоратор](https://refactoring.guru/ru/design-patterns/decorator) / [Swift](https://refactoring.guru/ru/design-patterns/swift) ![Декоратор](https://refactoring.guru/images/patterns/cards/decorator-mini-2x.png?id=3b58e540d7d28523080cad341ed9b2e9) **Декоратор** на Swift ====================== **Декоратор** — это структурный паттерн, который позволяет добавлять объектам новые поведения на лету, помещая их в объекты-обёртки. Декоратор позволяет оборачивать объекты бесчисленное количество раз благодаря тому, что и обёртки, и реальные оборачиваемые объекты имеют общий интерфейс. [Подробней о паттерне Декоратор](https://refactoring.guru/ru/design-patterns/decorator) Навигация  [Интро](https://refactoring.guru/ru/design-patterns/decorator/swift/example#)  [Концептуальный пример](https://refactoring.guru/ru/design-patterns/decorator/swift/example#example-0)  [Example](https://refactoring.guru/ru/design-patterns/decorator/swift/example#example-0--Example-swift)  [Output](https://refactoring.guru/ru/design-patterns/decorator/swift/example#example-0--Output-txt)  [Пример из реальной жизни](https://refactoring.guru/ru/design-patterns/decorator/swift/example#example-1)  [Example](https://refactoring.guru/ru/design-patterns/decorator/swift/example#example-1--Example-swift)  [Output](https://refactoring.guru/ru/design-patterns/decorator/swift/example#example-1--Output-txt) **Сложность:** **Популярность:** **Применимость:** Паттерн можно часто встретить в Swift-коде, особенно в коде, работающем с потоками данных. **Признаки применения паттерна:** Декоратор можно распознать по создающим методам, которые принимают в параметрах объекты того же абстрактного типа или интерфейса, что и текущий класс. Следующие примеры доступны на [Swift Playgrounds](https://www.alemohamad.com/playgrounds) . Благодарность [Alejandro Mohamad](https://www.alemohamad.com/) за создание версии Playground. Концептуальный пример --------------------- Этот пример показывает структуру паттерна **Декоратор**, а именно — из каких классов он состоит, какие роли эти классы выполняют и как они взаимодействуют друг с другом. После ознакомления со структурой, вам будет легче воспринимать второй пример, который рассматривает реальный случай использования паттерна в мире Swift. #### **Example.swift:** Пример структуры паттерна import XCTest /// Базовый интерфейс Компонента определяет поведение, которое изменяется /// декораторами. protocol Component { func operation() -> String } /// Конкретные Компоненты предоставляют реализации поведения по умолчанию. Может /// быть несколько вариаций этих классов. class ConcreteComponent: Component { func operation() -> String { return "ConcreteComponent" } } /// Базовый класс Декоратора следует тому же интерфейсу, что и другие /// компоненты. Основная цель этого класса - определить интерфейс обёртки для /// всех конкретных декораторов. Реализация кода обёртки по умолчанию может /// включать в себя поле для хранения завёрнутого компонента и средства его /// инициализации. class Decorator: Component { private var component: Component init(\_ component: Component) { self.component = component } /// Декоратор делегирует всю работу обёрнутому компоненту. func operation() -> String { return component.operation() } } /// Конкретные Декораторы вызывают обёрнутый объект и изменяют его результат /// некоторым образом. class ConcreteDecoratorA: Decorator { /// Декораторы могут вызывать родительскую реализацию операции, вместо /// того, чтобы вызвать обёрнутый объект напрямую. Такой подход упрощает /// расширение классов декораторов. override func operation() -> String { return "ConcreteDecoratorA(" + super.operation() + ")" } } /// Декораторы могут выполнять своё поведение до или после вызова обёрнутого /// объекта. class ConcreteDecoratorB: Decorator { override func operation() -> String { return "ConcreteDecoratorB(" + super.operation() + ")" } } /// Клиентский код работает со всеми объектами, используя интерфейс Компонента. /// Таким образом, он остаётся независимым от конкретных классов компонентов, с /// которыми работает. class Client { // ... static func someClientCode(component: Component) { print("Result: " + component.operation()) } // ... } /// Давайте посмотрим как всё это будет работать. class DecoratorConceptual: XCTestCase { func testDecoratorConceptual() { // Таким образом, клиентский код может поддерживать как простые // компоненты... print("Client: I've got a simple component") let simple = ConcreteComponent() Client.someClientCode(component: simple) // ...так и декорированные. // // Обратите внимание, что декораторы могут обёртывать не только простые // компоненты, но и другие декораторы. let decorator1 = ConcreteDecoratorA(simple) let decorator2 = ConcreteDecoratorB(decorator1) print("\\nClient: Now I've got a decorated component") Client.someClientCode(component: decorator2) } } #### **Output.txt:** Результат выполнения Client: I've got a simple component Result: ConcreteComponent Client: Now I've got a decorated component Result: ConcreteDecoratorB(ConcreteDecoratorA(ConcreteComponent)) Пример из реальной жизни ------------------------ #### **Example.swift:** Пример из реальной жизни import UIKit import XCTest protocol ImageEditor: CustomStringConvertible { func apply() -> UIImage } class ImageDecorator: ImageEditor { private var editor: ImageEditor required init(\_ editor: ImageEditor) { self.editor = editor } func apply() -> UIImage { print(editor.description + " applies changes") return editor.apply() } var description: String { return "ImageDecorator" } } extension UIImage: ImageEditor { func apply() -> UIImage { return self } open override var description: String { return "Image" } } class BaseFilter: ImageDecorator { fileprivate var filter: CIFilter? init(editor: ImageEditor, filterName: String) { self.filter = CIFilter(name: filterName) super.init(editor) } required init(\_ editor: ImageEditor) { super.init(editor) } override func apply() -> UIImage { let image = super.apply() let context = CIContext(options: nil) filter?.setValue(CIImage(image: image), forKey: kCIInputImageKey) guard let output = filter?.outputImage else { return image } guard let coreImage = context.createCGImage(output, from: output.extent) else { return image } return UIImage(cgImage: coreImage) } override var description: String { return "BaseFilter" } } class BlurFilter: BaseFilter { required init(\_ editor: ImageEditor) { super.init(editor: editor, filterName: "CIGaussianBlur") } func update(radius: Double) { filter?.setValue(radius, forKey: "inputRadius") } override var description: String { return "BlurFilter" } } class ColorFilter: BaseFilter { required init(\_ editor: ImageEditor) { super.init(editor: editor, filterName: "CIColorControls") } func update(saturation: Double) { filter?.setValue(saturation, forKey: "inputSaturation") } func update(brightness: Double) { filter?.setValue(brightness, forKey: "inputBrightness") } func update(contrast: Double) { filter?.setValue(contrast, forKey: "inputContrast") } override var description: String { return "ColorFilter" } } class Resizer: ImageDecorator { private var xScale: CGFloat = 0 private var yScale: CGFloat = 0 private var hasAlpha = false convenience init(\_ editor: ImageEditor, xScale: CGFloat = 0, yScale: CGFloat = 0, hasAlpha: Bool = false) { self.init(editor) self.xScale = xScale self.yScale = yScale self.hasAlpha = hasAlpha } required init(\_ editor: ImageEditor) { super.init(editor) } override func apply() -> UIImage { let image = super.apply() let size = image.size.applying(CGAffineTransform(scaleX: xScale, y: yScale)) UIGraphicsBeginImageContextWithOptions(size, !hasAlpha, UIScreen.main.scale) image.draw(in: CGRect(origin: .zero, size: size)) let scaledImage = UIGraphicsGetImageFromCurrentImageContext() UIGraphicsEndImageContext() return scaledImage ?? image } override var description: String { return "Resizer" } } class DecoratorRealWorld: XCTestCase { func testDecoratorRealWorld() { let image = loadImage() print("Client: set up an editors stack") let resizer = Resizer(image, xScale: 0.2, yScale: 0.2) let blurFilter = BlurFilter(resizer) blurFilter.update(radius: 2) let colorFilter = ColorFilter(blurFilter) colorFilter.update(contrast: 0.53) colorFilter.update(brightness: 0.12) colorFilter.update(saturation: 4) clientCode(editor: colorFilter) } func clientCode(editor: ImageEditor) { let image = editor.apply() /// Note. You can stop an execution in Xcode to see an image preview. print("Client: all changes have been applied for \\(image)") } } private extension DecoratorRealWorld { func loadImage() -> UIImage { let urlString = "https:// refactoring.guru/images/content-public/logos/logo-new-3x.png" /// Note: /// Do not download images the following way in a production code. guard let url = URL(string: urlString) else { fatalError("Please enter a valid URL") } guard let data = try? Data(contentsOf: url) else { fatalError("Cannot load an image") } guard let image = UIImage(data: data) else { fatalError("Cannot create an image from data") } return image } } #### **Output.txt:** Результат выполнения Client: set up an editors stack BlurFilter applies changes Resizer applies changes Image applies changes Client: all changes have been applied for Image **Декоратор** на других языках программирования ----------------------------------------------- [![Декоратор на C#](https://refactoring.guru/images/patterns/icons/csharp.svg?id=da64592defc6e86d57c39c66e9de3e58)](https://refactoring.guru/ru/design-patterns/decorator/csharp/example "Декоратор на C#") [![Декоратор на C++](https://refactoring.guru/images/patterns/icons/cpp.svg?id=f7782ed8b8666246bfcc3f8fefc3b858)](https://refactoring.guru/ru/design-patterns/decorator/cpp/example "Декоратор на C++") [![Декоратор на Go](https://refactoring.guru/images/patterns/icons/go.svg?id=1a89927eb99b1ea3fde7701d97970aca)](https://refactoring.guru/ru/design-patterns/decorator/go/example "Декоратор на Go") [![Декоратор на Java](https://refactoring.guru/images/patterns/icons/java.svg?id=e6d87e2dca08c953fe3acd1275ed4f4e)](https://refactoring.guru/ru/design-patterns/decorator/java/example "Декоратор на Java") [![Декоратор на PHP](https://refactoring.guru/images/patterns/icons/php.svg?id=be1906eb26b71ec1d3b93720d6156618)](https://refactoring.guru/ru/design-patterns/decorator/php/example "Декоратор на PHP") [![Декоратор на Python](https://refactoring.guru/images/patterns/icons/python.svg?id=6d815d43c0f7050a1151b43e51569c9f)](https://refactoring.guru/ru/design-patterns/decorator/python/example "Декоратор на Python") [![Декоратор на Ruby](https://refactoring.guru/images/patterns/icons/ruby.svg?id=b065b718c914bf8e960ef731600be1eb)](https://refactoring.guru/ru/design-patterns/decorator/ruby/example "Декоратор на Ruby") [![Декоратор на Rust](https://refactoring.guru/images/patterns/icons/rust.svg?id=1f5698a4b5ae23fe79413511747e4a87)](https://refactoring.guru/ru/design-patterns/decorator/rust/example "Декоратор на Rust") [![Декоратор на TypeScript](https://refactoring.guru/images/patterns/icons/typescript.svg?id=2239d0f16cb703540c205dd8cb0c0cb7)](https://refactoring.guru/ru/design-patterns/decorator/typescript/example "Декоратор на TypeScript") --- # Prototype em Go / Padrões de Projeto [There are patterns of patterns now! \ My friend's project: MetaPatterns.io](https://metapatterns.io/)  [](https://refactoring.guru/pt-br/design-patterns/prototype/go/example#checkout) [](https://refactoring.guru/pt-br/design-patterns/prototype/go/example#checkout) [](https://refactoring.guru/) / [Padrões de Projeto](https://refactoring.guru/pt-br/design-patterns) / [Prototype](https://refactoring.guru/pt-br/design-patterns/prototype) / [Go](https://refactoring.guru/pt-br/design-patterns/go) ![Prototype](https://refactoring.guru/images/patterns/cards/prototype-mini-2x.png?id=b871f789a736e7efbb1cd082d2de6398) **Prototype** em Go =================== O **Prototype** é um padrão de projeto criacional que permite a clonagem de objetos, mesmo complexos, sem acoplamento à suas classes específicas. Todas as classes de prototypes(protótipos) devem ter uma interface comum que permita copiar objetos, mesmo que suas classes concretas sejam desconhecidas. Objetos protótipos podem produzir cópias completas, pois objetos da mesma classe podem acessar os campos privados um do outro. [Saiba mais sobre o Prototype](https://refactoring.guru/pt-br/design-patterns/prototype) Navegação  [Introdução](https://refactoring.guru/pt-br/design-patterns/prototype/go/example#)  [Exemplo conceitual](https://refactoring.guru/pt-br/design-patterns/prototype/go/example#example-0)  [inode](https://refactoring.guru/pt-br/design-patterns/prototype/go/example#example-0--inode-go)  [file](https://refactoring.guru/pt-br/design-patterns/prototype/go/example#example-0--file-go)  [folder](https://refactoring.guru/pt-br/design-patterns/prototype/go/example#example-0--folder-go)  [main](https://refactoring.guru/pt-br/design-patterns/prototype/go/example#example-0--main-go)  [output](https://refactoring.guru/pt-br/design-patterns/prototype/go/example#example-0--output-txt) Exemplo conceitual ------------------ Vamos tentar descobrir o padrão Prototype usando um exemplo baseado no sistema de arquivos do sistema operacional. O sistema de arquivos do SO é recursivo: as pastas contêm arquivos e pastas, que também podem incluir arquivos e pastas e assim por diante. Cada arquivo e pasta pode ser representado por uma interface `inode`. A interface `inode` também possui a função `clone`. Ambas as structs `file` e `folder` implementam as funções `print` e `clone`, uma vez que são do tipo `inode`. Além disso, observe a função `clone` em `file` e `folder`. A função `clone` em ambos retorna uma cópia do respectivo arquivo ou pasta. Durante a clonagem, acrescentamos a palavra-chave “\_clone” ao campo de nome. #### **inode.go:** Interface do prototype package main type Inode interface { print(string) clone() Inode } #### **file.go:** Prototype concreto package main import "fmt" type File struct { name string } func (f \*File) print(indentation string) { fmt.Println(indentation + f.name) } func (f \*File) clone() Inode { return &File{name: f.name + "\_clone"} } #### **folder.go:** Prototype concreto package main import "fmt" type Folder struct { children \[\]Inode name string } func (f \*Folder) print(indentation string) { fmt.Println(indentation + f.name) for \_, i := range f.children { i.print(indentation + indentation) } } func (f \*Folder) clone() Inode { cloneFolder := &Folder{name: f.name + "\_clone"} var tempChildren \[\]Inode for \_, i := range f.children { copy := i.clone() tempChildren = append(tempChildren, copy) } cloneFolder.children = tempChildren return cloneFolder } #### **main.go:** Código cliente package main import "fmt" func main() { file1 := &File{name: "File1"} file2 := &File{name: "File2"} file3 := &File{name: "File3"} folder1 := &Folder{ children: \[\]Inode{file1}, name: "Folder1", } folder2 := &Folder{ children: \[\]Inode{folder1, file2, file3}, name: "Folder2", } fmt.Println("\\nPrinting hierarchy for Folder2") folder2.print(" ") cloneFolder := folder2.clone() fmt.Println("\\nPrinting hierarchy for clone Folder") cloneFolder.print(" ") } #### **output.txt:** Resultados da execução Printing hierarchy for Folder2 Folder2 Folder1 File1 File2 File3 Printing hierarchy for clone Folder Folder2\_clone Folder1\_clone File1\_clone File2\_clone File3\_clone **Prototype** em outras linguagens ---------------------------------- [![Prototype em C#](https://refactoring.guru/images/patterns/icons/csharp.svg?id=da64592defc6e86d57c39c66e9de3e58)](https://refactoring.guru/pt-br/design-patterns/prototype/csharp/example "Prototype em C#") [![Prototype em C++](https://refactoring.guru/images/patterns/icons/cpp.svg?id=f7782ed8b8666246bfcc3f8fefc3b858)](https://refactoring.guru/pt-br/design-patterns/prototype/cpp/example "Prototype em C++") [![Prototype em Java](https://refactoring.guru/images/patterns/icons/java.svg?id=e6d87e2dca08c953fe3acd1275ed4f4e)](https://refactoring.guru/pt-br/design-patterns/prototype/java/example "Prototype em Java") [![Prototype em PHP](https://refactoring.guru/images/patterns/icons/php.svg?id=be1906eb26b71ec1d3b93720d6156618)](https://refactoring.guru/pt-br/design-patterns/prototype/php/example "Prototype em PHP") [![Prototype em Python](https://refactoring.guru/images/patterns/icons/python.svg?id=6d815d43c0f7050a1151b43e51569c9f)](https://refactoring.guru/pt-br/design-patterns/prototype/python/example "Prototype em Python") [![Prototype em Ruby](https://refactoring.guru/images/patterns/icons/ruby.svg?id=b065b718c914bf8e960ef731600be1eb)](https://refactoring.guru/pt-br/design-patterns/prototype/ruby/example "Prototype em Ruby") [![Prototype em Rust](https://refactoring.guru/images/patterns/icons/rust.svg?id=1f5698a4b5ae23fe79413511747e4a87)](https://refactoring.guru/pt-br/design-patterns/prototype/rust/example "Prototype em Rust") [![Prototype em Swift](https://refactoring.guru/images/patterns/icons/swift.svg?id=0b716c2d52ec3a48fbe91ac031070c1d)](https://refactoring.guru/pt-br/design-patterns/prototype/swift/example "Prototype em Swift") [![Prototype em TypeScript](https://refactoring.guru/images/patterns/icons/typescript.svg?id=2239d0f16cb703540c205dd8cb0c0cb7)](https://refactoring.guru/pt-br/design-patterns/prototype/typescript/example "Prototype em TypeScript") --- # Memento em C# / Padrões de Projeto [There are patterns of patterns now! \ My friend's project: MetaPatterns.io](https://metapatterns.io/)  [](https://refactoring.guru/pt-br/design-patterns/memento/csharp/example#checkout) [](https://refactoring.guru/pt-br/design-patterns/memento/csharp/example#checkout) [](https://refactoring.guru/) / [Padrões de Projeto](https://refactoring.guru/pt-br/design-patterns) / [Memento](https://refactoring.guru/pt-br/design-patterns/memento) / [C#](https://refactoring.guru/pt-br/design-patterns/csharp) ![Memento](https://refactoring.guru/images/patterns/cards/memento-mini-2x.png?id=1d7cba189261dd84b11369a6838b1055) **Memento** em C# ================= O **Memento** é um padrão de projeto comportamental que permite tirar um “retrato” do estado de um objeto e restaurá-lo no futuro. O Memento não compromete a estrutura interna do objeto com o qual trabalha, nem os dados mantidos dentro dos retratos. [Saiba mais sobre o Memento](https://refactoring.guru/pt-br/design-patterns/memento) Navegação  [Introdução](https://refactoring.guru/pt-br/design-patterns/memento/csharp/example#)  [Exemplo conceitual](https://refactoring.guru/pt-br/design-patterns/memento/csharp/example#example-0)  [Program](https://refactoring.guru/pt-br/design-patterns/memento/csharp/example#example-0--Program-cs)  [Output](https://refactoring.guru/pt-br/design-patterns/memento/csharp/example#example-0--Output-txt) **Complexidade:** **Popularidade:** **Exemplos de uso:** O princípio do Memento pode ser alcançado usando a serialização, o que é bastante comum em C#. Embora não seja a única e a maneira mais eficiente de tirar retratos do estado de um objeto, ainda permite armazenar backups de estado, protegendo a estrutura do originador de outros objetos. Exemplo conceitual ------------------ Este exemplo ilustra a estrutura do padrão de projeto **Memento**. Ele se concentra em responder a estas perguntas: * De quais classes ele consiste? * Quais papéis essas classes desempenham? * De que maneira os elementos do padrão estão relacionados? #### **Program.cs:** Exemplo conceitual using System; using System.Collections.Generic; using System.Linq; using System.Threading; namespace RefactoringGuru.DesignPatterns.Memento.Conceptual { // The Originator holds some important state that may change over time. It // also defines a method for saving the state inside a memento and another // method for restoring the state from it. class Originator { // For the sake of simplicity, the originator's state is stored inside a // single variable. private string \_state; public Originator(string state) { this.\_state = state; Console.WriteLine("Originator: My initial state is: " + state); } // The Originator's business logic may affect its internal state. // Therefore, the client should backup the state before launching // methods of the business logic via the save() method. public void DoSomething() { Console.WriteLine("Originator: I'm doing something important."); this.\_state = this.GenerateRandomString(30); Console.WriteLine($"Originator: and my state has changed to: {\_state}"); } private string GenerateRandomString(int length = 10) { string allowedSymbols = "abcdefghijklmnopqrstuvwxyzABCDEFGHIJKLMNOPQRSTUVWXYZ"; string result = string.Empty; while (length > 0) { result += allowedSymbols\[new Random().Next(0, allowedSymbols.Length)\]; Thread.Sleep(12); length--; } return result; } // Saves the current state inside a memento. public IMemento Save() { return new ConcreteMemento(this.\_state); } // Restores the Originator's state from a memento object. public void Restore(IMemento memento) { if (!(memento is ConcreteMemento)) { throw new Exception("Unknown memento class " + memento.ToString()); } this.\_state = memento.GetState(); Console.Write($"Originator: My state has changed to: {\_state}"); } } // The Memento interface provides a way to retrieve the memento's metadata, // such as creation date or name. However, it doesn't expose the // Originator's state. public interface IMemento { string GetName(); string GetState(); DateTime GetDate(); } // The Concrete Memento contains the infrastructure for storing the // Originator's state. class ConcreteMemento : IMemento { private string \_state; private DateTime \_date; public ConcreteMemento(string state) { this.\_state = state; this.\_date = DateTime.Now; } // The Originator uses this method when restoring its state. public string GetState() { return this.\_state; } // The rest of the methods are used by the Caretaker to display // metadata. public string GetName() { return $"{this.\_date} / ({this.\_state.Substring(0, 9)})..."; } public DateTime GetDate() { return this.\_date; } } // The Caretaker doesn't depend on the Concrete Memento class. Therefore, it // doesn't have access to the originator's state, stored inside the memento. // It works with all mementos via the base Memento interface. class Caretaker { private List \_mementos = new List(); private Originator \_originator = null; public Caretaker(Originator originator) { this.\_originator = originator; } public void Backup() { Console.WriteLine("\\nCaretaker: Saving Originator's state..."); this.\_mementos.Add(this.\_originator.Save()); } public void Undo() { if (this.\_mementos.Count == 0) { return; } var memento = this.\_mementos.Last(); this.\_mementos.Remove(memento); Console.WriteLine("Caretaker: Restoring state to: " + memento.GetName()); try { this.\_originator.Restore(memento); } catch (Exception) { this.Undo(); } } public void ShowHistory() { Console.WriteLine("Caretaker: Here's the list of mementos:"); foreach (var memento in this.\_mementos) { Console.WriteLine(memento.GetName()); } } } class Program { static void Main(string\[\] args) { // Client code. Originator originator = new Originator("Super-duper-super-puper-super."); Caretaker caretaker = new Caretaker(originator); caretaker.Backup(); originator.DoSomething(); caretaker.Backup(); originator.DoSomething(); caretaker.Backup(); originator.DoSomething(); Console.WriteLine(); caretaker.ShowHistory(); Console.WriteLine("\\nClient: Now, let's rollback!\\n"); caretaker.Undo(); Console.WriteLine("\\n\\nClient: Once more!\\n"); caretaker.Undo(); Console.WriteLine(); } } } #### **Output.txt:** Resultados da execução Originator: My initial state is: Super-duper-super-puper-super. Caretaker: Saving Originator's state... Originator: I'm doing something important. Originator: and my state has changed to: oGyQIIatlDDWNgYYqJATTmdwnnGZQj Caretaker: Saving Originator's state... Originator: I'm doing something important. Originator: and my state has changed to: jBtMDDWogzzRJbTTmEwOOhZrjjBULe Caretaker: Saving Originator's state... Originator: I'm doing something important. Originator: and my state has changed to: exoHyyRkbuuNEXOhhArKccUmexPPHZ Caretaker: Here's the list of mementos: 12.06.2018 15:52:45 / (Super-dup...) 12.06.2018 15:52:46 / (oGyQIIatl...) 12.06.2018 15:52:46 / (jBtMDDWog...) Client: Now, let's rollback! Caretaker: Restoring state to: 12.06.2018 15:52:46 / (jBtMDDWog...) Originator: My state has changed to: jBtMDDWogzzRJbTTmEwOOhZrjjBULe Client: Once more! Caretaker: Restoring state to: 12.06.2018 15:52:46 / (oGyQIIatl...) Originator: My state has changed to: oGyQIIatlDDWNgYYqJATTmdwnnGZQj **Memento** em outras linguagens -------------------------------- [![Memento em C++](https://refactoring.guru/images/patterns/icons/cpp.svg?id=f7782ed8b8666246bfcc3f8fefc3b858)](https://refactoring.guru/pt-br/design-patterns/memento/cpp/example "Memento em C++") [![Memento em Go](https://refactoring.guru/images/patterns/icons/go.svg?id=1a89927eb99b1ea3fde7701d97970aca)](https://refactoring.guru/pt-br/design-patterns/memento/go/example "Memento em Go") [![Memento em Java](https://refactoring.guru/images/patterns/icons/java.svg?id=e6d87e2dca08c953fe3acd1275ed4f4e)](https://refactoring.guru/pt-br/design-patterns/memento/java/example "Memento em Java") [![Memento em PHP](https://refactoring.guru/images/patterns/icons/php.svg?id=be1906eb26b71ec1d3b93720d6156618)](https://refactoring.guru/pt-br/design-patterns/memento/php/example "Memento em PHP") [![Memento em Python](https://refactoring.guru/images/patterns/icons/python.svg?id=6d815d43c0f7050a1151b43e51569c9f)](https://refactoring.guru/pt-br/design-patterns/memento/python/example "Memento em Python") [![Memento em Ruby](https://refactoring.guru/images/patterns/icons/ruby.svg?id=b065b718c914bf8e960ef731600be1eb)](https://refactoring.guru/pt-br/design-patterns/memento/ruby/example "Memento em Ruby") [![Memento em Rust](https://refactoring.guru/images/patterns/icons/rust.svg?id=1f5698a4b5ae23fe79413511747e4a87)](https://refactoring.guru/pt-br/design-patterns/memento/rust/example "Memento em Rust") [![Memento em Swift](https://refactoring.guru/images/patterns/icons/swift.svg?id=0b716c2d52ec3a48fbe91ac031070c1d)](https://refactoring.guru/pt-br/design-patterns/memento/swift/example "Memento em Swift") [![Memento em TypeScript](https://refactoring.guru/images/patterns/icons/typescript.svg?id=2239d0f16cb703540c205dd8cb0c0cb7)](https://refactoring.guru/pt-br/design-patterns/memento/typescript/example "Memento em TypeScript") --- # Prototype を Java で / デザインパターン [There are patterns of patterns now! \ My friend's project: MetaPatterns.io](https://metapatterns.io/)  [](https://refactoring.guru/ja/design-patterns/prototype/java/example#checkout) [](https://refactoring.guru/ja/design-patterns/prototype/java/example#checkout) [](https://refactoring.guru/) / [デザインパターン](https://refactoring.guru/ja/design-patterns) / [Prototype](https://refactoring.guru/ja/design-patterns/prototype) / [Java](https://refactoring.guru/ja/design-patterns/java) ![Prototype](https://refactoring.guru/images/patterns/cards/prototype-mini-2x.png?id=b871f789a736e7efbb1cd082d2de6398) **Prototype** を Java で ====================== **Prototype** は、 生成に関するデザインパターンの一つで、 特定のクラスに結合することなく、 オブジェクト (たとえ複雑なオブジェクトでも) のクローン作成を可能とします。 プロトタイプのクラス全部には、 共通するインターフェースが必要です。 これにより、 具象クラスが不明であってもオブジェクトを複製することが可能となります。 プロトタイプ・オブジェクトが、 完全なコピーを生成できるのは、 同じクラスのオブジェクト同士が非公開フィールドを互いにアクセスできるからです。 [Prototype の詳細](https://refactoring.guru/ja/design-patterns/prototype) ナビゲーション  [はじめに](https://refactoring.guru/ja/design-patterns/prototype/java/example#)  [図形のコピー](https://refactoring.guru/ja/design-patterns/prototype/java/example#example-0)  shapes   [Shape](https://refactoring.guru/ja/design-patterns/prototype/java/example#example-0--shapes-Shape-java)   [Circle](https://refactoring.guru/ja/design-patterns/prototype/java/example#example-0--shapes-Circle-java)   [Rectangle](https://refactoring.guru/ja/design-patterns/prototype/java/example#example-0--shapes-Rectangle-java)  [Demo](https://refactoring.guru/ja/design-patterns/prototype/java/example#example-0--Demo-java)  [Output­Demo](https://refactoring.guru/ja/design-patterns/prototype/java/example#example-0--OutputDemo-txt)  cache   [Bundled­Shape­Cache](https://refactoring.guru/ja/design-patterns/prototype/java/example#example-0--cache-BundledShapeCache-java)  [Demo](https://refactoring.guru/ja/design-patterns/prototype/java/example#example-0--Demo-java)  [Output­Demo](https://refactoring.guru/ja/design-patterns/prototype/java/example#example-0--OutputDemo-txt) **複雑度:** **人気度:** **使用例:** Prototype パターンは、 Java では、 `Cloneable` インターフェースを使って、 初めから利用可能です。 このインターフェースを実装するクラスはどれもクローン作成可能です。 * [`java.lang.Object#clone()`](http://docs.oracle.com/javase/8/docs/api/java/lang/Object.html#clone--) (クラスは、 [`java.lang.Cloneable`](http://docs.oracle.com/javase/8/docs/api/java/lang/Cloneable.html) インターフェースを実装する必要あり) **見つけ方:** このパターンは、 `clone` や `copy` といったメソッドで容易に識別可能です。 図形のコピー ------ 標準の `Cloneable` インターフェースを使わずに、 どうやって Prototype を実装できるかを見ていきましょう。 ### **shapes:** 図形リスト #### **shapes/Shape.java:** 共通図形インターフェース package refactoring\_guru.prototype.example.shapes; import java.util.Objects; public abstract class Shape { public int x; public int y; public String color; public Shape() { } public Shape(Shape target) { if (target != null) { this.x = target.x; this.y = target.y; this.color = target.color; } } public abstract Shape clone(); @Override public boolean equals(Object object2) { if (!(object2 instanceof Shape)) return false; Shape shape2 = (Shape) object2; return shape2.x == x && shape2.y == y && Objects.equals(shape2.color, color); } } #### **shapes/Circle.java:** 単純な図形 package refactoring\_guru.prototype.example.shapes; public class Circle extends Shape { public int radius; public Circle() { } public Circle(Circle target) { super(target); if (target != null) { this.radius = target.radius; } } @Override public Shape clone() { return new Circle(this); } @Override public boolean equals(Object object2) { if (!(object2 instanceof Circle) || !super.equals(object2)) return false; Circle shape2 = (Circle) object2; return shape2.radius == radius; } } #### **shapes/Rectangle.java:** 別の図形 package refactoring\_guru.prototype.example.shapes; public class Rectangle extends Shape { public int width; public int height; public Rectangle() { } public Rectangle(Rectangle target) { super(target); if (target != null) { this.width = target.width; this.height = target.height; } } @Override public Shape clone() { return new Rectangle(this); } @Override public boolean equals(Object object2) { if (!(object2 instanceof Rectangle) || !super.equals(object2)) return false; Rectangle shape2 = (Rectangle) object2; return shape2.width == width && shape2.height == height; } } #### **Demo.java:** クローン作成例 package refactoring\_guru.prototype.example; import refactoring\_guru.prototype.example.shapes.Circle; import refactoring\_guru.prototype.example.shapes.Rectangle; import refactoring\_guru.prototype.example.shapes.Shape; import java.util.ArrayList; import java.util.List; public class Demo { public static void main(String\[\] args) { List shapes = new ArrayList<>(); List shapesCopy = new ArrayList<>(); Circle circle = new Circle(); circle.x = 10; circle.y = 20; circle.radius = 15; circle.color = "red"; shapes.add(circle); Circle anotherCircle = (Circle) circle.clone(); shapes.add(anotherCircle); Rectangle rectangle = new Rectangle(); rectangle.width = 10; rectangle.height = 20; rectangle.color = "blue"; shapes.add(rectangle); cloneAndCompare(shapes, shapesCopy); } private static void cloneAndCompare(List shapes, List shapesCopy) { for (Shape shape : shapes) { shapesCopy.add(shape.clone()); } for (int i = 0; i < shapes.size(); i++) { if (shapes.get(i) != shapesCopy.get(i)) { System.out.println(i + ": Shapes are different objects (yay!)"); if (shapes.get(i).equals(shapesCopy.get(i))) { System.out.println(i + ": And they are identical (yay!)"); } else { System.out.println(i + ": But they are not identical (booo!)"); } } else { System.out.println(i + ": Shape objects are the same (booo!)"); } } } } #### **OutputDemo.txt:** 実行結果 0: Shapes are different objects (yay!) 0: And they are identical (yay!) 1: Shapes are different objects (yay!) 1: And they are identical (yay!) 2: Shapes are different objects (yay!) 2: And they are identical (yay!) ### プロトタイプ・レジストリー 定義済みのプロトタイプ・オブジェクトを集めた、 集中型プロトタイプ・レジストリー (ファクトリーとも) を実装することもできます。 こうすると、 名前や他のパラメーターを元に、 ファクトリーから新規オブジェクトを取得できます。 ファクトリーは適切なプロトタイプを探し出し、 そのクローンを作成して、 返します。 ### **cache** #### **cache/BundledShapeCache.java:** プロトタイプ・ファクトリー package refactoring\_guru.prototype.caching.cache; import refactoring\_guru.prototype.example.shapes.Circle; import refactoring\_guru.prototype.example.shapes.Rectangle; import refactoring\_guru.prototype.example.shapes.Shape; import java.util.HashMap; import java.util.Map; public class BundledShapeCache { private Map cache = new HashMap<>(); public BundledShapeCache() { Circle circle = new Circle(); circle.x = 5; circle.y = 7; circle.radius = 45; circle.color = "Green"; Rectangle rectangle = new Rectangle(); rectangle.x = 6; rectangle.y = 9; rectangle.width = 8; rectangle.height = 10; rectangle.color = "Blue"; cache.put("Big green circle", circle); cache.put("Medium blue rectangle", rectangle); } public Shape put(String key, Shape shape) { cache.put(key, shape); return shape; } public Shape get(String key) { return cache.get(key).clone(); } } #### **Demo.java:** クローン作成例 package refactoring\_guru.prototype.caching; import refactoring\_guru.prototype.caching.cache.BundledShapeCache; import refactoring\_guru.prototype.example.shapes.Shape; public class Demo { public static void main(String\[\] args) { BundledShapeCache cache = new BundledShapeCache(); Shape shape1 = cache.get("Big green circle"); Shape shape2 = cache.get("Medium blue rectangle"); Shape shape3 = cache.get("Medium blue rectangle"); if (shape1 != shape2 && !shape1.equals(shape2)) { System.out.println("Big green circle != Medium blue rectangle (yay!)"); } else { System.out.println("Big green circle == Medium blue rectangle (booo!)"); } if (shape2 != shape3) { System.out.println("Medium blue rectangles are two different objects (yay!)"); if (shape2.equals(shape3)) { System.out.println("And they are identical (yay!)"); } else { System.out.println("But they are not identical (booo!)"); } } else { System.out.println("Rectangle objects are the same (booo!)"); } } } #### **OutputDemo.txt:** 実行結果 Big green circle != Medium blue rectangle (yay!) Medium blue rectangles are two different objects (yay!) And they are identical (yay!) 他言語での **Prototype** ------------------- [![Prototype を C# で](https://refactoring.guru/images/patterns/icons/csharp.svg?id=da64592defc6e86d57c39c66e9de3e58)](https://refactoring.guru/ja/design-patterns/prototype/csharp/example "Prototype を C# で") [![Prototype を C++ で](https://refactoring.guru/images/patterns/icons/cpp.svg?id=f7782ed8b8666246bfcc3f8fefc3b858)](https://refactoring.guru/ja/design-patterns/prototype/cpp/example "Prototype を C++ で") [![Prototype を Go で](https://refactoring.guru/images/patterns/icons/go.svg?id=1a89927eb99b1ea3fde7701d97970aca)](https://refactoring.guru/ja/design-patterns/prototype/go/example "Prototype を Go で") [![Prototype を PHP で](https://refactoring.guru/images/patterns/icons/php.svg?id=be1906eb26b71ec1d3b93720d6156618)](https://refactoring.guru/ja/design-patterns/prototype/php/example "Prototype を PHP で") [![Prototype を Python で](https://refactoring.guru/images/patterns/icons/python.svg?id=6d815d43c0f7050a1151b43e51569c9f)](https://refactoring.guru/ja/design-patterns/prototype/python/example "Prototype を Python で") [![Prototype を Ruby で](https://refactoring.guru/images/patterns/icons/ruby.svg?id=b065b718c914bf8e960ef731600be1eb)](https://refactoring.guru/ja/design-patterns/prototype/ruby/example "Prototype を Ruby で") [![Prototype を Rust で](https://refactoring.guru/images/patterns/icons/rust.svg?id=1f5698a4b5ae23fe79413511747e4a87)](https://refactoring.guru/ja/design-patterns/prototype/rust/example "Prototype を Rust で") [![Prototype を Swift で](https://refactoring.guru/images/patterns/icons/swift.svg?id=0b716c2d52ec3a48fbe91ac031070c1d)](https://refactoring.guru/ja/design-patterns/prototype/swift/example "Prototype を Swift で") [![Prototype を TypeScript で](https://refactoring.guru/images/patterns/icons/typescript.svg?id=2239d0f16cb703540c205dd8cb0c0cb7)](https://refactoring.guru/ja/design-patterns/prototype/typescript/example "Prototype を TypeScript で") --- # Prototype を TypeScript で / デザインパターン [There are patterns of patterns now! \ My friend's project: MetaPatterns.io](https://metapatterns.io/)  [](https://refactoring.guru/ja/design-patterns/prototype/typescript/example#checkout) [](https://refactoring.guru/ja/design-patterns/prototype/typescript/example#checkout) [](https://refactoring.guru/) / [デザインパターン](https://refactoring.guru/ja/design-patterns) / [Prototype](https://refactoring.guru/ja/design-patterns/prototype) / [TypeScript](https://refactoring.guru/ja/design-patterns/typescript) ![Prototype](https://refactoring.guru/images/patterns/cards/prototype-mini-2x.png?id=b871f789a736e7efbb1cd082d2de6398) **Prototype** を TypeScript で ============================ **Prototype** は、 生成に関するデザインパターンの一つで、 特定のクラスに結合することなく、 オブジェクト (たとえ複雑なオブジェクトでも) のクローン作成を可能とします。 プロトタイプのクラス全部には、 共通するインターフェースが必要です。 これにより、 具象クラスが不明であってもオブジェクトを複製することが可能となります。 プロトタイプ・オブジェクトが、 完全なコピーを生成できるのは、 同じクラスのオブジェクト同士が非公開フィールドを互いにアクセスできるからです。 [Prototype の詳細](https://refactoring.guru/ja/design-patterns/prototype) ナビゲーション  [はじめに](https://refactoring.guru/ja/design-patterns/prototype/typescript/example#)  [概念的な例](https://refactoring.guru/ja/design-patterns/prototype/typescript/example#example-0)  [index](https://refactoring.guru/ja/design-patterns/prototype/typescript/example#example-0--index-ts)  [Output](https://refactoring.guru/ja/design-patterns/prototype/typescript/example#example-0--Output-txt) **複雑度:** **人気度:** **使用例:** Prototype パターンは、 TypeScript では、 JavaScript の生来のメソッドである `Object.assign()` を使って、 初めから利用可能です。 **見つけ方:** このパターンは、 `clone` や `copy` といったメソッドで容易に識別可能です。 概念的な例 ----- この例は、 **Prototype** デザインパターンの構造を説明するためのものです。 以下の質問に答えることを目的としています: * どういうクラスからできているか? * それぞれのクラスの役割は? * パターンの要素同士はどう関係しているのか? #### **index.ts:** 概念的な例 /\*\* \* The example class that has cloning ability. We'll see how the values of field \* with different types will be cloned. \*/ class Prototype { public primitive: any; public component: object; public circularReference: ComponentWithBackReference; public clone(): this { const clone = Object.create(this); clone.component = Object.create(this.component); // Cloning an object that has a nested object with backreference // requires special treatment. After the cloning is completed, the // nested object should point to the cloned object, instead of the // original object. Spread operator can be handy for this case. clone.circularReference = new ComponentWithBackReference(clone); return clone; } } class ComponentWithBackReference { public prototype; constructor(prototype: Prototype) { this.prototype = prototype; } } /\*\* \* The client code. \*/ function clientCode() { const p1 = new Prototype(); p1.primitive = 245; p1.component = new Date(); p1.circularReference = new ComponentWithBackReference(p1); const p2 = p1.clone(); if (p1.primitive === p2.primitive) { console.log('Primitive field values have been carried over to a clone. Yay!'); } else { console.log('Primitive field values have not been copied. Booo!'); } if (p1.component === p2.component) { console.log('Simple component has not been cloned. Booo!'); } else { console.log('Simple component has been cloned. Yay!'); } if (p1.circularReference === p2.circularReference) { console.log('Component with back reference has not been cloned. Booo!'); } else { console.log('Component with back reference has been cloned. Yay!'); } if (p1.circularReference.prototype === p2.circularReference.prototype) { console.log('Component with back reference is linked to original object. Booo!'); } else { console.log('Component with back reference is linked to the clone. Yay!'); } } clientCode(); #### **Output.txt:** 実行結果 Primitive field values have been carried over to a clone. Yay! Simple component has been cloned. Yay! Component with back reference has been cloned. Yay! Component with back reference is linked to the clone. Yay! 他言語での **Prototype** ------------------- [![Prototype を C# で](https://refactoring.guru/images/patterns/icons/csharp.svg?id=da64592defc6e86d57c39c66e9de3e58)](https://refactoring.guru/ja/design-patterns/prototype/csharp/example "Prototype を C# で") [![Prototype を C++ で](https://refactoring.guru/images/patterns/icons/cpp.svg?id=f7782ed8b8666246bfcc3f8fefc3b858)](https://refactoring.guru/ja/design-patterns/prototype/cpp/example "Prototype を C++ で") [![Prototype を Go で](https://refactoring.guru/images/patterns/icons/go.svg?id=1a89927eb99b1ea3fde7701d97970aca)](https://refactoring.guru/ja/design-patterns/prototype/go/example "Prototype を Go で") [![Prototype を Java で](https://refactoring.guru/images/patterns/icons/java.svg?id=e6d87e2dca08c953fe3acd1275ed4f4e)](https://refactoring.guru/ja/design-patterns/prototype/java/example "Prototype を Java で") [![Prototype を PHP で](https://refactoring.guru/images/patterns/icons/php.svg?id=be1906eb26b71ec1d3b93720d6156618)](https://refactoring.guru/ja/design-patterns/prototype/php/example "Prototype を PHP で") [![Prototype を Python で](https://refactoring.guru/images/patterns/icons/python.svg?id=6d815d43c0f7050a1151b43e51569c9f)](https://refactoring.guru/ja/design-patterns/prototype/python/example "Prototype を Python で") [![Prototype を Ruby で](https://refactoring.guru/images/patterns/icons/ruby.svg?id=b065b718c914bf8e960ef731600be1eb)](https://refactoring.guru/ja/design-patterns/prototype/ruby/example "Prototype を Ruby で") [![Prototype を Rust で](https://refactoring.guru/images/patterns/icons/rust.svg?id=1f5698a4b5ae23fe79413511747e4a87)](https://refactoring.guru/ja/design-patterns/prototype/rust/example "Prototype を Rust で") [![Prototype を Swift で](https://refactoring.guru/images/patterns/icons/swift.svg?id=0b716c2d52ec3a48fbe91ac031070c1d)](https://refactoring.guru/ja/design-patterns/prototype/swift/example "Prototype を Swift で") --- # Прототип на Ruby [There are patterns of patterns now! \ My friend's project: MetaPatterns.io](https://metapatterns.io/)  [](https://refactoring.guru/ru/design-patterns/prototype/ruby/example#checkout) [](https://refactoring.guru/ru/design-patterns/prototype/ruby/example#checkout) [](https://refactoring.guru/) / [Паттерны проектирования](https://refactoring.guru/ru/design-patterns) / [Прототип](https://refactoring.guru/ru/design-patterns/prototype) / [Ruby](https://refactoring.guru/ru/design-patterns/ruby) ![Прототип](https://refactoring.guru/images/patterns/cards/prototype-mini-2x.png?id=b871f789a736e7efbb1cd082d2de6398) **Прототип** на Ruby ==================== **Прототип** — это порождающий паттерн, который позволяет копировать объекты любой сложности без привязки к их конкретным классам. Все классы—Прототипы имеют общий интерфейс. Поэтому вы можете копировать объекты, не обращая внимания на их конкретные типы и всегда быть уверены, что получите точную копию. Клонирование совершается самим объектом-прототипом, что позволяет ему скопировать значения всех полей, даже приватных. [Подробней о паттерне Прототип](https://refactoring.guru/ru/design-patterns/prototype) Навигация  [Интро](https://refactoring.guru/ru/design-patterns/prototype/ruby/example#)  [Концептуальный пример](https://refactoring.guru/ru/design-patterns/prototype/ruby/example#example-0)  [main](https://refactoring.guru/ru/design-patterns/prototype/ruby/example#example-0--main-rb)  [output](https://refactoring.guru/ru/design-patterns/prototype/ruby/example#example-0--output-txt) **Сложность:** **Популярность:** **Применимость:** Паттерн Прототип реализован в базовой библиотеке Ruby посредством методов `dup` или `clone`. **Признаки применения паттерна:** Прототип легко определяется в коде по наличию методов `clone`, `copy` и прочих. Концептуальный пример --------------------- Этот пример показывает структуру паттерна **Прототип**, а именно — из каких классов он состоит, какие роли эти классы выполняют и как они взаимодействуют друг с другом. #### **main.rb:** Пример структуры паттерна \# Пример класса, имеющего возможность клонирования. Мы посмотрим как происходит # клонирование значений полей разных типов. class Prototype attr\_accessor :primitive, :component, :circular\_reference def initialize @primitive = nil @component = nil @circular\_reference = nil end # @return \[Prototype\] def clone @component = deep\_copy(@component) # Клонирование объекта, который имеет вложенный объект с обратной ссылкой, # требует специального подхода. После завершения клонирования вложенный # объект должен указывать на клонированный объект, а не на исходный объект. @circular\_reference = deep\_copy(@circular\_reference) @circular\_reference.prototype = self deep\_copy(self) end # Нередко метод deep\_copy использует хак «маршалинг», чтобы создать глубокую # копию объекта. Однако это медленное и неэффективно, поэтому в реальных # приложениях используйте для этой задачи соответствующий пакет. # # @param \[Object\] object private def deep\_copy(object) Marshal.load(Marshal.dump(object)) end end class ComponentWithBackReference attr\_accessor :prototype # @param \[Prototype\] prototype def initialize(prototype) @prototype = prototype end end # Клиентский код. p1 = Prototype.new p1.primitive = 245 p1.component = Time.now p1.circular\_reference = ComponentWithBackReference.new(p1) p2 = p1.clone if p1.primitive == p2.primitive puts 'Primitive field values have been carried over to a clone. Yay!' else puts 'Primitive field values have not been copied. Booo!' end if p1.component.equal?(p2.component) puts 'Simple component has not been cloned. Booo!' else puts 'Simple component has been cloned. Yay!' end if p1.circular\_reference.equal?(p2.circular\_reference) puts 'Component with back reference has not been cloned. Booo!' else puts 'Component with back reference has been cloned. Yay!' end if p1.circular\_reference.prototype.equal?(p2.circular\_reference.prototype) print 'Component with back reference is linked to original object. Booo!' else print 'Component with back reference is linked to the clone. Yay!' end #### **output.txt:** Результат выполнения Primitive field values have been carried over to a clone. Yay! Simple component has been cloned. Yay! Component with back reference has been cloned. Yay! Component with back reference is linked to the clone. Yay! **Прототип** на других языках программирования ---------------------------------------------- [![Прототип на C#](https://refactoring.guru/images/patterns/icons/csharp.svg?id=da64592defc6e86d57c39c66e9de3e58)](https://refactoring.guru/ru/design-patterns/prototype/csharp/example "Прототип на C#") [![Прототип на C++](https://refactoring.guru/images/patterns/icons/cpp.svg?id=f7782ed8b8666246bfcc3f8fefc3b858)](https://refactoring.guru/ru/design-patterns/prototype/cpp/example "Прототип на C++") [![Прототип на Go](https://refactoring.guru/images/patterns/icons/go.svg?id=1a89927eb99b1ea3fde7701d97970aca)](https://refactoring.guru/ru/design-patterns/prototype/go/example "Прототип на Go") [![Прототип на Java](https://refactoring.guru/images/patterns/icons/java.svg?id=e6d87e2dca08c953fe3acd1275ed4f4e)](https://refactoring.guru/ru/design-patterns/prototype/java/example "Прототип на Java") [![Прототип на PHP](https://refactoring.guru/images/patterns/icons/php.svg?id=be1906eb26b71ec1d3b93720d6156618)](https://refactoring.guru/ru/design-patterns/prototype/php/example "Прототип на PHP") [![Прототип на Python](https://refactoring.guru/images/patterns/icons/python.svg?id=6d815d43c0f7050a1151b43e51569c9f)](https://refactoring.guru/ru/design-patterns/prototype/python/example "Прототип на Python") [![Прототип на Rust](https://refactoring.guru/images/patterns/icons/rust.svg?id=1f5698a4b5ae23fe79413511747e4a87)](https://refactoring.guru/ru/design-patterns/prototype/rust/example "Прототип на Rust") [![Прототип на Swift](https://refactoring.guru/images/patterns/icons/swift.svg?id=0b716c2d52ec3a48fbe91ac031070c1d)](https://refactoring.guru/ru/design-patterns/prototype/swift/example "Прототип на Swift") [![Прототип на TypeScript](https://refactoring.guru/images/patterns/icons/typescript.svg?id=2239d0f16cb703540c205dd8cb0c0cb7)](https://refactoring.guru/ru/design-patterns/prototype/typescript/example "Прототип на TypeScript") --- # Observer em Swift / Padrões de Projeto [There are patterns of patterns now! \ My friend's project: MetaPatterns.io](https://metapatterns.io/)  [](https://refactoring.guru/pt-br/design-patterns/observer/swift/example#checkout) [](https://refactoring.guru/pt-br/design-patterns/observer/swift/example#checkout) [](https://refactoring.guru/) / [Padrões de Projeto](https://refactoring.guru/pt-br/design-patterns) / [Observer](https://refactoring.guru/pt-br/design-patterns/observer) / [Swift](https://refactoring.guru/pt-br/design-patterns/swift) ![Observer](https://refactoring.guru/images/patterns/cards/observer-mini-2x.png?id=f205b0655572ac8e4636691c0e0debfd) **Observer** em Swift ===================== O **Observer** é um padrão de projeto comportamental que permite que um objeto notifique outros objetos sobre alterações em seu estado. O padrão Observer fornece uma maneira de assinar e cancelar a assinatura desses eventos para qualquer objeto que implemente uma interface de assinante. [Saiba mais sobre o Observer](https://refactoring.guru/pt-br/design-patterns/observer) Navegação  [Introdução](https://refactoring.guru/pt-br/design-patterns/observer/swift/example#)  [Exemplo conceitual](https://refactoring.guru/pt-br/design-patterns/observer/swift/example#example-0)  [Example](https://refactoring.guru/pt-br/design-patterns/observer/swift/example#example-0--Example-swift)  [Output](https://refactoring.guru/pt-br/design-patterns/observer/swift/example#example-0--Output-txt)  [Exemplo do mundo real](https://refactoring.guru/pt-br/design-patterns/observer/swift/example#example-1)  [Example](https://refactoring.guru/pt-br/design-patterns/observer/swift/example#example-1--Example-swift)  [Output](https://refactoring.guru/pt-br/design-patterns/observer/swift/example#example-1--Output-txt) **Complexidade:** **Popularidade:** **Exemplos de uso:** O padrão Observer é bastante comum no código Swift, especialmente nos componentes da interface de usuário. Ele fornece uma maneira de reagir a eventos que acontecem em outros objetos sem acoplamento às suas classes. **Identificação:** O padrão pode ser reconhecido por métodos de assinatura, que armazenam objetos em uma lista e por chamadas para o método de atualização emitido para objetos nessa lista. The following examples are available on [Swift Playgrounds](https://www.alemohamad.com/playgrounds) . Kudos to [Alejandro Mohamad](https://www.alemohamad.com/) for creating the Playground version. Exemplo conceitual ------------------ Este exemplo ilustra a estrutura do padrão de projeto **Observer**. Ele se concentra em responder a estas perguntas: * De quais classes ele consiste? * Quais papéis essas classes desempenham? * De que maneira os elementos do padrão estão relacionados? Depois de aprender sobre a estrutura do padrão, será mais fácil entender o exemplo a seguir, com base em um caso de uso Swift do mundo real. #### **Example.swift:** Exemplo conceitual import XCTest /// The Subject owns some important state and notifies observers when the state /// changes. class Subject { /// For the sake of simplicity, the Subject's state, essential to all /// subscribers, is stored in this variable. var state: Int = { return Int(arc4random\_uniform(10)) }() /// @var array List of subscribers. In real life, the list of subscribers /// can be stored more comprehensively (categorized by event type, etc.). private lazy var observers = \[Observer\]() /// The subscription management methods. func attach(\_ observer: Observer) { print("Subject: Attached an observer.\\n") observers.append(observer) } func detach(\_ observer: Observer) { if let idx = observers.firstIndex(where: { $0 === observer }) { observers.remove(at: idx) print("Subject: Detached an observer.\\n") } } /// Trigger an update in each subscriber. func notify() { print("Subject: Notifying observers...\\n") observers.forEach({ $0.update(subject: self)}) } /// Usually, the subscription logic is only a fraction of what a Subject can /// really do. Subjects commonly hold some important business logic, that /// triggers a notification method whenever something important is about to /// happen (or after it). func someBusinessLogic() { print("\\nSubject: I'm doing something important.\\n") state = Int(arc4random\_uniform(10)) print("Subject: My state has just changed to: \\(state)\\n") notify() } } /// The Observer protocol declares the update method, used by subjects. protocol Observer: AnyObject { func update(subject: Subject) } /// Concrete Observers react to the updates issued by the Subject they had been /// attached to. class ConcreteObserverA: Observer { func update(subject: Subject) { if subject.state < 3 { print("ConcreteObserverA: Reacted to the event.\\n") } } } class ConcreteObserverB: Observer { func update(subject: Subject) { if subject.state >= 3 { print("ConcreteObserverB: Reacted to the event.\\n") } } } /// Let's see how it all works together. class ObserverConceptual: XCTestCase { func testObserverConceptual() { let subject = Subject() let observer1 = ConcreteObserverA() let observer2 = ConcreteObserverB() subject.attach(observer1) subject.attach(observer2) subject.someBusinessLogic() subject.someBusinessLogic() subject.detach(observer2) subject.someBusinessLogic() } } #### **Output.txt:** Resultados da execução Subject: Attached an observer. Subject: Attached an observer. Subject: I'm doing something important. Subject: My state has just changed to: 4 Subject: Notifying observers... ConcreteObserverB: Reacted to the event. Subject: I'm doing something important. Subject: My state has just changed to: 2 Subject: Notifying observers... ConcreteObserverA: Reacted to the event. Subject: Detached an observer. Subject: I'm doing something important. Subject: My state has just changed to: 8 Subject: Notifying observers... Exemplo do mundo real --------------------- #### **Example.swift:** Exemplo do mundo real import XCTest class ObserverRealWorld: XCTestCase { func test() { let cartManager = CartManager() let navigationBar = UINavigationBar() let cartVC = CartViewController() cartManager.add(subscriber: navigationBar) cartManager.add(subscriber: cartVC) let apple = Food(id: 111, name: "Apple", price: 10, calories: 20) cartManager.add(product: apple) let tShirt = Clothes(id: 222, name: "T-shirt", price: 200, size: "L") cartManager.add(product: tShirt) cartManager.remove(product: apple) } } protocol CartSubscriber: CustomStringConvertible { func accept(changed cart: \[Product\]) } protocol Product { var id: Int { get } var name: String { get } var price: Double { get } func isEqual(to product: Product) -> Bool } extension Product { func isEqual(to product: Product) -> Bool { return id == product.id } } struct Food: Product { var id: Int var name: String var price: Double /// Food-specific properties var calories: Int } struct Clothes: Product { var id: Int var name: String var price: Double /// Clothes-specific properties var size: String } class CartManager { private lazy var cart = \[Product\]() private lazy var subscribers = \[CartSubscriber\]() func add(subscriber: CartSubscriber) { print("CartManager: I'am adding a new subscriber: \\(subscriber.description)") subscribers.append(subscriber) } func add(product: Product) { print("\\nCartManager: I'am adding a new product: \\(product.name)") cart.append(product) notifySubscribers() } func remove(subscriber filter: (CartSubscriber) -> (Bool)) { guard let index = subscribers.firstIndex(where: filter) else { return } subscribers.remove(at: index) } func remove(product: Product) { guard let index = cart.firstIndex(where: { $0.isEqual(to: product) }) else { return } print("\\nCartManager: Product '\\(product.name)' is removed from a cart") cart.remove(at: index) notifySubscribers() } private func notifySubscribers() { subscribers.forEach({ $0.accept(changed: cart) }) } } extension UINavigationBar: CartSubscriber { func accept(changed cart: \[Product\]) { print("UINavigationBar: Updating an appearance of navigation items") } open override var description: String { return "UINavigationBar" } } class CartViewController: UIViewController, CartSubscriber { func accept(changed cart: \[Product\]) { print("CartViewController: Updating an appearance of a list view with products") } open override var description: String { return "CartViewController" } } #### **Output.txt:** Resultados da execução CartManager: I'am adding a new subscriber: UINavigationBar CartManager: I'am adding a new subscriber: CartViewController CartManager: I'am adding a new product: Apple UINavigationBar: Updating an appearance of navigation items CartViewController: Updating an appearance of a list view with products CartManager: I'am adding a new product: T-shirt UINavigationBar: Updating an appearance of navigation items CartViewController: Updating an appearance of a list view with products CartManager: Product 'Apple' is removed from a cart UINavigationBar: Updating an appearance of navigation items CartViewController: Updating an appearance of a list view with products **Observer** em outras linguagens --------------------------------- [![Observer em C#](https://refactoring.guru/images/patterns/icons/csharp.svg?id=da64592defc6e86d57c39c66e9de3e58)](https://refactoring.guru/pt-br/design-patterns/observer/csharp/example "Observer em C#") [![Observer em C++](https://refactoring.guru/images/patterns/icons/cpp.svg?id=f7782ed8b8666246bfcc3f8fefc3b858)](https://refactoring.guru/pt-br/design-patterns/observer/cpp/example "Observer em C++") [![Observer em Go](https://refactoring.guru/images/patterns/icons/go.svg?id=1a89927eb99b1ea3fde7701d97970aca)](https://refactoring.guru/pt-br/design-patterns/observer/go/example "Observer em Go") [![Observer em Java](https://refactoring.guru/images/patterns/icons/java.svg?id=e6d87e2dca08c953fe3acd1275ed4f4e)](https://refactoring.guru/pt-br/design-patterns/observer/java/example "Observer em Java") [![Observer em PHP](https://refactoring.guru/images/patterns/icons/php.svg?id=be1906eb26b71ec1d3b93720d6156618)](https://refactoring.guru/pt-br/design-patterns/observer/php/example "Observer em PHP") [![Observer em Python](https://refactoring.guru/images/patterns/icons/python.svg?id=6d815d43c0f7050a1151b43e51569c9f)](https://refactoring.guru/pt-br/design-patterns/observer/python/example "Observer em Python") [![Observer em Ruby](https://refactoring.guru/images/patterns/icons/ruby.svg?id=b065b718c914bf8e960ef731600be1eb)](https://refactoring.guru/pt-br/design-patterns/observer/ruby/example "Observer em Ruby") [![Observer em Rust](https://refactoring.guru/images/patterns/icons/rust.svg?id=1f5698a4b5ae23fe79413511747e4a87)](https://refactoring.guru/pt-br/design-patterns/observer/rust/example "Observer em Rust") [![Observer em TypeScript](https://refactoring.guru/images/patterns/icons/typescript.svg?id=2239d0f16cb703540c205dd8cb0c0cb7)](https://refactoring.guru/pt-br/design-patterns/observer/typescript/example "Observer em TypeScript") --- # Mediator w języku PHP / Wzorce projektowe [There are patterns of patterns now! \ My friend's project: MetaPatterns.io](https://metapatterns.io/)  [](https://refactoring.guru/pl/design-patterns/mediator/php/example#checkout) [](https://refactoring.guru/pl/design-patterns/mediator/php/example#checkout) [](https://refactoring.guru/) / [Wzorce projektowe](https://refactoring.guru/pl/design-patterns) / [Mediator](https://refactoring.guru/pl/design-patterns/mediator) / [PHP](https://refactoring.guru/pl/design-patterns/php) ![Mediator](https://refactoring.guru/images/patterns/cards/mediator-mini-2x.png?id=d288d7c73f5581ae09701d61200ae09e) **Mediator** w języku PHP ========================= **Mediator** to behawioralny wzorzec projektowy pozwalający zredukować sprzężenie pomiędzy komponentami programu poprzez zmuszenie ich do komunikacji za pośrednictwem obiektu zwanego mediatorem. Mediator ułatwia modyfikację, rozszerzanie i ponowne wykorzystanie komponentów gdyż z jego pomocą nie są one zależne od wielu innych klas. [Dowiedz się więcej o Mediator](https://refactoring.guru/pl/design-patterns/mediator) Nawigacja  [Intro](https://refactoring.guru/pl/design-patterns/mediator/php/example#)  [Przykład koncepcyjny](https://refactoring.guru/pl/design-patterns/mediator/php/example#example-0)  [index](https://refactoring.guru/pl/design-patterns/mediator/php/example#example-0--index-php)  [Output](https://refactoring.guru/pl/design-patterns/mediator/php/example#example-0--Output-txt)  [Przykład z prawdziwego życia](https://refactoring.guru/pl/design-patterns/mediator/php/example#example-1)  [index](https://refactoring.guru/pl/design-patterns/mediator/php/example#example-1--index-php)  [Output](https://refactoring.guru/pl/design-patterns/mediator/php/example#example-1--Output-txt) **Złożoność:** **Popularność:** **Przykłady użycia:** Wierna implementacja wzorca Mediator nie jest tak powszechna w PHP, jak w innych językach, szczególnie tych nastawionych na graficzną interakcję z użytkownikiem — jak Java lub C#. Aplikacja PHP może zawierać wiele komponentów, ale rzadko mają one okazję komunikować się ze sobą bezpośrednio w czasie jednej sesji. Niemniej jednak wzorzec Mediator ma też inne zastosowania, jak dyspozycja zdarzeń w wielu frameworkach PHP, lub w niektórych implementacjach kontrolerów MVC. Przykład koncepcyjny -------------------- Poniższy przykład ilustruje strukturę wzorca **Mediator** ze szczególnym naciskiem na następujące kwestie: * Z jakich składa się klas? * Jakie role pełnią te klasy? * W jaki sposób elementy wzorca są ze sobą powiązane? Poznawszy strukturę wzorca będzie ci łatwiej zrozumieć następujący przykład, oparty na prawdziwym przypadku użycia PHP. #### **index.php:** Przykład koncepcyjny component1 = $c1; $this->component1->setMediator($this); $this->component2 = $c2; $this->component2->setMediator($this); } public function notify(object $sender, string $event): void { if ($event == "A") { echo "Mediator reacts on A and triggers following operations:\\n"; $this->component2->doC(); } if ($event == "D") { echo "Mediator reacts on D and triggers following operations:\\n"; $this->component1->doB(); $this->component2->doC(); } } } /\*\* \* The Base Component provides the basic functionality of storing a mediator's \* instance inside component objects. \*/ class BaseComponent { protected $mediator; public function \_\_construct(Mediator $mediator = null) { $this->mediator = $mediator; } public function setMediator(Mediator $mediator): void { $this->mediator = $mediator; } } /\*\* \* Concrete Components implement various functionality. They don't depend on \* other components. They also don't depend on any concrete mediator classes. \*/ class Component1 extends BaseComponent { public function doA(): void { echo "Component 1 does A.\\n"; $this->mediator->notify($this, "A"); } public function doB(): void { echo "Component 1 does B.\\n"; $this->mediator->notify($this, "B"); } } class Component2 extends BaseComponent { public function doC(): void { echo "Component 2 does C.\\n"; $this->mediator->notify($this, "C"); } public function doD(): void { echo "Component 2 does D.\\n"; $this->mediator->notify($this, "D"); } } /\*\* \* The client code. \*/ $c1 = new Component1(); $c2 = new Component2(); $mediator = new ConcreteMediator($c1, $c2); echo "Client triggers operation A.\\n"; $c1->doA(); echo "\\n"; echo "Client triggers operation D.\\n"; $c2->doD(); #### **Output.txt:** Wynik działania Client triggers operation A. Component 1 does A. Mediator reacts on A and triggers following operations: Component 2 does C. Client triggers operation D. Component 2 does D. Mediator reacts on D and triggers following operations: Component 1 does B. Component 2 does C. Przykład z prawdziwego życia ---------------------------- W poniższym przykładzie wzorzec **Mediator** rozszerza ideę wzorca Obserwator, udostępniając scentralizowanego dyspozytora zdarzeń. Pozwala to dowolnemu obiektowi śledzić i wyzwalać zdarzenia w innych obiektach bez tworzenia zależności między nadawcami i odbiorcami. #### **index.php:** Przykład z prawdziwego życia observers\["\*"\] = \[\]; } private function initEventGroup(string &$event = "\*"): void { if (!isset($this->observers\[$event\])) { $this->observers\[$event\] = \[\]; } } private function getEventObservers(string $event = "\*"): array { $this->initEventGroup($event); $group = $this->observers\[$event\]; $all = $this->observers\["\*"\]; return array\_merge($group, $all); } public function attach(Observer $observer, string $event = "\*"): void { $this->initEventGroup($event); $this->observers\[$event\]\[\] = $observer; } public function detach(Observer $observer, string $event = "\*"): void { foreach ($this->getEventObservers($event) as $key => $s) { if ($s === $observer) { unset($this->observers\[$event\]\[$key\]); } } } public function trigger(string $event, object $emitter, $data = null): void { echo "EventDispatcher: Broadcasting the '$event' event.\\n"; foreach ($this->getEventObservers($event) as $observer) { $observer->update($event, $emitter, $data); } } } /\*\* \* A simple helper function to provide global access to the event dispatcher. \*/ function events(): EventDispatcher { static $eventDispatcher; if (!$eventDispatcher) { $eventDispatcher = new EventDispatcher(); } return $eventDispatcher; } /\*\* \* The Observer interface defines how components receive the event \* notifications. \*/ interface Observer { public function update(string $event, object $emitter, $data = null); } /\*\* \* Unlike our Observer pattern example, this example makes the UserRepository \* act as a regular component that doesn't have any special event-related \* methods. Like any other component, this class relies on the EventDispatcher \* to broadcast its events and listen for the other ones. \* \* @see \\RefactoringGuru\\Observer\\RealWorld\\UserRepository \*/ class UserRepository implements Observer { /\*\* \* @var array List of application's users. \*/ private $users = \[\]; /\*\* \* Components can subscribe to events by themselves or by client code. \*/ public function \_\_construct() { events()->attach($this, "users:deleted"); } /\*\* \* Components can decide whether they'd like to process an event using its \* name, emitter or any contextual data passed along with the event. \*/ public function update(string $event, object $emitter, $data = null): void { switch ($event) { case "users:deleted": if ($emitter === $this) { return; } $this->deleteUser($data, true); break; } } // These methods represent the business logic of the class. public function initialize(string $filename): void { echo "UserRepository: Loading user records from a file.\\n"; // ... events()->trigger("users:init", $this, $filename); } public function createUser(array $data, bool $silent = false): User { echo "UserRepository: Creating a user.\\n"; $user = new User(); $user->update($data); $id = bin2hex(openssl\_random\_pseudo\_bytes(16)); $user->update(\["id" => $id\]); $this->users\[$id\] = $user; if (!$silent) { events()->trigger("users:created", $this, $user); } return $user; } public function updateUser(User $user, array $data, bool $silent = false): ?User { echo "UserRepository: Updating a user.\\n"; $id = $user->attributes\["id"\]; if (!isset($this->users\[$id\])) { return null; } $user = $this->users\[$id\]; $user->update($data); if (!$silent) { events()->trigger("users:updated", $this, $user); } return $user; } public function deleteUser(User $user, bool $silent = false): void { echo "UserRepository: Deleting a user.\\n"; $id = $user->attributes\["id"\]; if (!isset($this->users\[$id\])) { return; } unset($this->users\[$id\]); if (!$silent) { events()->trigger("users:deleted", $this, $user); } } } /\*\* \* Let's keep the User class trivial since it's not the focus of our example. \*/ class User { public $attributes = \[\]; public function update($data): void { $this->attributes = array\_merge($this->attributes, $data); } /\*\* \* All objects can trigger events. \*/ public function delete(): void { echo "User: I can now delete myself without worrying about the repository.\\n"; events()->trigger("users:deleted", $this, $this); } } /\*\* \* This Concrete Component logs any events it's subscribed to. \*/ class Logger implements Observer { private $filename; public function \_\_construct($filename) { $this->filename = $filename; if (file\_exists($this->filename)) { unlink($this->filename); } } public function update(string $event, object $emitter, $data = null) { $entry = date("Y-m-d H:i:s") . ": '$event' with data '" . json\_encode($data) . "'\\n"; file\_put\_contents($this->filename, $entry, FILE\_APPEND); echo "Logger: I've written '$event' entry to the log.\\n"; } } /\*\* \* This Concrete Component sends initial instructions to new users. The client \* is responsible for attaching this component to a proper user creation event. \*/ class OnboardingNotification implements Observer { private $adminEmail; public function \_\_construct(string $adminEmail) { $this->adminEmail = $adminEmail; } public function update(string $event, object $emitter, $data = null): void { // mail($this->adminEmail, // "Onboarding required", // "We have a new user. Here's his info: " .json\_encode($data)); echo "OnboardingNotification: The notification has been emailed!\\n"; } } /\*\* \* The client code. \*/ $repository = new UserRepository(); events()->attach($repository, "facebook:update"); $logger = new Logger(\_\_DIR\_\_ . "/log.txt"); events()->attach($logger, "\*"); $onboarding = new OnboardingNotification("1@example.com"); events()->attach($onboarding, "users:created"); // ... $repository->initialize(\_\_DIR\_\_ . "users.csv"); // ... $user = $repository->createUser(\[\ "name" => "John Smith",\ "email" => "john99@example.com",\ \]); // ... $user->delete(); #### **Output.txt:** Wynik działania UserRepository: Loading user records from a file. EventDispatcher: Broadcasting the 'users:init' event. Logger: I've written 'users:init' entry to the log. UserRepository: Creating a user. EventDispatcher: Broadcasting the 'users:created' event. OnboardingNotification: The notification has been emailed! Logger: I've written 'users:created' entry to the log. User: I can now delete myself without worrying about the repository. EventDispatcher: Broadcasting the 'users:deleted' event. UserRepository: Deleting a user. Logger: I've written 'users:deleted' entry to the log. **Mediator** w innych językach ------------------------------ [![Mediator w języku C#](https://refactoring.guru/images/patterns/icons/csharp.svg?id=da64592defc6e86d57c39c66e9de3e58)](https://refactoring.guru/pl/design-patterns/mediator/csharp/example "Mediator w języku C#") [![Mediator w języku C++](https://refactoring.guru/images/patterns/icons/cpp.svg?id=f7782ed8b8666246bfcc3f8fefc3b858)](https://refactoring.guru/pl/design-patterns/mediator/cpp/example "Mediator w języku C++") [![Mediator w języku Go](https://refactoring.guru/images/patterns/icons/go.svg?id=1a89927eb99b1ea3fde7701d97970aca)](https://refactoring.guru/pl/design-patterns/mediator/go/example "Mediator w języku Go") [![Mediator w języku Java](https://refactoring.guru/images/patterns/icons/java.svg?id=e6d87e2dca08c953fe3acd1275ed4f4e)](https://refactoring.guru/pl/design-patterns/mediator/java/example "Mediator w języku Java") [![Mediator w języku Python](https://refactoring.guru/images/patterns/icons/python.svg?id=6d815d43c0f7050a1151b43e51569c9f)](https://refactoring.guru/pl/design-patterns/mediator/python/example "Mediator w języku Python") [![Mediator w języku Ruby](https://refactoring.guru/images/patterns/icons/ruby.svg?id=b065b718c914bf8e960ef731600be1eb)](https://refactoring.guru/pl/design-patterns/mediator/ruby/example "Mediator w języku Ruby") [![Mediator w języku Rust](https://refactoring.guru/images/patterns/icons/rust.svg?id=1f5698a4b5ae23fe79413511747e4a87)](https://refactoring.guru/pl/design-patterns/mediator/rust/example "Mediator w języku Rust") [![Mediator w języku Swift](https://refactoring.guru/images/patterns/icons/swift.svg?id=0b716c2d52ec3a48fbe91ac031070c1d)](https://refactoring.guru/pl/design-patterns/mediator/swift/example "Mediator w języku Swift") [![Mediator w języku TypeScript](https://refactoring.guru/images/patterns/icons/typescript.svg?id=2239d0f16cb703540c205dd8cb0c0cb7)](https://refactoring.guru/pl/design-patterns/mediator/typescript/example "Mediator w języku TypeScript") --- # Obserwator w języku PHP / Wzorce projektowe [There are patterns of patterns now! \ My friend's project: MetaPatterns.io](https://metapatterns.io/)  [](https://refactoring.guru/pl/design-patterns/observer/php/example#checkout) [](https://refactoring.guru/pl/design-patterns/observer/php/example#checkout) [](https://refactoring.guru/) / [Wzorce projektowe](https://refactoring.guru/pl/design-patterns) / [Obserwator](https://refactoring.guru/pl/design-patterns/observer) / [PHP](https://refactoring.guru/pl/design-patterns/php) ![Obserwator](https://refactoring.guru/images/patterns/cards/observer-mini-2x.png?id=f205b0655572ac8e4636691c0e0debfd) **Obserwator** w języku PHP =========================== **Obserwator** to behawioralny wzorzec projektowy pozwalający obiektom powiadamiać inne obiekty o zmianach swojego stanu. Obserwator daje możliwość subskrypcji lub zrezygnowania z subskrypcji zdarzeń dowolnego obiektu implementującego interfejs subskrybenta. [Dowiedz się więcej o Obserwator](https://refactoring.guru/pl/design-patterns/observer) Nawigacja  [Intro](https://refactoring.guru/pl/design-patterns/observer/php/example#)  [Przykład koncepcyjny](https://refactoring.guru/pl/design-patterns/observer/php/example#example-0)  [index](https://refactoring.guru/pl/design-patterns/observer/php/example#example-0--index-php)  [Output](https://refactoring.guru/pl/design-patterns/observer/php/example#example-0--Output-txt)  [Przykład z prawdziwego życia](https://refactoring.guru/pl/design-patterns/observer/php/example#example-1)  [index](https://refactoring.guru/pl/design-patterns/observer/php/example#example-1--index-php)  [Output](https://refactoring.guru/pl/design-patterns/observer/php/example#example-1--Output-txt) **Złożoność:** **Popularność:** **Przypadki użycia:** PHP posiada wiele wbudowanych interfejsów ([SplSubject](http://php.net/manual/en/class.splsubject.php) , [SplObserver](http://php.net/manual/en/class.splobserver.php) ), z pomocą których można stworzyć własne implementacje wzorca Obserwator kompatybilne z resztą kodu PHP. **Identyfikacja:** Wzorzec Obserwator można poznać po obecności metod służących subskrypcji, które przechowują obiekty w strukturze listy i po wywołaniach metod aktualizacji obiektów z tej listy. Przykład koncepcyjny -------------------- Poniższy przykład ilustruje strukturę wzorca **Obserwator** ze szczególnym naciskiem na następujące kwestie: * Z jakich składa się klas? * Jakie role pełnią te klasy? * W jaki sposób elementy wzorca są ze sobą powiązane? Poznawszy strukturę wzorca będzie ci łatwiej zrozumieć następujący przykład, oparty na prawdziwym przypadku użycia PHP. #### **index.php:** Przykład koncepcyjny observers = new \\SplObjectStorage(); } /\*\* \* The subscription management methods. \*/ public function attach(\\SplObserver $observer): void { echo "Subject: Attached an observer.\\n"; $this->observers->attach($observer); } public function detach(\\SplObserver $observer): void { $this->observers->detach($observer); echo "Subject: Detached an observer.\\n"; } /\*\* \* Trigger an update in each subscriber. \*/ public function notify(): void { echo "Subject: Notifying observers...\\n"; foreach ($this->observers as $observer) { $observer->update($this); } } /\*\* \* Usually, the subscription logic is only a fraction of what a Subject can \* really do. Subjects commonly hold some important business logic, that \* triggers a notification method whenever something important is about to \* happen (or after it). \*/ public function someBusinessLogic(): void { echo "\\nSubject: I'm doing something important.\\n"; $this->state = rand(0, 10); echo "Subject: My state has just changed to: {$this->state}\\n"; $this->notify(); } } /\*\* \* Concrete Observers react to the updates issued by the Subject they had been \* attached to. \*/ class ConcreteObserverA implements \\SplObserver { public function update(\\SplSubject $subject): void { if ($subject->state < 3) { echo "ConcreteObserverA: Reacted to the event.\\n"; } } } class ConcreteObserverB implements \\SplObserver { public function update(\\SplSubject $subject): void { if ($subject->state == 0 || $subject->state >= 2) { echo "ConcreteObserverB: Reacted to the event.\\n"; } } } /\*\* \* The client code. \*/ $subject = new Subject(); $o1 = new ConcreteObserverA(); $subject->attach($o1); $o2 = new ConcreteObserverB(); $subject->attach($o2); $subject->someBusinessLogic(); $subject->someBusinessLogic(); $subject->detach($o2); $subject->someBusinessLogic(); #### **Output.txt:** Wynik działania Subject: Attached an observer. Subject: Attached an observer. Subject: I'm doing something important. Subject: My state has just changed to: 2 Subject: Notifying observers... ConcreteObserverA: Reacted to the event. ConcreteObserverB: Reacted to the event. Subject: I'm doing something important. Subject: My state has just changed to: 4 Subject: Notifying observers... ConcreteObserverB: Reacted to the event. Subject: Detached an observer. Subject: I'm doing something important. Subject: My state has just changed to: 1 Subject: Notifying observers... ConcreteObserverA: Reacted to the event. Przykład z prawdziwego życia ---------------------------- W poniższym przykładzie, wzorzec **Obserwator** pozwala różnym obiektom obserwować zdarzenia zachodzące w repozytorium użytkowników aplikacji. Repozytorium emituje informacje o różnych typach zdarzeń i umożliwia subskrypcję wszystkich lub tylko wybranych. #### **index.php:** Przykład z prawdziwego życia observers\["\*"\] = \[\]; } private function initEventGroup(string $event = "\*"): void { if (!isset($this->observers\[$event\])) { $this->observers\[$event\] = \[\]; } } private function getEventObservers(string $event = "\*"): array { $this->initEventGroup($event); $group = $this->observers\[$event\]; $all = $this->observers\["\*"\]; return array\_merge($group, $all); } public function attach(\\SplObserver $observer, string $event = "\*"): void { $this->initEventGroup($event); $this->observers\[$event\]\[\] = $observer; } public function detach(\\SplObserver $observer, string $event = "\*"): void { foreach ($this->getEventObservers($event) as $key => $s) { if ($s === $observer) { unset($this->observers\[$event\]\[$key\]); } } } public function notify(string $event = "\*", $data = null): void { echo "UserRepository: Broadcasting the '$event' event.\\n"; foreach ($this->getEventObservers($event) as $observer) { $observer->update($this, $event, $data); } } // Here are the methods representing the business logic of the class. public function initialize($filename): void { echo "UserRepository: Loading user records from a file.\\n"; // ... $this->notify("users:init", $filename); } public function createUser(array $data): User { echo "UserRepository: Creating a user.\\n"; $user = new User(); $user->update($data); $id = bin2hex(openssl\_random\_pseudo\_bytes(16)); $user->update(\["id" => $id\]); $this->users\[$id\] = $user; $this->notify("users:created", $user); return $user; } public function updateUser(User $user, array $data): User { echo "UserRepository: Updating a user.\\n"; $id = $user->attributes\["id"\]; if (!isset($this->users\[$id\])) { return null; } $user = $this->users\[$id\]; $user->update($data); $this->notify("users:updated", $user); return $user; } public function deleteUser(User $user): void { echo "UserRepository: Deleting a user.\\n"; $id = $user->attributes\["id"\]; if (!isset($this->users\[$id\])) { return; } unset($this->users\[$id\]); $this->notify("users:deleted", $user); } } /\*\* \* Let's keep the User class trivial since it's not the focus of our example. \*/ class User { public $attributes = \[\]; public function update($data): void { $this->attributes = array\_merge($this->attributes, $data); } } /\*\* \* This Concrete Component logs any events it's subscribed to. \*/ class Logger implements \\SplObserver { private $filename; public function \_\_construct($filename) { $this->filename = $filename; if (file\_exists($this->filename)) { unlink($this->filename); } } public function update(\\SplSubject $repository, string $event = null, $data = null): void { $entry = date("Y-m-d H:i:s") . ": '$event' with data '" . json\_encode($data) . "'\\n"; file\_put\_contents($this->filename, $entry, FILE\_APPEND); echo "Logger: I've written '$event' entry to the log.\\n"; } } /\*\* \* This Concrete Component sends initial instructions to new users. The client \* is responsible for attaching this component to a proper user creation event. \*/ class OnboardingNotification implements \\SplObserver { private $adminEmail; public function \_\_construct($adminEmail) { $this->adminEmail = $adminEmail; } public function update(\\SplSubject $repository, string $event = null, $data = null): void { // mail($this->adminEmail, // "Onboarding required", // "We have a new user. Here's his info: " .json\_encode($data)); echo "OnboardingNotification: The notification has been emailed!\\n"; } } /\*\* \* The client code. \*/ $repository = new UserRepository(); $repository->attach(new Logger(\_\_DIR\_\_ . "/log.txt"), "\*"); $repository->attach(new OnboardingNotification("1@example.com"), "users:created"); $repository->initialize(\_\_DIR\_\_ . "/users.csv"); // ... $user = $repository->createUser(\[\ "name" => "John Smith",\ "email" => "john99@example.com",\ \]); // ... $repository->deleteUser($user); #### **Output.txt:** Wynik działania UserRepository: Loading user records from a file. UserRepository: Broadcasting the 'users:init' event. Logger: I've written 'users:init' entry to the log. UserRepository: Creating a user. UserRepository: Broadcasting the 'users:created' event. OnboardingNotification: The notification has been emailed! Logger: I've written 'users:created' entry to the log. UserRepository: Deleting a user. UserRepository: Broadcasting the 'users:deleted' event. Logger: I've written 'users:deleted' entry to the log. **Obserwator** w innych językach -------------------------------- [![Obserwator w języku C#](https://refactoring.guru/images/patterns/icons/csharp.svg?id=da64592defc6e86d57c39c66e9de3e58)](https://refactoring.guru/pl/design-patterns/observer/csharp/example "Obserwator w języku C#") [![Obserwator w języku C++](https://refactoring.guru/images/patterns/icons/cpp.svg?id=f7782ed8b8666246bfcc3f8fefc3b858)](https://refactoring.guru/pl/design-patterns/observer/cpp/example "Obserwator w języku C++") [![Obserwator w języku Go](https://refactoring.guru/images/patterns/icons/go.svg?id=1a89927eb99b1ea3fde7701d97970aca)](https://refactoring.guru/pl/design-patterns/observer/go/example "Obserwator w języku Go") [![Obserwator w języku Java](https://refactoring.guru/images/patterns/icons/java.svg?id=e6d87e2dca08c953fe3acd1275ed4f4e)](https://refactoring.guru/pl/design-patterns/observer/java/example "Obserwator w języku Java") [![Obserwator w języku Python](https://refactoring.guru/images/patterns/icons/python.svg?id=6d815d43c0f7050a1151b43e51569c9f)](https://refactoring.guru/pl/design-patterns/observer/python/example "Obserwator w języku Python") [![Obserwator w języku Ruby](https://refactoring.guru/images/patterns/icons/ruby.svg?id=b065b718c914bf8e960ef731600be1eb)](https://refactoring.guru/pl/design-patterns/observer/ruby/example "Obserwator w języku Ruby") [![Obserwator w języku Rust](https://refactoring.guru/images/patterns/icons/rust.svg?id=1f5698a4b5ae23fe79413511747e4a87)](https://refactoring.guru/pl/design-patterns/observer/rust/example "Obserwator w języku Rust") [![Obserwator w języku Swift](https://refactoring.guru/images/patterns/icons/swift.svg?id=0b716c2d52ec3a48fbe91ac031070c1d)](https://refactoring.guru/pl/design-patterns/observer/swift/example "Obserwator w języku Swift") [![Obserwator w języku TypeScript](https://refactoring.guru/images/patterns/icons/typescript.svg?id=2239d0f16cb703540c205dd8cb0c0cb7)](https://refactoring.guru/pl/design-patterns/observer/typescript/example "Obserwator w języku TypeScript") --- # 루비로 작성된 프록시 / 디자인 패턴들 [There are patterns of patterns now! \ My friend's project: MetaPatterns.io](https://metapatterns.io/)  [](https://refactoring.guru/ko/design-patterns/proxy/ruby/example#checkout) [](https://refactoring.guru/ko/design-patterns/proxy/ruby/example#checkout) [](https://refactoring.guru/) / [디자인 패턴들](https://refactoring.guru/ko/design-patterns) / [프록시](https://refactoring.guru/ko/design-patterns/proxy) / [루비](https://refactoring.guru/ko/design-patterns/ruby) ![프록시](https://refactoring.guru/images/patterns/cards/proxy-mini-2x.png?id=8638fac9dc08c992852492f9cb29d9c6) 루비로 작성된 **프록시** =============== **프록시**는 클라이언트가 사용하는 실제 서비스 객체를 대신하는 객체를 제공하는 구조 디자인 패턴입니다. 프록시는 클라이언트 요청을 수신하고, 일부 작업​(접근 제어, 캐싱 등)​을 수행한 다음 요청을 서비스 객체에 전달합니다. 프록시 객체는 서비스 객체와 같은 인터페이스를 가지기 때문에 클라이언트에 전달되면 실제 객체와 상호교환이 가능합니다. [프록시에 대하여 더 자세히 알아보세요](https://refactoring.guru/ko/design-patterns/proxy) 내비게이션  [소개](https://refactoring.guru/ko/design-patterns/proxy/ruby/example#)  [개념적인 예시](https://refactoring.guru/ko/design-patterns/proxy/ruby/example#example-0)  [main](https://refactoring.guru/ko/design-patterns/proxy/ruby/example#example-0--main-rb)  [output](https://refactoring.guru/ko/design-patterns/proxy/ruby/example#example-0--output-txt) **복잡도:** **인기도:** **사용 사례들:** 프록시 패턴은 대부분의 루비 앱에서 일반적으로 발견되지 않습니다. 그러나 일부 특별한 경우에는 여전히 매우 유용할 수 있습니다. 클라이언트 코드를 변경하지 않고 기존 클래스의 객체에 몇 가지 추가 행동들을 추가해야 할 때 매우 유용합니다. **식별:** 프록시들은 모든 실제 작업을 다른 객체에 위임합니다. 각 프록시 메서드는 프록시가 서비스 객체의 자식 클래스가 아닌 이상 최종적으로 서비스 객체를 참조해야 합니다. 개념적인 예시 ------- 이 예시는 **프록시** 디자인 패턴의 구조를 보여주고 다음 질문에 중점을 둡니다: * 패턴은 어떤 클래스들로 구성되어 있나요? * 이 클래스들은 어떤 역할을 하나요? * 패턴의 요소들은 어떻게 서로 연관되어 있나요? #### **main.rb:** 개념적인 예시 \# The Subject interface declares common operations for both RealSubject and the # Proxy. As long as the client works with RealSubject using this interface, # you'll be able to pass it a proxy instead of a real subject. class Subject # @abstract def request raise NotImplementedError, "#{self.class} has not implemented method '#{\_\_method\_\_}'" end end # The RealSubject contains some core business logic. Usually, RealSubjects are # capable of doing some useful work which may also be very slow or sensitive - # e.g. correcting input data. A Proxy can solve these issues without any changes # to the RealSubject's code. class RealSubject < Subject def request puts 'RealSubject: Handling request.' end end # The Proxy has an interface identical to the RealSubject. class Proxy < Subject # @param \[RealSubject\] real\_subject def initialize(real\_subject) @real\_subject = real\_subject end # The most common applications of the Proxy pattern are lazy loading, caching, # controlling the access, logging, etc. A Proxy can perform one of these # things and then, depending on the result, pass the execution to the same # method in a linked RealSubject object. def request return unless check\_access @real\_subject.request log\_access end # @return \[Boolean\] def check\_access puts 'Proxy: Checking access prior to firing a real request.' true end def log\_access print 'Proxy: Logging the time of request.' end end # The client code is supposed to work with all objects (both subjects and # proxies) via the Subject interface in order to support both real subjects and # proxies. In real life, however, clients mostly work with their real subjects # directly. In this case, to implement the pattern more easily, you can extend # your proxy from the real subject's class. def client\_code(subject) # ... subject.request # ... end puts 'Client: Executing the client code with a real subject:' real\_subject = RealSubject.new client\_code(real\_subject) puts "\\n" puts 'Client: Executing the same client code with a proxy:' proxy = Proxy.new(real\_subject) client\_code(proxy) #### **output.txt:** 실행 결과 Client: Executing the client code with a real subject: RealSubject: Handling request. Client: Executing the same client code with a proxy: Proxy: Checking access prior to firing a real request. RealSubject: Handling request. Proxy: Logging the time of request. 다른 언어로 작성된 **프록시** ------------------ [![C#으로 작성된 프록시](https://refactoring.guru/images/patterns/icons/csharp.svg?id=da64592defc6e86d57c39c66e9de3e58)](https://refactoring.guru/ko/design-patterns/proxy/csharp/example "C#으로 작성된 프록시") [![C++로 작성된 프록시](https://refactoring.guru/images/patterns/icons/cpp.svg?id=f7782ed8b8666246bfcc3f8fefc3b858)](https://refactoring.guru/ko/design-patterns/proxy/cpp/example "C++로 작성된 프록시") [![Go로 작성된 프록시](https://refactoring.guru/images/patterns/icons/go.svg?id=1a89927eb99b1ea3fde7701d97970aca)](https://refactoring.guru/ko/design-patterns/proxy/go/example "Go로 작성된 프록시") [![자바로 작성된 프록시](https://refactoring.guru/images/patterns/icons/java.svg?id=e6d87e2dca08c953fe3acd1275ed4f4e)](https://refactoring.guru/ko/design-patterns/proxy/java/example "자바로 작성된 프록시") [![PHP로 작성된 프록시](https://refactoring.guru/images/patterns/icons/php.svg?id=be1906eb26b71ec1d3b93720d6156618)](https://refactoring.guru/ko/design-patterns/proxy/php/example "PHP로 작성된 프록시") [![파이썬으로 작성된 프록시](https://refactoring.guru/images/patterns/icons/python.svg?id=6d815d43c0f7050a1151b43e51569c9f)](https://refactoring.guru/ko/design-patterns/proxy/python/example "파이썬으로 작성된 프록시") [![러스트로 작성된 프록시](https://refactoring.guru/images/patterns/icons/rust.svg?id=1f5698a4b5ae23fe79413511747e4a87)](https://refactoring.guru/ko/design-patterns/proxy/rust/example "러스트로 작성된 프록시") [![스위프트로 작성된 프록시](https://refactoring.guru/images/patterns/icons/swift.svg?id=0b716c2d52ec3a48fbe91ac031070c1d)](https://refactoring.guru/ko/design-patterns/proxy/swift/example "스위프트로 작성된 프록시") [![타입스크립트로 작성된 프록시](https://refactoring.guru/images/patterns/icons/typescript.svg?id=2239d0f16cb703540c205dd8cb0c0cb7)](https://refactoring.guru/ko/design-patterns/proxy/typescript/example "타입스크립트로 작성된 프록시") --- # Proxy を C++ で / デザインパターン [There are patterns of patterns now! \ My friend's project: MetaPatterns.io](https://metapatterns.io/)  [](https://refactoring.guru/ja/design-patterns/proxy/cpp/example#checkout) [](https://refactoring.guru/ja/design-patterns/proxy/cpp/example#checkout) [](https://refactoring.guru/) / [デザインパターン](https://refactoring.guru/ja/design-patterns) / [Proxy](https://refactoring.guru/ja/design-patterns/proxy) / [C++](https://refactoring.guru/ja/design-patterns/cpp) ![Proxy](https://refactoring.guru/images/patterns/cards/proxy-mini-2x.png?id=8638fac9dc08c992852492f9cb29d9c6) **Proxy** を C++ で ================= **Proxy** は、 構造に関するデザインパターンの一つで、 クライアントが使う本物のサービス・オブジェクトの代理として機能するオブジェクト (プロキシー) を提供します。 プロキシーは、 アクセス制御、 キャッシングなど、 何らかの作業を行なった後、 リクエストをサービス・オブジェクトに渡します。 プロキシー・オブジェクトはサービスと同じインターフェースを持ち、 クライアントにとっては、 本物のオブジェクトと交換可能です。 [Proxy の詳細](https://refactoring.guru/ja/design-patterns/proxy) ナビゲーション  [はじめに](https://refactoring.guru/ja/design-patterns/proxy/cpp/example#)  [概念的な例](https://refactoring.guru/ja/design-patterns/proxy/cpp/example#example-0)  [main](https://refactoring.guru/ja/design-patterns/proxy/cpp/example#example-0--main-cc)  [Output](https://refactoring.guru/ja/design-patterns/proxy/cpp/example#example-0--Output-txt) **複雑度:** **人気度:** **使用例:** Proxy パターンは、 ほとんどの C++ アプリケーションにおいては、 あまり見かけませんが、 いくつかの特殊なケースでは便利です。 何らかの既存クラスのオブジェクトに何らかの振る舞いを追加したいがクライアント・コードには手を加えたくない時、 かけがえのないものです。 **見つけ方:** プロキシーは、 実際の作業はすべて他のオブジェクトに委任します。 プロキシーがサービスのサブクラスである場合を除き、 プロキシーのメソッドのそれぞれは、 最終的にはサービス・オブジェクトを参照するはずです。 概念的な例 ----- この例は、 **Proxy** デザインパターンの構造を説明するためのものです。 以下の質問に答えることを目的としています: * どういうクラスからできているか? * それぞれのクラスの役割は? * パターンの要素同士はどう関係しているのか? #### **main.cc:** 概念的な例 #include /\*\* \* The Subject interface declares common operations for both RealSubject and the \* Proxy. As long as the client works with RealSubject using this interface, \* you'll be able to pass it a proxy instead of a real subject. \*/ class Subject { public: virtual void Request() const = 0; }; /\*\* \* The RealSubject contains some core business logic. Usually, RealSubjects are \* capable of doing some useful work which may also be very slow or sensitive - \* e.g. correcting input data. A Proxy can solve these issues without any \* changes to the RealSubject's code. \*/ class RealSubject : public Subject { public: void Request() const override { std::cout << "RealSubject: Handling request.\\n"; } }; /\*\* \* The Proxy has an interface identical to the RealSubject. \*/ class Proxy : public Subject { /\*\* \* @var RealSubject \*/ private: RealSubject \*real\_subject\_; bool CheckAccess() const { // Some real checks should go here. std::cout << "Proxy: Checking access prior to firing a real request.\\n"; return true; } void LogAccess() const { std::cout << "Proxy: Logging the time of request.\\n"; } /\*\* \* The Proxy maintains a reference to an object of the RealSubject class. It \* can be either lazy-loaded or passed to the Proxy by the client. \*/ public: Proxy(RealSubject \*real\_subject) : real\_subject\_(new RealSubject(\*real\_subject)) { } ~Proxy() { delete real\_subject\_; } /\*\* \* The most common applications of the Proxy pattern are lazy loading, \* caching, controlling the access, logging, etc. A Proxy can perform one of \* these things and then, depending on the result, pass the execution to the \* same method in a linked RealSubject object. \*/ void Request() const override { if (this->CheckAccess()) { this->real\_subject\_->Request(); this->LogAccess(); } } }; /\*\* \* The client code is supposed to work with all objects (both subjects and \* proxies) via the Subject interface in order to support both real subjects and \* proxies. In real life, however, clients mostly work with their real subjects \* directly. In this case, to implement the pattern more easily, you can extend \* your proxy from the real subject's class. \*/ void ClientCode(const Subject &subject) { // ... subject.Request(); // ... } int main() { std::cout << "Client: Executing the client code with a real subject:\\n"; RealSubject \*real\_subject = new RealSubject; ClientCode(\*real\_subject); std::cout << "\\n"; std::cout << "Client: Executing the same client code with a proxy:\\n"; Proxy \*proxy = new Proxy(real\_subject); ClientCode(\*proxy); delete real\_subject; delete proxy; return 0; } #### **Output.txt:** 実行結果 Client: Executing the client code with a real subject: RealSubject: Handling request. Client: Executing the same client code with a proxy: Proxy: Checking access prior to firing a real request. RealSubject: Handling request. Proxy: Logging the time of request. 他言語での **Proxy** --------------- [![Proxy を C# で](https://refactoring.guru/images/patterns/icons/csharp.svg?id=da64592defc6e86d57c39c66e9de3e58)](https://refactoring.guru/ja/design-patterns/proxy/csharp/example "Proxy を C# で") [![Proxy を Go で](https://refactoring.guru/images/patterns/icons/go.svg?id=1a89927eb99b1ea3fde7701d97970aca)](https://refactoring.guru/ja/design-patterns/proxy/go/example "Proxy を Go で") [![Proxy を Java で](https://refactoring.guru/images/patterns/icons/java.svg?id=e6d87e2dca08c953fe3acd1275ed4f4e)](https://refactoring.guru/ja/design-patterns/proxy/java/example "Proxy を Java で") [![Proxy を PHP で](https://refactoring.guru/images/patterns/icons/php.svg?id=be1906eb26b71ec1d3b93720d6156618)](https://refactoring.guru/ja/design-patterns/proxy/php/example "Proxy を PHP で") [![Proxy を Python で](https://refactoring.guru/images/patterns/icons/python.svg?id=6d815d43c0f7050a1151b43e51569c9f)](https://refactoring.guru/ja/design-patterns/proxy/python/example "Proxy を Python で") [![Proxy を Ruby で](https://refactoring.guru/images/patterns/icons/ruby.svg?id=b065b718c914bf8e960ef731600be1eb)](https://refactoring.guru/ja/design-patterns/proxy/ruby/example "Proxy を Ruby で") [![Proxy を Rust で](https://refactoring.guru/images/patterns/icons/rust.svg?id=1f5698a4b5ae23fe79413511747e4a87)](https://refactoring.guru/ja/design-patterns/proxy/rust/example "Proxy を Rust で") [![Proxy を Swift で](https://refactoring.guru/images/patterns/icons/swift.svg?id=0b716c2d52ec3a48fbe91ac031070c1d)](https://refactoring.guru/ja/design-patterns/proxy/swift/example "Proxy を Swift で") [![Proxy を TypeScript で](https://refactoring.guru/images/patterns/icons/typescript.svg?id=2239d0f16cb703540c205dd8cb0c0cb7)](https://refactoring.guru/ja/design-patterns/proxy/typescript/example "Proxy を TypeScript で") --- # Go로 작성된 프록시 / 디자인 패턴들 [There are patterns of patterns now! \ My friend's project: MetaPatterns.io](https://metapatterns.io/)  [](https://refactoring.guru/ko/design-patterns/proxy/go/example#checkout) [](https://refactoring.guru/ko/design-patterns/proxy/go/example#checkout) [](https://refactoring.guru/) / [디자인 패턴들](https://refactoring.guru/ko/design-patterns) / [프록시](https://refactoring.guru/ko/design-patterns/proxy) / [Go](https://refactoring.guru/ko/design-patterns/go) ![프록시](https://refactoring.guru/images/patterns/cards/proxy-mini-2x.png?id=8638fac9dc08c992852492f9cb29d9c6) Go로 작성된 **프록시** =============== **프록시**는 클라이언트가 사용하는 실제 서비스 객체를 대신하는 객체를 제공하는 구조 디자인 패턴입니다. 프록시는 클라이언트 요청을 수신하고, 일부 작업​(접근 제어, 캐싱 등)​을 수행한 다음 요청을 서비스 객체에 전달합니다. 프록시 객체는 서비스 객체와 같은 인터페이스를 가지기 때문에 클라이언트에 전달되면 실제 객체와 상호교환이 가능합니다. [프록시에 대하여 더 자세히 알아보세요](https://refactoring.guru/ko/design-patterns/proxy) 내비게이션  [소개](https://refactoring.guru/ko/design-patterns/proxy/go/example#)  [개념적인 예시](https://refactoring.guru/ko/design-patterns/proxy/go/example#example-0)  [server](https://refactoring.guru/ko/design-patterns/proxy/go/example#example-0--server-go)  [nginx](https://refactoring.guru/ko/design-patterns/proxy/go/example#example-0--nginx-go)  [application](https://refactoring.guru/ko/design-patterns/proxy/go/example#example-0--application-go)  [main](https://refactoring.guru/ko/design-patterns/proxy/go/example#example-0--main-go)  [output](https://refactoring.guru/ko/design-patterns/proxy/go/example#example-0--output-txt) 개념적인 예시 ------- Nginx 같은 웹서버는 당신의 애플리케이션 서버의 프록시 역할을 할 수 있습니다: * 앱 서버에 대한 제어된 접근을 제공합니다. * 속도 제한​(rate limiting)​을 수행할 수 있습니다. * 요청 캐싱을 할 수 있습니다. #### **server.go:** 주제 package main type server interface { handleRequest(string, string) (int, string) } #### **nginx.go:** 프록시 package main type Nginx struct { application \*Application maxAllowedRequest int rateLimiter map\[string\]int } func newNginxServer() \*Nginx { return &Nginx{ application: &Application{}, maxAllowedRequest: 2, rateLimiter: make(map\[string\]int), } } func (n \*Nginx) handleRequest(url, method string) (int, string) { allowed := n.checkRateLimiting(url) if !allowed { return 403, "Not Allowed" } return n.application.handleRequest(url, method) } func (n \*Nginx) checkRateLimiting(url string) bool { if n.rateLimiter\[url\] == 0 { n.rateLimiter\[url\] = 1 } if n.rateLimiter\[url\] > n.maxAllowedRequest { return false } n.rateLimiter\[url\] = n.rateLimiter\[url\] + 1 return true } #### **application.go:** 실제 주제 package main type Application struct { } func (a \*Application) handleRequest(url, method string) (int, string) { if url == "/app/status" && method == "GET" { return 200, "Ok" } if url == "/create/user" && method == "POST" { return 201, "User Created" } return 404, "Not Ok" } #### **main.go:** 클라이언트 코드 package main import "fmt" func main() { nginxServer := newNginxServer() appStatusURL := "/app/status" createuserURL := "/create/user" httpCode, body := nginxServer.handleRequest(appStatusURL, "GET") fmt.Printf("\\nUrl: %s\\nHttpCode: %d\\nBody: %s\\n", appStatusURL, httpCode, body) httpCode, body = nginxServer.handleRequest(appStatusURL, "GET") fmt.Printf("\\nUrl: %s\\nHttpCode: %d\\nBody: %s\\n", appStatusURL, httpCode, body) httpCode, body = nginxServer.handleRequest(appStatusURL, "GET") fmt.Printf("\\nUrl: %s\\nHttpCode: %d\\nBody: %s\\n", appStatusURL, httpCode, body) httpCode, body = nginxServer.handleRequest(createuserURL, "POST") fmt.Printf("\\nUrl: %s\\nHttpCode: %d\\nBody: %s\\n", appStatusURL, httpCode, body) httpCode, body = nginxServer.handleRequest(createuserURL, "GET") fmt.Printf("\\nUrl: %s\\nHttpCode: %d\\nBody: %s\\n", appStatusURL, httpCode, body) } #### **output.txt:** 실행 결과 Url: /app/status HttpCode: 200 Body: Ok Url: /app/status HttpCode: 200 Body: Ok Url: /app/status HttpCode: 403 Body: Not Allowed Url: /app/status HttpCode: 201 Body: User Created Url: /app/status HttpCode: 404 Body: Not Ok 다른 언어로 작성된 **프록시** ------------------ [![C#으로 작성된 프록시](https://refactoring.guru/images/patterns/icons/csharp.svg?id=da64592defc6e86d57c39c66e9de3e58)](https://refactoring.guru/ko/design-patterns/proxy/csharp/example "C#으로 작성된 프록시") [![C++로 작성된 프록시](https://refactoring.guru/images/patterns/icons/cpp.svg?id=f7782ed8b8666246bfcc3f8fefc3b858)](https://refactoring.guru/ko/design-patterns/proxy/cpp/example "C++로 작성된 프록시") [![자바로 작성된 프록시](https://refactoring.guru/images/patterns/icons/java.svg?id=e6d87e2dca08c953fe3acd1275ed4f4e)](https://refactoring.guru/ko/design-patterns/proxy/java/example "자바로 작성된 프록시") [![PHP로 작성된 프록시](https://refactoring.guru/images/patterns/icons/php.svg?id=be1906eb26b71ec1d3b93720d6156618)](https://refactoring.guru/ko/design-patterns/proxy/php/example "PHP로 작성된 프록시") [![파이썬으로 작성된 프록시](https://refactoring.guru/images/patterns/icons/python.svg?id=6d815d43c0f7050a1151b43e51569c9f)](https://refactoring.guru/ko/design-patterns/proxy/python/example "파이썬으로 작성된 프록시") [![루비로 작성된 프록시](https://refactoring.guru/images/patterns/icons/ruby.svg?id=b065b718c914bf8e960ef731600be1eb)](https://refactoring.guru/ko/design-patterns/proxy/ruby/example "루비로 작성된 프록시") [![러스트로 작성된 프록시](https://refactoring.guru/images/patterns/icons/rust.svg?id=1f5698a4b5ae23fe79413511747e4a87)](https://refactoring.guru/ko/design-patterns/proxy/rust/example "러스트로 작성된 프록시") [![스위프트로 작성된 프록시](https://refactoring.guru/images/patterns/icons/swift.svg?id=0b716c2d52ec3a48fbe91ac031070c1d)](https://refactoring.guru/ko/design-patterns/proxy/swift/example "스위프트로 작성된 프록시") [![타입스크립트로 작성된 프록시](https://refactoring.guru/images/patterns/icons/typescript.svg?id=2239d0f16cb703540c205dd8cb0c0cb7)](https://refactoring.guru/ko/design-patterns/proxy/typescript/example "타입스크립트로 작성된 프록시") --- # Memento を Swift で / デザインパターン [There are patterns of patterns now! \ My friend's project: MetaPatterns.io](https://metapatterns.io/)  [](https://refactoring.guru/ja/design-patterns/memento/swift/example#checkout) [](https://refactoring.guru/ja/design-patterns/memento/swift/example#checkout) [](https://refactoring.guru/) / [デザインパターン](https://refactoring.guru/ja/design-patterns) / [Memento](https://refactoring.guru/ja/design-patterns/memento) / [Swift](https://refactoring.guru/ja/design-patterns/swift) ![Memento](https://refactoring.guru/images/patterns/cards/memento-mini-2x.png?id=1d7cba189261dd84b11369a6838b1055) **Memento** を Swift で ===================== **Memento** は、 振る舞いに関するデザインパターンの一つで、 オブジェクトの状態のスナップショットを作成し、 それを将来復元します。 Memento は、 その対象オブジェクトの内部構造やスナップショットの内部に保存されるデータの機密を守ります。 [Memento の詳細](https://refactoring.guru/ja/design-patterns/memento) ナビゲーション  [はじめに](https://refactoring.guru/ja/design-patterns/memento/swift/example#)  [概念的な例](https://refactoring.guru/ja/design-patterns/memento/swift/example#example-0)  [Example](https://refactoring.guru/ja/design-patterns/memento/swift/example#example-0--Example-swift)  [Output](https://refactoring.guru/ja/design-patterns/memento/swift/example#example-0--Output-txt)  [現実的な例](https://refactoring.guru/ja/design-patterns/memento/swift/example#example-1)  [Example](https://refactoring.guru/ja/design-patterns/memento/swift/example#example-1--Example-swift)  [Output](https://refactoring.guru/ja/design-patterns/memento/swift/example#example-1--Output-txt) **複雑度:** **人気度:** **使用例:** Memento の原則は、 シリアライゼーションを使って達成することが可能で、 Swift ではよく見かけます。 これは、 オブジェクトの状態のスナップショットを作る上で唯一の方法でも、 最も効率のいい方法でもありませんが、 オリジネーターの構造を他のオブジェクトから隠蔽しつつ状態のバックアップを取ることはできます。 以下の例は [Swift Playgrounds](https://www.alemohamad.com/playgrounds) で利用できます。 Playgroundバージョンを作成してくれた [Alejandro Mohamad](https://www.alemohamad.com/) に感謝します。 概念的な例 ----- この例は、 **Memento** デザインパターンの構造を説明するためのものです。 以下の質問に答えることを目的としています: * どういうクラスからできているか? * それぞれのクラスの役割は? * パターンの要素同士はどう関係しているのか? ここでパターンの構造を学んだ後だと、 これに続く、 現実世界の Swift でのユースケースが理解しやすくなります。 #### **Example.swift:** 概念的な例 import XCTest /// The Originator holds some important state that may change over time. It also /// defines a method for saving the state inside a memento and another method /// for restoring the state from it. class Originator { /// For the sake of simplicity, the originator's state is stored inside a /// single variable. private var state: String init(state: String) { self.state = state print("Originator: My initial state is: \\(state)") } /// The Originator's business logic may affect its internal state. /// Therefore, the client should backup the state before launching methods /// of the business logic via the save() method. func doSomething() { print("Originator: I'm doing something important.") state = generateRandomString() print("Originator: and my state has changed to: \\(state)") } private func generateRandomString() -> String { return String(UUID().uuidString.suffix(4)) } /// Saves the current state inside a memento. func save() -> Memento { return ConcreteMemento(state: state) } /// Restores the Originator's state from a memento object. func restore(memento: Memento) { guard let memento = memento as? ConcreteMemento else { return } self.state = memento.state print("Originator: My state has changed to: \\(state)") } } /// The Memento interface provides a way to retrieve the memento's metadata, /// such as creation date or name. However, it doesn't expose the Originator's /// state. protocol Memento { var name: String { get } var date: Date { get } } /// The Concrete Memento contains the infrastructure for storing the /// Originator's state. class ConcreteMemento: Memento { /// The Originator uses this method when restoring its state. private(set) var state: String private(set) var date: Date init(state: String) { self.state = state self.date = Date() } /// The rest of the methods are used by the Caretaker to display metadata. var name: String { return state + " " + date.description.suffix(14).prefix(8) } } /// The Caretaker doesn't depend on the Concrete Memento class. Therefore, it /// doesn't have access to the originator's state, stored inside the memento. It /// works with all mementos via the base Memento interface. class Caretaker { private lazy var mementos = \[Memento\]() private var originator: Originator init(originator: Originator) { self.originator = originator } func backup() { print("\\nCaretaker: Saving Originator's state...\\n") mementos.append(originator.save()) } func undo() { guard !mementos.isEmpty else { return } let removedMemento = mementos.removeLast() print("Caretaker: Restoring state to: " + removedMemento.name) originator.restore(memento: removedMemento) } func showHistory() { print("Caretaker: Here's the list of mementos:\\n") mementos.forEach({ print($0.name) }) } } /// Let's see how it all works together. class MementoConceptual: XCTestCase { func testMementoConceptual() { let originator = Originator(state: "Super-duper-super-puper-super.") let caretaker = Caretaker(originator: originator) caretaker.backup() originator.doSomething() caretaker.backup() originator.doSomething() caretaker.backup() originator.doSomething() print("\\n") caretaker.showHistory() print("\\nClient: Now, let's rollback!\\n\\n") caretaker.undo() print("\\nClient: Once more!\\n\\n") caretaker.undo() } } #### **Output.txt:** 実行結果 Originator: My initial state is: Super-duper-super-puper-super. Caretaker: Saving Originator's state... Originator: I'm doing something important. Originator: and my state has changed to: 1923 Caretaker: Saving Originator's state... Originator: I'm doing something important. Originator: and my state has changed to: 74FB Caretaker: Saving Originator's state... Originator: I'm doing something important. Originator: and my state has changed to: 3681 Caretaker: Here's the list of mementos: Super-duper-super-puper-super. 11:45:44 1923 11:45:44 74FB 11:45:44 Client: Now, let's rollback! Caretaker: Restoring state to: 74FB 11:45:44 Originator: My state has changed to: 74FB Client: Once more! Caretaker: Restoring state to: 1923 11:45:44 Originator: My state has changed to: 1923 現実的な例 ----- #### **Example.swift:** 現実的な例 import XCTest class MementoRealWorld: XCTestCase { /// State and Command are often used together when the previous state of the /// object should be restored in case of failure of some operation. /// /// Note: UndoManager can be used as an alternative. func test() { let textView = UITextView() let undoStack = UndoStack(textView) textView.text = "First Change" undoStack.save() textView.text = "Second Change" undoStack.save() textView.text = (textView.text ?? "") + " & Third Change" textView.textColor = .red undoStack.save() print(undoStack) print("Client: Perform Undo operation 2 times\\n") undoStack.undo() undoStack.undo() print(undoStack) } } class UndoStack: CustomStringConvertible { private lazy var mementos = \[Memento\]() private let textView: UITextView init(\_ textView: UITextView) { self.textView = textView } func save() { mementos.append(textView.memento) } func undo() { guard !mementos.isEmpty else { return } textView.restore(with: mementos.removeLast()) } var description: String { return mementos.reduce("", { $0 + $1.description }) } } protocol Memento: CustomStringConvertible { var text: String { get } var date: Date { get } } extension UITextView { var memento: Memento { return TextViewMemento(text: text, textColor: textColor, selectedRange: selectedRange) } func restore(with memento: Memento) { guard let textViewMemento = memento as? TextViewMemento else { return } text = textViewMemento.text textColor = textViewMemento.textColor selectedRange = textViewMemento.selectedRange } struct TextViewMemento: Memento { let text: String let date = Date() let textColor: UIColor? let selectedRange: NSRange var description: String { let time = Calendar.current.dateComponents(\[.hour, .minute, .second, .nanosecond\], from: date) let color = String(describing: textColor) return "Text: \\(text)\\n" + "Date: \\(time.description)\\n" + "Color: \\(color)\\n" + "Range: \\(selectedRange)\\n\\n" } } } #### **Output.txt:** 実行結果 Text: First Change Date: hour: 12 minute: 21 second: 50 nanosecond: 821737051 isLeapMonth: false Color: nil Range: {12, 0} Text: Second Change Date: hour: 12 minute: 21 second: 50 nanosecond: 826483011 isLeapMonth: false Color: nil Range: {13, 0} Text: Second Change & Third Change Date: hour: 12 minute: 21 second: 50 nanosecond: 829187035 isLeapMonth: false Color: Optional(UIExtendedSRGBColorSpace 1 0 0 1) Range: {28, 0} Client: Perform Undo operation 2 times Text: First Change Date: hour: 12 minute: 21 second: 50 nanosecond: 821737051 isLeapMonth: false Color: nil Range: {12, 0} 他言語での **Memento** ----------------- [![Memento を C# で](https://refactoring.guru/images/patterns/icons/csharp.svg?id=da64592defc6e86d57c39c66e9de3e58)](https://refactoring.guru/ja/design-patterns/memento/csharp/example "Memento を C# で") [![Memento を C++ で](https://refactoring.guru/images/patterns/icons/cpp.svg?id=f7782ed8b8666246bfcc3f8fefc3b858)](https://refactoring.guru/ja/design-patterns/memento/cpp/example "Memento を C++ で") [![Memento を Go で](https://refactoring.guru/images/patterns/icons/go.svg?id=1a89927eb99b1ea3fde7701d97970aca)](https://refactoring.guru/ja/design-patterns/memento/go/example "Memento を Go で") [![Memento を Java で](https://refactoring.guru/images/patterns/icons/java.svg?id=e6d87e2dca08c953fe3acd1275ed4f4e)](https://refactoring.guru/ja/design-patterns/memento/java/example "Memento を Java で") [![Memento を PHP で](https://refactoring.guru/images/patterns/icons/php.svg?id=be1906eb26b71ec1d3b93720d6156618)](https://refactoring.guru/ja/design-patterns/memento/php/example "Memento を PHP で") [![Memento を Python で](https://refactoring.guru/images/patterns/icons/python.svg?id=6d815d43c0f7050a1151b43e51569c9f)](https://refactoring.guru/ja/design-patterns/memento/python/example "Memento を Python で") [![Memento を Ruby で](https://refactoring.guru/images/patterns/icons/ruby.svg?id=b065b718c914bf8e960ef731600be1eb)](https://refactoring.guru/ja/design-patterns/memento/ruby/example "Memento を Ruby で") [![Memento を Rust で](https://refactoring.guru/images/patterns/icons/rust.svg?id=1f5698a4b5ae23fe79413511747e4a87)](https://refactoring.guru/ja/design-patterns/memento/rust/example "Memento を Rust で") [![Memento を TypeScript で](https://refactoring.guru/images/patterns/icons/typescript.svg?id=2239d0f16cb703540c205dd8cb0c0cb7)](https://refactoring.guru/ja/design-patterns/memento/typescript/example "Memento を TypeScript で") --- # Шаблонний метод на Rust [There are patterns of patterns now! \ My friend's project: MetaPatterns.io](https://metapatterns.io/)  [](https://refactoring.guru/uk/design-patterns/template-method/rust/example#checkout) [](https://refactoring.guru/uk/design-patterns/template-method/rust/example#checkout) [](https://refactoring.guru/) / [Патерни проектування](https://refactoring.guru/uk/design-patterns) / [Шаблонний метод](https://refactoring.guru/uk/design-patterns/template-method) / [Rust](https://refactoring.guru/uk/design-patterns/rust) ![Шаблонний метод](https://refactoring.guru/images/patterns/cards/template-method-mini-2x.png?id=178bf56e39b3a1f548dd636076209c98) **Шаблонний метод** на Rust =========================== **Шаблонний метод** — це поведінковий патерн, який визначає кістяк алгоритму в суперкласі та змушує підкласи реалізувати конкретні кроки цього алгоритму. [Детальніше про Шаблонний метод](https://refactoring.guru/uk/design-patterns/template-method) Навігація  [Інтро](https://refactoring.guru/uk/design-patterns/template-method/rust/example#)  [Conceptual Example](https://refactoring.guru/uk/design-patterns/template-method/rust/example#example-0)  [main](https://refactoring.guru/uk/design-patterns/template-method/rust/example#example-0--main-rs) Conceptual Example ------------------ #### **main.rs** trait TemplateMethod { fn template\_method(&self) { self.base\_operation1(); self.required\_operations1(); self.base\_operation2(); self.hook1(); self.required\_operations2(); self.base\_operation3(); self.hook2(); } fn base\_operation1(&self) { println!("TemplateMethod says: I am doing the bulk of the work"); } fn base\_operation2(&self) { println!("TemplateMethod says: But I let subclasses override some operations"); } fn base\_operation3(&self) { println!("TemplateMethod says: But I am doing the bulk of the work anyway"); } fn hook1(&self) {} fn hook2(&self) {} fn required\_operations1(&self); fn required\_operations2(&self); } struct ConcreteStruct1; impl TemplateMethod for ConcreteStruct1 { fn required\_operations1(&self) { println!("ConcreteStruct1 says: Implemented Operation1") } fn required\_operations2(&self) { println!("ConcreteStruct1 says: Implemented Operation2") } } struct ConcreteStruct2; impl TemplateMethod for ConcreteStruct2 { fn required\_operations1(&self) { println!("ConcreteStruct2 says: Implemented Operation1") } fn required\_operations2(&self) { println!("ConcreteStruct2 says: Implemented Operation2") } } fn client\_code(concrete: impl TemplateMethod) { concrete.template\_method() } fn main() { println!("Same client code can work with different concrete implementations:"); client\_code(ConcreteStruct1); println!(); println!("Same client code can work with different concrete implementations:"); client\_code(ConcreteStruct2); } ### Output Same client code can work with different concrete implementations: TemplateMethod says: I am doing the bulk of the work ConcreteStruct1 says: Implemented Operation1 TemplateMethod says: But I let subclasses override some operations ConcreteStruct1 says: Implemented Operation2 TemplateMethod says: But I am doing the bulk of the work anyway Same client code can work with different concrete implementations: TemplateMethod says: I am doing the bulk of the work ConcreteStruct2 says: Implemented Operation1 TemplateMethod says: But I let subclasses override some operations ConcreteStruct2 says: Implemented Operation2 TemplateMethod says: But I am doing the bulk of the work anyway **Шаблонний метод** іншими мовами програмування ----------------------------------------------- [![Шаблонний метод на C#](https://refactoring.guru/images/patterns/icons/csharp.svg?id=da64592defc6e86d57c39c66e9de3e58)](https://refactoring.guru/uk/design-patterns/template-method/csharp/example "Шаблонний метод на C#") [![Шаблонний метод на C++](https://refactoring.guru/images/patterns/icons/cpp.svg?id=f7782ed8b8666246bfcc3f8fefc3b858)](https://refactoring.guru/uk/design-patterns/template-method/cpp/example "Шаблонний метод на C++") [![Шаблонний метод на Go](https://refactoring.guru/images/patterns/icons/go.svg?id=1a89927eb99b1ea3fde7701d97970aca)](https://refactoring.guru/uk/design-patterns/template-method/go/example "Шаблонний метод на Go") [![Шаблонний метод на Java](https://refactoring.guru/images/patterns/icons/java.svg?id=e6d87e2dca08c953fe3acd1275ed4f4e)](https://refactoring.guru/uk/design-patterns/template-method/java/example "Шаблонний метод на Java") [![Шаблонний метод на PHP](https://refactoring.guru/images/patterns/icons/php.svg?id=be1906eb26b71ec1d3b93720d6156618)](https://refactoring.guru/uk/design-patterns/template-method/php/example "Шаблонний метод на PHP") [![Шаблонний метод на Python](https://refactoring.guru/images/patterns/icons/python.svg?id=6d815d43c0f7050a1151b43e51569c9f)](https://refactoring.guru/uk/design-patterns/template-method/python/example "Шаблонний метод на Python") [![Шаблонний метод на Ruby](https://refactoring.guru/images/patterns/icons/ruby.svg?id=b065b718c914bf8e960ef731600be1eb)](https://refactoring.guru/uk/design-patterns/template-method/ruby/example "Шаблонний метод на Ruby") [![Шаблонний метод на Swift](https://refactoring.guru/images/patterns/icons/swift.svg?id=0b716c2d52ec3a48fbe91ac031070c1d)](https://refactoring.guru/uk/design-patterns/template-method/swift/example "Шаблонний метод на Swift") [![Шаблонний метод на TypeScript](https://refactoring.guru/images/patterns/icons/typescript.svg?id=2239d0f16cb703540c205dd8cb0c0cb7)](https://refactoring.guru/uk/design-patterns/template-method/typescript/example "Шаблонний метод на TypeScript") --- # Memento を PHP で / デザインパターン [There are patterns of patterns now! \ My friend's project: MetaPatterns.io](https://metapatterns.io/)  [](https://refactoring.guru/ja/design-patterns/memento/php/example#checkout) [](https://refactoring.guru/ja/design-patterns/memento/php/example#checkout) [](https://refactoring.guru/) / [デザインパターン](https://refactoring.guru/ja/design-patterns) / [Memento](https://refactoring.guru/ja/design-patterns/memento) / [PHP](https://refactoring.guru/ja/design-patterns/php) ![Memento](https://refactoring.guru/images/patterns/cards/memento-mini-2x.png?id=1d7cba189261dd84b11369a6838b1055) **Memento** を PHP で =================== **Memento** は、 振る舞いに関するデザインパターンの一つで、 オブジェクトの状態のスナップショットを作成し、 それを将来復元します。 Memento は、 その対象オブジェクトの内部構造やスナップショットの内部に保存されるデータの機密を守ります。 [Memento の詳細](https://refactoring.guru/ja/design-patterns/memento) ナビゲーション  [はじめに](https://refactoring.guru/ja/design-patterns/memento/php/example#)  [概念的な例](https://refactoring.guru/ja/design-patterns/memento/php/example#example-0)  [index](https://refactoring.guru/ja/design-patterns/memento/php/example#example-0--index-php)  [Output](https://refactoring.guru/ja/design-patterns/memento/php/example#example-0--Output-txt)  [現実的な例](https://refactoring.guru/ja/design-patterns/memento/php/example#example-1)  [index](https://refactoring.guru/ja/design-patterns/memento/php/example#example-1--index-php)  [Output](https://refactoring.guru/ja/design-patterns/memento/php/example#example-1--Output-txt) **複雑度:** **人気度:** **使用例:** PHP に Memento パターンが実際に適用可能かは疑わしいところです。 ほとんどの場合、 オブジェクトの状態のコピーの作成は、 単にシリアライゼーションを使えば簡単にできます。 概念的な例 ----- この例は、 **Memento** デザインパターンの構造を説明するためのものです。 以下の質問に答えることを目的としています: * どういうクラスからできているか? * それぞれのクラスの役割は? * パターンの要素同士はどう関係しているのか? ここでパターンの構造を学んだ後だと、 これに続く、 現実世界の PHP でのユースケースが理解しやすくなります。 #### **index.php:** 概念的な例 state = $state; echo "Originator: My initial state is: {$this->state}\\n"; } /\*\* \* The Originator's business logic may affect its internal state. Therefore, \* the client should backup the state before launching methods of the \* business logic via the save() method. \*/ public function doSomething(): void { echo "Originator: I'm doing something important.\\n"; $this->state = $this->generateRandomString(30); echo "Originator: and my state has changed to: {$this->state}\\n"; } private function generateRandomString(int $length = 10): string { return substr( str\_shuffle( str\_repeat( $x = 'abcdefghijklmnopqrstuvwxyzABCDEFGHIJKLMNOPQRSTUVWXYZ', ceil($length / strlen($x)) ) ), 1, $length, ); } /\*\* \* Saves the current state inside a memento. \*/ public function save(): Memento { return new ConcreteMemento($this->state); } /\*\* \* Restores the Originator's state from a memento object. \*/ public function restore(Memento $memento): void { $this->state = $memento->getState(); echo "Originator: My state has changed to: {$this->state}\\n"; } } /\*\* \* The Memento interface provides a way to retrieve the memento's metadata, such \* as creation date or name. However, it doesn't expose the Originator's state. \*/ interface Memento { public function getName(): string; public function getDate(): string; } /\*\* \* The Concrete Memento contains the infrastructure for storing the Originator's \* state. \*/ class ConcreteMemento implements Memento { private $state; private $date; public function \_\_construct(string $state) { $this->state = $state; $this->date = date('Y-m-d H:i:s'); } /\*\* \* The Originator uses this method when restoring its state. \*/ public function getState(): string { return $this->state; } /\*\* \* The rest of the methods are used by the Caretaker to display metadata. \*/ public function getName(): string { return $this->date . " / (" . substr($this->state, 0, 9) . "...)"; } public function getDate(): string { return $this->date; } } /\*\* \* The Caretaker doesn't depend on the Concrete Memento class. Therefore, it \* doesn't have access to the originator's state, stored inside the memento. It \* works with all mementos via the base Memento interface. \*/ class Caretaker { /\*\* \* @var Memento\[\] \*/ private $mementos = \[\]; /\*\* \* @var Originator \*/ private $originator; public function \_\_construct(Originator $originator) { $this->originator = $originator; } public function backup(): void { echo "\\nCaretaker: Saving Originator's state...\\n"; $this->mementos\[\] = $this->originator->save(); } public function undo(): void { if (!count($this->mementos)) { return; } $memento = array\_pop($this->mementos); echo "Caretaker: Restoring state to: " . $memento->getName() . "\\n"; try { $this->originator->restore($memento); } catch (\\Exception $e) { $this->undo(); } } public function showHistory(): void { echo "Caretaker: Here's the list of mementos:\\n"; foreach ($this->mementos as $memento) { echo $memento->getName() . "\\n"; } } } /\*\* \* Client code. \*/ $originator = new Originator("Super-duper-super-puper-super."); $caretaker = new Caretaker($originator); $caretaker->backup(); $originator->doSomething(); $caretaker->backup(); $originator->doSomething(); $caretaker->backup(); $originator->doSomething(); echo "\\n"; $caretaker->showHistory(); echo "\\nClient: Now, let's rollback!\\n\\n"; $caretaker->undo(); echo "\\nClient: Once more!\\n\\n"; $caretaker->undo(); #### **Output.txt:** 実行結果 Originator: My initial state is: Super-duper-super-puper-super. Caretaker: Saving Originator's state... Originator: I'm doing something important. Originator: and my state has changed to: srGIngezAEboNPDjBkuvymJKUtMSFX Caretaker: Saving Originator's state... Originator: I'm doing something important. Originator: and my state has changed to: UwCZQaHJOiERLlchyVuMbXNtpqTgWF Caretaker: Saving Originator's state... Originator: I'm doing something important. Originator: and my state has changed to: incqsdoJXkbDUuVOvRFYyKBgfzwZCQ Caretaker: Here's the list of mementos: 2018-06-04 14:50:39 / (Super-dup...) 2018-06-04 14:50:39 / (srGIngezA...) 2018-06-04 14:50:39 / (UwCZQaHJO...) Client: Now, let's rollback! Caretaker: Restoring state to: 2018-06-04 14:50:39 / (UwCZQaHJO...) Originator: My state has changed to: UwCZQaHJOiERLlchyVuMbXNtpqTgWF Client: Once more! Caretaker: Restoring state to: 2018-06-04 14:50:39 / (srGIngezA...) Originator: My state has changed to: srGIngezAEboNPDjBkuvymJKUtMSFX 現実的な例 ----- この例では、 PHP Web アプリの設定管理ワークフローを実装するために **Memento** パターンを使用します。 多くの Web アプリはユーザーに設定のカスタマイズを許可しており、 ユーザーはときに変更を元に戻して以前の構成に戻したくなります。 変更が行われる前に設定オブジェクトの状態を取得して保存することで、 メメント (Memento) パターンでこの機能を実現できます。 #### **index.php:** 現実的な例 config = $initialConfig; echo "ConfigManager: Initialized with " . count($initialConfig) . " config items.\\n"; } /\*\* \* The ConfigManager's business logic may affect its internal state. \* Therefore, the client should backup the state before launching methods of \* the business logic via the save() method. \* \* This method simulates updating configuration values, which is a common \* operation in web applications (admin panels, user preferences, etc.). \* \* @param array $newValues New configuration values to merge with existing \* config \*/ public function updateConfig(array $newValues): void { echo "ConfigManager: Updating configuration with new values...\\n"; $this->config = array\_merge($this->config, $newValues); echo "ConfigManager: Configuration updated. Current config has " . count($this->config) . " items.\\n"; } /\*\* \* Retrieves the current configuration state. \* \* @return array The current configuration \*/ public function getConfig(): array { return $this->config; } /\*\* \* Saves the current state inside a memento. \* \* This method creates a snapshot of the current configuration state and \* returns it wrapped in a memento object. The memento contains all the \* information needed to restore the configuration to its current state \* later. \* \* @return ConfigSnapshot A memento containing the current config state \*/ public function save(): ConfigSnapshot { echo "ConfigManager: Saving current configuration state...\\n"; return new ConfigSnapshot($this->config); } /\*\* \* Restores the ConfigManager's state from a memento object. \* \* This method takes a memento and restores the configuration to the state \* that was saved in that memento. This is useful for implementing undo \* functionality or rolling back failed configuration changes. \* \* @param ConfigSnapshot $snapshot The memento to restore from \*/ public function restore(ConfigSnapshot $snapshot): void { $this->config = $snapshot->getState(); echo "ConfigManager: Configuration restored from snapshot.\\n"; } /\*\* \* Additional business method: Reset to defaults \* \* Resets the configuration to default values. This is another operation \* that might benefit from creating a backup before execution. \*/ public function resetToDefaults(): void { echo "ConfigManager: Resetting configuration to defaults...\\n"; $this->config = \[\ 'maintenance\_mode' => false,\ 'theme' => 'light',\ 'debug' => false\ \]; echo "ConfigManager: Configuration reset to defaults.\\n"; } /\*\* \* Additional business method: Enable maintenance mode \* \* Quickly enables maintenance mode across the application. \*/ public function enableMaintenanceMode(): void { echo "ConfigManager: Enabling maintenance mode...\\n"; $this->config\['maintenance\_mode'\] = true; $this->config\['maintenance\_message'\] = 'System under maintenance. Please try again later.'; echo "ConfigManager: Maintenance mode enabled.\\n"; } } /\*\* \* The Memento interface provides a way to retrieve the memento's metadata, such \* as creation date or name. However, it doesn't expose the Originator's state. \* \* This interface ensures that external classes can work with mementos without \* having direct access to the stored state. Only the originator should be able \* to extract the actual state data. \*/ interface ConfigMemento { /\*\* \* Returns a user-friendly name for this memento. \* \* @return string A descriptive name for this snapshot \*/ public function getName(): string; /\*\* \* Returns the date when this memento was created. \* \* @return string The creation timestamp \*/ public function getDate(): string; } /\*\* \* The Concrete Memento contains the infrastructure for storing the Originator's \* state. \* \* This class stores a snapshot of the configuration state along with metadata \* about when the snapshot was created. The actual state is stored privately and \* can only be accessed by the originator through the getState() method. \*/ class ConfigSnapshot implements ConfigMemento { /\*\* \* @var array The configuration state at the time this snapshot was created \*/ private $state; /\*\* \* @var string The timestamp when this snapshot was created \*/ private $date; /\*\* \* Constructor stores the provided state and records the current timestamp. \* \* @param array $state The configuration state to store \*/ public function \_\_construct(array $state) { $this->state = $state; $this->date = date('Y-m-d H:i:s'); echo "ConfigSnapshot: Created snapshot with " . count($state) . " config items.\\n"; } /\*\* \* The Originator uses this method when restoring its state. \* \* This method provides access to the stored state data. It should only be \* called by the ConfigManager when restoring configuration. \* \* @return array The stored configuration state \*/ public function getState(): array { return $this->state; } /\*\* \* The rest of the methods are used by the Caretaker to display metadata. \* \* Returns a descriptive name that includes the timestamp and a preview of \* the configuration content. \* \* @return string A user-friendly name for this snapshot \*/ public function getName(): string { $configCount = count($this->state); $maintenanceStatus = $this->state\['maintenance\_mode'\] ?? 'unknown'; return $this->date . " / ({$configCount} items, maintenance: {$maintenanceStatus})"; } /\*\* \* Returns the creation date of this snapshot. \* \* @return string The timestamp when this snapshot was created \*/ public function getDate(): string { return $this->date; } } /\*\* \* The Caretaker doesn't depend on the Concrete Memento class. Therefore, it \* doesn't have access to the originator's state, stored inside the memento. It \* works with all mementos via the base Memento interface. \* \* The ConfigHistory class manages a collection of configuration snapshots and \* provides undo functionality. It demonstrates how the caretaker can manage \* mementos without knowing their internal structure. \*/ class ConfigHistory { /\*\* \* @var ConfigSnapshot\[\] Array of stored configuration snapshots \*/ private $snapshots = \[\]; /\*\* \* @var ConfigManager Reference to the configuration manager \*/ private $configManager; /\*\* \* Constructor establishes the relationship with the originator. \* \* @param ConfigManager $configManager The configuration manager to work \* with \*/ public function \_\_construct(ConfigManager $configManager) { $this->configManager = $configManager; echo "ConfigHistory: History manager initialized.\\n"; } /\*\* \* Creates a backup of the current configuration state. \* \* This method asks the originator to create a memento and stores it in the \* history. This should be called before making changes that might need to \* be undone. \*/ public function backup(): void { echo "\\nConfigHistory: Creating backup of current configuration...\\n"; $this->snapshots\[\] = $this->configManager->save(); echo "ConfigHistory: Backup created. Total backups: " . count($this->snapshots) . "\\n"; } /\*\* \* Restores the configuration to the most recent backup. \* \* This method retrieves the most recent memento from the history and asks \* the originator to restore its state from that memento. \*/ public function undo(): void { if (!count($this->snapshots)) { echo "ConfigHistory: No backups available for undo.\\n"; return; } $memento = array\_pop($this->snapshots); echo "ConfigHistory: Restoring configuration to: " . $memento->getName() . "\\n"; try { $this->configManager->restore($memento); echo "ConfigHistory: Undo completed successfully.\\n"; } catch (\\Exception $e) { echo "ConfigHistory: Undo failed, trying previous backup...\\n"; $this->undo(); } } /\*\* \* Displays the history of all saved configuration snapshots. \* \* This method shows all available backups using only the information \* available through the memento interface, without accessing the actual \* configuration data. \*/ public function showHistory(): void { echo "\\nConfigHistory: Available configuration backups:\\n"; if (empty($this->snapshots)) { echo "No backups available.\\n"; } else { foreach ($this->snapshots as $index => $memento) { echo "\[{$index}\] " . $memento->getName() . "\\n"; } } echo "\\n"; } /\*\* \* Clears all stored backups. \* \* This method removes all mementos from the history, which might be useful \* when starting fresh or to free up memory. \*/ public function clearHistory(): void { $count = count($this->snapshots); $this->snapshots = \[\]; echo "ConfigHistory: Cleared {$count} backups from history.\\n"; } /\*\* \* Gets the number of available backups. \* \* @return int The number of stored backups \*/ public function getBackupCount(): int { return count($this->snapshots); } } /\*\* \* ============================================================================ \* CLIENT CODE - DEMONSTRATION AND USAGE EXAMPLES \* ============================================================================ \*/ echo "=== Configuration Manager with Memento Pattern Demo ===\\n\\n"; /\*\* \* Example 1: Basic configuration management with backup/restore \*/ echo "--- Example 1: Basic Configuration Management ---\\n"; // Initialize configuration manager with default settings $config = new ConfigManager(\[\ 'maintenance\_mode' => false,\ 'theme' => 'light',\ 'seo' => \['title' => 'My Website', 'description' => 'Welcome to my site!'\],\ 'debug' => false,\ 'max\_users' => 1000\ \]); // Create history manager $history = new ConfigHistory($config); echo "\\nInitial configuration:\\n"; print\_r($config->getConfig()); /\*\* \* Example 2: Making changes with backups \*/ echo "\\n--- Example 2: Making Changes with Backups ---\\n"; // Create backup before making changes $history->backup(); // Update theme settings $config->updateConfig(\[\ 'theme' => 'dark',\ 'theme\_options' => \['sidebar' => 'collapsed', 'font\_size' => 'large'\]\ \]); echo "\\nAfter theme update:\\n"; print\_r($config->getConfig()); // Create another backup $history->backup(); // Enable maintenance mode $config->enableMaintenanceMode(); echo "\\nAfter enabling maintenance mode:\\n"; print\_r($config->getConfig()); /\*\* \* Example 3: Demonstrating undo functionality \*/ echo "\\n--- Example 3: Undo Functionality ---\\n"; // Show current history $history->showHistory(); // Undo last change (maintenance mode) echo "Undoing maintenance mode activation...\\n"; $history->undo(); echo "\\nAfter first undo:\\n"; print\_r($config->getConfig()); // Undo theme changes echo "\\nUndoing theme changes...\\n"; $history->undo(); echo "\\nAfter second undo (back to original):\\n"; print\_r($config->getConfig()); /\*\* \* Example 4: Multiple configuration scenarios \*/ echo "\\n--- Example 4: Multiple Configuration Scenarios ---\\n"; // Scenario A: SEO Configuration $history->backup(); echo "\\nScenario A: Updating SEO settings...\\n"; $config->updateConfig(\[\ 'seo' => \[\ 'title' => 'Best Products Online',\ 'description' => 'Find the best products at great prices!',\ 'keywords' => 'products, online, shopping, deals'\ \],\ 'analytics' => \['google\_id' => 'GA-123456', 'facebook\_pixel' => 'FB-789012'\]\ \]); echo "SEO configuration updated:\\n"; print\_r($config->getConfig()); // Scenario B: Performance Settings $history->backup(); echo "\\nScenario B: Updating performance settings...\\n"; $config->updateConfig(\[\ 'cache\_enabled' => true,\ 'cache\_duration' => 3600,\ 'compression' => 'gzip',\ 'max\_users' => 2000\ \]); echo "Performance settings updated:\\n"; print\_r($config->getConfig()); // Scenario C: Emergency rollback echo "\\nScenario C: Emergency rollback to SEO-only changes...\\n"; $history->undo(); // Remove performance changes echo "Rolled back performance changes:\\n"; print\_r($config->getConfig()); /\*\* \* Example 5: Reset and recovery \*/ echo "\\n--- Example 5: Reset and Recovery ---\\n"; // Save current state before reset $history->backup(); // Reset configuration $config->resetToDefaults(); echo "\\nAfter reset to defaults:\\n"; print\_r($config->getConfig()); // Restore previous configuration echo "\\nRestoring previous configuration...\\n"; $history->undo(); echo "\\nAfter restoration:\\n"; print\_r($config->getConfig()); /\*\* \* Example 6: History management \*/ echo "\\n--- Example 6: History Management ---\\n"; // Show complete history $history->showHistory(); echo "Total backups available: " . $history->getBackupCount() . "\\n"; // Clear history echo "\\nClearing history...\\n"; $history->clearHistory(); // Show history after clearing $history->showHistory(); /\*\* \* Example 7: Real-world workflow simulation \*/ echo "\\n--- Example 7: Real-World Workflow Simulation ---\\n"; // Simulate a typical configuration update workflow echo "Simulating typical admin workflow...\\n\\n"; // Step 1: Admin wants to update site for promotion $history->backup(); echo "Step 1: Preparing for Black Friday promotion...\\n"; $config->updateConfig(\[\ 'promotion\_banner' => 'Black Friday Sale - 50% Off!',\ 'theme' => 'dark',\ 'special\_offers' => \['discount' => 50, 'code' => 'BLACKFRIDAY50'\]\ \]); // Step 2: Update SEO for promotion $history->backup(); echo "\\nStep 2: Updating SEO for promotion visibility...\\n"; $config->updateConfig(\[\ 'seo' => \[\ 'title' => 'Black Friday Sale - 50% Off Everything!',\ 'description' => 'Huge Black Friday discounts on all products. Limited time offer!',\ 'keywords' => 'black friday, sale, discount, deals, promotion'\ \]\ \]); // Step 3: Something goes wrong, need to rollback SEO changes only echo "\\nStep 3: SEO changes caused issues, rolling back SEO only...\\n"; $history->undo(); echo "Final configuration after workflow:\\n"; print\_r($config->getConfig()); echo "\\nFinal history state:\\n"; $history->showHistory(); #### **Output.txt:** 実行結果 \=== Configuration Manager with Memento Pattern Demo === --- Example 1: Basic Configuration Management --- ConfigManager: Initialized with 5 config items. ConfigHistory: History manager initialized. Initial configuration: Array ( \[maintenance\_mode\] => \[theme\] => light \[seo\] => Array ( \[title\] => My Website \[description\] => Welcome to my site! ) \[debug\] => \[max\_users\] => 1000 ) --- Example 2: Making Changes with Backups --- ConfigHistory: Creating backup of current configuration... ConfigManager: Saving current configuration state... ConfigSnapshot: Created snapshot with 5 config items. ConfigHistory: Backup created. Total backups: 1 ConfigManager: Updating configuration with new values... ConfigManager: Configuration updated. Current config has 6 items. After theme update: Array ( \[maintenance\_mode\] => \[theme\] => dark \[seo\] => Array ( \[title\] => My Website \[description\] => Welcome to my site! ) \[debug\] => \[max\_users\] => 1000 \[theme\_options\] => Array ( \[sidebar\] => collapsed \[font\_size\] => large ) ) ConfigHistory: Creating backup of current configuration... ConfigManager: Saving current configuration state... ConfigSnapshot: Created snapshot with 6 config items. ConfigHistory: Backup created. Total backups: 2 ConfigManager: Enabling maintenance mode... ConfigManager: Maintenance mode enabled. After enabling maintenance mode: Array ( \[maintenance\_mode\] => 1 \[theme\] => dark \[seo\] => Array ( \[title\] => My Website \[description\] => Welcome to my site! ) \[debug\] => \[max\_users\] => 1000 \[theme\_options\] => Array ( \[sidebar\] => collapsed \[font\_size\] => large ) \[maintenance\_message\] => System under maintenance. Please try again later. ) --- Example 3: Undo Functionality --- ConfigHistory: Available configuration backups: \[0\] 2025-07-28 15:04:16 / (5 items, maintenance: ) \[1\] 2025-07-28 15:04:16 / (6 items, maintenance: ) Undoing maintenance mode activation... ConfigHistory: Restoring configuration to: 2025-07-28 15:04:16 / (6 items, maintenance: ) ConfigManager: Configuration restored from snapshot. ConfigHistory: Undo completed successfully. After first undo: Array ( \[maintenance\_mode\] => \[theme\] => dark \[seo\] => Array ( \[title\] => My Website \[description\] => Welcome to my site! ) \[debug\] => \[max\_users\] => 1000 \[theme\_options\] => Array ( \[sidebar\] => collapsed \[font\_size\] => large ) ) Undoing theme changes... ConfigHistory: Restoring configuration to: 2025-07-28 15:04:16 / (5 items, maintenance: ) ConfigManager: Configuration restored from snapshot. ConfigHistory: Undo completed successfully. After second undo (back to original): Array ( \[maintenance\_mode\] => \[theme\] => light \[seo\] => Array ( \[title\] => My Website \[description\] => Welcome to my site! ) \[debug\] => \[max\_users\] => 1000 ) --- Example 4: Multiple Configuration Scenarios --- ConfigHistory: Creating backup of current configuration... ConfigManager: Saving current configuration state... ConfigSnapshot: Created snapshot with 5 config items. ConfigHistory: Backup created. Total backups: 1 Scenario A: Updating SEO settings... ConfigManager: Updating configuration with new values... ConfigManager: Configuration updated. Current config has 6 items. SEO configuration updated: Array ( \[maintenance\_mode\] => \[theme\] => light \[seo\] => Array ( \[title\] => Best Products Online \[description\] => Find the best products at great prices! \[keywords\] => products, online, shopping, deals ) \[debug\] => \[max\_users\] => 1000 \[analytics\] => Array ( \[google\_id\] => GA-123456 \[facebook\_pixel\] => FB-789012 ) ) ConfigHistory: Creating backup of current configuration... ConfigManager: Saving current configuration state... ConfigSnapshot: Created snapshot with 6 config items. ConfigHistory: Backup created. Total backups: 2 Scenario B: Updating performance settings... ConfigManager: Updating configuration with new values... ConfigManager: Configuration updated. Current config has 9 items. Performance settings updated: Array ( \[maintenance\_mode\] => \[theme\] => light \[seo\] => Array ( \[title\] => Best Products Online \[description\] => Find the best products at great prices! \[keywords\] => products, online, shopping, deals ) \[debug\] => \[max\_users\] => 2000 \[analytics\] => Array ( \[google\_id\] => GA-123456 \[facebook\_pixel\] => FB-789012 ) \[cache\_enabled\] => 1 \[cache\_duration\] => 3600 \[compression\] => gzip ) Scenario C: Emergency rollback to SEO-only changes... ConfigHistory: Restoring configuration to: 2025-07-28 15:04:16 / (6 items, maintenance: ) ConfigManager: Configuration restored from snapshot. ConfigHistory: Undo completed successfully. Rolled back performance changes: Array ( \[maintenance\_mode\] => \[theme\] => light \[seo\] => Array ( \[title\] => Best Products Online \[description\] => Find the best products at great prices! \[keywords\] => products, online, shopping, deals ) \[debug\] => \[max\_users\] => 1000 \[analytics\] => Array ( \[google\_id\] => GA-123456 \[facebook\_pixel\] => FB-789012 ) ) --- Example 5: Reset and Recovery --- ConfigHistory: Creating backup of current configuration... ConfigManager: Saving current configuration state... ConfigSnapshot: Created snapshot with 6 config items. ConfigHistory: Backup created. Total backups: 2 ConfigManager: Resetting configuration to defaults... ConfigManager: Configuration reset to defaults. After reset to defaults: Array ( \[maintenance\_mode\] => \[theme\] => light \[debug\] => ) Restoring previous configuration... ConfigHistory: Restoring configuration to: 2025-07-28 15:04:16 / (6 items, maintenance: ) ConfigManager: Configuration restored from snapshot. ConfigHistory: Undo completed successfully. After restoration: Array ( \[maintenance\_mode\] => \[theme\] => light \[seo\] => Array ( \[title\] => Best Products Online \[description\] => Find the best products at great prices! \[keywords\] => products, online, shopping, deals ) \[debug\] => \[max\_users\] => 1000 \[analytics\] => Array ( \[google\_id\] => GA-123456 \[facebook\_pixel\] => FB-789012 ) ) --- Example 6: History Management --- ConfigHistory: Available configuration backups: \[0\] 2025-07-28 15:04:16 / (5 items, maintenance: ) Total backups available: 1 Clearing history... ConfigHistory: Cleared 1 backups from history. ConfigHistory: Available configuration backups: No backups available. --- Example 7: Real-World Workflow Simulation --- Simulating typical admin workflow... ConfigHistory: Creating backup of current configuration... ConfigManager: Saving current configuration state... ConfigSnapshot: Created snapshot with 6 config items. ConfigHistory: Backup created. Total backups: 1 Step 1: Preparing for Black Friday promotion... ConfigManager: Updating configuration with new values... ConfigManager: Configuration updated. Current config has 8 items. ConfigHistory: Creating backup of current configuration... ConfigManager: Saving current configuration state... ConfigSnapshot: Created snapshot with 8 config items. ConfigHistory: Backup created. Total backups: 2 Step 2: Updating SEO for promotion visibility... ConfigManager: Updating configuration with new values... ConfigManager: Configuration updated. Current config has 8 items. Step 3: SEO changes caused issues, rolling back SEO only... ConfigHistory: Restoring configuration to: 2025-07-28 15:04:16 / (8 items, maintenance: ) ConfigManager: Configuration restored from snapshot. ConfigHistory: Undo completed successfully. Final configuration after workflow: Array ( \[maintenance\_mode\] => \[theme\] => dark \[seo\] => Array ( \[title\] => Best Products Online \[description\] => Find the best products at great prices! \[keywords\] => products, online, shopping, deals ) \[debug\] => \[max\_users\] => 1000 \[analytics\] => Array ( \[google\_id\] => GA-123456 \[facebook\_pixel\] => FB-789012 ) \[promotion\_banner\] => Black Friday Sale - 50% Off! \[special\_offers\] => Array ( \[discount\] => 50 \[code\] => BLACKFRIDAY50 ) ) Final history state: ConfigHistory: Available configuration backups: \[0\] 2025-07-28 15:04:16 / (6 items, maintenance: ) 他言語での **Memento** ----------------- [![Memento を C# で](https://refactoring.guru/images/patterns/icons/csharp.svg?id=da64592defc6e86d57c39c66e9de3e58)](https://refactoring.guru/ja/design-patterns/memento/csharp/example "Memento を C# で") [![Memento を C++ で](https://refactoring.guru/images/patterns/icons/cpp.svg?id=f7782ed8b8666246bfcc3f8fefc3b858)](https://refactoring.guru/ja/design-patterns/memento/cpp/example "Memento を C++ で") [![Memento を Go で](https://refactoring.guru/images/patterns/icons/go.svg?id=1a89927eb99b1ea3fde7701d97970aca)](https://refactoring.guru/ja/design-patterns/memento/go/example "Memento を Go で") [![Memento を Java で](https://refactoring.guru/images/patterns/icons/java.svg?id=e6d87e2dca08c953fe3acd1275ed4f4e)](https://refactoring.guru/ja/design-patterns/memento/java/example "Memento を Java で") [![Memento を Python で](https://refactoring.guru/images/patterns/icons/python.svg?id=6d815d43c0f7050a1151b43e51569c9f)](https://refactoring.guru/ja/design-patterns/memento/python/example "Memento を Python で") [![Memento を Ruby で](https://refactoring.guru/images/patterns/icons/ruby.svg?id=b065b718c914bf8e960ef731600be1eb)](https://refactoring.guru/ja/design-patterns/memento/ruby/example "Memento を Ruby で") [![Memento を Rust で](https://refactoring.guru/images/patterns/icons/rust.svg?id=1f5698a4b5ae23fe79413511747e4a87)](https://refactoring.guru/ja/design-patterns/memento/rust/example "Memento を Rust で") [![Memento を Swift で](https://refactoring.guru/images/patterns/icons/swift.svg?id=0b716c2d52ec3a48fbe91ac031070c1d)](https://refactoring.guru/ja/design-patterns/memento/swift/example "Memento を Swift で") [![Memento を TypeScript で](https://refactoring.guru/images/patterns/icons/typescript.svg?id=2239d0f16cb703540c205dd8cb0c0cb7)](https://refactoring.guru/ja/design-patterns/memento/typescript/example "Memento を TypeScript で") --- # Шаблонний метод на Java [There are patterns of patterns now! \ My friend's project: MetaPatterns.io](https://metapatterns.io/)  [](https://refactoring.guru/uk/design-patterns/template-method/java/example#checkout) [](https://refactoring.guru/uk/design-patterns/template-method/java/example#checkout) [](https://refactoring.guru/) / [Патерни проектування](https://refactoring.guru/uk/design-patterns) / [Шаблонний метод](https://refactoring.guru/uk/design-patterns/template-method) / [Java](https://refactoring.guru/uk/design-patterns/java) ![Шаблонний метод](https://refactoring.guru/images/patterns/cards/template-method-mini-2x.png?id=178bf56e39b3a1f548dd636076209c98) **Шаблонний метод** на Java =========================== **Шаблонний метод** — це поведінковий патерн, який визначає кістяк алгоритму в суперкласі та змушує підкласи реалізувати конкретні кроки цього алгоритму. [Детальніше про Шаблонний метод](https://refactoring.guru/uk/design-patterns/template-method) Навігація  [Інтро](https://refactoring.guru/uk/design-patterns/template-method/java/example#)  [Перевизначення кроків алгоритму](https://refactoring.guru/uk/design-patterns/template-method/java/example#example-0)  networks   [Network](https://refactoring.guru/uk/design-patterns/template-method/java/example#example-0--networks-Network-java)   [Facebook](https://refactoring.guru/uk/design-patterns/template-method/java/example#example-0--networks-Facebook-java)   [Twitter](https://refactoring.guru/uk/design-patterns/template-method/java/example#example-0--networks-Twitter-java)  [Demo](https://refactoring.guru/uk/design-patterns/template-method/java/example#example-0--Demo-java)  [Output­Demo](https://refactoring.guru/uk/design-patterns/template-method/java/example#example-0--OutputDemo-txt) **Складність:** **Популярність:** **Застосування:** Шаблонні методи можна зустріти в багатьох бібліотечних класах Java. Розробники створюють їх, щоб дозволити клієнтам легко та швидко розширювати стандартний код за допомогою спадкування. Приклади Шаблонних методів в стандартних бібліотеках Java: * Всі не абстрактні методи класів [`java.io.InputStream`](http://docs.oracle.com/javase/8/docs/api/java/io/InputStream.html) , [`java.io.OutputStream`](http://docs.oracle.com/javase/8/docs/api/java/io/OutputStream.html) , [`java.io.Reader`](http://docs.oracle.com/javase/8/docs/api/java/io/Reader.html) та [`java.io.Writer`](http://docs.oracle.com/javase/8/docs/api/java/io/Writer.html) . * Всі не абстрактні методи класів [`java.util.AbstractList`](http://docs.oracle.com/javase/8/docs/api/java/util/AbstractList.html) , [`java.util.AbstractSet`](http://docs.oracle.com/javase/8/docs/api/java/util/AbstractSet.html) та [`java.util.AbstractMap`](http://docs.oracle.com/javase/8/docs/api/java/util/AbstractMap.html) . * [`javax.servlet.http.HttpServlet`](http://docs.oracle.com/javaee/7/api/javax/servlet/http/HttpServlet.html) всі методи `doXXX()` типово (by default) повертають HTTP-код 405 "Method Not Allowed". Проте ви можете перевизначити їх за бажанням. **Ознаки застосування патерна:** Клас змушує своїх нащадків реалізувати методи-кроки, але самостійно реалізовує структуру алгоритму. Перевизначення кроків алгоритму ------------------------------- Соціальні мережі надають власні методи API для авторизації, постінга та виходу, але загальний процес для всіх мереж збігається. ### **networks** #### **networks/Network.java:** Базовий клас соціальної мережі package refactoring\_guru.template\_method.example.networks; /\*\* \* Base class of social network. \*/ public abstract class Network { String userName; String password; Network() {} /\*\* \* Publish the data to whatever network. \*/ public boolean post(String message) { // Authenticate before posting. Every network uses a different // authentication method. if (logIn(this.userName, this.password)) { // Send the post data. boolean result = sendData(message.getBytes()); logOut(); return result; } return false; } abstract boolean logIn(String userName, String password); abstract boolean sendData(byte\[\] data); abstract void logOut(); } #### **networks/Facebook.java:** Конкретна соціальна мережа package refactoring\_guru.template\_method.example.networks; /\*\* \* Class of social network \*/ public class Facebook extends Network { public Facebook(String userName, String password) { this.userName = userName; this.password = password; } public boolean logIn(String userName, String password) { System.out.println("\\nChecking user's parameters"); System.out.println("Name: " + this.userName); System.out.print("Password: "); for (int i = 0; i < this.password.length(); i++) { System.out.print("\*"); } simulateNetworkLatency(); System.out.println("\\n\\nLogIn success on Facebook"); return true; } public boolean sendData(byte\[\] data) { boolean messagePosted = true; if (messagePosted) { System.out.println("Message: '" + new String(data) + "' was posted on Facebook"); return true; } else { return false; } } public void logOut() { System.out.println("User: '" + userName + "' was logged out from Facebook"); } private void simulateNetworkLatency() { try { int i = 0; System.out.println(); while (i < 10) { System.out.print("."); Thread.sleep(500); i++; } } catch (InterruptedException ex) { ex.printStackTrace(); } } } #### **networks/Twitter.java:** Ще одна конкретна соціальна мережа package refactoring\_guru.template\_method.example.networks; /\*\* \* Class of social network \*/ public class Twitter extends Network { public Twitter(String userName, String password) { this.userName = userName; this.password = password; } public boolean logIn(String userName, String password) { System.out.println("\\nChecking user's parameters"); System.out.println("Name: " + this.userName); System.out.print("Password: "); for (int i = 0; i < this.password.length(); i++) { System.out.print("\*"); } simulateNetworkLatency(); System.out.println("\\n\\nLogIn success on Twitter"); return true; } public boolean sendData(byte\[\] data) { boolean messagePosted = true; if (messagePosted) { System.out.println("Message: '" + new String(data) + "' was posted on Twitter"); return true; } else { return false; } } public void logOut() { System.out.println("User: '" + userName + "' was logged out from Twitter"); } private void simulateNetworkLatency() { try { int i = 0; System.out.println(); while (i < 10) { System.out.print("."); Thread.sleep(500); i++; } } catch (InterruptedException ex) { ex.printStackTrace(); } } } #### **Demo.java:** Клієнтський код package refactoring\_guru.template\_method.example; import refactoring\_guru.template\_method.example.networks.Facebook; import refactoring\_guru.template\_method.example.networks.Network; import refactoring\_guru.template\_method.example.networks.Twitter; import java.io.BufferedReader; import java.io.IOException; import java.io.InputStreamReader; /\*\* \* Demo class. Everything comes together here. \*/ public class Demo { public static void main(String\[\] args) throws IOException { BufferedReader reader = new BufferedReader(new InputStreamReader(System.in)); Network network = null; System.out.print("Input user name: "); String userName = reader.readLine(); System.out.print("Input password: "); String password = reader.readLine(); // Enter the message. System.out.print("Input message: "); String message = reader.readLine(); System.out.println("\\nChoose social network for posting message.\\n" + "1 - Facebook\\n" + "2 - Twitter"); int choice = Integer.parseInt(reader.readLine()); // Create proper network object and send the message. if (choice == 1) { network = new Facebook(userName, password); } else if (choice == 2) { network = new Twitter(userName, password); } network.post(message); } } #### **OutputDemo.txt:** Результат виконання Input user name: Jhonatan Input password: qswe Input message: Hello, World! Choose social network for posting message. 1 - Facebook 2 - Twitter 2 Checking user's parameters Name: Jhonatan Password: \*\*\*\* .......... LogIn success on Twitter Message: 'Hello, World!' was posted on Twitter User: 'Jhonatan' was logged out from Twitter **Шаблонний метод** іншими мовами програмування ----------------------------------------------- [![Шаблонний метод на C#](https://refactoring.guru/images/patterns/icons/csharp.svg?id=da64592defc6e86d57c39c66e9de3e58)](https://refactoring.guru/uk/design-patterns/template-method/csharp/example "Шаблонний метод на C#") [![Шаблонний метод на C++](https://refactoring.guru/images/patterns/icons/cpp.svg?id=f7782ed8b8666246bfcc3f8fefc3b858)](https://refactoring.guru/uk/design-patterns/template-method/cpp/example "Шаблонний метод на C++") [![Шаблонний метод на Go](https://refactoring.guru/images/patterns/icons/go.svg?id=1a89927eb99b1ea3fde7701d97970aca)](https://refactoring.guru/uk/design-patterns/template-method/go/example "Шаблонний метод на Go") [![Шаблонний метод на PHP](https://refactoring.guru/images/patterns/icons/php.svg?id=be1906eb26b71ec1d3b93720d6156618)](https://refactoring.guru/uk/design-patterns/template-method/php/example "Шаблонний метод на PHP") [![Шаблонний метод на Python](https://refactoring.guru/images/patterns/icons/python.svg?id=6d815d43c0f7050a1151b43e51569c9f)](https://refactoring.guru/uk/design-patterns/template-method/python/example "Шаблонний метод на Python") [![Шаблонний метод на Ruby](https://refactoring.guru/images/patterns/icons/ruby.svg?id=b065b718c914bf8e960ef731600be1eb)](https://refactoring.guru/uk/design-patterns/template-method/ruby/example "Шаблонний метод на Ruby") [![Шаблонний метод на Rust](https://refactoring.guru/images/patterns/icons/rust.svg?id=1f5698a4b5ae23fe79413511747e4a87)](https://refactoring.guru/uk/design-patterns/template-method/rust/example "Шаблонний метод на Rust") [![Шаблонний метод на Swift](https://refactoring.guru/images/patterns/icons/swift.svg?id=0b716c2d52ec3a48fbe91ac031070c1d)](https://refactoring.guru/uk/design-patterns/template-method/swift/example "Шаблонний метод на Swift") [![Шаблонний метод на TypeScript](https://refactoring.guru/images/patterns/icons/typescript.svg?id=2239d0f16cb703540c205dd8cb0c0cb7)](https://refactoring.guru/uk/design-patterns/template-method/typescript/example "Шаблонний метод на TypeScript") --- # Посетитель на Rust [There are patterns of patterns now! \ My friend's project: MetaPatterns.io](https://metapatterns.io/)  [](https://refactoring.guru/ru/design-patterns/visitor/rust/example#checkout) [](https://refactoring.guru/ru/design-patterns/visitor/rust/example#checkout) [](https://refactoring.guru/) / [Паттерны проектирования](https://refactoring.guru/ru/design-patterns) / [Посетитель](https://refactoring.guru/ru/design-patterns/visitor) / [Rust](https://refactoring.guru/ru/design-patterns/rust) ![Посетитель](https://refactoring.guru/images/patterns/cards/visitor-mini-2x.png?id=9b87f3f3b772f434b28a25876829b504) **Посетитель** на Rust ====================== **Посетитель** — это поведенческий паттерн, который позволяет добавить новую операцию для целой иерархии классов, не изменяя код этих классов. > Подробней о том, почему Посетитель нельзя заменить простой перегрузкой методов читайте в статье [Посетитель и Double Dispatch](https://refactoring.guru/ru/design-patterns/visitor-double-dispatch) > . [Подробней о паттерне Посетитель](https://refactoring.guru/ru/design-patterns/visitor) Навигация  [Интро](https://refactoring.guru/ru/design-patterns/visitor/rust/example#)  [Deserialization](https://refactoring.guru/ru/design-patterns/visitor/rust/example#example-0)  [visitor](https://refactoring.guru/ru/design-patterns/visitor/rust/example#example-0--visitor-rs)  [main](https://refactoring.guru/ru/design-patterns/visitor/rust/example#example-0--main-rs) Deserialization --------------- A real-world example of the Visitor pattern is [serde serialization framework](https://serde.rs/) and its deserialization model (see [Serde data model](https://serde.rs/data-model.html) ). 1. `Visitor` should be implemented for a deserializable type. 2. `Visitor` is passed to a `Deserializer` (an "Element" in terms of the Visitor Pattern), which accepts and drives the `Visitor` in order to construct a desired type. Let's reproduce this deserializing model in our example. #### **visitor.rs** use crate::{TwoValuesArray, TwoValuesStruct}; /// Visitor can visit one type, do conversions, and output another type. /// /// It's not like all visitors must return a new type, it's just an example /// that demonstrates the technique. pub trait Visitor { type Value; /// Visits a vector of integers and outputs a desired type. fn visit\_vec(&self, v: Vec) -> Self::Value; } /// Visitor implementation for a struct of two values. impl Visitor for TwoValuesStruct { type Value = TwoValuesStruct; fn visit\_vec(&self, v: Vec) -> Self::Value { TwoValuesStruct { a: v\[0\], b: v\[1\] } } } /// Visitor implementation for a struct of values array. impl Visitor for TwoValuesArray { type Value = TwoValuesArray; fn visit\_vec(&self, v: Vec) -> Self::Value { let mut ab = \[0i32; 2\]; ab\[0\] = v\[0\]; ab\[1\] = v\[1\]; TwoValuesArray { ab } } } #### **main.rs** #!\[allow(unused)\] mod visitor; use visitor::Visitor; /// A struct of two integer values. /// /// It's going to be an output of \`Visitor\` trait which is defined for the type /// in \`visitor.rs\`. #\[derive(Default, Debug)\] pub struct TwoValuesStruct { a: i32, b: i32, } /// A struct of values array. /// /// It's going to be an output of \`Visitor\` trait which is defined for the type /// in \`visitor.rs\`. #\[derive(Default, Debug)\] pub struct TwoValuesArray { ab: \[i32; 2\], } /// \`Deserializer\` trait defines methods that can parse either a string or /// a vector, it accepts a visitor which knows how to construct a new object /// of a desired type (in our case, \`TwoValuesArray\` and \`TwoValuesStruct\`). trait Deserializer { fn create(visitor: V) -> Self; fn parse\_str(&self, input: &str) -> Result { Err("parse\_str is unimplemented") } fn parse\_vec(&self, input: Vec) -> Result { Err("parse\_vec is unimplemented") } } struct StringDeserializer { visitor: V, } impl Deserializer for StringDeserializer { fn create(visitor: V) -> Self { Self { visitor } } fn parse\_str(&self, input: &str) -> Result { // In this case, in order to apply a visitor, a deserializer should do // some preparation. The visitor does its stuff, but it doesn't do everything. let input\_vec = input .split\_ascii\_whitespace() .map(|x| x.parse().unwrap()) .collect(); Ok(self.visitor.visit\_vec(input\_vec)) } } struct VecDeserializer { visitor: V, } impl Deserializer for VecDeserializer { fn create(visitor: V) -> Self { Self { visitor } } fn parse\_vec(&self, input: Vec) -> Result { Ok(self.visitor.visit\_vec(input)) } } fn main() { let deserializer = StringDeserializer::create(TwoValuesStruct::default()); let result = deserializer.parse\_str("123 456"); println!("{:?}", result); let deserializer = VecDeserializer::create(TwoValuesStruct::default()); let result = deserializer.parse\_vec(vec!\[123, 456\]); println!("{:?}", result); let deserializer = VecDeserializer::create(TwoValuesArray::default()); let result = deserializer.parse\_vec(vec!\[123, 456\]); println!("{:?}", result); println!( "Error: {}", deserializer.parse\_str("123 456").err().unwrap() ) } ### Output Ok(TwoValuesStruct { a: 123, b: 456 }) Ok(TwoValuesStruct { a: 123, b: 456 }) Ok(TwoValuesArray { ab: \[123, 456\] }) Error: parse\_str unimplemented **Посетитель** на других языках программирования ------------------------------------------------ [![Посетитель на C#](https://refactoring.guru/images/patterns/icons/csharp.svg?id=da64592defc6e86d57c39c66e9de3e58)](https://refactoring.guru/ru/design-patterns/visitor/csharp/example "Посетитель на C#") [![Посетитель на C++](https://refactoring.guru/images/patterns/icons/cpp.svg?id=f7782ed8b8666246bfcc3f8fefc3b858)](https://refactoring.guru/ru/design-patterns/visitor/cpp/example "Посетитель на C++") [![Посетитель на Go](https://refactoring.guru/images/patterns/icons/go.svg?id=1a89927eb99b1ea3fde7701d97970aca)](https://refactoring.guru/ru/design-patterns/visitor/go/example "Посетитель на Go") [![Посетитель на Java](https://refactoring.guru/images/patterns/icons/java.svg?id=e6d87e2dca08c953fe3acd1275ed4f4e)](https://refactoring.guru/ru/design-patterns/visitor/java/example "Посетитель на Java") [![Посетитель на PHP](https://refactoring.guru/images/patterns/icons/php.svg?id=be1906eb26b71ec1d3b93720d6156618)](https://refactoring.guru/ru/design-patterns/visitor/php/example "Посетитель на PHP") [![Посетитель на Python](https://refactoring.guru/images/patterns/icons/python.svg?id=6d815d43c0f7050a1151b43e51569c9f)](https://refactoring.guru/ru/design-patterns/visitor/python/example "Посетитель на Python") [![Посетитель на Ruby](https://refactoring.guru/images/patterns/icons/ruby.svg?id=b065b718c914bf8e960ef731600be1eb)](https://refactoring.guru/ru/design-patterns/visitor/ruby/example "Посетитель на Ruby") [![Посетитель на Swift](https://refactoring.guru/images/patterns/icons/swift.svg?id=0b716c2d52ec3a48fbe91ac031070c1d)](https://refactoring.guru/ru/design-patterns/visitor/swift/example "Посетитель на Swift") [![Посетитель на TypeScript](https://refactoring.guru/images/patterns/icons/typescript.svg?id=2239d0f16cb703540c205dd8cb0c0cb7)](https://refactoring.guru/ru/design-patterns/visitor/typescript/example "Посетитель на TypeScript") --- # Prototype を PHP で / デザインパターン [There are patterns of patterns now! \ My friend's project: MetaPatterns.io](https://metapatterns.io/)  [](https://refactoring.guru/ja/design-patterns/prototype/php/example#checkout) [](https://refactoring.guru/ja/design-patterns/prototype/php/example#checkout) [](https://refactoring.guru/) / [デザインパターン](https://refactoring.guru/ja/design-patterns) / [Prototype](https://refactoring.guru/ja/design-patterns/prototype) / [PHP](https://refactoring.guru/ja/design-patterns/php) ![Prototype](https://refactoring.guru/images/patterns/cards/prototype-mini-2x.png?id=b871f789a736e7efbb1cd082d2de6398) **Prototype** を PHP で ===================== **Prototype** は、 生成に関するデザインパターンの一つで、 特定のクラスに結合することなく、 オブジェクト (たとえ複雑なオブジェクトでも) のクローン作成を可能とします。 プロトタイプのクラス全部には、 共通するインターフェースが必要です。 これにより、 具象クラスが不明であってもオブジェクトを複製することが可能となります。 プロトタイプ・オブジェクトが、 完全なコピーを生成できるのは、 同じクラスのオブジェクト同士が非公開フィールドを互いにアクセスできるからです。 [Prototype の詳細](https://refactoring.guru/ja/design-patterns/prototype) ナビゲーション  [はじめに](https://refactoring.guru/ja/design-patterns/prototype/php/example#)  [概念的な例](https://refactoring.guru/ja/design-patterns/prototype/php/example#example-0)  [index](https://refactoring.guru/ja/design-patterns/prototype/php/example#example-0--index-php)  [Output](https://refactoring.guru/ja/design-patterns/prototype/php/example#example-0--Output-txt)  [現実的な例](https://refactoring.guru/ja/design-patterns/prototype/php/example#example-1)  [index](https://refactoring.guru/ja/design-patterns/prototype/php/example#example-1--index-php)  [Output](https://refactoring.guru/ja/design-patterns/prototype/php/example#example-1--Output-txt) **複雑度:** **人気度:** **使用例:** Prototype パターンは、 PHP では、 [初めから利用可能](http://php.net/manual/en/language.oop5.cloning.php) です。 オブジェクトの完全なコピーは、 `clone` キーワードを使って取得できます。 クラスにクローンのサポートを追加するには、 `__clone` メソッドを実装する必要があります。 **見つけ方:** このパターンは、 `clone` や `copy` といったメソッドで容易に識別可能です。 概念的な例 ----- この例は、 **Prototype** デザインパターンの構造を説明するためのものです。 以下の質問に答えることを目的としています: * どういうクラスからできているか? * それぞれのクラスの役割は? * パターンの要素同士はどう関係しているのか? ここでパターンの構造を学んだ後だと、 これに続く、 現実世界の PHP でのユースケースが理解しやすくなります。 #### **index.php:** 概念的な例 component = clone $this->component; // Cloning an object that has a nested object with backreference // requires special treatment. After the cloning is completed, the // nested object should point to the cloned object, instead of the // original object. $this->circularReference = clone $this->circularReference; $this->circularReference->prototype = $this; } } class ComponentWithBackReference { public $prototype; /\*\* \* Note that the constructor won't be executed during cloning. If you have \* complex logic inside the constructor, you may need to execute it in the \* \`\_\_clone\` method as well. \*/ public function \_\_construct(Prototype $prototype) { $this->prototype = $prototype; } } /\*\* \* The client code. \*/ function clientCode() { $p1 = new Prototype(); $p1->primitive = 245; $p1->component = new \\DateTime(); $p1->circularReference = new ComponentWithBackReference($p1); $p2 = clone $p1; if ($p1->primitive === $p2->primitive) { echo "Primitive field values have been carried over to a clone. Yay!\\n"; } else { echo "Primitive field values have not been copied. Booo!\\n"; } if ($p1->component === $p2->component) { echo "Simple component has not been cloned. Booo!\\n"; } else { echo "Simple component has been cloned. Yay!\\n"; } if ($p1->circularReference === $p2->circularReference) { echo "Component with back reference has not been cloned. Booo!\\n"; } else { echo "Component with back reference has been cloned. Yay!\\n"; } if ($p1->circularReference->prototype === $p2->circularReference->prototype) { echo "Component with back reference is linked to original object. Booo!\\n"; } else { echo "Component with back reference is linked to the clone. Yay!\\n"; } } clientCode(); #### **Output.txt:** 実行結果 Primitive field values have been carried over to a clone. Yay! Simple component has been cloned. Yay! Component with back reference has been cloned. Yay! Component with back reference is linked to the clone. Yay! 現実的な例 ----- **Prototype** パターンは、 すべてのフィールドを直接コピーしてオブジェクトを再構築する代わりに、 既存のオブジェクトを複製する便利な方法を提供します。 直接的なやり方は、 クローンされるオブジェクトのクラスに密に結合してしまうばかりか、 非公開フィールドの内容はコピーできないという問題があります。 Prototype では、 実際のクローンの作業は、 クローンされるクラス中で行われるため、 非公開フィールドへのアクセスは無制限です。 この例では、 複雑な Page オブジェクトのクローン作成に Prototype パターンを使用しています。 Page クラスには多数の非公開フィールドがありますが、 Prototype パターンのおかげで、 クローンされたオブジェクトにうまく引き継がれます。 #### **index.php:** 現実的な例 title = $title; $this->body = $body; $this->author = $author; $this->author->addToPage($this); $this->date = new \\DateTime(); } public function addComment(string $comment): void { $this->comments\[\] = $comment; } /\*\* \* You can control what data you want to carry over to the cloned object. \* \* For instance, when a page is cloned: \* - It gets a new "Copy of ..." title. \* - The author of the page remains the same. Therefore we leave the \* reference to the existing object while adding the cloned page to the list \* of the author's pages. \* - We don't carry over the comments from the old page. \* - We also attach a new date object to the page. \*/ public function \_\_clone() { $this->title = "Copy of " . $this->title; $this->author->addToPage($this); $this->comments = \[\]; $this->date = new \\DateTime(); } } class Author { private $name; /\*\* \* @var Page\[\] \*/ private $pages = \[\]; public function \_\_construct(string $name) { $this->name = $name; } public function addToPage(Page $page): void { $this->pages\[\] = $page; } } /\*\* \* The client code. \*/ function clientCode() { $author = new Author("John Smith"); $page = new Page("Tip of the day", "Keep calm and carry on.", $author); // ... $page->addComment("Nice tip, thanks!"); // ... $draft = clone $page; echo "Dump of the clone. Note that the author is now referencing two objects.\\n\\n"; print\_r($draft); } clientCode(); #### **Output.txt:** 実行結果 Dump of the clone. Note that the author is now referencing two objects. RefactoringGuru\\Prototype\\RealWorld\\Page Object ( \[title:RefactoringGuru\\Prototype\\RealWorld\\Page:private\] => Copy of Tip of the day \[body:RefactoringGuru\\Prototype\\RealWorld\\Page:private\] => Keep calm and carry on. \[author:RefactoringGuru\\Prototype\\RealWorld\\Page:private\] => RefactoringGuru\\Prototype\\RealWorld\\Author Object ( \[name:RefactoringGuru\\Prototype\\RealWorld\\Author:private\] => John Smith \[pages:RefactoringGuru\\Prototype\\RealWorld\\Author:private\] => Array ( \[0\] => RefactoringGuru\\Prototype\\RealWorld\\Page Object ( \[title:RefactoringGuru\\Prototype\\RealWorld\\Page:private\] => Tip of the day \[body:RefactoringGuru\\Prototype\\RealWorld\\Page:private\] => Keep calm and carry on. \[author:RefactoringGuru\\Prototype\\RealWorld\\Page:private\] => RefactoringGuru\\Prototype\\RealWorld\\Author Object \*RECURSION\* \[comments:RefactoringGuru\\Prototype\\RealWorld\\Page:private\] => Array ( \[0\] => Nice tip, thanks! ) \[date:RefactoringGuru\\Prototype\\RealWorld\\Page:private\] => DateTime Object ( \[date\] => 2018-06-04 14:50:39.306237 \[timezone\_type\] => 3 \[timezone\] => UTC ) ) \[1\] => RefactoringGuru\\Prototype\\RealWorld\\Page Object \*RECURSION\* ) ) \[comments:RefactoringGuru\\Prototype\\RealWorld\\Page:private\] => Array ( ) \[date:RefactoringGuru\\Prototype\\RealWorld\\Page:private\] => DateTime Object ( \[date\] => 2018-06-04 14:50:39.306272 \[timezone\_type\] => 3 \[timezone\] => UTC ) ) 他言語での **Prototype** ------------------- [![Prototype を C# で](https://refactoring.guru/images/patterns/icons/csharp.svg?id=da64592defc6e86d57c39c66e9de3e58)](https://refactoring.guru/ja/design-patterns/prototype/csharp/example "Prototype を C# で") [![Prototype を C++ で](https://refactoring.guru/images/patterns/icons/cpp.svg?id=f7782ed8b8666246bfcc3f8fefc3b858)](https://refactoring.guru/ja/design-patterns/prototype/cpp/example "Prototype を C++ で") [![Prototype を Go で](https://refactoring.guru/images/patterns/icons/go.svg?id=1a89927eb99b1ea3fde7701d97970aca)](https://refactoring.guru/ja/design-patterns/prototype/go/example "Prototype を Go で") [![Prototype を Java で](https://refactoring.guru/images/patterns/icons/java.svg?id=e6d87e2dca08c953fe3acd1275ed4f4e)](https://refactoring.guru/ja/design-patterns/prototype/java/example "Prototype を Java で") [![Prototype を Python で](https://refactoring.guru/images/patterns/icons/python.svg?id=6d815d43c0f7050a1151b43e51569c9f)](https://refactoring.guru/ja/design-patterns/prototype/python/example "Prototype を Python で") [![Prototype を Ruby で](https://refactoring.guru/images/patterns/icons/ruby.svg?id=b065b718c914bf8e960ef731600be1eb)](https://refactoring.guru/ja/design-patterns/prototype/ruby/example "Prototype を Ruby で") [![Prototype を Rust で](https://refactoring.guru/images/patterns/icons/rust.svg?id=1f5698a4b5ae23fe79413511747e4a87)](https://refactoring.guru/ja/design-patterns/prototype/rust/example "Prototype を Rust で") [![Prototype を Swift で](https://refactoring.guru/images/patterns/icons/swift.svg?id=0b716c2d52ec3a48fbe91ac031070c1d)](https://refactoring.guru/ja/design-patterns/prototype/swift/example "Prototype を Swift で") [![Prototype を TypeScript で](https://refactoring.guru/images/patterns/icons/typescript.svg?id=2239d0f16cb703540c205dd8cb0c0cb7)](https://refactoring.guru/ja/design-patterns/prototype/typescript/example "Prototype を TypeScript で") --- # Template Method [There are patterns of patterns now! \ My friend's project: MetaPatterns.io](https://metapatterns.io/)  [](https://refactoring.guru/es/design-patterns/template-method#checkout) [](https://refactoring.guru/es/design-patterns/template-method#checkout) [](https://refactoring.guru/) / [Patrones de diseño](https://refactoring.guru/es/design-patterns) / [Patrones de comportamiento](https://refactoring.guru/es/design-patterns/behavioral-patterns) Template Method =============== También llamado: Método plantilla Propósito --------- **Template Method** es un patrón de diseño de comportamiento que define el esqueleto de un algoritmo en la superclase pero permite que las subclases sobrescriban pasos del algoritmo sin cambiar su estructura. ![Patrón de diseño Template method](https://refactoring.guru/images/patterns/content/template-method/template-method-2x.png?id=4e164dc41be4dcfa122628864c2be210) Problema -------- Imagina que estás creando una aplicación de minería de datos que analiza documentos corporativos. Los usuarios suben a la aplicación documentos en varios formatos (PDF, DOC, CSV) y ésta intenta extraer la información relevante de estos documentos en un formato uniforme. La primera versión de la aplicación sólo funcionaba con archivos DOC. La siguiente versión podía soportar archivos CSV. Un mes después, le “enseñaste” a extraer datos de archivos PDF. ![Las clases de minería de datos contenían mucho código duplicado](https://refactoring.guru/images/patterns/diagrams/template-method/problem-2x.png?id=fc8b434afec7b6135043d0d2f48189f0) Las clases de minería de datos contenían mucho código duplicado. En cierto momento te das cuenta de que las tres clases tienen mucho código similar. Aunque el código para gestionar distintos formatos de datos es totalmente diferente en todas las clases, el código para procesar y analizar los datos es casi idéntico. ¿No sería genial deshacerse de la duplicación de código, dejando intacta la estructura del algoritmo? Hay otro problema relacionado con el código cliente que utiliza esas clases. Tiene muchos condicionales que eligen un curso de acción adecuado dependiendo de la clase del objeto de procesamiento. Si las tres clases de procesamiento tienen una interfaz común o una clase base, puedes eliminar los condicionales en el código cliente y utilizar el polimorfismo al invocar métodos en un objeto de procesamiento. Solución -------- El patrón Template Method sugiere que dividas un algoritmo en una serie de pasos, conviertas estos pasos en métodos y coloques una serie de llamadas a esos métodos dentro de un único _método plantilla_. Los pasos pueden ser `abstractos`, o contar con una implementación por defecto. Para utilizar el algoritmo, el cliente debe aportar su propia subclase, implementar todos los pasos abstractos y sobrescribir algunos de los opcionales si es necesario (pero no el propio método plantilla). Veamos cómo funciona en nuestra aplicación de minería de datos. Podemos crear una clase base para los tres algoritmos de análisis. Esta clase define un método plantilla consistente en una serie de llamadas a varios pasos de procesamiento de documentos. ![El método plantilla define el esqueleto del algoritmo](https://refactoring.guru/images/patterns/diagrams/template-method/solution-es-2x.png?id=08d8d16899e75e62d28f6183e461ece0) El método plantilla divide el algoritmo en pasos, permitiendo a las subclases sobrescribir estos pasos pero no el método en sí. Al principio, podemos declarar todos los pasos como `abstractos`, forzando a las subclases a proporcionar sus propias implementaciones para estos métodos. En nuestro caso, las subclases ya cuentan con todas las implementaciones necesarias, por lo que lo único que tendremos que hacer es ajustar las firmas de los métodos para que coincidan con los métodos de la superclase. Ahora, veamos lo que podemos hacer para deshacernos del código duplicado. Parece que el código para abrir/cerrar archivos y extraer/analizar información es diferente para varios formatos de datos, por lo que no tiene sentido tocar estos métodos. No obstante, la implementación de otros pasos, como analizar los datos sin procesar y generar informes, es muy similar, por lo que puede meterse en la clase base, donde las subclases pueden compartir ese código. Como puedes ver, tenemos dos tipos de pasos: * Los _pasos abstractos_ deben ser implementados por todas las subclases * Los _pasos opcionales_ ya tienen cierta implementación por defecto, pero aún así pueden sobrescribirse si es necesario Hay otro tipo de pasos, llamados ganchos (_hooks_). Un gancho es un paso opcional con un cuerpo vacío. Un método plantilla funcionará aunque el gancho no se sobrescriba. Normalmente, los ganchos se colocan antes y después de pasos cruciales de los algoritmos, suministrando a las subclases puntos adicionales de extensión para un algoritmo. Analogía en el mundo real ------------------------- ![Construcción de viviendas en masa](https://refactoring.guru/images/patterns/diagrams/template-method/live-example-2x.png?id=89083a3dcd1fe2b627b9b6e6ff4986dc) Un plan arquitectónico típico puede alterarse ligeramente para que encaje mejor con las necesidades del cliente. El enfoque del método plantilla puede emplearse en la construcción de viviendas en masa. El plan arquitectónico para construir una casa estándar puede contener varios puntos de extensión que permitirán a un potencial propietario ajustar algunos detalles de la casa resultante. Cada paso de la construcción, como colocar los cimientos, el armazón, construir las paredes, instalar las tuberías para el agua y el cableado para la electricidad, etc., puede cambiarse ligeramente para que la casa resultante sea un poco diferente de las demás. Estructura ---------- ![Estructura del patrón de diseño Template Method](https://refactoring.guru/images/patterns/diagrams/template-method/structure-2x.png?id=25082d6d6a76f51c6b64d8aeeaffdbb5)![Estructura del patrón de diseño Template Method](https://refactoring.guru/images/patterns/diagrams/template-method/structure-indexed-2x.png?id=86f28789cdcc5a4c415d6a1100de56fc) 1. La **Clase Abstracta** declara métodos que actúan como pasos de un algoritmo, así como el propio método plantilla que invoca estos métodos en un orden específico. Los pasos pueden declararse `abstractos` o contar con una implementación por defecto. 2. Las **Clases Concretas** pueden sobrescribir todos los pasos, pero no el propio método plantilla. Pseudocódigo ------------ En este ejemplo, el patrón **Template Method** proporciona un “esqueleto” para varias ramas de inteligencia artificial (IA) en un sencillo videojuego de estrategia. ![Ejemplo de estructura del patrón Template Method](https://refactoring.guru/images/patterns/diagrams/template-method/example-2x.png?id=d8b309659c4b722237ec97733da935bd) Clases IA de un sencillo videojuego. Todas las razas del juego tienen tipos de unidades y edificios casi iguales. Por lo tanto, puedes reutilizar la misma estructura IA para varias de ellas, a la vez que puedes sobrescribir algunos de los detalles. Con esta solución, puedes sobrescribir la IA de los orcos para que sean más agresivos, hacer que los humanos tengan una actitud más defensiva y hacer que los monstruos no puedan construir nada. Para añadir una nueva raza al juego habría que crear una nueva subclase IA y sobrescribir los métodos por defecto declarados en la clase IA base. // La clase abstracta define un método plantilla que contiene un // esqueleto de algún algoritmo compuesto por llamadas, // normalmente a operaciones primitivas abstractas. Las // subclases concretas implementan estas operaciones, pero dejan // el propio método plantilla intacto. class GameAI is // El método plantilla define el esqueleto de un algoritmo. method turn() is collectResources() buildStructures() buildUnits() attack() // Algunos de los pasos se pueden implementar directamente // en una clase base. method collectResources() is foreach (s in this.builtStructures) do s.collect() // Y algunos de ellos pueden definirse como abstractos. abstract method buildStructures() abstract method buildUnits() // Una clase puede tener varios métodos plantilla. method attack() is enemy = closestEnemy() if (enemy == null) sendScouts(map.center) else sendWarriors(enemy.position) abstract method sendScouts(position) abstract method sendWarriors(position) // Las clases concretas tienen que implementar todas las // operaciones abstractas de la clase base, pero no deben // sobrescribir el propio método plantilla. class OrcsAI extends GameAI is method buildStructures() is if (there are some resources) then // Construye granjas, después cuarteles y después // fortaleza. method buildUnits() is if (there are plenty of resources) then if (there are no scouts) // Crea peón y añádelo al grupo de exploradores. else // Crea soldado, añádelo al grupo de guerreros. // ... method sendScouts(position) is if (scouts.length > 0) then // Envía exploradores a posición. method sendWarriors(position) is if (warriors.length > 5) then // Envía guerreros a posición. // Las subclases también pueden sobrescribir algunas operaciones // con una implementación por defecto. class MonstersAI extends GameAI is method collectResources() is // Los monstruos no recopilan recursos. method buildStructures() is // Los monstruos no construyen estructuras. method buildUnits() is // Los monstruos no construyen unidades. Aplicabilidad ------------- Utiliza el patrón Template Method cuando quieras permitir a tus clientes que extiendan únicamente pasos particulares de un algoritmo, pero no todo el algoritmo o su estructura. El patrón Template Method te permite convertir un algoritmo monolítico en una serie de pasos individuales que se pueden extender fácilmente con subclases, manteniendo intacta la estructura definida en una superclase. Utiliza el patrón cuando tengas muchas clases que contengan algoritmos casi idénticos, pero con algunas diferencias mínimas. Como resultado, puede que tengas que modificar todas las clases cuando el algoritmo cambie. Cuando conviertes un algoritmo así en un método plantilla, también puedes elevar los pasos con implementaciones similares a una superclase, eliminando la duplicación del código. El código que varía entre subclases puede permanecer en las subclases. Cómo implementarlo ------------------ 1. Analiza el algoritmo objetivo para ver si puedes dividirlo en pasos. Considera qué pasos son comunes a todas las subclases y cuáles siempre serán únicos. 2. Crea la clase base abstracta y declara el método plantilla y un grupo de métodos abstractos que representen los pasos del algoritmo. Perfila la estructura del algoritmo en el método plantilla ejecutando los pasos correspondientes. Considera declarar el método plantilla como `final` para evitar que las subclases lo sobrescriban. 3. No hay problema en que todos los pasos acaben siendo abstractos. Sin embargo, a algunos pasos les vendría bien tener una implementación por defecto. Las subclases no tienen que implementar esos métodos. 4. Piensa en añadir ganchos entre los pasos cruciales del algoritmo. 5. Para cada variación del algoritmo, crea una nueva subclase concreta. Ésta _debe_ implementar todos los pasos abstractos, pero también _puede_ sobrescribir algunos de los opcionales. Pros y contras -------------- * Puedes permitir a los clientes que sobrescriban tan solo ciertas partes de un algoritmo grande, para que les afecten menos los cambios que tienen lugar en otras partes del algoritmo. * Puedes colocar el código duplicado dentro de una superclase. * Algunos clientes pueden verse limitados por el esqueleto proporcionado de un algoritmo. * Puede que violes el _principio de sustitución de Liskov_ suprimiendo una implementación por defecto de un paso a través de una subclase. * Los métodos plantilla tienden a ser más difíciles de mantener cuantos más pasos tengan. Relaciones con otros patrones ----------------------------- * [Factory Method](https://refactoring.guru/es/design-patterns/factory-method) es una especialización del [Template Method](https://refactoring.guru/es/design-patterns/template-method) . Al mismo tiempo, un _Factory Method_ puede servir como paso de un gran _Template Method_. * [Template Method](https://refactoring.guru/es/design-patterns/template-method) se basa en la herencia: te permite alterar partes de un algoritmo extendiendo esas partes en subclases. [Strategy](https://refactoring.guru/es/design-patterns/strategy) se basa en la composición: puedes alterar partes del comportamiento del objeto suministrándole distintas estrategias que se correspondan con ese comportamiento. _Template Method_ trabaja al nivel de la clase, por lo que es estático. _Strategy_ trabaja al nivel del objeto, permitiéndote cambiar los comportamientos durante el tiempo de ejecución. Ejemplos de código ------------------ [![Template Method en C#](https://refactoring.guru/images/patterns/icons/csharp.svg?id=da64592defc6e86d57c39c66e9de3e58)](https://refactoring.guru/es/design-patterns/template-method/csharp/example "Template Method en C#") [![Template Method en C++](https://refactoring.guru/images/patterns/icons/cpp.svg?id=f7782ed8b8666246bfcc3f8fefc3b858)](https://refactoring.guru/es/design-patterns/template-method/cpp/example "Template Method en C++") [![Template Method en Go](https://refactoring.guru/images/patterns/icons/go.svg?id=1a89927eb99b1ea3fde7701d97970aca)](https://refactoring.guru/es/design-patterns/template-method/go/example "Template Method en Go") [![Template Method en Java](https://refactoring.guru/images/patterns/icons/java.svg?id=e6d87e2dca08c953fe3acd1275ed4f4e)](https://refactoring.guru/es/design-patterns/template-method/java/example "Template Method en Java") [![Template Method en PHP](https://refactoring.guru/images/patterns/icons/php.svg?id=be1906eb26b71ec1d3b93720d6156618)](https://refactoring.guru/es/design-patterns/template-method/php/example "Template Method en PHP") [![Template Method en Python](https://refactoring.guru/images/patterns/icons/python.svg?id=6d815d43c0f7050a1151b43e51569c9f)](https://refactoring.guru/es/design-patterns/template-method/python/example "Template Method en Python") [![Template Method en Ruby](https://refactoring.guru/images/patterns/icons/ruby.svg?id=b065b718c914bf8e960ef731600be1eb)](https://refactoring.guru/es/design-patterns/template-method/ruby/example "Template Method en Ruby") [![Template Method en Rust](https://refactoring.guru/images/patterns/icons/rust.svg?id=1f5698a4b5ae23fe79413511747e4a87)](https://refactoring.guru/es/design-patterns/template-method/rust/example "Template Method en Rust") [![Template Method en Swift](https://refactoring.guru/images/patterns/icons/swift.svg?id=0b716c2d52ec3a48fbe91ac031070c1d)](https://refactoring.guru/es/design-patterns/template-method/swift/example "Template Method en Swift") [![Template Method en TypeScript](https://refactoring.guru/images/patterns/icons/typescript.svg?id=2239d0f16cb703540c205dd8cb0c0cb7)](https://refactoring.guru/es/design-patterns/template-method/typescript/example "Template Method en TypeScript") [![](https://refactoring.guru/images/patterns/banners/patterns-book-banner-3-2x.png?id=0cc3f77ab421d1a5c02ee46488231c3a)](https://refactoring.guru/es/design-patterns/book) ### ¡Apoya nuestro sitio web gratuito y compra el libro! * 22 patrones de diseño y 8 principios explicados en profundidad * 436 páginas bien estructuradas, fáciles de leer y libres de tecnicismos * 225 ilustraciones y diagramas claros y útiles * Un archivo con ejemplos de código en 11 lenguajes * Todos los dispositivos soportados: Formatos PDF/EPUB/MOBI/KFX [Saber más…](https://refactoring.guru/es/design-patterns/book) --- # Patrones estructurales [There are patterns of patterns now! \ My friend's project: MetaPatterns.io](https://metapatterns.io/)  [](https://refactoring.guru/es/design-patterns/structural-patterns#checkout) [](https://refactoring.guru/es/design-patterns/structural-patterns#checkout) [](https://refactoring.guru/) / [Patrones de diseño](https://refactoring.guru/es/design-patterns) / [Catálogo](https://refactoring.guru/es/design-patterns/catalog) Patrones estructurales ====================== Los patrones estructurales explican cómo ensamblar objetos y clases en estructuras más grandes, a la vez que se mantiene la flexibilidad y eficiencia de estas estructuras. [![Adapter](https://refactoring.guru/images/patterns/cards/adapter-mini-3x.png) Adapter\ \ Permite la colaboración entre objetos con interfaces incompatibles.](https://refactoring.guru/es/design-patterns/adapter) [![Bridge](https://refactoring.guru/images/patterns/cards/bridge-mini-3x.png) Bridge\ \ Permite dividir una clase grande o un grupo de clases estrechamente relacionadas, en dos jerarquías separadas (abstracción e implementación) que pueden desarrollarse independientemente la una de la otra.](https://refactoring.guru/es/design-patterns/bridge) [![Composite](https://refactoring.guru/images/patterns/cards/composite-mini-3x.png) Composite\ \ Permite componer objetos en estructuras de árbol y trabajar con esas estructuras como si fueran objetos individuales.](https://refactoring.guru/es/design-patterns/composite) [![Decorator](https://refactoring.guru/images/patterns/cards/decorator-mini-3x.png) Decorator\ \ Permite añadir funcionalidades a objetos colocando estos objetos dentro de objetos encapsuladores especiales que contienen estas funcionalidades.](https://refactoring.guru/es/design-patterns/decorator) [![Facade](https://refactoring.guru/images/patterns/cards/facade-mini-3x.png) Facade\ \ Proporciona una interfaz simplificada a una biblioteca, un framework o cualquier otro grupo complejo de clases.](https://refactoring.guru/es/design-patterns/facade) [![Flyweight](https://refactoring.guru/images/patterns/cards/flyweight-mini-3x.png) Flyweight\ \ Permite mantener más objetos dentro de la cantidad disponible de memoria RAM compartiendo las partes comunes del estado entre varios objetos en lugar de mantener toda la información en cada objeto.](https://refactoring.guru/es/design-patterns/flyweight) [![Proxy](https://refactoring.guru/images/patterns/cards/proxy-mini-3x.png) Proxy\ \ Permite proporcionar un sustituto o marcador de posición para otro objeto. Un proxy controla el acceso al objeto original, permitiéndote hacer algo antes o después de que la solicitud llegue al objeto original.](https://refactoring.guru/es/design-patterns/proxy) --- # Шаблонный метод на Swift [There are patterns of patterns now! \ My friend's project: MetaPatterns.io](https://metapatterns.io/)  [](https://refactoring.guru/ru/design-patterns/template-method/swift/example#checkout) [](https://refactoring.guru/ru/design-patterns/template-method/swift/example#checkout) [](https://refactoring.guru/) / [Паттерны проектирования](https://refactoring.guru/ru/design-patterns) / [Шаблонный метод](https://refactoring.guru/ru/design-patterns/template-method) / [Swift](https://refactoring.guru/ru/design-patterns/swift) ![Шаблонный метод](https://refactoring.guru/images/patterns/cards/template-method-mini-2x.png?id=178bf56e39b3a1f548dd636076209c98) **Шаблонный метод** на Swift ============================ **Шаблонный метод** — это поведенческий паттерн, задающий скелет алгоритма в суперклассе и заставляющий подклассы реализовать конкретные шаги этого алгоритма. [Подробней о паттерне Шаблонный метод](https://refactoring.guru/ru/design-patterns/template-method) Навигация  [Интро](https://refactoring.guru/ru/design-patterns/template-method/swift/example#)  [Концептуальный пример](https://refactoring.guru/ru/design-patterns/template-method/swift/example#example-0)  [Example](https://refactoring.guru/ru/design-patterns/template-method/swift/example#example-0--Example-swift)  [Output](https://refactoring.guru/ru/design-patterns/template-method/swift/example#example-0--Output-txt)  [Пример из реальной жизни](https://refactoring.guru/ru/design-patterns/template-method/swift/example#example-1)  [Example](https://refactoring.guru/ru/design-patterns/template-method/swift/example#example-1--Example-swift)  [Output](https://refactoring.guru/ru/design-patterns/template-method/swift/example#example-1--Output-txt) **Сложность:** **Популярность:** **Применимость:** Шаблонные методы можно встретить во многих библиотечных классах Swift. Разработчики создают их, чтобы позволить клиентам легко и быстро расширять стандартный код при помощи наследования. **Признаки применения паттерна:** Класс заставляет своих потомков реализовать методы-шаги, но самостоятельно реализует структуру алгоритма. Следующие примеры доступны на [Swift Playgrounds](https://www.alemohamad.com/playgrounds) . Благодарность [Alejandro Mohamad](https://www.alemohamad.com/) за создание версии Playground. Концептуальный пример --------------------- Этот пример показывает структуру паттерна **Шаблонный метод**, а именно — из каких классов он состоит, какие роли эти классы выполняют и как они взаимодействуют друг с другом. После ознакомления со структурой, вам будет легче воспринимать второй пример, который рассматривает реальный случай использования паттерна в мире Swift. #### **Example.swift:** Пример структуры паттерна import XCTest /// Абстрактный Протокол и его расширение определяет шаблонный метод, содержащий /// скелет некоторого алгоритма, состоящего из вызовов (обычно) абстрактных /// примитивных операций. /// /// Конкретные подклассы должны реализовать эти операции, но оставить сам /// шаблонный метод без изменений. protocol AbstractProtocol { /// Шаблонный метод определяет скелет алгоритма. func templateMethod() /// Эти операции уже имеют реализации. func baseOperation1() func baseOperation2() func baseOperation3() /// А эти операции должны быть реализованы в подклассах. func requiredOperations1() func requiredOperation2() /// Это «хуки». Подклассы могут переопределять их, но это не обязательно, /// поскольку у хуков уже есть стандартная (но пустая) реализация. Хуки /// предоставляют дополнительные точки расширения в некоторых критических /// местах алгоритма. func hook1() func hook2() } extension AbstractProtocol { func templateMethod() { baseOperation1() requiredOperations1() baseOperation2() hook1() requiredOperation2() baseOperation3() hook2() } /// Эти операции уже имеют реализации. func baseOperation1() { print("AbstractProtocol says: I am doing the bulk of the work\\n") } func baseOperation2() { print("AbstractProtocol says: But I let subclasses override some operations\\n") } func baseOperation3() { print("AbstractProtocol says: But I am doing the bulk of the work anyway\\n") } func hook1() {} func hook2() {} } /// Конкретные классы должны реализовать все абстрактные операции базового /// класса. Они также могут переопределить некоторые операции с реализацией по /// умолчанию. class ConcreteClass1: AbstractProtocol { func requiredOperations1() { print("ConcreteClass1 says: Implemented Operation1\\n") } func requiredOperation2() { print("ConcreteClass1 says: Implemented Operation2\\n") } func hook2() { print("ConcreteClass1 says: Overridden Hook2\\n") } } /// Обычно конкретные классы переопределяют только часть операций базового /// класса. class ConcreteClass2: AbstractProtocol { func requiredOperations1() { print("ConcreteClass2 says: Implemented Operation1\\n") } func requiredOperation2() { print("ConcreteClass2 says: Implemented Operation2\\n") } func hook1() { print("ConcreteClass2 says: Overridden Hook1\\n") } } /// Клиентский код вызывает шаблонный метод для выполнения алгоритма. Клиентский /// код не должен знать конкретный класс объекта, с которым работает, при /// условии, что он работает с объектами через интерфейс их базового класса. class Client { // ... static func clientCode(use object: AbstractProtocol) { // ... object.templateMethod() // ... } // ... } /// Давайте посмотрим как всё это будет работать. class TemplateMethodConceptual: XCTestCase { func test() { print("Same client code can work with different subclasses:\\n") Client.clientCode(use: ConcreteClass1()) print("\\nSame client code can work with different subclasses:\\n") Client.clientCode(use: ConcreteClass2()) } } #### **Output.txt:** Результат выполнения Same client code can work with different subclasses: AbstractProtocol says: I am doing the bulk of the work ConcreteClass1 says: Implemented Operation1 AbstractProtocol says: But I let subclasses override some operations ConcreteClass1 says: Implemented Operation2 AbstractProtocol says: But I am doing the bulk of the work anyway ConcreteClass1 says: Overridden Hook2 Same client code can work with different subclasses: AbstractProtocol says: I am doing the bulk of the work ConcreteClass2 says: Implemented Operation1 AbstractProtocol says: But I let subclasses override some operations ConcreteClass2 says: Overridden Hook1 ConcreteClass2 says: Implemented Operation2 AbstractProtocol says: But I am doing the bulk of the work anyway Пример из реальной жизни ------------------------ #### **Example.swift:** Пример из реальной жизни import XCTest import AVFoundation import CoreLocation import Photos class TemplateMethodRealWorld: XCTestCase { /// A good example of Template Method is a life cycle of UIViewController func testTemplateMethodReal() { let accessors = \[CameraAccessor(), MicrophoneAccessor(), PhotoLibraryAccessor()\] accessors.forEach { item in item.requestAccessIfNeeded({ status in let message = status ? "You have access to " : "You do not have access to " print(message + item.description + "\\n") }) } } } class PermissionAccessor: CustomStringConvertible { typealias Completion = (Bool) -> () func requestAccessIfNeeded(\_ completion: @escaping Completion) { guard !hasAccess() else { completion(true); return } willReceiveAccess() requestAccess { status in status ? self.didReceiveAccess() : self.didRejectAccess() completion(status) } } func requestAccess(\_ completion: @escaping Completion) { fatalError("Should be overridden") } func hasAccess() -> Bool { fatalError("Should be overridden") } var description: String { return "PermissionAccessor" } /// Hooks func willReceiveAccess() {} func didReceiveAccess() {} func didRejectAccess() {} } class CameraAccessor: PermissionAccessor { override func requestAccess(\_ completion: @escaping Completion) { AVCaptureDevice.requestAccess(for: .video) { status in return completion(status) } } override func hasAccess() -> Bool { return AVCaptureDevice.authorizationStatus(for: .video) == .authorized } override var description: String { return "Camera" } } class MicrophoneAccessor: PermissionAccessor { override func requestAccess(\_ completion: @escaping Completion) { AVAudioSession.sharedInstance().requestRecordPermission { status in completion(status) } } override func hasAccess() -> Bool { return AVAudioSession.sharedInstance().recordPermission == .granted } override var description: String { return "Microphone" } } class PhotoLibraryAccessor: PermissionAccessor { override func requestAccess(\_ completion: @escaping Completion) { PHPhotoLibrary.requestAuthorization { status in completion(status == .authorized) } } override func hasAccess() -> Bool { return PHPhotoLibrary.authorizationStatus() == .authorized } override var description: String { return "PhotoLibrary" } override func didReceiveAccess() { /// We want to track how many people give access to the PhotoLibrary. print("PhotoLibrary Accessor: Receive access. Updating analytics...") } override func didRejectAccess() { /// ... and also we want to track how many people rejected access. print("PhotoLibrary Accessor: Rejected with access. Updating analytics...") } } #### **Output.txt:** Результат выполнения You have access to Camera You have access to Microphone PhotoLibrary Accessor: Rejected with access. Updating analytics... You do not have access to PhotoLibrary **Шаблонный метод** на других языках программирования ----------------------------------------------------- [![Шаблонный метод на C#](https://refactoring.guru/images/patterns/icons/csharp.svg?id=da64592defc6e86d57c39c66e9de3e58)](https://refactoring.guru/ru/design-patterns/template-method/csharp/example "Шаблонный метод на C#") [![Шаблонный метод на C++](https://refactoring.guru/images/patterns/icons/cpp.svg?id=f7782ed8b8666246bfcc3f8fefc3b858)](https://refactoring.guru/ru/design-patterns/template-method/cpp/example "Шаблонный метод на C++") [![Шаблонный метод на Go](https://refactoring.guru/images/patterns/icons/go.svg?id=1a89927eb99b1ea3fde7701d97970aca)](https://refactoring.guru/ru/design-patterns/template-method/go/example "Шаблонный метод на Go") [![Шаблонный метод на Java](https://refactoring.guru/images/patterns/icons/java.svg?id=e6d87e2dca08c953fe3acd1275ed4f4e)](https://refactoring.guru/ru/design-patterns/template-method/java/example "Шаблонный метод на Java") [![Шаблонный метод на PHP](https://refactoring.guru/images/patterns/icons/php.svg?id=be1906eb26b71ec1d3b93720d6156618)](https://refactoring.guru/ru/design-patterns/template-method/php/example "Шаблонный метод на PHP") [![Шаблонный метод на Python](https://refactoring.guru/images/patterns/icons/python.svg?id=6d815d43c0f7050a1151b43e51569c9f)](https://refactoring.guru/ru/design-patterns/template-method/python/example "Шаблонный метод на Python") [![Шаблонный метод на Ruby](https://refactoring.guru/images/patterns/icons/ruby.svg?id=b065b718c914bf8e960ef731600be1eb)](https://refactoring.guru/ru/design-patterns/template-method/ruby/example "Шаблонный метод на Ruby") [![Шаблонный метод на Rust](https://refactoring.guru/images/patterns/icons/rust.svg?id=1f5698a4b5ae23fe79413511747e4a87)](https://refactoring.guru/ru/design-patterns/template-method/rust/example "Шаблонный метод на Rust") [![Шаблонный метод на TypeScript](https://refactoring.guru/images/patterns/icons/typescript.svg?id=2239d0f16cb703540c205dd8cb0c0cb7)](https://refactoring.guru/ru/design-patterns/template-method/typescript/example "Шаблонный метод на TypeScript") --- # Шаблонний метод на PHP [There are patterns of patterns now! \ My friend's project: MetaPatterns.io](https://metapatterns.io/)  [](https://refactoring.guru/uk/design-patterns/template-method/php/example#checkout) [](https://refactoring.guru/uk/design-patterns/template-method/php/example#checkout) [](https://refactoring.guru/) / [Патерни проектування](https://refactoring.guru/uk/design-patterns) / [Шаблонний метод](https://refactoring.guru/uk/design-patterns/template-method) / [PHP](https://refactoring.guru/uk/design-patterns/php) ![Шаблонний метод](https://refactoring.guru/images/patterns/cards/template-method-mini-2x.png?id=178bf56e39b3a1f548dd636076209c98) **Шаблонний метод** на PHP ========================== **Шаблонний метод** — це поведінковий патерн, який визначає кістяк алгоритму в суперкласі та змушує підкласи реалізувати конкретні кроки цього алгоритму. [Детальніше про Шаблонний метод](https://refactoring.guru/uk/design-patterns/template-method) Навігація  [Інтро](https://refactoring.guru/uk/design-patterns/template-method/php/example#)  [Концептуальний приклад](https://refactoring.guru/uk/design-patterns/template-method/php/example#example-0)  [index](https://refactoring.guru/uk/design-patterns/template-method/php/example#example-0--index-php)  [Output](https://refactoring.guru/uk/design-patterns/template-method/php/example#example-0--Output-txt)  [Життєвий приклад](https://refactoring.guru/uk/design-patterns/template-method/php/example#example-1)  [index](https://refactoring.guru/uk/design-patterns/template-method/php/example#example-1--index-php)  [Output](https://refactoring.guru/uk/design-patterns/template-method/php/example#example-1--Output-txt) **Складність:** **Популярність:** **Застосування:** Шаблонні методи можна зустріти в багатьох PHP-фреймворках. Розробники створюють такі методи, щоб дозволити клієнтам легко і швидко розширювати стандартний код за допомогою наслідування. **Ознаки застосування патерна:** Клас змушує своїх нащадків реалізувати методи-кроки, але самостійно реалізовує структуру алгоритму. Концептуальний приклад ---------------------- Цей приклад показує структуру патерна **Шаблонний метод**, а саме — з яких класів він складається, які ролі ці класи виконують і як вони взаємодіють один з одним. Після ознайомлення зі структурою, вам буде легше сприймати наступний приклад, що розглядає реальний випадок використання патерна в світі PHP. #### **index.php:** Приклад структури патерна baseOperation1(); $this->requiredOperations1(); $this->baseOperation2(); $this->hook1(); $this->requiredOperation2(); $this->baseOperation3(); $this->hook2(); } /\*\* \* These operations already have implementations. \*/ protected function baseOperation1(): void { echo "AbstractClass says: I am doing the bulk of the work\\n"; } protected function baseOperation2(): void { echo "AbstractClass says: But I let subclasses override some operations\\n"; } protected function baseOperation3(): void { echo "AbstractClass says: But I am doing the bulk of the work anyway\\n"; } /\*\* \* These operations have to be implemented in subclasses. \*/ abstract protected function requiredOperations1(): void; abstract protected function requiredOperation2(): void; /\*\* \* These are "hooks." Subclasses may override them, but it's not mandatory \* since the hooks already have default (but empty) implementation. Hooks \* provide additional extension points in some crucial places of the \* algorithm. \*/ protected function hook1(): void { } protected function hook2(): void { } } /\*\* \* Concrete classes have to implement all abstract operations of the base class. \* They can also override some operations with a default implementation. \*/ class ConcreteClass1 extends AbstractClass { protected function requiredOperations1(): void { echo "ConcreteClass1 says: Implemented Operation1\\n"; } protected function requiredOperation2(): void { echo "ConcreteClass1 says: Implemented Operation2\\n"; } } /\*\* \* Usually, concrete classes override only a fraction of base class' operations. \*/ class ConcreteClass2 extends AbstractClass { protected function requiredOperations1(): void { echo "ConcreteClass2 says: Implemented Operation1\\n"; } protected function requiredOperation2(): void { echo "ConcreteClass2 says: Implemented Operation2\\n"; } protected function hook1(): void { echo "ConcreteClass2 says: Overridden Hook1\\n"; } } /\*\* \* The client code calls the template method to execute the algorithm. Client \* code does not have to know the concrete class of an object it works with, as \* long as it works with objects through the interface of their base class. \*/ function clientCode(AbstractClass $class) { // ... $class->templateMethod(); // ... } echo "Same client code can work with different subclasses:\\n"; clientCode(new ConcreteClass1()); echo "\\n"; echo "Same client code can work with different subclasses:\\n"; clientCode(new ConcreteClass2()); #### **Output.txt:** Результат виконання Same client code can work with different subclasses: AbstractClass says: I am doing bulk of the work ConcreteClass1 says: Implemented Operation1 AbstractClass says: But I let subclasses to override some operations ConcreteClass1 says: Implemented Operation2 AbstractClass says: But I am doing bulk of the work anyway Same client code can work with different subclasses: AbstractClass says: I am doing bulk of the work ConcreteClass2 says: Implemented Operation1 AbstractClass says: But I let subclasses to override some operations ConcreteClass2 says: Overridden Hook1 ConcreteClass2 says: Implemented Operation2 AbstractClass says: But I am doing bulk of the work anyway Життєвий приклад ---------------- #### **index.php:** Приклад з реального світу username = $username; $this->password = $password; } /\*\* \* The actual template method calls abstract steps in a specific order. A \* subclass may implement all of the steps, allowing this method to actually \* post something to a social network. \*/ public function post(string $message): bool { // Authenticate before posting. Every network uses a different // authentication method. if ($this->logIn($this->username, $this->password)) { // Send the post data. All networks have different APIs. $result = $this->sendData($message); // ... $this->logOut(); return $result; } return false; } /\*\* \* The steps are declared abstract to force the subclasses to implement them \* all. \*/ abstract public function logIn(string $userName, string $password): bool; abstract public function sendData(string $message): bool; abstract public function logOut(): void; } /\*\* \* This Concrete Class implements the Facebook API (all right, it pretends to). \*/ class Facebook extends SocialNetwork { public function logIn(string $userName, string $password): bool { echo "\\nChecking user's credentials...\\n"; echo "Name: " . $this->username . "\\n"; echo "Password: " . str\_repeat("\*", strlen($this->password)) . "\\n"; simulateNetworkLatency(); echo "\\n\\nFacebook: '" . $this->username . "' has logged in successfully.\\n"; return true; } public function sendData(string $message): bool { echo "Facebook: '" . $this->username . "' has posted '" . $message . "'.\\n"; return true; } public function logOut(): void { echo "Facebook: '" . $this->username . "' has been logged out.\\n"; } } /\*\* \* This Concrete Class implements the Twitter API. \*/ class Twitter extends SocialNetwork { public function logIn(string $userName, string $password): bool { echo "\\nChecking user's credentials...\\n"; echo "Name: " . $this->username . "\\n"; echo "Password: " . str\_repeat("\*", strlen($this->password)) . "\\n"; simulateNetworkLatency(); echo "\\n\\nTwitter: '" . $this->username . "' has logged in successfully.\\n"; return true; } public function sendData(string $message): bool { echo "Twitter: '" . $this->username . "' has posted '" . $message . "'.\\n"; return true; } public function logOut(): void { echo "Twitter: '" . $this->username . "' has been logged out.\\n"; } } /\*\* \* A little helper function that makes waiting times feel real. \*/ function simulateNetworkLatency() { $i = 0; while ($i < 5) { echo "."; sleep(1); $i++; } } /\*\* \* The client code. \*/ echo "Username: \\n"; $username = readline(); echo "Password: \\n"; $password = readline(); echo "Message: \\n"; $message = readline(); echo "\\nChoose the social network to post the message:\\n" . "1 - Facebook\\n" . "2 - Twitter\\n"; $choice = readline(); // Now, let's create a proper social network object and send the message. if ($choice == 1) { $network = new Facebook($username, $password); } elseif ($choice == 2) { $network = new Twitter($username, $password); } else { die("Sorry, I'm not sure what you mean by that.\\n"); } $network->post($message); #### **Output.txt:** Результат виконання Username: > neo Password: > 123123 Message: > What is the Matrix? Choose the social network to post the message: 1 - Facebook 2 - Twitter > 1 Checking user's credentials... Name: neo Password: \*\*\*\*\*\* ..... Facebook: 'neo' has logged in successfully. Facebook: 'neo' has posted 'What is the Matrix?'. Facebook: 'neo' has been logged out. **Шаблонний метод** іншими мовами програмування ----------------------------------------------- [![Шаблонний метод на C#](https://refactoring.guru/images/patterns/icons/csharp.svg?id=da64592defc6e86d57c39c66e9de3e58)](https://refactoring.guru/uk/design-patterns/template-method/csharp/example "Шаблонний метод на C#") [![Шаблонний метод на C++](https://refactoring.guru/images/patterns/icons/cpp.svg?id=f7782ed8b8666246bfcc3f8fefc3b858)](https://refactoring.guru/uk/design-patterns/template-method/cpp/example "Шаблонний метод на C++") [![Шаблонний метод на Go](https://refactoring.guru/images/patterns/icons/go.svg?id=1a89927eb99b1ea3fde7701d97970aca)](https://refactoring.guru/uk/design-patterns/template-method/go/example "Шаблонний метод на Go") [![Шаблонний метод на Java](https://refactoring.guru/images/patterns/icons/java.svg?id=e6d87e2dca08c953fe3acd1275ed4f4e)](https://refactoring.guru/uk/design-patterns/template-method/java/example "Шаблонний метод на Java") [![Шаблонний метод на Python](https://refactoring.guru/images/patterns/icons/python.svg?id=6d815d43c0f7050a1151b43e51569c9f)](https://refactoring.guru/uk/design-patterns/template-method/python/example "Шаблонний метод на Python") [![Шаблонний метод на Ruby](https://refactoring.guru/images/patterns/icons/ruby.svg?id=b065b718c914bf8e960ef731600be1eb)](https://refactoring.guru/uk/design-patterns/template-method/ruby/example "Шаблонний метод на Ruby") [![Шаблонний метод на Rust](https://refactoring.guru/images/patterns/icons/rust.svg?id=1f5698a4b5ae23fe79413511747e4a87)](https://refactoring.guru/uk/design-patterns/template-method/rust/example "Шаблонний метод на Rust") [![Шаблонний метод на Swift](https://refactoring.guru/images/patterns/icons/swift.svg?id=0b716c2d52ec3a48fbe91ac031070c1d)](https://refactoring.guru/uk/design-patterns/template-method/swift/example "Шаблонний метод на Swift") [![Шаблонний метод на TypeScript](https://refactoring.guru/images/patterns/icons/typescript.svg?id=2239d0f16cb703540c205dd8cb0c0cb7)](https://refactoring.guru/uk/design-patterns/template-method/typescript/example "Шаблонний метод на TypeScript") --- # Посетитель на TypeScript [There are patterns of patterns now! \ My friend's project: MetaPatterns.io](https://metapatterns.io/)  [](https://refactoring.guru/ru/design-patterns/visitor/typescript/example#checkout) [](https://refactoring.guru/ru/design-patterns/visitor/typescript/example#checkout) [](https://refactoring.guru/) / [Паттерны проектирования](https://refactoring.guru/ru/design-patterns) / [Посетитель](https://refactoring.guru/ru/design-patterns/visitor) / [TypeScript](https://refactoring.guru/ru/design-patterns/typescript) ![Посетитель](https://refactoring.guru/images/patterns/cards/visitor-mini-2x.png?id=9b87f3f3b772f434b28a25876829b504) **Посетитель** на TypeScript ============================ **Посетитель** — это поведенческий паттерн, который позволяет добавить новую операцию для целой иерархии классов, не изменяя код этих классов. > Подробней о том, почему Посетитель нельзя заменить простой перегрузкой методов читайте в статье [Посетитель и Double Dispatch](https://refactoring.guru/ru/design-patterns/visitor-double-dispatch) > . [Подробней о паттерне Посетитель](https://refactoring.guru/ru/design-patterns/visitor) Навигация  [Интро](https://refactoring.guru/ru/design-patterns/visitor/typescript/example#)  [Концептуальный пример](https://refactoring.guru/ru/design-patterns/visitor/typescript/example#example-0)  [index](https://refactoring.guru/ru/design-patterns/visitor/typescript/example#example-0--index-ts)  [Output](https://refactoring.guru/ru/design-patterns/visitor/typescript/example#example-0--Output-txt) **Сложность:** **Популярность:** **Применимость:** Посетитель нечасто встречается в TypeScript-коде из-за своей сложности и нюансов реализазации. Концептуальный пример --------------------- Этот пример показывает структуру паттерна **Посетитель**, а именно — из каких классов он состоит, какие роли эти классы выполняют и как они взаимодействуют друг с другом. #### **index.ts:** Пример структуры паттерна /\*\* \* Интерфейс Компонента объявляет метод accept, который в качестве аргумента \* может получать любой объект, реализующий интерфейс посетителя. \*/ interface Component { accept(visitor: Visitor): void; } /\*\* \* Каждый Конкретный Компонент должен реализовать метод accept таким образом, \* чтобы он вызывал метод посетителя, соответствующий классу компонента. \*/ class ConcreteComponentA implements Component { /\*\* \* Обратите внимание, мы вызываем visitConcreteComponentA, что соответствует \* названию текущего класса. Таким образом мы позволяем посетителю узнать, с \* каким классом компонента он работает. \*/ public accept(visitor: Visitor): void { visitor.visitConcreteComponentA(this); } /\*\* \* Конкретные Компоненты могут иметь особые методы, не объявленные в их \* базовом классе или интерфейсе. Посетитель всё же может использовать эти \* методы, поскольку он знает о конкретном классе компонента. \*/ public exclusiveMethodOfConcreteComponentA(): string { return 'A'; } } class ConcreteComponentB implements Component { /\*\* \* То же самое здесь: visitConcreteComponentB => ConcreteComponentB \*/ public accept(visitor: Visitor): void { visitor.visitConcreteComponentB(this); } public specialMethodOfConcreteComponentB(): string { return 'B'; } } /\*\* \* Интерфейс Посетителя объявляет набор методов посещения, соответствующих \* классам компонентов. Сигнатура метода посещения позволяет посетителю \* определить конкретный класс компонента, с которым он имеет дело. \*/ interface Visitor { visitConcreteComponentA(element: ConcreteComponentA): void; visitConcreteComponentB(element: ConcreteComponentB): void; } /\*\* \* Конкретные Посетители реализуют несколько версий одного и того же алгоритма, \* которые могут работать со всеми классами конкретных компонентов. \* \* Максимальную выгоду от паттерна Посетитель вы почувствуете, используя его со \* сложной структурой объектов, такой как дерево Компоновщика. В этом случае \* было бы полезно хранить некоторое промежуточное состояние алгоритма при \* выполнении методов посетителя над различными объектами структуры. \*/ class ConcreteVisitor1 implements Visitor { public visitConcreteComponentA(element: ConcreteComponentA): void { console.log(\`${element.exclusiveMethodOfConcreteComponentA()} + ConcreteVisitor1\`); } public visitConcreteComponentB(element: ConcreteComponentB): void { console.log(\`${element.specialMethodOfConcreteComponentB()} + ConcreteVisitor1\`); } } class ConcreteVisitor2 implements Visitor { public visitConcreteComponentA(element: ConcreteComponentA): void { console.log(\`${element.exclusiveMethodOfConcreteComponentA()} + ConcreteVisitor2\`); } public visitConcreteComponentB(element: ConcreteComponentB): void { console.log(\`${element.specialMethodOfConcreteComponentB()} + ConcreteVisitor2\`); } } /\*\* \* Клиентский код может выполнять операции посетителя над любым набором \* элементов, не выясняя их конкретных классов. Операция принятия направляет \* вызов к соответствующей операции в объекте посетителя. \*/ function clientCode(components: Component\[\], visitor: Visitor) { // ... for (const component of components) { component.accept(visitor); } // ... } const components = \[\ new ConcreteComponentA(),\ new ConcreteComponentB(),\ \]; console.log('The client code works with all visitors via the base Visitor interface:'); const visitor1 = new ConcreteVisitor1(); clientCode(components, visitor1); console.log(''); console.log('It allows the same client code to work with different types of visitors:'); const visitor2 = new ConcreteVisitor2(); clientCode(components, visitor2); #### **Output.txt:** Результат выполнения The client code works with all visitors via the base Visitor interface: A + ConcreteVisitor1 B + ConcreteVisitor1 It allows the same client code to work with different types of visitors: A + ConcreteVisitor2 B + ConcreteVisitor2 **Посетитель** на других языках программирования ------------------------------------------------ [![Посетитель на C#](https://refactoring.guru/images/patterns/icons/csharp.svg?id=da64592defc6e86d57c39c66e9de3e58)](https://refactoring.guru/ru/design-patterns/visitor/csharp/example "Посетитель на C#") [![Посетитель на C++](https://refactoring.guru/images/patterns/icons/cpp.svg?id=f7782ed8b8666246bfcc3f8fefc3b858)](https://refactoring.guru/ru/design-patterns/visitor/cpp/example "Посетитель на C++") [![Посетитель на Go](https://refactoring.guru/images/patterns/icons/go.svg?id=1a89927eb99b1ea3fde7701d97970aca)](https://refactoring.guru/ru/design-patterns/visitor/go/example "Посетитель на Go") [![Посетитель на Java](https://refactoring.guru/images/patterns/icons/java.svg?id=e6d87e2dca08c953fe3acd1275ed4f4e)](https://refactoring.guru/ru/design-patterns/visitor/java/example "Посетитель на Java") [![Посетитель на PHP](https://refactoring.guru/images/patterns/icons/php.svg?id=be1906eb26b71ec1d3b93720d6156618)](https://refactoring.guru/ru/design-patterns/visitor/php/example "Посетитель на PHP") [![Посетитель на Python](https://refactoring.guru/images/patterns/icons/python.svg?id=6d815d43c0f7050a1151b43e51569c9f)](https://refactoring.guru/ru/design-patterns/visitor/python/example "Посетитель на Python") [![Посетитель на Ruby](https://refactoring.guru/images/patterns/icons/ruby.svg?id=b065b718c914bf8e960ef731600be1eb)](https://refactoring.guru/ru/design-patterns/visitor/ruby/example "Посетитель на Ruby") [![Посетитель на Rust](https://refactoring.guru/images/patterns/icons/rust.svg?id=1f5698a4b5ae23fe79413511747e4a87)](https://refactoring.guru/ru/design-patterns/visitor/rust/example "Посетитель на Rust") [![Посетитель на Swift](https://refactoring.guru/images/patterns/icons/swift.svg?id=0b716c2d52ec3a48fbe91ac031070c1d)](https://refactoring.guru/ru/design-patterns/visitor/swift/example "Посетитель на Swift") --- # Шаблонный метод на TypeScript [There are patterns of patterns now! \ My friend's project: MetaPatterns.io](https://metapatterns.io/)  [](https://refactoring.guru/ru/design-patterns/template-method/typescript/example#checkout) [](https://refactoring.guru/ru/design-patterns/template-method/typescript/example#checkout) [](https://refactoring.guru/) / [Паттерны проектирования](https://refactoring.guru/ru/design-patterns) / [Шаблонный метод](https://refactoring.guru/ru/design-patterns/template-method) / [TypeScript](https://refactoring.guru/ru/design-patterns/typescript) ![Шаблонный метод](https://refactoring.guru/images/patterns/cards/template-method-mini-2x.png?id=178bf56e39b3a1f548dd636076209c98) **Шаблонный метод** на TypeScript ================================= **Шаблонный метод** — это поведенческий паттерн, задающий скелет алгоритма в суперклассе и заставляющий подклассы реализовать конкретные шаги этого алгоритма. [Подробней о паттерне Шаблонный метод](https://refactoring.guru/ru/design-patterns/template-method) Навигация  [Интро](https://refactoring.guru/ru/design-patterns/template-method/typescript/example#)  [Концептуальный пример](https://refactoring.guru/ru/design-patterns/template-method/typescript/example#example-0)  [index](https://refactoring.guru/ru/design-patterns/template-method/typescript/example#example-0--index-ts)  [Output](https://refactoring.guru/ru/design-patterns/template-method/typescript/example#example-0--Output-txt) **Сложность:** **Популярность:** **Применимость:** Шаблонные методы можно встретить во многих библиотечных классах TypeScript. Разработчики создают их, чтобы позволить клиентам легко и быстро расширять стандартный код при помощи наследования. **Признаки применения паттерна:** Класс заставляет своих потомков реализовать методы-шаги, но самостоятельно реализует структуру алгоритма. Концептуальный пример --------------------- Этот пример показывает структуру паттерна **Шаблонный метод**, а именно — из каких классов он состоит, какие роли эти классы выполняют и как они взаимодействуют друг с другом. #### **index.ts:** Пример структуры паттерна /\*\* \* Абстрактный Класс определяет шаблонный метод, содержащий скелет некоторого \* алгоритма, состоящего из вызовов (обычно) абстрактных примитивных операций. \* \* Конкретные подклассы должны реализовать эти операции, но оставить сам \* шаблонный метод без изменений. \*/ abstract class AbstractClass { /\*\* \* Шаблонный метод определяет скелет алгоритма. \*/ public templateMethod(): void { this.baseOperation1(); this.requiredOperations1(); this.baseOperation2(); this.hook1(); this.requiredOperation2(); this.baseOperation3(); this.hook2(); } /\*\* \* Эти операции уже имеют реализации. \*/ protected baseOperation1(): void { console.log('AbstractClass says: I am doing the bulk of the work'); } protected baseOperation2(): void { console.log('AbstractClass says: But I let subclasses override some operations'); } protected baseOperation3(): void { console.log('AbstractClass says: But I am doing the bulk of the work anyway'); } /\*\* \* А эти операции должны быть реализованы в подклассах. \*/ protected abstract requiredOperations1(): void; protected abstract requiredOperation2(): void; /\*\* \* Это «хуки». Подклассы могут переопределять их, но это не обязательно, \* поскольку у хуков уже есть стандартная (но пустая) реализация. Хуки \* предоставляют дополнительные точки расширения в некоторых критических \* местах алгоритма. \*/ protected hook1(): void { } protected hook2(): void { } } /\*\* \* Конкретные классы должны реализовать все абстрактные операции базового \* класса. Они также могут переопределить некоторые операции с реализацией по \* умолчанию. \*/ class ConcreteClass1 extends AbstractClass { protected requiredOperations1(): void { console.log('ConcreteClass1 says: Implemented Operation1'); } protected requiredOperation2(): void { console.log('ConcreteClass1 says: Implemented Operation2'); } } /\*\* \* Обычно конкретные классы переопределяют только часть операций базового \* класса. \*/ class ConcreteClass2 extends AbstractClass { protected requiredOperations1(): void { console.log('ConcreteClass2 says: Implemented Operation1'); } protected requiredOperation2(): void { console.log('ConcreteClass2 says: Implemented Operation2'); } protected hook1(): void { console.log('ConcreteClass2 says: Overridden Hook1'); } } /\*\* \* Клиентский код вызывает шаблонный метод для выполнения алгоритма. Клиентский \* код не должен знать конкретный класс объекта, с которым работает, при \* условии, что он работает с объектами через интерфейс их базового класса. \*/ function clientCode(abstractClass: AbstractClass) { // ... abstractClass.templateMethod(); // ... } console.log('Same client code can work with different subclasses:'); clientCode(new ConcreteClass1()); console.log(''); console.log('Same client code can work with different subclasses:'); clientCode(new ConcreteClass2()); #### **Output.txt:** Результат выполнения Same client code can work with different subclasses: AbstractClass says: I am doing the bulk of the work ConcreteClass1 says: Implemented Operation1 AbstractClass says: But I let subclasses override some operations ConcreteClass1 says: Implemented Operation2 AbstractClass says: But I am doing the bulk of the work anyway Same client code can work with different subclasses: AbstractClass says: I am doing the bulk of the work ConcreteClass2 says: Implemented Operation1 AbstractClass says: But I let subclasses override some operations ConcreteClass2 says: Overridden Hook1 ConcreteClass2 says: Implemented Operation2 AbstractClass says: But I am doing the bulk of the work anyway **Шаблонный метод** на других языках программирования ----------------------------------------------------- [![Шаблонный метод на C#](https://refactoring.guru/images/patterns/icons/csharp.svg?id=da64592defc6e86d57c39c66e9de3e58)](https://refactoring.guru/ru/design-patterns/template-method/csharp/example "Шаблонный метод на C#") [![Шаблонный метод на C++](https://refactoring.guru/images/patterns/icons/cpp.svg?id=f7782ed8b8666246bfcc3f8fefc3b858)](https://refactoring.guru/ru/design-patterns/template-method/cpp/example "Шаблонный метод на C++") [![Шаблонный метод на Go](https://refactoring.guru/images/patterns/icons/go.svg?id=1a89927eb99b1ea3fde7701d97970aca)](https://refactoring.guru/ru/design-patterns/template-method/go/example "Шаблонный метод на Go") [![Шаблонный метод на Java](https://refactoring.guru/images/patterns/icons/java.svg?id=e6d87e2dca08c953fe3acd1275ed4f4e)](https://refactoring.guru/ru/design-patterns/template-method/java/example "Шаблонный метод на Java") [![Шаблонный метод на PHP](https://refactoring.guru/images/patterns/icons/php.svg?id=be1906eb26b71ec1d3b93720d6156618)](https://refactoring.guru/ru/design-patterns/template-method/php/example "Шаблонный метод на PHP") [![Шаблонный метод на Python](https://refactoring.guru/images/patterns/icons/python.svg?id=6d815d43c0f7050a1151b43e51569c9f)](https://refactoring.guru/ru/design-patterns/template-method/python/example "Шаблонный метод на Python") [![Шаблонный метод на Ruby](https://refactoring.guru/images/patterns/icons/ruby.svg?id=b065b718c914bf8e960ef731600be1eb)](https://refactoring.guru/ru/design-patterns/template-method/ruby/example "Шаблонный метод на Ruby") [![Шаблонный метод на Rust](https://refactoring.guru/images/patterns/icons/rust.svg?id=1f5698a4b5ae23fe79413511747e4a87)](https://refactoring.guru/ru/design-patterns/template-method/rust/example "Шаблонный метод на Rust") [![Шаблонный метод на Swift](https://refactoring.guru/images/patterns/icons/swift.svg?id=0b716c2d52ec3a48fbe91ac031070c1d)](https://refactoring.guru/ru/design-patterns/template-method/swift/example "Шаблонный метод на Swift") --- # Абстрактная фабрика на C# [There are patterns of patterns now! \ My friend's project: MetaPatterns.io](https://metapatterns.io/)  [](https://refactoring.guru/ru/design-patterns/abstract-factory/csharp/example#checkout) [](https://refactoring.guru/ru/design-patterns/abstract-factory/csharp/example#checkout) [](https://refactoring.guru/) / [Паттерны проектирования](https://refactoring.guru/ru/design-patterns) / [Абстрактная фабрика](https://refactoring.guru/ru/design-patterns/abstract-factory) / [C#](https://refactoring.guru/ru/design-patterns/csharp) ![Абстрактная фабрика](https://refactoring.guru/images/patterns/cards/abstract-factory-mini-2x.png?id=22236aaa65ff52cbde1c713216d52c1f) **Абстрактная фабрика** на C# ============================= **Абстрактная фабрика** — это порождающий паттерн проектирования, который решает проблему создания целых семейств связанных продуктов, без указания конкретных классов продуктов. Абстрактная фабрика задаёт интерфейс создания всех доступных типов продуктов, а каждая конкретная реализация фабрики порождает продукты одной из вариаций. Клиентский код вызывает методы фабрики для получения продуктов, вместо самостоятельного создания с помощью оператора `new`. При этом фабрика сама следит за тем, чтобы создать продукт нужной вариации. [Подробней о паттерне Абстрактная фабрика](https://refactoring.guru/ru/design-patterns/abstract-factory) Навигация  [Интро](https://refactoring.guru/ru/design-patterns/abstract-factory/csharp/example#)  [Концептуальный пример](https://refactoring.guru/ru/design-patterns/abstract-factory/csharp/example#example-0)  [Program](https://refactoring.guru/ru/design-patterns/abstract-factory/csharp/example#example-0--Program-cs)  [Output](https://refactoring.guru/ru/design-patterns/abstract-factory/csharp/example#example-0--Output-txt) **Сложность:** **Популярность:** **Применимость:** Паттерн можно часто встретить в C#-коде, особенно там, где требуется создание семейств продуктов (например, внутри фреймворков). **Признаки применения паттерна:** Паттерн можно определить по методам, возвращающим фабрику, которая, в свою очередь, используется для создания конкретных продуктов, возвращая их через абстрактные типы или интерфейсы. Концептуальный пример --------------------- Этот пример показывает структуру паттерна **Абстрактная фабрика**, а именно — из каких классов он состоит, какие роли эти классы выполняют и как они взаимодействуют друг с другом. #### **Program.cs:** Пример структуры паттерна using System; namespace RefactoringGuru.DesignPatterns.AbstractFactory.Conceptual { // Интерфейс Абстрактной Фабрики объявляет набор методов, которые возвращают // различные абстрактные продукты. Эти продукты называются семейством и // связаны темой или концепцией высокого уровня. Продукты одного семейства // обычно могут взаимодействовать между собой. Семейство продуктов может // иметь несколько вариаций, но продукты одной вариации несовместимы с // продуктами другой. public interface IAbstractFactory { IAbstractProductA CreateProductA(); IAbstractProductB CreateProductB(); } // Конкретная Фабрика производит семейство продуктов одной вариации. Фабрика // гарантирует совместимость полученных продуктов. Обратите внимание, что // сигнатуры методов Конкретной Фабрики возвращают абстрактный продукт, в то // время как внутри метода создается экземпляр конкретного продукта. class ConcreteFactory1 : IAbstractFactory { public IAbstractProductA CreateProductA() { return new ConcreteProductA1(); } public IAbstractProductB CreateProductB() { return new ConcreteProductB1(); } } // Каждая Конкретная Фабрика имеет соответствующую вариацию продукта. class ConcreteFactory2 : IAbstractFactory { public IAbstractProductA CreateProductA() { return new ConcreteProductA2(); } public IAbstractProductB CreateProductB() { return new ConcreteProductB2(); } } // Каждый отдельный продукт семейства продуктов должен иметь базовый // интерфейс. Все вариации продукта должны реализовывать этот интерфейс. public interface IAbstractProductA { string UsefulFunctionA(); } // Конкретные продукты создаются соответствующими Конкретными Фабриками. class ConcreteProductA1 : IAbstractProductA { public string UsefulFunctionA() { return "The result of the product A1."; } } class ConcreteProductA2 : IAbstractProductA { public string UsefulFunctionA() { return "The result of the product A2."; } } // Базовый интерфейс другого продукта. Все продукты могут взаимодействовать // друг с другом, но правильное взаимодействие возможно только между // продуктами одной и той же конкретной вариации. public interface IAbstractProductB { // Продукт B способен работать самостоятельно... string UsefulFunctionB(); // ...а также взаимодействовать с Продуктами А той же вариации. // // Абстрактная Фабрика гарантирует, что все продукты, которые она // создает, имеют одинаковую вариацию и, следовательно, совместимы. string AnotherUsefulFunctionB(IAbstractProductA collaborator); } // Конкретные Продукты создаются соответствующими Конкретными Фабриками. class ConcreteProductB1 : IAbstractProductB { public string UsefulFunctionB() { return "The result of the product B1."; } // Продукт B1 может корректно работать только с Продуктом A1. Тем не // менее, он принимает любой экземпляр Абстрактного Продукта А в // качестве аргумента. public string AnotherUsefulFunctionB(IAbstractProductA collaborator) { var result = collaborator.UsefulFunctionA(); return $"The result of the B1 collaborating with the ({result})"; } } class ConcreteProductB2 : IAbstractProductB { public string UsefulFunctionB() { return "The result of the product B2."; } // Продукт B2 может корректно работать только с Продуктом A2. Тем не // менее, он принимает любой экземпляр Абстрактного Продукта А в качестве // аргумента. public string AnotherUsefulFunctionB(IAbstractProductA collaborator) { var result = collaborator.UsefulFunctionA(); return $"The result of the B2 collaborating with the ({result})"; } } // Клиентский код работает с фабриками и продуктами только через абстрактные // типы: Абстрактная Фабрика и Абстрактный Продукт. Это позволяет передавать // любой подкласс фабрики или продукта клиентскому коду, не нарушая его. class Client { public void Main() { // Клиентский код может работать с любым конкретным классом фабрики. Console.WriteLine("Client: Testing client code with the first factory type..."); ClientMethod(new ConcreteFactory1()); Console.WriteLine(); Console.WriteLine("Client: Testing the same client code with the second factory type..."); ClientMethod(new ConcreteFactory2()); } public void ClientMethod(IAbstractFactory factory) { var productA = factory.CreateProductA(); var productB = factory.CreateProductB(); Console.WriteLine(productB.UsefulFunctionB()); Console.WriteLine(productB.AnotherUsefulFunctionB(productA)); } } class Program { static void Main(string\[\] args) { new Client().Main(); } } } #### **Output.txt:** Результат выполнения Client: Testing client code with the first factory type... The result of the product B1. The result of the B1 collaborating with the (The result of the product A1.) Client: Testing the same client code with the second factory type... The result of the product B2. The result of the B2 collaborating with the (The result of the product A2.) **Абстрактная фабрика** на других языках программирования --------------------------------------------------------- [![Абстрактная фабрика на C++](https://refactoring.guru/images/patterns/icons/cpp.svg?id=f7782ed8b8666246bfcc3f8fefc3b858)](https://refactoring.guru/ru/design-patterns/abstract-factory/cpp/example "Абстрактная фабрика на C++") [![Абстрактная фабрика на Go](https://refactoring.guru/images/patterns/icons/go.svg?id=1a89927eb99b1ea3fde7701d97970aca)](https://refactoring.guru/ru/design-patterns/abstract-factory/go/example "Абстрактная фабрика на Go") [![Абстрактная фабрика на Java](https://refactoring.guru/images/patterns/icons/java.svg?id=e6d87e2dca08c953fe3acd1275ed4f4e)](https://refactoring.guru/ru/design-patterns/abstract-factory/java/example "Абстрактная фабрика на Java") [![Абстрактная фабрика на PHP](https://refactoring.guru/images/patterns/icons/php.svg?id=be1906eb26b71ec1d3b93720d6156618)](https://refactoring.guru/ru/design-patterns/abstract-factory/php/example "Абстрактная фабрика на PHP") [![Абстрактная фабрика на Python](https://refactoring.guru/images/patterns/icons/python.svg?id=6d815d43c0f7050a1151b43e51569c9f)](https://refactoring.guru/ru/design-patterns/abstract-factory/python/example "Абстрактная фабрика на Python") [![Абстрактная фабрика на Ruby](https://refactoring.guru/images/patterns/icons/ruby.svg?id=b065b718c914bf8e960ef731600be1eb)](https://refactoring.guru/ru/design-patterns/abstract-factory/ruby/example "Абстрактная фабрика на Ruby") [![Абстрактная фабрика на Rust](https://refactoring.guru/images/patterns/icons/rust.svg?id=1f5698a4b5ae23fe79413511747e4a87)](https://refactoring.guru/ru/design-patterns/abstract-factory/rust/example "Абстрактная фабрика на Rust") [![Абстрактная фабрика на Swift](https://refactoring.guru/images/patterns/icons/swift.svg?id=0b716c2d52ec3a48fbe91ac031070c1d)](https://refactoring.guru/ru/design-patterns/abstract-factory/swift/example "Абстрактная фабрика на Swift") [![Абстрактная фабрика на TypeScript](https://refactoring.guru/images/patterns/icons/typescript.svg?id=2239d0f16cb703540c205dd8cb0c0cb7)](https://refactoring.guru/ru/design-patterns/abstract-factory/typescript/example "Абстрактная фабрика на TypeScript") --- # Visitor em Java / Padrões de Projeto [There are patterns of patterns now! \ My friend's project: MetaPatterns.io](https://metapatterns.io/)  [](https://refactoring.guru/pt-br/design-patterns/visitor/java/example#checkout) [](https://refactoring.guru/pt-br/design-patterns/visitor/java/example#checkout) [](https://refactoring.guru/) / [Padrões de Projeto](https://refactoring.guru/pt-br/design-patterns) / [Visitor](https://refactoring.guru/pt-br/design-patterns/visitor) / [Java](https://refactoring.guru/pt-br/design-patterns/java) ![Visitor](https://refactoring.guru/images/patterns/cards/visitor-mini-2x.png?id=9b87f3f3b772f434b28a25876829b504) **Visitor** em Java =================== O **Visitor** é um padrão de projeto comportamental que permite adicionar novos comportamentos à hierarquia de classes existente sem alterar nenhum código existente. > Leia por que os Visitors não podem ser simplesmente substituídos pela sobrecarga de método em nosso artigo [Visitor e Double Dispatch](https://refactoring.guru/pt-br/design-patterns/visitor-double-dispatch) > . [Saiba mais sobre o Visitor](https://refactoring.guru/pt-br/design-patterns/visitor) Navegação  [Introdução](https://refactoring.guru/pt-br/design-patterns/visitor/java/example#)  [Exportando formas para XML](https://refactoring.guru/pt-br/design-patterns/visitor/java/example#example-0)  shapes   [Shape](https://refactoring.guru/pt-br/design-patterns/visitor/java/example#example-0--shapes-Shape-java)   [Dot](https://refactoring.guru/pt-br/design-patterns/visitor/java/example#example-0--shapes-Dot-java)   [Circle](https://refactoring.guru/pt-br/design-patterns/visitor/java/example#example-0--shapes-Circle-java)   [Rectangle](https://refactoring.guru/pt-br/design-patterns/visitor/java/example#example-0--shapes-Rectangle-java)   [Compound­Shape](https://refactoring.guru/pt-br/design-patterns/visitor/java/example#example-0--shapes-CompoundShape-java)  visitor   [Visitor](https://refactoring.guru/pt-br/design-patterns/visitor/java/example#example-0--visitor-Visitor-java)   [XMLExport­Visitor](https://refactoring.guru/pt-br/design-patterns/visitor/java/example#example-0--visitor-XMLExportVisitor-java)  [Demo](https://refactoring.guru/pt-br/design-patterns/visitor/java/example#example-0--Demo-java)  [Output­Demo](https://refactoring.guru/pt-br/design-patterns/visitor/java/example#example-0--OutputDemo-txt) **Complexidade:** **Popularidade:** **Exemplos de uso:** O Visitor não é um padrão muito comum devido à sua complexidade e aplicabilidade limitada. Aqui estão alguns exemplos do padrão nas principais bibliotecas Java: * [`javax.lang.model.element.AnnotationValue`](http://docs.oracle.com/javase/8/docs/api/javax/lang/model/element/AnnotationValue.html) e [`AnnotationValueVisitor`](http://docs.oracle.com/javase/8/docs/api/javax/lang/model/element/AnnotationValueVisitor.html) * [`javax.lang.model.element.Element`](http://docs.oracle.com/javase/8/docs/api/javax/lang/model/element/Element.html) e [`ElementVisitor`](http://docs.oracle.com/javase/8/docs/api/javax/lang/model/element/ElementVisitor.html) * [`javax.lang.model.type.TypeMirror`](http://docs.oracle.com/javase/8/docs/api/javax/lang/model/type/TypeMirror.html) e [`TypeVisitor`](http://docs.oracle.com/javase/8/docs/api/javax/lang/model/type/TypeVisitor.html) * [`java.nio.file.FileVisitor`](http://docs.oracle.com/javase/8/docs/api/java/nio/file/FileVisitor.html) e [`SimpleFileVisitor`](http://docs.oracle.com/javase/8/docs/api/java/nio/file/SimpleFileVisitor.html) * [`javax.faces.component.visit.VisitContext`](http://docs.oracle.com/javaee/7/api/javax/faces/component/visit/VisitContext.html) e [`VisitCallback`](http://docs.oracle.com/javaee/7/api/javax/faces/component/visit/VisitCallback.html) Exportando formas para XML -------------------------- Neste exemplo, gostaríamos de exportar um conjunto de formas geométricas para XML. O problema é que não queremos alterar o código de formas, diretamente ou, pelo menos, manter as alterações ao mínimo. No final, o padrão Visitor estabelece uma infraestrutura que nos permite adicionar comportamentos à hierarquia de formas sem alterar o código existente dessas classes. ### **shapes** #### **shapes/Shape.java:** Interface comum de forma package refactoring\_guru.visitor.example.shapes; import refactoring\_guru.visitor.example.visitor.Visitor; public interface Shape { void move(int x, int y); void draw(); String accept(Visitor visitor); } #### **shapes/Dot.java:** Um ponto package refactoring\_guru.visitor.example.shapes; import refactoring\_guru.visitor.example.visitor.Visitor; public class Dot implements Shape { private int id; private int x; private int y; public Dot() { } public Dot(int id, int x, int y) { this.id = id; this.x = x; this.y = y; } @Override public void move(int x, int y) { // move shape } @Override public void draw() { // draw shape } @Override public String accept(Visitor visitor) { return visitor.visitDot(this); } public int getX() { return x; } public int getY() { return y; } public int getId() { return id; } } #### **shapes/Circle.java:** Um círculo package refactoring\_guru.visitor.example.shapes; import refactoring\_guru.visitor.example.visitor.Visitor; public class Circle extends Dot { private int radius; public Circle(int id, int x, int y, int radius) { super(id, x, y); this.radius = radius; } @Override public String accept(Visitor visitor) { return visitor.visitCircle(this); } public int getRadius() { return radius; } } #### **shapes/Rectangle.java:** Um retângulo package refactoring\_guru.visitor.example.shapes; import refactoring\_guru.visitor.example.visitor.Visitor; public class Rectangle implements Shape { private int id; private int x; private int y; private int width; private int height; public Rectangle(int id, int x, int y, int width, int height) { this.id = id; this.x = x; this.y = y; this.width = width; this.height = height; } @Override public String accept(Visitor visitor) { return visitor.visitRectangle(this); } @Override public void move(int x, int y) { // move shape } @Override public void draw() { // draw shape } public int getId() { return id; } public int getX() { return x; } public int getY() { return y; } public int getWidth() { return width; } public int getHeight() { return height; } } #### **shapes/CompoundShape.java:** Uma forma composta package refactoring\_guru.visitor.example.shapes; import refactoring\_guru.visitor.example.visitor.Visitor; import java.util.ArrayList; import java.util.List; public class CompoundShape implements Shape { public int id; public List children = new ArrayList<>(); public CompoundShape(int id) { this.id = id; } @Override public void move(int x, int y) { // move shape } @Override public void draw() { // draw shape } public int getId() { return id; } @Override public String accept(Visitor visitor) { return visitor.visitCompoundGraphic(this); } public void add(Shape shape) { children.add(shape); } } ### **visitor** #### **visitor/Visitor.java:** Interface comum visitante package refactoring\_guru.visitor.example.visitor; import refactoring\_guru.visitor.example.shapes.Circle; import refactoring\_guru.visitor.example.shapes.CompoundShape; import refactoring\_guru.visitor.example.shapes.Dot; import refactoring\_guru.visitor.example.shapes.Rectangle; public interface Visitor { String visitDot(Dot dot); String visitCircle(Circle circle); String visitRectangle(Rectangle rectangle); String visitCompoundGraphic(CompoundShape cg); } #### **visitor/XMLExportVisitor.java:** Visitante concreto, exporta todas as formas em XML package refactoring\_guru.visitor.example.visitor; import refactoring\_guru.visitor.example.shapes.\*; public class XMLExportVisitor implements Visitor { public String export(Shape... args) { StringBuilder sb = new StringBuilder(); sb.append("" + "\\n"); for (Shape shape : args) { sb.append(shape.accept(this)).append("\\n"); } return sb.toString(); } public String visitDot(Dot d) { return "" + "\\n" + " " + d.getId() + "" + "\\n" + " " + d.getX() + "" + "\\n" + " " + d.getY() + "" + "\\n" + ""; } public String visitCircle(Circle c) { return "" + "\\n" + " " + c.getId() + "" + "\\n" + " " + c.getX() + "" + "\\n" + " " + c.getY() + "" + "\\n" + " " + c.getRadius() + "" + "\\n" + ""; } public String visitRectangle(Rectangle r) { return "" + "\\n" + " " + r.getId() + "" + "\\n" + " " + r.getX() + "" + "\\n" + " " + r.getY() + "" + "\\n" + " " + r.getWidth() + "" + "\\n" + " " + r.getHeight() + "" + "\\n" + ""; } public String visitCompoundGraphic(CompoundShape cg) { return "" + "\\n" + " " + cg.getId() + "" + "\\n" + \_visitCompoundGraphic(cg) + ""; } private String \_visitCompoundGraphic(CompoundShape cg) { StringBuilder sb = new StringBuilder(); for (Shape shape : cg.children) { String obj = shape.accept(this); // Proper indentation for sub-objects. obj = " " + obj.replace("\\n", "\\n ") + "\\n"; sb.append(obj); } return sb.toString(); } } #### **Demo.java:** Código cliente package refactoring\_guru.visitor.example; import refactoring\_guru.visitor.example.shapes.\*; import refactoring\_guru.visitor.example.visitor.XMLExportVisitor; public class Demo { public static void main(String\[\] args) { Dot dot = new Dot(1, 10, 55); Circle circle = new Circle(2, 23, 15, 10); Rectangle rectangle = new Rectangle(3, 10, 17, 20, 30); CompoundShape compoundShape = new CompoundShape(4); compoundShape.add(dot); compoundShape.add(circle); compoundShape.add(rectangle); CompoundShape c = new CompoundShape(5); c.add(dot); compoundShape.add(c); export(circle, compoundShape); } private static void export(Shape... shapes) { XMLExportVisitor exportVisitor = new XMLExportVisitor(); System.out.println(exportVisitor.export(shapes)); } } #### **OutputDemo.txt:** Resultados da execução 2 23 15 10 4 1 10 55 2 23 15 10 3 10 17 20 30 5 1 10 55 **Visitor** em outras linguagens -------------------------------- [![Visitor em C#](https://refactoring.guru/images/patterns/icons/csharp.svg?id=da64592defc6e86d57c39c66e9de3e58)](https://refactoring.guru/pt-br/design-patterns/visitor/csharp/example "Visitor em C#") [![Visitor em C++](https://refactoring.guru/images/patterns/icons/cpp.svg?id=f7782ed8b8666246bfcc3f8fefc3b858)](https://refactoring.guru/pt-br/design-patterns/visitor/cpp/example "Visitor em C++") [![Visitor em Go](https://refactoring.guru/images/patterns/icons/go.svg?id=1a89927eb99b1ea3fde7701d97970aca)](https://refactoring.guru/pt-br/design-patterns/visitor/go/example "Visitor em Go") [![Visitor em PHP](https://refactoring.guru/images/patterns/icons/php.svg?id=be1906eb26b71ec1d3b93720d6156618)](https://refactoring.guru/pt-br/design-patterns/visitor/php/example "Visitor em PHP") [![Visitor em Python](https://refactoring.guru/images/patterns/icons/python.svg?id=6d815d43c0f7050a1151b43e51569c9f)](https://refactoring.guru/pt-br/design-patterns/visitor/python/example "Visitor em Python") [![Visitor em Ruby](https://refactoring.guru/images/patterns/icons/ruby.svg?id=b065b718c914bf8e960ef731600be1eb)](https://refactoring.guru/pt-br/design-patterns/visitor/ruby/example "Visitor em Ruby") [![Visitor em Rust](https://refactoring.guru/images/patterns/icons/rust.svg?id=1f5698a4b5ae23fe79413511747e4a87)](https://refactoring.guru/pt-br/design-patterns/visitor/rust/example "Visitor em Rust") [![Visitor em Swift](https://refactoring.guru/images/patterns/icons/swift.svg?id=0b716c2d52ec3a48fbe91ac031070c1d)](https://refactoring.guru/pt-br/design-patterns/visitor/swift/example "Visitor em Swift") [![Visitor em TypeScript](https://refactoring.guru/images/patterns/icons/typescript.svg?id=2239d0f16cb703540c205dd8cb0c0cb7)](https://refactoring.guru/pt-br/design-patterns/visitor/typescript/example "Visitor em TypeScript") --- # Стратегія на PHP [There are patterns of patterns now! \ My friend's project: MetaPatterns.io](https://metapatterns.io/)  [](https://refactoring.guru/uk/design-patterns/strategy/php/example#checkout) [](https://refactoring.guru/uk/design-patterns/strategy/php/example#checkout) [](https://refactoring.guru/) / [Патерни проектування](https://refactoring.guru/uk/design-patterns) / [Стратегія](https://refactoring.guru/uk/design-patterns/strategy) / [PHP](https://refactoring.guru/uk/design-patterns/php) ![Стратегія](https://refactoring.guru/images/patterns/cards/strategy-mini-2x.png?id=f4e6608561f8e5d18be6927d4620ad29) **Стратегія** на PHP ==================== **Стратегія** — це поведінковий патерн, який виносить набір алгоритмів у власні класи і робить їх взаємозамінними. Інші об’єкти містять посилання на об’єкт-стратегію та делегують їй роботу. Програма може підмінити цей об’єкт іншим, якщо потрібен інший спосіб вирішення завдання. [Детальніше про Стратегія](https://refactoring.guru/uk/design-patterns/strategy) Навігація  [Інтро](https://refactoring.guru/uk/design-patterns/strategy/php/example#)  [Концептуальний приклад](https://refactoring.guru/uk/design-patterns/strategy/php/example#example-0)  [index](https://refactoring.guru/uk/design-patterns/strategy/php/example#example-0--index-php)  [Output](https://refactoring.guru/uk/design-patterns/strategy/php/example#example-0--Output-txt)  [Життєвий приклад](https://refactoring.guru/uk/design-patterns/strategy/php/example#example-1)  [index](https://refactoring.guru/uk/design-patterns/strategy/php/example#example-1--index-php)  [Output](https://refactoring.guru/uk/design-patterns/strategy/php/example#example-1--Output-txt) **Складність:** **Популярність:** **Застосування:** Стратегію часто використовують в PHP-коді, особливо там, де потрібно підміняти алгоритми під час виконання програми. Зверніть увагу, що для цього патерна в PHP є дуже потужний конкурент у вигляді анонімних функцій, які PHP вже дуже давно підтримує. **Ознаки застосування патерна:** Клас делегує виконання вкладеному об’єктові абстрактного типу чи інтерфейсу. Концептуальний приклад ---------------------- Цей приклад показує структуру патерна **Стратегія**, а саме — з яких класів він складається, які ролі ці класи виконують і як вони взаємодіють один з одним. Після ознайомлення зі структурою, вам буде легше сприймати наступний приклад, що розглядає реальний випадок використання патерна в світі PHP. #### **index.php:** Приклад структури патерна strategy = $strategy; } /\*\* \* Usually, the Context allows replacing a Strategy object at runtime. \*/ public function setStrategy(Strategy $strategy) { $this->strategy = $strategy; } /\*\* \* The Context delegates some work to the Strategy object instead of \* implementing multiple versions of the algorithm on its own. \*/ public function doSomeBusinessLogic(): void { // ... echo "Context: Sorting data using the strategy (not sure how it'll do it)\\n"; $result = $this->strategy->doAlgorithm(\["a", "b", "c", "d", "e"\]); echo implode(",", $result) . "\\n"; // ... } } /\*\* \* The Strategy interface declares operations common to all supported versions \* of some algorithm. \* \* The Context uses this interface to call the algorithm defined by Concrete \* Strategies. \*/ interface Strategy { public function doAlgorithm(array $data): array; } /\*\* \* Concrete Strategies implement the algorithm while following the base Strategy \* interface. The interface makes them interchangeable in the Context. \*/ class ConcreteStrategyA implements Strategy { public function doAlgorithm(array $data): array { sort($data); return $data; } } class ConcreteStrategyB implements Strategy { public function doAlgorithm(array $data): array { rsort($data); return $data; } } /\*\* \* The client code picks a concrete strategy and passes it to the context. The \* client should be aware of the differences between strategies in order to make \* the right choice. \*/ $context = new Context(new ConcreteStrategyA()); echo "Client: Strategy is set to normal sorting.\\n"; $context->doSomeBusinessLogic(); echo "\\n"; echo "Client: Strategy is set to reverse sorting.\\n"; $context->setStrategy(new ConcreteStrategyB()); $context->doSomeBusinessLogic(); #### **Output.txt:** Результат виконання Client: Strategy is set to normal sorting. Context: Sorting data using the strategy (not sure how it'll do it) a,b,c,d,e Client: Strategy is set to reverse sorting. Context: Sorting data using the strategy (not sure how it'll do it) e,d,c,b,a Життєвий приклад ---------------- #### **index.php:** Приклад з реального світу postNewOrder($data); } else { echo "Controller: 404 page\\n"; } } /\*\* \* Handle GET requests. \* \* @param $url \* @throws \\Exception \*/ public function get(string $url): void { echo "Controller: GET request to $url\\n"; $path = parse\_url($url, PHP\_URL\_PATH); $query = parse\_url($url, PHP\_URL\_QUERY); parse\_str($query, $data); if (preg\_match('#^/orders?$#', $path, $matches)) { $this->getAllOrders(); } elseif (preg\_match('#^/order/(\[0-9\]+?)/payment/(\[a-z\]+?)(/return)?$#', $path, $matches)) { $order = Order::get($matches\[1\]); // The payment method (strategy) is selected according to the value // passed along with the request. $paymentMethod = PaymentFactory::getPaymentMethod($matches\[2\]); if (!isset($matches\[3\])) { $this->getPayment($paymentMethod, $order, $data); } else { $this->getPaymentReturn($paymentMethod, $order, $data); } } else { echo "Controller: 404 page\\n"; } } /\*\* \* POST /order {data} \*/ public function postNewOrder(array $data): void { $order = new Order($data); echo "Controller: Created the order #{$order->id}.\\n"; } /\*\* \* GET /orders \*/ public function getAllOrders(): void { echo "Controller: Here's all orders:\\n"; foreach (Order::get() as $order) { echo json\_encode($order, JSON\_PRETTY\_PRINT) . "\\n"; } } /\*\* \* GET /order/123/payment/XX \*/ public function getPayment(PaymentMethod $method, Order $order, array $data): void { // The actual work is delegated to the payment method object. $form = $method->getPaymentForm($order); echo "Controller: here's the payment form:\\n"; echo $form . "\\n"; } /\*\* \* GET /order/123/payment/XXX/return?key=AJHKSJHJ3423&success=true \*/ public function getPaymentReturn(PaymentMethod $method, Order $order, array $data): void { try { // Another type of work delegated to the payment method. if ($method->validateReturn($order, $data)) { echo "Controller: Thanks for your order!\\n"; $order->complete(); } } catch (\\Exception $e) { echo "Controller: got an exception (" . $e->getMessage() . ")\\n"; } } } /\*\* \* A simplified representation of the Order class. \*/ class Order { /\*\* \* For the sake of simplicity, we'll store all created orders here... \* \* @var array \*/ private static $orders = \[\]; /\*\* \* ...and access them from here. \* \* @param int $orderId \* @return mixed \*/ public static function get(int $orderId = null) { if ($orderId === null) { return static::$orders; } else { return static::$orders\[$orderId\]; } } /\*\* \* The Order constructor assigns the values of the order's fields. To keep \* things simple, there is no validation whatsoever. \* \* @param array $attributes \*/ public function \_\_construct(array $attributes) { $this->id = count(static::$orders); $this->status = "new"; foreach ($attributes as $key => $value) { $this->{$key} = $value; } static::$orders\[$this->id\] = $this; } /\*\* \* The method to call when an order gets paid. \*/ public function complete(): void { $this->status = "completed"; echo "Order: #{$this->id} is now {$this->status}."; } } /\*\* \* This class helps to produce a proper strategy object for handling a payment. \*/ class PaymentFactory { /\*\* \* Get a payment method by its ID. \* \* @param $id \* @return PaymentMethod \* @throws \\Exception \*/ public static function getPaymentMethod(string $id): PaymentMethod { switch ($id) { case "cc": return new CreditCardPayment(); case "paypal": return new PayPalPayment(); default: throw new \\Exception("Unknown Payment Method"); } } } /\*\* \* The Strategy interface describes how a client can use various Concrete \* Strategies. \* \* Note that in most examples you can find on the Web, strategies tend to do \* some tiny thing within one method. However, in reality, your strategies can \* be much more robust (by having several methods, for example). \*/ interface PaymentMethod { public function getPaymentForm(Order $order): string; public function validateReturn(Order $order, array $data): bool; } /\*\* \* This Concrete Strategy provides a payment form and validates returns for \* credit card payments. \*/ class CreditCardPayment implements PaymentMethod { private static $store\_secret\_key = "swordfish"; public function getPaymentForm(Order $order): string { $returnURL = "https://our-website.com/" . "order/{$order->id}/payment/cc/return"; return <<
FORM; } public function validateReturn(Order $order, array $data): bool { echo "CreditCardPayment: ...validating... "; if ($data\['key'\] != md5($order->id . static::$store\_secret\_key)) { throw new \\Exception("Payment key is wrong."); } if (!isset($data\['success'\]) || !$data\['success'\] || $data\['success'\] == 'false') { throw new \\Exception("Payment failed."); } // ... if (floatval($data\['total'\]) < $order->total) { throw new \\Exception("Payment amount is wrong."); } echo "Done!\\n"; return true; } } /\*\* \* This Concrete Strategy provides a payment form and validates returns for \* PayPal payments. \*/ class PayPalPayment implements PaymentMethod { public function getPaymentForm(Order $order): string { $returnURL = "https://our-website.com/" . "order/{$order->id}/payment/paypal/return"; return <<
FORM; } public function validateReturn(Order $order, array $data): bool { echo "PayPalPayment: ...validating... "; // ... echo "Done!\\n"; return true; } } /\*\* \* The client code. \*/ $controller = new OrderController(); echo "Client: Let's create some orders\\n"; $controller->post("/orders", \[\ "email" => "me@example.com",\ "product" => "ABC Cat food (XL)",\ "total" => 9.95,\ \]); $controller->post("/orders", \[\ "email" => "me@example.com",\ "product" => "XYZ Cat litter (XXL)",\ "total" => 19.95,\ \]); echo "\\nClient: List my orders, please\\n"; $controller->get("/orders"); echo "\\nClient: I'd like to pay for the second, show me the payment form\\n"; $controller->get("/order/1/payment/paypal"); echo "\\nClient: ...pushes the Pay button...\\n"; echo "\\nClient: Oh, I'm redirected to the PayPal.\\n"; echo "\\nClient: ...pays on the PayPal...\\n"; echo "\\nClient: Alright, I'm back with you, guys.\\n"; $controller->get("/order/1/payment/paypal/return" . "?key=c55a3964833a4b0fa4469ea94a057152&success=true&total=19.95"); #### **Output.txt:** Результат виконання Client: Let's create some orders Controller: POST request to /orders with {"email":"me@example.com","product":"ABC Cat food (XL)","total":9.95} Controller: Created the order #0. Controller: POST request to /orders with {"email":"me@example.com","product":"XYZ Cat litter (XXL)","total":19.95} Controller: Created the order #1. Client: List my orders, please Controller: GET request to /orders Controller: Here's all orders: { "id": 0, "status": "new", "email": "me@example.com", "product": "ABC Cat food (XL)", "total": 9.95 } { "id": 1, "status": "new", "email": "me@example.com", "product": "XYZ Cat litter (XXL)", "total": 19.95 } Client: I'd like to pay for the second, show me the payment form Controller: GET request to /order/1/payment/paypal Controller: here's the payment form:
Client: ...pushes the Pay button... Client: Oh, I'm redirected to the PayPal. Client: ...pays on the PayPal... Client: Alright, I'm back with you, guys. Controller: GET request to /order/1/payment/paypal/return?key=c55a3964833a4b0fa4469ea94a057152&success=true&total=19.95 PayPalPayment: ...validating... Done! Controller: Thanks for your order! Order: #1 is now completed. **Стратегія** іншими мовами програмування ----------------------------------------- [![Стратегія на C#](https://refactoring.guru/images/patterns/icons/csharp.svg?id=da64592defc6e86d57c39c66e9de3e58)](https://refactoring.guru/uk/design-patterns/strategy/csharp/example "Стратегія на C#") [![Стратегія на C++](https://refactoring.guru/images/patterns/icons/cpp.svg?id=f7782ed8b8666246bfcc3f8fefc3b858)](https://refactoring.guru/uk/design-patterns/strategy/cpp/example "Стратегія на C++") [![Стратегія на Go](https://refactoring.guru/images/patterns/icons/go.svg?id=1a89927eb99b1ea3fde7701d97970aca)](https://refactoring.guru/uk/design-patterns/strategy/go/example "Стратегія на Go") [![Стратегія на Java](https://refactoring.guru/images/patterns/icons/java.svg?id=e6d87e2dca08c953fe3acd1275ed4f4e)](https://refactoring.guru/uk/design-patterns/strategy/java/example "Стратегія на Java") [![Стратегія на Python](https://refactoring.guru/images/patterns/icons/python.svg?id=6d815d43c0f7050a1151b43e51569c9f)](https://refactoring.guru/uk/design-patterns/strategy/python/example "Стратегія на Python") [![Стратегія на Ruby](https://refactoring.guru/images/patterns/icons/ruby.svg?id=b065b718c914bf8e960ef731600be1eb)](https://refactoring.guru/uk/design-patterns/strategy/ruby/example "Стратегія на Ruby") [![Стратегія на Rust](https://refactoring.guru/images/patterns/icons/rust.svg?id=1f5698a4b5ae23fe79413511747e4a87)](https://refactoring.guru/uk/design-patterns/strategy/rust/example "Стратегія на Rust") [![Стратегія на Swift](https://refactoring.guru/images/patterns/icons/swift.svg?id=0b716c2d52ec3a48fbe91ac031070c1d)](https://refactoring.guru/uk/design-patterns/strategy/swift/example "Стратегія на Swift") [![Стратегія на TypeScript](https://refactoring.guru/images/patterns/icons/typescript.svg?id=2239d0f16cb703540c205dd8cb0c0cb7)](https://refactoring.guru/uk/design-patterns/strategy/typescript/example "Стратегія на TypeScript") --- # 파이썬으로 작성된 어댑터 / 디자인 패턴들 [There are patterns of patterns now! \ My friend's project: MetaPatterns.io](https://metapatterns.io/)  [](https://refactoring.guru/ko/design-patterns/adapter/python/example#checkout) [](https://refactoring.guru/ko/design-patterns/adapter/python/example#checkout) [](https://refactoring.guru/) / [디자인 패턴들](https://refactoring.guru/ko/design-patterns) / [어댑터](https://refactoring.guru/ko/design-patterns/adapter) / [파이썬](https://refactoring.guru/ko/design-patterns/python) ![어댑터](https://refactoring.guru/images/patterns/cards/adapter-mini-2x.png?id=8274d99afbbe9c63bfbfd0d68ceeffc7) 파이썬으로 작성된 **어댑터** ================= **어댑터**는 구조 디자인 패턴이며, 호환되지 않는 객체들이 협업할 수 있도록 합니다. 어댑터는 두 객체 사이의 래퍼 역할을 합니다. 하나의 객체에 대한 호출을 캐치하고 두 번째 객체가 인식할 수 있는 형식과 인터페이스로 변환합니다. [어댑터에 대하여 더 자세히 알아보세요](https://refactoring.guru/ko/design-patterns/adapter) 내비게이션  [소개](https://refactoring.guru/ko/design-patterns/adapter/python/example#)  [상속을 사용한 개념적인 예시](https://refactoring.guru/ko/design-patterns/adapter/python/example#example-0)  [main](https://refactoring.guru/ko/design-patterns/adapter/python/example#example-0--main-py)  [Output](https://refactoring.guru/ko/design-patterns/adapter/python/example#example-0--Output-txt)  [객체 합성을 사용한 개념적인 예시](https://refactoring.guru/ko/design-patterns/adapter/python/example#example-1)  [main](https://refactoring.guru/ko/design-patterns/adapter/python/example#example-1--main-py)  [Output](https://refactoring.guru/ko/design-patterns/adapter/python/example#example-1--Output-txt) **복잡도:** **인기도:** **사용 예시들:** 어댑터 패턴은 파이썬 코드에 자주 사용됩니다. 특히 일부 레거시 코드를 기반으로 하는 시스템에서 매우 자주 사용됩니다. 이러한 경우 어댑터는 레거시 코드가 현대식 클래스들과 함께 작동하도록 합니다. **식별:** 어댑터는 다른 추상/인터페이스 유형의 인스턴스를 받는 생성자의 존재여부로 인식할 수 있습니다. 어댑터가 그의 메서드들에 대한 호출을 수신하면, 어댑터는 매개변수들을 적절한 형식으로 변환한 다음 해당 호출을 래핑 된 객체의 하나 또는 여러 메서드들에 전달합니다. 상속을 사용한 개념적인 예시 --------------- 이 예시는 **어댑터** 디자인 패턴의 구조를 보여주고 다음 질문에 중점을 둡니다: * 패턴은 어떤 클래스들로 구성되어 있나요? * 이 클래스들은 어떤 역할을 하나요? * 패턴의 요소들은 어떻게 서로 연관되어 있나요? #### **main.py:** 개념적인 예시 class Target: """ The Target defines the domain-specific interface used by the client code. """ def request(self) -> str: return "Target: The default target's behavior." class Adaptee: """ The Adaptee contains some useful behavior, but its interface is incompatible with the existing client code. The Adaptee needs some adaptation before the client code can use it. """ def specific\_request(self) -> str: return ".eetpadA eht fo roivaheb laicepS" class Adapter(Target, Adaptee): """ The Adapter makes the Adaptee's interface compatible with the Target's interface via multiple inheritance. """ def request(self) -> str: return f"Adapter: (TRANSLATED) {self.specific\_request()\[::-1\]}" def client\_code(target: "Target") -> None: """ The client code supports all classes that follow the Target interface. """ print(target.request(), end="") if \_\_name\_\_ == "\_\_main\_\_": print("Client: I can work just fine with the Target objects:") target = Target() client\_code(target) print("\\n") adaptee = Adaptee() print("Client: The Adaptee class has a weird interface. " "See, I don't understand it:") print(f"Adaptee: {adaptee.specific\_request()}", end="\\n\\n") print("Client: But I can work with it via the Adapter:") adapter = Adapter() client\_code(adapter) #### **Output.txt:** 실행 결과 Client: I can work just fine with the Target objects: Target: The default target's behavior. Client: The Adaptee class has a weird interface. See, I don't understand it: Adaptee: .eetpadA eht fo roivaheb laicepS Client: But I can work with it via the Adapter: Adapter: (TRANSLATED) Special behavior of the Adaptee. 객체 합성을 사용한 개념적인 예시 ------------------ 이 예시는 **어댑터** 디자인 패턴의 구조를 보여주고 다음 질문에 중점을 둡니다: * 패턴은 어떤 클래스들로 구성되어 있나요? * 이 클래스들은 어떤 역할을 하나요? * 패턴의 요소들은 어떻게 서로 연관되어 있나요? #### **main.py:** 개념적인 예시 class Target: """ The Target defines the domain-specific interface used by the client code. """ def request(self) -> str: return "Target: The default target's behavior." class Adaptee: """ The Adaptee contains some useful behavior, but its interface is incompatible with the existing client code. The Adaptee needs some adaptation before the client code can use it. """ def specific\_request(self) -> str: return ".eetpadA eht fo roivaheb laicepS" class Adapter(Target): """ The Adapter makes the Adaptee's interface compatible with the Target's interface via composition. """ def \_\_init\_\_(self, adaptee: Adaptee) -> None: self.adaptee = adaptee def request(self) -> str: return f"Adapter: (TRANSLATED) {self.adaptee.specific\_request()\[::-1\]}" def client\_code(target: Target) -> None: """ The client code supports all classes that follow the Target interface. """ print(target.request(), end="") if \_\_name\_\_ == "\_\_main\_\_": print("Client: I can work just fine with the Target objects:") target = Target() client\_code(target) print("\\n") adaptee = Adaptee() print("Client: The Adaptee class has a weird interface. " "See, I don't understand it:") print(f"Adaptee: {adaptee.specific\_request()}", end="\\n\\n") print("Client: But I can work with it via the Adapter:") adapter = Adapter(adaptee) client\_code(adapter) #### **Output.txt:** 실행 결과 Client: I can work just fine with the Target objects: Target: The default target's behavior. Client: The Adaptee class has a weird interface. See, I don't understand it: Adaptee: .eetpadA eht fo roivaheb laicepS Client: But I can work with it via the Adapter: Adapter: (TRANSLATED) Special behavior of the Adaptee. 다른 언어로 작성된 **어댑터** ------------------ [![C#으로 작성된 어댑터](https://refactoring.guru/images/patterns/icons/csharp.svg?id=da64592defc6e86d57c39c66e9de3e58)](https://refactoring.guru/ko/design-patterns/adapter/csharp/example "C#으로 작성된 어댑터") [![C++로 작성된 어댑터](https://refactoring.guru/images/patterns/icons/cpp.svg?id=f7782ed8b8666246bfcc3f8fefc3b858)](https://refactoring.guru/ko/design-patterns/adapter/cpp/example "C++로 작성된 어댑터") [![Go로 작성된 어댑터](https://refactoring.guru/images/patterns/icons/go.svg?id=1a89927eb99b1ea3fde7701d97970aca)](https://refactoring.guru/ko/design-patterns/adapter/go/example "Go로 작성된 어댑터") [![자바로 작성된 어댑터](https://refactoring.guru/images/patterns/icons/java.svg?id=e6d87e2dca08c953fe3acd1275ed4f4e)](https://refactoring.guru/ko/design-patterns/adapter/java/example "자바로 작성된 어댑터") [![PHP로 작성된 어댑터](https://refactoring.guru/images/patterns/icons/php.svg?id=be1906eb26b71ec1d3b93720d6156618)](https://refactoring.guru/ko/design-patterns/adapter/php/example "PHP로 작성된 어댑터") [![루비로 작성된 어댑터](https://refactoring.guru/images/patterns/icons/ruby.svg?id=b065b718c914bf8e960ef731600be1eb)](https://refactoring.guru/ko/design-patterns/adapter/ruby/example "루비로 작성된 어댑터") [![러스트로 작성된 어댑터](https://refactoring.guru/images/patterns/icons/rust.svg?id=1f5698a4b5ae23fe79413511747e4a87)](https://refactoring.guru/ko/design-patterns/adapter/rust/example "러스트로 작성된 어댑터") [![스위프트로 작성된 어댑터](https://refactoring.guru/images/patterns/icons/swift.svg?id=0b716c2d52ec3a48fbe91ac031070c1d)](https://refactoring.guru/ko/design-patterns/adapter/swift/example "스위프트로 작성된 어댑터") [![타입스크립트로 작성된 어댑터](https://refactoring.guru/images/patterns/icons/typescript.svg?id=2239d0f16cb703540c205dd8cb0c0cb7)](https://refactoring.guru/ko/design-patterns/adapter/typescript/example "타입스크립트로 작성된 어댑터") --- # State em PHP / Padrões de Projeto [There are patterns of patterns now! \ My friend's project: MetaPatterns.io](https://metapatterns.io/)  [](https://refactoring.guru/pt-br/design-patterns/state/php/example#checkout) [](https://refactoring.guru/pt-br/design-patterns/state/php/example#checkout) [](https://refactoring.guru/) / [Padrões de Projeto](https://refactoring.guru/pt-br/design-patterns) / [State](https://refactoring.guru/pt-br/design-patterns/state) / [PHP](https://refactoring.guru/pt-br/design-patterns/php) ![State](https://refactoring.guru/images/patterns/cards/state-mini-2x.png?id=7e24398b27a43c7bd286fc0ea54d2a35) **State** em PHP ================ O **State** é um padrão de projeto comportamental que permite que um objeto altere o comportamento quando seu estado interno for alterado. O padrão extrai comportamentos relacionados ao estado em classes separadas de estado e força o objeto original a delegar o trabalho para uma instância dessas classes, em vez de agir por conta própria. [Saiba mais sobre o State](https://refactoring.guru/pt-br/design-patterns/state) Navegação  [Introdução](https://refactoring.guru/pt-br/design-patterns/state/php/example#)  [Exemplo conceitual](https://refactoring.guru/pt-br/design-patterns/state/php/example#example-0)  [index](https://refactoring.guru/pt-br/design-patterns/state/php/example#example-0--index-php)  [Output](https://refactoring.guru/pt-br/design-patterns/state/php/example#example-0--Output-txt)  [Exemplo do mundo real](https://refactoring.guru/pt-br/design-patterns/state/php/example#example-1)  [index](https://refactoring.guru/pt-br/design-patterns/state/php/example#example-1--index-php)  [Output](https://refactoring.guru/pt-br/design-patterns/state/php/example#example-1--Output-txt) **Complexidade:** **Popularidade:** **Exemplos de uso:** O padrão State é ocasionalmente usado no PHP para transformar máquinas de estado grandes e complicadas com base nos operadores `switch` em objetos. **Identificação:** O padrão State pode ser reconhecido por métodos que alteram seu comportamento, dependendo do estado dos objetos, controlados externamente. Exemplo conceitual ------------------ Este exemplo ilustra a estrutura do padrão de projeto **State**. Ele se concentra em responder a estas perguntas: * De quais classes ele consiste? * Quais papéis essas classes desempenham? * De que maneira os elementos do padrão estão relacionados? Depois de aprender sobre a estrutura do padrão, será mais fácil entender o exemplo a seguir, com base em um caso de uso PHP do mundo real. #### **index.php:** Exemplo conceitual transitionTo($state); } /\*\* \* The Context allows changing the State object at runtime. \*/ public function transitionTo(State $state): void { echo "Context: Transition to " . get\_class($state) . ".\\n"; $this->state = $state; $this->state->setContext($this); } /\*\* \* The Context delegates part of its behavior to the current State object. \*/ public function request1(): void { $this->state->handle1(); } public function request2(): void { $this->state->handle2(); } } /\*\* \* The base State class declares methods that all Concrete State should \* implement and also provides a backreference to the Context object, associated \* with the State. This backreference can be used by States to transition the \* Context to another State. \*/ abstract class State { /\*\* \* @var Context \*/ protected $context; public function setContext(Context $context) { $this->context = $context; } abstract public function handle1(): void; abstract public function handle2(): void; } /\*\* \* Concrete States implement various behaviors, associated with a state of the \* Context. \*/ class ConcreteStateA extends State { public function handle1(): void { echo "ConcreteStateA handles request1.\\n"; echo "ConcreteStateA wants to change the state of the context.\\n"; $this->context->transitionTo(new ConcreteStateB()); } public function handle2(): void { echo "ConcreteStateA handles request2.\\n"; } } class ConcreteStateB extends State { public function handle1(): void { echo "ConcreteStateB handles request1.\\n"; } public function handle2(): void { echo "ConcreteStateB handles request2.\\n"; echo "ConcreteStateB wants to change the state of the context.\\n"; $this->context->transitionTo(new ConcreteStateA()); } } /\*\* \* The client code. \*/ $context = new Context(new ConcreteStateA()); $context->request1(); $context->request2(); #### **Output.txt:** Resultados da execução Context: Transition to RefactoringGuru\\State\\Conceptual\\ConcreteStateA. ConcreteStateA handles request1. ConcreteStateA wants to change the state of the context. Context: Transition to RefactoringGuru\\State\\Conceptual\\ConcreteStateB. ConcreteStateB handles request2. ConcreteStateB wants to change the state of the context. Context: Transition to RefactoringGuru\\State\\Conceptual\\ConcreteStateA. Exemplo do mundo real --------------------- Neste exemplo, o padrão **State** é usado para representar vários estados da Fatura. Esta abordagem permite implementar várias verificações de condições ao fazer a transição da fatura de um estado para outro, bem como encapsular a lógica de cada estado em uma classe separada. #### **index.php:** Exemplo conceitual invoice = $invoice; } /\*\* \* Default implementation for finalize event \* \* By default, finalize is not allowed in most states. Only states that \* support this transition will override this method. \* \* @throws InvalidStateTransitionException \*/ public function finalize(): void { throw new InvalidStateTransitionException("Cannot finalize invoice in " . $this->getName() . " state"); } /\*\* \* Default implementation for pay event \* \* By default, payment is not allowed in most states. Only states that \* support this transition will override this method. \* \* @throws InvalidStateTransitionException \*/ public function pay(): void { throw new InvalidStateTransitionException("Cannot pay invoice in " . $this->getName() . " state"); } /\*\* \* Default implementation for cancel event \* \* By default, cancellation is not allowed in most states. Only states that \* support this transition will override this method. \* \* @throws InvalidStateTransitionException \*/ public function cancel(): void { throw new InvalidStateTransitionException("Cannot cancel invoice in " . $this->getName() . " state"); } /\*\* \* Default implementation for void event \* \* By default, voiding is not allowed in most states. Only states that \* support this transition will override this method. \* \* @throws InvalidStateTransitionException \*/ public function void(): void { throw new InvalidStateTransitionException("Cannot void invoice in " . $this->getName() . " state"); } /\*\* \* Abstract method to get the state name \* \* Each concrete state must implement this method to return its name. This \* is used for logging, debugging, and display purposes. \* \* @return string The name of the current state \*/ abstract public function getName(): string; } /\*\* \* Each Concrete State corresponds to a specific state. \* \* This Concrete State Represents a draft invoice. \* \* This is the initial state of every invoice. In this state, the invoice is \* still being prepared and can only be finalized to move to the Open state. No \* other operations are allowed in this state. \*/ class DraftInvoiceState extends BaseInvoiceState { /\*\* \* Handle finalize event \* \* This is the only valid transition from Draft state. When an invoice is \* finalized, it transitions to the Open state where it can be paid, voided, \* or cancelled. \*/ public function finalize(): void { echo "Invoice #{$this->invoice->getId()} finalized - changing from Draft to Open\\n"; $this->invoice->setState(new OpenInvoiceState($this->invoice)); } public function getName(): string { return 'draft'; } } /\*\* \* This Concrete State Represents an open invoice. \* \* This state represents an invoice that has been finalized and is ready for \* processing. From this state, the invoice can be: \* - Paid (moves to Paid state) \* - Voided (moves to Void state) \* - Cancelled (moves to Uncollectable state) \*/ class OpenInvoiceState extends BaseInvoiceState { /\*\* \* Handle pay event \* \* When payment is received, the invoice transitions to the Paid state. This \* is a terminal state - no further operations are allowed. \*/ public function pay(): void { echo "Invoice #{$this->invoice->getId()} paid - changing from Open to Paid\\n"; $this->invoice->setState(new PaidInvoiceState($this->invoice)); } /\*\* \* Handle void event \* \* When an invoice is voided, it transitions to the Void state. This is a \* terminal state - no further operations are allowed. \*/ public function void(): void { echo "Invoice #{$this->invoice->getId()} voided - changing from Open to Void\\n"; $this->invoice->setState(new VoidInvoiceState($this->invoice)); } /\*\* \* Handle cancel event \* \* When an invoice is cancelled, it transitions to the Uncollectable state. \* From Uncollectable, the invoice can still be paid or voided. \*/ public function cancel(): void { echo "Invoice #{$this->invoice->getId()} cancelled - changing from Open to Uncollectable\\n"; $this->invoice->setState(new UncollectableInvoiceState($this->invoice)); } public function getName(): string { return 'open'; } } /\*\* \* This Concrete State Represents a paid invoice. \* \* This is a terminal state representing a paid invoice. Once an invoice is \* paid, no further state transitions are allowed. All event methods use the \* default implementation which throws exceptions. \*/ class PaidInvoiceState extends BaseInvoiceState { public function getName(): string { return 'paid'; } } /\*\* \* This Concrete State Represents a void invoice. \* \* This is a terminal state representing a voided invoice. Once an invoice is \* voided, no further state transitions are allowed. All event methods use the \* default implementation which throws exceptions. \*/ class VoidInvoiceState extends BaseInvoiceState { public function getName(): string { return 'void'; } } /\*\* \* This Concrete State Represents a collectable invoice. \* \* This state represents an invoice that has been cancelled but can still be \* recovered. From this state, the invoice can be: \* - Paid (moves to Paid state) \* - Voided (moves to Void state) \* \* This provides a way to handle invoices that were cancelled but later can be \* collected or definitively written off. \*/ class UncollectableInvoiceState extends BaseInvoiceState { /\*\* \* Handle pay event \* \* Even though the invoice was cancelled, payment can still be received. \* This transitions the invoice to the Paid state. \*/ public function pay(): void { echo "Invoice #{$this->invoice->getId()} paid - changing from Uncollectable to Paid\\n"; $this->invoice->setState(new PaidInvoiceState($this->invoice)); } /\*\* \* Handle void event \* \* If the invoice is definitively uncollectable, it can be voided. This \* transitions the invoice to the Void state. \*/ public function void(): void { echo "Invoice #{$this->invoice->getId()} voided - changing from Uncollectable to Void\\n"; $this->invoice->setState(new VoidInvoiceState($this->invoice)); } public function getName(): string { return 'uncollectable'; } } /\*\* \* Context class - Invoice \* \* This is the context class in the State pattern. It maintains a reference to \* the current state object and delegates all state-specific behavior to the \* current state. The context is unaware of the specific state classes and \* interacts with them through the abstract InvoiceState interface. \* \* The context also maintains the invoice's data (id, amount, etc.) that remains \* constant regardless of the state. \*/ class Invoice { private $id; private $amount; /\*\* \* Current state object \* \* This is the key component of the State pattern. The context maintains a \* reference to the current state object and delegates all state-specific \* operations to this object. \* \* @var InvoiceState \*/ private $state; private $createdAt; /\*\* \* Constructor \* \* Creates a new invoice. The invoice always starts in the Draft state as \* per business requirements. \*/ public function \_\_construct(int $id, float $amount) { $this->id = $id; $this->amount = $amount; $this->createdAt = new \\DateTime(); // Initial state is draft This is where the State pattern begins - we // set the initial state $this->state = new DraftInvoiceState($this); } public function getId(): int { return $this->id; } /\*\* \* Set the current state \* \* This method is called by state objects to transition to a new state. It's \* the mechanism that allows the State pattern to work - states can change \* the context's state by calling this method. \* \* @param InvoiceState $state The new state object \*/ public function setState(InvoiceState $state) { $this->state = $state; } /\*\* \* Get the current state object \* \* @return InvoiceState \*/ public function getState(): InvoiceState { return $this->state; } /\*\* \* Get the current state name \* \* This is a convenience method that delegates to the current state object. \* \* @return string \*/ public function getStateName(): string { return $this->state->getName(); } /\*\* \* Event method: finalize \* \* This method delegates the finalize operation to the current state. This \* is the core of the State pattern - the context doesn't know how to handle \* the operation, so it delegates to the current state. \*/ public function finalize() { $this->state->finalize(); } /\*\* \* Event method: pay \* \* This method delegates the pay operation to the current state. The \* behavior will vary depending on the current state. \*/ public function pay() { $this->state->pay(); } /\*\* \* Event method: cancel \* \* This method delegates the cancel operation to the current state. The \* behavior will vary depending on the current state. \*/ public function cancel() { $this->state->cancel(); } /\*\* \* Event method: void \* \* This method delegates the void operation to the current state. The \* behavior will vary depending on the current state. \*/ public function void() { $this->state->void(); } /\*\* \* Get invoice information \* \* Returns an array with all invoice information including current state. \* This is useful for debugging, logging, or API responses. \* \* @return array \*/ public function getInfo(): array { return \[\ 'id' => $this->id,\ 'amount' => $this->amount,\ 'state' => $this->getStateName(),\ 'created\_at' => $this->createdAt->format('Y-m-d H:i:s')\ \]; } } /\*\* \* Custom exception for invalid state transitions \* \* This exception is thrown when an invalid state transition is attempted. It \* provides clear error messages about what transition was attempted and why it \* failed. \*/ class InvalidStateTransitionException extends \\Exception { /\*\* \* Constructor \* \* @param string $message Error message \* @param int $code Error code \* @param \\Exception|null $previous Previous exception \*/ public function \_\_construct($message = "", $code = 0, \\Exception $previous = null) { parent::\_\_construct($message, $code, $previous); } } /\*\* \* ============================================================================ \* USAGE EXAMPLE AND DEMONSTRATION \* ============================================================================ \* \* The following code demonstrates how to use the State pattern implementation \* with various scenarios that show all possible state transitions. \*/ try { echo "=== Invoice State Pattern Demo ===\\n\\n"; // Create a new invoice (starts in draft state) $invoice = new Invoice(1001, 1500.00); echo "Created invoice: " . json\_encode($invoice->getInfo()) . "\\n\\n"; // Scenario 1: Draft -> Open -> Paid echo "--- Scenario 1: Draft -> Open -> Paid ---\\n"; $invoice->finalize(); // Draft -> Open echo "Current state: " . $invoice->getStateName() . "\\n"; $invoice->pay(); // Open -> Paid echo "Current state: " . $invoice->getStateName() . "\\n"; // Try to pay again (should fail) try { $invoice->pay(); } catch (InvalidStateTransitionException $e) { echo "Expected error: " . $e->getMessage() . "\\n"; } echo "\\n--- Scenario 2: Draft -> Open -> Void ---\\n"; $invoice2 = new Invoice(1002, 750.00); $invoice2->finalize(); // Draft -> Open $invoice2->void(); // Open -> Void echo "Invoice 2 state: " . $invoice2->getStateName() . "\\n"; echo "\\n--- Scenario 3: Draft -> Open -> Uncollectable -> Paid ---\\n"; $invoice3 = new Invoice(1003, 2000.00); $invoice3->finalize(); // Draft -> Open $invoice3->cancel(); // Open -> Uncollectable echo "Invoice 3 state: " . $invoice3->getStateName() . "\\n"; $invoice3->pay(); // Uncollectable -> Paid echo "Invoice 3 final state: " . $invoice3->getStateName() . "\\n"; echo "\\n--- Scenario 4: Draft -> Open -> Uncollectable -> Void ---\\n"; $invoice4 = new Invoice(1004, 500.00); $invoice4->finalize(); // Draft -> Open $invoice4->cancel(); // Open -> Uncollectable $invoice4->void(); // Uncollectable -> Void echo "Invoice 4 final state: " . $invoice4->getStateName() . "\\n"; echo "\\n--- Error Scenario: Invalid transition ---\\n"; $invoice5 = new Invoice(1005, 300.00); try { $invoice5->pay(); // Try to pay draft invoice (should fail) } catch (InvalidStateTransitionException $e) { echo "Expected error: " . $e->getMessage() . "\\n"; } echo "\\n--- State Information ---\\n"; echo "Invoice 1: " . json\_encode($invoice->getInfo()) . "\\n"; echo "Invoice 2: " . json\_encode($invoice2->getInfo()) . "\\n"; echo "Invoice 3: " . json\_encode($invoice3->getInfo()) . "\\n"; echo "Invoice 4: " . json\_encode($invoice4->getInfo()) . "\\n"; echo "Invoice 5: " . json\_encode($invoice5->getInfo()) . "\\n"; } catch (InvalidStateTransitionException $e) { echo "Error: " . $e->getMessage() . "\\n"; } #### **Output.txt:** Resultados da execução \=== Invoice State Pattern Demo === Created invoice: {"id":1001,"amount":1500,"state":"draft","created\_at":"2025-07-12 13:14:15"} --- Scenario 1: Draft -> Open -> Paid --- Invoice #1001 finalized - changing from Draft to Open Current state: open Invoice #1001 paid - changing from Open to Paid Current state: paid Expected error: Cannot pay invoice in paid state --- Scenario 2: Draft -> Open -> Void --- Invoice #1002 finalized - changing from Draft to Open Invoice #1002 voided - changing from Open to Void Invoice 2 state: void --- Scenario 3: Draft -> Open -> Uncollectable -> Paid --- Invoice #1003 finalized - changing from Draft to Open Invoice #1003 cancelled - changing from Open to Uncollectable Invoice 3 state: uncollectable Invoice #1003 paid - changing from Uncollectable to Paid Invoice 3 final state: paid --- Scenario 4: Draft -> Open -> Uncollectable -> Void --- Invoice #1004 finalized - changing from Draft to Open Invoice #1004 cancelled - changing from Open to Uncollectable Invoice #1004 voided - changing from Uncollectable to Void Invoice 4 final state: void --- Error Scenario: Invalid transition --- Expected error: Cannot pay invoice in draft state --- State Information --- Invoice 1: {"id":1001,"amount":1500,"state":"paid","created\_at":"2025-07-12 13:14:15"} Invoice 2: {"id":1002,"amount":750,"state":"void","created\_at":"2025-07-12 13:14:15"} Invoice 3: {"id":1003,"amount":2000,"state":"paid","created\_at":"2025-07-12 13:14:15"} Invoice 4: {"id":1004,"amount":500,"state":"void","created\_at":"2025-07-12 13:14:15"} Invoice 5: {"id":1005,"amount":300,"state":"draft","created\_at":"2025-07-12 13:14:15"} **State** em outras linguagens ------------------------------ [![State em C#](https://refactoring.guru/images/patterns/icons/csharp.svg?id=da64592defc6e86d57c39c66e9de3e58)](https://refactoring.guru/pt-br/design-patterns/state/csharp/example "State em C#") [![State em C++](https://refactoring.guru/images/patterns/icons/cpp.svg?id=f7782ed8b8666246bfcc3f8fefc3b858)](https://refactoring.guru/pt-br/design-patterns/state/cpp/example "State em C++") [![State em Go](https://refactoring.guru/images/patterns/icons/go.svg?id=1a89927eb99b1ea3fde7701d97970aca)](https://refactoring.guru/pt-br/design-patterns/state/go/example "State em Go") [![State em Java](https://refactoring.guru/images/patterns/icons/java.svg?id=e6d87e2dca08c953fe3acd1275ed4f4e)](https://refactoring.guru/pt-br/design-patterns/state/java/example "State em Java") [![State em Python](https://refactoring.guru/images/patterns/icons/python.svg?id=6d815d43c0f7050a1151b43e51569c9f)](https://refactoring.guru/pt-br/design-patterns/state/python/example "State em Python") [![State em Ruby](https://refactoring.guru/images/patterns/icons/ruby.svg?id=b065b718c914bf8e960ef731600be1eb)](https://refactoring.guru/pt-br/design-patterns/state/ruby/example "State em Ruby") [![State em Rust](https://refactoring.guru/images/patterns/icons/rust.svg?id=1f5698a4b5ae23fe79413511747e4a87)](https://refactoring.guru/pt-br/design-patterns/state/rust/example "State em Rust") [![State em Swift](https://refactoring.guru/images/patterns/icons/swift.svg?id=0b716c2d52ec3a48fbe91ac031070c1d)](https://refactoring.guru/pt-br/design-patterns/state/swift/example "State em Swift") [![State em TypeScript](https://refactoring.guru/images/patterns/icons/typescript.svg?id=2239d0f16cb703540c205dd8cb0c0cb7)](https://refactoring.guru/pt-br/design-patterns/state/typescript/example "State em TypeScript") --- # Fabryka abstrakcyjna w języku Go / Wzorce projektowe [There are patterns of patterns now! \ My friend's project: MetaPatterns.io](https://metapatterns.io/)  [](https://refactoring.guru/pl/design-patterns/abstract-factory/go/example#checkout) [](https://refactoring.guru/pl/design-patterns/abstract-factory/go/example#checkout) [](https://refactoring.guru/) / [Wzorce projektowe](https://refactoring.guru/pl/design-patterns) / [Fabryka abstrakcyjna](https://refactoring.guru/pl/design-patterns/abstract-factory) / [Go](https://refactoring.guru/pl/design-patterns/go) ![Fabryka abstrakcyjna](https://refactoring.guru/images/patterns/cards/abstract-factory-mini-2x.png?id=22236aaa65ff52cbde1c713216d52c1f) **Fabryka abstrakcyjna** w języku Go ==================================== **Fabryka abstrakcyjna** jest kreacyjnym wzorcem projektowym, który pozwala tworzyć rodziny spokrewnionych ze sobą obiektów bez określania ich konkretnych klas. Fabryka abstrakcyjna definiuje interfejs służący tworzeniu poszczególnych produktów, ale pozostawia faktyczne tworzenie produktów konkretnym klasom fabrycznym. Każdy typ fabryki odpowiada jednemu z wariantów produktu. Kod klienta wywołuje metody kreacyjne obiektu fabrycznego zamiast tworzyć produkty bezpośrednio — wywołując konstruktor (za pomocą operatora `new`). Skoro dana fabryka odpowiada jednemu z wariantów produktu, to wszystkie jej produkty będą ze sobą kompatybilne. Kod klienta współpracuje z fabrykami i produktami wyłącznie poprzez ich abstrakcyjne interfejsy. Dzięki temu jeden klient jest kompatybilny z wieloma różnymi produktami. Wystarczy stworzyć nową konkretną klasę fabryczną i przekazać ją kodowi klienta. > Jeśli masz problem ze zrozumieniem różnicy pomiędzy poszczególnymi koncepcjami i wzorcami wytwórczymi, przeczytaj nasze [Porównanie fabryk](https://refactoring.guru/pl/design-patterns/factory-comparison) > . [Dowiedz się więcej o Fabryka abstrakcyjna](https://refactoring.guru/pl/design-patterns/abstract-factory) Nawigacja  [Intro](https://refactoring.guru/pl/design-patterns/abstract-factory/go/example#)  [Przykład koncepcyjny](https://refactoring.guru/pl/design-patterns/abstract-factory/go/example#example-0)  [i­Sports­Factory](https://refactoring.guru/pl/design-patterns/abstract-factory/go/example#example-0--iSportsFactory-go)  [adidas](https://refactoring.guru/pl/design-patterns/abstract-factory/go/example#example-0--adidas-go)  [nike](https://refactoring.guru/pl/design-patterns/abstract-factory/go/example#example-0--nike-go)  [i­Shoe](https://refactoring.guru/pl/design-patterns/abstract-factory/go/example#example-0--iShoe-go)  [adidas­Shoe](https://refactoring.guru/pl/design-patterns/abstract-factory/go/example#example-0--adidasShoe-go)  [nike­Shoe](https://refactoring.guru/pl/design-patterns/abstract-factory/go/example#example-0--nikeShoe-go)  [i­Shirt](https://refactoring.guru/pl/design-patterns/abstract-factory/go/example#example-0--iShirt-go)  [adidas­Shirt](https://refactoring.guru/pl/design-patterns/abstract-factory/go/example#example-0--adidasShirt-go)  [nike­Shirt](https://refactoring.guru/pl/design-patterns/abstract-factory/go/example#example-0--nikeShirt-go)  [main](https://refactoring.guru/pl/design-patterns/abstract-factory/go/example#example-0--main-go)  [output](https://refactoring.guru/pl/design-patterns/abstract-factory/go/example#example-0--output-txt) Przykład koncepcyjny -------------------- Powiedzmy, że chcesz kupić dwa stroje gimnastyczne składające się z pary butów i podkoszulka. Najlepiej, gdyby wszystkie elementy stroju były tej samej marki. Jeśli chcemy zamienić to na kod, fabryka abstrakcyjna pozwoli nam tworzyć produkty zawsze do siebie pasujące. #### **iSportsFactory.go:** Interfejs fabryki abstrakcyjnej package main import "fmt" type ISportsFactory interface { makeShoe() IShoe makeShirt() IShirt } func GetSportsFactory(brand string) (ISportsFactory, error) { if brand == "adidas" { return &Adidas{}, nil } if brand == "nike" { return &Nike{}, nil } return nil, fmt.Errorf("Wrong brand type passed") } #### **adidas.go:** Konkretna fabryka package main type Adidas struct { } func (a \*Adidas) makeShoe() IShoe { return &AdidasShoe{ Shoe: Shoe{ logo: "adidas", size: 14, }, } } func (a \*Adidas) makeShirt() IShirt { return &AdidasShirt{ Shirt: Shirt{ logo: "adidas", size: 14, }, } } #### **nike.go:** Konkretna fabryka package main type Nike struct { } func (n \*Nike) makeShoe() IShoe { return &NikeShoe{ Shoe: Shoe{ logo: "nike", size: 14, }, } } func (n \*Nike) makeShirt() IShirt { return &NikeShirt{ Shirt: Shirt{ logo: "nike", size: 14, }, } } #### **iShoe.go:** Produkt abstrakcyjny package main type IShoe interface { setLogo(logo string) setSize(size int) getLogo() string getSize() int } type Shoe struct { logo string size int } func (s \*Shoe) setLogo(logo string) { s.logo = logo } func (s \*Shoe) getLogo() string { return s.logo } func (s \*Shoe) setSize(size int) { s.size = size } func (s \*Shoe) getSize() int { return s.size } #### **adidasShoe.go:** Konkretny produkt package main type AdidasShoe struct { Shoe } #### **nikeShoe.go:** Konkretny produkt package main type NikeShoe struct { Shoe } #### **iShirt.go:** Produkt abstrakcyjny package main type IShirt interface { setLogo(logo string) setSize(size int) getLogo() string getSize() int } type Shirt struct { logo string size int } func (s \*Shirt) setLogo(logo string) { s.logo = logo } func (s \*Shirt) getLogo() string { return s.logo } func (s \*Shirt) setSize(size int) { s.size = size } func (s \*Shirt) getSize() int { return s.size } #### **adidasShirt.go:** Konkretny produkt package main type AdidasShirt struct { Shirt } #### **nikeShirt.go:** Konkretny produkt package main type NikeShirt struct { Shirt } #### **main.go:** Kod klienta package main import "fmt" func main() { adidasFactory, \_ := GetSportsFactory("adidas") nikeFactory, \_ := GetSportsFactory("nike") nikeShoe := nikeFactory.makeShoe() nikeShirt := nikeFactory.makeShirt() adidasShoe := adidasFactory.makeShoe() adidasShirt := adidasFactory.makeShirt() printShoeDetails(nikeShoe) printShirtDetails(nikeShirt) printShoeDetails(adidasShoe) printShirtDetails(adidasShirt) } func printShoeDetails(s IShoe) { fmt.Printf("Logo: %s", s.getLogo()) fmt.Println() fmt.Printf("Size: %d", s.getSize()) fmt.Println() } func printShirtDetails(s IShirt) { fmt.Printf("Logo: %s", s.getLogo()) fmt.Println() fmt.Printf("Size: %d", s.getSize()) fmt.Println() } #### **output.txt:** Wynik działania Logo: nike Size: 14 Logo: nike Size: 14 Logo: adidas Size: 14 Logo: adidas Size: 14 **Fabryka abstrakcyjna** w innych językach ------------------------------------------ [![Fabryka abstrakcyjna w języku C#](https://refactoring.guru/images/patterns/icons/csharp.svg?id=da64592defc6e86d57c39c66e9de3e58)](https://refactoring.guru/pl/design-patterns/abstract-factory/csharp/example "Fabryka abstrakcyjna w języku C#") [![Fabryka abstrakcyjna w języku C++](https://refactoring.guru/images/patterns/icons/cpp.svg?id=f7782ed8b8666246bfcc3f8fefc3b858)](https://refactoring.guru/pl/design-patterns/abstract-factory/cpp/example "Fabryka abstrakcyjna w języku C++") [![Fabryka abstrakcyjna w języku Java](https://refactoring.guru/images/patterns/icons/java.svg?id=e6d87e2dca08c953fe3acd1275ed4f4e)](https://refactoring.guru/pl/design-patterns/abstract-factory/java/example "Fabryka abstrakcyjna w języku Java") [![Fabryka abstrakcyjna w języku PHP](https://refactoring.guru/images/patterns/icons/php.svg?id=be1906eb26b71ec1d3b93720d6156618)](https://refactoring.guru/pl/design-patterns/abstract-factory/php/example "Fabryka abstrakcyjna w języku PHP") [![Fabryka abstrakcyjna w języku Python](https://refactoring.guru/images/patterns/icons/python.svg?id=6d815d43c0f7050a1151b43e51569c9f)](https://refactoring.guru/pl/design-patterns/abstract-factory/python/example "Fabryka abstrakcyjna w języku Python") [![Fabryka abstrakcyjna w języku Ruby](https://refactoring.guru/images/patterns/icons/ruby.svg?id=b065b718c914bf8e960ef731600be1eb)](https://refactoring.guru/pl/design-patterns/abstract-factory/ruby/example "Fabryka abstrakcyjna w języku Ruby") [![Fabryka abstrakcyjna w języku Rust](https://refactoring.guru/images/patterns/icons/rust.svg?id=1f5698a4b5ae23fe79413511747e4a87)](https://refactoring.guru/pl/design-patterns/abstract-factory/rust/example "Fabryka abstrakcyjna w języku Rust") [![Fabryka abstrakcyjna w języku Swift](https://refactoring.guru/images/patterns/icons/swift.svg?id=0b716c2d52ec3a48fbe91ac031070c1d)](https://refactoring.guru/pl/design-patterns/abstract-factory/swift/example "Fabryka abstrakcyjna w języku Swift") [![Fabryka abstrakcyjna w języku TypeScript](https://refactoring.guru/images/patterns/icons/typescript.svg?id=2239d0f16cb703540c205dd8cb0c0cb7)](https://refactoring.guru/pl/design-patterns/abstract-factory/typescript/example "Fabryka abstrakcyjna w języku TypeScript") --- # Шаблонний метод на Python [There are patterns of patterns now! \ My friend's project: MetaPatterns.io](https://metapatterns.io/)  [](https://refactoring.guru/uk/design-patterns/template-method/python/example#checkout) [](https://refactoring.guru/uk/design-patterns/template-method/python/example#checkout) [](https://refactoring.guru/) / [Патерни проектування](https://refactoring.guru/uk/design-patterns) / [Шаблонний метод](https://refactoring.guru/uk/design-patterns/template-method) / [Python](https://refactoring.guru/uk/design-patterns/python) ![Шаблонний метод](https://refactoring.guru/images/patterns/cards/template-method-mini-2x.png?id=178bf56e39b3a1f548dd636076209c98) **Шаблонний метод** на Python ============================= **Шаблонний метод** — це поведінковий патерн, який визначає кістяк алгоритму в суперкласі та змушує підкласи реалізувати конкретні кроки цього алгоритму. [Детальніше про Шаблонний метод](https://refactoring.guru/uk/design-patterns/template-method) Навігація  [Інтро](https://refactoring.guru/uk/design-patterns/template-method/python/example#)  [Концептуальний приклад](https://refactoring.guru/uk/design-patterns/template-method/python/example#example-0)  [main](https://refactoring.guru/uk/design-patterns/template-method/python/example#example-0--main-py)  [Output](https://refactoring.guru/uk/design-patterns/template-method/python/example#example-0--Output-txt) **Складність:** **Популярність:** **Застосування:** Шаблонні методи можна зустріти в багатьох бібліотечних класах Python. Розробники створюють їх, щоб дозволити клієнтам легко та швидко розширювати стандартний код за допомогою спадкування. **Ознаки застосування патерна:** Клас змушує своїх нащадків реалізувати методи-кроки, але самостійно реалізовує структуру алгоритму. Концептуальний приклад ---------------------- Цей приклад показує структуру патерна **Шаблонний метод**, а саме — з яких класів він складається, які ролі ці класи виконують і як вони взаємодіють один з одним. #### **main.py:** Приклад структури патерна from abc import ABC, abstractmethod class AbstractClass(ABC): """ The Abstract Class defines a template method that contains a skeleton of some algorithm, composed of calls to (usually) abstract primitive operations. Concrete subclasses should implement these operations, but leave the template method itself intact. """ def template\_method(self) -> None: """ The template method defines the skeleton of an algorithm. """ self.base\_operation1() self.required\_operations1() self.base\_operation2() self.hook1() self.required\_operations2() self.base\_operation3() self.hook2() # These operations already have implementations. def base\_operation1(self) -> None: print("AbstractClass says: I am doing the bulk of the work") def base\_operation2(self) -> None: print("AbstractClass says: But I let subclasses override some operations") def base\_operation3(self) -> None: print("AbstractClass says: But I am doing the bulk of the work anyway") # These operations have to be implemented in subclasses. @abstractmethod def required\_operations1(self) -> None: pass @abstractmethod def required\_operations2(self) -> None: pass # These are "hooks." Subclasses may override them, but it's not mandatory # since the hooks already have default (but empty) implementation. Hooks # provide additional extension points in some crucial places of the # algorithm. def hook1(self) -> None: pass def hook2(self) -> None: pass class ConcreteClass1(AbstractClass): """ Concrete classes have to implement all abstract operations of the base class. They can also override some operations with a default implementation. """ def required\_operations1(self) -> None: print("ConcreteClass1 says: Implemented Operation1") def required\_operations2(self) -> None: print("ConcreteClass1 says: Implemented Operation2") class ConcreteClass2(AbstractClass): """ Usually, concrete classes override only a fraction of base class' operations. """ def required\_operations1(self) -> None: print("ConcreteClass2 says: Implemented Operation1") def required\_operations2(self) -> None: print("ConcreteClass2 says: Implemented Operation2") def hook1(self) -> None: print("ConcreteClass2 says: Overridden Hook1") def client\_code(abstract\_class: AbstractClass) -> None: """ The client code calls the template method to execute the algorithm. Client code does not have to know the concrete class of an object it works with, as long as it works with objects through the interface of their base class. """ # ... abstract\_class.template\_method() # ... if \_\_name\_\_ == "\_\_main\_\_": print("Same client code can work with different subclasses:") client\_code(ConcreteClass1()) print("") print("Same client code can work with different subclasses:") client\_code(ConcreteClass2()) #### **Output.txt:** Результат виконання Same client code can work with different subclasses: AbstractClass says: I am doing the bulk of the work ConcreteClass1 says: Implemented Operation1 AbstractClass says: But I let subclasses override some operations ConcreteClass1 says: Implemented Operation2 AbstractClass says: But I am doing the bulk of the work anyway Same client code can work with different subclasses: AbstractClass says: I am doing the bulk of the work ConcreteClass2 says: Implemented Operation1 AbstractClass says: But I let subclasses override some operations ConcreteClass2 says: Overridden Hook1 ConcreteClass2 says: Implemented Operation2 AbstractClass says: But I am doing the bulk of the work anyway **Шаблонний метод** іншими мовами програмування ----------------------------------------------- [![Шаблонний метод на C#](https://refactoring.guru/images/patterns/icons/csharp.svg?id=da64592defc6e86d57c39c66e9de3e58)](https://refactoring.guru/uk/design-patterns/template-method/csharp/example "Шаблонний метод на C#") [![Шаблонний метод на C++](https://refactoring.guru/images/patterns/icons/cpp.svg?id=f7782ed8b8666246bfcc3f8fefc3b858)](https://refactoring.guru/uk/design-patterns/template-method/cpp/example "Шаблонний метод на C++") [![Шаблонний метод на Go](https://refactoring.guru/images/patterns/icons/go.svg?id=1a89927eb99b1ea3fde7701d97970aca)](https://refactoring.guru/uk/design-patterns/template-method/go/example "Шаблонний метод на Go") [![Шаблонний метод на Java](https://refactoring.guru/images/patterns/icons/java.svg?id=e6d87e2dca08c953fe3acd1275ed4f4e)](https://refactoring.guru/uk/design-patterns/template-method/java/example "Шаблонний метод на Java") [![Шаблонний метод на PHP](https://refactoring.guru/images/patterns/icons/php.svg?id=be1906eb26b71ec1d3b93720d6156618)](https://refactoring.guru/uk/design-patterns/template-method/php/example "Шаблонний метод на PHP") [![Шаблонний метод на Ruby](https://refactoring.guru/images/patterns/icons/ruby.svg?id=b065b718c914bf8e960ef731600be1eb)](https://refactoring.guru/uk/design-patterns/template-method/ruby/example "Шаблонний метод на Ruby") [![Шаблонний метод на Rust](https://refactoring.guru/images/patterns/icons/rust.svg?id=1f5698a4b5ae23fe79413511747e4a87)](https://refactoring.guru/uk/design-patterns/template-method/rust/example "Шаблонний метод на Rust") [![Шаблонний метод на Swift](https://refactoring.guru/images/patterns/icons/swift.svg?id=0b716c2d52ec3a48fbe91ac031070c1d)](https://refactoring.guru/uk/design-patterns/template-method/swift/example "Шаблонний метод на Swift") [![Шаблонний метод на TypeScript](https://refactoring.guru/images/patterns/icons/typescript.svg?id=2239d0f16cb703540c205dd8cb0c0cb7)](https://refactoring.guru/uk/design-patterns/template-method/typescript/example "Шаблонний метод на TypeScript") --- # Абстрактная фабрика на C++ [There are patterns of patterns now! \ My friend's project: MetaPatterns.io](https://metapatterns.io/)  [](https://refactoring.guru/ru/design-patterns/abstract-factory/cpp/example#checkout) [](https://refactoring.guru/ru/design-patterns/abstract-factory/cpp/example#checkout) [](https://refactoring.guru/) / [Паттерны проектирования](https://refactoring.guru/ru/design-patterns) / [Абстрактная фабрика](https://refactoring.guru/ru/design-patterns/abstract-factory) / [C++](https://refactoring.guru/ru/design-patterns/cpp) ![Абстрактная фабрика](https://refactoring.guru/images/patterns/cards/abstract-factory-mini-2x.png?id=22236aaa65ff52cbde1c713216d52c1f) **Абстрактная фабрика** на C++ ============================== **Абстрактная фабрика** — это порождающий паттерн проектирования, который решает проблему создания целых семейств связанных продуктов, без указания конкретных классов продуктов. Абстрактная фабрика задаёт интерфейс создания всех доступных типов продуктов, а каждая конкретная реализация фабрики порождает продукты одной из вариаций. Клиентский код вызывает методы фабрики для получения продуктов, вместо самостоятельного создания с помощью оператора `new`. При этом фабрика сама следит за тем, чтобы создать продукт нужной вариации. [Подробней о паттерне Абстрактная фабрика](https://refactoring.guru/ru/design-patterns/abstract-factory) Навигация  [Интро](https://refactoring.guru/ru/design-patterns/abstract-factory/cpp/example#)  [Концептуальный пример](https://refactoring.guru/ru/design-patterns/abstract-factory/cpp/example#example-0)  [main](https://refactoring.guru/ru/design-patterns/abstract-factory/cpp/example#example-0--main-cc)  [Output](https://refactoring.guru/ru/design-patterns/abstract-factory/cpp/example#example-0--Output-txt) **Сложность:** **Популярность:** **Применимость:** Паттерн можно часто встретить в C++ коде, особенно там, где требуется создание семейств продуктов (например, внутри фреймворков). **Признаки применения паттерна:** Паттерн можно определить по методам, возвращающим фабрику, которая, в свою очередь, используется для создания конкретных продуктов, возвращая их через абстрактные типы или интерфейсы. Концептуальный пример --------------------- Этот пример показывает структуру паттерна **Абстрактная фабрика**, а именно — из каких классов он состоит, какие роли эти классы выполняют и как они взаимодействуют друг с другом. #### **main.cc:** Пример структуры паттерна /\*\* \* Каждый отдельный продукт семейства продуктов должен иметь базовый интерфейс. \* Все вариации продукта должны реализовывать этот интерфейс. \*/ class AbstractProductA { public: virtual ~AbstractProductA(){}; virtual std::string UsefulFunctionA() const = 0; }; /\*\* \* Конкретные продукты создаются соответствующими Конкретными Фабриками. \*/ class ConcreteProductA1 : public AbstractProductA { public: std::string UsefulFunctionA() const override { return "The result of the product A1."; } }; class ConcreteProductA2 : public AbstractProductA { std::string UsefulFunctionA() const override { return "The result of the product A2."; } }; /\*\* \* Базовый интерфейс другого продукта. Все продукты могут взаимодействовать друг \* с другом, но правильное взаимодействие возможно только между продуктами одной \* и той же конкретной вариации. \*/ class AbstractProductB { /\*\* \* Продукт B способен работать самостоятельно... \*/ public: virtual ~AbstractProductB(){}; virtual std::string UsefulFunctionB() const = 0; /\*\* \* ...а также взаимодействовать с Продуктами A той же вариации. \* \* Абстрактная Фабрика гарантирует, что все продукты, которые она создает, \* имеют одинаковую вариацию и, следовательно, совместимы. \*/ virtual std::string AnotherUsefulFunctionB(const AbstractProductA &collaborator) const = 0; }; /\*\* \* Конкретные Продукты создаются соответствующими Конкретными Фабриками. \*/ class ConcreteProductB1 : public AbstractProductB { public: std::string UsefulFunctionB() const override { return "The result of the product B1."; } /\*\* \* Продукт B1 может корректно работать только с Продуктом A1. Тем не менее, он \* принимает любой экземпляр Абстрактного Продукта А в качестве аргумента. \*/ std::string AnotherUsefulFunctionB(const AbstractProductA &collaborator) const override { const std::string result = collaborator.UsefulFunctionA(); return "The result of the B1 collaborating with ( " + result + " )"; } }; class ConcreteProductB2 : public AbstractProductB { public: std::string UsefulFunctionB() const override { return "The result of the product B2."; } /\*\* \* Продукт B2 может корректно работать только с Продуктом A2. Тем не менее, он \* принимает любой экземпляр Абстрактного Продукта А в качестве аргумента. \*/ std::string AnotherUsefulFunctionB(const AbstractProductA &collaborator) const override { const std::string result = collaborator.UsefulFunctionA(); return "The result of the B2 collaborating with ( " + result + " )"; } }; /\*\* \* Интерфейс Абстрактной Фабрики объявляет набор методов, которые возвращают \* различные абстрактные продукты. Эти продукты называются семейством и связаны \* темой или концепцией высокого уровня. Продукты одного семейства обычно могут \* взаимодействовать между собой. Семейство продуктов может иметь несколько \* вариаций, но продукты одной вариации несовместимы с продуктами другой. \*/ class AbstractFactory { public: virtual ~AbstractFactory(){}; virtual AbstractProductA \*CreateProductA() const = 0; virtual AbstractProductB \*CreateProductB() const = 0; }; /\*\* \* Конкретная Фабрика производит семейство продуктов одной вариации. Фабрика \* гарантирует совместимость полученных продуктов. Обратите внимание, что \* сигнатуры методов Конкретной Фабрики возвращают абстрактный продукт, в то \* время как внутри метода создается экземпляр конкретного продукта. \*/ class ConcreteFactory1 : public AbstractFactory { public: AbstractProductA \*CreateProductA() const override { return new ConcreteProductA1(); } AbstractProductB \*CreateProductB() const override { return new ConcreteProductB1(); } }; /\*\* \* Каждая Конкретная Фабрика имеет соответствующую вариацию продукта. \*/ class ConcreteFactory2 : public AbstractFactory { public: AbstractProductA \*CreateProductA() const override { return new ConcreteProductA2(); } AbstractProductB \*CreateProductB() const override { return new ConcreteProductB2(); } }; /\*\* \* Клиентский код работает с фабриками и продуктами только через абстрактные \* типы: Абстрактная Фабрика и Абстрактный Продукт. Это позволяет передавать \* любой подкласс фабрики или продукта клиентскому коду, не нарушая его. \*/ void ClientCode(const AbstractFactory &factory) { const AbstractProductA \*product\_a = factory.CreateProductA(); const AbstractProductB \*product\_b = factory.CreateProductB(); std::cout << product\_b->UsefulFunctionB() << "\\n"; std::cout << product\_b->AnotherUsefulFunctionB(\*product\_a) << "\\n"; delete product\_a; delete product\_b; } int main() { std::cout << "Client: Testing client code with the first factory type:\\n"; ConcreteFactory1 \*f1 = new ConcreteFactory1(); ClientCode(\*f1); delete f1; std::cout << std::endl; std::cout << "Client: Testing the same client code with the second factory type:\\n"; ConcreteFactory2 \*f2 = new ConcreteFactory2(); ClientCode(\*f2); delete f2; return 0; } #### **Output.txt:** Результат выполнения Client: Testing client code with the first factory type: The result of the product B1. The result of the B1 collaborating with the (The result of the product A1.) Client: Testing the same client code with the second factory type: The result of the product B2. The result of the B2 collaborating with the (The result of the product A2.) **Абстрактная фабрика** на других языках программирования --------------------------------------------------------- [![Абстрактная фабрика на C#](https://refactoring.guru/images/patterns/icons/csharp.svg?id=da64592defc6e86d57c39c66e9de3e58)](https://refactoring.guru/ru/design-patterns/abstract-factory/csharp/example "Абстрактная фабрика на C#") [![Абстрактная фабрика на Go](https://refactoring.guru/images/patterns/icons/go.svg?id=1a89927eb99b1ea3fde7701d97970aca)](https://refactoring.guru/ru/design-patterns/abstract-factory/go/example "Абстрактная фабрика на Go") [![Абстрактная фабрика на Java](https://refactoring.guru/images/patterns/icons/java.svg?id=e6d87e2dca08c953fe3acd1275ed4f4e)](https://refactoring.guru/ru/design-patterns/abstract-factory/java/example "Абстрактная фабрика на Java") [![Абстрактная фабрика на PHP](https://refactoring.guru/images/patterns/icons/php.svg?id=be1906eb26b71ec1d3b93720d6156618)](https://refactoring.guru/ru/design-patterns/abstract-factory/php/example "Абстрактная фабрика на PHP") [![Абстрактная фабрика на Python](https://refactoring.guru/images/patterns/icons/python.svg?id=6d815d43c0f7050a1151b43e51569c9f)](https://refactoring.guru/ru/design-patterns/abstract-factory/python/example "Абстрактная фабрика на Python") [![Абстрактная фабрика на Ruby](https://refactoring.guru/images/patterns/icons/ruby.svg?id=b065b718c914bf8e960ef731600be1eb)](https://refactoring.guru/ru/design-patterns/abstract-factory/ruby/example "Абстрактная фабрика на Ruby") [![Абстрактная фабрика на Rust](https://refactoring.guru/images/patterns/icons/rust.svg?id=1f5698a4b5ae23fe79413511747e4a87)](https://refactoring.guru/ru/design-patterns/abstract-factory/rust/example "Абстрактная фабрика на Rust") [![Абстрактная фабрика на Swift](https://refactoring.guru/images/patterns/icons/swift.svg?id=0b716c2d52ec3a48fbe91ac031070c1d)](https://refactoring.guru/ru/design-patterns/abstract-factory/swift/example "Абстрактная фабрика на Swift") [![Абстрактная фабрика на TypeScript](https://refactoring.guru/images/patterns/icons/typescript.svg?id=2239d0f16cb703540c205dd8cb0c0cb7)](https://refactoring.guru/ru/design-patterns/abstract-factory/typescript/example "Абстрактная фабрика на TypeScript") --- # Bridge を C++ で / デザインパターン [There are patterns of patterns now! \ My friend's project: MetaPatterns.io](https://metapatterns.io/)  [](https://refactoring.guru/ja/design-patterns/bridge/cpp/example#checkout) [](https://refactoring.guru/ja/design-patterns/bridge/cpp/example#checkout) [](https://refactoring.guru/) / [デザインパターン](https://refactoring.guru/ja/design-patterns) / [Bridge](https://refactoring.guru/ja/design-patterns/bridge) / [C++](https://refactoring.guru/ja/design-patterns/cpp) ![Bridge](https://refactoring.guru/images/patterns/cards/bridge-mini-2x.png?id=2622384cf623ed150ee9c21a0812dd87) **Bridge** を C++ で ================== **Bridge** は、 構造に関するデザインパターンの一つで、 ビジネス・ロジックや巨大なクラスを独立して開発可能なクラス階層に分割します。 階層の一つ (抽象化と呼ばれる) は、 二つ目の階層 (実装) のオブジェクトへの参照を持ちます。 抽象化階層は、 その呼び出しのいくつか (場合によっては大多数) を実装階層のオブジェクトに委任します。 すべての実装は、 共通のインターフェースを持っているので、 抽象化の中で入れ替え可能です。 [Bridge の詳細](https://refactoring.guru/ja/design-patterns/bridge) ナビゲーション  [はじめに](https://refactoring.guru/ja/design-patterns/bridge/cpp/example#)  [概念的な例](https://refactoring.guru/ja/design-patterns/bridge/cpp/example#example-0)  [main](https://refactoring.guru/ja/design-patterns/bridge/cpp/example#example-0--main-cc)  [Output](https://refactoring.guru/ja/design-patterns/bridge/cpp/example#example-0--Output-txt) **複雑度:** **人気度:** **使用例:** Bridge パターンは、 クロス・プラットフォーム・アプリを扱う時、 複数の種類のデータベース・サーバーをサポートする時、 あるいはある種の API プロバイダー (クラウド・プラットフォーム、 ソーシャル・ネットワークなど) を複数利用したい場合に特に便利です。 **見つけ方:** Bridge は、 制御するものと、 それが依存するいくつかの異なるプラットフォームとが明らかに分かれていることから識別できます。 概念的な例 ----- この例は、 **Bridge** デザインパターンの構造を説明するためのものです。 以下の質問に答えることを目的としています: * どういうクラスからできているか? * それぞれのクラスの役割は? * パターンの要素同士はどう関係しているのか? #### **main.cc:** 概念的な例 /\*\* \* The Implementation defines the interface for all implementation classes. It \* doesn't have to match the Abstraction's interface. In fact, the two \* interfaces can be entirely different. Typically the Implementation interface \* provides only primitive operations, while the Abstraction defines higher- \* level operations based on those primitives. \*/ class Implementation { public: virtual ~Implementation() {} virtual std::string OperationImplementation() const = 0; }; /\*\* \* Each Concrete Implementation corresponds to a specific platform and \* implements the Implementation interface using that platform's API. \*/ class ConcreteImplementationA : public Implementation { public: std::string OperationImplementation() const override { return "ConcreteImplementationA: Here's the result on the platform A.\\n"; } }; class ConcreteImplementationB : public Implementation { public: std::string OperationImplementation() const override { return "ConcreteImplementationB: Here's the result on the platform B.\\n"; } }; /\*\* \* The Abstraction defines the interface for the "control" part of the two class \* hierarchies. It maintains a reference to an object of the Implementation \* hierarchy and delegates all of the real work to this object. \*/ class Abstraction { /\*\* \* @var Implementation \*/ protected: Implementation\* implementation\_; public: Abstraction(Implementation\* implementation) : implementation\_(implementation) { } virtual ~Abstraction() { } virtual std::string Operation() const { return "Abstraction: Base operation with:\\n" + this->implementation\_->OperationImplementation(); } }; /\*\* \* You can extend the Abstraction without changing the Implementation classes. \*/ class ExtendedAbstraction : public Abstraction { public: ExtendedAbstraction(Implementation\* implementation) : Abstraction(implementation) { } std::string Operation() const override { return "ExtendedAbstraction: Extended operation with:\\n" + this->implementation\_->OperationImplementation(); } }; /\*\* \* Except for the initialization phase, where an Abstraction object gets linked \* with a specific Implementation object, the client code should only depend on \* the Abstraction class. This way the client code can support any abstraction- \* implementation combination. \*/ void ClientCode(const Abstraction& abstraction) { // ... std::cout << abstraction.Operation(); // ... } /\*\* \* The client code should be able to work with any pre-configured abstraction- \* implementation combination. \*/ int main() { Implementation\* implementation = new ConcreteImplementationA; Abstraction\* abstraction = new Abstraction(implementation); ClientCode(\*abstraction); std::cout << std::endl; delete implementation; delete abstraction; implementation = new ConcreteImplementationB; abstraction = new ExtendedAbstraction(implementation); ClientCode(\*abstraction); delete implementation; delete abstraction; return 0; } #### **Output.txt:** 実行結果 Abstraction: Base operation with: ConcreteImplementationA: Here's the result on the platform A. ExtendedAbstraction: Extended operation with: ConcreteImplementationB: Here's the result on the platform B. 他言語での **Bridge** ---------------- [![Bridge を C# で](https://refactoring.guru/images/patterns/icons/csharp.svg?id=da64592defc6e86d57c39c66e9de3e58)](https://refactoring.guru/ja/design-patterns/bridge/csharp/example "Bridge を C# で") [![Bridge を Go で](https://refactoring.guru/images/patterns/icons/go.svg?id=1a89927eb99b1ea3fde7701d97970aca)](https://refactoring.guru/ja/design-patterns/bridge/go/example "Bridge を Go で") [![Bridge を Java で](https://refactoring.guru/images/patterns/icons/java.svg?id=e6d87e2dca08c953fe3acd1275ed4f4e)](https://refactoring.guru/ja/design-patterns/bridge/java/example "Bridge を Java で") [![Bridge を PHP で](https://refactoring.guru/images/patterns/icons/php.svg?id=be1906eb26b71ec1d3b93720d6156618)](https://refactoring.guru/ja/design-patterns/bridge/php/example "Bridge を PHP で") [![Bridge を Python で](https://refactoring.guru/images/patterns/icons/python.svg?id=6d815d43c0f7050a1151b43e51569c9f)](https://refactoring.guru/ja/design-patterns/bridge/python/example "Bridge を Python で") [![Bridge を Ruby で](https://refactoring.guru/images/patterns/icons/ruby.svg?id=b065b718c914bf8e960ef731600be1eb)](https://refactoring.guru/ja/design-patterns/bridge/ruby/example "Bridge を Ruby で") [![Bridge を Rust で](https://refactoring.guru/images/patterns/icons/rust.svg?id=1f5698a4b5ae23fe79413511747e4a87)](https://refactoring.guru/ja/design-patterns/bridge/rust/example "Bridge を Rust で") [![Bridge を Swift で](https://refactoring.guru/images/patterns/icons/swift.svg?id=0b716c2d52ec3a48fbe91ac031070c1d)](https://refactoring.guru/ja/design-patterns/bridge/swift/example "Bridge を Swift で") [![Bridge を TypeScript で](https://refactoring.guru/images/patterns/icons/typescript.svg?id=2239d0f16cb703540c205dd8cb0c0cb7)](https://refactoring.guru/ja/design-patterns/bridge/typescript/example "Bridge を TypeScript で") --- # Strategy em Swift / Padrões de Projeto [There are patterns of patterns now! \ My friend's project: MetaPatterns.io](https://metapatterns.io/)  [](https://refactoring.guru/pt-br/design-patterns/strategy/swift/example#checkout) [](https://refactoring.guru/pt-br/design-patterns/strategy/swift/example#checkout) [](https://refactoring.guru/) / [Padrões de Projeto](https://refactoring.guru/pt-br/design-patterns) / [Strategy](https://refactoring.guru/pt-br/design-patterns/strategy) / [Swift](https://refactoring.guru/pt-br/design-patterns/swift) ![Strategy](https://refactoring.guru/images/patterns/cards/strategy-mini-2x.png?id=f4e6608561f8e5d18be6927d4620ad29) **Strategy** em Swift ===================== O **Strategy** é um padrão de projeto comportamental que transforma um conjunto de comportamentos em objetos e os torna intercambiáveis dentro do objeto de contexto original. O objeto original, chamado contexto, mantém uma referência a um objeto strategy e o delega a execução do comportamento. Para alterar a maneira como o contexto executa seu trabalho, outros objetos podem substituir o objeto strategy atualmente vinculado por outro. [Saiba mais sobre o Strategy](https://refactoring.guru/pt-br/design-patterns/strategy) Navegação  [Introdução](https://refactoring.guru/pt-br/design-patterns/strategy/swift/example#)  [Exemplo conceitual](https://refactoring.guru/pt-br/design-patterns/strategy/swift/example#example-0)  [Example](https://refactoring.guru/pt-br/design-patterns/strategy/swift/example#example-0--Example-swift)  [Output](https://refactoring.guru/pt-br/design-patterns/strategy/swift/example#example-0--Output-txt)  [Exemplo do mundo real](https://refactoring.guru/pt-br/design-patterns/strategy/swift/example#example-1)  [Example](https://refactoring.guru/pt-br/design-patterns/strategy/swift/example#example-1--Example-swift)  [Output](https://refactoring.guru/pt-br/design-patterns/strategy/swift/example#example-1--Output-txt) **Complexidade:** **Popularidade:** **Exemplos de uso:** O padrão Strategy é muito comum no código Swift. É frequentemente usado em várias estruturas para fornecer aos usuários uma maneira de alterar o comportamento de uma classe sem estendê-la. **Identificação:** O padrão Strategy pode ser reconhecido por um método que permite que o objeto aninhado faça o trabalho real, bem como pelo setter que permite substituir esse objeto por outro diferente. The following examples are available on [Swift Playgrounds](https://www.alemohamad.com/playgrounds) . Kudos to [Alejandro Mohamad](https://www.alemohamad.com/) for creating the Playground version. Exemplo conceitual ------------------ Este exemplo ilustra a estrutura do padrão de projeto **Strategy**. Ele se concentra em responder a estas perguntas: * De quais classes ele consiste? * Quais papéis essas classes desempenham? * De que maneira os elementos do padrão estão relacionados? Depois de aprender sobre a estrutura do padrão, será mais fácil entender o exemplo a seguir, com base em um caso de uso Swift do mundo real. #### **Example.swift:** Exemplo conceitual import XCTest /// The Context defines the interface of interest to clients. class Context { /// The Context maintains a reference to one of the Strategy objects. The /// Context does not know the concrete class of a strategy. It should work /// with all strategies via the Strategy interface. private var strategy: Strategy /// Usually, the Context accepts a strategy through the constructor, but /// also provides a setter to change it at runtime. init(strategy: Strategy) { self.strategy = strategy } /// Usually, the Context allows replacing a Strategy object at runtime. func update(strategy: Strategy) { self.strategy = strategy } /// The Context delegates some work to the Strategy object instead of /// implementing multiple versions of the algorithm on its own. func doSomeBusinessLogic() { print("Context: Sorting data using the strategy (not sure how it'll do it)\\n") let result = strategy.doAlgorithm(\["a", "b", "c", "d", "e"\]) print(result.joined(separator: ",")) } } /// The Strategy interface declares operations common to all supported versions /// of some algorithm. /// /// The Context uses this interface to call the algorithm defined by Concrete /// Strategies. protocol Strategy { func doAlgorithm(\_ data: \[T\]) -> \[T\] } /// Concrete Strategies implement the algorithm while following the base /// Strategy interface. The interface makes them interchangeable in the Context. class ConcreteStrategyA: Strategy { func doAlgorithm(\_ data: \[T\]) -> \[T\] { return data.sorted() } } class ConcreteStrategyB: Strategy { func doAlgorithm(\_ data: \[T\]) -> \[T\] { return data.sorted(by: >) } } /// Let's see how it all works together. class StrategyConceptual: XCTestCase { func test() { /// The client code picks a concrete strategy and passes it to the /// context. The client should be aware of the differences between /// strategies in order to make the right choice. let context = Context(strategy: ConcreteStrategyA()) print("Client: Strategy is set to normal sorting.\\n") context.doSomeBusinessLogic() print("\\nClient: Strategy is set to reverse sorting.\\n") context.update(strategy: ConcreteStrategyB()) context.doSomeBusinessLogic() } } #### **Output.txt:** Resultados da execução Client: Strategy is set to normal sorting. Context: Sorting data using the strategy (not sure how it'll do it) a,b,c,d,e Client: Strategy is set to reverse sorting. Context: Sorting data using the strategy (not sure how it'll do it) e,d,c,b,a Exemplo do mundo real --------------------- #### **Example.swift:** Exemplo do mundo real import XCTest class StrategyRealWorld: XCTestCase { /// This example shows a simple implementation of a list controller that is /// able to display models from different data sources: /// /// (MemoryStorage, CoreDataStorage, RealmStorage) func test() { let controller = ListController() let memoryStorage = MemoryStorage() memoryStorage.add(usersFromNetwork()) clientCode(use: controller, with: memoryStorage) clientCode(use: controller, with: CoreDataStorage()) clientCode(use: controller, with: RealmStorage()) } func clientCode(use controller: ListController, with dataSource: DataSource) { controller.update(dataSource: dataSource) controller.displayModels() } private func usersFromNetwork() -> \[User\] { let firstUser = User(id: 1, username: "username1") let secondUser = User(id: 2, username: "username2") return \[firstUser, secondUser\] } } class ListController { private var dataSource: DataSource? func update(dataSource: DataSource) { /// ... resest current states ... self.dataSource = dataSource } func displayModels() { guard let dataSource = dataSource else { return } let models = dataSource.loadModels() as \[User\] /// Bind models to cells of a list view... print("\\nListController: Displaying models...") models.forEach({ print($0) }) } } protocol DataSource { func loadModels() -> \[T\] } class MemoryStorage: DataSource { private lazy var items = \[Model\]() func add(\_ items: \[Model\]) { self.items.append(contentsOf: items) } func loadModels() -> \[T\] { guard T.self == User.self else { return \[\] } return items as! \[T\] } } class CoreDataStorage: DataSource { func loadModels() -> \[T\] { guard T.self == User.self else { return \[\] } let firstUser = User(id: 3, username: "username3") let secondUser = User(id: 4, username: "username4") return \[firstUser, secondUser\] as! \[T\] } } class RealmStorage: DataSource { func loadModels() -> \[T\] { guard T.self == User.self else { return \[\] } let firstUser = User(id: 5, username: "username5") let secondUser = User(id: 6, username: "username6") return \[firstUser, secondUser\] as! \[T\] } } protocol DomainModel { var id: Int { get } } struct User: DomainModel { var id: Int var username: String } #### **Output.txt:** Resultados da execução ListController: Displaying models... User(id: 1, username: "username1") User(id: 2, username: "username2") ListController: Displaying models... User(id: 3, username: "username3") User(id: 4, username: "username4") ListController: Displaying models... User(id: 5, username: "username5") User(id: 6, username: "username6") **Strategy** em outras linguagens --------------------------------- [![Strategy em C#](https://refactoring.guru/images/patterns/icons/csharp.svg?id=da64592defc6e86d57c39c66e9de3e58)](https://refactoring.guru/pt-br/design-patterns/strategy/csharp/example "Strategy em C#") [![Strategy em C++](https://refactoring.guru/images/patterns/icons/cpp.svg?id=f7782ed8b8666246bfcc3f8fefc3b858)](https://refactoring.guru/pt-br/design-patterns/strategy/cpp/example "Strategy em C++") [![Strategy em Go](https://refactoring.guru/images/patterns/icons/go.svg?id=1a89927eb99b1ea3fde7701d97970aca)](https://refactoring.guru/pt-br/design-patterns/strategy/go/example "Strategy em Go") [![Strategy em Java](https://refactoring.guru/images/patterns/icons/java.svg?id=e6d87e2dca08c953fe3acd1275ed4f4e)](https://refactoring.guru/pt-br/design-patterns/strategy/java/example "Strategy em Java") [![Strategy em PHP](https://refactoring.guru/images/patterns/icons/php.svg?id=be1906eb26b71ec1d3b93720d6156618)](https://refactoring.guru/pt-br/design-patterns/strategy/php/example "Strategy em PHP") [![Strategy em Python](https://refactoring.guru/images/patterns/icons/python.svg?id=6d815d43c0f7050a1151b43e51569c9f)](https://refactoring.guru/pt-br/design-patterns/strategy/python/example "Strategy em Python") [![Strategy em Ruby](https://refactoring.guru/images/patterns/icons/ruby.svg?id=b065b718c914bf8e960ef731600be1eb)](https://refactoring.guru/pt-br/design-patterns/strategy/ruby/example "Strategy em Ruby") [![Strategy em Rust](https://refactoring.guru/images/patterns/icons/rust.svg?id=1f5698a4b5ae23fe79413511747e4a87)](https://refactoring.guru/pt-br/design-patterns/strategy/rust/example "Strategy em Rust") [![Strategy em TypeScript](https://refactoring.guru/images/patterns/icons/typescript.svg?id=2239d0f16cb703540c205dd8cb0c0cb7)](https://refactoring.guru/pt-br/design-patterns/strategy/typescript/example "Strategy em TypeScript") --- # Visitor em Python / Padrões de Projeto [There are patterns of patterns now! \ My friend's project: MetaPatterns.io](https://metapatterns.io/)  [](https://refactoring.guru/pt-br/design-patterns/visitor/python/example#checkout) [](https://refactoring.guru/pt-br/design-patterns/visitor/python/example#checkout) [](https://refactoring.guru/) / [Padrões de Projeto](https://refactoring.guru/pt-br/design-patterns) / [Visitor](https://refactoring.guru/pt-br/design-patterns/visitor) / [Python](https://refactoring.guru/pt-br/design-patterns/python) ![Visitor](https://refactoring.guru/images/patterns/cards/visitor-mini-2x.png?id=9b87f3f3b772f434b28a25876829b504) **Visitor** em Python ===================== O **Visitor** é um padrão de projeto comportamental que permite adicionar novos comportamentos à hierarquia de classes existente sem alterar nenhum código existente. > Leia por que os Visitors não podem ser simplesmente substituídos pela sobrecarga de método em nosso artigo [Visitor e Double Dispatch](https://refactoring.guru/pt-br/design-patterns/visitor-double-dispatch) > . [Saiba mais sobre o Visitor](https://refactoring.guru/pt-br/design-patterns/visitor) Navegação  [Introdução](https://refactoring.guru/pt-br/design-patterns/visitor/python/example#)  [Exemplo conceitual](https://refactoring.guru/pt-br/design-patterns/visitor/python/example#example-0)  [main](https://refactoring.guru/pt-br/design-patterns/visitor/python/example#example-0--main-py)  [Output](https://refactoring.guru/pt-br/design-patterns/visitor/python/example#example-0--Output-txt) **Complexidade:** **Popularidade:** **Exemplos de uso:** O Visitor não é um padrão muito comum devido à sua complexidade e aplicabilidade limitada. Exemplo conceitual ------------------ Este exemplo ilustra a estrutura do padrão de projeto **Visitor**. Ele se concentra em responder a estas perguntas: * De quais classes ele consiste? * Quais papéis essas classes desempenham? * De que maneira os elementos do padrão estão relacionados? #### **main.py:** Exemplo conceitual from \_\_future\_\_ import annotations from abc import ABC, abstractmethod from typing import List class Component(ABC): """ The Component interface declares an \`accept\` method that should take the base visitor interface as an argument. """ @abstractmethod def accept(self, visitor: Visitor) -> None: pass class ConcreteComponentA(Component): """ Each Concrete Component must implement the \`accept\` method in such a way that it calls the visitor's method corresponding to the component's class. """ def accept(self, visitor: Visitor) -> None: """ Note that we're calling \`visitConcreteComponentA\`, which matches the current class name. This way we let the visitor know the class of the component it works with. """ visitor.visit\_concrete\_component\_a(self) def exclusive\_method\_of\_concrete\_component\_a(self) -> str: """ Concrete Components may have special methods that don't exist in their base class or interface. The Visitor is still able to use these methods since it's aware of the component's concrete class. """ return "A" class ConcreteComponentB(Component): """ Same here: visitConcreteComponentB => ConcreteComponentB """ def accept(self, visitor: Visitor): visitor.visit\_concrete\_component\_b(self) def special\_method\_of\_concrete\_component\_b(self) -> str: return "B" class Visitor(ABC): """ The Visitor Interface declares a set of visiting methods that correspond to component classes. The signature of a visiting method allows the visitor to identify the exact class of the component that it's dealing with. """ @abstractmethod def visit\_concrete\_component\_a(self, element: ConcreteComponentA) -> None: pass @abstractmethod def visit\_concrete\_component\_b(self, element: ConcreteComponentB) -> None: pass """ Concrete Visitors implement several versions of the same algorithm, which can work with all concrete component classes. You can experience the biggest benefit of the Visitor pattern when using it with a complex object structure, such as a Composite tree. In this case, it might be helpful to store some intermediate state of the algorithm while executing visitor's methods over various objects of the structure. """ class ConcreteVisitor1(Visitor): def visit\_concrete\_component\_a(self, element) -> None: print(f"{element.exclusive\_method\_of\_concrete\_component\_a()} + ConcreteVisitor1") def visit\_concrete\_component\_b(self, element) -> None: print(f"{element.special\_method\_of\_concrete\_component\_b()} + ConcreteVisitor1") class ConcreteVisitor2(Visitor): def visit\_concrete\_component\_a(self, element) -> None: print(f"{element.exclusive\_method\_of\_concrete\_component\_a()} + ConcreteVisitor2") def visit\_concrete\_component\_b(self, element) -> None: print(f"{element.special\_method\_of\_concrete\_component\_b()} + ConcreteVisitor2") def client\_code(components: List\[Component\], visitor: Visitor) -> None: """ The client code can run visitor operations over any set of elements without figuring out their concrete classes. The accept operation directs a call to the appropriate operation in the visitor object. """ # ... for component in components: component.accept(visitor) # ... if \_\_name\_\_ == "\_\_main\_\_": components = \[ConcreteComponentA(), ConcreteComponentB()\] print("The client code works with all visitors via the base Visitor interface:") visitor1 = ConcreteVisitor1() client\_code(components, visitor1) print("It allows the same client code to work with different types of visitors:") visitor2 = ConcreteVisitor2() client\_code(components, visitor2) #### **Output.txt:** Resultados da execução The client code works with all visitors via the base Visitor interface: A + ConcreteVisitor1 B + ConcreteVisitor1 It allows the same client code to work with different types of visitors: A + ConcreteVisitor2 B + ConcreteVisitor2 **Visitor** em outras linguagens -------------------------------- [![Visitor em C#](https://refactoring.guru/images/patterns/icons/csharp.svg?id=da64592defc6e86d57c39c66e9de3e58)](https://refactoring.guru/pt-br/design-patterns/visitor/csharp/example "Visitor em C#") [![Visitor em C++](https://refactoring.guru/images/patterns/icons/cpp.svg?id=f7782ed8b8666246bfcc3f8fefc3b858)](https://refactoring.guru/pt-br/design-patterns/visitor/cpp/example "Visitor em C++") [![Visitor em Go](https://refactoring.guru/images/patterns/icons/go.svg?id=1a89927eb99b1ea3fde7701d97970aca)](https://refactoring.guru/pt-br/design-patterns/visitor/go/example "Visitor em Go") [![Visitor em Java](https://refactoring.guru/images/patterns/icons/java.svg?id=e6d87e2dca08c953fe3acd1275ed4f4e)](https://refactoring.guru/pt-br/design-patterns/visitor/java/example "Visitor em Java") [![Visitor em PHP](https://refactoring.guru/images/patterns/icons/php.svg?id=be1906eb26b71ec1d3b93720d6156618)](https://refactoring.guru/pt-br/design-patterns/visitor/php/example "Visitor em PHP") [![Visitor em Ruby](https://refactoring.guru/images/patterns/icons/ruby.svg?id=b065b718c914bf8e960ef731600be1eb)](https://refactoring.guru/pt-br/design-patterns/visitor/ruby/example "Visitor em Ruby") [![Visitor em Rust](https://refactoring.guru/images/patterns/icons/rust.svg?id=1f5698a4b5ae23fe79413511747e4a87)](https://refactoring.guru/pt-br/design-patterns/visitor/rust/example "Visitor em Rust") [![Visitor em Swift](https://refactoring.guru/images/patterns/icons/swift.svg?id=0b716c2d52ec3a48fbe91ac031070c1d)](https://refactoring.guru/pt-br/design-patterns/visitor/swift/example "Visitor em Swift") [![Visitor em TypeScript](https://refactoring.guru/images/patterns/icons/typescript.svg?id=2239d0f16cb703540c205dd8cb0c0cb7)](https://refactoring.guru/pt-br/design-patterns/visitor/typescript/example "Visitor em TypeScript") --- # Odwiedzający w języku Ruby / Wzorce projektowe [There are patterns of patterns now! \ My friend's project: MetaPatterns.io](https://metapatterns.io/)  [](https://refactoring.guru/pl/design-patterns/visitor/ruby/example#checkout) [](https://refactoring.guru/pl/design-patterns/visitor/ruby/example#checkout) [](https://refactoring.guru/) / [Wzorce projektowe](https://refactoring.guru/pl/design-patterns) / [Odwiedzający](https://refactoring.guru/pl/design-patterns/visitor) / [Ruby](https://refactoring.guru/pl/design-patterns/ruby) ![Odwiedzający](https://refactoring.guru/images/patterns/cards/visitor-mini-2x.png?id=9b87f3f3b772f434b28a25876829b504) **Odwiedzający** w języku Ruby ============================== **Odwiedzający** to behawioralny wzorzec projektowy pozwalający dodawać nowe zachowanie istniejącej hierarchii klas bez zmiany kodu jej klas. > O tym, dlaczego Odwiedzającego nie można po prostu zastąpić przeciążaniem metod, przeczytasz w naszym artykule [Odwiedzający i podwójna dyspozycja](https://refactoring.guru/pl/design-patterns/visitor-double-dispatch) > . [Dowiedz się więcej o Odwiedzający](https://refactoring.guru/pl/design-patterns/visitor) Nawigacja  [Intro](https://refactoring.guru/pl/design-patterns/visitor/ruby/example#)  [Przykład koncepcyjny](https://refactoring.guru/pl/design-patterns/visitor/ruby/example#example-0)  [main](https://refactoring.guru/pl/design-patterns/visitor/ruby/example#example-0--main-rb)  [output](https://refactoring.guru/pl/design-patterns/visitor/ruby/example#example-0--output-txt) **Złożoność:** **Popularność:** **Przykłady użycia:** Odwiedzający nie jest zbyt powszechnie stosowany, gdyż jest skomplikowany i ma wąski zakres stosowania. Przykład koncepcyjny -------------------- Poniższy przykład ilustruje strukturę wzorca **Odwiedzający** ze szczególnym naciskiem na następujące zagadnienia: * Z jakich składa się klas? * Jakie role pełnią te klasy? * W jaki sposób elementy wzorca są ze sobą powiązane? #### **main.rb:** Przykład koncepcyjny \# The Component interface declares an \`accept\` method that should take the base # visitor interface as an argument. class Component # @abstract # # @param \[Visitor\] visitor def accept(\_visitor) raise NotImplementedError, "#{self.class} has not implemented method '#{\_\_method\_\_}'" end end # Each Concrete Component must implement the \`accept\` method in such a way that # it calls the visitor's method corresponding to the component's class. class ConcreteComponentA < Component # Note that we're calling \`visitConcreteComponentA\`, which matches the current # class name. This way we let the visitor know the class of the component it # works with. def accept(visitor) visitor.visit\_concrete\_component\_a(self) end # Concrete Components may have special methods that don't exist in their base # class or interface. The Visitor is still able to use these methods since # it's aware of the component's concrete class. def exclusive\_method\_of\_concrete\_component\_a 'A' end end # Same here: visit\_concrete\_component\_b => ConcreteComponentB class ConcreteComponentB < Component # @param \[Visitor\] visitor def accept(visitor) visitor.visit\_concrete\_component\_b(self) end def special\_method\_of\_concrete\_component\_b 'B' end end # The Visitor Interface declares a set of visiting methods that correspond to # component classes. The signature of a visiting method allows the visitor to # identify the exact class of the component that it's dealing with. class Visitor # @abstract # # @param \[ConcreteComponentA\] element def visit\_concrete\_component\_a(\_element) raise NotImplementedError, "#{self.class} has not implemented method '#{\_\_method\_\_}'" end # @abstract # # @param \[ConcreteComponentB\] element def visit\_concrete\_component\_b(\_element) raise NotImplementedError, "#{self.class} has not implemented method '#{\_\_method\_\_}'" end end # Concrete Visitors implement several versions of the same algorithm, which can # work with all concrete component classes. # # You can experience the biggest benefit of the Visitor pattern when using it # with a complex object structure, such as a Composite tree. In this case, it # might be helpful to store some intermediate state of the algorithm while # executing visitor's methods over various objects of the structure. class ConcreteVisitor1 < Visitor def visit\_concrete\_component\_a(element) puts "#{element.exclusive\_method\_of\_concrete\_component\_a} + #{self.class}" end def visit\_concrete\_component\_b(element) puts "#{element.special\_method\_of\_concrete\_component\_b} + #{self.class}" end end class ConcreteVisitor2 < Visitor def visit\_concrete\_component\_a(element) puts "#{element.exclusive\_method\_of\_concrete\_component\_a} + #{self.class}" end def visit\_concrete\_component\_b(element) puts "#{element.special\_method\_of\_concrete\_component\_b} + #{self.class}" end end # The client code can run visitor operations over any set of elements without # figuring out their concrete classes. The accept operation directs a call to # the appropriate operation in the visitor object. def client\_code(components, visitor) # ... components.each do |component| component.accept(visitor) end # ... end components = \[ConcreteComponentA.new, ConcreteComponentB.new\] puts 'The client code works with all visitors via the base Visitor interface:' visitor1 = ConcreteVisitor1.new client\_code(components, visitor1) puts 'It allows the same client code to work with different types of visitors:' visitor2 = ConcreteVisitor2.new client\_code(components, visitor2) #### **output.txt:** Wynik działania The client code works with all visitors via the base Visitor interface: A + ConcreteVisitor1 B + ConcreteVisitor1 It allows the same client code to work with different types of visitors: A + ConcreteVisitor2 B + ConcreteVisitor2 **Odwiedzający** w innych językach ---------------------------------- [![Odwiedzający w języku C#](https://refactoring.guru/images/patterns/icons/csharp.svg?id=da64592defc6e86d57c39c66e9de3e58)](https://refactoring.guru/pl/design-patterns/visitor/csharp/example "Odwiedzający w języku C#") [![Odwiedzający w języku C++](https://refactoring.guru/images/patterns/icons/cpp.svg?id=f7782ed8b8666246bfcc3f8fefc3b858)](https://refactoring.guru/pl/design-patterns/visitor/cpp/example "Odwiedzający w języku C++") [![Odwiedzający w języku Go](https://refactoring.guru/images/patterns/icons/go.svg?id=1a89927eb99b1ea3fde7701d97970aca)](https://refactoring.guru/pl/design-patterns/visitor/go/example "Odwiedzający w języku Go") [![Odwiedzający w języku Java](https://refactoring.guru/images/patterns/icons/java.svg?id=e6d87e2dca08c953fe3acd1275ed4f4e)](https://refactoring.guru/pl/design-patterns/visitor/java/example "Odwiedzający w języku Java") [![Odwiedzający w języku PHP](https://refactoring.guru/images/patterns/icons/php.svg?id=be1906eb26b71ec1d3b93720d6156618)](https://refactoring.guru/pl/design-patterns/visitor/php/example "Odwiedzający w języku PHP") [![Odwiedzający w języku Python](https://refactoring.guru/images/patterns/icons/python.svg?id=6d815d43c0f7050a1151b43e51569c9f)](https://refactoring.guru/pl/design-patterns/visitor/python/example "Odwiedzający w języku Python") [![Odwiedzający w języku Rust](https://refactoring.guru/images/patterns/icons/rust.svg?id=1f5698a4b5ae23fe79413511747e4a87)](https://refactoring.guru/pl/design-patterns/visitor/rust/example "Odwiedzający w języku Rust") [![Odwiedzający w języku Swift](https://refactoring.guru/images/patterns/icons/swift.svg?id=0b716c2d52ec3a48fbe91ac031070c1d)](https://refactoring.guru/pl/design-patterns/visitor/swift/example "Odwiedzający w języku Swift") [![Odwiedzający w języku TypeScript](https://refactoring.guru/images/patterns/icons/typescript.svg?id=2239d0f16cb703540c205dd8cb0c0cb7)](https://refactoring.guru/pl/design-patterns/visitor/typescript/example "Odwiedzający w języku TypeScript") --- # Adaptateur en Ruby / Patrons de conception [There are patterns of patterns now! \ My friend's project: MetaPatterns.io](https://metapatterns.io/)  [](https://refactoring.guru/fr/design-patterns/adapter/ruby/example#checkout) [](https://refactoring.guru/fr/design-patterns/adapter/ruby/example#checkout) [](https://refactoring.guru/) / [Patrons de conception](https://refactoring.guru/fr/design-patterns) / [Adaptateur](https://refactoring.guru/fr/design-patterns/adapter) / [Ruby](https://refactoring.guru/fr/design-patterns/ruby) ![Adaptateur](https://refactoring.guru/images/patterns/cards/adapter-mini-2x.png?id=8274d99afbbe9c63bfbfd0d68ceeffc7) **Adaptateur** en Ruby ====================== L’**Adaptateur** est un patron de conception structurel qui permet à des objets incompatibles de collaborer. L’adaptateur fait office d’emballeur entre les deux objets. Il récupère les appels à un objet et les met dans un format et une interface reconnaissables par le second objet. [En savoir plus sur la patron Adaptateur](https://refactoring.guru/fr/design-patterns/adapter) Navigation  [Intro](https://refactoring.guru/fr/design-patterns/adapter/ruby/example#)  [Exemple conceptuel](https://refactoring.guru/fr/design-patterns/adapter/ruby/example#example-0)  [main](https://refactoring.guru/fr/design-patterns/adapter/ruby/example#example-0--main-rb)  [output](https://refactoring.guru/fr/design-patterns/adapter/ruby/example#example-0--output-txt) **Complexité :** **Popularité :** **Exemples d’utilisation :** L’adaptateur est très répandu en Ruby. On le retrouve souvent dans des systèmes basés sur du code hérité, dans lesquels l’adaptateur fait fonctionner du code hérité avec des classes modernes. **Identification :** L’adaptateur peut être identifié grâce à son constructeur qui prend une instance d’un type abstrait différent ou d’une interface différente. Lorsque l’une des méthodes de l’adaptateur est appelée, il traduit les paramètres dans un format approprié et redirige l’appel vers une ou plusieurs méthodes de l’objet emballé. Exemple conceptuel ------------------ Dans cet exemple, nous allons voir la structure du patron de conception **Adaptateur**. Nous allons répondre aux questions suivantes : * Que contiennent les classes ? * Quel rôle jouent-elles ? * Comment les éléments du patron sont-ils reliés ? #### **main.rb:** Exemple conceptuel \# The Target defines the domain-specific interface used by the client code. class Target # @return \[String\] def request 'Target: The default target\\'s behavior.' end end # The Adaptee contains some useful behavior, but its interface is incompatible # with the existing client code. The Adaptee needs some adaptation before the # client code can use it. class Adaptee # @return \[String\] def specific\_request '.eetpadA eht fo roivaheb laicepS' end end # The Adapter makes the Adaptee's interface compatible with the Target's # interface. class Adapter < Target # @param \[Adaptee\] adaptee def initialize(adaptee) @adaptee = adaptee end def request "Adapter: (TRANSLATED) #{@adaptee.specific\_request.reverse!}" end end # The client code supports all classes that follow the Target interface. def client\_code(target) print target.request end puts 'Client: I can work just fine with the Target objects:' target = Target.new client\_code(target) puts "\\n\\n" adaptee = Adaptee.new puts 'Client: The Adaptee class has a weird interface. See, I don\\'t understand it:' puts "Adaptee: #{adaptee.specific\_request}" puts "\\n" puts 'Client: But I can work with it via the Adapter:' adapter = Adapter.new(adaptee) client\_code(adapter) #### **output.txt:** Résultat de l’exécution Client: I can work just fine with the Target objects: Target: The default target's behavior. Client: The Adaptee class has a weird interface. See, I don't understand it: Adaptee: .eetpadA eht fo roivaheb laicepS Client: But I can work with it via the Adapter: Adapter: (TRANSLATED) Special behavior of the Adaptee. **Adaptateur** dans les autres langues -------------------------------------- [![Adaptateur en C#](https://refactoring.guru/images/patterns/icons/csharp.svg?id=da64592defc6e86d57c39c66e9de3e58)](https://refactoring.guru/fr/design-patterns/adapter/csharp/example "Adaptateur en C#") [![Adaptateur en C++](https://refactoring.guru/images/patterns/icons/cpp.svg?id=f7782ed8b8666246bfcc3f8fefc3b858)](https://refactoring.guru/fr/design-patterns/adapter/cpp/example "Adaptateur en C++") [![Adaptateur en Go](https://refactoring.guru/images/patterns/icons/go.svg?id=1a89927eb99b1ea3fde7701d97970aca)](https://refactoring.guru/fr/design-patterns/adapter/go/example "Adaptateur en Go") [![Adaptateur en Java](https://refactoring.guru/images/patterns/icons/java.svg?id=e6d87e2dca08c953fe3acd1275ed4f4e)](https://refactoring.guru/fr/design-patterns/adapter/java/example "Adaptateur en Java") [![Adaptateur en PHP](https://refactoring.guru/images/patterns/icons/php.svg?id=be1906eb26b71ec1d3b93720d6156618)](https://refactoring.guru/fr/design-patterns/adapter/php/example "Adaptateur en PHP") [![Adaptateur en Python](https://refactoring.guru/images/patterns/icons/python.svg?id=6d815d43c0f7050a1151b43e51569c9f)](https://refactoring.guru/fr/design-patterns/adapter/python/example "Adaptateur en Python") [![Adaptateur en Rust](https://refactoring.guru/images/patterns/icons/rust.svg?id=1f5698a4b5ae23fe79413511747e4a87)](https://refactoring.guru/fr/design-patterns/adapter/rust/example "Adaptateur en Rust") [![Adaptateur en Swift](https://refactoring.guru/images/patterns/icons/swift.svg?id=0b716c2d52ec3a48fbe91ac031070c1d)](https://refactoring.guru/fr/design-patterns/adapter/swift/example "Adaptateur en Swift") [![Adaptateur en TypeScript](https://refactoring.guru/images/patterns/icons/typescript.svg?id=2239d0f16cb703540c205dd8cb0c0cb7)](https://refactoring.guru/fr/design-patterns/adapter/typescript/example "Adaptateur en TypeScript") --- # Odwiedzający w języku Go / Wzorce projektowe [There are patterns of patterns now! \ My friend's project: MetaPatterns.io](https://metapatterns.io/)  [](https://refactoring.guru/pl/design-patterns/visitor/go/example#checkout) [](https://refactoring.guru/pl/design-patterns/visitor/go/example#checkout) [](https://refactoring.guru/) / [Wzorce projektowe](https://refactoring.guru/pl/design-patterns) / [Odwiedzający](https://refactoring.guru/pl/design-patterns/visitor) / [Go](https://refactoring.guru/pl/design-patterns/go) ![Odwiedzający](https://refactoring.guru/images/patterns/cards/visitor-mini-2x.png?id=9b87f3f3b772f434b28a25876829b504) **Odwiedzający** w języku Go ============================ **Odwiedzający** to behawioralny wzorzec projektowy pozwalający dodawać nowe zachowanie istniejącej hierarchii klas bez zmiany kodu jej klas. > O tym, dlaczego Odwiedzającego nie można po prostu zastąpić przeciążaniem metod, przeczytasz w naszym artykule [Odwiedzający i podwójna dyspozycja](https://refactoring.guru/pl/design-patterns/visitor-double-dispatch) > . [Dowiedz się więcej o Odwiedzający](https://refactoring.guru/pl/design-patterns/visitor) Nawigacja  [Intro](https://refactoring.guru/pl/design-patterns/visitor/go/example#)  [Przykład koncepcyjny](https://refactoring.guru/pl/design-patterns/visitor/go/example#example-0)  [shape](https://refactoring.guru/pl/design-patterns/visitor/go/example#example-0--shape-go)  [square](https://refactoring.guru/pl/design-patterns/visitor/go/example#example-0--square-go)  [circle](https://refactoring.guru/pl/design-patterns/visitor/go/example#example-0--circle-go)  [rectangle](https://refactoring.guru/pl/design-patterns/visitor/go/example#example-0--rectangle-go)  [visitor](https://refactoring.guru/pl/design-patterns/visitor/go/example#example-0--visitor-go)  [area­Calculator](https://refactoring.guru/pl/design-patterns/visitor/go/example#example-0--areaCalculator-go)  [middle­Coordinates](https://refactoring.guru/pl/design-patterns/visitor/go/example#example-0--middleCoordinates-go)  [main](https://refactoring.guru/pl/design-patterns/visitor/go/example#example-0--main-go)  [output](https://refactoring.guru/pl/design-patterns/visitor/go/example#example-0--output-txt) Przykład koncepcyjny -------------------- Wzorzec Odwiedzający pozwala dodawać nowe zachowania do struktury bez konieczności modyfikowania jej. Powiedzmy, że naszym zadaniem jest utrzymanie biblioteki zawierającej różne struktury figur geometrycznych: * Kwadrat * Okrąg * Trójkąt Każda z powyższych struktur figur implementuje wspólny interfejs figury geometrycznej. Jak tylko twoi współpracownicy zaczęli korzystać z biblioteki, napłynęła masa próśb o dodatkową funkcjonalność. Skupmy się na najprostszych: powiedzmy, że zespół poprosił o dodanie funkcjonalności `getArea` (pobierz pole) do struktur. Jest wiele sposobów na rozwiązanie tego problemu. Pierwszą możliwością, jaka przychodzi do głowy, jest dodanie metody `getArea` bezpośrednio do interfejsu figury geometrycznej, a następnie zaimplementowanie jej dla każdej z figur. Jest to najpopularniejsze podejście w przypadku tego typu sytuacji, ale wiąże się z pewnym kosztem. Jako osoba odpowiedzialna za utrzymanie biblioteki nie chcesz ryzykować zepsucia kodu za każdym razem gdy ktoś poprosi o jakieś nowe funkcje. Z drugiej strony, chcesz pozwolić innym zespołom rozszerzać twoją bibliotekę. Drugą opcją jest umożliwienie zespołom samodzielnej implementacji potrzebnego zachowania. Nie jest to jednak zawsze możliwe, gdyż potrzebne zachowanie może być zależne od kodu prywatnego. Trzecie rozwiązanie sugeruje zastosowanie wzorca Odwiedzający w połączeniu z powyższym rozwiązaniem. Zaczniemy od zdefiniowania interfejsu odwiedzającego: type visitor interface { visitForSquare(square) visitForCircle(circle) visitForTriangle(triangle) } Funkcje `visitForSquare(square)`, `visitForCircle(circle)`, `visitForTriangle(triangle)` pozwolą dodać funkcjonalność do — odpowiednio — kwadratów, okręgów i trójkątów. Pewnie zastanawiasz się, dlaczego nie możemy mieć tylko jednej metody `visit(shape)` dla wszystkich figur. Powodem jest brak możliwości przeciążania metod w języku Go, więc nie możemy mieć metod o takiej samej nazwie, różniących się tylko parametrem. Kolejnym istotnym krokiem jest dodanie metody `accept` (przyjmij) do interfejsu figury. func accept(v visitor) Wszystkie struktury figur geometrycznych muszą definiować tę metodę w następujący sposób: func (obj \*square) accept(v visitor){ v.visitForSquare(obj) } Ale zaraz, przecież nie chcieliśmy zmieniać istniejących struktur figur! Niestety — zastosowanie wzorca Odwiedzający nakłada na nas taki obowiązek. Na szczęście modyfikację trzeba wykonać tylko jednorazowo. W przypadku dodawania innych funkcjonalności, jak `getNumSides` lub `getMiddleCoordinates` będziemy mogli stosować tę samą funkcję przyjmowania `accept(v visitor)` bez konieczności ponownego zmieniania struktur reprezentujących figury. Podsumowując, struktury odpowiadające poszczególnym figurom trzeba zmodyfikować tylko raz, a wszystkie nowe funkcjonalności będzie można obsłużyć tą samą funkcją przyjmującą. Jeśli zespół poprosi o funkcjonalność `getArea`, możemy po prostu zdefiniować konkretną implementację interfejsu odwiedzającego i zaprogramować logikę obliczania w tej konkretnej implementacji. #### **shape.go:** Element package main type Shape interface { getType() string accept(Visitor) } #### **square.go:** Konkretny element package main type Square struct { side int } func (s \*Square) accept(v Visitor) { v.visitForSquare(s) } func (s \*Square) getType() string { return "Square" } #### **circle.go:** Konkretny element package main type Circle struct { radius int } func (c \*Circle) accept(v Visitor) { v.visitForCircle(c) } func (c \*Circle) getType() string { return "Circle" } #### **rectangle.go:** Konkretny element package main type Rectangle struct { l int b int } func (t \*Rectangle) accept(v Visitor) { v.visitForrectangle(t) } func (t \*Rectangle) getType() string { return "rectangle" } #### **visitor.go:** Odwiedzający package main type Visitor interface { visitForSquare(\*Square) visitForCircle(\*Circle) visitForrectangle(\*Rectangle) } #### **areaCalculator.go:** Konkretny odwiedzający package main import ( "fmt" ) type AreaCalculator struct { area int } func (a \*AreaCalculator) visitForSquare(s \*Square) { // Calculate area for square. // Then assign in to the area instance variable. fmt.Println("Calculating area for square") } func (a \*AreaCalculator) visitForCircle(s \*Circle) { fmt.Println("Calculating area for circle") } func (a \*AreaCalculator) visitForrectangle(s \*Rectangle) { fmt.Println("Calculating area for rectangle") } #### **middleCoordinates.go:** Konkretny odwiedzający package main import "fmt" type MiddleCoordinates struct { x int y int } func (a \*MiddleCoordinates) visitForSquare(s \*Square) { // Calculate middle point coordinates for square. // Then assign in to the x and y instance variable. fmt.Println("Calculating middle point coordinates for square") } func (a \*MiddleCoordinates) visitForCircle(c \*Circle) { fmt.Println("Calculating middle point coordinates for circle") } func (a \*MiddleCoordinates) visitForrectangle(t \*Rectangle) { fmt.Println("Calculating middle point coordinates for rectangle") } #### **main.go:** Kod klienta package main import "fmt" func main() { square := &Square{side: 2} circle := &Circle{radius: 3} rectangle := &Rectangle{l: 2, b: 3} areaCalculator := &AreaCalculator{} square.accept(areaCalculator) circle.accept(areaCalculator) rectangle.accept(areaCalculator) fmt.Println() middleCoordinates := &MiddleCoordinates{} square.accept(middleCoordinates) circle.accept(middleCoordinates) rectangle.accept(middleCoordinates) } #### **output.txt:** Wynik działania Calculating area for square Calculating area for circle Calculating area for rectangle Calculating middle point coordinates for square Calculating middle point coordinates for circle Calculating middle point coordinates for rectangle **Odwiedzający** w innych językach ---------------------------------- [![Odwiedzający w języku C#](https://refactoring.guru/images/patterns/icons/csharp.svg?id=da64592defc6e86d57c39c66e9de3e58)](https://refactoring.guru/pl/design-patterns/visitor/csharp/example "Odwiedzający w języku C#") [![Odwiedzający w języku C++](https://refactoring.guru/images/patterns/icons/cpp.svg?id=f7782ed8b8666246bfcc3f8fefc3b858)](https://refactoring.guru/pl/design-patterns/visitor/cpp/example "Odwiedzający w języku C++") [![Odwiedzający w języku Java](https://refactoring.guru/images/patterns/icons/java.svg?id=e6d87e2dca08c953fe3acd1275ed4f4e)](https://refactoring.guru/pl/design-patterns/visitor/java/example "Odwiedzający w języku Java") [![Odwiedzający w języku PHP](https://refactoring.guru/images/patterns/icons/php.svg?id=be1906eb26b71ec1d3b93720d6156618)](https://refactoring.guru/pl/design-patterns/visitor/php/example "Odwiedzający w języku PHP") [![Odwiedzający w języku Python](https://refactoring.guru/images/patterns/icons/python.svg?id=6d815d43c0f7050a1151b43e51569c9f)](https://refactoring.guru/pl/design-patterns/visitor/python/example "Odwiedzający w języku Python") [![Odwiedzający w języku Ruby](https://refactoring.guru/images/patterns/icons/ruby.svg?id=b065b718c914bf8e960ef731600be1eb)](https://refactoring.guru/pl/design-patterns/visitor/ruby/example "Odwiedzający w języku Ruby") [![Odwiedzający w języku Rust](https://refactoring.guru/images/patterns/icons/rust.svg?id=1f5698a4b5ae23fe79413511747e4a87)](https://refactoring.guru/pl/design-patterns/visitor/rust/example "Odwiedzający w języku Rust") [![Odwiedzający w języku Swift](https://refactoring.guru/images/patterns/icons/swift.svg?id=0b716c2d52ec3a48fbe91ac031070c1d)](https://refactoring.guru/pl/design-patterns/visitor/swift/example "Odwiedzający w języku Swift") [![Odwiedzający w języku TypeScript](https://refactoring.guru/images/patterns/icons/typescript.svg?id=2239d0f16cb703540c205dd8cb0c0cb7)](https://refactoring.guru/pl/design-patterns/visitor/typescript/example "Odwiedzający w języku TypeScript") ---