# Table of Contents
- [Documentation - Sparrow Wallet](#documentation-sparrow-wallet)
- [Best Practices - Sparrow Wallet](#best-practices-sparrow-wallet)
- [Connect to Bitcoin Core - Sparrow Wallet](#connect-to-bitcoin-core-sparrow-wallet)
- [Setup a Coldcard wallet - Sparrow Wallet](#setup-a-coldcard-wallet-sparrow-wallet)
- [Server Performance - Sparrow Wallet](#server-performance-sparrow-wallet)
- [Quick Start Guide - Sparrow Wallet](#quick-start-guide-sparrow-wallet)
- [Spending Privately - Sparrow Wallet](#spending-privately-sparrow-wallet)
- [Frequently Asked Questions - Sparrow Wallet](#frequently-asked-questions-sparrow-wallet)
---
# Documentation - Sparrow Wallet
### [Quick Start Guide](https://sparrowwallet.com/docs/quick-start.html)
[Permalink](https://sparrowwallet.com/docs/#quick-start-guide "Permalink")
A great place to start. Contains an explanation of how to setup Sparrow to connect to a public server, and create your first wallet.
### [Connect to Bitcoin Core](https://sparrowwallet.com/docs/connect-node.html)
[Permalink](https://sparrowwallet.com/docs/#connect-to-bitcoin-core "Permalink")
Make your wallet private by connecting Sparrow to your Bitcoin Core node using this guide.
### [Setup a Coldcard wallet](https://sparrowwallet.com/docs/coldcard-wallet.html)
[Permalink](https://sparrowwallet.com/docs/#setup-a-coldcard-wallet "Permalink")
Secure your bitcoin by using Sparrow with a Coldcard hardware wallet.
### [Spending Privately](https://sparrowwallet.com/docs/spending-privately.html)
[Permalink](https://sparrowwallet.com/docs/#spending-privately "Permalink")
Learn how to protect your privacy when spending from Sparrow.
### [Best Practices](https://sparrowwallet.com/docs/best-practices.html)
[Permalink](https://sparrowwallet.com/docs/#best-practices "Permalink")
Learn which Sparrow configuration is best for you at each stage in your Bitcoin journey.
### [Frequently Asked Questions](https://sparrowwallet.com/docs/faq.html)
[Permalink](https://sparrowwallet.com/docs/#frequently-asked-questions "Permalink")
Reading this may help you figure something out, or improve your understanding and usage.
### [Server Performance](https://sparrowwallet.com/docs/server-performance.html)
[Permalink](https://sparrowwallet.com/docs/#server-performance "Permalink")
Compare and contrast popular Electrum server implementations for your needs.
### Contributed[Permalink](https://sparrowwallet.com/docs/#contributed "Permalink")
* [Why You Need Sparrow Bitcoin Wallet NOW](https://www.youtube.com/watch?v=yJpvfRl03Tw)
by [@BTCSessions](https://x.com/BTCSessions)
**(Recommended!)**
* [Unlock Sparrow Bitcoin Wallet’s Hidden Power: Advanced Features Tutorial](https://www.youtube.com/watch?v=ppZ9cPvGTVU)
by [@BTCSessions](https://x.com/BTCSessions)
* [Sparrow Wallet Walkthrough](https://youtu.be/9dcXXz1CHV8)
by [@ministryofnodes](https://x.com/ministryofnodes)
* [How To Send Bitcoin](https://www.athena-alpha.com/how-to-send-bitcoin/)
by [@athena\_alpha\_](https://x.com/athena_alpha_)
* [SeedSigner and Sparrow Wallet](https://youtu.be/qJ_SpQX_YKw)
by [@BTCSessions](https://x.com/BTCSessions)
* [Bitcoiner Guide - Sparrow Wallet 101](https://bitcoiner.guide/sparrow/)
by [@BitcoinQ\_A](https://x.com/BitcoinQ_A)
* [Bitcoin Wallets For Beginners - Installing Sparrow Wallet](https://bitcoinmagazine.com/guides/bitcoin-wallets-for-beginners-part-four-installing-sparrow-wallet)
by [@econoalchemist](https://x.com/econoalchemist)
* [Bitcoin Replace By Fee and Child Pays For Parent Tutorial using Sparrow Wallet](https://www.youtube.com/watch?v=7EmshGDXi04)
by [@Wicked](https://x.com/w_s_bitcoin)
* [How to setup and secure your Bitcoin with Foundation Passport wallet (and Sparrow)](https://bitcoinmagazine.com/technical/how-to-use-passport-hardware-bitcoin-wallet)
by [@econoalchemist](https://x.com/econoalchemist)
* [Setup and run an ElectrumX server](https://www.youtube.com/watch?v=QiX0rR_o_fI)
by [@ministryofnodes](https://x.com/ministryofnodes)
* [Setup and run an Fulcrum server](https://www.youtube.com/watch?v=SpQRrbJt7cg)
by [@ministryofnodes](https://x.com/ministryofnodes)
### Support[Permalink](https://sparrowwallet.com/docs/#support "Permalink")
As an open source project Sparrow Wallet does not have a support team. Instead, there is an active community-managed Telegram group: [@SparrowWallet](https://telegram.me/SparrowWallet)
.
Please be aware that there are many scammers on Telegram! The group admins (or “Sparrow support”) **will not DM you**.
---
# Best Practices - Sparrow Wallet
### [How To Store Bitcoin](https://sparrowwallet.com/docs/best-practices.html#how-to-store-bitcoin)
[Permalink](https://sparrowwallet.com/docs/best-practices.html#how-to-store-bitcoin "Permalink")
Becoming financially self-sovereign by storing your own Bitcoin brings many advantages. Your wealth cannot be inflated away, taken from you with arbitrary regulations, or restricted to certain jurisdictions. However, it is also a responsibility that needs to be taken seriously.
The best way to do this is to educate yourself. By investing time in understanding the **tradeoffs of different approaches**, you can greatly reduce your risk and improve your financial freedom. This guide is designed to help you consider not only how to use Sparrow safely, but also evaluate other wallets and approaches depending on your needs.
### [How Much Are You Storing?](https://sparrowwallet.com/docs/best-practices.html#how-much-are-you-storing)
[Permalink](https://sparrowwallet.com/docs/best-practices.html#how-much-are-you-storing "Permalink")
The best place to begin is to understand where you are on your Bitcoin journey. Generally, this is a matter of time and the size of your investment. As your conviction in Bitcoin grows over time, so will the amount of money you invest. It’s important for the security of your Bitcoin storage to improve as well.
The following sections describe 3 common stages in a Bitcoiners journey. You should be able to recognise where you are on your own journey, and consider your approach accordingly.
### [Summary](https://sparrowwallet.com/docs/best-practices.html#summary)
[Permalink](https://sparrowwallet.com/docs/best-practices.html#summary "Permalink")
Here is a quick summary of the 3 stages:
| | | | |
| --- | --- | --- | --- |
| | **Beginner** | **Intermediate** | **Expert** |
| Max Amount | US$10,000 | US$100,000 | \- |
| Server Type | Public Electrum
 | Private Bitcoin Core
 | Private Electrum
 |
| Wallet Type | Singlesig | Singlesig | Multisig |
| Private To\* | None | Passive Listeners | Active Attackers |
\* No security is perfect, but these general descriptions apply.
### [The Beginner Stage](https://sparrowwallet.com/docs/best-practices.html#the-beginner-stage)
[Permalink](https://sparrowwallet.com/docs/best-practices.html#the-beginner-stage "Permalink")
It’s normal for beginners to start with small, non-life-changing amounts - perhaps a monthly salary. It’s unrealistic to expect this kind of usage to have the highest level of security - after all, you are a beginner.
But, it’s still important to **take your coins off the exchange and use a hardware wallet** or dedicated computer to store your private keys. You will likely be using a Single Signature (singlesig) wallet with Sparrow, with the hardware wallet communicating with your computer through USB or perhaps QR codes. The hardware wallet should be stored securely along with a backup of the seed words (the latter ideally in a different location).
At this level, it’s not necessary to run your own Bitcoin Core node. You will likely be using a public server, or if you’re lucky, the node/server of a family member or friend. Follow the [Quick Start guide](https://sparrowwallet.com/docs/quick-start.html)
to configure Sparrow for this stage. While privacy is less important at these amounts, it’s a good time to start thinking about the implications of Bitcoin being a public ledger, and your balance being visible to the server you are connected to.
### [The Intermediate Stage](https://sparrowwallet.com/docs/best-practices.html#the-intermediate-stage)
[Permalink](https://sparrowwallet.com/docs/best-practices.html#the-intermediate-stage "Permalink")
Over time, the value of your Bitcoin investment will likely grow through additional purchases and price appreciation. As this happens, you should be aware that sharing your balance with public servers may be making you a target. The point at which that happens will vary depending on the jurisdiction you live in, but consider that you are sharing your balance and location via your IP address.
If this thought makes you uncomfortable, it’s time to **consider running a Bitcoin Core node** (or using one run by a person that you trust). You can download the software from [bitcoin.org](https://bitcoin.org/en/download)
and install it using the [Running a Full Node](https://bitcoin.org/en/full-node)
guide. Once installed, go to the Sparrow [Connect to Bitcoin Core](https://sparrowwallet.com/docs/connect-node.html)
guide to configure Sparrow to connect to it. Generally, the disk space requirement is the biggest hurdle, but be aware that you can run Bitcoin Core in pruned mode - see the [guide](https://sparrowwallet.com/docs/connect-node.html#pruned-nodes)
for details.
Running your own node is a big step forward. Not only are you keeping your transactions private, but you are validating them yourself. And, you are contributing to the health and decentralization of the Bitcoin network. Congratulations!
However, while you are now transacting privately, you are not yet at the stage of true cold storage.
### [The Expert Stage](https://sparrowwallet.com/docs/best-practices.html#the-expert-stage)
[Permalink](https://sparrowwallet.com/docs/best-practices.html#the-expert-stage "Permalink")
At this stage, you are storing a appreciable percentage of your wealth in Bitcoin, where losing it might have a considerable impact on your future.
This is the stage where you need **true cold storage**.
Although you have eliminated some privacy concerns by running your own node (or connecting to someone’s that you trust), others remain. If your wallet software is connecting directly to Bitcoin Core, you are using Bitcoin Core’s wallet internally. This is true not only for Sparrow in this configuration, but always true for Specter, FullyNoded, and of course the Bitcoin Qt wallet itself. Unfortunately, **Bitcoin Core stores your public keys and balance unencrypted** on the computer it is running on. If this computer is regularly connected to the internet, it is at risk to hackers - which will make you a target once your balance is discovered.
If this is a concern to you, consider running an Electrum server, which does not keep any record of your balance, but indexes all Bitcoin transactions equally. There are both [prebuilt](https://www.nodl.it/)
[options](https://mynodebtc.com/products/one)
, and you can [install](https://getumbrel.com/)
[yourself](https://bennet.org/learn/building-a-bitcoin-node-with-raspberry-pi/)
on inexpensive hardware like a Raspberry Pi. Running an Electrum server is no longer difficult, and the investment to set one up is well worth it at this stage of your journey.
By connecting Sparrow to an Electrum server, you also get a private blockchain explorer, making you even safer. The [Quick Start](https://sparrowwallet.com/docs/quick-start.html)
guide explains how to connect Sparrow to an Electrum server - just replace the server URL with your own. You can also connect via Tor if your server provides a `.onion` address, which means you can connect privately from anywhere.
With respect to wallet type, if you are not using a Multi Signature (multisig) wallet at this stage, you should be educating yourself on the benefits. Multisig wallets require more investment in time and resource, requiring you to purchase multiple hardware wallets and ensure they (and their backups) are stored safely and ideally in different locations. However, this setup offers greatly improved security.
You should be using hardware wallets from multiple vendors, ensuring that a vulnerability in one vendor does not completely compromise the setup. If you have located the hardware wallets at different secure locations, you are much less vulnerable to physical attacks - particularly if the travel to these different locations is time-consuming or subject to security checks.
For **true cold storage** on Sparrow, you need to:
* Connect to a private Electrum server
* Use a good, unique password on your wallet
* Employ at least a 2-of-3 multisig setup
* Require hardware wallets from different vendors for a quorum
* Secure the hardware wallets (and backups) in different locations
* Minimize the time your cold storage wallet is open in Sparrow
If you are doing all of these things, congratulations! While there is no such thing as perfect security, you are now following generally accepted best practice and can rest assured that your Bitcoin is relatively safe.
---
# Connect to Bitcoin Core - Sparrow Wallet
### [Prerequistes](https://sparrowwallet.com/docs/connect-node.html#prerequistes)
[Permalink](https://sparrowwallet.com/docs/connect-node.html#prerequistes "Permalink")
This guide explains how to connect Sparrow Wallet to your Bitcoin Core node. If you haven’t read the [Quick Start](https://sparrowwallet.com/docs/quick-start.html)
guide yet, that’s a good place to learn how to install and get introduced to Sparrow.
### [Bitcoin Core setup](https://sparrowwallet.com/docs/connect-node.html#bitcoin-core-setup)
[Permalink](https://sparrowwallet.com/docs/connect-node.html#bitcoin-core-setup "Permalink")
#### Local setup[Permalink](https://sparrowwallet.com/docs/connect-node.html#local-setup "Permalink")
Before you can connect to Bitcoin Core, you will need to make sure that it is configured correctly. If you are connecting to Bitcoin Core running on the same machine as Sparrow, this is relatively simple. There is only one gotcha - if you are running the **Bitcoin-Qt** graphical user interface (as opposed to the command line), you will need to add a setting to the Bitcoin Core config file. This file is usually located in a standard location:
| OS | Location |
| --- | --- |
| macOS | ~/Library/Application Support/Bitcoin |
| Windows | %AppData%/Bitcoin ([Locate AppData](https://www.freecodecamp.org/news/appdata-where-to-find-the-appdata-folder-in-windows-10/)
) |
| Linux | ~/.bitcoin |
The config file is called `bitcoin.conf`. If it’s not there, you can create it in a text editor. Make sure the following line is present near the top:
server=1
This should be all that is necessary for Bitcoin Core running on the same machine (localhost). Make sure you do not have `disablewallet=1`.
If you are using Bitcoin Core v25 or later, you can also add the block filter index for faster rescans:
blockfilterindex=1
#### Remote setup[Permalink](https://sparrowwallet.com/docs/connect-node.html#remote-setup "Permalink")
If Bitcoin Core is running on a different machine, you will need to make sure that it binds to the IP address you will connect to it on. For example, if it is running on `192.168.0.10`, add the following lines to `bitcoin.conf` below the other settings:
rpcuser=bitcoin
rpcpassword=yourpassword
[main]
rpcbind=127.0.0.1
rpcbind=192.168.0.10
rpcallowip=127.0.0.1
rpcallowip=192.168.0.0/16
This will allow you to connect to Bitcoin Core from anywhere on your local network using the provided username and password.
If you are using testnet, be sure to replace `[main]` with `[test]` in the configuration above.
#### Pruned nodes[Permalink](https://sparrowwallet.com/docs/connect-node.html#pruned-nodes "Permalink")
Running a pruned node is fine - this is a way of reducing the disk space required by your Bitcoin Core node. If you are running out of space, you can add this setting to your configuration and Bitcoin Core will prune (delete) old blocks to keep under the limit you specify. For example, you can add the following at the top of `bitcoin.conf` to reduce Bitcoin Core’s disk usage to 1000MB (1GB):
prune=1000
However there are two caveats:
1. Firstly, you won’t be able to scan for transactions earlier than whatever the earliest retained (unpruned) block is. Already scanned transactions are fine, so if your wallet reflects them (or is new) you are good going forward.
2. Secondly, if you want to reverse this, you will need to start your full blockchain sync from the beginning again.
#### Transaction Index[Permalink](https://sparrowwallet.com/docs/connect-node.html#transaction-index "Permalink")
If you are not using a pruned node, and you have a little extra disk space, you can add the transaction index in Bitcoin Core. This enables certain features in Sparrow that are normally only available with an Electrum server, like looking up the inputs on transactions. To add the transaction index, add the following to the top of `bitcoin.conf`:
txindex=1
#### Restart and Sync[Permalink](https://sparrowwallet.com/docs/connect-node.html#restart-and-sync "Permalink")
You can now restart Bitcoin Core to take advantage of the new configuration. If you are still busy syncing your node, it’s best to wait until this is done, as you won’t have a complete ledger yet so Sparrow won’t be able to find your transactions.
### [Sparrow Wallet setup](https://sparrowwallet.com/docs/connect-node.html#sparrow-setup)
[Permalink](https://sparrowwallet.com/docs/connect-node.html#sparrow-wallet-setup "Permalink")
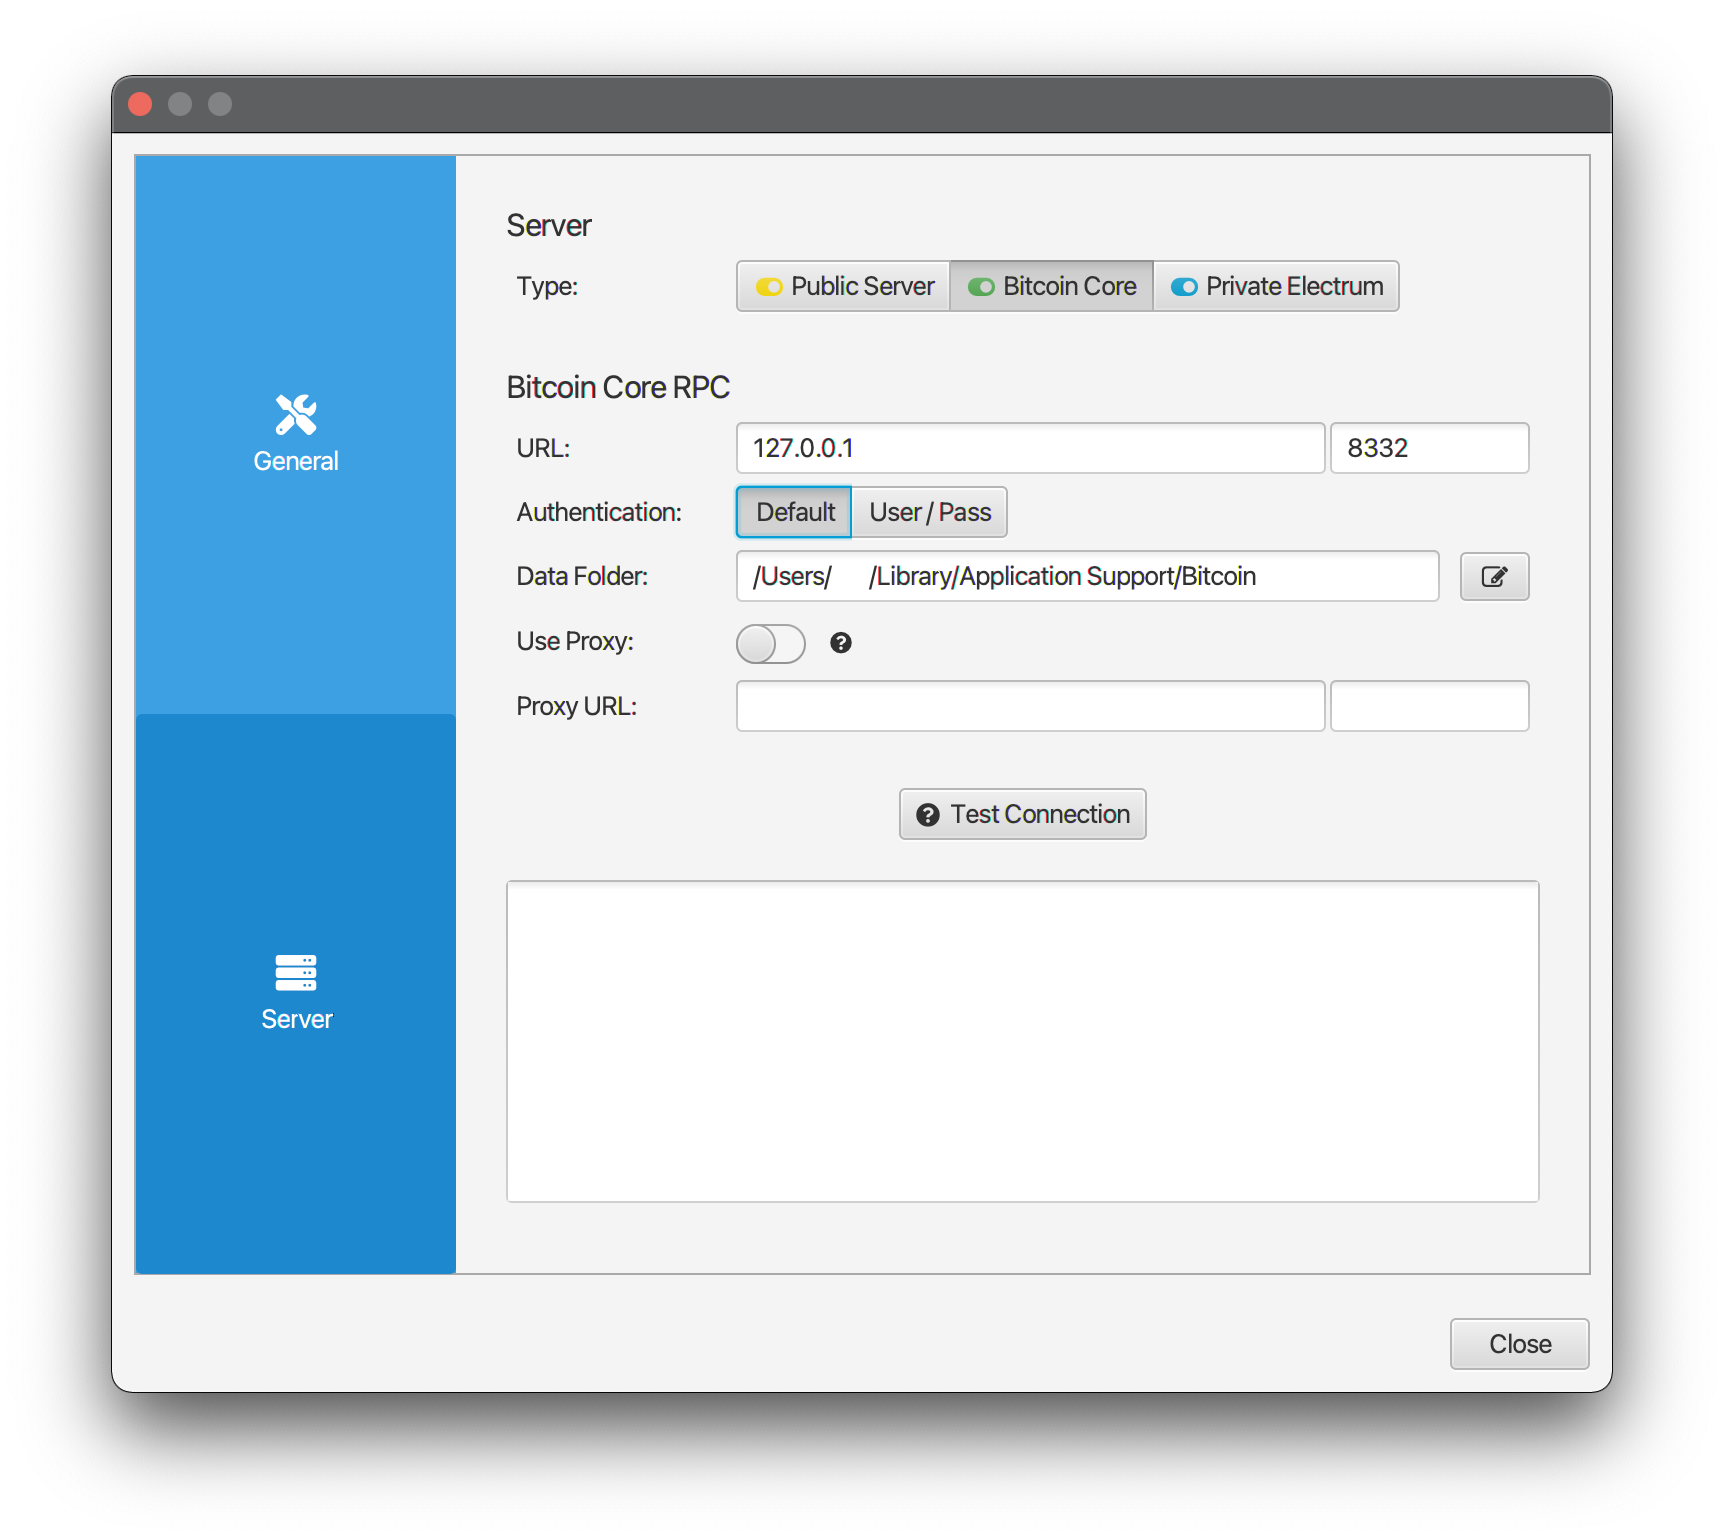
Once your node has synced, you are ready to connect Sparrow Wallet. Open the application Settings dialog and select the Server tab. You should see a screen similar to this:
#### Local setup[Permalink](https://sparrowwallet.com/docs/connect-node.html#local-setup-1 "Permalink")
The good news is that with a local setup and the default configuration, you should be ready to go! Sparrow will connect on localhost (127.0.0.1) using the default port, and authenticate by retrieving the cookie file that Bitcoin Core writes to the data folder every time it starts up. If you have changed the data folder for Bitcoin Core, be sure to select that folder now.
You can also configure a Tor proxy. Sparrow won’t use the proxy to connect to Bitcoin Core unless you specify a `.onion` address in the URL. But, it will use the proxy for all other external addresses, such as fetching exchange or fee rates. Although connecting to Bitcoin Core over Tor is possible, it is fairly slow. Consider using a private Electrum server instead if you need to connect over Tor.
#### Remote setup[Permalink](https://sparrowwallet.com/docs/connect-node.html#remote-setup-1 "Permalink")
If you are connecting to Bitcoin Core on another machine, make sure you have configured Bitcoin Core correctly as described above. You will then need to configure the URL in Sparrow to match the IP address of the Bitcoin Core machine (the same IP you used in `bitcoin.conf`). The default port should be fine. Instead of authenticating via a cookie, you will need to select the User/Pass button and enter the username and password you configured in `bitcoin.conf` earlier.
#### Testing the Connection[Permalink](https://sparrowwallet.com/docs/connect-node.html#testing-the-connection "Permalink")
Once you have configured Sparrow to match your Bitcoin Core setup, you’re ready to test the connection. Click **Test Connection**. Sparrow will attempt to connect to Bitcoin Core. If successful, you should see the following:
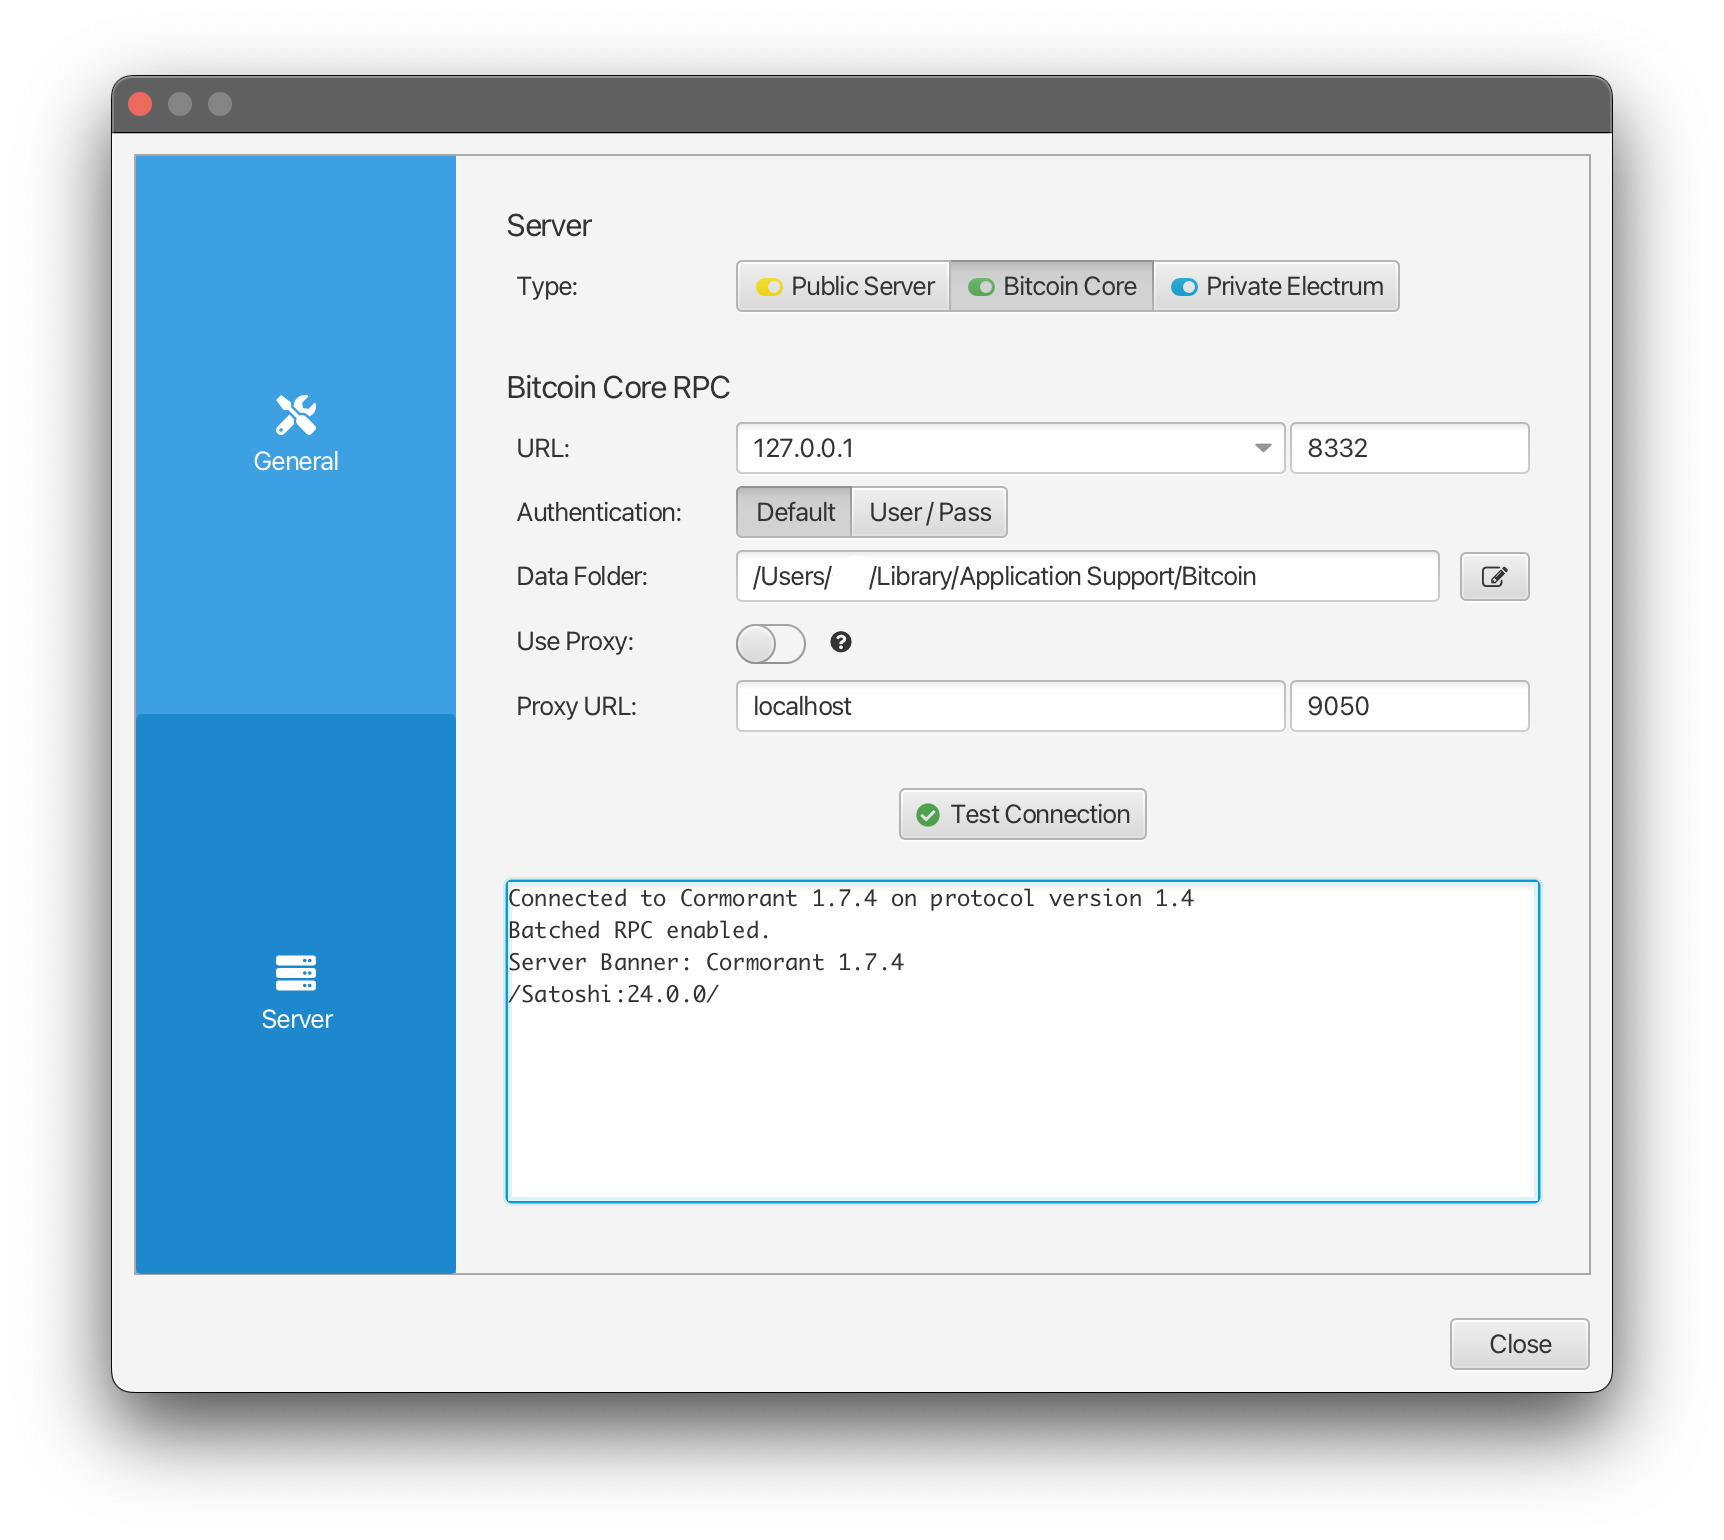
The details you see are provided by Cormorant, a library Sparrow uses to connect to Bitcoin Core. If you see `Connected to bwt` instead, you are using an earlier version of Bitcoin Core (pre v24) which Sparrow connects to using the [bwt library](https://github.com/bwt-dev/bwt)
.
If Sparrow did not successfully connect, check your configuration settings. Make sure that you are running a recent version of Bitcoin Core, and that there are no firewalls preventing the connection.
Once you have successfully tested your server setup, you can close the Settings dialog. Sparrow will automatically connect to your node, and is now ready to import your wallet.
### [Creating your Wallet](https://sparrowwallet.com/docs/connect-node.html#creating-your-wallet)
[Permalink](https://sparrowwallet.com/docs/connect-node.html#creating-your-wallet "Permalink")
You can now create a wallet in Sparrow. Select **File > New Wallet** in the menu.
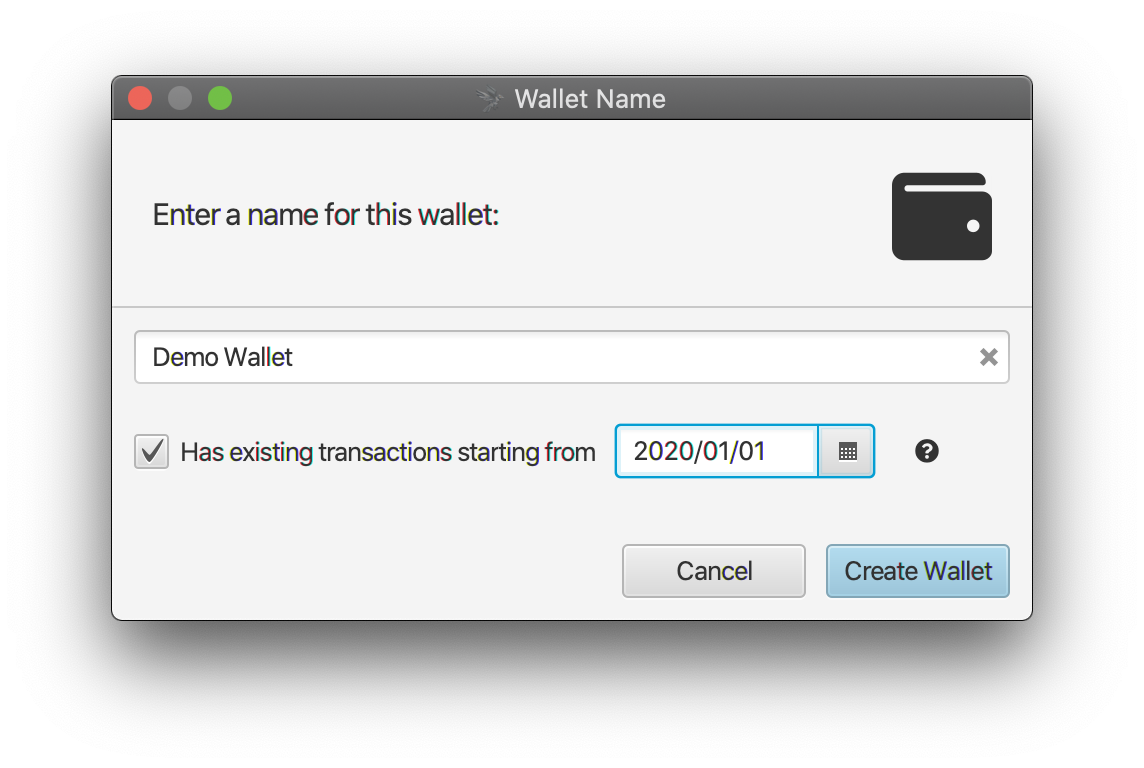
Choose a name for the wallet (it must be unique). If you are creating a wallet with existing transactions, select the checkbox and choose an approximate date to start scanning from. Note you don’t need to be exact, so choose an earlier date if you are unsure. You can also change the date and rescan later if necessary.
Click **Create Wallet**.
You can now configure your wallet. Refer to the other guides for help in configuring different types of wallet. For example, you can create a wallet using seed words using the [Quick Start guide](https://sparrowwallet.com/docs/quick-start.html#creating-your-first-wallet)
.
Once you have configured your wallet, click **Apply** and choose a password to secure it. You can now click on the **Transactions** tab at the top. If this wallet has existing transactions, you should see a screen similar to the following:
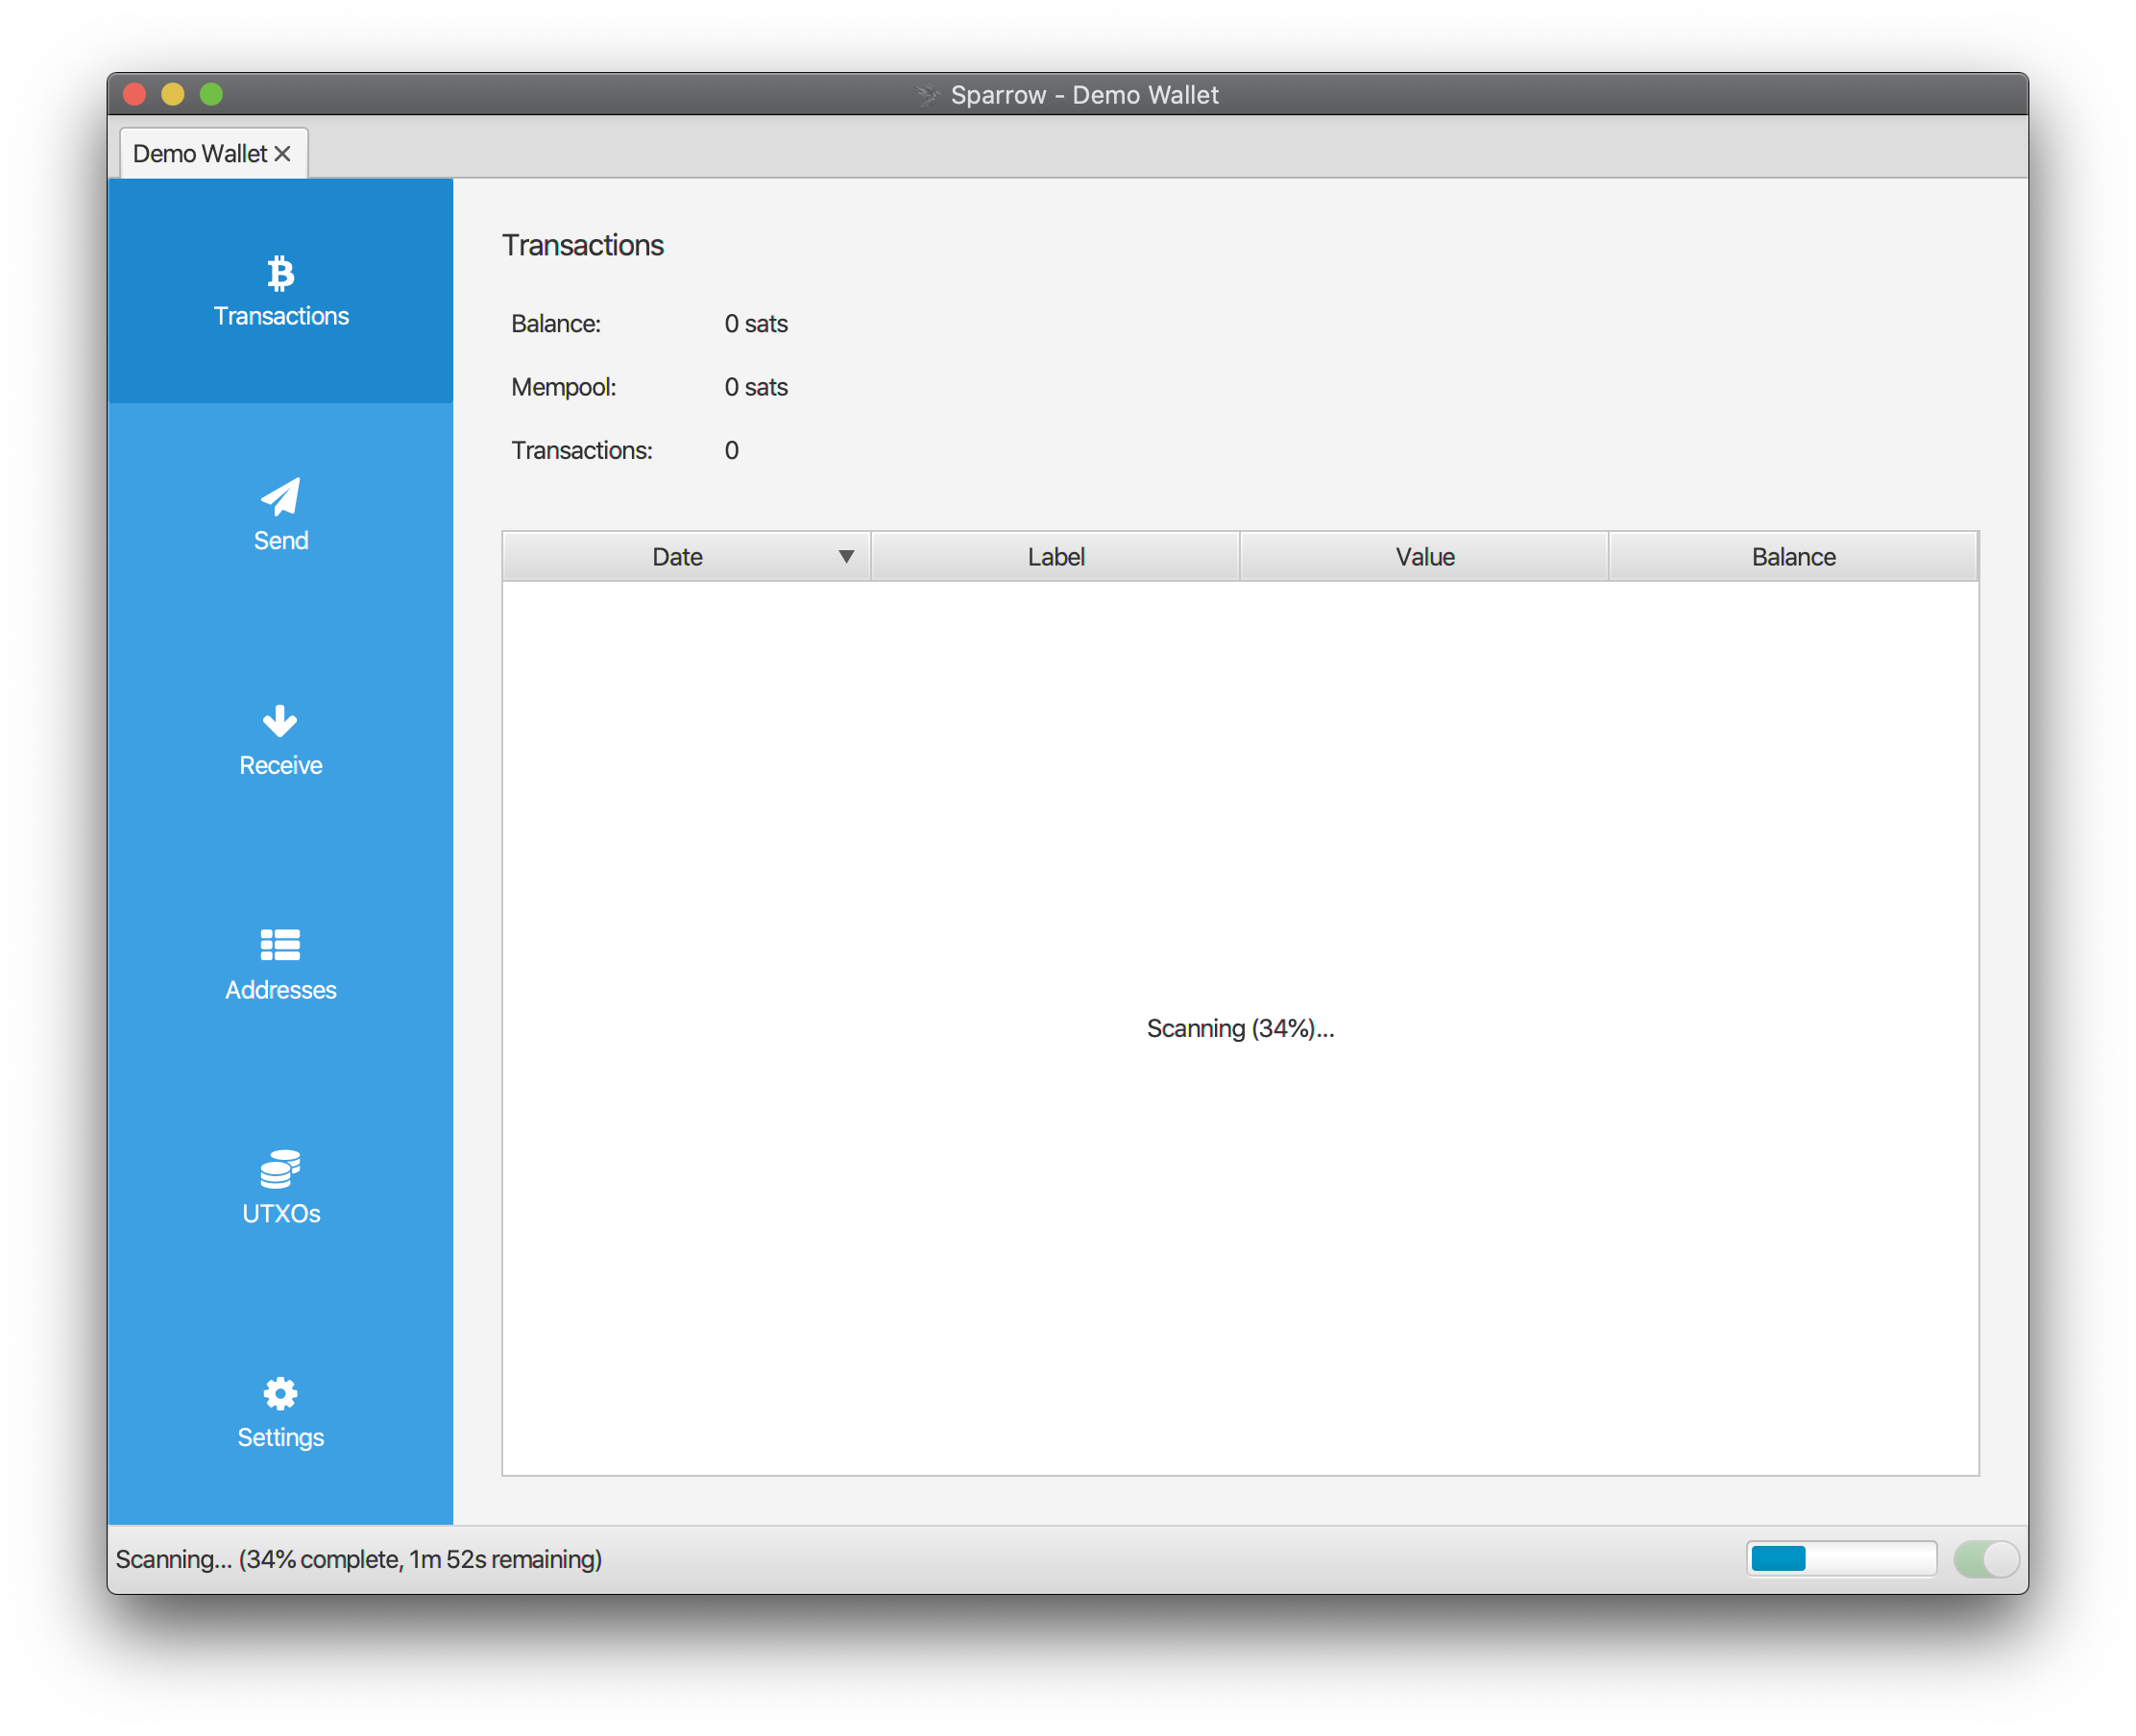
This indicates that Sparrow is requesting Bitcoin Core to scan for the existing transactions. Depending on the date specified earlier, and the hardware the node is running on, this process might take awhile to complete. The estimated time remaining is provided in the status bar.
Once completed, the existing transactions should appear in the table. If you don’t see any but expect to, you may have misconfigured your wallet, or set a scan start date that is not early enough.
You can change the start date and trigger a rescan using the **Settings** tab. Click on **Settings**, then **Advanced** and edit the date in the dialog that appears. Close the dialog and click **Apply**. Sparrow will clear the wallet history and rescan from Bitcoin Core from the date provided.
#### Congratulations
You have successfully connected Sparrow to your Bitcoin Core node, and setup your wallet. You can now be confident that your wallet is private and you’re ready to send and receive bitcoin.
---
# Setup a Coldcard wallet - Sparrow Wallet
### [Prerequistes](https://sparrowwallet.com/docs/coldcard-wallet.html#prerequistes)
[Permalink](https://sparrowwallet.com/docs/coldcard-wallet.html#prerequistes "Permalink")
This guide explains how to setup a Coldcard hardware wallet with Sparrow to create a secure Bitcoin storage solution. If you haven’t read the [Quick Start](https://sparrowwallet.com/docs/quick-start.html)
guide yet, that’s a good place to learn how to install and get introduced to Sparrow.
### [Why use a hardware wallet?](https://sparrowwallet.com/docs/coldcard-wallet.html#why-use-hardware-wallet)
[Permalink](https://sparrowwallet.com/docs/coldcard-wallet.html#why-use-a-hardware-wallet "Permalink")
If you’ve followed the [Quick Start](https://sparrowwallet.com/docs/quick-start.html)
guide, you will already have Sparrow running with a software wallet. This is a good place to start getting familiar with sending and receiving Bitcoin transactions, and is a reasonable option to store small amounts. If your balance starts to grow however (to the point where you would care about losing it), then it’s time to consider purchasing a hardware wallet.
Hardware wallets offer something that software wallets cannot - they are simple devices that store your private keys and sign transactions, but otherwise have very limited connectivity and functionality. This is a good thing, because it means they are very difficult to hack! In a connected world of viruses and other malware, hardware wallets represent a major improvement in securing your Bitcoin.
### [Why Coldcard?](https://sparrowwallet.com/docs/coldcard-wallet.html#why-coldcard)
[Permalink](https://sparrowwallet.com/docs/coldcard-wallet.html#why-coldcard "Permalink")
There are many hardware wallets available to purchase. The Coldcard however is similar to Sparrow in that it:
* Is Bitcoin only (no resources go to other coins)
* Transparently displays the details of your wallet and transactions
* Contains a good set of privacy and security related features
It is worth noting however that other choices are also reasonable, and in fact it is preferable when setting up a multisig wallet to use multiple vendors.
### [Ordering and receiving](https://sparrowwallet.com/docs/coldcard-wallet.html#ordering-and-receiving)
[Permalink](https://sparrowwallet.com/docs/coldcard-wallet.html#ordering-and-receiving "Permalink")
The Coldcard should be ordered from the [Coinkite store](https://store.coinkite.com/store/coldcard)
only, and not third party resellers. Ideally, have it shipped to an address that is not your home - but don’t let this be a reason for not buying one! You may need to pay for it in Bitcoin. It’s a good idea to buy a microSD card as well - we will be using one later. You should also have a microSD card reader for your computer.
Once you have received the Coldcard, examine the bag for tampering. This photo shows a new bag on the left, and an opened bag on the right:
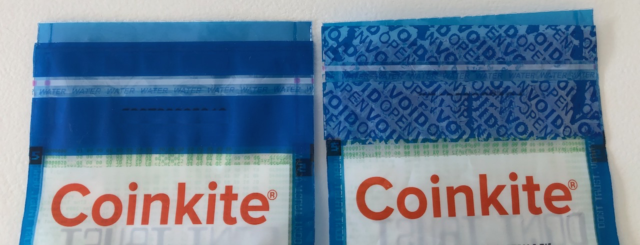
Note there is a number on the bag (obscured in the photo above). It will be used later as a further check. If you are sure your bag has not been tampered with, you can open it and inspect the Coldcard. It should look like the following:
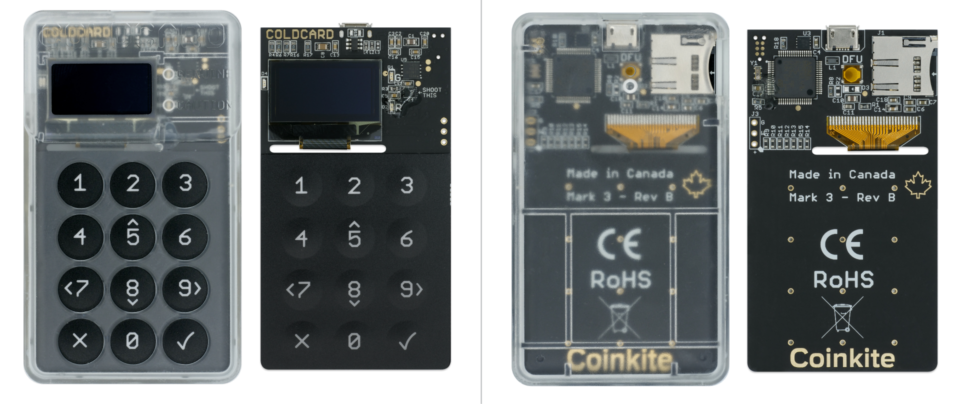
If you’re confident the package has not been tampered with, you can proceed to setting up your Coldcard.
### [Setting up your Coldcard](https://sparrowwallet.com/docs/coldcard-wallet.html#setting-up-your-coldcard)
[Permalink](https://sparrowwallet.com/docs/coldcard-wallet.html#setting-up-your-coldcard "Permalink")
In order to power your Coldcard, you will need to connect it to a USB cable (the MicroUSB type). The guide will take you through an airgapped setup, which means you never connect the Coldcard to your computer! This makes it even more secure.
It’s best to use a simple battery pack, since more advanced ones do not stay on for low power devices. Coinkite themselves offer the [Coldpower](https://store.coinkite.com/store/cldpwr)
adapter, which uses a standard 9-volt battery. If you don’t have either of these, use a USB charger connected to a wall outlet. Don’t connect it to your computer for an airgapped setup.
When you power on the Coldcard, the device will show the number on the bag. Confirm this is a match. You will then need to agree to the Terms of Sale. After that, you will need to select a PIN.
Similar to a phone passcode, this PIN is an important defense against others using the device to sign transactions and steal your Bitcoin. On the Coldcard, the PIN consists of two parts, for example `1234-5678`. You need to choose a PIN that others cannot easily guess, and that you can remember. If you forget your PIN, you cannot regain access to your Coldcard. Coldcard recommends using “four plus four” digits in your PIN, as in the example above.
You will enter the first four digits, and then be presented with two anti-phishing words. These words will be unique for each Coldcard, and prevent someone replacing your Coldcard with a fake copy and learning your PIN. If in future the anti-phishing words do not match the ones displayed now, don’t proceed to enter the second four digits of your PIN. After you confirm the anti-phishing words and enter the second four digits, you will be asked to confirm the PIN by entering it again.
### [Creating the wallet on the Coldcard](https://sparrowwallet.com/docs/coldcard-wallet.html#creating-the-wallet-on-the-coldcard)
[Permalink](https://sparrowwallet.com/docs/coldcard-wallet.html#creating-the-wallet-on-the-coldcard "Permalink")
You should now be presented with the following screen:
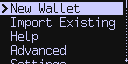
For this guide, we will be setting up a new wallet, so select `New Wallet`. The Coldcard will then generate a unique, long random number, which is the seed for your wallet. It will then encode that random number into a set of 24 words, which should now be displayed on-screen.
At this point, it’s a good idea to add additional entropy (randomness), just to be sure that your seed can only have been created once. To do this, get a normal 6-sided dice. Then press `4` on the Coldcard. Roll the dice and press the number `1-6` on the Coldcard that comes up on the dice roll. Do this 100 times, and you can be sure that your seed is yours and yours alone!
Once you’re done, the Coldcard will ask you to write down the 24 words. You should do this carefully on paper only (or even better, on a metal plate). It will then quiz you to make sure you’ve done so correctly.
These 24 words are the key to your wallet - anyone who has them can steal your Bitcoin! Unless you know what you’re doing, you should NEVER enter these words anywhere but another hardware wallet. Store the words in the most secure place you can think of, and consider making a another copy for a second location in case of fire etc.
Congratulations! Your Coldcard is now ready.
### [Importing the Coldcard into Sparrow](https://sparrowwallet.com/docs/coldcard-wallet.html#importing-the-coldcard-into-sparrow)
[Permalink](https://sparrowwallet.com/docs/coldcard-wallet.html#importing-the-coldcard-into-sparrow "Permalink")
Although your Coldcard is great at keeping your seed secure, it can’t create a transaction or display your balance. For that, you need Sparrow. Importing your Coldcard into Sparrow means importing the public key details into Sparrow so it can display your balance and addresses, and send and receive transactions to your wallet.
The difference between public and private keys is beyond the scope of this guide, but know that someone who has your public key can see your wallet transactions, but can’t steal your funds. The Coldcard will never export your private key.
Since we are doing an airgapped setup, we’re going to use an SD card to export the public key details from the Coldcard. (Note that you can also do it in a non-airgapped fashion by connecting your Coldcard to your computer, and choosing ‘Connected Hardware Wallet’ in Sparrow later). Insert a microSD card into the slot in the top left of the Coldcard until it clicks into place.
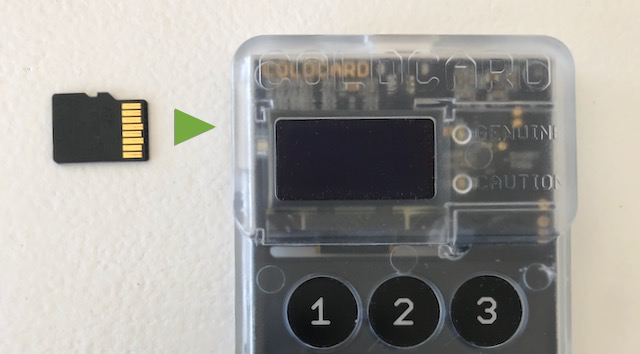
Then, in the Coldcard menu, scroll down to the `Advanced` menu item near the bottom. Select `Advanced > MicroSD Card > Export Wallet > Generic JSON` from the menu. Enter `0` for the account number. This will write a file called `coldcard-export.json` to the SD card. You can now eject the SD card from the Coldcard by first pressing it in gently so it pops back out. Insert the SD card into a microSD card reader on your computer.
In Sparrow, from the menu select File > New Wallet and choose a name for your wallet:
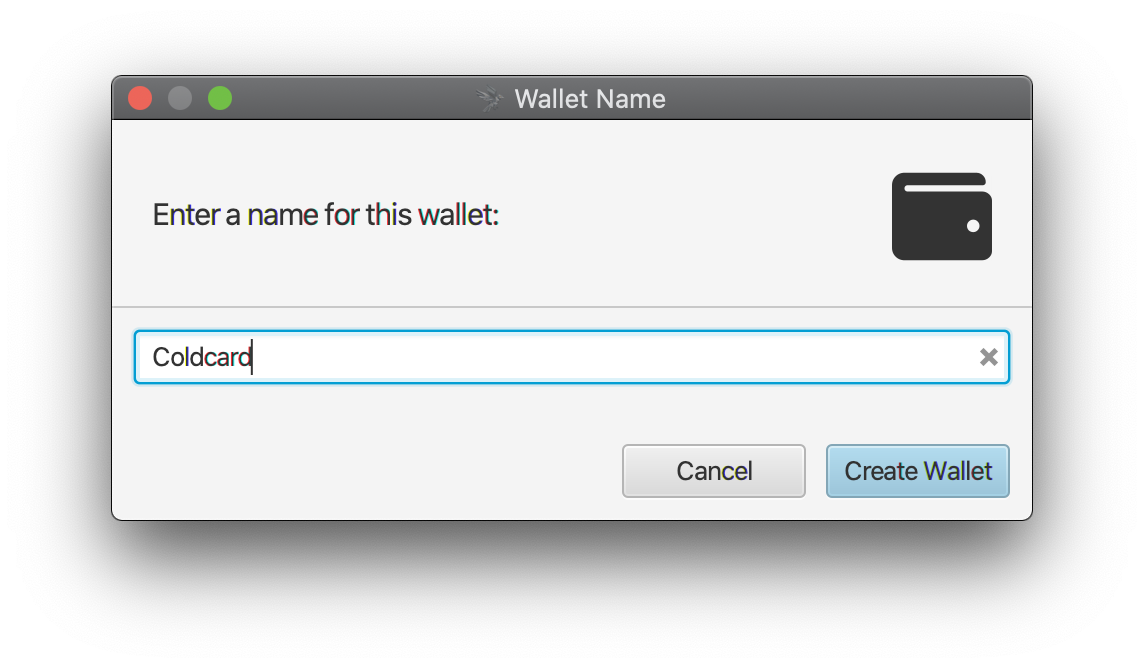
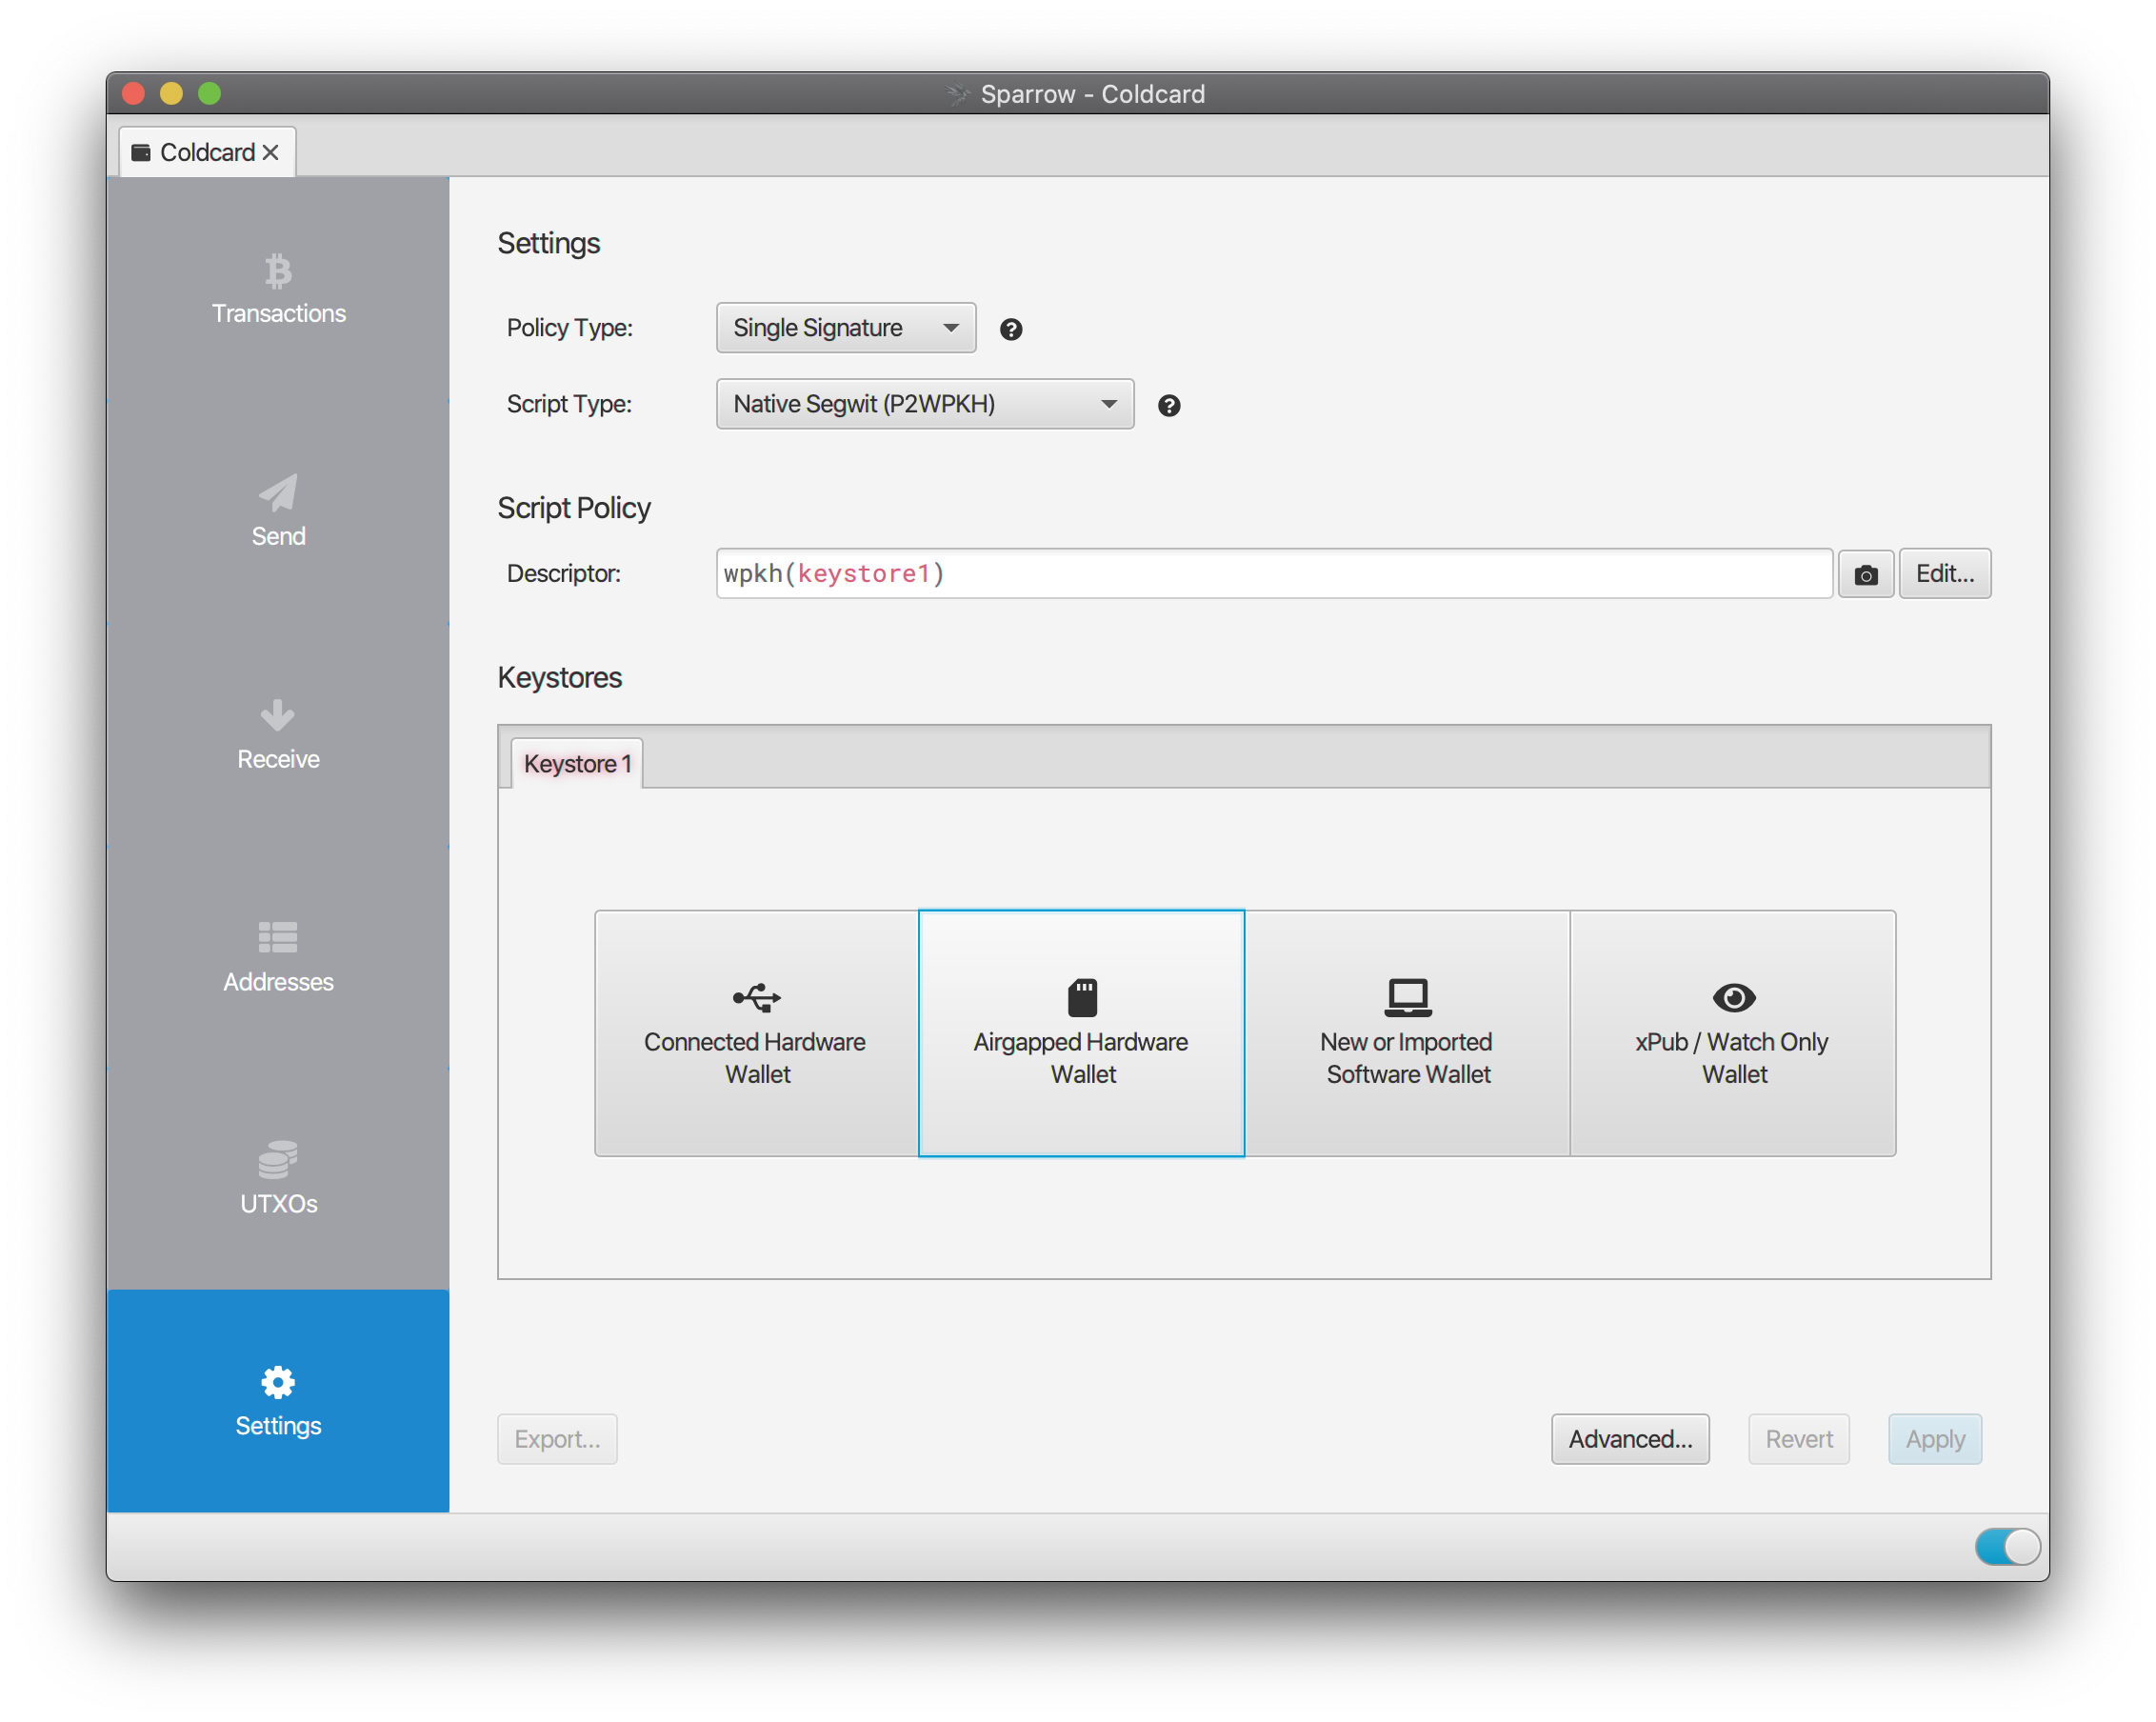
You will now see the Sparrow wallet Settings screen. You can leave all of the fields on the defaults and select ‘Airgapped Hardware Wallet’ from the four buttons below. (Note that if you are not doing an airgapped setup and have connected your Coldcard to your computer, you should select ‘Connected Hardware Wallet’ instead.)
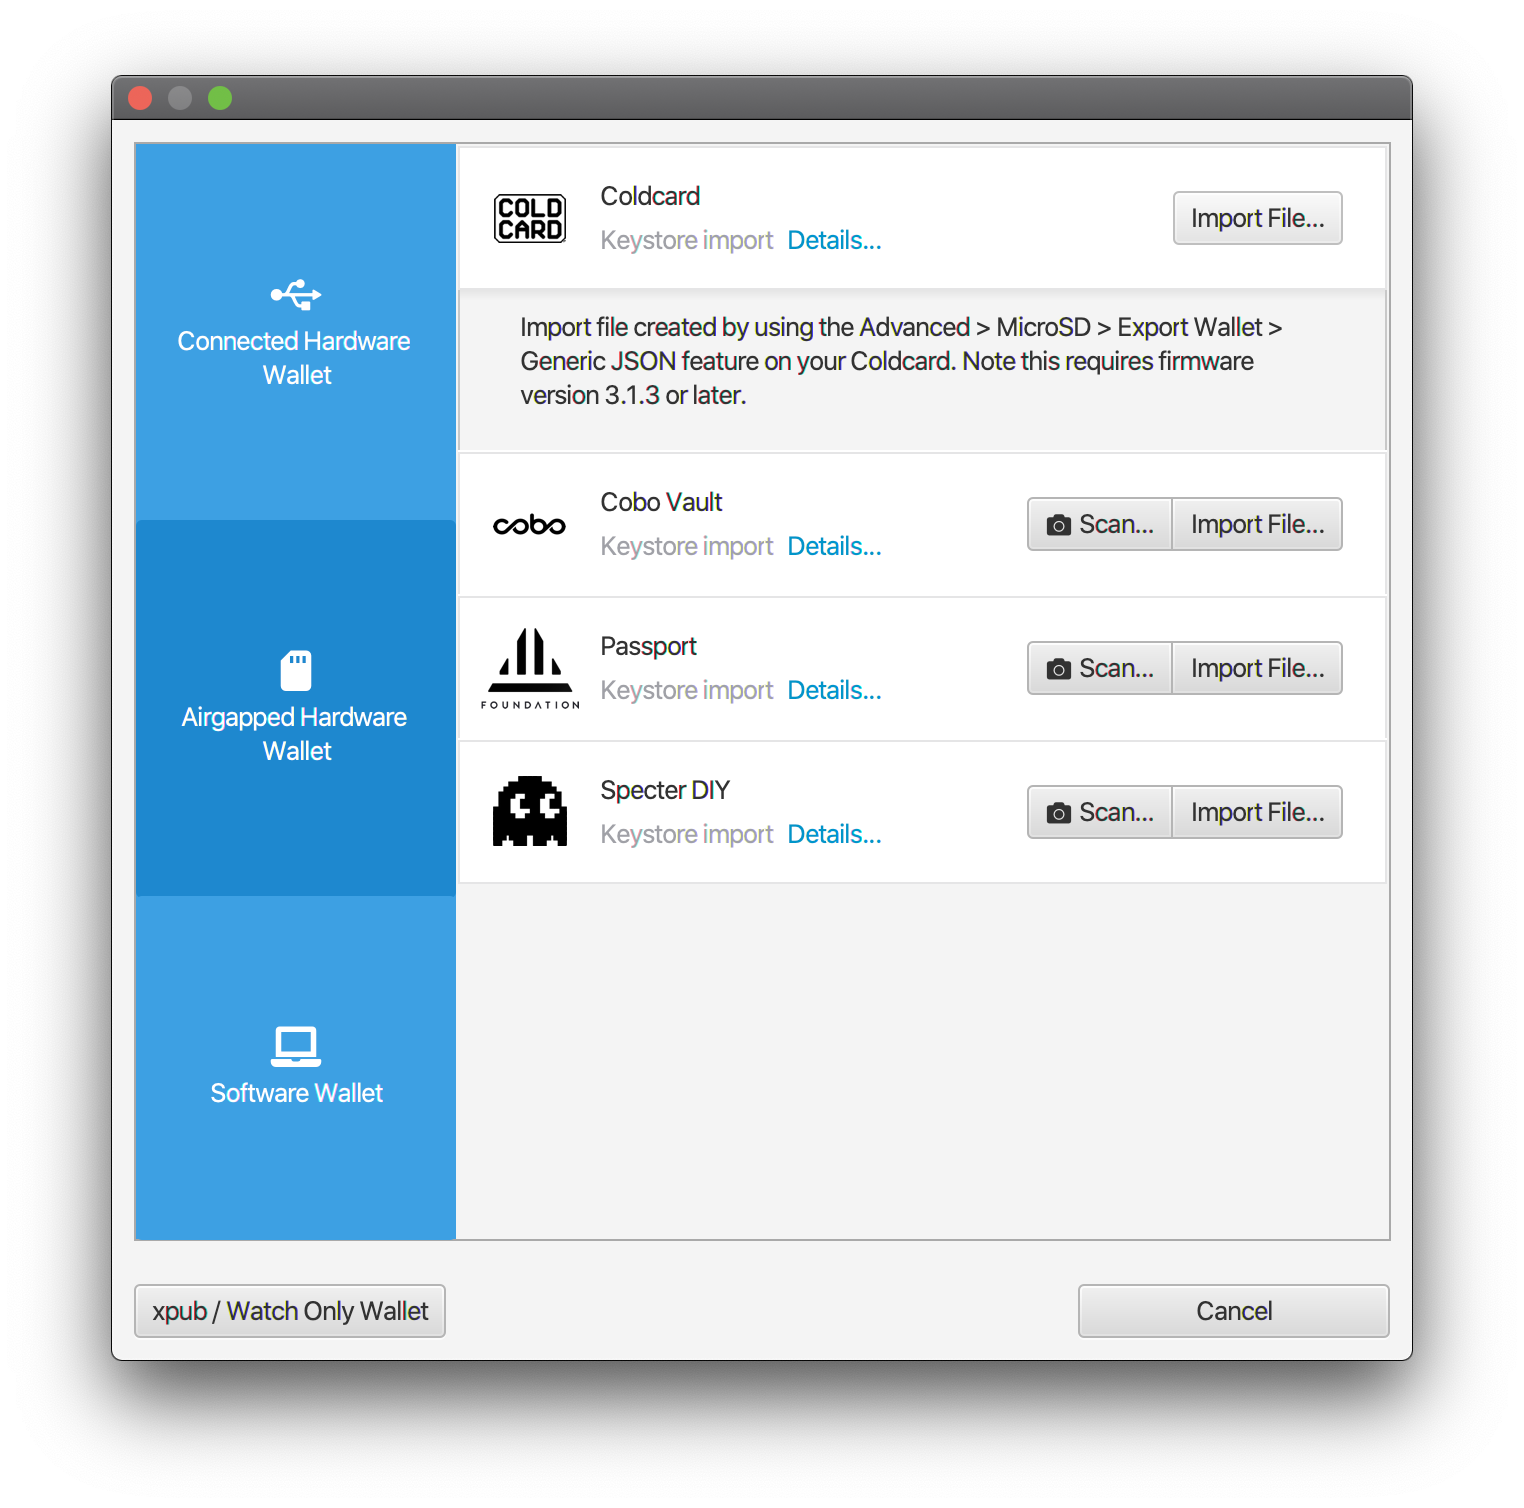
You will see a list of different import options for various hardware wallets. Look for the Coldcard option and select ‘Import File…’. (Note clicking on the ‘Details’ link will display the instructions for creating the file on the Coldcard, which we did earlier.)
Select the `coldcard-export.json` file from the SD card. Sparrow will read the file and import the Coldcard’s public key details:
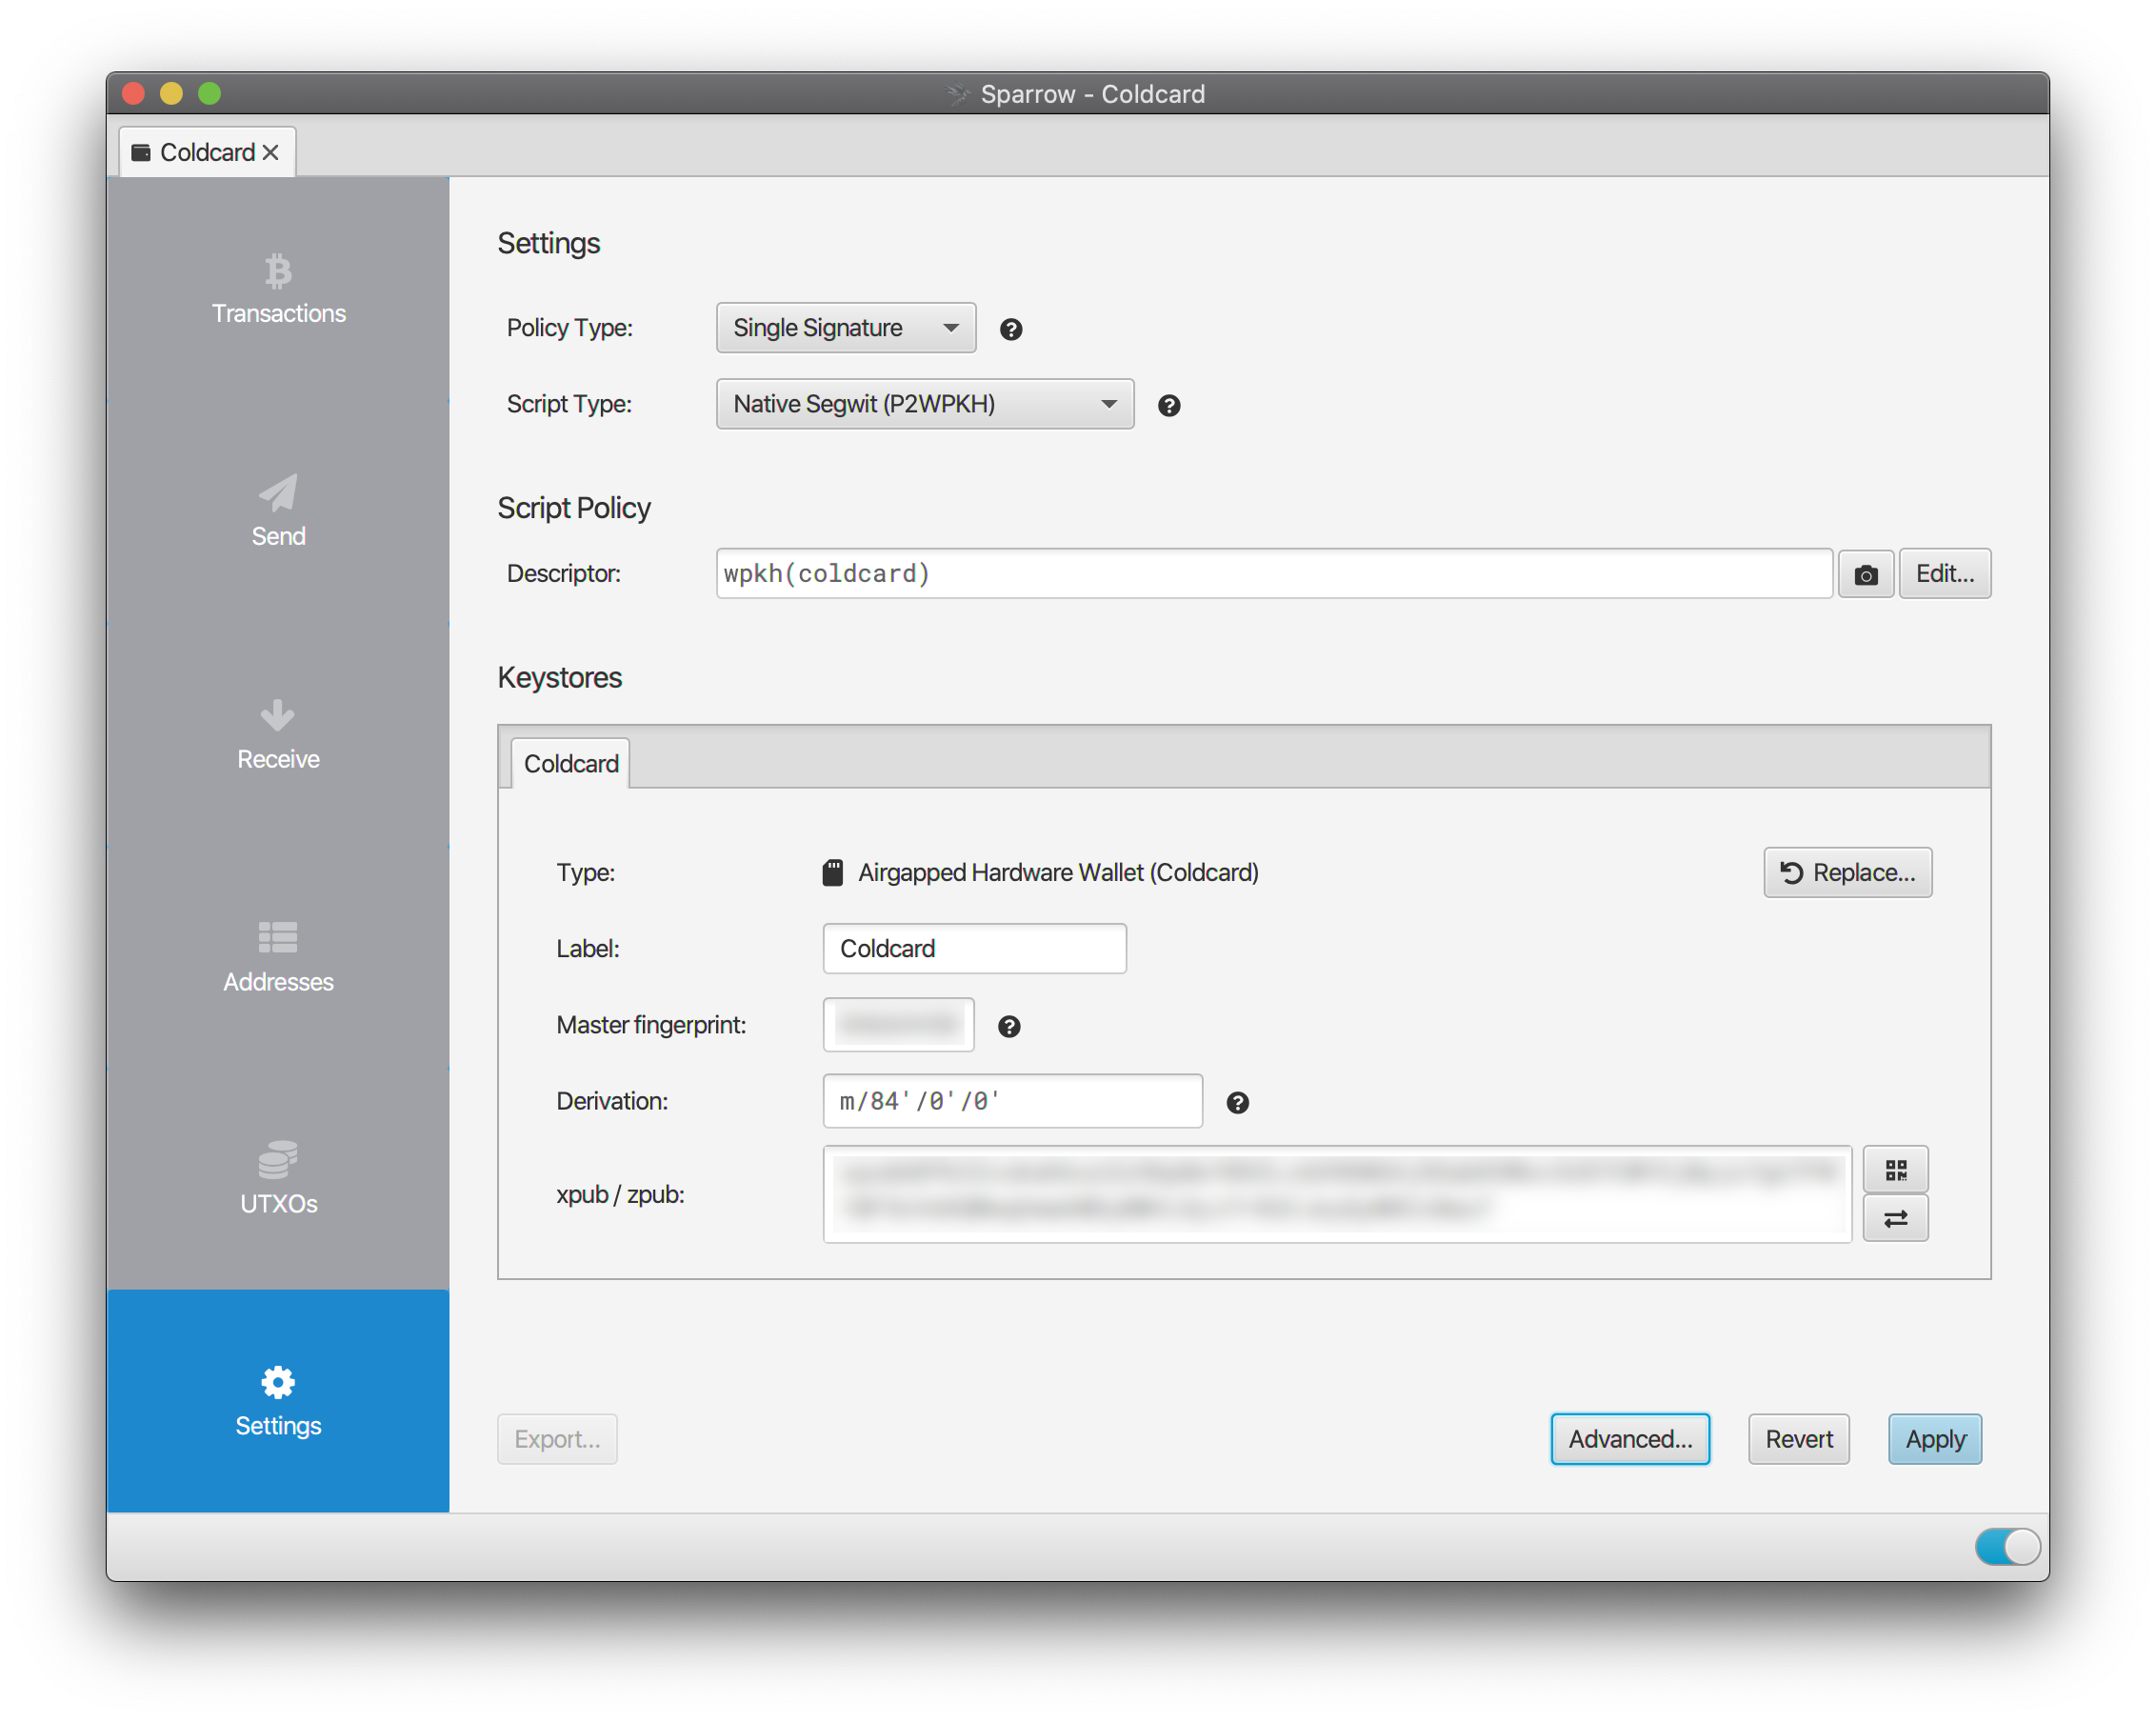
You can now click ‘Apply’ at the bottom. You should choose a good password to protect the wallet file - even though the Coldcard is protecting your funds from being stolen, a password on the Sparrow wallet protects your privacy. If Sparrow is connected it will look for any transactions, but since this is a new wallet there won’t be any.
Congratulations! Setup is complete and your wallet is ready to receive bitcoin.
### [Receiving Bitcoin](https://sparrowwallet.com/docs/coldcard-wallet.html#receiving-bitcoin)
[Permalink](https://sparrowwallet.com/docs/coldcard-wallet.html#receiving-bitcoin "Permalink")
In Sparrow, using the blue menu on the left select ‘Receive’. The address field will display the first receive address in your wallet:
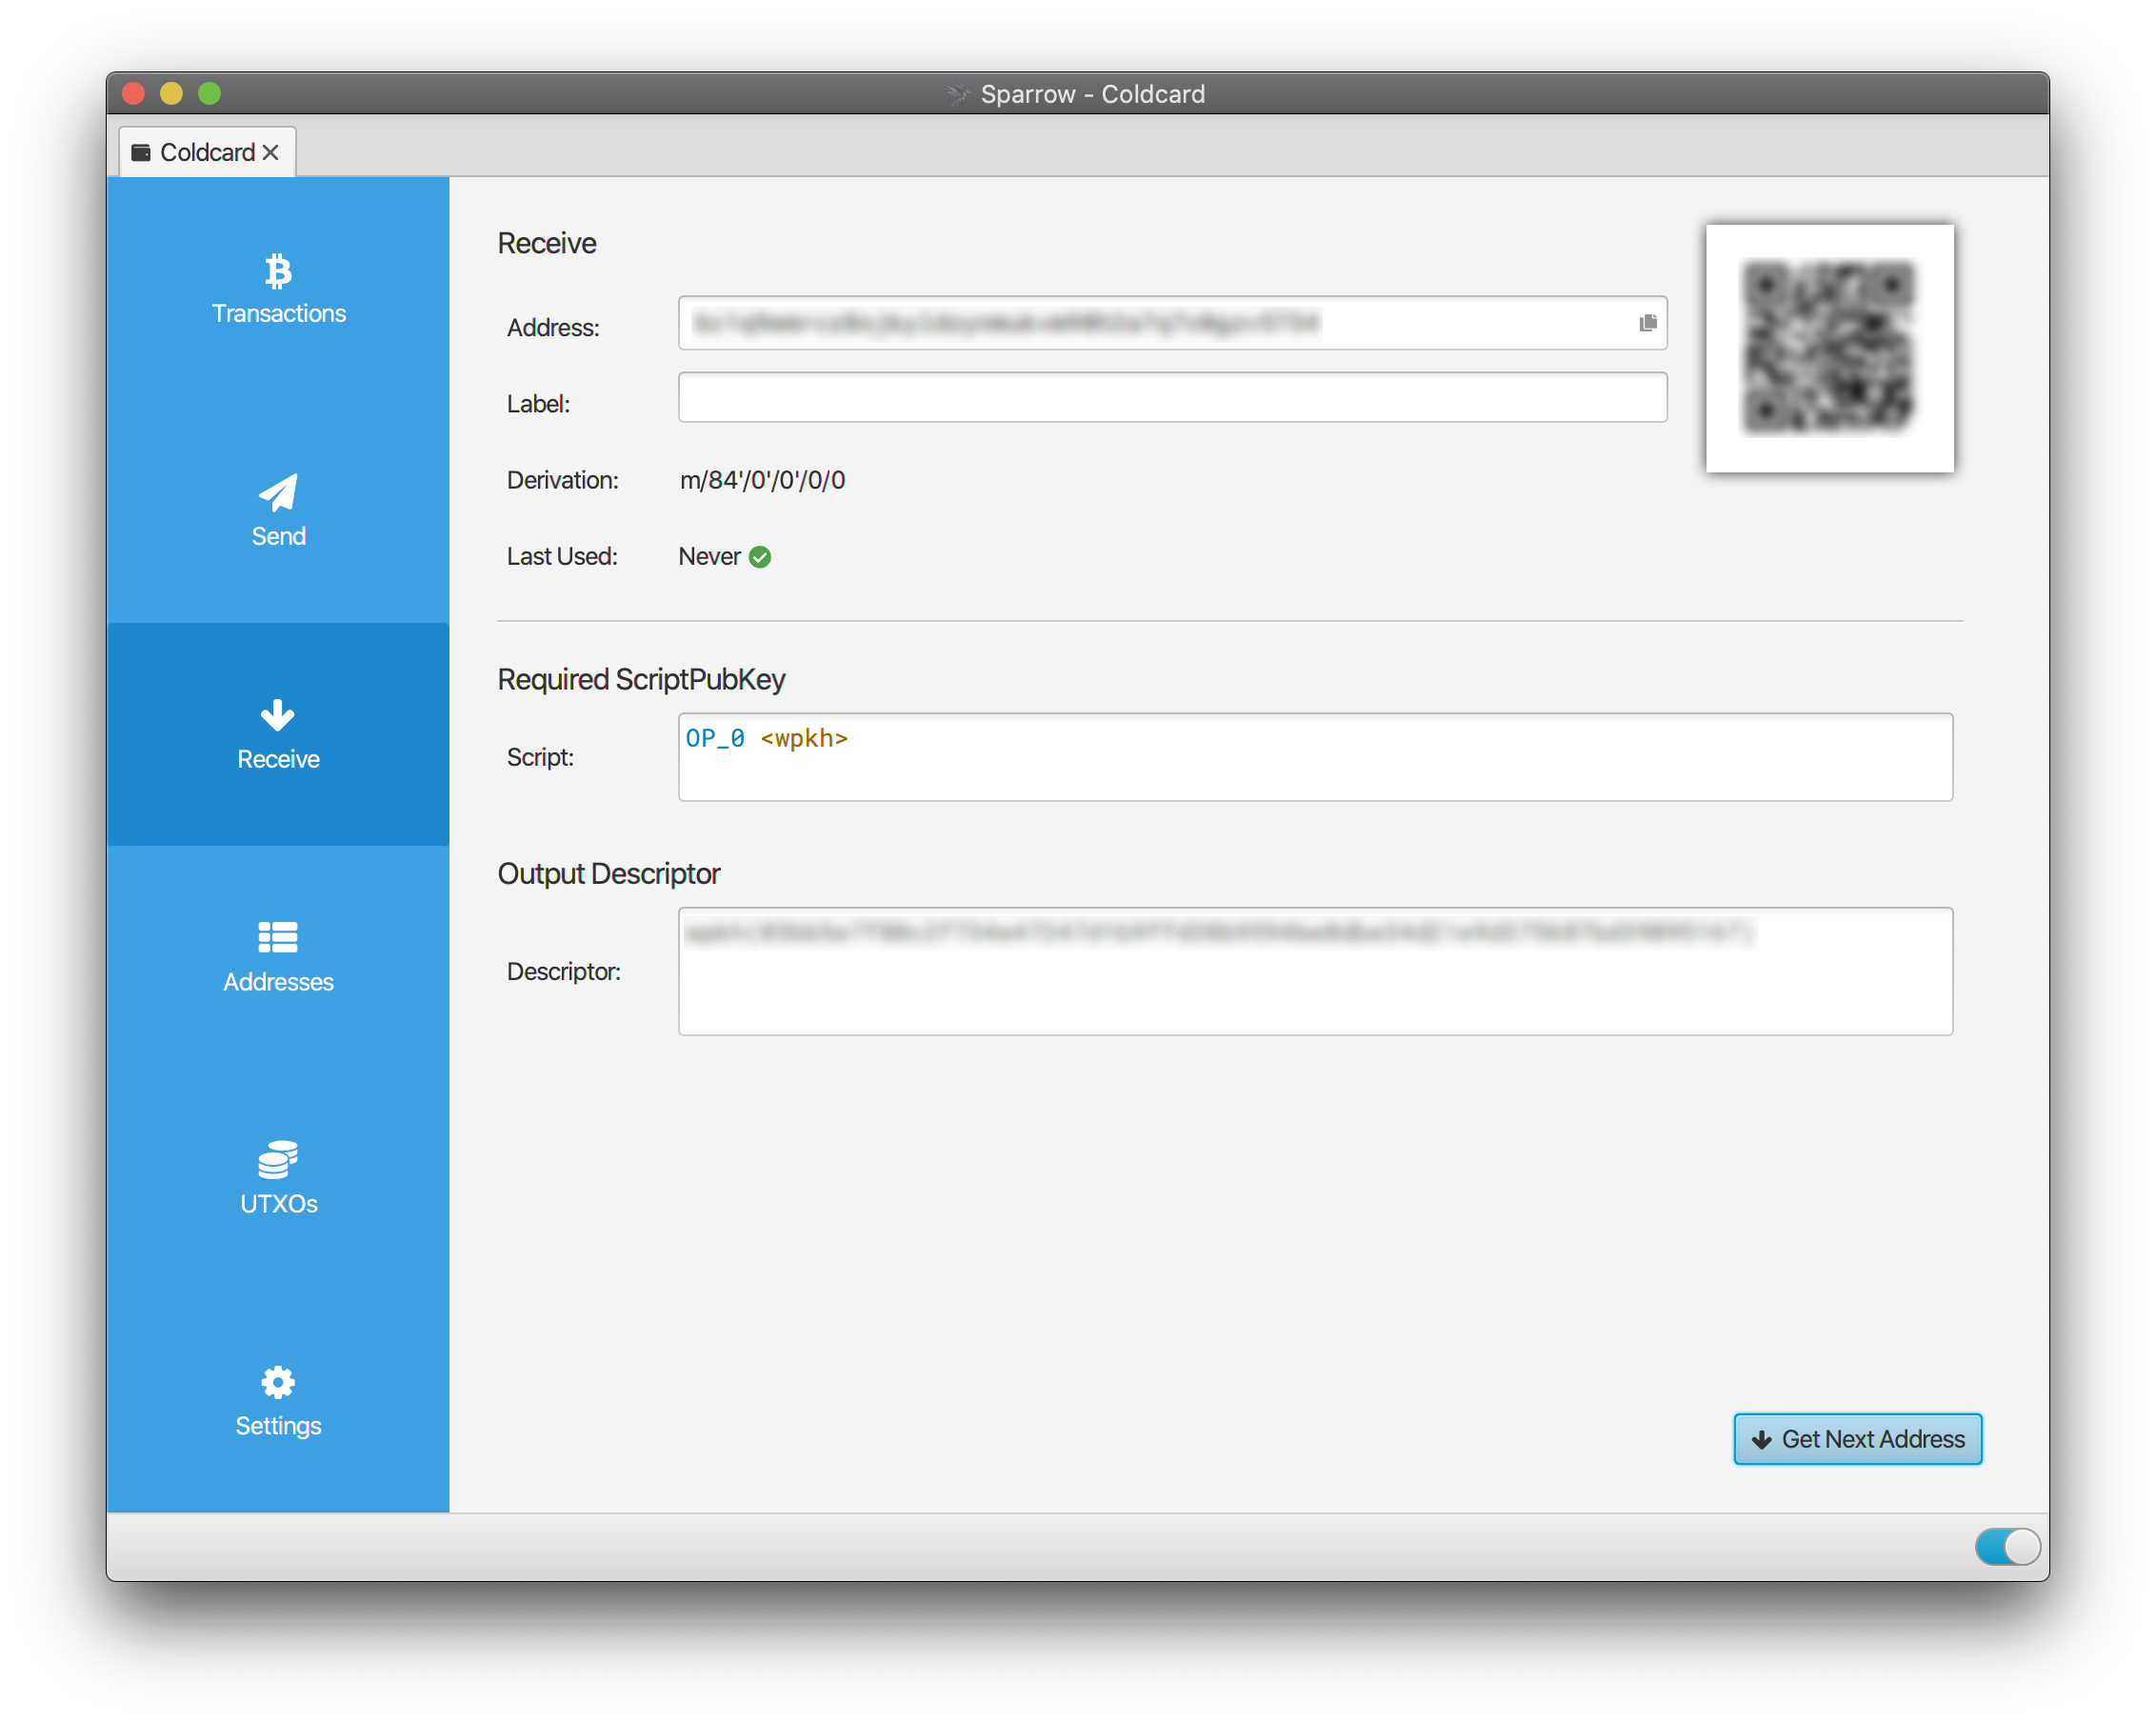
You can also confirm this address on the Coldcard using the Address Explorer feature. From the Coldcard main menu, select `Address Explorer`, press `4`, and then scroll down to the entry that matches the address Sparrow is displaying. Select it to check the full address.
You can now receive to this address, for example from an exchange. Once the exchange has sent the funds, you will see a new transaction in the Transactions screen (top button on blue menu) in Sparrow. Generally you should wait for at least one confirmation of this transaction (about 10-30 minutes) before you can send bitcoin from this wallet. However, if you are sending to yourself, you can send a transaction immediately.
### [Sending Bitcoin](https://sparrowwallet.com/docs/coldcard-wallet.html#sending-bitcoin)
[Permalink](https://sparrowwallet.com/docs/coldcard-wallet.html#sending-bitcoin "Permalink")
Once your wallet has funds, you can send from it. To do this, go to the Send screen and enter the destination address, the label and the amount:
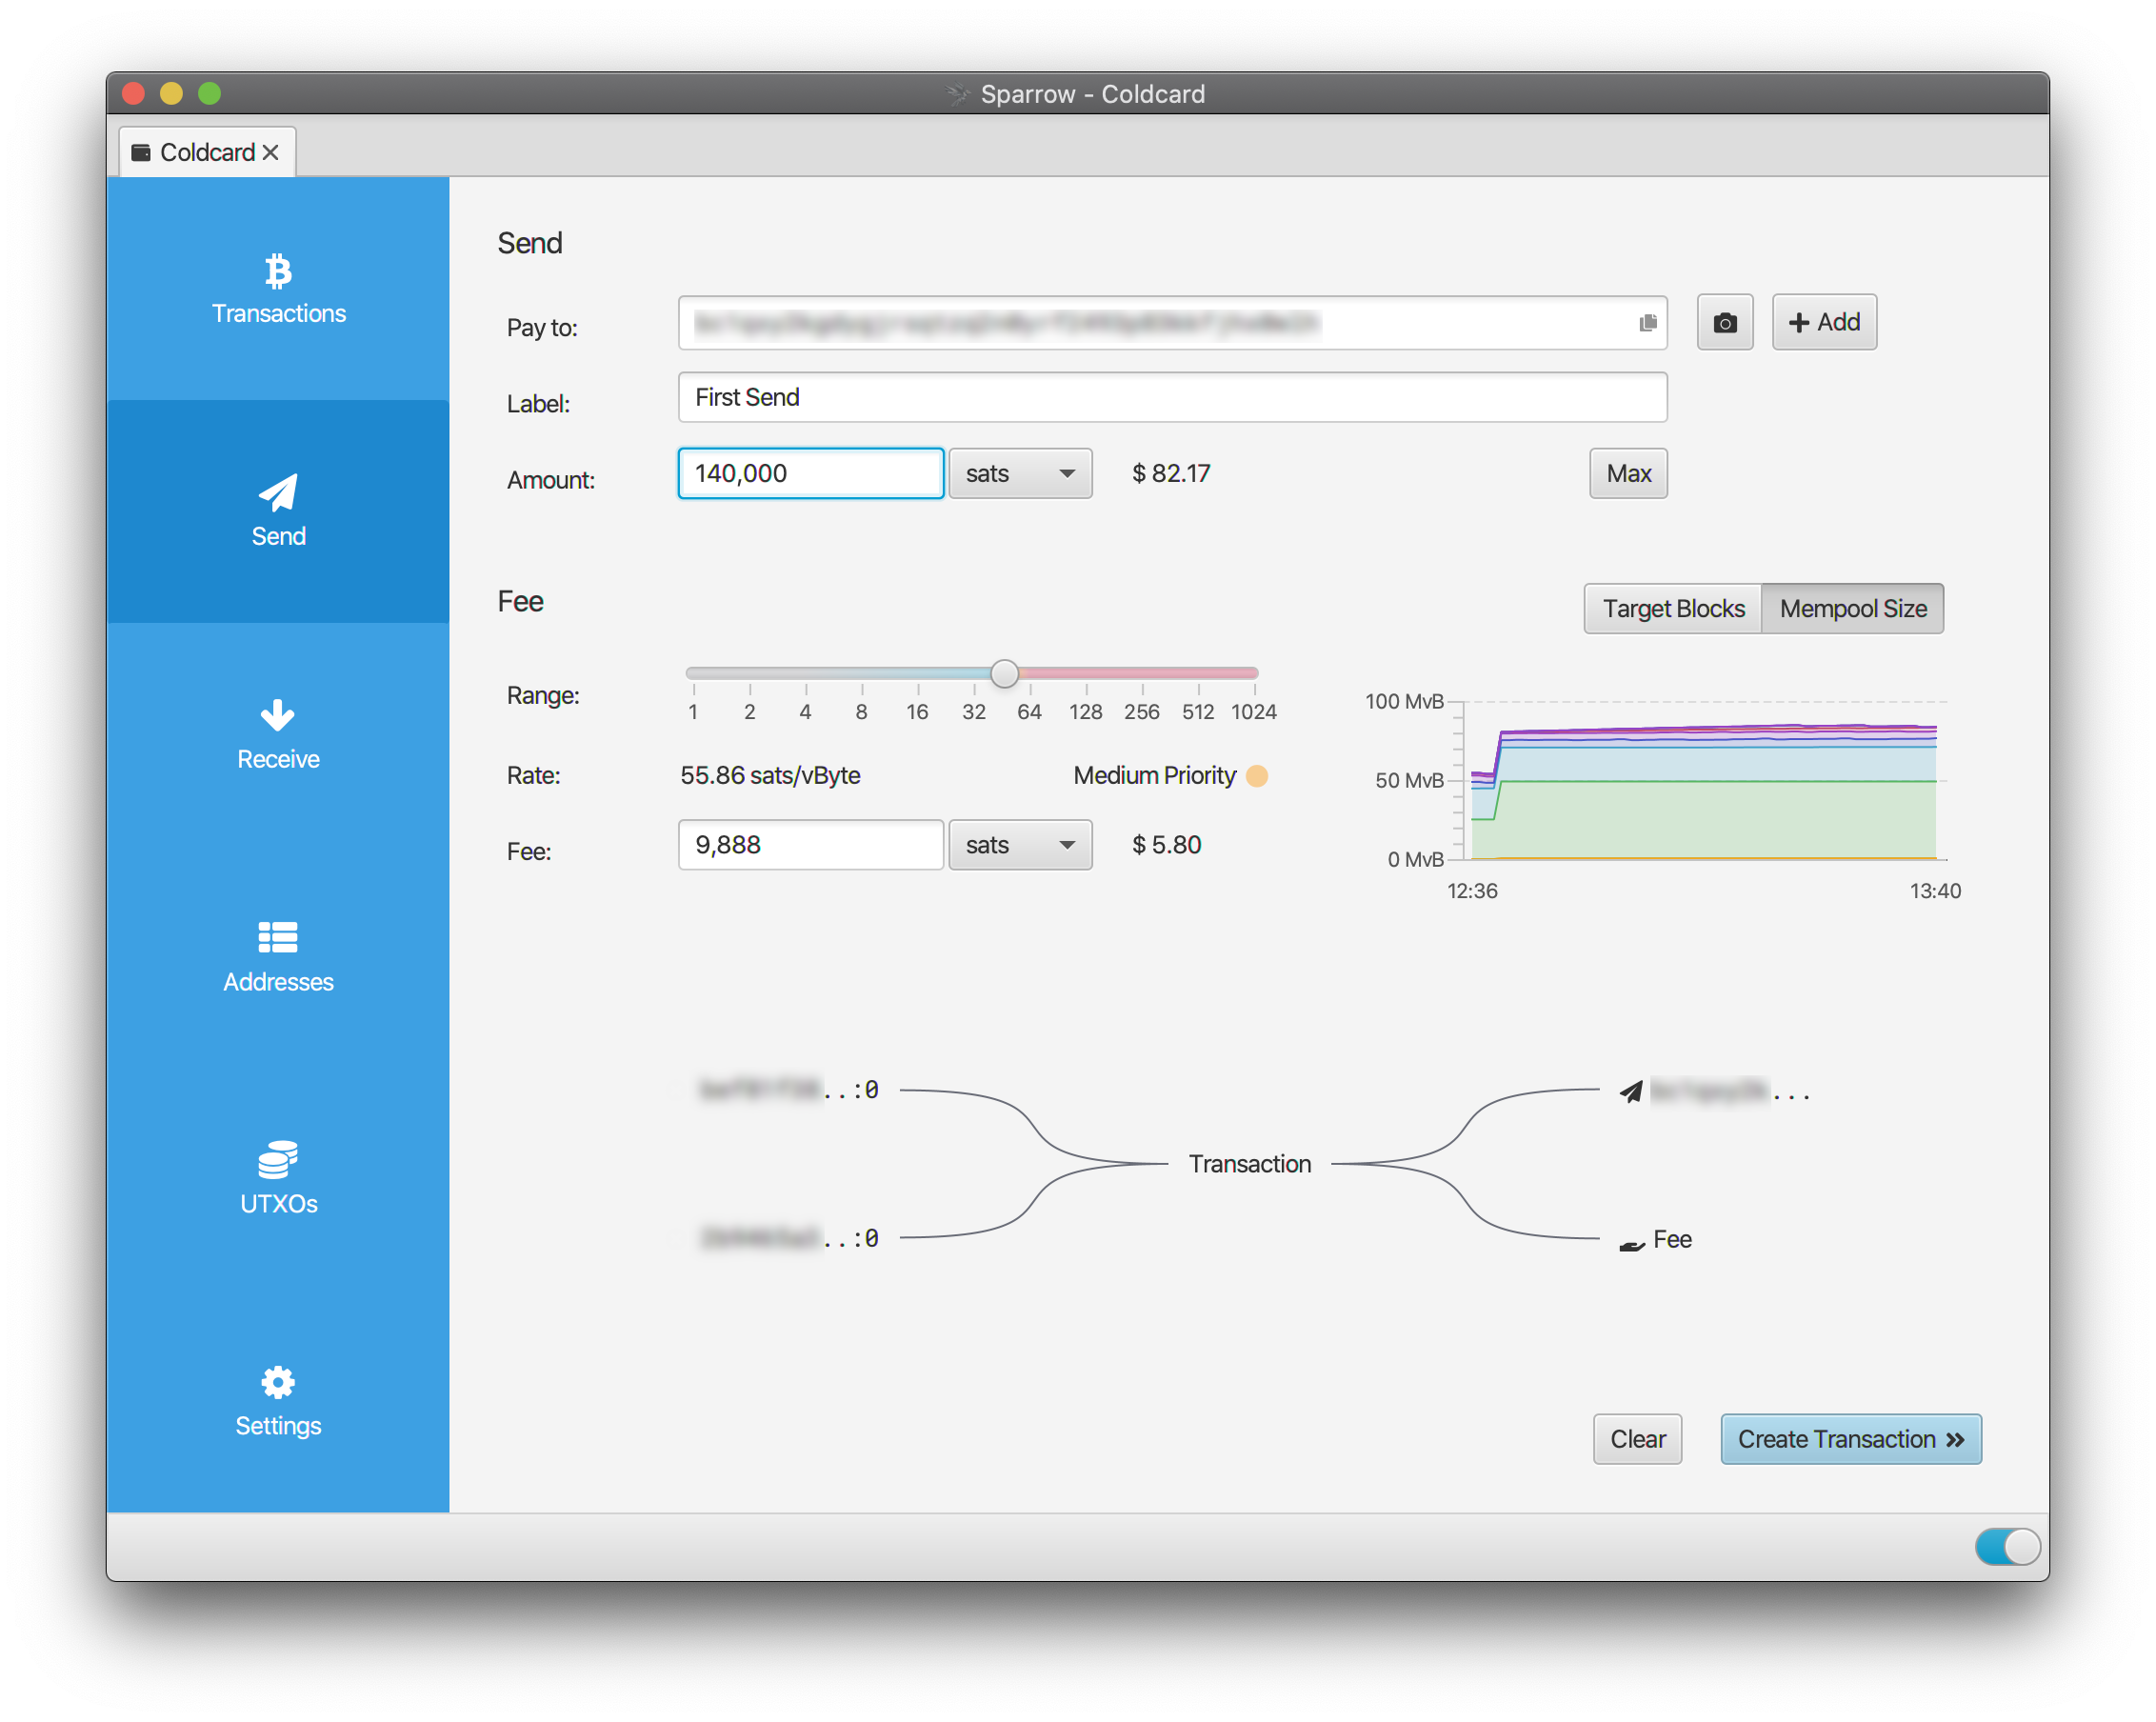
Note that you can use an address from this wallet (send to yourself) using the drop-down arrow on the right in the address field. You can then click ‘Create Transaction’. This will open up the transaction editor with your new transaction, where you can inspect the inputs and outputs. For now though, we are going to practice signing with the Coldcard.
Click the large blue ‘Finalize Transaction for Signing’ button. You will now see the Signatures area:
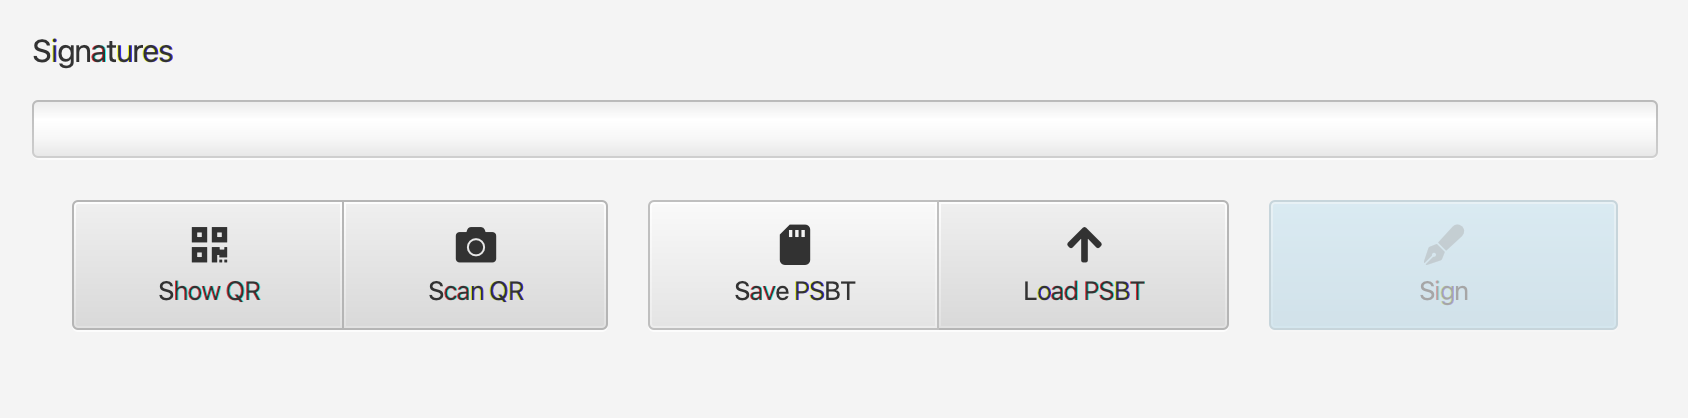
Because we are using the Coldcard in an airgapped manner, we will be doing the signing via file on the SD card. Make sure the SD card is readable by the computer and click the ‘Save PSBT’ button. You will save a `.psbt` file to the SD card, which is a type of file that contains a Partially Signed Bitcoin Transaction. Eject the SD card from the computer and insert it into the Coldcard.
On the Coldcard, select `Ready to Sign`:
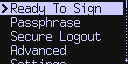
You will then need to select the file you just saved. The Coldcard will read the file and present the details of the transaction to you. It’s important to verify these details are correct. Check that the address and amount matches. You can select from the Outputs tree on the left in the Sparrow transaction editor to view these details.
Once you’re satisfied, ask the Coldcard to sign the transaction. It will save the signed PSBT file to the SD card in a file name similar to `First Send-signed.psbt`.
Now eject the SD card from the Coldcard and reinsert to the computer. Click ‘Load PSBT’ and load the signed PSBT file. The signatures progress bar will fill to indicate the transaction is now signed!
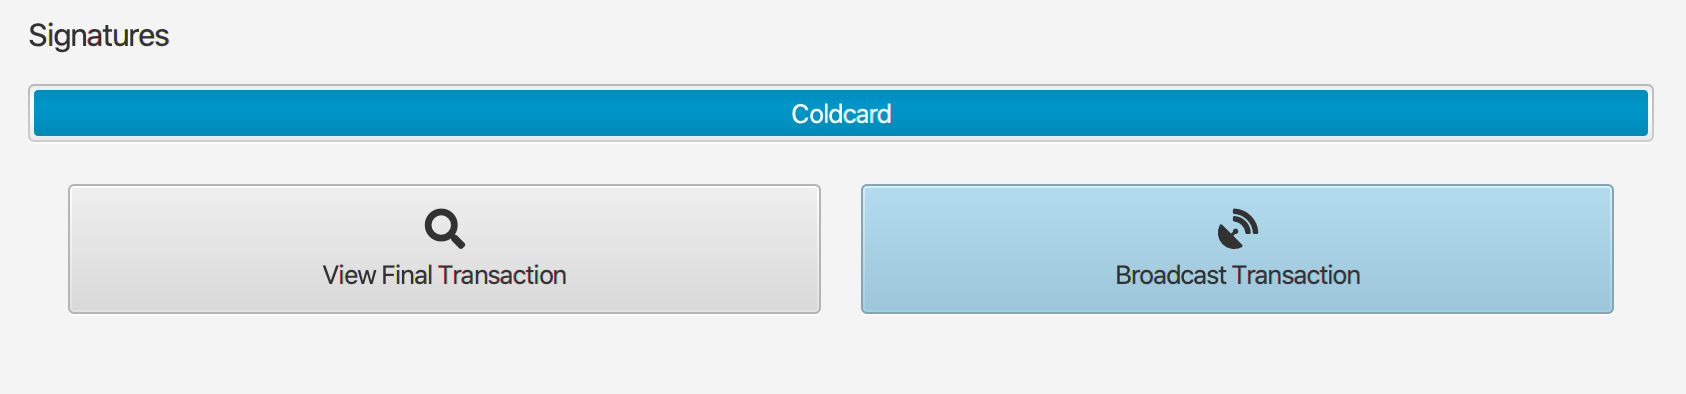
To send the transaction, click ‘Broadcast Transaction’. Your transaction will be broadcast to the Bitcoin network, and hopefully be confirmed into the blockchain shortly.
Congratulations! You now have a secure Bitcoin storage solution, and can send and receive from it. Consider [upgrading your Coldcard](https://coldcardwallet.com/docs/upgrade#upgradenow)
to the latest firmware in order to take advantage of all its features. Keep it in a safe place, and it will make sure you don’t need to worry about loss of funds!
### [Bonus: Adding an account](https://sparrowwallet.com/docs/coldcard-wallet.html#adding-an-account)
[Permalink](https://sparrowwallet.com/docs/coldcard-wallet.html#bonus-adding-an-account "Permalink")
You can now add an account to your wallet, which is in effect creating a second Bitcoin wallet based on the same seed but a different derivation path. A second account allows you to segregate funds (for example KYC and non-KYC funds) which ensures that differently sourced UTXOs are not linked when spending. You can also use accounts to segregate funds intended for different purposes.
To add an Account, go to the Settings tab in Sparrow and click **Add Account…** at the bottom. You will be able to select up to 8 different accounts - for now, select **Account #1**.
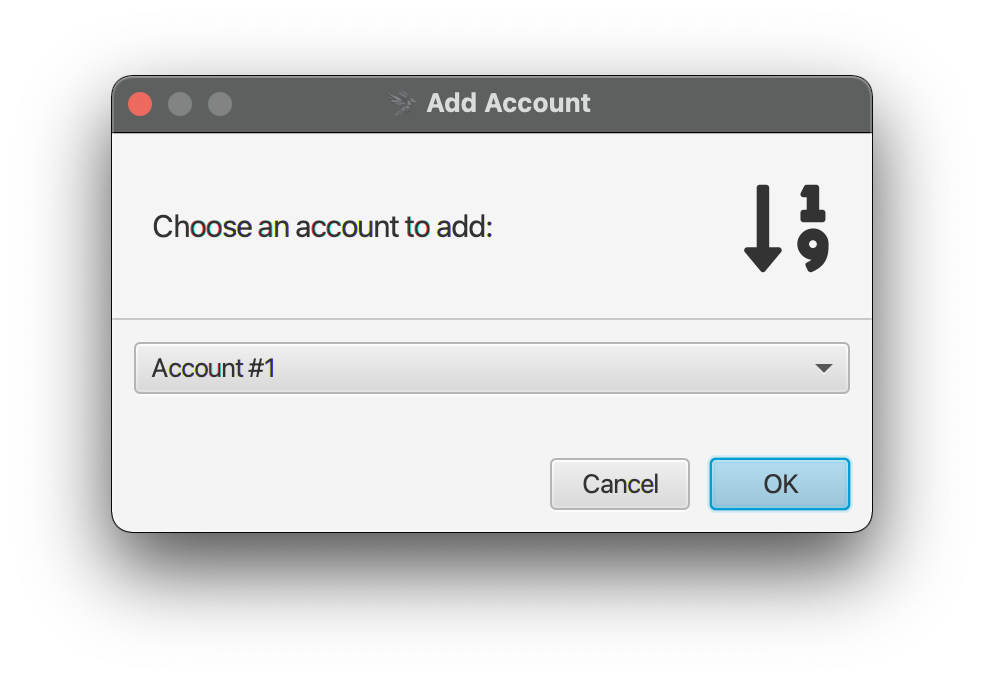
Sparrow will then add a row of tabs on the left. The wallet account you have recently configured will be labelled **Deposit**, and the new wallet account is **Account #1**.
You need to upload a new configuration file from the Coldcard for the new wallet account. To do so, select `Advanced > MicroSD Card > Export Wallet > Generic JSON` from the Coldcard menu, and this time enter `1` for the account number. Click ‘Airgapped Hardware Wallet’ from the four buttons in Sparrow and upload the file just saved to the SD card. You can then click **Apply**, and your second account is ready for use!
---
# Server Performance - Sparrow Wallet
Updated: 1 Feb, 2022
Sparrow Wallet depends on the Electrum server protocol for retrieving and sending transaction information. This document serves to provide a reasonably up-to-date performance benchmark for different full index Electrum server implementations running on commonly used hardware. It also contains a discussion on two different approaches taken by implementations, based on these findings.
### Background[Permalink](https://sparrowwallet.com/docs/server-performance.html#background "Permalink")
An Electrum server is an example of a Bitcoin address index. In simple terms, you provide it an arbitrary address, and it returns transactions associated with that address. The Bitcoin reference implementation does not ([and probably will never](https://bitcoin.stackexchange.com/questions/107619/why-does-bitcoin-core-support-a-transaction-index-but-not-an-address-index)
) support this functionality. Note that you can also obtain this information using [compact block filters](https://github.com/bitcoin/bips/blob/master/bip-0157.mediawiki)
, but this method does not support mempool transactions and is [much less performant](https://github.com/bitcoin/bitcoin/pull/20702#issuecomment-753480327)
.
Other examples of address indexes exist, but the Electrum server protocol is by far the most widely used Bitcoin address index protocol. This benchmark focuses on full address indexes. A full address index is important privacy-wise because it does not store details about any particular wallet on the server. For true cold storage, all details about the wallet should be contained in the wallet file and not left on the server once the wallet has been closed. This excludes projects such as [BWT](http://github.com/bwt-dev/bwt)
and [EPS](https://github.com/chris-belcher/electrum-personal-server)
which must store the addresses for any wallet provided to them.
### Motivation[Permalink](https://sparrowwallet.com/docs/server-performance.html#motivation "Permalink")
A previous performance report was written by Jameson Lopp in July 2020, and [is worth reading](https://blog.keys.casa/electrum-server-performance-report/)
.
This page serves to build on that work in two ways:
1. A Raspberry Pi 4 is used instead of an AWS server
2. Up-to-date builds of the projects are used, and retested whenever important changes are made
As such, Sparrow users who are looking to run their own Electrum server on a single board computer may find it useful to compare and contrast different implementations for their own needs.
### Hardware[Permalink](https://sparrowwallet.com/docs/server-performance.html#hardware "Permalink")
In order to mimic the situation of most privacy-conscious Sparrow users, a single board computer (SBC) is used for all these tests. Currently the most common SBC is a Raspberry Pi 4. This benchmark uses the 8GB iteration of that board running Ubuntu 21.10 64-bit operating system.
The Bitcoin blockchain, and any indexes built off of it, are fairly large in data size (currently around 0.5 TB). For this reason, it is generally recommended to prefer an SSD over a normal HDD for data storage. This test uses a 1TB external USB SSD.
### Projects[Permalink](https://sparrowwallet.com/docs/server-performance.html#projects "Permalink")
#### ElectrumX[Permalink](https://sparrowwallet.com/docs/server-performance.html#electrumx "Permalink")
ElectrumX is the second iteration of Electrum server implementations after the original Electrum server project was abandoned in favour of it in 2017. After the original author of ElectrumX decided not to support the Bitcoin blockchain, the Electrum developers forked the project. It is now maintained at [https://github.com/spesmilo/electrumx](https://github.com/spesmilo/electrumx)
.
A notable difficulty in running ElectrumX is initially building the index. Building the index on the hardware used for this test takes [around one week](https://x.com/openoms/status/1487099572694437892)
. Note however that the index can be built on a more powerful computer and transferred to an SBC.
* Current database size: 75 GB
* Requires txindex enabled on Bitcoin Core
* No binaries provided
* Tested version: ElectrumX 1.16
#### Electrs[Permalink](https://sparrowwallet.com/docs/server-performance.html#electrs "Permalink")
While ElectrumX was designed with public server use in mind, Electrs is designed for personal use. As such, it has lower storage requirements (but higher CPU usage as we will see later). It is maintained at [https://github.com/romanz/electrs](https://github.com/romanz/electrs)
.
In contrast to ElectrumX, building the index takes 12-24 hours on the hardware used for this test. This has led to it being preferred on all prebuilt node packages.
* Current database size: 32 GB
* Does not require txindex on Bitcoin Core
* No binaries provided
* Tested version: Electrs 0.9.4
### Fulcrum[Permalink](https://sparrowwallet.com/docs/server-performance.html#fulcrum "Permalink")
Fulcrum is a recent implementation written in modern C++. Although it has higher disk space requirements than ElectrumX and Electrs, it is highly performant. It is maintained at [https://github.com/cculianu/Fulcrum](https://github.com/cculianu/Fulcrum)
.
Fulcrum’s indexing can be completed in 2-3 days on the hardware used here, depending on configuration. This puts it between Electrs and ElectrumX on this metric, but the performance it achieves once the index is built is remarkable.
* Current database size: 102 GB
* Requires txindex enabled on Bitcoin Core
* Binaries provided for Linux (x86\_64 and arm64) and Windows
* Tested version: Fulcrum 1.6.0
#### Electrs-esplora[Permalink](https://sparrowwallet.com/docs/server-performance.html#electrs-esplora "Permalink")
This is a fork of the Electrs project which builds a number of additional indexes to improve performance for enterprise use. However given the high data requirements (~800 GB) this implementation was not considered suitable for the hardware used in this test. Note that it can also be run with the `--lightmode` flag, which halves the disk space requirements. However, even then the capacity of a 1TB drive would be almost exhausted considering the blockchain itself is around 420GB currently.
#### addrindexrs[Permalink](https://sparrowwallet.com/docs/server-performance.html#addrindexrs "Permalink")
This is another fork of the Electrs project used by the Dojo backend to retrieve historical transaction data. There are no significant performance-related changes to warrant inclusion as a separate implementation.
### Indexing[Permalink](https://sparrowwallet.com/docs/server-performance.html#indexing "Permalink")
Before proceeding to the performance testing it’s important to consider initial indexing in more depth. The three tested implementations range between 1 day and 1 week. Considering each in turn:
ElectrumX is the slowest to index, likely due to it’s use of Python which is single-threaded and slower to parse blocks. However, the index it builds is able to respond to common requests without reaching out to Bitcoin Core, which leads to a more scalable server. Be sure to use a 64-bit operating system with ElectrumX - the indexing performance is far poorer otherwise.
Electrs indexes quickly because it has a smaller less complicated index, and because block retrieval and parsing is highly optimized. It needs to be, because Electrs doesn’t store enough information in its index to respond to most requests - instead, it must reparse blocks on the fly during normal operation. This tradeoff becomes problematic when wallets increase in depth as discussed later.
Fulcrum builds a slightly larger index than ElectrumX, but does so much more quickly. Being highly resource intensive, the indexing performance benefits from the lower level language implementation. Note that indexing performance can be improved through use of the [fast sync](https://github.com/cculianu/Fulcrum/blob/master/doc/fulcrum-example-config.conf#L685)
configuration option. It will become clear that this comprehensive index leads to very impressive performance in operation.
### The Test[Permalink](https://sparrowwallet.com/docs/server-performance.html#the-test "Permalink")
In order to provide meaningful numbers, a large wallet (~3000 used addresses) was used.
This benchmark serves to test two common (but quite different) server loads from Sparrow:
1. Initial loading of a wallet. Since an existing Sparrow wallet already contains much of the wallet data (transactions and blocks) which does not need to be re-retrieved, this test focuses on address subscriptions. Address subscriptions allow Sparrow to “subscribe” an address so that the server will provide it with updates whenever transactions for an address change. **In addition, a subscription request returns a hash of all of the transaction ids (txids) and block heights affecting that address.** This second requirement is key to understanding server performance. The test measures how long subscribing to all the addresses in the wallet takes.
2. Refreshing a wallet. In ideal circumstances, wallet refreshes should never be necessary - the wallet should only need to be updated incrementally. However, communication and server issues can lead to bad data, which is solved by refreshing the wallet in Sparrow (View menu). This test measures only the time to retrieve all wallet data (transactions and blocks), since addresses are already subscribed to when a refresh takes place.
All servers tested support batching of requests. For this test, a batch page size of 50 was used.
### Results[Permalink](https://sparrowwallet.com/docs/server-performance.html#results "Permalink")
#### Test 1: Initial load[Permalink](https://sparrowwallet.com/docs/server-performance.html#test-1-initial-load "Permalink")
| Test | Cold Start | Run 1 | Run 2 | Run 3 |
| --- | --- | --- | --- | --- |
| ElectrumX | 52655 ms | 40721 ms | 54143 ms | 49011 ms |
| Electrs | 322386 ms | 393303 ms | 384036 ms | 427722 ms |
| Fulcrum | 2333 ms | 1413 ms | 1472 ms | 1413 ms |
> **Tl;dr:** Fulcrum is 22x faster than ElectrumX, ~300x faster than Electrs
#### Test 2: Wallet refresh[Permalink](https://sparrowwallet.com/docs/server-performance.html#test-2-wallet-refresh "Permalink")
| Test | Cold Start | Run 1 | Run 2 | Run 3 |
| --- | --- | --- | --- | --- |
| ElectrumX | 114466 ms | 66175 ms | 80133 ms | 75489 ms |
| Electrs | 17562 ms | 11621 ms | 11219 ms | 11521 ms |
| Fulcrum | 14152 ms | 7854 ms | 7382 ms | 7442 ms |
> **Tl;dr:** Fulcrum is 8x faster than ElectrumX, 1.5x faster than Electrs
### Discussion[Permalink](https://sparrowwallet.com/docs/server-performance.html#discussion "Permalink")
The results of this test are at first surprising for Test 1. There is a vast difference in performance between Fulcrum and Electrs (1.4 secs vs 6 mins to produce the same data!). This is primarily because Electrs does not store all the data required to find the transactions associated with an address.
As can be seen from the [Electrs database schema](https://github.com/romanz/electrs/blob/master/doc/schema.md)
, only the block height for an address is stored. To be more specific, the [ScriptPubKey is hashed](https://electrumx-spesmilo.readthedocs.io/en/latest/protocol-basics.html#script-hashes)
and the first 8 bytes of this ‘script hash’ are stored as a key where the value is the confirmed block height for a transaction associated with that script hash. This means that block must be retrieved from Bitcoin Core using the P2P interface and parsed for transactions that have outputs matching the address. For a deep wallet such as that used in this test, this can be a lot of data that must be reparsed for every wallet load. **For this particular wallet, 3.5GB of blocks needed to be fetched from Bitcoin Core and parsed every time the wallet is loaded!**
This presents a significant CPU load for an SBC, both for the Bitcoin Core and Electrs processes involved. The most significant problem this causes is that Electrs is sometimes so busy it fails to respond to any other requests, or to notify Sparrow when one of its subscribed addresses has new transactions during this period. This can lead to outdated or bad data in any wallet should a loading wallet have significant depth. If you have ever had cause to use the Refresh Wallet function in Sparrow when using Electrs, this is probably the reason.
ElectrumX and Fulcrum on the other hand do store the data required for a full address index lookup. More specifically, when provided with an address they can return all of the transaction IDs associated with that address, along with their block heights. This allows wallets like Sparrow to efficiently check if they already know about all existing transactions affecting the wallet, and to request only the transactions they don’t. When combined with the transaction index (`txindex=1`) in Bitcoin Core, this approach can be highly efficient as the Fulcrum results show.
Even with this in mind, the performance of Fulcrum is remarkable. It is clear that being written in modern `C++17` is particularly advantageous, not only because it is faster, but because performance is consistent across platforms. In the case of ElectrumX, Python appears a less suitable choice for this application. Not only is it slower, but both indexing and query performance varies depending on the underlying server architecture - the previous version of this benchmark using a 32 bit operating system showed faster query performance but much slower indexing. It is worth noting as well that CPU utilisation was comparatively higher using ElectrumX than Fulcrum while serving queries (as well as being much longer in duration).
### Conclusion[Permalink](https://sparrowwallet.com/docs/server-performance.html#conclusion "Permalink")
We can be relatively sure of two trends continuing into the next few years - wallet depths will increase, and storage costs will decrease.
**For this reason, Fulcrum emerges as a clear winner in this benchmark.** Although it takes slightly longer to index than Electrs, once that indexing is complete the benefits of a scalable and performant server will greatly outweigh this once-off cost, not only in query speed and reliability but in prolonging hardware lifespan.
Although Electrs may have some application when disk space is very limited and wallet depths are small, Fulcrum is recommended as the ideal server to pair with Sparrow.
> **Technical note**
>
> It is interesting to understand how an efficient address index can be built. Let’s consider how Fulcrum and ElectrumX store data. In ElectrumX, similar to Electrs, the history database stores the first 11 bytes of the script hash as a key (this slightly longer key increases data storage but reduces ‘false positive’ incorrect lookups). Fulcrum stores the full 32 bytes of each script hash, which means a bigger index but no false positives at all.
>
> Contrary to Electrs (which maps the script hash to a block height), the value stored against this script hash is a list containing the ordered numbers (called `tx_num`) of its associated transactions in the blockchain. The `tx_num` can be described as follows: Each transaction is ordered within a block, so a cumulative number for a transaction can be determined by looking at its order in the entire blockchain. This is effectively a shorthand for the txid, which not only reduces data storage but also allows for fast block height lookups.
>
> For example, the txid is determined from a logical file containing all txids in blockchain order, where the offset in the file is simply the `tx_num` \* 32 bytes (the size in bytes of a SHA256 hash). Similarly, Fulcrum and ElectrumX keep an array in memory where each index corresponds to the blockheight, and the value at that index contains the cumulative number of transactions that existed at that height. This means from the list of `tx_nums` retrieved from a script hash, they can quickly lookup both the txid and the block height for each `tx_num`. This is how they achieve such fast performance in comparison to Electrs. The cost to this performance is increased data storage - in the case of ElectrumX, an additional 21GB of storage is needed for the logical file to perform the `tx_num` to txid lookup. Software engineering is often about tradeoffs, and the tradeoff here leads to dramatic improvements in querying performance.
---
# Quick Start Guide - Sparrow Wallet
### [Installation](https://sparrowwallet.com/docs/quick-start.html#installation)
[Permalink](https://sparrowwallet.com/docs/quick-start.html#installation "Permalink")
Sparrow can be downloaded from the [Download](https://sparrowwallet.com/download)
page. Be sure to follow the instructions on the page to verify your download before proceeding. Once verified, install and run Sparrow as normal for your operating system.
### [Welcome to Sparrow](https://sparrowwallet.com/docs/quick-start.html#welcome-to-sparrow)
[Permalink](https://sparrowwallet.com/docs/quick-start.html#welcome-to-sparrow "Permalink")
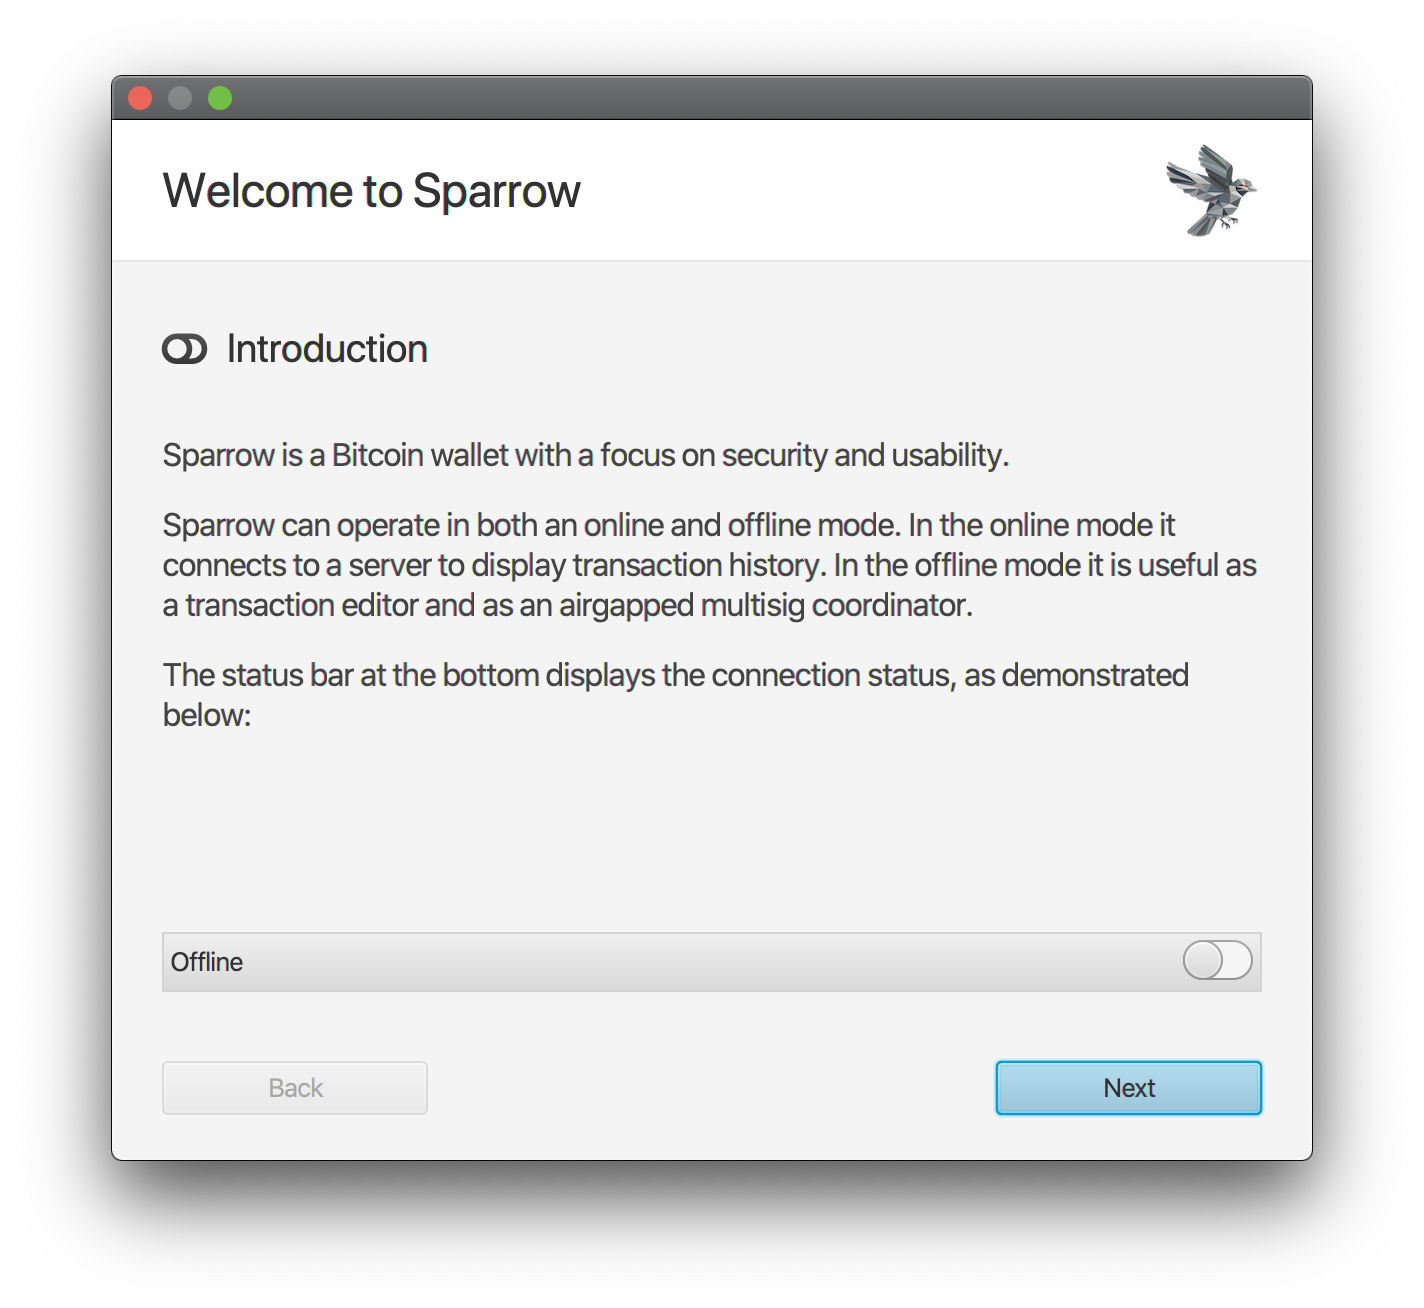
Every new Sparrow installation starts with a Welcome wizard to explain the different ways of connecting Sparrow to the Bitcoin blockchain. You can also use Sparrow offline to verify wallet addresses, and analyse and sign transactions and messages.
There are 3 ways to connect Sparrow to a server to view your balance, and send and receive transactions:
*  Public server
*  Bitcoin Core node
*  Private Electrum server
In this guide, we’ll be connecting to a public server. This means sharing your public key information (and thus your privacy) with whoever is running the server. It is not recommended to do this for any significant funds, but it’s a simple way to start using Sparrow.
The Welcome screen also explains how you can switch between online and offline mode at any time when using Sparrow with the toggle button  that appears in the status bar. The toggle will change color depending on which one of the 3 types of connections you are using.
### [Sparrow Server Setup](https://sparrowwallet.com/docs/quick-start.html#sparrow-server-setup)
[Permalink](https://sparrowwallet.com/docs/quick-start.html#sparrow-server-setup "Permalink")
After you have completed the Welcome wizard, click **Configure Server** and you will see the following dialog:
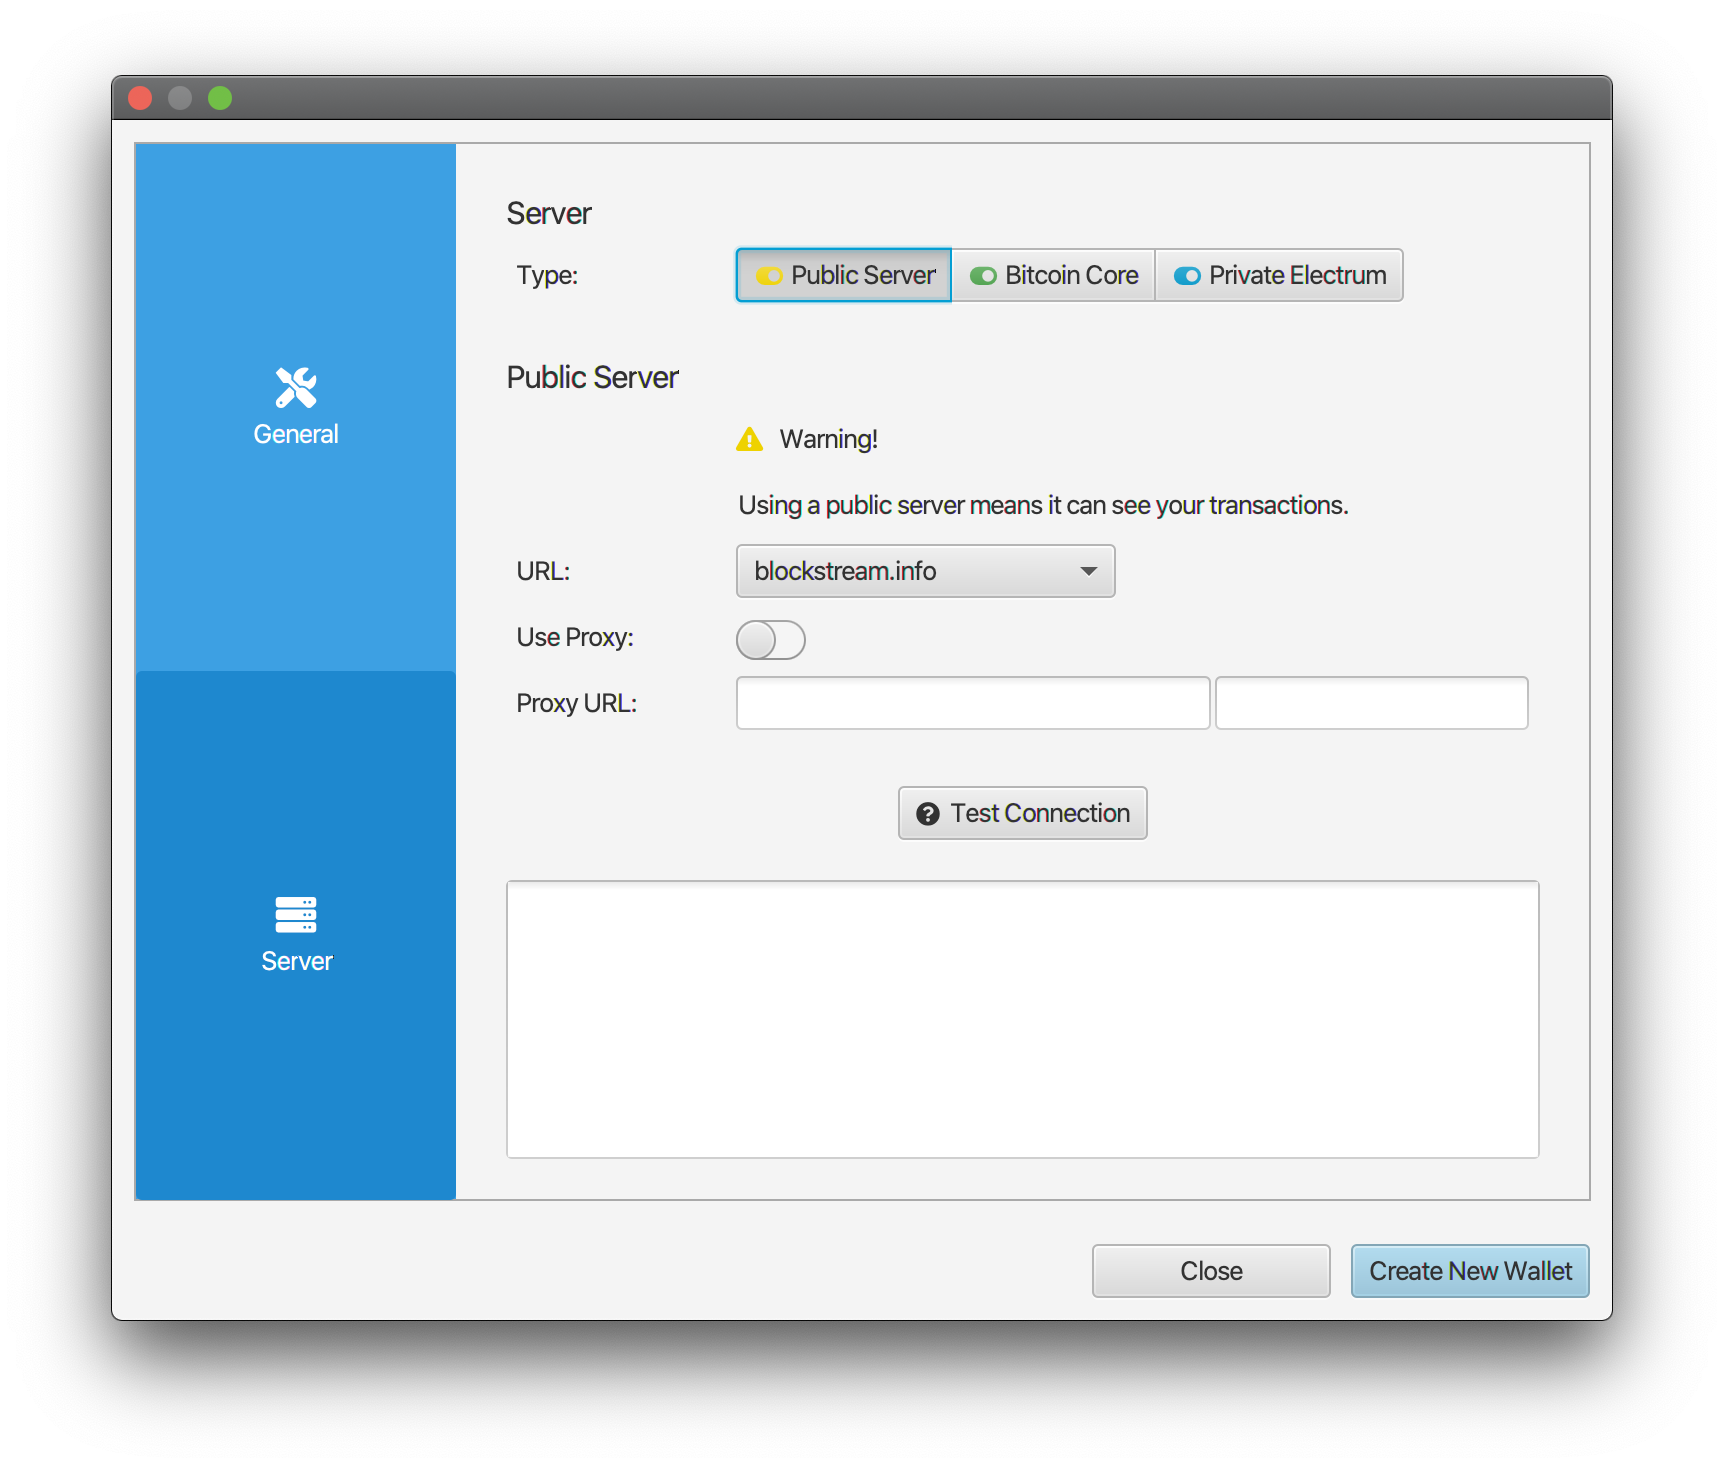
**Warning**: It is not advisable to use Sparrow with a public server if you plan to store any significant funds. In that case, you should only connect to a server you trust. Your funds are never at risk, but your privacy is shared. Read the [best practices guide](https://sparrowwallet.com/docs/best-practices.html)
for further information in considering which approach is right for you.
Note that the URL in the dialog might be different for you, since Sparrow selects a server randomly if one is not configured. There is no additional configuration necessary.
From here, you can proceed to click **Create New Wallet**.
### [Creating Your First Wallet](https://sparrowwallet.com/docs/quick-start.html#creating-your-first-wallet)
[Permalink](https://sparrowwallet.com/docs/quick-start.html#creating-your-first-wallet "Permalink")
Enter a name for your first wallet and click **New Wallet**:
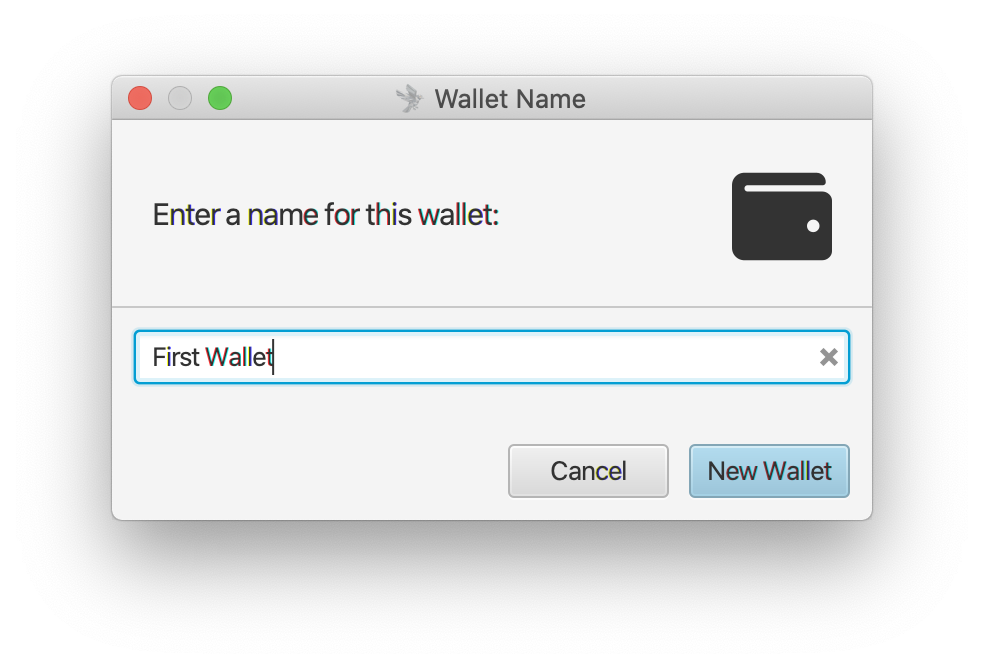
You are now shown the Settings screen for your new wallet. Every Sparrow wallet has the following details:
| Field | Available Values |
| --- | --- |
| Policy Type | Single Signature or Multi Signature |
| Script Type | What type of Bitcoin script will be used (Native Segwit, Nested Segwit etc) |
| Keystores | Details of the public and private keys your wallet is aware of |
For this guide, we are going to create a single signature wallet using a Native Segwit (P2WPKH) script type. This is the default, so we can leave the settings as they appear:

Now we need to choose which kind of keystore we want for this wallet. You can choose between four different kinds:
| Type | Description |
| --- | --- |
| Connected Hardware Wallet | For connecting your Coldcard, Trezor etc with USB to your computer |
| Airgapped Hardware Wallet | For adding your Coldcard or Cobo Vault hardware wallet without connecting it |
| New or Imported Software Wallet | To create a wallet with the private keys in Sparrow, or to import a wallet (like Electrum) |
| xPub / Watch Only Wallet | To create a wallet with an xpub that can see your transactions but not spend them directly |
For this guide we are going to create a Software Wallet. Select the 3rd button, **New or Imported Software Wallet**.
This opens the Keystore screen. Here you can see on the left the first 3 types of keystores from the table above. For Software Wallets, you can choose Mnemonic Words (BIP39) or Electrum import. This guide will create a keystore using BIP39, a common standard which uses a set of words to create a private key or seed. We are going to choose the minimum number of words (12) by clicking on the arrow next to **Enter 24 Words** to open the dropdown:
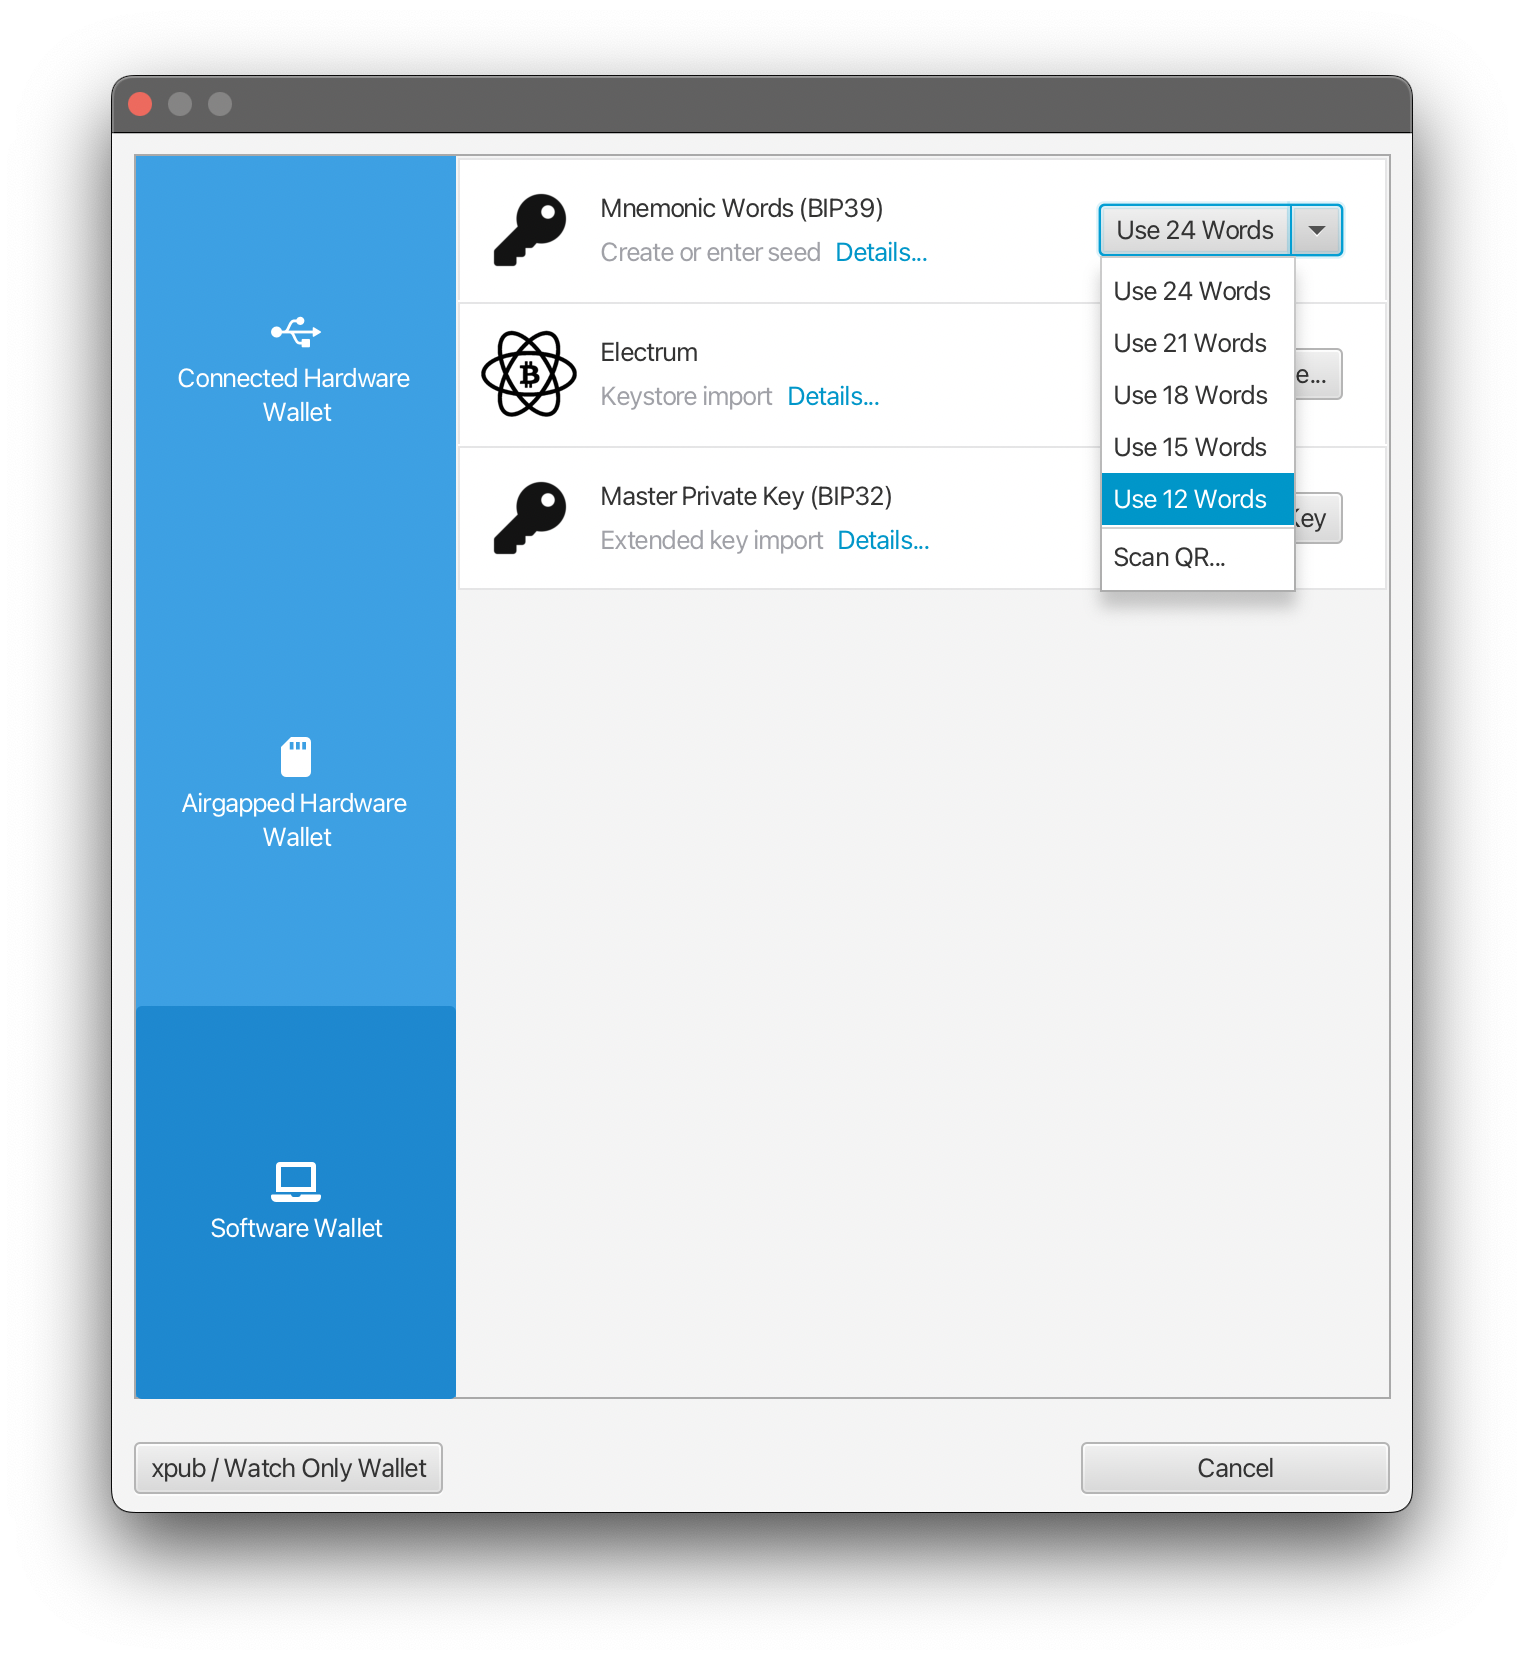
Click **Enter 12 Words**. You will now see 12 text fields which will contain the secret words for our seed. Click the **Generate New** Button to get Sparrow to randomly choose 12 words (note your words must be different!):
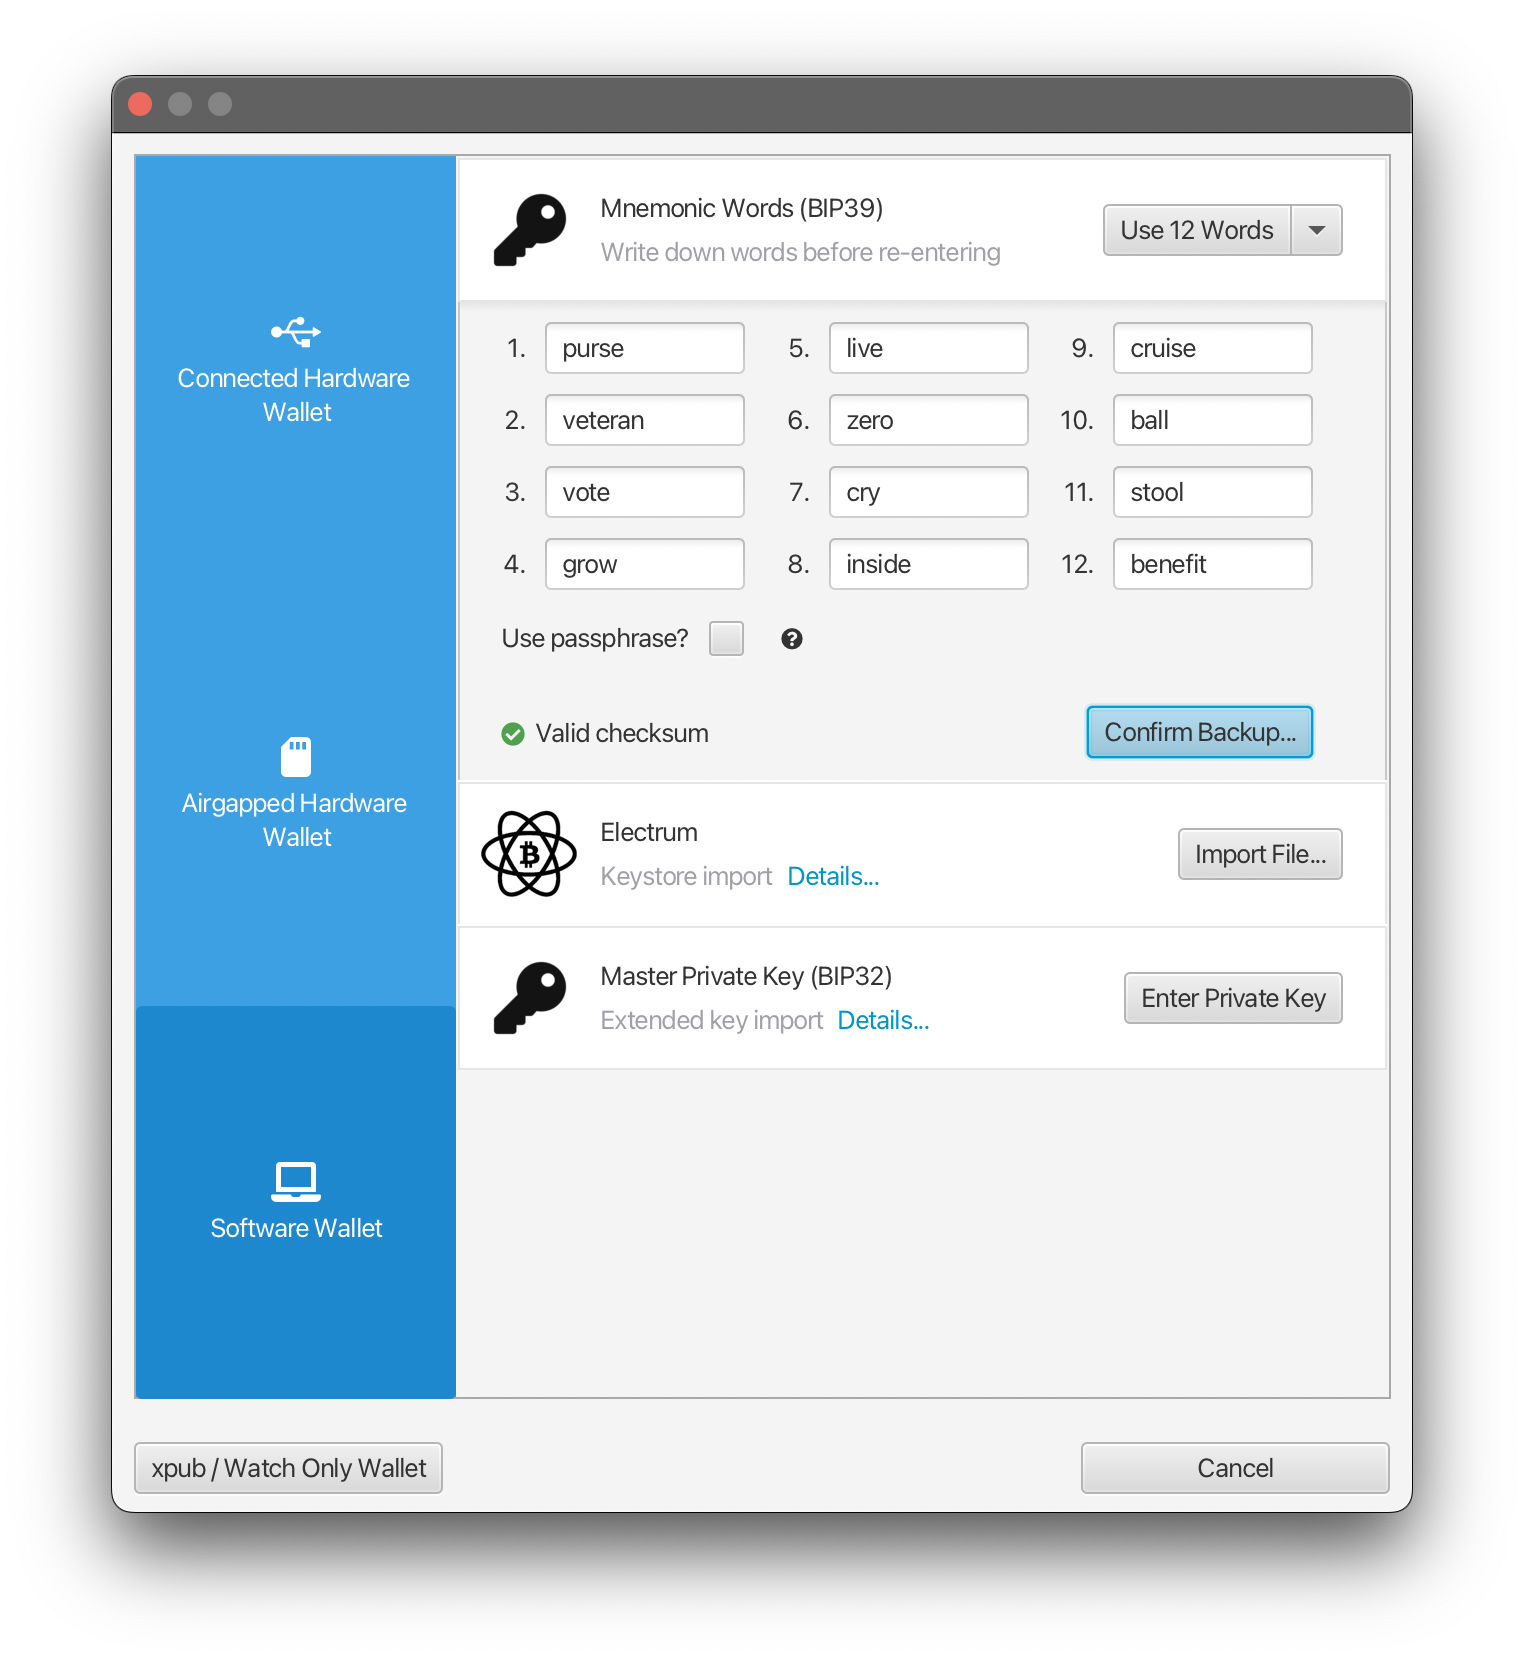
You will now need to write these words down for safekeeping. Sparrow checks that you have done this process correctly by asking you to re-enter the words. Click **Confirm Backup…**, then **Re-enter Words…** and re-enter the 12 words in order. If your words are correct, Sparrow will indicate this by displaying message with ‘Valid checksum’. Now click **Create Keystore** to create your seed.
Sparrow will then give you the opportunity to check your derivation path. We don’t need to make a change here, so click **Import Keystore**:
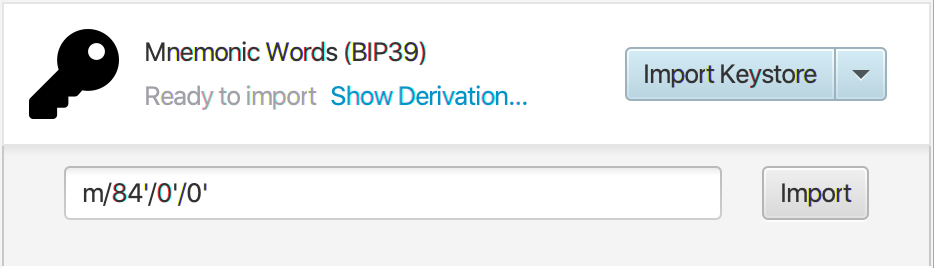
Sparrow will use your seed to calculate the xpub for the derivation path specified, and display it on the Settings screen:
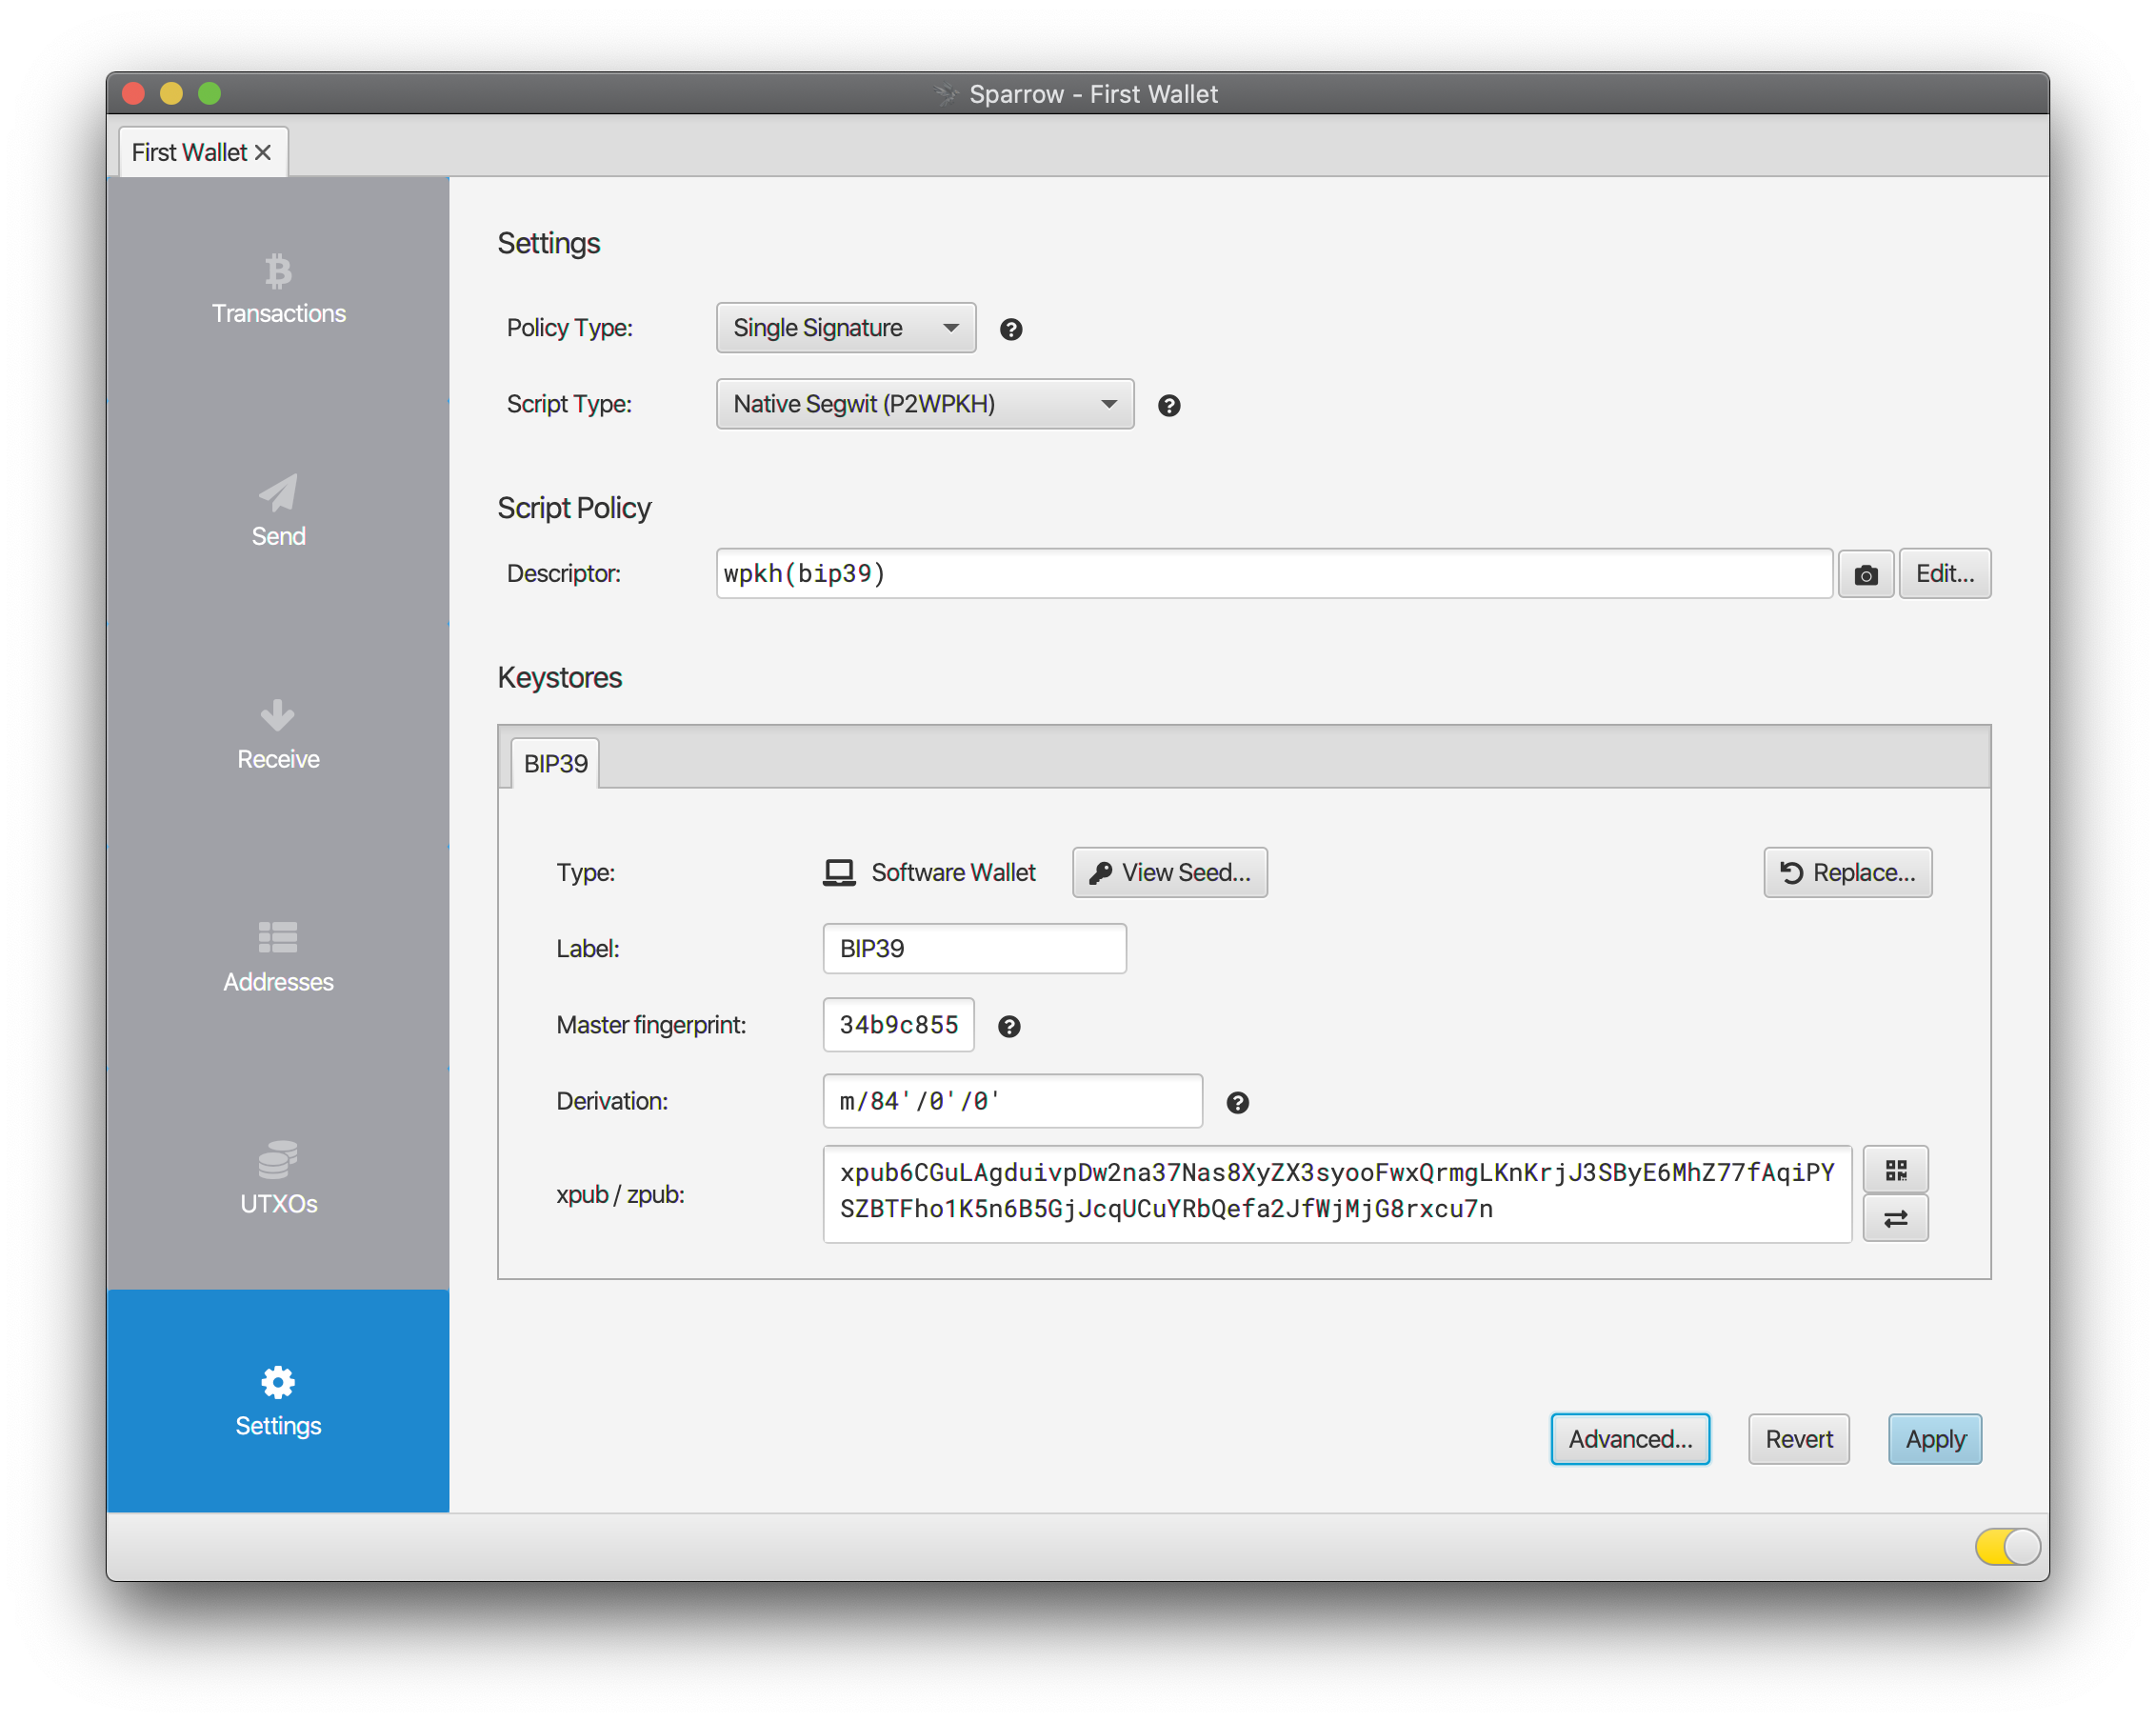
Each keystore has the following fields:
| Field | Available Values |
| --- | --- |
| Label | The name of the keystore (to identify when signing) |
| Master fingerprint | This identifies the master private key of the keystore, and is the same no matter what the derivation path is |
| Derivation | The derivation path for the xpub, which is usually different for each script type |
| xpub | The public key at the given derivation. Note that some script types have aliases for the xpub which identify the script type as well (ypub, zpub etc). These are synonymous and Sparrow lets you switch between them using the  button on the right. |
Because we have already specified all these details when creating our seed, we don’t need to make any changes here. The wallet is now complete!
Click **Apply** button to save the wallet and choose a password to secure it. The grey tabs on the left will become blue, indicating we have a valid wallet. You can click on the Addresses tab to see the addresses for this wallet, or click on the Receive tab to get an address to receive funds to. On the Receive tab, click the **Get Next Address** to get your first address:
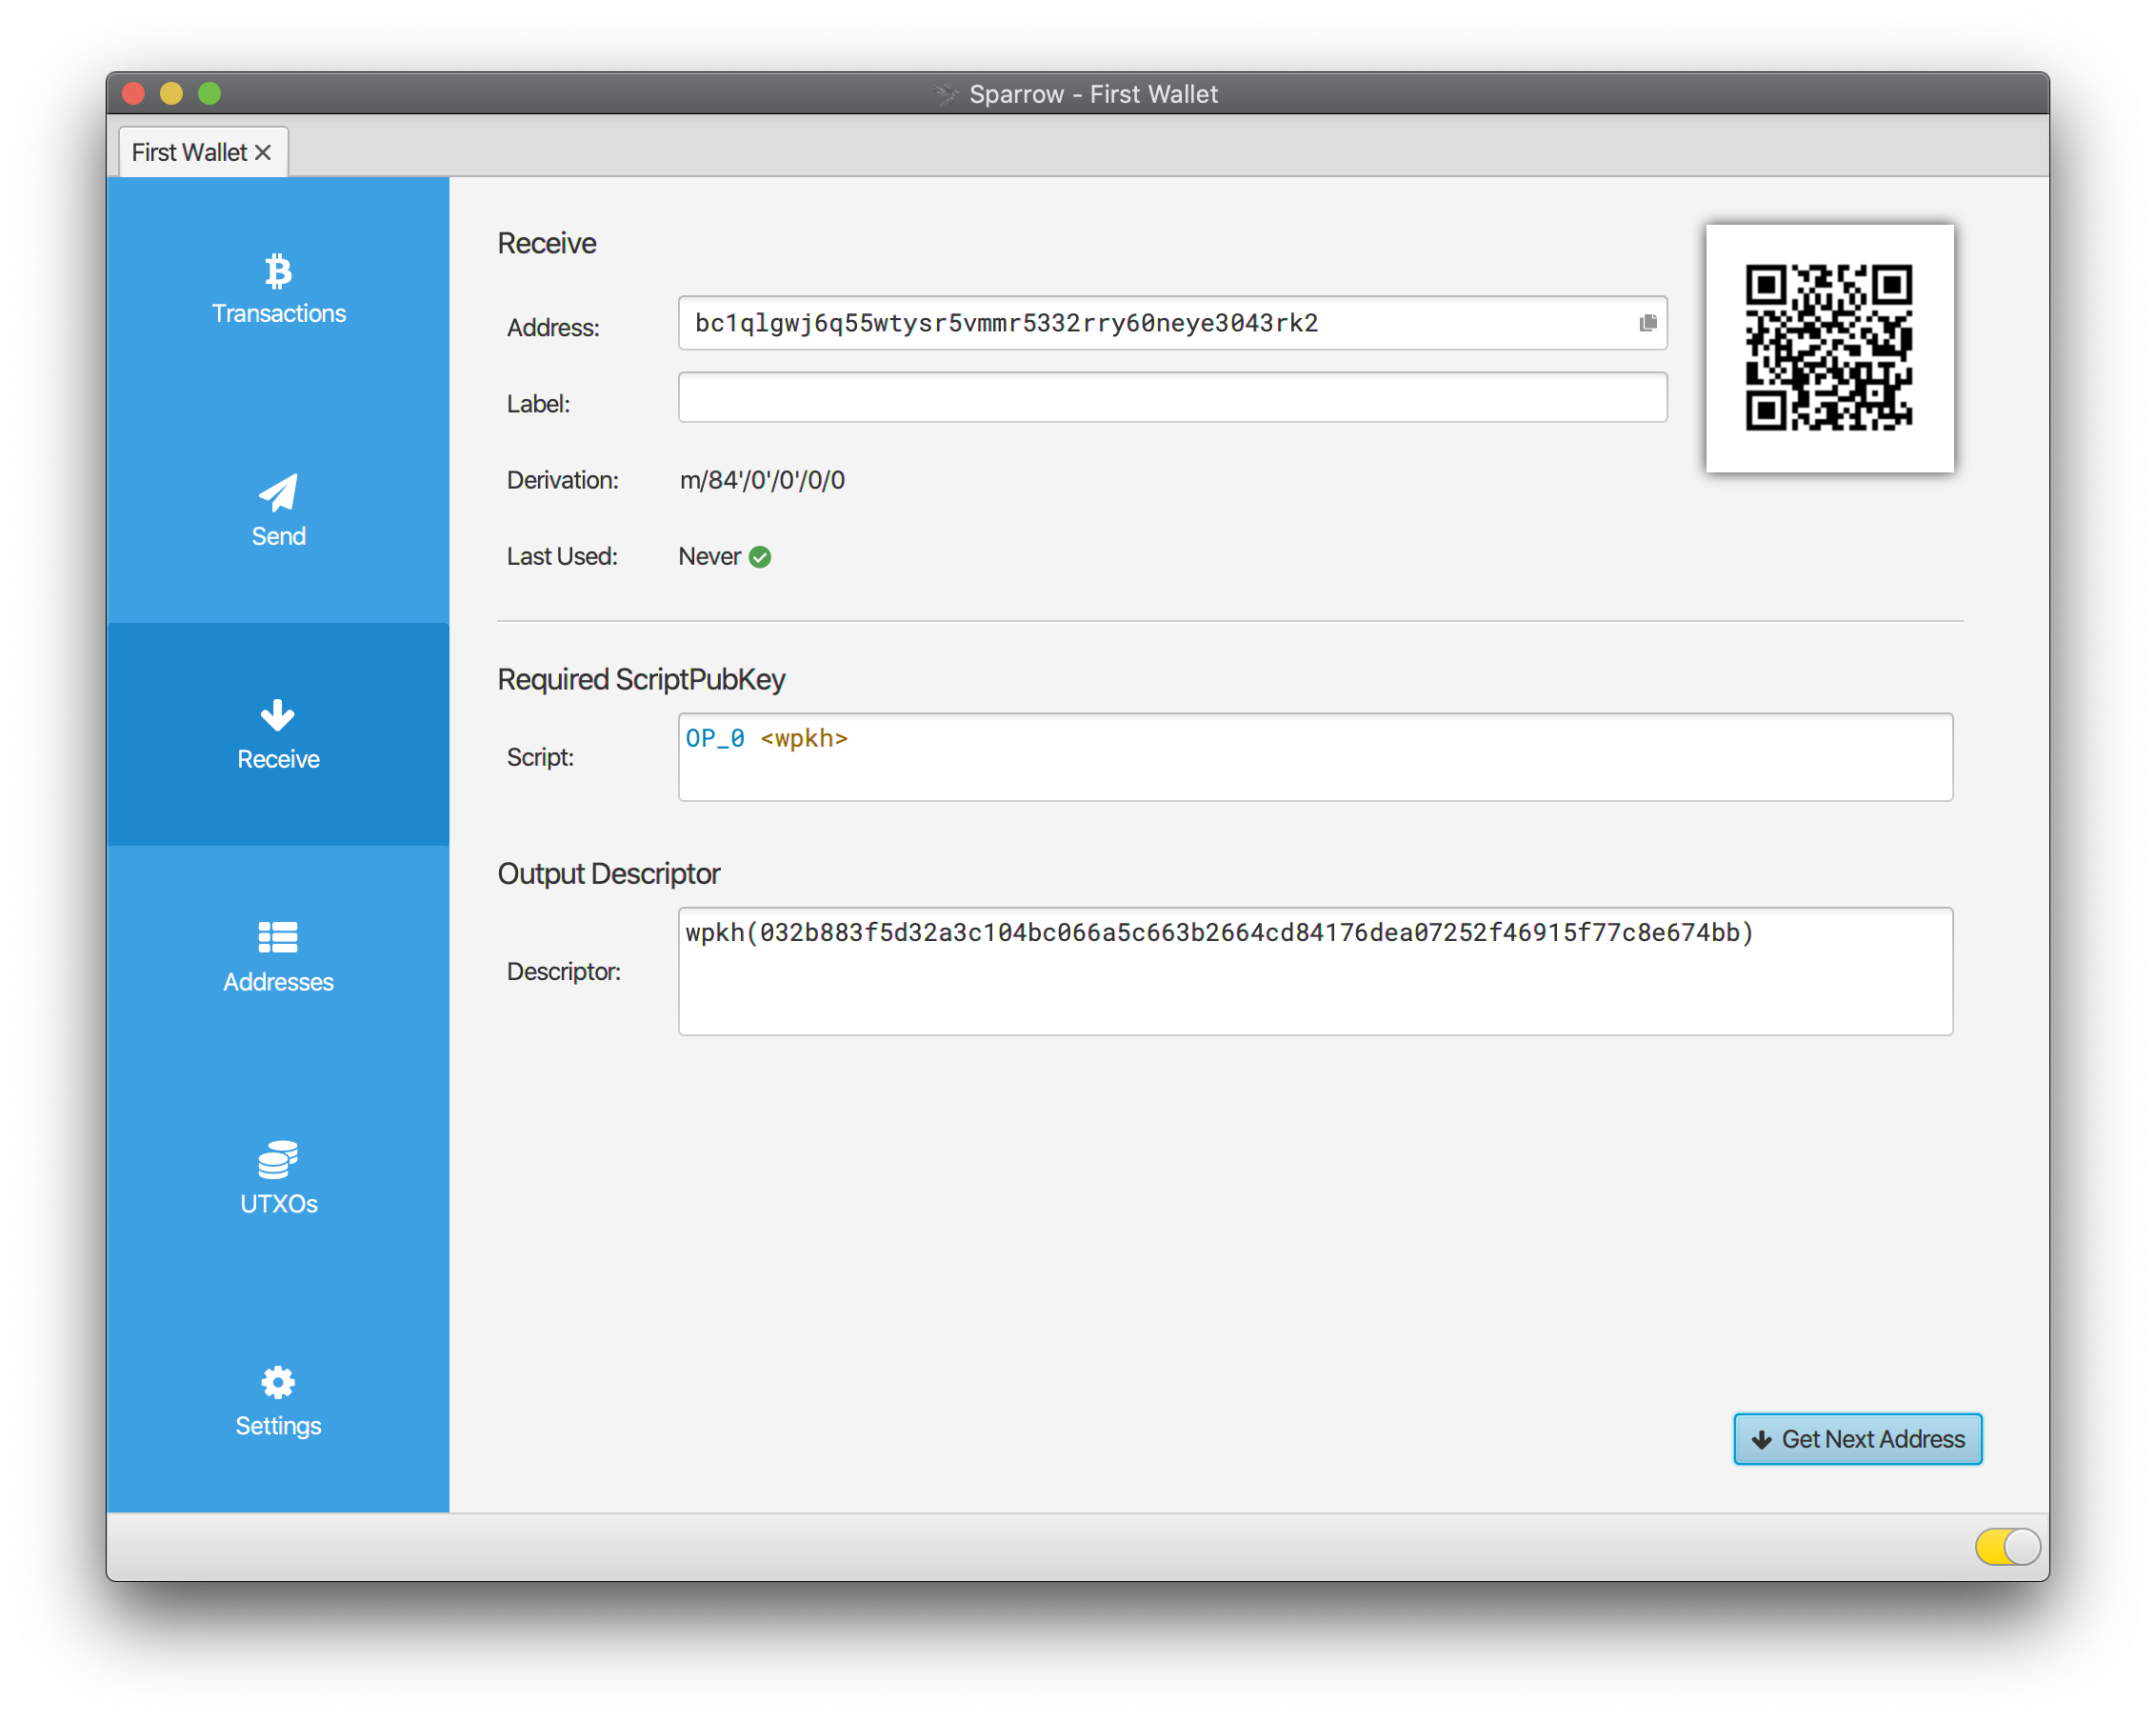
Once you have sent funds to this address, it will appear in the Transactions tab.
The Quick Start Guide concludes here, but has only scratched the surface of Sparrow’s capabilities. You can create multisig wallets, add hardware wallets, create and edit transactions, and manage your UTXOs - go explore!
---
# Spending Privately - Sparrow Wallet
### [Prerequistes](https://sparrowwallet.com/docs/spending-privately.html#prerequistes)
[Permalink](https://sparrowwallet.com/docs/spending-privately.html#prerequistes "Permalink")
This guide explains how to send Bitcoin in a relatively private manner. If you haven’t read the [Quick Start](https://sparrowwallet.com/docs/quick-start.html)
guide yet, that’s a good place to learn how to install and get introduced to Sparrow.
### [Why is this necessary?](https://sparrowwallet.com/docs/spending-privately.html#why-is-this-necessary)
[Permalink](https://sparrowwallet.com/docs/spending-privately.html#why-is-this-necessary "Permalink")
Key to understanding the need for privacy tools is first understanding the Bitcoin UTXO model.
Every amount in Bitcoin consists of a transaction output - that is, the output of a transaction which sends an amount to a given address. Every transaction output, or TXO has a specific, discrete amount. Before an amount is spent, it is called an unspent transaction output, or UTXO.
When you create a Bitcoin transaction, you combine one or more UTXOs as inputs, providing the funds you are looking to spend. When the transaction is broadcast and mined in a block, all of these UTXOs become spent. In other words, they are not reduced in value, but completely consumed, and can never be spent again.
When the new output of your transaction does not match the input amount (less fees), a change output is created. This change output sends funds back to your wallet, which are then available as another UTXO.
Because the Bitcoin blockchain is public, this model has several privacy implications:
1. The recipient of any transaction (and any outside observers who learn their address) can determine some information about the amount of funds you hold by looking at the input UTXOs you spent.
2. If your transaction has a change UTXO, the same observers can see when that change (and its change) gets spent, and so learn more about your spending history as you transact over time.
3. All input UTXOs in a transaction are generally assumed to be from the same owner, linking them together in a “cluster” to an outside observer (we’ll see how to break this assumption later).
Blockchain analysis uses a number of generally applicable rules or heuristics to separate payment amounts from change amounts. The primary goal of this lies in learning when ownership changes in order to understand more about your funds and how you use them. While these heuristics depend on probabilities, they can be very effective. Without privacy tools, once your identity is linked to one UTXO much about your wealth and transaction history can be determined with relatively high probability over time.
Privacy tools seek to disrupt these heuristics. Some, like the fake two person coinjoins discussed here, create transactions which introduce confusion (or entropy) in the transaction graph. Others, like payjoin, break some of the assumptions that common heuristics depend on. Used together, it is possible to remain relatively private when transacting with Bitcoin.
### [Fake two person coinjoin](https://sparrowwallet.com/docs/spending-privately.html#fake-two-person-coinjoin)
[Permalink](https://sparrowwallet.com/docs/spending-privately.html#fake-two-person-coinjoin "Permalink")
A common approach for spending privately is to create an equal output coinjoin while spending.
An equal output coinjoin is a technique where individuals contribute inputs to construct a specific transaction containing a number of equal output amounts. This adds ambiguity about which of the output amounts went to which wallets or entities, and makes the probability of tracing ownership of funds much lower. In the case of a two person coinjoin with two equal outputs, either output could represent the funds of one of the individuals. In addition, a coinjoin output might or might not represent an external payment, since it is common to send the output amount back to a wallet you own. For example, you might do this to consolidate or break up UTXOs you own.
The simplest way to add privacy when spending is to create a fake coinjoin (also known as a Stonewall transaction). This is a transaction you create alone, but that appears to be potentially constructed by multiple individuals. To the outside observer, there is no way to determine whether the coinjoin is fake or not - it is ambiguous. This approach requires no collaboration, and can be done with any kind of wallet (including hardware wallets).
To create a coinjoin with yourself, create a transaction as normal on the Send tab and select to optimize for **Privacy** using the toggle button in the lower left. If the wallet has sufficient funds available, Sparrow will construct the coinjoin as follows:
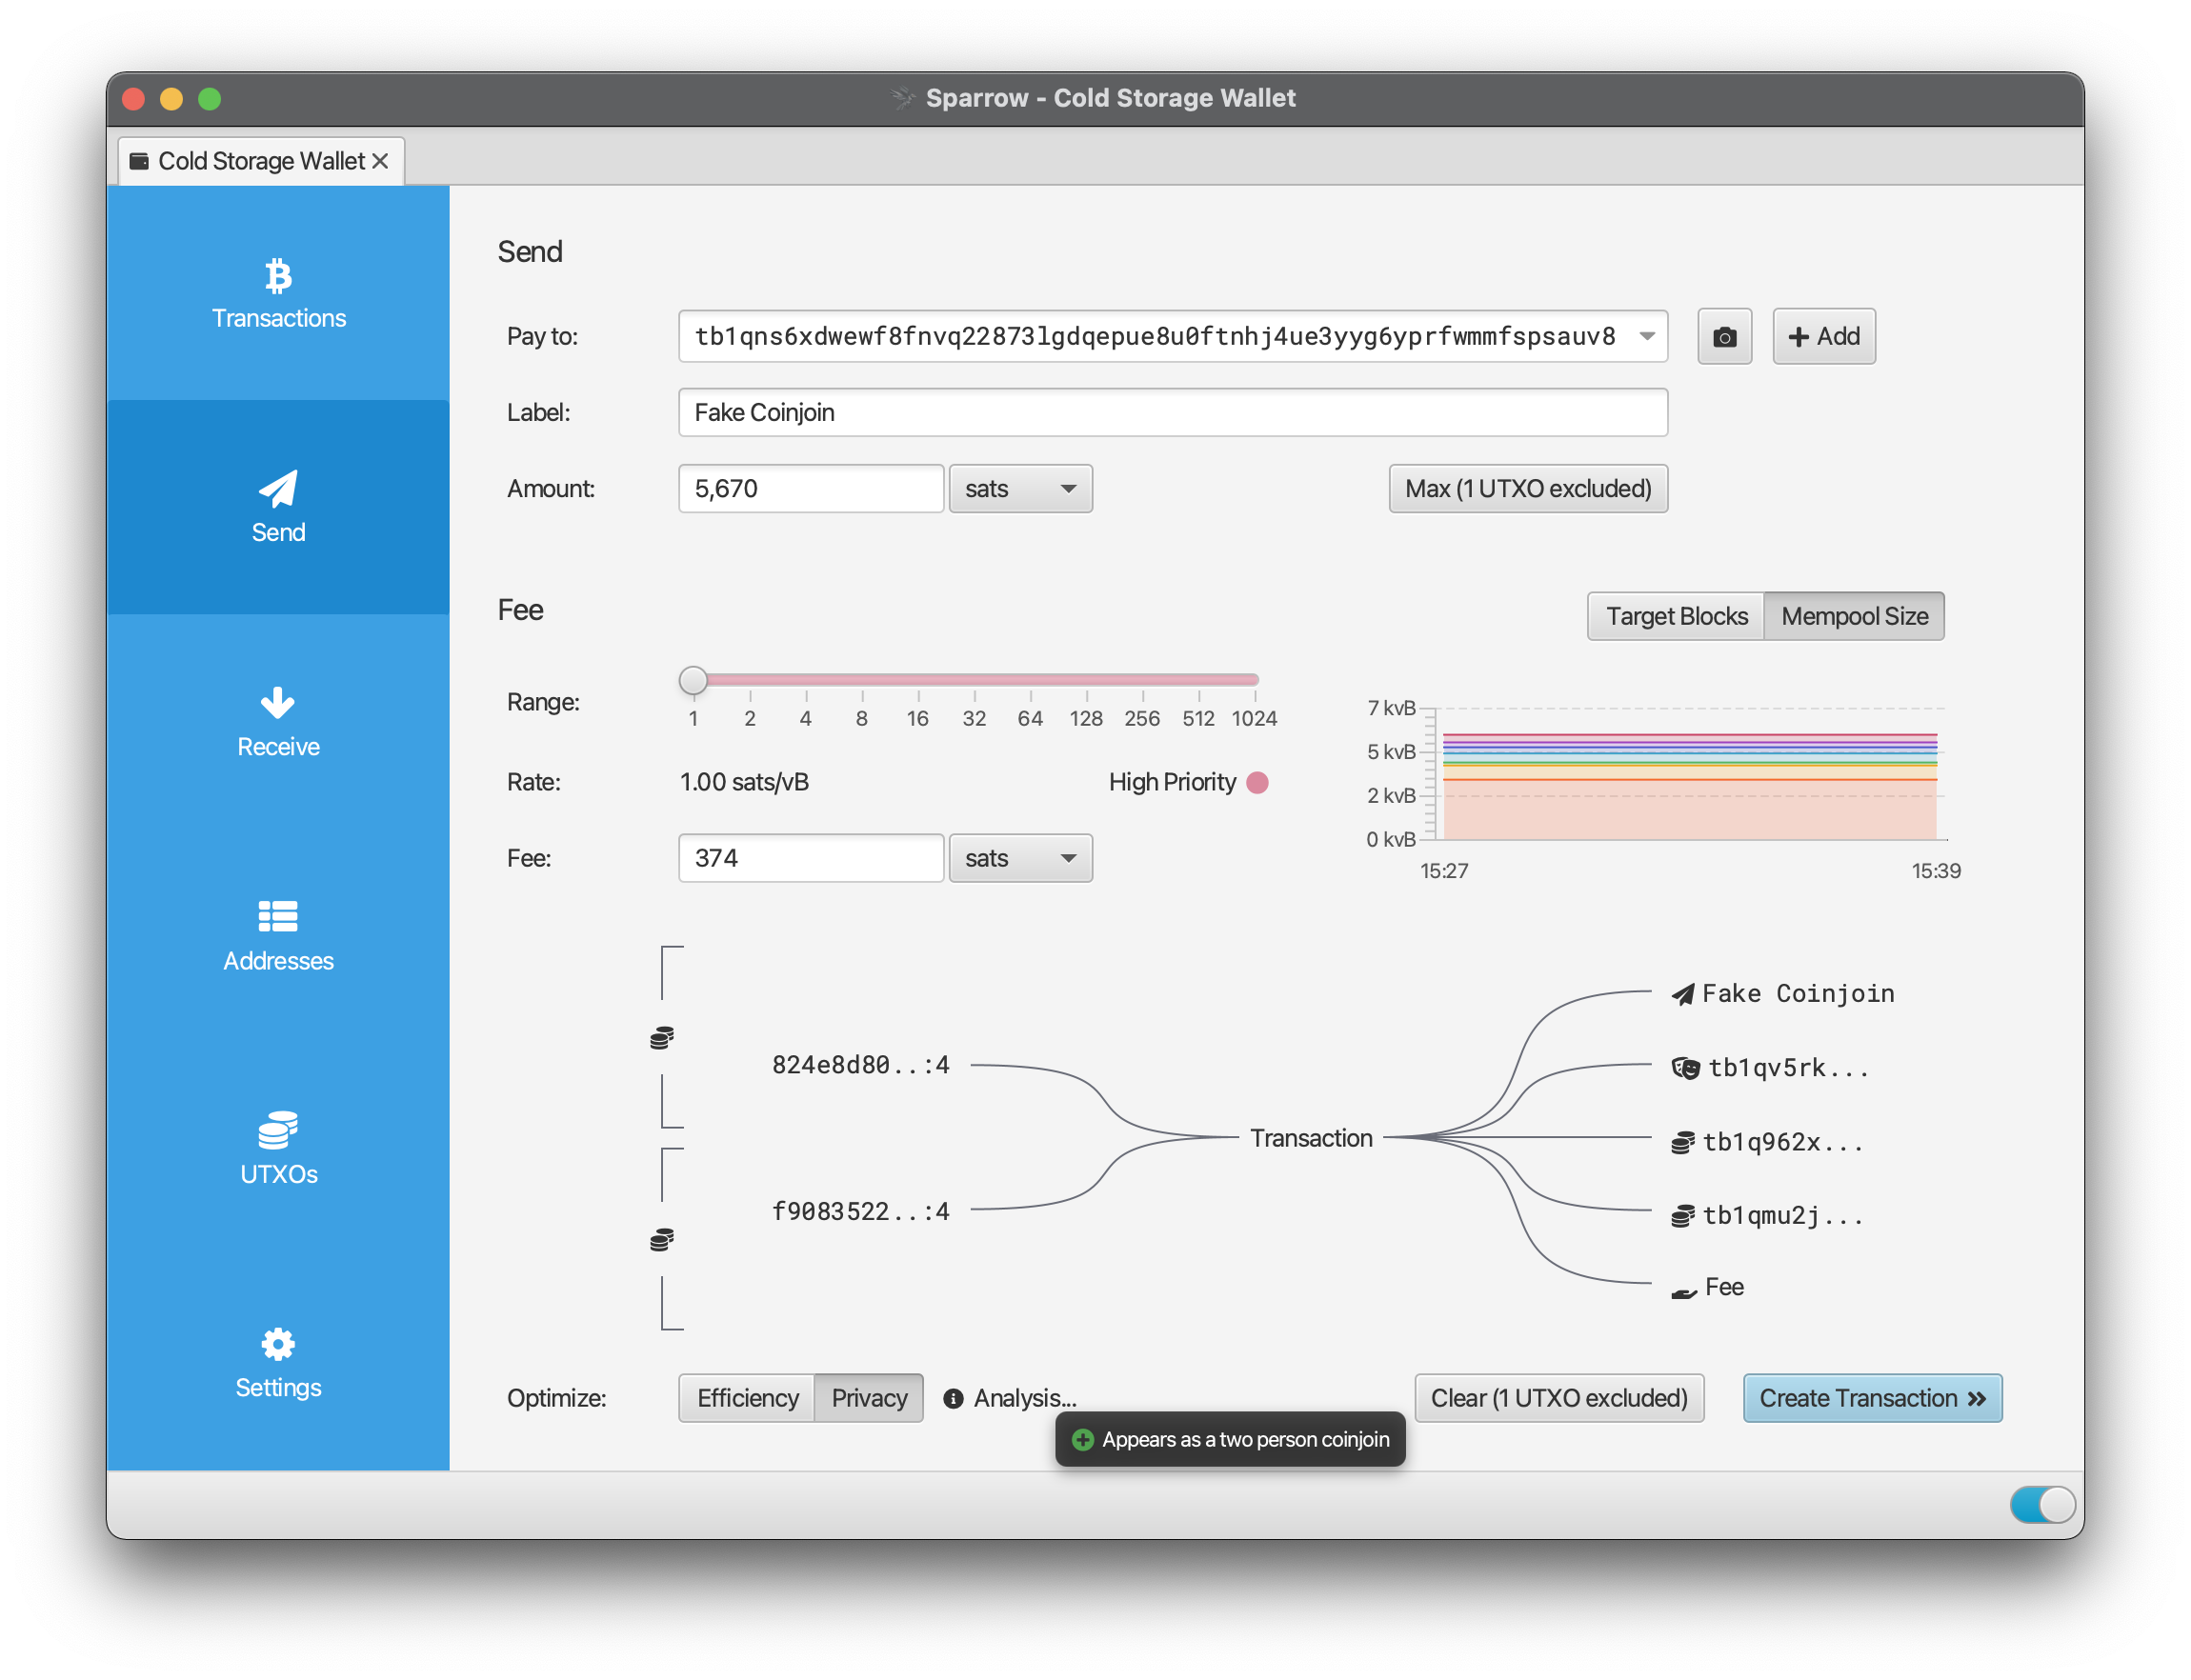
Note that there are two sets of inputs (indicated by the brackets on the left in the transaction diagram), representing each “individual” in the coinjoin. Each “individual” must contribute more than the payment amount, meaning your wallet must have funds greater than twice the payment you are making. If your wallet doesn’t have enough funds, you can still perform a collaborative coinjoin discussed below.
Of the outputs, the first output represents the payment to the address in the **Pay to** field. The second output is a “decoy” of the same amount (5,670 sats) and is paid to one of the change addresses in this wallet. Then there are two change outputs, representing change to each of the “individuals” - both of these are also sent back to this wallet as change.
As the **Analysis…** tooltip indicates, to the outside observer this appears to be a possible two person coinjoin. However, it is actually a transaction where all inputs are owned by the same wallet. You can now create, sign and broadcast this transaction as normal, having gained additional privacy at the cost of a slightly higher fee due to the additional inputs and outputs.
Note that to create this kind of coinjoin in Sparrow, the address you are paying to needs to be of the same type as your wallet (so the outputs look the same).
### [PayNym? Payment code?](https://sparrowwallet.com/docs/spending-privately.html#paynym-payment-code)
[Permalink](https://sparrowwallet.com/docs/spending-privately.html#paynym-payment-code "Permalink")
In the previous example, the address we sent to was provided by the recipient. But what if we want to pay someone non-interactively (that is, without asking them for a fresh address every time)? For that to work in a private manner, we need to get a unique identifier for the recipient we can use to create fresh addresses. Each wallet can create this identifier deterministically, called a payment code. It’s similar to an xpub, except that no information about a wallet can be learned from it. In this sense, it is safe to share.
The payment code is however quite long, making it more difficult to share in person. Fortunately, there is a directory of payment codes at [https://PayNym.is](http://paynym.is/)
. Every payment code that is added to the directory is run through an algorithm that gives it a short, friendly name, such as `+roundgrass881`. This name is known as a PayNym. Every one is unique, and each has an associated “robot” profile picture to make them more memorable. In addition, each PayNym has a list of contacts. Much like the contacts on your phone, these contacts represent other PayNyms you collaborate with regularly. That said, use of PayNyms is opt-in via an application wide setting in the config file, and you can use all of the techniques described here with payment codes alone.
### [Paying to a PayNym](https://sparrowwallet.com/docs/spending-privately.html#paying-to-paynym)
[Permalink](https://sparrowwallet.com/docs/spending-privately.html#paying-to-a-paynym "Permalink")
It is possible to send a payment directly to a PayNym, which sends it directly to a private address known only to you and the recipient.
To perform this kind of payment, click the down arrow to the right of the **Pay To** field in the Send tab and select **PayNym…**.
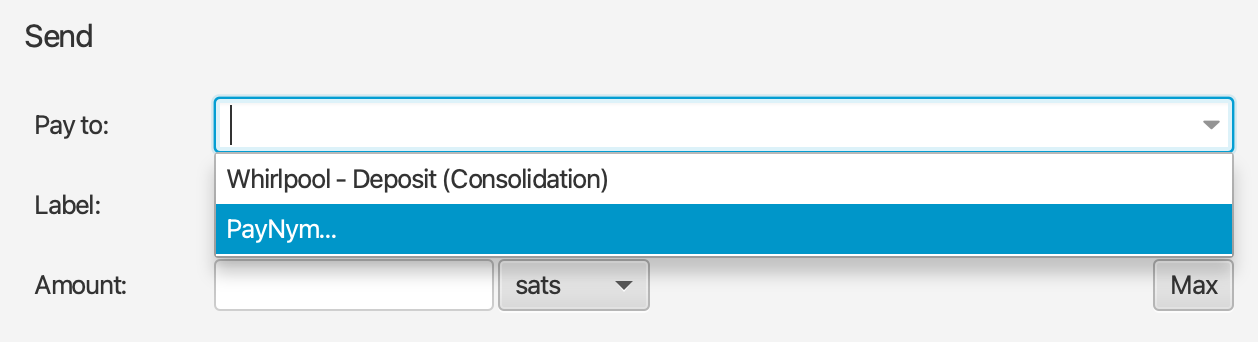
You will see a dialog showing the PayNym of this wallet (click **Retrieve PayNym** if necessary).
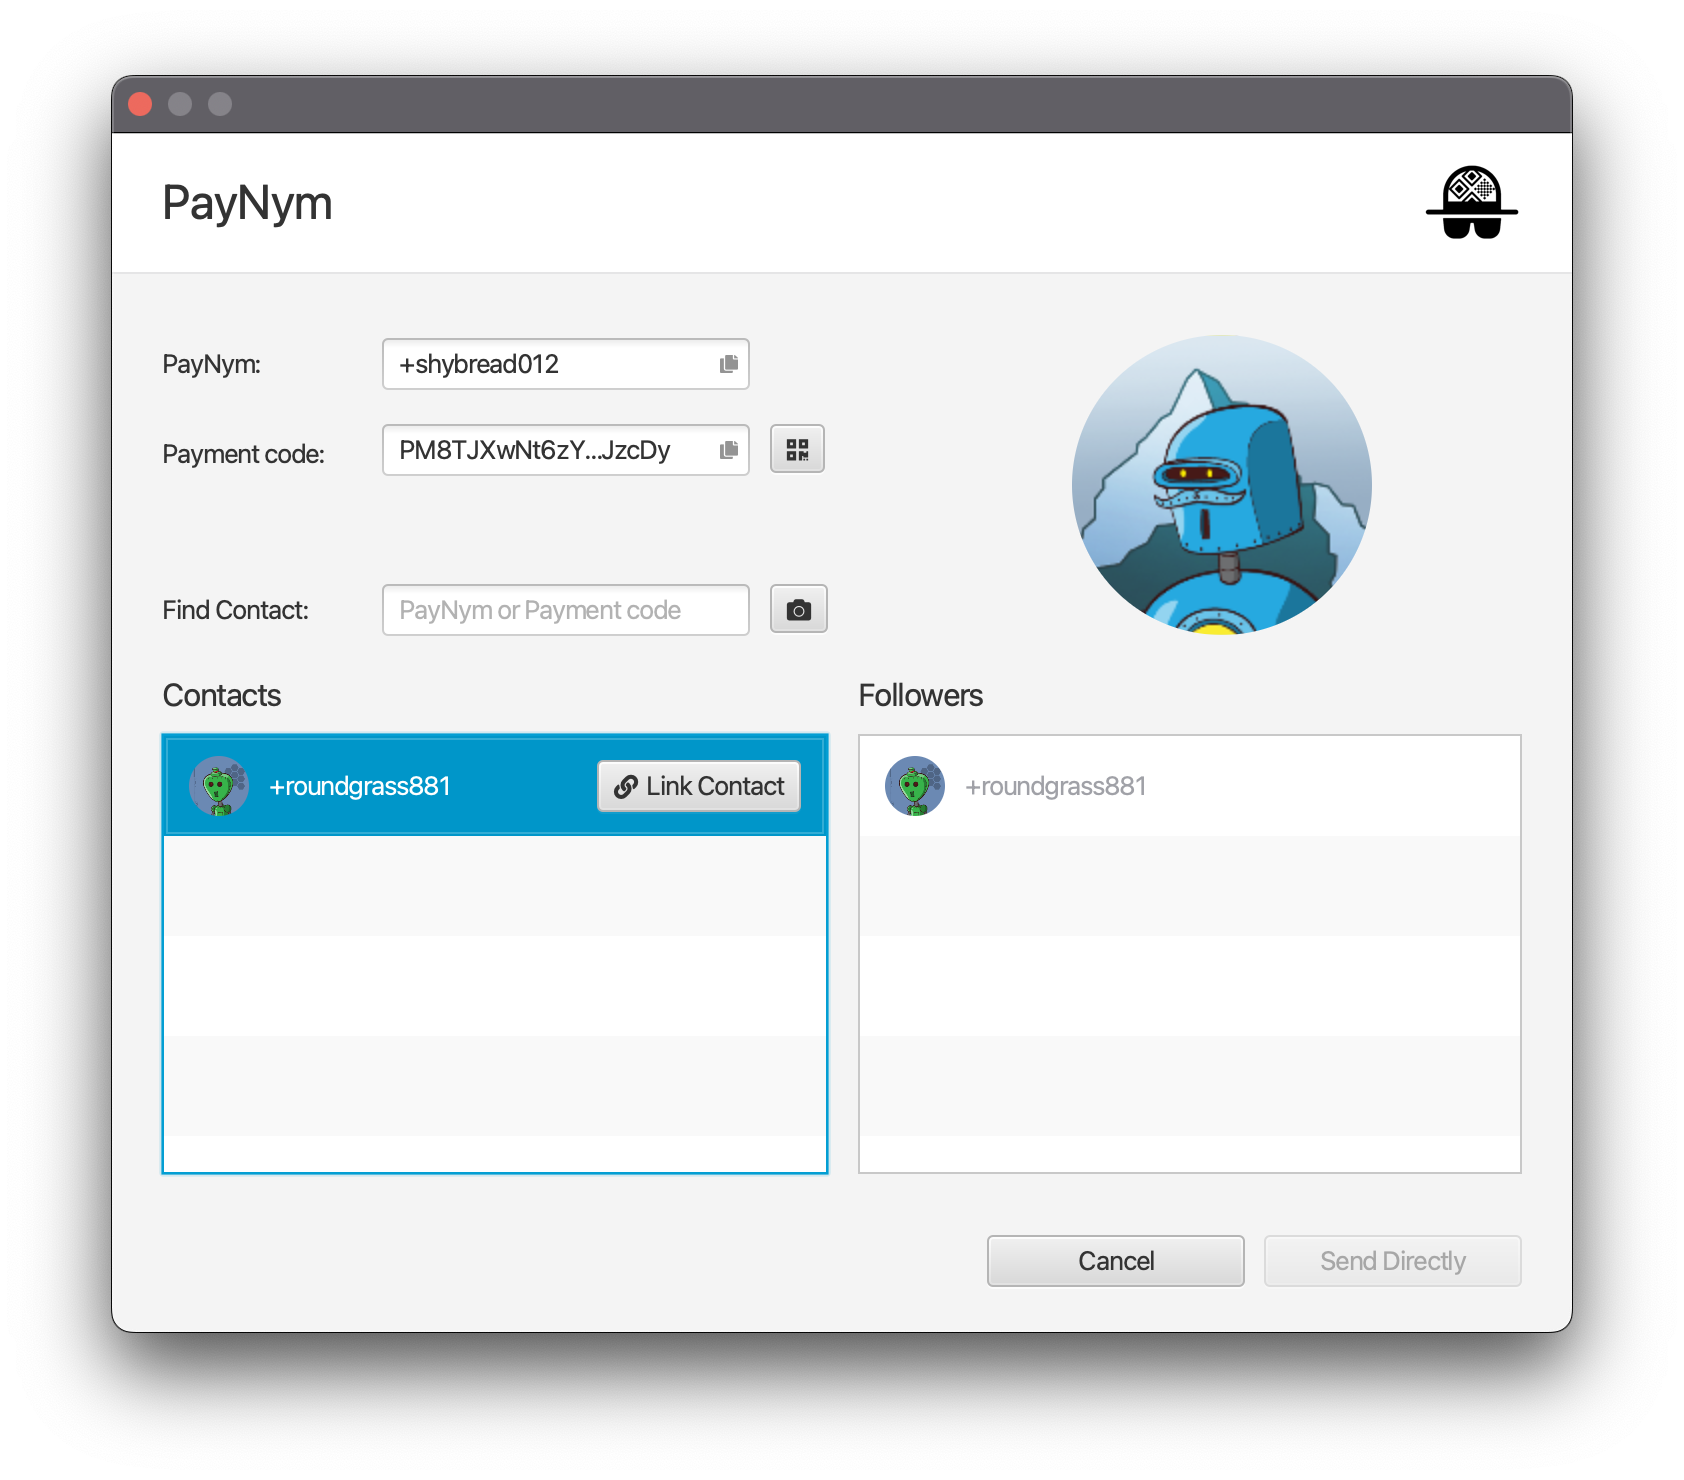
You will now need to find the PayNym of the wallet you are paying to in the list of Contacts. If you need to add the PayNym to your list of contacts, enter it in the Find Contact field and click **Add Contact** when it appears.
To send to the PayNym, you will need to click the **Link Contact** button that appears after you have added the contact. Linking a contact requires sending a notification transaction to an address being watched by the PayNym wallet you are sending to. This will cost 546 sats, plus the mining fee.
Note: It is also possible to send directly to a payment code by pasting it into the Pay to field. Sending directly to a PayNym is not currently supported with a Taproot (P2TR) wallet.
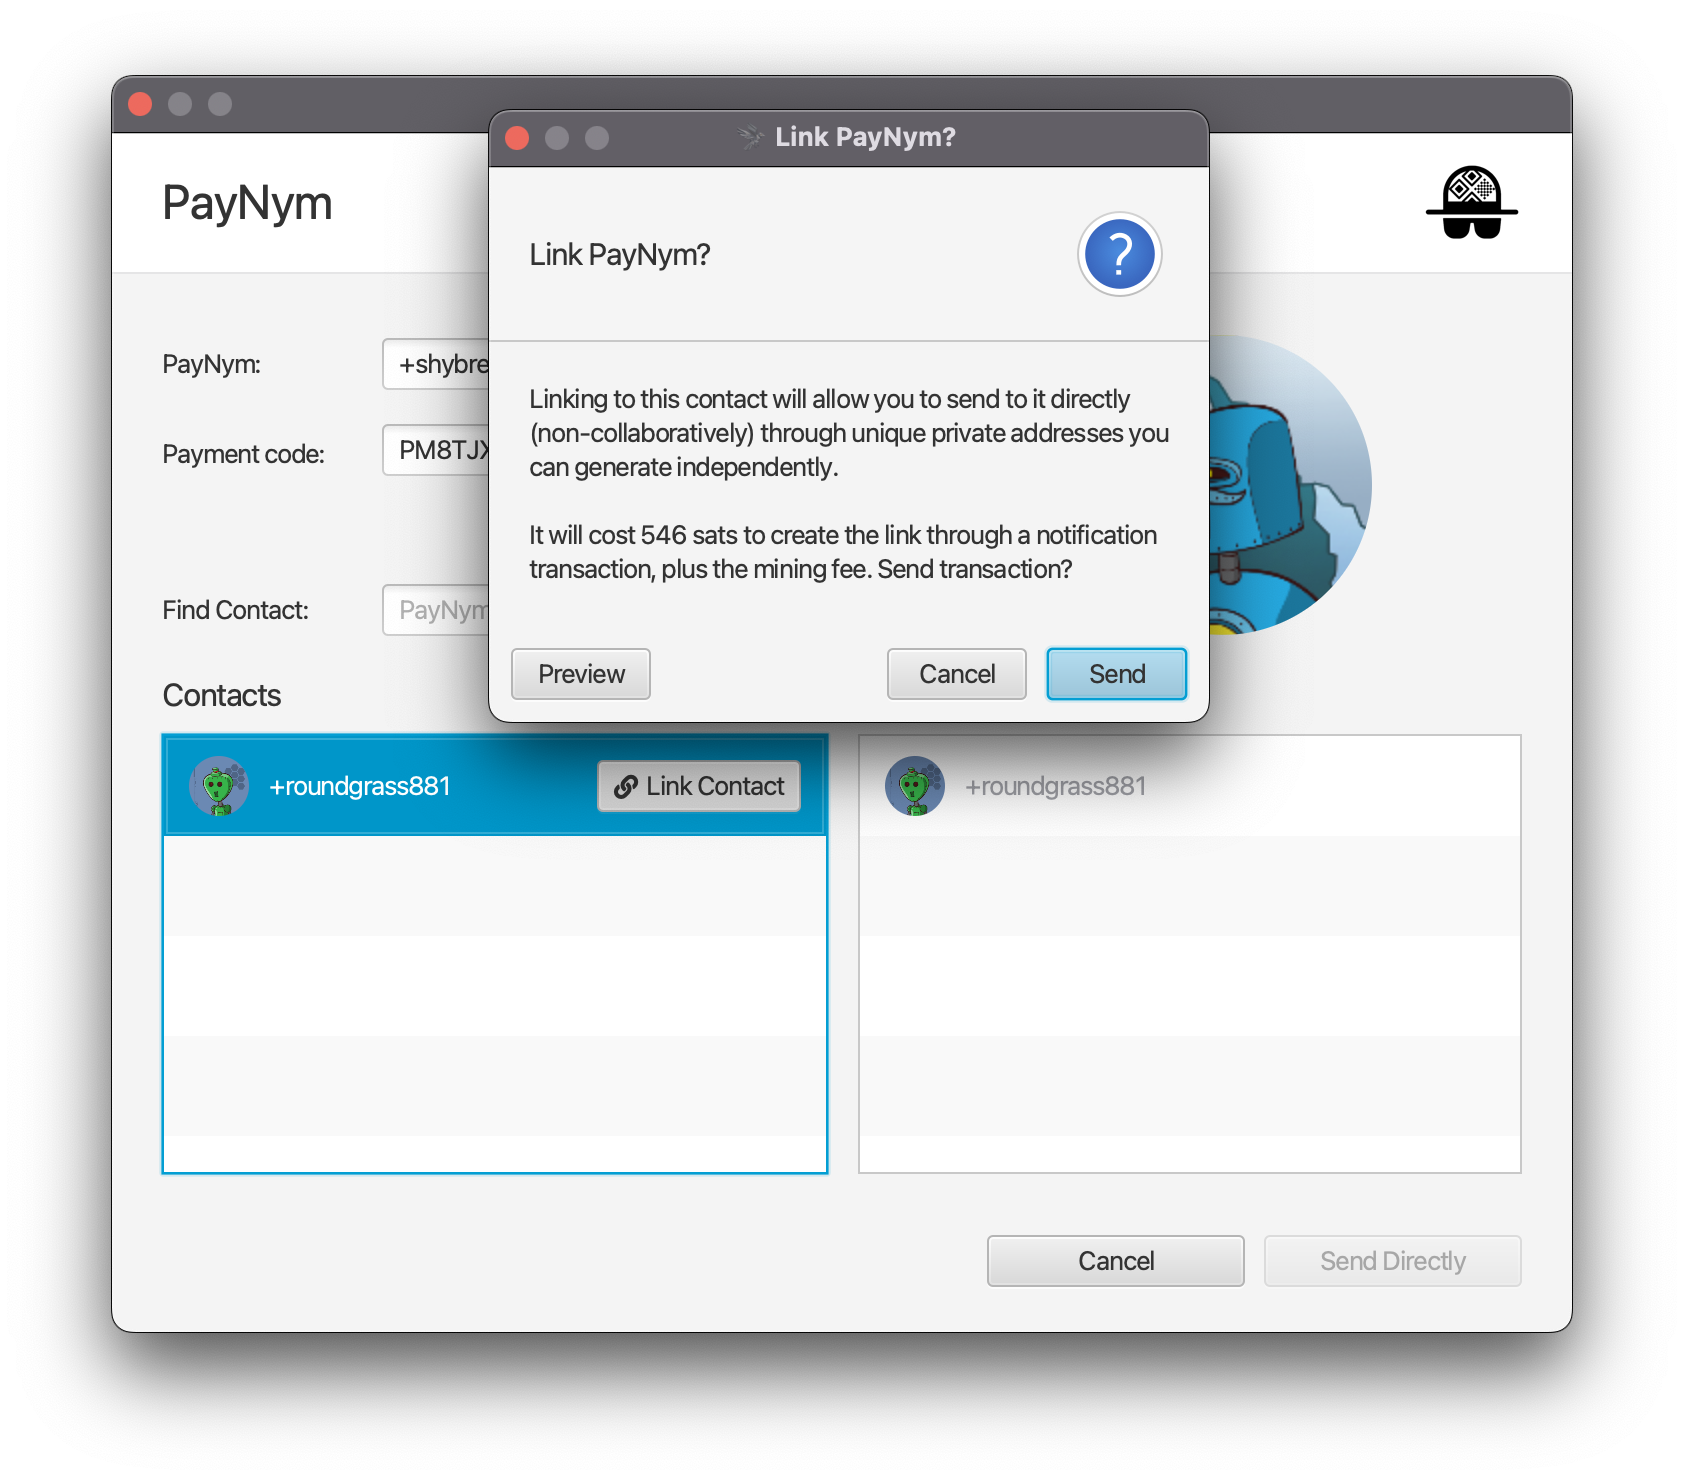
Once this has been done, a set of unique send and receive addresses are created both in Sparrow and the PayNym wallet, allowing you to send to the PayNym independently and privately. The notification transaction only needs to be sent once, and if the PayNym chooses to add you as a contact they will already be linked and can send to you immediately in the same way. This link is stored on the blockchain and any funds sent to these addresses are automatically found using only the wallet seed should you need to restore from backup. Amounts sent to you using this feature will appear in the first (master) wallet should you have multiple accounts configured.
Click **Send To Contact** to send directly to linked PayNyms. The dialog will close and the Pay to field will indicate you are paying to a PayNym. You can enter the Label and Amount as normal.
If you have linked the PayNym and are sending directly, you can proceed to **Create Transaction** as normal. Sparrow will automatically use one of the private send addresses known only to you and the PayNym you are paying to.
### [Conclusion](https://sparrowwallet.com/docs/spending-privately.html#conclusion)
[Permalink](https://sparrowwallet.com/docs/spending-privately.html#conclusion "Permalink")
Using these tools, it is possible to remain relatively private while transacting. Linking and paying directly to a PayNym is a powerful feature particularly useful to send and receive payments independently and without the use of a server to offer fresh addresses. Consider using these techniques for every transaction you send. It is never too late to start.
---
# Frequently Asked Questions - Sparrow Wallet
### [Where does Sparrow store data?](https://sparrowwallet.com/docs/faq.html#where-does-sparrow-store-data)
[Permalink](https://sparrowwallet.com/docs/faq.html#where-does-sparrow-store-data "Permalink")
Sparrow’s home folder is different depending on the operating system:
| Platform | Location |
| --- | --- |
| macOS | ~/.sparrow |
| Linux | ~/.sparrow |
| Windows | %APPDATA%/Sparrow |
On Windows, the %APPDATA% folder can be found by opening File Explorer/Windows Explorer, typing %APPDATA% into the address bar, pressing enter. The Sparrow folder will be in the Roaming or Local subfolder.
You can change the home folder using the `-d` command line flag (see the following FAQ for details). This is useful to store wallets in separate locations, or have a different application configuration for different sets of wallets.
### [How can I run testnet?](https://sparrowwallet.com/docs/faq.html#how-can-i-run-testnet)
[Permalink](https://sparrowwallet.com/docs/faq.html#how-can-i-run-testnet "Permalink")
Testnet is a copy of the Bitcoin network where coins have no value. It is ideal for testing wallets and transactions, and it’s use is highly recommended. The simplest way to start Sparrow using testnet is via the Tools > Restart in Testnet menu command. This will close Sparrow, and restart it with a separate testnet configuration in the `testnet` folder in Sparrow home.
It’s also possible to run Sparrow from the command line (or set up an equivalent shortcut). Sparrow has a number of command line options, for example to change its home folder or use testnet:
Usage: Sparrow [options]
Options:
--dir, -d
Path to Sparrow home folder
--help, -h
Show usage
--level, -l
Set log level
Possible Values: [ERROR, WARN, INFO, DEBUG, TRACE]
--network, -n
Network to use
Possible Values: [mainnet, testnet, regtest, signet]
--terminal, -t
Terminal mode
Default: false
--version, -v
Show version
Default: false
For example:
macOS:
> open /Applications/Sparrow.app --args -n testnet
Linux:
> Sparrow/bin/Sparrow -n testnet
Windows:
> Sparrow.exe -n testnet
As a fallback, the network (mainnet, testnet, regtest or signet) can also be set using an environment variable `SPARROW_NETWORK`. For example:
> export SPARROW_NETWORK=testnet
A final fallback which can be useful when running the Sparrow binary is to create a file called `network-testnet` in the Sparrow home folder (see below) to configure the testnet network.
Note that if you are connecting to an Electrum server when using testnet, that server will need to be running on testnet configuration as well.
When not explicitly configured using the command line argument above, Sparrow stores its mainnet config file, log file and wallets in a home folder location appropriate to the operating system.
Testnet, regtest and signet configurations (along with their wallets) are stored in subfolders of Sparrow’s home folder to allow easy switching between networks.
Once Sparrow is running in testnet, you will need to connect it to server or node that is also configured for testnet. A public testnet server is configurable from the Server Settings tab.
Finally, you can receive free testnet bitcoin from a Bitcoin Testnet Faucet like [https://testnet-faucet.mempool.co/](https://testnet-faucet.mempool.co/)
.
### [How can I choose where my wallet is saved?](https://sparrowwallet.com/docs/faq.html#how-can-i-choose-where-wallet-is-saved)
[Permalink](https://sparrowwallet.com/docs/faq.html#how-can-i-choose-where-my-wallet-is-saved "Permalink")
See the section above. You need to run Sparrow with the `-d` command line flag. Setting this will cause Sparrow to store its configuration and any wallets at the given location. For example on Windows:
> Sparrow.exe -d D:\sparrow
This feature allows you to store all Sparrow data on removable media making for more plausible deniability.
### [All my addresses have changed!](https://sparrowwallet.com/docs/faq.html#all-my-addresses-have-changed)
[Permalink](https://sparrowwallet.com/docs/faq.html#all-my-addresses-have-changed "Permalink")
This is almost certainly due to an incorrect passphrase. Following the BIP39 specification, Sparrow stores nothing in your wallet file that is derived from your passphrase. This makes a passphrase enabled wallet more difficult to brute force. It also means that if you enter an incorrect passphrase, Sparrow will be using a different seed and will therefore derive different addresses. Your existing address labels will even be applied to the new addresses, since Sparrow has no way of telling the passphrase has changed. Further, your wallet will show no funds are present. They are not lost however.
To fix this, close the wallet and reopen it, entering the passphrase carefully. If you can’t remember your passphrase, take your time and try different options systematically.
### [I’ve restored my wallet but some of my funds are missing](https://sparrowwallet.com/docs/faq.html#ive-restored-my-wallet-but-some-of-my-funds-are-missing)
[Permalink](https://sparrowwallet.com/docs/faq.html#ive-restored-my-wallet-but-some-of-my-funds-are-missing "Permalink")
If you have restored your wallet from seed, but are missing newer transactions, it is likely you need to increase the wallet gap limit. This is a setting which controls how far ahead a wallet looks in your sequential address list for new transactions. You can increase it in the Settings tab by clicking Advanced. Increase the gap limit value, Close and then Apply. The default is 20 for normal wallets, and 40 for Postmix wallets. If you have had a lot of connection errors while coinjoining, the gap limit may be need to be increased substantially. Increasing it makes Sparrow look farther ahead in the address list, but don’t increase it too much as your wallet loading will take longer.
### [UTXOs are missing from my Postmix wallet](https://sparrowwallet.com/docs/faq.html#utxos-are-missing-from-my-postmix-wallet)
[Permalink](https://sparrowwallet.com/docs/faq.html#utxos-are-missing-from-my-postmix-wallet "Permalink")
See the [answer](https://sparrowwallet.com/docs/faq.html#ive-restored-my-wallet-but-some-of-my-funds-are-missing)
above.
### [How do I increase the fee on a broadcasted transaction?](https://sparrowwallet.com/docs/faq.html#how-do-i-increase-the-fee-on-a-broadcasted-transaction)
[Permalink](https://sparrowwallet.com/docs/faq.html#how-do-i-increase-the-fee-on-a-broadcasted-transaction "Permalink")
A transaction’s fee can be increased either by replacing it (RBF), or creating a child transaction (CPFP).
To perform Replace by Fee (RBF), the transaction must:
1. Be in the mempool (not yet confirmed)
2. Have all inputs enabled for RBF (this is the default for transactions sent by Sparrow)
3. Have all inputs from your wallet
If all the above is true, then Sparrow will add a hover icon next to the transaction on the Transactions screen which looks like a hand with a cross above it. You can also right click to ‘Increase Fee’, which takes you to the Send screen with the transaction loaded, from where you can increase the fee (Sparrow may add another UTXO if there is insufficient change).
You can also use CPFP by spending the outputs of the transaction at a higher fee rate.
### [Does Sparrow require Tor?](https://sparrowwallet.com/docs/faq.html#does-sparrow-require-tor)
[Permalink](https://sparrowwallet.com/docs/faq.html#does-sparrow-require-tor "Permalink")
While Sparrow does not require Tor (which can be unreliable), it is used for all external connections when either of the following are true:
1. An external Tor proxy is configured (see the following FAQ)
2. A `.onion` server address is configured
In the latter case, Sparrow will start its internal Tor proxy.
### [How does the proxy support work?](https://sparrowwallet.com/docs/faq.html#how-does-the-proxy-support-work)
[Permalink](https://sparrowwallet.com/docs/faq.html#how-does-the-proxy-support-work "Permalink")
When you configure a proxy in Sparrow, it will be used for all external connections. This excludes IP addresses in the `192.168.*.*`, `172.16.*.*` and `10.*.*.*` ranges, so you can connect directly to your node on the local network even with a proxy configured. If Sparrow cannot connect via the configured proxy, but the server is using an onion address, it will start it’s internal Tor proxy automatically. You can disable this behaviour by closing Sparrow and changing the value of the `autoSwitchProxy` property in the config file.
### [What does a red Tor icon in the status bar mean?](https://sparrowwallet.com/docs/faq.html#what-does-a-red-tor-icon-mean)
[Permalink](https://sparrowwallet.com/docs/faq.html#what-does-a-red-tor-icon-in-the-status-bar-mean "Permalink")
This error (with the tooltip “External Tor proxy error: Connection refused”) occurs when you have configured an external proxy (or one was running previously), and Sparrow can no longer connect to it. Most likely, the proxy is simply not running. For a Tor proxy running on the standard port, check if it is working with
> curl --socks5-hostname localhost:9050 https://check.torproject.org/api/ip
### [How does Sparrow broadcast transactions?](https://sparrowwallet.com/docs/@how-does-sparrow-broadcast-transactions)
[Permalink](https://sparrowwallet.com/docs/faq.html#how-does-sparrow-broadcast-transactions "Permalink")
If you are not using Tor, Sparrow simply broadcasts transactions to the server you are connected to. However, if you are using Tor, Sparrow will broadcast over Tor through a public server. This is actually more private than broadcasting from your own node, as it is possible (although difficult) to monitor the Bitcoin network to determine the origin of propagation of a new transaction. Whichever approach is used, Sparrow then waits for the transaction to be received in your connected server before showing it as successfully broadcasted.
### [What does a red wallet icon mean?](https://sparrowwallet.com/docs/faq.html#what-does-a-red-wallet-icon-mean)
[Permalink](https://sparrowwallet.com/docs/faq.html#what-does-a-red-wallet-icon-mean "Permalink")
If your wallet tab has a red icon, it means there was an error loading the wallet history from your configured server. This is due to either a problem with the connection to it, or (more likely) a problem with the server itself. If you are using a prebuilt node (like Umbrel) it is often a good idea to restart it. Also, consider uninstalling unnecessary apps on it, which can affect performance of the system as a whole. If the issue persists, consider upgrading to a [more performant server](https://sparrowwallet.com/docs/server-performance.html)
such as Fulcrum.
### [Your system is missing a dependency for the webcam](https://sparrowwallet.com/docs/faq.html#your-system-is-missing-a-dependency-for-the-webcam)
[Permalink](https://sparrowwallet.com/docs/faq.html#your-system-is-missing-a-dependency-for-the-webcam "Permalink")
If you see this error on a Windows machine, you are probably missing two Microsoft libraries the webcam driver depends on. These standard libraries can be added by installing the [Microsoft Visual C++ 2010 Service Pack 1 Redistributable Package MFC Security Update](https://www.microsoft.com/en-us/download/details.aspx?id=26999)
. Here’s a guide that describes the [installation process](https://www.techadvisor.com/how-to/windows/msvcr100dll-is-missing-3589464/)
.
Some users have also reported success by downloading `msvcr100.dll` and `msvcp100.dll` from [dll-files.com](https://www.dll-files.com/)
, and copying them into `C:\Windows\System32`.
### [I can’t connect to my Ledger](https://sparrowwallet.com/docs/faq.html#i-cant-connect-to-my-ledger)
[Permalink](https://sparrowwallet.com/docs/faq.html#i-cant-connect-to-my-ledger "Permalink")
Make sure that:
* Ledger Live is not running
* The Bitcoin app is running on the device
* If you are on Linux, ensuring that udev rules are installed. Install using the commands from the Install udev Rules dialog in the Tools menu.
* If you are on Windows, ensuring your antivirus is not blocking Sparrow. For example, Norton users may need to add Sparrow.exe as a Process Exclusion for Data Protector.
* Nothing is running on ports 2222, 21324, 11044, or 9999. For example, Acronis users may need to [change it’s port](https://kb.acronis.com/content/64771?ckattempt=1)
.
If that doesn’t help, try rebooting your computer to resolve any USB related issues.
### [I can’t connect to my Trezor](https://sparrowwallet.com/docs/faq.html#i-cant-connect-to-my-trezor)
[Permalink](https://sparrowwallet.com/docs/faq.html#i-cant-connect-to-my-trezor "Permalink")
If you’re on Windows, you may be missing a driver. To fix:
* Download the [Zadig software](https://github.com/pbatard/libwdi/releases)
* Run Zadig
* Connect the Trezor
* In the Zadig application, select “Options” from the top menu and “List all devices”
* Select the most likely device (it may be listed as “Unknown device”)
* To the right of the green arrow, leave the WinUSB option selected
* Click the option that says “Install Driver” or “Replace Driver”
* Wait until it is done and then close the Zadig application
* Restart your computer
See also the instructions from [Trezor support](https://trezor.io/support/a/trezor-suite-doesn-t-see-my-device)
.
### [How do I import my Trezor?](https://sparrowwallet.com/docs/faq.html#how-do-i-import-my-trezor)
[Permalink](https://sparrowwallet.com/docs/faq.html#how-do-i-import-my-trezor "Permalink")
If you have been using the Trezor web wallet at trezor.io, it is likely that when recreating your wallet in Sparrow you need to select the ‘Nested Segwit’ script type. After this is done, import your Trezor xpub by using the Connected Hardware Wallet option.
You can also get Sparrow to search for the script type by using File > Import Wallet…, then click Scan for Connected Devices at the bottom.
### [There is an error when signing with my Jade](https://sparrowwallet.com/docs/faq.html#there-is-an-error-when-signing-with-my-jade)
[Permalink](https://sparrowwallet.com/docs/faq.html#there-is-an-error-when-signing-with-my-jade "Permalink")
If you are connecting over USB, you may need to update the driver. See [Fix issues connecting Jade via USB](https://help.blockstream.com/hc/en-us/articles/900005443223-Fix-issues-connecting-Jade-via-USB)
. If Sparrow still can’t find the original Jade (not Jade Plus), there are additional [drivers](https://www.silabs.com/developer-tools/usb-to-uart-bridge-vcp-drivers)
you can install.
### [I can’t see my BitBox02 on Linux](https://sparrowwallet.com/docs/faq.html#i-cant-see-my-bitbox02-on-linux)
[Permalink](https://sparrowwallet.com/docs/faq.html#i-cant-see-my-bitbox02-on-linux "Permalink")
If you use the BitBoxApp (v4.47.0 or lower), it will disconnect the device from the system to obtain exclusive access. Unplug and reconnect for Sparrow to use it. Note you don’t need to pair with the BitBoxApp as of Sparrow v2.1.0.
### [Does getting the fiat value leak privacy?](https://sparrowwallet.com/docs/faq.html#does-getting-the-fiat-value-leak-privacy)
[Permalink](https://sparrowwallet.com/docs/faq.html#does-getting-the-fiat-value-leak-privacy "Permalink")
Sparrow gets the exchange rate from the configured exchange rate provider, and then multiplies that with your wallet balance internally. Your wallet balance is never shared externally.
If you have a Tor proxy configured, Sparrow will use it to retrieve the exchange rate. You can also turn it off by configuring ‘None’ for the exchange rate provider in the Settings.
### [What is the master fingerprint for a watch-only wallet?](https://sparrowwallet.com/docs/faq.html#what-is-the-master-fingerprint-for-a-watch-only-wallet)
[Permalink](https://sparrowwallet.com/docs/faq.html#what-is-the-master-fingerprint-for-a-watch-only-wallet "Permalink")
Often, when setting up a watch only wallet only the xpub is known. In this case, it’s safe to use a default value like `00000000` for the master fingerprint. The derivation path can be set to the default for the script type (indicated in the textfield prompt) if not known.
### [I’m getting a “man-in-the-middle” certificate warning when connecting](https://sparrowwallet.com/docs/faq.html#pkix-path-validation-failed)
[Permalink](https://sparrowwallet.com/docs/faq.html#im-getting-a-man-in-the-middle-certificate-warning-when-connecting "Permalink")
This is an SSL error, mostly likely due to an expired certificate. If you are using a public server, it may simply be that the certificate has been replaced, in which case it is safe to proceed. Otherwise, it may make sense to be cautious, especially if you are connecting over a public wifi. To find the existing certificate, look in the `certs` folder of [Sparrow home](https://sparrowwallet.com/docs/faq.html#where-does-sparrow-store-data)
for a file with the same name as the URL of the server. You can delete that file to clear Sparrow’s record of the SSL cert. It will download the cert again on reconnection.
### [How can I see the log file?](https://sparrowwallet.com/docs/faq.html#how-can-i-see-the-log-file)
[Permalink](https://sparrowwallet.com/docs/faq.html#how-can-i-see-the-log-file "Permalink")
Sparrow’s log file is available in the Sparrow home folder, as `sparrow.log`.
You can open it by using the Help > Show Log File menu command.
### [How do I use coin control?](https://sparrowwallet.com/docs/faq.html#how-do-i-use-coin-control)
[Permalink](https://sparrowwallet.com/docs/faq.html#how-do-i-use-coin-control "Permalink")
Go the UTXOs screen (just above the Settings), select the UTXOs you want to spend (use Ctrl/Cmd+Click to select several), and click ‘Send Selected’.
You will need to fill in the address to send to and the label on the Send screen.
### [I’m running on a high resolution screen and Sparrow icons and text are tiny](https://sparrowwallet.com/docs/faq.html#im-running-on-a-high-resolution-screen-and-sparrow-icons-and-text-are-tiny)
[Permalink](https://sparrowwallet.com/docs/faq.html#im-running-on-a-high-resolution-screen-and-sparrow-icons-and-text-are-tiny "Permalink")
It’s possible to control the scaling of Sparrow in Linux or Windows by setting an environment variable.
On Linux:
_JAVA_OPTIONS=-Dglass.gtk.uiScale=200% /opt/sparrowwallet/bin/Sparrow
You can also try setting the scaling factor in GNOME more globally:
gsettings set org.gnome.desktop.interface scaling-factor 2
On Windows:
Set the environment variable `glass.win.uiScale` to whatever percentage of scaling you require (e.g. `200%`). Here’s a [guide](https://www.architectryan.com/2018/08/31/how-to-change-environment-variables-on-windows-10/)
on how to do it.
### [Sparrow is too big for my screen](https://sparrowwallet.com/docs/faq.html#sparrow-is-too-big-for-my-screen)
[Permalink](https://sparrowwallet.com/docs/faq.html#sparrow-is-too-big-for-my-screen "Permalink")
See the [answer](https://sparrowwallet.com/docs/faq.html#im-running-on-a-high-resolution-screen-and-sparrow-icons-and-text-are-tiny)
above, but set the scaling factor to `80%`.
### [What NFC readers are supported?](https://sparrowwallet.com/docs/faq.html#what-nfc-readers-are-supported)
[Permalink](https://sparrowwallet.com/docs/faq.html#what-nfc-readers-are-supported "Permalink")
Coinkite [lists supported readers](https://github.com/coinkite/coinkite-tap-proto#requirements)
for the Tapsigner/Satscard.
### [How do I connect my NFC card reader in Linux?](https://sparrowwallet.com/docs/faq.html#how-do-i-connect-my-nfc-card-reader-in-linux)
[Permalink](https://sparrowwallet.com/docs/faq.html#how-do-i-connect-my-nfc-card-reader-in-linux "Permalink")
You need to install a few packages first:
sudo apt install libccid libpcsclite-dev pcscd
Make sure the `pcscd` daemon is running:
service status pcscd
### [What keys are using during PGP download verification?](https://sparrowwallet.com/docs/faq.html#what-keys-are-using-during-pgp-download-verification)
[Permalink](https://sparrowwallet.com/docs/faq.html#what-keys-are-using-during-pgp-download-verification "Permalink")
Sparrow uses up to 3 sources for keys when verifying signatures for download verification:
* Any keys optionally provided by the user in the dialog
* The gpg user keyring, usually located at `~/.gnupg` (or the value of `$GNUPGHOME`)
* Verified keys [included](https://github.com/sparrowwallet/drongo/blob/master/src/main/resources/gpg/)
in the Sparrow release
### [How do I rename my wallet?](https://sparrowwallet.com/docs/faq.html#how-do-i-rename-my-wallet)
[Permalink](https://sparrowwallet.com/docs/faq.html#how-do-i-rename-my-wallet "Permalink")
To rename a wallet, use the File > Rename Wallet menu option.
### [I get a No route to host error connecting to a .local address](https://sparrowwallet.com/docs/faq.html#no-route-to-host-error)
[Permalink](https://sparrowwallet.com/docs/faq.html#i-get-a-no-route-to-host-error-connecting-to-a-local-address "Permalink")
On macOS 15 or later, you will need to grant permission to access the local network. Go to Settings > Privacy & Security > Local Network and enable Sparrow.
### [I can’t import my Cobo Vault](https://sparrowwallet.com/docs/faq.html#i-cant-import-my-cobo-vault)
[Permalink](https://sparrowwallet.com/docs/faq.html#i-cant-import-my-cobo-vault "Permalink")
Some devices that are no longer supported by the manufacturers are deprecated in Sparrow. You can show options for deprecated devices by setting the value of `showDeprecatedImportExport` to `true` in Sparrow’s config file. Note however that deprecated devices will be removed in a future release.
### [Is the Apache 2 license open source?](https://sparrowwallet.com/docs/faq.html#is-the-apache-2-license-open-source)
[Permalink](https://sparrowwallet.com/docs/faq.html#is-the-apache-2-license-open-source "Permalink")
Yes! The Apache 2 license is very similar to the MIT license, which is used by Bitcoin Core. You can read a reasonable summary here: [MIT vs. Apache vs. GPL](https://exygy.com/blog/which-license-should-i-use-mit-vs-apache-vs-gpl/)
### [How can I build and run from source?](https://sparrowwallet.com/docs/faq.html#how-can-i-build-and-run-from-source)
[Permalink](https://sparrowwallet.com/docs/faq.html#how-can-i-build-and-run-from-source "Permalink")
Read the instructions here: [https://github.com/sparrowwallet/sparrow](https://github.com/sparrowwallet/sparrow)
### [How can I report an issue?](https://sparrowwallet.com/docs/faq.html#how-can-i-report-an-issue)
[Permalink](https://sparrowwallet.com/docs/faq.html#how-can-i-report-an-issue "Permalink")
Please use the [Issues](https://github.com/sparrowwallet/sparrow/issues)
on Github to report an issue. If possible, look in the sparrow.log file in the configuration directory for information helpful in debugging.
---