# Table of Contents
- [Twitch API | Twitch Developers](#twitch-api-twitch-developers)
- [Get Started | Twitch Developers](#get-started-twitch-developers)
- [Raids | Twitch Developers](#raids-twitch-developers)
- [Clips | Twitch Developers](#clips-twitch-developers)
- [Twitch Extensions Tutorials | Twitch Developers](#twitch-extensions-tutorials-twitch-developers)
- [Twitch Developer Documentation | Twitch Developers](#twitch-developer-documentation-twitch-developers)
- [Polls | Twitch Developers](#polls-twitch-developers)
- [Prediction | Twitch Developers](#prediction-twitch-developers)
- [Markers | Twitch Developers](#markers-twitch-developers)
- [Schedule | Twitch Developers](#schedule-twitch-developers)
- [Videos | Twitch Developers](#videos-twitch-developers)
- [Twitch API Concepts | Twitch Developers](#twitch-api-concepts-twitch-developers)
- [EventSub | Twitch Developers](#eventsub-twitch-developers)
- [Mobile Deep Links | Twitch Developers](#mobile-deep-links-twitch-developers)
- [Embedding Twitch | Twitch Developers](#embedding-twitch-twitch-developers)
- [Extension File Structure and HTML Views | Twitch Developers](#extension-file-structure-and-html-views-twitch-developers)
- [Locally Test Your Extension | Twitch Developers](#locally-test-your-extension-twitch-developers)
- [JSON Web Tokens (JWT) | Twitch Developers](#json-web-tokens-jwt-twitch-developers)
- [Configuration Service | Twitch Developers](#configuration-service-twitch-developers)
- [Build Your Backend | Twitch Developers](#build-your-backend-twitch-developers)
- [Create an Extension | Twitch Developers](#create-an-extension-twitch-developers)
- [Game Engine Plugins | Twitch Developers](#game-engine-plugins-twitch-developers)
- [Insights & Analytics | Twitch Developers](#insights-analytics-twitch-developers)
- [Product Lifecycle | Twitch Developers](#product-lifecycle-twitch-developers)
- [PubSub | Twitch Developers](#pubsub-twitch-developers)
- [Video & Clips | Twitch Developers](#video-clips-twitch-developers)
- [Video Broadcast | Twitch Developers](#video-broadcast-twitch-developers)
- [Organizations | Twitch Developers](#organizations-twitch-developers)
- [Handling Conduit Events | Twitch Developers](#handling-conduit-events-twitch-developers)
- [Managing Subscriptions | Twitch Developers](#managing-subscriptions-twitch-developers)
- [WebSocket Messages | Twitch Developers](#websocket-messages-twitch-developers)
- [Handling Webhook Events | Twitch Developers](#handling-webhook-events-twitch-developers)
- [Unity Getting Started | Twitch Developers](#unity-getting-started-twitch-developers)
- [Creator Goals | Twitch Developers](#creator-goals-twitch-developers)
- [EventSub Reference | Twitch Developers](#eventsub-reference-twitch-developers)
- [Handling WebSocket Events | Twitch Developers](#handling-websocket-events-twitch-developers)
- [Moderating Twitch Chatrooms | Twitch Developers](#moderating-twitch-chatrooms-twitch-developers)
- [Chat & Chatbots | Twitch Developers](#chat-chatbots-twitch-developers)
- [Get an access token | Twitch Developers](#get-an-access-token-twitch-developers)
- [Drops | Twitch Developers](#drops-twitch-developers)
- [Register Your App | Twitch Developers](#register-your-app-twitch-developers)
- [Chat & Chatbots | Twitch Developers](#chat-chatbots-twitch-developers)
- [Twitch CLI | Twitch Developers](#twitch-cli-twitch-developers)
- [Authentication | Twitch Developers](#authentication-twitch-developers)
- [Reference | Twitch Developers](#reference-twitch-developers)
- [EventSub Subscription Types | Twitch Developers](#eventsub-subscription-types-twitch-developers)
- [Extensions | Twitch Developers](#extensions-twitch-developers)
- [Changelog | Twitch Developers](#changelog-twitch-developers)
---
# Twitch API | Twitch Developers
[Contents](https://dev.twitch.tv/docs/api/#)
Twitch API
==========
The Twitch API provides the tools and data used to develop Twitch integrations. The data models and systems are designed to provide relevant data in an easy, consistent, and reliable way. For the full list of endpoints that you can use in your integration, explore the [Twitch API Reference](https://dev.twitch.tv/docs/api/reference/)
.
The Twitch API uses OAuth 2.0 for authentication. To learn about the different types of access tokens that the API supports, see [Authentication](https://dev.twitch.tv/docs/authentication/)
. If you plan to use some of the extension-related endpoints, you’ll also need learn how to get JSON Web Tokens (JWT) (see [JSON Web Tokens](https://dev.twitch.tv/docs/extensions/required-technical-background#json-web-tokens-jwts)
and [Managing Extension Secrets](https://dev.twitch.tv/docs/extensions/building#managing-extension-secrets)
).
For information about using the APIs, see the following guides:
* [Starting a Poll](https://dev.twitch.tv/docs/api/polls)
* [Starting a Prediction](https://dev.twitch.tv/docs/api/predictions)
* [Starting a Raid](https://dev.twitch.tv/docs/api/raids)
* [Creating Stream Clips](https://dev.twitch.tv/docs/api/clips)
* [Creating Stream Markers](https://dev.twitch.tv/docs/api/markers)
* [Getting Videos](https://dev.twitch.tv/docs/api/videos)
* [Scheduling Broadcasts](https://dev.twitch.tv/docs/api/schedule)
* [Moderating a Broadcaster’s Chat](https://dev.twitch.tv/docs/api/moderation)
* [Getting a Creator’s Goals](https://dev.twitch.tv/docs/api/goals)
* [Getting an Extension Analytics Report](https://dev.twitch.tv/docs/insights#extension-developer-analytics)
* [Getting a Game Analytics Report](https://dev.twitch.tv/docs/insights#game-developer-analytics)
You should also become familiar with the following features:
| Feature | Description |
| --- | --- |
| [EventSub](https://dev.twitch.tv/docs/eventsub) | The Twitch API provides APIs that you can call to poll the status of a given resource. These APIs are fine if you need a snapshot of the resource but it’s recommended that you subscribe to receive resource updates instead. For information about subscribing to events, see [EventSub](https://dev.twitch.tv/docs/eventsub) subscriptions. |
| [Command-line Interface](https://dev.twitch.tv/docs/cli) | Twitch offers a command-line interface for managing Twitch resources. You can use it to call the Twitch endpoints, get an OAuth access token, and test EventSub events. |
Next steps
----------
Call your first Twitch API in minutes using [Getting started](https://dev.twitch.tv/docs/api/get-started)
.
Thumb through Twitch API [Concepts](https://dev.twitch.tv/docs/api/guide)
to learn how Twitch [handles breaking changes](https://dev.twitch.tv/docs/api/guide#breaking-changes)
, [pagination](https://dev.twitch.tv/docs/api/guide#pagination)
, and [rate limits](https://dev.twitch.tv/docs/api/guide#twitch-rate-limits)
.
Join our [community](https://link.twitch.tv/devchat)
of Twitch developers! And for other ways to connect with the community, explore our [developer support](https://dev.twitch.tv/support)
page.
Provide feedback for this page
[Docs](https://dev.twitch.tv/docs)
[Status](https://devstatus.twitch.tv/)
[Support](https://dev.twitch.tv/support)
[Showcase](https://dev.twitch.tv/showcase)
[Blog](https://blog.twitch.tv/en/tags/developers/)
[](https://twitter.com/twitchdev)
[](https://github.com/twitchdev)
[](https://blog.twitch.tv/en/tags/developers/)
[](https://twitch.tv/twitchdev)
---
# Get Started | Twitch Developers
[Contents](https://dev.twitch.tv/docs/api/get-started/#)
Get Started with the Twitch API
===============================
The Twitch API lets developers build creative integrations for the broader Twitch community. To see how easy it is to integrate with the API, let’s create a simple app to get information about the TwitchDev user.
What do I need to get started?
------------------------------
A Twitch account. That’s all you need. No special developer credentials or tokens required.
Register an application
-----------------------
All Twitch integrations require you to register your app with Twitch. For information about how to register an app, see [Register your app](https://dev.twitch.tv/docs/authentication/register-app)
. For this exercise, use the following information to register your app:
* Set **Name** to any name you’d like, it just needs to be unique amongst all Twitch applications.
* Set **OAuth Redirect URLs** to http://localhost:3000.
* Choose any **Category** of application that you’d like.
* Capture your **Client ID**, which you’ll use in the next step to get an OAuth token.
* Click **New Secret** to generate a secret, which you’ll use in the next step to get an OAuth token.
Get an OAuth token
------------------
Twitch requires OAuth access tokens to access most Twitch resources. A resource requires either an app access token or user access token. To determine which type of token a resource requires, see the [reference](https://dev.twitch.tv/docs/api/reference)
content for the endpoints you plan to use.
Because the [Get Users](https://dev.twitch.tv/docs/api/reference#get-users)
endpoint (which we’re using to get information about the TwitchDev user) accepts either type of token, let’s get an app access token since it’s easier. For information about app access tokens, see [Client Credentials Grant Flow](https://dev.twitch.tv/docs/authentication/getting-tokens-oauth#client-credentials-grant-flow)
.
For this exercise, open a terminal window and enter the following cURL POST command (you’ll need [cURL installed](https://curl.se/download.html)
on your computer). Update the client ID and secret placeholders with the client ID and secret you recieved when you registered your app.
curl -X POST 'https://id.twitch.tv/oauth2/token' \
-H 'Content-Type: application/x-www-form-urlencoded' \
-d 'client_id=&client_secret=&grant_type=client_credentials'
**NOTE** For information about running the query on Microsoft Windows, see [cURL examples](https://dev.twitch.tv/docs/api/guide#curl-examples)
.
The response contains a JSON object with the access token.
{
"access_token": "jostpf5q0puzmxmkba9iyug38kjtg",
"expires_in": 5011271,
"token_type": "bearer"
}
You can also use Twitch’s [CLI](https://dev.twitch.tv/docs/cli)
to get an OAuth token for testing. See [Using the CLI to Get an Access Token](https://dev.twitch.tv/docs/cli/token-command)
.
Make your first call
--------------------
To get information about the TwitchDev user, you use the [Get Users](https://dev.twitch.tv/docs/api/reference#get-users)
endpoint. The endpoint requires a user’s name or ID. Because we know the user’s name, set the _login_ query parameter to TwitchDev’s login name, which is twitchdev (all lowercase). Remember to replace the OAuth Bearer token with your token and the client ID with your app’s ID.
curl -X GET 'https://api.twitch.tv/helix/users?login=twitchdev' \
-H 'Authorization: Bearer jostpf5q0puzmxmkba9iyug38kjtg' \
-H 'Client-Id: wbmytr93xzw8zbg0p1izqyzzc5mbiz'
**NOTE** For information about running the query on Microsoft Windows, see [cURL examples](https://dev.twitch.tv/docs/api/guide#curl-examples)
.
### The JSON response
The following example shows the JSON response that the request returns.
{
"data": [\
{\
"broadcaster_type": "partner",\
"created_at": "2021-07-30T20:32:28Z",\
"description": "Supporting third-party developers building Twitch integrations from chatbots to game integrations.",\
"display_name": "TwitchDev",\
"id": "141981764",\
"login": "twitchdev",\
"offline_image_url": "https://static-cdn.jtvnw.net/jtv_user_pictures/3f13ab61-ec78-4fe6-8481-8682cb3b0ac2-channel_offline_image-1920x1080.png",\
"profile_image_url": "https://static-cdn.jtvnw.net/jtv_user_pictures/8a6381c7-d0c0-4576-b179-38bd5ce1d6af-profile_image-300x300.png",\
"type": "",\
"view_count": 6652509\
}\
]
}
Next steps
----------
Check out the Twitch’s [command-line interface](https://dev.twitch.tv/docs/cli)
(CLI), which you can use to call Twitch endpoints.
For a list of the endpoints that you can call, see [Twitch API Reference](https://dev.twitch.tv/docs/api/reference/)
.
Thumb through Twitch API [Concepts](https://dev.twitch.tv/docs/api/guide)
to learn how Twitch [handles breaking changes](https://dev.twitch.tv/docs/api/guide#breaking-changes)
, [pagination](https://dev.twitch.tv/docs/api/guide#pagination)
, and [rate limits](https://dev.twitch.tv/docs/api/guide#twitch-rate-limits)
.
To get into the nuts and bolts of authentication, see the [Authentication](https://dev.twitch.tv/docs/authentication/)
guide. This guide explains how to enable your application to take actions on behalf of a Twitch account, or access specific data about a user’s account.
Join our [community](https://link.twitch.tv/devchat)
of Twitch developers! And for other ways to connect with the community, explore our [developer support](https://dev.twitch.tv/support)
page.
Provide feedback for this page
[Docs](https://dev.twitch.tv/docs)
[Status](https://devstatus.twitch.tv/)
[Support](https://dev.twitch.tv/support)
[Showcase](https://dev.twitch.tv/showcase)
[Blog](https://blog.twitch.tv/en/tags/developers/)
[](https://twitter.com/twitchdev)
[](https://github.com/twitchdev)
[](https://blog.twitch.tv/en/tags/developers/)
[](https://twitch.tv/twitchdev)
---
# Raids | Twitch Developers
[Contents](https://dev.twitch.tv/docs/api/raids/#)
Raids
=====
[NEW](https://dev.twitch.tv/docs/product-lifecycle)
A Raid is a Twitch feature that lets a broadcaster send their viewers over to watch another broadcaster’s stream. Raiding is a great way to make connections and network with other broadcasters by sharing audiences and growing your communities.
To raid another broadcaster
---------------------------
To raid another broadcaster, your chatbot or Extension POSTs a request to the [Start a raid](https://dev.twitch.tv/docs/api/reference#start-a-raid)
endpoint. Set the request’s _from\_broadcaster\_id_ query parameter to the broadcaster that’s sending the raiding party and set the _to\_broadcaster\_id_ query parameter to the broadcaster that’s being raided.
curl -X POST 'https://api.twitch.tv/helix/raids?from_broadcaster_id=12345678&to_broadcaster_id=87654321' \
-H 'Authorization: Bearer kpvy3cjboyptmdkiacwr0c19hotn5s' \
-H 'Client-Id: hof5gwx0su6owfnys0nyan9c87zr6t'
The request doesn’t actually start the raid but instead pops up a window at the top of the raiding broadcaster’s chat room that shows the number of viewers in the raid. The raid occurs when the broadcaster clicks **Raid Now** or after the 90 seconds countdown expires.
Here’s what the response looks like to the previous request:
{
"data": [\
{\
"created_at": "2022-02-18T07:20:50.52Z",\
"is_mature": false\
}\
]
}
You can use the `is_mature` field in the response to let viewers know that the targeted channel contains mature content. The Twitch UX also lets viewers know that the targeted channel restricts chat to subscribers only or followers only. If you want to provide the same information in your experience, use the [Get Chat Settings](https://dev.twitch.tv/docs/api/reference#get-chat-settings)
endpoint and check the `subscriber_mode` and `follower_mode` fields.
Get notified when a raid begins
-------------------------------
The [Start a raid](https://dev.twitch.tv/docs/api/reference#start-a-raid)
response just lets you know that the request was queued. To determine whether the raid actually took place, you must subscribe to the [Channel Raid](https://dev.twitch.tv/docs/eventsub/eventsub-subscription-types#channelraid)
event. For details about subscribing to an event, see [EventSub](https://dev.twitch.tv/docs/eventsub/manage-subscriptions)
.
To know whether the raid event is for your raid, compare the _from_ and _to_ broadcaster IDs in your request to the _from_ and _to_ IDs in the event.
Canceling the raid
------------------
To cancel a raid, send a DELETE request to the [Cancel a raid](https://dev.twitch.tv/docs/api/reference#cancel-a-raid)
endpoint. You can cancel a raid at any point up until the broadcaster clicks **Raid Now** in the Twitch UX or the 90 seconds countdown expires.
The following example shows a request that cancels a raid. Set the _broadcaster\_id_ query parameter to the ID of the broadcaster that initiated the raid.
curl -X DELETE 'https://api.twitch.tv/helix/raids?broadcaster_id=12345678' \
-H 'Authorization: Bearer kpvy3cjboyptmdkiacwr0c19hotn5s' \
-H 'Client-Id: hof5gwx0su6owfnys0nyan9c87zr6t'
If the raid hasn’t started and the raid was successfully canceled, the HTTP response code is 204 No Content; otherwise, if the raid has already started, the response code is 404 Not Found.
Note that calling this endpoint effectively clicks the Cancel button in the Twitch UX, dismissing the Raid pop up window.
Provide feedback for this page
[Docs](https://dev.twitch.tv/docs)
[Status](https://devstatus.twitch.tv/)
[Support](https://dev.twitch.tv/support)
[Showcase](https://dev.twitch.tv/showcase)
[Blog](https://blog.twitch.tv/en/tags/developers/)
[](https://twitter.com/twitchdev)
[](https://github.com/twitchdev)
[](https://blog.twitch.tv/en/tags/developers/)
[](https://twitch.tv/twitchdev)
---
# Clips | Twitch Developers
[Contents](https://dev.twitch.tv/docs/api/clips/#)
Clips
=====
Clips lets Twitch viewers share interesting moments from broadcasts while letting broadcasters grow their channels through social sharing! [Read more](https://help.twitch.tv/s/article/how-to-use-clips)
Creating Clips
--------------
To create a clip from a broadcaster’s stream, use the [Create Clip](https://dev.twitch.tv/docs/api/reference#create-clip)
API. It’s easy to use, just specify the ID of the broadcaster whose stream you want to create a clip from. The OAuth user access token must include the **clips:edit** scope.
curl -X POST 'https://api.twitch.tv/helix/clips?broadcaster_id=123456' \
-H 'Authorization: Bearer n6fyjy1qlo2hmzzt3bdjhkdgda4d' \
-H 'Client-Id: hof5gwx0su6owfnys0nyac87zr6t'
The following example shows the request’s response.
{
"data": [\
{\
"id": "FunPoisedGiraffeGingerPower-KDy2fwLNuUEHU",\
"edit_url": "https://clips.twitch.tv/FunPoisedGiraffeGingerPower-KDy2fwLNuUEHU/edit"\
}\
]
}
Creating a clip is an asynchronous process that can take a short amount of time to complete. To determine whether the clip was successfully created, call [Get Clips](https://dev.twitch.tv/docs/api/reference#get-clips)
using the clip ID that the request returned. If Get Clips returns the clip, the clip was successfully created. If, after 15 seconds, Get Clips hasn’t returned the clip, assume it failed.
The API captures up to 90 seconds of the broadcaster’s stream. The 90 seconds spans the point in the stream when you called the API; about 85 seconds of the stream before the call and about 5 seconds after the call. For example, if you called the API at the 4:00 minute mark, the API captures from approximately the 3:35 mark to approximately the 4:05 minute mark. While Twitch tries its best to capture 90 seconds of the stream, the actual length may be less. For example, it may be less if you begin capturing the clip near the beginning or end of the stream.
By default, Twitch publishes up to the last 30 seconds of the 90 seconds window and provides a default title for the clip. If you want control over the title and which portion of the 90 seconds window is used as the clip, use the URL in the response’s `edit_url` field. You can specify a clip that’s from 5 seconds in length to 60 seconds in length. The URL is valid for up to 24 hours or until the clip is published, whichever comes first.
### Setting optional parameters
The API provides an optional _has\_delay_ query parameter. Use this parameter to capture the clip at the time the viewer requests it or after a delay. If **false**, the API captures the clip at the point in time that the viewer requests it (this is the same experience that the Twitch UX provides). If **true**, Twitch adds a delay before capturing the clip, which basically shifts the capture window to the right slightly. The default is **false**.
### Possible issues you can run into
You may only capture clips:
* If the broadcaster is streaming.
* If the broadcaster has enabled clips (see **Clips Settings** under **Creator Dashboard**, **Settings**, **Stream**).
* If the broadcaster hasn’t enabled the follower-only or subscribers-only clips settings, or if they have, you are a subscriber or a follower that has followed the broadcaster the required amount of time.
Getting clips
-------------
To get clips, use the [Get Clips](https://dev.twitch.tv/docs/api/reference#get-clips)
API. The API lets you get [specific clips](https://dev.twitch.tv/docs/api/clips/#getting-a-specific-clip)
, get [clips captured from a specific game](https://dev.twitch.tv/docs/api/clips/#getting-a-games-clips)
, or get [clips captured from a specific broadcaster’s streams](https://dev.twitch.tv/docs/api/clips/#getting-a-broadcasters-clips)
.
You can use any valid OAuth token to get clips, such as an app access token or user access token. For example, if you’re also creating clips, just use that user access token.
Depending on the broadcaster or game, it’s possible that the results may contain a large number of clips. By default, the API returns 20 clips. If the results contain more than 20 clips, the response’s `pagination` field includes a `cursor` that you use to get the next page of clips. For information about paging results, see [Pagination](https://dev.twitch.tv/docs/api/guide#pagination)
. Only specify the pagination parameters (_first_, _after_, and _before_) if you specify the _game\_id_ or _broadcaster\_id_ query parameter.
The following example shows what the Get Clips response looks like. The broadcaster fields identify the broadcaster whose stream the clip was captured from and the creator fields identify the viewer that captured the clip. To get the game’s title, use the [Get Games](https://dev.twitch.tv/docs/api/reference#get-games)
API and set the _id_ query parameter to the ID in the `game_id` field. Use the URL in the `embed_url` field to embed the clip in your user experience (see [Embedding Video and Clips](https://dev.twitch.tv/docs/embed/video-and-clips/)
). Note that the `title` field may not contain useful information.
{
"data": [\
{\
"id": "AnimatedOptimisticWasabiVoteNay",\
"url": "https://clips.twitch.tv/AnimatedOptimisticWasabiVoteNay",\
"embed_url": "https://clips.twitch.tv/embed?clip=AnimatedOptimisticWasabiVoteNay",\
"broadcaster_id": "423168062",\
"broadcaster_name": "qa_vod_automation",\
"creator_id": "7036025",\
"creator_name": "Crono",\
"video_id": "704533034",\
"game_id": "27471",\
"language": "en",\
"title": "a",\
"view_count": 1198514,\
"created_at": "2020-08-10T17:04:10Z",\
"thumbnail_url": "https://clips-media-assets2.twitch.tv/100660082970470268-offset-153206-preview-480x272.jpg",\
"duration": 28,\
"vod_offset": 222\
},\
. . .\
],
"pagination": {
"cursor": "eyJiIjpudWxsLCJhIjp7IkN1cnNvciI6Ik1qQT0ifX0"
}
}
### Offset to the clip in the video
Clips include a `vod_offset` field, which contains the offset, in seconds, from the beginning of the video to the start of the clip. Twitch keeps videos for a minimum amount of time before deleting them and broadcasters can also delete their videos. If the video is no longer available, the `video_id` field is set to an empty string and the `vod_offset` field is set to **null**.
If you get a clip that was created during the current broadcast, the `video_id` field may contain an empty string and the `vod_offset` field may contain **null**. This is because there’s a delay between when a clip is created during a broadcast and when the offset is determined. The delay is indeterminate but typically lasts minutes. If you get the clip after the delay, the `video_id` field will contain the video’s ID and the `vod_offset` field will contain the clip’s offset.
### Getting a broadcaster’s clips
To get clips captured from a specific broadcaster’s streams, use the _broadcaster\_id_ query parameter.
curl -X GET 'https://api.twitch.tv/helix/clips?broadcaster_id=123456' \
-H 'Authorization: Bearer n6fyjy1qlo2hmzzt3bdjhkdgda4d' \
-H 'Client-Id: hof5gwx0su6owfnys0nyac87zr6t'
The clips are returned in descending order of views. Because the request could return thousands of results to page through, you could use the _first_ query parameter to get the top 10 clips with the most views. Or, to get clips captured within a specific date range, use the _started\_at_ and _ended\_at_ query parameters (see [Getting clips captured within a specific date range](https://dev.twitch.tv/docs/api/clips/#getting-clips-captured-within-a-specific-date-range)
).
### Getting a game’s clips
To get clips captured from a specific game, use the _game\_id_ query parameter. The following example shows how to get all clips captured from broadcasters that were playing Minecraft.
curl -X GET 'https://api.twitch.tv/helix/clips?game_id=27471' \
-H 'Authorization: Bearer n6fyjy1qlo2hmzzt3bdjhkdgda4d' \
-H 'Client-Id: hof5gwx0su6owfnys0nyac87zr6t'
The clips are returned in descending order of views. Because the request could return thousands of results to page through, you could use the _first_ query parameter to get the top 10 clips with the most views. Or, to get clips captured within a specific date range, use the _started\_at_ and _ended\_at_ query parameters (see [Getting clips captured within a specific date range](https://dev.twitch.tv/docs/api/clips/#getting-clips-captured-within-a-specific-date-range)
).
To get a game’s ID, use the [Search Categories](https://dev.twitch.tv/docs/api/reference#search-categories)
API.
### Getting a specific clip
To get specific clips, use the _id_ query parameter. Include the _id_ query parameter for each ID that you specify. You may specify a maximum of 100 IDs.
curl -X GET 'https://api.twitch.tv/helix/clips?id=SpillYummyPigeonPieHuhu&id=DillDiligentTireOneHand' \
-H 'Authorization: Bearer n6fyjy1qlo2hmzzt3bdjhkdgda4d' \
-H 'Client-Id: hof5gwx0su6owfnys0nyac87zr6t'
If you specify the _id_ query parameter, the API ignores the pagination query parameters and date range parameters.
### Getting clips captured within a specific date range
By default, Get Clips returns all clips that were captured for the specified game or broadcaster. If you’re only interested in clips for a specific date range like the last week or yesterday, use the _started\_at_ and _ended\_at_ query parameters. Dates are UTC.
The following example shows how to get clips that were captured in the last week from the specified broadcaster’s streams.
curl -X GET 'https://api.twitch.tv/helix/clips?broadcaster_id=123456&started_at=2022-07-03T00:00:00Z&ended_at=2022-07-09T00:00:00Z' \
-H 'Authorization: Bearer n6fyjy1qlo2hmzzt3bdjhkdgda4d' \
-H 'Client-Id: hof5gwx0su6owfnys0nyac87zr6t'
The _ended\_at_ parameter is optional. If you don’t specify it, the date range is one week from the start date. The following example shows how the above request could have been written:
curl -X GET 'https://api.twitch.tv/helix/clips?broadcaster_id=123456&started_at=2022-07-03T00:00:00Z' \
-H 'Authorization: Bearer n6fyjy1qlo2hmzzt3bdjhkdgda4d' \
-H 'Client-Id: hof5gwx0su6owfnys0nyac87zr6t'
Specify a date range only if you specify the _game\_id_ or _broadcaster\_id_ query parameter.
Provide feedback for this page
[Docs](https://dev.twitch.tv/docs)
[Status](https://devstatus.twitch.tv/)
[Support](https://dev.twitch.tv/support)
[Showcase](https://dev.twitch.tv/showcase)
[Blog](https://blog.twitch.tv/en/tags/developers/)
[](https://twitter.com/twitchdev)
[](https://github.com/twitchdev)
[](https://blog.twitch.tv/en/tags/developers/)
[](https://twitch.tv/twitchdev)
---
# Twitch Extensions Tutorials | Twitch Developers
[Contents](https://dev.twitch.tv/docs/tutorials/extension-101-tutorial-series/introduction/#)
Extension 101 tutorial series
=============================
Twitch Extensions Tutorials: Introduction
=========================================
Prerequisites
-------------
Requires knowledge of:
* HTML
* CSS
* JS
Objectives
----------
* Step by step tutorials for how to build a Twitch Extension from start to finish.
* Learn core concepts of Extensions via hands-on development and code walkthroughs.
* At the end of these tutorials, you will have developed your first production-ready Extension!
What are Extensions?
--------------------
Extensions are web apps that are embedded as HTML iframes into a broadcaster’s channel. Extensions live in the broadcaster’s creator dashboard and provide more engaging, interactive experiences for both the broadcaster and the viewers. In this tutorial series, we will build a panel Extension. You can find more information about each type of Extension [here](https://dev.twitch.tv/docs/extensions/)
.
What are we going to build?
---------------------------
Through these tutorials, we will be building an Extension that implements the “Would You Rather..?” conversation game. For those of you unfamiliar with that game, essentially the idea is that viewers will have the ability to ask questions that begin with “Would you rather…?” and select two scenarios for the broadcaster to choose from. The more similar the two choices are, the harder the dilemma. On stream, the broadcaster must choose one of the scenarios they would rather do. This Extension thus helps create a more engaging experience specifically for chat-oriented streams.
While this is the basic idea of the Extension we are going to build, we will also be adding other features to emphasize how Extensions can provide a better, more engaging experience for both the broadcaster and the viewers. Awesome! Now that we know what we are going to accomplish in this tutorial, let’s start building.
Provide feedback for this page
[Docs](https://dev.twitch.tv/docs)
[Status](https://devstatus.twitch.tv/)
[Support](https://dev.twitch.tv/support)
[Showcase](https://dev.twitch.tv/showcase)
[Blog](https://blog.twitch.tv/en/tags/developers/)
[](https://twitter.com/twitchdev)
[](https://github.com/twitchdev)
[](https://blog.twitch.tv/en/tags/developers/)
[](https://twitch.tv/twitchdev)
---
# Twitch Developer Documentation | Twitch Developers
[Contents](https://dev.twitch.tv/docs/#)
Twitch Developer Documentation
==============================
> Reviews for chatbot verification continue to be temporarily paused while we revise our processes. Reviews for Extensions, developer organizations, and game ownership have resumed. Thank you for your patience and understanding.
Welcome to the Twitch developer documentation site. Here you’ll find the information needed to develop third-party experiences with Twitch.
| Products | Concepts | Informative Resources |
| --- | --- | --- |
| [Twitch API](https://dev.twitch.tv/docs/api)
[Product Lifecycle](https://dev.twitch.tv/docs/product-lifecycle) |
What’s New?
-----------
Added the following Twitch API endpoints for open beta:
* [Add suspicious status to chat user](https://dev.twitch.tv/docs/api/reference/#add-suspicious-status-to-chat-user)
- Adds a suspicious user status to a chatter on the broadcaster’s channel.
* [Remove suspicious status from chat user](https://dev.twitch.tv/docs/api/reference/#remove-suspicious-status-from-chat-user)
- Remove a suspicious user status from a chatter on broadcaster’s channel.
_See all the latest documentation updates on the [changelog](https://dev.twitch.tv/docs/change-log)
._
Recent Announcements
--------------------
Feedback and Assistance
-----------------------
For help using Twitch developer products, or to let us know about product or documentation improvements:
* Ask questions on the [Twitch Developer Forums](https://discuss.dev.twitch.tv/)
.
* Chat with the community on [Discord](https://link.twitch.tv/devchat)
.
* Provide feedback suggestions on [UserVoice](https://twitch.uservoice.com/forums/310213-developers)
.
* File issues or bug reports on [GitHub](https://github.com/twitchdev/issues/issues/)
.
* Reach out on [Twitter](https://twitter.com/twitchdev)
.
Terms of Use
------------
By accessing or using the Twitch API and other developer products, you agree to comply with and be bound by the [Twitch Developer Services Agreement](https://www.twitch.tv/p/legal/developer-agreement/)
. If you do not agree to be bound by the Twitch Developer Agreement, do not access or otherwise use Twitch developer products.
Provide feedback for this page
There's no need to go alone!
----------------------------
[Get Support](https://dev.twitch.tv/support/)
[Docs](https://dev.twitch.tv/docs)
[Status](https://devstatus.twitch.tv/)
[Support](https://dev.twitch.tv/support)
[Showcase](https://dev.twitch.tv/showcase)
[Blog](https://blog.twitch.tv/en/tags/developers/)
[](https://twitter.com/twitchdev)
[](https://github.com/twitchdev)
[](https://blog.twitch.tv/en/tags/developers/)
[](https://twitch.tv/twitchdev)
---
# Polls | Twitch Developers
[Contents](https://dev.twitch.tv/docs/api/polls/#)
Polls
=====
Polls are a great way for broadcasters to get feedback from their community. For example, a broadcaster can ask their viewers which game they should play next. Polls can provide from 2 to 5 choices for viewers to choose from. Viewers can vote once for free, but depending on how the poll is configured, viewers can spend Channel Points to vote multiple times (for the same choice or different choices).
Broadcasters can start a poll at any time but may run only one poll at a time. The broadcaster’s moderators or editors can create or manage the broadcaster’s polls.
Running polls is available to partners and affiliates only. [Read more](https://help.twitch.tv/s/article/how-to-use-polls)
.
Creating a poll
---------------
To create a poll, send a POST request to the [Create Poll](https://dev.twitch.tv/docs/api/reference#create-poll)
endpoint. The endpoint requires a [user access token](https://dev.twitch.tv/docs/authentication#user-access-tokens)
with scope **channel:manage:polls**. This scope works for creating, ending, and getting polls.
The following POST shows a poll that asks what time the broadcaster should stream on Tuesday. The poll runs for 5 minutes.
curl -X POST 'https://api.twitch.tv/helix/polls' \
-H 'Authorization: Bearer vpx9etxs8bbii29krls1ljai1kdr' \
-H 'Client-Id: dt4z41sa8uexdkjvt7uu9jjqm575' \
-H 'Content-Type: application/json' \
-d '{"broadcaster_id":"123456","title":"Streaming next Tuesday. Which time works best for you?","choices":[{"title":"9AM"},{"title":"10AM"},{"title":"7PM"},{"title":"8PM"},{"title":"9PM"}],"duration":300}'
In the above poll everyone gets a single vote. To let viewers cast more than one vote, enable voting with Channel Points. If enabled, viewers may cast as many votes as they want but each additional vote costs them Channel Points (to cast additional votes, the viewers must own Channel Points).
The following POST shows enabling Channel Points voting where each additional vote costs the viewer 200 Channel Points.
curl -X POST 'https://api.twitch.tv/helix/polls' \
-H 'Authorization: Bearer vpx9etxs8bbii29krls1ljai1kdr' \
-H 'Client-Id: dt4z41sa8uexdkjvt7uu9jjqm575' \
-H 'Content-Type: application/json' \
-d '{"broadcaster_id":"123456","title":"Streaming next Tuesday. Which time works best for you?","choices":[{"title":"9AM"},{"title":"10AM"},{"title":"7PM"},{"title":"8PM"},{"title":"9PM"}],"duration":300,"channel_points_voting_enabled":true,"channel_points_per_vote":200}'
If the request is successful, the poll is displayed in the broadcaster’s chat.
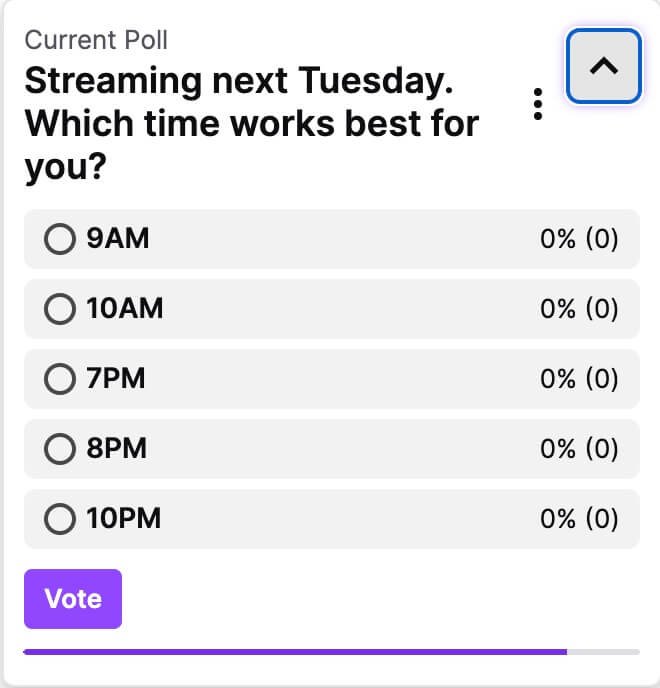
The POST’s response contains the poll’s ID (see the response’s `id` field), which you can use to end the poll early or get the current state of the poll.
Ending a poll
-------------
The poll runs for the length of time that you specified in the `duration` field when you created the poll. In the above example, the poll runs for 5 minutes. If you want to end the poll early, send a PATCH request to the [End Poll](https://dev.twitch.tv/docs/api/reference#end-poll)
endpoint.
To end the poll:
1. Set the _id_ query parameter to the poll’s ID (the Create Poll response contains the ID).
2. Set the _status_ query parameter to TERMINATED or ARCHIVED. Set to TERMINATED if you want to end the poll and display the results of the poll in chat; otherwise, set to ARCHIVED to end the poll and remove it from chat. If TERMINATED, the results are displayed in chat for a limited time, afterwhich, the poll’s status changes to ARCHIVED.
The following PATCH shows how to end a poll and display the result in chat.
curl -X PATCH 'https://api.twitch.tv/helix/polls?broadcaster_id=123456&id=b308bea0-b108-4c77-88bc-e8f234e72d2e&status=TERMINATED' \
-H 'Authorization: Bearer vpx9etxs8bbii29krls1ljai1kdr' \
-H 'Client-Id: dt4z41sa8uexdkjvt7uu9jjqm575'
Getting a poll’s current state
------------------------------
To get a list of all polls that the broadcaster has run in the last 90 days, send a GET request to the [Get Polls](https://dev.twitch.tv/docs/api/reference#get-polls)
endpoint. The response returns the polls in descending order by when they were created (with the latest poll first). If your app only gets polls (and doesn’t create them), you’ll need an access token with the **channel:read:polls** scope; otherwise, if you’re also creating polls, you can use an access token with the **channel:manage:polls** scope.
curl -X GET 'https://api.twitch.tv/helix/polls?broadcaster_id=123456' \
-H 'Authorization: Bearer vpx9etxs8bbii29krls1ljai1kdr' \
-H 'Client-Id: dt4z41sa8uexdkjvt7uu9jjqm575'
The following shows a partial response.
{
"data": [\
{\
"id": "84c8d008-5f57-4583-b7fa-b824e15b0655",\
"broadcaster_id": "123456",\
"broadcaster_name": "smartysmartmaster",\
"broadcaster_login": "smartysmartmaster",\
"title": "Streaming next Tuesday. Which time works best for you?",\
"choices": [\
{\
"id": "0214c236-f36d-49ca-a019-0f78329aaa60",\
"title": "9AM",\
"votes": 0,\
"channel_points_votes": 0,\
"bits_votes": 0\
},\
{\
"id": "975c4906-278d-468c-9706-4e33a7a35adc",\
"title": "10AM",\
"votes": 0,\
"channel_points_votes": 0,\
"bits_votes": 0\
},\
{\
"id": "8b04fd83-37f9-4d60-89cb-d8b54be7c461",\
"title": "7PM",\
"votes": 0,\
"channel_points_votes": 0,\
"bits_votes": 0\
},\
{\
"id": "93b42451-92d4-420e-ae0e-8219f440b9d0",\
"title": "8PM",\
"votes": 0,\
"channel_points_votes": 0,\
"bits_votes": 0\
},\
{\
"id": "807a3550-463b-45d6-8b5c-bb94095ccb37",\
"title": "10PM",\
"votes": 0,\
"channel_points_votes": 0,\
"bits_votes": 0\
}\
],\
"bits_voting_enabled": false,\
"bits_per_vote": 0,\
"channel_points_voting_enabled": true,\
"channel_points_per_vote": 20,\
"status": "ARCHIVED",\
"duration": 300,\
"started_at": "2022-06-22T16:15:29.899952649Z",\
"ended_at": "2022-06-22T16:20:29.899952649Z"\
},\
. . .\
],
"pagination": {}
}
To get a specific poll, use the _id_ query parameter. You may specify a maximum of 100 IDs.
curl -X GET 'https://api.twitch.tv/helix/polls?broadcaster_id=123456&id=86efb61a-dae2-4b66-9e93-48c1836bf748' \
-H 'Authorization: Bearer vpx9etxs8bbii29krls1ljai1kdr' \
-H 'Client-Id: dt4z41sa8uexdkjvt7uu9jjqm575'
The following response shows the single poll that you requested. The poll’s status is ACTIVE which means the poll is still running, and it looks like someone spent channel points to cast an additional vote.
{
"data": [\
{\
"id": "86efb61a-dae2-4b66-9e93-48c1836bf748",\
"broadcaster_id": "123456",\
"broadcaster_name": "smartysmartmaster",\
"broadcaster_login": "smartysmartmaster",\
"title": "Streaming next Tuesday. Which time works best for you?",\
"choices": [\
{\
"id": "7815e46b-d886-47fc-8962-0f6893e08b3d",\
"title": "9AM",\
"votes": 0,\
"channel_points_votes": 0,\
"bits_votes": 0\
},\
{\
"id": "5b6f2aed-1463-4f82-a62e-6da88c8141f5",\
"title": "10AM",\
"votes": 0,\
"channel_points_votes": 0,\
"bits_votes": 0\
},\
{\
"id": "bdd2de39-30f3-417d-893a-806c2b3e216c",\
"title": "7PM",\
"votes": 2,\
"channel_points_votes": 1,\
"bits_votes": 0\
},\
{\
"id": "88ed6e6f-fb92-4425-968c-1560ca09588a",\
"title": "8PM",\
"votes": 1,\
"channel_points_votes": 0,\
"bits_votes": 0\
},\
{\
"id": "75fd6a0d-f205-4770-ae07-ea4abae59ffb",\
"title": "10PM",\
"votes": 0,\
"channel_points_votes": 0,\
"bits_votes": 0\
}\
],\
"bits_voting_enabled": false,\
"bits_per_vote": 0,\
"channel_points_voting_enabled": true,\
"channel_points_per_vote": 2,\
"status": "ACTIVE",\
"duration": 300,\
"started_at": "2022-06-22T17:43:36.272090996Z"\
}\
],
"pagination": {}
}
Get notified when a poll’s state changes
----------------------------------------
To get notified when someone votes in the broadcaster’s poll, subscribe to the [Channel Poll Progress](https://dev.twitch.tv/docs/eventsub/eventsub-subscription-types#channelpollprogress)
event.
You can also subscribe to the following events to get notified when the broadcaster starts or ends a poll. Use the Poll End event to display the final poll results.
* [Channel Poll Begin](https://dev.twitch.tv/docs/eventsub/eventsub-subscription-types#channelpollbegin)
* [Channel Poll End](https://dev.twitch.tv/docs/eventsub/eventsub-subscription-types#channelpollend)
For information about how to subscribe to events, see [Managing Event Subscriptions](https://dev.twitch.tv/docs/eventsub/manage-subscriptions)
.
Provide feedback for this page
[Docs](https://dev.twitch.tv/docs)
[Status](https://devstatus.twitch.tv/)
[Support](https://dev.twitch.tv/support)
[Showcase](https://dev.twitch.tv/showcase)
[Blog](https://blog.twitch.tv/en/tags/developers/)
[](https://twitter.com/twitchdev)
[](https://github.com/twitchdev)
[](https://blog.twitch.tv/en/tags/developers/)
[](https://twitch.tv/twitchdev)
---
# Prediction | Twitch Developers
[Contents](https://dev.twitch.tv/docs/api/predictions/#)
Predictions
===========
Predictions are a great way for broadcasters to involve their community in a little light rivalry by asking viewers to predict the outcome of an event like _Will I make grandmaster today?_. Viewers use their Channel Points to back one of the outcomes with the chance to win points from the pool if their guess is correct.
You can provide from 2 to 10 outcomes for viewers to choose from. The outcomes can be binary choices for questions like _Will I set a PB lap time?_ or non-binary for questions like _Which level will I reach today?_.
Broadcasters can start a prediction at any time but may run only one prediction at a time. The broadcaster’s moderators and editors may create and manage the broadcaster’s predictions.
Because predictions may result in your viewers generating a high amount of Channel Points quickly, you should review your custom rewards and reward pricing before running a prediction.
Running predictions is available to partners and affiliates only. [Read more](https://help.twitch.tv/s/article/channel-points-predictions)
.
Creating a prediction
---------------------
To create a prediction, send a POST request to the [Create Prediction](https://dev.twitch.tv/docs/api/reference#create-prediction)
endpoint. The endpoint requires a [user access token](https://dev.twitch.tv/docs/authentication#user-access-tokens)
with scope **channel:manage:predictions**. This scope works for creating, ending, and getting predictions.
The following POST shows a prediction that asks the viewers to predict which level the broadcaster will reach today. The prediction runs for 5 minutes.
curl -X POST 'https://api.twitch.tv/helix/predictions' \
-H 'Authorization: Bearer vpx9etxs8bbii29krls1ljai1kdr' \
-H 'Client-Id: dt4z41sa8uexdkjvt7uu9jjqm575' \
-H 'Content-Type: application/json' \
-d '{"broadcaster_id":"123456","title":"What level will I reach today?","outcomes":[{"title":"Level 1"},{"title":"Level 2"},{"title":"Level 3"},{"title":"Level 4"}],"prediction_window":300}'
If the request is successful, the prediction is displayed in the broadcaster’s chat.
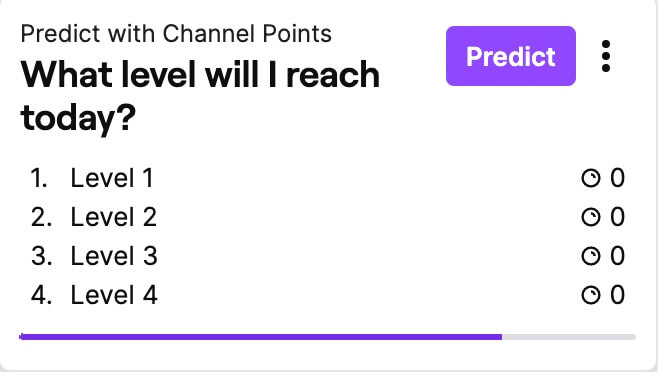
The POST’s response contains the prediction’s ID (see the response’s `id` field), which you use to identify the winning outcome or to get the current state of the prediction. Because the prediction specifies more than two outcomes, the color for each outcome is blue. If you specify only two outcomes, one outcome is blue and the other is pink.
{
"data": [\
{\
"id": "5921de75-e302-42d4-89a3-a858604da590",\
"broadcaster_id": "123456",\
"broadcaster_name": "smartysmartmaster",\
"broadcaster_login": "smartysmartmaster",\
"title": "What level will I reach today?",\
"winning_outcome_id": null,\
"outcomes": [\
{\
"id": "db70c764-9b4b-4036-87da-154720a648d4",\
"title": "Level 1",\
"users": 0,\
"channel_points": 0,\
"top_predictors": null,\
"color": "BLUE"\
},\
{\
"id": "81e995f6-b3ac-4eba-84c0-7e5bff53a25d",\
"title": "Level 2",\
"users": 0,\
"channel_points": 0,\
"top_predictors": null,\
"color": "BLUE"\
},\
{\
"id": "852378b7-ff5c-4b4e-b54d-615459b35574",\
"title": "Level 3",\
"users": 0,\
"channel_points": 0,\
"top_predictors": null,\
"color": "BLUE"\
},\
{\
"id": "ce597276-7b58-4aaf-98cb-a833cd40a316",\
"title": "Level 4",\
"users": 0,\
"channel_points": 0,\
"top_predictors": null,\
"color": "BLUE"\
}\
],\
"prediction_window": 300,\
"status": "ACTIVE",\
"created_at": "2022-06-27T16:22:15.478726636Z",\
"ended_at": null,\
"locked_at": null\
}\
]
}
Ending a prediction
-------------------
The prediction runs for the length of time that you specified in the `prediction_window` field when you created the prediction. In the above example, the prediction gives viewers 5 minutes to predict what level the broadcaster will reach. After the broadcaster finishes the game, they must identify the winning outcome. Points are only allocated to viewers if you select a winning outcome. If you don’t select a winning outcome within 24 hours, all points are returned to the viewers. Also, you can’t run another prediction until you select an outcome or cancel the prediction.
### Selecting the winning outcome
To select the winning outcome, send a PATCH request to the [End Prediction](https://dev.twitch.tv/docs/api/reference#end-prediction)
endpoint.
1. Set the _id_ query parameter to the prediction’s ID (the Create Prediction response contains the ID).
2. Set the _status_ query parameter to RESOLVED.
3. Set the _winning\_outcome\_id_ query parameter to the ID of the winning outcome. Each **Outcome** object contains an `id` field.
curl -X PATCH 'https://api.twitch.tv/helix/predictions?broadcaster_id=123456&id=5921de75-e302-42d4-89a3-a858604da590&status=RESOLVED&winning_outcome_id=852378b7-ff5c-4b4e-b54d-615459b35574' \
-H 'Authorization: Bearer vpx9etxs8bbii29krls1ljai1kdr' \
-H 'Client-Id: dt4z41sa8uexdkjvt7uu9jjqm575'
After selecting the winning outcome, the prediction’s results are displayed in chat for a limited time.
The following example shows the response after resolving the prediction. The `winning_outcome_id` field identifies the winning outcome. The **Outcome** object shows how many Channel Points were used to vote for the outcome and it identifies the user that voted for the outcome with the most Channel Points.
{
"data": [\
{\
"id": "5921de75-e302-42d4-89a3-a858604da590",\
"broadcaster_id": "123456",\
"broadcaster_name": "smartysmartmaster",\
"broadcaster_login": "smartysmartmaster",\
"title": "What level will I reach today?",\
"winning_outcome_id": "852378b7-ff5c-4b4e-b54d-615459b35574",\
"outcomes": [\
{\
"id": "db70c764-9b4b-4036-87da-154720a648d4",\
"title": "Level 1",\
"users": 0,\
"channel_points": 0,\
"top_predictors": null,\
"color": "BLUE"\
},\
{\
"id": "81e995f6-b3ac-4eba-84c0-7e5bff53a25d",\
"title": "Level 2",\
"users": 0,\
"channel_points": 0,\
"top_predictors": null,\
"color": "BLUE"\
},\
{\
"id": "852378b7-ff5c-4b4e-b54d-615459b35574",\
"title": "Level 3",\
"users": 1,\
"channel_points": 1,\
"top_predictors": [\
{\
"user_id": "654321",\
"user_login": "panpanpan",\
"user_name": "panpanpan",\
"channel_points_used": 1,\
"channel_points_won": 1\
}\
],\
"color": "BLUE"\
},\
{\
"id": "ce597276-7b58-4aaf-98cb-a833cd40a316",\
"title": "Level 4",\
"users": 0,\
"channel_points": 0,\
"top_predictors": null,\
"color": "BLUE"\
}\
],\
"prediction_window": 300,\
"status": "RESOLVED",\
"created_at": "2022-06-27T16:22:15.478726636Z",\
"ended_at": "2022-06-27T16:28:04.625329479Z",\
"locked_at": "2022-06-27T16:26:05.029735601Z"\
}\
],
"pagination": {}
}
### Canceling or locking the prediction
If you need to cancel a prediction or end the prediction early, send a PATCH request to the [End Prediction](https://dev.twitch.tv/docs/api/reference#end-prediction)
endpoint.
1. Set the _id_ query parameter to the prediction’s ID (the Create Prediction response contains the ID).
2. Set the _status_ query parameter to CANCELED or LOCKED. Set to CANCELED if you want to cancel the prediction and give everyone back their Channel Points. Set to LOCKED if you want to end the prediction early. If locked, you must still choose a winning outcome or cancel the prediction.
The following PATCH shows how to cancel the prediction.
curl -X PATCH 'https://api.twitch.tv/helix/predictions?broadcaster_id=123456&id=b1a72ca6-6f58-4ff8-b526-0c0ccc50363f&status=CANCELED' \
-H 'Authorization: Bearer vpx9etxs8bbii29krls1ljai1kdr' \
-H 'Client-Id: dt4z41sa8uexdkjvt7uu9jjqm575'
Getting a prediction’s current state
------------------------------------
To get a list of all predictions that the broadcaster has run in the last 90 days, send a GET request to the [Get Predictions](https://dev.twitch.tv/docs/api/reference#get-predictions)
endpoint. The response returns the predictions in descending order by when they were created (with the latest prediction first). If your app only gets predictions, you’ll need an access token with the **channel:read:predictions** scope; otherwise, if you’re also creating predictions, you can use an access token with the **channel:manage:predictions** scope.
curl -X GET 'https://api.twitch.tv/helix/predictions?broadcaster_id=123456' \
-H 'Authorization: Bearer vpx9etxs8bbii29krls1ljai1kdr' \
-H 'Client-Id: dt4z41sa8uexdkjvt7uu9jjqm575'
The following shows a partial response.
{
"data": [\
{\
"id": "f6a64b42-02be-450f-9637-b22813720a57",\
"broadcaster_id": "123456",\
"broadcaster_name": "smartysmartmaster",\
"broadcaster_login": "smartysmartmaster",\
"title": "What level will I reach today?",\
"winning_outcome_id": null,\
"outcomes": [\
{\
"id": "5cdf0e7a-fc1b-4562-aa62-16ce70173ea7",\
"title": "Level 1",\
"users": 0,\
"channel_points": 0,\
"top_predictors": null,\
"color": "BLUE"\
},\
{\
"id": "1f2c0d2d-001a-437a-a096-9672b74403c1",\
"title": "Level 2",\
"users": 0,\
"channel_points": 0,\
"top_predictors": null,\
"color": "BLUE"\
},\
{\
"id": "68494b90-1cbf-4a51-aa05-82b46c6fc350",\
"title": "Level 3",\
"users": 0,\
"channel_points": 0,\
"top_predictors": null,\
"color": "BLUE"\
},\
{\
"id": "4cdaa34d-5580-4a89-a70d-5dd1038adfc0",\
"title": "Level 4",\
"users": 0,\
"channel_points": 0,\
"top_predictors": null,\
"color": "BLUE"\
}\
],\
"prediction_window": 200,\
"status": "ACTIVE",\
"created_at": "2022-06-27T19:29:55.034259659Z",\
"ended_at": null,\
"locked_at": null\
},\
. . .\
{\
"id": "6f7b8113-add1-4d20-8700-534e9bab2c38",\
"broadcaster_id": "123456",\
"broadcaster_name": "smartysmartmaster",\
"broadcaster_login": "smartysmartmaster",\
"title": "Will I set a PB lap time?",\
"winning_outcome_id": null,\
"outcomes": [\
{\
"id": "fac2e75c-6e8c-47ea-8e26-74cffb1067da",\
"title": "Absolutely",\
"users": 0,\
"channel_points": 0,\
"top_predictors": null,\
"color": "BLUE"\
},\
{\
"id": "b43a57cb-4ec1-4a6d-b8a6-b8a7cd2704de",\
"title": "Not a chance",\
"users": 0,\
"channel_points": 0,\
"top_predictors": null,\
"color": "PINK"\
}\
],\
"prediction_window": 60,\
"status": "CANCELED",\
"created_at": "2022-05-17T18:07:03.222132487Z",\
"ended_at": "2022-05-17T19:33:19.30761015Z",\
"locked_at": "2022-05-17T18:08:03.354254258Z"\
}\
],
"pagination": {}
}
To get a specific prediction, use the _id_ query parameter. You may specify a maximum of 100 IDs.
curl -X GET 'https://api.twitch.tv/helix/predictions?broadcaster_id=123456&id=5921de75-e302-42d4-89a3-a858604da590' \
-H 'Authorization: Bearer vpx9etxs8bbii29krls1ljai1kdr' \
-H 'Client-Id: dt4z41sa8uexdkjvt7uu9jjqm575'
The following response shows the single prediction that you requested. The predictions’s status is RESOLVED which means the prediction is over and an outcome was selected (see the Level 3 outcome).
{
"data": [\
{\
"id": "5921de75-e302-42d4-89a3-a858604da590",\
"broadcaster_id": "123456",\
"broadcaster_name": "smartysmartmaster",\
"broadcaster_login": "smartysmartmaster",\
"title": "What level will I reach today?",\
"winning_outcome_id": "852378b7-ff5c-4b4e-b54d-615459b35574",\
"outcomes": [\
{\
"id": "db70c764-9b4b-4036-87da-154720a648d4",\
"title": "Level 1",\
"users": 0,\
"channel_points": 0,\
"top_predictors": null,\
"color": "BLUE"\
},\
{\
"id": "81e995f6-b3ac-4eba-84c0-7e5bff53a25d",\
"title": "Level 2",\
"users": 0,\
"channel_points": 0,\
"top_predictors": null,\
"color": "BLUE"\
},\
{\
"id": "852378b7-ff5c-4b4e-b54d-615459b35574",\
"title": "Level 3",\
"users": 1,\
"channel_points": 1,\
"top_predictors": [\
{\
"user_id": "654321",\
"user_login": "panpanpan",\
"user_name": "panpanpan",\
"channel_points_used": 1,\
"channel_points_won": 1\
}\
],\
"color": "BLUE"\
},\
{\
"id": "ce597276-7b58-4aaf-98cb-a833cd40a316",\
"title": "Level 4",\
"users": 0,\
"channel_points": 0,\
"top_predictors": null,\
"color": "BLUE"\
}\
],\
"prediction_window": 300,\
"status": "RESOLVED",\
"created_at": "2022-06-27T16:22:15.478726636Z",\
"ended_at": "2022-06-27T16:28:04.625329479Z",\
"locked_at": "2022-06-27T16:26:05.029735601Z"\
}\
],
"pagination": {}
}
Get notified when a prediction’s state changes
----------------------------------------------
To get notified when someone votes in the broadcaster’s prediction, subscribe to the [Channel Prediction Progress](https://dev.twitch.tv/docs/eventsub/eventsub-subscription-types#channelpredictionprogress)
event.
You can also subscribe to the following events to get notified when the broadcaster starts or ends a prediction. Use the Prediction End event to display the final prediction results.
* [Channel Prediction Begin](https://dev.twitch.tv/docs/eventsub/eventsub-subscription-types#channelpredictionbegin)
* [Channel Prediction End](https://dev.twitch.tv/docs/eventsub/eventsub-subscription-types#channelpredictionend)
For information about how to subscribe to events, see [Managing Event Subscriptions](https://dev.twitch.tv/docs/eventsub/manage-subscriptions)
.
Provide feedback for this page
[Docs](https://dev.twitch.tv/docs)
[Status](https://devstatus.twitch.tv/)
[Support](https://dev.twitch.tv/support)
[Showcase](https://dev.twitch.tv/showcase)
[Blog](https://blog.twitch.tv/en/tags/developers/)
[](https://twitter.com/twitchdev)
[](https://github.com/twitchdev)
[](https://blog.twitch.tv/en/tags/developers/)
[](https://twitch.tv/twitchdev)
---
# Markers | Twitch Developers
[Contents](https://dev.twitch.tv/docs/api/markers/#)
Stream Markers
==============
Stream Markers let you and your editors mark points in your live broadcast that you think could be used in a highlight reel using Twitch’s Highlighter feature. The markers are shown on the Highlighter’s timeline at the point of the stream that you created them. [Read more](https://help.twitch.tv/s/article/creating-highlights-and-stream-markers)
Creating Markers
----------------
To create a stream marker, use the [Create Stream Marker](https://dev.twitch.tv/docs/api/reference#create-stream-marker)
API. The request requires a user access token that includes the **channel:manage:broadcast** scope. The body of the request specifies the ID of the broadcaster whose stream you want to mark. To create a marker, the broadcaster must be streaming live.
curl -X POST 'https://api.twitch.tv/helix/streams/markers' \
-H 'Authorization: Bearer raayetjqpx1gfwu1h8iivy5cqfs1' \
-H 'Client-Id: hof5gwx0su6owfs0nyan9c87zr6t' \
-H 'Content-Type: application/json' \
-d '{"user_id":123456}'
The following example shows the request’s response. The `position_seconds` field marks the offset of the marker from the beginning of the stream. Because the request didn’t specify a description of the marker, the `description` field contains an empty string.
{
"data": [\
{\
"id": "636c75f397acee3aef1cfcb8dbcd28e7",\
"created_at": "2022-07-18T17:13:20.505877606Z",\
"position_seconds": 99,\
"description": ""\
}\
]
}
### Viewing your markers in the Highlighter
By default, the Highlighter selects roughly the middle two-thirds of the stream to highlight. Markers are shown as yellow if they fall within a highlighted segment; otherwise, they’re shown as gray. If a marker is gray and you create a highlight segment that spans the marker or extend a highlighted area beyond the marker, it turns yellow.
### Setting optional parameters
The request may also include an optional short description to help remind you why you created the marker. The description is limited to a maximum of 140 characters.
curl -X POST 'https://api.twitch.tv/helix/streams/markers' \
-H 'Authorization: Bearer raayetjqpx1gfwu1h8iivy5cqfs1' \
-H 'Client-Id: hof5gwx0su6owfs0nyan9c87zr6t' \
-H 'Content-Type: application/json' \
-d '{"user_id":123456,"description":"killer retort"}'
### Possible issues you can run into
You may only create markers:
* If the broadcaster is streaming live.
* If the broadcaster has enabled the ability to store past broadcasts. See **Store past broadcasts** under **Settings**, **Stream**, **VOD Settings** in your **Creator Dashboard**.
* If the broadcast is not a premiere (a live, first-viewing event that combines uploaded videos with live chat).
* If the broadcast is not a rerun of a past broadcast.
Getting markers
---------------
To get your markers, use the [Get Stream Markers](https://dev.twitch.tv/docs/api/reference#get-stream-markers)
API. You can get markers from your most recent on-demand video (VOD) or from a specific VOD. The request requires a user access token that includes the **channel:manage:broadcast** or **channel:read:broadcast** scope.
### Getting markers from your most recent VOD
To get markers from your most recent VOD, set the _user\_id_ query parameter to the broadcaster’s ID.
curl -X GET 'https://api.twitch.tv/helix/streams/markers?user_id=123456' \
-H 'Authorization: Bearer raayetjqpx1gfwu1h8iivy5cqfs1' \
-H 'Client-Id: hof5gwx0su6owfs0nyan9c87zr6t'
The following example shows the request’s response. The `videos` field contains a single video, which is your most recent VOD. The `markers` field contains the list of markers you created. In this example, only one marker was created. The `position_seconds` field is the offset from the beginning of the video to the marker.
{
"data": [\
{\
"user_id": "123456",\
"user_name": "fun2bfun",\
"user_login": "fun2bfun",\
"videos": [\
{\
"video_id": "1537415906",\
"markers": [\
{\
"id": "29b23f883d0c79b1e1787aeef3b0d5be",\
"created_at": "2022-07-20T15:08:27.527678964Z",\
"description": "",\
"position_seconds": 114,\
"URL": "https://twitch.tv/fun2bfun/manager/highlighter/1537415906?t=1m114s"\
}\
]\
}\
]\
}\
],
"pagination": {}
}
If you don’t have any VODs, the request returns 404 Not Found.
### Getting markers from a specific VOD
To get markers from a specific VOD, set the _video\_id_ query parameter to the VOD’s ID. To get a video’s ID, see the [Get Videos](https://dev.twitch.tv/docs/api/reference#get-videos)
API.
curl -X GET 'https://api.twitch.tv/helix/streams/markers?video_id=9876543' \
-H 'Authorization: Bearer raayetjqpx1gfwu1h8iivy5cqfs1' \
-H 'Client-Id: hof5gwx0su6owfs0nyan9c87zr6t'
### Setting optional parameters
The API provides the optional _first_ and _after_ query parameters used for pagination. To learn how to page through the results, see [Pagination](https://dev.twitch.tv/docs/api/guide#pagination)
.
**NOTE**: Pagination for Get Stream Markers differs from pagination for the other parts of the Twitch API. For most of the APIs you’re paging the objects in the `data` array, but with this API, you’re paging the objects in the `markers` array.
Provide feedback for this page
[Docs](https://dev.twitch.tv/docs)
[Status](https://devstatus.twitch.tv/)
[Support](https://dev.twitch.tv/support)
[Showcase](https://dev.twitch.tv/showcase)
[Blog](https://blog.twitch.tv/en/tags/developers/)
[](https://twitter.com/twitchdev)
[](https://github.com/twitchdev)
[](https://blog.twitch.tv/en/tags/developers/)
[](https://twitch.tv/twitchdev)
---
# Schedule | Twitch Developers
[Contents](https://dev.twitch.tv/docs/api/schedule/#)
Scheduling Broadcasts
=====================
Creating a broadcasting schedule lets viewers know when they should tune in next to watch another great show. To help manage the broadcaster’s schedule, the Twitch API provides a number of endpoints that developers can use to create an experience that displays and manages a broadcaster’s schedule.
A schedule is made up of one or more recurring and non-recurring segments. Recurring segments are broadcasts that stream weekly on the same weekday and time of day (for example, Fridays at 10:30 AM). Non-recurring segments are single event broadcasts.
[Read More](https://help.twitch.tv/s/article/channel-page-setup#Schedule)
Getting the broadcaster’s streaming schedule
--------------------------------------------
To get a broadcaster’s streaming schedule, use the [Get Channel Stream Schedule](https://dev.twitch.tv/docs/api/reference#get-channel-stream-schedule)
endpoint.
The request must include:
* An app or user access token.
* The _broadcaster\_id_ query parameter that’s set to the ID of the broadcaster whose streaming schedule you want to get.
The following example shows how to get a broadcaster’s schedule. The request returns segments that start after the current UTC date and time. To specify the date and time used in the request, see [Getting segments by date](https://dev.twitch.tv/docs/api/schedule/#getting-segments-by-date)
.
curl -X GET 'https://api.twitch.tv/helix/schedule?broadcaster_id=123456' \
-H 'Authorization: Bearer nazuiljmm4vk3x1l5xhlsnakgrhj' \
-H 'Client-Id: dt4z41sa8uexdkjvtu49jjqm575f'
The following response shows that the broadcaster has scheduled 1) a 40 minute stream that occurs every Wednesday at 7:00 AM UTC (you know that it’s a recurring broadcast because the `is_recurring` field is set to **true**), 2) a 30 minute non-recurring stream that occurs on 24 August, and 3) a vacation for the month of September.
{
"data": {
"segments": [\
{\
"id": "eyJzZWdtZW50SUQiOiIzNiM2QwLTQwOTQtYWRlMy0zNzVjYTQ0ZjA1NWQiLCJpc29ZZWFyIjoyMDIyLCJpc29XZWVrIjozNH0=",\
"start_time": "2022-08-24T07:00:00Z",\
"end_time": "2022-08-24T07:40:00Z",\
"title": "Emira or Cayman?",\
"canceled_until": null,\
"category": 509658,\
"is_recurring": true\
},\
{\
"id": "eyJzZWdtZW50SUQiOiJlNjE4OTyLTQ4N2ItYWE2My03Y2I5NmNiZGU5MTgiLCJpc29ZZWFyIjoyMDIyLCJpc29XZWVrIjozNH0=",\
"start_time": "2022-08-24T07:45:00Z",\
"end_time": "2022-08-24T08:15:00Z",\
"title": "First Drive",\
"canceled_until": null,\
"category": 509658,\
"is_recurring": false\
},\
. . .\
],
"broadcaster_id": "123456",
"broadcaster_name": "zippydodah",
"broadcaster_login": "ZippyDoDah",
"vacation": {
"start_time": "2020-09-01T00:00:00Z",
"end_time": "2020-09-30T23:59:59Z"
}
},
"pagination": {
"cursor": "eyJiIjpudWxsLCJhIjp7IkN1cnNvci..."
}
}
If the broadcaster hasn’t scheduled any broadcasts, the request returns an HTTP 404 Not Found status code.
The number of occurrences in the response for a recurring segment is undetermined but may extend for years, so plan your pagination logic accordingly.
### Getting segments by ID
If you know a segment’s ID, you can use it to get the segment’s data. You may specify a maximum of 100 IDs. To specify multiple IDs, repeat the _id_ parameter for each segment you want to get. For example, `id=123&id=456&id=789`. The request doesn’t ignore duplicate IDs.
curl -X GET 'https://api.twitch.tv/helix/schedule?broadcaster_id=123456&id=eyJzZWdtZW50SUQiOiIxMzdkM2M2Ni1lM2QwLMTUiLCJpc29ZZWFyIjoyMDIyLCJpc29XZWVrIjo0MX0=' \
-H 'Authorization: Bearer nazuilj4vk36jx1l5xhlsnakgrhj' \
-H 'Client-Id: dt4z41sa8uekjvt7uu49jjqm575f'
The above ID returns the 11 October segment.
{
"data": {
"segments": [\
{\
"id": \
"eyJzZWdtZW50SUQiOiIxMzdkM2M2Ni1lM2QwLMTUiLCJpc29ZZWFyIjoyMDIyLCJpc29XZWVrIjo0MX0=",\
"start_time": "2022-10-11T06:00:00Z",\
"end_time": "2022-10-11T06:30:00Z",\
"title": "30 minutes of talking nonsense",\
"canceled_until": null,\
"category": null,\
"is_recurring": true\
}\
],
"broadcaster_id": "88776655",
"broadcaster_name": "chitterchatter",
"broadcaster_login": "ChitterChatter",
"vacation": {
"start_time": "2022-08-08T00:00:00Z",
"end_time": "2022-09-16T00:00:00Z"
}
},
"pagination": {}
}
Because the above segment is part of a recurring broadcast, if you include the _start\_time_ query parameter in the above request and set it to 1 August (`2022-08-01T00:00:00Z`), it returns the next broadcast segment that occurs on or after 1 August. In this case, the recurring broadcast occurs on Tuesdays, so the response contains the 2 August segment of the recurring broadcast.
{
"data": {
"segments": [\
{\
"id": "eyJzZWdtZW50SUQiOiIxMzdkM2M2Ni1lM2QwLMTUiLCJpc29ZZWFyIjoyMDIyLCJpc29XZWVrIjozMX0==",\
"start_time": "2022-08-02T06:00:00Z",\
"end_time": "2022-08-02T06:30:00Z",\
"title": "30 minutes of talking nonsense",\
"canceled_until": null,\
"category": null,\
"is_recurring": true\
}\
],
"broadcaster_id": "88776655",
"broadcaster_name": "chitterchatter",
"broadcaster_login": "ChitterChatter",
"vacation": {
"start_time": "2022-08-08T00:00:00Z",
"end_time": "2022-09-16T00:00:00Z"
}
},
"pagination": {}
}
### Getting segments by date
By default, when you get the broadcaster’s schedule, it returns scheduled segments starting from the current UTC date and time. For example, if the UTC date and time is 8:15 PM on 23 August, the response contains segments that start on or after 8:15 PM on 23 August. This means that if the broadcaster also scheduled a 1:00 PM broadcast on 23 August, the response wouldn’t include it. To ensure that the response contains the entire day’s schedule, use the _start\_time_ query parameter and set the time portion to zeroes.
curl -X GET 'https://api.twitch.tv/helix/schedule?broadcaster_id=123456&start_time=2022-08-23T00:00:00Z' \
-H 'Authorization: Bearer nazuiljmm436jx1l5xhlsnakgrhj' \
-H 'Client-Id: dt4z41sa8udkjvt7uu49jjqm575f'
You may use the _start\_time_ parameter to get the broadcaster’s past or future scheduled segments. For example, if the current month is August and you want to preview their September schedule, use `start_time=2022-09-01T00:00:00Z`.
Setting your vacation schedule
------------------------------
It’s a good idea to let your viewers know when you’re going on vacation, so they can plan accordingly. To set your planned vacation, use the [Update Channel Stream Schedule](https://dev.twitch.tv/docs/api/reference#update-channel-stream-schedule)
endpoint.
The request must include:
* A user access token that includes the **channel:manage:schedule** scope.
* The _broadcaster\_id_ query parameter that’s set to the ID of the broadcaster who wants to set their vacation schedule.
* An object in the request body with the following fields:
* The `is_vacation_enabled` field that’s set to **true**.
* The `vacation_start_time` field that’s set to the day that the broadcaster’s vacation starts.
* The `vacation_end_time` field that’s set to the day that the broadcaster’s vacation ends.
* The `timezone` field that’s set to the time zone where the broadcaster is located. Specify the time zone using [IANA time zone database](https://www.iana.org/time-zones)
format.
The following example shows how to specify the broadcaster’s vacation schedule.
curl -X PATCH 'https://api.twitch.tv/helix/schedule/settings?broadcaster_id=123456' \
-H 'Authorization: Bearer nazuiljmm4vkjx1l5xhlsnakgrhj' \
-H 'Client-Id: dt4z41sa8uexdkjvuu49jjqm575f' \
-H 'Content-Type: application/json' \
-d '{"is_vacation_enabled":true,"vacation_start_time":"2022-10-01T00:00:00Z","vacation_end_time":"2023-04-30T23:59:59Z","timezone":"America/Los_Angeles"}'
Scheduling a vacation doesn’t:
* Affect the broadcaster’s existing streaming schedule; it doesn’t remove or cancel the segments within the scheduled vacation.
* Prevent you from adding a streaming segment that falls within the scheduled vacation.
When the broadcaster’s vacation is over, remember to remove the vacation schedule by setting _is\_vacation\_enabled_ to **false**.
curl -X PATCH 'https://api.twitch.tv/helix/schedule/settings?broadcaster_id=123456' \
-H 'Authorization: Bearer nazuiljmm4vkjx1l5xhlsnakgrhj' \
-H 'Client-Id: dt4z41sa8uexdkjvuu49jjqm575f' \
-H 'Content-Type: application/json' \
-d '{"is_vacation_enabled":false}'
Creating a broadcasting segment
-------------------------------
To schedule a streaming segment, use the [Create Channel Stream Schedule Segment](https://dev.twitch.tv/docs/api/reference#create-channel-stream-schedule-segment)
endpoint. The endpoint lets you create recurring and non-recurring segments.
**NOTE**: Only partners and affiliates may create non-recurring segments.
### Recurring segment
A recurring segment defines a weekly broadcast that’s streamed on the same weekday and at the same time every week.
The request must include:
* A user access token that includes the **channel:manage:schedule** scope.
* The _broadcaster\_id_ query parameter that’s set to the ID of the broadcaster who wants to add the weekly segment.
* An object in the request body with the following fields:
* The `start_time` field that’s set to the day and time when the broadcaster wants to broadcast. The date determines the day of the week that the broadcast falls on. If the date is set to 2 September at 10:00 AM, the broadcaster’s weekly segment occurs on Fridays at 10:00 AM. Segments start on the first weekday on or after today’s date. So, if today is Wednesday, 24 August and you specify a start date of 2 September, the first segment begins 26 August; you cannot schedule a recurring broadcasting schedule that starts in the future.
* The `timezone` field that’s set to the time zone where the broadcaster is located. Specify the time zone using [IANA time zone database](https://www.iana.org/time-zones)
format. For example, America/Los\_Angeles.
* The `duration` field that’s set to the length of the broadcast in minutes.
* The `is_recurring` field that’s set to **true**.
Although optional, you should also specify:
* The `category_id` field that’s set to the ID of the category or game that identifies the type of content that the broadcaster will stream. For example, if the broadcaster has a talk show, set this parameter to the Just Chatting ID (509658). To discover category or game IDs, use the [Search Categories](https://dev.twitch.tv/docs/api/reference#search-categories)
endpoint.
* The `title` field that’s set to a short description of what the segment will cover.
The following example shows how to create a recurring segment.
curl -X POST 'https://api.twitch.tv/helix/schedule/segment?broadcaster_id=123456' \
-H 'Authorization: Bearer nazuiljmvk36jx1l5xhlsnakgrhj' \
-H 'Client-Id: dt4z41sa8uexdkt7uu49jjqm575f' \
-H 'Content-Type: application/json' \
-d '{"start_time":"2022-08-26T07:00:00Z","duration":45,"timezone":"America/Los_Angeles","title":"Emira or Cayman?","is_recurring":true,"category_id":509658}'
The following example shows the response if the request succeeds.
{
"data": {
"segments": [\
{\
"id": "eyJzZWdtZW50SUQiOiI1MDc2NmFlOC1lMmJlLTQzMjYjRkNzkiLCJpc29ZZWFyIjoyMDIyLCJpc29XZWVrIjo1MX0=",\
"start_time": "2022-08-26T07:00:00Z",\
"end_time": "2022-08-26T07:45:00Z",\
"title": "Emira or Cayman?",\
"canceled_until": null,\
"category": {\
"id": "509658",\
"name": "Just Chatting"\
},\
"is_recurring": true\
}\
],
"broadcaster_id": "123456",
"broadcaster_name": "zippydodah",
"broadcaster_login": "ZippyDoDah",
"vacation": {
"start_time": "2020-09-01T00:00:00Z",
"end_time": "2020-09-30T23:59:59Z"
}
}
}
Scheduling recurring segments that overlap will fail. For example, if a recurring segment occurs on Thursdays from 8:30 AM to 9:30 AM, you may not create another recurring segment on Thursdays that overlaps that time period.
### Non-recurring segment
A non-recurring segment is a one-time broadcast segment. In the Twitch UX, non-recurring segments are shown under **Upcoming Events** in the broadcaster’s schedule.
**NOTE**: Only partners and affiliates may create non-recurring segments.
The only differences between creating recurring and non-recurring segments are:
* The _start\_time_ query parameter specifies the actual date and time of the segment, which may be a future date.
* The _is\_recurring_ query parameter is set to **false**.
curl -X POST 'https://api.twitch.tv/helix/schedule/segment?broadcaster_id=123456' \
-H 'Authorization: Bearer nazuiljmvk36jx1l5xhlsnakgrhj' \
-H 'Client-Id: dt4z41sa8uexdkt7uu49jjqm575f' \
-H 'Content-Type: application/json' \
-d '{"start_time":"2022-09-05T07:00:00Z","duration":45,"timezone":"America/Los_Angeles","title":"Emira First Drive","is_recurring":false,"category_id":509658}'
Non-recurring segments may overlap recurring segments, but this might confuse viewers unless you also cancel the recurring segment.
Updating a broadcasting segment
-------------------------------
To update a broadcasting segment, use the [Update Channel Stream Schedule Segment](https://dev.twitch.tv/docs/api/reference#update-channel-stream-schedule-segment)
endpoint.
When you create a recurring segment, it applies the same title, duration, etc. to each occurrence in the schedule. If the broadcaster changes their broadcast’s topic weekly, you’d use this endpoint to update the title for the current week’s broadcast. But just like when you create the segment, the title change applies to all of that segment’s occurrences. The same is true for duration and category ID.
To update the segment’s title, the request must include:
* A user access token that includes the **channel:manage:schedule** scope.
* The _broadcaster\_id_ query parameter that’s set to the ID of the broadcaster who wants to update the segment.
* The _id_ query parameter that’s set to the ID of the segment to update. To get the ID associated with a specific segment, see [Getting the broadcaster’s streaming schedule](https://dev.twitch.tv/docs/api/schedule/#getting-the-broadcasters-streaming-schedule)
. Because the update applies to all of the segment’s occurrences, it doesn’t matter which ID you use.
* An object in the body of the request that includes the following fields:
* The `title` field that’s set to the new title.
curl -X PATCH 'https://api.twitch.tv/helix/schedule/segment?broadcaster_id=123456&id=eyJzZWdtZW50SUQiOiIxYjY4YzQyOC1kZmJ2NTAyNmIiLCJpc29ZZWFyIjoyMDIyLCJpc29XZWVrIjozNX0=' \
-H 'Authorization: Bearer nazuiljmm4vkjx1l5xhlsnakgrhj' \
-H 'Client-Id: dt4z41sa8uexdkt7uu49jjqm575f' \
-H 'Content-Type: application/json' \
-d '{"title":"The 2023 GT3 RS is a beast!"}'
The ID for the above request is for a future broadcast date but since the change affects all dates in the segment, the response shows the date of the next scheduled segment.
{
"data": {
"segments": [\
{\
"id": "eyJzZWdtZW50SUQiOiIxYjY4YzQyOC1kZm0zODhjMGQ2NTAyNmIiLCJpc29ZZWFyIjoyMDIyLCJpc29XZWVrIjozNH0=",\
"start_time": "2022-08-25T22:00:00Z",\
"end_time": "2022-08-25T22:35:00Z",\
"title": "The 2023 GT3 RS is a beast!",\
"canceled_until": null,\
"category": null,\
"is_recurring": true\
}\
],
"broadcaster_id": "123456",
"broadcaster_name": "zippydodah",
"broadcaster_login": "ZippyDoDah",
"vacation": {
"start_time": "2022-10-01T00:00:00Z",
"end_time": "2023-04-30T23:59:59Z"
}
}
}
For recurring segments, you may change the segment’s duration but not the start date. Updating the duration changes the duration of all occurrences in that segment.
If you need to change the start time of this week’s broadcast, you could 1) cancel this week’s broadcast, 2) create a new recurring segment with the same information but a new start time, and 3) delete the new recurring segment after the broadcast. Note that the new segment’s start time can’t overlap the original segment’s start time and duration.
For non-recurring segments, you may change the segment’s start time and duration.
**NOTE**: Only partners and affiliates may update a non-recurring segment’s start time and duration.
### Canceling a segment
If the broadcaster is unable to broadcast a segment, you can cancel it by setting the `is_canceled` field to **true**.
For recurring segments, you may cancel only the next scheduled occurrence. If you try to cancel a future occurrence, it cancels the next scheduled segment only. But you may cancel future, non-recurring segments.
The request must include:
* A user access token that includes the **channel:manage:schedule** scope.
* The _broadcaster\_id_ query parameter that’s set to the ID of the broadcaster who wants to cancel one of their broadcasting segments.
* The _id_ query parameter that’s set to the ID of the occurrence to cancel. To get the ID associated with an occurrence of a segment, see [Getting the broadcaster’s streaming schedule](https://dev.twitch.tv/docs/api/schedule/#getting-the-broadcasters-streaming-schedule)
.
* An object in the body of the request that includes the following fields:
* The `is_canceled` field set to **true**.
curl -X PATCH 'https://api.twitch.tv/helix/schedule/segment?broadcaster_id=123456&id=eyJzZWdtZW50SUQiOiIxYjY4YzQyOC1kZmJiLTQ2NjkiLCJpc29ZZWFyIjoyMDIyLCJpc29XZWVrIjozNX0=' \
-H 'Authorization: Bearer nazuimm4vk36jx1l5xhlsnakgrhj' \
-H 'Client-Id: dt4z41sa8uekjvt7uu49jjqm575f' \
-H 'Content-Type: application/json' \
-d '{"is_canceled":true}'
If the request succeeds, the `canceled_until` field is set to the value in `end_time`.
{
"data": {
"segments": [\
{\
"id": "eyJzZWdtZW50SUQiOiIxYjY4YzQyOC1kZmJiLTQ2NjkiLCJpc29ZZWFyIjoyMDIyLCJpc29XZWVrIjozNX0=",\
"start_time": "2022-08-27T19:00:00Z",\
"end_time": "2022-08-27T19:45:00Z",\
"title": "created to test canceling non-recurring segment",\
"canceled_until": "2022-08-27T19:45:00Z",\
"category": {\
"id": "509658",\
"name": "Just Chatting"\
},\
"is_recurring": false\
}\
],
"broadcaster_id": "123456",
"broadcaster_name": "zippydodah",
"broadcaster_login": "ZippyDoDah",
"vacation": {
"start_time": "2022-10-01T00:00:00Z",
"end_time": "2023-04-30T23:59:59Z"
}
}
}
Deleting a broadcasting segment
-------------------------------
To delete a broadcasting segment, use the [Delete Channel Stream Schedule Segment](https://dev.twitch.tv/docs/api/reference#delete-channel-stream-schedule-segment)
endpoint.
The request must include:
* A user access token that includes the **channel:manage:schedule** scope.
* The _broadcaster\_id_ query parameter that’s set to the ID of the broadcaster who wants to delete one of their broadcasting segments.
* The _id_ query parameter that’s set to the ID of the segment to delete. To get the ID associated with a segment, see [Getting the broadcaster’s streaming schedule](https://dev.twitch.tv/docs/api/schedule/#getting-the-broadcasters-streaming-schedule)
. For non-recurring segments, the request deletes the specified segment, but for recurring segments, the request deletes the entire recurring segment and not just the occurrence associated with the ID. For example, if you pass the ID of a broadcast that occurs in two weeks, the request deletes the entire recurring segment and not just the broadcast that occurs in two weeks.
curl -X DELETE 'https://api.twitch.tv/helix/schedule/segment?broadcaster_id=123456&id=eyJzZWdtZW50SUQiOiIxYjY4YzQyOC1kZmJiLTTAyNmIiLCJpc29ZZWFyIjoyMDIyLCJpc29XZWVrIjozNn0=' \
-H 'Authorization: Bearer nazujmm4vk36jx1l5xhlsnakgrhj' \
-H 'Client-Id: dt4z4a8uexdkjvt7uu49jjqm575f'
If the request succeeds, the response is HTTP status code 204 No Content.
Provide feedback for this page
[Docs](https://dev.twitch.tv/docs)
[Status](https://devstatus.twitch.tv/)
[Support](https://dev.twitch.tv/support)
[Showcase](https://dev.twitch.tv/showcase)
[Blog](https://blog.twitch.tv/en/tags/developers/)
[](https://twitter.com/twitchdev)
[](https://github.com/twitchdev)
[](https://blog.twitch.tv/en/tags/developers/)
[](https://twitch.tv/twitchdev)
---
# Videos | Twitch Developers
[Contents](https://dev.twitch.tv/docs/api/videos/#)
Videos
======
When a broadcaster enables on-demand videos, their live streams are saved as videos. This lets the broadcaster’s fans watch the streams they missed. [Read more](https://help.twitch.tv/s/article/video-on-demand)
The Twitch API lets apps:
* [Display a list of videos](https://dev.twitch.tv/docs/api/videos/#getting-videos)
. Users can then select a video from the list to watch. For information about embedding and viewing videos, see [Embedding Video and Clips](https://dev.twitch.tv/docs/embed/video-and-clips)
.
* [Delete one or more videos](https://dev.twitch.tv/docs/api/videos/#deleting-videos)
. Broadcasters can manage their videos by deleting videos they no longer want in their library.
Getting videos
--------------
To get videos, use the [Get Videos](https://dev.twitch.tv/docs/api/reference#get-videos)
API. The API lets you get videos by ID, by broadcaster, or by game. The request requires an app access token or user access token.
### Getting videos by ID
To get videos by ID, set the _id_ query parameter to the ID of the video you want to get. You may specify a maximum of 100 IDs. To specify multiple IDs, repeat the _id_ parameter for each video you want to get. For example, `id=123&id=456&id=789`.
The following example, gets a single video.
curl -X GET 'https://api.twitch.tv/helix/videos?id=987654321' \
-H 'Authorization: Bearer ohzjccugqczn10eau1pfophkpv' \
-H 'Client-Id: hof5gwx0su6owfnyan9c87zr6t'
Here’s what the response looks like:
{
"data": [\
{\
"id": "987654321",\
"stream_id": "111222333",\
"user_id": "56789",\
"user_login": "zzzztopper",\
"user_name": "zzzzTopper",\
"title": "The incredible artistry that is me.",\
"description": "",\
"created_at": "2022-07-08T16:58:46Z",\
"published_at": "2022-07-08T16:58:46Z",\
"url": "https://www.twitch.tv/videos/987654321",\
"thumbnail_url": "https://static-cdn.jtvnw.net/cf_vods/dgeft87wbj63p/ce4ddf3095472cde00cd_zzzztopper_45725106652_1657299521//thumb/thumb0-%{width}x%{height}.jpg",\
"viewable": "public",\
"view_count": 395246,\
"language": "en",\
"type": "archive",\
"duration": "6h26m14s",\
"muted_segments": null\
}\
],
"pagination": {}
}
If you request multiple videos, the API returns them in the same order that you requested them in. The API ignores duplicate IDs. If the list contains invalid IDs, the API ignores them if the list also contains valid IDs; otherwise, the API returns 404 Not Found.
The request ignores all optional parameters like pagination and sorting parameters.
### Getting videos by broadcaster
To get a broadcaster’s videos, set the _user\_id_ query parameter to the ID of the broadcaster whose videos you want to get. The API returns the videos in descending order by when they were created (latest video first).
curl -X GET 'https://api.twitch.tv/helix/videos?user_id=123456' \
-H 'Authorization: Bearer ohzjccugqczn10eau1pfophkpv' \
-H 'Client-Id: hof5gwx0su6owfnyan9c87zr6t'
Some broadcasters may have a long list of videos to page through. To page through all the videos, use the optional _first_, _after_, and _before_ query parameters. For information about paging, see [Pagination](https://dev.twitch.tv/docs/api/guide#pagination)
.
By default, the API returns the broadcaster’s VODs, highlights, and uploads. To filter the list by type, use the _type_ query parameter. To return only VODs, set _type_ to archive; to return only highlights, set _type_ to highlights; and to return only videos that the broadcaster has uploaded, set _type_ to upload.
The following example returns the broadcaster’s [highlight](https://help.twitch.tv/s/article/creating-highlights-and-stream-markers)
videos.
curl -X GET 'https://api.twitch.tv/helix/videos?user_id=123456&type=highlight' \
-H 'Authorization: Bearer ohzjccugqczn10eau1pfophkpv' \
-H 'Client-Id: hof5gwx0su6owfnyan9c87zr6t'
Here’s what the response looks like:
{
"data": [\
{\
"id": "11223344",\
"stream_id": "111222333",\
"user_id": "56789",\
"user_login": "zzzztopper",\
"user_name": "zzzzTopper",\
"title": "The incredible artistry that is me.",\
"description": "",\
"created_at": "2022-07-08T16:58:46Z",\
"published_at": "2022-07-08T16:58:46Z",\
"url": "https://www.twitch.tv/videos/11223344",\
"thumbnail_url": "https://static-cdn.jtvnw.net/cf_vods/dgeft87wbj63p/ce4ddf3095472cde00cd_zzzztopper_45725106652_1657299521//thumb/thumb0-%{width}x%{height}.jpg",\
"viewable": "public",\
"view_count": 395246,\
"language": "en",\
"type": "highlight",\
"duration": "26m14s",\
"muted_segments": null\
},\
. . .\
],
"pagination": {
"cursor": "eyJiIjpudWxsLCJhIjp7Ik9mZnNldCI6MTN9fQ"
}
}
### Getting videos by game
To get videos that captured playing a specific game, set the _game\_id_ query parameter to the ID of the game whose videos you want to get. Because the number of videos that the request might return could be large, the API limits the results to about 500 videos.
curl -X GET 'https://api.twitch.tv/helix/videos?game_id=888777666' \
-H 'Authorization: Bearer ohzjccugqczn10eau1pfophkpv' \
-H 'Client-Id: hof5gwx0su6owfnyan9c87zr6t'
By default, the API returns the videos in descending order by when they were created (latest video first). To change the order, use the _sort_ query parameter. To return the list by time (default), set _sort_ to time. To sort the results in descending order by the number of views, set _sort_ to views. To return the list in descending order by the video with the biggest gains in viewership, set _sort_ to trending.
The other optional query parameters that you may specify are _type_, _language_, and _period_. The _type_ parameter lets you filter the list for only VODs, highlights, or uploads. To filter the list by VODs, set _type_ to archive; to filter the list by highlights, set _type_ to highlight; and to filter the list by videos that were uploaded by a broadcaster, set _type_ to upload. By default, the results include all video types.
The _language_ query parameter lets you filter the results by the language that the video’s owner broadcasts in. For example, to get videos that were broadcast in German, set this parameter to the ISO 639-1 two-letter code for German (i.e., DE). For a list of supported languages, see [Supported Stream Language](https://help.twitch.tv/s/article/languages-on-twitch#streamlang)
. For languages not in the list of supported languages, use “other”.
The _period_ filter filters the list of videos by when they were published. For example, you can use it to get videos that were published in the last day, week, or month.
The following example gets highlights of the League of Legends game that was played within the last day by broadcasters that broadcast in German, and sorts the results in descending order by most viewed.
curl -X GET 'https://api.twitch.tv/helix/videos?game_id=21779&period=day&type=highlight&language=de&sort=views' \
-H 'Authorization: Bearer ohzjccugqcz1wnmj10eau1pfophkpv' \
-H 'Client-Id: hof5gwx0su6owfnys0nyan9c87zr6t'
Here’s what the response looks like:
{
"data": [\
{\
"id": "4445566",\
"stream_id": "1",\
"user_id": "87651234",\
"user_login": "coolio",\
"user_name": "Coolio",\
"title": "Epischer Kampf für die Ewigkeit",\
"description": "",\
"created_at": "2022-08-01T17:11:52Z",\
"published_at": "2022-08-01T17:11:52Z",\
"url": "https://www.twitch.tv/videos/4445566",\
"thumbnail_url": "https://static-cdn.jtvnw.net/cf_vods/dgeft87wbj63p/f5f4f11ee38ec9ffcfc6_autophil_81311763389_8358981495//thumb/thumb11223344-%{width}x%{height}.jpg",\
"viewable": "public",\
"view_count": 6,\
"language": "de",\
"type": "highlight",\
"duration": "30m54s",\
"muted_segments": null\
}\
. . .\
],
"pagination": {
"cursor": "eyJiIjpudWxsLCJhIjp7Ik9mZnNldCI6MTN9fQ"
}
}
Deleting videos
---------------
Twitch automatically deletes VODs after 14 days for normal broadcasters and 60 days for all others like partners. Highlights and uploads don’t expire. [Read more](https://help.twitch.tv/s/article/video-on-demand)
Your app can let broadcasters delete any of their videos (VODs, highlights, or uploads) by calling the [Delete Videos](https://dev.twitch.tv/docs/api/reference#delete-videos)
API. The API requires a user access token that includes the **channel:manage:videos** scope. To delete a video, set the _id_ query parameter to the video’s ID. To get a video’s ID, see [Getting videos](https://dev.twitch.tv/docs/api/videos/#getting-videos)
.
You may delete a maximum of five videos at a time. To specify multiple IDs, repeat the _id_ parameter for each video you want to delete. For example, `id=123&id=456&id=789`. If the user doesn’t have permission to delete one of the videos in the list, none of the videos are deleted.
curl -X DELETE 'https://api.twitch.tv/helix/videos?id=1535513785' \
-H 'Authorization: Bearer mf1g5iz0ki7x72ecbenzlf8t08x' \
-H 'Client-Id: hof5gwx0sufnys0nyan9c87zr6t'
If the request succeeds, the response contains the IDs of the videos that were deleted.
{
"data": [\
"1535513785"\
]
}
If the video doesn’t exist or doesn’t belong to the broadcaster, or the token doesn’t include the correct scope, the request returns an HTTP 401 Unauthorized status code.
Provide feedback for this page
[Docs](https://dev.twitch.tv/docs)
[Status](https://devstatus.twitch.tv/)
[Support](https://dev.twitch.tv/support)
[Showcase](https://dev.twitch.tv/showcase)
[Blog](https://blog.twitch.tv/en/tags/developers/)
[](https://twitter.com/twitchdev)
[](https://github.com/twitchdev)
[](https://blog.twitch.tv/en/tags/developers/)
[](https://twitch.tv/twitchdev)
---
# Twitch API Concepts | Twitch Developers
[Contents](https://dev.twitch.tv/docs/api/guide/#)
Twitch API Concepts
===================
This topic contains concepts that you should be familiar with when working with the Twitch API.
Breaking changes
----------------
In rare cases it may be necessary to introduce breaking changes to the Twitch API. Twitch will provide as much notification as possible prior to introducing a breaking change; however, there may be times when providing prior notification isn’t possible (for example, to address security or privacy issues).
Twitch uses the **Announcement** section of the [Twitch Developer Forum](https://discuss.dev.twitch.tv/c/announcements/)
to provide notification of a pending breaking change. To prevent disruption of your application or service, be sure to update your application as appropriate and in a timely fashion. The notification will identify all programming elements involved in the breaking change and will provide guidance on work-arounds if available.
Some of the reasons why Twitch may introduce a breaking change, include but are not limited to:
* Security issues
* Privacy concerns
* Legal concerns
* A bug that prevents the API from working as intended (for example, adding or updating constraints, adding required parameters without default values, or changing the response data)
* A business change that requires removal of an API or feature of an API such as removing an option to retrieve a single resource instead of the entire list
### Non-breaking changes
Twitch may make the following non-breaking changes without prior notification:
* Add optional query parameters or fields to a request
* Add new values to the list of possible values that you can set the request’s query parameters or fields to
* Add fields to the response (your code should ignore any fields that it doesn’t expect)
* Change the order of the fields in the response
* Add or update error message strings (your code should not take dependencies on message strings)
* Change the path, query parameters, or fragment of a URL that the API returns such as image URLs (your code should not take dependencies on the URLs that the API returns except where noted)
To discover non-breaking changes, review the [change log](https://dev.twitch.tv/docs/change-log)
.
### Taking dependencies
Your application should not take dependencies on:
* Error message strings
* URLs that the API returns (except where noted)
* The format of strings in the API responses
Twitch Rate Limits
------------------
To protect Twitch services, and to make sure there are enough resources for all partners, Twitch limits the number of requests a client ID (app) may make. If your app exceeds the limit, the request returns HTTP status code 429 (Too Many Requests).
### How it works
Twitch uses a token-bucket algorithm to ensure the limits are respected. Your app is given a bucket of points. Each endpoint is assigned a points value (the default points value per request for an endpoint is 1). When your app calls the endpoint, the endpoint’s points value is subtracted from the remaining points in your bucket. If your bucket runs out of points within 1 minute, the request returns status code 429.
Your app is given a bucket for app access requests and a bucket for user access requests. For requests that specify a user access token, the limits are applied per client ID per user per minute.
If an endpoint uses a non-default points value, or specifies different limit values, the endpoint’s documentation identifies the differences.
For details about the Extensions API rate limits, see [Extension rate limits](https://dev.twitch.tv/docs/extensions/frontend-api-usage#rate-limits)
.
### Keeping track of your usage
The API includes the following headers with each response to help you stay within your request limits.
* `Ratelimit-Limit` — The rate at which points are added to your bucket.
* `Ratelimit-Remaining` — The number of points in your bucket.
* `Ratelimit-Reset` — A Unix epoch timestamp that identifies when your bucket is reset to full.
If you receive HTTP status code 429, use the `Ratelimit-Reset` header to learn how long you must wait before making another request.
Pagination
----------
The Twitch API supports cursor-based pagination for APIs that return lists of resources.
List APIs like [Get Videos](https://dev.twitch.tv/docs/api/reference#get-videos)
use the following query parameters to control paging:
* _after_ — Use to get the next page of results
* _before_ — Use to get the previous page of results
* _first_ — Use to specify the number of items to include per page
The _after_ and _before_ parameters are mutually exclusive; you may specify only one of them in the request.
If the list API is able to return another page of results, the response includes the `pagination` field, which is a **Pagination** object that includes the `cursor` field.
"pagination": {
"cursor": "eyJiI..."
}
Use the cursor’s value to set the _after_ or _before_ query parameter depending on the direction you want to page. See [Forward pagination](https://dev.twitch.tv/docs/api/guide/#forward-pagination)
and [Backward pagination](https://dev.twitch.tv/docs/api/guide/#backward-pagination)
.
The **Pagination** object is empty if there are no more pages to return in the direction you’re paging.
"pagination": {}
### Specifying the page size
List APIs return a default number of items per page. For example, the default page size for [Get Streams](https://dev.twitch.tv/docs/api/reference#get-streams)
is 20 items per page. To specify a different page size, include the _first_ query parameter with each request.
curl -X GET 'https://api.twitch.tv/helix/streams?first=40' \
-H 'Authorization: Bearer ' \
-H 'Client-Id: '
The API’s documentation specifies the minimum page size, maximum page size, and default page size. For example, the maximum page size for Get Streams is 100.
An API may return less than the number of items requested per page, which is often the case for the last page of results.
### Forward pagination
To get the first page, don’t specify the _after_ query parameter.
curl -X GET 'https://api.twitch.tv/helix/streams?first=40' \
-H 'Authorization: Bearer ' \
-H 'Client-Id: '
To get the next page, and all subsequent pages, set the _after_ query parameter to the value in the `cursor` field of the response’s **Pagination** object. The cursor marks the top of the next page of results.
curl -X GET 'https://api.twitch.tv/helix/streams?first=40&after=eyJiI...' \
-H 'Authorization: Bearer ' \
-H 'Client-Id: '
You’ll know you’re at the end of the list when the response contains an empty **Pagination** object.
### Backward pagination
Not all APIs support paging backward. Check the documentation to confirm whether the API supports backward pagination — the API supports backward pagination if the list of query parameters includes the _before_ query parameter.
To page backward through a list, set the _before_ query parameter to the value in the `cursor` field of the response’s **Pagination** object. The cursor marks the top of the previous page of results.
curl -X GET 'https://api.twitch.tv/helix/streams?first=40&before=eyJiI...' \
-H 'Authorization: Bearer ' \
-H 'Client-Id: '
You’ll know you’re at the beginning of the list when the response contains an empty **Pagination** object. To page forward when you’re at the top of the list, don’t include a cursor parameter.
If you page forward to the end of the list, the **Pagination** object is empty. Because of this, you must keep a copy of the previous cursor to use to page backward.
### Lists are dynamic
Because lists are dynamic views of the data, it’s possible that the cursor may return an empty page (`"data":[]`) when you’re near the end of the list.
It’s also possible that you might see the same data on multiple pages. For example, [Get Streams](https://dev.twitch.tv/docs/api/reference#get-streams)
orders the list of streamers by the number of viewers they have. If the streamer’s viewership changes between the time you get the cursor and the the time the user pages forward or backward, it’s possible that the streamer could have moved up or down in the list and the user would see them on both pages.
For the same reason, it’s also possible that if the user pages forward and then backward, the contents of the previous page may be partially or fully different depending on how volatile the data is.
### Known issues
The following list contains known issues that you should consider when designing your app.
1. The [Get EventSub Subscriptions](https://dev.twitch.tv/docs/api/reference#get-eventsub-subscriptions)
endpoint doesn’t let you specify the page size (the _first_ query parameter is not supported).
2. The [Get Extension Live Channels](https://dev.twitch.tv/docs/api/reference#get-extension-live-channels)
endpoint doesn’t use the same **Pagination** object as the other endpoints that support paging. Instead, it contains a `pagination` field that contains either an empty string or a cursor value.
Query Parameters
----------------
Things to know about endpoint query parameters and fields.
### IDs are opaque
All IDs are strings and should be considered opaque, meaning its value can be anything. All POST operations that add a resource will return the resource’s ID and all GET operations include the resource’s ID.
### Required versus optional parameters
All required query parameters and fields are marked as required. You should consider all other fields optional.
Some endpoints such as [Get Videos](https://dev.twitch.tv/docs/api/reference#get-videos)
specify required query parameters that are mutually exclusive, meany you may specify only one of the required parameters that are marked as mutually excluisve. The description for these parameters clearly will indicate that they are mutually exclusive.
### Specifying multiple query parameter values
Some endpoints use query parameters to filter the data. If a query parameter lets you specify a list of values, you must specify the query parameter for each value in the list; the list is not comma delimited. For example, to specify multiple _login_ values, you’d specify them as `&login=twitch&login=twitchdev&login=twitchgaming`.
### Enumeration values
If a query parameter lists a set of enumeration values, consider the list case sensitive unless stated otherwise.
### Timestamps
All date and time query parameters and fields used in the Twitch API are in [RFC3339](https://datatracker.ietf.org/doc/html/rfc3339)
format. For example, YYYY-MM-DDT00:00:00.000Z.
**NOTE** The timestamps used in all [EventSub](https://dev.twitch.tv/docs/eventsub)
events are in RFC3339 format; however, the timestamps use nanoseconds instead of milliseconds. For example, YYYY-MM-DDT00:00:00.000000000Z.
### Pagination parameters
Some GET endpoints that return lists of resources support pagination. For details, see [Pagination](https://dev.twitch.tv/docs/api/guide/#pagination)
.
cURL Examples
-------------
All cURL examples shown throughout the Twitch API documentation use UNIX and Linux format. This means that the examples will not run as-is on Microsoft Windows computers. To run the examples on Windows computers, you must change the continuation marks from `\` to `^` and change the single quotes to double quotes.
A UNIX formatted cURL query:
curl -X POST 'https://id.twitch.tv/oauth2/token' \
-H 'Content-Type: application/x-www-form-urlencoded' \
-d 'client_id=&client_secret=&grant_type=client_credentials'
The equivalent Windows cURL query:
curl -X POST "https://id.twitch.tv/oauth2/token" ^
-H "Content-Type: application/x-www-form-urlencoded" ^
-d "client_id=&client_secret=&grant_type=client_credentials"
Twitch API Health
-----------------
If you receive an HTTP status code 503 (Service Unavailable) error, retry once. You may also report any issue that appears to be a bug via [GitHub Issues](https://github.com/twitchdev/issues/issues)
.
Provide feedback for this page
[Docs](https://dev.twitch.tv/docs)
[Status](https://devstatus.twitch.tv/)
[Support](https://dev.twitch.tv/support)
[Showcase](https://dev.twitch.tv/showcase)
[Blog](https://blog.twitch.tv/en/tags/developers/)
[](https://twitter.com/twitchdev)
[](https://github.com/twitchdev)
[](https://blog.twitch.tv/en/tags/developers/)
[](https://twitch.tv/twitchdev)
---
# EventSub | Twitch Developers
[Contents](https://dev.twitch.tv/docs/eventsub/#)
EventSub
========
EventSub subscriptions let your application listen for events that happen on Twitch. When an event occurs for one of your subscriptions, Twitch sends you a notification. For example, you can receive a notification when:
* A broadcaster goes online
* A broadcaster gets a new follower
* A broadcaster gets a new subscriber
* A user cheered in a channel
* A user redeemed Channel Points
Twitch support the following transport methods:
* Webhook
* WebSocket
* Conduits
Before you can subscribe to events, you must create a webhook callback or WebSocket client that listens for events. For information about webhook callbacks, see [Getting Events Using Webhook Callbacks](https://dev.twitch.tv/docs/eventsub/handling-webhook-events)
and for information about WebSocket clients, see [Getting Events Using WebSockets](https://dev.twitch.tv/docs/eventsub/handling-websocket-events)
.
After implementing your webhook callback or WebSocket client, you can subscribe to events. For information about subscribing to events, see [Managing Subscriptions](https://dev.twitch.tv/docs/eventsub/manage-subscriptions/)
.
**NOTE:** EventSub subscriptions are transport agnostic. For the most part, all subscriptions are available to all transports that Twitch supports. If a transport can’t support a subscription type, the documenation will identify the restriction. When new subscription types are added to EventSub, Twitch supports them on all transports simultaneously, when possible.
Handling duplicate events
-------------------------
Twitch sends event notifications at least once, but if Twitch is unsure of whether you received a notification, it’ll resend the event. Under some circumstances this means you may receive a notification twice. If Twitch resends the message, the message ID will be the same.
If receiving the same message more than once is an issue, you’ll need to track messages that you’ve processed. The `message_id` field contains the message’s ID. If you’ve already processed the message, don’t process the message again.
Guarding against replay attacks
-------------------------------
If you need resiliency against replay attacks, consider the following:
* Make sure the value in the `message_timestamp` field isn’t older than 10 minutes.
* Make sure you haven’t seen the ID in the `message_id` field before.
Provide feedback for this page
[Docs](https://dev.twitch.tv/docs)
[Status](https://devstatus.twitch.tv/)
[Support](https://dev.twitch.tv/support)
[Showcase](https://dev.twitch.tv/showcase)
[Blog](https://blog.twitch.tv/en/tags/developers/)
[](https://twitter.com/twitchdev)
[](https://github.com/twitchdev)
[](https://blog.twitch.tv/en/tags/developers/)
[](https://twitch.tv/twitchdev)
---
# Mobile Deep Links | Twitch Developers
[Contents](https://dev.twitch.tv/docs/mobile-deeplinks/#)
Mobile Deep Links
=================
Introduction
------------
Deep links allow third party mobile apps and mobile web sites to bring users to a specific place within a Twitch app. This guide explains how to check whether the Twitch App is installed and describes deep link formats.
Deep links are important because they allow tighter integration with Twitch on mobile apps. For example, an app that helps a broadcaster manage his channel could link directly to the user’s dashboard within the Twitch App (as opposed to just launching the app and leaving the user on the “Following” tab).
You can find more information about deep links [here](https://en.wikipedia.org/wiki/Mobile_deep_linking)
. For support, visit the [Twitch Developer Forums](https://discuss.dev.twitch.tv/)
.
Checking Whether the Twitch App is Installed
--------------------------------------------
You can check whether the Twitch App is already installed on a mobile device as follows:
### On iOS Objective C
NSURL *twitchURL = [NSURL URLWithString:@"twitch://open"];
if ([[UIApplication sharedApplication] canOpenURL:twitchURL]) {
// The Twitch app is installed, do whatever logic you need, and call -openURL:
} else {
// The Twitch app is not installed. Prompt the user to install it!
}
### On iOS Swift
let twitchURL = NSURL(string: "twitch://open")
if (UIApplication.sharedApplication().canOpenURL(twitchURL!)) {
// The Twitch app is installed, do whatever logic you need, and call -openURL:
} else {
// The Twitch app is not installed. Prompt the user to install it!
}
Note: On both iOS platforms, you also must change your app’s `Info.plist` file to declare that your app is allowed to query the twitch scheme. See the [Apple documentation](https://developer.apple.com/documentation/uikit/uiapplication/1622952-canopenurl)
for detailed information.
### On Android
// Where "packagename" is the package name of the Twitch app:
private boolean isPackageInstalled(String packagename, Context context) {
PackageManager pm = context.getPackageManager();
try {
pm.getPackageInfo(packagename, PackageManager.GET_ACTIVITIES);
return true;
} catch (NameNotFoundException e) {
return false;
}
}
Deep Link Formats
-----------------
To launch the Twitch App, use `twitch://open`.
| To launch the Twitch App and… | Use this URL |
| --- | --- |
| Navigate to a specific channel | `twitch://stream/` – OR – `twitch://open?stream=` |
| Open a specific game directory | `twitch://game/` – OR – `twitch://open?game=` |
| Open a specific VOD | `twitch://video/